

Page 1

Internet Telephony PBX System
IPX-2500
Internet Telephony PBX
System
IPX-2500
1
Page 2

Internet Telephony PBX System
IPX-2500
Copyright
Copyright© 2014 by PLANET Technology Corp. All rights reserved. No part of this publication may be
reproduced, transmitted, transcribed, stored in a retrieval system, or translated into any language or
computer language, in any form or by any means, electronic, mechanical, magnetic, optical, chemical,
manual or otherwise, without the prior written permission of PLANET. PLANET makes no representations
or warranties, either expressed or implied, with respect to the contents hereof and specifically disclaims
any warranties, merchantability or fitness for any particular purpose. Any software described in this
manual is sold or licensed "as is". Should the programs prove defective following their purchase, the
buyer (and not this company, its distributor, or its dealer) assumes the entire cost of all necessary
servicing, repair, and any incidental or consequential damages resulting from any defect in the software.
Further, this company reserves the right to revise this publication and to make changes from time to time
in the contents hereof without obligation to notify any person of such revision or changes. All brand and
product names mentioned in this manual are trademarks and/or registered trademarks of their respective
holders.
Disclaimer
PLANET Technology does not warrant that the hardware will work properly in all environments
and applications, and makes no warranty and representation, either implied or expressed, with
respect to the quality, performance, merchantability, or fitness for a particular purpose.
PLANET has made every effort to ensure that this User’s Manual is accurate; PLANET
disclaims liability for any inaccuracies or omissions that may have occurred. Information in this
User’s Manual is subject to change without notice and does not represent a commitment on
the part of PLANET. PLANET assumes no responsibility for any inaccuracies that may be
contained in this User’s Manual. PLANET makes no commitment to update or keep current the
information in this User’s Manual, and reserves the right to make improvements to this User’s
Manual and/or to the products described in this User’s Manual, at any time without notice. If
you find information in this manual that is incorrect, misleading, or incomplete, we would
appreciate your comments and suggestions.
Trademarks
The PLANET logo is a trademark of PLANET Technology. This documentation may refer to
numerous hardware and software products by their trade names. In most, if not all cases,
these designations are claimed as trademarks or registered trademarks by their respective
companies.
CE mark Warning
This is a class B device, in a domestic environment; this product may cause radio interferen ce,
in which case the user may be required to take adequate measures.
2
Page 3

Internet Telephony PBX System
IPX-2500
Federal Communication Commission Interference Statement
This equipment has been tested and found to comply with the limits for a Class B digital device,
pursuant to Part 15 of FCC Rules. These limits are designed to provide reasonable protection
against harmful interference in a residential installation. This equipment generates, uses, and
can radiate radio frequency energy and, if not installed and used in accordance with the
instructions, may cause harmful interference to radio communications. However, there is no
guarantee that interference will not occur in a particular installation. If this equipment does
cause harmful interference to radio or television recep tion, which ca n be determined by turning
the equipment off and on, the user is encouraged to try to correct the interference by one or
more of the following measures:
1. Reorient or relocate the receiving antenna.
2. Increase the separation between the equipment and receiver.
3. Connect the equipment into an outlet on a circuit different from that to which the receiver is
connected.
4. Consult the dealer or an experienced radio technician for help.
FCC Caution:
To assure continued compliance (example-use only shielded interface cables when
connecting to computer or peripheral devices). Any changes or modifications not expressly
approved by the party responsible for compliance could void the user’s autho rity to operate the
equipment. This device complies with Part 15 of the FCC Rules. Operation is subject to the
Following two conditions: (1) This device may not cause harmful interference, and (2) this
Device must accept any interference received, including interference that may cause
undesired operation.
R&TTE Compliance Statement
This equipment complies with all the requirements of DIRECTIVE 1999/5/EC OF THE
EUROPEAN PARLIAMENT AND THE COUNCIL OF 9 March 1999 on radio equipment and
telecommunication terminal Equipment and the mutual recognition of their conformity (R&TTE)
The R&TTE Directive repeals and replaces in the directive 98/13/EEC (Telecommuni cations
Terminal Equipment and Satellite Earth Station Equipment) As of April 8, 2000.
3
Page 4

Internet Telephony PBX System
IPX-2500
WEEE Caution
To avoid the potential effects on the environment and human health as a result of
the presence of hazardous substances in electrical and electronic equipment, end
users of electrical and electronic equipment should understand the meaning of the
crossed-out wheeled bin symbol. Do not dispose of WEEE as unsorted municipal waste and
have to collect such WEEE separately.
Safety
This equipment is designed with the utmost care for the safety of those who install and use it.
However, special attention must be paid to the dangers of electric shock and static electricity
when working with electrical equipment. All guidelines of this and of the computer manufacture
must therefore be allowed at all times to ensure the safe use of the equipment.
Customer Service
For information on customer service and support for the Gigabit SSL VPN Security Router,
please refer to the following Website URL: http://www.planet.com.tw
Before contacting customer service, please take a moment to gather the following information:
• Internet Telephony PBX System serial number and MAC address
• Any error messages that displayed when the problem occurred
• Any software running when the problem occurred
• Steps you too k to re solve the problem on your own
Revision
User’s Manual for PLANET Internet Telephony PBX System
Model: IPX-2500
Rev: 1.0 (Dec, 2013)
4
Page 5

Internet Telephony PBX System
IPX-2500
TABLE OF CONTENTS
Chapter 1 Introduction.................................................................................................... 8
1.1 Features.............................................................................................................................11
1.2 Package Contents..............................................................................................................13
1.3 Physical Specifications .....................................................................................................13
1.4 Specifications....................................................................................................................15
Chapter 2 Installation Procedure................................................................................. 17
2.1 W eb Login.........................................................................................................................17
2.2 Configuring the Network Setting......................................................................................18
Chapter 3 Basic Configuration..................................................................................... 20
3.1 Preparation Before Operation ...........................................................................................20
3.2 Before Making a Call........................................................................................................20
3.2.1 System Information ...........................................................................................20
3.2.2 Operator..............................................................................................................23
3.2.3 Basic Configuration ...........................................................................................24
3.2.4 Time-based Rules.............................................................................................26
3.3 Outbound Call...................................................................................................................28
3.3.1 Trunks...................................................................................................................28
3.3.2 Outbound Routes ............................................................................................... 30
3.4 Inbound Call......................................................................................................................32
3.4.1 Inbound Routes ..................................................................................................32
3.4.2 IVR.......................................................................................................................34
3.4.3 IVR Prompts.......................................................................................................36
3.4.4 Ring Groups .......................................................................................................38
3.5 Black List..........................................................................................................................39
3.5.1 Pick up Call..........................................................................................................39
3.6 On The Call.......................................................................................................................40
3.6.1 Call Parking ........................................................................................................40
3.6.2 Call Transfer.......................................................................................................41
3.6.3 Conference .........................................................................................................42
3.7 Settings before leaving office............................................................................................44
3.7.1 Follow me.............................................................................................................44
3.7.2 Voice Mail.............................................................................................................47
3.8 Call Center(Call Queues)..................................................................................................49
3.8.1 Create Agent .......................................................................................................49
Chapter 4 Advanced ..................................................................................................... 52
5
Page 6

Internet Telephony PBX System
IPX-2500
4.1 Options..............................................................................................................................52
4.1.1 General ................................................................................................................52
4.1.2 Global Analog Settings......................................................................................53
4.1.3 Global SIP Settings............................................................................................54
4.2 VoiceMail ..........................................................................................................................57
4.3 SMTP Setting....................................................................................................................59
4.4 Email to Fax......................................................................................................................60
4.5 Music Settings...................................................................................................................60
4.6 DISA.................................................................................................................................62
4.7 Paging and Intercom.........................................................................................................63
4.8 PIN Set..............................................................................................................................64
4.9 Call Recording..................................................................................................................64
4.10 Speed Dial.......................................................................................................................65
4.11 Smart DID.......................................................................................................................66
4.12 Call Back.........................................................................................................................66
4.13 Phone Book.....................................................................................................................67
4.14 Feature Codes..................................................................................................................69
4.15 IP Phone Provision..........................................................................................................71
4.16 PnP Settings....................................................................................................................72
Chapter 5 Network Settings ......................................................................................... 73
5.1 Network.............................................................................................................................73
5.2 Static Routing....................................................................................................................75
5.3 VPN Server .......................................................................................................................76
5.4 VPN Client........................................................................................................................77
5.5 DHCP server.....................................................................................................................78
5.6 DDNS Settings..................................................................................................................79
5.7 SNMPv2 Settings ..............................................................................................................79
5.8 Troubleshooting ................................................................................................................80
Chapter 6 Security ........................................................................................................ 81
6.1 Network And Country.......................................................................................................81
6.2 Service...............................................................................................................................82
Chapter 7 Report........................................................................................................... 83
7.1 Record List........................................................................................................................83
7.2 Call logs............................................................................................................................83
7.3 System logs.......................................................................................................................84
7.4 Data Storage......................................................................................................................84
7.5 Management......................................................................................................................86
7.6 Backup ..............................................................................................................................87
6
Page 7

Internet Telephony PBX System
IPX-2500
7.7 Reset & Reboot.................................................................................................................87
7.8 Upgrade.............................................................................................................................88
7.8.1 WEB Upgrade.....................................................................................................88
7.8.2 TFTP Upgrade ....................................................................................................89
7.9 Hot Standby.......................................................................................................................89
7.10 Time Settings...................................................................................................................92
7.11 Module Settings ..............................................................................................................93
Chapter 8 Operating Instructions................................................................................ 94
8.1 How to connect the IPX-2500 IP PBX to the Internet ......................................................94
8.2 How to combine two IPX-2500 IP PBX in a different network........................................94
8.3 How to resolve the problem about hearing one side only.................................................96
8.4 How to use Skype account in IPX-2500 ...........................................................................97
7
Page 8

Internet Telephony PBX System
IPX-2500
Chapter 1 Introduction
Ntuitive, Ease-of-Use IP PBX Machine Management
PLANET IPX-2500 IP PBX telephony system is SIP based and optimized for the small and
medium business in daily communications. The IPX-2500 is able to accept 500 user
registrations, and easy to manage a full voice over IP system with the convenience and cost
advantages.
Leading Enterprises and Workgroup users to High-Speed Networking Generation
With the increasing popularity of desktops and laptop s built with Gig abit network Interface, and
wide application of shared Database Device and Multi-Media Center day by day,
IPX-2500 equipped with Dual Gigabit RJ-45 ports (10/100/1000Mbps) (WAN / LAN) provides
advanced voice and data communications features businesses need to stay productive and
responsive.
Off-net Calling Capability, Call Restriction, Call Access Control
The IPX-2500 integrates up to 8 calls via the IPX-21FO
IPX-21GS (4 GSM) module to become a feature-rich PBX system that supports seamless
communications between existing PSTN calls, analog, IP phones and SIP-based endpoints.
(4 FXO) , IPX-21SL (2 FXO + 2 FXS) and
Replaces old PBX directly without requiring any new wiring to be put in
Cost-effective, easy-to-install and simple-to-use, the IPX-2500 converts standard telephones
to IP-based networks. It enables the service providers and enterprises to offer users traditional
and enhanced telephony communication services via the existing broadband connectio n to the
Internet or corporation network.
8
Page 9
Internet Telephony PBX System
IPX-2500
With the IPX-2500, home users and companies are able to save the installation cost and
extend their past investments in telephones, conferences and speakerphones. The IPX-2500
can be the bridge between traditional analog systems and IP network with an extremely
affordable investment.
Distributed VoIP Network Infrastructure
For the new generation communication age, the IPX-2500 supports IPv6 and VPN (client /
server) connection to provide users with more flexible and advantage co mmuni cation products.
With PLANET DDNS function, the IPX-2500 also helps users to apply and remember the login
information easier. Moreover, its multiple language features helps user to quickly and friendly
manage the system.
Standard Compliance
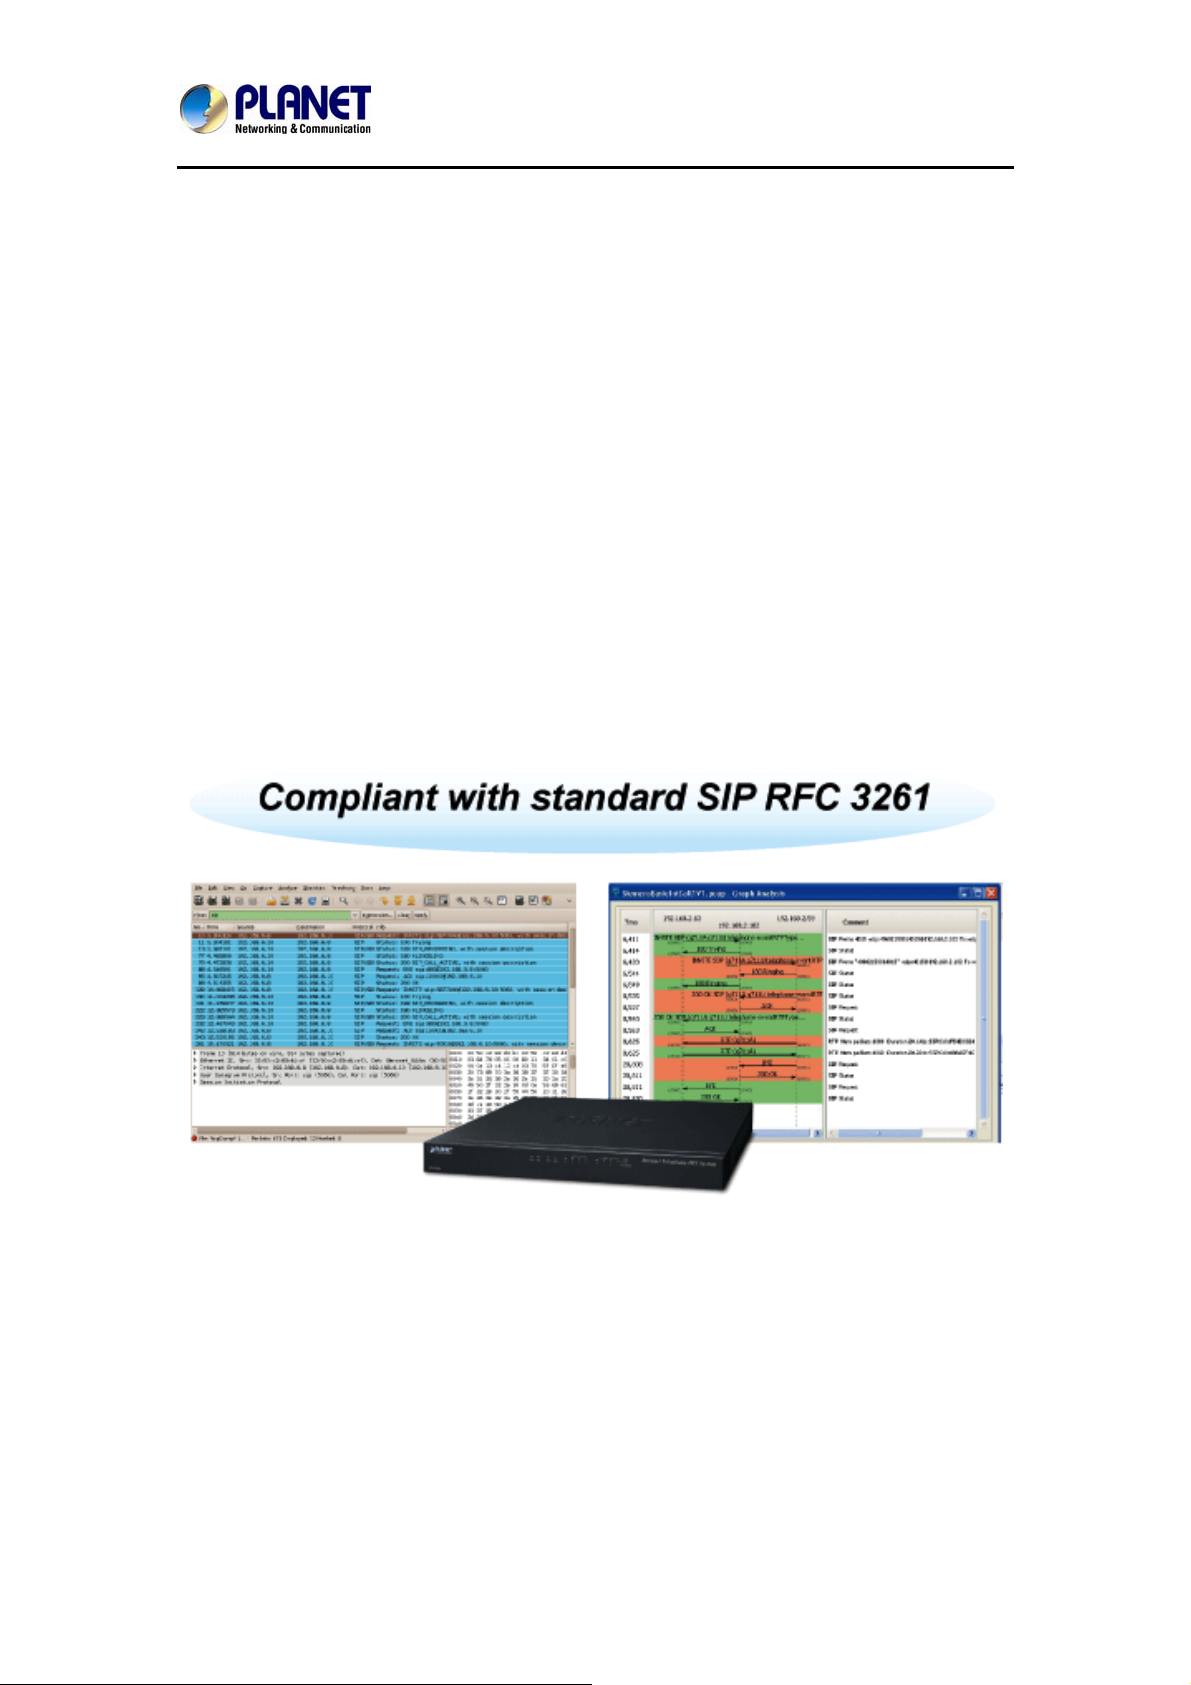
Compliant with the Session Initiation Protocol 2.0 (RFC 3261), the IPX-2500 is able to broadly
interoperate with equipment provided by VoIP infrastructure providers, thus enabling them to
provide their customers with better multi-media exchange services.
Green IP Office
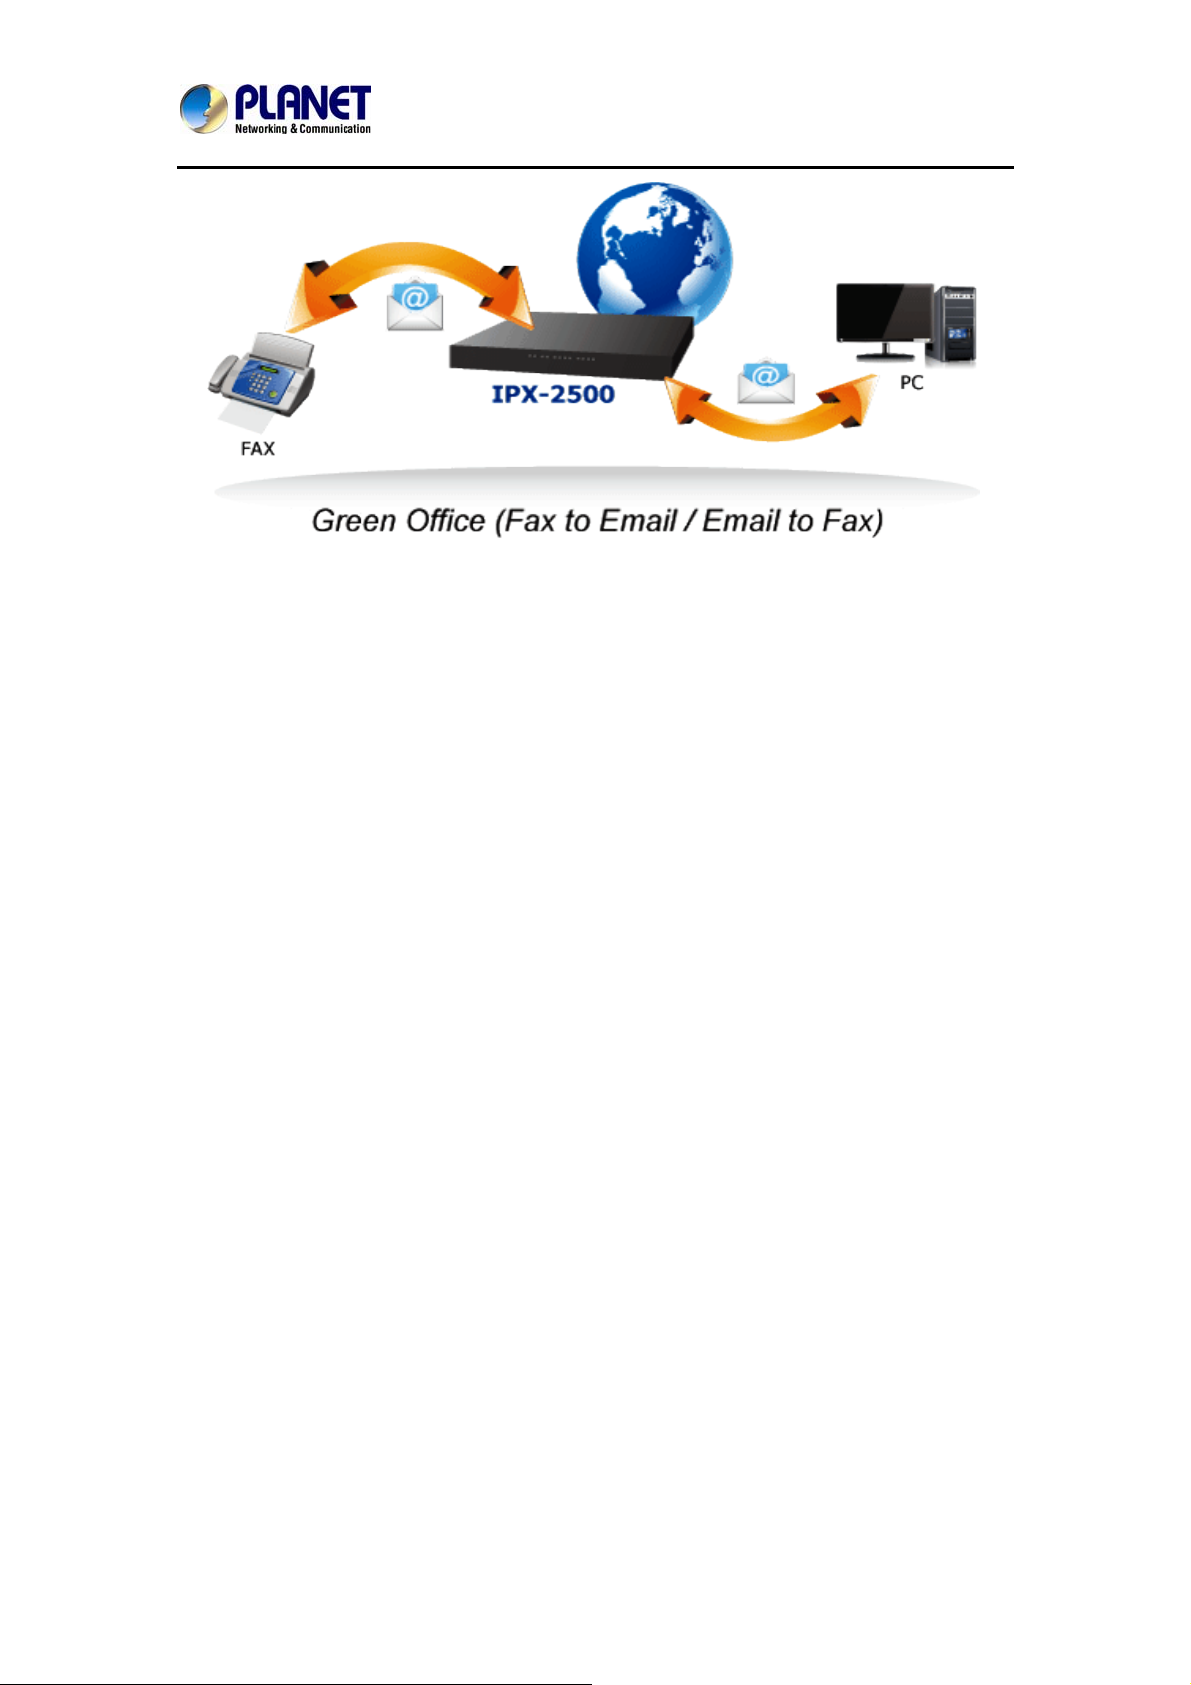
The Fax to Email / Email to Fax service by the IPX-2500 allows users to transfer / receive
faxes directly to / from your email inbox as file attachments. It’s an easy and confidential way of
receiving, storing and forwarding important Fax document s, thus creating a paperle ss or green
office.
9
Page 10
Internet Telephony PBX System
IPX-2500
Full Security with VPN Support
The IPX-2500 VPN securely and cost-effectively connects geographically disparate offices of
an organization, creating one cohesive virtual network. The IPX-2500 VPN technology is also
used by ordinary Internet users to connect to proxy servers for the purpose of protecting one's
identity. It includes VPN server and client function that can support users full security login.
10
Page 11

Internet Telephony PBX System
1.1 Features
¾ System Highlights
80 concurrent calls and up to 500 registers
Dual Gigabit Ethernet (WAN / LAN)
HD voice codec G.722 for perfect voice quality
Fax to Email / Email to Fax for Green Office
Voicemail to Email for not missing any important message
Paging and intercom function strengthens work efficiency
Built-in SIP Proxy Server following RFC 3261
Multiple Language of GUI for international business
Web based Control Panel for easy configuration and management of the system
Hardware Echo Cancellation module for great and smooth communication
Support VPN Client / Server function.
Supports maximum 8 ports FXO / FXS / GSM (on 2 slots)
IPX-2500
¾ Codec and Protocol
SIP 2.0 (RFC3261) / IAX2 compliant
Audio Codec: G.722 / G.711-Ulaw / G.711-Alaw / G.726 / G.729 / GSM / SPEEX
Video Codec: H.261 / H.263 / H.263+ / H.264
DTMF: RFC2833, SIP INFO, In-band
¾ Network and Security Features
DDNS Client (PLANET DDNS, Easy DDNS, DynDNS, Zone Edit, No IP)
DHCP Server / SNMP v1 / v2
IEEE 802.1Q of VLAN
Supports IPv6 in addition to IPv4
Manual Configuration of Static Route Table
Trouble Shooting (Ping, Traceroute)
VPN Client (Supports N2N / L2TP / PPTP / OpenVPN)
VPN Server (Supports PPTP / L2TP / OpenVPN Server)
Refuse SIP Register DoS
Refuse Abort Invite Dos
Refuse SSH Login DoS
Firewall / SRTP
11
Page 12

Internet Telephony PBX System
¾ PBX Features
Black List
BLF (Busy Lamp Field)
CDR (Call Detailed Record)
Conference Room (3 rooms)
DID (Direct Inward Dialing Number)
DISA (Direct Inward System Access)
DND / Feature Codes / Flash Operation Panel
Follow Me / Auto-Provision
IVR (Interactive Voice Responses)
Multi-language System Prompt
Multiple Language of GUI
Phone Book / PIN Set
Record Files Download
Ring Group / SIP Trunk
IPX-2500
Skype for SIP / Smart DID / System Log
T.38 Fax (Pass-through) / Time based rule
Virtual Fax / Voicemail & Voice Mail to E-Mail
¾ Call Features
Call Back / Call Forward / Call Group
Call Hold / Call Paging and Intercom
Call Park / Call Pickup / Call Queue
Call Record / Call Route / Blind Transfer
Attend Transfer / Call Waiting
Caller ID / Dial by Name
Customized IVR / on hold music / T ran sfer
Three-way Conference / Video Call
12
Page 13
Internet Telephony PBX System
IPX-2500
1.2 Package Contents
Thank you for purchasing PLANET Internet Telephony PBX system, IPX-2500. This Quick
Installation Guide will introduce how to finish the basic setting of connecting the web
management interface and the Internet. Open the box of the Internet Telephony PBX system
and carefully unpack it. The box should contain the following items:
Internet Telephony PBX System Unit x 1
Quick Installation Guide x 1
User’s Manual CD x 1
Power Cord x 1
RJ-45 x 1
Bracket x 2
If any of the above items are damaged or missing, please contact your dealer immediately.
1.3 Physical Specifications
¾ Dimensions
Dimensions:
Net Weight:
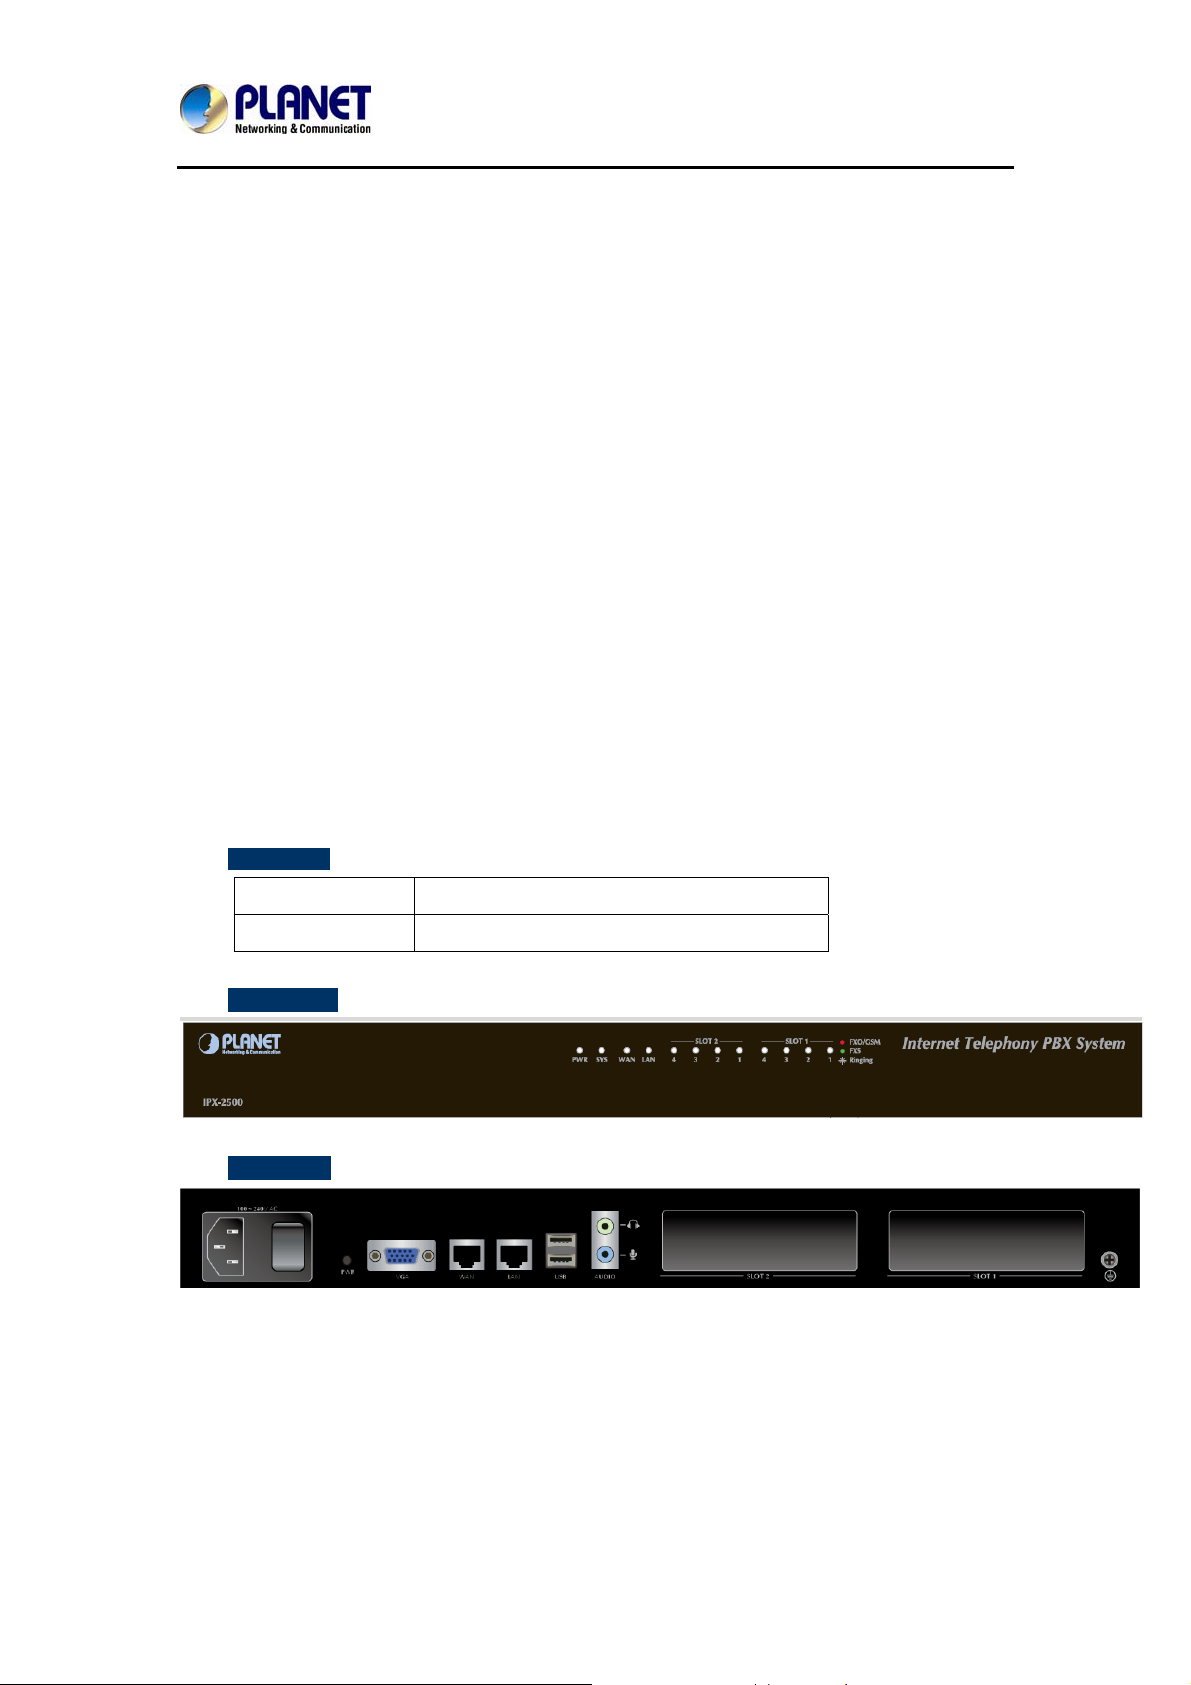
¾ Front Panel
¾ Rear Panel
310 (L) x 500 (W) x 90 (H)mm
3.3kg (without package)
13
Page 14
Internet Telephony PBX System
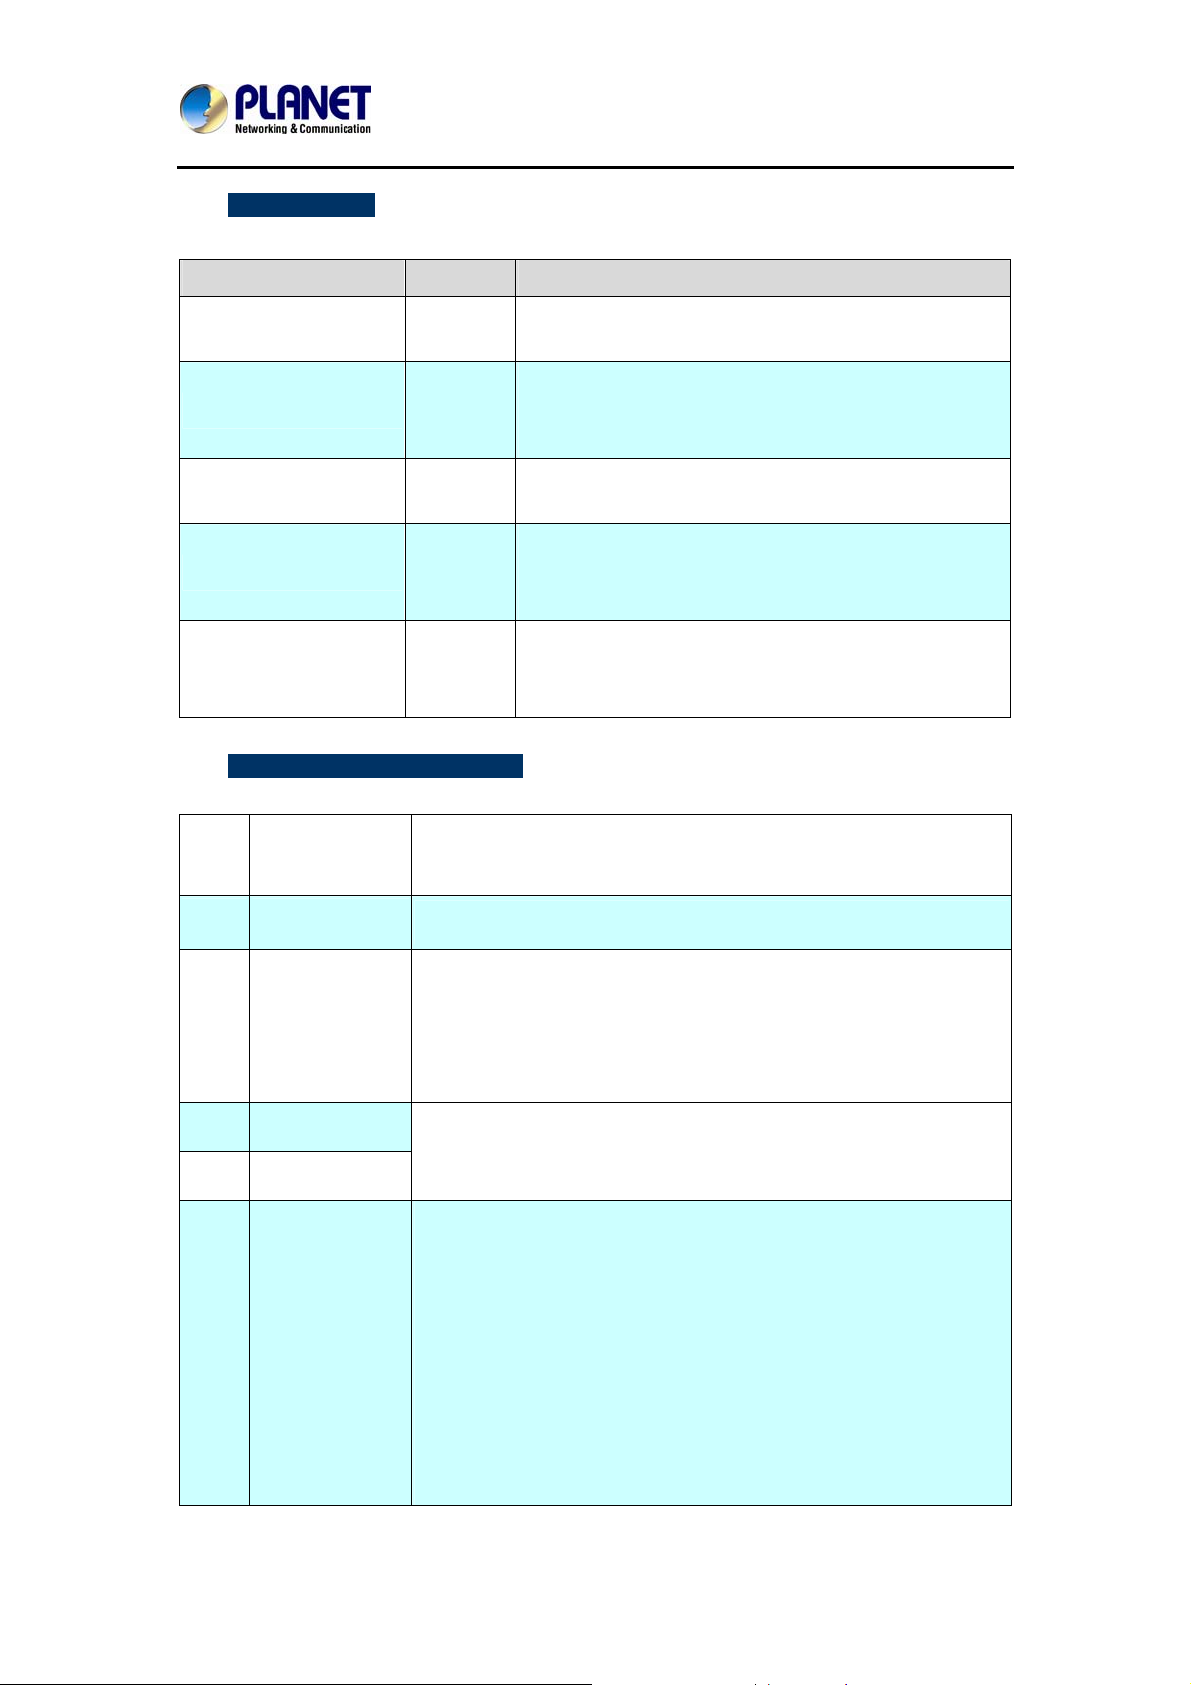
¾ LED definitions
Front Panel LED State Descriptions
IPX-2500
PWR
SYS
WAN/LAN
FXO / GSM
FXS
On
Off
On
Flashing
Off
Flashing
Off
On
Flashing
Off
On
Flashing
Off
¾ Physical interfaces descr i ption
1 Reset
The reset button, when pressed, resets the IP PBX without the
need to unplug the power cord.
PBX Power ON
PBX Power OFF
Enabling system.
System is working
System is off
PBX network connection established
Waiting for network connection
Red
Ringing
Waiting for connection
Green
Ringing
Waiting for connection
2 Power
3 WAN / LAN
4 Audio
5 USB
6
Slots 1 / Slots 2
AC 100~240V, 50 / 60Hz, 1.5A max
The WAN / LAN port supports auto negotiating Gigabit Ethernet
10/100/1000 Base-TX networks. This port allows your IP PBX to be
connected to an Internet Access device, e.g. router, cable modem,
ADSL modem, through a CAT.5 twisted pair Ethernet cable.
The Audio / USB are reserved for the factory / production line
usage; it is not applicable for regular application.
2 external slots with compliance FXO / FXS / GSM module.
FXO module is connects to PBX or CO line with RJ-11 (Write)
analog line. FXO port was connected to the extension port of a PBX
or directly connected to a PSTN line of carrier.
FXS module is connects to Phone with RJ-11 (Write) analog line.
FXS port was connected to your telephone sets, FAX, or Trunk Line
of PBX.
GSM module is connects to Global System for Mobile
14
Page 15
Internet Telephony PBX System
IPX-2500
Communications (GSM) with SIM Card.
Supporting 2 slots, user can buy expansion module like IPX-21FO (4 FXO),
IPX-21SL (2 FXO + 2 FXS) or IPX-21GS (4 GSM) for extending port service.
1.4 Specifications
Product
Hardware
WAN 1 x 10 / 100 / 1000 Mbps RJ-45 port
LAN 1 x 10 / 100 / 1000 Mbps RJ-45 port
2 Slot Supports maximum 8 ports (FXS / FXO / GSM)
USB Future Feature
Audio Future Feature
VGA VGA Interface
Protocols and Standard
Standard SIP 2.0 (RFC3261), IAX2
Protocols RFC 793 TCP
Voice Codec G.722 / G.711-Ulaw / G.711-Alaw / G.726 / G.729 / GSM / SPEEX
Video Codec H.261 / H.263 / H.263+ / H.264
Fax over IP
Voice Processing
Protocols
Internet Sharing
Network Features
IPX-2500
Internet Telephony PBX system (500 SIP Users registrations)
RFC 826 ARP
RFC 1034, 1035 DNS
RFC 1631 NAT
RFC 2068 HTTP
RFC 2131 DHCP
RFC 2516 PPPoE
RFC 3261, RFC 3311, RFC 3515
RFC 3265, RFC 3892, RFC 3361
RFC 3842, RFC 3389, RFC 3489
RFC 3428, RFC 2327, RFC 2833
RFC 2976, RFC 3263
T.38 Fax (Pass-through)
Note: T.38 support is dependent on fax machine, SIP provider and
network / transport resilience
DTMF detection and generation
In-Band and RFC 2833, SIP INFO
SIP 2.0 (RFC-3261), TCP/IP, UDP / RTP / RTCP, HTTP, ICMP,
ARP, DNS, DHCP, NTP/SNTP, PPP , PPPoE
DDNS Client (Planet DDNS and Easy DDNS),
DHCP Server / SNMP v1/v2
IEEE802.1Q of VLAN
IP Assignment (PPPoE / DHCP / Static)
IPv4/IPv6
Manual Configuration of Static Route Table
15
Page 16

Internet Telephony PBX System
Trouble Shooting (Ping, Traceroute)
VPN Client (Support N2N / L2TP/PPTP/OpenVPN)
VPN Server
Refuse SIP Register DoS
Security Features
Features
PBX Features
Call Features
System Capacity
System Capacity
Network and Configuration
Access Mode Static IP, PPPoE, DHCP
LED Indications
Dimensions (W x D x H) 310 × 500 × 90 mm
Refuse Abort Invite Dos
Refuse SSH Login DoS
Firewall / SRTP
Black List
BLF (Busy Lamp Field)
CDR (Call Detailed Record)
Conference Room
DID (
DISA (Direct Inward System Access)
DND / Feature Codes / Flash Operation Panel
Follow Me / Auto-Provision
IVR (Interactive Voice Responses)
Multi-language System Prompt
Multiple Language of GUI
Phone Book / PIN Set
Record Files Download
Ring Group / SIP Trunk
Skype for SIP / Smart DID / System Log
T.38 Fax (Pass-through) / Time based Rule
Virtual Fax / Voicemail &Voice Mail to E-mail
Call Back / Call Forward / Call Group
Call Hold / Call Paging and Intercom
Call Park / Call Pickup / Call Queue
Call Record / Call Route / Blind Transfer
Attend Transfer / Call Waiting /
Caller ID / Dial by Name
Customized IVR / on hold music / T ran sfer
Three-way Conference / Video Call
80 Concurrent Call Legs
Up to 500 IP Phone Registers/Extensions
Recording (GSM / default): 2,500,000 mins minutes;
Wav: 210,000 mins
Voicemail (GSM / default): 2,500,000 mins minutes;
Wav: 210,000 mins
SYS: 1, LNK / Off
WAN: 1, LNK / Off
LAN: 1, LNK / Off
PWR: 1, LNK / Off
FXO / GSM: Red
FXS: Green
(PPTP/L2TP/OpenVPN Server)
(3 rooms)
Direct Inward Dialing Number)
IPX-2500
Operating Environment -10~45 degrees C, 10~80% humidity
Power Requirements AC 100~240V, 50 / 60Hz, 1.5A max.
EMC/EMI CE, FCC Class B, RoHS
16
Page 17
Internet Telephony PBX System
IPX-2500
Chapter 2 Installation Procedure
2.1 Web Login
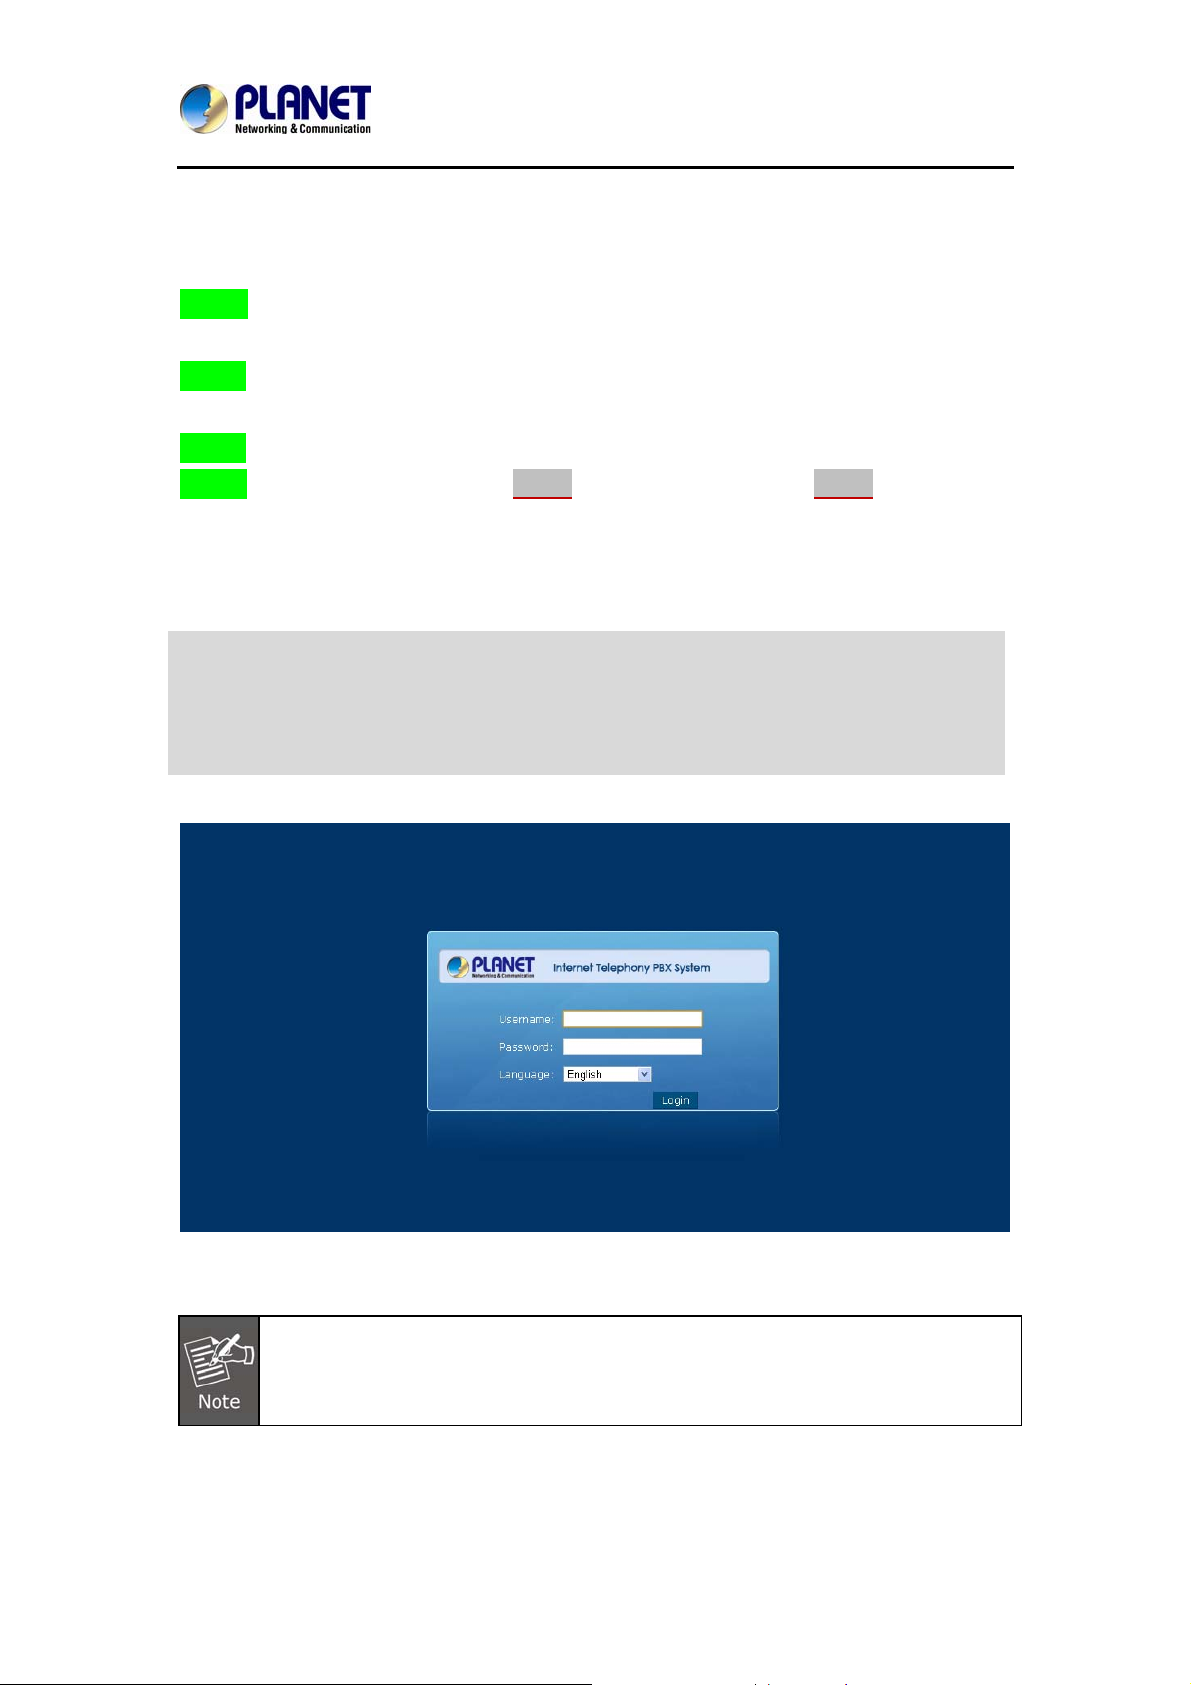
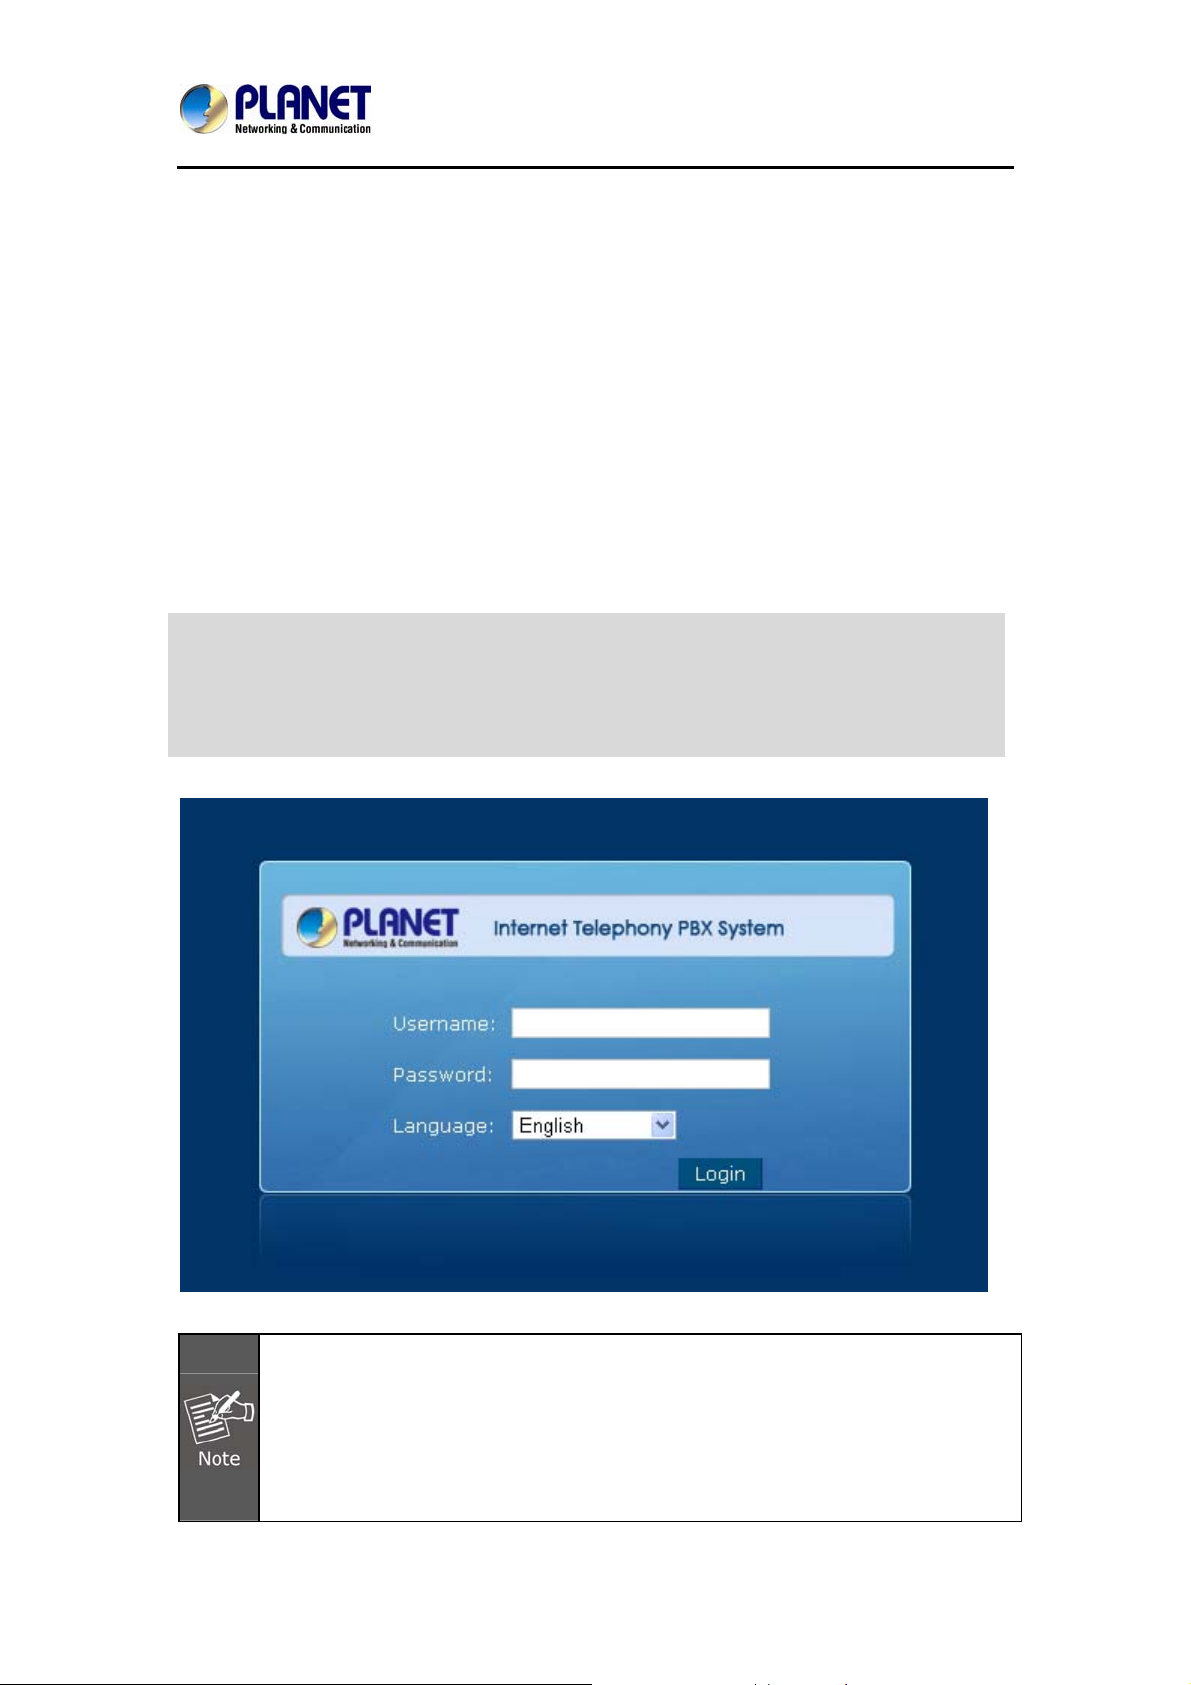
Step 1. Connect a computer to an LAN port on the IPX-2500. Your PC must set up to the
same domain of 192.168.0.X as that of the IPX-2500.
Step 2. Start a web browser. To use the user interface, you need a PC with Internet Explorer
(version 6 and higher), Firefox, or Safari (for Mac).
Step 3. Enter the default IP address of the IPX-2500: 192.168.0.1 in the URL address box.
Step 4. Enter the default user name admin and the default password admin, and then click
Login to enter Web-based user interface.
(Default IP)
Default WAN IP: 172.16.0.1
Default LAN IP: 192.168.0.1
Default User Name: admin
Default Password: admin
Figure 2-1. Login page of the IPX-2500
For security reason, please change and memorize the new password after this first
setup.
17
Page 18
Internet Telephony PBX System
2.2 Configuring the Network Setting
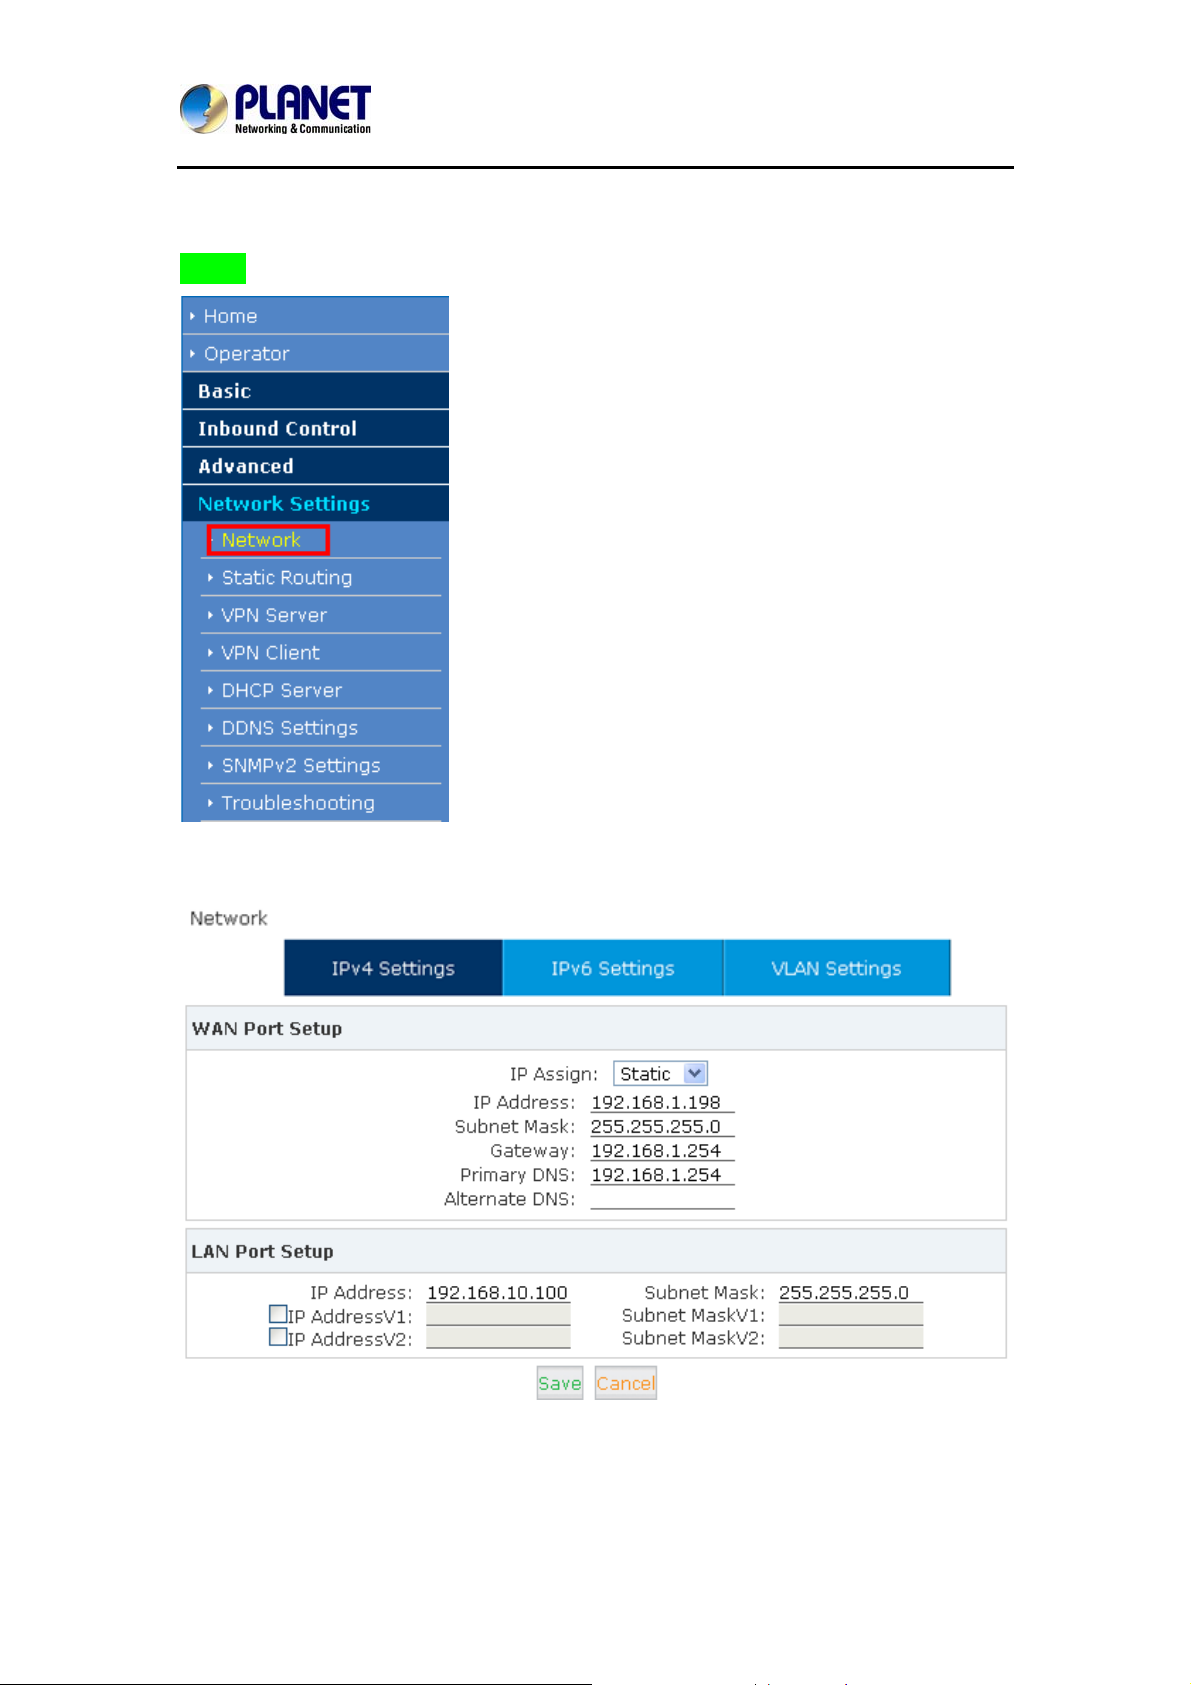
Step 1. Go to Network Settings → Network
IPX-2500
Network & Country Button
Network Setting page
18
Page 19
Internet Telephony PBX System
IPX-2500
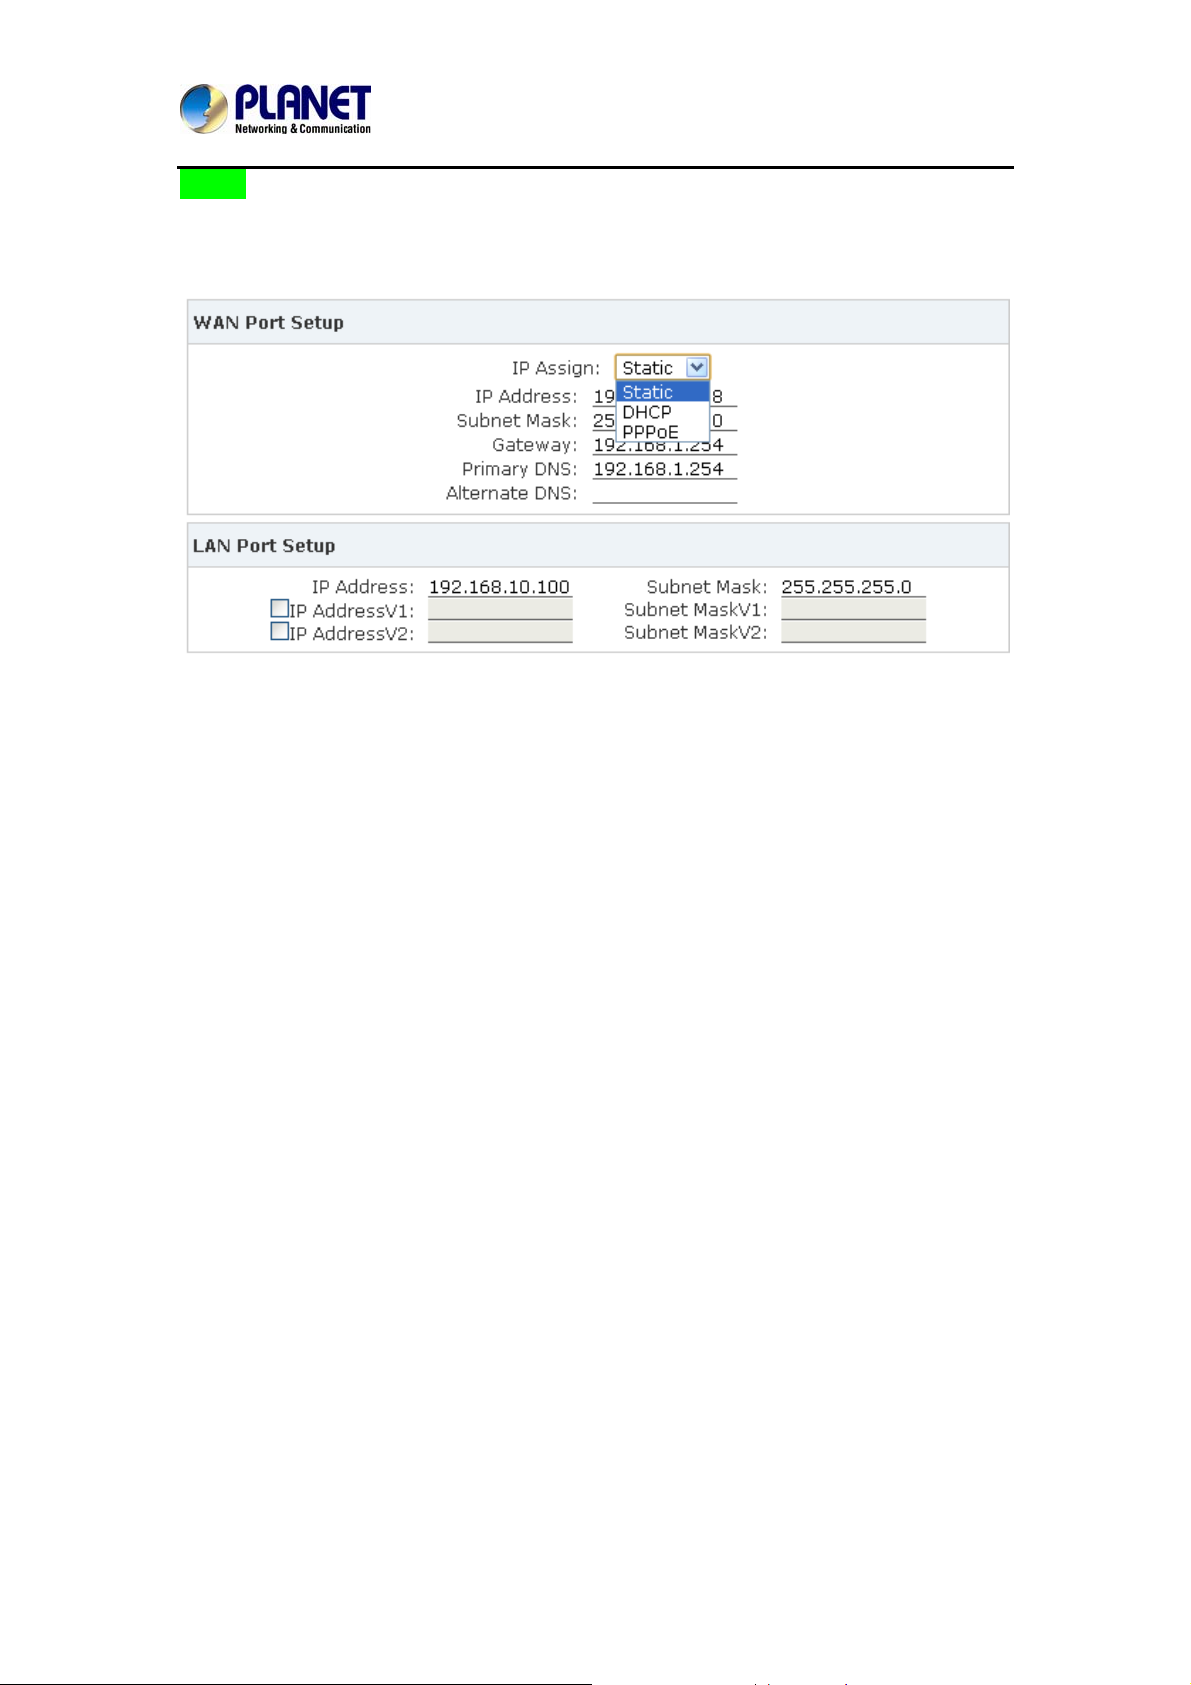
Step 2. Edit your WAN port IP information.
There are three types of Ethernet port connection. They are Static IP, PPPoE (Point-to-Point
Protocol over Ethernet), DHCP. You can find detailed setting process in the user manual.
Selection of IP Connection Type
19
Page 20
Internet Telephony PBX System
IPX-2500
Chapter 3 Basic Configuration
3.1 Preparation before Operation
What kind of IP phone can be used with the IPX-2500 IP PBX?
z Our IPX-2500 is based on SIP 2.0 (RFC 3261); any IP phone model based on the same
protocol can work with the IPX-2500.
3.2 Before Making a Call
3.2.1 System Information
(Default IP)
Default WAN IP: 172.16.0.1
Default LAN IP: 192.168.0.1
Default User Name: admin
Default Password: admin
1. To login to the IPX-2500, your PC must use the same domain as the eth0 IP
address of the IPX-2500.
2. For security reason, please modify the user name and password after you login.
You can modify it on this page: “System”---“Management”
3. Every Time after saving the change, please press the “Activate Chang es” to
20
Page 21
Internet Telephony PBX System
make modification effective.
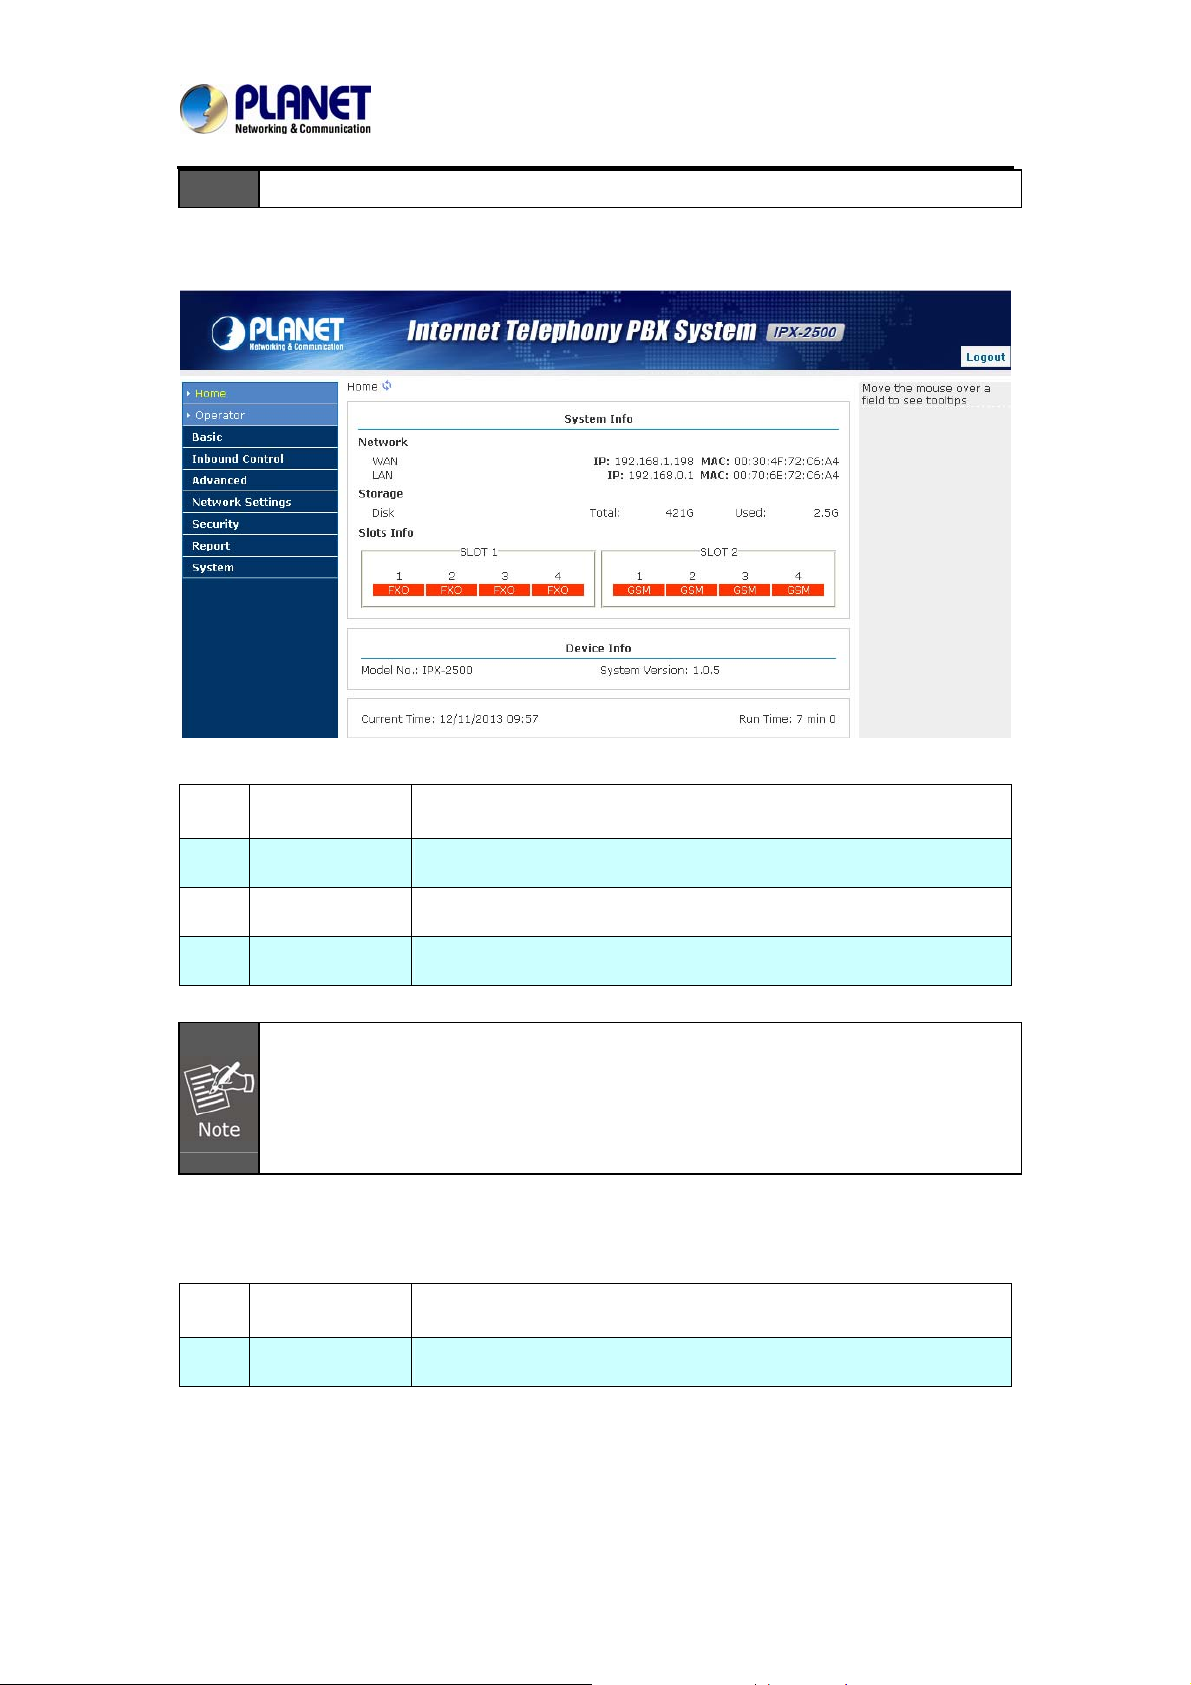
If user name and password are right, this following page will be displayed:
IPX-2500
1 Network
2 Storage
3 Slots Info
4 Device Info
ETH0 IP and MAC will be displayed
Total storage and used storage will be displayed
Channel information will be based on the product model
Product Model and System Version will be displayed
1. If FXO is connected, the slot color and the front panel LED will be red and steady
red, respectively.
2. If FXS is connected, the slot color and the front panel LED will be green and
steady green, respectively.
Commonly Used Button
On the home page, besides the system info, there are other function buttons as shown below:
1 Logout
Logout the Web panel
2 Activate Change
Activate the changes for your current configuration
21
Page 22

Internet Telephony PBX System
System Menu
System Menu includes the following sub menu:
IPX-2500
1 Home
2 Operator
3 Basic
4 Inbound Control
5 Advanced
Network
6
Settings
7 Security
8 Report
9 System
Display device information
Extension / Trunk / Channel Status
Basic configuration on extension, trunks, etc
Configuration of Inbound Route, IVR and Black List, etc
Configuration of extension's default information,
Conference Call, Call Transfer, Function Key, etc.
Configuration of Routing, Network, VPN, DHCP and other
related network parameters
Configuration of Firewall, SSH, FTP.
Record List, Call Logs and System Logs.
Time Settings, Management, Back Up and Upgrade, etc.
22
Page 23
3.2.2 Operator
Internet Telephony PBX System
IPX-2500
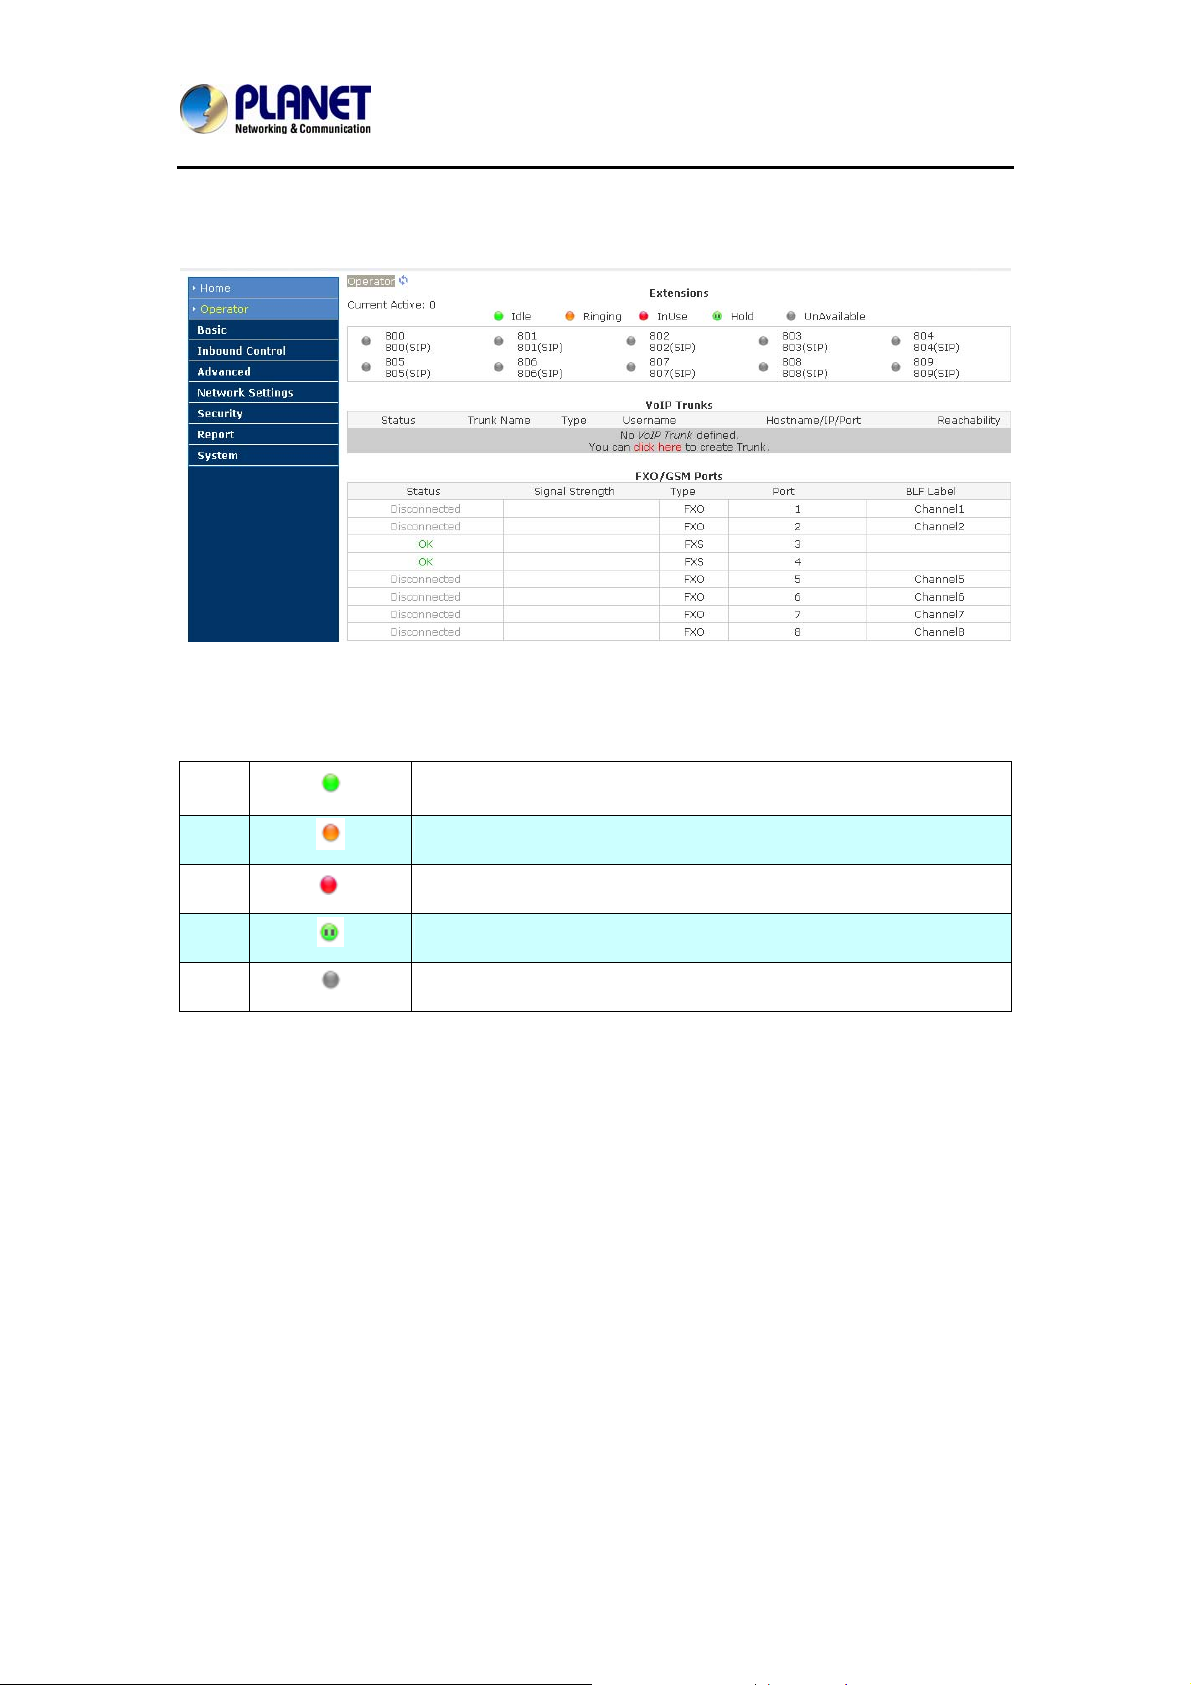
Display all the Extension, VoIP Trunk and Slot information.
About extension:
1
2
3
4
5
Idle
Ringing
In use
Hold
Unavailable
23
Page 24
Internet Telephony PBX System
IPX-2500
3.2.3 Basic Configuration
Configure Extensions
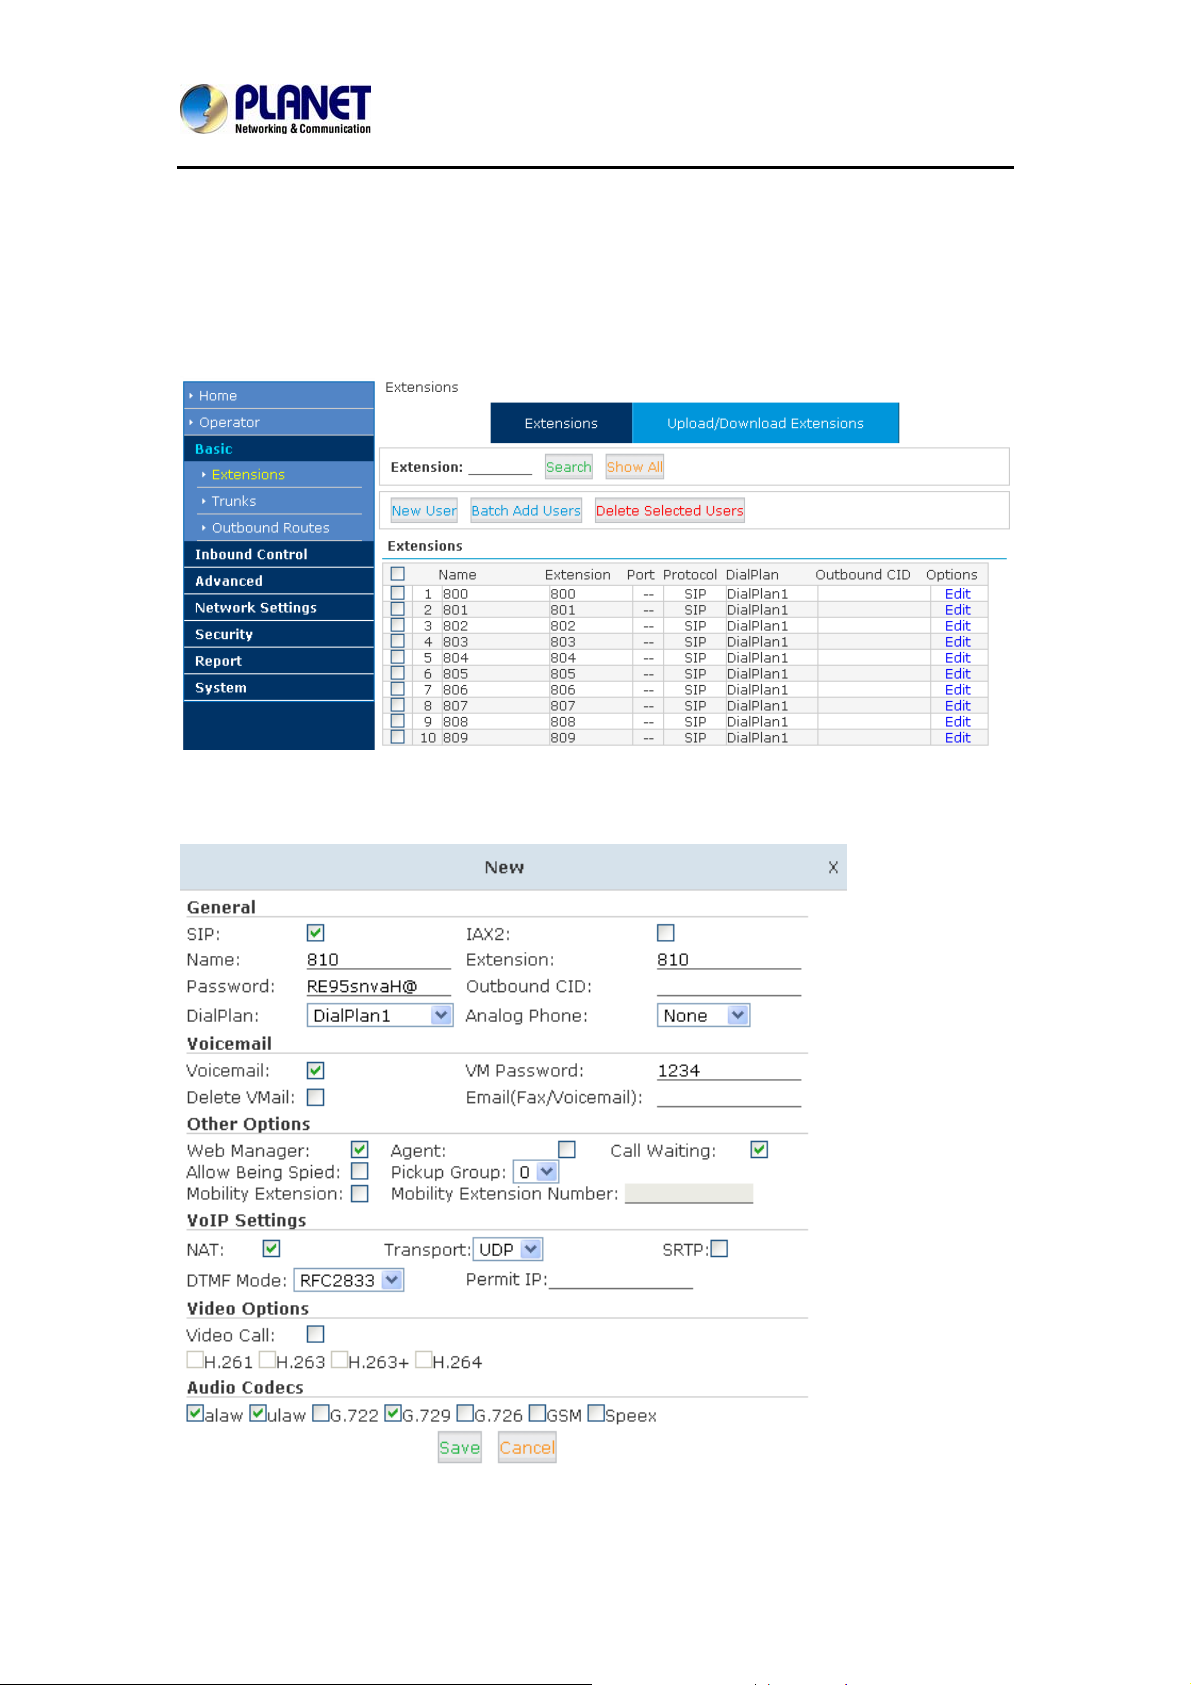
Planet IP PBX supports SIP / IAX2 and analog extension; configure extension on this page:
【Basic】----【Extensions】
Click【New User】to see the extension configuration interface as shown below:
24
Page 25

Internet Telephony PBX System
Extension Settings
Item Explanation
SIP / IAX2 Choose extension protocol.
Name Extension Name (English Character Only), e.g. Tom.
Extension Extension Number connected to the phone, e.g. 888.
Password Same password as voicemail. (4-16 digits, e.g.123456)
Outbound CID Override the caller ID when dialing out with a trunk.
IPX-2500
Dial Plan
Please choose the Dial Plan which is defined in the menu “Outbound
Routes”.
Analog Phone Please select the related FXS port for your analog phone.
Voicemail Select this option to open the voicemail account
VM Password Set password for Voicemail, e.g. "1234"
Delete VMail Check this option to delete voicemail from system after it’s sent to
mail box.
Email
(Fax / Voicemail)
Extension user’s mail box, which is used for receiving fax or
voicemail (you need to open the function to fax to email / voicemail),
e.g. [email protected]
Web Manager It’s allowed to login Extension Management Panel to manage
extension like voicemail, call recording, call transfer, etc when you
select this option.
Agent Check this option to set this extension user as agent.
Call Waiting Enable call waiting
Allowing Being
Check this option to allow being spied.
Spied
NAT Check this option if extension user or the phone is located after the
NAT (Network Address Translation) available gateway.
Pickup Group Select the Pickup Group which the extension user belongs to.
Mobility Extension After checking this option, you must set mobility extension number.
User can make calls to the IP PBX server with this mobility number,
and have all rights of this extension, e.g. Outbound Call, Internal Call,
Listen to the voicemail.
Transport Select the Transport Protocol: UDP, TCP, TLS
SRTP Enable SRTP
DTMF Mode Default DTMF is rfc2833. It can be changed if necessary.
Video Call Check to enable video call for this extension. And select the audio
codecs you need to use.
Permit IP Set computer permitted IP to visit this IP PBX, e.g.192.168.1.77or
25
Page 26
Internet Telephony PBX System
192.168.10.0/255.255.255.0. Computer with other IPs is not allowed
to visit this IP PBX.
Audio Codec Select what audio codec you need to use.
1. There are few default extensions which number started with "8XX", you can add
or delete extension by your requirement
2.
Maximum extensions: 100.
3. For security reason the default password is random character or number e.g.
BB%ChH64rI, and every time when you reset to default system, it will randomly
have a new password again
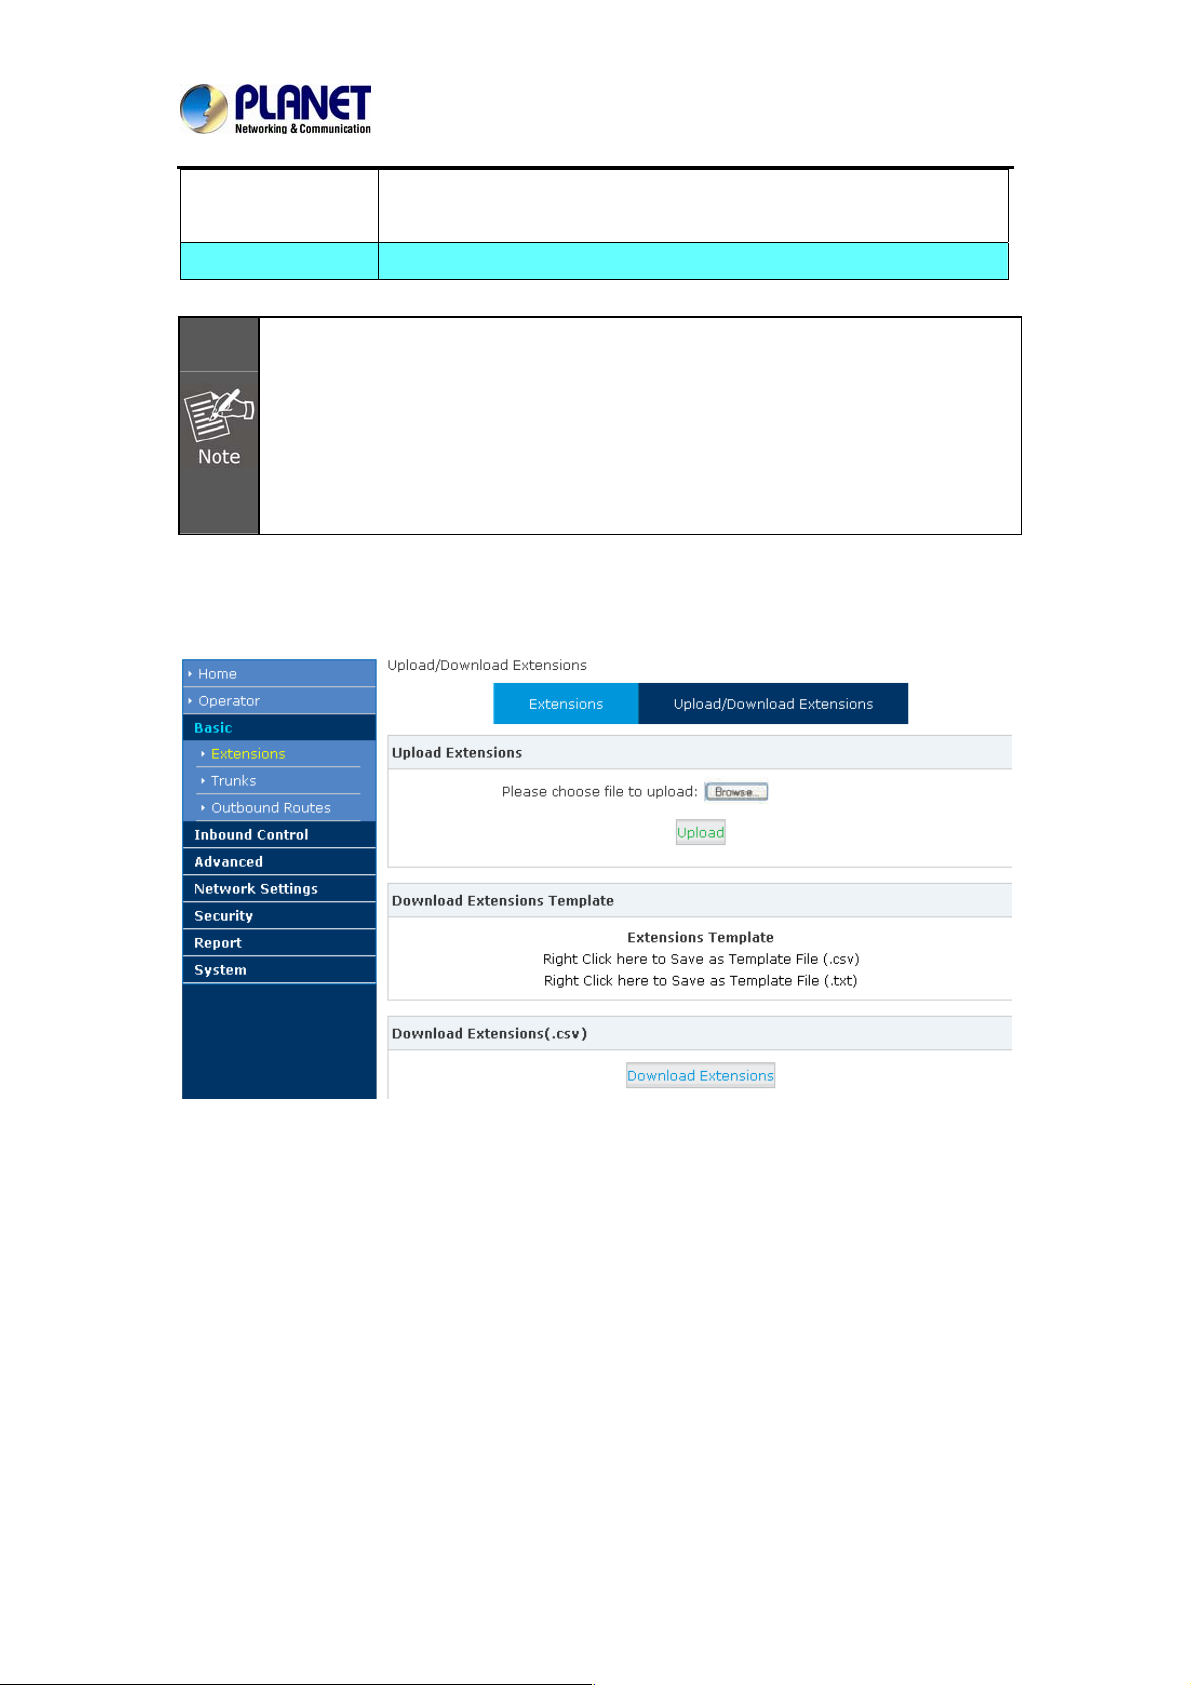
Upload / Download Extensions
Click【Upload/Download Extensions】to add extensions as shown below:
IPX-2500
Download the extension template from the【Download Extensions Templet】, add extension
information based on the template format and save.
Select the extension file to upload from【Upload Extensions】
Download current extension information from【Download Extensions (.csv)】
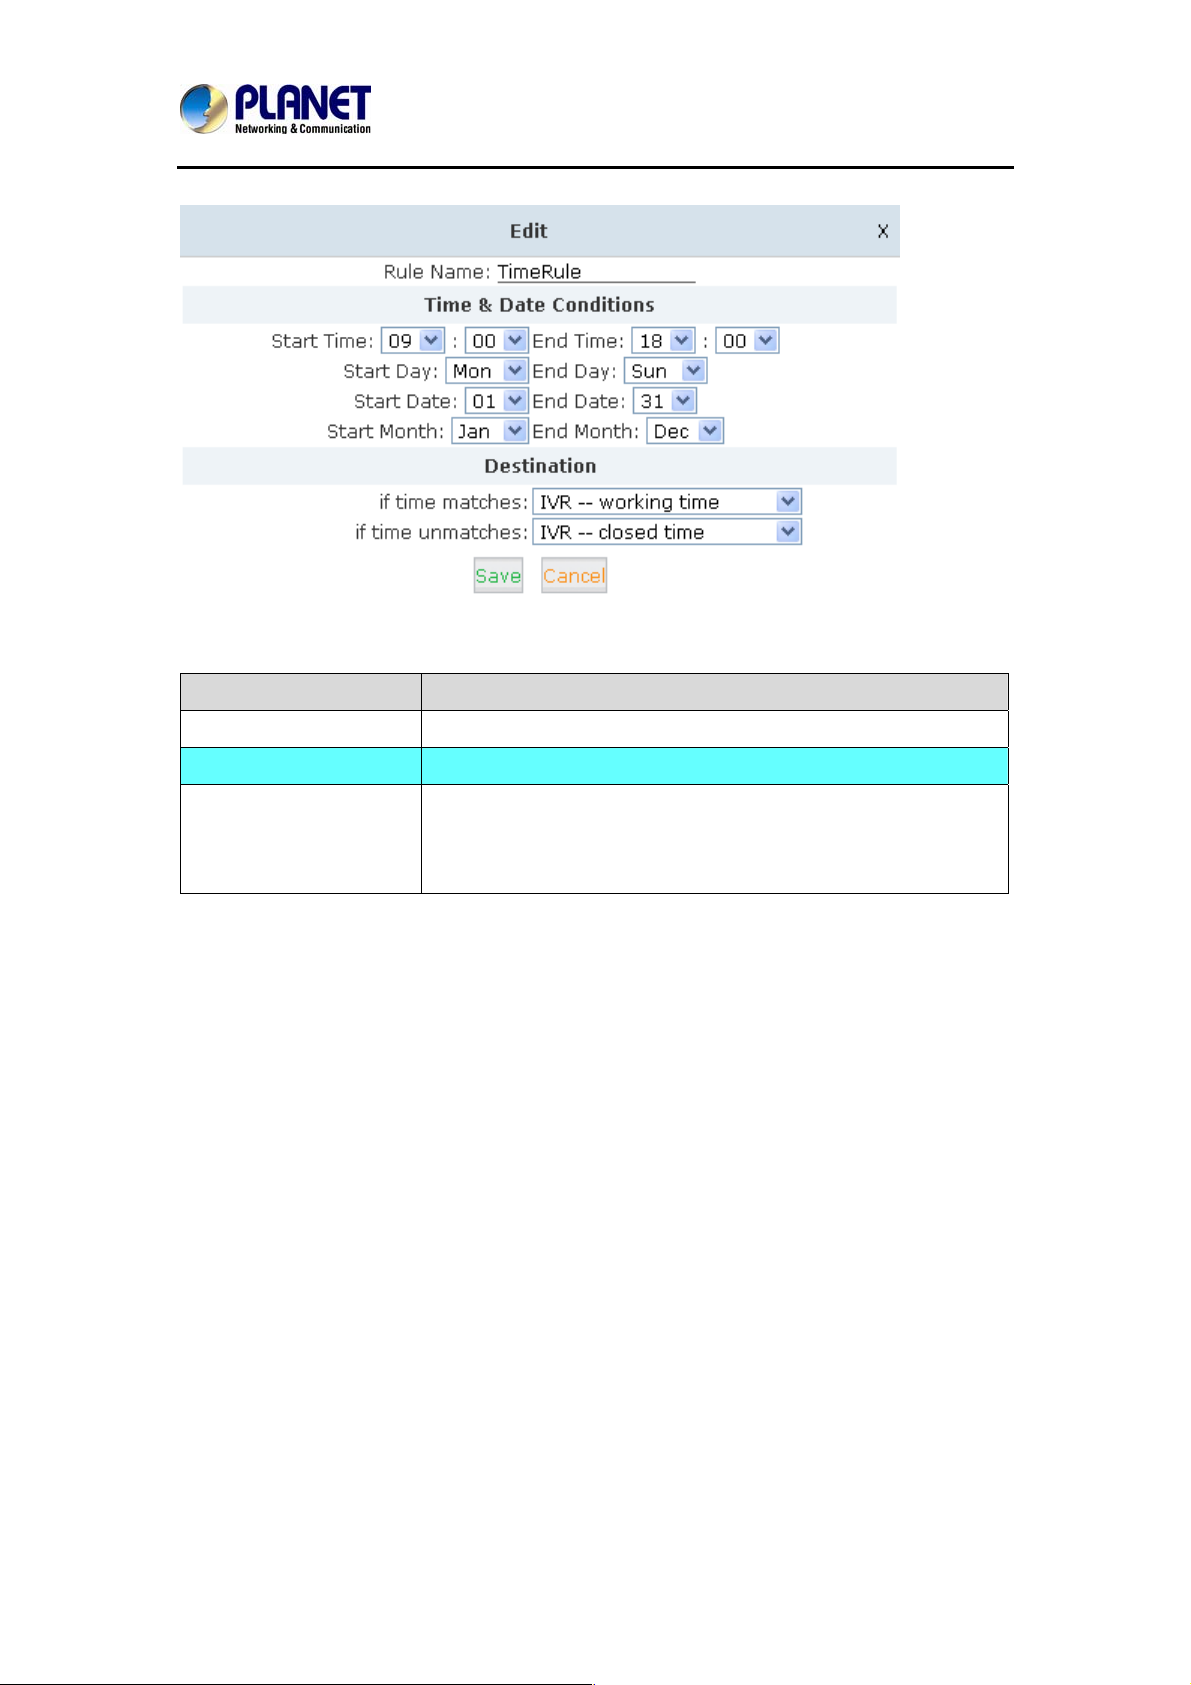
3.2.4 Time-based Rules
Please set time rule for working time and after-working time, and deal with inbound calls based
on this time rule.
26
Page 27
Internet Telephony PBX System
Please set from this page:【Time-based Rule】---【New Time Rule】:
New Time Rule:
Item Explanation
IPX-2500
Rule Name Define the name for this Time Rule.
Time & Date Conditions Set time segment for Day/ Date/ Month.
Destination How to deal with the inbound call in different time segments. For
example, inbound call can be directed to operator in working
time.
27
Page 28
Internet Telephony PBX System
IPX-2500
3.3 Outbound Call
3.3.1 Trunks
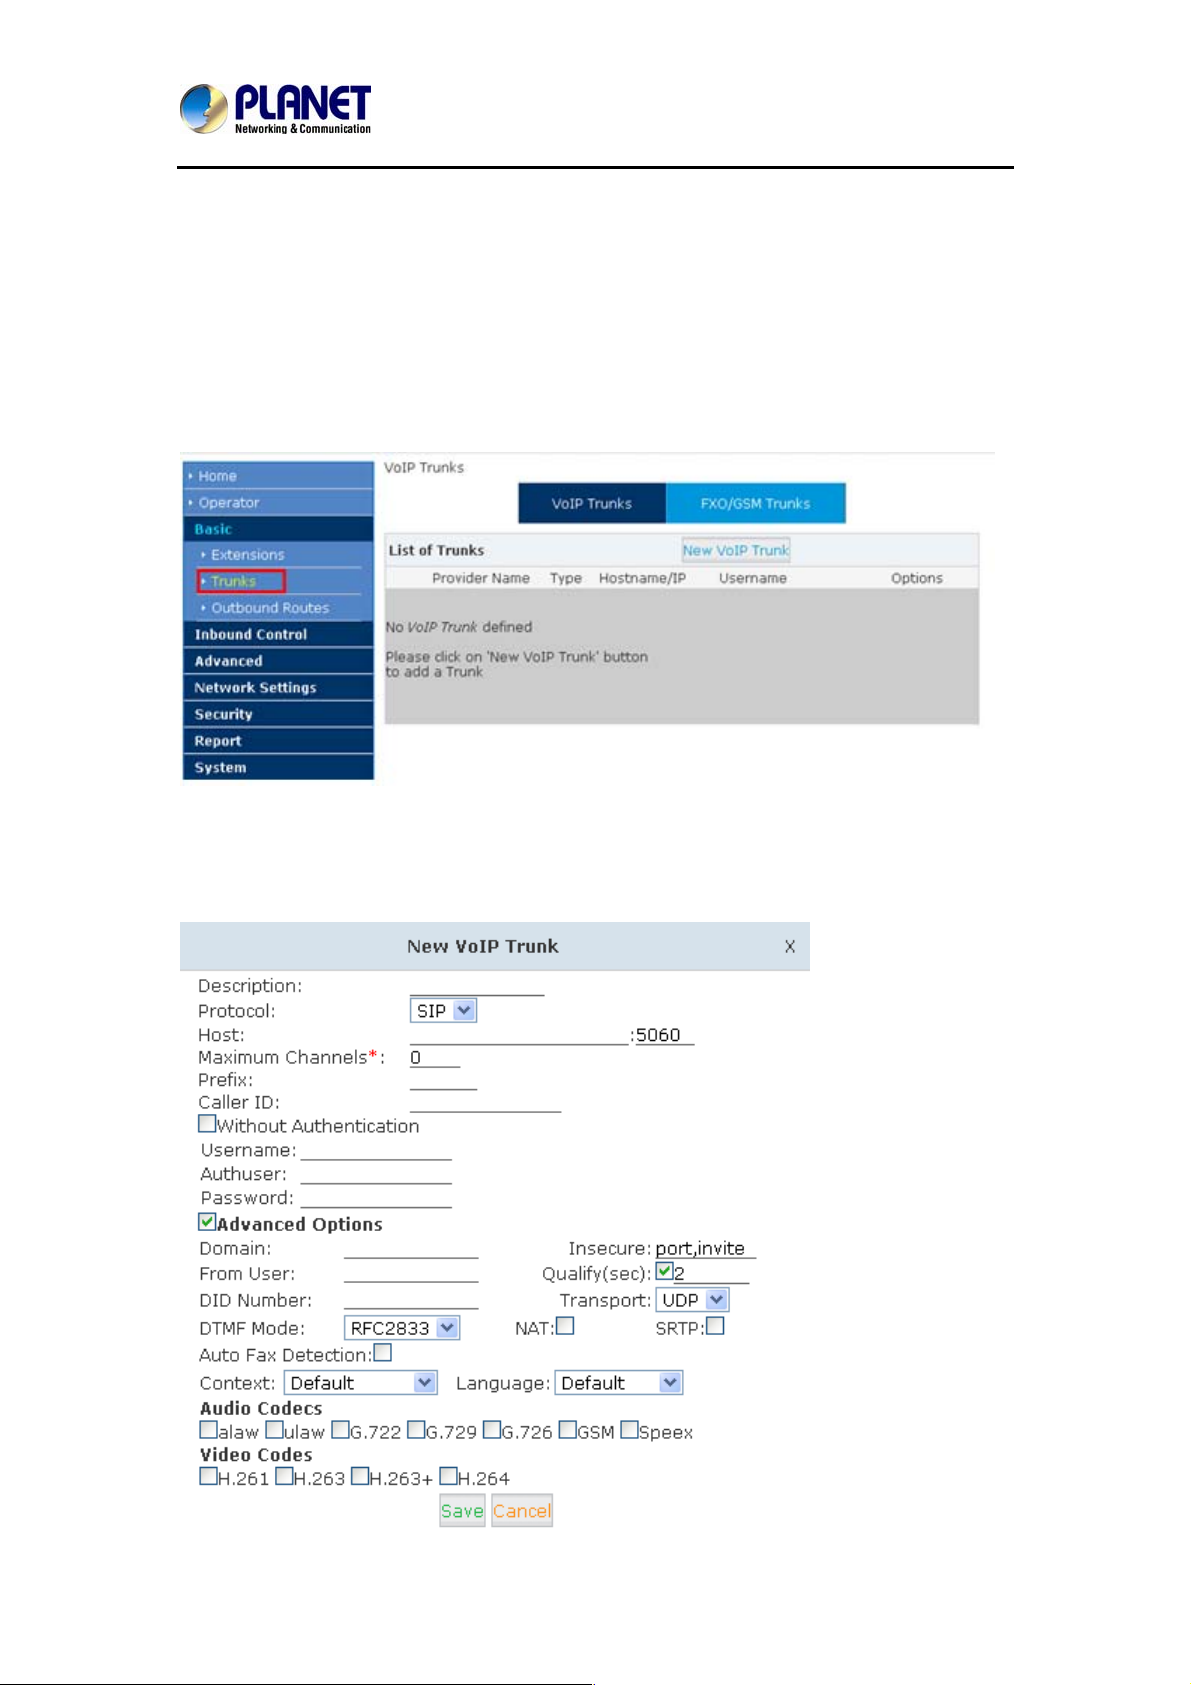
If you want to set up outbound call to connect to PSTN (Public Switch Telephone Network) or
VoIP provider, please configure on this page: 【Basic】->【Trunks】
Planet IP PBX supports 2 kinds of trunks: VoIP Trunks and FXO/ FXS Trunks.
VoIP Trunks
1.Click【VoIP Trunk】->【New VoIP Trunk】:
28
Page 29
Internet Telephony PBX System
IPX-2500
Item Explanation
Description Define the V oIP(figure or character).
Protocol Select protocol for outbound route, SIP or IAX2.
Host Set host address (provided by VoIP Provider).
Maximum Channels Set maximum channels for simultaneous call. (Only for outbound
call; “0” = no limitation).
Prefix The prefix will be added in front of your dialed number automatically
when the trunk is in use.
Caller ID This Caller ID will be displayed when user make outbound call.
Note: This function must be supported by local provider.
Without
Authentication
User Name User Name provided by VoIP Provider.
Password Password provided by VoIP Provider.
Advanced Options Advanced options for this trunk, e.g. codec, dial plan, etc.
If you don’t need the Authentication when connecting the IP PBX,
please check this option.
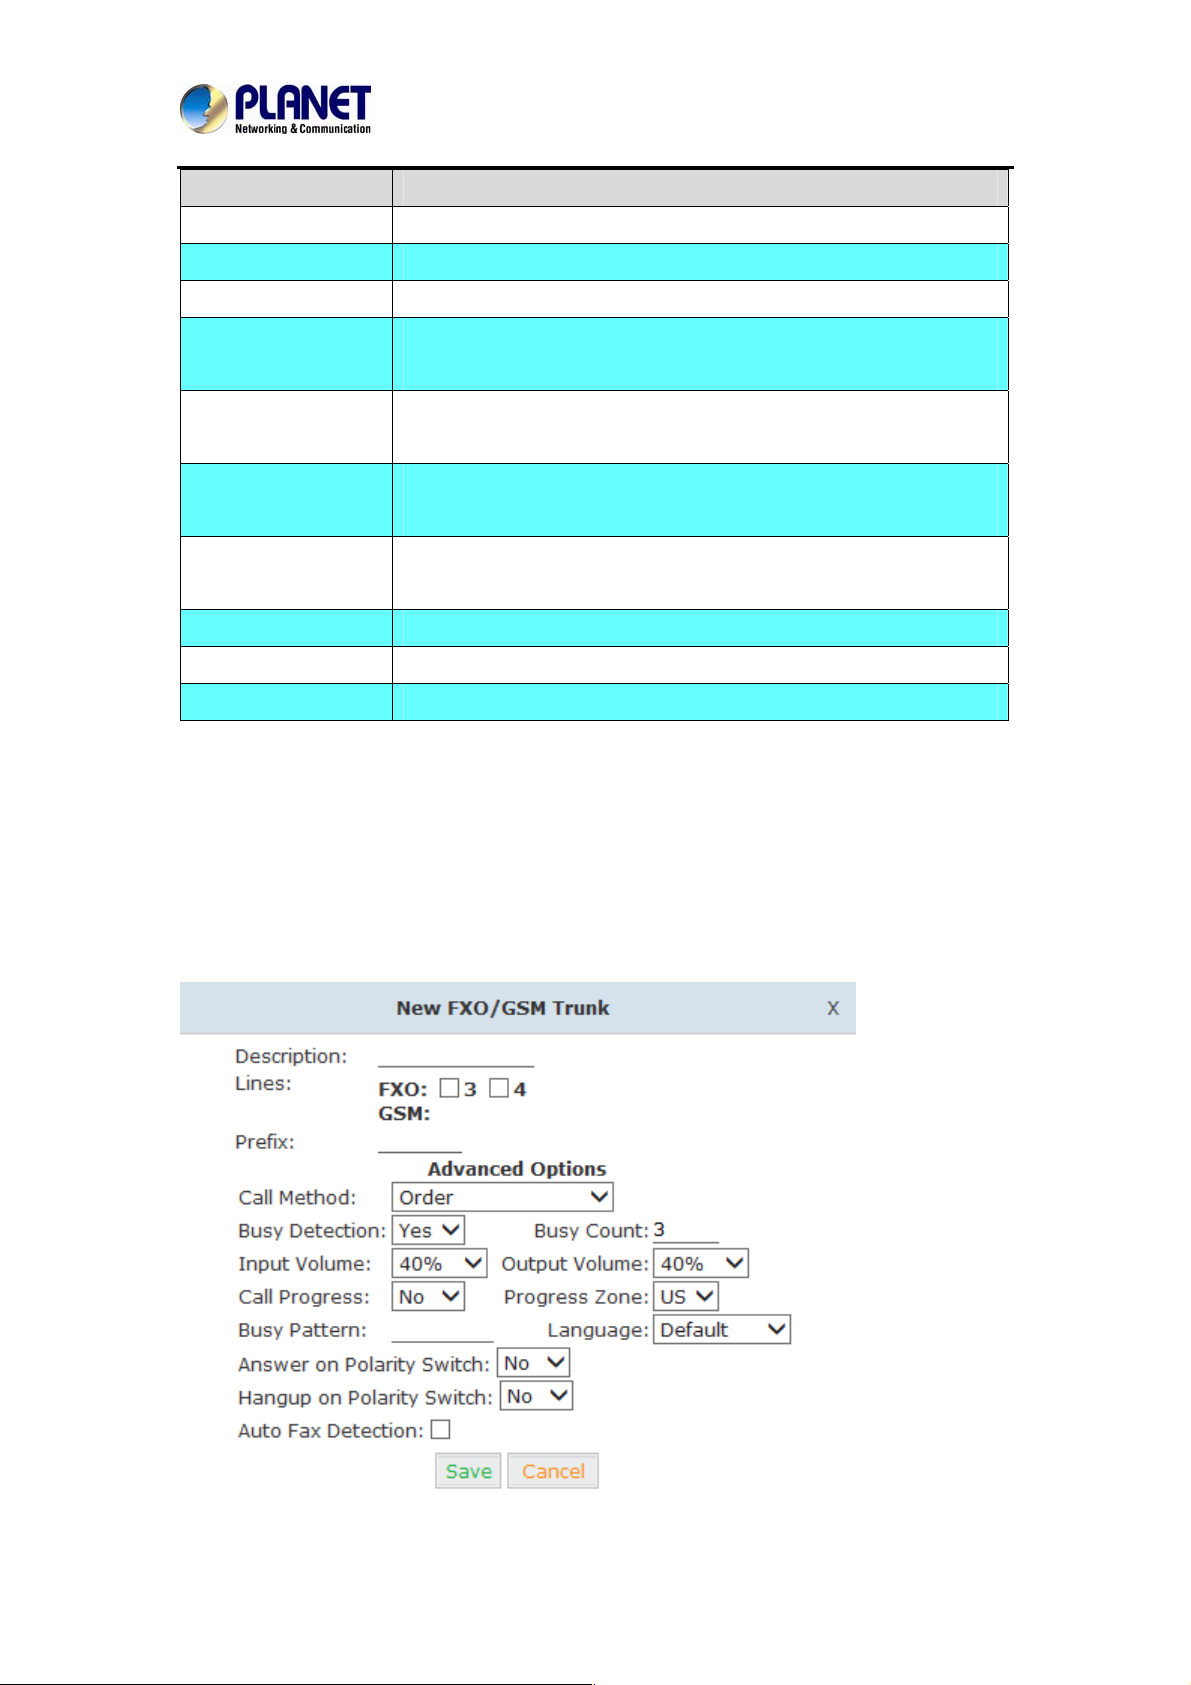
You can configure the Analog / GSM line through PLANET IP PBX. The same analog line can’t
be used in multiple trunks. If you don't have available analog / GSM trunk, you can't set up
trunk.
2) FXO / GSM Trunk
Click【FXO / GSM Trunk】->【New FXO / GSM Trunk】:
29
Page 30
Internet Telephony PBX System
IPX-2500
Item Explanation
Description Define the description for this trunk (figure or character).
Lines Available line
Prefix The prefix will be added to the dialed number automatically when t his
trunk is in use.
Advanced Options Advanced Options for this trunk, e.g. Call Method, Busy Detection,
etc.
Set the available analog line for this device. The same analog line can’t be used in several
FXO / GSM trunks. If you don’t have available analog line, you can’t set up FXO / GSM trunk.
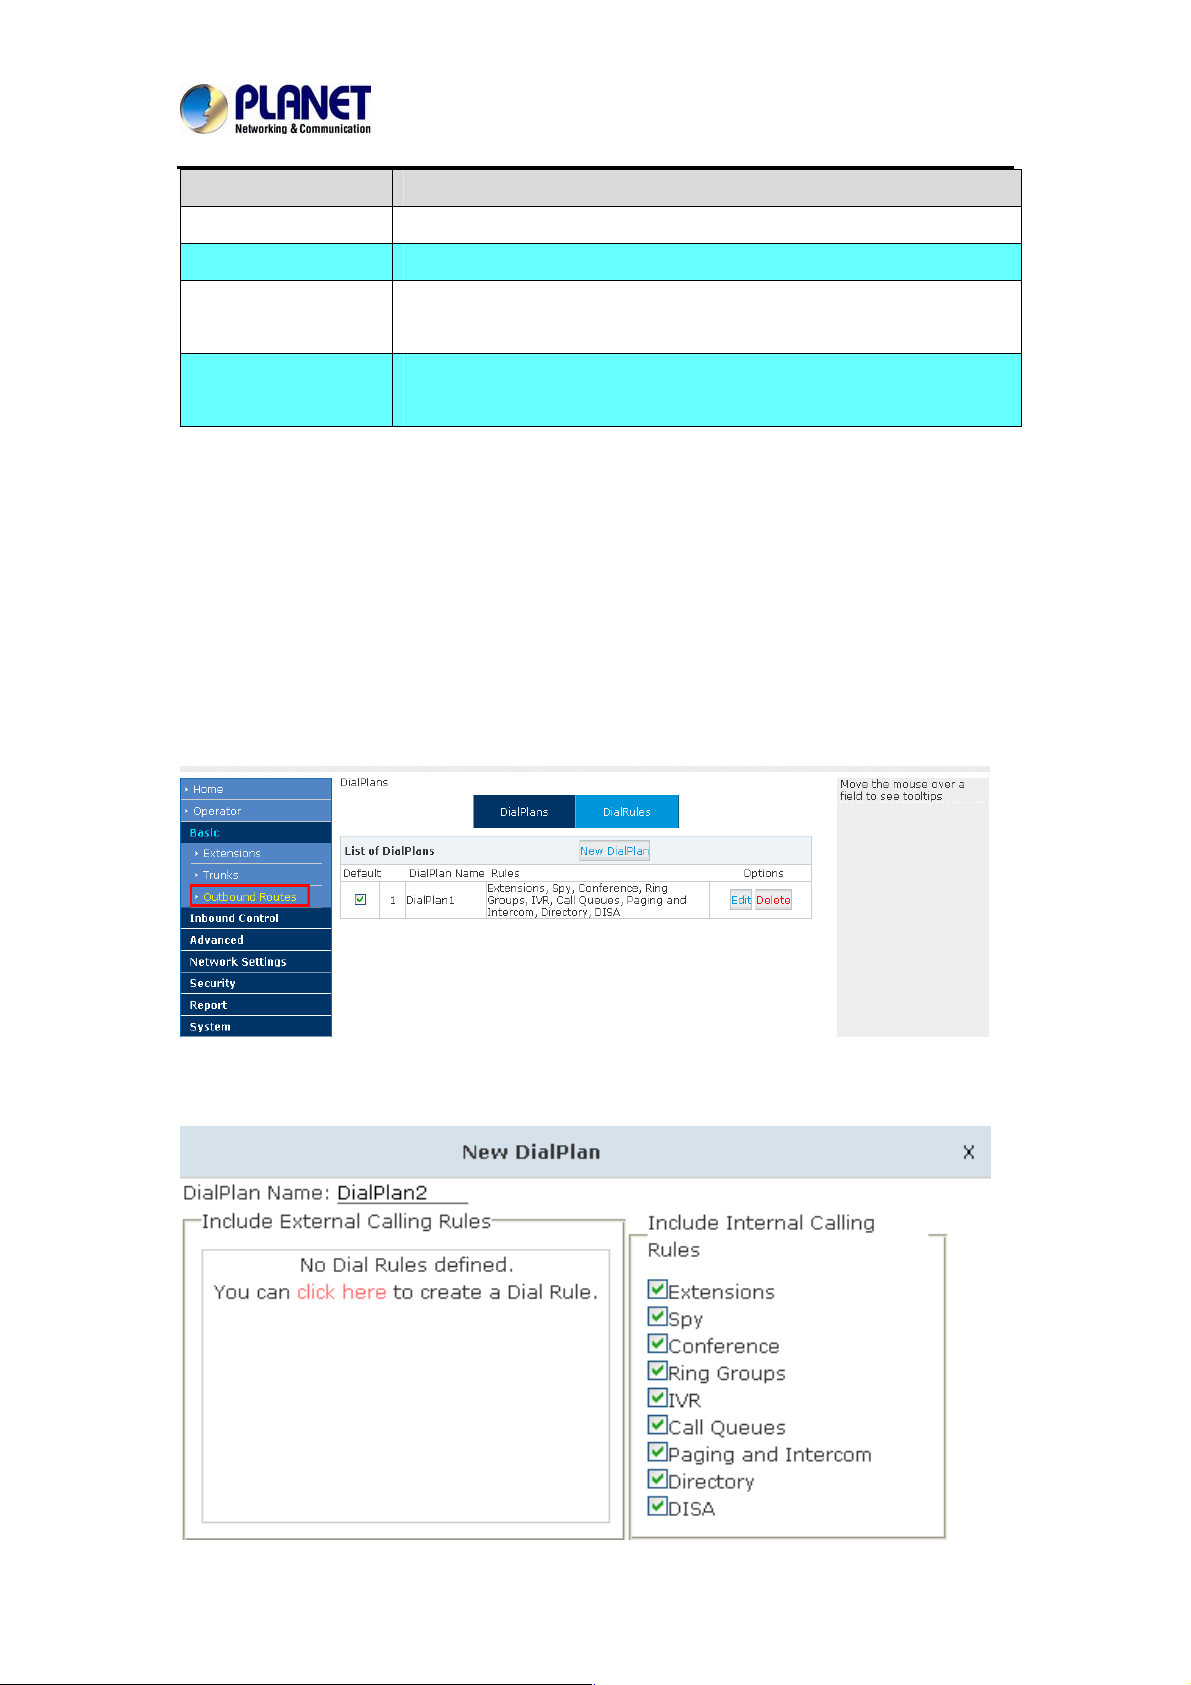
3.3.2 Outbound Routes
Outbound Routes is to define what trunk is used for outbound call by extension user. If user
don't allow extension user to call out, please ignore this part.
Please configure on this page: 【Basic】->【Outbound Routes】
On this page, user can configure the basic match pattern of the outbound routes and create
different dial plans. Please configure by clicking【Add a Dial Rule】
30
Page 31
Internet Telephony PBX System
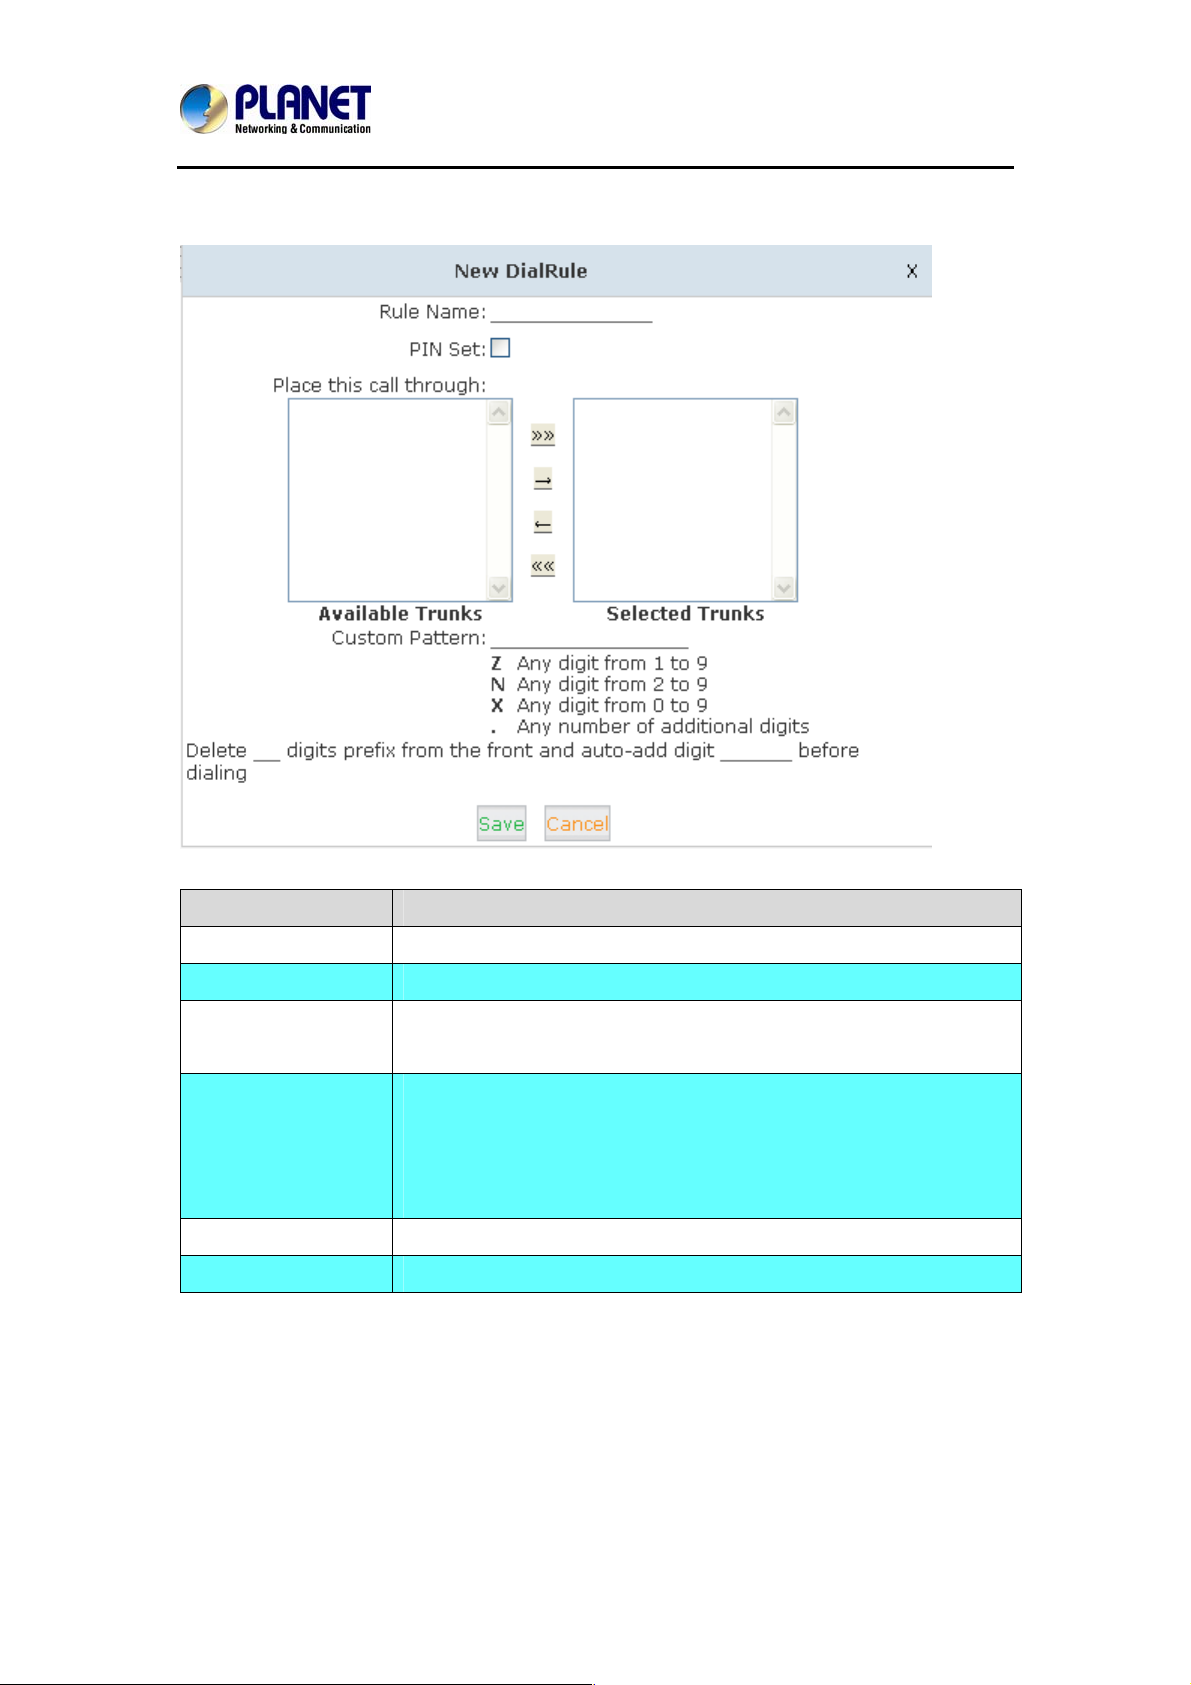
User can create dial rule for dial plan on this page:
IPX-2500
Item Explanation
Rule Name Define the name for the dial rule.
Pin Set Input this Pin when you use this dial rule.
Place this call
through
Custom Pattern
Delete[ ]digits prefix If one digit prefix be deleted, when dial 12345, 2345 will be sent.
Auto-add digit[ ] If figure “1” is added,123451 will be sent when dialing 12345
Select a trunk for this dial rule
N any figure from 2 to 9
Z any figure from 1 to 9
X any figure from 0 to 9
. One figure or multi-digit figures
31
Page 32
Internet Telephony PBX System
IPX-2500
3.4 Inbound Call
3.4.1 Inbound Routes
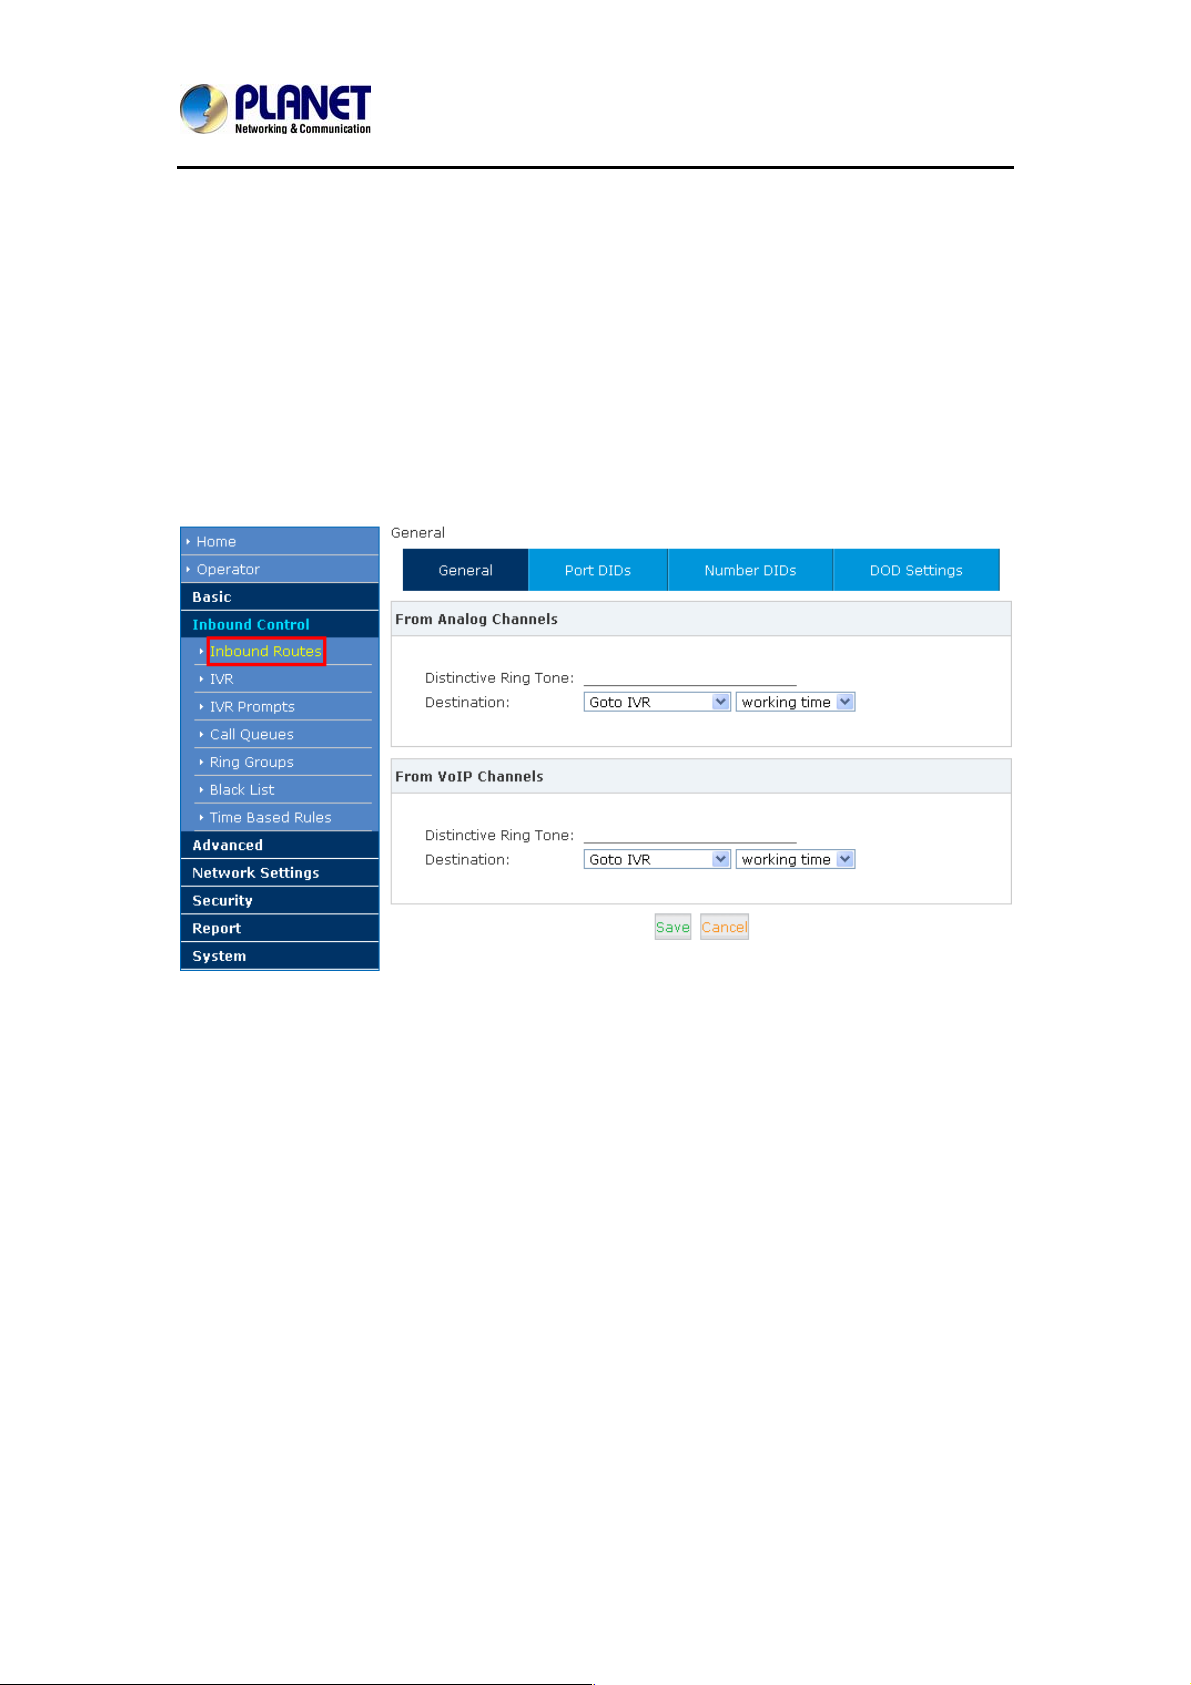
When a call is made from outside, you want to forward this call to an extension or IVR. This
Chapter will introduce you how to deal with the inbound calls.
Please configure it on this page:【Inbound Routes】
General
Distinctive Ring Tone: mapping the custom ring tone file, e.g. set distinctive ring tone as
“External”, the phone will play this ring tone when receiving the call. Note: The phone must
support such feature as well.
When incoming calls come from outbound line (FXO / GSM, VoIP), the calls can be accessed
to Extension User, Call Queue, Conference, IVR, etc. You can choose freely based on your
condition.
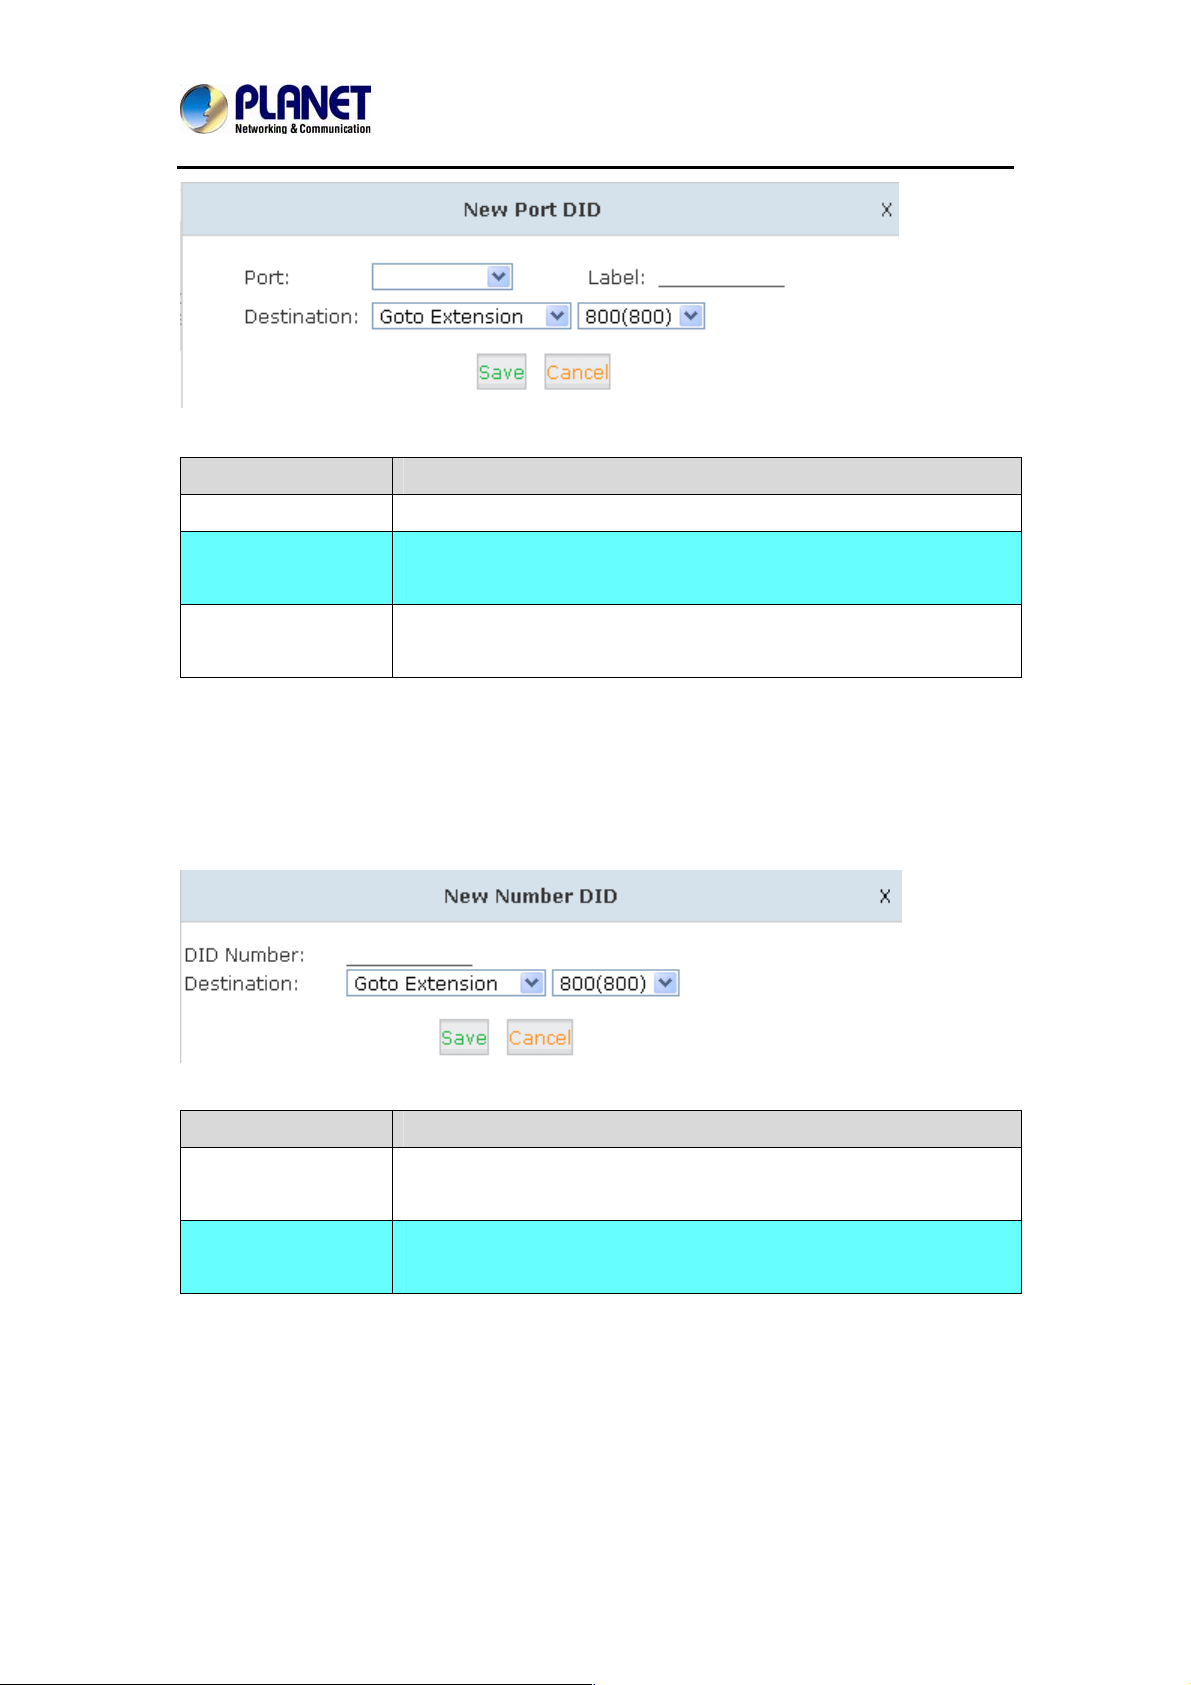
Port DIDs
If user wants to make the incoming call from the outbound line (FXO / GSM trunk) ac cess to
the specified extension user, call queue, conference or IVR, please configure it here:
Click【Port DIDs】->【New Port DIDs】:
32
Page 33
Internet Telephony PBX System
IPX-2500
Item Explanation
Port Select the port for outbound line.
Label Set a label for this port. When incoming calls are from this port,
the label will be displayed.
Destination Incoming calls will access directly to this destination (extension user,
call queue, conference, or IVR).
Number DIDs
If user wants to make an outbound line (VoIP Trunk) access to the specified extension / queue
/ conference / IVR, please use this feature:
Click【Number DID】->【New Number DID】:
Item Explanation
DID Number DID number calling into VoIP (This number is configured in the
advance option of V oIP trunk).
Destination Choose a specified extension, call queue, conference or IVR to be
directed to call.
33
Page 34
Internet Telephony PBX System
IPX-2500
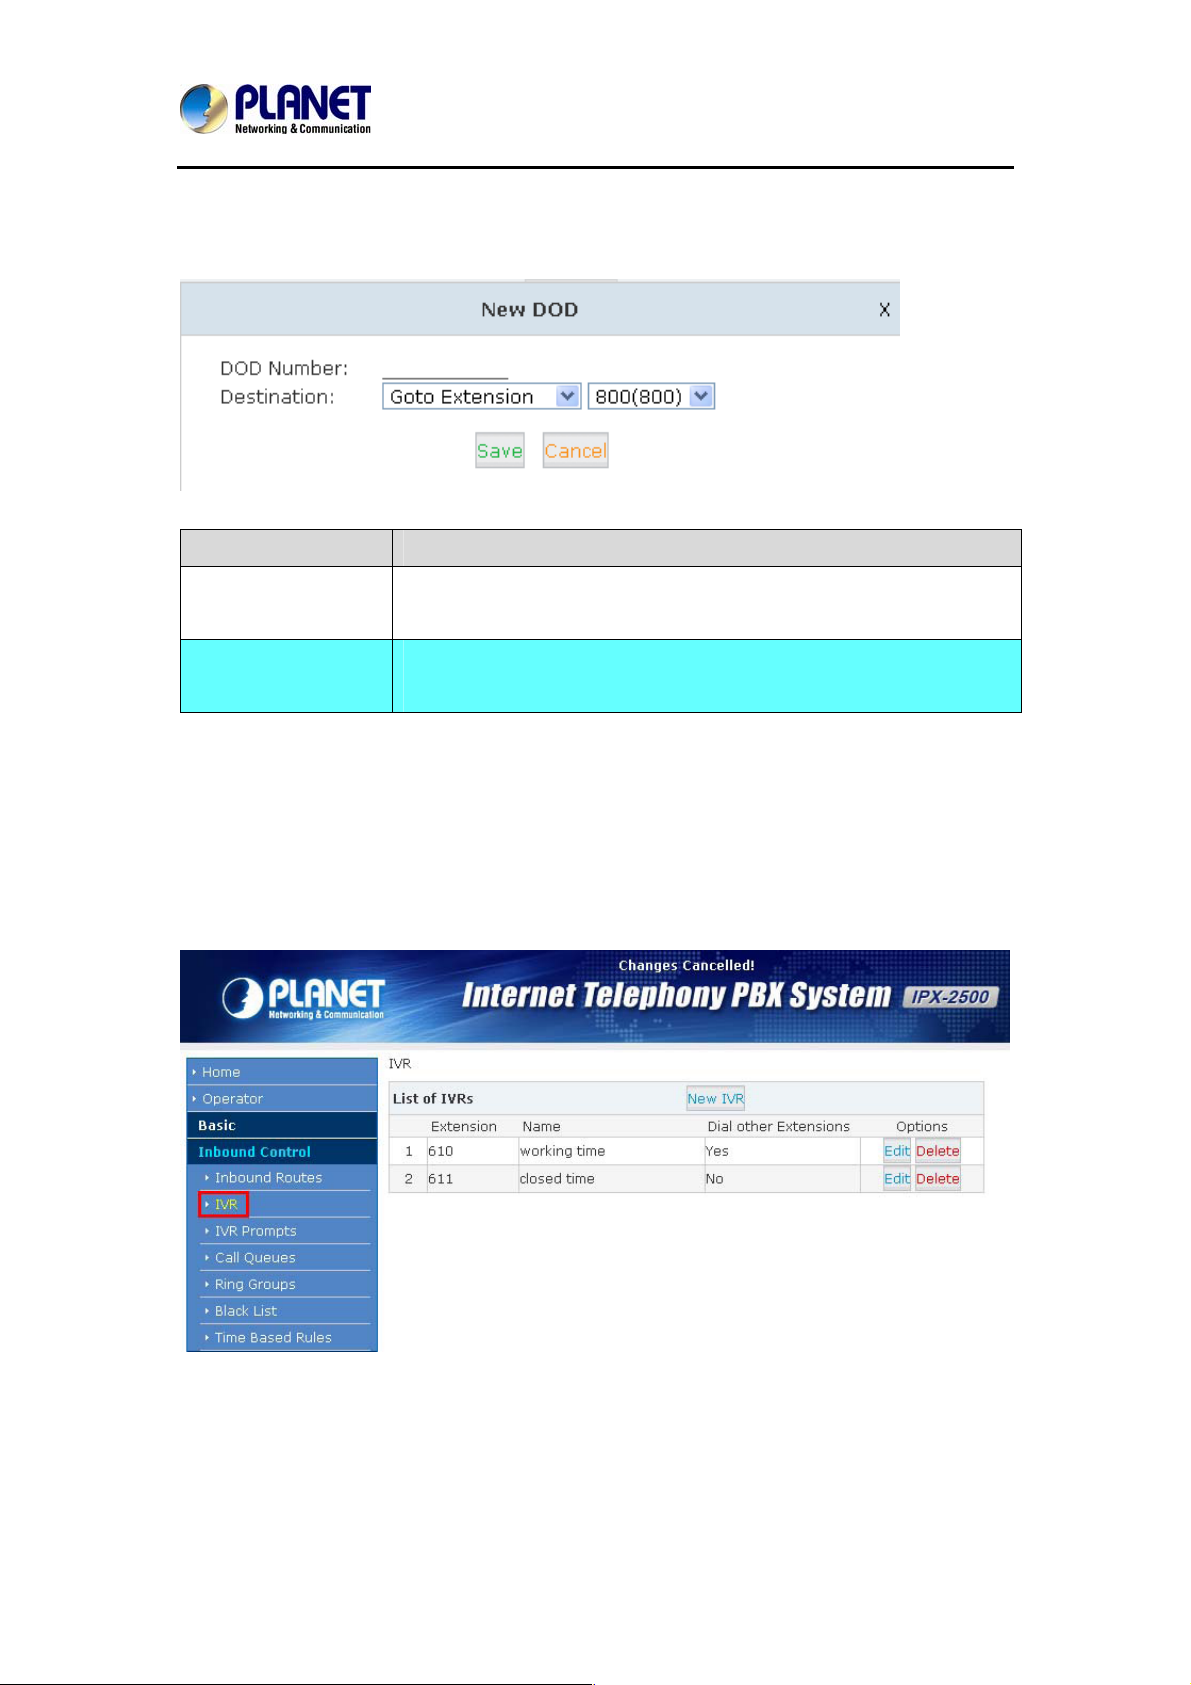
DOD Settings
If user wants to make the outbound call directly to the specified extension user, call queue,
conference, IVR, please configure it here. Click 【DOD Settings】->【New DOD】
Item Explanation
DOD Number Set the DOD number, and use it to match the Caller ID.
If matched, the call will access to the defined destination.
Destination Outbound calls will access directly to this destination (extension user ,
call queue, conference, or IVR).
3.4.2 IVR
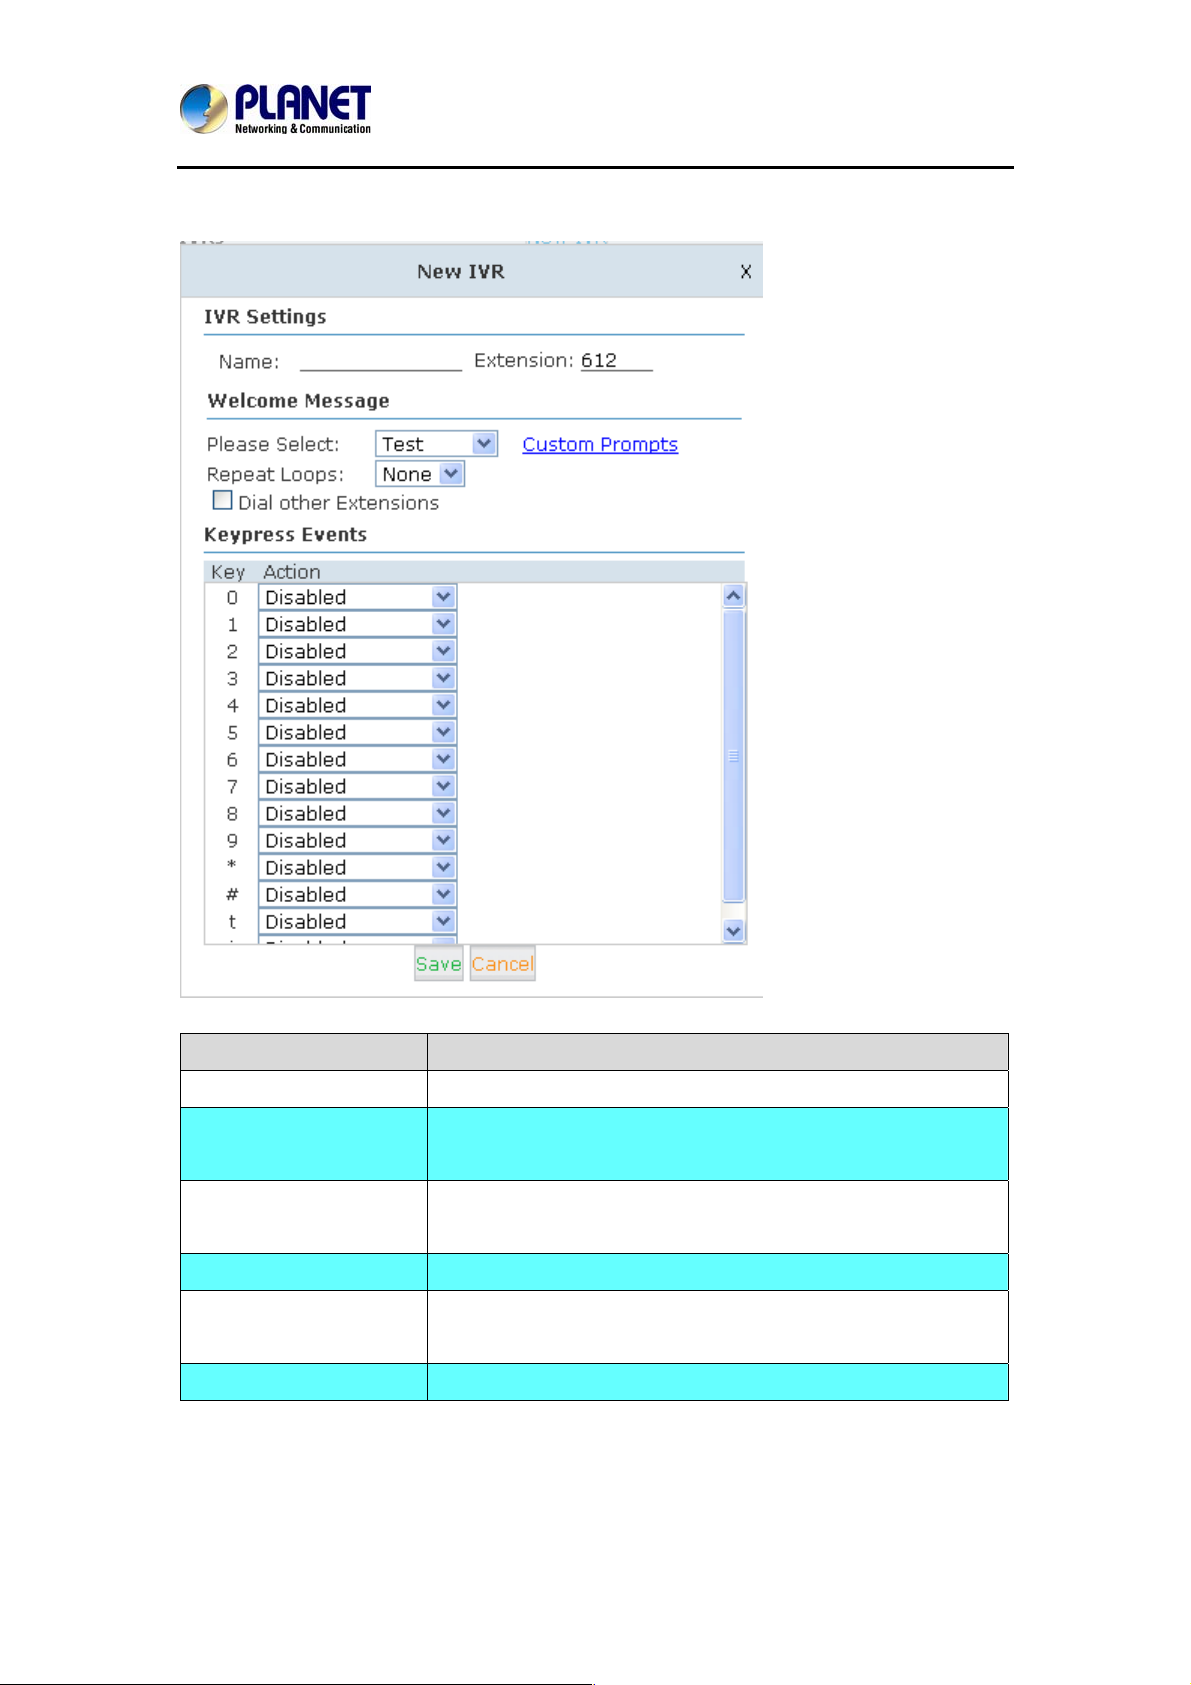
IVR will improve office efficiency based on your requirement.
Please configure on this page【Inbound Control】->【IVR】:
34
Page 35
Internet Telephony PBX System
Click【New IVR】to creates a new IVR:
IPX-2500
Item Explanation
Name Set a name for the IVR
Extension If you want to listen to the IVR by dialing extension, please
input an extension Number.
Please Select Select IVR audio file, please configure in this page:
【IVR Prompts】
Repeat Loops Loop times to repeat playing the IVR prompt.
Dial Other Extensions Allow caller to dial other extensions besides the ones listed
below.
Key Press Events Each digit will be related to the actions defined in the blank.
35
Page 36
Internet Telephony PBX System
IPX-2500
3.4.3 IVR Prompts
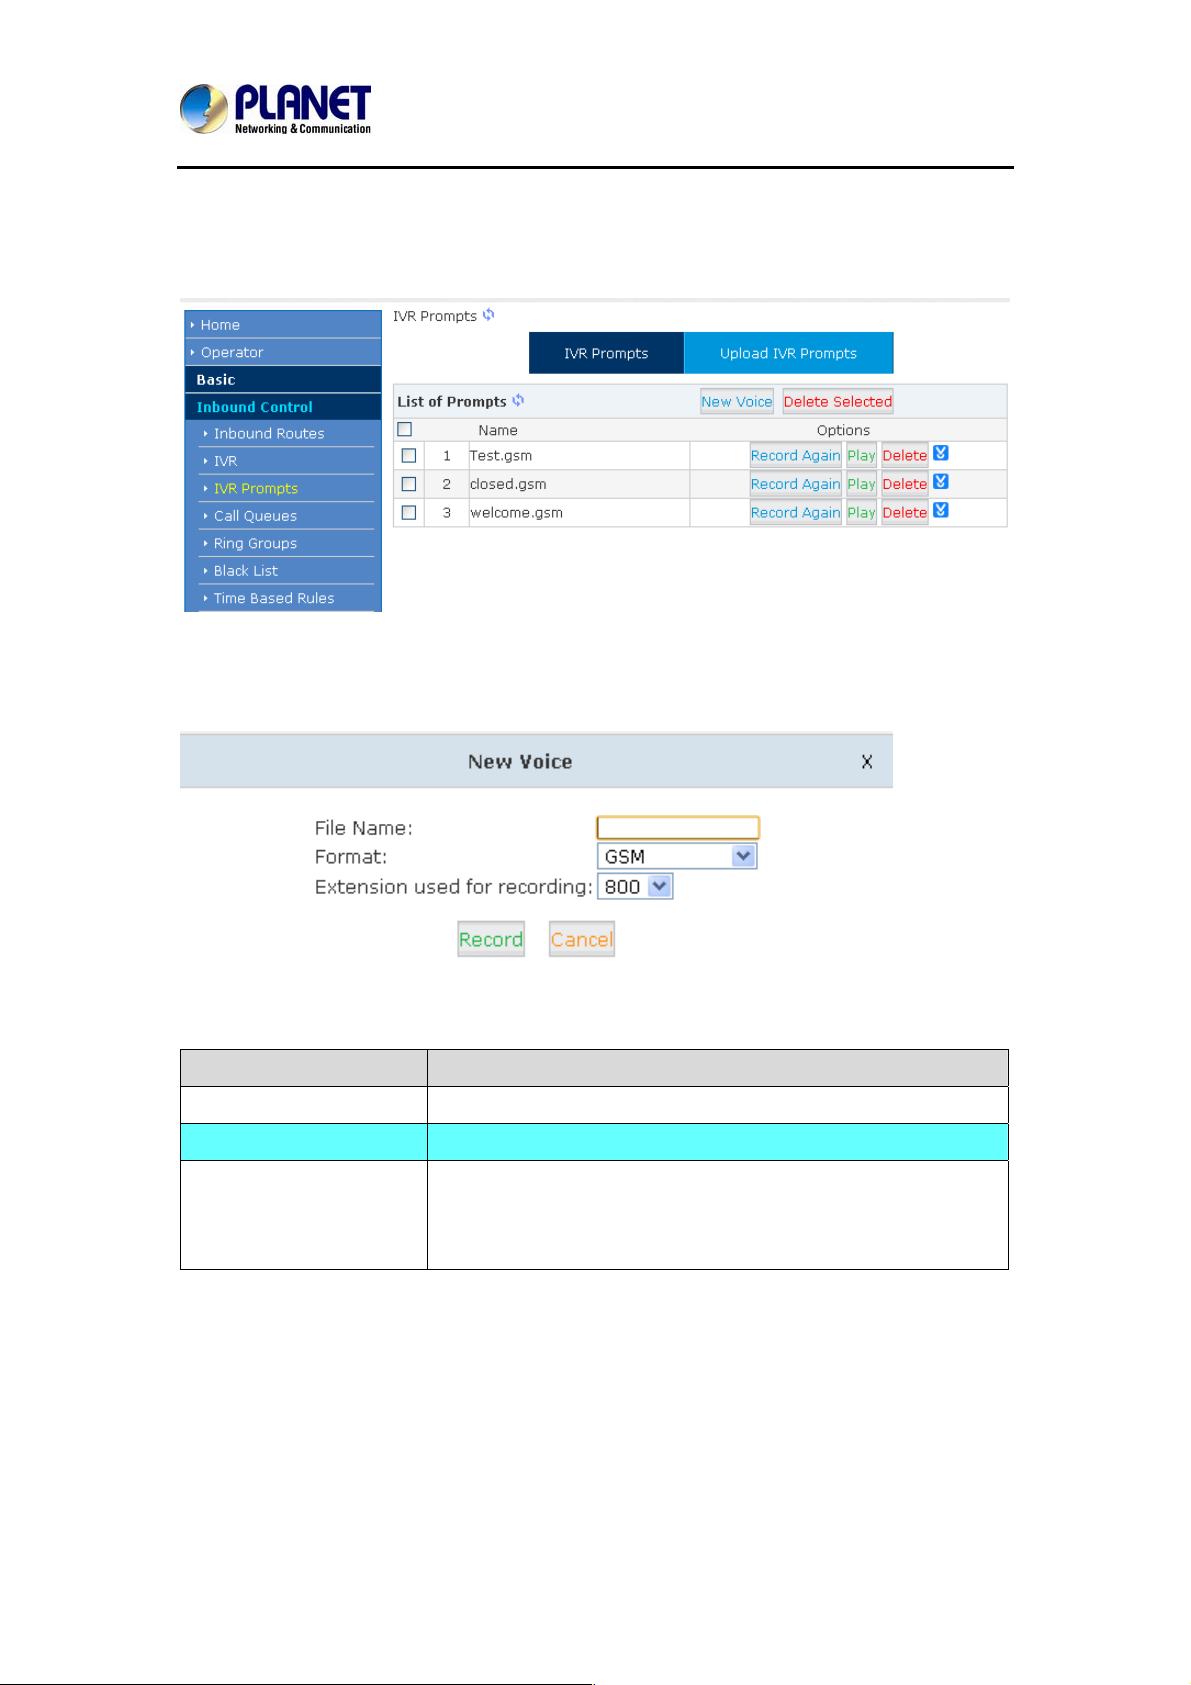
Record or play IVR music from extension. Please configure on this page:【IVR Prompts】
Click【IVR Prompts】----【New Voice】to create new IVR prompt:
Item Explanation
File Name Define a name for this voice file.
Format Select the voice format, GSM / WAV (16bit) supported only.
Extension used for
recording:
Select the extension which is used for recording the IVR
prompt. Click【Record】, this extension will ring, and then you
can pick up the phone and record.
36
Page 37
Internet Telephony PBX System
IPX-2500
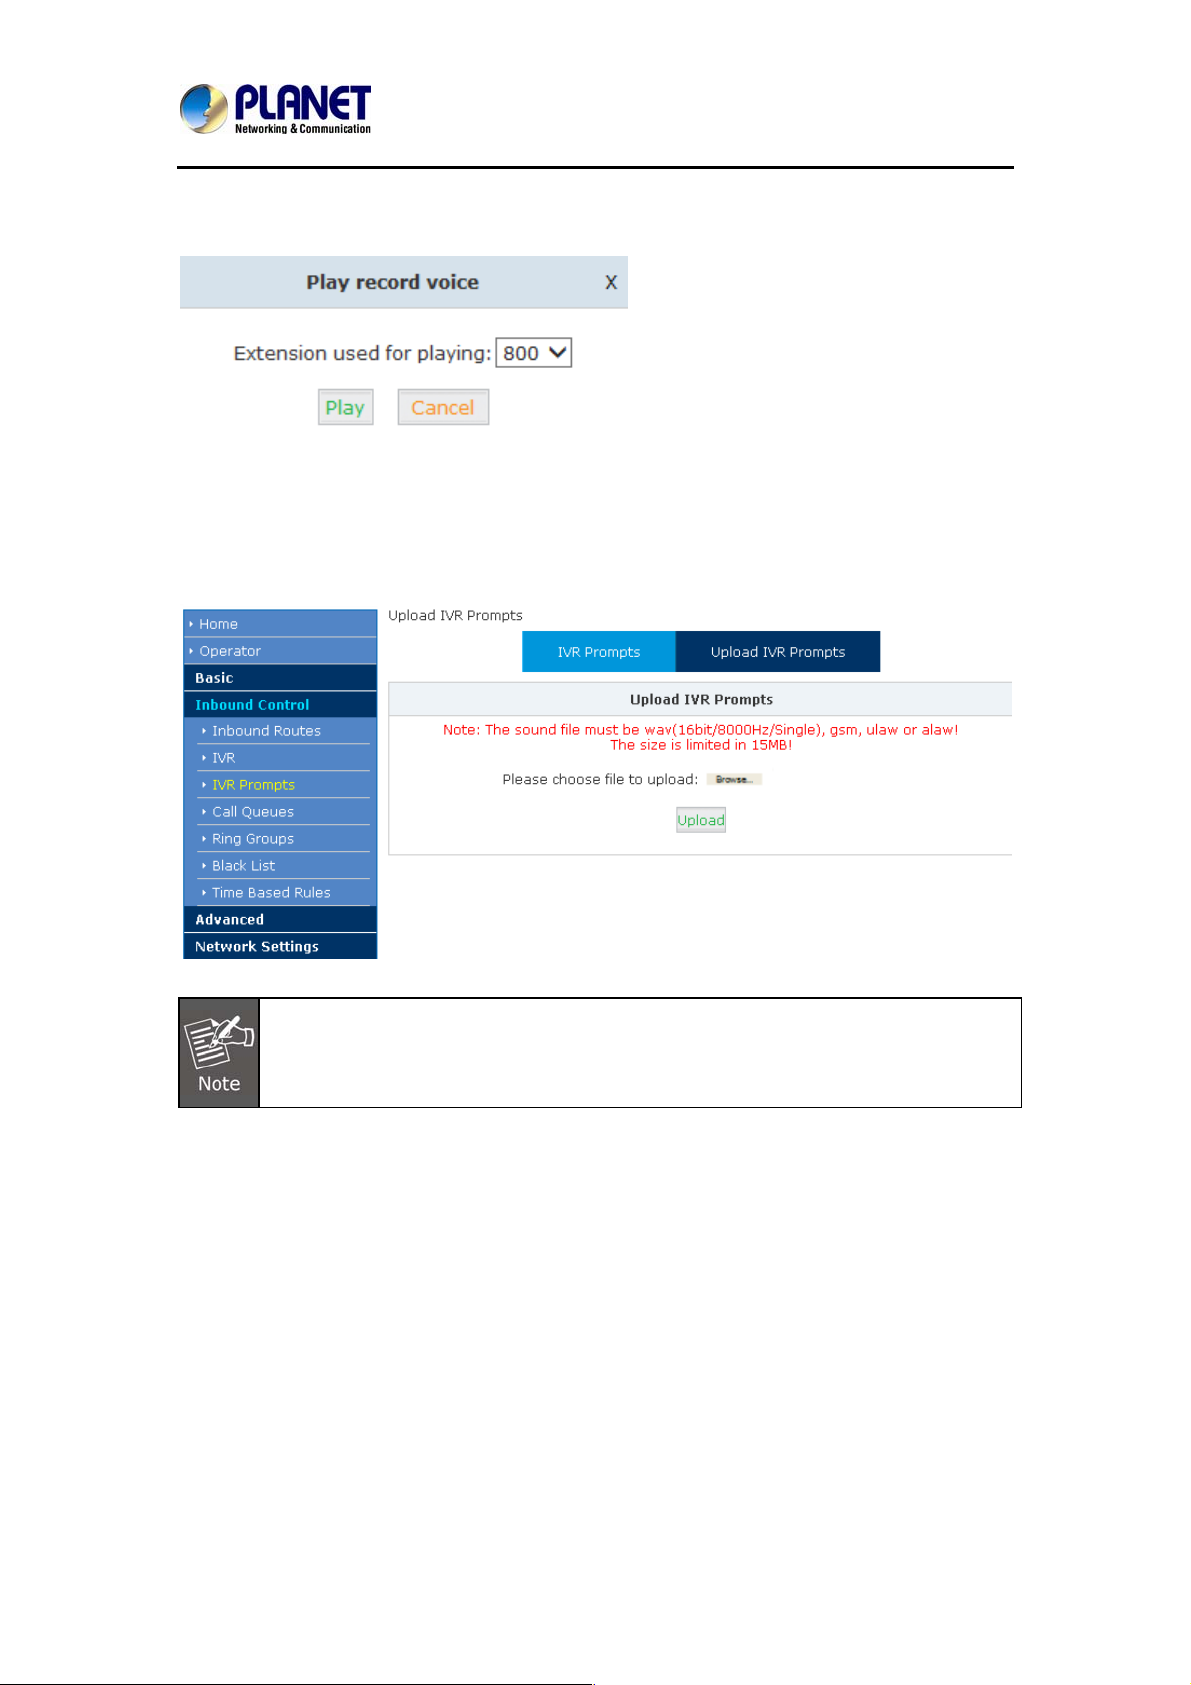
If you want to hear the prompt, please click【Play】:
Select the extension, click【Play】, the selected extension will ring, and you will hear the
recorded prompt after picking up the phone.
Upload IVR prompt
Uploading customized audio file must be in the wav, gsm, ulaw, alaw format, and
size must be less than 15MB.
37
Page 38
Internet Telephony PBX System
IPX-2500
3.4.4 Ring Groups
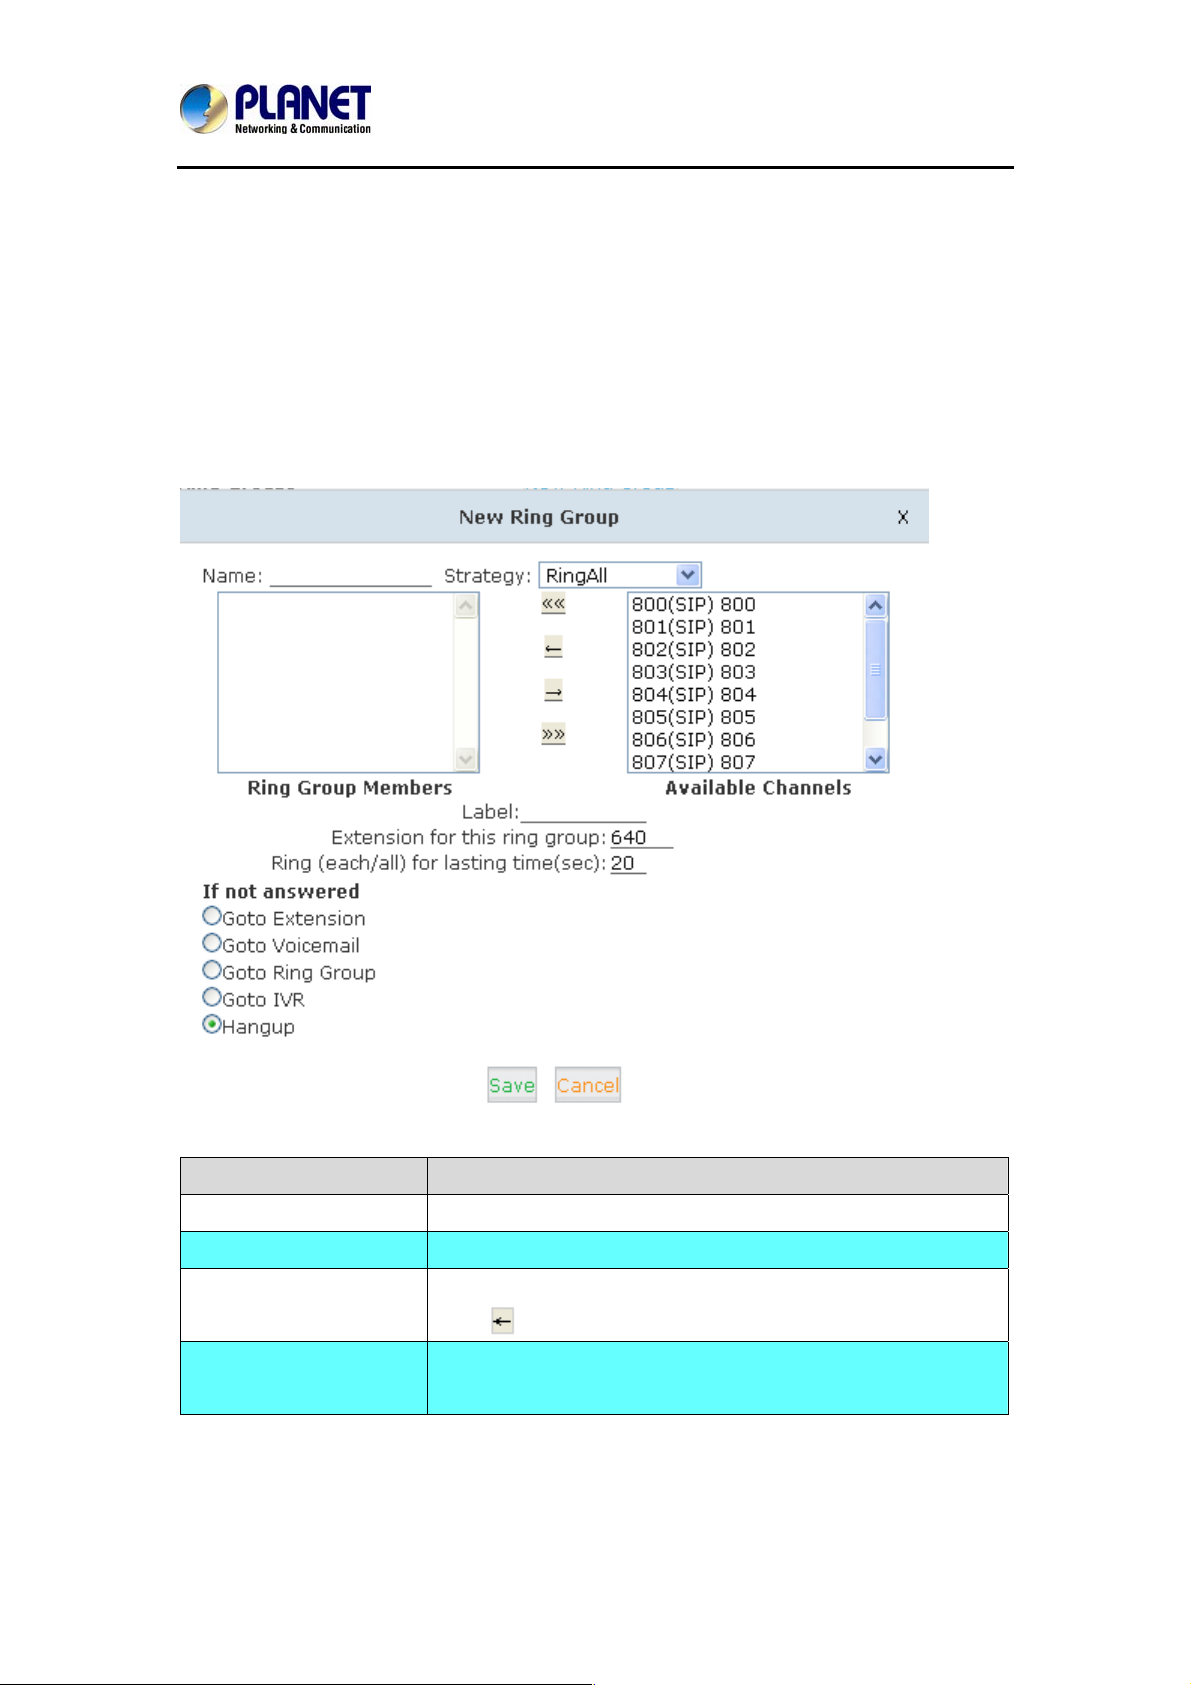
Ring Group is a collection of extensions. When a call to a ring group is made, all extensions in
this ring group will ring in different ways based on their different configurations. If ring time
exceeds a defined time, the call will be directed to IVR or others based on your configuration.
There isn't any data in the factory default 【Ring Groups】, please configure it here.
Click【Inbound Control】-> 【Ring Groups】->【New Ring Group】:
Item Explanation
Name Define a name for the Ring Group.
Strategy Select “Ring All” or “Ring in order”.
Ring Group Members Select the Ring Group Member from “the Available Channels”,
click
If not answered You can choose to forward the call to extension, voicemail, ring
group, IVR or hang up if not answered.
to add.
38
Page 39
Internet Telephony PBX System
IPX-2500
3.5 Black List
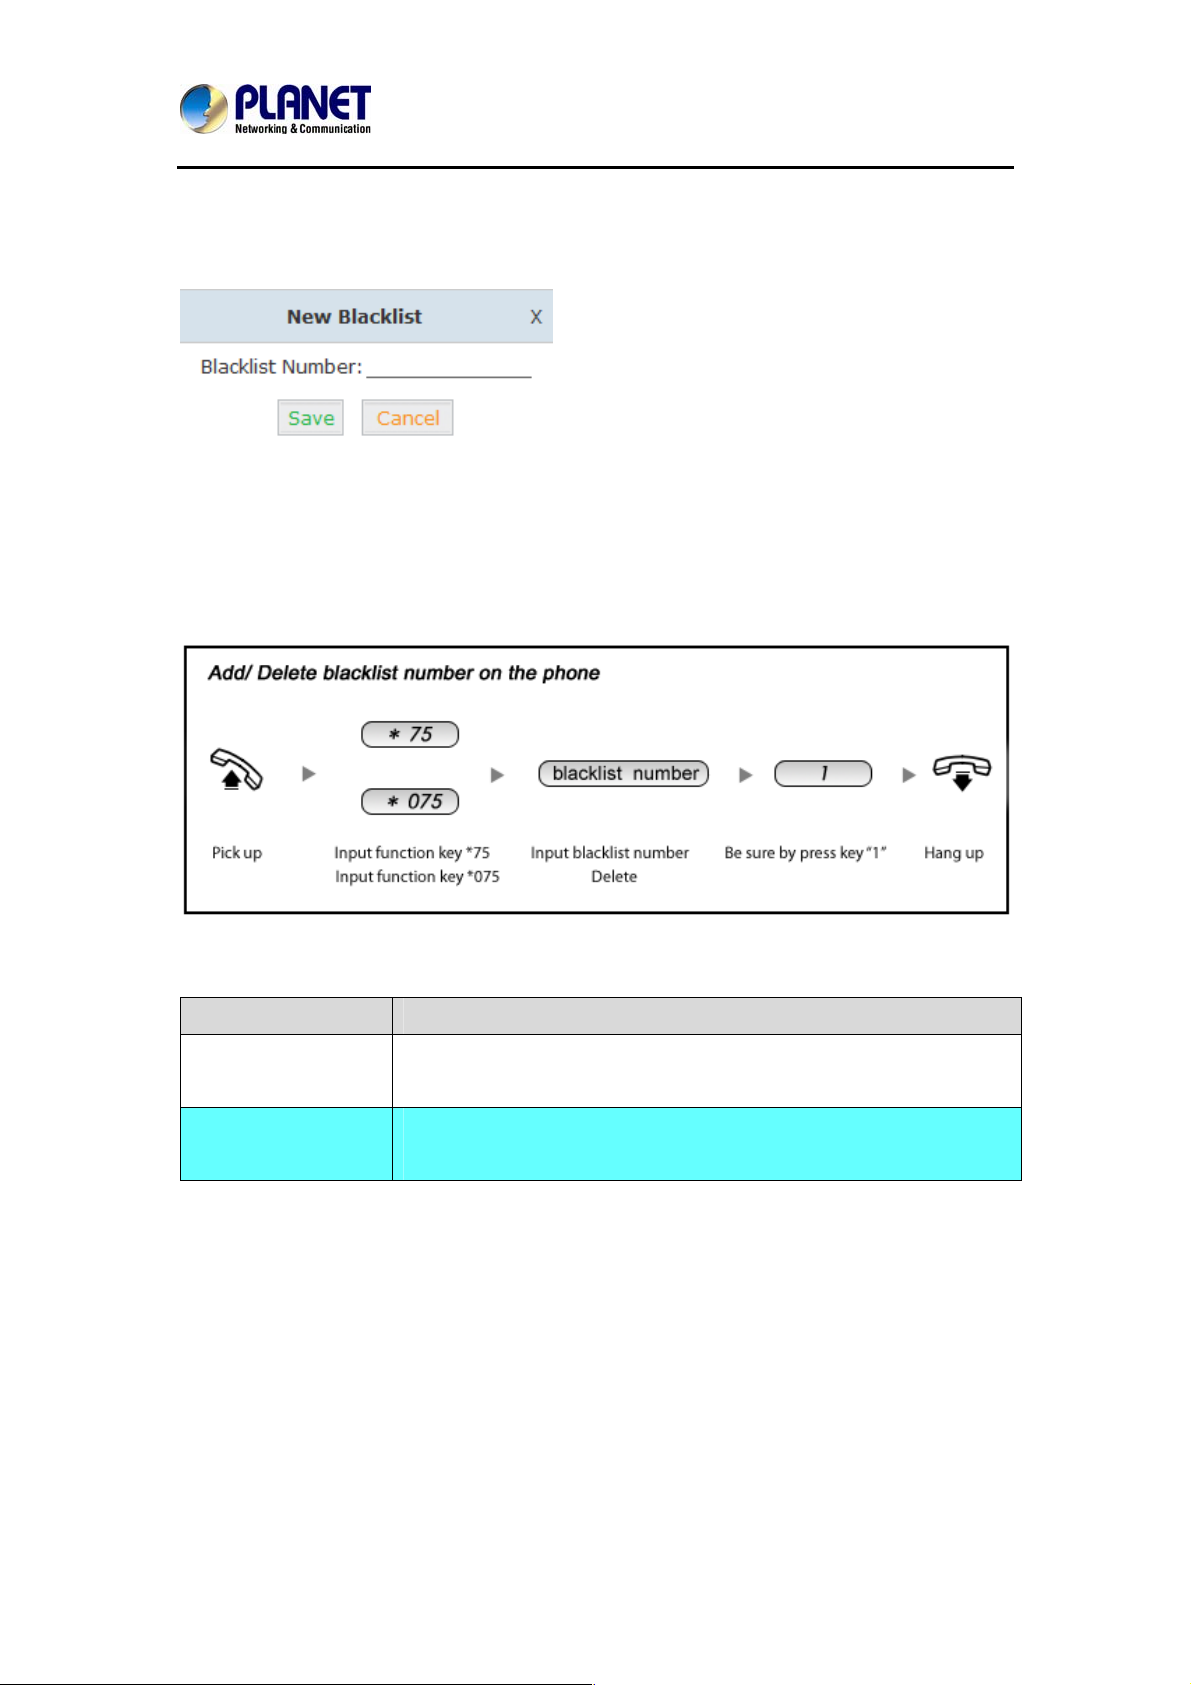
If some numbers need to be blocked, you can use this functionality, please configure it here:
Click【Inbound Control】->【Blacklist】->【New Blacklist】
Input caller's number in the blank, then this caller's number will be blocked when the call
comes again. Meanwhile, extension user can add or delete the blacklisted number by function
key on the phone. Please operate according to the following diagram:
Reference Parameters and Explanation of the Blacklist:
Item Explanation
*75
*075
When the registered extension user inputs *75 + blackliste d number,
this number will be added in the list of Blacklist Number.
When the registered extension user inputs *075+blacklist number,
this number will be deleted in the list of Blacklisted Number.
3.5.1 Pick up Call
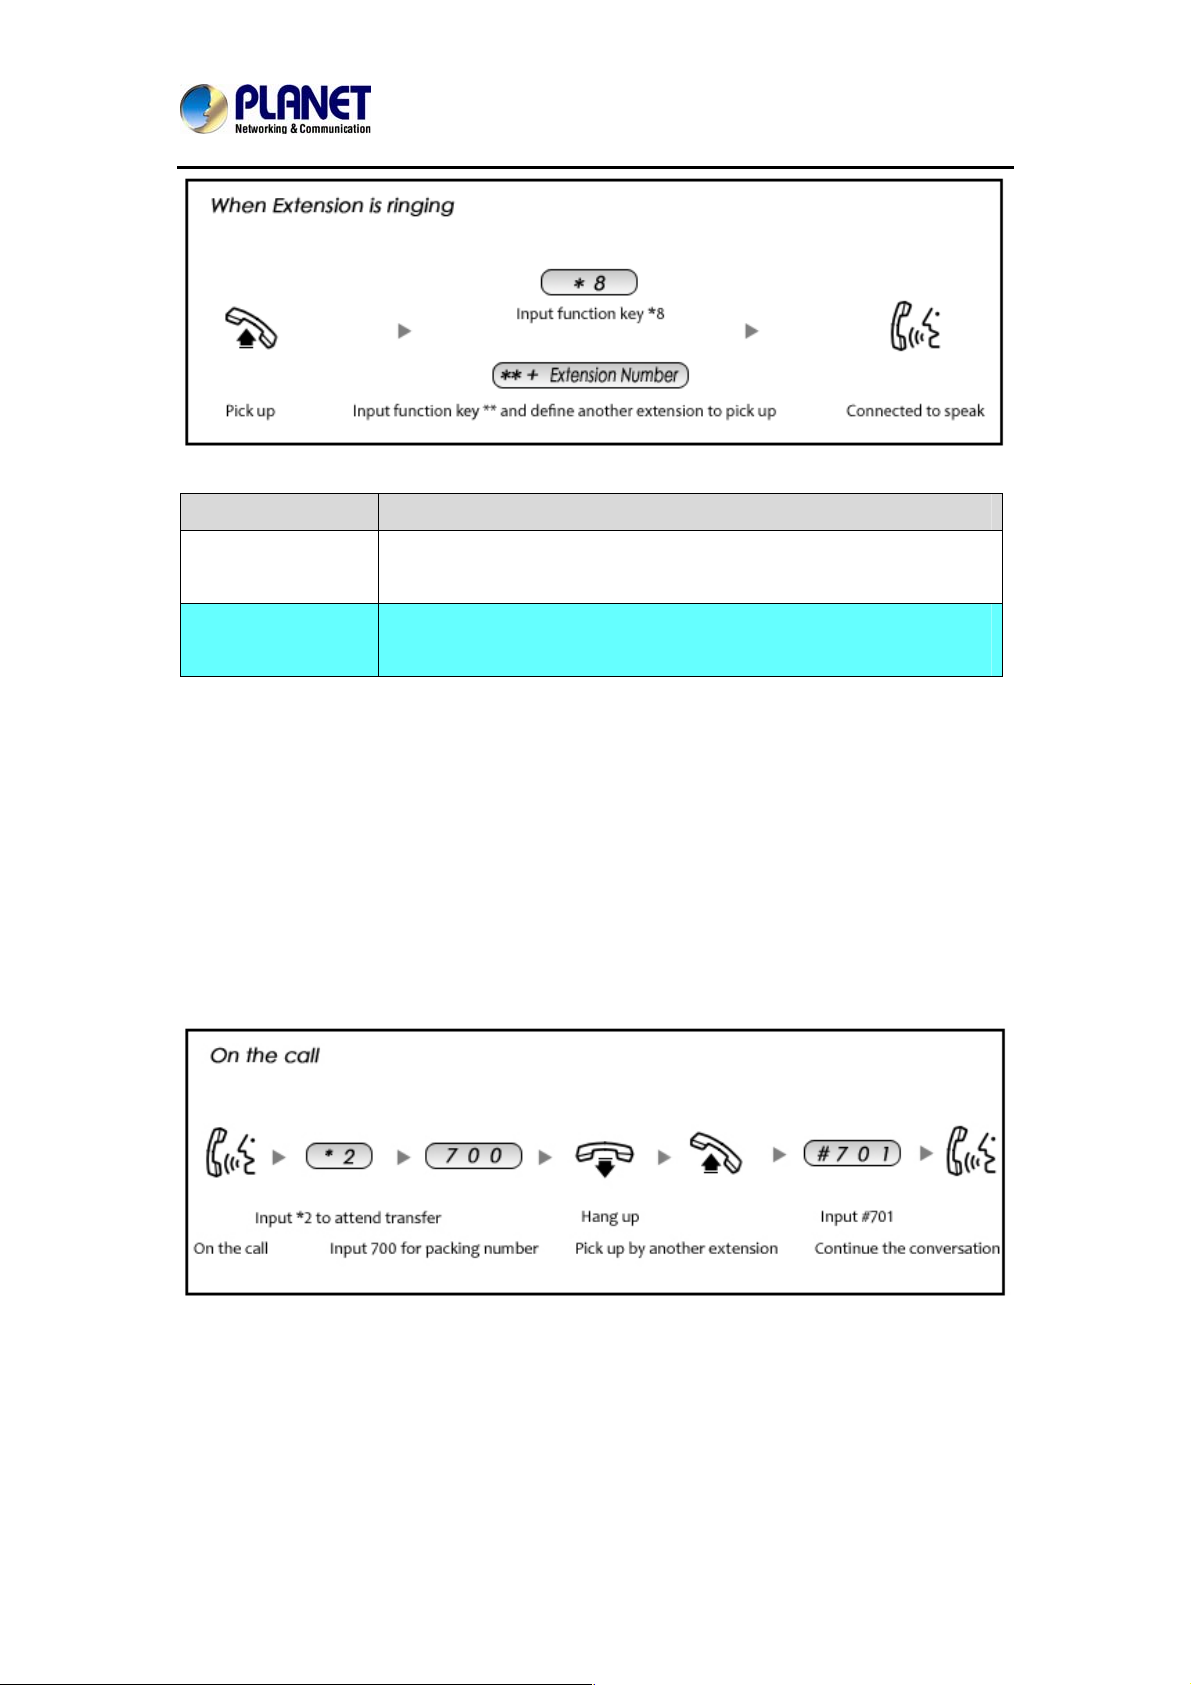
If an extension user is away from his/her desk, other extension users can pick up the call by
function key on the phone. Please check the following diagram to learn more:
39
Page 40
Internet Telephony PBX System
Reference Parameters and Explanation of Pickup Calls
Item Explanation
IPX-2500
*8
**
Input function key *8 to pick up the registered extension which is in
the ring at random. This can be defined in 【Feature Codes】
Input function key ** and define another extension to pick up. This
can be defined in 【Feature Codes】.
3.6 On The Call
3.6.1 Call Parking
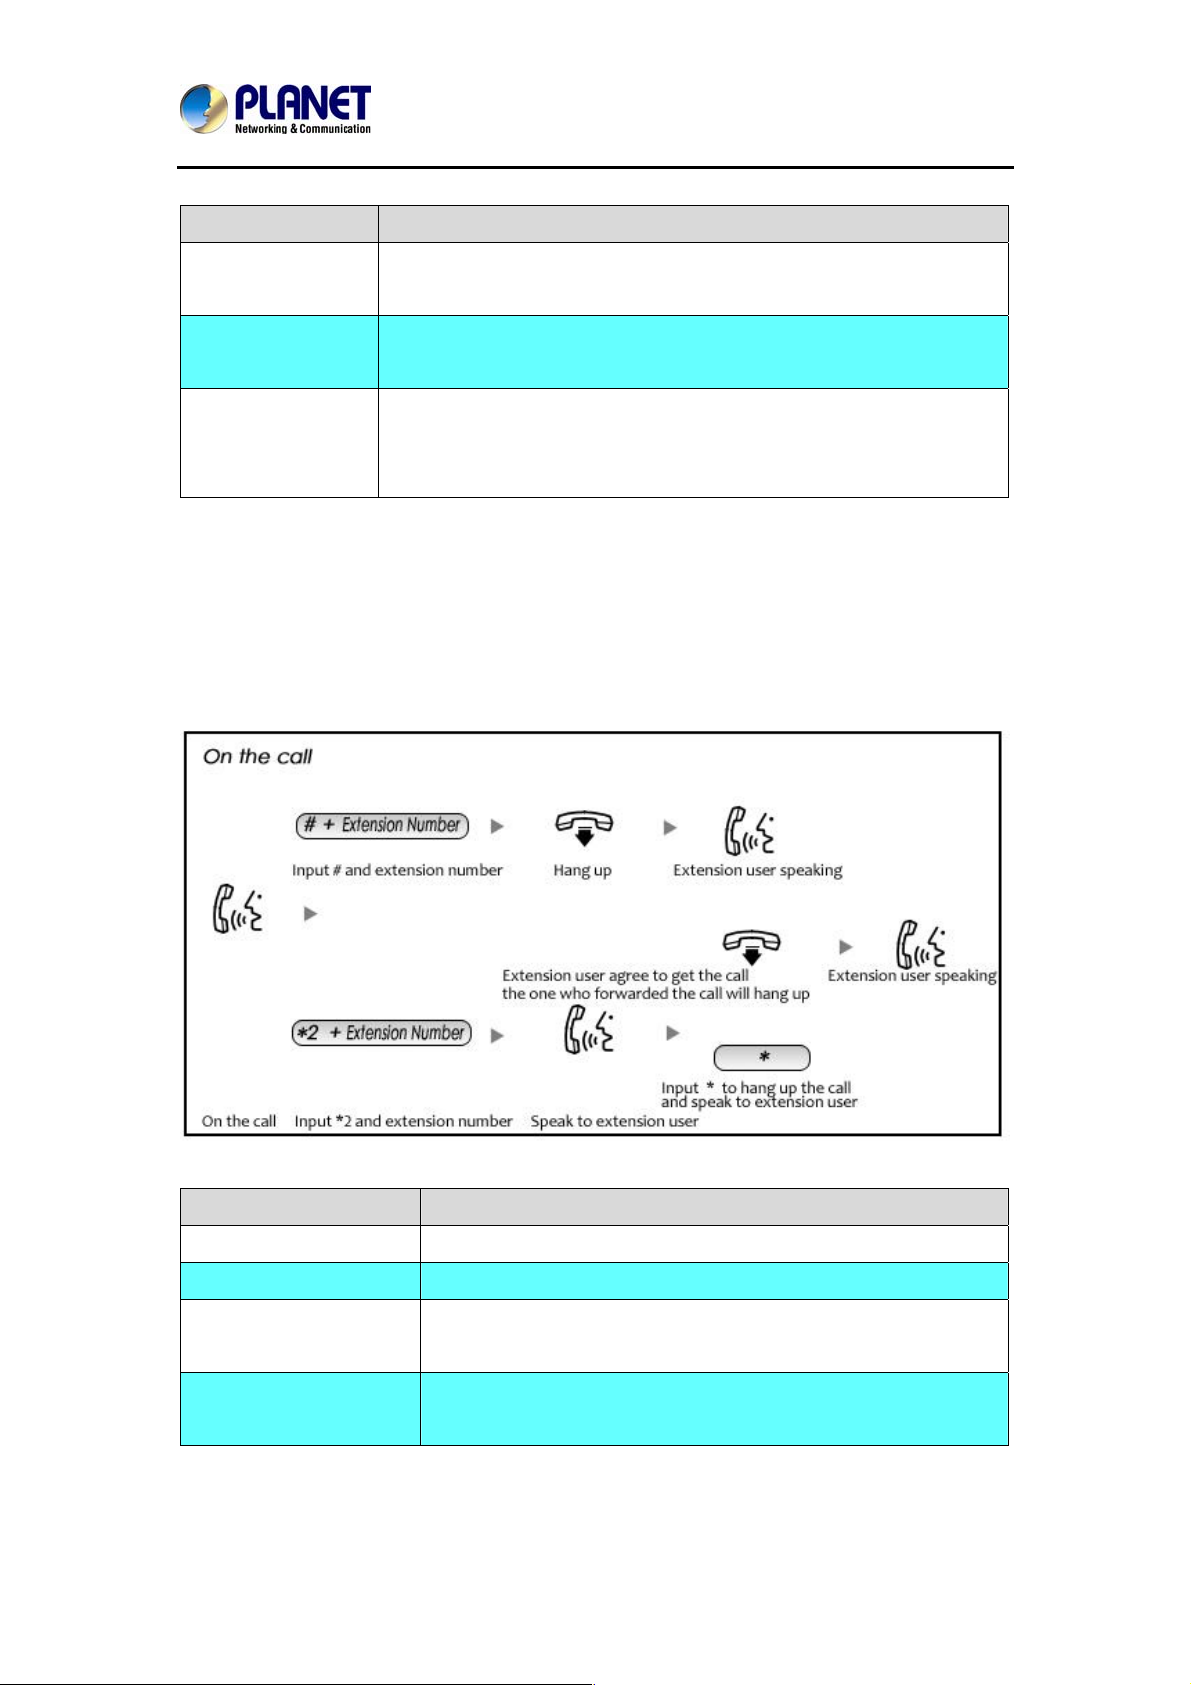
If you pick up a call at your seat, but it's not convenient to talk in public, you need go to the
conference room to talk secretly. At this time , you can input 700 to park this call. The system
will tell you a parking number 701 which you can input for continuing conversation when you
go to the conference room. Please check the following diagram to learn more:
40
Page 41
Internet Telephony PBX System
Reference Parameters and Explanation of Call Park:
Item Explanation
IPX-2500
Extension to Dial
for Parking Calls
What Extension to
park calls on
How many seconds
a call can be parked
for
Default Number: 700, Define in【Feature Codes】
Default Number: 701 - 720. Define in【Feature Codes】
Default is 45 seconds. Define in 【Feature Codes】.
3.6.2 Call Transfer
If an incoming call is for your colleague, you can transfer the call directly to your colleague or
transfer the call after agreeing by your colleague. Please check the diagram below to learn
more:
Reference Parameters and Explanation of Transfer:
Item Explanation
Blind Transfer
Attended Transfer
Disconnect Call
Timeout for answer on
attended transfer
Default is #t. Define in 【Feature Codes】
Default is *2. Define in【Feature Codes】
Default is *, it can be used when you use *2. Define in 【Feature
Code】
Default is 15 seconds. Define in【Feature Codes】
41
Page 42
Internet Telephony PBX System
IPX-2500
3.6.3 Conference
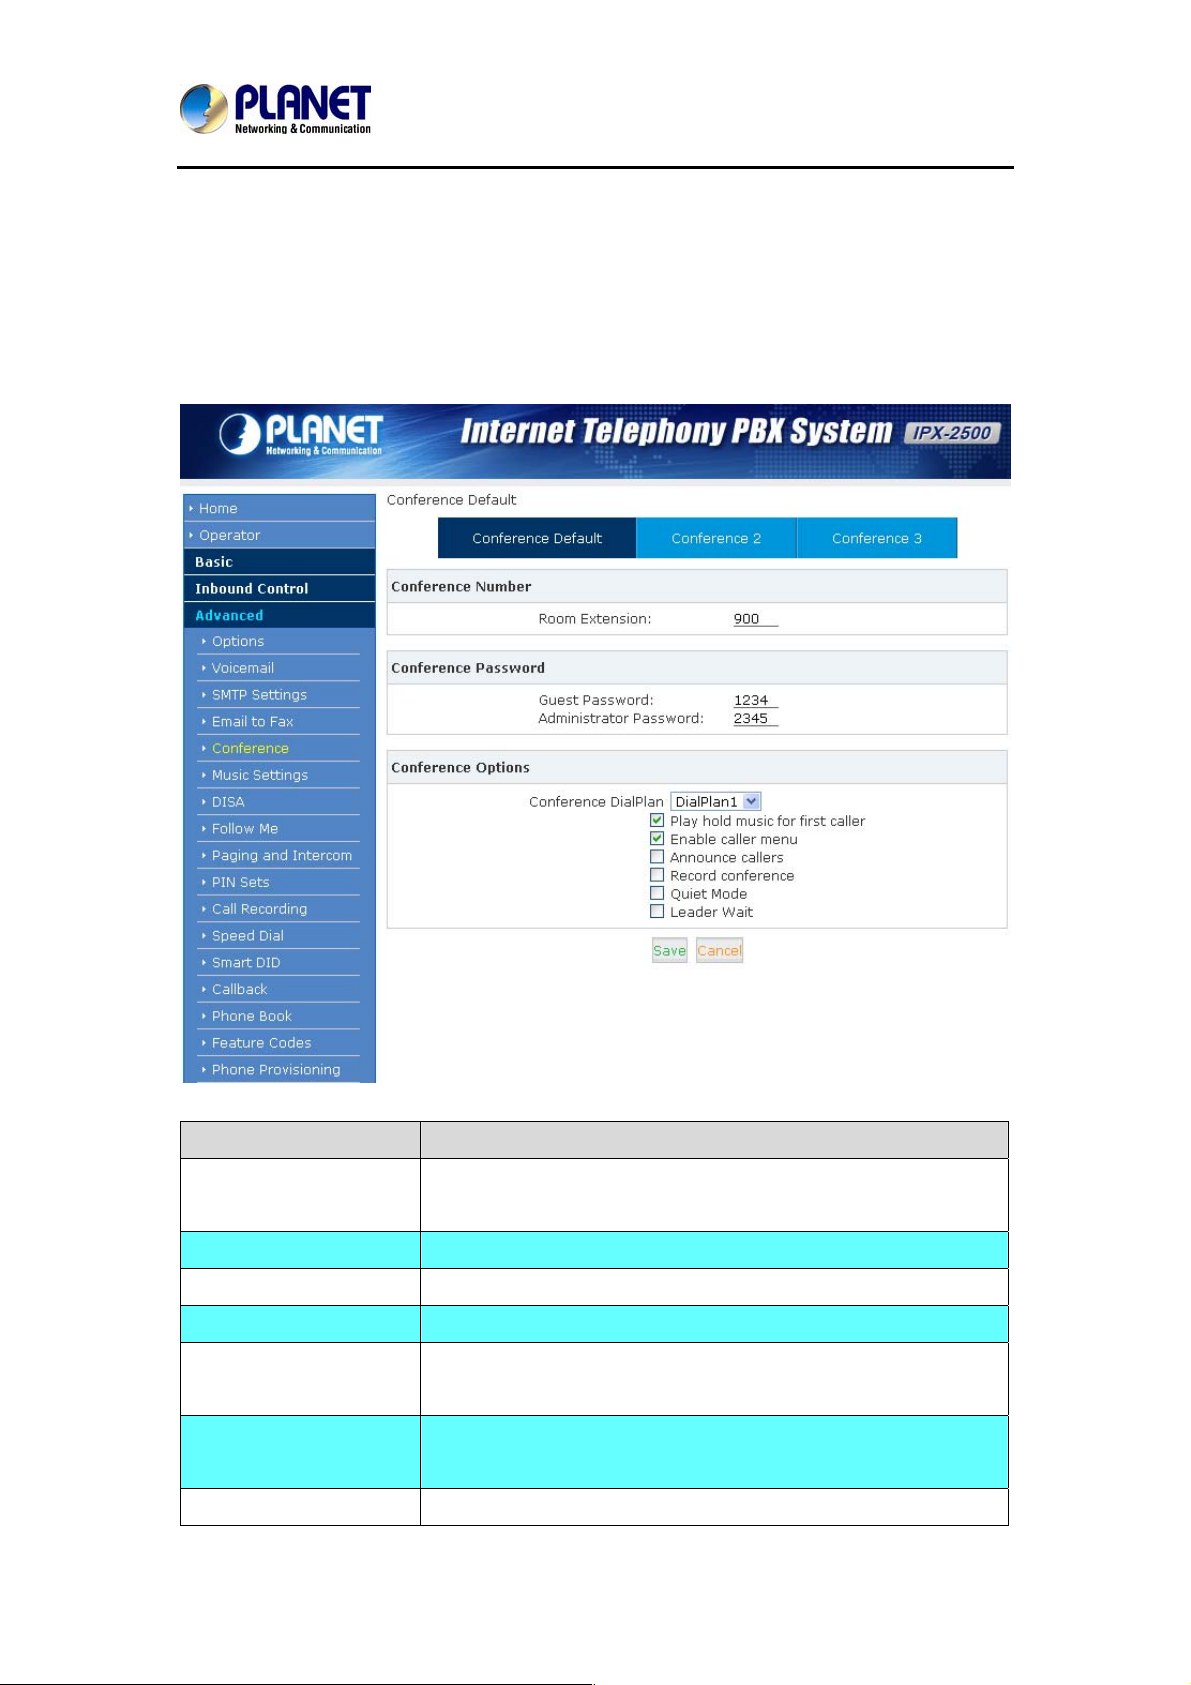
If you want to create a conference room for some extension users or with external lines, you
can input conference room number 900, input conference room password 1234 (Admin's
password is 2345), then enter the conference room. This IPX-2500 supports 3 conference
rooms. Please configure it on this page【Conference】
:
Item Explanation
Conference Number The number that users call in order to access the conferen ce
room; the default number is “900”.
Conference Password Password for users to access the conference, e.g."1234".
Administrator Password Password for administrator to access the conference.
Conference DialPlan Use this dial plan to invite other participants.
Play hold music for the
first participant
Enable caller menu Check this option to allow the participant to access the
Announce callers Check this option to announce to all Bridge participants that a
Check this option to play the hold music for the first participant in
the conference until another participant enters this conferen ce.
Conference Bridge menu by pressing “*” on the dial pad.
42
Page 43
Internet Telephony PBX System
IPX-2500
new participant is joining the conference.
Record conference Recorded conference format is WAV.
Quiet Mode If this option is checked, all the participants in the conference
can hear only, but it is not allowed to speak.
Leader Wait Wait until the conference leader (administrator) enters the
conference before starting the conference.
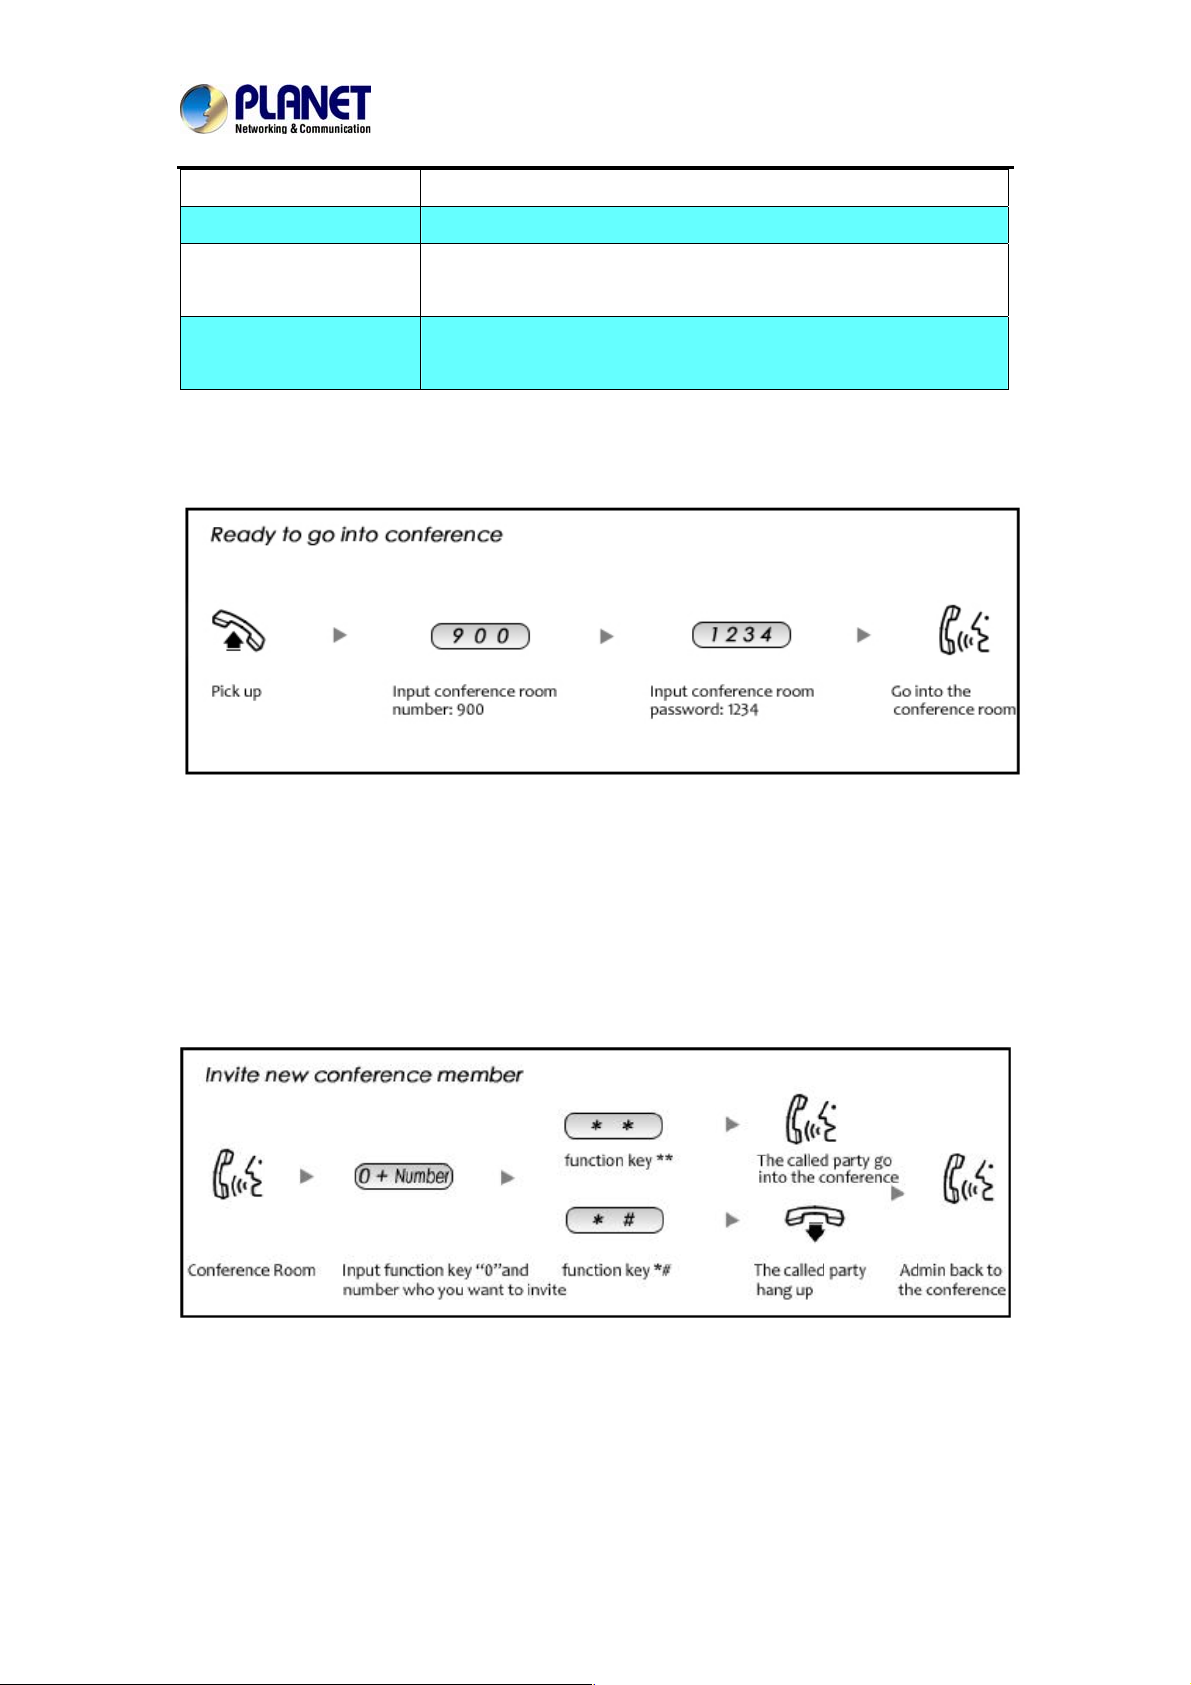
Please check the following diagram to learn:
Go to conference:
In the conference, admin can add new participant (extension user or external number) to the
conference.
In the conference, the administrator can invite new guest (extension user or external number)
to the conference. (Default password for admin is 2345)
Learn how to invite new guest to the conference as the diagram is shown below:
43
Page 44
Internet Telephony PBX System
3.7 Settings before leaving office
3.7.1 Follow me
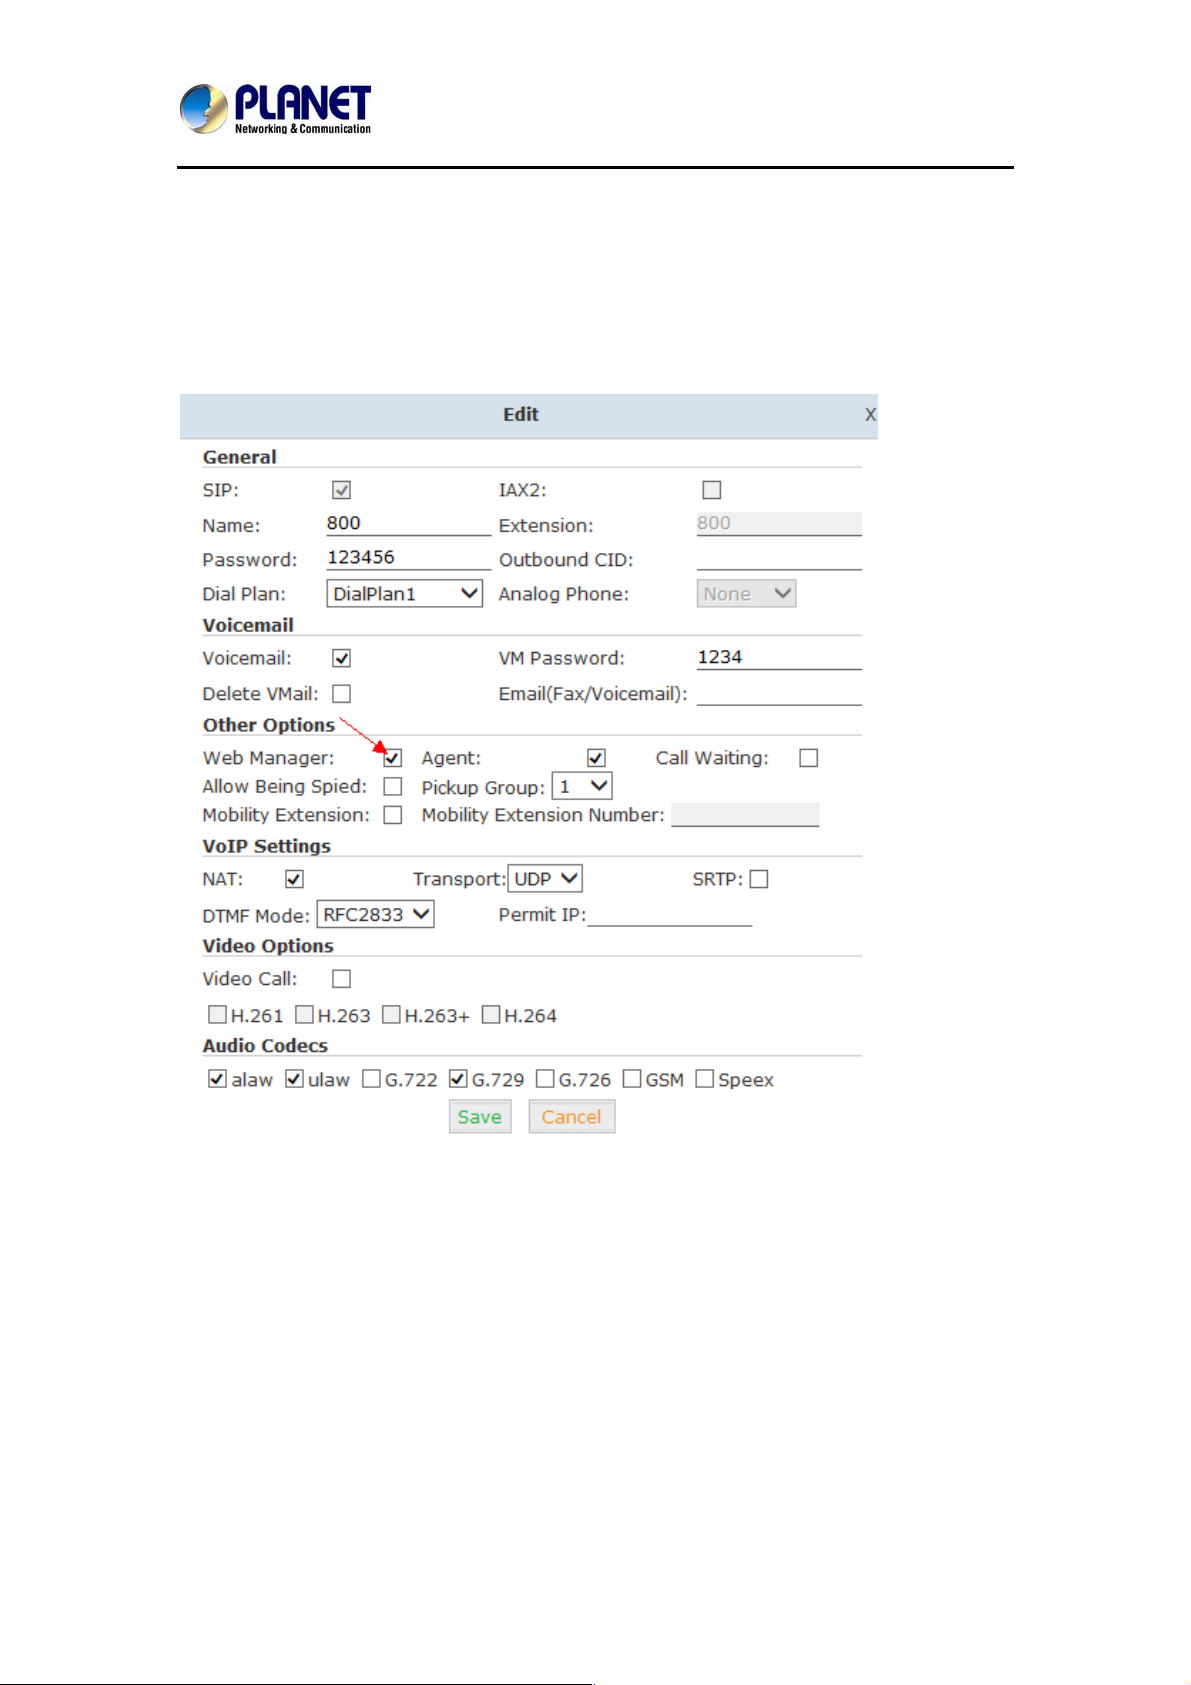
If you don’t want to miss any call, please configure this function as shown below:
Click【Basic】->【Extension】->【Edit】the extension you want to configure.
IPX-2500
Check【Web Manager】 and【Save】
44
Page 45
Internet Telephony PBX System
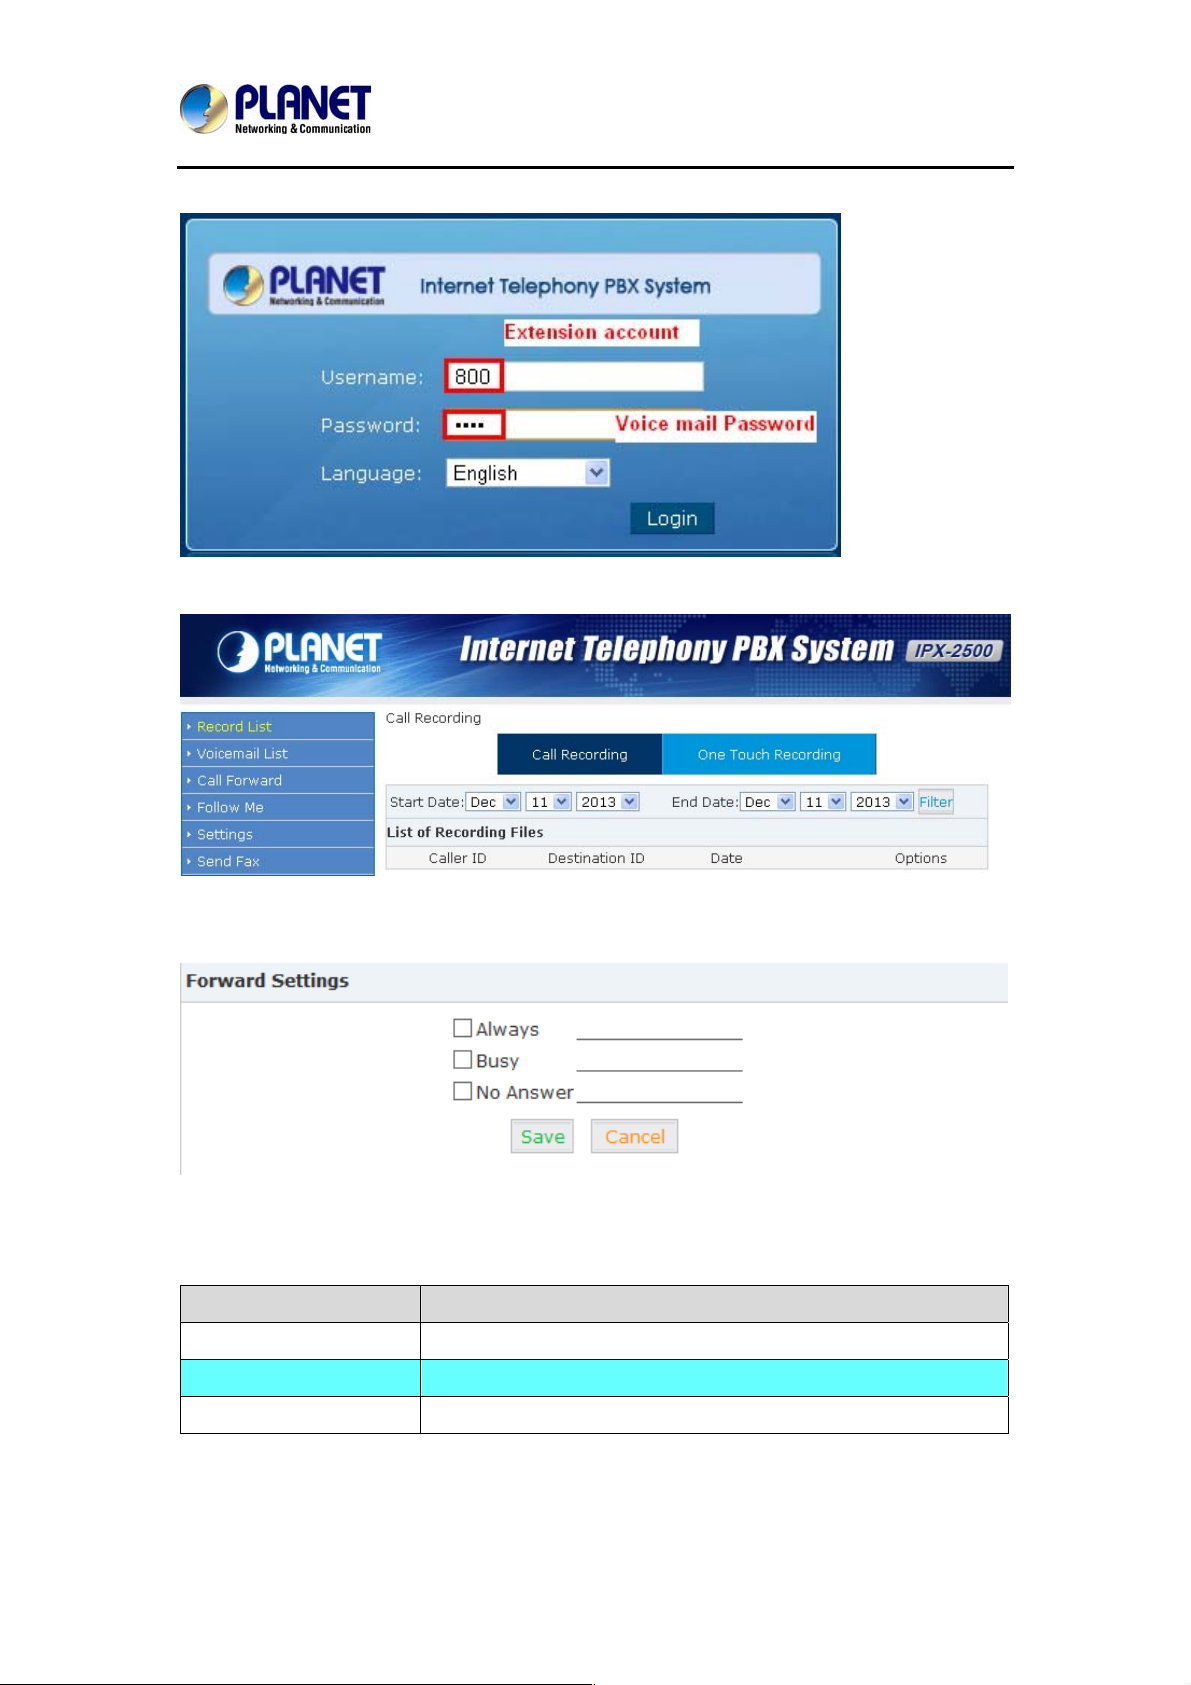
Then login to the Extension Web Panel:
IPX-2500
Click【Call Forward】:
Reference
Item Explanation
Always All incoming calls will be forwarded.
Busy Forward when extension is busy.
No Answer Forward when no answer from extension.
45
Page 46
Internet Telephony PBX System
IPX-2500
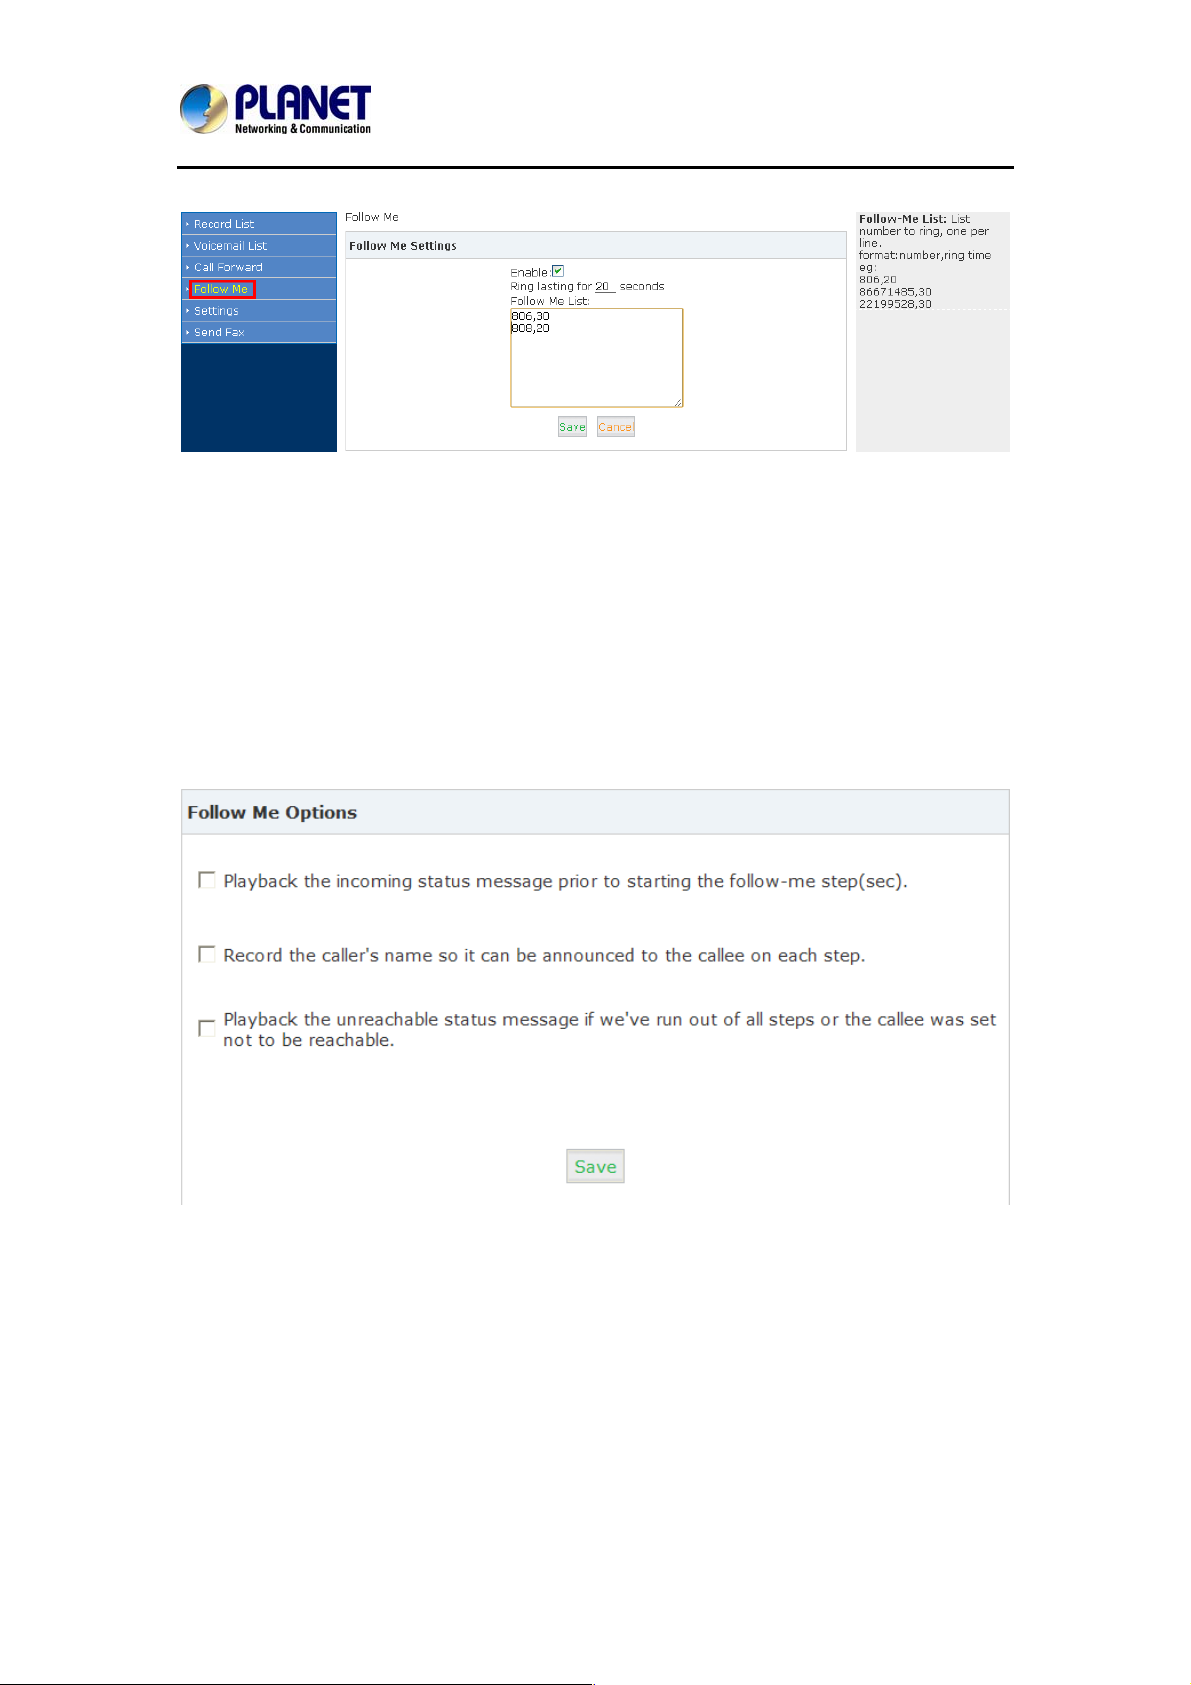
Or used the Follow me feature.
Select an extension, set the ring duration, and add the numbers in the Follow Me List; 【Save】
and 【Activate】.
List Format: Extension Number, Ring Duration
E.g.: 806,30
808,20
806 rings, after 30 seconds, the call is going to 808
【Follow Me Option】
46
Page 47
Internet Telephony PBX System
IPX-2500
3.7.2 Voice Mail
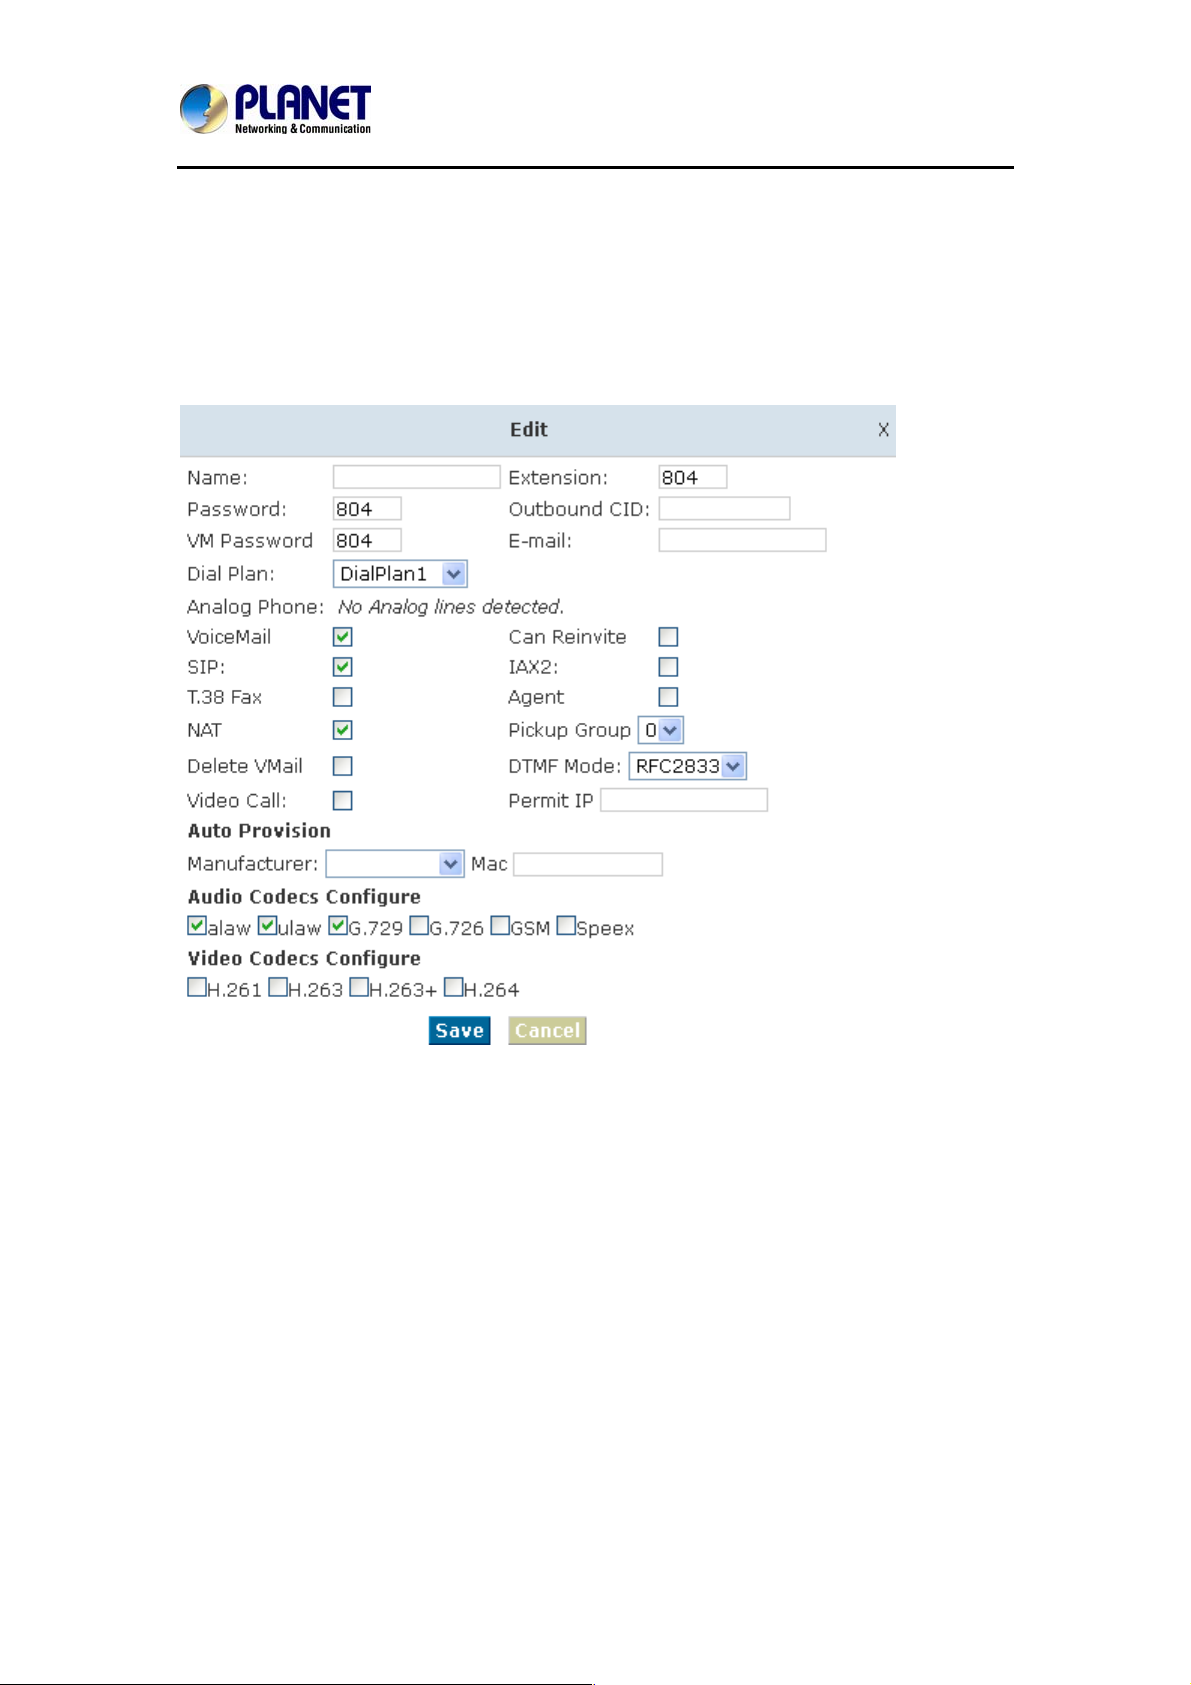
If you don't want to configure "Follow Me", you can record the message of incoming call, and
email the message to your defined mailbox.
Click【Extension】---【Extension Settings】
Please enable【Voice mail】before configuration, and configure【VM Password】and【Email】.
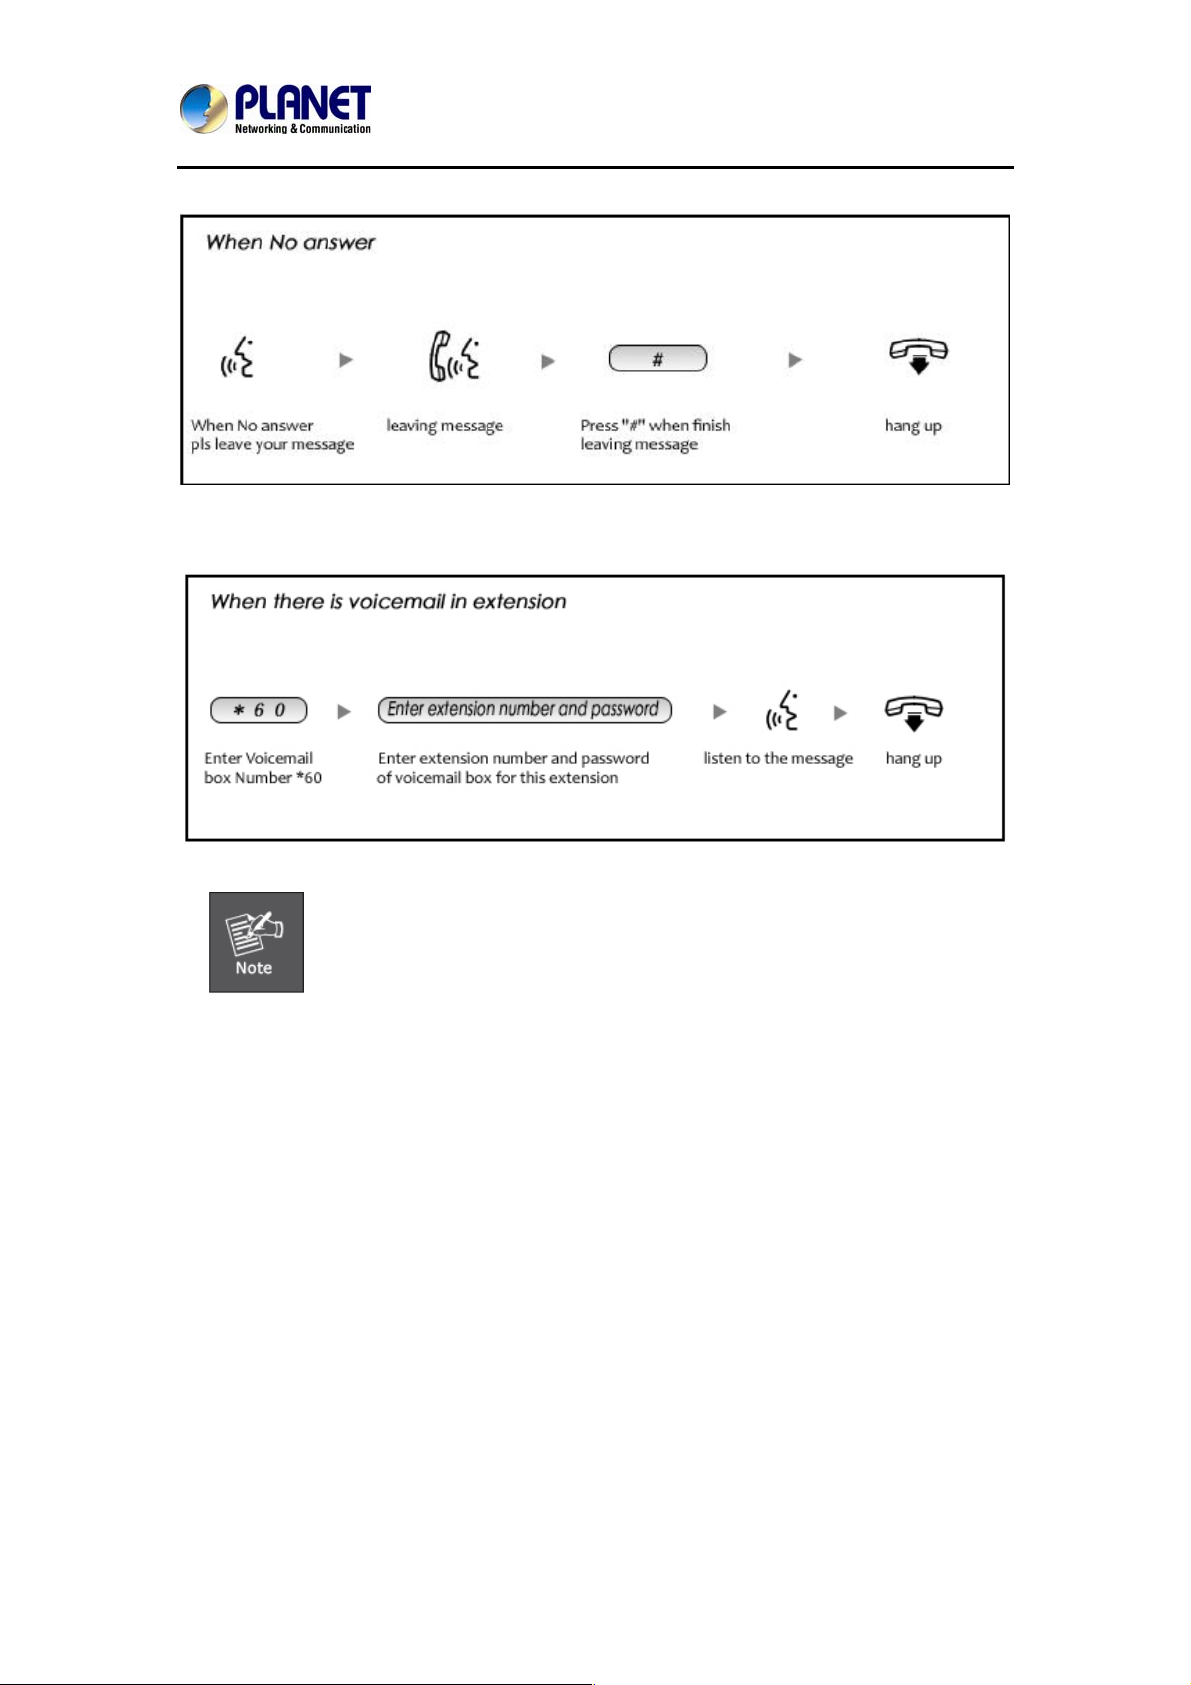
If there is no answer for the incoming call and when the default ring time is over, the system
will play: “Please leave your message and press the “#” key. Then voicemail will be sent to the
specified mailbox by email.
47
Page 48
Internet Telephony PBX System
Leave a message:
Listen to the message
IPX-2500
1. If you would like to use this function, you must write the correct email
address in "extension settings".
2. You need to configure SMTP and Email model in【Voice Mail】. Please
check the details in the following chapter【Voice Mail】
48
Page 49
Internet Telephony PBX System
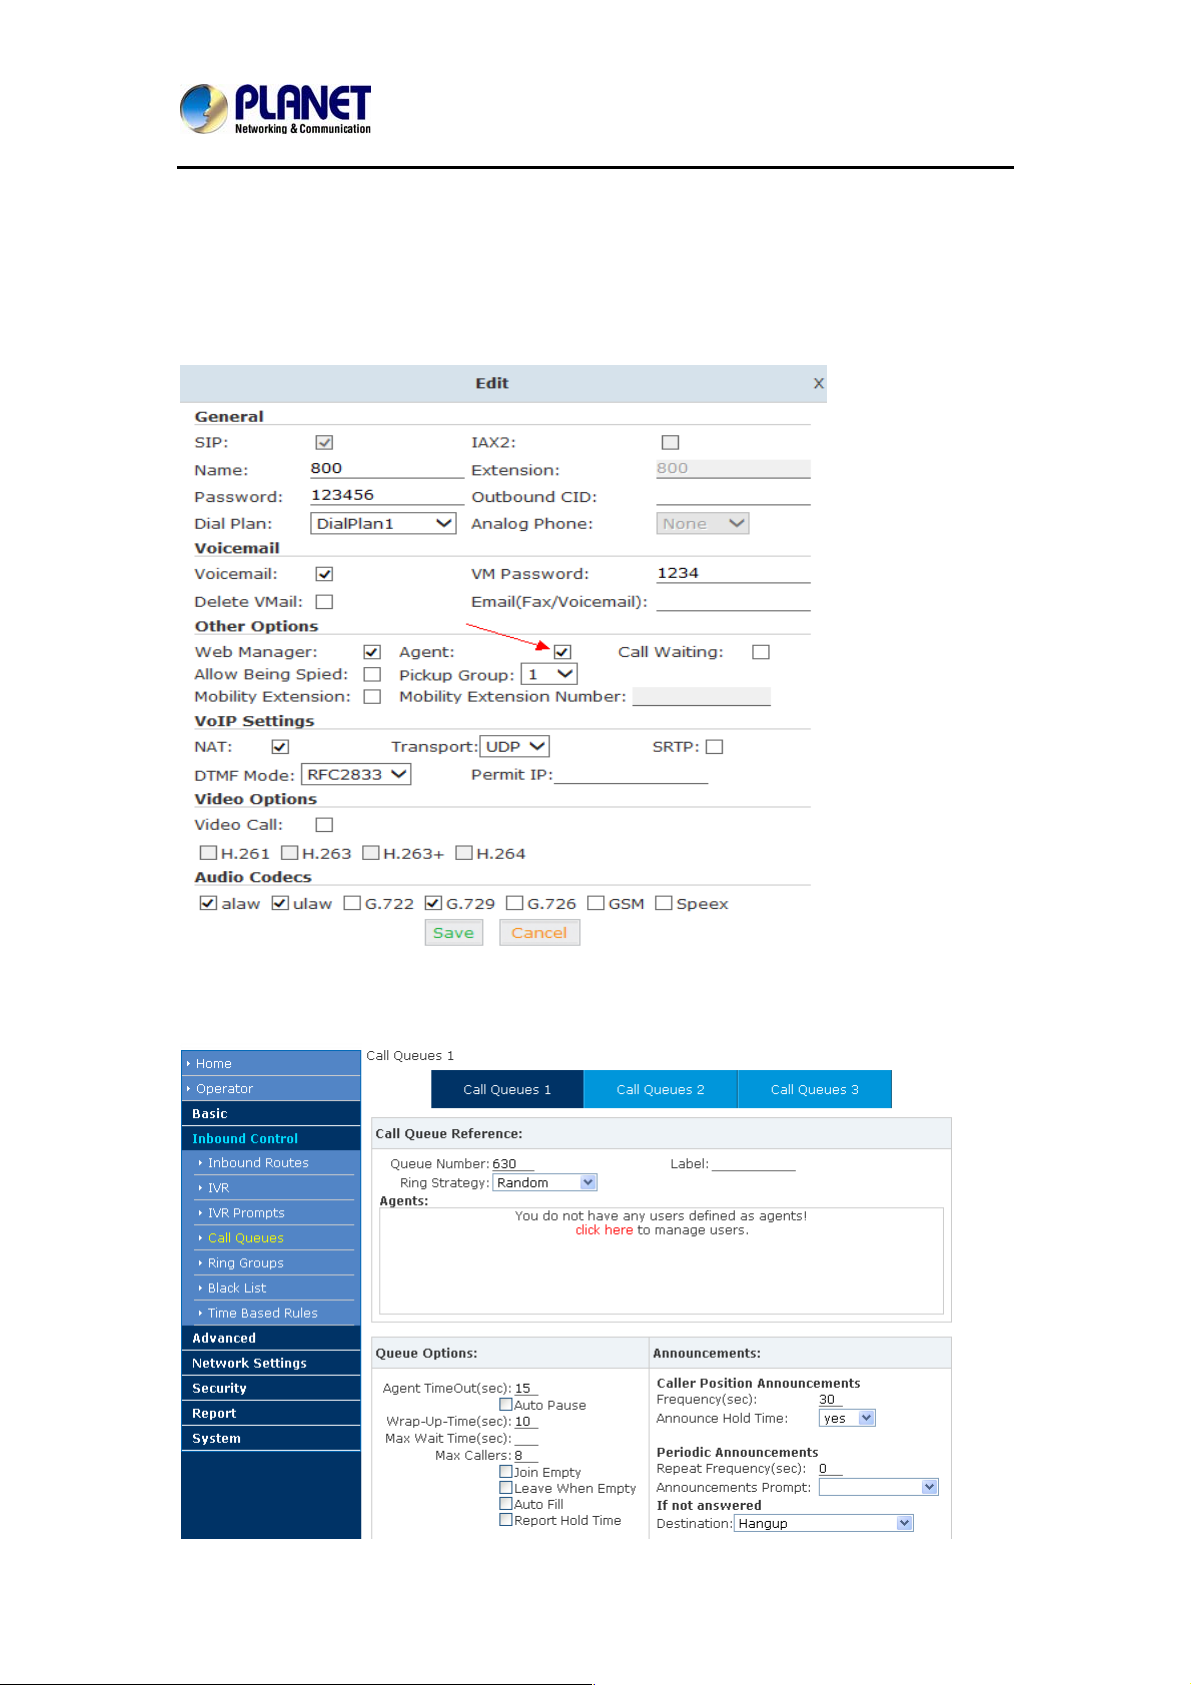
3.8 Call Center (Call Queues)
3.8.1 Create Agent
Click【Basic】->【Extension】->【Edit】the extension you want to configure:
IPX-2500
Step1: Check【Agent】and【Save】
Step2: Click【Inbound Control】->【Call Queu es 】
49
Page 50
Internet Telephony PBX System
IPX-2500
Item Explanation
Queue Number Define an extension number for the queue.
Label Define the label for the queue.
Ring Strategy RingAll -- Ring all available agents until one answers (default)
RoundRobin -- Every available agent will take turns to ring.
LeastRecent -- Agent with the least calls rings
FewestCalls -- Agent with the fewest completed calls rings.
Random -- Agent rings randomly.
RRmemory -- RoundRobin with Memory, and remember where it’s left
off in the last ring.
Agent Every extension defined as Agent will be listed here. Selected agent
will be a member of the current Queue.
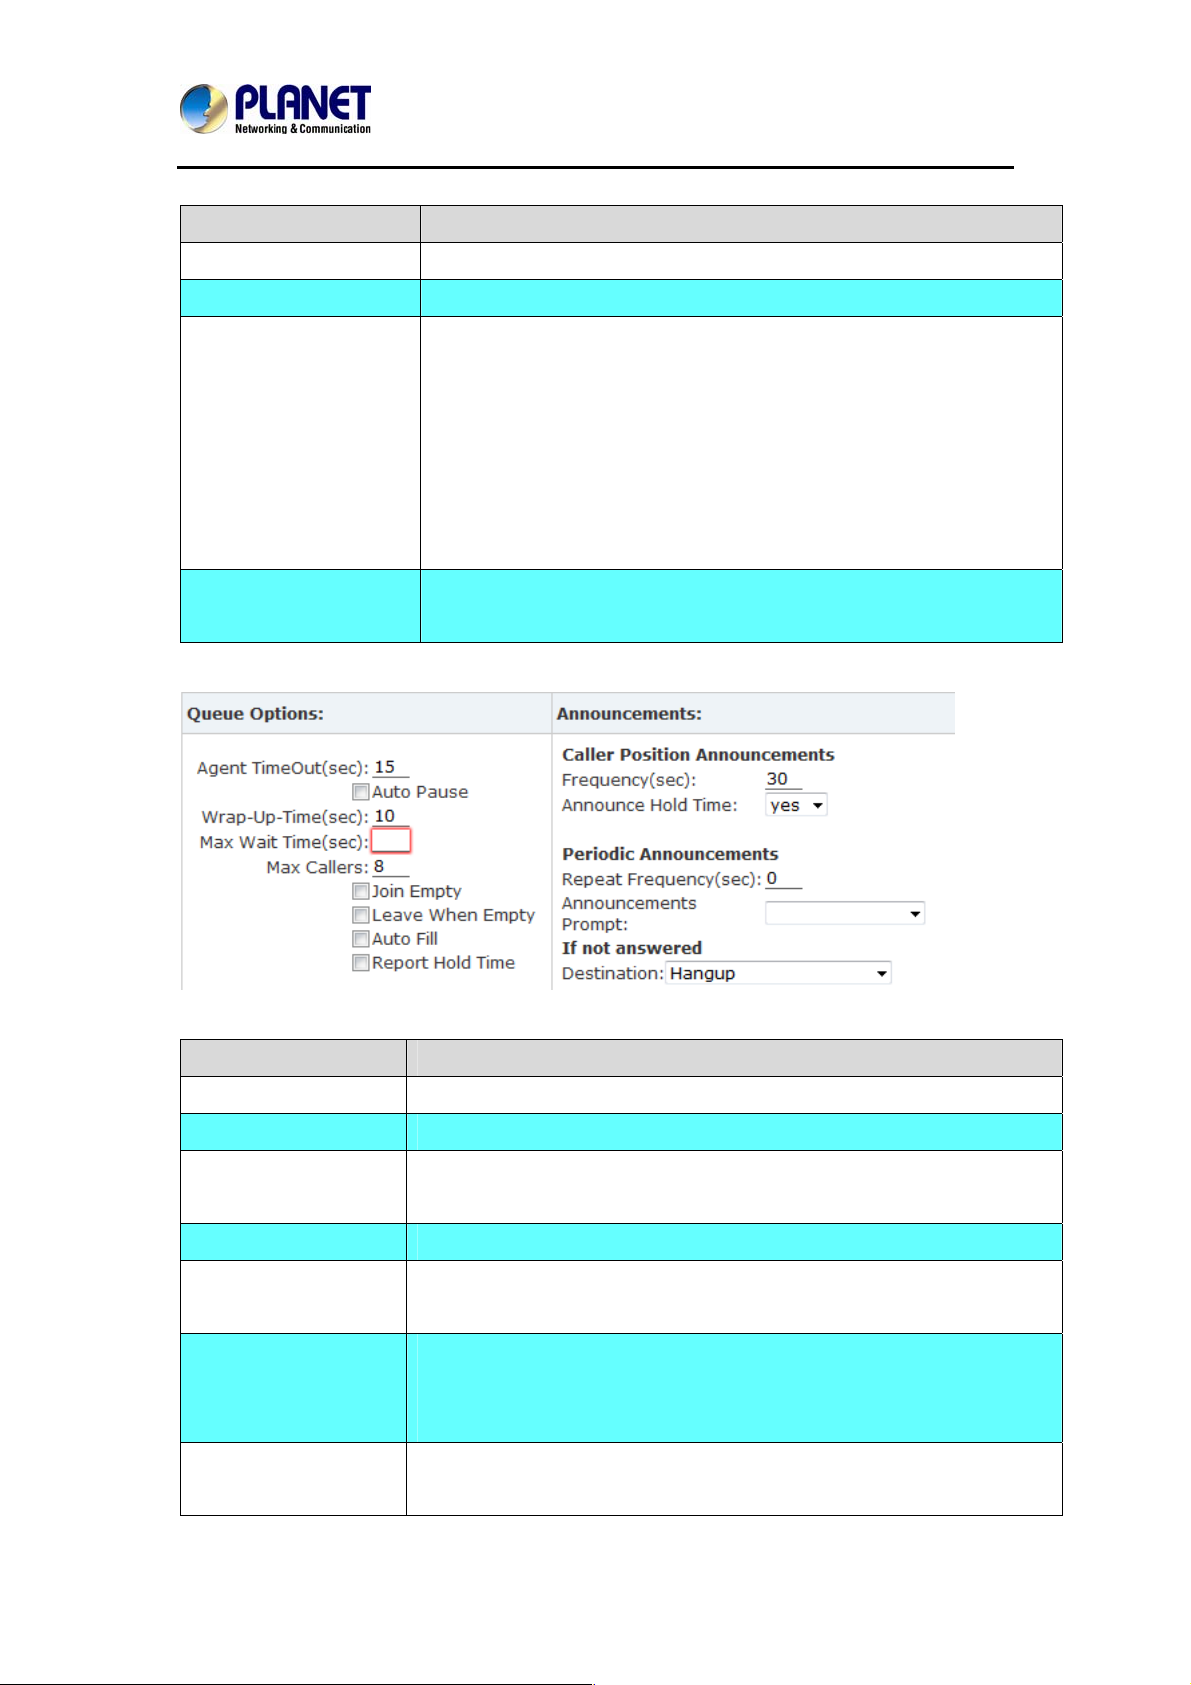
Item Explanation
Agent TimeOut (sec) The next Agent will ring after this time.
Auto Pause Pause the Agent when it fails to answer the first call.
Wrap-Up-Tim e (sec) Wrap-up time between the first answer and second answer. (Default is
0, which means no wrap-up time.)
Max Wait Time (sec) Maximum wait time for callers in the queue.
Max Callers Maximum number of callers who are allowed to wait in the queue.
(Default is 0, which means no limitation.)
Join Empty Allow callers to enter the Queue when no Agents are available. If this
option is not defined, callers will not be able to enter Queues with no
available agents.
Leave When Empty All callers in the Queue will be moved out when new caller cannot enter
the Queue. This option cannot be used with Join Empty simultaneously.
50
Page 51

Internet Telephony PBX System
IPX-2500
Auto Fill Callers will be distributed to Agent automatically.
Report Hold Time Report the hold time of the next caller for Agent when the Agent is
answering the call.
Frequency(sec) Repeat frequency to announce the hold time for callers in the Queue.
(“0” means no announcement).
Announce Hold Time Announce the hold time. Announce (yes), not announce(no) or
announce once(once), it will not be announced when the hold time is
less than 1 minute.
Repeat
Interval time to play the voice menu for callers. (“0” mean not to play).
Frequency(sec)
Announcement Prompt Select a prompt as the Announcements Prompt from the IVR Prompts.
51
Page 52
Internet Telephony PBX System
IPX-2500
Chapter 4 Advanced
4.1 Options
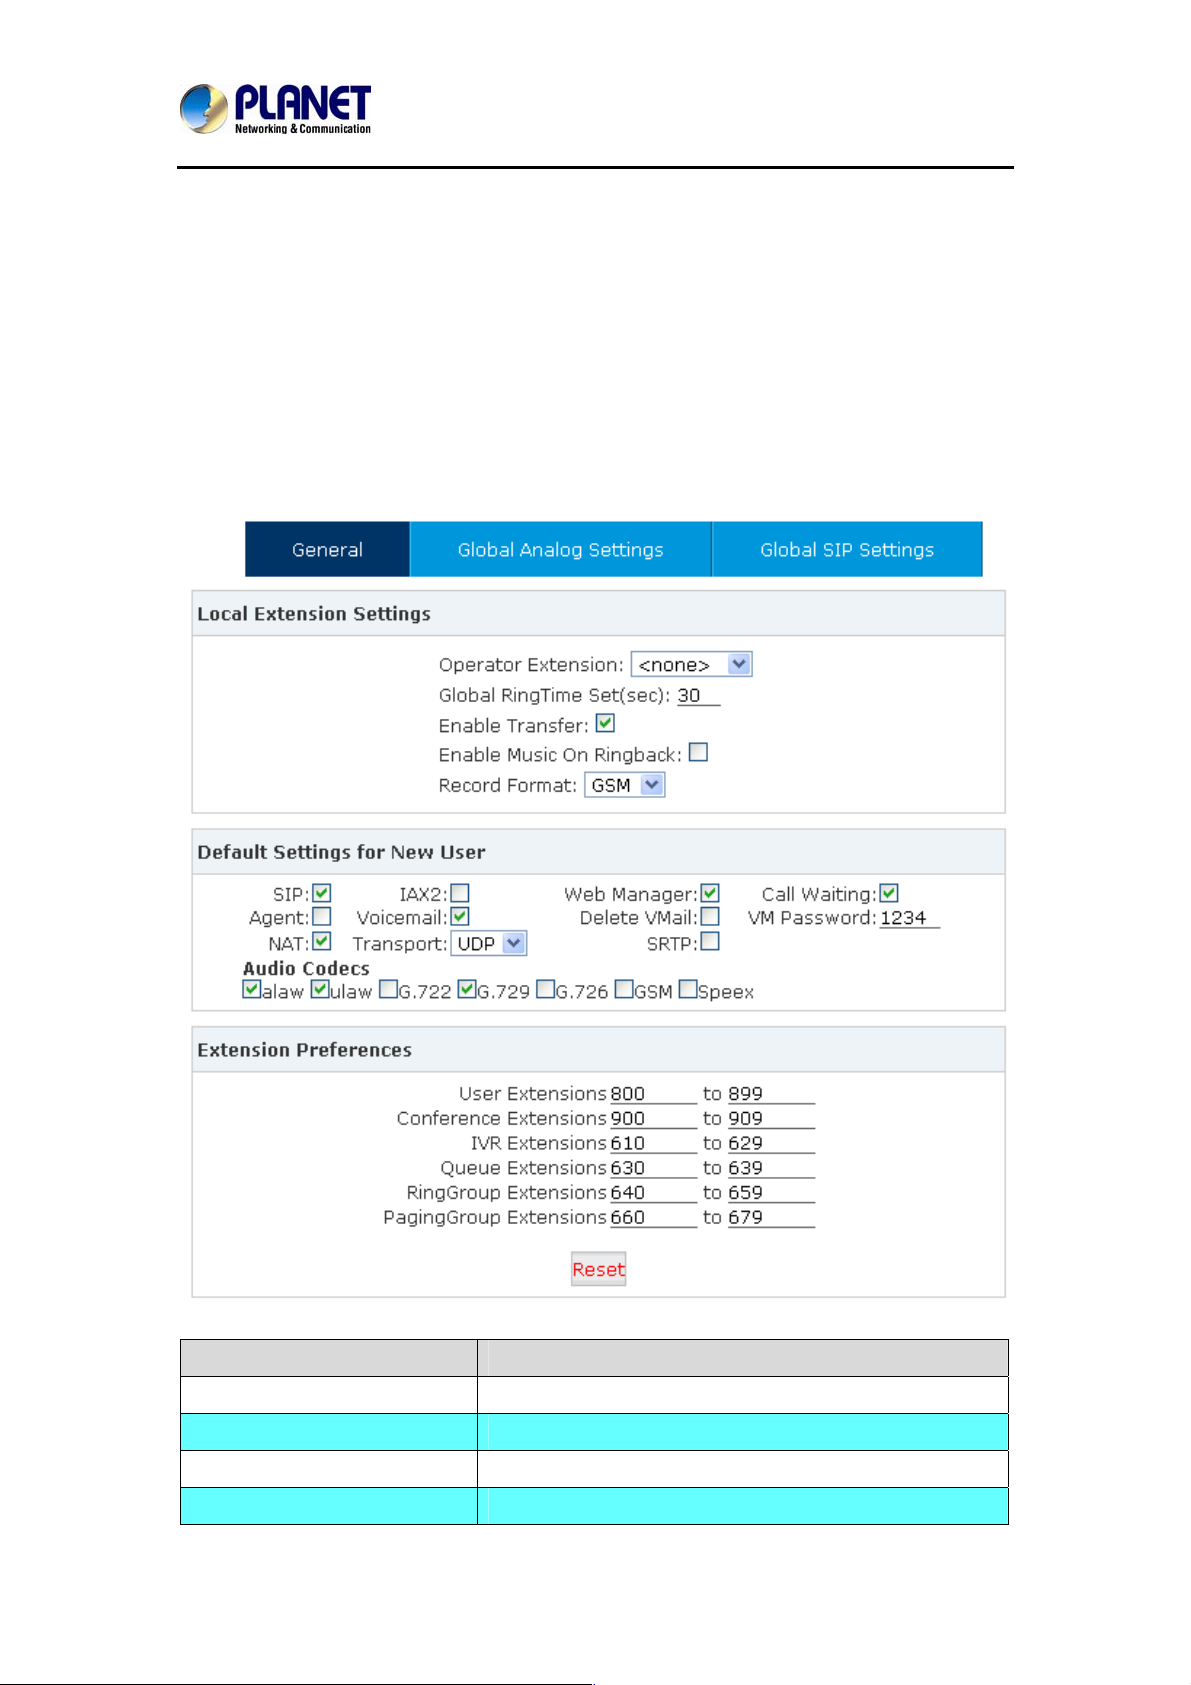
Options include local extension settings and new extension default settings【General】, caller
ID setting 【Global Analog Setting】, and NAT FAX setting 【Global SIP Setting】.
4.1.1 General
Click【General】to display the dialog as shown below:
Item Explanation
Operator Extension Set extension number for Operator.
Global Ring Time Set Set Ring time for every extension.
Enable Transfer Check to enable Transfer.
Enable Music On Ring back Check to enable Music On Ring back.
52
Page 53
Internet Telephony PBX System
IPX-2500
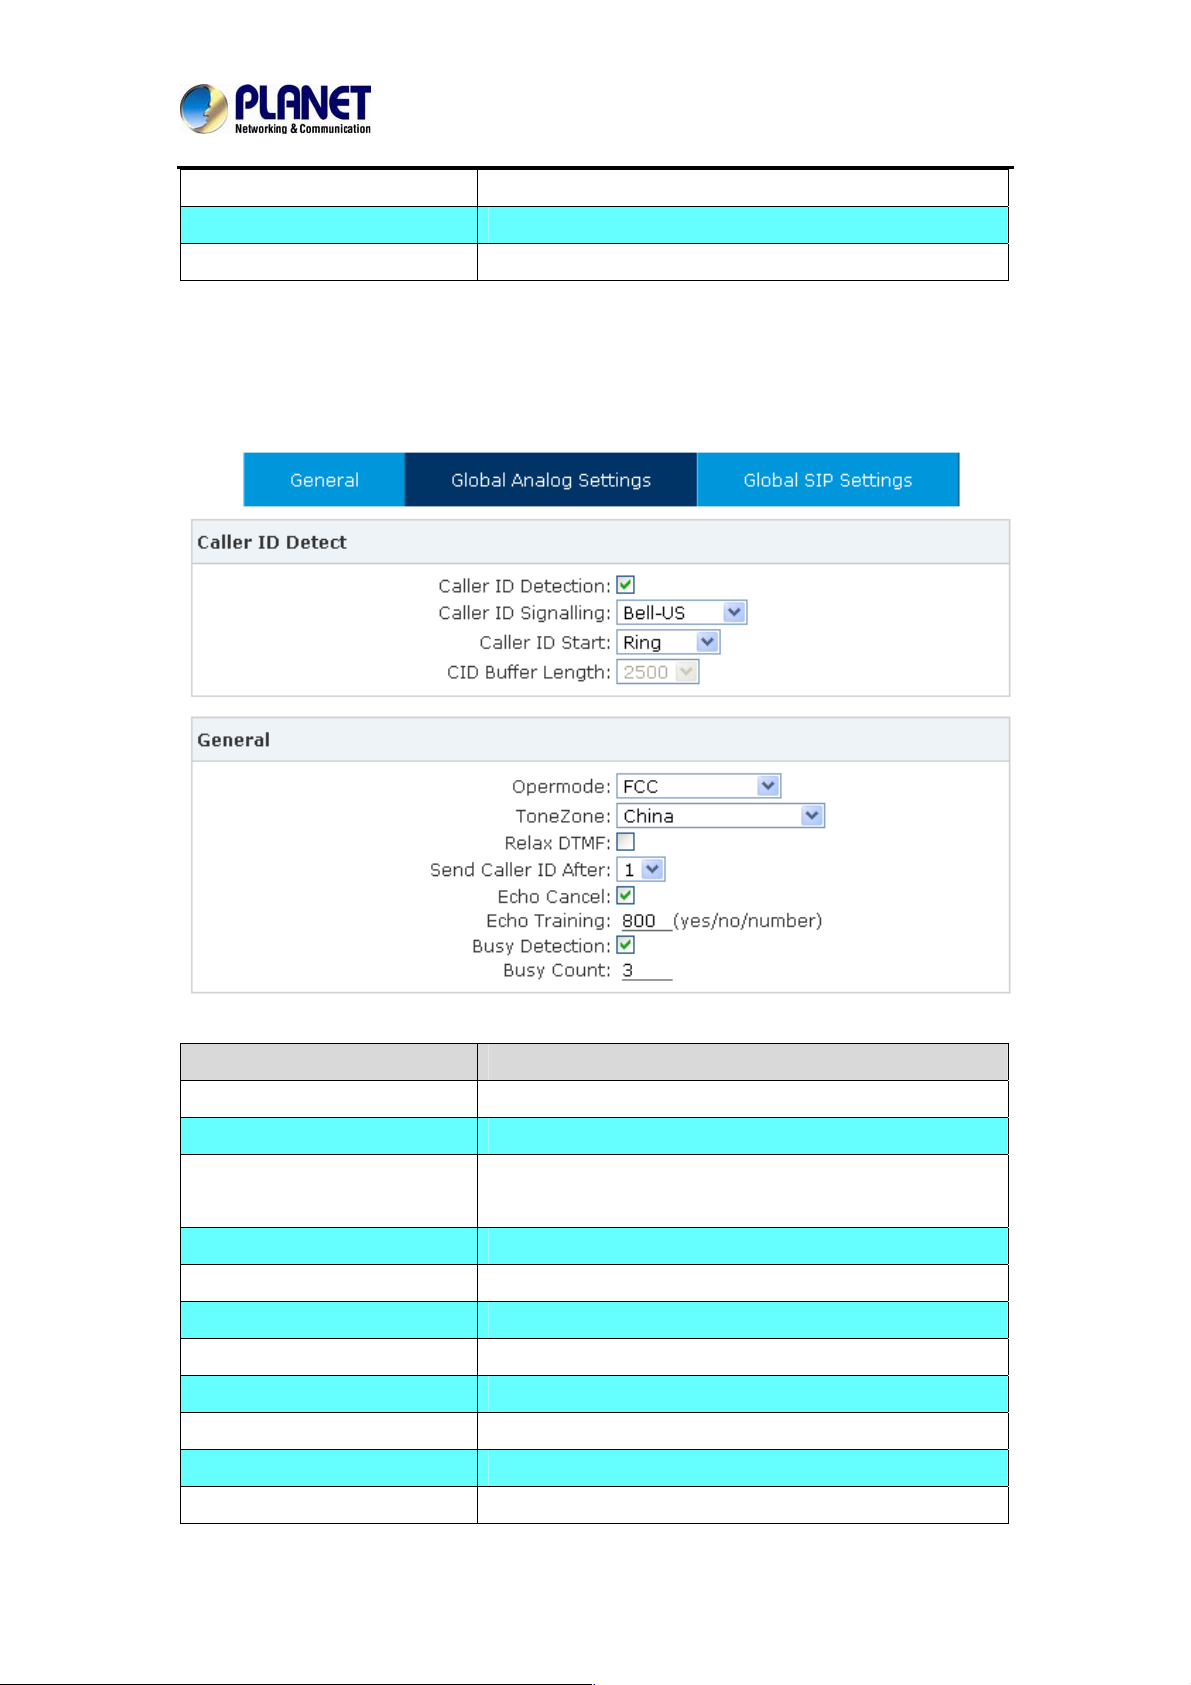
Record Format Set the format for recording files. (GSM / WAV only)
Default Settings for New User Check to enable the default settings.
Extension Preferences Set the rule for extensions.
4.1.2 Global Analog Settings
Click【Advance】->【Options】->【Global Analog Settings】:
Item Explanation
Caller ID Detection Enable/Disable Caller ID Detection
Caller ID Signaling Select the mode of Caller ID Signaling.
Caller ID Start Ring--Caller ID start before ring.
Polarity--Caller ID start when polarity reversal starts.
CID Buffer Length Default CID Buffer Length
Opermode Set the Opermode for FXO/GSM Ports.
ToneZone Select the ToneZone in your country.
Relax DTMF Enable/Disa ble Relax DTMF inspection.
Echo Cancel Enable/Disable Echo Cancel
Echo Training Set Echo Training (default unit: ms)
Busy Detection Enable/Disable Busy Detection.
Busy Count Count the Busy Detection. It will be active when enabling
53
Page 54
Internet Telephony PBX System
IPX-2500
Busy Detection.
4.1.3 Global SIP Settings
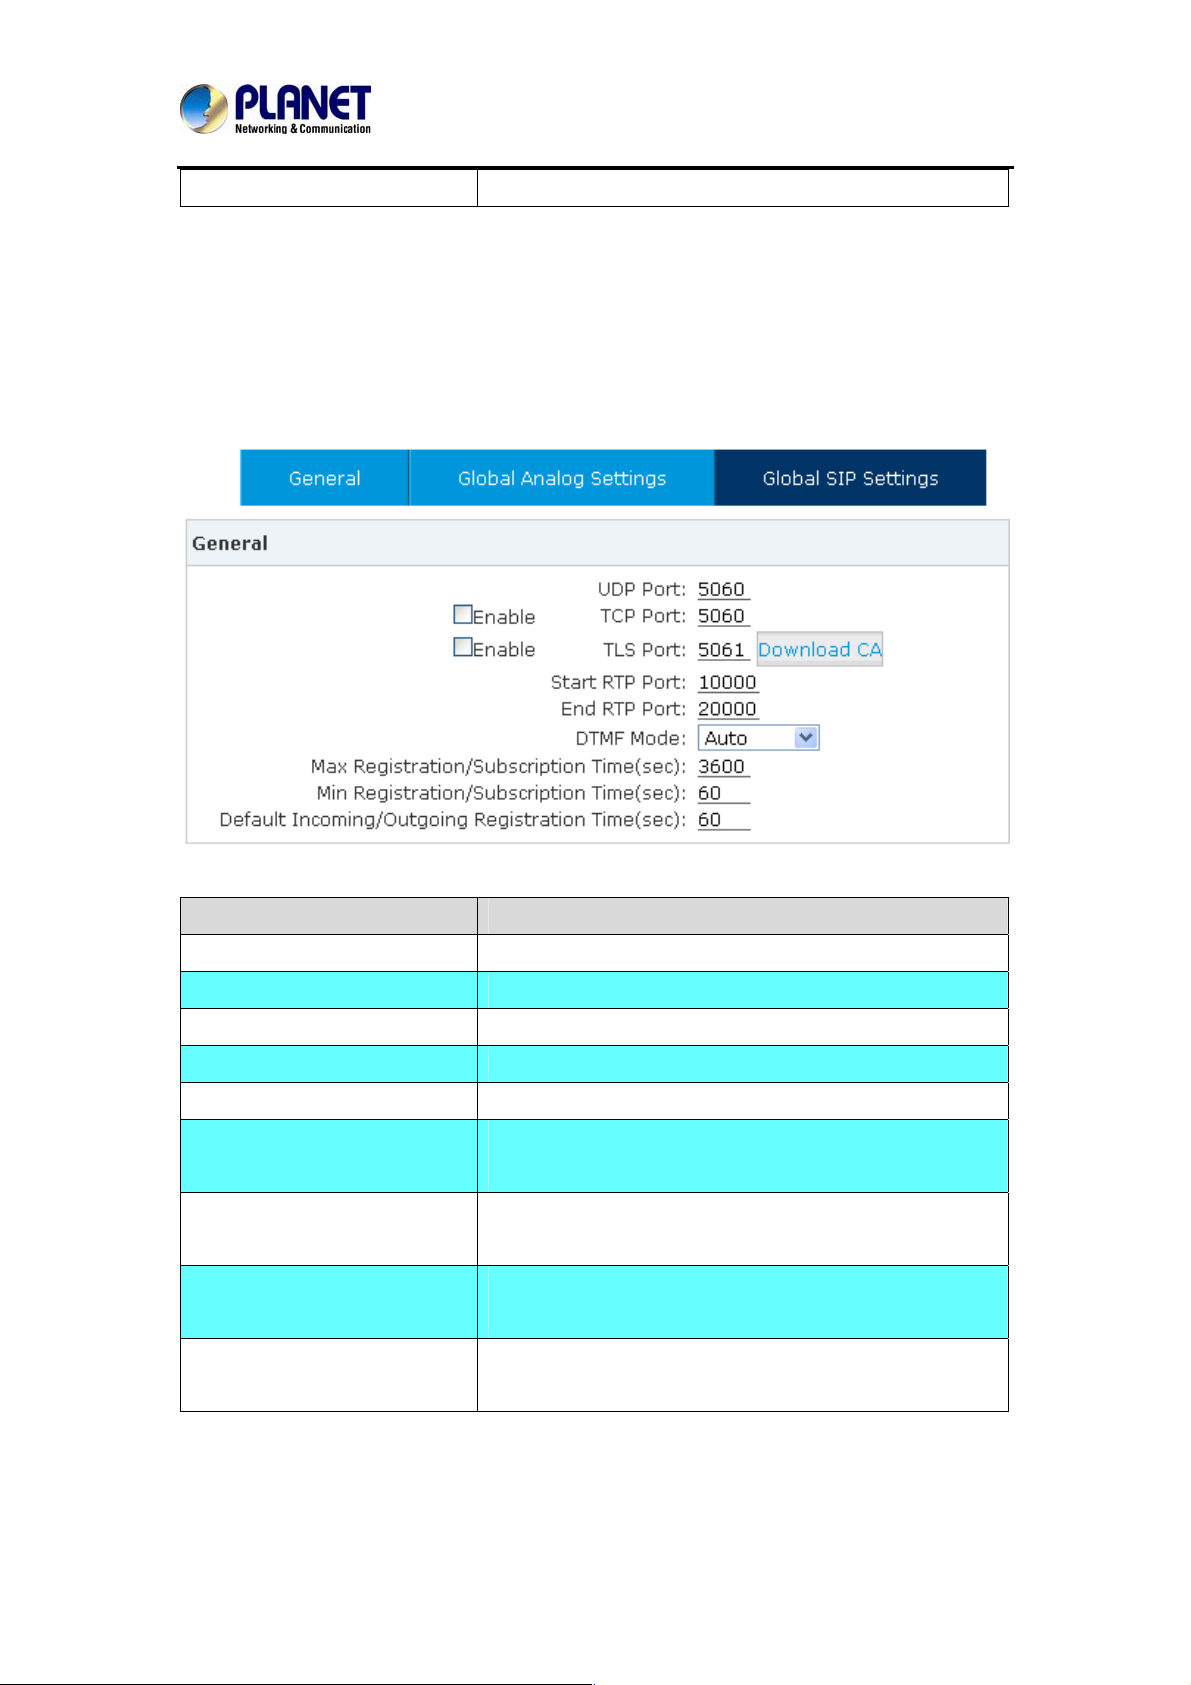
【Global SIP Settings】is appropriate for professionals. If anything needs to be modified,
please contact our tech-support people.
Item Explanation
UDP Port to bind to SIP standard port is 5060
TCP Port Default TCP port is 5060
TLS Port Default TLS port is 5061
Start RTP Port RTP port range
End RTP Port RTP port range
DTMF Mode Set default DTMF mode for sending DTMF, support auto,
RFC2833, inband, info. Default: RFC 2833
Max Registration/Subscription
Time
Min Registration/Subscription
Time
Default Incoming/Outgoing
Registration Time
Maximum duration (in seconds) of incoming
registrations/subscriptions is 3600 seconds by defa ult
Minimum duration (in seconds) of
registrations/subscriptions is 60 seconds by default
Default duration (in seconds) of incoming/outgoing
registration
54
Page 55
Internet Telephony PBX System
Item Explanation
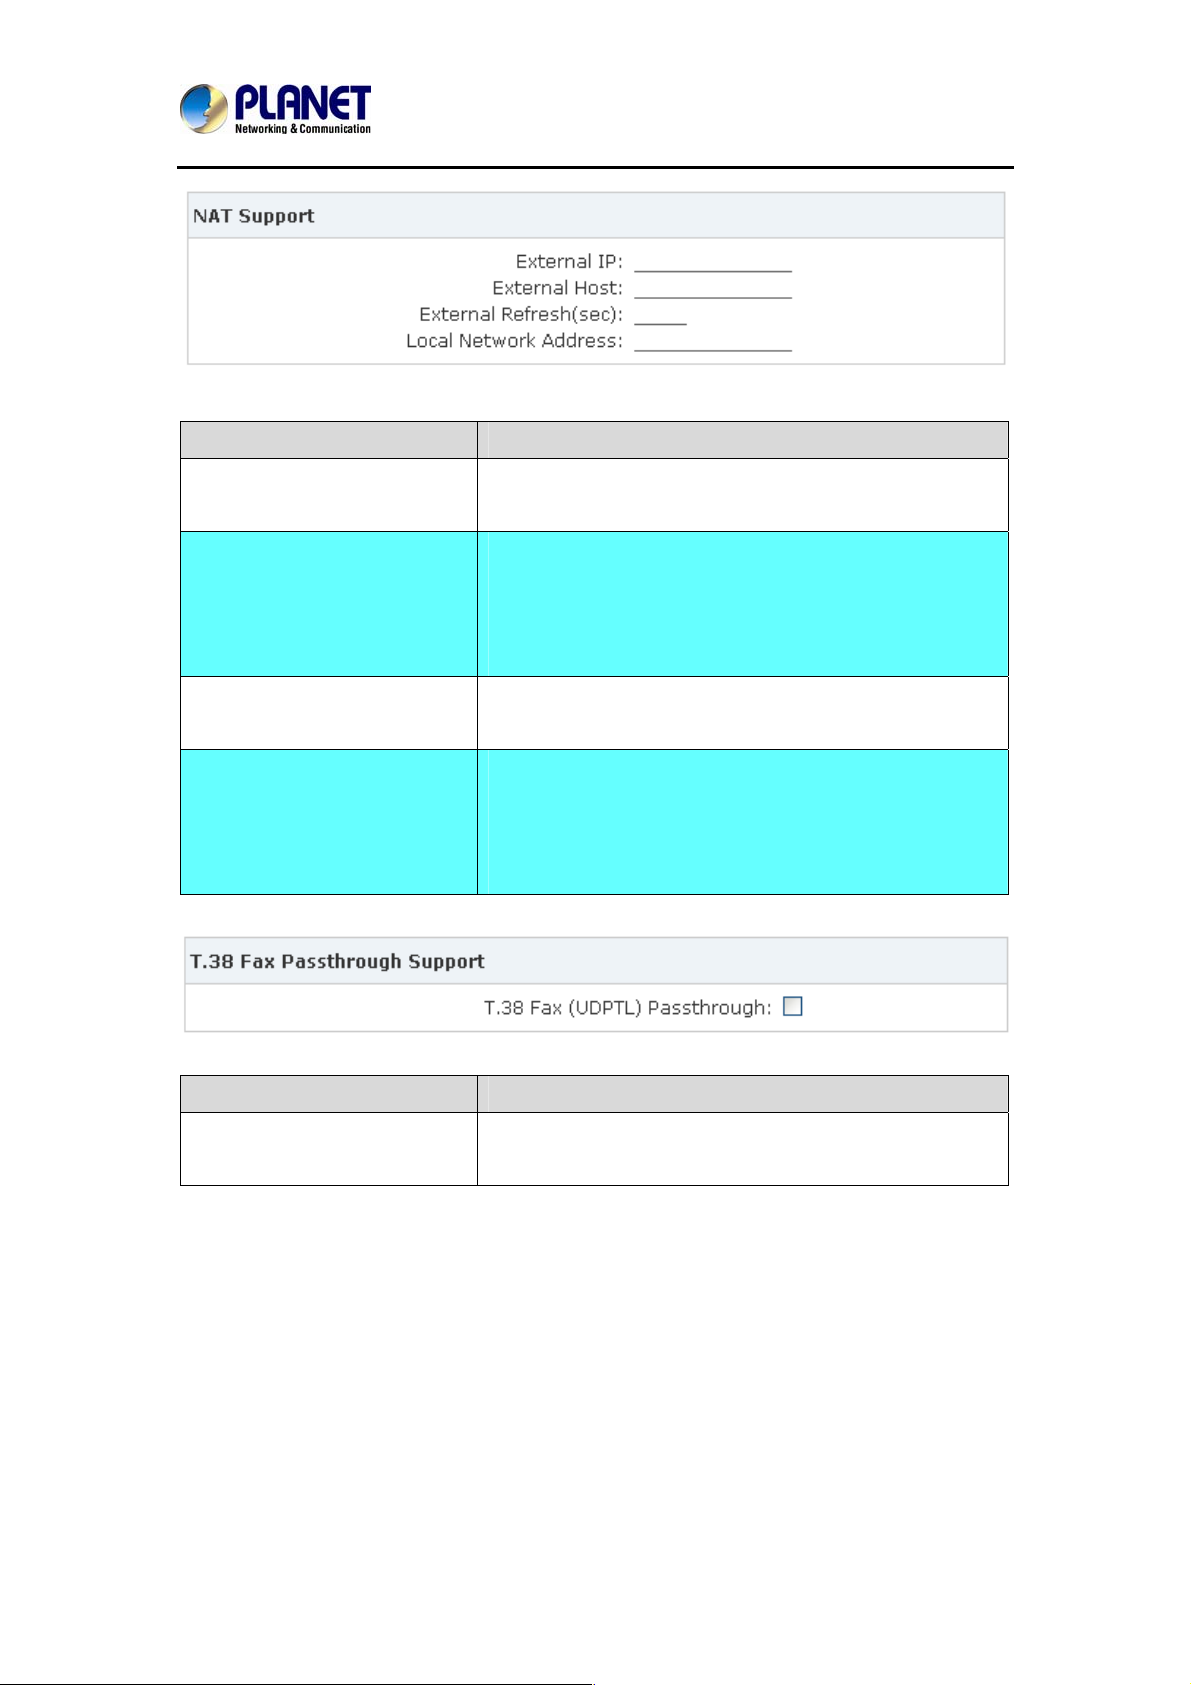
External IP Address that we're going to put in outbound SIP
messages if we're behind a NAT
External Host Alternatively, you can specify an external host, and
Asterisk will perform DNS queries periodically. Not
recommended for production environments! Use external
IP instead
External Refresh How often to refresh external host if used. You may
IPX-2500
specify a local network in the field below
Local Network Add re ss 192.168.0.0/255.255.0.0' : All RFC 1918 addresses are
local networks, '10.0.0.0/255.0.0.0' : Also RFC1918,
'172.16.0.0/12' : Another RFC1918 with CIDR notation,
'169.254.0.0/255.255.0.0' : Zero conf local network
Item Explanation
T.38 fax (UDPTL) Pass through Enables T.38 fax (UDPTL) pass through on SIP to SIP
calls
55
Page 56
Internet Telephony PBX System
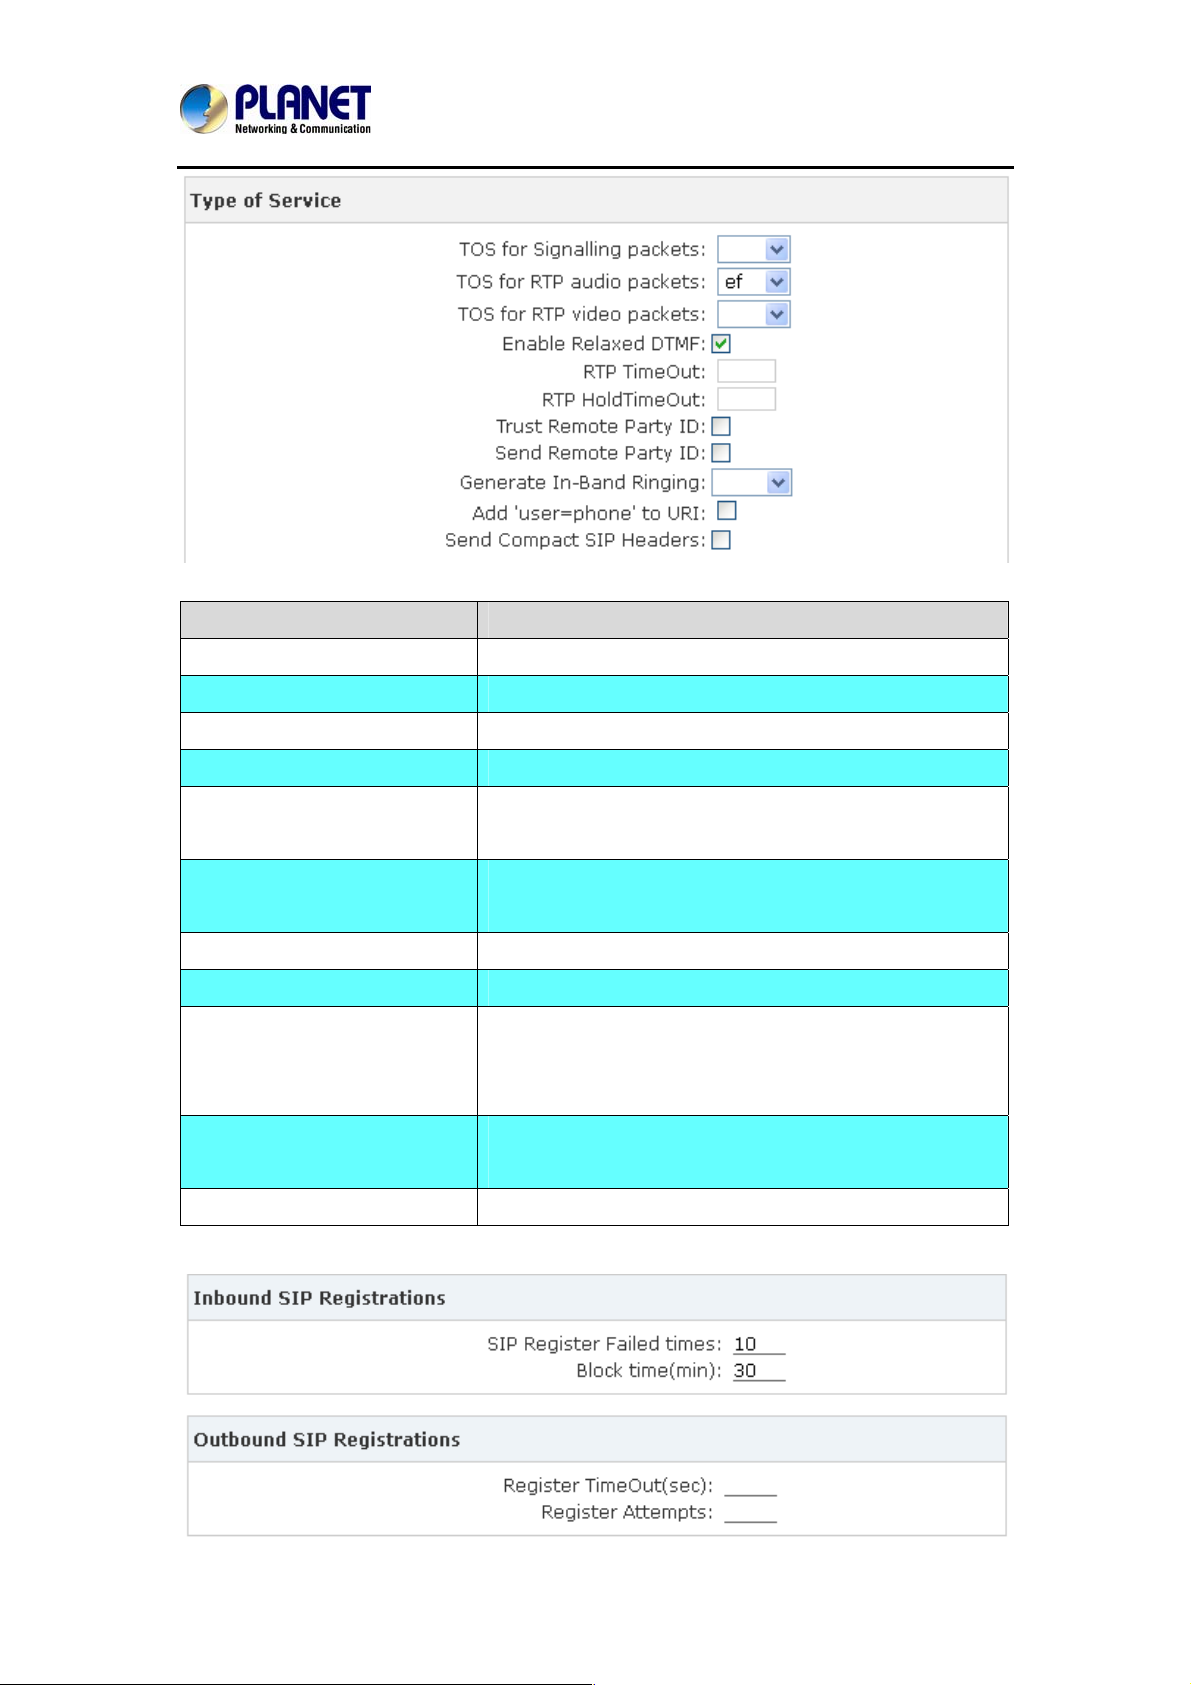
Item Explanation
TOS for Signaling packets Sets Type of Service for SIP packets
TOS for RTP audio packets Sets Type of Service for RTP audio packets
IPX-2500
TOS for RTP video packets Sets Type of Service for RTP video packets
Enable Relaxed DTMF Relax DTMF handling
RTP Time Out Terminate call if 60 seconds of no RTP activity when
we're not on hold
RTP Hold Time Out Terminate call if 300 seconds of no RTP activity when
we're on hold (must be > RTP time out)
Trust Remote Party ID If Remote-Party-ID should be trusted
Send Remote Party ID If Remote-Party-ID should be sent
Generate In-Band Ringing If we should generate in-band ringing always, use 'never'
to never use in-band signaling, even in cases where
some buggy devices might not render it. Default: never
Add 'user=phone' to URI If checked, 'user=phone' is added to URI that contains a
valid phone number
Send Compact SIP Headers Send compact sip headers
56
Page 57
Internet Telephony PBX System
IPX-2500
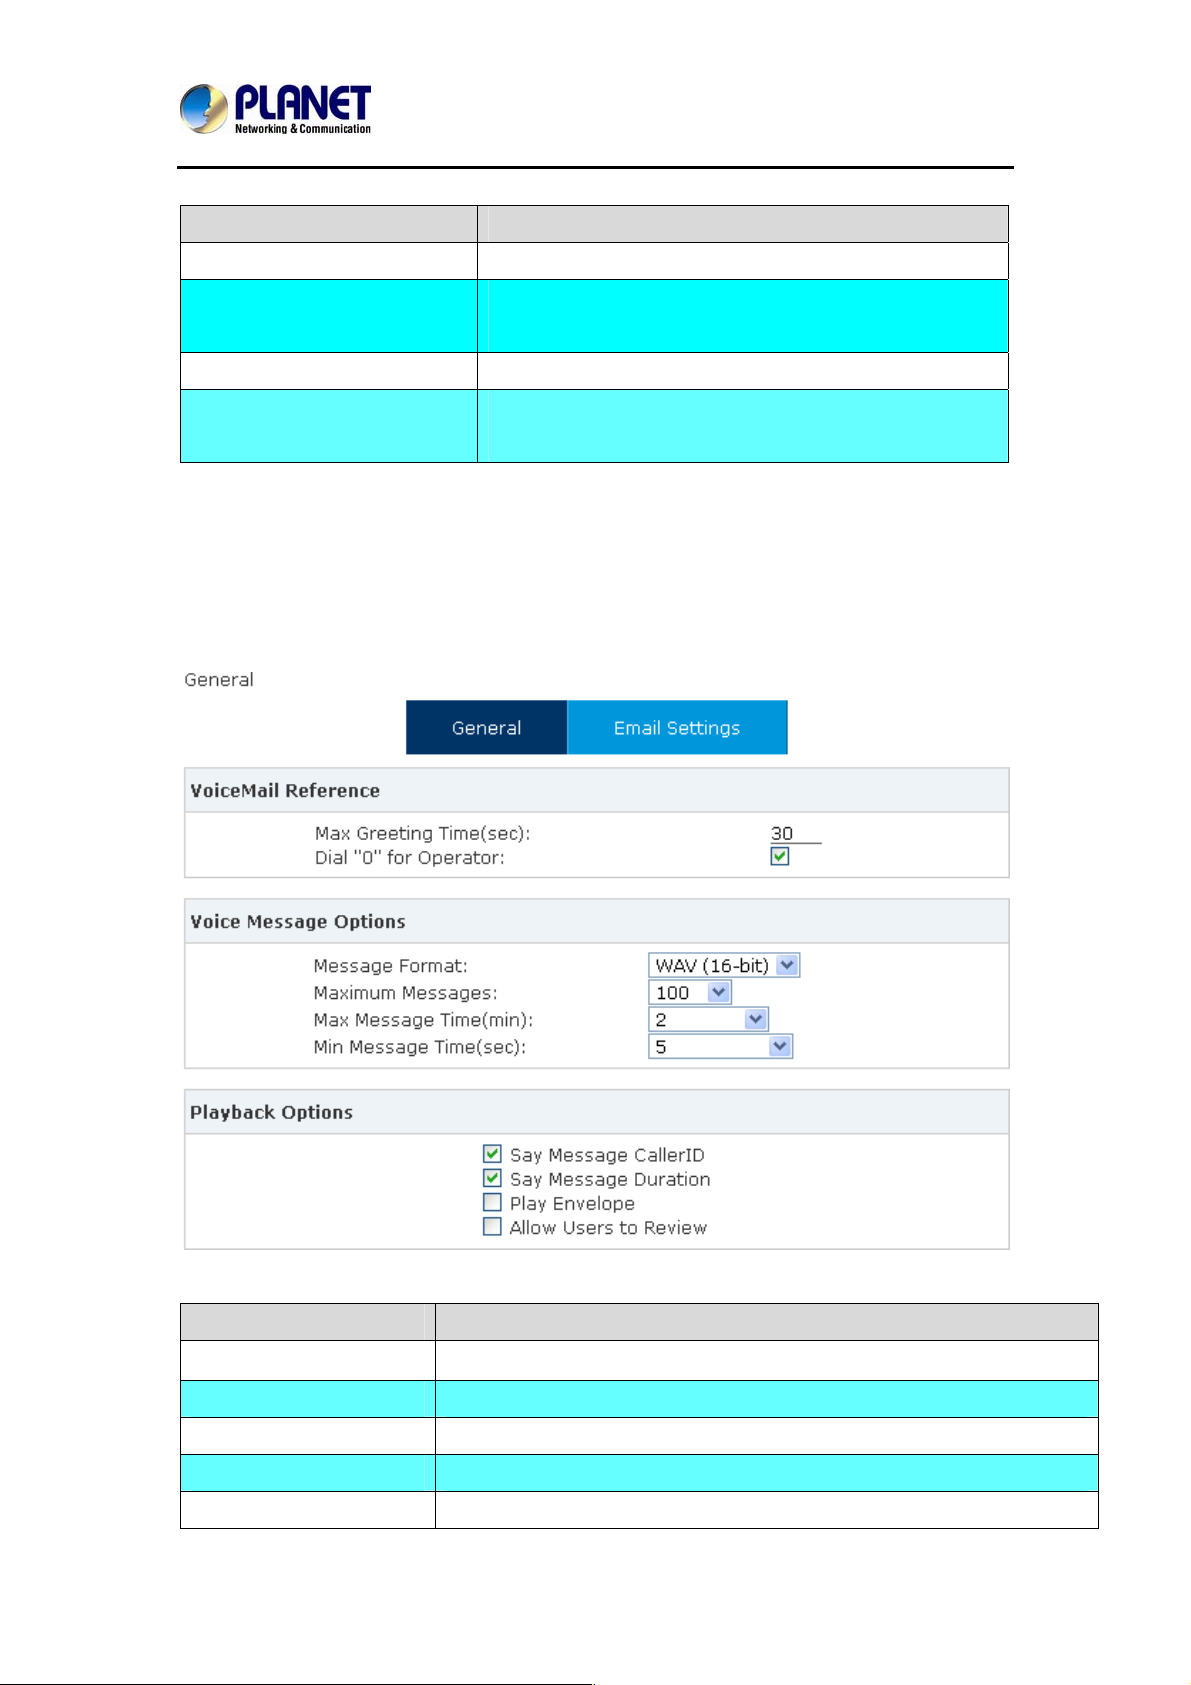
Item Explanation
SIP Register Failed Times Allowed failure time for register attempts.
Block times How long will be limited, when you Beyond the number of
register failure.
Register Time Out Retry registration calls at every 'x' seconds (default 20)
Register Attempts Number of registration attempts before we give up; 0 =
continue forever
4.2 VoiceMail
Details configuration on Voice Mail: Voice Mail Reference/ Voice Message Options/ Playback
Options. If you need to send message by mail to your defined mailbox, you must configure
SMTP and Email model. Click【Voicemail】to display the dialog as shown below:
Item Explanation
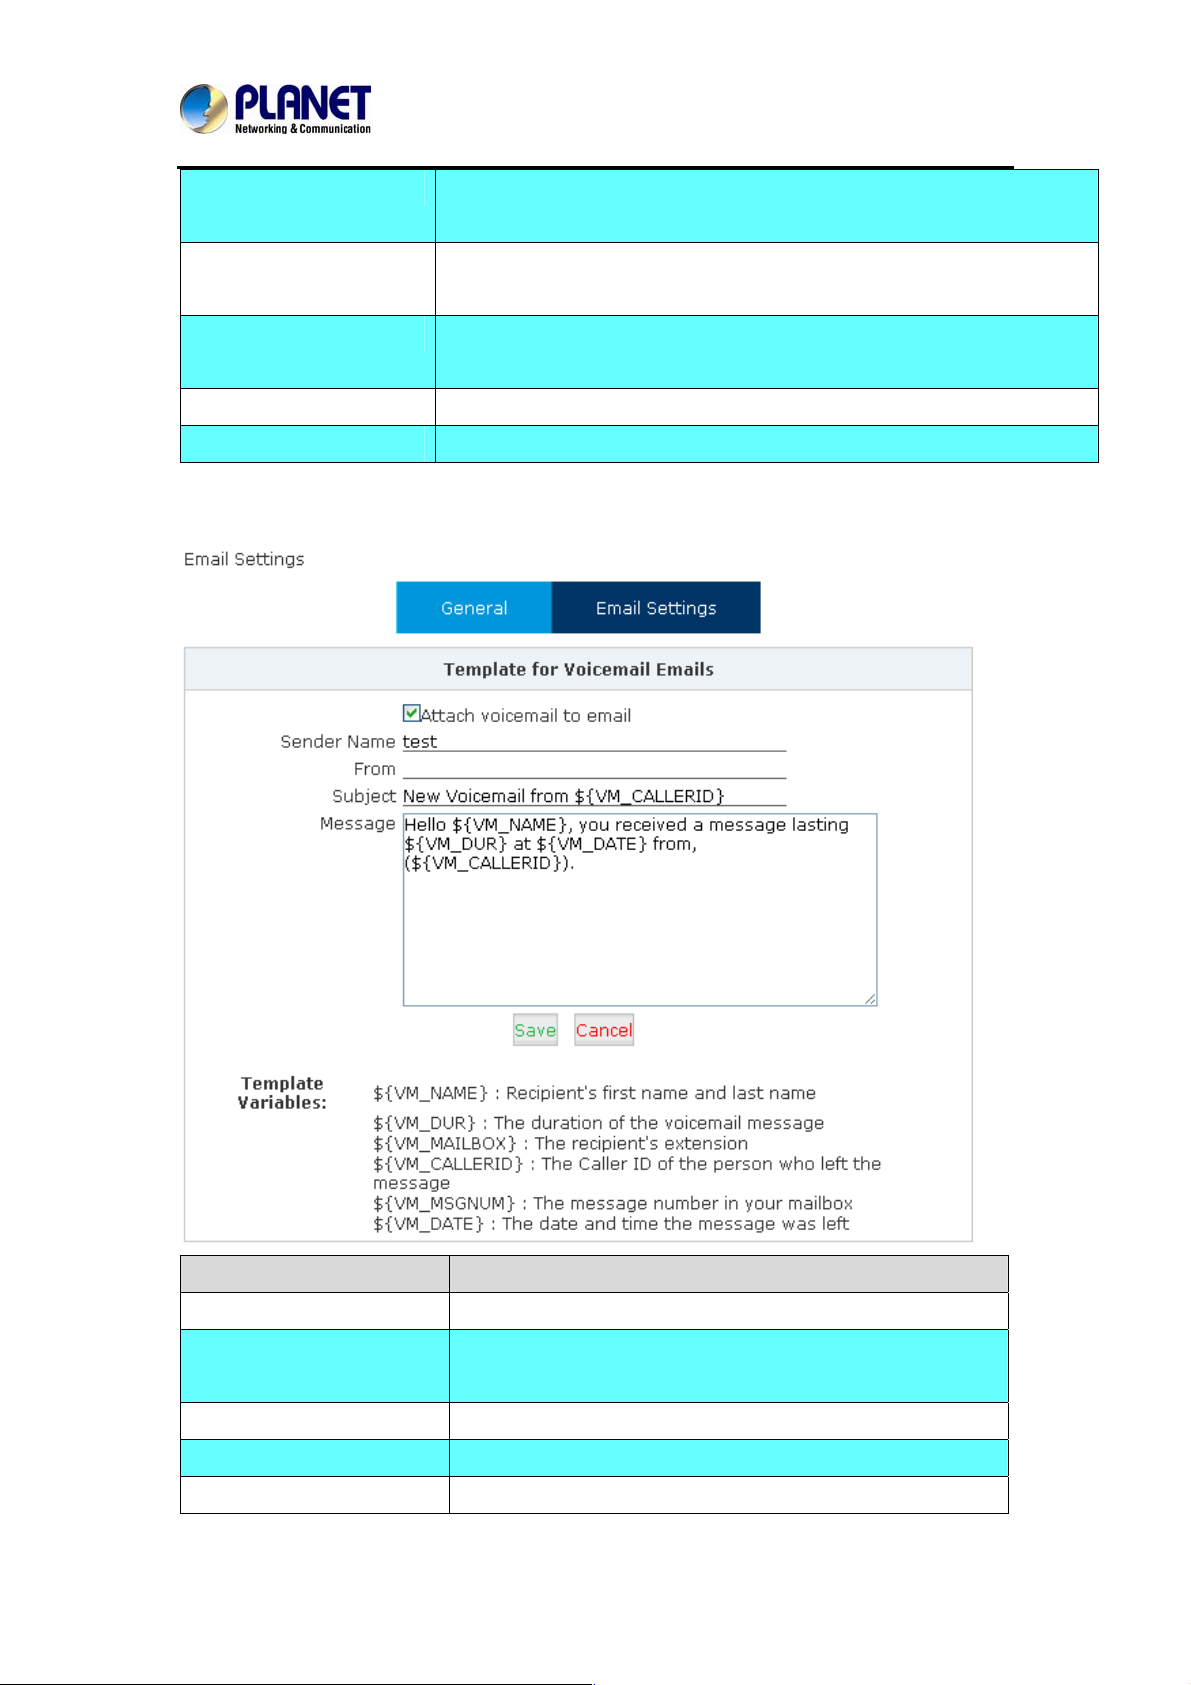
Max Greeting Time(sec) Maximum Greeting Time
Dial "0" for Operator Dial "0" to cancel the voicemail and forward to Operator.
Message Format Save the voice message as this format, WAV (16-bit) or Raw GSM.
Maximum Messages Maximum messages to be allowed to leave.
Max Message Time(min) Maximum Time for each message to be allowed to leave.
57
Page 58
Internet Telephony PBX System
IPX-2500
Min Message Time(sec) Minimum Time for each message. The message will be deleted
automatically if the time is less than the minimum message time.
Say Message Caller ID Checking this option, Caller ID will be played when user login email to
receive the voice message.
Say Message Duration Checking this option, the message duration will be played before playing
the voice message.
Play Envelop Envelop includes date, time and caller ID.
Allow Users to Review Check this option to allow users to review the voice message.
Email Settings
Item Explanation
Attach voicemail to Email The voicemail will be sent as attachment to the user’s Email.
Sender Name The sender ’s name will be displayed when you receive the
Email.
From Mailbox to send email
Subject Subject of the Email.
Message Input the Email template.
58
Page 59
Internet Telephony PBX System
IPX-2500
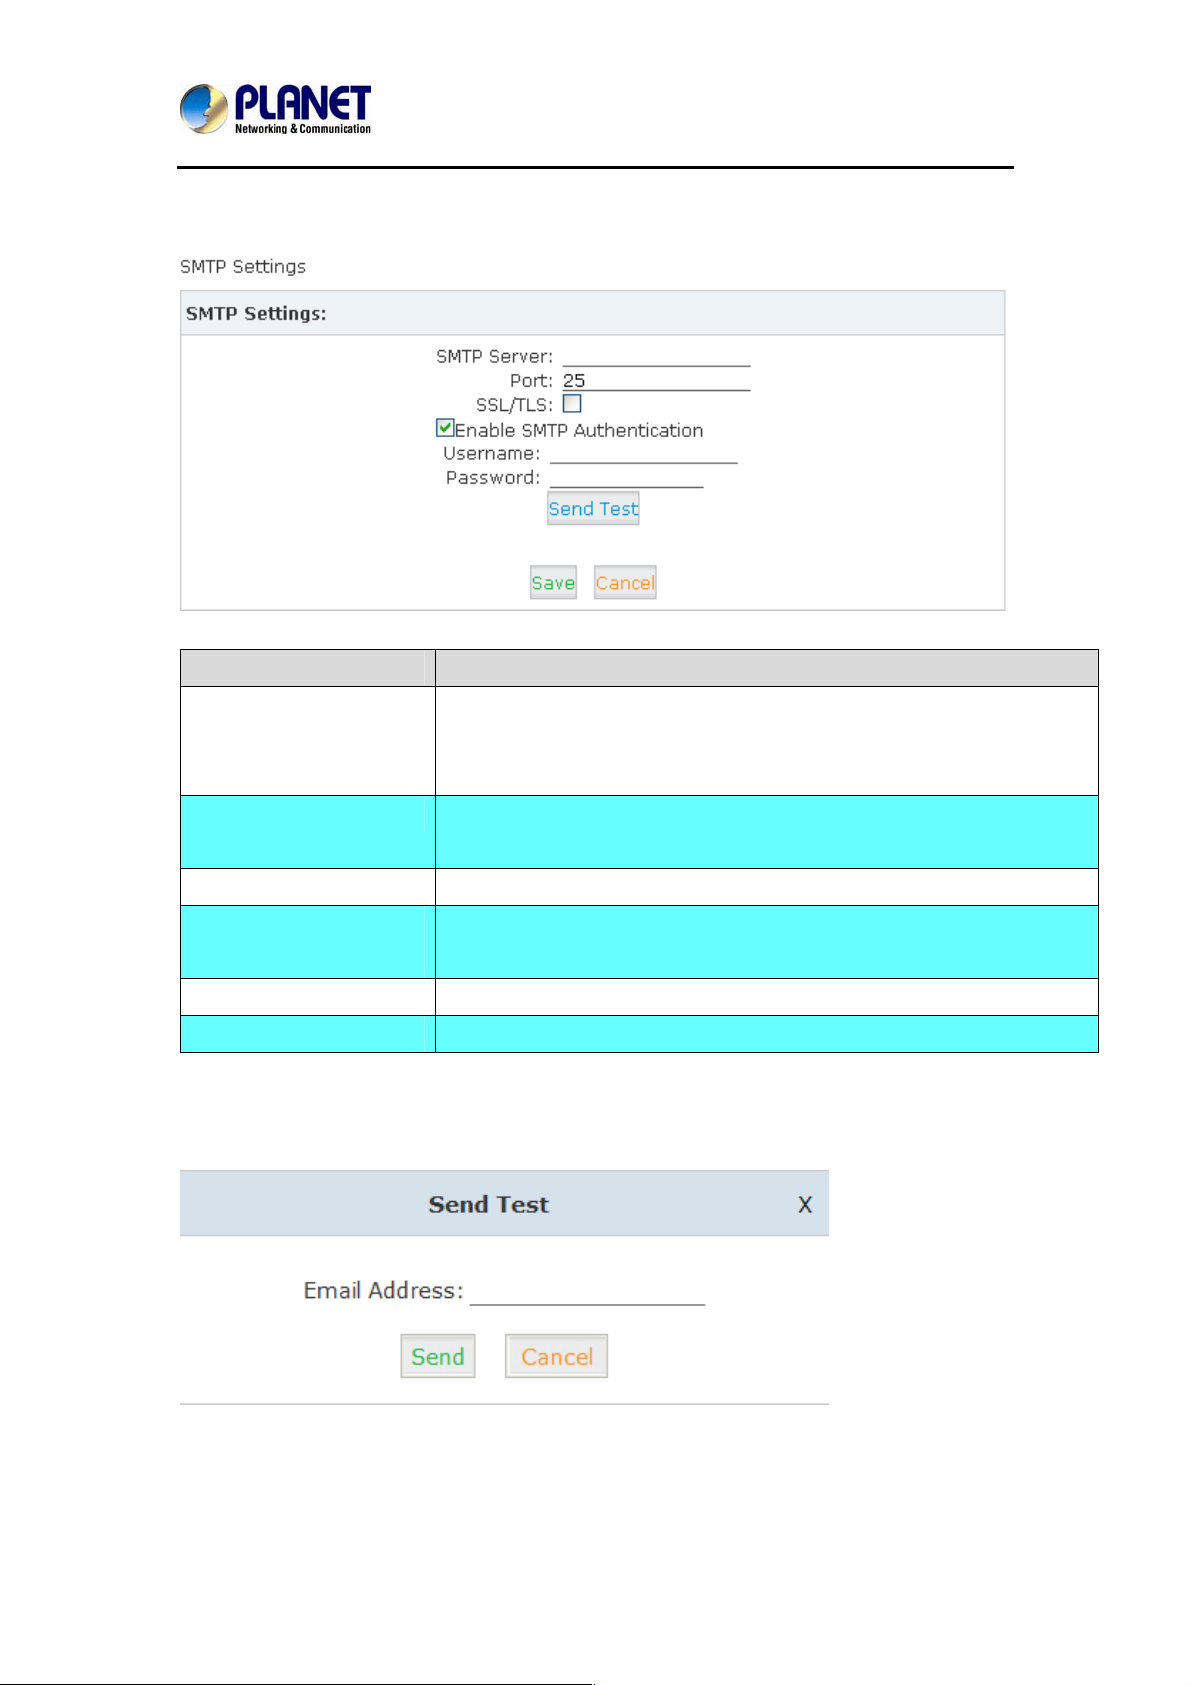
4.3 SMTP Setting
Item Explanation
SMTP server In order to send e-mail notifications of your voicemail, set the IP address
or domain name of a SMTP server that your IP PBX may connect to.
e.g. mail.yourcompany.com
Port The port number the SMTP server runs is gene rally port 25. If SSL is
encrypted, please use port 465 instead.
SSL/TSL Enable SSL/TLS to send secure messages to serve r.
Enable SMTP
Authentication
User Name Input user name of your email box.
Password Input password of your email box.
If your SMTP server needs Authentication, please enable SMTP
Authentication, and configure the following information.
Click【Send Test】after configuration, the following diagram will be displayed to ask you to input
the Email for receiving.
Input the Email and click【 Send】to send the test email. Login your Email to check;
configuration is successful if you receive the test email; otherwise, it fails. Please check your
email settings.
59
Page 60
Internet Telephony PBX System
IPX-2500
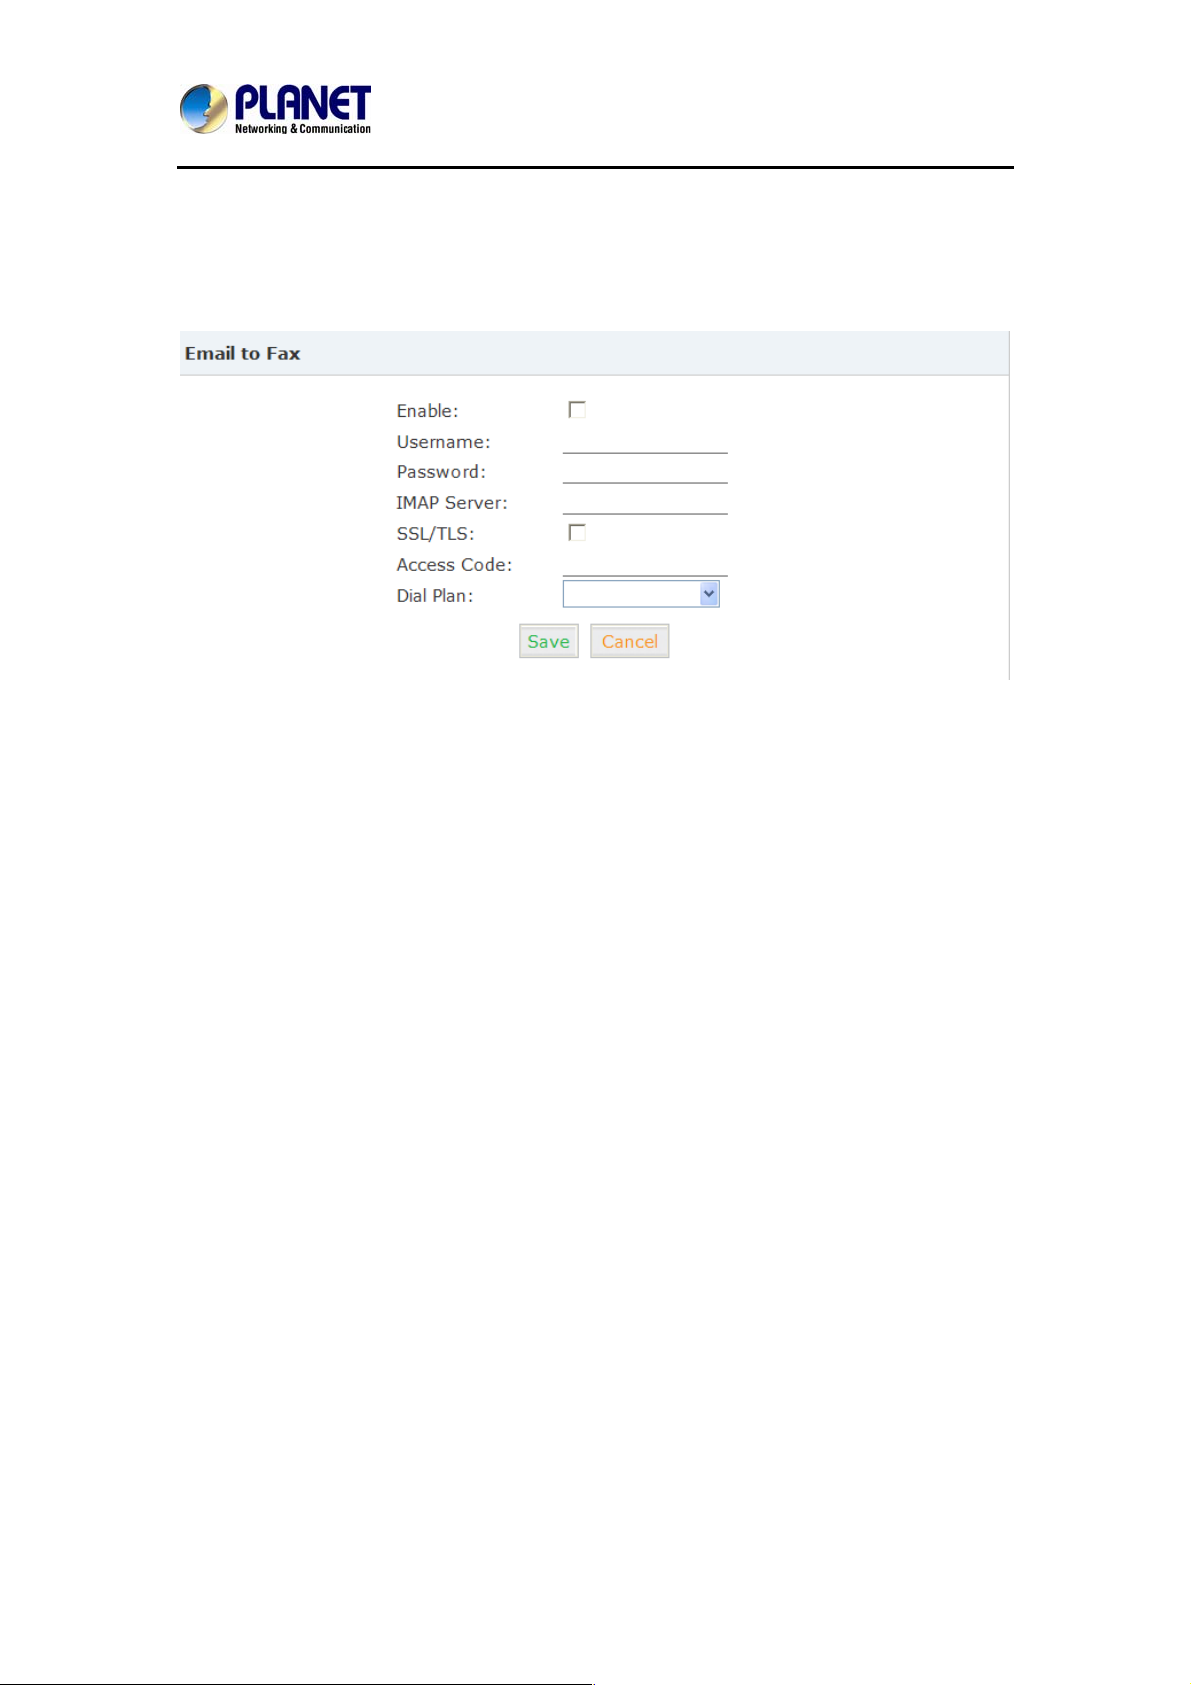
4.4 Email to Fax
Users can send fax by Email. Please configure as shown below.
Click【Advanced】->【Email to Fax】
Check “Enable”, input user name, password and IMAP Server(server format: imap.XX.com),
select the Dial Plan and then “Save” and “Activate”.
Practical Case:
Send a fax to telephone number 86671485: In Dial Plan 1, there is prefix “9” before the
telepho
subj
If you need to dial the extension when sending fax, e.g. fax number:
need to u
ne number; you need to input the 【Access Code】
ect when sending Email. Then the fax will be sent by Email as attachm ent.
se the 【Access Code】
: 986671485-515 as subject.
: 986671485 and take it as the
86671485 ext.515, you
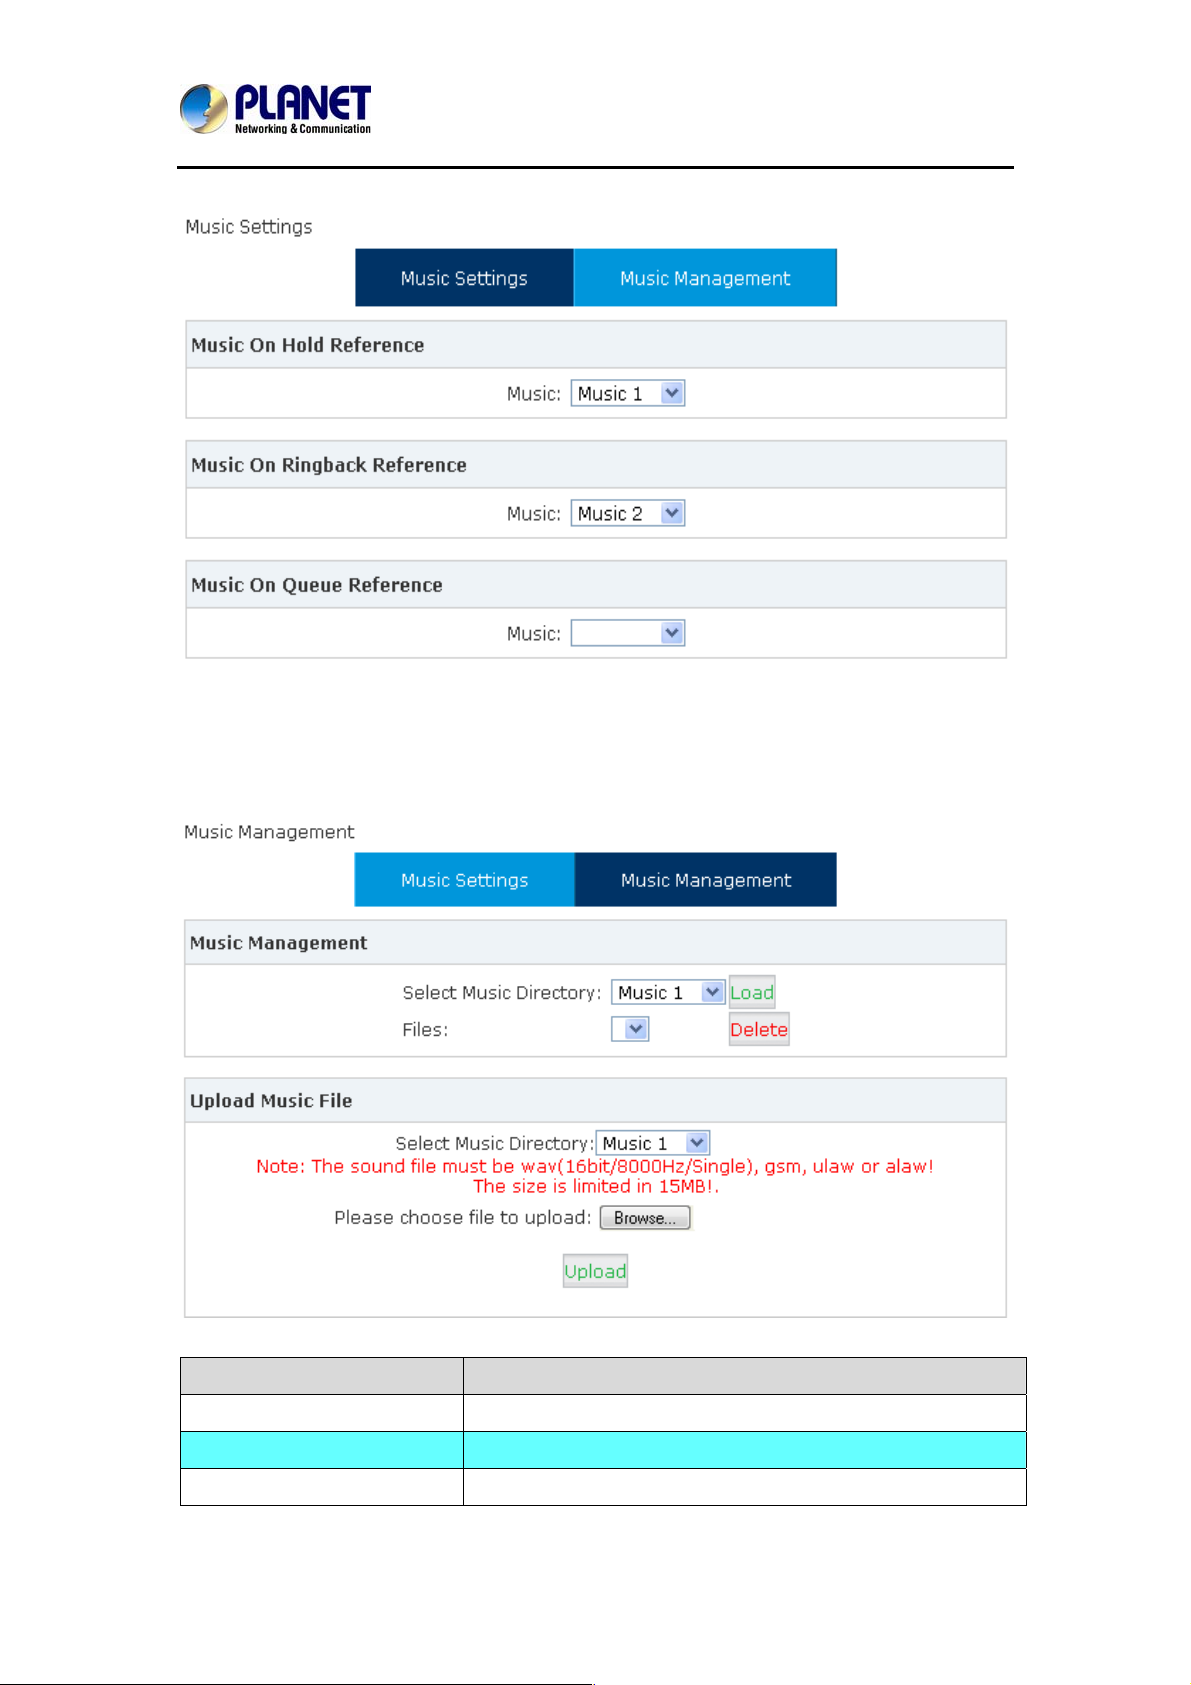
4.5 Music Settings
Management for music on hold, music on ring back, music on call queue…
Click【Music Settings】 to display the dialog as below:
60
Page 61
Music Settings:
Internet Telephony PBX System
IPX-2500
Please define different music files for different music folders.
Music Management:
Item Explanation
Select Music Directory Load music in the music file.
File Display music name under the music file. You can delete it.
Select Music Directory Select the file where you want to save your uploaded music.
61
Page 62
Internet Telephony PBX System
IPX-2500
Please choose file to upload Select the music you want to upload. Note: music file must be
WAV (16bit/8000Hz / Single), GSM, ulaw or alaw, and less
than 15MB.
The sound file must be wav (16bit/8000Hz/Single), gsm, ulaw or alaw !! The size
is limited in 15MB
4.6 DISA
A trunk call is made to the PBX, and call is made to another trunk through outbound route of
the PBX. This trunk can make international calls. You are out of the office and want to contact
your customer in a foreign country. Now you can dial DISA number after PIN authentication.
You are now connected to your customer, and you can speak to your customer now.
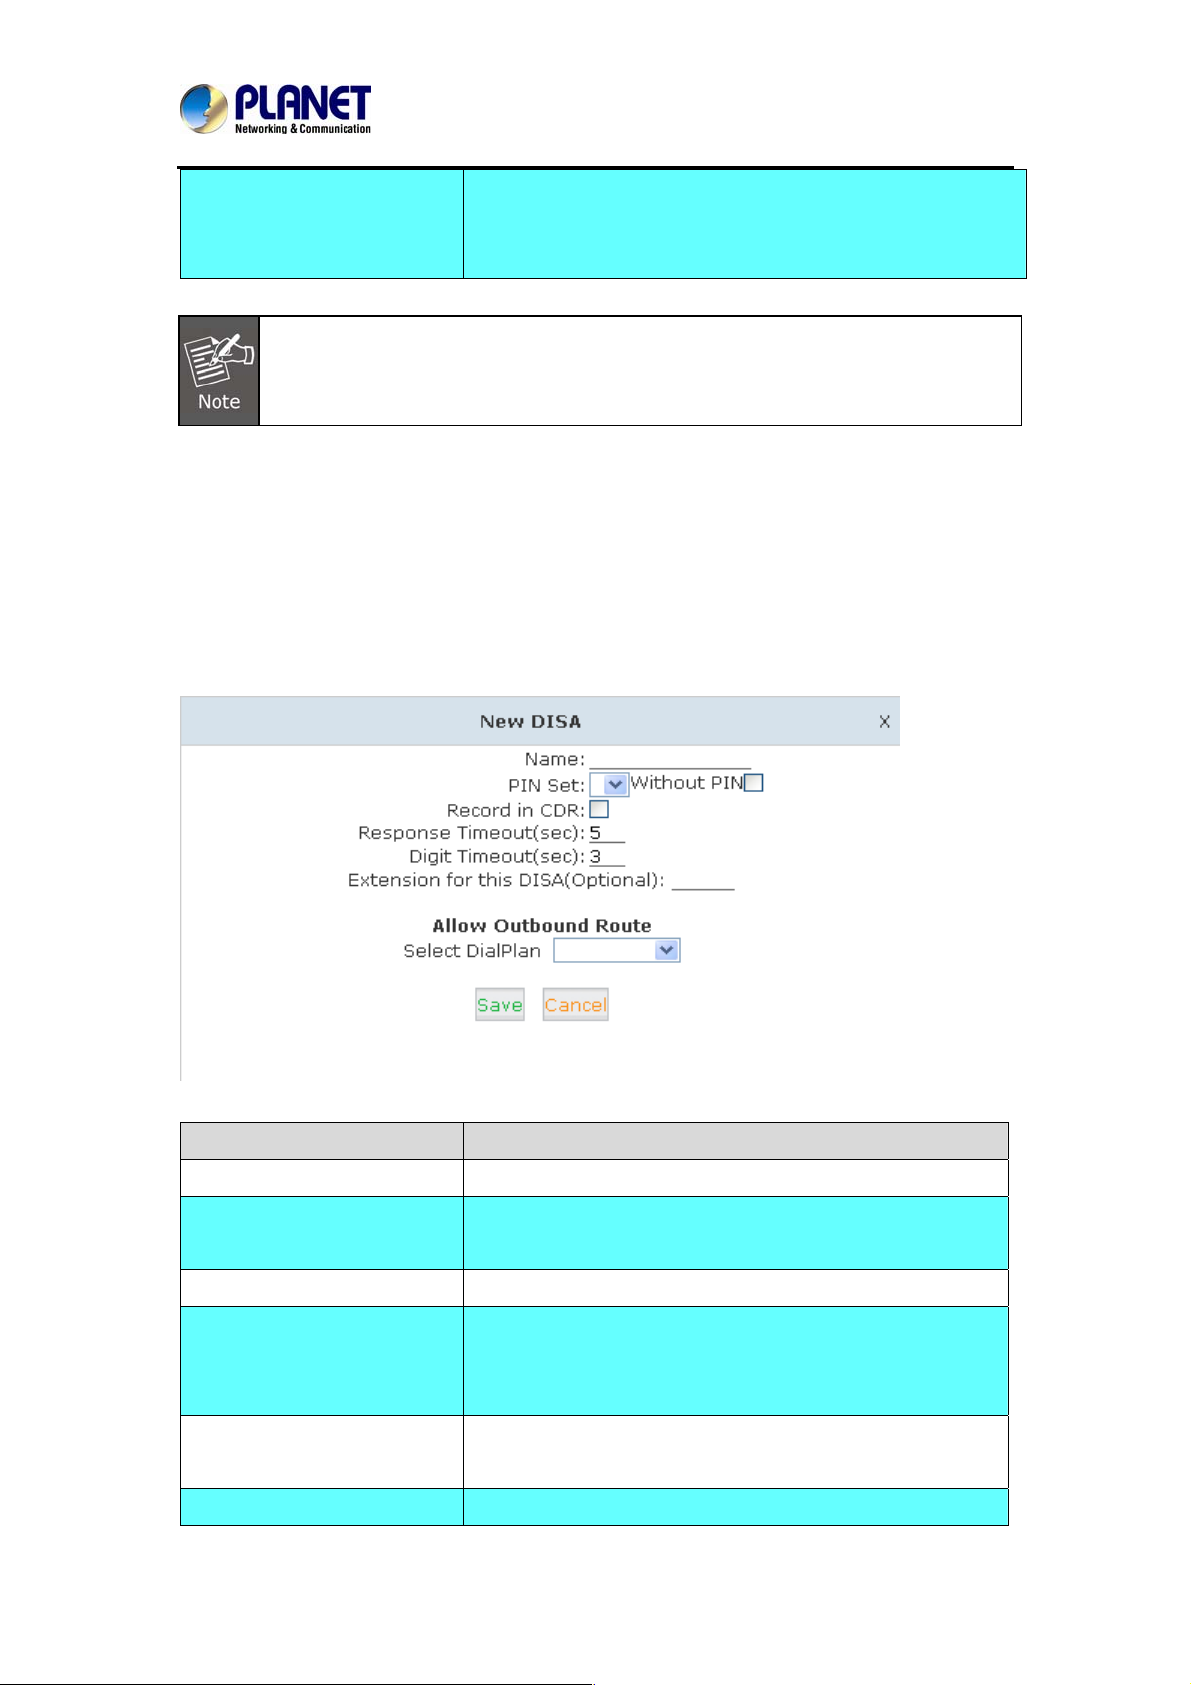
Click【DISA】---【New DISA】to display the dialog as shown below:
Item Explanation
Name Define a name for DISA.
PIN Set User will be prompted to input this number when PIN
Authentication is needed.
Record in CDR Check to record.
Response Timeout(sec) The maximum time for waiting before hanging up if the
dialed number is incomplete or invalid. Default is 10
seconds
Digit Timeout(sec) The maximum interval time between digits when typing
extension number is 5 seconds by default.
Extension for this If you want to access DISA by dialing an extension, you can
62
Page 63
Internet Telephony PBX System
IPX-2500
DISA(Optional) define an extension number for this DISA.
Select Dial Plan Select the Dial Plan for this DISA.
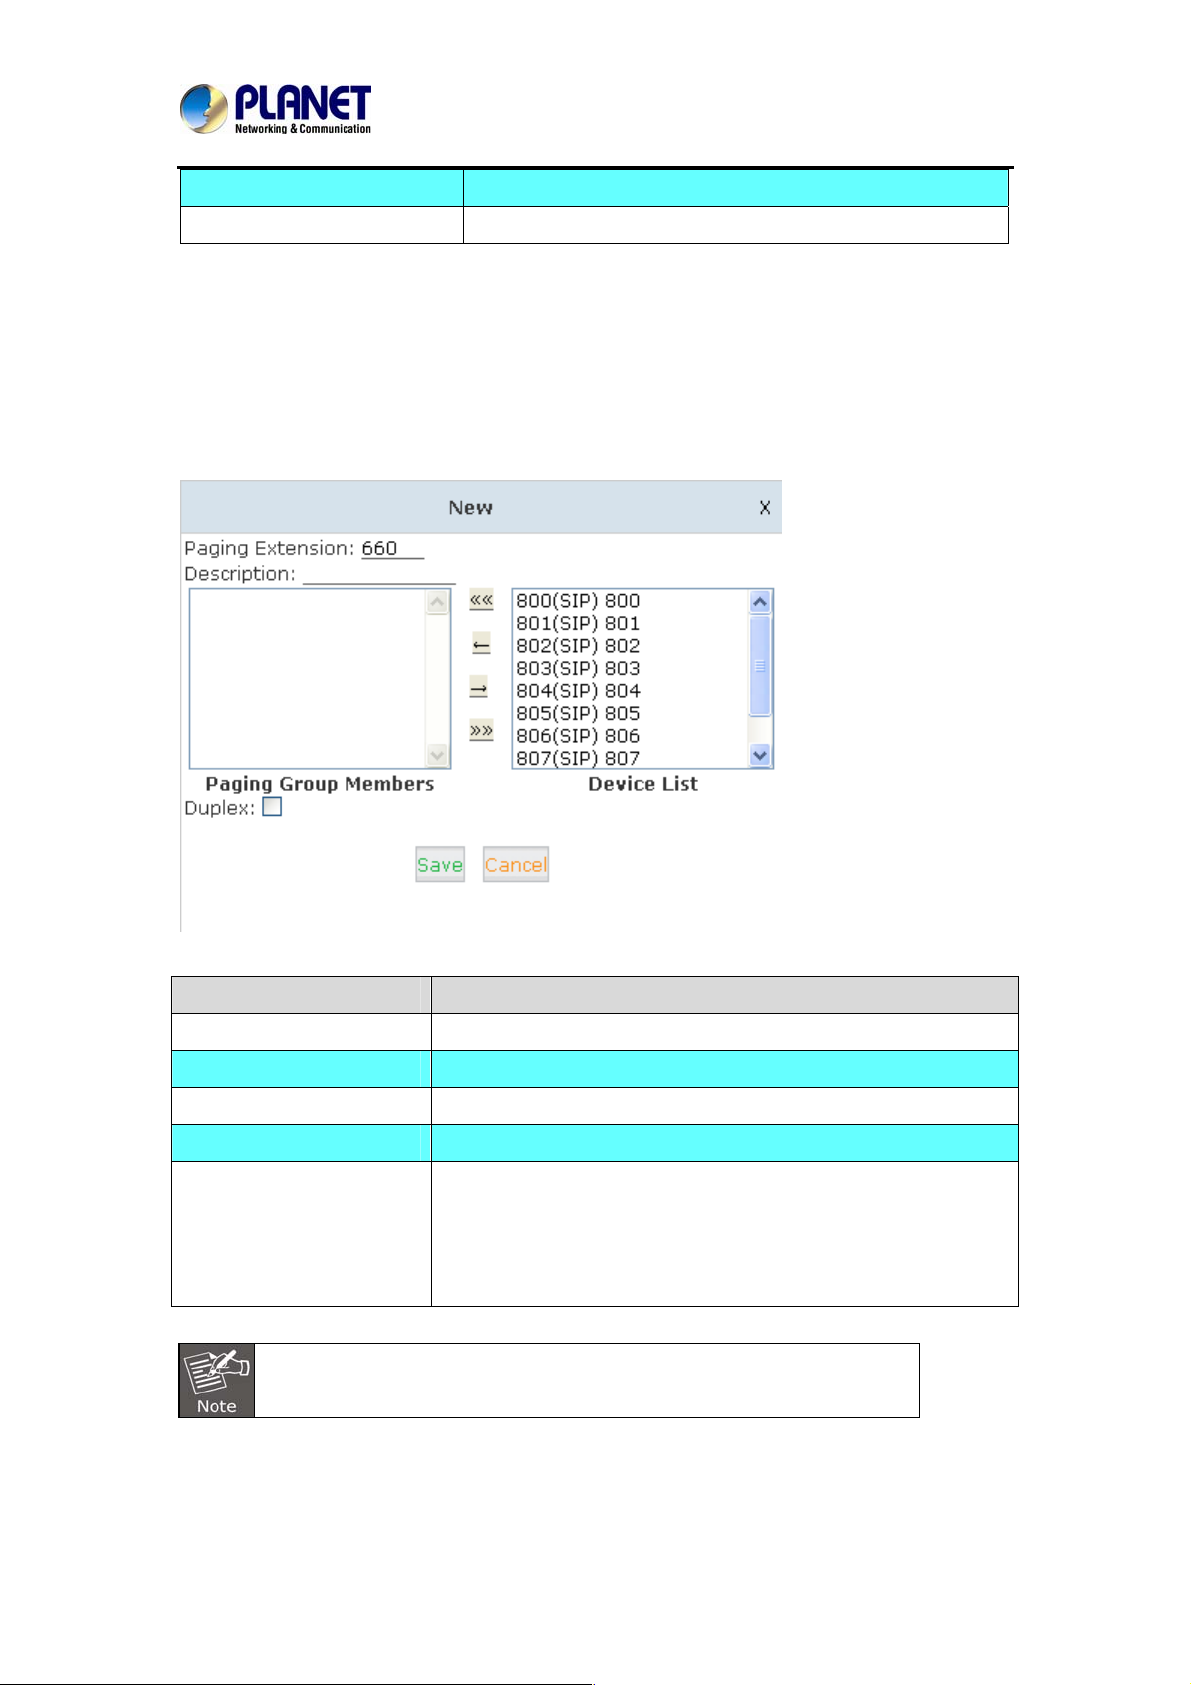
4.7 Paging and Intercom
Paging and Intercom is used for calling a paging extension; all terminals which support this
function will be picked up automatically and listen;, meanwhile, it support duplex.
Click【Advanced】->【Paging and Intercom】->【New Paging Group】:
Item Explanation
Paging Extension The number users will dial to page this group.
Description Provide a descriptive title for this Page Group.
Paging Group Members Selected device(s) on this page
Device List Select Device(s) to page.
Paging is typically one way for announcements only. Checking
Duplex
this will make the paging duplex, allowing all phones in the
paging group to be able to talk a nd be heard by all. Thi s makes it
like an "instant conference".
For Paging/Intercom function extension(IP phone), enable Auto Answer
63
Page 64
Internet Telephony PBX System
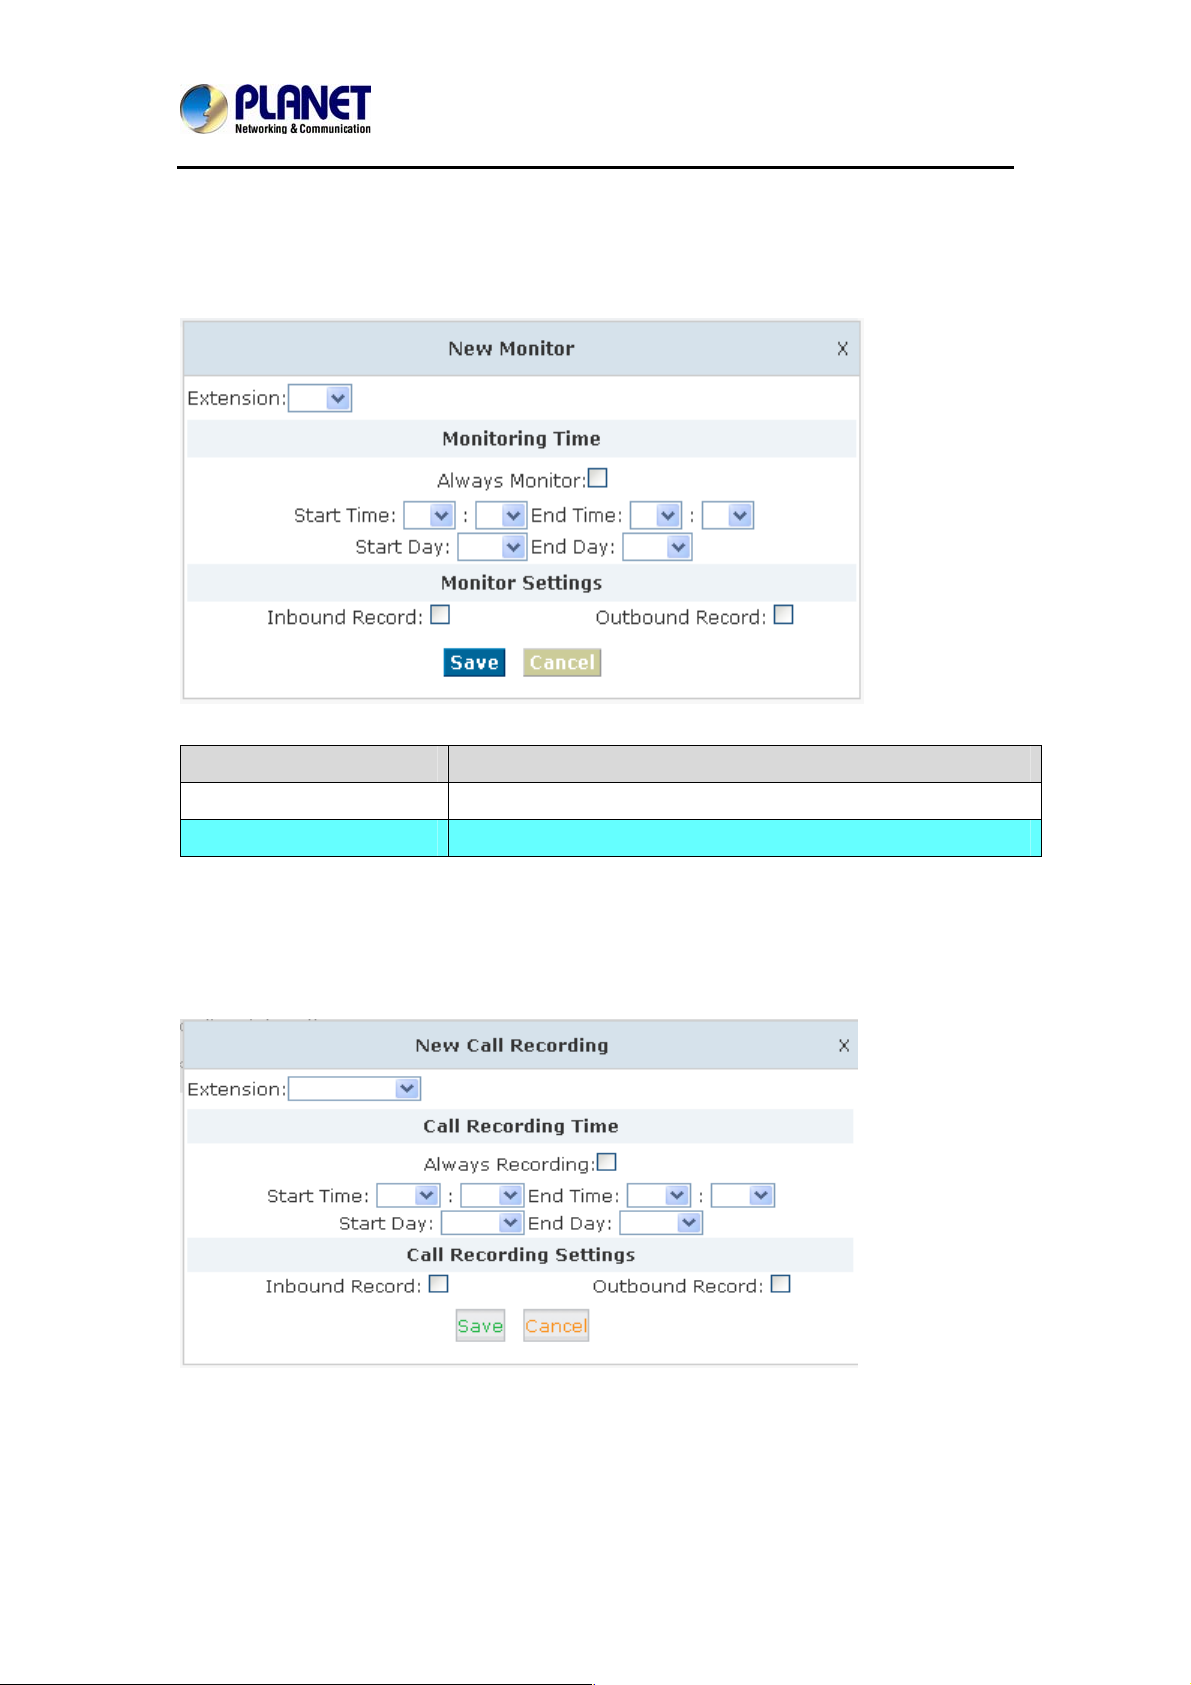
4.8 PIN Set
Monitor is used for recording the defined extensions.
Click【Monitor】---【New Monitor】to display the dialog below:
IPX-2500
Item Explanation
PIN Set Name Define the name for this PIN Set.
PIN List Define PIN codes in this list.
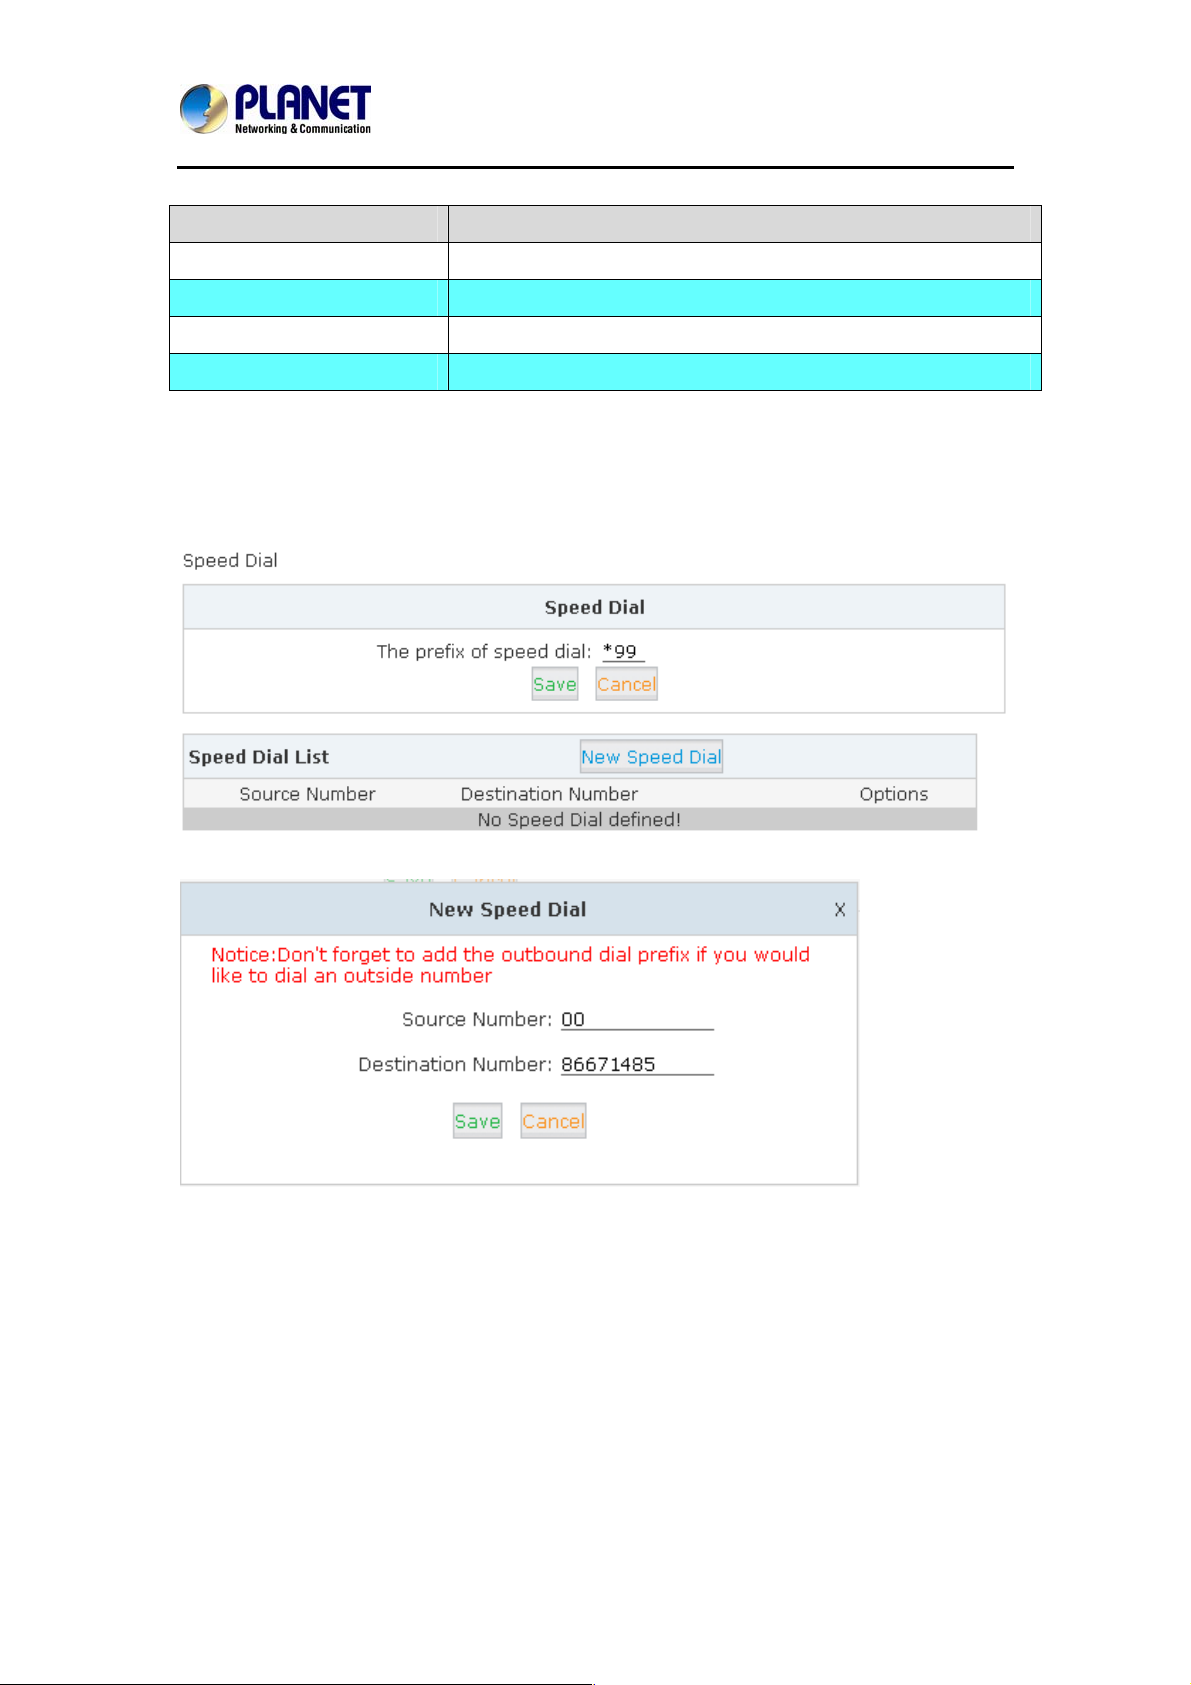
4.9 Call Recording
Call Recording is used for recording extension. Please configure it as shown below:
Click【Advanced】->【Call Recording】->【New Call Recording】:
64
Page 65
Internet Telephony PBX System
Reference:
Item Explanation
Extension Define an extension for recording.
Call Recording Ti me Set the time to record.
Inbound Record Check to record inb ound calls.
Outbound Record Check to record outbound calls.
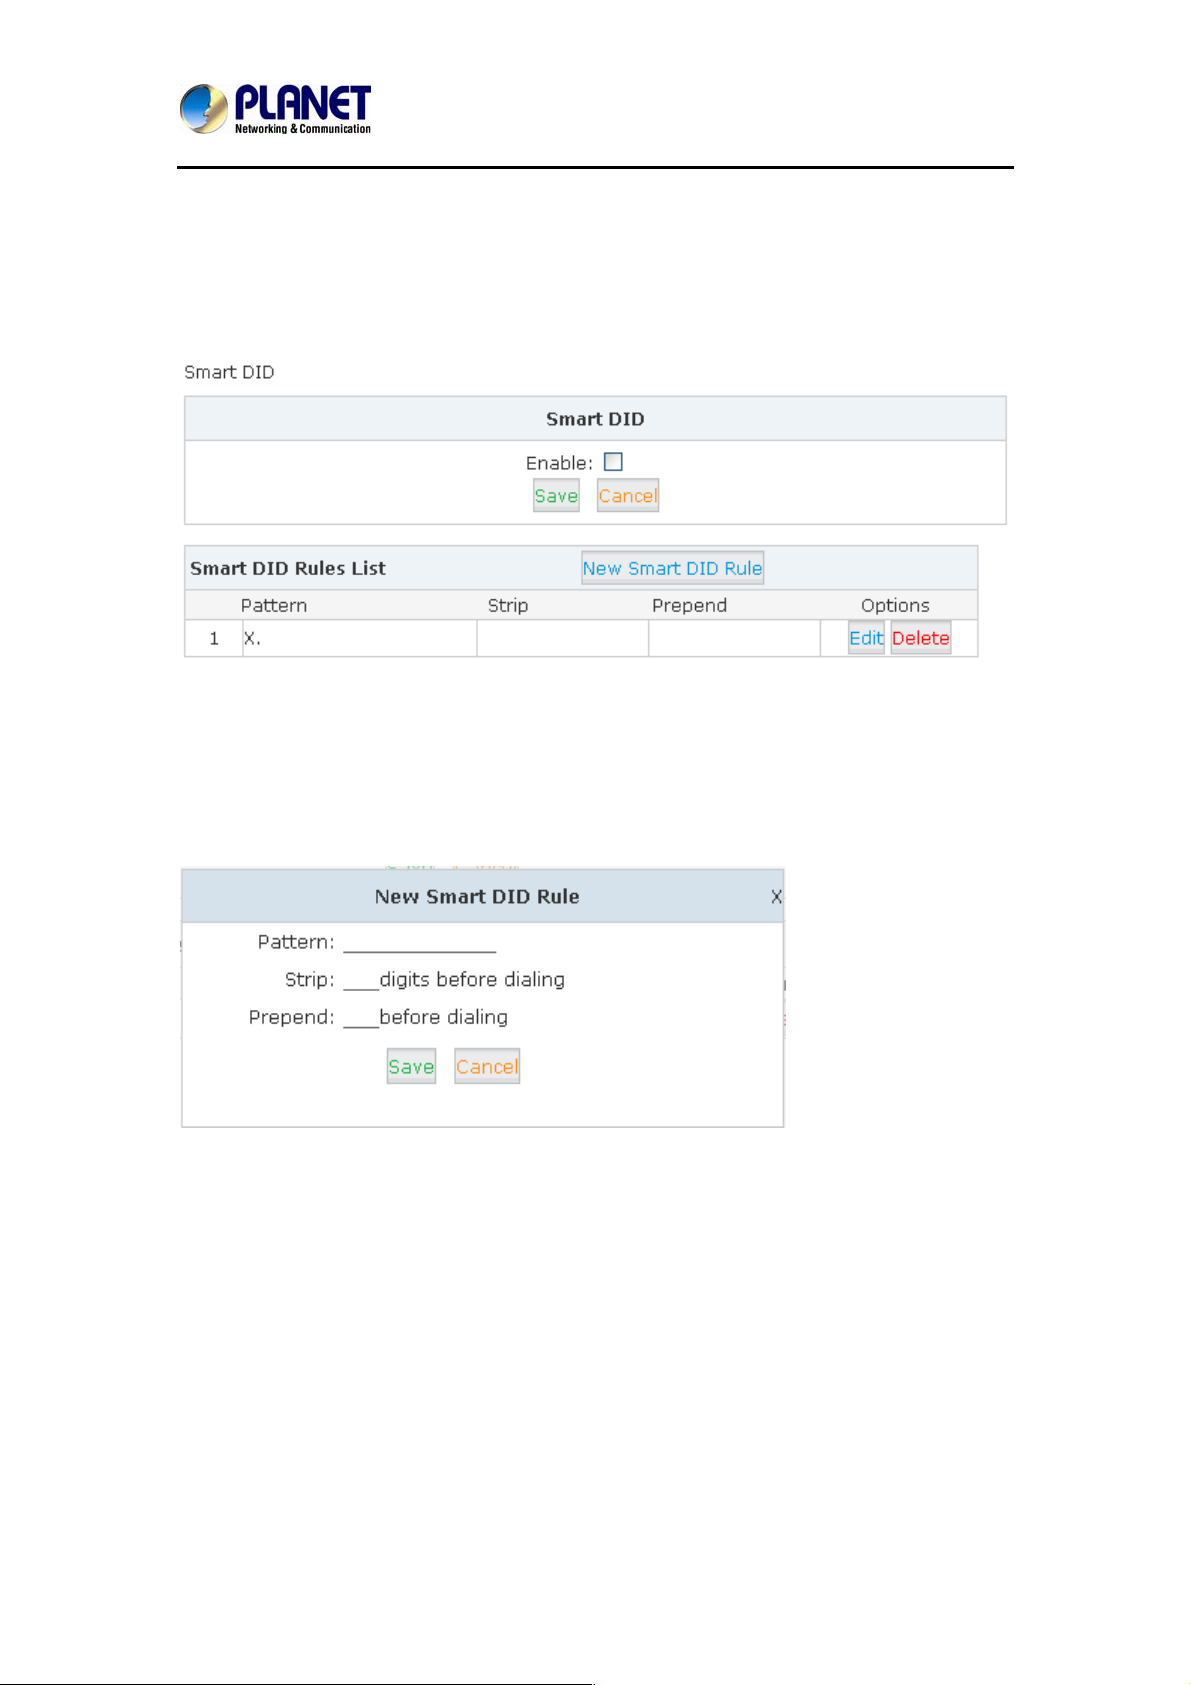
4.10 Speed Dial
Please configure as shown below:
Click【Advanced】->【Speed Dial】->【New Speed Dial】:
IPX-2500
E.g. prefix is *99, speed number is 00, destination telephone num
When dialing *9900, the call is going to 86671485 automatically.
ber is 86671485.
65
Page 66
Internet Telephony PBX System
IPX-2500
4.11 Smart DID
Smart DID: After extension user makes an outbound call, the call is ringing back to Planet IP
PBX, and directed to the one who made the last call. Please configure it as shown below:
Click【Advanced】->【Smart DID】:
Check “Enable” and “Save” to make this function activates.
Click【New Smart DID Rule】to display the following diagram:
Input the pattern and define how many digits need to be striped or prepend, and then click
“Save”--“Activate”.
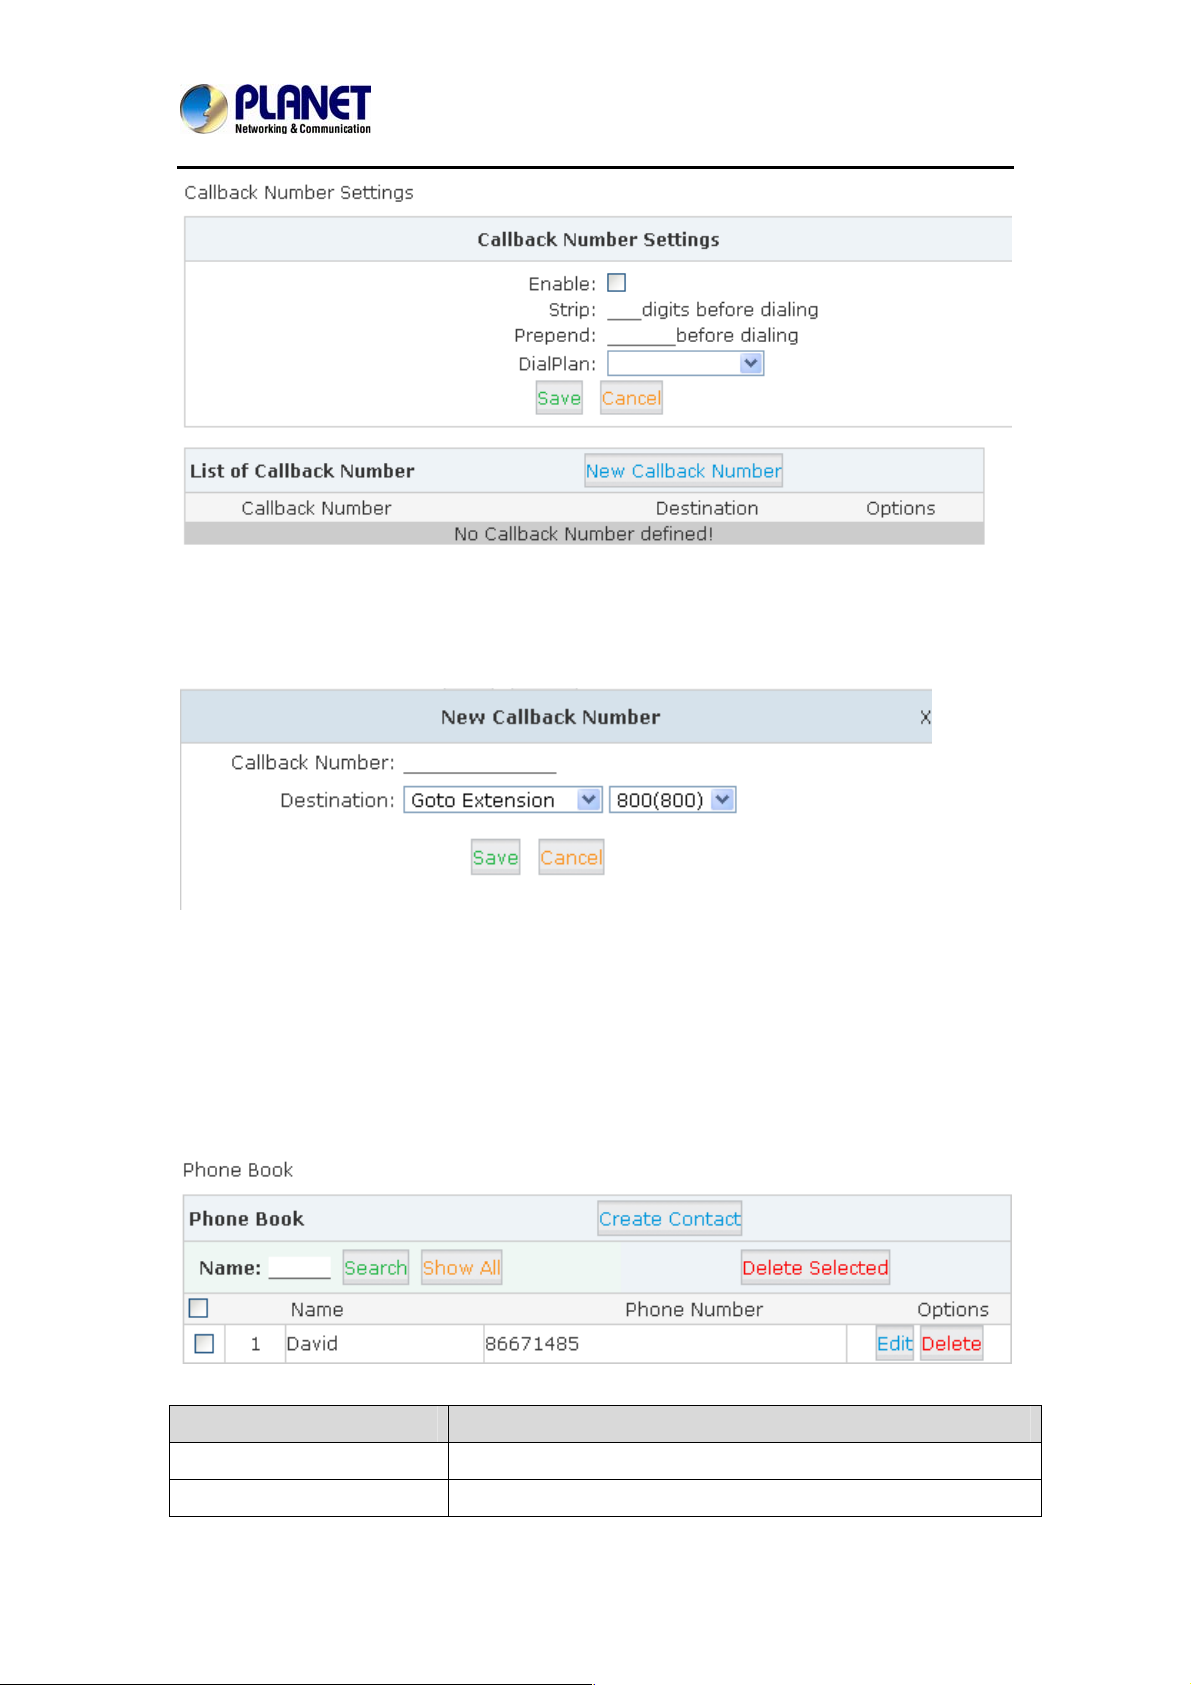
4.12 Call Back
When user makes calls by the callback number to Planet IP PBX, the call will be hung up
automatically. Then the PBX will call back this number and forwarded to define destination
after the call is connected. Please configure it as shown below:
Click【Advanced】->【Callback】:
66
Page 67
Internet Telephony PBX System
IPX-2500
At first, enable this function. Select Dial Plan, and define the callback rule (strip digits or
prepend prefix). Click【New Callback Number】to add callback number.
Input callback number and define the destination.
4.13 Phone Book
When incoming call matches the number in the phone book, the name of the matched number
will be displayed. Please configure it as shown below:
Click【Advanced】->【Phone Book】:
Item Explanation
Search Search by name
Show All All contacts will be displayed in the following list.
67
Page 68
Internet Telephony PBX System
IPX-2500
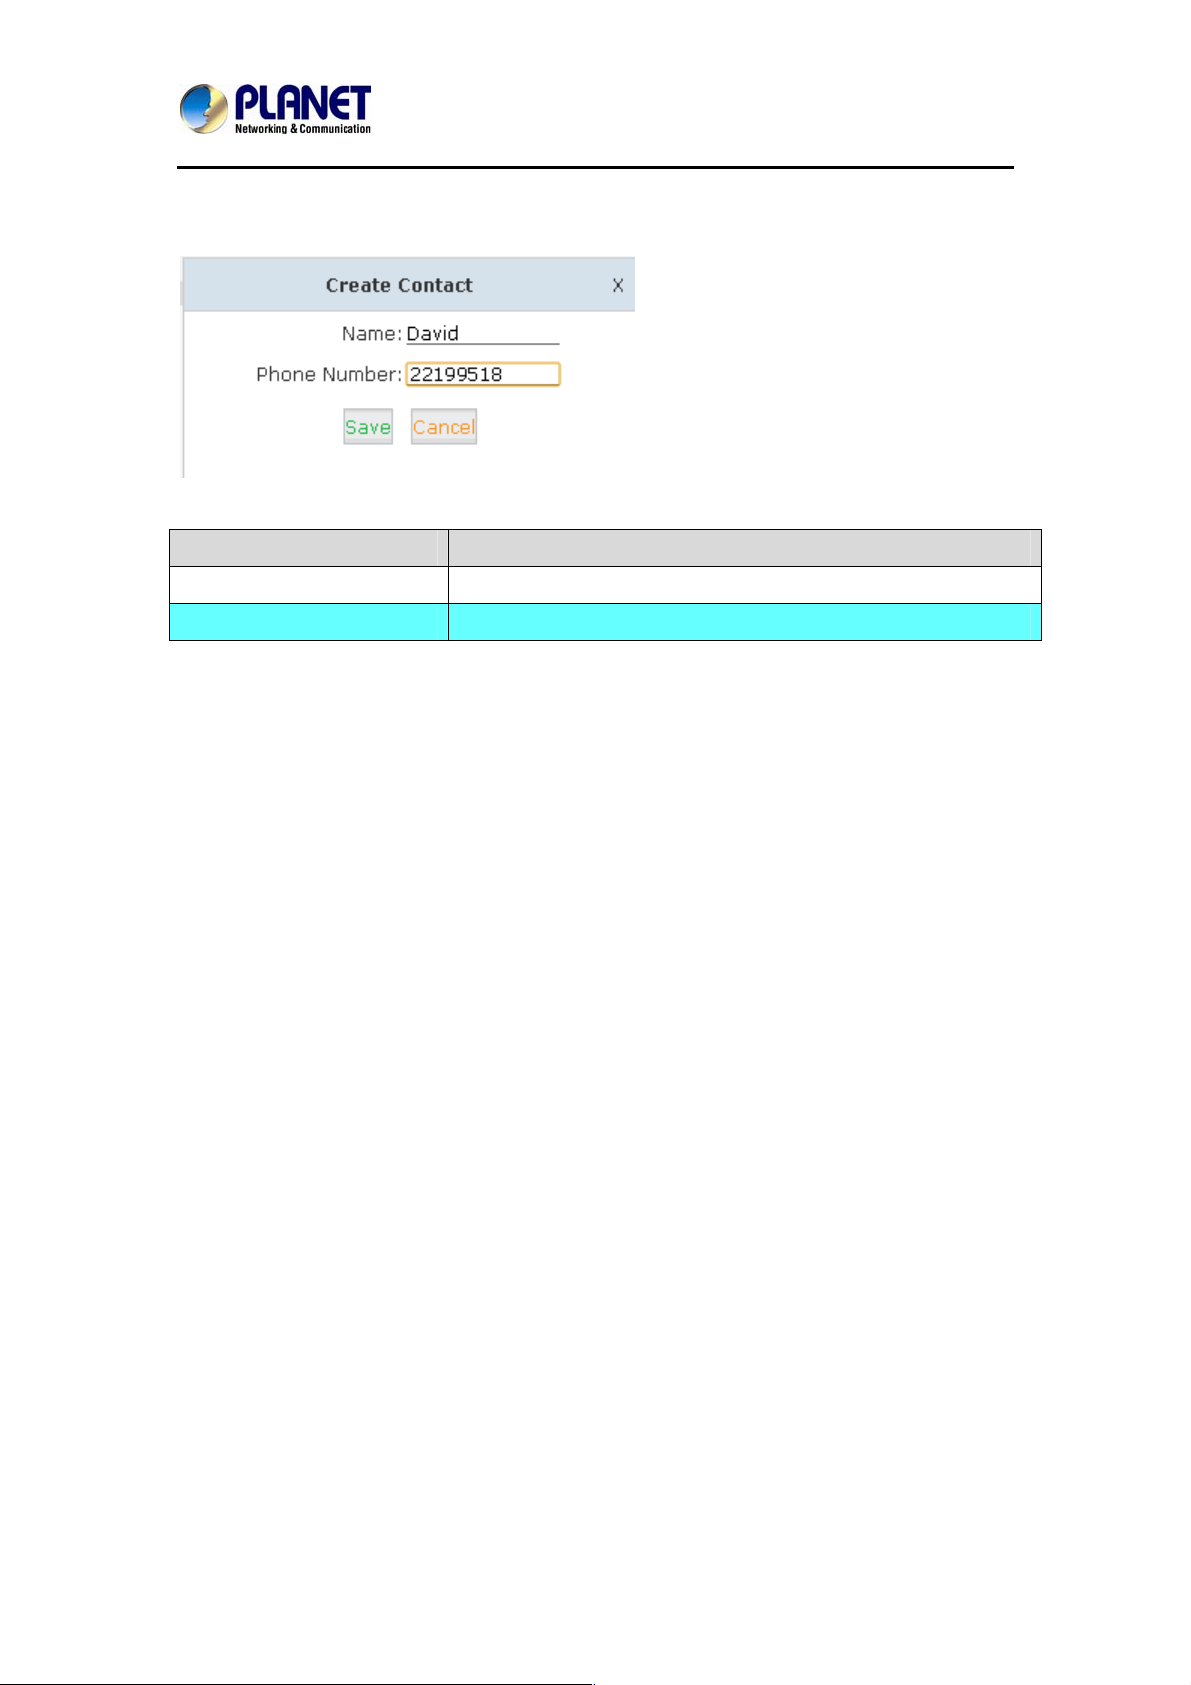
Click【Create Contact】to see the following diagram:
Item Explanation
Name Input contact’s name. (Letter or figure only).
Phone Number Input Phone Number of contact. (IDD Number is available).
Phone book is for the incoming call to use; if the incoming caller ID matches the number in
Phone book, it will display the name defined in Phone book.
For example, Name: David Numb
n system receives the
Whe
displayed.
er: 22199518.
call 22199518, the extension answers this call with “David” being
68
Page 69
Internet Telephony PBX System
IPX-2500
4.14 Feature Codes
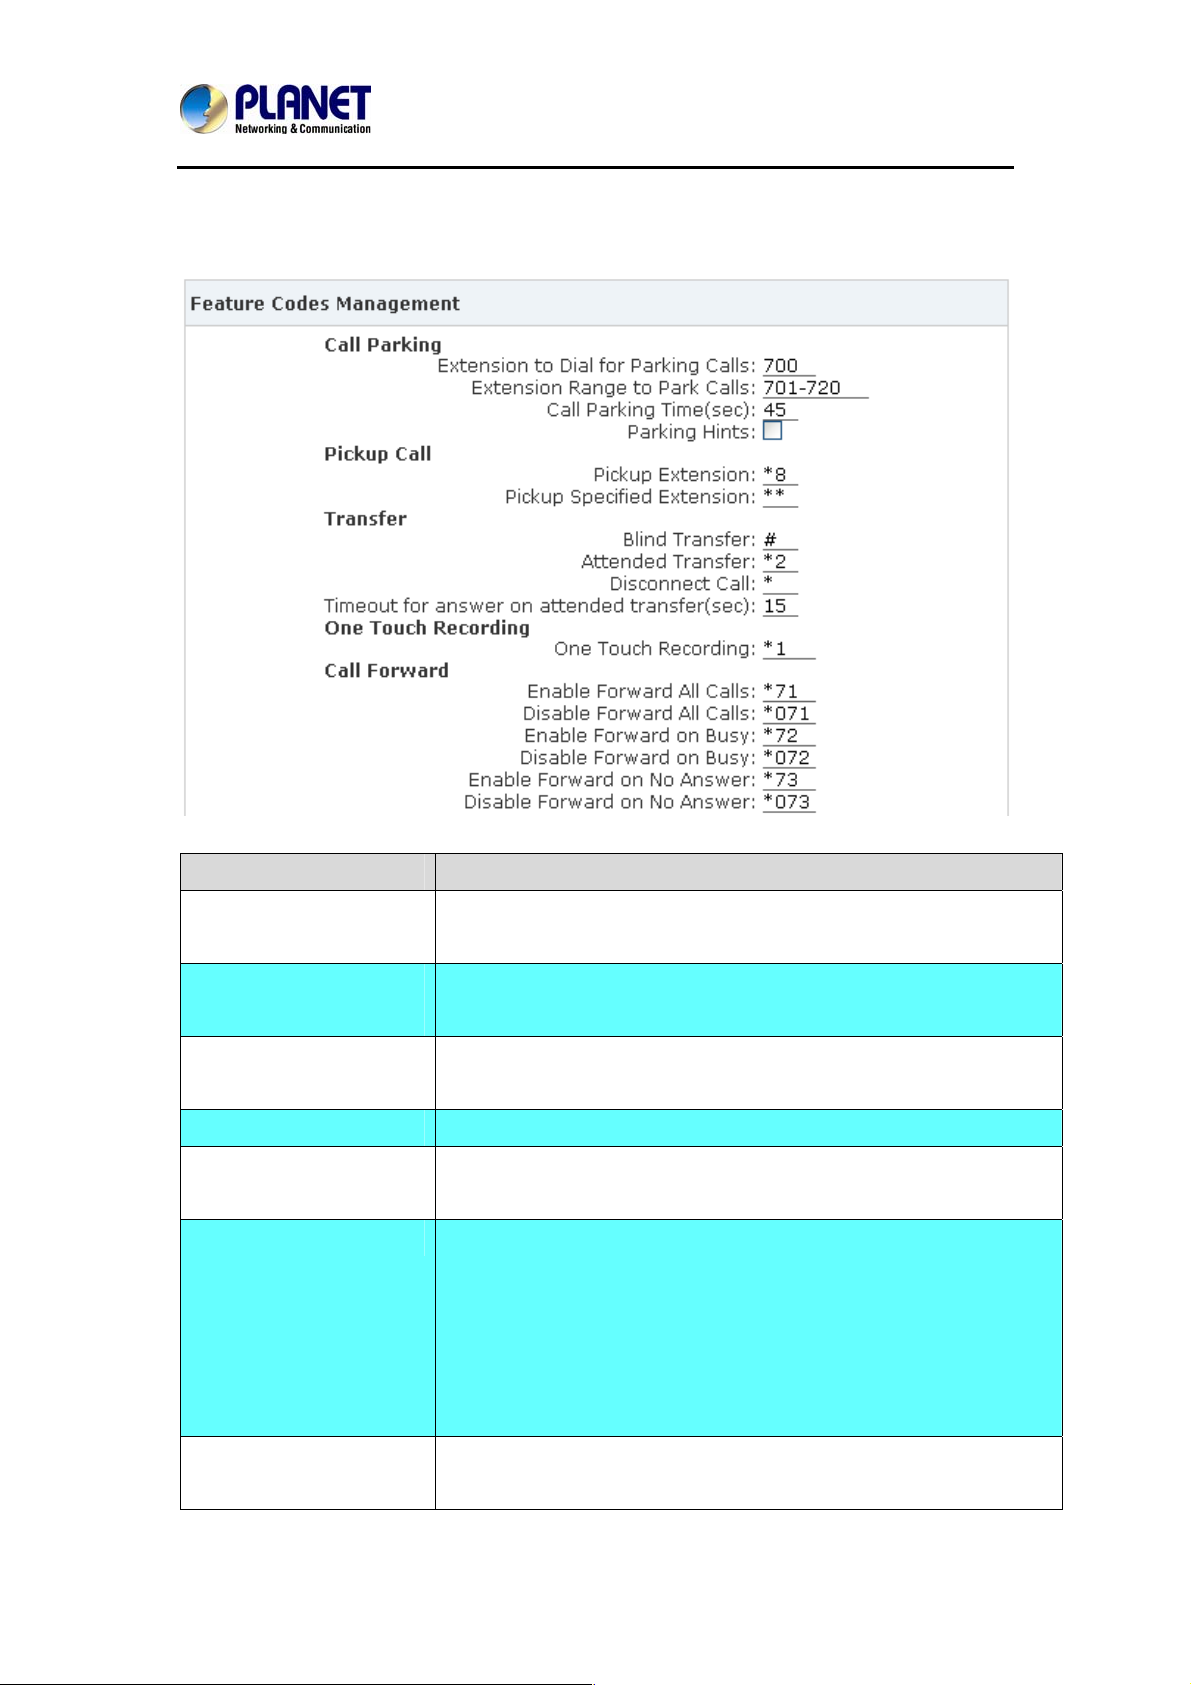
Click【Feature Codes】to display the dialog as shown below. You can define relevant
parameter.
Item Explanation
Extension to Dial for
Parking Calls
Extension Range to Park
Calls
Call Parking Time(sec) Define the time for parking calls. Planet IP PBX will call the extension
Pickup Extension Define an extension for pickup.
Pickup Specified
Extension
Blind Transfer Allow unattended or blind transfers. It works like this: While o n a
Define an extension for parking calls.
Define the extension range for parking calls. (e.g. 701-720)
again if parking is over time.
Pick up the specified extension. Default: Dial**+extension number to
pick up the specified extension
conversation with A, you dial the blind transfe r key sequence. The
system says "Transfer" then gives you a dial tone, while A is on hold.
You dial the transferee number (B's number) and A is put through to
B immediately. Your line is off. The caller ID displayed to B is exactly
the same as the caller ID presented to you.
Attended Transfer Allow attended transfer or supervised transfer. It works like this:
While on conversation with A, you dial the Attended Transfer key
69
Page 70

Internet Telephony PBX System
IPX-2500
sequence. The system says "Transfer" then gives you a dial tone,
while A is on hold. You dial the transferee number (B's number) and
talk with B to introduce the call, then you can hang up and A will be
connected with B. In case B does not want to answer the call, he/she
simply hangs up and you will be back to your original conversation.
Disconnect Call Disconnect the current transfer call (for Attended transfer).
Timeout for answer on
attended transfer(sec)
One Touch Recording Configure the function key for One Touch Recording
Call Forward Enable / Disable Call Forward and the settings of function keys for
Do Not Disturb Enable / Disable “Do Not Disturb”
Spy Configure the function keys for spy modes.
Blacklist Add / Delete blacklisted number.
Voicemail Configure the function keys for entering voicemail and check
Invite Participant In conference, the administrator can invite people into the
Create Conference During the call, you can dial *0 to forward to the conference with the
Set the timeout value
different forward modes.
extension voicemail.
conference by dialing “0”. After pressing “0”, you will get dial tone,
and you can dial to invite people. After the call is connected, please
press ** to direct the people into the conference, or *# to hang up the
current call and return to the conference.
callee.
Return to conference with
participant
Return to conference
without participant
Pause Queue Member
Extension
Unpause Queue Member
Extension
Others Function key for Intercom / Paging / Directory
In conference, the administrator can dial “0” to invite people into the
conference. After pre ssing “0”, you will get dial tone, and you can dial
to invite the participant; when the call is connected, dial “**” to return
to the conference with invited participant.
In conference, the administrator can dial “0” to invite people into the
conference. After pre ssing “0”, you will get dial tone, and you can dial
to invite the participant. When the call is connected, you can dial “*#”
to hang up and return the conference yourself.
Pause the agent, and the agent cannot receive the call.
Unpause the agent, and the agent can receive the call.
70
Page 71
Internet Telephony PBX System
IPX-2500
4.15 IP Phone Provision
When you need many IP Phones, please record the MAC, extension number, and user name
of each phone according to the format (please take reference of the auto provision script file
model for details). Then import the format file. Once the phone is connected to the local
network, it will get the extension number and password automatically.
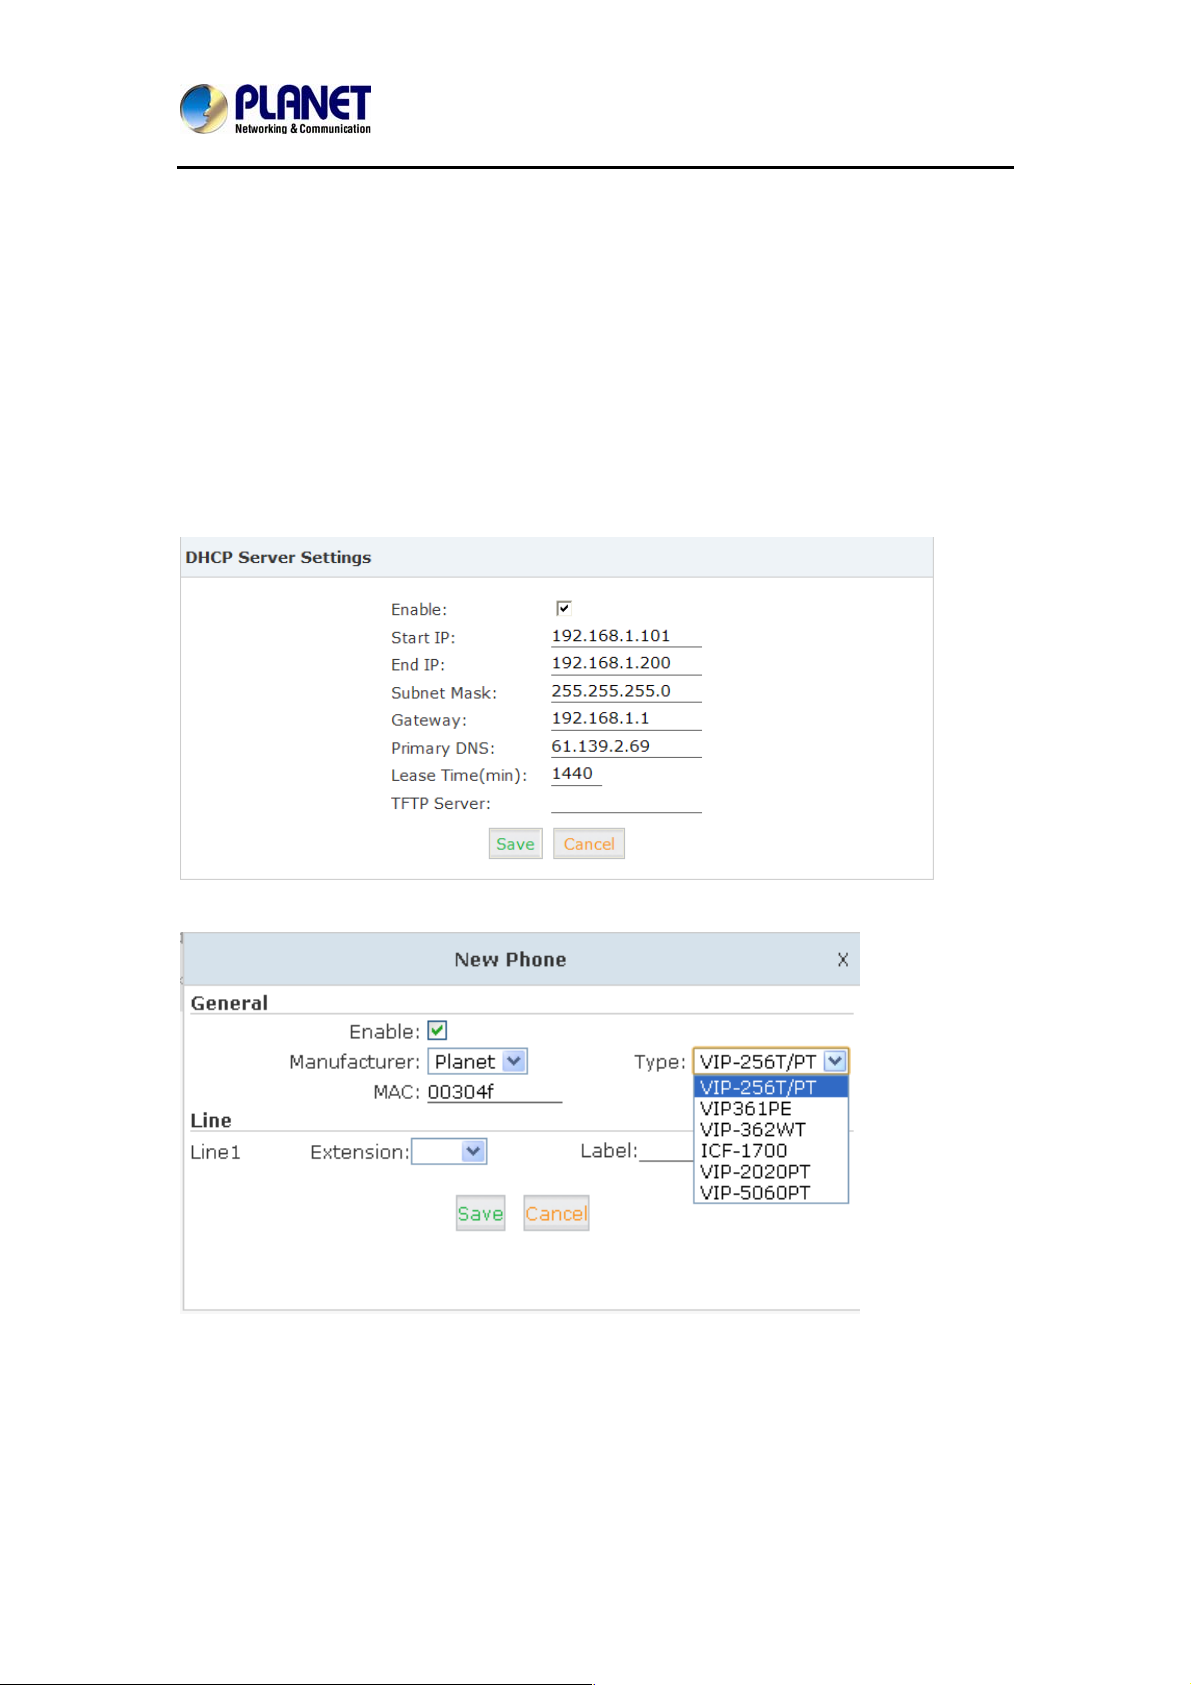
There are two operation methods to fulfill this function. Please see details as shown below:
Enable DHCP service
Click【Network Settings】->【DHCP Server】, enable DHCP Server in the dialog as shown
below:
Then Click【Advanced】->【Phone Provisioning】->【New Phone】:
Enable Phone Provisioning in【Basic】, select the IP Phone manufacture, input MAC of the
phone, and select the extension for provisioning.
71
Page 72
Internet Telephony PBX System
IPX-2500
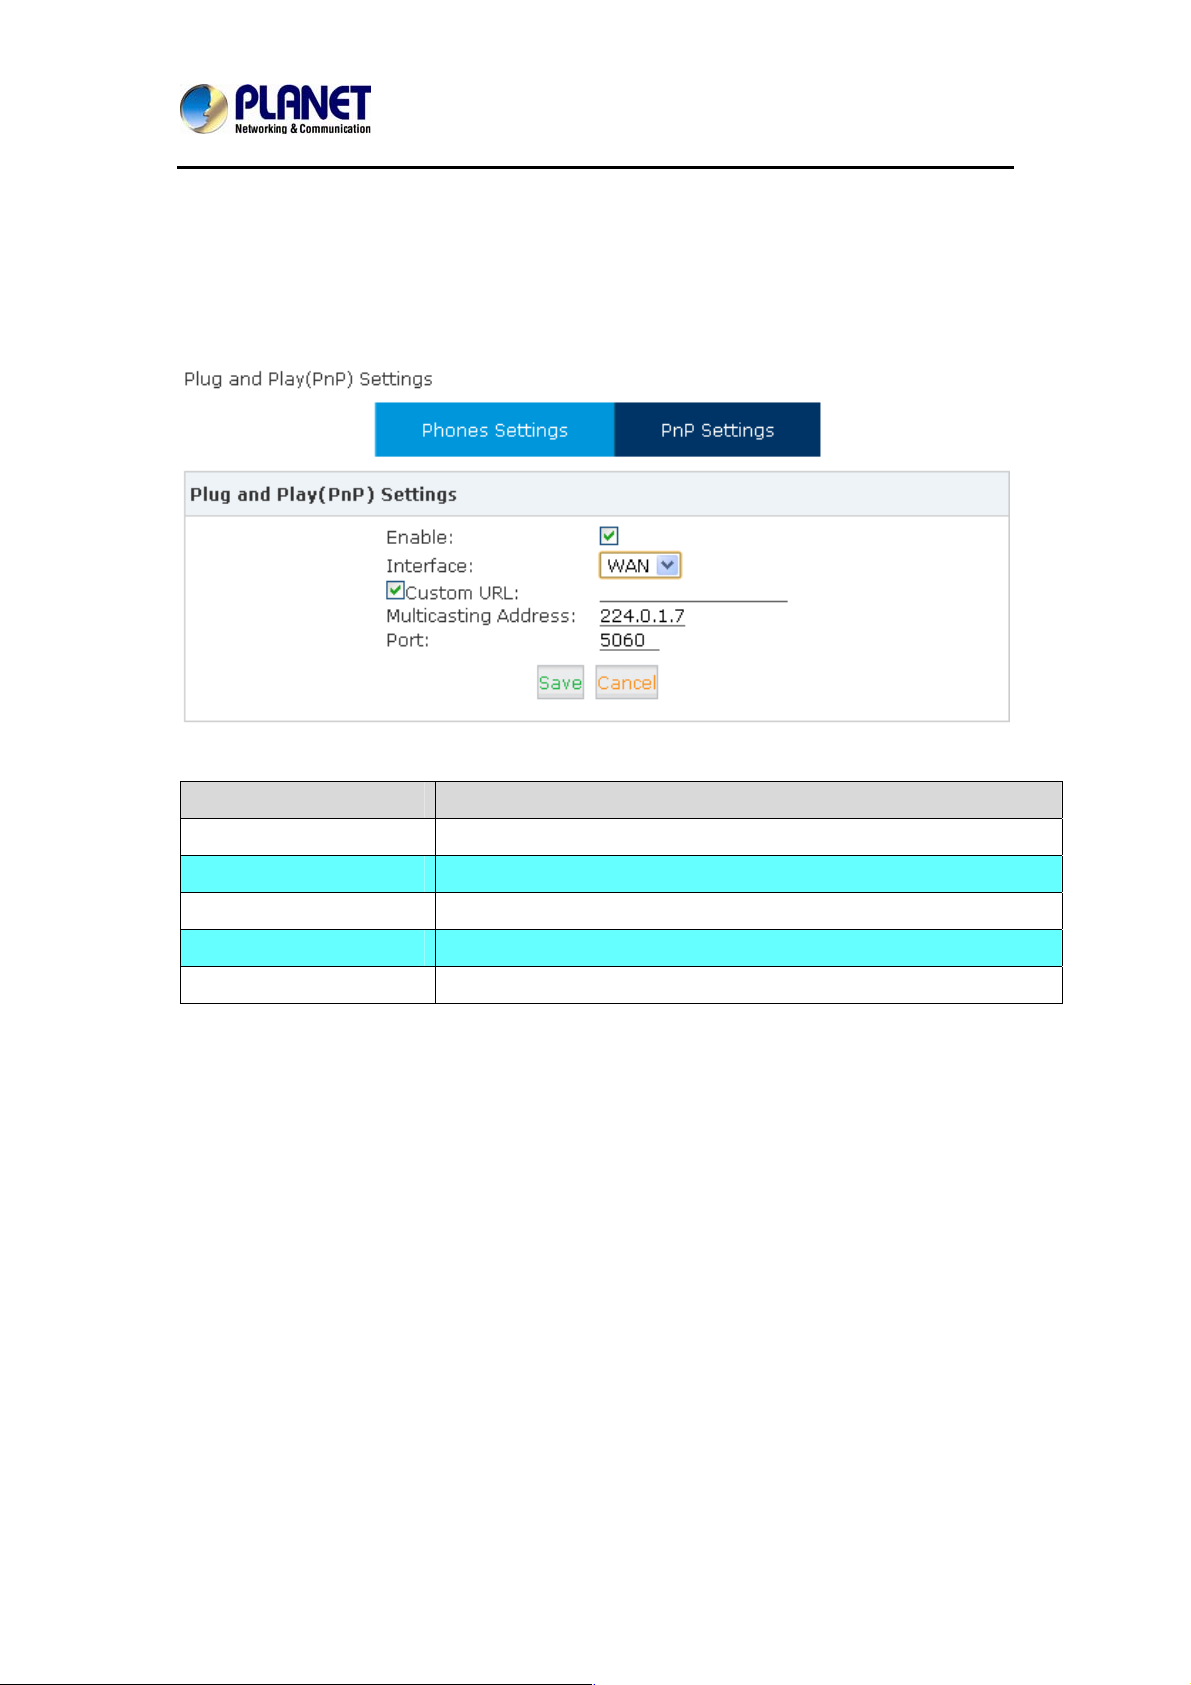
4.16 PnP Settings
Plug and Play function (PnP) is used as Auto-Provisioning for IP Phones. Once it’s enabled,
the system will make configuration on the specified phone (as long the phone supports PnP)
according to the settings in Phone Provisioning page
Item Explanation
Enable Enable / Disable PnP function
Interface Choose a port that PnP works on
Custom URL:
Multicasting Address: Multicasting address that PnP uses, default is 224.0.1.75
Port Port that PnP uses, default is 5060
Specify a URL if you need one. Default is download from local PC
72
Page 73
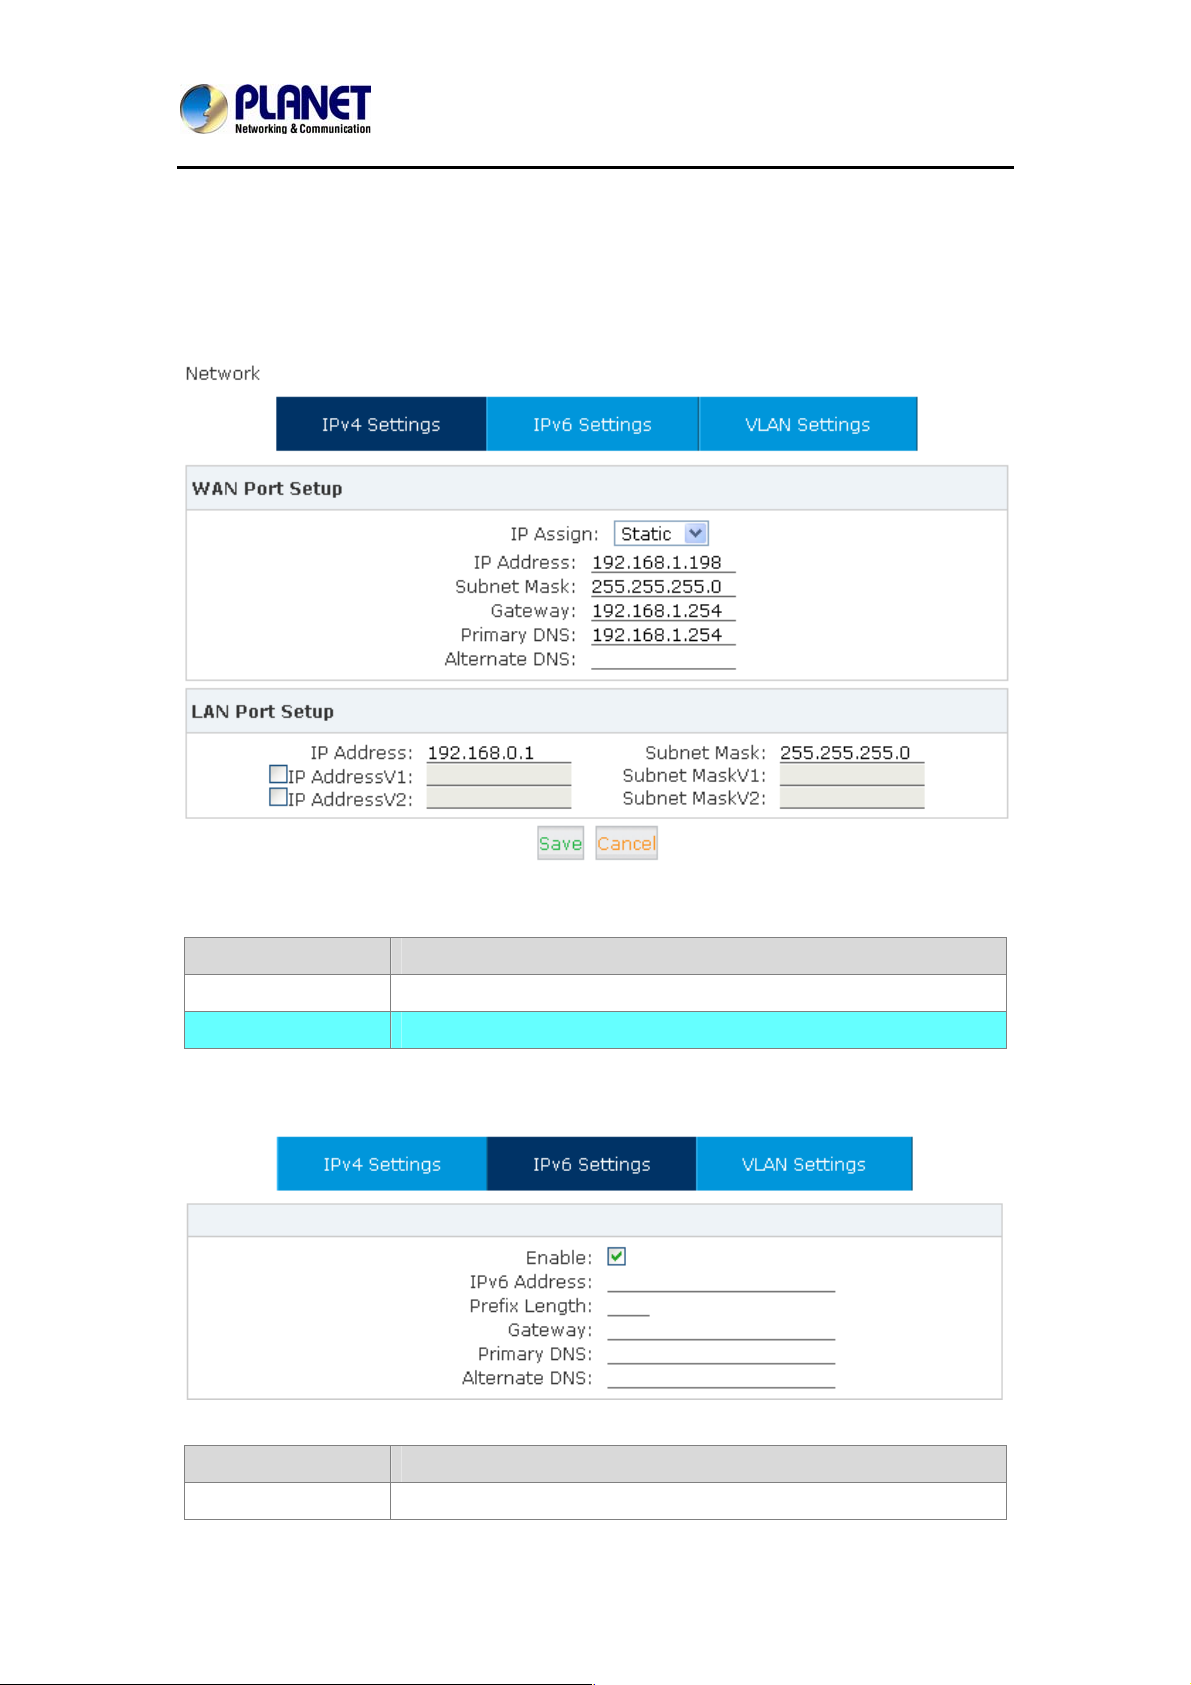
Internet Telephony PBX System
Chapter 5 Network Settings
5.1 Network
You can configure the WAN Port, and define the Virtual Interface.
Click【Network Settings】->【Network】->【IPv4 Settings】
IPX-2500
Reference
Item Explanation
IP Assign S tatic / DHCP/PPOE supported.
LAN Port Setup Define the virtual interface for WAN Port.
Click【Network Settings】->【Network】->【IPv6 Settings】
IPv6 Reference:
Item Explanation
Enable Enable IPv6, define the IPv6 address, gateway, and DNS.
73
Page 74
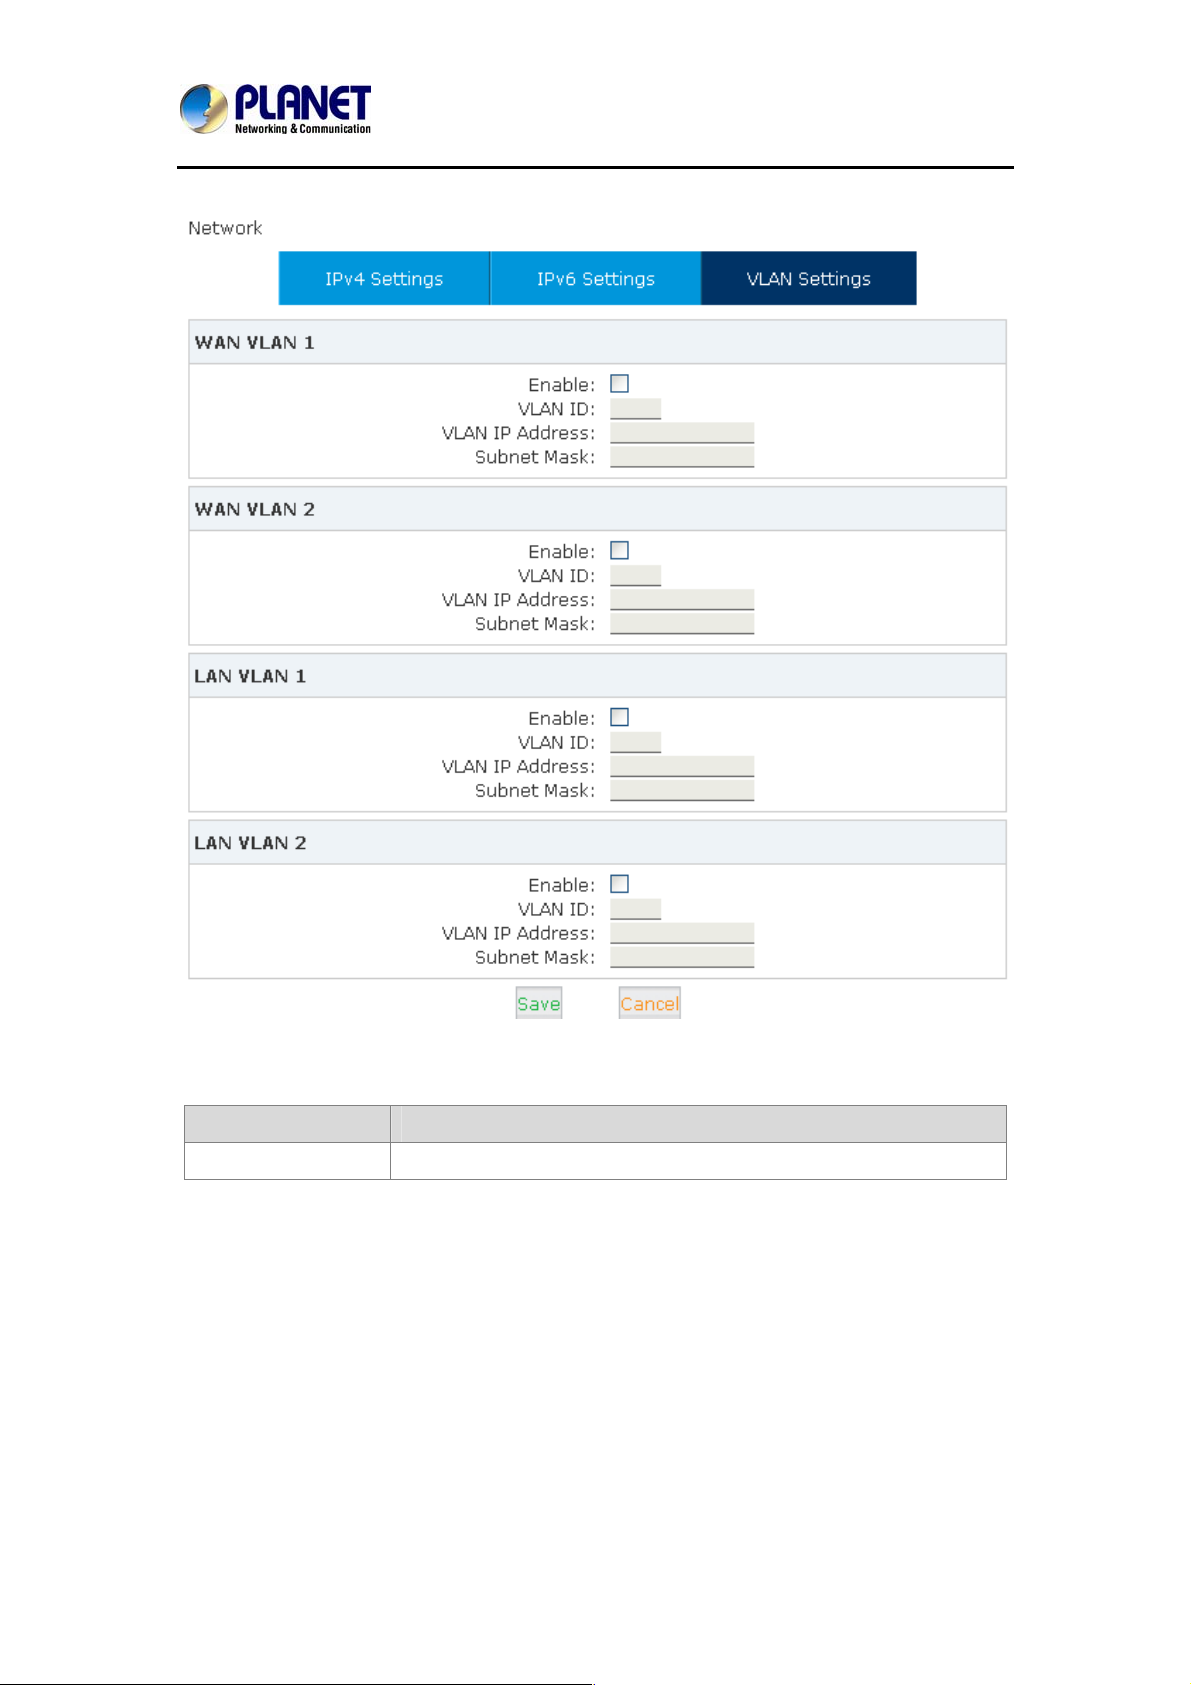
Internet Telephony PBX System
Click【Network Settings】->【Network】->【VLAN Settings】:
IPX-2500
VLAN Reference:
Item Explanation
Enable Enable VLAN to define the VLAN address and VLAN ID.
74
Page 75
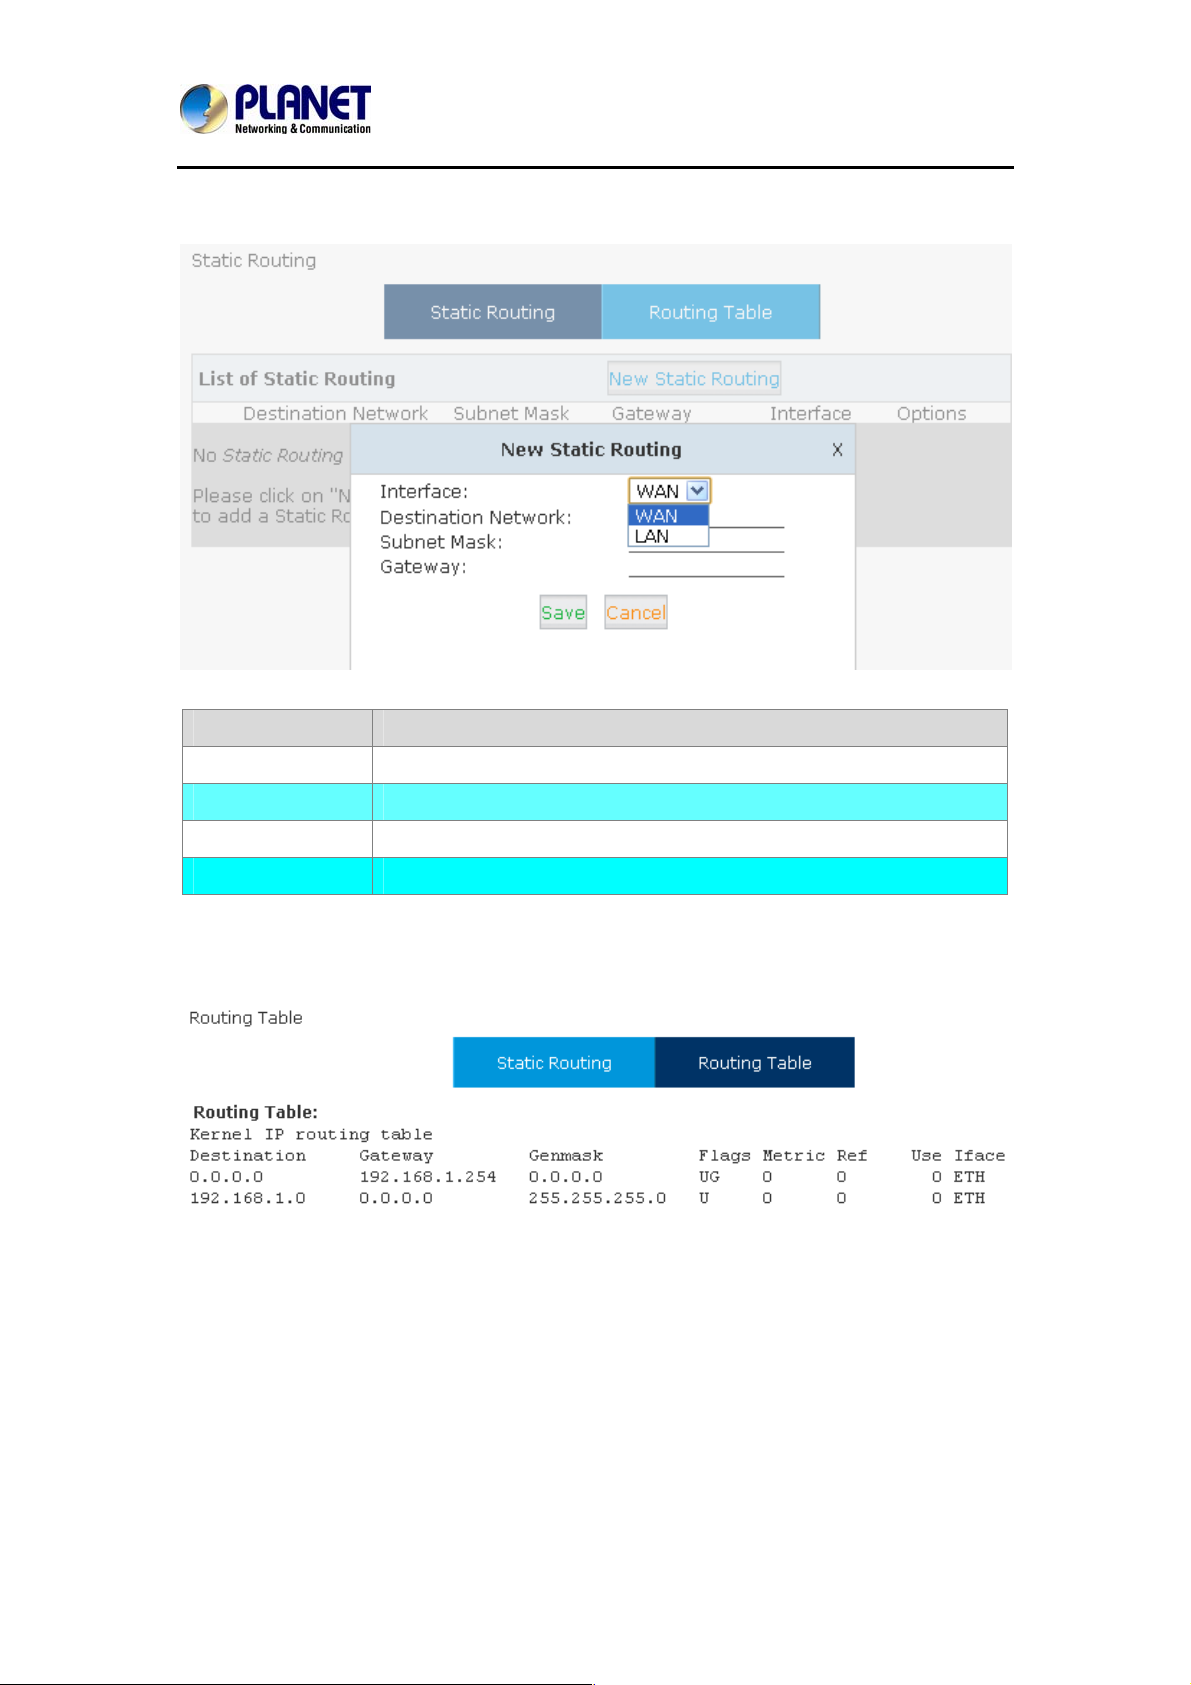
Internet Telephony PBX System
5.2 Static Routing
Click【Network Settings】->【Static Routing】:
IPX-2500
Item Explanation
Interface Choice WA N / LAN
Destination Set destination network for static routing.
Subnet Mask Set subnet mask of the destination network.
Gateway Define the gateway accessing the destination network.
Click【Network Settings】->【Static Routing】->【Routing Table】, and the current routing
information will be displayed below:
75
Page 76
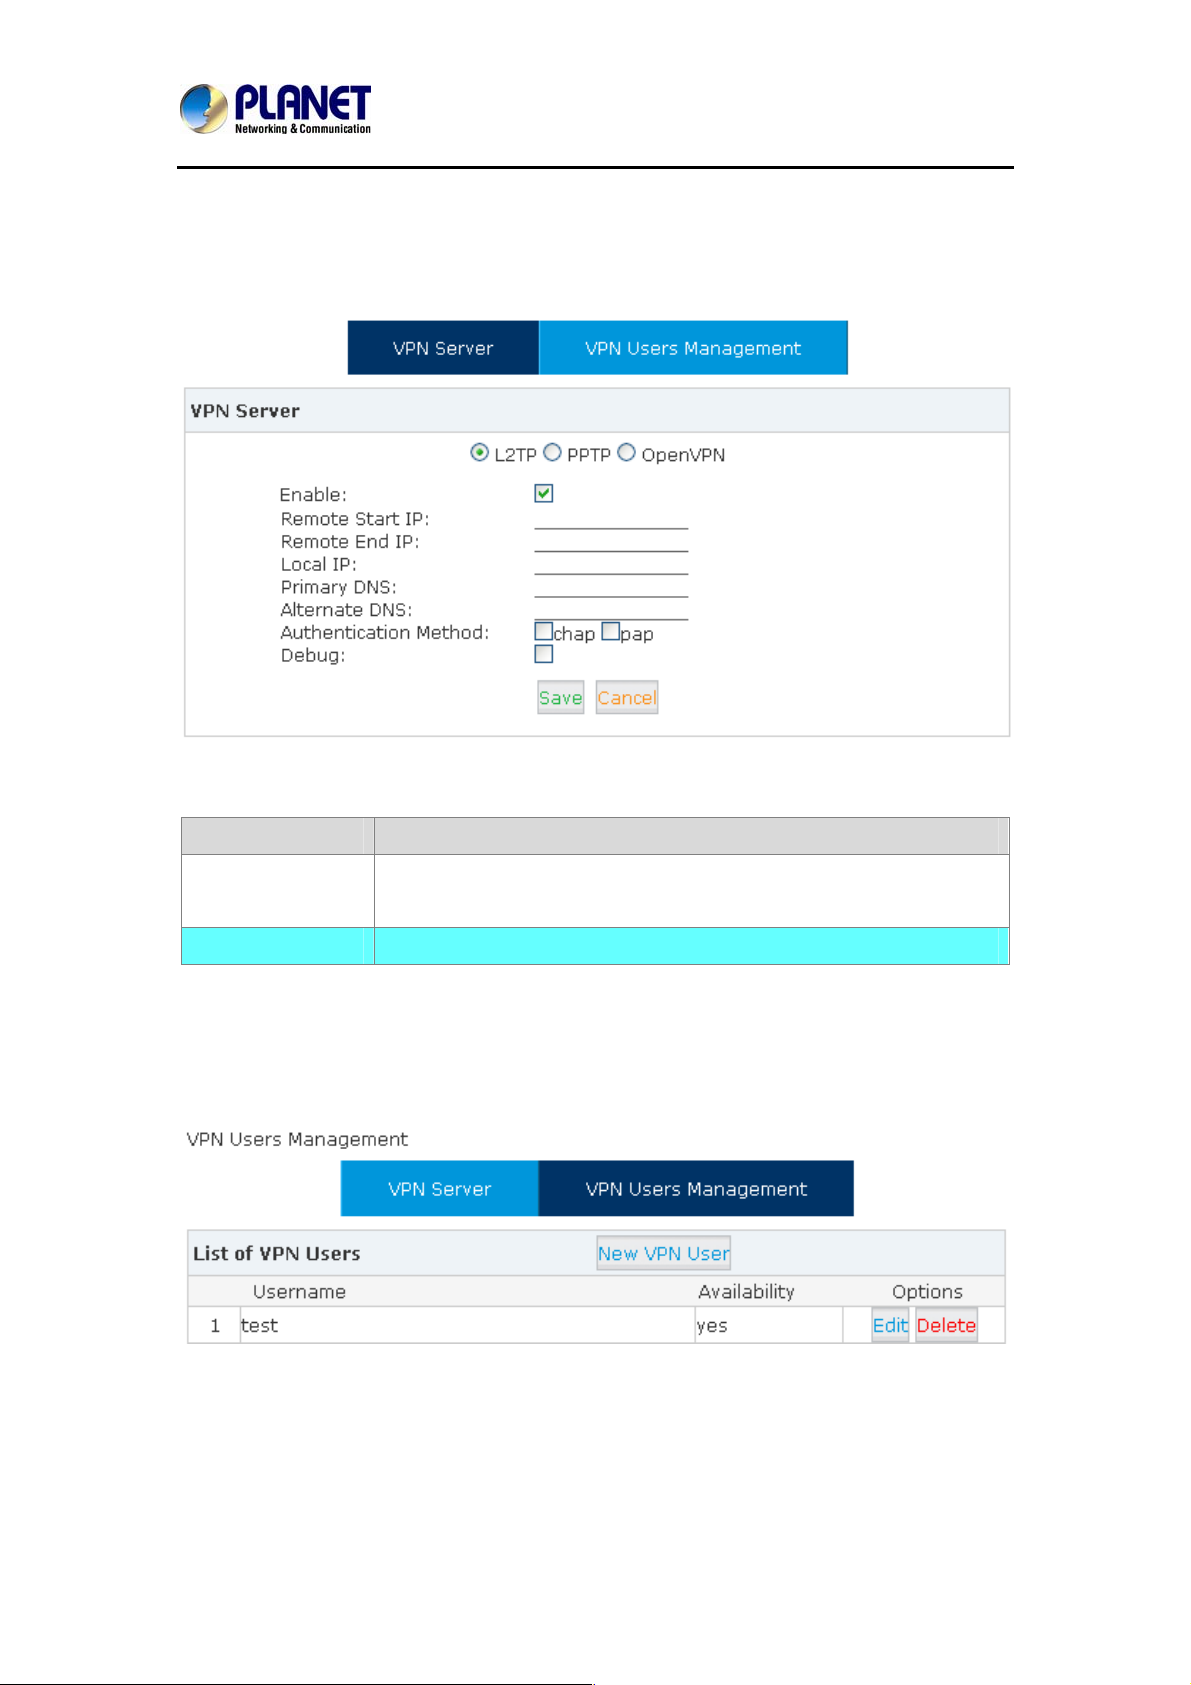
Internet Telephony PBX System
5.3 VPN Server
Planet IP PBX supports three kinds of VPN servers: L2TP, PPTP and OpenVPN.
Click【Network Settings】->【VPN Server】:
IPX-2500
Reference:
Item Explanation
VPN Server Mode Three kinds of VPN servers -- L2TP, PPTP and OpenVPN --
supported(Only one mode can be enabled simultaneously).
Enable Enable / Disable VPN Server
When the mode is L2TP or PPTP VPN server, click【Network Settings】->【VPN Server】->
【VPN Users Management】:
This page is used for management of VPN user name and password.
When the mode is OpenVPN server , click【Network Settings】->【VPN Server】->【OpenVPN
Certificate Download】:
76
Page 77
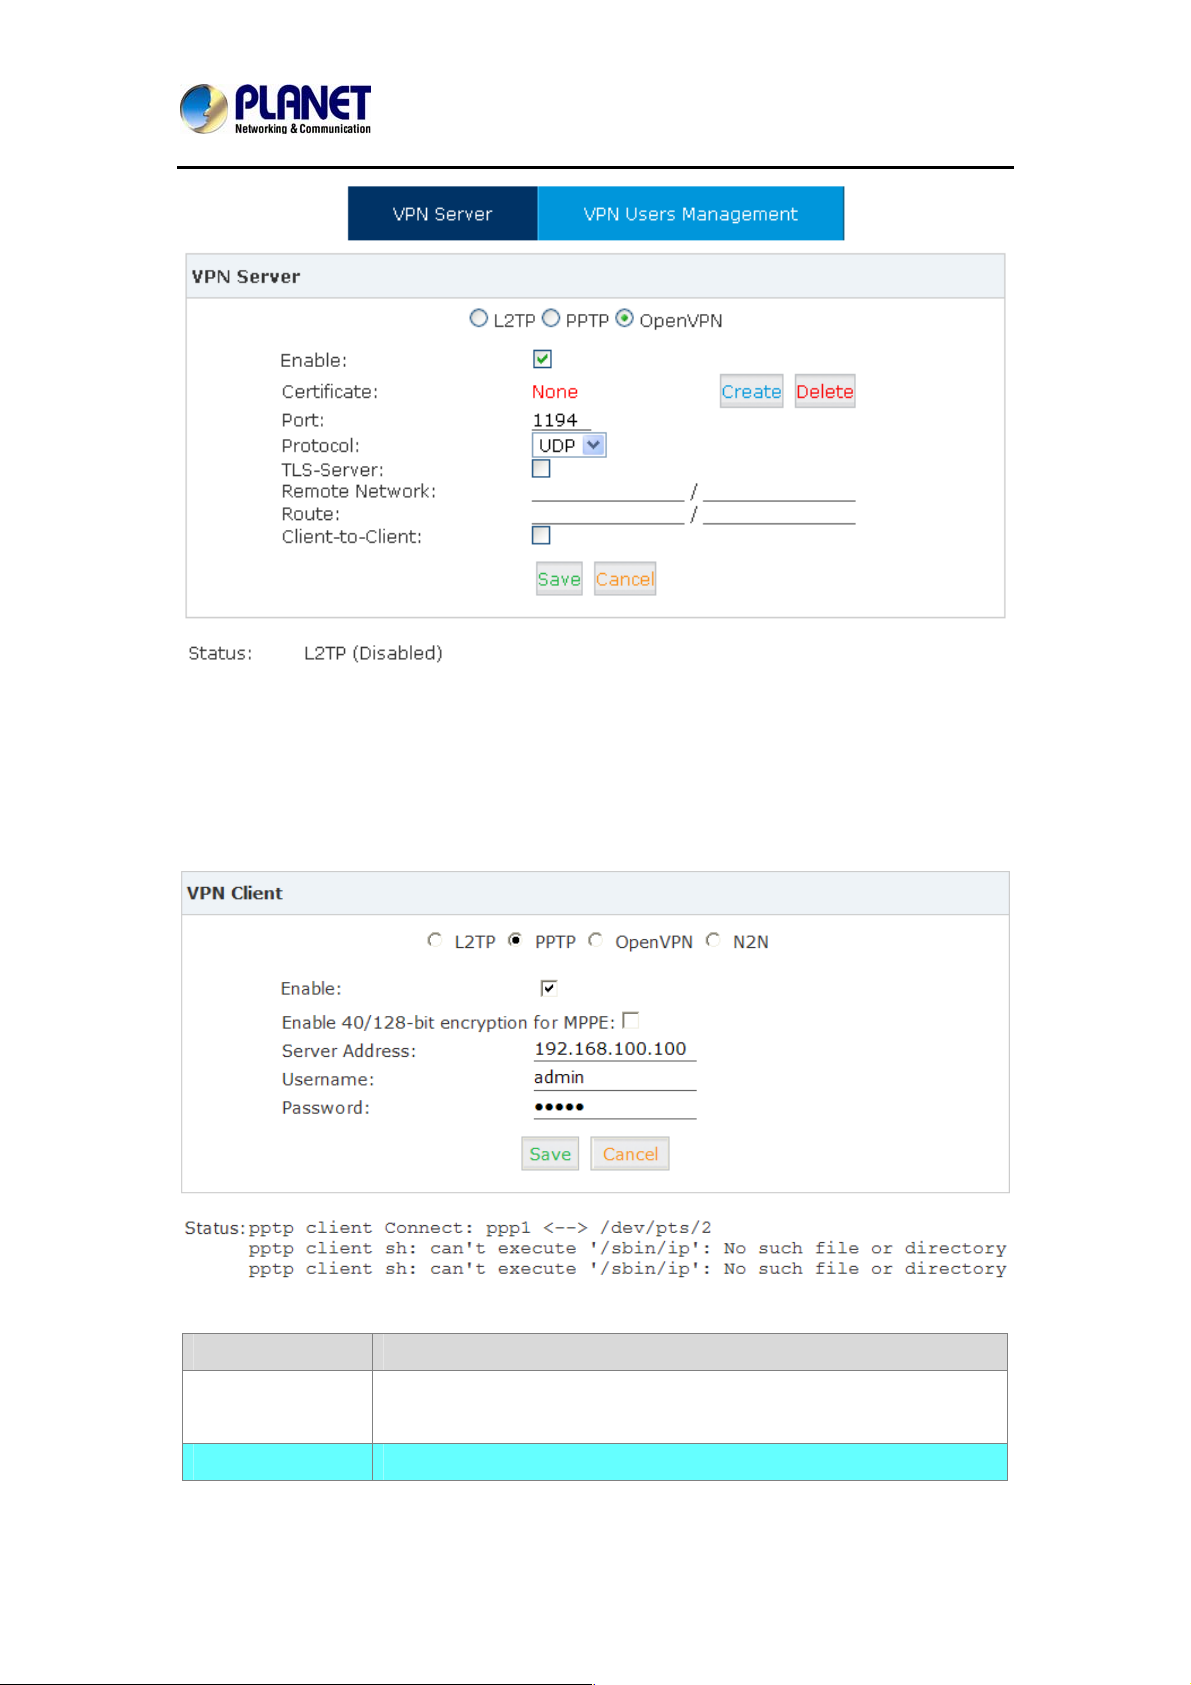
Internet Telephony PBX System
This page is used for management of OpenVPN certificate file.
IPX-2500
5.4 VPN Client
Planet IP PBX supports four kinds of VPN Clients: L2TP, PPTP, OpenVPN and N2N.
Click【Network Settings】->【VPN Client】:
Reference:
Item Explanation
VPN Client Four kinds of VPN Clients supported: L2TP, PPTP, OpenVPN and
N2N(Only one mode can be enabled simultaneously)
Enable Enable / Disable VPN Client
77
Page 78
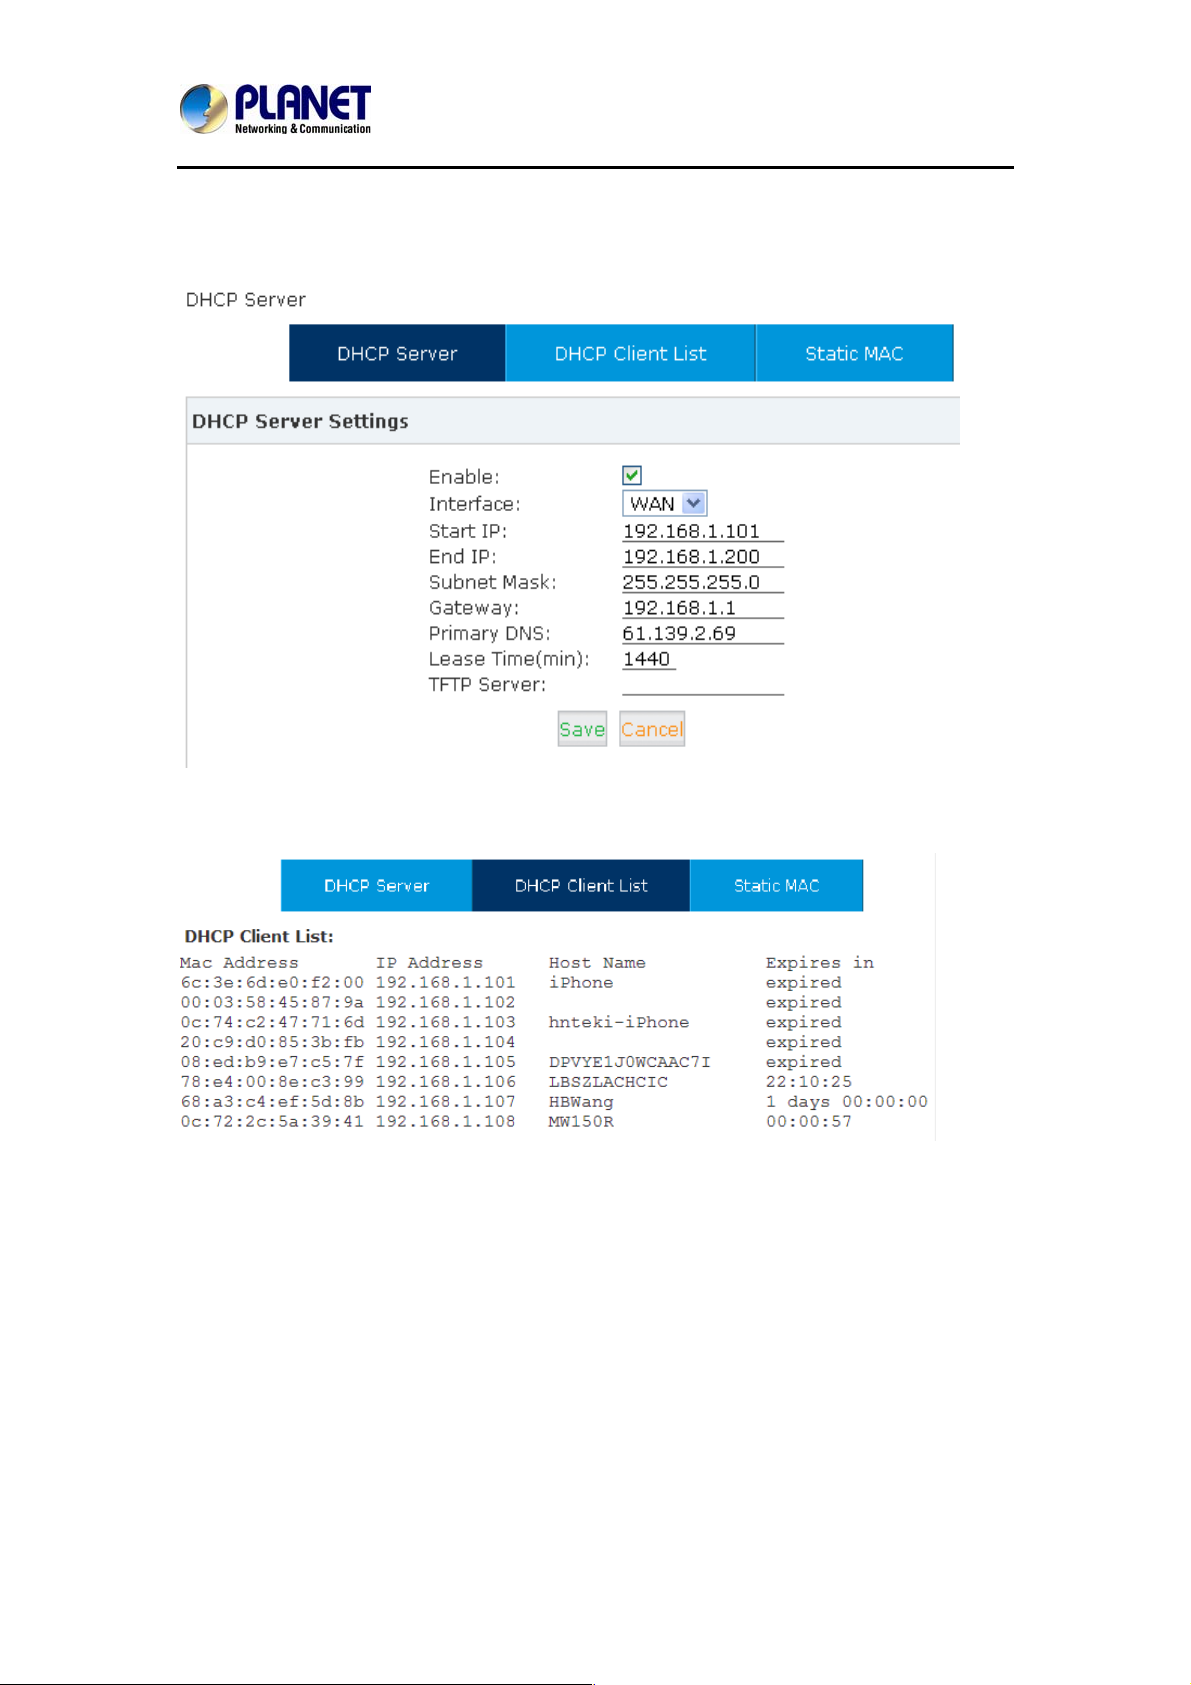
Internet Telephony PBX System
5.5 DHCP server
Click【Network Settings】->【DHCP Server】:
IPX-2500
Click【Network Settings】->【DHCP Server】->【DHCP Client List】:
This page is used to display DHCP Client address and relate d information.
When DHCP Server distributes address, the Client’s MAC address is associated with the IP
address, and then the device will get the same IP address every time.
Click【Network Settings】->【DHCP Server】->【Static MAC】->【New Static MAC】:
78
Page 79
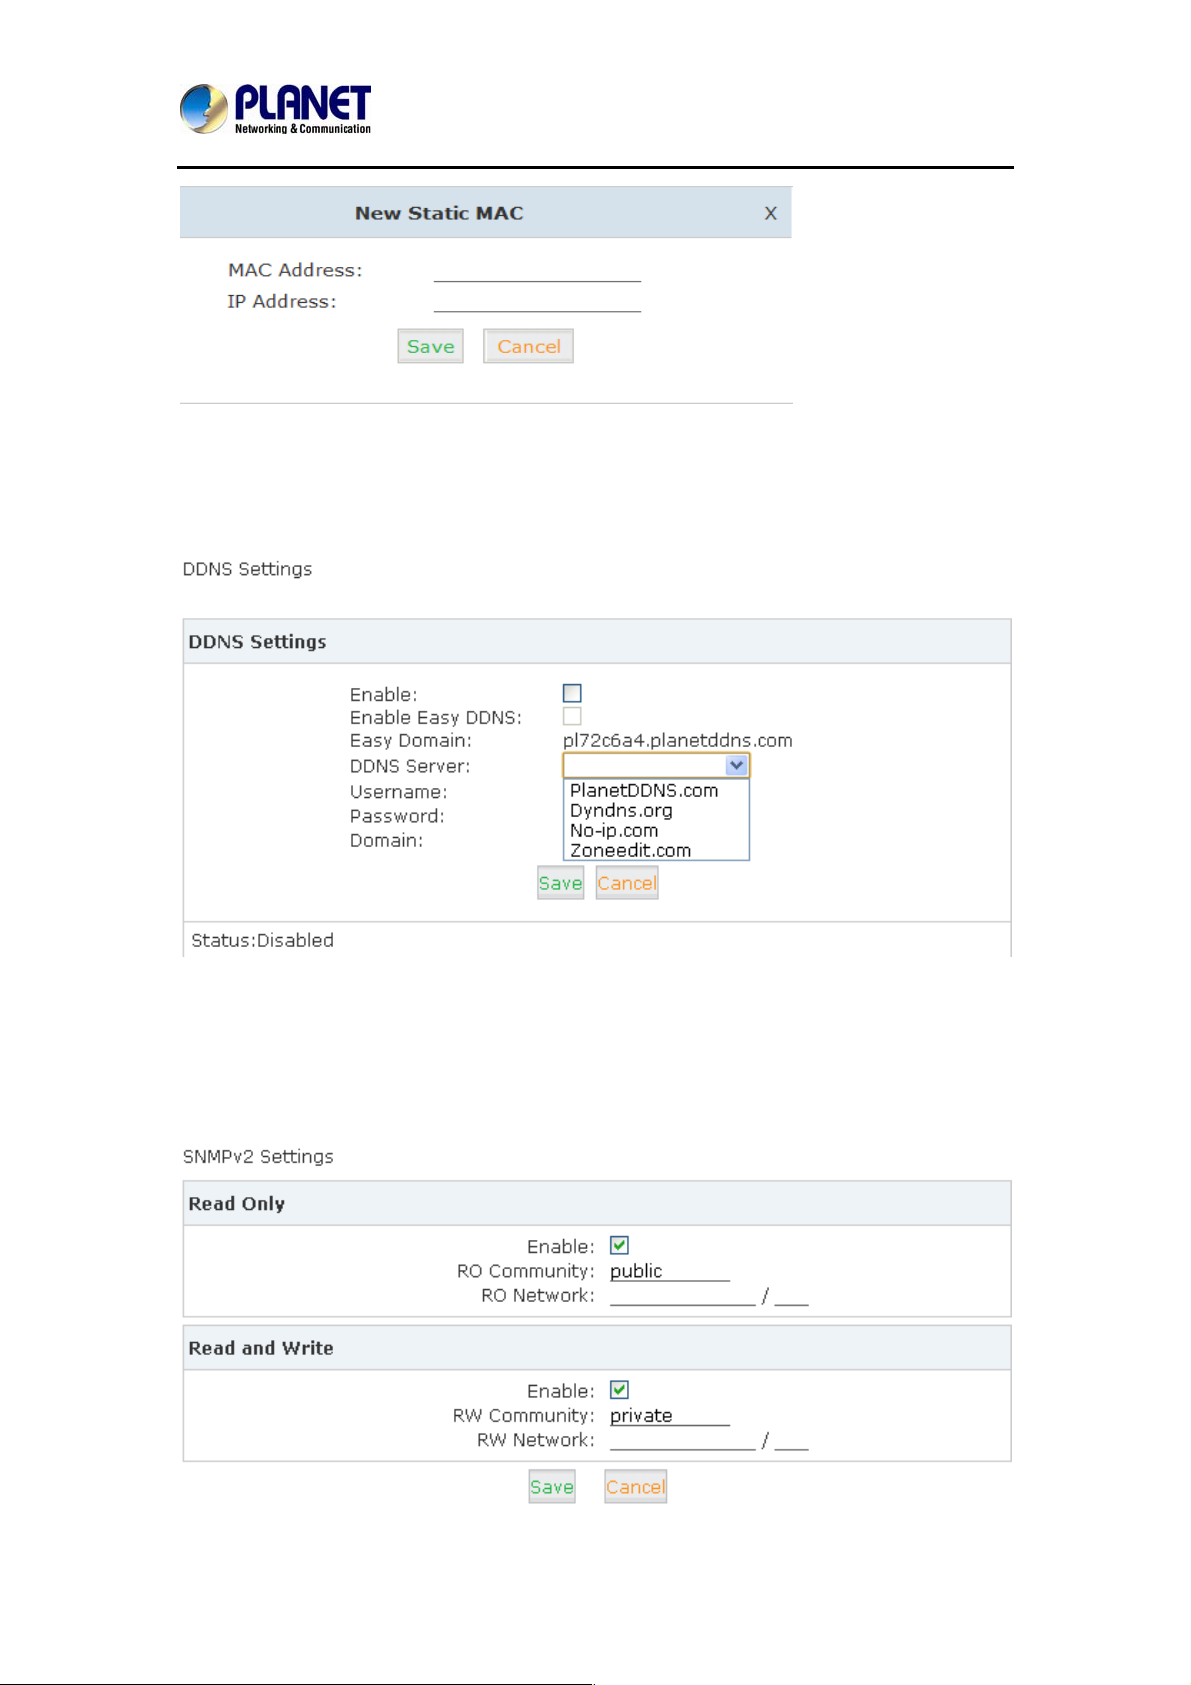
Internet Telephony PBX System
IPX-2500
5.6 DDNS Settings
After setting DDNS (Dynamic Domain Network Server), Planet IP PBX settings will be visited
remotely. Click【Network Settings】->【DDNS Settings】:
Planet supports DDNS provided by Planet DDNS / Dyndns.org / No-ip.com / zoneedit.com.
5.7 SNMPv2 Settings
SNMP (Simple Network Management Protocol) is used for remote management.
Click【Network Settings】->【SNMPv2 Settings】:
79
Page 80
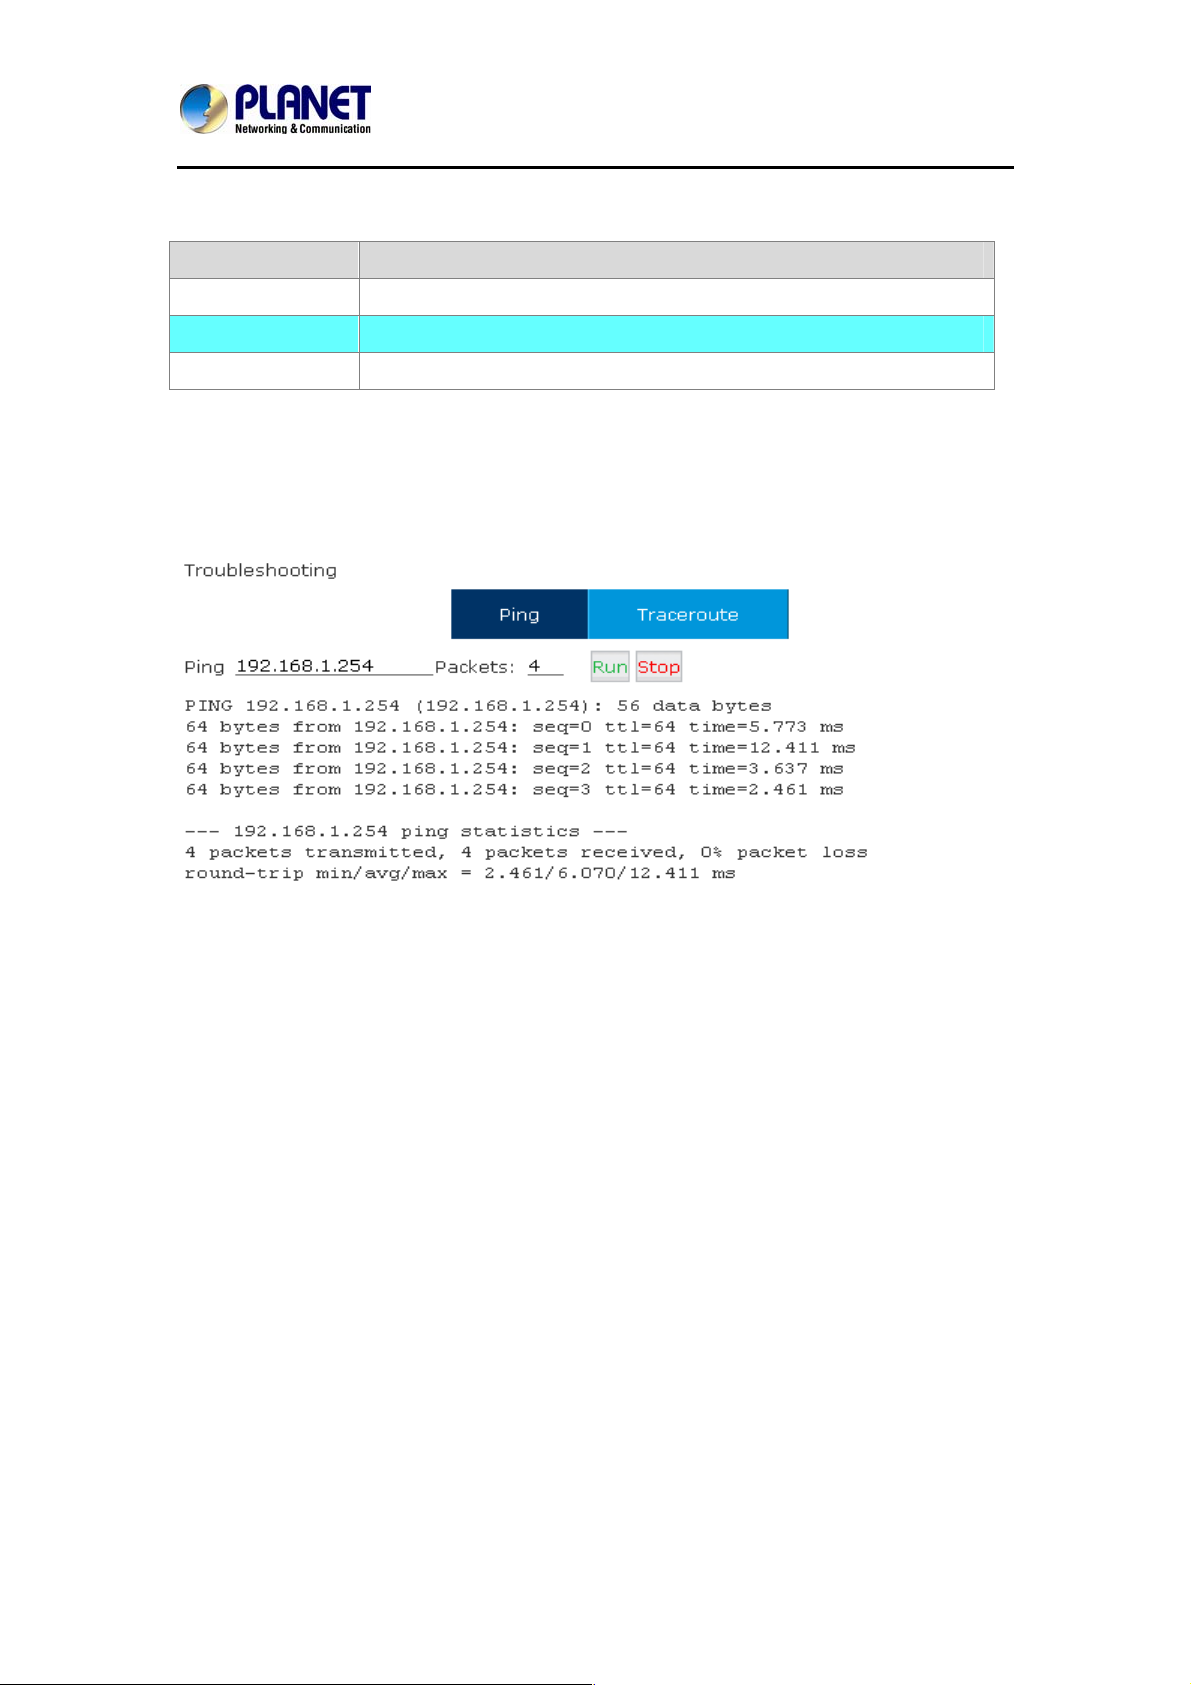
Internet Telephony PBX System
IPX-2500
Reference
Item Explanation
Enable Enable “Read Only” of SNMP
RO Community Define the name of RO Community of SNMP
RO Network Define network of RO
5.8 Troubleshooting
You can ping other network devices through Planet IP PBX and track network routing by
command "Traceroute" . Click【Network Settings】->【Troubleshooting】:
80
Page 81
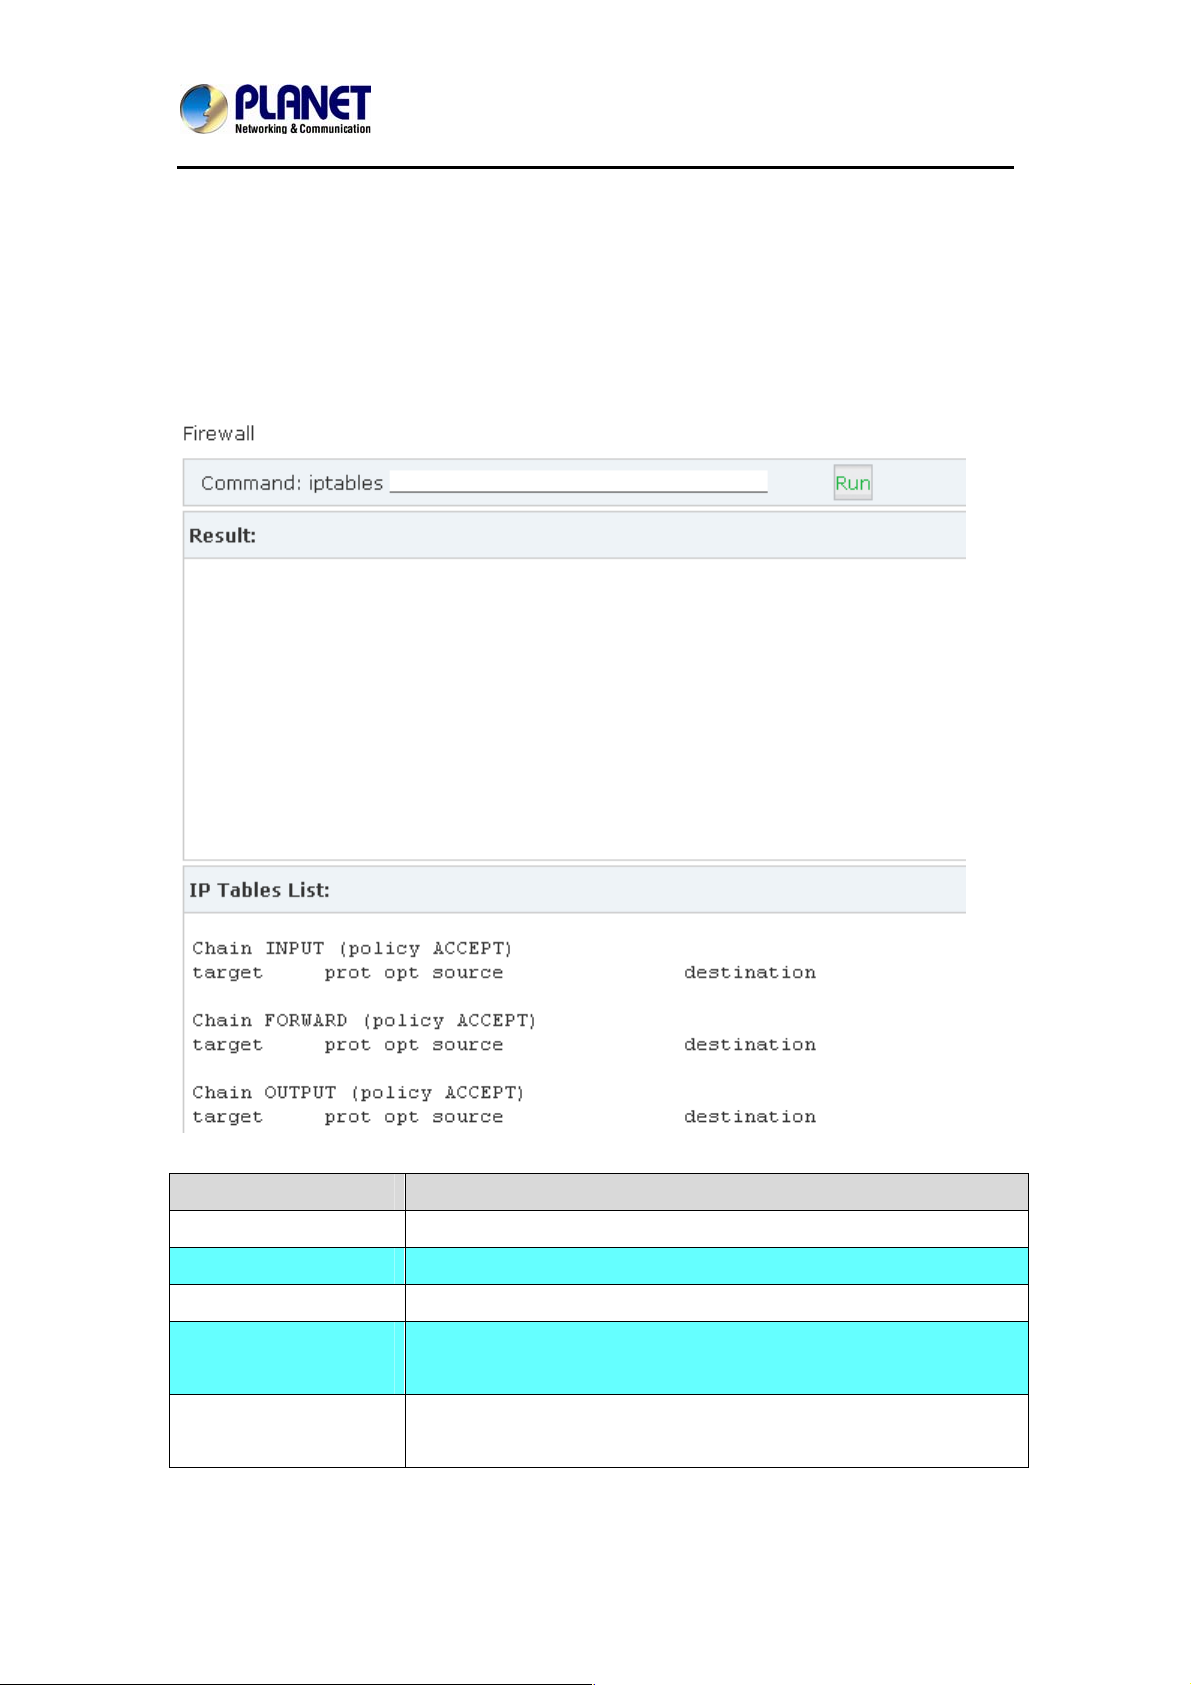
Internet Telephony PBX System
IPX-2500
Chapter 6 Security
This chapter will introduce you how to configure the Security of PLANET IP PBX.
6.1 Network and Country
Click【Security】->【Firewall】
Iptables Command Explanation
Check iptables list iptables -L -n
Clear iptables list iptables -F
Deny an IP(192.168.0.3
Deny every IP to access
80 port
Deny IP(192.168.0.3)
to access port 80
iptables -A INPUT -s 192.168.0.3 -j DROP
iptables -A INPUT -p tcp --dport 80 -j DROP
iptables -A INPUT -s 192.168.0.3 -p tcp --dport 80-j DROP
81
Page 82
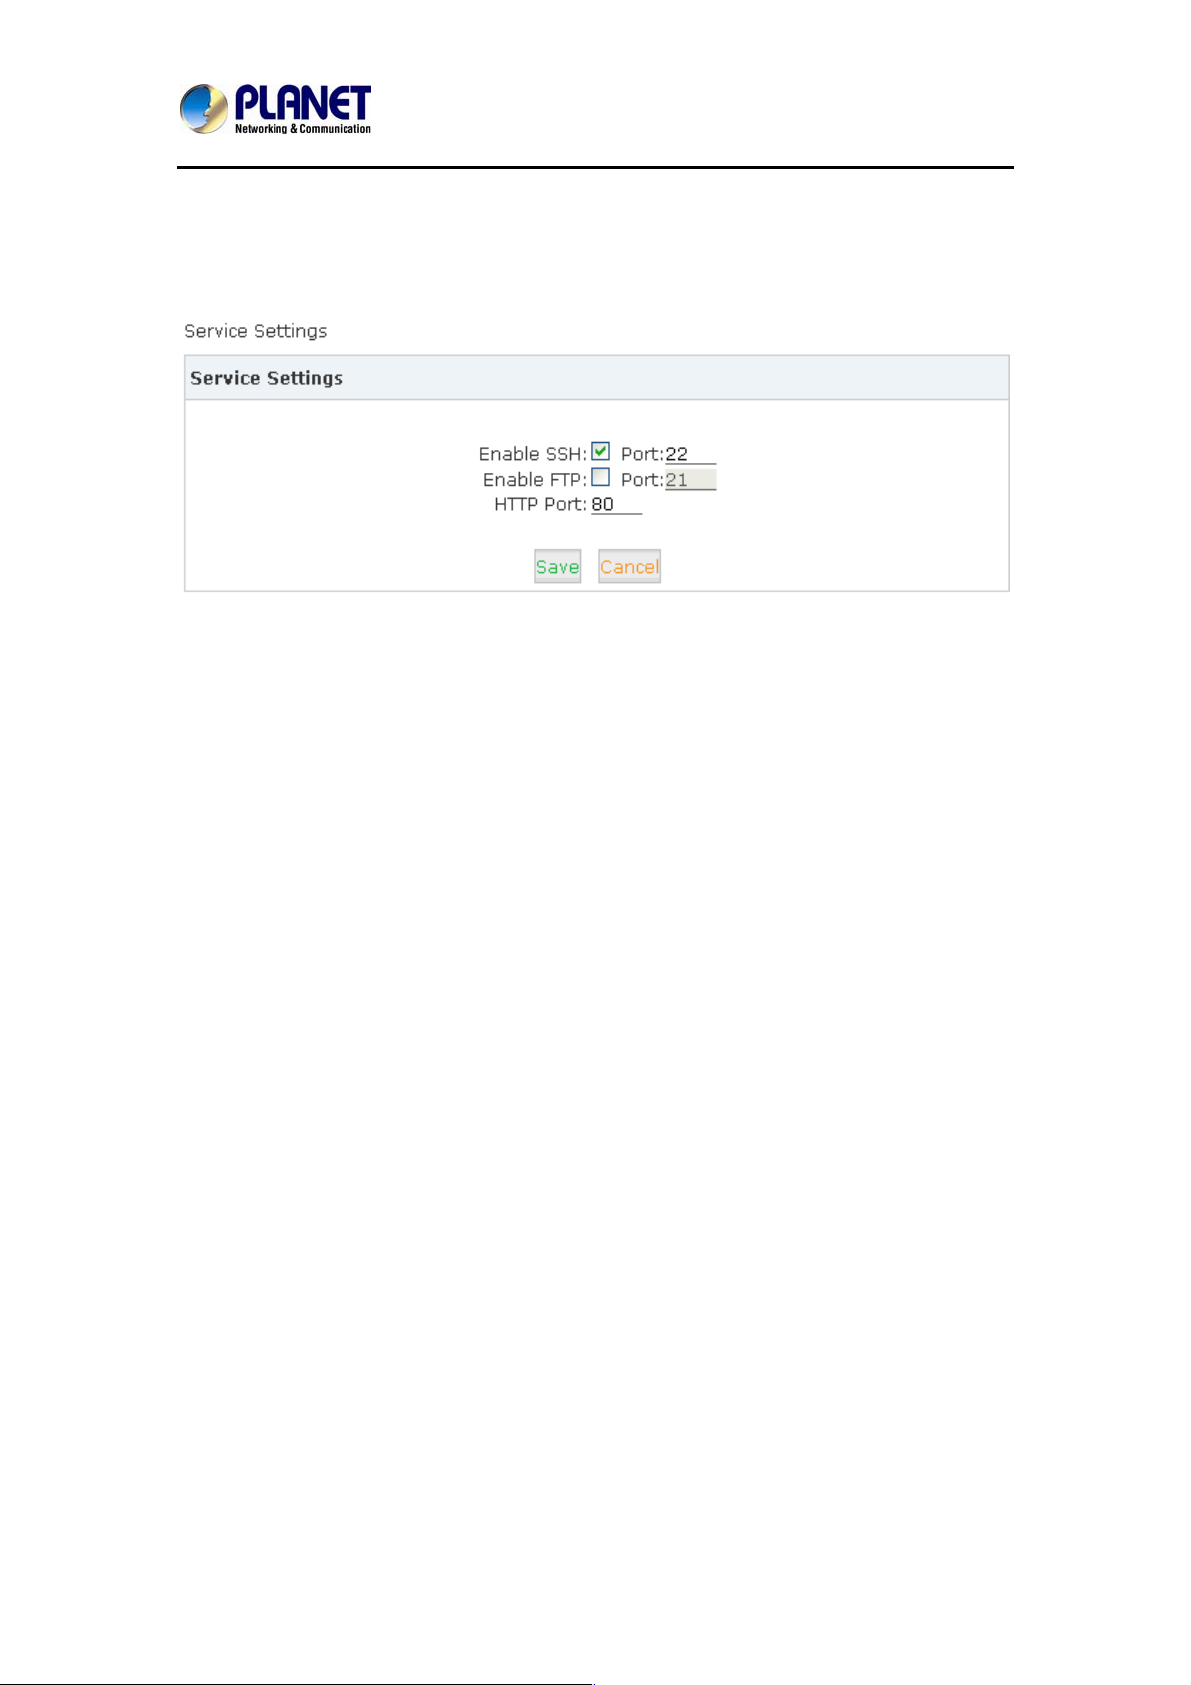
Internet Telephony PBX System
6.2 Service
【Service】: Settings of SSH / FTP and HTTP Port.
Click【Security】->【Service】:
Enable SSH to login background management system through SSH.
Enable FTP to allow uploading files to system through FTP.
IPX-2500
82
Page 83
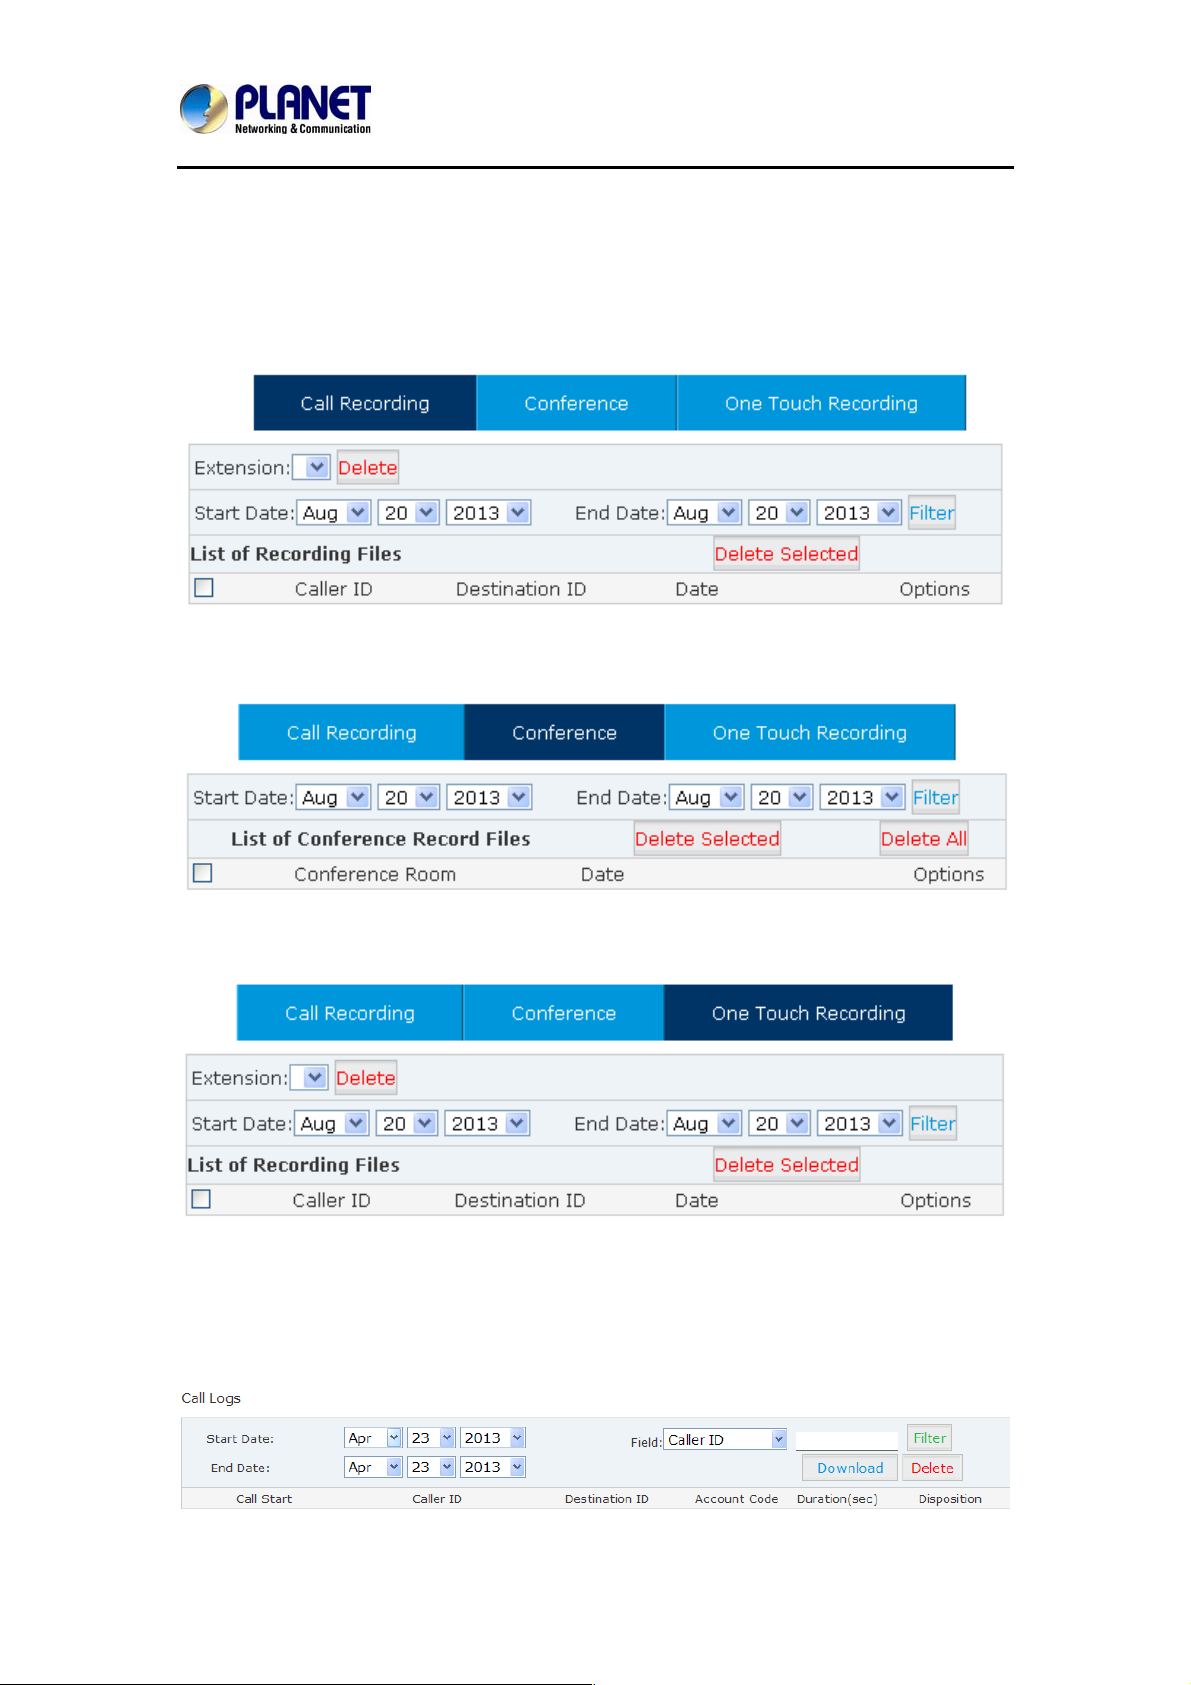
Internet Telephony PBX System
IPX-2500
Chapter 7 Report
7.1 Record List
Check recordings of specified extension or conference here, or d elete the recording file.
【Record List】:
【Conference】:
【One Touch Recording】
7.2 Call logs
Check call logs by caller ID or callee ID.
Click【Report】->【Call Logs】:
83
Page 84
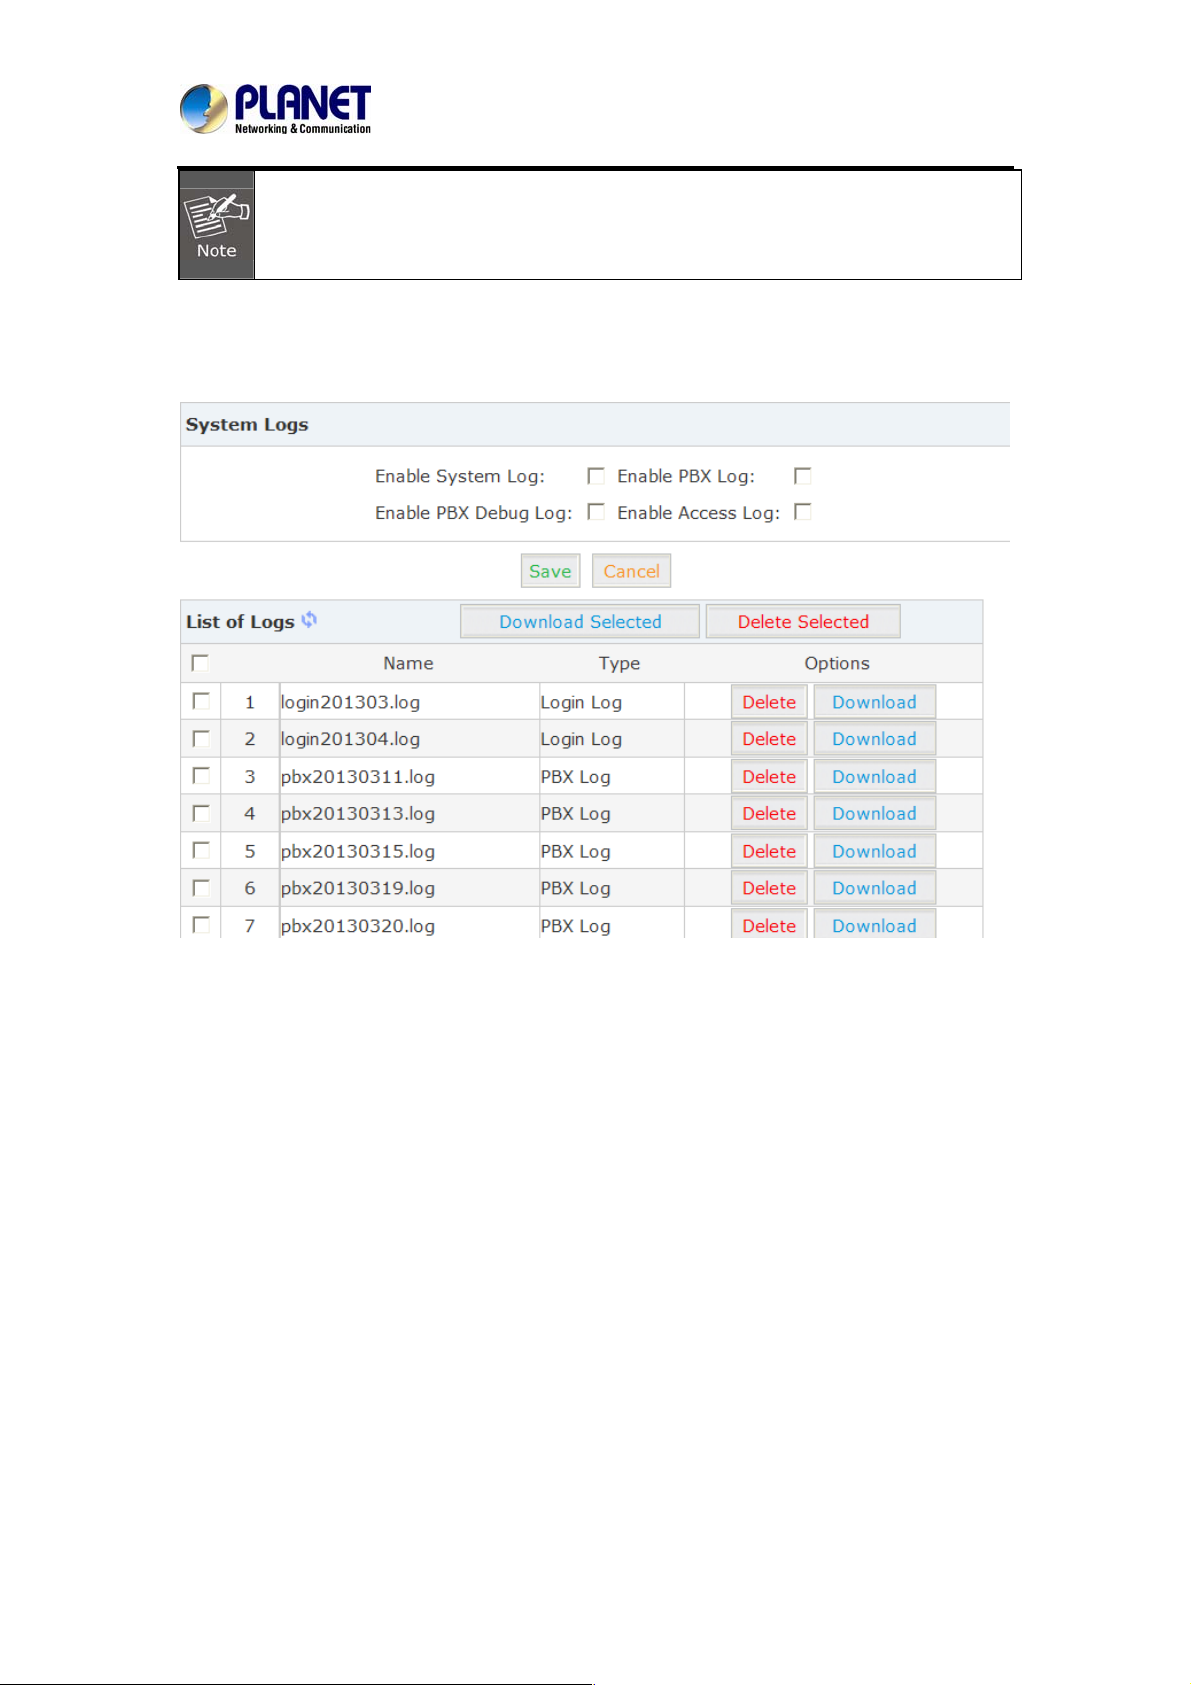
Internet Telephony PBX System
IPX-2500
Duration in the call logs is not really charged duration. If you need billing, PSTN must
support polarity reversal function, and meanwhile, you must configure relevance
parameters of polarity reversal in trunk configuration for Planet IP PBX.
7.3 System logs
Click【Report】->【System Logs】, and you can download/ delete the system logs.
7.4 Data Storage
When you need mass storage of recording files, voicemails, call logs, etc, you can upload
these files to FTP server through FTP Data Storage based on the specified time freque ncy
Click【System】->【Data Storage】:
84
Page 85
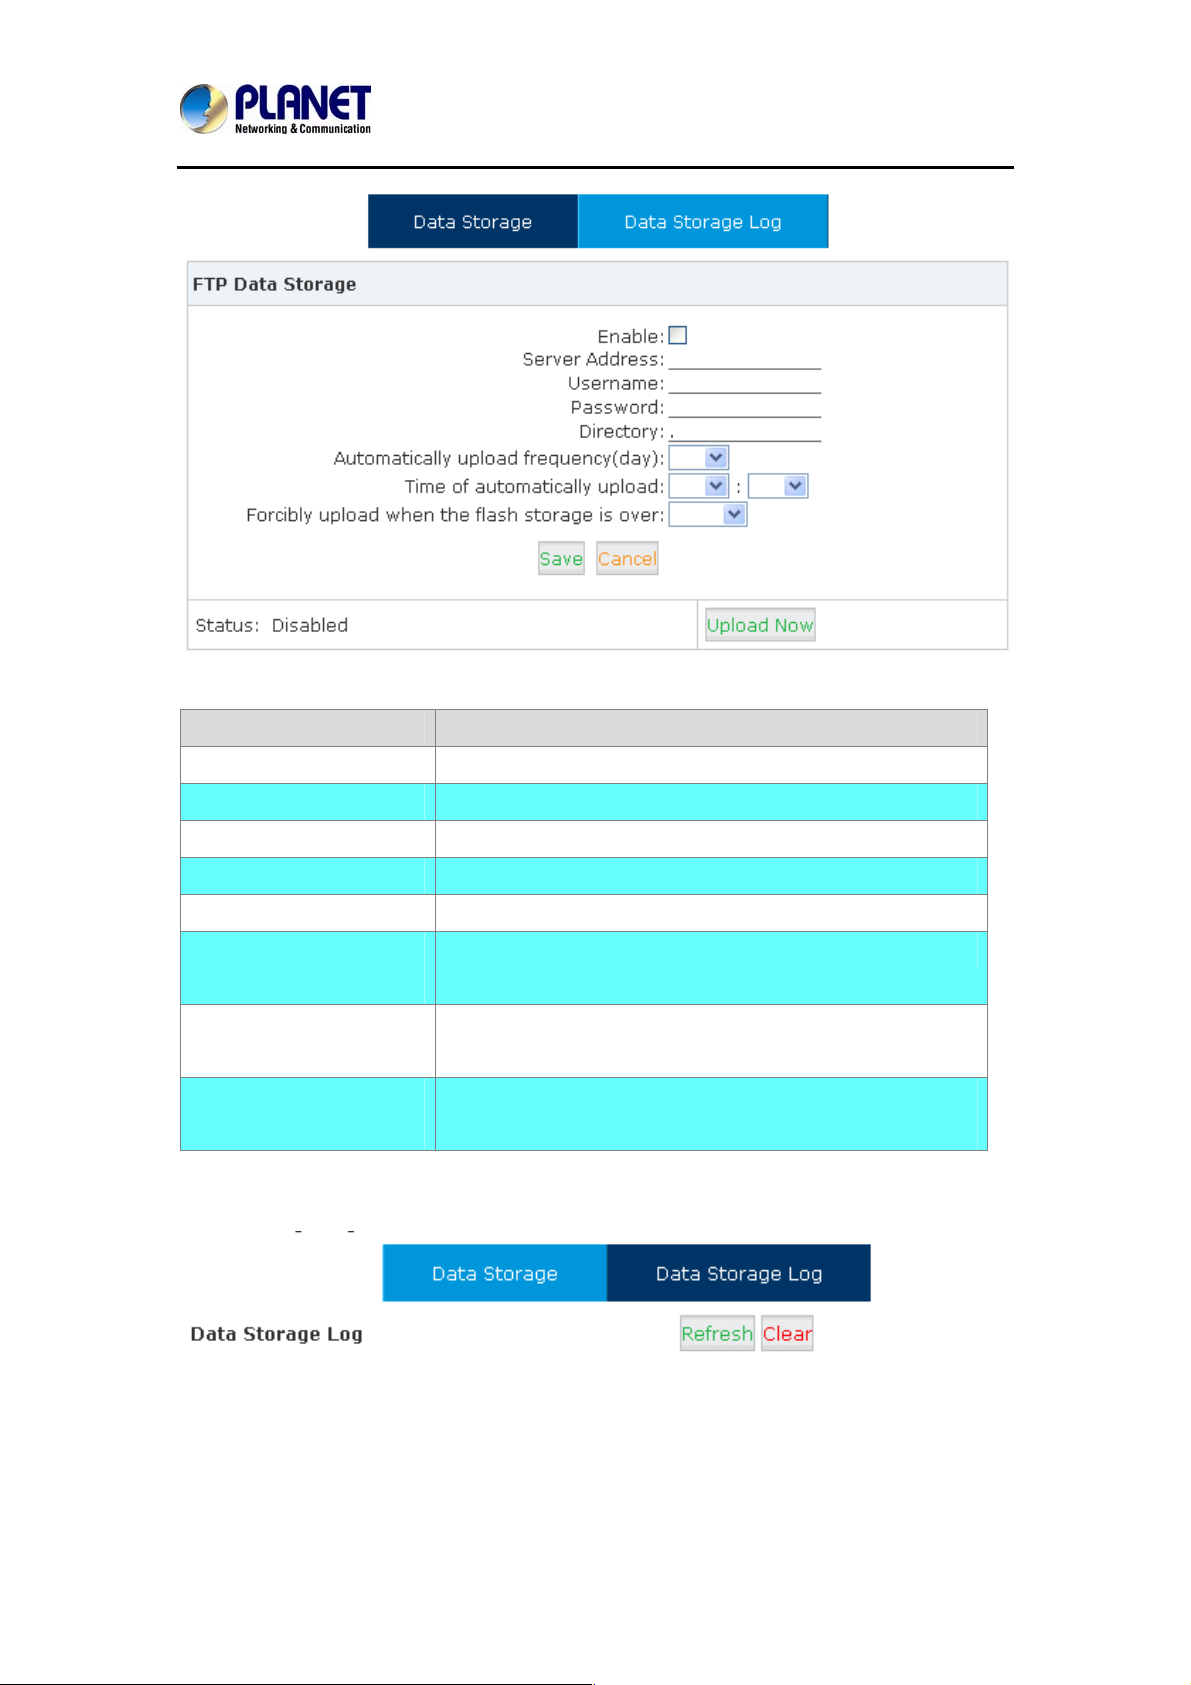
Reference
Internet Telephony PBX System
IPX-2500
Item Explanation
Enable Enable FTP Data Storage.
Server Address Set FTP server address (IP address or domain).
User Name User name for login FTP.
Password Password for login FTP.
Directory Define a directory used for storage on FTP server.
Automatically upload
frequency ( by the day)
Time of automatically
upload
Forcibly upload when the
flash storage is over
Check from【Data Storage Log】:
Define frequency (by the day) to upload the data.
Define the time to upload the data.
Forcibly upload data when flash storage is over the
percentage value.
Click【Refresh】to refresh data storage log.
Click【clear】to clear data storage log.
85
Page 86
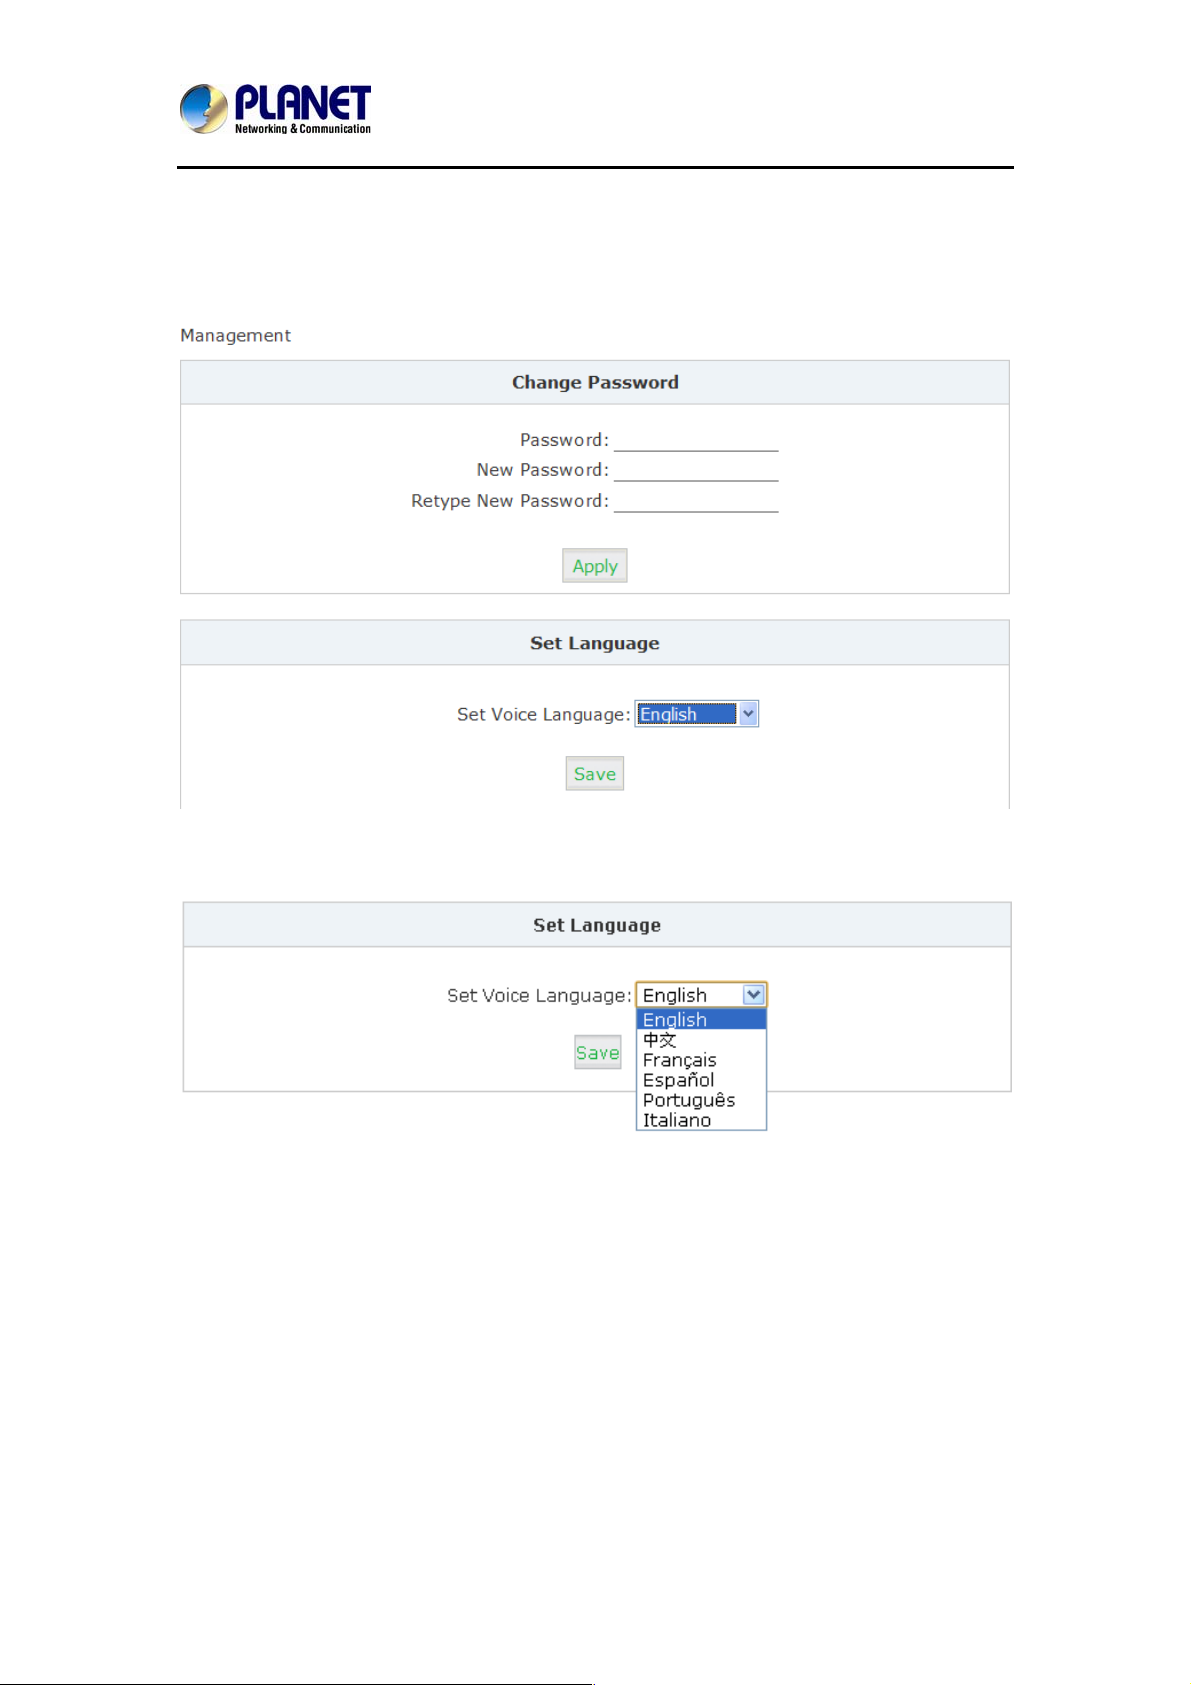
Internet Telephony PBX System
IPX-2500
7.5 Management
【Management】is used to modify password of Planet system, and the settings of system
voice.
Click 【System】->【Management】:
【Set Language】Choose the voice language you want
86
Page 87
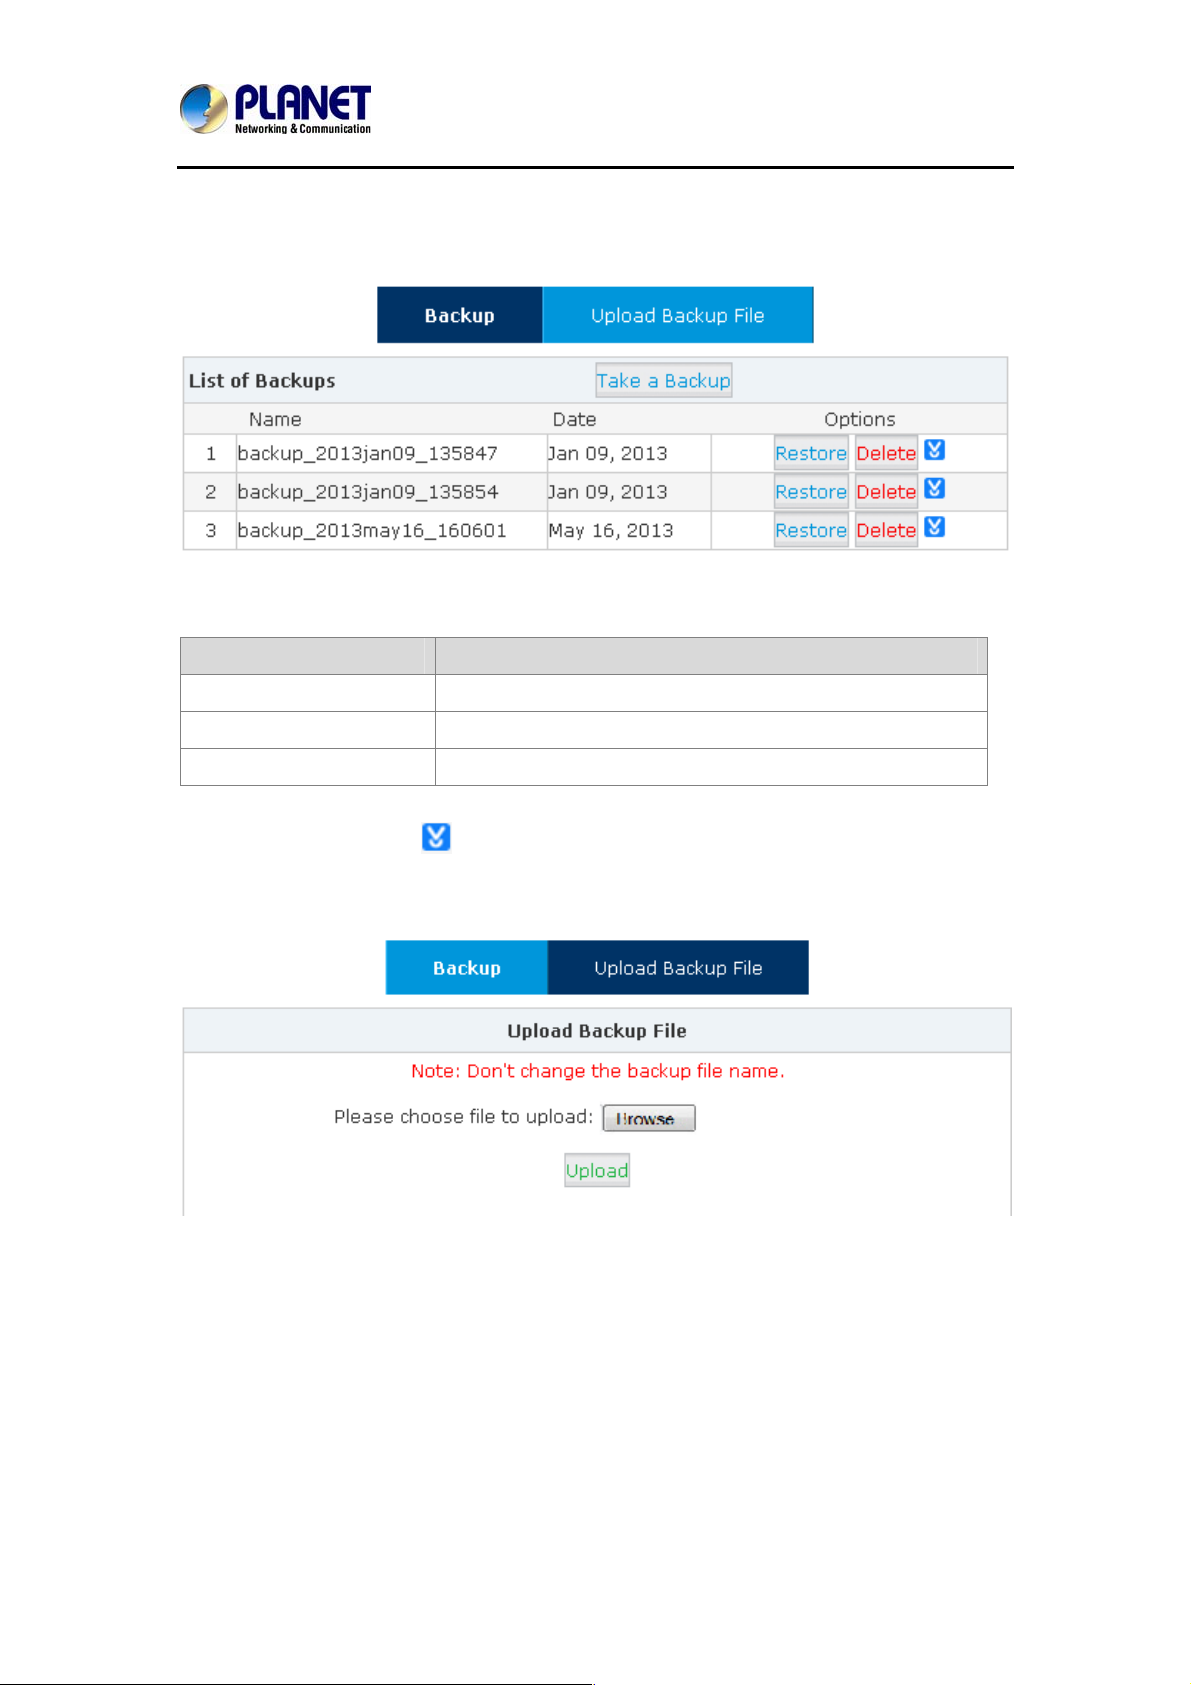
Internet Telephony PBX System
7.6 Backup
Click【System】->【Backup】
Reference:
Item Explanation
Take a Backup Take a backup of the current system configuration.
IPX-2500
Restore Restore system to the specified backup configuration.
Delete Delete specified backup file.
Click the download button “
Click【Upload Backup File】to upload the backup file here.
Click【browse】to select the local backup file, and click【Upload】to upload the backup file to
system.
” to download the specified backup file and manage locally.
7.7 Reset & Reboot
If you need to reset the system to factory default or reboot, please click 【System】->【Reset &
Reboot】:
87
Page 88
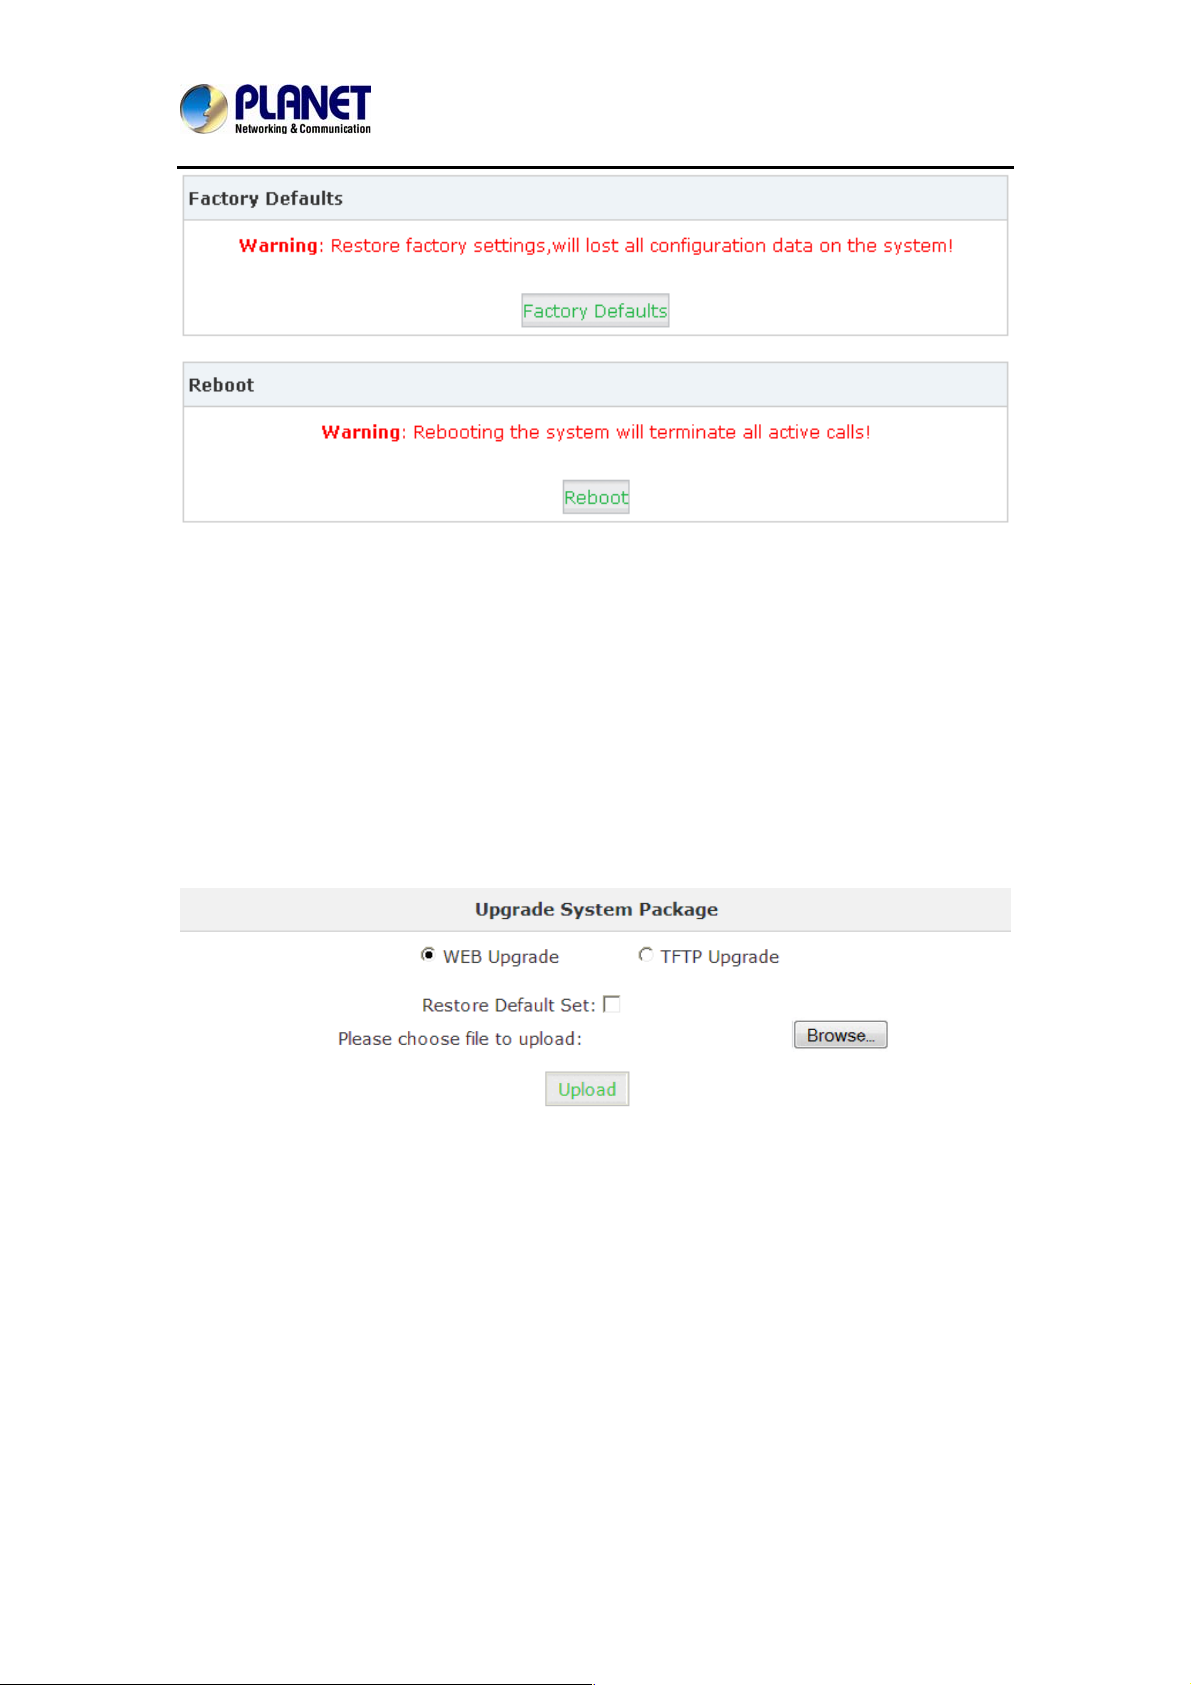
Internet Telephony PBX System
Click【Factory Default】to reset the system to factory default.
Click【Reboot】to reboot the system.
7.8 Upgrade
IPX-2500
7.8.1 WEB Upgrade
Click【System】->【Upgrade】->【WEB Upgrade】:
Click【Browse】to select the firmware file, and then click【Upload】to upload the selected
firmware to system and finish the upgrading automatically.
If check【Restore Default Set】, the system will clear all the configuration and reset to factory
default.
88
Page 89
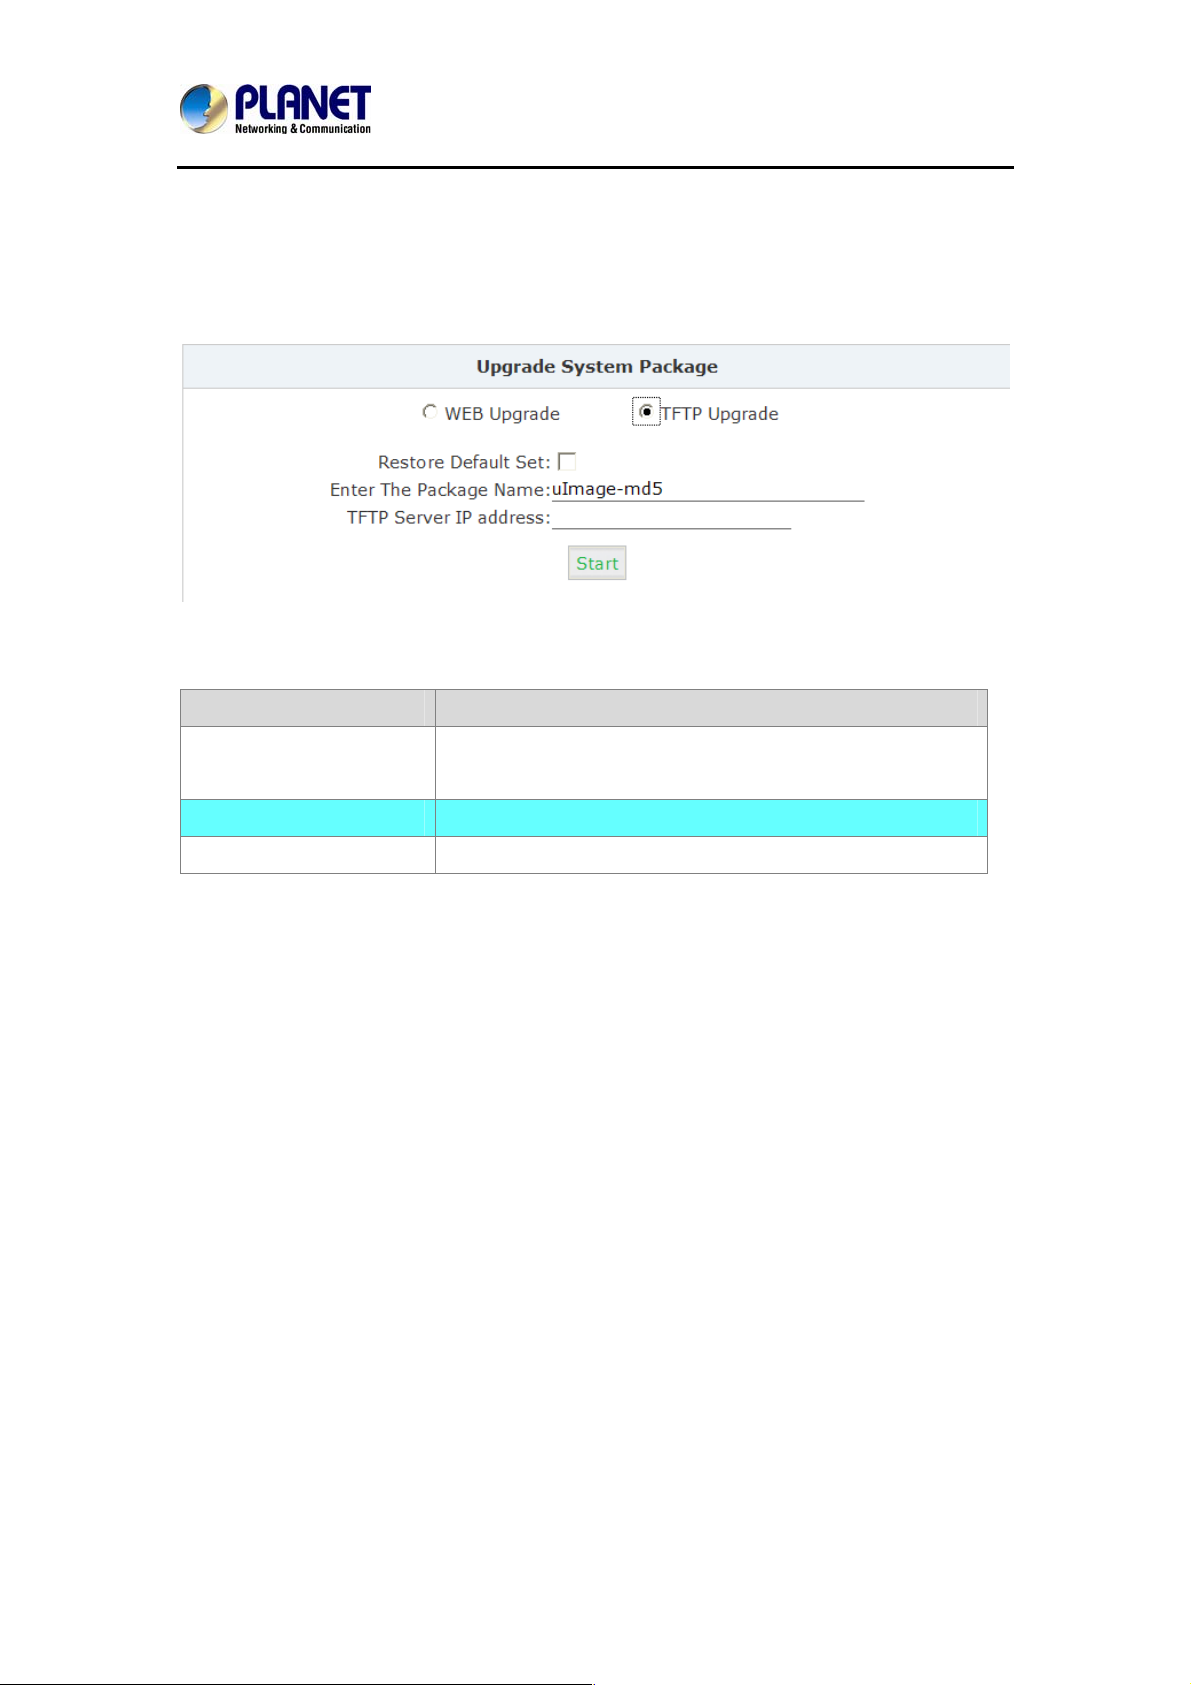
Internet Telephony PBX System
7.8.2 TFTP Upgrade
Click【System】->【Upgrade】->【TFTP Upgrade】:
Reference:
IPX-2500
Item Explanation
Restore Default Set System will restore to factory defaults after checking this
option.
Enter The Package Name Enter the package name for upgrading.
TFTP Server IP address Enter your TFTP server IP address.
7.9 Hot Standby
Hot Stanby ——this functi on is used to backup and share configuration file and regular dat a on
two IPX-2500 units (Master & Slave) each other in local network. In case the system the
Master Unit crashes, Slave Unit will automatically start to work in order instead Settings:
89
Page 90
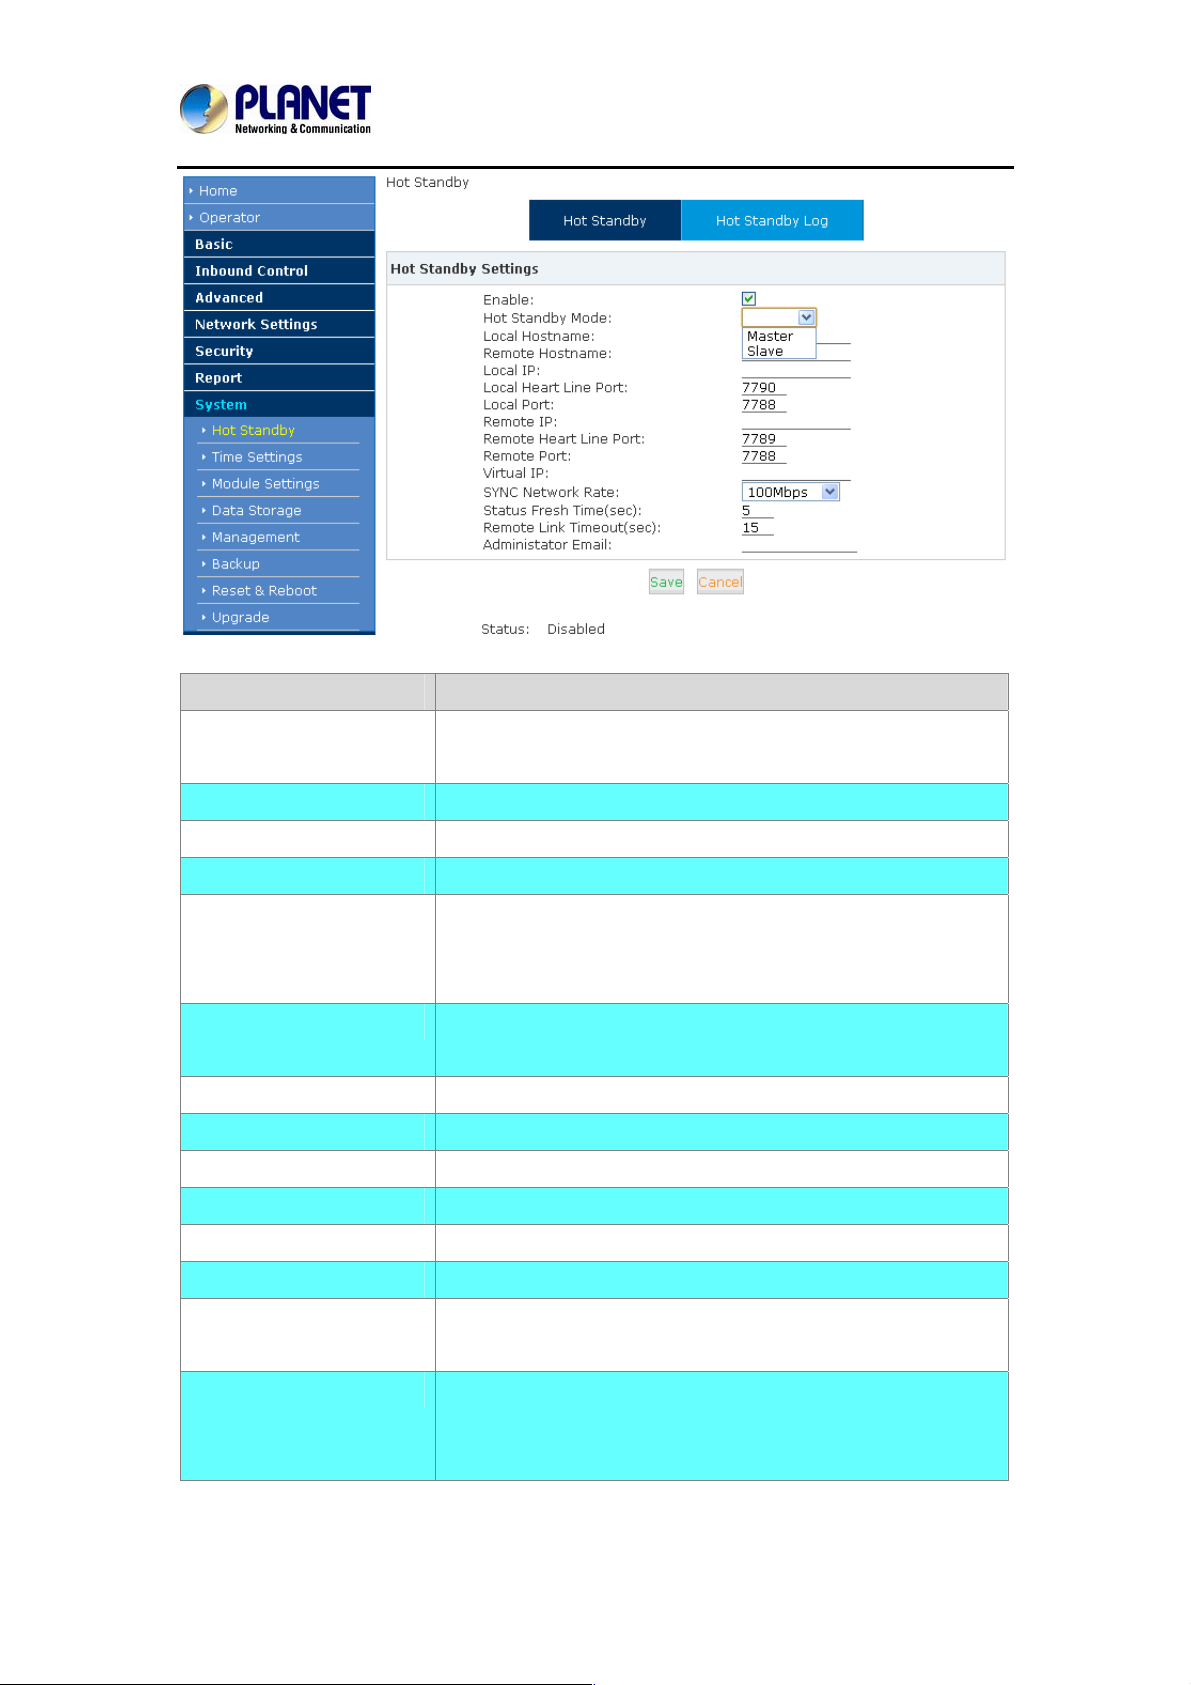
Internet Telephony PBX System
Item Explanation
IPX-2500
Hot Standby Mode: Set the unit to be Master or Slave (Make sure one unit is
Master and the other is Slave)
Local Hostname Hostname of local unit (Make sure it’s dif f erent on two units)
Remote Hostname Hostname of remote unit
Local IP IP address of local unit
Local Heart Line Port: Heart line port of local unit (Make sure local heart line port of
local unit is the same
as remote heart line port of remote unit)
Local Port: Port of local unit (Default is suggested, and make sure port on
both units are the same)
Remote IP: IP address of remote unit
Remote Heart Line Port Heart line port of remote unit
Remote Port Port of remote unit
Virtual IP Virtual IP address (on which IP extensions will be registere d)
SYNC Network Rate Rate of Sync Network (Retain default)
Status Fresh Time(sec):
Fresh rate of status (Retain default)
Remote Link
Timeout(sec):
Administrator Email: Email address of administrator (In case the device is working
Timeout for remote link (retain default)
improperly, notification
will be sent to this email address)
90
Page 91
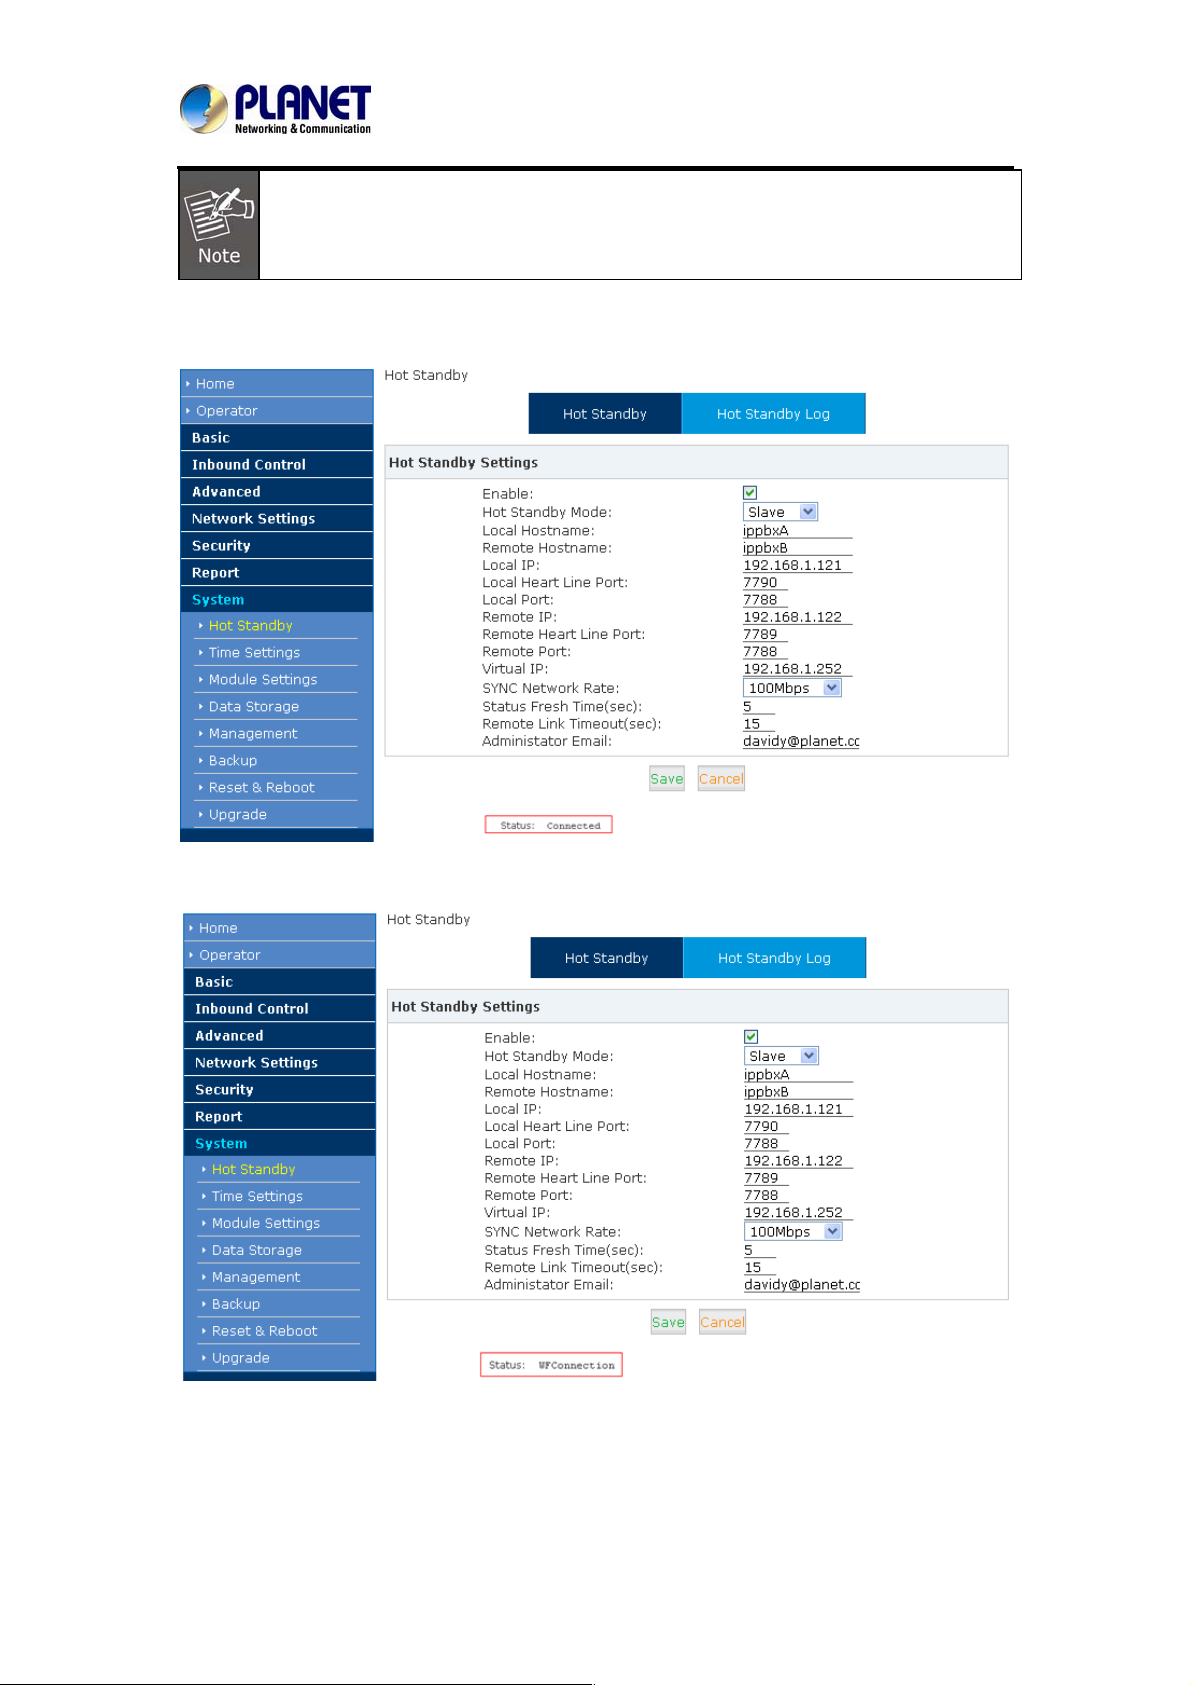
Status:
Internet Telephony PBX System
IPX-2500
User must configure properly on Master Unit and reboot first, then configure and
reboot Slave Unit
Status:Connected indicates two units are connected successfully
Status:WFConnection indicates waiting for connection from the other unit
91
Page 92
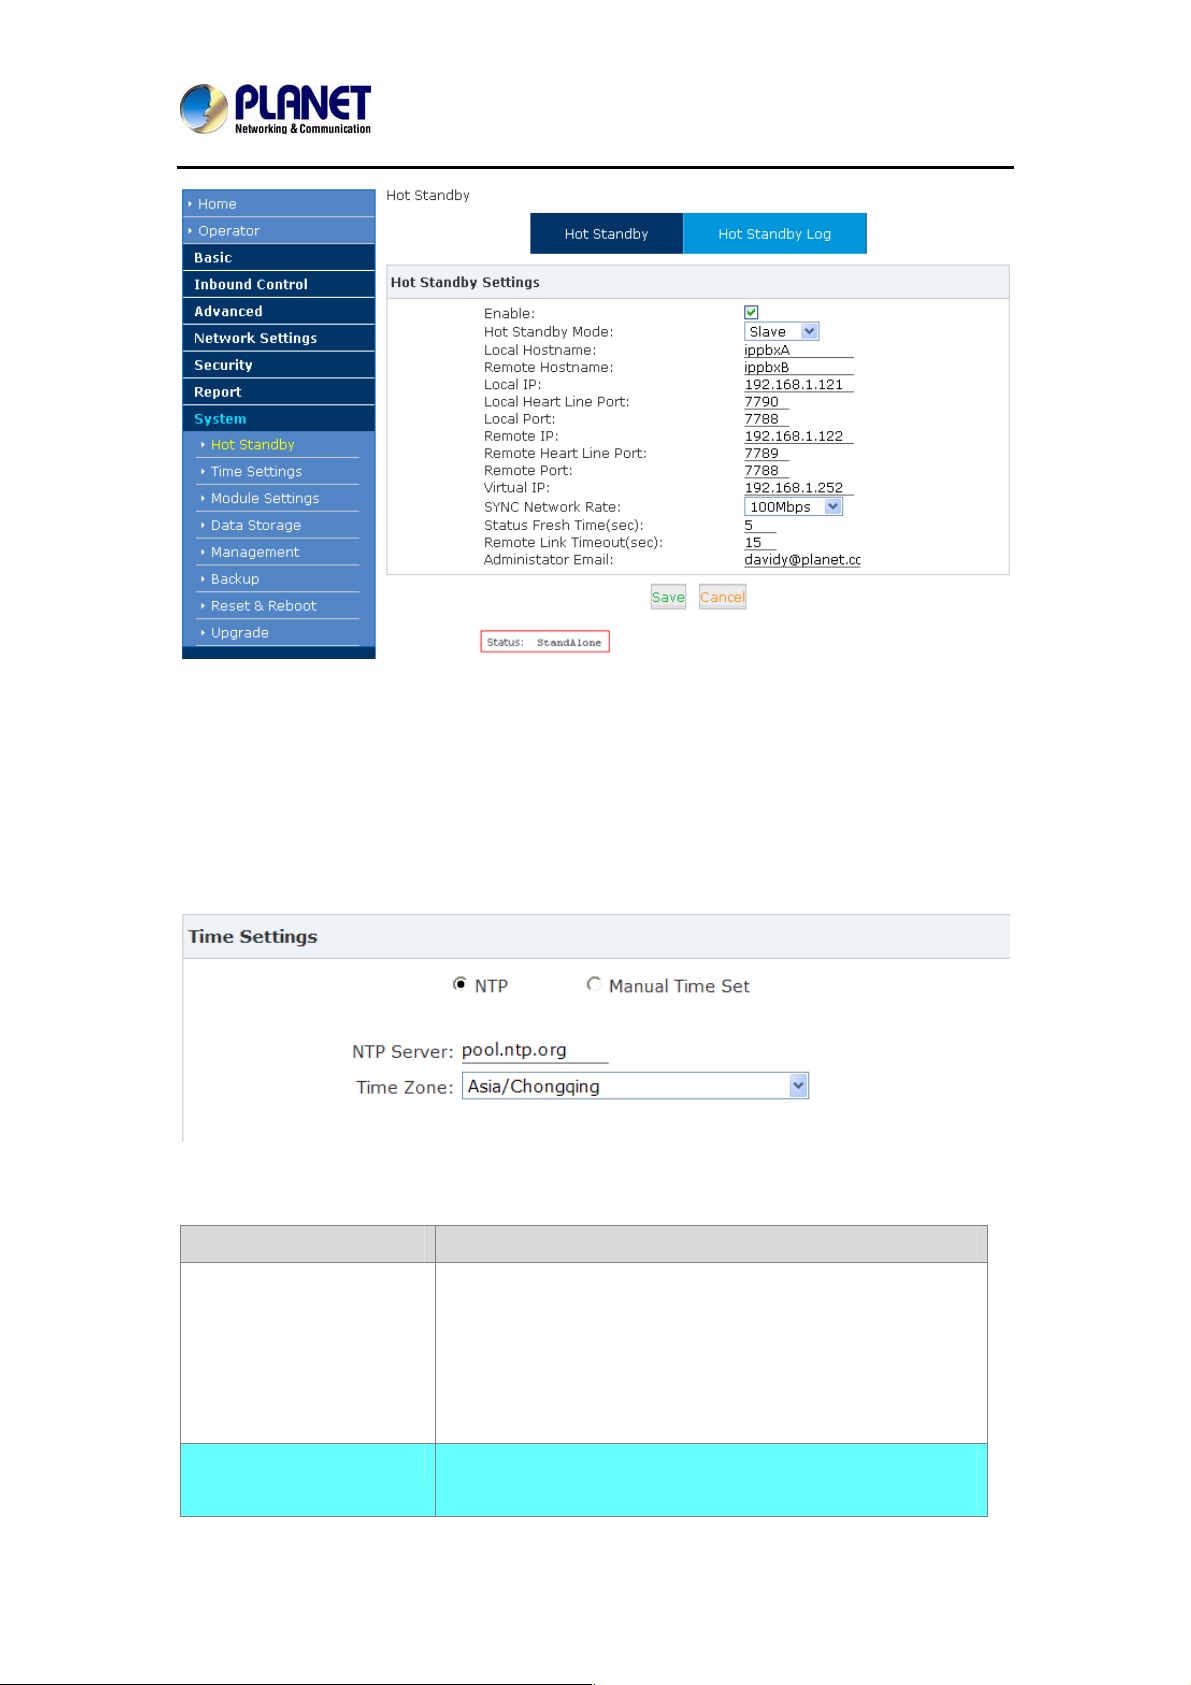
Internet Telephony PBX System
IPX-2500
Status:StandAlone indicates offline (which means you need to configure properly and reboot
to reconnect
7.10 Time Settings
Time settings for Planet system, the system supports NTP and Manual Time Set.
【NTP】:
Reference:
Item Explanation
NTP Server
Define the NTP Server. You can input the IP address or
Time Zone
domain of this server, whatever it’s local or remote. Default
server is pool.ntp.org. Be aware that the Planet IP PBX
needs to be able to connect to a NTP server to perfect
functions.
Select your time zone so that the system will set time based
on the time zone.
92
Page 93
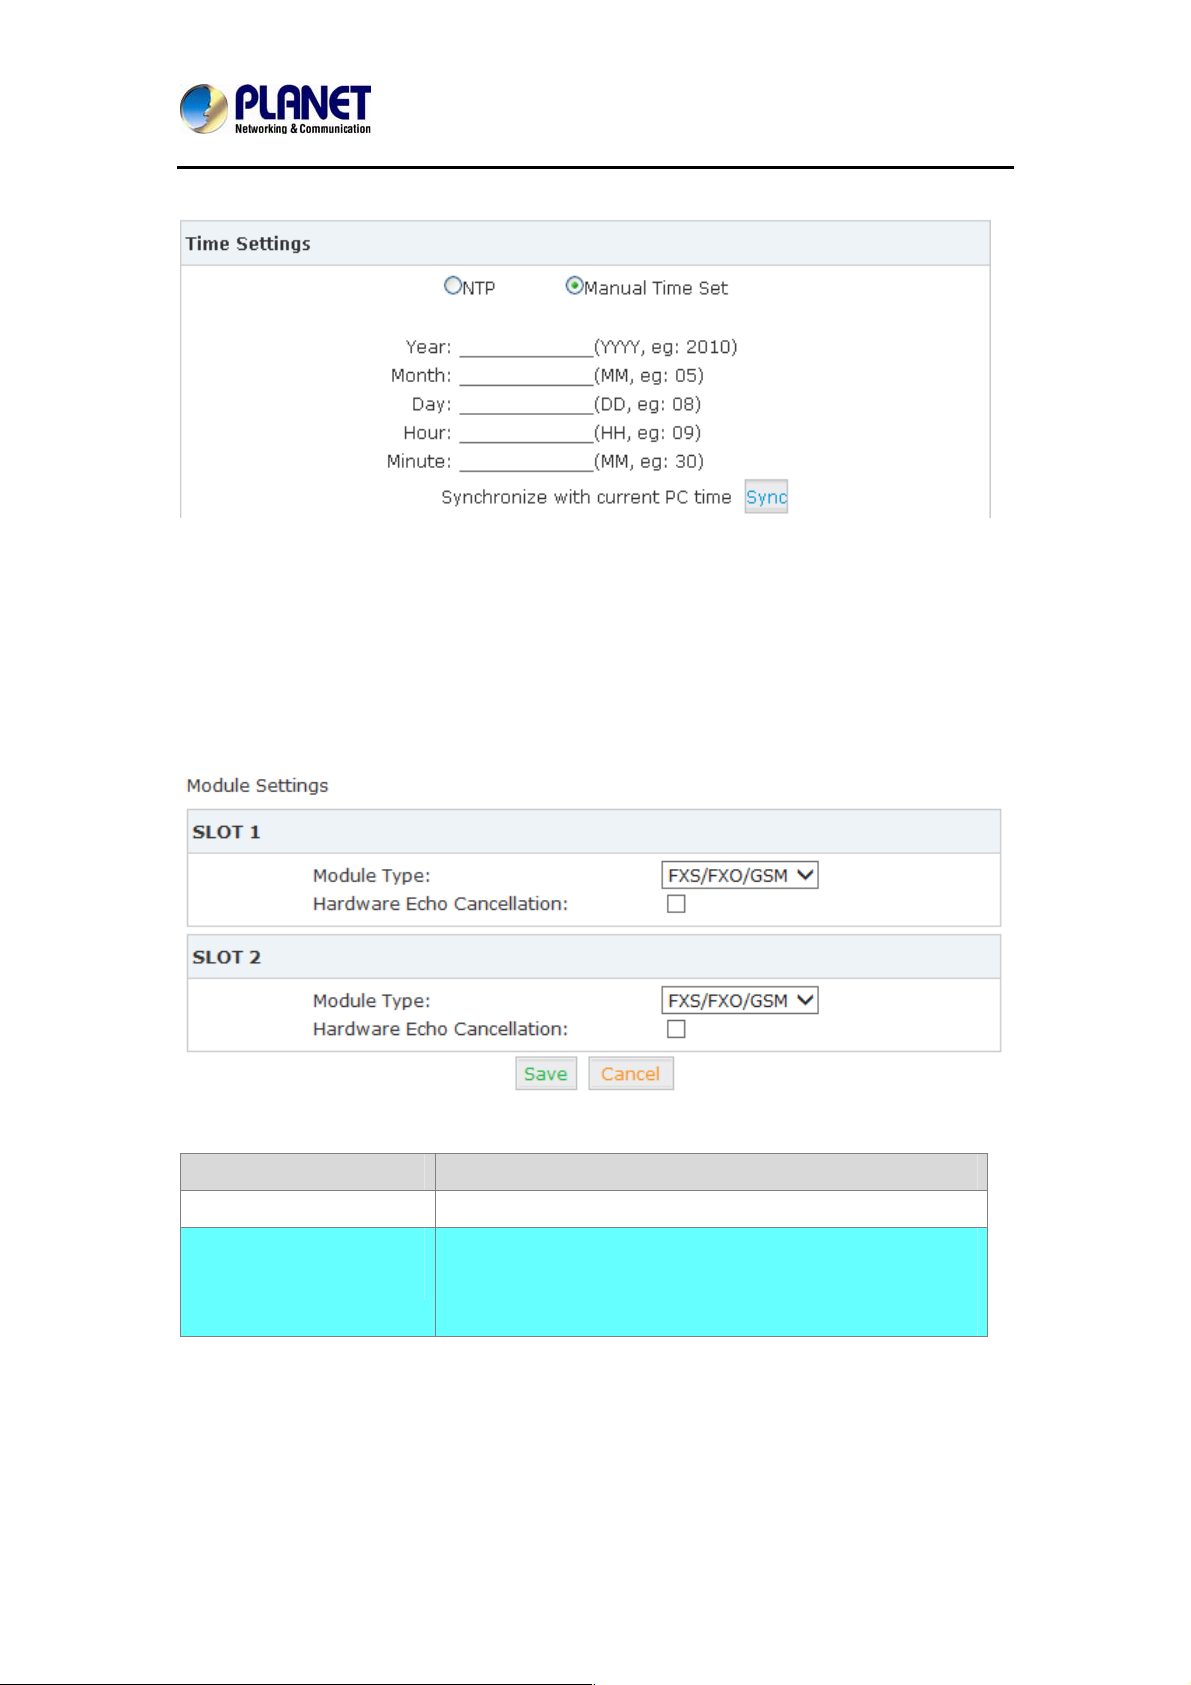
Internet Telephony PBX System
【Manual Time Set】:
After entering Year/ Month/ Day/ Hour/ Minute, then save and activate.
Or, you can click【Sync】to synchronize with current PC time.
7.11 Module Settings
IPX-2500
Choose module type and make configuration on this page
Item Explanation
Module Type Choose module type
Hardware Echo
Cancellation
Enable/Disable hardware Echo Cancellation (Make sure the
Echo Cancellation module is properly installed before
enabling this function)
93
Page 94
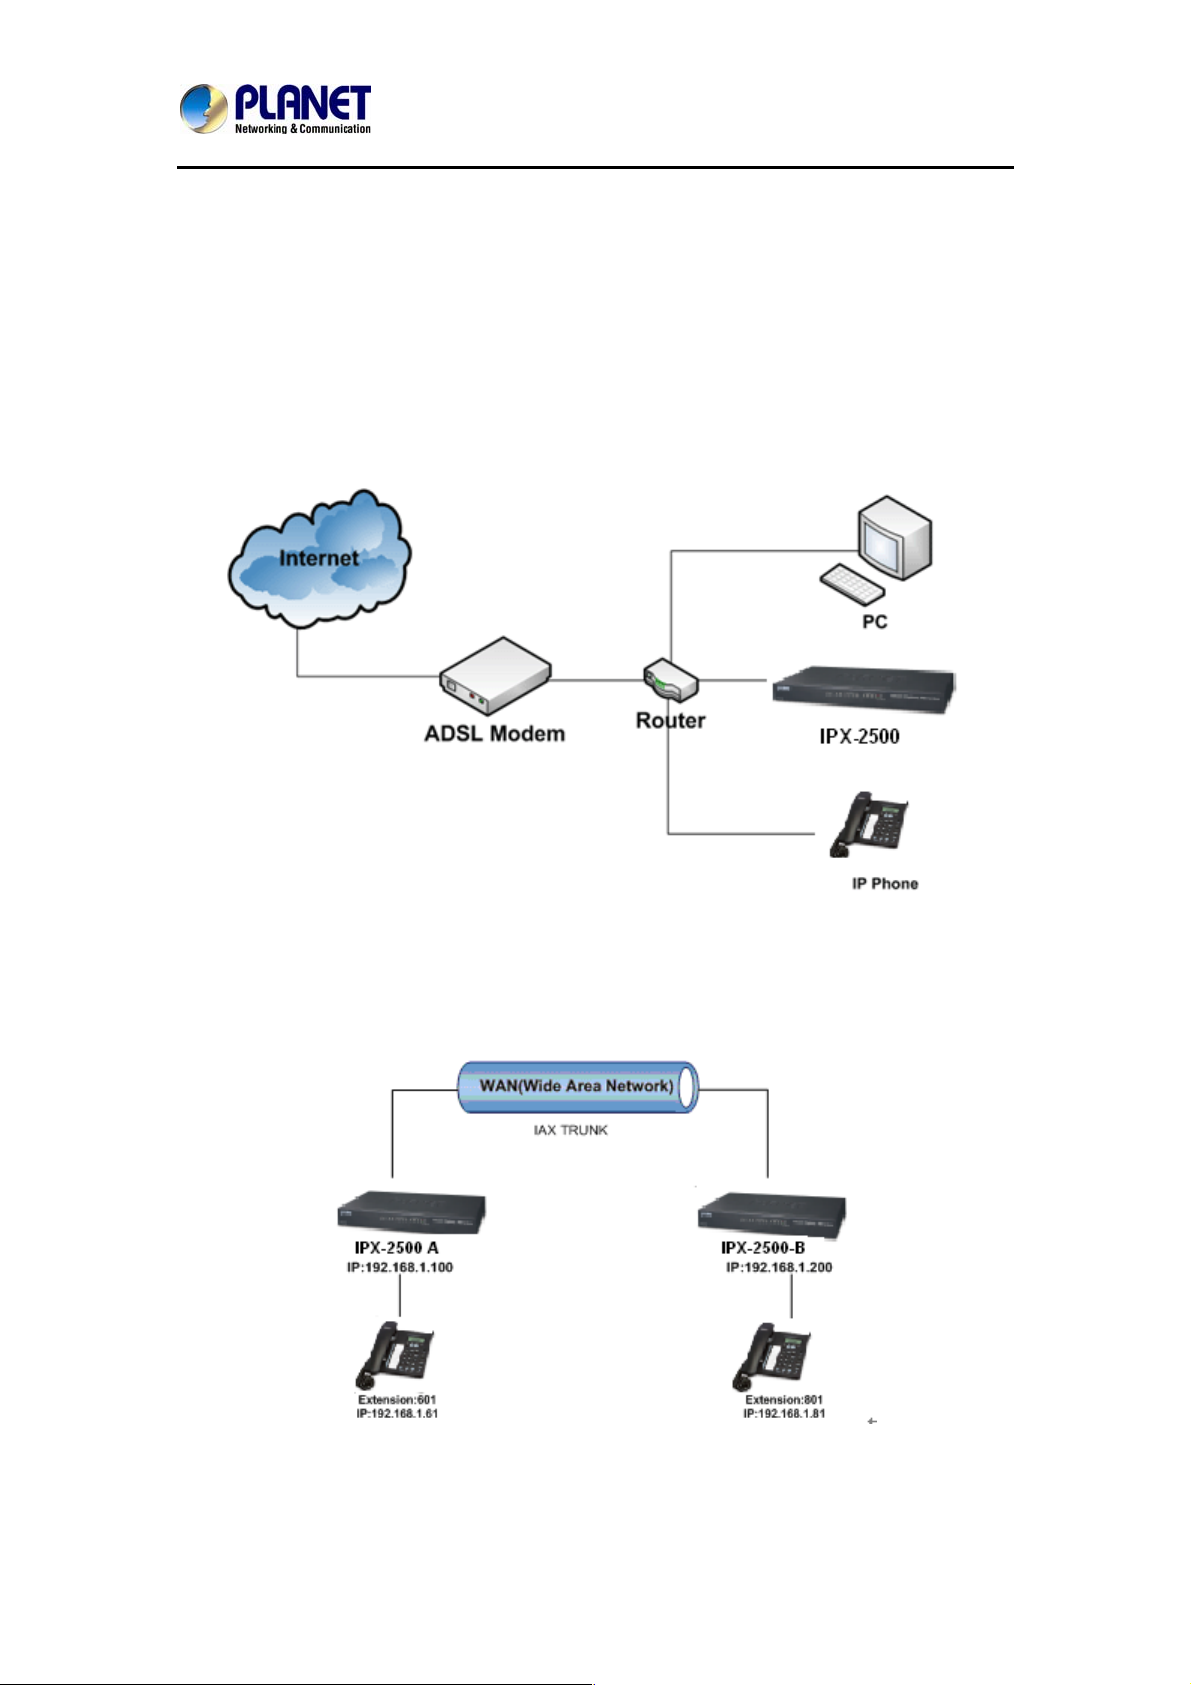
Internet Telephony PBX System
IPX-2500
Chapter 8 Operating Instructions
This chapter will introduce you how to use PLANET IP PBX by example.
8.1 How to connect the IPX-2500 IP PBX to the Internet
If your office accesses the public network through router, you can put Planet IP PBX behind
the router. You should connect the WAN port of the IP PBX to the LAN port of the router.
8.2 How to combine two IPX-2500 IP PBX in a different network
Normally, two sets of the IPX-2500 are located in different places with different IP addresses
for Internet access.
For external line configuration, you must use public IP address.
Take the following instructions as an example:
94
Page 95
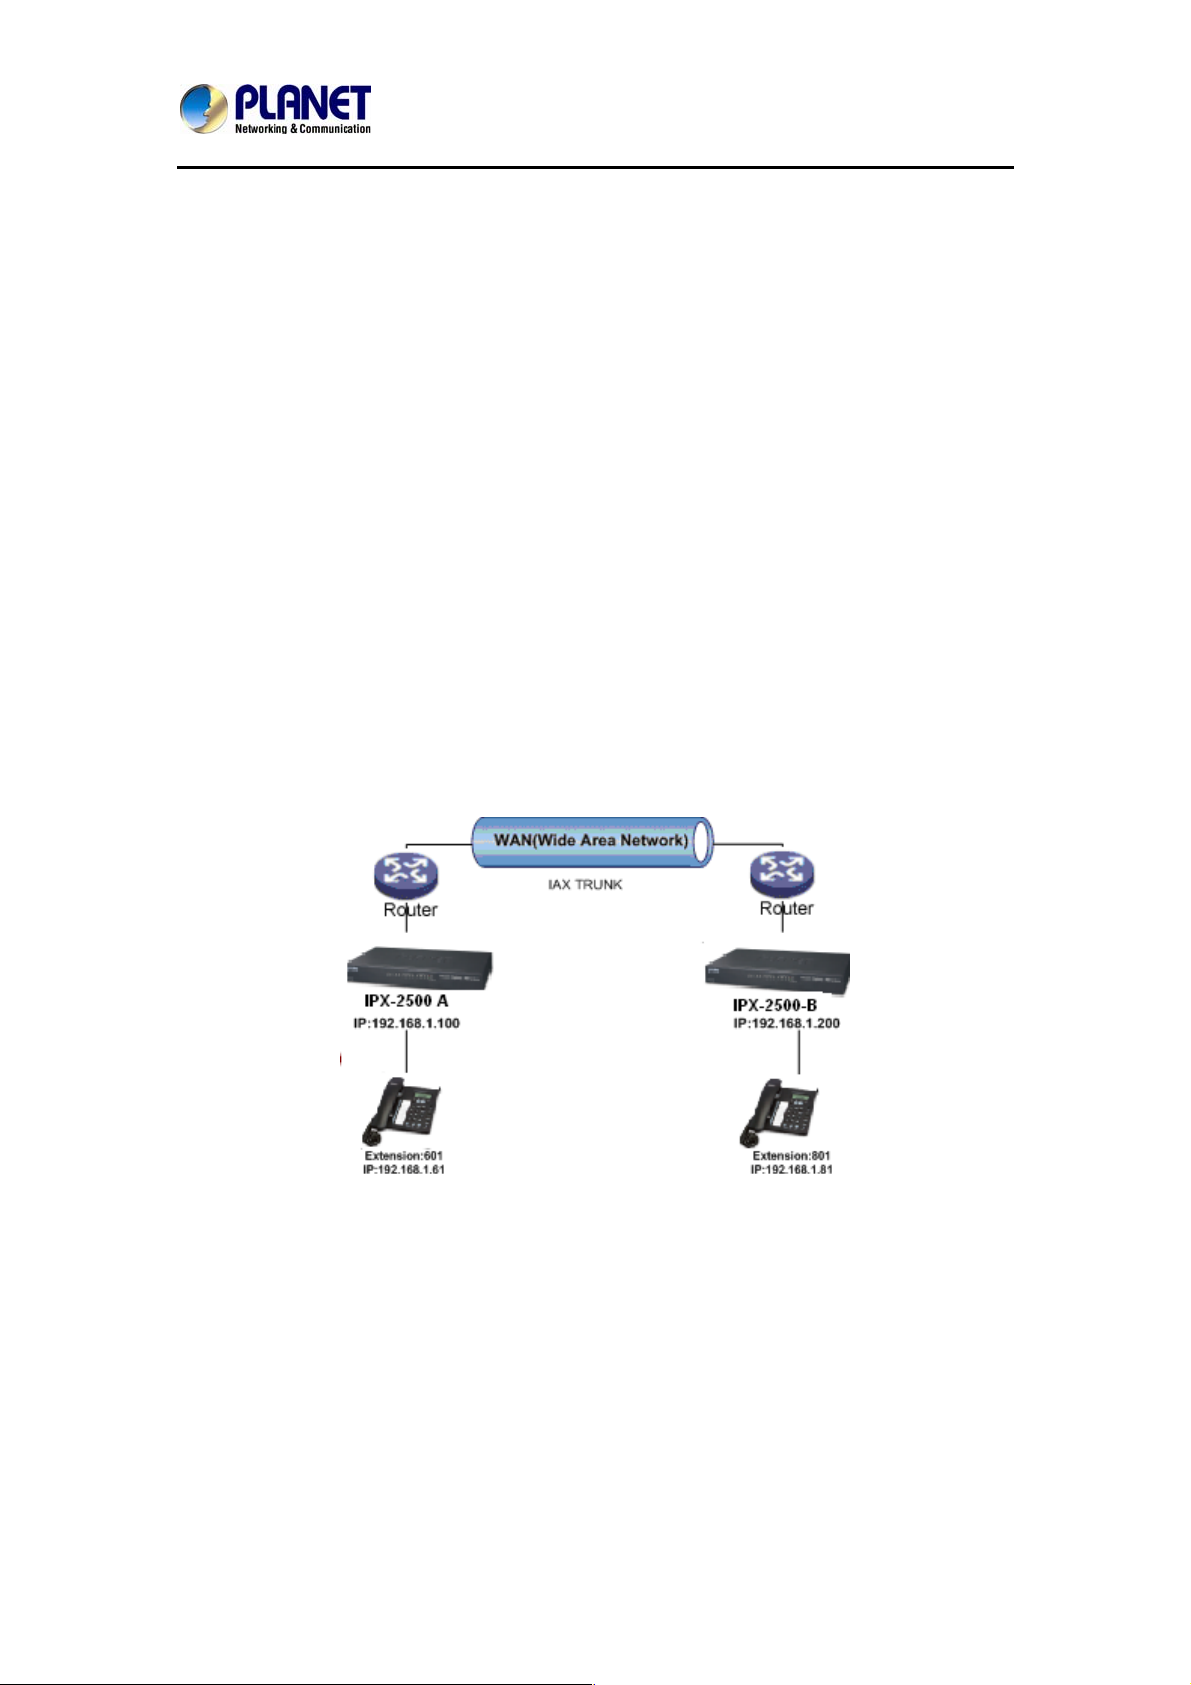
Internet Telephony PBX System
IPX-2500
Register IPX-2500-B IP to a trunk of IPX-2500-A with authentication.
Configuration Rule:
1. IP Phone registers on IPX-2500-A as extension 601.
1. Another IP Phone registers on U50-B as extension 8 01.
2. IPX-2500-A IP:192.168.1.100.
3. IPX-2500-B IP:192.168.1.200.
4. Extension format of IPX-2500-A: 6XX.
5. Extension format of IPX-2500-B: 8XX
6. Create an extension 888 with password 123456 on IPX-2500-B.
7. All extensions on IPX-2500-A can call e x tensions on IPX-2500-B with format 8XX.
8. All extensions on IPX-2500-B can call e x tensions on IPX-2500-A with format 6XX.
For detailed steps, please take chapter 8.2 as reference.
Two sets of IPX-2500 behind router
Sometimes the IPX-2500 doesn’t have a public IP address, and you have to configure port
mapping for your router.
Step1: Configure the mapping rule of IPX-2500-A on the router.
The IPX-2500-B is connected behind the router, and registers on IPX-2500 -A th rough inte rne t.
You need to configure the port mapping of IAX2 port(4569) on the router. Then, all data
received from eth0 port of router (192.168.1.100:4569) will be sent to IPX-2500-A
Now, take the web management panel of AND-4100 router as an example.
In here both UTP and TCP must open for IP PBX.
95
Page 96
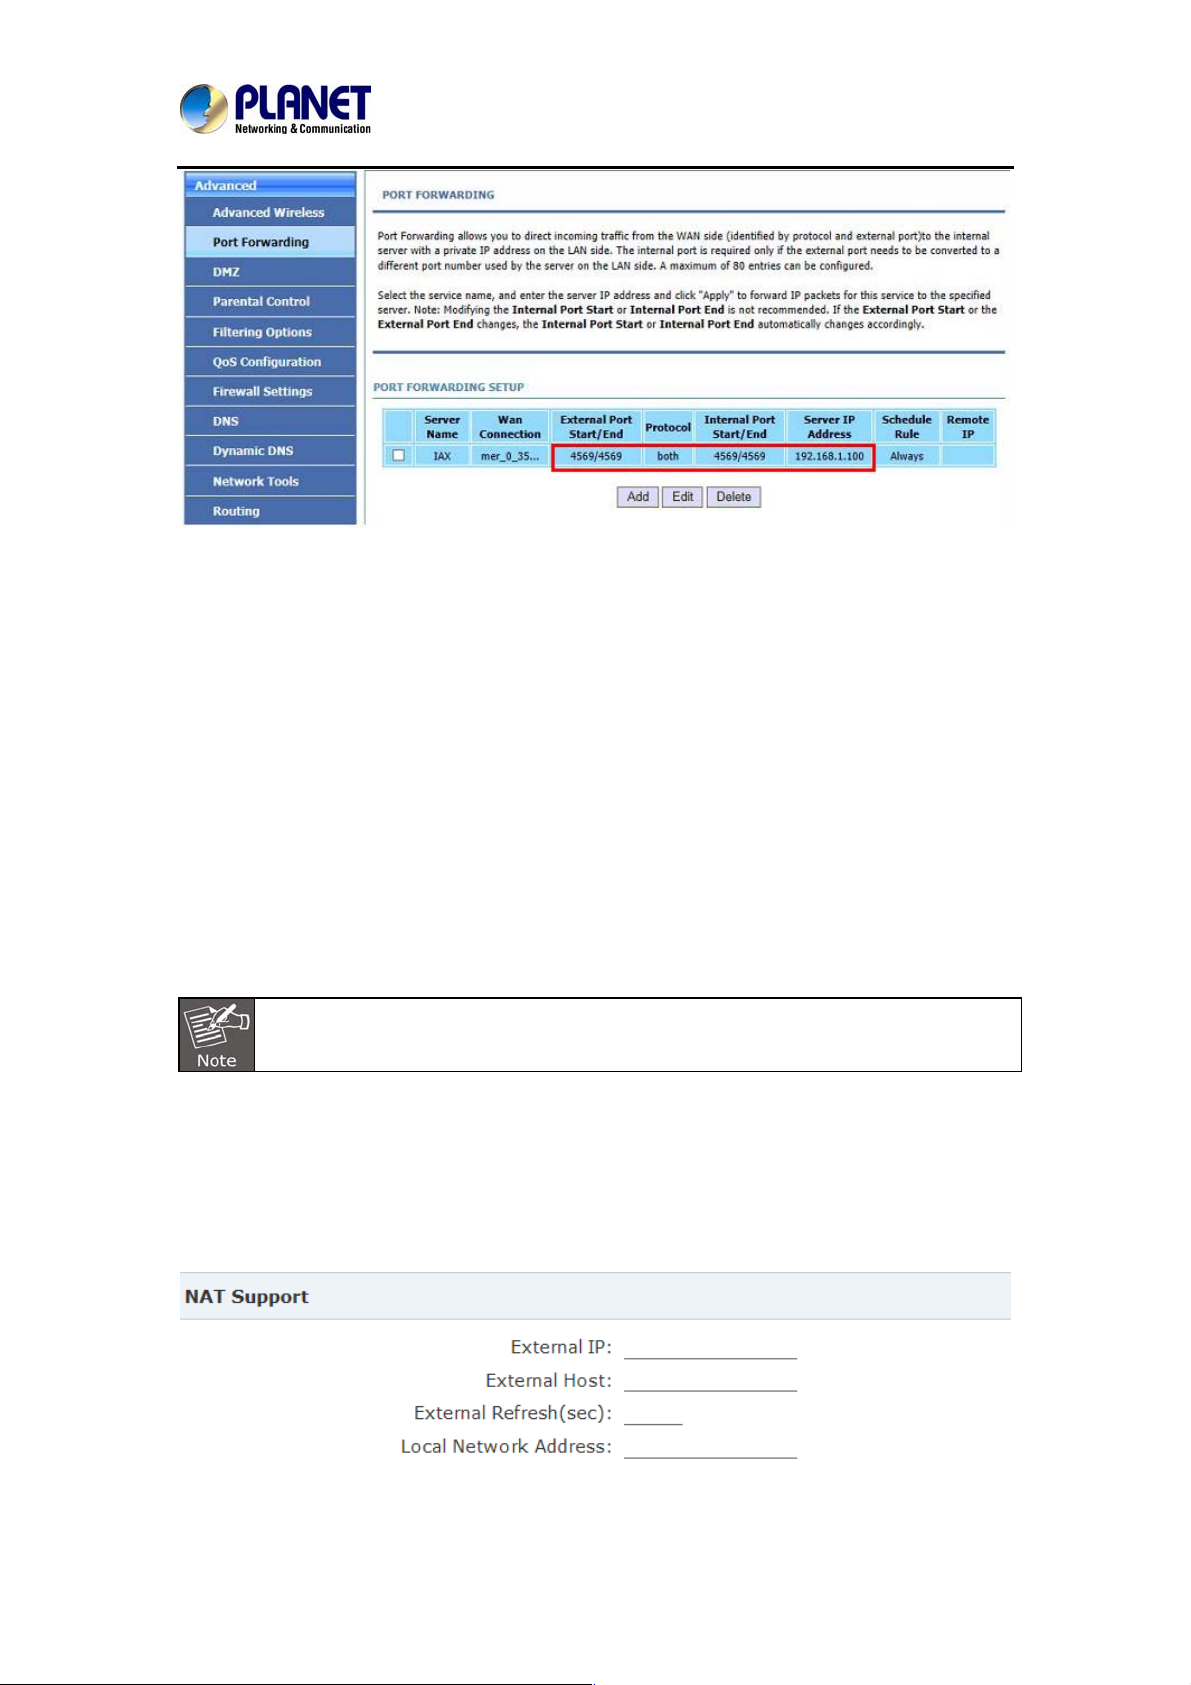
Internet Telephony PBX System
IPX-2500
Step2: IPX-2500 Configuration
Configure the trunk and dial plan on IPX-2500-B, and register IPX-2500-B IP to IPX-2500-A.
The configuration is the same as the above, but you have to replace the public IP address wit h
the internal IP:192.168.1.21.
Step3: Configure port mapping rule of IPX-2500-B on the router
Configure port mapping of IPX-2500-B on the router according to Step1.
Step4: Connect two sets of the IPX-2500 and make the call
Create extension 601 on IPX-2500-A, extension 801 on IPX-2500-B, and create the correct
outbound rule.
Public IP must be provided by network provider. It could be dynamic IP address, and
easy to change; you can resolve this problem by using DDNS.
8.3 How to resolve the problem about hearing one side only
If the IPX-2500 is behind router, to resolve the problem, please set up IP address as shown
below:
Click【Advanced】->【Option】->【Global SIP Settings】:
96
Page 97
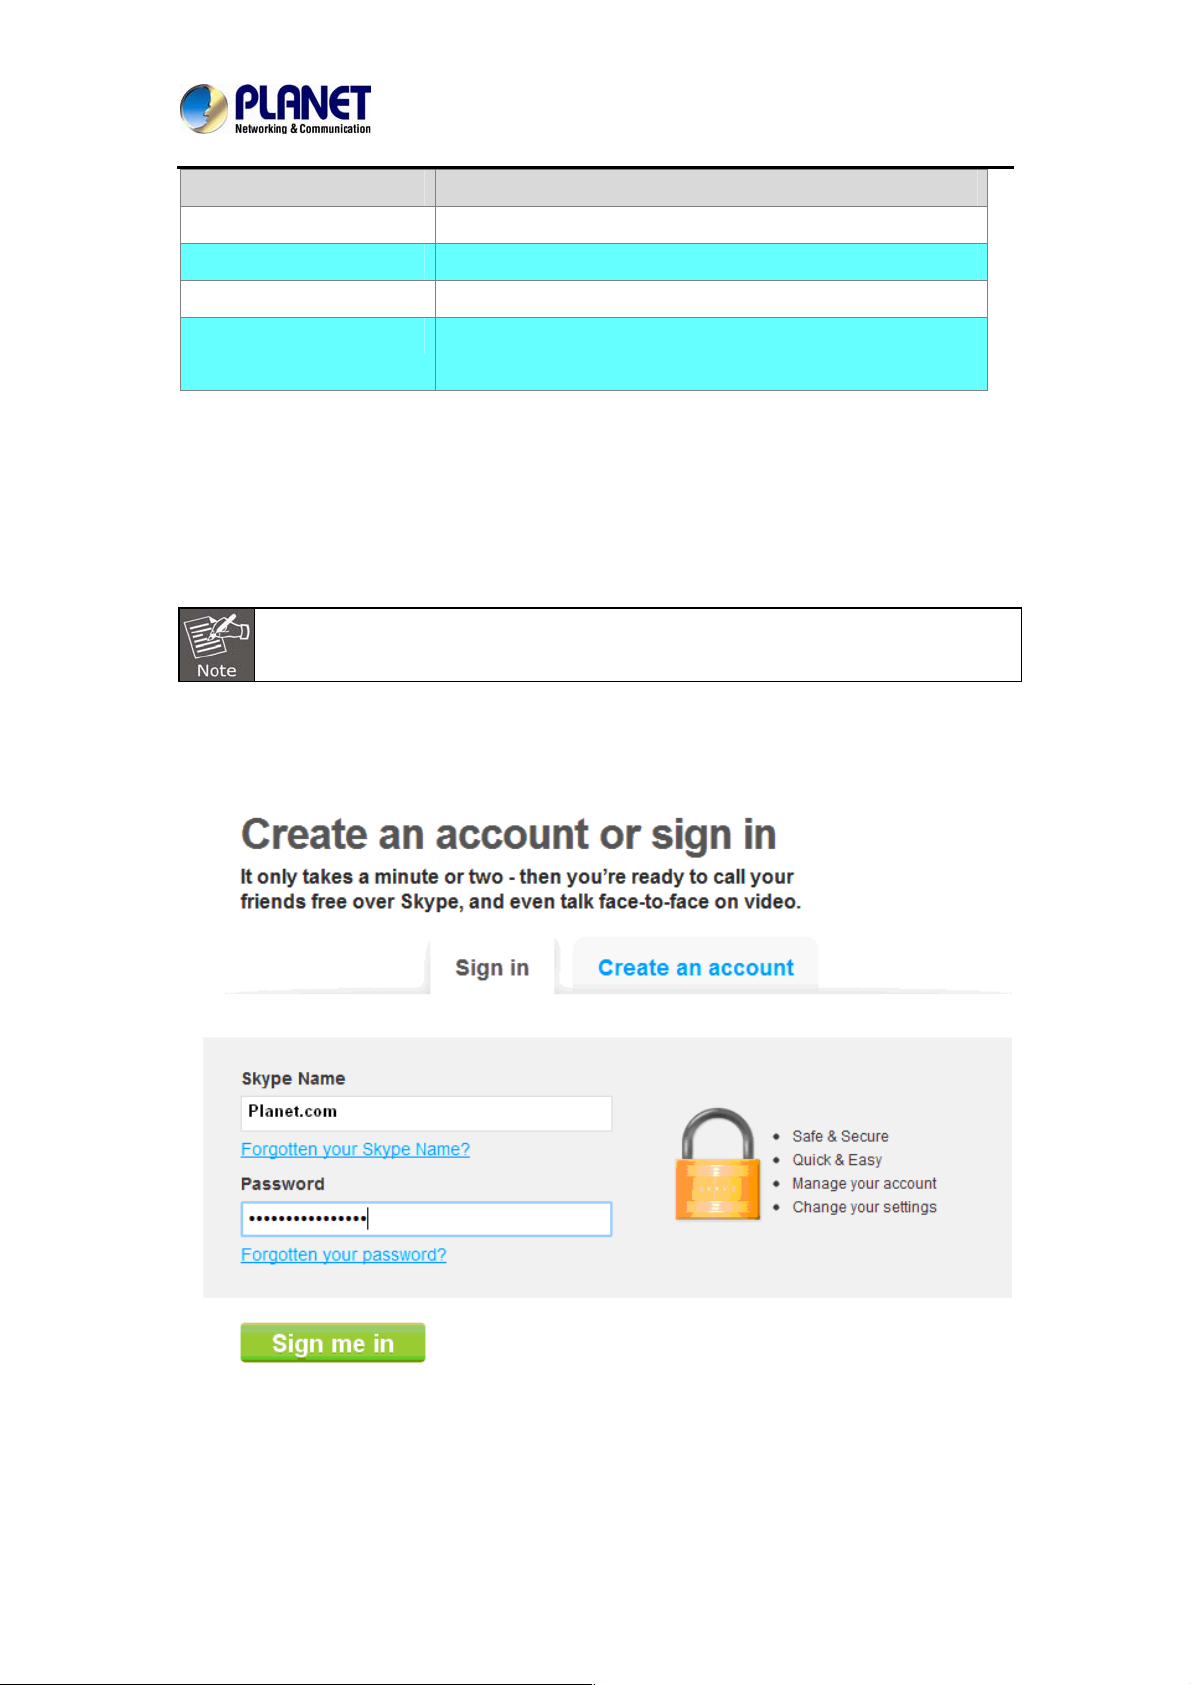
Internet Telephony PBX System
IPX-2500
Item Explanation
External IP External IP or domain to replace the device IP
External Host External domain to replace the device IP.
External Refresh(sec) Refresh time, default is 10 seconds
Local Network Add re ss IP address and subnet mask needed to be converted.
e.g. 192.168.1.100/255.255.255.0
8.4 How to use Skype account in IPX-2500
[Answer]:
The fee of your business account is much more than €50 when you use the account
for the first time.
1. https://login.skype.com
Sign in with the business account.
1) When you have signed in, at the end of this page, you will find the Skype Manager,
Please click it.
97
Page 98
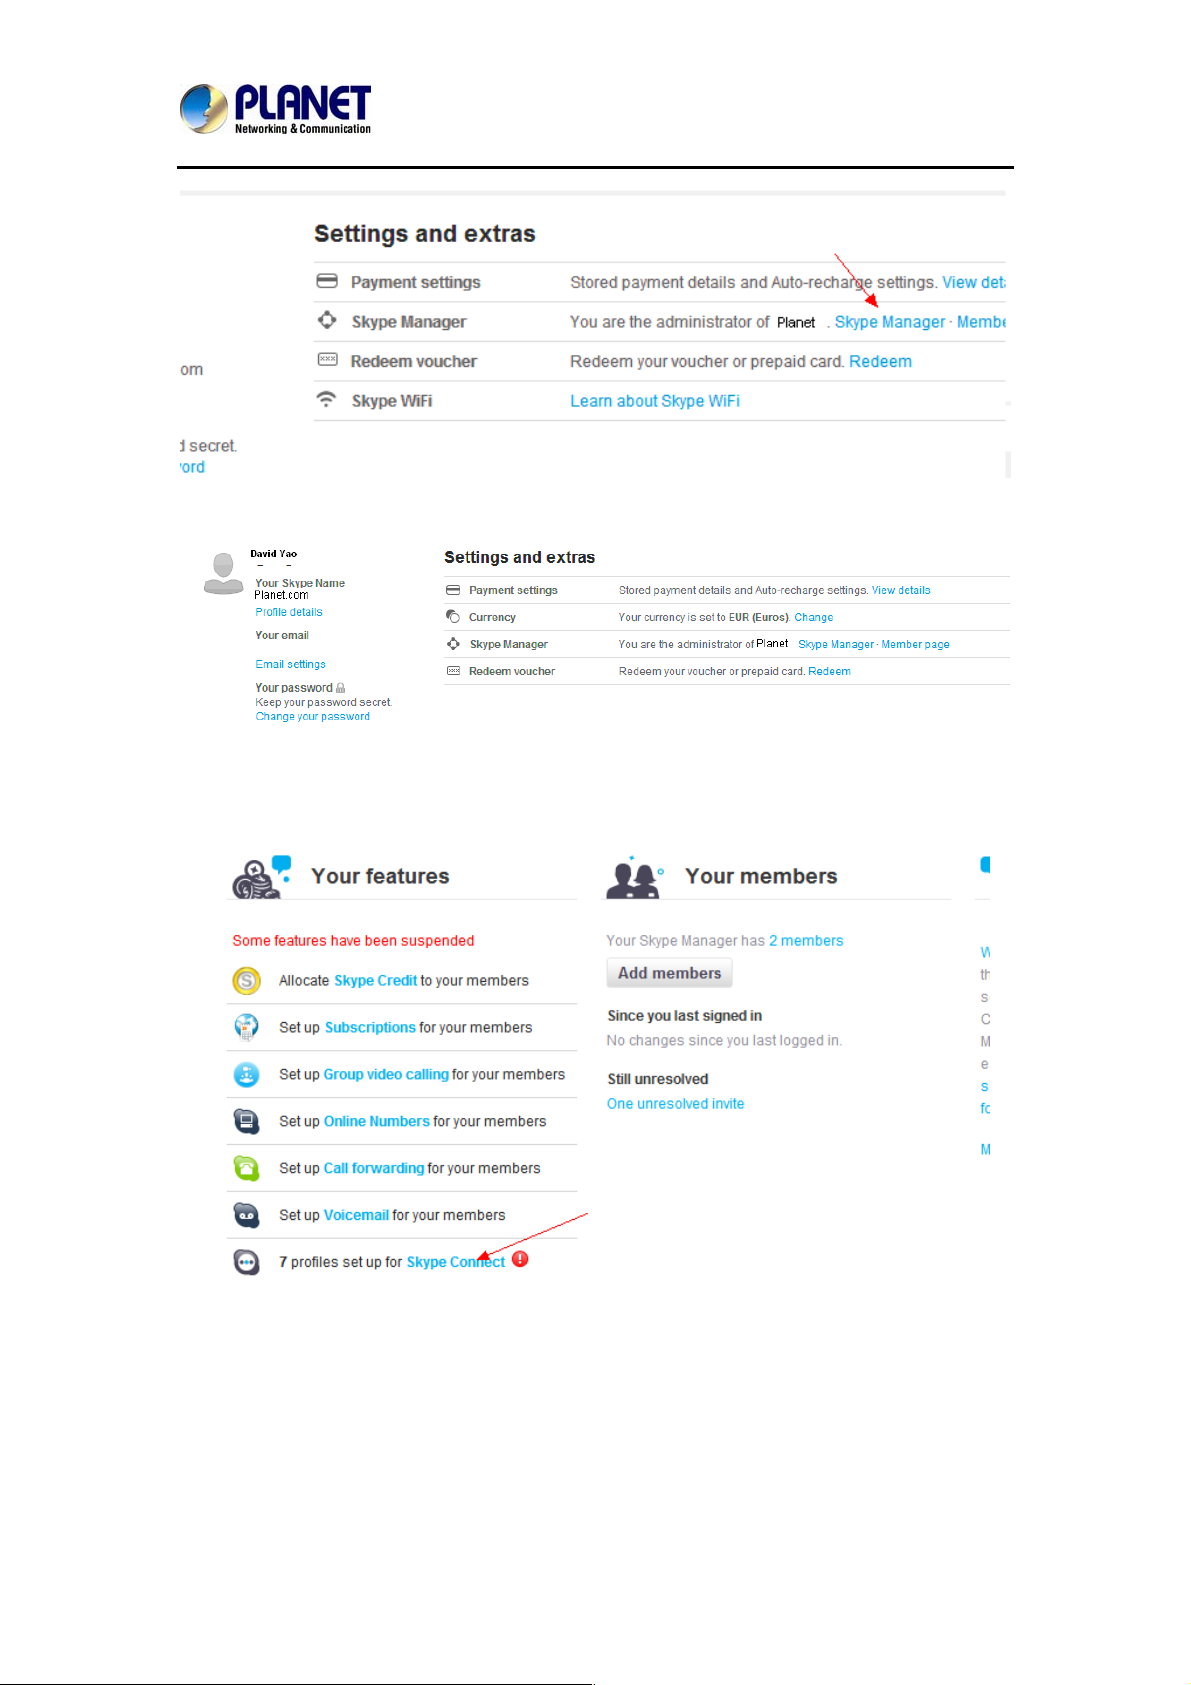
Internet Telephony PBX System
IPX-2500
3. Please click the Skype connect
98
Page 99
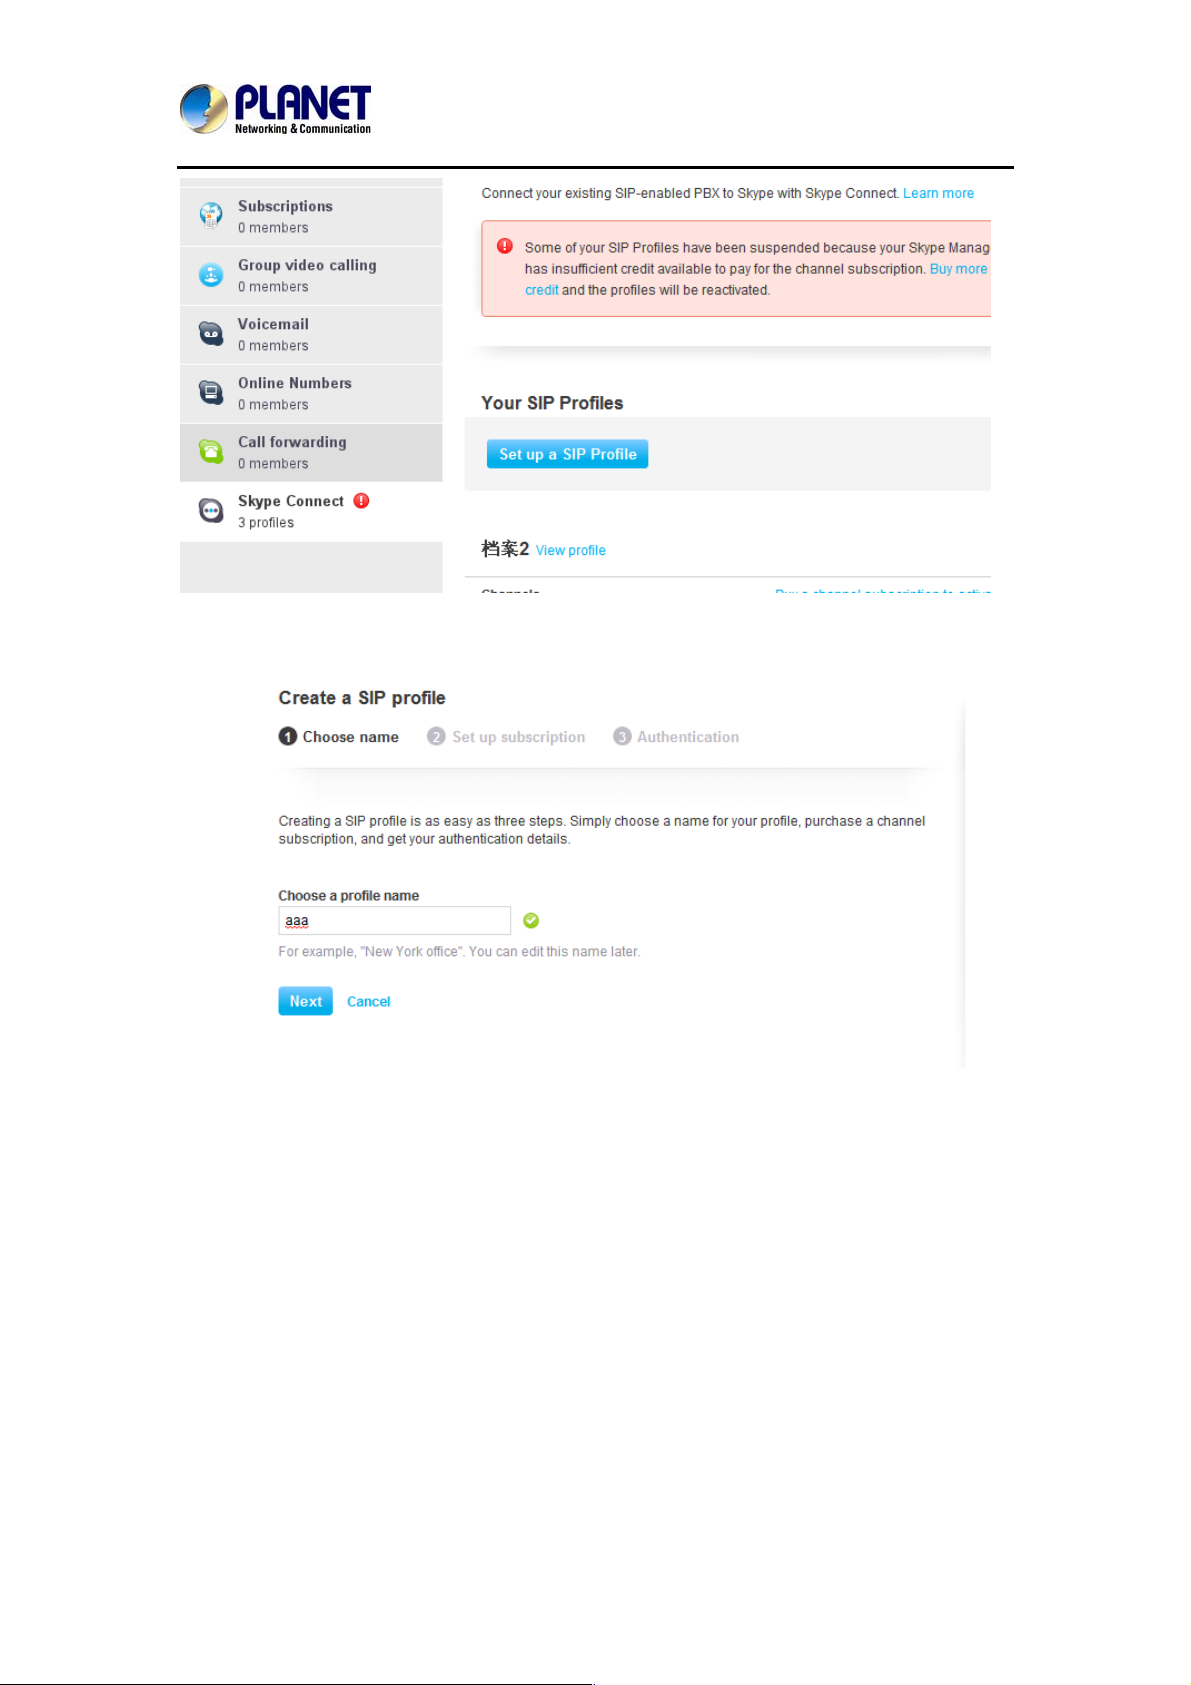
Internet Telephony PBX System
4. Create a SIP profile
IPX-2500
Then you can create one sip account, you need to pay € 4.95 for one channel as monthly rent
and you need to input the registration information in our VoIP trunk blank. Then you can
register with Skype server. And then you need to assign money for outgoing calls, and then
you can call out.
99
Page 100
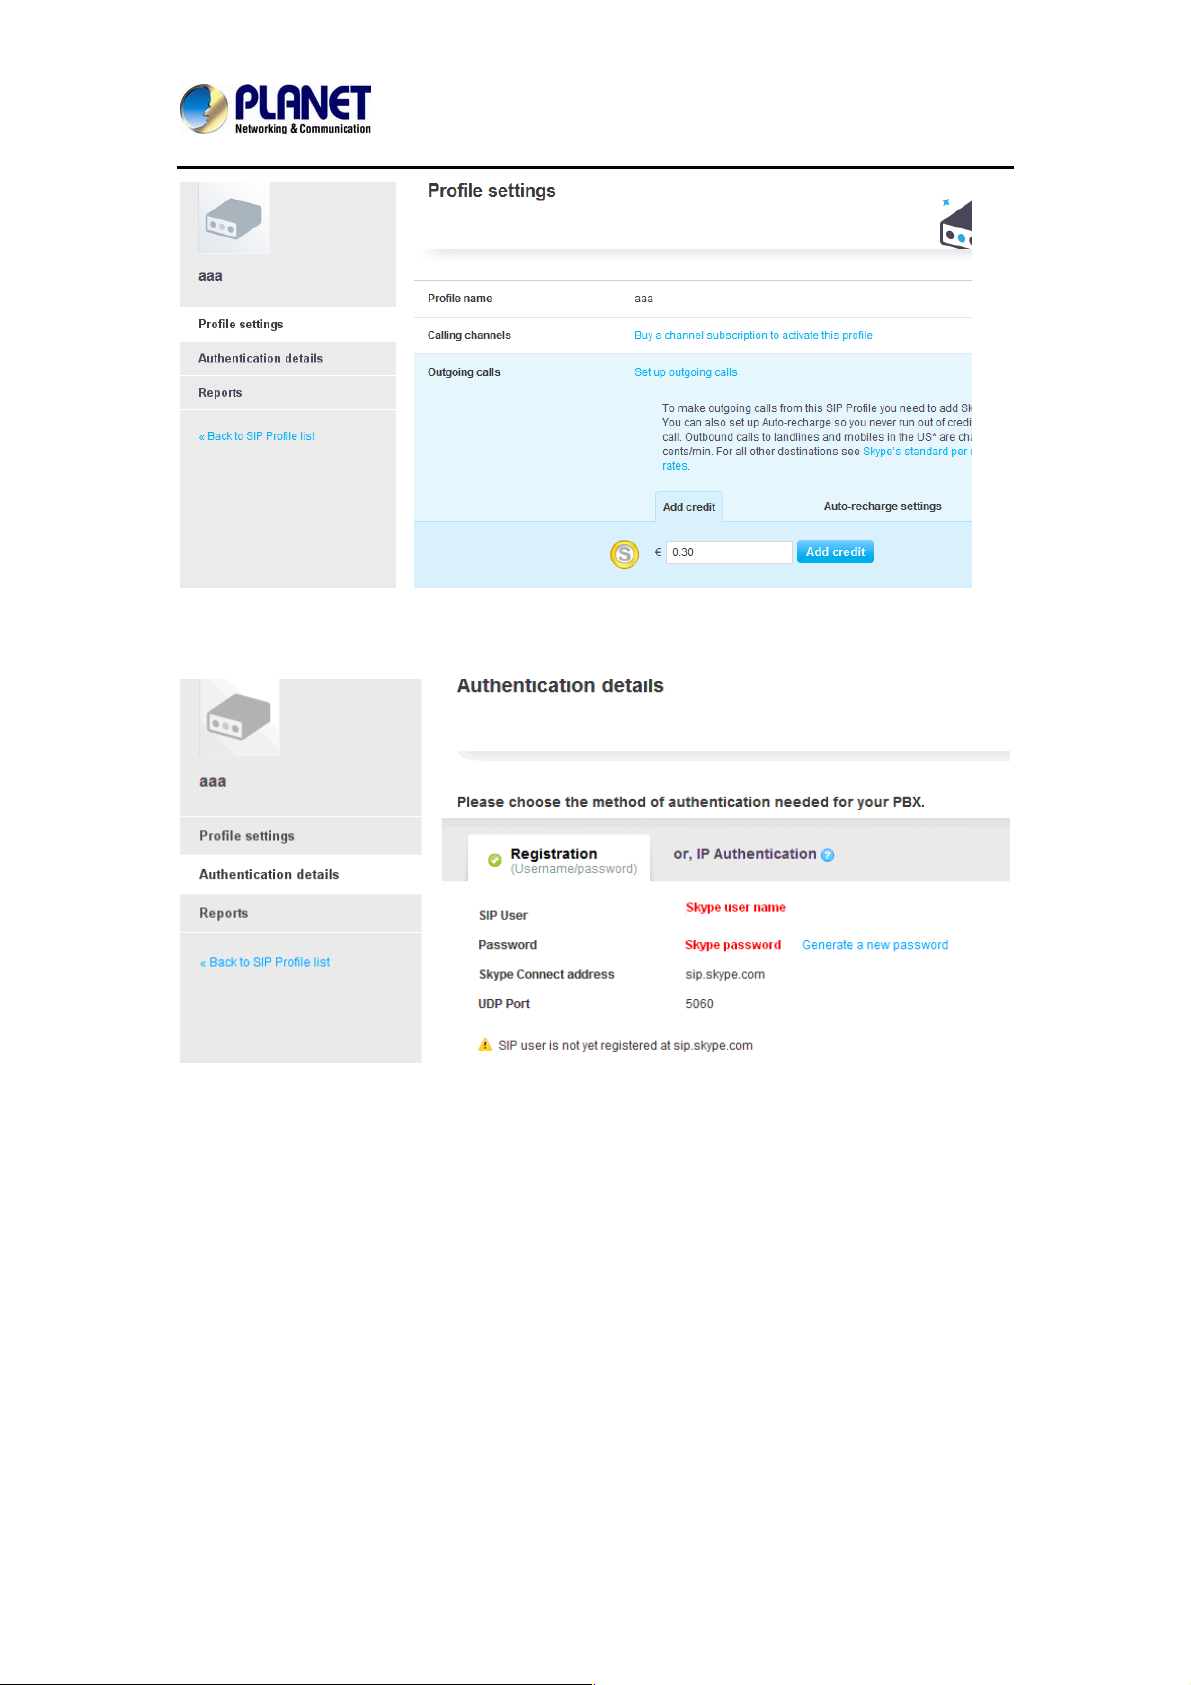
Internet Telephony PBX System
IPX-2500
Then you can see the sip account information, and please click the Authentications details.
5.Settings on IPPBX
3. build one sip trunk with Skype for sip account
Provider Type: Custom T runk
Host: sip.skybe.com
User name: the user name you defined in Authentication detail
Password: the password you defined in Authentication detail
100
 Loading...