


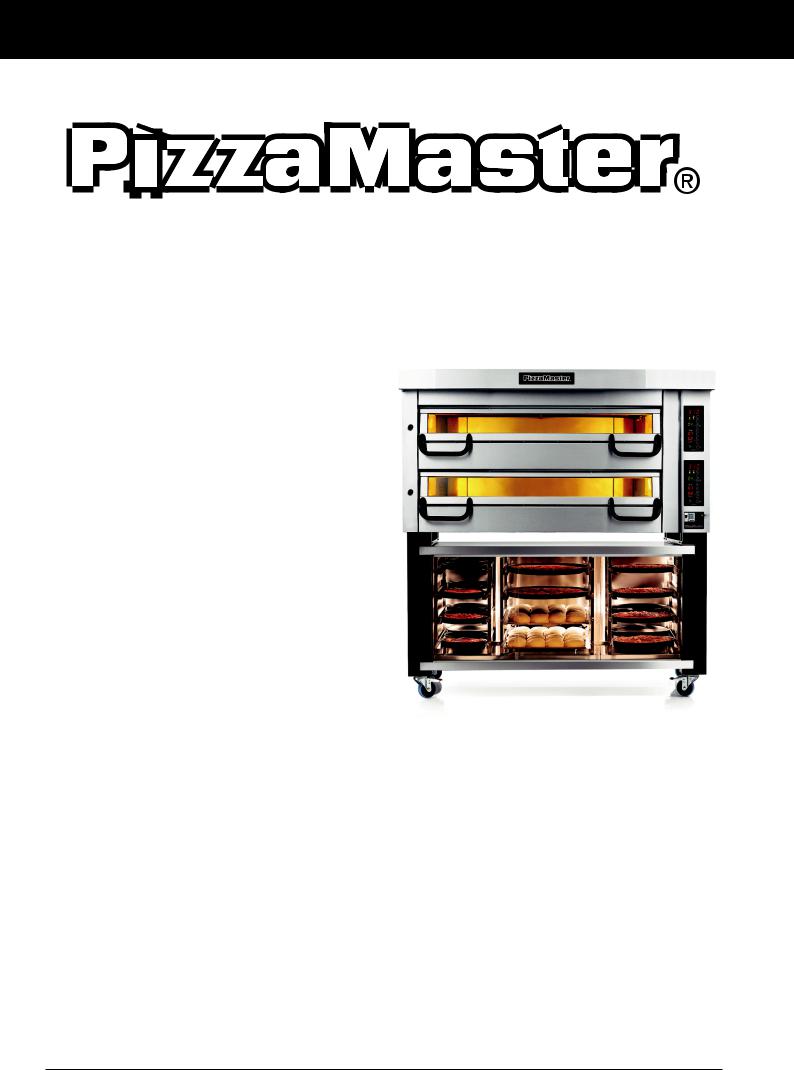
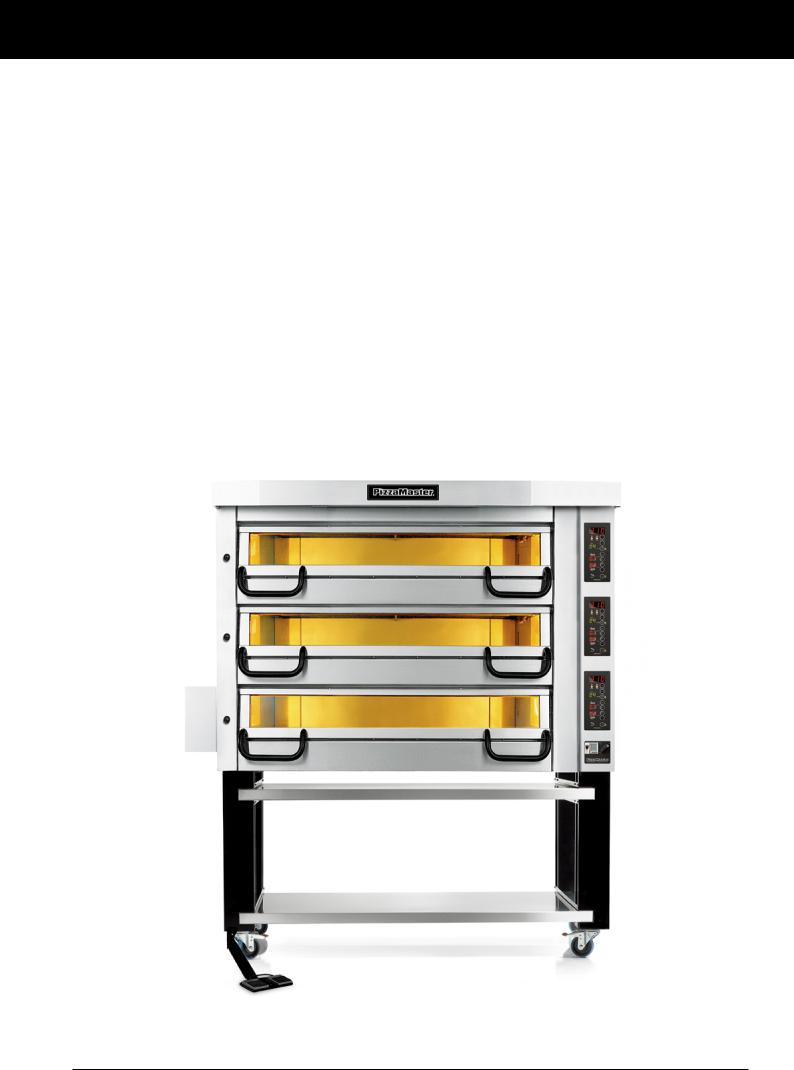
Instruction for installation, operation and maintenance
Series 700
PM 721 – PM 722 – PM 723 – PM 724 – PM 725
PM 731 – PM 732 – PM 733 – PM 724 – PM 725
PM 741 – PM 742 – PM 743 – PM 744 – PM 745
Series 800
PM 821 – PM 822 – PM 823 – PM 824 – PM 825
PM 831 – PM 832 – PM 833 – PM 834 – PM 835
PM 841 – PM 842 – PM 843 – PM 844 – PM 845
Series 900
PM 921 – PM 922 – PM 923 – PM 924 – PM 925
PM 931 – PM 932 – PM 933 – PM 934 – PM 935
PM 941 – PM 942 – PM 943 – PM 944 – PM 945
9006-0101 R1A
Warranty and service
Quality tastes better
PizzaMaster® ovens are designed and built by Svenska BakePartner AB
We thank you for your trust and congratulate you on the purchase of your new PizzaMaster® oven. Our goal has always been to build the best pizza ovens in the world.
Right from the start, we knew this could be achieved only by specializing in the pizza industry and making bake-quality our top priority. PizzaMaster® ovens are therefore made exclusively for the pizza industry to meet the demands of all businesses that depend on quality pizza.
2-year manufacturer’s warranty
All PizzaMaster® ovens come with a 2-year limited warranty that covers the purchaser against any defect in material or workmanship. For further details about this important cover, please consult your BakePartner representative.
Special expertise
PizzaMaster® service technicians are trained specialists. They are equipped with all instruments and tools needed to make the correct diagnosis and perform service work quickly and efficiently. Our technicians travel the world continuously, training local technicians to uphold the BakePartner standard.
Genuine parts
Your PizzaMaster® oven consists of over 1000 quality parts with long service life. Should it become necessary to replace a part, it is most important to replace it with a genuine PizzaMaster® part. This ensures not only optimum function but also continued safety in the workplace.
When contacting BakePartner or your local PizzaMaster® distributor for assistance, please remember to quote the model designation and serial number of your oven. This will help us to help you more quickly.
Svenska BakePartner AB
Odegaerdsgatan 5
SE-504 94 Boras
Sweden
Tel: |
+46(0)33-230 025 |
Fax: |
+46(0)33-248 140 |
Internet: |
www.pizzamaster.com or |
|
www.bakepartner.com |
E-mail: |
info@bakepartner.com |
2 |
PizzaMaster® |

Index
Index |
Page |
Serial No / Oven rating plate...................................................... |
1 |
Warranty and service................................................................. |
2 |
Index.......................................................................................... |
3 |
Capacities and technical data.................................................... |
4 |
Positioning the oven................................................................... |
5 |
Packing list................................................................................. |
6 |
Installation – Assembly oven................................................... |
7-8 |
Installation – Assembly accessories.......................................... |
9 |
Installation – Electrical connection oven.................................. |
10 |
Installation – Evacuation connection........................................ |
11 |
Installation – Assembly UBC............................................... |
12-13 |
Installation - Automatic door opener.......................................... |
14 |
Oven operation - Guide of usage.............................................. |
15 |
Oven operation - Display ED............................................... |
16-17 |
Oven operation - Display E................................................. |
18-19 |
Oven settings and baking tips.................................................. |
20 |
First-time start-up / Changing of oven lamps / Maintenance.... 21 |
|
Maintenance and Preventative Maintenances.................... |
22-23 |
7-day clock timer................................................................. |
24-25 |
Throubleshooting..................................................................... |
26 |
EU-Declaration of conformity................................................... |
27 |
Quality assurance and delivery certificate.......................... |
28-29 |
Attachment : |
|
Electrical diagram |
|
Parts list – Electrical components |
|
BakePartner has a policy of continuous product development and reserves the right to change specifications and designs without prior notice.
PizzaMaster® |
3 |

Capacities and technical data
PizzaMaster® 700-series (optimized for pizzas up to 355 mm / 14 in)
|
Dimensions in millimetres |
Dimensions in inches |
No. of |
Power |
Capacity (pizzas per oven) |
||||||
Model *)a |
Width x Depth x Height *b) |
Width x Depth x Height *b) |
decks |
output |
|
|
|
|
|||
254 mm |
355 mm |
406 mm |
457 mm |
||||||||
|
|
|
|
|
*c) |
kW |
|
|
|
|
|
|
External |
Internal |
External |
Internal |
10 in |
14 in |
16 in |
18 in |
|||
PM 721 |
1125 x 905 x 480 |
|
44.3 x 35.6 x 18.9 |
|
1 |
6.7 |
6 |
4 |
2 |
1 |
|
PM 722 |
1125 x 905 x 820 |
710 x 710 x 210/245 |
44.3 x 35.6 x 32.3 |
28.0 x 28.0 x 8.2/9.6 |
2 |
13.4 |
12 |
8 |
4 |
2 |
|
PM 723 |
1125 x 905 x 1160 |
44.3 x 35.6 x 45.7 |
3 |
20.1 |
18 |
12 |
6 |
3 |
|||
|
|
||||||||||
PM 724 |
1125 x 905 x 1500 |
|
44.3 x 35.6 x 59.1 |
|
4 |
26.8 |
24 |
16 |
9 |
4 |
|
PM 731 |
1480 x 905 x 480 |
|
58.3 x 35.6 x 18.9 |
|
1 |
9.5 |
11 |
6 |
3 |
2 |
|
PM 732 |
1480 x 905 x 820 |
1065 x 710 x 210/245 |
58.3 x 35.6 x 32.3 |
42.0 x 28.0 x 8.2/9.6 |
2 |
19.0 |
22 |
12 |
6 |
4 |
|
PM 733 |
1480 x 905 x 1160 |
58.3 x 35.6 x 45.7 |
3 |
28.5 |
33 |
18 |
9 |
6 |
|||
|
|
||||||||||
PM 734 |
1480 x 905 x 1500 |
|
58.3 x 35.6 x 59.1 |
|
4 |
38.0 |
44 |
24 |
12 |
8 |
|
PM 741 |
1835 x 905 x 480 |
|
72.3 x 35.6 x 18.9 |
|
1 |
12.5 |
15 |
8 |
4 |
3 |
|
PM 742 |
1835 x 905 x 820 |
1440 x 710 x 210/245 |
72.3 x 35.6 x 32.3 |
56.0 x 28.0 x 8.2/9.6 |
2 |
25.0 |
30 |
16 |
8 |
6 |
|
PM 743 |
1835 x 905 x 1160 |
72.3 x 35.6 x 45.7 |
3 |
37.5 |
45 |
24 |
12 |
9 |
|||
|
|
||||||||||
PM 744 |
1835 x 905 x 1500 |
|
72.3 x 35.6 x 59.1 |
|
4 |
50.0 |
60 |
32 |
16 |
12 |
|
PizzaMaster® 800-series (optimized for pizzas up to 410 mm / 16 in)
Model |
Dimensions in millimetres |
Dimensions in inches |
No. of |
Power |
Capacity (pizzas per oven) |
||||||
Width x Depth x Height *b) |
Width x Depth x Height *b) |
decks |
output |
|
|
|
|
||||
254 mm |
355 mm |
406 mm |
457 mm |
||||||||
*)a |
|
|
|
|
*c) |
kW |
|||||
External |
Internal |
External |
Internal |
10 in |
14 in |
16 in |
18 in |
||||
|
|||||||||||
PM 821 |
1250 x 1025 x 480 |
|
49.2 x 40.4 x 18.9 |
|
1 |
9.0 |
9 |
4 |
4 |
2 |
|
PM 822 |
1250 x 1025 x 820 |
820 x 820 x 210/245 |
49.2 x 40.4 x 32.3 |
32.3 x 32.3 x 8.2/9.6 |
2 |
18.0 |
18 |
8 |
8 |
4 |
|
PM 823 |
1250 x 1025 x 1160 |
49.2 x 40.4 x 45.7 |
3 |
27.0 |
27 |
12 |
12 |
6 |
|||
PM 824 |
1250 x 1025 x 1500 |
|
49.2 x 40.4 x 59.1 |
|
4 |
36.0 |
36 |
16 |
16 |
8 |
|
PM 831 |
1660 x 1025 x 480 |
|
65.4 x 40.4 x 18.9 |
|
1 |
13.5 |
14 |
6 |
6 |
3 |
|
PM 832 |
1660 x 1025 x 820 |
1230 x 820 x 210/245 |
65.4 x 40.4 x 32.3 |
48.4 x 32.3 x 8.2/9.6 |
2 |
27.0 |
28 |
12 |
12 |
6 |
|
PM 833 |
1660 x 1025 x 1160 |
65.4 x 40.4 x 45.7 |
|
3 |
40.5 |
42 |
18 |
18 |
9 |
||
PM 834 |
1660 x 1025 x 1500 |
|
65.4 x 40.4 x 59.1 |
|
4 |
54.0 |
56 |
24 |
24 |
12 |
|
PM 841 |
2070 x 1025 x 480 |
|
81.5 x 40.4 x 18.9 |
|
1 |
17.0 |
18 |
9 |
8 |
5 |
|
PM 842 |
2070 x 1025 x 820 |
1640 x 820 x 210/245 |
81.5 x 40.4 x 32.3 |
64.6 x 32.3 x 8.2/9.6 |
2 |
34.0 |
36 |
18 |
16 |
10 |
|
PM 843 |
2070 x 1025 x 1160 |
81.5 x 40.4 x 45.7 |
3 |
51.0 |
54 |
27 |
24 |
15 |
|||
PM 844 |
2070 x 1025 x 1500 |
|
81.5 x 40.4 x 59.1 |
|
4 |
68.0 |
72 |
36 |
32 |
20 |
|
PizzaMaster® 900-series (optimized for pizzas up to 460 mm / 18 in)
Model |
Dimensions in millimetres |
Dimensions in inches |
No. of |
Power |
Capacity (pizzas per oven) |
||||||
Width x Depth x Height *b) |
Width x Depth x Height *b) |
decks |
output |
|
|
|
|
||||
254 mm |
355 mm |
406 mm |
457 mm |
||||||||
*)a |
|
|
|
|
*c) |
kW |
|||||
External |
Internal |
External |
Internal |
10 in |
14 in |
16 in |
18 in |
||||
|
|||||||||||
PM 921 |
1350 x 1125 x 480 |
|
53.2 x 44.3 x 18.9 |
|
1 |
11.0 |
12 |
5 |
4 |
4 |
|
PM 922 |
1350 x 1125 x 820 |
920 x 920 x 210/245 |
53.2 x 44.3 x 32.3 |
36.2 x 36.2 x 8.2/9.6 |
2 |
22.0 |
24 |
10 |
8 |
8 |
|
PM 923 |
1350 x 1125 x 1160 |
53.2 x 44.3 x 45.7 |
3 |
32.9 |
36 |
15 |
12 |
12 |
|||
PM 924 |
1350 x 1125 x 1500 |
|
53.2 x 44.3 x 59.1 |
|
4 |
44.0 |
48 |
20 |
16 |
16 |
|
PM 931 |
1810 x 1125 x 480 |
|
71.3 x 44.3 x 18.9 |
|
1 |
16.9 |
18 |
8 |
6 |
6 |
|
PM 932 |
1810 x 1125 x 820 |
1380 x 920 x 210/245 |
71.3 x 44.3 x 32.3 |
54.3 x 36.2 x 8.2/9.6 |
2 |
33.7 |
36 |
16 |
12 |
12 |
|
PM 933 |
1810 x 1125 x 1160 |
71.3 x 44.3 x 45.7 |
3 |
50.6 |
54 |
24 |
18 |
18 |
|||
PM 934 |
1810 x 1125 x 1500 |
|
71.3 x 44.3 x 59.1 |
|
4 |
67.6 |
72 |
36 |
24 |
24 |
|
PM 941 |
2270 x 1125 x 480 |
|
89.4 x 44.3 x 18.9 |
|
1 |
21.4 |
24 |
11 |
8 |
8 |
|
PM 942 |
2270 x 1125 x 820 |
1840 x 920 x 210/245 |
89.4 x 44.3 x 32.3 |
72.4 x 36.2 x 8.2/9.6 |
2 |
42.7 |
48 |
22 |
16 |
16 |
|
PM 943 |
2270 x 1125 x 1160 |
89.4 x 44.3 x 45.7 |
3 |
64.1 |
72 |
33 |
24 |
24 |
|||
PM 944 |
2270 x 1125 x 1500 |
|
89.4 x 44.3 x 59.1 |
|
4 |
85.6 |
96 |
44 |
36 |
36 |
|
4 |
PizzaMaster® |
Positioning the oven
Positioning the oven
When positioning your oven, it is important to consider the following points:
•The oven is normally installed on the legs supplied with it. Remember to fit the legs with the lockable wheels at the front of the oven. It is also important for the floor to be flat, so that the oven is both horizontal and stable.
•For ventilation of the oven
DO NOT install closer than 2” (50mm) from all sides .
•If possible, position the oven so that its right-hand side can be accessed easily in order to remove the right-hand panel. This gives easy access to the back of the control panel and facilitates servicing of the oven.
•The oven can also be installed without its legs. In this case, however, it is important to position the oven so that the underneath of the oven is ventilated.
See page 8 “Assembly for ovens with spacers”
PizzaMaster® |
5 |
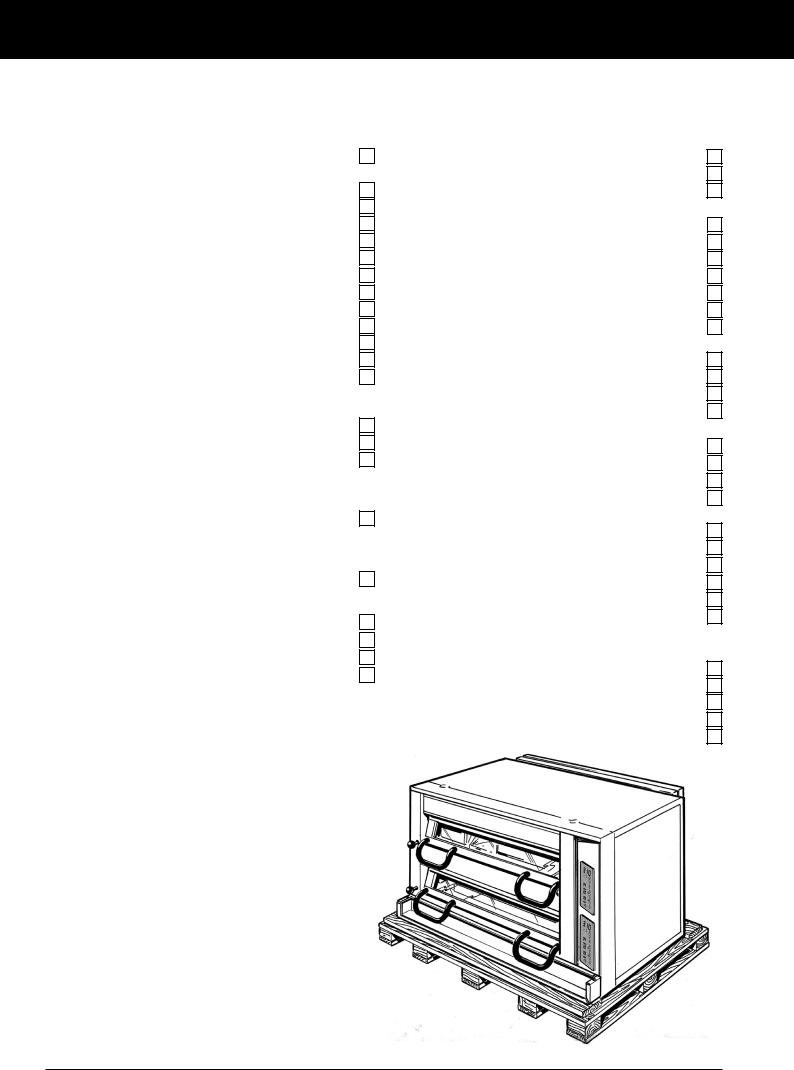
Packing list
Packing list
Please make sure the following items are present and un-damaged.
Standard equipment |
|
1.Oven Model......................................................... |
|
Serial No.............................................................. |
|
2.Leg with lockable wheel............................. |
2 pcs |
3.Leg with non-lockable wheel...................... |
2 pcs |
4.Steam duct................................................... |
1 pc |
5.Sliding shelf.................................................. |
1 pc |
6.Slide rail for legs......................................... |
4 pcs |
7.Top side panel............................................ |
2 pcs |
8.Flue diverter................................................. |
1 pc |
9.Bolt M10x30............................................. |
12 pcs |
10.Washer 20x10.5....................................... |
12 pcs |
11.Self-tapping screw (wafer head).................... |
pcs |
12.Self-tapping screw (hexagonal)................ |
16 pcs |
13.Instruction........................................................... |
|
Optional equipment
14.Clock timer..........................................................
15.Extra sliding shelf................................................
16.Peel holder..........................................................
(1 pcs upper bracket, 1 pcs lower bracket,
1 pcs soft pad and 6pcs self-tapping screw,
hexagonal)
17.Oiland spice rack .............................................
(1 pcs rack, 2 pcs bowl, 1 pcs basting brush,
1 pcs slicer and 4 pcs self-tapping screw,
hexagonal)
18.Side shelf ...........................................................
(1 pcs shelf and 2 pcs bracket)
19.Semi-automatic door opening
lower deck...........................................................
deck 2..................................................................
deck 3..................................................................
deck 4..................................................................
UBC |
|
20.UBC (standard)................................................... |
|
21.UBC-W (heating cabinet).................................... |
|
22.UBC-P (proofer cabinet)...................................... |
|
Included parts for UBC (20-22) |
|
Support bar - Top ...................................... |
2 pcs |
Support bar - Bottom.................................. |
2 pcs |
Divider - Side............................................. |
4 pcs |
Divider - Middle............................................. |
pcs |
Slide rails....................................................... |
pcs |
Glass................................................................... |
|
Water container (UBC-P only)............................. |
|
23.Steam system |
|
lower deck........................................................... |
|
deck 2.................................................................. |
|
deck 3.................................................................. |
|
deck 4.................................................................. |
|
24.High temperature model |
|
lower deck........................................................... |
|
deck 2.................................................................. |
|
deck 3.................................................................. |
|
deck 4.................................................................. |
|
25.Extra high chamber |
|
lower deck........................................................... |
|
deck 2.................................................................. |
|
deck 3.................................................................. |
|
deck 4.................................................................. |
|
26.Phantom Black model....................................... |
|
27.Royal Gold model.............................................. |
|
Other |
|
28 ..................................................................... |
pcs |
29 ..................................................................... |
pcs |
30. ..................................................................... |
pcs |
30. ..................................................................... |
pcs |
31. ..................................................................... |
pcs |
Packed by :
........................................................................................
6 |
PizzaMaster® |
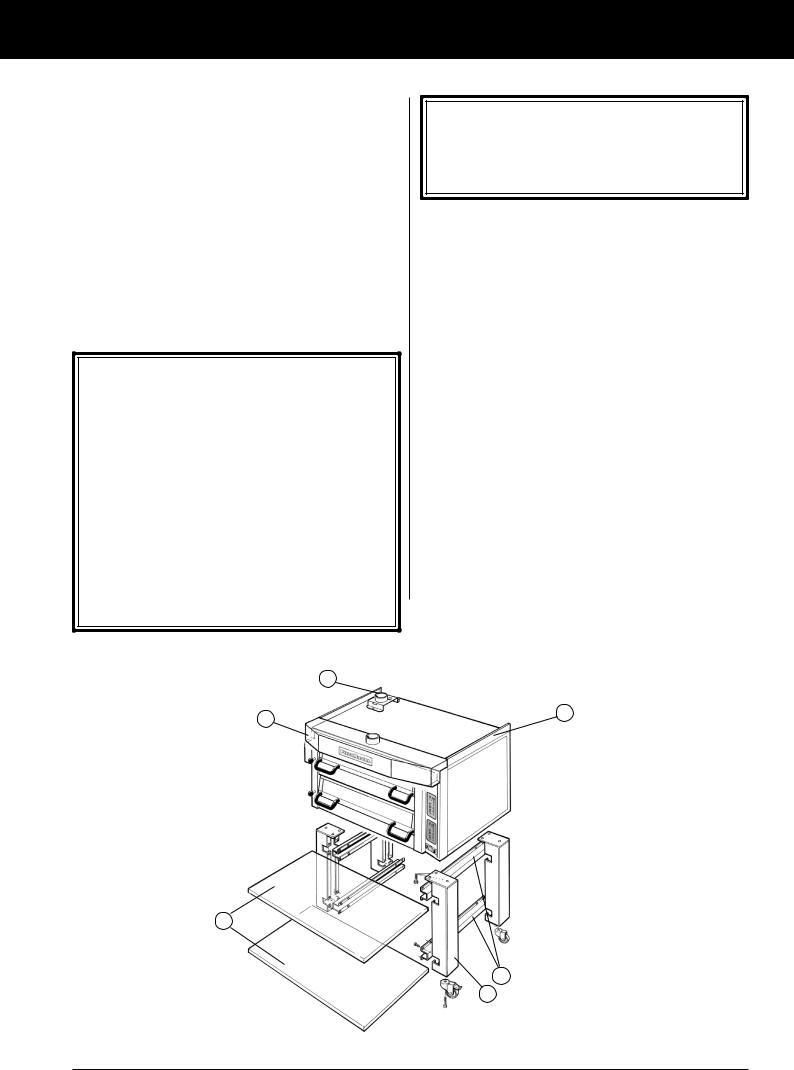
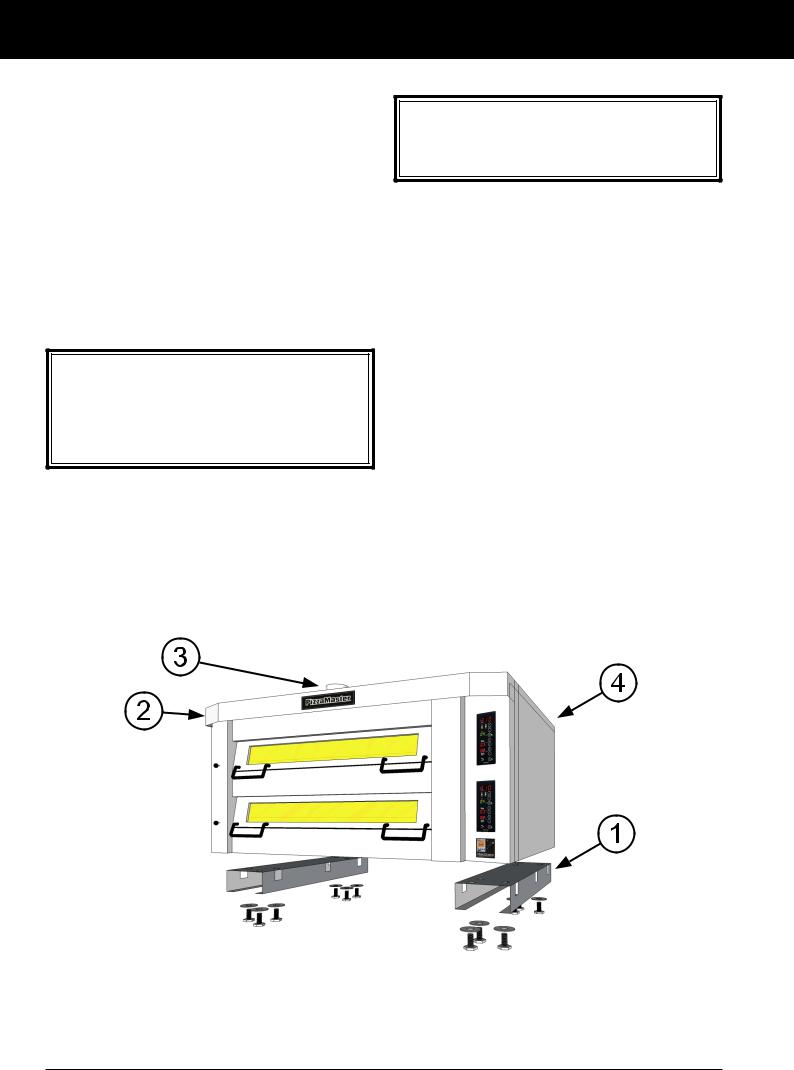
Installation – Assembly oven
Assembly for ovens with legs
Tip! If possible, use a forklift truck to lift the oven to fit the legs. Alternatively, lift the oven manually on to a strong table or flat bench, so that the legs can be fitted safely.
Minimum lift height for fitting of legs:
1-deck oven |
1105 mm |
2-deck oven |
935 mm |
3-deck oven |
765 mm |
4-deck oven |
425 mm |
Approximate weights: |
|
1-deck oven |
200 kg |
2-deck oven |
350 kg |
3-deck oven |
500 kg |
4-deck oven |
650 kg |
Important!
Do not remove the wooden supports for the hearthstones until you reach point 7 opposite.
Do not use the oven-door handles or the ovenvent knobs to lift the oven, for it can damage the oven.
APPLIANCE MUST BE SECURED TO BUILDING STRUCTURE.
The appliance must be installed with an adequate restraining to limit the movement of the appliance without transmitting stress to the electrical conduit. The restraining must be fastened in one of the supports leg or spacers as shown in the figure below.
The appliance must be installed with a flexible conduit.
5
4
3
Warning!
Make sure all 12 bolts for assembly the legs on to the oven are in place and proper tightened, before moving the oven.
The oven can otherwise tip over when moving it.
Important! Fit the 2 legs with the lockable wheels to the front of the oven, and the 2 legs with non-lockable wheels to the rear.
1. Lift the oven and fit the legs using the M10x30 bolts (12 pcs) + 20x10.5 washers (12 pcs) provided.
For each leg, first screw in (but do not tighten) the internal bolt, i.e. the one that has to be inserted through the top inside of the leg. Then screw in the 2 external bolts, but do not tighten. Now tighten the 3 bolts progressively and alternately to fix the leg firmly to the oven.
2. Fit the slide rails (4 pcs) to the legs as shown below, using the self-tapping screws (hexagonal) provided (16 pcs).
3. Insert the sliding shelf into either the upper or the lower pair of rails, as required. (1 sliding shelf is supplied as standard)
Depending on oven model it is possible to install up to 2 work top shelves. Any installed worktop shelf must be secured with 2 stop plates.
4. Fit the steam duct, using the screws (wafer head) provided (no. of screws depending on model).
5. Fit the flue diverter, using the self-tapping screws (wafer head) provided (3 pcs).
6. Fit the Top side panel (2pcs), using self-tapping screws (wafer head) (4pcs)
7. Remove the wooden supports that hold the hearthstones in place.
8. Remove all protective plastic film from the oven.
6
2
1
PizzaMaster® |
7 |
Installation – Assembly oven
Assembly for ovens with spacers
Tip! If possible, use a forklift truck to lift the oven to fit the legs. Alternatively, lift the oven manually on to a strong table or flat bench, so that the legs can be fitted safely.
Minimum lift height for fitting of legs:
1-deck oven |
110 mm |
2-deck oven |
110 mm |
3-deck oven |
110 mm |
4-deck oven |
110 mm |
Approximate weights: |
|
1-deck oven |
200 kg |
2-deck oven |
350 kg |
3-deck oven |
500 kg |
4-deck oven |
650 kg |
Important!
Do not remove the wooden supports for the hearthstones until you reach point 5 opposite.
Do not use the oven-door handles or the ovenvent knobs to lift the oven, for it can damage the oven.
Warning!
Make sure all 12 bolts for assembly the spacers on to the oven are in place and proper tightened, before moving the oven.
1. Lift the oven and fit the spacers using the M10x30 bolts (12 pcs) + 20x10.5 washers (12 pcs) provided. For each spacer, first screw in (but do not tighten) the bolts. When all bults are in place. Now tighten bolts progressively and alternately to fix the spacer firmly to the oven.
2. Fit the steam duct, using the screws (wafer head) provided (no. of screws depending on model).
3. Fit the flue diverter, using the self-tapping screws (wafer head) provided (3 pcs).
4. Fit the Top side panel (2pcs), using self-tapping screws (wafer head) (4pcs)
5. Remove the wooden supports that hold the hearthstones in place.
6. Remove all protective plastic film from the oven.
8 |
PizzaMaster® |

Installation – Assembly accessories
Assembly – accessories
All PizzaMaster® accessories can be mounted on either the leftor right-hand side of the oven.
Peel holder
1. Fit the lower bracket, using the self-tapping screws (hexagonal) provided (3 pcs).
2. Peel off the backing from the soft pad and stick the pad to the lower bracket, as shown in the illustration.
3. Now fit the upper bracket, using the self-tapping screws (hexagonal) provided (3 pcs).
Oil-and-spice rack (also holds the slicer)
4. Fit the oil-and-spice rack, using the self-tapping screws (hexagonal) provided (4 pcs).
5. Insert the spice bowl and oil bowl with basting brush, as shown below.
6. Carefully fold out the lug, as shown below. 7. Hang the slicer (provided) on the lug.
Side shelf
8. Hook the brackets (2 pcs) on to the legs. 9. Mount the shelf as shown below.
9
5 
8
3
4
Lug
6
7
 Soft pad 2
1
PizzaMaster® |
9 |
 Loading...