


 Loading...
PizzaMaster PM 721, PM 722, PM 723, PM 724, PM 725 Installation - Operation - Maintenance
...Owners Manual
Installation - Operation - Maintenance
Electric Modular Ovens
700 series
PM 721 – PM 722 – PM 723 – PM 724 – PM 725 PM 731 – PM 732 – PM 733 – PM 734 – PM 735 PM 741 – PM 742 – PM 743 – PM 744 – PM 745
800 series
PM 821 – PM 822 – PM 823 – PM 824 – PM 825 PM 831 – PM 832 – PM 833 – PM 834 – PM 835 PM 841 – PM 842 – PM 843 – PM 844 – PM 845
900 series
PM 911 – PM 912 – PM 913 – PM 914 – PM 915 PM 921 – PM 922 – PM 923 – PM 924 – PM 925 PM 931 – PM 932 – PM 933 – PM 934 – PM 935 PM 941 – PM 942 – PM 943 – PM 944 – PM 945
APPROVALS approvals vary depending on market
ANSI/NSF 4
<![endif]>Owners Manual_PizzaMaster_Modular series_90027-EN-R1B
E326671 |
E326671 |
E335108 |
Warranty and service
Quality tastes better
PizzaMaster® ovens are designed and built by Svenska BakePartner AB
We thank you for your trust and congratulate you on the purchase of your new PizzaMaster® oven. Your new oven is a result of our goal to build the very best pizza ovens in the world. Built into the oven is our in-depth knowledge of pizza baking that daily help customers all around the world to bake pizza very fast and with a very high quality in one of our 80 diffrent PizzaMaster® oven models.
2-year manufacturer’s warranty
All PizzaMaster® ovens come with a 2-year limited warranty that covers the purchaser against any defect in material or workmanship. For further details about this important cover, please consult your PizzaMaster® representative.
Special expertise
PizzaMaster® service technicians are trained specialists. They are equipped with all instruments and tools needed to make the correct diagnosis and perform service work quickly and efficiently. Our technicians travel the world continuously, training local
technicians to uphold the PizzaMaster® standard.
Genuine parts
Your PizzaMaster® oven consists of over 1000 quality parts with long service life. Should it become necessary to replace a part, it is most important to replace it with a genuine PizzaMaster® part. This ensures not only optimum function but also continued safety in the workplace.
Your PizzaMaster® oven
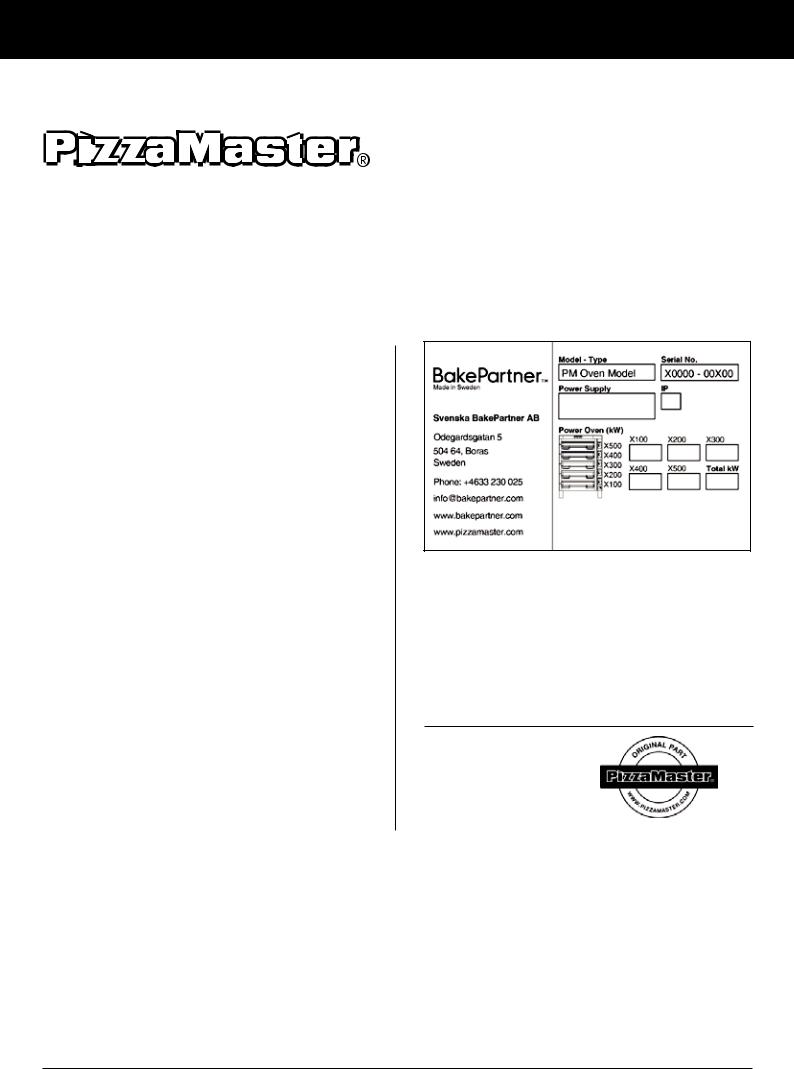
When contacting your local PizzaMaster® distributor or BakePartner direct for assistance, remember to quote the model designation and serial number of your oven, a copy of the power rating plate is placed above on the original owners manual that follows each oven delivered from our factory. This help us to help you more quickly.
Look for the PizzaMaster® original parts logo when ordering replacement parts
PizzaMaster® Stone Hearth Deck Ovens are manufactured by Svenska BakePartner AB Customer Support: Tel: +46 33 230-025 I E-mail: info@bakepartner.com
Website: www.pizzamaster.com or www.bakepartner.com I HQ: Svenska BakePartner AB, Odegardsgatan 5, SE 504 64 Boras Sweden
2 |
PizzaMaster® |

Index
INDEX
Warranty and service..................................................................................................................... |
2 |
Index.............................................................................................................................................. |
3 |
Safety and Warnings...................................................................................................................... |
4 |
Installation – Assembly oven.......................................................................................................... |
5 |
Installation – Assembly accessories........................................................................................... |
13 |
Installation – Electrical connection oven..................................................................................... |
14 |
Installation – Evacuation connection........................................................................................... |
18 |
Installation – Steam System....................................................................................................... |
19 |
Installation – Assembly UBC....................................................................................................... |
21 |
Installation – Automatic door opener........................................................................................... |
23 |
Oven operation – Display ED...................................................................................................... |
24 |
Oven operation – Display E........................................................................................................ |
29 |
Oven operation - First-time start-up ........................................................................................... |
31 |
Clock timer.................................................................................................................................. |
32 |
Pizza Recipe / Oven Settings / Baking Guidelines...................................................................... |
36 |
Maintenance and Preventative Maintenance ............................................................................. |
38 |
Changing of oven lamp and door gasket.................................................................................... |
41 |
Throubleshooting........................................................................................................................ |
42 |
Capacities and technical data..................................................................................................... |
44 |
EU-Declaration of conformity...................................................................................................... |
45 |
Notes........................................................................................................................................... |
46 |
Attachment : |
|
Electrical diagram |
|
Svenska BakePartner has a policy of continuous product development and reserves the right to change specifcations and designs without prior notice.
PizzaMaster® |
3 |
Safety and Warnings
Safety Precautions and Warnings
To ensure safe operation, read |
High Risk of Electrocution! |
This appliances is not intended for |
the following manual that contains |
Disconnect appliance from power |
use by persons (including children) |
safety precautions and warnings |
with reduced physical, sensory or |
|
for your own safety |
supply before opening. |
mental capabilities, or lack of ex- |
|
To reduce the risk of electric shock, |
perience and knowledge, unless |
|
they have been given supervisory |
|
|
DO NOT remove or open electrical |
or instruction concerning use of the |
|
cover. Refer servicing to qualifed |
appliance by a person responsible |
|
personnel. |
for their safety. |
|
|
|
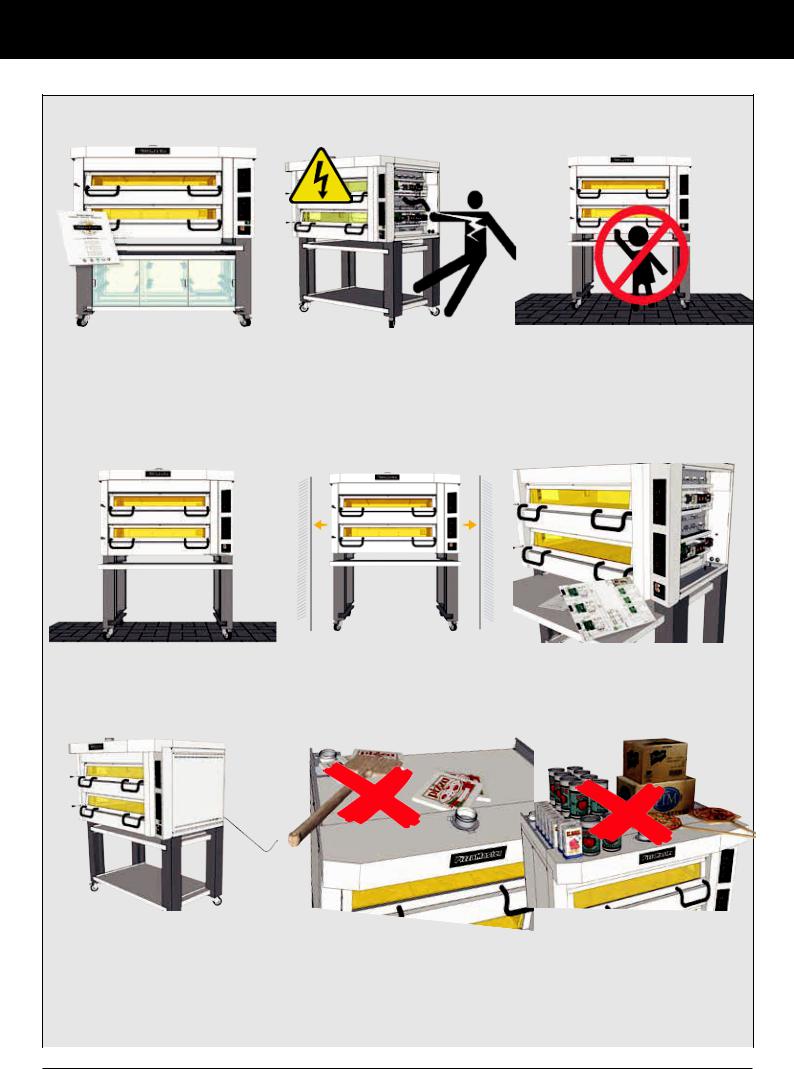
The oven is normally installed on |
For ventilation reasons, position |
If possible, position the oven so that |
the legs supplied with it. It is also |
the oven leaving 50mm (2”) bet- |
its right-hand side can be accessed |
important for the floor to be flat, |
ween the oven and any adjacent |
easily in order to remove the right- |
so that the oven is both horizontal |
wall |
hand panel. This gives easy access |
and stable. |
|
to the back of the control panel and |
|
|
facilitates servicing of the oven. |
|
|
|
The appliance must be installed with an |
DO NOT place any object blocking |
The top of the oven is not consid- |
adequate restraining to limit the move- |
the ventilation. this affects the |
ered as a food storage or as an food |
ment of the appliance without transmit- |
baking, oven performance and may |
preparation area. |
ting stress to the electrical conduit.The |
cause fre |
|
restraining must be fastened in one of |
|
|
the supports leg or spacers. |
|
|
The appliance must be installed with a |
|
|
flexible conduit. |
|
|
|
|
|
4 |
PizzaMaster® |
Installation – Assembly oven
Assembly For Ovens With Legs
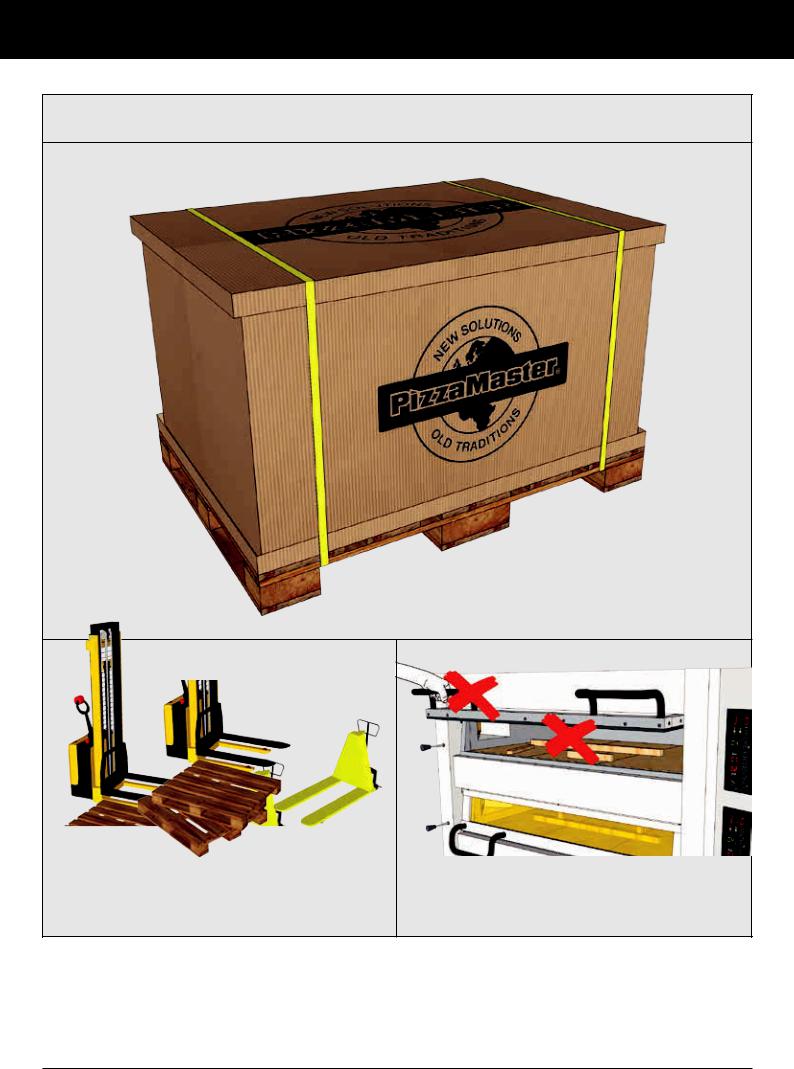
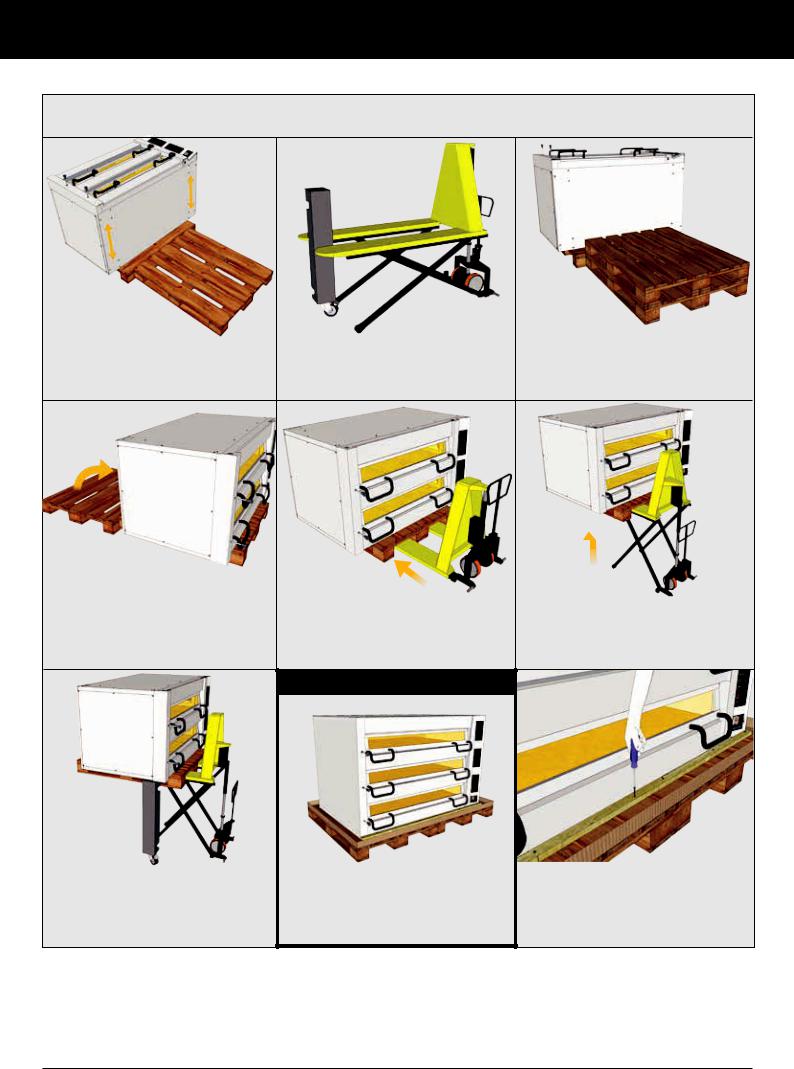
YOU WILL NEED at least 2 standard pallets. Depending on the oven´s size and weight, you will need a manual lift, pallet truck, forklift or Genie lift (USA), (see illustration)
DO NOT carry the oven by the door handle and
DO NOT remove the wooden stone supports until the oven is installed
PizzaMaster® |
5 |
Installation – Assembly oven
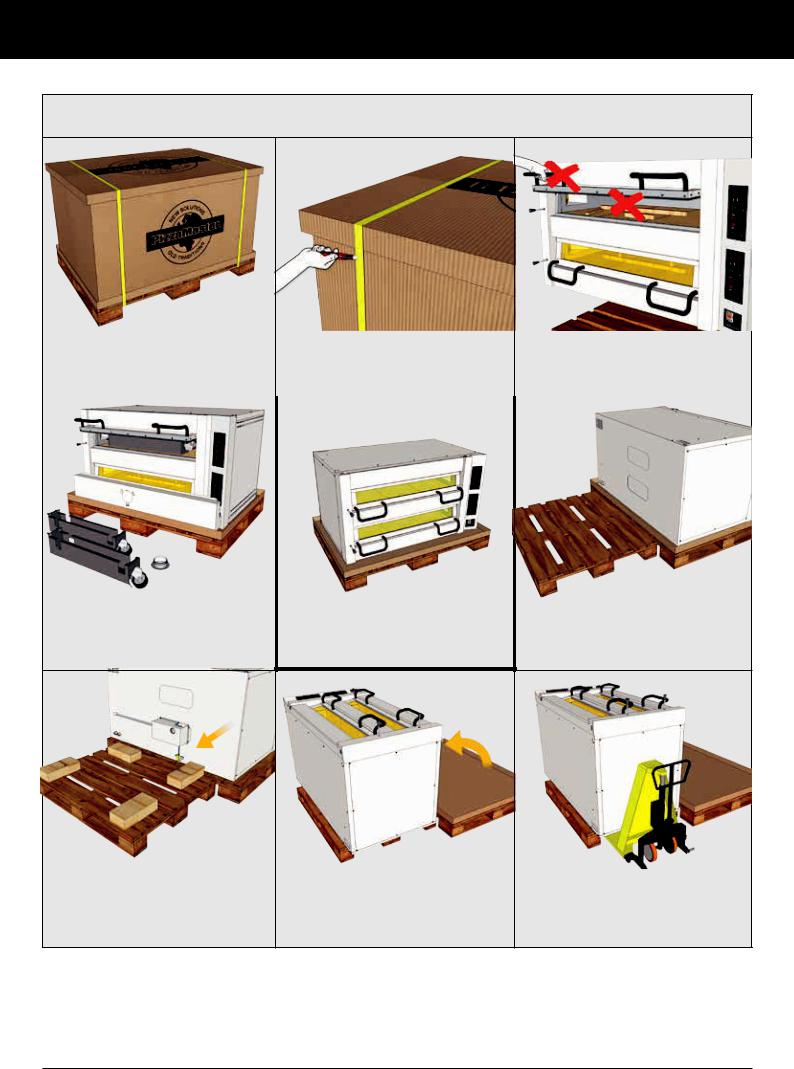
Unpack and prepare
1. The oven is packed safely and for |
2. Cut the packing bands and remove |
3. DO NOT carry the oven by the door |
easy transportation. Do not drop it or |
the top and side cardboards |
handle and do not remove the wooden |
allow hard knocks |
|
stone supports until the oven is installed |
|
|
|
|
Steps for 1 to 2 decks ovens |
|
|
|
|
|
|
|
4. Remove wooden stone supports from |
|
For 1 or 2 Decks Ovens Follow |
5. Place a pallet behind the oven |
|
|||
top deck. Remove legs (carefully) and |
|
Steps 5 to 15 |
|
accesories from inside. Replace the |
|
|
|
wooden stone supports |
|
|
|
6. If the oven has a Steam System, |
|
7. Turn the oven back side down, make |
|
8. Use a pallet jack/ pallet truck to |
|
|
|||
place ”wooden blocks” to lay the oven |
|
|
||
|
|
|||
down in a higher position |
|
sure that the stones have not moved |
|
transport the oven in this position to |
|
|
|
|
pass through doors or narrow areas |
|
|
|
|
|
6 |
PizzaMaster® |
Installation – Assembly oven
Assembling
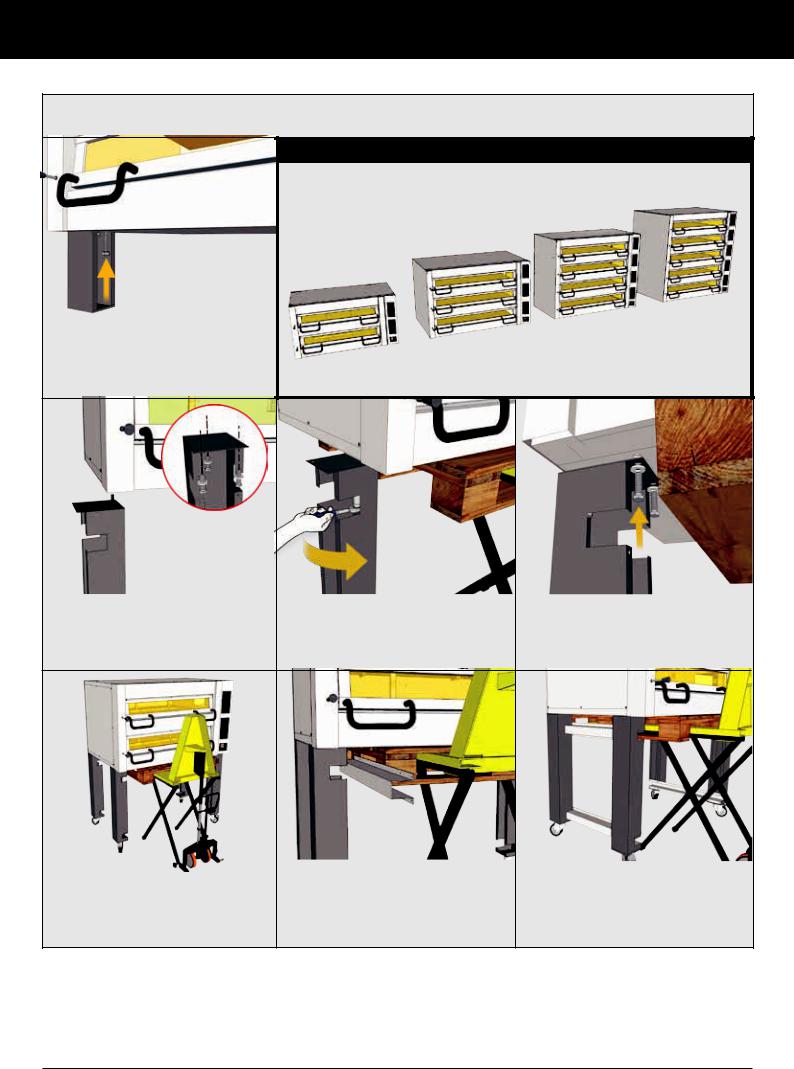
9. Transport the oven carefully. Place a verticle pallet, make sure not to block the leg bolt holes in the bottom of the oven
10. Check the maximum height of the pallet truck/genie lift so the oven is high enough to bolt the legs underneath
11. Place more pallets under to reach the desired height
12. Turn the oven upright carefully |
13. Place pallet truck/genie lift in front |
|
of the oven |
14. Lift the oven high enough to bolt the legs easily
Steps for 3 to 4 decks ovens
15.Continue at step 26 for legs installation
For 3 to 4 Decks Ovens Follow Steps 16 to 20
16. Remove the front and back wooden stick
PizzaMaster® |
7 |

Installation – Assembly oven
Assembling
17. Remove the staples from one side of |
18. Cut the cardboard between every |
19. Push and center steady the oven |
|
the oven |
|||
plallet |
over the biggest pallet and remove the |
||
|
|||
|
|
other(s) pallet(s) |
|
|
|
|
|
|
Steps for 5 decks ovens |
|
|
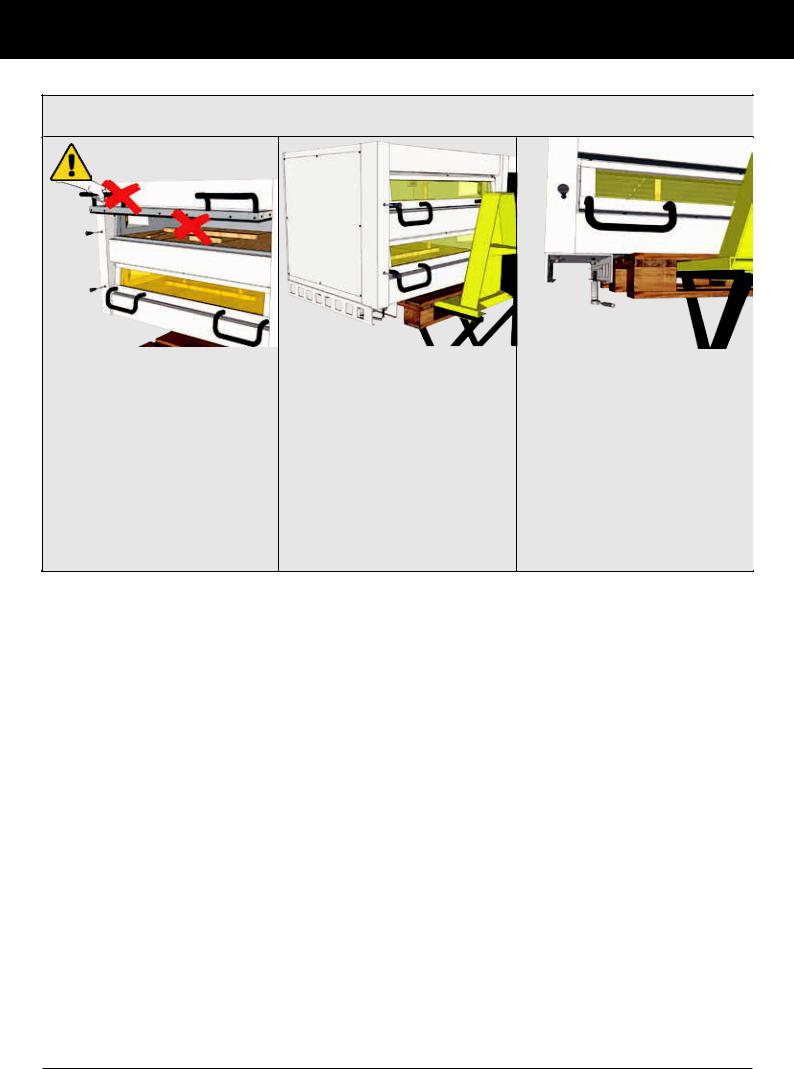
20. Carefully lift the oven using a pal- |
|
21. Remove the cardboard |
|
For 5 Decks Ovens Follow |
|||
let truck, forklift or Genie lift, depending |
|||
Steps 21 to 25 |
|
||
upon the weight of the oven. (Continue at |
|
||
|
|
||
step 26) |
|
|
|
|
|
|
|
22. Remove the hex bolts and take out |
23. Carefullly lift the oven using a pallet |
24. Remove the 8 hex bolts M10x30 |
|
the wood cage |
truck, forklift or Genie lift, depending of |
under the oven and keep them |
|
|
the weight of the oven |
|
|
|
|
|
8 |
PizzaMaster® |
Installation – Assembly oven
Support Assembling
Continue here for all models
25. Use these hex bolts to place the legs, follow the next steps. (Continue at step 26)
|
1 |
|
|
|
2 |
3 |
|
|
|
|
|
|
2 |
3 |
|
|
|
|
|
1 |
|
|
|
|
|
|
1 |
|
|
26. Use 3 bolts M10x30 and 1 washer per |
27. Let the bolt loose and rotate the leg |
28. Tighten the bolts alternately for better |
||
bolt 20x10.5 (provided). Rotate the leg |
180° |
ft. Hand tight all frst |
|
|
180° out to place the inside bolt frst, |
|
|
|
|
29. Make sure that all the legs are frmly and well adjusted
30. DO NOT remove the pallet truck/ genie lift before placing the leg cutouts
31. Fit all four shelf slide rails in place in the leg cut-outs
PizzaMaster® |
9 |

Installation – Assembly oven
Accesories Assembling
32. Secure the slide rails with the 4 hexagonal screws (provided)
33. Insert the sliding shelf into either the upper or the lower pair of rails (1 shelf provided as standard). Order a second shelf separately as an accesory
34. To place the shelf blockers, pull out the shelf and place them behind both front legs. With two shelfs, place two on the top and two on the bottom
35. Use 2 self-tapping screws per blocker
36. Fit the shelf blocker and repeat in the other front leg
37. Attach the back flue diverter, using
3 self-tapping screws (wafer head, provided)
38. Place the Eyebrow hood piece |
39. Attach front Eyebrow piece with |
40. Place the front flue diverter |
|
self-tapping screws (wafer head) |
|
10 |
PizzaMaster® |
Installation – Assembly oven
Finalize Installation
41. Bend oven metal tabs to secure flue |
42. Fit the Top Side panels |
43. Make sure to put the screw between |
connection |
|
the Top Side panels and the Eyebrow |
|
|
hood |
44. Remove the wooden stone supports |
45. For ventilation reasons, position the |
|
oven leaving 50mm (2”) between the |
|
oven and any adjacent wall |
46. Position the oven over a flat floor, so the oven is horizontal and stable
47. If possible, position the oven with easy access to the right hand panel to facilitate the electrical installation and future services
48. Read the Owner´s manual to install other accesories
CONGRATULATIONS!
Your PizzaMaster oven is now installed. DO NOT remove the ”Quick Start Guide” from the handle before the frst use
PizzaMaster® |
11 |
Installation – Assembly oven
Assembly For Ovens With Spacers
Important!
Do not remove the wooden supports for the hearthstones until you reach point 5 opposite.
Do not use the oven-door handles or the oven-vent knobs to lift the oven, this might damage the oven.
Tip! If possible, use a forklift truck to lift the oven to ft the spacers . Alternatively, lift the oven manually on to a strong table or flat bench, so that the legs can be ftted safely.
Minimum lift height for ftting of
legs: |
|
1-deck oven |
125mm / 5in |
2-deck oven |
125mm / 5in |
3-deck oven |
125mm / 5in |
4-deck oven |
125mm / 5in |
5-deck oven |
125mm / 5in |
Lift the oven and fit the spacers using the M10x30 bolts (12 pcs) + 20x10.5 washers (12 pcs) provided. For each spacer, first screw in (but do not tighten) the bolts. When all bolts are in place, tighten bolts progressively and alternately to fix the spacer firmly to the oven.
Warning!
Make sure all 12 bolts for assembly the legs on to the oven are in place and proper tightened, before moving the oven.
12 |
PizzaMaster® |
Installation – Assembly accessories
Assembly - Accesories
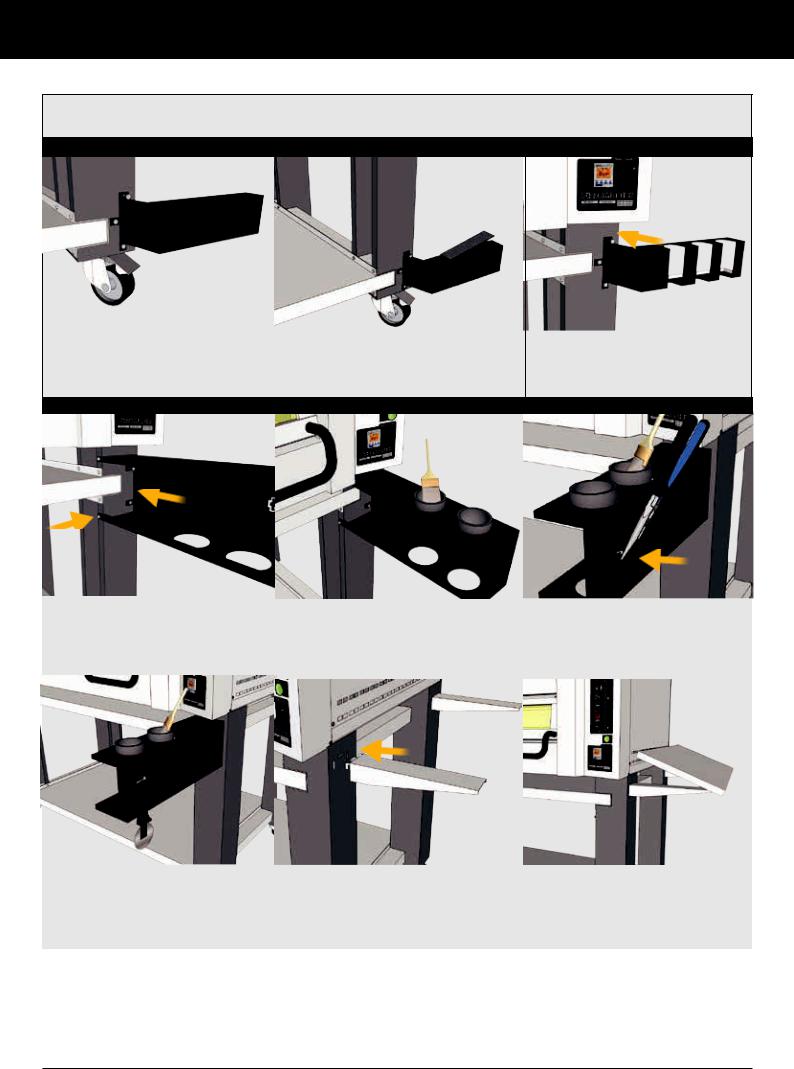
Peel Holder
1. Fit the lower bracket, using the |
2. Peel off the backing from the soft |
self-tapping screws (hexagonal) |
pad and stick the pad to the lower |
provided (3 pcs) |
bracket, as shown in the illustration |
|
|
Oil-and-spice rack (also holds the slicer)
3. Now ft the upper bracket, using the self-tapping screws (hexagonal) provided (3 pcs)
1. Fit the oil-and-spice rack, using |
2. Insert the spice bowl and oil bowl |
3. Carefully fold out the lug, as |
the self-tapping screws (hexagonal) |
with basting brush, as shown below |
shown below |
provided (4 pcs) |
|
|
|
|
|
|
Side Shelf |
|
4. Hang the slicer (provided) on the |
1. Hook the brackets (2 pcs) on to |
2. Mount the shelf as shown below |
lug |
the legs |
|
|
|
|
PizzaMaster® |
13 |
Installation – Electrical connection oven
Electrical connection
For connection and correct fuse rating, see the oven rating plate, the table for fuse protection need and the attached electrical diagram.
After reading all above information, follow instructions below for correct electrical connection.
The earth potential equalizer screw has to be installed. The earth potential equalizer screw is located on the backside next to the connecting cable.
Important!
For reasons of safety and the validity of the warranty, all electrical work must be carried out by a qualifed electrician.
The oven must be connected via an external main swich with min. 3 mm gap.
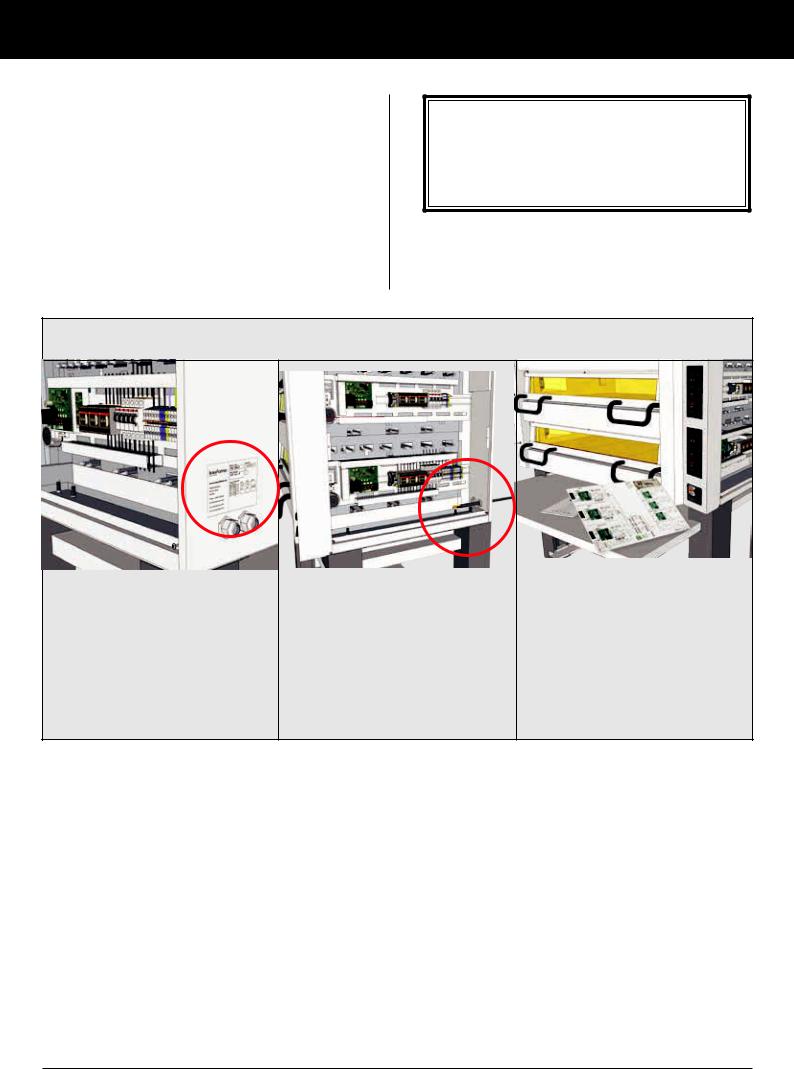
Electrical Connection
1. Make sure electrical supply corresponds with that specifed on the oven rating plate
Remove the screws (6 pcs) that secures the right-hand side panel, and take off the panel.
2. Take the power supply cable (depending on voltage the oven can be connected with 1 power supply per deck or 1 power supply per oven, power supply cable(s) is not included) through the hole(s) on the backsides right-hand side of the oven and further to the connecting terminal. An adequate restraining
must be used for each power supply cable.
3. Following the appropriate electrical wiring diagram confrming to the oven rating plate, connect the power supply leads to the feld terminal block.
Make sure all connections are tight, then place back the righthand side panel.
14 |
PizzaMaster® |

<![endif]>PizzaMaster®
<![if ! IE]><![endif]>15
PM 700 Series
AMPS per phase and DECK (1) or OVEN (2) for ovens with – Power Guard, see (3) – Door Opener, see (4)
|
230V 1ph + N |
400V 3ph + N |
480V 3ph + N |
230V 3ph / 400V 3ph + N |
200V 3ph |
208V 1ph |
208V 3ph |
240V 1ph |
240V 3ph |
|
400V 3ph |
|
460V 3ph |
||||||
Model |
|
|
|
|
|
|
|
||||||||||||
|
|
|
|
|
230V 3ph |
400V 3ph + N |
|
|
|
|
|
|
|
|
|
(440-480) |
|||
|
|
|
|
|
|
|
|
|
|
|
|
|
|
|
|
|
|
|
|
|
(1) |
(1) |
(2) |
(1) |
(2) |
(1) |
(1) |
(2) |
(1) |
(1) |
(1) |
(1) |
(1) |
(1) |
|
(2) |
(1) |
|
(2) |
|
|
|
|
|
|
|
|
|
|
|
|
|
|
|
|
|
|
|
|
PM 721 |
|
|
9.3 |
|
7.8 |
|
|
9.3 |
|
|
|
|
|
|
|
9.3 |
|
|
8.1 |
|
|
|
|
|
|
|
|
|
|
|
|
|
|
|
|
|
|
|
|
PM 722 |
|
|
18.6 |
|
14.9 |
|
|
18.6 |
|
|
|
|
|
|
|
18.6 |
|
|
16.1 |
|
27.7 |
9.3 |
|
7.8 |
|
16.2 |
9.3 |
|
17.2 |
30.6 |
17.9 |
28.9 |
16.9 |
9.3 |
|
|
8.1 |
|
|
PM 723 |
27.9 |
22.4 |
27.9 |
|
27.9 |
|
24.2 |
||||||||||||
|
|
|
|
|
|
|
|
|
|
|
|
|
|
|
|
|
|
|
|
PM 724 |
|
|
27.9 + 9.3 |
|
22.4 + 7.8 |
|
|
27.9 + 9.3 |
|
|
|
|
|
|
|
27.9 + 9.3 |
|
|
24.2 + 8.1 |
|
|
|
|
|
|
|
|
|
|
|
|
|
|
|
|
|
|
|
|
PM 725 |
|
|
27.9 + 18.6 |
|
22.4 + 14.9 |
|
|
27.9 + 18.6 |
|
|
|
|
|
|
|
27.9 + 18.6 |
|
|
24.2 + 16.1 |
|
|
|
|
|
|
|
|
|
|
|
|
|
|
|
|
|
|
|
|
PM 731 |
|
|
13.9 |
|
11.6 |
|
|
13.9 |
|
|
|
|
|
|
|
13.9 |
|
|
12.0 |
|
|
|
|
|
|
|
|
|
|
|
|
|
|
|
|
|
|
|
|
PM 732 |
|
|
27.8 |
|
23.1 |
|
|
27.8 |
|
|
|
|
|
|
|
27.8 |
|
|
24.1 |
|
41.2 |
13.9 |
|
11.6 |
|
24.1 |
13.9 |
|
25.6 |
45.6 |
26.6 |
43.3 |
25.1 |
13.9 |
|
|
12.0 |
|
|
PM 733 |
41.7 |
34.7 |
41.7 |
|
41.7 |
|
36.1 |
||||||||||||
|
|
|
|
|
|
|
|
|
|
|
|
|
|
|
|
|
|
|
|
PM 734 |
|
|
41.7 + 13.9 |
|
34.7 + 11.6 |
|
|
41.7 + 13.9 |
|
|
|
|
|
|
|
41.7 + 13.9 |
|
|
36.1 + 12.0 |
|
|
|
|
|
|
|
|
|
|
|
|
|
|
|
|
|
|
|
|
PM 735 |
|
|
41.7 + 27.8 |
|
34.7 + 23.1 |
|
|
41.7 + 27.8 |
|
|
|
|
|
|
|
41.7 + 27.8 |
|
|
36.1 + 24.1 |
|
|
|
|
|
|
|
|
|
|
|
|
|
|
|
|
|
|
|
|
PM 741 |
|
|
18.5 |
|
15.4 |
|
|
18.5 |
|
|
|
|
|
|
|
18.5 |
|
|
16.0 |
|
|
|
|
|
|
|
|
|
|
|
|
|
|
|
|
|
|
|
|
PM 742 |
|
|
37.0 |
|
30.8 |
|
|
37.0 |
|
|
|
|
|
|
|
37.0 |
|
|
32.1 |
|
54.8 |
18.5 |
|
15.4 |
|
32.1 |
18.5 |
|
34.1 |
60.6 |
35.5 |
57.2 |
33.5 |
18.5 |
|
|
16.0 |
|
|
PM 743 |
55.6 |
46.1 |
55.6 |
|
55.6 |
|
48.1 |
||||||||||||
|
|
|
|
|
|
|
|
|
|
|
|
|
|
|
|
|
|
|
|
PM 744 |
|
|
55.6 + 18.5 |
|
46.1 + 15.4 |
|
|
55.6 + 18.5 |
|
|
|
|
|
|
|
55.6 + 18.5 |
|
|
48.1 + 16.0 |
|
|
|
|
|
|
|
|
|
|
|
|
|
|
|
|
|
|
|
|
PM 745 |
|
|
55.6 + 37.0 |
|
46.1 + 30.8 |
|
|
55.6 + 37.0 |
|
|
|
|
|
|
|
55.6 + 37.0 |
|
|
48.1 + 32.1 |
|
|
|
|
|
|
|
|
|
|
|
|
|
|
|
|
|
|
|
|
(1)Amps per phase and deck with 1 power supply cable per oven deck.
(2)Amps per phase and oven with 1 power supply cable per oven, up to 3 deck. If 4 and 5 deck, 2 power supply cables per oven is required.
(3)Power Guard reduce ovens Amp draw. Calculate sec. deck as 0 A. Simultaneously used master / sec. decks reduce the sec. decks capacity.
(4)Door Opener require 1 separate 3ph (208/230/400/480) supply. Supplies up to 5 deck. Amp draw 1 A / deck / phase.
CANADA VERSION - Only 1power supply cable, up to 120 A per oven can be used. For Amp draw over 120 A use Power Guard option.
<![endif]>oven connection Electrical – Installation
Loading...