

Page 1
Operator Guide
US English Version
DM1100™
DM Series
™
Digital Mailing System
Page 2

Page 3

SV62146 Rev. D ©2009 Pitney Bowes Inc.
All rights reserved. This book may not be reproduced in whole or in part in any fashion or stored in a
retrieval system of any type or transmitted by any means, electronically or mechanically, without the
express, written permission of Pitney Bowes.
We have made every reasonable effort to ensure the accuracy and usefulness of this manual; however, we cannot assume responsibility for errors or omissions or liability for the misuse or misapplication of our products.
Due to our continuing program of product improvement, equipment and material specifica tions as well
as performance features are subject to change without notice. Your postage meter may not have
some of the features described in this book.
AccuTrac, Ascent, DM1100, DM Series, E-Z Seal, IntelliLink, WEIGH-ON-THE-WAY (W-O-W®) Postage By Phone, INVIEW and Pitney Bowes Supply Line are trademarks or registered trademarks of
Pitney Bowes Inc. All other trademarks are trademarks or registered trademarks of the respective
owners.
Page 4
Alerting Messages
Various messages are used throughout this guide to alert you to potentially hazardous or error causing conditions. These messages are as follows:
WARNING! Alerts you to conditions or practices that could cause serious injury.
CAUTION: Alerts you to conditions or practices that could cause damage to the
equipment or to the material being run.
IMPORTANT: Alerts you to conditions or practices that could adversely affect equipment operation if
instructions are not followed exactly.
NOTE: Provides a comment or explanation of the associated topic.
FCC Compliance
This equipment has been tested and found to comply with the limits for a Class A digital device, pursuant to part 15 of the FCC rules. These limits are designed to provide reasonable protection against
interference when the equipment is operated in a commercial environment. This equipment gener
ates, uses, and can radiate radio frequency energy and, if not installed and used in accordance with
the instruction manual, may cause interference to radio communications. Operation of this equip
ment in a residential area is likely to cause interference, in which case the user will be required to correct the interference at his own expense.
Use only a shielded interface cable to operate this equipment with a scale or other peripheral device
-
-
CAUTION: Changes or modifications to this equipment not expressly
approved by the party responsible for compliance (Pitney Bowes) could void
the user’s authority to operate the equipment.
Page 5

FCC Compliance of Modem
This equipment complies with Part 68 of the FCC rules and the requirements adopted by the ACTA.
On the bottom of the IntelliLink® Control Center is a label that contains, among other information, a
product identifier in the format US:AAAEQ##TXXXX. If requested, this number must be provided to
the telephone company.
This equipment is designed to be connected to a Facility Interface Code 02LS2 network with RJ11C
network interface.
A plug and jack used to connect this equipment to the premises wiring and telephone network must
comply with the applicable FCC Part 68 rules and requirements adopted by the ACTA. A compliant
telephone cord and modular plug is provided with this product. It is designed to be connected to a
compatible modular jack that is also compliant. See installation instructions for details.
The ringer equivalence number (REN) is used to determine the number of devices that may be connected to a telephone line. Excessive RENs on a telephone line may resu lt in the d evices not ringing
in response to an incoming call. In most but not all areas, the sum of RENs should not exceed five
(5.0). To be certain of the number of devices that may be connected to a line, as determined by the
total RENs, contact the local telephone company. The REN for this product is part of the product
identifier that has the format US:AAAEQ##TXXXX. The digits represented by ## are the REN without
a decimal point (for example 03 is a REN of 0.3).
If this IntelliLink® Control Center causes harm to the telephone network, the telephone company will
notify you in advance that temporary discontinuance of service may be required. But if advance
notice isn’t practical, the telephone company will notify you as soon as possible. Also, you will be
advised of your right to file a complaint with the FCC if you believe it is necessary.
The telephone company may make changes in its facilities, equipment, operations, or procedures
that could affect the operation of the equipment. If this happens the telephone company will provide
advance notice in order for you to make necessary modifications to maintain uninterrupted service.
If trouble is experienced with this IntelliLink® Control Center please cont act the help desk for rep air or
warranty information. Refer to the Pitney Bowes Contact Information List in this guide for the number
of the help desk. If the equipment is causing harm to the telephone network, the telephone company
may request that you disconnect the equipment until the problem is resolved. This equipment is not
intended to be repaired by the customer (user).
Connection to party-line service is subject to state tariffs. Contact the state public utility commission,
public service commission, or corporation commission for information.
If the installation site has specially wired alarm equipment connect ed to the telephone line, ensure the
installation of this IntelliLink® Control Center does not disable the alarm equipment. If you have
questions about what will disable alarm equipment, consult your telephone company or a qualified
installer.
Page 6

Page 7
T able of Contents
Pitney Bowes Contact Information List
Chapter 1 - Read this First
Chapter 2 - Meet the DM Series™ Digital Mailing System
Chapter 3 - Mail in a Minute
Chapter 4 - Running Mail
Chapter 5 - Mailing System Setup
Chapter 6 - Adding Postage
Chapter 7 - INVIEW™ Accounting
Chapter 8 - Reports
Chapter 9 - Maintaining and Updating
Chapter 10 - Troubleshooting
Chapter 11 - Supplies and Options
Chapter 12 - Specifications
Appendix A - Glossary
Index
SV62146 Rev. D
Page 8

Page 9

Pitney Bowes Contact Information List
PB Web Sites • For frequently asked questions, go to:
http://www.pb.com
• To place requests for service or training, go to:
http://www.pb.com and click on My Account.
• To order PB supplies and accessories, go to:
http://www.pb.com and click on Online Store.
• To view and pay invoices online, go to:
http://www.pb.com and click on My Account.
• To view inventory, go to:
http://www.pb.com and click on My Account.
• To add postage to your Postage By Phone® Meter Payment System
account, go to:
http://www.pb.com and click on Add Postage to Your Meter.
Our Help Desk For direct questions, call: 1.800.522.0020. Customer Service Represen-
tatives are available Monday through Friday, 8AM - 8:00PM EST.
Postage By
To contact, call 1.800.243.7800
Phone® System
Pitney Bowes Supplies
To order Pitney Bowes approved supplies, call our PB Supply Line™ at
1.800.243.7824.
SV62146 Rev. D
Page 10

Page 11
1 • Read This First
What’s in this Guide.............................................................................1-2
Other Information.................................................................................1-2
What You Need to Know......................................................................1-3
Safety Requirements............................................................................1-3
Important Information About Powering Off Your DM Series™ Digital
Mailing System.....................................................................................1-6
SV62146 Rev. D
Page 12

1 • Read This First
What’s in this Guide
Chapter 1 - Read this First contains important information about USPS
requirements and equipment and telephone safety precautions.
Chapter 2 - Meet the DM Series™ Digital Mailing System gives an over-
view of the mailing system and the location of each control and machine
feature. Please read this section carefully. It provides a foundation for the
instructions in later sections of this book.
Chapter 3 - Mail in a Minute explains the basics of running mail on your
system. By following these instructions, you will be able to run mail quickly.
Chapter 4 - Running Mail explains how to run mail in the different mail
modes as well as when to use the various options.
Chapter 5 - Mailing System Setup provides step-by-step instructions for
customizing your mailing system to suit your needs.
Chapter 6 - Adding Postage explains how to add postage funds to your
postage meter (Postal Security Device) using the Pitney Bowe s Postage By
Phone® Meter Payment system.
Chapter 7 - INVIEW™ Accounting explains how to use the INVIEW™
Accounting feature to track postage.
Chapter 8 - Reports explains the different types of reports available and
how to print them.
Other
Information
Chapter 9 - Maintaining and Updating explains how to check the quality
of the meter stamp and how to take care of the moistener and t ape feeder. It
also tells you how to add features and update postal rates and carriers.
Chapter 10 - Troubleshooting contains a list of problems you may
encounter while using your mailing system.
Chapter 11 - Supplies and Options lists the supplies available for your
system and how to order them.
Chapter 12 - Specifications contains the specifications fo r the mailing system and mailing materials.
Appendix A - Glossary defines mailing terms used throughout this operator guide.
This section describes other sources of information available for the
DM Series™ Digital Mailing System.
• Quick Reference Cards - Much of the information contained in the
Operator guide, such as how to set postage, process mail, or clear jams
is summarized in the Quick Reference Card Set. The cards are located
in a slot in the Stacker module of your system.
• Our Help Desk - For a list of the Pitney Bowes web sites, refer to the
Pitney Bowes Contact Information List located at the front of this guide.
1 - 2 SV62146 Rev. D
Page 13
DM1100™ Digital Mailing System Operating Guide
WARNING! Follow normal safety precautions for all office equipment whenever using your mailing system.
What You Need to Know
USPS Requirements
Safety Requirements
Since your postage meter (Postal Security Device) is licensed by the United
States Postal Service (USPS), you must follow a few basic requirements.
• Mail must have the correct date and postage amount in the meter
stamp.
• Metered mail must bear the ZIP Code location of the post office where
the postage meter (Postal Security Device) is registered.
• If you move to another ZIP Code location, you must update the ZIP
Code. You can do this by calling Postage by Phone®.
• Each time you refill your postage meter (Postal Security Device)
through the modem or LAN, the Postage By Phone® Meter Payment
System computer automatically performs a postal inspection. If the
postage meter in your mailing machine has not detected a modemor
LAN refill transaction at certain intervals, the message “Inspection
Required” appears on the main screen of the IntelliLink® Control Cen
ter. (The system will then prompt you to connect to Pitney Bowes and
perform an inspection.)
• The postage tape you use must meet USPS specifications.
-
Read all instructions before you attempt to operate the machine. Use
the equipment only for its intended purpose.
• Use only Pitney Bowes approved supplies, in particular aerosol dusters.
Improper storage and use of aerosol dusters or flammable aerosol dust
ers, can cause an explosive-like condition that could result in a personal
injury and/or property damage. Never use aerosol dusters labeled flam
mable and always read instructions and safety precautions on the
duster container label.
• Use the power cord supplied with the machine an d plug it into a properly
grounded wall outlet located near the machine and easily accessible.
Failure to properly ground the machine can result in severe personal
injury and/or fire.
• The power cord wall plug is the primary means of disconnecting the
machine from the AC supply.
• Do not remove the power cord's ground pin and do not use a ground
adapter.
• Make sure the area in front of the power outlet is free of obstruction.
• DO NOT route the power cord over sharp edges or trap it between
pieces of furniture. Make sure there is no strain on it.
• To reduce the risk of fire or electrical shock, DO NOT attempt to remove
covers or disassemble the equipment. The housing encloses hazardous
parts. If any components are dropped or otherwise damaged, report
such damage to your Pitney Bowes customer service representative.
• Keep fingers, long hair, jewelry, neck ties, and loose clothing away from
moving parts at all times.
• When removing jammed material, avoid using too much force to prevent
personal injury and damaging equipment.
• To prevent overheating do not cover system vent openings.
SV62146 Rev. D 1- 3
-
-
Page 14
1 • Read This First
• When lifting covers, wait for all parts to stop moving before placing
hands near feeder path or printer.
• Do not remove covers as they enclose hazardous parts that should only
be accessed by a Pitney Bowes Service Representative.
• Use only Pitney Bowes approved supplies, e.g., inks, tapes, and cleaners. Call the Pitney Bowes Supply Line™ listed in the Pitney Bowes
Contact Information List at the front of this guide.
• Always follow the specific occupational safety and health standards prescribed for your workplace.
NOTE: Your mailing system requires annual cleaning by a Pitney Bowes
service representative. For continued safe operation, contact your local Pit
ney Bowes office for a scheduled cleaning
-
If you use an AC adapter to power the meter when it is off the mailing
machine base:
• Use only the AC adapter designed specifically for the IntelliLink® Control Center. Third-party AC adapters may damage the IntelliLink® Control Center.
• To protect against electrical shock, plug the AC adapter into a properly
grounded power outlet.
• Do not route the AC adapter cable over sharp edges or trap between
furniture.
CAUTION: In case of an ink spill, leaking ink or excessive ink
accumulation, immediately power down and disconnect the
power cord from the wall plug and call your local Pitney
Bowes office for a cleaning.
The IntelliLink® Control Center and its built-in postage meter (Postal Security Device) connect directly to analog telephone lines. For your protection
we urge you to follow basic safety precautions to reduce the risk of fire,
electric shock and injury to persons, as well as the following:
• Never connect telephone wiring during a lightning storm.
• Disconnect the meter telephone line during a lightning storm.
• Avoid using a telephone or equipment that connects to a telephone line
during an electrical storm; there may be a remote risk of electrical shock
from lightning.
• Never install telephone jacks in wet locations.
• Do not use this product near water, for example, near a bath tub, wash
bowl, kitchen sink or laundry tub, in a wet basement or near a swimming
pool.
• Never touch non-insulated telephone wires or terminals unless the telephone line has been disconnected at the network interface.
• Use caution when installing or modifying telephone lines.
• Do not use the telephone or equipment connected to the telephone line
in the vicinity of a gas leak
1 - 4 SV62146 Rev. D
Page 15
U7PS Power
WARNING! Follow normal safety precautions for all office equipment whenever using the Power Stacker.
Stacker
DM1100™ Digital Mailing System Operating Guide
• Do not connect your postage meter (Postal Security Device) to a digital
phone line. The device’s built-in modem is designed to work with an
analog phone line only. (Your fax machine is usually connected to an
analog phone line.) If you do not know if your line is digital, call your
phone provider for verification.
• Disconnect the telephone cord from the wall before removing the
IntelliLink® Control Center.
CAUTION: To reduce the risk of fire, use only the 26 AWG
telecommunication line cord supplied separately.
• Use only Pitney Bowes approved supplies, in particular aerosol dusters.
Improper storage and use of aerosol dusters or flammable aerosol dust
ers, can cause an explosive-like condition that could result in a personal
injury and/or property damage. Never use aerosol dusters labeled flam
mable and always read instructions and safety precautions on the
duster container label.
• To obtain Pitney Bowes supplies, please contact our Pitney Bowes Supply Line™. Material Safety Data Sheets can be obtained on the web or
from our Pitney Bowes Supply Line™. Refer to the Pitney Bowes Con
tact Information List at the front of this guide for phone numbers and
web site information.
• Use the power cord supplied with the machine an d plug it into a properly
grounded wall outlet located near the machine and easily accessible.
Failure to properly ground the machine can result in severe personal
injury and/or fire.
• Avoid touching moving parts or materials while the machine is in use.
Keep hands, loose clothing, jewelry and long hair away from all moving
parts.
• Do not remove covers. Covers enclose hazardous parts that should
only be accessed by properly trained service personnel. Immediately
report to Pitney Bowes Service any damaged or non-functioning compo
nents that renders the unit unsafe.
• Place the unit in an accessible location to allow for proper venting of the
equipment and to facilitate servicing.
• The power cord wall plug is the primary means of disconnecting the
machine from the AC supply.
• Do not use an adapter plug on the line cord or wall outlet.
• Do not remove the ground pin from the line cord.
• Avoid using wall outlets that are controlled by wall switches, or shared
with other equipment.
• Do not route the power cord over sharp edges or trapped between furniture.
• Ensure there is no strain on the power cord where it becomes jammed
between the equipment, walls or furniture.
-
-
-
-
SV62146 Rev. D 1- 5
Page 16
1 • Read This First
NO NONO
YES
OFF
ON
• Be certain the area in front of the wall receptacle into which the machine
is plugged is free from obstruction.
• To prevent overheating, do not cover the vent openings.
• Read all instructions before attempting to operate the equipment.
• Use this equipment only for its intended purpose.
If your stacker has an AC adapter to power the stacker:
• Use only the AC adapter designed specifically for the stacker and
shown in Chapter 11, Supplies and Options. Third-party AC adapters
may damage the stacker.
• To protect against electrical shock, plug the AC adapter power cord into
a properly grounded wall outlet.
Do not route the AC adapter cable over sharp edges or trap it between
furniture.
NOTE: Always follow the specific occupational safety and health st andards
for your workplace.
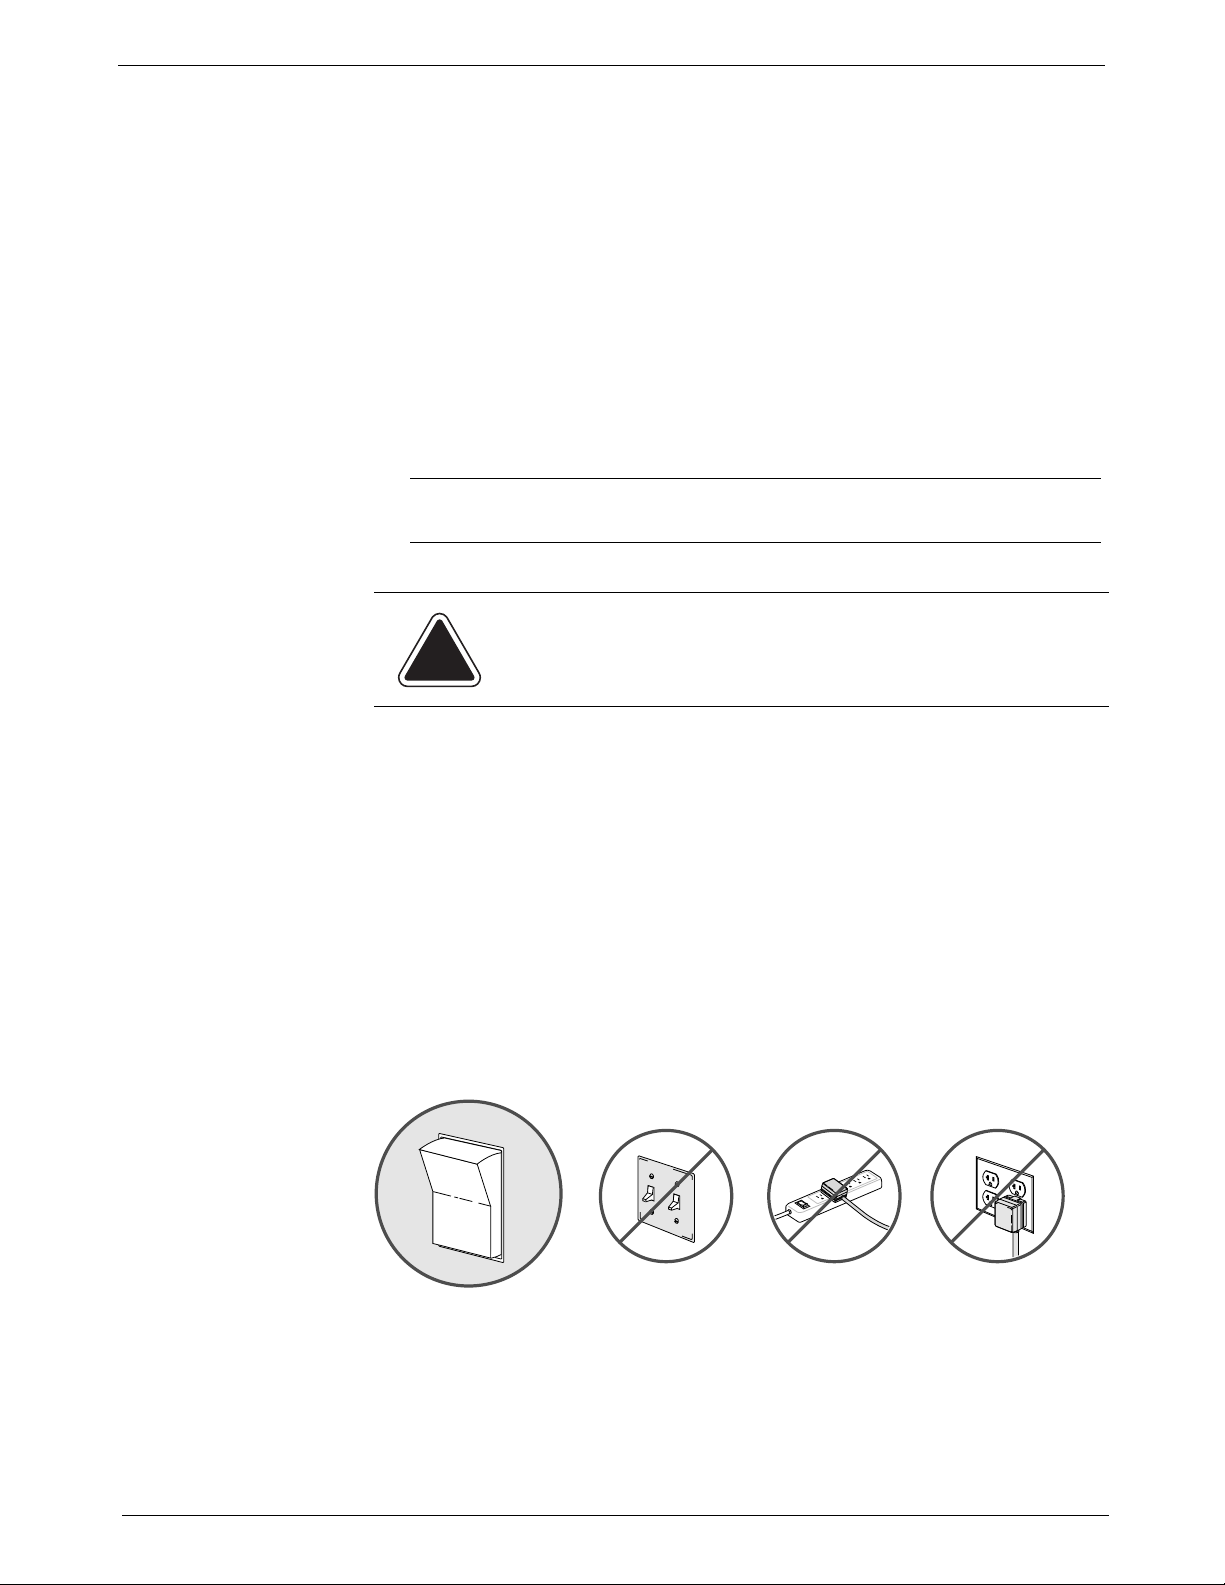
Important Information About Powering Off Your DM Series™ Digital Mailing System
Your DM Series™ Digital Mailing System is designe d to remain powered on
at all times. This is necessary so that the printer station can perform the
required maintenance it needs to maintain peak performance.
Your DM Series™ System has a power switch (for the location, refer to
Chapter 2 of this guide) so that you can properly remove power to the sys
tem.
If you need to power off your system, you must use the power switch. When
you power off the system, the system immediately moves the printhead
back to the capping station to keep the printhead from drying out.
Powering off your system by any other means, such as a wall switch, a
power strip, or unplugging from a wall outlet, will result in higher than normal
ink consumption and could damage your mailing system.
-
1 - 6 SV62146 Rev. D
Page 17
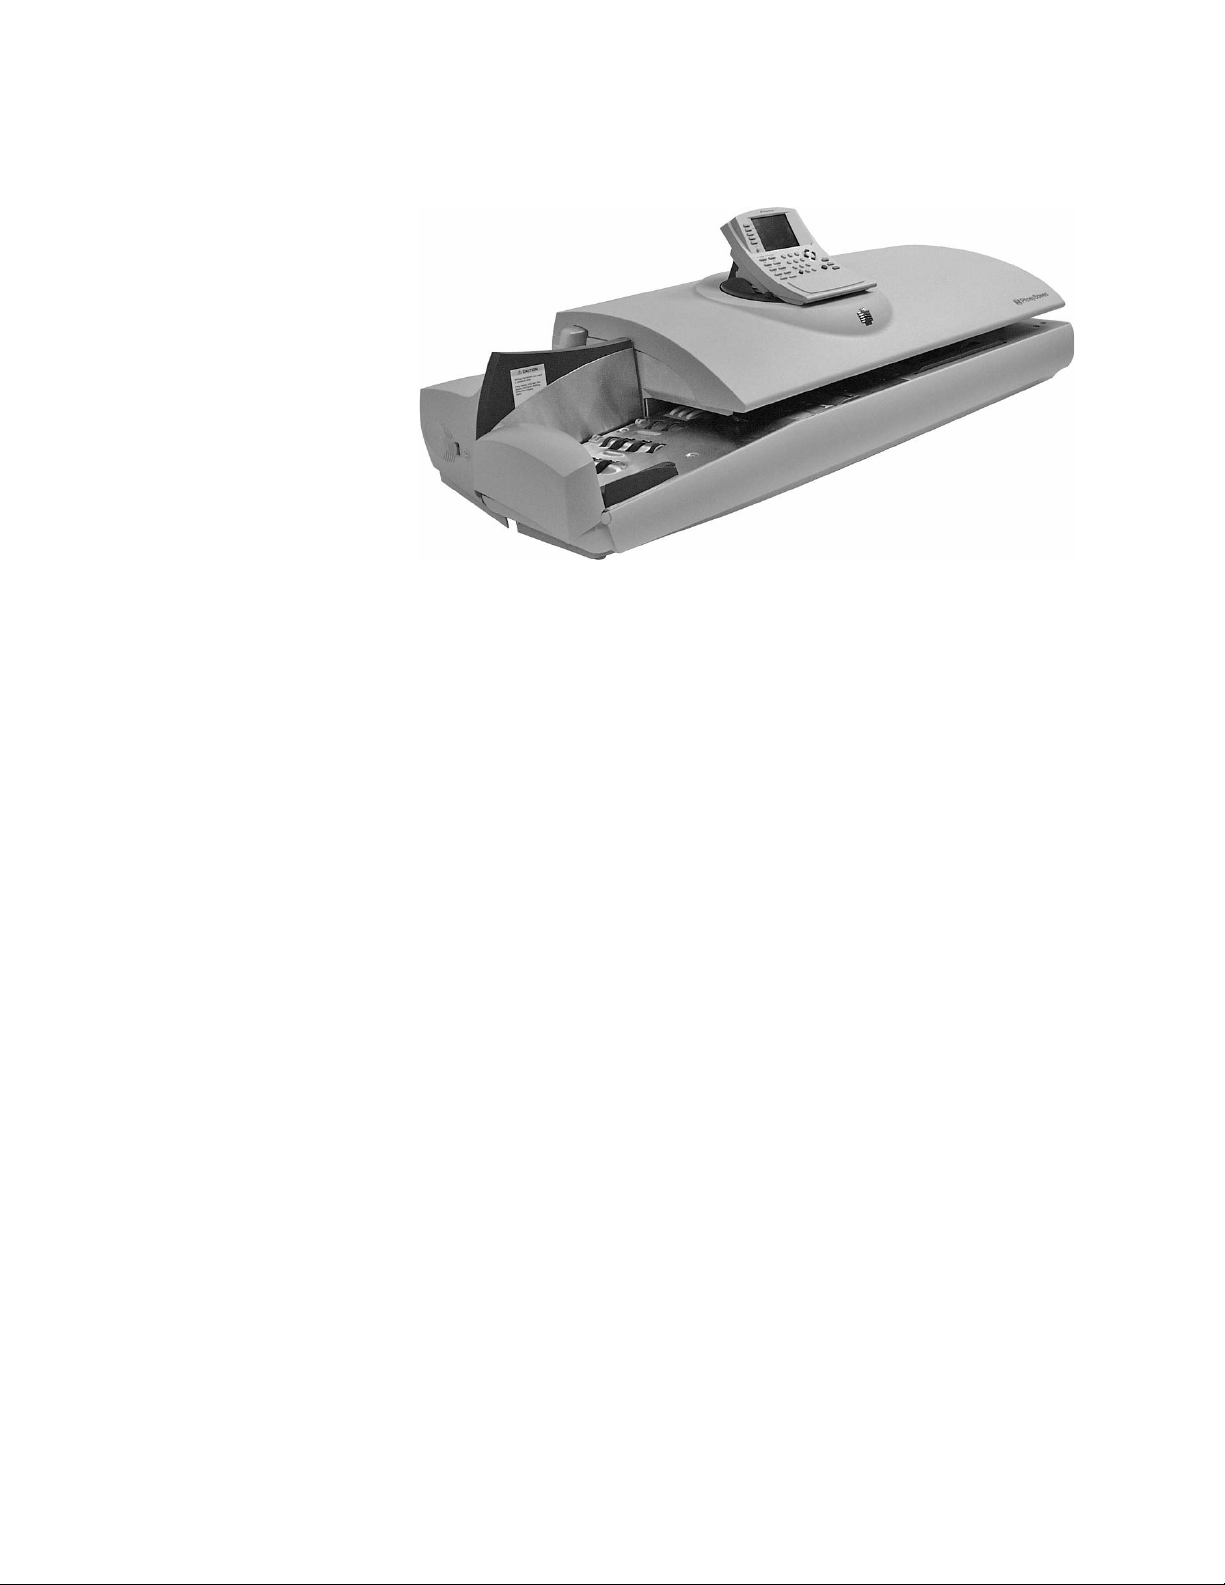
2 • Meet the DM1100™ Digital Mailing System
Introducing the DM Series™ Mailing System.......................................2-2
Features and Benefits..........................................................................2-2
Parts of the Mailing System..................................................................2-5
SV62146 Rev. D
Page 18

2 • Meet the DM1100™ Digital Mailing System
Introducing the DM Series™ Mailing System
Features and Benefits
Postage Security Device
The DM Series™ Digital Mailing System is an easy-to-use digital mailing
system you can tailor to satisfy the unique requirements of your organiza
tion. This system:
• Automatically feeds a stack of mixed mail envelopes.
• Weighs envelopes, flats and packages (up to 1lb.)
• Moistens and seals the envelopes with flaps open or closed.
• Imprints the correct postage amount.
• Stacks the finished mail.
The following section provides a summary of the main features and benefits of the DM Series™ Digital Mailing System.
Your mailing system is equipped with a Postal Security Device (PSD) that
incorporates the latest technology approved by the United States Postal
Service to secure funds. This technology eliminates the need to perform
physical inspections of your postal security device. The PSD contains the
funds and performs all calculations necessary to print meter stamps that
comply with current USPS standards. The PSD is located in your mailing
system's IntelliLink® Control Center.
-
Easy-to-Use IntelliLink® Control Center
Variety of Communications Options
The IntelliLink® Control Center is mounted on the top of your mailing system and features a large easy-to-read graphic display, function keys and
alpha and numeric keypads. A series of messages and options appear in
the display to prompt you through all of the setup and mailing operations.
You use the function keys and keypads to respond to the system prompts
and select your options.
Your DM Series™ Digital Mailing System comes with communications
ports for data communications with Pitney Bowes support services and for
interfacing to external devices such as a personal computer, an optional
scale, or other peripherals.
An internal modem with an external interface to analog telephone lines
allows data communications with Pitney Bowes support services as well as
external mail/parcel carriers.
Communications with Pitney Bowes provides the following benefits:
• Postage By Phone® Meter Payment System refills
• Remote postage inspections
• USPS Confirmation Services (Delivery Confirmation, Signature Confirmation, and electronic filing of Certified Mail)
• Ability to download graphic images (ads, inscriptions, and permits)
• Ability to download rate change and software updates
2 - 2 SV62146 Rev. D
Page 19

DM1100™ Digital Mailing System Operating Guide
Ability to Use Other Pitney Bowes Equipment
You can use the following Pitney Bowes equipment with your mailing system:
U7PS Power Stacker.
This provides a larger area for stacking imprinted envelopes. (Optional.)
Mail Machine Interface
The Mail Machine Interface (MMI) enables communication between
DI900™/DI950™ FastPac® Inserting Systems and the DM Series™ Mail
ing System via a USB connection.
The DI900™/DI950™ sends start and stop signals to the mailing system,
and the mailing system can send error messages back to the inserter to
stop feeding.
• If the mailing system is overcome with mail, it can pause the inserter to
prevent it from producing any additional mail pieces, process the mail
pieces on the feeder, then signal the inserter to resume once it has
caught up.
• When the mailing system is in maintenance mode, it will pause the
inserter, then signal the inserter to resume once maintenance is com
plete.
• If you want to operate the mailing system in standalone mode, press
the Stop key on the IntelliLink® Control Center. The DI900™/DI950™
inserter will finish creating any mail pieces in process. Press Start (at
the mailing system) to finish processing any pieces of mail on the
feeder. Then, refer to your the operating guide for you mailing system
for instructions on processing mail.
NOTE: Once you have completed processing mail in standalone mode,
press the Stop key. To resume using the MMI Interface, start creating mail
pieces at the DI900™/DI950™ inserter.
Contact your Pitney Bowes Account Representative for more information.
-
-
Accounting and Reporting
INVIEW™ Accounting
INVIEW™ Accounting and reporting allows you to store postage costs for
300 accounts. You can run reports on single or multiple accounts and limit
access to the accounts by password protecting them. For more information
about INVIEW™ Accounting, refer to Chapter 7, INVIEW™ Accounting in
this guide.
Budget Manager
You can also acquire the enhanced accounting package, Budget Manager.
Budget Manager allows you to create more accounts with higher levels of
detail. For more information on Budget Manager, refer to Budget Manager
Operator Guide, SV60957.
Business Manager
You can connect your DM Series™ system d irectly to a Business Man ager
host PC and control all of your accounts, operators and postal transaction
data through the Business Manager Administration module. For more infor
mation on Business Manager, refer to the help within the Business Manager application.
SV62146 Rev. D 2 - 3
-
Page 20

2 • Meet the DM1100™ Digital Mailing System
COMPLIANTCOMPLIANT
S
h
a
p
e
B
a
s
e
d
R
a
t
i
n
g
S
h
a
p
e
B
a
s
e
d
R
a
t
i
n
g
Advertisements and Inscriptions
Ads and inscriptions are messages you can include in the meter stamp. A
number of standard advertisements and in scriptions are inclu ded with yo ur
mailing system. You can order customized ads and inscriptions by calling
the Pitney Bowes Supply Line™ (refer to the Pitney Bowes Contact Infor
mation List at the front of this guide for the phone number). For information
on ordering ads and inscriptions, refer to Chapter 11, Supplies and Options
in this guide.
When you order additional advertisements or inscriptions you receive an
art card which you insert into a slot on the side of the IntelliLink® Control
Center. Once installed, you can select an advertisement or inscription when
you run mail.
Shape Based Rating
Shape based rates are USPS® rates that are based on the
weight and dimensions (thickness, length, width) of the mail
piece. All new DM Series™ mailing systems have been
updated to support this rating structure.
Optional Permits You can print a permit on a piece of mail instead of a meter stamp. A permit
is a postal mark containing a permit number that provides you with special
processing or discount rates. You get the permit(s) from the US Post Office
and the permit artwork from Pitney Bowes. For information on ordering p er
mits, refer to Chapter 11, Supplies and Options in this guide.
-
2 - 4 SV62146 Rev. D
Page 21
DM1100™ Digital Mailing System Operating Guide
1234567
8
Parts of the Mailing System
Mailing System Exterior
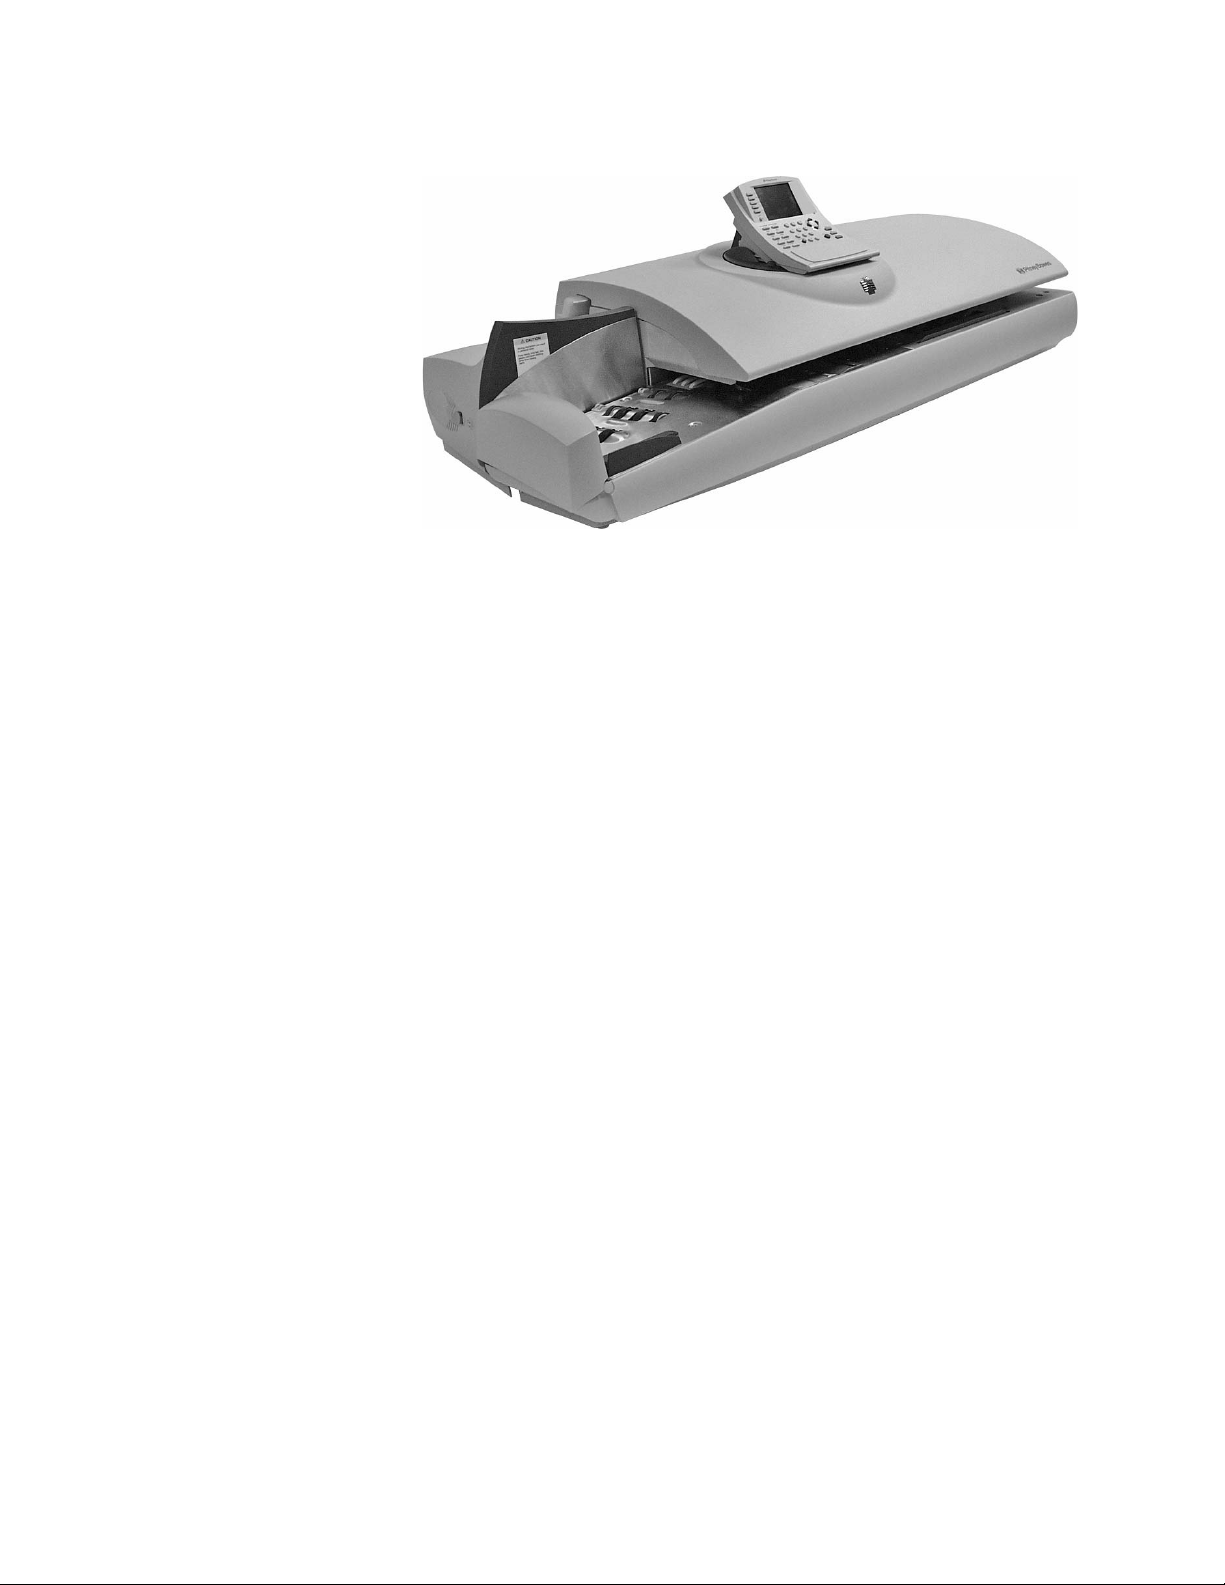
This section describes the parts of your DM1100™ mailing system and
includes:
• The Mailing System Exterior
• The Mailing System Interior
• The IntelliLink® Control Center
• The Main Screen
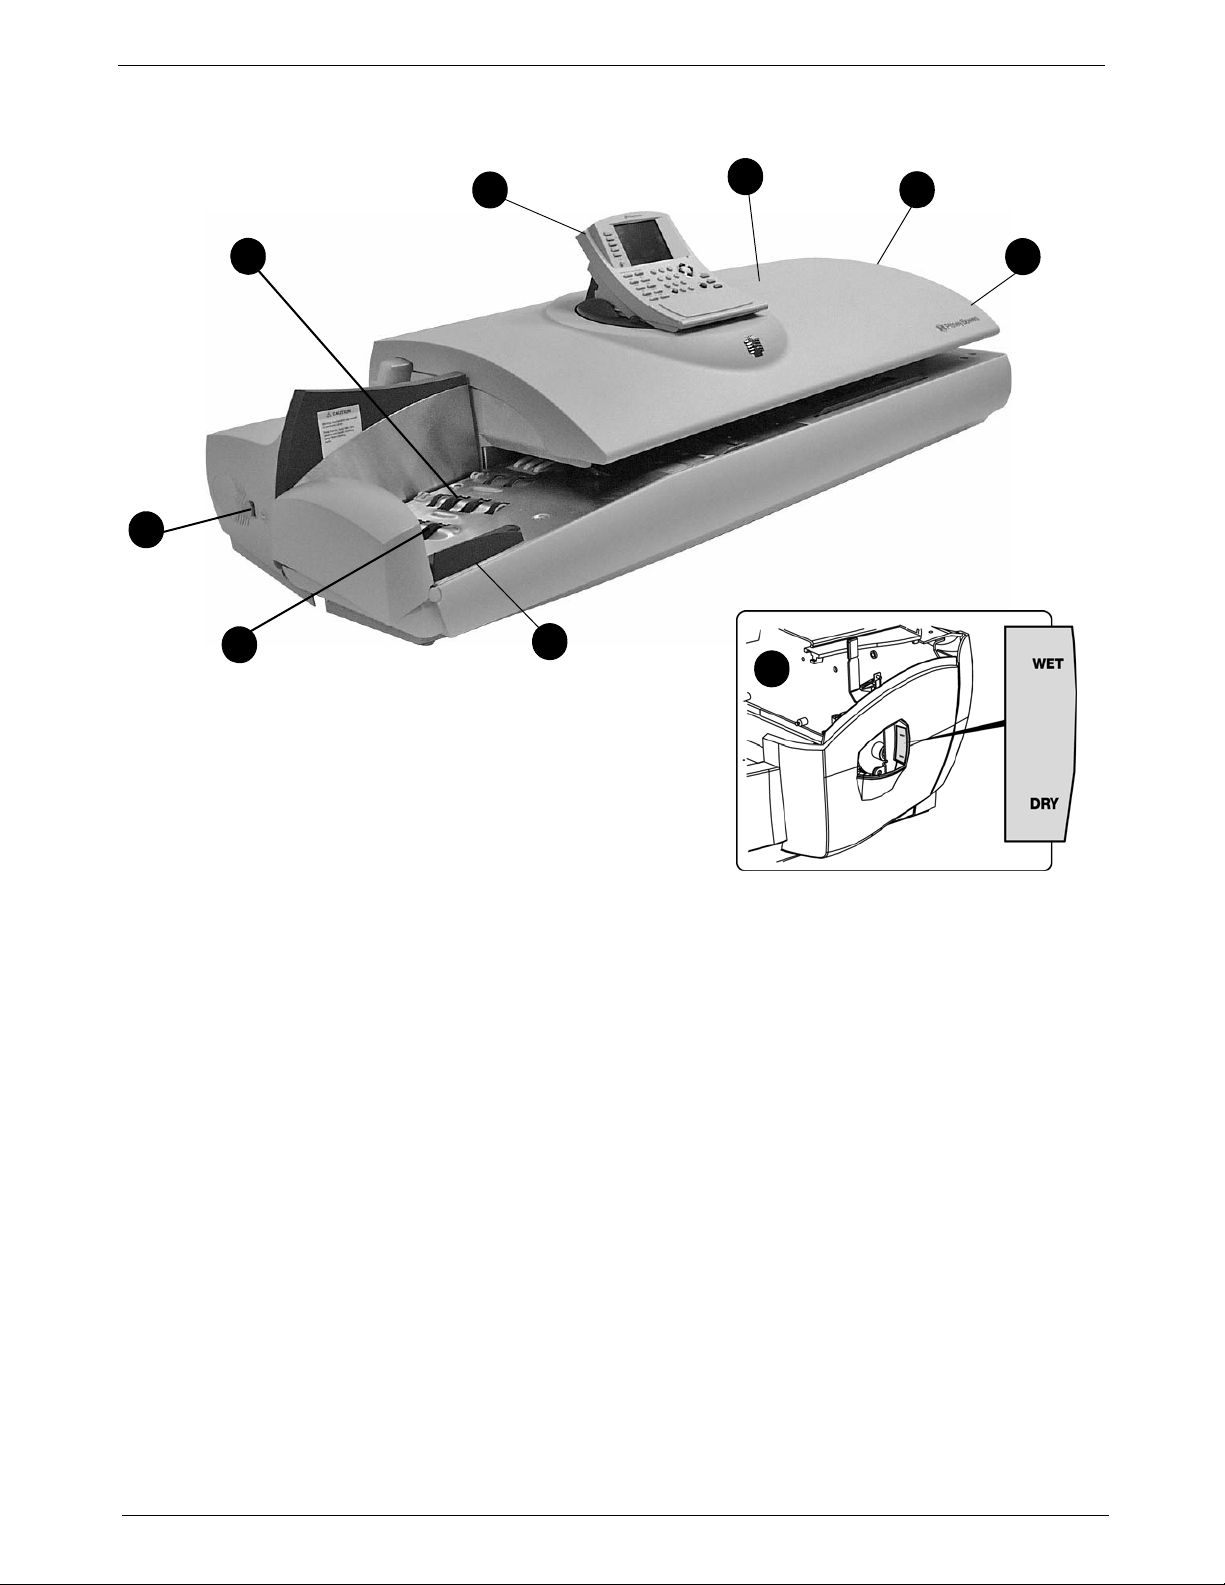
Refer to the diagram for the location of each component.
IntelliLink® Control Center - This contains the screen and keypad for communicating with the mailing machine and the built-in
postage meter (Postal Security Device).
Main Cover - Protect moving parts and prevent foreign objects
from entering the machine. The feed cover protects the feeder.
Wet/Dry Tape Lever - Move this lever down for dry tapes or
pressure-sensitive tapes; move it up to wet gummed tapes.
Stacker (not shown) - This is where mail is deposited after the
postage is applied to the piece of mail. It is located on the right
side of the machine. It may be a drop stacker, or an optional
U7PS Power Stacker.
Flats Guide - Keeps flats aligned while feeding.
Feed Rollers - Rollers that move the mail on the transport deck
into the feeder.
On/Off switch - Turns the mailing system on and off. This is
located on the lower left side of the feed deck.
Feed Deck - This is where you load the mail.
SV62146 Rev. D 2 - 5
Page 22
2 • Meet the DM1100™ Digital Mailing System
1
2
see inset
3
3
4
5
6
7
8
The Digital Mailing System Exterior
2 - 6 SV62146 Rev. D
Page 23

DM1100™ Digital Mailing System Operating Guide
12345
6
7
8
Mailing System Interior
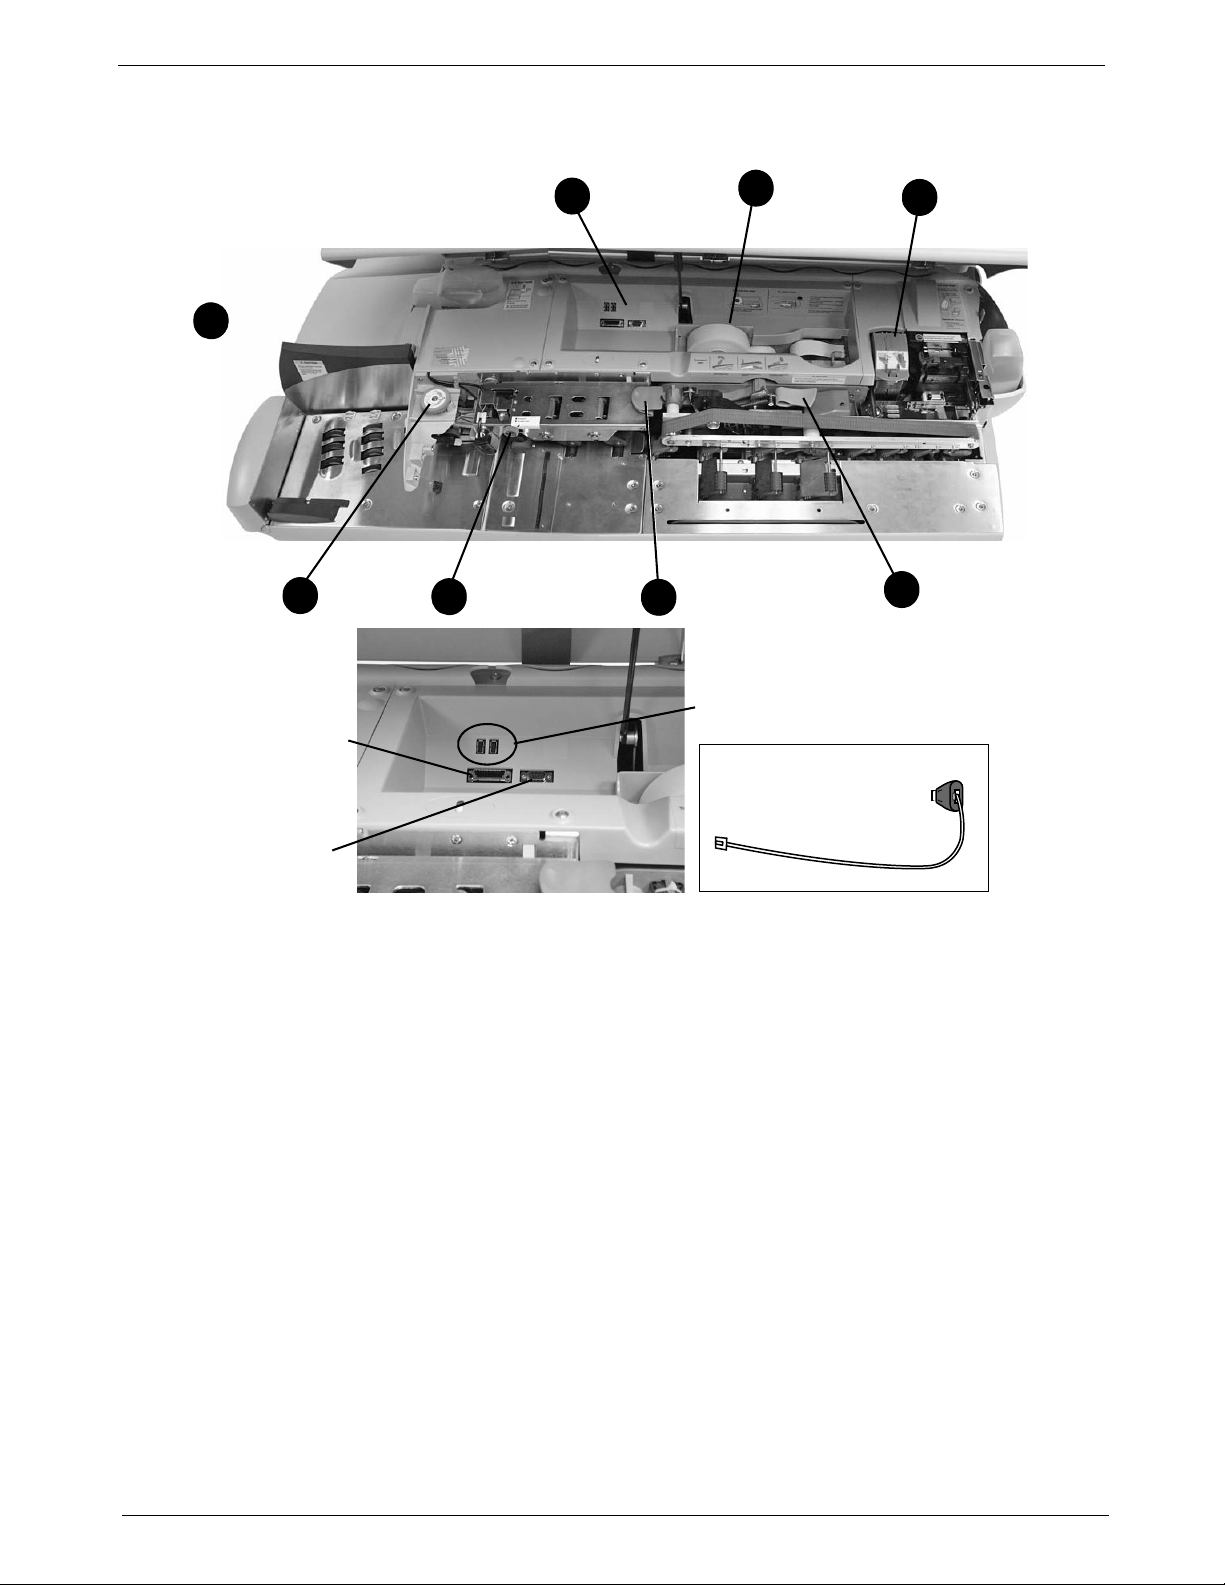
Refer to the diagram for the location of each component.
Roll tape - The tape supply is located here. Print meter stamps
on tape for pieces of mail that cannot go through the system. You
can also print reports on tape.
Printer and Ink Cartridge - Produces the meter stamp on the
mail piece or tape.
Transport Jam Lever - Lift this to clear jams on the transport
section of the feed deck.
Feeder Jam Release Lever - Lift this to clear jams in the feeder
section of the feed deck.
Light Mail/Postcard Selection Knob - Applies pressure to
envelopes to ensure proper sealing.
Thickness Adjustment Knob - Use this to adjust for the thickness of the envelopes.
E-Z Seal® Sealing Solution Moistener Bottles - Hold the E-Z
Seal® Sealing Solution used to seal mail and tapes.
External Device Ports - Use these ports to connect to external
devices like a power stacker.
SV62146 Rev. D 2 - 7
Page 24
2 • Meet the DM1100™ Digital Mailing System
1
2
4
6
7
8
(see inset)
USB Ports (USB network adapter
can be plugged in here)
Power
Stacker Port
Serial Port
USB Network Adapter
and LAN Cable
5
3
The Digital Mailing System Interior
2 - 8 SV62146 Rev. D
Page 25

DM1100™ Digital Mailing System Operating Guide
1
234
5
6
7
8
9
10
11
121314
15
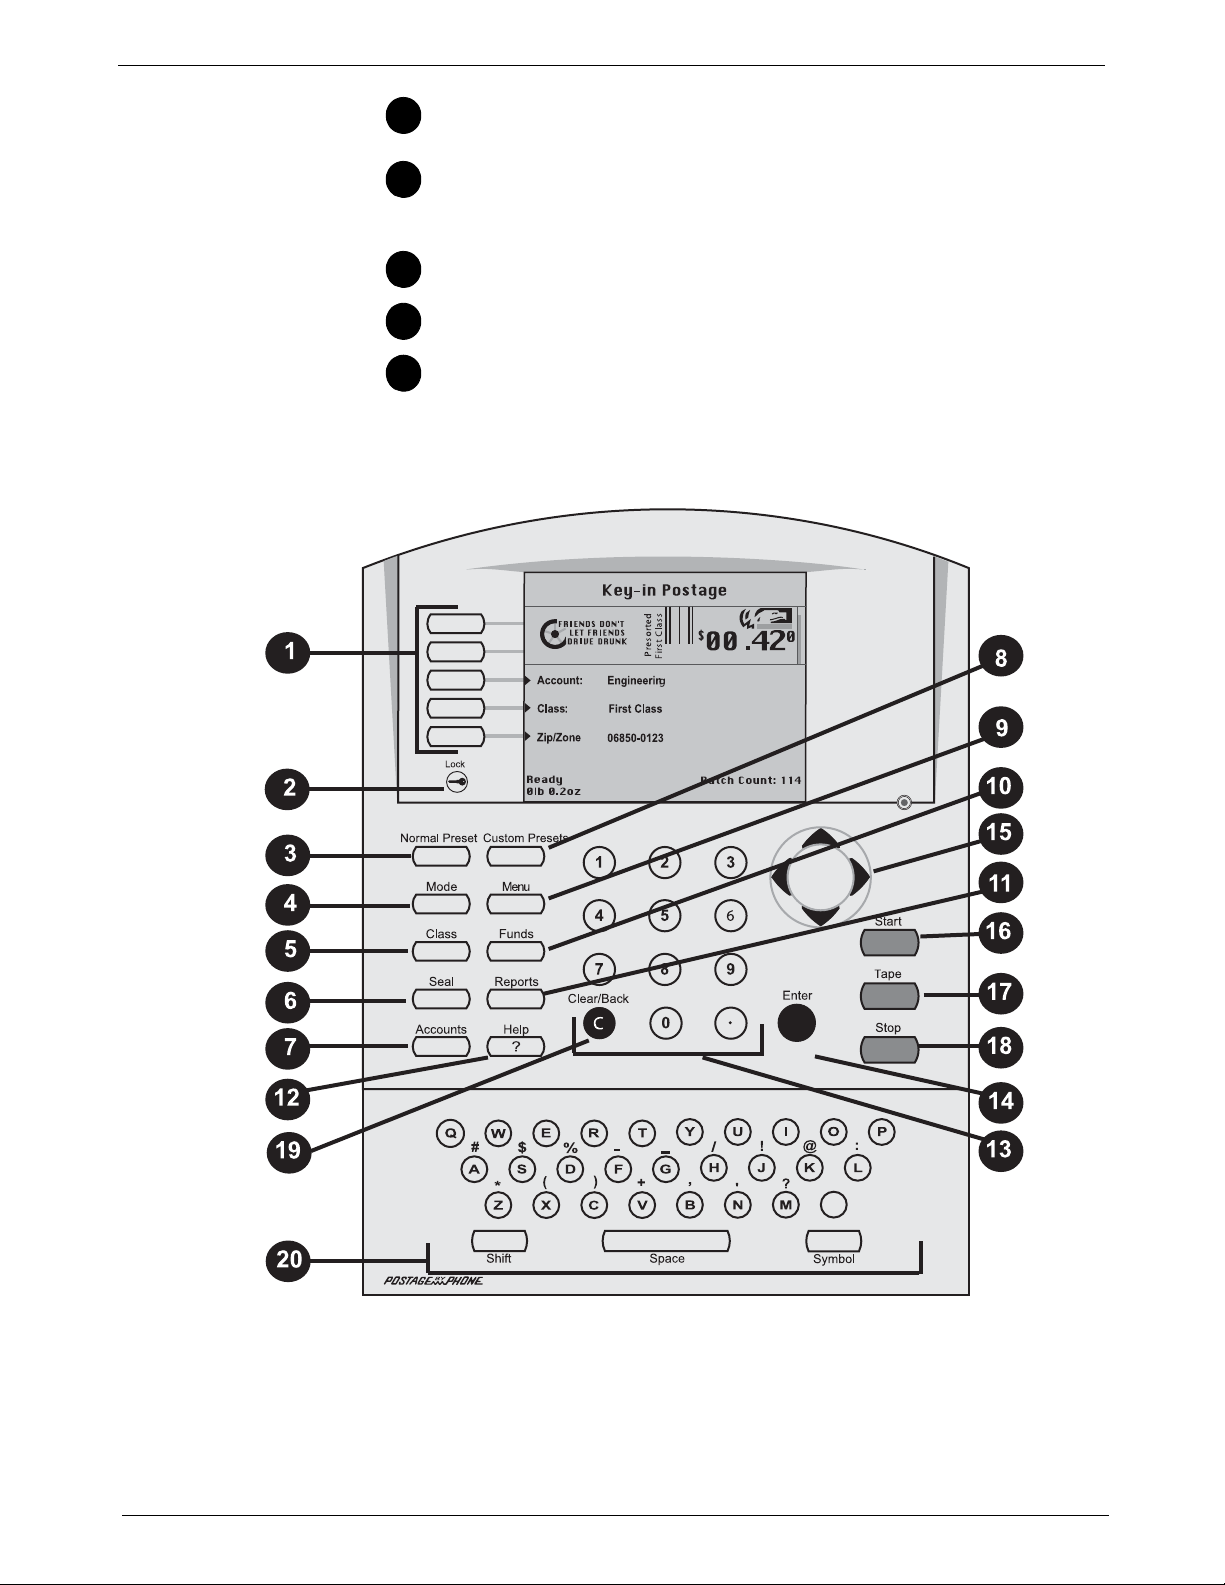
The IntelliLink® Control Center
This section describes all of the function keys on the IntelliLink Control
Center, the control center Main Screen, and the connectors on the back of
the control center used to connect it to the AC adapter and to internal and
external phone lines.
Function Keys
Five Screen Keys - The five keys directly to the left of the display
screen allow you to select options displayed on the screen.
Lock Button - Locks the IntelliLink® Control Center.
Normal Preset Key - Returns you to the most commonly used set-
ting.
Mode Key - Press to choose from a variety of mail processing
modes.
Class Key - Enables you to select the correct class for your mailing
(e.g., First Class, Priority, Media mail).
Seal Key - Allows you to moisten and seal envelopes, with or with-
out applying postage. You can also choose not to seal the envelopes at all. You can also choose not to seal the envelopes at all,
adjust the wetness, or prime the moistener.
Accounts Key - Press to set up and edit accounts.
Custom Preset Key - Use this to choose frequently-used system
key settings for running different jobs
Menu Key - Press to view the following settings and options:
• Meter Stamp Options
•Set Up
• Zero Scale
• Maintenance
• Turn Features On
• Confirmation Services
• Adjust Display Contrast
Funds Key - Press to view the following settings and options:
• Funds Available (in postage meter)
• Funds Used
• Total Pieces (of mail processed by your mail system)
Reports Key - Offers a selection of different types of reports to run.
Help Key - Gives detailed information about a screen you are view-
ing.
Numeric Keys - Press numbered keys to enter postage amounts
and weight. You can also use these keys to select numbered
options appearing in the display.
Enter Key - Press to enter the informa tion you have selected for
the mailing system.
Arrow Keys - Moves you to new menus, or scrolls menus and
selects options.
SV62146 Rev. D 2 - 9
Page 26
2 • Meet the DM1100™ Digital Mailing System
16
171819
20
Start Key - Begins processing mail with the options you have
selected.
Tape Key - Allows you to print postage tapes for packages or
pieces of mail that are outside the limits specified for mailing materials. See Specifications in Chapter 12 of this guide for details.
Stop Key - Ends a mail or tape processing job in progress.
Clear Key - Clears an entry, or takes you back one screen.
Alpha Keyboard - Use to enter accounts and other setup informa-
tion. This keyboard is under a cover that opens for access.
2 - 10 SV62146 Rev. D
Page 27
DM1100™ Digital Mailing System Operating Guide
1
2
3
4
5
6
7
8
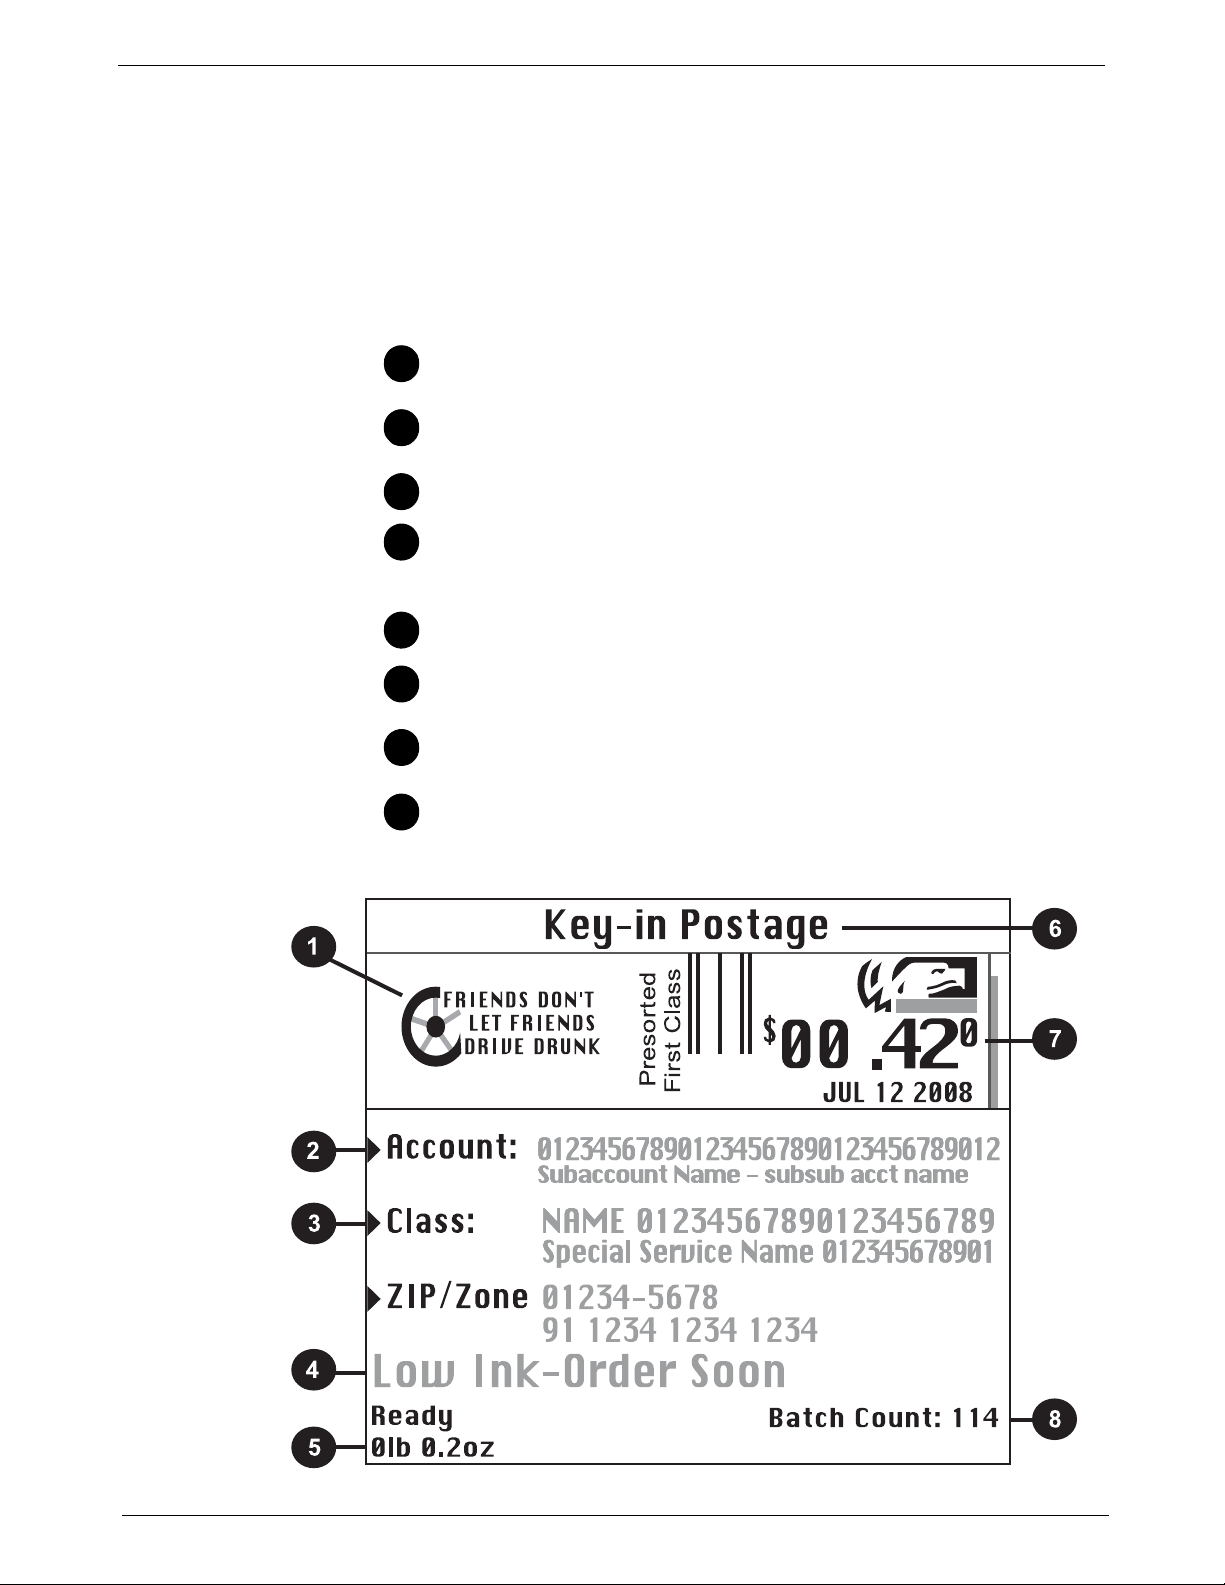
The Main Screen
The content of the main screen depends upon the current mode of the
machine. Main screens are the only screens that contain a meter stamp
replica area and a main status area.
The main screen enters a sleep mode after a certain period of inactivity.
Pressing any key wakes up the system and shows the last screen on the
display, or the one corresponding to the Normal Preset settings (refer to
Define Presets in Chapter 5 in this guide for more information).
Advertisement Display - The optional message to be printed on
the envelopes or tape (if selected).
Account - The optional account number or name charged with
postage.
Class - The class you selected for the piece of mail.
Main Status Area - Important information such as warnings or help
or navigation tips. For example, if you select a class, a message
appears in this area.
Weight Display Area - The weight of the piece of mail.
Mode - The mode in which the piece of mail will be processed, or
what the next required action will be.
Meter Stamp - The of ficial USPS indicia printed on the envelope or
tape.
Batch Count - The number of pieces of mail run in a job.
SV62146 Rev. D 2 - 11
Page 28
2 • Meet the DM1100™ Digital Mailing System
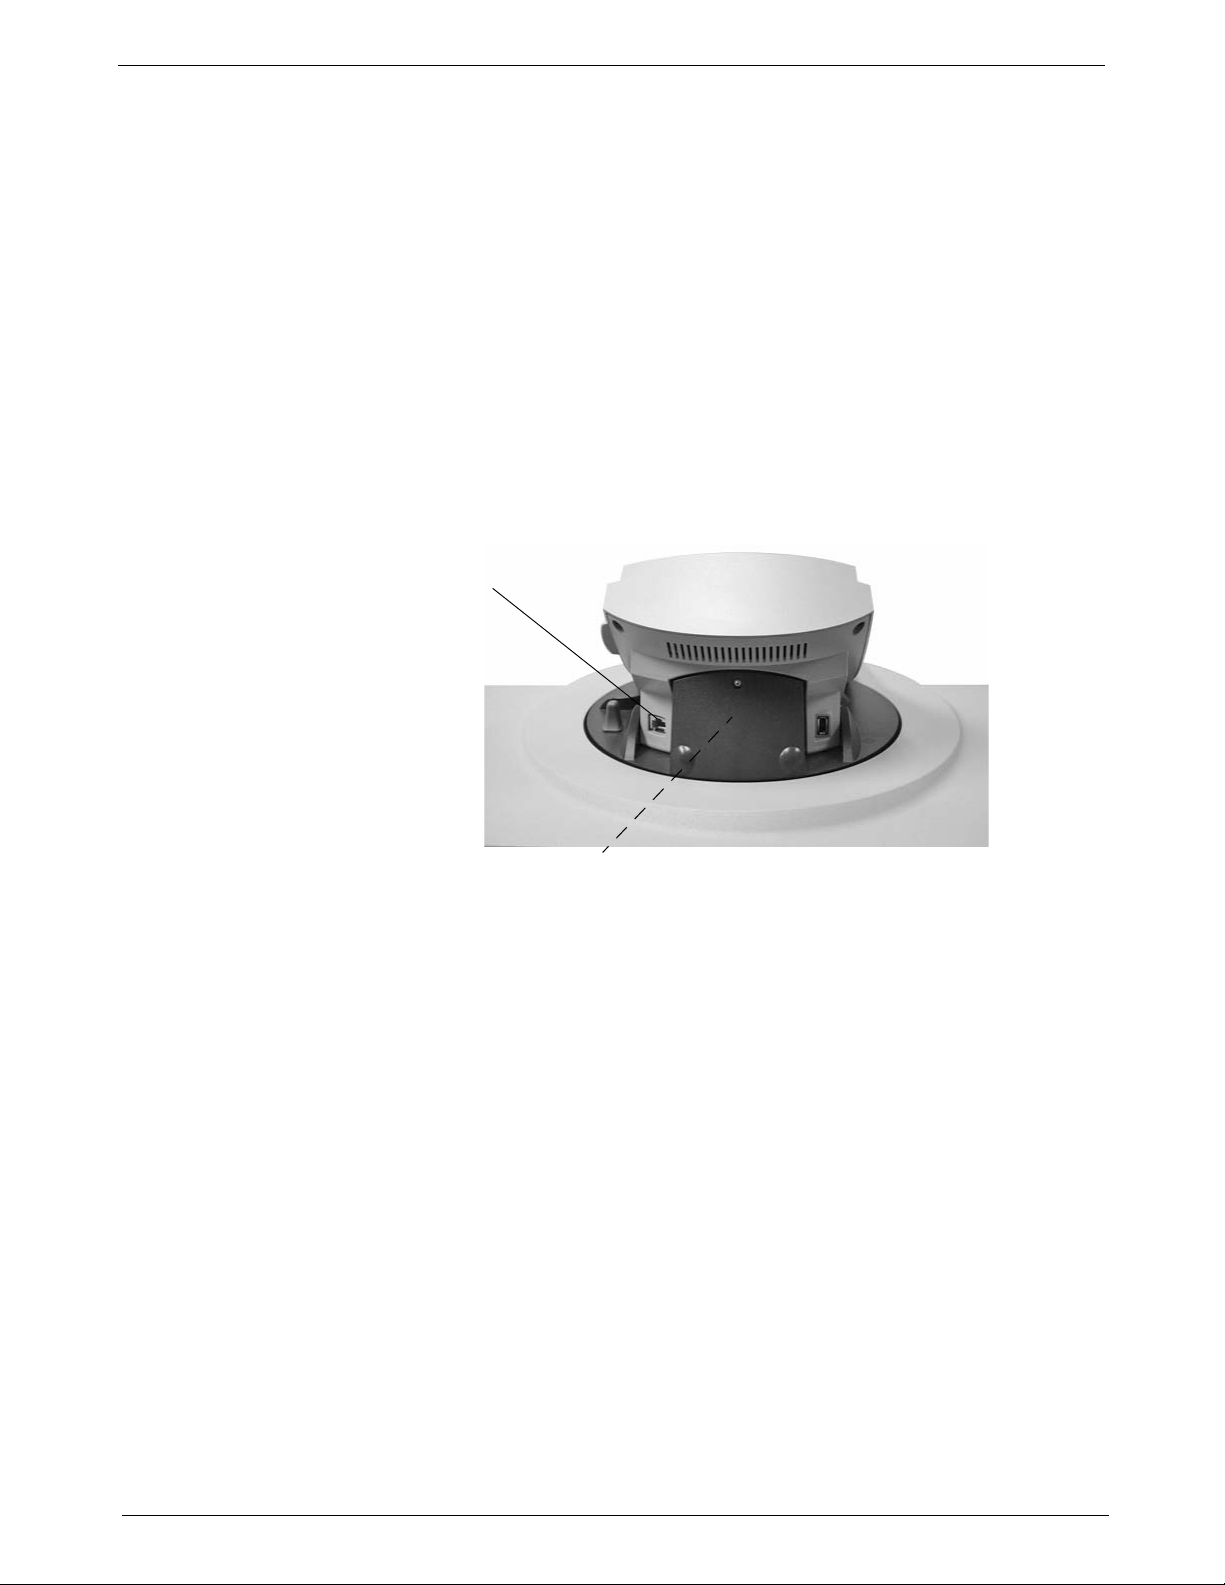
Internal Analog Phone
Line Connector
Use this to connect
directly to an analog
phone line
IntelliLink® Control Center installed on a DM1100™ Digital Mailing System base.
Dotted line indicates AC Adapter Receptacle is covered by base
Connectors on the Back of the IntelliLink® Control Center
• Internal Analog Phone Line Connector - The IntelliLink® Control
Center has an internal analog modem and can connect directly to an
analog phone line. The term analog phone line refers to a RJ11C or
RJ11W compatible (single line) telephone wall plug typically used for a
residential phone or facsimile hookup.
• IntelliLink® Control Center AC Adapter Receptacle - The receptacle
for the AC adapter is located on the back of the IntelliLink® Control
Center. If you need to remove the control center from the mailing sys
tem base and move it to an analog telephone line, you plug the AC
adapter into this receptacle. When the control center is connected to
the mailing system base, access to the AC adapter is blocked as indi
cated by the dotted line in the picture below.
-
-
2 - 12 SV62146 Rev. D
Page 29
3 • Mail in a Minute
Mail in a Minute....................................................................................3-2
Preparing Your Mail..............................................................................3-2
Running the Mail..................................................................................3-3
Printing Postage Tapes ........................................................................3-4
SV62146 Rev. D
Page 30
3 • Mail in a Minute
Envelopes shingled to the left
Feed
Sensor
Flats Guide
Mail in a Minute This chapter explains how to use the “Key In Postage” mode. It’s the quick-
est and easiest way to run a piece of mail or print a postage tape.
Use this mode if:
• You know the postage amount.
• All envelopes are the same size.
• You are printing postage on postcards.
For instructions on other available modes for running your mail, refer to
Determining the Correct Postage Mode section in Chapter 4 in this guide.
For tips on feeling light weight or bulky pieces of mail, flats and postcards,
or any mail that is easily damaged, refer the Tips on Feeding Mail section in
Chapter 4 in this guide.
Preparing Your Mail
1. Remove any onion skin/airmail type envelopes, Tyvek® envelopes,
envelopes that are thicker than 5/8” or any pieces of mail that are out
-
side the limits specified for mailing materials - see Specifications in
Chapter 12 of this guide for details. Print the postage for this type of
mail on tape.
2. Sort the mail by envelope size and weight. If you are using the accou nt-
ing feature, sort by account as well.
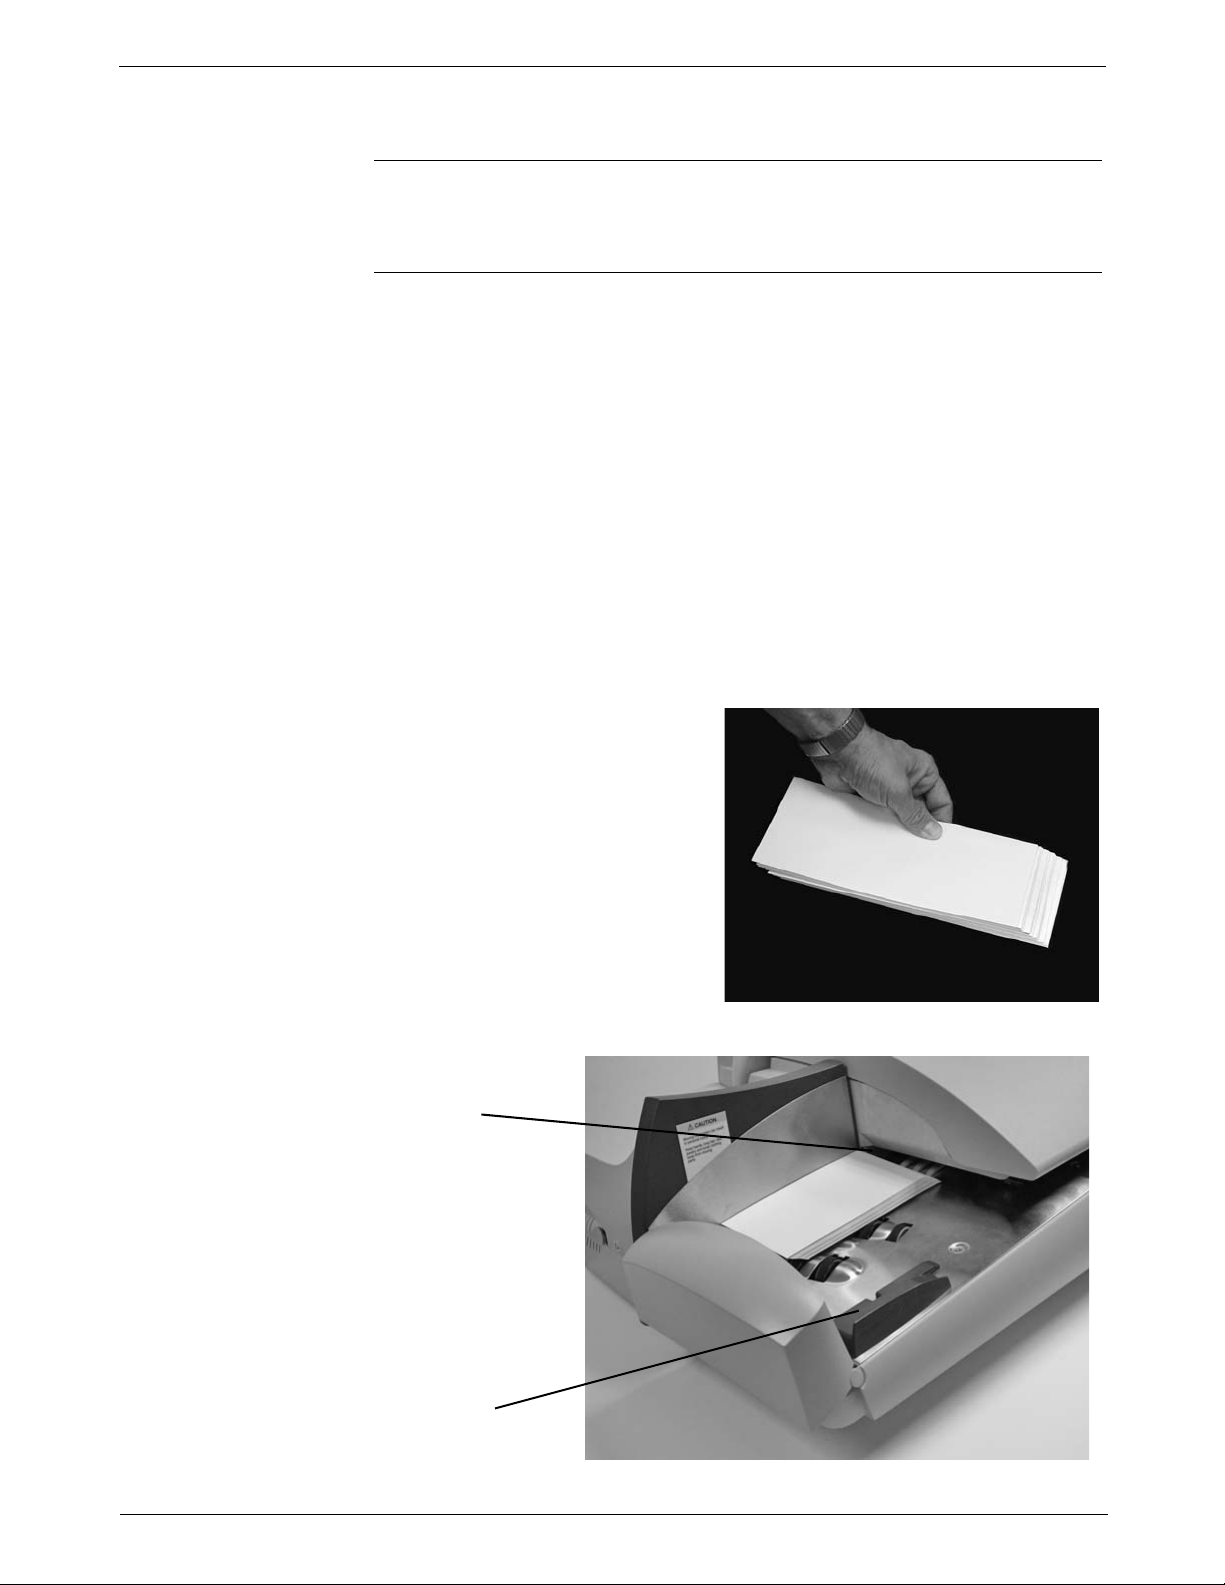
3. Shingle the envelopes so they
are slanted slightly to the left
as shown in the picture shown
at right.
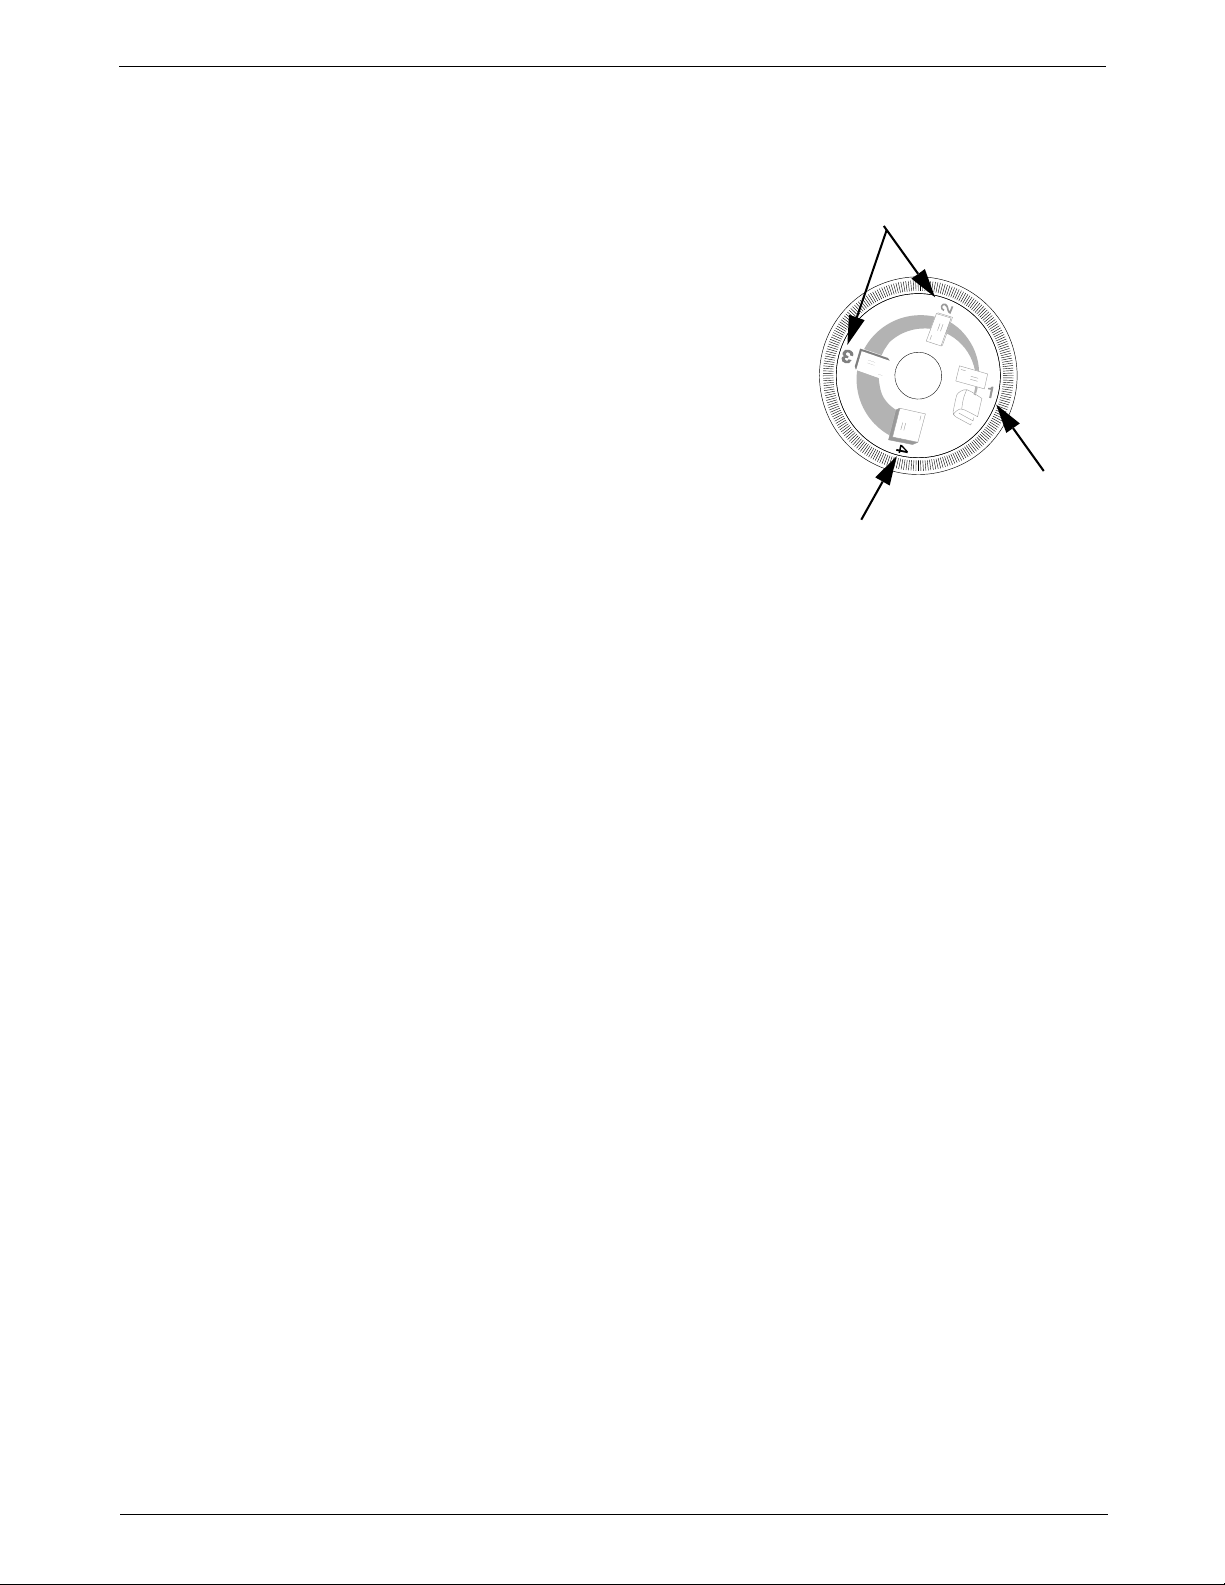
4. Place the stack of mail on the feed deck shown in the picture below.
3-2 SV62146 Rev. D
Page 31
DM1100™ Digital Mailing System Operating Guide
Normal Mail Setting
Thick Mail
Setting
Thin Mail
Setting
• Place the envelopes with the flaps down and against the rear wall.
• Make sure the envelopes are pushed far enough so that they cover
the feed sensor on the rear wall.
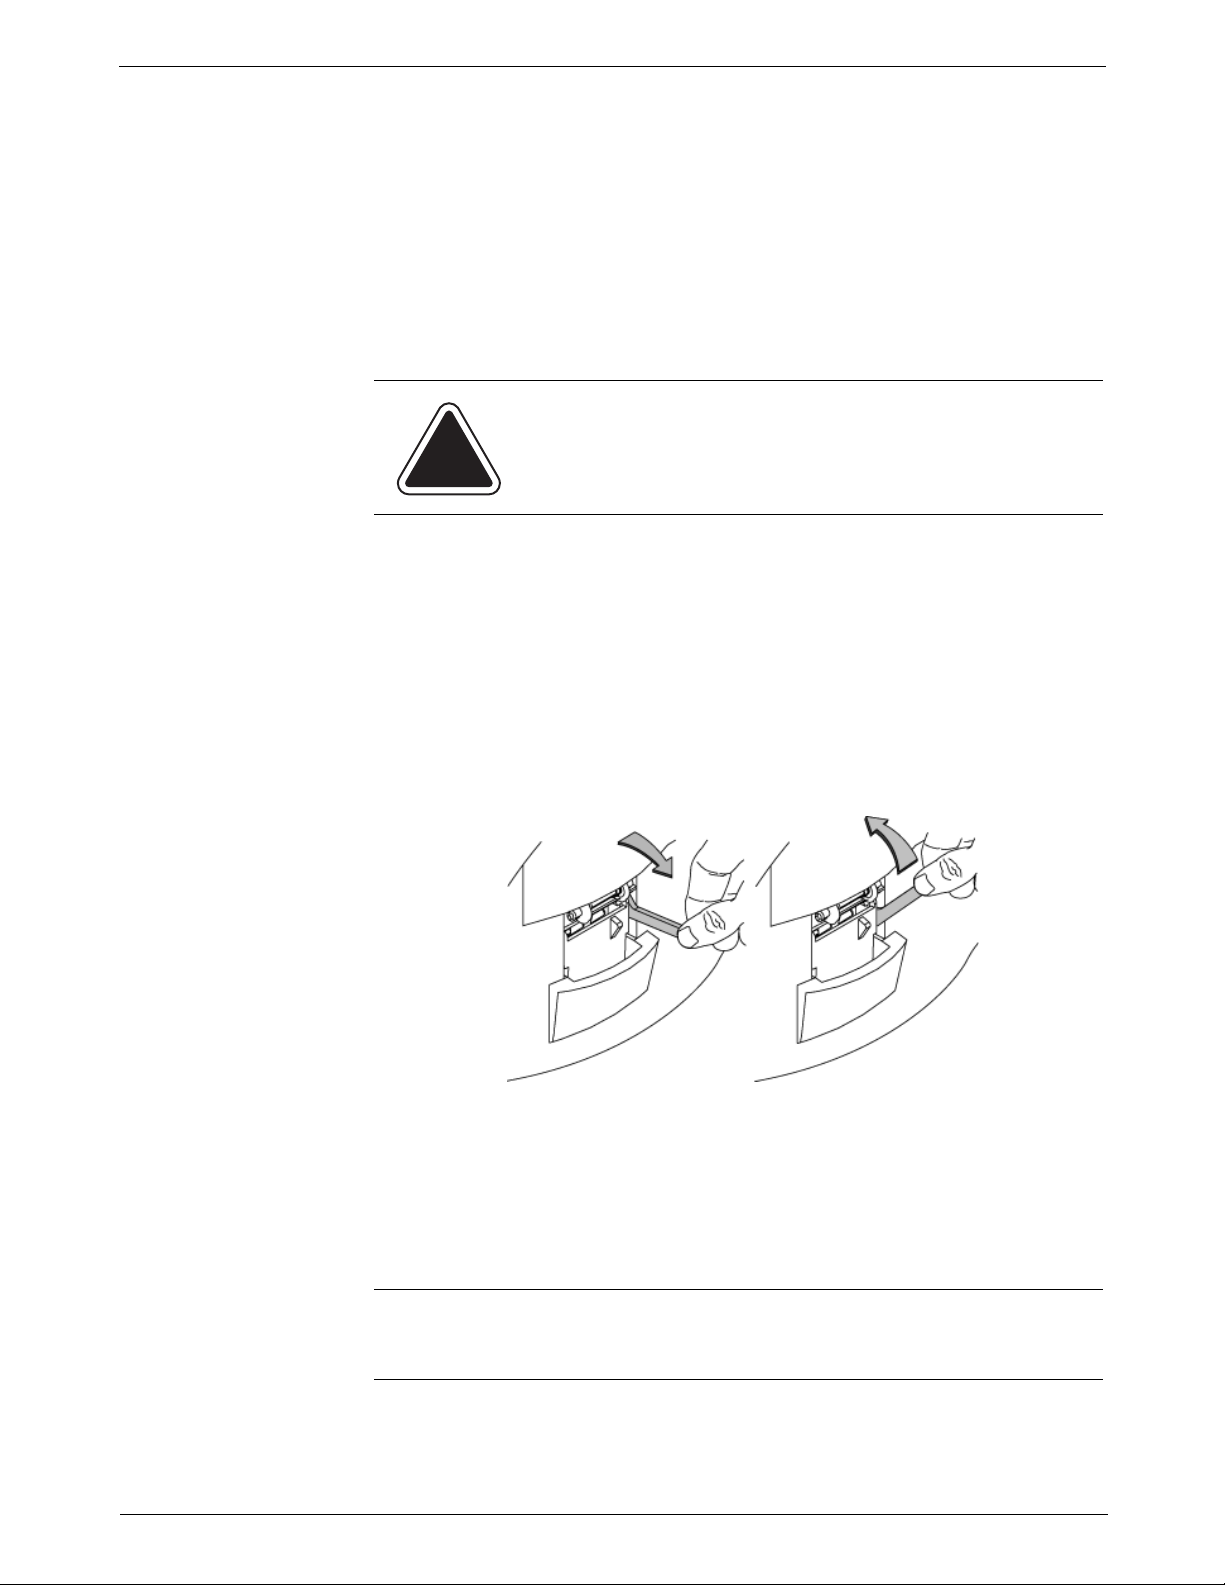
5. Use the thickness adjustment
knob to adjust for envelope
thickness.
• For thicker pieces of mail
(3/8” to 5/8”), or mail containing several inserts, use the
thick mail setting. For most
mail under 3/8", use the nor
mal mail settings.
• For large stacks of thin mail,
such as single inserts or post
cards, the thin mail setting
may be needed for better
performance. Refer to the
figure on the right.
To pick a setting, turn the knob
to the arrow located on the feed
cover.
6. Make sure you have sufficient funds in your postage meter. If the message “Low Funds” appears on the screen, make sure you can complete
the mail run with the funds you have. If you do not have enough funds,
see Chapter 6, Adding Postage in this guide.
-
Running the Mail
1. Press the Mode key on the IntelliLink® Control Center.
2. Select Key In Postage.
3. Key in the correct postage value using the numeric keys on the control
center, then press the Enter key.
4. Place the piece of mail on the feed deck and press the Start key.
SV62146 Rev. D 3-3
Page 32
3 • Mail in a Minute
Dry T ape
Setting
Wet Tape
Setting
Printing Postage Tapes
Print postage tapes for:
• Packages
• Onion skin/airmail type envelopes
• Tyvek® envelopes
• Envelopes that are thicker than 3/4”
• Any pieces of mail that are outside the limits specified for mailing materials - see Specifications, Mailing Materials in Chapter 12 of this guide
for details.
To use this feature you must know the amount of postage you want to print.
You can easily determine this using a scale.
CAUTION: Use only fresh rolls of Pitney Bowes tape to avoid
distortion or jams in the mechanism and possible loss of post
age.
-
To print a postage tape:
1. Press the Mode key on the IntelliLink® Control Center.
2. Select Key In Postage.
3. When the “Ready “ screen appears, use the numeric keypad to enter in
the postage amount.
4. Press Enter to confirm the postage amount.
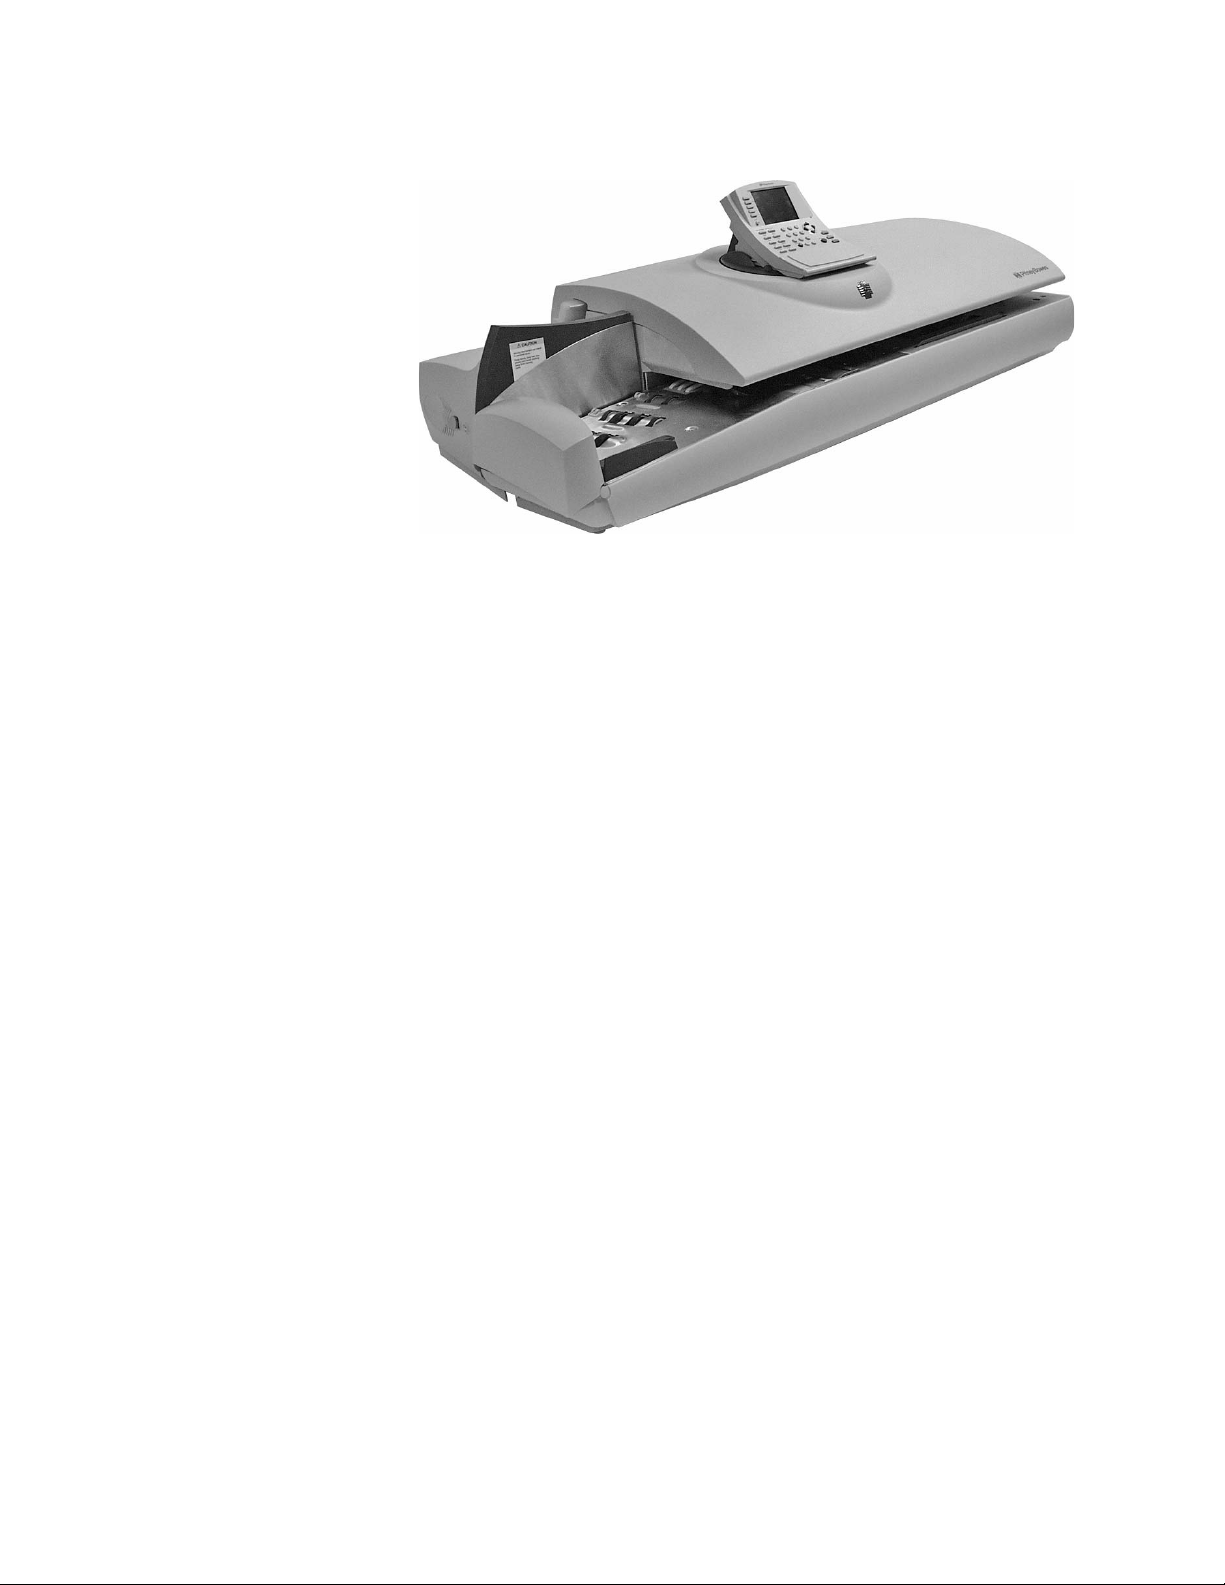
5. Locate the tape exit on the right side of the machine.
6. Move the “wet/dry” tape lever
• down for dry tapes or pressure-sensitive tapes,
• up for wetting gummed tapes.
7. Press the Tape key to print one tape. To print multiple tapes:
• Enter the number of tapes you want to print using the number keys.
• Press the Tape key.
8. The mailing system ejects dry tapes until the number you entered is
reached. The machine won’t print another wet tape until you remove
the previous one. This prevents tapes from sticking to each other.
9. Remove tapes from the tape exit on the right side of the machine.
NOTE: The machine ejects dry tapes until th e number you enter ed is r eached.
The machine will not print another wet tape until you remove the previous one.
This prevents tapes from sticking to each other.
3-4 SV62146 Rev. D
Page 33
4 • Running Mail
Navigating Hints...................................................................................4-2
Applying Postage and Running Mail....................................................4-3
Determining the Correct Postage Mode...............................................4-4
Preparing Your Mail..............................................................................4-6
Selecting the Postage Mode and Running the Mail........................... 4-10
Selecting or Deselecting an Account .................................................4-16
Selecting the Class, Carrier, Special Services or Options .................4-18
Selecting the Meter Stamp Options....................................................4-20
Using Electronic Confirmation Services.............................................4-22
Adding Postage or Changing the Date...............................................4-32
Clearing the Batch Count...................................................................4-33
SV62146 Rev. D
Page 34
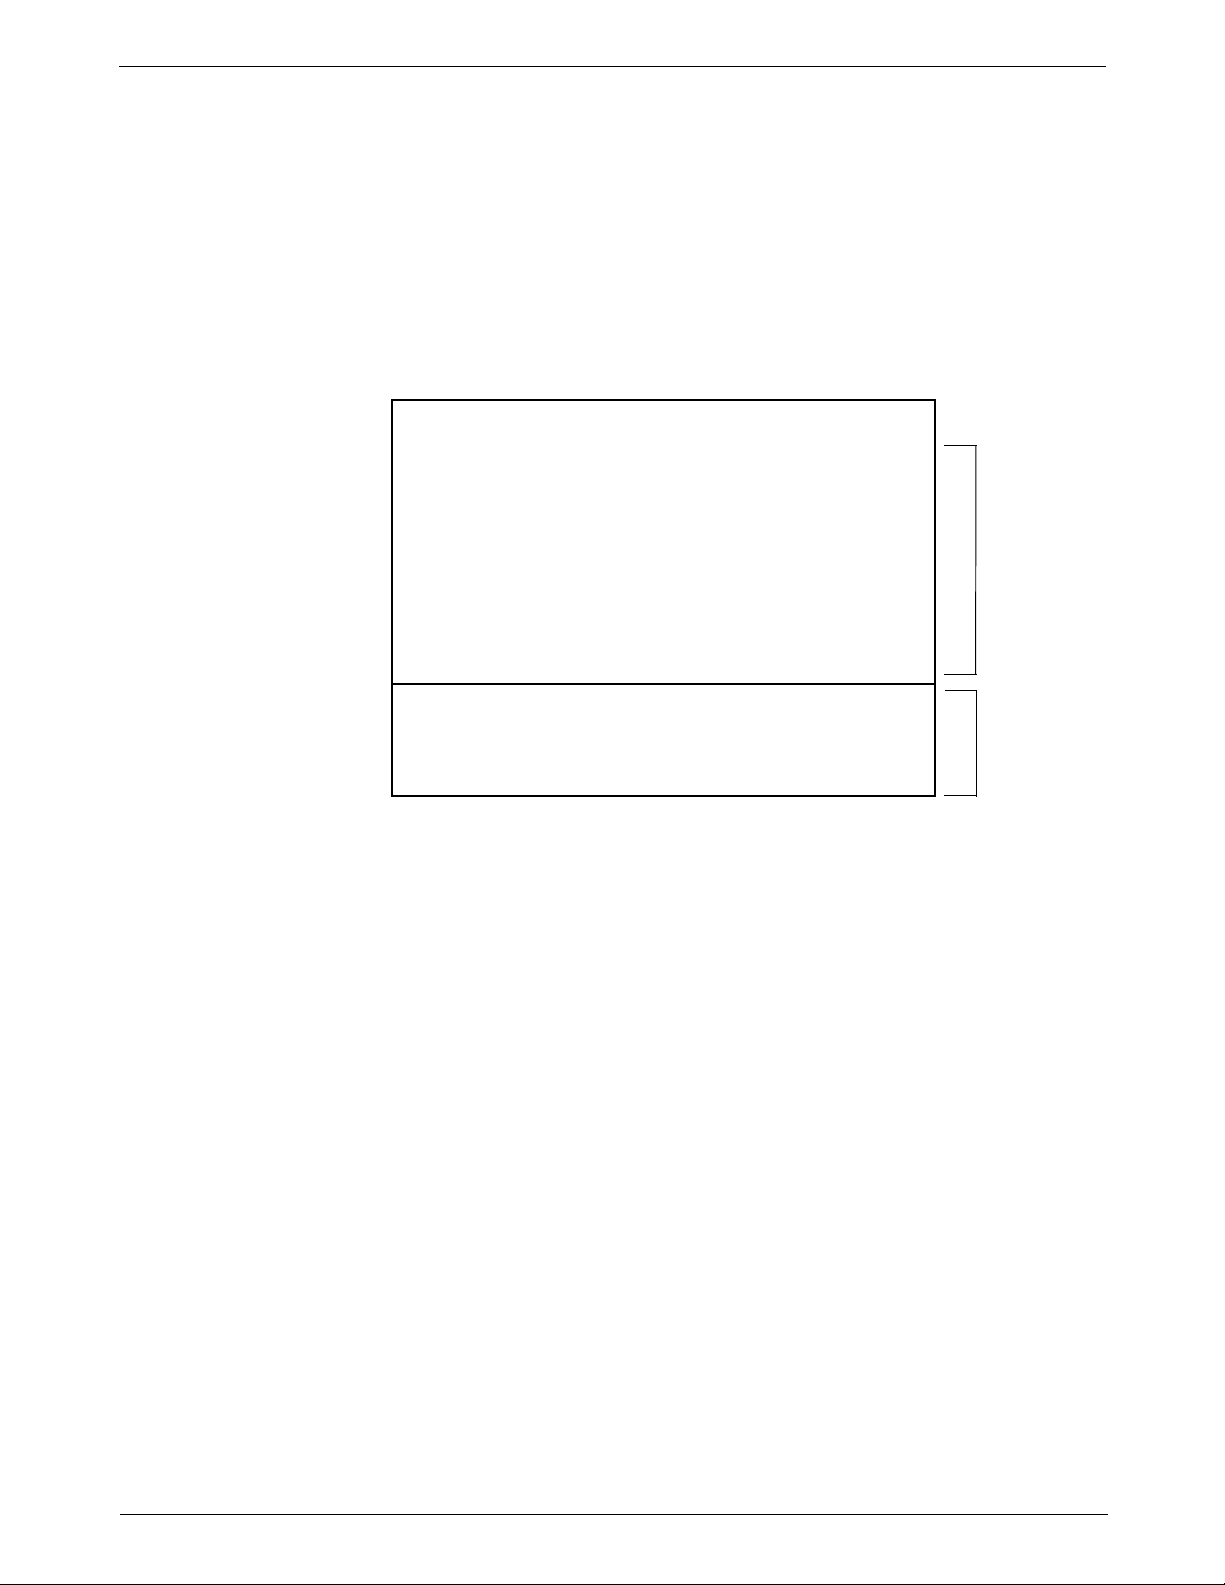
4 • Running Mail
Select Mode
1. Key in Postage
2. W-O-W® - Weigh on the Way
3. Weigh First Piece
4. Differential Weighing
5. Attached Scale
Home
Screen
Options
Arrow Keys
and Help
Information
Navigating Hints
• The maximum number of options displayed is 5. To view more options,
press the down arrow key.
• You can select a numbered option either by pressing the screen key
next to the option, or by pressing the corresponding number on the key
board and then pressing the Enter key.
• To go back one screen or more, clear an entry, or return to the “Ready”
screen, press the Clear key. Pressing the left arrow key returns you to
the main screen.
• Other selection or navigation or help information appears at the bottom
of the screen. Also, check for messages next to the arrow keys on the
bottom right side of the screen.
-
4-2 SV62146 Rev. D
Page 35

DM1100™ Digital Mailing System Operating Guide
123
45678
9
Applying Postage and Running Mail
To apply postage and run mail on the DM1100™ mailing system, follow the
procedures listed here.
You must follow procedures 1 and 2 before you run mail through the system and apply postage. If you are using Accounting, you must also follow
procedure 4.
Follow the other procedures listed here as needed.
For details on each procedure, refer to the section number listed here.
Determining the Correct Postage Mode. Deciding the appropriate mode for
your specific mail run.
Preparing Your Mail. Getting your mail ready for the Digit al Mailing System.
Selecting the Postage Mode and Running Mail. Choosing the mode for
running your mail and tapes.
Selecting or Deselecting an Account. Refer to this section if your system
uses accounting.
Selecting the Class, Carrier, Special Services or Options. Refer to this
section if you need to specify a class or select a special service.
Selecting Meter Stamp Options. This section describes how to change the
elements printed on your piece of mail.
Using Electronic Confirmation Services. This section tells you how to use
preprinted barcode labels provided by Pitney Bowes to electronically process
and submit records for USPS® Confirmation Services to the Pitney Bowes
Data Center.
Adding Postage or Changing the Date. This sections tells you how to add
more postage or change the date of your postage.
Clearing the Batch Count. Refer to this section if you want to clear or reset
the number of pieces of mail processed by your system.
SV62146 Rev. D 4-3
Page 36
4 • Running Mail
1
Determining the Correct Postage Mode
Feeding Mail or Printing Tape?
1. If your mail requires no application of postage, see Chart C on the following page to choose your mode.
2. If your mail requires postage, you must determine if you can print
directly on your mail. You can feed mail if your pieces of mail are:
• under 5/8in. (15.9mm) thick.
• over 3.5 in. x 5 in. or under 13 in. x 15 in.
• under 1.0 lbs (16 oz.).
• not too thin (such as fliers, or Tyvek® envelopes) or too fragile
(such as air mail and onion skin envelopes) to pass through the
feeder.
• Meet the other requirements for mail feeding listed in Chapter 12,
Specifications in this guide.
3. If your mail meets the above requirements, select the appropriat e mode
from Chart A below.
4. If your mail does NOT meet the requirements for direct printing, you
MUST print a postage tape. Select the applicable postage mode from
Chart B on the following page.
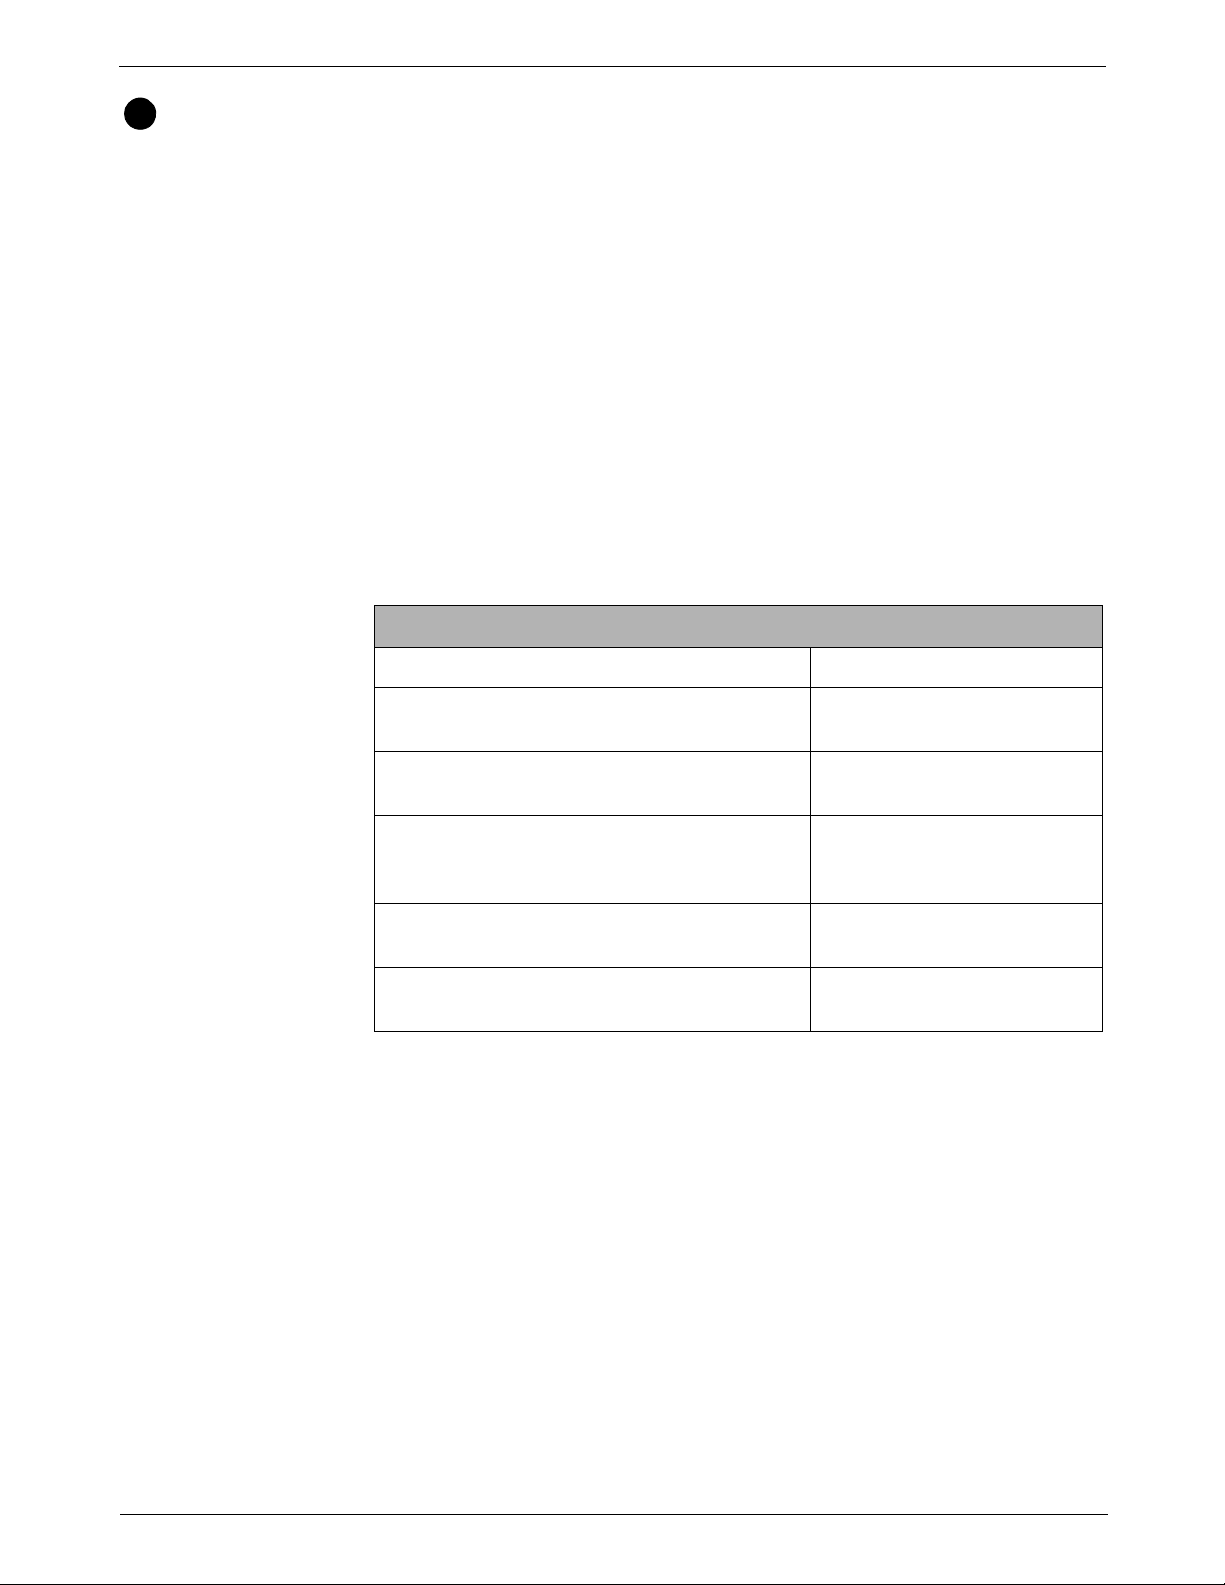
Chart A - Printing on Mail
If: Then use this mode:
You know the amount of postage needed for
your piece of mail.
You do not know the weight of your piece of
mail.
The pieces of mail are different weights bu t fall
within the guidelines listed above and in the
Specifications in Chapter 12 in this guide.
All pieces of mail are identical.
Your pieces of mail vary in types, sizes, and/or
weights.
Key In Postage
Attached Scale
W-O-W® - Weigh-On-TheWay®
Weight First Piece (only available with W-O-W®)
Differential Weighing
4-4 SV62146 Rev. D
Page 37
DM1100™ Digital Mailing System Operating Guide
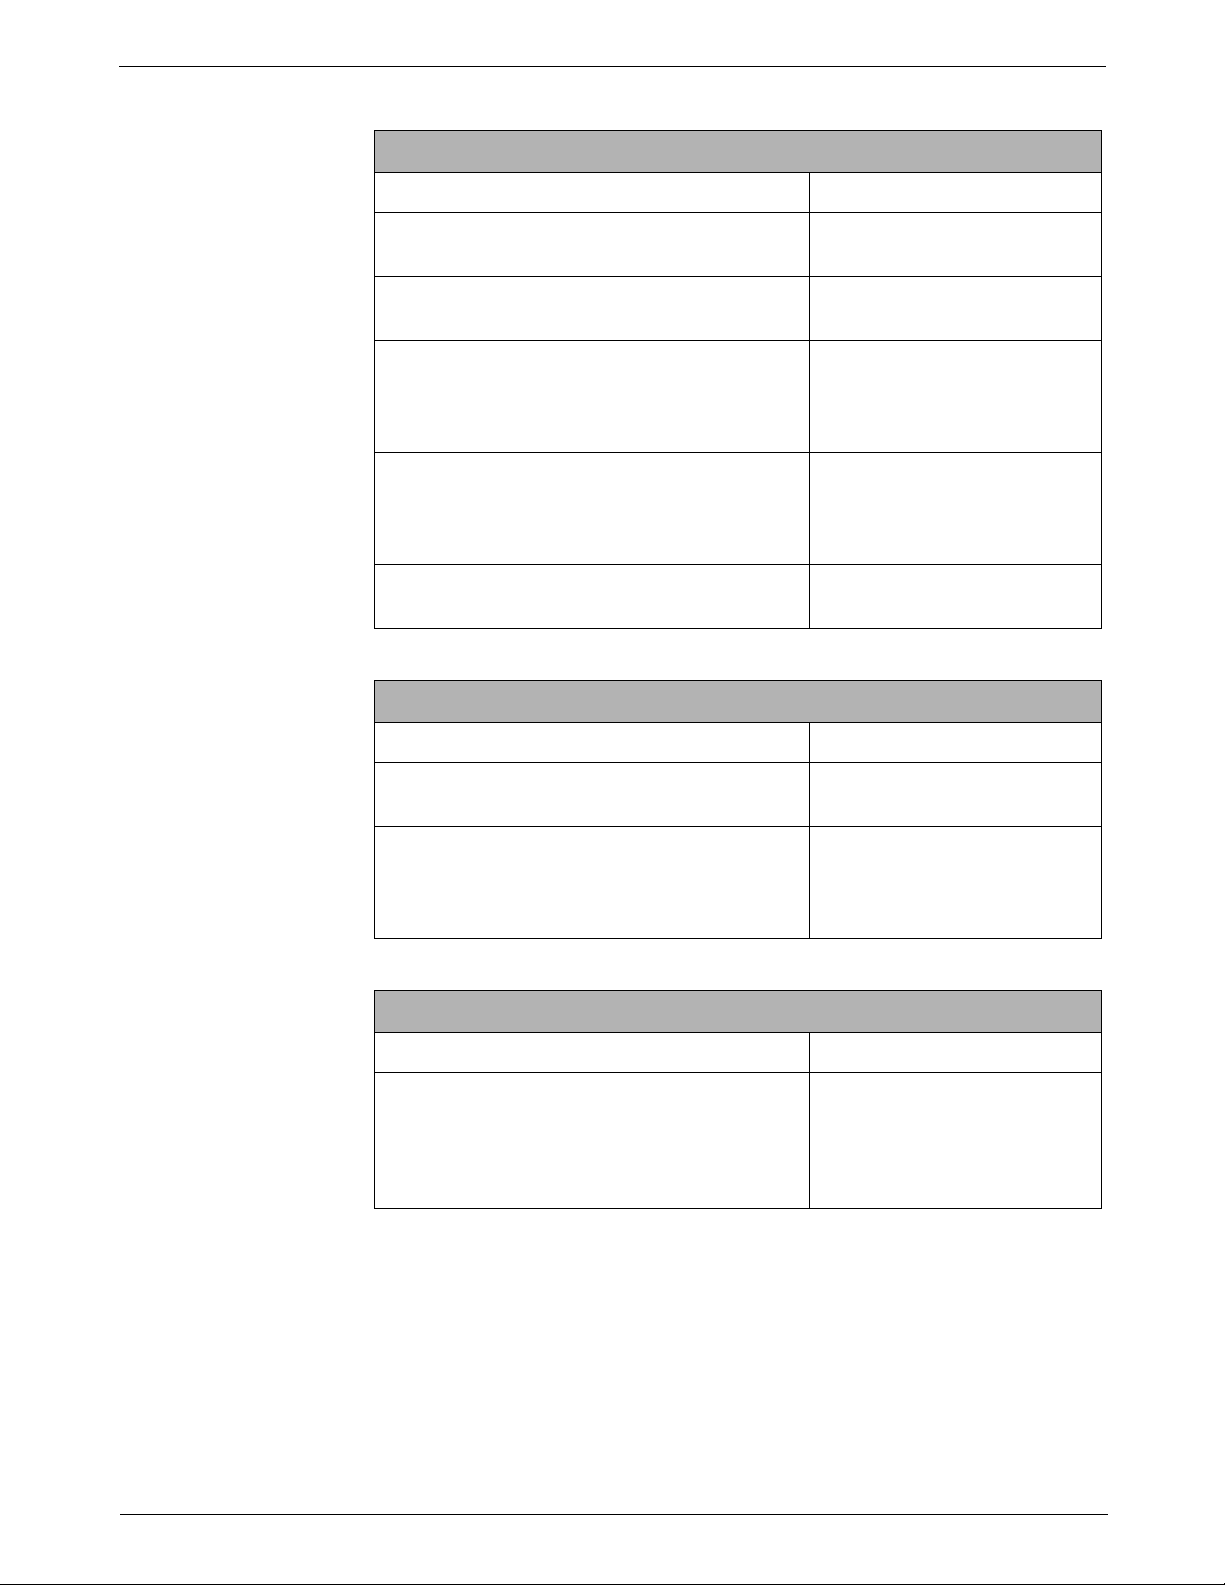
Chart B - Postage Tape Mode
If: Then use this mode:
You know the amount of postage needed for
your piece of mail.
You do not know the weight of your piece of
mail.
You have several pieces of mail and do not
know their postage
You know the weight.
Your pieces of mail vary in types, sizes and/or
weights.
Key In Postage
Attached Scale
Attached Scale - AutoTape
(An option you may be able to
purchase. Not available on all
systems.)
Manual Weight Entry (An
option you may be able to pur
chase. Not available on all
systems.)
Differential Weighing
Chart C - Mail Modes with NO Postage
If: Then use this mode:
You only want to seal the envelope and do
NOT want to apply postage.
Seal Only (No Printing)
-
Time and Date Stamp (An
You want to print the date or time on incoming
mail for record keeping.
option you may be able to pur
chase. Not available on all
systems.)
Chart D - Permit Mail
If: Then use this mode:
Print Permit (An option you
may be able to purchase that
Your mail requires a permit.
requires a separate
IntelliLink® Control Center.
Not available on all systems.)
-
SV62146 Rev. D 4-5
Page 38
4 • Running Mail
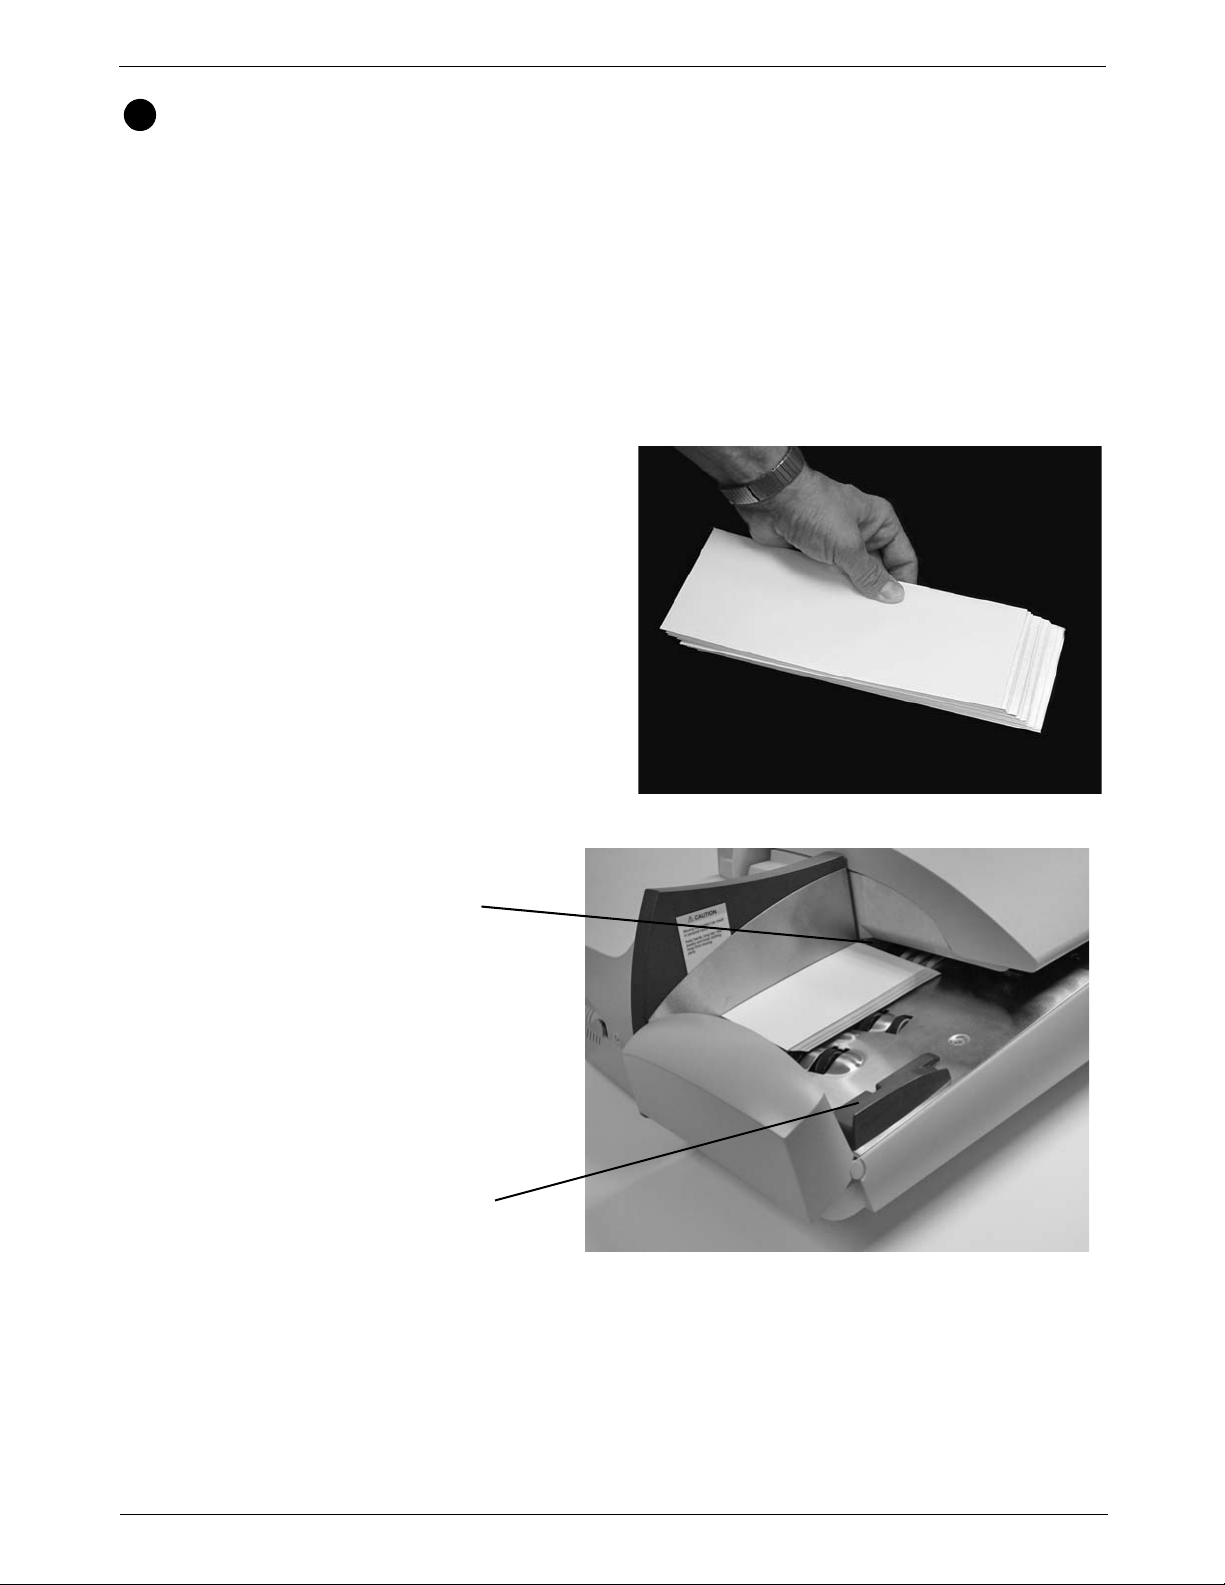
2
Envelopes shingled to the left
Feed
Sensor
Flats Guide
Preparing Your Mail
About Running Mail
If you intend to run pieces of mail through your system, read About Running Mail below . If you are going to print postage t apes, read About Printing
Postage Tapes in this section.
Then, proceed to instructions for selecting the mode and running the job.
Refer to Chapter 12, Specifications in this guide to make sure your mail is
compatible with your mailing system. For tips on feeding light weight or
bulky pieces of mail, flats and postcards, or any mail that is easily dam
aged, refer to “Tips on Feeding Mail” in this section.
1. Sort the mail by envelope size. If you are using the accounting feature,
sort by account as well.
2. Shingle the envelopes
so they are slanted
slightly to the left as
shown in the picture
on the right.
-
3. Place the stack of mail on the feed deck shown in the picture below.
• Place the envelopes with the flaps down and against the rear wall.
• Make sure the envelopes are pushed far enough so that they cover
the feed sensor on the rear wall.
4-6 SV62146 Rev. D
Page 39
DM1100™ Digital Mailing System Operating Guide
Normal Mail Setting
Thick Mail
Setting
Thin Mail
Setting
4. Use the thickness adjustment
knob to adjust for envelope
thickness.
• For thicker pieces of mail
(3/8” to 5/8”), or mail containing several inserts, use the
thick mail setting. For most
mail under 3/8", use the nor
mal mail settings.
• For large stacks of thin mail,
such as single inserts or post
cards, the thin mail setting
may be needed for better
performance. Refer to the
figure on the right.
5. To pick a setting, turn the knob to the arrow located on the feed cover.
Make sure you have sufficient funds in your postage meter. If the mes
sage “Low Funds” appears on the screen, make sure you can complete
the mail run with the funds you have. If you do not have enough funds,
see Chapter 6, Adding Postage in this guide.
-
-
SV62146 Rev. D 4-7
Page 40
4 • Running Mail
if this is where you want the
indicia ...
make sure the mail is completely
sealed when
you feed
Flap face-down
and sealed
Tips on Feeding Mail
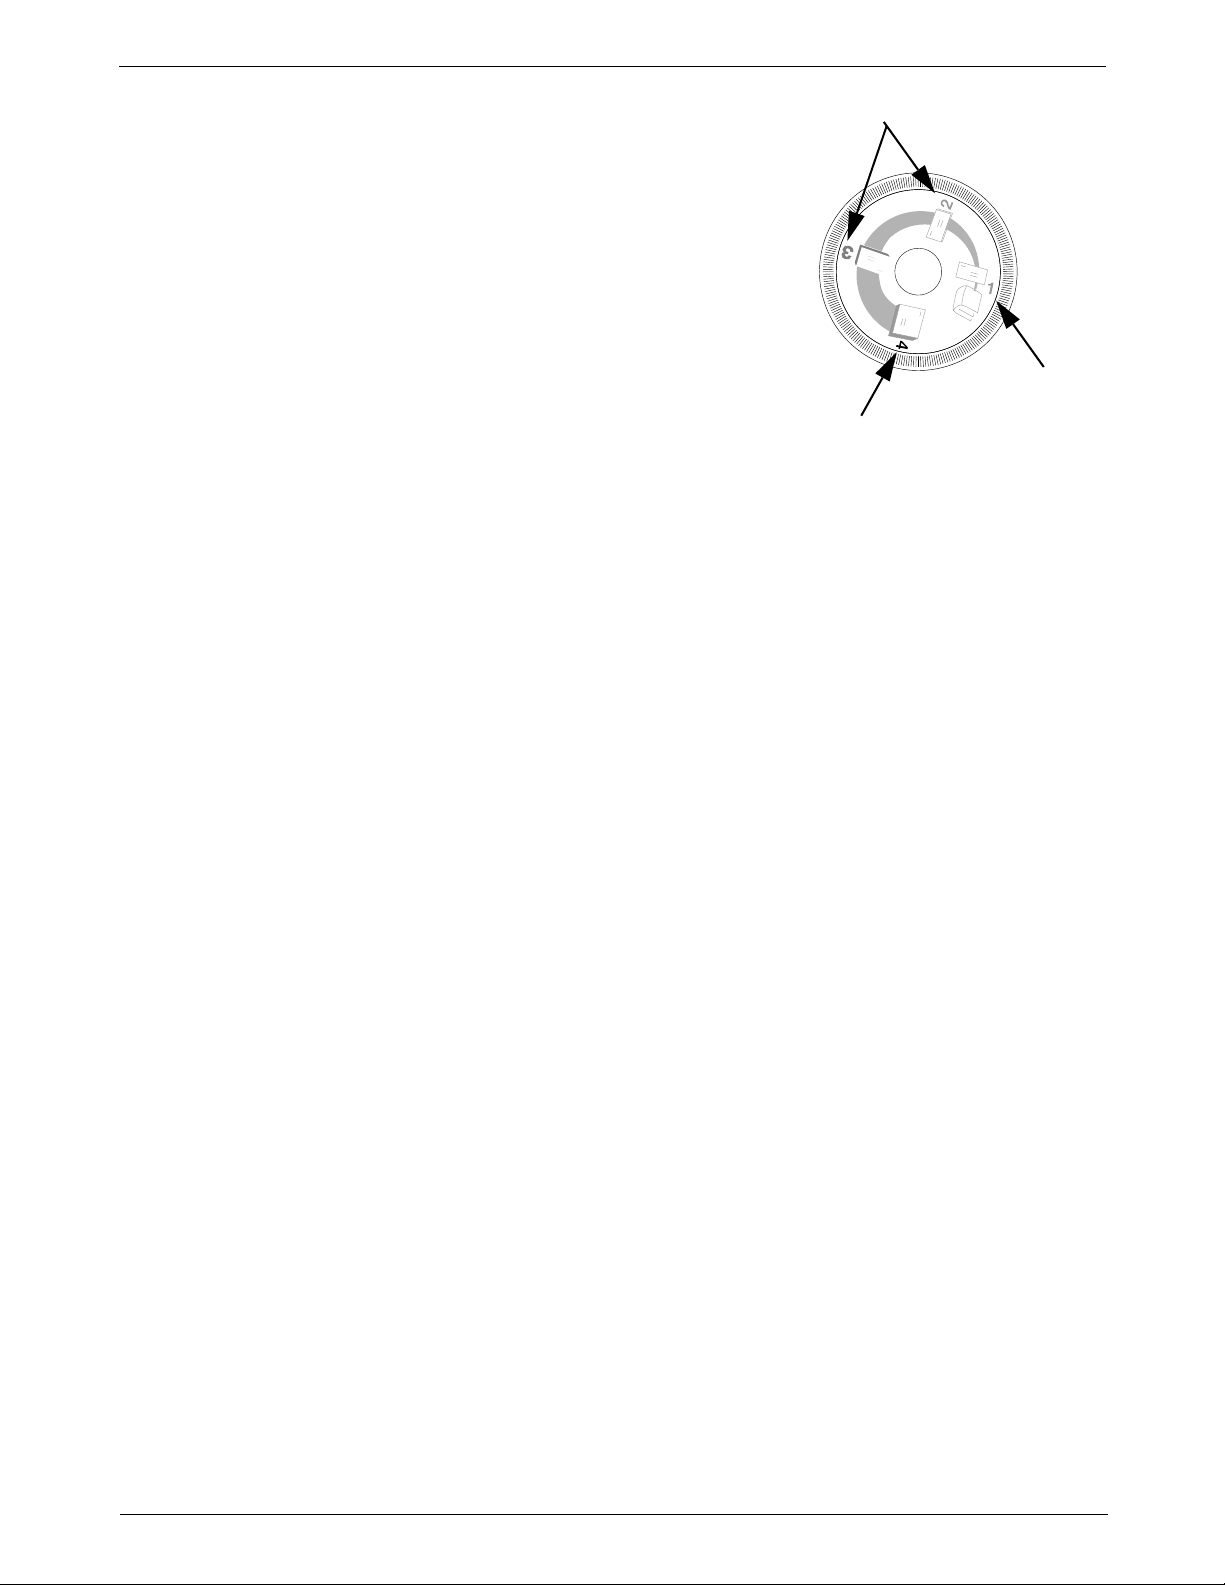
• Presealed Envelopes: If you are using presealed envelopes, make
sure you press the Seal key on the IntelliLink® Control Center and
select Sealer off or the envelopes will jam.
• Pieces of mail that are 5/8" thick: If you are running pieces of mail
that are each 5/8” thick, you must run them one piece at a time. Do not
stack them on the feed deck and attempt to feed them automatically they will jam.
• Puffy mail: Be sure to compress all "puffy" mail before placing it on the
feed deck.
• Portrait flats or light, easily damaged mail: You may want to reduce
the speed at which the pieces of mail travel through the mach ine. To do
this, press the Mode key, then press the right arrow key (speed) to
change between normal and reduced speed.
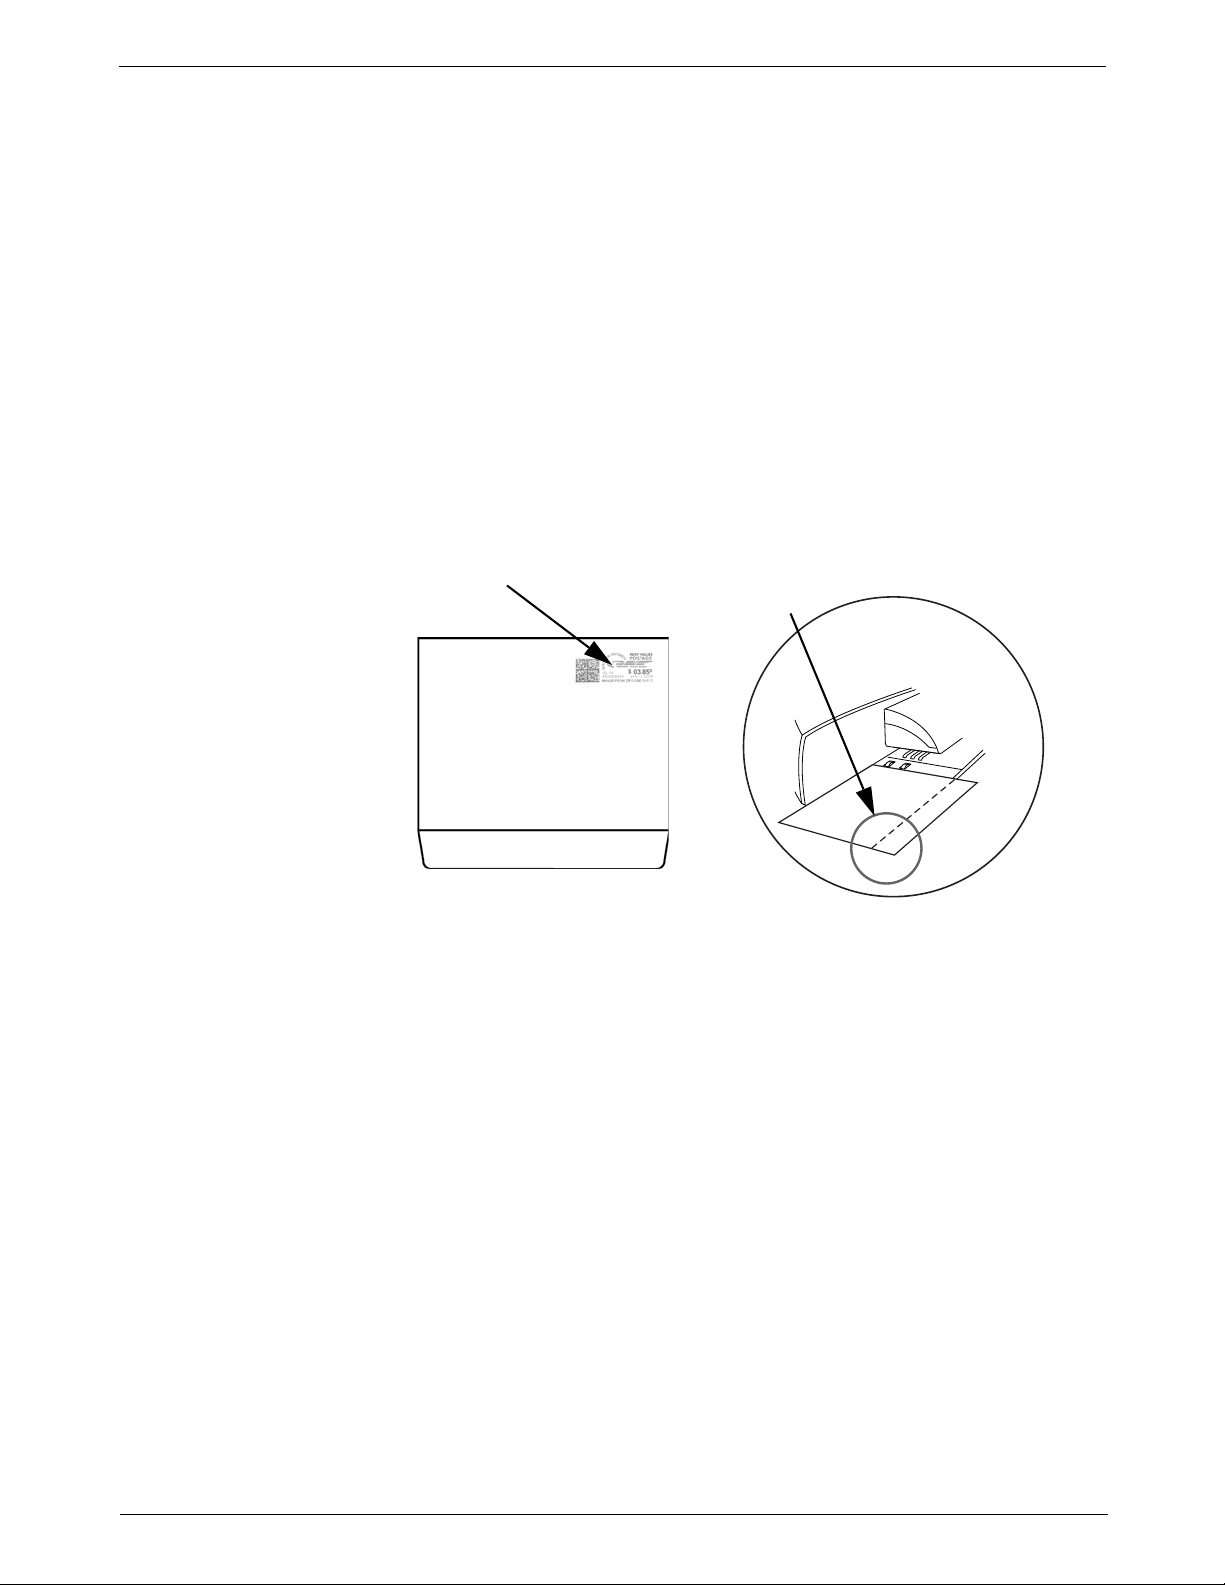
• Any mail with the flap on the opposite side: For mail where the ind icia is located on the side opposite of the flap (the flap is on the bottom
of the mail piece), make sure the mail is completely sealed before pro
cessing the mail in the W-O-W® mode as shown below.
-
4-8 SV62146 Rev. D
• Postcards: You may want to process postcards using the reduced
speed mode. Remember to use the Key in Postage mode for postcards
Page 41
DM1100™ Digital Mailing System Operating Guide
About Printing Postage Tapes
Print postage tapes for:
• Packages
• Onion skin/airmail type envelopes
• Tyvek® envelopes
• Envelopes that are thicker than 5/8”
• Any pieces of mail that are outside the limits specified for mailing materials - see Chapter 12, Specifications in this guide for details.
You can request up to 100 tapes at a time. The tapes exit into the stacker.
The mailing system is designed to use a special pressure sensitive adhe
-
sive tape made exclusively for it.
CAUTION: Use only fresh rolls of Pitney Bowes® tape to avoid
distortion or jams in the mechanism and possible loss of postage.
• To print one tape, you simply press the Tape key instead of placing
mail on the feed deck.
• To print more than one tape, use the numeric keys to type in the number of tapes you want, then press the Tape key. The tapes exit into the
stacker on the right side of the mailing system.
NOTE: Do not lift any of the covers on the mailing system while the tape is
printing or the system will stop printing, cut and eject the tape.
SV62146 Rev. D 4-9
Page 42
4 • Running Mail
3
Select Mode
Reduced Speed
Key in Postage
W-O-W® - Weigh on the
Way
Weigh First Piece
Differential Weighing
Manual Weight Entry
Attached Scale
Seal Menu
Time and Date Stamping
Selecting the Postage Mode and Running the Mail
Once you decide the appropriate mode for
running your mail job, you select the mode
on your mailing system. To access the
modes, press the Mode key on the
IntelliLink® Control Center.
The names of the modes as they appear on
the screen are shown in the menu on the
right.
Depending on your model number, you
may have all or only some of these options.
For a detailed description of each mode,
refer to the specific mode topic in this sec
tion. Follow the steps for your mode
exactly.
While your mailing system processes the mail, the screen:
• Displays the status of the current job.
• Instructs you, if necessary, to insert an envelope or to reboot your system (or displays an error message).
• Keeps a running count of processed mail.
• Displays errors, at which point the machine stops immediately.
-
Mode Selection: Reduced Speed
4-10 SV62146 Rev. D
Reduced Speed Mode provides "Normal" or "Reduced" speed mode for
mail that requires extra care during processing. This option can be saved in
a custom preset.
To use this mode:
1. Press the Mode key.
2. Press the right arrow key to toggle between "Normal" and "Reduced"
speed. The current speed appears on the bottom left corner of the
screen.
Reduced Speed Mode will remain active unless it is changed by the operator, or the system defaults to ‘Normal’ as part of the Normal Preset.
Page 43
DM1100™ Digital Mailing System Operating Guide
Mode Selection: Key in Postage
Mode Selection:
W-O-W® - WeighOn-The-Way®
Use this mode if you know what the correct amount of postage is for your
mail and you intend to apply this postage to each piece.
1. Press the Mode key.
2. Select Key In Postage.
3. Key in the correct postage value using the numeric keys on the
IntelliLink® Control Center, then press the Enter key.
4. If you are done, place the mail on the feed deck and press the Start
key, otherwise go to step 4.
5. If you want to change the date, add or change an advertisement or
inscription, press the Menu key and select Meter Stamp Options. For
more information, refer to
chapter.
6. When finished, place the stack of mail or piece of mail on the feed deck
and press the Start key.
7. If you are using the optional Power Stacker, we recommend you
remove your mail in manageable stacks and not allow the deck to fill
completely. The system will halt the stacker if it is filled to its maximum
capacity.
The W-O-W® feature increases your productivity by weighing the piece of
mail and applying the correct postage as it travels through the mailing
machine.
“Selecting the Meter Stamp Options” in this
WARNING! Do not lean on or disturb the system while it is processing mail in this mode. It will affect the amount of postage applied to
the mail piece.
To run mail in the W-O-W® mode:
1. Press the Mode key.
2. Select W-O-W® - Weigh on the Way.
3. Press the Class key and select the class. For more information, refer to
“Selecting the Class, Carrier , Special Se rvices or Options” in this chapter.
4. Press the Seal key and select your sealing option.
5. Place the stack of mail on the feed deck.
6. Press the Start key.
7. If you are using the optional Power Stacker, we recommend you
remove your mail in manageable stacks and not allow the deck to fill
completely. The system will halt the stacker if it is filled to its maximum
capacity.
SV62146 Rev. D 4-11
Page 44
4 • Running Mail
Mode Selection: Weigh First Piece
This feature is available only on systems that have the optional
Weigh-On-The-Way® (W-O-W®) module installed.
In this mode, the machine weighs the first mail piece and processes the
remaining mail at the same postage rate.
WARNING! Do not lean on or disturb the system while it is processing mail in this mode. It will affect the amount of postage
applied to the mail piece.
To run mail in this mode:
1. Press the Mode key.
2. Select Weigh First Piece.
3. Press the Class key and select the class. For more information, refer to
Selecting the Class, Carrier, Special Services or Optio ns in this chapter.
4. Press the Seal key and select your sealing option.
5. Place the stack of mail on the feed deck.
6. Press the Start key.
7. If you are using the optional Power Stacker, we recommend you
remove your mail in manageable stacks and not allow the deck to fill
completely. The system will halt the stacker if it is filled to its maximum
capacity.
Mode Selection: Differential Weighing
This option is available on your system if it has an attached external scale.
This option allows you to place all of the mail on the scale at once, then
remove each piece, one at a time and run it through the system. The sys
tem calculates the postage for each piece of mail you remove from the
scale and applies the postage to the piece as it goes through the mailing
system.
For larger pieces of mail (large envelopes or packages), you can use differential weighing to have the system automatically print a tape every time
you remove a piece of mail from the scale.
Before using differential weighing:
• Make sure each piece of mail weighs at least as much as the amount
specified as the differential trip weight during the installation of your
mailing system. Refer to the Set Up the Scale/Select Rates: Diff Weigh
Trip Weight section in Chapter 5 in this guide.
• Make sure the stack of mail is less than the capacity of the scale. If
"overweight" appears on the display, remove pieces of mail until the
message disappears.
To use differential weighing:
1. Remove all pieces of mail from the scale.
2. Set the scale to zero by pressing the Menu key, then selecting Zero
Scale.
3. Press the Mode key.
-
4-12 SV62146 Rev. D
Page 45
DM1100™ Digital Mailing System Operating Guide
4. Select Differential Weighing. The system prompts you to place the
mail on the scale.
CAUTION: Make sure you center the mail on the scale and
check to be sure it is not touching any other surface or object.
5. Place the mail on the scale.
• If you have previously selected a class, the system displays the fol-
lowing prompt at the top of the screen: Print tapes automatically
On or Off.
- If you select On, then when you remove each piece of mail, the
system automatically prints a tape.
- If you select Off, you remove the first piece of mail and place it
on the feed deck. The system automatically feeds the mail.
• If you have not previously selected a class, you are prompted to
select one now. For more information, refer to
Carrier, Special Services or Options” in this chapter.
6. Begin removing mail from the scale. Please note the following:
• Remove each piece of mail in a single continuous motion.
• If you mistakenly remove more than one piece of mail, put all of the
pieces of mail back on the scale. If you only put one piece back on,
the system does not print the correct postage.
7. When you remove the last piece of mail from the scale, the system asks
you if you want to print postage. This is in case the last piece you
remove from the scale is the container for the mail.
8. If you are using the optional Power Stacker, we recommend you
remove your mail in manageable stacks and not allow the deck to fill
completely. The system will halt the stacker if it is filled to its maximum
capacity.
“Selecting the Class,
SV62146 Rev. D 4-13
Page 46
4 • Running Mail
Mode Selection: Attached Scale
If the attached scale is particularly sensitive, run this mode with the Autoscale feature set to Off. This will prevent the system from automatically
reverting to Attached Scale mode when W-O-W® mode is in use.
Use this option If the AutoScale feature is set to Off. See Set Up Scales/
Rates: AutoScale in Chapter 5 in this guide.
1. Press the Mode key.
2. Select Attached Scale. The “Attached Scale Mode” screen appears.
3. Place the piece of mail on the scale.
CAUTION: Make sure you center the mail on the scale and
check to be sure it is not touching any other surface or object.
4. If the class displayed in this screen is incorrect, press the Class key
and select the class. For more information, refer to
“Selecting the
Class, Carrier, Special Services or Options” in this chapter.
5. If this is a package, press the Tape key, otherwise go to step 6.
6. Place the piece of mail on the feed deck.
7. Press the Start key.
8. If you are using the optional Power Stacker, we recommend you
remove your mail in manageable stacks and not allow the deck to fill
completely. The system will halt the stacker if it is filled to its maximum
capacity.
Mode Selection: Seal Menu
Seal Only Mode allows you to seal envelopes without applying postage. If
you are running INVIEW™ Accounting, and you select Seal Only Mode,
you will be prompted to select an account to track the pieces against.
When you view or print an accounting report, “Seal Only” will appear in the
Class column if the pieces were processed in Seal Only mode.
1. Press the Mode key.
2. Select Seal Menu and then select the appropriate option.
3. Select the Reset Counter option if you want to clear the number of
pieces of mail fed into the machine in the seal only mode.
4. Place the mail on the feed deck.
5. Press the Start key.
NOTE: For additional se aling options, press the Seal key on the IntelliLink®
Control Center. This allows you to select the following options:
• Sealer and Print
• Seal Only
•Print Only
• Adjust Wetness*
*For more information, refer to the Adjusting the Wetness section in
Chapter 9 of this guide.
6. If you are using the optional Power Stacker, we recommend you
remove your mail in manageable stacks and not allow the deck to fill
completely. The system will halt the stacker if it is filled to its maximum
capacity.
4-14 SV62146 Rev. D
Page 47
DM1100™ Digital Mailing System Operating Guide
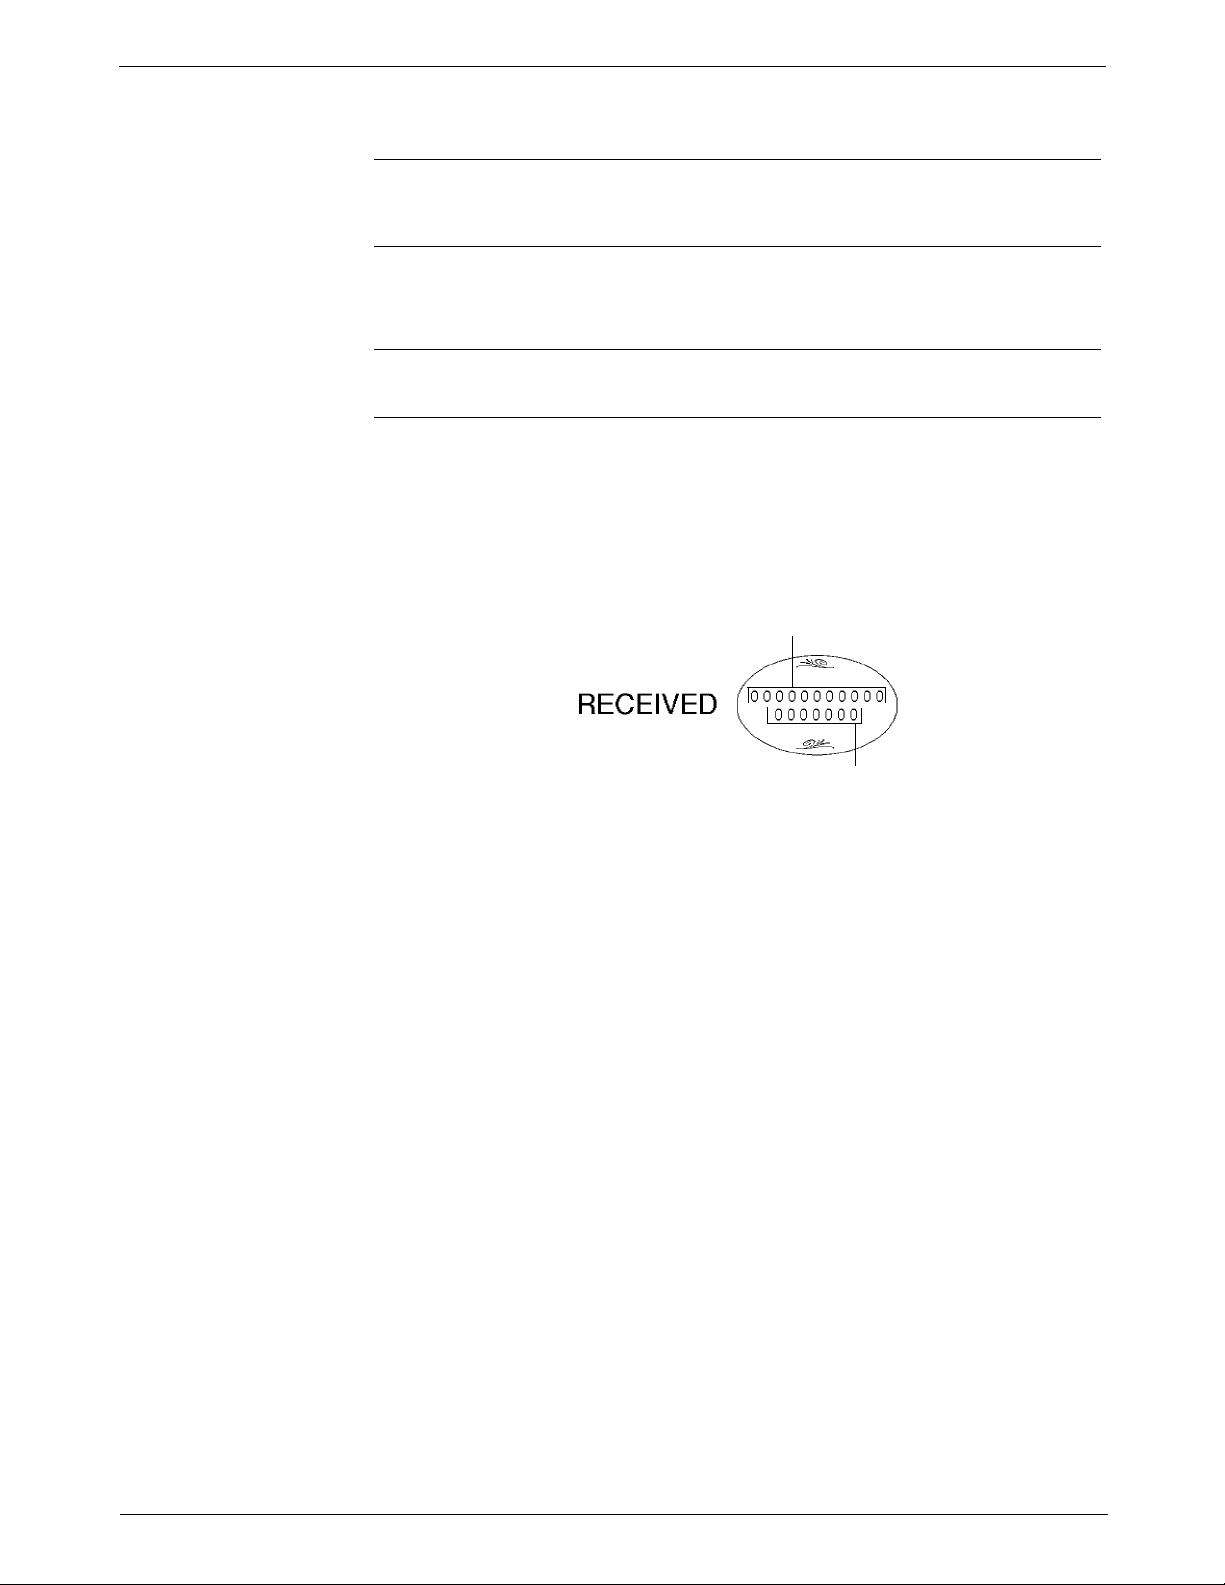
Date prints here (MMM DD YYYY)
Time prints here
Mode Selection: Time and Date Stamping
Time Date Stamping mode allows you to print the current time and date,
along with the word “Received” on incoming mail.
NOTE: If you are using INIVEW™ Accounting, Time and Date Stamping mode
has additional attributes. Refer to “Selecting an Account in Time Date Stamping
Mode” in Chapter 7 for more information.
The time and date will remain the same during a single transaction
(whether you process a single envelope or 100 envelopes.) The system will
update the date and time during the mail run.
NOTE: The mailing system may operate at a slightly slower speed during this process.
1. Press the Mode key.
2. Select Time and Date Stamping.
3. Turn the piece of mail over, so the meter stamp is facing down. Then,
place the envelope on the feed deck with the flap facing up.
4. Press the Start key. The Time/Date stamp prints on the envelope. A
sample Time/Date stamp is shown below.
5. Press the Start key. The Time/Date stamp prints on the envelope.
SV62146 Rev. D 4-15
Page 48
4 • Running Mail
4
Selecting or Deselecting an Account
Selecting an Account
If you use Accounting, you must select an account. If you are using Budget
Manager or Business Manager refer to the operator guide or help system
provided with those applications.
You can select an account manually by scrolling through the entire list of
accounts on your system.
If you know part of the account name or the speed code, you can use the
account name search or the speed code search to locate the account you
want to use.
If you know only part of the account name or the speed code, you can use
the account name or speed code search to narrow down the list of
accounts to those that most closely match the search criteria you entered.
NOTES:
• You can use the left arrow key to toggle between the account name and
speed code search methods on the Select Account screen.
• When you select an account by name or by speed code, the search setting
remains in effect even after you leave the Select Account screen. The next
time you select an account, the last search method you used will be active.
Selecting an Account Manually
Follow the steps below to select an account:
1. Press the Account screen key. The Select Account screen appears
listing all of your accounts.
2. Select the Account you want to use to charge postage. Use the down
arrow key to scroll through the Account list, then press the screen key
that corresponds with the account name.
3. If the Account password is enabled, the Enter Account Password
screen appears. If the Account password is not enabled, go to step 4.
a. Type in the password.
b. Press Enter.
4. The system returns to the Main screen. The name of the account you
selected appears in the Account field.
Selecting an Account by Name
The account name search allows you to type in the account name, or part
of the account name, to narrow down your search. Follow the steps below
to select an account by name:
1. Press the Account screen key. The Select Account screen appears
listing all of your accounts.
2. If necessary, press the left arrow key to toggle the search by account
name method.
3. Type in the first few characters of the account name. The list on the
screen will show all the account names that start with the characters
you have entered.
4-16 SV62146 Rev. D
Page 49

DM1100™ Digital Mailing System Operating Guide
4. Select the account you want to use:
•Press Enter to select the account that most closely matches the
characters you searched on; or
• If a list of account names appear on the screen, press the screen
key that corresponds with the account you want to use.
The system returns to the Main screen, and the name of the account
appears in the Account field.
5. If the account password is enabled, the Enter Account Password
screen appears. If the account password is not enabled, go to step 4.
a. Type in the password.
b. Press Enter.
Selecting an Account by Speed Code
The speed code search allows you to type in the speed code, or part of the
speed code, to narrow your search. Follow the steps below to select an
account by speed code:
1. Press the Account screen key. The Select Account screen appears
listing all of your accounts.
2. If necessary, press the left arrow key to toggle the search by account
name method.
3. Type in the speed code, or the first few numbers of the speed code.
The screen will show the account names that correspond with the
speed code you typed.
4. Select the account you want to use:
•Press Enter to select the account that most closely matches the
characters you searched on; or
• If a list of account names appear on the screen, press the screen
key that corresponds with the account you want to use.
The system returns to the Main screen, and the name of the account
appears in the Account field.
4. If the account password is enabled, the Enter Account Password
screen appears. If the account password is not enabled, go to step 4.
a. Type in the password.
b. Press Enter.
Deselecting an Account
SV62146 Rev. D 4-17
1. Press the Accounts key.
2. Select 0. None from the top of the list.
3. “Account: None” now appears in the main screen.
Page 50

4 • Running Mail
5
Selecting the Class, Carrier, Special Services or Options
Each carrier has its own set of classes and each class has its own set of
special services. When you select a class or carrier, only those options
available for that selection display in the main screen.
NOTE: When selecting a class/carrier:
• If your system has been set up to retain the class on each piece of mail
weighed then the class that appears in the main screen will be the one you
selected last.
• If you turn off and then turn on the power to your system, or if your system
has been set up to clear the class on each piece of mail weighed, it will clear
the class. In this case, you need to select a new class.
• If you place a piece of mail on the scale, or enter a weight manually , the system automatically prompts you to select a new class if the new weight
requires a different class.
1. Press the Class key. A list of available classes appears in the screen.
2. Select the class and press Enter.
3. If a ZIP Code or Zone is required, you are prompted to enter it. Press
Enter to accept it. For more information, refer to
and Zones” in this section.
4. If a country is required, you are prompted to select it. Press Enter to
accept. For more information, refer to Selecting a Country in this sec
tion.
5. If special services are available with the class you select, they are displayed.
6. Even if you do not want any special services, press the Enter key to
confirm the class.
7. Press the Tape key to print a post age t ape. To apply postage to a piece
of mail, place it on the feed deck and press the Start key.
8. If you are using the optional Power Stacker, we recommend you
remove your mail in manageable stacks and not allow the deck to fill
completely. The system will halt the stacker if it is filled to its maximum
capacity.
“Selecting ZIP Codes
-
Selecting ZIP Codes and Zones
If your postal rate or special service requires a ZIP Code or Zone, you are
prompted to enter it. The system prompts you for either the ZIP Code or
Zone (for details, see Setting Up the Scale/Rates: ZIP/Zone prompt section
in Chapter 5 of this guide).
1. When you select a class, you may be prompted to enter the ZIP Code
or Zone:
• To access the Intra-BMC Package Services Parcel Post rates, enter
only the first 3 digits of the ZIP Code.
• To access the Inter-BMC Package Services Parcel Post rates, enter
all 5 digits of the ZIP Code.
2. Press Enter.
4-18 SV62146 Rev. D
Page 51
DM1100™ Digital Mailing System Operating Guide
Selecting a Country
Selecting a Smart Class™
If your class requires you to select another country:
1. A list of countries appears in the display. You can scroll through the
countries:
• Using the up/down arrows;
• By typing in the first few letters of the country until you get a match;
or
• By typing in the numeric code for that country.
2. Select the country you want.
1. Press the Class key.
2. Press the right arrow key (ll Rates).
3. You are prompted to "Select Rate". Select the name of the custom carrier you created, for example, Carrier 1.
4. You are prompted to "Select Class". Select the name of the Smart
Class™ you created, for example, Smart Class 1.
5. The name of the Smart Class™ appears in the main display along with
the first weight break class:
Class: Smart Class 1
1st Class Auto Letter 5 Digit
6. For more information on creating a Smart Class™, refer to Setting up
the Optional Smart Class™ Feature in Chapter 5 in this guide.
SV62146 Rev. D 4-19
Page 52
4 • Running Mail
6
Meter Stamp Options
Date
Ad/Message
Inscription
Print Position
Multiple Tapes
Custom Messaging
Address Service Requested
Return Service Requested
Seasons Greetings
United States Flag
Recycle
Happy Thanksgiving
Please Open Immediately
Urgent
Selecting the Meter Stamp Options
Meter Stamp Options: Date
The Meter Stamp Options selection allows
you to change the elements printed on your
piece of mail or tape.
You access the Meter Stamp options by
pressing the Menu key on the IntelliLink®
Control Center and then selecting Meter
Stamp Options.
The list of options that display depends on
the model number of your mailing system.
All of the possible options, shown in the
menu on the right, are described in this sec
tion.
1. Press the Menu key.
2. Select Meter Stamp Options.
3. Select the Date option. Depending on your previous selections, a combination of the following selections appears.
• Don’t Print Date
• Print only Month and Year
• Advance Date (see NOTE)
4. Make your selection and follow the prompts on the main screen. Press
Enter when complete.
-
Meter Stamp Options: Advertisement
NOTE: If you select Advance Date and choose to store it in a preset, refer to
How to Store Advance Date in a Custom Preset in Chapter 5 in this guide.
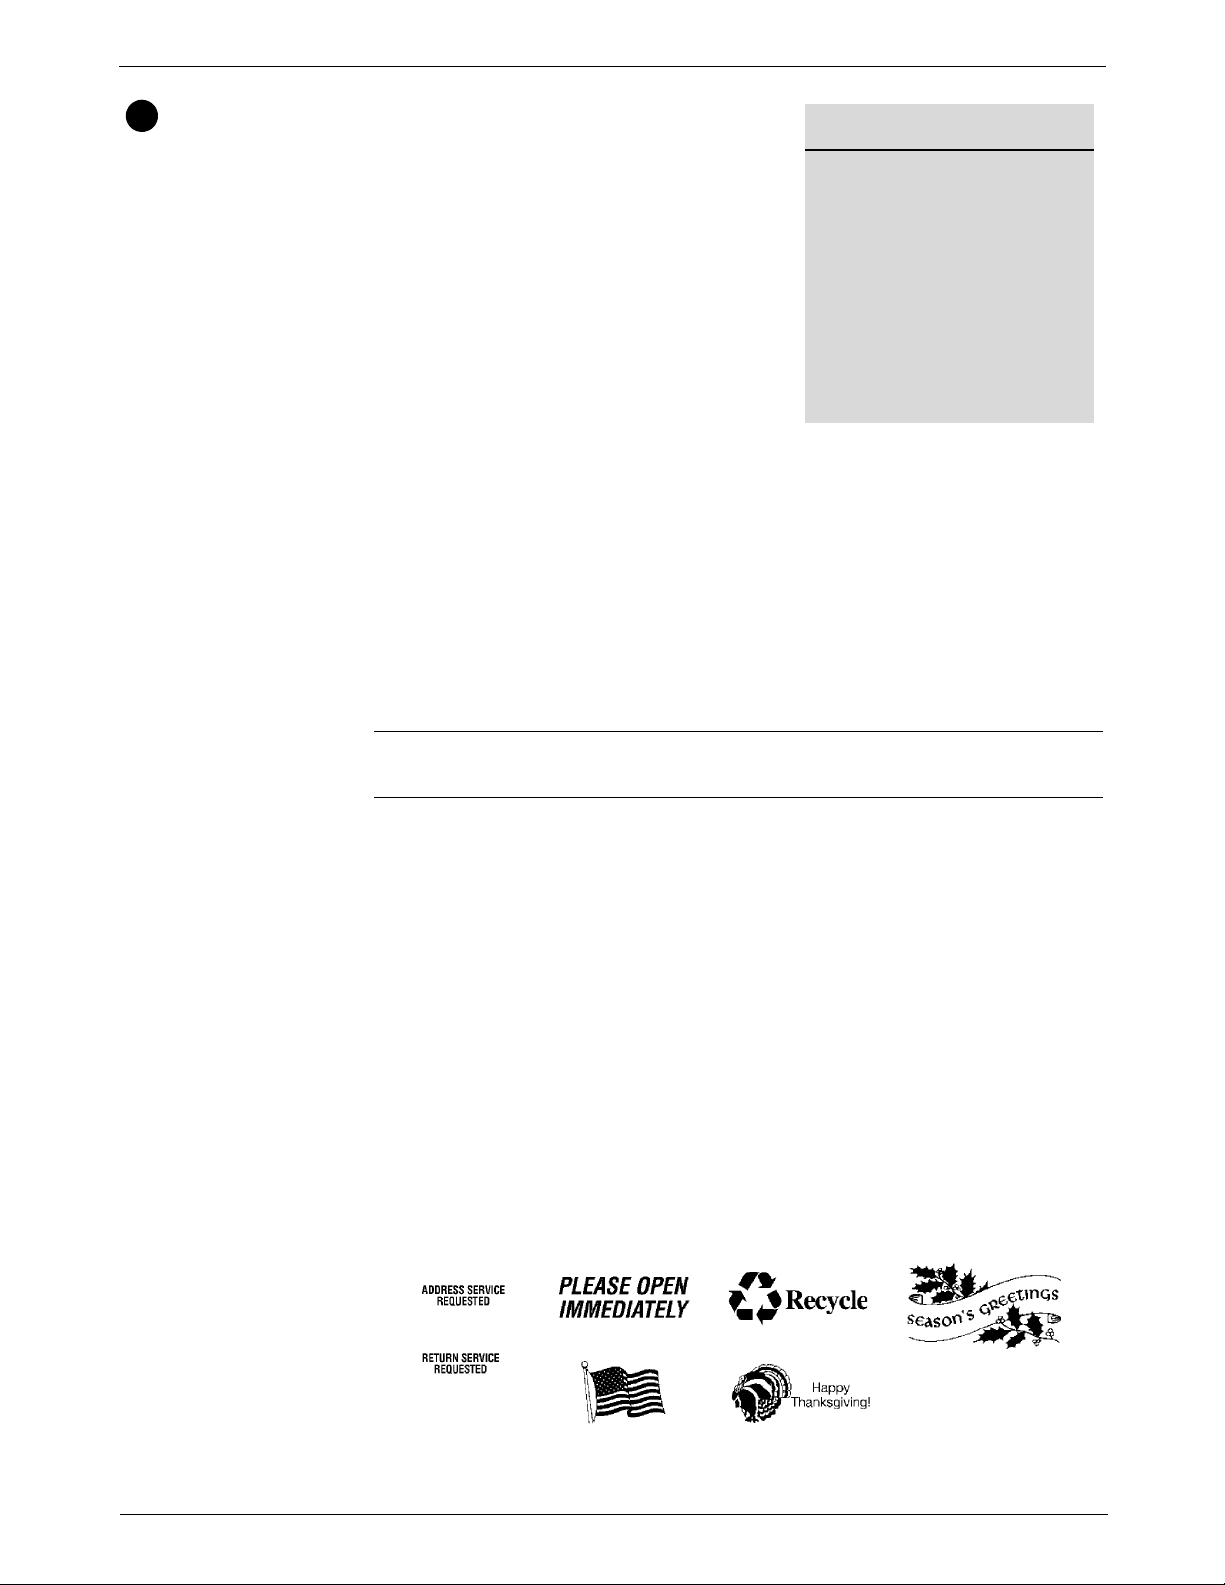
You can have a variety of advertisements appear on your mail.
To add more advertisements, refer to Performing Updates or Adding Fea-
tures in Chapter 9 in this guide.
1. Press the Menu key.
2. Select Meter Stamp Options.
3. Select the Ad/Message option.
4. Use the down arrow key to scroll through the advertisements.
5. Press the screen key that is next to the advertisement you want. The
advertisement then appears next to the meter stamp.
The advertisements provided with your system are shown here.
4-20 SV62146 Rev. D
Page 53
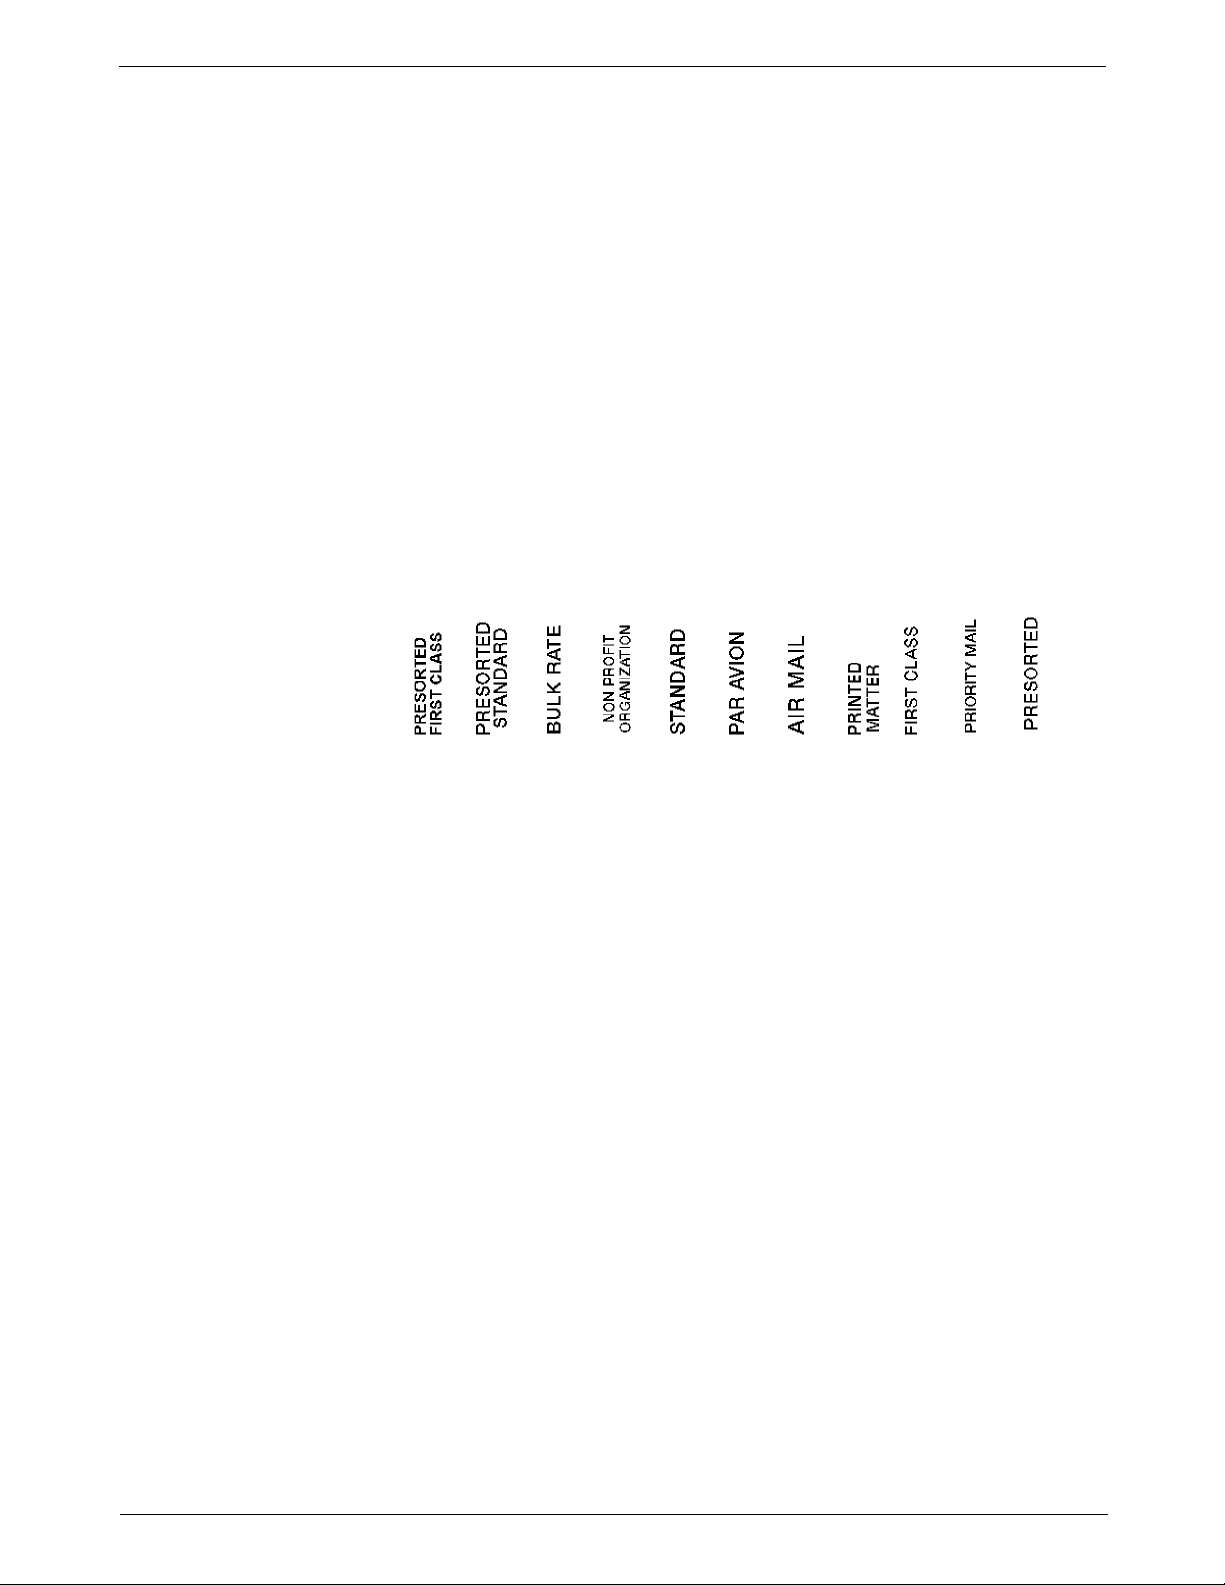
DM1100™ Digital Mailing System Operating Guide
Presorted First Class
Presorted Standard
Non Profit Organization
Standard
Par Avion
Air Mail
Printed Matter
First Class
Priority Mail
Presorted
Meter Stamp Options: Inscription
You can have a variety of inscriptions appear on your piece of mail. For a
list of the inscriptions provided with your mailing system, refer to Chapter
11, Supplies and Options in this guide.
To add more inscriptions, refer to Performing Updates or Adding Features
in Chapter 9 in this guide.
1. Press the Menu key.
2. Select Meter Stamp Options.
3. Select the Inscription option.
4. Use the down arrow key to scroll through the inscriptions.
5. Press the screen key that is next to the inscription you want. The
inscription then appears next to the meter stamp.
The inscriptions provided with your system are shown here.
Meter Stamp Options: Print Position
Meter Stamp Options: Multiple Tapes
Meter Stamp Options: Custom Messaging
This selection allows you to move the print position of the meter stamp
away from the right edge of the envelope.
1. Press the Menu key.
2. Select Meter Stamp Options.
3. Select the Print Position option.
4. Use the left and right arrow keys to switch between the possible positions (1 - 5 where 1 is the position closest to the right edge).
This provides an alternate method for printing multiple tapes.
1. Press the Menu key.
2. Select Meter Stamp Options.
3. Select the Multiple Tapes option.
4. Enter the number of tapes you want to print.
5. Press Enter.
This selection allows you to add a custom message adjacent to the meter
stamp. For more information about custom messaging, refer to Chapter 5.
1. Press the Menu key.
2. Select Meter Stamp Options, then select Text Entries.
3. Select the custom message you want to print on the envelope.
4. Press Enter when done.
5. Press the left arrow key to return to the Main screen.
SV62146 Rev. D 4-21
Page 54
4 • Running Mail
7
Using
Electronic
Confirmation
Services
The United States Post Office (USPS) provides three types of confirmatio n
services:
• Delivery Confirmation - shows you when the postal carrier delivered
the mail.
• Signature Confirmation - shows you who signed for the mail.
• Certified Mail - provides you with proof that you mailed the item.
Each of these services has its own barcode labels. Using preprinted barcode labels provided by Pitney Bowes, you can electronically process and
submit records for the three types of USPS Confirmation Services to the
Pitney Bowes Data Center.
Overview Postage Calculation for Confirmation Services
As soon as you weigh your piece of mail and select the class and service,
your mailing system automatically calculates the postage.
NOTE: When using these services, you cannot type in the postage manually.
You can however use manual weigh t entry.
Discounts for Confirmation Services
• When you use any of these services with your mailing system and send
the barcodes electronically over the phone line, you get a discount on
the cost of the service.
• In some cases, like adding Electronic Delivery Confirmation to a Priority
letter, you only pay the postage required for Priority mail.
NOTE: Your discounts are valid only if you use the barcode labels provided by
Pitney Bowes and send the records electronically.
Sending Your Records to Pitney Bowes
Your system stores up to 100 of your barcode records and automatically
connects to Pitney Bowes and uploads these records either at the sched
uled time you specified during set up, or whenever you have processed the
maximum number of pieces of mail on the system.
NOTE: In order to automatically upload yo ur re cord s, your system must ha ve a
full-time LAN or dedicated analog phone line connection.
Tracking Information on the Internet
• After 24 hours you can track your mail on the internet using your Pitney
Bowes Postage By Phone® Meter Payment System account number
and the barcode number. Refer to the Contact Information List at the
front of this guide for more information.
• You can also track your mail by going to the Postal Service’s web site
at www.usps.com.
-
4-22 SV62146 Rev. D
Page 55

DM1100™ Digital Mailing System Operating Guide
Adding Services or Making Changes
• If you already have postage on the mail and then decide you want to
add a service, follow the instructions here for Adding Confirmation Ser
vices After Printing Postage.
• If you need to add more postage to cover the confirmation services,
refer to the section, Add Postage and/or Change the Date in this chap
ter.
• If you realize you have put the wrong barcode on a piece of mail or
package, you can change it as long as you have not sent the records to
Pitney Bowes. Follow the instructions here for Editing, Deleting or
Sending Confirmation Services Records.
-
-
Using Confirmation Services Before Printing Postage
USPS Confirmation Services are available when you are in the Attached
Scale mode, or Manual Weight Entry mode. Refer to
age Mode and Running the Mail” in this chapter for more information.
The following procedure is based on using a Priority class and the E-Del
Con service. Your procedure may vary slightly depending on your class
and service.
1. Place the piece of mail or package on the scale.
2. Press the Class key.
3. Select the class, for example, Priority.
4. Select the service, for example, E-Del Con. As soon as you select the
service, a check mark appears in front of it.
5. Press the Enter key.
6. At this point, you are prompted to enter the 5-digit destination ZIP
Code. Use the numeric keyboard to enter the code.
7. Press the Enter key and the “Barcode” screen appears.
8. If this is the first time you are entering a confirmation service, the
screen is blank and you need to enter the entire barcode value. If you
have a barcode scanner, you can scan in the number.
a. If you have used the confirmation service before, the next barcode
value (in the series of barcode labels) appears, minus the last digit.
b. If you have used all of the labels in a series of barcode labels, make
sure you start with the top label with the lowest last 4-digits and not
the bottom label with the highest last 4-digits. If you have a ba rcode
scanner, you can scan in the number.
9. If you are using a barcode scanner and have set up your system to
automatically enter the barcode value (see Setting Auto-Enter in Chap
ter 5 in this guide), go to step 10.
If you type in the barcode value, enter the last digit of the number from
the label you will use. Then press the Enter key to accept the barcode
value and the system returns to the main screen (“Attached Scale
Mode” appears).
“Selecting the Post-
-
NOTE: Make sure the barcode on the label matches the barcode valu e you
just entered in the system.
10. Press the Tape key to print a tape. To print postage on a piece of mail,
place it on the feeder and press the Start key.
11. You are prompted to apply the barcode label to the package. Apply the
barcode to the package.
SV62146 Rev. D 4-23
Page 56

4 • Running Mail
12. Press the Enter key. The “Enter another package?” screen appears.
Follow the screen prompts to process more pieces of mail for confirma
tion services.
-
Adding Confirmation Services After Printing Postage
If you have already applied postage to a piece of mail and you now want to
add a confirmation service to it, follow the procedure here.
This procedure is based on using a Priority class and the E-Del Con service. Your procedure may vary slightly depending on your class and service.
1. Place the piece of mail or package on the scale.
2. Press the Menu key.
3. Press the down arrow key and then select Confirmation Services.
4. Select Add Record. The “Select Class” screen appears.
5. Select the class, for example Priority Mail. The “Select Service” screen
appears.
6. Select the service, for example, E-Del Con. Press the Enter key.
7. At this point, you are prompted to enter the 5-digit destination ZIP
Code. Use the numeric keyboard to enter the code.
8. Press the Enter key and the “Barcode” screen appears.
• If this is the first time you are entering a confirmation service, the
screen is blank and you need to enter the entire barcode value. If
you have a barcode scanner, you can scan in the number.
• If you have used the confirmation service before, the next barcode
value (in the series of barcode labels) appears, minus the last digit.
• If you have used all of the labels in a series of barcode labels, make
sure you start with the top label with the lowest last 4-digits and not
the bottom label with the highest last 4-digits. If you have a ba rcode
scanner, you can scan in the number.
• If you are using a barcode scanner and have set up your system to
automatically enter the barcode value (see Setting Auto-Enter in
Chapter 5 in this guide), go to step 9.
• If you type in the barcode value, enter the last digit of the number
from the label you will use. Then press the Enter key. Once you
have entered or accepted the displayed barcode value, you get a
screen that summarizes the information you are sending.
NOTE: If you have selected a confirmation service that is not free, the
postage amount appearing in the summary will be greater than the
amount of postage you have already applied. If this is the case, you
must add more postage after you have applied the barcode. Refer to
the Add Postage section in this chapter.
9. Press the screen key for OK and the system stores the confirmation
information. You are prompted to apply the barcode label to the pack
age.
10. Press the Enter key. The “Enter another package?” screen appears.
Follow the screen prompts to process more pieces of mail for confirma
tion services.
4-24 SV62146 Rev. D
-
-
Page 57

DM1100™ Digital Mailing System Operating Guide
Editing, Deleting or Sending Confirmation Services Records
Using Electronic Return Receipt (ERR)
This procedure tells you how to edit, delete or send confirmation services
records once you have entered them into your system.
Your system can store up to 100 of your barcode records before sending
them to Pitney Bowes.
1. Press the Menu key.
2. Press the down arrow key and then select Confirmation Services.
3. Select the appropriate option:
• To edit an existing record, select Edit records. You can edit either
the ZIP Code or barcode entry. To modify the class or service, you
need to delete the record and add it as a new record.
• To delete a record, select Mark record for deletion (you cannot
delete a record once you have sent it to Pitney Bowes).
• To send all of the confirmation service records now, select Send
records.
4. As soon as the system sends all of your records, you can sele ct to print
a receipt on a tape or an envelope, or you can skip printing a receipt
altogether.
ERR is the electronic version of the Return Receipt, and is a complimentary
service to the E-Certified Mail service offered on the DM Series system.
When the user selects E-Certified, and E-Return Receipt, they will be able
to track their Certified Mail and Return Receipts over the Internet, including
both www.pb.com and www.usps.com.
NOTE: These electronic services for Certified Mail and Return Receipt are fully
approved by the USPS.
Processing Certified Mail electronically through the DM Series™ mailing
system enables you to track delivery over the Internet. When this E-Certi
fied Mail is processed with E-Return Receipt, the mailer receives a significant benefit by processing through the mailing system.
• First, the E-Return Receipt is processed at a discount from the normal
“Green Card” for Return Receipt.
• Secondly, the Green Card is substituted by an electronic PDF document that includes the delivery information and recipient signature. This
eliminates the hard copy Green Cards that often get lost or misfiled.
• And most importantly, the electronic information is stored for 7 years,
allowing electronic access to the records at no additional charge.
Installation/Setup
IMPORTANT: Perform the following steps in the order given.
1. Verify that services are enabled:
a. Press Existing Features.
b. Press Confirmation Services.
-
SV62146 Rev. D 4-25
Page 58

4 • Running Mail
Confirmation Services
Delivery Confirmation: Enabled
Signature Confirmation: Enabled
E-Certified: Enabled
E-Return Receipt: Enabled
E-Ret Receipt w/Ref #: Enabled
c. Verify that the services are
enabled. The list of services
that appears may look like
the sample shown at the
right.
2. If you have not already done so,
enter the Mailer ID/D-U-N-S®
number. This number must be
manually entered the first time on
the Mailer ID/ DUNS prompt
screen after ERR is enabled.
NOTE: The Mailer ID/D-U-N-S® number is a unique nine-digit identification
sequence that identifies businesses by geographical location. The intent is
to identify both the mailer and unique location of the mailer.
a. Press the Menu button.
b. Select Set Up, then Basic Settings.
c. Select My Mailer ID/DUNS Number.
d. Type in the Mailer ID/ DUNS number.
e. Press Enter when done.
f. Press the left arrow key to return to the Main screen.
3. Verify the b arcode scanner is set up a nd functional. With the auto-enter
feature set to "ON" you can save some keystrokes as you step through
a Confirmation Services transaction.
4. Verify the printer is set up and functional.
Setup Options
1. Press the Menu button.
2. Select Confirmation Services.
3. Press the right arrow key to go to Set Up CFM Svcs. You are now in
the Confirmation Services Setup screen. Each option is explained
below.
• Apply Label Prompt - If this option is on, the system automatically
prompts the operator to apply the barcode label to each Confirma
tion Services mail piece.
• Upload Records Prompt - When on, this option prompts the oper-
ator to upload records after each Confirmation Services piece of
mail is run.
• Receipt Prompt - When on, this option prompts the operator to
print receipts after uploading records.
• Postal Manifest Prompt - When on, this option prompts the opera-
tor to print the manifest report after uploading records.
• DelCon Customer Reference - If this option is on, and Delivery
Confirmation is selected, the system will prompt the operator to
enter a customer reference number.
• SigCon Customer Reference - If this option is on, and Signature
Confirmation is selected, the system will prompt the operator to
enter a customer reference number.
• E-Certified Customer Ref - If this option is on, and E-Certified is
selected, the system will prompt the operator to enter a customer
reference number.
-
4-26 SV62146 Rev. D
Page 59

DM1100™ Digital Mailing System Operating Guide
• BPOD for SigCon - If this option is on, and Signature Confirmation
is selected, the system will include your Mailer ID/ D-U-N-S® Num
ber for bulk signature retrieval.
• Records Warning - This option allows the operator to enter the
number at which the system will warn that only a few more Confir
mation Services mail pieces can be processed: 0 records remaining.
Processing Electronic Return Receipt
1. Weigh the envelope/package. Place the mail piece on the attached
scale or process using the mailing machine in the W-O-W® mode.
2. Select class: Select the class of mail, for example, First Class or Prior-
ity Mail.
3. Select services:
a. Select E-Certified as the service for mail.
b. Select E-Ret Receipt.
c. Press Enter.
4. Enter the destination ZIP Code:
a. Scan or manually type the 5-digit destination ZIP Code.
b. Press Enter. (This step is not required if the system is set to auto-
enter.)
5. Enter the USPS tracking barcode number.
-
-
NOTES:
• You will not be prompted to enter the Customer Reference Number if
you scanned a combined barcode when entering the destination ZIP
Code.
• If you use labels supplied by Pitney Bowes, be sure to use the correct
label for the selected service, in this case E-Certified (dark green)
labels. If the control panel display shows the next number in the bar
code sequence, enter the last digit to accept it as long as it matches the
number on your next label; or scan or manually type in the 22-digit bar
code number from the label you’re using.
• If the control panel does not sh ow th e ne xt number in the barcode
sequence, it shows the next number in the barcode sequence MINUS
the check digit (last digit). You must enter the check digit.
6. Apply the barcode:
a. Apply the 22-digit barcode label to your mail piece if it is not already
pre-printed on the mail piece.
NOTE: 22-digit barcode labels for tracking E-Certified Mail must begin
with “9171” in order to be tracked correctly per USPS guidelines.
b. Press Enter. (This step is not required if the system is set to auto-
enter.)
7. Print postage:
•Press Start to print the postage on the envelope, or
•Press Tape to print a tape.
The control center returns to the Main screen.
8. For multiple mail pieces:
a. Press the ZIP key.
b. Type in the ZIP Code.
c. Press Enter.
d. Start processing the next mail piece.
-
-
SV62146 Rev. D 4-27
Page 60

4 • Running Mail
9. Repeat steps 1-8 as necessary.
10. Transfer Files:
a. Connect the control center to the Pitney Bowes Data Center.
b. Upload your records no later than the end of every day. To do this,
press Menu and select Confirmation Services.
11. The display automatically prompts you to print receipts or reports after
you upload records, provided this feature is enabled in the customer
setting menu (the default for this option is enabled).
Use the Reports key to select and print receipts and, optionally, a
report of all tracking information processed through the control panel.
Processing Electronic Return Receipt with a Customer Reference
Number
The Pitney Bowes solution for Electronic Return Receipt (ERR) may
include the option to use a Reference Number that can tie the USPS Track
ing Number to an internal tracking number your organization assigns to a
client or matter. By using this Reference Number, you’ll be able to look up
tracking numbers on the Internet, and relate that piece of mail to a specific
client.
Pitney Bowes provides a Reference Label Application to support you with
processing mail using the Reference Number. This includes the ability to
print a barcode label (in the standard 3 of 9 format) that can be applied to
the mail piece for customer reference tracking for Electronic Return
Receipt. The label includes the 5-digit destination ZIP Code required by the
USPS, which eliminates the steps required to enter this information manu
ally into the DM Series™ mailing system. The Reference Number can be
up to 14 alphanumeric characters in length.
-
-
This information can be easily scanned into the mailing machine during
mail processing, saving valuable time in entering the data manually. Also,
you can access delivery information from www.pb.com at “My Account.”
Using this site, you can search records using your unique customer refer
ence number or the USPS tracking number from the Green Label.
1. Weigh the envelope/package. Place the mail piece on the attached
scale or process using the mailing machine in the W-O-W® mode.
2. Select the class of mail, for example, First Class or Priority Mail.
3. Select services:
a. Select E-Certified as the service for mail.
b. Select E-Ret Receipt.
c. Press Enter.
4. Enter the destination ZIP Code:
a. Scan or manually type the 5-digit destination ZIP Code.
b. Press Enter. (This step is not required if the system is set to auto-
enter.)
-
4-28 SV62146 Rev. D
Page 61

DM1100™ Digital Mailing System Operating Guide
5. Enter the USPS tracking barcode number.
NOTES:
• You will not be prompted to enter the Customer Reference Number if
your barcode includes the reference number.
• If you use labels supplied by Pitney Bowes, be sure to use the correct
label for the selected service, in this case E-Certified (dark green)
labels. If the control panel display shows the next number in the bar
code sequence, enter the last digit to accept it as long as it matches the
number on your next label; or scan or manually type in the 22-digit bar
code number from the label you’re using.
• If the control panel does not sh ow th e ne xt number in the barcode
sequence, it shows the next number in the barcode sequence MINUS
the check digit (last digit). You must enter the check digit.
6. Apply the barcode:
a. Apply the 22-digit barcode label to your mail piece if it is not already
pre-printed on the mail piece.
NOTE: 22-digit barcode labels for tracking E-Certified Mail must begin
with “9171” in order to be tracked correctly per USPS guidelines.
-
-
b. Press Enter. (This step is not required if the system is set to auto-
enter.
7. Enter the customer reference number.
a. Scan or manually type your own unique reference number for this
mail piece. This can be a Client Number , Su mmons Number, Policy
or Claim Number, or Invoice Number. You will not be prompted for
this number if you scanned a combined barcode that includes the
customer reference number and destination ZIP Code.
b. Press Enter.
8. Print postage:
•Press Start to print the postage on the envelope, or
•Press Tape to print a tape.
The control center returns to the Main screen.
9. For multiple mail pieces:
a. Press the ZIP key.
b. Type in the ZIP Code.
c. Press Enter.
d. Start processing the next mail piece.
10. Repeat steps 1-9 as necessary.
11. Transfer Files:
a. Connect the control center to the Pitney Bowes Data Center.
b. Upload your records no later than the end of every day. To do this,
press Menu and select Confirmation Services.
12. The display automatically prompts you to print receipts or reports after
you upload records, provided this feature is enabled in the customer
setting menu (the default for this option is enabled).
Use the Reports key to select and print receipts and, optionally, a
report of all tracking information processed through the control panel.
SV62146 Rev. D 4-29
Page 62

4 • Running Mail
Customer Reference Number (ERR)
The Pitney Bowes solution for Electronic Return Receipt (ERR) may
include the option to use a Reference Number that can tie the USPS Track
ing Number to an internal tracking number your organization assigns to a
client or matter. By using this Reference Number, you’ll be able to look up
tracking numbers on the Internet, and relate that piece of mail to a specific
client.
Pitney Bowes provides a Reference Label Application to support you with
processing mail using the Reference Number. This includes the ability to
print a barcode label (in the standard 3 of 9 format) that can be applied to
the mail piece for customer reference tracking for Electronic Return
Receipt. The label includes the 5-digit destination ZIP Code required by the
USPS, which eliminates the steps required to enter this information manu
ally into the DM Series™ mailing system. The Reference Number can be
up to 14 alphanumeric characters in length.
This information can be easily scanned into the mailing machine during
mail processing, saving valuable time in entering the data manually. Also,
you can access delivery information from www.pb.com at “My Account.”
Using this site, you can search records using your unique customer refer
-
ence number or the USPS tracking number from the Green Label.
Processing Electronic Return Receipt with a Customer Reference
Number
-
-
1. Weigh the envelope/package. Place the mail piece on the attached
scale or process using the mailing machine in the W-O-W® mode.
2. Select class: Select the class of mail, for example, First Class or Priority
Mail.
3. Select services:
a. Select E-Certified as the service for mail.
b. Select E-Ret Receipt.
c. Press Enter.
4. Enter the destination ZIP Code:
a. Scan or manually type the 5-digit destination ZIP Code.
b. Press Enter. (This step is not required if the system is set to auto-
enter.)
5. Enter the USPS tracking barcode number.
NOTES:
• You will not be prompted to enter the Customer Reference Number if
you scanned a combined barcode when entering the destination ZIP
Code.
• If you use labels supplied by Pitney Bowes, be sure to use the correct
label for the selected service, in this case E-Certified (dark green)
labels. If the control panel display shows the next number in the barcode
sequence, enter the last digit to accept it as long as it matches the num
ber on your next label; or scan or manually type in the 22-digit barcode
number from the label you’re using.
• If the control panel does not sh ow th e ne xt number in the barcode
sequence, it shows the next number in the barcode sequence MINUS
the check digit (last digit). You must enter the check digit.
-
4-30 SV62146 Rev. D
Page 63

DM1100™ Digital Mailing System Operating Guide
6. Apply the barcode:
a. Apply the 22-digit barcode label to your mail piece if it is not already
pre-printed on the mail piece.
NOTE: 22 -digit barcode labels for tracking E-Certified Mail must begin
with “9171” in order to be tracked correctly per USPS guidelines.
b. Press Enter. (This step is not required if the system is set to auto-
enter.)
7. Enter the customer reference number.
a. Scan or manually type your own unique reference number for this
mail piece. This can be a Client Number , Su mmons Number, Policy
or Claim Number, or Invoice Number.
Y ou will not be prompted for this number if you scanned a combined
barcode that includes the customer reference number and destina
tion ZIP Code.
b. Press Enter.
8. Print postage:
•Press Start to print the postage on the envelope, or
•Press Tape to print a tape.
The control center returns to the Main screen.
9. For multiple mail pieces:
a. Select ZIP.
b. Type in the ZIP Code.
c. Press Enter.
d. Start processing the next mail piece.
10. Repeat steps 1-9 as necessary.
11. Transfer Files:
a. Connect the control center to the Pitney Bowes Data Center using
your telephone line.
b. Upload your records no later than the end of every day. To do this,
press the Menu key and select Confirmation Services.
12. The display automatically prompts you to print receipts or reports after
you upload records, provided this feature is enabled in the customer
setting menu (the default for this option is enabled).
Use the Reports key to select and print receipts and, optionally, a
report of all tracking information processed through the control panel.
-
SV62146 Rev. D 4-31
Page 64
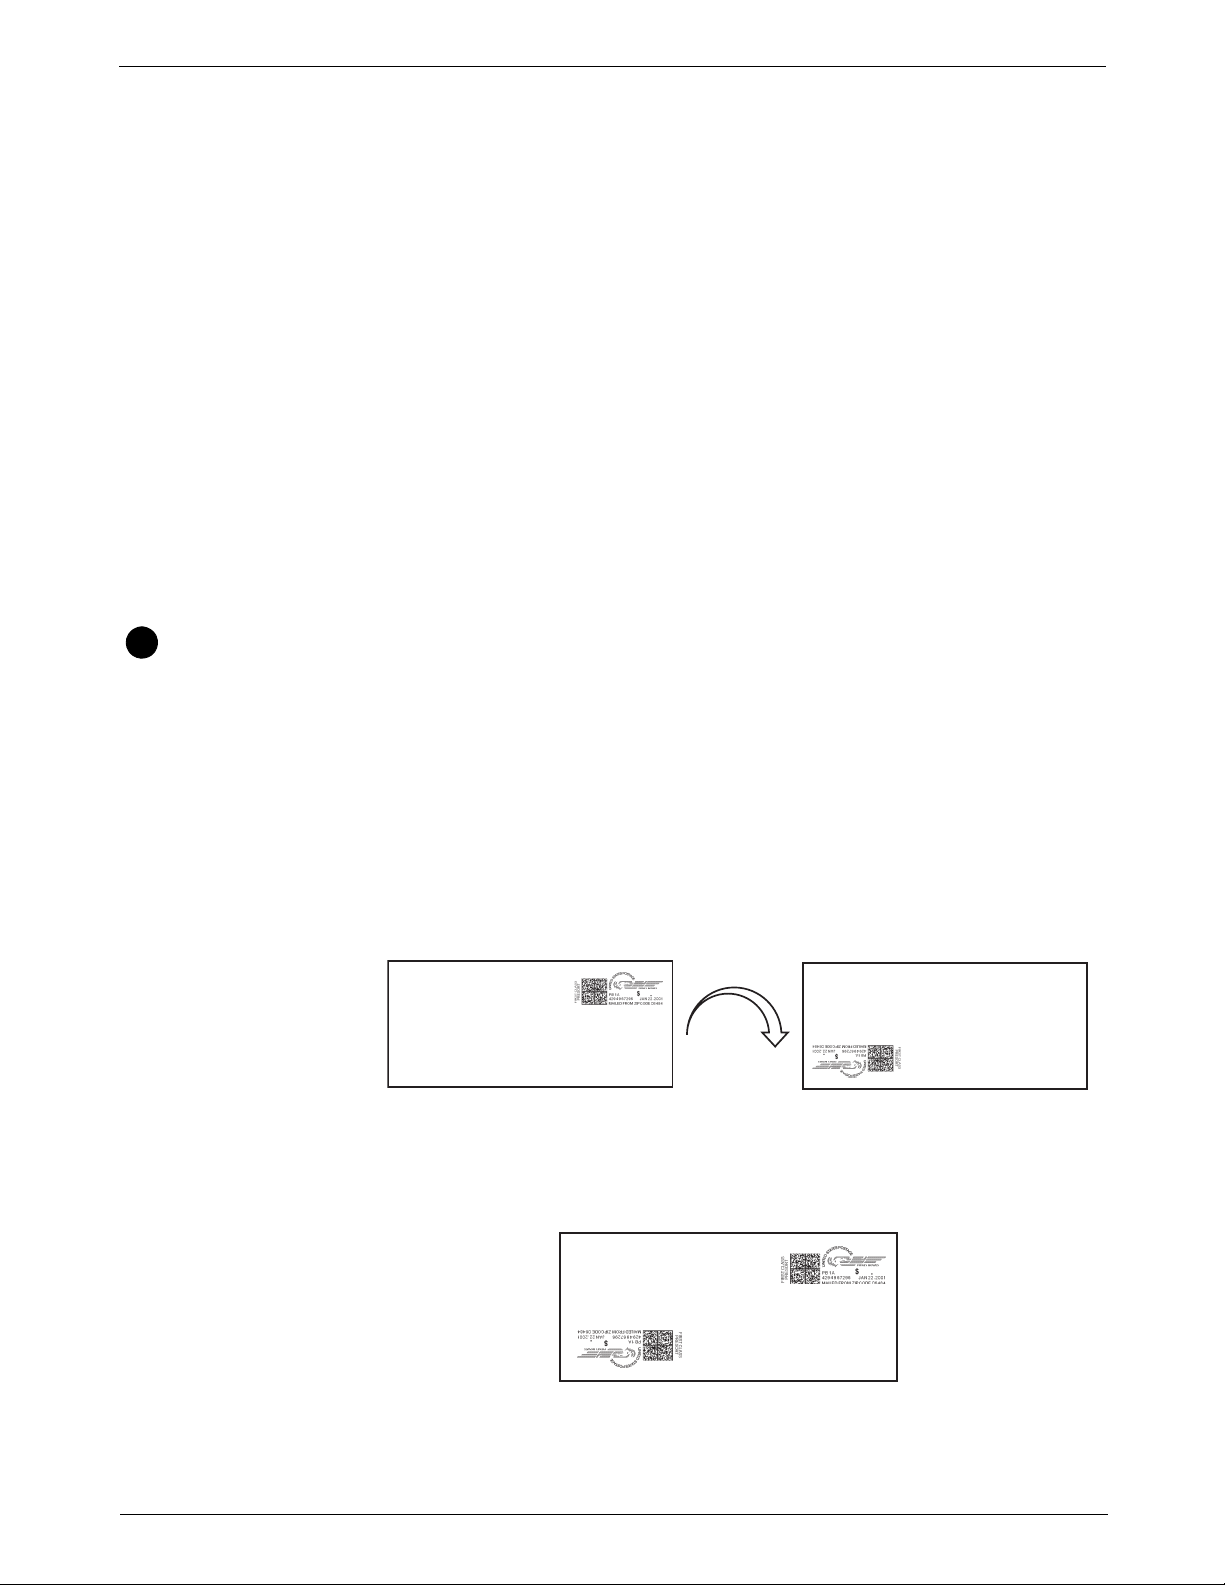
4 • Running Mail
8
00 30
00 30
00 30
00 07
00 30
Off-Line Electronic Return Receipt (ERR)
Adding Postage or Changing the Date
Off-line ERR allows you to process Certified Mail™ with Electronic Return
Receipt using applications other than Pitnew Bowes’ electronic Certified
Mail solution.
If you already have a Certified Mail solution, or acquire one outside of
Pitney Bowes, you can use the Off-line ERR feature to process your Certified Mail and Electronic Return Receipt without entering or scanning the
tracking number into the meter. The appropriate fees for Certified Mail and
ERR will be applied to the mailpiece automatically. You then refer to your
service provider’s application to track the mail and obtain the electronic
return receipt.
Follow the steps below to select the Off-line ERR feature:
1. On the main screen, select Class. The Select Class menu opens.
2. Select 1stCl Letter.
3. Select Letter.
4. Select Certified.
5. Select Offline eRR.
6. Press Enter. The system returns to the main screen.
If you do not have the correct postage or date on a piece of mail, you can
add more postage or change the date directly on a piece of ma il. If you p re
fer, you can print the corrections on at a tape instead and then apply it to
the piece of mail.
Adding More Postage
-
1. If you are printing more postage on an envelope and if the envelope is
sealed, press the seal key and select Sealer Off. If you are printing on
a tape, go to step 3.
2. Turn the piece of mail around 180 degrees so that the meter st amp is in
the lower left corner as shown here. Then, place the envelope on the
feed deck with the flap facing down.
3. To add more postage, press the Mode key and select Key In Postage.
4. Enter the additional amount using the numeric keys and press Enter.
Press the Start key. If you are printing a tape, press the Tape key. The
additional postage prints on the envelope as shown below.
5. If you print a tape, apply the tape to the envelope below the existing
meter stamp.
4-32 SV62146 Rev. D
Page 65
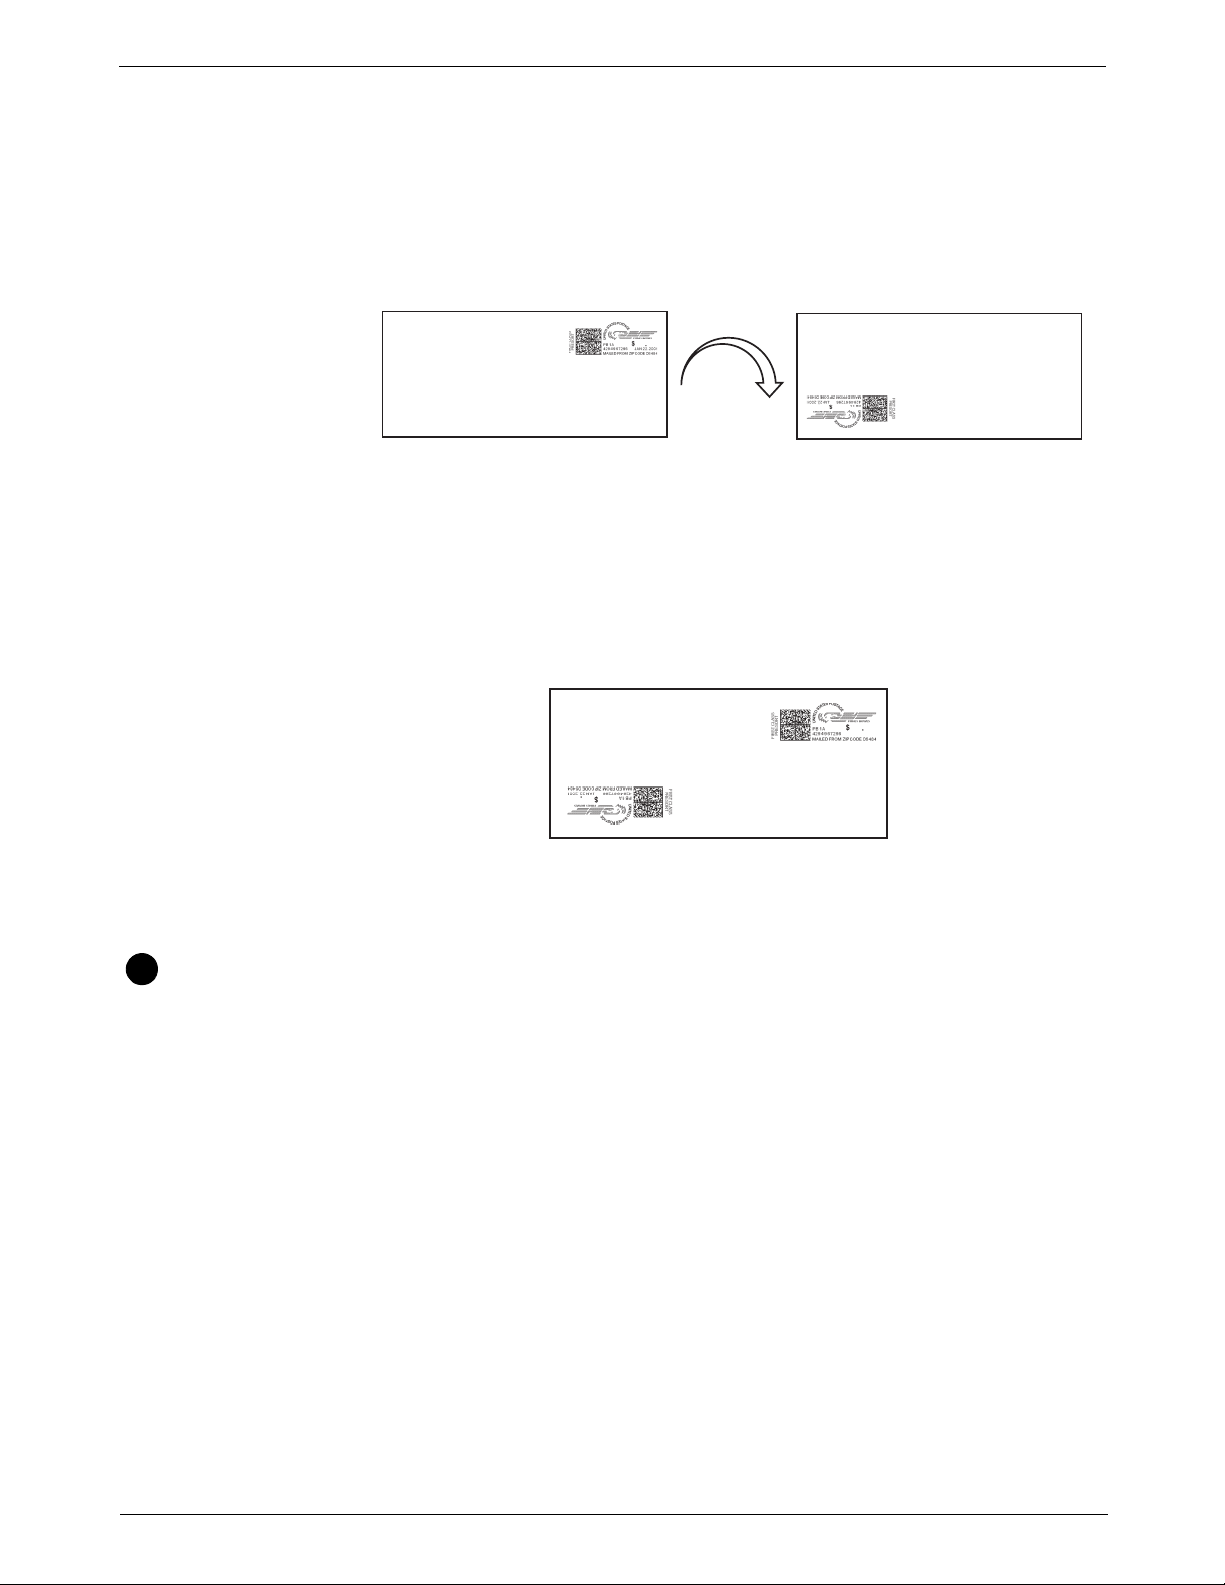
DM1100™ Digital Mailing System Operating Guide
00 30
00 37
00 37
00 00
JULY 03,2002
00 37
9
Changing the Date
1. If you are printing the date correction on an envelope and if the envelope is sealed, press the Seal key and select Sealer Of f. If you are printing on a tape, go to step 3.
2. Turn the piece of mail around 180 degrees so that the meter st amp is in
the lower left corner as shown here. Then, place the envelope on the
feed deck with the flap facing down.
3. Press the Mode key and select Key In Postage.
4. Enter the 00.00 for the postage value using the numeric keys and press
Enter.
5. Press the Menu key and then select Meter Stamp Options.
6. Select the Date option and make the appropriate selection.
7. Follow the prompts on the main screen. Press Enter when complete.
8. Press the Start key. If you are printing a tape, press the Tape key. The
date correction prints on the envelope as shown below.
Clearing the Batch Count
9. If you print a tape, apply the tape to the envelope below the existing
meter stamp.
If you keep track of the number of pieces of mail you process for each job
or mail run, you may want to clear the batch count at the end of a run or just
before starting a new run. The batch count appears on the display in the
lower right corner.
To clear the batch count:
1. Press the Funds key.
2. The “View Funds” screen appears.
3. Press the right arrow key to clear the batch count.
4. If you have specified that a supervisor password must be entered to
clear the batch count, you are prompted to enter the password now.
5. Enter the password and press the Enter key.
SV62146 Rev. D 4-33
Page 66

4 • Running Mail
This page intentionally left blank.
4-34 SV62146 Rev. D
Page 67
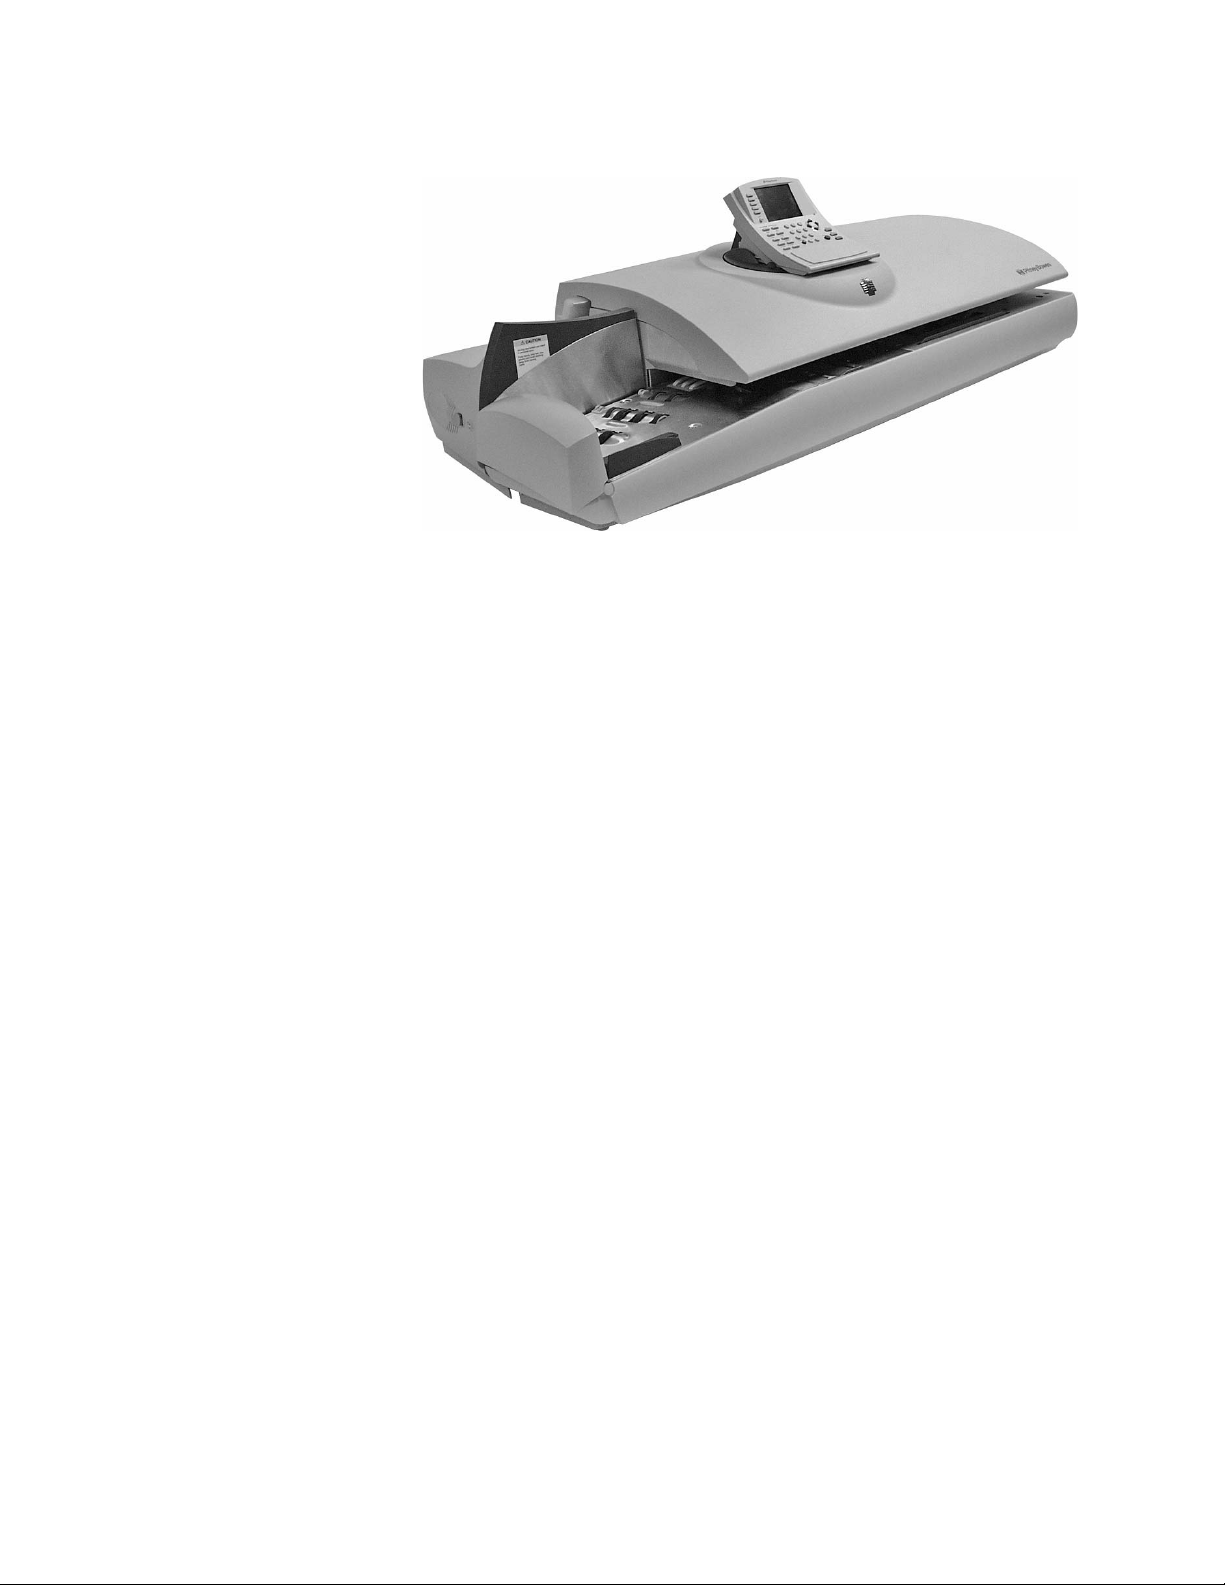
5 • Mailing System Setup
Navigating Hints...................................................................................5-2
Overview of Mailing System Set Up.....................................................5-3
Setting the Display Language..............................................................5-4
Adjusting Display Contrast...................................................................5-4
Adjusting the Feeder Deck Sensor ......................................................5-4
Setting the Date and Time of Day........................................................5-5
Setting Up a Supervisor Password ......................................................5-6
Setting Up a Lock Code.......................................................................5-6
Setting Up the Scale and Selecting Rates...........................................5-7
Setting Up Postage By Phone® Meter Payment System...................5-15
Configuring High/Low Funds Warning................................................5-18
Configuring Low Ink Warning.............................................................5-18
Configuring System Timeouts............................................................5-19
Defining Presets.................................................................................5-21
Creating Custom Messages...............................................................5-25
Taking the Meter Out of Service.........................................................5-28
Adding an Optional Printer.................................................................5-28
Configuring the Optional Barcode Scanner........................................5-29
SV62146 Rev. D
Page 68
5 • Mailing System Setup
Screen
Options
Arrow Keys
and Help
Information
Select Mode
1. Meter Stamp Options
2. Set Up
3. Zero Scale
4. Rate Details
5. Maintenance
Home
More Options
Navigating Hints
• The maximum number of options displayed is 5. To view more options,
press the down arrow key.
• You can select a numbered option either by pressing the screen key
next to the option, or by pressing the corresponding number on the key
board and then pressing the Enter key.
• To go back one screen or more, clear an entry, or return to the “Ready”
screen, press the Clear key. Pressing the left arrow key returns you to
the main screen.
• Other selection or navigation or help information appears at the bottom
of the screen. Also, check for messages next to the arrow keys on the
bottom right side of the screen.
-
5-2 SV62146 Rev. D
Page 69

DM1100™ Digital Mailing System Operating Guide
1
234
45
678
9
10
11
12
13
14
15
16
Overview of Mailing System Set Up
Follow the other procedures listed here as needed.
For details on each procedure, refer to the section number listed here.
Set the Display Language.
Adjusting the Display Contrast.
Adjusting the Feed Deck Sensor
Setting the Date and Time of Day.
Setting up a Supervisor Password.
Setting up a Lock Code.
Setting up the Scale and Selecting Rates.
Setting up Postage By Phone®.
Configuring High and Low Funds Warnings.
Configuring Low Ink Warnings.
Configuring System Timeouts.
Defining Presets.
Creating Custom Messages.
Taking the Meter Out of Service.
Setting up the Optional Printer.
Configuring the Optional Barcode Scanner.
SV62146 Rev. D 5-3
Page 70

5 • Mailing System Setup
1
2
3
Setting the Display Language
Adjusting Display Contrast
Depending on the model of your mailing system, you may be able to set the
display to any of the following languages:
• English
• Espanol
To change the language of the display:
1. Press the Menu key.
2. Select Set Up, or press 1 and the Enter key.
3. Select Change Language, or press 4 and the Enter key.
4. Select the language you want to appear in the display.
•Press 1 for English.
•Press 2 for Espanol.
5. Press the Enter key.
You can adjust the contrast of your display and set the volume (1D00 only)
of the speaker on your mailing system.
To adjust the contrast level of your display:
1. Press the Menu Key.
2. Press the down arrow key and then select Adjust Display Contrast, or
press ? and the Enter key
3. Use the left or right arrow keys on the control center to select the contrast (1 - 9) you want. The screen updates to the new setting.
4. Press the Enter key to save this setting.
Adjusting the Feeder Deck Sensor
The feeder deck sensitivity adjustments improve mail piece sensing capabilities on DM1100™ mailing systems, eliminating the need to press down
on the hopper mail stack to activate the feeder.
1. Press the Menu Key.
2. Press the down arrow key and then select Adjust Feeder Deck
Sensor.
• Press the right arrow key to view specific instructions about sensi-
tivity adjustments.
• Select Increase by 1 to increase the sensitivity of the Hopper Sen-
sor.
• Select Decrease by 1 to decrease the sensitivity of the Hopper
Sensor.
• Select Return to Factory Default to set the Hopper Sensor to the
default setting.
3. Press the Enter when done.
5-4 SV62146 Rev. D
Page 71
DM1100™ Digital Mailing System Operating Guide
4
Setting the Date and Time of Day
If your mail is picked up at a certain time each day, you can set your system
to advance the date at the mail pickup time.
NOTE: The date on the meter stamp should correspond to the date when you r
mail goes to the post office.
If you enter an invalid time or date, the system beeps and the screen displays the message: “Invalid Time”.
To adjust the time and enter date advance:
1. Press the Menu key.
2. Select Set Up.
3. Press the down arrow and select Time of Day.
4. Select the option you want to set:
• Current Time - if you select this option, enter the actual time. Use
the right arrow key to toggle between AM and PM. You do not need
to enter the colon (:) between hours and minutes. Press Enter to
accept the time. To return to the main screen, press the left arrow
key.
• Date will advance after - if you select this option, enter the time
when you want the date to advance. As soon as your system
reaches the time you set, it automatically advances the date 24
hours and prints that date on your postage.
EXAMPLE: If your mail goes to the Post Office at 3:00 PM each day,
then set the date advance to "3:00 PM". Any mail processed after 3:00
PM will have the date for the following day printed on it. This ensures
that the date printed on the mail piece corresponds with the date it is
brought to the Post Office.
Press Enter to accept the time. To return to the main screen, press
the left arrow key.
• Daylight Saving - if you select this option, you will be able to turn
the Daylight Saving mode on or off. Select Turn off, or Turn on. T o
exit the Daylight Saving mode, press the left arrow key.
NOTE: Turn Daylight Savings Time on in the Spring and off in the Fall.
SV62146 Rev. D 5-5
Page 72

5 • Mailing System Setup
5
6
Setting Up a Supervisor Password
Creating a Supervisor Password
Password Protecting an Operation
You can limit access to the following operations by creating a supervisor
password.
• Adding Postage (Refill)
• Clearing Batch Information (the number of pieces of mail your system
processes)
• Setting up Scale/Rates
• Accounting Set Up
Whenever you perform any of these operations, the system prompts you
for the password.
1. Press the Menu key.
2. Select Set Up, then select Basic Settings.
3. Select Supervisor Set Up. Enter the current password if prompted.
4. Select Edit (or Add) Supervisor Password to create or change an
existing password. The system prompts you to enter the passwo rd and
then confirm it.
NOTE: Passwords are case-sensitive and must be at least 4 characters or
digits long.
1. Press the Menu key.
2. Select Set Up, then select Basic Settings.
3. Press the down arrow and select Supervisor Set Up.
4. Select the option that corresponds to the operation you want to password protect. The options are:
a. Refill - select this to require a password for adding postage.
b. Clear Batch - select this to require a password before you can clear
the batch count information from the system. The batch count corre
sponds to the number of pieces of mail processed by the system.
c. Scale/Rates Setup - select this to require a password before you
can modify any of the Scale/Rates features.
d. T ext Entry Setup - select this to require a password before you can
create or modify a custom text message.
e. Accounting Setup - select this to password protect account editing
and setup.
-
Setting Up a Lock Code
5-6 SV62146 Rev. D
Use the Lock Code option to enter a four- digit password to prevent unauthorized use of your postage meter.
1. Press the Menu key.
2. Select Set Up, then select Basic Settings.
3. Select Lock Code and two options are displayed:
a. Lock Code - On/Off
b. Change Lock Code
If this is the first time you are setting up a lock code, “Off” ap pears next
to the Lock Code selection.
4. Select Lock Code and enter a four digit code. Press Enter and the sys-
tem prompts you to confirm it. As soon as you confirm the code, “On”
appears next to the Lock Code selection.
5. Press the Clear key or the left arrow to exit and set the lock code.
6. To activate the system lock, press the Lock button on the IntelliLink®
Control Center.
Page 73

DM1100™ Digital Mailing System Operating Guide
7
Scale/Rates Set Up
Attached Scale
W-O-W® Weight Limit
W-O-W® Start Key
Autoscale
Carrier/Class Disp
Class if new Piece
Dest. if new Piece
Dest. if new Class
Autoclear Dest Value
BMC Intra ZIP
Confirm Svc
Smart Classes
Auto Rate Large Env
Setting Up the Scale and Selecting Rates
If you have a scale on your mailing system,
you can use this section to set up how your
scale works with your system.
For example, the Attached Scale option
allows you to set your scale to accommo
date for environments subject to vibrations.
The Class if new Piece, Dest. if new
Piece and Dest. if new Class options allow
you to specify if you want to clear or retain
the class or destination (ZIP Code or Zone)
whenever you put a new piece of mail on
the scale.
The list of options that displays depends on
the model number of your mailing system.
All of the options are listed in the menu on
the right.
1. To access the scale/rates options,
press the Menu key on the
IntelliLink® Control Center and select Set Up from the main screen.
Press the down arrow key and select Scale/Rates.
2. If you have set up a supervisor password for Scale/Rates, you are
prompted to enter the password.
-
Scale/Rates:
Attached Scale
SV62146 Rev. D 5-7
This option appears only if you have an integrated scale or an attached
external scale connected to your mailing system.
Use this option to select how much time your system allows the scale to
settle (Normal or Adjust for Motion).
Select Adjust for motion if your mailing system is in an environment subject
to vibrations, such as near air-conditioning vents or closing doors. If you
select this, the scale will require more time to settle.
NOTE: If this is the first time you are using an attached scale, you may be
prompted to enter a location code. Refer to the documentation that arrived with
the scale, or contact the Pitney Bowes Help Desk. Refer to the Pitney Bowes
Contact Information List
1. Press the Menu key on the control center and select Set Up. Press the
down arrow key and select Scale/Rates.
2. Select Attached Scale. The “Vibration Setting” screen displays.
3. Press the screen key for the Attached Scale selection in this screen to
toggle between Normal and Adjust for Motion.
4. Press the Enter key to accept.
at the front of this guide for the phone number.
Page 74

5 • Mailing System Setup
Scale/Rates: WO-W® Weight
Limit
Scales/Rates: WO-W® Start Key
You can set the W-O-W® weight limit to prevent the system from printing
postage on pieces of mail that exceed a set weight.
1. Press the Menu key on the control center and select Set Up. Press the
down arrow key and select Scale/Rates.
2. Select W-O-W® Weight Limit.
3. Enter the weight in lbs., and/or press the right arrow key and enter the
weight in oz. The weight cannot be great than 1 lb. 0 oz (or 0 lb. 16 oz).
NOTE: Select Return to Maximum If you want to reset to the default
settings for the W-O-W® weight limit.
4. Press the Enter to set the weight limit.
While in W-O-W® mode, placing mail on the scale and manually typing a
postage amount will change the postage mode. Select what should happen
when the Start key is pressed.
• Select Revert to W-O-W® to process the piece of mail in W-O-W®
mode.
• Select Use Current Mode to process the piece of mail in the current
postage mode.
1. Press the Menu key on the control center and select Set Up. Press the
down arrow key and select Scale/Rates.
2. Select W-O-W® Start Ke y.
3. Select the appropriate option.
4. Press Clear or press the left arrow key to exit.
Scale/Rates: Autoscale
Scale/Rates: Carrier/Class Display
You can set AutoScale to On or Off.
Select On to enable the AutoScale fe ature. When a mail piece is placed on
the scale it will automatically weigh and rate the mail piece.
Select Off to disable this feature. If you disable this feature and your sys-
tem has an attached scale, you need to select the Attached Scale mode
when running mail if you want your system to weigh the mail and calculate
postage. Refer to Selecting the Postage Mode and Running the Mail in
Chapter 4 of this guide.
1. Press the Menu key on the control center and select Set Up. Press the
down arrow key and select Scale/Rates.
2. Select AutoScale to toggle between On and Off.
Use this option to control how the carrier and class are displayed on the
Main screen.
1. Press the Menu key on the control center and select Set Up. Press the
down arrow key and select Scale/Rates.
2. Select Carrier/Class Disp.
• Select Class Only if you only want the class to display on the Main
screen.
• Select Concatenate Carrier and Class if you want the carrier and
class to display on the main screen.
I
NOTE: If you select this option the carrier and class name will be
concatenated, or broken out onto multiple lines.
5-8 SV62146 Rev. D
Page 75

DM1100™ Digital Mailing System Operating Guide
Scale/Rates: Class if New Piece
Scale/Rates: Destination if New Piece
Use this option to set the system to prompt you to select a new class for
each piece of mail weighed or to keep the last class used.
1. Press the Menu key on the control center and select Set Up. Press the
down arrow key and select Scale/Rates.
2. Select Class if new Piece.
• To clear the class information select Prompt: Select New Class.
• To retain the class information select Retain: Use Previous Class.
3. The system returns to the Scale/Rates Set Up menu.
Use this option to set the system to prompt you to select a new destination
(ZIP, Zone code or country) for each piece of mail weighed, or to keep the
last destination used.
Press the Menu key on the control center and select Set Up. Press the
down arrow key and select Scale/Rates.
1. Select Dest. if new Piece.
• To clear the destination select Prompt: Enter New Destination.
• To retain the destination select Retain: Use Class Destination.
2. The system returns to the Scale/Rates Set Up menu.
SV62146 Rev. D 5-9
Page 76

5 • Mailing System Setup
Scale/Rates:
Destination if New
Class
Scale/Rates: Autoclear Destination Value
Use this option to set the system to prompt you to select a new destination
(ZIP, Zone code or country) each time you change the class of mail, or to
keep the last destination used.
1. Press the Menu key on the control center and select Set Up. Press the
down arrow key and select Scale/Rates.
2. Select Dest. if new Class.
• To clear the destination select Prompt: Enter New Destination.
• To retain the destination select Retain: Use Previous Destina-
tion.
3. The system returns to the Scale/Rates Set Up menu.
Use this option to set the system to automatically clear the destination
value, so that the destination value is blank each t ime you are prompted to
enter a destination or to automatically retain the destination value.
1. Press the Menu key on the control center and select Set Up. Press the
down arrow key and select Scale/Rates.
2. Select Autoclear Dest. Value.
• To clear the destination select Yes: Clear Destination Value.
• To retain the destination select No: Retain Last Destination.
The system returns to the Scale/Rates Set Up menu.
Scale/Rates:
BMC Intra ZIP
Scale/Rates:
Confirm Svc
Use this option to edit a group of predefined zip code ranges, or create a
new group of ZIP Codes, within a Bulk Mailing Center (BMC).
1. Press the Menu key on the control center and select Set Up. Press the
down arrow key and select Scale/Rates.
2. Select BMC Intra ZIP.
3. To create a new group, select Create new group and enter the new
beginning and ending ZIP Code. You only need to enter the first three
digits of the beginning and ending ZIP Code.
4. To edit an existing group press the corresponding screen key for that
group. You are prompted to enter a new beginning and ending ZIP
Code. You only need to enter the first three digits of the beginning and
ending ZIP Code.
Refer to the Using Electronic Confirmation Services section in Chapter 4,
Running Mail for information about the Confirmation Services features.
5-10 SV62146 Rev. D
Page 77
DM1100™ Digital Mailing System Operating Guide
Scale/Rates: Smart Classes
The Smart Class™ capability of the DM Series™ mailing system software
has been enhanced to provide fully automatic printing of postal inscriptions
or postal endorsements. With the Smart Class™ feature, you are able to
set the W-O-W® (Weigh-On-The-Way®) in an automatic mode to allow
changes in Class based on the weight of the mail-piece. (Example: Auto
matically switch between Presort Classes depending on the weight of mailpieces.) Now, the system can also automatically switch between Postal
Inscriptions (i.e. PRESORT) or Postal Endorsement (i.e. MEDIA MAIL,
ADDRESS SERVICE REQUESTED) that you choose for each weight
break.
Two steps are required to use this feature. First, you must select an advertisement and/or inscription while setting up the Smart Class™ template.
Second, you must turn “on” the printing capability of printing Auto Inscrip
tions. See Setting Up a Smart Class™ with an Auto Inscription in this section for more information.
Creating a Smart Class™ with an Auto Inscription
The following example shows how to set 3 different weight breaks. The
weight breaks will use the following three classes.
For weight break: Use Class:
0.0 oz to 3.0 oz 1st Class Automation Letter 5 Digit
3.0 oz to 13.0 oz 1st Class Non-Automation Presort
13.0 oz to 1.0 lb. Priority
1. Press the Menu key.
2. Select Set Up, then press the down arrow and select Scales/Rates.
3. Press the down arrow (depending on your system you may have to
press it twice) and select Smart Classes.
4. Select Create.
5. Select the appropriate Carrier, in this example, USPS Domestic.
a. You are prompted to enter the maximum weight for this weight
break:
Enter the max weight for this
weight break
0 lb. 0.0 oz to __lb. __oz
b. To set the first weight break, use the numeric keys and enter 0 for
lb. Press the Enter key. Enter 3 for oz and press the Enter key.
c. Select the appropriate class, in this example, 1st Class Auto.
d. Select the appropriate subclass. In this example, select Letter, then
select 5-Digit.
e. The Fees screen appears. Press Enter.
SV62146 Rev. D 5-11
Page 78
5 • Mailing System Setup
6. To set the next weight break point, select Add Another Class.
f. The Select Auto Ad/Inscriptions screen appears:
• To add an ad, select Ads/Messages. Scroll through the list and
select the appropriate option.
• To add an inscription, select Inscriptions. Scroll through the list
and select the appropriate option.
•Press Enter when done. The display shows the first weight
break for this Smart Class™:
Weight Class/+Fees
0 lb. 0.0 oz — 0 lb. 3.0 oz 1stAuto...r 5 Dig
a. You are prompted to enter the maximum weight for this weight
break:
Enter the max weight for this weight break
0 lb. 3.0 oz to __lb. __oz
b. For the second weight break, enter 0 for lb. Press the Enter key.
c. Enter 13 for oz and press the Enter key. Select the appropriate
class, in this example, 1st Cls Presort.
d. The Fees screen appears. Press Enter.
e. The Select Auto Ad/Inscriptions screen appears:
• To add an ad, select Ads/Messages. Scroll through the list and
select the appropriate option.
• To add an inscription, select Inscriptions. Scroll through the list
and select the appropriate option.
•Press Enter when done. The display shows the first weight
break for this Smart Class™.
Weight Class/+Fees
0 lb. 0.0 oz — 0 lb. 3.0 oz 1stAuto...r 5 Dig
0 lb. 3.0 oz — 0 lb. 13.0 oz 1st Cls Presort
7. To set the next weight break point, select Add Another Class.
a. You are prompted to enter the maximum weight for this weight
break:
Enter the max weight for this weight break
0 lb. 13.0 oz to __lb. __oz
b. For the third weight break, enter 1 for lb. Press the Enter key.
c. Enter 0 for oz and press the Enter key.
5-12 SV62146 Rev. D
Page 79
DM1100™ Digital Mailing System Operating Guide
d. Select the appropriate class, in this example Priority Mail. The
Fees screen appears. Press Enter. The Select Auto Ad/Inscriptions
screen appears:
• To add an ad, select Ads/Messages. Scroll through the list and
select the appropriate option.
• To add an inscription, select Inscriptions. Scroll through the list
and select the appropriate option.
•Press Enter when done. The display shows the first weight
break for this Smart Class™. Since we did not create a fourth
weight break it is listed as None.
Weight Class/+Fees
0 lb. 0.0 oz — 0 lb. 3.0 oz 1stAuto...r 5 Dig
0 lb. 3.0 oz — 0 lb. 13.0 oz 1st Cls Presort
0 lb. 13.0 oz — 1 lb. 0.0 oz Priority Mail
0 lb. 0.0 oz — 0 lb. 0.0 oz None
8. Press the Enter key again and "Select Custom Carrier" appears in the
display. You are presented with a list of available custom carriers for
grouping your Smart Classes.
9. Select one that is listed as "Available". You can have up to a maximum
of 4 custom carriers.
10. Next, you are prompted to enter a "Carrier Name". Enter a name (up to
15 letters and/or numbers) for your Smart Class grouping, for example,
Carrier 1. Press the Enter key.
11. You are now prompted to e nter the "Smart Class™ Name ". This will be
the class name for the Smart Class™ you have created. Enter the
name (up to 15 letters and/or numbers), for example, Smart Class 1,
and press the Enter key.
12. To exit, press the left arrow key. The main display appears. You can
now begin to use this Smart Class™.
To use a Smart Class™, refer to Selecting a Smart Class™ in Chapter 4 of
the operator guide for your mailing system.
Setting Up a Smart Class™ with an Auto Inscription
1. Press the Menu key.
2. Select Set Up and press the down arrow key.
3. Select Auto Ad/Inscription Setup to toggle printing:
• "On" means the ad and/or inscription will print when a Smart
Class™ is used.
• "Off" means the ad and/or inscription will not print when a Smart
Class™ is used.
4. Follow the prompts to save your changes.
SV62146 Rev. D 5-13
Page 80

5 • Mailing System Setup
Modifying a Smart Class™ with an Auto Inscription
1. Press the Menu key.
2. Select Set Up, then press the down arrow and select Scales/Rates.
3. Press the down arrow (depending on your system you may have to
4. Select View.
5. Select the Smart Class™ you wish to edit.
6. Select View Detail.
7. Select Modify Auto Ad/Inscription.
8. The Select Auto Ad/Inscriptions screen appears:
press it twice) and select Smart Classes.
• To add an ad, select Ads/Messages. Scroll through the menu
screens and select the appropriate option.
• To add an inscription, select Inscriptions. Scroll through the menu
screens and select the appropriate option.
•Press Enter when done.
Scales/Rates: Auto Rate Large Envelope
Use this option to automatically post large envelopes using the Flat category when using Shape Based Rating.
1. Press the Menu key.
2. Select Set Up, then press the down arrow and select Scales/Rates.
3. Press the down arrow (depending on your system you may have to
press it twice) and select Auto Rate Large Env.
• If you want to post large envelopes using the Flat category, select
Yes, Post as Flat.
• If you do not want to post large envelopes using the Flat category,
select No, Display Error.
4. The system returns to the Scale/Rates Set Up menu.
5-14 SV62146 Rev. D
Page 81
DM1100™ Digital Mailing System Operating Guide
8
Phone/Network Set Up
PBP Account #
Dialing Prefix
PB Phone #
My Phone #
Modem Type
LAN Firewall Settings
Network Settings
Remote PCRefill
Setting Up Postage By Phone® Meter Payment System
Phone/Network Set Up: PBP Account #
This section describes how to set up Postage By Phone® Meter Payment System on
your mailing system. It also includes
advanced phone setup instructions for
modifying individual phone connection
parameters (user ID and password and
server IP address).
To access the Postage By Phone® System
setup options, press the Menu key on the
IntelliLink® Control Center, select Set Up
from the main screen, and then select
Phone/Network Set Up.
All of the possible options are listed on the menu at the right.
Your Pitney Bowes representative uses this to set up your Postage By
®
Phone
tem. Your account number is supplied by Pitney Bowes when you order
your system.
Do not change this unless you are directed to do so by Pitney Bowes.
Meter Payment System account when installing your mailing sys-
Phone/Network Set Up: Dialing Prefix
Phone/Network Set Up: PB Phone #
SV62146 Rev. D 5-15
If you need to dial a number in order to reach an outside line, use this
option to enter that prefix number.
1. Press the Menu key on the control center. Select Set Up from the main
screen, then select Phone/Network Set Up.
2. Select Dialing Prefix.
3. Use the numeric keypad to enter the number you need to dial to reach
an outside line, for example, 9.
To enter a symbol hold down the Symbol key and at the same time
press the key for the symbol (for example, the # or * keys).
4. Press the Enter key.
Use this option to enter the Pitney Bowes phone number that you use to
add postage to your postage meter.
1. Press the Menu key on the control center. Select Set Up from the main
screen, then select Phone/Network Set Up.
2. Select PB Phone #. This number is supplied by your Pitney Bowes representative.
3. Use the numeric keypad to enter the phone number you need to dial to
connect to Pitney Bowes to add postage, or select Reset to Factory
Phone Number to change back to the number present when the sys
tem was delivered.
4. Press the Enter key.
-
Page 82

5 • Mailing System Setup
Phone/Network Set Up: My Phone #
Phone/Network Set Up: Modem Type
Use this option to enter your local phone number (the number to which your
mailing system is connected).
1. Press the Menu key on the control center. Select Set Up from the main
screen, then select Phone/Network Set Up.
2. Select My Phone #.
3. Use the numeric keypad to enter your local phone number. Be sure and
include the area code with your number. Also, use only digits and do
not include spaces or dashes.
4. Press the Enter key.
Use this option to select the modem type: USB, Serial, or Internal.
1. Press the Menu key on the control center. Select Set Up from the main
screen, then select Phone/Network Set Up.
2. Select Modem Type and the "Select Modem Type" screen appears.
3. Select the appropriate modem type (USB, Serial, Internal or Use LAN).
The Phone/Network Set Up screen reappears.
4. In order for this change to take effect you must restart your system. Use
the On/Off switch located on the base of your machine to restart your
system (see Mailing System Exterior section in Chapter 2 of this guide
for the location of the On/Off switch).
Phone/Network Set Up: Use LAN Firewall Settings
This option allows you to modify individual LAN firewall settings.
1. Press the Menu key on the control center. Select Set Up from the main
screen, then select Phone/Network Set Up.
2. Select LAN Firewall Settings. The "LAN Firewall Settings" screen
appears and displays the following options:
•Ping
•Trust
• Default Settings
3. Select Ping to toggle between Enable/Disable.
4. Select Trust. The “LAN Firewall Trusted Host Settings” screen
appears. and displays the following options:
•Trust All
• Trust None
• Trust Hosts Only
Select the appropriate option.
5. Select Default Settings to revert to the default LAN firewall settings for
the system.
5-16 SV62146 Rev. D
Page 83
DM1100™ Digital Mailing System Operating Guide
Phone/Network Set Up: Network Settings
This option allows you to modify individual phone connection parameters.
CAUTION: Changing these parameters may result in errors
when trying to contact Pitney Bowes. Contact your Pitney Bowes
representative or call the Help Desk if you are not sure. Refer to
the
Pitney Bowes Contact Information List at the front of this
guide for the phone number.
1. Press the Menu key on the control center. Select Set Up from the main
screen, then select Phone/Network Set Up.
2. Select Network Settings. The "Network Set Up" screen appears and
displays the following options:
• Distributor Parameters
• Mailing System Network Settings
3. If you select Distributor Parameters, the system displays the following
connection parameters:
• Global Account & User Id
• Global Password
• ANI/LCZ Server IP
• ANI/LCZ Server Port #
• Primary DNS Server
• Secondary DNS Server
• Distributor URL
• Backup Data Center URL
4. If you select Mailing System Network Settings, the system displays
the following options.
• Get IP Address
• IP Address
• Subnet Mask
• Default Gateway
• MAC Address (you cannot modify this)
5. Select the parameter you want to edit and make the changes.
6. Press Enter when complete.
Phone/Network Set Up: Remote PC Refill
SV62146 Rev. D 5-17
This option is available only on systems that have the optional Remote
Refill feature installed.
Use this option to turn the Remote PC Refill feature on or off.
NOTE: Once you select this option, the system will restart.
1. Press the Menu key on the control center. Select Set Up from the main
screen, then select Phone/Network Set Up.
2. If necessary , pre ss the down arrow key and select Remote PC Refill to
toggle this option on or off.
3. The mailing system must restart in order for the change to take effect.
The system will restart automatically; however, you can select OK,
restart now to expedite the process.
Page 84

5 • Mailing System Setup
9
10
Configuring High/Low Funds Warning
Setting the High Value Warning for Key In Postage
Setting the Low Funds Warning Value
Use this option to set a value at which the mailing system warns you that
the funds remaining in the meter are getting low.
NOTE: This option does not appear if the Automated Meter Refill feature is
turned on.
1. Press the Menu key on the control center, select Set Up from the main
screen, and then select Basic Settings.
2. Select Low Funds Warning.
3. Enter the low value warning amount using the numeric keyboard.
4. Press the Enter key.
Use this option to set a value at which the mailing system warns you that
you have entered a postage value that is more than the amount you are
setting here. This feature prevents you from acciden tally printin g a post age
amount that is more than you need.
1. Press the Menu key on the control center, select Set Up from the main
screen, and then select Basic Settings.
2. Select High Value Warning.
3. Enter the high value warning amount ($0 - $99.99) using the numeric
keypad.
4. Press the Enter key.
5. Confirm that the high value warning amount that appears in the displayed is correct. Press the key corresponding to the option you want.
Configuring Low Ink Warning
2nd Low Ink Warming
Use this option to specify how you want the system to notify you when you
are running low on ink.
1st Low Ink Warning
1. Press the Menu key on the control center, and select Set Up.
2. Select Basic Settings.
3. Press the down arrow key and select 1st Low Ink Warning.
4. Press the screen key corresponding to the option you want. You can
choose to have the system notify you when there is less than a 5-day
supply of ink, or you can choose to ignore the warning.
Repeat the above for 1.5 day notification.
5-18 SV62146 Rev. D
Page 85

DM1100™ Digital Mailing System Operating Guide
11
Timeouts
Display Sleep
System Sleep
Normal Preset Timer
Feeding Timeout
Transaction Timeout
Configuring System Timeouts
Timeouts: Display Sleep
This section describes how to set various
system timeouts for your mailing system.
1. To access the system timeouts, press
the Menu key on the control center, and
select Set Up.
2. Select Basic Settings and then Time-
outs to get all of the timeout options.
The timeout options are listed on the right.
All of these options are described in the fol
lowing sections.
Standby Mode: Least Power Usage
In order to reach the lowest level of power consumption, the mailing system
can be manually switched "Off" while still plugged into the wall. Toggle the
"On/Off" switch to "Off" when not using the mailing system for an extended
period of time. When switched back "On" expect some delay for a normal
reboot to assure that the entire system is ready to go.
This option allows you to specify how long the system can remain inactive
before the display turns off. You can set the timeout for 1 - 30 minutes, in 1
minute increments. The default timeout is 5 minutes.
-
Timeouts: System Sleep
The display turns on again when you press any key on the control center or
if you place mail in the feeder or on the scale (either integrated or attached
external scale).
1. Press the Menu key and select Set Up.
2. Select Basic Settings and then Timeouts.
3. Select Display Sleep.
4. Enter the number of minutes (1-30) using the numeric keyboard.
5. Press the Enter key.
Use this option to specify how long the system remains inactive before it
goes into "sleep".
You can set this timeout for 40 - 240 minutes, in 1 minute increments. The
default timeout is 10 minutes.
The system goes into display sleep before it goes into system sleep. The
system wakes up again when you press any key on the control center or if
you place mail in the feeder or on the scale (either integrated or attached
external scale).
1. Press the Menu key and select Set Up.
2. Select Basic Settings and then Timeouts.
3. Select System Sleep.
4. Enter the number of minutes (40 - 240 minutes) using the numeric keypad.
5. Press the Enter key.
SV62146 Rev. D 5-19
Page 86

5 • Mailing System Setup
Timeouts: Normal Preset Timer
Timeouts: Feeding Timeout
The normal preset timer option allows you to specify how much time you
want to allow the system to remain idle before it returns to the Normal Pre
set settings (refer to Define Preset section in this chapter for more information on Normal Presets).
You can set this timeout for 0 - 1440 minutes, in 1 minute increments. The
default timeout is 30 minutes.
1. Press the Menu key and select Set Up.
2. Select Basic Settings and then Timeouts.
3. Select Normal Preset Timer.
4. To set the timer, enter the number of minutes (0-1440) using the
numeric keyboard.
5. If you want the system to stay at the last settings used, select Never
reset to Normal Preset.
6. Press the Enter key.
Use this option to specify how much time to allow before the feeder stops
after the last envelope is processed.
You can set this timeout for 5 - 90 seconds, in 1 second increments. The
default timeout is 5 seconds.
This reduces the wear on your machine and acts as a safety measure if
you leave the machine unattended.
-
Timeouts: Transaction Timeout
1. Press the Menu key and select Set Up.
2. Select Basic Settings and then Timeouts.
3. Select Feeding Timeout.
4. Enter the number of seconds (0 - 90) using the numeric keyboard, or
press the screen key corresponding to Turn Rollers off Immediately,
or Run Until Stop key is Pressed.
5. If you entered the number of seconds, press the Enter key.
This option is available only if your mailing machine is connected to the
AccuTrac™ Mail Accounting system.
Use this option if you routinely batch your mail runs. This option allows you
to specify how much time to allow the system to remain idle before it ends
the current accounting transaction. You can set this timeout for 10 - 65520,
in 1 second increments. The default timeout is 14,400 seconds.
1. Press the Menu key and select Set Up.
2. Select Basic Settings and then Timeouts.
3. Select Transaction Timer.
4. Enter the number of seconds (10 - 65520) using the numeric keyboard.
5. Press the Enter key.
5-20 SV62146 Rev. D
Page 87

DM1100™ Digital Mailing System Operating Guide
12
Defining Presets
Defining Normal Preset Values
You can define up to 50 sets (0-49) of preset mailing system values, with
each set having different values for such items as the account name, post
age value, class, carrier, a special service, a mode such as Attached
Scale or Differential weighing, and the like. You can use these presets for
different mailing jobs.
The 0 preset is the normal preset and the one you use to store your most
commonly used system values. These are the values your system will use
whenever you restart your machine. After a certain period of inactivity, or
when you power up, the system restores the normal preset settings.
After you define all of your presets, you can invoke the normal preset values simply by pressing the Normal Preset key. To select any of the other
presets, press the Custom Preset key and select the preset you want for
the particular mailing operation.
Follow the steps below to define the Normal Preset values.
NOTE: First Class, 1 oz as the default factory setting for the Normal Preset.
1. Enter the values you use most often to run a mail job, for example, the
weighing mode, the postage value, class and carrier etc.
NOTE: Proceed as if you were actually running a job. Select the mode and
class and service etc. By doing this, you are entering the values that you will
use for the normal preset. Refer to Chapter 4, Running Mail in this guide for
more information on selecting mode and class.
-
2. Press the Custom Presets key. A list of presets, starting with “0 Nor-
mal” appears. Do not press any of the screen keys corresponding to
these presets.
3. Press the right arrow key.
4. Press the screen key for Store Current Setting to Preset.
5. Select the normal preset by pressing the key for 0. Normal.
6. If you have selected Key in Postage mode, the system will prompt you
to choose a class for the preset. Choosing a class will ensure your pre
set values are automatically updated when postage rates change.
• Press the Select Class screen key, then follow the prompts to
select a weighing and class options. The system will return to the
Main screen. Return to step 2 to set the Normal Preset.
OR
• Press the down arrow key to continue setting the preset without
selecting a class.
7. The "View Preset" screen appears and displays all of the values you
defined in this session. Press the Enter key to return to the main
screen.
-
SV62146 Rev. D 5-21
Page 88

5 • Mailing System Setup
Defining Custom Preset Values
Defining Custom Preset Values
When creating a custom preset, the mailing system will prompt you to
select a class of mail if you are using Key In Postage Mode. Selecting a
class will ensure your preset values are updated automatically when post
-
age rates change.
NOTE: You can elect to save the custom preset without a selecting a class, but
your preset values will not update automatically when postage rates change.
1. Enter the values for the mail job (for example, the weighing mode, the
postage value, class and carrier etc.) that correspond to the values you
want to be able to call up in the future by selecting a custom preset key.
For example, you may want to define a set of conditions so that the
envelopes are sealed only (no postage applied).
NOTE: Proceed as if you were actually running a job. Select the mod e and
class and service etc. By doing this, you are entering the values that you will
use for the normal preset. Refer to Chapter 4, Running Mail in this guide for
more information on selecting mode and class.
2. Press the Custom Presets key.
3. Press the right arrow key.
4. Select Store Current Setting to Preset.
5. A list of presets, starting with “0 Normal” appears. Se lect one of the presets that has not been defined yet. These presets are named “Available”. To change an existing preset, refer to Editing Custom Preset
Values in this section.
6. If you have selected Key in Postage mode, the system will prompt you
to choose a class for the preset. Choosing a class will ensure your pre
set values are automatically updated when postage rates change.
• Press the Select Class screen key, then follow the prompts to
select a weighing and class options. The system will return to the
Main screen. Return to step to set the Custom Preset.
OR
• Press the down arrow key to continue setting the custom preset
without selecting a class.
7. The system prompts you to “Enter New Preset Name”. Type in the
name using the alphanumeric keys.
8. Press the Enter key. The "View Preset" screen appears and displays all
of the values you defined in this session.
9. To use these values in the future, simply press the Custom Presets
Key and select the screen key corresponding to this preset name.
10. Press the Enter key to return to the main screen.
-
5-22 SV62146 Rev. D
Page 89

DM1100™ Digital Mailing System Operating Guide
Store Advance Date in a Custom Preset
This feature may be offered as a standard or optional feature and is not
available on all Pitney Bowes solutions. Please contact your local account
representative to determine if this option is accessible on your system.
In order to store an Advance Date setting in a custom preset, you need to
first turn on this feature. For information on setting an advance date, refer
to Meter Stamp Options: Date section in Chapter 4 in this guide.
To enable this feature:
1. Press the Custom Presets key.
2. Press the right arrow key and the "Set Up Preset" screen opens.
3. Select Date Advance. The following message appears: "If set on, pre-
sets stored when the date is not advanced will return the system to
today's date."
• Select On to turn on this feature and store the date advance.
• Select Off if you want to turn off the feature.
4. Refer to the examples on the next page for more information on how
storing the Advance Date in custom presets works.
NOTE: If you create a custom preset with the Advance Date feature turned
off and you recall this preset, the current date setting is not affected.
Example 1 - If today is Wednesday and you set the advance date for 2
days* and store this advance in a custom preset, then:
• if you recall the preset on the same day (Wednesday) it will print Friday's date on your postage.
• if you recall the preset on the next day (Thursday) it will print Saturday's
date on your postage.
* To set ad va n ce da te , pr es s the Menu button, select Meter Stamp Options,
then select Advance Date.
Example 2 - If you have previously set up your system so that it automatically advances the date at 3 PM*, and you created a custom preset with the
Advance Date set to zero (that is, you did not advance the date), then:
• if you recall the preset before 3 PM it will print today's date on your
postage.
• if you recall the preset after 3 PM it will print tomorrow's date on your
postage.
* To automatically advance the date (by 24 hours), press Menu button, select
Set Up, press the down arrow key, then select Date will advance after.
Example 3 - If you have previously set up your system so that it automati-
cally advances the date at 3 PM, and you create a custom preset that
advances the date by 2 days, then:
• if you recall the preset before 3 PM, the system will set the date two
days ahead.
• if you recall the preset after 3 PM, the system will still set the date two
days ahead.
SV62146 Rev. D 5-23
Page 90

5 • Mailing System Setup
Editing Custom Preset Values
Viewing, Renaming, or Deleting Presets
To edit an existing custom preset, you define its new values and then overwrite the old values.
1. Enter the new values for the mail job that correspond to the custom preset you want to change or edit.
2. Press the Custom Presets key.
3. Press the right arrow key (Set up Presets appears next to the right
arrow key).
4. Press the screen key for Store Current Setting to Preset.
5. The system prompts you to “Select Preset to Replace”. Press the
screen key next to the name of the preset you want to edit.
6. Press the Enter key to view the preset values. Press Enter again to
return to the main screen.
1. Press the Custom Presets key.
2. A list of presets, starting with 0 Normal appears. Select the approp riate
preset. 0 - 4 presets are displayed on the screen. To view the other pre
set names, press the down arrow key.
3. Press the right arrow key (Set up Presets appears next to the right
arrow key).
4. The following options appear:
• Store Current Setting to Preset
• View Preset
• Rename Preset
• Delete Preset
Select the screen key corresponding to the option you want. Follow the
screen prompts.
-
5-24 SV62146 Rev. D
Page 91

DM1100™ Digital Mailing System Operating Guide
13
Creating Custom Messages
Custom Messaging enables you to enter text at the Control Center which
can print directly on envelopes as they pass through the mailing system.
Custom messages can be saved in the memory of the system, and recalled
whenever appropriate to print. In the Control Center, this feature is shown
as “Text Entries.”
IMPORTANT: You should be familiar with the USPS regulations and standards
relating to custom message printing and envelope usage for guidance concern
ing appropriate content, format, and other usage co nsiderations
-
Sample:
ACME Corporation
Finance Department
Bldg 3, Floor 4
201 Aberdeen Parkway
Charlotte NC 28255
Specifications
• Print up to five lines of information.
• Print a maximum of 20 characters per line (including spaces).
• Fixed font (Lucida Console, 10 Point).
• UPPER CASE and lower case available.
• Special characters available (as outlined on the keypad).
• Save up to five custom messages in memory.
• Custom messages can be saved in the Normal or Custom Presets.
• Uses full QWERTY keypad standard on all DM Series™ mailing systems.
• Custom messages always print to the left of the post age, and left of any
advertisements and inscriptions.
• Operating speed is reduced slightly to accommodate printing operation.
The Custom Messaging capability of your DM Series™ mailing system has
several applications. Use it for all outgoing mail that does not have a preprinted custom message such as Business Reply Mail. Even if you use a
pre-printed custom message on outgoing mail, this capability can be used
to define a department or section of your organization for “return mail.” By
implementing this as a process, undeliverable mail can bypass the Mail
Center, and be returned directly to the department that generated the mail
ing.
IMPORTANT: Custom Messaging requires an envelope at least 6 3/4" long to
print effectively. See
your envelopes before running.
SV62146 Rev. D 5-25
Envelope Guidance in this section regarding testing of
-
Page 92

5 • Mailing System Setup
Postal Rules and Guidance
IMPORTANT: Any custom message printed by the DM Series™ system must
follow USPS guidelines as published in the Domestic Mail Manual (DMM).
Creating a Custom Message for the First Time
1. Press the Menu key.
2. Select Set Up, then select Text Entry Set Up.
3. Select Create.
4. Select a line of text to enter. Type in the text and press Enter.
5. Repeat step 4 until all lines of text have been entered. You can enter up
6. Press Enter when done. The Enter Text Entry Name screen appears.
7. Type in a name for the custom message and press Enter.
8. Press the left arrow key to return to the Main screen.
Adding Additional Custom Messages
The system can hold up to five custom messages at a time. To add additional custom messages to the system:
to five lines of text.
1. Press the Menu key.
2. Select Meter Stamp Options, then select Text Entries.
3. Follow steps 3 through 8 in Creating a Custom Message, above, to add
and save the address information.
TIP: Print a sample piece of mail to see ensure the custom message prints as
desired on the envelope.
Selecting/Deselecting a Custom Message
1. Press the Menu key.
2. Select Meter Stamp Options, then select Text Entries.
3. Select the custom message you want to print on the envelope.
If you do not wish to print a custom message at this time, select Don't
Print Text Entry.
4. Press Enter when done.
5. Press the left arrow key to return to the Main screen.
Viewing a Custom Message
1. Press the Menu key.
2. Select Meter Stamp Options, then select Text Entries.
3. Press the right arrow key, then select View.
4. Select the appropriate custom message. The custom message appears
on the screen.
5. Press Enter when done.
6. Press the left arrow key to return to the Main screen.
5-26 SV62146 Rev. D
Page 93

DM1100™ Digital Mailing System Operating Guide
Editing a Custom Message
1. Press the Menu key.
2. Select Meter Stamp Options, then select Text Entries.
3. Press the right arrow key, the select Edit.
4. Select the appropriate custom message.
5. Select a line of text to edit.
a. Press Clear to clear the existing entry, or press the left arrow key.
b. Make any necessary changes to the text.
c. Press Enter when done.
6. Repeat step 5 until you have edited the appropriate lines of text.
7. Press Enter. The Edit Text Entry Name screen appears.
8. If necessary, edit the name of the custom message. Press Enter wh en
done.
9. Press the left arrow key to return to the Main screen.
Deleting a Custom Message
1. Press the Menu key.
2. Select Meter Stamp Option, then select Text Entries.
3. Press the right arrow key, then select Delete.
4. Select a custom message to delete.
5. Select Yes. The custom message is deleted from the list.
6. Press the left arrow key to return to the Main screen.
Envelope Guidance
NOTE: Always run a test print (at $0.00 postage) befor e using Custom Messag -
ing to ensure proper placement on an envelope. Custom Messaging prints a
custom message or other information directly to the left of your postage meter
imprint and any Postal Endorsements or Inscriptions on the envelope. This mes
sage does not print on the left margin of the envelope, nor does your mailing
system allow for placement of the custom message on your envelope. There
fore, before printing a mailrun using this feature, you should always process a
Test Print with ZERO POSTAGE to ensure that the full message is properly
positioned on the envelope.
Drop Shipment Endorsement
NOTE: In most cases, the Drop Shipment Authorization is printed using an
Endorsement purchased from the Pitney Bowes Online Store. The Custom Mes
saging feature of the DM Series™ may satisfy USPS requirements for Drop
Shipment endorsements on your mailings. However, the application and
endorsement format must be authorized locally by the USPS. Under current
Postal guidelines, the local business mail entry management of the USPS must
approve the application or endorsement format for mail deposited as “Drop
Shipment Authorization.” Contact the USPS directly for further guidance.
-
-
-
SV62146 Rev. D 5-27
Page 94
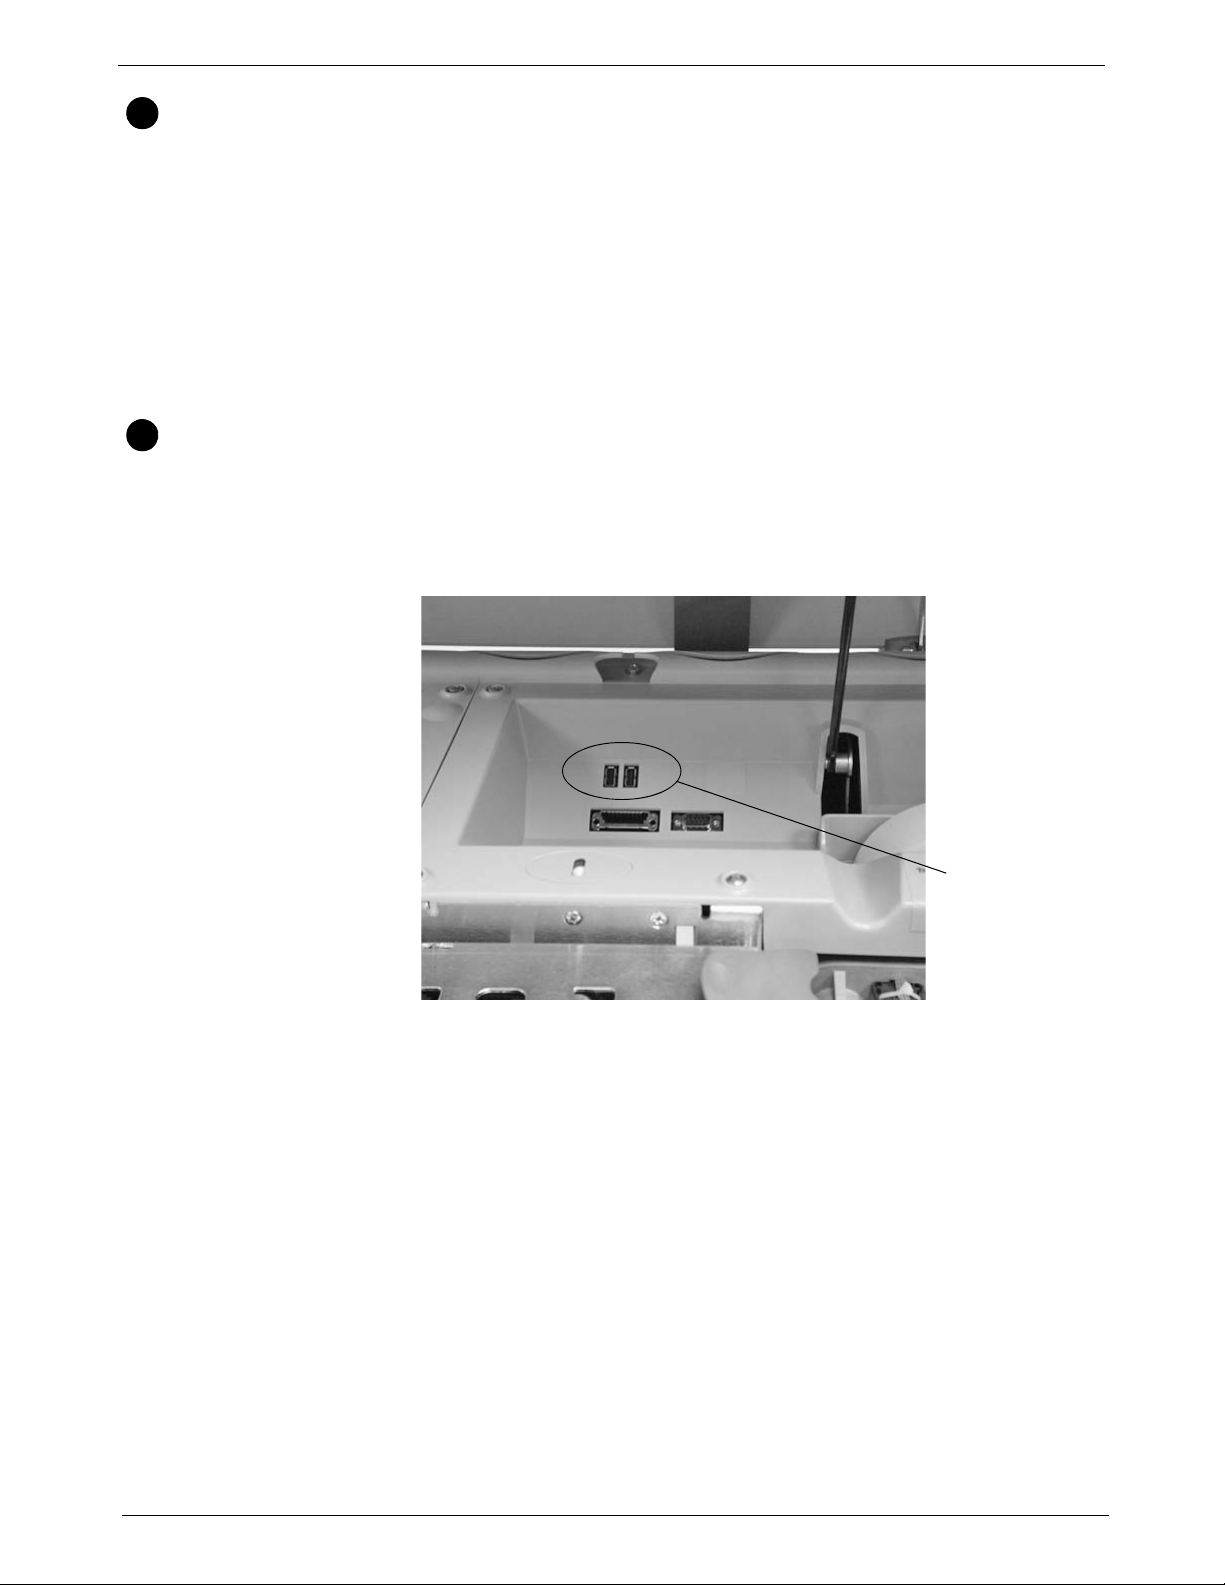
5 • Mailing System Setup
14
15
USB Ports
Taking the Meter Out of Service
Adding an Optional Printer
Call your Pitney Bowes representative if you need to return the postage
meter (contained in the IntelliLink® Control Center) to Pitne y Bowes. When
instructed, follow the procedure here.
1. Press the Menu key and select Set Up.
2. Select Take Meter Out of Service.
3. Select Transfer Funds from Meter. This transfers the funds from your
meter back to your account.
4. The system transfers the funds and displays the amount transferred. To
print this amount on an envelope, place an envelope on the feed deck
and press the Start key. To print on a tape, simply press the Tape key.
You can connect a Pitney Bowes USB printer to your mailing system. To
add this optional external printer, all you need to do is plug the USB con
nector from the printer into one of the two USB connectors on the mailing
system. Your mailing system recognizes the printer as soon as you plug it
into the base.
The dual USB ports are located beneath the main cover as shown here.
-
5-28 SV62146 Rev. D
Page 95

DM1100™ Digital Mailing System Operating Guide
16
Configuring the Optional Barcode Scanner
If you have a barcode scanner attached to your mailing system, you can
configure it to scan:
• account names,
• account codes (Business Manager only),
• speed codes (INVIEW™, Budget Manager only),
• Custom and Normal Presets,
• Job IDs, or
• ZIP Codes
if you are in the INVIEW™, Budget Manager or Business Manager
accounting systems.
NOTE: You can use a barcode scanner to scan in barcodes for USPS Special
Services regardless of the accounting system you are using. USPS Special Ser
vices do not require any set up operations here.
Refer to the appropriate topic in this section:
• If you are using an accounting system on your mailing system you can
set the default scan type so that your system recognizes your particular
accounting application when it scans the barcode. Refer to Setting the
Default Scan Type.
• If you are attempting to scan barcodes that were defined for other
accounting systems and those accounts contain a prefix, you can set
up your system to recognize that prefix when it scans in the barcode.
Refer to Adding Barcode Prefixes.
• If you need to combine multiple barcode scans into a single barcode,
refer to Combining Barcodes.
• If you want your system to require an operator to press the Enter key to
accept each barcode value after it is scanned and displayed on the
IntelliLink® Control Center screen, refer to Setting Auto-Enter.
-
SV62146 Rev. D 5-29
Page 96
5 • Mailing System Setup
Setting the Default Scan Type
If you are using an accounting system on your mailing system you can set
up the scanner so that it knows what field is scanning without using a prefix
code. Your selection of Account Name or Account Code depends on your
accounting system. You can then scan the account code or name directly
from the Main screen on IntelliLink® Control Center display.
To set the default value:
1. Press the Menu key on the control center, then select Set Up.
2. Press the down arrow key and then select Barcode Scanner.
3. At the "Barcode Scanner Setup" menu, select Default Scan Type.
4. Select the appropriate option according to the table here:
If your accounting
system is:
Business Manager
And the barcode
contains:
Account Name Account Name
Account Code Account Code
Preset Preset
Job ID 1 Job ID 1
Job ID 2 Job ID 2
Account Name Account Name
Select this default
scan type:
Account Code Account Code
INVIEW™ or Budget
Manager
Preset Preset
Job ID 1 Job ID 1
Job ID 2 Job ID 2
5. If you do not want any default account system, or preset, or if you will
be scanning multiple fields select None.
6. As soon as you make your selection, the "Barcode Scanner Setup"
menu reappears. You can make other selections or press the left arrow
key to return to the "Set Up" menu.
5-30 SV62146 Rev. D
Page 97

DM1100™ Digital Mailing System Operating Guide
Adding Barcode Prefixes
If you are going to scan multiple fields, you will need to create barcodes
that contain a 1 or 2 digit prefix. This prefix identifies the field you are scan
ning. You may use this if you are transferring accounts from a different
accounting system like the Paragon®, or from a set of pre-printed barcode
labels that have a prefix as part of the barcode. You can then scan these
barcodes when the Main screen displays IntelliLink® Control Center.
To set the prefix value:
1. Press the Menu key on the control center, then select Set Up.
2. Press the down arrow key and then select Barcode Scanner.
3. At the "Barcode Scanner Setup" menu, select Barcode Prefixes.
4. Select the Prefix Size and then select 1 or 2 whichever is appropriate.
5. Select the appropriate barcode prefix option according to the table
here:
If your accounting
system is:
Business Manager
And the barcode
contains:
a prefix and Account
Name
a prefix and Account
Code
a prefix and Job ID 1 Job ID 1 Prefix
Select this barcode
prefix option:
Account Name Prefix
Account Code Prefix
-
a prefix and Job ID 2 Job ID 2 Prefix
INVIEW™ or Budget
Manager
a prefix and Account
Name
a prefix and Speed
Code
a prefix and Job ID 1 Job ID 1 Prefix
a prefix and Job ID 2 Job ID 2 Prefix
Account Name Prefix
Speed Code Prefix
6. When you select the barcode prefix, the default value for that option
appears on the screen. To enter a new value, press the Clear key to
remove the default, then type in the prefix character(s).
NOTE: Barcode prefixes are case-sensitive.
7. Press the Enter key.
8. As soon as you make your selection, the "Barcode Scanner Setup"
menu reappears. You can make other selections or press the left arrow
key to return to the Set Up menu.
SV62146 Rev. D 5-31
Page 98
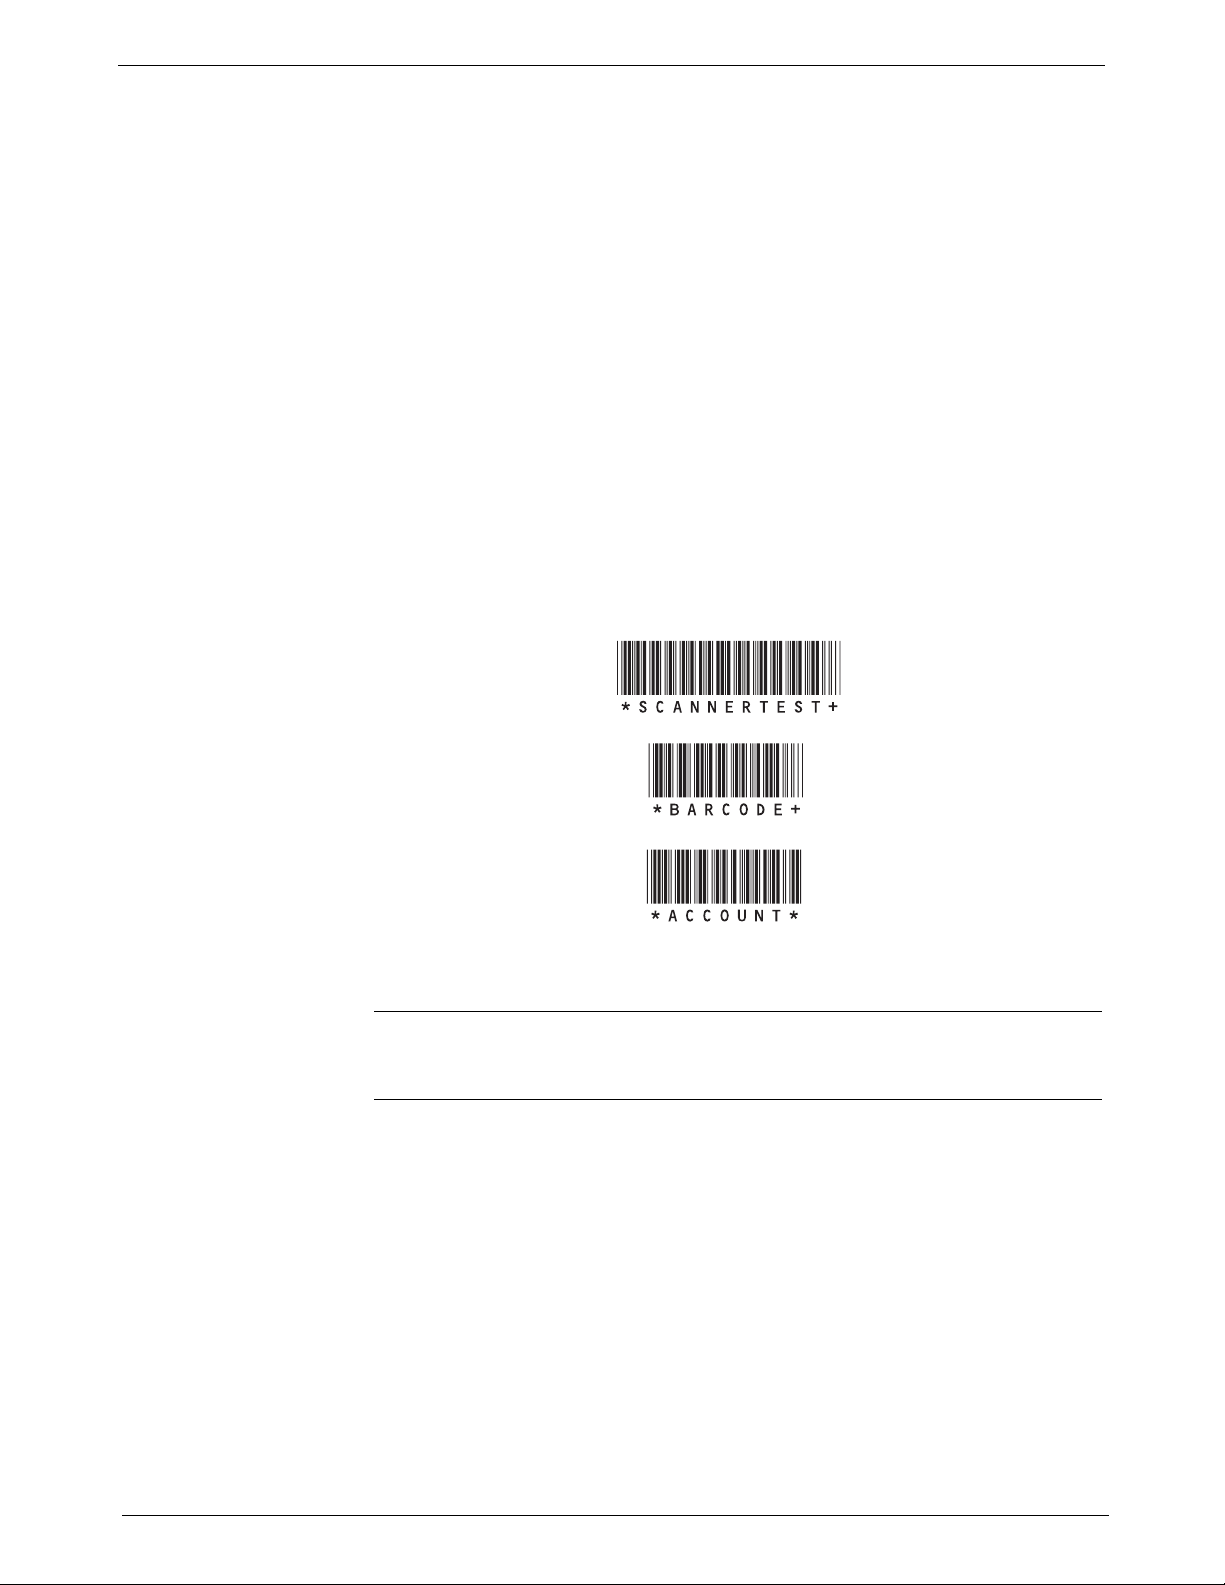
5 • Mailing System Setup
Combining Barcodes
If you need to combine multiple barcode scans into a single barcode, use
this setup option. For example, the typical barcode scanner can only
accept a maximum of 30 characters. If you want to scan an account name
that contains more than 30 characters, say 50 characters, you add a "join
character" at the end of the first 30 characters. These first 30 characters
with the join character at the end, would be on the first line and the second
20 characters would be on the second line. When you scan these two bar
code lines, the system will combine them into a single barcode account
value.
To select the character to join multiple barcode scans:
1. Press the Menu key on the control center, then select Set Up.
2. Press the down arrow key and then select Barcode Scanner.
3. At the "Barcode Scanner Setup" menu, select Concatenate Scans.
4. A list of possible "join character" options is displayed. Select the character you use to combine the barcode values.
5. As soon as you make your selection, the "Barcode Scanner Setup"
menu reappears. You can make other selections or press the left arrow
key to return to the Set Up menu.
The following is an example using a + symbol as a join character.
-
When you scan in these three barcodes, the system will combine them into
a single barcode value.
NOTE: When creating your own barcodes, create them in uppercase. If you
create them in lowercase, the length of the barcode will be twice that of the
same barcode created using uppercase text.
Setting Auto-Enter
5-32 SV62146 Rev. D
You can set up your system so that after it scans in a barcode value and
displays it on the IntelliLink® Control Center screen, it requires you to press
the Enter key to accept that value. You can do this if you want to be sure
that an operator verifies that the correct barcode has been scanned. By
default, the system will automatically enter the value as soon as it scans in
the barcode.
To require you to press Enter to accept each scan:
1. Press the Menu key on the control center, then select Set Up.
2. Press the down arrow key and then select Barcode Scanner.
3. At the "Barcode Scanner Setup" menu, select Auto-enter.
4. Select Off to disable the Auto-enter. This will now require you to manually press the Enter key after each scan.
Page 99
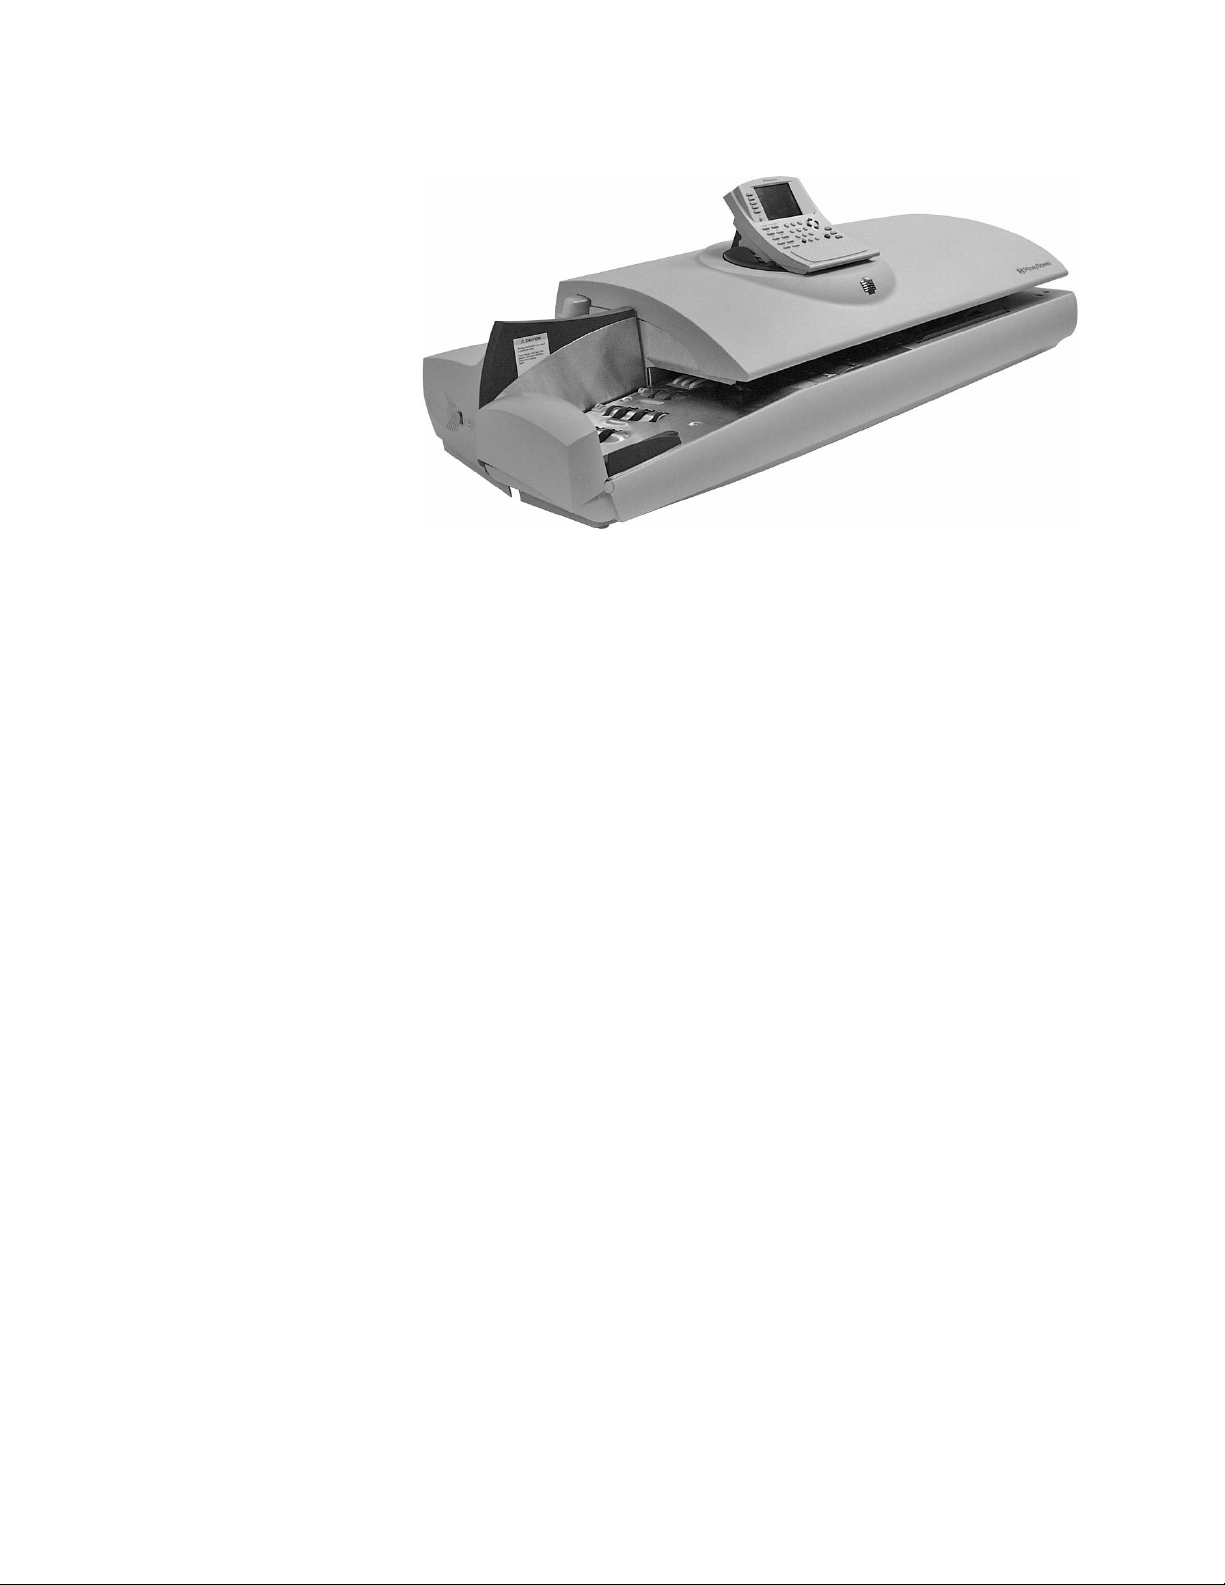
6 • Adding Postage
Postage By Phone® Meter Payment System ......................................6-2
Your Postage Meter .............................................................................6-2
Connection Alternatives.......................................................................6-3
USPS Rekey Requirements.................................................................6-3
Managing Your Postage Funds............................................................6-4
Connecting Your Postage Meter to an Analog Phone Line..................6-5
Checking Available Funds in Your Postage Meter...............................6-6
Checking Your Postage By Phone® Meter Payment System Account
Balance................................................................................................6-6
Adding Postage....................................................................................6-7
Postage Pass - Automated Postage Refill...........................................6-7
SV62146 Rev. D
Page 100

6 • Adding Postage
Postage By Phone® Meter Payment System
Your Postage Meter
Postage By Phone® Meter Payment System is a Pitney Bowes service that
you use to add postage to your meter. You can access the Postage By
Phone® System 24 hours a day, 7 days a week through your IntelliLink®
Control Center . For more information, refer t o the Post ag e By Phone® Sys
tem materials furnished with your system.
If you need assistance with Postage By Phone® System: If you need
assistance, have your account number ready and call the Postage By
Phone® System number. Refer to the Pitney Bowes Contact Information
List at the front of this guide for the phone number.
The postage meter on your mailing system is a Postal Security Device
(PSD) that incorporates the latest technology approved by the United
St ates Postal Service to secure funds. This techn ology eliminates the need
to perform physical inspections thereby making the system easier and
more convenient to use. The PSD contains the funds and performs all of
the calculations necessary to print meter stamp s that comply with the latest
USPS standards.
The United St ates Post al Service (USPS) licenses your meter and requires
a modem inspection of the meter. Periodically, your IntelliLink® Control
Center will be required to connect to Postage By Phone® as a means of
inspecting the PSD (Postal Security Device) and validating information in
your Control Center.
-
To ensure that your operations are not interrupted, the time periods for the
Data Center Connection are pre-established in your system, and will give
adequate warning to you when this connection may be required:
• The message “Data Center Contact Required” will first be shown
approximately 21 days after your last connection. The Control Center
will allow you to either “Connect Now” or “Later.” By selecting “Later”,
you enter a grace period that lasts approximately 7 days.
• The “Data Center Contact Required” message will appear each day for
7 days (when you power-up your system), and will only disappear after
a successful connection. This may also appear on the main screen in
reverse-type with the “Connect to Data Center” message.
• On the 28th day after your last successful connection, your Control
Center will display a message, “You will not be able to print postage
until this process is completed.” Please connect to the Postage By
Phone® Data Center to continue your operations.
• Follow the prompts on your Control Center or perform a Balance Inquiry
to make a successful connection. After a successful connection, your
screen will indicate “Data Center Contact Complete.”
To improve overall productivity, Pitney Bowes recommends that you establish a “constant connection,” where a LAN connection or phone line is connected to your Control Center (direct or wireless), or you use an approved
alternative connection. See the Connection Alternatives – Review section
of this guide for more details.
6-2 SV62146 Rev. D
 Loading...