

Page 1
Page 2

OfficeRightTMDesktop Letter Folder DF100
SV40207 First Edition, May 2003
© 2003 Pitney Bowes Inc.
All rights reserved. This book may not be reproduced in whole or in
part in any fashion or stored in a retrieval system of any type or
transmitted by any means, electronically or mechanically, without the
express written permission of Pitney Bowes Inc.
We have made every reasonable effort to assure the accuracy and
usefulness of this manual, however, we cannot assume responsibility
for errors or omissions or liability for the misuse or misapplication of
our products.
OfficeRight is a registered trademark and PB Supply Line is a
service mark of Pitney Bowes Inc.
WARNING: Never connect power to this product
until you are ready to use the letter folder. The AC
outlet used for this machine must be nearby and
must not be blocked. This machine contains
moving parts that can catch hair, loose clothing
or jewelry. During operation and maintenance,
keep hair, loose clothing and jewelry clear of
moving parts. Disconnect the power supply from
the wall outlet before attempting any service to the
unit, and before removing the cover for any reason.
Specifications
Operation:
Paper Sizes:
Capacity
Power:
Size:
Weight:
Page 2
Manual feed, automatic on/off, 1800 letter folds per hour
Adjustable for two standard paper sizes:
• 8 1/2" x 11" to fit a #10 envelope
• ISO A4 paper (210 x 297mm) to fit a DL envelope (Europe)
: 1-3 sheets of 16-24# bond paper. Sheets may be stapled.
1.2 Amp 24 Volt wall pack power supply
12 3/4" W x 6" H x 5 1/2"D (326mm W x 153mmH x 140mm D)
7.5 lbs. (3.4 kg)
Page 3
OfficeRightTMDesktop Letter Folder DF100
Normal Operation
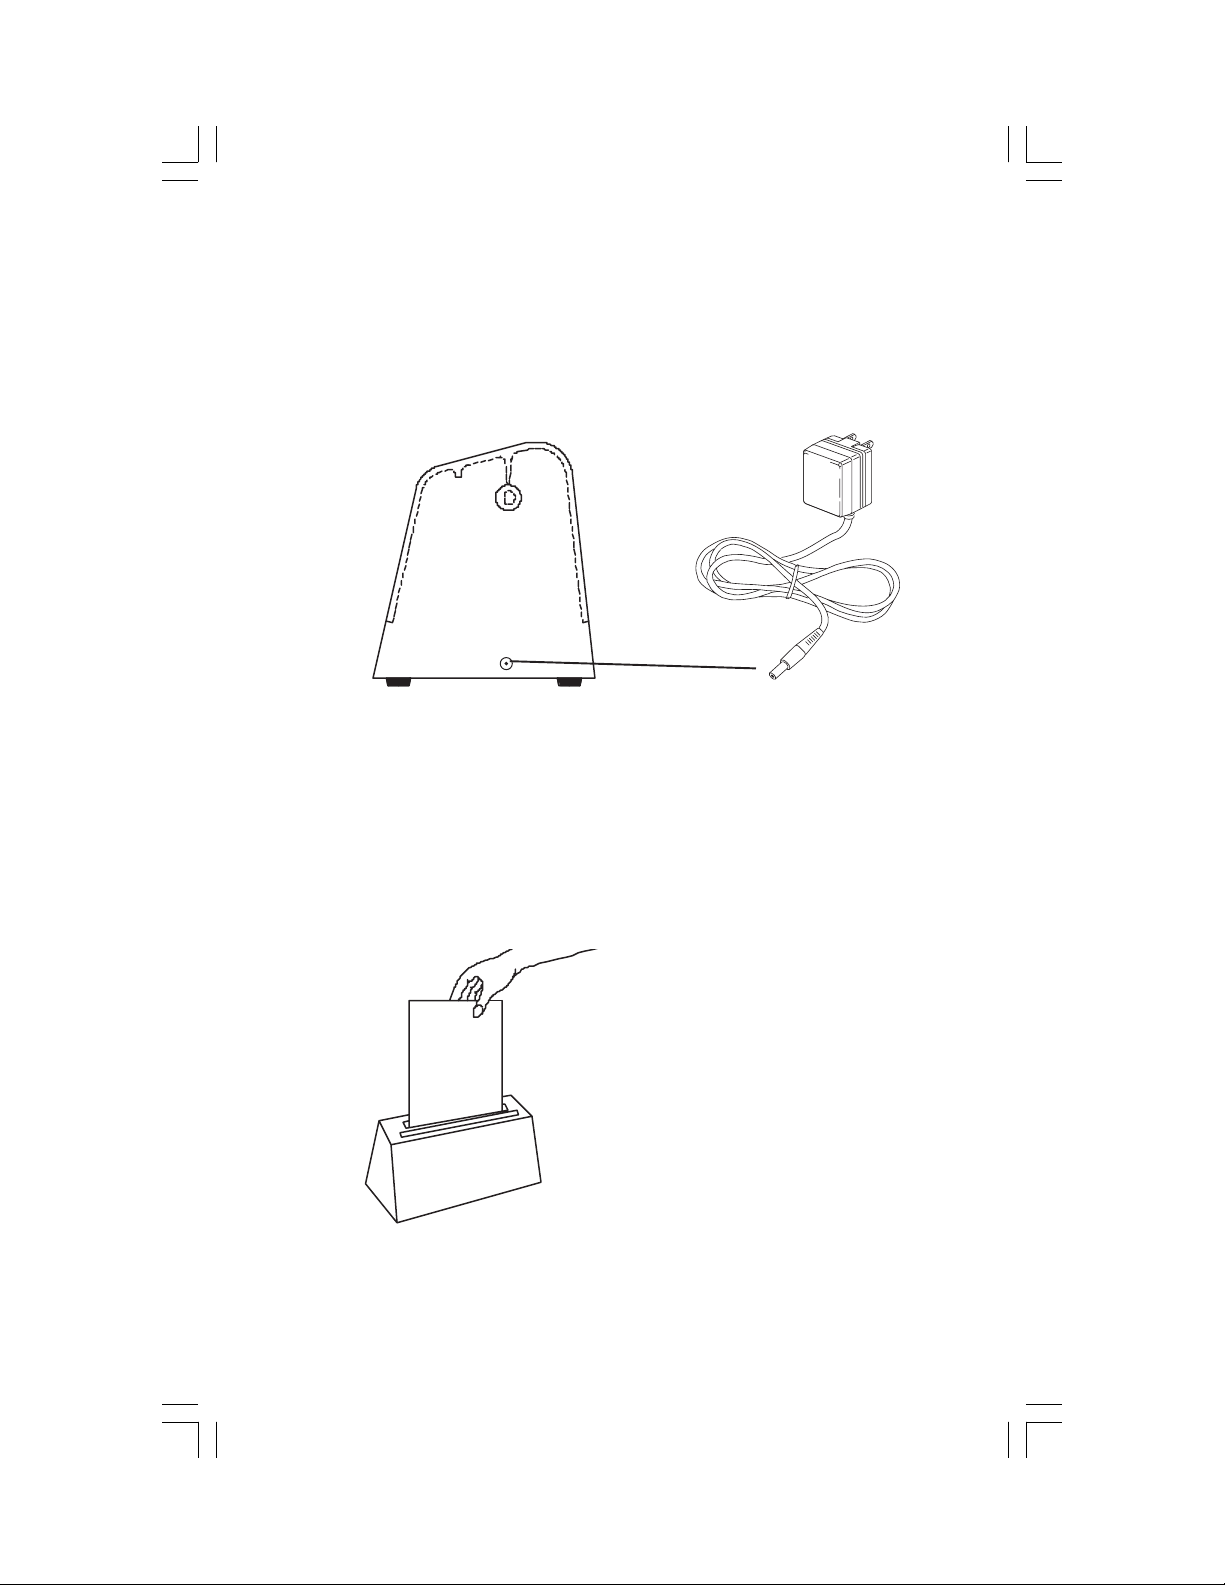
1. Insert the power connector into the receptacle on the right hand
side of the paper folder (see figure below). Plug the other end of
the power connector into an appropriate wall outlet. NOTE: The
paper folder does not have an ON-OFF switch, so your folder is
active immediately after the power connector is plugged in.
Connect to
Wall Outlet
Power Connector
Goes Here
2. Insert up to three sheets of paper approximately 1 1/2" into the rear
slot. Hold paper so that it lies squarely in the nip (pinch point) of the
rollers underneath. There will be a brief time delay, then the folder
will automatically pull the paper in. Once the folding starts, the paper
should be released. NOTE: For accurate folds, hold your document
very lightly at the top center of the sheets, as shown below. This will
allow the paper to square itself on the folding rollers.
3. Remove the folded paper from the front slot.
Page 3
Page 4

OfficeRightTMDesktop Letter Folder DF100
Tips For Best Performance
• Never put more than three sheets of paper into the folder at one
time.
• To fold for a window envelope, insert paper with the top up and
the writing facing yourself. To fold for a business letter, insert paper
top up and writing facing away from yourself (see below).
• Stapled pages may be used in the folder; however, do not place
staples at the fold positions (that is, approximately 1/3 of the
distance from the top and bottom of the sheet). Stapled end of
paper must enter machine first.
Page 4
Page 5

OfficeRightTMDesktop Letter Folder DF100
Clearing Jams
1. Unplug the folder.
2. From the bottom of the folder, remove the paper stop (see below)
by gently flexing it in the middle and withdrawing one end first.
DeJamming
Handle
Lifting Out
Paper Stop
3. Remove the dejamming handle (PN#18MR0620014) by turning it
in either direction while pulling out gently.
4. Insert the dejamming handle through the hole in the folder cover
onto the D-shaped shaft inside the unit (see below).
Shaft for
DeJamming
Handle
DeJamming
Handle Installed
(PN#18MR0620014)
5. Turn the handle in either direction while carefully pulling the
paper out the top or bottom of the folder.
6. After the jam has been cleared, return the dejamming handle and
paper stop to their normal positions.
7. Plug in the folder and follow
Normal Operation
procedure.
Page 5
Page 6

OfficeRightTMDesktop Letter Folder DF100
Changing the Fold Setting to A4 Paper
The folder is shipped with the paper stop (fold) setting set for 8 1/2"
x 11" paper. To use A4 paper (as in the UK), you will need to
change the paper stop. When you view the bottom of the folder as
shown below, the top pair of slots is for the paper stop setting for 8
1/2" x 11" paper; the bottom pair of slots is the setting for A4 paper.
Paper Stop Setting for 8-1/2” x11” Paper (Factory Set)
Paper Stop in
Top Slots
Paper Stop Setting for A4 Paper (Manually Set)
Paper Stop in
Bottom Slots
1. Unplug the folder.
2. Remove paper stop (PN#18MR0620013) by gently flexing it in
the middle and withdrawing one end at a time.
3. Insert the paper stop into the other pair of slots by gently flexing
it and inserting one end at a time.
Lifting Out Paper Stop
(PN#18MR0620013)
4. Plug in the folder and follow
Page 6
Normal Operation
procedure.
Page 7

OfficeRightTMDesktop Letter Folder DF100
Troubleshooting
• Check that the folder is plugged into a working AC outlet.
• Check for jams and clear as explained in
• Check that the paper stops are set to the correct size of paper as
explained in
• The circuit breaker may have tripped. Reset the breaker by
unplugging the folder for at least 1 minute to allow the circuit
breaker to cool. The paper folder should then function properly.
Changing the Fold Setting
Clearing Jams
.
.
Service Support
Should you need additional support, you can:
• Visit our website for instant information, available 24 hours a
day, 7 days a week, at:
www.pitneybowes.com
Follow the prompts to get the FAQs or to enter an incident
report for your product.
• Call Service Support at 1-800-522-0020.
When calling for support, you will need the following information. You
can get the serial number (on the back of the folder) and your
customer account number on your contract.
PCN/Model: FD10 Serial Number:
Customer Account Number:
Supplies: 1-800-243-7824
• Multipurpose Cleaning Kit (Part # 902-0)
• Paper Stop (PN#18MR0620013)
• DeJamming Handle (PN#18MR0620014)
Page 7
Page 8

 Loading...