


Super TunerIII D AVIC-F900BT
Pioneer Super TunerIII D AVIC-F900BT, F900BT - AVIC - Navigation, AVIC-F900BT, Super TunerIII D AVIC-F700BT, Super TunerIII D AVIC-F7010BT System Operation Manual
...
Operation Manual
FLASH MEMORY MULTIMEDIA AV NAVIGATION
RECEIVER
AVIC-F900BT
AVIC-F700BT
AVIC-F7010BT
Notice to all users:
Be sure to read “Important Information for the user” first!
“Important Information for the user” includes the
important information that you must understand before
using this navigation system.
This software requires that the navigation system is
properly connected to your vehicle’s parking brake and
depending on your vehicle, additional installation may
be required. For more information, please contact your
Authorized Pioneer Electronics retailer or call us at
(800) 421-1404.
English
Thank you for buying this Pioneer product.
Please read through these operating instructions so you will know how to operate
your model properly. After you have finished reading the instructions, keep this man-
ual in a safe place for future r eference.
Important
The screens shown in the examples may differ
from the actual screens.
The actual screens may be changed without
notice for performance and function improvements.
Introduction
Manual overview 8
– How to read this manual 8
– Terminology 8
– About the definition of terminology 8
Features 9
Map coverage 11
Protecting the LCD panel and screen 11
Viewing the LCD comfortably 11
Notes for internal memory 11
– Before removing the vehicle
battery 11
– About the data being deleted 11
– Resetting the microprocessor 11
Basic operation
Checking part names and functions 13
Inserting/ejecting a disc 14
– Inserting a disc 14
– Ejecting a disc 14
Inserting and ejecting an SD memory
card 14
– Inserting an SD memory card 15
– Ejecting an SD memory card 15
Plugging and unplugging a USB storage
device 15
– Plugging in a USB storage device 15
– Unplugging a USB storage device 15
Connecting and disconnecting iPod 16
– Connecting your iPod 16
– Disconnecting your iPod 16
Flow from startup to termination 16
On first-time startup 16
Regular startup 17
How to use the navigation menu
screens 18
– Screen switching overview 18
– What you can do on each menu 19
– Displaying the rear camera image 19
How to use the map 20
– How to read the map screen 20
– Switching the map between 2D and
3D 22
– Changing the scale of the map 22
– Scrolling the map to the position you
want to see 22
– Changing the tilt and rotation angle of
the map 23
The basic flow of creating your route 23
The operations of a list screen (e.g. city
list) 24
The operation of the on-screen keyboard 24
Searching for and selecting a location
Searching for a location by address 25
Searching for the vicinity Points of Interest
(POI) 27
– Searching for POIs around the
cursor 27
– Searching for a nearby POI 28
– Searching for POIs along the current
route 28
– Searching for POIs around the
destination 28
– Using “Saved Criteria” 29
Searching for POIs by using the data on
external storage devices (USB, SD) 31
Searching for a location by coordinates 32
Selecting a location you searched for
recently 33
– Deleting an entry in “History ” 33
Selecting a location stored in “Favorites” 33
– Deleting an entry in “Favorites” 34
Setting up a route to your home 34
Setting a route by recalling a saved route 34
Contents
En
2

Searching for a location by scrolling the
map 35
After the location is decided (Map
Confirmation Screen)
What you can do with the “Map Confirmation
Screen” 36
Route... 36
Save as... 37
Setting the location as a new destination 37
Setting the location as a waypoint 37
Replacing the location as the new final
destination 37
Setting the location as the start point 37
Viewing the information of a specified
location 38
Placing a map pin on the location 38
– Removing a map pin 39
Registering the location as a customized
POI 39
Storing the location in “Favorites” 40
Deleting an entry in “Favorites” 40
Checking the current route
Checking the current route conditions 41
– Playing simulated travel at high
speed 42
– Checking the entire route overview on
the map 42
Checking the current itinerary 42
Editing waypoints and the destination
Editing waypoints 44
– Adding a waypoint 44
– Sorting waypoints 44
– Deleting a waypoint 44
Storing the current route 44
– Deleting the entry in “Saved
Routes” 45
Deleting the current route 45
Browsing information on MSN Direct
Activating the service 46
– Checking your product key 46
– Subscribing to the MSN Direct
service 47
– Activating the MSN Direct
function 47
Browsing gas prices 47
Browsing movie times 48
– Searching for a theater by selecting a
movie title 48
– Searching for a movie title by selecting
a theater 49
Browsing weather information 50
– Checking the local weather
information 50
– Checking worldwide weather
conditions 50
Using traffic information 50
– Viewing the traffic list 50
– How to read traffic information on the
map 51
– Setting the traffic information 51
Using hands-free phoning
Hands-free phoning overview 52
Preparing communication devices 52
Displaying the Phone Menu 52
Registering your cellular phone 52
– Searching for nearby phones 53
– Searching for a specified phone 53
– Pairing from your mobile phone 54
Connecting a registered cellular phone 55
– Disconnecting a cellular phone 55
– Deleting a registered phone 55
Receiving a phone call 56
– Answering an incoming call 56
– Rejecting an incoming call 56
Making a phone call 56
– Direct dialing 57
– Dialing from the history 57
– Calling a number in the “Contacts”
screen 58
– Dialing a phone number on the “Map
Confirmation Screen” 58
– Making a call home easily 58
En
3
Contents

– Dialing GOOG-411 59
Announcing incoming short mails 59
Transferring the phone book 59
Clearing memory 60
Setting the phone 60
– Setting the phone volume 60
– Stopping Bluetooth wave
transmission 61
– Answering a call automatically 61
– Setting the automatic rejection
function 61
– Echo canceling and noise
reduction 62
– Setting the automatic connection 62
– Editing the device name 62
Notes for hands-free phoning 62
Updating the Bluetooth wireless technology
software 64
Playing the audio CD
Reading the screen 65
Using the touch panel keys 65
Selecting a track from the list 66
Using the “Function” menu 66
Playing music files on ROM
Reading the screen 67
Using the touch panel keys 67
– Selecting a track from the list 68
– Browsing embedded text
information 68
Using the “Function” menu 69
Playing a DVD-Video
Reading the screen 70
Using the touch panel keys 70
– Resuming playback (Bookmark) 72
– Searching for a desired scene and
starting playback from a specified
time 72
– Direct number search 72
– Operating the DVD menu 72
– Frame-by-frame playback 73
– Slow motion playback 73
Using the “Function” menu 73
Playing a DVD-VR
Reading the screen 75
Using the touch panel keys 75
– Searching for a desired scene and
starting playback from a specified
time 76
– Switching the playback mode 77
– Using the short-time skip function 77
– Playing by selecting from the title
list 77
– Frame-by-frame playback 77
– Slow motion playback 77
Using the “Function” menu 78
Playing a DivX
Reading the screen 79
Using the touch panel keys 79
– Frame-by-frame playback 80
– Slow motion playback 80
– Searching for a desired scene and
starting playback from a specified
time 80
Using the “Function” menu 81
DVD-Video, DVD-VR, DivX setup
Displaying DVD Setup menu 82
Setting the top-priority languages 82
Setting assist subtitles on or off 82
Setting the angle icon display 83
Setting the aspect ratio 83
Setting the parental lock 83
– Setting the code number and level 83
Displaying your DivX® VOD registration
code 84
Setting “Auto Play” 84
Setting the subtitle file for DivX® 85
Language code chart for DVDs 86
Playing the music file (USB, SD)
Starting procedures 87
Reading the screen 87
Contents
En
4

Using the touch panel keys (Music) 88
– Selecting a track from the list 89
– Browsing embedded text
information 89
Using the “Function” menu 89
Playing the movie file (USB, SD)
Starting procedures 91
Reading the screen 91
Using the touch panel keys (Video) 91
– Searching for a desired scene and
starting playback from a specified
time 92
Using the “Function” menu 92
Using the iPod® (iPod)
Starting procedures 94
Reading the screen 94
Using the touch panel keys (Music) 95
– Browsing for a song 95
Starting the video playback 96
Using the touch panel keys (Video) 97
– Browsing for a video 97
Using the “Function” menu 98
Using the radio (FM)
Reading the screen 100
Using the touch panel keys 100
– Switching between the detailed
information display and the preset list
display 101
– Storing and recalling broadcast
frequencies 101
Using the “Function” menu 101
– Storing the strongest broadcast
frequencies 101
– Tuning in strong signals 102
Using the HD Radio (Digital Radio)
Reading the screen 103
Using the touch panel keys 103
– Switching between the detailed
information display and the preset list
display 104
– Storing and recalling broadcast
frequencies 104
Switching the display 104
Using the “Function” menu 104
– Storing the strongest broadcast
frequencies 105
– Switching the seek mode 105
– Tuning in strong signals 105
– Switching the reception mode 105
Using the radio (AM)
Reading the screen 106
Using the touch panel keys 106
– Switching between the detailed
information display and the preset list
display 106
– Storing and recalling broadcast
frequencies 107
Using the “Function” menu 107
– Storing the strongest broadcast
frequencies 107
– Tuning in strong signals 107
Using the XM tuner
Reading the screen 109
Using the touch panel keys 109
– Selecting an XM channel directly 110
– Displaying the Radio ID 110
– Storing and recalling broadcast
stations 111
– Selecting a channel from the list 111
– Using “My Mix” function 111
– Using the direct traffic announcement
function 112
Using the “Function” menu 112
– Setting the memorized songs 113
Using the SIRIUS tuner
Reading the screen 114
Using the touch panel keys 114
– Selecting a SIRIUS channel
directly 115
– Display the Radio ID 115
En
5
Contents

– Storing and recalling broadcast
stations 116
– Using “My Mix” function 116
– Using the direct traffic announcement
function 116
– Using the “Instant Replay”
function 117
Using the “Function” menu 117
– Setting the memorized songs 118
– Using the Game Alert function 118
– Displaying Game Information 119
Using the AV input
Using the AV1 120
Using the AV2 120
Using the touch panel keys 120
Using the external unit (EXT1, EXT2)
Reading the screen 121
Using the touch panel keys 121
Customizing preferences
The options in the “Navi Settings”
menu 123
– Basic operations in the “Navi Settings”
menu 123
– GPS & Time Settings 123
– Time Settings 124
– 3D Settings 125
– Map Settings 125
– Displayed Info 126
– Smart Zoom 126
– Overview Mode 127
– Manage POI 127
– Manage Track Logs 127
– Route 127
– Warnings 128
– Regional Settings 129
– Restore Factory Settings 129
– Set Home 129
– Demo Mode 129
– Sound settings 130
– About 130
– Setting the POI appearance 130
– Creating new categories 131
– Editing your customized POI 132
– Recording your travel history 132
– Setting your home position 134
The options on the “System Settings”
menu. 134
– Displaying the “System Settings”
menu 134
– Selecting the language 135
– Changing the splash screen 135
– Setting the rear view camera 136
– Adjusting the response positions of the
touch panels (touch panel
calibration) 137
– Adjusting the screen brightness 137
– Setting the illumination color 137
– Checking the version information 138
– Turning off the screen 138
The “AV Sound” menu options 139
– Displaying the “AV Sound” menu 139
– Using balance adjustment 139
– Using the equalizer 139
– Adjusting loudness 141
– Using subwoofer output 141
– Using the high pass filter 142
– Adjusting source levels 142
– Enhancing bass (Bass Booster) 142
The options on the “AV Settings” menu 142
– Displaying the “AV Settings”
menu 142
– Setting video input 1 (AV1) 143
– Setting video input 2 (AV2) 143
– Switching the auto antenna
setting 143
– Changing the wide screen mode 143
– Switching the sound muting/
attenuation 144
– Setting the rear output 144
– Acquiring iPod music
information 144
Contents
En
6

Operating Your Navigation System with
Voice
To Ensure Safe Driving 146
Basics of Voice Operation 146
– Flow of voice operation 146
– Starting voice operation 147
Operating iPod by voice 147
Calling the entry on “Contacts” 147
Available Basic Voice Commands 148
– Basic commands 148
– Voice operation for the iPod 148
– Voice operation for AV source (other
than iPod) 149
– Voice commands related to hands-free
phoning 150
Tips for Voice Operation 151
Other functions
Setting the anti-theft function 152
– Setting the password 152
– Entering the password 152
– Deleting the password 152
– Forgotten passwords 152
Returning the navigation system to the
default or factory settings 153
– Setting items to be deleted 154
Appendix
Troubleshooting 155
Messages and how to react to them 159
Messages for Audio Functions 160
Positioning technology 163
– Positioning by GPS 163
– Positioning by “Dead Reckoning” 163
– How do GPS and “Dead Reckoning”
work together? 163
Handling large errors 164
– When positioning by GPS is
impossible 164
– Conditions likely to cause noticeable
positioning errors 165
Route setting information 166
– Route search specifications 166
Handling and care of the disc 168
– Built-in drive and care 168
– Ambient conditions for playing a
disc 168
Playable discs 169
– About DVD-Video and CD 169
– About AVCHD recorded discs 169
– About playing DualDisc 169
– About Dolby Digital 169
– About DTS sound 169
Detailed information for playable media 169
– Compatibility 169
– Media compatibility chart 172
About Bluetooth 176
About the SAT RADIO READY Logo 176
About HD Radio 176
About SD and SDHC logo 177
About WMA 177
About DivX 177
About AAC 177
Detailed information regarding connectable
iPods 177
Using the LCD screen correctly 178
– Handling the LCD screen 178
– Liquid crystal display (LCD)
screen 178
– Maintaining the LCD screen 178
– Small fluorescent tube 178
Display information 179
– Destination Menu 179
– Phone Menu 179
– Settings Menu 180
– Shortcut menu 182
– DVD Setup 183
Glossary 184
Specifications 187
En
7
Contents

Manual overview
Before using this product, be sure to read “Important Information for the user” (a separate
manual) which contains warnings, cautions,
and other important information that you
should note.
This manual provides important information
you need to make full use of your new navigation system.
The beginning chapters outline this navigation
system. The later chapters describe the details
of the navigation functions.
Chapter 8 describes the operations related to
hands-free phoning by using a cellular phone
featuring Bluetooth®technology.
Chapter 9 to Chapter 23 describe how to control the AV sources. Please read these chapters when you use the various functions in the
built-in audio and visual source or operate the
audio equipment connected to the navigation
system.
Chapter 25 describes how to change the settings so as to suit your tastes. The behavior of
your navigation system depends the settings
for navigation and audio-visual functions.
How to read this manual
Finding the operation procedure from
what you want to do
When you have decided what you want to do,
you can find the page you need from the
“Contents”.
Finding the operation procedure from
a menu name
If you want to check the meaning of each item
displayed on the screen, you will find the necessary page from the “Display information” at
the end of the manual.
Glossary
See the glossary to find the meaning of a
term.
Terminology
Before moving on, take a few minutes to read
the following information about the conventions used in this manual. Familiarity with
these conventions will help you greatly as you
learn how to use your new equipment.
! Buttons on your navigation system are de-
scribed in ALL CAPITAL, BOLD lettering:
e.g.)
MENU button, MAP button.
! Items in different menus, screen titles, and
functional components are described in
bold with double quotation marks “”:
e.g.)
“Destination Menu” screen or “AV
Source” screen
! Touch panel keys that are available on the
screen are described in bold in brackets [ ]:
e.g.)
[Destination], [Settings].
! Extra information, alternatives and other
notes are presented in the following format:
e.g.)
p If the home location has not been stored
yet, set the location first.
! References are indicated like this:
e.g.)
= For details, refer to Setting your home
position on page 134.
About the definition of
terminology
“Front Display” and “Rear Display”
In this manual, the screen that is attached to
the body of this navigation unit will be referred
to as the “Front Display”. Any additional optional screen that is purchased for use in conjunction with this navigation unit will be
referred to as the “Rear Display”.
Introduction
En
8
Chapter
01

“Video image”
“Video image” in this manual indicates the
moving images of DVD-Video, DivX, iPod, and
any equipment that is connected to this system with an RCA cable, such as general-purpose AV equipment.
“External storage device (USB, SD)”
The SD memory card, SDHC memory card,
USB memory device and USB portable audio
player are collectively referred to as the “external storage device (USB, SD)”. If it indicates
the USB memory and USB portable audio
player only, they are referred to as the “USB
storage device”.
Features
Touch panel key operation
It is possible to operate the navigation and
audio functions by using the touch panel key.
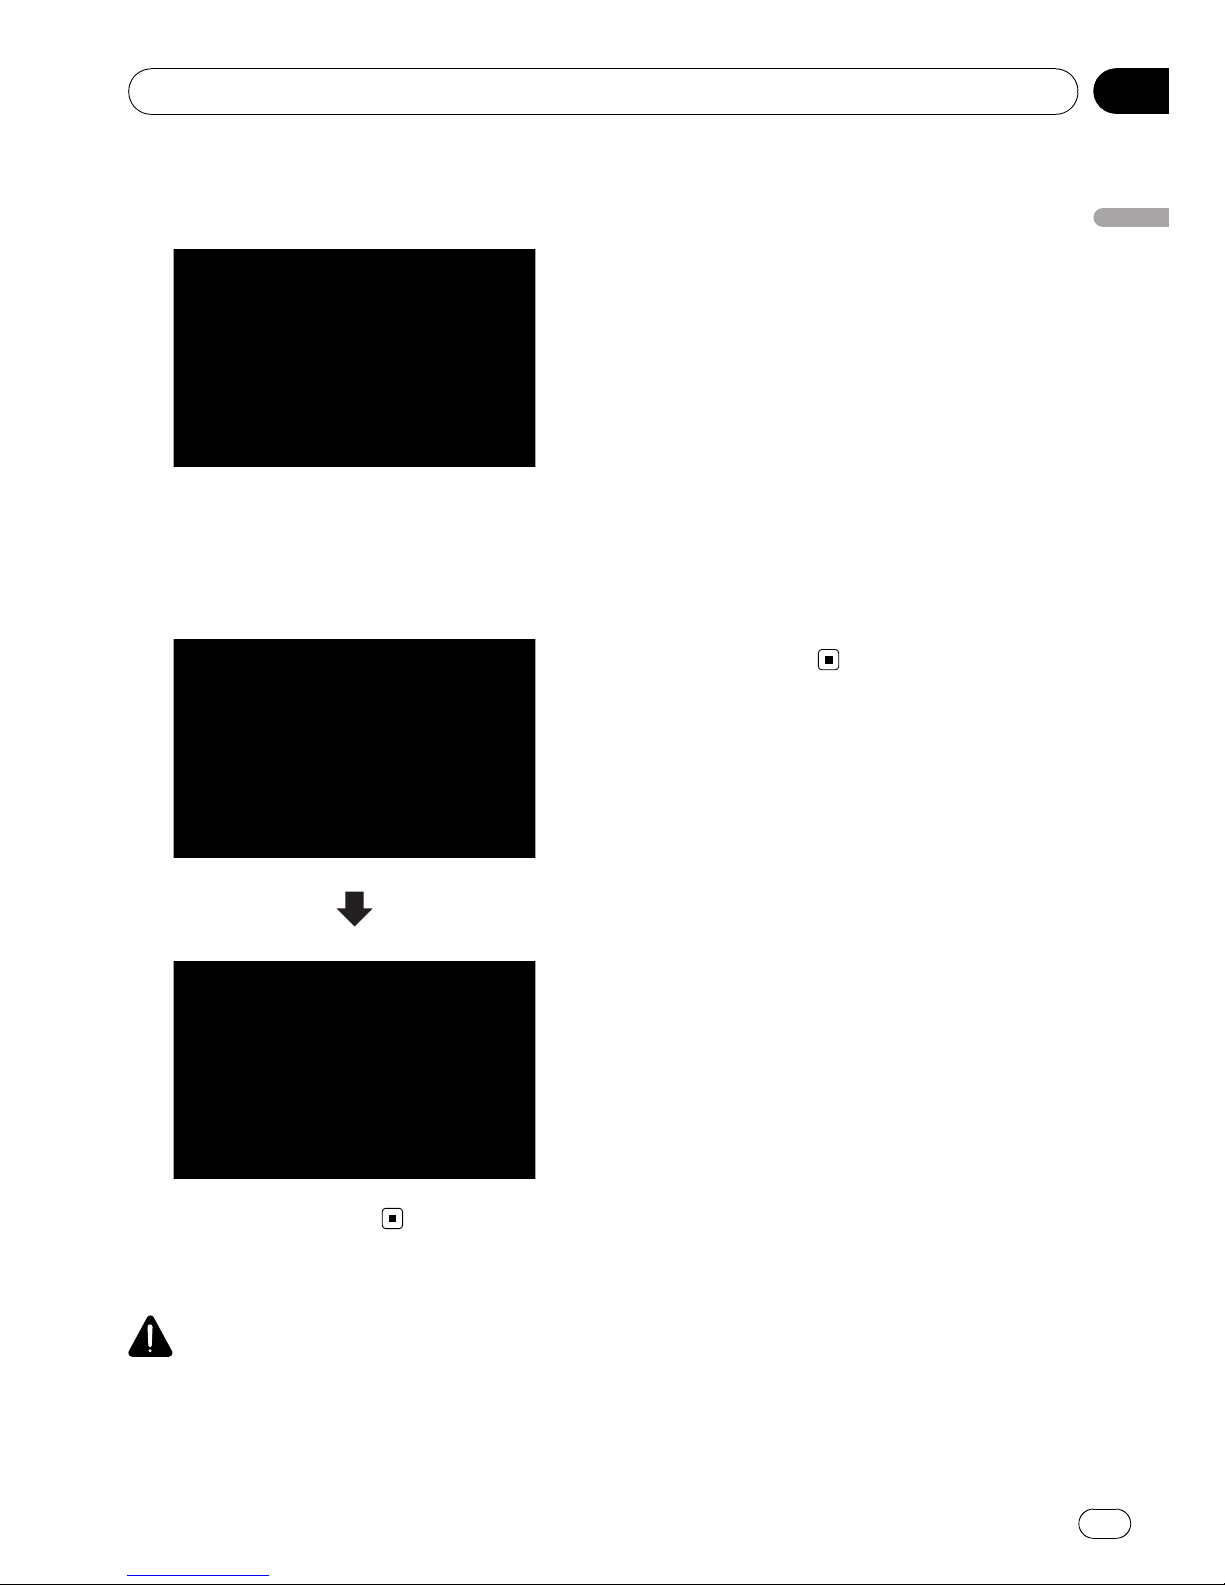
2D and 3D map view modes
Various types of screen displays can be selected for navigation guidance.
2D map screen
3D map screen
A wide variety of Points of Interest
(POI) information
More than 100 types of POI categories are included in the database. You can also create
your own customized POIs and categories.
Auto reroute function
If you deviate from the set route, the system
will re-calculate the route from that point so
that you remain on track to the destination.
p This function may not work under certain
conditions.
Assign your original image as a splash
screen
You can store your own pictures on an external
storage device (USB, SD) in JPEG or BMP format and import an original splash screen to
this navigation system. These imported
images can be set up as customized splash
screens.
p Imported original images will be stored in
the built-in memory, but the ability to save
these images cannot be guaranteed completely. If your original image data is deleted, set the external storage device (USB,
SD) again and re-import the original image.
A wide variety of playable file formats
! Built-in DVD drive (AVIC-F900BTand
AVIC-F90BT)
DVD-Video (commercial-release DVDVideo), DVD-R/-RW/-R DL (DVD-Video,
DVD-VR, Data<MP3, WMA, AAC, DivX>),
CD (commercial-release audio CD), CD-R/RW (CD-DA, Data<MP3, WMA, AAC,
DivX>)
Introduction
En
9
Chapter
01
Introduction

! Built-in CD drive (AVIC-F700BTand
AVIC-F7010BT)
CD (commercial-release audio CD), CD-R/RW (CD-DA, Data<MP3, WMA, AAC, DivX,
WAV>)
! External storage device (USB, SD)
Following file types is playable on the external storage device (USB, SD).
MP3, WMA, AAC, WAV, MPEG-4, AVI
— Notice regarding video viewing
Remember that use of this system for commercial or public viewing purposes may
constitute an infringement on the author’s
rights as protected by the Copyright Law.
— Notice regarding DVD-Video viewing
This product incorporates copyright protection technology that is protected by method
claims of certain U.S. patents and other intellectual property rights owned by
Macrovision Corporation and other rights
owners. Use of this copyright protection
technology must be authorized by
Macrovision Corporation, and is intended
for home and other limited viewing uses
only unless otherwise authorized by
Macrovision Corporation. Reverse engineering or disassembly is prohibited.
— Notice regarding MP3 file usage
Supply of this navigation system conveys
only a license for private, non-commercial
use and does not convey a license nor
imply any right to use this product in any
commercial (i.e. revenue-generating), real
time broadcasting (terrestrial, satellite,
cable and/or any other media), broadcasting/streaming via internet, intranets and/or
other networks or in other electronic content distribution systems, such as payaudio or audio-on-demand applications. An
independent license for such use is required. For details, please visit
http://www.mp3licensing.com.
Auto file name listing
The track name will be automatically listed
when this function is available. This system
provides easy-to-operate audio functions that
allow playback simply by selecting an item
from the list.
iPod
®
compatibility
This product supports only the following iPod
models and iPod software versions. Others
may not be work correctly.
! iPod nano first generation; Ver. 1.3.1
! iPod nano second generation; Ver. 1.1.3
! iPod nano third generation; Ver. 1.1
! iPod fifth generation; Ver. 1.3
! iPod classic; Ver. 1.1.1
! iPod touch; Ver. 1.1.4
p When you use this navigation system with
a Pioneer USB interface cable for iPod (CDIU230V) (sold separately), you can control
an iPod compatible with this navigation
system.
p To obtain maximum performance, we re-
commend that you use the latest software
for the iPod.
p Operations may vary depending on the
iPod models and the software version of
iPod.
p For more details about iPod compatibility
with this navigation system, refer to the information on our website.
p iPod is a trademark of Apple Inc., regis-
tered in the U.S. and other countries.
Hands-free phoning
A cellular phone featuring Bluetooth
®
technology can be connected wirelessly.
— The cellular phone used must be compati-
ble with the profile of this navigation system.
— When using Bluetooth wireless technology,
this navigation system may not be able to
operate all of the functions on the cellular
phone.
Rear display entertainment
Video sources can be displayed on the rear
display.
Introduction
En
10
Chapter
01
—“Video image” that is output from the built-
in DVD drive (DVD-V, DVD-VR, DivX) and
AV input (AV1, AV2) can be displayed on
the rear display.
— This function is available for AVIC-F900BT
and AVIC-F90BT.
Rear view camera ready
You can display what is behind the vehicle if
connected to a rear view camera (e.g. NDBC2) (sold separately).
Map coverage
For more details about the map coverage of
this navigation system, refer to the information
on our website.
Protecting the LCD panel
and screen
p Do not allow direct sunlight to fall on the
LCD screen when this product is not being
used. Extended exposure to direct sunlight
can result in LCD screen malfunction due
to the resulting high temperatures.
p When using a cellular phone, keep the an-
tenna of the cellular phone away from the
LCD screen to prevent disruption of the
video in the form of spots, colored stripes,
etc.
p To protect the LCD screen from damage, be
sure to touch the touch panel keys with
your finger. (The stylus is supplied for special calibrations. Do not use the stylus for
normal operations.)
Viewing the LCD comfortably
Due to its construction, the viewing angle of
the LCD screen is limited. However, “Bright-
ness” may be used to adjust the black density
of the video. When using the screen for the
first time, the adjustment of the black density
for clear viewing is recommended.
Notes for internal memory
Before removing the vehicle
battery
If the battery is disconnected or discharged,
the memory will be erased and must be reprogrammed.
p Some data remains. Read Returning the na-
vigation system to the default or factory settings before you operate this function.
= For more detailed information about the
items to be deleted, refer to Returning
the navigation system to the default or
factory settings on page 153.
About the data being deleted
The information is erased by pressing RESET
button or disconnecting the yellow lead from
the battery (or removing the battery itself).
However, some items remain.
p Some data remains. Read Returning the na-
vigation system to the default or factory settings before you operate this function.
= For more detailed information about the
items to be deleted, refer to Returning
the navigation system to the default or
factory settings on page 153.
Resetting the microprocessor
CAUTION
Pressing RESET button clears the settings for the
AV source without clearing all the navigation
function items. Please refer to the related section
before clearing.
= For more detailed information about the items
to be deleted, refer to Returning the navigation
system to the default or factory settings on
page 153.
Introduction
En
11
Chapter
01
Introduction

The microprocessor must be reset under the
following conditions:
! Prior to using this product for the first time
after installation.
! If the product fails to operate properly.
! If there appear to be problems with the op-
eration of the system.
! When changing the combination of the
equipment.
! When adding/removing additional pro-
ducts that connect to the navigation system.
! If your vehicle position shown on the map
with a significant positioning error.
1 Turn the ignition switch OFF.
2 Press RESET button with a pen tip or
other pointed instrument.
RESET button
p If you have connected other equipment to
this navigation system with IP-BUS, be sure
to reset that equipment too.
Introduction
En
12
Chapter
01
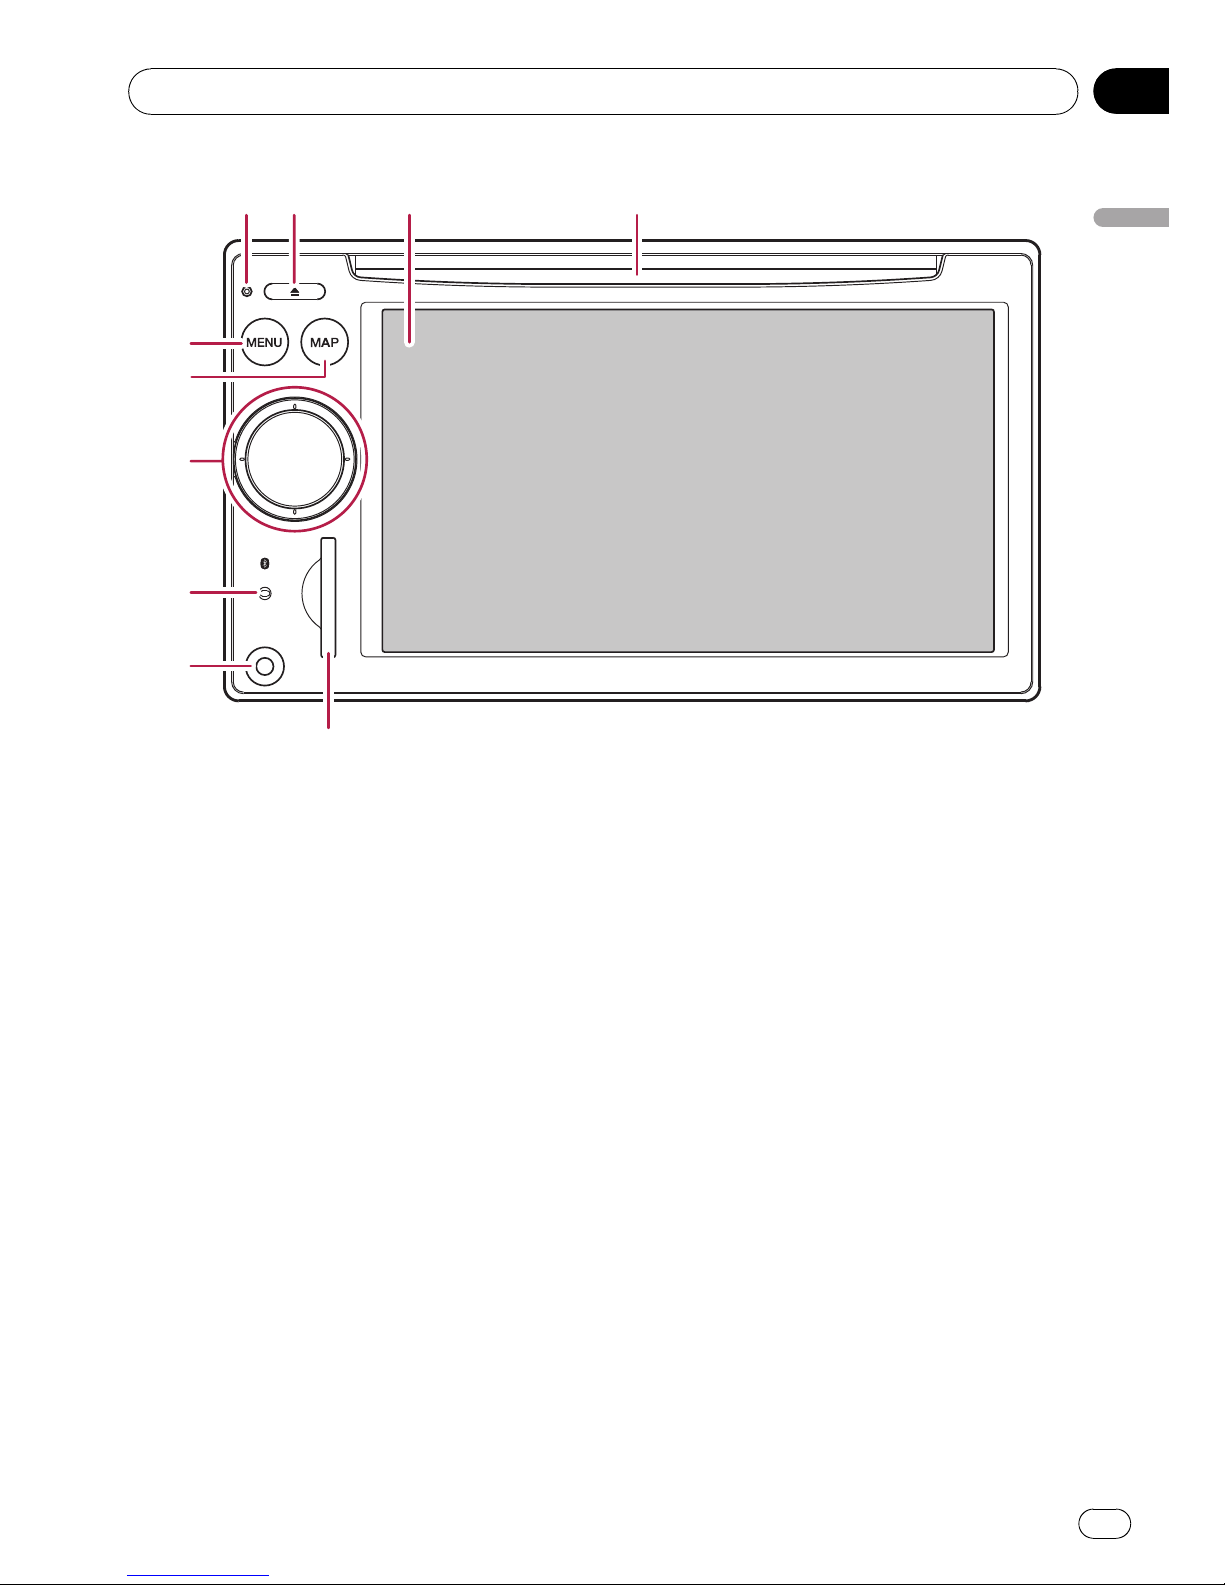
Checking part names and functions
This chapter gives information about the
names of the parts and the main features
using the buttons.
1 Disc loading slot
Insert a disc to play.
= For details concerning operations, refer
to Inserting/ejecting a disc on the next
page.
2 LCD screen
3 EJECT button
4 RESET button
= For details concerning operations, refer
to Resetting the microprocessor on page
11.
5 MENU button
Press MENU button to display the “Top
Menu”.
Press and hold to display the “Screen Cali-
bration” screen.
= For details concerning operations, refer
to Adjusting the response positions of the
touch panels (touch panel calibration) on
page 137.
6 MAP button
Press to view the map screen.
Press and hold to display the “Picture Ad-
justment” screen.
= For details concerning operations, refer
to Adjusting the screen brightness on
page 137.
7 MULTI-CONTROL
Rotating;
Adjusts the AV (Audio and Video) source volume.
Moving upward or downward once;
Changes the map scale one step at a time.
1234
5
6
7
8
9
a
Basic operation
En
13
Chapter
02
Basic operation
Keep moving upward or downward;
Changes the map scale continuously.
p This operation is available only while the
map screen is displayed.
Moving MULTI-CONTROL to the left or
right;
Allows you to change the frequency one
step at a time; operates track search controls.
Keep moving MULTI-CONTROL to the
left or right;
Allows you to perform manual seek tuning,
fast forward or reverse.
Pressing the center of MULTI-CONTROL;
Enables you to start the voice operation
when “English” is selected in “ Program lan-
guage:”. (When a language other than
“English” is selected, pressing the center al-
lows you to hear the previous route guidance.)
p When your phone is paired to the naviga-
tion system, pressing its center allows
you to answer an incoming call or end
the phone call.
Keep pressing the center of MULTI-CONTROL;
Mutes the AV (Audio and Video) source. To
cancel the muting, press and hold it again.
8 Bluetooth connection status indicator
Lights up when your phone is paired to the
navigation system by Bluetooth wireless
technology.
9 “AV2” input jack
This is the “AV2” input terminal. Use the
CD-RM10 (sold separately) to connect the
external video component.
p To connect your iPod by using USB inter-
face cable for iPod (CD-IU230V), use
“AV1” input (RCA) on the backside.
a SD card slot
= For more detailed information, refer to In-
serting and ejecting an SD memory card
on this page.
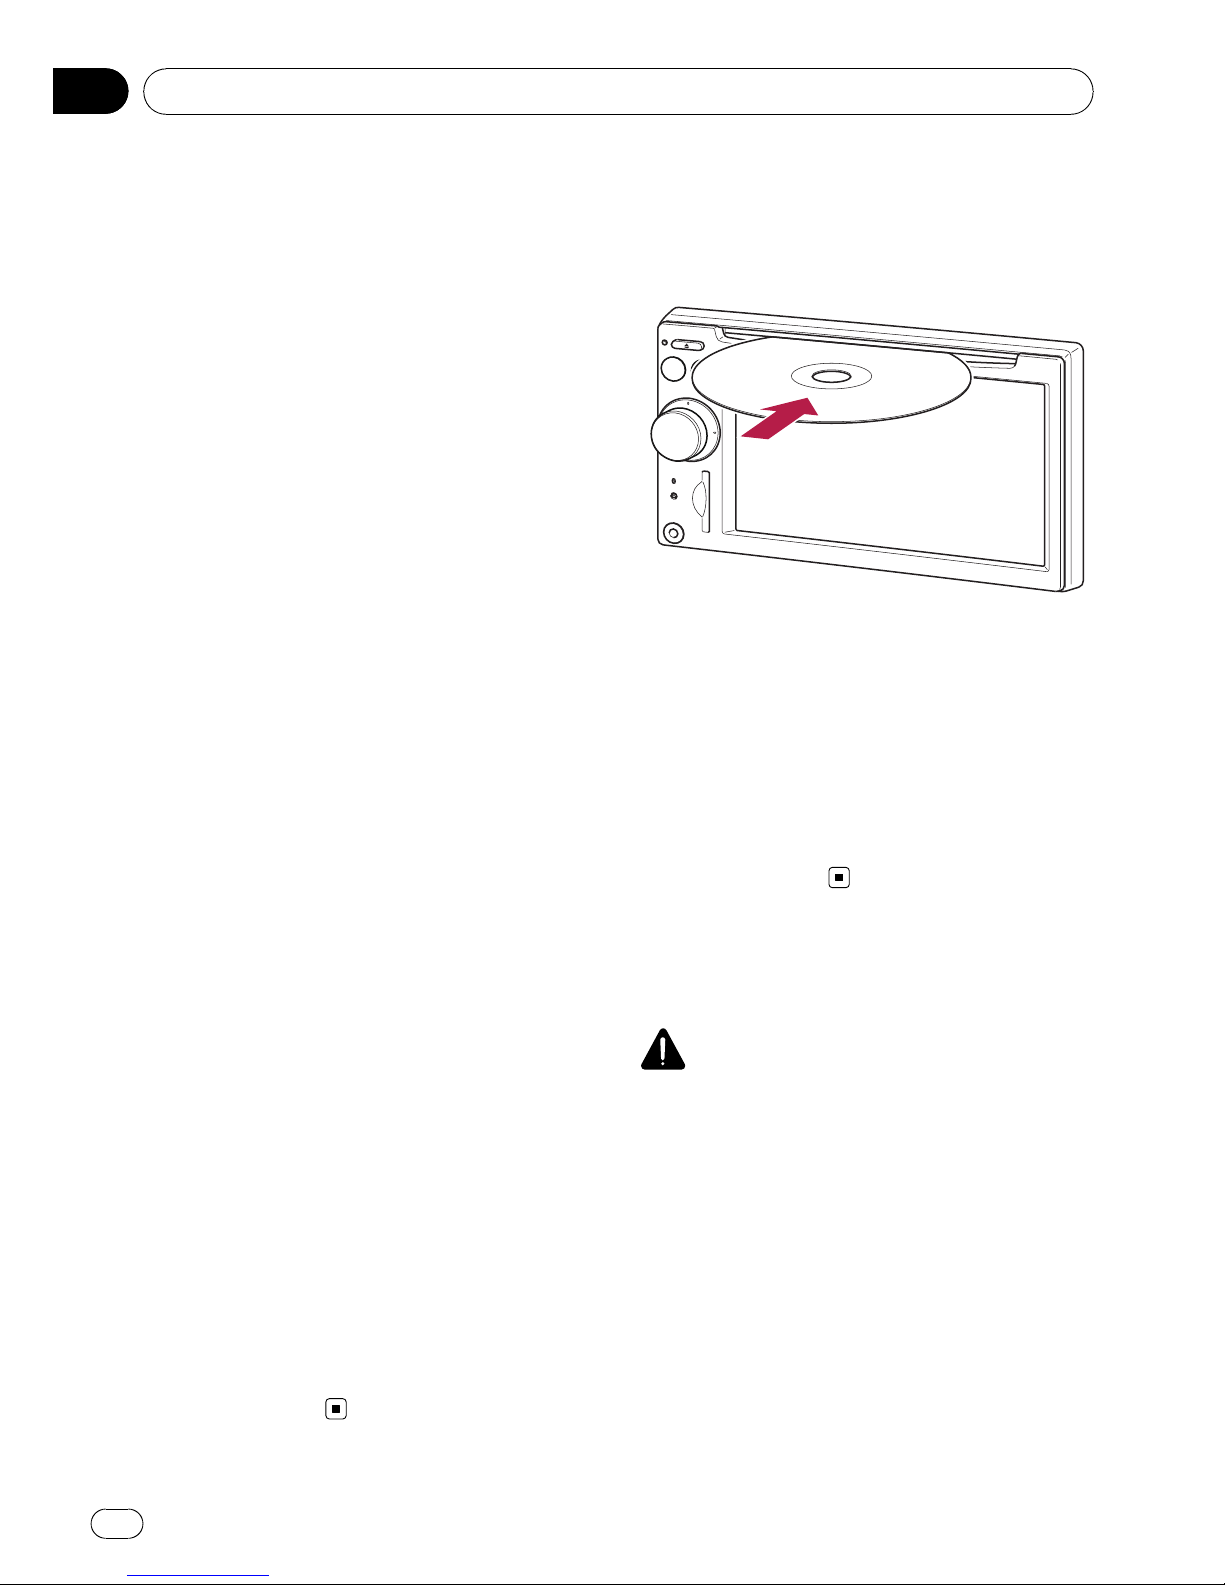
Inserting/ejecting a disc
Inserting a disc
% Insert a disc into the disc loading slot.
p The built-in drive plays one standard 12-cm
or 8-cm (single) disc at a time. Do not use
an adapter when playing 8-cm discs.
p Do not insert anything other than a disc
into the disc loading slot.
Ejecting a disc
% Press EJECT button.
The disc is ejected.
Inserting and ejecting an
SD memory card
CAUTION
! Keep the dummy SD card out of the reach of
small children to prevent them from accidentally swallowing it.
! To prevent data loss and damage to the sto-
rage device, never remove it from this navigation system while data is being transferred.
! If data loss or corruption occurs on the sto-
rage device for any reason, it is usually not
possible to recover the data. Pioneer accepts
no liability for damages, costs or expenses
arising from data loss or corruption.
Basic operation
En
14
Chapter
02
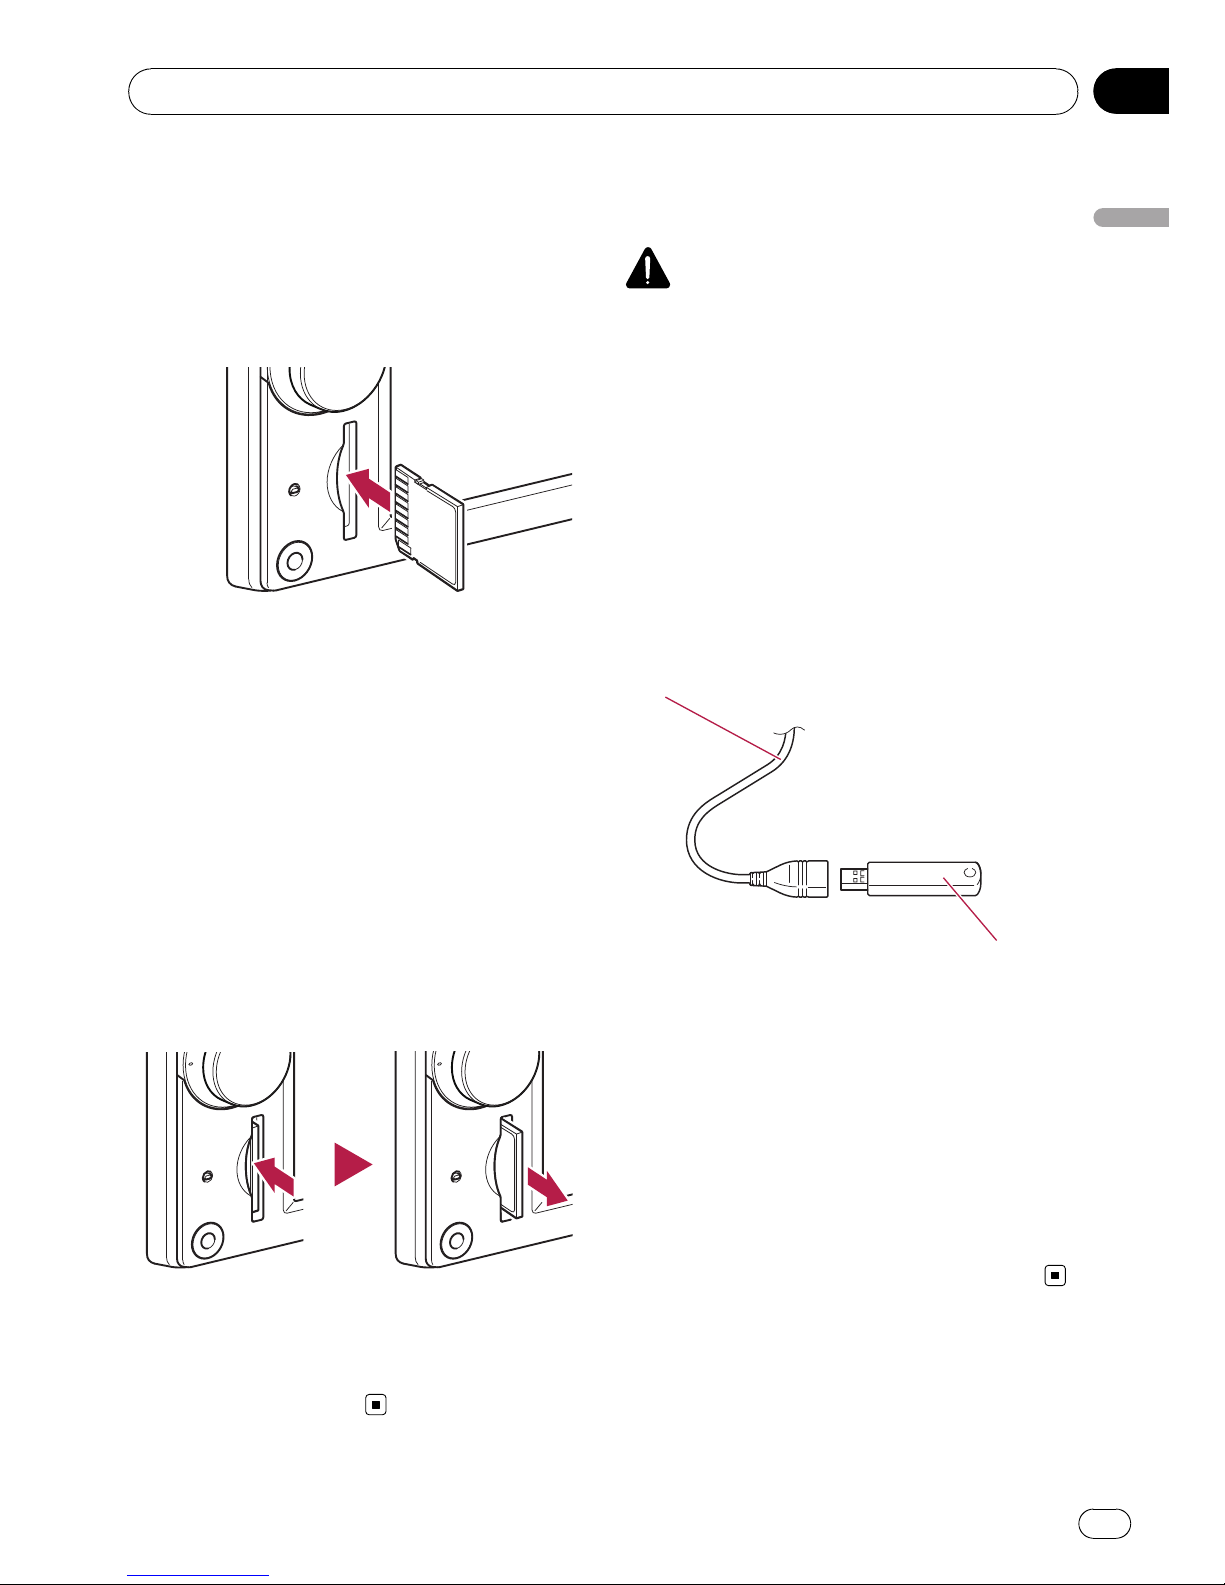
Inserting an SD memory card
% Insert an SD memory card into the SD
card slot.
Insert it with the contact surface facing to the
left and press the card until it clicks and completely locks.
p There is no compatibility for Multi Media
Card (MMC).
p Compatibility with all SD memory card is
not guaranteed.
p Optimum performance of this unit may not
be obtained depending on the SD memory
card.
p Do not insert anything other than SD mem-
ory cards or dummy SD cards into the SD
card slot.
Ejecting an SD memory card
1 Press the SD memory card until it clicks.
The SD memory card is ejected.
2 Pull out the SD memory card.
p Insert the dummy SD card to keep the SD
card slot free of dust when the SD memory
card is not inserted.
Plugging and unplugging a
USB storage device
CAUTION
! To prevent data loss and damage to the sto-
rage device, never remove it from this navigation system while data is being transferred.
! If data loss or corruption occurs on the sto-
rage device for any reason, it is usually not
possible to recover the data. Pioneer accepts
no liability for damages, costs or expenses
arising from data loss or corruption.
Plugging in a USB storage device
% Plug a USB storage device into the USB
connector.
USB connector
USB storage device
p Compatibility with all USB storage device is
not guaranteed.
Optimum performance of this navigation
system may not be obtained depending on
the USB storage device that is connected.
p Connection via USB hub is not available.
Unplugging a USB storage device
% Pull out the USB storage device after
checking that no data is being accessed.
Basic operation
En
15
Chapter
02
Basic operation
Connecting and
disconnecting iPod
CAUTION
! To prevent data loss and damage to the sto-
rage device, never remove it from this navigation system while data is being transferred.
! If data loss or corruption occurs on the sto-
rage device for any reason, it is usually not
possible to recover the data. Pioneer accepts
no liability for damages, costs or expenses
arising from data loss or corruption.
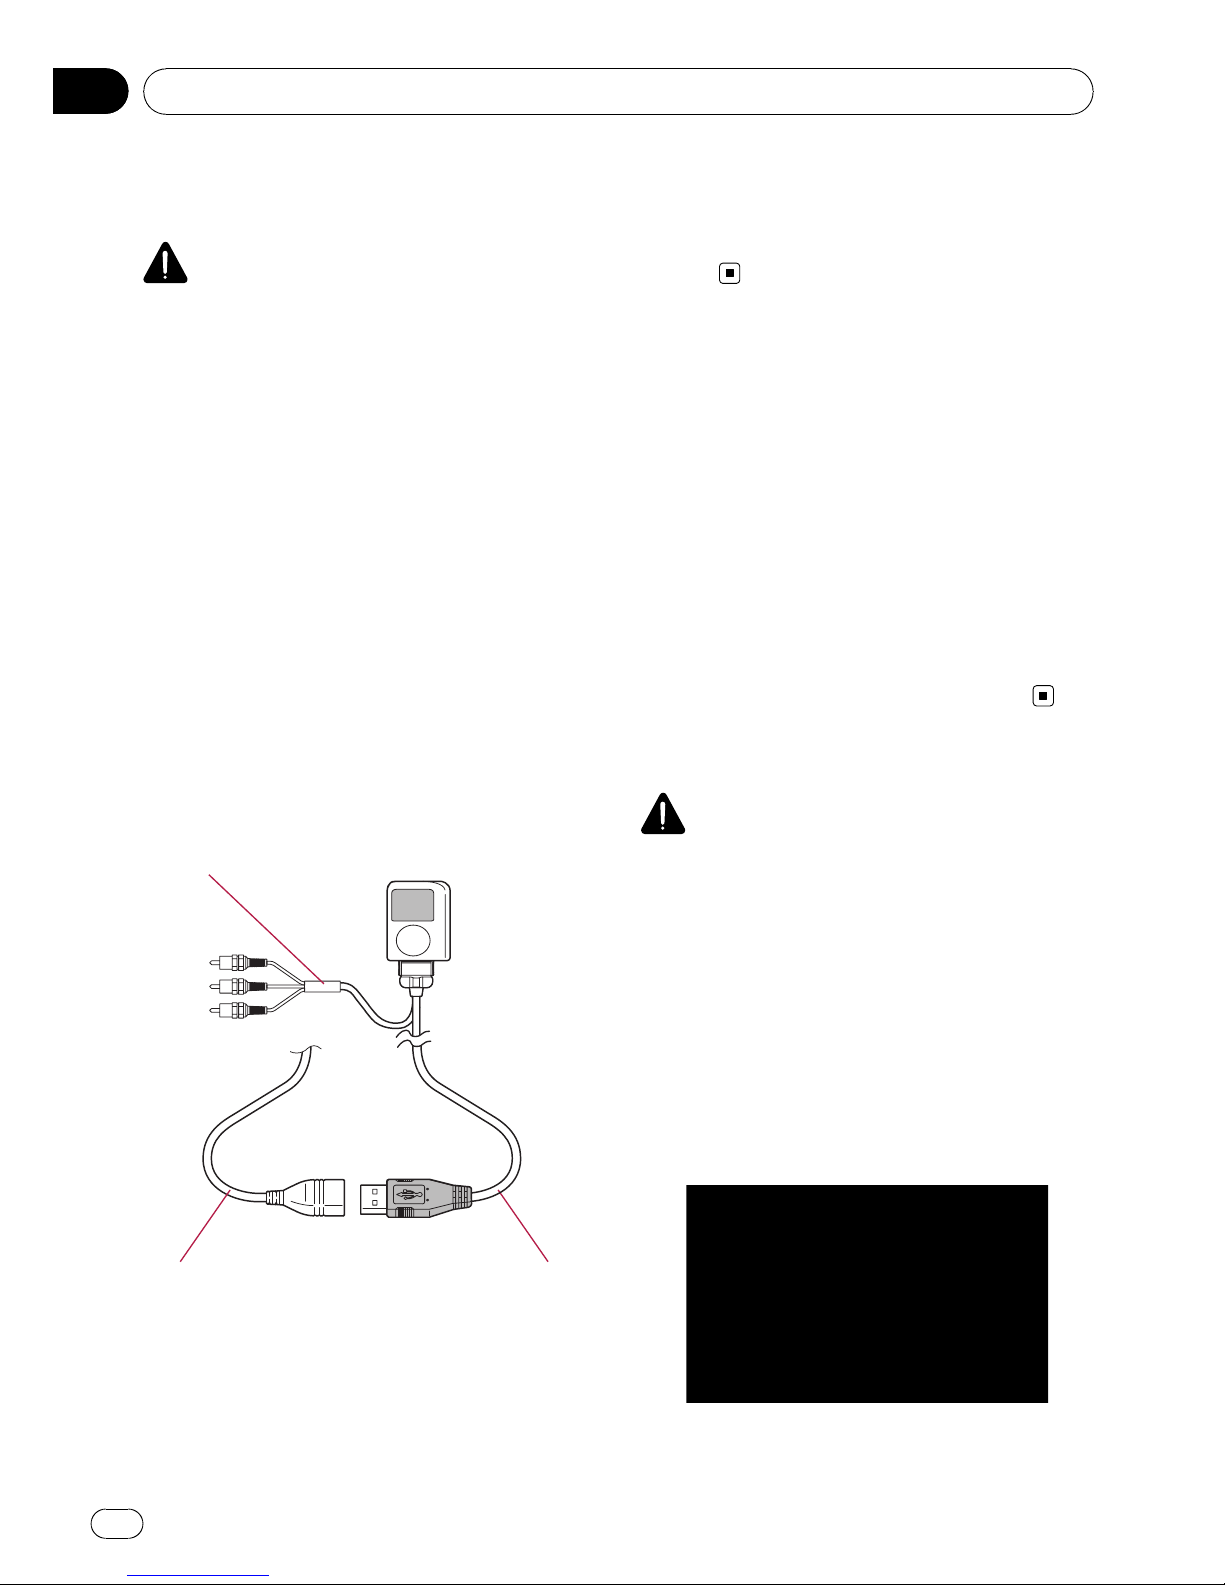
Connecting your iPod
Using the USB interface cable for iPod enables you to connect your iPod to the navigation system.
p For connection, USB interface cable for
iPod (CD-IU230V) (sold separately) is required.
p USB interface cable for iPod is supplied
with AVIC-F90BT.
1 Pull out the USB storage device after
checking that no data is being accessed.
To AV input on the back of the navigation system
USB connector USB interface cable for
iPod
p For more details about iPod compatibility
with this navigation system, refer to the information on our website.
p Connection via USB hub is not available.
2 Connect your iPod.
Disconnecting your iPod
% Pull out the USB interface cable for iPod
after checking that no data is being accessed.
Flow from startup to
termination
1 Start the engine to boot up the system.
After a short pause, the navigation splash
screen comes on for a few seconds.
p To protect the LCD screen from damage, be
sure to use your fingers to touch the touch
panel keys. (The stylus is supplied for special calibrations. Do not use the stylus for
normal operations.)
2 Turn off the vehicle engine to terminate the system.
The navigation system is also turned off.
On first-time startup
CAUTION
The rear view camera function is not available for
safety reasons until the navigation system boots
up completely.
When you use the navigation system for the
first time, select the language that you want to
use.
1 Start the engine to boot up the system.
After a short pause, the navigation splash
screen comes on for a few seconds.
2 Touch the language that you want to
use on the screen.
Basic operation
En
16
Chapter
02
3 Touch the language that you want to
use for the voice guidance.
The navigation system will now restart.
4 Read the disclaimer carefully, checking
its details, and then touch [OK] if you
agree to the conditions.
The “Top Menu” appears.
Regular startup
CAUTION
The rear view camera function is not available for
safety reasons until the navigation system boots
up completely.
% Start the engine to boot up the system.
After a short pause, the navigation splash
screen comes on for a few seconds.
p The screen shown will differ depending on
the previous conditions.
p If the navigation screen was shown pre-
viously, the disclaimer appears.
Read the disclaimer carefully, checking its
details, and then touch [OK] if you agree to
the conditions.
p If other screens were shown previously, the
disclaimer screen will be skipped.
p If the anti-theft function is activated, you
must enter your password. After unlocking
the navigation system, the “Top Menu” ap-
pears. If you enter the navigation screen
first, the disclaimer screen will appear.
Read the disclaimer carefully, checking its
details, and then touch [OK] if you agree to
the conditions.
Basic operation
En
17
Chapter
02
Basic operation
How to use the navigation menu screens
The “Top Menu” appears when you boot up the navigation system for the first time.
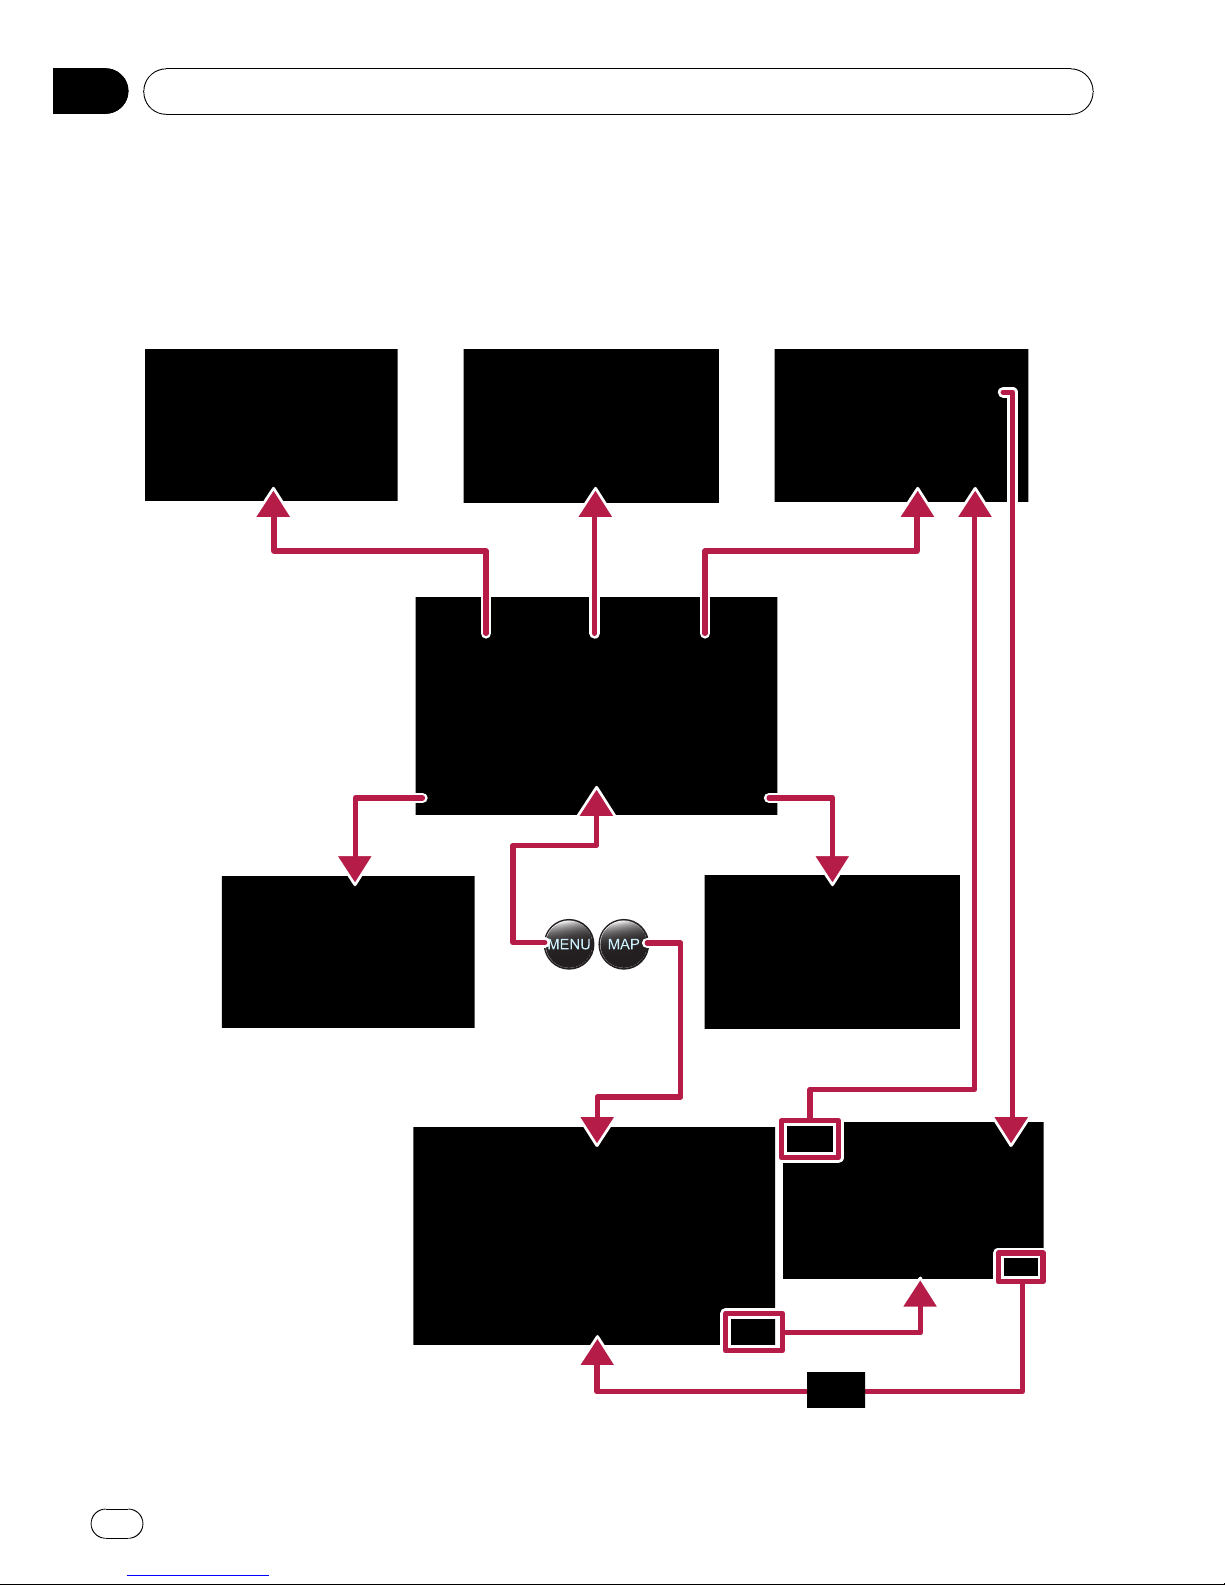
Screen switching overview
2
5
7
8
6
1
3
4
Basic operation
En
18
Chapter
02

What you can do on each menu
1 Top Menu
Press MENU button to display the “To p
Menu”.
This is the starting menu to access the desired
screens and operate the various functions.
2 Destination Menu
You can search for your destination on this
menu. You can also check or cancel your set
route from this menu.
p [MSN Direct] is available for AVIC-
F900BT and AVIC -F90BT.
3 Contacts screen
You can access the list of contacts to call up
an entry.
4 AV Source menu
You can access the screen for selecting the
audio and visual source to play.
5 Phone Menu
You can access the screen that is related to
hands-free phoning to see call histories and
change the settings on the Bluetooth wireless
technology connection.
6 Settings Menu
You can access the screen to customize settings.
7 Map screen
Press MAP button to display the navigation
map screen.
8 AV operation screen
When you play the AV source, this screen appears regularly. Touching the icon on the top
left corner displays the “AV Source” menu.
p To return to the previous screen, touch
.
Displaying the rear camera image
[RearView] can be displayed the full-screen
rear camera image. [RearView] is useful if
you want to monitor an attached trailer, etc.
= For details, refer to Setting the rear view
camera on page 136.
1 Press MENU button to display the “Top
Menu”, and then touch [Settings].
2 Touch [System Settings] and then touch
[Back Camera].
3 Touch [On] next to “Camera” to activate the camera setting.
4 Press MENU button to display the “Top
Menu” and then touch [AV Source].
5 Touch [RearView] on the “AV Source”
menu.
Basic operation
En
19
Chapter
02
Basic operation

How to use the map
Most of the information provided by your navigation system can be seen on the map. You need to become familiar with how the information appears on the map.
How to read the map screen
This example shows an example of a 2D map screen.
23 4
5
6
7
8
9
a
bcde
f
g
h
1
p Information with the mark (*) appears only
when the route is set.
p Depending on the conditions and settings,
some items may not be displayed.
1 Next direction of travel*
When you approach a guidance point, this appears green. Touching this item enables you
to hear the previous guidance again.
p For more information about the direc-
tion symbol, refer to Supplemental infor-
mation about directions on page 167.
2 Distance to the guidance point*
Shows the distance to the next guidance
point.
3 Name of the street to be used (or next gui-
dance point)*
4 Current time
5 Compass
The red arrow indicates north.
6 Map mode selector
= For details, refer to Switching the map
between 2D and 3D on page 22.
7 Shortcut to the “Map Confirmation
Screen”
Touching this shortcut enables the screen to
switch to the “Map Confirmation Screen” directly with the current position or the cursor
position centered.
= For details, refer to What you can do with
the “Map Confirmation Screen” on page
36.
8 Stop key for the dummy run
Basic operation
En
20
Chapter
02

This key will be displayed while you activate
the dummy run (“Fly over” or “Demo
Mode”). Touching the key to cancel the
dummy run.
= For details, refer to Demo Mode on
page 129.
= For details, refer to Playing simulated tra-
vel at high speed on page 42.
9 Album artwork on iPod
If you connect your iPod to this navigation system, the album artwork that is playing appears.
a Shortcut to the AV operation screen
The AV Source currently selected is shown.
Touching the indicator displays the AV operation screen of the current source directly.
b Extension tab for the AV information bar
Touching this tab opens the AV information
bar and enables you to briefly view the current
status on the AV source. Touching it again retracts the bar.
c Current route*
The route currently set is highlighted in bright
color on the map. If a waypoint is set on the
route, the route after the next waypoint is
highlighted in other color.
d Current position
Indicates the current location of your vehicle.
The apex of the triangular mark indicates your
orientation and the display moves automatically as you drive.
p The apex of the triangular mark is the
proper current position.
e Street name (or city name) that your vehi-
cle is traveling along
f Multi-Info window
Shows the value on the items selected on
“Displayed Info”. Touching this area allows
you to display the “Route Information”
screen.
= For details, refer to Displayed Info on
page 126.
= For details, refer to Checking the current
route conditions on page 41.
p This item is not shown when “Full
Screen Cockpit” is set to “On”.
= For details, refer to Map Settings on
page 125.
p The estimated time of arrival is an ideal
value that the navigation system computes internally as the route is calculated. The estimated time of arrival
should be read just as a reference value,
and does not guarantee arrival at the
time indicated.
g Map scale
The scale of the map is indicated by distance.
h Second Maneuver Arrow*
Shows the turning direction after next and the
distance to there.
p This item is not shown when “Full
Screen Cockpit” is set to “On”.
= For details, refer to Map Settings on
page 125.
Meaning of guidance flags
: Destination
The checkered flag indicates your
destination.
: Waypoint
The yellow flags indicate your waypoints.
: Start point
The light blue flag indicates your
start point.
When you drive on a multi-lane road
Appears where multi-lane roads exist when
you are driving on your route. The highlighted
lane indicates the recommended lane.
Basic operation
En
21
Chapter
02
Basic operation
p This information is based on the map data-
base. Thus, the information may be different from what actual condition exists. Use
it as just a directional reference for your
driving.
Note regarding the route highlighted
in purple
p A route highlighted in purple on the map
indicates that your route includes a road
not matching your preference on the following settings in “Route”; “Unpaved
Roads”, “Highways”, “Ferries”, “U-turns”,
“Permit Needed”, “Toll Roads”.
For your safety, please review and obey all
local traffic rules along the highlighted
route.
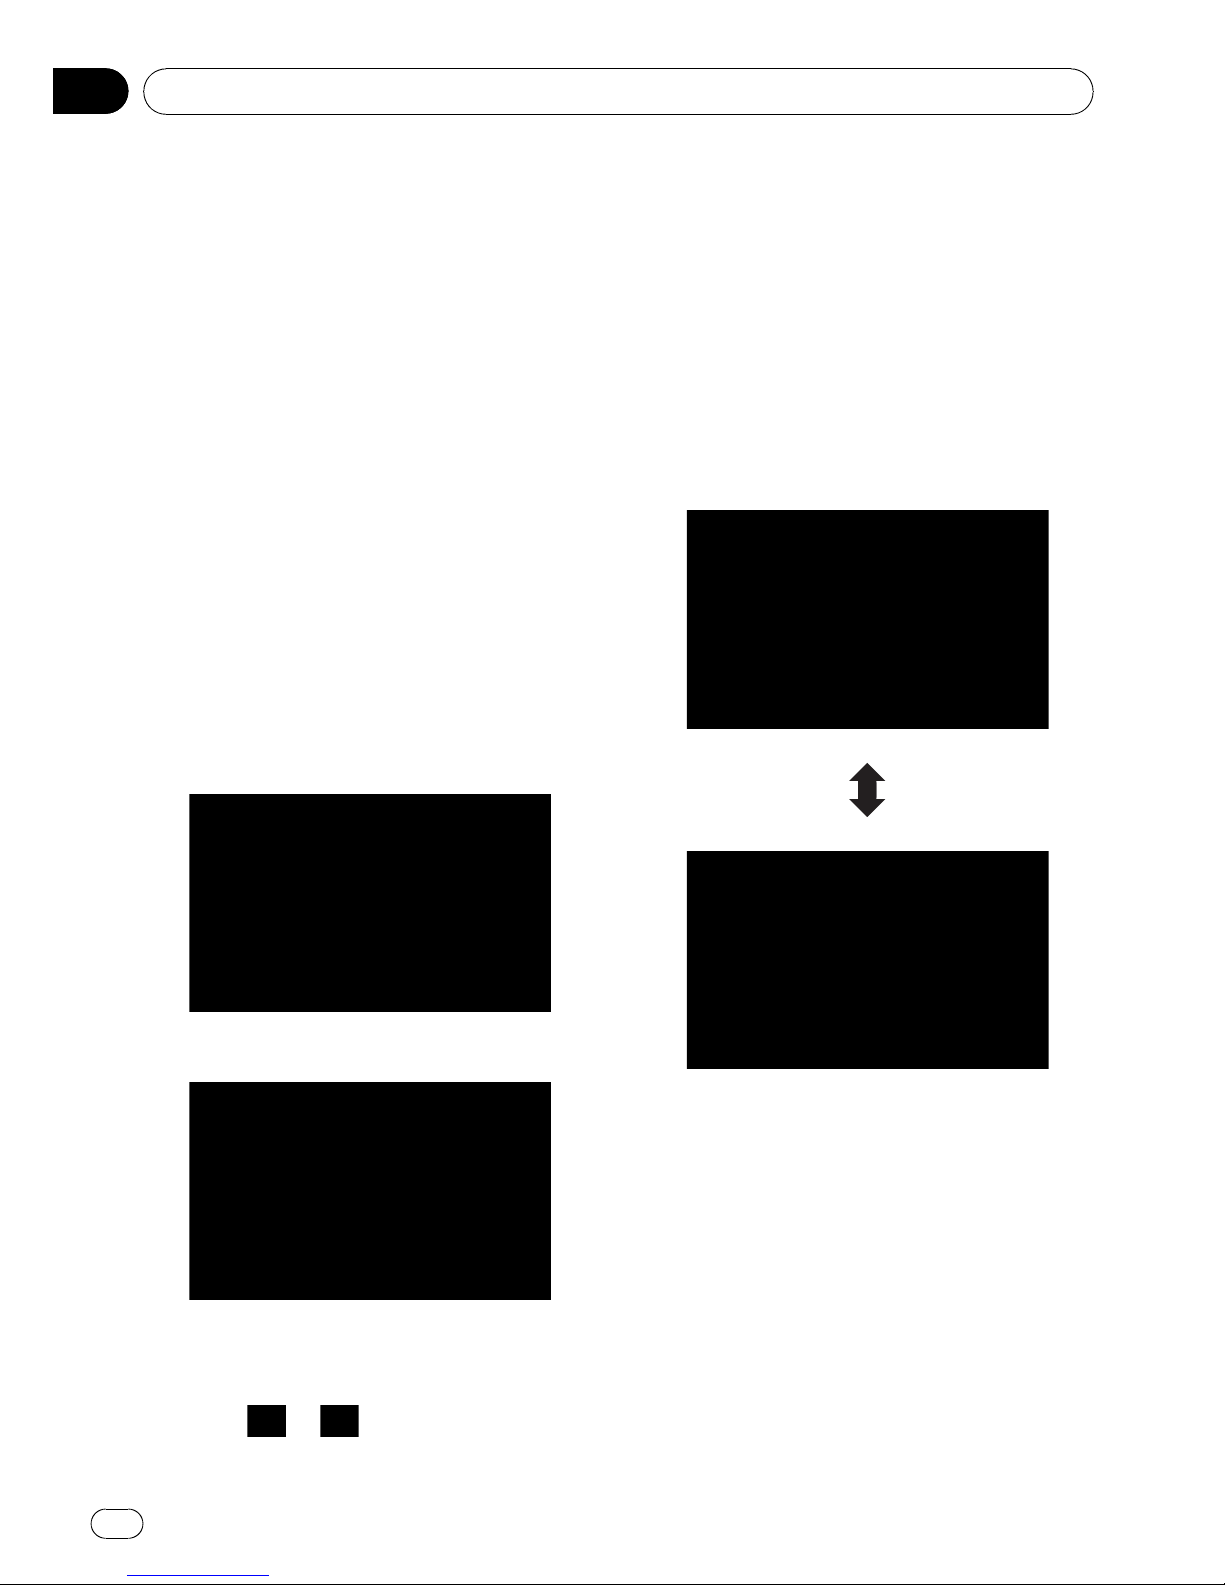
Switching the map between 2D
and 3D
2D map screen
3D map screen
1 Press MAP button to display the navigation map screen.
2 Touch
or to switch the map
mode.
Changing the scale of the map
1 Press MAP button to display the navigation map screen.
2 Move MULTI-CONTROL down or up to
zoom in or out.
Moving MULTI-CONTROL upward or down-
ward once allows you to change the map
scale one step at a time. Holding MULTI-CON-
TROL while moving it up or down allows you
to change the scale sequentially.
p Zooming out will reduce the size of the icon
and further zooming out will hide it. However, the pin-shaped icon is not resized and
keeps displayed.
p Further zooming out hides the lines of traf-
fic information.
Scrolling the map to the
position you want to see
1 Press MAP button to display the navigation map screen.
Basic operation
En
22
Chapter
02
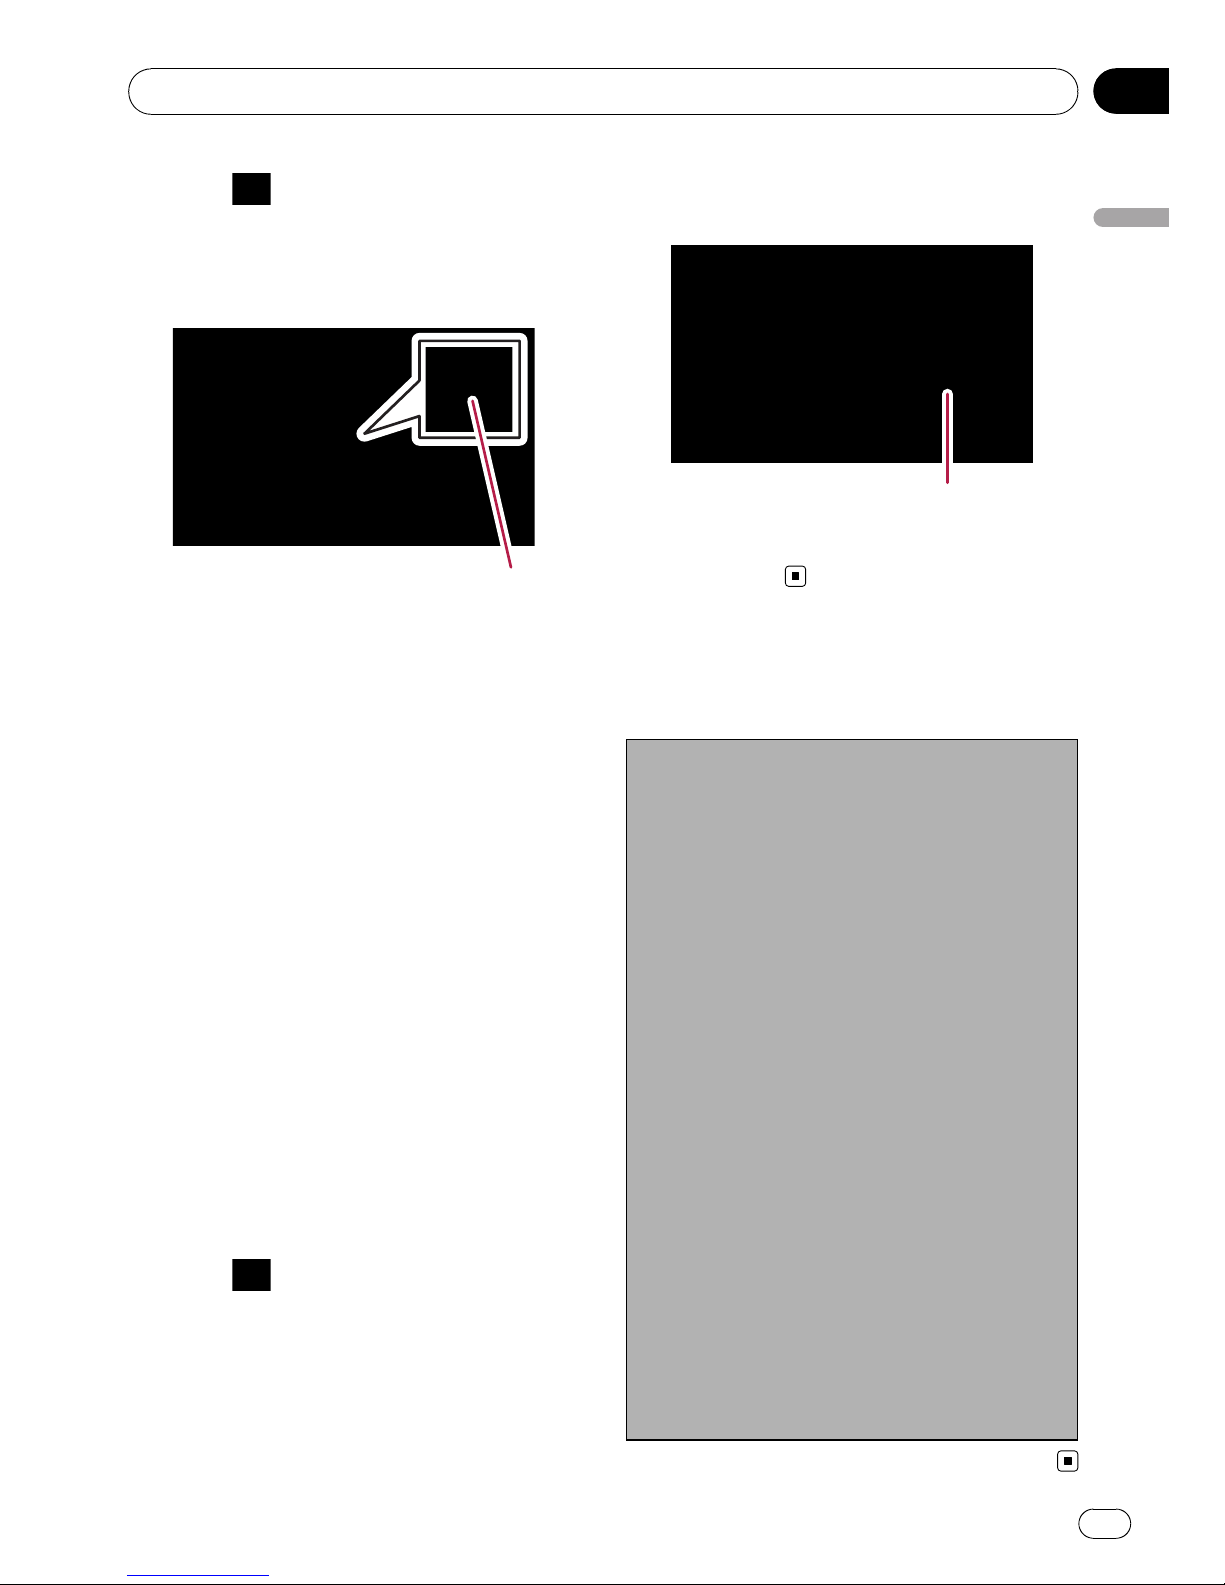
2 Touch to switch the 2D map mode.
3 Touch the map briefly.
Briefly touching the position on the map that
you want to see positions the cursor there.
Cursor
Positioning the cursor to the desired location
results in a brief informational overview about
the location being displayed at the bottom of
screen, with street name and other information for this location being shown. (The information shown varies depending on the
position.)
4 Touch and drag the map in the desired
direction to scroll.
Dragging the map scrolls it. The scrolling increment depends on your dragging length.
p Pressing MAP button returns the map to
the current position.
Changing the tilt and rotation
angle of the map
On the 3D map screen, briefly touching the
map shows the tilt controls and rotation angle.
1 Press MAP button to display the navigation map screen.
2 Touch
to switch the 3D map mode.
3 Touch anywhere on the map briefly to
show the tilt controls and rotation angle.
Controls for tilt and rotation angle
4 Touch the controls to adjust the tilt and
rotation angle.
The basic flow of creating
your route
1 Park your vehicle in a safe place, and apply
the parking brake.
j
2 Display the “Destination Menu”.
j
3 Select the method of searching for your
destination.
j
4 Enter the information for the destination
and narrow down candidates to one.
j
5 Touch [Go Here Now] on the “Map Confir-
mation Screen”.
j
6 The navigation system calculates the route
to your destination, and then shows the
route on the map.
j
7 After releasing the parking brake, drive in
accordance with navigation guidance.
Basic operation
En
23
Chapter
02
Basic operation
The operati ons of a list
screen (e.g. city list)
1
2
45
3
1 Screen title
This description will provide you with a reference for the next operation.
2 Current page/total pages
3
:
Returns the previous screen.
4
:
Touching
or on the scroll bar scrolls
through the list and allows you to view the remaining items.
5 Listed items:
Touching an item on the list allows you to narrow down the options and proceed to the next
operation.
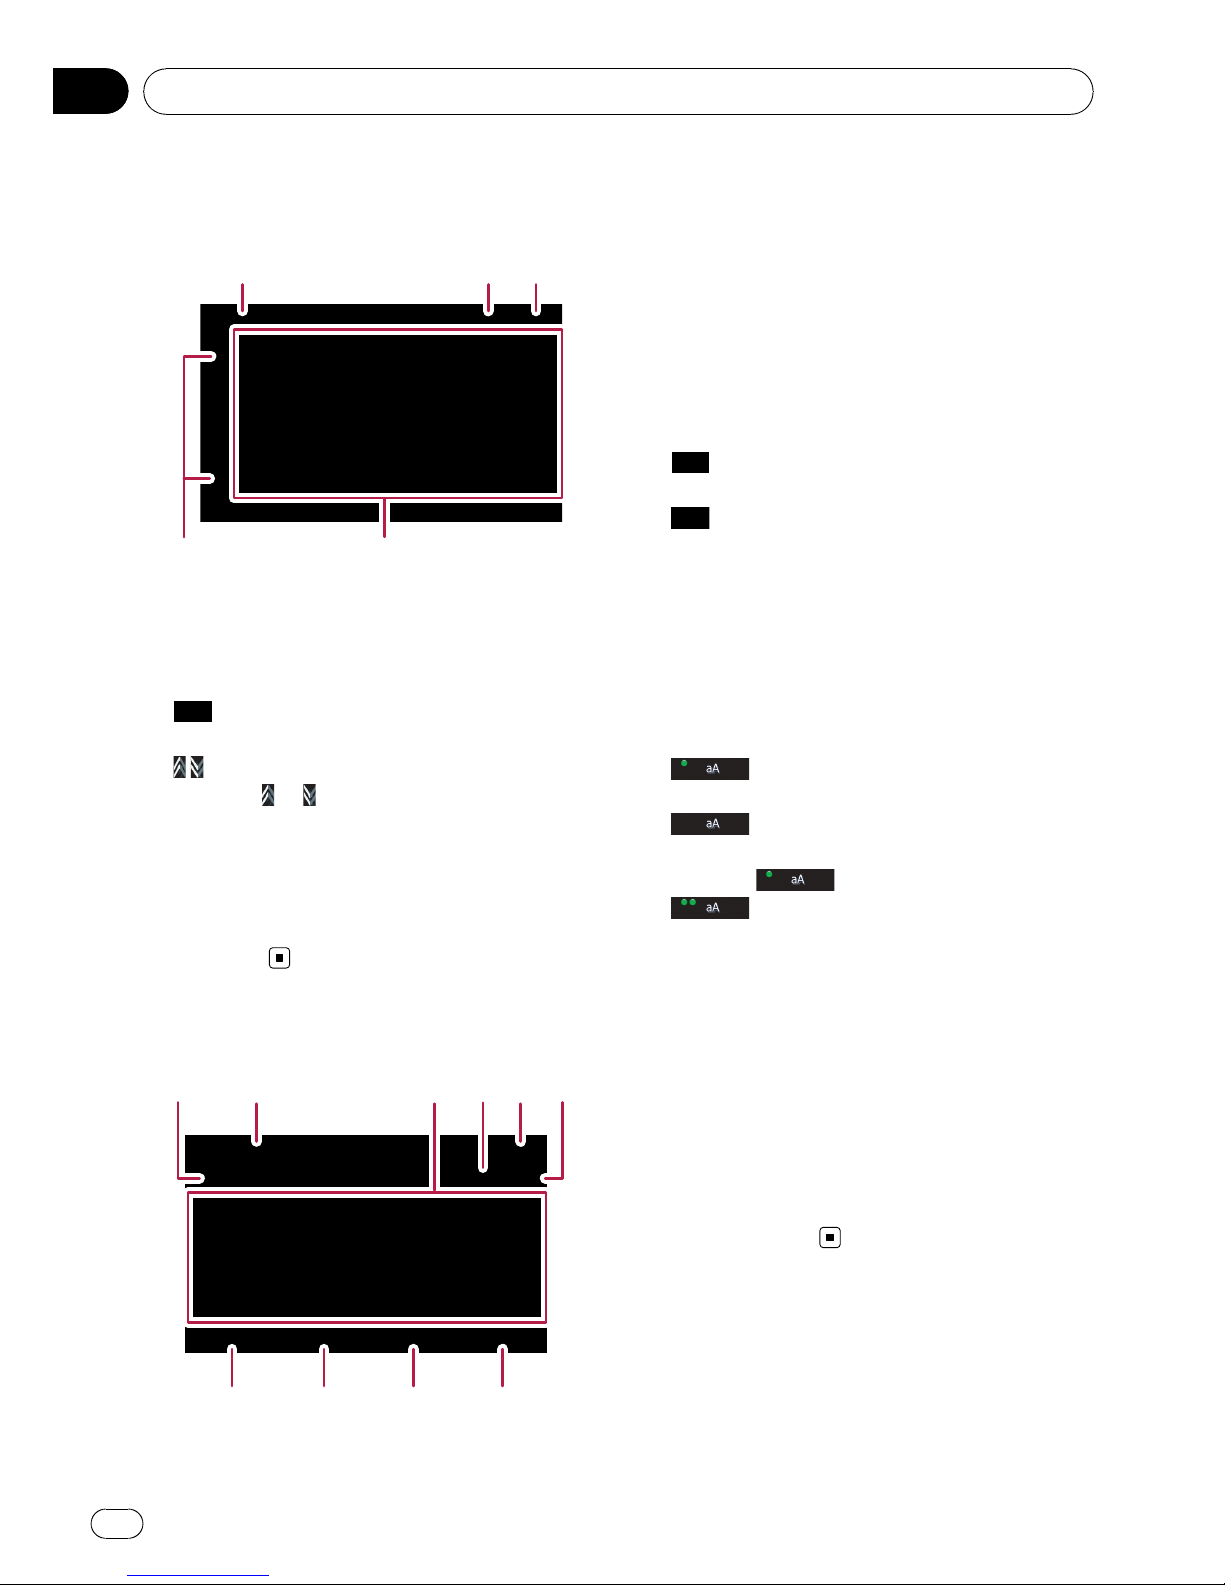
The operati on of the onscreen keyboard
12 3456
789a
1 Text box:
Displays the characters that are entered. If
there is no text in the box, an informative
guide with text appears.
2 Screen title
This description will provide you with a reference for the next operation.
3 Keyboard:
Touching the keys enables you to enter the
characters.
4 Number of possible choices
5
:
Returns the previous screen.
6
:
Deletes the input text one letter at a time, beginning at the end of the text. Continuing to
touch the button deletes all of the text.
7 Caps lock control
Switches the keyboard between lowercase letters and uppercase letters.
Each touch of [aA] changes the settings as
follows:
— enables you to capitalize the first
letter of a word.
— enables you to enter letters in
lower-case. (When a space is entered, it
switches
automatically.)
— enables you to enter letters with
capitals (caps) lock.
8 [@/!]:
Displays the key to enter special characters,
such as [!].
p The appearance of this key and typeable
characters change according to the current keyboard layout.
9 [Keys]:
Switches the on-screen keyboard layout.
a [Done]:
Confirms the entry and allows you to proceeds
to the next step.
Basic operation
En
24
Chapter
02

CAUTION
For safety reasons, these route-setting functions
are not available while your vehicle is in motion.
To enable these functions, you must stop in a
safe place and put on the parking brake before
setting your route.
p Some information regarding traffic regula-
tions depends on the time when the route
calculation is performed. Thus, the information may not correspond with a certain
traffic regulation when your vehicle actually
passes through the location in question.
Also, the information on the traffic regulations provided will be for a passenger vehicle, and not for a truck or other delivery
vehicles. Always follow the actual traffic
regulations when driving.
Searching for a location by
address
The most frequently used function is [Address], in which the address is specified and
the destination is searched.
1 Touch [Destination] on the “Top Menu”.
2 Touch [Address].
3 Touch the key next to “Country:” to display the country list.
4 Touch one of the items on the list to set
the country as search area.
The screen returns to the previous screen.
Searching for and selecting a location
En
25
Chapter
03
Searching for and selecting a location

5 Touch the key next to “State:” and
touch the desired state, province, or territory on the list.
The screen returns to the previous screen.
6 Touch the key next to “City:” to enter
the city name.
7 Enter the city name or Zip code.
! When the options are narrowed down to six
or less, those are automatically listed.
! If you want to list the options matching to
the current information entered, touch
[Done].
! Touching [History] displays the list of cities
that you selected before.
8 Touch the desired city name.
! When a city is already set, touching [City
Center] allows you to select the representa-
tive location of the city and proceed to the
“Map Confirmation Screen”.
9 Enter the street name and touch the desired one from the list.
! When a street is already set, touching
[Street Center] allows you to select the representative point of the street and proceed
to the “Map Confirmation Screen”.
! When a street is already set, touching [In-
tersection] allows you to search for an in-
tersection. After entering the second street
name and selecting the desired intersection, the “Map Confirmation Screen” appears. This is useful when you don’t know
the house number or cannot input the
house number of the selected street.
10 Enter the house number and then
touch [Done].
! If the house number you have entered is
not found, a message appears. In that case,
touch [OK] and try entering the existing
house number.
Searching for and selecting a location
En
26
Chapter
03

11 Touch on of the options at the bottom
of the “Map Confirmation Screen” to select
the next operation.
Touching [Route...] and [Go Here Now] sequentially enables you to set your selected position as your destination and calculate the
route up that point.
= For details concerning other operations on
the “Map Confirmation Screen”, refer to
What you can do with the “Map Confirmation
Screen” on page 36.
If only one option is appropriate for your entry,
the screen will jump to the “Map Confirmation
Screen” directly and the process of entering the
street name or house number will be skipped. If
this is an undesirable location, touch
to retry
with another address.
Searching for the vicinity
Points of Interest (POI)
Information about various facilities (Points Of
Interest - POI), such as gas stations, parkings
or restaurants, is available. By selecting the
category (or entering the POI Name), you can
search for a POI.
Searching for POIs around the
cursor
1 Touch [Destination] on the “Top Menu”,
and then touch [POI].
2 Touch [Around Cursor].
3 Drag the map to move the cursor to the
desired position and touch [OK].
The number of nearby POIs will appear at the
bottom of the screen.
4 Touch your desired category.
If there are more detailed categories within the
selected category, repeat this step as many
times as necessary.
Touch [Search] to search for a POI by entering
the POI name in the selected category.
Searching for and selecting a location
En
27
Chapter
03
Searching for and selecting a location

5 Touch your desired POI.
! Touching [Name] tab sorts the options in
the list in alphabetical order.
! Touching [Distance] tab sorts the options in
the list in order by distance.
p Icons are helpful for quickly telling the cate-
gory of facilities with the same name.
6 Touch on of the options at the bottom
of the “Map Confirmation Screen” to select
the next operation.
Touching [Route...] and [Go Here Now] sequentially enables you to set your selected position as your destination and calculate the
route up that point.
= For details concerning other operations on
the “Map Confirmation Screen”, refer to
What you can do with the “Map Confirmation
Screen” on page 36.
p Searching for a spot and touching [Info]on
the “Map Confirmation Screen” also allows
you to search for nearby POIs around the
cursor.
= For details, refer to Viewing the information
of a specified location on page 38.
Searching for a nearby POI
1 Touch [Destination] on the “Top Menu”,
and then touch [POI].
2 Touch [Around Current GPS Location].
The list of POI categories appears.
= For the subsequent operations, refer to
Searching for POIs around the cursor on the
previous page.
Searching for POIs along the
current route
p This function is available when the route is
set.
1 Touch [Destination] on the “Top Menu”,
and then touch [POI].
2 Touch [Along Route].
The list of POI categories appears.
= For the subsequent operations, refer to
Searching for POIs around the cursor on the
previous page.
Searching for POIs around the
destination
p This function is available when the route is
set.
1 Touch [Destination] on the “Top Menu”,
and then touch [POI].
2 Touch [Around Destination].
The list of POI categories appears.
= For the subsequent operations, refer to
Searching for POIs around the cursor on the
previous page.
Searching for and selecting a location
En
28
Chapter
03

Using “Saved Criteria”
Memorizing your selection sequence
You can store the selected search method and
one of the categories as the shortcut to recall
it later. It allows you to search for a POI in the
same way as you did before. You can also delete the shortcuts.
1 Touch [Destination] on the “Top Menu”,
and then touch [POI].
2 Touch [Register Search Criteria].
3 Touch one of the items on the list.
! Selecting an item that has already been
stored allows you to overwrite it.
4 Touch the search method that you
want to put it into memory.
The list of POI categories appears.
5 Touch the category that you want to
put it into memory.
If there are more detailed categories within the
selected category, select the desired category
from the list repeatedly until your desired category appears.
Your selection sequence is shown on the top
of the screen.
6 Recheck the sequence and touch [Save
Criteria] to put it into memory.
Searching for and selecting a location
En
29
Chapter
03
Searching for and selecting a location

! Touching [Save Criteria] without selecting
a category allows you to store only your selected search method including all categories.
! If there aren’t anymore detailed categories,
a blank list appears. In such case, touching
[Save Criteria] allows you to store it as the
currently selected category. To know the
states of the current sequence, refer to the
top of the screen.
7 Enter the desired name and then touch
[Done] to complete the entry.
The storing process has completed and the
shortcut is available on “Saved Criteria”.
Searching for POIs by using the
memorized sequence
You can search for POIs with using the prestored shortcut.
1 Touch [Destination] on the “Top Menu”,
and then touch [POI].
2 Touch [Saved Criteria].
3 Touch one of the items on the list.
4 Touch the desired POI.
5 Touch on of the options at the bottom
of the “Map Confirmation Screen” to select
the next operation.
Touching [Route...] and [Go Here Now] sequentially enables you to set your selected position as your destination and calculate the
route up that point.
= For details concerning other operations on
the “Map Confirmation Screen”, refer to
What you can do with the “Map Confirmation
Screen” on page 36.
Deleting the memorized POI shortcuts
1 Touch [Destination] on the “Top Menu”,
and then touch [POI].
2 Touch [Saved Criteria].
Searching for and selecting a location
En
30
Chapter
03
 Loading...