

Pioneer S-ST770, RCS-77H User Manual
RCS-77H
HDD DVD Recorder Home Cinema System
SX-SW77
S-ST770
Audio Multi-channel Receiver Subwoofer
Speaker System
DVR-530H-AV
DVD Recorder
Discover the benefits of registering your product online at www.pioneer.uk
(www.pioneer-eur.com)
Operating Instructions
™
®
IMPORTANT
CAUTION
RISK OF ELECTRIC SHOCK
DO NOT OPEN
The lightning flash with arrowhead symbol,
within an equilateral triangle, is intended to
alert the user to the presence of uninsulated
"dangerous voltage" within the product's
enclosure that may be of sufficient
magnitude to constitute a risk of electric
shock to persons.
CAUTION:
TO PREVENT THE RISK OF ELECTRIC
SHOCK, DO NOT REMOVE COVER (OR
BACK). NO USER-SERVICEABLE PARTS
INSIDE. REFER SERVICING TO QUALIFIED
SERVICE PERSONNEL.
WARNING
This equipment is not waterproof. To prevent a fire
or shock hazard, do not place any container filed
with liquid near this equipment (such as a vase or
flower pot) or expose it to dripping, splashing, rain
or moisture.
D3-4-2-1-3_A_En
Operating Environment
Operating environment temperature and humidity:
+5 ºC – +35 ºC (+41 ºF – +95 ºF); less than 85 %RH
(cooling vents not blocked)
Do not install this unit in a poorly ventilated area, or in
locations exposed to high humidity or direct sunlight (or
strong artificial light)
D3-4-2-1-7c_A_En
WARNING
To prevent a fire hazard, do not place any naked
flame sources (such as a lighted candle) on the
equipment.
This product complies with the Low Voltage Directive
(73/23/EEC, amended by 93/68/EEC), EMC Directives
(89/336/EEC, amended by 92/31/EEC and
93/68/EEC).
D3-4-2-1-7a_A_En
D3-4-2-1-9a_En
The exclamation point within an equilateral
triangle is intended to alert the user to the
presence of important operating and
maintenance (servicing) instructions in the
literature accompanying the appliance.
D3-4-2-1-1_En-A
WARNING
Before plugging in for the first time, read the following
section carefully.
The voltage of the available power supply differs
according to country or region. Be sure that the
power supply voltage of the area where this unit
will be used meets the required voltage (e.g., 230V
or 120V) written on the rear panel.
This product is for general household purposes. Any failure
due to use for other than household purposes (such as longterm use for business purposes in a restaurant or use in a
car or ship) and which requires repair will be charged for
even during the warranty period. K041_En
This product incorporates copyright protection technology
that is protected by method claims of certain U.S. patents
and other intellectual property rights owned by
Macrovision Corporation and other rights owners. Use of
this copyright protection technology must be authorized
by Macrovision Corporation, and is intended for home and
other limited viewing uses only unless otherwise
authorized by Macrovision Corporation. Reverse
engineering or disassembly is prohibited.
D3-4-2-1-4_A_En
CAUTION
This product is a class 1 laser product, but this
product contains a laser diode higher than Class 1.
To ensure continued safety, do not remove any covers
or attempt to gain access to the inside of the product.
Refer all servicing to qualified personnel.
The following caution label appears on your unit.
Location: inside of the unit
CLASS 3B VISIBLE AND INVISIBLE LASER RADIATION
CAUTION
WHEN OPEN, AVOID EXPOSURE TO THE BEAM.
RADIATIONS LASER VISIBLES ET INVISIBLES DE CLASSE 3B
ATTENTION
QUAND OUVERT. ÉVITEZ TOUT EXPOSITION AU FAISCEAU.
KLASSE 3B SYNLIG OG USYNLIG LASERSTRÅLING VED ÅBNING.
ADVARSEL
UNDGÅ UDSÆTTELSE FOR STRÅLING.
KLASS 3B SYNLIG OCH OSYNLIG LASERSTRÅLNING NÄR DENNA
VARNING
DEL ÄR ÖPPNAD. UNDVIK ATT UTSÄTTA DIG FÖR STRÅLEN.
BEI GEÖFFNETER ABDECKUNG IST SICHTBARE UND UNSICHTBARE
VORSICHT
LASERSTRAHLUNG DER KLASSE 3B IM GERÄTEINNEREN
VORHANDEN. AUGEN NICHT DEM LASERSTRAHLAUSSETZEN!
PRECAUCIAÓN
VARO!
CUANDO SE ABRE HAY RADIACIÓN LÁSER DE CLASE 3B VISIBLE
E INVISIBLE. EVITE LA EXPOSICIÓN A LOS RAYOS LÁSER.
AVATTAESSA OLET ALTTIINA NÄKYVÄLLE JA
NÄKYMÄTTÖMÄLLE LUOKAN 3B LASERSÄTEILYLLE.
ÄLÄ KATSO SÄTEESEEN.
DRW2247 - A
D3-4-2-1-8_A_En
If the AC plug of this unit does not match the AC
outlet you want to use, the plug must be removed
and appropriate one fitted. Replacement and
mounting of an AC plug on the power supply cord of
this unit should be performed only by qualified
service personnel. If connected to an AC outlet, the
cut-off plug can cause severe electrical shock. Make
sure it is properly disposed of after removal.
The equipment should be disconnected by removing
the mains plug from the wall socket when left
unused for a long period of time (for example, when
on vacation).
D3-4-2-2-1a_A_En
CAUTION
The STANDBY/ON switch on this unit will not
completely shut off all power from the AC outlet.
Since the power cord serves as the main disconnect
device for the unit, you will need to unplug it from
the AC outlet to shut down all power. Therefore,
make sure the unit has been installed so that the
power cord can be easily unplugged from the AC
outlet in case of an accident. To avoid fire hazard,
the power cord should also be unplugged from the
AC outlet when left unused for a long period of time
(for example, when on vacation).
POWER-CORD CAUTION
Handle the power cord by the plug. Do not pull out the
plug by tugging the cord and never touch the power
cord when your hands are wet as this could cause a
short circuit or electric shock. Do not place the unit, a
piece of furniture, etc., on the power cord, or pinch the
cord. Never make a knot in the cord or tie it with other
cords. The power cords should be routed such that they
are not likely to be stepped on. A damaged power cord
can cause a fire or give you an electrical shock. Check
the power cord once in a while. When you find it
damaged, ask your nearest PIONEER authorized
service center or your dealer for a replacement.
S002_En
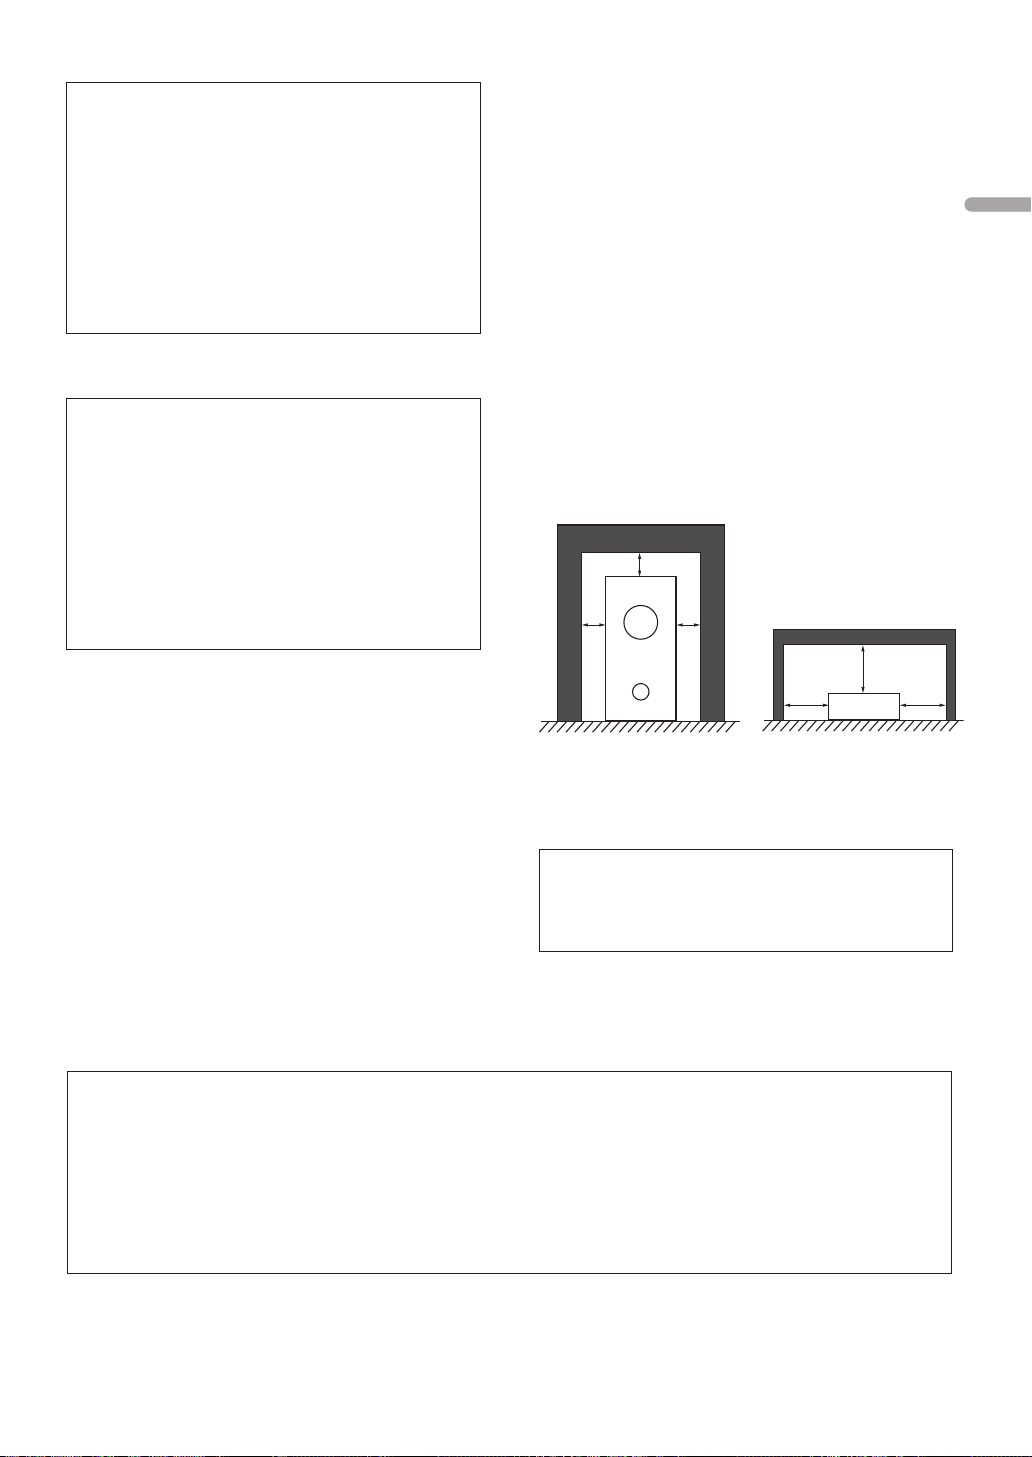
VENTILATION CAUTION (Receiver subwoofer)
When installing this unit, make sure to leave space
around the unit for ventilation to improve heat
radiation (at least 5 cm at top, 5 cm at rear, and 5
cm at each side).
VENTILATION CAUTION (DVD Recorder)
When installing this unit, make sure to leave space
around the unit for ventilation to improve heat
radiation (at least 10 cm at top, 10 cm at rear, and
10 cm at each side).
WARNING
Slots and openings in the cabinet are provided for
ventilation to ensure reliable operation of the
product, and to protect it from overheating. To
prevent fire hazard, the openings should never be
blocked or covered with items (such as newspapers,
table-cloths, curtains) or by operating the
equipment on thick carpet or a bed.
5 cm
5 cm
Receiver subwoofer DVD Recorder
5 cm
10 cm
This product includes FontAvenue® fonts licenced by NEC
corporation. FontAvenue is a registered trademark of NEC
Corporation.
D3-4-2-1-7b_A_En
10 cm
10 cm
English
Replacement and mounting of an AC plug on the power supply cord of this unit should be performed only by qualified
service personnel.
Do not connect either wire to the earth terminal of a
three pin plug.
NOTE
After replacing or changing a fuse, the fuse cover in
the plug must be replaced with a fuse cover which
corresponds to the colour of the insert in the base
of the plug or the word that is embossed on the
base of the plug, and the appliance must not be
used without a fuse cover. If lost replacement fuse
covers can be obtained from your dealer.
Only 5 A fuses approved by B.S.I or A.S.T.A to
B.S.1362 should be used.
D3-4-2-1-2-2_En
IMPORTANT
FOR USE IN THE UNITED
KINGDOM
The wires in this mains lead are coloured in
accordance with the following code:
Blue : Neutral
Brown : Live
If the plug provided is unsuitable for your socket
outlets, the plug must be cut off and a suitable plug
fitted.
The cut-off plug should be disposed of and must
not be inserted into any 13 amp socket as this can
result in electric shock. The plug or adaptor or the
distribution panel should be provided with 5 A fuse.
As the colours of the wires in the mains lead of this
appliance may not correspond with coloured
markings identifying the terminals in your plug,
proceed as follows ;
The wire which is coloured blue must be connected
to the terminal which is marked with the letter N or
coloured black.
The wire which is coloured brown must be
connected to the terminal which is marked with the
letter L or coloured red.

01
Section One
Thank you for buying this Pioneer product.
Please read through these operating instructions so that you will know how to operate your model properly. After you
have finished reading the instructions, put them in a safe place for future reference
.
Features
1 Home cinema system with the latest features
This unit is equipped with a variety of the latest features
for DVD recording.
• Extended recording time
Up to 455 hours recording on 160GB HDD (page 154)
• 24 hours recording (DVD-R DL)
• High speed copy
DVD-R: 12x, DVD-RW: 6x (page 42)
• Ease of use
Help function
EPG (Guide plus+) (page 68)
ShowView / Video Plus (page 75)
Advanced Disc Navigator (moving thumbnail)
(page 92
• Digital Jukebox
Record your favorite music CDs to the hard disk and
produce your own library of favorites (page 120)
2 Subwoofer with 5.1ch receiver function
This unit includes a subwoofer equipped with 5.1
channel amplifier and FM/AM tuner with RDS support.
The receiver is equipped with Dolby Digital, Dolby Pro
Logic II, and DTS decoders for the ultimate in live
listening presence.
Advanced surround modes are also provided to allow you
to select your own uniquely designed listening
environment (page 24).
,
111)
4 Three-spot front surround setting allows two
kinds of speaker placement
In addition to the conventional 5.1ch speaker placement,
the rear (surround) speakers can be placed in the front if
desired, thus producing a 3-spot front surround setting
with the same kind of sound field as the normal 5.1ch
arrangement. This provides greater freedom in speaker
placement to match different sound environments and
room conditions.
For example, the 3-spot front setting can be used in cases
where the listening room has no space for the placement
of surround (rear) speakers, or in cases where speaker
wiring to the rear would be particularly difficult.
To produce the most lifelike ambience from the 3-spot
front setting, original surround modes (Front Surround
Movie / Front Surround Music / Extra Power) are provided
thus allowing you to create genuine 5.1ch audio
ambience and a sense of spatial movement not possible
with conventional virtual surround systems (page 6).
5 Full input/output connector systems
Three digital input connector systems and one analog
input connector system are provided, allowing you to
connect sound from a variety of television monitors,
satellite tuners and other components (page 31).
6 Environmentally conscious design
The sub-woofer with its 5.1ch amplifier consumes less
than 0.5W of energy in standby mode, providing
economic, environmentally conscious operation.
4
En
3 Includes a separate display for greater freedom
in installation layout.
The separate display makes it easy to choose the
optimum layout for your installation location. Choose the
setting that provides the best storage and viewing
position.
The separate display is provided with control buttons,
allowing you to perform basic operations at the display
alone, without using the remote. On the other hand, the
separate display is also equipped with a remote control
receiver, allowing you to operate the unit by pointing the
remote at the display instead of at the DVD recorder or
subwoofer (page 22).

Section One
Contents
Section One
01 Features ...........................................................
02 Contents ..........................................................
What’s in the box
. . . . . . . . . . . . . . . . . . . . . . . . . . . . 5
03 Speaker Setup Guide ......................................
Safety precautions when setting up
Home theater sound setup
Wall mounting the surround speaker system
Attaching the brackets
Before mounting
. . . . . . . . . . . . . . . . . . . . . . . . . . . 8
. . . . . . . . . . . . . . . . . . . . 6
. . . . . . . . . . . . . . . . . . . . . . 8
. . . . . . . . . . . . . . 6
. . . . . . . 8
04 Connecting up .................................................
Basic connections
Using this system for TV audio
05 Remote control .............................................
Using the remote control
Putting the batteries in the remote control
. . . . . . . . . . . . . . . . . . . . . . . . . . . 9
. . . . . . . . . . . . . . . . . 13
14
. . . . . . . . . . . . . . . . . . . . . 16
. . . . . . . 16
What’s in the box
Please confirm that the following items are all supplied.
Receiver subwoofer (SX–SW77) box:
• Remote control (page 14)
• AA/R6P dry cell batteries x2 (page 16)
• Display unit (page 22)
• Power cord (page 11)
• AM loop antenna (page 9)
• FM wire antenna (page 9)
• Control cable (page 9)
• Display cable (page 9)
• Audio cable (red/white) (page 9)
• Optical cable (page 9)
• These operating instructions
• Warranty card
DVD recorder (DVR–530H-AV) box:
• Audio/video cable (red/white/yellow) (page 11)
• G-LINK™ cable (page 49)
• RF antenna cable (page 11)
• Power cord (page 11)
06 Before you start ............................................
Switching on
4
Setting up
5
Basic operation
Watching a DVD
Listening to a CD
6
Watching a title recorded on the HDD
Listening to the radio
Section Two
. . . . . . . . . . . . . . . . . . . . . . . . . . . . . . 17
. . . . . . . . . . . . . . . . . . . . . . . . . . . . . . . . 17
. . . . . . . . . . . . . . . . . . . . . . . . . . . . 18
. . . . . . . . . . . . . . . . . . . . . . . . . . 18
. . . . . . . . . . . . . . . . . . . . . . . . . . 19
. . . . . . . . . 19
. . . . . . . . . . . . . . . . . . . . . . . 19
Operating instructions for the Audio
9
Multi-channel Receiver Subwoofer and
Speaker System . . . . . . . . . . . . . . . . . . . . . 20
Section Three
Operating intructions for the DVD
Recorder . . . . . . . . . . . . . . . . . . . . . . . . . . . 37
Speakers (S–ST770) box:
• Speakers (front x2, surround x2, center x1) (page 11)
• Speaker cables x5 (page
• Non-skid pads (small) x4 (page 6)
• Non-skid pads (large) x4 (page 6)
• Front speaker stand bases x 2 (page 6)
• Screws (for bases) x 6 (page 6)
•
Brackets
•
Screws (for brackets)
• Mounting Brackets x 2 (page 8)
• Screws (for mounting brackets) x 2 (page 8)
x 2 (page 7)
12)
x 4 (page 7)
17
En
5
Speaker Setup Guide
Speaker Setup Guide
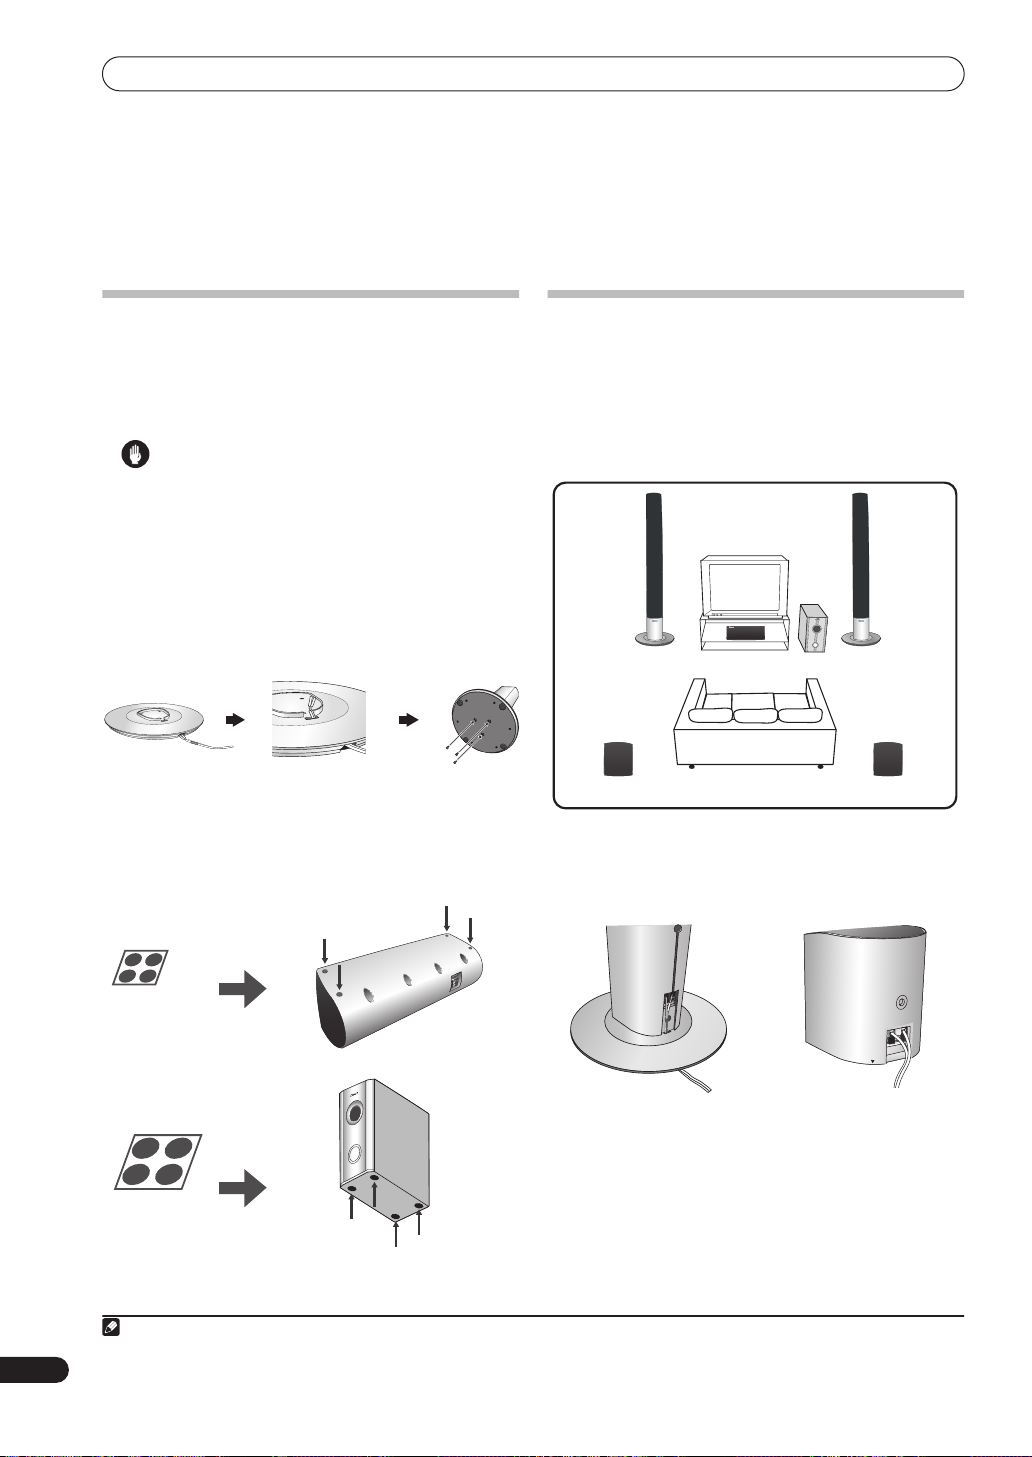
Safety precautions when setting up
When assembling the speakers, lay them down flat on
their side to avoid accidents or injury. Make sure to use a
stable surface when assembling, setting up, and placing
the speakers.
Caution
• Please don’t use the any attachments with the front
speakers other than the brackets provided.
1 Attach the front speaker stand bases to the
stems using the screws provided.
Before securing the base to the stand, thread the speaker
wire through the holes provided on the base as shown
below. Then, once you have aligned the stem and base,
secure with the small screws at the points shown at right.
2 Attach the smaller non-skid pads to the base of
the center speaker. The four large non-skid pads are
for the receiver subwoofeer (as shown).
Use the supplied adhesive to attach 4 pads to the base of
each speaker.
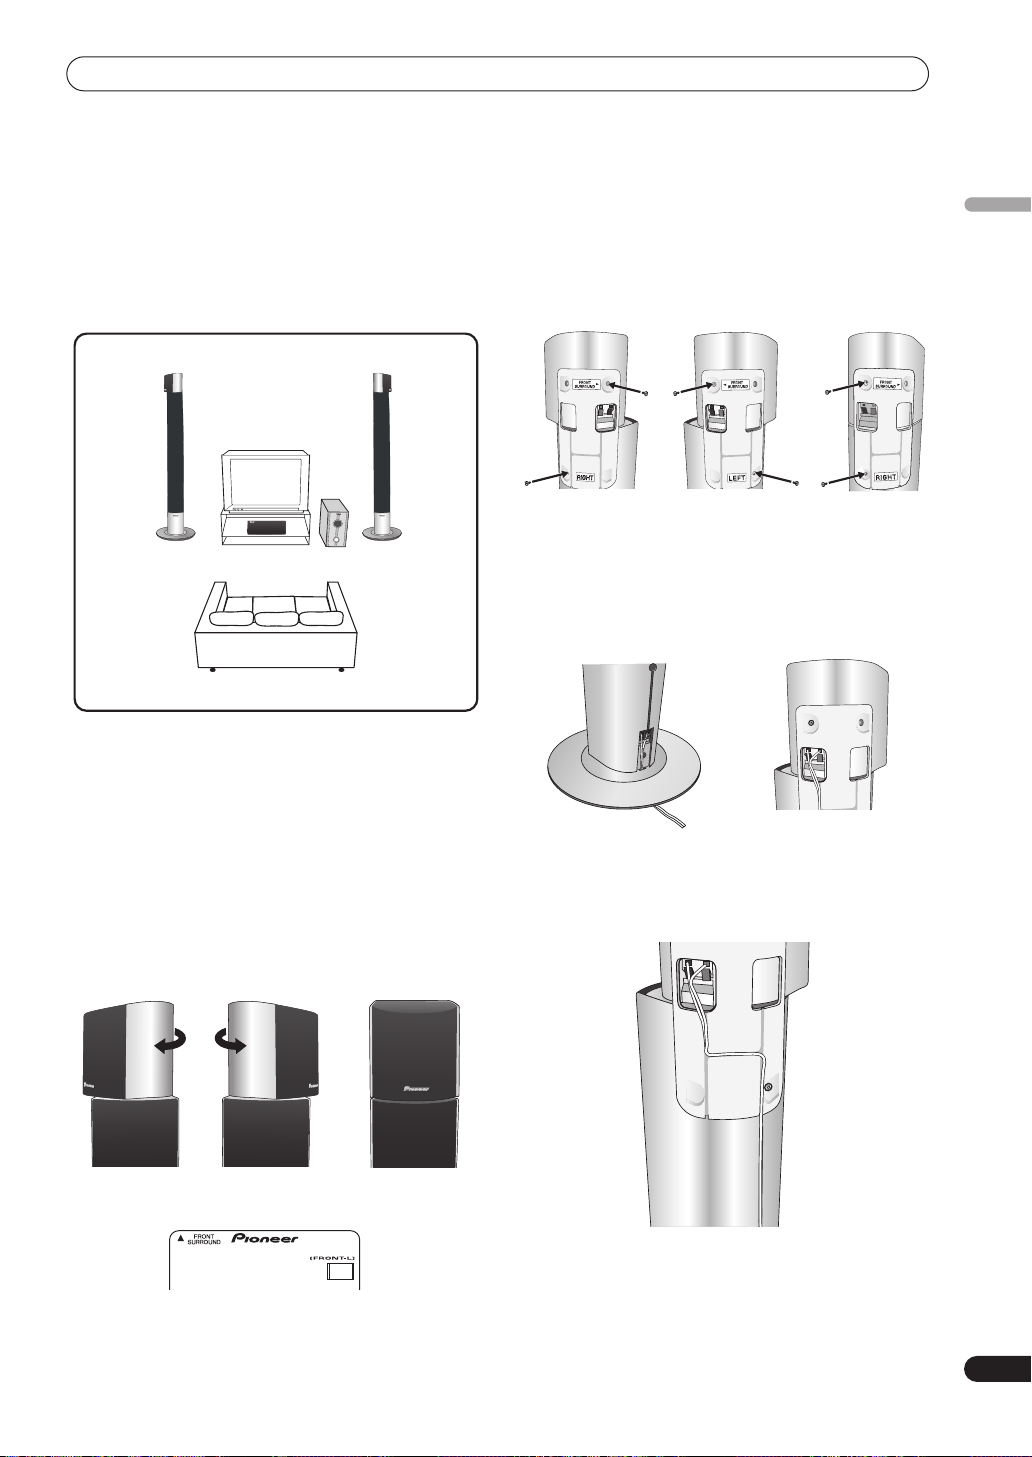
Home theater sound setup
Depending on the size and characteristics of your room,
you can place your speakers in one of two ways using this
1
system:
•
Standard surround 5-spot setup
standard multichannel surround sound speaker
setup for optimal 5.1 channel home theater sound.
Front
left
Center
Surround
left
Listening position
• Connect the speaker system.
Refer to
Connecting up
to connect the speakers properly.
Place them as shown in the diagram above for optimal
surround sound.
– This is a
Receiver subwoofer
Front
right
Surround
right
6
En
Non-skid pads
(small) x 4
Non-skid pads
(large) x 4
Note
1 See
About the listening modes
Center speaker
After placing your speakers, complete
setting
on page 29 then refer to
on page 29 to complete your surround sound setup.
Receiver
subwoofer
on page 24 for more on using the different listening modes with each speaker setup.
Channel level
Speaker distance setting
Speaker Setup Guide
•
Front surround 3-spot setup
when rear surround speaker placement isn't possible
or you want to avoid running long speaker cables in
your listening area. Use this setup together with the
Front Surround modes to take advantage of wall and
ceiling reflections for a very realistic surround effect.
– This setup is ideal
2 Secure in position with the brackets provided.
Line up the holes in the bracket with the holes in the
speakers, then secure with two screws at the points
shown below. Make sure you’ve matched the right and
left brackets with the speakers (as shown).
English
Surround
left
Front
left
Center
Receiver subwoofer
Listening position
Surround
right
Front
right
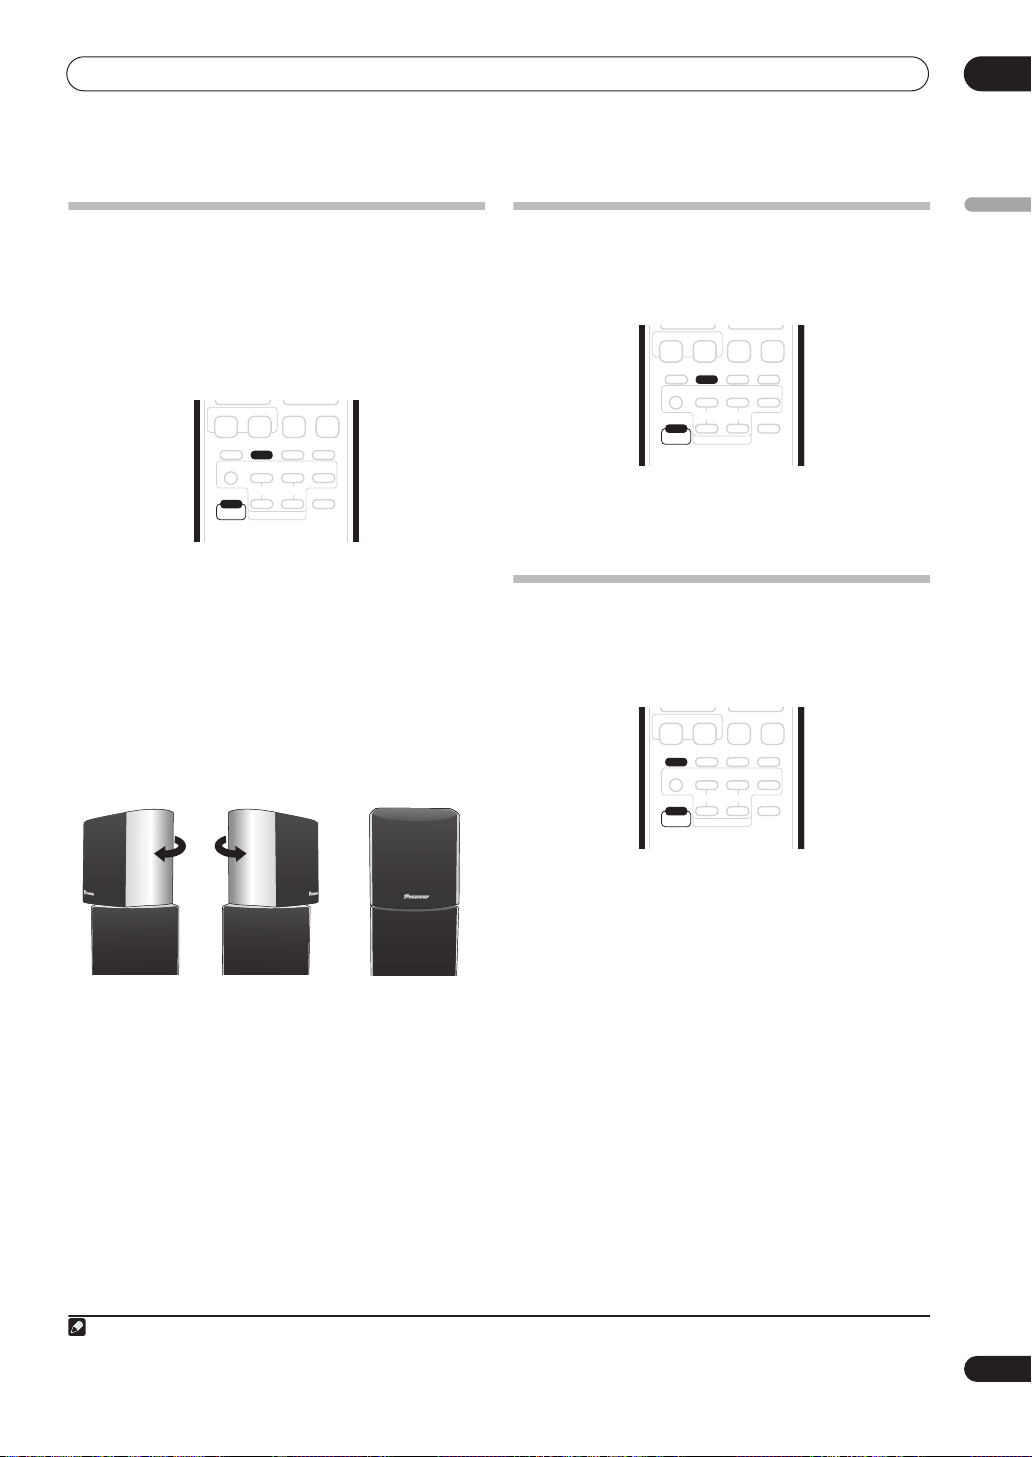
1 Place the surround speakers on top of the front
speakers, turn the surround speakers towards the
closest wall, lining the arrows up for optimal Front
Surround.
Turn each surround speaker so that the arrow at the
base is lined up with the
FRONT SURROUND
arrow on
the front speaker. This is only necessary with the
FRTMOVIE
or
FRTMUSIC
modes. With
EXTPOWER
(Extra Power), the surround speakers should be in the
same direction as the front speakers (as shown below).
See
Using Front Surround
on page 25 for more
informations.
FRTMOVIE / FRTMUSIC
EXTPOWER
• Please don’t use any attachments with the front
speakers other than the brackets provided.
3 Connect the speaker system.
Refer to
Connecting up
to connect the speakers properly.
4 Secure the speaker wire.
When you’re finished, thread the surround speaker cords
through the outlet on the back of the speaker stand and
through the base of the brackets as shown below.
FRTMOVIE / FRTMUSIC
EXTPOWER
7
En
Speaker Setup Guide
Additional notes on speaker placement
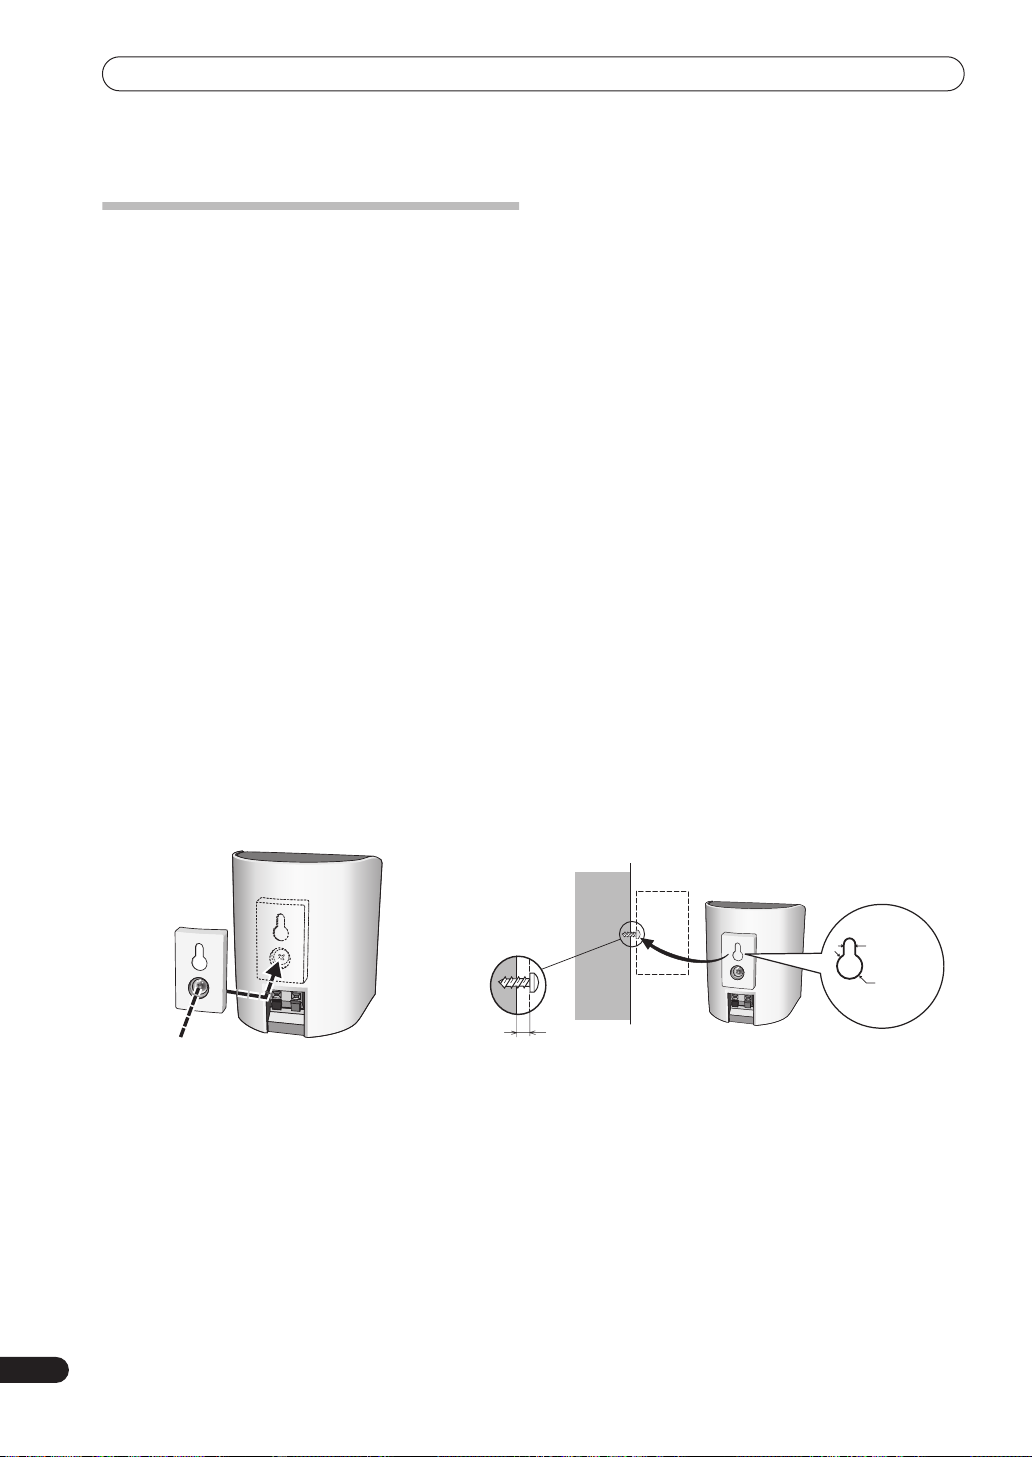
Wall mounting the surround speaker
system
Attaching the brackets
• Make sure to tighten the supplied screw as securely
as possible when attaching the bracket to the back of
the speaker.
• Please do not attach the brackets to the center
speakers.
• Please do not attach the brackets to the tall front
speakers supplied with the S-ST770 speaker system.
Before mounting
• Remember that the speaker system heavy and that
its weight could cause the wood screws to work
loose, or the wall material to fail to support it,
resulting in the speaker falling. Make sure that the
wall on which you intend to mount the speakers is
strong enough to support them. Do not mount on
plywood or soft surface walls.
• Mounting screws are not supplied. Use screws that
are suitable for the wall material and that will support
the weight of the speaker.
• If you are unsure of the qualities and strength of the
wall, consult a professional for advice.
• Pioneer is not responsible for any accidents or
damage that result from improper installation.
• Install the main front left and right speakers at an
equal distance from the TV.
• For optimum effect, install the rear speakers slightly
above ear level.
• Install the center speaker above or below the TV so
that the sound of the center channel is localized at
the TV screen.
• When installing the center speaker on top of the TV,
be sure to secure it with suitable means. Otherwise,
the speaker may fall from the TV due to external
shocks such as earthquakes, endangering those
nearby or damaging the speaker.
• This system’s speakers supplied with this system are
magnetically shielded. However, depending on the
installation location, color distortion may occur if the
speaker is installed extremely close to the screen of a
television set. If this happens case, turn the power
switch of the television set OFF, and turn it ON after
15 to 30 minutes. If the problem persists, place the
speaker system away from the television set.
• Do not fix the front or center speakers, or the receiver
subwoofer to the wall or ceiling; they could cause
injury if they fell.
8
En
Bracket screw (supplied)
Mounting screw (not supplied)
5 – 7 mm
5 mm
10 mm
Connecting up
Connecting up
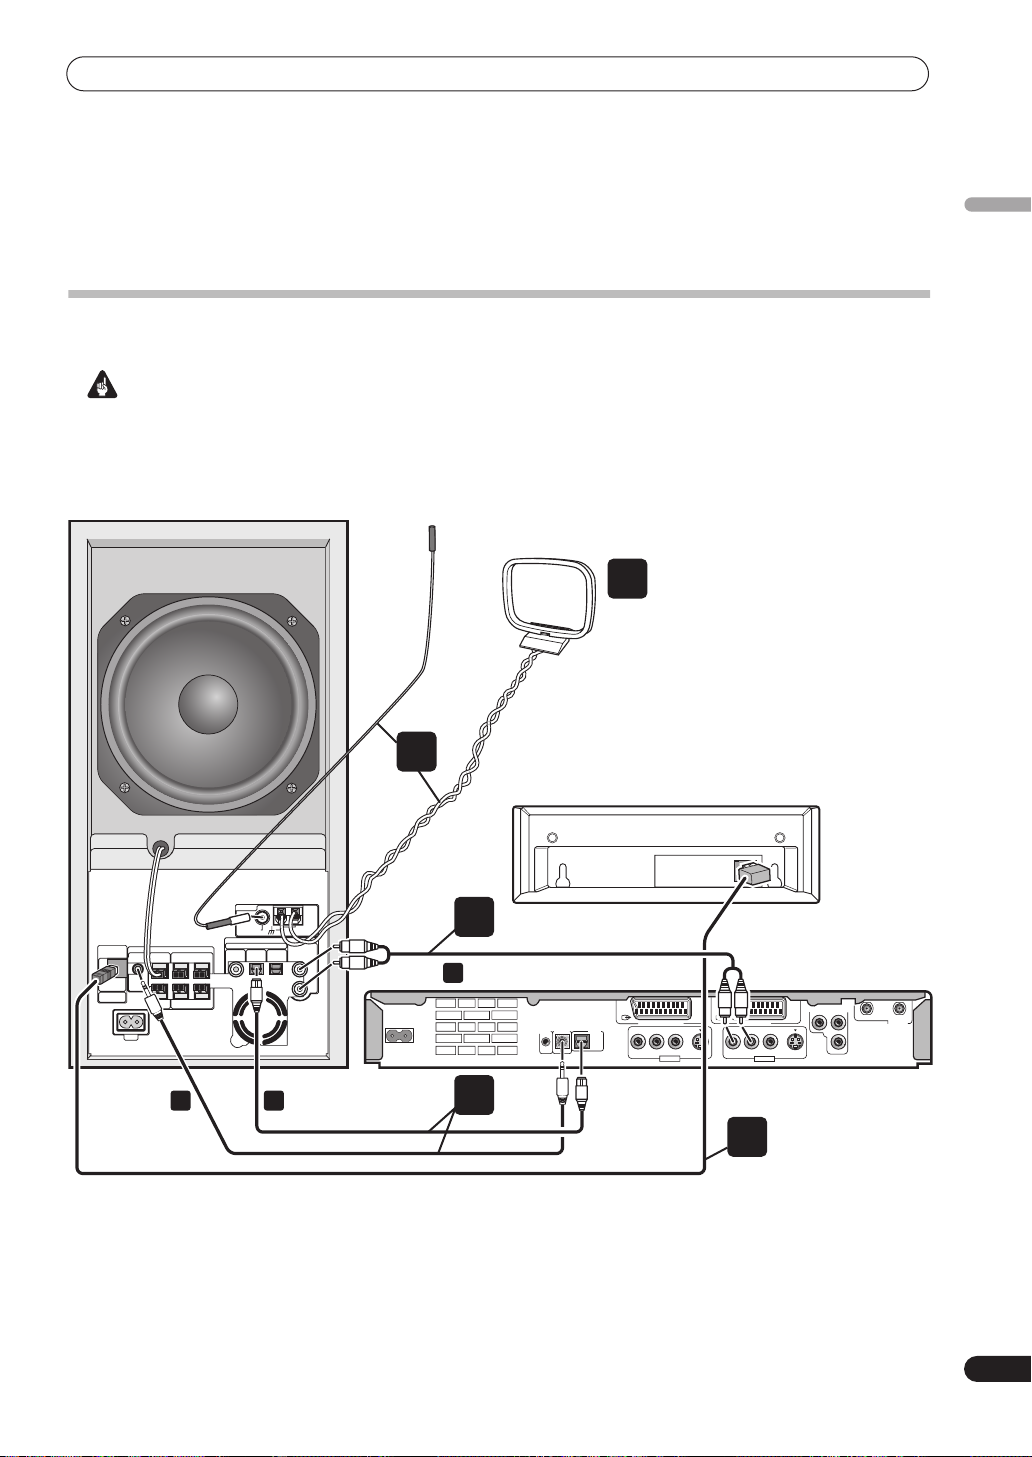
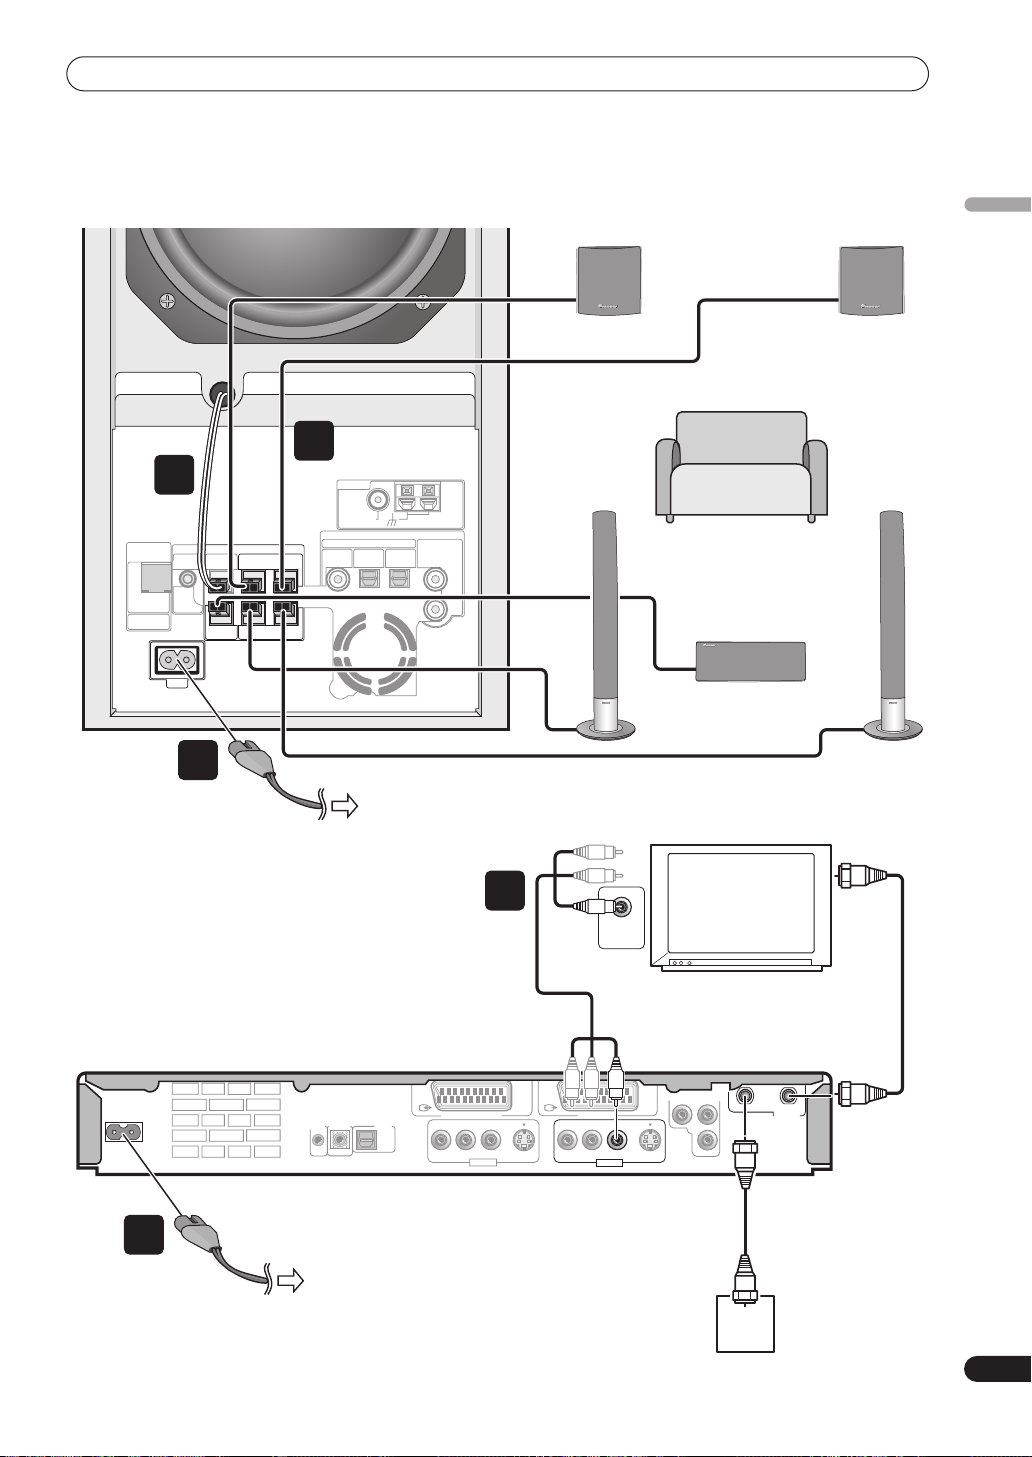
Basic connections
Important
• When connecting this system or changing connections, be sure to switch power off and disconnect the power
cord from the wall socket.
After completing all connections, connect the power cord to the wall socket.
Receiver subwoofer (SX-SW77)
FM antenna
AM loop antenna
3
4
Display unit
English
SYSTEM
CONNECTOR
USE ONLY WITH
DISPLAY UNIT
CONTROL
OUT
SUB WOOFER
CENTER
AC IN
ANTENNA
FM
UNBALAMLOOP ANTENNA
75Ω
DVD/DVR 1
(COAXIAL)
DIGITAL
DVD/DVR 2
(OPTICAL)
SPEAKERS
SURROUND
RL
FRONT
RL
a b
AUDIO INPUT
DIGITAL
(OPTICAL)
Optical cable Control cable
1
ANALOG
L
R
c
Audio cable (red/white)
COMPONENT VIDEO OUT
B
P
Y
AC IN
G-LINK
CONTROL
IN
AV 2 (INPUT 1/DECODER)
R
DIGITAL
OUT
OPTICAL
L
VIDEO
AUDIO
INPUT 3
AV 1 (RGB) – TV
R
L
VIDEO
AUDIO
S-VIDEO
S-VIDEO
OUTPUT
IN
OUT
ANTENNA
P
R
DVD Recorder
1
(DVR-530H-AV)
2
Display cable
9
En
Connecting up
1 Connect the DVD recorder to the receiver
subwoofer.
a. Plug the control cable into the control jack on the
rear of the receiver subwoofer.
Plug the other end of the cable into the control jack
on the rear of the DVD recorder.
b. Plug the optical cable into the
INPUT (DVD/DVR 2)
jack on the rear of the receiver
DIGITAL AUDIO
subwoofer.
Plug the other end of the cable into the
DIGITAL OUT
jack on the rear of the DVD recorder.
c. Plug the red/white audio cable into the
AUDIO INPUT
jack on the receiver subwoofer.
Plug the other end of the cable into the
OUTPUT
jack on the rear of the DVD recorder.
OPTICAL
ANALOG
AUDIO
Note that unless the audio and control
cables are connected, you can’t use the
remore control with the DVD recorder.
2 Connect the display unit to the receiver
subwoofer.
• Plug the L-shaped end of the display cable into the
connector on the rear of the display unit.
Plug the other end of the display cable into
CONNECTOR
jack on the receiver subwoofer.
SYSTEM
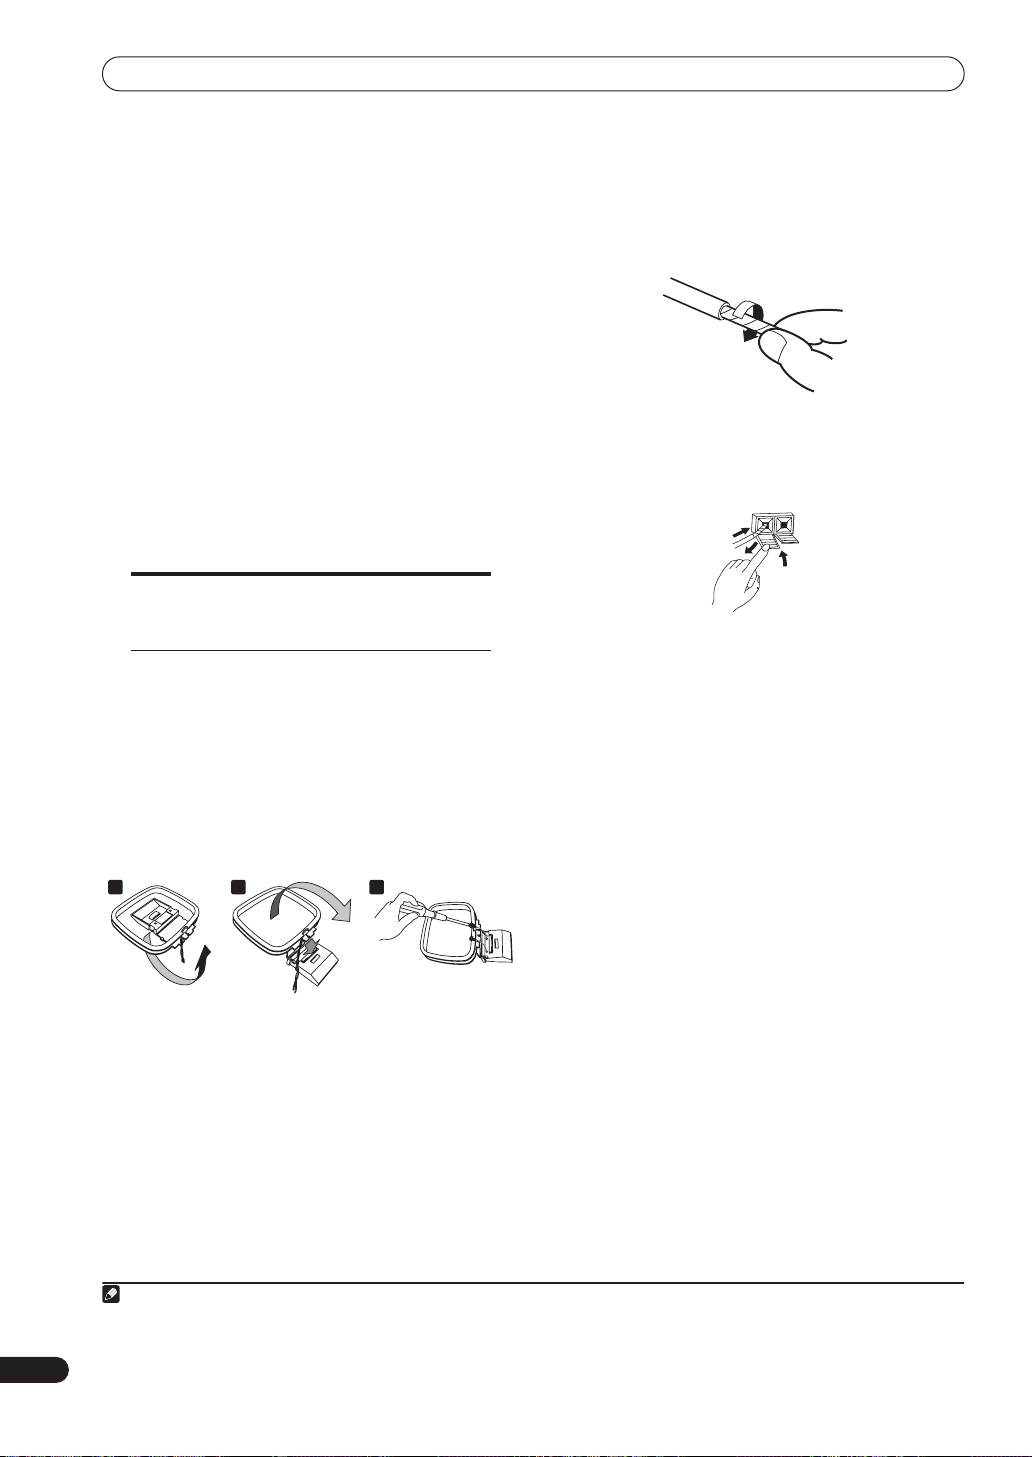
3 Assemble the AM loop antenna.
4 Connect the AM and FM antennas1.
a. Twist off the plastic insulation on the end of each
strand of the AM antenna.
b. Connect one wire of the AM loop antenna to each AM
antenna terminal.
For each terminal, press down on the tab to open;
insert the wire, then release to secure.
1
2
c. Push the FM antenna
FM antenna socket.
2
plug onto the center pin of the
10
En
a b c
a. Bend the stand in the direction indicated by the
arrow.
b. Clip the loop onto the stand.
c. If you want to fix to a wall or other surface, perform
step b after first securing the stand with screws.
It is recommended that you determine the reception
strength before securing the stand with the screws.
Note
1• Keep antenna cables away from other cables, the display unit, receiver subwoofer and DVD recorder.
• If reception with the supplied antenna is poor, See
2• To ensure optimum reception, make sure the FM antenna is fully extended and not coiled or hanging at the rear of the unit.
Connecting external antennas
on page 32.
Connecting up
Receiver subwoofer (SX-SW77)
5
SYSTEM
CONNECTOR
USE ONLY WITH
DISPLAY UNIT
6
AC IN
CONTROL
OUT
SUB WOOFER
CENTER
SPEAKERS
SURROUND
RL
FRONT
RL
DVD/DVR 1
ANTENNA
FM
UNBAL
75Ω
DIGITAL
DVD/DVR 2
AUDIO INPUT
8
OPTICAL
AM
LOOP ANTENNA
ANALOG
English
Surround right
(Gray)
Listening position
L
R
Center (Green)
Front right
(Red)
Surround left
(Blue)
Front left
(White)
DVD Recorder (DVR-530H-AV)
DVD Recorder
AC IN
AC IN
7
8
G-LINK
G-LINK
CONTROL
CONTROL
IN
IN
To AC outlet
To AC outlet
To AC outlet
7
Audio/video cable*
(red/white/yellow)
* Use just the yellow plug
of the three-pin audio/video
cable for this connection.
DIGITAL
DIGITAL
OUT
OUT
OPTICAL
OPTICAL
AV 2 (INPUT 1/DECODER)
AV 2 (INPUT 1/DECODER)
R
R
L
L
AUDIO
AUDIO
INPUT 3
INPUT 3
6
VIDEO
VIDEO
S-VIDEO
S-VIDEO
R
R
AV 1 (RGB) – TV
AV 1 (RGB) – TV
AUDIO
AUDIO
VIDEO
IN
L
L
OUTPUT
OUTPUT
VIDEO
IN
VIDEO
VIDEO
S-VIDEO
S-VIDEO
TV
TV
ANTENNA IN
ANTENNA IN
COMPONENT VIDEO OUT
COMPONENT VIDEO OUT
B
B
P
P
Y
Y
P
R
P
R
IN
IN
ANTENNA
ANTENNA
RF antenna
cable
Antenna/cable TV
Antenna/cable TV
wall outlet
wall outlet
OUT
OUT
ANTENNA IN
ANTENNA IN
RF antenna
cable
ANTENNA
ANTENNA
OUT
OUT
11
En
Connecting up
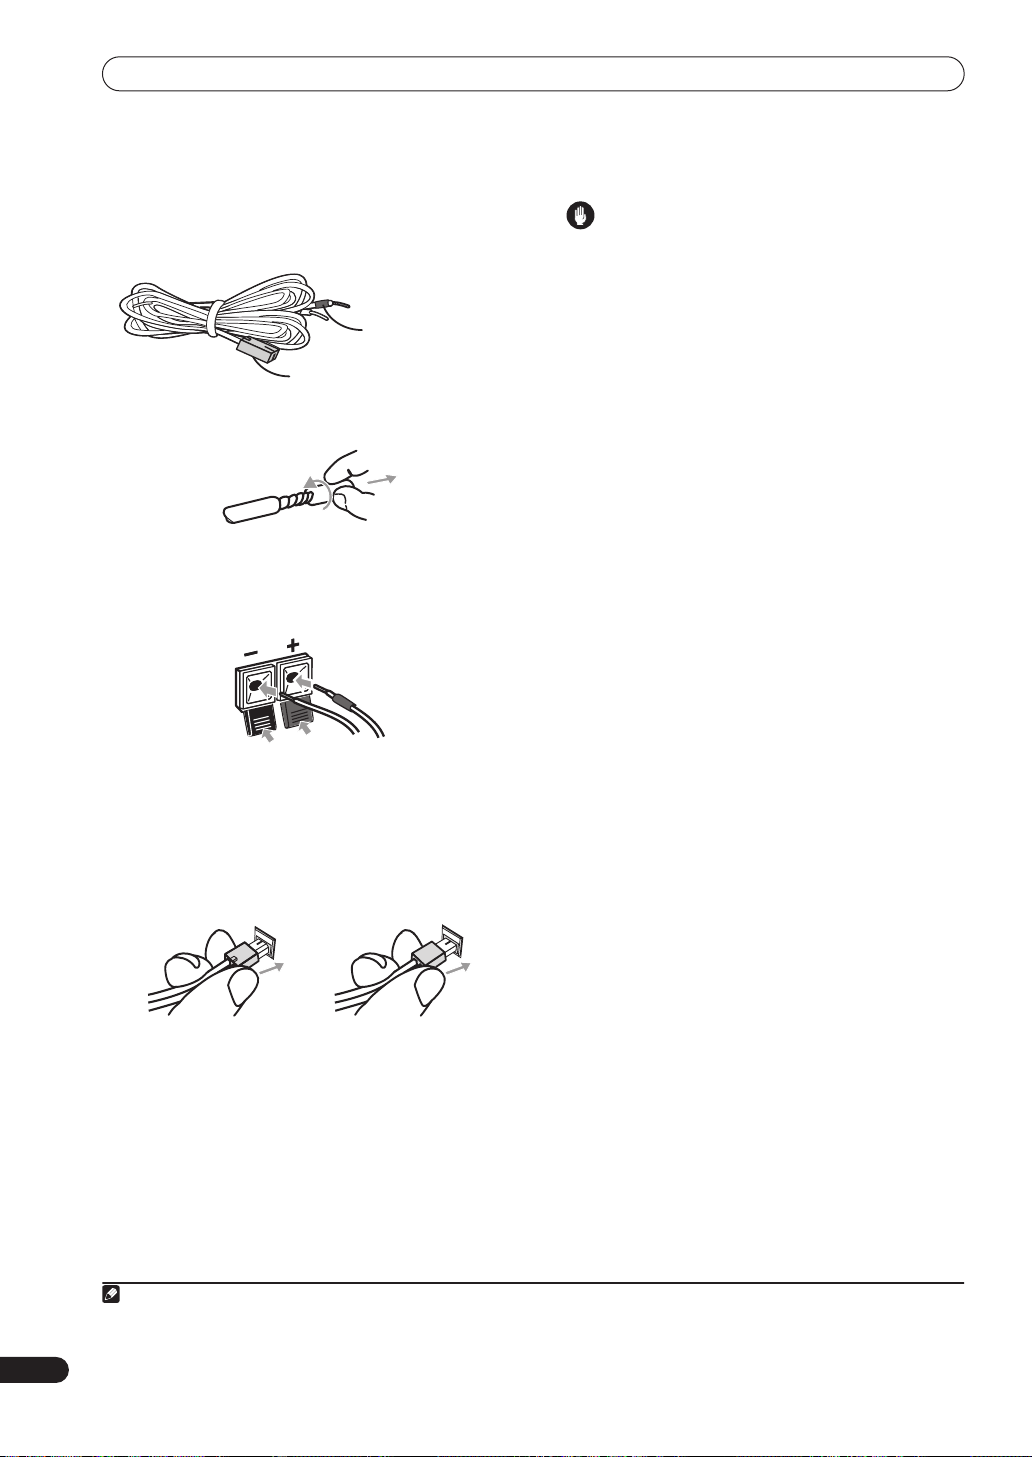
5 Connect each speaker.
Each speaker cable has a color-coded connector at one
end and two wires at the other end.
Color-coded wire
(Connect to speaker)
Color-coded connector
(Connect to rear panel)
• Twist and pull off the protective shields on each wire.
• Connect the wires to the speaker. Match the colored
wired with the color-coded label (above the tabs),
then insert the colored wire into the red (
the other wire into the black (
–
) side.
+
) side and
• Connect the other end to the color-coded speaker
terminals on the rear of the receiver subwoofer. Make
sure to insert completely.
The small lug at the wire-end of the speaker plug
should face up or down depending on whether it’s
being plugged into one of the upper or lower speaker
terminals. Please make sure to connect correctly.
Caution
• These speaker terminals carry
voltage
. To prevent the risk of electric shock when
HAZARDOUS LIVE
connecting or disconnecting the speaker cables,
disconnect the power cord before touching any
uninsulated parts.
• Do not connect any speakers other than those
supplied to this system.
• Do not connect this speaker system to any amplifier
other than the one supplied with this system.
Connection to any other amplifier may result in
malfunction or fire.
7 Connect the DVD recorder to your TV.
• Connect the
VIDEO OUTPUT
jack to a video input on
1
your TV.
Use the yellow jack of the supplied audio/video cable
for the video connection.
8 Connect the power cord.
2
• Connect the power cords to AC inlets on the receiver
subwoofer and DVD recorder.
Connect the power cords to a wall socket.
12
En
Upper terminal Lower terminal
6 Connect the suboofer cable.
Just below the subwoofer speaker, to the left of center,
you should see the subwoofer connecting cable. Plug
this into the
Note
1 Other types of video connection are possible. See page 47-page 51 for more information.
2• Do not use any power cord other than the one supplied with this system.
• Do not use the supplied power cord for any purpose other than connecting to this system.
SUBWOOFER SPEAKER
terminal.
Connecting up
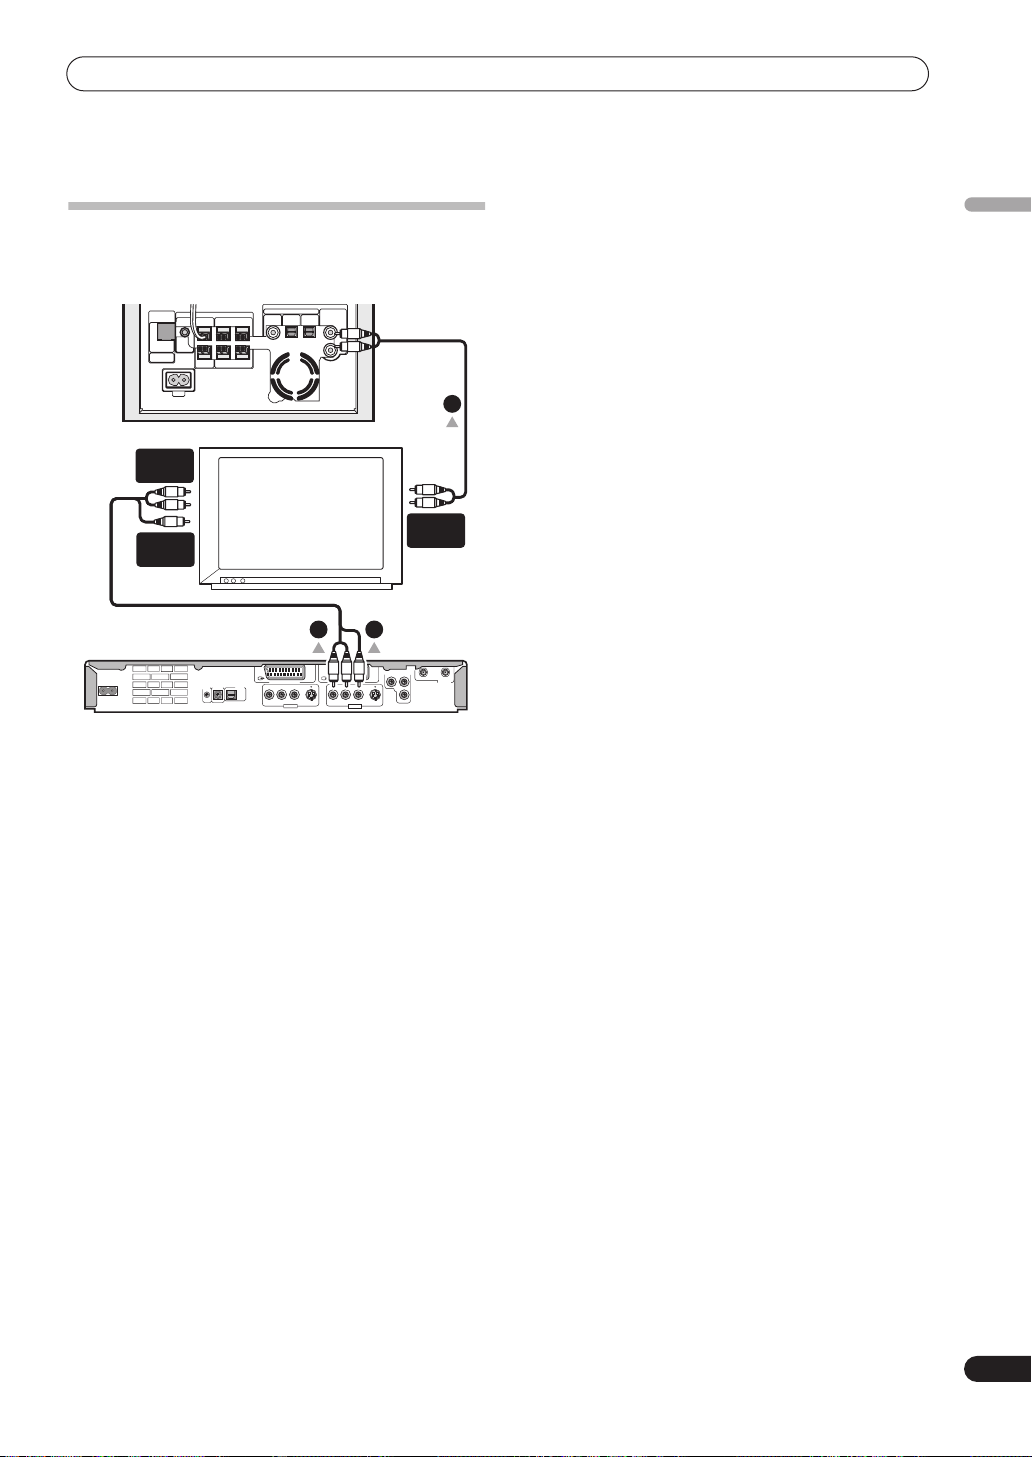
Using this system for TV audio
If your TV has a stereo audio output you can connect it to
this system and enjoy surround TV sound.
AUDIO INPUT
SYSTEM
CONTROL
CONNECTOR
USE ONLY WITH
DISPLAY UNIT
SPEAKERS
OUT
SUB WOOFER
RL
CENTER
RL
AC IN
AUDIO
INPUT
VIDEO
INPUT
AC IN
G-LINK
CONTROL
IN
1 Connect the AUDIO OUTPUT jacks on your TV the
ANALOG AUDIO INPUT jacks on the receiver
subwoofer.
Use the supplied red/white stereo audio cable for this
connection. Make sure you match the left and right
outputs with their corresponding inputs for correct
stereo sound.
2 Connect the VIDEO OUTPUT jack to a video input
on your TV.
Use the yellow jack of the supplied audio/video cable for
the video connection.
3 Connect the AUDIO OUTPUT jacks to the
corresponding audio inputs on your TV.
Use the red and white jacks of the supplied audio/video
cable for the audio connection. Make sure you match the
left and right outputs with their corresponding inputs for
correct stereo sound.
SURROUND
FRONT
DIGITAL
DVD/DVR 2
ANALOG
OPTICAL
L
R
DVD/DVR 1
1
AUDIO
OUTPUT
TV
2
3
COMPONENT VIDEO OUT
YP
B
IN
AV 2 (INPUT 1/DECODER)
R
DIGITAL
OUT
OPTICAL
AUDIO
AV 1 (RGB) – TV
R
L
INPUT 3
L
VIDEO
VIDEO
AUDIO
S-VIDEO
S-VIDEO
OUTPUT
OUT
ANTENNA
P
R
English
13
En
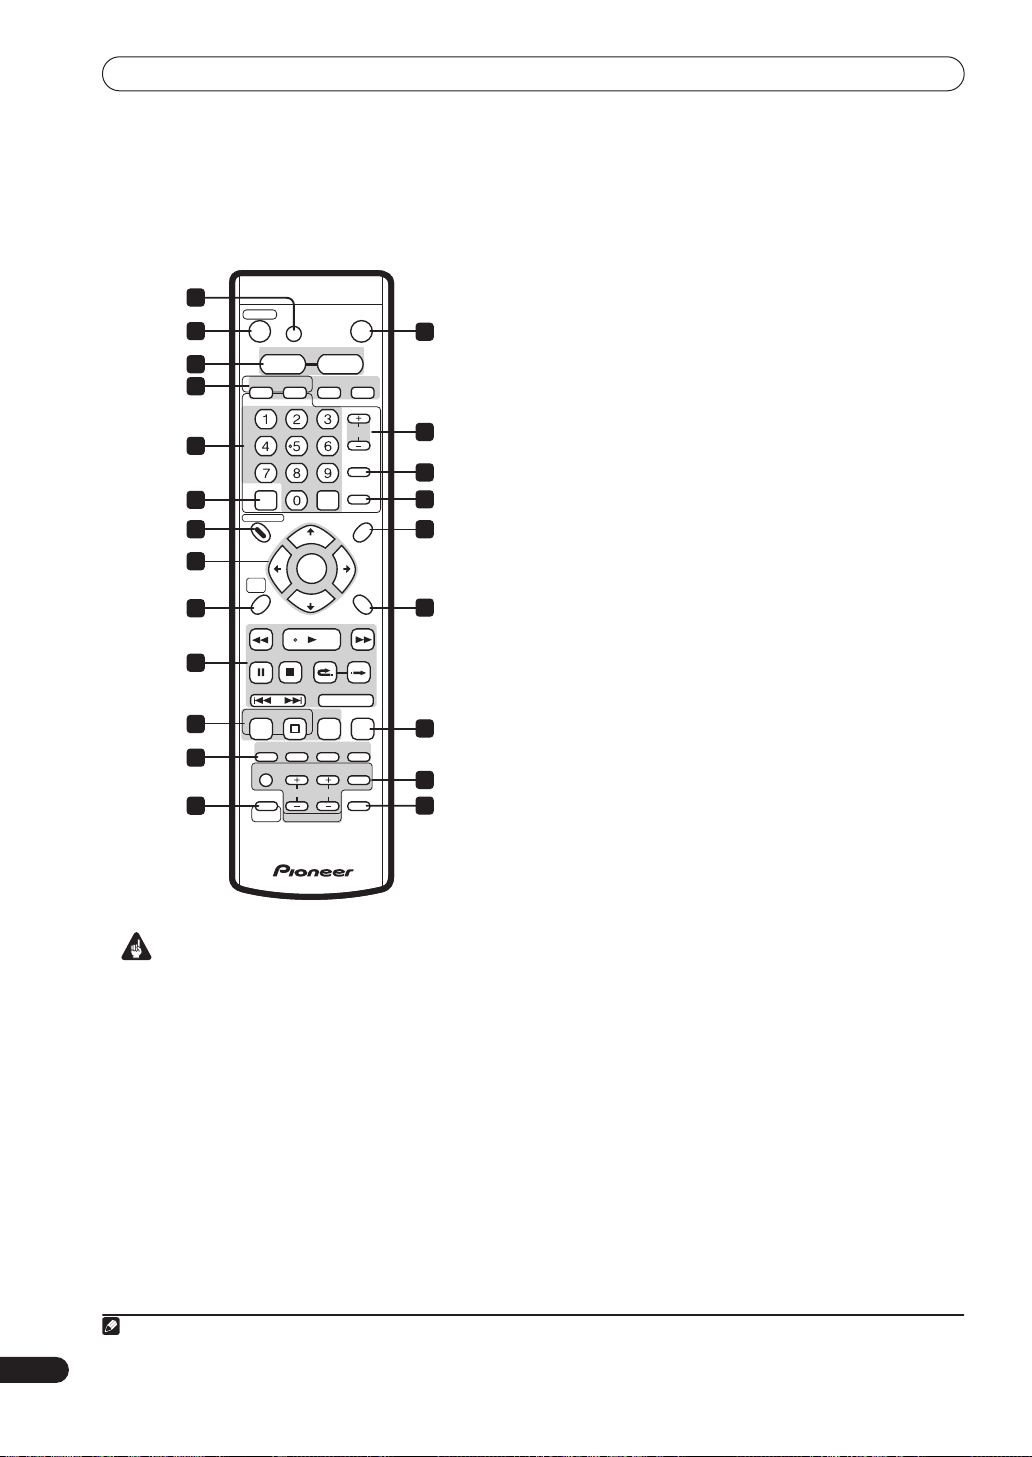
Remote control
Remote control
1
RECORDER RECEIVER
MUTE
2
4
5
7
9
11
13
14
16
17
19
21
Important
• Functions printed in green on the remote control are
accessed by pressing the button indicated while
holding down the
1 MUTE
Press to mute all audio from the speakers. Press again to
cancel and restore the sound.
2 RECORDER
Press to switch the recorder on or into standby.
3 RECEIVER
Press to switch the receiver on or into standby.
4 VOLUME +/–
Use to adjust the volume.
VOLUME
HDD DVD
HELP
DISC NAVIGATOR DVD MENU
TOP MENU
RDS DISP
HOME
MENU
PREV NEXT STEP/SLOW
REC
SURROUND ADVANCED SOUND TIMER REC
AUDIO
TV
SHIFT
SHIFT
+–
FM/AM AUDIO INPUT
CLEAR
TUNE +
ENTER
TUNE –
STOP REC REC MODE
SUBTITLE ANGLE PLAY MODE
VOLUME
CHANNEL
TV CONTROL
button.
CHANNEL
VIDEO INPUT
INFO
GUIDE
DISPLAYTEST TONE
SKIPCMBACK
ONE TOUCH
COPY
INPUT
TV/DVD
TV DIRECT
REC
SYSTEM
ST +ST –
RETURN
3
6
8
10
12
SETUP
15
18
20
22
5 Function select buttons
(page 60)
HDD
Press to select the hard disk (HDD) for recording or
playback. The receiver subwoofer’s audio input is
also switched to
DVD
(page 60)
DVD/DVR2
1
.
Press to select the DVD for recording or playback.
The receiver subwoofer’s audio input is also switched
to
DVD/DVR2
FM/AM
1
.
(page 27)
Press to select the built-in radio tuner.
AUDIO INPUT
(page 31)
Press repeatedly to select one of the receiver
subwoofer’s audio inputs (
DIGITAL
6 CHANNEL +/–
or
ANALOG
(page 61)
DVD/DVR1, DVD/DVR2
).
Press to change the channel of the built-in TV tuner.
7 Numeric buttons and CLEAR
Use the number buttons for track/chapter/title selection;
channel selection, and so on.
Use
CLEAR
to clear an entry and start again.
8 VIDEO INPUT
(page 87)
Press to change the DVD recorder input for recording
and playback.
9 HELP
Press for help on how to use the current GUI screen.
10 GUIDE Plus+™ system controls
GUIDE
Press to display the GUIDE Plus+™ screen; press
again to exit.
+ SHIFT: INFO
Press to see additional information for the
highlighted item in GUIDE Plus+™.
11 DISC NAVIGATOR
(page 92, 111)
/ TOP MENU
(page 63)
Press to display the Disc Navigator screen, or the top
menu if a DVD-Video disc is loaded.
+ SHIFT: RDS DISP
Changes RDS displays (page 28).
,
14
En
Note
1 If the recorder is set to remote mode 2 or 3, the subwoofer’s audio input will not be switched. See also
Remote Control Mode
on page 136.

Remote control
12 DVD MENU
Press to display the disc menu if a DVD-Video disc is
loaded.
When in the GUIDE Plus+™ system, use to jump
directly to the Menu bar.
+ SHIFT: SYSTEM SETUP
Use to access the menu system for surround sound
setup, tuner settings and so on (page 23, 27, 28, 33).
13
///
Use to navigate all DVD recorder on-screen displays.
Press
option.
Use together with the
receiver subwoofer menus.
14 HOME MENU
Press to display the Home Menu, from which you can
navigate many the functions of the system.
+ SHIFT: TEST TONE
Use to output the test tone (for speaker setup)
(page 30).
15 RETURN
Press to go back one level in the on-screen menu or
display.
+ SHIFT: DISPLAY
Displays/changes the on-screen information
displays.
16 Playback controls
/ (page 94)
Press to start reverse or forward scanning. Press
again to change the speed.
Press to start playback.
Press to pause playback or recording.
Press to stop playback.
CM BACK (commercial back)
Press repeatedly to skip progressively backward
through the audio or video playing.
CM SKIP (commercial skip)
Press repeatedly to skip progressively forward
through the audio or video playing.
PREV / NEXT
Press to skip to the previous or next title/chapter/
track/folder; or to display the previous or next menu
page.
When GUIDE Plus+™ is displayed, use to display the
previous/next page.
(page 63)
(cursor buttons) and ENTER
ENTER
to select the currently highlighted
SHIFT
button to navigate the
(page 65)
(page 65)
(page 62)
STEP/SLOW (page 94)
During playback, press to start slow-motion
playback; while paused, press to show the previous
or next video frame.
When GUIDE Plus+™ is displayed, use to display the
previous/next day.
17 Recording controls
REC
Press to start recording. Press repeatedly to set the
recording time in blocks of 30 mins.
STOP REC
Press to stop recording.
REC MODE
Press repeatedly to change the recording mode
(picture quality).
18 ONE TOUCH COPY
Press to start One Touch Copy of the currently playing
title to DVD or the HDD.
19 GUIDE Plus+™ Action buttons, DVD playback
functions and surround sound mode/sound
enhancement buttons
When in the GUIDE Plus+™ system, these buttons
act as the Red, Green, Yellow and Blue Action
buttons (the functions of these buttons change
according to the GUIDE Plus+™ Area). (page 68)
AUDIO
Changes the audio language or channel. (When no
disc is playing or recording, press to change the
tuner audio.)
+ SHIFT: SURROUND
Use to select a Surround mode (page 24).
SUBTITLE
Displays/changes the subtitles included in
multilingual DVD-Video discs.
+ SHIFT: ADVANCED
Use to select an Advanced Surround mode (page 25).
ANGLE
Switches camera angles on discs with multi-angle
scenes.
(page 81)
(page 61, 99)
(page 98)
(page 100)
(page 60)
(page 101)
English
15
En
Remote control
+ SHIFT: SOUND
Press to access the sound menu, from which you can
adjust bass and treble, etc.
PLAY MODE
Press to display the Play Mode menu (for features
such as search, repeat and program play).
+ SHIFT: TIMER REC
Press to set a timer recording from the GUIDE
Plus+™ system.
20 TV CONTROL
After setting up, use these controls to control your TV.
21 SHIFT
Press to access functions on the remote printed in green.
22 TV DIRECT REC
Press to start recording whatever channel your TV is
set to.
+
SHIFT: TV/DVD
Press to switch between ‘TV mode’, in which you get
the picture and sound from the TV’s tuner, and ‘DVD
mode’, in which you get picture and sound from the
system’s tuner (or an external input).
(page 26)
(page 95)
(page 69)
(page 139)
(page 82)
(page 62)
Using the remote control
Please keep in mind the following when using the remote
control:
• Make sure that there are no obstacles between the
remote and the remote sensor on the unit.
• Remote operation may become unreliable if strong
sunlight or fluorescent light is shining on the unit’s
remote sensor.
• Remote controllers for different devices can interfere
with each other. Avoid using remotes for other
equipment located close to this unit.
• Replace the batteries when you notice a fall off in the
operating range of the remote.
• When the batteries run down or you change the
batteries, the TV preset codes are automatically reset.
See
Setting up the remote to control your TV
page 139 to reset them.
• If you changed the remote control mode, this will also
be reset when you change the batteries. See also
Remote Control Mode
• Use within the operating range in front of the remote
control sensor on the display unit, as shown.
on page 136.
on
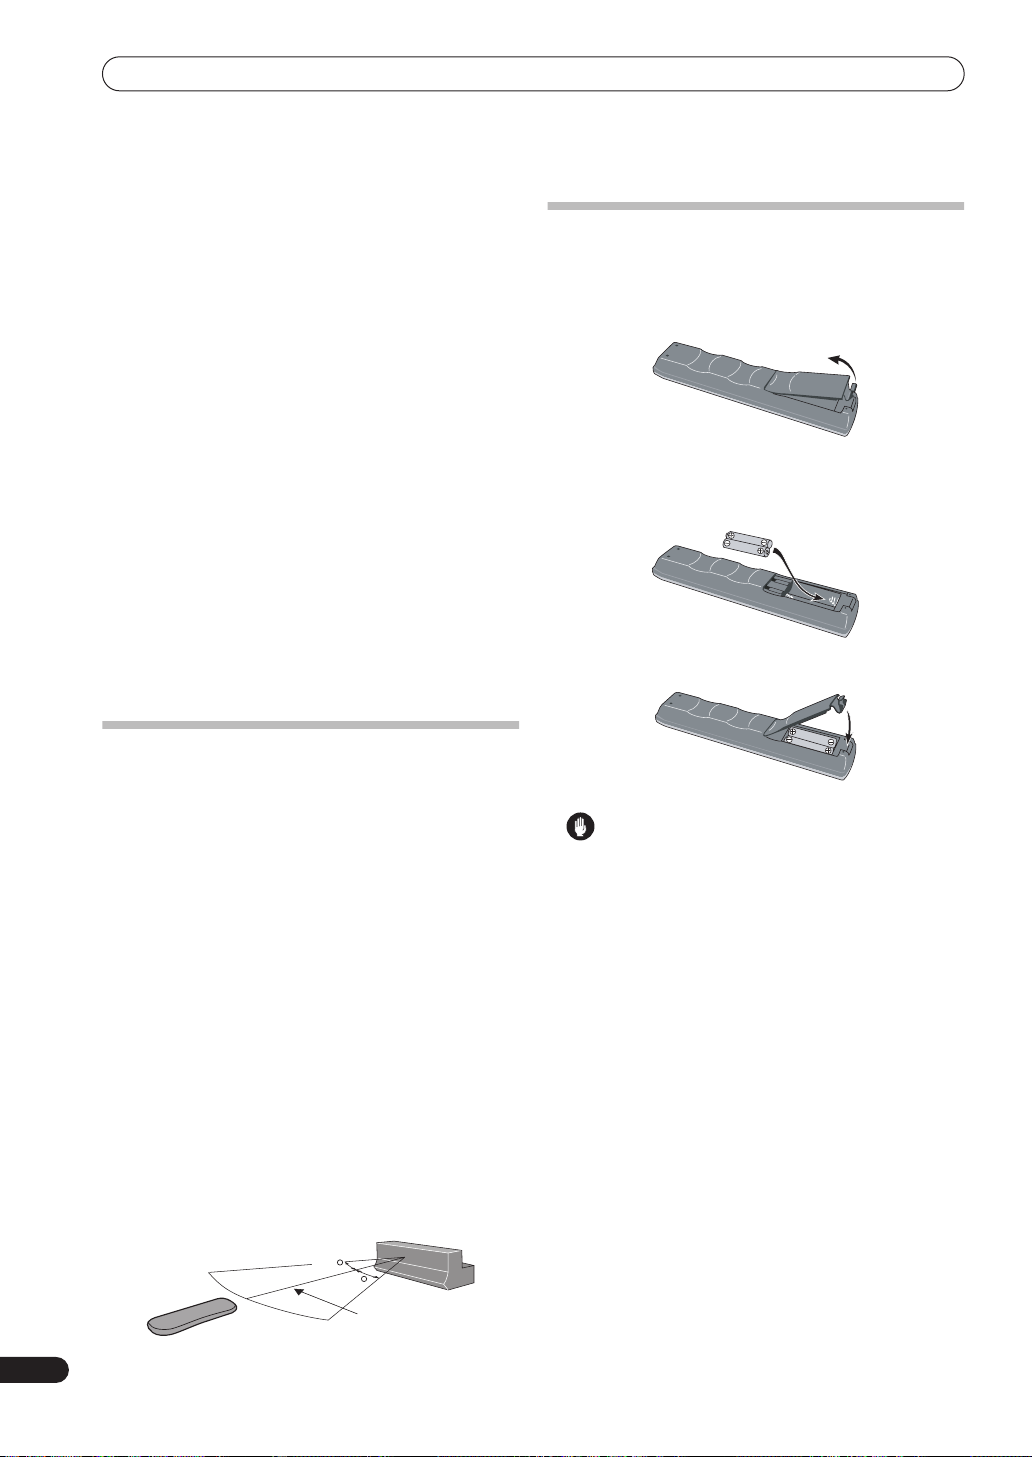
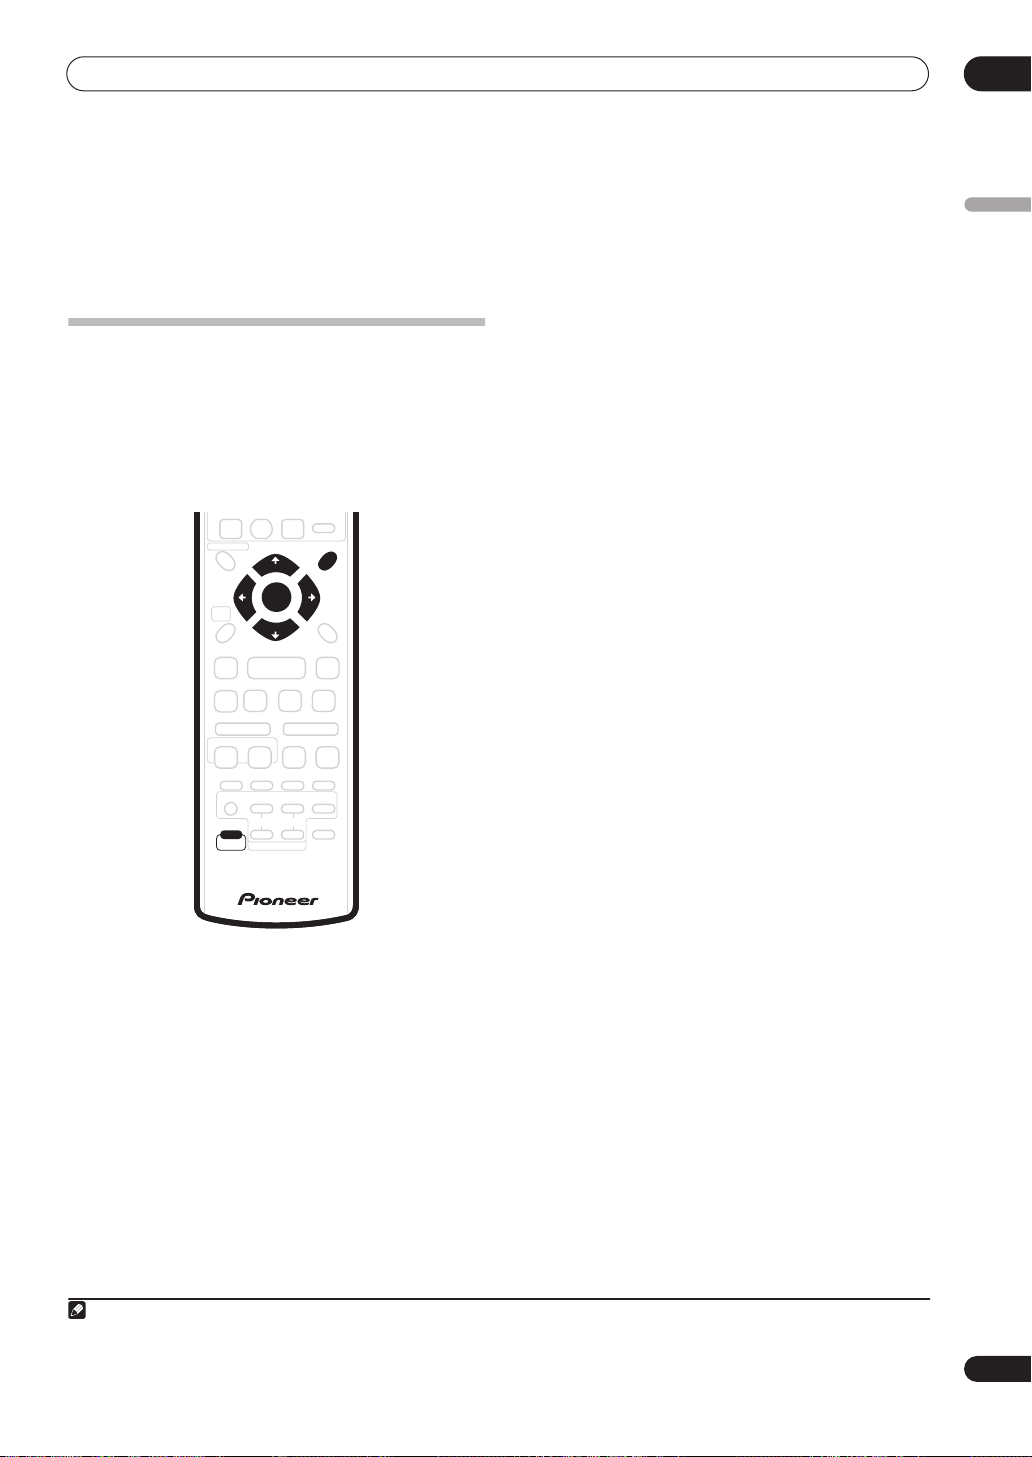
Putting the batteries in the remote
control
1 Open the battery compartment cover on the
back of the remote control.
2 Insert two AA/R6P batteries into the battery
compartment following the indications (
the compartment.
3 Close the cover.
Caution
Incorrect use of batteries can result in hazards such
as leakage and bursting. Please observe the
following:
• Don’t mix new and old batteries together.
• Don’t use different kinds of battery together—
although they may look similar, different batteries
may have different voltages.
• Make sure that the plus and minus ends of each
battery match the indications in the battery
compartment.
• Remove batteries from equipment that isn’t going to
be used for a month or more.
• When disposing of used batteries, please comply
with governmental regulations or environmental
public instruction’s rules that apply in your country or
area.
,
) inside
16
En
30
30
7m
Before you start
Before you start
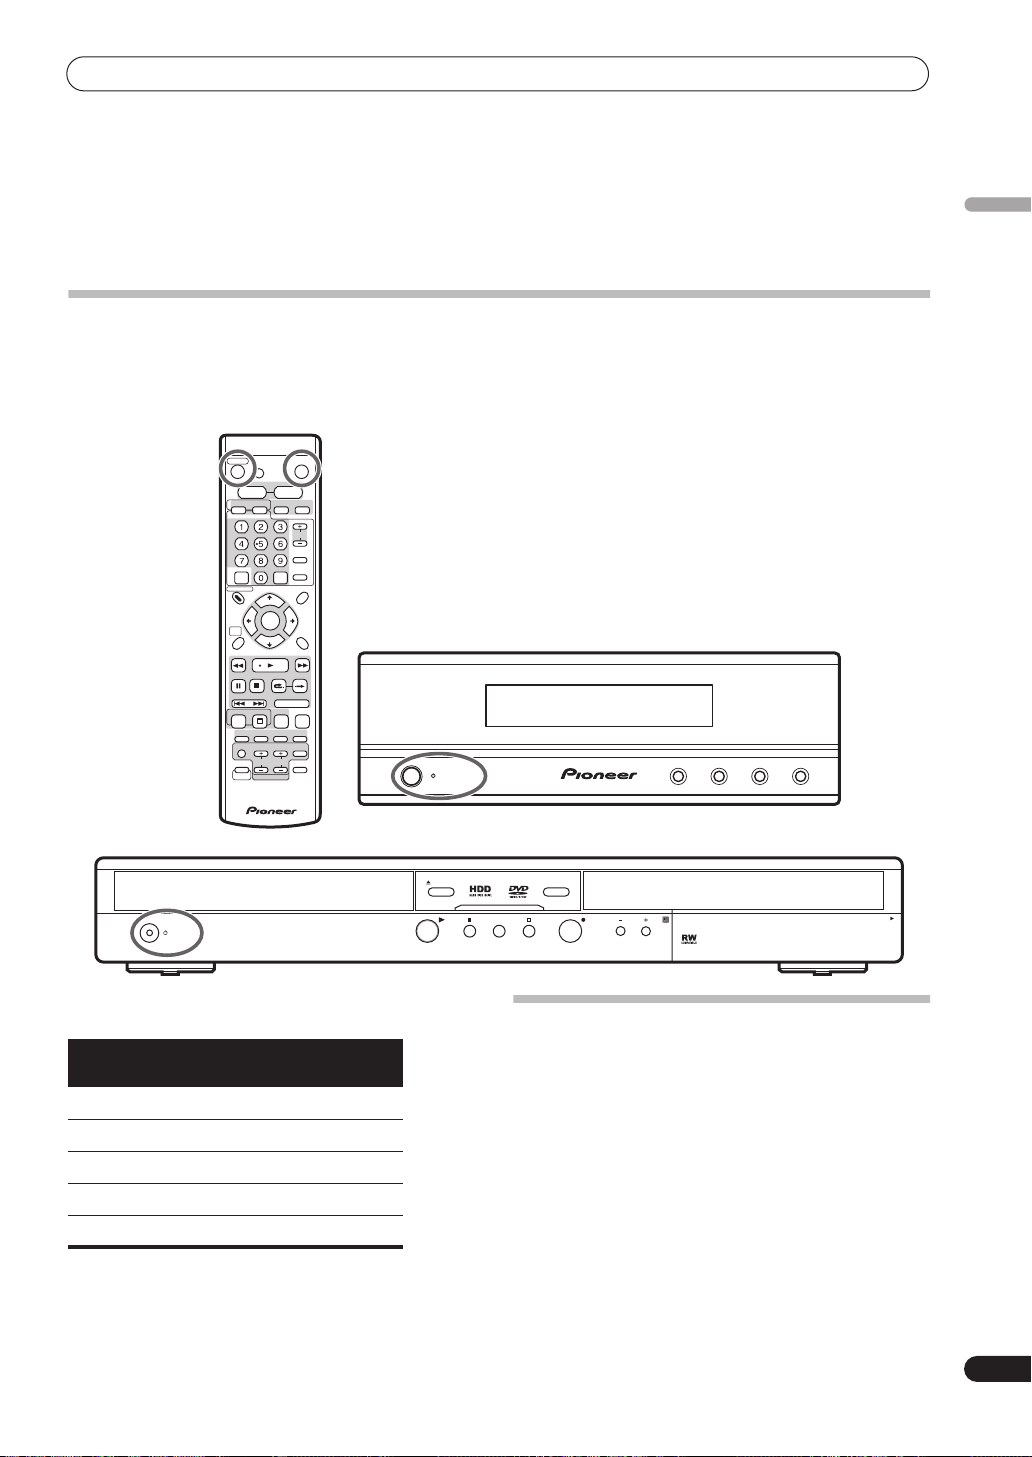
Switching on
The DVD recorder and receiver subwoofer have separate power switches. The power switch for the receiver subwoofer
is located on the display unit.
Remote control
RECORDER RECEIVER
MUTE
VOLUME
+–
HDD DVD
FM/AM AUDIO INPUT
CHANNEL
VIDEO INPUT
INFO
HELP
GUIDE
CLEAR
TUNE +
DISC NAVIGATOR DVD MENU
TOP MENU
RDS DISP
HOME
MENU
PREV NEXT STEP/SLOW
REC
SURROUND ADVANCED SOUND TIMER REC
AUDIO
TV
SHIFT
ENTER
TUNE –
STOP REC REC MODE
SUBTITLE ANGLE PLAY MODE
VOLUME
CHANNEL
TV CONTROL
SYSTEM
SETUP
ST +ST –
RETURN
DISPLAYTEST TONE
SKIPCMBACK
ONE TOUCH
COPY
INPUT
TV/DVD
TV DIRECT
REC
STANDBY/ON
– VOLUME + AUDIO INPUT SURROUND
Display unit
English
OPEN/CLOSE
STANDBY/ON
The table below shows what needs to be switched on for
various system functions:
Function
Display unit
DVD
recorder
DVD playback On On
CD playback On On
HDD playback On On
Radio On Off
Timer recording Off On
DVD Recorder
HDD/DVD
ONE TOUCH COPY
REC
Setting up
After connecting and installing the DVD recorder and
receiver subwoofer, complete the steps below to set the
system up for use.
DVD recorder
• Set the date and time, TV channel tuning and the type
of TV in the Setup Navigator (page 55).
Receiver subwoofer
• Switch off the display demo mode (page 23).
• Complete the Room Setup to optimize the surround
sound (page 23).
PULL-OPEN
17
En
Before you start
Basic operation
This manual is split into to parts, one covering using the
receiver subwoofer, the other using the DVD recorder.
Below are some common operations and where to find
them explained in this manual.
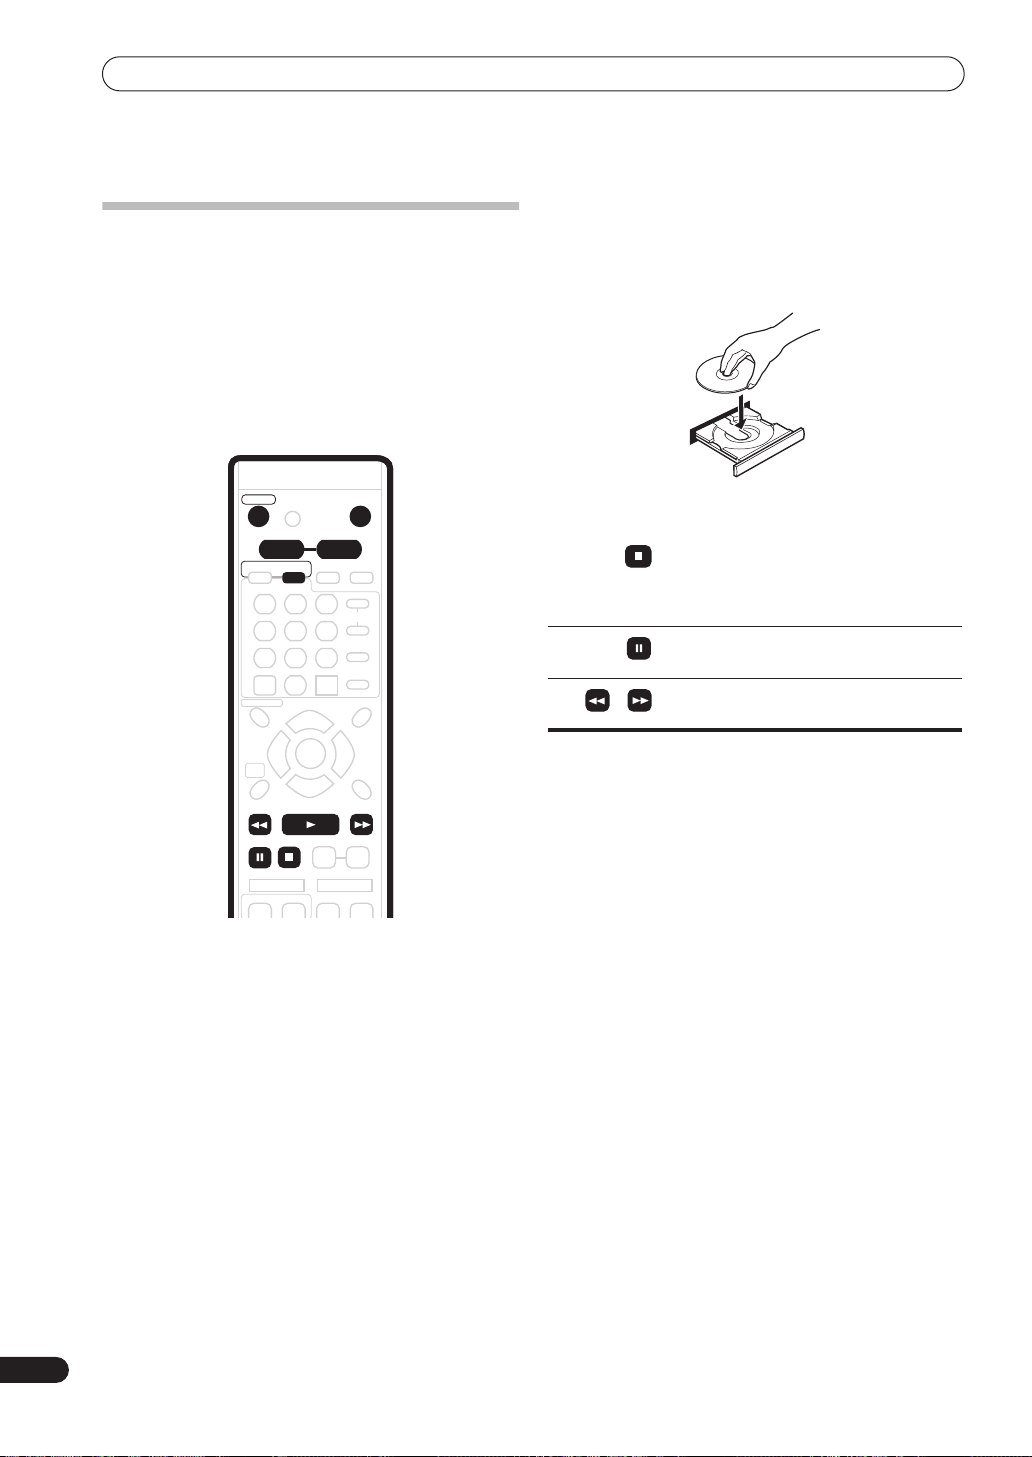
Watching a DVD
Remember that when using the remote to control the
DVD recorder, you should point the remote towards the
display unit, not the recorder itslelf.
6 Load a disc.
Load a disc with the label side facing up, using the disc
tray guide to align the disc (if you’re loading a doublesided DVD disc, load it with the side you want to play
face-down).
RECORDER RECEIVER
MUTE
VOLUME
HDD DVD
HELP
DISC NAVIGATOR DVD MENU
TOP MENU
RDS DISP
HOME
MENU
PREV NEXT STEP/SLOW
REC
FM/AM AUDIO INPUT
CLEAR
TUNE +
ENTER
TUNE –
STOP REC REC MODE
+–
CHANNEL
VIDEO INPUT
INFO
GUIDE
DISPLAYTEST TONE
SKIPCMBACK
ONE TOUCH
COPY
ST +ST –
SYSTEM
RETURN
SETUP
1 Switch on the display unit (receiver subwoofer).
2 Switch on the DVD recorder.
3 Switch on your TV.
Turn on your TV and make sure that it is set to the correct
video input.
4 Press DVD.
5 Press
OPEN/CLOSE on the DVD recorder to
open the disc tray.
7 Press (play) to start playback.
Press to stop playback.
You can resume playback from the same
point by pressing . (Press again to
cancel the resume function.)
Pauses playback, or restarts playback
when paused.
Press to start scanning. Press repeatedly
to increase the scanning speed.
See
Basic playback
on page 62 for more on playing discs.
8 Adjust the volume.
9 Adjust the sound using the surround effects
See
Listening to your system
on page 24 for details.
18
En

Before you start
Listening to a CD
1 Switch on the display unit (receiver subwoofer).
2 Switch on the DVD recorder.
3 Press DVD.
4 Load a CD and start playback
5 Adjust the volume.
6 Adjust the sound using the surround effects
(page 24)
.
(page 64)
.
Watching a title recorded on the HDD
1 Switch on the display unit (receiver subwoofer).
2 Switch on the DVD recorder.
3 Switch on your TV.
4 Press HDD.
5 Start playback of the HDD title
6 Adjust the volume.
7 Adjust the sound using the surround effects
(page 24)
.
(page 63)
.
Listening to the radio
1 Switch on the display unit (receiver subwoofer).
2 Tune to a station
3 Adjust the volume.
4 Adjust the sound using the surround effects
(page 24)
.
(page 27)
.
English
19
En
20
En

Section Two
Contents
01 Controls and displays
Display unit
Display
. . . . . . . . . . . . . . . . . . . . . . . . . . . . . . . 22
. . . . . . . . . . . . . . . . . . . . . . . . . . . . . . . . . 22
02 Getting started
System demo setting
Using the Room Setup
. . . . . . . . . . . . . . . . . . . . . . . . 23
. . . . . . . . . . . . . . . . . . . . . . . 23
03 Listening to your system
About the listening modes
Auto listening mode
Listening in surround sound
Using Front Surround
Using Advanced Surround
Listening in stereo
Enhancing dialogue
Adjusting the bass and treble
Boosting the bass level
. . . . . . . . . . . . . . . . . . . . 24
. . . . . . . . . . . . . . . . . . . . . . . . 24
. . . . . . . . . . . . . . . . . . 24
. . . . . . . . . . . . . . . . . . . . . . . 25
. . . . . . . . . . . . . . . . . . . . 25
. . . . . . . . . . . . . . . . . . . . . . . . . . 25
. . . . . . . . . . . . . . . . . . . . . . . . . 26
. . . . . . . . . . . . . . . . . 26
. . . . . . . . . . . . . . . . . . . . . . 26
04 Listening to the radio
Listening to the radio
Improving poor FM reception
Improving poor AM sound
Memorizing stations
Listening to station presets
An introduction to RDS
Displaying RDS information
Searching for RDS programs
. . . . . . . . . . . . . . . . . . . . . . . . 27
. . . . . . . . . . . . . . . . 27
. . . . . . . . . . . . . . . . . . . 27
. . . . . . . . . . . . . . . . . . . . . . . 27
. . . . . . . . . . . . . . . . . . 28
. . . . . . . . . . . . . . . . . . . . . . 28
. . . . . . . . . . . . . . . . . 28
. . . . . . . . . . . . . . . . 28
05 Surround sound settings
Using the System Setup menu
Channel level setting
Speaker distance setting
Dynamic Range Control
Dual mono setting
Adjusting the channel levels using the test tone
. . . . . . . . . . . . . . . . . . . . . . . 29
. . . . . . . . . . . . . . . . . . . . . . . . . 30
. . . . . . . . . . . . . . . . 29
. . . . . . . . . . . . . . . . . . . . 29
. . . . . . . . . . . . . . . . . . . . 30
06 Other connections
Connecting auxiliary components
Listening to an external audio source
Connecting external antennas
. . . . . . . . . . . . . . 31
. . . . . . . . . . . 31
. . . . . . . . . . . . . . . . . 32
. . . 30
07 Additional information
Setting the sleep timer
Dimming the display
DTS CD setting
Resetting the system
Installation and maintenance
Hints on installation
Troubleshooting
General
. . . . . . . . . . . . . . . . . . . . . . . . . . . . . . . . . 34
Tuner
. . . . . . . . . . . . . . . . . . . . . . . . . . . . . . . . . . . 35
Error Messages
Glossary
Specifications
. . . . . . . . . . . . . . . . . . . . . . . . . . . . . . . . . . 35
. . . . . . . . . . . . . . . . . . . . . . . . . . . . . 36
. . . . . . . . . . . . . . . . . . . . . . . 33
. . . . . . . . . . . . . . . . . . . . . . . . 33
. . . . . . . . . . . . . . . . . . . . . . . . . . . . 33
. . . . . . . . . . . . . . . . . . . . . . . . 33
. . . . . . . . . . . . . . . . . 34
. . . . . . . . . . . . . . . . . . . . . . . 34
. . . . . . . . . . . . . . . . . . . . . . . . . . . . 34
. . . . . . . . . . . . . . . . . . . . . . . . . . . 35
21
En
01
Controls and displays
Chapter 1
Controls and displays
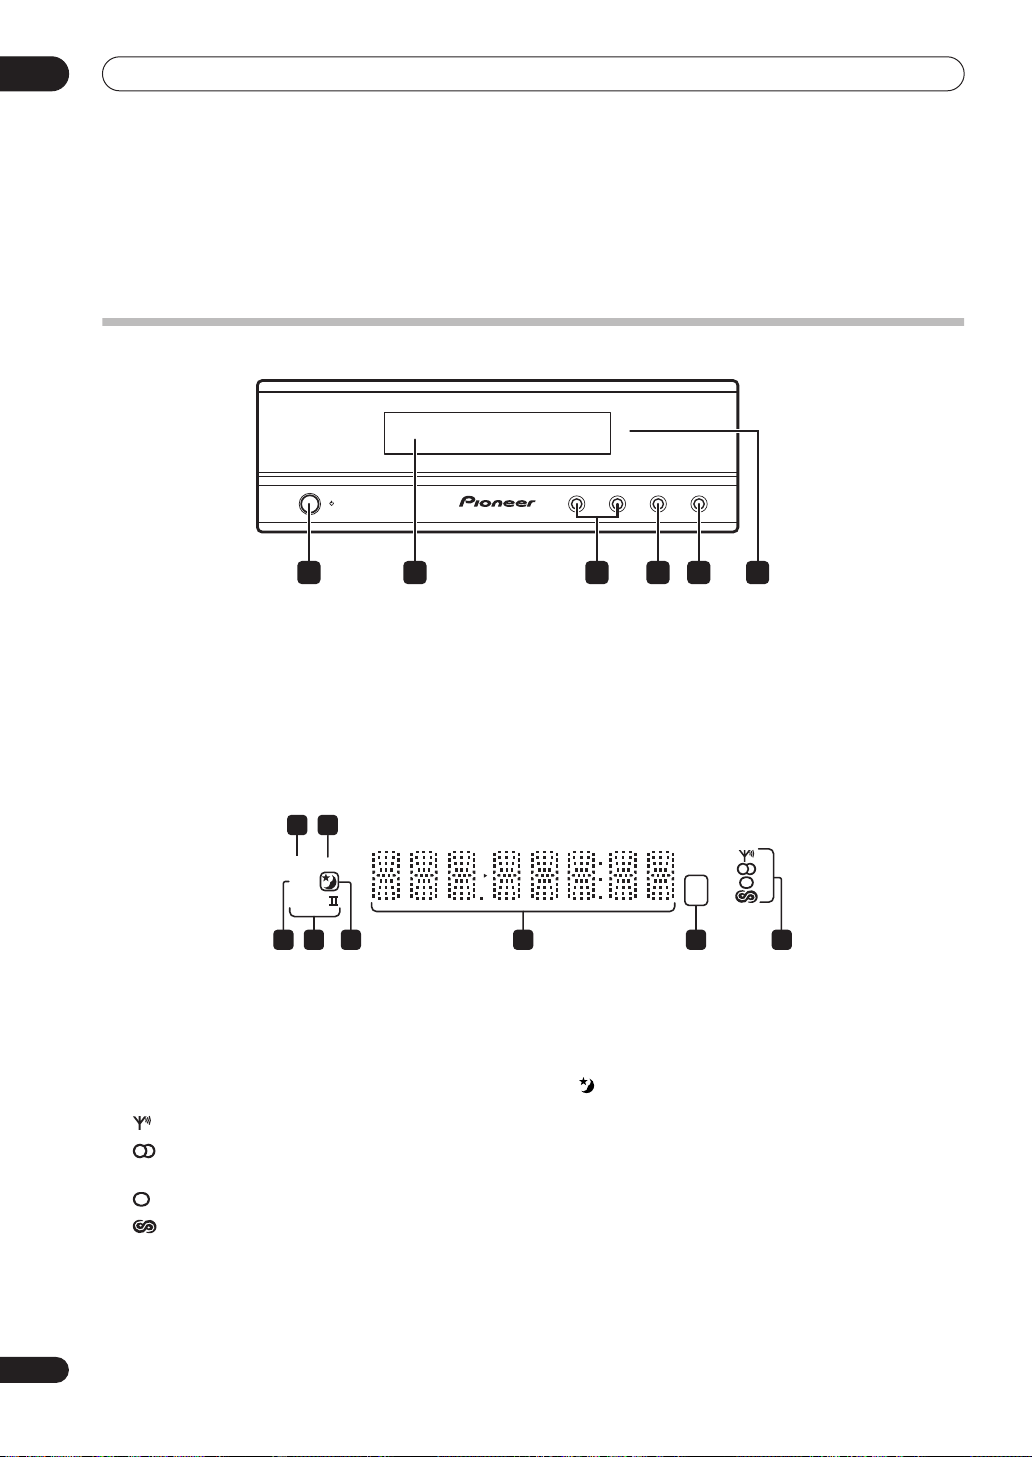
Display unit
STANDBY/ON
1 4 652 3
1 STANDBY/ON
Press to switch the system on/into standby.
2 Front panel display
See below for details.
3 VOLUME buttons
Use to adjust the volume.
Display
2
1
DTS F.SURR.
2D
2PL
678
1
DTS
Lights during playback of a DTS source (page 24).
2
F.SURR.
Lights when the Front Surround listening mode is
selected (page 25).
3 Tuner indicators
– Lights when a broadcast is being received.
– Lights when a stereo FM broadcast is being
received in auto stereo mode.
– Lights when FM mono reception is selected.
– Lights when in one of the RDS display or search
modes.
– VOLUME + AUDIO INPUT SURROUND
4 AUDIO INPUT
Press repeatedly to select one of the external audio
inputs (
DVD/DVR1, DVD/DVR2, DIGITAL
5 SURROUND
Use to select a Surround mode (page 24).
6 IR remote sensor
5
4 kHz / MHz
Indicates the frequency unit shown in the character
display (
5 Character display
6
Lights when sleep timer is active (page 33).
72 PL II
Lights during Dolby Pro Logic II decoding (page 24).
82 D
Lights during playback of a Dolby Digital source
(page 24).
kHz
kHz
MHz
for AM,
(page 31)
(page 16)
4 3
MHz
for FM).
or
ANALOG
).
22
En

Getting started
02
Chapter 2
Getting started
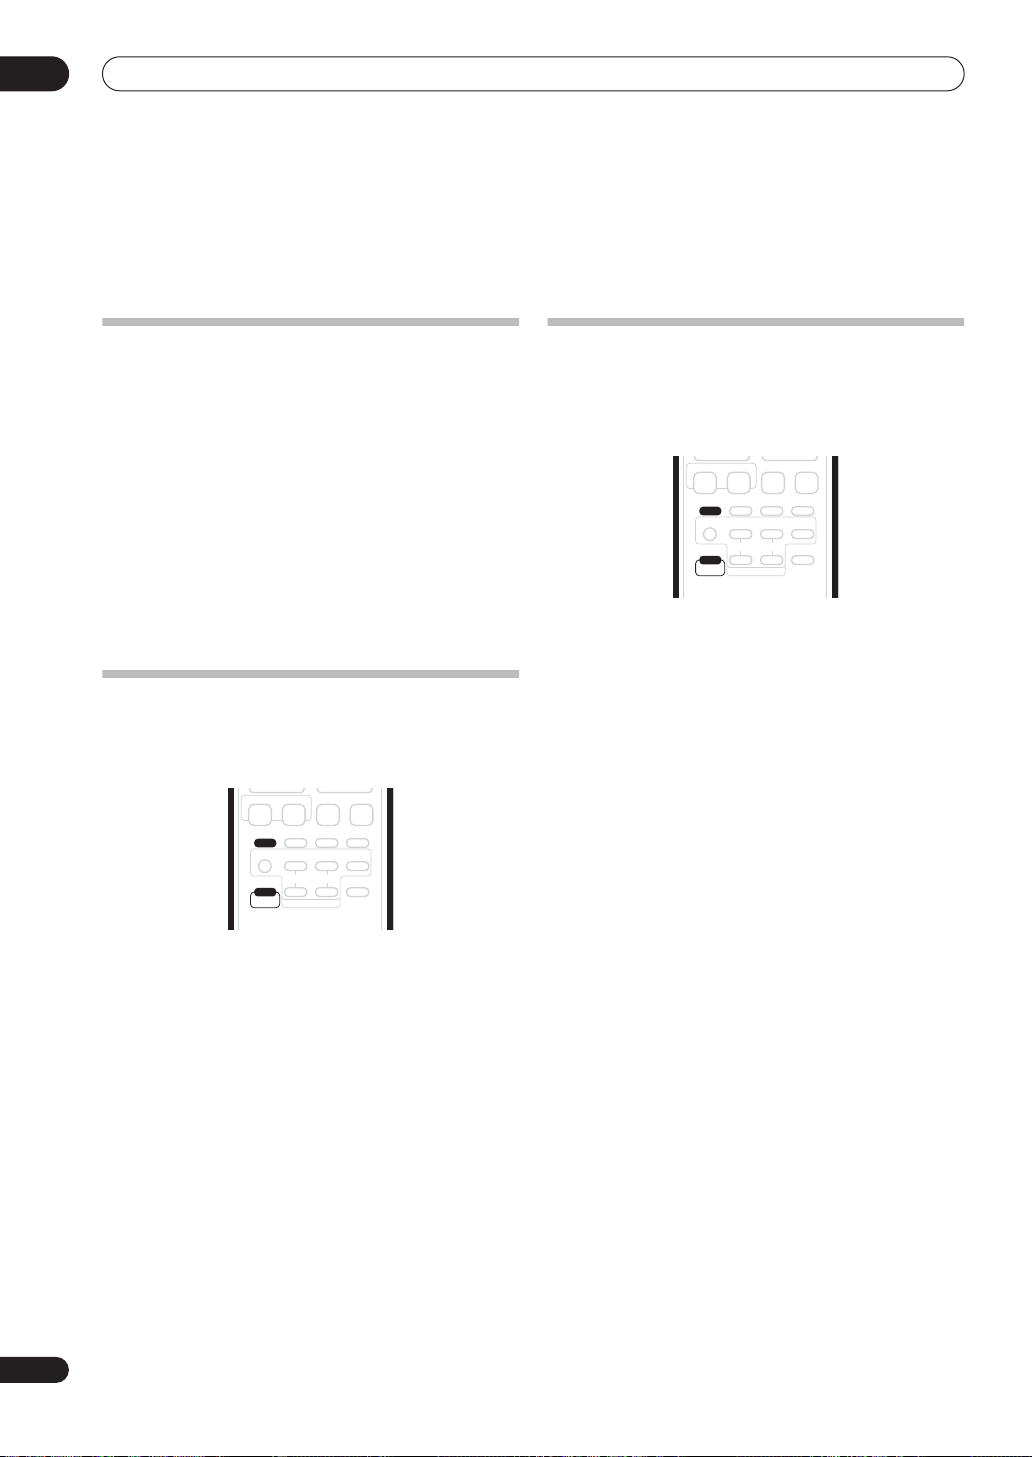
System demo setting
Switches the automatic demo feature on or off (this
starts when you plug in for the first time):
1 Switch the system into standby.
2 Press SHIFT + SYSTEM SETUP.
/
3 Hold SHIFT and use the
DEMO from the menu, then press SHIFT + ENTER.
4 Hold SHIFT and use the
setting, then press SHIFT + ENTER
Select from:
•
DEMO ON
•
DEMO OFF
– Switches the demo feature on.
– Switches the demo feature off.
Using the Room Setup
After you have set up your speakers to your liking (see
Home theater sound setup
calibrate your system for surround sound. This is a quick
and easy way to get good surround sound for your room.
For a more detailed surround sound setup, see
System Setup menu
on page 6), make sure you
on page 29.
HELP
TUNE +
DISC NAVIGATOR DVD MENU
TOP MENU
RDS DISP
ENTER
HOME
MENU
TUNE –
buttons to select
/
buttons to select a
.
VIDEO INPUT
INFO
GUIDE
CLEAR
SYSTEM
SETUP
ST +ST –
RETURN
DISPLAYTEST TONE
Using the
1 If the system isn’t already on, RECEIVER to
switch on.
2 Press SHIFT + SYSTEM SETUP.
/
3 Hold SHIFT and use the
buttons to select
ROOM SET from the menu, then press SHIFT +
ENTER.
4 Hold SHIFT and use the
room size setting, then press SHIFT + ENTER
/
buttons to select a
.
Select from:
•
ROOM S
– Smaller than average room (approx. 3.5 x
4.5m)
•
ROOM M
ROOM L
•
– Average room (approx. 5.5 x 6.0m)
– Larger than average room (approx. 7.5 x
9.0m)
5 Hold SHIFT and use the
/
buttons to select a
seating position setting, then press SHIFT + ENTER.
Select from:
SEAT FWD
•
– If you are nearer to the front speakers
than the surround speakers
•
SEAT MID
– If you are equal distance from the front
and surround speakers
•
SEATBACK
– If you are nearer to the surround
speakers than the front speakers
English
CM
BACK
PREV NEXT STEP/SLOW
REC
STOP REC
REC MODE
SURROUND ADVANCED SOUND TIMER REC
AUDIO
SUBTITLE ANGLE PLAY MODE
TV
VOLUME
CHANNEL
TV CONTROL
TV DIRECT
SHIFT
SKIP
ONE TOUCH
COPY
INPUT
TV/DVD
REC
23
En
03
Listening to your system
Chapter 3
Listening to your system
About the listening modes
As explained in
there are two basic surround speaker setup options
available. You can select any of the listening modes
regardless of speaker placement, but you will get the best
surround effect by using the listening modes in
conjunction with your speaker setup:
•
Standard surround 5-spot setup
Standard (
Advanced (
surround listening modes with this setup.
•
Front surround 3-spot setup
Surround
this speaker setup.
Home theater sound setup
on page 6,
– Use the
Listening in surround sound
Using Advanced Surround
– See
below) and
on page 25)
Using Front
on page 25 for the options available with
Auto listening mode
The Auto listening mode is the simplest way to listen to
any source as it was mastered: the output from the
speakers mirrors the channels in the source material.
TV CONTROL
REC MODE
VOLUME
ONE TOUCH
COPY
INPUTTV
TV/DVD
TV DIRECT
REC
button on the
REC STOP REC
SURROUND ADVANCED SOUND TIMER REC
AUDIO
SUBTITLE ANGLE PLAY MODE
CHANNEL
SHIFT
• Press SHIFT+SURROUND to select the AUTO
listening mode.
If the source is Dolby Digital or DTS, the front panel 2 D
or
DTS
indicator lights.
• You can also use the
SURROUND
display unit to change the listening mode.
Listening in surround sound
You can listen to stereo or multichannel sources in
surround sound. Surround sound is generated from
stereo sources using one of the Dolby Pro Logic
decoding modes.
TV CONTROL
REC MODE
VOLUME
ONE TOUCH
COPY
INPUTTV
TV/DVD
TV DIRECT
REC
button on the
on page 25
2
D
REC STOP REC
SURROUND ADVANCED SOUND TIMER REC
AUDIO
SUBTITLE ANGLE PLAY MODE
CHANNEL
SHIFT
• Press SHIFT+SURROUND repeatedly to select a
listening mode.
• You can also use the
SURROUND
display unit to change the listening mode.
The choices that appear in the display will vary according
to the type of source that’s playing.
If the source is Dolby Digital or DTS, the front panel
or
DTS
indicator lights.
•
AUTO
– Auto listening mode (see above)
PROLOGIC
•
– (Dolby Pro Logic) 4.1 channel surround
sound for use with any two-channel source
•
MOVIE
– (Dolby Pro Logic II Movie) 5.1 channel
surround sound, especially suited to movie sources,
for use with any two-channel source
•
MUSIC
– (Dolby Pro Logic II Music) 5.1 channel
surround sound, especially suited to music sources,
for use with any two-channel source
•
STEREO
– See
Listening in stereo
24
En
Listening to your system
03
Using Front Surround
The Front Surround modes are effective when you are
using the Front surround 3-spot speaker setup as
described in
surround speakers should be placed on top of the front
speakers and oriented either towards the walls, or
straight ahead, depending on which mode you are using
(see below).
• Press SHIFT+ADVANCED to select a Front
Surround mode.
Press repeatedly to select
EXTPOWER
• If you have selected
each surround speaker so that the
base is lined up with the
arrow on the front speaker. With
Power), the surround speakers should point in the
same direction as the front speakers. (as shown
below)
Home theater sound setup
TV CONTROL
REC MODE
VOLUME
ONE TOUCH
INPUTTV
TV/DVD
TV DIRECT
COPY
REC
REC STOP REC
SURROUND ADVANCED SOUND TIMER REC
AUDIO
SUBTITLE ANGLE PLAY MODE
CHANNEL
SHIFT
FRTMOVIE, FRTMUSIC
.
FRTMOVIE
or
FRONT SURROUND
on page 6. The
FRTMUSIC
arrow at the
EXTPOWER
or
, turn
(Extra
Using Advanced Surround
The Advanced Surround effects can be used with any
multichannel or stereo source for a variety of additional
surround sound effects.
1
TV CONTROL
REC MODE
VOLUME
ONE TOUCH
INPUTTV
TV/DVD
TV DIRECT
REC STOP REC
SURROUND ADVANCED SOUND TIMER REC
AUDIO
SUBTITLE ANGLE PLAY MODE
CHANNEL
SHIFT
COPY
REC
• Press SHIFT+ADVANCED to select an Advanced
Surround mode.
Press repeatedly to select
EXPANDED, TV SURR., SPORTS, GAME
ADVMOVIE, ADVMUSIC
or
5 STEREO
,
.
Listening in stereo
You can listen to any source—stereo or multichannel—in
stereo. When playing a multichannel source, all
channels are downmixed to the front left/right speakers
and the subwoofer.
TV CONTROL
REC MODE
VOLUME
ONE TOUCH
INPUTTV
TV/DVD
TV DIRECT
REC
COPY
REC STOP REC
SURROUND ADVANCED SOUND TIMER REC
AUDIO
SUBTITLE ANGLE PLAY MODE
CHANNEL
SHIFT
English
FRTMOVIE / FRTMUSIC
Note
1 The 5-spot setup described in
EXTPOWER
Home theater sound setup
• Press SHIFT+SURROUND repeatedly until STEREO
shows in the display.
• You can also use the
display unit to change the listening mode.
on page 6 should be used with these effects.
SURROUND
button on the
25
En
03
INFO
HELP
Listening to your system
Enhancing dialogue
The Dialogue Enhancement feature is designed to make
the dialogue stand out from other background sounds in
a TV or movie soundtrack.
GUIDE
CLEAR
DISC NAVIGATOR DVD MENU
1 Press SHIFT+SOUND.
2 Hold SHIFT and use the
DIALOGUE then press SHIFT+ENTER.
3 Hold SHIFT and use the
amount dialogue enhancement then press
SHIFT+ENTER to confirm.
Select between
OFF, MID
TUNE +
TOP MENU
RDS DISP
ENTER
HOME
MENU
TUNE –
CM
BACK
PREV NEXT STEP/SLOW
REC
STOP REC
REC MODE
SURROUND ADVANCED SOUND TIMER REC
AUDIO
SUBTITLE ANGLE PLAY MODE
TV
VOLUME
CHANNEL
SHIFT
TV CONTROL
/
/
or
MAX
SYSTEM
SETUP
ST +ST –
RETURN
DISPLAYTEST TONE
SKIP
ONE TOUCH
COPY
INPUT
TV/DVD
TV DIRECT
REC
buttons to select
buttons to select the
.
Adjusting the bass and treble
Use the bass and treble controls to adjust the overall
tone.
1 Press SHIFT+SOUND.
2 Hold SHIFT and use the
/
buttons to select
BASS or TREBLE then press SHIFT+ENTER.
3 Hold SHIFT and use the
/
buttons to adjust
the sound then press SHIFT+ENTER to confirm.
Boosting the bass level
There are two bass modes you can use to enhance the
bass in a source.
1 Press SHIFT+SOUND.
/
2 Hold SHIFT and use the
BASSMODE then press SHIFT+ENTER.
3 Hold SHIFT and use the
the sound then press SHIFT+ENTER to confirm.
Select between
OFF, MUSIC
buttons to select
/
buttons to adjust
or
CINEMA
.
26
En

Listening to the radio
04
Chapter 4
Listening to the radio
•
High-speed tuning
–
Listening to the radio
The tuner can receive both FM and AM broadcasts, and
lets you memorize your favorite stations so you don’t have
to manually tune in every time you want to listen.
RECORDER RECEIVER
MUTE
VOLUME
HDD DVD
HELP
DISC NAVIGATOR DVD MENU
TOP MENU
RDS DISP
HOME
MENU
FM/AM AUDIO INPUT
CLEAR
TUNE +
ENTER
TUNE –
+–
CHANNEL
VIDEO INPUT
INFO
GUIDE
DISPLAYTEST TONE
ST +ST –
SYSTEM
RETURN
SETUP
until the frequency display starts to move rapidly.
Keep the button held down until you reach the
frequency you want. If necessary, fine tune the
frequency using the manual tuning method.
Improving poor FM reception
If you’re listening to an FM station in stereo but the
reception is weak, you can improve the sound quality by
switching to mono.
1 Tune to an FM radio station then press
SHIFT+SYSTEM SETUP
2 Hold
MODE then press
3 Hold
MONO
The mono indicator ( ) lights when the tuner is in mono
reception mode.
Select
mode (the stereo indicator ( ) lights when receiving a
stereo broadcast).
SHIFT
SHIFT
then press
FM AUTO
: Press and hold
SHIFT+TUNE +/
.
and use the
SHIFT+ENTER
and use the
SHIFT+ENTER
/
buttons to choose FM
.
/
buttons to select
.
above to switch back to auto-stereo
English
FM
SKIP
CM
BACK
1 Press
PREV NEXT STEP/SLOW
REC
STOP REC
SURROUND ADVANCED SOUND TIMER REC
AUDIO
SUBTITLE ANGLE PLAY MODE
TV
CHANNEL
SHIFT
FM/AM
to switch to the tuner, then press
TV CONTROL
REC MODE
VOLUME
ONE TOUCH
INPUT
TV/DVD
TV DIRECT
COPY
REC
repeatedly to select the FM or AM band.
The display shows the band and frequency.
2 Tune to a frequency.
There are three tuning modes—manual, auto, and highspeed:
•
Manual tuning
: Press
SHIFT+TUNE +/–
repeatedly
to change the displayed frequency.
•
Auto tuning
: Press and hold
SHIFT+TUNE +/–
until
the frequency display starts to move, then release.
The tuner will stop on the next station it finds. Repeat
to keep searching.
Improving poor AM sound
The simplest way to improve the sound quality of AM
radio is to make sure that the TV in the room is switched
off. Also try changing the position and direction of the
AM loop antenna.
Changing the noise cut mode
If you find that the sound quality is bad even after trying
the above, you may be able to improve it using a different
noise cut mode. Just choose the one that sounds best.
1 Tune to an AM radio station then press
SHIFT+SYSTEM SETUP.
2
Hold
SHIFT
and use the
/
buttons
to choose
NOISECUT then press SHIFT+ENTER.
Hold
SHIFT
3
and use the
/
buttons
to select a
Noise cut mode (1, 2 or 3) then press SHIFT+ENTER.
Memorizing stations
You can save up to 30 station presets so that you always
have easy access to your favorite stations without having
to tune in manually each time.
1 Tune to an AM or FM radio station.
For the FM band, select mono or auto-stereo reception as
necessary. This setting is saved along with the preset.
27
En

04
Listening to the radio
2 Press
3 Hold
ST.MEM. then press
4 Hold
station preset you want then press
SHIFT+SYSTEM SETUP
SHIFT
and use the
/
SHIFT+ENTER
SHIFT
and use the
/
.
buttons to choose
.
buttons to select the
SHIFT+ENTER
.
Listening to station presets
1 Make sure the tuner function is selected.
2 Use the
SHIFT +
/
buttons to select a station
preset.
• You can also use the number buttons (while holding
SHIFT
) to do this.
An introduction to RDS
Radio Data System (RDS) is a system used by most FM
radio stations to provide listeners with various kinds of
information—the name of the station and the kind of
show they’re broadcasting, for example.
One feature of RDS is that you can search by type of
program. For example, you can search for a station that’s
broadcasting a show with the program type,
You can search the following program types:
NEWS –
News
AFFAIRS
– Current Affairs
INFO
– General Information
SPORT
– Sport
EDUCATE
DRAMA
CULTURE
regional culture, theater,
etc.
SCIENCE
technology
VARIED
based material, such as
quiz shows or interviews.
POP M
ROCK M
EASY M
LIGHT M
music
CLASSICS
classical music
OTHER M
fitting above categories
WEATHER
reports
– Educational
– Radio plays, etc.
– National or
– Science and
– Usually talk-
– Pop music
– Rock music
– Easy listening
– ‘Light’ classical
– ‘Serious’
– Music not
– Weather
FINANCE
– Stock market
reports, commerce,
trading, etc.
CHILDREN
children
SOCIAL
RELIGION
concerning religion
PHONE IN
expressing their views by
phone
TRAVEL
travel rather than traffic
announcements
LEISURE
interests and hobbies
JAZZ
COUNTRY
NATION M
music in a language other
than English
OLDIES
from the ’50s and ’60s
FOLK M
DOCUMENT
– Programs for
– Social affairs
– Programs
– Public
– Holiday-type
– Leisure
– Jazz
– Country music
– Popular
– Popular music
– Folk music
– Documentary
JAZZ
1
.
Displaying RDS information
Use the
types of RDS information available.
• Press
Each press changes the display as follows:
SHIFT+RDS DISP
SHIFT+RDS DISP
• Radio Text (
RT
button to display the different
2
for RDS information.
) – Messages sent by the radio station.
For example, a talk radio station may provide a phone
number as RT.
• Program Service Name (
PS
) – The name of the radio
station.
• Program Type (
PTY
) – This indicates the kind of
program currently being broadcast.
•
SEARCH
– PTY search (see below)
• Current tuner frequency
Searching for RDS programs
You can search for a program type listed above.
1 Press the
2 Press
FM/AM
button for the FM band.
SHIFT+RDS DISP
repeatedly until SEARCH
appears in the display.
3 Hold
SHIFT
and use the
/
buttons to select the
program type you want to hear.
4 Press
SHIFT+ENTER
to start the search.
The system searches the station presets for a match. If it
finds one, searching stops for 5 sec.
5 If you want to keep listening to the station, press
SHIFT+ENTER
If you don’t press
within the 5 seconds.
SHIFT+ENTER
, searching resumes.
3
28
En
Note
1 In addition, there are three other program types,
search for these, but the tuner will switch automatically to this RDS broadcast signal. NO TYPE appears when a program type cannot be found.
2• If any noise is picked up while displaying the RT scroll, some characters may be displayed incorrectly.
• If you see NO DATA in the RT display, it means no RT data is sent from the broadcast station. The display will automatically switch to the PS data
display (if no PS data, the frequency is displayed).
• In the PTY display, NO DATA or NO TYPE may be shown. In this case, the PS display is shown after a few seconds.
3 RDS is only possible in the FM band.
TEST, ALARM
, and
NO TYPE. ALARM and TEST are used for emergency announcements. You can’t
Surround sound settings
INFO
05
Chapter 5
Surround sound settings
1 Select stereo or multichannel playback for a
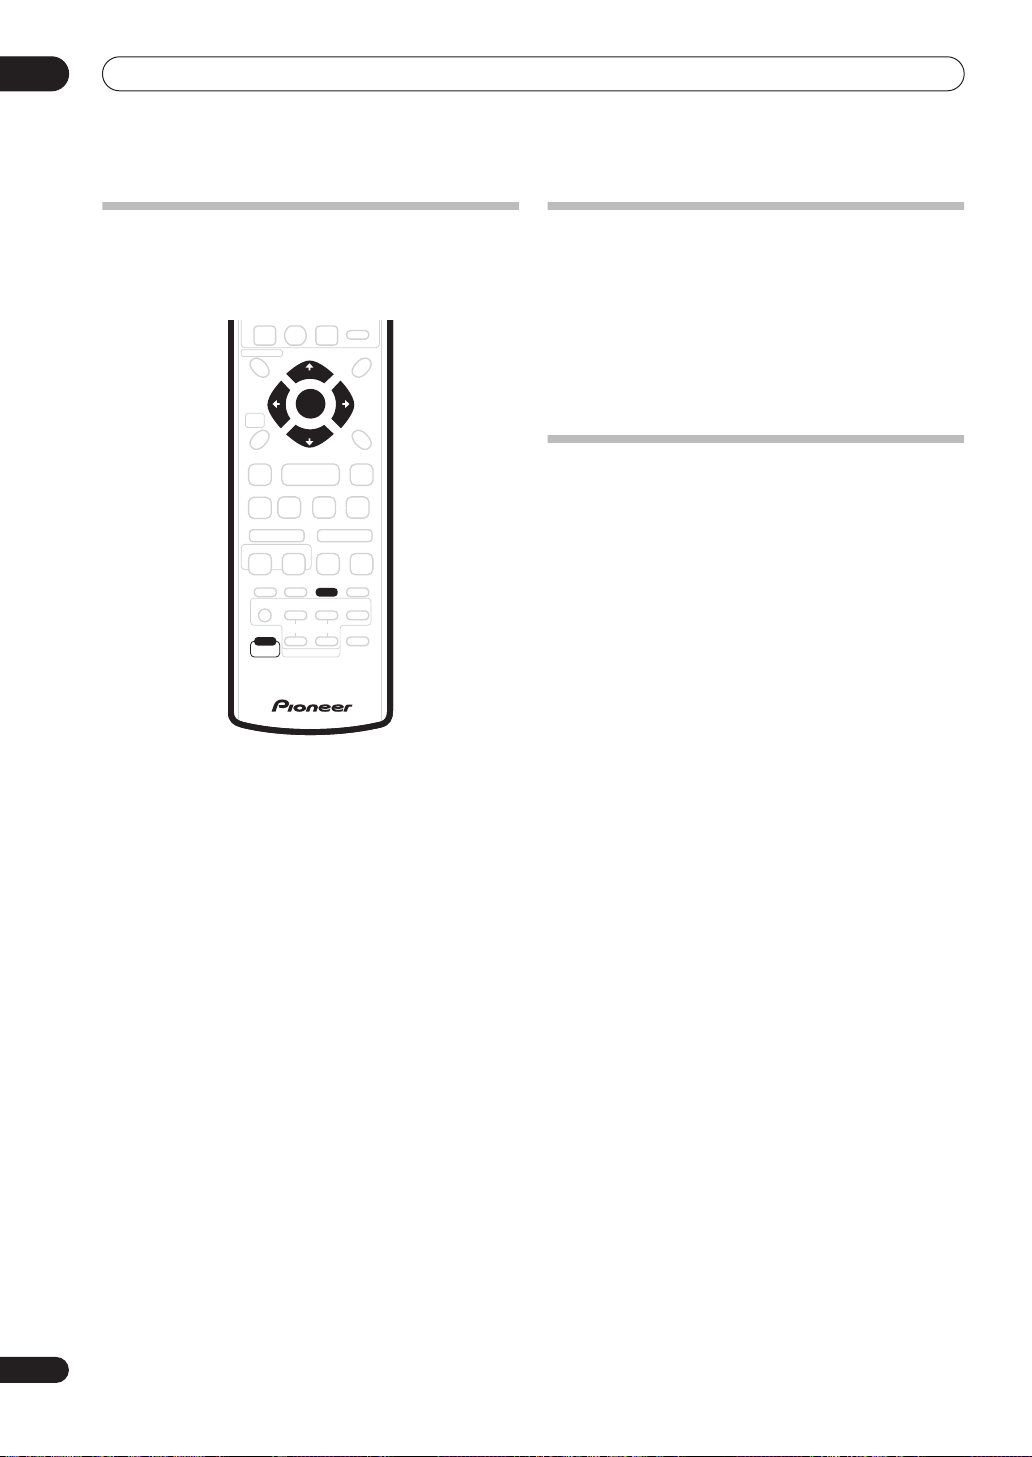
Using the System Setup menu
From the System Setup menu you can access all the
surround sound settings of the system
channel levels, speaker distances, dynamic range
adjustment and dual mono audio playback.
Use the following buttons to use the System Setup menu.
HELP
CLEAR
TUNE +
DISC NAVIGATOR DVD MENU
TOP MENU
RDS DISP
ENTER
HOME
MENU
TUNE –
BACK
PREV NEXT STEP/SLOW
REC
STOP REC
REC MODE
SURROUND ADVANCED SOUND TIMER REC
AUDIO
SUBTITLE ANGLE PLAY MODE
TV
VOLUME
CHANNEL
SHIFT
TV CONTROL
Channel level setting
The Room Setup feature (see page 23) is designed to give
you a basic surround sound setup very quickly by setting
the channel levels (and speaker distances) for you
according to your room size and seating position. If you
need to adjust the relative channel levels in more detail,
you can do it here.
This method of setting the channel levels allows you to
listen to a source and adjust the levels of each playback
channel. Note that the channel level settings for stereo
playback are independent of the settings for surround
sound playback.
A further method of setting the channel levels is to use
the test tone method. See
using the test tone
Adjusting the channel levels
on page 30 for more on this.
CM
GUIDE
SKIP
ONE TOUCH
INPUT
TV/DVD
TV DIRECT
SYSTEM
ST +ST –
RETURN
DISPLAYTEST TONE
COPY
REC
1
, including
SETUP
source.
2 Press SHIFT+SYSTEM SETUP.
3 Hold SHIFT and use the
CH LEVEL, then press SHIFT+ENTER.
4 Use SHIFT +
/
to adjust the level of that channel.
/
5 Press SHIFT+ENTER when you’re finished.
• If you use the Room Setup feature again, it will
overwrite the settings you have made here.
Speaker distance setting
The Room Setup feature (see page 23) is designed to give
you a basic surround sound setup very quickly by setting
the speaker distances (and channel levels) for you
according to your room size and seating position. If you
need to adjust the speaker distance settings in more
detail, you can do it here.
Set the distance of each speaker from your normal
listening position.
1 Press SHIFT+SYSTEM SETUP.
2 Hold SHIFT and use the
DISTANCE, then press SHIFT+ENTER.
3 Use SHIFT +
/
to adjust the distance.
Adjust the following speakers:
•
L
– Front left speaker
C
– Center speaker
•
•
R
– Front right speaker
•
SR
– Surround right speaker
SL
– Surround left speaker
•
•
SW
– Subwoofer
Each speaker can be adjusted between
4 Press SHIFT+ENTER when you’re finished.
• If you use the Room Setup feature again, it will
overwrite the settings you have made here.
/
/
buttons to select
to select a channel; SHIFT +
/
buttons to select
to select a speaker; SHIFT +
0.3 m
~
9.0 m
English
.
Note
1 There are other settings you can adjust from the System Setup menu; these are explained in
information
on page 33.
Listening to the radio
on page 27 and
Additional
29
En

05
Surround sound settings
Dynamic Range Control
When watching Dolby Digital or DTS material at low
volume, low level sounds—including some of the
dialog—can be difficult to hear properly. Using one of the
Dynamic Range Control (DRC) settings can help by
bringing up the low level sounds, while controlling high
level peaks.
1 Press SHIFT+SYSTEM SETUP.
2 Hold SHIFT and use the
DRC.
3 Use SHIFT +
Select one of the following:
•
DRC OFF (default)
(use when listening at higher volume)
•
DRC MID
•
DRC HIGH
are reduced in volume while quieter sounds are
increased)
4 Press SHIFT+ENTER to exit.
/
– No dynamic range adjustment
– Mid setting
– Dynamic range is reduced (loud sounds
Dual mono setting
Specifies how dual mono encoded Dolby Digital or DTS
soundtracks should be played. You can also use this
setting to switch the audio channel on DVD-RW discs
recorded with bilingual audio.
1 Press SHIFT+SYSTEM SETUP.
2 Hold SHIFT and use the
DRC.
3 Use SHIFT +
Select one of the following:
CH1 MONO (default)
•
•
CH2 MONO
CH1/CH2
•
front speakers
4 Press SHIFT+ENTER to exit.
/
– Only channel 2 is played
– Both channels are played through the
1
/
buttons to select
to select a setting.
2
/
buttons to select
to select a setting.
– Only channel 1 is played
Adjusting the channel levels using
the test tone
If you prefer, you can set the channel levels using a test
tone as a reference, rather than playing a source (see
Channel level setting
through each speaker in turn, allowing you to adjust the
level as it plays.
Note that the channel level settings for stereo sources
are independent of the settings for surround sound
sources.
1 Press SHIFT+SURROUND to select the Auto
listening mode.
• If you want to set the channel levels for stereo (two
channel) playback, select the
mode.
2 Press SHIFT+TEST TONE.
The test tone is output from each speaker in turn.
3 While a test tone is playing, hold SHIFT and use
the
/
buttons to adjust that channel level.
The aim is to adjust the levels so that you hear the test
tone at the same volume from each speaker. You can
adjust the level of each channel by ± 10 dB.
• You can adjust the overall volume of test tone output
using the
the channel level settings).
• Because of the ultra low frequencies the subwoofer
produces, it may sound quieter than it really is. We
suggest adjusting the subwoofer level using the
method described in
page 29.
4 When you’re done, press SHIFT+ENTER to exit
test tone setup.
• If you use the Room Setup feature again, it will
overwrite the settings you have made here.
on page 29). A test tone is played
STEREO
VOLUME
+/– buttons (this does not affect
Channel level setting
listening
on
30
En
Note
1A similar adjustment feature is available on the DVD recorder—see
2A similar adjustment feature is available on the DVD recorder—see
Audio DRC
Switching audio channels
on page 129.
on page 99.
 Loading...