

Pioneer S-SP410-K, S-SP410 User Manual
S-SP410
S-SP410-K
English
This system is used in conjunction with the S-W90S subwoofer
SPEAKER SYSTEM
ENCEINTE ACOUSTIQUE
LAUTSPRECHERSYSTEM
SISTEMA ALTOPARLANTE
LUIDSPREKERSYSTEEM
HÖGTALARSYSTEM
SISTEMA DE ALTAVOCES
SISTEMA DE ALTIFALANTES
INSTRUCTION MANUAL
MODE D'EMPLOI
BEDIENUNGSANLEITUNG
GUIDA PER L'USO
GEBRUIKSAANWIJZING
BRUKSANVISNING
GUIA DE OPERACI
GUIA DE OPERAÇÃO
All reproduction and translation rights reserved.
Printed in China <PM-11003-10091-AFQ>
Ó
N
Published by Pioneer Corporation.
© 2007 Pioneer Corporation.
CONNECTIONS
Switch off the amplifier power supply (OFF).
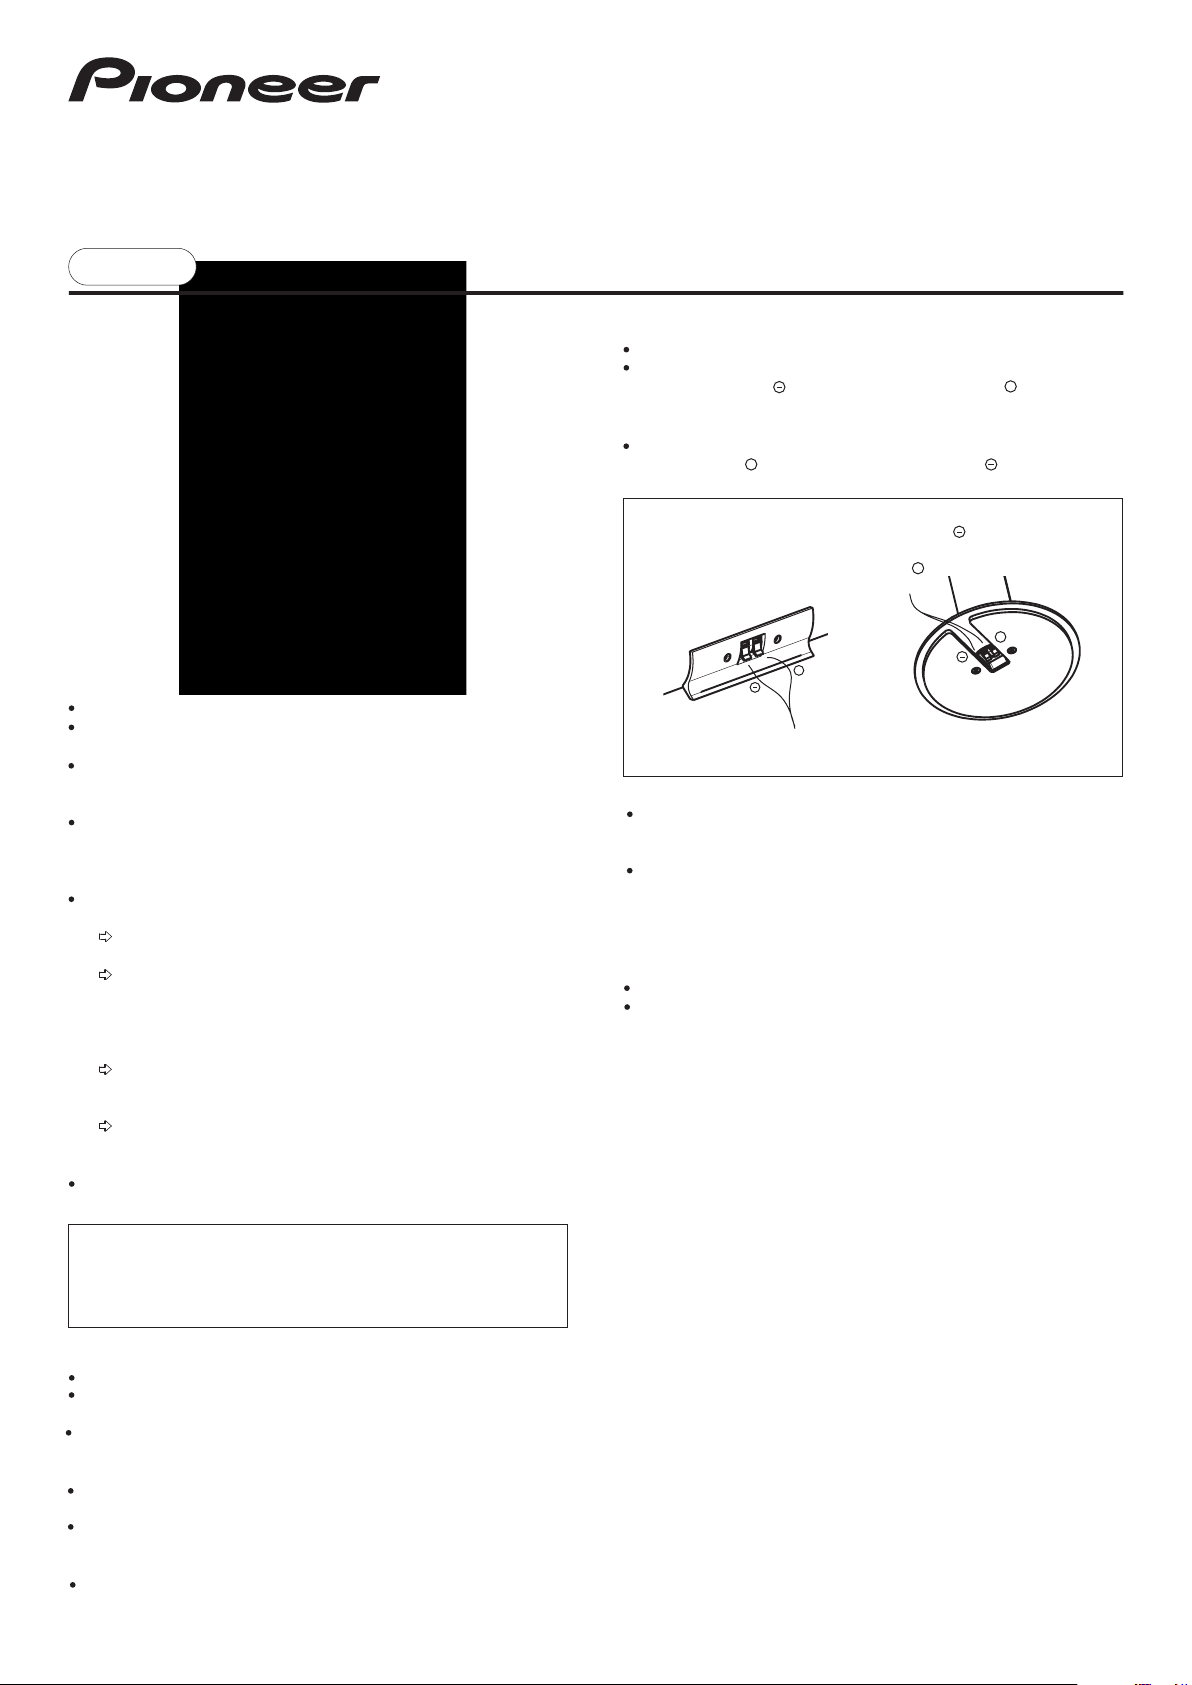
Connect the cables to the input terminals on the rear of the speaker: Connect
the neutral cable to the terminal and the live cable to the terminal. Do not
forget that the red input terminal has positive polarity and that the black input
terminal has negative polarity.
Connect the cables to the loudspeaker outlet terminals of the amplifier. Connect
the live cable to the terminal and the neutral cable to the terminal.
+
+
BEFORE OPERATION
Thank you for buying this PIONEER product.
The S-SP410 system can be combined with the S-W90S to produce a 5.1
channels speaker system.
Read the Instruction Manual carefully before using this speaker system so that
you can operate it properly. After you have finished, put this manual away in a
safe place for future reference.
The rated impedance of this speaker system is 8W.Itmust be connected to a
amplifier which accepts this type of load (miminum and maximum impedances
accepted by the amplifier are generally indicated near the loudspeaker outlets:
for example "4
To guard against damage to this speaker system due to an electric power
overload, take the following precautions:
system (see Specifications).
player, tuner etc.) must be carried out after switching off the amplifier or at
least with the loudspeaker outlets disconnected (if the amplifier allows).
Interference caused by these operations will otherwise reach the speaker
and may damage the treble loudspeaker units.
and treble correctors, make sure that you do not increase the amplifier
volume excessively, as the speaker will be overloaded more quickly.
harmonic distortion increases rapidly in this situation and may pose a
danger to the treble speaker units.
Avoid touching the diaphragms and suspensions of speaker units as they are
fragile
The speaker units in this speaker system are magnetically shielded.
However, colours may blur if the speakers are positioned too close to a
television screen. If this happens, switch off the television and switch it
back on again after 15 to 30 minutes. If the problem persists, move the
speakers away from the television set.
W
to 16W"or"6
Do not supply more than the maximum permitted power to the speaker
Any connection or switching on or off of part of the audio system (CD
When boosting particular frequencies using a graphic equaliser or bass
Do not force a low-power amplifier to produce a high level of sound as
W to16W
INSTALLATION PRECAUTIONS
The S-SP410 system is composed of 1 centre, 2 front and 2 rear speakers.
For optimum sound reproduction of high frequencies, the treble speaker units
must be at the same height as the listener's ears.
For low frequencies, it is possible to increase the level of bass sounds by
positioning the speakers close to a wall (the maximum increase being obtained
for a position in a corner of the listening room).
Install the centre speaker above or below the TV so that the sound of the center
channel is localized at the tv screen.
Do not install these speakers close to an oven or heating appliance. Avoid
exposing them to direct sunlight. High temperature can distort the structure of the
enclosure and adversely affect the sound.
These speakers are heavy and fragile, therefore it is dangerous to install them
in an unstable position.
").
1. Strip the insulation at the tip of
the cord and twist the strands
+
Centre Speaker
REMARKS :
Check that the cables are securely connected to the terminals. A loose
connection may cause not just intermittent or distorted sound but short-circuiting
and breakdown of the amplifier.
If the cables of one of the speakers have been connected with the wrong
polarities, you will find when listening to a stereo recording that bass sounds are
weakened and the stereo effect normally obtained between the two speakers
does not exist.
MAINTENANCE OF THE ENCLOSURE
Use a cloth to wipe away dust and dirt.
If the enclosure is very dirty, wipe with a soft cloth dipped in a neutral detergent
diluted five to six times with water, then wipe again with the dry cloth. Do not use
thinner, benzene, cleaning sprays or other chemical products on or near the
enclosures as the surfaces could be adversely affected.
2. Connect the common-side speaker
cord to the terminal
3. Connect the hot-side speaker cord to
+
the terminal
+
Ta ll-boy Speaker
SPECIFICATIONS
Speaker Front - Rear speaker..............................Floor-standing type, enclosed
System ...............................................................................2 ways, 5 speaker units
Speaker units Woofers ........................................ Cone speaker units, 50 mm x 4
Nominal Impedance ......................................................................................8
Frequency range :................................................................ 150 Hz to 20 000 Hz
Sensitivity ....................................................................... 85 dB/W at 1 m distance
Maximum power ..........................................................................................100 W
Dimensions
Front - Rear speaker............................ 210 mm (W) x 1050 mm (H) x 210 mm (D)
Centre speaker........................................... 370 mm (W) x 68 mm (H) x 48 mm (D)
Weight
Front - Rear speaker.......................................................................................... 3 kg
Centre speaker................................................................................................ 0.9 kg
Accessory parts
Instruction Manual .................................................................................................1
Warranty ................................................................................................................1
Cables.................................................................................................................... 5
REMARK : The specifications and design of this product are subject to change
without notice, in the interests of improvements.
Centre............................................................Compact type, enclosed
Tweeter ..........................................................1 Dome type, 20 mm
W
Français
Ce système s'utilise en combinaison avec le caisson de basse S-W90S
CONNEXIONS
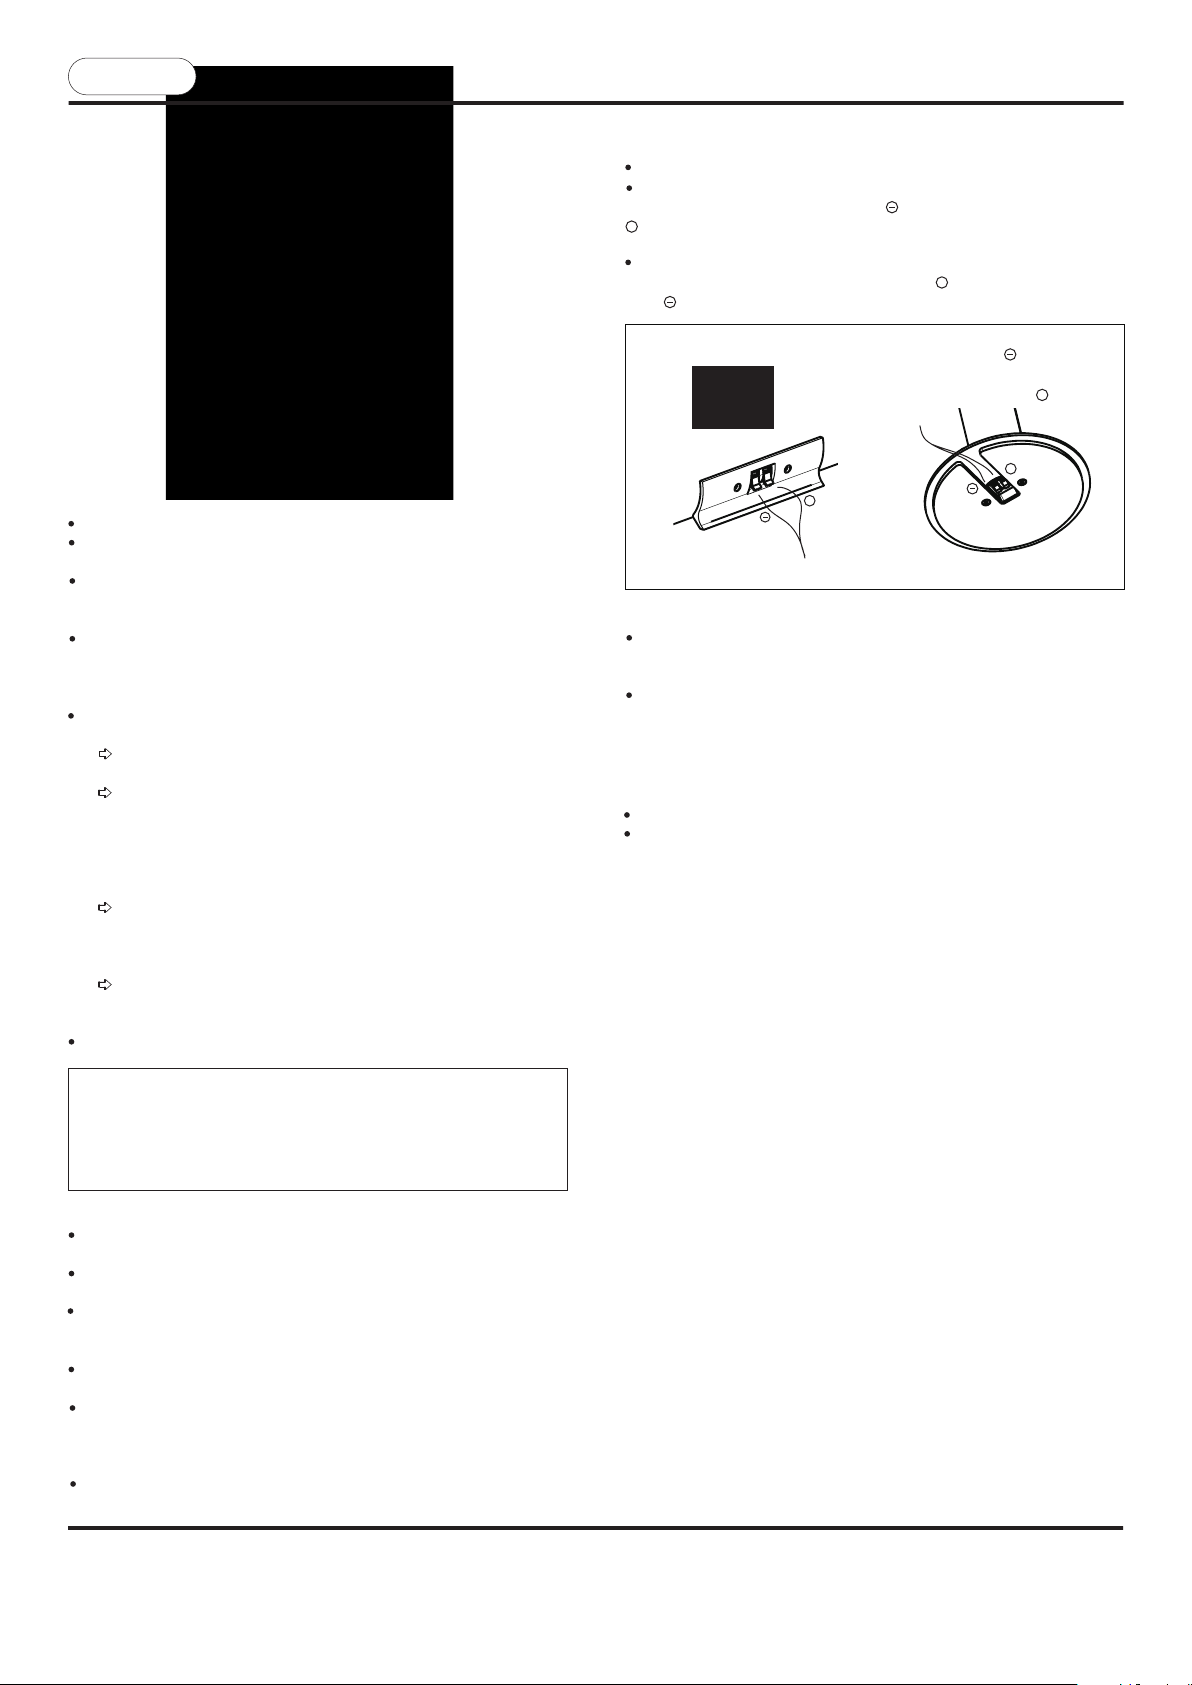
Couper l'alimentation de l'amplificateur (OFF).
Connecter les câbles aux bornes d'entrée à l'arrière des enceintes acoustiques.
Connecter le câble côté neutre à la borne et celui côté sous tension à la borne
+
. Ne pas oublier que la borne d'entrée rouge a une polarité positive et que la
borne d'entrée noire a une polarité négative.
Connecter les câbles aux bornes de sortie Haut-parleurs de l'amplificateur.
Connecter le câble côté sous-tension à la borne et le câble côté neutre à la
borne .
+
AVANT UTILISATION
Merci d'avoir acheté ce produit PIONEER.
Le S-SP410 peut être associé au S-W90S pour offrir un système Home
Cinéma à 5.1 canaux.
Lire attentivement le mode d'emploi avant d'utiliser ces enceintes acoustiques
afin de savoir comment optimiser leurs performances. Après l'avoir lu, conserver
ce mode d'emploi dans un endroit facilement accessible en cas de besoin.
L'impédance nominale de ces enceintes est de 8 :. Elles doivent donc être
connectées à un amplificateur acceptant ce type de charge (les impédances
minimale et maximale acceptées par l'amplificateur sont généralement indiquées
près des sorties Haut-parleurs : "4 : à 16 :" ou "6 : à 16 :" par exemple).
Pour éviter d'endommager ces enceintes acoustiques suite à une surcharge de
puissance électrique, prendre les précautions suivantes :
Ne pas fournir aux enceintes acoustiques une puissance supérieure à
celle maximale autorisée (voir Fiche Technique).
Toute connexion, mise sous ou hors tension d'un appareil de la chaîne
audio (lecteur CD, tuner…) doit être effectuée après avoir mis l'amplificateur
hors tension ou au moins avec les sorties Haut-parleurs coupées (si
l'amplificateur le permet). Dans le cas contraire, les bruits parasites
provoqués par ces manipulations parviennent aux enceintes acoustiques et
peuvent endommager les haut-parleurs d'aigus.
Lors du renforcement de certaines fréquences à l'aide d'un égaliseur
graphique ou de correcteurs de graves et d'aigus, veiller à ne pas pousser
excessivement le volume de l'amplificateur car la surcharge des enceintes
acoustiques sera atteinte plus rapidement.
Ne pas forcer un amplificateur de faible puissance à produire un niveau
sonore élevé car dans ce cas la distorsion harmonique augmente
rapidement, ce qui peut-être dangereux pour les haut-parleurs d'aigus.
Eviter de toucher les membranes et les suspensions des haut-parleurs car
celles-ci sont fragiles.
Les haut-parleurs de ces enceintes acoustiques sont magnétiquement
blindés. Cependant, un flou des couleurs peut se produire si les
enceintes sont trop proches d'un écran de télévision. Dans ce cas,
couper l'alimentation du téléviseur puis remettre celui-ci sous tension
après 15 à 30 minutes. Si le problème persiste, écarter les enceintes
acoustiques du téléviseur.
PRECAUTIONS CONCERNANT L'INSTALLATION
Le S-SP410 comprend 1 enceinte centrale, 2 enceintes avant et 2 enceintes
arrière.
Pour une restitution sonore optimale des hautes fréquences, les haut-parleurs
d'aigus doivent se situer à hauteur des oreilles de l'auditeur.
Pour les basses fréquences, il est possible d'augmenter le niveau des graves
en positionnant les enceintes acoustiques près d'une paroi (l'augmentation
maximale étant obtenue pour une position dans un coin du local d'écoute).
Installez l'enceinte centrale au-dessus ou au-dessous du téléviseur de sorte
que le son du canal central soit perçu comme provenant de l'écran du téléviseur.
Ne pas installer ces enceintes acoustiques à proximité d'un four ou d'un
appareil de chauffage. Eviter également l'exposition à de forts rayons du soleil.
Ces températures élevées peuvent provoquer une déformation de la structure du
coffret et nuire au son.
Ces enceintes acoustiques sont lourdes et fragiles donc il est dangereux de les
installer dans une position instable.
1. Retirer l'isolant à l'extrémité
du câble et vriller les brins.
+
Enceinte centrale
REMARQUES :
Vér ifier que les câbles sont bien connectés aux bornes. Une connexion
incomplète peut non seulement entraîner une interruption ou une distorsion du
son, mais également un court-circuit et une panne de l'amplificateur.
Si les câbles d'une des enceintes acoustiques ont été branchés sans respecter
les polarités, vous constaterez à l'écoute d'un enregistrement stéréo que les
graves sont atténués et que l'image stéréo normalement située entre les deux
enceintes est inexistante.
2. Connecter le câble de haut-parleur
côté neutre à la borne .
3. Connecter le câble de haut-parleur
côté sous tension à la borne .
+
+
Enceinte colonne
ENTRETIEN DU COFFRET
Utiliser un chiffon de polissage pour essuyer la poussière et la saleté.
Lorsque le coffret est très sale, essuyer avec un chiffon doux trempé dans un
détergent neutre dilué cinq à six fois avec de l'eau, puis essuyer de nouveau
avec un chiffon sec. Ne pas utiliser de diluant, benzine, bombe aérosol et autres
produits chimiques sur ou à proximité des coffrets car ils pourraient détériorer
leurs surfaces.
SPECIFICATIONS
Enceintes Avant - Arrière................................................................colonne, close
Système..............................................................................2 voies, 5 haut-parleurs
Haut-parleurs Woofers .............................................4 woofers à cône de 50 mm
Impedance Nominale.......................................................................................8 :
Bande passante .....................................................................150 Hz à 20 000 Hz
Sensibilité.................................................................... 85 dB/W à 1 m de distance
Puissance maximale...................................................................................100 W
Dimensions Avant - Arrière...............210 mm (L) x 1050 mm (H) x 210 mm (P)
Poids Avants - Arrières...................................................................................3 kg
Pièces Accessoires
Mode d'emploi........................................................................................................1
Garantie..................................................................................................................1
Câbles.....................................................................................................................5
REMARQUE : Caractéristiques et conception sont sujettes à modifications sans
préavis en vue d'amélioration.
Centrale.......................................................................compacte, close
Tw eeter.............................................1 Tweeter à dôme de 20 mm
Centrale...............................370 mm (L) x 68 mm (H) x 48 mm (P)
Centrale..............................................................................................0,9 kg
Publication de Pioneer Corporation.
© 2007 Pioneer Corporation.
Tous droits de reproduction et de traduction réservés.
PIONEER CORPORATION
PIONEER ELECTRONICS (USA) INC. P.O. BOX 1540, Long Beach, California 90801-1540
PIONEER ELECTRONICS OF CANADA, INC. 300 Allstate Parkway, Markham, Ontario L3R 0P2, Canada
PIONEER EUROPE N.V. Haven 1087, Keetberglaan 1, 9120 Melsele, Belgium, TEL : 03 / 570.05.11
PIONEER ELECTRONICS AUSTRALIA PTY. LTD. 178-184 Boundary Road, Braeside, Victoria 3195, Australia, TEL : (03) 580-911
PIONEER ELECTRONICS DE MEXICO S.A. DE C.V. San Lorenzo Num 1009 3er piso Desp. 302 Col. Del Valle, Mexico D.F; C.P. 03100 TEL : 5-688-52-90
4-1, Meguro 1-Chome, Meguro-ku, Tokyo 153, Japan
Deutsch
Dieses System wird in Verbindung mit dem Bass-Gehäuse S-W90S verwendet.
ANSCHLÜSSE
Stromversorgung des Verstärkers abschalten (OFF).
Die Kabel an die Eingangsklemmen auf der Rückseite der Akustikgehäuse
anschliessen: Das Kabel auf der Nulleiterseite an die Klemme anschliessen
und das auf der Spannungsseite an die Klemme . Nicht vergessen, dass die
rote Eingangsklemme eine positive und die schwarze Eingangsklemme eine
negative Polarität hat.
Die Kabel an die Lautsprecher-Ausgangsklemmen des Verstärkers
anschliessen. Das Kabel auf der Spannungsseite an die Klemme und das auf
der Nulleiterseite an die Klemme anschliessen.
+
+
VOR GEBRAUCH
Vielen Dank, dass Sie dieses Produkt von PIONEER gekauft haben.
Dieses S-SP410 System kann mit dem aktiven Subwoofer S-W90S zu einem
5.1-Kanal-Lautsprechersystem erweitert werden.
Lesen Sie bitte aufmerksam die Gebrauchsanweisung, bevor Sie diese
Akustikanlage benutzen, damit Sie wissen, wie sie ihre Leistungen optimieren
können. Bewahren Sie diese Gebrauchsanleitung nach der Lektüre sorgfältig an
einer Stelle auf, an der Sie sie im Bedarfsfall schnell wiederfinden.
Die Nenn-Impedanz (der nominale Scheinwiderstand) der Lautsprecher beträgt
8 :. Sie müssen also an einen Verstärker angeschlossen werden, der diese
Belastung veträgt (die vom Verstärker akzeptierten Mindest- und
Höchstimpedanzen sind normalerweise an den Lautsprecherausgängen
angegeben: z.B. "4 : bis 16 :" oder "6 : bis 16 :").
Um eine Beschädigung dieser Akustikgehäuse durch eine elektrische
Überbelastung zu verhindern, treffen Sie bitte folgende Vorsichtsmassnahmen :
Die Akustikgehäuse nicht mit einer höheren als der zulässigen
Eingangsleistung belasten (siehe Technische Angaben).
Jeder Anschluss, jeder Unter- oder Ausserspannungsetzung eines
Geräts der Audio-Anlage (CD-Laufwerk, Tuner usw.) darf nur erfolgen,
nachdem der Verstärker ausser Spannung gesetzt wurde oder nachdem
zumindest mit unterbrochenen Lautsprecherausgängen (wenn der
Verstärker dies ermöglicht). Andernfalls gelangen die durch diese
Manipulationen erzeugten Parasitengeräusche in die Akustikgehäuse und
können die Höhenlautsprecher beschädigen.
Bei der Verstärkung bestimmter Frequenzen mit Hilfe eines
Grafikentzerrers oder von Tiefen- und Höhenentzerrern darauf achten, die
Verstärkerlautstärke nicht zu hoch einzustellen, da die Überbelastung der
Akustikgehäuse schneller erreicht wird.
Einen Verstärker mit geringer Leistung nicht zur Erzeugung eines hohen
Klangniveaus zwingen, weil in diesem Fall die Harmonikverzerrung schnell
zunimmt, was gefährlich für die Höhenlautsprecher sein kann.
Ver meiden Sie das Berühren der Membranen und der Aufhängungen der
Lautsprecher, da diese zerbrechlich sind.
Die Lautsprecher dieser Akustikgehäuse sind magnetisch gepanzert. Es
kann jedoch eine Farbenunschärfe auftreten, wenn sich die Gehäuse zu
nah an einem Fernsehbildschirm befinden. In diesem Fall schalten Sie
die Stromzufuhr des Fernsehers ab und schalten sie nach 15 bis 30
Minuten wieder ein. Wenn das Problem weiterhin besteht, stellen Sie die
Akustikgehäuse weiter von dem Fernsehgerät entfernt auf.
RAT UND VORSICHTSMASSNAHMEN
Das System S-SP410 ist ein Kombination aus einem Mitten, zwei Front und
zwei Hintergrund-Lautsprechern.
Für eine optimale Klangwiedergabe hoher Frequenzen müssen sich die
Höhenlautsprecher in Ohrhöhe des Hörers befinden.
Für die niedrigen Frequenzen ist es möglich, das Tiefenniveau zu erhöhen,
indem man die Akustikgehäuse nahe einer Wand aufstellt (die maximale
erhorung erzielt man mit einer position in einer ecke des raums).
Installieren Sie den Mitten-Lautsprecher unter oder über dem Fernseher und
richten Sie diesen möglichst direkt in Richnung der Hörposition.
Diese Akustikgehäuse sind schwer und zerbrechlich, weshalb es gefährlich ist,
sie in einer unstabilen Position aufzustellen.
Stellen Sie die Akustikgehäuse nicht in der Nähe eines Ofens oder eines
Heizgeräts auf. Vermeiden Sie auch die Möglichkeit einer zu starken
Sonnenbestrahlung. Hohe Temperaturen können eine Verformung der
Gehäusestruktur verursachen und den Klang beeinträchtigen.
1. Entfernen Sie die Isolierung von
den Enden der Adern und
verdrehen Sie die Drähte
miteinander.
+
Mitten
ANMERKUNGEN :
Sicherstellen, dass die Kabel gut an die Klemmen angeschlossen sind. Eine
unvollständige Verbindung kann nicht nur zu einer Unterbrechung oder
Verzerrung des Klangs führen, sondern auch zu einem Kurzschluss und einem
Ausfall des Verstärkers.
Wenn die Kabel eines der Akustikgehäuse ohne Beachtung der Polaritäten
angeschlossen wurden, werden Sie beim Hören einer Stereoaufnahme
feststellen, dass die Tiefen verstärkt sind und dass das Stereobild, das
normalerweise zwischen den beiden Gehäusen liegt, nicht vorhanden ist.
2. Schließen Sie den Nulleiter an die
Klemme an.
3. Schließen Sie die spannungsführende
Ader an die Klemme an.
+
+
Front - Hintergrund
PFLEGE DES GEHÄUSES
Entfernen Sie mit einem Staublappen Staub und Schmutz.
Wenn das Gehäuse sehr verschmutzt ist, reinigen Sie es mit einem weichen
Lappen, den Sie in ein neutrales Reinigungsmittel tauchen, das mit fünf bis
sechs Teilen Wasser verdünnt ist. Dann mit einem trockenen Lappen
nachwischen. Kein Verdünnungsmittel, Benzin, Spray oder anderes chemisches
Mittel für die Gehäuse oder in deren Nähe verwenden, da dadurch die
Oberflächen beschädigt werden könnten.
TECHNISCHE ANGABEN
Akustikgehause Front - Hintergrund...........................Säulentyp, geschlossen
System............................................................................2 Kanäle, 5 Lautsprecher
Lautsprecher Tiefen ........................................................4 Kegel-Woofer, 50 mm
Nennimpedanz................................................................................................8 :
Durchlassenbereich............................................................ 150 Hz bis 20 000 Hz
Empfindlichkeit.......................................................... 85 dB/W in 1 m Entfernung
Max. Leistung............................................................................................... 100 W
Aussenabmessungen
Front - Hintergrund...............................210 mm (B) x 1050 mm (H) x 210 mm (T)
Mitten...........................................................370 mm (B) x 68 mm (H) x 48 mm (T)
Gewicht
Front - Hintergrund.............................................................................................3 kg
Mitten...............................................................................................................0,9 kg
Zubehör
Bedienungsanleitung ............................................................................................. 1
Garantie ................................................................................................................. 1
Kabel....................................................................................................................... 5
ANMERKUNG: Technische Eigenschaften und Konzeption können zwecks
Verbesserung ohne Vorankündigung verändert werden.
Mitten.................................................compact, geschlossen
Höhon ...................................................1 Kuppel-Tweeter, 20 mm
Herausgeber: Pioneer Corporation.
© 2007 Pioneer Corporation.
Alle Rechte der Reproduzierung und Übersetzung vorbehalten.
 Loading...