

Pioneer S-DVR9ST User Manual

Speaker System
Système Acoustique
Sistema di diffusori
Lautsprechersystem
Luidsprekersysteem
Sistemas de parlantes
S-DVR9ST
Speaker Setup guide
Guide d'installation des enceintes
Guida all’impostazione dei diffusori
Anleitung zur Lautsprecheraufstellung
Installatiehandleiding luidsprekers
Guía de instalación de los altavoces
S-DVR9ST Speaker Setup guide
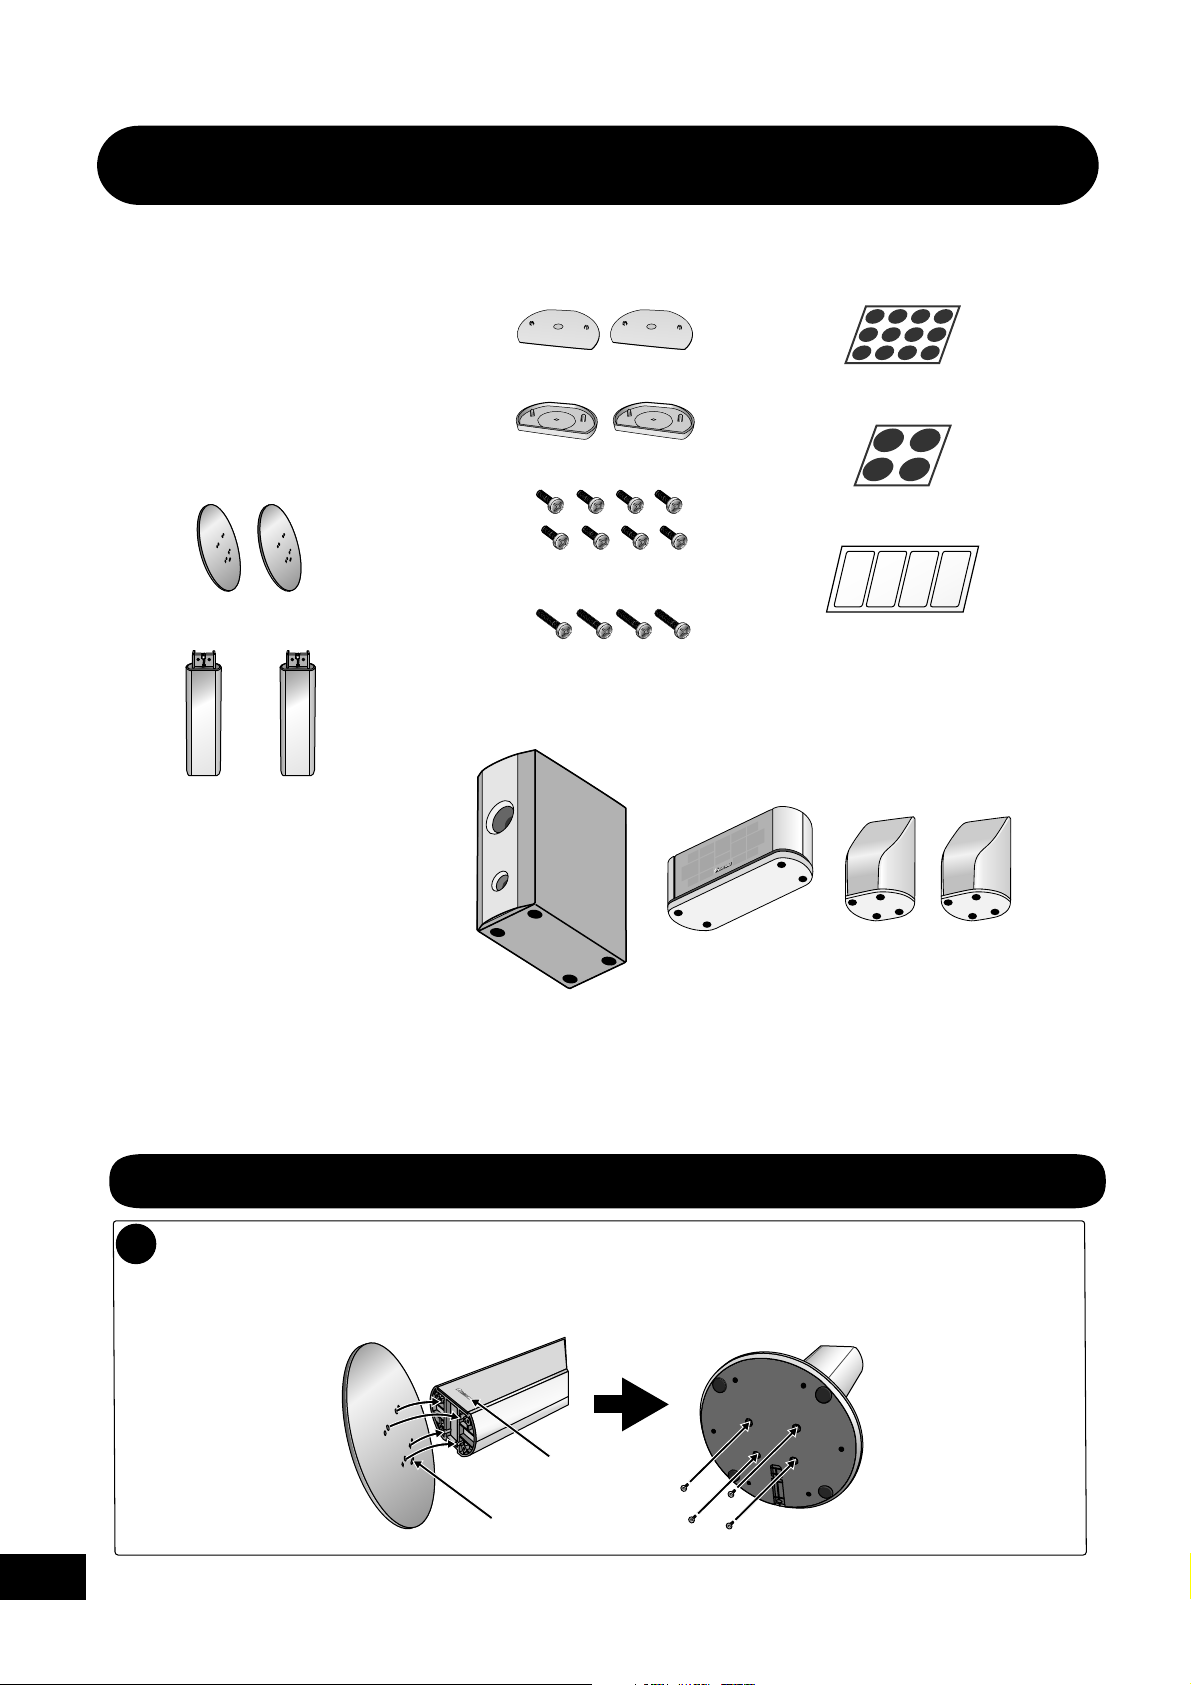
What's in the box
• Front speakers x 2
• Center speaker x 1
• Surround speakers x 2
• Speaker cables:
Red/White (Front speakers) 5m x 2
Green (Center speaker) 5m x 1
Blue/Grey (Surround speakers) 10m x 2
•
Front speaker covers x 2
• Surround speaker bases x 2
• Non-slip pads (small) x 12
• Non-slip pads (large) x 4
• Front speaker stand bases x 2
• Front speaker stand stems x 2
• Small screws x 8
• Adhesive strips x 4
• Large screws x 4
Attach the four large non-slip pads to the base of the subwoofer
(as shown). The smaller non-slip pads are for the surround
speakers (if the 5-spot setup is used), and the center speaker.
Subwoofer (packaged separately)
Center speaker
Surround speakers
2
En
Safety precautions when setting up
When assembling the speakers, lay them down flat on their side to avoid accidents or injury. Make sure to use a
stable surface when assembling, setting up, and placing the speakers.
Assembling the speaker stands and securing your front speakers
1
Attach the speaker stand bases to the stems using the screws provided.
Using four small screws for each speaker stand, secure the base to the stem as shown in the illustrations below.
Make sure the Pioneer logo on the stem is facing forward, and the outlet on the base (for the speaker cord) is
towards the back.
Once you have
aligned the stem
and base, secure
with the small
Pioneer logo
Speaker cord outlet
screws at the
points shown at
left.

Place the front speakers onto the speaker stands as shown below.
2
Line up the base of the speaker with the stand (figure A), then push the speaker slowly onto the speaker
stand (figure B). Use even pressure to make sure the speaker is fully inserted and secure.
A B
Secure the speaker to the speaker stand with the screws provided.
3
Using two large screws for each speaker stand, secure the speaker to the speaker stand as shown in the
illustration below.
After you have finished, refer to the other side of this sheet for the speaker setup
4
options available with this system.
3
En

Standard surround
5-spot setup
This is a standard multichannel surround sound speaker
setup for optimal 5.1 channel home theater sound. See also
chapter 12 in the main Operating Instructions.
Attach the non-slip pads to the base
3
of each of the center and surround
speakers.
Use the adhesive to attach 4 pads to the base of
each speaker.
Front left
Surround
left
Detach the surround speakers from the
1
Center
Subwoofer
Listening position
Front right
Surround
right
front speakers.
To remove, turn the surround speaker so that the
arrow at its base lines up with the DETACH POSITION
(%) on the top of the front speaker. Once aligned, the
surround speaker can be removed easily by gently
lifting it upwards.
2
1
Connect the speaker system.
4
Refer to the setup guide provided to connect the
speakers properly. After connecting the speaker
cable
s, t
hread the front speaker cable through
the outlet on the base of the speaker stand as
shown below. Make sure to use a stable
surface when doing this, and lay the speakers
flat on their side.
Caution
To prevent accidents when in use, make sure the
surround speaker is secure by turning it so the arrow
at the base of the speaker is not in the UNLOCK AREA.
To keep the stand steady when upright, tuck the
cable into the groove on the bottom as shown
below.
Attach the front speaker covers and
2
surround speaker bases.
Line up the holes with the spurs on the cover or
base as shown below. Press in firmly.
4
En

Front surround
3-spot setup
This setup is ideal when rear surround speaker placement
isn’t possible or you want to avoid running long speaker
cables in your listening area.
main Operating Instructions.
Front
left
Subwoofer
Surround
left
Attach the non-slip pads to the base
1
of the center speaker.
Use the adhesive to attach 4 pads to the base of
center speaker.
See also chapter 12 in the
Center
Front
right
Surround
right
Listening position
After connecting the speaker cables to the surround
speakers, use the groove provided to secure the speaker
cable as shown at left. Leave 10cm of slack from the
speaker terminals so the upper (surround) speaker can
turn freely.
When you're finished, t
cable
s through the outlet on the base of the speaker
stand as above.
To keep the stand steady when upright, tuck the
speaker cables into the grooves on the bottom as
shown below.
hread the surround speaker
Connect the speaker system.
2
Refer to the setup guide provided to connect the
speakers properly. After connecting the front
speaker cables, t
through the outlet on the base of the speaker
stand as shown below. Make sure to use a
stable surface when doing this, and lay the
speakers flat on their side.
hread the front speaker cables
Turn the surround speakers 50º towards
3
the closest wall.
The speaker will stop turning at about a 50º angle.
This is only necessary with the FrontMovie or
FrontMusic modes (leave them facing forward with
ExtraPower). See the operating instructions for more
on the Front Surround modes.
ExtraPower FrontMovie / FrontMusic
Caution
To prevent accidents when in use, make sure the
surround speaker is secure by turning it so the arrow
at the base of the speaker is not in the UNLOCK AREA.
With the 3-spot setup, it is
recommended that you fix
the surround speakers in
place with the adhesive
strips provided when in use.
Adhesive strips
5
En

S-DVR9ST Guide d'installation des enceintes
Éléments fournis
•
• Enceintes avant x 2
• Enceinte centrale x 1
• Enceintes Surround x 2
• Câbles d'enceintes:
Rouge/blanc (enceintes avant) 5m x 2
Vert (enceinte centrale) 5m x 1
Bleu/gris (enceintes Surround) 10m x 2
• Supports d'enceintes avant x 2
Caches de protection des enceintes
avant x 2
• Supports pour enceintes Surround x 2
• Petites vis x 8
• Tampons antidérapants
(petits) x 12
• Tampons antidérapants
(grands) x 4
• Bandes adhésives x 4
• Colonnes d'enceintes avant x 2
• Grandes vis x 4
Fixez les quatre tampons antidérapants sur la base du caisson de
basses (comme illustré). Les petits tampons antidérapants sont
pour les enceintes surround (si la configuration à 5 points est
utilisée) et pour l'enceinte centrale.
Caisson de basses (Subwoofer)
(emballée séparément)
Enceinte centrale
Enceintes Surround
Précautions de sécurité lors de l'installation
Lors du montage des enceintes, posez-les sur le côté sur une surface plane afin d'éviter tout accident ou blessure.
Veillez à monter, installer et placer les enceintes sur une surface stable.
Montage des supports d'enceintes et fixation des enceintes avant
1
Fixez les supports d'enceintes aux colonnes à l'aide des vis fournies.
Assemblez les supports d'enceintes et les colonnes deux à deux au moyen des petites vis, comme indiqué dans
l'illustration ci-dessous. Vérifiez que le logo Pioneer est orienté vers l'avant sur chaque colonne et que l'orifice sur
le support (pour le cordon d'enceinte) est orienté vers l'arrière.
Lorsque vous avez
aligné la colonne
avec le support,
assemblez ces deux
Logo Pioneer
Connecteur de
cordon d'enceinte
6
Fr
parties en insérant
les petites vis aux
points indiqués à
gauche.

Placez les enceintes avant sur les supports d'enceintes, comme indiqué ci-dessous.
2
Alignez la partie inférieure d'une enceinte avec la partie supérieure de la colonne (figure A), puis poussez
délicatement l'enceinte sur la colonne (figure B). Poussez de façon uniforme afin de vous assurer que
l'enceinte est engagée à fond et qu'elle est fermement fixée.
A B
Attachez l'enceinte à la colonne à l'aide des vis fournies.
3
Utilisez deux grandes vis pour chaque enceinte et fixez l'enceinte à la colonne comme indiqué dans
l'illustration ci-dessous.
Après avoir terminé, consultez le verso de cette page au sujet des options de
4
configuration des enceintes disponibles pour ce système.
7
Fr

Configuration Surround
standard à 5 points
Il s'agit d'une configuration standard d'enceintes pour un
son Surround multicanaux 5.1, qui permet d'obtenir un son
de cinéma à domicile optimal. Reportez-vous aussi au
chapitre 12 du Mode d'emploi principal.
Avant gauche
Centrale
Subwoofer
Position d'écoute
Avant droite
Fixez les tampons antidérapants sous
3
les enceintes Surround et sous
l'enceinte centrale.
Placez quatre tampons antidérapants sous les
supports de chaque enceinte.
Raccordez les enceintes.
4
Consultez le Guide d'installation fourni pour
connecter les enceintes correctement. Après
avoir connecté les câbles d'enceintes, faites
passer le câble de chaque enceinte avant par
l'orifice pratiqué en bas du support d'enceinte,
comme indiqué ci-dessous. Lors de cette
opération, placez les enceintes sur une surface
stable et posez-les sur le côté.
Surround
gauche
Séparez les enceintes Surround des
1
enceintes avant.
Pour séparer l'enceinte Surround, faites-la pivoter de
manière à aligner le symbole flèche situé en bas de
celle-ci avec le repère de position de séparation
DETACH POSITION (%) situé en haut de l'enceinte
avant. Dans cette position, l'enceinte Surround peut
facilement être détachée en la soulevant délicatement.
2
Attention
Afin d'empêcher tout accident, vérifiez que l'enceinte
Surround est correctement fixée en la faisant pivoter de
manière à ce que la flèche située en bas de celle-ci ne
se trouve pas dans la zone de séparation UNLOCK AREA.
Surround
droite
1
Afin d'assurer la stabilité de l'ensemble en position
verticale, faites passer le câble d'enceinte dans la
rainure située en dessous du support, comme
Fixez les caches de protection des
2
indiqué ci-dessous.
enceintes avant, ainsi que les
supports pour enceintes Surround.
Alignez les trous sur les enceintes avec les ergots
situés sur les caches et les supports. Appuyez
fermement pour verrouiller.
8
Fr
 Loading...