


DVD-R/RW WRITER UNIT
GRAVEUR DE DVD-R/RW DVD-R/RW-SCHREIBEINHEIT
DVD-R/RW
PRA-DW11
 Deutsch Français English
Operating Instructions Mode d’emploi Bedienungsanleitung

LASER DIODE – This product contains a laser diode. To assure continued safety, DO NOT remove any convers or attempt to gain access to the inside of the product.
CAUTION: USE OF CONTROLS OR ADJUSTMENTS OR PERFORMANCE OF PROCEDURES OTHER THAN THOSE SPECIFIED HEREIN MAY RESULT IN HAZARDOUS RADIATION EXPOSURE.
CAUTION: USE OF OPTICAL INSTRUMENTS WITH THIS PRODUCT WILL INCREASE EYE HAZARD.
For U.S. model
INFORMATION COMPLYING DHHS
RULES IS MARKED ON THE TOP COVER
AS FOLLOWS:
DANDER – VISIBLE AND
INVISIBLE LASER RADIATION
WHEN OPEN.
AVOID DIRECT EXPOSURE TO
BEAM.
[For Canadian model]
This Class A digital apparatus complies with Canadian ICES-003.
[Pour le modèle Canadien]
Cet appareil numérique de la Classe A est conforme à la norme NMB-003 du Canada.
2
PRA-DW11

Information to User
Alteration or modifications carried out without appropriate authorization may invalidate the user’s right to operate the equipment.
This equipment has been tested and found to comply with the limits for a Class A digital device, pursuant to Part 15 of the FCC Rules. These limits are designed to provide reasonable protection against harmful interference when the equipment is operated in a commercial environment. This equipment generates, uses, and can radiate radio frequency energy and, if not installed and used in accordance with the instruction manual, may cause harmful interference to radio communications. Operation of this equipment in a residential area is likely to cause harmful interference in which case the user will be required to correct the interference at his own expense.
This product complies with the EMC Directives (89/336/EEC, 92/31/EEC) and CE Marking Directive (93/68/EEC).
Ce produit est conforme aux directives relatives à la compatibilité électromagnétique (89/336/ CEE, 92/31/CEE) et à la directive CE relative aux marquages (93/68/CEE).
Dieses Produkt entspricht den EMV-Richtlinien (89/336/EEC, 92/31/EEC) und CEMarkierungsrichtlinien (93/68/EEC).
Questo prodotto è conforme alle direttive EMC (89/336/CEE, 92/31/CEE) e alla direttiva sul marchio CE (93/68/CEE).
Dit produkt voldoet aan de EMC-richtlijnen (89/336/EEC en 92/31/EEC) en de CEmarkeringsrichtlijn (93/68/EEC).
Denna produkt uppfyller föreskrifterna i EMC-direktiv (89/336/EEC, 92/31/EEC) och CEmärkningsdirektiv (93/68/EEC).
Este producto cumple con las Directivas EMC (89/336/CEE, 92/31/CEE) y Directiva de Marcación CE (93/68/CEE).
Este produto cumpre com as Directivas EMC (89/336/CEE, 92/31/CEE) e Directiva da Marcação CE (93/68/CEE).
Dette produkt er i overensstemmelse med direktiverne vedrørende elektromagnetisk kompatibilitet (89/336/EEC, 92/31/EEC) og CE-direktivet vedrørende mærkning (93/68/EEC).
VARNING!
Om apparaten används på annat sätt än i denna bruksanvisning spacificerats, kan användaren utsättas för osynling laserstrålning som överskrider gränsen för laserklass 1.
ADVARSEL:
Usynlig laserstråling ved åbning når sikkerhedsafbrydere er ude af funktion. Undgå udsaettelse for stråling.
VAROITUS!
Laitten käyttäminen muulla kuin tässä käyttöohjeessa mainitulla tavalla saattaa altistaa käuttäjän turvallisuusluokan 1 ylittävälle näkymättömälle lasersäteilylle.
WARNING:
Handling the cord on this product or cords associated with accessories sold with the product will expose you to lead, a chemical known to the State of California and other governmental entities to cause cancer and birth defects or other reproductive harm.
Wash hands after handling.
3
PRA-DW11

FOR ENGLAND
Warning
This is a class A product. In a domestic environment this product may cause radio interference in which case the user may be required to take adequate measures.
FOR FRANCE
Attention
Ce produit est de classe A. Dans un environnement domestique, il peut entraîner des interférences et l’utilisateur peut alors être améne à prendre les mesures qui s’imposent.
FOR GERMANY
Warnung
Dies ist ein Produkt der Klasse A. In einer häuslichen Umgebung kann dieses Produkt Störgeräusche (Funkstörungen) verursachen. In diesem Fall kann es erforderlich sein, geeignete Maßnahmen zu ergreifen.
FOR ITALY
Avvertenza
Questo è un prodotto di classe A. In ambiente domestico, questo prodotto può provocare interferenze radio per le quali l’utente deve adottare contromisure adeguate.
FOR SPAIN
Advertencia
Éste es un producto de clase A. En un entorno doméstico, este producto Puede causar radiointerferencias internas que obliguen al usuario a tomar las medidas adecuadas.
FOR PORTUGAL
Aviso
Este produto pertence à classe A. Quando num ambiente doméstico este produto pode provocar rádio interferências para as quais o utilizador pode ter que tomar medidas adequadas.
FOR BELGIUM AND NETHERLANDS
Waarschuwing
Dit is een product dat tot klasse A behoort. In woningen kan dit product radiostoringen veroorzaken. In voorkomend geval moet de gebruiker gepaste maatregelen nemen.
FOR DENMARK
Advarsel
Dette er et klasse A-produkt, som kan forårsage radiointerferens ved brug i hjemmet. Hvis det er tilfældet, kan brugeren blive nødt til tage passende forholdsregler.
FOR SWEDEN
Varning
Det här är en klass A-produkt. I hemmiljö kan radiostörningar uppstå och användaren bör då vidta lämpliga åtgärder.
[For Australian and New Zealander models]
Warning
This is a class A product. In a domestic environment this product may cause radio interference in which case the user may be required to take adequate measures.
[For Korean model]
[For Taiwanese model]
4
PRA-DW11
Thank you for buying this Pioneer product.
Please read through these operating instructions so you will know how to operate your model properly.
This product is an optional drive designed for model PRV-LX1 DVD recorder.
This means that this unit cannot be used alone or connected to other equipment than specified.
Installation Precautions
7Installation of this device requires a high level of technological expertise; to assure proper operation and personal safety, installation is to be performed by a Pioneer Service representative. For details, consult your dealer.
Precautions Regarding Use
7Pioneer may not be held liable for the loss of any data or any other direct or indirect damage suffered as the result of the use or breakdown of this product. It is strongly recommended that regular backups be taken of all critical data.
7Care must be taken not to infringe copyright restrictions under the laws of each country.
If this device is used to record copyrighted materials, approval must be obtained from the respective copyright holders. The recording of copyrighted materials without the express approval of the respective copyright holders may result in legal penalties. Pioneer disclaims any and all responsibility for any legal damages resulting from the use of this device in the unauthorized copying of copyrighted materials.
7All names of corporations, products, and systems listed herein, even when the (™) or (®) symbols are omitted, should be considered the registered trademarks of their respective owners.
CAUTION
This product contains a laser diode of higher class than 1. To ensure continued safety, do not remove any covers or attempt to gain access to the inside of the product.
Refer all servicing to qualified personnel. The following caution label appears on your unit.
Location: on top of the cover
CLASS 1 LASER PRODUCT
LASER KLASSE 1
The Generation of Acoustical Noise Is Less Than 70dB.(ISO7779/DIN45635)
[For U.S. model] |
|
IMPORTANT NOTICE |
H006AEn |
The serial number for this equipment is located on the top panel. Please write this serial number on your enclosed warranty card and keep it in a secure area. This is for your security.
Table of Contents
Confirm Accessories ........................ |
6 |
Precautions Regarding Use ............. |
6 |
Connectors (rear panel of drive unit) .. |
8 |
Installation ........................................ |
9 |
Specifications ................................. |
14 |
5
English
PRA-DW11
En

Confirm Accessories
Heat sink (with heat dissipation sheet) (1)
Tray panel 2 (1)
Drive 2 frame (1)
Screws (for heat sink installation) (2)
Flange screws (black, for drive installation) (4)
Warranty card for USA (1)
Warranty card for Japan (1)
Operating Instructions (1)
÷ Consult your dealer regarding missing accessories.
Precautions Regarding Use
÷Be sure to read and thoroughly understand the operating instructions for the main unit (PRV-LX1) before use.
÷Be sure to store these Operating Instructions in a safe and convenient place, where they can be consulted easily if necessary.
÷Do not install or use this unit in locations exposed to high temperature, high humidity, or high concentrations of dust.
÷Do not subject the unit to impacts or vibrations during use, and do not disconnect the power while the unit is operating.
÷When installing this unit to the DVD recorder PRV-LX1, always detach all cables and the power cord to the DVD recorder before beginning (except when performing operating confirmation).
÷Take care not to allow foreign objects or liquids to enter the unit.
÷Take precautions to avoid condensation. If condensation occurs, disconnect power to the PRV-LX1 and allow to rest unused until completely dry.
÷Do not attempt to inspect or modify internal parts.
÷If unusual smells or sounds are detected from the unit during use, immediately disconnect power to the PRV-LX1 and have the component inspected by professional service personnel.
Recording to DVD-R/RW discs in the "video" mode is a new standard recognized in 2000 by the DVD Forum. Support for this standard, however, is optional on the part of each manufacturer, with the result that depending on the DVD player or DVDROM drive involved, some may not play back such DVD-R/RW discs.
Also, depending on the condition of the player's pickup and the specific combination of discs and players used, some players that support the video recording standard may not be able to play back all discs.
6
PRA-DW11
En
Precautions Regarding Use
Disc Precautions
7 Recommended Discs
÷Use only recommended disc media in order to assure stable recording and playback.
÷Consult the Operating Instructions for the main unit PRV-LX1 regarding recommended disc media.
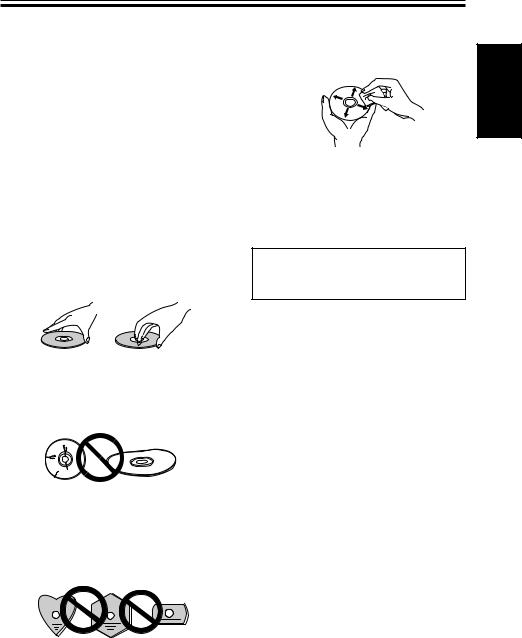
÷To clean fingerprints from a soiled disc, wipe gently from the center hole radially toward the circumference. Do not wipe in a circular motion.
7 Handling of Discs
Discs may become incapable of recording and playback when scratched, or when soiled with fingerprints or dust. Always handle discs as noted below:
÷Never touch the recording surface (mirror surface) when handling discs. Hold discs between their edges, or between one edge and one finger in the center hole.
÷Do not use anti-static or other record sprays. Also, never use benzene, thinner or toher volatile cleaners to clean the surface of discs, since such chemicals may melt or otherwise damage the surface.
Always store discs in their protective cases; before use, check the recording surface for fingerprints or other soiling.
÷Do not apply adhesive tapes or labels to discs.
÷Do not use cracked or warped discs, since they may shatter dangerously at high rotation speeds.
÷Do not use non-standard discs, since they may cause adverse affects to the player and other components.
÷Do not use discs shaped in non-circular shapes (hearts, polygons, etc.), since they may cause malfunctions.
Disc Problem Checklist
7 Data recording errors or inability to record
÷Was a recommended disc used ?
÷Was sufficient recording area on the disc?
÷Had the disc been finalized after previous recording sessions?
÷Was the disc loaded properly, recording surface down and label up?
÷Was the disc soiled or scratched?
7 Playback errors
÷Was a recommended disc used ?
÷Was the disc properly recorded (not empty)?
÷Was the disc soiled or scratched?
÷Condensation of moisture on the player's optical parts or disc surface is also a possibility; allow the disc and player to sit for 1-2 hours before attempting to use again.
7
English
PRA-DW11
En
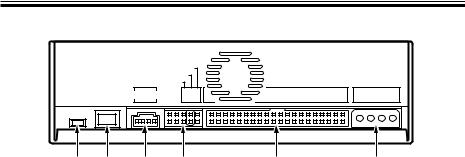
Connectors (rear panel of drive unit)
|
MASTER |
|
|
|
|
|
|
SLAVE |
|
|
|
DC INPUT |
|
CABLE SELECT |
|
|
|
|||
ANLOG AUDIO |
C S M |
39 |
IDE INTERFACE |
1 |
5V G G 12V |
|
S L A |
40 |
2 |
||||
|
|
|
||||
6 5 |
4 |
1 |
2 |
3 |
1 Device configuration jumpers
Placing the jumper on a pair of pins turns the pair ON. Confirm that pin set 2 is set for ON (jumper connected).
2 Host IDE interface
Connect to the PRV-LX1's IDE interface cable (see installation instructions, step 9).
3 DC INPUT connectors
Connect to the PRV-LX1's power cable (see installation instructions, step 9).
Connectors 4, 5, and 6 are not used with the PRV-LX1.
8
PRA-DW11
En
Installation
Precautions Regarding Static Electricity
7When handling this unit, be very cautious never to touch any of the connectors or terminals, to prevent damage due to electrostatic discharge.
NOTE:
÷Installation of this unit requires a high level of technical expertise; for this reason, and to assure safe operation, installation is to be performed by authorized Pioneer service personnel. For details, consult your dealer.
÷Loose mounting screws may allow disc rotation to cause sound distortion, or the unit may fall, leading to personal injuries and physical damages to the unit or other materials. Be sure that all mounting screws are fastened securely.
÷Use only the designated mounting screws. Use of threaded fasteners other than those designated may result in damage to the unit and DVD recorder PRV-LX1.
÷To prevent hazard of fire, electrical shock, and potential electronic damage to the unit, be sure to detach all cables and the power cord connected to the main unit PRV-LX1 before beginning installation.
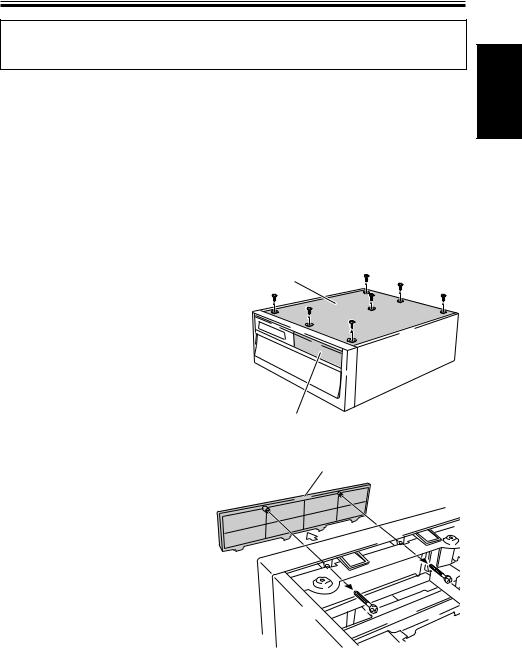
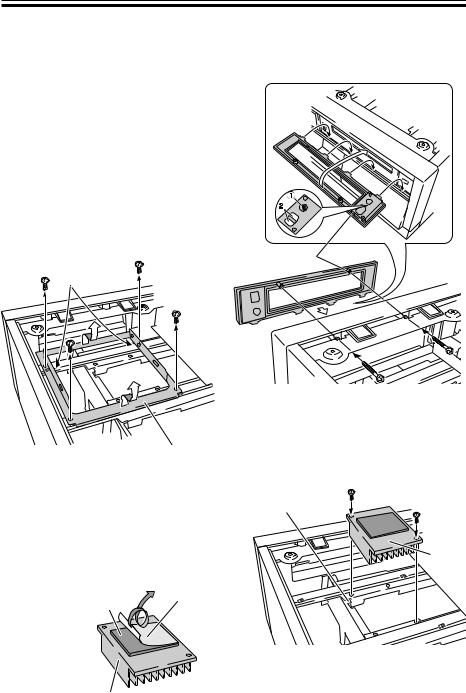
1.Remove PRV-LX1's top panel.
÷Remove the top panel’s 7 screws, then the top panel itself.
2.Remove the drive 2 cosmetic panel.
÷To prevent the cosmetic panel from dropping, hold it in place while removing the two panel installation screws (the two screws will be used to install the drive 2 frame in step 3).
*When removing the two screws, work carefully to avoid dropping the screws inside the unit.
Top panel
Drive 2 cosmetic panel
Drive 2 cosmetic panel
English
9
PRA-DW11
En
Installation
3. Install the accessory drive 2 frame. |
NOTE 1. |
Do not hold or press |
÷ Insert the tabs of the accessory drive 2 |
|
against the cross-ribs. |
frame into the square holes (4) beneath the |
NOTE 2. |
Do not touch the lens |
drive 2 opening on the front panel of the |
|
area. |
PRV-LX1, then press the frame into the |
|
|
opening. While holding the drive 2 frame |
|
|
carefully to prevent it from dropping, use |
|
|
the two screws (those removed in previous |
|
|
step 2) to secure the drive 2 frame in place. |
|
|
4. Remove the drive 2 mounting fixture.
÷ Remove the four mounting screws and take off the drive 2 mounting fixture (the screws will be used in step 8 to reinstall the mounting fixture).
NOTE: |
|
Take care to avoid touching sharp edges(*) |
Drive 2 frame |
(do not hold by edges). |
|
(*) |
|
Drive 2 mounting fixture
5.Remove the protective paper from the head dissipation sheet.
÷Remove the protective paper from the accessory heat sink's heatdissipation sheet.
NOTE:
If the heat-dissipation sheet is applied without removing the protective paper, necessary heat dissipation effects will not be produced, leading to possible damage or malfunctions.
Heat-dissipation |
Protective |
sheet |
paper |
|
(remove) |
6.Install the heat sink.
÷With the fins toward the front, align the accessory heat sink with the guide, then use the 2 accessory screws (without collars) to fasten into place.
Guide
Heat |
sink |
10
PRA-DW11
En
Heat sink
Installation
7.Fasten the drive 2 mounting fixture to the DVD-R/RW unit.
÷Attach the drive 2 mounting fixture to the DVD-R/RW unit so that the % mark on the fixture is oriented toward the front.
÷Fasten the fixture in place by using the four accessory flange screws (black) and tightening in the order
1= 2= 3= 4.
8.Once the mounting fixture has been fastened to the DVD-R/RW unit, install the DVD-R/RW unit together with its mounting fixture to the DVD recorder PRV-LX1.
÷Align the two square holes on the drive 2 mounting fixture with the tabs on the PRV-LX1, then use the 4 screws removed in step 4 to fasten the drive in place (fasten screws in order 1= 2= 3= 4).
Square holes
Tabs
Towards |
|
front |
|
|
|
|
|
|
|
|
Drive 2 |
% mark |
mounting fixture |
9.Attach the IDE cable and power cable
÷Remove the IDE cable and power cable from the cable binder.
NOTE:
Beware of all surrounding sharp edges when connecting and arranging cables.
IDE cable |
Power cable |
connector |
connector |
Binder strap
÷Align the connectors correctly and connect securely.
DC INPUT
1 |
5V G G 12V |
|
2 |
||
|
IDE cable
Power cable
11
English
PRA-DW11
En
Installation
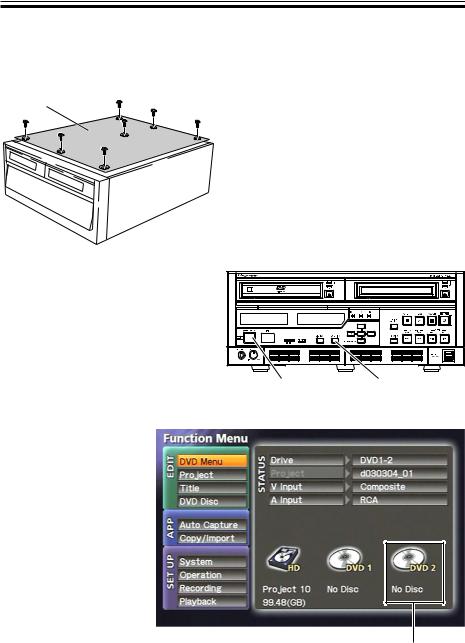
10. Reinstall the top panel of the PRVLX1.
÷Use the 7 screws removed in step 1 to reinstall the top panel.
Top panel
11. Confirm proper operation.
1Connect the PRV-LX1’s power plug to a power outlet, and turn on the power switch (on rear panel of main unit). Then press the front-panel’s STANDBY/ON
button to turn on the power.
2Wait until the main unit recognizes the newly added DVD-R/RW unit.
3When the PRV-LX1 enters idling status (see PRV-LX1 operating instructions), press the FUNCTION button on the
front panel.
4The function menu will appear on the TV monitor; confirm that the “DVD2” indicator is displayed on the screen (see accompanying image).
STANDBY/ON button |
FUNCTION button |
Function menu
Indicates that Drive 2 is connected.
12
PRA-DW11
En
Installation
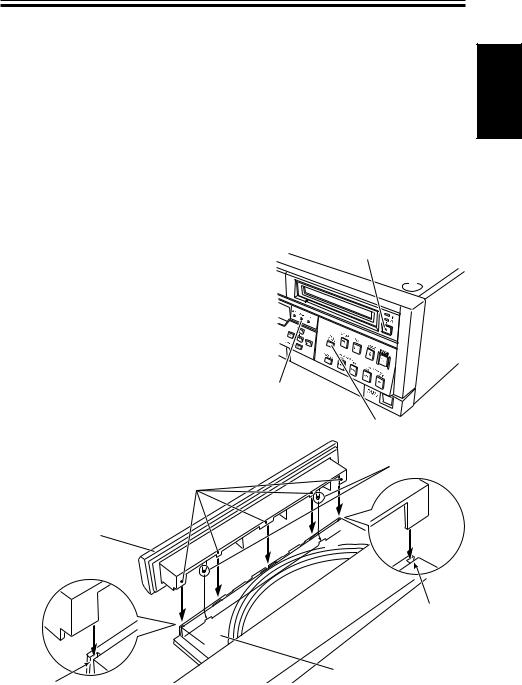
12. Install tray panel 2 on the drive 2 disc table.
1Press the DRIVE SELECT button to select DVD2.
÷Press the DRIVE SELECT button several times until the DVD2 indicator lights.
2 Press the drive 2 EJECT button. The DVD2 disc table will emerge.
3Insert the ribs of the accessory tray panel 2 into the grooves along the front edge of the disc table that emerged in step 2. Then press down until the two hooks engage securely as shown.
13. Completion of installation
1 Press the main unit's front panel STANDBY/ON button and wait until the unit enters the standby mode.
2Once the main unit is in the standby mode, set the unit's main power switch (on rear panel) to OFF, then disconnect the power cord from its power outlet.
NOTE:
Do not leave the power to the unit turned on when tray panel 2 is not installed (see step 12 for installation instructions). If tray panel 2 is not installed, dust may be pulled into the unit more easily, leading to malfunctions in recording and playback.
NOTE:
When installing tray panel 2, take care not to press the disc table in the closing direction, since the automatic disc loading mechanism will cause the disc table to be pulled back in. If you accidentally press the disc table so that it is pulled back in, allow it to close naturally without touching it, then press the drive 2 EJECT button once again to open the disc table.
NEVER turn off the power during this operation or attempt to pull the disc table out, since the main unit (PRV-LX1) and this unit (PRA-DW11) may be damaged, and internal data may be
erased.
4When the tray panel 2 is installed, press the drive 2 EJECT button to close the DVD2 disc table.
Ribs
Tray panel 2
Drive 2 EJECT button
DVD 2 indicator
DRIVE SELECT button
Hooks
Slit
Disc table
Slit
13
English
PRA-DW11
En

Specifications
[Disc size]
12 cm, 8 cm
[Miscellaneous] |
|
Dimensions: |
148 (W) x 42.3 (H) x 198 (D) mm (drive body only) |
Weight: |
1.8 kg (including packaging) |
Ambient operating temperature: |
+5 °C – +35 °C (PRV-LX1 installed) |
Ambient operating humidity: |
5 % – 85 % (PRV-LX1 installed) (without condensation) |
Ambient storage temperature: |
–40 °C – +60 °C |
Ambient storage humidity: |
5 % – 90 % (without condensation) |
[Accessories]
Heat sink (with heat dissipation sheet): 1
Tray panel 2: |
1 |
Drive 2 frame: |
1 |
Screws (for heat sink installation): |
2 |
Flange screws (black, for drive installation): 4
Warranty card for USA: |
1 |
Warranty card for Japan: |
1 |
Operating Instructions: |
1 |
• Specifications and appearance are subject to change without notice.
Published by Pioneer Corporation.
Copyright © 2003 Pioneer Corporation.
All rights reserved.
14
PRA-DW11
En
 Loading...