

Page 1
デジタルサウンドプロジェクター
壁掛けユニット
Wall mount unit
Support mural
Wandmontage-einheit
Wandmontage-element
B-PDSP-W
「据付工事」について
本機は十分な技術・技能を有する専門業者が据付けを行うことを前提
に販売されているものです。据付け・取付けは必ず据付工事専門業者
または販売店にご依頼ください。
なお、据付け・取付けの不備、誤使用、改造、天災などによる事故損
傷については、弊社は一切責任を負いません。
取扱説明書
Operating Instructions
Mode d’emploi
Bedienungsanleitung
Gebruiksaanwijzing
Page 2
このたびは、パイオニアの製品をお買い求めいただきまして
まことにありがとうございます。お使いになる前には取扱説
明書をよくお読みになり、安全に正しくご使用ください。ま
たお読みになった後も、この取扱説明書は大切に保管してく
ださい。
■取扱上の注意
本製品はデジタルサウンドプロジェクターPDSP-1専用壁掛
けユニットです。
[据付工事専門業者取扱品]
指定外の組み立て、取り付け、使い方をされた場合、およ
び改造、天災などによる事故損傷については、弊社は一切
責任を負いません。
ご注意 安全上の絵表示について
取扱説明書および製品に記されている注意事項には、損害の
レベルや内容を示す絵表示が付けられていることがあります。
それら絵表示の意味は以下のとおりです。
人が死亡または重傷を負うおそ
警告
注意
警告・注意(気をつけること)
禁止(やってはいけないこと)
れがある内容を示します。
人がけがをしたり財産に損害を
受けるおそれがある内容を示し
ます。
指定外の製品の取り付けや改造および他の用途への使
用はしないでください。
禁止
設置場所について
・工事の前には必ず設置場所の構造や安全性を確認してくだ
さい。
・壁の構造強度によっては取り付けできない場合、または補
強工事が必要な場合がありますので工事専門業者へご相談
ください。
・設置場所は、製品本体とこの壁掛けユニットの重量に十分
耐えうる強度を持つ場所を選定してください。
人が容易にぶら下がったり寄り掛かれる場所、振動や
衝撃の加わる場所には設置しないでください。
屋外や温泉、海辺の近くには設置しないでください。
直射日光が当たる場所や異常に温度が高くなる場所に
は設置しないでください。
禁止
組み立て・設置について
・作業の際は、PDSP-1本体の主電源スイッチを切り、電源
プラグをコンセントから抜いてください。
・作業は安全のため 2 人以上で行ってください。
・取り付け後の破損、転倒などの事故を避けるため、ネジ止
めは設置手順に従って確実に行ってください。
2
Ja
指示・強制(しなければならないこと)
各部のネジがゆるんでいると落下等の事故につなが
りますので、絶対にゆるめたままで設置しないでく
禁止
ださい。
使用について
本製品に乗ったりぶらさがったりしないでください。
特にお子様はご注意ください。倒れたり壊れたりして
禁止
けがの原因となることがあります。
異常や不具合が発見されたときは、すみやかに修理を工事専
門業者へ依頼してください。
この壁掛けユニットを長期間使用されると、環境によっては
経年変化で強度が不足することがあります。5 年を目安に工
事専門業者に点検を依頼し、ご使用に問題のないことをお確
かめください。
Page 3
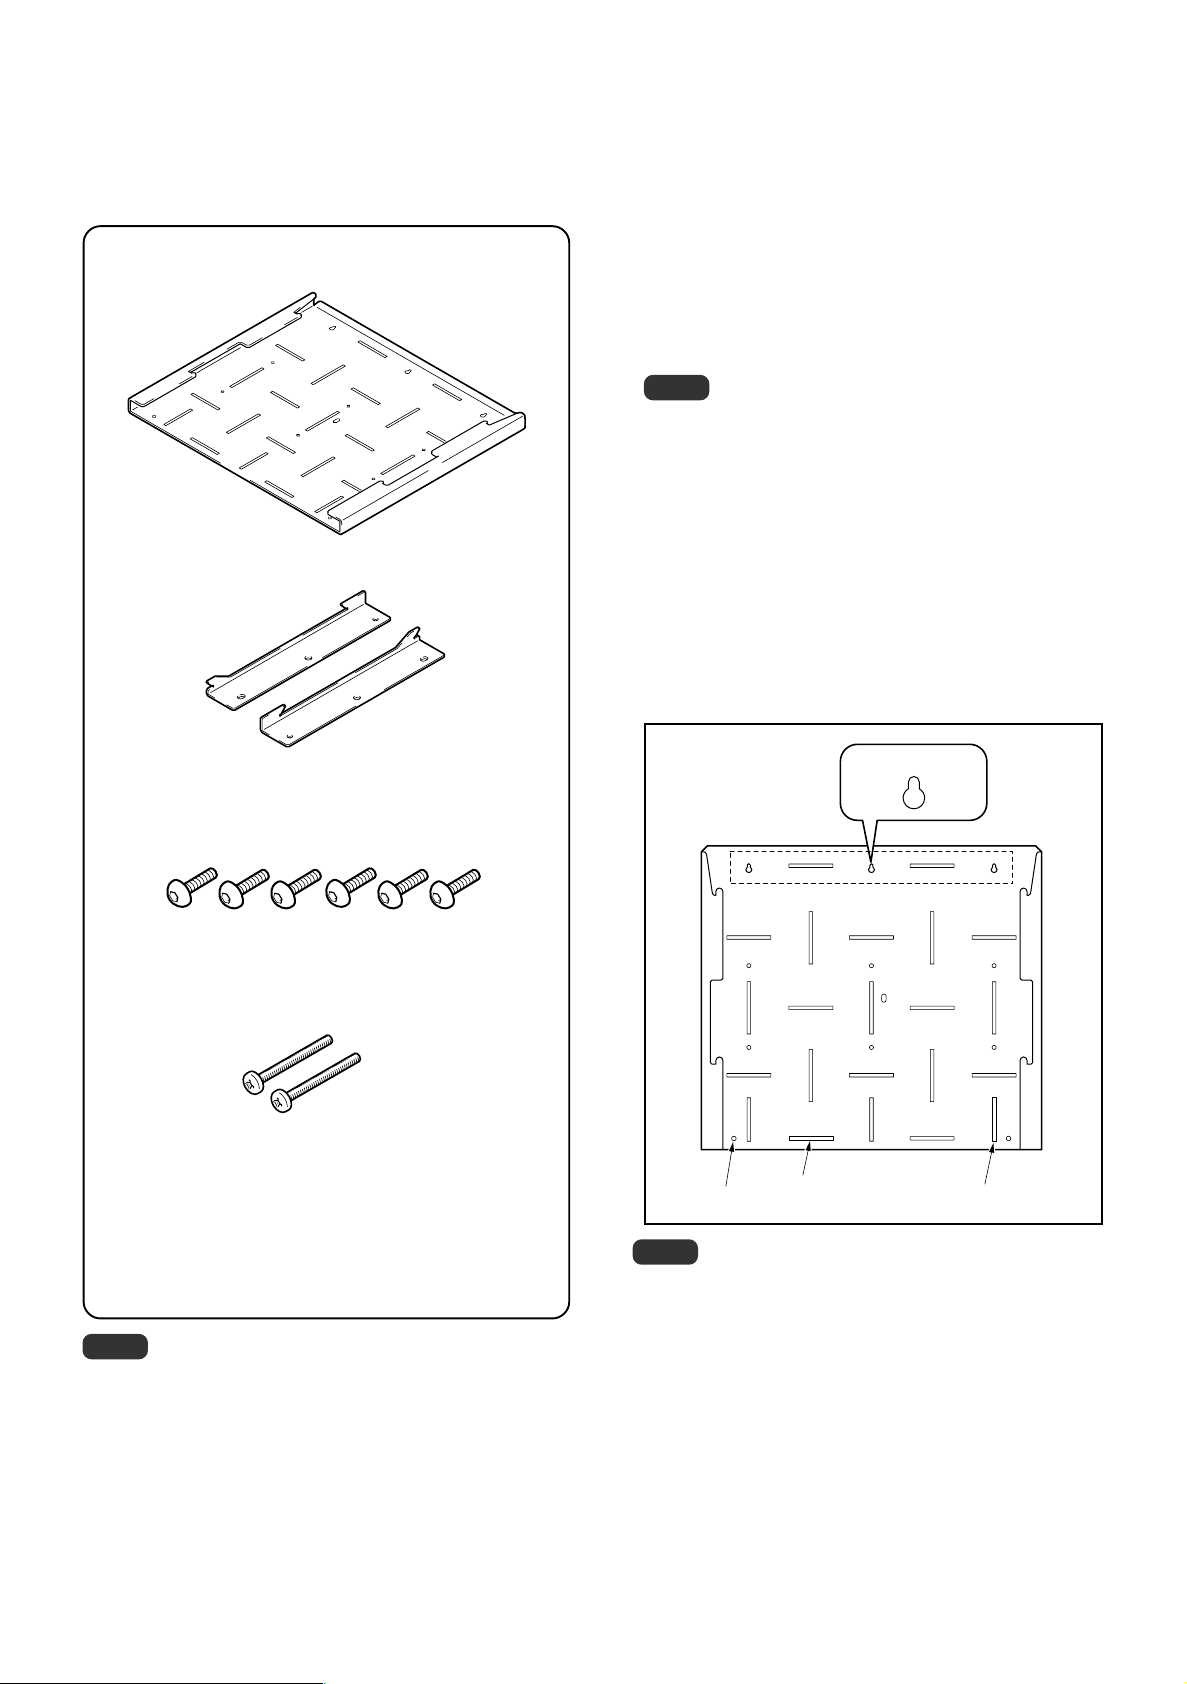
■構成部品の確認
■設置の手順
設置の前に、壁掛けユニットの部品を確認してください。
壁掛け金具x1
取付金具x2
壁掛けユニットの設置とデジタルサウンドプロジェクターの
取り付けは、次の 1 〜 7 の手順で行います。
1
設置する壁面の位置決めをする
原寸大の型紙を使って、壁掛け金具を取り付けるネジの位
置に強固な下地があることを確認し、設置する位置を決め
ます。
ご注意
壁掛けユニットと取り付けるデジタルサウンドプロジェク
ターの合計質量は約58kgになります。取付位置の壁に十
分な強度があることを必ず確認してから取り付けてくださ
い。もし強固な下地がないときは、設置位置を変更するか
または下地補強を行ってください。
2
壁掛け金具を壁面に引っ掛ける
水平に取り付けるため、仮止め用ネジ穴の位置に合わせて
壁面にネジを止めて、壁掛け金具を引っ掛けます。
(このとき、中央の仮止め用ネジ穴を使って引っ掛けると
水平に取り付けやすくなります。)
仮止め用ネジ穴
六角穴付ボルト(M8x15mm)x6
⊕ バインドネジ(M5x40mm)x2
六角レンチx1
壁掛け金具(原寸大)型紙x1
取扱説明書(本書)x1
ご注意
壁掛け金具を壁面に固定するためのネジ類は、付属していま
せん。
丸穴
ご注意
壁掛け金具を壁面に固定するためのネジ類は付属していま
せん。壁の強度や材質に適したネジ類をご使用ください。
3
壁掛け金具を壁面に取り付ける
縦スリット、横スリットまたは丸穴の位置に、安定のため
6本以上ネジ止めします。ネジは左右対称に、また全体に
平均して止めてください。
横スリット
縦スリット
3
Ja
Page 4
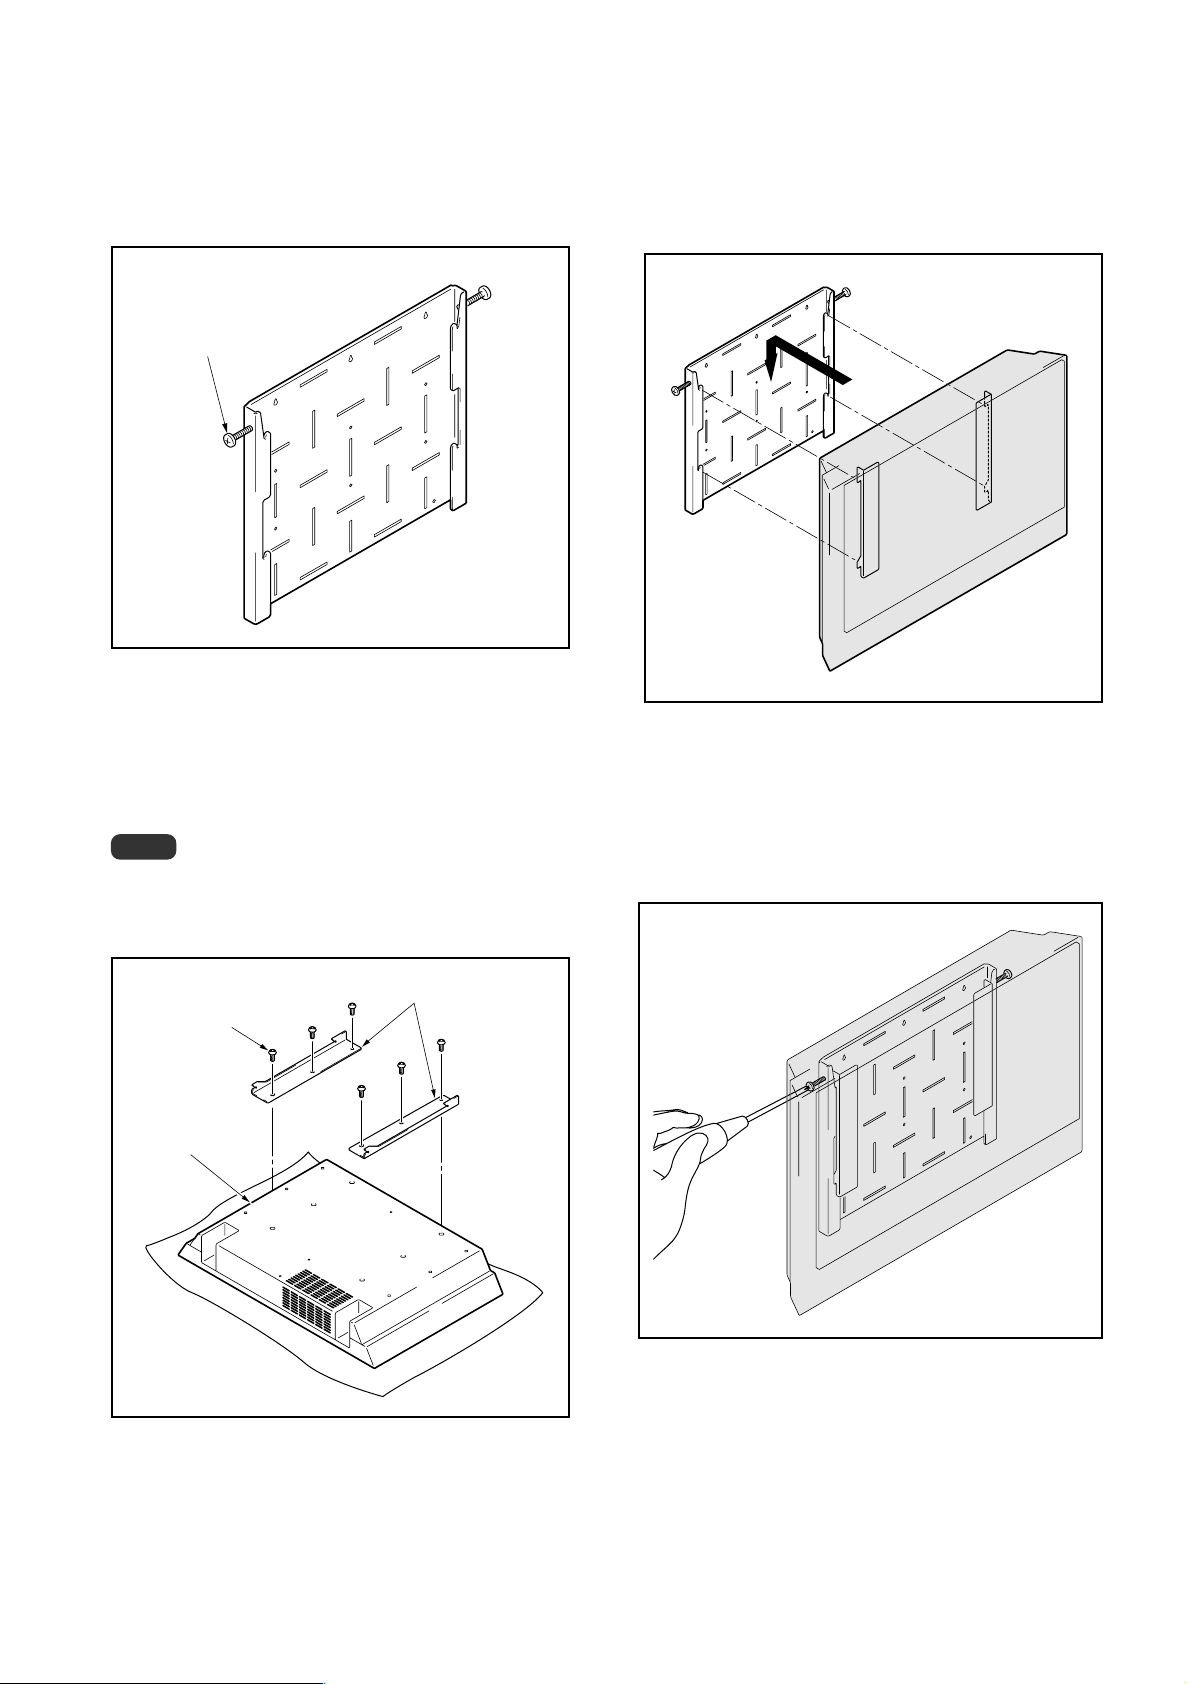
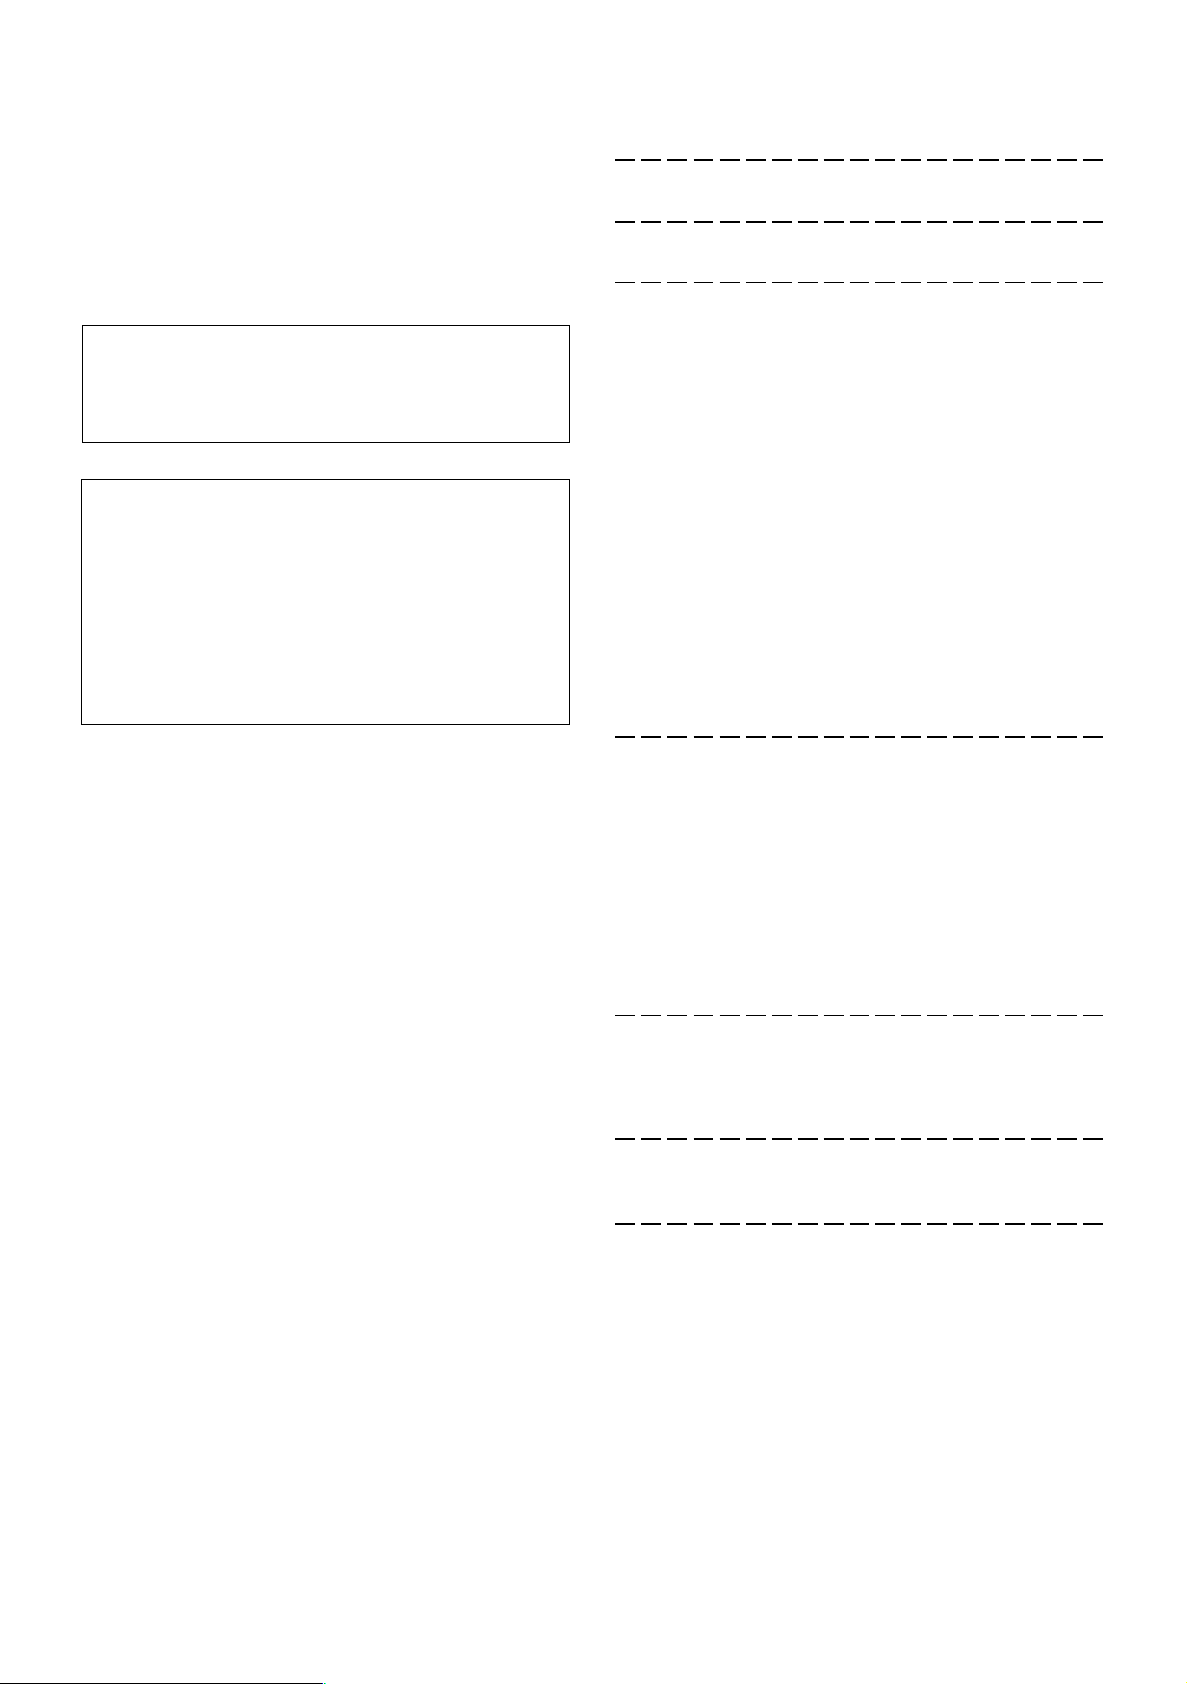
4
壁掛け金具にネジを仮止めする
壁掛け金具に製品を取り付けたときにネジ止めするため、
バインドネジ(M5 ×40mm)を使って(2mm 〜 3mm
入る程度に)仮止めします。
バインドネジ(M5x40mm)
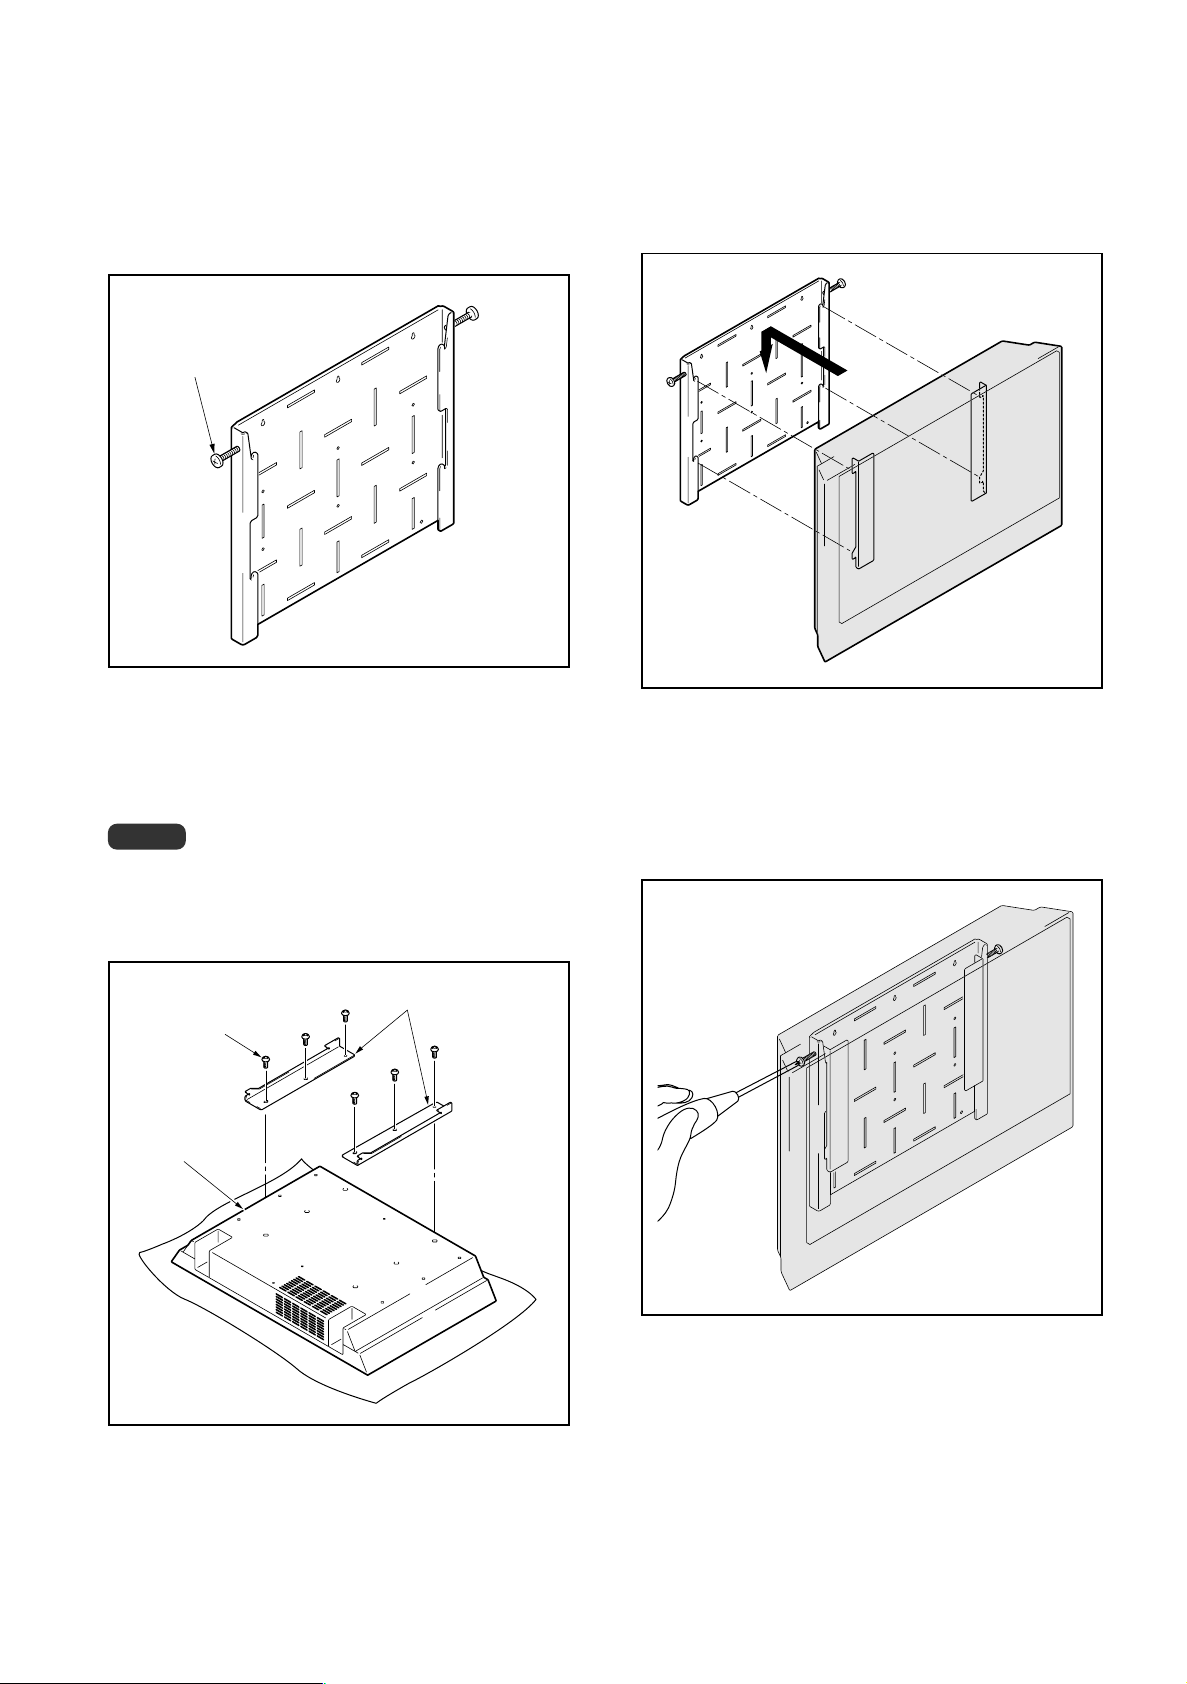
6
デジタルサウンドプロジェクターを壁面に
固定した金具に取り付ける
壁側金具の4か所の溝に確実に入るように合わせて、取付
金具のフックを引っ掛けます。
5
デジタルサウンドプロジェクターに取付金
具を取り付ける
ボルト(M8 × 15mm)を使って、1〜 3 の順に6 か所
を止めます。
ご注意
製品本体、特にそのスピーカー部はとても繊細な音響装置
です。製品本体の下に安全のためのシートを敷いて保護す
るなどして、傷や破損がないようにしてください。
取付金具
ボルト
(M8 × 15mm)
2
PDSP-1
1
3
7
壁掛け金具からデジタルサウンドプロジェ
クターが外れないようネジ止めする
バインドネジ(M5× 40mm)を使って、⊕ ドライバー
で 2 か所を止めます。
4
Ja
Page 5
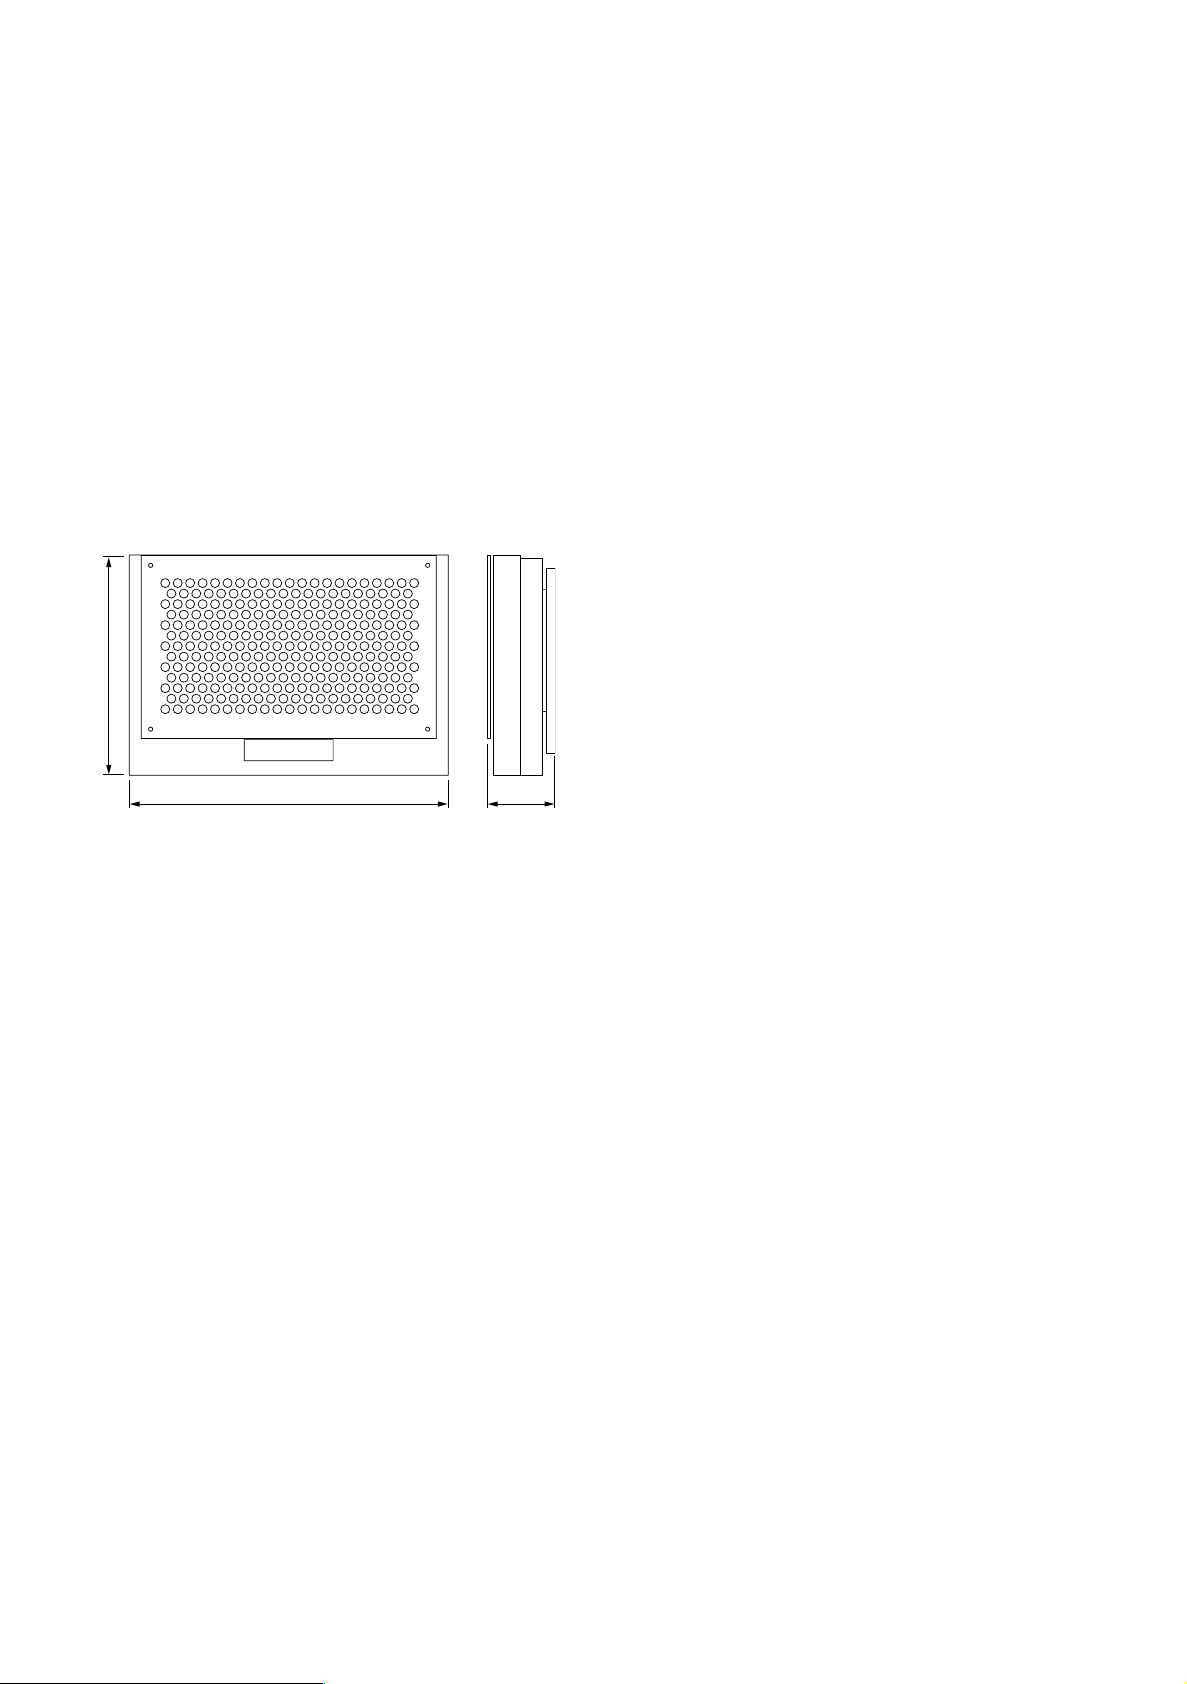
■仕様
外形寸法 630(幅)x550(高さ)x33(奥行き)mm
質量 8.0kg
上記の仕様および外観は、改良のため予告なく変更するこ
とがあります。
■寸法図
単位:mm
デジタルサウンドプロジェクターを取り付けたとき
640
2003パイオニア株式会社 禁無断転載
178963
5
Ja
Page 6
Thank you for buying Pioneer’s product. Please read through
the Operating Instructions to learn how to operate your
model safely and properly. Please be advised to keep the
Operating Instructions in your place for future reference.
7 Cautions
This Wall Mount Unit is exclusively designed for the Digital
Sound Projector PDSP-1.
[Item to Be Handled by Professional Installation
Workers]
Pioneer is not liable for any damages resulting from
improper assembling, installation, or use other than
specified in the instructions, or accidental damages due to
modification or natural disasters.
Installation Work
÷ This product is sold on the premise that it will be installed
by a professional with sufficient technique and skills.
Make sure to request installation and mounting from a
professional construction company or your sales agent.
÷ Pioneer shall not be liable in any way for any accidents
or damage resulting from improper installation or
mounting, incorrect usage, remodeling, natural disasters
or the like.
Do not install or modify the product other than specified.
Do not use this product for any other purpose.
Installation Location
• Do not neglect to verify the structure’s suitability and
safety of the installation location before starting the
installation work.
• Please be advised to consult with professional installation
workers in the case the wall is not sufficiently strong to
support the unit and the main projector, or in the case any
supplemental material should be needed to support the
unit.
• Make sure to install this Wall Mount Unit in a location that
can sufficiently support the combined weight of the
product to be attached and Wall Mount Unit.
• Do not install the Wall Mount Unit in a location where any
person may easily hang on to or lean over the Stand, or
where the Wall Mount Unit may be affected by vibration
or shock.
• Do not install this unit outdoors, at a hot spring, or near
the beach.
• Install this unit away from direct sunlight or extremely high
temperatures.
Assembling and Installation
• Before assembling and installation, make sure the main
power switch on the main body of PDSP-1 is turned off,
and remove the power plug from the wall outlet.
• Please be advised that two persons or more should be in
charge of the work for safety purposes.
• Tighten the screws firmly in accordance with the installation steps to prevent damages and accidents such as a
violent fall after installation.
• Do not forget to make sure the screws on each part are
tightened before installation. If they are too loose, an
accident may occur such as the falling of the unit.
6
En
How to Use the Wall Mount Unit
• Do not ride or hang on to the Wall Mount Unit. Be careful
to prevent children from doing such activities with the
Wall Mount Unit. If the Wall Mount Unit falls down or
breaks, it can be dangerous and may cause injury.
Please be advised to immediately contact a professional
installation worker when any abnormality is found or any part
is out of order.
This unit may become unable to support the main projector
due to aging, depending on the installation environment,
after being used for a long time. Ask a professional installation worker to check the unit about every five years, making
sure the unit can be used without problems.
Page 7

7 Verify That You Have All
the Parts
Verify you have the enclosed parts for the Wall Mount Unit
before installation.
Wall mount metal fitting x 1
7 Installation Steps
Follow procedures 1-7 to install the Wall Mount Unit and to
attach the Digital Sound Projector.
1
Determining the installation location on
the wall.
Make sure the foundation around the screw positions
under the wall mount metal fitting has sufficient
strength, using the actual size of the pattern, to
determine the installation location of the Unit.
Caution
The combined weight of the Wall Mount Unit and the
Digital Sound Projector to be attached is about 58 kg.
Before installation, do not forget to make sure that the
installation location on the wall has sufficient strength.
If the wall’s foundation is not strong enough, change the
installation location, or reinforce the installation location.
Installation metal fitting x 2
Hexagon socket head cap bolt (M8 x 15mm) x 6
Phillips binder screw (M5 x 40mm) x 2
Hexagonal wrench x 1
Wall mount metal fitting (actual size) pattern x 1
Operating Instructions (this manual) x 1
Caution
This product does not include screws to fix the wall mount
metal fitting onto the wall.
2
Hook the wall mount metal fitting onto
the wall.
Insert a screw into the tentative screw hole, and tighten
it so the wall mount metal fitting is level, then hook the
wall mount metal fitting onto the screw.
(Hook the wall mount metal fitting onto the screw in the
center so you can easily make sure it is level.)
Tentative screw hole
Round hole
Horizontal slit
Vertical slit
Caution
This product does not include screws to fix the wall
mount metal fitting onto the wall. Use screws suitable
for the strength and material of the wall.
3
Attach the wall mount metal fitting
onto the wall.
Tighten six or more screws at the positions of the vertical
slits, horizontal slits, or round holes to stabilize the
installation of the unit. Screws must be tightened
symmetrically on both sides and evenly onto the entire
surface.
7
En
Page 8
4
Tentatively screw the wall mount metal
fitting.
Using the Phillips binder screws (M5 x 40 mm),
tentatively attach the wall mount metal fitting by
screwing in at least 2 mm – 3 mm, as the product is
screwed onto the wall mount metal fitting.
Phillips binder screw
(M5 x 40 mm)
6
Attach the Digital Sound Projector to
the metal fitting fixed to the wall.
Make sure to firmly insert the installation metal fittings
into the four slots on the wall mount metal fitting, to
hang the hooks of the installation metal fittings.
5
Attaching the installation metal fittings
to the Digital Sound Projector.
Tighten the six places 1 – 3 in order, using the bolts
(M8 x 15 mm).
Caution
The main body of the product, especially the speaker
section, is a very delicate sound device. Be careful not to
damage or impair the main body; for example, put a
sheet under the main body for safety.
Metal fittings
Bolt
(M8 x 15 mm)
2
PDSP-1
1
3
7
Screwing the Digital Sound Projector to
the wall mount metal fitting so the
Projector will not be moved.
Using a Phillips screwdriver, tighten the Phillips binder
screws (M5 x 40 mm) on the two places of the Projector.
8
En
Page 9

7 Specifications
Dimensions: 630 (W) x 550 (H) x 33 (D) mm
Weight: 8.0 kg
In the case of modifications, the above specifications and
exterior view may be changed without notification.
7 Dimensional Diagram
Unit: mm
When the Digital Sound Projector is attached:
640
Published by Pioneer Corporation.
Copyright © 2003 Pioneer Corporation.
All rights reserved.
178963
En
9
Page 10

Pioneer vous remercie de l’achat de ce produit. Nous vous
invitons à lire attentivement le mode d’emploi qui vous
enseignera comment vous servir de votre appareil au mieux
et en toute sécurité. Rangez-le à portée de votre main pour
pouvoir le consulter facilement à l’avenir.
[L’installation et le maniement de cet article
doivent être effectués par des professionnels]
7 Précautions
Ce support mural a été projeté à l’usage exclusif du
Projecteur de Son Audionumérique PDSP-1.
N’installez pas le produit d’une manière différente de celle
qui vous est indiquée et n’effectuez pas de modification.
Ne l’utilisez pas à des fins différentes de celles pour
lesquelles il a été projeté.
Pioneer n’assume pas la responsabilité des dommages
résultant d’un assemblage ou d’une installation incorrects,
d’une utilisation différente de celle qui est spécifiée dans
le mode d’emploi, et des dommages accidentels dus à
des modifications ou à une catastrophe naturelle.
Chantier d’installation
÷ Lors de la vente de ce produit, il est entendu qu’il sera
installé par un professionnel doté de la qualification
requise. Il vous est recommandé de confier l’assemblage
et l’installation à un professionnel du bâtiment ou à votre
revendeur.
÷
Pioneer n’assume pas la responsabilité des accidents ou
dommages résultant d’un assemblage ou d’une
installation non appropriés, d’un usage incorrect, de
modifications, de catastrophes naturelles ou autres
évènements similaires.
Emplacement de l’installation
• N’omettez pas de vérifier la conformité et la sécurité de la
structure destinée au positionnement de cette installation
avant de procéder aux travaux d’installation.
• Nous vous conseillons de consulter in professionnel de ce
type d’installation si la paroi n’est pas suffisamment solide
pour supporter cet équipement et le Projecteur principal
ou si des éléments complémentaires sont nécessaires
pour supporter le poids de l’équipement.
• Assurez-vous que l’emplacement choisi pour l’installation
de ce support mural peut supporter sans difficulté le poids
combiné du support mural et du produit qui sera fixé au
support.
• Ne positionnez pas ce support mural dans un endroit où
quelqu’un pourrait facilement s’y appuyer ou s’y agripper
ou encore dans un emplacement sujet à des vibrations ou
des chocs éventuels.
• Ne positionnez pas ce produit à l’extérieur, près d’une
plage ou d’une source thermale.
• Installez cet équipement à l’abri de la lumière directe du
soleil et de températures extrêmement élevées.
Assemblage et installation
• Avant de procéder à l’assemblage et à l’installation,
assurez –vous que la touche d’alimentation secteur située
sur l’unité principale du PDSP-1 est désactivée, et
déconnectez le cordon d’alimentation de la prise murale.
• Nous vous rappelons que pour des raisons de sécurité, il
est recommandé de s’assurer la présence d’au moins
deux personnes chargées de ces travaux.
• Serrez les vis bien à fond, en suivant les étapes du
processus d’installation pour prévenir dommages ou
accidents, tels qu’une chute brusque et violente de
l’équipement après l’installation.
• N’oubliez pas de vous assurer que les vis de chaque coté
sont bien serrées avant de procéder à l’installation. Si elles
ne le sont pas suffisamment, un accident tel que la chute
de l’appareil peut se produire.
10
Fr
Comment utiliser le support mural
• Ne montez pas sur le support mural, ne vous y suspendez
pas. Veillez à ce que les enfants ne se livrent pas à de
telles activités avec le support mural. En effet, si celui-ci
tombe ou se casse, cela peut être dangereux et causer
des blessures.
Nous vous conseillons de contacter immédiatement un
professionnel dès que vous remarquez un élément anormal
ou une anomalie de l’une des pièces.
Cet équipement peut être sujet à usure ou vieillissement,
par suite d’un usage prolongé ou à cause des conditions
d’environnement de l’installation. Demandez à un
professionnel de vérifier l’installation tous les cinq ans, afin
de vous assurer que son utilisation ne causera aucun
problème.
Page 11

7 Vérifiez que vous avez
toutes les pièces
Avant l’installation, vérifiez que vous avez toutes les pièces
nécessaires au montage du support mural.
Plaque métallique du support mural x 1
Barre métalliques d’installation x 2
Vis-boulon hexagonales (M8 x 15mm) x 6
7 Procédures d’installation
Pour installer le support mural et fixer à celui-ci le Projecteur
de Son Audionumérique, suivez les procédures 1 à 7.
1
Localiser sur le mur l’emplacement
réservé à l’installation.
Pour déterminer l’emplacement où vous installerez
l’unité, à l’aide du patron de papier à grandeur réelle
assurez-vous que l’ouvrage de maçonnerie autour des
positions des vis, sous la plaque de métal du support
mural, est doté de la solidité requise.
Attention
Le poids combiné de l’installation du support mural et du
Projecteur de Son Audionumérique qui sera fixé au
support est d’environ 58 kg. Avant de procéder à
l’installation, n’oubliez pas de vérifier que l’emplacement
dédier à l’installation sur le mur a la solidité nécessaire.
Si l’ouvrage de maçonnerie n’est pas suffisamment
résistant, changez l’emplacement ou encore procédez au
renforcement de la maçonnerie à l’emplacement choisi.
2
Accrochez au mur la plaque de métal
du support mural.
Insérez une vis dans le trou de vis provisoire et serrez la
de manière que la plaque de métal du support mural
soit de niveau et ensuite accrochez la plaque du support
mural à cette vis. (Accrochez la plaque de métal du
support mural à la vis en son centre. Afin de pouvoir
facilement vérifier qu’il est bien de niveau.)
Trou pour l’insertion
provisoire d’une vis
Vis cruciformes Phillips (M5 x 40mm) x 2
Clé hexagonale x 1
Patron de la plaque métallique du support mural
(grandeur réelle) x 1
Mode d’emploi (ce manuel) x 1
Attention
Les vis de fixation destinées à fixer le support mural au mur
ne sont pas fournies avec le support.
Trou rond
Attention
Ce produit est fourni sans les vis de fixation destinées à
fixer le support mural au mur. Veuillez utiliser des vis
adaptées aux matériaux de l’ouvrage de maçonnerie du
mur et à sa résistance.
3
Fixez la plaque de métal du support au mur.
Insérez au moins six vis dans les fentes verticales,
horizontales ou dans les trous ronds, et serrez-les pour
assurer la stabilité de l’installation de l’appareil. Cers vis
doivent être disposées et serrées symétriquement des
deux côtés et de manière homogène sur toute la surface
de la plaque.
Fente horizontale
Fente verticale
11
Fr
Page 12

4
Procédez à la fixation provisoire de la
plaque métallique du support mural en
serrant les vis de montage.
A l’aide des vis cruciformes Phillips, (M5 x 40mm),
procédez à la fixation provisoire de la plaque de métal du
support en vissant jusqu’à une profondeur de 2 à 3 mm,
le produit se trouvant fixé sur la plaque métallique du
support mural.
Vis cruciformes Phillips
(M5 x 40mm)
6
Assemblez le Projecteur de Son
Audionumérique à la plaque de métal
fixée au mur.
Assurez-vous que les barres d’installation métalliques
sont solidement insérées dans les quatre encoches
situées sur la plaque de métal du support, afin que les
parties saillantes des barres y soient bien accrochées.
5
Comment fixer les barres métalliques
d’installation au Projecteur de Son
Audionumérique.
Serrez les vis aux six emplacements 1 à 3 selon l’ordre
indiqué, à l’aide des boulons à tête (M8 x 15mm).
Attention
Le corps de l’appareil, et le haut-parleur en particulier,
sont des équipements audio extrêmement délicats.
Veillez à ne pas abîmer ni détériorer l’appareil ; par
exemple, mettez une pièce de tissu sous l’appareil, par
mesure de sécurité.
Barres métalliques
d’installation
Vis-boulon
(M8 x 15mm)
2
PDSP-1
1
3
7
Comment fixer le Projecteur de Son
Audionumérique à la plaque de métal
du support mural en vissant de manière
à éviter tout mouvement ou
déplacement du Projecteur.
A l’aide d’un tournevis cruciforme Phillips, serrez les vis
cruciformes Phillips (M5 x 40 mm) aux deux
emplacements prévus sur le Projecteur.
12
Fr
Page 13

7 Spécifications
Dimensions: 630 (L) x 550 (H) x 33 (P) mm
Poids: 8,0 kg
En cas de modification, les spécifications ci-dessus et
l’aspect extérieur peuvent être changées sans avis
préalable.
7 Diagramme dimensionnel
Unité : mm
Lorsque le Projecteur de Son Audionumérique est fixé
640
Publication de Pioneer Corporation.
© 2003 Pioneer Corporation.
Tous droits de reproduction et de traduction réservés.
178963
13
Fr
Page 14

Vielen Dank, dass Sie sich für den Kauf eines Erzeugnisses
der Firma Pioneer entschieden haben. Bitte lesen Sie die
Bedienungsanleitung aufmerksam durch, um sich zu
informieren, wie Sie Ihr Modell sicher und richtig bedienen.
Sie sollten die Bedienungsanleitung so aufbewahren, dass
Sie sie später jederzeit wieder zu Rate ziehen können.
[Baueinheit für eine Montage durch InstallationsFachkräfte]
Die Firma Pioneer haftet nicht für Schäden durch falsche
Montage, durch falsche Installation oder durch einen
anderen Gebrauch als in der Betriebsanleitung
angegeben. Ferner haftet Pioneer nicht für zufällige
Schäden aufgrund von vorgenommenen Änderungen
sowie für Schäden durch Naturkatastrophen.
Installationsarbeiten
÷ Dieses Erzeugnis wurde mit der Maßgabe verkauft, dass
sie durch Fachkräfte mit ausreichender Technik und
Ausbildung installiert wird. Sichern Sie sich unbedingt
die Installation und die Montage durch eine Fachwerkstatt
oder Ihren Fachhändler.
÷ Die Firma Pioneer haftet nicht für Unfälle oder Schäden
durch falsche Installation oder Montage, ferner durch
falschen Gebrauch, durch Umänderungen, durch
Naturkatastrophen oder ähnliches.
7 Vorsicht!
Diese Wandmontage-Einheit ist ausschließlich für den
Digitalen Klangprojektor PDSP-1 bestimmt.
Installieren Sie das Produkt nicht anders als vorgesehen und
beschrieben und nehmen Sie keine willkürlichen
Änderungen vor.
Verwenden Sie das Produkt für keinen anderen Zweck.
Installationsort
• Vergewissern Sie sich unbedingt vor Beginn der Installationsarbeiten, dass der Installationsort geeignet und sicher
ist.
• Wir empfehlen Ihnen, Fachkräfte zu konsultieren, wenn
die Wand nicht stark genug ist, die Einheit und den
Hauptprojektor zu tragen, oder wenn Sie Zusatzmaterial
nötig sein sollte, um die Einheit zu tragen.
• Installieren Sie diese Wandmontage-Einheit nur an einem
Ort, der mit Sicherheit das Gesamtgewicht des Produkts
und der Wandmontage-Einheit tragen kann.
• Installieren Sie die Wandmontage-Einheit nicht an einem
Ort, an dem sich Personen leicht daran hängen oder
darüber lehnen können oder an dem sie Vibrationen oder
Stößen ausgesetzt sein kann.
• Installieren Sie diese Einheit nicht im Freien, an einer
heißen Quelle oder in der Nähe des Strandes.
• Installieren Sie diese Einheit so, dass sie nicht dem
direkten Sonnenlicht oder extrem hohen Temperaturen
ausgesetzt ist.
Montage und Installation
• Vergewissern Sie sich vor der Montage und Installation,
dass der Haupt-Stromschalter der Einheit PDSP-1
ausgeschaltet ist und dass der Stecker vom Netz getrennt
ist.
• Aus Sicherheitsgründen sollten zwei oder mehr Personen
für die Arbeiten verantwortlich sein.
• Ziehen Sie die Schrauben entsprechend den
Installationsschritten fest, um Beschädigungen und
Unfälle wie beispielsweise ein gefährliches Fallen nach der
Installation zu verhindern.
• Vergessen Sie nicht, sich vor der Installation zu
vergewissern, dass die Schrauben richtig angezogen sind.
Wenn sie zu lose sind, kann es zu einem Unfall kommen
wie beispielsweise dem Fallen der Einheit.
14
Ge
Verwendung der Wandmontage-Einheit
• Steigen Sie nicht auf die Wandmontage-Einheit und
hängen Sie sich nicht an sie. Treffen Sie Maßnahmen, die
verhindern, dass Kinder so etwas tun. Wenn die Wandmontage-Einheit herunterfällt oder entzwei geht, kann das
gefährlich sein und kann zu Verletzungen führen.
• Wir empfehlen Ihnen, sofort eine Installations-Fachkraft zu
kontaktieren, wenn irgend etwas Ungewöhnliches auftritt
oder wenn ein Teil defekt ist.
Aufgrund der Alterung dieser Einheit ist es, je nach der
Umgebung am Installationsort, möglich, dass sie nach
längerem Einsatz den Projektor nicht mehr tragen kann.
Lassen Sie deshalb die Einheit etwa alle fünf Jahren von
einer Installations-Fachkraft überprüfen, um sicher zu sein,
dass Sie die Einheit problemlos verwenden können.
Page 15

7 Überzeugen Sie sich, dass
alle Teile vorhanden sind
Überzeugen Sie sich vor der Installation, dass alle zur
Wandmontage-Einheit zugehörigen Teile vorhanden sind.
Metall-Zubehörteil zur Wandmontage x 1
Metall-Zubehörteil zur Installation x 2
Innensechskantschraube (M8 x 15mm) x 6
7 Installationsschritte
Folgen Sie den beschriebenen Verfahrensschritten 1 – 7, um
die Wand-Montageeinheit zu installieren und den Digitalen
Klangprojektor zu montieren.
1
Festlegung der Position für die
Installation an der Wand.
Vergewissern Sie sich unter Verwendung der Schablone
in natürlicher Größe zur Festlegung der Position für die
Installation der Einheit an der Wand, dass der
Untergrund rund um die Schraubpositionen unter dem
Metall-Zubehörteil zur Wandmontage ausreichende
Festigkeit hat.
Vorsicht!
Das Gesamtgewicht der Wand-Montageeinheit und des
zu montierenden Digitalen Klangprojektors beträgt etwa
58 kg. Vergewissern Sie sich vor der Installation
unbedingt darüber, dass die für die Montage
vorgesehene Position an der Wand eine ausreichende
Festigkeit aufweist. Ändern Sie die Position für die
Installation, wenn die Wandfestigkeit nicht ausreicht,
oder verstärken Sie diese Position.
2
Haken Sie das Metall-Zubehörteil zur
Wandmontage an der Wand an.
Führen Sie eine Schraube in das vorläufige Schraubloch
ein und ziehen Sie so weit an, dass das MetallZubehörteil zur Wandmontage plan ist und haken Sie
dann das Metall-Zubehörteil an den Schrauben ein.
(Haken Sie das Metall-Zubehörteil zur Wandmontage an
der Schraube im Zentrum an, so dass Sie leicht
feststellen können, dass es plan ist.)
Kreuzschlitzschraube (M5 x 40mm) x 2
Innensechskant-Schraubendreher x 1
Schablone für das Metall-Zubehörteil zur Wandmontage
(natürliche Größe) x 1
Bedienungsanleitung x 1
Vorsicht!
Zum Lieferumfang dieses Produkts gehören keine
Schrauben zur Befestigung des Metall-Zubehörteils zur
Wandmontage an der Wand.
Vorläufiges
Schraubloch
Rundloch
Vorsicht!
Schrauben zur Installation des Metall-Zubehörteils zur
Wandmontage an der Wand gehören nicht zum
Lieferumfang dieses Produkts. Verwenden Sie Schrauben,
die zur Festigkeit und zum Material der Wand passen.
3
Montieren Sie das Metall-Zubehörteil
Horizontaler Schlitz
Vertikaler Schlitz
zur Wandmontage an der Wand.
Schrauben Sie zur Stabilisierung der Installation der Einheit
sechs oder mehr Schrauben an den Positionen der
vertikalen Schlitze, der horizontalen Schlitze oder der
Rundlöcher fest. Die Schrauben müssen symmetrisch auf
beiden Seiten positioniert und festgezogen werden.
15
Ge
Page 16

4
Schrauben Sie das Metall-Zubehörteil
zur Wandmontage vorläufig an.
Befestigen Sie das Metall-Zubehörteil zur Wandmontage
unter Verwendung der vorgesehenen
Kreuzschlitzschrauben (M5 x 40 mm) vorläufig durch ein
mindestens 2 – 3 mm tiefes Einschrauben, da das
Produkt an das Metall-Zubehörteil zur Wandmontage
angeschraubt wird.
Kreuzschlitzschraube
(M5 x 40mm)
6
Montieren Sie den Digitalen
Klangprojektor an dem an der Wand
befestigten Metall-Zubehörteil.
Vergewissern Sie sich, dass die Metall-Zubehörteile zur
Installation fest in die vier am Metall-Zubehörteil zur
Wandmontage befindlichen Schlitze eingeführt werden,
die vorgesehen sind, die Haken der Metall-Zubehörteile
zur Installation einzuhängen.
5
Montieren Sie die Metall-Zubehörteile
für die Installation an den Digitalen
Klangprojektor.
Verschrauben Sie die sechs Positionen 1 – 3 unter
Verwendung der vorgesehenen Schrauben (M8 x 15) in
der entsprechenden Reihenfolge.
Vorsicht!
Die Hauptbaueinheit des Produkts, insbesondere der
Lautsprecherbereich, ist ein sehr empfindliches
Klanggerät. Seien Sie deshalb vorsichtig, um die Einheit
nicht zu beschädigen oder zu beeinträchtigen. So ist
beispielsweise zu empfehlen, zur Sicherheit eine Decke
unter die Einheit zu legen.
Metall-Zubehörteile
zur Installation
Schraube
(M8 x 15 mm)
2
PDSP-1
1
3
7
Schrauben Sie den Digitalen
Klangprojektor so an das MetallZubehörteil zur Wandmontage, dass
der Projektor nicht bewegt wird.
Befestigen Sie die Kreuzschlitzschrauben (M5 x 40 mm)
mit Hilfe eines Kreuzschlitz-Schraubendrehers an den
zwei Positionen des Projektors.
16
Ge
Page 17

7 Technische Daten
Abmessungen: 630 (B) x 550 (H) x 33 (T) mm
Gewicht: 8,0 kg
Im Falle technischer Änderungen können sich die oben
angegebenen technischen Daten sowie das Aussehen
ohne vorherige Ankündigung ändern.
7 Diagramm zu den
Abmessungen
Einheit: mm
Wenn der Digitale Klangprojektor montiert ist:
640
Veröffentlicht von Pioneer Corporation.
Urheberrechtlich geschützt © 2003 Pioneer Corporation.
Alle Rechte vorbehalten.
178963
17
Ge
Page 18

Hartelijk dank voor de aankoop van dit Pioneer product. Lees
de Gebruiksaanwijzing s.v.p. aandachtig door voor een
veilige en juiste bediening van dit product. Bewaar de
Gebruiksaanwijzing opdat deze naderhand ook nog
geraadpleegd kan worden.
[Dit product dient door een erkend installateur te
worden gemonteerd]
Pioneer is niet aansprakelijk voor enige schade
veroorzaakt door onjuiste montage, plaatsing of ander
gebruik dan bedoeld overeenkomstig de
gebruiksaanwijzing, of voor onvoorziene schade door
veranderingen of natuurrampen.
Installatiewerkzaamheden
÷ Dit product wordt verkocht op voorwaarde dat het door
een erkend installateur met voldoende technische kennis
wordt gemonteerd. Zorg ervoor dat de plaatsing en
montage plaatsvindt door een erkend bouwbedrijf of uw
verkoopagent.
÷ Pioneer is geenszins aansprakelijk voor ongevallen of
schade veroorzaakt door onjuiste installatie of montage,
verkeerd gebruik, aangebrachte veranderingen,
natuurrampen etc.
7 Waarschuwing
Dit Wandmontage-element is speciaal vervaardigd voor de
Digitale Geluidsprojector PDSP-1.
Product mag niet op een andere dan de aangegeven wijze
worden geïnstalleerd of gewijzigd. Dit product mag niet voor
enig ander doel worden gebruikt.
Plaats van installatie
• Zorg er voorafgaande aan montage voor dat de constructie
geschikt is voor de plaats waar dit element wordt
opgehangen en dat het product op een veilige plaats
wordt gemonteerd.
• Overleg met erkende installateurs in het geval de muur
niet sterk genoeg is om het element en de hoofdprojector
te dragen, of in het geval extra ondersteuning nodig is.
• Dit Wandmontage-element dient op een plaats te worden
bevestigd die sterk genoeg is om het gewicht van het
product dat wordt aangehecht en het Wandmontageelement te kunnen dragen.
• Het Wandmontage-element mag niet worden
geïnstalleerd op een plaats waar het mogelijk is dat
iemand eraan gaat hangen of erop kan leunen, en ook niet
op een plaats waar trillingen of schokken kunnen
voorkomen.
• Plaats het element niet buiten, en ook niet bij een warme
bron of bij het strand.
• Plaats dit element nooit in direct zonlicht en stel het niet
bloot aan uitzonderlijk hoge temperaturen.
Montage en installatie
• Voordat het element wordt gemonteerd en bevestigd
dient het hoofdelement van PDSP-1 uitgeschakeld te zijn
en niet op de netspanning te zijn aangesloten.
• Zorg er om veiligheidsredenen voor dat twee of meerdere
personen de installatie verrichten.
• Draai de schroeven goed aan overeenkomstig de te
doorlopen stappen voor installatie ter voorkoming van
schade en ongevallen, zoals een zware val na installatie.
• Zorg ervoor dat de schroeven op elk onderdeel
voorafgaande aan de installatie aangedraaid zijn. Indien ze
te los zitten kan dit een ongeval veroorzaken, en kan het
element bijvoorbeeld vallen.
18
Du
Gebruik van het Wandmontage-element
• Zorg ervoor dat kinderen niet aan het Wandmontageelement gaan hangen of er tegenaan stoten. Indien het
Wandmontage-element valt of kapot gaat kan dit letsel
veroorzaken.
Neem onmiddellijk contact op met een erkend installateur
wanneer u een gebrek constateert of wanneer een
onderdeel niet werkt.
Het is mogelijk dat dit element de hoofdprojector niet langer
door veroudering - afhankelijk van de plaats van bevestiging kan dragen nadat het element lange tijd is gebruikt. Vraag
een erkend installateur om het element ongeveer elke vijf
jaar na te kijken om er zeker van te zijn dat het zonder
probleem kan worden gebruikt.
Page 19

7 Zorg ervoor dat u alle
7 Te volgen stappen voor
onderdelen heeft
Zorg er voorafgaande aan montage voor dat u alle
meegeleverde onderdelen van het Wandmontage-element
heeft.
Wanddraagconstructie x 1
Metalen montageplaatje x 2
Zeskantbout (M8 x 15mm) x 6
installatie
Volg stap 1 – 7 voor plaatsing van het Wandmontageelement en voor bevestiging van de Digitale
Geluidsprojector.
1
Bepaling van de plaats van bevestiging
aan de muur.
Zorg ervoor dat de ondergrond rondom de schroefposities
onder de wanddraagconstructie sterk genoeg is, waarbij
gebruik wordt gemaakt van de ware grootte van het
sjabloon om de plaats van bevestiging te bepalen.
Waarschuwing
Het gewicht van het Wandmontage-element samen met
de te bevestigen Digitale Geluidsprojector bedraagt
ongeveer 58 kg. Zorg er voorafgaande aan montage voor
dat de bevestigingsplaats aan de muur sterk genoeg is.
Indien de grondmuur niet sterk genoeg is bevestig het
element dan op een andere plaats, of verstevig de plaats
voor bevestiging van het element.
2
Bevestig de wanddraagconstructie aan
de muur.
Steek een schroef in het voorlopig schroefgat en draai
deze zover aan dat de wanddraagconstructie waterpas
staat; haak vervolgens de wanddraagconstructie aan de
schroef. (Gebruik de schroef in het midden om de
wanddraagconstructie aan te haken, zodat gemakkelijk
te zien is of deze waterpas staat.)
Voorlopig schroefgat
Kruiskopschroef (M5 x 40mm) x 2
Zeskantsleutel x 1
Sjabloon voor Wandmontage-element (ware grootte) x 1
Gebruiksaanwijzing (deze handleiding) x 1
Waarschuwing
Er zijn geen schroeven bij dit product meegeleverd voor
montage van de wanddraagconstructie aan de muur.
Rond gaatje
Waarschuwing
Bij dit product zijn geen schroeven voor bevestiging van
de wanddraagconstructie aan de muur meegeleverd.
Gebruik schroeven die sterk genoeg zijn voor de muur.
3
Bevestig de wanddraagconstructie aan
Horizontale sleuf
Verticale sleuf
de muur.
Draai zes of meerdere schroeven goed aan op de
posities van de verticale gleuven, de horizontale sleuven,
of de ronde gaten voor een stabiele bevestiging van het
element. De schroeven dienen aan beide zijden
symmetrisch en gelijkmatig op het hele oppervlak
aangedraaid te worden.
19
Du
Page 20

4
Schroef de wanddraagconstructie
voorlopig nog niet geheel vast.
Bevestig de wanddraagconstructie met de
kruiskopschroeven (M5 x 40 mm) en draai de schroeven
ongeveer 2 à 3 mm in omdat nog een product aan de
wanddraagconstructie dient te worden vastgeschroefd.
Kruiskopschroef
(M5 x 40mm)
6
Bevestig de Digitale Geluidsprojector
aan de wanddraagconstructie die aan
de muur bevestigd is.
Zorg ervoor dat de metalen montageplaatjes stevig in de
vier sleuven op de wanddraagconstructie worden
aangebracht zodat de montageplaatjes daar goed
inhangen.
5
Bevestiging van de metalen
montageplaatjes aan de Digitale
Geluidsprojector.
Schroef de bouten (M8 x 15 mm) op de zes plaatsen in
de juiste volgorde 1 – 3 vast.
Waarschuwing
Het hoofdelement van het product, en met name het
speakergedeelte, is een zeer gevoelig geluidsmiddel.
Zorg ervoor dat het hoofdelement niet wordt beschadigd;
u kunt bijvoorbeeld voor de veiligheid een doek onder het
hoofdelement leggen.
Metalen
montageplaatjes
Bout
(M8 x 15 mm)
2
PDSP-1
1
3
7
Schroef de Digitale Geluidsprojector
aan de wanddraagconstructie zodat de
projector niet kan verschuiven.
Draai met gebruik van een kruiskopschroevendraaier de
kruiskopschroeven (M5 x 40 mm) op de twee plaatsen
van de projector aan.
20
Du
Page 21

7 Specificaties
Afmetingen: 630 (B) x 550 (H) x 33 (D) mm
Gewicht: 8,0 kg
In geval van aanpassingen is het mogelijk dat
bovenstaande specificaties en het uiterlijk van het
element zonder mededeling worden gewijzigd.
7 Schema van afmetingen
Element: mm
Wanneer de Digitale Geluidsprojector is bevestigd:
640
Uitgegeven door Pioneer Corporation.
Copyright © 2003 Pioneer Corporation.
Alle rechten voorbehouden.
178963
21
Du
Page 22

22
Page 23

23
Page 24

AFTER-SALES SERVICE FOR PIONEER PRODUCTS
Please contact the dealer or distributor from where you purchased the product for its after-sales service
(including warranty conditions) or any other information. In case the necessary information is not
available, please contact the Pioneer's subsidiaries (regional service headquarters) listed below:
PLEASE DO NOT SHIP YOUR PRODUCT TO THE COMPANIES at the addresses listed below for repair
without advance contact, for these companies are not repair locations.
AMERICA
PIONEER ELECTRONICS (USA) INC. CUSTOMER SUPPORT DIVISION
P.O. BOX 1760, LONG BEACH, CA 90801-1760, U.S.A. CUSTOMER SERVICE HOTLINE : (800) 421-1404
EUROPE
PIONEER EUROPE NV EUROPEAN SERVICE DIVISION
HAVEN 1087, KEETBERGLAAN 1, B-9120 MELSELE, BELGIUM
ASEAN
PIONEER ELECTRONICS ASIACENTRE PTE. LTD. SERVICE DEPARTMENT
253, ALEXANDRA ROAD #04-01 SINGAPORE 159936
JAPAN AND OTHERS
PIONEER CORPORATION (HEAD OFFICE) CUSTOMER SUPPORT CENTER
4-1, MEGURO 1-CHOME, MEGURO-KU, TOKYO 153-8654 JAPAN
製品のご購入や取り扱いについてのご相談窓口
● パイオニア・カスタマーサポートセンター(全国共通フリーフォン)
受付 月曜〜金曜 9:30 〜 17:00、 土曜 9:30 〜 12:00、13:00 〜 17:00 (日曜・祝日・弊社休日は除く)
<ご注意>フリーフォンは、PHS、携帯電話、自動車電話、列車公衆電話、船舶電話、ピンク電話および海外からの国際電話ではご利用になれません。
あらかじめご了承ください。
家庭用オーディオ/ビジュアル製品のご相談窓口 :
カタログのご請求窓口 :
ファックス :
パイオニアホームページでのご案内
お問い合わせ先のご案内
カタログ請求とメールサービス登録のご案内
http://www.pioneer.co.jp/support/
http://www.pioneer.co.jp/support/ctlg/index.html
修理のご依頼/修理についてのご相談窓口
● パイオニア修理受付センター(沖縄県を除く全国)
受付 月曜〜金曜 9:30 〜 18:00、 土曜 9:30〜 12:00、13:00 〜 17:00 (日曜・祝日・弊社休日は除く)
<ご注意>フリーダイアルは、携帯電話、PHSではご利用になれません。あらかじめご了承ください。
電話(フリーダイアル) :
一般電話 :
ファックス(フリーダイアル)
:
● 沖縄サービスステーション(沖縄県のみ)
受付 月曜〜金曜 9:30 〜 18:00 (土曜・日曜・祝日・弊社休日は除く)
一般電話 :
ファックス :
098-879-1910
098-879-1352
ゴーパイオニア
0120-5-81028
03-5496-2023
0120-5-81029
Published by Pioneer Corporation.
2003パイオニア株式会社 禁無断転載
〒153-8654 東京都目黒区目黒1丁目4番1号
Copyright © 2003 Pioneer Corporation.
All rights reserved.
PIONEER CORPORATION 4-1, Meguro 1-Chome, Meguro-ku, Tokyo 153-8654, Japan
PIONEER ELECTRONICS (USA) INC. P.O.BOX 1540, Long Beach, California 90801-1540, U.S.A., TEL: 1-310-952-2111
PIONEER EUROPE NV MULTIMEDIA DIVISION
PIONEER ELECTRONICS AUSTRALIA PTY.LTD. 178-184 Boundary Road, Braeside, Victoria 3195, Australia, TEL: 61-39-586-6300
PIONEER ELECTRONICS ASIACENTRE PTE. LTD. 253 Alexandra Road #04-01, Singapore 159936, TEL: 65-472-1111
PIONEER HIGH FIDELITY TAIWAN CO., LTD.
PIONEER ELECTRONICS (CHINA) LTD. Room 1704-06, 17/F World Trade Centre, 280 Gloucester Rd. Causeway Bay, Hong Kong, TEL: 852-2848-6488
PIONEER GULF FZE Lob 11-017, Jebel Ali Free Zone P.O. BOX 61226, Jebel Ali, Dubai, United Arab Emirates, TEL: 971- 4-8815756
PIONEER ELECTRONICS DE MEXICO S.A. DE C.V. Blvd.Manuel Avila Camacho 138 10 piso Col.Lomas de Chapultepec, Mexico,D.F. 11000 TEL: 55-9178-4270
<TNMSZ/03B00000>
Pioneer House Hollybush Hill, Stoke Poges, Slough SL2 4QP, U.K., TEL: 44-1753-789-789
13FL., No44 Chung Shan North Road, Sec.2. Taipei, Taiwan, TEL: 886-2-2521-3588
Printed in Japan / Imprimé au Japon <TEXPDSPW-A>
 Loading...