

Pioneer PDP-5045HD, PDP-4345HD Owner’s Manual

sound, vision.sou/
PLASMADISPLAYSYSTEM
SYSTEMED'ECRANPLASMA
SISTEMADEPANTALLADEPLASMA
PDP-505OHD
PDP-4350HD
PDP-5045HD
PDP-4345HD
DD_
DIGITAL
Operating Instructions
--ode d'emploi
Manual de instrucciones
i...ll_lrlrlll

IMPORTANT
CAUTION
The lightn ng flash wth arrowhead symbol, within an
equilateral tr angle, is intended to alert the user to the
presence of uninsulated "dangerous voltage" within the
product's enclosure that may be of sufficient magnitude
to constitute a risk of electric shock to persons.
CAUTION:
TO PREVE NT THE RISK OF ELECTRIC SHOCK, DO NOT
REMOVE COVER (OR BACK). NO USER-SERVICEABLE
PARTS INSIDE. REFER SERVICING TO QUALIFIED
SERVICE PERSONNEL.
IMPORTANT SAFETY INSTRUCTIONS
1) Read these instructions. 11)
2) Keep these instructions.
3) Heed all warnings. 12)
4) Follow all instructions.
5) Do not use this apparatus near water.
6) Clean only with dry cloth.
7) Do not block any ventilation openings. Install in
accordance with the manufacturer's instructions.
8) Do not install near any heat sources such as
radiators, heat registers, stoves, or other apparatus
(including amplifiers) that produce heat.
9) Do not defeat the safety purpose of the polarized or
grounding-type plug. A polarized plug has two
blades with one wider than the other. A grounding
type plug has two blades and a third grounding 13)
prong. The wide blade or the third prong are
provided for your safety. If the provided plug does 14)
not fit into your outlet, consult an electrician for
replacement of the obsolete outlet.
10) Protect the power cord from being walked on or
pinched particularly at plugs, convenience
receptacles, and the point where they exit from the
apparatus.
The exclamation point within an equilateral triangle s
intended to alert the user to the presence of mportant
operating and maintenance (servicing) instructions in the
literature accompany ng the appliance.
Only use attachments/accessories specified by the
manufacturer.
Use only with the cart, stand, tripod, bracket, or
table specified by the manufacturer, or sold with the
apparatus. When a cart is used, use caution when
moving the cart/apparatus combination to avoid
injury from tip-over.
Unplug this apparatus during lightning storms or
when unused for long periods of time.
Refer all servicing to qualified service personnel.
Servicing is required when the apparatus has been
damaged in any way, such as power-supply cord or
plug is damaged, liquid has been spilled or objects
have fallen into the apparatus, the apparatus has
been exposed to rain or moisture, does not operate
normally, or has been dropped.
Note to CATV system installer.
This reminder is provided to call the CATV system installer's attention to Article 820-40 of the NEC that provides
guidelines for proper grounding and, in particular, specifies that the cable ground-shall be connected to the
grounding system of the building, as close to the point of cable entry as practical.
WARNING: THE APPARATUS IS NOT WATER-
PROOFS,TO PREVENT FIRE OR SHOCK HAZARD, DO
NOT EXPOSETHIS APPLIANCE TO RAIN OR MOISTURE
AND DO NOT PUT ANY WATER SOURCE NEAR THIS
APPARATUS, SUCH AS VASE, FLOWER POT,COSMET-
ICS CONTAINER AND MEDICINE BOTTLEETC,
WARNING: Handling the cord on this product or
cords associated with accessories sold with the prod-
uct will expose you to lead, a chemical known to the
State of California and other governmental entities to
cause cancer and birth defects or other reproductive
harm, Wash hands after handling.
NOTE: This equipment has been tested and found to
comply with the limits for a class B digital device, pur-
suant to Part 15 of the FCC Rules, These limits are de-
signed to provide reasonable protection against harmful
interference in a residential installation, This equipment
generates, uses, and can radiate radio frequency energy
and, if not installed and used in accordance with the
instructions, may cause harmful interference to radio
communications, Howeve_sthere is no guarantee that
interference will not occur in a particular installation, If
this equipment does cause harmful interference to radio
or television reception, which can bedetermined byturn-
ing the equipment off and on, the user is encouraged to
try to correct the interference by one or more of the fol-
lowing measures:
-- Reorient or relocate the receiving antenna,
-- Increase the separation between the equipment and
receiven
-- Connect the equipment into an outlet on a circuit
different from that to which the receiver is connected,
-- Consult the dealer or an experienced radio/TV tech-
nician for help,
CAUTION:
This product satisfies FCC regulatbns when shielded
cables and connectors are used to connect the unit to
other equipment, To prevent electromagnetic interfer-
ence with electric appliances such as radios and televi-
sions, use shielded cables and connectors for connec-
tions,
FEDERAL COMMUNICATIONS COMMISSION
DECLARATION OF CONFORMITY
This device complies with part 15 of the FCC Rules, Op-
eration issubject to the following two conditions: (1)This
device may not cause harmful interference, and (2) this
device must accept any interference received, including
interference that may cause undesired operation,
Product Name: Plasma Display System
(Plasma Display)
(Media Receiver)
Model Number:
Product Category: Class BPersonal Computers & Periph-
erals
Responsible Party Name: PIONEER ELECTRONICS
(USA), INC,, Customer Support Div,
Address: RO,BOX 1760, LONG BEACH, CA,,90801-1760
U,S,A,
Phone: (800) 421-1625
For Business Customer URL
http://www, PioneerUSA,com
PDP-B050HD
(PDP-505PU)
(PDP-AR05U)
PDP-5045HD
(PDP-504PU)
(PDP-R05U)
PDP-4350HD
(PDP-435PU)
(PDP-AR05U)
PDP-4345HD
(PDP-434PU)
(PDP-R05U)
m
m,
Information to User
Alteration or modifications carried out without appro-
priate authorization may invalidate the user's right to
operate the equipment,
[For Canadian model]
This Class B digital apparatus complies with Canadian
ICES-003,
IMPORTANT NOTICE: The serial number for this
equipment is located on the rear panel, Please write this
serial number on your enclosed warranty card and keep
it in a secure area, This is for your security,
WARNING: Be sure to plug this equipment into a
grounding-type AC outlet,
B/ ",
, Contents j
Thank you for buying this Pioneer product,
Please read through these operating instructions so you will know how to operate your model properly, After you have finished
reading the instructions, put them away in a safe place for future reference,
In some countries or regions, the shape of the power plug and power outlet may sometimes differ from that shown in the explana-
tory drawings, However the method of connecting and operating the unit is the same,
01 Important User Guidance Information
02 Safety Precautions
03 Operational Precautions
04 Supplied Accessories
Plasma Display ...................................................................11
Media Receiver....................................................................11
05 Part Names
Plasma Display ...................................................................12
Media Receiver....................................................................12
Remotecontrol unit ............................................................14
06 Preparation
Installing the PlasmaDisplay............................................15
Installing the MediaReceiver............................................16
Installing the Media Receiververtically ......................16
Connectingthe systemcable ............................................18
Routing cables ....................................................................19
Preparingthe remotecontrol unit .....................................20
Inserting batteries.........................................................20
Cautions regarding batteries.......................................20
Allowed operationrangeof the remote
control unit ....................................................................20
Cautions regarding the remote control unit ..............20
Cableconnections for watching digital and/or
conventionalTVchannels ..................................................21
ConnectingVHF/UHFantennasand a Cable
Converter.......................................................................21
Cableconnections for watching digital
TVchannels overair (VHF/UHF)........................................21
ConnectingVHF/UHFantennas..................................21
Switching betweenantennaA and B ...............................22
Inserting the cablecard .....................................................22
Connectingthe powercord ...............................................23
07 Basic Operations
Turningon the power (Standby) ........................................24
Turningoff the power (Standby) ........................................24
WatchingTVchannels........................................................25
Selecting the antenna ..................................................25
Changingchannels ......................................................25
Changingthe volumeand sound ................................26
Viewinga channel banner ...........................................26
Using the PODservice.................................................27
Changingthe language................................................27
Setting MTS/SAPmode ...............................................27
Usingthe multiscreen functions .......................................28
Splitting the screen ......................................................28
Freezingimages............................................................29
08 Menu Setup
Menuconfiguration ............................................................30
AV modemenus............................................................30
PCmodemenus ...........................................................30
Menuoperations .................................................................30
09 Tuner Setup
Setting upTVchannels ......................................................31
Using Auto ChannelPreset .........................................31
Setting for skipping unwanted channels....................31
Setting up?# channels manually ...............................31
Naming TVchannels ....................................................32
Checkingsignal strength .............................................32
Checkingthe CableCard ID ........................................32
Enablingdata acquisition ............................................32
ParentalControl ..................................................................33
Changingthe password...............................................33
Clearingthe password .................................................34
Activating the ParentalControl ...................................34
Setting thevoluntary movie rating system
(MPAA)..........................................................................34
Setting theTVratings ...................................................35
Setting theTVParentalGuidelines_V Guidelines),,, 35
Blocking NotRatedTVprograms ................................35
Canadianrating systems.............................................36
Setting CanadianEnglish ratings ...............................36
Setting CanadianFrenchratings ................................37
Temporarilydeactivating the ParentalControl ...........37
Setting your favoritechannels ...........................................37
Setting upclosedcaptions ................................................37
Activating the closed caption ......................................38
Selectingthe type of conventional closedcaptions ,,38
Selectingdigital closed captions ................................38
Selectingdigital closed caption parameters .............38
ClockSetting .......................................................................39
Er]
, °Contents }
10 Adjustments and Settings
SleepTimer,.........................................................................40
AVSelection ........................................................................40
Picture adjustments ...........................................................41
ProAdjust ......................................................................41
Sound adjustments ............................................................42
FOCUS...........................................................................43
FrontSurround..............................................................43
PowerControl ......................................................................43
EnergySave...................................................................43
NoSignal off (AVmodeonly).......................................43
NoOperationoff (AVmode only).................................44
PowerManagement (PCmodeonly) ..........................44
Adjusting image positions (AVmodeonly) ......................44
Adjusting image positionsand clock automatically
(PCmode only)....................................................................45
Adjusting image positionsand clock manually
(PCmode only)....................................................................45
Selecting a screensize.......................................................46
Changing the brightness at both sidesofthe screen
(SideMask)..........................................................................47
Languagesetting ................................................................47
11 Timer Presetting
PresettingTV programsusing the timer ...........................48
Priority rulesfor overlappedpresettings...........................49
12 Enjoying through External Equipment
Watching a DVDimage......................................................50
Connectinga DVDplayer.............................................50
Displayinga DVDimage ..............................................50
Watching aVCRimage ......................................................50
Connectinga VCR ........................................................50
Displayinga VCRimage...............................................50
Using HDMI Input...............................................................51
Connecting HDMI equipment .....................................51
Enjoyinga game consoleor watching camcorder
images .................................................................................52
Connectinga game console or camcorder ................52
Displayingan imageof the game consob or
camcorder .....................................................................52
Recordingdigital TVprograms using aVCRor
DVDrecorder.......................................................................52
Avoiding unwanted feedback ......................................52
Connectinga recorder .................................................53
Connecting otheraudio equipment ..................................53
Connecting an AVreceiver ..........................................53
Watching a D-VHSimage...................................................54
What is i,LINK?..............................................................54
Which i,LINKdevicesare connectable?.....................54
What can berecordedthrough i,LINK?......................54
Connecting D-VHSrecorders ......................................54
When connecting asingle D-VHSrecorder ...............54
When connecting two D-VHSrecorders.....................54
Displayinga D-VHSimage.................................................55
Usefuland important notification ...............................55
Setting upfor controlling a D-VHSrecorder..............56
Editingthe i,LINKlist ....................................................56
Setting upfor i,LINKstandby.......................................57
Operatingthe control panelscreen ............................57
Watching an imagefrom a personalcomputer ...............58
Connecting a personalcomputer ...............................58
Displayingan imagefrom a personalcomputer .......58
Computercompatibility chart ............................................58
Connectingthe VCRcontroller..........................................59
The lists ofcontrollable recording
equipment manufactures ............................................60
Connecting control cords ..................................................61
About SR+ ....................................................................61
13 Useful Remote Control Features
Learningfunction ofthe remotecontrol unit ...................62
Usingthe learning function .........................................62
Presettingmanufacture codes ....................................62
Manufacture codes ......................................................63
Using the remotecontrol unit to control other
devices.................................................................................64
Receivercontrol buttons ..............................................64
Cablecontrol buttons ...................................................65
SATcontrol buttons ......................................................66
VCRcontrol buttons .....................................................67
DVD/DVRcontrol buttons ............................................68
14 Appendix
Troubleshooting ..................................................................69
Specifications......................................................................79
m
ER
1.1
lmportant User Guidance Information j
In order to obtain maximum enjoyment from this Pioneer
PureVision PDP-5050H D/PDP-4350HD/PDP-5045H D/P DP-
4345HD Plasma Display System, please first read this
information carefully,
With the Pioneer PureVision PDP-5050HD/PDP-4350HD/PDP-
5045HD/PDP-4345HD, you can be assured of a high quality
Plasma Display System with long-life and high reliability, To
achieve images of exceptional quality, this Pioneer Plasma
Display System incorporates state-of-the-art design and
construction, as well as very precise and highly advanced
technology,
Over the course of its lifetime, the luminosity of the Pioneer
PDP-5050H D/PDP-4350H D/P DP-5045HD/PDP-4345H D Plasma
Display System will diminish very slowly, such as with all
phosphor-based screens (for example, a traditional tube-type
television), To enjoy beautiful and bright images on your
Pioneer Plasma Display System for many years to come, please
carefully read and follow the usage guidelines below,
Usage guidelines
All phosphor-based screens (including conventional tube4ype
televisions) can be affected by displaying static images for a
prolonged period, Plasma Display Systems are no exception to
this rule, After-image and permanent effects on the screen can
be avoided by taking some basic precautions, By following the
recommendations listed below, you can ensure longer and
satisfactory results from your plasma:
• Whenever possible, avoid frequently displaying the same
image or virtually still moving pictures (e,g, closed-captioned
images or video game images which have static portions),
• Avoid viewing the On Screen Display for extended periods,
from a DVD player, VCR, and all other components,
• Do not leave the same picture freeze-framed or paused
continuously over a long period of time, when using the still
picture mode from a TV,VCR, DVD player or any other
component,
• Images which have both very bright areas and very dark
areas side by side should not be displayed for a prolonged
period of time,
• When playing a game, the "GAME" mode setting within "AV
Selection" is strongly recommended, However, please limit its
use to less than 2 hours at a time,
• After playing a game, or displaying a PC image or any still
image, it is best to view a normal moving picture in the
"WIDE" or "FULL" screen setting for over 3 times longer than
the previous stilYmoving image,
• After using the Plasma Display System, always switch the
display to "STANDBY" mode,
Installation guidelines
The Pioneer PureVision PDP-5050HD/PDP-4350HD/PDP-
5045HD/PDP-4345HD Plasma Display System incorporates a
very thin design, To ensure safety, please take the proper
measures to mount or install the Plasma Display, in order to
prevent the unit from tipping over in the event of vibration or
accidental movement,
This product should be installed by using only parts and
accessories designed by PIONEER, Use of accessories other
than the PIONEER stand or installation bracket may result in
instability, and could cause injury, For custom installation,
please consult the dealer where the unit was purchased, To
ensure correct installation, experienced and qualified experts
must install the unit, PIONEER will not be held responsible for
accident or damage caused bythe use of parts and accessories
manufactured byother companies,
To avoid malfunction and overheating when installing, make
sure that the vents on the main unit are not blocked, To ensure
proper heat emission:
• Distance the unit slightly from other equipment, walls, etc,
For the minimum space required around the unit, see pages
15 to 16,
• Do not fit the unit inside narrow spaces where ventilation is
poor,
• Do not cover with a cloth, etc,
• Clean the vents on the sides and rear of the unit to remove
dust build-up by using a vacuum cleaner set to its lowest
suction setting,
• Do not place the product on a carpet or blanket,
• Do not leavethe product tilted over except the case of vertical
installation of the Media Receiver,
• Do not reverse the product,
Using the unit without proper ventilation may cause the
internal temperature to rise, and could result in possible
malfunction, When the surrounding or internal temperature
exceeds a certain degree, the display will automatically power
off in order to cool the internal electronics and prevent a
hazardous occurrence,
Malfunction can be caused by many factors: inappropriate
installation site, improper assembly/installation/mounting,
improper operation of or modifications made to this product,
However, PIONEER cannot be held responsible for accidents or
malfunction caused by the above,
r_ NOTE
Typical effects and characteristics of a phosphor-based matrix
display such as permanent residual images upon the
phosphors of the panel and the existence of a minute number
of inactive light cells in the screen are not covered by local
warranties,
Erl
Important User Guidance Information
,_ CAUTION
Panel sticking and after-image lag
• Displaying tile same images such as still images for a long
time may cause after-image lagging, This may occur in the
following two cases,
1. After-image lagging due to remaining electric
load
When image patterns with very high peak lumblance are
displayed more than 1 minute, after-image lagging may occur
due to the remaining electric load, The after-images remaining
on the screen will disappear when moving images are
displayed, The time for the after-images to disappear depends
on the luminance of the still images and the time they had
been displayed,
2. After-image (lag image) due to burning
Avoid displaying tile same image on tile Plasma Display
continuously over a long period of time, Ifthe same image is
displayed continuously for several hours, or for shorter periods
of time over several (Jays,a permanent after-image may remain
on the screen due to burning of the fluorescent materials, Such
images may become less noticeable if moving images are later
displayed, but they will not disappear completely,
• The Energy save function can be set to help prevent damage
from screen burning (see page 43),
m
t_
About operations through i.LINK,
PIONEER shall not always assure normal video/audio recording
or playback when a D-VHS is operated through i,LINK,
,_CAUTION
DO NOT PLACETHIS PRODUCT ON AN UNSTABLE CART,
STAND, TRIPOD, BRACKET, OR TABLE, THE PRODUCT MAY
FALL,CAUSING SERIOUS PERSONAL INJURYAND SERIOUS
DAMAGE TO THE PRODUC]] USE ONLY WITH A CART, STAND,
TRIPOD, BRACKET, OR TABLE RECOMMENDED BYTHE
MANUFACTURER, OR SOLD WITH THE PRODUC1] FOLLOW
THE MANUFACTURE'S INSTRUCTIONS WHEN INSTALLING
THE PRODUCT AND USE MOUNTING ACCESSORIES
RECOMMENDED BYTHE MANUFACTURER,
A PRODUCT AND CART COMBINATION SHOULD BE MOVED
WITH THE CARE, QUICK STOPS, EXCESSIVEFORCE, AND
UNEVEN SURFACES MAYCAUSE THE PRODUCT AND CART
COMBINATION TO OVERTURN,
ER
J Safety PrecautionsI /i
Electricity is used to perform many useful functions, but it can
also cause personal injudes and property damage if improperly
handled, This product has been engineered and manufactured
with the highest priority on safety, However, improper use can
result in electric shock and/or fire, In order to prevent potential
danger, please observe the following instructions when install-
ing, operating and cleaning the product, Toensure your safety
and prolong the service life of your product, please read the
following precautions carefully before using the product,
1, Read instructions--All operating instructions must be read
and understood before the product is operated,
2, Keep this manual in a safe place--These safety and
operating instructions must be kept in a safe place for
future reference,
3, Observe warnings--All warnings on the product and inthe
instructions must be observed closely,
4, Follow instructions--All operating instructions must be
followed,
5, Cleaning--Unplug the power cord from the AC outlet before
cleaning the product, Use a damp cloth to clean the
product, Do not use liquid cleaners or aerosol cleaners,
6, Attachments--Do not use attachments not recommended
by the manufacturer, Use of inadequate attachments can
result in accidents,
7, Water and moisture--Do not use the product near water,
such as bathtub, washbasin, kitchen sink and laundrytub,
swimming pool and in a wet basement,
8, Stand--Do not place the product on an unstable cart,
stand, tripod or table, Placing the product on an unstable
base can cause the product to fall, resulting in serious
personal injuries as well as damage to the product, Use
only a cart, stand, tripod, bracket or table recommended by
the manufacturer or sold with the product, When mounting
the product on a wall, be sure to follow the manufacturer's
instructions, Use only the mounting hardware
recommended by the manufacturer,
9, When relocating the product placed on a cart, it must be
moved with utmost care, Sudden stops, excessive force and
uneven floor surface can cause the product to fall from the
cart,
10, Ventilation--The vents and other openings inthe cabinet
are designed for ventilation, Do not cover or block these
vents and openings since insufficient ventilation can cause
overheating and/or shorten the life of the product, Do not
place the product on a bed, sofa, rug or other similar
surface, since they can block ventilation openings, This
product is not designed for built-in installation; do not place
the product in an enclosed place such as a bookcase or
rack, unless proper ventilation is provided or the
manufacturer's instructions are followed,
11, Power source--This product must operate on a power
source specified on the specification label, Ifyou are not
sure of the type of power supply used in your home, consult
your dealer or local power company,
12, Power cord protection--The power cords must be routed
properly to prevent people from stepping on them or objects
from resting on them, Check the cords at the plugs and
product,
13,The plasma Display used in this product is made of glass,
Therefore, it can break when the product is dropped or
applied with impact, Be careful not to be injured by broken
glass pieces in case the plasma Display breaks,
14, Overloading--Do not overload AC outlets or extension
cords, Overloading can cause fire or electric shock,
15, Entering of objects and liquids--Never insert an object into
the product through vents or openings, High voltage flows
in the product, and inserting an object can cause electric
shock and/or short internal parts, Forthe same reason, do
not spill water or liquid on the product,
16, Servicing--Do not attempt to service the product yourself,
Removing covers can expose you to high voltage and other
dangerous conditions, Request a qualified service person to
perform servicing,
17, Repair--If any of the following conditions occurs, unplug
the power cord from the AC outlet, and request a qualified
service person to perform repairs,
a, When the power cord or plug is damaged,
b, When a liquid was spilled on the product or when
objects have fallen into the product,
c, When the product has been exposed to rain or water,
d, When the product does not operate properly as de-
scribed in the operating instructions,
Do not touch the controls other than those described in
the operating instructions, Improper adjustment of
controls not described in the instructions can cause
damage, which often requires extensive adjustment work
by a qualified technician,
e, When the product has been dropped or damaged,
f, When the product displays an abnormal condition, Any
noticeable abnormality in the product indicates that the
product needs servicing,
18, Replacement parts--In case the product needs replace-
ment parts, make sure that the service person uses
replacement parts specified by the manufacturer, or those
with the same characteristics and performance as the
original parts, Use of unauthorized parts can result in fire,
electric shock and/or other dangen
19, Safety checks--Upon completion of service or repair work,
request the service technician to perform safety checks to
ensure that the product is in proper operating condition,
20, Wall or ceiling mounting--When mounting the product on
a wall or ceiling, be sure to install the product according to
the method recommended bythe manufacturer,
21, Heat sources--Keep the product away from heat sources
such as radiators, heaters, stoves and other heat- generat-
ing products (including amplifiers),
22, Unplug the power cord from the AC outlet before installing
the speakers,
23, Never expose the screen of the Plasma Display to a strong
impact, for example, by hitting it, The screen may be
broken, resulting in fire or personal injury,
24, Do not expose the Plasma Display to direct sunlight for a
long period of time, The optical characteristics of the front
protection panel changes, resulting in discoloration or
warp,
25, The Plasma Display weighs about 32,8 kg (72,3 Ibs,) for the
PDP-505PU, about 38 kg (83,8 Ibs,)for the PDP-504PU,
about 26,8 kg (59,1 Ibs,) for the PDP-435PU and about 30,5
kg (67,3 Ibs,) for the PDP-434PU, Because it has small
depth and is unstable, unpack, carry, and install the
product with one more person at least and use the handles,
ER
Safety Precautions }
Installation Precautions
Observethefollowing precautionswhen installing with anyitems such astile optional stand,
When using the optional stand, brackets, or equivalent items
• Ask your dealer to perform tile installation,
• Be sure to use the supplied bolts,
• Fordetails, see the instruction manual that comes with the optional stand (or equivalent items),
When using other items
• Consult your dealer,
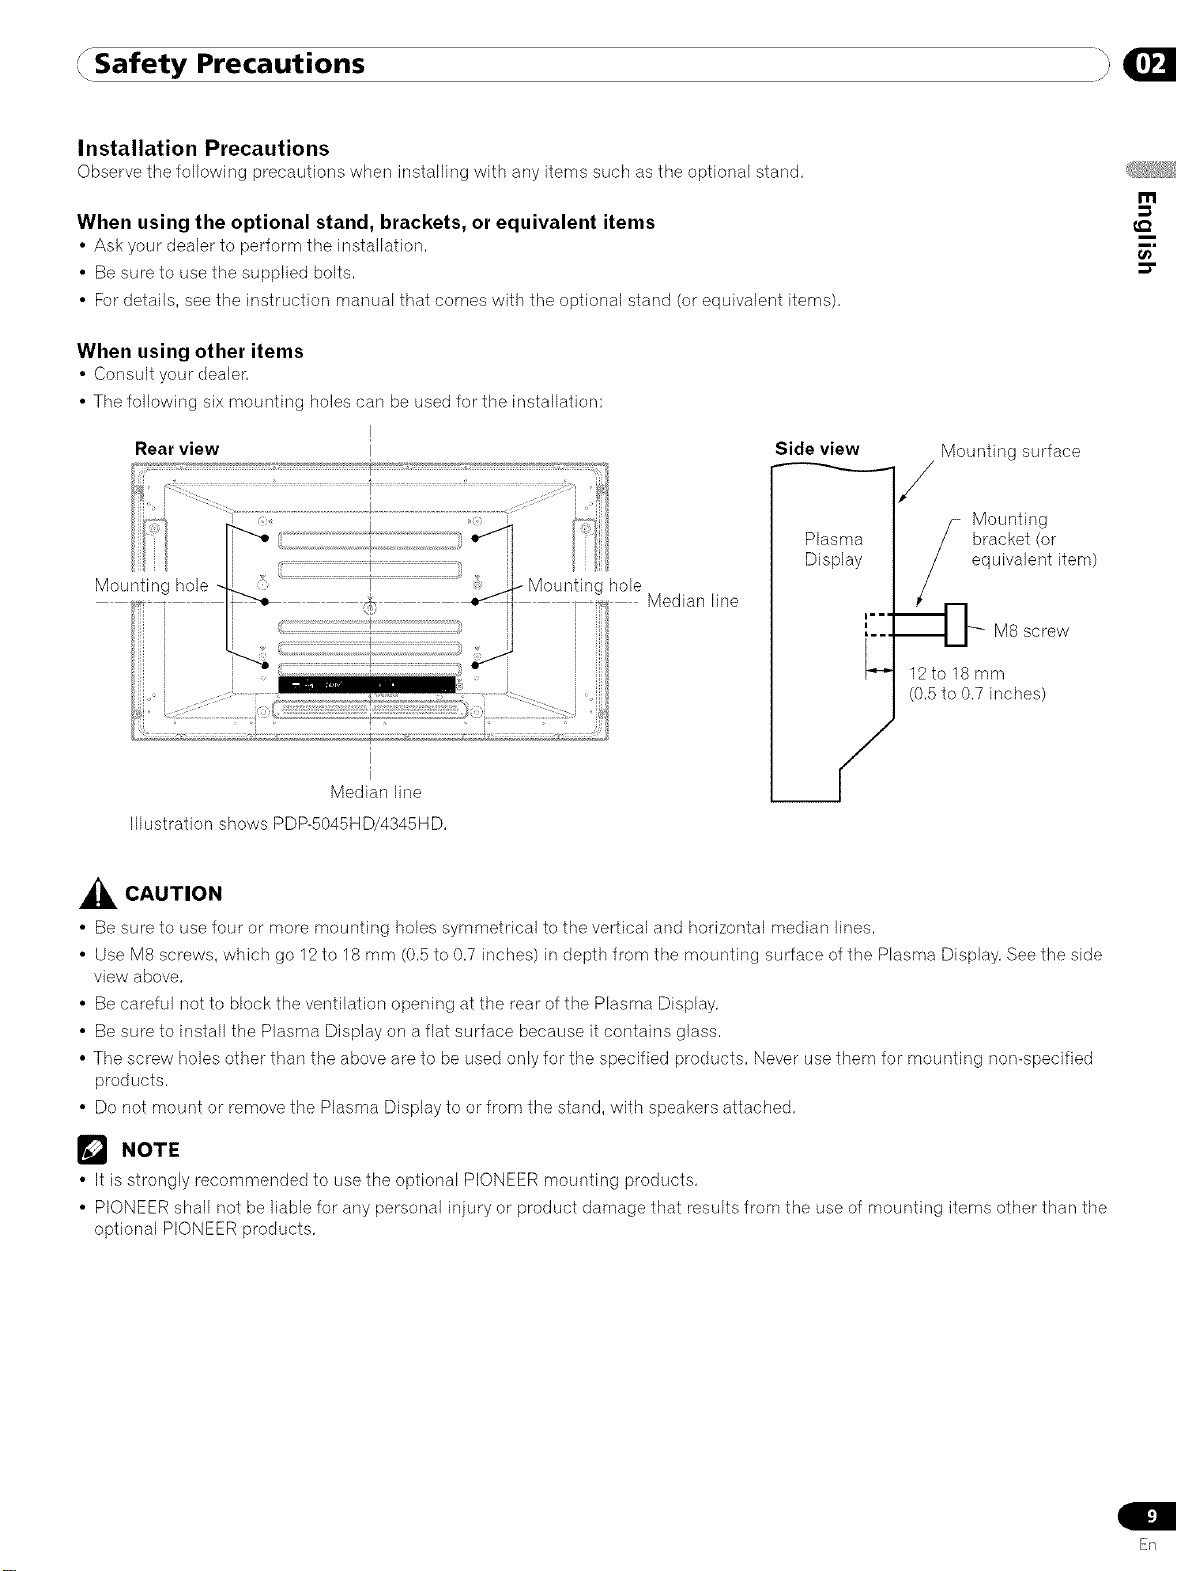
• The following six mounting holes can be used for the installation:
m
t_
Rear view
Side view
Mounting surface
Mounting
Mounting hole
: i
Plasma
Display
- Mounting hole
I
Median line
12 to 18 mm
(0,5 to 0,7 inches)
bracket (or
equivalent item
M8 screw
Median line
Illustration shows PDP-5045HD/4345HD,
,_k CAUTION
• Be sure to use four or more mounting holes symmetrical to the vertical and horizontal median lines,
• Use M8 screws, which go 12to 18 mm (0,5 to 0,7 inches) in depth from the mounting surface of the Plasma Display, Seethe side
view above,
• Be careful not to block the ventilation opening at the rear of the Plasma Display,
• Be sure to install the Plasma Display on a flat surface because it contains glass,
• The screw holes other than the above are to be used only for the specified products, Never usethem for mounting non-specified
products,
• Do not mount or remove the Plasma Display to or from the stand, with speakers attached,
_'_ NOTE
• It is strongly recommended to use the optional PIONEER mounting products,
• PIONEER shall not be liable for any personal injury or product damage that results from the use of mounting items other than the
optional PIONEER products,
Sn
" Operational Precautions j,
_ CAUTION
PIONEER bears no responsibility for any damages arising from
incorrect use of the product by you or other people,
malfunctions when in use, other product related problems, and
use of the product except in cases where the company must be
liable,
Plasma Display protection function
When still images (such as photos and computer images) stay
on the screen for an extended period of time, the screen will be
slightly dimmed, This is because the protection function of the
Plasma Display automatically adjusts the brightness to protect
the screen when detecting still images; so this does not
designate malfunction, The screen is dimmed when a still
image is detected for about three minutes,
Infrared rays
The Plasma Display releases infrared rays because of its
characteristics, Depending on how the Plasma Display is in
use, the remote controls of nearby equipment may be adversely
affected or wireless headphones using infrared rays are
interfered by noise, If this is the case, place that equipment at a
location where its remote control sensor is not affected,
Radio interference
While this product meets tile required specifications, it emits a
small amount of noise, If you place such equipment as an AM
radio, personal computer, and VCR close to this product, that
equipment may be interfered, If this happens, place that
equipment far enough from this product,
Fan motor noise
When ambient temperature of tile Media Receiver becomes
high, the rotation speed of the cooling fan motor increases,
This may make you feel that the fan motor is noisy at such an
occasion,
The fan motor keeps running until the power cord of the Media
Receiver is removed from a wall outlet,
Do not attach such items as labels and tape to the
product.
• Thismay result in the discoloration or scratch of the cabinet,
When not using the product for a long period of time
• Ifyou do not use the product for a long period of time, tile
functions of the product may be adversely affected, Switch on
and run the product occasionally,
Condensation
• Condensation may take place on the surface or inside of tile
product when the product is rapidly moved from a cold place
to a warm place or just after a heater is switched on in winter
morning, for example, When condensation takes place, do
not switch on the product and wait until condensation
disappears, Using the product with condensation may result
in malfunction,
Cleaning the screen
• When cleaning the screen of this product, gently wipe it with
a soft dry cloth; the supplied cleaning cloth or other similar
cloths (e,g,, cotton and flannel), Ifyou use a hard cloth or rub
the screen hard, the surface of the screen will be scratched,
• If you clean the surface of the screen with awet cloth, water
droplets on the surface may enter into the product, resulting
in malfunction,
Cleaning the cabinet
• When cleaning the cabinet of this product, gently wipe it with
a soft dry cloth; the supplied cleaning cloth or other similar
cloths (e,g,, cotton and flannel), Ifyou use a hard cloth or rub
the cabinet hard, the surface of the cabinet will be scratched,
• The cabinet of this product is mostly composed of plastic, Do
not use chemicals such as benzine or thinner to clean the
cabinet, Using these chemicals may result in quality
deterioration or coating removal,
• Do not expose the product to volatile gas or fluid such as
pesticide, Do not make the product contact with rubber or
vinyl products for a long period of time, The effect of
plasticizer in the plastic may result in quality deterioration or
coating removal,
• If you clean the surface of the cabinet with a wet cloth, water
droplets on the surface may enter into the product, resulting
in malfunction,
Handles at the rear of the Plasma Display
• Do not remove the handles from the rear of tile Plasma
Display,
• When moving the Plasma Display, ask another person for
help and use the handles attached to the rear of the Plasma
Display, Do not move the Plasma Display by holding only a
single handle, Usethe handles as shown,
• Do not use the handles to hang the product when installing
or carrying the product, for example, Do not use the handles
for the purpose of preventing the product from tilting over,
Supplied Accessories }
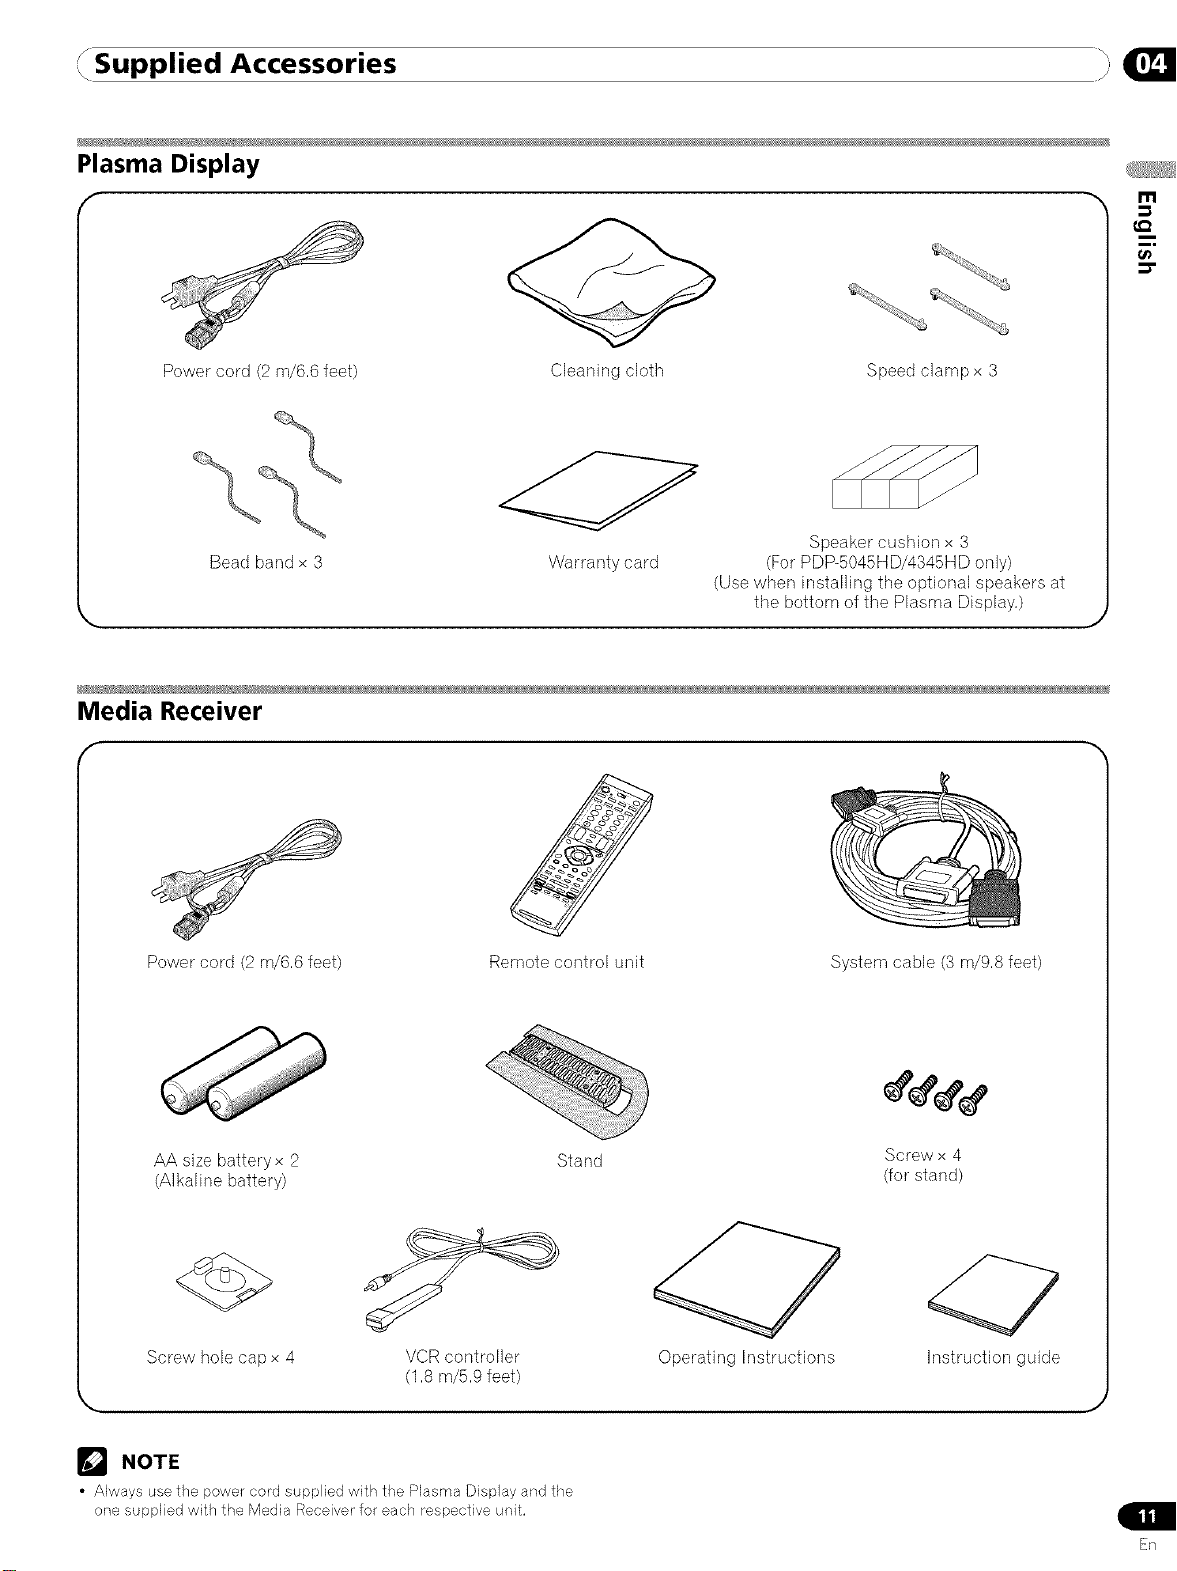
Plasma Display
r
Power cord (2 m/6,6 feet) Cleaning cloth Speed clampx 3
Bead band x 3
Media Receiver
Power cord (2 m/6,6 feet) Remote control unit
Warranty card
Speaker cushion x 3
(For PDP-5045HD/4345HD only)
(Use when installing the optional speakers at
the bottom of the Plasma Display,)
System cable (3 m/9,8 feet)
AA size batteryx 2 Stand
(Alkaline battery)
Screw hole cap x 4
VCR controller
(1,8 m/5,9 feet)
NOTE
• Always use the power cord supplied with the Plasma Display and the
one supplied with the Media Receiver for each t'espective unit.
Screw x 4
(for stand)
Operating Instructions Instruction guide
J
Sn
rPart Names
I, / )
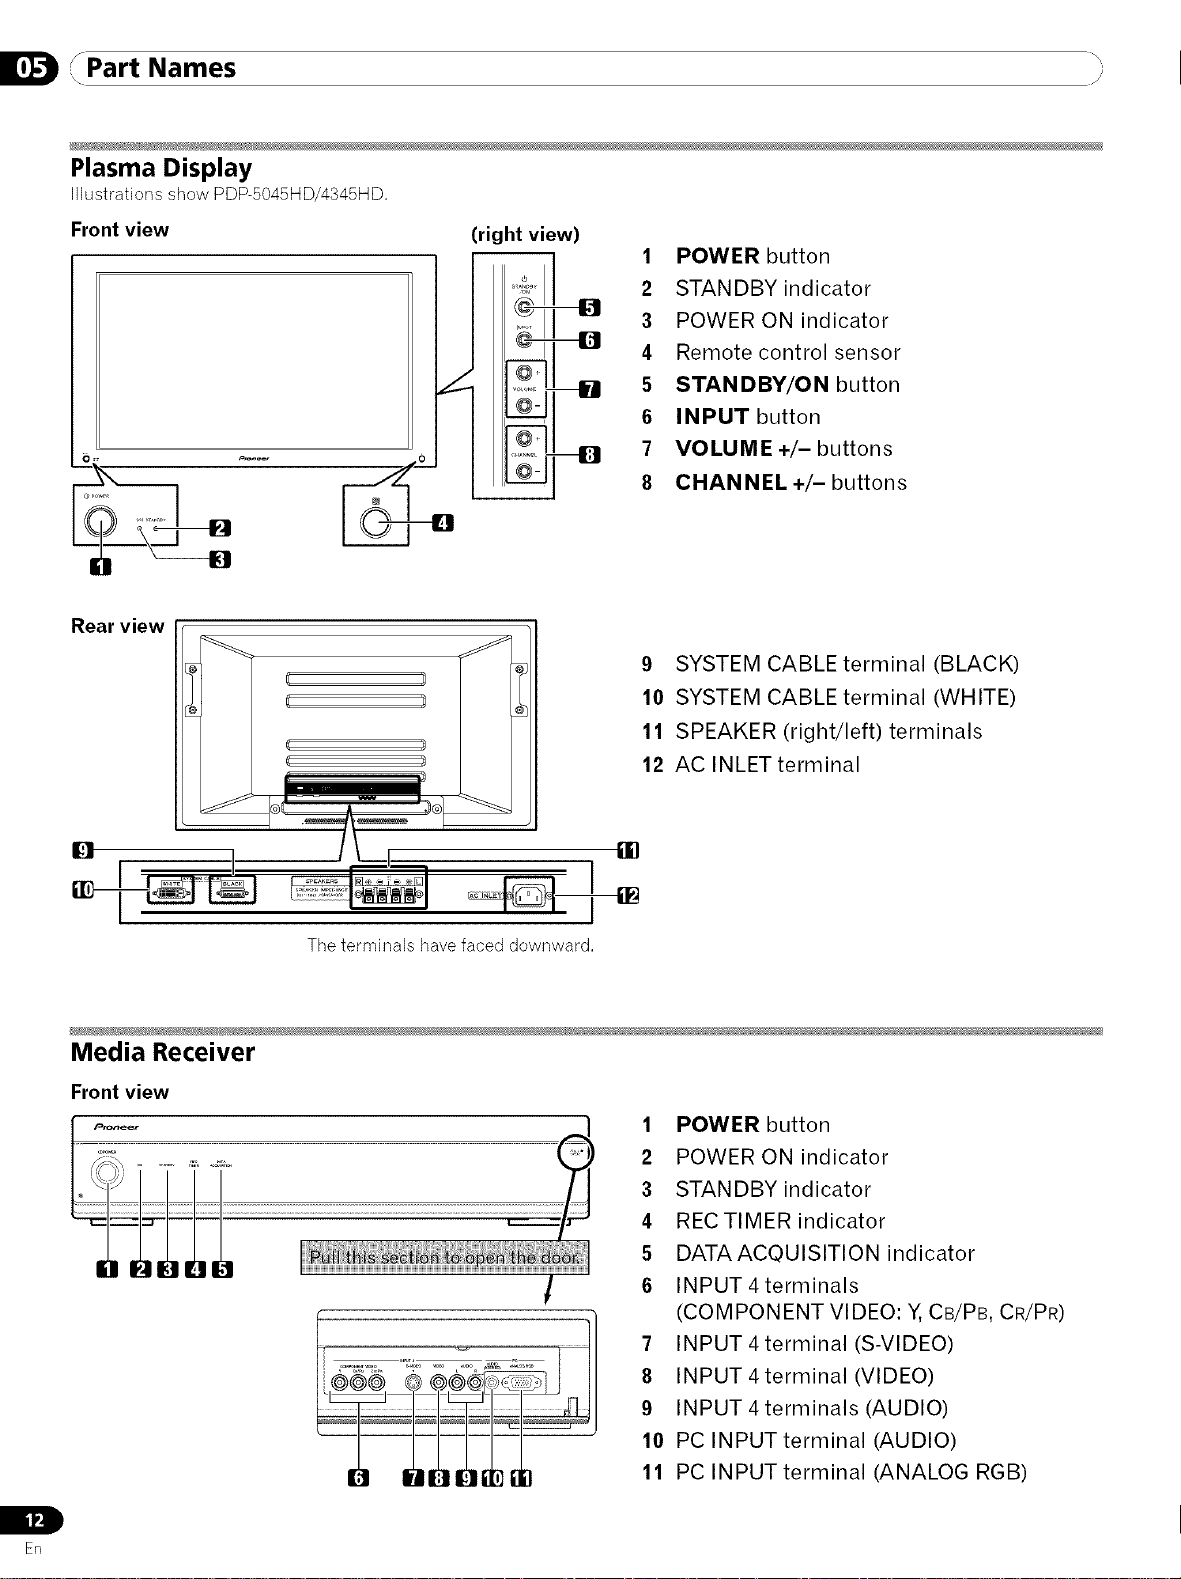
Plasma Display
Illustrations show PDP-5045HD/4345HD,
Front view (right view)
1 POWER button
2 STANDBY indicator
3 POWER ON indicator
4 Remote control sensor
5 STANDBY/ON button
6 INPUT button
7 VOLUME +/- buttons
8 CHANNEL +/- buttons
Rear view
Media Receiver
Front view
IL
Ill
En
:; 10 SYSTEM CABLE terminal (WHITE)
_ 12 AC INLETterminal
14
The terminals have faced downward,
!
11 SPEAKER (right/left) terminals
1 POWER button
2 POWER ON indicator
3 STANDBY indicator
4 RECTIMER indicator
5 DATAACOUISITION indicator
6 INPUT 4 terminals
(COMPONENT VIDEO: Y, CB/PB, CR/PR)
7 INPUT4terminal (S-VIDEO)
8 INPUT 4 terminal (VIDEO)
9 INPUT4terminals (AUDIO)
10 PC INPUTterminal (AUDIO)
11 PC INPUTterminal (ANALOG RGB)
Part Names _:,
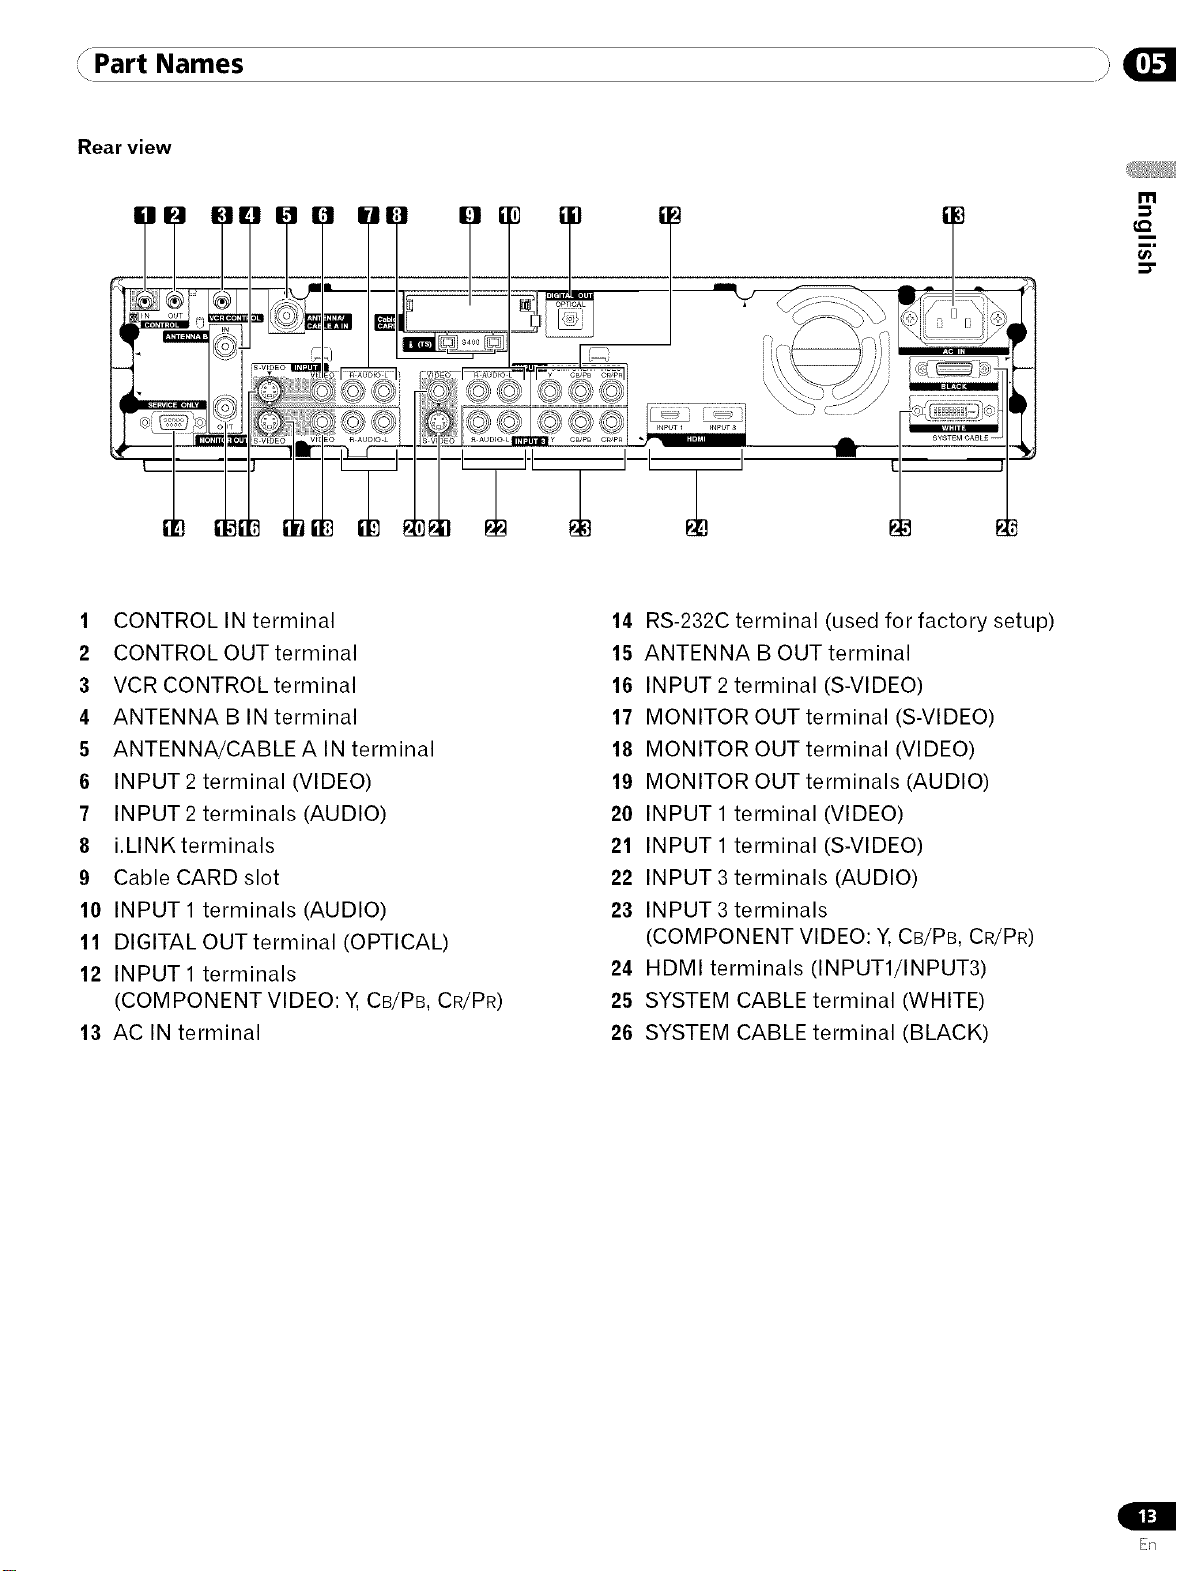
Rear view
m
€,Q
1 CONTROL IN terminal
2 CONTROL OUT terminal
3 VCR CONTROL terminal
4 ANTENNA B IN terminal
5 ANTENNA/CABLEA IN terminal
6 INPUT2 terminal (VIDEO)
7 INPUT2 terminals (AUDIO)
8 i.LINK terminals
9 Cable CARD slot
10 INPUT 1 terminals (AUDIO)
11 DIGITAL OUTterminal (OPTICAL)
12 INPUT1 terminals
(COMPONENT VIDEO: Y, CB/PB, CR/PR)
13 AC IN terminal
14 RS-232C terminal (used for factory setup)
15 ANTENNA B OUT terminal
16 INPUT 2 terminal (S-VIDEO)
17 MONITOR OUT terminal (S-VIDEO)
18 MONITOR OUT terminal (VIDEO)
19 MONITOR OUT terminals (AUDIO)
20 INPUT 1 terminal (VIDEO)
21 INPUT 1 terminal (S-VIDEO)
22 INPUT 3 terminals (AUDIO)
23 INPUT 3 terminals
(COMPONENT VIDEO: Y,CB/PB, CR/PR)
24 HDMI terminals (INPUT1/INPUT3)
25 SYSTEM CABLE terminal (WHITE)
26 SYSTEM CABLE terminal (BLACK)
E_q
/Part Names
I, / I
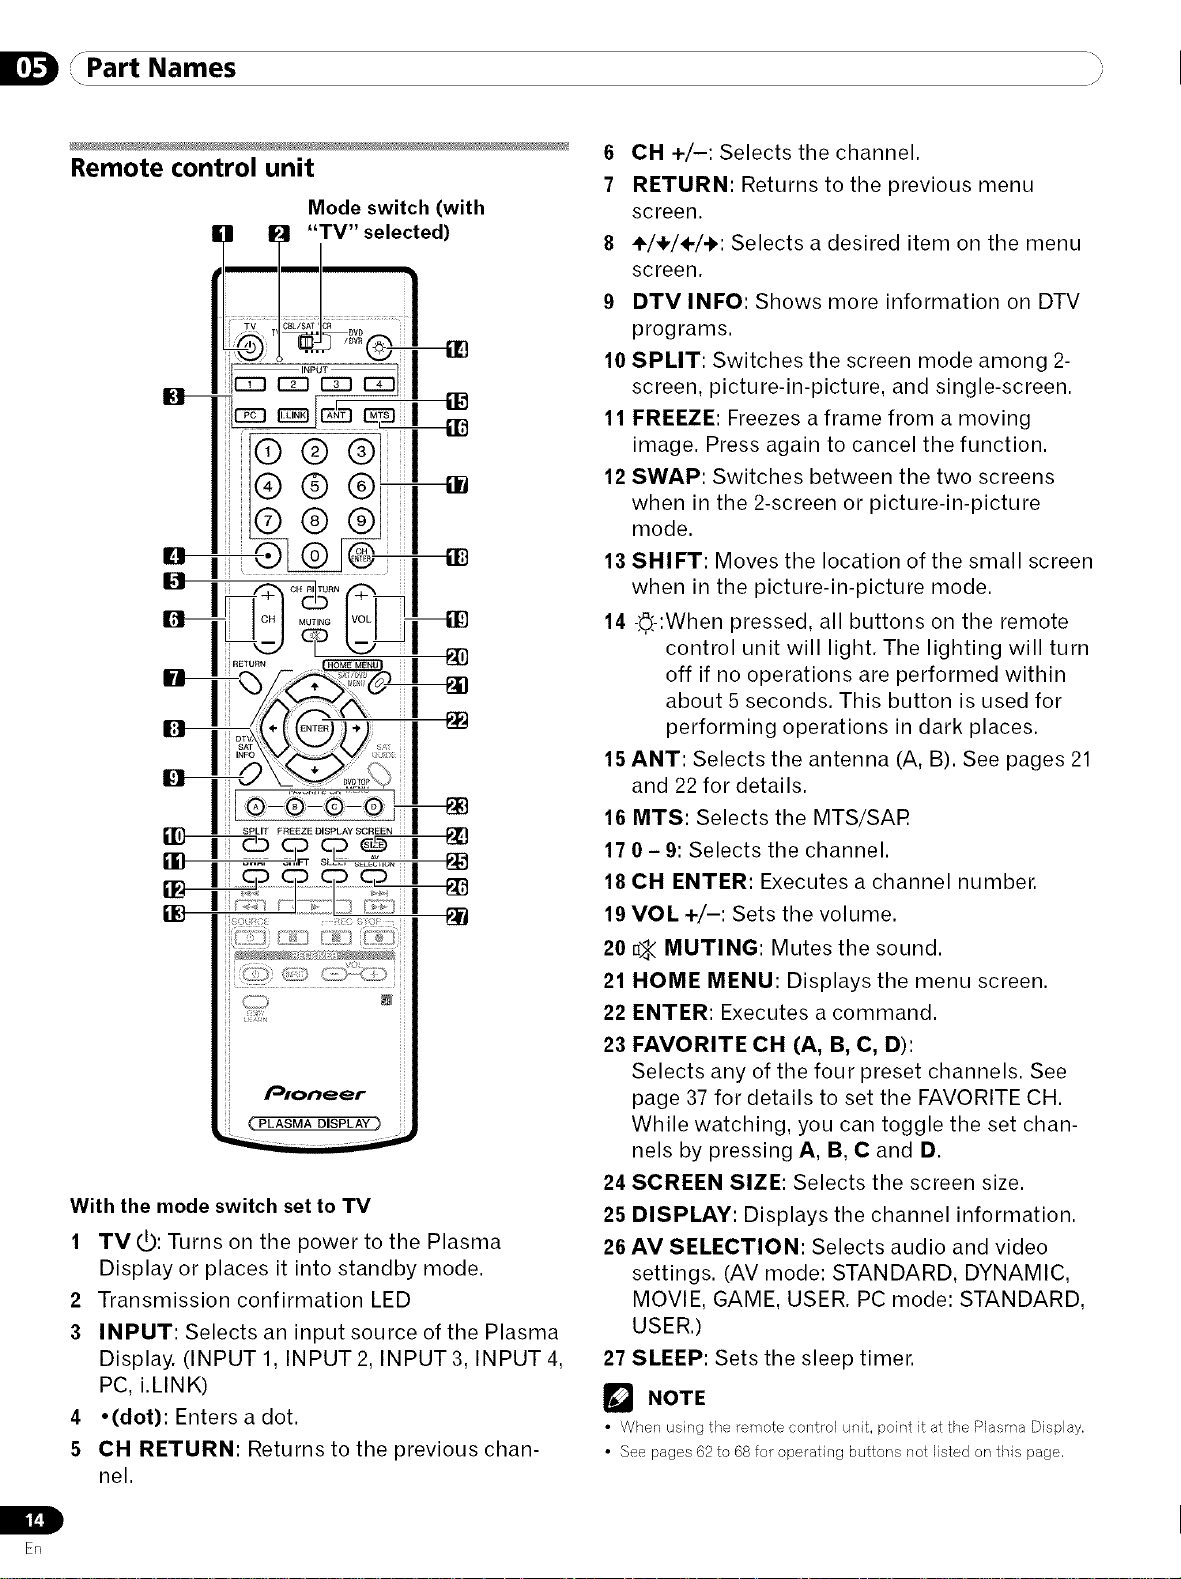
Remote control unit
[,,3 I_1 "TV" selected)
_ I _£>SAT;_...................................................
I I m
Mode switch (with
G- ,
@@
@@
@@
6 CH +/-: Selects the channel.
7 RETURN: Returns to the previous menu
screen.
8 ÷/÷/÷/-I,: Selects a desired item on the menu
screen.
9 DTV INFO: Shows more information on DTV
programs.
10 SPLIT: Switches the screen mode among 2-
screen, picture-in-picture, and single-screen.
11 FREEZE: Freezes a frame from a moving
image. Press again to cancel the function.
12 SWAP: Switches between the two screens
when in the 2-screen or picture-in-picture
mode.
13 SHIFT: Moves the location of the small screen
when in the picture-in-picture mode.
14 -.'.6.'-:Whenpressed, all buttons on the remote
control unit will light. The lighting will turn
off if no operations are performed within
about 5 seconds. This button is used for
performing operations in dark places.
15 ANT: Selects the antenna (A, B). See pages 21
and 22 for details.
16 MTS: Selects the MTS/SAR
17 0 - 9: Selects the channel.
18 CH ENTER: Executes a channel number.
19 VOL +/-: Sets the volume.
ki ........... _ ii
H
H
H
H
H
H
H
_ P#oneer
H
H
( PLASMA DISPLAY)
With the mode switch set to TV
1 TV_: Turns on the power to the Plasma
Display or places it into standby mode.
2 Transmission confirmation LED
3 INPUT: Selects an input source of the Plasma
Display. (INPUT 1, INPUT 2, INPUT 3, INPUT 4,
PC, i.LINK)
4 ,(dot): Enters a dot.
5 CH RETURN: Returns to the previous chan-
nel.
L
20 _ MUTING: Mutes the sound.
21 HOME MENU: Displays the menu screen.
22 ENTER: Executes a command.
23 FAVORITE CH (A, B, C, D):
Selects any of the four preset channels. See
page 37 for details to set the FAVORITE CH.
While watching, you can toggle the set chan-
nels by pressing A, B, C and D.
24 SCREEN SIZE: Selects the screen size.
25 DISPLAY: Displays the channel information.
26 AV SELECTION: Selects audio and video
settings. (AV mode: STANDARD, DYNAMIC,
MOVIE, GAME, USER. PC mode: STANDARD,
USER.)
27 SLEEP: Sets the sleep timer.
NOTE
• When using the remote control unit, point it at the Plasma Display.
• See pages 62to 68fo_"operating buttons not listed on this page,
En
Preparation
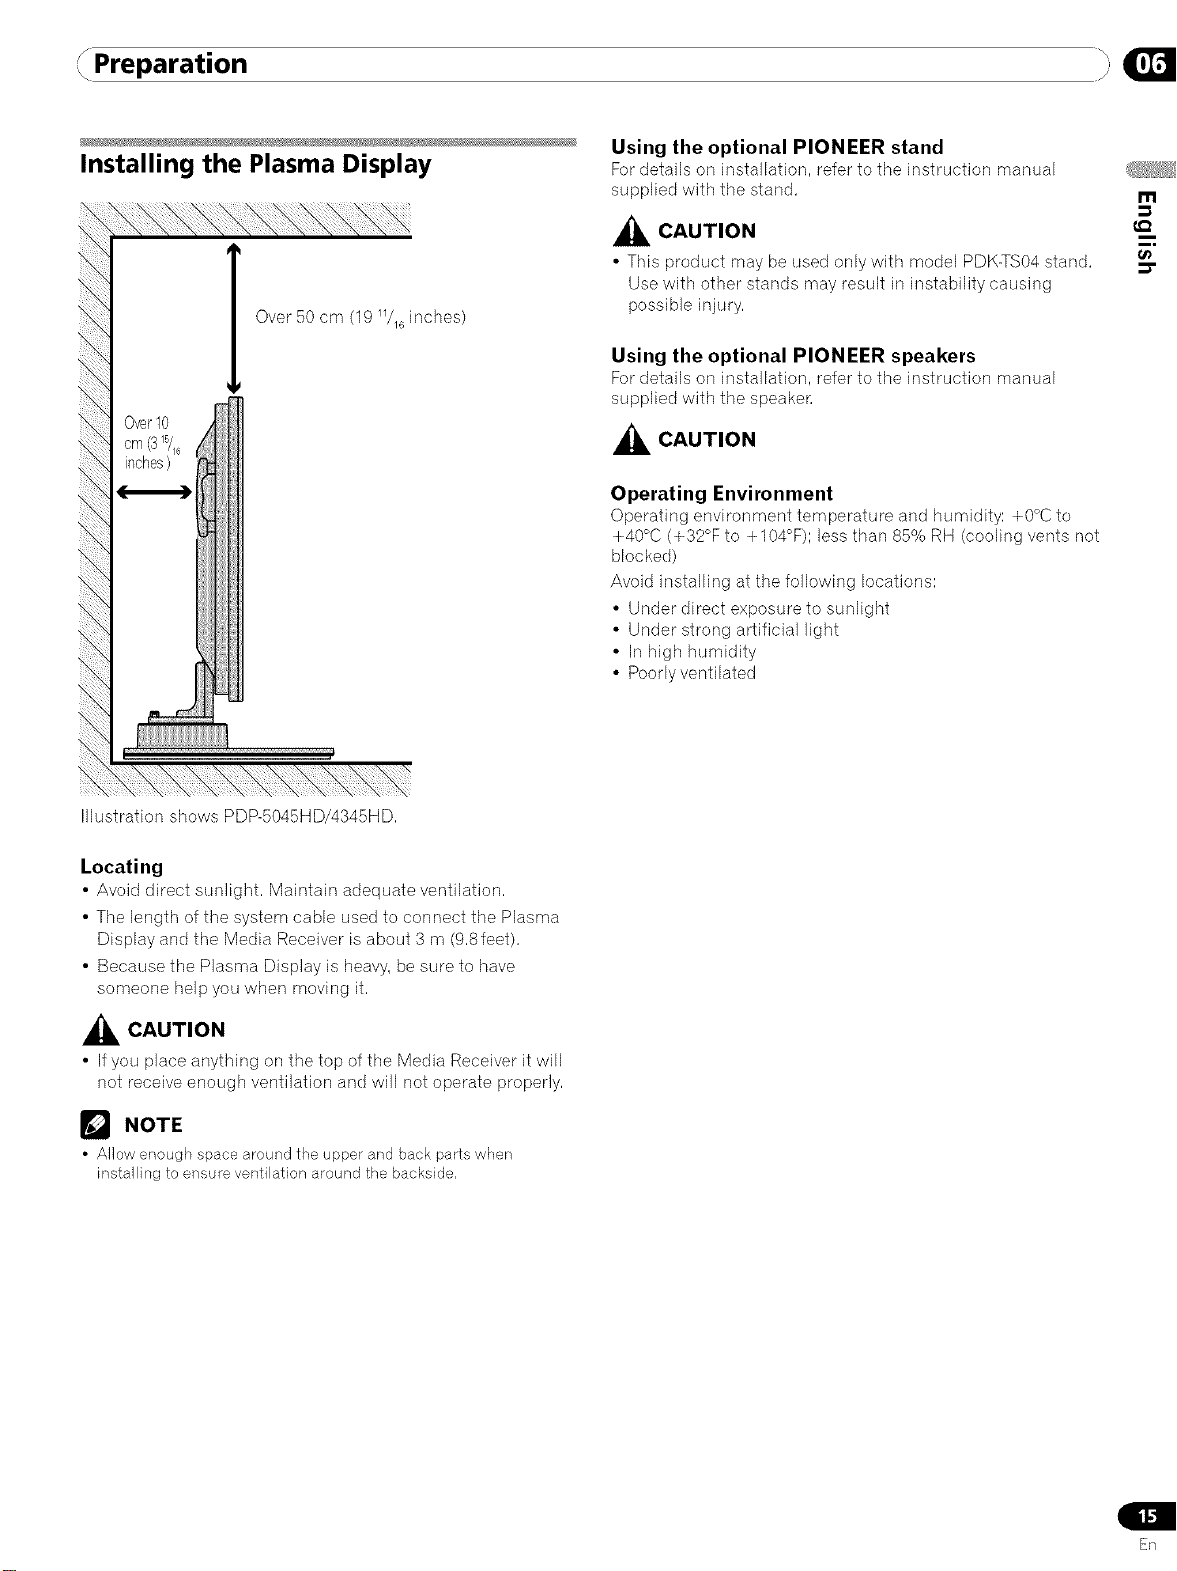
Installing the Plasma Display
Using the optional PIONEER stand
For details on installation, refer to the instruction manual
supplied with the stand,
m
Over10
cm(315/16
inches)
Over 50 cm (19 _/_ inches)
_ CAUTION
• This product may be used only with model PDK-TS04 stand,
Use with other stands may result in instability causing
possible injury,
Using the optional PIONEER speakers
For details on installation, refer to the instruction manual
supplied with the speaken
_ CAUTION
Operating Environment
Operating environment temperature and humidity: +0°C to
+40°C (+32°F to +104°F)1 less than 85% RH (cooling vents not
blocked)
Avoid installing at the following locations:
• Under direct exposure to sunlight
• Under strong arlificial light
• In high humidity
• Poorly ventilated
i
i,
t_
Illustration shows PDP-5045HD/4345HD,
Locating
• Avoid direct sunlight, Maintain adequate ventilation,
• The length of the system cable used to connect the Plasma
Display and the Media Receiver is about 3 m (9,Sleet),
• Because the Plasma Display is heavy, be sure to have
someone help you when moving it,
_lL CAUTION
• Ifyou place anything on the top of the Media Receiver it will
not receive enough ventilation and will not operate properly,
NOTE
• Allow enough space around the upper and back parts when
installing to ensure ventilation around the backside,
En
,, Preparation j_
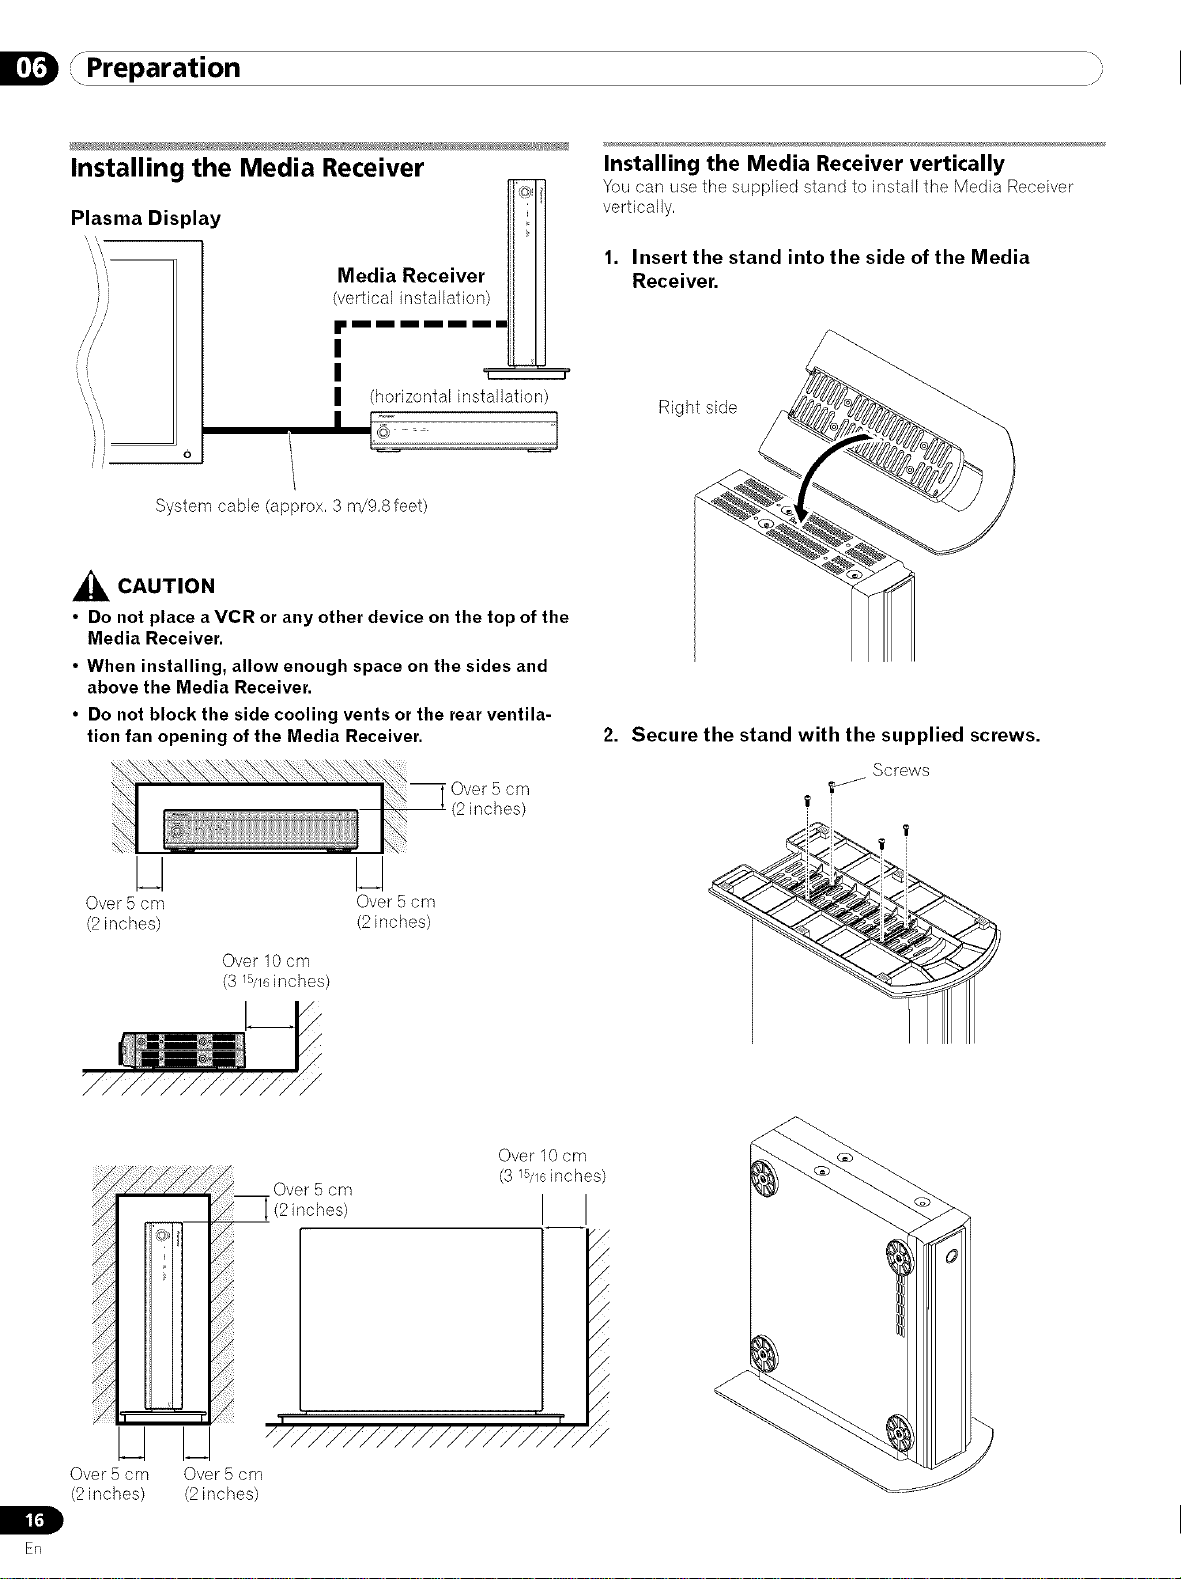
Installing the Media Receiver
Plasma Display
'i
/ /
','\
0
System cable (approx, 3 m/9,8 feet)
_k CAUTION
• Do not place a VCR or any other device on the top of the
Media Receiver.
• When installing, allow enough space on the sides and
above the Media Receiver.
• Do not block the side cooling vents or the rear ventila-
tion fan opening of the Media Receiver.
Media Receiver
(vertical installation)
'i2222::::::::£222_
(horizontal installation)
J
Over 5 cm
(2 inches)
Installing the Media Receiver vertically
You carl use tile supplied stand to install the Media Receiver
vertically,
1. Insert the stand into the side of the Media
Receiver.
Right side
Secure the stand with the supplied screws.
Screws
I[,1
Erl
N
Over 5 cm Over 5 cm
(2 inches) (2 inches)
Over 10 cm
(3 lS/16inches)
Over 5 cm
(2inches) I I
............... /
Over 5 cm
(2 inches)
L
N
I-I
Over 5 cm
(2 inches)
Over 10 cm
(3 lS/16inches)
<

Preparation }
3. Remove the shock absorbing pads.
I"11
Shock absorbing pad
Keep the shock absorbing pads and screws, They are required
when you place the Media Receiver in the horizontal position,
4. Plug the screw holes using the supplied caps.
t_
Remove the separation shee{'_
Align with the
hole and attach,
Screw bob cap
,_ CAUTION
• When you have installed the Media Receiver vertically,
be sure to use the supplied stand, If you place the unit
directly on the floor, the cooling vents will be blocked,
resulting in mechanical failure,
ER
,, Preparation ,_
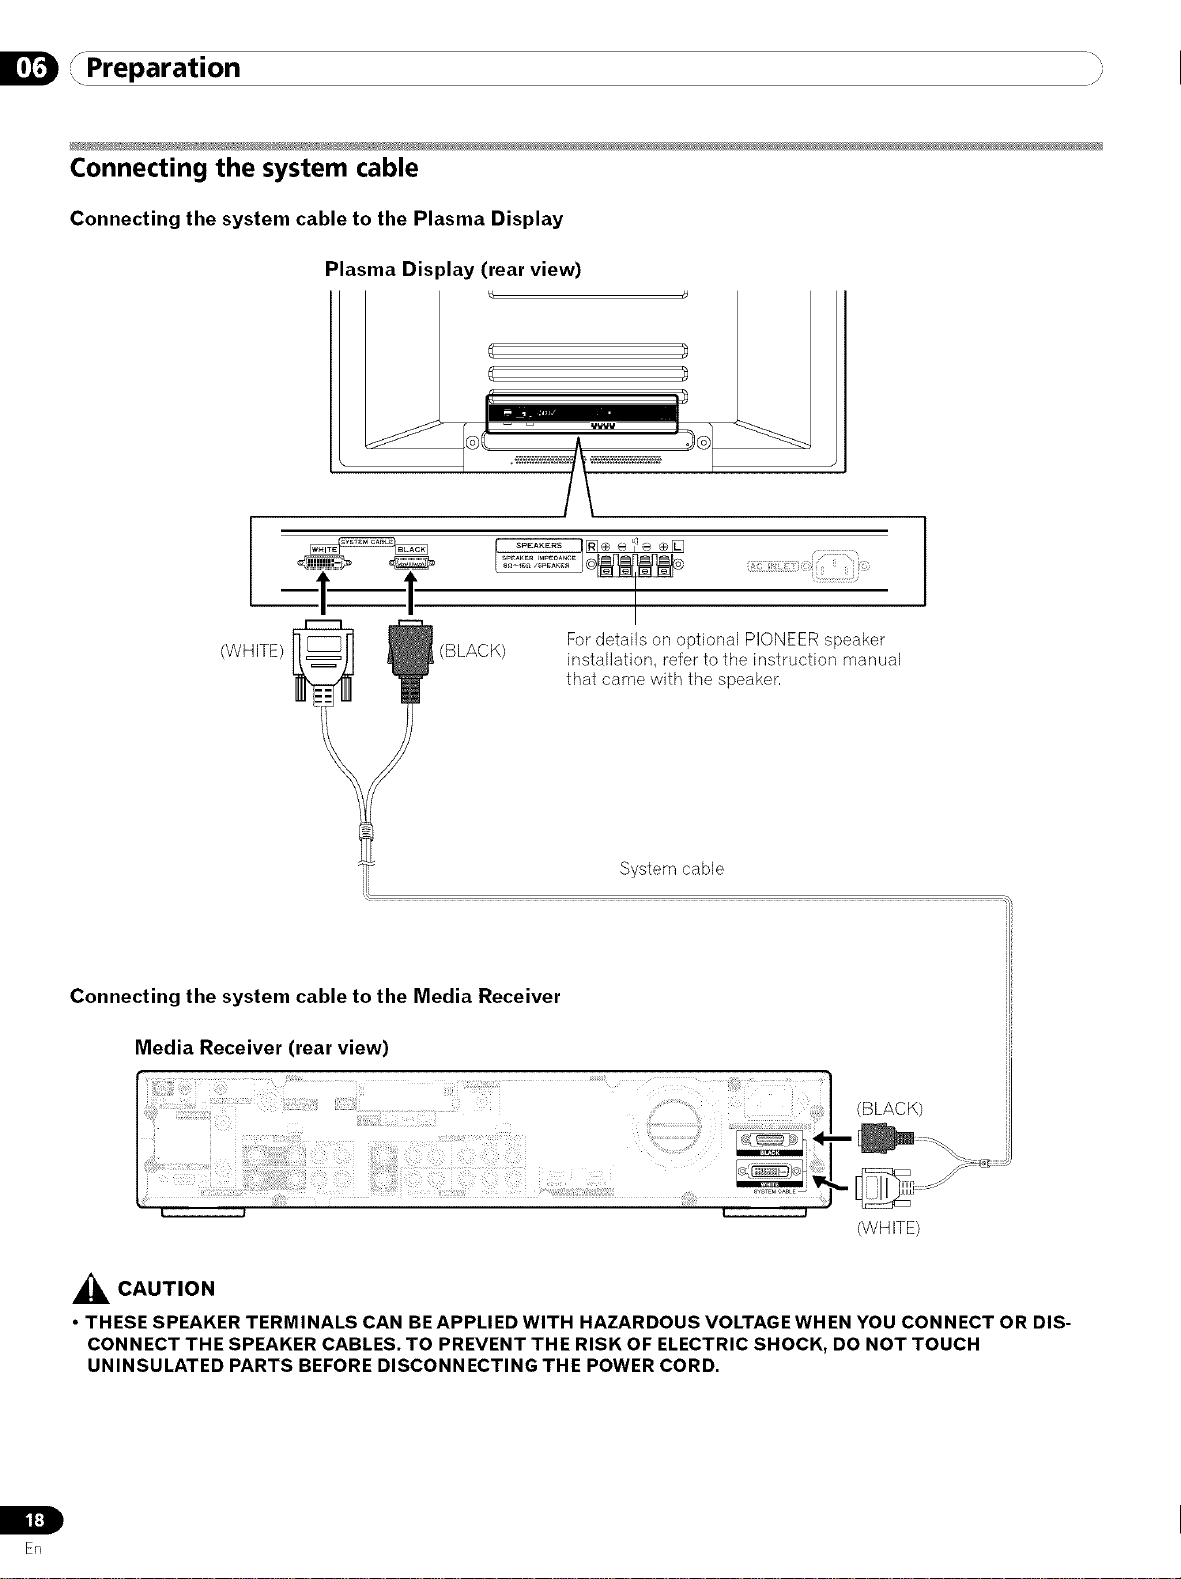
Connecting the system cable
Connecting the system cable to the Plasma Display
Plasma Display (rear view)
! !
(WHITE/ (BLACK)
Connecting the system cable to the Media Receiver
Media Receiver (rear view)
For details on optional PIONEER speaker
installation, refer to the instruction manual
that came with the speaker,
System cable
<BLACK)
(WHITE)
_k CAUTION
• THESE SPEAKER TERMINALS CAN BE APPLIED WITH HAZARDOUS VOLTAGE WHEN YOU CONNECT OR DIS-
CONNECT THE SPEAKER CABLES. TO PREVENT THE RISK OF ELECTRIC SHOCK, DO NOT TOUCH
UNINSULATED PARTS BEFORE DISCONNECTING THE POWER CORD.
L
i t:]
En
Preparation
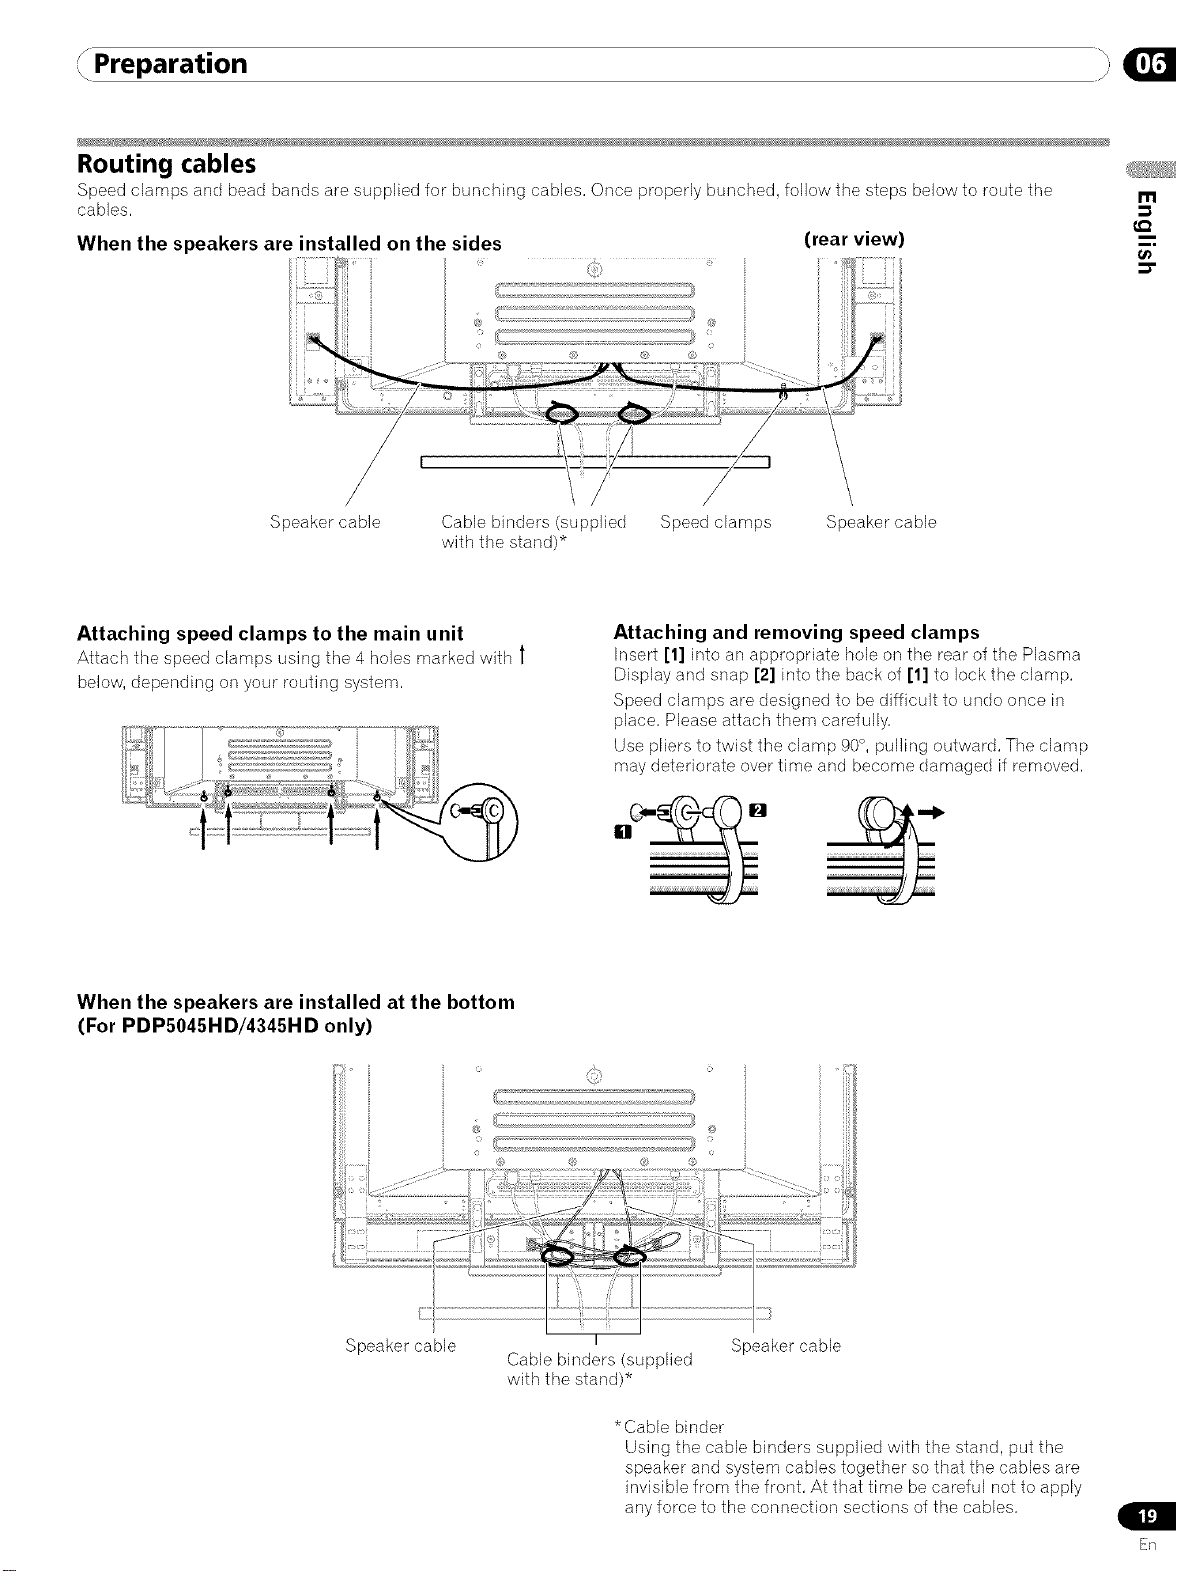
Routing cables
Speed clamps and bead bands are supplied for bunching cables, Once properly bunched, follow the steps below to route the
cables,
When the speakers are installed on the sides
/ i
/ i
/ i
/ i
(rear view)
m
0_
Speaker cable Cable binders (supplied Speed clamps Speaker cable
with the stand)*
Attaching speed clamps to the main unit
Attach the speed clamps using tile 4 holes marked with l
below, depending on your routing system,
When the speakers are installed at the bottom
(For PDPS045HD/4345HD only)
Attaching and removing speed clamps
Inset1 [1] into an appropriate bole on tile rear of the Plasrna
Display and snap [2] into the back of [1] to lock the clamp,
Speed clamps are designed to be difficult to undo once in
place, Please attach them carefully,
Use pliers to twist the clamp 90°, pulling outward, The clamp
may deteriorate over time and become damaged if removed,
Speaker cable
I
Cable binders (supplied
with the stand)*
*Cable binder
Using the cable binders supplied with the stand, put the
speaker and system cables together so that the cables are
invisible from the front, At that time be careful not to apply
any force to the connection sections of the cables,
Speaker cable
ER
D f. _\
,, Preparation
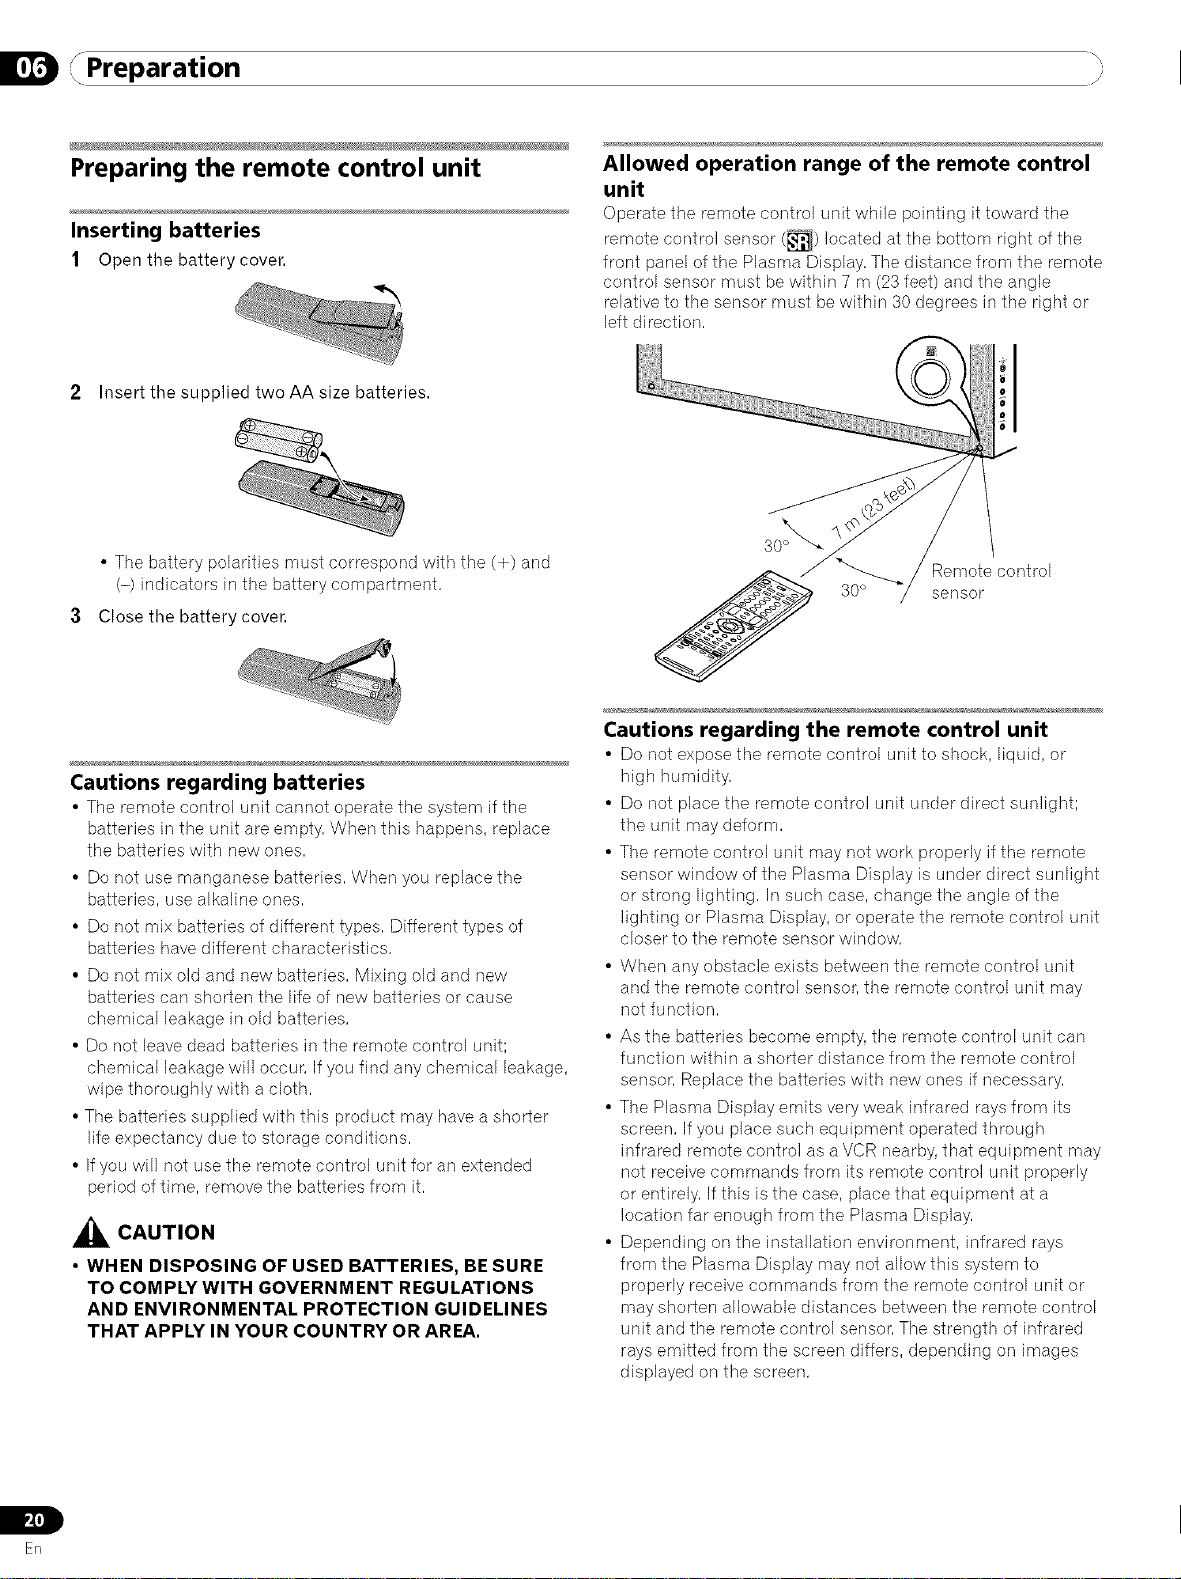
Preparing the remote control unit
Inserting batteries
1 Open the battery cover.
2 Insert the supplied two AA size batteries.
• The battery polarities must correspond with the (+) and
(-) indicators in the battery compartment,
3 Close the battery cover.
Cautions regarding batteries
• Tile remote control unit cannot operate the system if tile
batteries in the unit are empty, When this happens, replace
the batteries with new ones,
• Do not use manganese batteries, When you replace the
batteries, use alkaline ones,
• Do not mix batteries of different types, Different types of
batteries have different characteristics,
• Do not mix old and new batteries, Mixing old and new
batteries can shorlen the life of new batteries or cause
chemical leakage in old batteries,
• Do not leave dead batteries in the remote control unit;
chemical leakage will occur, If you find any chemical leakage,
wipe thoroughly with a cloth,
• The batteries supplied with this product may have a shorler
life expectancy due to storage conditions,
• Ifyou will not use the remote control unit for an extended
period of time, remove the batteries from it,
_k CAUTION
• WHEN DISPOSING OF USED BATTERIES, BE SURE
TO COMPLY WITH GOVERNMENT REGULATIONS
AND ENVIRONMENTAL PROTECTION GUIDELINES
THAT APPLY IN YOUR COUNTRY OR AREA,
Allowed operation range of the remote control
unit
Operate the remote control unit while pointing it toward tile
remote control sensor (_1) located at the bottom right of the
front panel of the Plasma Display, The distance from the remote
control sensor must be within 7 m (23feet) and the angle
relative to the sensor must be within 30 degrees in the right or
left direction,
Remote control
30° sensor
Cautions regarding the remote control unit
• Do not expose the remote control unit to shock, liquid, or
high humidity,
• Do not place the remote control unit under direct sunlight;
the unit may deform,
• The remote control unit may not work properly if the remote
sensor window of the Plasma Display is under direct sunlight
or strong lighting, In such case, change the angle of the
lighting or Plasma Display, or operate the remote control unit
closer to the remote sensor window,
• When any obstacle exists between the remote control unit
and the remote control sensor, the remote control unit may
not function,
• As the batteries become empty, the remote control unit can
function within a shorler distance from the remote control
sensor, Replace the batteries with new ones if necessary,
• The Plasma Display emits very weak infrared rays from its
screen, If you place such equipment operated through
infrared remote control as a VCR nearby, that equipment may
not receive commands from its remote control unit properly
or entirely, If this is the case, place that equipment at a
location far enough from the Plasma Display,
• Depending on the installation environment, infrared rays
from the Plasma Display may not allow this system to
properly receive commands from the remote control unit or
may shorten allowable distances between the remote control
unit and the remote control sensor, The strength of infrared
rays emitted from the screen differs, depending on images
displayed on the screen,
pZl]
ER
IL
Preparation }
Cable connections for watching digital
and/or conventional TV channels
This system is equipped with two terminals for inputting TV
broadcasting signals: ANTENNA/CABLE A IN and ANTENNA B,
The ANTENNA/CABLE A IN terminal accepts both digital and
conventional TV broadcasting signals while the ANTENNA B
terminal accepts only conventional TVbroadcasting signals,
When using a cable TV to watch digital and/or conventional TV
channels, connect to the ANTENNA/CABLE A IN terminal as
shown, In addition, you may connect an antenna to the
ANTENNA B terminal as shown; use an outdoor antenna to
enjoy clearer pictures, Ifyour outdoor uses a 75-ohm coaxial
cable with an F-type connector, plug it into the antenna
terminal at the rear of the Media Receiven
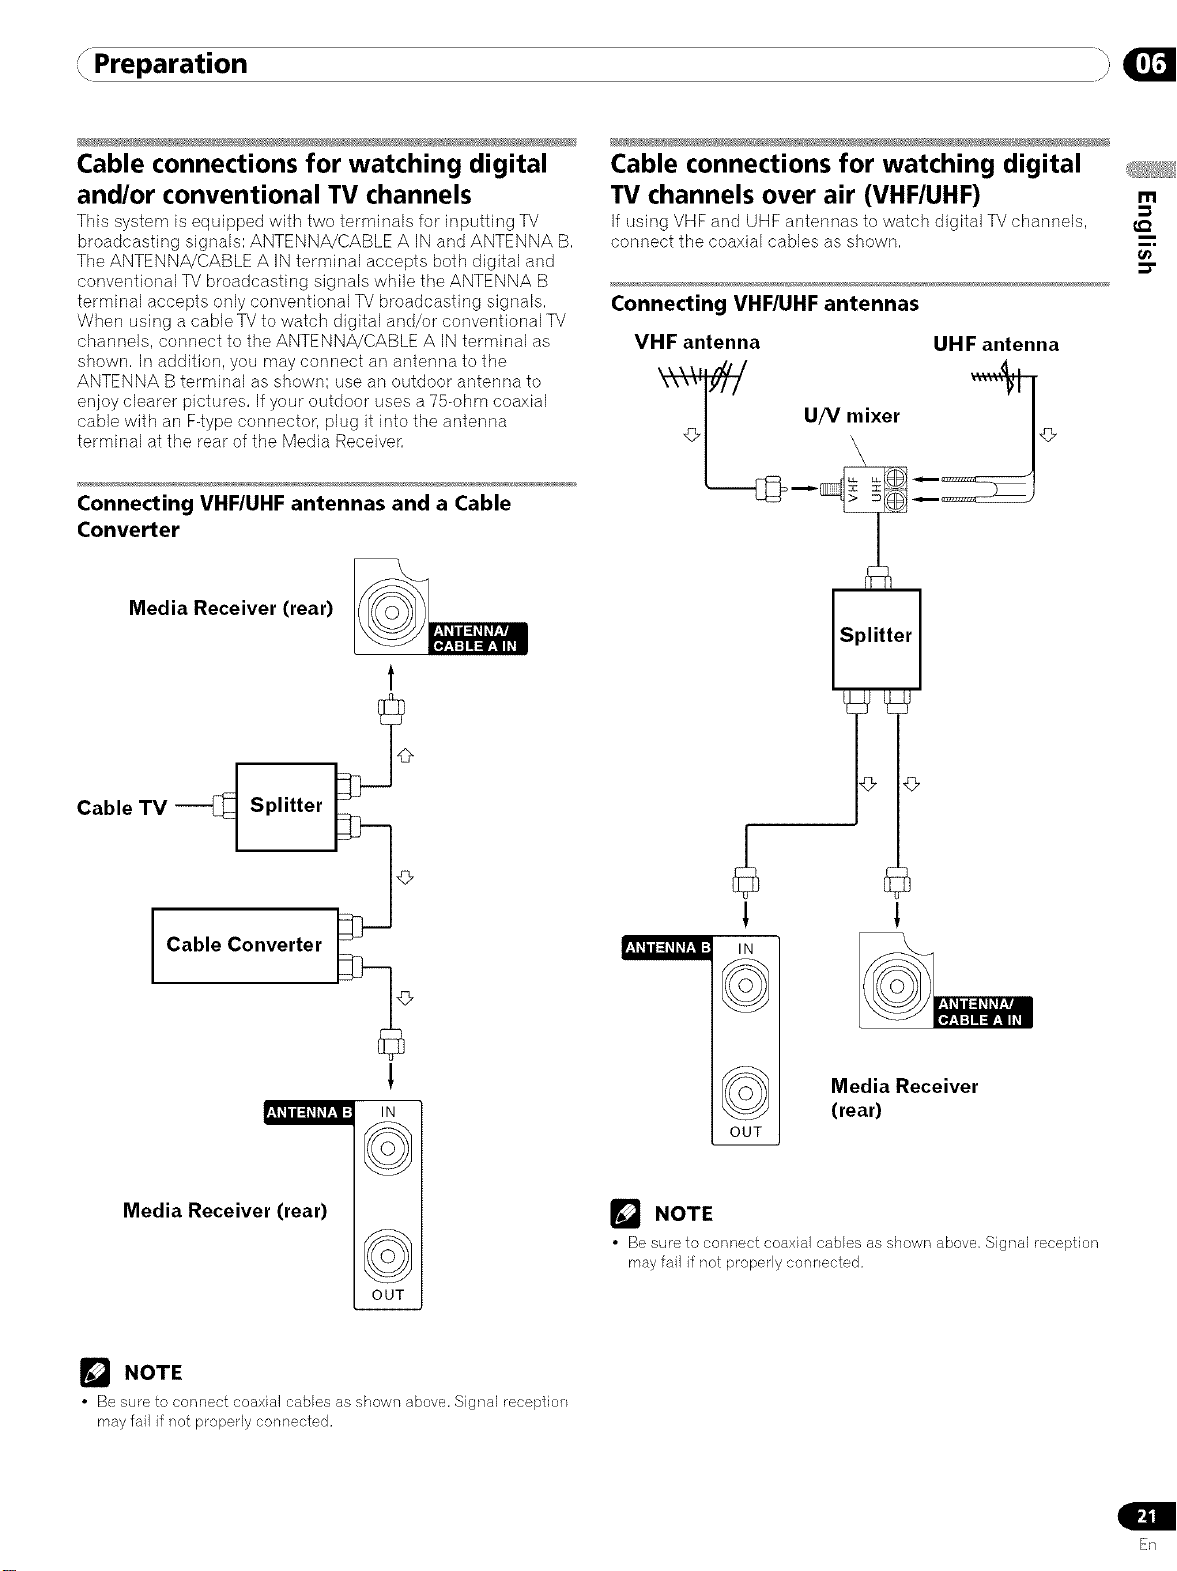
Connecting VHF/UHF antennas and a Cable
Converter
Media Receiver (rear)
1
Cable connections for watching digital
TV channels over air (VHF/UHF)
If using VHF and UHF antennas to ,watch digital TV channels,
connect the coaxial cables as shown,
Connecting VHF/UHF antennas
VHF antenna UHF antenna
T.{__ '/v mixer _4}_
m
t_
Cable TV H Splitter
I Cable Converter
!
I((o ))1
Media Receiver (rear)
OUT
r_ NOTE
• Be sure to connect coaxial cables as shown above. Signal reception
may fail if not properly connected,
!
Media Receiver
(rear)
OUT
r_J NOTE
• Be sure to connect coaxial cables as shown above, Signal reception
may fail if not properly connected,
En
D 'x_ _\
,, Preparation
Switching between antenna A and B
Towatch broadcasts via the two antennas, you carl select it by
pressing ANT on the remote control unit.
• While watching a broadcast, press ANT to view the image
received from the other antenna.
• Pressing ANT while watching in the 2-screen mode (rv
image and video image) with TV selected will display the TV
image of the other antenna.
• Pressing ANT while watching in the 2-screen mode with two
TV images displayed will not have any effect.
• Pressing ANT while watching in the 2-screen mode with two
video images displayed will switch the selected screen to a
TV image.
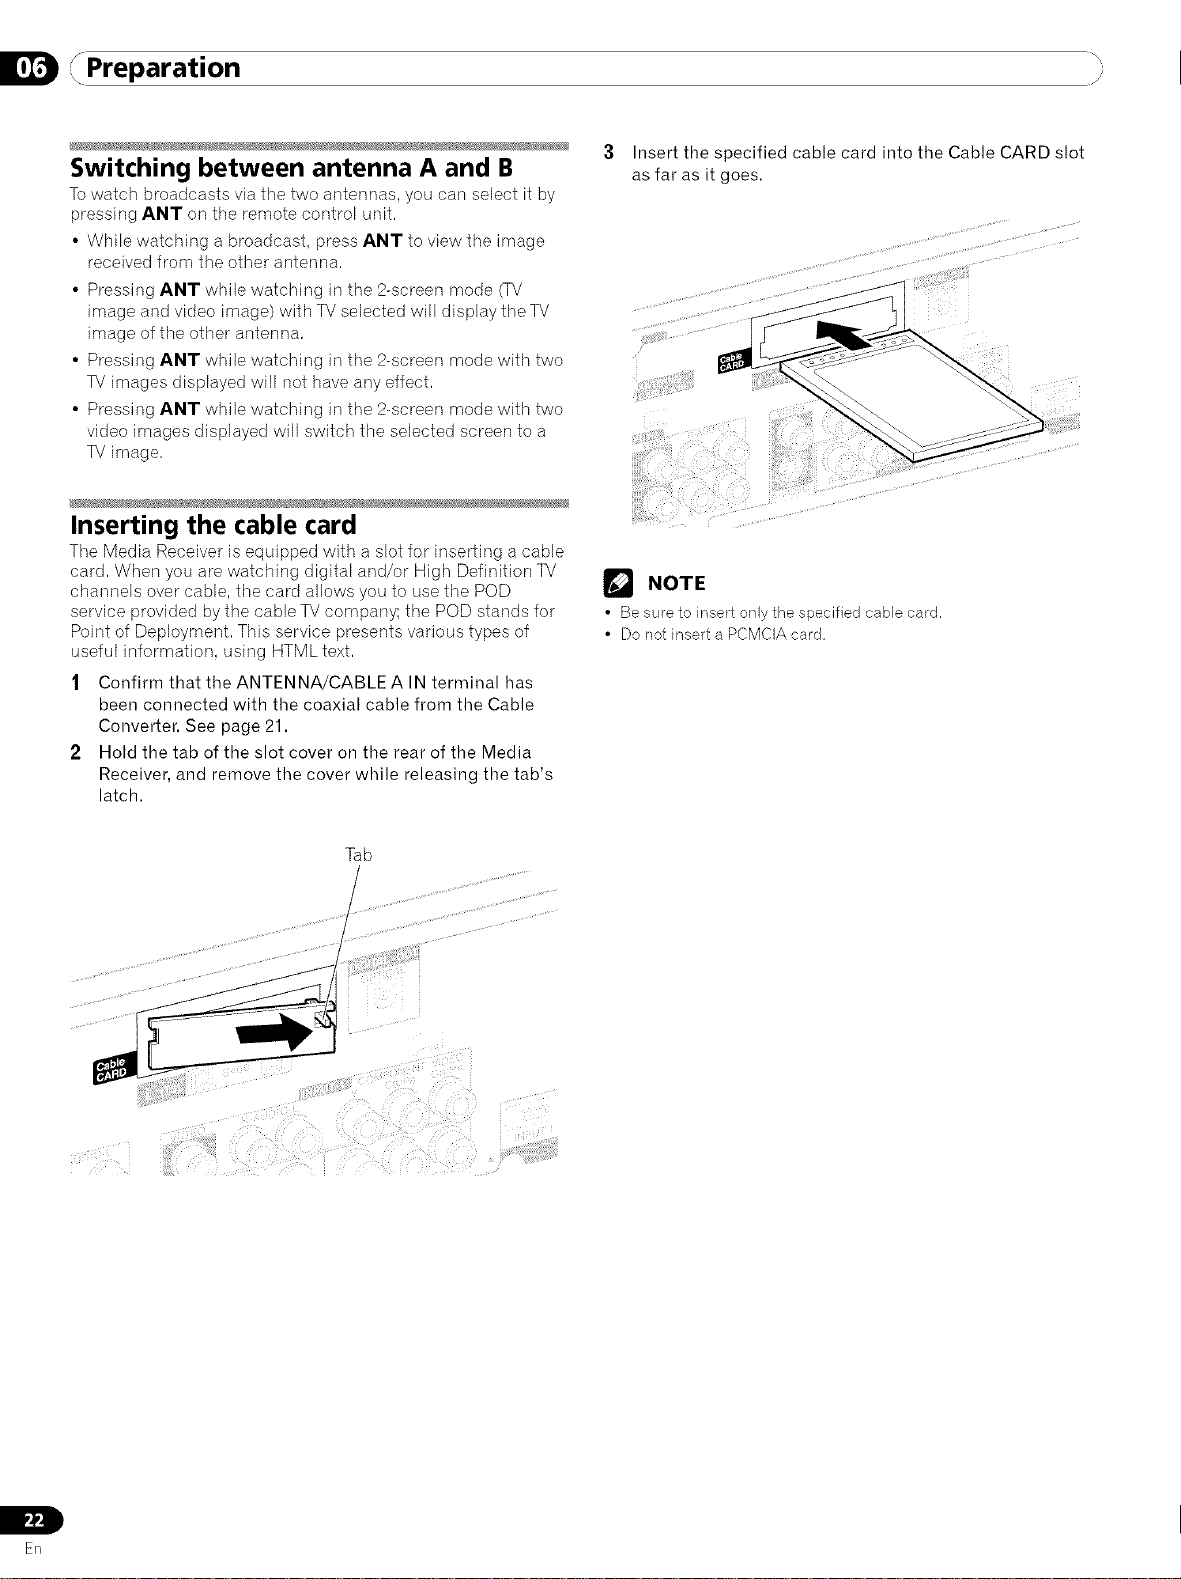
Inserting the cable card
Tile Media Receiver is equipped with a slot for inserting a cable
card. When you are watching digital and/or High Definition TV
channels over cable, the card allows you to use the POD
service provided by the cable TVcompany; the POD stands for
Point of Deployment. This service presents various types of
useful information, using HTML text.
1 Confirm that the ANTENNA/CABLEA IN terminal has
been connected with the coaxial cable from the Cable
Converter. See page 21.
2 Hold the tab of the slot cover on the rear of the Media
Receiver, and remove the cover while releasing the tab's
latch.
3 Insert the specified cable card into the Cable CARD slot
as far as it goes.
NOTE
• Be sure to insert only the specified cable card,
• Do not insert a PCMCIA card,
Tab
IL
ER
Preparation
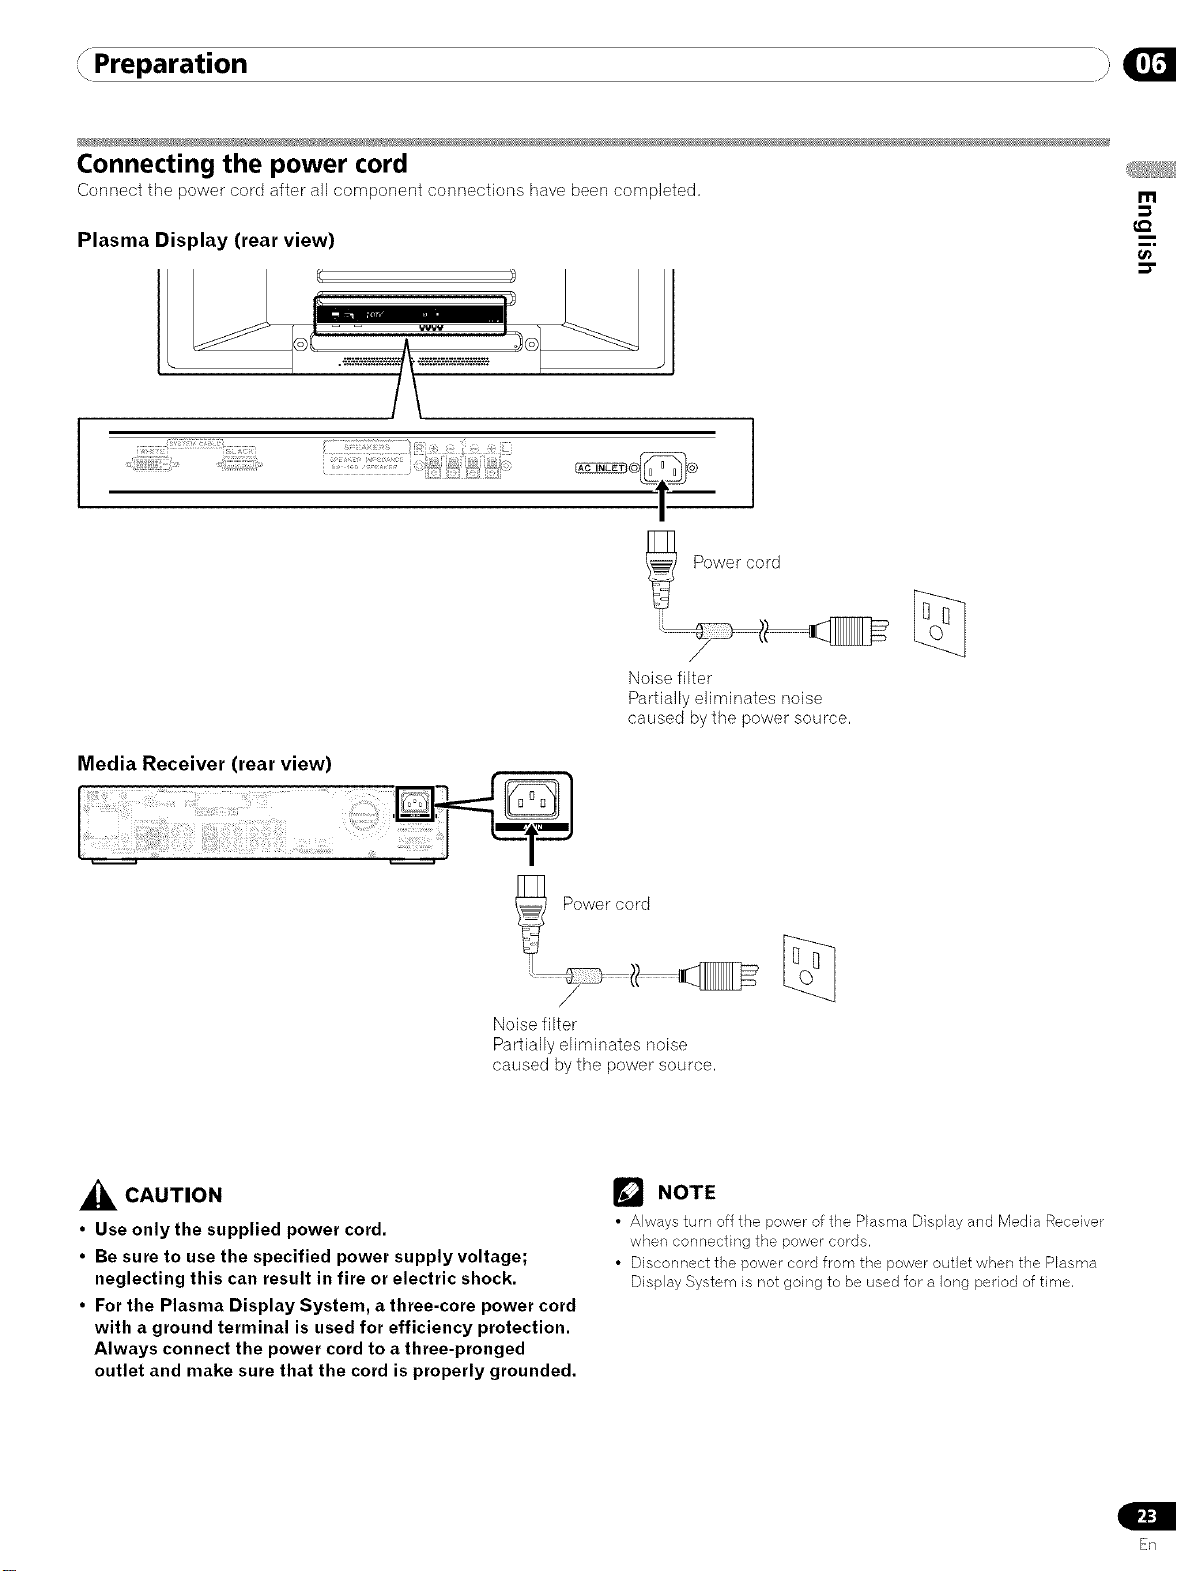
Connecting the power cord
Connect the power cord after all component connections have been completed,
Plasma Display (rear view)
L I:a
i_,i ii ............... 14i iii;i
l
m
Media Receiver (rear view)
Noise filter
Partially eliminates noise
caused by the power source,
_ CAUTION
• Use only the supplied power cord.
• Be sure to use the specified power supply voltage;
neglecting this can result in fire or electric shock.
• For the Plasma Display System, a three-core power cord
with a ground terminal is used for efficiency protection.
Always connect the power cord to a three-pronged
outlet and make sure that the cord is properly grounded.
/
Noise filter
Partially eliminates noise
caused by the power source,
Power cord
/
NOTE
• Always turn off the power of the Plasma Display and Media Receiver
when connecting the power cords.
• Disconnect the power cord from the power outlet when the Plasma
Display System is not going to be used for a long period of time,
En
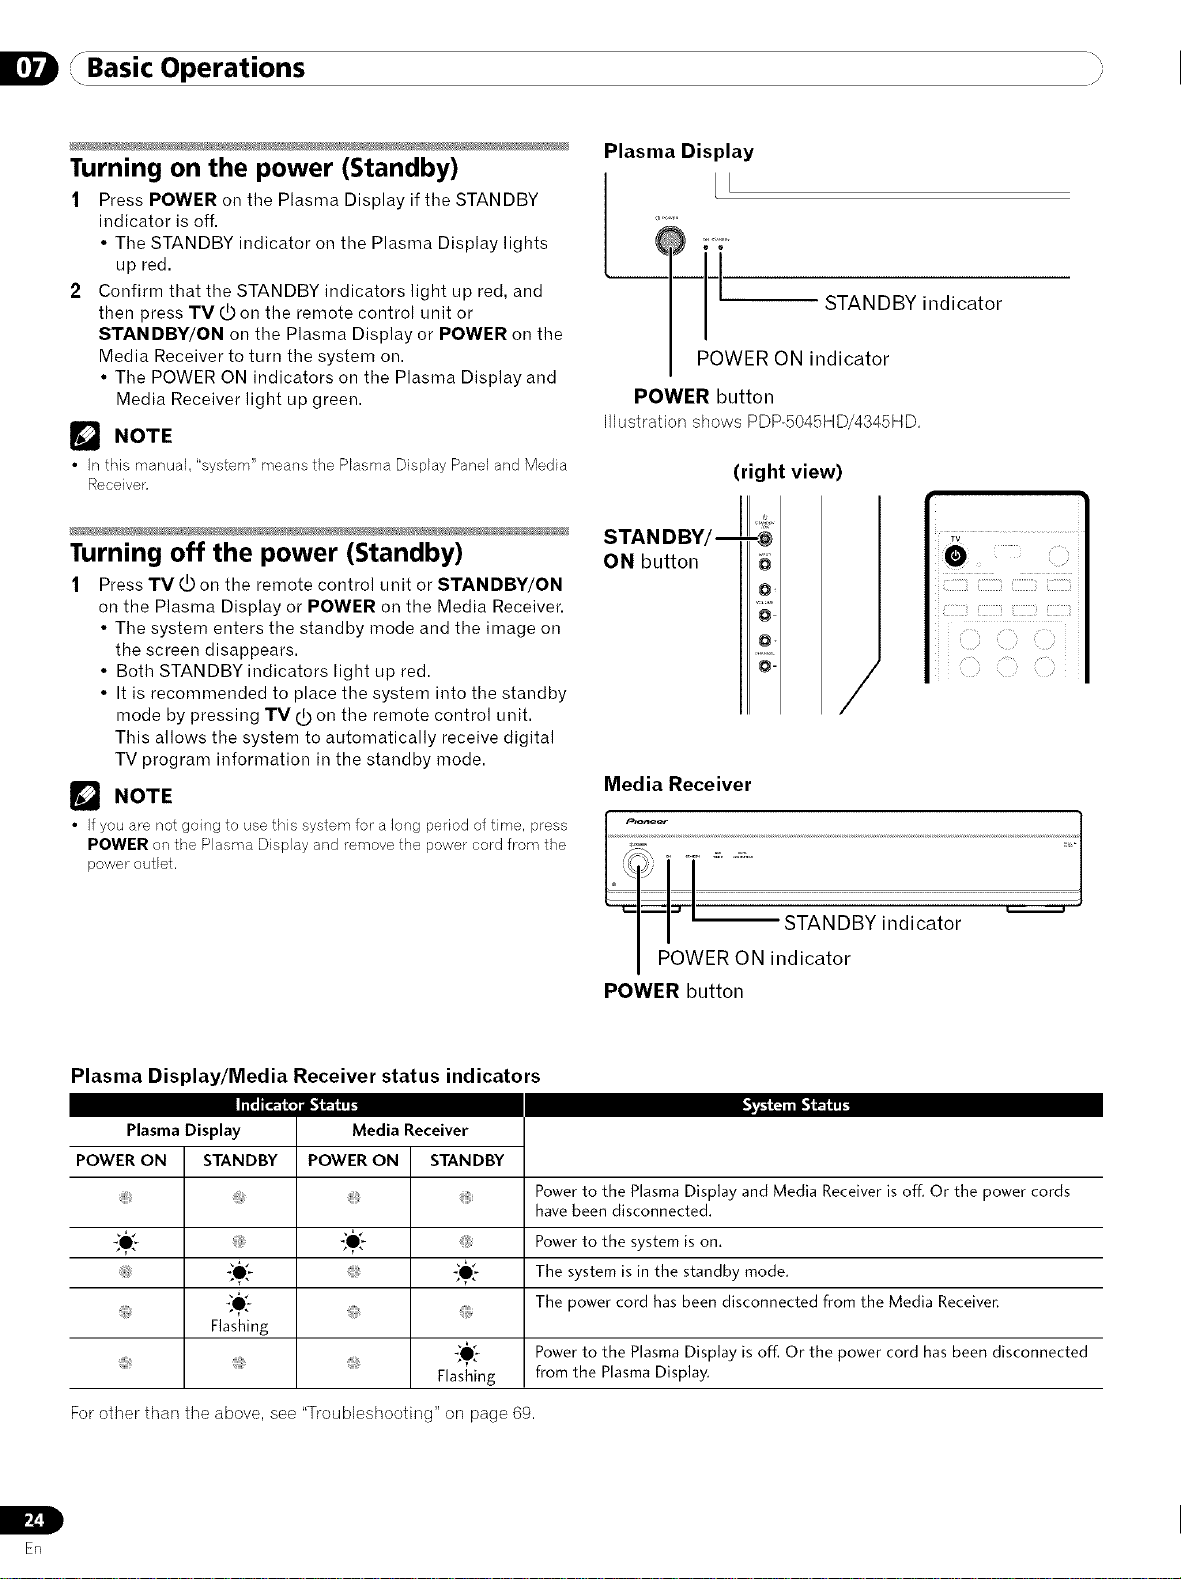
/Basic OperationsI /i
Plasma Display
Turning on the power (Standby)
1 Press POWER on tile Plasma Display if tile STANDBY
indicator is off.
• The STANDBY indicator on the Plasma Display lights
up red.
2 Confirm that the STANDBY indicators light up red, and
then press TVdDon the remote control unit or
STANDBY/ON on the Plasma Display or POWER on the
Media Receiver to turn the system on.
• The POWER ON indicators on the Plasma Display and
Media Receiver light up green.
[] NOTE
• In this manual, "system" means the Plasma Display Panel and Media
Receiver,
POWER button
H]ustrationshows PDP-5045HD/4345HD,
LL
,.,,,
-' STANDBY indicator
POWER ON indicator
(right view)
Turning off the power (Standby)
1 Press TV _ on the remote control unit or STANDBY/ON
on the Plasma Display or POWER on the Media Receiver.
• The system enters the standby mode and the image on
the screen disappears.
• Both STANDBY indicators light up red.
• It is recommended to place the system into the standby
mode by pressing TV dOon the remote control unit.
This allows the system to automatically receive digital
TV program information in the standby mode.
NOTE
• Ifyou are not going to usethis system for a long period of time, press
POWER on the Plasma Display and remove the power cord from the
power outlet.
Plasma Display/Media Receiver status indicators
STAN DBY/
ON button
/
Media Receiver
_I=):_ER _ i|:_:NDSY indicator .................... _
POWER button
Plasma Display Media Receiver
POWER ON STANDBY POWERON STANDBY
_*_ _0__ Powerto the systemis on.
_O_ The system is inthe standby mode.
_,[- The power cord hasbeen disconnected from the Media Receiver.
Flashing
. _,0[_ Powerto the PlasmaDisplay is off. Or the power cord has beendisconnected
For other than the above, see "Troubleshooting" on page 69.
L
ER
Powerto the PlasmaDisplay and Media Receiveris off. Or the power cords
havebeen disconnected.
Flashing from the PlasmaDisplay.
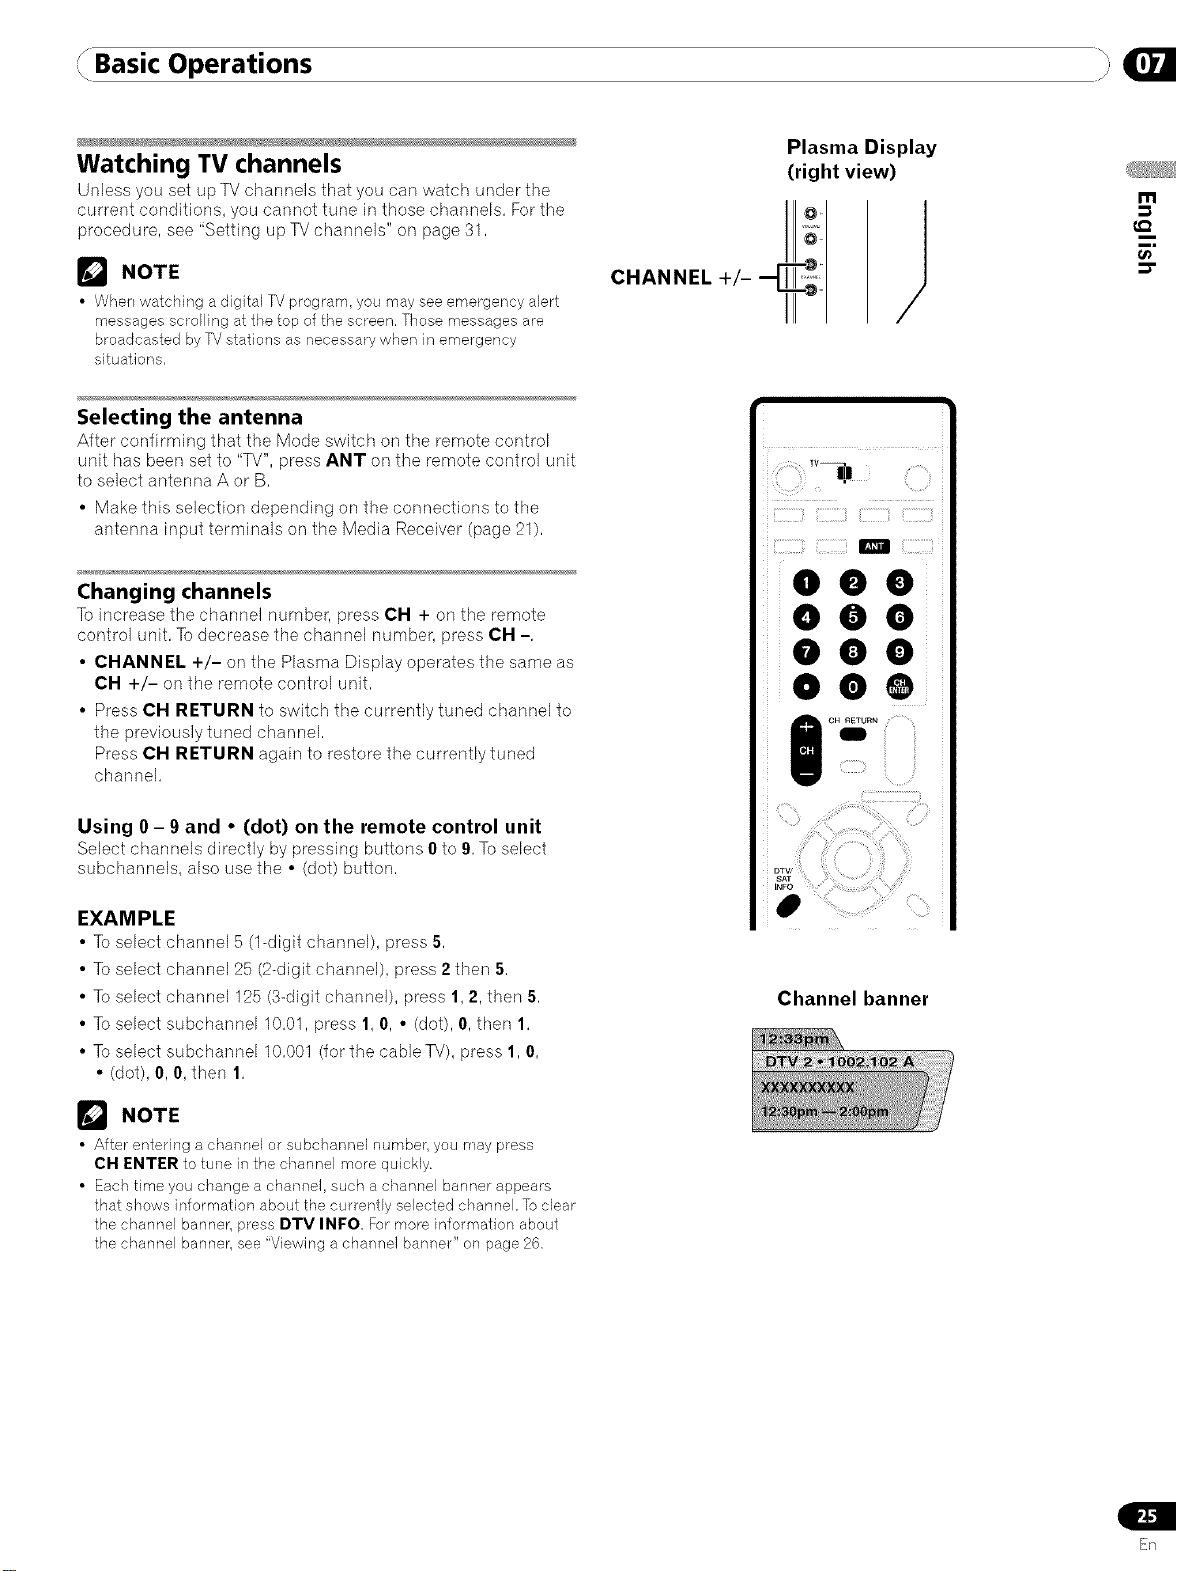
Basic Operations
Watching TV channels
Unless you set up TV channels that you carl watch under the
current conditions, you cannot tune in those channels, Forthe
procedure, see "Setting up TV channels" on page 31,
_'_ NOTE
• When watching a digital TV program, you may see emergency alert
messages scrolling at the top of the screen. Those messages are
broadcasted by TV stations as necessary when in emergency
situations,
Selecting the antenna
After confirming that the Mode switch on tile remote control
unit has been set to "TV", press ANT on the remote control unit
to select antenna A or B,
• Make this selection depending on the connections to the
antenna input terminals on the Media Receiver (page 21),
Changing channels
Toincrease the channel number, press CH + on the remote
control unit, To decrease the channel number, press CH -,
• CHANNEL +/- on the Plasma Display operates the same as
CH +/- on the remote control unit,
• Press CH RETURN to switch the currently tuned channel to
the previously tuned channel,
Press CH RETURN again to restore the currently tuned
channel,
Plasma Display
(right view)
m
€.Q
ii 'i_?i: ::!!i _ ,/
iiiiiiil]iiil],'_!,TTil]iiiiil]]]]_ii!]iiiiil]]_i
/
m i'iii
I CH RETURN
Using 0 - 9 and • (dot) on the remote control unit
Select channels directly by pressing buttons 0 to 9, To select
subchannels, also use the • (dot) button,
EXAMPLE
• Toselect channel 5 (1-digit channel), press 5,
• Toselect channel 25 (2-digit channel), press 2 then 5,
• Toselect channel 125 (3-digit channel), press 1, 2, then 5,
• Toselect subchannel 10,01, press 1, 0, • (dot), 0, then 1,
• Toselect subchannel 10,001 (for the cable TV), press 1,0,
• (dot), 0, 0, then 1,
_'_ NOTE
• After entering a channel or subchannel number, you may press
CH FNTFR to tune in the channel more quickly.
• Each time you change a channel, such a channel banner appears
that shows information about the currently selected channel. To clear
the channel banner, press DTV INFO For more information about
the channel banner, see "Viewing a channel banner" on page 26,
Channelbanner
En
 Loading...