

Page 1
PLASMA DISPLAY SYSTEM
SYSTEME D'ÉCRAN PLASMA
PLASMA DISPLAY-SYSTEM
PDP-503HDE
PDP-433HDE
Operating Instructions
Mode d'emploi
Bedienungsanleitung
PDP-503HDE/(HYO1) 9/3/02, 1:30 PM1
Page 2
Thank you for buying this Pioneer product.
Please read through these operating instructions so you will know
how to operate your model properly. After you have finished read-
ing the instructions, put them away in a safe place for future
reference.
In some countries or regions, the shape of the power plug and
power outlet may sometimes differ from that shown in the ex-
planatory drawings. However the method of connecting and op-
erating the unit is the same.
The following symbols are found on labels
attached to the product. They alert the operators
and service personnel of this equipment to any
potentially dangerous conditions.
WARNING
This symbol refers to a hazard or unsafe
practice which can result in personal injury or
property damage.
CAUTION
This symbol refers to a hazard or unsafe
practice which can result in severe personal
injury or death.
WARNING: BEFORE PLUGGING IN THE UNIT FOR THE FIRST
TIME, READ THE FOLLOWING SECTION CAREFULLY.
THE VOLTAGE OF THE AVAILABLE POWER SUPPLY DIFFERS
ACCORDING TO COUNTRY OR REGION. BE SURE THAT THE
POWER SUPPLY VOLTAGE OF THE AREA WHERE THIS UNIT WILL
BE USED MEETS THE REQUIRED VOLTAGE (E.G. 230V OR 120V)
WRITTEN ON THE REAR PANEL.
WARNING: THIS PRODUCT EQUIPPED WITH A THREE-WIRE
GROUNDING (EARTHLING) TYPE PLUG. A PLUG HAVING A THIRD
(GROUNDING, EARTHLING) PIN, IT WILL ONLY FIT INTO A
GROUNDING (EARTHLING) TYPE POWER OUTLET. THIS IS A
SAFETY FEATURE. IF YOU ARE UNABLE TO INSERT THE PLUG
INTO THE OUTLET, CONTACT YOUR ELECTRICIAN TO REPLACE
YOUR OBSOLETE OUTLET. DO NOT DEFEAT THE SAFETY
PURPOSE OF THE GROUNDING (EARTHLING) TYPE PLUG.
WARNING:
CANDLE, SHOULD BE PLACED ON THE APPARATUS.
IF NAKED FLAME SOURCES ACCIDENTALLY FALL DOWN, FIRE
SPREAD OVER THE APPARATUS THEN MAY CAUSE FIRE.
NO NAKED FLAME SOURCES SUCH AS LIGHTED
VENTILATION: WHEN INSTALLING THIS UNIT, MAKE SURE
TO LEAVE SPACE AROUND THE UNIT FOR VENTILATION TO
IMPROVE HEAT RADIATION (AT LEAST 50 CM AT TOP, 10 CM AT
REAR, AND 10 CM AT EACH SIDE.)
WARNING: SLOTS AND OPENINGS IN THE CABINET ARE
PROVIDED FOR VENTILATION AND TO ENSURE RELIABLE
OPERATION OF THE PRODUCT AND TO PROTECT IT FROM
OVERHEATING, TO PREVENT FIRE HAZARD, THE OPENINGS
SHOULD NEVER BE BLOCKED AND COVERED WITH ITEMS, SUCH
AS NEWSPAPERS, TABLE-CLOTHS, CURTAINS, ETC. ALSO DO
NOT PUT THE APPARATUS ON THE THICK CARPET, BED, SOFA,
OR FABRIC. HAVING A THICK PILE.
PDP-503HDE/(WARNING) 8/31/02, 5:06 PM1
Page 3

Dear customer
Thank you for your purchase of the PIONEER product. To ensure safety and many years of trouble-free operation
of your product, please read the Safety Precautions carefully before using this product.
Contents
Dear customer …………………………………………… 1
Contents …………………………………………………… 1
Important User Guidance Information ………………… 2
Safety precautions ……………………………………… 3
Features …………………………………………………… 4
Supplied accessories …………………………………… 5
Plasma Display ………………………………………… 5
Media Receiver ……………………………………… 5
Preparation ………………………………………………… 6
Installing the Plasma Display ………………………… 6
Setting the system …………………………………… 7
Using the remote control unit ………………………… 8
Cautions regarding remote control unit ……… 8
Inserting the batteries …………………………… 8
Cautions regarding batteries …………………… 8
Part names ………………………………………………… 9
Plasma Display ………………………………………… 9
Media Receiver ……………………………………… 10
Remote control unit …………………………………… 11
Watching TV …………………………………………… 12
Basic connection ……………………………………… 12
Connecting to an antenna ………………………12
Connecting to the power cord ………………… 12
Turning on the power ………………………………… 13
Turning off the power ………………………………… 13
Initial auto installation ………………………………… 14
Simple button operations for changing channels …16
Simple button operation for changing
volume/sound …………………………………… 17
Basic adjustment settings …………………………… 20
AV mode menu items ………………………………… 20
PC mode menu items ………………………………… 21
Moving the picture on the screen …………………… 22
Auto installation ……………………………………… 23
Language setting ………………………………… 23
Country setting …………………………………… 23
Programme auto search ………………………… 24
Auto labelling …………………………………… 24
Auto sorting ……………………………………… 25
Preset download ………………………………… 25
Programme setup……………………………………… 26
Auto search ……………………………………… 26
Manual setting for each channel ……………… 26
Additional channels entry ………………… 27
Fine tuning …………………………………… 27
Colour system ……………………………… 27
Sound system ……………………………… 28
Labelling channels ………………………… 28
Skipping channels ………………………… 28
Setting the decoder ………………………… 29
Setting the child lock ……………………… 29
Sort ………………………………………………… 30
Language setting ……………………………………… 31
Picture adjustments …………………………………… 32
Colour temperature ……………………………… 33
Black ……………………………………………… 33
Black & White …………………………………… 34
PureCinema ……………………………………… 34
Sound adjustment …………………………………… 35
Power control ………………………………………… 36
Power control for AV source …………………… 36
Power control for PC source …………………… 37
Using external equipment …………………………… 38
Watching a decoder image ………………………… 39
Connecting a decoder …………………………… 39
Displaying a programme ………………………… 39
Watching a VCR image ……………………………… 40
Connecting a VCR ……………………………… 40
Displaying a VCR image ………………………… 40
Using i/o Link.A ……………………………………… 41
Watching a DVD image ……………………………… 42
Connecting a DVD player ……………………… 42
Displaying a DVD image ………………………… 42
Enjoying a game console and viewing camcorder
images …………………………………………… 43
Connecting a game console or camcorder …… 43
Displaying an image of the game player
and camcorder ……………………………… 43
Viewing an image from a computer ………………… 44
Connecting a computer ………………………… 44
Displaying an image from a computer ………… 44
Control cord connection ……………………………… 45
How to route cables …………………………………… 46
Useful adjustment settings ………………………… 47
Image position (AV mode only) ……………………… 47
Noise reduction (NR) (AV mode only) ……………… 47
Auto Sync. adjustment (PC mode only) …………… 48
Fine Sync. adjustment (PC mode only) …………… 48
Input signal source …………………………………… 49
Colour system setting (AV mode only) ……………… 50
AV selection …………………………………………… 50
WIDE mode …………………………………………… 51
Wide screen signalling (WSS) (AV mode only) …… 52
Picture aspect ratio (AV mode only) ………………… 52
Audio out ……………………………………………… 53
Sleep timer …………………………………………… 53
Password setting for Child lock (AV mode only) …… 54
Useful features ………………………………………… 55
Multiscreen functions ………………………………… 55
Teletext function ……………………………………… 57
Appendix ………………………………………………… 59
Troubleshooting ……………………………………… 59
Computer compatibility chart ………………………… 60
Connecting pin assignments for SCART …………… 61
Specifications ………………………………………… 62
1
PDP-503HDE/(E)-a 8/31/02, 5:08 PM1
Page 4

Important User Guidance Information
In order to obtain maximum enjoyment from this Pioneer PureVision PDP-503HDE/PDP-433HDE Plasma Display System,
please first read this information carefully.
With the Pioneer PureVision PDP-503HDE/PDP-433HDE, you can be assured of a high quality Plasma Display System with
long-life and high reliability. To achieve images of exceptional quality, this Pioneer Plasma Display System incorporates
state-of-the-art design and construction, as well as very precise and highly advanced technology. On a total of nearly 3
million light cells, more than 99.999 percent of the cells remain active.
Over the course of its lifetime, the luminosity of the Pioneer PDP-503HDE/PDP-433HDE Plasma Display System will diminish
very slowly, such as with all phosphor-based screens (for example, a traditional tube-type television). To enjoy beautiful
and bright images on your Pioneer Plasma Display System for a long time, please carefully read and follow the usage
guidances below:
Usage guidelines
All phosphor-based screens (including conventional tube-type televisions) can be affected by displaying static images for
a prolonged period. Plasma Display System’s are no exception to this rule. After-image and permanent effects on the
screen can be avoided by taking some basic precautions. By following the recommendations listed below, you can ensure
longer and satisfactory results from your plasma:
• Whenever possible, avoid frequently displaying the same image or virtually still moving pictures (e.g. closed-captioned
images or video game images which have static portions).
• Do not display Teletext for a prolonged period of time.
• Avoid viewing the On Screen Display for extended periods, from a decoder, DVD player, VCR and all other components.
• Do not leave the same picture freeze-framed or paused continuously over a long period of time, when using the still
picture mode from a TV, VCR, DVD player or any other component.
• Images which have both very bright areas and very dark areas side by side should not be displayed for a prolonged
period of time.
• When playing a game, the “GAME” mode setting within “AV SELECTION” is strongly recommended. However, please
limit its use to less than 2 hours at a time.
• After playing a game, or displaying a PC image or any still image, it is best to view a normal moving picture in
the “WIDE” or “FULL” screen setting for more than 3 times the length of the previous still moving image.
• After using the Plasma Display System, always switch the display to “STAND BY” mode.
Installation guidelines
The Pioneer PureVision PDP-503HDE/PDP-433HDE Plasma Display System incorporates a very thin design. To ensure
safety, please take the proper measures to mount or install the Plasma Display, in order to prevent the unit from tipping over
in the event of vibration or accidental movement.
This product should be installed by using only parts and accessories designed by PIONEER. Use of accessories other than
the PIONEER stand or installation bracket may result in instability, and could cause injury. For custom installation, please
consult the dealer where the unit was purchased. To ensure correct installation, experienced and qualified experts must
install the unit. PIONEER will not be held responsible for accident or damage caused by the use of parts and accessories
manufactured by other companies.
To avoid malfunction and overheating, make sure that the vents on the main unit are not blocked when installing to ensure
proper heat emission:
• Distance the unit slightly from other equipment, walls, etc. (more than 10 cm)
• Do not fit the unit inside narrow spaces where ventilation is poor.
• Do not cover with a cloth, etc.
• Clean the vents on the sides and rear of the unit to remove dust build-up, by using a vacuum cleaner set to its lowest
suction setting.
Using the unit without proper ventilation may cause the internal temperature to rise, and could result in possible malfunction.
When the surrounding or internal temperature exceeds a certain degree, the display will automatically power off in order to
cool the internal electronics and prevent hazardous occurrences.
Any malfunction may occur due to: an inappropriate installation site, improper assembly, installation, mounting, or operation
of this product, modifications made to the product. However, PIONEER cannot be held responsible for such accidents or
malfunction.
A
Typical effects and characteristics of a phosphor-based matrix display, e.g. permanent residual images upon the phosphor
of the panel, and the existence of a minute number of inactive light cells in the screen, are not covered by local warranties.
PDP-503HDE/(E)-a 8/31/02, 5:08 PM2
2
Page 5

Safety precautions
Electricity is used to perform many useful functions, but it can also cause personal injuries and property damage
if improperly handled. This product has been engineered and manufactured with the highest priority on safety.
However, improper use can result in electric shock and/or fire. In order to prevent potential danger, please
observe the following instructions when installing, operating and cleaning the product. To ensure your safety
and prolong the service life of your product, please read the following precautions carefully before using the
product.
1. Read instructions—All operating instructions must be read and understood before the product is operated.
2. Keep this manual in a safe place—These safety and operating instructions must be kept in a safe place for future
reference.
3. Observe warnings—All warnings on the product and in the instructions must be observed closely.
4. Follow instructions—All operating instructions must be followed.
5. Cleaning—Unplug the power cord from the AC outlet before cleaning the product. Use a damp cloth to clean the
product. Do not use liquid cleaners or aerosol cleaners.
6. Attachments—Do not use attachments not recommended by the manufacturer. Use of inadequate attachments can
result in accidents.
7. Water and moisture—Do not use the product near water, such as bathtub, washbasin, kitchen sink and laundry tub,
swimming pool and in a wet basement.
8. Stand—Do not place the product on an unstable cart, stand, tripod or table. Placing the product on an unstable
base can cause the product to fall, resulting in serious personal injuries as well as damage to the product. Use only
a cart, stand, tripod, bracket or table recommended by the manufacturer or sold with the product. When mounting
the product on a wall, be sure to follow the manufacturer’s instructions. Use only the mounting hardware recommended
by the manufacturer.
9. When relocating the product placed on a cart, it must be moved with utmost care. Sudden
stops, excessive force and nueven floor surface can cause the product to fall from the cart.
10. Ventilation—The vents and other openings in the cabinet are designed for ventilation. Do not
cover or block these vents and openings since insufficient ventilation can cause overheating
and/or shorten the life of the product. Do not place the product on a bed, sofa, rug or other
similar surface, since they can block ventilation openings. This product is not designed for builtin installation; do not place the product in an enclosed place such as a bookcase or rack,
unless proper ventilation is provided or the manufacturer’s instructions are followed.
11. Power source—This product must operate on a power source specified on the specification label. If you are not sure
of the type of power supply used in your home, consult your dealer or local power company.
12. Power cord protection—The power cords must be routed properly to prevent people from stepping on them or
objects from resting on them. Check the cords at the plugs and product.
13. The plasma Display used in this product is made of glass. Therefore, it can break when the product is dropped or
applied with impact. Be careful not to be injured by broken glass pieces in case the plasma Display breaks.
14. Overloading—Do not overload AC outlets or extension cords. Overloading can cause fire or electric shock.
15. Entering of objects and liquids—Never insert an object into the product through vents or openings. High voltage
flows in the product, and inserting an object can cause electric shock and/or short internal parts. For the same
reason, do not spill water or liquid on the product.
16. Servicing—Do not attempt to service the product yourself. Removing covers can expose you to high voltage and
other dangerous conditions. Request a qualified service person to perform servicing.
17. Repair—If any of the following conditions occurs, unplug the power cord from the AC outlet, and request a qualified
service person to perform repairs.
a. When the power cord or plug is damaged.
b. When a liquid was spilled on the product or when objects have fallen into the product.
c. When the product has been exposed to rain or water.
d. When the product does not operate properly as described in the operating instructions.
Do not touch the controls other than those described in the operating instructions. Improper adjustment of
controls not described in the instructions can cause damage, which often requires extensive adjustment work
by a qualified technician.
e. When the product has been dropped or damaged.
f. When the product displays an abnormal condition. Any noticeable abnormality in the product indicates that
the product needs servicing.
18. Replacement parts—In case the product needs replacement parts, make sure that the service person uses
replacement parts specified by the manufacturer, or those with the same characteristics and performance as the
original parts. Use of unauthorized parts can result in fire, electric shock and/or other danger.
19. Safety checks—Upon completion of service or repair work, request the service technician to perform safety checks
to ensure that the product is in proper operating condition.
20. Wall or ceiling mounting—When mounting the product on a wall or ceiling, be sure to install the product according
to the method recommended by the manufacturer.
21. Heat sources—Keep the product away from heat sources such as radiators, heaters, stoves and other heat- generating
products (including amplifiers).
22. Unplug the power cord from the AC outlet before installing the speakers.
3
PDP-503HDE/(E)-a 8/31/02, 5:08 PM3
Page 6

Features
• Newly developed WIDE XGA Plasma Panel (H:1280 m V:768 pixels)
• Wide Viewing Angle
• NICAM/A2 Stereo Sound
• SRS, FOCUS Sound System*
1
• Multi-System TV Tuner
• Built-in TELETEXT Function (TOP/FLOF/FASTEXT)
• Picture and Picture. Still Image function.
• 12-Language On Screen Display
• 4 Video Input with 3 SCART terminals and PC (XGA) Input
• Component terminal
• Child Lock System
PDP-503HDE/(E)-a 8/31/02, 5:08 PM4
4
Page 7
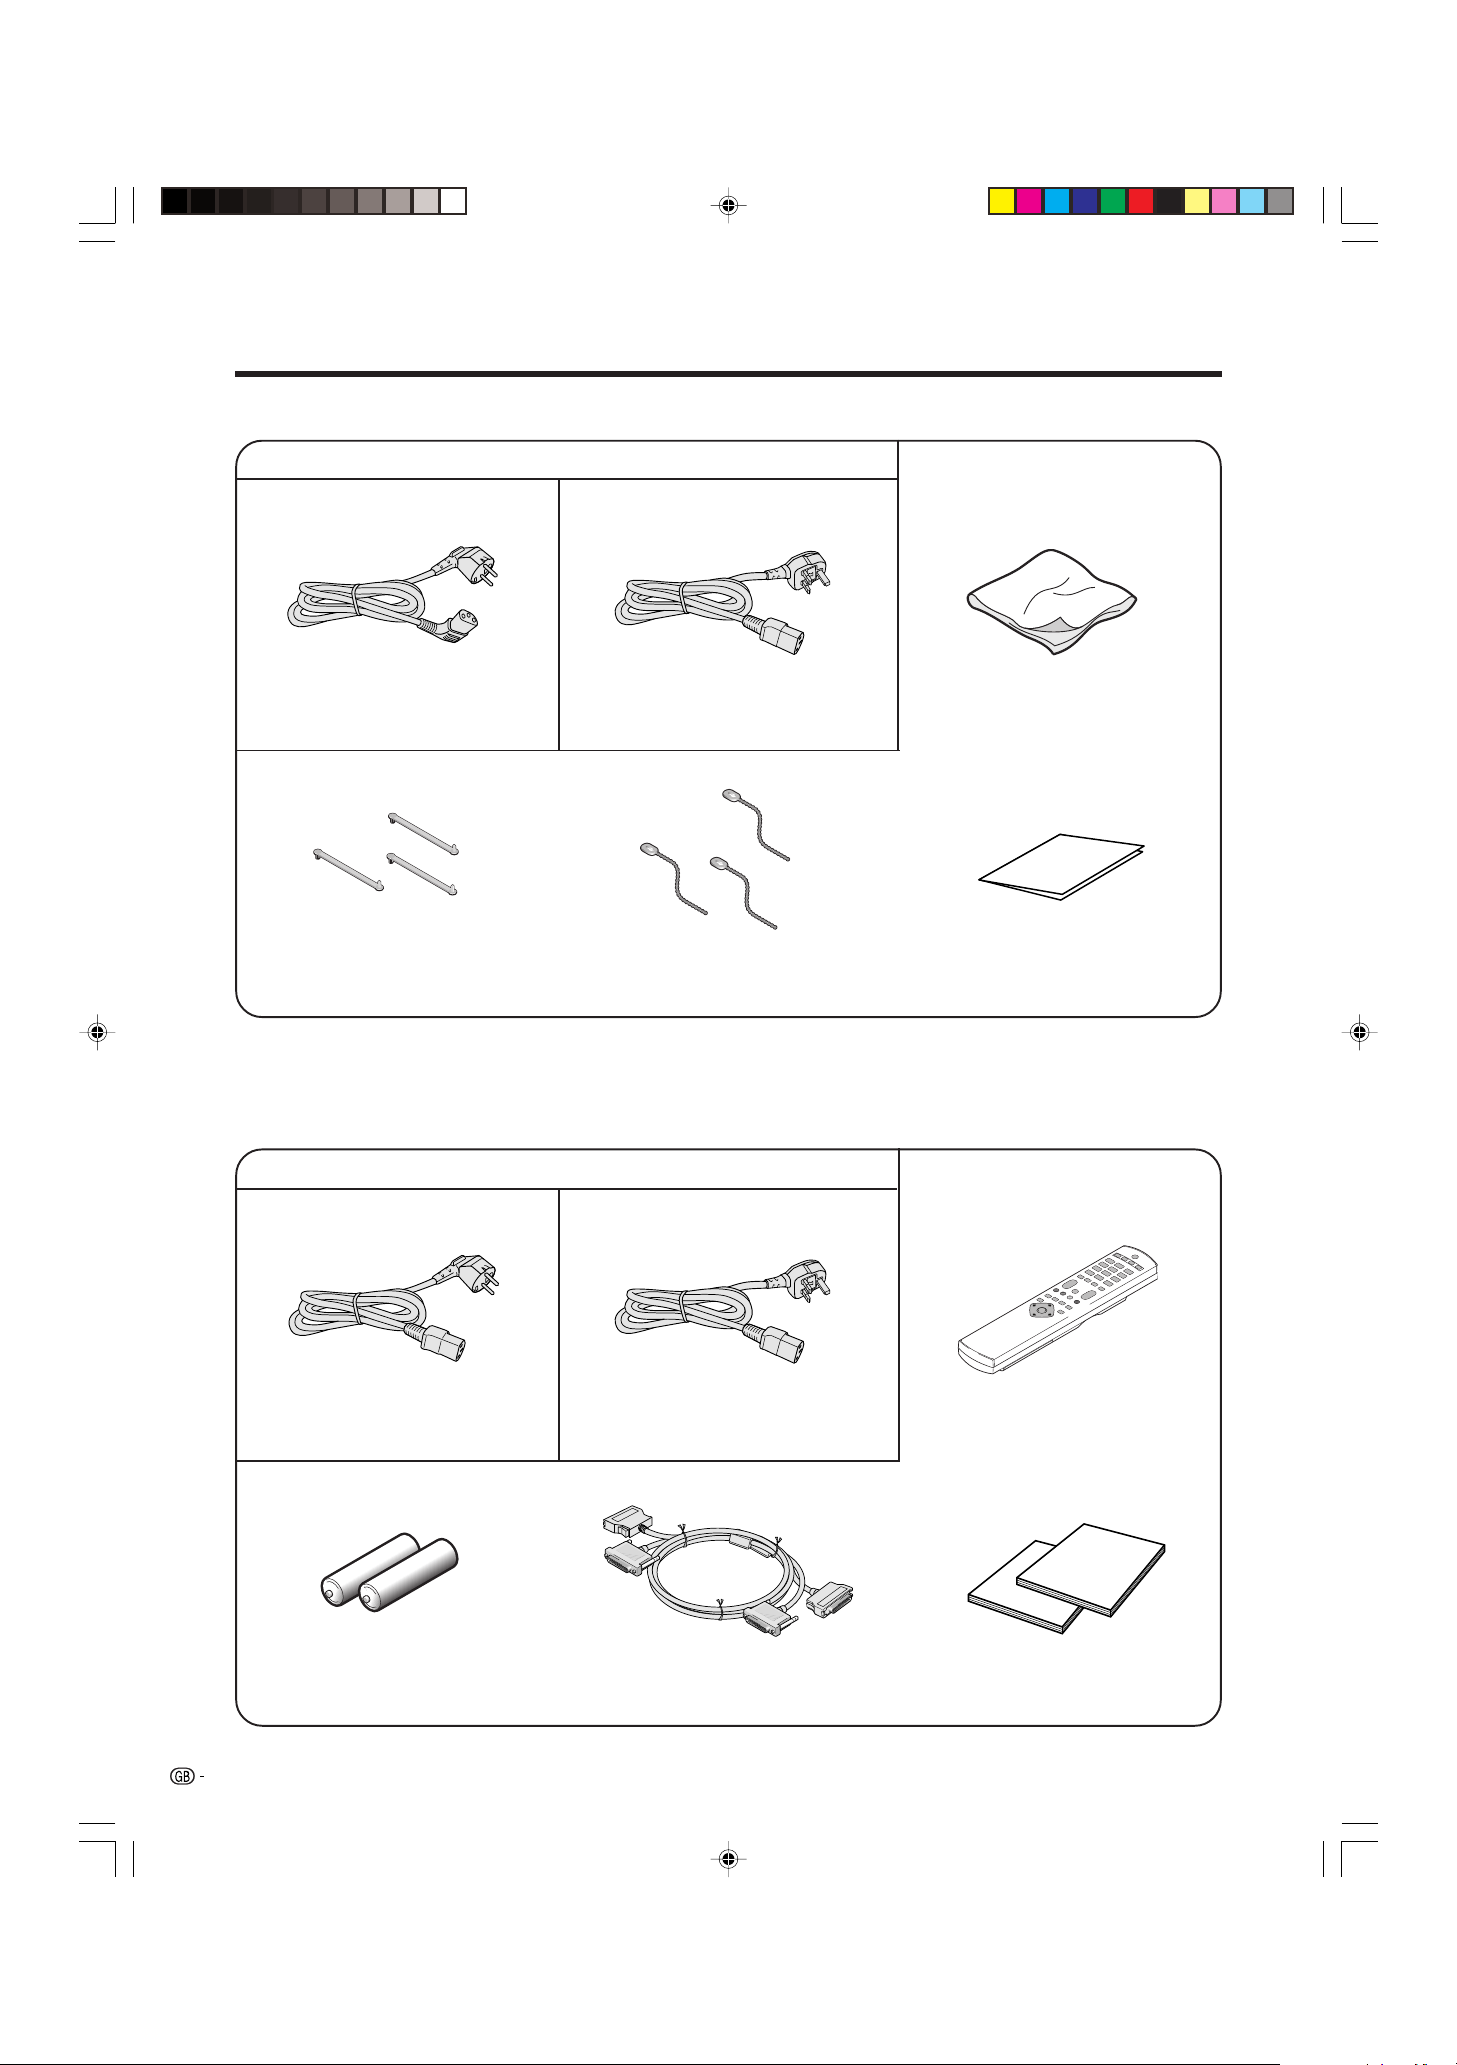
Supplied accessories
Plasma Display
Power cord
(For Europe, except U.K. and Eire) (For U.K., and Eire)
Three speed clamps
A
• Always use the power cord supplied with the Plasma Display and the one supplied with the Media Receiver for each
respective unit.
Three bead bands
Cleaning cloth
Warranty card
Media Receiver
Power cord
(For Europe, except U.K. and Eire) (For U.K., and Eire) Remote control unit
Two AA size batteries
(Alkaline battery)
5
PDP-503HDE/(E)-a 8/31/02, 5:08 PM5
System cable
Two operating instructions
Page 8
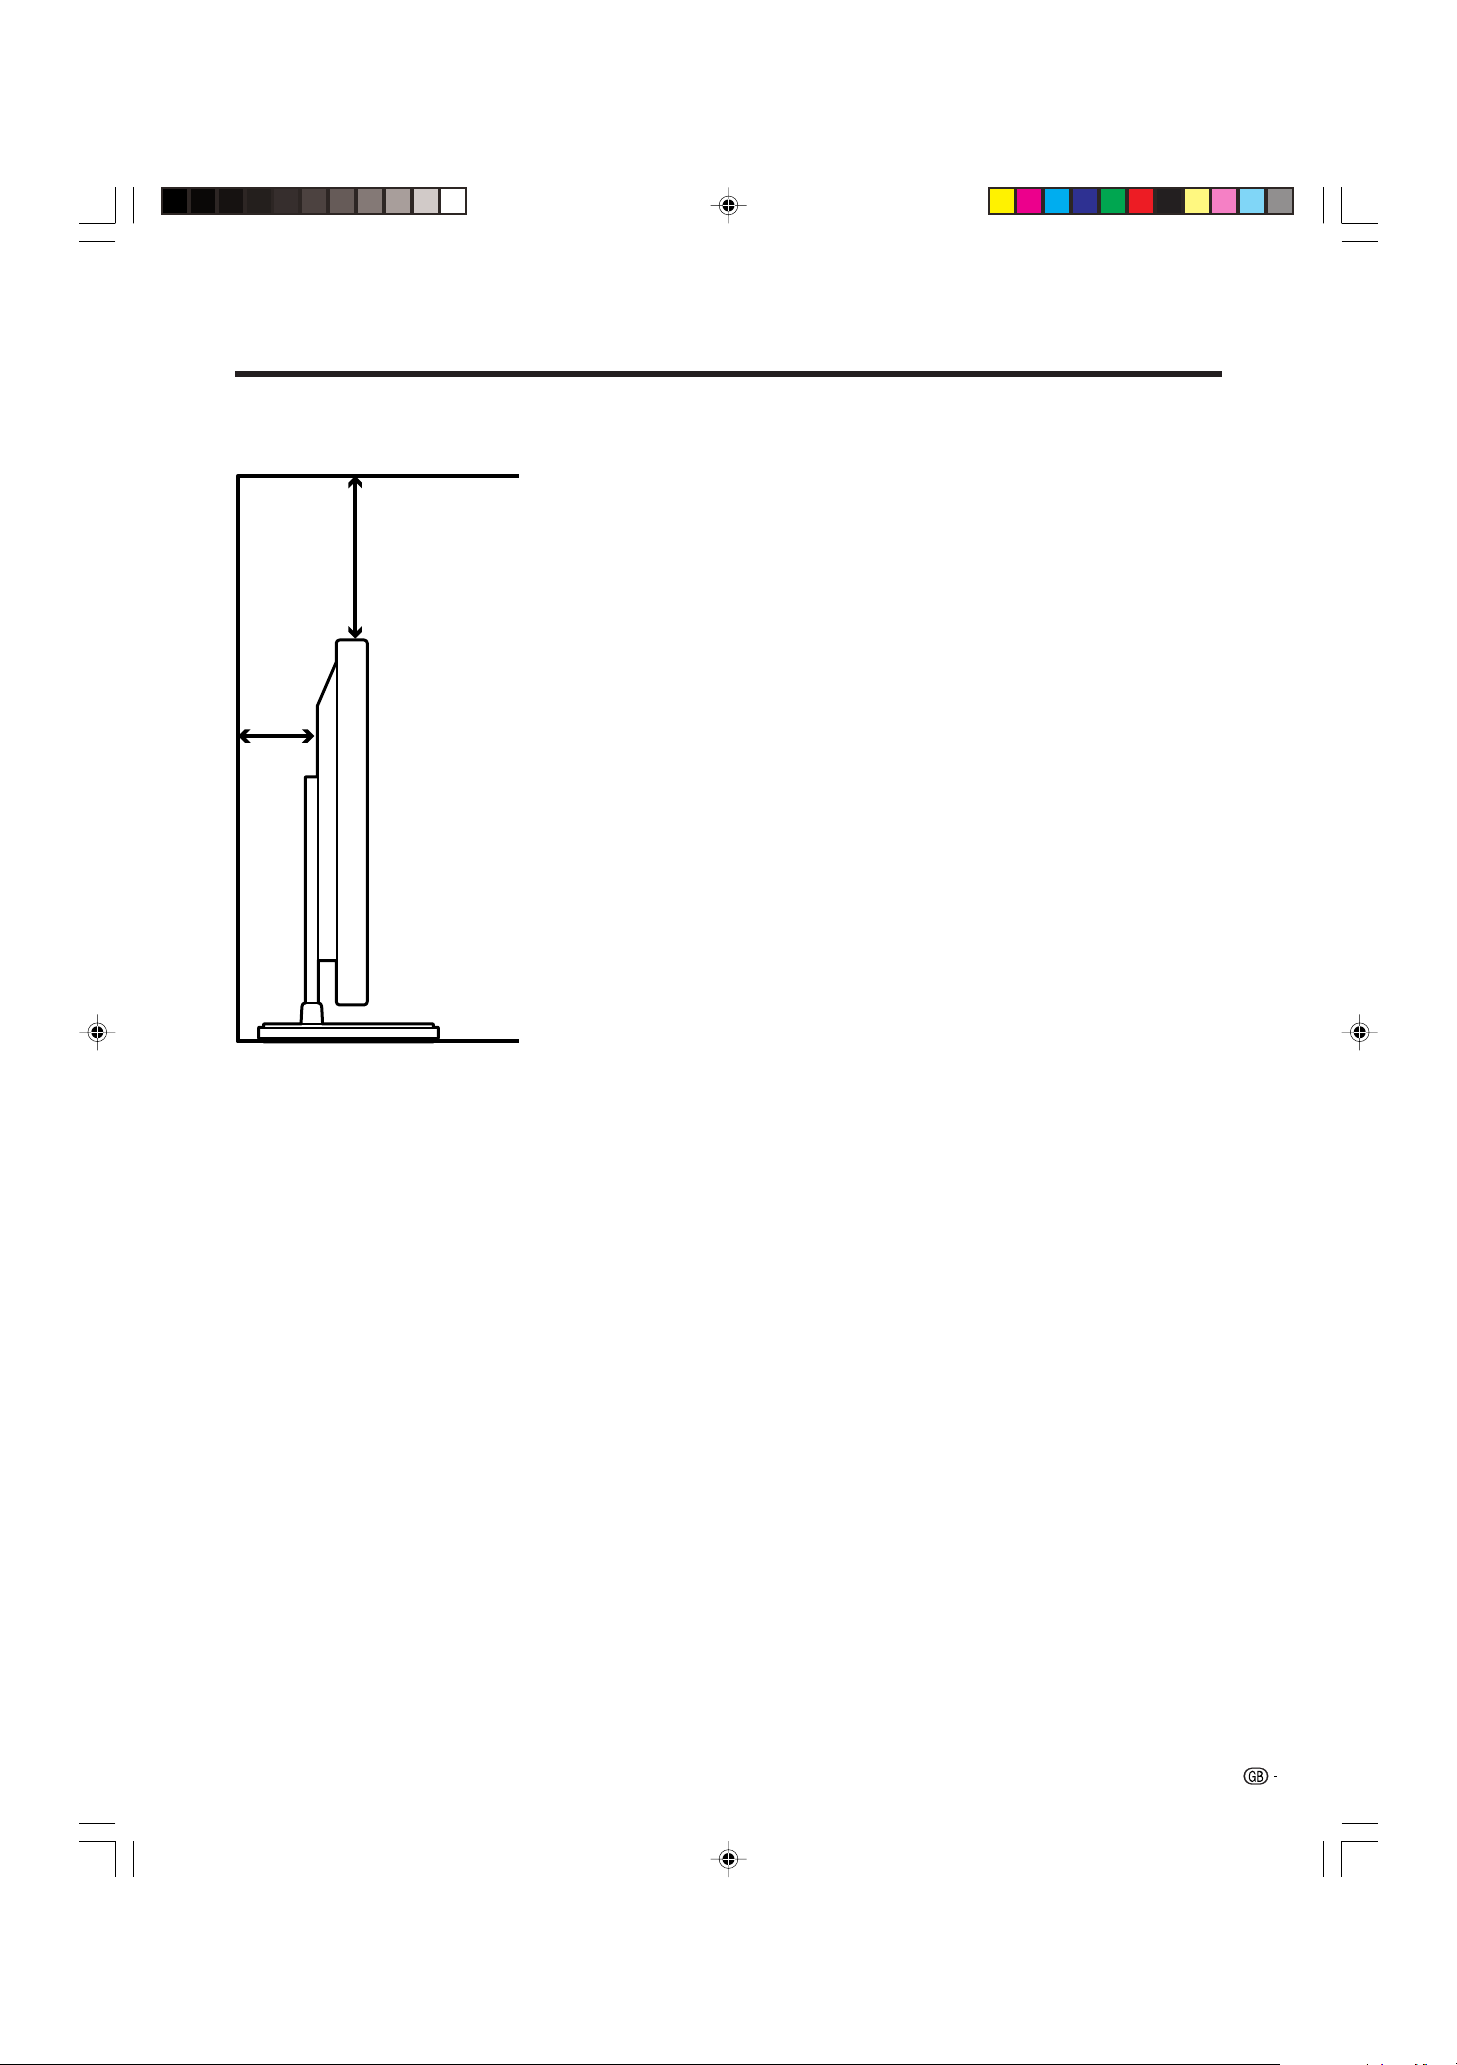
Preparation
Installing the Plasma Display
Over
50 cm
Over
10 cm
Locating
• Avoid the direct sunlight. Keep enough ventilation.
• The length of the system cable used to connect the
Plasma Display and the Media Receiver is about 3
m.
• Because the Plasma Display is heavy, be sure to
move it by more than two persons.
L
• Do not place anything on the Media Receiver. Otherwise,
the Media Receiver does not receive enough ventilation,
and does not operate properly.
A
• When installing, keep enough space around the upper
part and the back part, in order that ventilation around
back part is secured.
Using the optional PIONEER stand
• For details concerning installation, please refer to
the instruction manual provided with the stand.
Using the optional PIONEER speakers
• For details concerning installation, please refer to
the instruction manual provided with the speaker.
L
Operating Environment
Operating environment temperature and humidity: e0°C–
e40°C (e32F–e104F); less than 20–80%RH (cooling vents
not blocked)
Avoid installing in the following locations:
• Under direct exposure to sunlight,
• Under strong artificial light,
• In high humidity,
• Poorly ventilated.
PDP-503HDE/(E)-a 8/31/02, 5:08 PM6
6
Page 9
Preparation
Setting the system
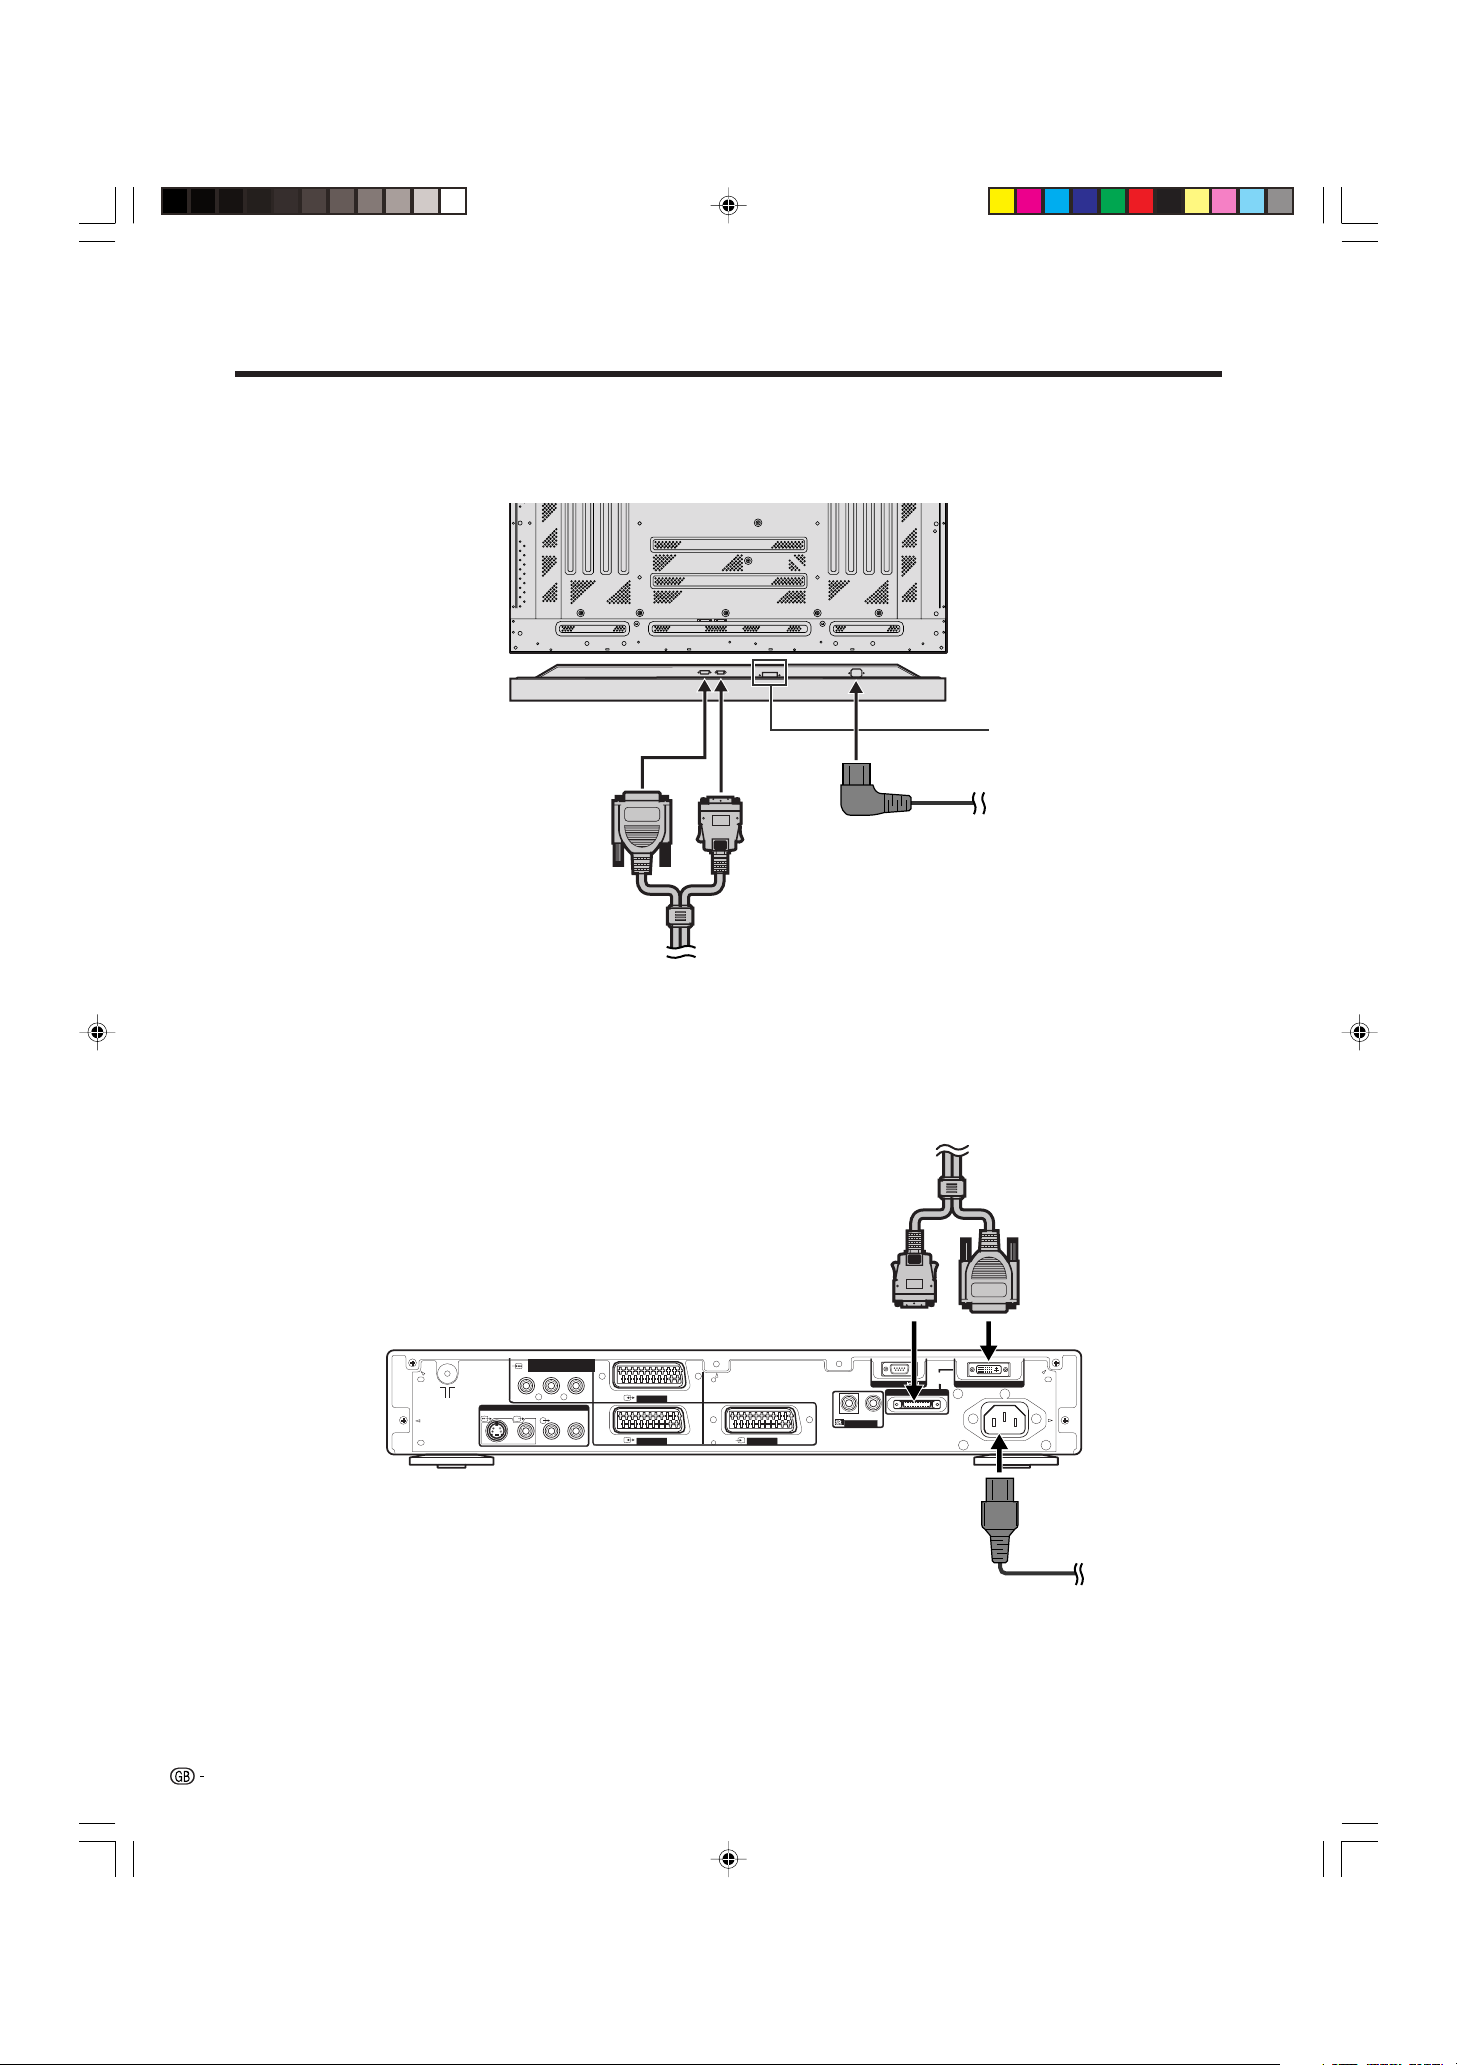
1. Connecting the system cable and the power cord to the Plasma Display
Plasma Display (rear view)
(bottom view)
(GRAY)(WHITE)
Power cord
For details concerning
optional PIONEER speaker
installation, please refer to
the speaker instruction
manual provided.
System cable
2. Connecting the system cable and the power cord to the Media Receiver
(GRAY)
Media Receiver (rear view)
COMPONENT
Y
P
S-VIDEO
MONITOR OUTPUT
R–AUDIO–L
VIDEO
B PR
INPUT 3
INPUT 2
INPUT 1
IN
CONTROL
OUT
RS-232C
(GRAY)
SYSTEM
System cable
CABLE
(WHITE)
(WHITE)
AC INLET
L
• THESE SPEAKER TERMINALS CAN BE UNDER HAZARDOUS VOLTAGE WHEN YOU CONNECT OR DISCONNECT
THE SPEAKER CABLES, TO PREVENT THE RISK OF ELECTRIC SHOCK, DO NOT TOUCH UNINSULATED PARTS
BEFORE DISCONNECTING THE POWER CORD.
7
PDP-503HDE/(E)-a 8/31/02, 5:08 PM7
Power cord
Page 10
Preparation
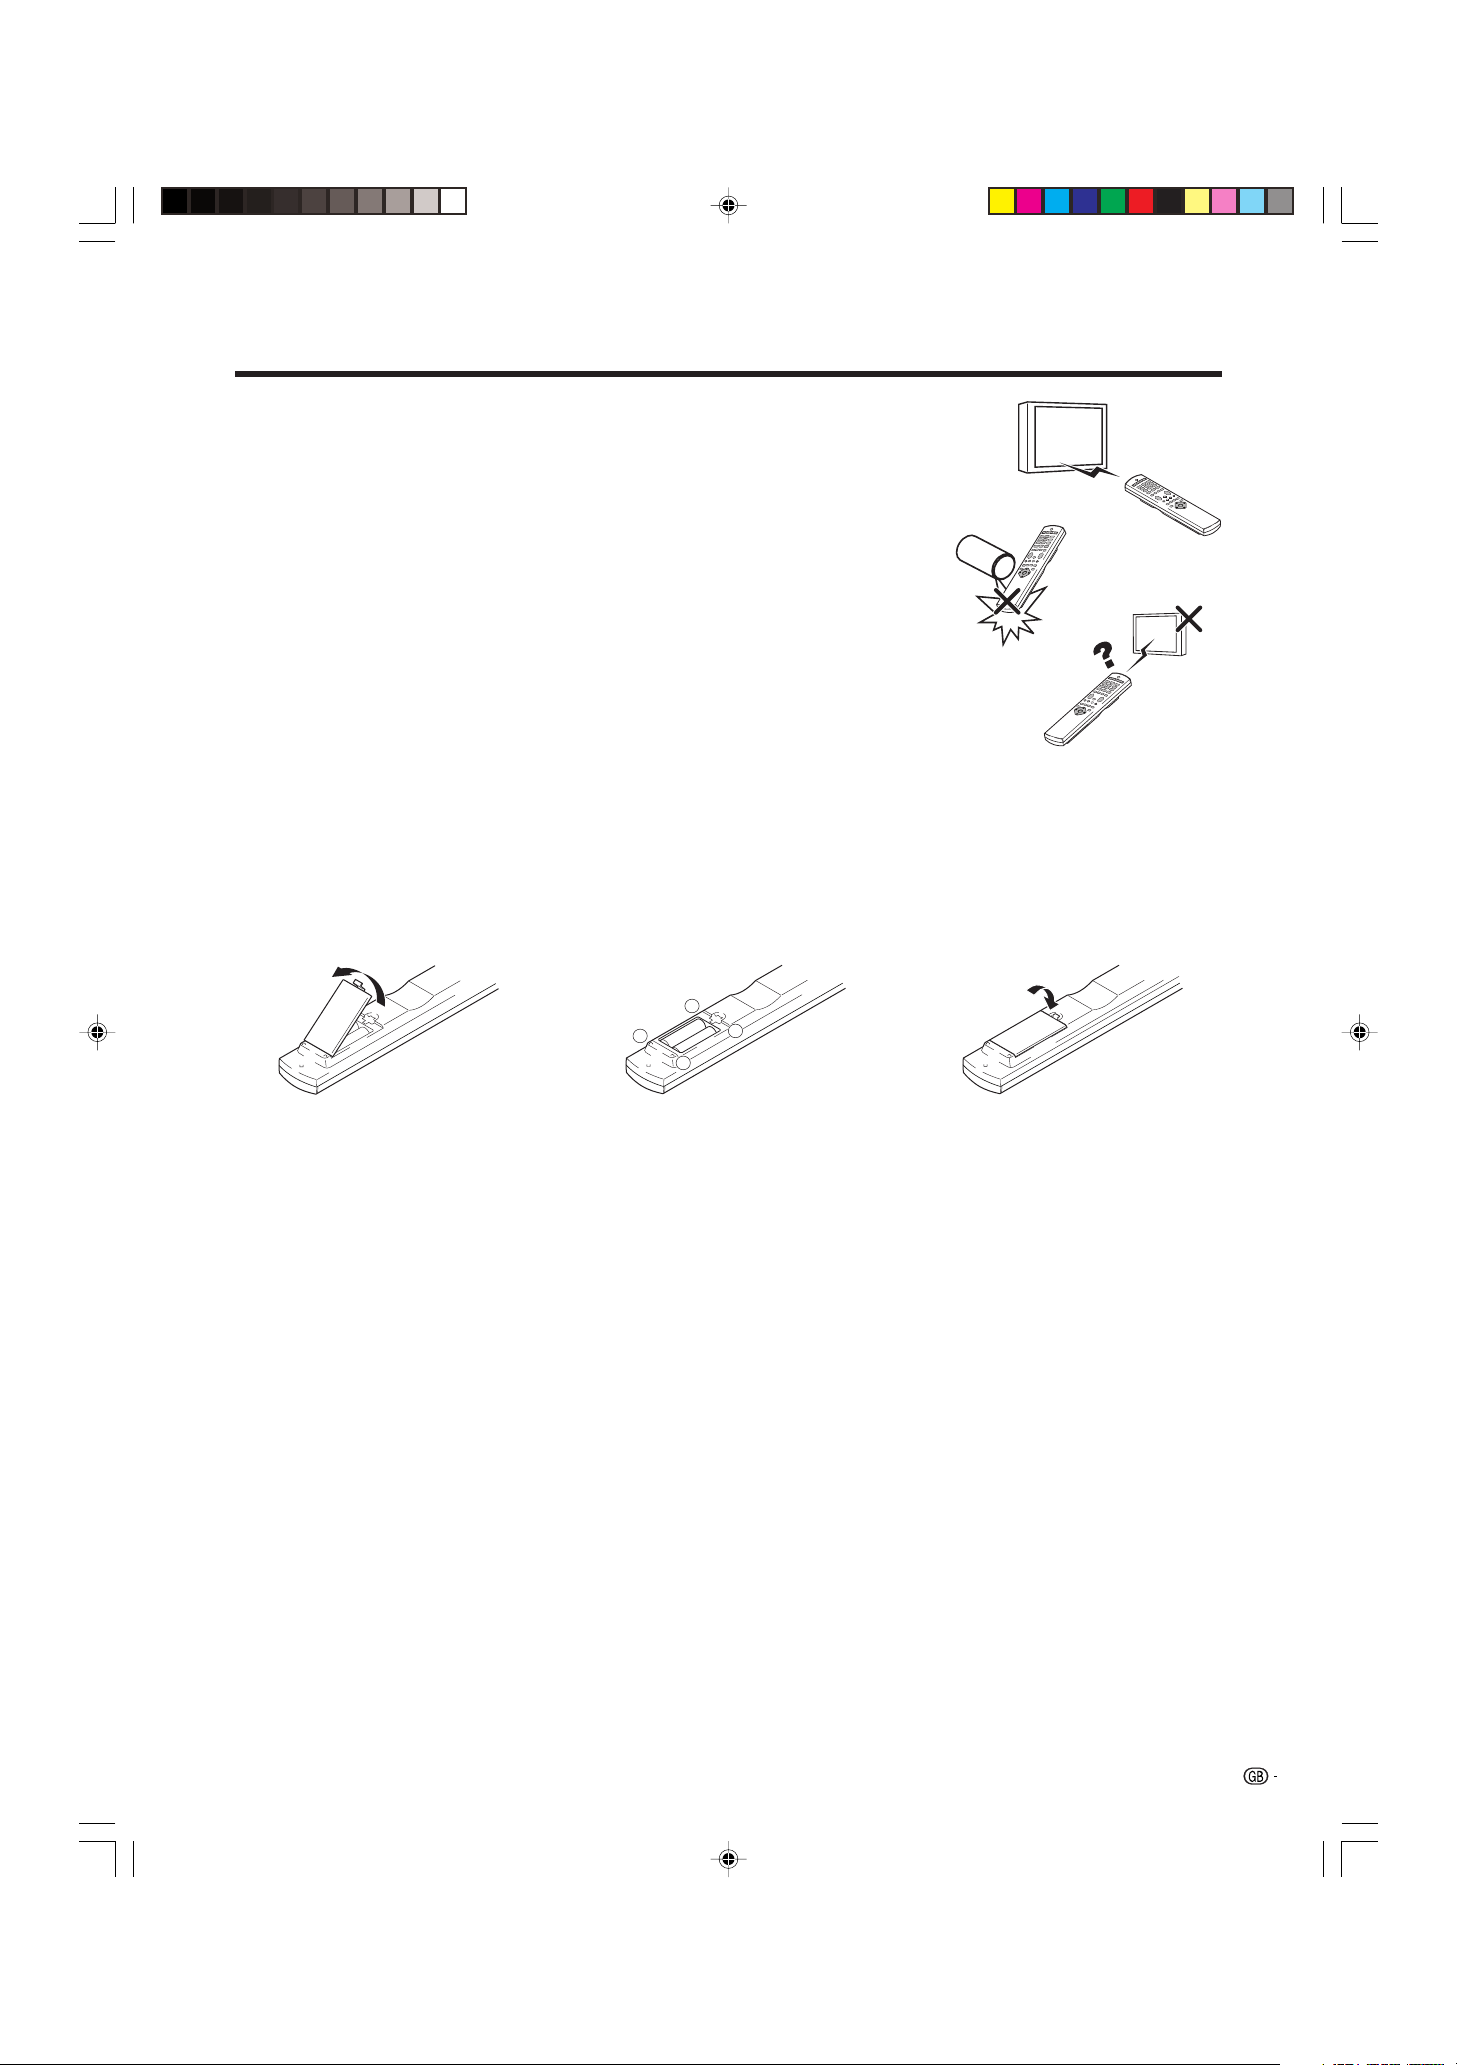
Using the remote control unit
Use the remote control unit by pointing it towards the remote sensor window.
Objects between the remote control unit and sensor window may prevent proper
operation.
Cautions regarding remote control unit
• Do not expose the remote control unit to shock. In addition, do not expose the
remote control unit to liquids, and do not place in an area with high humidity.
• Do not install or place the remote control unit under direct sunlight. The heat
may cause deformation of the unit.
• The remote control unit may not work properly if the remote sensor window of
the Plasma Display is under direct sunlight or strong lighting. In such case,
change the angle of the lighting or Plasma Display set, or operate the remote
control unit closer to the remote sensor window.
Inserting the batteries
If the remote control unit fails to operate Plasma Display System functions,
replace the batteries in the remote control unit.
1 Open the battery cover. 2 Insert batteries (two AA size
3 Close the battery cover.
batteries, supplied with product).
+
_
• Place batteries with their terminals
corresponding to the (e) and (f)
indicators in the battery compartment.
_
+
Cautions regarding batteries
Improper use of batteries can result in chemical leakage or explosion. Be sure to follow the instructions below.
• Do not use manganese batteries. When you replace the batteries, use alkaline ones.
• Place the batteries with their terminals corresponding to the (e) and (f) indicators.
• Do not mix batteries of different types. Different types of batteries have different characteristics.
• Do not mix old and new batteries. Mixing old and new batteries can shorten the life of new batteries or cause
chemical leakage in old batteries.
• Remove batteries as soon as they have worn out. Chemicals that leak from batteries can cause a rash. If you
find any chemical leakage, wipe thoroughly with a cloth.
• The batteries supplied with this product may have a shorter life expectancy due to storage conditions.
• If you used the remote control unit for an extended period of time, remove the batteries from it.
L
• WHEN DISPOSING OF USED BATTERIES, PLEASE COMPLY WITH GOVERNMENTAL REGULATIONS OR
ENVIRONMENTAL PUBLIC INSTRUCTION'S RULES THAT APPLY IN YOUR COUNTRY/AREA.
PDP-503HDE/(E)-a 8/31/02, 5:08 PM8
8
Page 11
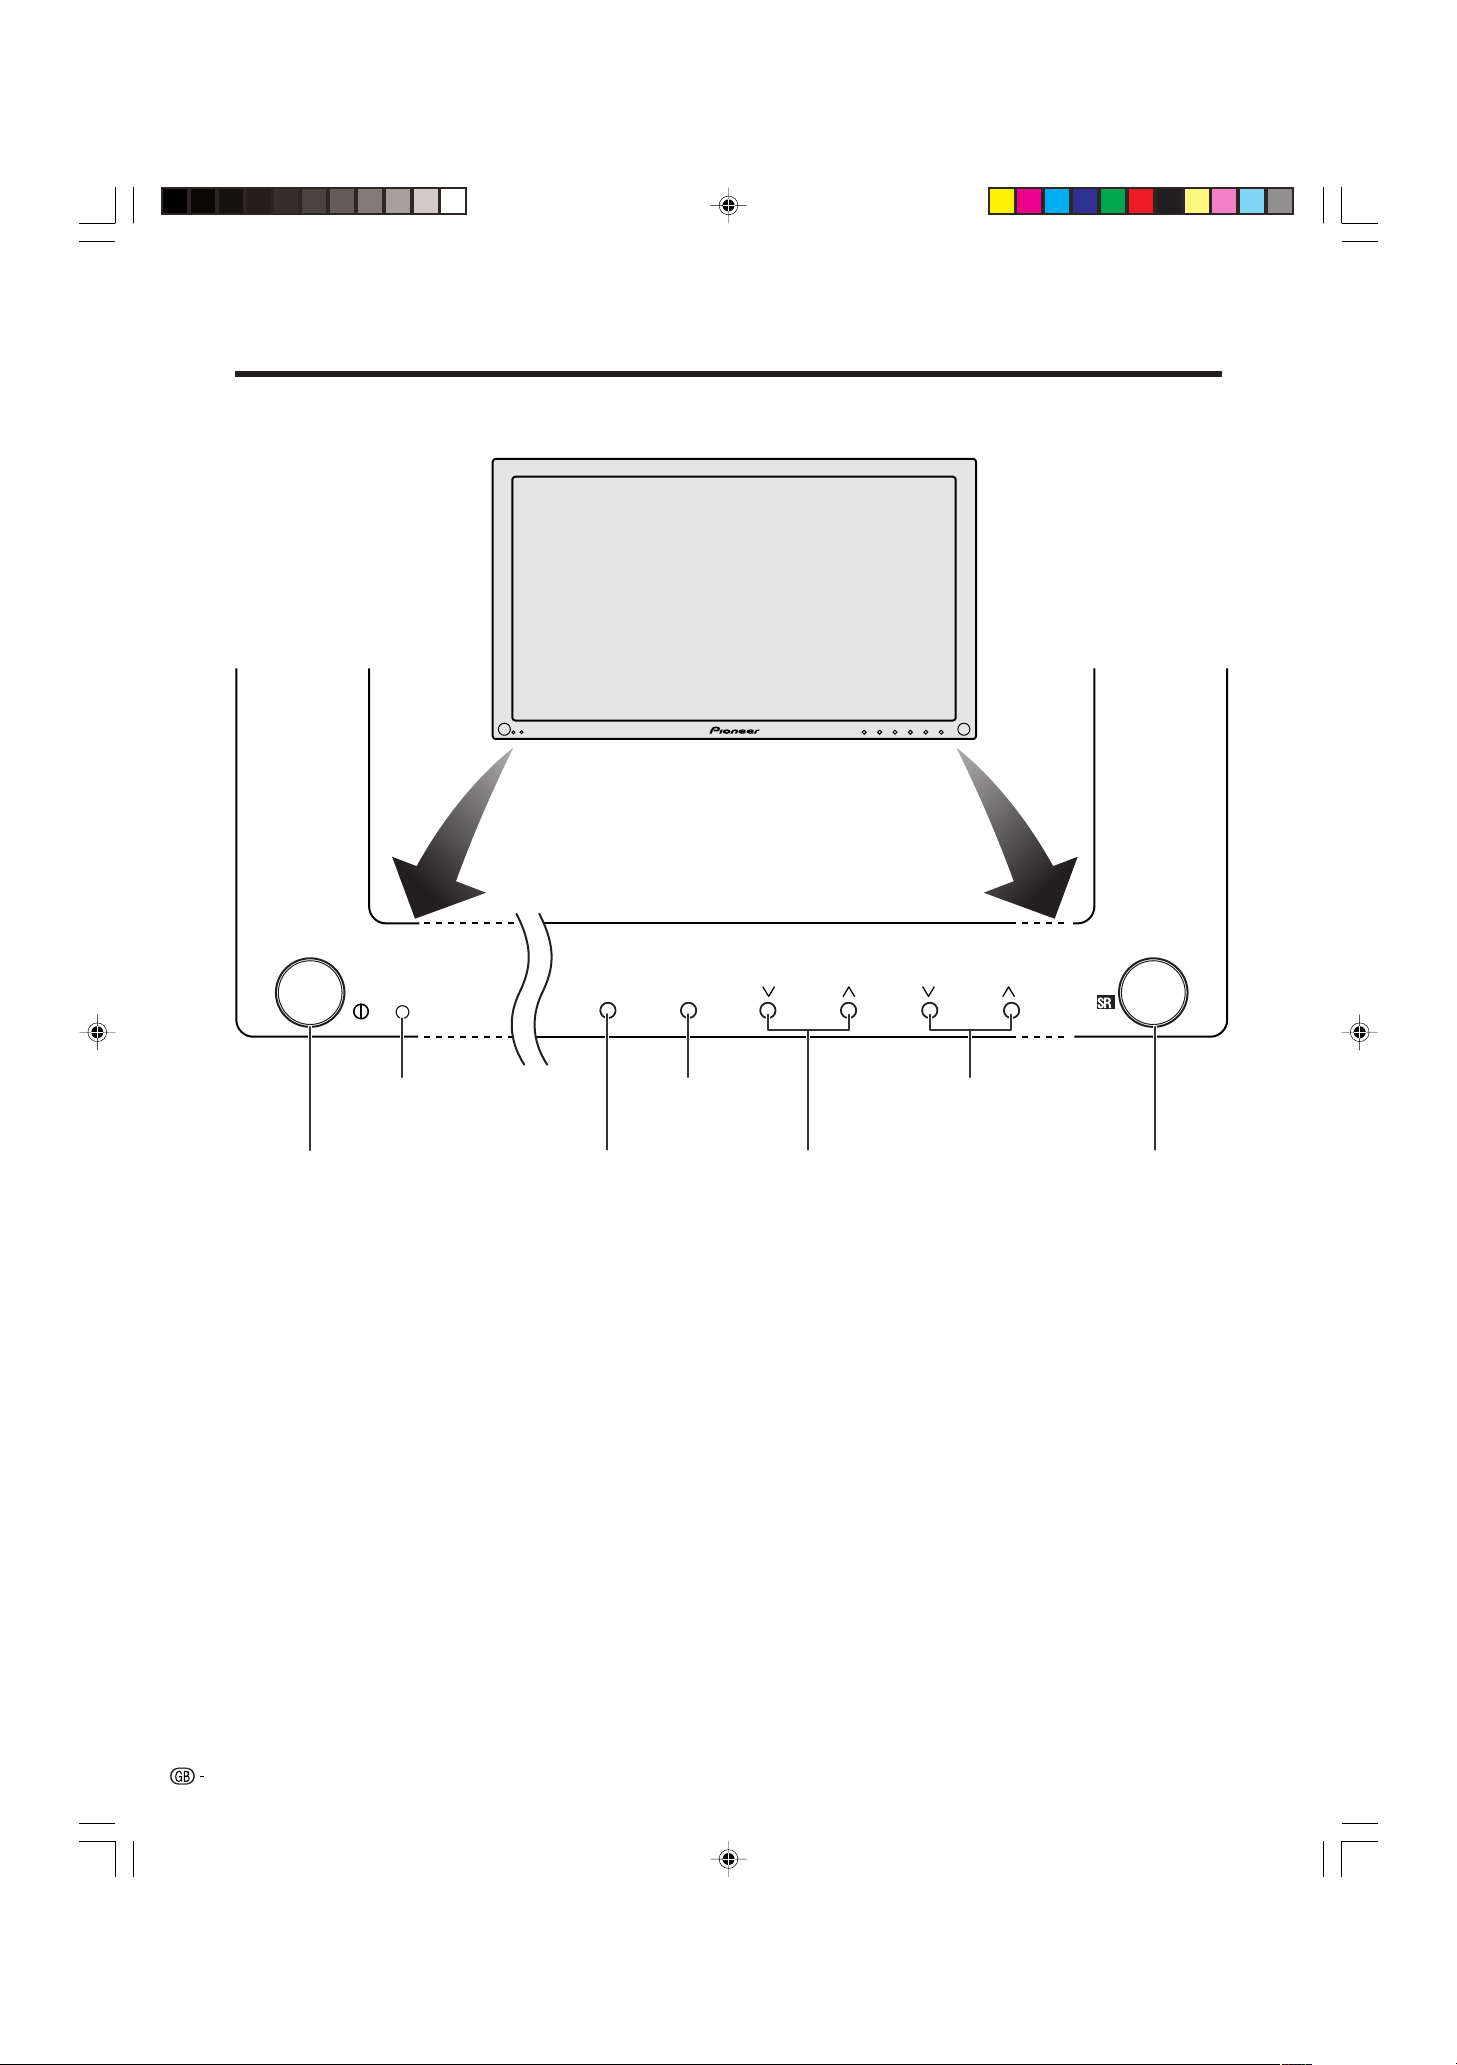
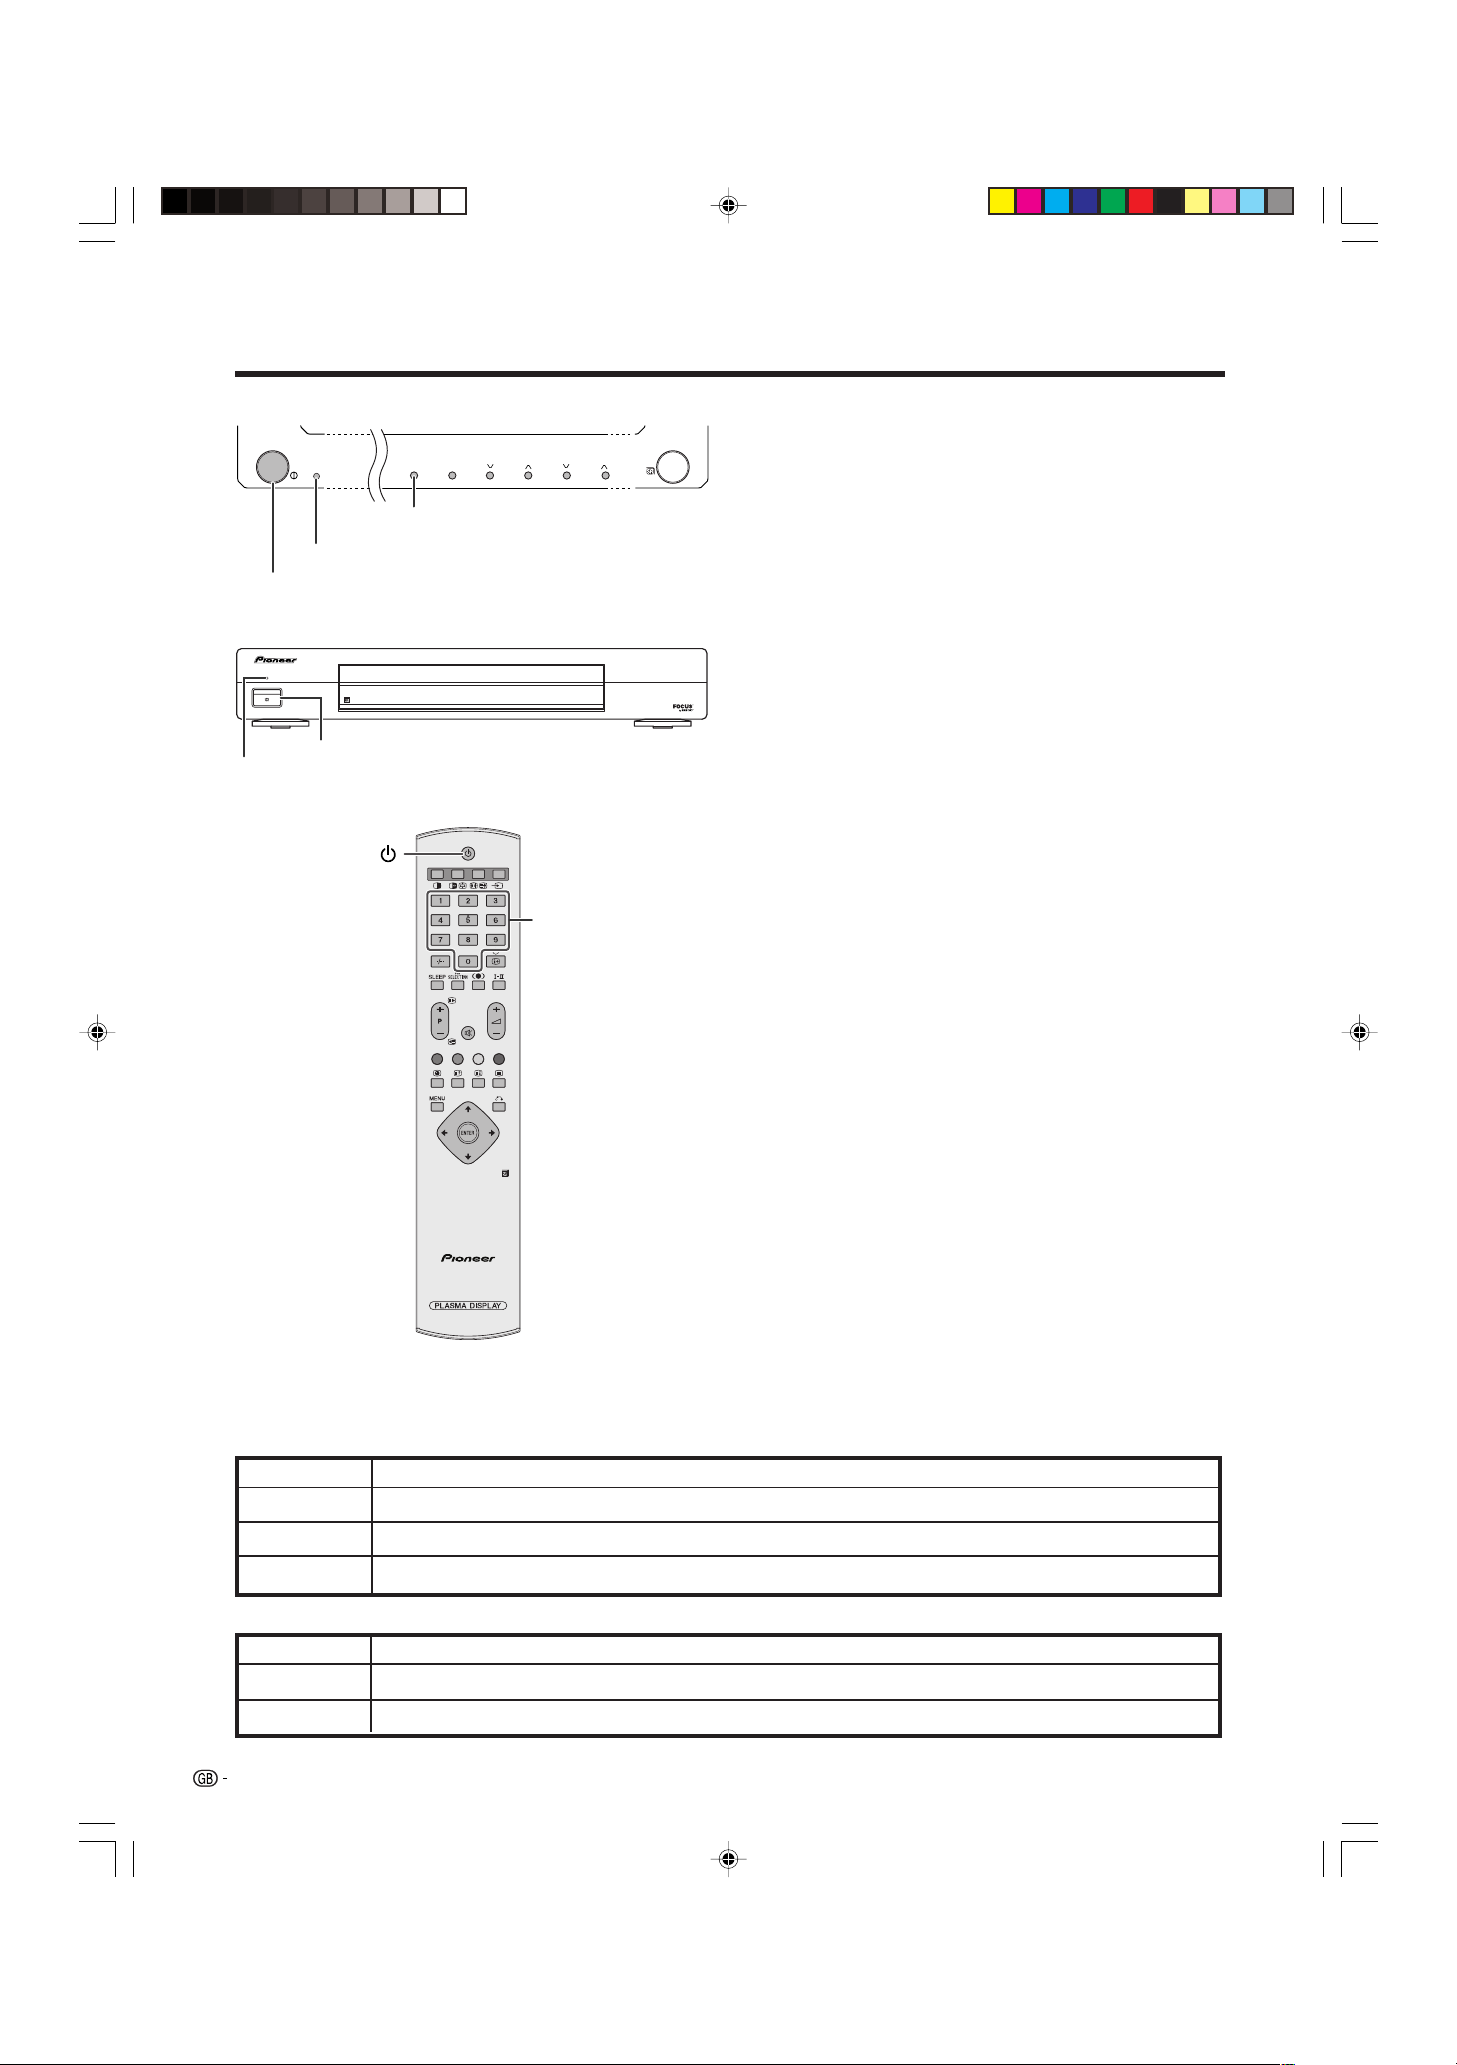
Part names
Plasma Display
Power indicator
MAIN POWER button
STANDBY/ON
INPUTSTANDBY/ON VOLUMECHANNEL
INPUT button VOLUME r/s buttons
STANDBY/ON button
CHANNEL r/s buttons Remote control sensor
9
PDP-503HDE/(E)-a 8/31/02, 5:08 PM9
Page 12
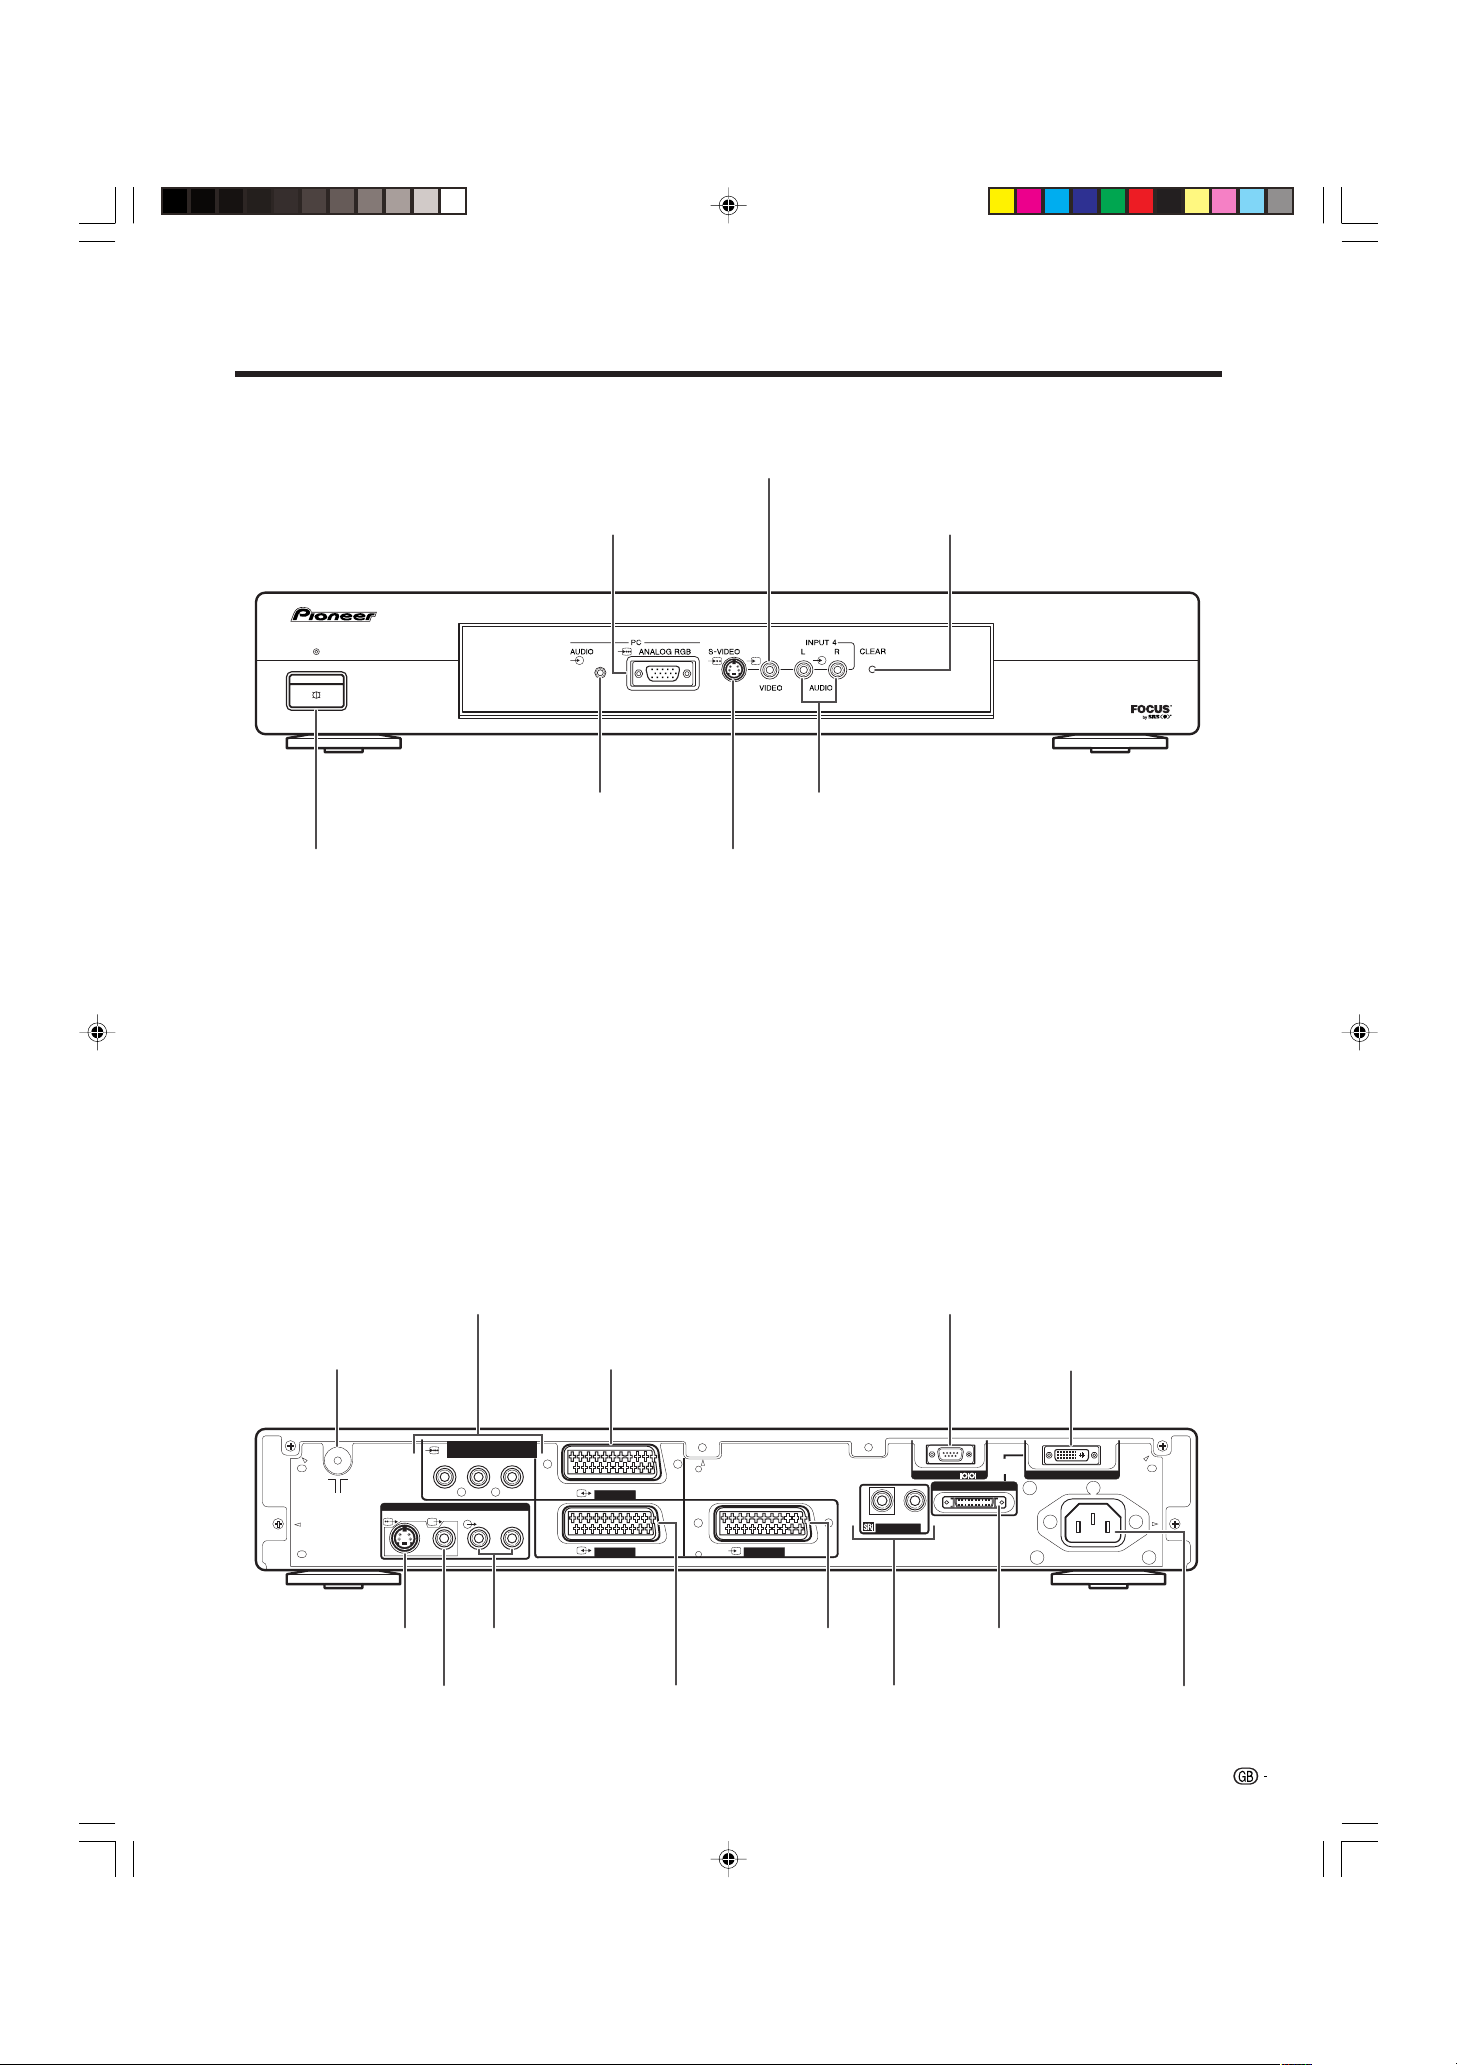
Part names
Media Receiver
Front view
PC INPUT terminal (ANALOG RGB)
STANDBY/ON
POWER
INPUT 4 terminal (VIDEO)
CLEAR button*
MEDIA RECEIVER
PDP-R03E
PC INPUT terminal (AUDIO) INPUT 4 terminals (AUDIO)
POWER button
INPUT 4 terminal (S-VIDEO)
* If you’re having problems operating the Media Receiver and want to return to normal screen, even when it
stays on (the indicator lights green), press CLEAR on the Media Receiver. Pressing CLEAR resets the System
as shown below.
• AV SELECTION resets to STANDARD
• TV channel resets to channel 1
• Multiscreen resets to normal
• Audio setting initialises
• SRS resets to Off.
• Image position is initialises
A
• Pressing CLEAR will not work if the System is in standby mode but the indicator lights red.
• Pressing CLEAR will not delete channel preset or password. See Page 54 for initialising factory preset settings when you
know your password. See Page 63 for initialising factory preset values when you have forgotten your password.
Rear view
INPUT 3 terminals (Y, P
Antenna input terminal
S-VIDEO
MONITOR OUTPUT
terminal (S-VIDEO)
MONITOR OUTPUT
terminal (VIDEO)
INPUT 3 terminal (SCART)
COMPONENT
Y
P
B PR
MONITOR OUTPUT
R–AUDIO–L
VIDEO
MONITOR OUTPUT
terminals (AUDIO)
B, PR)
INPUT 3
INPUT 2
INPUT 2 terminal
(SCART)
INPUT 1
INPUT 1 terminal
(SCART)
RS-232C terminal
(used in the factory setup)
SYSTEM CABLE terminal
(WHITE)
SYSTEM
CABLE
RS-232C
(GRAY)
OUT
IN
CONTROL
SYSTEM CABLE terminal
(GRAY)
CONTROL terminal
(WHITE)
AC INLET
AC INPUT terminal
10
PDP-503HDE/(E)-a 8/31/02, 5:08 PM10
Page 13
Part names
Remote control unit
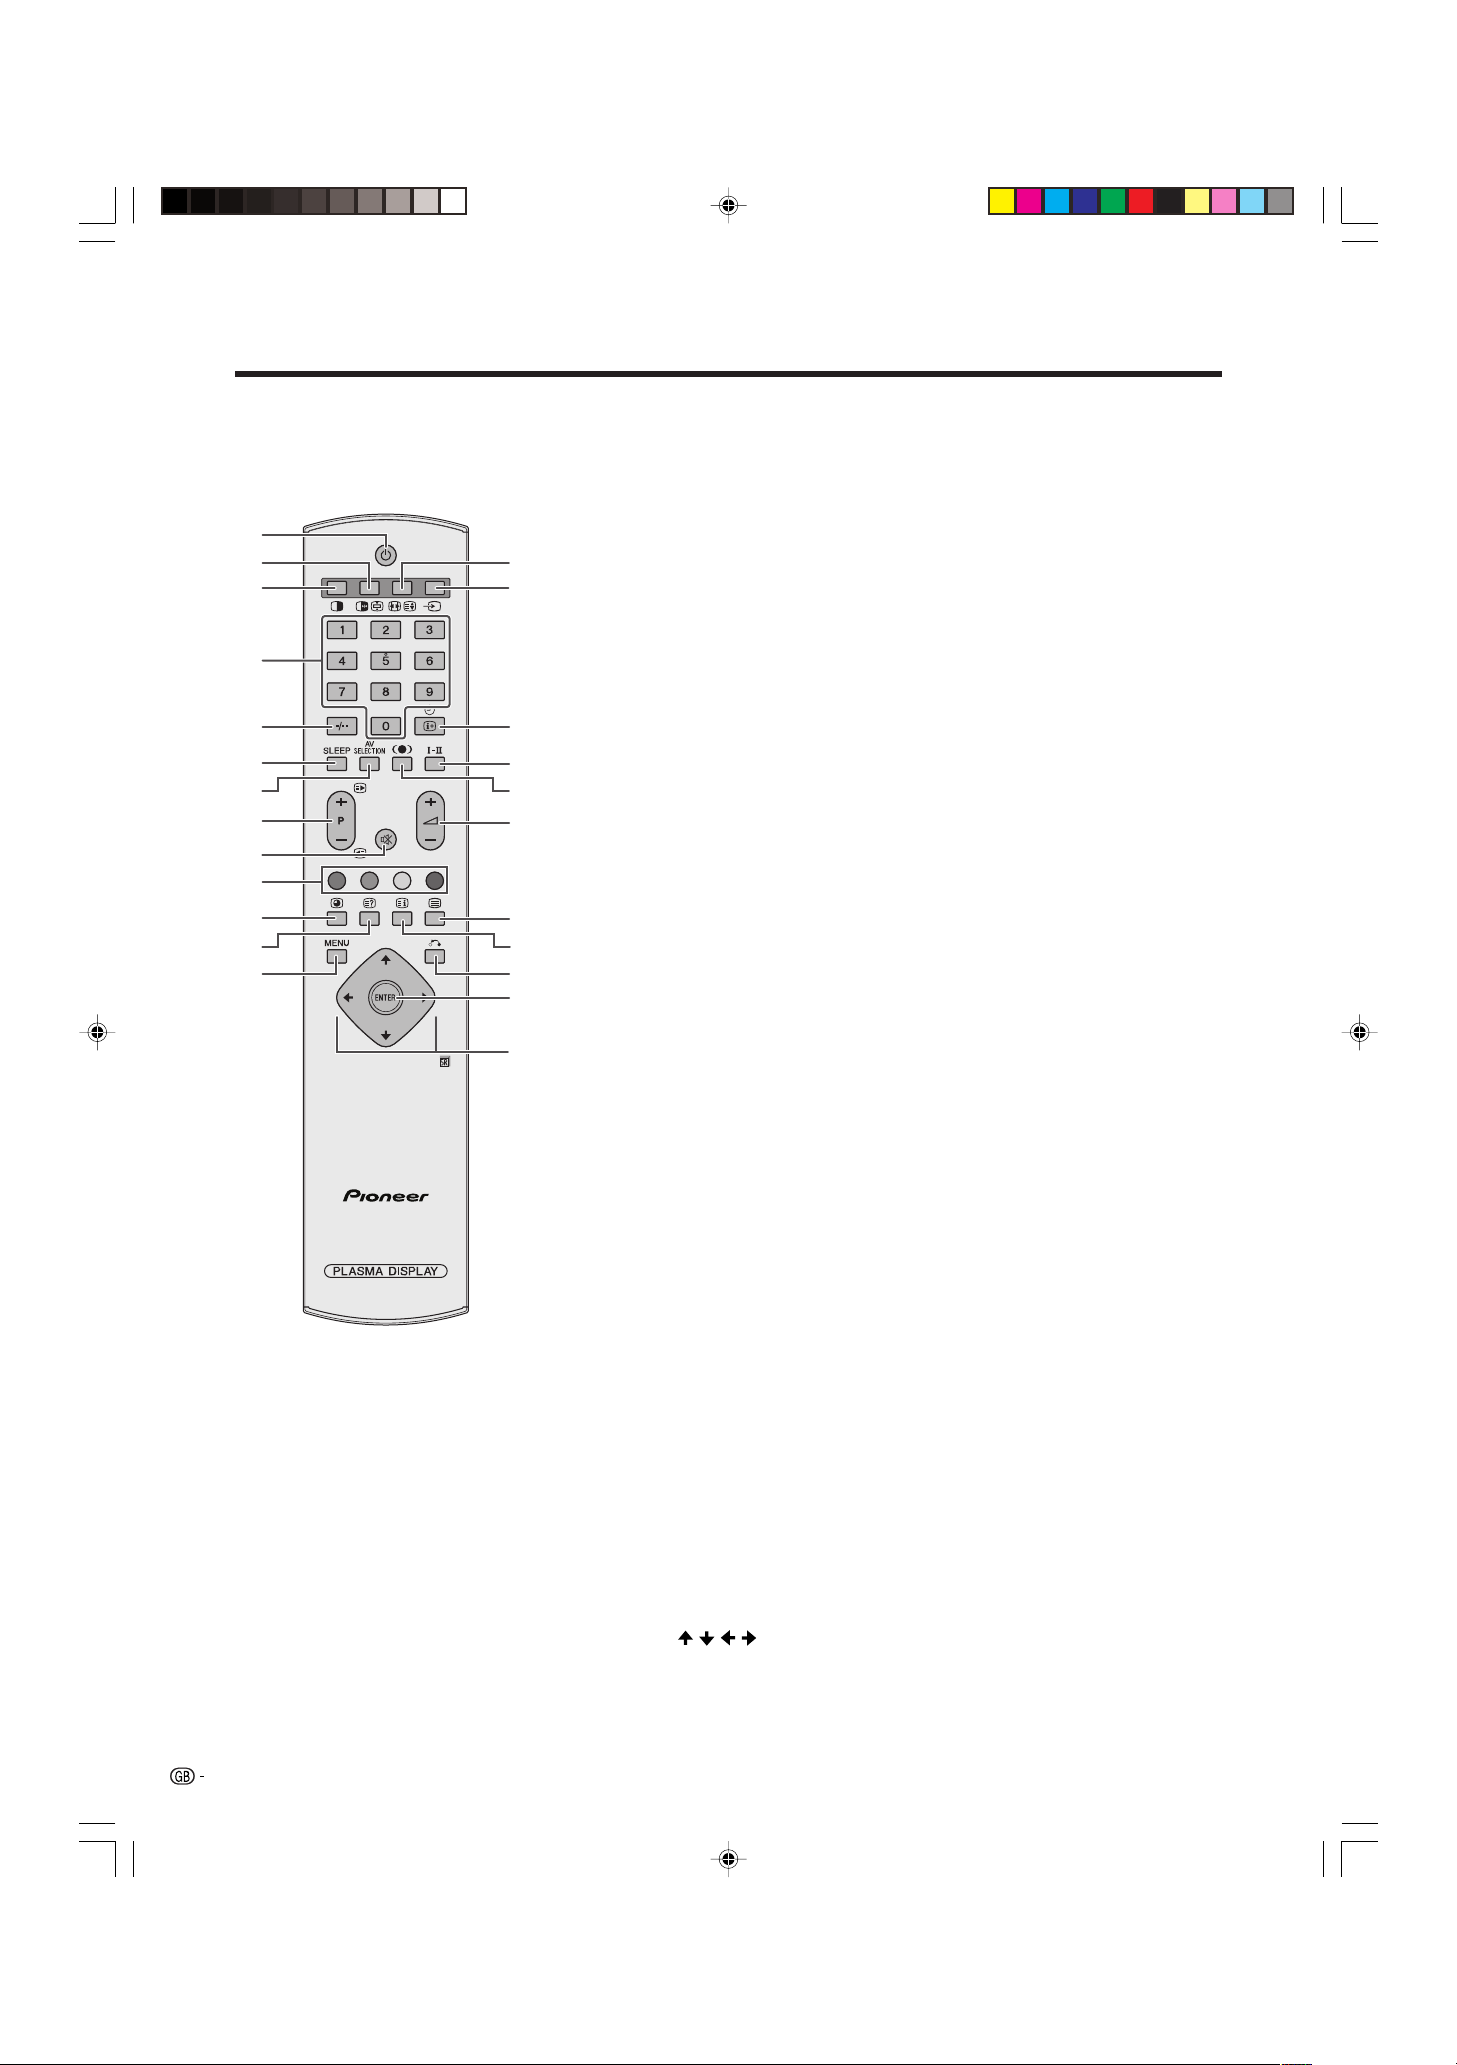
1
2
3
4
5
6
7
8
9
10
11
12
13
A
• When using the remote control unit,
point it at the Plasma Display.
14
15
16
17
18
19
20
21
22
23
24
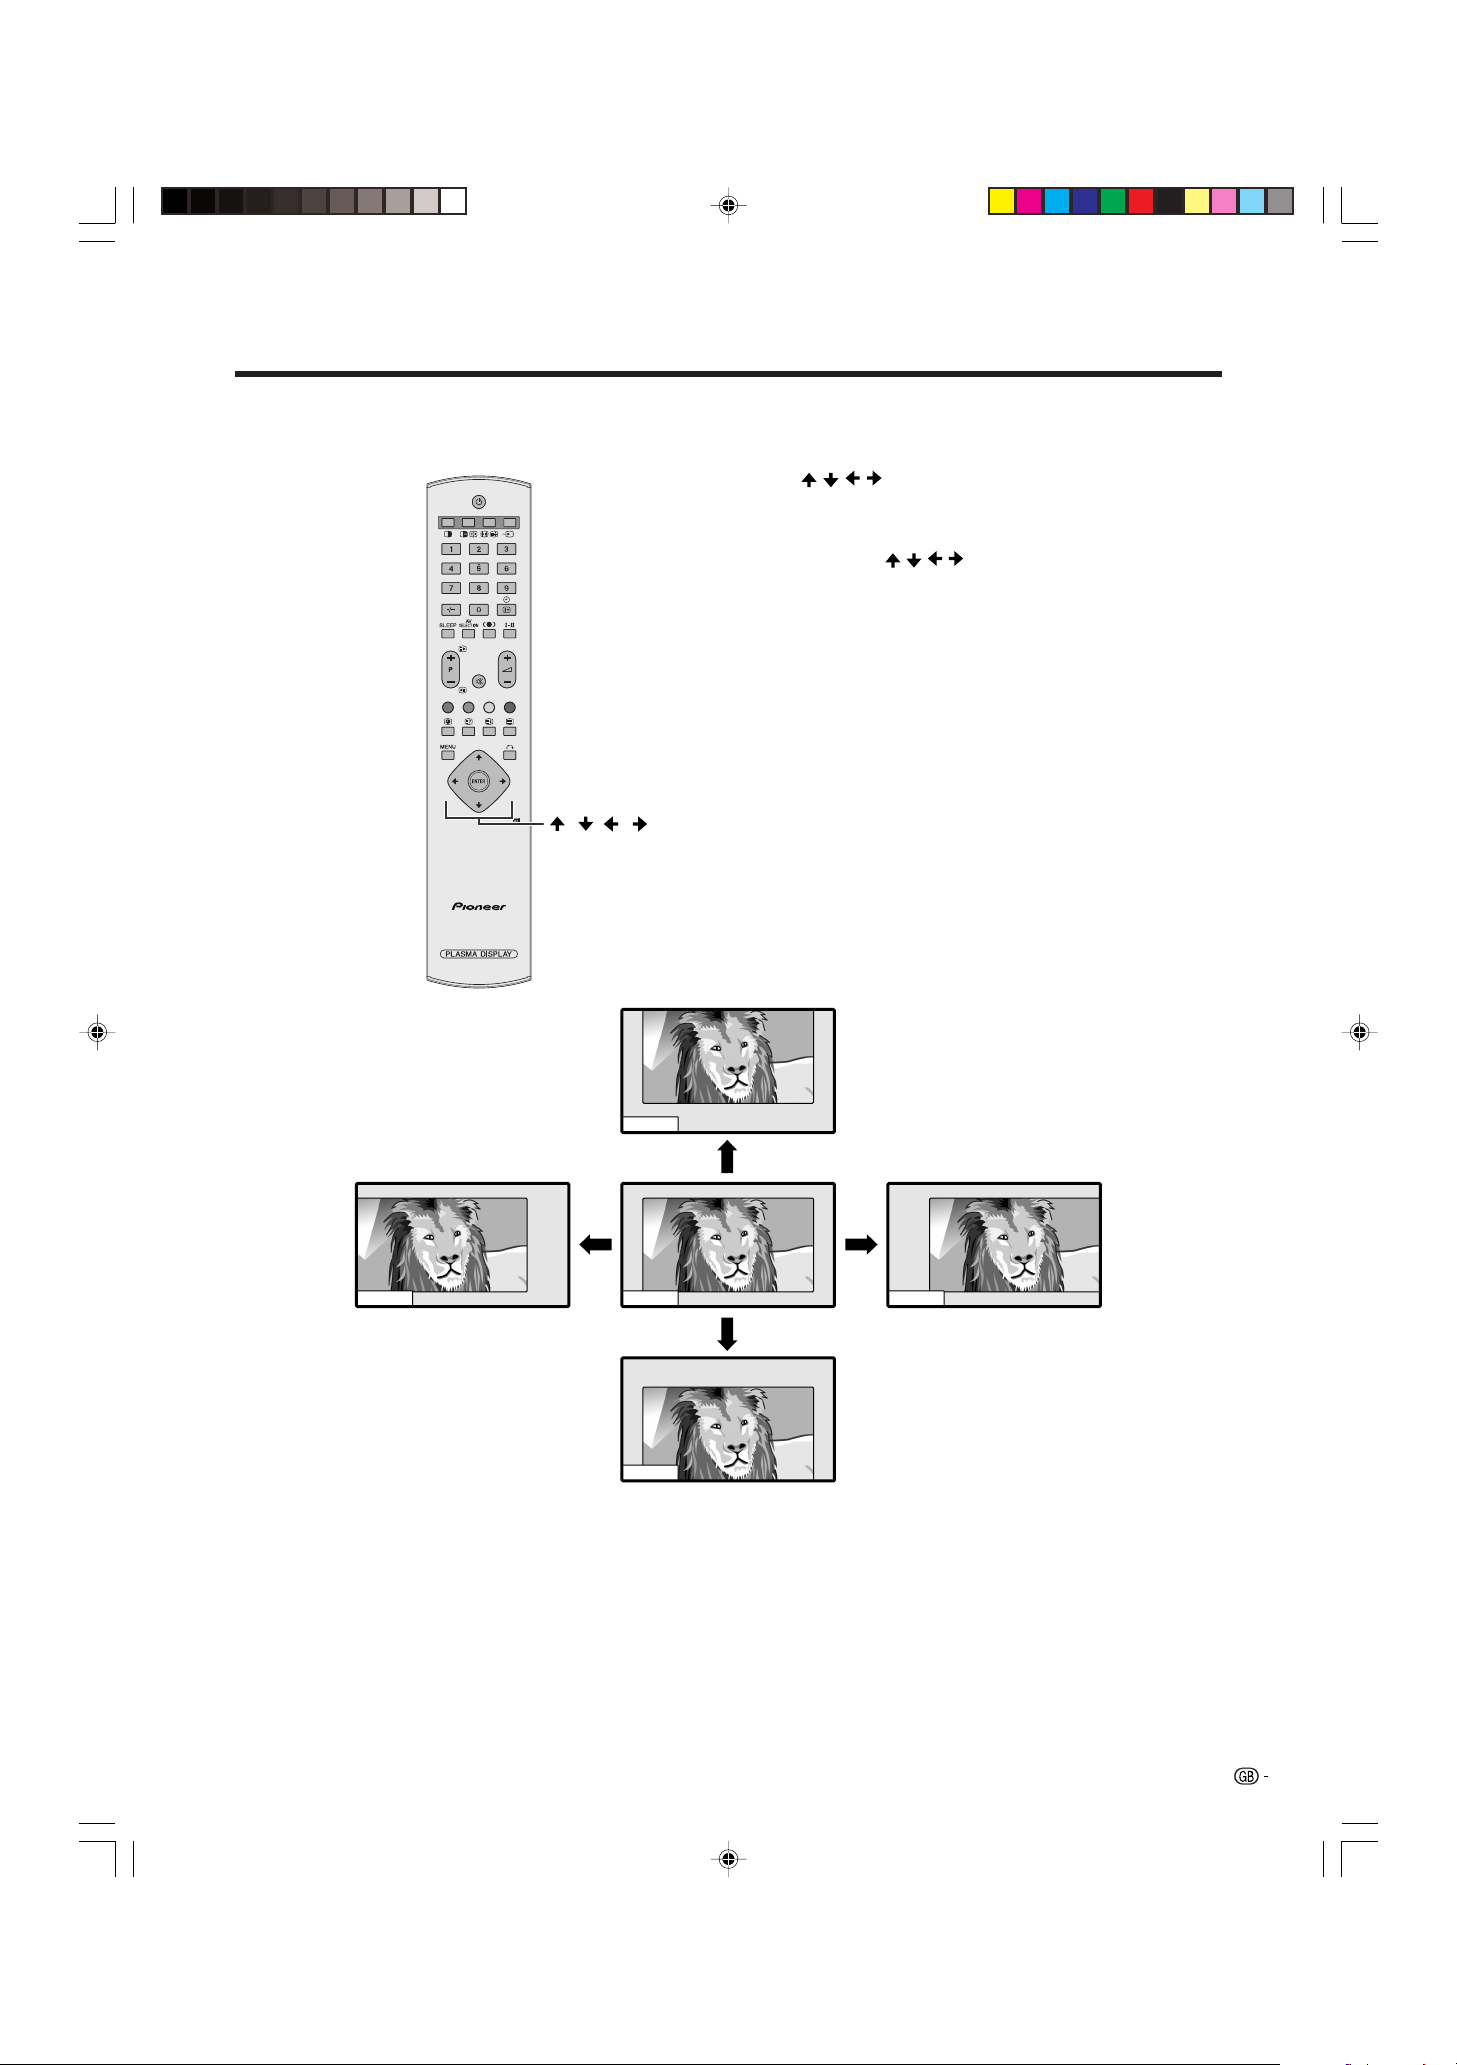
1 a
Switch off the power.
2 du
TV/External input mode: Change the still image mode.
TELETEXT mode: Freeze a multi-page on screen while other
pages are automatically updated. Press d again to return to the
normal image.
3 c
Set the dual picture mode. Press c again to return to normal view.
40 – 9
Switch on the power.
TV/External input mode: Set the channel.
TELETEXT mode: Set the page.
5 o
Select the two digit mode.
6 SLEEP
Set the OFF timer.
7 AV SELECTION
Select an audio or video setting. AV MODE: STANDARD, DYNAMIC,
MOVIE, GAME, USER. PC MODE: STANDARD, USER.
8 w/x (Pk/Pl)
TV/External input mode: Select the channel.
TELETEXT mode: Set the page.
9 e
Mute the sound.
10 Colour (RED/GREEN/YELLOW/BLUE)
TELETEXT mode: Select a page.
11 j
TELETEXT mode: Change the picture mode for sub-page selecting.
12 k
TELETEXT mode: Display hidden characters.
13 MENU
Display the Menu screen.
14 fv
TV/External input mode: Change the wide image mode.
TELETEXT mode: Set the area of magnification. (full/upper half/
lower half)
15 b
Select an input source. (TV, INPUT 1, INPUT 2, INPUT 3, INPUT 4,
PC)
16 p
Display the channel information.
17 g
Set the sound multiplex mode.
18 h
Set SRS and FOCUS Sound System.
19 il/ik
Set the volume.
20 m
Select the TELETEXT mode. (all TV image, all TEXT image, TV/TEXT
image)
21 l
TELETEXT mode: Display an index page for CEEFAX/FLOF
information. TOP OVER VIEW for TOP programme.
22 n
MENU mode: Return to the previous menu screen.
23 ENTER
Execute a command.
24
/ / /
Select a desired item on the setting screen.
Move the picture on the screen.
11
PDP-503HDE/(E)-a 8/31/02, 5:08 PM11
Page 14

Watching TV
Simple operations for watching a TV programme
Basic connection
Connecting to an antenna
To enjoy a clearer picture, use an outdoor antenna. The following is a brief explanation of the types of connections
that are used for coaxial cable.
COMPONENT
Y
P
Standard DIN45325 plug (IEC169-2)
75-ohm coaxial cable (round
cable) (commercially available)
Antenna cables-commercially available
If your outdoor antenna uses a 75-ohm coaxial cable with a standard DIN45325
plug (IEC 169-2), plug it into the antenna terminal at the rear of the Media
Receiver.
S-VIDEO
MONITOR OUTPUT
VIDEO
R–AUDIO–L
BPR
INPUT 3
INPUT 2
INPUT 1
SYSTEM
CABLE
(WHITE)
RS-232C
(GRAY)
OUT
IN
CONTROL
AC INLET
Connecting to the power cord
Plasma Display (bottom view)
Media Receiver (rear view)
S-VIDEO
Y
MONITOR OUTPUT
VIDEO
COMPONENT
R–AUDIO–L
BPR
P
INPUT 3
INPUT 2
OUT
IN
CONTROL
INPUT 1
AC INLET
and Eire
U.K. and Eire
Europe, except U.K.
SYSTEM
CABLE
(WHITE)
RS-232C
(GRAY)
AC INLET
AC INLET
Europe, except U.K.
and Eire
U.K. and Eire
A
• Always turn off the main power of Plasma Display and Media Receiver when connecting the power cords.
• Disconnect the power cord from the power outlet, Plasma Display and Media Receiver when the System is not going to
be used long period of time.
PDP-503HDE/(E)-b 8/31/02, 5:08 PM12
12
Page 15
Watching TV
STANDBY/ON
STANDBY/ON
Power indicator
MAIN POWER
STANDBY/ON
POWER
POWER
Power indicator
Plasma Display
INPUTSTANDBY/ON VOLUMECHANNEL
Media Receiver
PLASMA DISPLAY SYSTEM
0–9
Turning on the power
1 Press MAIN POWER on the Plasma Display.
• The power indicator on the Plasma Display flashes red.
2 Press POWER on the Media Receiver.
• The System turns the power on.
• The power indicator on the Plasma Display lights up
green and the one on the Media Receiver lights up in
green.
• If the power indicators still light up red, press any
button from 0 to 9 on the remote control unit or
STANDBY/ON on the Plasma Display to turn the
MEDIA RECEIVER
PUSH
PDP-R03E
System on.
When turning the Media Receiver on first
1 Press POWER on the Media Receiver.
• The power indicator on the Media Receiver lights up
red.
2 Press MAIN POWER on the Plasma Display.
• The System turns the power on.
• The power indicator on the Plasma Display lights up
green and the one on the Media Receiver lights up in
green.
• If the power indicators still light up red, press any
button from 0 to 9 on the remote control unit or
STANDBY/ON on the Plasma Display to turn the
System on.
A
•“Plasma Display System” and “System” above mean the Plasma
Display Panel and Media Receiver.
• The initial auto installation starts when the System powers on for
the first time. If the System has been turned on before, the initial
auto installation will not be invoked. See page 23 to try auto
installation from the Setup menu.
Plasma Display status indicators
Off
Flashing red
Red
Green
Power off
Media Receiver does not turn on or its power cord is disconnected.
The Plasma Display System is in standby mode.
The Plasma Display System turns the power on.
Media Receiver status indicators
Off
Red
Green
Power off
Only the Media Receiver is in standby mode or the Plasma Display System is in standby mode.
The Plasma Display System turns the power on.
Turning off the power
1 Press a on the remote control unit or STANDBY/
ON on the Plasma Display.
• The System enters standby mode and the image on
the screen disappears.
• Both power indicators change from green to red.
2 Press MAIN POWER on the Media Receiver.
• The power indicator on the Media Receiver turns off
and the one on the Plasma Display flashes red.
3 Press MAIN POWER on the Plasma Display.
• The power indicator on the Plasma Display turns off
after approximately 5 seconds.
A
• If you are not going to use this System for a long time, be sure to
remove the AC cord from the power outlet.
13
PDP-503HDE/(E)-b 8/31/02, 5:08 PM13
Page 16
Watching TV
Initial auto installation
When the Plasma Display System power on for the first time after purchase, the initial auto installation is invoked.
You can automatically set language, country and channels in successive operations.
A
• See page 23 to try Auto installation from the setup menu.
Language menu
Auto Installation - Language
English
Deutsch
Français
Italiano
Español
Nederlands
Svenska
Português
Suomi
Türkçe
Country menu
Auto Installation - Country
Austria
Belgium
Denmark
A
B
DK
B/G
B/G
B/G
1. Setting a language
1 Press / to select the desired language listed on
the screen.
2 Press ENTER to enter the setting.
2. Setting the country or area
1 Press / to select your country or area listed on
the screen.
2 Press ENTER to enter the setting.
• The programme auto search starts at the same time.
A
• Return to the Language menu by pressing n.
Searching TV channels
Auto Installation - Setup “Auto”
1011142.25
010255.25
85.25
03 102.25
04
05
06
07
08
09
PDP-503HDE/(E)-b 8/31/02, 5:09 PM14
148.25
3. Automatic channel searching
Channel auto search makes the Plasma Display System
look for all channels viewable in the set country or area.
A
• If no channel is found, “No programme found. Is antenna
connected properly?” displays. And the auto installation
is finished.
• If you want to try Auto installation again, see page 23.
14
Page 17
Watching TV
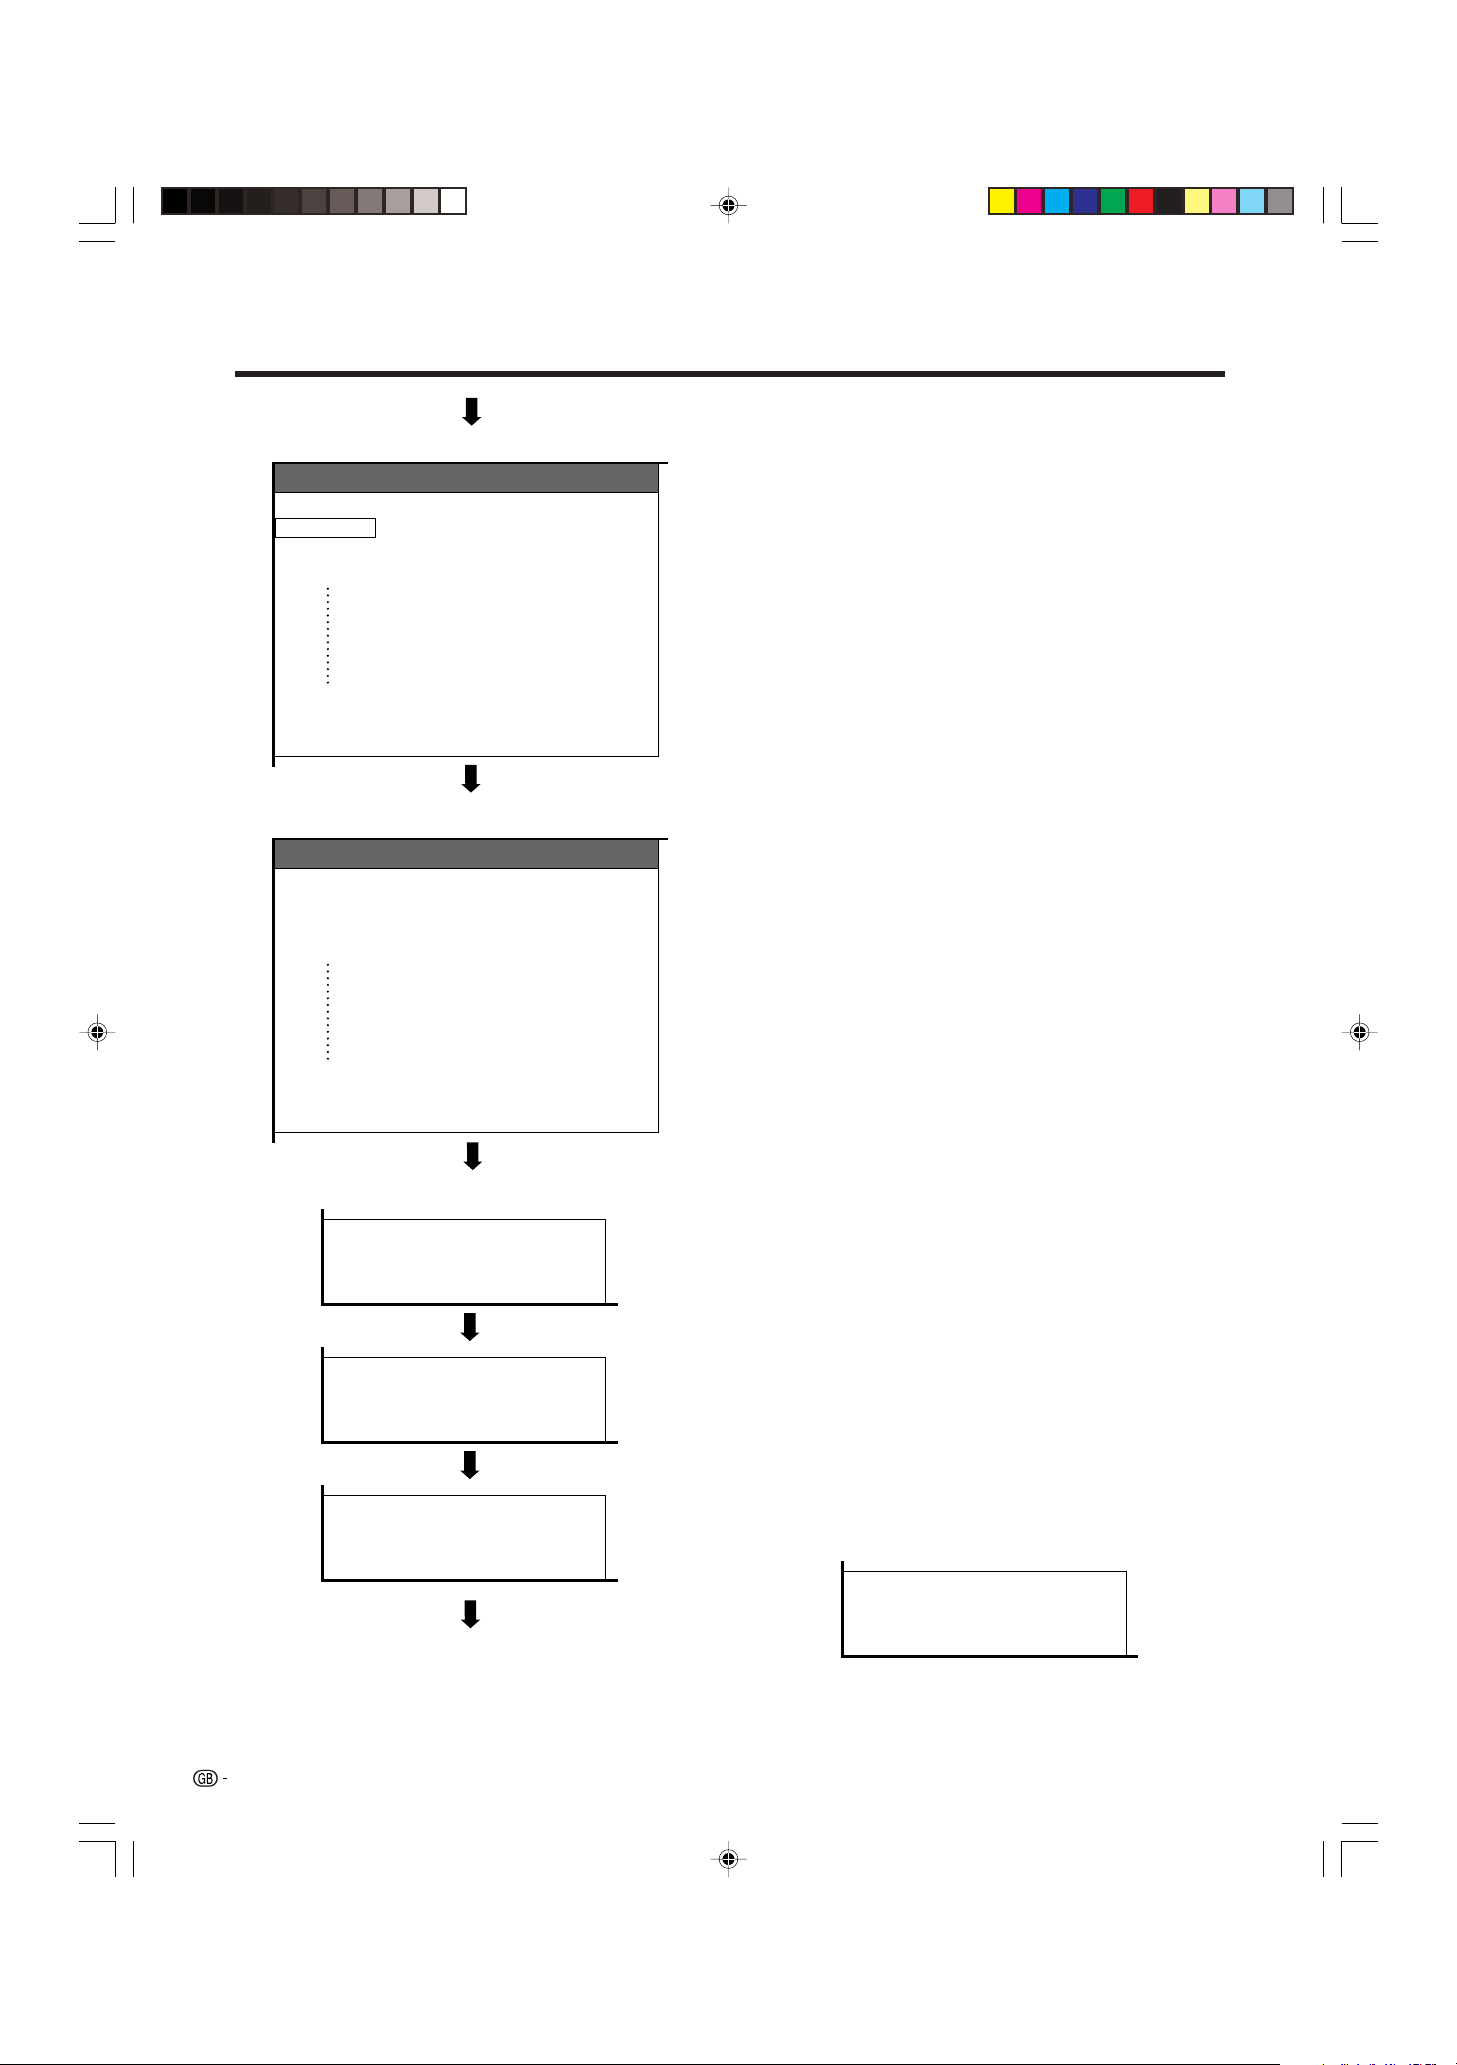
4. Automatic channel labelling
Labelling TV channels
Auto Installation - Setup “Auto”
10 142.25
0102SAT.1
PRO7
03 KABEL
04
05
06
07
130.25
08
136.25
09
11 148.25
12 155.25
Sorting TV channels
Auto Installation - Setup “Auto”
10 -----
0102SAT.1
PRO7
03 KABEL
04
05
06
07
08
09
11 -----
12 -----
VOX
QVC
After finding TV channels, the Plasma Display System
starts naming each TV channel found.
A
• The System can only name channels labelling information.
If no information is available, the System displays “-----”.
• Cancel the setting by pressing n and the System
automatically returns to the status before programme auto
search.
5. Automatic channel sorting
When channel auto labelling finishes, the Plasma
Display System starts sorting the labelled channels.
A
• Cancel the setting by pressing n. The system
automatically returns to the status before programme auto
search.
Preset download
Sending programme 10 settings.
Programme data sent successfully.
Auto Installation completed.
6. Preset download
When auto sorting finishes, the Plasma Display System
automatically downloads and stores each sorted
channel.
• Each time a channel preset download finishes, “Sending
programme 10 settings.” displays. Once all presets have
downloaded, “Programme data sent successfully.”
displays.
• When a VCR is connected via INPUT 2, the System sends
all preset channel information to the VCR. See pages 25,
40 and 41.
A
• If a channel preset download is not successful, “Error in
sending programme data.” displays. And preset
downloading will stop at that moment.
Error in sending programme data.
15
PDP-503HDE/(E)-b 8/31/02, 5:09 PM15
Page 18
Watching TV
STANDBY/ON
Channel display
SAT.1
1
PAL
B/G
Plasma Display
INPUTSTANDBY/ON VOLUMECHANNEL
CHANNEL
When preset download finishes, your initial auto
installation is completed.
•“Auto Installation completed.” displays. After that, the
screen changes to the auto installation menu.
7. Watching TV
The setup menu disappears and you can watch the
programmes on channel 1.
Simple button operations for changing
channels
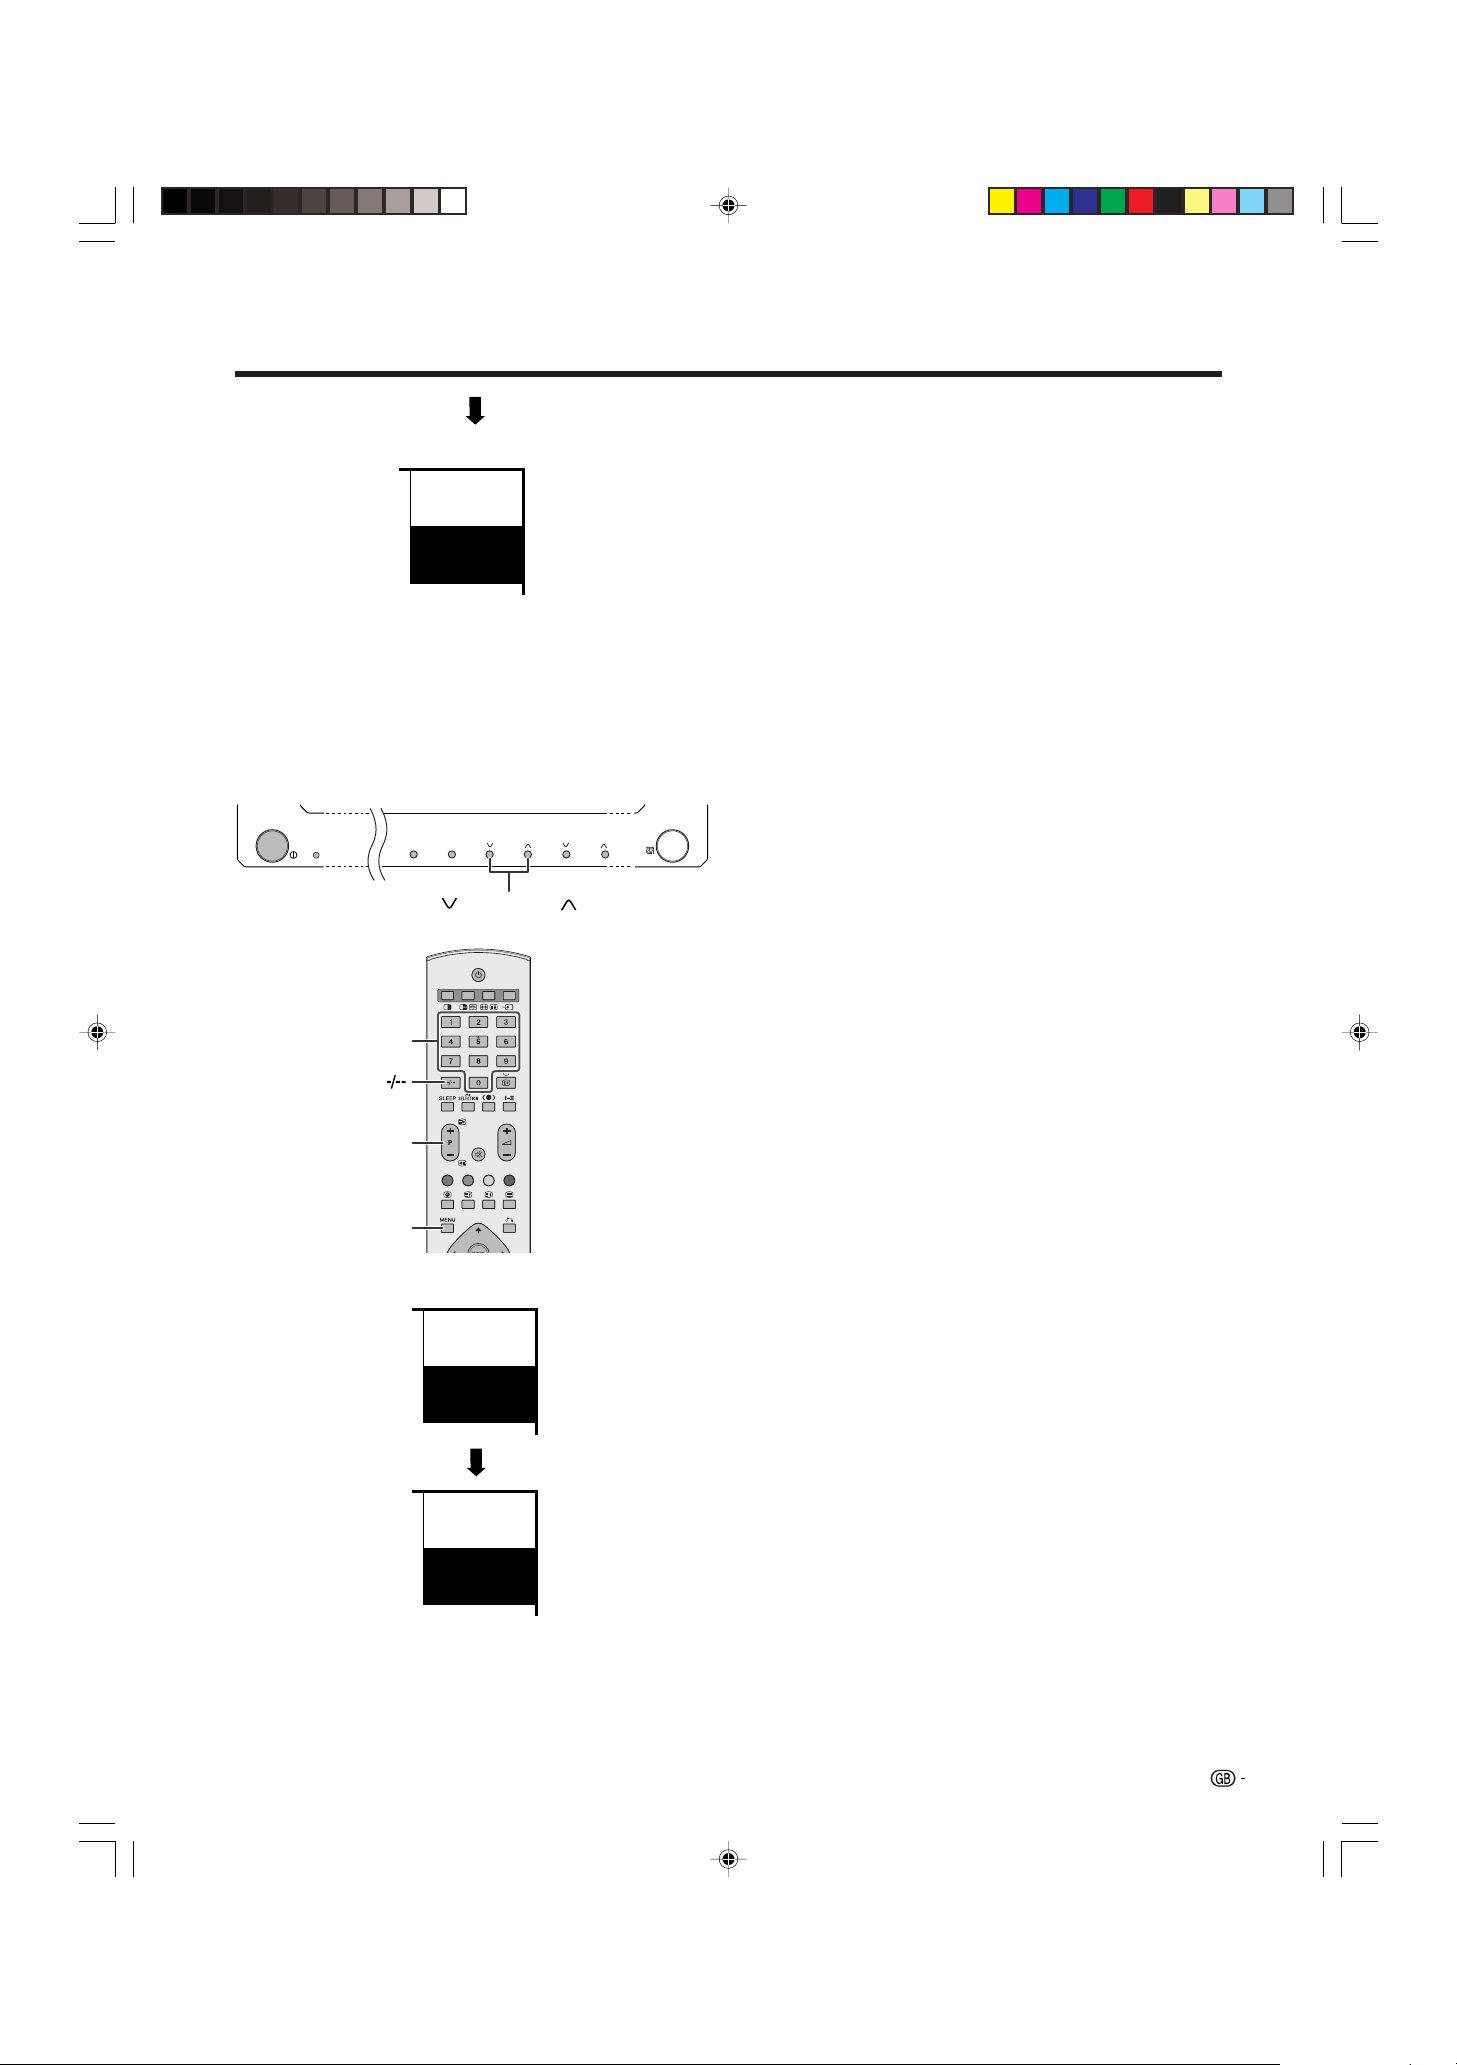
kk
Using P
• Press P
• Press P
When viewing the Teletext information
• Press P
• Press P
A
• CHANNEL r/s on the Plasma Display operates the
same as P
ll
k/
lon the remote control unit
kk
ll
kk
k to increase channel number.
kk
ll
l to decrease channel number.
ll
kk
k to increase the page number.
kk
ll
l to decrease the page number.
ll
kk
ll
k/
l.
kk
ll
0–9
Pⴐ/ⴑ
MENU
Channel display
SAT.1
12
PAL
B/G
SAT.1
12
MONO
Using 0 – 9 on the remote control unit
Select the channels directly by pressing buttons 0 to
9.
a
• To select channel 2, a 1-digit channel, press 2.
• To select channel 12, a 2-digit channel, press o to
select 2-digit input. Then press 1, followed by 2.
When viewing Teletext information
View a page directly which is 3-digit page number from
100 to 899 by pressing buttons 0 to 9. With Teletext,
you do not use o. See page 57.
A
• The selected channel such as “12” has been displayed.
With Teletext, the page number displays continuously.
• In the standby mode, when you press 0, the power turns
on and the on-screen image comes from the INPUT 1
source. Or, when you press any button from 1 to 9, a TV
image displays.
PDP-503HDE/(E)-b 8/31/02, 5:09 PM16
16
Page 19
Watching TV
20
Simple button operation for changing
volume/sound
Plasma Display
STANDBY/ON
INPUTSTANDBY/ON VOLUMECHANNEL
VOLUME
Volume adjustment
ⴐ/ⴑ
kk
Using i
• To increase the volume, press i
• To decrease the volume, press i
A
• VOLUME r/s on the Plasma display operates the same
as i
kk
k/
kk
ll
k/
l on the remote control unit
kk
ll
l.
ll
ll
kk
k.
kk
ll
l.
ll
Audio status
Output device
Speaker
MONITOR OUT
* When “Audio Out” is set to “Variable”, the indicator on the
screen changes as shown below.
A
• See page 53 for details on the audio out function.
Variable sound
Constant as
specified
Audio out
VariableFixed
Mute
Variable sound
Mute
20
Using e on the remote control unit
e mutes the current sound output.
1 Press e.
•“e” has been displayed on the screen for 8 minutes,
and the sound is silenced.
• The System does not suddenly output loud sound as
the volume level is set to 0.
2 Press e again to cancel the mute.
kk
• Pressing i
mute.
ll
k/
l and g can also cancel the
kk
ll
17
PDP-503HDE/(E)-b 8/31/02, 5:09 PM17
Page 20
Watching TV
Using h on the remote control unit
h produces SRS, FOCUS effect from the speakers.
Each time you press h, the mode changes among
SRS, FOCUS, FOCUS e SRS and Off.
SRS sound options
• SRS (Sound Retrieval System): Creates more a
natural sound retrieving the spatial information from
any stereo recording and restoring the original threedimensional sound field.
• FOCUS: Repositions a sound image from two
speakers to a more optimal listening position or
height without moving them.
• FOCUS e SRS: Produces both SRS and FOCUS
effects.
• Off: Outputs the normal sound.
: Off
: SRS
: FOCUS
: FOCUSⴐSRS
PDP-503HDE/(E)-b 8/31/02, 5:09 PM18
18
Page 21
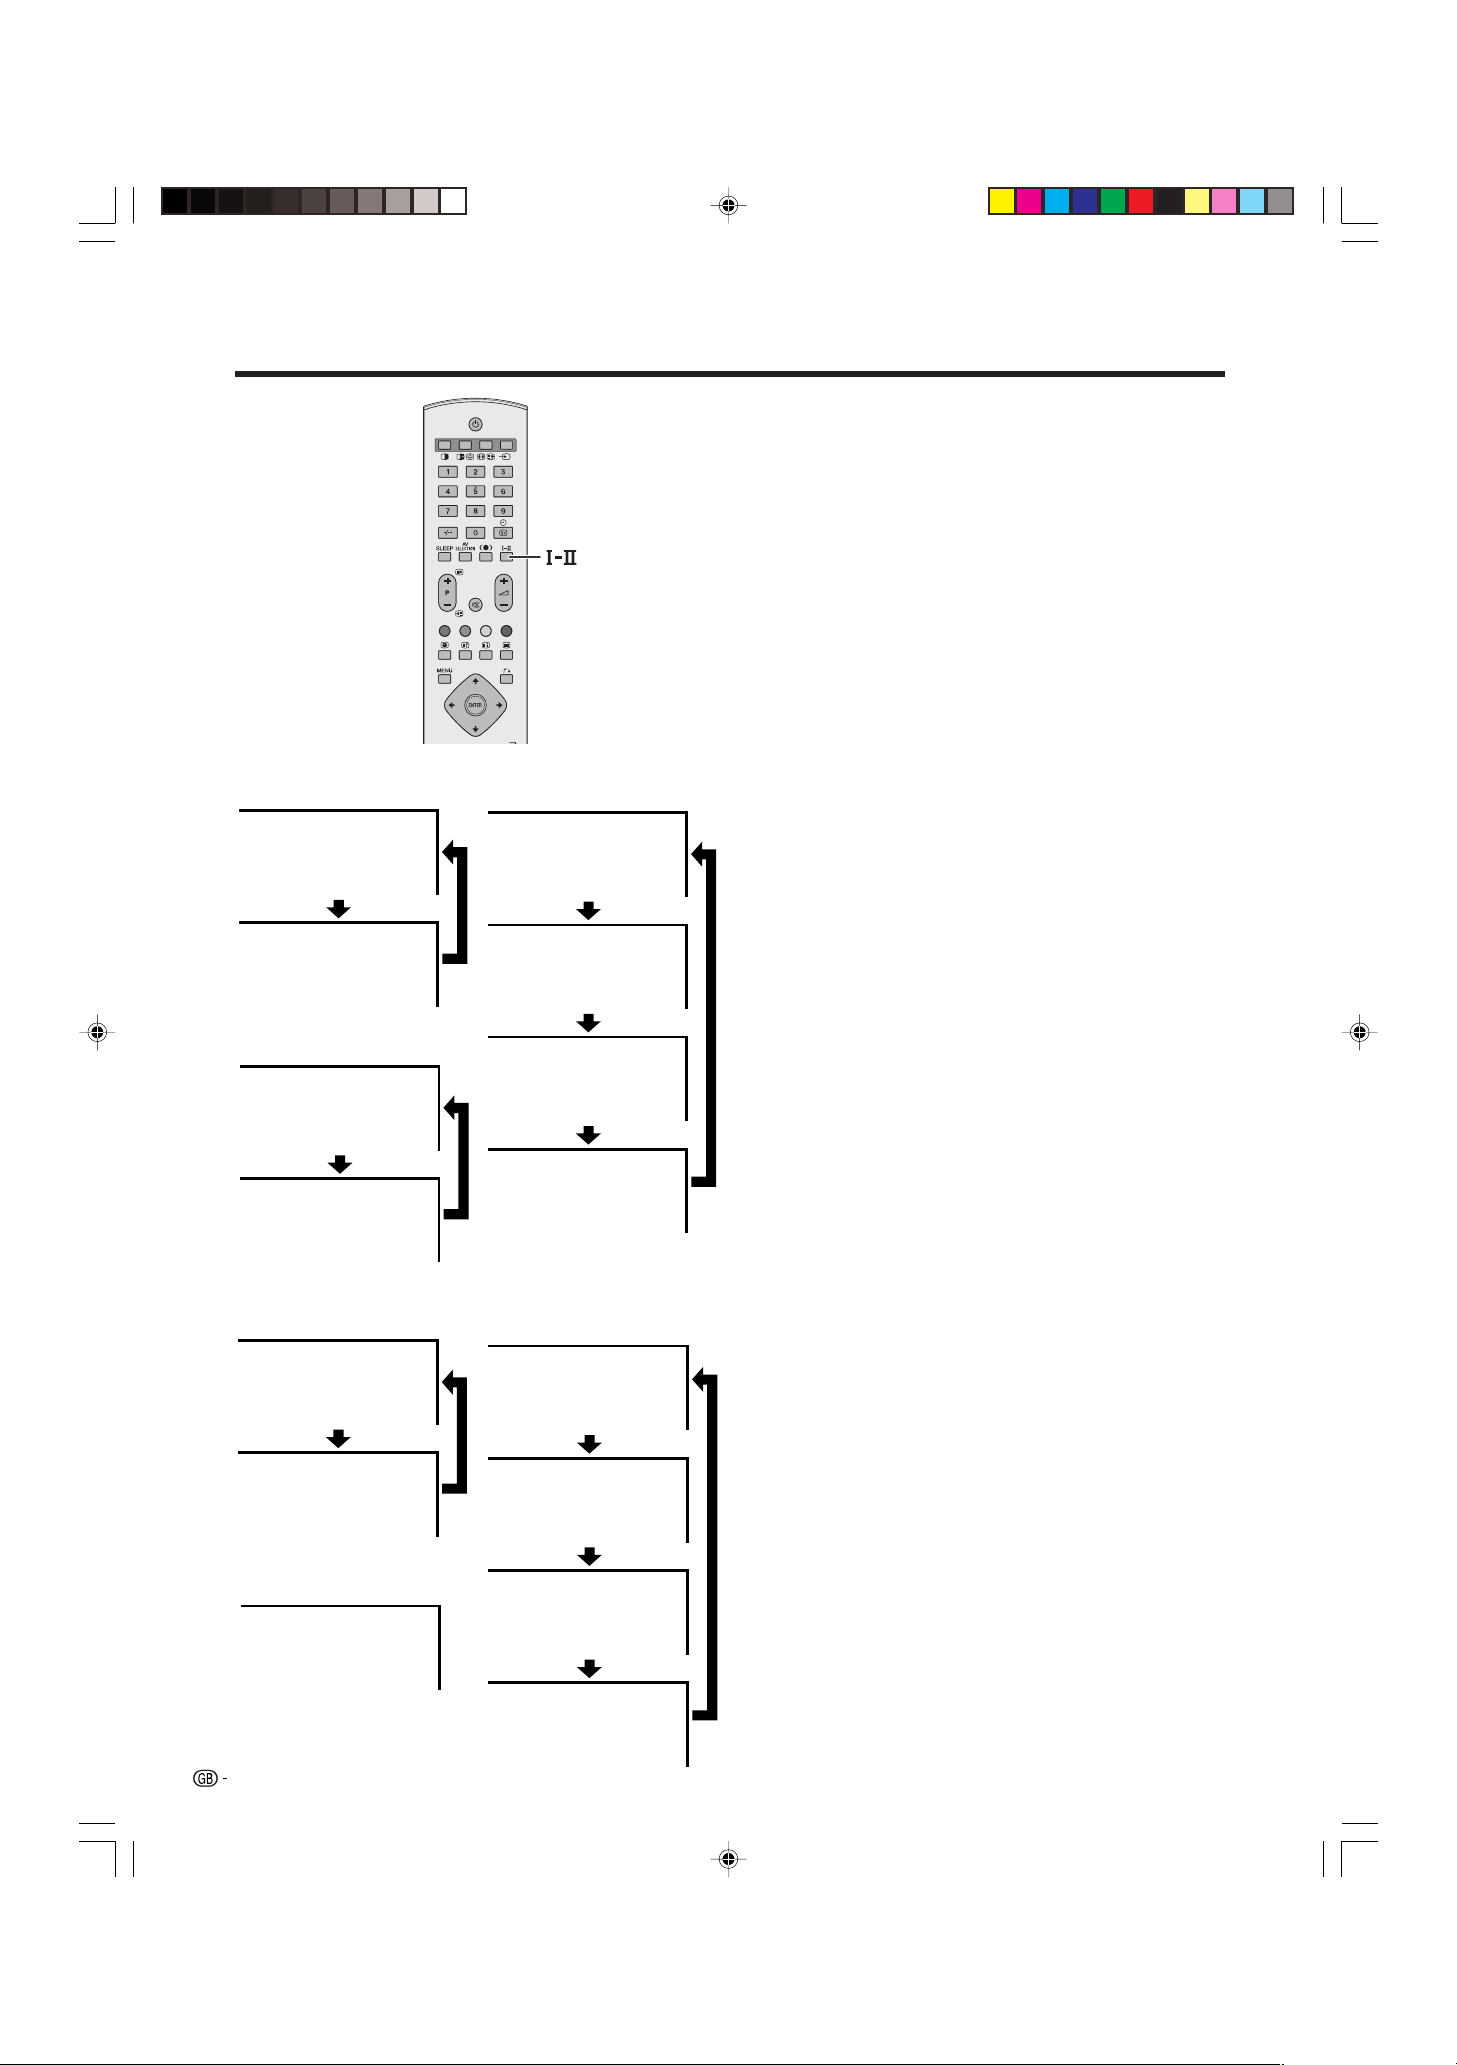
Watching TV
NICAM broadcasts
Stereo mode
NICAM
STEREO
BBC2
Using g on the remote control unit
NICAM TV broadcasts
When receiving a stereo signal
Each time you press g, the mode switches between
NICAM STEREO and MONO.
When receiving a bilingual signal
Each time you press g, the mode switches among
NICAM p, NICAM pp, NICAM p/pp and MONO.
When receiving a monaural signal
Each time you press g, the mode switches between
NICAM MONO and MONO.
In the TV mode of A2 broadcasts
When receiving a stereo signal
Bilingual mode
99
BBC2
99
NICAM
1
Each time you press g, the mode switches between
STEREO and MONO.
When receiving a bilingual signal
Each time you press g, the mode switches among
DUAL p, DUAL pp, DUAL p/pp and MONO.
Monaural mode
A2 broadcasts
Stereo mode
BBC2
MONO
BBC2
NICAM
MONO
BBC2
MONO
BBC2
STEREO
BBC2
MONO
When receiving a monaural signal
99
99
99
BBC2
NICAM
BBC2
NICAM
1/2
BBC2
MONO
99
2
99
99
99
Bilingual mode
99
99
BBC2
99
DUAL1
BBC2
99
DUAL2
When you press g, “MONO” displays.
A
• No channel and sound mode display.
•“BBC2” and “99” are tentative network name and channel.
Monaural mode
BBC2
MONO
19
PDP-503HDE/(E)-b 8/31/02, 5:09 PM19
BBC2
99
99
99
DUAL1/2
BBC2
99
MONO
Page 22
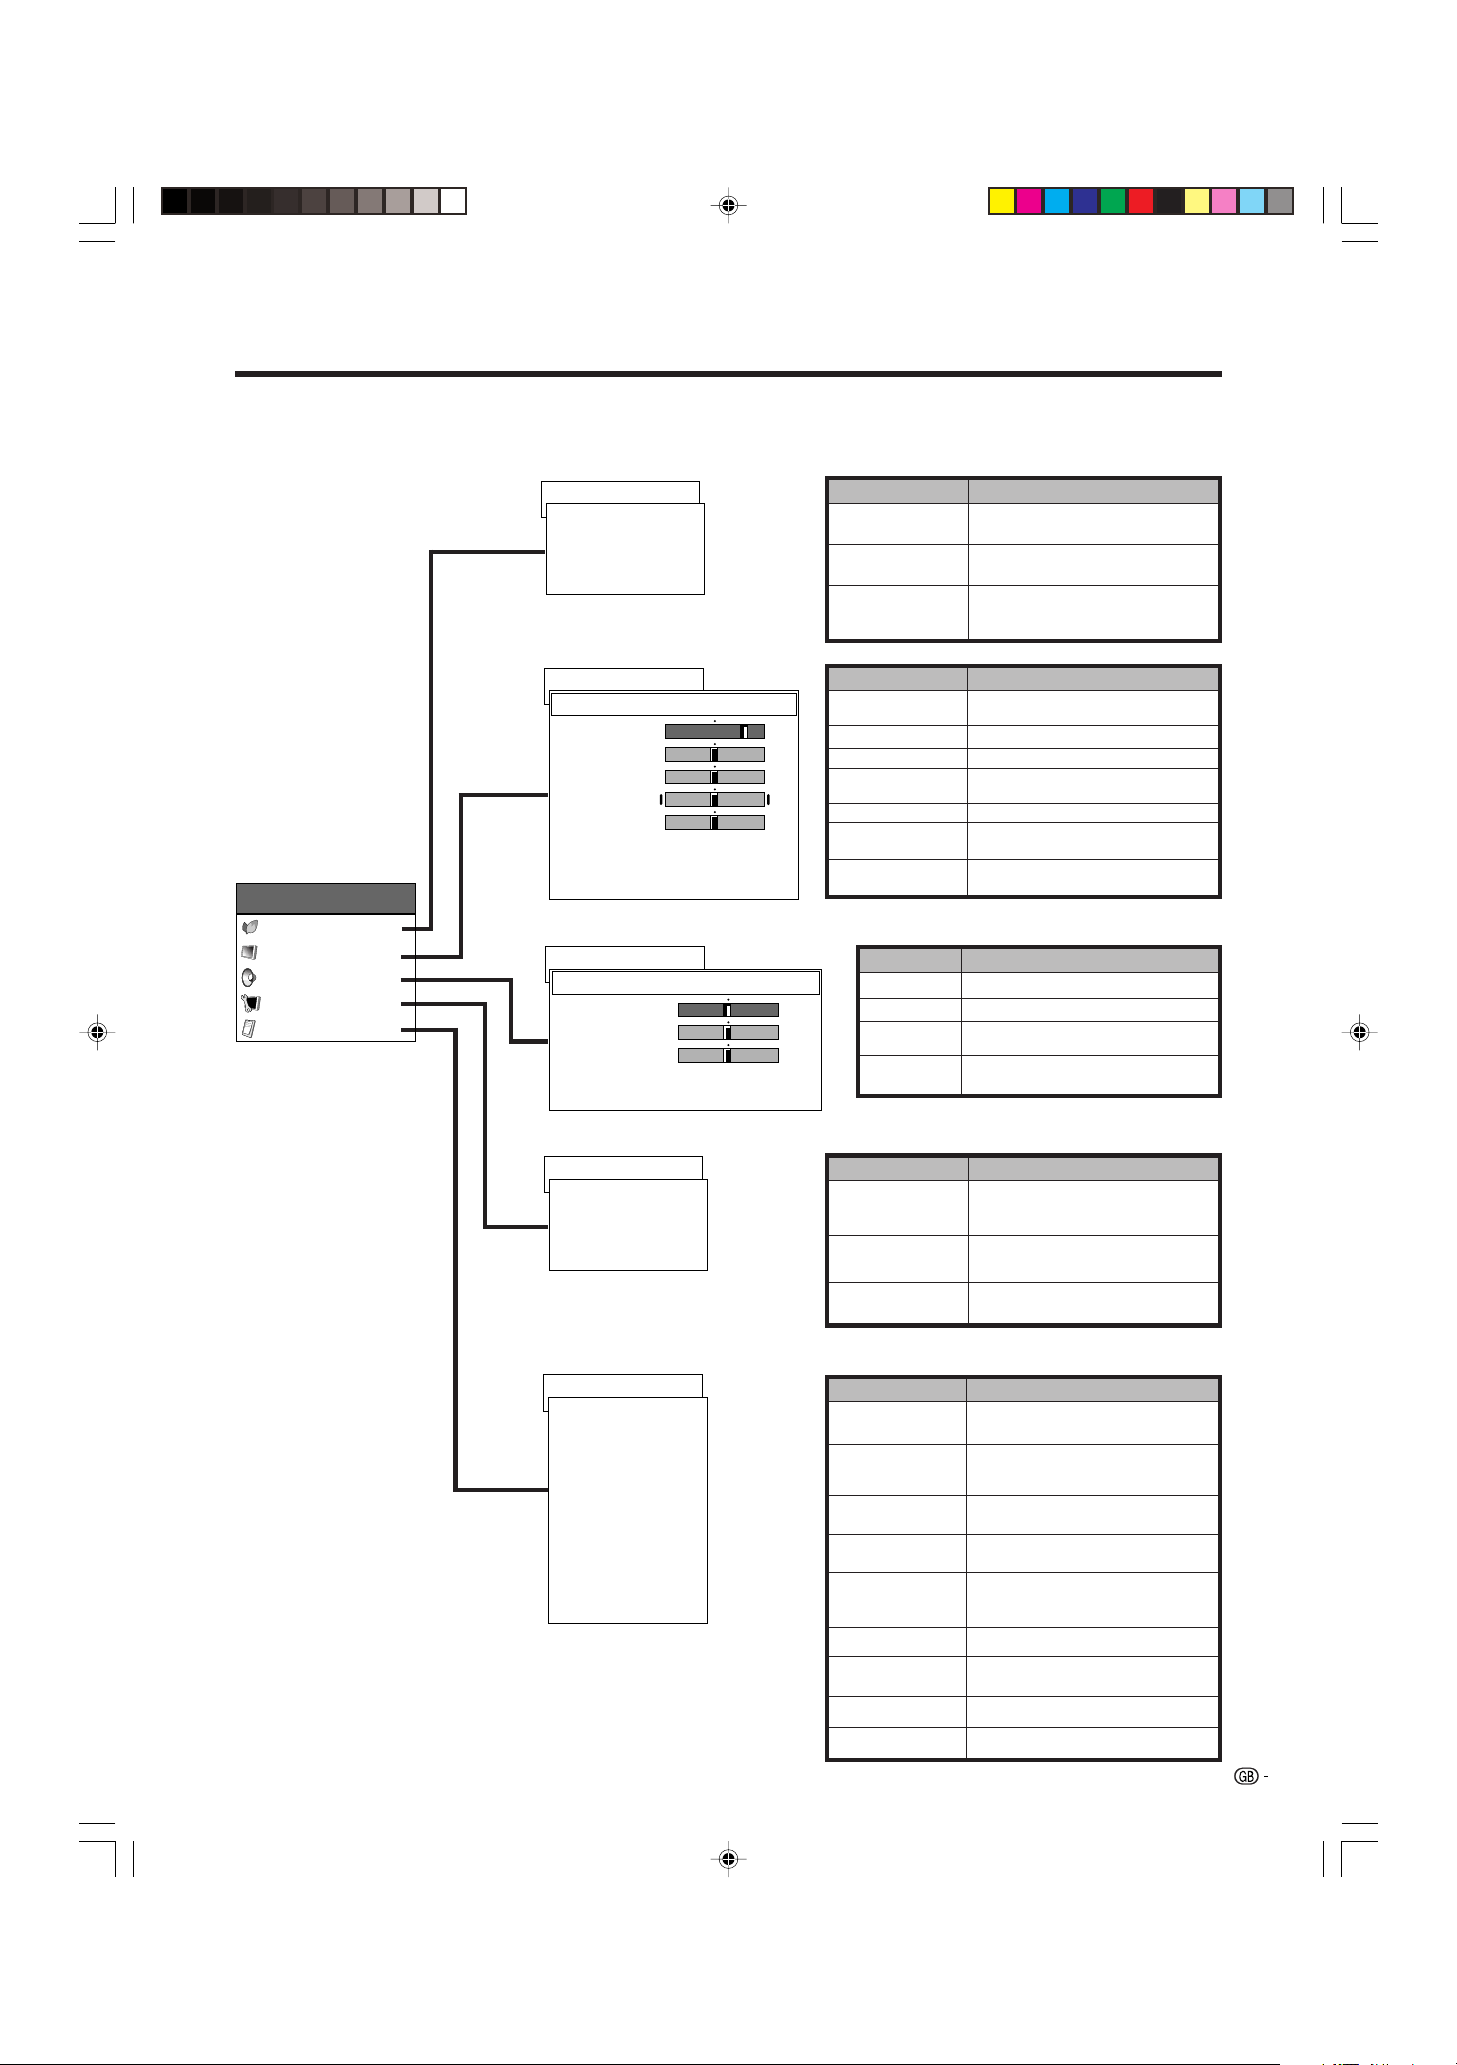
Basic adjustment settings
AV mode menu items
List of AV menu items to help you with operations.
Page 36
Power Control
Energy Save [Standard]
No signal off [Disable]
First MENU
MENU
Power Control
Picture
Audio
Setup
Option
No operation off
RETURN
Page 32–34
Picture
DYNAMIC
Contrast
Bright
Colour
Tint
Sharp
Advanced
Reset
RETURN
Page 35
Audio
DYNAMIC
Treble
Bass
Balance
Reset
RETURN
[+30]
[0]
[0]
[0]
[0]
[0]
[0]
[0]
[Disable]
0
–30
–30
–30
–7
–15
–15
Left
+40
+30
+30
+30
+7
Energy Save
No signal off
No operation off
Contrast
Bright
Colour
Tint
Sharp
Advanced
Reset
+15
+15
Right
MENU
MENU
MENU
Treble
Bass
Balance
Reset
Description
Save power by decreasing picture
brightness.
System automatically shuts down if
no video signal inputs for 15 minutes.
System automatically shuts down if
you do not operate the System for 3
hours.
Description
Adjusts the picture between light and
shade.
Adjusts picture brightness.
Adjusts colour intensity.
Adjusts skin colour to a more natural
tone for all colour system.
Adjusts picture sharpness.
Adjusts colour temperature, pure
cinema, black and black & white.
All image adjustment settings return
to the factory preset values.
Description
Adjusts the treble weaker or stronger.
Adjusts the bass weaker or stronger.
Adjusts audio output between left
and right speakers.
All audio adjustment settings return
the factory preset values.
Page 23–30, 54
Setup
Auto Installation
Programme Setup
Child Lock
RETURN
Page 31, 47, 49, 50, 52, 53
Option
Input Select
WSS
4:3 Mode
Position
Audio Out
Demo
Colour Sys.
Language [English]
NR
RETURN
[On]
[4:3]
[Fixed]
[Off]
[Auto]
[Off]
MENU
Auto Installation
Programme
Setup
Child Lock
MENU
Input Select
WSS
4:3 Mode
Position
Audio Out
Demo
Colour Sys.
Language
NR
Description
Runs auto installation again the same
as when the System powers on for
the first time after purchase.
Sets the channel preset.
Sets a password to restrict
operations.
Description
Select the kind of input signal of each input
source.
When wide screen signal bits are present in the
TELETEXT data, you can view information in
wide screen mode.
When you receive a 4:3 or 14:9 mode signal,
select 4:3 or WIDE display.
Adjusts the horizontal/vertical position of the
image displayed.
Select the type of monitor output. You can
adjust volume for the main speaker or monitor
output.
Demonstration setting for storefront displays.
Select the colour system of an image current
input.
Select the on screen display language.
Reduces the noise of the picture.
20
PDP-503HDE/(E)-c 8/31/02, 5:47 PM20
Page 23
Basic adjustment settings
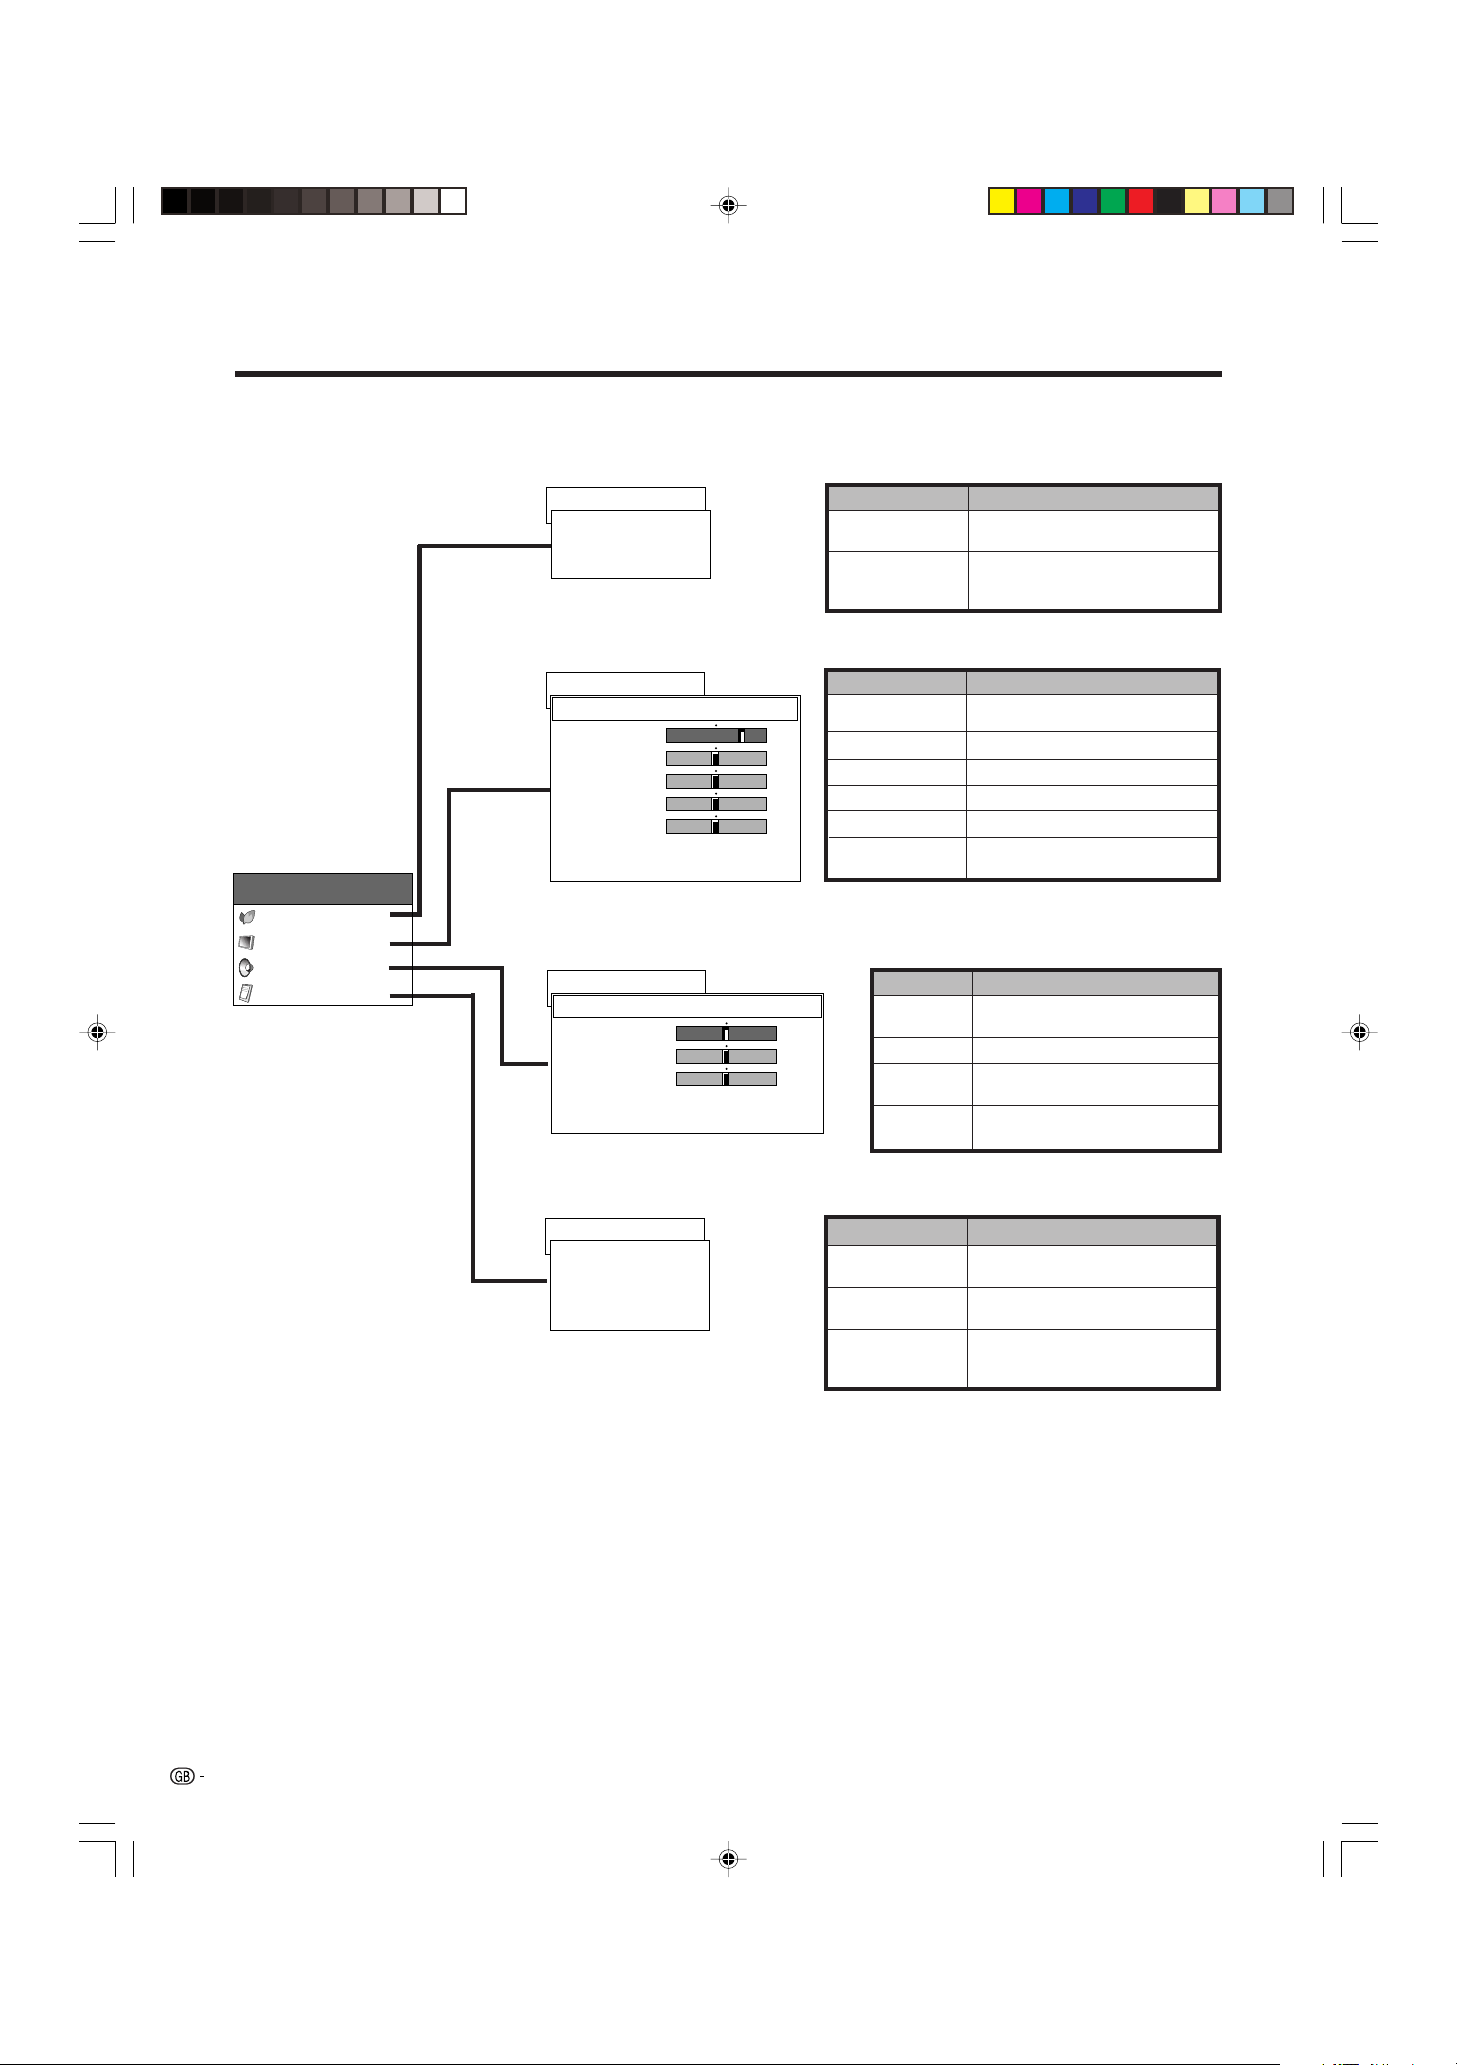
PC mode menu items
List of PC menu items to help you with operations.
Page 37
Power Control
Energy Save [Standard]
First MENU
MENU
Power Control
Picture
Audio
Option
Power Management
RETURN
Page 32
Picture
USER
Contrast
[+30]
Bright
[0]
Red
[0]
Green
[0]
Blue
[0]
Reset
RETURN
Page 35
Audio
USER
Treble
Bass
Balance
Reset
RETURN
[0]
[0]
[0]
[Off]
0
–30
–30
–30
–30
–15
–15
Left
+40
+30
+30
+30
+30
+15
+15
Right
MENU
Energy Save
Power
Management
MENU
Contrast
Bright
Red
Green
Blue
Reset
MENU
Tre bl e
Bass
Balance
Reset
Description
Save power by decreasing picture
brightness.
System automatically shuts down if
you set the time. Select mode 1 or
mode 2.
Description
Adjusts the picture between light and
shade.
Adjusts picture brightness.
Adjusts red colour intensity.
Adjusts green colour intensity.
Adjusts blue colour intensity.
All image adjustment settings return
to the factory preset values.
Description
Adjusts the treble weaker or
stronger.
Adjusts the bass weaker or stronger.
Adjusts audio output between left
and right speakers.
All audio adjustment settings return
the factory preset values.
21
Page 48, 53
Option
Auto Sync.
Fine Sync.
Audio Out
RETURN
[Fixed]
MENU
Auto Sync.
Fine Sync.
Audio Out
Description
Provides a clear input image.
Adjusts image H-Pos, V-Pos, clock
and phase.
After selecting type of monitor output,
adjusts the volume of the main
speaker or monitor output.
PDP-503HDE/(E)-c 8/31/02, 5:47 PM21
Page 24
Basic adjustment settings
Moving the picture on the screen
You can move the picture around on the screen.
///
Press / / / to move an image on the screen to the
desired position.
A
• While pressing
Position” displays to the desired position.
• This setting cannot be stored. Once the System shuts
down or enters standby mode, the setting is erased. To
move the picture around the screen again, you must
perform the above procedure again.
• An on-screen image from a PC source cannot be moved
around.
• Initialise the image position by pressing ENTER.
/ / / , an on-screen image, “Adjusting
PDP-503HDE/(E)-c 8/31/02, 5:47 PM22
22
Page 25
Basic adjustment settings
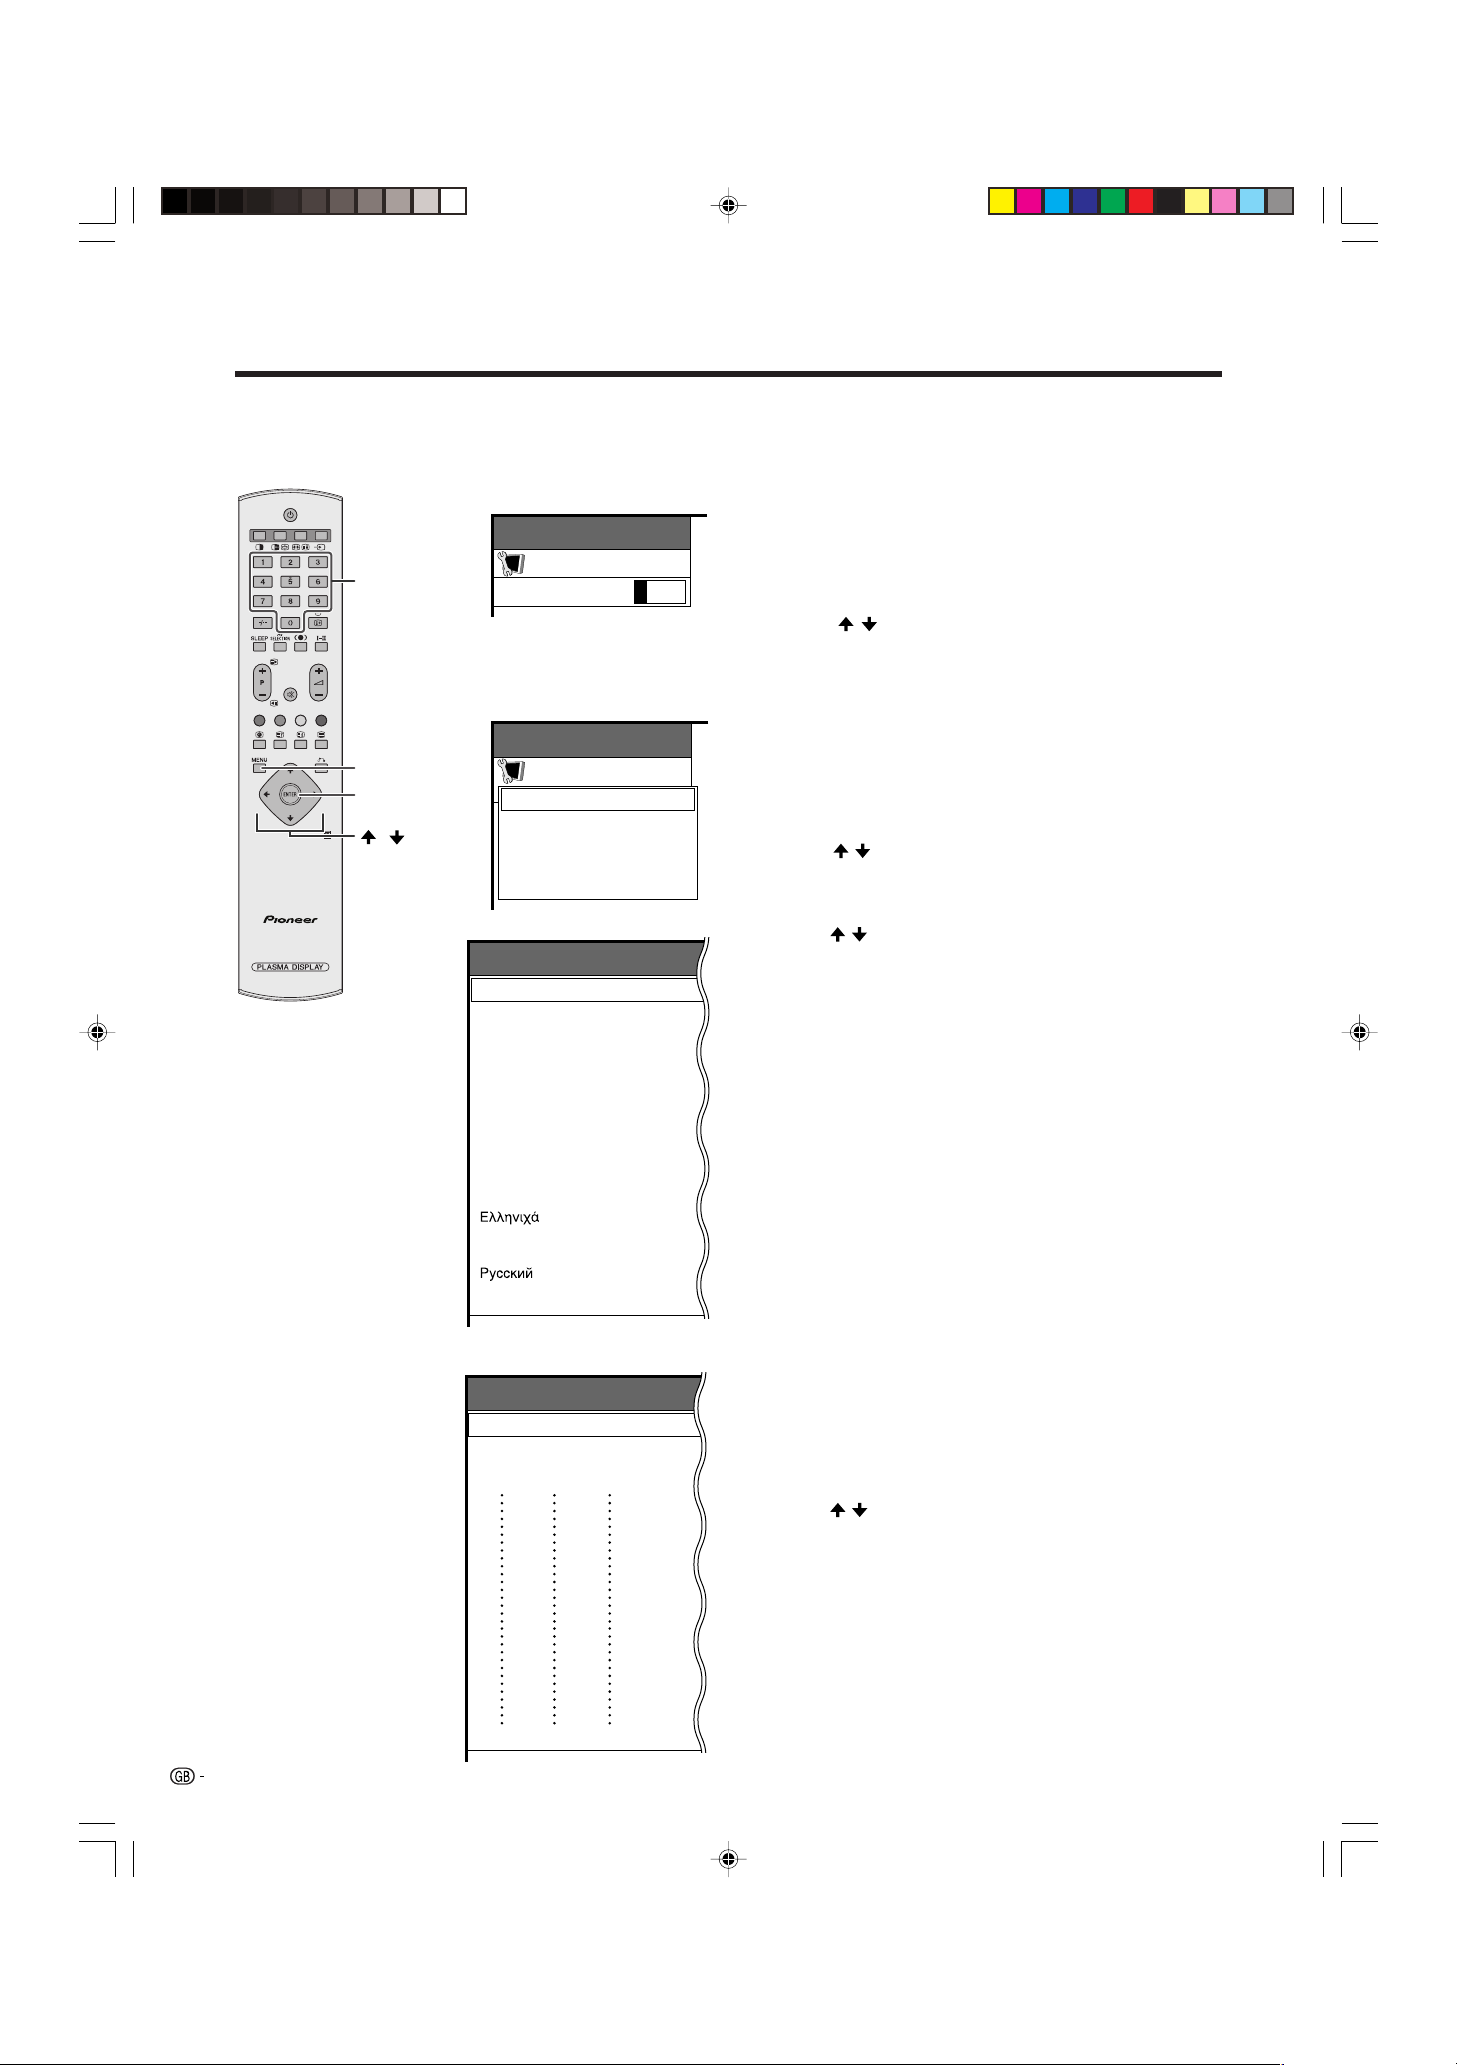
Auto installation
You can run auto installation again, even after setting up the preset channels.
0–9
MENU
ENTER
/
Password menu
MENU
Setup
Password
A
• This menu displays when setting
the child lock. See page 54.
- ---
Setup menu
MENU
Setup
Auto Installation
Programme Setup
Child Lock
RETURN
Language menu
Auto Installation - Language
English
Deutsch
Français
Italiano
Español
Nederlands
Svenska
Português
Language setting
Select from among 12 languages: English, German,
French, Italian, Spanish, Dutch, Swedish, Portuguese,
Greek, Finnish, Russian and Turkish.
1 Press MENU.
2 Press / to select “Setup”, and then press
ENTER.
• Password setting menu displays only when child lock
is set. See page 54.
• Setup menu displays when the child lock is not set.
Skip the step 3.
3 Enter your 4-digit password with 0 – 9 to cancel
the child lock when you set it.
• See page 54 for details of cancelling the child lock.
4 Press / to select “Auto Installation”, and then
press ENTER.
• Language menu displays.
5 Press / to select the desired language listed on
the screen, and then press ENTER.
• Country menu displays.
23
Suomi
Türkçe
Country menu
Auto Installation - Country
Austria
Belgium
Denmark
A
B
DK
B/G
B/G
B/G
Country setting
After setting the language, to use the Plasma Display
System you have to select the country, which sets the
colour system for viewable TV channels.
Setting screen displays.
1 Press / to select your country or area listed on
the screen.
2 Press ENTER.
• The country is set and the programme auto search
starts at the same times.
A
• Return to the language menu by pressing n.
PDP-503HDE/(E)-c 8/31/02, 5:47 PM23
Page 26
Basic adjustment settings
Searching TV programmes
Programme Setup “Auto”
010255.25
85.25
03 102.25
Labelling TV channels
Programme Setup “Auto”
10 -----
0102SAT.1
85.25
03 102.25
-----
04
125.25
05
175.25
06
199.25
07
210.25
08
216.0
09
Programme auto search
After setting the country, perform the procedure below
to search TV channels.
A
• Cancel the setting by pressing n and the System
automatically returns the status before programme auto
search.
• If no channels were found, you should check your
antenna connection, and try auto installation again
because it is finished. (See page 12)
Auto labelling
After finding new TV channels, each network name
are searched and displays.
A
• Cancel the setting by pressing n and the System
automatically returns the status before programme auto
search.
Reading broadcasting station names.
PDP-503HDE/(E)-c 8/31/02, 5:47 PM24
24
Page 27

Basic adjustment settings
Sorting TV channels
Programme Setup “Auto”
10 -----
0102SAT.1
PRO7
03 KABEL
04
05
06
07
08
09
-----
Auto sorting
Automatically sorts TV channels.
A
• Cancel the setting by pressing n and the System
automatically returns to the status before programme auto
search.
• Don’t shut down the System until “Sorting channels.”
displays.
Sorting channels.
Sending programme 10 settings.
Programme data sent successfully.
Auto Installation completed.
Preset download
Preset download
When auto sorting finishes, the channels are
automatically stored in memory.
•“Sending programme 10 settings.” displays during each
channel preset download. Once all presets have
downloaded, “Programme data sent successfully.”
displays.
• The System can only send preset channel information to
a VCR when that device is connected via the INPUT 2
terminal.
A
• If a channel preset download is not successful, “Error in
sending programme data.” displays. And preset
downloading will stop at that moment.
Error in sending programme data.
25
PDP-503HDE/(E)-c 8/31/02, 5:47 PM25
Page 28
Basic adjustment settings
Programme setup
After completing channel preset download, you can try again with the Programme Setup menu from programme
auto search to preset download, or run manual adjust to set channel items individually.
MENU
ENTER
/
Programme Setup “Manual” menu
Programme Setup “Manual”
10
01
02
03
04
05
06
07
08
09
SAT.1
PRO7
KABEL
11
12
13
14
15
16
17
18
19
20
21
22
23
24
25
26
27
28
29
MENU
Setup
Auto Installation
Programme Setup
Child Lock
RETURN
Auto search
You can also automatically search and download TV
channels by performing the procedure below. This is
the same function as from programme auto search to
preset download in auto installation on pages 24 to
25.
1 Press MENU.
2 Press / to select “Setup”, and then press
ENTER.
MENU
Setup
Programme Setup
Auto Search
Manual Adjust
Sort
RETURN
3 Press / to select “Programme Setup”, and then
press ENTER.
4 Press / to select “Auto Search”, and then press
ENTER.
• Programme auto search starts as shown below.
1 Programme auto search
2 Auto labelling
3 Auto sorting
4 Preset download
A
• Return to the previous menu by pressing n before
programme auto search starts.
• See pages 24 to 25 for the details on the programme auto
search.
MENU
Setup
Programme Setup
Auto Search
Manual Adjust
Sort
RETURN
Manual setting for each channel
You can set some channel items manually. They are
Fine (TV frequency), Colour sys, Sound sys, Label
(Network name), Skip, Decoder and Lock (Child Lock).
1 Press MENU.
2 Press / to select “Setup”, and then press
ENTER.
3 Press / to select “Programme Setup”, and then
30
31
32
33
34
35
36
37
38
39
40
41
42
43
44
45
46
47
48
49
Fine
Colour sys.
Sound sys.
Label
Skip
Decoder
Lock
[NEXT]
179.75MHz
AUTO
B/G
SAT.1
Off
Off
Off
press ENTER.
4 Press / to select “Manual Adjust”, and then press
ENTER.
• Programme Setup “Manual” menu displays.
A
• Return to the previous menu by pressing n.
• Exit the menu by pressing MENU.
• When you exit Programme Setup “Manual” menu, preset
download automatically runs if you change information
on that menu.
Please select channel to be edited.
PDP-503HDE/(E)-c 8/31/02, 5:48 PM26
26
Page 29
Basic adjustment settings
Programme Setup “Manual” menu
Programme Setup “Manual”
10
SAT.1
PRO7
KABEL
11
12
13
14
15
16
17
18
19
01
02
03
04
05
06
07
08
09
Please select channel to be edited.
20
21
22
23
24
25
26
27
28
29
30
31
32
33
34
35
36
37
38
39
40
41
42
43
44
45
46
47
48
49
[NEXT]
Fine
Colour sys.
Sound sys.
Label
Skip
Decoder
Lock
179.75MHz
AUTO
B/G
SAT.1
Off
Off
Off
Additional channels entry
On Programme Setup “Manual” menu
1 Press / / / to select a channel number with
blue, and then press ENTER.
• Listed channels are black for “Skip” set to “Off” or blue
for “Skip” set to “On” or no channel.
• The selected channel information displays.
2 Press / to select “Skip”, and then press ENTER.
• Skip menu displays.
3 Press / to set “Skip” to “Off”, and then press
ENTER.
• Channels set “Skip” to “On” are skipped even if you
select them by using Pk/Pl.
A
• Return to the previous menu by pressing n.
• Exit the menu by pressing MENU.
Fine tuning menu
Programme Setup “Manual”
Fine
01
02
PRO7
03 KABEL
Programme Setup “Manual”
Fine
01
02
PRO7
03 KABEL
Colour system menu
Programme Setup “Manual”
Colour sys.
01
SAT.1
02
PRO7 PAL
196.25MHzSAT.1
196.25 MHzSAT.1
AUTO
PAL-60
SECAM
NTSC 4.43
Fine tuning
On Programme Setup “Manual” menu
1 Press / / / to select the channel you want to
edit, and then press ENTER.
• The selected channel information displays.
2 Press / to select “Fine”, and then press ENTER.
• Fine tuning bar displays.
3 Press / to adjust the frequency, and then press
ENTER.
• Adjust with checking the back image as a reference.
• Instead of the above, you can also set by directly
entering the frequency number of the channel with 0 –
9.
a
• 179.75 MHz: Press 1 / 7 / 9 / 7 / 5 / ENTER.
• 49.25 MHz: Press 4 / 9 / 2 / 5 / ENTER.
A
• Return to the previous menu by pressing n.
• Exit the menu by pressing MENU.
Colour system
On Programme Setup “Manual” menu
1 Press / / / to select the channel you want to
edit, and then press ENTER.
• The selected channel information displays.
2 Press / to select “Colour sys.”, and then press
ENTER.
• Receivable colour systems are listed.
3 Press / to select your colour system, and then
press ENTER.
27
PDP-503HDE/(E)-c 8/31/02, 5:48 PM27
A
• Return to the previous menu by pressing n.
• Exit the menu by pressing MENU.
Page 30

Basic adjustment settings
Sound menu
Programme Setup “Manual”
Sound sys.
SAT.1
01
PRO7 D/K
02
Labelling menu
Programme Setup “Manual”
Label
01
SAT.1
02
PRO7
03 KABEL
KABEL
A
H
O
V
W
2
9+–
Sound system
On Programme Setup “Manual” menu
1 Press / / / to select the channel you want to
B/G
I
L
L’
edit, and then press ENTER.
• The selected channel information displays.
2 Press / to select “Sound sys.”, and then press
ENTER.
• Receivable sound systems (Broadcasting systems) are
listed.
3 Press / to select your sound system, and then
press ENTER.
A
• If you adjust this setting, please check the colour system
information on page 27.
• Return to the previous menu by pressing n.
• Exit the menu by pressing MENU.
Labelling channels
Auto installation automatically assigns names to all
viewable networks. However, you can change
individual channel names.
G
B
C
D
E
F
CLEAR
I
J
K
L
M
N
P
Q
R
S
T
U
X
Y
Z
0
1
NEXT
3
4
5
6
7
8
BACK
END.
On Programme Setup “Manual” menu
1 Press / / / to select the channel you want to
edit, and then press ENTER.
• The selected channel information displays.
2 Press / to select “Label”, and then press
ENTER.
• Alphabet and numbers are listed.
3 Press / / / to select each character of the new
name for the channel, and then press ENTER.
4 Repeat the above until the name is fully spelt out.
• The name can be 5 characters or less.
Programme Setup “Manual”
01
02
PRO7
03 KABEL
Skip menu
Skip
A
• Return to the previous menu by pressing n.
• Exit the menu by pressing MENU.
Skipping channels
Channels with “Skip” set to “On” with Pk/Pl are
passed over even if you select them.
OffSAT.1
On
On Programme Setup “Manual” menu
1 Press / / / to select the channel you want to
edit, and then press ENTER.
• The selected channel information displays.
2 Press / to select “Skip”, and then press ENTER.
• Skip menu displays.
3 Press / to set “Skip” to “On”, and then press
ENTER.
A
• Return to the previous menu by pressing n.
• Exit the menu by pressing MENU.
28
PDP-503HDE/(E)-c 8/31/02, 5:48 PM28
Page 31

Basic adjustment settings
MENU
ENTER
///
Setting the decoder
When connecting a decoder to, you need assign the
terminal input.
On Programme Setup “Manual” menu
1 Press / / / to select the channel you want to
edit, and then press ENTER.
• The selected channel information displays.
2 Press / to select “Decoder”, and then press
ENTER.
• Terminal inputs are displays.
3 Press / to select an INPUT terminal, and then
press ENTER.
A
•“Off” is factory preset value. When set to “Off”, you cannot
watch any image from decoders.
• Return to the previous menu by pressing n.
• Exit the menu by pressing MENU.
Decoder menu
Programme Setup “Manual”
01
SAT.1
02
PRO7
03 KABEL
Lock menu
Programme Setup “Manual”
01
02
PRO7
03 KABEL
Decoder
Lock
Off
INPUT1
INPUT2
INPUT3
OffSAT.1
On
Setting the child lock
You can block the viewing of any channel.
On Programme Setup “Manual” menu
1 Press / / / to select the channel you want to
edit, and then press ENTER.
• The selected channel information displays.
2 Press / to select “Lock”, and then press ENTER.
• Child lock menu displays.
3 Press / to set “Lock” to “On”, and then press
ENTER.
A
• Even if set to “On”, this function never works if not setting
password, See page 54 for the details on password
setting.
• Return to the previous menu by pressing n.
• Exit the menu by pressing MENU.
29
PDP-503HDE/(E)-c 8/31/02, 5:48 PM29
Page 32

Basic adjustment settings
MENU
Programme Setup
Auto Search
Manual Adjust
MENU
ENTER
///
Setup
Sort
RETURN
Sort
Channel positions can be sorted freely.
1 Press MENU.
2 Press / to select “Setup”, and then press
ENTER.
3 Press / to select “Programme Setup”, and then
press ENTER.
4 Press / to select “Sort”, and then press ENTER.
• The channels are listed. Black ones are set “Skip” to
“Off” and blue are set “Skip” to “On”.
5 Press / / / to select the channel you want to
move, and then press ENTER.
6 Move it to the desired position by pressing / / /
, and then press ENTER.
7 Repeat the steps 5 and 6 until all desired channels
have sorted.
A
• Return to the previous menu by pressing n.
• Exit the menu by pressing MENU.
Sort menus
Programme Setup “Sort”
0102SAT.1
03 KABEL
04
05
06
07
08
09
Please select channel to replace.
10 -----
PRO7
VOX
Press
.
Programme Setup “Sort”
0102PRO7
03 KABEL
04
05
06
07
08
09
Sorting channels.
10 -----
SAT.1
VOX
Press
.
Programme Setup “Sort”
0102PRO7
03 SAT.1
04
05
06
07
08
09
10 -----
KABEL
VOX
PDP-503HDE/(E)-c 8/31/02, 5:48 PM30
30
Page 33

Basic adjustment settings
Language setting
You can also select a language from option menu. Select from among 12 languages: English, German, French,
Italian, Spanish, Dutch, Swedish, Portuguese, Greek, Finnish, Russian and Turkish.
MENU
ENTER
/
MENU
Option
Input Select
WSS
4:3 Mode
Position
Audio Out
Demo
Colour Sys.
Language [English]
NR
RETURN
[Fixed]
[Auto]
MENU
Option
Language
English
Deutsch
Français
Italiano
Español
Nederlands
Svenska
Português
[On]
[4:3]
[Off]
[Off]
1 Press MENU.
2 Press / to select “Option”, and then press
ENTER.
• Option menu displays.
3 Press / to select “Language”, and then press
ENTER.
• Language menu displays.
4 Press / to select the desired language listed on
the screen, and then press ENTER.
5 Press MENU to exit the menu.
A
• Return to the previous menu by pressing n.
31
Suomi
Türkçe
PDP-503HDE/(E)-c 8/31/02, 5:48 PM31
Page 34

Basic adjustment settings
Picture adjustments
Adjust the picture to your preference with the following picture settings.
1 Press MENU.
2 Press / to select “Picture”, and then press
ENTER.
• Picture menu displays.
3 Press / to select a specific adjustment item.
AV SELECTION
MENU
Adjustments items for AV source
MENU
Picture
AV selection mode
DYNAMIC
Contrast
Bright
Colour
Tint
Sharp
Advanced
Reset
RETURN
[+30]
[0]
[0]
[0]
[0]
0
–30
–30
–30
–7
ENTER
///
+40
+30
+30
+30
+7
4 Press / to adjust the item to your desired
position.
5 Press MENU to exit the menu.
A
• When all adjustments set to factory preset values,
1 Press
2 Press
• Return to the previous menu by pressing n.
• If you select “STANDARD” with AV SELECTION on the
remote control unit, these items will display in gray
and not be selectable. See page 50.
/ to select “Reset”, and then press ENTER.
/ to select “Ye s”, and then press ENTER.
Adjustments items for PC source
MENU
Picture
AV selection mode
USER
Contrast
Bright
Red
Green
Blue
Reset
RETURN
[+30]
[0]
[0]
[0]
[0]
–30
–30
–30
–30
0
+40
+30
+30
+30
+30
Selected item
Contrast
Bright
Colour
Tint
Sharp
For less contrast
For less brightness
For less colour
intensity
Skin tones become
purplish
For less sharpness
A
• Select “Advanced” and then press ENTER to set “Colour
Te mp ”, “Black”, “Black & White” or “PureCinema” settings.
See pages 33 and 34.
PDP-503HDE/(E)-c 8/31/02, 5:48 PM32
button
button
For more contrast
For more brightness
For more colour
intensity
Skin tones become
greenish
For more sharpness
Selected item
Contrast
Bright
Red
Green
Blue
button
For less contrast
For less brightness
For weaker red
For weaker green
For weaker blue
button
For more contrast
For more brightness
For stronger red
For stronger green
For stronger blue
32
Page 35

Basic adjustment settings
AV
SELECTION
MENU
ENTER
/
MENU
Picture
DYNAMIC
Advanced
Colour Temp [High]
High
Mid-High
Mid
Mid-Low
Low
Colour temperature
Adjust the colour temperature to suit whitish tone.
1 Press MENU.
2 Press / to select “Picture”, and then press
ENTER.
3 Press / to select “Advanced”, and then press
ENTER.
4 Press / to select “Colour Temp”, and then press
ENTER.
5 Press / to select the desired level, and then
press ENTER.
6 Press MENU to exit the menu.
A
• Return to the previous menu by pressing n.
• If you select “STANDARD” with AV SELECTION on the
remote control unit, this item will display in gray and
not be selectable. See page 50.
Selected item
High
Mid-High
Mid
Mid-Low
Low
Description
White with Bluish tone
White with Reddish tone
MENU
Picture
DYNAMIC
Advanced
Black [High]
Off
High
Low
Black
Allows you to select a level for automatically adjusting
blackish tone to suit viewing conditions.
1 Press MENU.
2 Press / to select “Picture”, and then press
ENTER.
3 Press / to select “Advanced”, and then press
ENTER.
4 Press / to select “Black”, and then press
ENTER.
5 Press / to select the desired level, and then
press ENTER.
6 Press MENU to exit the menu.
A
• Return to the previous menu by pressing n.
• If you select “STANDARD” with AV SELECTION on the
remote control unit, this item will display in gray and
not be selectable. See page 50.
33
PDP-503HDE/(E)-c 8/31/02, 5:48 PM33
Page 36

Basic adjustment settings
AV
SELECTION
MENU
ENTER
/
MENU
Picture
DYNAMIC
Advanced
Black & White [On]
Off
On
MENU
Picture
DYNAMIC
Advanced
PureCinema [On]
Off
On
Black & White
For viewing a video in monochrome.
1 Press MENU.
2 Press / to select “Picture”, and then press
ENTER.
3 Press / to select “Advanced”, and then press
ENTER.
4 Press / to select “Black & White”, and then press
ENTER.
5 Press / to select “On”, and then press ENTER.
6 Press MENU to exit the menu.
A
• Return to the previous menu by pressing n.
• If you select “STANDARD” with AV SELECTION on the
remote control unit, this item will display in gray and
not be selectable. See page 50.
PureCinema
Automatically detects a film-based source (originally
encoded at 24 frames/second), analyses it then
recreates each still film frame for high-definition picture
quality.
1 Press MENU.
2 Press / to select “Picture”, and then press
ENTER.
3 Press / to select “Advanced”, and then press
ENTER.
4 Press / to select “PureCinema”, and then press
ENTER.
5 Press / to select “On”, and then press ENTER.
PDP-503HDE/(E)-c 8/31/02, 5:48 PM34
6 Press MENU to exit the menu.
A
• Return to the previous menu by pressing n.
• If you select “STANDARD” with AV SELECTION on the
remote control unit, or input sources with vertical
frequency 50 Hz (e.g. PAL, SECAM etc.), this item will
display in gray and not be selectable. See page 50.
34
Page 37

Basic adjustment settings
Sound adjustment
You can adjust the sound quality to your preference with the following settings.
1 Press MENU.
2 Press / to select “Audio”, and then press
ENTER.
• Audio menu displays.
3 Press / to select a specific adjustment item.
AV SELECTION
MENU
Adjustments items for AV source
MENU
Audio
DYNAMIC
Treble
Bass
Balance
Reset
RETURN
[0]
–15
[0]
–15
[0]
Left
ENTER
///
+15
+15
Right
4 Press / to adjust the item to your desired
position.
5 Press MENU to exit the menu.
A
• When all adjustments set to factory preset values,
1 Press
2 Press
• Return to the previous menu by pressing n.
• If you select “STANDARD” with AV SELECTION on the
remote control unit, these items will display in gray
and not be selectable. See page 50.
Selected item
Tre ble
Bass
Balance
/ to select “Reset”, and then press ENTER.
/ to select “Ye s”, and then press ENTER.
button
For weaker treble
For weaker bass
Decrease audio from
the right speaker
For stronger treble
For stronger bass
Decrease audio from
the left speaker
button
35
PDP-503HDE/(E)-c 8/31/02, 5:48 PM35
Page 38

Basic adjustment settings
Power control
Power Control setting allows you to reduce the display brightness to save energy.
Power control for AV source
Energy save
MENU
Power Control
Energy Save [Save]
Standard
Save
When set to “Save”, the power consumption is saved
by degrading picture brightness.
1 Press MENU.
2 Press / to select “Power Control”, and then press
ENTER.
3 Press / to select “Energy Save”, and then press
ENTER.
4 Press / to select “Save”, and then press ENTER.
5 Press MENU to exit the menu.
MENU
ENTER
/
MENU
Power Control
No signal off [Enable]
Disable
Enable
A
•“Standard” is factory preset value.
• Return to the previous menu by pressing n.
No signal off
When set to “Enable”, the power will automatically shut
down if no signal inputs for 15 minutes.
1 Press MENU.
2 Press / to select “Power Control”, and then press
ENTER.
3 Press / to select “No signal off”, and then press
ENTER.
4 Press / to select “Enable”, and then press
ENTER.
5 Press MENU to exit the menu.
• Five minutes before the power shuts down, hazard
warning displays every minute.
A
•“Disable” is factory preset value.
• Return to the previous menu by pressing n.
• When a TV programme finishes, and the Media Receiver
receives signal input, this function may not operate.
PDP-503HDE/(E)-c 8/31/02, 5:48 PM36
MENU
Power Control
No operation off [Enable]
Disable
Enable
No operation off
When set to “Enable”, the power will automatically shut
down if the signal stays inactive for 3 hours.
1 Press MENU.
2 Press / to select “Power Control”, and then press
ENTER.
3 Press / to select “No operation off”, and then
press ENTER.
4 Press / to select “Enable”, and then press
ENTER.
5 Press MENU to exit the menu.
• Five minutes before the power shuts down, hazard
warning displays every minute.
A
•“Disable” is factory preset value.
• Return to the previous menu by pressing n.
36
Page 39

Basic adjustment settings
MENU
ENTER
/
MENU
Power Control
Energy Save [Save]
Standard
Save
Power control for PC source
Power control allows you to reduce display brightness
and save energy.
Energy save
1 Press MENU.
2 Press / to select “Power Control”, and then press
ENTER.
3 Press / to select “Energy Save”, and then press
ENTER.
4 Press / to select “Save”, and then press ENTER.
5 Press MENU to exit the menu.
A
•“Standard” is factory preset value.
• Return to the previous menu by pressing n.
MENU
Power Control
Power Management [Off]
Off
Mode1
Mode2
Power management
When set, the power will automatically shut down.
1 Press MENU.
2 Press / to select “Power Control”, and then press
ENTER.
3 Press / to select “Power Management”, and then
press ENTER.
4 Press / to select “Mode1” or “Mode2”, and then
press ENTER.
5 Press MENU to exit the menu.
A
• Return to the previous menu by pressing n.
Selected item
Off
Mode1
Mode2
• No power management
• Factory preset value.
• If no signal inputs for 8 minutes, the power
shuts down.
• Even if you start using the computer and
the signal inputs again, the System stays
off.
• The System turns on again by pressing
STANDBY/ON on the Plasma Display or 0
– 9 on the remote control unit. The System
is out of PC mode. (See page 13.)
• If no signal inputs for 8 seconds, the power
shuts down.
• When you start using the computer and the
signal inputs again, the System turns on.
Description
37
PDP-503HDE/(E)-c 8/31/02, 5:48 PM37
Page 40

Using external equipment
You can connect many types of external equipment to your Plasma Display System, like a decoder, VCR, DVD
player, computer, game console and camcorder. To view external source images, select the input source from
b on the remote control unit or INPUT on the Plasma Display.
Plasma Display
(rear view)
DVD player
Power cord
COMPONENT
Y
B PR
S-VIDEO
MONITOR OUTPUT
VIDEO
P
R–AUDIO–L
INPUT 3
INPUT 1
INPUT 2
SYSTEM
CABLE
(WHITE)
RS-232C
(GRAY)
OUT
IN
CONTROL
Media Receiver
(rear view)
AC INLET
Power cord
AV Receiver
VCR Decoder
(Built-in Tuner
Amp)
MEDIA RECEIVER
PDP-R03E
Media Receiver
(front view)
Game console/
Computer
STANDBY/ON
POWER
Camcorder
L
• To protect all equipment, always turn off the Media Receiver before connecting to a decoder, VCR, DVD player, computer,
game console, camcorder or other external equipment.
A
• Please refer to the relevant operation manual (DVD player, computer, etc.) carefully before making connections.
PDP-503HDE/(E)-d 9/4/02, 2:16 PM38
38
Page 41

Using external equipment
Watching a decoder image
Connecting a decoder
You can use the INPUT 1 terminal when connecting a decoder and other audiovisual equipment.
Media Receiver (rear view)
COMPONENT
Y
P
S-VIDEO
MONITOR OUTPUT
R–AUDIO–L
VIDEO
B PR
INPUT 3
INPUT 2
INPUT 1
SCART cable
(commercially available)
IN
CONTROL
SYSTEM
CABLE
RS-232C
(GRAY)
OUT
(WHITE)
AC INLET
Decoder
MENU
Option
Input Select
INPUT1 [AV]
AV
RGB
INPUT SOURCE
TV
INPUT1
INPUT2
INPUT3
INPUT4
PC
Displaying a programme
When connecting to the INPUT 1 terminal, select
“INPUT1” and set the correct input signal type on “Input
Select” in the menu. (See page 49.)
The setting is stored and can be selected on the
“INPUT SOURCE” menu.
To watch a decoder image, select “INPUT1” from the
“INPUT SOURCE” menu using b on the remote
control unit or INPUT on the Plasma Display. (See page
49.)
A
• Each time b is pressed, the input source toggles.
• If the decoder image does not come in clearly, you may
need to change the input signal type setting on the “Input
Select” menu.
• It is recommended to connect to the INPUT 1 terminal
when using a decoder for ground wave signal input. If
INPUT 1 signals preset in auto installation or programme
setup, make sure to set “Decoder” to “INPUT1” in the
Programme Setup “Manual” menu. (See page 29.)
• Refer to your decoder operation manual for the signal type.
39
PDP-503HDE/(E)-d 9/2/02, 9:39 AM39
Page 42

Using external equipment
Watching a VCR image
Connecting a VCR
You can use the INPUT 2 terminal when connecting a VCR and other audiovisual equipment.
If your VCR supports TV-VCR advanced “AV Link” systems (see page 41), you can connect the VCR to the
INPUT 2 terminal on the Media Receiver using the fully-wired 21-pin SCART cable.
AV Link advanced system
• Download tuning information directly from TV to VCR (Preset download).
• While watching TV, you can record a programme with a one-touch press of the VCR recording button. (WYSIWYR*)
* Refer to your VCR operation manual as some VCRs have an exclusive key for WYSIWYR.
• When you press the play button on the VCR, the TV automatically turns on from standby and displays a VCR image.
• When you press the system standby button on the VCR, the TV also enters standby mode.
A
• TV-VCR advanced “AV Link” systems may not compatible with some external sources.
• It is recommended to connect to the INPUT 2 terminal when using a decoder for ground wave signal input with a VCR. If
INPUT 2 signals preset in auto installation or programme setup, make sure to set “Decoder” to “INPUT2” in the Programme
Setup “Manual” menu. (See page 29.)
Media Receiver (rear view)
COMPONENT
Y
P
S-VIDEO
MONITOR OUTPUT
R–AUDIO–L
VIDEO
B PR
INPUT 3
INPUT 2
INPUT 1
IN
CONTROL
OUT
RS-232C
(GRAY)
SYSTEM
CABLE
(WHITE)
AC INLET
SCART cable
(commercially available)
MENU
Option
Input Select
INPUT2 [AV]
AV
Y/C
INPUT SOURCE
TV
INPUT1
INPUT2
INPUT3
INPUT4
VCR
Decoder
Displaying a VCR image
When connecting to the INPUT 2 terminal, select
“INPUT2” and set the correct input signal type on “Input
Select” in the menu. (See page 49.)
The setting is stored and can be selected on the
“INPUT SOURCE” menu.
To watch a VCR image, select “INPUT2” from the
“INPUT SOURCE” menu using b on the remote
control unit or INPUT on the Plasma Display. (See page
49.)
A
• Each time b is pressed, the input source toggles.
• If the VCR image does not come in clearly, you may need
to change the input signal type setting on the “Input Select”
menu.
• Refer to your VCR operation manual for the signal type.
PDP-503HDE/(E)-d 9/2/02, 9:39 AM40
PC
40
Page 43

Using external equipment
Using i/o Link.A
This System incorporates four typical i/o Link.A functions for smooth connections between Media Receiver and
other audiovisual equipment.
A
• Only works when the audiovisual equipment is connected to the INPUT 2 terminal on the Media Receiver with i/o Link.A
via a fully wired 21-pin SCART.
One Touch Play
While the Plasma Display System is in standby mode,
it automatically turns on and plays back the image
from the audiovisual source (e.g. VCR, DVD).
System Standby
When the connected audiovisual equipment (e.g. VCR,
DVD) enters standby mode, so does the Plasma
Display System.
WYSIWYR (What You See Is What You
Record)
When the remote control unit of the connected VCR
has the WYSIWYR button, you can automatically start
recording by pressing the WYSIWYR button.
Preset Download
Automatically transfer the channel preset information
from the tuner on the Plasma Display System to the
one on the connected audiovisual equipment (e.g.
VCR) via the INPUT 2 terminal.
A
• Refer to operation manuals of each external equipment
for the details.
Media Receiver (rear view)
COMPONENT
Y
B PR
P
S-VIDEO
MONITOR OUTPUT
VIDEO
INPUT 3
R–AUDIO–L
INPUT 2
INPUT 1
SCART cable
(commercially available)
OUT
IN
CONTROL
VCR
RS-232C
SYSTEM
CABLE
(WHITE)
(GRAY)
AC INLET
41
PDP-503HDE/(E)-d 9/2/02, 9:39 AM41
Page 44

Using external equipment
Watching a DVD image
Connecting a DVD player
You can use the INPUT 3 terminal when connecting to a DVD player and other audiovisual equipment.
Media Receiver (rear view)
COMPONENT
Y
P
B PR
S-VIDEO
MONITOR OUTPUT
R–AUDIO–L
VIDEO
INPUT 3
INPUT 2
SCART cable
(commercially available)
INPUT 1
IN
CONTROL
OUT
RS-232C
(GRAY)
SYSTEM
CABLE
(WHITE)
AC INLET
When using component cable,
select “COMPONENT” for “Input
Select” in the menu.
Component cable (commercially available)
MENU
Option
Input Select
INPUT3 [COMPONENT]
AV
Y/C
RGB
COMPONENT
Displaying a DVD image
When connecting to the INPUT 3 terminal, select
“INPUT3” and set the correct input signal type on “Input
Select” in the menu. (See page 49.)
The setting is stored and can be selected on the
“INPUT SOURCE” menu.
To watch a DVD image, select “INPUT3” from “INPUT
SOURCE” menu using b on the remote control unit
or INPUT on the Plasma Display. (See page 49.)
A
• Each time b is pressed, the input source toggles.
• If the DVD image does not come in clearly, you may need
INPUT SOURCE
to change the input signal type setting on the “Input Select”
menu.
TV
INPUT1
• Refer to your DVD player operation manual for the signal
type.
INPUT2
DVD player
PDP-503HDE/(E)-d 9/2/02, 9:39 AM42
INPUT3
INPUT4
PC
42
Page 45

Using external equipment
Enjoying a game console and viewing camcorder images
Connecting a game console or camcorder
A game console, camcorder and some other audiovisual equipment are conveniently connected using the
INPUT 4 terminals.
A
• The S-video terminal has priority over the video terminals.
Media Receiver (front view)
MEDIA RECEIVER
PDP-R03E
STANDBY/ON
POWER
Composite video cables
(commercially available)
S-video cable
(commercially available)
INPUT SOURCE
TV
INPUT1
INPUT2
INPUT3
INPUT4
PC
Game console/Camcorder
Displaying an image of the game player and
camcorder
When connecting to the INPUT 4 terminals, select
“INPUT4”.
You only need to select the input source on the “INPUT
SOURCE” menu.
To connect a game console or view a camcorder, select
“INPUT4” from the “INPUT SOURCE” menu using b
on the remote control unit or INPUT on the Plasma
Display. (See page 49.)
A
• Each time b is pressed, the input source toggles.
43
PDP-503HDE/(E)-d 9/2/02, 9:39 AM43
Page 46

Using external equipment
Viewing an image from a computer
Connecting a computer
Use the PC terminals to connect a computer.
A
• The PC input terminals are DDC1/2B-compatible.
• Refer to page 60 for a list of computer signals compatible with the Plasma Display System.
Media Receiver (front view)
MEDIA RECEIVER
STANDBY/ON
POWER
RGB cable
(commercially available)
PDP-R03E
ø 3.5 mm stereo minijack cable
(commercially available)
Signal names for 15-pin mini D-sub connecter
5
4 321
10
15
141312
9
11
6
7
8
Pin No. Signal name Pin No. Signal name Pin No. Signal name
1 R 6 GND (Ground) q Not connected
2 G 7 GND (Ground) w SDA
3 B 8 GND (Ground) e HD
4 Not connected 9 Ⳮ5V r VD
5 CSYNC 0 GND (Ground) t SCL
A
• Macintosh adaptor may be required for use for some Macintosh computers.
INPUT SOURCE
TV
INPUT1
INPUT2
INPUT3
INPUT4
Displaying an image from a computer
When connecting to a computer, the correct input
signal type is automatically detected. (See page 49.)
If the computer image does not come in clearly, you
may need to set the Auto Sync. adjustment on the “Auto
Sync.” in the menu. (See page 48.)
You only need to select the input source on the “INPUT
SOURCE” menu.
Computer
PDP-503HDE/(E)-d 9/2/02, 9:39 AM44
PC
To view an image from a computer, select “PC” from
the “INPUT SOURCE” menu using b on the remote
control unit or INPUT on the Plasma Display. (See page
49.)
A
• Each time b is pressed, the input source toggles.
44
Page 47

Using external equipment
Control cord connection
When connecting control cords to the Media Receiver form other remote controlled PIONEER components
bearing the t logo, remote control operations are performed through the sensor on the System side.
After connecting to a CONTROL IN jack on another component, its sensor will no longer receive signals. To
operate a component remotely, point the remote control unit of the connected component at the remote control
sensor on the System.
A
• Make sure the power is turned off when making connections.
• Please complete all component connections before making control cord connections.
CONTROL
IN
Media Receiver (rear view)
RS-232C
OUT
IN
CONTROL
The control cables (not supplied) are monaural cables
with mini plugs (no resistance).
(GRAY)
SYSTEM
CABLE
OUT
CONTROL
IN
OUT
CONTROL
IN
OUT
45
PDP-503HDE/(E)-d 9/2/02, 9:39 AM45
Page 48

Using external equipment
How to route cables
Speed clamps and bead bands are included with this System for bunching cables. Once properly bunched,
follow the steps below to route the cables.
To the left
System cable Speed clamps Bead bands Speaker cable
As viewed from the rear of the display.
To the right
System cableSpeaker cable Speed clamps Bead bands
Bunch cables using provided speed clamps
Attaching speed clamps to the main unit
Connect the speed clamps using the 4 holes marked with • below, depending on your routing system.
Attaching and Removing speed clamps
Insert 1 into an appropriate hole on the rear of the Plasma Display and snap 2 into the back of 1 to fix the
clamp.
Speed clamps are designed to be difficult to undo once in place. Please attach carefully.
Use pliers to twist the clamp 90°, pulling outward. The clamp may deteriorate over time and become damaged
if removed.
2
1
Gather cables into a bunch, secure with provided bead bands
A
• Cables can be routed to the right or left.
46
PDP-503HDE/(E)-d 9/2/02, 9:39 AM46
Page 49

Useful adjustment settings
MENU
ENTER
///
MENU
Option
Position
H-Pos.
V-Pos.
Reset
RETURN
[0]
–15
[0]
–60
+15
+60
Image position (AV mode only)
For adjusting a picture’s horizontal and vertical
position.
1 Press MENU.
2 Press / to select “Option”, and then press
ENTER.
3 Press / to select “Position”, and then press
ENTER.
4 Press / to select “H-Pos.” or “V-Pos.”.
5 Press / to adjust the item to your desired
position.
6 Press MENU to exit the menu.
A
• For resetting all adjustment items set to the factory preset
values,
1 Press
2 Press
• Return to the previous menu by pressing n.
• Adjustments are stored separately according to input
source.
• Image position returns to the factory preset value when
“H-Pos.” or “V-Pos.” value is adjusted. (See page 22.)
Selected item
H-Pos.
V-Pos.
/ to select “Reset”, and then press ENTER.
/ to select “Yes”, and then press ENTER.
Description
Centres the image by moving it to the left or
right.
Centres the image by moving it up or down.
47
MENU
Option
NR [High]
Off
High
Low
Noise reduction (NR) (AV mode only)
The noise of the picture can be reduced by the NR
function.
1 Press MENU.
2 Press / to select “Option”, and then press
ENTER.
3 Press / to select “NR”, and then press ENTER.
4 Press / to select the desired level, and then
press ENTER.
5 Press MENU to exit the menu.
A
• Return to the previous menu by pressing n.
• The NR setting functions during 480i, 580i, and 480p input.
It cannot be selected during 1080i and 720p input.
• The NR setting is recorded for each INPUT SOURCE (TV,
INPUT1 to 4).
PDP-503HDE/(E)-e 8/31/02, 5:40 PM47
Page 50

Useful adjustment settings
MENU
MENU
ENTER
///
Auto Sync.
Adjusting the image 32%
Option
Auto Sync.
Fine Sync.
Audio Out
RETURN
[Fixed]
Auto Sync. adjustment (PC mode only)
For automatically adjusting the computer image.
1 Press MENU.
2 Press / to select “Option”, and then press
ENTER.
3 Press / to select “Auto Sync.”, and then press
ENTER.
• Auto Sync. starts and “Adjusting the image.” displays.
A
• Return to the previous menu by pressing n.
• When Auto Sync. is successful, “Auto Sync completed
successfully” displays. If not, Auto Sync. failed.
• Auto Sync. may fail even if “Auto Sync completed
successfully” displays.
• Auto Sync. may fail with a PC image composed of similar
patterns or monochrome. If not successful, change the
PC image and try again.
• Be sure to connect the computer to the Media Receiver
and switch it on before starting Auto Sync.
Selected item
H-Pos.
V-Pos.
Clock
Phase
MENU
Option
Fine Sync.
H-Pos.
V-Pos.
Clock
Phase
Reset
RETURN
Centres the image by moving it to the left or
right.
Centres the image by moving it to the up or
down.
Adjusts the clock frequency.
Adjusts the clock phase.
[0]
–90
[0]
–60
[0]
–90
[0]
–20
Description
+90
+60
+90
+20
Fine Sync. adjustment (PC mode only)
Ordinarily you can easily adjust the picture as
necessary to change image position using Auto Sync.
In some cases, however, manual adjustment is needed
to optimise the image.
1 Press MENU.
2 Press / to select “Option”, and then press
ENTER.
3 Press / to select “Fine Sync.”, and then press
ENTER.
4 Press / to select the specific adjustment item.
5 Press / to adjust the item to your desired
position.
6 Press MENU to exit the menu.
A
• When all adjustments set to factory preset values,
1 Press
2 Press
• Return to the previous menu by pressing n.
/ to select “Reset”, and then press ENTER.
/ to select “Yes”, and then press ENTER.
PDP-503HDE/(E)-e 8/31/02, 5:40 PM48
48
Page 51

Useful adjustment settings
MENU
ENTER
/
INPUT 1 signal menu
MENU
Option
Input Select
INPUT1 [AV]
AV
RGB
INPUT 2 signal menu
MENU
Option
Input Select
INPUT2 [AV]
AV
Y/C
INPUT 3 signal menu
MENU
Option
Input Select
INPUT3 [COMPONENT]
AV
Y/C
RGB
COMPONENT
Input signal source
Input signal setting
For setting the signal type of external equipment.
1 Press MENU.
2 Press / to select “Option”, and then press
ENTER.
3 Press / to select “Input Select”, and then press
ENTER.
4 Press / to select an input source you want to
set, and then press ENTER.
5 Press / to select a signal type, and then press
ENTER.
• If the selected signal type is incorrect, an image does
not display or no colour image displays.
6 Press MENU to exit the menu.
A
• Return to the previous menu by pressing n.
• The System automatically sets input signals from “INPUT4”
and “PC”.
• If no (colour) image displays, try to change the signal
type.
• Check the operation manual of the external equipment
for the signal type.
49
INPUT SOURCE
TV
INPUT1
INPUT2
INPUT3
INPUT4
PC
Input selection
Can use for selecting the input source.
1 Press b on the remote control unit or INPUT on
the Plasma Display.
• INPUT SOURCE menu displays.
2 Hold down b on the remote control unit or INPUT
on the Plasma Display to select the input source.
• An image from the selected source automatically
displays.
• You can also select the input source by pressing
.
A
• When there are no external sources connected to those
terminals, “INPUT3” (COMPONENT) or “INPUT4” will
display in gray and not be selectable.
• Return to the previous menu by pressing n.
/
PDP-503HDE/(E)-e 8/31/02, 5:40 PM49
Page 52

Useful adjustment settings
Colour system setting (AV mode only)
You can change the colour system to one that is
compatible with the image on the screen.
MENU
Option
AV
SELECTION
MENU
ENTER
/
Mode selection for the INPUT 1 to 4 terminal
AV SELECTION: STANDARD
AV SELECTION: DYNAMIC
AV SELECTION: MOVIE
AV SELECTION: GAME
Colour Sys. [PAL]
AUTO
PAL
PAL-60
SECAM
NTSC 3.58
NTSC 4.43
1 Press MENU.
2 Press / to select “Option”, and then press
ENTER.
3 Press / to select “Colour Sys.”, and then press
ENTER.
4 Press / to select a compatible video signal
system of your equipment, and then press ENTER.
5 Press MENU to exit the menu.
A
• Factory preset value is “AUTO”.
• If “AUTO” is selected, colour systems for each channel
are automatically set. If an image does not display clearly,
select another colour system (e.g. PAL, NTSC 4.43).
• Return to the previous menu by pressing n.
AV selection
AV selection gives you five viewing options to choose
from to best match the Plasma Display System
environment, which can vary due to factors like roombrightness, type of programme watched or the type of
image input from external equipment.
1 Press AV SELECTION.
• Present AV selection mode displays.
2 Press AV SELECTION again before the mode
displayed on the screen disappears.
• The mode changes as shown left.
AV SELECTION: USER
Mode selection for the PC terminal
AV SELECTION: STANDARD
AV SELECTION: USER
PDP-503HDE/(E)-e 8/31/02, 5:40 PM50
Selected item
STANDARD
DYNAMIC
MOVIE
GAME
USER
Description
For a highly defined image in a normally
bright room
For a clear-cut image emphasising high
contrast for sports viewing.
For a movie
Lowers image brightness for easier viewing
Allows the user to customise settings as
desired. You can set the mode for each
input source.
50
Page 53

Useful adjustment settings
WIDE MODE
4:3
FULL 14:9
CINEMA 14:9
WIDE
FULL
ZOOM
CINEMA
/
4:3 Mode set to “4:3” 4:3 Mode set to “WIDE”
WIDE mode
Manual Selection
1 Press f.
• The WIDE MODE menu displays.
• The menu lists the wide mode options selectable for
the type of video signal currently received.
2 Press f or / while the WIDE MODE menu is
still on the screen.
• You can sequentially select a wide mode that has its
own aspect ratio.
Auto Selection
If you set “WSS” and “4:3 Mode” in the Option menu
on page 52, the optimum screen mode is automatically
chosen for every broadcast containing the WSS
information.
“WSS” menu
To enable Auto Selection, set “WSS” in the Option menu
to “On”. (See page 52.)
“4:3 Mode” menu
To set the type of the wide screen, select “4:3” or
“WIDE” in the 4:3 Mode menu. (See page 52.)
A
• If the broadcast signal contains no WSS information, Auto
Selection will not function even when the WSS option is
enabled.
Selected item
4:3
FULL 14:9
CINEMA 14:9
WIDE
FULL
ZOOM
CINEMA
4:3 FULL 14:9 CINEMA 14:9
Description
For 4:3 “standard” pictures. A side bar appears on each side.
For 14:9 squeeze pictures. A thin side bar appears on each side.
For 14:9 letterbox pictures. A thin side bar appears on each side, and you may also see bars on
the top and bottom with some programs.
In this mode the picture is progressively stretched toward each side of the screen.
For 16:9 squeeze pictures.
For 16:9 letterbox pictures. Bars may appear on the top and bottom with some programs.
For 14:9 letterbox pictures. Bars may appear on the top and bottom on some programs.
WIDE
FULLZOOMCINEMA
51
PDP-503HDE/(E)-e 8/31/02, 5:40 PM51
Page 54

Useful adjustment settings
MENU
ENTER
/
MENU
Option
WSS [On]
Off
On
Wide screen signalling (WSS) (AV
mode only)
WSS allows a television to switch automatically among
the different screen formats.
1 Press MENU.
2 Press / to select “Option”, and then press
ENTER.
3 Press / to select “WSS”, and then press ENTER.
4 Press / to select “Off” or “On”, and then press
ENTER.
5 Press MENU to exit the menu.
A
• Return to the previous menu by pressing n.
• Try to set WIDE mode if an image does not switch to the
correct screen format. When the broadcast signal contains
no WSS information, the function will not work even if
enabled. See page 51.
Picture aspect ratio (AV mode only)
Allows you to select the aspect ratio of a video signal
for standard 4:3 or full screen images.
WSS signal 4:3 screen
4:3 mode “4:3”
MENU
Option
4:3 Mode [4:3]
4:3
WIDE
4:3 mode “WIDE”
1 Press MENU.
2 Press / to select “Option”, and then press
ENTER.
3 Press / to select “4:3 Mode”, and then press
ENTER.
4 Press / to select “4:3” or “WIDE”, and then press
ENTER.
5 Press MENU to exit the menu.
A
• Return to the previous menu by pressing n.
• Try to set WIDE mode if an image does not switch to the
correct screen format. When the broadcast signal contains
no WSS information, the function will not work even if
enabled. See page 51.
Selected item
4:3
WIDE
Normal range keeping 4:3 or 16:9 aspect
ratio
Wide image without sidebars
Description
PDP-503HDE/(E)-e 8/31/02, 5:41 PM52
52
Page 55

Useful adjustment settings
SLEEP
MENU
ENTER
/
MENU
Option
Audio Out [Variable]
Fixed
Variable
Audio out
Allows you to select what controls the audio output.
1 Press MENU.
2 Press / to select “Option”, and then press
ENTER.
3 Press / to select “Audio Out”, and then press
ENTER.
4 Press / to select “Fixed” or “Variable”, and then
press ENTER.
5 Press MENU to exit the menu.
A
• Return to the previous menu by pressing n.
Selected item
Fixed
Variable
• Sound via optional speakers is adjusted
with ik/l on the remote control unit
or VOLUME on the Plasma Display.
• Sound via the MONITOR OUT terminal is
not adjustable and constantly outputs.
• Sound via the MONITOR OUT terminal is
adjusted with ik/l on the remote
control unit or VOLUME on the Plasma
Display.
• Sound via optional speakers is muted.
Description
SLEEP TIMER: REMAIN 120
Sleep timer
Allows you to set a time when the TV automatically
switches to standby.
1 Press SLEEP.
• Remaining time displays when sleep timer has been
set.
2 Each time you press SLEEP, the remaining time
switches as shown below.
• When set the time, countdown automatically starts.
• Five minutes before the preset of time expires, the
remaining time displays each minute.
30 60 90
0
A
• Select “0” by pressing SLEEP to cancel the sleep timer.
120
(minutes)
53
PDP-503HDE/(E)-e 8/31/02, 5:41 PM53
Page 56

Useful adjustment settings
Password setting for Child lock (AV
mode only)
Allows you to use a password to protect certain settings
from being accidentally changed.
0–9
MENU
ENTER
/
MENU
Setup
Child Lock
Password
New Password
Reconfirm
MENU
Setup
Child Lock
Password Clear
No
Yes
– –––
––––
Setting a password
1 Press MENU.
2 Press / to select “Setup”, and then press
ENTER.
3 Press / to select “Child Lock”, and then press
ENTER.
4 Press / to select “Password”, and then press
ENTER.
5 Enter the 4-digit number as a password using 0 –
9.
6 Enter the same 4-digit number as in step 5 to
confirm.
•“New Password is registered.” displays.
7 Press MENU to exit the menu.
A
• Return to the previous menu by pressing n.
• To view a locked channel (Lock setting in Programme
Setup “Manual” is set to “On”), you must enter a password.
(See page 29.) When you select a locked channel, a
password prompt message pops up. Press ENTER to
display the password input window.
Clearing the password
Allows you to clear your password.
1 Press MENU.
2 Press / to select “Setup”, and then press
ENTER.
• Password input menu displays.
3 Enter your 4-digit password with 0 – 9, and then
press ENTER.
• Setup menu displays.
4 Press / to select “Child Lock”, and then press
ENTER.
5 Press / to select “Password Clear”, and then
press ENTER.
6 Press / to select “Ye s”, and the press ENTER.
• Your password is cleared.
7 Press MENU to exit the menu.
PDP-503HDE/(E)-e 8/31/02, 5:41 PM54
A
• Return to the previous menu by pressing n.
• As a precautionary measure, make a note of your
password and keep it in a familiar place. If you lose or
forget your password, initialise the Plasma Display
System to return all settings except for the TV channel
settings to factory preset values. (See page 63.)
54
Page 57

Useful features
Multiscreen functions
Allows you to display two pictures on the screen at one time.
Dual screen
You can display two same-sized pictures except when
inputting from a PC INPUT terminal.
1 Press c.
2 Press / to set either screen to be active.
3 Press b to select another input source on the
/
4 Press c to exit dual screen.
A
• This function does not work under the following input
conditions:
1PC INPUT mode,
2Two pictures from the same source (e.g. INPUT 1 and
3Images from a high frequency signal source,
4Two pictures with different vertical frequency (e.g. PAL
• When this function is not available, “No dual screen display
available” will display.
• Dual screen displays and a selected input source
image displays.
•“z” displays on the active screen, which has sound
output.
active screen.
• A selected image displays.
INPUT 1),
and PAL-60).
55
PDP-503HDE/(E)-f 8/31/02, 5:14 PM55
Page 58

Useful features
ENTER
Picture and still image
You can display two same-sized pictures when
inputting from a AV source.
1 Press d.
• A moving image displays on the left screen and a still
image displays on the right screen. The still image is
one frame captured from a moving image at the
moment you press d.
2 Update the still image by pressing ENTER.
• Each time you press ENTER, the image on the right
screen updates.
3 Press d to exit still image.
A
• This function does not work under the following input
conditions:
1PC INPUT mode,
2Images from a high frequency signal source.
• When this function is not available, “No still image display
available.” will display.
FREEZE
56
PDP-503HDE/(E)-f 8/31/02, 5:14 PM56
Page 59

Useful features
Teletext function
What is Teletext?
Teletext broadcasts pages of information and entertainment to specially equipped television sets. Your Plasma
Display System receives Teletext signals broadcast by a TV networks, and decodes them into graphical format
for viewing. News, weather and sports information, stock exchange prices and programme previews are among
the many services available.
Teletext mode
TELETEXT
0–9
Colour
(RED/GREEN/
YELLOW/BLUE)
Teletext is turned on/off with m on the remote control
unit. You can operate your Plasma Display System in
Teletext mode directly by inputting commands with the
remote control unit.
Turning on and off Teletext
1 Select a TV channel or external input source
providing the Teletext programme.
2 Press m to display the Teletext.
3 Press m again to display the Teletext on the right
screen and normal image on the left screen.
• Each time you press m, the screen switches as shown
left.
• If you select a programme with no Teletext signal, “No
Teletext available.” displays.
Button functions
Colour (RED/GREEN/YELLOW/BLUE):
You can select a group or block of pages displayed in
the coloured brackets at the bottom of the screen by
pressing the corresponding Colour (RED/GREEN/
YELLOW/BLUE) on the remote control unit.
0 – 9:
Directly select any page from 100 to 899 by using 0 –
9.
GREEN
RED
57
PDP-503HDE/(E)-f 8/31/02, 5:14 PM57
TELETEXT
TELETEXT
YELLOW BLUE
v:
Each time you press v, the TELETEXT image switches
as shown below.
Full
Upper half
Lower half
k:
To reveal hidden information such as an answer to a
quiz, press k.
• Press k again to hide the information.
u:
To stop updating Teletext pages automatically, press
u.
• Press u again to release the hold mode.
Page 60

Useful features
0–9
Displaying Subpages
You can display several subpages as they are
transmitted.
1 Press m to display Teletext.
2 Press j to display the subpage as shown left.
/
( / )
RED
GREEN
ENTER
///
Subpage screen
203 203TEXT 01:44:37
3 Select the desired subpage by using / /RED/
GREEN.
• 0 – 9 directly selects the desired subpage.
4 Press j to exit the subpage screen.
kk
• If you press w/x (P
change to the next/previous page and simultaneously
exit the subpage screen.
ll
k/P
l), the present page will
kk
ll
ⳮⳭ
TOP Overview screen
BLOCK PAGES
TV PROGRAMS
COLOR BAR
WEATHER
NEWS
MOVIE
LOCAL
SPORTS
BLOCK 1
BLOCK 2
BLOCK 3
0005 ‹‹ 02 03 04 05 06
INDEX
GROUP PAGES
FOOT BALL
BASKETBALL
TENNIS
SKI
JUDO
SWIM
GROUP 1
GROUP 2
GROUP 3
GROUP 4
Displaying TOP Overview
When receiving TOP Teletext, you can read a TOP text
overview.
1 Press m to display Teletext.
2 Press l to display the TOP Overview as shown
left.
3 Select the desired block or group by using / / /
.
4 Press ENTER to display the selected block or group
pages.
5 Press l to exit the TOP Overview screen.
PDP-503HDE/(E)-f 8/31/02, 5:14 PM58
58
Page 61

Appendix
Troubleshooting
Problem Possible Solution
• No power.
• Unit cannot be operated.
• Remote control unit does not
operate.
• Picture is cut off.
• Strange colour, light colour, or
dark, or colour misalignment.
• Make sure the Plasma Display and the Media Receiver are connected correctly.
(See page 7.)
• Check if you pressed a on the remote control unit. (See page 13.)
If the indicator on the Plasma Display lights up red, press 0 – 9.
• Is the power cord disconnected? (See page 12.)
• Has the main power been turned on? (See page 13.)
• External influences such as lightning, static electricity, etc., may cause improper
operation. In this case, operate the unit after first turning the power of the Plasma
Display and the Media Receiver, or unplugging the power cord and re-plugging
it in after 1 or 2 minutes.
• Are batteries inserted with polarity (e, f) aligned? (See page 8.)
• Are batteries worn out? (Replace with new batteries.)
• Are you using it under strong or fluorescent lighting?
• Is a fluorescent light illuminated to remote control sensor?
• Is the image position correct? (See pages 22, 47 and 48.)
• Are screen mode adjustments such as picture size made correctly? (See pages
51 and 52.)
• Adjust the picture tone. (See pages 32 to 34.)
• Is the room too bright? The picture may look dark in a room that is too bright.
• Check the colour system setting. (See page 27 and 50.)
• Check the input signal setting. (See page 49.)
• Power is suddenly turned off.
• No picture.
Problem with Plasma Display SystemWarning Possible Solution
E01
E04
E06
• System cable connection
• Abnormal internal temperature
• Abnormal internal signaling or circuit
operation of the Plasma Display
• The unit’s internal temperature has increased.
Remove any objects blocking vent or clean. (See page 6.)
• Check the power control setting. (See pages 36 and 37.)
• Check the sleep timer setting. (See page 53.)
• Is connection to other components correct? (See pages 38 to 44.)
• Has setup been done correctly after connection? (See page 49.)
• Is the correct input selected? (See page 49.)
• Is a non-compatible signal being input? (See page 60.)
• Is picture adjustment correct? (See pages 32 to 34.)
• System cables are not properly connected. Check that
all system cables are connected properly. (See page
7.)
• The internal temperature of the Plasma Display is
abnormally high. Check the location the System is
installed. (See page 6.)
• Turn off the power once and turn it on again. (See page
13.)
Please check to see if a warning is displayed on the screen. If the problem still cannot be solved please consult the dealer
where this unit was purchased.
59
PDP-503HDE/(E)-g 8/31/02, 5:15 PM59
Page 62

Appendix
Computer compatibility chart
Resolution
640400
720400
640480
800600
832624
1024768
1280768
Frequency
85 Hz
70 Hz
85 Hz
60 Hz
65 Hz
72 Hz
75 Hz
85 Hz
56 Hz
60 Hz
72 Hz
75 Hz
85 Hz
74.5 Hz
60 Hz
70 Hz
75 Hz
85 Hz
60 Hz
Remarks
Macintosh 13 (67 Hz)
Macintosh 16
Macintosh 19
Apple and Macintosh are registered trademarks
of Apple Computer, Inc.
Microsoft is a registered trademark of Microsoft
Corporation.
DDC is a registered trademark of Video Electronics
Standards Association.
Power Management is a registered trademark of
Sun Microsystems, Inc.
VGA and XGA are registered trademarks of
International Business Machines Co., Inc.
PDP-503HDE/(E)-g 8/31/02, 5:15 PM60
60
Page 63

Appendix
Connecting pin assignments for SCART
Various audio and video devices may be connected via the SCART terminals.
13579111315171921
2468101214161820
SCART (INPUT 1)
1. Audio right output
2. Audio right input
3. Audio left output
4. Common earth for audio
5. Earth for blue
6. Audio left input
7. Blue input
8. Audio-video control
9. Earth for green
10. Not used
11. Green input
12. Not used
13. Earth for red
14. Not used
15. Red input
16. Red/Green/Blue control
17. Earth for video
18. Earth for Red/Green/Blue
19. Video output
20. Video input
21. Plug shield
control
SCART (INPUT 2)
1. Audio right output
2. Audio right input
3. Audio left output
4. Common earth for audio
5. Earth
6. Audio left input
7. Not used
SCART (INPUT 3)
1. Audio right output
2. Audio right input
3. Audio left output
4. Common earth for audio
5. Earth
6. Audio left input
7. Blue input
8. Audio-video control
9. Earth
10. AV LINK control
11. Not used
12. Not used
13. Earth
14. Not used
8. Audio-video control
9. Earth
10. Not used
11. Green input
12. Not used
13. Earth
14. Not used
15. Chroma S-Video input
16. Not used
17. Earth for video
18. Earth
19. Video output
20. Video input/S-video input
21. Plug shield
15. Red input/Chroma S-Video
input
16. Red/Green/Blue control
17. Earth for video
18. Earth
19. Video output
20. Video input/S-video input
21. Plug shield
61
PDP-503HDE/(E)-g 8/31/02, 5:15 PM61
Page 64

Appendix
Specifications
Item 50o Plasma Display, Model: PDP-503PE
Number of Pixels
Audio Amplifier
Power Requirement
Dimensions 1218 (W), 714 (H), 98 (D) mm
Weight
Accessories Power Cord, Cleaning Cloth, Three speed
Item Media Receiver, Model: PDP-R03E
Colour System
TV
Function
Terminals SCART (AV in, RGB in, TV out)
Receiving System
Tuner
Auto Channel Preset
STEREO NICAM/A2
Rear INPUT 1
1280g768 pixels
12 We12 W (10 % distortion)
AC 220–240 V, 50/60 Hz, 356 W
(0.6 W Standby)
38.9 kg
clamps, Three bead bands,
Warranty card
PAL/SECAM/NTSC 3.58/NTSC 4.43/PAL 60
B/G, D/K, I, L/L’
VHF/UHF
CATV Hyper-band, S1–S41ch
E2–E69ch, F2–F10ch, I21–I69ch, IR A–IR Jch
99 ch, Auto Preset, Auto Label, Auto Sort
43o Plasma Display, Model: PDP-433PE
1024g768 pixels
12 We12 W (10 % distortion)
AC 220–240 V, 50/60 Hz, 320 W
(0.6 W Standby)
1070 (W), 630 (H), 98 (D) mm
31.5 kg
Power Cord, Cleaning Cloth, Three speed
clamps, Three bead bands,
Warranty card
INPUT 2
INPUT 3
Antenna 75 q Din Type for VHF/UHF in
Front
Monitor Out Terminal
Power Requirement
Dimensions 420 (W), 70 (H), 330 (D) mm
Weight
Accessories Power Cord, Remote control unit, Two AA size batteries, System Cable,
• Design and specifications are subject to change without notice.
INPUT 4 S-VIDEO, AV in
PC 15 Pin mini D-Sub, Audio in
Rear
SCART (AV in/out, S-VIDEO in, AV Link)
SCART (AV in/out, S-VIDEO in, RGB in), Component
Audio (Variable, Fixed), S-VIDEO out, AV out
AC 220–240 V, 50/60 Hz, 40 W (0.8 W Standby)
4.4 kg
Two Operating Instructions
PDP-503HDE/(E)-g 8/31/02, 5:15 PM62
62
Page 65

HOW TO SET THE FACTORY PRESETTINGS
Press and hold down CLEAR on the Media Receiver while it is in standby mode. Then press STANDBY/ON
on the Plasma Display or 0 – 9 on the remote control unit to turn the Plasma Display System on.
All setting items (except TV channel) return to the factory presetting.
A
• Running the factory presetting operation also clears the password.
You can run the Auto Installation again by using the following steps.
1 Turn on the power of the Plasma Display and the Media Receiver.
2 Press MENU. (Make sure the menu screen displays.)
3 Press to select “Setup”.
4 Press ENTER.
A
• If the password setting screen displays, you need to enter your password.
• If you forget your password, refer to HOW TO SET THE FACTORY PRESETTINGS above.
5 Press / to select “Auto Installation”.
6 Press ENTER.
“Auto Installation completed” displays. After that, the screen changes to the TV mode.
The secret number is .
A
• As a precautionary measure, make a note of your secret number above, scissor it from this manual, and keep it in a
familiar place.
*1SRS and the symbol are trademarks of SRS Labs, Inc.
SRS technology is incorporated under license from SRS Labs, Inc.
1
FOCUS and the symbol are trademarks of SRS Labs, Inc.
*
FOCUS technology is incorporated under license from SRS Labs, Inc.
A
• Products above are a trademark or registered trademark of corporation.
About the plasma panel’s protection function
The brightness of this display will deteriorate slightly when an image with little movement such as a photograph or computer
image is continuously displayed. This is caused by the plasma panel’s protection function which detects images with slight
movement and automatically adjusts brightness to protect the display, and is not a malfunction.The screen-saver function
begins operating when the display detects no or little screen movement for a period of about three minutes.
L
Panel sticking and after-image lag
• Displaying the same images such as still images for a long time may cause after-image lagging. This may occur in the
following two cases.
1. After-image lagging due to remaining electrical load
When image patterns with very high peak luminance are displayed for more than 1 minute, after-image lagging may occur
due to the remaining electric load. The after-images remaining on the screen will disappear when moving images are
displayed. The time for the after-images to disappear depends on the luminance of the still images and the time they had
been displayed.
2. After-image (lag image) due to burning
Avoid displaying the same image on the Plasma Display continuously over a long period of time. If the same image is
displayed continuously for several hours, or for shorter periods of time over several days, a permanent after-image
may remain on the screen due to burning of the fluorescent materials. Such images may become less noticeable if
moving images are later displayed, but they will not disappear completely.
• The energy save function can be set to help prevent damage from screen burning (See page 36-37).
63
PDP-503HDE/(E)-g 8/31/02, 5:15 PM63
Page 66

Nous vous remercions pour cet achat d’un produit Pioneer. Nous
vous demandons de lire soigneusement ce mode d’emploi; vous
serez ainsi à même de faire fonctionner l’appareil correctement.
Après avoir bien lu le mode d’emploi, le ranger dans un endroit
sûr pour pouvoir s’y référer ultérieurement. Dans certains pays
ou certaines régions, la forme de la fiche d’alimentation et de la
prise d’alimentation peut différer de celle qui figure sur les
schémas, mais les branchements et le fonctionnement de
l’appareil restent les mêmes.
Ce produit est conforme à la directive relative aux appareils
basse tension (73/23/CEE, amendements 93/68/CEE), à la
directive CE relative à la compatibilité electromagnétique
(89/336/CEE, amendements 92/31/CEE et 93/68/CEE).
AVERTISSEMENT : LISEZ ATTENTIVEMENT LA SECTION
SUIVANTE AVANT DE BRANCHER L’APPAREIL POUR LA PREMIERE
FOIS. LA TENSION DE L’ALIMENTATION ELECTRIQUE FOURNIE
DIFFERE SELON LES PAYS OU LES REGIONS. VERIFIEZ SI CELLE
DE LA REGION OU L’APPAREIL SERA UTILISE CORRESPOND A
LA TENSION REQUISE (230 V OU 120 V) INDIQUEE SUR LE
PANNEAU ARRIERE.
Les symboles qui suivent se trouvent sur les
étiquettes apposées sur le produit. Ils alertent
les utilisateurs de ce matériel ainsi que le
personnel du service après- vente sur toutes les
situations qui présentent un danger potentiel.
DANGER
Ce symbole concerne un risque ou une
pratique dangereuse qui peut entraîner des
blessures graves ou la mort.
ATTENTION
Ce symbole concerne un risque ou une
pratique dangereuse qui peut entraîner des
blessures ou des dégâts matériels.
AVERTISSEMENT :
COMME DES BOUGIES ALLUMEES SUR L’APPAREIL. ELLES
RISQUENT DE TOMBER ACCIDENTELLEMENT, DE PROPAGER LE
FEU A L’APPAREIL ET DE PROVOQUER UN INCENDIE.
VENTILATION: VEILLEZ A LAISSER UN ESPACE DE
VENTILATION AUTOUR DE L’APPAREIL LORS DE SON
INSTALLATION POUR AMELIORER LES RADIATIONS DE CHALEUR
(AU MINIMUM 50 CM EN HAUT, ET 10 CM A L’ARRIERE ET DE
CHAQUE COTE.)
NE PAS PLACER DE FLAMMES NUES
AVERTISSEMENT : CET APPAREIL EST DOTE D’UNE FICHE
TROIS FILS AVEC MISE A LA TERRE. CETTE FICHE AYANT UNE
TROISIEME BROCHE (TERRE), ELLE NE POURRA SE BRANCHER
QUE SUR UNE PRISE AVEC MISE A LA TERRE. IL S’AGIT D’UN
DISPOSITIF DE SECURITE. SI VOUS NE POUVEZ PAS
L’INTRODUIRE DANS LA PRISE, CONTACTEZ VOTRE ELECTRICIEN
POUR REMPLACER LA PRISE OBSOLETE. N’ANNULEZ PAS LA
FONCTION DE SECURITE DE LA FICHE AVEC MISE A LA TERRE.
PDP-503HDE/(F)-WR 9/3/02, 4:23 PM1
AVERTISSEMENT : LES FENTES ET OUVERTURES DANS
LE COFFRET SONT PREVUES POUR LA VENTILATION, POUR
ASSURER UN FONCTIONNEMENT STABLE DU PRODUIT ET POUR
LE PROTEGER CONTRE LES SURCHAUFFES. POUR PREVENIR LES
INCENDIES, LES OUVERTURES NE DOIVENT JAMAIS ETRE
BLOQUEES NI RECOUVERTES D’OBJETS COMME DES
JOURNAUX, UNE NAPPE, DES RIDEAUX, ETC. EVITEZ
EGALEMENT DE PLACER L’APPAREIL SUR UN TAPIS EPAIS, UN
LIT, UN SOFA OU UNE PILE DE TISSUS.
Page 67

Cher client
Nous vous remercions pour votre achat de cet appareil PIONEER. Par mesure de sécurité et pour assurer un
fonctionnement sans problème pendant de nombreuses années, veuillez lire attentivement les Précautions de
sécurité avant de l’utiliser.
Table des matières
Cher client ………………………………………………… 1
Table des matières ……………………………………… 1
Informations importantes pour l’utilisateur ………… 2
Précautions de sécurité ………………………………… 3
Caractéristiques ………………………………………… 4
Accessoires fournis ……………………………………… 5
Ecran à plasma ……………………………………… 5
Récepteur média ……………………………………… 5
Préparation ………………………………………………… 6
Installation de l’écran à plasma …………………… 6
Mise en place du système …………………………… 7
Utilisation de la télécommande …………………… 8
Précautions pour la télécommande …………… 8
Mise en place des piles ………………………… 8
Précautions sur les piles ……………………… 8
Nomenclature …………………………………………… 9
Ecran à plasma ……………………………………… 9
Récepteur de média ………………………………… 10
Télécommande ……………………………………… 11
Pour regarder la télévision ……………………………… 12
Raccordements de base …………………………… 12
Raccordement à une antenne ………………… 12
Raccordement au cordon d’alimentation …… 12
Mise sous tension …………………………………… 13
Mise hors tension …………………………………… 13
Auto installation initiale ……………………………… 14
Opérations sur une touche pour changer
de canel …………………………………………… 16
Opération sur une touche pour changer
le volume/son …………………………………… 17
Réglages de base ………………………………………… 20
Rubriques du menu du mode AV …………………… 20
Rubriques du menu du mode PC …………………… 21
Déplacement de l’image à l’écran ………………… 22
Auto installation ……………………………………… 23
Réglage de la langue …………………………… 23
Réglage du pays ………………………………… 23
Recherche auto de programme ……………… 24
Etiquetage auto ………………………………… 24
Tri auto …………………………………………… 25
Téléchargement des préréglages …………… 25
Installation du programme …………………………… 26
Recherche auto ………………………………… 26
Réglage manuel de chaque canal …………… 26
Entrée de canaux supplémentaires ……… 27
Accord fin …………………………………… 27
Système couleur …………………………… 27
Système son ………………………………… 28
Etiquetage des canaux …………………… 28
Omission des canaux ……………………… 28
Réglage du décodeur ……………………… 29
Réglage du verrouillage enfant …………… 29
Tri ………………………………………………… 30
Réglage de la langue ………………………………… 31
Réglages de l’image ………………………………… 32
Température de couleur ………………………… 33
Noir ………………………………………………… 33
Noir et blanc ……………………………………… 34
PureCinema ……………………………………… 34
Réglage du son ……………………………………… 35
Commande d’alimentation …………………………… 36
Commande d’alimentation pour source AV …… 36
Commande d’alimentation pour source PC … 37
Utilisation d’appareils externes ……………………… 38
Pour regarder l’image d’un décodeur ……………… 39
Raccordement d’un décodeur ………………… 39
Affichage d’un programme …………………… 39
Pour regarder l’image d’un magnétoscope ……… 40
Raccordement d’un magnétoscope …………… 40
Affichage de l’image d’un magnétoscope …… 40
Utilisation de e/s Link.A ……………………………… 41
Pour regarder une image DVD ……………………… 42
Raccordement d’un lecteur DVD ……………… 42
Affichage d’une image DVD …………………… 42
Pour jouer sur une console et regarder les images
d’un caméscope ………………………………… 43
Raccordement d’une console de jeu ou d’un
caméscope ………………………………… 43
Affichage de l’image de la console de jeu
et du caméscope …………………………… 43
Pour regarder l’image d’un ordinateur …………… 44
Raccordement d’un ordinateur ………………… 44
Affichage de l’image d’un ordinateur ………… 44
Raccordement du cordon de commande ………… 45
Comment acheminer les câbles …………………… 46
Réglages pratiques ……………………………………… 47
Position de l’image (mode AV uniquement) ……… 47
Diminution de son (NR) (mode AV uniquement) … 47
Réglage Sync.Automat. (mode PC uniquement) … 48
Réglage Sync. fine (mode PC uniquement) ……… 48
Source de signal d’entrée …………………………… 49
Réglage du système couleur
(mode AV uniquement) ………………………… 50
Sélection AV …………………………………………… 50
Mode GRAND ÉCRAN ……………………………… 51
Signalisation Grand écran (Wide screen
signalling WSS) (mode AV uniquement) ……… 52
Rapport hauteur/largeur de l’image
(mode AV uniquement) ………………………… 52
Sortie audio …………………………………………… 53
Minuterie d’extinction ………………………………… 53
Réglage du mot de passe pour verrouillage enfant
(mode AV uniquement) ………………………… 54
Fonctions pratiques ……………………………………… 55
Fonctions d’écrans multiples ……………………… 55
Fonction Télétexte …………………………………… 57
Annexe …………………………………………………59
Guide de dépannage ………………………………… 59
Tableau de compatibilité des ordinateurs ………… 60
Attribution des broches de connexion
pour prise Péritel ………………………………… 61
Fiche technique ……………………………………… 62
1
PDP-503HDE/(F)-a 9/4/02, 3:09 PM1
Page 68

Informations importantes pour l’utilisateur
Veuillez lire attentivement ces informations pour pouvoir apprécier pleinement ce système d’écran à plasma Pioneer
PureVision PDP-503HDE/PDP-433HDE.
Avec l’écran à plasma Pioneer PureVision PDP-503HDE/PDP-433HDE, vous disposez d’un système de haute qualité, d’une
longue durée de vie et d’une haute fiabilité. Afin de vous offrir des images d’une qualité exceptionnelle, le système d’écran
à plasma Pioneer intègre une conception et une structure ultra-sophistiquées ainsi qu’une technologie de pointe de haute
précision. Sur un total de près de 3 millions de cellules lumineuses, plus de 99,999 pour cent des cellules restent actives.
Pendant sa durée de vie, la luminosité du système d’écran à plasma Pioneer PDP-503HDE/PDP-433HDE diminuera très
lentement, comme pour tous les écrans à base de phosphore (par exemple, un téléviseur traditionnel de type tube). Pour
pouvoir apprécier pendant longtemps de belles images lumineuses sur votre système d’écran à plasma Pioneer, lisez
attentivement et respectez les instructions d’usage ci-dessous.
Instructions d’usage
Tous les écrans à base de phosphore (y compris les téléviseurs traditionnels de type tube) peuvent être affectés par
l’affichage d’images statiques pendant une période prolongée. L’écran à plasma ne fait pas exception à la règle. Les
images résiduelles et les effets permanents à l’écran peuvent être évités en prenant certaines précautions de base. Suivez
les recommandations ci-dessous pour utiliser de manière satisfaisante votre système d’écran pendant longtemps :
• Dans la mesure du possible, évitez d’afficher fréquemment la même image ou des images mobiles virtuellement fixes
(images avec sous-titres ou images de jeux vidéo avec des parties statiques).
• N’affichez pas le Télétexte pendant une période prolongée.
• Evitez de regarder l’affichage sur écran pendant longtemps à partir d’un décodeur, d’un lecteur DVD, d’un magnétoscope
ou d’autres appareils.
• Ne laissez pas la même image à l’arrêt ou en pause continue pendant longtemps lorsque vous utilisez le mode d’image
fixe à partir d’un téléviseur, d’un magnétoscope, d’un lecteur DVD ou d’un autre appareil.
• Les images comportant des zones très claires et des zones très sombres côte à côte ne doivent pas être affichées
pendant une période prolongée.
• Le réglage en mode “JEU” dans “SELECTION AV” est vivement recommandé lorsque vous jouez à un jeu. Toutefois,
limitez cet usage à moins de 2 heures à la fois.
• Après la fin du jeu, l’affichage de l’image d’un PC ou d’une image fixe, il est préférable de voir une image mobile
normale dans le réglage “LARGE” ou “PLEIN” pendant trois fois la durée de l’image fixe précédente.
• Après avoir utilisé l’écran à plasma, mettez toujours l’écran en mode “ATTENTE”.
Instructions d’installation
Le système d’écran à plasma Pioneer PureVision PDP-503HDE/PDP-433HDE est de conception très mince. Par mesure de
sécurité, montez ou installez l’écran à plasma de façon à ce qu’il ne tombe pas en cas de vibrations ou de mouvements
accidentels.
Cet appareil doit être installé en utilisant uniquement des pièces et accessoires PIONEER. L’usage d’autres accessoires
que le socle ou le support d’installation PIONEER peut rendre l’installation instable et provoquer des blessures. Pour une
installation personnalisée, adressez-vous au revendeur qui vous a vendu l’appareil. Des techniciens expérimentés et qualifiés
peuvent assurer une installation correcte. PIONEER ne sera pas tenue responsable des accidents ou des dommages
provoqués par l’utilisation de pièces ou d’accessoires d’autres marques.
Pour éviter les défauts de fonctionnement et la surchauffe et assurer la bonne dissipation de la chaleur, veillez à ce que les
évents de l’unité principale ne soient pas bloqués lors de l’installation.
• Eloignez légèrement l’appareil des autres équipements, des murs, etc. (plus de 10 cm)
• N’encastrez pas l’appareil dans des endroits étroits avec une ventilation médiocre.
• Ne le recouvrez pas d’un tissu, etc.
• Nettoyez les évents sur les côtés et l’arrière de l’appareil pour retirer la poussière à l’aide d’un aspirateur réglé sur sa
vitesse d’aspiration la plus basse.
L’utilisation de l’appareil sans ventilation appropriée peut provoquer une hausse de la température interne et
entraîner des problèmes de fonctionnement. Lorsque la température ambiante ou interne excède un certain
niveau, l’écran se met automatiquement hors tension pour refroidir les pièces électroniques internes et éviter
les dangers.
Des défauts de fonctionnement peuvent se produire si le site de l’installation est inapproprié, si l’assemblage,
l’installation et le montage ne sont pas corrects et en cas de modification de l’appareil. PIONEER ne sera
toutefois pas tenue responsable de ces accidents ou défauts.
B
Les effets typiques et caractéristiques des écrans à matrice à base phosphore, comme les images résiduelles permanentes
sur le phosphore du panneau et l’existence d’un nombre infime de cellules lumineuses inactives dans l’écran, ne sont pas
couverts par les garanties locales.
PDP-503HDE/(F)-a 9/3/02, 4:15 PM2
2
Page 69

Précautions de sécurité
L’électricité est très utile mais peut également provoquer des blessures personnelles et matérielles si elle n’est
pas manipulée correctement. Cet appareil a été conçu et fabriqué en accordant la plus haute priorité à la
sécurité. Toutefois, un usage inadéquat peut provoquer une électrocution ou un incendie. Pour éviter tout
danger potentiel, observez les précautions suivantes lors de l’installation, du fonctionnement et du nettoyage
de l’appareil. Pour assurer votre sécurité et prolonger la durée de vie de votre appareil, lisez attentivement les
précautions suivantes avant de l’utiliser.
1. Lisez les instructions—Toutes les instructions doivent être lues et comprises avant de faire fonctionner l’appareil.
2. Conservez ce mode d’emploi dans un endroit sûr—Ces instructions de sécurité et de fonctionnement doivent être
conservées dans un endroit sûr pour future référence.
3. Observez les avertissements—Tous les avertissements sur le produit et dans le mode d’emploi doivent être observés.
4. Suivez les instructions—Toutes les instructions doivent être observées.
5. Nettoyage—Débranchez le cordon d’alimentation de la prise secteur avant de nettoyer l’appareil. Utilisez un chiffon
mouillé pour le nettoyer. N’utilisez pas de détergents liquides ou en aérosols.
6. Fixations—N’utilisez pas de fixations non recommandées par le fabricant. L’utilisation de fixations inappropriées
peut provoquer des accidents.
7. Eau et humidité—N’utilisez pas l’appareil à proximité de l’eau, près d’une baignoire, d’un lavabo, d’un évier, d’une
machine à laver, d’une piscine et dans un sous-sol humide.
8. Support—Ne placez pas l’appareil sur un chariot, un support, un trépied ou une table instable. S’il est sur une base
instable, l’appareil peut tomber et provoquer des blessures personnelles graves ou être endommagé. Utilisez
uniquement un chariot, un support, un trépied ou une table recommandés par le fabriquant ou vendus avec l’appareil.
Pour monter l’appareil sur un mur, suivez les instructions du fabricant et n’utilisez que du matériel recommandé par
ce dernier.
9. Pour déplacer l’appareil placé sur un chariot, procédez au transport avec précaution. Des arrêts
brusques, une force excessive ou des irrégularités de la surface du sol peuvent provoquer la
chute de l’appareil.
10. Ventilation—Les évents et autres ouvertures du coffret sont destinés à la ventilation. Ne les
recouvrez pas et ne les bloquez pas car une ventilation insuffisante risque de provoquer une
surchauffe et/ou de réduire la durée de vie de l’appareil. Ne placez pas l’appareil sur un lit, un
sofa, un tapis ou une autre surface similaire risquant de bloquer les ouvertures de ventilation.
Ce produit n’est pas conçu pour être encastré ; ne le placez pas dans des endroits clos comme
une bibliothèque ou une étagère, sauf si une ventilation adéquate est prévue ou si les instructions du fabricant sont
respectées.
11. Alimentation—Cet appareil doit fonctionner avec la source d’alimentation mentionnée sur l’étiquette des spécifications.
Si vous n’êtes pas sûr du type d’alimentation utilisé dans votre région, consultez votre revendeur ou la compagnie
d’électricité locale.
12. Protection du cordon d’alimentation—Les cordons d’alimentation doivent être acheminés correctement pour éviter
d’être piétinés ou d’être encombrés par des objets. Vérifiez les cordons aux fiches et sur l’appareil.
13. L’écran à plasma utilisé dans cet appareil est en verre. Il peut donc se briser lorsque l’appareil chute ou subit un
choc. Veillez à ne pas vous blesser avec les éclats de verre si l’écran se brise.
14. Surcharge—Ne surchargez pas les prises secteur et les rallonges. Une surcharge peut être à l’origine d’un incendie
ou d’une électrocution.
15. Pénétration d’objets et de liquides—Ne jamais introduire d’objet dans l’appareil par les évents ou les ouvertures.
Une haute tension circule dans l’appareil et l’introduction d’un objet peut provoquer une électrocution et/ou courtcircuiter les pièces internes. Pour la même raison, ne renversez pas d’eau ni de liquide sur l’appareil.
16. Entretien—Ne tentez pas de procédez vous-même à l’entretien de l’appareil. La dépose des couvercles risque de
vous exposer à de hautes tensions et d’autres situations dangereuses. Faites appel à un technicien qualifié pour
l’entretien.
17. Réparations—Dans les situations ci-dessous, débranchez le cordon d’alimentation de la prise secteur et faites
appel à un technicien qualifié pour procéder aux réparations.
a. Lorsque le cordon d’alimentation ou la fiche est endommagée.
b. Lorsque du liquide a été renversé sur l’appareil ou que des objets sont tombés dans l’appareil.
c. Lorsque l’appareil a été exposé à la pluie ou à l’eau.
d. Lorsque l’appareil ne fonctionne pas conformément aux descriptions du mode d’emploi.
Ne touchez pas à d’autres commandes que celles décrites dans le mode d’emploi. Un réglage incorrect des
commandes qui ne sont pas indiquées dans le mode d’emploi peut provoquer des dommages qui demanderont
par la suite un travail intensif au technicien qualifié.
e. Lorsque l’apareil est tombé ou endommagé.
f. Lorsque l’appareil présente des anomalies. Toute anomalie de l’appareil indique la nécessité d’une inspection
d’entretien.
18. Pièces de rechange—Si des pièces de rechange sont nécessaires, assurez-vous que le technicien utilise des
pièces recommandées par le fabricant, ou ayant les mêmes caractéristiques et performances que les pièces d’origine.
L’utilisation de pièces non autorisées peut provoquer un incendie, une électrocution et/ou d’autres dangers.
19. Contrôle de sécurité—Après un travail d’entretien ou de réparation, demandez au technicien de procéder à un
contrôle de sécurité pour vérifier si l’appareil est en bonne condition de marche.
20. Montage sur un mur ou au plafond—Lors du montage sur un mur ou au plafond, veillez à installer l’appareil selon la
méthode recommandée par le fabricant.
21. Sources de chaleur—Eloignez l’appareil des sources de chaleur comme les radiateurs, les chauffages, et les autres
3
appareils produisant de la chaleur (y compris les amplificateurs).
22. Débranchez le cordon d’alimentation de la prise secteur avant d’installer les haut-parleurs.
PDP-503HDE/(F)-a 9/3/02, 4:15 PM3
Page 70

Caractéristiques
• Nouveau panneau à plasma XGA LARGE (H:1280 m V:768 pixels)
• Grand angle de vision
• Son stéréo NICAM/A2
• Système sonore SRS, FOCUS *
1
• Tuner TV multisystème
• Fonction TELETEXTE intégrée (TOP/FLOF/FASTEXT)
• Image dans l’image. Fonction d’image fixe.
• Affichage à l’écran en 12 langues
• 4 entrées vidéo avec 3 prises Péritel et entrée PC (XGA)
• Prise pour périphérique
• Verrouillage pour enfant
PDP-503HDE/(F)-a 9/3/02, 4:15 PM4
4
Page 71

Accessoires fournis
Ecran à plasma
Cordon d’alimentation
(Pour l’Europe, excepté le
Royaume-Uni et l’Eire)
Trois colliers rapides
B
• Utilisez toujours le cordon d’alimentation fourni avec l’écran à plasma et celui fourni avec le récepteur de média pour
chaque appareil respectif.
(Pour le Royaume-Uni et l’Eire)
Trois serre-câbles
Chiffon de nettoyage
Carte de garantie
Récepteur de média
Cordon d’alimentation
(Pour l’Europe, excepté le
Royaume-Uni et l’Eire)
Deux piles AA
(Piles alcalines)
5
PDP-503HDE/(F)-a 9/3/02, 4:15 PM5
(Pour le Royaume-Uni et l’Eire) Télécommande
Câble système
Deux modes d’emploi
Page 72

Préparation
Installation de l’écran à plasma
Plus de
50 cm
Plus de
10 cm
Emplacements
• Evitez l’exposition directe au soleil. Assurez une
ventilation suffisante.
• Le câble système utilisé pour raccorder l’écran à
plasma et le récepteur de média a une longueur
d’environ 3 m.
• L’écran à plasma est lourd. Veillez à le déplacer à
deux personnes ou plus.
M
• Ne placez rien sur le récepteur de média. Sinon, il ne
disposera pas d’une ventilation suffisante et ne pourra
pas fonctionner correctement.
B
• Lors de l’installation, prévoyez suffisamment d’espace en
haut et à l’arrière afin d’assurer la ventilation autour de
l’appareil.
Utilisation du socle PIONEER en option
• Pour les détails sur l’installation, reportez-vous au
mode d’emploi fourni avec le socle.
Utilisation des haut-parleurs PIONEER en
option
• Pour les détails sur l’installation, reportez-vous au
mode d’emploi fourni avec les haut-parleurs.
M
Environnement de fonctionnement
Température et humidité de l’environnement de
fonctionnement : e0°C à e 40°C (e32F à e104F); moins
de 20 à 80% d’humidité relative (sans obstruer les évents
de ventilation)
Eviter d’installer dans les endroits suivants :
• Directement exposés au soleil,
• Sous un éclairage artificiel intense,
• Avec une humidité élevée,
• Mal aérés.
PDP-503HDE/(F)-a 9/3/02, 4:15 PM6
6
Page 73

Préparation
Mise en place du système
1. Raccordement du câble système et du cordon d’alimentation à l’écran à plasma
Ecran à plasma (vue arrière)
Pour les détails sur
l’installation des hautparleurs PIONEER en
(vue de dessous)
(GRIS)(BLANC)
Cordon d’alimentation
option, reportez-vous au
mode d’emploi fourni avec
les haut-parleurs.
Câble système
2. Raccordement du câble système et du cordon d’alimentation au récepteur de média
Câble système
Récepteur de média (vue arrière)
COMPONENT
Y
P
B PR
S-VIDEO
MONITOR OUTPUT
R–AUDIO–L
VIDEO
INPUT 3
INPUT 2
INPUT 1
(GRIS)
IN
CONTROL
OUT
RS-232C
(GRAY)
SYSTEM
CABLE
(BLANC)
(WHITE)
AC INLET
M
• CES PRISES POUR HAUT-PARLEURS PEUVENT ETRE SOUS TENSION DANGEREUSE LORSQUE VOUS BRANCHEZ
OU DEBRANCHEZ LES CABLES DES HAUT-PARLEURS. POUR EVITER LES RISQUES D’ELECTROCUTION, NE
TOUCHEZ PAS AUX PIECES NON ISOLEES AVANT DE DEBRANCHER LE CORDON D’ALIMENTATION.
7
PDP-503HDE/(F)-a 9/3/02, 4:15 PM7
Cordon d’alimentation
Page 74

Préparation
Utilisation de la télécommande
Utilisez la télécommande en la dirigeant vers la fenêtre du capteur. Des objets
placés entre la télécommande et la fenêtre du capteur peuvent gêner le bon
fonctionnement de la télécommande.
Précautions sur la télécommande
• N’exposez pas la télécommande à des chocs. Ne l’exposez pas non plus à
des liquides, et ne la placez pas dans des endroits très humides.
• N’installez pas et n’exposez pas la télécommande directement au soleil. La
chaleur risque de la déformer.
• La télécommande risque de ne pas fonctionner correctement si la fenêtre du
capteur de télécommande de l’écran à plasma est directement exposée au
soleil ou à un éclairage violent. Dans ce cas, changez l’angle de l’éclairage
ou de l’écran à plasma, ou rapprochez la télécommande de la fenêtre du
capteur.
Mise en place des piles
Si la télécommande n’agit plus sur les fonctions du système de l’écran à plasma,
remplacez les piles.
1 Ouvrez le couvercle des piles. 2 Introduisez les piles (deux piles
3 Refermez le couvercle.
AA, fournies avec l’appareil).
+
_
• Placez les piles en faisant correspondre
leurs bornes avec les indications (e)
et (f) dans le compartiment.
_
+
Précautions sur les piles
Une utilisation incorrecte des piles peut provoquer des fuites ou une explosion. Veillez à suivre les instructions
ci-dessous.
• N’utilisez pas de piles au manganèse. Utilisez des piles alcalines lors du remplacement.
• Placez les piles en faisant correspondre leurs bornes avec les indications (e) et (f).
• N’utilisez pas ensemble des piles de types différents. Les autres piles ont des caractéristiques différentes.
• N’utilisez pas ensemble des piles usagées et neuves. Ceci peut raccourcir la durée de vie des piles neuves
ou provoquer des fuites des piles usagées.
• Retirez les piles dès qu’elles sont usées. Les produits chimiques s’écoulant d’une pile peuvent provoquer
une allergie. En cas de fuite, essuyez soigneusement avec un chiffon.
• Les piles fournies avec l’appareil peuvent avoir une durée de vie plus courte que prévue en raison des
conditions de stockage.
• Si vous avez utilisé la télécommande pendant une période prolongée, retirez les piles.
M
• POUR LA MISE AU REBUT DES PILES USAGEES, CONFORMEZ-VOUS AUX REGLEMENTS GOUVERNEMENTAUX
OU AUX REGULATIONS PUBLIQUES SUR L’ENVIRONNEMENT EN USAGE DANS VOTRE PAYS/REGION.
PDP-503HDE/(F)-a 9/3/02, 4:15 PM8
8
Page 75

Nomenclature
Ecran à plasma
Indicateur d’alimentation
Touche MAIN POWER
STANDBY/ON
INPUTSTANDBY/ON VOLUMECHANNEL
Touche INPUT Touches VOLUME r/s
Touche STANDBY/ON
Touches CHANNEL r/s Capteur de télécommande
9
PDP-503HDE/(F)-a 9/3/02, 4:15 PM9
Page 76

Nomenclature
Récepteur de média
Vue avant
Prise PC INPUT (ANALOG RGB)
STANDBY/ON
POWER
Prise INPUT 4 (VIDEO)
Touche CLEAR*
MEDIA RECEIVER
PDP-R03E
Prise PC INPUT (AUDIO) Prises INPUT 4 (AUDIO)
Touche POWER
Prise INPUT 4 (S-VIDEO)
* Si vous avez des problèmes avec le récepteur de média et si vous désirez retourner à l’écran normal, même
si l’appareil reste sous tension (l’indicateur est allumé en vert), appuyez sur CLEAR du récepteur de média.
La pression sur CLEAR réinitialise le système comme indiqué ci-dessous.
• SELECTION AV revient à STANDARD.
• Le canal télévisé revient sur le canal 1.
• Les écrans multiples reviennent à la normale.
• Le réglage audio est initialisé.
• SRS revient sur Arrêt.
• La position de l’image est initialisée.
B
• La pression sur CLEAR ne sera pas opérationnelle si le système est en mode d’attente mais l’indicateur allumé en rouge.
• La pression sur CLEAR n’annule pas le préréglage des canaux ni le mot de passe. Voir Page 54 pour réinitialiser les
préréglages d’usine si vous connaissez votre mot de passes. Voir page 63 pour réinitialiser les préréglages d’usine si
vous avez oublié votre mot de passe.
Vue arrière
Prises INPUT 3 (Y, P
Prise d’entrée de l’antenne
S-VIDEO
Prise MONITOR
OUTPUT (S-VIDEO)
Prise MONITOR
OUTPUT (VIDEO)
PDP-503HDE/(F)-a 9/3/02, 4:15 PM10
COMPONENT
Y
P
B PR
MONITOR OUTPUT
R–AUDIO–L
VIDEO
Prises MONITOR
OUTPUT (AUDIO)
B, PR)
Prise INPUT 3 (Péritel)
INPUT 3
INPUT 2
Prise INPUT 2
(Péritel)
INPUT 1
Prise INPUT 1
terminal (Péritel)
Prise RS-232C
(utilisé pour le réglage en usine)
Prise SYSTEM CABLE (BLANC)
SYSTEM
CABLE
IN
CONTROL
OUT
RS-232C
(GRAY)
(WHITE)
AC INLET
Prise SYSTEM CABLE
(GRIS)
Prise CONTROL
Prise AC INLET
10
Page 77

Nomenclature
Télécommande
1
2
3
4
5
6
7
8
9
10
11
12
13
B
• Pour utiliser la télécommande,
dirigez-la vers l’écran à plasma.
14
15
16
17
18
19
20
21
22
23
24
1 a
Pour mettre hors tension.
2 du
Mode d’entrée TV/externe : Change le mode d’image fixe.
Mode TELETEXTE : Immobilise des pages multiples à l’écran alors
que les autres pages sont automatiquement mises à jour.
Appuyez de nouveau sur d pour revenir à l’image normale.
3 c
Règle le mode d’image double. Appuyez de nouveau sur c pour
revenir à l’image normale.
4 0 – 9
Pour mettre sous tension.
Mode d’entrée TV/externe : Règle le canal.
Mode TELETEXTE : Règle la page.
5 o
Sélectionne le mode à deux chiffres.
6 SLEEP
Règle la minuterie d’extinction.
7 AV SELECTION
Sélectionne un réglage audio ou vidéo. MODE AV : STANDARD,
DYNAMIQUE, CINÉMA, JEU, UTILISATEUR. MODE PC : STANDARD,
UTILISATEUR.
8 w/x (Pk/Pl)
Mode d’entrée TV/externe : Sélectionne le canal.
Mode TELETEXTE : Règle la page.
9 e
Coupe le son.
10 Couleur (ROUGE/VERT/JAUNE/BLEU)
Mode TELETEXTE : Sélectionne une page.
11 j
Mode TELETEXTE : Change le mode de l’image pour la sélection de
la sous-page.
12 k
Mode TELETEXTE : Affiche les caractères dissimulés.
13 MENU
Affiche l’écran du menu.
14 fv
Mode d’entrée TV/externe : Change le mode d’image large.
Mode TELETEXTE : Règle la zone d’agrandissement. (totale/moitié
supérieure/moitié inférieure)
15 b
Sélectionne une source d’entrée. (TV, Entrée 1, Entrée 2, Entrée 3,
Entrée 4, PC)
16 p
Affiche les informations sur le canal.
17 g
Règle le mode multiplex.
18 h
Règle le système sonore SRS et FOCUS.
19 il/ik
Règle le volume.
20 m
Sélectionne le mode TELETEXTE. (toute image TV, toute image
TEXTE, image TV/TEXTE)
21 l
Mode TELETEXTE : Affiche une page d’index pour l’information
CEEFAX/FLOF. Vue d’ensemble TOP pour programme TOP.
22 n
Mode MENU : Revient à l’écran de menu précédent.
23 ENTER
Exécute une commande.
/ / /
24
Sélectionne la rubrique désirée sur l’écran de réglage.
Déplace l’image sur l’écran.
11
PDP-503HDE/(F)-a 9/4/02, 2:26 PM11
Page 78

Pour regarder la télévision
Opérations simples pour regarder un programme télévisé
Raccordements de base
Raccordement à une antenne
Pour obtenir des images plus nettes, utilisez une antenne externe. Ce qui suit est une brève explication des
types de raccordements utilisés pour le câble coaxial.
COMPONENT
Y
P
Fiche standard DIN45325 (IEC169-2)
Câble coaxial de 75 ohms (câble rond)
(en vente dans le commerce)
Antennes et câbles en vente dans le commerce
Si votre antenne externe est dotée d’un câble coaxial de 75 ohms avec fiche
standard DIN45325 (IEC 169-2), branchez-la dans la prise d’antenne à l’arrière
du récepteur de média.
S-VIDEO
MONITOR OUTPUT
VIDEO
R–AUDIO–L
BPR
INPUT 3
INPUT 2
INPUT 1
SYSTEM
CABLE
(WHITE)
RS-232C
(GRAY)
OUT
IN
CONTROL
AC INLET
Branchement du cordon d’alimentation
Ecran à plasma (vue de dessous)
AC INLET
Récepteur de média (vue arrière)
S-VIDEO
Y
MONITOR OUTPUT
VIDEO
COMPONENT
R–AUDIO–L
BPR
P
INPUT 3
INPUT 1
INPUT 2
SYSTEM
CABLE
(WHITE)
RS-232C
(GRAY)
OUT
IN
CONTROL
AC INLET
AC INLET
Europe, à l’exception du
Royaume-Uni et de l’Eire
Royaume-Uni et Eire
Europe, à l’exception du
Royaume-Uni et de l’Eire
Royaume-Uni et Eire
B
• Mettez toujours l’écran à plasma et le récepteur de média hors tension lors du branchement des cordons d’alimentation.
• Débranchez le cordon d’alimentation de la prise murale, de l’écran à plasma et du récepteur de média lorsque vous
n’avez pas l’intention d’utiliser le système pendant une période prolongée.
PDP-503HDE/(F)-b 9/3/02, 4:16 PM12
12
Page 79

Pour regarder la télévision
Ecran à plasma
STANDBY/ON
STANDBY/ON
Indicateur d’alimentation
MAIN POWER
Récepteur de média
STANDBY/ON
POWER
POWER
Indicateur d’alimentation
INPUTSTANDBY/ON VOLUMECHANNEL
PLASMA DISPLAY SYSTEM
0–9
Mise sous tension
1 Appuyez sur MAIN POWER de l’écran à plasma.
• L’indicateur d’alimentation de l’écran à plasma clignote en
rouge.
2 Appuyez sur POWER sur le récepteur de média.
• Le système se met sous tension.
• L’indicateur d’alimentation de l’écran à plasma s’allume en
vert et celui du récepteur de média en vert également.
• Si les indicateurs d’alimentation restent allumés en rouge,
appuyez sur une touche de 0 à 9 sur la télécommande ou
sur STANDBY/ON de l’écran à plasma pour mettre le système
MEDIA RECEIVER
PUSH
PDP-R03E
sous tension.
Pour mettre d’abord le récepteur sous tension
1 Appuyez sur POWER sur le récepteur de média.
• L’indicateur d’alimentation sur le récepteur de média s’allume
en rouge.
2 Appuyez sur MAIN POWER de l’écran à plasma.
• Le système se met sous tension.
• L’indicateur d’alimentation de l’écran à plasma s’allume en
vert et celui du récepteur de média en vert également.
• Si les indicateurs d’alimentation restent allumés en rouge,
appuyez sur une touche de 0 à 9 sur la télécommande ou
sur STANDBY/ON de l’écran à plasma pour mettre le système
sous tension.
B
•“Le système d’écran à plasma” et “le système” mentionnés ci-dessus
signifient le panneau de l’écran à plasma et le récepteur de média.
• L’auto installation initiale démarre lorsque le système est mis pour la
première fois sous tension. Si le système a déjà été mis sous tension,
l’auto installation initiale n’a pas lieu. Voir page 23 pour tenter l’auto
installation à partir du menu Installation.
Indicateurs de l’état de l’écran à plasma
Eteint
Clignote en rouge
Rouge
Vert
Hors tension
Le récepteur de média n’est pas sous tension ou son cordon d’alimentation est débranché.
Le système d’écran à plasma est en mode d’attente.
Le système d’écran à plasma est sous tension.
Indicateurs de l’état du récepteur de média
Eteint
Rouge
Vert
Hors tension
Seul le récepteur de média est en mode d’attente ou le système d’écran à plasma est en mode d’attente.
Le système d’écran à plasma est sous tension.
Mise hors tension
1 Appuyez sur a de la télécommande ou sur
STANDBY/ON sur l’écran à plasma.
• Le système entre en mode d’attente et l’image à l’écran
disparaît.
• Les deux indicateurs d’alimentation passent du vert au rouge.
2 Appuyez sur MAIN POWER du récepteur de
média.
• L’indicateur d’alimentation du récepteur de média s’éteint et
celui de l’écran à plasma clignote en rouge.
3 Appuyez sur MAIN POWER de l’écran à plasma.
• L’indicateur d’alimentation de l’écran à plasma s’éteint après
environ 5 secondes.
B
• Si vous n’avez pas l’intention d’utiliser le système pendant une
longue période, retirez le cordon d’alimentation de la prise
murale.
13
PDP-503HDE/(F)-b 9/3/02, 4:16 PM13
Page 80

Pour regarder la télévision
Auto installation initiale
L’auto installation initiale a lieu lorsque le système d’écran à plasma est mis sous tension pour la première fois
après l’achat. Vous pouvez régler automatiquement la langue, le pays et les canaux par opérations successives.
B
• Voir page 23 pour tenter l’auto installation à partir du menu d’installation.
Menu de la langue
Auto Installation - Language
English
Deutsch
Français
Italiano
Español
Nederlands
Svenska
Português
Suomi
Türkçe
Menu du pays
Autoinstallation - Pays
Autriche
Belgique
Danemark
A
B
DK
B/G
B/G
B/G
1. Réglage de la langue
1 Appuyez sur / pour sélectionner la langue
désirée sur la liste à l’écran.
2 Appuyez sur ENTER pour entrer le réglage.
2. Réglage du pays ou de la région
1 Appuyez sur / pour sélectionner votre pays ou
région dans la liste à l’écran.
2 Appuyez sur ENTER pour entrer le réglage.
• La recherche automatique de programme démarre en
même temps.
B
• Revenez au menu de la langue en appuyant sur n.
Recherche des canaux télévisés
Autoinstallation - Installation “Auto”
1011142.25
010255.25
85.25
03 102.25
04
05
06
07
08
09
PDP-503HDE/(F)-b 9/4/02, 2:28 PM14
148.25
3. Recherche automatique des canaux
La recherche auto des canaux fait rechercher au
système d’écran à plasma tous les canaux visibles
dans le pays ou la région réglée.
B
• Si aucun canal n’est trouvé, “Aucun programme trouvé.
L’antenne est-elle correctement branchée ?” est affiché
et l’auto installation prend fin.
• Si vous désirez tenter de nouveau l’auto installation,
reportez-vous page 23.
14
Page 81

Pour regarder la télévision
4. Etiquetage automatique des canaux
Etiquetage des canaux télévisés
Autoinstallation - Installation “Auto”
10 142.25
0102SAT.1
PRO7
03 KABEL
04
05
06
07
130.25
08
136.25
09
11 148.25
12 155.25
Tri des canaux télévisés
Autoinstallation - Installation “Auto”
10 -----
0102SAT.1
PRO7
03 KABEL
04
05
06
07
08
09
11 -----
12 -----
VOX
QVC
Lorsqu’il a trouvé les canaux TV, le système d’écran à
plasma commence à nommer chacun des canaux
trouvés.
B
• Le système ne peut nommer que les canaux ayant des
informations pour étiquetage. S’il n’y a pas d’informations,
il affiche “-----”.
• Annulez le réglage en appuyant sur n et le système
revient automatiquement à l’état avant la recherche
automatique de programme.
5. Tri automatique des canaux
Lorsque l’étiquetage automatique des canaux est
terminé, le système d’écran à plasma commence à
trier les canaux étiquetés.
B
• Annulez le réglage en appuyant sur n. Le système
revient automatiquement à l’état avant la recherche
automatique de programme.
Téléchargement des préréglages
Envoi des réglages de programme 10.
Envoi des données de programme réussi.
Installation automatique terminée.
6. Téléchargement des préréglages
Lorsque le tri automatique est terminé, le système
d’écran au plasma télécharge et sauvegarde
automatiquement chacun des canaux triés.
• A chaque fois que le téléchargement d’un canal préréglé
est terminé, “Envoi des réglages de programme 10.” est
affiché. Lorsque tous les préréglages ont été téléchargés,
“Envoi des données de programme réussi.” est affiché.
• Lorsqu’un magnétoscope est raccordé par INPUT 2, le
système envoie toutes les informations sur les canaux
préréglés au magnétoscope. Voir pages 25, 40 et 41.
B
• Si le téléchargement du préréglage d’un canal a échoué,
“Erreur d’envoi des données de programme.” apparaît et
le téléchargement s’arrête à ce moment-là.
Erreur d'envoi des données de programme.
15
PDP-503HDE/(F)-b 9/3/02, 4:16 PM15
Page 82

Pour regarder la télévision
Affichage des canaux
SAT.1
Ecran à plasma
STANDBY/ON
INPUTSTANDBY/ON VOLUMECHANNEL
CHANNEL
PAL
B/G
Lorsque le téléchargement des préréglages est
terminé, l’auto installation initiale est terminée.
•“Installation automatique terminée.” est affiché. L’écran
1
passe ensuite au menu d’auto installation.
7. Pour regarder la télévision
Le menu d’installation disparaît et vous pouvez
regarder les programmes sur le canal 1.
Opérations sur une touche pour
changer de canal
kk
Utilisation de P
• Appuyez sur P
• Appuyez sur P
Pour regarder les informations Télétexte
• Appuyez sur P
• Appuyez sur P
B
• CHANNEL r/s sur l’écran à plasma fonctionne de la
même manière que P
ll
k/
lsur la télécommande
kk
ll
kk
k pour un numéro de canal supérieur.
kk
ll
l pour un numéro de canal inférieur.
ll
kk
k pour un numéro de page supérieur.
kk
ll
l pour un numéro de page inférieur.
ll
kk
ll
k/
l.
kk
ll
0–9
Pⴐ/ⴑ
MENU
Affichage des canaux
SAT.1
12
PAL
B/G
SAT.1
12
MONO
Utilisation de 0 – 9 sur la télécommande
Sélectionnez directement les canaux en appuyant sur
les touches 0 à 9.
a
• Pour sélectionner le canal 2, un canal à un chiffre,
appuyez sur 2.
• Pour sélectionner le canal 12, un canal à deux
chiffres, appuyez sur o pour sélectionner une
entrée à 2 chiffres. Appuyez ensuite sur 1, puis sur
2.
Pour regarder les informations Télétexte
Regardez directement une page avec un numéro à
trois chiffres de 100 à 899 en appuyant sur les touches
0 to 9. Avec le Télétexte, o n’est pas utilisé. Voir
page 57.
B
• Le canal sélectionné, “12” par exemple, est affiché. Avec
le Télétexte, le numéro de page reste affiché en continu.
• En mode d’attente, lorsque vous appuyez sur 0, l’appareil
se met sous tension et l’image à l’écran provient de la
source Entrée 1. Une image télévisée est également
affichée lorsque vous appuyez sur une touche de 1 à 9.
PDP-503HDE/(F)-b 9/3/02, 4:16 PM16
16
Page 83

Pour regarder la télévision
20
Opération sur une touche pour
changer le volume/son
Ecran à plasma
STANDBY/ON
INPUTSTANDBY/ON VOLUMECHANNEL
VOLUME
Réglage du volume
ⴐ/ⴑ
kk
Utilisation de i
• Pour augmenter le volume, appuyez sur i
• Pour diminuer le volume, appuyez sur i
B
• VOLUME r/s sur l’écran à plasma fonctionne de la
même manière que i
ll
k/
l de la télécommande
kk
ll
kk
ll
k/
l.
kk
ll
ll
l.
ll
kk
k.
kk
Etat audio
spécifié
Sortie audio
VariableFixe
Sourdine
Son variable
Appareil de
sortie
Haut-parleur
MONITOR OUT
* Lorsque “Sortie audio” est réglé sur “Variable”, l’indicateur
à l’écran change de la manière indiquée ci-dessous.
B
• Voir page 53 pour les détails sur la fonction de sortie audio.
Son variable
Constant comme
Sourdine
20
Utilisation de e de la télécommande
ecoupe la sortie de son en cours.
1 Appuyez sur e.
•“e” est affiché pendant 8 minutes à l’écran, et le son
est coupé.
• Le son ne sort pas brusquement à plein volume du
système si le niveau du volume est réglé sur 0.
2 Appuyez de nouveau sur e pour annuler la
sourdine.
kk
• Appuyez sur i
annuler la sourdine.
ll
k/
l et g peut également
kk
ll
17
PDP-503HDE/(F)-b 9/3/02, 4:17 PM17
Page 84

Pour regarder la télévision
: Arret
L’utilisation de h sur la télécommande
hproduit un effet SRS, FOCUS à partir des haut-
parleurs.
A chaque pression sur h, le mode passe de SRS
à FOCUS, FOCUS e SRS et Arrêt.
Options son SRS
• SRS (Sound Retrieval System, système de reprise
du son): Rend un son plus naturel en reprenant
l’information spatiale à partir d’un enregistrement
stéréo et en la remettant dans le champ sonore tridimensionnel d’origine.
• FOCUS: Repositionne une image avec le son
provenant de deux haut-parleurs sur une position
d’écoute ou une hauteur optimale sans les déplacer.
• FOCUS e SRS: Produit les deux effets SRS et
FOCUS.
• Arret: Sortie du son normal.
: SRS
: FOCUS
: FOCUSⴐSRS
PDP-503HDE/(F)-b 9/3/02, 4:17 PM18
18
Page 85

Pour regarder la télévision
Emissions NICAM
Mode stéréo
BBC2
99
NICAM
STÉREO
BBC2
99
MONO
Mode monaural
BBC2
99
NICAM
MONO
BBC2
99
MONO
Mode bilingue
BBC2
NICAM
BBC2
NICAM
BBC2
NICAM
1/2
BBC2
MONO
Utilisation de g de la télécommande
Emissions NICAM TV
Lors de la réception d’un signal stéréo
A chaque pression sur g, le mode passe de NICAM
STÉREO à MONO.
Lors de la réception d’un signal bilingue
A chaque pression sur g, le mode passe de NICAM
p à NICAM pp, NICAM p/pp et MONO.
Lors de la réception d’un signal monaural
A chaque pression sur g, le mode passe de NICAM
MONO à MONO.
Dans le mode télévisé d’émissions A2
Lors de la réception d’un signal stéréo
A chaque pression sur g, le mode passe de
STÉREO à MONO.
99
1
Lors de la réception d’un signal bilingue
A chaque pression sur g, le mode passe de
DOUBLE p à DOUBLE pp, DOUBLE p/pp et MONO.
Lors de la réception d’un signal monaural
Lorsque vous appuyez sur g, “MONO” apparaît.
99
2
99
99
99
B
• Aucun canal et ni mode de son n’est affiché.
•“BBC2” et “99” sont les noms provisoires d’un réseau et
d’un canal.
Emissions A2
Mode stéréo
BBC2
STÉREO
BBC2
MONO
Mode monaural
BBC2
MONO
19
PDP-503HDE/(F)-b 9/3/02, 4:17 PM19
Mode bilingue
99
99
99
BBC2
DOUBLE1
BBC2
DOUBLE2
BBC2
DOUBLE1/2
BBC2
MONO
99
99
99
99
99
Page 86

Réglages de base
Rubriques du menu du mode AV
Liste des rubriques du menu AV pour vous aider avec les opérations.
Page 36
MENU
Éco. d’énergie
Aucun sig arrêt
Pas d’opé. arrêt
MENU
Contraste
Luminos.
Couleur
Teinte
Netteté
Avancé
Réinitial.
MENU
Aigus
Graves
Balance
Réinitial.
MENU Premier
MENU
Commande alimentation
Image
Audio
Installation
Options
Commande alimentation
Éco. d’énergie
Aucun sig arrêt
Pas d’opé. arrêt
RETOUR
Page 32–34
Image
DYNAMIQUE
[+30]
Contraste
Luminos.
Couleur
Teinte
Netteté
Avancé
Réinitial.
RETOUR
0
[0]
–30
[0]
–30
[0]
–30
[0]
–7
Page 35
Audio
DYNAMIQUE
Aigus
Graves
Balance
Réinitial.
RETOUR
–15
[0]
–15
[0]
[0]
Gche
[Standard]
[Désactiver]
[Désactiver]
+40
+30
+30
+30
+7
+15
+15
Drte
Description
Economise l’énergie en diminuant la
luminosité des images.
Le système se ferme
automatiquement si aucun signal
vidéo n’est entré pendant 15
minutes.
Le système se ferme
automatiquement si vous n’effectuez
aucune opération pendant 3 heures.
Description
Règle l’image entre lumière et ombre.
Règle la luminosité de l’image.
Règle l’intensité de la couleur.
Règle les couleurs chair sur des tons
plus naturels pour tous les systèmes
couleur.
Règle la netteté de l’image.
Règle la température de couleur,
PureCinema, le noir et noir et blanc.
Tous les réglages de l’image reviennent
aux valeurs préréglées en usine.
Description
Augmente ou diminue les aigus.
Augmente ou diminue les basses.
Règle la sortie audio entre les haut-
parleurs gauche et droit.
Tous les réglages audio reviennent
aux valeurs préréglées en usine.
Page 23–30, 54
Installation
Autoinstallation
Installation programme
Verrouil. Enfant
RETOUR
Page 31, 47, 49, 50, 52, 53
Options
Sélection d’entrée
WSS
Mode 4:3
Position
Sortie audio
Démo
Systeme Couleur
Langue [Français]
NR
RETOUR
[Marche]
[4:3]
[Fixe]
[Arret]
[Auto]
[Arret]
MENU
Autoinstallation
Installation
programme
Verrouil. Enfant
MENU
Sélection d’entrée
WSS
Mode 4:3
Position
Sortie audio
Démo
Systeme Couleur
Langue
Description
Lance de nouveau l’auto installation
comme lorsque le système est mis
sous tension la première fois après
l’achat.
Pour le préréglage des canaux.
Règle un mot de passe pour interdire
les opérations.
Description
Sélectionnez le type de signal pour chaque
source d’entrée.
Lorsque les bits des signaux de grand écran
sont présents dans les données TELETEXTE,
vous pouvez regarder les informations dans le
mode grand écran.
Si vous recevez un signal de mode 4:3 ou 14:9,
sélectionnez l’affichage 4:3 ou LARGE.
Règle la position horizontale/verticale de
l’image affichée.
Sélectionnez le type de sortie de l’écran. Vous
pouvez régler le volume du haut-parleur
principal ou de sortie de l’écran.
Réglages de démonstration pour présentation
devant le magasin.
Sélectionne le système couleur de l’image en
cours d’entrée.
Sélectionne la langue de l’affichage sur écran.
PDP-503HDE/(F)-c 9/4/02, 2:36 PM20
NR
Diminue le son de l’image.
20
Page 87

Réglages de base
Rubriques du menu du mode PC
Liste des rubriques du menu PC pour vous aider avec les opérations.
Page 37
MENU Premier
MENU
Commande alimentation
Image
Audio
Options
Commande alimentation
Éco. d’énergie
Gestion alim.
RETOUR
Page 32
Image
UTILISATEUR
Contraste
Luminos.
Rouge
Vert
Bleu
Réinitial.
RETOUR
[+30]
[0]
[0]
[0]
[0]
0
–30
–30
–30
–30
Page 35
Audio
UTILISATEUR
Aigus
Graves
Balance
Réinitial.
RETOUR
[0]
–15
[0]
–15
Gche
[0]
[Standard]
[Arret]
+40
+30
+30
+30
+30
+15
+15
Drte
MENU
Éco. d’énergie
Gestion alim.
MENU
Contraste
Luminos.
Rouge
Vert
Bleu
Réinitial.
MENU
Aigus
Graves
Balance
Réinitial.
Description
Economise l’énergie en diminuant la
luminosité des images.
Le système se ferme
automatiquement si vous réglez
l’heure. Sélectionnez le mode 1 ou le
mode 2.
Description
Règle l’image entre lumière et ombre.
Règle la luminosité de l’image.
Règle l’intensité de la couleur rouge.
Règle l’intensité de la couleur verte.
Règle l’intensité de la couleur bleue.
Tous les réglages de l’image reviennent
aux valeurs préréglées en usine.
Description
Augmente ou diminue les aigus.
Augmente ou diminue les basses.
Règle la sortie audio entre les hautparleurs gauche et droit.
Tous les réglages audio reviennent
aux valeurs préréglées en usine.
21
Page 48, 53
Options
Sync.Automat.
Sync.fine
Sortie audio
RETOUR
[Fixe]
MENU
Sync.Automat.
Sync.fine
Sortie audio
Description
Procure une image d’entrée nette.
Règle la position horizontale et
verticale de l’image, l’horloge et la
phase.
Après la sélection du type de sortie
de l’écran, règle le volume du hautparleur principal ou de la sortie de
l’écran.
PDP-503HDE/(F)-c 9/3/02, 4:18 PM21
Page 88

Réglages de base
Déplacement de l’image à l’écran
Vous pouvez déplacer l’image sur l’écran.
///
Appuyez sur / / / pour déplacer l’image à l’écran
sur la position désirée.
B
• En appuyant sur
de réglage” s’affiche sur la position désirée.
• Ce réglage ne peut pas être sauvegardé. Il est effacé
lorsque le système se ferme ou entre en mode d’attente.
Pour déplacer de nouveau l’image à l’écran, vous devrez
exécuter de nouveau la procédure ci-dessus.
• L’image à l’écran provenant d’un PC ne peut pas être
déplacée.
• Initialisez la position de l’image en appuyant sur ENTER.
/ / / , une image à l’écran, “Position
PDP-503HDE/(F)-c 9/3/02, 4:18 PM22
22
Page 89

Réglages de base
Autoinstallation
Vous pouvez lancer de nouveau l’auto installation, même après l’installation des canaux préréglés.
0–9
MENU
ENTER
/
Menu du mot de passe
MENU
Installation
Mot de passe
B
• Ce menu s’affiche lors du réglage
du verrouillage enfant. Voir page
54.
- ---
Menu d’installation
MENU
Installation
Autoinstallation
Installation programme
Verrouil. Enfant
RETOUR
Menu de la langue
Autoinstallation - Langue
English
Deutsch
Français
Italiano
Español
Nederlands
Svenska
Português
Réglage de la langue
Sélectionnez parmi 12 langues : Anglais, Allemand,
Français, Italien, Espagnol, Néerlandais, Suédois,
Portugais, Grec, Finlandais, Russe et Turc.
1 Appuyez sur MENU.
2 Appuyez sur / pour sélectionner “Installation”,
et appuyez ensuite sur ENTER.
• Le menu de réglage du mot de passe ne s’affiche que
lorsque le verrouillage enfant est réglé. Voir page 54.
• Le menu d’installation s’affiche lorsque le verrouillage
enfant n’est pas réglé. Omettez l’étape 3.
3 Entrez votre mot de passe à 4 chiffres avec 0 – 9
pour annuler le verrouillage enfant lorsque vous
l’avez réglé.
• Voir page 54 pour les détails sur l’annulation du
verrouillage enfant.
4 Appuyez sur / pour sélectionner
“Autoinstallation”, et appuyez ensuite sur ENTER.
• Le menu Langue est affiché.
5 Appuyez sur / pour sélectionner la langue
désirée dans la liste à l’écran, et appuyez ensuite
sur ENTER.
• Le menu du pays s’affiche.
23
Suomi
Türkçe
Menu du pays
Autoinstallation - Pays
Autriche
Belgique
Danemark
A
B
DK
B/G
B/G
B/G
Réglage du pays
Après le réglage de la langue, vous devrez
sélectionner le pays pour régler le système couleur
des canaux télévisés et utiliser le système d’écran à
plasma.
L’écran de réglage s’affiche.
1 Appuyez sur / pour sélectionner le pays ou la
région sur la liste à l’écran.
2 Appuyez sur ENTER.
• Le pays est réglé et la recherche automatique de
programme démarre en même temps.
B
• Revenez au menu de la langue en appuyant sur n.
PDP-503HDE/(F)-c 9/3/02, 4:18 PM23
Page 90

Réglages de base
Recherche des programmes télévisés
Installation programme “Auto”
010255.25
85.25
03 102.25
Etiquetage des canaux télévisés
Installation programme “Auto”
10 -----
0102SAT.1
85.25
03 102.25
-----
04
125.25
05
175.25
06
199.25
07
210.25
08
216.0
09
Recherche auto de programme
Après le réglage du pays, exécutez la procédure cidessous pour rechercher les canaux télévisés.
B
• Annulez le réglage en appuyant sur n. Le système
revient automatiquement à l’état précédant la recherche
auto de programme.
• Si aucun canal n’a été trouvé, vérifiez le branchement
de l’antenne, et tentez de nouveau l’auto installation
car elle est terminée. (Voir page 12)
Etiquetage auto
Lorsqu’un nouveau canal télévisé est trouvé, le nom
de la station est recherché et affiché.
B
• Annulez le réglage en appuyant sur n. Le système
revient automatiquement à l’état précédant la recherche
auto de programme.
Lecture des noms des stations de TV
PDP-503HDE/(F)-c 9/3/02, 4:18 PM24
24
Page 91

Réglages de base
Tri des canaux télévisés
Installation programme “Auto”
10 -----
0102SAT.1
PRO7
03 KABEL
04
05
06
07
08
09
-----
Tri auto
Trie automatiquement les canaux télévisés.
B
• Annulez le réglage en appuyant sur n. Le système
revient automatiquement à l’état précédant la recherche
auto de programme.
• Ne fermez pas le système avant que “Tri des canaux.”
ne s’affiche.
Tri des canaux.
Téléchargement des préréglages
Envoi des réglages de programme 10.
Envoi des données de programme réussi.
Installation automatique terminée.
Téléchargement des préréglages
Lorsque le tri auto est terminé, les canaux sont
automatiquement sauvegardés en mémoire.
•“Envoi des réglages de programme 10.” s’affiche pendant
chaque téléchargement des préréglages des canaux.
Lorsque tous les préréglages ont été téléchargés, “Envoi
des données de programme réussi.” s’affiche.
• Le système ne peut envoyer des informations sur un canal
préréglé à un magnétoscope que si celui-ci est raccordé
par la prise INPUT 2.
B
• Si le téléchargement des préréglages des canaux a
échoué, “Erreur d’envoi des données de programme.”
s’affiche et le téléchargement des préréglages s’arrête à
ce moment-là.
Erreur d'envoi des données de programme.
25
PDP-503HDE/(F)-c 9/3/02, 4:18 PM25
Page 92

Réglages de base
Installation du programme
Après le téléchargement des préréglages des canaux, vous pouvez tenter de nouveau avec le menu Installation
de programme à partir de la recherche auto de programme pour le téléchargement des préréglages, ou lancer
le réglage manuel pour régler individuellement les rubriques des canaux.
MENU
Installation
Autoinstallation
Installation programme
Verrouil. Enfant
RETOUR
Recherche auto
Vous pouvez aussi rechercher automatiquement et
télécharger les canaux télévisés en suivant la
procédure ci-dessous. Il s’agit de la même fonction
que celle de la recherche automatique de programme
pour le téléchargement des préréglages dans l’auto
installation en pages 24 et 25.
1 Appuyez sur MENU.
2 Appuyez sur / pour sélectionner “Installation”,
et appuyez ensuite sur ENTER.
3 Appuyez sur / pour sélectionner “Installation
programme”, et appuyez ensuite sur ENTER.
4 Appuyez sur / pour sélectionner “Recherche
auto”, et appuyez ensuite sur ENTER.
• La recherche auto de programme démarre comme
indiqué ci-dessous.
1Recherche auto de programme
2Etiquetage auto
3Tri auto
4Téléchargement des préréglages
MENU
ENTER
/
MENU
Installation
Installation programme
Recherche auto
Réglage manuel
Tri
RETOUR
MENU
Installation
Installation programme
Recherche auto
Réglage manuel
Tri
RETOUR
Menu “Manuel” d’Installation programme
Installation programme “Manuel”
10
01
02
03
04
05
06
07
08
09
Sélectionnez le canal à éditer.
SAT.1
PRO7
KABEL
11
12
13
14
15
16
17
18
19
20
21
22
23
24
25
26
27
28
29
30
31
32
33
34
35
36
37
38
39
40
41
42
43
44
45
46
47
48
49
[SUIVANT]
Fin
Syst. couleur
Système son
Station
Omission
Décodeur
Verrou.
179.75MHz
AUTO
B/G
SAT.1
Arret
Arret
Arret
B
• Revenez au menu précédent en appuyant surn avant
que la recherche auto de programme ne démarre.
• Voir pages 24 to 25 pour les détails sur la recherche auto
de programme.
Réglage manuel de chaque canal
Vous pouvez régler manuellement certaines rubriques
des canaux. Ces rubriques sont Fin (Fréquence TV),
Syst. couleur, système son, Station (Nom de la station),
Omission, Décodeur et Verrou. (Verrouillage enfant).
1 Appuyez sur MENU.
2 Appuyez sur / pour sélectionner “Installation”,
et appuyez ensuite sur ENTER.
3 Appuyez sur / pour sélectionner “Installation
programme”, et appuyez ensuite sur ENTER.
4 Appuyez sur / pour sélectionner “Réglage
manuel”, et appuyez ensuite sur ENTER.
• Le menu “Manuel” d’Installation programme s’affiche.
B
• Revenez au menu précédent en appuyant sur n.
• Sortez du menu en appuyant sur MENU.
• Lorsque vous sortez du menu “Manuel” d’Installation
programme, le téléchargement des préréglages est
automatiquement lancé si vous changez les informations
sur ce menu.
PDP-503HDE/(F)-c 9/3/02, 4:18 PM26
26
Page 93

Réglages de base
Menu “Manuel” d’Installation programme
Installation programme “Manuel”
10
01
11
SAT.1
02
12
PRO7
03
13
KABEL
04
14
05
15
06
16
07
17
08
18
09
19
Sélectionnez le canal à éditer.
20
21
22
23
24
25
26
27
28
29
30
31
32
33
34
35
36
37
38
39
40
41
42
43
44
45
46
47
48
49
[SUIVANT]
Fin
Syst. couleur
Système son
Station
Omission
Décodeur
Verrou.
179.75MHz
AUTO
B/G
SAT.1
Arret
Arret
Arret
Entrée de canaux supplémentaires
Sur le menu “Manuel” d’Installation programme
1 Appuyez sur / / / pour sélectionner un numéro
de canal en bleu, et appuyez ensuite sur ENTER.
• Les canaux de la liste sont en noir pour “Omission”
réglée sur “Arret” ou en bleu pour “Omission” réglée
sur “Marche” ou s’il n’y a pas de canal.
• Les informations sur le canal sélectionné sont
affichées.
2 Appuyez sur / pour sélectionner “Omission”, et
appuyez ensuite sur ENTER.
• Le menu d’omission est affiché.
3 Appuyez sur / pour régler “Omission” sur
“Arret”, et appuyez ensuite sur ENTER.
• Les canaux pour lesquels “Omission” est réglée sur
“Marche” sont omis même si vous les sélectionnez
avec Pk/Pl.
B
• Revenez au menu précédent en appuyant sur n.
• Sortez du menu en appuyant sur MENU.
Installation programme “Manuel”
01
02
PRO7
03 KABEL
Installation programme “Manuel”
01
02
PRO7
03 KABEL
Menu Système couleur
Installation programme “Manuel”
01
SAT.1
02
PRO7 PAL
27
Menu Accord fin
Fin
Fin
Syst. couleur
196.25 MHzSAT.1
196.25MHzSAT.1
AUTO
PAL-60
SECAM
NTSC 4.43
Accord fin
Sur le menu “Manuel” d’Installation programme
1 Appuyez sur / / / pour sélectionner le canal
à éditer, et appuyez ensuite sur ENTER.
• Les informations sur le canal sélectionné sont
affichées.
2 Appuyez sur / pour sélectionner “Fin”, et
appuyez ensuite sur ENTER.
• Une barre d’accord fin s’affiche.
3 Appuyez sur / pour régler la fréquence, et
appuyez ensuite sur ENTER.
• Réglez en vérifiant l’image précédente comme
référence.
• Au lieu de ce qui précède, vous pouvez également
régler en entrant directement le numéro de fréquence
du canal avec 0 – 9.
b
• 179.75 MHz : Appuyez sur 1 / 7 / 9 / 7 / 5 / ENTER.
• 49.25 MHz : Appuyez sur 4 / 9 / 2 / 5 / ENTER.
B
• Revenez au menu précédent en appuyant sur n.
• Sortez du menu en appuyant sur MENU.
Système couleur
Sur le menu “Manuel” d’Installation programme
1 Appuyez sur / / / pour sélectionner le canal
à éditer, et appuyez ensuite sur ENTER.
• Les informations sur le canal sélectionné sont
affichées.
2 Appuyez sur / pour sélectionner “Syst. Couleur”,
et appuyez ensuite sur ENTER.
• La liste des systèmes couleur recevables s’affiche.
3 Appuyez sur / pour sélectionner votre système
couleur, et appuyez ensuite sur ENTER.
B
• Revenez au menu précédent en appuyant sur n.
• Sortez du menu en appuyant sur MENU.
PDP-503HDE/(F)-c 9/3/02, 4:18 PM27
Page 94

Réglages de base
Menu son
Installation programme “Manuel”
Système son
SAT.1
01
PRO7 D/K
02
B/G
I
L
L’
Système son
Sur le menu “Manuel” d’Installation programme
1 Appuyez sur / / / pour sélectionner le canal
à éditer, et appuyez ensuite sur ENTER.
• Les informations sur le canal sélectionné sont
affichées.
2 Appuyez sur / pour sélectionner “Système son”,
et appuyez ensuite sur ENTER.
• La liste des systèmes son recevables (systèmes
d’émission) s’affiche.
3 Appuyez sur / pour sélectionner votre système
son, et appuyez ensuite sur ENTER.
B
• Si vous procédez à ce réglage, vérifiez les informations
sur le système couleur en page 27.
• Revenez au menu précédent en appuyant sur n.
• Sortez du menu en appuyant sur MENU.
Menu Etiquetage
Installation programme “Manuel”
01
SAT.1
02
PRO7
03 KABEL
Menu Omission
Installation programme “Manuel”
01
SAT.1
02
PRO7
03 KABEL
Station
KABEL
A
B
H
I
O
P
V
W
2
3
9+–
Omission
Etiquetage des canaux
L’auto installation attribue automatiquement des noms
à toutes les stations visibles. Vous pouvez toutefois
changer les noms individuels des canaux.
C
D
E
F
ANNULER
G
J
K
L
M
N
Q
R
S
T
U
X
Y
Z
0
1
SUIVANT
4
5
6
7
8
PRECED.
FIN.
Sur le menu “Manuel” d’Installation programme
1 Appuyez sur / / / pour sélectionner le canal
à éditer, et appuyez ensuite sur ENTER.
• Les informations sur le canal sélectionné sont
affichées.
2 Appuyez sur / pour sélectionner “Station”, et
appuyez ensuite sur ENTER.
• Un alphabet et des nombres sont affichés.
3 Appuyez sur / / / pour sélectionner chaque
lettre du nouveau nom du canal et appuyez ensuite
sur ENTER.
4 Répétez l’opération jusqu’à ce que le nom soit écrit.
• Ce nom peut avoir 5 caractères ou moins.
B
• Revenez au menu précédent en appuyant sur n.
• Sortez du menu en appuyant sur MENU.
Omission des canaux
Arret
Marche
Les canaux avec “Omission” réglée sur “Marche” avec
Pk/Pl sont omis même si vous les sélectionnez.
Sur le menu “Manuel” d’Installation programme
PDP-503HDE/(F)-c 9/3/02, 4:18 PM28
1 Appuyez sur / / / pour sélectionner le canal
à éditer, et appuyez ensuite sur ENTER.
• Les informations sur le canal sélectionné sont
affichées.
2 Appuyez sur / pour sélectionner “Omission”, et
appuyez ensuite sur ENTER.
• Le menu d’omission est affiché.
3 Appuyez sur / pour régler “Omission” sur
“Marche”, et appuyez ensuite sur ENTER.
B
• Revenez au menu précédent en appuyant sur n.
• Sortez du menu en appuyant sur MENU.
28
Page 95

Réglages de base
MENU
ENTER
///
Réglage du décodeur
Pour le raccordement d’un décodeur, vous devrez
attribuer l’entrée de la prise.
Sur le menu “Manuel” d’Installation programme
1 Appuyez sur / / / pour sélectionner le canal
à éditer, et appuyez ensuite sur ENTER.
• Les informations sur le canal sélectionné sont
affichées.
2 Appuyez sur / pour sélectionner “Décodeur”,
et appuyez ensuite sur ENTER.
• Les entrées de prises sont affichées.
3 Appuyez sur / pour sélectionner une prise
ENTRÉE, et appuyez ensuite sur ENTER.
B
•“Arret” est la valeur préréglée d’usine. Lorsque le réglage
est sur “Arret”, vous ne pouvez pas regarder d’image à
partir de décodeurs.
• Revenez au menu précédent en appuyant sur n.
• Sortez du menu en appuyant sur MENU.
Menu décodeur
Installation programme “Manuel”
01
SAT.1
02
PRO7
03 KABEL
Menu verrouillage
Installation programme “Manuel”
01
02
PRO7
03 KABEL
Décodeur
Verrou.
Arret
ENTRÉE1
ENTRÉE2
ENTRÉE3
ArretSAT.1
Marche
Réglage du verrouillage enfant
Vous pouvez verrouiller la vue de n’importe quel canal.
Sur le menu “Manuel” d’Installation programme
1 Appuyez sur / / / pour sélectionner le canal
à éditer, et appuyez ensuite sur ENTER.
• Les informations sur le canal sélectionné sont
affichées.
2 Appuyez sur / pour sélectionner “Verrou.”, et
appuyez ensuite sur ENTER.
• Le menu Verrouillage enfant s’affiche.
3 Appuyez sur / pour régler “Verrou.” sur
“Marche”, et appuyez ensuite sur ENTER.
29
PDP-503HDE/(F)-c 9/3/02, 4:18 PM29
B
• Même si elle est réglée sur “Marche”, cette fonction n’est
pas opérationnelle si un mot de passe n’est pas réglé.
Voir page 54 pour les détails sur le réglage du mot de
passe.
• Revenez au menu précédent en appuyant sur n.
• Sortez du menu en appuyant sur MENU.
Page 96

Réglages de base
MENU
ENTER
///
MENU
Installation
Installation programme
Recherche auto
Réglage manuel
Tri
RETOUR
Tri
Les positions des canaux peuvent être librement triées.
1 Appuyez sur MENU.
2 Appuyez sur / pour sélectionner “Installation”,
et appuyez ensuite sur ENTER.
3 Appuyez sur / pour sélectionner “Installation
programme”, et appuyez ensuite sur ENTER.
4 Appuyez sur / pour sélectionner “Tri”, et
appuyez ensuite sur ENTER.
• La liste des canaux est présentée. Les canaux en noir
sont ceux pour lesquels “Omission” est réglé
sur “Arret” et ceux en bleu sont ceux réglés sur
“Marche”.
5 Appuyez sur / / / pour sélectionner le canal
à déplacer, et appuyez ensuite sur ENTER.
6 Déplacez-le dans la position désirée en appuyant
sur / / / , et appuyez ensuite sur ENTER.
7 Répétez les étapes 5 et 6 jusqu’à ce que tous les
canaux désirés soient triés.
Menus de tri
Installation programme “Tri”
0102SAT.1
03 KABEL
04
05
06
07
08
09
Sélectionnez le canal à remplacer.
10 -----
PRO7
VOX
Appuyez sur
Installation programme “Tri”
0102PRO7
03 KABEL
04
05
06
07
08
09
Tri des canaux.
10 -----
SAT.1
VOX
B
• Revenez au menu précédent en appuyant sur n.
• Sortez du menu en appuyant sur MENU.
.
Appuyez sur .
Installation programme “Tri”
0102PRO7
03 SAT.1
04
05
06
07
08
09
KABEL
VOX
10
-----
PDP-503HDE/(F)-c 9/3/02, 4:18 PM30
30
Page 97

Réglages de base
Réglage de la langue
Vous pouvez également sélectionner une langue à partir du menu option. Sélectionnez parmi 12 langues :
Anglais, Allemand, Français, Italien, Espagnol, Néerlandais, Suédois, Portugais, Grec, Finlandais, Russe et
Turc.
MENU
ENTER
/
MENU
Options
Sélection d’entrée
WSS
Mode 4:3
Position
Sortie audio
Démo
Systeme Couleur
Langue [Français]
NR
RETOUR
[Marche]
[Fixe]
[Arret]
[Auto]
[Arret]
MENU
Options
Langue
English
Deutsch
Français
Italiano
Español
Nederlands
Svenska
Português
[4:3]
1 Appuyez sur MENU.
2 Appuyez sur / pour sélectionner “Options”, et
appuyez ensuite sur ENTER.
• Le menu Options est affiché.
3 Appuyez sur / pour sélectionner “Langue”, et
appuyez ensuite sur ENTER.
• Le menu Langue est affiché.
4 Appuyez sur / pour sélectionner la langue
désirée dans la liste à l’écran, et appuyez ensuite
sur ENTER.
5 Appuyez sur MENU pour sortir du menu.
B
• Revenez au menu précédent en appuyant sur n.
31
Suomi
Türkçe
PDP-503HDE/(F)-c 9/3/02, 4:18 PM31
Page 98

Réglages de base
Réglages de l’image
Ajustez l’image selon vos préférences avec les réglages de l’image suivants.
1 Appuyez sur MENU.
2 Appuyez sur / pour sélectionner “Image”, et
appuyez ensuite sur ENTER.
• Le menu Image est affiché.
3 Appuyez sur / pour sélectionner une rubrique
AV SELECTION
de réglage spécifique.
4 Appuyez sur / pour régler la rubrique sur la
position désirée.
5 Appuyez sur MENU pour sortir du menu.
MENU
ENTER
///
Rubriques de réglages pour source AV
MENU
Image
Mode sélection AV Mode sélection AV
DYNAMIQUE
Contraste
Luminos.
Couleur
Teinte
Netteté
Avancé
Réinitial.
RETOUR
[+30]
[0]
[0]
[0]
[0]
0
–30
–30
–30
–7
+40
+30
+30
+30
+7
B
• Pour remettre tous les réglages sur les valeurs préréglées
en usine :
1 Appuyez sur
/ pour sélectionner “Réinitial.”, et
appuyez ensuite sur ENTER.
2 Appuyez sur
/ pour sélectionner “Oui”, et appuyez
ensuite sur ENTER.
• Revenez au menu précédent en appuyant sur n.
• Si vous sélectionnez “STANDARD” pour AV
SELECTION avec la télécommande, ces rubriques sont
affichées en gris et ne peuvent pas être sélectionnées.
Voir page 50.
Rubriques de réglage pour source PC
MENU
Image
UTILISATEUR
Contraste
Luminos.
Rouge
Vert
Bleu
Réinitial.
RETOUR
[+30]
[0]
[0]
[0]
[0]
0
–30
–30
–30
–30
+40
+30
+30
+30
+30
Rubrique
sélectionnée
Contraste
Luminos.
Couleur
Teinte
Netteté
Pour diminuer le
contraste
Pour diminuer la
luminosité
Pour diminuer
l’intensité des
couleurs
Les tons chair
deviennent plus
violets
Pour diminuer la
netteté
B
• Sélectionnez “Avancé” et appuyez ensuite sur ENTER
pour régler “Temp Couleur”, “Noir”, “Noir et blanc” ou
“PureCinema”. Voir pages 33 et 34.
PDP-503HDE/(F)-c 9/4/02, 2:41 PM32
touche
touche
Pour augmenter le
contraste
Pour augmenter la
luminosité
Pour augmenter
l’intensité des
couleurs
Les tons chair
deviennent plus
verts.
Pour augmenter la
netteté
Rubrique
sélectionnée
Contraste
Luminos.
Rouge
Ver t
Bleu
touche
Pour diminuer le
contraste
Pour diminuer la
luminosité
Pour atténuer le
rouge
Pour atténuer le vert
Pour atténuer le bleu
touche
Pour augmenter le
contraste
Pour augmenter la
luminosité
Pour accentuer le
rouge
Pour accentuer le
vert
Pour accentuer le
bleu
32
Page 99

Réglages de base
AV
SELECTION
MENU
ENTER
/
MENU
Image
DYNAMIQUE
Avancé
Temp Couleur [Haut]
Haut
Moyen-Haut
Moyen
Moyen-Bas
Bas
Température de couleur
Réglez la température de couleur pour convenir aux
tons blancs.
1 Appuyez sur MENU.
2 Appuyez sur / pour sélectionner “Image”, et
appuyez ensuite sur ENTER.
3 Appuyez sur / pour sélectionner “Avancé”, et
appuyez ensuite sur ENTER.
4 Appuyez sur / pour sélectionner “Temp
Couleur”, et appuyez ensuite sur ENTER.
5 Appuyez sur / pour sélectionner le niveau
désiré, et appuyez ensuite sur ENTER.
6 Appuyez sur MENU pour sortir du menu.
B
• Revenez au menu précédent en appuyant sur n.
• Si vous sélectionnez “STANDARD” pour AV
SELECTION avec la télécommande, cette rubrique est
affichée en gris et ne peut pas être sélectionnée. Voir
page 50.
Rubrique
sélectionnée
Description
MENU
Image
DYNAMIQUE
Avancé
Noir [Haut]
Arret
Haut
Bas
Haut
Moyen-Haut
Moyen
Moyen-Bas
Bas
Blanc avec nuance bleue
Blanc avec nuance rouge
Noir
Vous permet de sélectionner un niveau pour régler
automatiquement les tons noirs convenant aux
conditions de visionnement.
1 Appuyez sur MENU.
2 Appuyez sur / pour sélectionner “Image”, et
appuyez ensuite sur ENTER.
3 Appuyez sur / pour sélectionner “Avancé”, et
appuyez ensuite sur ENTER.
4 Appuyez sur / pour sélectionner “Noir”, et
appuyez ensuite sur ENTER.
5 Appuyez sur / pour sélectionner le niveau
désiré, et appuyez ensuite sur ENTER.
6 Appuyez sur MENU pour sortir du menu.
B
• Revenez au menu précédent en appuyant sur n.
• Si vous sélectionnez “STANDARD” pour AV
SELECTION avec la télécommande, cette rubrique est
affichée en gris et ne peut pas être sélectionnée. Voir
page 50.
33
PDP-503HDE/(F)-c 9/3/02, 4:19 PM33
Page 100

Réglages de base
AV
SELECTION
MENU
ENTER
/
MENU
Image
DYNAMIQUE
Avancé
Noir et blanc [Marche]
Arret
Marche
MENU
Image
DYNAMIQUE
Avancé
PureCinema [Marche]
Arret
Marche
Noir et blanc
Pour regarder une vidéo en monochrome.
1 Appuyez sur MENU.
2 Appuyez sur / pour sélectionner “Image”, et
appuyez ensuite sur ENTER.
3 Appuyez sur / pour sélectionner “Avancé”, et
appuyez ensuite sur ENTER.
4 Appuyez sur / pour sélectionner “Noir et blanc”,
et appuyez ensuite sur ENTER.
5 Appuyez sur / pour sélectionner “Marche”, et
appuyez ensuite sur ENTER.
6 Appuyez sur MENU pour sortir du menu.
B
• Revenez au menu précédent en appuyant sur n.
• Si vous sélectionnez “STANDARD” pour AV
SELECTION avec la télécommande, cette rubrique est
affichée en gris et ne peut pas être sélectionnée. Voir
page 50.
PureCinema
Détecte automatiquement une source sous forme de
film (codée à l’origine 24 vues/seconde), l’analyse et
recrée chaque image fixe du film pour une qualité
d’image haute définition.
1 Appuyez sur MENU.
2 Appuyez sur / pour sélectionner “Image”, et
appuyez ensuite sur ENTER.
3 Appuyez sur / pour sélectionner “Avancé”, et
appuyez ensuite sur ENTER.
4 Appuyez sur / pour sélectionner “PureCinema”,
et appuyez ensuite sur ENTER.
5 Appuyez sur / pour sélectionner “Marche”, et
appuyez ensuite sur ENTER.
6 Appuyez sur MENU pour sortir du menu.
PDP-503HDE/(F)-c 9/3/02, 4:19 PM34
B
• Revenez au menu précédent en appuyant sur n.
• Si vous sélectionnez “STANDARD” pour AV
SELECTION avec la télécommande ou des sources
d’entrée avec fréquence verticale de 50 Hz (par ex. PAL,
SECAM), cette rubrique est affichée en gris et ne peut
pas être sélectionnée. Voir page 50.
34
 Loading...