

Pioneer PDK-TS30 User Manual [en, de, es, fr, it]

テーブルトップスタンド
Table top stand
Pied de table
Tischständer
Supporto di tavolo
Tafelbladstaander
Soporte de mesa
PDK-TS30
PDK-TS30A
必ず転倒・落下防止対策を行ってください。(6 ページ参照)
When placing this unit, ensure that it is firmly secured to
reduce the risk of it falling and causing injury. (see page 12)
Lorsque vous installez ce produit, veillez à le fixer solidement
afin d’éviter toute chute. Il risquerait de provoquer des
blessures. (voir page 18)
取扱説明書
Operating Instructions
Mode d’emploi
Bedienungsanleitung
Istruzioni di utilizzo
Handleiding
Manual de instrucciones

このたびは、パイオニアの製品をお買い求めいただきまして
まことにありがとうございます。お使いになる前には取扱説
明書をよくお読みになり、安全に正しくご使用ください。
また、お読みになったあとも、この取扱説明書は大切に保管
してください。
本製品は弊社製プラズマテレビ PDP-6010HD 専用の
テーブルトップスタンドです。
その他の機器への取り付けに関しては対応しておりません。
詳しくは、お買い求めの販売店にご相談ください。
「据え付け」について
お客様がご自身で本機の取り付けを困難だと思われる場
合は、販売店にご相談ください。
なお、据え付け、取り付けの不備、誤使用、改造、天災
などによる事故損傷については、弊社は一切責任を負い
ません。
もくじ
取扱上の注意 ................................................................ 2
同梱された部品の確認 ................................................ 3
スタンドの組み立て .................................................... 3
遮光板の取り付け(PDK-TS30A のみ) ................. 4
プラズマテレビの取り付け方 ..................................... 5
ラックなどに設置する場合 ......................................... 5
転倒防止 ........................................................................ 6
仕 様............................................................................ 6
寸法図............................................................................ 7
注意
指定外のプラズマテレビへの取り付け、改造および
他の用途での使用はしないでください。
設置場所について
設置場所にはスタンドとプラズマテレビの質量に十
分耐えられる強度をもつ場所を選定してください。
必ず平坦で安定した場所に設置してください。
屋外や温泉、海辺などの水場には設置しないでくだ
さい。
振動や衝撃の加わるような場所には設置しないでく
ださい。
組み立て・設置について
組み立ての手順を守り、指定の箇所はすべて確実に
ネジ留めしてください。
指定を守らないとプラズマテレビ取り付け後に、
破損や転倒など思わぬ事故の原因となることがあ
ります。
取扱上の注意
ご注意 安全上の絵表示について
取扱説明書および製品に記されている注意事項には、損害の
レベルや内容を示す絵表示が付けられていることがありま
す。それら絵表示の意味は以下のとおりです。
人が死亡または重傷を負う恐れ
警告
注意
警告・注意(気をつけること)
禁止(やってはいけないこと)
がある内容を示します。
人がけがをしたり財産に損害を受
ける恐れがある内容を示します。
プラズマテレビの取り付け作業は安全のため、必ず
2 人以上で行ってください。
作業の際には、プラズマテレビと周辺機器の電源を
切り、電源プラグをコンセントから抜いてください。
地震などでの製品の転倒・落下によるけがなどの
危害を軽減するために、必ず転倒・落下防止対策
を行ってください(6 ページ参照)。
Ja
指示・強制(しなければならないこと)
2
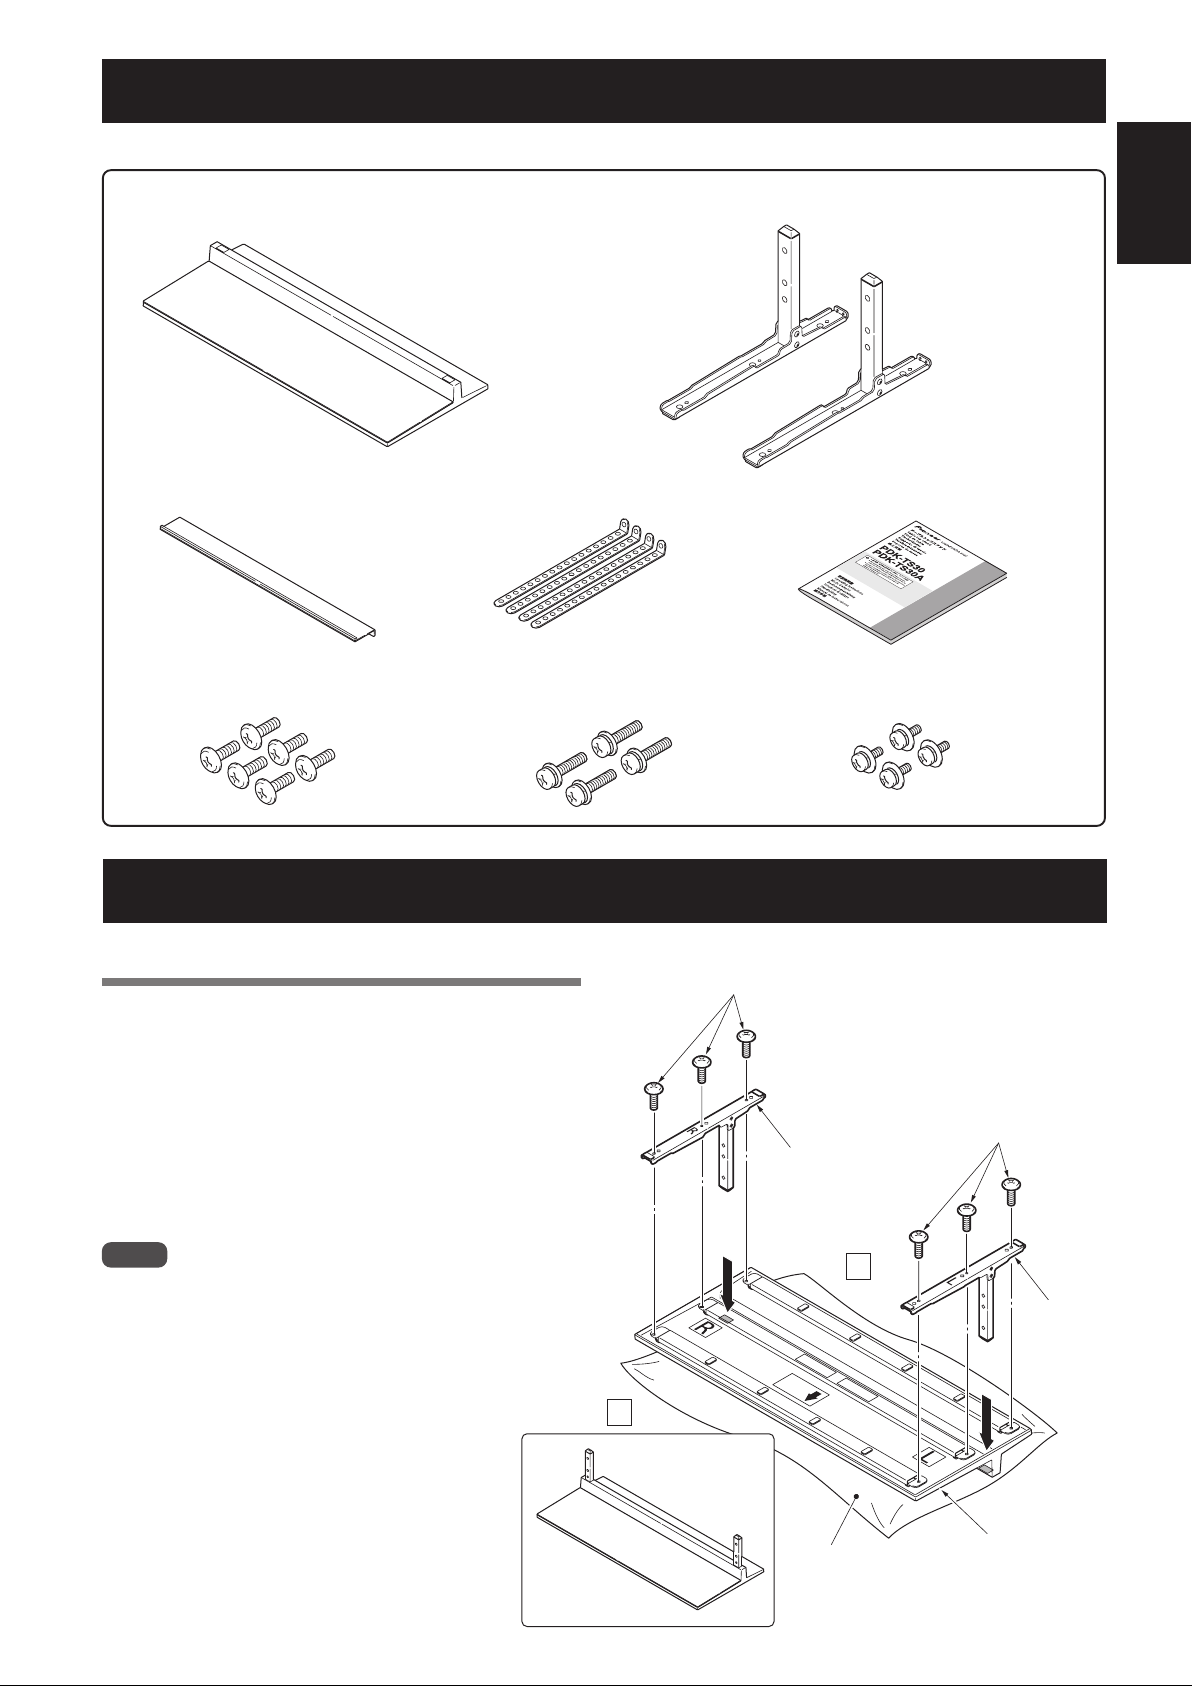
同梱された部品の確認
組み立て・設置の前に同梱された部品を確認してください。
ベースカバー× 1
遮光板(PDK-TS30Aのみ)×1
ネジ1
(M5 × 10mm:黒)× 6
スタンドパイプ(L)× 1
スタンドパイプ(R)× 1
転倒防止ベルト× 4 取扱説明書(本書)× 1
取付ネジ 2
(M6 × 20mm:黒)× 4
ネジ3
(M4 × 10mm:黒)× 4
日本語
スタンドの組み立て
組み立て手順
1 ベースカバーを裏側にする
2 スタンドパイプをベースカバーに挿入する
R マーク側にスタンドパイプ(R)、L マーク側にスタン
ドパイプ(L)を挿入してください。
3 ネジ 1(M5 × 10mm:黒)でスタンドパイ
プをベースカバーに固定する
ご注意
スタンドを組み立てる際は、ベースカバーの下に柔らかいシート
などを敷いて組み立ててください。
シートを敷いて組み立てを行わないと、ベースカバーの表面をキ
ズつける恐れがあります。
スタンドパイプ(L)、(R)を間違えないように取り付けてくだ
さい。間違えて取り付けると、スタンドを破損する恐れがありま
す。
前
1
ネジ
(M5 × 10mm:黒)
テーブル
トップスタンド
完成図
ネジ 1
(M5 × 10mm:黒)
スタンド
パイプ(R)
後
スタンド
パイプ(L)
シート
ベースカバー
3
Ja

遮光板の取り付け(PDK-TS30Aのみ)
製品背面に接続したケーブル類のベースカバーへの映り込み
を防止する部品です。
ご注意
平坦で安定した場所にベースカバーを固定してから、取り付けを
行ってください。
遮光板
前
ベースカバー
後
取り付け手順
2 遮光板端部を固定しながら、両面テープで貼る
前
後
ご注意
パイプ差込口に遮光板がかからないようにしてください。
隙間がないように固定してください(下図参照)。
隙間があると、遮光板がはがれる可能性があります。
1 遮光板の両面テープをはがす
それぞれの両面テープをはがす
3上から押さえつけながら固定する
前
後
押す
押す
隙間がないよう
にする
Ja
4

プラズマテレビの取り付け方
プラズマテレビは質量が約 55.5kg あり、奥行きがな
く不安定なため、取り付けおよび設置は必ず2人以上で
注意
行ってください。
ご注意
必ず平坦で安定した場所で取り付けをしてください。
ネジは穴に対して垂直に挿入し、必要以上に強く締めつけないで
ください。
ディスプレイにキズおよび破損が生じないように、シートなどを
敷いてください。
ネジを手で2、3回軽く締めてからドライバーで締めつけてくだ
さい。
1 プラズマテレビにスタンドを取り付ける
プラズマテレビを寝かせた状態にして、プラズマテレビ
のスタンド挿入部にスタンドの支柱を合わせ、水平に
ゆっくり挿入してください。
スタンドの支柱をプラズマテレビのスタンド挿入口以外
の部分に当てないように注意してください。
本体裏面や端子にキズをつけたり、変形させる恐れがあ
ります。
2 取付ネジ 2(M6 × 20mm:黒)でプラズマ
テレビを固定する
プラスドライバーを使用して固定してください。
取付ネジ 2
(M6 × 20mm:黒)
後
前
日本語
後
前
ご注意
プラズマテレビを寝かせるときは、ディスプレイにキズおよび破損
が生じないようにご注意ください。
ラックなどに設置する場合
プラズマテレビの上部と
注意
ラックなどに設置する場
合は、必ず 2 人以上でプ
ラズマテレビを持ってく
ださい。
スピーカー部、およびス
タンドは持たないでくだ
さい。破損の原因となり
ます。
取っ手を持ってください。
ご注意
取り付け後は、プラズマテレビを起こしてください。
スピーカーは持たないで
ください。
スタンドは持たないでく
ださい。
5
Ja

転倒防止(設置後は転倒防止の備えを必ず行ってください)
プラズマテレビはラックと壁面の両方に固定してください。
ラックなどに固定する方法
ネジ 3(M4 × 10mm:黒)および転倒防止ベルトを使っ
て、図のように固定してください。ラックなどに固定するネ
ジは、市販品を購入してご使用ください。
ご注意
ラックなどに固定する際のネジは、
呼び径 4mm、長さ 20mm 以上の
ものを使用してください。
20mm以上
8mm〜15mm
4mm
壁を利用する方法
1 プラズマテレビに転倒防止用ボルトを取り付け
る(2 カ所)
転倒防止用ボルトは、プラズマテレビに付属しています。
2 壁、柱などのがんじょうな部分に、丈夫なヒモ
でしっかりと固定する
左右対称に同様の作業を行ってください。
ご注意
ヒモ、取付具は本製品およびプラズマテレビには付属していませ
ん。市販品をご使用ください。
1 転倒防止用ボルト
(プラズマテレビ付属品)
2 ヒモ
取付具
ネジ3
(M4×10mm:黒)
ネジ(市販品)
転倒防止ベルト
ラック天板の厚さの中心に下
穴を開けてから、市販のネジ
でネジ留めしてください。
設置後の転倒・落下防止のお願い
地震などでの製品の転倒・落下によるけがなどの危害を軽減するために、必
ず転倒・落下防止対策を行ってください。
ご注意:
転倒・落下防止器具を取り付ける壁や台の強度によっては、転倒・落下防止
効果が大幅に減少します。その場合は適当な補強を施してください。
また転倒・落下防止対策は、けがなどの危害の軽減を意図したものですが、
すべての地震に対してその効果を保障するものではありません。
仕 様
外形寸法 PDK-TS30 ............. 920mm(幅)× 222.4mm(高さ)× 380mm(奥行)
PDK-TS30A .......... 922mm(幅)× 222.4mm(高さ)× 381mm(奥行)
質量 PDK-TS30 ............. 5.7kg
PDK-TS30A .......... 6.8kg
・上記の仕様および外観は、改良のため予告なく変更することがあります。
Ja
6

寸法図
サイドスピーカー取り付け時
単位:mm
* PDK-TS30
** PDK-TS30A
88275
スピーカーなしの時
単位:mm
* PDK-TS30
** PDK-TS30A
1684
1472
124.5 60
*920/**922 *380/**381
1472
122
95
122
日本語
88275
95
*920/**922
124.5 60
*380/**381
2007パイオニア株式会社 禁無断転載
7
Ja
Thank you for buying Pioneer’s product.
Please read through the Operating Instructions to learn
how to operate your model safely and properly.
Please be advised to keep the Operating Instructions in
your place for future reference.
Installation
¶ Consult your dealer if you encounter any difficulties
with this installation.
¶ Pioneer is not liable for any damage resulting from
improper installation, improper use, modification, or
natural disasters.
IMPORTANT NOTICE
Record the model number and serial number of this
equipment below.
Model No. Serial No.
Keep these numbers for future use.
Contents
Cautions ...................................................................8
Checking the Standard Accessories ...................... 9
Assembling the Stand ............................................ 9
Attaching the Light-blocking Shield
(PDK-TS30A only) .................................................. 10
Attaching the Plasma Television ......................... 11
Installing the Product on a Rack etc.................... 11
Preventing Equipment from Falling Over ...........12
Specifications ........................................................ 12
Dimensions Diagram ............................................ 13
Cautions
This product is a table top stand exclusively designed for
plasma televisions (PDP-608ZD / PDP-608ZDA) from
Pioneer.
Use with other model is capable of resulting in instability
causing possible injury. For further information, please
contact the store where you purchased your display.
Do not install or modify the product other than specified.
Do not use this stand for a Plasma television other than
those designated and do not modify it or use it for other
purposes.
Installation Location
• Select a location that is strong enough to support the
weight of the stand and the displays.
• Make sure to place it in a level and stable location.
• Do not install it outdoors, at a hot spring, or near a beach.
• Do not install the stand where it may be subjected to
vibration or shock.
Assembling and Installation
• Assemble the stand in accordance with the assembly
instructions and securely attach all screws at the
designated locations.
There have been cases where unforeseen accidents
such as the equipment breaking or falling over
occurred after the installation of the display because
the stand was not installed as instructed.
• The display must always be installed by two or more
people to assure it is installed safely.
• Before installation, turn off the power for the display
and peripheral devices then remove the power cord
plug from the power outlet.
Prevent accidents caused by the product falling over by
taking reliable measures to prevent it from falling over (see
Page 12).
CAUTION
This symbol refers to a hazard or unsafe practice which
can result in personal injury or property damage.
8
En

Checking the Standard Accessories
Check to make sure that you have all the standard accessories before assembly and installation.
Base cover × 1
Light-blocking shield × 1
(PDK-TS30A only)
Screw 1
(M5 × 10 mm: black) × 6
Stand pipe (L) × 1
Stand pipe (R) × 1
Fall-prevention strap × 4 Operating instructions
(this document) × 1
Installation screw 2
(M6 × 20 mm: black) × 4
Screw 3
(M4 × 10 mm: black) × 4
English
Assembling the Stand
Assembly Procedure
1 Turn the base cover over so the underside
is facing up.
2 Insert the stand pipes into the base cover.
Insert stand pipe (R) into the side marked "R" and stand
pipe (L) into the side marked "L".
3 Tighten the screws 1 (M5 × 10 mm: black)
to stabilize the stand pipes.
Note
Assemble the stand with a soft sheet placed under the base
cover. If a sheet is not laid before assembly, the front surface
of the base cover may be scratched.
Please take care when installing stand pipes (L) and (R) to
ensure that they are in the correct positions. Mistakenly
installing the stand pipes may damage the stand.
Front
Screws 1
(M5 x 10 mm: black)
Completed
Table Top Stand
Stand
pipe (R)
Rear
1
Screws
(M5 x 10 mm: black)
Stand
pipe (L)
Sheet
Base cover
9
En

Attaching the Light-blocking Shield (PDK-TS30A only)
This part prevents reflection of the cables connected to the
back of the plasma television on the base cover.
Note
Attach it after anchoring the base cover on a flat stable
place.
Light-blocking shield
Front
Base cover
Rear
Attachment Procedure
1 Remove the double-sided adhesive tape
from the light-blocking shield.
2 While firmly holding the ends of the light-
blocking shield, apply it with the doublesided adhesive tape.
Front
Rear
Note
Be careful that the light-blocking shield does not catch on
the pipe insertion holes.
Anchor it in place so that there are no gaps (See diagram
at below). If there is a gap, the light-blocking shield may
peel off.
Remove each double-sided
adhesive tape.
3 Anchor it in place while pressing it down
from above.
Front
Rear
Press
Press
Be sure that
there is no gap.
10
En
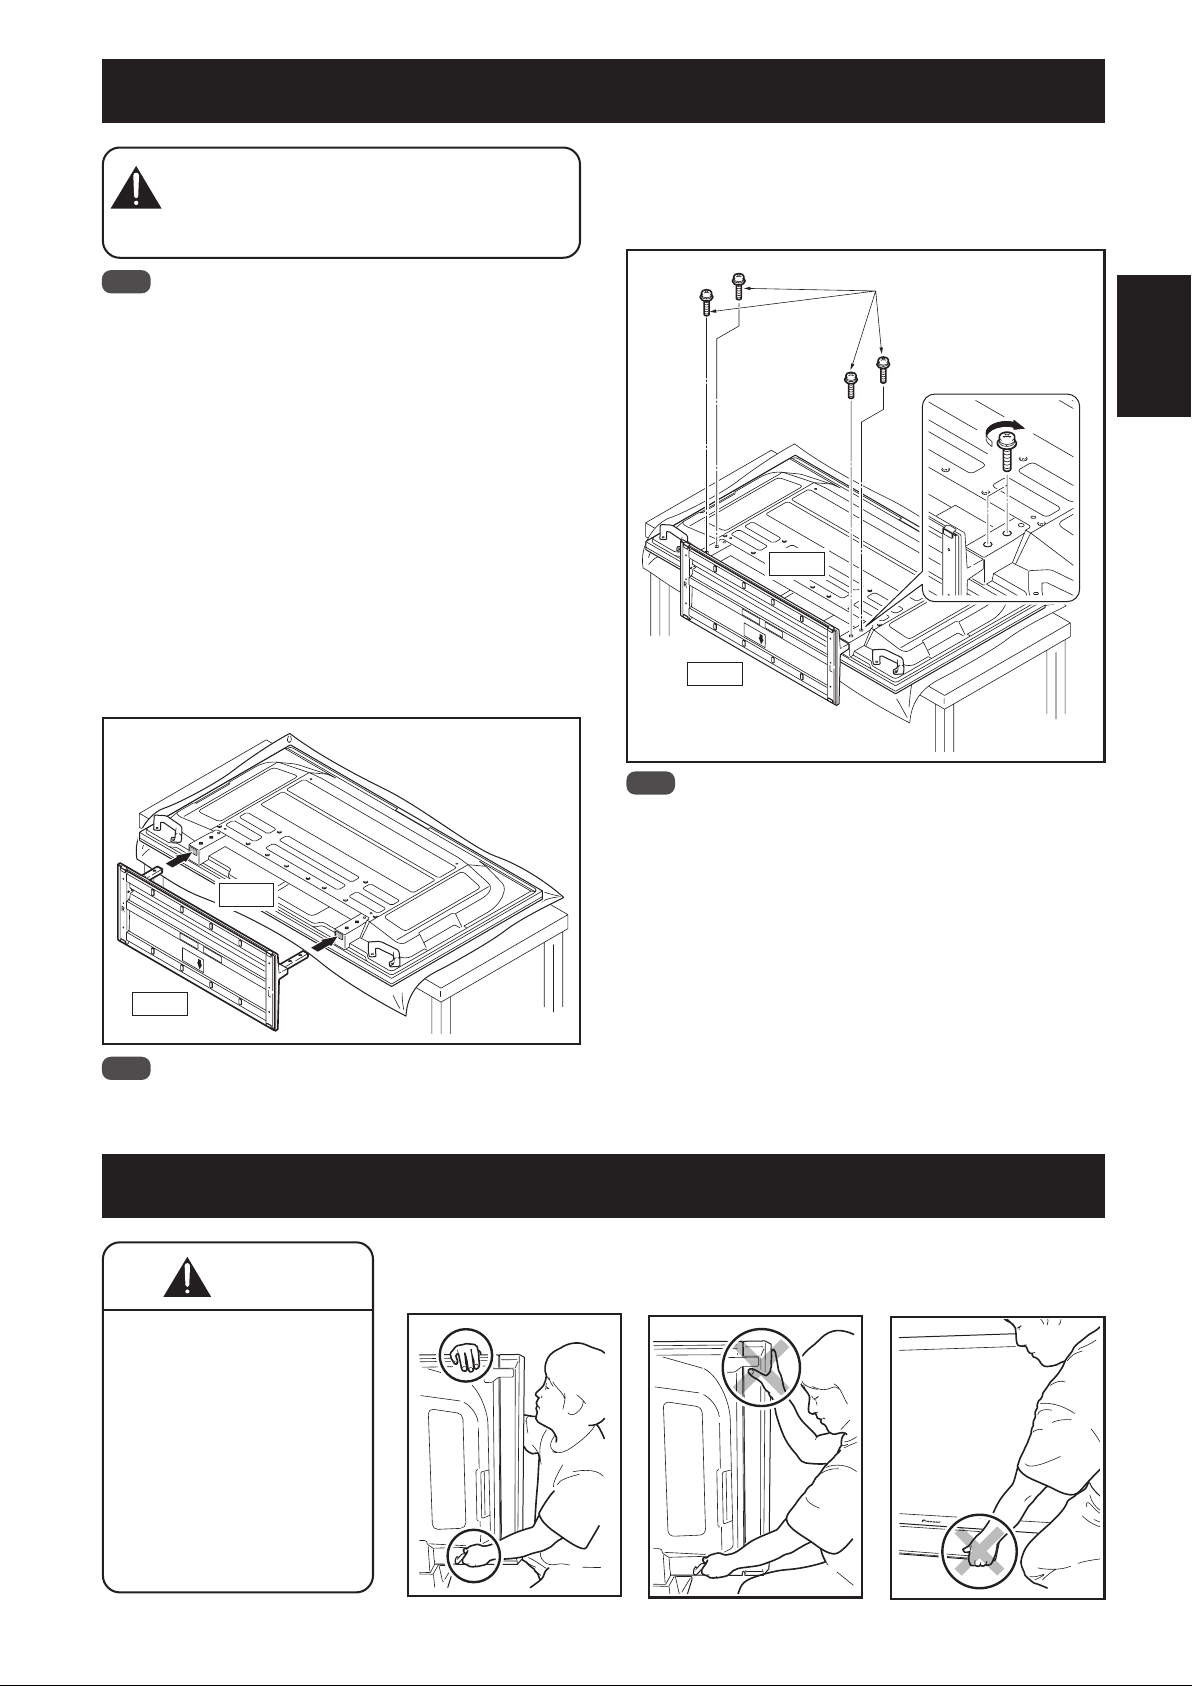
Attaching the Plasma Television
The weight of a plasma television is about 55.5 kg
(122.4 lbs), they have no depth, and are unstable.
Caution
Note
Be sure to install it on a flat stable location.
Insert the screws in the holes vertically and do not tighten
Place a sheet or other material under the display to
After manually turning the screw lightly two or three
Therefore, at least two people must assemble and
install them.
them with more force than necessary.
prevent scratches or damage to it.
times, tighten it with a screw-driver.
1 Attaching the plasma television to the
stand.
Lay the plasma television down flat. Align the stand
supports with the plasma television stand slots, and slowly
insert the supports horizontally.
Please ensure that the stand supports do not come into
contact with anything other than the plasma television
stand slots. Contact with any other area may result in
scratching or deformation of the display's rear side or
terminals.
2 Securing the plasma television with
Installation screws 2 (M6 × 20 mm: black).
Please tighten the screws with a Phillips screwdriver.
Installation screws 2
(M6 × 20 mm: black)
English
Rear
Front
Note
Please stand the plasma television upright after installing the
stand.
Rear
Front
Note
When laying down the plasma television, be careful so as to
not scratch or damage it.
Installing the Product on a Rack etc.
Caution
When installing on a
rack etc., please be sure
that the plasma
television is held by
two or more people.
Please do not hold the
plasma television by
the speakers or stand.
Doing so may damage
the product.
Hold the plasma
television by its handles
and from the top.
Do not hold the plasma
television by the
speakers.
Do not hold the plasma
television by the stand.
11
En
Preventing Equipment from Falling Over
After installing the stand, be sure to take special care to ensure that the equipment will not fall over.
Secure the plasma television to both the rack and the wall surface.
Stabilizing on a rack etc.
Fix the plasma television using the screws 3 (M4 × 10 mm:
black) and fall-prevention straps as shown in the diagram.
Fix the racks etc. using screws for sale on the market.
Note
To stabilize the equipment on a
table, use screws that have a
nominal diameter of 4 mm (5/32
inch) and that are at least 20 mm
(13/16 inch) long.
8 mm to 15 mm
Min. 20 mm
(13/16 inch)
(3/8 inch to 5/8 inch)
4 mm
(5/32 inch)
Using a wall for stabilization
1 Attaching falling prevention bolts (hooks)
to the plasma television.
2 Using strong cords to firmly stabilize it
appropriately and firmly to a wall, pillar, or
other sturdy element.
Perform this work in the same way on the left and right
sides.
Note
Use hooks, cords, and fittings that
are available on the market.
Recommended hook:
Nominal diameter M8
Length 12 mm to 15 mm (1/2 inch to 5/8 inch)
(1/2 inch to 5/8 inch)
1 Hook
2 Cord
Fitting
12 mm to 15 mm
M8
Screws 3
(M4 x 10 mm: black)
Screws
(commercially available)
Make a pilot hole in the rack's top
board (center of the board's
thickness), and fix the strap with a
store-bought screw.
Fall-prevention strap
Specifications
External dimensions:
PDK-TS30 ................ 920 mm (W) × 222.4 mm (H) × 380 mm (D) (36-7/32 in. (W) × 8-3/4 in. (H) × 14-31/32 in. (D))
PDK-TS30A ............. 922 mm (W) × 222.4 mm (H) × 381 mm (D) (36-5/16 in. (W) × 8-3/4 in. (H) × 15 in. (D))
Weight:
PDK-TS30 ................ 5.7 kg (13.0 lbs)
PDK-TS30A ............. 6.8 kg (15 lbs)
• The above specifications and exterior may be modified without prior notice to improve the product.
12
En

Dimensions Diagram
When the side speakers are installed
Unit: mm (inch)
* PDK-TS30
** PDK-TS30A
882 (34-23/32)
75
(2-15/16)
Without speakers
Unit: mm (inch)
* PDK-TS30
** PDK-TS30A
1684 (66-5/16)
1472 (57-15/16)
*920 (36-7/32)
**922 (36-5/16)
1472 (57-15/16)
(3-3/4)
60 (2-3/8)
124.5
(4-29/32)
122
(4-13/16)
95
*380 (14-31/32)
**381 (15)
122
(4-13/16)
English
882 (34-23/32)
75
(2-15/16)
*920 (36-7/32)
**922 (36-5/16)
95
(3-3/4)
60 (2-3/8)
124.5
(4-29/32)
Published by Pioneer Corporation.
Copyright © 2007 Pioneer Corporation.
All rights reserved.
*380 (14-31/32)
**381 (15)
13
En
Nous vous remercions d’avoir choisi un produit Pioneer.
Veuillez lire attentivement ce mode d’emploi pour savoir
comment utiliser votre support correctement et en toute
sécurité. Nous vous conseillons de conserver
soigneusement ce mode d’emploi à portée de main et
dans un endroit sûr afin de pouvoir vous y référer le cas
échéant.
Installation
¶ En cas de difficultés, veuillez consulter votre
revendeur.
¶ Pioneer ne saurait être tenu responsable d’aucun
dommage résultant d’une installation ou d’une
utilisation incorrecte de ce produit, de sa modification
ou encore de catastrophes naturelles.
AVIS IMPORTANT
Veuillez prendre note du numéro du modèle et du numéro
de série de cet équipement ci-dessous.
N° du modèle. N° de série.
Conservez ces numéros pour pouvoir les utiliser
ultérieurement.
Attention
Ce produit est un pied de table conçu exclusivement pour les
téléviseurs plasma Pioneer (PDP-608ZD / PDP-608ZDA).
L’utilisation de ce produit avec un autre modèle peut être à
l’origine d’un manque de stabilité pouvant provoquer une
blessure. Pour de plus amples informations, veuillez
contacter le magasin où vous avez acheté votre écran.
Ne procédez en aucun cas à installer ou à modifier le
produit autrement qu’en suivant les indications fournies.
N’utilisez pas ce pied de table pour un téléviseur plasma qui
ne figure pas parmi ceux qui sont spécifiés et ne l’utilisez
pas à d’autres fins.
Lieu d’installation
• Sélectionnez un emplacement assez solide pour supporter le poids du support et de l’écran.
• Assurez-vous de placer le produit à un emplacement
stable et plat.
• N’installez pas le support à l’extérieur, à proximité d’une
source thermale ou sur une plage.
• N’installez pas le support à un endroit où il pourrait être
soumis à des chocs ou à des vibrations.
Table des matières
Attention ................................................................ 14
Vérification des pièces fournies........................... 15
Assemblage du support ....................................... 15
Mise en place de l’écran occultant
(PDK-TS30A uniquement) .................................... 16
Installez le téléviseur plasma ............................... 17
Installation du produit sur une étagère, etc. ......17
Prévenir toute chute de l’équipement ................ 18
Caractéristiques techniques................................. 18
Schéma de dimensions ........................................ 19
ATTENTION
Ce symbole indique un danger ou une pratique
dangereuse susceptible de provoquer des dommages
corporels ou matériels.
Montage et installation
• Montez le support en suivant les instructions et
vissez solidement toutes les vis aux endroits prévus à
cet effet.
Des accidents ont été constatés (casse, chute du
matériel, etc.) suite à l’installation de l’écran parce
que le support n’avait pas été installé conformément
aux instructions.
• Pour une bonne installation, l’écran doit toujours être
installé par au moins deux personnes.
• Avant de procéder à l’installation, mettez l’écran ainsi
que les équipements périphériques hors tension en
coupant l’alimentation, puis retirez la prise du câble
d’alimentation de la prise murale.
Prévenez les accidents causés par la chute du produit
en prenant des mesures fiables visant à éviter toute chute
(voir Page 18).
14
Fr

Vérification des pièces fournies
Veuillez vous assurer que vous possédez bien toutes les pièces nécessaires avant de procéder au montage et à l’installation
du support.
Couverture de table × 1
Ecran occultant × 1
(PDK-TS30A uniquement)
Vis 1
(M5 × 10 mm : noire) × 6
Colonne de support
(L : gauche) × 1
Bandes anti-chute × 4
Vis d’installation 2
(M6 × 20 mm : noire) × 4
Colonne de support
(R : droit) × 1
Mode d’emploi
(ce document) × 1
Français
Vis 3
(M4 × 10 mm : noire) × 4
Assemblage du support
Procédure de montage
1 Tournez le support de couverture de table
de façon à ce que le dessous regarde vers
le haut.
2 Insérez les colonnes de support dans le
support de couverture de table.
Insérez la colonne de support (R) dans le côté
marqué « R » et la colonne de support (L) dans le
côté marqué « L ».
3 Serrez les vis 1 (M5 × 10 mm : noire) afin
de stabiliser les colonnes de support.
Remarque
Avant de monter le support, glissez un drap doux sous la
couverture de table. Sans ce drap, vous risqueriez d’érafler
la surface de la couverture de table.
Procédez avec précaution lorsque vous installez les
colonnes de support (L) et (R) de façon à vous
assurer qu’elles sont dans la bonne position. Si vous
vous trompez en les installant, cela risquerait
d’endommager le pied.
Vis 1
(M5 x 10 mm : noire)
Avant
Pied de table monté
Colonne de
support (R)
Drap
Arrière
1
Vis
(M5 x 10 mm : noire)
Colonne de
support (L)
Couverture
de table
15
Fr
 Loading...