

Page 1
Table top stand
Pied de table
Tischständer
Supporto di tavolo
Tafelbladstaander
Soporte de mesa
PDK-TS15
Operating instructions
Mode d’emploi
Bedienungsanleitung
Istruzioni per l’uso
Gebruiksaanwijzing
Manual de instrucciones
Page 2
このたびは、パイオニアの製品をお買い求めいただきまして
まことにありがとうございます。お使いになる前には取扱説
明書をよくお読みになり、安全に正しくご使用ください。
また、お読みになったあとも、この取扱説明書は大切に保管
してください。
本製品は弊社製プラズマテレビPDP-607HX専用のテーブ
ルトップスタンドです。
その他の機器への取り付けに関しては対応しておりません。
詳しくは、お買い求めの販売店にご相談ください。
「据え付け」について
お客様がご自身で本機の取り付けを困難だと思われる場
合は、販売店にご相談ください。
なお、据え付け、取り付けの不備、誤使用、改造、天災
などによる事故損傷については、弊社は一切責任を負い
ません。
もくじ
取扱上の注意 ................................................................ 2
同梱された部品の確認 ................................................ 3
スタンドの組み立て .................................................... 3
プラズマテレビの取り付け方 ..................................... 4
テレビ台などに設置する場合 ..................................... 4
ケーブルのまとめ方 .................................................... 5
転倒防止 ........................................................................ 6
プラズマテレビをスタンドから取り外す場合 .......... 7
仕 様............................................................................ 7
寸法図............................................................................ 7
取扱上の注意
注意
指定外のプラズマテレビへの取り付け、改造および
他の用途への使用はしないでください。
取り付けなどに不具合があると転倒などの事故につ
ながり大変危険です。
設置場所について
設置場所にはスタンドとプラズマテレビの質量に十
分耐えられる強度をもつ場所を選定してください。
必ず平坦で安定した場所に設置してください。
屋外や温泉、海辺などの水場には設置しないでくだ
さい。
振動や衝撃の加わるような場所には設置しないでく
ださい。
組み立て・設置について
組み立ての手順を守り、指定の箇所はすべて確実に
ねじ留めしてください。
指定を守らないとプラズマテレビ取り付け後に、破
損や転倒など思わぬ事故の原因となることがありま
す。
ご注意 安全上の絵表示について
取扱説明書および製品に記されている注意事項には、損害の
レベルや内容を示す絵表示が付けられていることがありま
す。それら絵表示の意味は以下のとおりです。
人が死亡または重傷を負うおそ
警告
注意
れがある内容を示します。
人がけがをしたり財産に損害を
受けるおそれがある内容を示し
ます。
警告・注意(気をつけること)
禁止(やってはいけないこと)
指示・強制(しなければならないこと)
プラズマテレビの取り付け作業は安全のため、必ず
2 人以上で行ってください。
作業の際には、プラズマテレビと周辺機器の電源を
切り、電源プラグをコンセントから抜いてください。
転倒による事故防止のため、転倒防止の措置を確
実に行ってください(6 ページ参照)。
Ja
2
Page 3
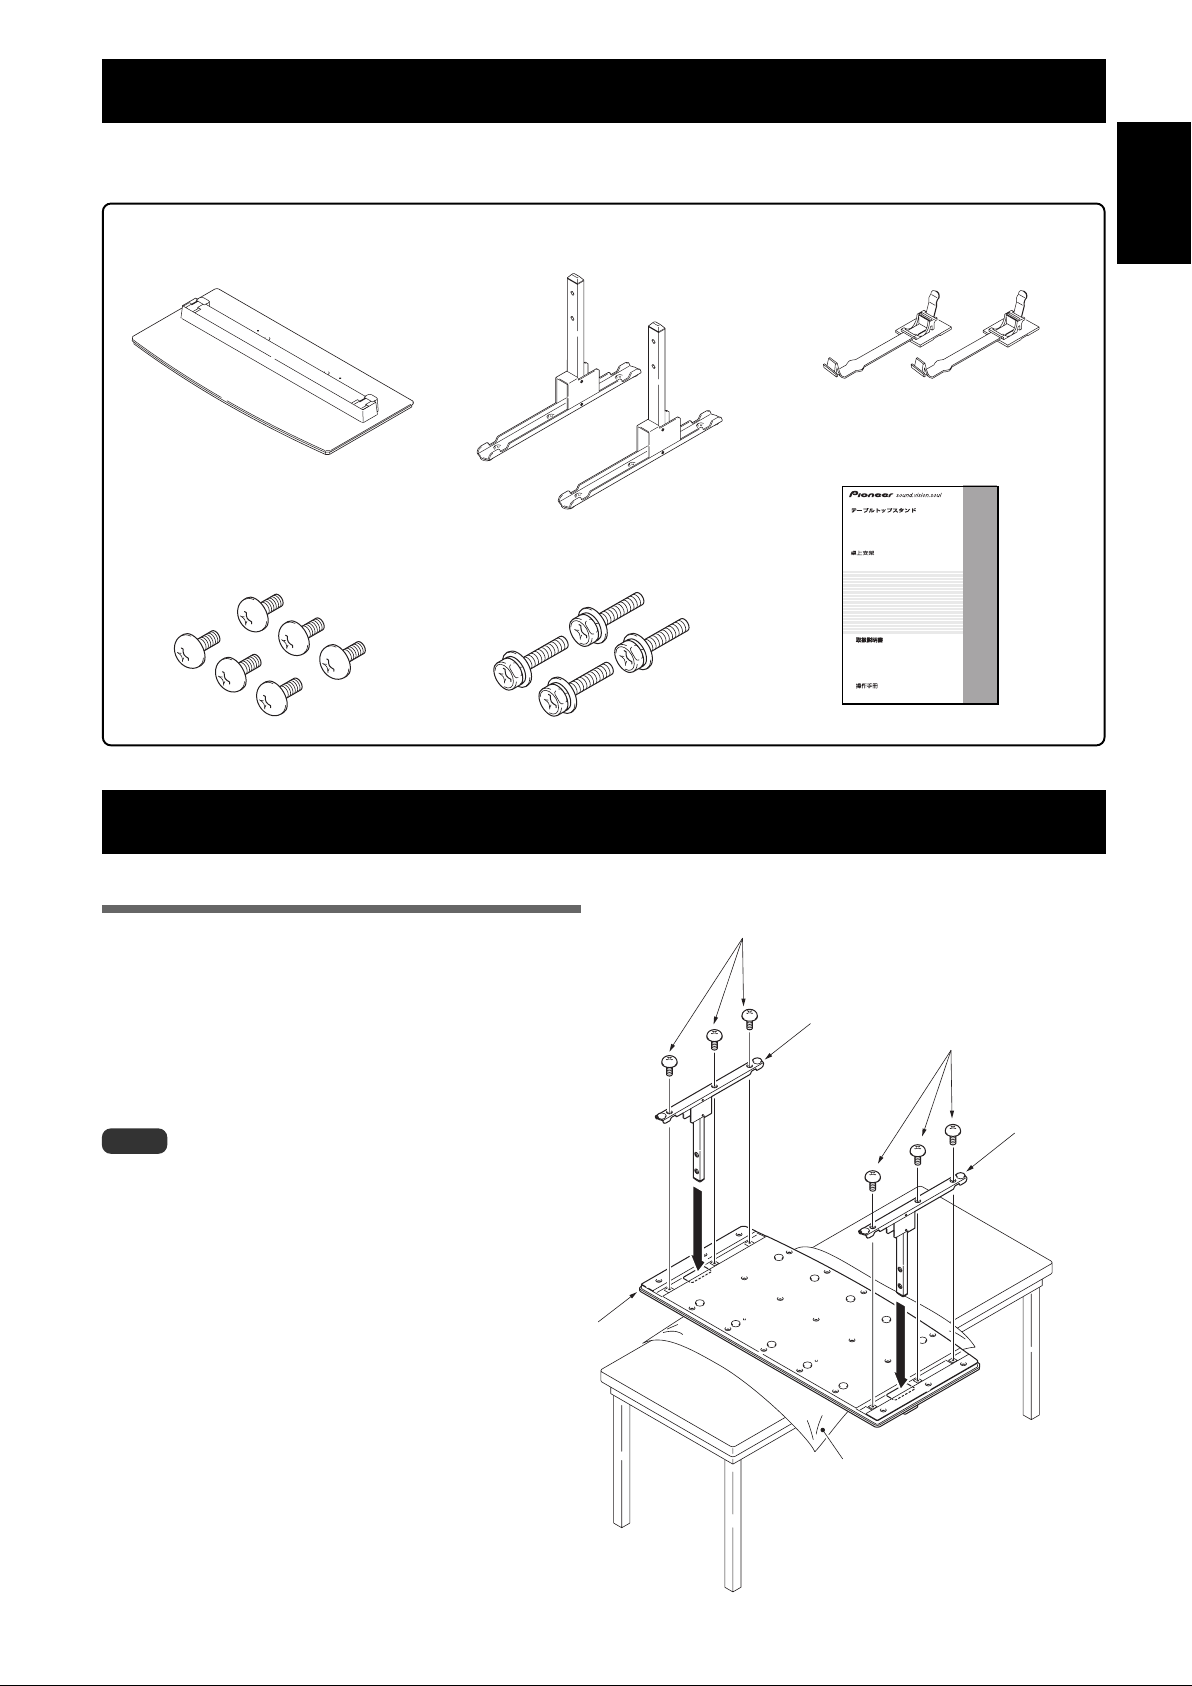
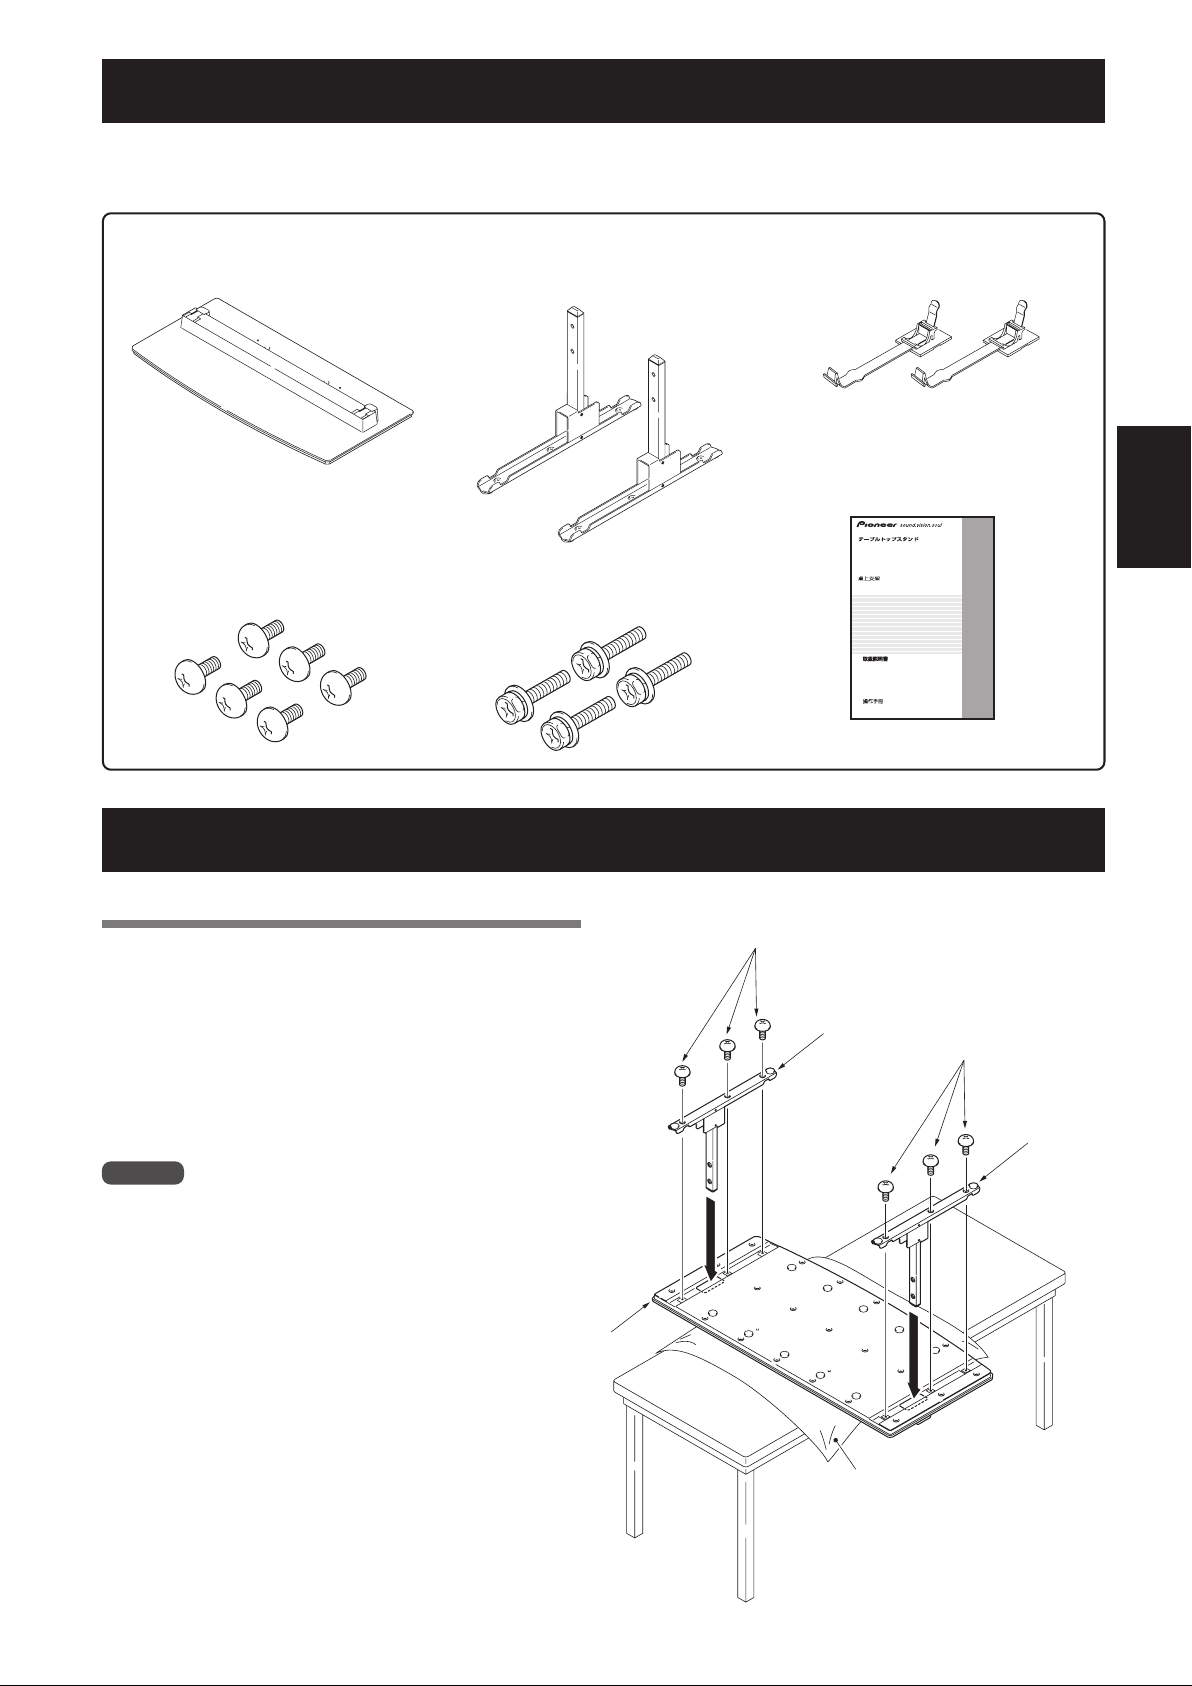
同梱された部品の確認
組み立て・設置の前に同梱された部品を確認してください。
※設置の際にはプラスドライバーが必要です。別途、ご用意ください。
ベースカバー× 1
ねじ
(M5×10mm:シルバー) ×6
スタンドパイプ(L、R 共通)× 2
取付ボルト
(M6 × 20mm:黒) × 4
ケーブルクランパ× 2
取扱説明書(本書)× 1
Table top stand
Support de couverture de table
Tischständer
Supporto di tavolo
Tafelbladstaander
Soporte de mesa
PDK-TS15
Operating instructions
Mode d’emploi
Bedienungsanleitung
Istruzioni per l’uso
Gebruiksaanwijzing
Manual de instrucciones
日本語
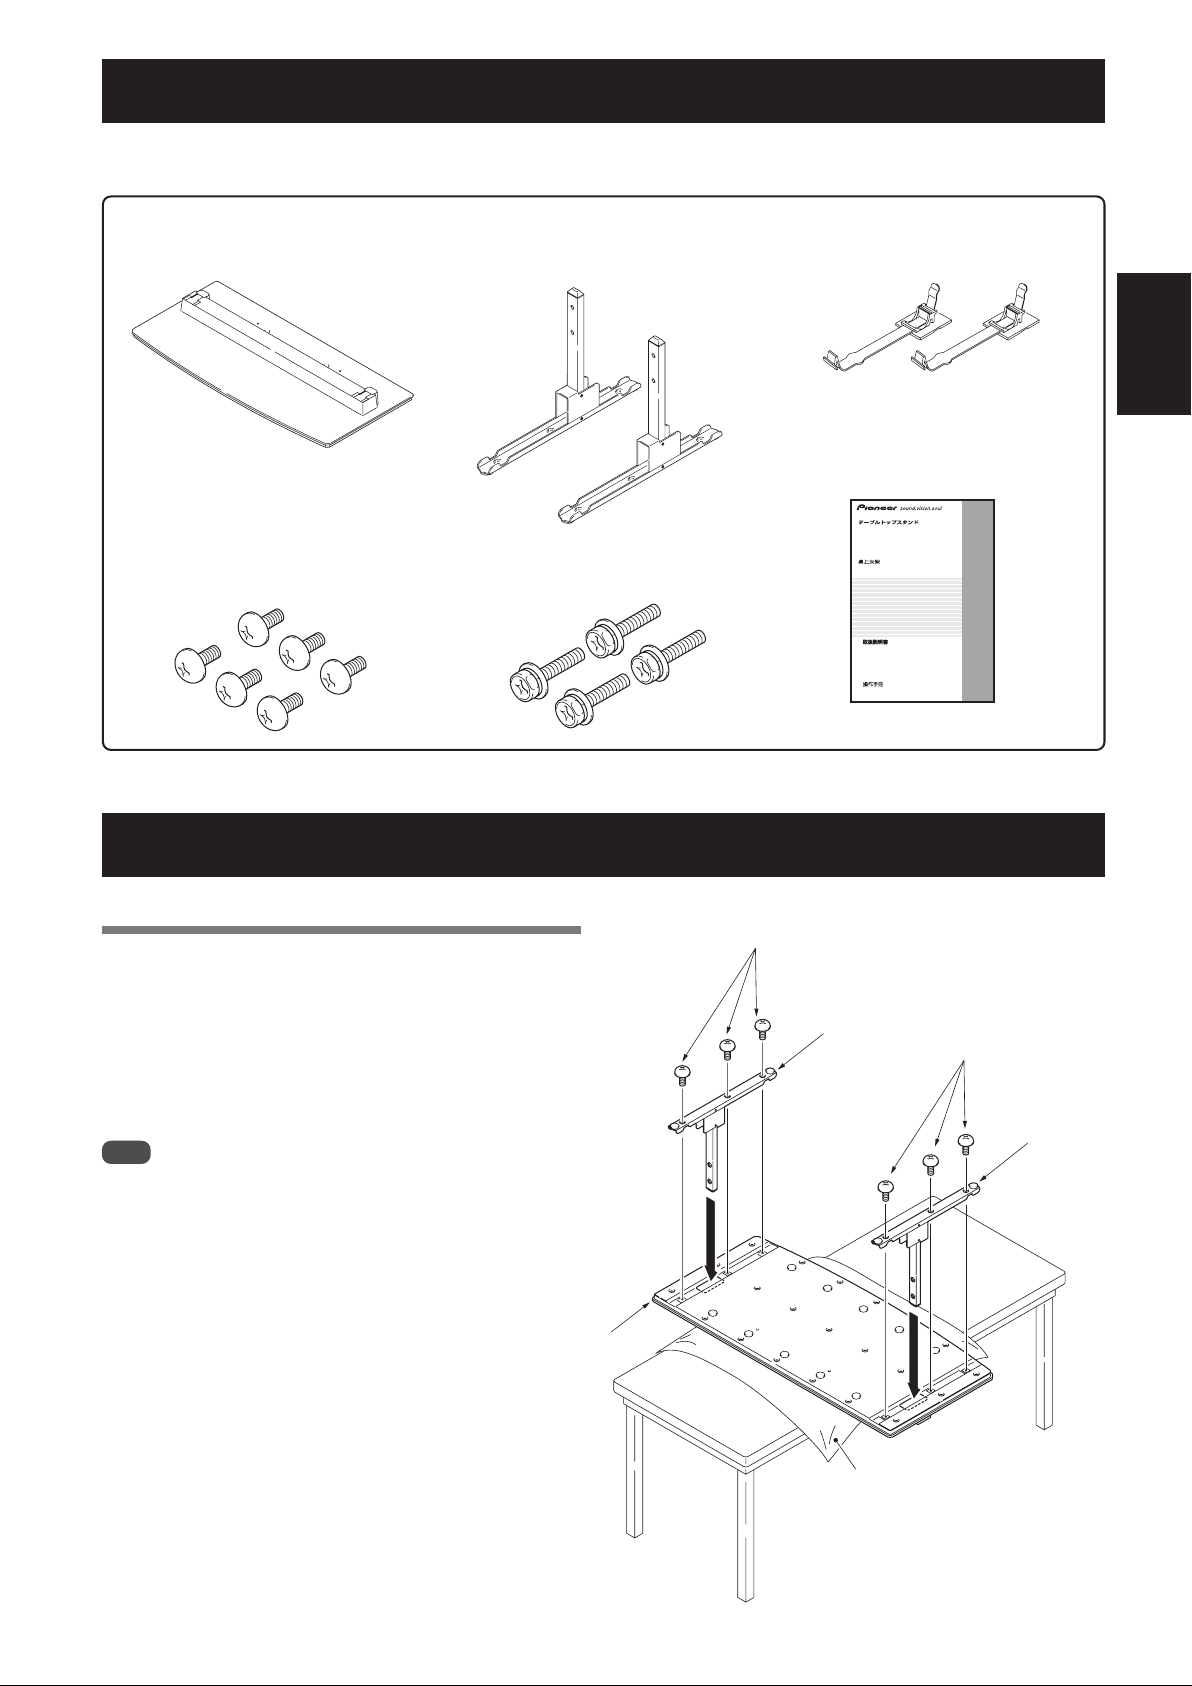
スタンドの組み立て
組み立て手順
1 ベースカバーを裏側にする
2 スタンドパイプをベースカバーに挿入する
3 ねじでスタンドパイプをベースカバーに固定
する
ご注意
スタンドを組み立てる際は、ベースカバーの下に柔らかいシートな
どを敷いて組み立ててください。
シートを敷いて組み立てを行わないと、ベースカバーの表面をキズ
つける恐れがあります。
ベースカバー
ねじ
(M5 × 10mm:シルバー)
スタンドパイプ
ねじ
(M5 × 10mm:シルバー)
スタンドパイプ
シート
3
Ja
Page 4
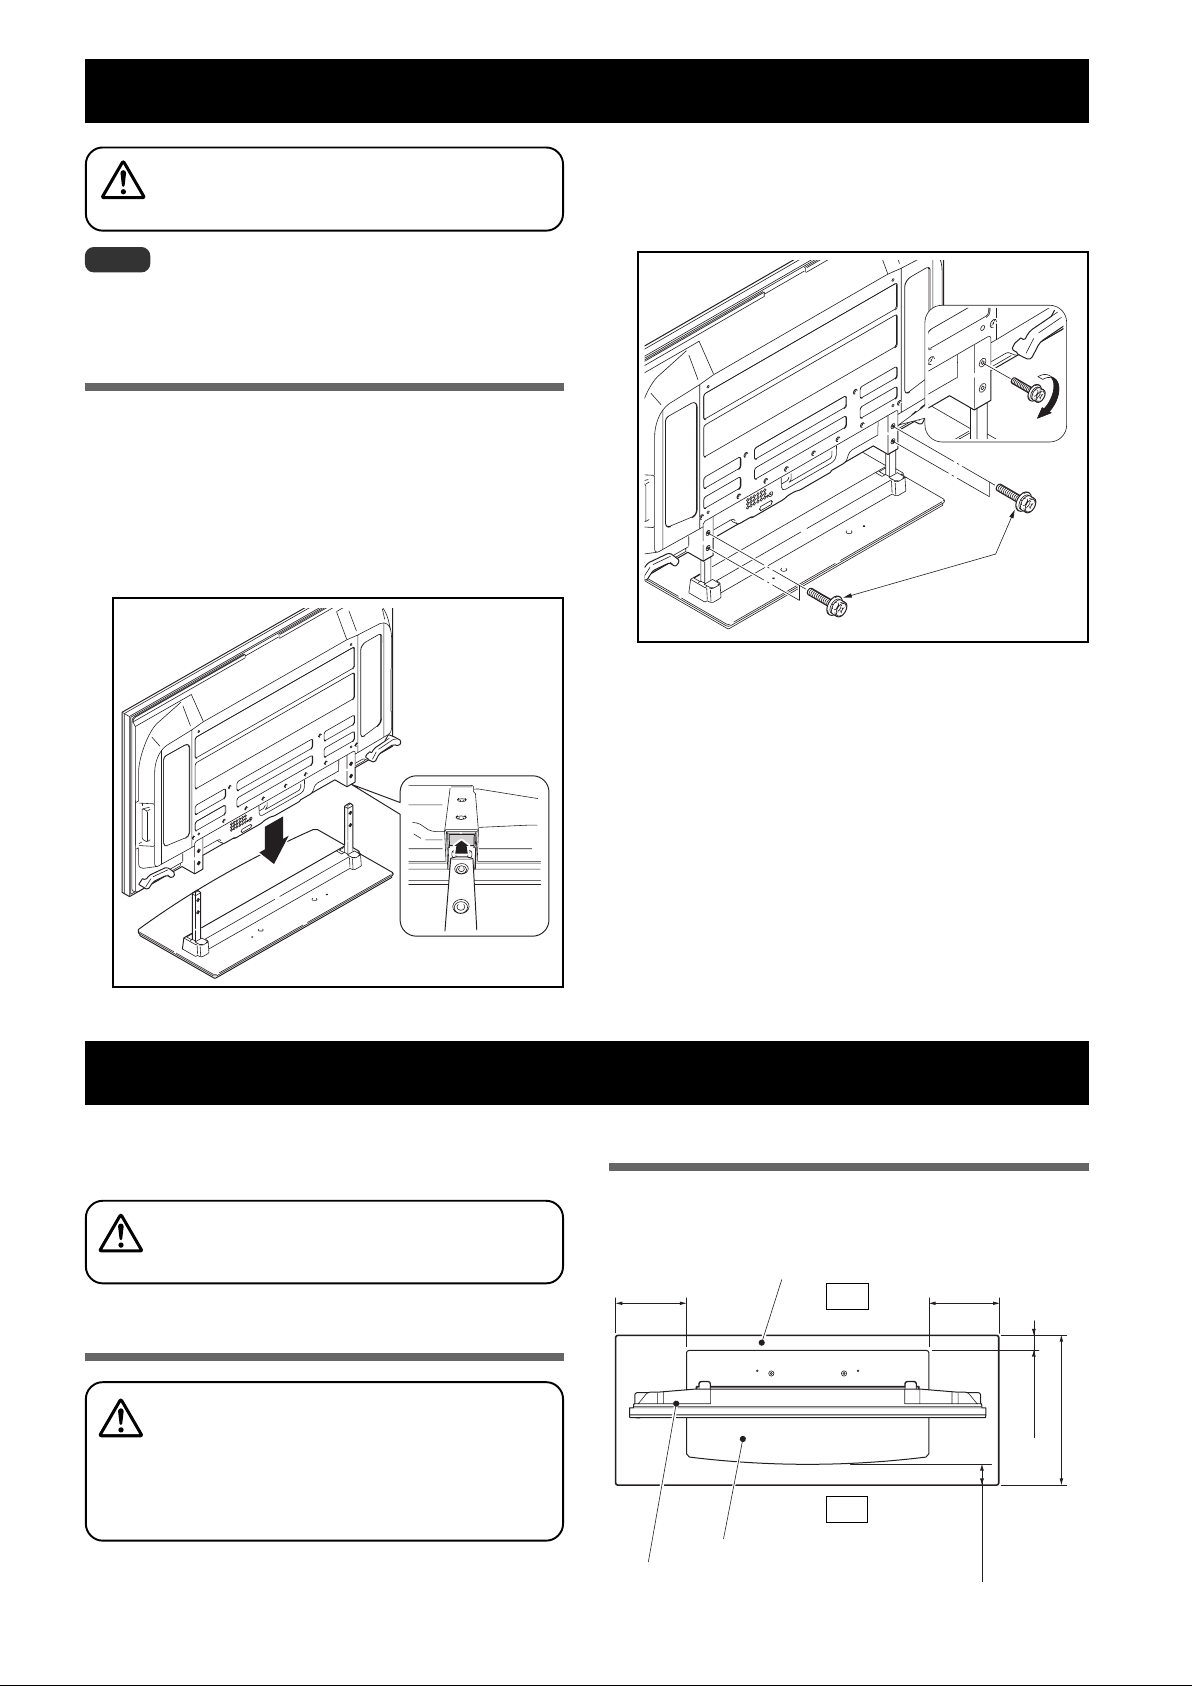
プラズマテレビの取り付け方
プラズマテレビは質量が約 50kg あり、奥行きがなく
不安定なため、取り付けおよび設置は必ず 2 人以上で
行ってください。
注意
ご注意
必ず平坦で安定した場所で取り付けをしてください。
ねじは穴に対して垂直に挿入し、しっかりと締めつけてくださ
い。
取り付け手順
1 プラズマテレビをスタンドに取り付ける
下図を参照に、スタンドの支柱にプラズマテレビを合わ
せて、垂直にゆっくり挿入してください。スタンドの支
柱をプラズマテレビのスタンド挿入口以外の部分に当て
ないように注意してください。本体裏面や端子にキズを
つけたり、変形させる危険があります。
プラズマテレビ下部と
支柱を図のように合わ
せる
2 取付ボルトでプラズマテレビを固定する
プラスドライバーを使用して、本体取付部を固定してく
ださい。
取付ボルト
(M6 × 20mm:黒)
テレビ台などに設置する場合
プラズマテレビを取り付けた本製品をテレビ台などに移動、
設置する場合は、下記の点にご注意ください。
テレビ台などに設置する場合は、必ず2人でプラズマテ
レビを持ってください。
注意
移動時のご注意
長い距離の移動をする際は、先にスピーカーを取り外
し、次にプラズマテレビ本体もスタンドから取り外
注意
4
Ja
し、別々に移動してください。
プラズマテレビをスタンドから取り外す場合は、事故を
防止するために「プラズマテレビをスタンドから取り外
す場合」(7 ページ)の手順を必ず守ってください。
設置上のご注意
テーブルトップスタンドの前側および後側は、必ず下図の指
示以上のスペースを確保して設置してください。
テレビ台
30mm 以上 30mm 以上
テーブルトップスタンド
プラズマテレビ
後側
10mm 以上
テレビ台奥行き寸法
前側
30mm 以上
500mm 以上推奨
Page 5
テレビ台などに設置する場合
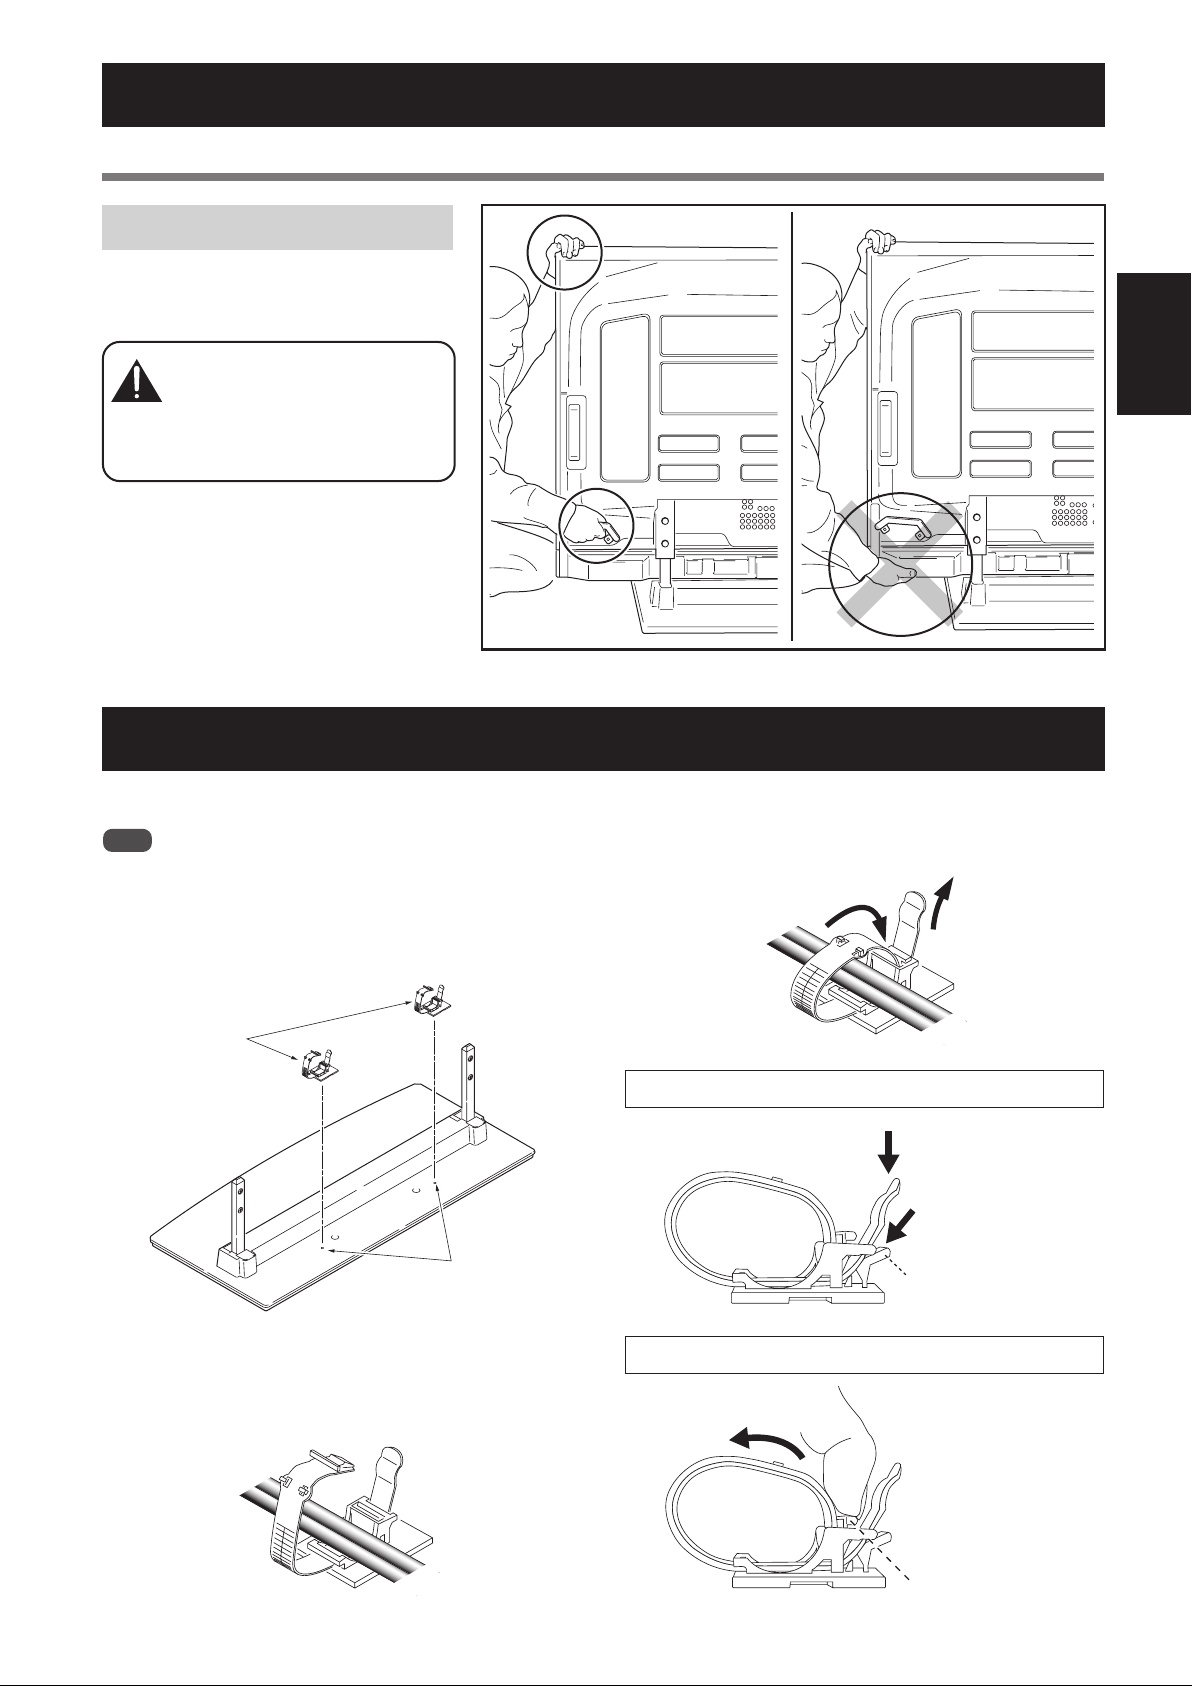
テレビ台などに設置する際のご注意
スピーカーを持たないでください
プラズマテレビの下部の取っ手と側面上部を
持ってください。
テレビ台などに設置する際は、プラ
ズマテレビの下部の取っ手と側面上
注意
部を持ってください。スピーカーを
持つと変形、破損の原因となります。
日本語
ケーブルのまとめ方ケーブルのまとめ方
ケーブルのまとめ方
ケーブルのまとめ方ケーブルのまとめ方
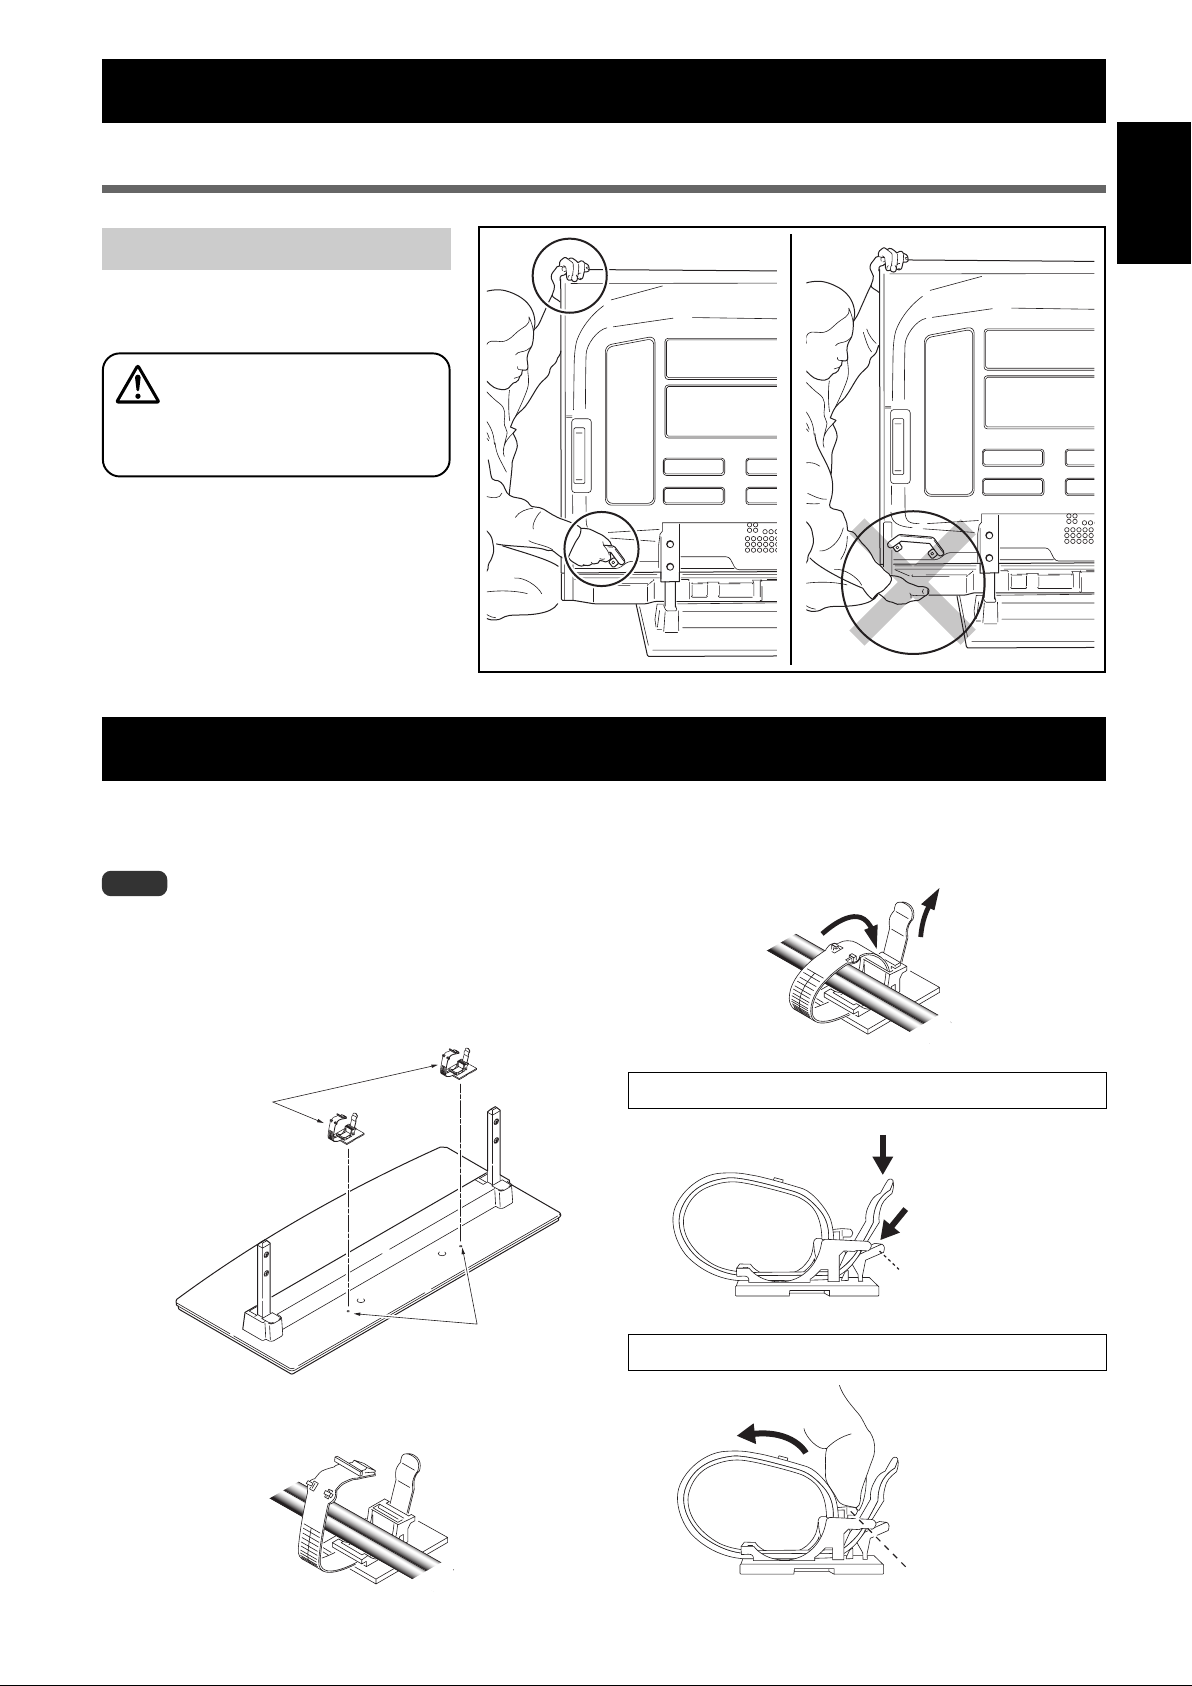
スタンドに取り付けられているケーブルクランパを使って、
ケーブル類をまとめてください。
ご注意
ケーブルを扱う時には、ケーブルの根元に不必要な力が加わらない
ように、注意してください。
1 ケーブルクランパ取付穴にケーブルクランパを
差し込む
ケーブルクランパ
3 ケーブルクランパを閉じてから、ケーブルク
ランパの先端を引っ張って、ケーブルを固定
する
ケーブルクランパの緩め方
ケーブルクランパをきつく
し過ぎたときは、左図のボ
タンを押し、ケーブルクラ
ンパの先端を押して、緩め
ます。
ボタン
ケーブルクランパ
取付穴
2 ケーブル類をまとめて、ケーブルクランパの上
に置く
ケーブルクランパの開き方
指先でロックを
外します。
5
Ja
Page 6
転倒防止(設置後は転倒防止の備えを必ず行ってください)
本機は大型でかなり重量がありますので、転倒した場合、けがや事故の原因となる恐れがあります。
安全にご使用いただくために、設置後は必ず転倒防止の処置をしてください。
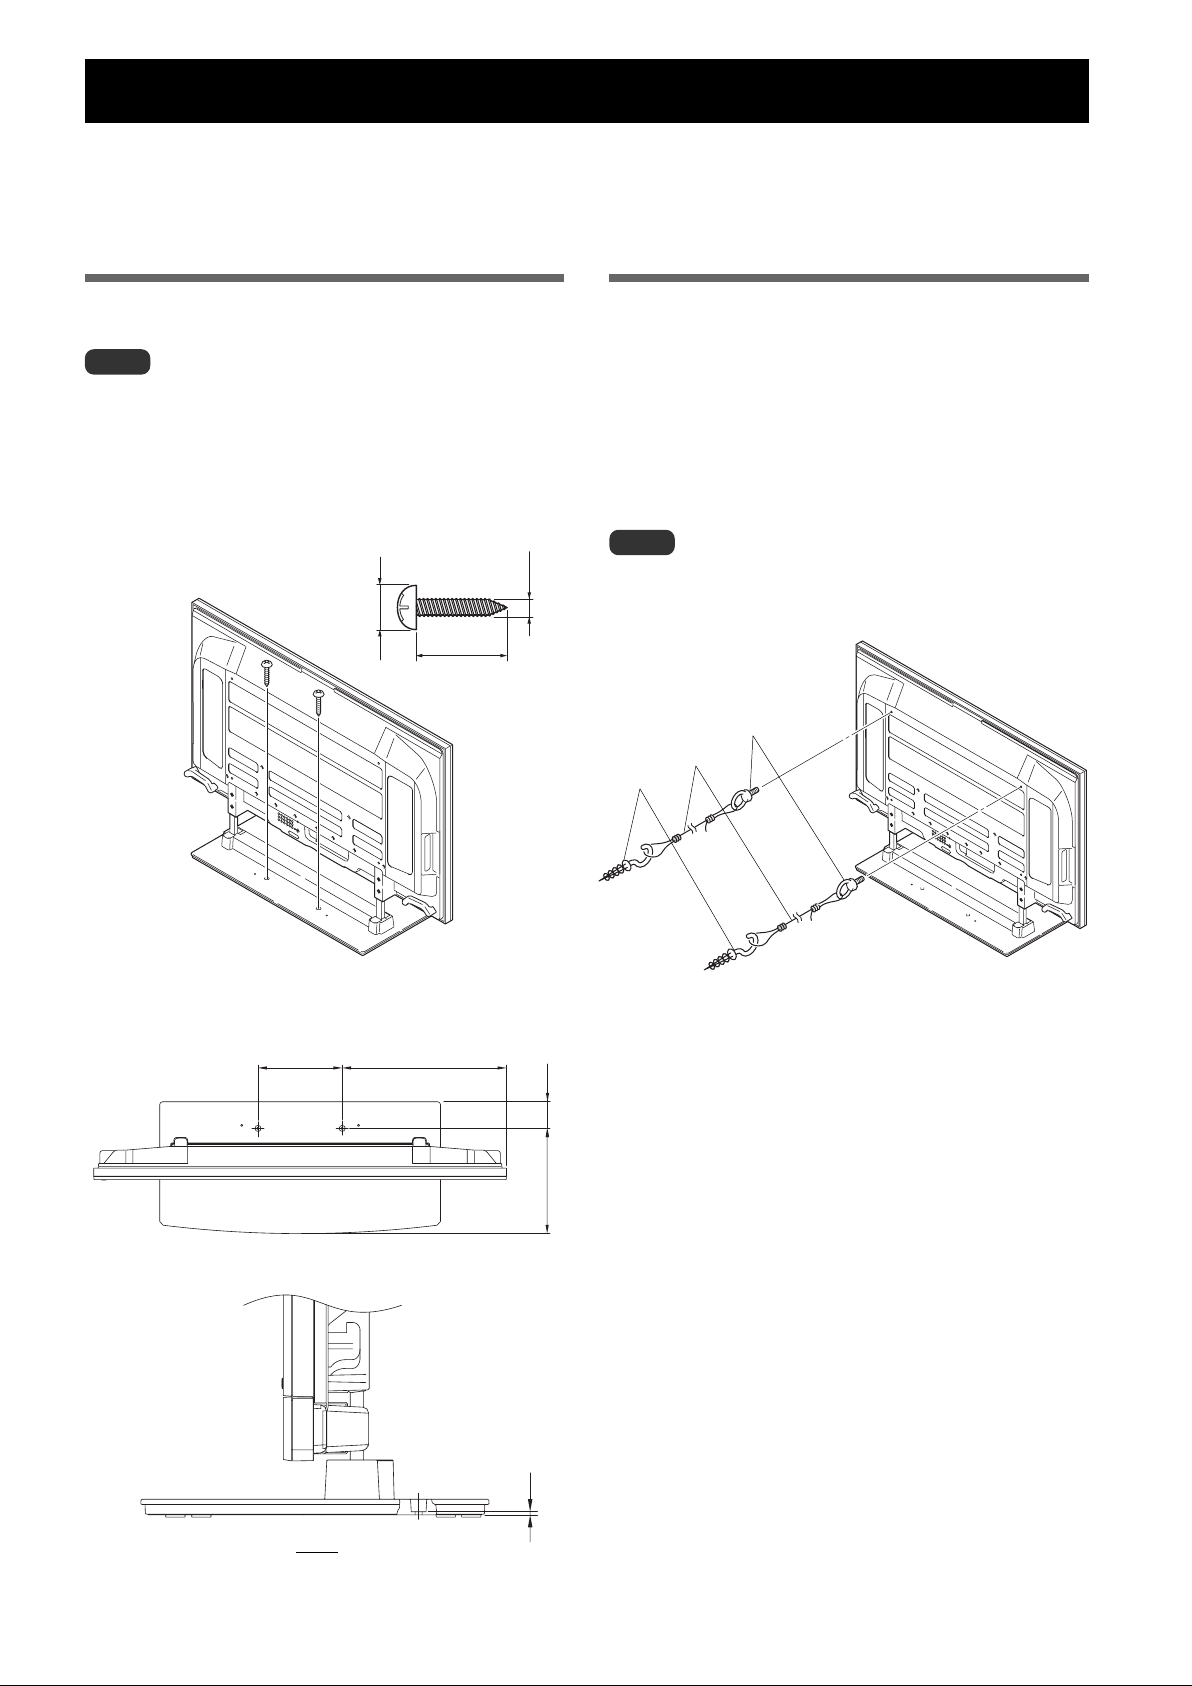
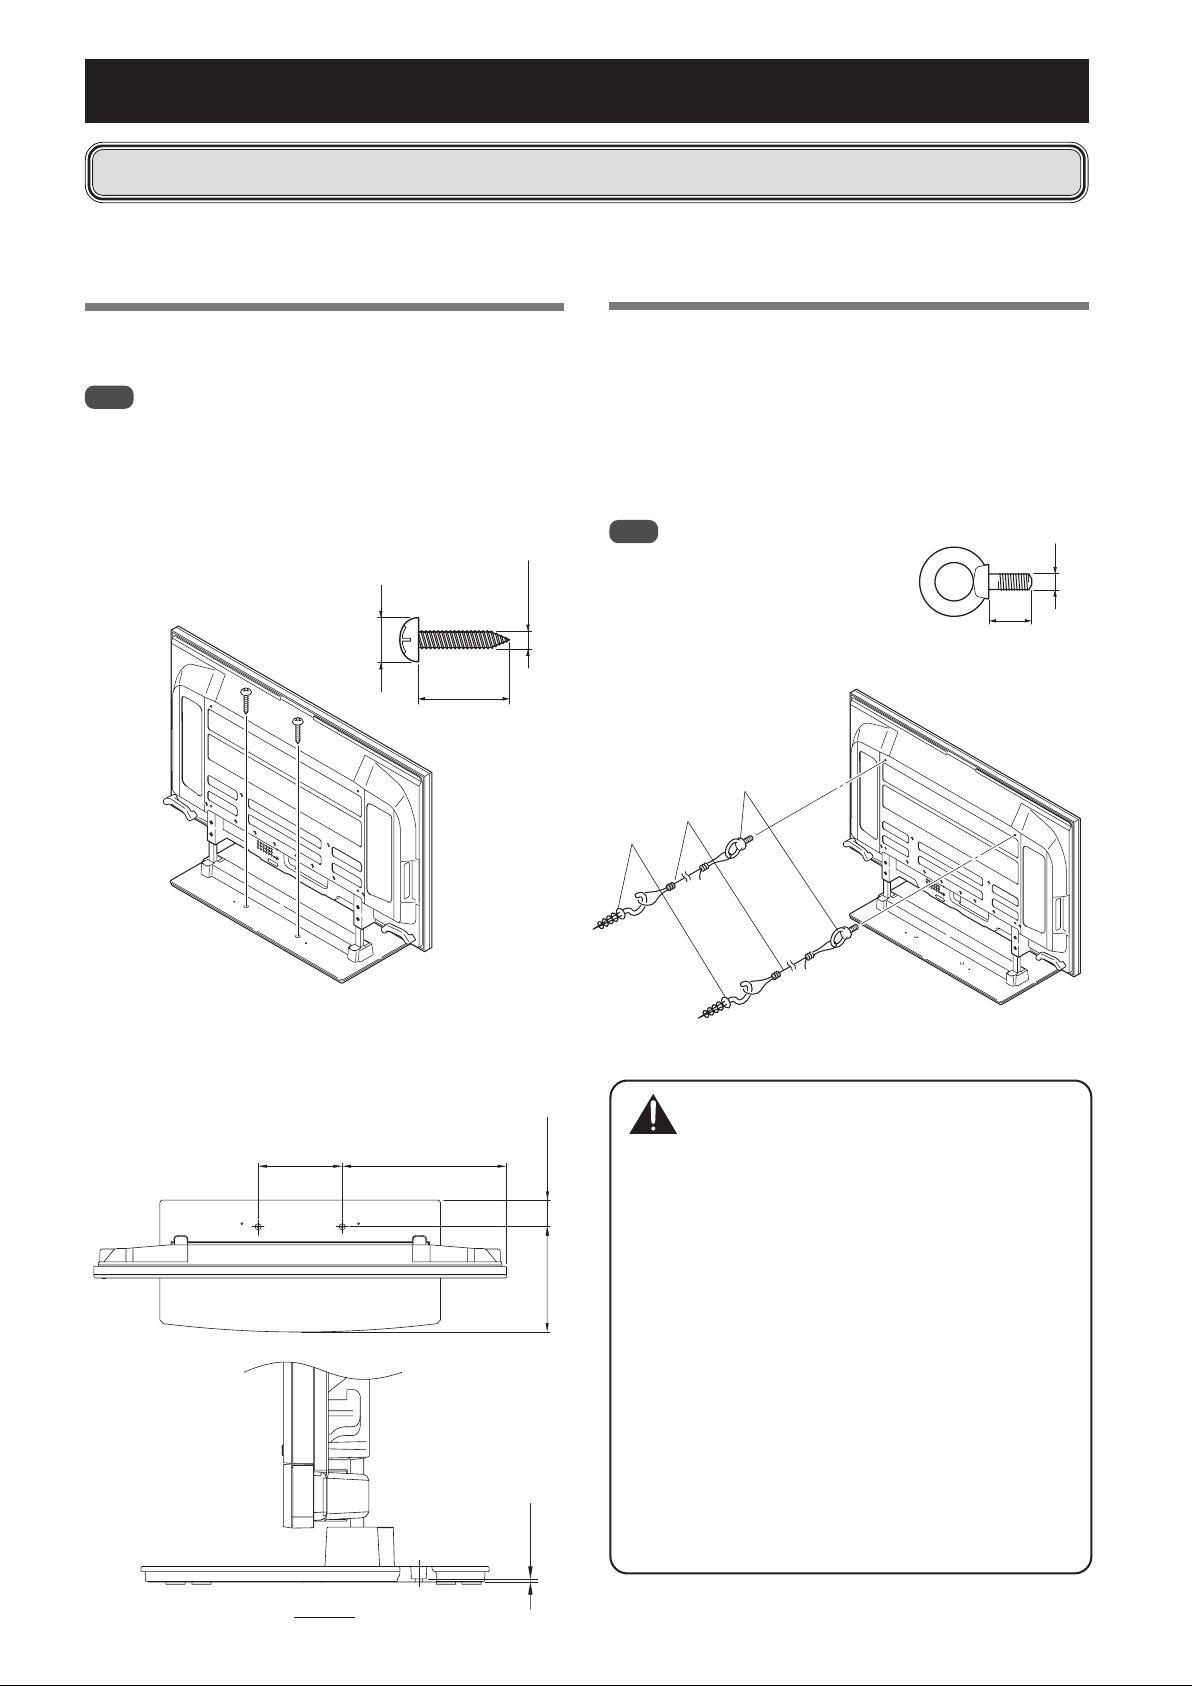
テレビ台などに固定する方法
市販のねじを使って図のように固定してください。
ご注意
本機はかなり重量がありますので、設置するテレビ台はこの重
さに耐えられる堅牢なもので、かつ十分な幅と奥行きがあり、
転倒しない台を使用してください。
市販のねじを使用するときは、テレビ台の材質に合った、直径
6mmのねじをご用意ください。ねじの種類についてはお買い
上げの販売店や工事店にご相談ください。
6mm
20mm以上
9mm〜15mm
壁を利用する方法
1 プラズマテレビに転倒防止用ボルトを取り付け
る(2 カ所)
転倒防止用ボルトは、プラズマテレビに付属しています。
2 壁、柱などのがんじょうな部分に、丈夫なヒモ
でしっかりと固定する
左右対称に同様の作業を行ってください。
ご注意
ヒモ、取付具は本製品およびプラズマテレビには付属していませ
ん。市販品をご使用ください。
1 転倒防止用ボルト
(プラズマテレビ付属品)
2 ヒモ
取付具
固定ねじ取付位置
単位:mm
300 585
95
375
4
側面図
Ja
6
Page 7
プラズマテレビをスタンドから取り外す場合
プラズマテレビをスタンドから取り外す場合は、事故を
防止するために以下の手順を必ず守ってください。
注意
1 あらかじめ平らな床などにプラズマテレビを寝
かせるスペースを作り、キズおよび破損が生じ
3「プラズマテレビの取り付け方」(4ページ)の手
順 2 を参照し、取付ボルト(4 本)を外す
4 プラズマテレビの下部の取っ手と側面上部を
持って、ゆっくり垂直に持ち上げる
ないようにシートを敷く
2 スピーカーを取り外す
5 手順1で用意したシートの上に、画面を下側に
して静かに置く
仕 様
外形寸法 1000mm(幅)× 309mm(高さ)× 470mm(奥行き)
質量 10.2kg
・上記の仕様および外観は、改良のため予告なく変更することがあります。
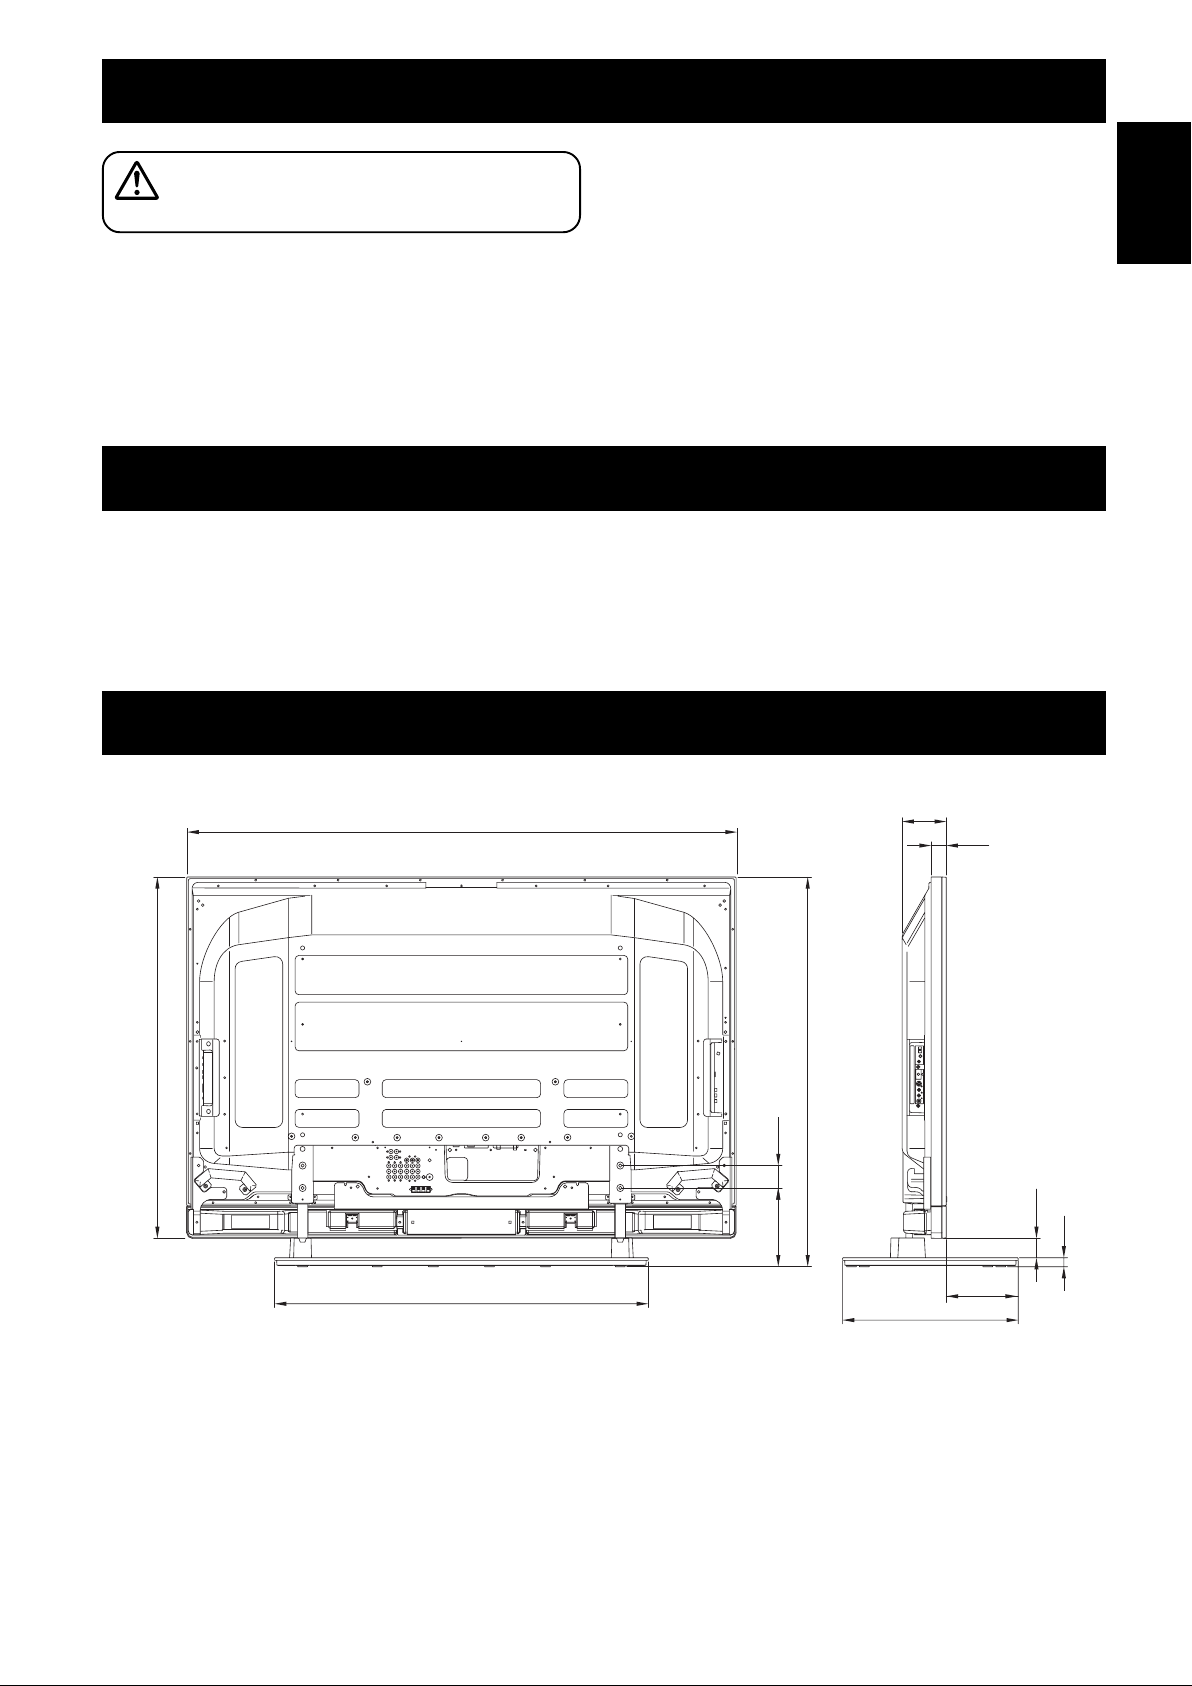
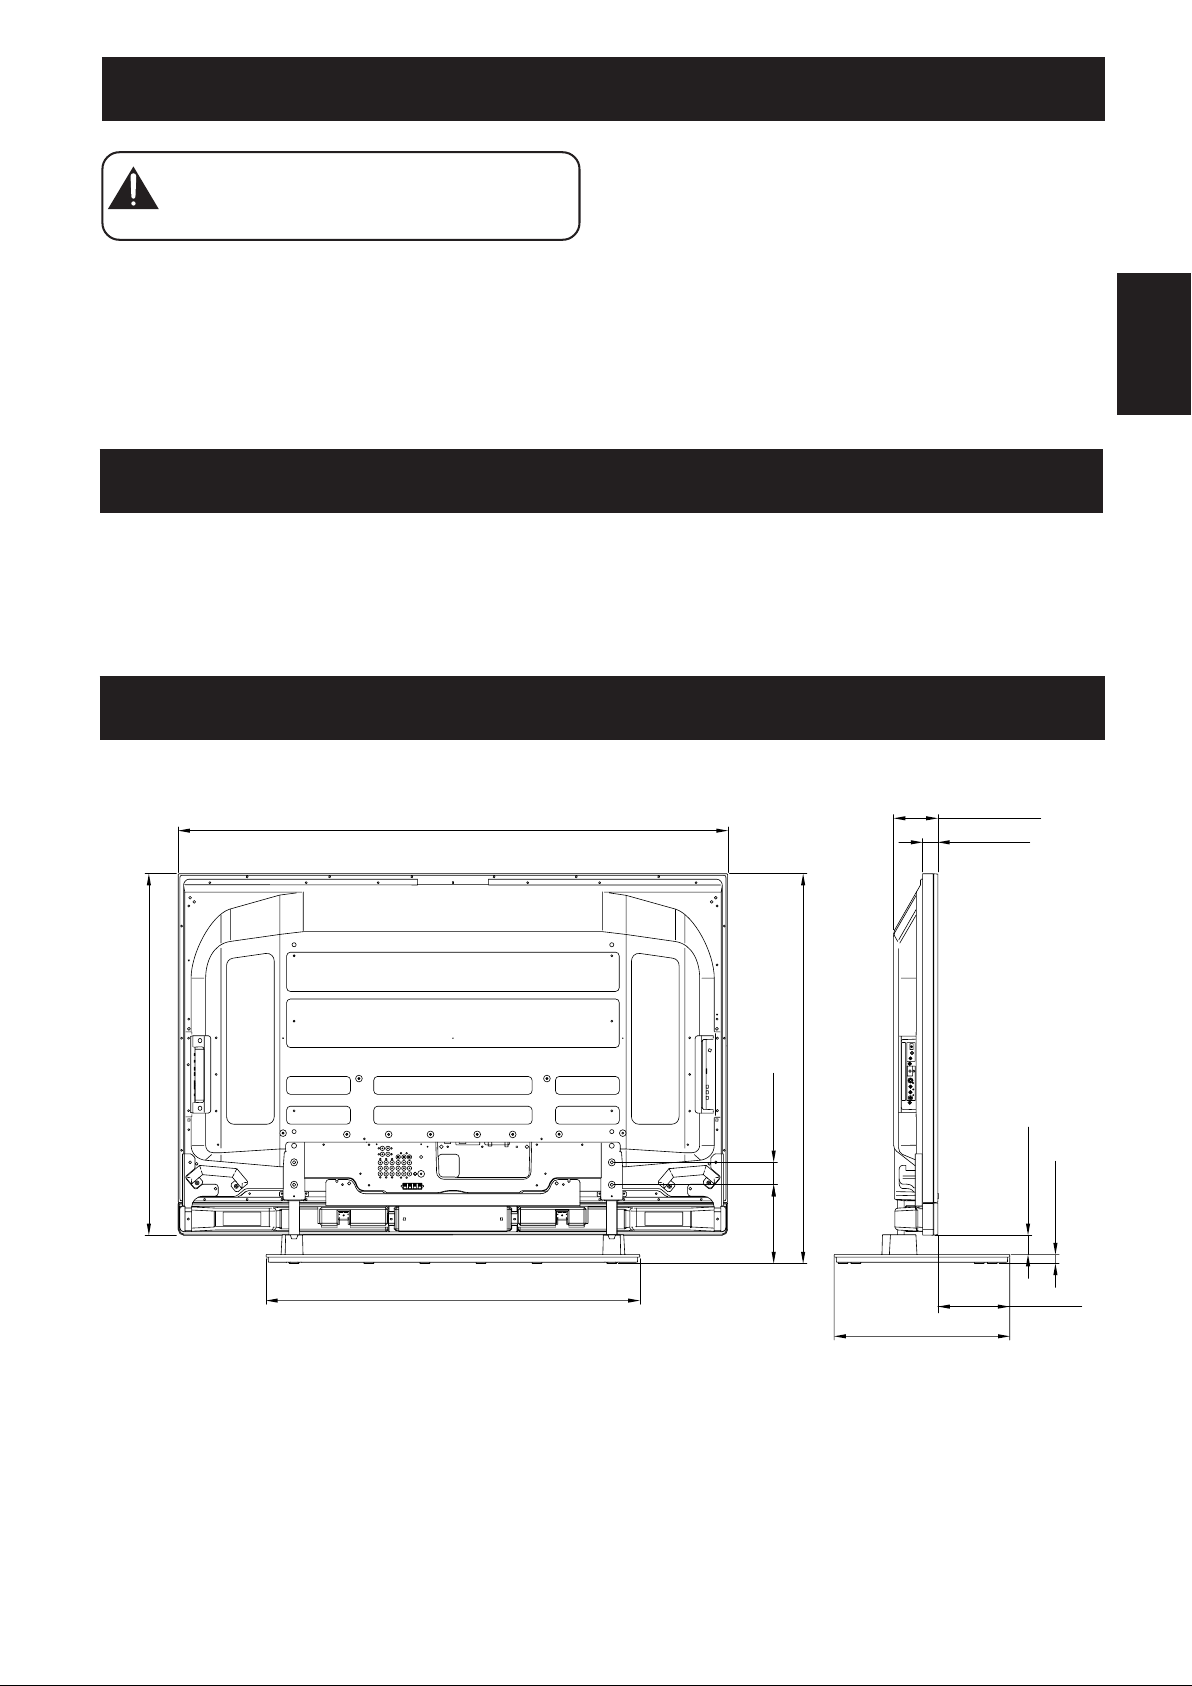
寸法図
日本語
単位:mm
967
1470
1000
60
211
118
41
1043
51.5
24
192.5
470
2006パイオニア株式会社 禁無断転載
7
Ja
Page 8
Thank you for buying Pioneer’s product.
Please read through the Operating Instructions to learn
how to operate your model safely and properly.
Please be advised to keep the Operating Instructions in
your place for future reference.
Installation
¶ Consult your dealer if you encounter any difficulties
with this installation.
¶ Pioneer is not liable for any damage resulting from
improper installation, improper use, modification, or
natural disasters.
Cautions
This product is a table top stand exclusively designed for
Plasma Displays (PDP- 6070PU / PDP- 607XD) from
Pioneer. Use with other model is capable of resulting in
instability causing possible injury. For further information,
please contact the store where you purchased your display.
Do not install or modify the product other than specified.
Do not use this stand for a Plasma Display other than those
designated and do not modify it or use it for other
purposes.
IMPORTANT NOTICE
Record the model number and serial number of this
equipment below.
Model No. PDK-TS15 Serial No.
Keep these numbers for future use.
Contents
Cautions ...................................................................8
Checking the Standard Accessories ...................... 9
Assembling the Stand ............................................ 9
Attaching the Plasma Display .............................. 10
Installing the Product on a TV table etc. ............ 10
Preparing the cables ............................................. 11
Preventing Equipment from Falling Over ...........12
Detaching the Plasma Display from the Stand .. 13
Specifications ........................................................ 13
Dimensions Diagram ............................................ 13
CAUTION
This symbol refers to a hazard or unsafe practice which
can result in personal injury or property damage.
Improper installation is extremely dangerous because it
may result in it falling over or other accident.
Installation Location
• Select a location that is strong enough to support the
weight of the stand and the displays.
• Make sure to place it in a level and stable location.
• Do not install it outdoors, at a hot spring, or near a beach.
• Do not install the stand where it may be subjected to
vibration or shock.
Assembling and Installation
• Assemble the stand in accordance with the assembly
instructions and securely attach all screws at the
designated locations.
There have been cases where unforeseen accidents
such as the equipment breaking or falling over
occurred after the installation of the display because
the stand was not installed as instructed.
• The display must always be installed by two or more
people to assure it is installed safely.
• Before installation, turn off the power for the display
and peripheral devices then remove the power cord
plug from the power outlet.
Prevent accidents caused by the product falling over by
taking reliable measures to prevent it from falling over (see
Page 12).
En
8
Page 9
Checking the Standard Accessories
Check to make sure that you have all the standard accessories before assembly and installation.
• Note that a Phillips screwdriver (not included) is required for assembly.
Base cover x 1
Screws
(M5 x 10 mm: silver) x 6
Stand pipes
(left and right, interchangeable) x 2
Installation bolts
(M6 x 20 mm: black) x 4
Cable clamps x 2
Operating instructions
(this document) x 1
Table top stand
Support de couverture de table
Tischständer
Supporto di tavolo
Tafelbladstaander
Soporte de mesa
PDK-TS15
Operating instructions
Mode d’emploi
Bedienungsanleitung
Istruzioni per l’uso
Gebruiksaanwijzing
Manual de instrucciones
English
Assembling the Stand
Assembly Procedure
1 Turn the base cover over so the underside
is facing up.
2 Insert the stand pipes into the base cover.
3 Tighten the screws to stabilize the stand
pipes.
Note
Assemble the stand with a soft sheet placed under the base
cover.
If a sheet is not laid before assembly, the front surface of the
base cover may be scratched.
Base cover
Screws
(M5 x 10 mm: silver)
Stand pipe
Screws
(M5 x 10 mm: silver)
Stand pipe
Sheet
9
En
Page 10

Attaching the Plasma Display
The weight of a Plasma Display is about 50 kg
(110 lbs), they have no depth, and are unstable.
Caution
Note
Be sure to install it on a flat stable location.
Insert the screws in the holes vertically and tighten them
firmly.
Therefore, at least two people must assemble and
install them.
Attachment Method
1 Attaching the Plasma Display to the stand.
Fit the stand’s support columns to the bottom of the
Plasma Display as indicated by below, then slowly insert
them vertically. Be extremely careful not to insert the
support columns of the stand into any part of the Plasma
Display other than the stand insertion slots. Note that doing
so might damage the Plasma Display panel or its ports or
result in the warping of the stand.
Line up the column
supports with the
bottom of the Plasma
Display as indicated
in the accompanying
diagram.
2 Securing the Plasma Display with
Installation bolts.
Attach the Plasma Display at the points indicated below
using the phillips screwdriver.
Installation bolts
(M6 x 20 mm: black)
Installing the Product on a TV table etc.
Be sure to observe the following precautions when moving
or installing this product with a Plasma Display into a TV
table or other enclosure.
When installing on a TV table, etc., please be sure
that the Plasma Display is held by two people.
Caution
Precautions when moving
When moving the product more than a few
meters, first remove the speaker, then remove
Caution
10
En
the Plasma Display from the stand and move the
speaker, Plasma Display, and stand separately.
When detaching the Plasma Display from the
stand, be sure to follow the procedure described
in “Detaching the Plasma Display from the
Stand” on page 13.
Installation precautions
Make sure that you always secure a space at least as large
as that shown in the following diagram in front of and
behind the table top stand.
Min. 30 mm
(1-3/16 inch)
Plasma Display
TV table
Table top stand
Back
Front
Min. 30 mm
(1-3/16 inch)
Min. 30 mm
Min. 10 mm
(13/32 inch)
Depth of the TV table
(1-3/16 inch)
500 mm (16-9/16 inch)
or more recommended
Page 11
Installing the Product on a TV table etc.
Precautions when installing in a TV table or other enclosure
Do not hold the speaker
Hold the Plasma Display by the handle at
the bottom, with your other hand hold the
top.
When installing in a TV table or
other enclosure, hold the Plasma
Caution
Display by the handle at the
bottom, with your other hand hold
the top. If you hold the speakers,
they may be damaged or twisted.
English
Preparing the cables
Use the enclosed cable clamps to bind the cables.
Note
Be very careful not to apply force to the bases of the cables.
1 Insert the cable clamps into the cable
clamp mounting holes.
Cable clamps
Cable clamp
mounting holes
3 Close each cable clamp, and then pull its
extremity to make the cables immobile.
Loosening a cable clamp
If a cable clamp is closed
too tight, press the
button shown on the left
and push the extremity
of the cable clamp to
loosen it.
Button
2 Bundle the cables and place them on each
cable clamp.
Opening a cable clamp
Unlock here
with a finger.
11
En
Page 12
Preventing Equipment from Falling Over
After installing the stand, be sure to take special care to ensure that the equipment will not fall over.
Because of the Plasma Display’s weight, if it could fall down, this can result in injury.
For safety, be sure to take special care to ensure that the Plasma Display will not fall over.
Stabilizing on TV table or other location
Stabilize the equipment as shown in the diagram using
screws that are available on the market.
Note
A TV table with adequate strength, width and depth
should always be used to support the Plasma Display.
Failure to do so could result in falling over.
To stabilize the Plasma Display on a TV table, use screws
that have a nominal diameter of 6 mm (1/4 inch).
Select the appropriate screws after consulting a professional installer if necessary.
6 mm
(1/4 inch)
Min. 20 mm
(3/8 to 5/8 inch)
9 mm to 15 mm
(13/16 inch)
Using a wall for stabilization
1 Attaching falling prevention bolts (hooks)
to the Plasma Display.
2 Using strong cords to stabilize it
appropriately and firmly to a wall, pillar, or
other sturdy element.
Perform this work in the same way on the left and right
sides.
Note
Use hooks, cords, and fittings that are
available on the market.
Recommended hook:
Nominal diameter M8
Length 12 mm to 15 mm (1/2 inch to
5/8 inch)
1 Hook
2 Cord
Fitting
12 mm to 15 mm
(1/2 inch to 5/8 inch)
M8
Position of table screws
When stabilizing the stand to a TV table, use nominal
diameter 6 mm (1/4 inch) with a length above
20 mm (13/16 inch).
Unit: mm (inch)
300
(11-13/16)
585
(23-1/32)
95 (3-3/4)
375 (14-3/4)
4 (5/32)
Caution
• A table or an area of the floor with adequate strength
should always be used to support the Plasma Display.
Failure to do so could result in personal injury and
physical damage.
• When installing the Plasma Display, please take the
necessary safety measures to prevent it from falling or
overturning in case of emergencies, such as
earthquakes, or of accidents.
• If you do not take these precautions, the Plasma
Display could fall down and cause injury.
• The screws, hooks, chains and other fittings that you
use to secure the Plasma Display to prevent it from
overturning will vary according to the composition and
thickness of the surface to which it will be attached.
• Select the appropriate screws, hooks, chains and other
fittings after first inspecting the surface carefully to
determine its thickness and composition and after
consulting a professional installer if necessary.
12
En
Side View
Page 13
Detaching the Plasma Display from the Stand
To remove the Plasma Display from the stand, be sure
to always follow the procedure described below to
Caution
prevent accidents.
1 First clear a space on a flat floor etc. where
you can lay the Plasma Display flat, then
lay a sheet to protect it from scratches or
other damage.
2 Remove the speakers.
3 Referring to step 2 in “Attaching the
Plasma Display” (Page 10.), remove the
installation bolts (4 screws).
4 Holding the Plasma Display by its handles
at the bottom, with your other hand hold
the top, lift the display vertically.
5 Place the Plasma Display slowly onto the
sheet laid out in step 1 with its screen
facing downwards.
Specifications
External dimensions 1000 mm (W) x 309 mm (H) x 470 mm (D) (39-3/8 in. (W) x 12-5/32 in. (H) x 18-1/2 (D) in.)
Weight 10.2 kg (22.5 lbs)
• The above specifications and exterior may be modified without prior notice to improve the product.
Dimensions Diagram
English
Unit: mm (inch)
967 (38-1/16)
1470 (57-7/8)
1000 (39-3/8)
60
(2-3/8)
211
(8-5/16)
1043 (41-1/16)
470 (18-1/2)
118 (4-21/32)
41 (1-5/8)
51.5 (2-1/32)
24 (31/32)
192.5
(7-19/32)
Published by Pioneer Corporation.
Copyright © 2006 Pioneer Corporation.
All rights reserved.
13
En
Page 14
Nous vous remercions d’avoir choisi un produit Pioneer.
Veuillez lire attentivement ce mode d’emploi pour savoir
comment utiliser votre support correctement et en toute
sécurité. Nous vous conseillons de conserver
soigneusement ce mode d’emploi à portée de main et
dans un endroit sûr afin de pouvoir vous y référer le cas
échéant.
Installation
En cas de difficultés, veuillez consulter votre revendeur.
Pioneer ne saurait être tenu responsable d’aucun dommage
résultant d’une installation ou d’une utilisation incorrecte de
ce produit, de sa modification ou encore de catastrophes
naturelles.
Attention
Ce produit est un pied de table conçu exclusivement pour les
écrans à plasma (PDP- 6070PU / PDP- 607XD) de marque Pioneer.
L’utilisation de ce produit avec un autre modèle peut être à
l’origine d’un manque de stabilité pouvant provoquer une
blessure. Pour de plus amples informations, veuillez contacter le
magasin où vous avez acheté votre écran.
Ne procédez en aucun cas à installer ou à modifier le produit
autrement qu’en suivant les indications fournies. En outre,
n’utilisez pas ce support pour un écran à plasma autre que celui
pour lequel il a été conçu et ne le modifiez pas ou ne l’utilisez pas
à des fins autres que celles pour lesquelles il a été conçu.
AVIS IMPORTANT
Veuillez prendre note du numéro du modèle et du numéro de
série de cet équipement ci-dessous.
N° du modèle. PDK-TS15 N° de série.
Conservez ces numéros pour pouvoir les utiliser
ultérieurement.
Table des matières
Attention ......................................................................... 14
Vérification des pièces fournies.................................... 15
Assemblage du support ................................................ 15
Installation et fixation de l’écran à plasma.................. 16
Installation du produit sur un meuble de
télévision, etc. ................................................................ 16
Préparation des câbles .................................................. 17
Prévenir toute chute de l’équipement ......................... 18
Une installation incorrecte est extrêmement dangereuse car elle
peut provoquer la chute du support ou tout autre accident.
Lieu d’installation
• Sélectionnez un emplacement assez solide pour supporter le
poids du support et de l’écran.
• Assurez-vous de placer le produit à un emplacement stable et
plat.
• N’installez pas le support à l’extérieur, à proximité d’une source
thermale ou sur une plage.
• N’installez pas le support à un endroit où il pourrait être soumis
à des chocs ou à des vibrations.
Montage et installation
• Montez le support en suivant les instructions et vissez
solidement toutes les vis aux endroits prévus à cet effet.
Des accidents ont été constatés (casse, chute du matériel,
etc.) suite à l’installation de l’écran parce que le support
n’avait pas été installé conformément aux instructions.
• Pour une bonne installation, l’écran doit toujours être
installé par au moins deux personnes.
• Avant de procéder à l’installation, mettez l’écran ainsi que
les équipements périphériques hors tension en coupant
l’alimentation, puis retirez la prise du câble d’alimentation
de la prise murale.
Démontage de l’écran à plasma du support ............... 19
Caractéristiques techniques.......................................... 19
Schéma de dimensions ................................................. 19
ATTENTION
Ce symbole indique un danger ou une pratique dangereuse
susceptible de provoquer des dommages corporels ou
matériels.
14
Fr
Prévenez les accidents causés par la chute du produit
en prenant des mesures fiables visant à éviter toute chute
(voir Page 18).
Page 15
Vérification des pièces fournies
Veuillez vous assurer que vous possédez bien toutes les pièces nécessaires avant de procéder au montage et à l’installation du support.
• Veuillez prendre note qu’un tournevis de type Phillips (non inclus avec les pièces) pour vis à empreinte cruciforme est nécessaire pour
assembler le support de base.
Couverture de table x 1 unité
Vis (M5 x 10 mm : argentée) x 6 unités
Colonnes de support
(gauche et droite, interchangeables) x 2 unités
Vis d’installation
(M6 x 20 mm : noir) x 4 unités
Colliers de câble x 2 unités
Mode d’emploi
(ce document) x 1 exemplaire
Table top stand
Support de couverture de table
Tischständer
Supporto di tavolo
Tafelbladstaander
Soporte de mesa
PDK-TS15
Operating instructions
Mode d’emploi
Bedienungsanleitung
Istruzioni per l’uso
Gebruiksaanwijzing
Manual de instrucciones
Français
Assemblage du support
Procédure de montage
1 Tournez le pied de table de façon à ce que le
dessous regarde vers le haut.
2 Insérez les colonnes de support dans le pied de
table.
3 Serrez les vis afin de stabiliser les colonnes de
support.
Remarque
Avant de monter le support, glissez un drap doux sous la
couverture de table. Sans ce drap, vous risqueriez d’érafler la
surface de la couverture de table.
Couverture de table
Vis (M5 x 10 mm : argentée)
Colonne de support
Vis (M5 x 10 mm : argentée)
Colonne de support
Drap
15
Fr
Page 16

Installation et fixation de l’écran à plasma
Le poids d’un écran à plasma est d’environ 50 kg. Leur
profondeur étant limitée, ils ne sont pas stables.
Attention
Remarque
Montez toujours l’écran à plasma sur une surface plane et stable.
Introduisez les vis à la verticale et serrez-les fort.
Leur profondeur étant limitée, ils ne sont pas stables. Par
conséquent, ils doivent toujours être installés par deux
personnes à la fois.
Méthode de fixation
1 Installation de l’écran à plasma sur le support.
Mettez les colonnes de soutien en place au bas de l’écran à
plasma comme indiqué ci-dessous, puis insérez-les lentement
à la verticale. Veillez à ne pas insérer les colonnes ailleurs que
dans les fentes prévues à cet effet. Cela risquerait
d’endommager l’écran, ses ports ou encore le support.
Alignez les colonnes du
support sur la partie
inférieure de l’écran
comme indiqué sur le
schéma ci-joint.
2 Fixez solidement l’écran à plasma avec les vis
d’installation.
Fixez l’écran à plasma aux endroits indiqués en bas à l’aide du
tournevis Phillips.
Vis d’installation
(M6 x 20 mm : noir)
Installation du produit sur un meuble de télévision, etc.
Veillez à observer les précautions ci-après lorsque vous déplacez
ce produit ou que vous l’installez avec un écran à plasma dans un
meuble de télévision ou un autre espace clos.
En cas d’installation de l’écran sur un meuble de
télévision, etc., veillez à ce qu’il soit maintenu par deux
Attention
personnes.
Précautions à respecter lors du
déplacement du produit
Avant de déplacer l’appareil sur plusieurs mètres,
démontez les enceintes. Séparez également l’écran à
Attention
plasma de son support et transportez chaque partie
séparément.
Lorsque vous démontez l’écran à plasma du support,
assurez-vous de suivre la procédure décrite dans la
partie « Démontage de l’écran à plasma du support » à
la page 19.
Précautions d’installation
Veillez à toujours ménager devant et derrière le pied de table un
espace au moins égal à celui qui est indiqué sur le schéma cidessous.
30 mm mini
Meuble de télévision
Arrière
Avant
Pied de table
Ecran à plasma
30 mm mini
10 mm mini
30 mm mini
ée du meuble
Profondeur recommand
de télévision : 500 mm ou plus
16
Fr
Page 17

Installation du produit sur un meuble de télévision, etc.
Précautions à observer lors de l’installation du produit dans un meuble de télévision ou autre espace clos
Ne tenez pas l’enceinte
Prenez l’écran plasma par la poignée située audessous et tenez-le par le haut de l’autre main.
En cas d’installation dans un meuble
de télévision ou autre espace clos,
Attention
prenez l’écran plasma par la poignée
située au-dessous et tenez-le par le
haut de l’autre main. Si vous le
soulevez par les enceintes, ces
dernières risqueraient d’être
endommagées ou de se tordre.
Français
Préparation des câbles
Maintenez les câbles ensemble à l’aide des colliers de câbles.
Remarque
Veillez à ne pas forcer sur la base des câbles.
1 Insérez les colliers de câble dans les trous de
montage destinés à cet effet.
Colliers de câble
Trous de montage
des colliers de câble
3 Fermez chaque collier de câble puis tirez son
extrémité de façon à immobiliser les câbles.
Desserrer un collier de câble
Si un collier de câble est
trop serré, appuyez sur le
bouton indiqué à gauche et
poussez l’extrémité du
collier pour le desserrer.
Bouton
2 Maintenez les câbles ensemble et placez-les sur
chaque collier de câble.
Ouvrir un collier de câble
Un geste du doigt
suffit à tout relâcher.
17
Fr
Page 18

Prévenir toute chute de l’équipement
Après avoir installé le support, veillez à prendre les précautions nécessaires pour qu’il ne tombe pas.
En raison de son poids, toute chute de l’écran à plasma risque de blesser quelqu’un.
Pour plus de sécurité, veillez à prendre toutes les mesures nécessaires pour que votre écran à plasma ne chute pas.
Stabilisation sur une table ou sur la base
Stabilisez le support comme indiqué sur le schéma à l’aide de vis
vendues dans le commerce.
Remarque
L’écran plasma doit toujours être installé sur un meuble de
télévision suffisamment solide, large et profond. Sans cela, il
risquerait de tomber.
Pour stabiliser l’écran à plasma sur un meuble de télévision,
utilisez des vis de 6 mm de diamètre nominal.
Pour sélectionner les vis, consultez si nécessaire un installateur
professionnel.
6 mm
9 mm à 15 mm
Min. 20 mm
Utilisation d’un mur pour stabiliser le support
1 Fixation des boulons empêchant la chute
(crochets) sur l’écran à plasma.
2
Utilisation de câbles solides pour stabiliser
solidement le dispositif sur un mur, un pilier ou
d’autres éléments stables.
Ces opérations doivent être effectuées de la même manière à
gauche et à droite.
Remarque
Utilisez des crochets, des câbles et d’autres
dispositifs de fixation en vente dans le
commerce.
Crochet recommandé : Diamètre
nominal M8, longueur de 12 mm à 15 mm.
1Crochet
2 Câble
Attache
12 mm à 15 mm
M8
Emplacement des vis de la table
Pour stabiliser le pied sur un meuble de télévision, utilisez des
vis de 6 mm de diamètre nominal et d’au moins 20 mm de
long.
Unité : mm
300 585
Vue latérale
18
Fr
Attention
•
95
375
4
Choisissez toujours une table ou une portion du sol avec une
force suffisante pour supporter l’écran plasma. Il en
résulterait autrement des blessures corporelles et des
dégâts physiques.
•
Lors de l’installation de l’écran plasma, veuillez prendre les
mesures de sécurité nécessaires pour l’empêcher de tomber
ou de basculer en cas de sinistres comme un tremblement
de terre ou un accident.
•
Le cas contraire, l’écran plasma pourrait tomber et provoquer
des dégâts.
•
Les vis, crochets, chaînes et autres raccords que vous
utilisez pour fixer en place l’écran plasma afin de l’empêcher
de basculer dépendront de la composition et de l’épaisseur
de la surface sur laquelle vous le fixez.
•
Choisissez les vis, crochets, chaînes et autres raccords
appropriés après avoir tout d’abord soigneusement inspecter
la surface pour déterminer sa composition et son épaisseur
et après avoir pris contact avec un installateur professionnel
si besoin est.
Page 19

Démontage de l’écran à plasma du support
Attention
Lorsque vous démontez l’écran à plasma de son support,
observez strictement la procédure indiquée ci-dessous afin
d’éviter les accidents.
3
En vous référant à l’opération 2 décrite dans le
chapitre « Installation et fixation de l’écran à
plasma » (page 16), retirez les 4 boulons.
4 Tout en le tenant par les poignées qui sont
1 Faites d’abord de la place sur une surface
plane, etc. où vous pouvez laisser l’écran à
plasma à plat, puis déposez une feuille afin de
le protéger des rayures et autres dégâts
éventuels.
situées dessous, placez l’écran à la verticale.
5 Placez l’écran à plasma avec soin sur la feuille
citée lors de l’étape 1, l’écran regardant vers le
bas.
2 Retirez les enceintes.
Caractéristiques techniques
Dimensions extérieures 1000 mm (largeur) x 309 mm (hauteur) x 470 mm (profondeur)
Poids 10,2 kg
•
Les caractéristiques techniques indiquées ci-dessus ainsi que les dimensions extérieures peuvent êtres modifiées sans préavis en vue
d’améliorer le produit.
Français
Schéma de dimensions
Unité : mm
1470
967
1000
60
211
118
41
1043
51,5
24
192,5
470
Publication de Pioneer Corporation.
© 2006 Pioneer Corporation.
Tous droits de reproduction et de traduction réservés.
19
Fr
Page 20

Wir danken Ihnen, dass Sie sich für den Kauf dieses Produkts der
Firma Pioneer entschieden haben.
Bitte lesen Sie die Bedienungsanleitung aufmerksam, um sich
damit vertraut zu machen, Ihr Modell richtig und sicher zu
handhaben.
Wir empfehlen Ihnen, die Bedienungsanleitung gut
aufzubewahren, um sie künftig im Bedarfsfalle jederzeit zu Rate
ziehen zu können.
Installation
¶ Sollten Sie bei der Installation irgendwelche Schwierigkeiten
haben, dann wenden Sie sich bitte an Ihren Händler.
¶ Für Schäden aufgrund von inkorrekter Installation,
falscher Verwendung, vorgenommenen
Veränderungen oder Naturkatastrophen übernimmt
Pioneer keine Verantwortung.
Sicherheitshinweise
Dieses Produkt ist ein Tischständer, der ausschließlich für
Plasmadisplays (PDP- 607XD) der Firma Pioneer vorgesehen ist.
Die Verwendung des Tischständers für ein anderes Modell führt
möglicherweise zu einer Instabilität und kann demzufolge Unfälle
mit Verletzungen verursachen. Hinsichtlich weiterer Informationen
wenden Sie sich bitte an diejenige Handelseinrichtung, bei der Sie
das Plasmadisplay gekauft haben.
Installieren Sie das Produkt nicht anders als angegeben und
nehmen Sie keine Veränderungen am Produkt vor. Verwenden Sie
den Tischständer nicht für ein anderes Plasmadisplay als für die
Modelle, für die er vorgesehen ist, nehmen Sie keine
Veränderungen daran vor und verwenden Sie ihn nicht für andere
Zwecke.
Wichtiger Hinweis!
Bitte notieren Sie sich unten die Nummer des Modells und die
Serien-Nummer des Geräts.
Modell: PDK-TS15 Serien-Nummer:
Bewahren Sie diese Angaben für den künftigen Gebrauch.
Inhalt
Sicherheitshinweise....................................................... 20
Überprüfung des Standardzubehörs auf
Vollständigkeit ............................................................... 21
Montage des Tischständers .......................................... 21
Montieren des Plasmadisplays ..................................... 22
Installieren des Produkts auf einem Fernsehtisch oder
etwas Ähnlichem ........................................................... 22
Vorbereitung der Kabel ................................................. 23
Verhinderung eines möglichen Umfallens
der Einheit....................................................................... 24
Demontieren des Plasmadisplays vom Ständer ......... 25
Technische Daten ........................................................... 25
Darstellung der Abmessungen ..................................... 25
Eine falsche Installation ist sehr gefährlich, da sie zum Umfallen
der Einheit oder zu einem anderen Unfall führen kann.
Installationsort
• Wählen Sie für die Installation einen Platz, der stabil genug ist,
das Gewicht des Tischständers und des Displays zu tragen.
• Sorgen Sie dafür, dass der Ständer und das betreffende Display
auf einem ebenen und stabilen Platz installiert werden.
• Installieren Sie beides nicht im Freien, in der Nähe einer heißen
Quelle oder in Strandnähe.
• Installieren Sie die Einheit nicht an einem Platz, an dem sie
möglicherweise Vibrationen oder Stößen ausgesetzt ist.
Montage und Installation
• Montieren Sie den Ständer gemäß den
Montageanweisungen und befestigen Sie sorgfältig alle
Schrauben an den dafür vorgesehenen Positionen.
Es hat Fälle gegeben, dass es zu unvorhergesehenen
Unfällen wie beispielsweise einer Havarie oder einem
Umfallen der Einheit gekommen ist, weil der Ständer nicht
gemäß den gegebenen Anweisungen installiert wurde.
• Das Display muss immer von mindestens zwei Personen
installiert werden, um zu sicherzugehen, dass es sicher
installiert wird.
• Schalten Sie das Display und die peripheren Geräte vor der
Installation aus und ziehen Sie anschließend den Stecker
der Netzschnur aus der Steckdose.
Verhindern Sie Unfälle, die durch das Umfallen der Einheit
verursacht werden, indem Sie geeignete Maßnahmen treffen, die
dies ausschließen (siehe Seite 24).
Vorsicht!
Dieses Symbol kennzeichnet eine gefährliche oder
unsichere Handlungsweise, die zu einem Unfall mit
Verletzung oder zu Sachschäden führen kann.
20
Ge
Page 21

Überprüfung des Standardzubehörs auf Vollständigkeit
Überprüfen Sie vor Beginn der Montage und Installation, ob alle Teile des Standardzubehörs vorhanden sind.
• Bitte beachten Sie, dass für die Montage ein Kreuzschlitzschraubenzieher (nicht enthalten) erforderlich ist.
Basisabdeckung x 1
Schrauben
(M5 x 10 mm, silberfarben) x 6
Ständerelemente
(links und rechts, austauschbar) x 2
Installationsschrauben
(M6 x 20 mm, schwarz) x 4
Kabelhalterungen x 2
Bedienungsanleitung
(das vorliegende Dokument) x 1
Table top stand
Support de couverture de table
Tischständer
Supporto di tavolo
Tafelbladstaander
Soporte de mesa
PDK-TS15
Operating instructions
Mode d’emploi
Bedienungsanleitung
Istruzioni per l’uso
Gebruiksaanwijzing
Manual de instrucciones
Deutsch
Montage des Tischständers
Montage
1 Drehen Sie die Basisabdeckung um, so dass die
Unterseite nach oben zeigt.
2 Führen Sie Ständerelemente in die
Basisabdeckung ein.
3 Ziehen Sie die Schrauben fest an, um die
Ständerelemente zu stabilisieren.
Hinweis
Montieren Sie den Ständer, indem Sie ein weiches Tuch unter die
Basisabdeckung legen.
Wenn Sie das nicht tun, ist es möglich, dass die vordere Oberfläche
zerkratzt wird.
Basisabdeckung
Schrauben
(M5 x 10 mm, silberfarben)
Ständerelement
Schrauben
(M5 x 10 mm, silberfarben)
Ständerelement
Tuch
21
Ge
Page 22

Montieren des Plasmadisplays
Ein Plasmadisplay wiegt etwa 50 kg. Die Modelle weisen
keine Tiefe auf und sind daher instabil.
Vorsicht!
Hinweise
Vergewissern Sie sich, dass Sie das Plasmadisplay an einem
Führen Sie die Schrauben in die Schraublöcher ein und ziehen Sie
Daher müssen beim Zusammenbau und bei der
Installation mindestens zwei Personen beteiligt sein.
ebenen und stabilen Ort installieren.
sie fest an.
Befestigungsmethode
1 Befestigen des Plasmadisplays am Ständer.
Passen Sie die Stützsäulen des Tischständers auf der
Unterseite des Plasmadisplays an, wie es in der Abbildung
unten dargestellt ist, und führen Sie sie dann langsam vertikal
ein. Achten Sie dabei besonders darauf, die Stützsäulen des
Tischständers nicht anders einzuführen als in die dafür
vorgesehenen Öffnungen. Wenn Sie dies nicht beachten,
besteht die Gefahr, dass Sie das Bedienfels des
Plasmadisplays beschädigen oder seine Anschlussbuchsen
oder dass sich der Ständer verzieht.
Bringen Sie die
Stützsäulen in
Übereinstimmung mit
dem unteren Teil des
Plasamdisplays, wie es in
der zugehörigen
Abbildung dargestellt ist.
2 Sichern des Plasmadisplays mit den
Installationsschrauben.
Montieren Sie das Plasmadisplay unter Verwendung des
Kreuzschlitzschraubenziehers an den unten angezeigten
Punkten.
Installationsschrauben
(M6 x 20 mm, schwarz)
Installieren des Produkts auf einem Fernsehtisch oder etwas Ähnlichem
Beachten Sie bitte unbedingt die nachfolgend beschriebenen
Vorsichtsmaßregeln, wenn Sie den Ständer mit einem
Plasmadisplay fortbewegen oder diese Einheit auf einem
Fernsehtisch oder in einem umschlossenen Möbelstück
installieren.
Bitte achten Sie darauf, dass das Plasmadisplay bei der
Installation auf einem Fernsehtisch usw. von zwei
Vorsicht!
Personen gehalten wird.
Sicherheitshinweise für das Fortbewegen
oder Transportieren
Wenn Sie den Tischständer mit dem Plasmadisplay und
den Lautsprechern mehr als ein paar Meter fortbewegen
Vorsicht!
22
Ge
oder transportieren wollen, dann entfernen Sie zunächst
die Lautsprecher und dann das Plasmadisplay vom
Tischständer und transportieren Sie anschließend
Lautsprecher, Plasmadisplay und Tischständer getrennt.
Verfahren Sie, wenn Sie das Plasmadisplay vom Ständer
demontieren, unbedingt so, wie es auf Seite 25 in
„Demontieren des Plasmadisplays vom Ständer“
beschrieben ist.
Sicherheitshinweise für die Installation
Vergewissern Sie sich, dass Sie vor und hinter dem Tischständer
immer einen Mindestabstand absichern, wie er im folgenden
Diagramm angegeben ist.
Min. 30 mm Min. 30 mm
Plasmadisplay
Fernsehtisch
Rückseite
Vorderseite
Tischständer
Min. 30 mm
Min. 10 mm
Tiefe des Fernsehtisches: Mind.
500 mm werden empfohlen
Page 23

Installieren des Produkts auf einem Fernsehtisch oder etwas Ähnlichem
Vorkehrungen bei der Installation auf einem Fernsehtisch oder in einem umschlossenen Möbelstück
Halten Sie die Einheit nicht am
Lautsprecher fest
Halten Sie das Plasmadisplay an dem unten
befindlichen Handgriff, während Sie mit der
anderen Hand die Oberseite festhalten.
Halten Sie das Plasmadisplay, wenn Sie
es auf einem Fernsehtisch oder in einem
Vorsicht!
umschlossenen Möbelstück installieren,
an dem unten befindlichen Handgriff,
während Sie mit der anderen Hand die
Oberseite festhalten.
Wenn Sie das Ganze an den
Lautsprechern halten, dann können
diese beschädigt oder verdreht werden.
Vorbereitung der Kabel
Verwenden Sie die mitgelieferten Kabelhalterungen zum Fixieren
der Kabel.
Hinweise
Achten Sie sorgfältig darauf, keine Gewalt auf die Kabelbasis
auszuüben.
1 Führen Sie die Kabelhalterungen in die dafür
vorgesehenen Montageöffnungen ein.
Kabelhalterungen
3 Schließen Sie jede Kabelhalterung und ziehen
Sie an deren Ende, um die Kabel zu fixieren.
Lockern einer Kabelhalterung
Drücken Sie, wenn eine
Kabelhalterung zu fest
geschlossen ist, die Taste,
wie links dargestellt ist, und
drücken Sie das jeweilige
Ende der Kabelhalterung,
um sie zu lockern.
Deutsch
Montageöffnungen für
Kabelhalterungen
2 Bündeln Sie die Kabel und verlegen Sie sie in
der jeweiligen Kabelhalterung.
Öffnen eines Kabelfixierers
Taste
Entriegeln Sie hier
mit einem Finger.
23
Ge
Page 24

Verhinderung eines möglichen Umfallens der Einheit
Verwenden Sie bei der Installation des Tischständers besonderes Augenmerk darauf, zu verhindern, dass die
Einheit umfallen kann.
Aufgrund seines hohen Gewichtes kann das Plasmadisplay, wenn es umfallen sollte, erhebliche Verletzungen verursachen.
Achten Sie aus Sicherheitsgründen ganz besonders darauf, das Plasmadisplay vor dem Umstürzen zu bewahren.
Stabilisierung auf dem Tisch oder dem Boden
Verwendung einer Wand zur Stabilisierung
Stabilisieren Sie die Einheit unter Verwendung handelsüblicher
Schrauben, wie im Bild dargestellt.
Hinweise
Zum Aufstellen des Plasmadisplays sollte stets ein Fernsehtisch
mit einer ausreichenden Stabilität, Breite und Tiefe dienen. Wenn
dies nicht beachtet wird, könnte das Plasmadisplay umstürzen.
Verwenden Sie zur Stabilisierung des Plasmadisplays auf einem
Fernsehtisch Schrauben mit einem Nenndurchmesser von 6 mm.
Wählen sie die geeigneten Schrauben, wenn erforderlich, nach
Konsultation eines versierten Monteurs.
6 mm
Mind. 20 mm
9 mm bis 15 mm
1 Montage von Schrauben (Haken) an das
Plasmadisplay zur Verhinderung des Umfallens.
2
Verwendung starker Schnuren zur
angemessenen und sicheren Stabilisierung der
Einheit an einer Wand, einer Säule oder einem
anderen stabilen Bauelement.
Führen Sie diese Arbeiten in der gleichen Weise auf der linken
und der rechten Seite aus.
Hinweise
Verwenden Sie handelsübliche
Halteschrauben, Schnuren und Haken.
Empfohlene Halteschrauben:
Nenndurchmesser M8
Länge 12 mm bis 15 mm
1Halteschraube
2 Schnur
Haken
12 mm bis 15 mm
M8
Position der Tischschrauben
Verwenden Sie zur Stabilisierung des Ständers auf einem
Fernsehtisch Schrauben mit einem Nenndurchmesser von 6
mm und einer Länge von über 20 mm.
Einheit: mm
300 585
4
Seitenansicht
95
375
Vorsicht!
•
Für das Plasmadisplay muss ein ausreichend stabiler Tisch
oder eine entsprechende Bodenfläche gewählt werden.
Geschieht das nicht, könnte es zu einem Unfall mit
Verletzungen oder mit Sachschaden kommen.
•
Bitte treffen Sie die nötigen Vorsichtsmaßnahmen zur
Verhinderung des Fallens oder Umkippens im Falle von
Gefahren wie beispielsweise Erdbeben oder von Unfällen.
•
Wenn Sie diese Vorsichtsmaßnahmen nicht treffen, könnte
das Plasmadisplay herunterfallen oder umfallen und so zu
einem Unfall mit Verletzungen führen.
•
Die Schrauben, Halteschrauben, Ketten und Haken, die Sie
zur Sicherung des Plasmadisplays verwenden, um es vor
dem Umfallen zu bewahren, können je nach dem Aufbau
und der Dicke der Fläche, auf der es montiert wird, variieren.
•
Wählen Sie die jeweils geeigneten Schrauben,
Halteschrauben, Ketten und Haken, nachdem Sie sich
zunächst die vorgesehene Fläche genau angesehen haben,
um ihre Dicke und ihren Aufbau zu beurteilen, und nachdem
Sie, wenn erforderlich, einen Fachmann konsultiert haben.
24
Ge
Page 25

Demontieren des Plasmadisplays vom Ständer
Vorsicht!
Wenn Sie das Plasmadisplay vom Tischständer entfernen
wollen, dann befolgen Sie, um Unfälle zu verhüten, stets
die nachfolgend beschriebene Verfahrensweise.
3
Entfernen Sie in Anlehnung an Schritt 2 unter
„Montieren des Plasmadisplays“ (Seite 22) die
Installationsschrauben (4 Schrauben).
4 Halten Sie das Plasmadisplay an seinen unten
1 Schaffen Sie zunächst Platz auf einem flachen
Untergrund, auf den Sie das Plasmadisplay
legen können, und legen Sie dann ein Tuch
oder eine Decke aus, um das Plasmadisplay vor
Kratzern und anderen Beschädigungen zu
schützen.
befindlichen Handgriffen, während Sie es mit
der anderen Hand oben halten, und heben Sie
es vertikal an.
5 Legen Sie das Plasmadisplay langsam mit der
Schirmfläche nach unten auf das in Schritt 1
ausgelegte Tuch oder die ausgelegte Decke.
2 Entfernen Sie die Lautsprecher.
Technische Daten
Außenabmessungen 1000 mm (Breite) x 309 mm (Höhe) x 470 mm (Tiefe)
Gewicht 10,2 kg
•
Die obigen technischen Daten und das Äußere können, um das Produkt zu verbessern, ohne vorherige Ankündigung verändert werden.
Deutsch
Darstellung der Abmessungen
Einheit: mm
1470
967
1000
60
211
118
41
1043
51,5
24
192,5
470
Ver öffentlicht von Pioneer Corporation.
Urheberrechtlich geschützt © 2006 Pioneer Corporation.
Alle Rechte vorbehalten.
25
Ge
Page 26

Grazie per aver acquistato un prodotto Pioneer.
Per imparare ad usare il vostro modello in modo sicuro e
corretto, leggete accuratamente le istruzioni per l’uso.
Vi consigliamo di tenere le istruzioni per l’uso a portata di
mano per future consultazioni.
Installazione
¶ Se incontrate delle difficoltà durante l’installazione,
rivolgetevi al vostro fornitore.
¶ Pioneer non è responsabile per qualsiasi danno
causato da un’installazione non corretta, da un uso
improprio, da modifiche o da calamità naturali.
AVVISO IMPORTANTE
Registrate il numero di modello e di serie dell’apparecchio
qui sotto.
Modello n. PDK-TS15 Serie n.
Conservate questo numero per usarlo in seguito.
Indice
Attenzione ...................................................................... 26
Controllo degli accessori standard ............................... 27
Montaggio del supporto................................................ 27
Fissaggio del Display a Plasma ..................................... 28
Montaggio del prodotto su scaffale TV, ecc. ............... 28
Preparazione dei cavi ..................................................... 29
Prevenire la caduta dell’apparecchio ........................... 30
Separare il Display a Plasma dal Supporto ................. 31
Attenzione
Questo articolo è un supporto di tavolo, progettato
esclusivamente per i display a plasma Pioneer (PDP- 607XD).
L’uso con altri modelli può causare instabilità e provocare danni.
Per ulteriori informazioni, contattate il negozio dove avete
acquistato il Vostro display.
Non installate o modificate il prodotto diversamente da come
illustrato. Non usate un supporto per display a plasma diverso da
quello progettato, e non modificatelo per altri scopi.
Un’installazione non corretta è estremamente pericolosa perché
potrebbere causare la caduta dell’apparecchio o altri incidenti.
Posizione dell’installazione
• Scegliete una posizione abbastanza resistente da sostenere i
pesi del supporto e del display.
• Assicuratevi di posizionarlo in piano e in modo stabile.
• Non installatelo all’aperto, vicino a fonti di calore o a una
spiaggia.
• Non installate il supporto dove potrebbe essere esposto a
vibrazioni o urti.
Montaggio e installazione
• Montate il supporto secondo le istruzioni di montaggio e
fissate bene tutte le viti nelle posizioni predisposte.
Dopo l’installazione del display, si possono verificare
incidenti imprevisti, come la rottura o la caduta
dell’apparecchio, se il supporto non è stato installato
secondo le istruzioni.
• Per garantire un’installazione sicura, il display deve essere
montato sempre da due o più persone.
• Prima dell’installazione, spegnete il display e le periferiche,
poi disinserite la spina dalla presa di alimentazione.
Per evitare incidenti causati dalla caduta del prodotto, prendete le
necessarie precauzioni per impedire la sua caduta (vedi pagina 30).
Dati tecnici ...................................................................... 31
Grafico delle misure ....................................................... 31
ATTENZIONE
Questo simbolo si riferisce ad una procedura azzardata
o pericolosa che può recare danni alle persone o alle
cose.
26
It
Page 27

Controllo degli accessori standard
Prima del montaggio e dell’installazione controllate che tutti gli accessori standard siano stati forniti.
• Vi preghiamo di notare che per il montaggio è necessario un cacciavite Phillips (che non è incluso).
Coperchio della base x 1
Viti x 6 (M5 x 10 mm, argento)
Gambe del supporto x 2
(sinistra e destra, intercambiabili)
Bulloni da installazione x 4
(M6 x 20 mm, nere)
Morsetti per cavi x 2
Istruzioni per l’uso x 1
(questo manuale)
Table top stand
Support de couverture de table
Tischständer
Supporto di tavolo
Tafelbladstaander
Soporte de mesa
PDK-TS15
Operating instructions
Mode d’emploi
Bedienungsanleitung
Istruzioni per l’uso
Gebruiksaanwijzing
Manual de instrucciones
Montaggio del supporto
Procedura di montaggio
1 Girate il coperchio della base con la parte
inferiore rivolta verso l’alto.
2 Inserite le gambe del supporto nel coperchio
della base.
3 Stringere le viti per bloccare le gambe del
supporto.
Nota
Quando montate il supporto appoggiate un lenzuolo sotto il
coperchio della base. Se non si appoggia il lenzuolo prima del
montaggio, la superficie anteriore del coperchio della base potrebbe
graffiarsi.
Coperchio della base
Italiano
Viti (M5 x 10 mm, argento)
Gamba del supporto
Viti (M5 x 10 mm, argento)
Gamba del supporto
Lenzuolo
27
It
Page 28

Fissaggio del Display a Plasma
Il peso di un display a plasma è di circa 50 kg. Non sono
profondi e sono instabili.
Attenzione
Nota
Assicuratevi che la superficie sulla quale installate il dispay sia
Inserite verticalmente le viti nei fori e serratele bene.
Per questo motivo devono essere montati e installati da
almeno due persone.
perfettamente piana e stabile.
Metodo di Fissaggio
1 Montaggio del display a plasma sul supporto.
Fissate le colonne di supporto di tavolo alla parte inferiore del
display a plasma, come indicato sotto, quindi inseritele adagio
verticalmente. Fate molta attenzione ad inserirle esattamente
nelle scanalature del display a plasma e solo in quel punto.
Agire in un altro modo può danneggiare il pannello del display
a plasma, le sue aperture o provocare una deformazione del
supporto.
Allineate le colonne di
sostegno con la parte
inferiore del display a
plasma, come indicato
nello schema allegato.
2 Fissaggio del display a plasma con le bulloni da
installazione.
Fissate il Display a Plasma nei punti indicati sotto, usando il
cacciavite Phillips.
Bulloni da installazione
(M6 x 20 mm, nere)
Montaggio del prodotto su scaffale TV, ecc.
Assicuratevi di osservare le seguenti precauzioni quando
trasportate o installate questo prodotto con un display a plasma su
un scaffale TV o in altri spazi delimitati.
Se installate il Display a Plasma su un tavolino TV, ecc.,
assicuratevi che sia sostenuto da due persone.
Attenzione
Precauzioni durante lo spostamento
Se dovete spostare il prodotto per più di qualche metro,
per prima cosa rimuovete l’altoparlante, quindi togliete
Attenzione
28
It
il display a plasma dal supporto e spostate l’altoparlante,
il display a plasma e il supporto separatamente.
Se rimuovete il display a plasma dal supporto,
assicuratevi di seguire la procedura descritta in
“Separare il Display a Plasma dal Supporto” a pag. 31.
Precauzioni per l’installazione
Assicuratevi che la quantità di spazio libero nella parte anteriore e
posteriore del supporto di tavolo sia sufficiente, come mostrato in
questo schema.
Minimo 30 mm Minimo 30 mm
Supporto di tavolo
Display a plasma
Scaffale TV
Dietro
Davanti
Minimo 10 mm
Profondità consigliata
Minimo 30 mm
per lo scaffale TV pari o
superiore a 500 mm
Page 29

Montaggio del prodotto su scaffale TV, ecc.
Precauzioni per l’installazione su uno scaffale TV o in altri spazi chiusi
Non tenetelo dall’altoparlante
Sollevate il display a plasma dalla maniglia sulla
parte inferiore, tenendo la parte superiore con
l’altra mano.
Se installate il display a plasma su
uno scaffale TV o in altri spazi chiusi,
Attenzione
sollevatelo dalla maniglia sulla parte
inferiore, tenendo la parte superiore
con l’altra mano. Afferrandolo per gli
altoparlanti potreste danneggiarli o
torcerli.
Preparazione dei cavi
Usate i morsetti in dotazione per legare i cavi.
Nota
Prestate molta attenzione a non forzare le basi dei cavi.
1 Inserite i morsetti per cavi nei relativi fori di
montaggio.
Morsetti per cavi
Fori di montaggio dei
morsetti per cavi
3 Chiudete ogni morsetto, quindi tiratene
l’estremità per fissare i cavi.
Allentare un morsetto per cavi
Se un morsetto per cavi è
troppo serrato, premete il
pulsante sulla sinistra e
spingete l’estremità del
morsetto per allentarlo.
Pulsante
Italiano
2 Legate i cavi e posizionateli su ogni morsetto.
Apertura di un morsetto per cavi
Aprite qui con un dito.
29
It
Page 30

Prevenire la caduta dell’apparecchio
Dopo il montaggio del supporto, assicuratevi che l’apparecchio non sia in condizioni di cadere.
A causa del suo peso, il display a plasma potrebbe provocare danni, in caso di caduta.
Assicuratevi di prendere le dovute misure di sicurezza per evitare che il display a plasma cada.
Fissare su tavolo o a pavimento
Fissare l’apparecchio usando delle viti disponibili sul mercato
come mostrato nel grafico.
Nota
Per sostenere il display a plasma, deve essere sempre usato uno
scaffale TV sufficientemente resistente, largo e profondo. In caso
contrario, l’apparecchio potrebbe cadere.
Per installare il display a plasma su uno scaffale TV, usate viti con
diametro nominale di 6 mm. Scegliete le viti adatte dopo aver
consultato un installatore professionista, se necessario.
6 mm
min. 20 mm
da 9 mm a 15 mm
Fissare l’apparecchio al muro
1 Fissate i bulloni (ganci) al display a plasma per
prevenire la caduta.
2
Usate corde robuste per stabilizzarlo con
sicurezza e saldamente al muro, a un pilastro o
a qualche altro solido elemento.
Svolgete questo lavoro nello stesso modo sul lato sinistro e su
quello destro.
Nota
Usate ganci, corde e accessori che si
trovano sul mercato.
Gancio consigliato:
Diametro nominale M8
Lunghezza da 12 mm ai 15 mm
1Gancio
2 Corda
Accessorio
da 12 mm a 15 mm
M8
Posizione delle viti del tavolo
Per fissare il supporto su uno scaffale TV, usate viti con un
diametro nominale di 6 mm, e una lunghezza superiore a 20
mm.
Unità: mm
300 585
Attenzione
•
Per sostenere il display a plasma si dovrebbe usare sempre
95
375
4
un tavolo o una superficie del pavimento con resistenza
adeguata. Se ciò non fosse possibile ne potrebbero derivare
danni alle cose o alle persone.
•
Durante l’installazione del display a plasma, prendere le
necessarie precauzioni per prevenire la caduta o il
capovolgimento in casi d’emergenza, come terremoti o
incidenti.
•
Se non si prendono queste precauzioni, il display a plasma
potrebbe cadere e causare danni.
•
Le viti, i ganci e gli altri accessori usati per fissare il display a
plasma e prevenire alla sua caduta varieranno secondo la
composizione e lo spessore della superficie alla quale sarà
agganciato.
•
Scegliere le viti, i ganci, le catene e gli altri accessori adatti
dopo aver controllato accuratamente la superficie e
determinato il suo spessore e la sua composizione, ed
eventualmente dopo avere consultato un esperto.
30
Vista laterale
It
Page 31

Separare il Display a Plasma dal Supporto
Attenzione
Per rimuovere il display a plasma dal supporto, assicuratevi
di seguire sempre la procedura descritta sotto per evitare
incidenti.
3
Riferendovi alla fase 2 nel capitolo “Fissaggio
del Display a Plasma” (Pagina 28), rimuovete i
bulloni di installazione (4 viti).
4 Tenendo il display a plasma dalle maniglie sulla
1 Prima di tutto, liberate uno spazio su una
superficie piana ecc., dove potete appoggiare il
display a plasma piatto, quindi copritelo con un
telo per proteggerlo dai graffi o da altri
danneggiamenti.
parte inferiore, e dalla parte superiore con
l’altra mano, sollevatelo verticalmente.
5 Collocate lentamente il display a plasma sul
telo che avete preparato al punto 1 con lo
schermo rivolto verso il basso.
2 Rimuovete gli altoparlanti.
Dati tecnici
Misure esterne 1000 mm (L) x 309 mm (A) x 470 mm (P)
Peso 10,2 kg
•
Le specifiche sopramenzionate e l’aspetto esteriore possono essere modificati senza alcun preavviso per migliorare il prodotto.
Grafico delle misure
Unità: mm
967
1470
1000
60
211
1043
118
470
Italiano
41
51,5
24
192,5
Pubblicato da Pioneer Corporation.
Copyright © 2006 Pioneer Corporation.
Tutti i diritti riservati.
31
It
Page 32

Hartelijk dank voor de aanschaf van dit product van Pioneer.
Lees s.v.p. de gebruiksaanwijzing door voor informatie
omtrent de juiste bediening van uw product.
Bewaar de gebruiksaanwijzing zorgvuldig zodat u deze
naderhand nogmaals kunt raadplegen.
Installatie
¶ Raadpleeg uw dealer wanneer u problemen met de
installatie ondervindt.
¶ Pioneer is niet aansprakelijk voor schade ontstaan
tengevolge van onjuiste installatie, onjuist gebruik,
wijzigingen of natuurrampen.
BELANGRIJK BERICHT
Neem het hieronder vermelde model- en serienummer
van deze apparatuur over.
Modelnr. PDK-TS15 Serienr.
Bewaar deze nummers voor later gebruik.
Inhoud
Waarschuwingen ........................................................... 32
Controleren van de standaardonderdelen ................... 33
Montage van de tafelbladstaander .............................. 33
Bevestiging van de Plasma-Display ............................. 34
Installatie van het product op een TV-tafel enz. ......... 34
Voorbereiding van de snoeren...................................... 35
Zo zorgt u ervoor dat de apparatuur niet omvalt ....... 36
De plasma-display loskoppelen van de staander........ 37
Technische gegevens ..................................................... 37
Afmetingen ..................................................................... 37
Waarschuwingen
Dit product is een tafelbladstaander die exclusief voor plasmadisplays (PDP- 607XD) van Pioneer is ontworpen.
Indien dit model met een ander model wordt gebruikt kan dit tot
instabiliteit leiden hetgeen letsel kan veroorzaken. Raadpleeg
s.v.p. het verkooppunt waar u deze display heeft gekocht voor
meer gegevens hierover.
Het product mag niet op een andere dan volgens de aangegeven
wijze worden geïnstalleerd of gewijzigd. Deze staander mag niet
voor andere dan de daarvoor bestemde plasma-display worden
gebruikt; ook mogen er geen wijzigingen op worden aangebracht
noch mag het voor andere doeleinden worden gebruikt.
Onjuiste installatie is uiterst gevaarlijk omdat het apparaat
daardoor kan vallen of omdat ongelukken kunnen worden
veroorzaakt.
Plaats van installatie
• Kies een plaats die sterk genoeg is om het gewicht van de
staander en de displays te kunnen dragen.
• Zorg ervoor dat de plaats van installatie vlak en stabiel is.
• Plaats het apparaat niet buiten, bij een warmwaterbron of nabij
het strand.
• Plaats de standaard niet waar deze blootstaat aan trillen of
schokken.
Montage en installatie
• Monteer de tafelbladstaander overeenkomstig de montageinstructies en bevestig alle schroeven stevig op de
aangegeven plaatsen.
Onvoorziene ongevallen, zoals het breken of omvallen van
de apparatuur, kunnen zich na installatie van de display
voordoen wanneer de staander niet op de aangegeven
wijze wordt geïnstalleerd.
• De display dient altijd door twee of meerdere mensen te
worden geplaatst om er zeker van te zijn dat het apparaat
op veilige wijze wordt geïnstalleerd.
• Schakel de display en randapparatuur voorafgaande aan de
installatie uit, en verwijder vervolgens het netsnoer van de
netspanning.
Waarschuwing
Dit symbool waarschuwt voor gevaarlijk of onveilig
gebruik waardoor lichamelijk letsel kan ontstaan of de
apparatuur kan beschadigen.
32
Du
Ongelukken veroorzaakt door het omvallen van het product
kunnen worden voorkomen wanneer de juiste maatregelen
worden genomen (zie blz. 36).
Page 33

Controleren van de standaardonderdelen
Controleer voorafgaande aan de montage en installatie of alle standaardonderdelen aanwezig zijn.
• Een kruiskopschroevendraaier (niet meegeleverd) dient voor de montage te worden gebruikt.
Voetstuk x 1
Schroeven
(M5 x 10 mm: zilverkleurig) x 6
Opzetstukken
(links en rechts, onderling verwisselbaar) x 2
Montagebouten
(M6 x 20 mm: zwart) x 4
Kabelklemmen x 2
Gebruiksaanwijzing
(deze handleiding) x 1
Table top stand
Support de couverture de table
Tischständer
Supporto di tavolo
Tafelbladstaander
Soporte de mesa
PDK-TS15
Operating instructions
Mode d’emploi
Bedienungsanleitung
Istruzioni per l’uso
Gebruiksaanwijzing
Manual de instrucciones
Montage van de tafelbladstaander
Wijze van montage
1 Keer het voetstuk om zodat de onderzijde naar
boven wijst.
2 Voeg de opzetstukken in het voetstuk.
3 Draai de schroeven aan om de opzetstukken
vast te zetten.
Let op
Plaats een zachte doek onder het voetstuk wanneer de staander
wordt gemonteerd.
Indien er voorafgaande aan de montage geen doek onder wordt
neergelegd, kunnen er aan de bovenzijde van het voetstuk krassen
ontstaan.
Voetstuk
Schroeven
(M5 x 10 mm: zilverkleurig)
Opzetstuk
Schroeven
(M5 x 10 mm: zilverkleurig)
Opzetstuk
Nederlands
Doek
33
Du
Page 34

Bevestiging van de Plasma-Display
Het gewicht van een plasma-display bedraagt ongeveer
Waarschuwing
Let op
Zorg ervoor dat de plasma-display op een vlakke plaats wordt
geïnstalleerd.
Voeg de schroeven verticaal in de gaten en draai ze stevig aan.
50 kg; de display is niet diep en daardoor onstabiel.
Zorg er daarom voor dat tenminste twee personen de
display monteren en installeren.
Bevestigingsmethode
1 Bevestig de plasma-display aan de staander.
Bevestig zoals hieronder aangegeven de steunkolommen van
de staander aan het onderste gedeelte van de plasma-display,
en leid ze vervolgens verticaal naar binnen. Zorg ervoor dat de
steunkolommen van de staander niet in enig ander gedeelte
van de plasma-display dan in de invoegsleuven van de
staander worden geplaatst, anders kan het paneel of de
uitgangen van de plasma-display beschadigd raken of kan de
staander kromtrekken.
Zorg dat de
steunkolommen zijn
opgelijnd met het
onderste gedeelte van de
plasma-display zoals
aangegeven in het
bijbehorende schema.
2 Het vastzetten van de plasma-display met
montagebouten.
Bevestig de plasma-display op de bij de pijlen aangegeven
plaatsen met gebruik van de kruiskopschroevendraaier.
Montagebouten
(M6 x 20 mm: zwart)
Installatie van het product op een TV-tafel enz.
Houdt u zich aan de volgende voorzorgsmaatregelen bij het
verplaatsen of installeren van dit product met een plasma-display
in een TV-tafel of andere behuizing.
Zorg ervoor dat de plasma-display door twee
personen wordt vastgehouden wanneer deze op een
Waarschuwing
TV-tafel etc. wordt geplaatst.
Voorzorgsmaatregelen bij verplaatsing
Verwijder voorafgaande aan verplaatsing eerst de
speakers en vervolgens de plasma-display van de
Waarschuwing
34
Du
staander wanneer het product over een afstand van
meer dan enkele meters wordt verplaatst, en
verplaats de speakers, plasma-display en de staander
afzonderlijk.
Wanneer de plasma-display van de staander wordt
verwijderd, volg dan de procedure in “De plasmadisplay loskoppelen van de staander” op blz. 37.
Voorzorgsmaatregelen voor installatie
Zorg ervoor dat u aan de voorzijde en achterzijde van de
tafelbladstaander minimaal zoveel ruimte heeft als in de figuur
hieronder aangegeven.
TV-tafel
Min. 30 mm
Voorzijde
Tafelbladstaander
Plasma-display
Achterzijde
Min. 30 mm
Min. 30 mm
Min. 10 mm
De aanbevolen diepte
voor een TV-tafel is 500
mm of meer
Page 35

Installatie van het product op een TV-tafel enz.
Voorzorgsmaatregelen bij het installeren in een TV-tafel of andere behuizing
Niet bij de speaker vasthouden
Houd de plasma-display bij de handgreep aan de
onderzijde vast, en uw andere hand bovenop de
behuizing.
Houd de plasma-display tijdens
installatie in een TV-tafel of andere
Waarschuwing
behuizing bij de handgreep aan de
onderzijde vast, en uw andere
hand bovenop de behuizing.
Indien u de plasma-display bij de
speakers vasthoudt kunnen deze
beschadigd raken of vervormen.
Voorbereiding van de snoeren
Gebruik de bijgeleverde kabelklemmen om de snoeren vast te
binden.
Let op
Gebruik vooral geen kracht op de bases van de snoeren.
1 Geleid de kabelklemmen in de montagegaten
voor de kabelklemmen.
Kabelklemmen
Montagegaten voor de
kabelklemmen
3 Sluit elke kabelklem en trek vervolgens aan het
uiteinde zodat de snoeren vast komen te
liggen.
De kabelklem losser maken
Indien een kabelklem te
vast is dichtgemaakt druk
dan op de aan de
linkerzijde aangegeven
drukknop, en duw
vervolgens het uiteinde van
de kabelklem weg om hem
losser te maken.
Drukknop
Nederlands
2 Voeg de snoeren bijelkaar en leg ze op elke
kabelklem.
De kabelklem openen
Ontsluit de kabelklem
hier met de vinger.
35
Du
Page 36

Zo zorgt u ervoor dat de apparatuur niet omvalt
Zorg ervoor nadat de staander is geïnstalleerd, dat de apparatuur niet omvalt.
Wanneer de plasma-display omvalt kan vanwege het gewicht letsel worden berokkend.
Zorg er voor de veiligheid goed voor dat de plasma-display niet kan omvallen.
Stabiliteit op de tafel of op de grond
Zorg voor stabiliteit van de apparatuur zoals in de figuur
aangegeven met schroeven die in de winkel verkrijgbaar zijn.
Let op
Er dient te allen tijde een TV-tafel van voldoende sterkte, breedte
en diepte te worden gebruikt om de plasma-display te
ondersteunen. Indien dit niet het geval is kan de plasma-display
omvallen.
Gebruik schroeven met een nominale diameter van 6 mm om de
plasma-display stabiel op een TV-tafel te plaatsen.
Kies, indien nodig in overleg met een erkende installateur, de
juiste schroeven.
6 mm
Min. 20 mm
9 mm tot 15 mm
Gebruik van een muur voor stabiliteit
1 Bevestiging van de bouten (haken) aan de
plasma-display zodat deze niet omvalt.
2
Gebruik stevige snoeren om de display op de
juistre wijze stabiliteit te geven, en deze stevig
aan een muur, zuil, of ander stevig element te
bevestigen.
Dit dient op dezelfde wijze aan de linker- en rechterzijde van
de display te worden gedaan.
Let op
Gebruik haken, snoeren en appendages
die in de winkel verkrijgbaar zijn.
Aanbevolen schroefhaak:
Nominale diameter M8
Lengte 12 mm tot 15 mm
1schroefhaak
2 Snoer
Montagestuk
12 mm tot 15 mm
M8
Positie van de tafelschroeven
Voor het stabiel plaatsen van de standaard op een TV-tafel
moeten schroeven met een nominale diameter van 6 mm en
een lengte van meer dan 20 mm worden gebruikt.
Eenheid: mm
36
Du
300 585
Zijaanzicht
Waarschuwing
•
95
375
4
De tafel of het gedeelte van de grond dat voor de apparatuur
wordt gebruikt dient stevig genoeg te zijn ter ondersteuning
van de plasma-display; indien dit niet het geval is, kan
lichamelijk letsel worden veroorzaakt.
•
Zorg ervoor wanneer de plasma-display wordt geïnstalleerd,
dat de juiste maatregelen worden getroffen zodat deze niet
valt of kantelt, zoals tijdens een aardbeving of bij ongevallen.
•
Indien u deze voorzorgsmaatregelen niet neemt kan de
plasma-display omvallen en letsel veroorzaken.
•
De schroeven, schroefhaken, kettingen en overige
montagestukken die u gebruikt ter versteviging van de
plasma-display zodat deze niet kantelt variëren al naar gelang
de samenstelling en dikte van het oppervlak waarop deze
wordt aangebracht.
•
Kies de juiste schroeven, haken, kettingen en overige
montagestukken nadat u eerst het oppervlak grondig heeft
onderzocht op de juiste dikte en samenstelling en nadat u,
indien nodig, een erkend installateur heeft geraadpleegd.
Page 37

De plasma-display loskoppelen van de staander
Waarschuwing
Wanneer de plasma-display van de staander wordt
verwijderd, neem dan de hierna omschreven procedure
in acht ter voorkoming van ongevallen.
3
Verwijder de montagebouten (4 schroeven)
zoals aangegeven in stap 2 onder “Bevestiging
van de Plasma-Display” (blz. 34).
4 Houd de plasma-display vast bij de handgrepen
1 Maak eerst ruimte vrij op een vlakke vloer etc.
waarop de plasma-display vlak kan worden
neergelegd; leg vervolgens een doek op het
oppervlak zodat de display niet bekrast of
anderszins beschadigd raakt.
aan de onderzijde met uw andere hand
bovenop, en til de display verticaal op.
5 Plaats de plasma-display langzaam op het doek
dat in stap 1 werd neergelegd, met het scherm
naar beneden.
2 Verwijder de speakers.
Technische gegevens
Afmetingen buitenzijde 1000 mm (B) x 309 mm (H) x 470 mm (D)
Gewicht 10,2 kg
•
Het is mogelijk dat bovenstaande gegevens en de buitenzijde zonder voorafgaande berichtgeving ter verbetering van het product worden
gewijzigd.
Afmetingen
Eenheid: mm
967
1470
1000
60
211
118
41
Nederlands
1043
51,5
24
192,5
470
Uitgegeven door Pioneer Corporation.
Copyright © 2006 Pioneer Corporation.
Alle rechten voorbehouden.
37
Du
Page 38

Gracias por comprar un producto Pioneer.
Tenga la amabilidad de leer el Manual de Instrucciones para
saber cómo utilizar este modelo de una forma segura y
adecuada. Asimismo, le recomendamos que conserve el
Manual de Instrucciones para futuras referencias.
Instalación
¶ Si experimentara alguna dificultad con la instalación,
consulte a su distribuidor.
¶ Pioneer no se responsabiliza de ningún daño que
pudiera derivarse de una instalación incorrecta, un uso
inadecuado, la realización de modificaciones o
catástrofes naturales.
AVISO IMPORTANTE
Anote más abajo el número de modelo y el número de
serie de este equipo.
N.° de modelo: PDK-TS15 N.° de serie:
Guarde estos números para futuras referencias.
Índice
Advertencias ................................................................... 38
Verificación de las piezas suministradas ..................... 39
Cómo montar el soporte ............................................... 39
Montaje de la pantalla de plasma ................................ 40
Instalación del producto en una mesa de TV u otro
lugar similar .................................................................... 40
Preparación de los cables .............................................. 41
Cómo evitar que el equipo se caiga ............................. 42
Desmontaje de la pantalla de plasma del soporte ..... 43
Especificaciones ............................................................. 43
Advertencias
Este producto es un soporte de mesa que ha sido diseñado
específicamente para pantallas de plasma Pioneer (PDP- 6070PU /
PDP- 607XD). Su empleo con otros modelos podría provocar su
inestabilidad, con el consiguiente riesgo de lesiones. Para más
información, póngase en contacto con el establecimiento donde
adquirió su pantalla.
No instale ni modifique el producto, salvo según lo especificado.
No utilice este soporte para una pantalla de plasma distinta de las
indicadas, ni lo modifique ni lo destine a otros usos.
Si la instalación no se efectúa correctamente, las consecuencias
podrían ser extremadamente peligrosas, incluyendo la caída de la
pantalla u otros accidentes imprevistos.
Dónde instalar el soporte
• Elija un lugar cuya resistencia permita aguantar el peso del
soporte y de la pantalla.
• Asegúrese de que el lugar de instalación sea una superficie
llana y estable.
• No instale el soporte en el exterior, junto a una fuente termal o
cerca de una playa.
• No instale el soporte donde el mismo pueda estar sujeto a
vibraciones o golpes.
Montaje e instalación
• Instale el soporte de acuerdo con las instrucciones de
montaje y fije correctamente todos los tornillos en los
lugares indicados.
En ocasiones, se han producido accidentes imprevistos –
como la rotura o la caída del equipo– tras haber montado la
pantalla de plasma, debido a que el soporte no se instaló
conforme a las instrucciones facilitadas.
• Para tener la certeza de que la pantalla se instala de forma
segura, es imprescindible que en su montaje intervengan
dos o más personas.
• Antes de proceder a la instalación, apague la pantalla y los
dispositivos periféricos. Seguidamente, desenchufe el cable
de alimentación de la toma de corriente.
Diagrama de dimensiones............................................. 43
PRECAUCIÓN
Este símbolo indica un riesgo o práctica insegura que
podría ocasionar lesiones corporales o daños
materiales.
38
Sp
Tome las debidas precauciones para impedir la caída del producto
y evitar accidentes imprevistos (consulte las página 42).
Page 39

Verificación de las piezas suministradas
Antes de proceder al montaje e instalación, asegúrese de que dispone de todas las piezas suministradas.
• Fíjese en que el montaje requiere un destornillador Phillips (no se incluye).
Base de apoyo x 1
Tornillos (M5 x 10 mm: plateados) x 6
Columnas de soporte
(izquierda y derecha, intercambiables) x 2
Tornillos de fijación
(M6 x 20 mm: negros) x 4
Bridas para cables x 2
Manual de instrucciones
(este documento) x 1
Table top stand
Support de couverture de table
Tischständer
Supporto di tavolo
Tafelbladstaander
Soporte de mesa
PDK-TS15
Operating instructions
Mode d’emploi
Bedienungsanleitung
Istruzioni per l’uso
Gebruiksaanwijzing
Manual de instrucciones
Cómo montar el soporte
Procedimiento de montaje
1 Déle la vuelta a la base de apoyo, de manera
que la parte inferior mire hacia arriba.
2 Introduzca las columnas de soporte en la base
de apoyo.
3 Apriete los tornillos para estabilizar las
columnas de soporte.
Nota
Para montar el soporte, coloque una sábana suave debajo de la
base de apoyo.
Si no coloca ninguna sábana antes de proceder al montaje, la
superficie frontal de la base de apoyo se podría rayar.
Base de apoyo
Tornillos
(M5 x 10 mm: plateados)
Columna
de soporte
Tornillos
(M5 x 10 mm: plateados)
Columna
de soporte
Español
Sábana
39
Sp
Page 40

Montaje de la pantalla de plasma
Una pantalla de plasma pesa unos 50 kg; al no tener
fondo, es inestable.
PRECAUCIÓN
Nota
Asegúrese de que la instala en un lugar estable.
Introduzca los tornillos verticalmente en los agujeros y apriételos
firmemente.
Por lo tanto, es necesario que al menos dos personas
intervengan en su montaje e instalación.
Método de fijación
1 Montaje de la pantalla de plasma en el soporte.
Coloque las columnas de soporte debajo de la pantalla de
plasma, tal y como se indica más abajo. Después,
introdúzcalas lentamente de forma vertical. Tenga muchísimo
cuidado de no insertar las columnas del soporte en ningún
otro lugar de la pantalla de plasma que no sean las ranuras de
inserción del soporte. Tenga en cuenta que si eso ocurriera, se
podrían producir daños en el panel de la pantalla de plasma o
sus puertos, o deformaciones en el soporte.
Alinee los soportes de
las columnas con la
parte inferior de la
pantalla de plasma, tal
como se indica en la
figura que sigue.
2 Fijación de la pantalla de plasma con los
tornillos de fijación.
Con la ayuda del destornillador Phillips, asegure la pantalla de
plasma en los puntos indicados más abajo.
Tornillos de fijación
(M6 x 20 mm: negros)
Instalación del producto en una mesa de TV u otro lugar similar
Asegúrese de que respeta las siguientes precauciones al
desplazar o instalar este producto con una pantalla de plasma en
una mesa de TV u otro lugar similar.
Cuando instale este producto en una mesa de
TV u otro lugar similar, asegúrese de que dos
PRECAUCIÓN
personas sujetan la pantalla de plasma.
Precauciones para el desplazamiento
Si va a desplazar el producto a más de unos pocos
metros, desmonte primero los altavoces, después
desmonte la pantalla de plasma del soporte y lleve
PRECAUCIÓN
40
Sp
los altavoces, la pantalla de plasma y el soporte por
separado a su nueva ubicación.
Cuando vaya a desmontar la pantalla del plasma del
soporte, asegúrese de seguir el procedimiento
descrito en la página 43: “Desmontaje de la pantalla
de plasma del soporte.”
Precauciones para la instalación
Asegúrese de dejar siempre libre delante y detrás del soporte un
espacio de la medida indicada en la siguiente figura, como
mínimo.
Mín. 30 mm
Pantalla de plasma
Mesa de TV
Mín. 30 mm
Parte trasera
Mín. 10 mm
Fondo de la mesa de TV:
Parte delantera
Soporte de mesa
Mín. 30 mm
recomendable 500 mm
como mínimo
Page 41

Instalación del producto en una mesa de TV u otro lugar similar
Precauciones al realizar la instalación en una mesa de TV u otro lugar similar
No sujetar el altavoz
Sujete la pantalla de plasma por el asa situada
en la parte inferior, al tiempo que con la otra
mano la sujeta por la parte superior.
Si va a realizar la instalación en
una mesa de TV u otro lugar
PRECAUCIÓN
similar, sujete la pantalla de
plasma por el asa situada en la
parte inferior, al tiempo que con la
otra mano la sujeta por la parte
superior. Si la sujeta por los
altavoces, puede dañarlos o
doblarlos.
Preparación de los cables
Para sujetar los cables, utilice las bridas para cables que se
incluyen con el soporte.
Nota
Tenga mucho cuidado de no ejercer fuerza en la base de los cables.
1 Introduzca las bridas para cables en los
agujeros de montaje de las bridas para cables.
Bridas para
cables
Agujeros de montaje de
las bridas para cables
3 Cierre cada una de las bridas para cables, y
seguidamente tire del extremo para inmovilizar
los cables.
Cómo aflojar una brida para cables
Si una brida para cables
ha quedado demasiado
apretada, presione el
botón indicado en el
dibujo de la izquierda y
empuje el extremo de la
brida para cables con el
fin de aflojarla.
Botón
Español
2 Reúna los cables y colóquelos sobre cada una
de las bridas para cables.
Cómo abrir una brida para cables
Abrir con un dedo.
41
Sp
Page 42

Cómo evitar que el equipo se caiga
Tras haber instalado el soporte, preste especial atención a las medidas que deberá tomar para evitar la caída
del equipo.
Debido al peso de la pantalla de plasma, ésta se podría caer y provocar lesiones.
Por razones de seguridad, tome las medidas necesarias para garantizar que la pantalla de plasma no puede caerse.
Cómo estabilizar el equipo en una mesa o
en el suelo
Estabilice el equipo, según se indica en el diagrama, utilizando
tornillos de venta en establecimientos especializados.
Nota
La pantalla de plasma siempre deberá instalarse sobre una mesa
de TV que presente la resistencia, ancho y fondo adecuados.
De lo contrario, podría caerse.
Para estabilizar la pantalla de plasma sobre una mesa de TV,
utilice tornillos con un diámetro nominal de 6 mm. De ser
necesario, seleccione los tornillos adecuados tras consultar con
un instalador profesional.
6 mm
Mín. 20 mm
De 9 mm a 15 mm
Elemento
de enganche
Cómo estabilizar el equipo utilizando una
pared
1 Coloque tornillos anticaída (ganchos) en la
pantalla de plasma.
2
Utilice cuerdas fuertes para estabilizarla
adecuadamente y de forma segura a una pared,
columna u otro elemento resistente.
Practique esta operación en el lado izquierdo y derecho de la
pantalla de plasma.
Nota
Utilice ganchos, cuerdas y fijaciones
disponibles en el mercado.
Gancho recomendado:
Diámetro nominal: M8
Longitud: entre 12 mm y 15 mm
1Gancho
2 Cuerda
De 12 mm a 15 mm
M8
Posición de los tornillos en la mesa
Cuando estabilice el soporte sobre una mesa de TV, utilice
tornillos con un diámetro nominal de 6 mm y una longitud de
más de 20 mm.
Unidad: mm
42
Sp
300 585
Vista lateral
PRECAUCIÓN
95
375
4
•
Para apoyar la pantalla de plasma siempre debe utilizarse una
mesa o un área del piso con la resistencia adecuada. De no
ser así se podrían causar lesiones personales y daños físicos.
•
Al instalar la pantalla de plasma, adopte las medidas de
seguridad necesarias para evitar que la misma se caiga o se
vuelque en caso de emergencias, como terremotos, o de
accidentes.
•
Si no adopta estas precauciones, la pantalla de plasma puede
caerse y causar lesiones.
•
Los tornillos, alcayatas, cadenas y otros accesorios que
utilice para asegurar la pantalla de plasma e impedir que se
vuelque variarán de acuerdo con la composición y el espesor
de la superficie a la cual se fijará.
•
Seleccione los tornillos, alcayatas, cadenas y otros
accesorios adecuados después de haber inspeccionado
detenidamente la superficie para determinar su composición
y su espesor y de haber consultado con un instalador
profesional en caso de ser necesario.
Page 43

Desmontaje de la pantalla de plasma del soporte
PRECAUCIÓN
Para evitar accidentes, siga siempre el procedimiento
descrito a continuación para desmontar la pantalla de
plasma del soporte.
3
Consulte el paso 2 de “Montaje de la pantalla
de plasma” (página 40) y extraiga los tornillos
de instalación (4 tornillos).
4 Sujete la pantalla de plasma por el asa situada
1 Primero, despeje un espacio sobre un suelo
plano en el que pueda colocar tumbada la
pantalla de plasma; después, cubra el espacio
así despejado con una sábana para proteger la
pantalla de arañazos u otros daños.
2 Desmonte los altavoces.
en la parte inferior, al tiempo que con la otra
mano la sujeta por la parte superior, y levántela
de forma vertical.
5 Coloque lentamente la pantalla de plasma
sobre la sábana extendida, según lo indicado
en el paso 1, con la cara de la pantalla mirando
hacia abajo.
Especificaciones
Dimensiones externas: 1000 mm (ancho) x 309 mm (alto) x 470 mm (fondo)
Peso: 10,2 kg
•
Las anteriores especificaciones y el exterior podrán modificarse sin previo aviso con objeto de mejorar el producto.
Diagrama de dimensiones
Unidad: mm
1470
967
1000
60
211
1043
118
41
Español
51,5
24
192,5
470
Publicado por Pioneer Corporation.
Copyright © 2006 Pioneer Corporation.
Todos los derechos reservados.
43
Sp
Page 44

感謝您購買本Pioneer產品。
為使您熟知本機的正確操作方式,務求詳閱本「操作手冊」。
在您閱讀完手冊的內容後,請妥為保存,以備日後參考之用。
安裝
如果您在安裝時遇到任何問題,請與您的經銷商連絡。
Pioneer對於因安裝錯誤、不當使用、修改或天災所造成
的任何意外或損害,恕概不負責。
重要警示
將位於設備下方的型號和序號記錄下來。
型號 PDK-TS15 序號
保留這些號碼以備不時之需。
注意
這個桌上支架是專為先鋒牌電漿顯示器 (PDP-607XD) 所設計
的。如果使用其他機種,可能會因為不穩定而造成傷害。想
要獲得更進一步的資訊,請跟你購買顯示器的店家聯絡。
除了詳細的指示,請不要安裝或修改產品。除了那些指示說
明,請不要將此支架安裝電漿顯示器,也不要修改或是另有
用途。
不當的安裝是非常危險的,因為如此可能會造成翻覆或是其他
意外。
安裝位置
選擇一個夠堅固,足以支撐桌上支架和顯示器的地方。
確認是安裝於平坦和堅固的地方。
不要安裝於戶外或是潮濕的地方,例如溫泉或是海灘旁邊。
不要將支架安裝於會震動或衝撞的地方。
目錄
注意 ........................................ 44
核對標準隨附零件 ............................ 45
組合支架 .................................... 45
安裝電漿顯示器 .............................. 46
將產品安裝至電視桌等部位上 .................. 46
固定纜線 .................................... 47
預防設備翻覆 ................................ 48
從支架拆卸電漿顯示器 ........................ 49
規格 ........................................ 49
尺寸圖 ...................................... 49
注意
本標誌在於指出:存在有可能造成人體傷害或財物損失的危
險或不安全的做法。
組合和安裝
請按照裝配指示組合桌上支架,將所有螺絲穩固的栓在指定
的地方。
安裝顯示器以後,因為桌上支架沒有按照指示安裝,可能會
發生幾種狀況,如設備碎裂或是翻覆的意外發生。
安裝顯示器時一定要有兩人或兩人以上去確認是否安裝妥當。
安裝以前,將顯示器和周邊設備的電源關閉,然後再將電源
線插頭從插座拔除。
為防止產品翻覆造成意外,請務必採取穩妥措施(請參閱第
48頁)。
44
ChH
Page 45

核對標準隨附零件
在組合和安裝之前請核對您擁有所有的隨附零件。
•
請注意在組合時會需要用到十字螺絲起子(未附)。
底座板 ×1
螺絲 (M5 x 10 mm:銀色) ×6 安裝螺栓
立管(左右各一,可互換)×2
(M6 x 20 mm:黑色) ×4
纜線固定座 x 2
操作手冊(本分文件) ×1
Table top stand
Support de couverture de table
Tischständer
Supporto di tavolo
Tafelbladstaander
Soporte de mesa
PDK-TS15
Operating instructions
Mode d’emploi
Bedienungsanleitung
Istruzioni per l’uso
Gebruiksaanwijzing
Manual de instrucciones
組合支架
組合程序
1
翻轉底座板,使其底面朝上。
2
將立管插入底座板中。
3
鎖緊螺絲,固定住立管。
附註
組裝支架管時,請於座板放置一軟墊。
組裝前若未放置軟墊,則座板正面可能會刮傷。
螺絲 (M5 x 10 mm:銀色)
立管
螺絲 (M5 x 10 mm:銀色)
立管
中文
底座板
軟墊
45
ChH
Page 46

安裝電漿顯示器
電漿顯示器的重量約為50 kg,本身並無任何深度且不
穩。所以當要組合與安裝時,至少需要兩個人來操作。
注意
附注
永遠組合在平坦的桌面上。
將螺絲垂直插入孔內並牢牢上緊。
安裝方法
1 將電漿顯示器安裝在支架上。
將電漿顯示器的底部安裝在支架的支撐柱狀條,如下圖所
示的方向,並慢慢的以垂直方式插入。除了支架的插入狹
縫以外,請非常小心的不要將支撐柱狀條插入電漿電視的
任何地方,如果隨意插入電漿電視的任何零件有可能會導
致電漿面板和接頭的損壞,或是支架彎曲變形。
如下圖所示,將支撐柱
狀條對齊電漿顯示器的
底部。
2 用安裝用的螺栓將電漿顯示器固定住。
利用十字螺絲起子將電漿顯示器接合至下圖所指各處位
置。
安裝螺栓
(M6 x 20 mm:黑色)
將產品安裝至電視桌等部位上
在將本產品連同電漿顯示器一同移至或安裝至電視桌或其他
箱櫃時, 請確實遵守下列注意事項:
在安裝到電視桌等裝置上時,請務必由兩人合力握住。
注意
移動時的預防措施
當需要將產品移動數公尺以外,先搬移揚聲器,然後
再從支架搬開電漿顯示器,而後才分別移動揚聲器,
注意
46
ChH
電漿顯示器,和支架。
當從支架拆卸電漿顯示器時,請按照第49頁的"從支
架拆卸電漿顯示器"步驟。
安裝的預防措施
請確認你可以長久將桌上支架最少固定如下圖所標的前面和
後面的距離空間。
最少 30 mm 最少 30 mm
桌上支架
電漿顯示器
電視桌
背面
最少 10 mm
建議電視桌厚度最少
前面
最少 30 mm
500 mm 以上
Page 47

將產品安裝至電視桌等部位上
安裝至電視桌或其他機架上之注意事項
切勿握住揚聲器
請一手握住電漿顯示器底部,再一手握住上
端。
安裝於電視桌或其他機櫃上時,請
一手握住電漿顯示器底部,再一手
注意
握住上端。若您是握住揚聲器,可
能會造成揚聲器損壞或扭曲。
固定纜線
請使用產品內附的纜線固定座綁住纜線。
附注
小心不要施力於纜線的主要部分。
1 將纜線固定座插入纜線固定座安裝孔內。
纜線固定座
纜線固定座安裝孔
3 收合各個纜線固定座,拉住其末端將纜線固定。
鬆開纜線固定座
若纜線固定座收合過緊,
請壓下左側所指按鈕,然
後回推纜線固定座末端將
其鬆開。
按鈕
中文
2 將纜線捆紮好後放到各個纜線固定座上。
打開纜線固定座
請用手指解開這裡。
47
ChH
Page 48

預防設備翻覆
在安裝好支架之後,請特別小心確認設備不會翻覆。
可能會因為電漿顯示器的重量而發生摔落,使人受傷。
為了安全起見,請確實特別小心,確定電漿顯示器不會摔落。
穩固安裝在桌上或是地上
使用市面上有的螺絲如圖所示,可以穩固安裝設備。
附注
請使用擁有適當強度、寬度及深度的電視桌支撐電漿顯示器。如
未遵照使用,則可能會發生摔落。
要將電漿顯示器穩固於電視桌上,請使用額定直徑為6 mm的螺
絲。如有必要,請向專業安裝人員請教後再選擇適當的螺絲。
6 mm
最少20 mm
9 mm 至 15 mm
利用牆壁固定
1
使用防掉落的門栓(掛勾) 拴住電漿電視。
2 利用強力鋼索適當地穩固並牢牢固定到牆上、柱
上或其他堅固的元件上。
左右邊也按照此種方式進行安裝。
附註
請使用一般市面上的掛鉤、鋼索及固定
配件。
推薦掛鉤:直徑M8
長度在12 mm與15 mm之間
1掛鉤
2鋼索
固定配件
12 mm 至 15 mm
M8
桌用螺絲的位置
將腳架固定到電視桌上時,請使用額定直徑6 mm以及長度
20 mm的位置。
單位:mm
300 585
95
注意
• 要有足夠強度的桌上或是地上才可永久支撐電漿顯示
器。如果強度不夠將可能導致個人傷害和身體的損害。
375
4
• 當安裝電漿顯示器時,請先量測安全的尺度,如果發生
緊急狀況,比如地震或是意外,可以避免機台翻覆或是
翻倒。
• 如果你沒有做這預防措施,那麼電漿顯示器有可能會翻覆
且造成傷害。
• 使用螺絲,掛鉤,鏈條,和其他裝配來穩固電漿顯示器
以防翻倒會因為嵌入合成的材質或是表面厚度的不同而
有所差別。
• 當有必要時再詢問專業安裝員以後,首先小心審查嵌入
表面的厚度和材質,並選擇適當的螺絲,掛鉤,鏈條,
和其他裝配。
48
ChH
側視圖
Page 49

從支架拆卸電漿顯示器
從支架來拆解電漿顯示器,請參照以下所敘述的步驟,以
防意外的發生。
注意
1 先將平坦地面清空,這樣便能將電漿顯示器平
躺放好,然後舖張紙在上方,便可以防止被刮
傷或其他的傷害。
2 將揚聲器搬開。
規格
外部尺寸 1000 mm (寬) × 309 mm (高) × 470 mm (深)
重量 10.5 公斤
• 以上的外部規格如有修改,以改善產品品質,恕不另行通知。
尺寸圖
3 請參照「安裝電漿顯示器」中的步驟2(第46
頁),將安裝螺栓拆下(4顆螺絲)。
4 一手握住電漿顯示器底部把手,再一手握住上
端,將顯示器垂直抬起。
5 如步驟2將電漿顯示器慢慢的以紙張覆蓋,並
使螢幕面朝下。
單位:mm
967
1470
1000
60
211
1043
118
470
41
192.5
51.5
24
中文
日本先鋒公司出版。
版權 2006日本先鋒公司。
版權所有。
49
ChH
Page 50

この取扱説明書の印刷には
植物性大豆油インキを使用
しています。
この取 扱説明書は再生紙を使用しています。
Printed on recycled paper.
Imprimé sur papier recyclé.
Gedruckt auf Recyclingpapier.
Stampato su carta riciclata.
Gedrukt op recycled papier.
Impreso en papel reciclado.
使用再生紙印刷。
Published by Pioneer Corporation.
Copyright © 2006 Pioneer Corporation.
All rights reserved.
Printed in Japan / Imprimé au Japon <AZR1220-A>
 Loading...