

Page 1
テーブルトップスタンド
Table top stand
Support de couverture de table
Tischständer
Supporto di tavolo
Tafelbladstaander
Soporte de mesa
PDK-TS05
取扱説明書
Operating instructions
Mode d’emploi
Bedienungsanleitung
Istruzioni per l’uso
Gebruiksaanwijzing
Manual de instrucciones
Page 2
このたびは、パイオニアの製品をお買い求めいただきまして
まことにありがとうございます。お使いになる前には取扱説
明書をよくお読みになり、安全に正しくご使用ください。ま
たお読みになった後も、この取扱説明書は大切に保管してく
ださい。
本製品は弊社製デジタルハイビジョンプラズマテレビ
PDP-505HDL / PDP-505HDS / PDP-435HDL / PDP435HDS / PDP-435SX / PDP-504HD / PDP-504HDV /
PDP-434HD / PDP-434HDV / PDP-434BX / PDP434TX 専用のテーブルトップスタンドです。
「据付」について
お客様がご自身で本機の取り付けを困難だと思われる場
合は、販売店にご相談ください。
なお、据え付け、取り付けの不備、誤使用、改造、天災
などによる事故損傷については、弊社は一切責任を負い
ません。
もくじ
取扱上の注意 ................................................................. 2
同梱された部品の確認 ................................................. 3
支柱およびスペーサー使用・不使用一覧...................3
スタンドの組み立てかた ..............................................4
プラズマテレビの取り付けかた ..................................6
前後角度調整機構 ......................................................... 7
ラックなどに設置する場合 .......................................... 8
ケーブル処理のしかた ................................................. 9
転倒防止 ...................................................................... 10
プラズマテレビをスタンドから取り外す場合 ........ 11
その他の機器への取り付けに関しては対応しておりません。
詳しくは、お買い求めの販売店にご相談ください。
指定外のプラズマテレビへの取り付け、改造および
禁止
注意
設置場所について
注意
注意
禁止
禁止
他の用途への使用はしないでください。
取り付けなどに不具合があると転倒などの事故につ
ながり大変危険です。
設置場所にはスタンドとプラズマテレビの質量に十
分耐えられる強度をもつ場所を選定してください。
必ず平坦で安定した場所に設置してください。
屋外や温泉、海辺の近くには設置しないでください。
振動や衝撃の加わるような場所には設置しないでく
ださい。
仕 様..........................................................................11
寸法図..........................................................................11
取扱上の注意
ご注意 安全上の絵表示について
取扱説明書および製品に記されている注意事項には、損害の
レベルや内容を示す絵表示が付けられていることがありま
す。それら絵表示の意味は以下のとおりです。
人が死亡または重傷を負うおそ
警告
注意
警告・注意(気をつけること)
禁止(やってはいけないこと)
れがある内容を示します。
人がけがをしたり財産に損害を
受けるおそれがある内容を示し
ます。
組み立て・設置について
組み立ての手順を守り、指定の箇所はすべて確実に
ねじ止めしてください。
注意
注意
注意
注意
注意
指定を守らないとプラズマテレビ取り付け後に、破
損や転倒など思わぬ事故の原因となることがありま
す。
プラズマテレビの取り付け作業は安全のため、必ず
2 人以上で行ってください。
作業の際には、プラズマテレビと周辺機器の電源を
切り、電源プラグをコンセントから抜いてください。
本製品は左右 10°回転、前後 2°傾斜します。
本製品およびプラズマテレビ回転範囲に物を置か
ないでください。また、通常使用時および本製品
が回転した時に、ラックなどの設置場所から外側
にはみ出さないように設置を行ってください。破
損や転倒など思わぬ事故の原因となることがあり
ます(8 ページ参照)。
転倒による事故防止のため、転倒防止の措置を確
実に行ってください(10 ページ参照)。
Ja
指示・強制(しなければならないこと)
2
Page 3
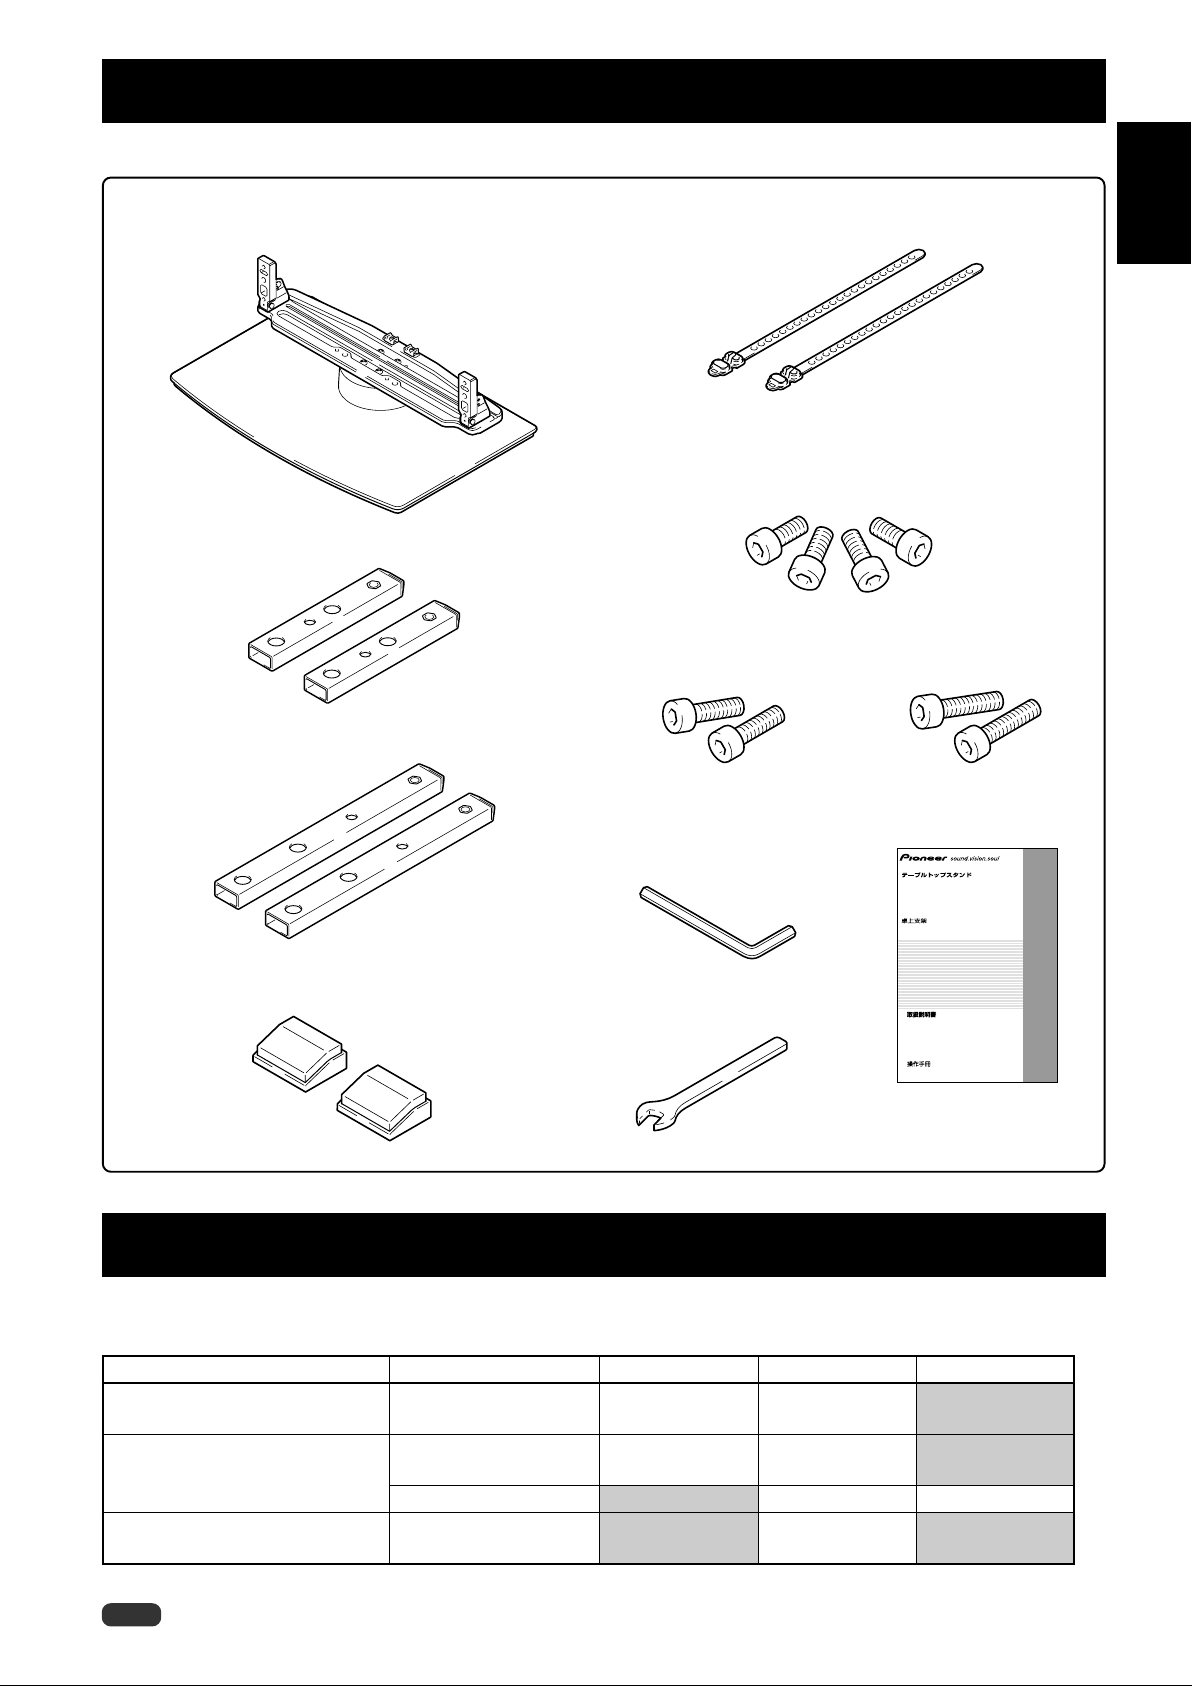
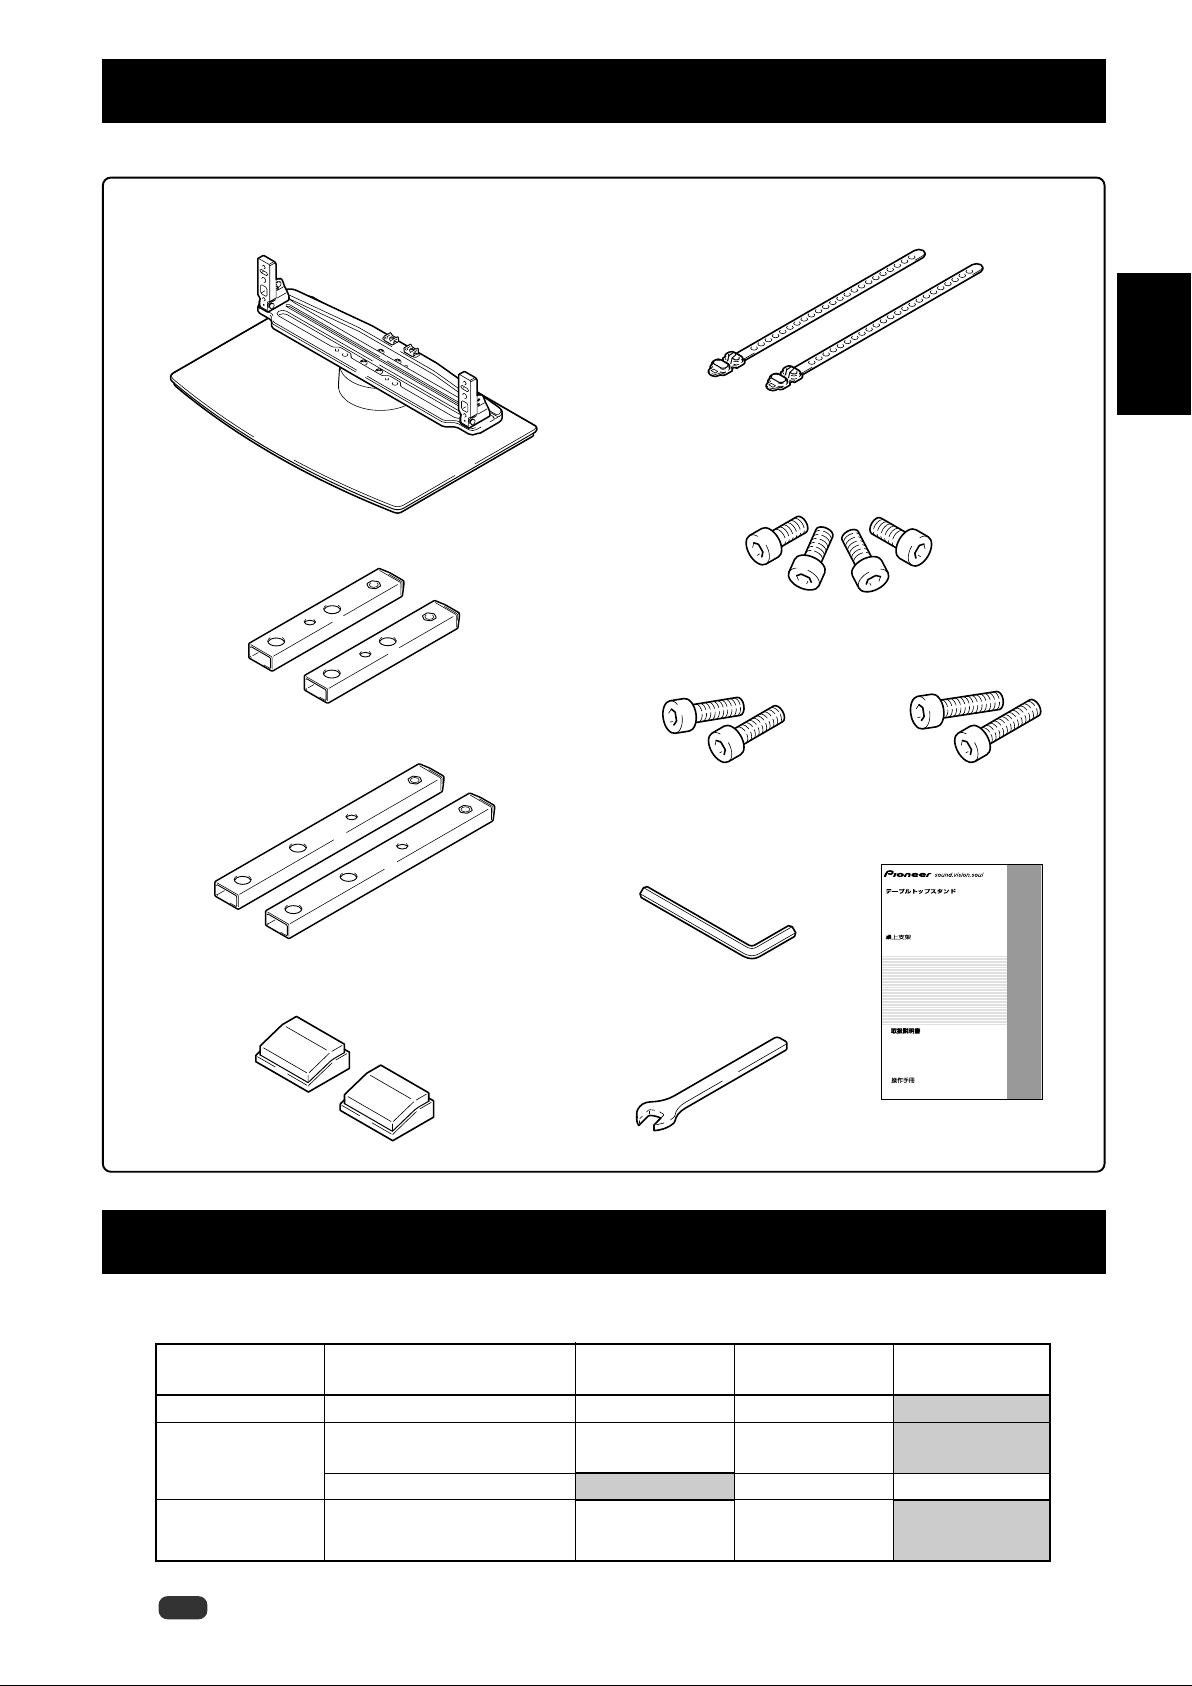
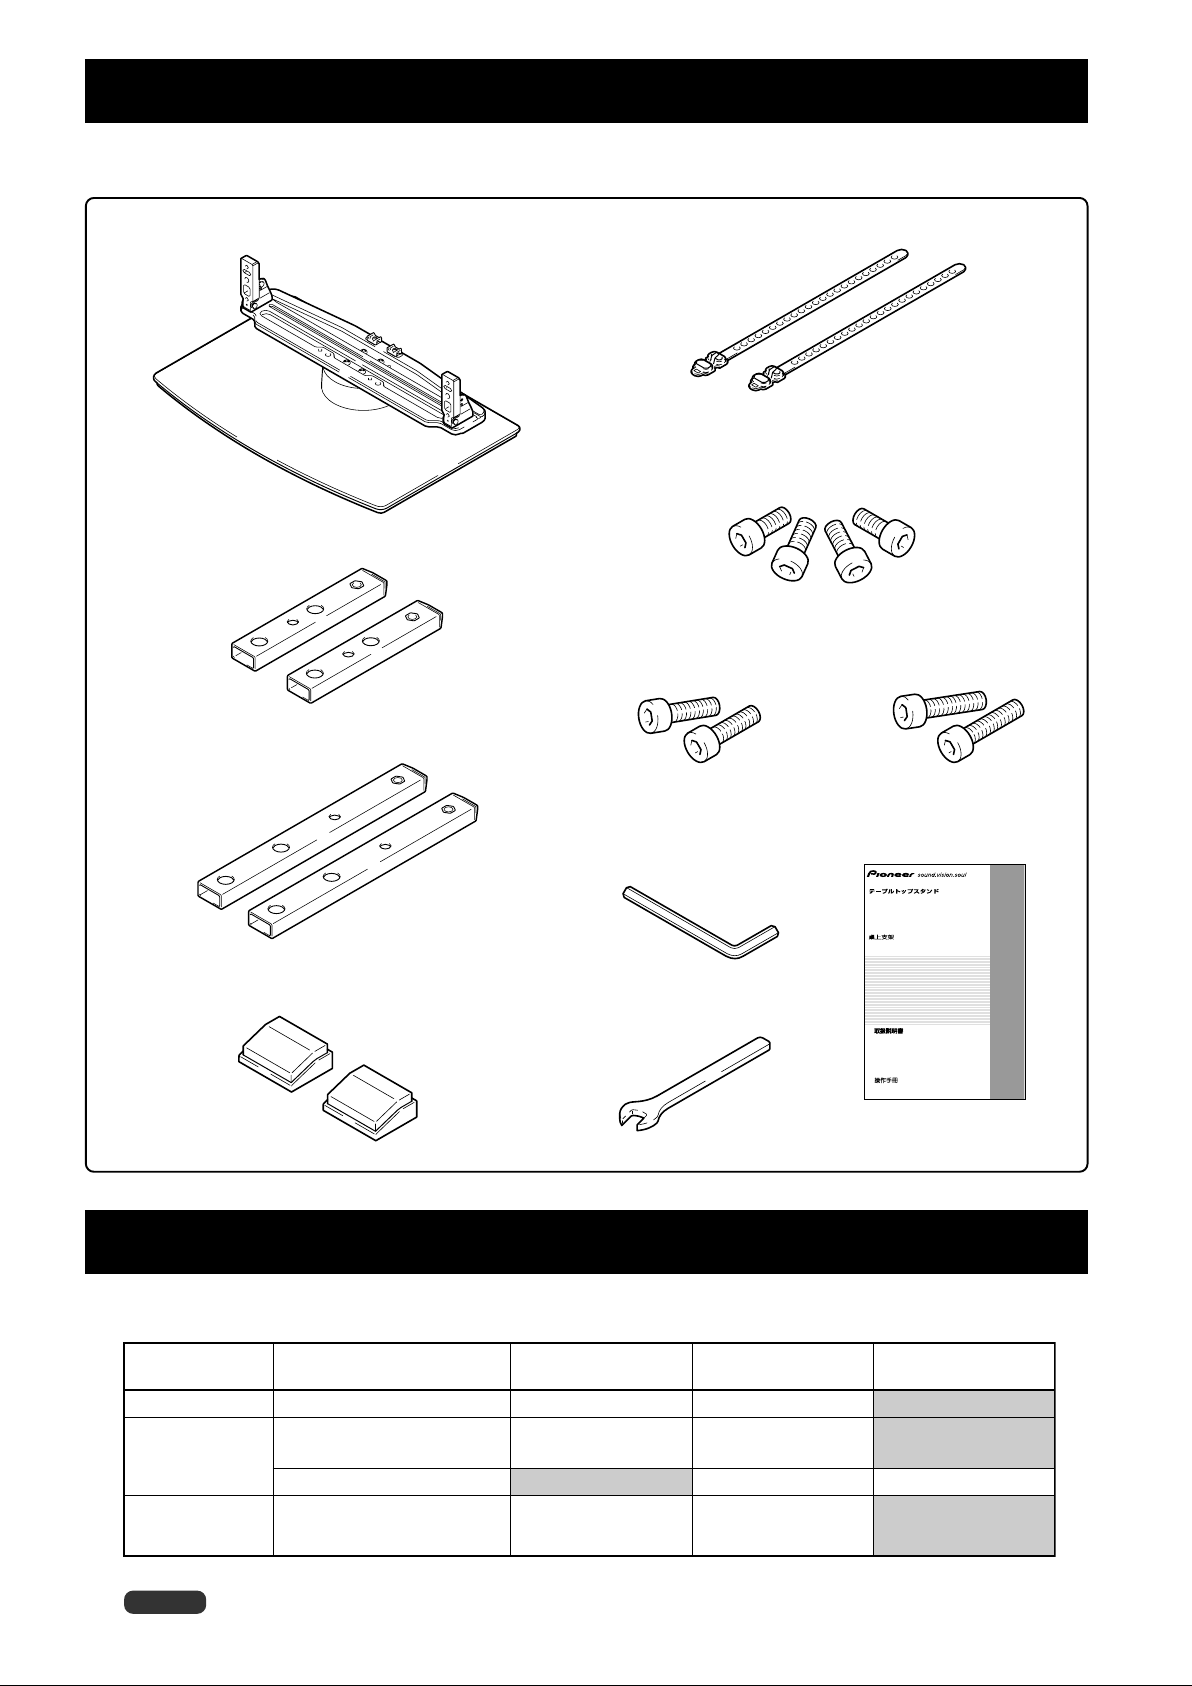
同梱された部品の確認
組み立て・設置の前に同梱された部品を確認してください。
テーブルトップスタンド本体× 1
支柱 S× 2
[短い支柱]
支柱 L×2
[長い支柱]
ケーブルバインダー× 2
取付ねじ 1(M8 × 16mm:シルバー)× 4
[支柱、テーブルトップスタンド本体固定用]
取付ねじ 2
(M8 × 30mm:黒)× 2
取付ねじ 3
(M8 × 40mm:黒)× 2
日本語
六角レンチ× 1
取扱説明書(本書)×1
(対辺寸法: 6mm)
Table top stand
Support de couverture de table
Tischständer
Supporto di tavolo
Tafelbladstaander
Soporte de mesa
PDK-TS05
スペーサー × 2
C レンチ× 1
(10mm)
Operating instructions
Mode d’emploi
Bedienungsanleitung
Istruzioni per l’uso
Gebruiksaanwijzing
Manual de instrucciones
支柱およびスペーサー使用・不使用一覧
本スタンドは、お客様のお買い上げのプラズマテレビ、またはスピーカー取り付け位置によって、使用部品が異なります。下
の表をご覧になって、使用部品を選んでください。
システム型番 スピーカー取り付け位置 支柱 S[短い支柱] 支柱 L[長い支柱] スペーサー
PDP-505HDL/PDP-435HDL
PDP-505HDS/PDP-435HDS/
PDP-504HD/PDP-504HDV/
PDP-434HD/PDP-434HDV
PDP-435SX/PDP-434BX/
PDP-434TX
本体両サイド
(または使用しない)
本体両サイド
(または使用しない)
本体下側 不可
ー 使用します
使用します(推奨)
使用します(推奨)
不可
使用できます*
使用できます*
不可
不可
使用します 使用します
不可
*画面の位置を高く設定するときに使用できます。
ご注意 PDP-505HDLおよびPDP-435HDLではスピーカーをプラズマテレビ下側に取り付けることはできません。
3
Ja
Page 4
スタンドの組み立てかた
ご注意
必ず平坦なテーブルなどの上で取り付けをしてください。
ねじは穴に対して垂直に挿入し、必要以上に強く締めつけないで
ください。
組み立て手順
1 取り付ける支柱を選定する
下記を参照してお客様のお買い上げになったプラズマテレ
ビの種類や、スピーカーの設定に応じた支柱を選んでくだ
さい(2 種類のうち、1 種類を使います)。
お客様のお買い上げのプラズマテレビが
PDP-505HDL / PDP-435HDLの場合
【使用する支柱:支柱 S(短い支柱)】
使用する支柱:支柱 S
本体下側にスピーカーを取り付ける場合
【使用する支柱:支柱 L(長い支柱)】
使用する支柱:支柱 L
お客様のお買い上げのプラズマテレビが
PDP-435SX / PDP-434BX / PDP-434TX
の場合
お客様のお買い上げのプラズマテレビが
PDP-505HDS / PDP-435HDS / PDP-504HD /
PDP-504HDV/ PDP-434HD / PDP-434HDV
の場合
本体両サイドにスピーカーを取り付ける場合
【使用する支柱:支柱 S(短い支柱)】
使用する支柱:支柱 S
【使用する支柱:支柱 L(長い支柱)】
支柱 S(短い支柱)は使用できません。
使用する支柱:支柱 L
Ja
4
Page 5
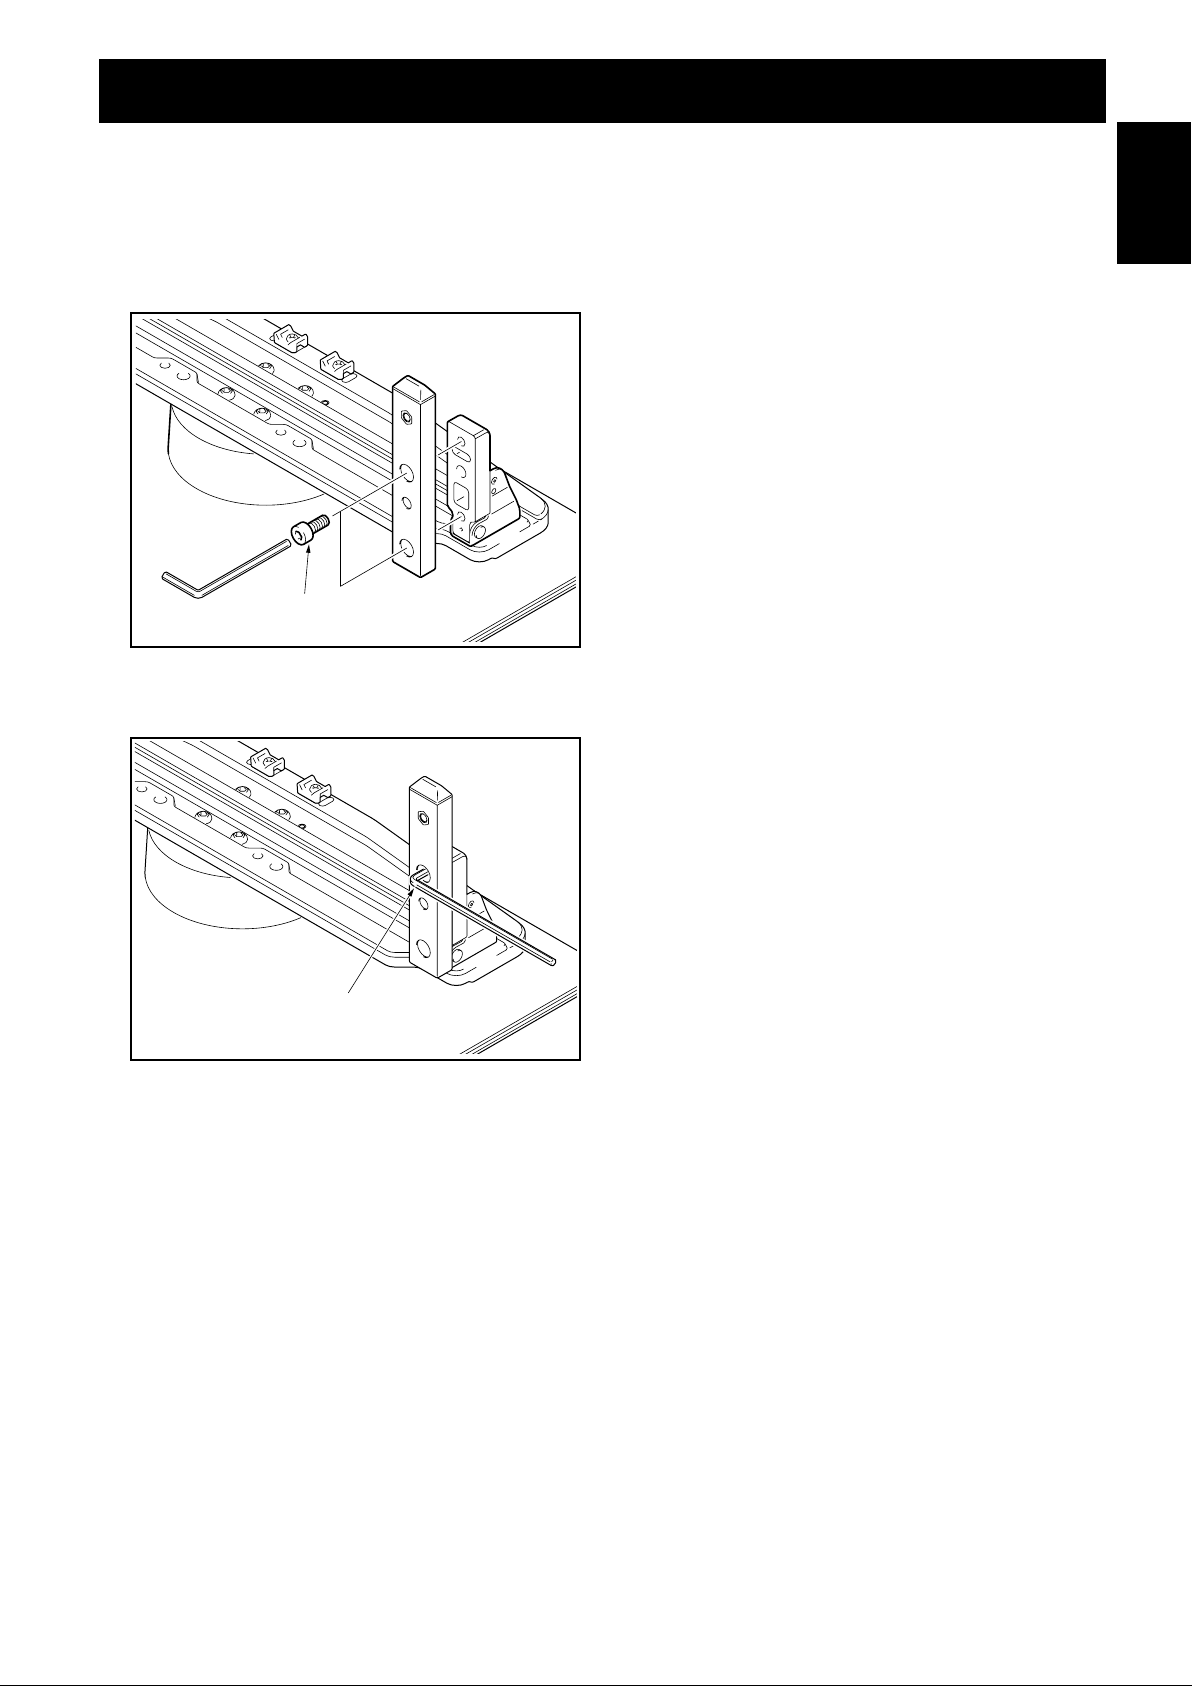
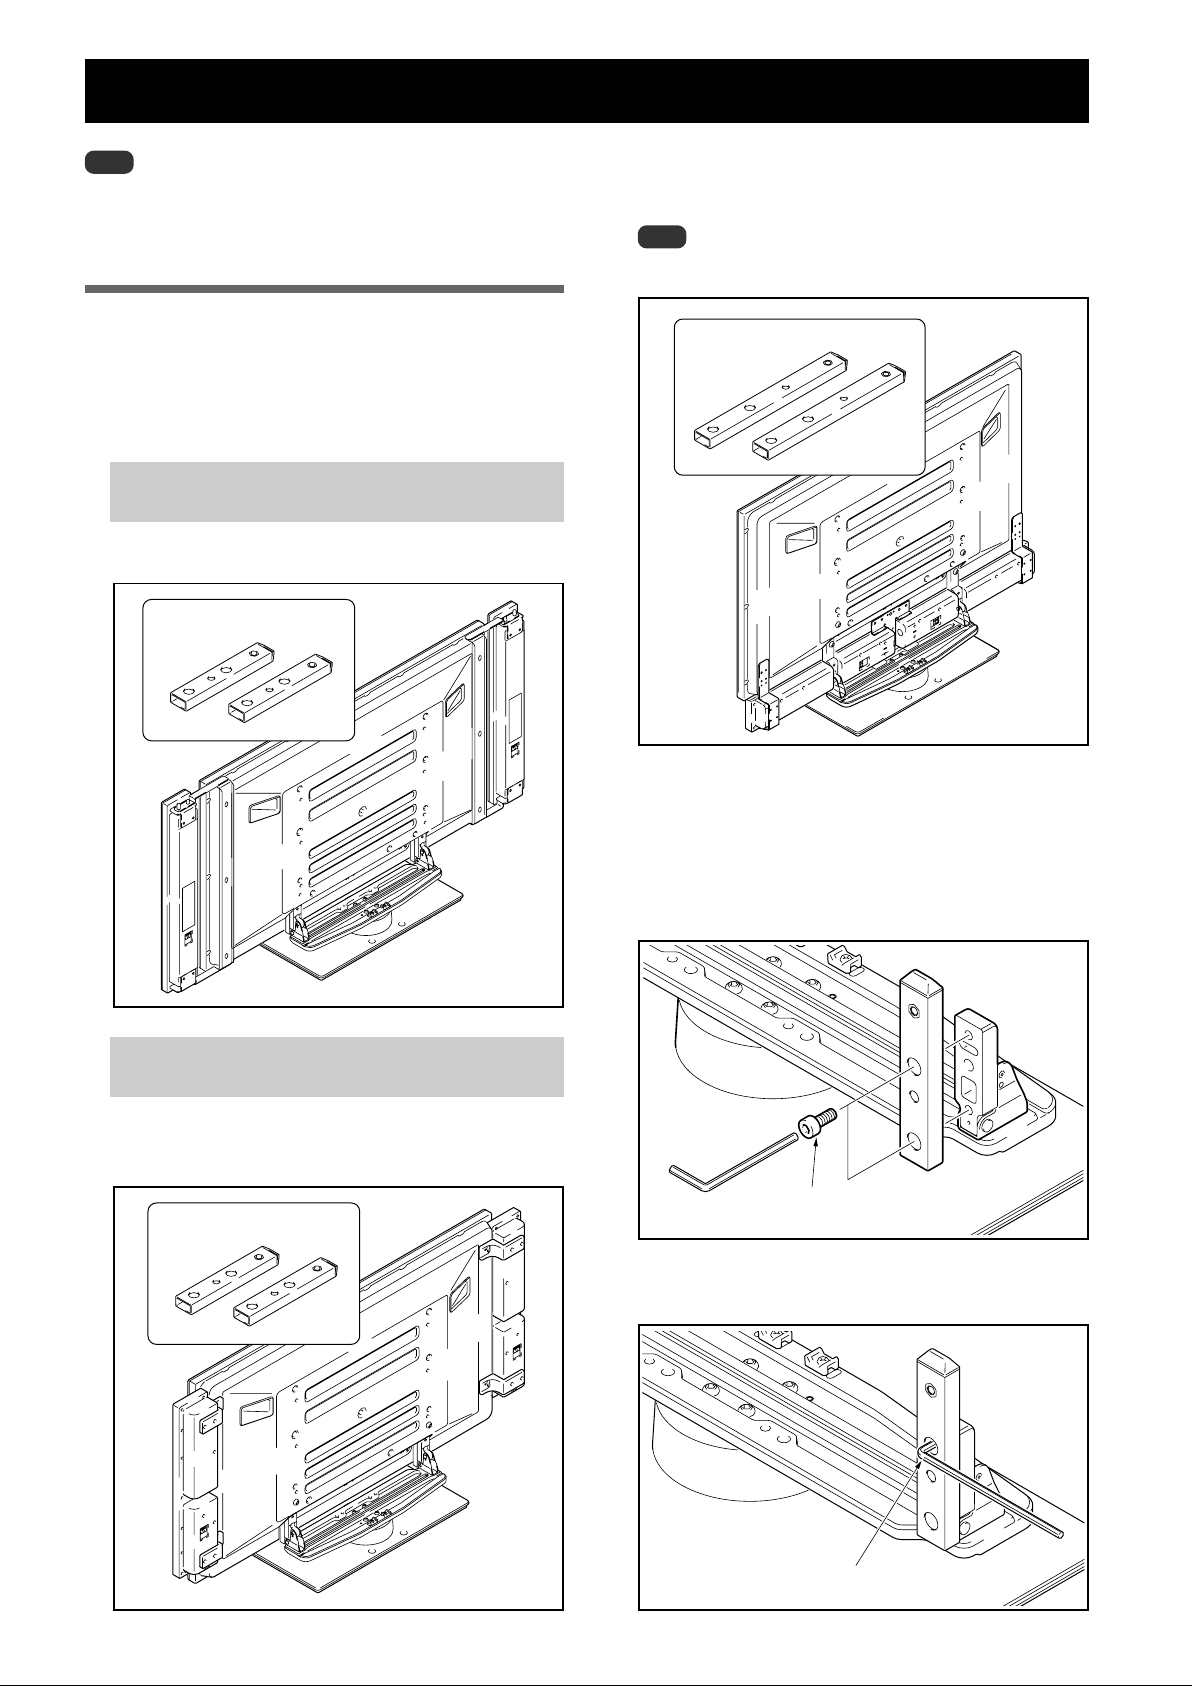
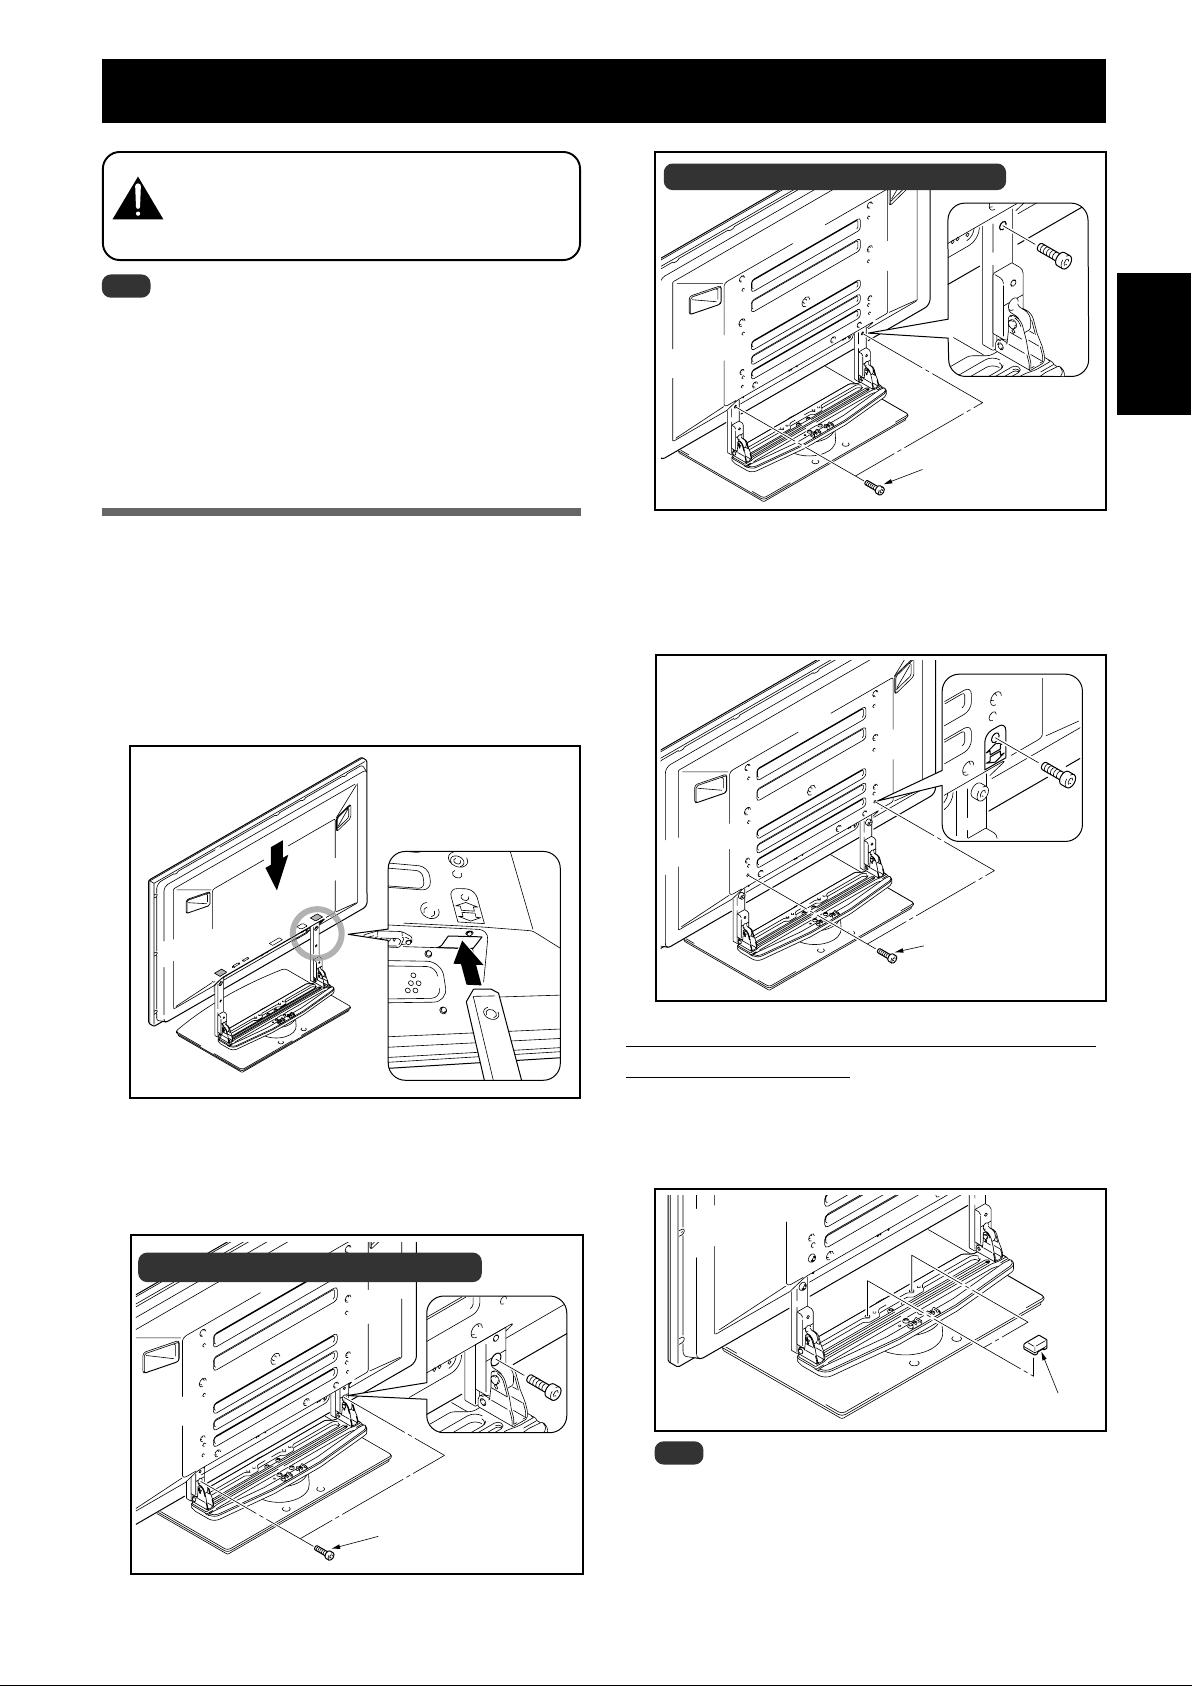
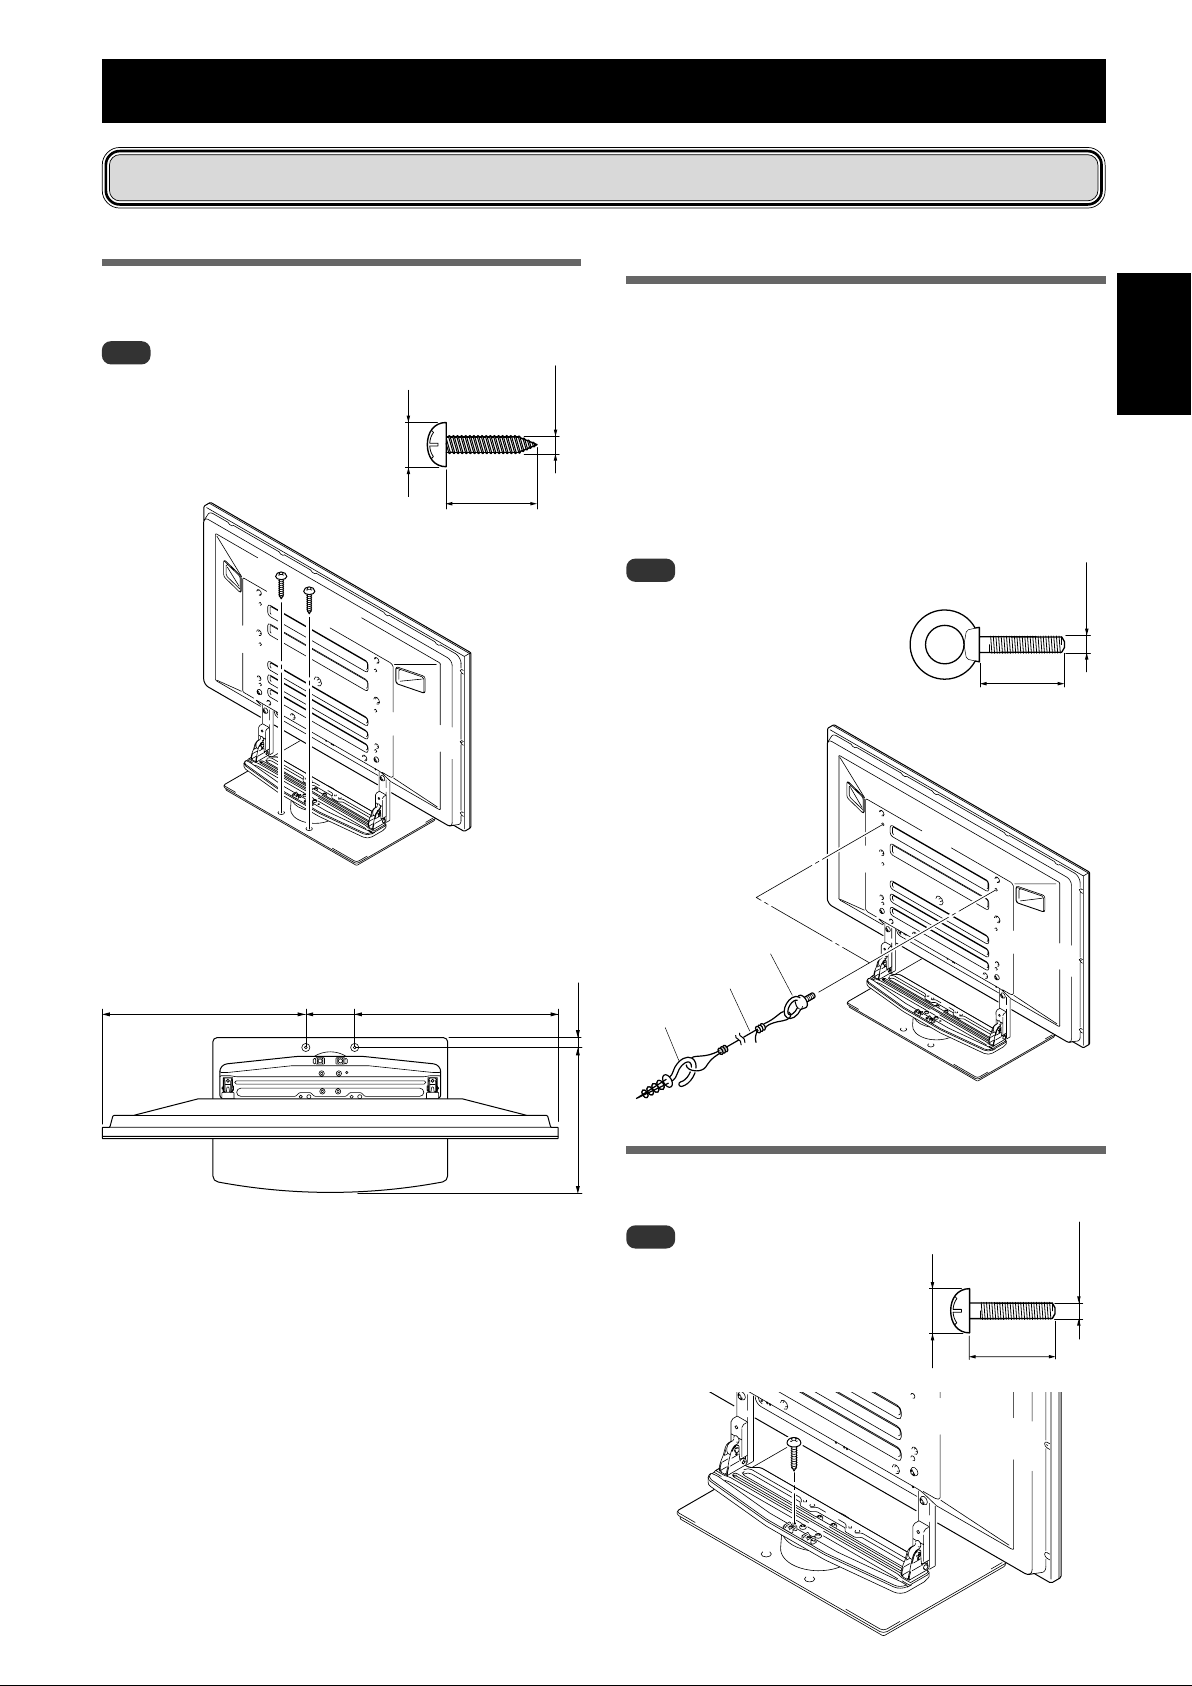
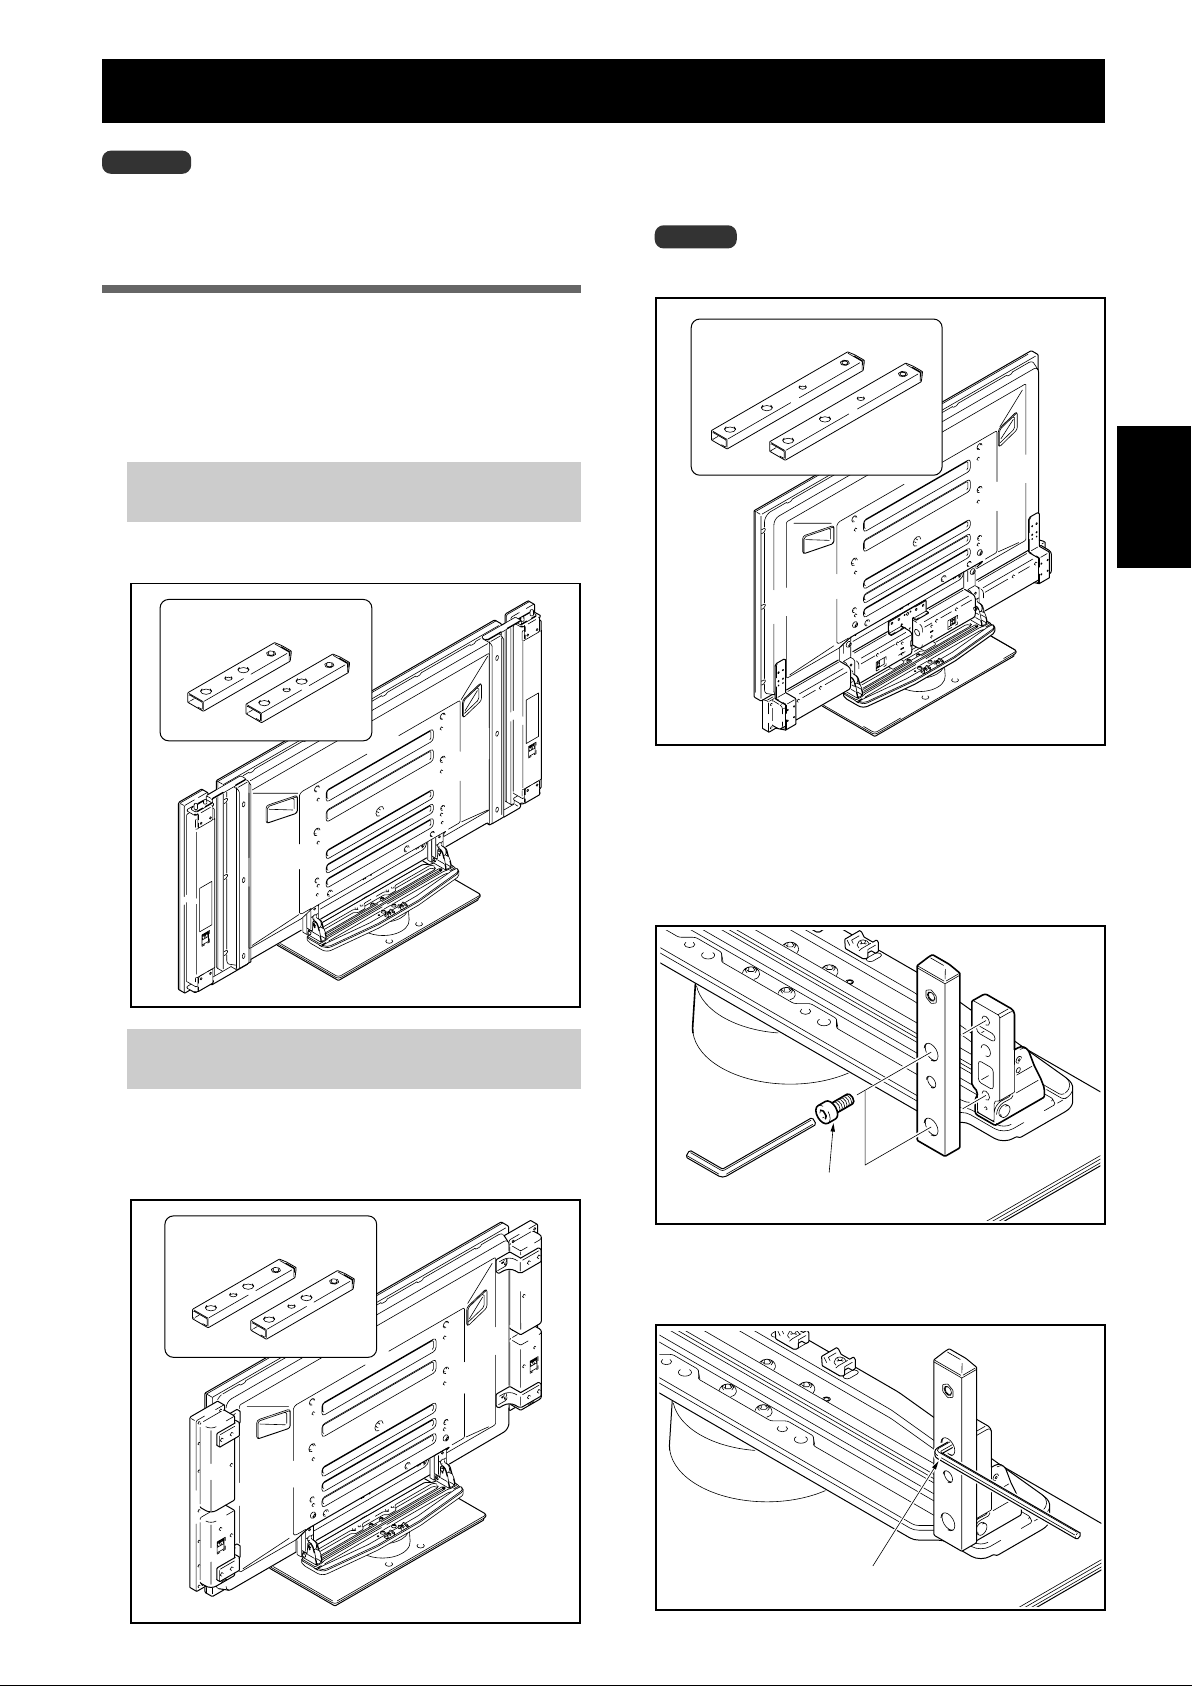
2 支柱とスタンドを取付ねじ 1 で固定する(左
右 4 カ所)
付属の六角レンチを使用して、はじめに上側の取付ね
じを仮止めし、その後、下側の取付ねじを仮止めして
ください。
取付ねじ 1
(M8 × 16mm:シルバー)
スタンドの組み立てかた
日本語
3 取り付けたねじを増し締めする(左右4 ケ所)
取り付けたねじを増し締めする
5
Ja
Page 6
プラズマテレビの取り付けかた
プラズマテレビは質量が50型モデルで約40kg、43型
モデルで約30kgあり、奥行きがなく不安定なため、取
注意
り付けおよび設置は必ず 2 人以上で行ってください。
ご注意
必ず平坦で安定した場所で取り付けをしてください。
ねじは穴に対して垂直に挿入し、必要以上に強く締めつけないで
ください。
『スタンドの組み立てかた』の手順を参照して、お客様のお買い上
げになったプラズマテレビの種類やスピーカーの設定に応じた支柱
が確実に取り付いていることを確認してください。
取り付け手順
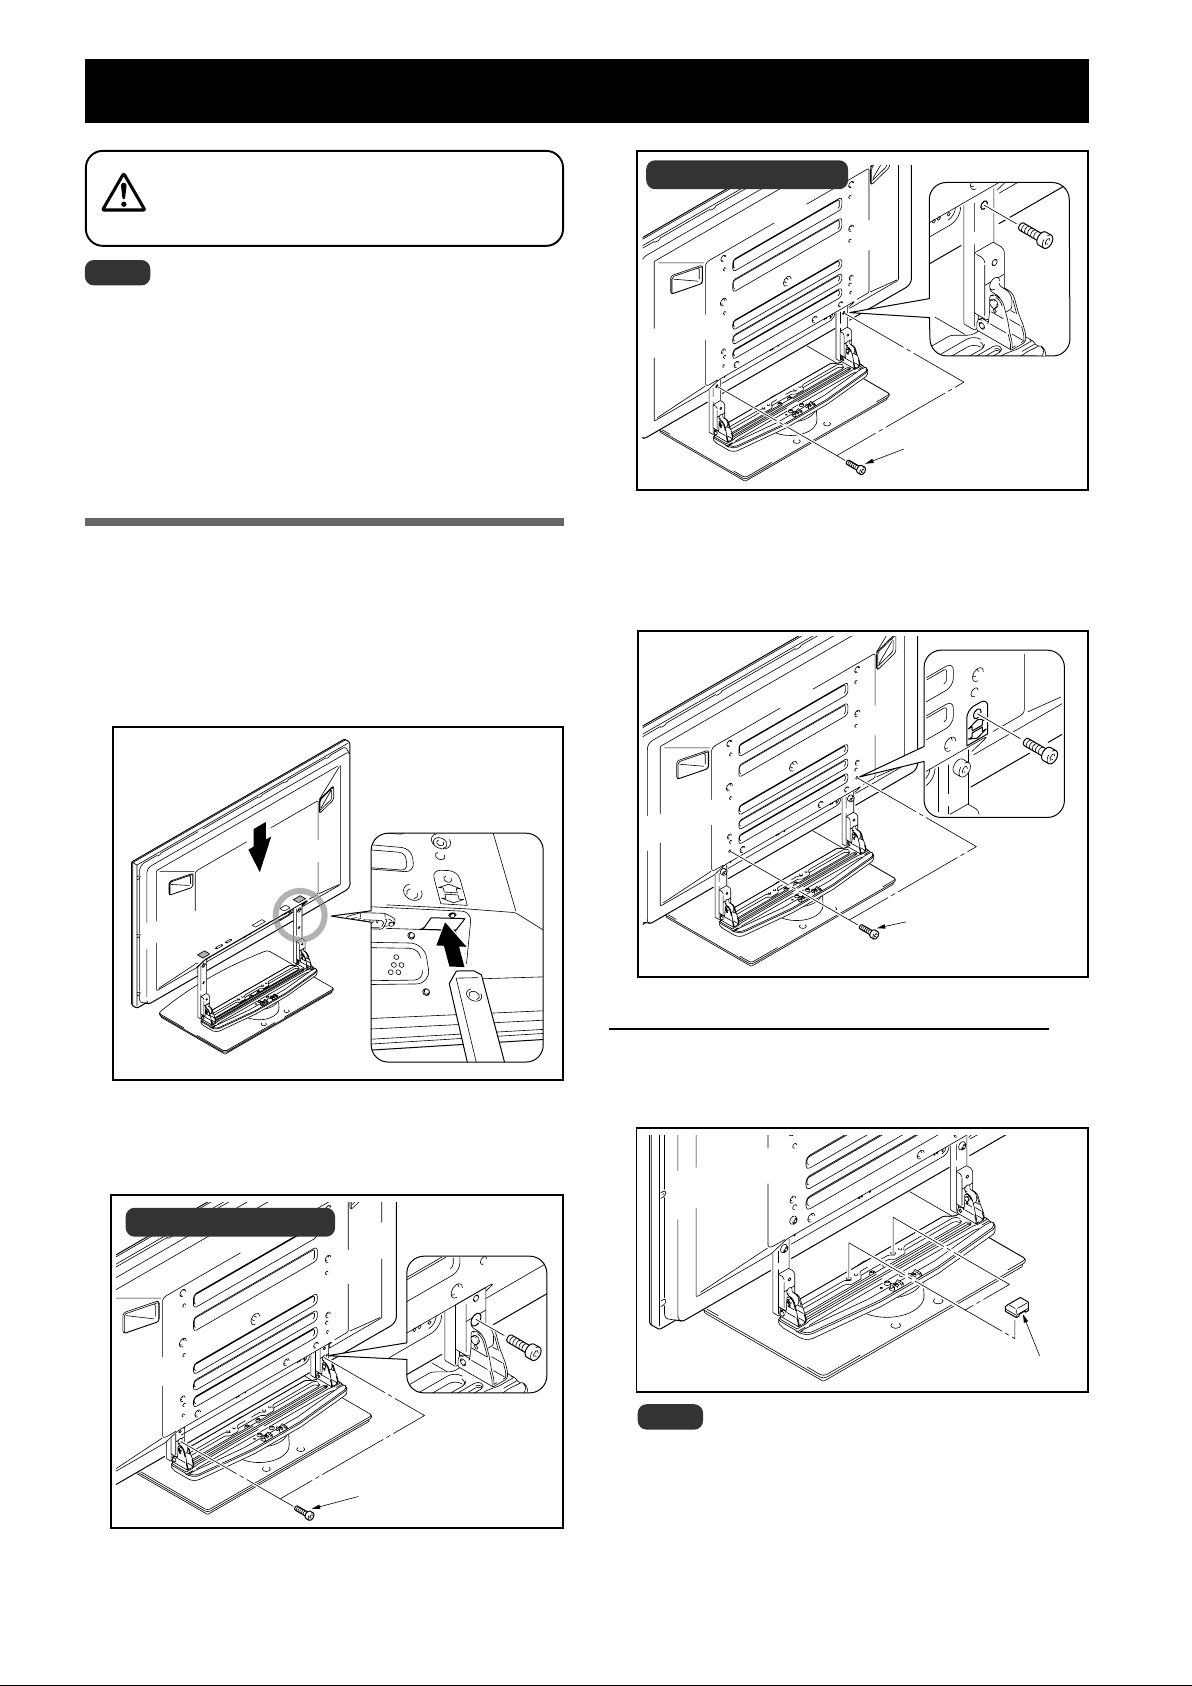
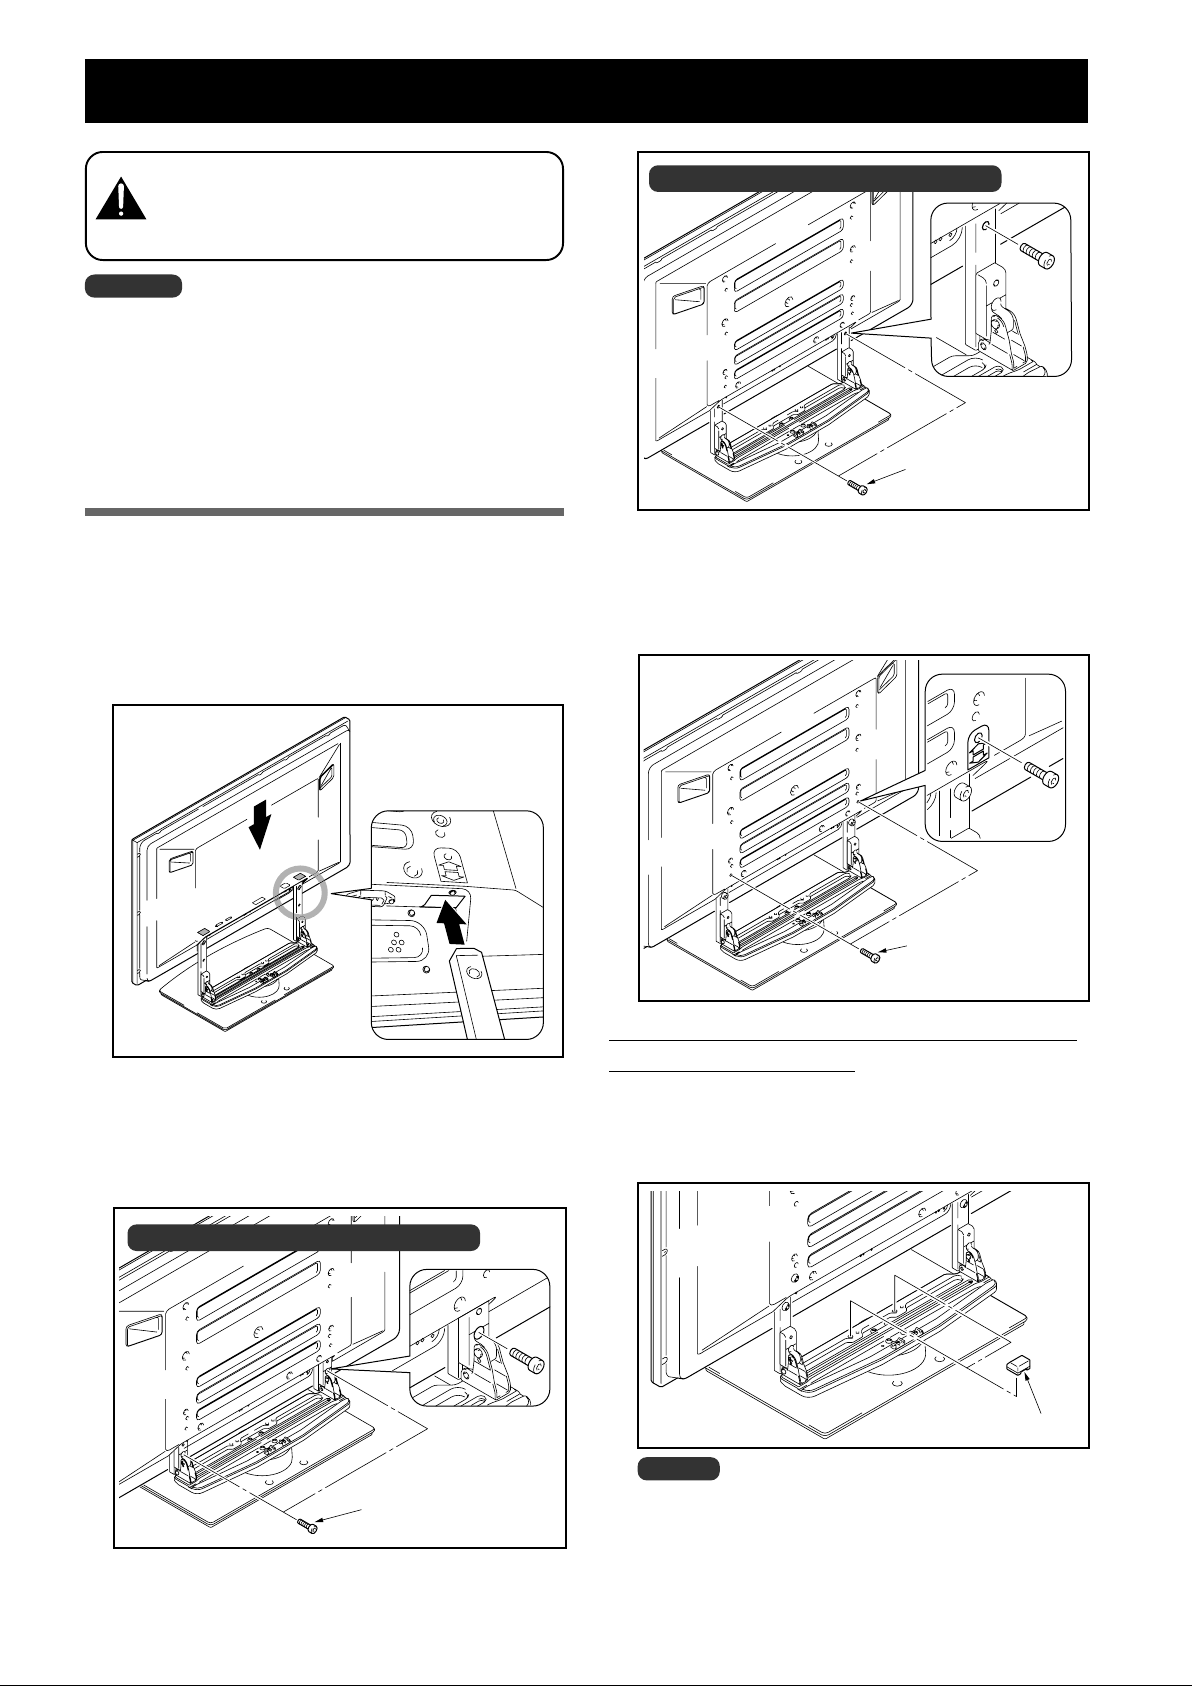
1 プラズマテレビをスタンドに取り付ける
プラズマテレビの下側矢印にスタンドの支柱を合わせて、
垂直にゆっくり挿入してください。スタンドの支柱をプラ
ズマテレビのスタンド挿入口以外の部分に当てないように
注意してください。本体裏面や端子にキズを付けたり、変
形させる危険があります。
イラスト:支柱L使用時
2
取付ねじ
(M8 × 30mm:黒)
3 取付ねじ 3 でプラズマテレビを固定する
付属の六角レンチを使用して、本体矢印部を固定してく
ださい。
プラズマテレビ下部と支柱を
図のように合わせる
2 取付ねじ 2 でプラズマテレビを固定する
付属の六角レンチを使用して固定してください。
イラスト:支柱 S 使用時
3
取付ねじ
(M8 × 40mm:黒)
本体下側にスピーカーを取り付ける場合のみ
4 スペーサーをはめ込む
スペーサーをスタンド回転台上の穴にはめ込みます。
スペーサー
Ja
ご注意
両サイドにスピーカーを取り付ける場合、またはお買い上げの
取付ねじ 2
(M8 × 30mm:黒)
プラズマテレビが PDP-435SX/PDP-434BX/PDP434TX の場合、スペーサーは使用しないでください。
5 スピーカーを取り付ける
スピーカーの取り付け手順は、プラズマテレビに付属さ
6
れている取扱説明書を参照してください。
Page 7
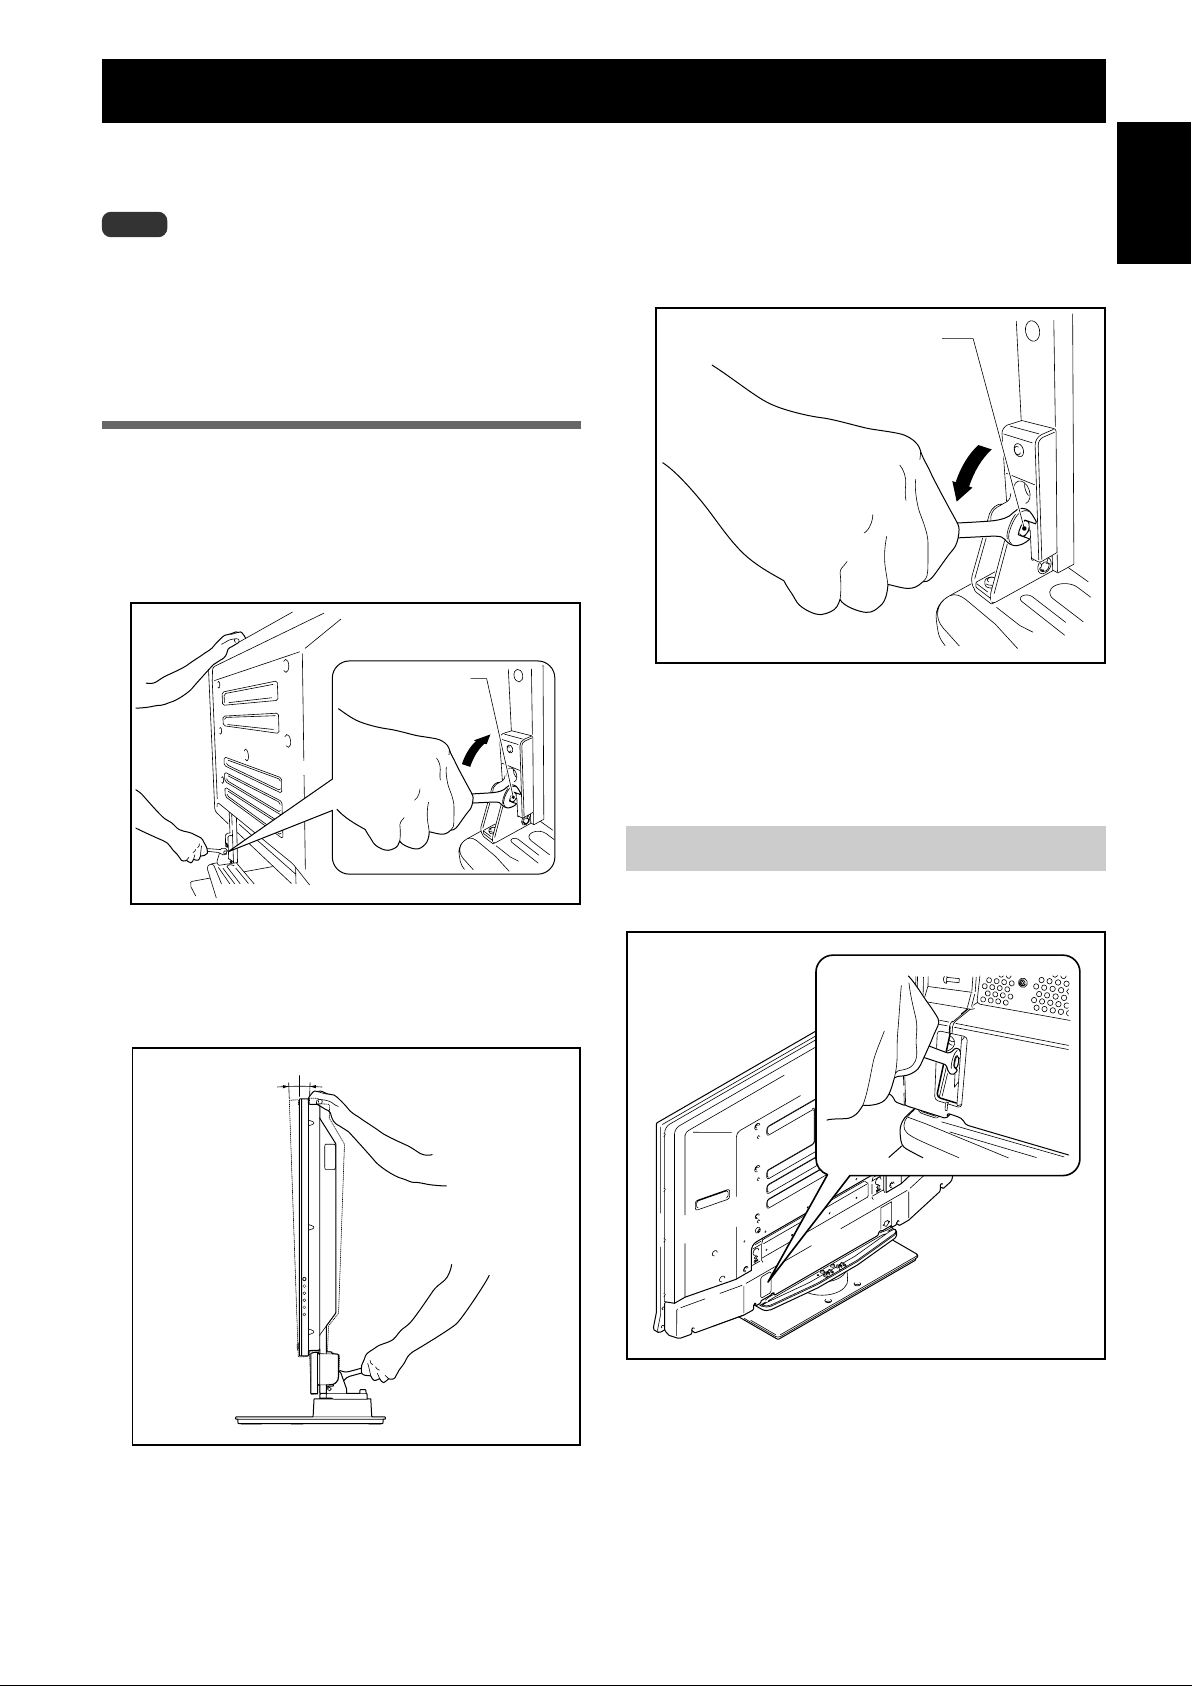
前後角度調整機構
本スタンドはお客様のお好みに合わせて、前後2°の範囲で
傾きを調整することができます。
ご注意
角度調整は必ずプラズマテレビを設置した後で
行ってください。
必ず平坦なテーブルなどの上で行ってください。
角度調整中は必ず本体上部を手で押さえてください。
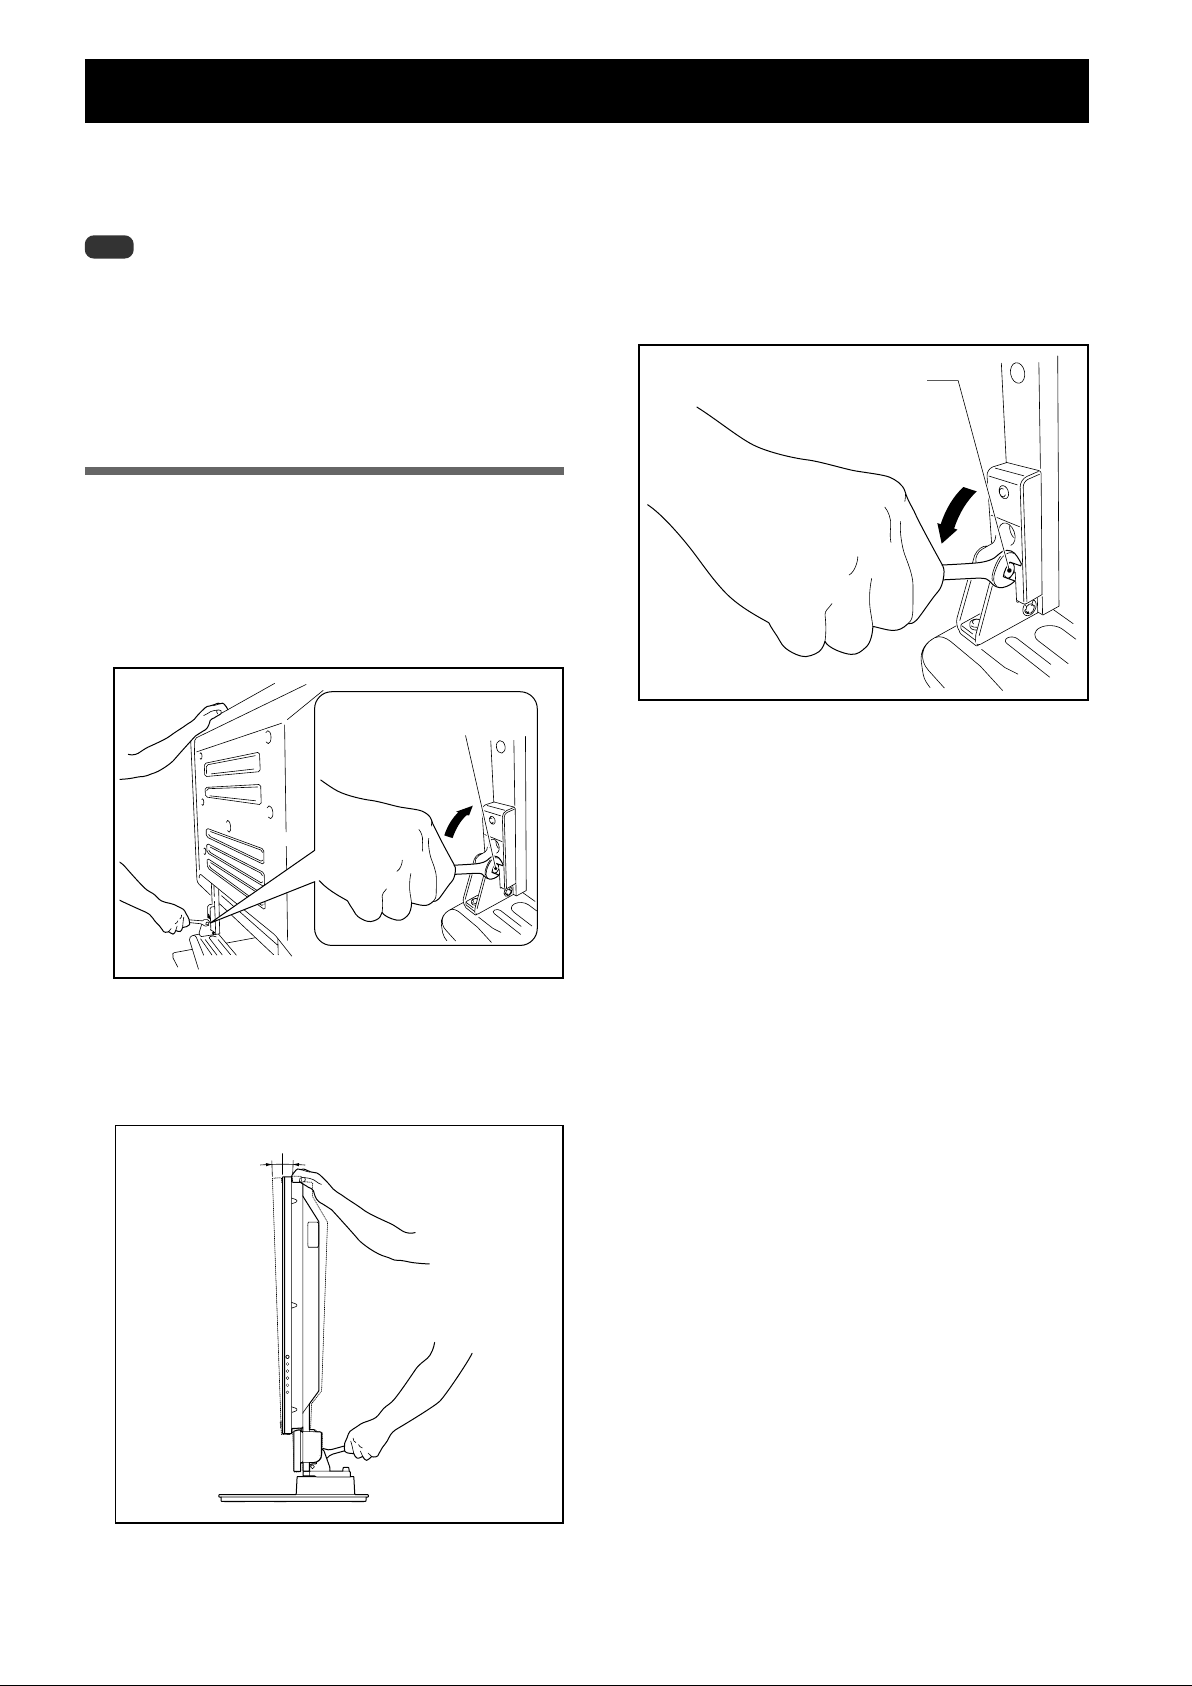
調整手順
1 前後傾き固定ボルトを付属の C レンチでゆる
める
必ず本体上部を手で押さえながら、左右の前後傾き固定
ボルトを付属の C レンチで上方向にまわし、ゆるめてく
ださい。
前後傾き固定ボルト
ゆるめる
3 前後傾き固定ボルトを締める
左右の前後傾き固定ボルトを付属の C レンチで下方向に
まわし、しっかり締めつけてください。
完全に締めつけるまで、本体上部を手で押さえてくだ
さい。
前後傾き固定ボルト
締める
4 前後傾き固定ボルトがしっかりと締めつけられ
ているか、再度確認してください
日本語
2 お好みの角度に合わせる
プラズマテレビをゆっくり動かし、お好みの角度に合わ
せてください。
2˚
2˚
お買い上げのプラズマテレビが PDP-435SX の場合
本体開口部から同様に角度調整が可能です。
7
Ja
Page 8
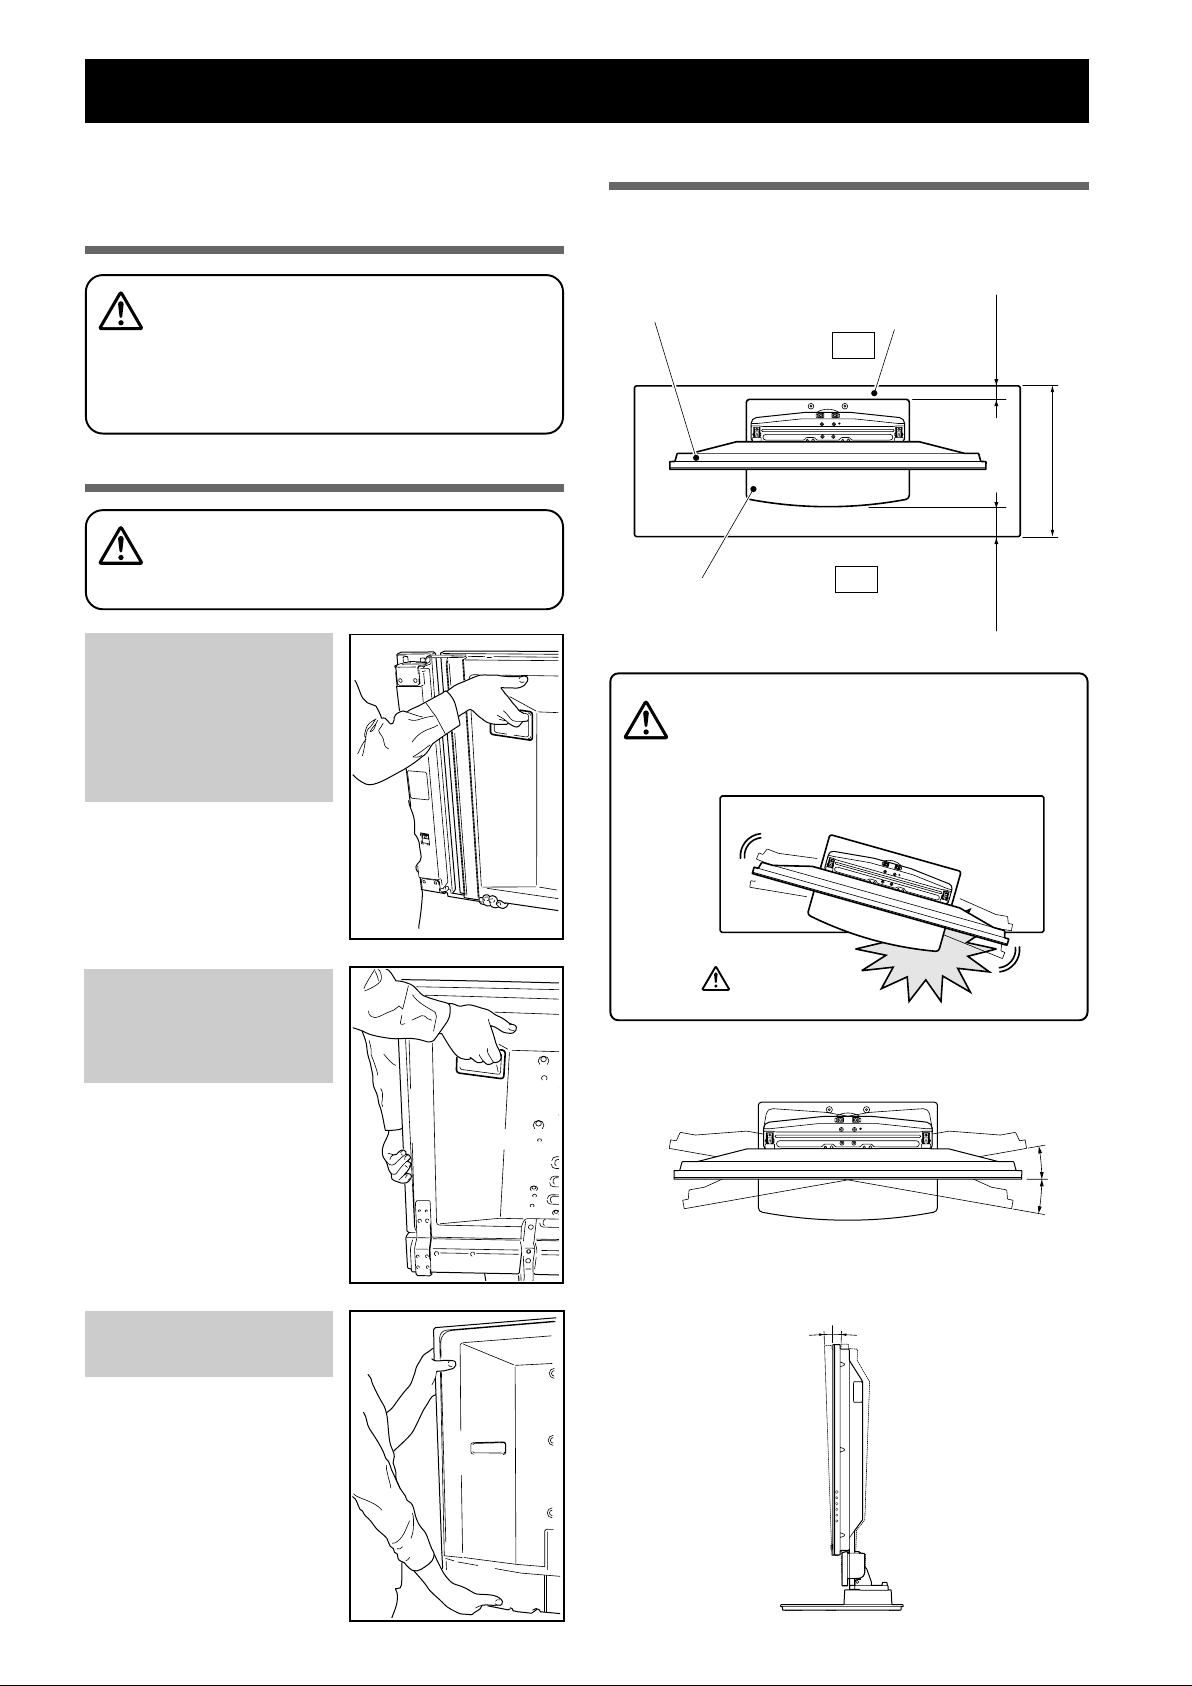
ラックなどに設置する場合
プラズマテレビを取り付けた本製品をラックなどに移動、設
置する場合は、下記の点にご注意ください。
移動時のご注意
数メートルを超える移動をする際は、先にスピーカー
を取り外し、次にプラズマテレビ本体もスタンドから
注意
取り外し、別々に移動してください。
プラズマテレビをスタンドから取り外す場合は、事故を
防止するために「プラズマテレビをスタンドから取り外
す場合」(11 ページ)の手順を必ず守ってください。
ラックなどに設置する際のご注意
ラックなどに設置する際は、プラズマテレビの下部と裏
側の取っ手を持ってください。スピーカーを持つと変
注意
形、破損の原因となります。
プラズマテレビ
PDP-505HDL / PDP-505HDS
PDP-435HDL / PDP-435HDS
PDP-504HD / PDP-504HDV
の両サイドにスピーカーを設
置する場合
設置上のご注意
テーブルトップスタンドの前側および後側は、必ず下図の指
示以上のスペースを確保して設置してください。
プラズマテレビ
テーブルトップスタンド
スタンドがラックからはみ出すと、破損や転倒など思
わぬ事故の原因となります。
回転させる時は、周囲の壁や物に注意してゆっくり動
注意
かしてください。
後側
前側
ラック
10mm 以上
30mm 以上
ラック奥行き寸法
420mm 以上推奨
プラズマテレビの下部と取っ
手を持ってください。
プラズマテレビ
PDP-505HDS / PDP-435HDS
の下側にスピーカーを設置す
る場合
プラズマテレビ本体の横と
取っ手を持ってください。
プラズマテレビ
PDP-435SX
の場合
本モデルには取っ手がありま
せん。
プラズマテレビ本体の横と下
部を持ってください。
はみ出すと危険です。
回転角度調整範囲
前後傾き調整範囲
10˚
10˚
2˚
2˚
Ja
8
Page 9
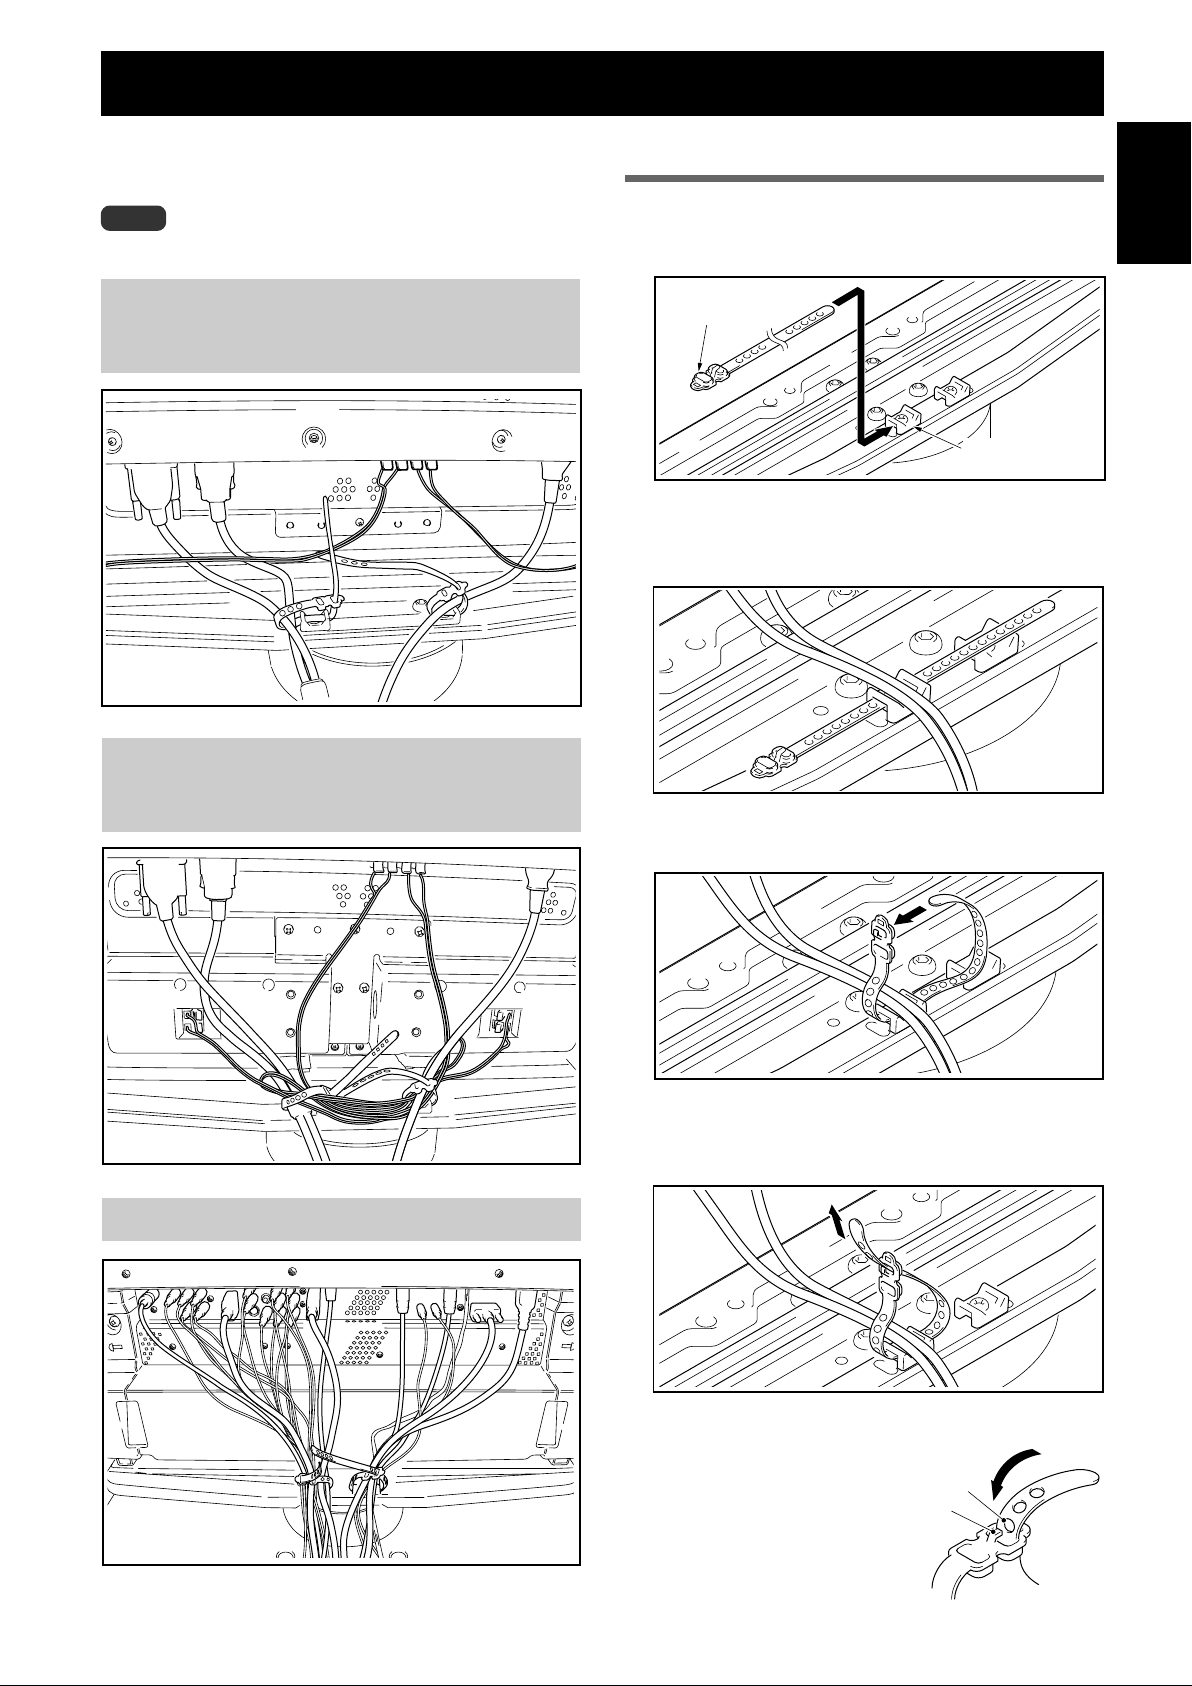
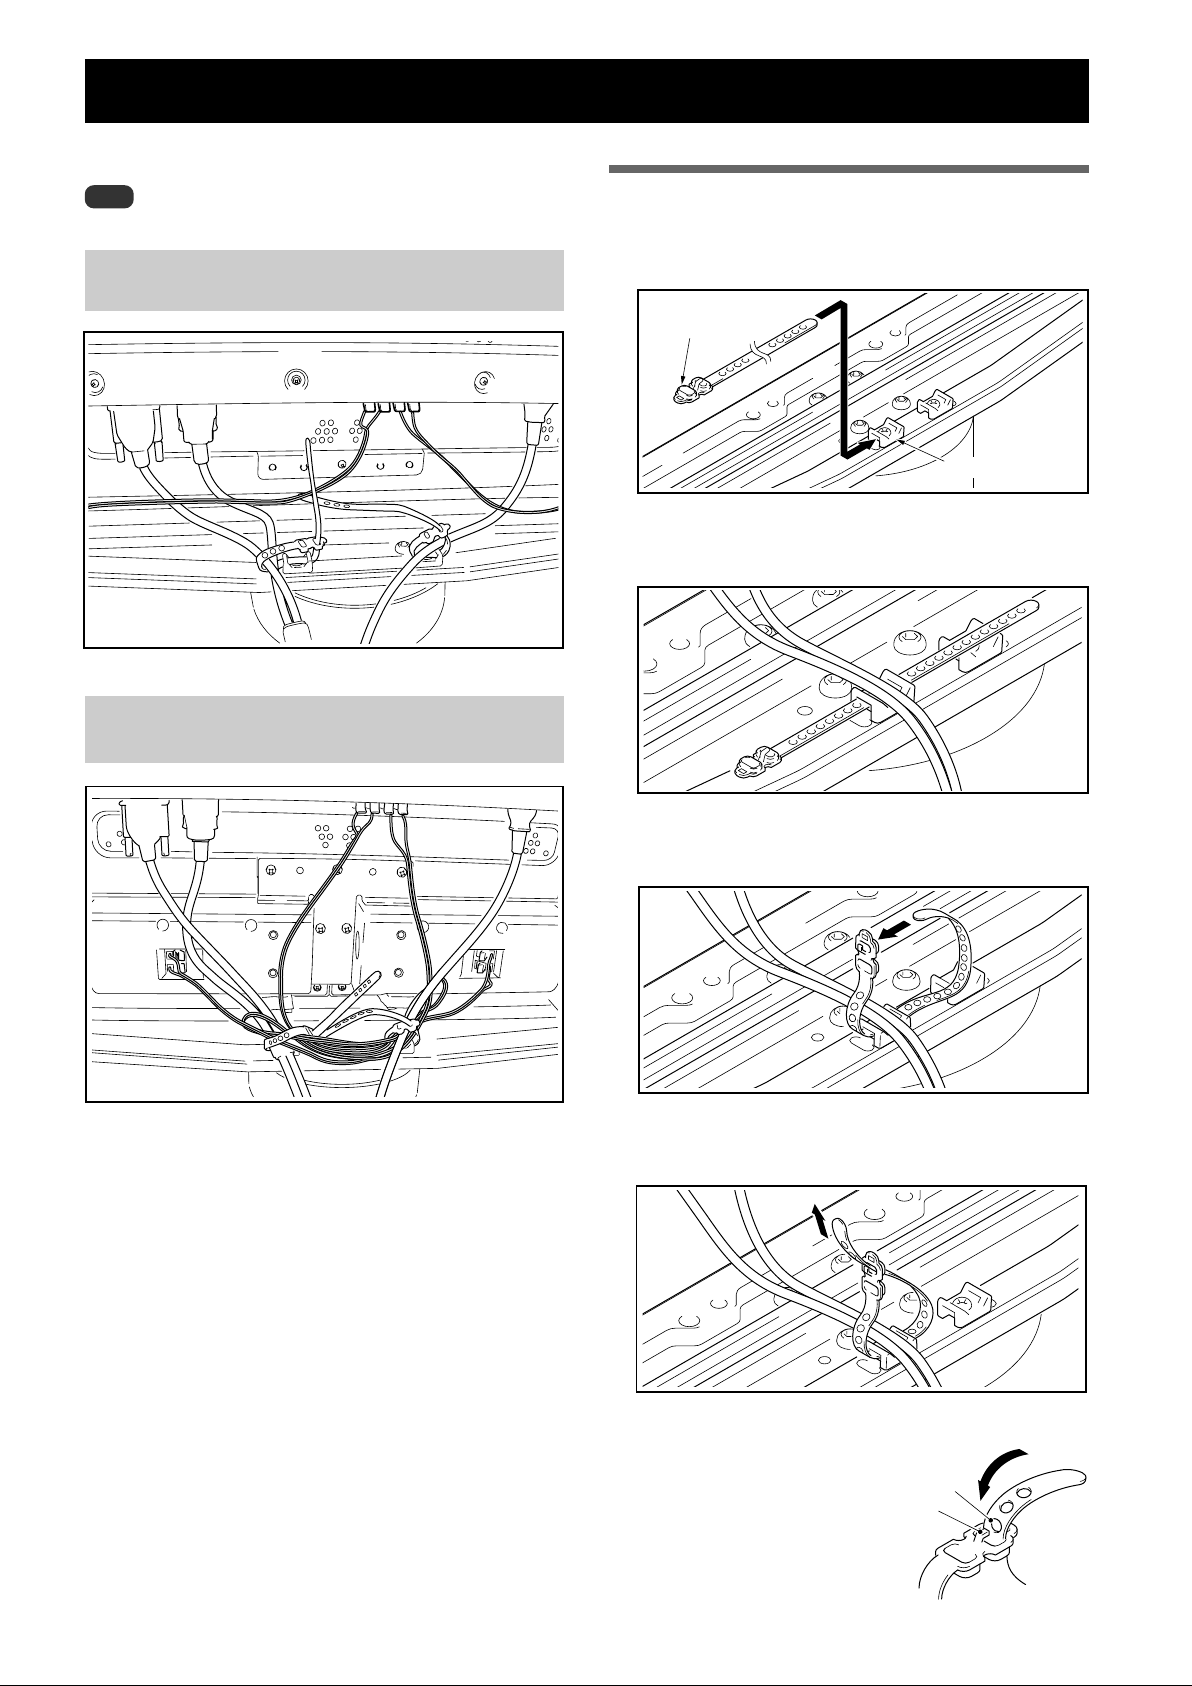
ケーブル処理のしかた
付属のケーブルバインダーを使用して、ケーブル類をまとめ
てください。
ご注意
ケーブルの根元に力が加わらないように注意してください。
プラズマテレビ
PDP-505HDL/PDP-505HDS/PDP-435HDL/
PDP-435HDSの両サイドにスピーカーを設置する場合
ケーブルバインダーの使いかた
1 スタンドの回転台上のケーブルバインダーホル
ダーにケーブルバインダーを通す
ケーブルバインダー
ケーブルバインダー
ホルダー
2 ケーブル類をまとめて、ケーブルバインダー上
に置く
日本語
プラズマテレビ
PDP-505HDS/PDP-435HDSの下側にスピーカー
を設置する場合
プラズマテレビPDP-435SX の場合
3 ケーブルバインダーの先端を穴に通す
4 ケーブルバインダーの先端をひっぱり、ケーブ
ルを固定する
ケーブルバインダーの外しかた
ケーブルバインダーの穴から固定
部を外すとロックが外れます。
穴
固定部
9
Ja
Page 10
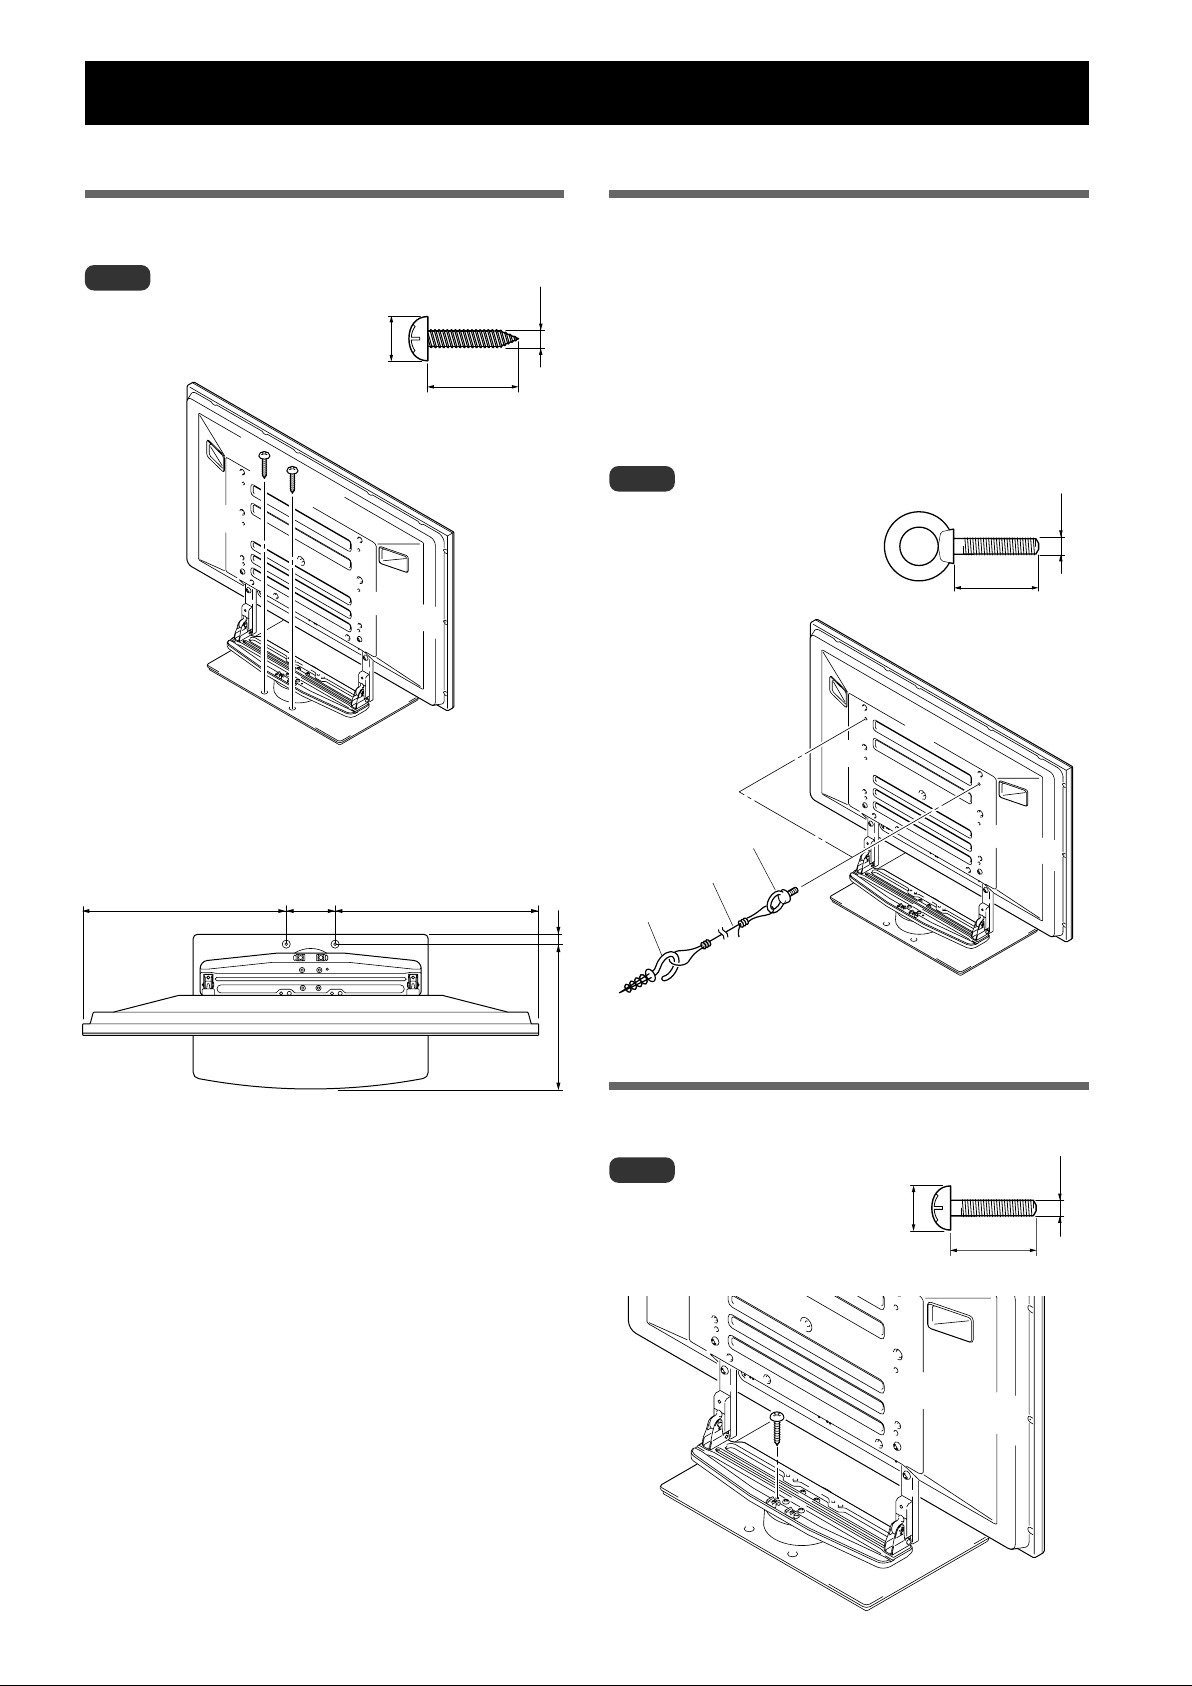
転倒防止(設置後は転倒防止の備えを必ず行ってください)
床に固定する方法
市販のねじを使って図のように固定してください。
ご注意
床に固定する際のねじは、呼び径M6、
長さ 20mm 以上のものを使用して
ください。
9〜15mm
20mm以上
6mm
壁を利用する方法(イラストは 43 型です)
1 プラズマテレビに転倒防止用ボルト(フック)
を取り付ける
2 壁、柱などの堅牢部に、丈夫なヒモまたはくさ
りでしっかりと固定する
左右対称に同様の作業を行ってください。
ヒモまたはくさりは、スタンド回転分の余裕をもって
長さを設定してください。
ご注意
フック、ヒモまたはくさり、取り付
け具は市販品をご使用ください。
推奨フック: 呼び径 M8、
長さ 12 〜 15mm
12〜15mm
8mm
床固定ねじ取付位置(下図はスピーカーなし)
単位:mm
575(PDP-505HDL / PDP-505HDS)
500(PDP-435HDL / PDP-435HDS)
554(PDP-435SX)
575(PDP-505HDL / PDP-505HDS)
500(PDP-435HDL / PDP-435HDS)
120
554(PDP-435SX)
1 フック
2 ヒモまたはくさり
24
356
取付具
回転を正面で固定する方法
市販のねじを使って図のように固定してください。
ご注意
回転を正面で固定する際のねじは、
呼び径 M4、長さ 15 〜 20mm の
ものを使用してください。
7〜12mm
15〜20mm
4mm
10
Ja
Page 11
プラズマテレビをスタンドから取り外す場合
プラズマテレビをスタンドから取り外す場合は、事故を
防止するために以下の手順を必ず守ってください。
注意
1 始めに、前後傾き固定ボルトが確実に締まって
いることを確認する。
2 あらかじめ平らな床などにプラズマテレビを寝
かせるスペースを作り、キズおよび破損が生じ
4「プラズマテレビの取り付けかた」(6 ページ)
の手順 2、3を参照し、黒色のねじ(4 本)を
外す。
ご注意
シルバーのねじは外さないでください。支柱が外れて転倒する
危険があります。
5 プラズマテレビの下側と取っ手を持って、ゆっ
くり垂直に持ち上げる。
ないようにシートを敷く。
6 手順2で用意したシートの上に、画面を下側に
3 スピーカーを取り外す。
して静かに置く。
ご注意
再度プラズマテレビをスタンドに取り付ける場合は、左右の支
柱が同じ傾き設定であることを確認してください。
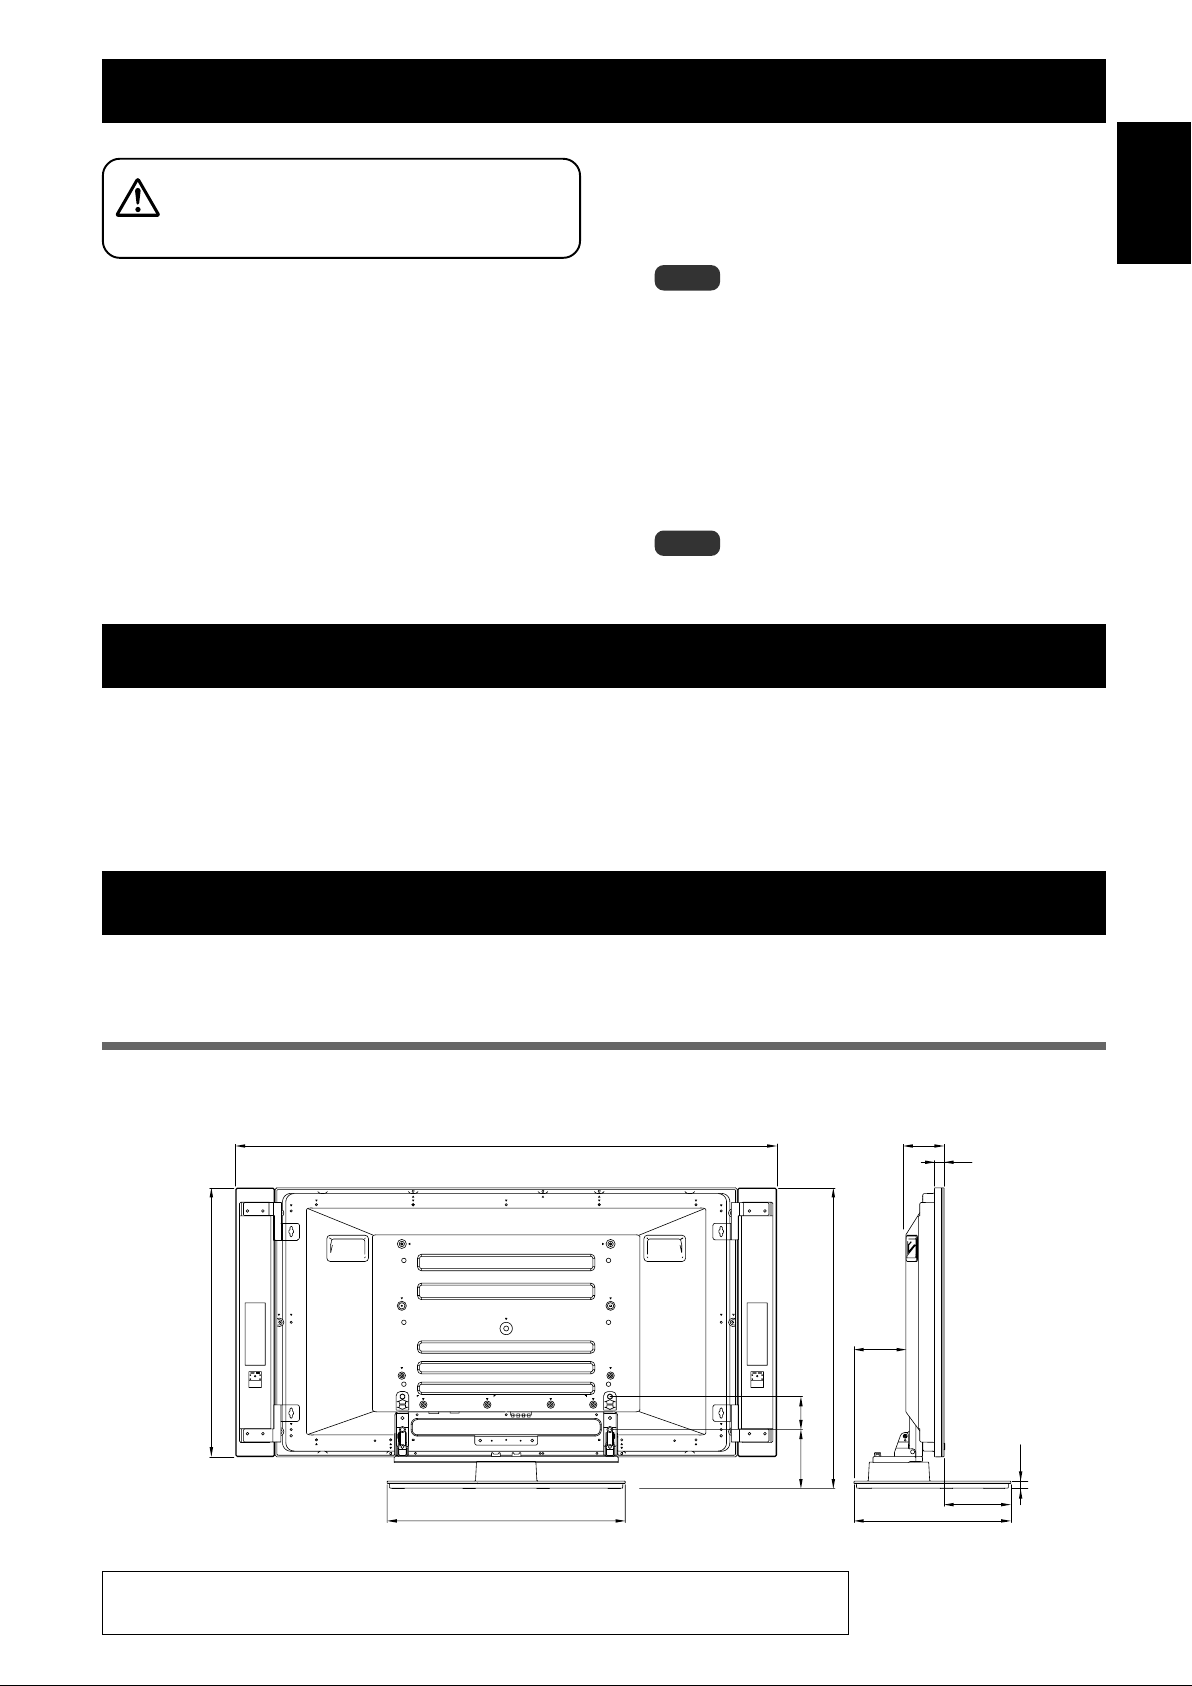
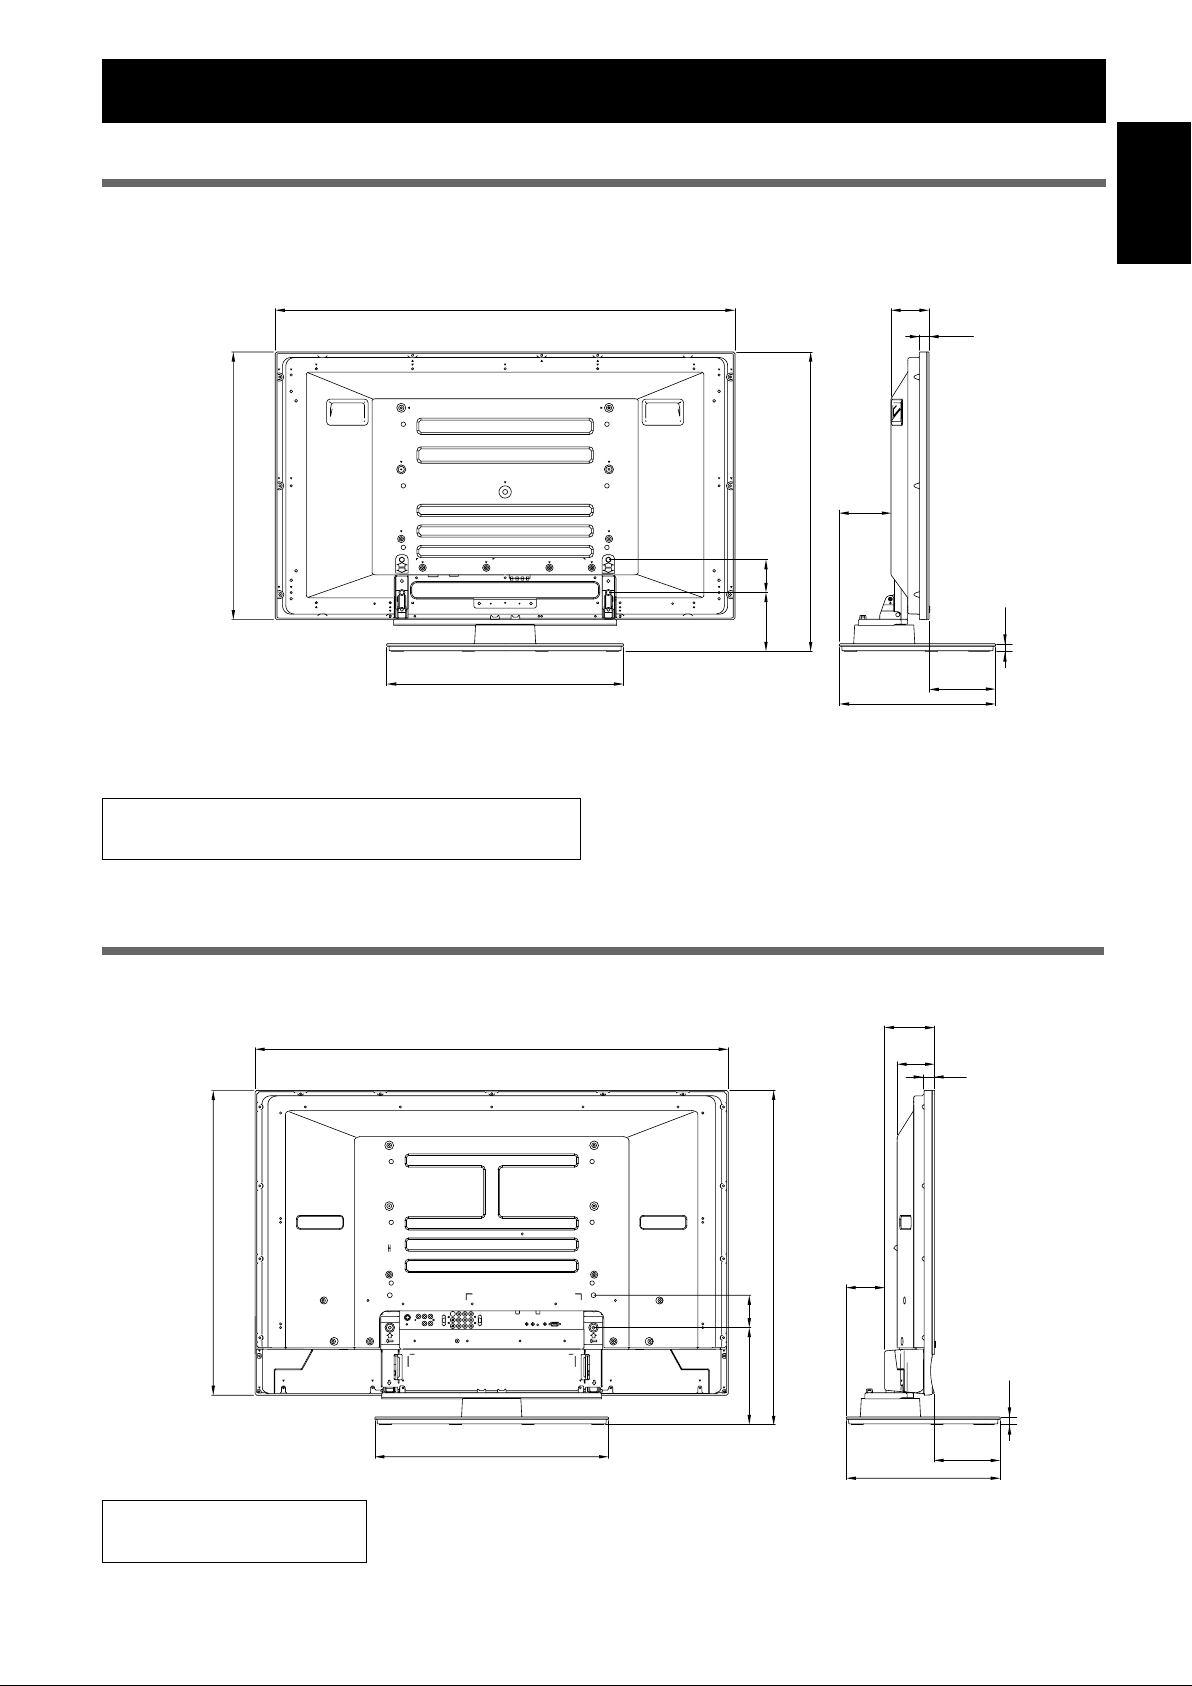
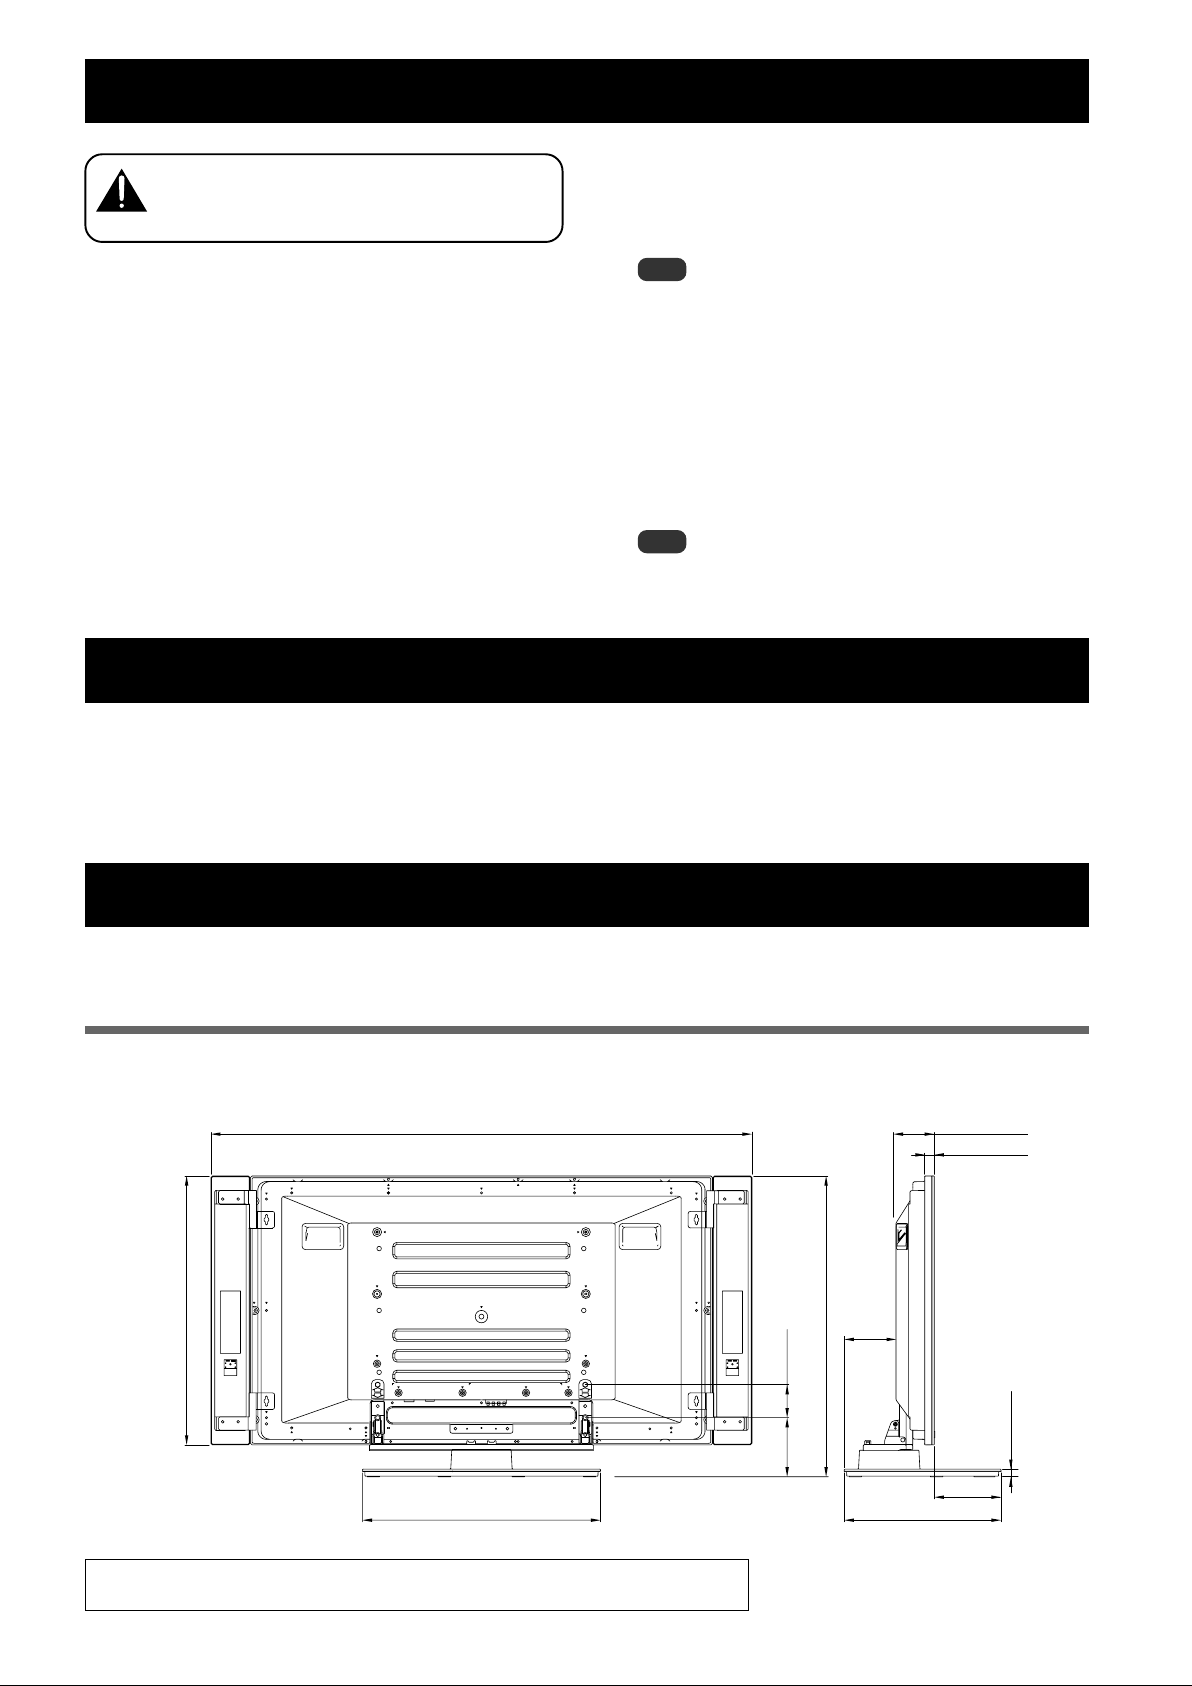
仕 様
外形寸法 577(幅)× 351(高)× 380(奥行)mm【支柱 L 使用時】
質量 9.5kg
日本語
・上記の仕様および外観は、改良のため予告なく変更することがあります。
寸法図
単位:mm
イラストの寸法は、スピーカー取付用の金具を含みません。
PDP-505HDL/435HDL 取り付け時
1
) *
2
) *
1
) *
2
) *
737 (PDP-505HDL)
652 (PDP-435HDL)
1500 (PDP-505HDL
1462 (PDP-505HDL
1350 (PDP-435HDL
1312 (PDP-435HDL
ワイド取り付け時
ダイレクト取り付け時
ワイド取り付け時
ダイレクト取り付け時
93
125
814 (PDP-505HDL)
729 (PDP-435HDL)
23
143 80
577
※支柱 L 使用時には高さ 910(PDP-505HDL) / 825(PDP-435HDL)となります。
*1
ワイド取り付け:スピーカーの角度を調整できるように取り付ける。
*2
ダイレクト取り付け:システムの横幅をコンパクトにし、スピーカーの角度を固定して取り付ける。
18.5
162
380
11
Ja
Page 12
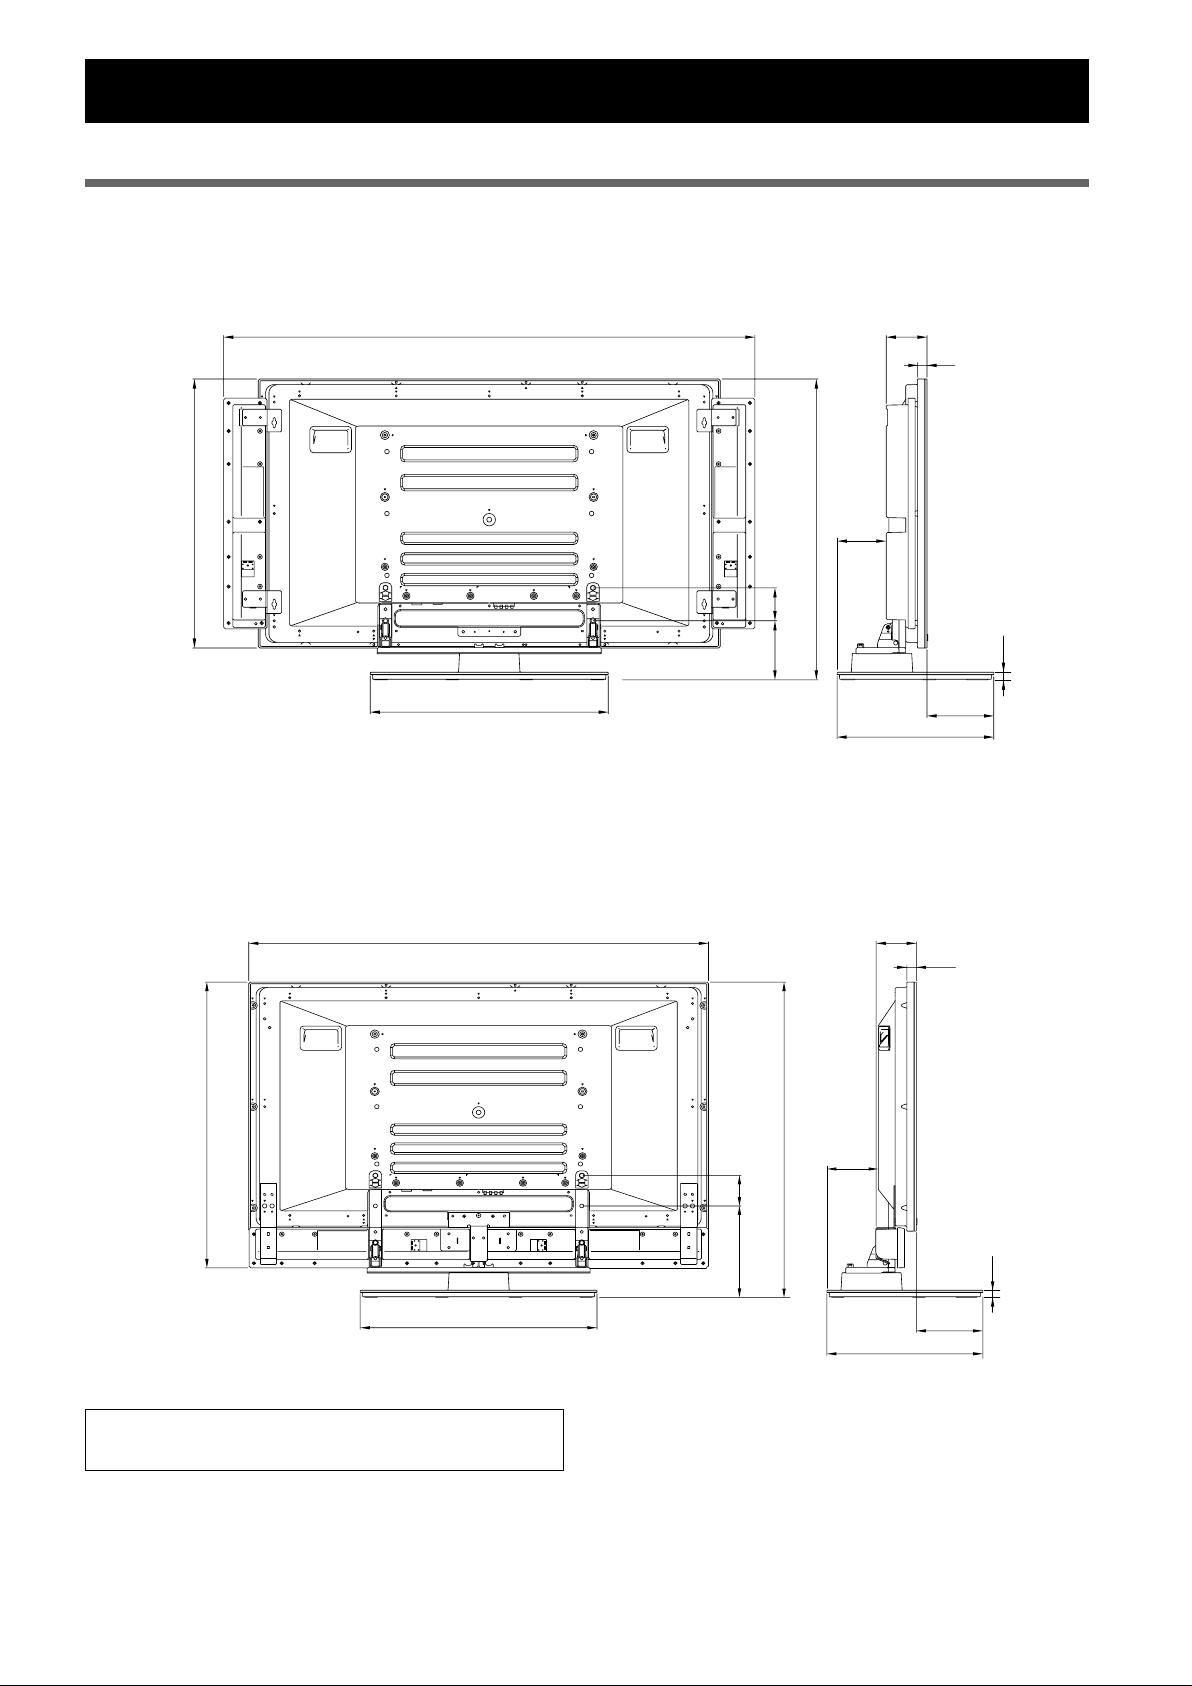
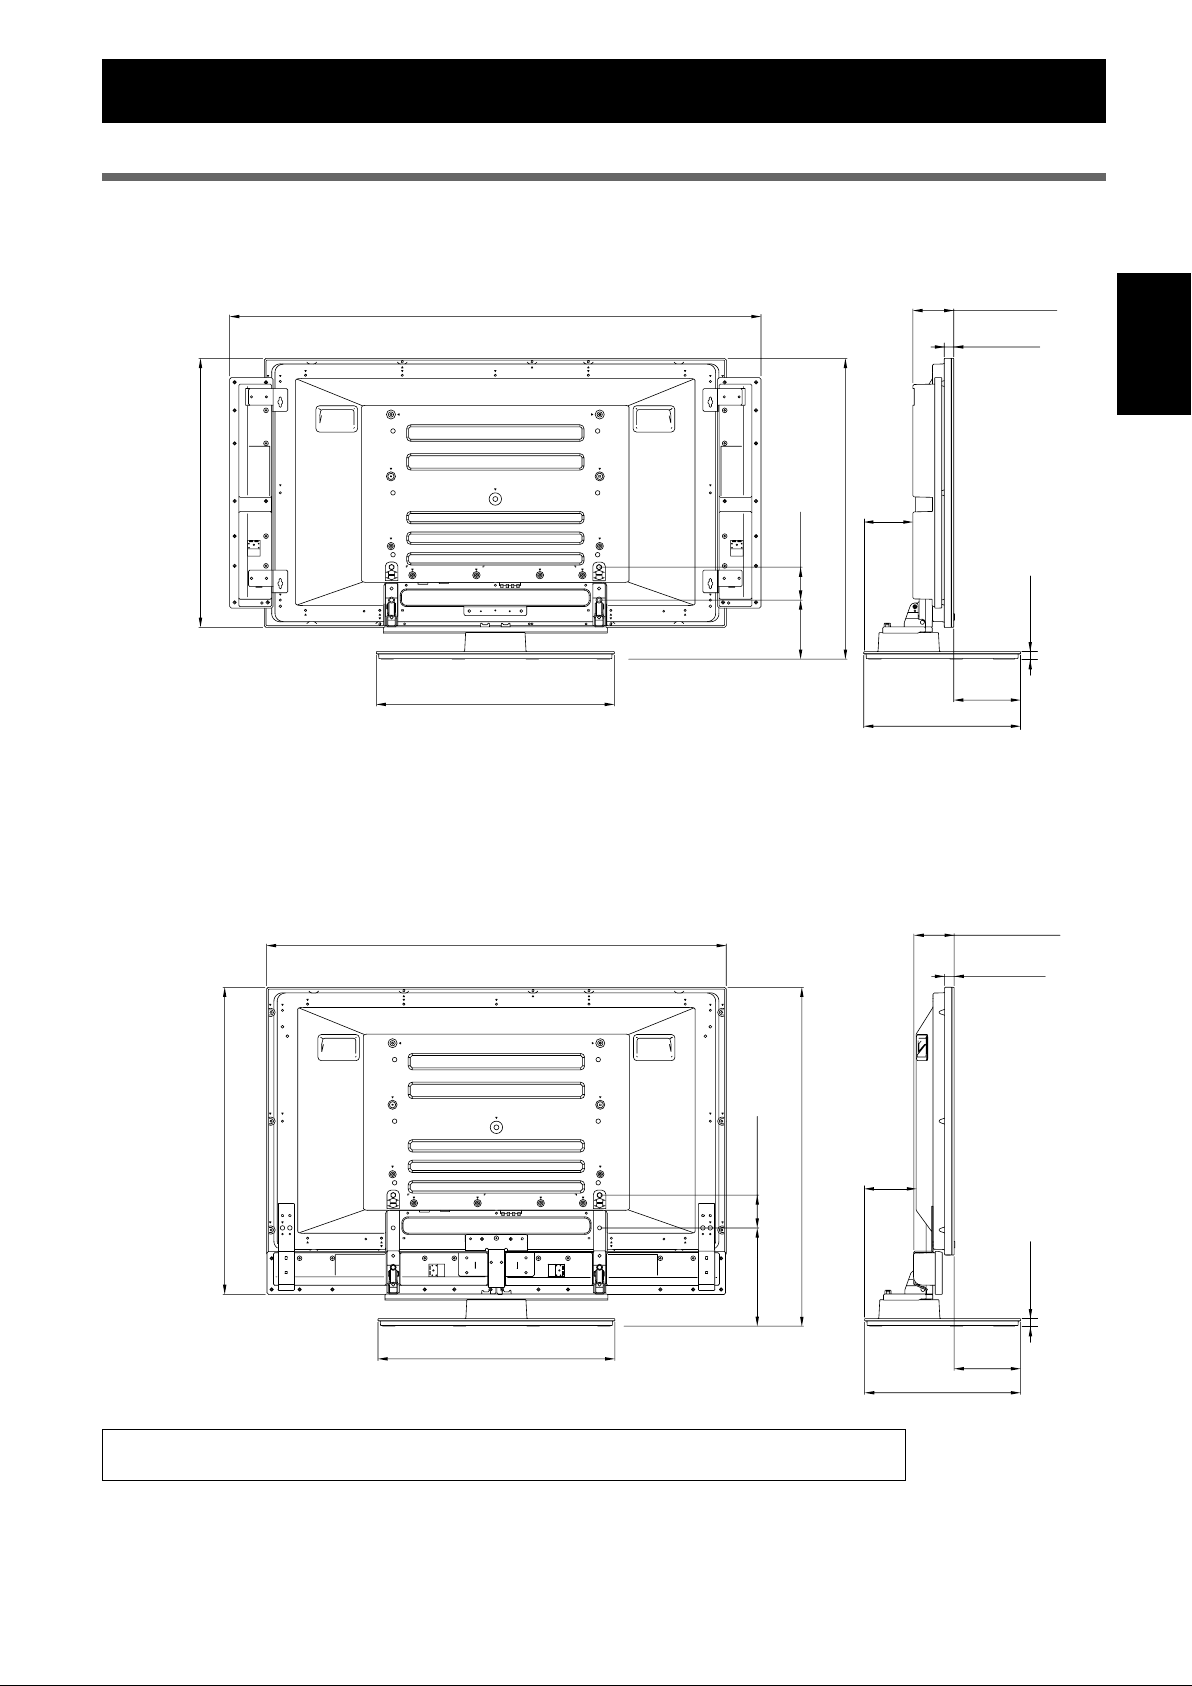
寸法図
PDP-505HDS/435HDS/504HD/504HDV/434HD/434HDV 取り付け時
本体両サイドにスピーカー取り付け時
1438 (PDP-505HDS)
1440 (PDP-504HD/504HDV)
1288 (PDP-435HDS)
1290 (PDP-434HD/434HDV)
737 (PDP-505HDS/504HD/504HDV)
652 (PDP-435HDS/434HD/434HDV)
577
125
814 (PDP-505HDS/504HD/504HDV)
729 (PDP-435HDS/434HD/434HDV)
143 80
100*
98*
380
1
2
1
23*
2
28*
18.5
1
162*
2
157*
※支柱 L 使用時には高さ 910(PDP-505HDS) / 825(PDP-435HDS)となります。
本体下側にスピーカー取り付け時
1270 (PDP-505HDS/504HD/504HDV)
1120 (PDP-435HDS/434HD/434HDV)
833 (PDP-505HDS/504HD/504HDV)
748 (PDP-435HDS/434HD/434HDV)
577
1
100*
2
98*
23*
28*
125
80
910 (PDP-505HDS/504HD/504HDV)
825 (PDP-435HDS/434HD/434HDV)
239
162*
157*
380
1
2
18.5
1
2
12
Ja
1
PDP-505HDS/435HDS
...............
*
2
PDP-504HD/504HDV/434HD/434HDV
...............
*
Page 13
寸法図
PDP-505HDL/505HDS/435HDL/435HDS/504HD/504HDV/434HD/434HDV
スピーカーなし
1270 (PDP-505HDL/505HDS/504HD/504HDV)
1120 (PDP-435HDL/435HDS/434HD/434HDV)
125
737 (PDP-505HDL/505HDS/504HD/504HDV)
652 (PDP-435HDL/435HDS/434HD/434HDV)
143 80
814 (PDP-505HDL/505HDS/504HD/504HDV)
729 (PDP-435HDL/435HDS/434HD/434HDV)
577
※ 支柱 L使用時には高さ910(PDP-505HDL/505HDS/504HD/504HDV) / 825(PDP-435HDL/435HDS/434HD/434HDV)
となります。
93*
98*
380
1
2
1
23*
2
28*
18.5
1
162*
2
157*
日本語
1
PDP-505HDL/505HDS/435HDL/435HDS
...............
*
2
...............
PDP-504HD/504HDV/434HD/434HDV
*
PDP-435SX/434BX/434TX 取り付け時
1168
753
577
80
239
825
94
123
93*
92*
380
1
2
26
18.5
1
162*
2
155*
1
...............
PDP-435SX
*
2
...............
PDP-434BX/434TX
*
2004パイオニア株式会社 禁無断転載
13
Ja
Page 14
Thank you for buying Pioneer’s product.
Please read through the Operating Instructions to learn how
to operate your model safely and properly.
Please be advised to keep the Operating Instructions in
your place for future reference.
Installation
¶ Consult your dealer if you encounter any difficulties
with this installation.
¶ Pioneer is not liable for any damage resulting from
improper installation, improper use, modification, or
natural disasters.
Contents
Cautions ................................................................. 14
Checking the Enclosed Parts................................ 15
Support Columns/Spacers
Used/Not Used Table ........................................... 15
Assembling the Stand .......................................... 16
Attaching the Plasma Display .............................. 17
Forward/Backward Angle of Inclination
Adjustment Mechanism ....................................... 18
Installing the Product on a Rack etc. ................... 19
Preparing the Cables............................................. 20
Preventing Equipment from Falling Over ........... 21
Detaching the Plasma Display from the Stand .... 22
Specifications ........................................................ 22
Dimensions Diagram ............................................ 22
CAUTION
This symbol refers to a hazard or unsafe practice which
can result in personal injury or property damage.
Cautions
This product is a table top stand exclusively designed for
plasma displays (PDP-505XDE / PDP-505HDE / PDP505HDG / PDP-435XDE / PDP-435HDE / PDP-435FDE /
PDP-435HDG / PDP-504HD / PDP-5040HD / PDP-504HDE /
PDP-504HDG / PDP-504HDC / PDP-5045HD / PDP-434HD /
PDP-4340HD /PDP-434HDE / PDP-434HDG / PDP-434HDC /
PDP-4345HD) from Pioneer. Use with other model is
capable of resulting in instability causing possible injury. For
further information, please contact the store where you
purchased your display.
Do not install or modify the product other than specified.
Do not use this stand for a plasma display other than those
designated and do not modify it or use it for other purposes.
Improper installation is extremely dangerous because it
may result in it falling over or other accident.
Installation Location
• Select a location that is strong enough to support the
weight of the stand and the displays.
• Make sure to place it in a level and stable location.
• Do not install it outdoors, at a hot spring, or near a beach.
• Do not install the stand where it may be subjected to
vibration or shock.
Assembling and Installation
• Assemble the stand in accordance with the assembly
instructions and securely attach all screws at the
designated locations.
There have been cases where unforeseen accidents
such as the equipment breaking or falling over
occurred after the installation of the display because
the stand was not installed as instructed.
• The display must always be installed by two or more
people to assure it is installed safely.
• Before installation, turn off the power for the display
and peripheral devices then remove the power cord
plug from the power outlet.
14
En
This product rotates 10° to the left and right and inclines 2°
forward and backward.
Do not place objects within the range of rotation of this
product and the plasma display. Install this product so that
during routine use or when it is rotated, it does not protrude
from the rack or other location it has been installed. Failure
to do so could cause unforeseen accidents such as the
equipment breaking or falling over (see page 19).
Prevent accidents caused by the product falling over by
taking reliable measures to prevent it from falling over (see
Page 21).
Page 15
Checking the Enclosed Parts
Check to make sure that you have all the enclosed parts before assembly and installation.
Table top stand x 1
Support columns S x 2
[short columns]
Support columns L x 2
[long columns]
Cable binders x 2
Installation screws 1 (M8 x 16 mm: silver) x 4
[used to anchor the support columns and the table top stand]
Installation screws 2
(M8 x 30 mm: black) x 2
Installation screws 3
(M8 x 40 mm: black) x 2
English
Hexagonal wrench x 1
(Diagonal size: 6 mm)
Operating instructions
(this document) x 1
Table top stand
Support de couverture de table
Tischständer
Supporto di tavolo
Tafelbladstaander
Soporte de mesa
PDK-TS05
Spacers x 2
C wrench x 1 (10 mm)
Operating instructions
Mode d’emploi
Bedienungsanleitung
Istruzioni per l’uso
Gebruiksaanwijzing
Manual de instrucciones
Support Columns/Spacers Used/Not Used Table
The parts of this stand that are used vary depending on the speakers that you have purchased and on their installation
location on the plasma display. Please select the parts you use according to the following table.
Combined speaker
numbers
Not used
PDP-S21-LR
PDP-S22-LR
PDP-S25-LR
PDP-S26-LR
Speaker installation location
–
Both sides of the plasma display
(or not used)
Bottom of the plasma display
Both sides of the plasma display
(or not used)
*: Can be used when the screen is located in a high position.
The PDP-S25-LR and the PDP-S26-LR speakers cannot be installed at the bottom of the plasma display.
Note
Support columns S
(short columns)
Recommended
Recommended
Cannot be used
Recommended
Support columns L
(long columns)
Spacers
Can be used* Cannot be used
Can be used* Cannot be used
Used Used
Cannot be usedCan be used*
15
En
Page 16
Assembling the Stand
Note
Always assemble it on a flat table etc.
Insert the screws in the holes vertically and do not tighten
them with more force than necessary.
Assembly Procedure
1 Select the support columns to attach.
Select the support columns according to the settings of
the speakers that you have purchased with reference to
the following stipulation (Only one type of the two types
of available support columns should be used).
When the speakers you have purchased are PDPS25-LR or PDP-S26-LR.
[Support column used: support column S (short
columns)]
Support column used:
support column S
When installing speakers at the bottom of the
plasma display [Support column used: support
column L (long columns)]
Note
The PDP-S25-LR and PDP-S26-LR cannot be installed at
the bottom of the plasma display.
Support column used:
support column L
When the speakers you have purchased are PDPS21-LR or PDP-S22-LR.
When installing speakers on both sides of the
plasma display [Support column used: support
column S (short columns)]
Support column used:
support column S
2 Secure the support column to the stand
with the Installation screws 1 (4
locations on the left and right).
Using the enclosed hexagonal wrench, first loosely
attach the top attachment screw, then loosely attach
the bottom attachment screw.
Installation screws 1
(M8 x 16 mm: silver)
3 Fully tighten the Installation screws (4
locations on the left and right).
16
En
Fully tighten the attachment screws.
Page 17
Attaching the Plasma Display
The weight of a 50 inch plasma display is about 40 kg
(88 lbs), that of a 43 inch model is about 30 kg (66 lbs),
Caution
Note
Be sure to install it on a flat stable location.
Insert the screws in the holes vertically and do not tighten
Make sure that you install the support columns reliably
they have no depth, and are unstable. Therefore, at
least two people must assemble and install them.
them with more force than necessary.
according to the settings of the type of speakers you have
purchased with reference to the procedure in Assembling
the Stand.
Attachment Method
1 Attaching the plasma display to the stand.
Fit the stand’s support columns to the bottom of the
plasma display as indicated by the arrows, then slowly
insert them vertically. Be extremely careful not to insert the
support columns of the stand into any part of the plasma
display other than the stand insertion slots. Note that doing
so might damage the plasma display panel or its ports or
result in the warping of the stand.
Illustration: when using support columns L
Installation screws 2
(M8 x 30 mm: black)
3 Securing the plasma display with
Installation screws 3.
Attach the plasma display at the points indicated by the
arrows using the enclosed hexagonal wrench.
English
Line up the column
supports with the bottom
of the plasma display as
indicated in the accompanying diagram.
2 Securing the plasma display with
Installation screws 2.
Secure them using the enclosed hexagonal wrench.
Illustration: when using support columns S
Installation screws 3
(M8 x 40 mm: black)
Only when attaching speakers at the bottom
of the plasma display
4 Inserting the spacers.
Insert the spacers in the holes on the rotating platform
of the stand.
Installation screws 2
(M8 x 30 mm: black)
Spacer
Note
Please do not use the spacer if the speakers are to be
attached to both sides of the plasma display.
5 Attaching the speakers.
Refer to the operating instructions for the speaker for
the installation method.
17
En
Page 18
Forward/Backward Angle of Inclination Adjustment Mechanism
On this stand, you can adjust the angle of inclination of the
plasma display within a range of 2° forward or backward
according to your preference.
Note
Be sure to adjust the angle only after you have
attached the plasma display.
Be sure to install it on a flat table or other flat
surface.
Be sure to hold the top of the plasma display
with your hand while adjusting the angle.
Adjustment Procedure
1 Loosen the forward/backward inclination
anchor bolts using the enclosed C wrench.
While being sure to hold the top of the plasma display
with your hand, loosen the forward/backward
inclination anchor bolts on the left and right sides by
rotating them upwards using the enclosed C wrench.
Forward/backward
inclination anchor bolt
Loosening
3 Tighten the forward/backward inclination
anchor bolts.
Firmly tighten the forward/backward inclination
anchor bolts on the left and right sides by rotating
them downward using the enclosed C wrench.
Be sure to hold the top of the plasma display with your
hand until you have fully tightened the bolts.
Forward/backward
inclination anchor bolt
Tightening
4 Check once more to make sure that the
forward/backward inclination anchor bolts
are fully tightened.
2 Set the angle you prefer.
Set the angle you prefer by slowly moving the plasma
display.
2˚
2˚
18
En
Page 19
Installing the Product on a Rack etc.
Be sure to observe the following precautions when moving
or installing this product with a plasma display into a rack or
other enclosure.
Precautions when moving
When moving the product more than a few
meters, first remove the speaker, then remove
Caution
the plasma display from the stand and move the
speaker, plasma display, and stand separately.
When detaching the plasma display from the
stand, be sure to follow the procedure described
in “Detaching the Plasma Display from the
Stand” on page 22.
Precautions when installing in a rack
or other enclosure
When installing in a rack or other enclosure, hold the
plasma display by the handles located on the rear
Caution
and bottom of the plasma display. If you hold the
speakers, they may be damaged or twisted.
Installation precautions
Make sure that you always secure a space at least as large
as that shown in the following diagram in front of and
behind the table top stand.
Plasma display
Table top stand
If the stand protrudes from the rack, it could cause
Caution
When rotating, take care not to allow the display
Back
Front
unforeseen accidents such as the equipment breaking or falling over.
to bump into walls or surrounding objects.
Rack
Min. 10 mm
(13/32 inch)
Min. 30 mm
(1-3/16 inch)
Depth of the rack
420 mm (16-9/16 inch)
English
or more recommended
When installing
speakers on both
sides of the plasma
display
Hold the plasma display
by its handles and from
the bottom.
When installing
speakers at the
bottom of the
plasma display
Hold the plasma display
by its handles and from
the sides.
Protrusion is dangerous.
Range of angle rotation
10˚
10˚
Forward/backward angle of inclination adjustment
range
2˚
2˚
19
En
Page 20
Preparing the Cables
Use the enclosed cable binders to bind the cables.
Note
Be very careful not to apply force to the bases of the cables.
When installing speakers on both sides of the
plasma display
When installing speakers at the bottom of the
plasma display
Using the cable binders
1 Passing a cable binder though the cable
binder holder on the top of the rotating
platform of the stand.
Cable binder
Cable binder holder
2 Gathering cables and placing them on the
cable binder.
3 Passing the cable binder through the hole
on its end.
4 Pulling the end of the cable binder to
secure the cables.
20
En
Removing a cable binder
If the secured part is removed
from the cable binder hole, it is
unlocked.
Hole
Secured
part
Page 21
Preventing Equipment from Falling Over
After installing the stand, be sure to take measures so that the equipment will not fall over.
Stabilizing on the floor
Stabilize the equipment as shown in the diagram using
screws that are available on the market.
Note
To stabilize the equipment on the
floor use screws that have a
nominal diameter of 6 mm (1/4
inch) and that are at least 20 mm
(13/16 inch) long.
9 to 15 mm
Min. 20 mm
(3/8 to 5/8 inch)
(13/16 inch)
6 mm
(1/4 inch)
Using a wall for stabilization
(43 inch display model in the figure)
1 Attaching falling prevention bolts (hooks)
to the plasma display.
2 Using strong cords or chains to firmly
stabilize it to a wall, pillar, or other sturdy
element.
Perform this work in the same way on the left and
right sides.
The length of the cords or chains used must be long
enough to allow the stand to rotate freely.
Note
Use hooks, ropes, chains, and fittings
that are available on the market.
Recommended hook:
Nominal diameter 8 mm (3/8 inch)
Length 12 to 15 mm (1/2 to 5/8 inch)
12 to 15mm
(1/2 to 5/8 inch)
8mm
(3/8 inch)
English
Position of floor screws: Without speakers
Unit: mm (inch)
575 (22-21/32)*
500 (19-11/16)**
* : 50 inch display model
** : 43 inch display model
120
(4-23/32)
575 (22-21/32)*
500 (19-11/16)**
1 Hook
2 Cord or chain
24 (1)
(14-1/16)
356
Fitting
Fixing the rotation to the front
Stabilize the equipment as shown in the diagram using
screws that are available on the market.
Note
Use a screw that has a nominal
diameter of 4 mm (3/16 inch)
and length from 15 to 20 mm
(5/8 to 13/16 inch) to fix the
rotation to the front.
7 to 12 mm
(5/16 to 1/2 inch)
15 to 20 mm
(5/8 to 13/16 inch)
4 mm
(3/16 inch)
21
En
Page 22
Detaching the Plasma Display from the Stand
To remove the plasma display from the stand, be sure
to always follow the procedure described below to
Caution
prevent accidents
1 First, confirm that the forward/backward
inclination anchor bolt is securely
tightened.
2 First clear a space on a flat floor etc. where
you can lay the plasma display flat, then
lay a sheet to protect it from scratches or
other damage.
3 Remove the speakers.
4 Referring to steps 2 and 3 in Attaching the
Plasma Display (Page 17.), remove the
black screws (4 screws).
Note
Do not remove the silver screws. If you do, the column
supports might slip out of place and fall over.
5 Holding the plasma display by its handles
and from the bottom, lift the display vertically.
6 Place the plasma display slowly onto the
sheet laid out in step 2 with its screen
facing downwards.
Note
When reattaching the plasma display to the stand, be
certain that the left/right support columns are set at the
same angle.
Specifications
External dimensions 577 (W) x 351 (H) x 380 (D) mm (22-3/4 (W) x 13-7/8 (H) x 15 (D) in.)
[When using the support columns L]
Weight 9.5 kg (20.16 lbs)
• The above specifications and exterior may be modified without prior notice to improve the product.
Dimensions Diagram
Unit: mm (inch)
The illustration measurements do not include the fixtures for attaching the speakers.
When installing the PDP-S25-LR or the PDP-S26-LR speakers
1500 (59-1/16) [50 inch display model: when doing air installation] *
1462 (57-9/16) [50 inch display model: when doing flush installation] *
1350 (53-3/16) [43 inch display model: when doing air installation] *
1312 (51-11/16) [43 inch display model: when doing flush installation] *
1
2
1
2
125
80
(3-3/16)
93 (3-11/16)
23 (15/16)
737 (29-1/16) [50 inch display model]
652 (25-11/16) [43 inch display model]
577 (22-3/4)
• When using the support columns L, the height is 910 (35-7/8) [50 inch display model] / 825 (32-1/2) [43 inch display model].
*1 Air installation: Attached to allow adjustment of the speaker angle
*2 Flush installation: Attached to fix the speaker angle and give the system a more compact width
22
En
814 (32-1/16) [50 inch display model]
729 (28-3/4) [43 inch display model]
143
(5-11/16)
162 (6-7/16)
380 (15)
18.5 (3/4)
Page 23
When installing the PDP-S21/S22/S12/S13-LR speakers
When installing speakers on both sides of the plasma display
Dimensions Diagram
1483 (58-7/16) [50 inch display model]
1288 (50-3/4) [43 inch display model]
737 (29-1/16) [50 inch display model]
652 (25-11/16) [43 inch display model]
577 (22-3/4)
• When using the support columns L, the height is 910 (35-7/8) [50 inch display model] / 825 (32-1/2) [43 inch display model].
When installing speakers at the bottom of the plasma display
93 (3-11/16)*
98 (3-7/8)*
125
80
(3-3/16)
814 (32-1/16) [50 inch display model]
143
729 (28-3/4) [43 inch display model]
(5-11/16)
380 (15)
162 (6-7/16)*
157 (6-3/16)*
23 (15/16)*
28 (1-1/8)*
1
2
1
2
1
2
18.5 (3/4)
English
1270 (50) [50 inch display model]
1120 (44-1/8) [43 inch display model]
80 (3-3/16)
833 (32-13/16) [50 inch display model]
748 (29-1/2) [43 inch display model]
577 (22-3/4)
*1...... PDP-505XDE/505HDE/505HDG/435XDE/435HDE/435FDE/435HDG
*2...... PDP-504HD/5040HD/504HDE/504HDG/504HDC/5045HD/434HD/4340HD/434HDE/434HDG/434HDC/4345HD
910 (35-7/8) [50 inch display model]
825 (32-1/2) [43 inch display model]
239 (9-7/16)
125
380 (15)
100 (3-15/16)*
98 (3-7/8)*
23 (15/16)*
28 (1-1/8)*
162 (6-7/16)*
157 (6-3/16)*
2
18.5 (3/4)
1
2
1
1
2
23
En
Page 24
Dimensions Diagram
Without speakers
1270 (50) [50 inch display model]
1120 (44-1/8) [43 inch display model]
80
(3-3/16)
737 (29-1/16) [50 inch display model]
652 (25-11/16) [43 inch display model]
577 (22-3/4)
• When using the support columns L, the height is 910 (35-7/8) [50 inch display model] / 825 (32-1/2) [43 inch display model].
*1...... PDP-505XDE/505HDE/505HDG/435XDE/435HDE/435FDE/435HDG
*2...... PDP-504HD/5040HD/504HDE/504HDG/504HDC/5045HD/434HD/4340HD/434HDE/434HDG/434HDC/4345HD
814 (32-1/16) [50 inch display model]
143
729 (28-3/4) [43 inch display model]
(5-11/16)
125
93 (3-11/16)*
98 (3-7/8)*
162 (6-7/16)*
157 (6-3/16)*
380 (15)
23 (15/16)*
28 (1-1/8)*
18.5 (3/4)
1
2
1
2
1
2
24
En
Published by Pioneer Corporation.
Copyright © 2004 Pioneer Corporation.
All rights reserved.
Page 25
Nous vous remercions d’avoir choisi un produit Pioneer. Veuillez
lire attentivement ce mode d’emploi pour savoir comment utiliser
correctement et en toute sécurité votre support. Nous vous
conseillons de conserver soigneusement ce mode d’emploi à
proximité et dans un endroit sûr afin de pouvoir vous y référer le
cas échéant.
Installation
¶ En cas de difficultés, veuillez consulter votre revendeur.
¶ Pioneer ne saura être tenu responsable d’aucun
dommage résultant d’une installation ou d’une
utilisation incorrecte de ce produit, de sa modification
ou encore de catastrophes naturelles.
Table des matières
Attention .......................................................................... 25
Vérification des pièces contenues dans le carton
d’emballage ..................................................................... 26
Tableau : Colonnes de support/Avec ou sans pièces
d’écartement ................................................................... 26
Assemblage du support ................................................. 27
Installation et fixation de l’écran plasma...................... 28
Mécanisme d’ajustement de l’angle d’inclinaison en
avant et en arrière ........................................................... 29
Installation du produit sur une étagère, etc. ................ 30
Préparation des câbles ................................................... 31
Prévenir le basculement et la chute de l’équipement ... 32
Démontage de l’écran plasma du support ................... 33
Spécificités....................................................................... 33
Schéma indiquant les dimensions ................................ 33
Attention
Ce produit est un support conçu exclusivement pour les écrans
plasma Pioneer (PDP-505XDE / PDP-505HDE / PDP-505HDG /
PDP-435XDE / PDP-435HDE / PDP-435FDE / PDP-435HDG /
PDP-504HD / PDP-5040HD / PDP-504HDE / PDP-504HDG /
PDP-504HDC / PDP-5045HD / PDP-434HD / PDP-4340HD /
PDP-434HDE / PDP-434HDG / PDP-434HDC / PDP-4345HD).
L’utilisation de ce produit avec un autre modèle peut être à
l’origine d’un manque de stabilité pouvant entraîner une blessure.
Pour de plus amples informations, veuillez contacter le magasin
où vous avez acheté votre écran.
N’installez pas le produit d’une manière autre que celle qui est
spécifiée ni le modifier. En outre, n’utilisez pas ce support pour un
écran plasma autre que ceux pour lesquels il a été conçu et ne le
modifiez pas ou ne l’utilisez pas à des fins autres que celles pour
lesquelles il a été conçu.
Une installation incorrecte est extrêmement dangereuse car elle
peut provoquer la chute du support ou un autre accident.
Lieu d’installation
• Sélectionnez un emplacement assez solide pour supporter le
poids du support et de l’écran.
• Assurez-vous de placer le produit à un emplacement stable et
plat.
• N’installez pas le support à l’extérieur, à proximité d’une source
thermale ou sur une plage.
• N’installez pas le support à un endroit où il pourrait être soumis
à des chocs ou à des vibrations.
Montage et installation
• Montez le support en suivant les instructions et vissez
solidement toutes les vis aux endroits prévus à cet effet.
Des accidents ont été constatés (casse, chute du matériel,
etc.) après l’installation de l’écran parce que le support
n’avait pas été installé conformément aux instructions.
• Pour une bonne installation, l’écran doit toujours être
installé par au moins deux personnes.
• Avant de procéder à l’installation, mettez l’écran ainsi que
les équipements périphériques hors tension en coupant
l’alimentation, puis retirer la prise du câble d’alimentation
de la prise murale.
English
Français
ATTENTION
Ce symbole indique un danger ou une pratique
dangereuse susceptible de provoquer des dommages
corporels ou matériels.
Ce produit pivote de 10° vers la gauche et s’incline de 2° en avant
et en arrière.
Veillez à ne pas placer d’objets à l’intérieur du champ de rotation
de telle sorte que durant l’utilisation habituelle ou la rotation du
produit, rien ne dépasse de l’étagère ou de l’emplacement sur
lequel il a été installé. Sans cela, des accidents pourraient survenir,
entraînant la détérioration de l’appareil ou sa chute (Voir page 30).
Il convient de prévenir les accidents causés par la chute du produit
en prenant des mesures fiables pour éviter toute chute (Voir page
32).
25
Fr
Page 26
Vérification des pièces contenues dans le carton d’emballage
Cette vérification vous permettra de vous assurer que vous possédez bien toutes les pièces nécessaires avant de procéder au montage et
à l’installation du support.
Support de couverture de table x 1 unité
Colonnes de support S x 2 unités
[Colonnes courtes]
Colonnes de support L x 2 unités
[Colonnes longues]
Serre-câbles x 2 unités
Vis d’installation
1
(M8 x 16 mm : argentée) x 4 unités
[Utilisées pour fixer les colonnes de support et le support de
couverture de table]
Vis d’installation
(M8 x 30 mm : noir) x 2 unités
2
Vis d’installation
3
(M8 x 40 mm : noir) x 2 unités
Clé hexagonale (à six pans) x 1 unité
(Taille en diagonale : 6 mm)
Mode d’emploi
(ce document) x 1 exemplaire
Table top stand
Support de couverture de table
Tischständer
Supporto di tavolo
Tafelbladstaander
Soporte de mesa
PDK-TS05
Pièces d’écartement x 2 unités
Clé hexagonale x 1 unité
(10 mm)
Operating instructions
Mode d’emploi
Bedienungsanleitung
Istruzioni per l’uso
Gebruiksaanwijzing
Manual de instrucciones
Tableau : Colonnes de support/Avec ou sans pièces d’écartement
Les différentes parties de ce support à utiliser varient en fonction des haut-parleurs que vous avez achetées et de leur installation par
rapport à l’écran plasma. Veuillez sélectionner les parties que vous allez utiliser en vous reportant au tableau suivant.
Numéros des hautparleurs combinées
Non utilisées
PDP-S21-LR
PDP-S22-LR
PDP-S25-LR
PDP-S26-LR
Lieu d’installation des haut-parleurs
–
De part et d’autre de l’écran plasma
(ou alors enceintes non utilisées)
Au bas de l’écran plasma
Ne peuvent pas être utilisées
De part et d’autre de l’écran plasma
(ou alors enceintes non utilisées)
Colonnes de support S
(Colonnes courtes)
Utilisation recommandée
Utilisation recommandée
Utilisation recommandée
Colonnes de support L
(Colonnes longues)
Pièces d’écartement
Peuvent être utilisées* Ne peuvent pas être utilisées
Peuvent être utilisées* Ne peuvent pas être utilisées
A utiliser A utiliser
Ne peuvent pas être utiliséesPeuvent être utilisées*
26
* : Peuvent être utilisées lorsque l’écran est placé en hauteur.
Remarque
Les haut-parleurs PDP-S25-LR et le PDP-S26-LR ne peuvent être installées au bas de l’écran plasma.
Fr
Page 27
Assemblage du support
Remarques
Pour monter le support, travaillez toujours sur une surface plane.
Introduisez les vis à la verticale et ne les serrez pas plus que
nécessaire.
Procédure de montage
1 Sélectionnez les colonnes de support à fixer.
Sélectionnez les colonnes de support en fonction de
l’emplacement des haut-parleurs que vous avez achetées et
d’après les indications ci-dessous (un seul des deux jeux de
colonnes doit être utilisé).
Si vous avez acheté des haut-parleurs PDP-S25-LR et le
PDP-S26-LR.
[Colonnes de support utilisées : colonnes de support S
(Colonnes courtes)]
Colonnes de support utilisées :
colonnes de support S
En cas d’installation des haut-parleurs à la base de
l’écran plasma. [Colonnes de support utilisées :
colonnes de support L (Colonnes longues)]
Remarque
Les haut-parleurs PDP-S25-LR et le PDP-S26-LR ne peuvent être
installées au bas de l’écran plasma.
Colonnes de support utilisées :
colonnes de support L
Français
Si vous avez acheté des haut-parleurs PDP-S21-LR et le
PDP-S22-LR.
En cas d’installation des haut-parleurs de part et
d’autre de l’écran plasma.
[Colonnes de support utilisées : colonnes de support S
(Colonnes courtes)]
Colonnes de support utilisées :
colonnes de support S
2 Fixez les colonnes sur le support à l’aide des
vis d’installation 1 (2 sur le côté gauche et 2
sur le côté droit).
A l’aide de la clé hexagonale fournie, vissez légèrement les vis
en commençant par celle du haut.
Vis d’installation
(M8 x 16 mm : argentée)
1
3 Vissez à fond les vis d’installation (2 sur le côté
gauche et 2 sur le côté droit).
Vissez à fond les vis d’installation.
27
Fr
Page 28
Installation et fixation de l’écran plasma
Le poids d’un écran plasma 50 pouces est d’environ 40 kg,
et celui d’un modèle 43 pouces d’environ 30 kg. Leur largeur
Attention
Remarques
Montez toujours l’écran plasma sur une surface plane et stable.
Introduisez les vis à la verticale et ne les serrez pas plus que
Veillez à bien installer les colonnes en fonction de l’emplacement
étant limitée, ils ne sont pas stables. Par conséquent, ils
doivent toujours être installés par deux personnes à la fois.
nécessaire.
des haut-parleurs que vous avez achetées et en suivant la marche
à suivre décrite dans le chapitre Montage du support.
Méthode de fixation
1 Installation de l’écran plasma sur le support.
Mettez les colonnes de soutien en place au bas de l’écran
plasma comme indiqué par les flèches, puis insérez-les
lentement à la verticale. Veillez à ne pas insérer les colonnes
ailleurs que dans les fentes prévues à cet effet. Cela risquerait
d’endommager l’écran, ses ports ou encore le support.
Alignez les colonnes du
support sur la partie inférieure
de l’écran comme indiqué sur
le schéma ci-joint.
Illustration lorsque l’on utilise les colonnes de support L.
Vis d’installation
(M8 x 30 mm : noir)
2
3 Fixez solidement l’écran plasma avec les vis
3
d’installation
Fixez l’écran plasma aux endroits indiqués par les flèches à
l’aide de la vis hexagonale fournie.
.
2 Fixez solidement l’écran plasma avec les vis
2
d’installation
Vissez solidement celles-ci au moyen de la clé hexagonale
fournie avec le support.
Illustration lorsque l’on utilise les colonnes de support S.
.
Vis d’installation
(M8 x 30 mm : noir)
2
Vis d’installation
(M8 x 40 mm : noir)
3
Uniquement en cas d’installation des haut-parleurs
à la base de l’écran plasma
4 Insertion des pièces d’écartement.
Insérez les pièces d’écartement dans les orifices de la plateforme rotative du support.
Pièces d’écartement
Remarque
Ne pas utiliser la pièce d’écartement si les haut-parleurs
doivent être fixées des deux côtés de l’écran plasma.
28
5 Mise en place des haut-parleurs.
Pour la méthode d’installation, reportez-vous au mode
d’emploi des haut-parleurs.
Fr
Page 29

Mécanisme d’ajustement de l’angle d’inclinaison en avant et en arrière
Sur ce support, vous pouvez ajuster l’angle d’inclinaison de l’écran
plasma de 2° en avant ou en arrière en fonction de vos
préférences.
Remarques
Veuillez ajuster l’angle uniquement après avoir fixé
l’écran plasma.
Assurez-vous de l’installer sur une table plane ou
toute autre surface plane.
Assurez-vous de tenir le haut de l’écran plasma
entre vos mains lorsque vous ajustez l’angle.
Procédure d’ajustement
1 Desserrez les boulons d’ancrage servant à
régler l’inclinaison en avant et en arrière à
l’aide de la clé hexagonale fournie.
En vous assurant de tenir le haut de l’écran plasma entre vos
mains, desserrez les boulons d’ancrage servant à régler
l’inclinaison en avant et en arrière, sur le côté gauche et sur
le côté droit, en les tournant vers le haut à l’aide de la clé
hexagonale fournie.
3 Serrez les boulons d’ancrage servant à régler
l’inclinaison en avant et en arrière.
Serrez fermement les boulons d’ancrage servant à régler
l’inclinaison en avant et en arrière, sur le côté gauche et sur
le côté droit, en les tournant vers le bas à l’aide de la clé
hexagonale fournie. Assurez-vous de tenir le haut de l’écran
plasma entre vos mains jusqu’à ce que les boulons soient
complètement serrés.
Boulons d’ancrage servant à régler
l’inclinaison en avant et en arrière.
Resserrement
Français
Boulons d’ancrage servant à régler
l’inclinaison en avant et en arrière.
Desserrement
2 Choisissez l’angle que vous préférez.
Choisissez l’angle que vous préférez en manipulant
doucement l’écran plasma.
2˚
2˚
4 Vérifiez une fois de plus que les boulons
d’ancrage servant à régler l’inclinaison en avant
et en arrière sont complètement serrés.
29
Fr
Page 30

Installation du produit sur une étagère, etc.
Les précautions suivantes doivent être strictement observées
lorsque vous déplacez ou installez le produit avec un écran plasma
sur une étagère ou dans un espace limité.
Précautions à respecter lors du
déplacement du produit
Avant de déplacer l’appareil sur plusieurs mètres,
démontez les haut-parleurs. Séparez également l’écran
Attention
plasma de son support et transportez chaque partie
séparément.
Lorsque vous démontez l’écran plasma du support,
assurez-vous de suivre la procédure décrite dans la
partie « Démontage de l’écran plasma du support » à
la page 33.
Précautions à respecter en cas d’installation
de l’appareil sur une étagère ou à tout autre
endroit où l’espace est restreint
Lors de l’installation de l’appareil sur une étagère ou dans
endroit exigu, tenez l’écran plasma par les poignées à
Attention
l’arrière et par le fond. Si vous le soulevez par les hautparleurs, ces derniers risqueraient d’être endommagés ou
de se tordre.
Précautions d’installation
Veillez à toujours ménager devant et derrière le support un espace
au moins égal à celui qui est indiqué sur le schéma ci-dessous.
Ecran plasma
Arrière
Avant
Support de cauverture de table
Tout dépassement de l’étagère risquerait de provoquer
la détérioration ou la chute de l’appareil.
Attention
Lors des rotations du support, veillez à ce que l’écran
n’entre pas en contact avec le mur ou avec les autres
objets environnants.
Etagère
10 mm mini
Profondeur de l’étagère
30 mm mini
Nous recommandons 420 mm
au minimum.
En cas d’installation
des haut-parleurs de
part et d’autre de
l’écran plasma
Tenez l’écran plasma par
ses poignées et par le
fond.
En cas d’installation
des haut-parleurs à la
base de l’écran
plasma
Tenez l’écran plasma par
les poignées et par les
côtés.
Tout dépassement est
dangereux.
Fourchette de l’angle de rotation
10˚
10˚
Fourchette d’ajustement des boulons d’ancrage servant à
régler l’inclinaison en avant et en arrière
2˚
2˚
30
Fr
Page 31

Préparation des câbles
Utilisez les serre-câbles pour regrouper les câbles.
Remarque
Veillez à ne pas forcer la base des câbles.
En cas d’installation des haut-parleurs de part et d’autre de
l’écran plasma
En cas d’installation des haut-parleurs à la base de l’écran
plasma
Utilisation des serre-câbles
1 Passez un serre-câbles dans le support de
serre-câbles situé sur la partie supérieure de la
plate-forme rotative du support.
Serre-câbles
Support de
serre-câbles
2 Rassemblez les câbles et les placer dans le
serre-câbles.
Français
3 Faites passer le serre-câbles dans l’orifice situé
à son extrémité.
4 Tirez sur l’extrémité du serre-câbles pour
bloquer les câbles.
Retrait d’un serre-câbles
Quand la partie bloquée est retirée
de l’orifice du serre-câbles, elle est
débloquée.
Orifice
Partie
bloquée
31
Fr
Page 32

Prévenir le basculement et la chute de l’équipement
Après avoir installé le support, veillez à prendre les précautions nécessaires pour qu’il ne tombe pas.
Stabilisation sur la base
Stabilisez le support comme indiqué sur le schéma à l’aide de vis
vendues dans le commerce.
Remarque
Afin de stabiliser l’équipement sur le
sol, utilisez des vis de 6 mm de
diamètre nominal et d’au moins 20
mm de long.
9 à 15 mm
20 mm mini
6 mm
Utilisation d’un mur pour stabiliser le support.
(Modèle d’écran 43 pouces comme indiqué sur la figure)
1 Fixation des boulons empêchant la chute
(crochets) sur l’écran plasma.
2 Utilisation de câbles solides ou de chaînes pour
stabiliser solidement le dispositif sur un mur,
un pilier ou d’autres éléments stables.
Ces opérations doivent être effectuées de la même
manière à gauche et à droite.
La longueur des câbles ou des chaînes utilisés doit être
suffisante pour permettre au support de tourner librement
sur sa base.
Remarque
Utiliser des crochets, des chaînes ou
d’autres dispositifs de fixation en vente
dans le commerce.
Crochet recommandé : Diamètre nominal 8 mm,
longueur de 12 à 15 mm.
12 à 15 mm
8mm
Position des vis de fixation au sol : sans les haut-parleurs
Unité : mm
575 (Ecran d'affichage 50 pouces)
500 (Ecran d'affichage 43 pouces)
575 (Ecran d'affichage 50 pouces)
120
500 (Ecran d'affichage 43 pouces)
1 Crochet
2Câble ou chaîne
24
Attache
356
Fixation de la rotation à l’avant
Stabilisez le support comme indiqué sur le schéma à l’aide de vis
vendues dans le commerce.
Remarque
utilisez une vis de 4 mm de diamètre et
longue de 15 à 20 mm afin de fixer la
rotation à l’avant.
7 à 12 mm
4 mm
15 à 20 mm
32
Fr
Page 33

Démontage de l’écran plasma du support
Lorsque vous démontez l’écran plasma de son support,
observez strictement la procédure indiquée ci-dessous afin
Attention
d’éviter les accidents.
1 Assurez-vous d’abord que les boulons
d’ancrage servant à l’inclinaison en avant et en
arrière sont serrés correctement.
2 Faites d’abord de la place sur une surface
plane, etc. où vous pouvez laisser l’écran
plasma à plat, puis déposez une feuille afin de
le protéger des rayures et autres dégâts
éventuels.
3 Retirez les haut-parleurs.
4 En vous référant aux opérations 2 et 3 décrites
dans le chapitre Installation et fixation de
l’écran plasma (p. 28), retirez les 4 vis noires.
Remarque
Ne retirez pas les boulons argentés, sinon les colonnes de
support risquent de bouger de place et de tomber.
5 Tout en le tenant par ses poignées et par le
fond, placez l’écran à la verticale.
6 Placez l’écran plasma avec soin sur la feuille
citée lors de l’étape 2, l’écran regardant vers le
bas.
Remarque
lorsque vous remontez l’écran plasma sur le support, assurezvous d’installer les colonnes de support de gauche et de droite
en respectant le même angle.
Spécificités
Dimensions extérieures : 577 (largeur) x 351 (hauteur) x 380 (profondeur) mm (en cas d’utilisation de colonnes de support L)
Poids : 9,5 kg
Français
• Les caractéristiques techniques indiquées ci-dessus ainsi que les dimensions extérieures peuvent êtres modifiées sans avis préalable en
vue d’améliorer le produit.
Schéma indiquant les dimensions
Unité : mm
Les mesures de l’illustration ne comprennent pas les fixations destinées aux haut-parleurs.
Installation des haut-parleurs PDP-S25-LR et le PDP-S26-LR
1500 [Ecran d'affichage 50 pouces : Lors du montage pivotant]*
1462 [Ecran d'affichage 50 pouces : Lors du montage à ras]*
1350 [Ecran d'affichage 43 pouces : Lors du montage pivotant]*
1312 [Ecran d'affichage 43 pouces : Lors du montage à ras]*
1
2
1
2
93
23
125
737 [Ecran d'affichage 50 pouces]
652 [Ecran d'affichage 43 pouces]
577
• En cas d’utilisation des colonnes de support L, la hauteur est de 910 mm (écran de 50 pouces) et de 825 mm (écran de 43 pouces).
*1 Montage pivotant : attachées pour permettre les ajustements de l’angle de l’enceinte
*2 Montage à ras : attachées afin de fixer l’angle de l’enceinte et de rendre le système plus compact en largeur.
80
814 [Ecran d'affichage 50 pouces]
729 [Ecran d'affichage 43 pouces]
143
162
380
18,5
33
Fr
Page 34

Schéma indiquant les dimensions
Installation des haut-parleurs PDP-S21/S22/S12/S13-LR
En cas d’installation des haut-parleurs de part et d’autre de l’écran plasma
1483 [Ecran d'affichage 50 pouces]
1288 [Ecran d'affichage 43 pouces]
737 [Ecran d'affichage 50 pouces]
652 [Ecran d'affichage 43 poucesl]
577
• En cas d’utilisation des colonnes de support L, la hauteur est de 910 mm (écran de 50 pouces) et de 825 mm (écran de 43 pouces).
En cas d’installation des haut-parleurs à la base de l’écran plasma
1
93*
2
98*
23*
28*
125
80
814 [Ecran d'affichage 50 pouces]
729 [Ecran d'affichage 43 pouces]
143
380
1
2
162*
157*
18,5
1
2
1270 [Ecran d'affichage 50 pouces]
1120 [Ecran d'affichage 43 pouces]
80
833 [Ecran d'affichage 50 pouces]
748 [Ecran d'affichage 43 pouces]
910 [Ecran d'affichage 50 pouces]
825 [Ecran d'affichage 43 pouces]
239
577
*1....... PDP-505XDE/505HDE/505HDG/435XDE/435HDE/435FDE/435HDG
*2....... PDP-504HD/5040HD/504HDE/504HDG/504HDC/5045HD/434HD/4340HD/434HDE/434HDG/434HDC/4345HD
125
100*
98*
380
1
2
1
23*
2
28*
18,5
1
162*
2
157*
34
Fr
Page 35

Sans les haut-parleurs
Schéma indiquant les dimensions
1270 [Ecran d'affichage 50 pouces]
1120 [Ecran d'affichage 43 pouces]
737 [Ecran d'affichage 50 pouces]
652 [Ecran d'affichage 43 pouces]
577
• En cas d’utilisation des colonnes de support L, la hauteur est de 910 mm (écran de 50 pouces) et de 825 mm (écran de 43 pouces).
*1....... PDP-505XDE/505HDE/505HDG/435XDE/435HDE/435FDE/435HDG
*2....... PDP-504HD/5040HD/504HDE/504HDG/504HDC/5045HD/434HD/4340HD/434HDE/434HDG/434HDC/4345HD
80
814 [Ecran d'affichage 50 pouces]
729 [Ecran d'affichage 43 pouces]
143
125
93*
98*
380
1
2
1
23*
2
28*
Français
18,5
1
162*
2
157*
Publication de Pioneer Corporation.
© 2004 Pioneer Corporation.
Tous droits de reproduction et de traduction réservés.
35
Fr
Page 36

Wir danken Ihnen, dass Sie sich für den Kauf eines Produkts der
Firma Pioneer entschieden haben.
Bitte lesen die Bedienungsanleitung aufmerksam, um sich über
die sichere und richtige Bedienung Ihres Modells zu informieren.
Wir empfehlen Ihnen, die Bedienungsanleitung anschließend
sicher aufzubewahren, um Sie später im Bedarfsfalle zu Rate
ziehen zu können.
Installation
¶ Bitte setzen Sie sich mit Ihrem Händler in Verbindung, wenn
Sie auf Schwierigkeiten bei der Installation stoßen.
Die Firma Pioneer haftet nicht für Schäden, die auf falsche
Installation, auf inkorrekte Verwendung, auf vorgenommene
Veränderungen oder auf Naturkatastrophen zurückzuführen
sind.
Inhalt
Sicherheitshinweise........................................................ 36
Überprüfen der mitgelieferten Teile .............................. 37
Tabelle zum Einsatz der Stützsäulen und
Abstandshalter ................................................................ 37
Montage des Ständers ................................................... 38
Montieren des Plasmadisplays ...................................... 39
Justiermechanismus für den Neigungswinkel nach
vorn und nach hinten...................................................... 40
Installieren des Produkts auf einem Gestell oder
etwas Ähnlichem ............................................................ 41
Verlegen der Kabel .......................................................... 42
Mittel zur Verhütung des Umstürzens.......................... 43
Demontieren des Plasmadisplays vom Ständer .......... 44
Technische Daten ............................................................ 44
Abbildungen zu den Abmessungen .............................. 44
Vorsicht!
Dieses Symbol kennzeichnet eine gefährliche oder riskante
Vorgehensweise, die zu eigenen Verletzungen, zu
Verletzungen anderer Personen oder zu Sachschäden führen
kann.
Sicherheitshinweise
Dieses Produkt ist ein Tischständer, und er ist ausschließlich für
die Plasmadisplays der Firma Pioneer (PDP-505XDE / PDP505HDE / PDP-505HDG / PDP-435XDE / PDP-435HDE / PDP435FDE / PDP-435HDG / PDP-504HD / PDP-5040HD / PDP504HDE / PDP-504HDG / PDP-504HDC / PDP-5045HD / PDP434HD / PDP-4340HD / PDP-434HDE / PDP-434HDG / PDP434HDC / PDP-4345HD) bestimmt.
Die Verwendung in Kombination mit anderen Modellen kann zur
Instabilität und auf diese Weise zu Unfällen führen.
Bitte setzen Sie sich hinsichtlich weiterer Informationen mit der
Handelseinrichtung in Verbindung, in der Sie Ihr Display gekauft
haben.
Installieren Sie das Produkt nicht anders als angegeben und
nehmen Sie keine Änderungen am Produkt vor. Verwenden Sie
diesen Ständer nicht für ein anderes Plasmadisplay als für das, für
das es vorgesehen ist, verändern Sie ihn nicht und verwenden Sie
ihn nicht für andere Zwecke.
Eine falsche Installation ist sehr gefährlich, da sie zum Umfallen
des Displays oder einem anderen Unfall führen kann.
Installationsort
• Wählen Sie für die Installation einen Ort, der stabil genug ist,
das Gewicht des Ständers und des Displays zu tragen.
• Vergewissern Sie sich, dass Sie Ständer und Display an einem
ebenen und stabilen Platz aufstellen.
• Installieren Sie den Ständer nicht im Freien, in der Nähe einer
heißen Quelle oder in Strandnähe.
• Installieren Sie den Ständer nicht an Orten, an denen er
Vibrationen oder Stößen ausgesetzt ist.
Montage und Installation
• Montieren Sie den Ständer gemäß den
Montageanweisungen und befestigen Sie alle Schrauben
sicher an den jeweils vorgesehenen Positionen.
Es hat Fälle gegeben, in denen es nach der Installation des
Displays zu unvorhergesehenen Unfällen wie
beispielsweise einem Bruch oder zum Umfallen kam, weil
der Ständer nicht wie vorgeschrieben installiert wurde.
• Das Display muss stets von zwei oder mehr Personen
installiert werden, um zu sichern, dass es sicher installiert
wird.
• Schalten Sie das Display und periphere Geräte vor der
Installation aus und trennen Sie es bzw. sie durch
Herausziehen des Steckers aus der Steckdose vom Netz.
Dieses Produkt lässt sich 10° nach links und nach rechts drehen
und 2° nach vorn und nach hinten neigen.
Platzieren Sie keine Objekte im Drehbereich dieses Produkts und
des Plasmadisplays. Installieren Sie den Ständer so, dass er beim
normalen Gebrauch oder wenn er gedreht wird nicht aus dem
Gestell oder einem anderen Ort, an dem er installiert ist,
herausragt. Wenn Sie dies nicht tun, riskieren Sie
unvorhergesehene Unfälle wie beispielsweise das Zerbrechen
oder Umfallen des Displays (siehe Seite 41).
36
Ge
Beugen Sie Unfällen durch das Umfallen des Produkts vor, indem
Sie zuverlässige Maßnahmen treffen, die es vor dem Umfallen
bewahren (siehe Seite 43).
Page 37

Überprüfen der mitgelieferten Teile
Überprüfen Sie vor der Montage und Installation die mitgelieferten Teile auf Vollständigkeit.
Tischständer: 1
Stützsäulen S: 2 (kurze Säulen)
Stützsäulen L: 2 (lange Säulen)
Kabel-Fixierband: 2
Befestigungsschrauben 1 (M8 x 16 mm, silberfarben): 4
[zur Verankerung der Stützsäulen und des Tischständers]
Befestigungsschrauben 2
(M8 x 30 mm, schwarz): 2
Befestigungsschrauben 3
(M8 x 40 mm, schwarz): 2
Deutsch
Sechskant-Stiftschlüssel: 1
(Diagonalgröße: 6 mm)
Bedienungsanleitung
(dieses Dokument): 1
Table top stand
Support de couverture de table
Tischständer
Supporto di tavolo
Tafelbladstaander
Soporte de mesa
PDK-TS05
Distanzstücke: 2
Maulschlüssel x 1 (10 mm)
Operating instructions
Mode d’emploi
Bedienungsanleitung
Istruzioni per l’uso
Gebruiksaanwijzing
Manual de instrucciones
Tabelle zum Einsatz der Stützsäulen und Abstandshalter
Die Teile des Ständers, die verwendet werden, variieren je nach den Lautsprechern, die Sie gekauft haben, und der Position ihrer Installation am Plasmadisplay. Bitte wählen Sie die Teile gemäß der folgenden Tabelle aus.
Bezeichnung der
angeschlossenen
Lautsprecher
Nicht verwendet.
PDP-S21-LR
PDP-S22-LR
PDP-S25-LR
PDP-S26-LR
Position der Installation der
Lautsprecher
–
Beide Seiten des Plasmadisplays
(oder nicht verwendet)
Unterseite des Plasmadisplays
Beide Seiten des Plasmadisplays
(oder nicht verwendet)
Stützsäulen S
(kurze Säulen)
Empfohlen.
Empfohlen.
Verwendung nicht möglich.
Empfohlen.
*: Verwendung möglich, wenn sich der Bildschirm auf einer erhöhten Position befindet.
Hinweis
Die Lautsprecher PDP-S25-LR und PDP-S26-LR können nicht auf der Unterseite des Plasmadisplays installiert
werden.
Stützsäulen L
(lange Säulen)
Verwendung möglich.*
Verwendung möglich.*
Distanzstücke
Verwendung nicht möglich.
Verwendung nicht möglich.
Verwendet. Verwendet.
Verwendung möglich.*
Verwendung nicht möglich.
37
Ge
Page 38

Montage des Ständers
Hinweise
Montieren Sie den Ständer immer auf einem ebenen Tisch oder
etwas Ähnlichem.
Führen Sie die Schrauben vertikal in die vorgesehenen
Schraublöcher ein und ziehen Sie sie nicht mit mehr Kraft als
erforderlich an.
Montagevorgang
1 Wählen Sie die zu befestigenden Stützsäulen.
Wählen Sie die Stützsäulen gemäß den Einstellungen der
Lautsprecher, die Sie gekauft haben, mit Bezug auf die nachfolgend
dargestellten Bedingungen (Jeweils nur ein Typ der zwei Typen von
verfügbaren Stützsäulen darf verwendet werden).
Wenn es sich bei den von Ihnen gekauften Lautsprechern
um die Typen PDP-S25-LR oder PDP-S26-LR handelt:
[zu verwendende Stützsäule: Stützsäule S (kurze Säulen)]
Zu verwendende Stützsäule:
Stützsäule S
Installation der Lautsprecher unterhalb des
Plasmadisplays [zu verwendende Stützsäule:
Stützsäule L (lange Säulen)]
Hinweise
Die Lautsprecher PDP-S25-LR und PDP-S26-LR können nicht auf
der Unterseite des Plasmadisplays installiert werden.
Zu verwendende Stützsäule:
Stützsäule L
Wenn es sich bei den von Ihnen gekauften Lautsprechern
um die Typen PDP-S21-LR oder PDP-S22-LR handelt:
Installation der Lautsprecher an den beiden Seiten des
Plasmadisplays [zu verwendende Stützsäule: Stützsäule
S (kurze Säulen)]
Zu verwendende Stützsäule:
Stützsäule S
2 Befestigen Sie die Stützsäule mit den
Befestigungsschrauben 1 am Ständer
(4 Positionen links und rechts).
Schrauben Sie zunächst unter Verwendung des mitgelieferten
Innensechskant-Stiftschlüssels die oberen
Befestigungsschrauben und dann die unteren
Befestigungsschrauben lose an.
Befestigungsschrauben
(M8 x 16 mm, silberfarben)
1
3 Schrauben Sie die Befestigungsschrauben
richtig fest (4 Positionen links und rechts).
38
Ge
Schrauben Sie die Befestigungsschrauben richtig fest.
Page 39

Montieren des Plasmadisplays
Das Gewicht eines 50-Zoll-Plasmadisplays beträgt etwa
40 kg und das eines 43-Zoll-Modells etwa 30 kg. Die
Vorsicht!
Hinweise
Vergewissern Sie sich, dass Sie das Plasmadisplay an einem
Führen Sie die Schrauben vertikal in die Schraublöcher ein und
Achten Sie bitte unbedingt darauf, die Stützsäulen bezüglich der
Plasmadisplays sind flach, das heißt, sie haben keine
Tiefe und sind somit instabil. Daher muss die Montage
und Installation von mindestens zwei Personen
vorgenommen werden.
ebenen und stabilen Ort installieren.
ziehen Sie sie nicht mit mehr Kraft als erforderlich fest.
Verfahrensweise der Montage des Ständers sicher gemäß den
Einstellungen des von Ihnen gekauften Lautsprechertyps zu
installieren.
Befestigungsmethode
1 Befestigen des Plasmadisplays am Ständer.
Passen Sie die Stützsäulen des Tischständers auf der
Unterseite des Plasmadisplays an, wie es in der Abbildung
durch Pfeile dargestellt ist, und führen Sie dann den
Plasmaständer langsam vertikal ein. Achten Sie dabei
besonders darauf, die Stützsäulen des Tischständers nicht
anders einzuführen als in die dafür vorgesehenen Öffnungen.
Wenn Sie dies nicht beachten, besteht die Gefahr, dass Sie
das Bedienfels des Plasmadisplays beschädigen oder seine
Anschlussbuchsen oder dass sich der Ständer verzieht.
Bringen Sie die Stützsäulen
in Übereinstimmung mit
dem unteren Teil des
Plasamdisplays, wie es in
der zugehörigen Abbildung
dargestellt ist.
Illustration: when using support columns L
Abbildung: Verwendung der Stützsäule L
Befestigungsschraube
(M8 x 30 mm, schwarz)
3 Sichern des Plasmadisplays mit den
3
Befestigungsschrauben
Montieren Sie das Plasmadisplay an den in der Abbildung
durch Pfeil angezeigten Punkten unter Verwendung des
mitgelieferten Innensechskant-Stiftschlüssels.
.
2
Deutsch
2 Sichern des Plasmadisplays mit den
2
Befestigungsschrauben
Ziehen Sie die Befestigungsschrauben unter Verwendung des
mitgelieferten Sechskant-Stiftschlüssels fest.
Abbildung: Verwendung der Stützsäule S
.
Befestigungsschraube
(M8 x 40 mm, schwarz)
3
Nur bei Installation der Lautsprecher unterhalb
des Plasmadisplays
4 Einsetzen der Distanzstücke.
Setzen Sie die Distanzstücke in die Löcher an der drehbaren
Platte des Ständers.
Distanzstück
Hinweis
Bitte verwenden Sie die Abstandshalter nicht, wenn die
Lautsprecher auf beiden Seiten des Plasmadisplays montiert
werden sollen.
Befestigungsschraube
(M8 x 30 mm, schwarz)
2
5 Befestigen der Lautsprecher.
Informieren Sie sich hinsichtlich der Verfahrensweise der
Installation in der Bedienungsanleitung für den Lautsprecher.
39
Ge
Page 40

Justiermechanismus für den Neigungswinkel nach vorn und nach hinten
Am Tischständer können Sie den Neigungswinkel des
Plasmadisplays entsprechend Ihren Wünschen innerhalb eines
Bereichs von 2° nach vorn oder nach hinten einstellen.
Hinweise
Achten Sie darauf, den Neigungswinkel nur nach
der Befestigung des Plasmadisplays einzustellen.
Installieren Sie das Plasmadisplay auf einem
ebenen Tisch oder einer anderen ebenen
Oberfläche.
Halten Sie, während Sie den Winkel einstellen,
unbedingt die obere Seite des Plasmadisplays mit
der Hand fest.
Verfahrensweise der Einstellung
1 Lösen Sie unter Verwendung des mitgelieferten
Maulschlüssels die Befestigungsschrauben für
die Einstellung des Neigungswinkels.
Lösen Sie, während Sie den oberen Teil des Plasmadisplays
mit der Hand festhalten, unter Verwendung des mitgelieferten
Maulschlüssels die Befestigungsschrauben für die
Einstellung des Neigungswinkels nach vorn und nach
hinten auf der linken und rechten Seite, indem Sie sie nach
oben (im Uhrzeigersinn) drehen.
3 Schrauben Sie die Befestigungsschrauben für
die Einstellung des Neigungswinkels nach vorn
und nach hinten fest.
Schrauben Sie unter Verwendung des mitgelieferten
Maulschlüssels die Befestigungsschrauben für die
Einstellung des Neigungswinkels nach vorn und nach
hinten auf der linken und rechten Seite fest, indem Sie sie
nach unten (entgegen dem Uhrzeigersinn) drehen.
Achten Sie darauf, den oberen Teil des Plasmadisplays mit der
Hand festzuhalten, bis Sie die Schrauben fest angezogen
haben.
Befestigungsschraube für die
Einstellung des Neigungswinkels
nach vorn und nach hinten
Festziehen
Befestigungsschraube für die
Einstellung des Neigungswinkels
nach vorn und nach hinten
Lösen der
Schraube
2 Stellen Sie den gewünschten Winkel ein.
Stellen Sie den gewünschten Neigungswinkel durch
langsames Bewegen des Plasmadisplays ein.
2˚
2˚
4 Überprüfen Sie noch einmal, ob die
Befestigungsschrauben für die Einstellung des
Neigungswinkels richtig festgezogen sind.
40
Ge
Page 41

Installieren des Produkts auf einem Gestell oder etwas Ähnlichem
Beachten Sie bitte unbedingt die folgenden Sicherheitshinweise,
wenn Sie den Ständer mit einem Plasmadisplay fortbewegen oder
ihn in einem Gestell oder einem anderen Möbelstück installieren.
Sicherheitshinweise für das Fortbewegen
oder Transportieren
Wenn Sie den Tischständer mit dem Plasmadisplay
und den Lautsprechern mehr als ein paar Meter
Vorsicht!
fortbewegen oder transportieren wollen, dann
entfernen Sie zunächst die Lautsprecher und dann das
Plasmadisplay vom Tischständer und transportieren
Sie anschließend Lautsprecher, Plasmadisplay und
Tischständer getrennt.
Verfahren Sie, wenn Sie das Plasmadisplay vom
Ständer demontieren, unbedingt so, wie es auf Seite
44 in „Demontieren des Plasmadisplays vom Ständer“
beschrieben ist.
Sicherheitshinweise für das Installieren in
einem Gestell oder einem anderen
Möbelstück
Wenn Sie den Ständer mit den Lautsprechern und dem
Vorsicht!
Display in einem Gestell oder einem anderen Möbelstück
installieren, dann halten sie das Plasmadisplay an den
auf der Rückseite des Plasmadisplays befindlichen
Handgriffen und an der Unterseite des Plasmadisplays.
Wenn Sie das Ganze an den Lautsprechern halten, dann
können diese beschädigt oder verdreht werden.
Sicherheitshinweise für die Installation
Vergewissern Sie sich, dass Sie vor und hinter dem Tischständer
immer einen Mindestabstand absichern, wie er im folgenden
Diagramm angegeben ist.
Plasmadisplay
Tischständer
Wenn der Ständer aus dem Gestell herausragt,
Vorsicht!
Wenn Sie das Display drehen, dann achten Sie bitte
Rückseite
Vorderseite
besteht die Gefahr, dass unvorhergesehene Unfälle
wie beispielsweise ein Zerbrechen oder ein Umstürzen
der Anlage passieren.
unbedingt darauf, dass es nicht an Wände oder andere
Objekte der unmittelbaren Umgebung stößt.
Gestell
Min. 10 mm
Tiefe des Gestells:
Min. 30 mm
Mind. 420 mm werden
empfohlen
Deutsch
Bei Installation der
Lautsprecher an den
beiden Seiten des
Plasmadisplays
Halten Sie das
Plasmadisplay an seinen
Handgriffen und von
unten her.
Bei Installation der
Lautsprecher
unterhalb des
Plasmadisplays
Halten Sie das
Plasmadisplay an seinen
Handgriffen und von den
Seiten her.
Herausragen ist gefährlich!
Drehwinkel-Bereich
10˚
10˚
Bereich für die Einstellung des Neigungswinkels nach vorn
und nach hinten.
2˚
2˚
41
Ge
Page 42

Verlegen der Kabel
Verwenden Sie die mitgelieferten Kabelbänder zum
übersichtlichen Verlegen der Kabel.
Hinweis
Achten Sie bitte sorgfältig darauf, keine Kraft auf die Kabelbasis
auszuüben.
Bei Installation der Lautsprecher an den beiden Seiten des
Plasmadisplays
Verwendung der Kabelbänder
1 Hindurchführung eines Kabelbands durch den
Kabelbandhalter auf der Dreh- Plattform des
Ständers.
Kabelband
Kabelbandhalter
2 Zusammenführen von Kabeln und Platzieren
dieser Kabel auf dem Kabelband.
Bei Installation der Lautsprecher unterhalb des
Plasmadisplays
3 Hindurchführung des Kabelbands durch den
Schlitz an seinem Ende.
4 Ziehen am Ende des Kabelbands, um die Kabel
zu fixieren.
42
Ge
Entfernen eines Kabelbands
Wenn das Sicherungsteil aus dem
Kabelbandloch entfernt wird, lässt
sich das Band öffnen.
Sicherungsteil
Loch
Page 43

Mittel zur Verhütung des Umstürzens
Ergreifen Sie nach der Installation des Ständers mit Display Maßnahmen, die sichern, dass die Anlage
nicht umstürzt.
Stabilisierung auf dem Fußboden
Stabilisieren Sie die Anlage unter Verwendung von marktüblichen
Schrauben, wie es in der Abbildung unten dargestellt ist.
Hinweis
Verwenden Sie zur Stabilisierung der
Anlage auf dem Fußboden Schrauben
mit einem Nenndurchmesser von 6 mm
und einer Länge von mindestens 20 mm.
9 – 15 mm
Min. 20 mm
6 mm
Verwendung einer Wand zur Stabilisierung
(In der Abbildung ist ein 43-Zoll-Modell dargestellt)
1 Befestigen von Bolzen (Haken) am
Plasmadisplay zur Verhütung des Umfallens.
2 Verwendung starker Schnuren oder Ketten zur
sicheren Stabilisierung der Anlage an einer
Wand, einer Säule oder einem anderen stabilen
Bauelement.
Führen Sie diese Arbeiten in derselben Art und Weise auf
der linken und der rechten Seite aus.
Die verwendeten Schnuren oder Ketten müssen so lang
sein, dass Drehungen des Ständers einschließlich Display
möglich sind.
Hinweis
Verwenden Sie marktübliche Schraubbolzen,
Seile, Ketten und Schraubhaken.
Empfohlener Schraubbolzen:
Nenndurchmesser 8mm, Länge 12 – 15 mm
12–15 mm
8mm
Deutsch
Position der Bodenschrauben: ohne Lautsprecher
Einheit: mm
575 (50-Zoll-Display-Modell)
500 (43-Zoll-Display-Modell)
575 (50-Zoll-Display-Modell)
120
500 (43-Zoll-Display-Modell)
1 Schraubbolzen
2 Seil oder Kette
Schraubhaken
24
356
Fixierung der Drehung an der Vorderseite
Stabilisieren Sie die Anlage unter Verwendung von marktüblichen
Schrauben, wie es in der Abbildung unten dargestellt ist.
Hinweis
Verwenden Sie eine Schraube mit einem
Nenndurchmesser von 4 mm und einer
Länge von 15 – 20 mm zur Fixierung der
Drehung an der Vorderseite.
7 – 12 mm
4 mm
15 – 20 mm
43
Ge
Page 44

Demontieren des Plasmadisplays vom Ständer
Wenn Sie das Plasmadisplay vom Tischständer entfernen
wollen, dann befolgen Sie, um Unfälle zu verhüten, stets
Vorsicht
die nachfolgend beschriebene Verfahrensweise.
1 Vergewissern Sie sich, dass die
Befestigungsschraube für die Neigung nach
vorn und nach hinten richtig festgezogen ist.
2 Schaffen Sie zunächst Platz auf einem flachen
Untergrund, auf den Sie das Plasmadisplay
legen können, und legen Sie dann ein Tuch
4 Entfernen Sie in Anlehnung an die Schritte 2 und
3 unter “Montieren des Plasmadisplay” (Seite
39) die schwarzen Schrauben (4 Schrauben).
Hinweis
Entfernen Sie nicht die silberfarbenen Schrauben. Wenn Sie
nämlich diese Schrauben entfernen, könnte es passieren, dass
die Stützsäulen aus ihren Positionen herausgleiten und dass
das Plasmadisplay umfällt.
5 Halten Sie das Plasmadisplay an seinen
Handgriffen und von unten her und heben Sie
es vertikal an.
oder eine Decke aus, um das Plasmadisplay vor
Kratzern und anderen Beschädigungen zu
schützen.
6 Legen Sie das Plasmadisplay langsam mit der
Schirmfläche nach unten auf das in Schritt 2
ausgelegte Tuch oder die ausgelegte Decke.
3 Entfernen Sie die Lautsprecher.
Hinweis
Vergewissern Sie sich, wenn Sie das Plasmadisplay wieder am
Ständer montieren, dass die linke/rechte Stützsäule im
gleichen Winkel befestigt werden.
Technische Daten
Außenabmessungen: 577 (B) x 351 (H) x 380 (T) mm (bei Verwendung der Stützsäulen L)
Gewicht: 9,5 kg
• Die oben aufgeführten technischen Daten und das Äußere können aus Gründen der Verbesserung des Produkts ohne vorherige
Ankündigung verändert werden.
Abbildungen zu den Abmessungen
Einheit: mm
Bei den in der Abbildung angegebenen Abmessungen sind die Halterungen für die Befestigung der Lautsprecher nicht enthalten.
Bei Installation der Lautsprecher PDP-S25-LR oder PDP-S26-LR
1500 [50-Zoll-Display-Modell: bei versetzter Installation]*
1462 [50-Zoll-Display-Modell: bei bündiger Installation]*
1350 [43-Zoll-Display-Modell: bei versetzter Installation]*
1312 [43-Zoll-Display-Modell: bei bündiger Installation]*
737 [50-Zoll-Display-Modell]
652 [43-Zoll-Display-Modell]
577
1
2
1
2
80
814 [50-Zoll-Display-Modell]
729 [43-Zoll-Display-Modell]
143
93
23
125
18,5
162
380
• Bei Verwendung der Stützsäulen L beträgt die Höhe 910 mm (50-Zoll-Display-Modell) / 825 mm (43-Zoll-Display-Modell).
*1 Versetzte Installation: Ermöglicht die Einstellung des Lautsprecherwinkels.
*2 Bündige Installation: Fixiert den Lautsprecherwinkel und gibt dem System eine kompaktere Breite.
44
Ge
Page 45

Abbildungen zu den Abmessungen
Bei Installation der Lautsprecher PDP-S21/S22/S12/13-LR
Bei Installation der Lautsprecher an den beiden Seiten des Plasamadisplays
1483 [50-Zoll-Display-Modell]
1288 [43-Zoll-Display-Modell]
737 [50-Zoll-Display-Modell]
652 [43-Zoll-Display-Modell]
577
• Bei Verwendung der Stützsäulen L beträgt die Höhe 910 mm (50-Zoll-Display-Modell) / 825 mm (43-Zoll-Display-Modell).
Bei Installation der Lautsprecher unterhalb des Plasamadisplays
93*
98*
125
80
814 [50-Zoll-Display-Modell]
729 [43-Zoll-Display-Modell]
143
380
1
2
1
23*
2
28*
18,5
1
162*
2
157*
Deutsch
1270 [50-Zoll-Display-Modell]
1120 [43-Zoll-Display-Modell]
833 [50-Zoll-Display-Modell]
748 [43-Zoll-Display-Modell]
577
*1....... PDP-505XDE/505HDE/505HDG/435XDE/435HDE/435FDE/435HDG
*2....... PDP-504HD/5040HD/504HDE/504HDG/504HDC/5045HD/434HD/4340HD/434HDE/434HDG/434HDC/4345HD
80
910 [50-Zoll-Display-Modell]
825 [43-Zoll-Display-Modell]
239
125
100*
98*
380
1
2
1
23*
2
28*
18,5
1
162*
2
157*
45
Ge
Page 46

Abbildungen zu den Abmessungen
Ohne Lautsprecher
1270 [50-Zoll-Display-Modell]
1120 [43-Zoll-Display-Modell]
737 [50-Zoll-Display-Modell]
652 [43-Zoll-Display-Modell]
577
• Bei Verwendung der Stützsäulen L beträgt die Höhe 910 mm (50-Zoll-Display-Modell) / 825 mm (43-Zoll-Display-Modell).
*1....... PDP-505XDE/505HDE/505HDG/435XDE/435HDE/435FDE/435HDG
*2....... PDP-504HD/5040HD/504HDE/504HDG/504HDC/5045HD/434HD/4340HD/434HDE/434HDG/434HDC/4345HD
80
814 [50-Zoll-Display-Modell]
729 [43-Zoll-Display-Modell]
143
125
93*
98*
380
1
2
1
23*
2
28*
18,5
1
162*
2
157*
46
Ge
Ver öffentlicht von Pioneer Corporation.
Urheberrechtlich geschützt © 2004 Pioneer
Corporation. Alle Rechte vorbehalten.
Page 47

Vi ringraziamo per avere acquistato un prodotto Pioneer.
Vi preghiamo di leggere attentamente le Istruzioni per l’uso per
imparare il modo sicuro e corretto di operare sul vostro modello. Vi
consigliamo di tenere le Istruzioni per l’uso a portata di mano per
farvi riferimento in futuro.
Installazione
¶ In caso di difficoltà durante l’installazione, rivolgetevi al vostro
rivenditore.
Pioneer non è responsabile per alcun danno causato
dall’installazione o dall’uso impropri, nonché da modifiche o
catastrofi naturali.
Indice
Precauzioni ...................................................................... 47
Verifica dei Pezzi Contenuti nella Confezione .............. 48
Precauzioni
Questo prodotto è un supporto di tavolo progettato
esclusivamente dalla Pioneer per display a plasma (PDP-505XDE /
PDP-505HDE / PDP-505HDG / PDP-435XDE / PDP-435HDE /
PDP-435FDE / PDP-435HDG / PDP-504HD / PDP-5040HD /
PDP-504HDE / PDP-504HDG / PDP-504HDC / PDP-5045HD /
PDP-434HD / PDP-4340HD / PDP-434HDE / PDP-434HDG /
PDP-434HDC / PDP-4345HD).
L’uso di modelli diversi potrebbe provocare instabilità ed essere la
causa di possibili incidenti.
Per ulteriori informazioni rivolgetevi al negozio dove lo avete
acquistato.
Non installate o modificate in alcun caso il prodotto in modo
diverso da quello indicato. Non usate questo supporto per display
a plasma progettati da altri e non modificatelo o usatelo per altri
scopi.
Un’installazione impropria è molto pericolosa perché potrebbe
cadervi addosso o causare altri incidenti.
Colonne di Sostegno/Distanziatori Usati/Tavolo
Non Usato ........................................................................ 48
Montaggio del Supporto ................................................ 49
Fissaggio del Display a Plasma ...................................... 50
Meccanismo di Regolazione dell’Inclinazione
dell’Angolo in Avanti/Indietro ....................................... 51
Installazione del Prodotto su una Struttura
di Sostegno, ecc. ............................................................. 52
Preparazione dei cavi ...................................................... 53
Prendere precauzioni contro la caduta dell’apparecchio ... 54
Separare il Display a Plasma dal Supporto .................. 55
Specifiche......................................................................... 55
Diagramma delle Dimensioni......................................... 55
ATTENZIONE
Questo simbolo si riferisce a una pratica pericolosa o insicura
che potrebbe causare incidenti alla persona o alle cose.
Posizionamento dell’installazione
• Cercate una posizione abbastanza solida da sostenere il peso
del supporto e del display.
• Assicuratevi di collocarlo in una posizione piana e stabile.
• Non installatelo all’esterno, su una fonte di calore o vicino ad
una spiaggia.
• Non installate il supporto dove potrebbe essere soggetto a
vibrazioni o colpi.
Assemblaggio e installazione
• Montate il supporto in conformità alle istruzioni per
l’assemblaggio e la sicurezza, fissate tutte le viti nelle
apposite sedi.
Esistono casi in cui si possono verificare incidenti
imprevisti, come la rottura dell’attrezzatura o la caduta in
seguito all’installazione del display a plasma, perché il
supporto non era stato installato correttamente.
• Il display deve sempre essere installato da due o più
persone per assicurarsi di installarlo correttamente.
• Prima dell’installazione spegnete il display e i dispositivi
periferici, quindi staccate il cavo con la spina di corrente
dalla presa.
Questo prodotto può ruotare di 10° verso sinistra e destra e può
essere inclinato di 2° in avanti e indietro.
Non appoggiate alcun oggetto all’interno del suo campo di
rotazione e di quello del display a plasma. Installatelo in maniera
che, durante l’uso normale o durante le rotazioni, non sporga dalla
struttura di sostegno o da altro tipo di alloggiamento. La mancata
osservanza di queste istruzioni, potrebbe causare incidenti
imprevisti come la rottura o la caduta dell’apparecchio (vedi a
pagina 52).
Deutsch
Italiano
Evitate incidenti prendendo precise precauzioni contro la caduta
dell’apparecchio (vedi a pagina 54).
47
It
Page 48

Verifica dei Pezzi Contenuti nella Confezione
Verificate che ci siano tutti i pezzi accessori prima di procedere al montaggio e all’installazione.
Supporto di tavolo x 1
Colonne di sostegno S x 2
[colonne corte]
Colonne di sostegno L x 2
[colonne lunghe]
Legatori per cavo x 2
Viti di installazione 1 (M8 x 16mm, argento) x 4
[da usare per ancorare le colonne di sostegno e il supporto di tavolo]
Viti di installazione 2
(M8 x 30 mm, nere) x 2
Viti di installazione 3
(M8 x 40mm, nere) x 2
Brugola esagonale x 1
(dimensione diagonale 6 mm)
Istruzioni per l’uso
(questo documento) x 1
Table top stand
Support de couverture de table
Tischständer
Supporto di tavolo
Tafelbladstaander
Soporte de mesa
PDK-TS05
Distanziatori x 2
Chiave inglese x 1 (10 mm)
Operating instructions
Mode d’emploi
Bedienungsanleitung
Istruzioni per l’uso
Gebruiksaanwijzing
Manual de instrucciones
Colonne di Sostegno/Distanziatori Usati/Tavolo Non Usato
I pezzi di questo supporto vengono utilizzati secondo gli altoparlanti che avete acquistato e la posizione in cui li avete collocati sul display a
plasma. Siete pregati di scegliere i pezzi da usare secondo la tabella seguente.
Colonne di sostegno L
(colonne lunghe)
Distanziatori
Può essere usato* Non può essere usato
Può essere usato* Non può essere usato
Utilizzati Utilizzati
Non può essere usatoPuò essere usato*
48
Numero di altoparlanti
combinati
Inutilizzati
PDP-S21-LR
PDP-S22-LR
PDP-S25-LR
PDP-S26-LR
Posizione d’installazione
degli altoparlanti
–
Entrambi i lati del display a plasma
(o inutilizzati)
Parte inferiore del display a plasma
Entrambi i lati del display a plasma
(o inutilizzati)
Colonne di sostegno S
(colonne corte)
Raccomandate
Raccomandate
Non può essere usato
Raccomandate
*: Possono essere utilizzati se lo schermo si trova in posizione elevata
Gli altoparlanti PDP-S25-LR e il PDF-S26-LR non possono essere installati nella parte inferiore del display a plasma.
Nota
It
Page 49

Montaggio del Supporto
Nota
Assemblatelo sempre su una superficie piana, ecc.
Inserite le viti nei fori verticalmente e non serratele con una forza
maggiore al necessario.
Procedura di montaggio
1 Scegliete le colonne di sostegno da fissare.
Scegliete le colonne di supporto adatte all’installazione
effettuata degli altoparlanti che avete acquistato, con
riferimento alle seguenti specifiche (Deve essere utilizzato
solo uno dei due tipi di colonne di supporto disponibili).
Se gli altoparlanti che avete acquistato sono PDP-S25-LR
o PDP-S26-LR.
[colonna di sostegno da usare: S (colonne corte)]
Colonna di sostegno usata: S
Altoparlanti installati nella parte inferiore del display a
plasma [colonna di sostegno da usare: L (colonne
lunghe)
Nota
Gli altoparlanti PDP-S25-LR e il PDP-S26-LR non possono essere
installati nella parte inferiore del display a plasma.
Colonna di sostegno usata: L
Se gli altoparlanti che avete acquistato sono PDP-S21-LR
o PDP-S22-LR.
Altoparlanti installati ai lati del display a plasma
[colonna di sostegno da usare: S (colonne corte)]
Colonna di sostegno usata: S
2 Assicurate la colonna di supporto al supporto
con le viti di installazione 1 (4 posizioni a
sinistra e a destra).
Utilizzate la brugola esagonale, prima di tutto per fissare le viti
di fissaggio della parte superiore, quindi per le viti di fissaggio
della parte inferiore.
Viti di installazione
(M8 x 16mm, argento)
1
3 Serrate strettamente le viti di installazione (4
posizioni a sinistra e a destra).
Italiano
Serrate strettamente le viti di installazione.
49
It
Page 50

Fissaggio del Display a Plasma
Il peso di un display a plasma di 50 pollici è di circa 40 kg,
quello di un modello da 43 pollici è di circa 30 kg, poiché
Attenzione
Nota
Assicuratevi che la superficie sulla quale installate il dispay sia
Inserite verticalmente le viti nei fori e non serratele con una forza
Assicuratevi di installare le colonne di supporto in modo sicuro
non hanno profondità, sono instabili. Sono, quindi,
necessarie almeno due persone per montarli e installarli.
perfettamente piana e stabile.
maggiore al necessario.
secondo le impostazioni del tipo di altoparlanti che avete
acquistato, con riferimento alle procedure di Montaggio del
Supporto.
Metodo di Fissaggio
1 Montaggio del display a plasma sul supporto.
Fissate le colonne di supporto di tavolo alla parte inferiore del
display a plasma, come indicato dalle frecce, quindi inseritele
adagio verticalmente. Fate molta attenzione ad inserirle
esattamente nelle scanalature del display a plasma e solo in
quel punto. Agire in un altro modo può danneggiare il pannello
del display a plasma, le sue aperture o provocare una
deformazione del supporto.
Illustrazione: si riferisce all’utilizzo delle colonne di sostegno L
Viti di installazione
(M8 x 30 mm, nere)
2
3 Fissaggio del display a plasma con le viti di
3
installazione
Fissate il display a plasma nei punti indicati dalle frecce,
utilizzando la brugola esagonale in dotazione.
.
Allineate le colonne di
sostegno con la parte
inferiore del display a
plasma, come indicato nello
schema allegato.
2 Fissaggio del display a plasma con le viti di
2
installazione
Serratele utilizzando la brugola esagonale fornita.
Illustrazione: si riferisce all’utilizzo delle colonne di sostegno S
Illustration: when using support columns S
.
Viti di installazione
(M8 x 40mm, nere)
3
Solo per il fissaggio degli altoparlanti alla parte
inferiore del display a plasma
4 Inserite i distanziatori.
Inserite i distanziatori nei fori sulla piattaforma rotante del
supporto.
50
Distanziatori
Nota
Siete pregati di non usare il distanziatore se gli altoparlanti
devono essere collocati da entrambi i lati del display a plasma.
Viti di installazione
(M8 x 30 mm, nere)
It
2
5 Montaggio degli altoparlanti.
Vedi le istruzioni per l’uso degli altoparlanti alla voce metodo di
installazione.
Page 51

Meccanismo di Regolazione dell’Inclinazione dell’Angolo in Avanti/Indietro
Su questo supporto è possibile regolare l’angolo d’inclinazione del
display a plasma entro parametri di 2° in avanti o indietro, secondo
le vostre preferenze.
Note
Assicuratevi di regolare l’angolo solo dopo aver
fissato il display a plasma.
Assicuratevi di installarlo su tavolo piatto o
altre superfici piatte.
Assicuratevi di tenere la parte superiore del display
a plasma con le mani mentre regolate
l’angolazione.
Procedura di Regolazione
1 Allentate i bulloni di ancoraggio per
l’inclinazione in avanti/indietro utilizzando la
chiave inglese in dotazione.
Mentre vi accertate di tenere ben salda la parte superiore del
display con le mani, allentate i bulloni di ancoraggio per
l’inclinazione in avanti/indietro sui lati desto e sinistro,
ruotandoli verso l’alto con la chiave inglese in dotazione.
3 Serrare i bulloni di ancoraggio per l’inclinazione
in avanti/indietro.
Serrate strettamente i bulloni di ancoraggio per
l’inclinazione in avanti/indietro sui lati sinistro e destro,
ruotandoli verso il basso con la chiave inglese in dotazione.
Assicuratevi di tenere saldamente la parte superiore del
display a plasma con le mani fino a quando non avrete stretto
completamente i bulloni.
Bulloni di ancoraggio per
l’inclinazione in avanti/indietro
Serraggio
Bulloni di ancoraggio per
l’inclinazione in avanti/indietro
Allentamento
2 Impostare l’angolazione preferita.
Fissate l’angolazione preferita muovendo lentamente il display
a plasma.
2˚
2˚
4 Controllate ancora una volta per assicurarvi che
i bulloni di ancoraggio per l’inclinazione in
avanti/indietro siano serrati completamente.
Italiano
51
It
Page 52

Installazione del Prodotto su una Struttura di Sostegno, ecc.
È necessario prendere queste precauzioni quando si sposta il
prodotto e se lo si installa in una struttura di sostegno o altro tipo
di alloggiamento.
Precauzioni durante lo spostamento
Se dovete spostare il prodotto per più di qualche
metro, per prima cosa rimuovete l’altoparlante, quindi
Attenzione
togliete il display a plasma dal supporto e spostate
l’altoparlante, il display a plasma e il supporto
separatamente.
Se rimuovete il display a plasma dal supporto,
assicuratevi di seguire la procedura descritta in
“Separare il Display a Plasma dal Supporto” a pag. 65
Precauzioni nel caso di installazione su
una struttura di sostegno o altro tipo di
alloggiamento
Dovendo installare il supporto su una struttura di
sostegno o altro tipo di alloggiamento, sostenetelo per i
Attenzione
manici che si trovano nella parte posteriore ed inferiore.
Afferrandolo per gli altoparlanti potreste danneggiarli o
torcerli.
Precauzioni per l’installazione
Assicuratevi che la quantità di spazio libero nella parte anteriore e
posteriore del supporto di tavolo sia sufficiente, come mostrato in
questo schema.
Display a plasma
Supporto di tavolo
Se il supporto sporge dalla struttura di sostegno
potrebbe causare incidenti imprevisti come la rottura
Attenzione
o la caduta dell’apparecchio.
Durante la rotazione, fate attenzione a non permettere
al display di urtare il muro o gli oggetti circostanti.
Struttura di sostegno
Dietro
Davanti
Minimo 10mm
à di
Si consiglia una profondit
Minimo 30 mm
420 mm o maggiore per la
struttura di sostegno.
Per Installare gli
altoparlanti da
entrambi i lati del
display a plasma,
sostenetelo per i manici e
dalla parte inferiore.
Per Installare gli
altoparlanti nella
parte inferiore del
display a plasma,
sostenete il display a
plasma per i manici e dai
lati.
Sporgenza pericolosa
Campo di variazione dell’angolo di rotazione.
10˚
10˚
I parametri dell’angolo d’inclinazione in avanti/indietro
2˚
2˚
52
It
Page 53

Preparazione dei cavi
Per legare i cavi, utilizzate i legatori forniti.
Nota
Prestate molta attenzione a non forzare le basi dei cavi.
Altoparlanti installati ai lati del display a plasma
Altoparlanti installati nella parte inferiore del display a
plasma
Uso dei legatori per cavo
1 Inserite il legatore per cavo nel passante
corrispondente posto sulla piattaforma rotante
del supporto.
Legatore per cavo
Passante per legatore
per cavo
2 Riunite i cavi e collocateli sul legatore.
3 Inserite il legatore per cavo nell’apposito foro
sull’estremità.
4 Tirate il legatore per serrare i cavi.
Italiano
Togliere un legatore per cavo
Per sbloccarlo rimuovete la
linguetta di serraggio dal foro del
legatore per cavo.
Linguetta di
serraggio
Foro
53
It
Page 54

Prendere precauzioni contro la caduta dell’apparecchio
Installando il supporto assicuratevi di aver preso opportune precauzioni contro la caduta dell’apparecchio.
Fissare l’apparecchio sul pavimento
Fissate l’apparecchio come illustrato nello schema, utilizzando le
viti reperibili sul mercato.
Nota
Per fissare l’apparecchio al pavimento
usate viti con un diametro nominale di 6
mm e una lunghezza minima di 20 mm.
da 9 a 15 mm
Minimo
20 mm
6 mm
Fissare l’apparecchio al muro
(la figura illustra il display da 43 pollici)
1 Fissare al display a plasma bulloni (ganci) anti-
caduta.
2 Usate ganci, cordoni o catene per fissare
stabilmente l’apparecchio a una parete, un
pilastro o a qualche altro solido elemento.
Eseguite questo lavoro nello stesso modo sul lato sinistro e
su quello destro.
La lunghezza dei cordoni o catene utilizzate deve essere
sufficiente a permettere al supporto di ruotare liberamente.
Nota
Usate ganci, cordoni, catene o raccordi
disponibili sul mercato.
Il gancio consigliato: diametro
nominale 8 mm, lunghezza 12-15 mm
12–15 mm
8mm
Posizione delle viti del pavimento: senza gli altoparlanti
Unità: mm
575 (display da 50 pollici)
500 (display da 43 pollici)
120
575 (display da 50 pollici)
500 (display da 43 pollici)
24
356
1 Gancio
2 Cordone o catena
Raccordo
Fissare la rotazione verso la parte anteriore
Fissate l’apparecchio come illustrato nello schema, utilizzando le
viti reperibili sul mercato.
Nota
Utilizzate una vite che abbia un normale
diametro di 4 mm e una lunghezza da 15 a
20 mm per fissare la rotazione verso la
parte anteriore.
da 15 a 20 mm
da 7 a 12 mm
4 mm
54
It
Page 55

Separare il Display a Plasma dal Supporto
Per rimuovere il display a plasma dal supporto,
assicuratevi di seguire sempre la procedura descritta
Attenzione
sotto per evitare incidenti.
1 Prima di tutto, assicuratevi che il bullone di
ancoraggio per l’inclinazione in avanti/indietro
sia stato serrato perfettamente.
2 Prima di tutto, liberate uno spazio su una
superficie piana ecc., dove potete appoggiare il
display a plasma piatto, quindi copritelo con un
telo per proteggerlo dai graffi o da altri
danneggiamenti.
3 Rimuovete gli altoparlanti.
4 Con riferimento alle fasi 2 e 3 nel capitolo sul
Fissaggio del Display a Plasma (Pag. 50),
rimuovete le viti nere (4 viti).
Nota
Non rimuovete le viti argentate. Se lo fate, la colonna di
sostegno potrebbe scivolare fuori posto e cadere.
5 Tenendo il display a plasma per i manici e dalla
parte inferiore, sollevatelo verticalmente.
6 Collocate lentamente il display a plasma sul
telo che avete preparato al punto 2 con lo
schermo rivolto verso il basso.
Nota
Quando ricollocate il display a plasma sul supporto,
assicuratevi che le colonne di supporto destra e sinistra siano
state inserite con la stessa angolazione.
Specifiche
Dimensioni esterne 577mm(L) x 351mm(A) x 380mm(P) (Se si usano le colonne di sostegno L)
Peso 9,5 kg
• Le specifiche sopraesposte e la forma esterna possono essere modificate per migliorare il prodotto senza alcun preavviso.
Diagramma delle Dimensioni
Unità: mm
Le misurazioni nella figura non comprendono gli impianti di base per la collocazione degli altoparlanti.
Per installare gli altoparlanti PDP-S25-LR o PDP-S26-LR
1500 [display da 50 pollici: se l’installazione è in posizione libera]*
1462 [display da 50 pollici: se l’installazione è in posizione allineata]*
1350 [display da 43 pollici: se l’installazione è in posizione libera]*
1312 [display da 43 pollici: se l’installazione è in posizione allineata]*
737 [display da 50 pollici]
652 [display da 43 pollici]
577
1
2
1
2
125
80
814 [display da 50 pollici]
729 [display da 43 pollici]
143
Italiano
93
23
18,5
162
380
• Se usate le colonne di sostegno L, l’altezza è 910 (modello di display da 50 pollici) / 825 (modello di display da 43 pollici)
*1 Posizione libera: collocato in modo da permettere la regolazione dell’angolo dell’altoparlante
*2 Posizione allineata: collocato in modo da fissare l’angolazione dell’altoparlante e conferire all’apparecchio una dimensione più compatta.
55
It
Page 56

Diagramma delle Dimensioni
Per installare gli altoparlanti PDP-S21/S22/S12/S13-LR
Altoparlanti istallati ai lati del display a plasma
1483 [display da 50 pollici]
1288 [display da 43 pollici]
737 [display da 50 pollici]
652 [display da 43 pollici]
577
• Se usate le colonne di sostegno L, l’altezza è 910 (modello di display da 50 pollici) / 825 (modello di display da 43 pollici)
Altoparlanti istallati nella parte inferiore del display a plasma
125
814 [display da 50 pollici]
729 [display da 43 pollici]
80
143
93*
98*
380
1
2
1
23*
2
28*
18,5
1
162*
2
157*
1270 [display da 50 pollici]
1120 [display da 43 pollici]
833 [display da 50 pollici]
748 [display da 43 pollici]
80
910 [display da 50 pollici]
825 [display da 43 pollici]
239
577
*1....... PDP-505XDE/505HDE/505HDG/435XDE/435HDE/435FDE/435HDG
*2....... PDP-504HD/5040HD/504HDE/504HDG/504HDC/5045HD/434HD/4340HD/434HDE/434HDG/434HDC/4345HD
125
100*
98*
380
1
2
1
23*
2
28*
18,5
1
162*
2
157*
56
It
Page 57

Senza altoparlanti
Diagramma delle Dimensioni
1270 [display da 50 pollici]
1120 [display da 43 pollici]
737 [display da 50 pollici]
652 [display da 43 pollici]
577
• Se usate le colonne di sostegno L, l’altezza è 910 (modello di display da 50 pollici) / 825 (modello di display da 43 pollici)
*1....... PDP-505XDE/505HDE/505HDG/435XDE/435HDE/435FDE/435HDG
*2....... PDP-504HD/5040HD/504HDE/504HDG/504HDC/5045HD/434HD/4340HD/434HDE/434HDG/434HDC/4345HD
80
814 [display da 50 pollici]
729 [display da 43 pollici]
143
125
93*
98*
380
1
2
1
23*
2
28*
18,5
1
162*
2
157*
Italiano
Pubblicato da Pioneer Corporation.
Copyright © 2004 Pioneer Corporation.
Tutti i diritti riservati.
57
It
Page 58

Hartelijk dank voor de aanschaf van dit Pioneer product.
Lees deze gebruiksaanwijzing aandachtig door voor een veilige en
juiste bediening van dit model.
Berg de gebruiksaanwijzing veilig op voor het geval u deze later
wilt raadplegen.
Installatie
¶ Raadpleeg uw verkoper indien u problemen met de installatie
ondervindt.
Pioneer is niet verantwoordelijk voor schade veroorzaakt door
onjuiste installatie, onjuist gebruik, wijzigingen of
natuurrampen.
Inhoud
Waarschuwingen ............................................................ 58
Controleer de meegeleverde onderdelen ..................... 59
Tabel voor de te gebruiken steunkolommen/
afstandsblokjes ............................................................... 59
Monteren van de Staander ............................................ 60
Bevestiging van de Plasma-Display .............................. 61
Instellingsmechanisme voor de voor- en achterwaartse
hellingshoek .................................................................... 62
Installeren van het Product op een Rek, etc. ................ 63
Voorbereiding van de kabels ......................................... 64
Zorg ervoor dat het apparaat niet omvalt .................... 65
De plasma-display loskoppelen van de staander......... 66
Technische gegevens ...................................................... 66
Schema van afmetingen................................................. 66
Waarschuwing
Dit symbool geeft een gevaar of onveilig gebruik aan dat
kan leiden tot lichamelijk letsel of schade aan goederen.
Waarschuwingen
Dit product is een tafelstaander die speciaal is ontworpen voor de
plasma-displays van Pioneer (PDP-505XDE / PDP-505HDE /
PDP-505HDG / PDP-435XDE / PDP-435HDE / PDP-435FDE /
PDP-435HDG / PDP-504HD / PDP-5040HD / PDP-504HDE /
PDP-504HDG / PDP-504HDC / PDP-5045HD / PDP-434HD /
PDP-4340HD / PDP-434HDE / PDP-434HDG / PDP-434HDC /
PDP-4345HD).
Indien dit product met een ander model wordt gebruikt kan door
instabiliteit schade worden veroorzaakt.
Neem s.v.p. contact op met het verkooppunt waar u deze
staander heeft gekocht voor meer informatie.
Het product mag niet op een andere dan de aangegeven wijze
worden geïnstalleerd of gewijzigd.
Deze staander mag niet voor een andere dan de daarvoor
bestemde plasma-display worden gebruikt, noch mag de staander
worden gewijzigd of voor andere doeleinden worden gebruikt.
Onjuiste installatie is zeer gevaarlijk omdat de staander kan
omvallen of een ander ongeval kan veroorzaken.
Plaats van installatie
• Kies een plaats die stevig genoeg is om het gewicht van de
staander en de displays te kunnen dragen.
• Zorg ervoor dat de staander op een vlakke en stabiele plaats
wordt geïnstalleerd.
• Installeer de staander niet buiten, bij een warme bron of in de
buurt van het strand.
• Installeer de staander niet waar hij blootstaat aan trillingen of
schokken.
Montage en installatie
• Monteer de staander overeenkomstig de montageinstructies en bevestig alle schroeven stevig vast op de
daarvoor bestemde plaatsen.
Een ongeval zoals het breken of omvallen van de
apparatuur heeft zich weleens voorgedaan nadat de display
was geïnstalleerd, omdat de staander niet was
geïnstalleerd volgens instructies.
• De display dient altijd door twee of meer mensen te
worden geïnstalleerd om er zeker van te zijn dat hij veilig
wordt geplaatst.
• Koppel voorafgaande aan installatie de display en
randapparatuur los van de netspanning, en verwijder
vervolgens de netstekker uit het stopcontact.
58
Du
Dit product kan 10° naar links en naar rechts, en 2° voorwaarts en
achterwaarts gedraaid worden.
Plaats geen objecten binnen het rotatiebereik van dit product en
de plasma-display. Installeer het product zodanig dat het tijdens
normaal gebruik niet uit het rek of een andere plaats waar het is
geïnstalleerd uitsteekt.. Indien dit niet in acht wordt genomen,
kunnen ongevallen zoals het breken of omvallen van de apparatuur
zich voordoen (zie blz. 63).
Voorkom ongevallen veroorzaakt door het omvallen van het
product door de juiste maatregelen te nemen zodat de staander
niet omvalt (zie blz. 65).
Page 59

Controleer de meegeleverde onderdelen
Controleer voorafgaande aan montage en installatie of u alle meegeleverde onderdelen heeft ontvangen.
Tafelbladstaander x 1
Steunkolommen S x 2
[korte kolommen]
Steunkolommen L x 2
[lange kolommen]
Kabelbinders x 2
Montageschroeven 1 (M8 x 16 mm: zilverkleurig) x 4
[Voor het vastzetten van de steunkolommen en de tafelbladstaander]
Montageschroeven 2
(M8 x 30 mm: zwart) x 2
Montageschroeven 3
(M8 x 40 mm: zwart) x 2
Zeskantsleutel x 1
(Afmeting diagonaal: 6 mm)
Gebruiksaanwijzing
(dit document) x 1
Table top stand
Support de couverture de table
Tischständer
Supporto di tavolo
Tafelbladstaander
Soporte de mesa
PDK-TS05
Afstaandersblokjes x 2
Moersleutel x 1 (10mm)
Operating instructions
Mode d’emploi
Bedienungsanleitung
Istruzioni per l’uso
Gebruiksaanwijzing
Manual de instrucciones
Tabel voor de te gebruiken steunkolommen/afstandsblokjes
Welke onderdelen voor deze staander dienen te worden gebruikt is afhankelijk van het gekochte type speakers en van de plaats van
installatie van de plasma-display. Kies aan de hand van de volgende tabel de onderdelen die dienen te worden gebruikt.
Gecombineerde
speakernummers
Wordt niet gebruikt
PDP-S21-LR
PDP-S22-LR
PDP-S25-LR
PDP-S26-LR
Plaats van installatie van de speaker
–
Beide zijden van de plasma-display
(of wordt niet gebruikt)
Onderste gedeelte van de plasma-display
Beide zijden van de plasma-display
(of wordt niet gebruikt)
Steunkolommen S
(korte kolommen)
Aanbevolen
Aanbevolen
Kan niet worden gebruikt
Aanbevolen
Steunkolommen L
(lange kolommen)
Afstaandersblokjes
Kan worden gebruikt* Kan niet worden gebruikt
Kan worden gebruikt* Kan niet worden gebruikt
Wordt gebruikt Wordt gebruikt
Kan niet worden gebruiktKan worden gebruikt*
Nederlands
*: Kan worden gebruikt wanneer het scherm op hoogte is geplaatst.
De speakers PDP-S25-LR en PDP-S26-LR kunnen niet aan het onderste gedeelte van de plasma-display worden bevestigd.
Let op
59
Du
Page 60

Monteren van de Staander
Let op
Monteer de staander op een vlakke tafel, etc.
Voeg twee schroeven verticaal in de gaten en draai ze niet
steviger vast dan nodig.
Wijze van monteren
1 Kies de steunkolommen die moeten worden
aangebracht.
Kies de steunkolommen overeenkomstig de instelling van de
speakers die u heeft gekocht met inachtneming van het
navolgende (Slechts één van de twee soorten beschikbare
steunkolommen dient te worden gebruikt).
Wanneer de door u aangeschafte speakers PDP-S25-LR
of PDP-S26-LR zijn.
[Steunkolom die wordt gebruikt: steunkolom S (korte
kolommen)]
Steunkolom die wordt gebruikt:
Steunkolom S
Bij montage van de speakers aan het onderste
gedeelte van de plasma-display [Steunkolom die wordt
gebruikt: steunkolom L (lange kolommen]
Let op
De PDP-S25-LR en PDP-S26-LR kunnen niet aan het onderste
gedeelte van de plasma-display worden bevestigd.
Steunkolom die wordt gebruikt:
Steunkolom L
Wanneer de door u aangeschafte speakers PDP-S21-LR
of PDP-S22-LR zijn.
Bij de montage van de speakers aan elke zijde van de
plasma-display [Steunkolom die wordt gebruikt:
steunkolom S (korte kolommen)]
Steunkolom die wordt gebruikt:
Steunkolom S
2 Bevestig de steunkolom met de
montageschroeven 1 (op 4 plaatsen aan de
linker- en rechterzijde) aan de staander.
Bevestig eerst met gebruik van de bijgeleverde zeskantsleutel
de bovenste montageschroef, en vervolgens de onderste
montageschroef, en draai ze niet helemaal aan.
Montageschroeven
(M8 x 16 mm: zilverkleurig)
1
3 Draai de montageschroeven nu (op 4 plaatsen
aan de linker- en rechterzijde) helemaal aan.
60
Du
Draai de montageschroeven nu helemaal aan
Page 61

Bevestiging van de Plasma-Display
De plasma-display van 50 inch weegt ongeveer 40 kg,
het model van 43 inch ongeveer 30 kg; ze zijn niet
Waarschuwing
Let op
Zorg ervoor dat de plasma-display op een vlakke plaats wordt
geïnstalleerd.
Voeg de schroeven verticaal in de gaten en draai ze niet steviger
vast dan nodig.
Zorg ervoor dat u de steunkolommen zorgvuldig overeenkomstig
de opstelling van het door u aangeschafte type speakers plaatst
met inachtneming van de procedure in de Montage van de
Staander.
diep en zijn daardoor onstabiel. Zorg er daarom voor
dat tenminste twee personen de display monteren en
installeren.
Bevestigingsmethode
1 Bevestig de plasma-display aan de staander.
Bevestig zoals bij de pijlen aangegeven de steunkolommen
van de staander aan het onderste gedeelte van de plasmadisplay, en leidt ze vervolgens verticaal naar binnen. Zorg
ervoor dat de steunkolommen van de staander niet in enig
ander gedeelte van de plasma-display dan in de invoegsleuven
van de staander worden geplaatst, anders kan het paneel of
de uitgangen van de plasma-display beschadigd raken of kan
de staander kromtrekken.
Zorg dat de steunkolommen
zijn opgelijnd met het
onderste gedeelte van de
plasma-display zoals
aangegeven in het
bijbehorende schema.
Illustratie: bij het gebruik van steunkolommen L
Illustration: when using support columns L
Montageschroeven
(M8 x 30 mm: zwart)
2
3 Het vastzetten van de plasma-display met
montageschroeven 3.
Bevestig de plasma-display op de bij de pijlen aangegeven
plaatsen met gebruik van de bijgeleverde zeskantsleutel.
2 Het vastzetten van de plasma-display met
2
montageschroeven
Schroef deze stevig vast met gebruik van de bijgeleverde
zeskantsleutel.
Illustratie: bij het gebruik van steunkolommen S
.
Montageschroeven
(M8 x 40 mm: zwart)
3
Alleen wanneer de speakers aan het onderste
gedeelte van de plasma-display worden bevestigd
4 Invoegen van afstandsblokjes.
Voeg de afstandsblokjes in de gaten op het roterend vlak van
de staander.
Afstandsblokje
Let op
Het afstandsblokje mag niet worden gebruikt indien de speakers
aan elke zijde van de plasma-display worden bevestigd.
Nederlands
Montageschroeven
(M8 x 30 mm: zwart)
2
5 Bevestiging van de speakers.
Zie de gebruiksaanwijzing van de speaker voor de wijze van
monteren.
61
Du
Page 62

Instellingsmechanisme voor de voor- en achterwaartse hellingshoek
Op deze staander kan de hellingshoek van de plasma-display
binnen een bereik van 2° naar wens voorwaarts en achterwaarts
worden ingesteld.
Let op
Zorg ervoor dat de hoek pas wordt ingesteld nadat
de plasma-display is bevestigd.
Zorg ervoor dat deze op een vlakke tafel of op
ander vlak oppervlak wordt geplaatst.
Houd de bovenzijde van de plasma-display vast
terwijl u de hoek instelt.
Procedure voor Instelling
1 Maak met gebruik van de moersleutel de
ankerbouten voor de voor- en achterwaartse
hellingshoek los.
Terwijl u de bovenzijde van de plasma-display vasthoudt maakt
u de voorwaartse/achterwaartse hellingsankerbouten aan
de linker- en rechterzijden los door deze met gebruik van de
bijgeleverde moersleutel naar boven te draaien.
Voorwaartse/achterwaartse
hellingsankerbout
Losdraaien
3 Draai de voor-/achterwaartse
hellingsankerbouten aan.
Draai de voor-/achterwaartse hellingsankerbouten stevig
op de linker- en rechterzijden aan door deze met de
bijgeleverde moersleutel naar beneden te draaien.
Houd de bovenzijde van de plasma-display met de hand vast
totdat de bouten geheel zijn aangedraaid.
Voorwaartse/achterwaartse
hellingsankerbout
Aandraaien
4 Controleer nogmaals of de voor-/achterwaartse
hellingsankerbouten geheel zijn aangedraaid.
2 Stel de gewenste hoek in.
Stel de gewenste hoek in door de plasma-display langzaam
voor- of achterwaarts te bewegen.
2˚
62
Du
2˚
Page 63

Installeren van het Product op een Rek, etc.
Neem de volgende voorzorgsmaatregelen in acht bij het
verplaatsen of installeren van dit product met een plasma-display
in een rek of andere omkasting.
Voorzorgsmaatregelen bij verplaatsing
Verwijder voorafgaande aan verplaatsing eerst de
speakers en vervolgens de plasma-display van de
Waarschuwing
staander wanneer het product over een afstand
van meer dan enkele meters wordt verplaatst, en
verplaats de speakers, plasma-display en de
staander afzonderlijk.
Wanneer de plasma-display van de staander wordt
verwijderd, volg dan de procedure in “De plasmadisplay loskoppelen van de staander” op blz. 66.
Voorzorgsmaatregelen bij installatie in een
rek of andere omkasting
Houd de plasma-display bij installatie in een rek of
andere omkasting bij de handvaten vast die zich aan
Waarschuwing
de achterzijde en de onderkant van de plasma-display
bevinden. Indien u de plasma-display bij de speakers
vasthoudt kunnen deze beschadigd raken of
vervormen.
Voorzorgsmaatregelen voor installatie
Zorg ervoor dat u aan de voorzijde en achterzijde van de
tafelbladstaander minimaal zoveel ruimte heeft als in de figuur
hieronder aangegeven.
Plasma-display
Tafelbladstaander
Waarschuwing
Achterzijde
Voorzijde
Indien de staander uit het rek uitsteekt kan dit
ongevallen veroorzaken, en kan het apparaat
breken of omvallen.
Zorg er bij het draaien voor dat de display niet
tegen een muur of andere objecten aanstoot.
Rek
Min. 10 mm
Diepte van het rek
Min. 30 mm
420 mm of meer wordt
aanbevolen
Bij het installeren van
speakers aan beide
zijden van de plasmadisplay
Houd de plasma-display
bij de handvaten en aan
de onderzijde vast.
Bij het installeren van
de speakers aan het
onderste gedeelte
van de plasmadisplay
Houd de plasma-display
bij de handvaten en aan
de zijkanten vast.
Een display die
uitsteekt is gevaarlijk.
Bereik van de draaihoeken
10˚
10˚
Instellingsbereik van de voor-/achterwaartse hellingshoek
2˚
2˚
Nederlands
63
Du
Page 64

Voorbereiding van de kabels
Gebruik de bijgeleverde kabelbinders om de kabels vast te binden.
Let op
Zorg ervoor dat er geen kracht op de kabels wordt uitgeoefend.
Bij het installeren van de speakers aan elke zijde van de
plasma-display
Bij het installeren van de speakers aan het onderste
gedeelte van de plasma-display
Kabelbinders gebruiken
1 Een kabelbinder door de kabelbinderhouder
leiden aan de bovenzijde van het roterend vlak
van de staander.
Kabelbinder
Kabelbinderhouder
2 Het bijeen binden van kabels en plaatsing
daarvan op de kabelbinder.
3 De kabelbinder door het gat aan het uiteinde
van de kabelbinder leiden.
4 Aan het uiteinde van de kabelbinder trekken
om de kabels vast te zetten.
64
Du
Verwijderen van de kabelbinder
Wanneer het vastgezette gedeelte
uit het kabelbindergat wordt
verwijderd, dan zit het los.
Vastgezet
gedeelte
Gat
Page 65

Zorg ervoor dat het apparaat niet omvalt
Nadat de staander is geïnstalleerd, dient u zodanige maatregelen te nemen dat de staander niet omvalt.
Het stabiel plaatsen van de staander op de
grond
Plaats het apparaat stabiel op de grond zoals in het schema
aangegeven met in de winkel verkrijgbare schroeven.
Let op
Voor het stabiel plaatsen van het
apparaat op de grond moeten
schroeven met een nominale diameter
van 6 mm en een lengte van min. 20
mm worden gebruikt.
9 tot 15 mm
Min. 20 mm
6 mm
Een muur gebruiken voor een stabiele
plaatsing
(Model met display van 43 inch in de figuur)
1 Bevestiging van bouten (haken) om te
voorkomen dat de plasma-display omvalt.
2 Sterke snoeren of kettingen gebruiken om de
display stevig aan een muur, kolom of ander
stevig element te plaatsen.
Voer dit uit aan zowel de linker- als aan de rechterzijde.
De lengte van het snoer of de ketting dient zo lang te zijn
dat de staander vrij kan draaien.
Let op
Gebruik haken, touwen, kettingen en
appendages die in de winkel verkrijgbaar
zijn.
Aanbevolen haak: Nominale diameter 8 mm
Lengte 12 tot 15 mm
12 tot 15 mm
8mm
Plaats van de vloerbevestigingsschroeven: zonder speakers
Eenheid: mm
575 (model met display van 50 inch)
500 (model met display van 43 inch)
575 (model met display van 50 inch)
120
500 (model met display van 43 inch)
24
356
1 Haak
2 Snoer of ketting
Appendage
Vastzetten van de draaiing voorwaarts
Plaats het apparaat stabiel op de grond zoals in het schema
aangegeven met in de winkel verkrijgbare schroeven.
Let op
Gebruik een schroef met een nominale
diameter van 4 mm en een lengte van 15
tot 20 mm om de draaiing voorwaarts
vast te zetten.
7 tot 12 mm
15 tot 20 mm
Nederlands
4 mm
65
Du
Page 66

De plasma-display loskoppelen van de staander
Wanneer de plasma-display van de staander wordt
verwijderd, neem dan de hierna omschreven
Waarschuwing
procedure in acht ter voorkoming van ongevallen.
1 Controleer eerst of de ankerbout voor de
helling voor- en achterwaarts stevig vastzit.
2 Maak eerst ruimte vrij op een vlakke vloer etc.
waarop de plasma-display vlak kan worden
4 Verwijder zoals aangegeven in stap 2 en 3
onder Bevestiging van de Plasma-Display (blz.
61) de zwarte schroeven (4 schroeven).
Let op
De zilveren schroeven mogen niet worden verwijderd. Indien
dit wel gebeurt, dan is het mogelijk dat de steunkolommen van
hun plaats schuiven en omvallen.
5 Houd de plasma-display vast bij de handvaten
en aan de onderzijde en til hem verticaal op.
neergelegd; leg vervolgens een doek op het
oppervlak zodat de display niet bekrast of
anderszins beschadigd raakt.
6 Plaats de plasma-display langzaam op het doek
dat in stap 2 werd neergelegd, met het scherm
naar beneden.
3 Verwijder de speakers.
Let op
Wanneer de plasma-display weer aan de staander wordt
bevestigd dient u ervoor te zorgen dat de linker- en
rechtersteunkolommen op dezelfde hoek zijn ingesteld.
Technische gegevens
Externe afmetingen 577 (W) x 351 (H) x 380 (D) mm (Wanneer steunkolommen L worden gebruikt.)
Gewicht 9,5 kg
• Bovenstaande gegevens en uiterlijk kunnen zonder nadere aankondiging ter verbetering van het product worden gewijzigd.
Schema van afmetingen
Eenheid: mm
De appendages voor het bevestigen van de speakers zijn niet in de afmetingen van deze figuur opgenomen.
Bij het plaatsen van de speakers PDP-S25-LR of PDP-S26-LR
1500 [model met display van 50 inch: wanneer afstaand geplaatst]*
1462 [model met display van 50 inch: wanneer vlak geplaatst]*
1350 [model met display van 43 inch: wanneer afstaand geplaatst]*
1312 [model met display van 43 inch: wanneer vlak geplaatst]*
1
2
1
2
93
23
125
737 [model met display van 50 inch]
652 [model met display van 43 inch]
577
• Wanneer de steunkolommen L worden gebruikt is de hoogte 910 (model met display van 50 inch) / 825 (model met display van 43 inch).
*1 Afstaand geplaatst: Zodanig bevestigd dat de speakerhoek kan worden aangepast.
*2 Vlak geplaatst: Zodanig bevestigd dat de speakerhoek is vastgezet en het apparaat compacter is.
66
Du
80
814 [model met display van 50 inch]
729 [model met display van 43 inch]
143
162
380
18,5
Page 67

Bij het plaatsen van de speakers PDP-S21/S22/S12/S13-LR
Bij installatie van speakers aan elke zijde van de plasma-display
Schema van afmetingen
1483 [model met display van 50 inch]
1288 [model met display van 43 inch]
737 [model met display van 50 inch]
652 [model met display van 43 inch]
577
• Wanneer de steunkolommen L worden gebruikt is de hoogte 910 (model met display van 50 inch) / 825 (model met display van 43 inch).
Bij installatie van speakers aan het onderste gedeelte van de plasma-display
1
93*
2
98*
23*
28*
125
80
814 [model met display van 50 inch]
729 [model met display van 43 inch]
143
162*
157*
380
1
2
18,5
1
2
1270 [model met display van 50 inch]
1120 [model met display van 43 inch]
80
833 [model met display van 50 inch]
748 [model met display van 43 inch]
577
*1....... PDP-505XDE/505HDE/505HDG/435XDE/435HDE/435FDE/435HDG
*2....... PDP-504HD/5040HD/504HDE/504HDG/504HDC/5045HD/434HD/4340HD/434HDE/434HDG/434HDC/4345HD
910 [model met display van 50 inch]
825 [model met display van 43 inch]
239
125
100*
98*
380
1
2
1
23*
2
28*
Nederlands
18,5
1
162*
2
157*
67
Du
Page 68

Schema van afmetingen
Zonder speakers
1270 [model met display van 50 inch]
1120 [model met display van 43 inch]
80
737 [model met display van 50 inch]
652 [model met display van 43 inch]
577
• Wanneer de steunkolommen L worden gebruikt is de hoogte 910 (model met display van 50 inch) / 825 (model met display van 43 inch).
*1....... PDP-505XDE/505HDE/505HDG/435XDE/435HDE/435FDE/435HDG
*2....... PDP-504HD/5040HD/504HDE/504HDG/504HDC/5045HD/434HD/4340HD/434HDE/434HDG/434HDC/4345HD
814 [model met display van 50 inch]
729 [model met display van 43 inch]
143
125
93*
98*
380
1
2
1
23*
2
28*
18,5
1
162*
2
157*
68
Du
Uitgegeven door Pioneer Corporation.
Copyright © 2004 Pioneer Corporation.
Alle rechten voorbehouden.
Page 69

Gracias por comprar un producto Pioneer.
Por favor, lea atentamente el Manual de instrucciones para saber
cómo utilizar este modelo de una forma segura y correcta.
Le recomendamos que conserve el Manual de instrucciones para
consultarlo en el futuro.
Instalación
¶ Si encuentra dificultades para la instalación, consulte a su
distribuidor.
Pioneer no es responsable de ningún daño que pueda
derivarse de una instalación o uso inapropiados,
modificaciones o desastres naturales.
Índice
Precauciones.................................................................... 69
Comprobación de las piezas incluidas .......................... 70
Tabla de usos de las columnas de
soporte / espaciadores ................................................... 70
Montaje del soporte ....................................................... 71
Montaje de la pantalla de plasma ................................. 72
Mecanismo de ajuste del ángulo de inclinación
delantera y posterior ...........................................................
Instalación del producto en un bastidor o similar ....... 74
73
Precauciones
Este producto es un soporte de mesa diseñado exclusivamente
para pantallas de plasma (PDP-505XDE / PDP-505HDE /
PDP-505HDG / PDP-435XDE / PDP-435HDE / PDP-435FDE /
PDP-435HDG / PDP-504HD / PDP-5040HD / PDP-504HDE /
PDP-504HDG / PDP-504HDC / PDP-5045HD / PDP-434HD /
PDP-4340HD / PDP-434HDE / PDP-434HDG / PDP-434HDC /
PDP-4345HD) de Pioneer.
Su empleo con otros modelos podría provocar la inestabilidad del
producto, con el consiguiente riesgo de lesiones. Si desea más
información, póngase en contacto con el establecimiento en el
que compró su pantalla.
No instale ni modifique el producto de una forma distinta a la
especificada.
No utilice este soporte para una pantalla de plasma diferente de
las indicadas, y no lo modifique ni lo utilice para otros fines.
Es muy peligroso realizar una instalación inadecuada, ya que
puede tener como resultado la caída de la pantalla o accidentes de
otro tipo.
Lugar de instalación
• Elija un lugar lo suficientemente resistente como para aguantar
el peso del soporte y la pantalla.
• Asegúrese de que el lugar de instalación sea una superficie
llana y estable.
• No lo instale en exteriores, en fuentes termales ni cerca de una
playa.
• No instale el soporte donde pueda sufrir vibraciones o golpes.
Preparación de los cables ............................................... 75
Preventing Equipment from Falling Over ..................... 76
Desmontaje de la pantalla de plasma del soporte ...... 77
Especificaciones .............................................................. 77
Diagrama de dimensiones.............................................. 77
PRECAUCIÓN
Este símbolo indica un riesgo o práctica insegura que puede
tener como resultado daños personales o materiales.
Montaje e instalación
• Monte el soporte de acuerdo con las instrucciones de
montaje y atornille de forma segura todos los tornillos en
los lugares indicados.
Ha habido casos de accidentes imprevistos, como la rotura
o caída del equipo después de la instalación de la pantalla,
porque el soporte no se había instalado de acuerdo con las
instrucciones.
• Para garantizar una instalación segura de la pantalla , es
necesario que siempre lo hagan dos o más personas.
• Antes de la instalación, apague la pantalla y los
dispositivos periféricos y desenchufe el cable de
alimentación de la toma eléctrica.
Este producto gira 10° a derecha e izquierda, y se inclina 2° hacia
adelante y hacia atrás.
No coloque objetos en la zona de rotación de este producto y de la
pantalla de plasma. Instale este producto de tal forma que durante
su uso normal o cuando se gire no sobresalga del bastidor o del
lugar en el que lo haya montado. Si no lo hace así, es posible que
se produzcan accidentes imprevistos, como la rotura o caída del
equipo (véase la página 74).
Para evitar accidentes causados por la caída del producto, tome
todas las medidas necesarias para impedir que se caiga (véase la
página 76).
Nederlands
Español
69
Sp
Page 70

Comprobación de las piezas incluidas
Antes de proceder al montaje e instalación, asegúrese de tener todas las piezas incluidas.
Soporte de mesa x 1
Columnas de soporte C x 2
[columnas cortas]
Columnas de soporte L x 2
[columnas largas]
Bridas para cables x 2
Tornillos de instalación 1 (M8 x 16 mm: plateados) x 4
[utilizados para anclar las columnas y el soporte de mesa]
Tornillos de instalación
(M8 x 30 mm: negros) x 2
2
Tornillos de instalación
3
(M8 x 40 mm: negros) x 2
Llave Allen x 1
[tamaño diagonal: 6 mm)
Manual de instrucciones
(este documento) x 1
Table top stand
Support de couverture de table
Tischständer
Supporto di tavolo
Tafelbladstaander
Soporte de mesa
PDK-TS05
Espaciadores x 2
Llave de maquinista x 1 (10 mm)
Operating instructions
Mode d’emploi
Bedienungsanleitung
Istruzioni per l’uso
Gebruiksaanwijzing
Manual de instrucciones
Tabla de usos de las columnas de soporte / espaciadores
Las piezas empleadas en este soporte dependerán de los altavoces adquiridos y de su lugar de colocación en la pantalla de plasma. Utilice
la siguiente tabla para seleccionar las piezas que deberá utilizar.
Números de los
altavoces combinados
No se utilizan
PDP-S21-LR
PDP-S22-LR
PDP-S25-LR
PDP-S26-LR
Lugar de instalación de los
altavoces
–
A ambos lados de la pantalla
de plasma (o no se utilizan)
Debajo de la pantalla de plasma
A ambos lados de la pantalla
de plasma (o no se utilizan)
Columnas de soporte C
(columnas cortas)
Recomendadas
Recomendadas
No pueden utilizarse
Recomendadas
Columnas de soporte L
(columnas largas)
Espaciadores
Pueden utilizarse* No pueden utilizarse
Pueden utilizarse* No pueden utilizarse
Se utilizan Se utilizan
Pueden utilizarse*
No pueden utilizarse
70
Sp
*: pueden utilizarse cuando la pantalla esté colocada en una posición alta.
Los altavoces PDP-S25-LR y PDP-S26-LR no pueden instalarse debajo de la pantalla de plasma.
Nota
Page 71

Montaje del soporte
Nota
Móntelo siempre en una mesa plana o similar.
Introduzca los tornillos verticalmente en los agujeros y no los
apriete más de lo necesario.
Procedimiento de montaje
1 Seleccione las columnas de soporte que va a
utilizar.
Seleccione las columnas de soporte de acuerdo con la
configuración de los altavoces que ha comprado y respetando
la siguiente condición: sólo deberá utilizar uno de los dos tipos
de columnas de soporte disponibles.
Cuando los altavoces que ha adquirido son PDP-S25-LR o
PDP-S26-LR.
[Columna de soporte utilizada: columna de soporte C
(columnas cortas)]
Columna de soporte utilizada:
columna de soporte C
Si se van a instalar los altavoces debajo de la pantalla
de plasma [Columna de soporte utilizada: columna de
soporte L (columnas largas)]
Nota
Los altavoces PDP-S25-LR y PDP-S26-LR no pueden instalarse
debajo de la pantalla de plasma.
Columna de soporte utilizada:
columna de soporte L
Cuando los altavoces que ha adquirido son PDP-S21-LR o
PDP-S22-LR.
Si se van a instalar los altavoces a ambos lados de la
pantalla de plasma [Columna de soporte utilizada:
columna de soporte C (columnas cortas)]
Columna de soporte utilizada:
columna de soporte C
2 Asegure la columna en el soporte mediante los
Tornillos de instalación 1 (4 posiciones a la
derecha e izquierda).
Utilice la llave Allen suministrada para primero apretar
ligeramente el tornillo de acoplamiento superior y, a
continuación, el tornillo de acoplamiento inferior.
Tornillos de instalación
(M8 x 16 mm: plateados)
1
3 Apriete completamente los tornillos de
acoplamiento (4 posiciones a la derecha e
izquierda).
Español
Apriete completamente los tornillos de acoplamiento.
71
Sp
Page 72

Montaje de la pantalla de plasma
Una pantalla de plasma de 50 pulgadas pesa
aproximadamente 40 kg, el modelo de 43 pulgadas,
PRECAUCIÓN
Nota
Asegúrese de que la instala en un lugar estable.
Introduzca los tornillos verticalmente en los agujeros y no los
apriete más de lo necesario.
Asegúrese de que instala correctamente las columnas de soporte
de acuerdo con la configuración del tipo de altavoces que ha
comprado y respetando el procedimiento detallado en “Montaje
del soporte”.
unos 30 kg; al no tener fondo, son inestables. Por lo
tanto, es necesario que al menos dos personas
intervengan en su montaje e instalación.
Método de fijación
1 Montaje de la pantalla de plasma en el soporte.
Coloque las columnas del soporte debajo de la pantalla de
plasma, tal y como indican las flechas. Después, introdúzcalas
lentamente de forma vertical. Tenga muchísimo cuidado de no
insertar las columnas del soporte en ningún otro lugar de la
pantalla de plasma que no sean las ranuras de inserción del
soporte. Tenga en cuenta que si eso ocurriera, se podrían
producir daños en el panel de la pantalla de plasma o sus
puertos, o deformaciones en el soporte.
Figura: si se utilizan columnas de soporte L
Tornillos de instalación
(M8 x 30 mm: negros)
2
3 Fijación de la pantalla de plasma con los
3
Tornillos de instalación
Con la ayuda de la llave Allen suministrada, asegure la pantalla
de plasma en los puntos indicados por las flechas.
.
Alinee los soportes de las
columnas con la parte
inferior de la pantalla de
plasma, tal como se indica
en la figura que sigue.
2 Fijación de la pantalla de plasma con los
2
Tornillos de instalación
Apriételos con la llave Allen que se incluye con el soporte.
Figura: si se utilizan columnas de soporte C
.
Tornillos de instalación
(M8 x 40 mm: negros)
3
Sólo si se van a instalar los altavoces debajo de la
pantalla de plasma
4 Colocación de los espaciadores.
Introduzca los espaciadores en los agujeros que hay en la
plataforma giratoria del soporte.
72
Sp
Tornillos de instalación
(M8 x 30 mm: negros)
Espaciadores
Nota
Recuerde que si desea instalar los altavoces a ambos lados de
la pantalla de plasma, no deberá utilizar el espaciador.
2
5 Montaje de los altavoces.
Consulte el método de instalación en el Manual de
instrucciones de los altavoces.
Page 73

Mecanismo de ajuste del ángulo de inclinación delantera y posterior
Este soporte le permite ajustar el ángulo de inclinación de la
pantalla de plasma, hacia delante o hacia atrás, hasta un máximo
de 2°, según sus preferencias.
Nota
Recuerde que sólo deberá ajustar el ángulo una vez
que haya instalado la pantalla de plasma.
Asegúrese de realizar la instalación sobre una mesa
plana u otra superficie llana.
Cuando ajuste el ángulo, no se olvide de sujetar
con la mano la parte superior de la pantalla de
plasma.
Procedimiento de ajuste
1 Utilice la llave de maquinista suministrada para
aflojar los pernos de anclaje que permiten la
inclinación delantera y posterior de la pantalla.
Sujete con la mano la parte superior de la pantalla de plasma y
proceda a aflojar los pernos de anclaje que permiten la
inclinación delantera y posterior, situados en el lado
derecho e izquierdo, haciéndolos girar hacia arriba con llave de
maquinista suministrada.
3 Apriete los pernos de anclaje que permiten la
inclinación delantera y posterior.
Apriete firmemente los pernos de anclaje que permiten la
inclinación delantera y posterior, situados en el lado
derecho e izquierdo, haciéndolos girar hacia abajo mediante la
llave de maquinista suministrada. Recuerde sujetar con la
mano la parte superior de la pantalla de plasma hasta que haya
terminado de apretar por completo todos los pernos.
Perno de anclaje que permite la
inclinación delantera y posterior
Apretar
Perno de anclaje que permite la
inclinación delantera y posterior
Aflojar
2 Determine el ángulo que usted prefiera.
Determine el ángulo que usted prefiera moviendo lentamente
la pantalla de plasma. Este ajuste puede realizarse fácilmente
entre dos o más personas, de manera que una de ellas mire la
pantalla mientras se realiza el ajuste.
2˚
2˚
4 Compruebe una vez más que los pernos de
anclaje que permiten la inclinación delantera y
posterior están bien apretados.
Español
73
Sp
Page 74

Instalación del producto en un bastidor o similar
Asegúrese de que respeta las siguientes precauciones al
desplazar o instalar este producto con una pantalla de plasma en
un bastidor o similar.
Precauciones para el desplazamiento
Si va a desplazar el producto a más de unos pocos
metros, desmonte primero los altavoces, después
PRECAUCIÓN
desmonte la pantalla de plasma del soporte y lleve
los altavoces, la pantalla de plasma y el soporte por
separado a su nueva ubicación.
Cuando vaya a desmontar la pantalla del plasma
del soporte, asegúrese de seguir el procedimiento
descrito en la página 77: “Desmontaje de la
pantalla de plasma del soporte.”
Precauciones para instalar en un bastidor
o similar
Si la va a instalar en un bastidor o similar, sujete la
pantalla por las asas que hay en la parte posterior y
PRECAUCIÓN
Con los altavoces
instalados a ambos
lados de la pantalla
de plasma
por debajo de la pantalla de plasma. Si la sujeta por
los altavoces, puede dañarlos o doblarlos.
Precauciones para la instalación
Asegúrese de dejar siempre libre delante y detrás del soporte un
espacio de la medida indicada en la siguiente figura, como
mínimo.
Pantalla de plasma
Soporte de mesa
Si el soporte sobresale del bastidor, podría
provocar accidentes imprevistos, como la rotura o
PRECAUCIÓN
caída del equipo.
Al girarla, tenga cuidado de que la pantalla no
choque contra las paredes o los objetos de
alrededor.
Parte trasera
Parte delantera
Bastidor
Mín. 10 mm
Mín. 30 mm
Fondo del bastidor
Recomendable 420 mm
como mínimo
Sujete la pantalla de
plasma por las asas y por
la parte inferior.
Con los altavoces
instalados debajo de
la pantalla de plasma
Sujete la pantalla de
plasma por las asas y por
los lados.
Es peligroso que sobresalga.
Rango de rotación del ángulo
10˚
Rango de ajuste del ángulo de inclinación delantera y
posterior
2˚
2˚
10˚
74
Sp
Page 75

Preparación de los cables
Para sujetar los cables, utilice las bridas para cables que se
incluyen con el soporte.
Nota
Tenga mucho cuidado de no ejercer fuerza en la base de los cables.
Si los altavoces están instalados a ambos lados de la
pantalla de plasma
Uso de las bridas para cables
1 Pase una brida para cables a través del soporte
de bridas que hay en la parte superior de la
plataforma giratoria del soporte.
Brida para cables
Soporte de brida
para cables
2 Reúna los cables y colóquelos sobre la brida
para cables.
Si los altavoces están instalados debajo de la pantalla de
plasma
3 Pase la brida para cables por el agujero que
tiene en su extremo.
4 Tire del extremo de la brida para asegurar los
cables.
Español
Retirar una brida para cables
Para abrir la brida, saque la pieza de
sujeción del agujero de la brida.
Agujero
Pieza de
sujeción
75
Sp
Page 76

Preventing Equipment from Falling Over
Después de instalar el soporte, asegúrese de tomar las medidas necesarias para que el equipo no se caiga.
Estabilización sobre la base
Estabilice el equipo de la forma que se muestra en la figura
utilizando tornillos disponibles en el mercado.
Nota
Para estabilizar el equipo sobre la
base, utilice tornillos con un diámetro
nominal de 6 mm y una longitud
mínima de 20 mm.
Mín. 20 mm
De 9 a 15 mm
6 mm
Utilización de una pared para estabilizar la
pantalla
(en la figura se muestra un modelo de pantalla de 43
pulgadas)
1 Fije pernos (ganchos) a la pantalla de plasma
para evitar su caída.
2 Utilice cuerdas fuertes o cadenas para
estabilizarla de forma segura a una pared, pilar
u otro elemento resistente.
Realice este procedimiento de la misma forma en el lado
derecho e izquierdo.
La longitud de las cuerdas o cadenas deberá ser lo
suficientemente larga para permitir que el soporte gire
libremente.
Nota
Utilice ganchos, cuerdas, cadenas y
fijaciones disponibles en el mercado.
Gancho recomendado: Diámetro nominal: 8 mm
Longitud: entre 12 y 15 mm
De 12 a 15 mm
8 mm
Posición de los tornillos asegurados en el suelo:
sin altavoces
Unidad: mm
575 (modelo de pantalla de 50 pulgadas)
500 (modelo de pantalla de 43 pulgadas)
575 (modelo de pantalla de 50 pulgadas)
120
500 (modelo de pantalla de 43 pulgadas)
1 Gancho
2 Cuerda o cadena
Fijación
24
356
Cómo fijar la rotación en la parte delantera
Estabilice el equipo de la forma que se muestra en la figura
utilizando tornillos disponibles en el mercado.
Nota
Para fijar la rotación en la parte delantera,
utilice un tornillo cuyo diámetro nominal
sea de 4 mm y cuya longitud esté
comprendida entre los 15 y 20 mm.
De 7 a 12 mm
De 15 a 20 mm
4 mm
76
Sp
Page 77

Desmontaje de la pantalla de plasma del soporte
Para evitar accidentes, siga siempre el procedimiento
descrito a continuación para desmontar la pantalla de
PRECAUCIÓN
plasma del soporte.
1 Primero, asegúrese de que el perno de anclaje
que permite la inclinación delantera y posterior
de la pantalla está bien apretado.
2 Primero, despeje un espacio sobre un suelo
plano en el que pueda colocar tumbada la
pantalla de plasma; después, cubra el espacio
así despejado con una sábana para proteger la
pantalla de arañazos u otros daños.
3 Desmonte los altavoces.
4 Consulte los pasos 2 y 3 de Montaje de la
pantalla de plasma (página 72) para quitar los
tornillos negros (4 tornillos).
Nota
No extraiga los tornillos plateados. Si lo hace, los soportes de
las columnas podrían salirse de su sitio y caerse.
5 Mientras sujeta la pantalla de plasma por las
asas y por la parte inferior, deslícela hacia
arriba.
6 Coloque lentamente la pantalla de plasma
sobre la sabana extendida, según lo indicado
en el paso 2, con la cara de la pantalla mirando
hacia abajo.
Nota
Cuando vuelva a instalar la pantalla de plasma en el soporte,
asegúrese de que las columnas de soporte de la izquierda y la
derecha estén colocadas en el mismo ángulo.
Especificaciones
Dimensiones externas: 577 (ancho) x 351 (alto) x 380 (fondo) mm (Si se utilizan las columnas de soporte L)
Peso: 9,5 kg
• Las especificaciones anteriores y el exterior pueden ser modificados sin previo aviso para mejorar el producto.
Diagrama de dimensiones
Unidad: mm
Las medidas que se indican en la figura no incluyen los dispositivos para asegurar los altavoces.
Para instalar los altavoces PDP-S25-LR o PDP-S26-LR
1500 [modelo de pantalla de 50 pulgadas: cuando se realice una instalación separada] *
1462 [modelo de pantalla de 50 pulgadas: cuando se realice una instalación empotrada] *
1350 [modelo de pantalla de 43 pulgadas: cuando se realice una instalación separada] *
1312 [modelo de pantalla de 43 pulgadas: cuando se realice una instalación empotrada] *
1
2
1
2
93
23
125
Español
80
737 [modelo de pantalla de 50 pulgadas]
652 [modelo de pantalla de 43 pulgadas]
577
• Si se utilizan las columnas de soporte L, la altura es de 910 (en el modelo de pantalla de 50 pulgadas) / 825 (en el modelo de pantalla de 43 pulgadas).
*1
Instalación separada: colocación que permite ajustar el ángulo de los altavoces.
*2
Instalación empotrada: colocación que permite fijar el ángulo de los altavoces y proporcionar al sistema una anchura más compacta.
143
814 [modelo de pantalla de 50 pulgadas]
729 [modelo de pantalla de 43 pulgadas]
380
18,5
162
77
Sp
Page 78

Diagrama de dimensiones
Para instalar los altavoces PDP-S21/S22/S12/S13-LR
Con los altavoces instalados a ambos lados de la pantalla de plasma
1483 [modelo de pantalla de 50 pulgadas]
1288 [modelo de pantalla de 43 pulgadas]
93*
98*
1
2
125
80
737 [modelo de pantalla de 50 pulgadas]
652 [modelo de pantalla de 43 pulgadas]
577
143
814 [modelo de pantalla de 50 pulgadas]
729 [modelo de pantalla de 43 pulgadas]
380
• Si se utilizan las columnas de soporte L, la altura es de 910 (en el modelo de pantalla de 50 pulgadas) / 825 (en el modelo de pantalla de 43 pulgadas).
Con los altavoces instalados debajo de la pantalla de plasma
23*
28*
162*
157*
1
2
18,5
1
2
1270 [modelo de pantalla de 50 pulgadas]
1120 [modelo de pantalla de 43 pulgadas]
80
833 [modelo de pantalla de 50 pulgadas]
748 [modelo de pantalla de 43 pulgadas]
239
910 [modelo de pantalla de 50 pulgadas]
825 [modelo de pantalla de 43 pulgadas]
577
*1....... PDP-505XDE/505HDE/505HDG/435XDE/435HDE/435FDE/435HDG
*2....... PDP-504HD/5040HD/504HDE/504HDG/504HDC/5045HD/434HD/4340HD/434HDE/434HDG/434HDC/4345HD
125
100*
98*
380
1
2
1
23*
2
28*
18,5
1
162*
2
157*
78
Sp
Page 79

Sin altavoces
Diagrama de dimensiones
1270 [modelo de pantalla de 50 pulgadas]
1120 [modelo de pantalla de 43 pulgadas]
125
80
737 [modelo de pantalla de 50 pulgadas]
652 [modelo de pantalla de 43 pulgadas]
577
• Si se utilizan las columnas de soporte L, la altura es de 910 (en el modelo de pantalla de 50 pulgadas) / 825 (en el modelo de pantalla de 43 pulgadas).
*1....... PDP-505XDE/505HDE/505HDG/435XDE/435HDE/435FDE/435HDG
*2....... PDP-504HD/5040HD/504HDE/504HDG/504HDC/5045HD/434HD/4340HD/434HDE/434HDG/434HDC/4345HD
143
814 [modelo de pantalla de 50 pulgadas]
729 [modelo de pantalla de 43 pulgadas]
93*
98*
380
1
2
23*
28*
162*
157*
1
2
18,5
1
2
Publicado por Pioneer Corporation.
Copyright © 2004 Pioneer Corporation.
Todos los derechos reservados.
Español
79
Sp
Page 80

感謝您購買本Pioneer產品。
為使您熟知本機的正確操作方式,務求詳閱本「操作手冊」。
在您閱讀完手冊的內容後,請妥為保存,以備日後參考之用。
安裝
如果您在安裝時遇到任何問題,請與您的經銷商連絡。
Pioneer對於因安裝錯誤、不當使用、修改或天災所造成
的任何意外或損害,恕概不負責。
目錄
注意 ........................................ 80
檢查隨附的配件 .............................. 81
支撐柱間隔塊使用未用對照表 .............. 81
組合支架 .................................... 82
組裝電漿顯示器 .............................. 83
傾斜調整結構的前傾後傾角度 ................ 84
本產品在各式機架上的安裝方式 ................ 85
接線方式 .................................... 86
防止顯示器翻落 .............................. 87
從支架上取下電漿顯示器 ...................... 88
規格 ........................................ 88
尺寸圖解 .................................... 88
注意
本標誌在於指出:存在有可能造成人體傷害或財物損失的危
險或不安全的做法。
注意
本產品是一專為Pioneer電漿顯示器(PDP-505XDE/PDP-505HDE/
PDP-505HDG/PDP-435XDE/PDP-435HDE/PDP-435FDE/PDP-435HDG/
PDP-504HD/PDP-5040HD/PDP-504HDE/PDP-504HDG/PDP-504HDC/
PDP-5045HD/PDP-434HD/PDP-4340HD/PDP-434HDE/PDP-434HDG/
PDP-434HDC/PDP-4345HD)設計的桌上型支架。使用在其它機型
會導致不穩定,並引發受傷的可能。要獲得更詳細的資訊請
與您購買顯示器的商家聯絡。
請勿以操作手冊以外所述的方法安裝或改造本產品。
請勿將本支架用於指定以外的電漿顯示器並勿修改或將此產
品用於其他用途。
不正確的安裝方式非常危險,因為可能會造成產品翻落或其
他意外。
安裝位置
請選擇一個可支撐支架和顯示器重量的位置。
確認將其置放在水平且穩固的表面上。
請勿將本產品安裝在戶外、溫泉或靠近海邊。
請勿將本支架安裝在容易搖晃或震動的位置。
組合與安裝
請依照組合指示中的說明組合支架並將所有螺絲穩固地安裝
在指定的位置中。
有時會有一些無法預期的意外發生,例如因為沒有依照指示
來安裝本支架在安裝顯示器後造成其他設備破裂或翻落。
安裝本顯示器時務必至少由兩個人合作完成以確保安全。
安裝之前,請先關閉電漿顯示器和其他週邊裝置的電源後再
從牆上插座拔除電源插頭。
本產品可左右旋轉10°、前後傾斜2°。
請勿在本產品和電漿顯示器的旋轉範圍內放置任何的物品。請
以在一般使用或選轉時本產品不會從機架上或其他安裝位置向
外突出的方式來安裝本產品。此方式以外的安裝會造成一些無
法預期的意外發生,例如顯示器破裂或翻落(請參閱第8 5
頁)。
請採取可靠的預防措施以免因本產品翻落而造成的意外(請參
閱第87頁)。
80
ChH
Page 81

檢查隨附的配件
在組合和安裝之前,請先檢查隨附的配件,確定有無任何一項遺失。
桌上支架 × 1
S型支柱 × 2
[短支柱]
L型支柱 × 2
[長支柱]
紮線帶 × 2
安裝螺絲1(M8 × 16公釐:銀)× 4
[用來固定支撐柱和桌上支架]
安裝螺絲2
(M8 × 30公釐:黑)× 2
安裝螺絲3
(M8 × 40公釐:黑)× 2
間隔塊 × 2
六角扳手 × 1
(對角尺寸:6公釐)
C型扳手 × 1(10公釐)
操作手冊
(本文件)× 1
Table top stand
Support de couverture de table
Tischständer
Supporto di tavolo
Tafelbladstaander
Soporte de mesa
PDK-TS05
Operating instructions
Mode d’emploi
Bedienungsanleitung
Istruzioni per l’uso
Gebruiksaanwijzing
Manual de instrucciones
支撐柱間隔塊使用未用對照表
本支架使用的附件視您購買的揚聲器和安裝在電漿顯示器上的位置而有不同。請根據下列表格選擇您要使用的附件。
連接的揚聲器編號
未用
PDP-S21-LR
PDP-S22-LR
PDP-S25-LR
PDP-S26-LR
揚聲器安裝位置
-
電漿顯示器的兩側
(或者未使用)
電漿顯示器的底下
電漿顯示器的兩側
(或者未使用)
支撐柱S
(短柱)
建議
建議
不可以使用
建議
*:當畫面是位於較高的位置便可以使用
附注 PDP-S25-LR和PDP-S26-LR揚聲器無法安裝在電漿顯示器的底部。
支撐柱L
(長柱)
可以使用*
可以使用*
使用 使用
可以使用*
間隔塊
不可以使用
不可以使用
不可以使用
中文
81
ChH
Page 82

組合支架
附注
務必在平坦的桌面上組合。
請將螺絲垂直裝入孔中,勿以超過一般的力量栓緊螺絲。
組合程序
1 選擇要組裝的支撐柱。
根據您購買的揚聲器設定值並參考底下的條件選擇要使用
的支撐柱(只能使用兩種可用的支撐柱中的一種)。
當您購買的揚聲器是PDPS25-LR或PDP-S26-LR時。
[使用的支撐柱:S型支柱(短支柱)]
使用的支撐柱:
S型支柱
在電漿顯示器底部安裝揚聲器時 [使用的支撐柱:L型支
柱(長支柱)]
附注
PDPS25-LR及PDP-S26-LR無法安裝在電漿顯示器的底部。
使用的支撐柱:
L型支柱
當您購買的揚聲器是PDPS21-LR或PDP-S22-LR時。
在電漿顯示器兩側安裝揚聲器時 [使用的支撐柱:S型支
柱(短支柱)]
使用的支撐柱:
S型支柱
2 請以安裝螺絲1固定支撐柱(左右合計四個部
位)。
使用隨附的六角扳手,請先安裝上方的組裝螺絲但不栓
緊,再以同樣的方式安裝底部組裝螺絲。
安裝螺絲1
(M8 × 16公釐:銀)
3 完全栓緊組裝螺絲(左右的四個位置)。
82
ChH
完全栓緊組裝螺絲
Page 83

組裝電漿顯示器
50吋的電漿顯示器重量約為40公斤43吋的重量約為30公
斤,深度很淺並且重量分布不均。因此至少需要兩個人合
注意
力完成組裝和安裝工作。
附注
務必安裝在平坦、穩定的位置。
請將螺絲垂直裝入孔中,勿以超過一般的力量栓緊螺絲。
請確定您是根據與所購買揚聲器的「組合支架」程序有關的設定方
式來穩固地安裝支撐柱。
組裝方式
1 將電漿顯示器組裝到支架上。
請依圖中箭頭所示將支架的支撐柱放在電漿顯示器底部合
適的位置,然後緩慢地垂置插入。在插入支撐柱時請特別
小心,切勿將支架的支撐柱插出電漿顯示器支架插槽以外
的部位。若插錯位置即會造成電漿顯示器、其他組件損壞
或支架彎曲變形。
如旁邊的圖示排列支撐架電
漿顯示器底部的位置。
圖例:使用支撐柱L時
安裝螺絲2
(M8 × 30公釐:黑)
3 請以安裝螺絲3固定電漿顯示器。
請按圖中箭頭所示的部位利用隨附的六角扳手來組裝電漿
顯示器。
2 請以安裝螺絲2固定電漿顯示器。
請使用隨附的六角扳手來固定。
圖例:使用支撐柱S時
安裝螺絲2
(M8 × 30公釐:黑)
安裝螺絲3
(M8 × 40公釐:黑)
僅在電漿顯示器底部安裝揚聲器時使用
4 嵌入間隔塊。
請將間隔塊置入支架的旋轉平台上。
中文
間隔塊
附注
如果揚聲器要安裝在電漿顯示器的兩側時,請不使要使用間隔片。
5 組裝揚聲器。
安裝方式請參閱揚聲器的操作手冊。
83
ChH
Page 84

傾斜調整結構的前傾後傾角度
在本支架上,您可以根據您的喜好調整電漿顯示器往前或向後
傾斜2°的角度。
附注
請務必在組裝了電漿顯示器之後再行調整角度。
務必安裝在平坦的桌面或其他平坦表面上。
調整角度時務必用手抓住電漿顯示器上緣。
調整程序
1 請使用隨附的C 型板手鬆開前後傾斜固定插
銷。
在用手抓住電漿顯示器上緣的同時,請使用隨附的C型板手
向上旋轉來鬆開左右兩邊的前/後傾斜固定插銷。
前後傾斜固定插銷
鬆開
3 栓緊前後傾斜固定插銷。
請使用隨附的C型扳手向下旋轉,穩固地栓緊左右兩邊的前
後傾斜固定插銷。
務必用手抓住電漿顯示器上緣直到您完全栓緊插銷為止。
前後傾斜固定插銷
拴緊
4 請再檢查一次,確定已完全栓緊前後傾斜固定
插銷。
2 設定您要的角度。
緩慢地移動電漿顯示器來設定您要的角度。
2˚
2˚
84
ChH
Page 85

本產品在各式機架上的安裝方式
移動或安裝本產品及電漿顯示器於機架上及其他外接盒時請務
必詳閱底下的注意事項。
移動時的注意事項
當移動本產品的距離超過好幾公尺時,請先移除揚聲
器,然後將電漿顯示器從支架上移除,之後再個別移動
注意
揚聲器、電漿顯示器和支架。
當將電漿顯示器從腳架上面拆卸下來時,請確認并依照
第88頁「將電漿顯示器從腳架拆卸下來」所描述之程序
來進行拆卸的動作。
機架或其他機櫃的安裝注意事項
安裝在機架或其它外接盒上時,請抓住電漿顯示器背面和
底部的把手。如果您抓住揚聲器可能會造成損壞或彎曲變
形。
注意
在電漿顯示器兩側安
裝揚聲器時
安裝注意事項
固定時,請務必於桌上支架的前後能保留如下圖所示的距離。
電漿顯示器
桌上支架
注意
前
如果支架超出機架,會造成無法預期的意外如顯示器破
裂或翻落。
旋轉時請注意不要讓顯示器碰撞到牆壁或周圍的物品。
機架
後
最少10公釐
機架深度
建議420公釐以上
最少30公釐
先由底部抓住電漿顯示
器的把手。
在電漿顯示器底部安
裝揚聲器時
先由側面抓住電漿顯示
器的把手。
突出是危險的。
旋轉角度的範圍
前╱後傾斜角度的調整範圍
2˚
10˚
10˚
中文
2˚
85
ChH
Page 86

接線方式
請使用隨附的紮線帶綑綁電線。
附注
小心請勿重壓電線的末端。
在電漿顯示器兩側安裝揚聲器時
在電漿顯示器底部安裝揚聲器時
使用紮線帶
1 將紮線帶穿過位於支架旋轉平台上緣的紮線帶固
定器。
紮線帶
紮線帶固定器
2 收攏電線並放置在紮線帶上。
3 將紮線帶穿過其尾端的洞。
4 拉緊紮線帶尾端以固定電線。
86
ChH
移除紮線帶
從紮線帶孔移除固定部份便可解開
紮線帶。
孔
固定部分
Page 87

防止顯示器翻落
至
公釐
(50吋顯示器機型)
吋顯示器機型)
至
公釐
支架安裝完畢後,請務必採取預防措施以免設備翻落。
座落平穩
請以市售的螺絲如圖所示來平穩顯示器。
附注
要使顯示器能座落平穩,請使用額定直
徑為 6公釐、至少20公釐長的螺絲。
15
9
最小20公釐
6公釐
靠牆穩固
(圖例為43吋顯示器機型)
1 將防翻落插銷(鉤)組裝在電漿顯示器上。
2 請使用結實的繩索或鎖鏈,牢牢地將顯示器穩固
在牆壁、柱子或其他堅固的地方。
左右兩側請以同樣方式穩固。
使用的繩索或鎖鏈長度必須夠長以讓支架可自由旋轉。
附注
請利用市面販售的掛鉤、繩索、鎖鏈和其
他附件。
建議使用的掛鉤: 額定直徑8公釐
長度12至15公釐
12至15公釐
8公釐
地板螺絲的位置:不含揚聲器部份
單位:公釐
575(50
500(43吋顯示器機型)
120
575
500(43吋顯示器機型)
1 鉤子
2 繩索或鎖鏈
附件
24
固定只能向前旋轉
356
請以市售的螺絲如圖所示固定顯示器。
附注
要穩固顯示器只能向前旋轉,請使用
額定直徑為4公釐、長度介於15至20公
釐的螺絲。
12
7
15至20公釐
4公釐
中文
87
ChH
Page 88

[
吋顯示器機型]
從支架上取下電漿顯示器
要從支架上取下電漿顯示器,請務必遵照底下說明的步驟
以避免意外發生。
注意
1 首先,請確認調整前/後傾斜固定插銷已經安全
4 請參考「組裝電漿顯示器」(第83頁)的步驟2
和3,移除黑色螺絲(四個螺絲)。
附注
請勿移除銀色螺絲。如果移除它們的話,支撐柱可能會滑動造成
顯示器翻落。
地鎖緊。
5 從底部開始並抓住電漿顯示器的把手,垂直舉起
2 首先請清出一個您要平放電漿顯示器的地方,如
地板等,然後再鋪上一層薄被以防止刮傷或造成
其他損壞。
3 取下揚聲器。
顯示器。
6 將顯示器畫面朝下、緩慢地置於步驟2中的薄被
上。
附注
當重新安裝電漿顯示器至腳架時,請確定左/右兩側的支撐柱都
是設定在同一個角度。
規格
外型尺寸 577(寬)× 351(高)× 380(深)公釐 [使用長(L)支柱時]
重量 9.5公斤
為求產品改良,以上規格和外型尺寸如有變更,恕不另行通知。
尺寸圖解
單位:公釐
圖示之測量法並沒有包括安裝揚聲器的固定裝置。
安裝PDP-S25-LR或PDP-S26-LR揚聲器時
1500 [50吋顯示器機型:採用分離安裝時]*
1462 [50吋顯示器機型:採用分離安裝時]*
1350 [43吋顯示器機型:採用分離安裝時]*
1312 [43吋顯示器機型:採用分離安裝時]*
50
737
652 [43吋顯示器機型]
1
2
1
2
型]
型]
機
機
814 [50吋顯示器
729 [43吋顯示器
80
143
93
23
125
18.5
*1
*2
88
ChH
577
使用長(L)支柱時,高度為910[50吋顯示器機型]/825[43吋顯示器機型]。
「分離」安裝:安裝上去可允許做揚聲器角度的調整
「同一高度」安裝:安裝上去以固定揚聲器的角度,並給系統更緊緻的寬度
162
380
Page 89

安裝PDP-S21/S22/S12/S13-LR揚聲器時
吋顯示器機型]
[
吋顯示器
機
型]
[
吋顯示器
機
型]
在電漿顯示器兩側安裝揚聲器時
尺寸圖解
型]
機
50
737
652 [43吋顯示器
使用長(L)支柱時,高度為910[50吋顯示器機型]/825[43吋顯示器機型]。
在電漿顯示器底部安裝揚聲器時
1483 [50
1288 [43吋顯示器機型]
577
型]
型]
機
機
814 [50吋顯示器
729 [43吋顯示器
80
143
125
93*
98*
380
1
2
1
23*
2
28*
18.5
1
162*
2
157*
1270 [50吋顯示器機型]
1120 [43吋顯示器機型]
型]
機
50
833
748 [43吋顯示器
577
*1... PDP-505XDE/505HDE/505HDG/435XDE/435HDE/435FDE/435HDG
*2... PDP-504HD/5040HD/504HDE/504HDG/504HDC/5045HD/434HD/4340HD/434HDE/434HDG/434HDC/4345HD
型]
機
80
910 [50吋顯示器
239
型]
機
125
825 [43吋顯示器
100*
98*
380
1
2
1
23*
2
28*
162*
157*
18.5
1
2
中文
89
ChH
Page 90

[
吋顯示器
機
型]
[50吋顯示器機型]
尺寸圖解
不含揚聲器時
1270
1120 [43吋顯示器機型]
型]
機
50
737
652 [43吋顯示器
80
143
577
使用長(L)支柱時,高度為910[50吋顯示器機型]/825[43吋顯示器機型]。
*1... PDP-505XDE/505HDE/505HDG/435XDE/435HDE/435FDE/435HDG
*2... PDP-504HD/5040HD/504HDE/504HDG/504HDC/5045HD/434HD/4340HD/434HDE/434HDG/434HDC/4345HD
型]
型]
機
機
125
814 [50吋顯示器
729 [43吋顯示器
93*
98*
380
1
2
1
23*
2
28*
18.5
1
162*
2
157*
90
ChH
日本先鋒公司出版。
版權 2004日本先鋒公司。
版權所有。
Page 91

この取扱説明書は再生紙を使用しています。
2004パイオニア株式会社 禁無断転載
〒153-8654 東京都目黒区目黒1丁目4番1号
PIONEER CORPORATION
4-1, Meguro 1-Chome, Meguro-ku, Tokyo 153-8654, Japan
PIONEER ELECTRONICS (USA) INC.
P.O. BOX 1540, Long Beach, California 90810-1540, U.S.A. TEL: (800) 421-1404
PIONEER ELECTRONICS OF CANADA, INC.
300 Allstate Parkway, Markham, Ontario L3R OP2, Canada TEL: 1-877-283-5901
PIONEER EUROPE NV
Haven 1087, Keetberglaan 1, B-9120 Melsele, Belgium TEL: 03/570.05.11
PIONEER ELECTRONICS ASIACENTRE PTE. LTD.
253 Alexandra Road, #04-01, Singapore 159936 TEL: 65-6472-7555
PIONEER ELECTRONICS AUSTRALIA PTY. LTD.
178-184 Boundary Road, Braeside, Victoria 3195, Australia, TEL: (03) 9586-6300
PIONEER ELECTRONICS DE MEXICO S.A. DE C.V.
Blvd.Manuel Avila Camacho 138 10 piso Col.Lomas de Chapultepec, Mexico,D.F. 11000 TEL: 55-9178-4270
Printed in Japan / Imprimé au Japon <AZR1089-A>
Published by Pioneer Corporation.
Copyright © 2004 Pioneer Corporation.
All rights reserved.
 Loading...