

Page 1

ORDER NO.
CRT3684
ND-BT1/E5
BLUETOOTH UNIT
ND-BT1
/E5
For details, refer to "Important Check Points for Good Servicing".
PIONEER CORPORATION 4-1, Meguro 1-chome, Meguro-ku, Tokyo 153-8654, Japan
PIONEER ELECTRONICS (USA) INC. P.O. Box 1760, Long Beach, CA 90801-1760, U.S.A.
PIONEER EUROPE NV Haven 1087, Keetberglaan 1, 9120 Melsele, Belgium
PIONEER ELECTRONICS ASIACENTRE PTE. LTD. 253 Alexandra Road, #04-01, Singapore 159936
PIONEER CORPORATION 2006
K-ZZD.MAR. 2006 Printed in Japan
Page 2

1234
SAFETY INFORMATION
CAUTION
A
This service manual is intended for qualified service technicians; it is not meant for the casual do-it-yourselfer.
Qualified technicians have the necessary test equipment and tools, and have been trained to properly and safely repair
complex products such as those covered by this manual.
Improperly performed repairs can adversely affect the safety and reliability of the product and may void the warranty.
If you are not qualified to perform the repair of this product properly and safely, you should not risk trying to do so
and refer the repair to a qualified service technician.
W
ARNING
This product contains lead in solder and certain electrical parts contain chemicals which are known to the state of
California to cause cancer, birth defects or other reproductive harm.
B
Health & Safety Code Section 25249.6 - Proposition 65
- Service Precaution
1.You should conform to the regulations governing the product (safety, radio and noise, and other regulations),
and should keep the safety during servicing by following the safety instructions described in this manual.
2. Be careful in handling ICs. Some ICs such as MOS type are so fragile that they can be damaged by
electrostatic induction.
C
D
E
F
2
1234
ND-BT1/E5
Page 3

5678
[Important Check Points for Good Servicing]
In this manual, procedures that must be performed during repairs are marked with the below symbol.
Please be sure to confirm and follow these procedures.
1. Product safety
Please conform to product regulations (such as safety and radiation regulations), and maintain a safe servicing environment by
following the safety instructions described in this manual.
1 Use specified parts for repair.
Use genuine parts. Be sure to use important parts for safety.
2 Do not perform modifications without proper instructions.
Please follow the specified safety methods when modification(addition/change of parts) is required due to interferences such as
radio/TV interference and foreign noise.
3 Make sure the soldering of repaired locations is properly performed.
When you solder while repairing, please be sure that there are no cold solder and other debris.
Soldering should be finished with the proper quantity. (Refer to the example)
4 Make sure the screws are tightly fastened.
Please be sure that all screws are fastened, and that there are no loose screws.
5 Make sure each connectors are correctly inserted.
Please be sure that all connectors are inserted, and that there are no imperfect insertion.
6 Make sure the wiring cables are set to their original state.
Please replace the wiring and cables to the original state after repairs.
In addition, be sure that there are no pinched wires, etc.
7 Make sure screws and soldering scraps do not remain inside the product.
Please check that neither solder debris nor screws remain inside the product.
8 There should be no semi-broken wires, scratches, melting, etc. on the coating of the power cord.
Damaged power cords may lead to fire accidents, so please be sure that there are no damages.
If you find a damaged power cord, please exchange it with a suitable one.
9 There should be no spark traces or similar marks on the power plug.
When spark traces or similar marks are found on the power supply plug, please check the connection and advise on secure
connections and suitable usage. Please exchange the power cord if necessary.
0 Safe environment should be secured during servicing.
When you perform repairs, please pay attention to static electricity, furniture, household articles, etc. in order to prevent injuries.
Please pay attention to your surroundings and repair safely.
A
B
C
D
2. Adjustments
To keep the original performance of the products, optimum adjustments and confirmation of characteristics within specification.
Adjustments should be performed in accordance with the procedures/instructions described in this manual.
3. Lubricants, Glues, and Replacement parts
Use grease and adhesives that are equal to the specified substance.
Make sure the proper amount is applied.
4. Cleaning
For parts that require cleaning, such as optical pickups, tape deck heads, lenses and mirrors used in projection monitors, proper
cleaning should be performed to restore their performances.
5. Shipping mode and Shipping screws
To protect products from damages or failures during transit, the shipping mode should be set or the shipping screws should be
installed before shipment. Please be sure to follow this method especially if it is specified in this manual.
56
ND-BT1/E5
E
F
7
8
3
Page 4

1234
CONTENTS
SAFETY INFORMATION ..................................................................................................................................... 2
1. SPECIFICATIONS ............................................................................................................................................ 5
2. EXPLODED VIEWS AND PARTS LIST ............................................................................................................ 6
A
B
2.1 PACKING ................................................................................................................................................... 6
2.2 EXTERIOR................................................................................................................................................. 7
3. BLOCK DIAGRAM AND SCHEMATIC DIAGRAM ............................................................................................ 8
3.1 BLOCK DIAGRAM ..................................................................................................................................... 8
3.2 BLUETOOTH ASSY ................................................................................................................................. 10
4. PCB CONNECTION DIAGRAM ..................................................................................................................... 12
4.1 BLUETOOTH ASSY ................................................................................................................................. 12
5. ELECTRICAL PARTS LIST ............................................................................................................................ 16
6. ADJUSTMENT ............................................................................................................................................... 18
6.1 BLUETOOTH TEST MODE...................................................................................................................... 18
7. GENERAL INFORMATION ............................................................................................................................. 22
7.1 DIAGNOSIS ............................................................................................................................................. 22
7.1.1 DISASSEMBLY ..................................................................................................................................... 22
7.1.2 CONNECTOR FUNCTION DESCRIPTION.......................................................................................... 23
7.2 IC ............................................................................................................................................................. 24
8. OPERATIONS ................................................................................................................................................ 26
C
D
E
F
4
1234
ND-BT1/E5
Page 5

5678
1. SPECIFICATIONS
A
B
C
D
E
56
ND-BT1/E5
F
7
8
5
Page 6
N
1234
2. EXPLODED VIEWS AND PARTS LIST
OTES : • Parts marked by " * " are generally unavailable because they are not in our Master Spare Parts List.
• The > mark found on some component parts indicates the importance of the safety factor of the part.
A
Therefore, when replacing, be sure to use parts of identical designation.
• Screw adjacent to mark on the product are used for disassembly.
• For the applying amount of lubricants or glue, follow the instructions in this manual.
(In the case of no amount instructions,apply as you think it appropriate.)
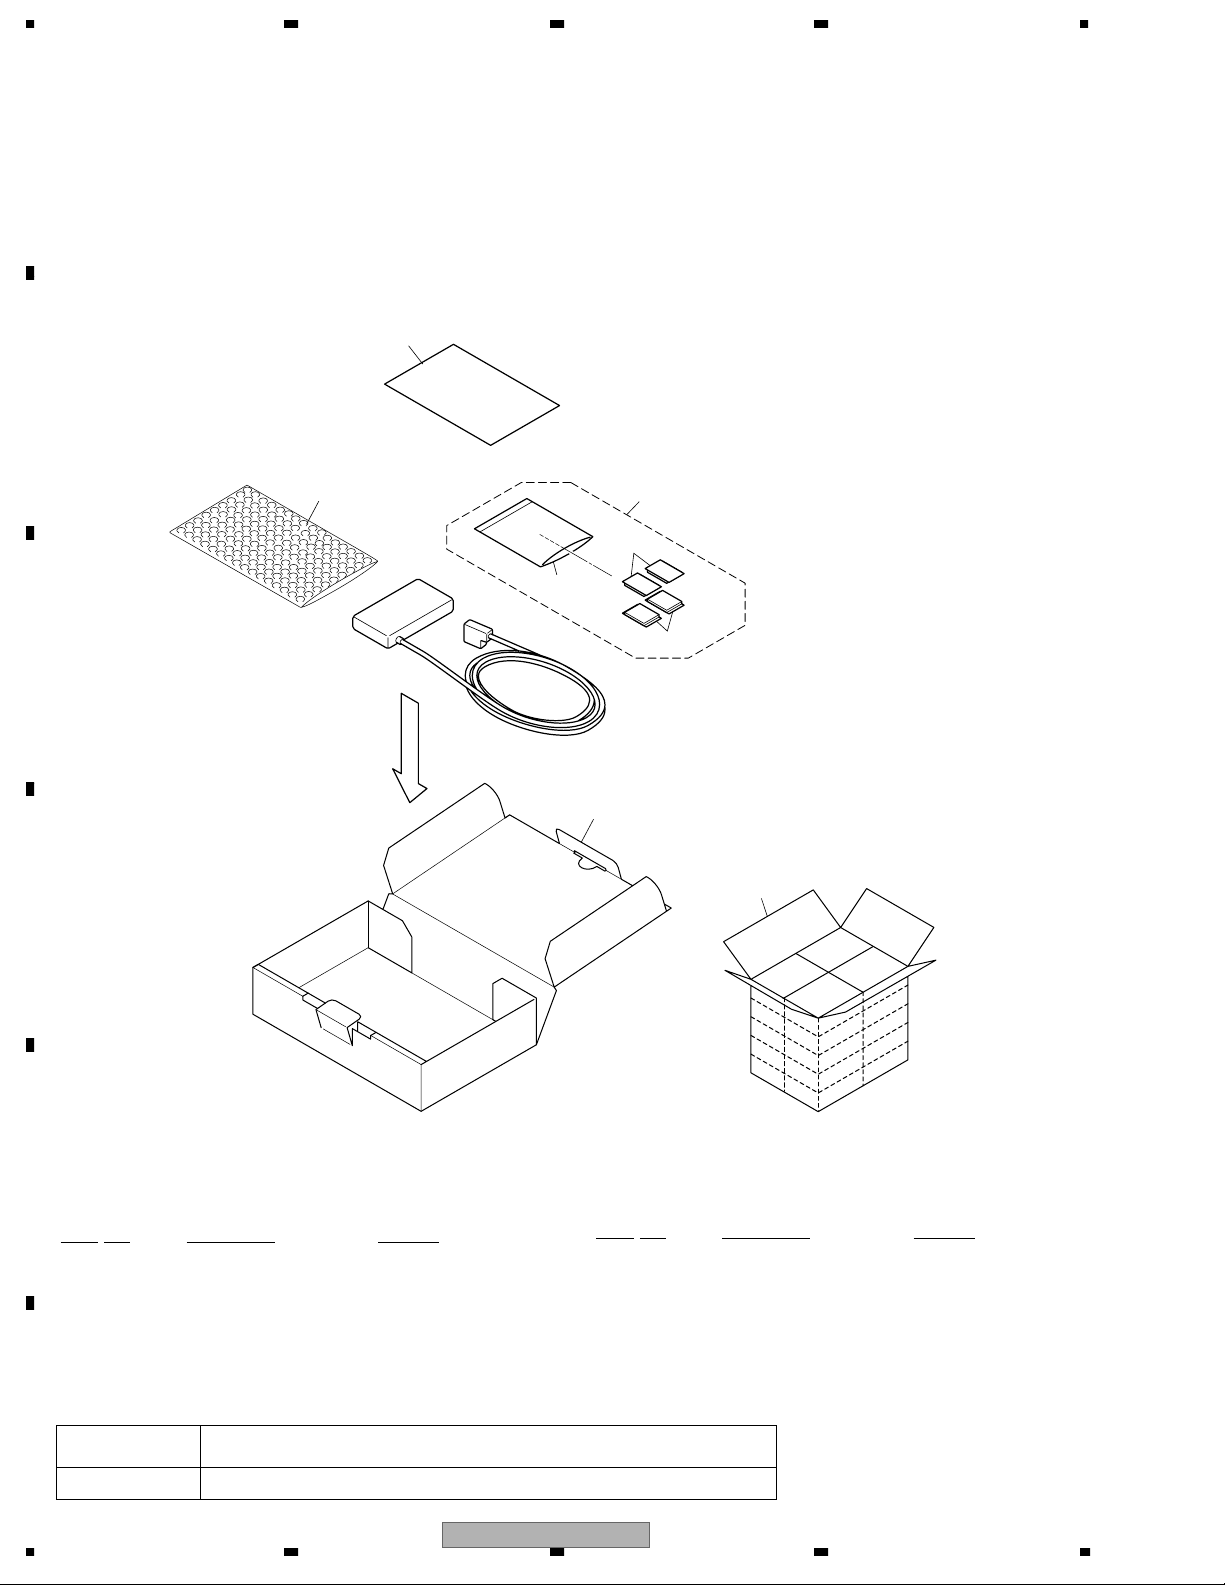
2.1 PACKING
B
"
8
1
3
C
D
2
4
5
6
7
E
PACKING SECTION PARTS LIST
Mark
No. Description Part No.
1 Air Cushioned Bag CEG1081
2 Accessories Assy CEA5378
* 3 Polyethylene Bag CEG1158
4 Fastener CNM9866
5 Fastener CNM9867
Owner's Manual
F
Part No. Language
CRD4118 English, Spanish, German, French, Italian, Dutch, Russian
6
1234
ND-BT1/E5
Mark
No. Description Part No.
6 Carton CHG5904
7 Contain Box CHL5904
8 Owner's Manual CRD4118
Page 7

5678
2.2 EXTERIOR
10
3
A
5
7
B
9
6
2
A
C
4
1
EXTERIOR SECTION PARTS LIST
No. Description Part No.
Mark
1 Screw BPZ20T100FTB
2 Cord Assy CDE7963
3 Cover CNS8686
4 Case CNS8741
5 Bluetooth Assy CWN1211
9
8
D
To remove the #1 screw,
1
use a torques screwdriver(T6)(GGK1072)
E
6 Connector(CN1051) CKS5270
7 Shield CND3026
8 Shield CND3027
9 Insulator CNM9813
10 Antenna(ANT1001) CTX1095
56
ND-BT1/E5
F
7
8
7
Page 8

1234
3. BLOCK DIAGRAM AND SCHEMATIC DIAGRAM
3.1 BLOCK DIAGRAM
A
BLUETOOTH ASSY
A
3.3V
RESET
1
DX
BCLK
DR
FS
IC1081
BD5230FVE
CODEC
IC1041
AK2301A
RSTN
MUTEN
VFTN
GSR
B
BLUETOOTH MODULE
SIOF_SS2
Y1001
BLUETOOTH
ANTENNA
ANT1001
C
CWX3131
A5
RF_I/O
RESETP
SIOF_RXD
SIOF_SCK
SIOF_TXD
SIOF_SYNC
SCIF1_RTS
SCIF1_TXD
SCIF1_RXD
SCIF1_CTS
P1
Q2
N2
2
N1
3
N3
4
5O2
I2
H3
H2
I1
BT3V REGULATOR
5
3
IC1051
NJM2391DL1-33
Q1041
22
23
15
7
Q1001
CN1051
1
BT5V
BTTEST
BTRST
BTMUTE
MICIN
TELOUT
BTCTS
BTRX
BTTX
BTRTS
23
2
9
14
7
12
10
11
2
19
3
15
17
18
18
9
16
7
20
16
MULTIPLEXER
1
1Y
TC74HC4053AFT
13
1X
IC1052
Y-COM
X-COM
15
14
135791113151719212325
D
2468101214161820222426
E
F
8
1234
ND-BT1/E5
Page 9

5678
A
B
C
D
E
56
ND-BT1/E5
F
7
8
9
Page 10

T
1234
3.2 BLUETOOTH ASSY
Note: When ordering service parts, be sure to refer to " EXPLODED VIEWS AND PARTS LIST" or
A
"ELECTRICAL PARTS LIST".
BLUETOOTH ASSY
A
B
C
D
E
BLUETOOTH ANTENNA
NO
F
A
10
1234
ND-BT1/E5
Page 11

5678
A
B
NOTE :
Symbol indicates a resistor.
No differentiation is made between chip resistors and
discrete resistors.
Symbol indicates a capacitor.
No differentiation is made between chip capacitors and
discrete capacitors.
Decimal points for resistor
and capacitor fixed values
are expressed as :
←
2.2 2R2
←
0.022 R022
135791113151719212325
2468101214161820222426
1
2
3
4
5
6
7
8
9
10
11
12
13
Pin Name
DT2MICIN
TELOUT
(NC)
AGND
BOOT_E
BT_RST
(NC)
BT_TEST
BT_MUTE
(NC)
(NC)
(NC)
14
15
16
17
18
19
20
21
22
23
24
25
26
GNDE
Pin Name
(NC)
(NC)
BT_TX
BT_CTS
BT_RX
/CE
BT_RTS
(NC)
(NC)
BT5V
(NC)
(NC)
DGND
GND
1
2
17
5
20
3
9
5
7
10
19
18
26
16
26
6
23
26
23
23
C
D
E
F
56
ND-BT1/E5
A
7
8
11
Page 12

1234
4. PCB CONNECTION DIAGRAM
4.1 BLUETOOTH ASSY
A
BLUETOOTH ASSY
A
B
NOTE FOR PCB DIAGRAMS
1.The parts mounted on this PCB
include all necessary parts for
several destination.
For further information for
respective destinations, be sure
to check with the schematic dia gram.
2.Viewpoint of PCB diagrams
Connector
Capacitor
SIDE A
P.C.Board
C
D
Chip Part
SIDE B
30
CORD ASSY
20
10
E
Y
0
F
X
10 20
A
12
1234
ND-BT1/E5
Page 13

5678
A
SIDE A
B
BLUETOOTH ANTENNA
C
D
E
30 40 50 60
56
ND-BT1/E5
7
F
A
8
13
Page 14

1234
A
B
C
BLUETOOTH ASSY
A
D
E
30405060
F
A
14
1234
ND-BT1/E5
Page 15

5678
30
SIDE B
A
B
C
20
D
10
E
Y
102030
X
0
56
ND-BT1/E5
F
A
7
8
15
Page 16

N
1234
5. ELECTRICAL PARTS LIST
OTE:
A
• Parts whose parts numbers are omitted are subject to being not supplied.
• The part numbers shown below indicate chip components.
Chip Resistor
RS1/_S___J,RS1/__S___J
Chip Capacitor (except for CQS.....)
CKS....., CCS....., CSZS.....
• The > mark found on some component parts indicates the importance of the safety factor of the part.
Therefore, when replacing, be sure to use parts of identical designation.
• Meaning of the figures and others in the parentheses in the parts list.
B
Example) IC 301 is on the point (face A, 91 of x-axis, and 111 of y-axis) of the corresponding
PC board.
IC 301 (A, 91, 111) IC NJM2068V
Circuit Symbol and No. Part No.
Unit Number : CWN1211
Unit Name : Bluetooth Assy
C
A
Unit Number : CWN1211
Unit Name : Bluetooth Assy
MISCELLANEOUS
IC 1041 (A,16,14) IC AK2301A
IC 1051 (A,13,34) IC NJM2391DL1-33
IC 1052 (A,34,8) IC TC74HC4053AFT
IC 1081 (B,23,38) IC BD5230FVE
Q 1001 (B,28,38) Transistor DTC124EU
D
Q 1041 (A,22,7) Transistor DTC124EU
D 1051 (B,7,14) Diode UDZS6R8(B)
D 1052 (B,11,14) Diode UDZS6R8(B)
D 1053 (B,16,17) Diode UDZS6R8(B)
D 1054 (B,16,20) Diode UDZS6R8(B)
D 1055 (B,6,33) Diode UDZS6R8(B)
D 1056 (B,14,34) Diode UDZS6R8(B)
D 1057 (B,8,25) Diode UDZS6R8(B)
D 1058 (B,11,28) Diode UDZS6R8(B)
D 1059 (B,19,26) Diode UDZS6R8(B)
D 1060 (B,21,29) Diode UDZS6R8(B)
E
D 1061 (B,15,29) Diode UDZS6R8(B)
D 1062 (B,19,35) Diode UDZS6R8(B)
L 1001 (A,29,38) Inductor LCTAW1R0J3225
L 1041 (A,18,30) Inductor LCYC2R2K2125
Circuit Symbol and No. Part No.
R 1008 (A,32,37) RS1/16S103J
R 1009 (A,28,15) RS1/16S473J
R 1012 (A,43,14) RS1/16S681J
R 1013 (A,30,15) RS1/16S471J
R 1014 (A,33,15) RS1/16S471J
R 1015 (A,32,15) RS1/16S471J
R 1021 (A,11,11) RS1/16S203J
R 1022 (A,12,8) RS1/16S203J
R 1023 (A,8,10) RS1/16S103J
R 1024 (A,9,8) RS1/16S103J
R 1031 (A,17,22) RS1/16S393J
R 1032 (A,15,23) RS1/16S393J
R 1033 (A,16,26) RS1/16S103J
R 1034 (A,14,24) RS1/16S103J
R 1041 (A,22,16) RS1/16S471J
R 1042 (A,22,10) RS1/16S104J
R 1045 (A,22,11) RS1/16S473J
R 1051 (B,11,30) RS1/16S681J
R 1052 (B,9,33) RS1/16S681J
R 1053 (B,17,29) RS1/16S681J
R 1054 (B,23,29) RS1/16S0R0J
R 1055 (B,21,33) RS1/16S681J
R 1056 (B,7,26) RS1/16S0R0J
R 1057 (B,13,36) RS1/16S681J
R 1058 (A,10,14) RS1/16S0R0J
R 1059 (B,17,22) RS1/16S0R0J
R 1060 (B,20,25) RS1/16S0R0J
R 1065 (A,26,9) RS1/16S473J
R 1066 (A,39,8) RS1/16S473J
R 1068 (A,27,6) RS1/16S473J
R 1081 (B,31,37) RS1/16S103J
Y 1001 (A,35,24) BT Module CWX3131
ANT1001 (A,56,21) Antenna CTX1095
RESISTORS
R 1001 (A,41,14) RS1/16S681J
R 1002 (A,42,34) RS1/16S0R0J
F
R 1003 (A,40,14) RS1/16S681J
R 1004 (A,38,15) RS1/16S103J
R 1006 (A,35,15) RS1/16S103J
16
1234
ND-BT1/E5
CAP
ACITORS
C 1001 (A,44,32) CCSRCH101J50
C 1002 (A,44,33) CKSRYB105K10
C 1003 (A,41,32) CKSRYB104K16
C 1004 (A,38,32) CKSRYB104K16
C 1005 (A,39,34) CKSQYB475K6R3
C 1006 (A,36,32) CKSRYB104K16
C 1007 (A,38,37) CEVW100M16
C 1010 (A,27,15) CCSRCH150J50
Page 17

5678
Circuit Symbol and No. Part No.
C 1021 (A,9,11) CCSRCH101J50
C 1022 (A,11,8) CCSRCH101J50
C 1023 (A,8,13) CKSRYB105K10
C 1024 (A,9,5) CKSRYB105K10
C 1026 (A,11,5) CKSRYB105K10
C 1031 (A,17,21) CCSRCH101J50
C 1032 (A,15,21) CKSRYB105K10
C 1033 (A,18,24) CKSRYB105K10
C 1034 (A,14,22) CKSRYB105K10
C 1041 (A,19,21) CKSRYB104K16
C 1042 (A,18,26) 10 µF CCG1171
C 1043 (A,16,8) CKSRYB105K10
C 1044 (A,19,8) CKSRYB334K10
C 1051 (A,5,32) CEVW100M16
C 1052 (A,9,34) CKSRYB104K16
C 1053 (A,20,35) CEVW100M16
C 1056 (B,13,30) CCSRCH101J50
C 1064 (A,29,5) CKSRYB103K50
C 1081 (B,25,37) CKSRYB104K16
C 1082 (B,21,37) CKSRYB473K50
A
B
C
D
E
F
56
ND-BT1/E5
7
8
17
Page 18

1234
6. ADJUSTMENT
6.1 BLUETOOTH TEST MODE
A
- Bluetooth Test Mode (when using BT Built-in mobile phone)
0. Specifications for BT Built-in mobile phone
A mobile phone supporting Bluetooth Ver.1.1 and mounting HFP and OPP is required.
Models with which connection has been verified are recommended.
*HFP : Hands-Free Profile, OPP : Object Push Profile
Recommneded mobile phone model;
for AVIC-HD1BT/EW5 (ND-BT1/E5)
- SonyEricsson S700i/K750i
B
for AVIC-Z1/UC + ND-BT1/E5
- AUDIOVOX SMT5600
Notes: SMT5600 is not possible to transfer whole address book at a time.
It can be transfered one by one on this model.
1. Caution
*This is a precaution for the case where the mobile phone is actually connected at the serviced site.
For AVIC-HD1BT/EW5 and AVIC-Z1/UC, up to 5 sets of Bluetooth units can be registered.
When more than 5 sets are tried to be registered, the 6th set and beyond will be overwritten. (Overwriting will
be made by selecting the model number to be overwritten.)
In the case of overwriting, be careful as the device information stored by the user will be deleted.
C
2. Outline of functions
When checking the operation using the BT built-in mobile phone, check the connection under the normal
operation.
• Checking of Bluetooth connection (authentication connection and voice connection)
• Checking of Bluetooth antenna sensitivity (connection)
3. Configuration diagram
AVIC-HD1BT/EW5, AVIC-Z1/UC ND-BT1/E5
D
Bluetooth
E
Mobile Phone
F
18
1234
ND-BT1/E5
Page 19

5678
4. Procedure for checking
Display Operation Method
ND-BT1/E5 will be connected to the connectable product, and
start.
Select [Menu] [Settings] [Hardware] [Conection Status].
Make sure on the left screen that the items under Phone Connection Status are indicating [OK].
In this case, because registration of the BT telephone has not
been completed, level indication of the antenna bar is not displayed even though the status is indicated as OK.
* In the case of NOK, possible case is poor connection between
ND-BT1/E5 and navigation product or failure of the wired section of ND-BT1/E5.
A
B
Select [Menu] [Info/Phone] [Phone Menu] [Phone Settings]
[Registration] [Mobile].
Search for the Bluetooth device and enter the passkey by operating the mobile telephone.
* In case the device name is not displayed in Bluetooth device
search, the possible cause is the failure of the wireless section
of ND-BT1/E5.
When the connection with the BT telephone is completed,
the screen as shown on the left will be displayed.
Antenna bar will be displayed on the [Conection Status] screen.
When the connection is successfully established, conduct speech test and check the voice transmission and reception.
C
D
56
ND-BT1/E5
E
F
7
8
19
Page 20

1234
- Bluetooth Test Mode (using spectrum analyzer)
A
1. Cautions
If there is a spectrum analyzer supporting 2.4 GHz at the service site, confirmation of
transmission carrier becomes possible.
Since ND-BT1/E5 cannot operate singly, the AVIC-HD1/EW5 or AVIC-Z1/UC is required.
Carrier existence is checked by removing the product case and applying the probe onto
the "ANT" land of the base unit.
Since it is done by probe connection, the level cannot be confirmed accurately.
2. Function outline
Simple operation check on Bluetooth is executed in test mode using a spectrum analyzer
supporting 2.4 GHz.
B
Output check on Bluetooth unit
3. Configuration diagram
Spectrum analyzer supporting 2.4 GHzAVIC-HD1/EW5, AVIC-Z1/UC ND-BT1/E5
C
4. Procedure for test mode startup
D
E
Display Operation Method
Enter the test mode using a product connectable to ND-BT1/E5.
When the test screen is displayed, select [Bluetooth Unit Test]
from the menu.
1) Loop Back(TX) Test (Not used for servicing.)
2) Page Scan Test (Not used for servicing.)
3) Inquily Scan Test (Not used for servicing.)
4) Local TX Test (Not used for servicing.)
5) Local TX(No Modulated) Test (Not used for servicing.)
5) Select Local TX(No Modulated) Test.
F
20
1234
ND-BT1/E5
Page 21

5678
Display Operation Method
Bring the cursor to [TX Frequency], and push [OK] button.
As the selectable frequencies will be displayed on the right side
of the screen, bring the cursor by using up/down cursor and
push [OK] button.
00 : 2 402 MHz (default value)
27 : 2 441 MHz
4E : 2 480 MHz
A
B
C
Press [Ret] key to return to the top screen of Local TX (No
Modulated) Test.
* On the top screen, " [OK] Exec " is displayed on the lower left
position of the screen.
Push [OK] button on the top screen, and take measurement
using a spectrum analyzer.
Apply a probe to [ANT] land on the PCB, and check if any
carrier is displayed at the designated frequency band.
Furthermore, make sure that carrier is displayed at each of the
three bands.
D
E
56
ND-BT1/E5
F
7
8
21
Page 22

1234
7. GENERAL INFORMATION
7.1 DIAGNOSIS
7.1.1 DISASSEMBLY
A
-
Removing the Case (Fig.1)
1
Remove the four screws by tolcs driver
(GGK1072) and then remove the Case.
B
Case
1
1
1
- Removing the Bluetooth Assy (Fig.2)
1
Remove the solder.
C
D
Remove the Bluetooth Assy.
1
Bluetooth Assy
1
Fig.1
1
Fig.2
E
F
22
1234
ND-BT1/E5
Page 23

5678
7.1.2 CONNECTOR FUNCTION DESCRIPTION
A
B
TO NAVIGATION UNIT
135791113151719212325
2468101214 16 18 20 22 24 26
1
2
3
4
5
6
7
8
9
10
11
12
13
Pin Name
DT2MICIN
TELOUT
(NC)
AGND
BOOT_E
BT_RST
(NC)
BT_TEST
BT_MUTE
(NC)
(NC)
(NC)
GNDE
14
15
16
17
18
19
20
21
22
23
24
25
26
Pin Name
(NC)
(NC)
BT_TX
BT_CTS
BT_RX
/CE
BT_RTS
(NC)
(NC)
BT5V
(NC)
(NC)
DGND
GND
C
D
E
56
ND-BT1/E5
F
7
8
23
Page 24

7.2 IC
1234
A
B
C
AK2301A
- Pin Layout
24 23 22 21 20 15 14 13
1 2 3 4 5 6 7 8 9 10 11 12
19 18 17 16
- Block Diagram
GST
VFTN
VFTP
D
VR
VFR
GSR
E
TAGND
VREF
VDD
VSS
-
+
AMPR
AMPT
-
+
BGREF
AAF
SMF
AMP1
-
+
A/D
D/A
CODEC Core
Internal
Main Clock
AMP2
PCM I/F
PLL
-
+
DX
DR
FS
BCLK
PLLC
MUTEN
RSTN
TEST1
TEST2
TEST3
AMP1O
F
24
1234
AMP1I AMP2O AMP2I
ND-BT1/E5
Page 25

BD5230FVE
5678
VDD
GND
54
-
+
Vref
123
VOUT
SUB CT
A
B
C
D
E
F
56
ND-BT1/E5
7
8
25
Page 26

1234
8. OPERATIONS
A
B
C
D
E
F
26
1234
ND-BT1/E5
Page 27

5678
A
B
C
D
E
56
ND-BT1/E5
F
7
8
27
Page 28

-
GG
(T6)
.
s
1234
Jigs List
ame
Torques screwdriver
A
B
g No
K1072
emark
Torques screwdriver
C
D
E
F
28
1234
ND-BT1/E5
 Loading...