


FH-P80BT

Operation Manual
CD RDS RECEIVER
FH-P80BT
English
2
En

Contents
Thank you for buying this Pioneer product.
Please read through these operating instructions so you will know how to operate
your model properly. After you have finished reading the instructions, keep this man-
ual in a safe place for future reference.
Before You Start
About this unit 6
– Operating environment 7
Visit our website 8
In case of trouble 8
Resetting the microprocessor 8
About the demo mode 8
Use and care of the remote control 8
– Installing the battery 8
– Using the remote control 9
Operating this unit
What’s What 10
– Head unit 10
– Remote control 11
– Display indication 12
Basic Operations 13
– Power ON/OFF 13
– Selecting a source 13
– Adjusting the volume 14
Tuner 14
– Basic Operations 14
– Storing and recalling broadcast
frequencies 15
– Receiving PTY alarm broadcasts 15
– Introduction to advanced
operations 15
– Storing the strongest broadcast
frequencies 16
– Tuning in strong signals 16
– Selecting alternative frequencies 16
– Receiving traffic announcements 17
– Using PTY functions 17
– PTY list 18
Built-in CD Player 19
– Basic Operations 19
– Selecting a track directly 20
– Displaying text information on disc 20
– Selecting tracks from the track title
list 21
– Selecting files from the file name
list 21
– Introduction to advanced
operations 21
– Selecting a repeat play range 22
– Playing tracks in random order 22
– Scanning folders and tracks 22
– Pausing playback 22
– Using Sound Retriever 22
– Using disc title functions 23
Playing songs on USB portable audio player/
USB memory 24
– Basic Operations 24
– Selecting an audio file directly in the
current folder 24
– Displaying text information of an audio
file 24
– Selecting files from the file name
list 24
– Introduction to advanced
operations 25
Playing songs on iPod 26
– Basic Operations 26
– Browsing for a song 26
– Displaying text information on
iPod 27
– Introduction to advanced
operations 27
– Playing songs in a random order
(shuffle) 28
– Playing all songs in a random order
(shuffle all) 28
– Selecting songs from album list of
currently playing artist 28
– Operating this unit’s iPod function
from your iPod 28
– Changing audiobook speed 29
En
3

Contents
Bluetooth Audio 29
– Connecting a Bluetooth audio
player 30
– Disconnecting a Bluetooth audio
player 31
– Basic Operations 31
– Introduction to advanced
operations 31
– Playing songs on a Bluetooth audio
player 32
– Stopping playback 32
– Connecting to a Bluetooth audio player
automatically 32
– Displaying BD (Bluetooth Device)
address 32
Bluetooth Telephone 33
– Setting up for hands-free phoning 33
– Introduction to connection and
pairing 33
– Connecting and disconnecting a
cellular phone 34
– Making a phone call 37
– Taking a phone call 37
– Using the phone number list 38
– Using the call history 38
– Using the phone book 39
– Using preset numbers 40
– Introduction to advanced
operations 42
– Downloading phone books from your
cellular phone 43
– Transferring entries to the phone
book 43
– Setting the automatic connection 44
– Setting automatic answering 44
– Echo canceling and noise
reduction 44
– Switching the ring tone 44
– Making a call by entering phone
number 45
– Clearing memory 45
– Adding the prefix for international
calls 45
– Changing the phone book display
order 45
– Selecting menu language 46
Audio Adjustments
Introduction of audio adjustments 47
Using balance adjustment 47
Using the equalizer 47
– Recalling equalizer curves 47
– Adjusting equalizer curves 48
– Adjusting 7-band graphic equalizer 48
Adjusting loudness 49
Using subwoofer output 49
– Adjusting subwoofer settings 49
Boosting the bass 50
Using the high pass filter 50
Adjusting source levels 50
Using automatic sound levelizer 51
Initial Settings
Adjusting initial settings 52
Setting the date 52
Setting the clock 52
Turning the off clock display on or off 53
Setting the FM tuning step 53
Switching Auto PI Seek 53
Switching the auxiliary setting 53
Switching the dimmer setting 54
Setting the rear output and subwoofer
controller 54
Switching the sound muting/attenuation 54
Switching the feature demo 55
Switching the ever scroll 55
Multi language display setting 55
Activating the BT AUDIO source 55
4
En

Contents
Entering PIN code for Bluetooth wireless
connection 56
Editing device name 56
Displaying system version for repair 56
Resetting the Bluetooth wireless technology
module 57
Updating the software about Bluetooth
connection 57
Other Functions
Using the AUX source 58
– About AUX1 and AUX2 58
– AUX1 source: 58
– AUX2 source: 58
– Selecting AUX as the source 58
– Setting the AUX title 58
Using the external unit 58
– Selecting the external unit as the
source 58
– Basic operation 59
– Advanced operations 59
Using the PGM button 59
Available accessories
Playing songs on iPod 60
– Basic operation 60
– Displaying text information on
iPod 60
– Browsing for a song 60
– Introduction to advanced
operations 60
– Playing songs in a random order
(shuffle) 61
Multi-CD Player 61
– Basic Operations 61
– Using CD TEXT functions 62
– Introduction to advanced
operations 62
– Using compression and bass
emphasis 62
– Using ITS playlists 63
– Using disc title functions 64
DVD Player 65
– Basic Operations 65
– Selecting a disc 65
– Selecting a folder 66
– Introduction to advanced
operations 66
TV tuner 67
– Basic Operations 67
– Storing and recalling broadcast
stations 67
– Storing the strongest broadcast
stations sequentially 68
Additional Information
Troubleshooting 69
Error messages 69
Handling guideline of discs and player 71
Dual Discs 71
Compressed audio compatibility 71
Compressed audio files on the disc 72
– Example of a hierarchy 72
USB audio player/USB memory 73
– USB audio player/USB memory
compatibility 73
– Handling guideline and supplemental
information 73
iPod 74
– About handling the iPod 74
– About iPod settings 74
Bluetooth profiles 74
Russian character chart 74
Specifications 76
En
5
Section
01
Before You Start
If you want to dispose this product, do not mix
it with general household waste. There is a separate collection system for used electronic
products in accordance with legislation that requires proper treatment, recovery and recycling.
Private households in the member states of
the EU, in Switzerland and Norway may return
their used electronic products free of charge
to designated collection facilities or to a retailer (if you purchase a similar new one).
For countries not mentioned above, please
contact your local authorities for the correct
method of disposal.
By doing so you will ensure that your disposed
product undergoes the necessary treatment,
recovery and recycling and thus prevent potential negative effects on the environment
and human health.
About this unit
The tuner frequencies on this unit are allocated for use in Western Europe, Asia, the
Middle East, Africa and Oceania. Use in other
areas may result in poor reception. The RDS
(radio data system) function operates only in
areas with FM stations broadcasting RDS signals.
CAUTION
! Do not allow this unit to come into contact
with liquids. Electrical shock could result.
Also, damage to this unit, smoke, and overheating could result from contact with liquids.
! “CLASS 1 LASER PRODUCT”
This product contains a laser diode of higher
class than 1. To ensure continued safety, do
not remove any covers or attempt to gain ac-
cess to the inside of the product. Refer all servicing to qualified personnel.
! The Pioneer CarStereo-Pass is for use only in
Germany.
! Keep this manual handy as a reference for op-
erating procedures and precautions.
! Always keep the volume low enough so that
you can hear sounds from outside the vehicle.
! Protect this unit from moisture.
! If the battery is disconnected or discharged,
the preset memory will be erased and must be
reprogrammed.
About WMA
The Windows Media™ logo printed on the box
indicates that this unit can play back WMA
data.
Windows Media and the Windows logo are trademarks or registered trademarks of Microsoft
Corporation in the United States and/or other
countries.
! This unit may not operate correctly depend-
ing on the application used to encode
WMA files.
About MP3
Supply of this product only conveys a license
for private, non-commercial use and does not
convey a license nor imply any right to use
this product in any commercial (i.e. revenuegenerating) real time broadcasting (terrestrial,
satellite, cable and/or any other media), broadcasting/streaming via internet, intranets and/
or other networks or in other electronic content distribution systems, such as pay-audio or
audio-on-demand applications. An independent license for such use is required. For details, please visit
http://www.mp3licensing.com.
6
En
Before You Start
Section
01
About AAC
This unit plays back AAC files encoded by
®
iTunes
.
iTunes is a trademark of Apple Inc., registered
in the U.S. and other countries.
Portable audio player compatibility
! Inquire at the manufacturer about your
USB portable audio player/USB memory.
This unit corresponds to the following.
— USB MSC (Mass Storage Class) compliant
portable audio player and memory
— WMA, MP3, AAC and WAV file playback
For details about the compatibility, refer to
USB audio player/USB memory compatibility
on page 73.
®
iPod
compatibility
This unit can control and listen to songs on an
iPod.
! This unit supports only the following iPods.
Supported iPod software versions are
shown below. Older versions of iPod soft-
ware may not be supported.
— iPod fifth generation (software version
1.2.1)
— iPod nano first generation (software ver-
sion 1.3.1)
— iPod nano second generation (software
version 1.1.3)
— iPod nano third generation (software
version 1.0.2)
— iPod classic (software version 1.0.2)
— iPod touch (software version 1.1.1)
! Operations may vary depending on the soft-
ware version of iPod.
! When using an iPod, iPod Dock Connector
to USB Cable is required.
! Pioneer CD-IU50 interface cable is also
available. For details, consult your dealer.
! This unit can control previous generations
iPod models with a Pioneer iPod adapter
(e.g. CD-IB100N).
For details concerning operation with the
iPod adapter, refer to Playing songs on iPod
on page 60.
! iPod is a trademark of Apple Inc., regis-
tered in the U.S. and other countries.
About Bluetooth
Bluetooth is a short-range wireless radio connectivity technology that is developed as a
cable replacement for mobile phones, handheld PCs and other devices. Bluetooth operates in 2.4 GHz frequency range and transmits
voice and data at speeds up to 1 megabit per
second. Bluetooth was launched by a special
interest group (SIG) that comprises of Ericsson
Inc., Intel Corp., Nokia Corp., Toshiba and IBM
in 1998, and it is currently developed by nearly
2 000 companies worldwide.
! The Bluetooth word mark and logos are
owned by the Bluetooth SIG, Inc. and any
use of such marks by Pioneer Corporation
is under license. Other trademarks and
trade names are those of their respective
owners.
CAUTION
! Pioneer accepts no responsibility for data lost
on the USB portable audio player/USB memory even if that data is lost while using this
unit.
! Pioneer accepts no responsibility for data lost
on the iPod even if that data is lost while
using this unit.
Operating environment
This unit should be used within the temperature ranges shown below.
Operating temperature range: -10 °C to +60 °C
(14 °F to 140 °F)
EN300328 ETC test temperature: -20 °C and
+55 °C (-4 °F and 131 °F)
Before You Start
En
7
Section
01
Before You Start
Visit our website
Visit us at the following site:
http://www.pioneer.co.uk
! Register your product. We will keep the de-
tails of your purchase on file to help you
refer to this information in the event of an
insurance claim such as loss or theft.
! We offer the latest information about
Pioneer Corporation on our website.
In case of trouble
Should this product fail to operate properly,
contact your dealer or nearest authorized
Pioneer Service Station.
Resetting the microprocessor
The microprocessor must be reset under the
following conditions:
! Prior to using this unit for the first time
after installation
! If the unit fails to operate properly
! When strange or incorrect messages ap-
pear on the display
Important
The red lead (ACC) of this unit should be connected to a terminal coupled with ignition switch
on/off operations. If this is not done, the vehicle
battery may be drained.
Feature demo mode
The feature demo automatically starts when
power to this unit is turned off while the ignition switch is set to ACC or ON. Press DISP
during feature demo operation to cancel the
feature demo mode. Press DISP again to start.
Remember that if the feature demo continues
operating when the car engine is turned off, it
may drain battery power.
Use and care of the remote
control
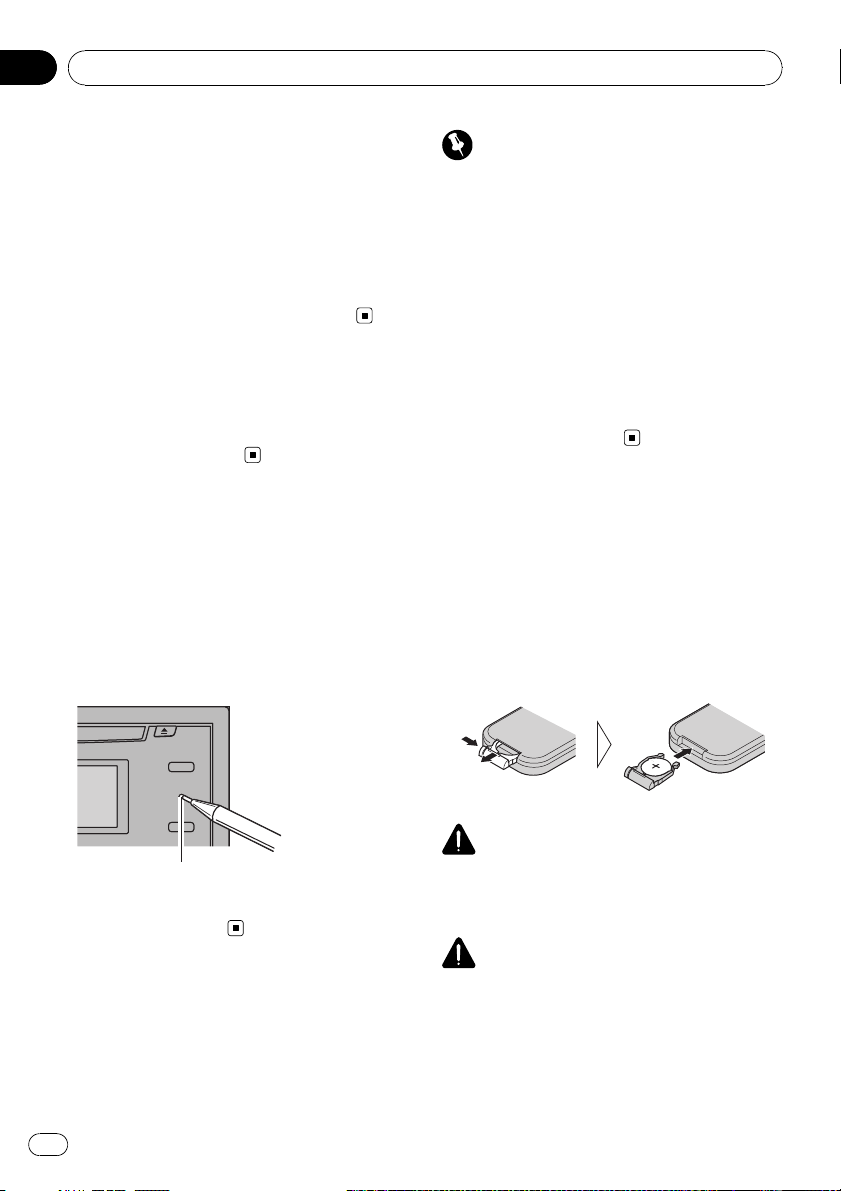
Installing the battery
Slide the tray on the back of the remote control out and insert the battery with the plus (+)
and minus (–) poles aligned properly.
! When using for the first time, pull out the
film protruding from the tray.
RESET button
% Press RESET with a pen tip or other
pointed instrument.
About the demo mode
This unit features the feature demo mode.
8
En
WARNING
Keep the battery out of the reach of children.
Should the battery be swallowed, consult a doctor immediately.
CAUTION
! Use one CR2025 (3 V) lithium battery.
! Remove the battery if the remote control is not
used for a month or longer.
! There is a danger of explosion if the battery is
incorrectly replaced. Replace only with the
same or equivalent type.

Before You Start
Section
01
! Do not handle the battery with metallic tools.
! Do not store the battery with metallic objects.
! If the battery leaks, wipe the remote control
completely clean and install a new battery.
! When disposing of used batteries, comply
with governmental regulations or environmen-
tal public institutions’ rules that apply in your
country/area.
Using the remote control
Point the remote control in the direction of the
front panel to operate.
! The remote control may not function prop-
erly in direct sunlight.
Important
! Do not store the remote control in high tem-
peratures or direct sunlight.
! Do not let the remote control fall onto the
floor, where it may become jammed under the
brake or accelerator pedal.
Before You Start
En
9
Section
02
Operating this unit
What’s What
Head unit
1 S.Rtrv button
Press to switch Sound Retriever settings.
2 DISP/SCROLL button
Press to select different displays.
Press and hold to scroll through the text information.
3 Disc loading slot
Insert a disc to play.
4 EJECT button
Press to eject a CD from your built-in CD
player.
5 TA/NEWS button
Press to turn TA function on or off. Press
and hold to turn NEWS function on or off.
6 RESET button
Press to reset the microprocessor.
7 MUTE/HOLD button
Press to turn off the sound. To turn on the
sound, press again.
While talking on the phone, press to put the
call on hold.
! While connecting, this indicator flashes.
9
Lights up when your cellular phone is connected via Bluetooth wireless technology.
! While connecting, this indicator flashes.
! While phone connection is not com-
a LIST button
Press to display the disc title list, track title
list, folder list, file list, preset channel list or
phone number list depending on the
source.
b PHONE/
Press to select the phone as the source.
While operating a phone source, press to
end a call, reject an incoming call or cancel
making a call.
Press and hold to perform Bluetooth connection.
c MULTI-CONTROL
Move to perform manual seek tuning, fast
forward, reverse and track search controls.
Also used for controlling functions.
Turn to increase or decrease the volume.
d BAND/ESC button
Press to select among three FM bands and
MW/LW bands.
Press to return to the ordinary display when
operating the menu.
e SOURCE/OFF button
This unit is turned on by selecting a source.
Press to cycle through all the available
sources.
f RDM/
Press to turn random function on or off
while using CD or USB.
indicator
pleted, this indicator flashes.
/CONNECT button
/iPod button
8
10
indicator
Lights up when your Bluetooth audio player
is connected via Bluetooth wireless technology.
En
Operating this unit
Section
02
While using an iPod, press to shuffle all
tracks.
Press and hold to switch the control mode
while using an iPod.
If using the iPod with an interface adapter
(CD-IB100N), press to switch the shuffle
function.
Remote control
Operation is the same as when using the buttons on the head unit.
g VOLUME buttons
Press to increase or decrease the volume.
k CLEAR button
Press to cancel the input number when 0 to
9 are used.
l 0 to 9 buttons
Press to directly select the desired track,
preset tuning or disc. Buttons 1 to 6 can operate the preset tuning for the tuner or disc
number search for the multi-CD player.
m OFF HOOK button
Press to start talking on the phone while operating a phone source.
n ON HOOK button
While operating the phone source, press to
end a call or reject an incoming call.
o MUTE button
Press to turn off the sound. To turn on the
sound, press again.
p PGM button
Press to operate the preprogrammed functions for each source. (Refer to Using the
PGM button on page 59.)
q AUDIO button
Press to select various sound quality controls.
Operating this unit
h FUNCTION button
Press to select functions.
i Thumb pad
Move to perform manual seek tuning, fast
forward, reverse and track search controls.
Also used for controlling functions.
Functions are the same as
MULTI-CONTROL except for volume control.
Press to display the disc title list, track title
list, folder list, file list or preset channel list
depending on the source.
j DIRECT button
Press to directly select the desired track.
En
11
Section
02
Operating this unit
Display indication
1 Main display section
Displays band, frequency, elapsed playback
time and other settings.
2
(artist) indicator
Appears when the disc (track) artist name is
displayed on the main display section.
Appears when artist search refinement on
the iPod browsing function is in use.
3
(shuffle) indicator
Appears when shuffle function is on while
iPod source is being selected.
4
(disc) indicator
Appears when the disc (album) name is displayed on the main display section.
Appears when album search refinement on
the iPod browsing function is in use.
5
(folder) indicator
Appears when operating list function.
When an upper tier folder or menu exists, c
appears.
When a lower tier folder or menu exists, d
appears.
6
(song) indicator
Appears when the track (song) name is displayed on the main display section.
Appears when song search refinement on
the iPod browsing function is in use.
7
(iPod connection) indicator
Appears when the iPod connection is recognized while USB source is being selected.
8 F-RDM indicator
Appears when folder random is on.
When random function is on, only RDM is
displayed.
9 F-RPT indicator
Appears when folder repeat is on.
When repeat function is on, only RPT is displayed.
a LOC indicator
Appears when local seek tuning is on.
b 5 (stereo) indicator
Appears when the selected frequency is
being broadcast in stereo.
c
d AUTO (auto answer) indicator
e
f
g
(Sound Retriever) indicator
Appears when Sound Retriever function is
on.
Shows when the automatic answering function is on (for more details, refer to Setting
automatic answering on page 44).
(missed call) indicator
Appears when there are missed call log.
Appears when missed call list is displayed
while telephone source is being selected.
(dialled call) indicator
Appears when dialled call list is displayed
while telephone source is being selected.
(received call) indicator
Appears when received call list is displayed
while telephone source is being selected.
12
En

Operating this unit
Section
02
h (phone book) indicator
Appears when phone book list is displayed
while telephone source is being selected.
i NEWS indicator
Appears when NEWS (news program interruption) function is on.
j TA indicator
Appears when TA (traffic announcement
standby) function is on.
k TP indicator
Appears when a TP station is tuned in.
Basic Operations
Power ON/OFF
Turning the unit on
% Press SOURCE to turn the unit on.
Turning the unit off
% Press OFF and hold until the unit turns
off.
Selecting a source
You can select a source you want to listen to.
To switch to the built-in CD player, load a disc
in the unit (refer to page 19).
% Press SOURCE repeatedly to switch between the following sources.
Tuner—Television—DVD player/MultiDVD player—Built-in CD player—MultiCD player—iPod—USB—External unit 1—
External unit 2—AUX1—AUX2—BT Audio
—BT Telephone
Notes
! In the following cases, the sound source will
not change.
— When no unit corresponding to the se-
lected source is connected.
— When there is no disc or magazine in the
player.
— When the iPod is not connected to this
unit.
— When AUX (auxiliary input) is set to off
(refer to page 53).
— When the BT audio source is set to off
(refer to Activating the BT AUDIO source
on page 55).
! AUX1 is set to on by default. Turn off the AUX1
when not in use (refer to Switching the auxili-
ary setting on page 53).
! Charging the portable audio player using
car’s DC power source while connecting it to
AUX input may generate noise. In this case,
stop charging.
Operating this unit
En
13

Section
02
Operating this unit
! External unit refers to a Pioneer product (such
as ones available in the future) that, although
incompatible as a source, enables control of
basic functions with this unit. Two external
units can be controlled with this unit. When
two external units are connected, the external
unit is automatically allocated to external unit
1 or external unit 2 by this unit.
! When this unit’s blue/white lead is connected
to the vehicle’s auto-antenna relay control
terminal, the vehicle’s antenna extends when
this unit’s source is turned on. To retract the
antenna, turn the source off.
Adjusting the volume
% Turn MULTI-CONTROL to adjust the
sound level.
Tuner
Basic Operations
RDS
1 Band indicator
2 Preset number indicator
3 Program service name
4 PTY label indicator
Non-RDS or MW/LW
1 Band indicator
2 Preset number indicator
3 Frequency indicator
14
En
% Select a band
Press BAND.
# Band can be selected from among FM1, FM2,
FM3 or MW/LW.
% Manual tuning (step by step)
Push MULTI-CONTROL left or right.
% Seek tuning
Push and hold MULTI-CONTROL left or right,
and then release.
# You can cancel seek tuning by pushing
MULTI-CONTROL left or right.
# While pushing and holding MULTI-CONTROL
left or right, you can skip stations. Seek tuning
starts as soon as you release MULTI-CONTROL.

Operating this unit
Section
02
Notes
! This unit’s AF (alternative frequencies search)
function can be turned on and off. AF should
be off for normal tuning operation (refer to the
next page).
! RDS service may not be provided by all sta-
tions.
! RDS functions such as AF and TA are only ac-
tive when your radio is tuned to an RDS sta-
tion.
Storing and recalling broadcast
frequencies
You can easily store up to six broadcast frequencies for later recall.
! Six stations for each band can be stored in
memory.
1 Press LIST.
Preset screen is displayed.
2 Use MULTI-CONTROL to store the selected frequency in memory.
Turn to change the preset number. Press and
hold to store.
3 Use MULTI-CONTROL to select the desired station.
Turn to change the station. Press to select.
# You can also change the station by pushing
MULTI-CONTROL up or down.
# To return to the ordinary display, press BAND
or LIST.
# If you do not operate the list within about 30
seconds, the display automatically returns to the
ordinary display.
Using the remote control
% When you find a frequency that you
want to store in memory, press one of preset tuning buttons 1 to 6 and hold until the
preset number stops flashing.
The number you have pressed will flash in the
preset number indicator and then remain lit.
The selected radio station frequency has been
stored in memory.
The next time you press the same preset tuning button the radio station frequency is recalled from memory.
# You can also recall radio station frequencies
assigned to preset tuning numbers by pushing
MULTI-CONTROL up or down during the frequency display.
Receiving PTY alarm broadcasts
When the emergency PTY code broadcasts,
the unit receives it automatically (ALARM appears). When the broadcasting ends, the system returns to the previous source.
! An emergency announcement can be can-
celed by pressing TA.
Introduction to advanced
operations
1 Press MULTI-CONTROL to display the
main menu.
2 Use MULTI-CONTROL to select
FUNCTION.
Turn to change the menu option. Press to select.
The function menu is displayed.
3 Turn MULTI-CONTROL to select the
function.
BSM (best stations memory)—REGIONAL (re-
gional)—LOCAL (local seek tuning)—
PTY SEARCH (program type selection)—
TRAFFIC ANNOUNCE (traffic announcement
standby)—ALTERNATIVE FREQ (alternative
frequencies search)—NEWS INTERRUPT
(news program interruption)
Notes
! You can also select the function by pressing
FUNCTION on the remote control.
! To return to the ordinary display, press BAND.
Operating this unit
En
15

Section
02
Operating this unit
! If MW/LW band is selected, you can only se-
lect BSM or LOCAL.
Storing the strongest broadcast
frequencies
BSM (best stations memory) lets you automatically store the six strongest broadcast frequencies.
1 Display the function menu.
Refer to Introduction to advanced operations
on the previous page.
2 Use MULTI-CONTROL to select BSM in
the function menu.
3 Press MULTI-CONTROL to turn BSM on.
The six strongest broadcast frequencies are
stored in the order of their signal strength.
# To cancel, press MULTI-CONTROL again.
Tuning in strong signals
Local seek tuning lets you tune in only those
radio stations with sufficiently strong signals
for good reception.
1 Display the function menu.
Refer to Introduction to advanced operations
on the previous page.
2 Use MULTI-CONTROL to select LOCAL in
the function menu.
3 Press MULTI-CONTROL to turn local
seek tuning on.
# To turn local seek tuning off, press
MULTI-CONTROL again.
4 Push MULTI-CONTROL left or right to
set the sensitivity.
FM: LEVEL 1—LEVEL 2—LEVEL 3—LEVEL 4
MW/LW: LEVEL 1—LEVEL 2
The LEVEL 4 setting allows reception of only
the strongest stations, while lower settings let
you receive progressively weaker stations.
Selecting alternative frequencies
When the tuner cannot get a good reception,
the unit automatically searches for a different
station in the same network.
1 Display the function menu.
Refer to Introduction to advanced operations
on the previous page.
2 Use MULTI-CONTROL to select
ALTERNATIVE FREQ in the function menu.
3 Press MULTI-CONTROL to turn AF on.
# To turn off, press MULTI-CONTROL again.
Notes
! Only RDS stations are tuned in during seek
tuning or BSM when AF is on.
! When you recall a preset station, the tuner
may update the preset station with a new frequency from the station’s AF list. No preset
number appears on the display if the RDS
data for the station received differs from that
of the originally stored station.
! During AF search, sound may be temporarily
interrupted.
! AF can be turned on or off independently for
each FM band.
Using PI Seek
If the tuner cannot find a suitable station, or
reception status becomes bad, the unit automatically searches for a different station with
the same programming. During the search,
PI SEEK is displayed and the output is muted.
Using Auto PI Seek for preset stations
When preset stations cannot be recalled, the
unit can be set to perform PI Seek during preset recall.
! The default setting for Auto PI Seek is off.
See Switching Auto PI Seek on page 53.
16
En

Operating this unit
Section
02
Limiting stations to regional
programming
When AF is used, the regional function limits
the selection of stations broadcasting regional
programs.
1 Display the function menu.
Refer to Introduction to advanced operations
on page 15.
2 Use MULTI-CONTROL to select
REGIONAL in the function menu.
3 Press MULTI-CONTROL to turn the regional function on.
# To turn off, press MULTI-CONTROL again.
Notes
! Regional programming and regional networks
are organized differently depending on the
country (i.e., they may change according to
the hour, state or broadcast area).
! The preset number may disappear from the
display if the tuner tunes in a regional station
which differs from the originally set station.
! The regional function can be turned on or off
independently for each FM band.
Receiving traffic announcements
TA (traffic announcement standby) lets you receive traffic announcements automatically, no
matter what source you are listening to. TA
can be activated for both a TP station (a station that broadcasts traffic information) or an
enhanced other network’s TP station (a station
carrying information which cross-references
TP stations).
3 Use MULTI-CONTROL to adjust the TA
volume when a traffic announcement begins.
The newly set volume is stored in memory and
recalled for subsequent traffic announcements.
4 Press TA while a traffic announcement
is being received to cancel the announcement.
The tuner returns to the original source but remains in the standby mode until TA is pressed
again.
Notes
! You can also turn this function on or off in the
menu that appears by using
MULTI-CONTROL.
! The system switches back to the original
source following traffic announcement reception.
! Only TP and enhanced other network’s TP sta-
tions are tuned in during seek tuning or BSM
when TA is on.
Using PTY functions
You can tune in a station by using PTY (program type) information.
Operating this unit
1 Tune in a TP or enhanced other network’s TP station.
TP indicator lights.
2 Press TA to turn traffic announcement
standby on.
# To turn off, press TA again.
En
17

Section
02
Operating this unit
Searching for an RDS station by PTY
information
You can search for general types of broadcasting programs, such as those listed on this
page.
1 Display the function menu.
Refer to Introduction to advanced operations
on page 15.
2 Use MULTI-CONTROL to select
PTY SEARCH in the function menu.
3 Push MULTI-CONTROL left or right to
select a program type.
NEWS/INFO—POPULAR—CLASSICS—
OTHERS
4 Press MULTI-CONTROL to begin the
search.
The unit searches for a station broadcasting
that program type. When a station is found, its
program service name is displayed.
PTY (program type ID code) information is
listed on this page.
# To cancel the search, press MULTI-CONTROL
again.
# The program of some stations may differ from
that indicated by the transmitted PTY.
# If no station is broadcasting the type of program you searched for, NOT FOUND is displayed
for about two seconds and then the tuner returns
to the original station.
Using news program interruption
When a news program is broadcast from a
PTY code news station, the unit automatically
switches to the news broadcast station. When
the news program ends, reception of the previous program resumes.
# A news program can be canceled by pressing
NEWS.
Note
You can also turn on or off news programs in the
menu that appears by using MULTI-CONTROL.
PTY list
General Specific Type of program
NEWS/INFO NEWS News
AFFAIRS Current affairs
INFO General information
and advice
SPORT Sports
WEATHER Weather reports/me-
teorological information
FINANCE Stock market reports,
commerce, trading,
etc.
POPULAR POP MUS Popular music
ROCK MUS Contemporary modern
music
EASY MUS Easy listening music
OTH MUS Non-categorized
music
JAZZ Jazz
COUNTRY Country music
NAT MUS National music
OLDIES Oldies, golden oldies
FOLK MUS Folk music
CLASSICS L. CLASS Light classical music
CLASSIC Classical music
% Press NEWS and hold to turn on news
program interruption.
Press NEWS until NEWS ON appears in the
display.
# To turn off news program interruption, press
NEWS and hold until OFF appears in the display.
18
En
Operating this unit
Section
02
OTHERS EDUCATE Educational programs
DRAMA Radio plays and seri-
als
CULTURE National or regional
culture
SCIENCE Nature, science and
technology
VARIED Light entertainment
CHILDREN Children’s
SOCIAL Social affairs
RELIGION Religious affairs or ser-
vices
PHONE IN Phone in
TOURING Travel programs; not
for traffic announcements
LEISURE Hobbies and recrea-
tional activities
DOCUMENT Documentaries
Built-in CD Player
Basic Operations
1 Folder number indicator
Shows the folder number currently playing
when the compressed audio is playing.
2 Track number indicator
3 Play time indicator
4 Bit rate/sampling frequency indicator
Shows the bit rate or sampling frequency of
the current track (file) when the compressed
audio is playing.
! When playing back VBR (variable bit
rate)-recorded WMA files, the average
bit rate value is displayed.
! When playing back VBR (variable bit
rate)-recorded MP3 files, VBR is displayed instead of bit rate value.
% Insert a disc into the disc loading slot.
Playback will automatically start.
# When loading a disc, face the label side of
a disc up.
Operating this unit
% Eject a disc
Press EJECT.
% Select a folder
Push MULTI-CONTROL up or down.
# You cannot select a folder that does not have
a compressed audio file recorded in it.
% Select a track
Push MULTI-CONTROL left or right.
% Fast forward or reverse
Push and hold MULTI-CONTROL left or right.
# When playing compressed audio, there is no
sound on fast forward or reverse.
En
19

Section
02
Operating this unit
% Return to root folder
Press and hold BAND.
# If folder 01 (ROOT) contains no files, playback
commences with folder 02.
% Switch between compressed audio and
CD-DA
Press BAND.
# This operation is available only when playing
CD-EXTRA or MIXED-MODE CDs.
# If you have switched between compressed
audio and CD-DA, playback starts at the first
track on the disc.
Notes
! The built-in CD player can play back audio CD
and compressed audio recorded on a CDROM. (Refer to page 72 for files that can be
played back.)
! Read the precautions for discs and player on
page 71.
! A disc has already been inserted, press
SOURCE to select the built-in CD player.
! There is sometimes a delay between starting
up disc playback and the sound being issued.
When being read, FORMAT READ is displayed.
! If an error message is displayed, refer to Error
messages on page 69.
! Playback is carried out in order of file number.
Folders are skipped if they contain no files. (If
folder 01 (ROOT) contains no files, playback
commences with folder 02.)
Selecting a track directly
When using the remote control, you can select
a track directly by entering the desired track
number.
! When audio files are being played back,
you can select track in the current folder.
1 Press DIRECT.
Track number input display appears.
2 Press 0 to 9 to enter the desired track
number.
# You can cancel the input number by pressing
CLEAR.
3 Press DIRECT.
The track for the entered number will play.
# After entering the number input mode, if you
do not perform an operation within about eight
seconds, the mode is automatically canceled.
Displaying text information on
disc
% Press DISP to select the desired text information.
! For title entered CD
Play time—disc title and play time
! For CD TEXT discs
Play time—disc artist name and track title
—disc artist name and disc title—disc title
and track title—track artist name and track
title—track title and play time
! For WMA/MP3/AAC
Play time—folder name and file name—artist name and track title—artist name and
album title—album title and track title—
track title and play time—comment and
play time
! For WAV
Play time—folder name and file name
Notes
! You can scroll to the left of the title by pressing
and holding DISP.
! Audio CD that contains certain information
such as text and/or number is CD TEXT.
! If specific information is not recorded on a
disc, title or name is not displayed.
! Depending on the version of iTunes
write MP3 files onto a disc, comment information may not be correctly displayed.
! Depending on the version of Windows Media
Player used to encode WMA files, album
names and other text information may not be
correctly displayed.
®
used to
20
En

Operating this unit
Section
02
! When playing back VBR (variable bit rate)-re-
corded WMA files, the average bit rate value is
displayed.
! When playing back VBR (variable bit rate)-re-
corded MP3 files, VBR is displayed instead of
bit rate value.
! The sampling frequency shown in the display
may be abbreviated.
! When Ever Scroll is set to ON at the initial set-
ting, text information scrolls continuously in
the display. Refer to Switching the ever scroll
on page 55.
! Depending on the character sets in the disc,
Russian texts may be garbled. About the al-
lowed character sets for Russian texts, refer to
Compressed audio files on the disc on page 72.
Selecting tracks from the track
title list
Track title list lets you see the list of track titles
on a CD TEXT disc and select one of them to
play back.
1 Press LIST to switch to the track title list
mode.
2 Use MULTI-CONTROL to select the desired track title.
Turn to change the track title. Press to play.
# You can also change the track title by pushing
MULTI-CONTROL up or down.
# To return to the ordinary display, press BAND
or LIST.
# If you do not operate the list within about 30
seconds, the display automatically returns to the
ordinary display.
Selecting files from the file
name list
File name list lets you see the list of file names
(or folder names) and select one of them to
playback.
1 Press LIST to switch to the file name list
mode.
Names of files and folders appear in the display.
2 Use MULTI-CONTROL to select the desired file name (or folder name).
Turn to change the name of file or folder.
— when a file is selected, press to play.
— when a folder is selected, press to see a list
of files (or folders) in the seleted folder.
— when a folder is selected, press and hold to
play a song in the selected folder.
# You can also play the file by pushing
MULTI-CONTROL right.
# You can also play a song in the selected folder
by pushing and holding MULTI-CONTROL right.
# To return to the previous list (the folder one
level higher), push MULTI-CONTROL left.
# Number of the folders/files in the currently selected folder will be indicated on the right side of
the display.
# To return to the ordinary display, press BAND
or LIST.
# If you do not operate the list within about 30
seconds, the display automatically returns to the
ordinary display.
Introduction to advanced
operations
1 Press MULTI-CONTROL to display the
main menu.
2 Use MULTI-CONTROL to select
FUNCTION.
Turn to change the menu option. Press to select.
The function menu is displayed.
3 Turn MULTI-CONTROL to select the
function.
PLAY MODE (repeat play)—RANDOM MODE
(random play)—SCAN MODE (scan play)—
PAUSE (pause)—SOUND RETRIEVER (sound
retriever)—TITLE INPUT (disc title input)
Operating this unit
En
21

Section
02
Operating this unit
Notes
! You can also select the function by pressing
FUNCTION on the remote control.
! To return to the ordinary display, press BAND.
! If you do not operate functions except for
TITLE INPUT within about 30 seconds, the display automatically returns to the ordinary display.
! When playing a compressed audio disc or CD
TEXT disc, you cannot switch to disc title input
display.
Selecting a repeat play range
1 Display the function menu.
Refer to Introduction to advanced operations
on the previous page.
2 Use MULTI-CONTROL to select
PLAY MODE in the function menu.
3 Press MULTI-CONTROL to select the repeat range.
! DISC REPEAT – Repeat all tracks
! TRACK REPEAT – Repeat the current track
! FOLDER REPEAT – Repeat the current
folder
# If you select another folder during repeat play,
the repeat play range changes to disc repeat.
# Performing track search or fast forward/reverse during TRACK REPEAT (track repeat)
changes the repeat play range to disc/folder.
# When FOLDER REPEAT (folder repeat) is se-
lected, it is not possible to play back a subfolder
of that folder.
Note
You can also turn this function on or off in the
menu that appears by using MULTI-CONTROL.
Scanning folders and tracks
Scan play searches the song within the selected repeat range.
1 Display the function menu.
Refer to Introduction to advanced operations
on the previous page.
2 Use MULTI-CONTROL to select
SCAN MODE in the function menu.
3 Press MULTI-CONTROL to turn scan play
on.
The first 10 seconds of each track is played.
4 When you find the desired track press
MULTI-CONTROL to turn scan play off.
# If the display has automatically returned to
the playback display, select SCAN MODE again
by using MULTI-CONTROL.
# After scanning of a disc (folder) is finished,
normal playback of the tracks begins.
Pausing playback
1 Display the function menu.
Refer to Introduction to advanced operations
on the previous page.
2 Use MULTI-CONTROL to select PAUSE in
the function menu.
Playing tracks in random order
Tracks in a selected repeat range are played in
random order.
% Press RDM to turn random play on.
Tracks play in a random order.
# To turn random play off, press RDM again.
22
En
3 Press MULTI-CONTROL to turn pause
on.
Playback of the current track pauses.
# To turn pause off, press MULTI-CONTROL
again.
Using Sound Retriever
Sound Retriever function automatically enhances compressed audio and restores rich
sound.

Operating this unit
Section
02
% Press S.Rtrv repeatedly to select the desired setting.
OFF (off)—1—2
# 2 is more effective than 1.
Note
You can also perform this operation in the menu
that appears by using MULTI-CONTROL.
Using disc title functions
You can input CD titles and display the title.
The next time you insert a CD for which you
have entered a title, the title of that CD is displayed.
Entering disc titles
Use the disc title input feature to store up to
48 CD titles in the unit. Each title can be up to
10 characters long.
1 Display the function menu.
Refer to Introduction to advanced operations
on page 21.
2 Play the CD that you want to enter a
title for.
7 Move the cursor to the last position by
pushing MULTI-CONTROL right after entering the title.
When you push MULTI-CONTROL right one
more time, the entered title is stored in memory.
8 Press BAND to return to the playback
display.
Notes
! Titles remain in memory, even after the disc is
removed from the unit, and are recalled when
the disc is reinserted.
! After data for 48 discs are stored in the mem-
ory, data for a new disc overwrites the oldest
one.
! If you connect a multi-CD player, you can
input disc titles for up to 100 discs.
! When a multi-CD player that does not support
disc title functions is connected, you cannot
enter disc titles in this unit.
Operating this unit
3 Use MULTI-CONTROL to select
TITLE INPUT in the function menu.
4 Press DISP to select the desired character type.
Press DISP repeatedly to switch between the
following character types:
Alphabet—Numbers and symbols
5 Push MULTI-CONTROL up or down to
select a letter of the alphabet.
6 Push MULTI-CONTROL left or right to
move the cursor to the previous or next
character position.
En
23
Section
02
Operating this unit
Playing songs on USB portable
audio player/USB memory
For details about the supported device, refer to
Portable audio player compatibility on page 7.
Basic Operations
1 Folder number indicator
2 Track number indicator
3 Play time indicator
4 Bit rate/sampling frequency indicator
! When playing back VBR (variable bit
rate)-recorded WMA files, the average
bit rate value is displayed.
! When playing back VBR (variable bit
rate)-recorded MP3 files, VBR is displayed instead of bit rate value.
% Select a folder
Push MULTI-CONTROL up or down.
unit and the ignition switch is set to ACC or
ON, the battery is charged.
! You can disconnect the USB portable audio
player/USB memory anytime you want to finish listening to it.
! If USB portable audio player/USB memory is
connected to this unit, the source is changed
to USB automatically. If you do not use an
USB device, disconnect it from this unit. Depending on the connected USB device, turning on the ignition switch while USB device is
connected to this unit may change the source
automatically.
Selecting an audio file directly
in the current folder
The operation is the same as that of the builtin CD player.
Refer to Selecting a track directly on page 20.
Displaying text information of
an audio file
The operation is the same as that of the builtin CD player.
Refer to Displaying text information on disc on
page 20.
% Select a track
Push MULTI-CONTROL left or right.
% Fast forward or reverse
Push and hold MULTI-CONTROL left or right.
% Return to root folder
Press and hold BAND.
Notes
! Optimum performance of this unit may not be
obtained depending on the connected USB
portable audio player/USB memory.
! If folder 01 (ROOT) contains no files, playback
commences with folder 02.
! When the USB portable audio player having
battery charging function is connected to this
24
En
Notes
! If the characters recorded on the audio file are
not compatible with the head unit, those characters are not displayed.
! The text information of some audio files may
not be correctly displayed.
Selecting files from the file
name list
The operation is the same as that of the builtin CD player.
Refer to Selecting files from the file name list
on page 21.
 Loading...