

Page 1

Operation Manual
Mode demploi
Multi-CD control DSP High power CD Cassette player
with FM/AM tuner
Syntoniseur FM/AM-CD-cassette, puissante
amplification, contrôleur DSP pour lecteur CD à
chargeur
FH-P4100
English Français
Page 2
Contents
Thank you
for buying this Pioneer product.
Please read through these operating instructions so you will know how to operate
your model properly. After you have finished reading the instructions, put them away
in a safe place for future reference.
Before You Start
About this unit 5
About this manual 5
After-sales service for Pioneer products 5
Precautions 5
Use and care of the remote control 6
Installing the battery 6
Using the remote control 6
Protecting your unit from theft 6
Removing the front panel 7
Attaching the front panel 7
Resetting the microprocessor 7
About the XM READY mark 7
Whats What
Head unit 9
Remote control 10
Power ON/OFF
Turning the unit on 11
Selecting a source 11
Turning the unit off 11
Tuner
Listening to the radio 12
Introduction of advanced tuner
operation 14
Storing and recalling broadcast
frequencies 14
Tuning in strong signals 15
Storing the strongest broadcast
frequencies 15
Cassette Player
Playing a tape 16
Introduction of advanced cassette player
operation 18
Repeating play 18
Skipping blank tape sections 19
Using Dolby noise reduction 19
Built-in CD player
Playing a CD 20
Introduction of advanced built-in CD player
operation 22
Repeating play 22
Playing tracks in a random order 23
Scanning tracks of a CD 23
Pausing CD playback 23
Using disc title functions 23
Entering disc titles 24
Displaying disc titles 24
Using CD TEXT functions 25
Displaying titles on CD TEXT
discs 25
Scrolling titles in the display 25
Multi-CD Player
Playing a CD 26
Introduction of advanced multi-CD player
operation 28
Repeating play 29
Playing tracks in a random order 29
Scanning CDs and tracks 29
Pausing CD playback 30
Using ITS playlists 30
Creating a playlist with ITS
programming 30
Playback from your ITS playlist 30
Erasing a track from your ITS
playlist 31
Erasing a CD from your ITS
playlist 31
Using disc title functions 31
Entering disc titles 31
Displaying disc titles 32
Selecting discs from the disc title
list 32
Using CD TEXT functions 33
Displaying titles on CD TEXT
discs 33
Scrolling titles in the display 33
2
En
Page 3
Contents
English
Using compression and bass emphasis 33
50-disc multi-CD player 34
Audio Adjustments
Introduction of audio adjustments 35
Using balance adjustment 35
Adjusting loudness 36
Adjusting source levels 36
Digital Signal Processor
Using the digital signal processor 37
Using the graphic equalizer 38
Recalling equalizer curves 38
Adjusting equalizer curves 38
Adjusting 9-band graphic
equalizer 39
Using sound field control, octaver and BBE
sound 39
Recalling sound field programs 39
Adjusting BBE sound level 40
Using the position selector 40
Using subwoofer output 41
Adjusting subwoofer settings 41
Using the high pass filter 41
Initial Settings
Adjusting initial settings 42
Setting the time 42
Switching the warning tone 43
Switching the auxiliary setting 43
Switching the dimmer setting 43
Switching the rear output setting 43
Selecting the digital attenuator 44
Adjusting display contrast 44
Using the AUX source 46
Selecting AUX as the source 46
Setting the AUX title 46
Additional Information
Understanding built-in CD player error
messages 48
Cassette tapes 48
Cleaning the playback head 48
Music search and repeat functions during
tape playback 48
CD player and care 49
CD-R/CD-RW discs 49
Specifications 50
Other Functions
Introduction of other functions 45
Using the demonstration 45
Using different entertainment displays 45
Cellular telephone muting 46
Setting the time display on or off 46
En
3
Page 4

Selecting fine audio equipment such as the unit you’ve just purchased is only the start of your
musical enjoyment. Now it’s time to consider how you can maximize the fun and excitement your
equipment offers. This manufacturer and the Electronic Industries Association’s Consumer
Electronics Group want you to get the most out of your equipment by playing it at a safe level. One
that lets the sound come through loud and clear without annoying blaring or distortion—and, most
importantly, without affecting your sensitive hearing.
Sound can be deceiving. Over time your hearing “comfort level” adapts to higher volumes of
sound. So what sounds “normal” can actually be loud and harmful to your hearing. Guard against
this by setting your equipment at a safe level BEFORE your hearing adapts.
To establish a safe level:
• Start your volume control at a low setting.
• Slowly increase the sound until you can hear it comfortably and clearly, and without distortion.
Once you have established a comfortable sound level:
• Set the dial and leave it there.
Taking a minute to do this now will help to prevent hearing damage or loss in the future. After
all, we want you listening for a lifetime.
We Want You Listening For A Lifetime
Used wisely, your new sound equipment will provide a lifetime of fun and enjoyment. Since
hearing damage from loud noise is often undetectable until it is too late, this manufacturer and the
Electronic Industries Association’s Consumer Electronics Group recommend you avoid prolonged
exposure to excessive noise. This list of sound levels is included for your protection.
Decibel
Level Example
30 Quiet library, soft whispers
40 Living room, refrigerator, bedroom away from traffic
50 Light traffic, normal conversation, quiet office
60 Air conditioner at 20 feet, sewing machine
70 Vacuum cleaner, hair dryer, noisy restaurant
80 Average city traffic, garbage disposals, alarm clock at two feet.
THE FOLLOWING NOISES CAN BE DANGEROUS UNDER CONSTANT EXPOSURE
90 Subway, motorcycle, truck traffic, lawn mower
100 Garbage truck, chain saw, pneumatic drill
120 Rock band concert in front of speakers, thunderclap
140 Gunshot blast, jet plane
180 Rocket launching pad
Information courtesy of the Deafness Research Foundation.
4
En
Page 5
Before You Start
Section
01
About this unit
The tuner frequencies on this unit are allocated for use in North America. Use in other
areas may result in improper receiption.
Important
The serial number is located on the top of this
unit. For your own security and convenience, be
sure to record this number on the enclosed
warranty card.
About this manual
This unit features a number of sophisticated
functions ensuring superior reception and operation. All the functions have been designed
for the easiest possible use, but many are not
self-explanatory. This operation manual will
help you benefit fully from this productspotential and to maximize your listening enjoyment.
We recommend that you familiarize yourself
with the functions and their operation by reading through the manual before you begin
using this unit. It is especially important that
you read and observe precautions on this page
and in other sections.
After-sales service for
Pioneer products
Please contact the dealer or distributor from
where you purchased this unit for after-sales
service (including warranty condtions) or any
other information. In case the necessary information is not available, please contact the
companies listed below:
Please do not ship your unit to the companies
at the addresses listed below for repair without
advance contact.
U.S.A.
Pioneer Electronics (USA) Inc.
CUSTOMER SUPPORT DIVISION
P.O. Box 1760
Long Beach, CA 90801-1760
800-421-1404
CANADA
Pioneer Electronics of Canada, Inc.
CUSTOMER SATISFACTION DEPARTMENT
300 Allstate Parkway
Markham, Ontario L3R OP2
(905) 479-4411
1-877-283-5901
For warranty information please see the Limited Warranty sheet included with this unit.
Precautions
CAUTION:
USE OF CONTROL OR ADJUSTMENT OR
PERFORMANCE OF PROCEDURES OTHER
THAN THOSE SPECIFIED HEREIN MAY
RESULT IN HAZARDOUS RADIATION
EXPOSURE.
CAUTION:
THE USE OF OPTICAL INSTRUMENTS
WITH THIS PRODUCT WILL INCREASE EYE
HAZARD.
! Keep this manual handy as a reference for
operating procedures and precautions.
! Always keep the volume low enough so you
can hear sounds outside of the car.
! Protect this product from moisture.
English
En
5
Page 6
Section
01
Before You Start
! If the battery is disconnected or discharged,
the preset memory will be erased and must be
reprogrammed.
Using the remote control
Point the remote control in the direction of the
front panel to operate.
Use and care of the remote
control
Installing the battery
Slide the tray out on the back of the remote
control and insert the battery with the plus (+)
and minus () poles pointing in the proper direction.
WARNING
Keep the battery out of the reach of children.
Should the battery be swallowed, immediately
consult a doctor.
CAUTION
! Use only one CR2025 (3V) lithium battery.
! Remove the battery if the remote control is
not to be used for a month or longer.
! Do not recharge, disassemble, heat or
dispose of battery in fire.
! Do not handle the battery with metallic tools.
! Do not store the battery with metallic
materials.
! In the event of battery leakage, wipe the
remote control completely clean and install a
new battery.
! When disposing of used batteries, please
comply with governmental regulations or
environmental public institutions rules that
apply in your country/area.
6
En
Important
! Do not store the remote control in high
temperatures or direct sunlight.
! The remote control may not function
properly in direct sunlight.
! Do not let the remote control fall onto the
floor, where it may become jammed under the
brake or accelerator pedals.
Protecting your unit from
theft
The front panel can be detached from the
head unit and stored in the protective case
provided to discourage theft.
! If the front panel is not detached from the
head unit within five seconds of turning off
the ignition, a warning tone will sound.
! You can turn off the warning tone. See
Switching the warning tone on page 43.
Important
! Never use force or grip the display and the
buttons tightly when removing or attaching.
! Avoid subjecting the front panel to excessive
shocks.
! Keep the front panel out of direct sunlight
and hight temperatures.
Page 7
Before You Start
Section
01
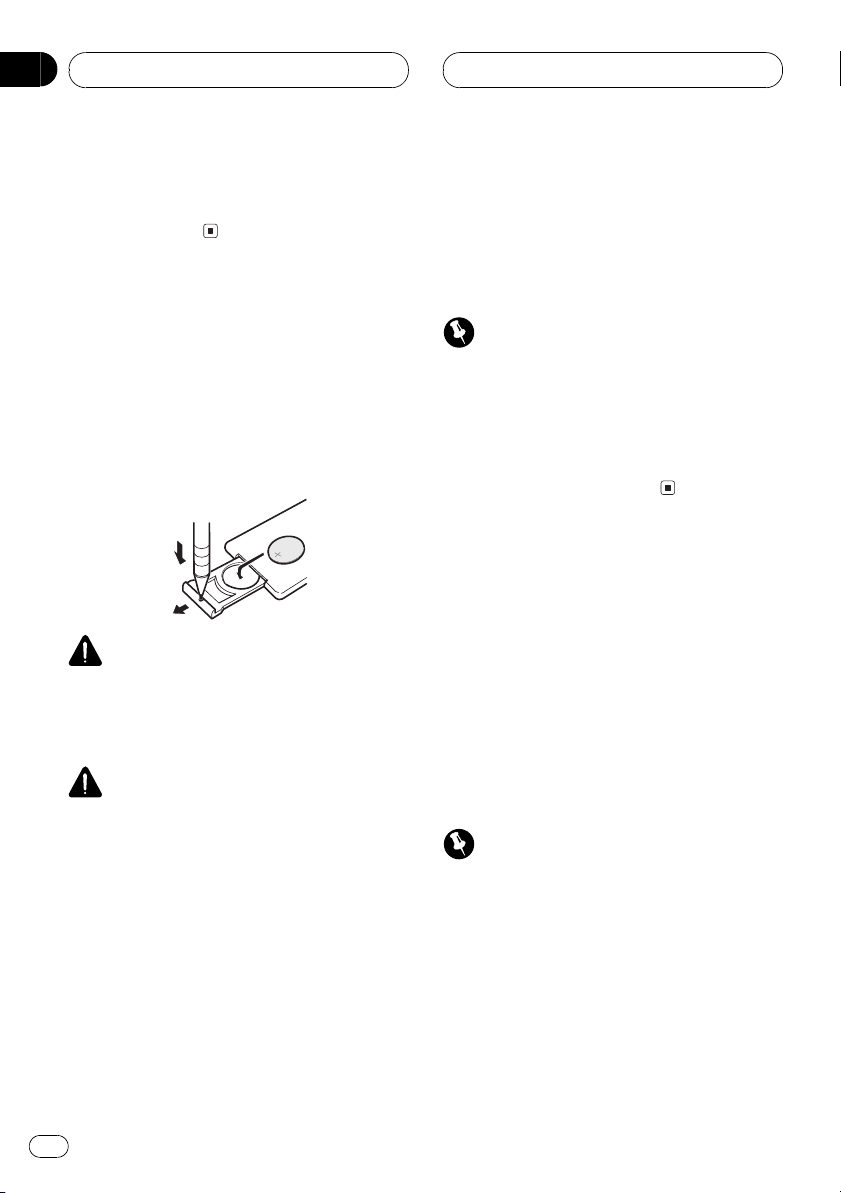
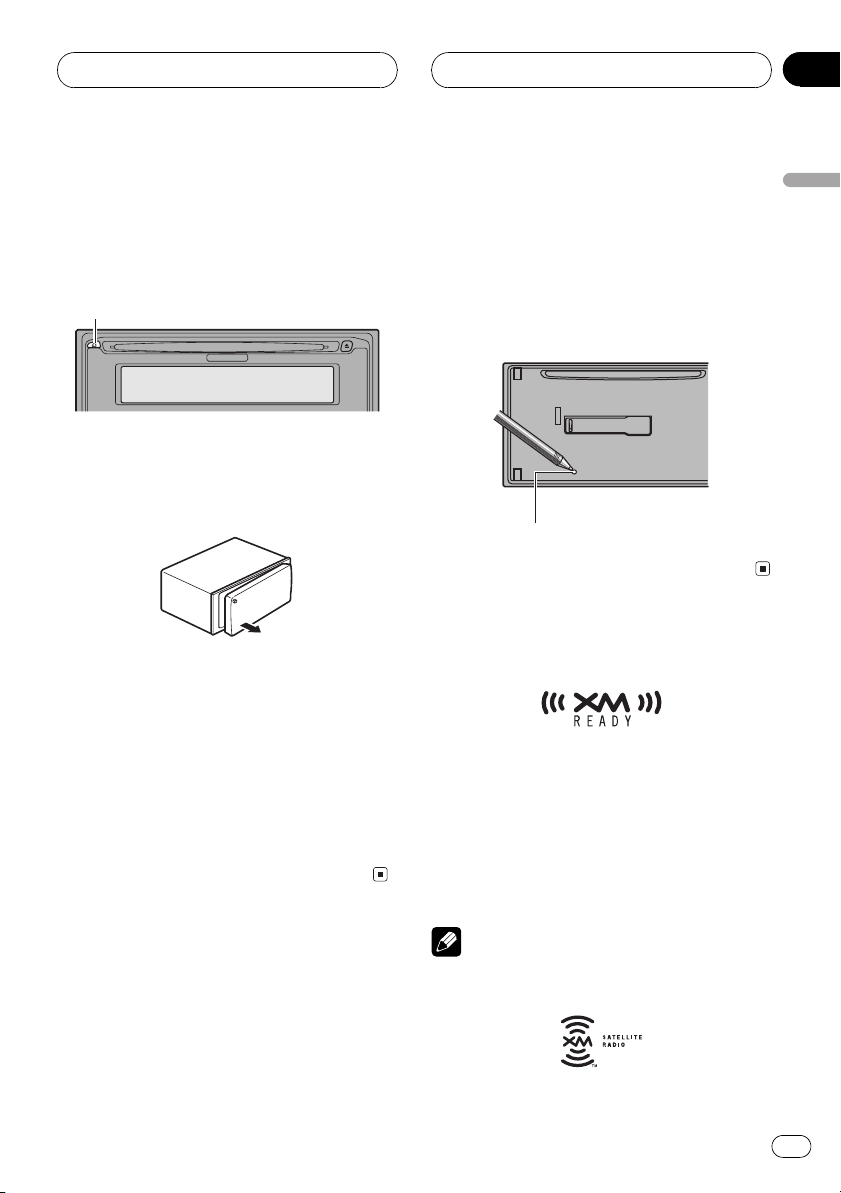
Removing the front panel
1 Press DETACH to release the front
panel.
Press DETACH and the left side of the panel is
released from the head unit.
DETACH button
2 Grab the front panel and remove.
Grab the left side of the front panel and pull
away to the right. The front panel will be detached from the head unit.
3 Put the front panel into the
protective case provided for safe keeping.
Attaching the front panel
1 Place the front panel flat against
the head unit.
2 Press the front panel into the face
of the head unit until it is firmly seated.
! When strange or incorrect messages appear
on the display
1 Remove the front panel.
See Removing the front panel on this page.
2 Press RESET on the head unit with a
pen tip or other pointed instrument.
RESET button
About the XM READY mark
The XM READY mark printed on the front panel indicates that the Pioneer XM tuner (sold
separately) can be controlled by this unit.
Please inquire to your dealer or nearest
authorized Pioneer service station regarding
the XM tuner that can be connected to this
unit. For XM tuner operation, please refer to
the XM tuner owners manual.
English
Resetting the
microprocessor
The microprocessor must be reset under the
following conditions:
! Prior to using this unit for the first time after
installation
! If the unit fails to operate properly
Notes
! XM Satellite Radio is developing a new band
of radio in the U.S.A.
En
7
Page 8
Section
01
Before You Start
The system will use direct satellite-to-receiver
broadcasting technology to provide listeners
in their cars and at home with crystal-clear
sound seamlessly from coast to coast. XM will
create and package up to 100 channels of
digital-quality music, news, sports, talk and
childrens programming.
! The XM name and related logos are
trademarks of XM Satellite Radio Inc.
! When this unit is connected to a XM tuner,
only one additional external unit can also be
connected. Please see page 11 for more
information about the external unit.
8
En
Page 9
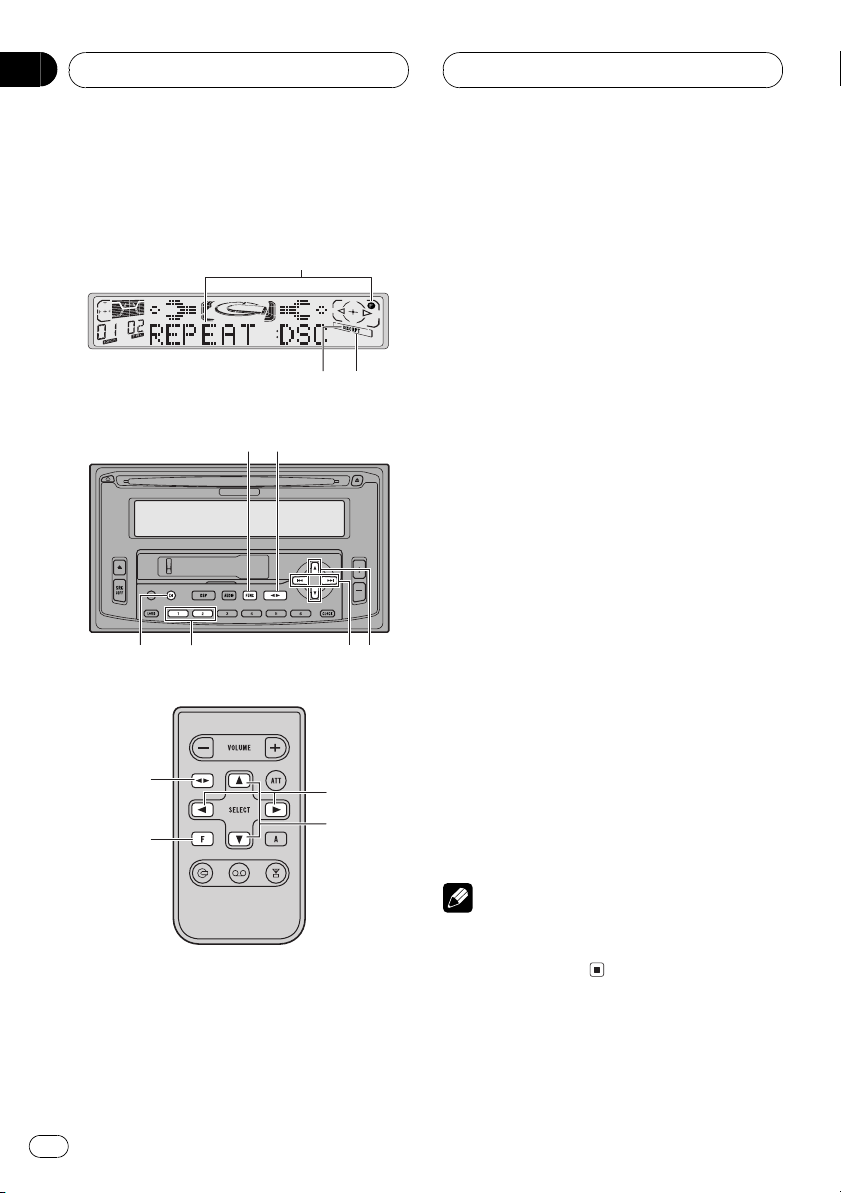
7
0
-
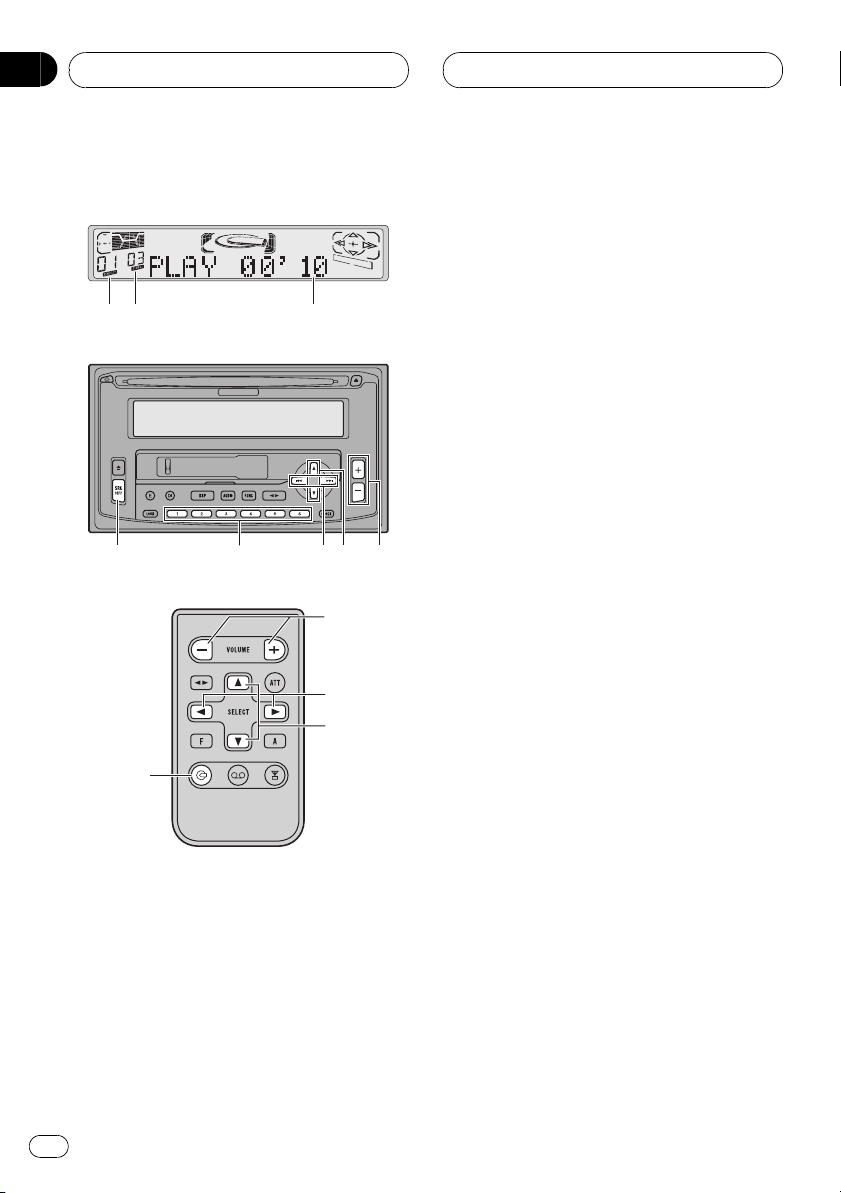
Whats What
Section
02
1
2
3
4
5
6
8
9
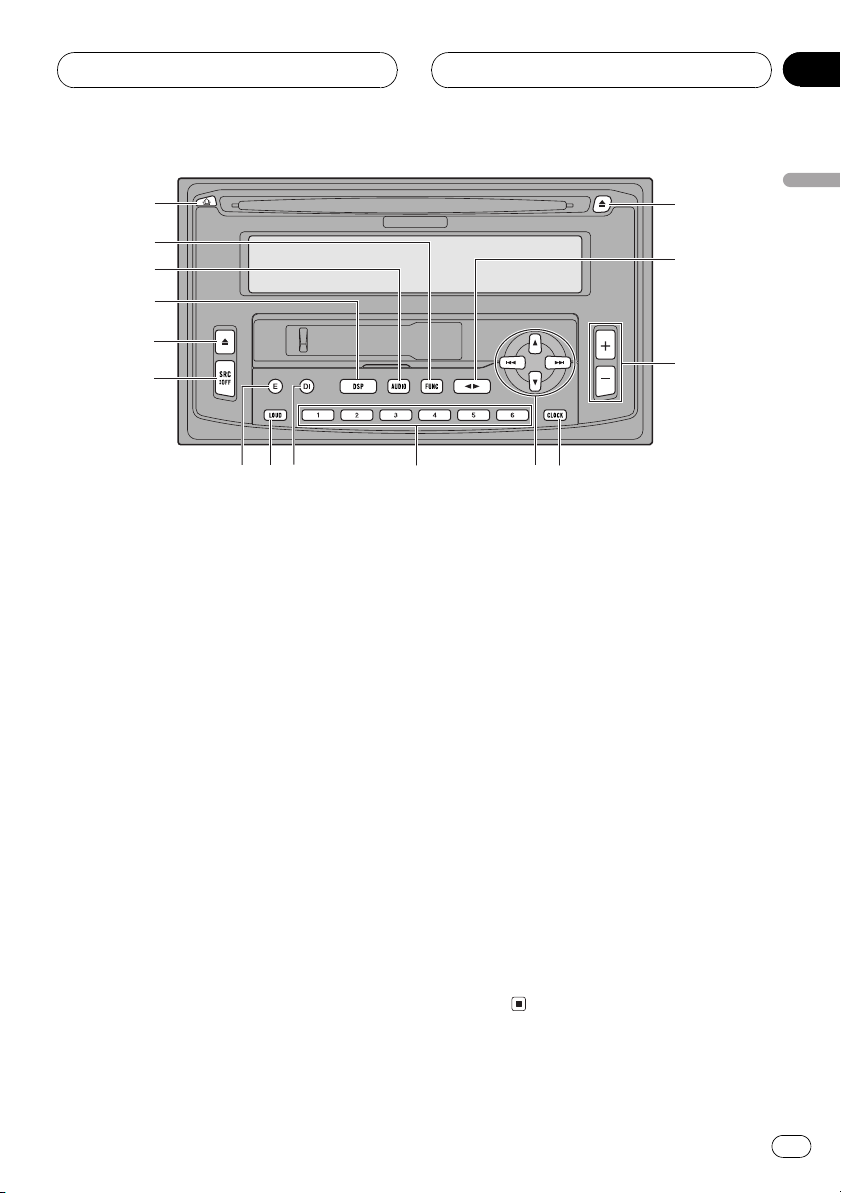
Head unit
1 DETACH button
Press to remove the front panel from the
head unit.
2 FUNCTION button
Press to select functions.
3 AUDIO button
Press to select various sound quality controls.
4 DSP button
Press to select sound field functions.
5 TAPE EJECT button
Press to eject a tape from your cassette
player.
6 SOURCE button
This unit is switched on by selecting a
source. Press to cycle through all of the
available sources.
7 ENTERTAINMENT button
Press to change to the entertainment display.
8 LOUD button
Press to switch loudness on or off.
~
!
@
=
9 DISPLAY button
Press to select different displays.
a 16 buttons
Press for preset tuning and disc number
search when using a multi-CD player.
b a/b/c/d buttons
Press to do manual seek tuning, fast forward, reverse and track search controls.
Also used for controlling functions.
c CLOCK button
Press to change to the clock display.
d CD EJECT button
Press to eject a CD from your built-in CD
player.
e BAND button
Press to select among three FM and one
AM band and cancel the control mode of
functions.
f VOLUME button
Press to increase or decrease the
volume.
English
En
9
Page 10

Section
02
Whats What
!
@
^
-
2
#
$
Remote control
The supplied remote control enables convenient remote operation of the head unit. Operation is the same as when using button on the
head unit.
g CD button
Press to select the built-in or multi-CD
player as source.
h CASSETTE button
Press to select the cassette player as
source.
i TUNER button
Press to select the tuner as source.
j ATT button
Press to quickly lower the volume level, by
about 90%. Press once more to return to the
original volume level.
3
%
10
En
Page 11
Power ON/OFF
Section
03
Turning the unit on
% Press SOURCE on the head unit, or
press TUNER, CASSETTE or CD on the
remote, to turn the unit on.
When you select a source the unit is turned
on.
Selecting a source
You can select a source you want to listen to.
To switch to the built-in CD player, load a disc
in this unit (refer to page 20). To switch to the
cassette player, load a cassette tape in this
unit (refer to page 16).
% When using the head unit, press
SOURCE to select a source.
Press SOURCE repeatedly to switch between
the following sources:
Built-in CD playerTelevisionTuner
Cassette playerMulti-CD playerExternal unit 1External unit 2 AUX
% When using the remote control, press
TUNER, CASSETTE or CD to select a source.
Press each button repeatedly to switch between the following sources:
TUNER: TelevisionTunerSources off
CASSETTE: Cassette playerAUXSources
off
CD: Built-in CD playerMulti-CD player
Sources off
When no magazine is set in the multi-
CD player.
When the AUX (auxiliary input) is set to
off (refer to page 43).
! External unit refers to a Pioneer product
(such as one available in the future) that,
although incompatible as a source, enables
control of basic functions by this unit. Two
external units can be controlled by this unit.
When two external units are connected, the
allocation of them to external unit 1 or
external unit 2 is automatically set by this unit.
! When this units blue/white lead is
connected to the cars auto-antenna relay
control terminal, the cars antenna extends
when this units source is switched on. To
retract the antenna, switch the source off.
Turning the unit off
% Press SOURCE on the head unit and
hold for at least one second to turn the
unit off.
When using the remote control, press TUNER,
CASSETTE or CD repeatedly.
English
Notes
! In the following cases, the sound source will
not change:
When a product corresponding to each
source is not connected to this unit.
When no disc is set in this unit.
When no cassette is set in this unit.
En
11
Page 12
Section
04
Tuner
Listening to the radio
1 3
2
5
4
5
6
7
6
7
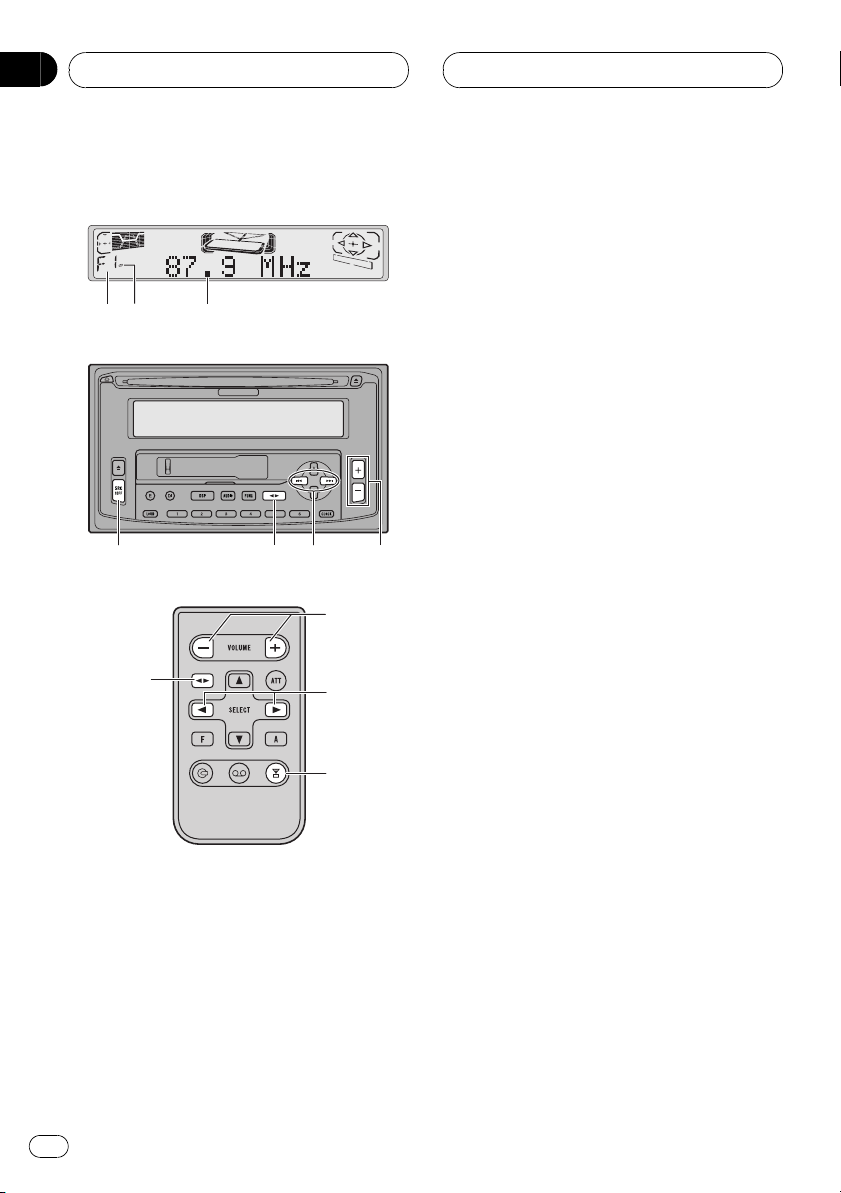
3 Frequency indicator
Shows to which frequency the tuner is
tuned.
4 SOURCE button
Press to select the tuner as the source.
5 BAND button
Press to select among three FM and one
AM band.
6 c/d buttons (Manual or seek tuning)
Press to tune in a radio station.
7 VOLUME button
Press to increase or decrease the volume.
8 TUNER button
Press to select the tuner as the source.
1 Press SOURCE on the head unit, or
TUNER on the remote, to select the tuner.
Press SOURCE or TUNER until you see Tuner
displayed.
2 Use VOLUME to adjust the sound
level.
When you press VOLUME up/+, the volume is
raised and when pressed down/, the volume
is lowered.
8
These are the basic steps necessary to operate
the radio. More advanced tuner operation is
explained starting on page 14.
1 Band indicator
Shows which band the radio is tuned to, AM
or FM.
2 Stereo (5) indicator
Shows that the frequency selected is being
broadcast in stereo.
12
En
3 Press BAND to select a band.
Press BAND until the desired band is displayed, F1, F2, F3 for FM or AM.
4 To perform manual tuning, press c
or d with quick presses.
The frequencies move up or down step by
step.
5 To perform seek tuning, press and
hold c or d for about one second and
release.
The tuner will scan the frequencies until a
broadcast strong enough for good reception is
found.
Page 13

Tuner
You can cancel seek tuning by pressing
#
either c or d with a quick press.
If you press and hold c or d you can skip
#
broadcasting stations. Seek tuning starts as soon
as you release the buttons.
Note
When the frequency selected is being broadcast
in stereo the stereo (5) indicator will light.
Section
04
English
En
13
Page 14
Section
04
Tuner
Introduction of advanced
tuner operation
1
2
6
4
5
3
7
8
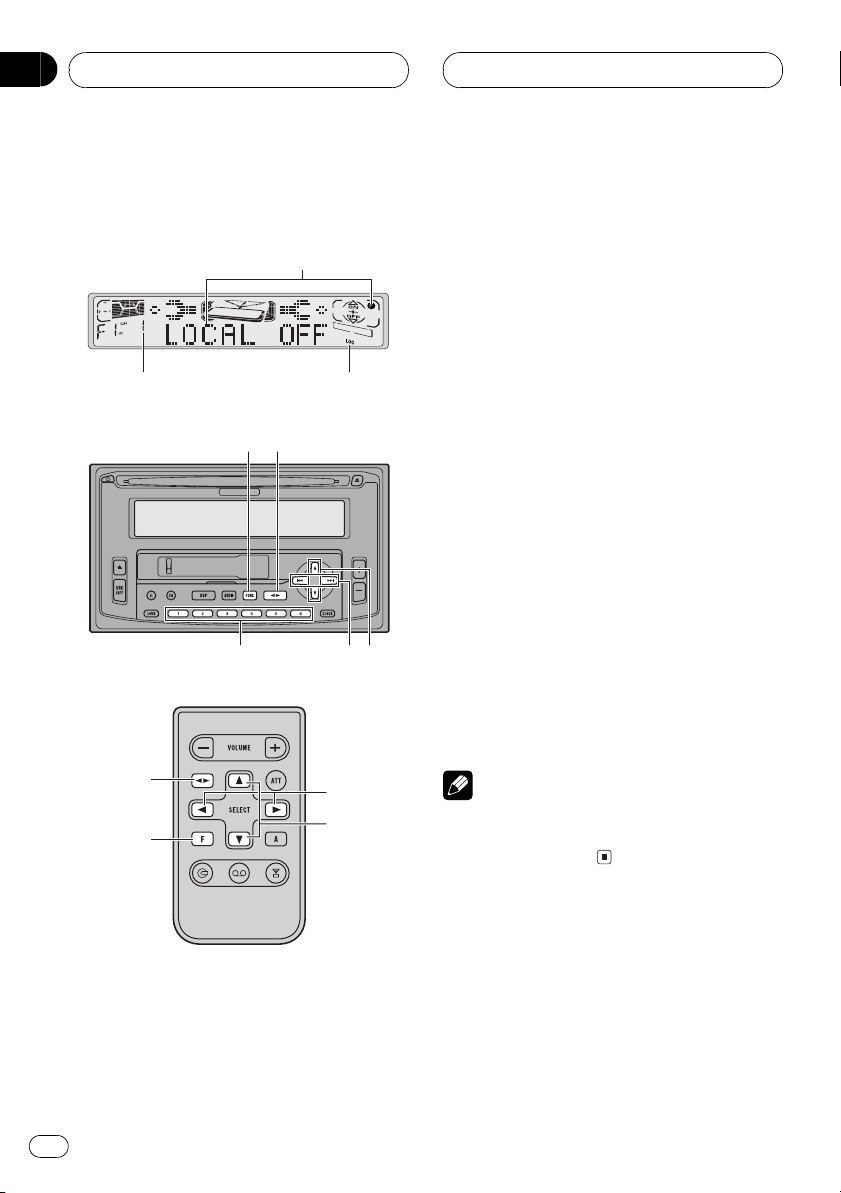
3 LOC indicator
Shows when local seek tuning is on.
4 FUNCTION button
Press to select an advanced function.
5 BAND button
Press to return to the frequency display.
6 16 buttons (Preset tuning)
Press for one-button selection of radio stations you have entered into memory. To
store a radio station, press and hold.
7 c/d buttons
Press to choose the item (mode) of the selected function.
8 a/b buttons
Press to select frequencies stored in memory and turn the selected function on/off.
% Press FUNCTION to display the
function names.
Press FUNCTION repeatedly to switch between the following functions:
BSM (best station memory)LOCAL (local
seek tuning)
To return to the frequency display, press
#
BAND.
5
4
1 Function display
Shows the function status.
2 Preset number indicator
Shows what preset has been selected.
14
En
7
8
Note
If you do not operate the function within about 30
seconds, the display is automatically returned to
the frequency display.
Storing and recalling
broadcast frequencies
If you press any of the preset tuning buttons
16 you can easily store up to six broadcast
frequencies for later recall with the touch of a
button.
Page 15
Tuner
Section
04
% When you find a frequency that you
want to store in memory press a preset
tuning button 16 and hold until the preset
number stops flashing.
The number you have pressed will flash in the
preset number indicator and then remain lit.
The selected radio station frequency has been
stored in memory.
The next time you press the same preset tuning button 16 the radio station frequency is
recalled from memory.
Notes
! Up to 18 FM stations, 6 for each of the three
FM bands, and 6 AM stations can be stored in
memory.
! You can also use a and b to recall radio
station frequencies assigned to preset tuning
buttons 16.
Tuning in strong signals
Local seek tuning lets you tune in only those
radio stations with sufficiently strong signals
for good reception.
1 Press FUNCTION to select LOCAL.
Press FUNCTION until LOCAL appears in the
display.
The LOCAL 4 setting allows reception of only
the strongest stations, while lower settings let
you receive progressively weaker stations.
4 When you want to return to normal
seek tuning, press b to turn local seek
tuning off.
LOCAL :OFF appears in the display.
Storing the strongest
broadcast frequencies
BSM (best stations memory) lets you automatically store the six strongest broadcast frequencies under preset tuning buttons 16 and
once stored there you can tune in to those frequencies with the touch of a button.
1 Press FUNCTION to select BSM.
Press FUNCTION until BSM appears in the
display.
2 Press a to turn BSM on.
BSM begins to flash. While BSM is flashing
the six strongest broadcast frequencies will be
stored under preset tuning buttons 16 in order of their signal strength. When finished,
BSM stops flashing.
To cancel the storage process, press b.
#
English
2 Press a to turn local seek tuning on.
Local seek sensitivity (e.g., LOCAL 2) appears
in the display.
3 Press c or d to set the sensitivity.
There are four levels of sensitivity for FM and
two levels for AM:
FM: LOCAL 1LOCAL 2LOCAL 3
LOCAL 4
AM: LOCAL 1LOCAL 2
Note
Storing broadcast frequencies with BSM may
replace broadcast frequencies you have saved
using 16.
En
15
Page 16
Section
05
Cassette Player
Playing a tape
1
5
4
6
6
2
7
8
7
3
8
3 MTL indicator
Shows when a metal or chrome tape is inserted.
4 TAPE EJECT button
Press to eject a tape from your cassette
player.
5 SOURCE button
Press to select the cassette player as the
source.
6 BAND button
Press to change the direction of the tape
transport and return to playback after fast
forward or rewind.
7 c/d buttons
Press to fast forward or rewind the tape.
8 VOLUME button
Press to increase or decrease the volume.
9 CASSETTE button
Press to select the cassette player as the
source.
1 Insert a cassette tape into the
cassette loading slot.
Playback will automatically start.
9
These are the basic steps necessary to play a
tape with your cassette player. More advanced
cassette player operation is explained starting
on page 18.
1 Tape direction indicator
Shows the direction of the tape transport.
2 Play time indicator
Shows the elapsed playing time of the current side of the tape.
16
En
Cassette loading slot
You can eject a cassette tape by pressing
#
TAPE EJECT.
2 After a cassette tape has been
inserted, press SOURCE on the head unit,
or CASSETTE on the remote, to select the
cassette player.
Press SOURCE or CASSETTE until you see
Cassette displayed.
Page 17
Cassette Player
Section
05
3 Use VOLUME to adjust the sound
level.
When you press VOLUME up/+, the volume is
raised and when pressed down/, the volume
is lowered.
4 To perform fast forward or rewind,
press c or d.
FF or REW appears in the display.
To cancel fast forward or rewind and return
#
to playback, press BAND.
You can cancel fast forward or rewind by
#
pressing c or d in the same direction twice.
5 To perform forward or rewind music
search, press c or d twice.
F-MS (forward music search) or R-MS (rewind
music search) appears in the display. The cassette player will fast forward or rewind to the
next or previous blank spot on the tape and begin to play.
To cancel music search and return to play-
#
back, press BAND.
You can cancel music search by pressing c
#
or d in the same direction again.
6 To change the direction of the tape
transport, press BAND.
English
Notes
! Do not insert anything other than a cassette
tape into the cassette loading slot.
! Play time indicator starts from 0000 in the
following cases:
When a tape is inserted
When the tape direction is changed
When you rewind the tape to the begin-
ning
! Play time indicator is halted when fast
forward, rewind or music search is
operating.
En
17
Page 18
Section
05
Cassette Player
Introduction of advanced
cassette player operation
1
342
7
6
5
6
5
7
4 RPT indicator
Shows when repeat play is turned on.
5 FUNCTION button
Press to select an advanced function.
6 BAND button
Press to return to the playback display.
7 a/b buttons
Press to turn the selected function on/off.
% Press FUNCTION to display the
function names.
Press FUNCTION repeatedly to switch between the following functions:
REPEAT (repeat play)B.SKIP (blank skip)
NR (Dolby B NR)
To return to the playback display, press
#
BAND.
Note
If you do not operate the function within about 30
seconds, the display is automatically returned to
the playback display.
Repeating play
Repeat play lets you hear the same track over
again.
1 Function display
Shows the function status.
2 2B indicator
Shows when Dolby B NR is turned on.
3 B.SKIP indicator
Shows when blank skip is turned on.
18
En
1 Press FUNCTION to select REPEAT.
Press FUNCTION until REPEAT appears in the
display.
2 Press a to turn repeat play on.
REPEAT:ON appears in the display. The track
presently playing will play and then repeat.
3 Press b to turn repeat play off.
REPEAT:OFF appears in the display. The track
presently playing will continue to play and
then play the next track.
Page 19

Cassette Player
Section
05
Skipping blank tape
sections
Blank skip automatically fast forwards to the
next song if there is a long period of silence
(12 seconds or longer) between songs.
1 Press FUNCTION to select B.SKIP.
Press FUNCTION until B.SKIP appears in the
display.
2 Press a to turn blank skip on.
B.SKIP :ON appears in the display. Long peri-
ods of silence between songs will be skipped.
3 Press b to turn blank skip off.
B.SKIP :OFF appears in the display. The com-
plete cassette tape will play.
Using Dolby noise
reduction
When you listen to tapes that have been recorded with Dolby B NR, turn Dolby B NR on.
1 Press FUNCTION to select NR.
Press FUNCTION until NR appears in the display.
English
2 Press a to turn Dolby B NR on.
B NR :ON appears in the display. The tape will
play with Dolby B NR on.
3 Press b to turn Dolby B NR off.
NR :OFF appears in the display. The tape will
play without Dolby B NR.
Note
Manufactured under license from Dolby
Laboratories. Dolby and the double-D symbol
are trademarks of Dolby Laboratories.
En
19
Page 20
Section
06
Built-in CD player
Playing a CD
1 2
4
5
6
5
3
6
3 CD EJECT button
Press to eject a CD from your built-in CD
player.
4 SOURCE button
Press to select the built-in CD player as the
source.
5 c/d buttons (Track search and FF/
REV)
Press to select a track from the current CD
and for fast forward and reverse.
6 VOLUME button
Press to increase or decrease the volume.
7 CD button
Press to select the built-in CD player as the
source.
1 Insert a CD into the CD loading slot.
Playback will automatically start.
CD loading slot
You can eject a CD by pressing CD EJECT.
#
7
These are the basic steps necessary to play a
CD with your built-in CD player. More advanced CD operation is explained starting on
page 22.
1 Track number indicator
Shows the track currently playing.
2 Play time indicator
Shows the elapsed playing time of the current track.
20
En
2 After a CD has been inserted, press
SOURCE on the head unit, or CD on the
remote, to select the built-in CD player.
Press SOURCE or CD until you see
CompactDisc displayed.
3 Use VOLUME to adjust the sound
level.
When you press VOLUME up/+, the volume is
raised and when pressed down/, the volume
is lowered.
Page 21

Built-in CD player
Section
06
4 To perform fast forward or reverse,
press and hold c or d.
5 To skip back or forward to another
track, press c or d.
Pressing d skips to the start of the next track.
Pressing c once skips to the start of the current track. Pressing again will skip to the previous track.
Notes
! The built-in CD player plays one, standard,
12-cm or 8-cm (single) CD at a time. Do not
use an adapter when playing 8-cm CDs.
! Do not insert anything other than a CD into
the CD loading slot.
! If you cannot insert a disc completely or if
after you insert a disc the disc does not play,
check that the label side of the disc is up.
Press CD EJECT to eject the disc, and check
the disc for damage before inserting the disc
again.
! If the built-in CD player does not operate
properly, an error message such as CD ERR-
11 may be displayed. Refer to Understanding
built-in CD player error messages on page
48.
English
En
21
Page 22
Section
06
Built-in CD player
Introduction of advanced
built-in CD player
operation
1
2
4
3
5
6
7
8
3 FUNCTION button
Press to select an advanced function.
4 BAND button
Press to return to the playback display.
5 DISPLAY button
Press to change the display.
6 12 buttons
Press to change between letters or number/
symbol input.
7 c/d buttons
Press to choose the item (mode) of the selected function.
8 a/b buttons
Press to turn the selected function on/off
and select numbers, letters or spaces to input track titles.
% Press FUNCTION to display the
function names.
Press FUNCTION repeatedly to switch between the following functions:
REPEAT (repeat play)RANDOM (random
play)T.SCAN (scan play)PAUSE (pause)
To return to the playback display, press
#
BAND.
4
3
1 Function display
Shows the function status.
2 RPT indicator
Shows when repeat play is turned on.
22
En
7
8
Note
If you do not operate the function within about 30
seconds, the display is automatically returned to
the playback display.
Repeating play
Repeat play lets you hear the same track over
again.
1 Press FUNCTION to select REPEAT.
Press FUNCTION until REPEAT appears in the
display.
Page 23
Built-in CD player
Section
06
2 Press a to turn repeat play on.
REPEAT:ON appears in the display. The track
presently playing will play and then repeat.
3 Press b to turn repeat play off.
REPEAT:OFF appears in the display. The track
presently playing will continue to play and
then play the next track.
Note
If you perform track search or fast forward/
reverse, repeat play is automatically cancelled.
Playing tracks in a random
order
Random play lets you play back tracks on the
CD in a random order.
1 Press FUNCTION to select RANDOM.
Press FUNCTION until RANDOM appears in
the display.
2 Press a to turn random play on.
RANDOM :ON appears in the display. Tracks
will play in a random order.
3 Press b to turn random play off.
RANDOM :OFF appears in the display. Tracks
will continue to play in order.
Scanning tracks of a CD
Scan play lets you hear the first 10 seconds of
each track on the CD.
1 Press FUNCTION to select T.SCAN.
Press FUNCTION until T.SCAN appears in the
display.
2 Press a to turn scan play on.
SCAN :ON appears in the display. The first 10
seconds of each track is played.
3 When you find the desired track
press b to turn scan play off.
T.SCAN :OFF appears in the display. The track
will continue to play.
If the display has automatically returned to
#
the playback display, select T.SCAN again by
pressing FUNCTION.
Note
After scanning of a CD is finished, normal
playback of the tracks will begin again.
Pausing CD playback
Pause lets you temporarily stop playback of
the CD.
1 Press FUNCTION to select PAUSE.
Press FUNCTION until PAUSE appears in the
display.
2 Press a to turn pause on.
PAUSE :ON appears in the display. Play of the
current track pauses.
3 Press b to turn pause off.
PAUSE :OFF appears in the display. Play will
resume at the same point that you turned
pause on.
Using disc title functions
You can input CD titles and display the title.
The next time you insert a CD for which you
have entered a title, the title of that CD will be
displayed.
English
En
23
Page 24
Section
06
Built-in CD player
Entering disc titles
Disc title input lets you input CD titles up to 10
letters long and up to 48 disc titles into the
built-in CD player.
1 Play a CD that you want to enter
the title.
2 Press FUNCTION and hold until
TITLE IN appears in the display.
When playing a CD TEXT disc, you cannot
#
switch to TITLE IN. The disc title will have already
been recorded on a CD TEXT disc.
3 Press 1 numbered button to select
the desired character type.
Press 1 numbered button repeatedly to switch
between the following character type:
Alphabet (upper case), Numbers and Symbols
Alphabet (lower case)
You can select to input Numbers and Sym-
#
bols by pressing 2 numbered button.
4 Press a or b to select a letter of the
alphabet.
Each press of a will display a letter of the alphabet in A B C ... X Y Z, numbers and symbols in 1 2 3 ... @ # < order. Each press of b
will display a letter in the reverse order, such
as Z Y X ... C B A order.
6 Move the cursor to the last position
by pressing d after entering the title.
When you press d one more time, the entered
title is stored in memory.
7 Press BAND to return to the
playback display.
Notes
! Titles remain in memory, even after the disc
has been removed from built-in CD player, and
are recalled when the disc is reinserted.
! After data for 48 discs has been stored in
memory, data for a new disc will overwrite the
oldest one.
! When a multi-CD player that does not
support disc title functions is connected, you
cannot enter disc titles in this unit.
Displaying disc titles
You can display the title of any disc that has
had a disc title entered.
% Press DISPLAY.
Press DISPLAY repeatedly to switch between
the following settings:
Play timeDISC TITLE (disc title)
When you select DISC TITLE, the title of the
currently playing disc is shown in the display.
If no title has been entered for the currently
#
playing disc, NO TITLE is displayed.
5 Press d to move the cursor to the
next character position.
When the letter you want is displayed, press d
to move the cursor to the next position and
then select the next letter. Press c to move
backwards in the display.
24
En
Page 25

Built-in CD player
Section
06
Using CD TEXT functions
Some discs have certain information encoded
on the disc during manufacture. These discs
may contain such information as the CD title,
track title, artists name and playback time
and are called CD TEXT discs. Only these specially encoded CD TEXT discs support the
functions listed below.
Displaying titles on CD TEXT
discs
% Press DISPLAY when playing a CD
TEXT disc.
Press DISPLAY repeatedly to switch between
the following settings:
Play timeDISC TITLE (disc title)D.ARTIST
(disc artist)TRK TITLE (track title)
T.ARTIST (track artist)
If specific information has not been recorded
#
on a CD TEXT disc, NO XXXX will be displayed
(e.g., NO TA-NAME).
Scrolling titles in the display
This unit can display the first 10 letters only of
DISC TITLE, D.ARTIST, TRK TITLE and
T.ARTIST. When the recorded information is
longer than 10 letters, you can scroll the text
to the left so that the rest of the title can be
seen.
English
% Press DISPLAYand hold until the title
begins to scroll to the left.
The rest of the title will appear in the display.
En
25
Page 26
Section
07
Multi-CD Player
Playing a CD
1
2 3
4
9
5
6
8
6
7
7
8
3 Play time indicator
Shows the elapsed playing time of the current track.
4 SOURCE button
Press to select the multi-CD player as the
source.
5 16 buttons (Disc number search)
Press to select a disc from the multi-CD
player.
6 c/d buttons (Track search and FF/
REV)
Press to select a track from the current CD
and for fast forward and reverse.
7 a/b buttons (Disc search)
Press to select a disc from the multi-CD
player.
8 VOLUME button
Press to increase or decrease the volume.
9 CD button
Press to select the multi-CD player as the
source.
1 Press SOURCE on the head unit, or
CD on the remote, to select the multi-CD
player.
Press SOURCE or CD until you see Multi-CD
displayed.
You can use this unit to control a multi-CD
player, which is sold separately.
These are the basic steps necessary to play a
CD with your multi-CD player. More advanced
CD operation is explained starting on page 28.
1 Disc number indicator
Shows the disc currently playing.
2 Track number indicator
Shows the track currently playing.
26
En
2 Use VOLUME to adjust the sound
level.
When you press VOLUME up/+, the volume is
raised and when pressed down/, the volume
is lowered.
3 Select a disc you want to listen to
with the 16 buttons.
For discs located at 1 to 6, press the corresponding number button.
If you want to select a disc located at 7 to 12,
press and hold the corresponding numbers
such as 1 for disc 7, until the disc number appears in the display.
Page 27
Multi-CD Player
You can also sequentially select a disc by
#
pressing a/b.
4 To perform fast forward or reverse,
press and hold c or d.
5 To skip back or forward to another
track, press c or d.
Pressing d skips to the start of the next track.
Pressing c once skips to the start of the current track. Pressing again will skip to the previous track.
Notes
! When the multi-CD player performs the
preparatory operations, READY is displayed.
! If the multi-CD player does not operate
properly, an error message such as CD ERR-
11 may be displayed. Refer to the multi-CD
player owners manual.
! If there are no discs in the multi-CD player
magazine, NO DISC is displayed.
Section
07
English
En
27
Page 28
Section
07
Multi-CD Player
Introduction of advanced
multi-CD player operation
1
32
5
4
6
5
4
7
8
9
8
9
3 RPT indicator
Shows when repeat range is selected to current track.
4 FUNCTION button
Press to select an advanced function.
5 BAND button
Press to return to the playback display.
6 DISPLAY button
Press to change the display.
7 12 buttons
Press to change between letters or number/
symbol input.
8 c/d buttons
Press to choose the item (mode) of the selected function.
9 a/b buttons
Press to turn the selected function on/off
and select numbers, letters or spaces to input track titles.
% Press FUNCTION to display the
function names.
Press FUNCTION repeatedly to switch between the following functions:
REPEAT (repeat play)TITLE LIST (disc title
list)RANDOM (random play)SCAN (scan
play)ITS.P (ITS play)PAUSE (pause)
COMP (compression and DBE)
To return to the playback display, press
#
BAND.
1 Function display
Shows the function status.
2 DISC indicator
Shows when repeat range is selected to current disc.
28
En
Note
If you do not operate the function within about 30
seconds, the display is automatically returned to
the playback display.
Page 29
Multi-CD Player
Section
07
Repeating play
There are three repeat play ranges for the multi-CD player: MCD (multi-CD player repeat),
TRK (one-track repeat), and DSC (disc repeat).
1 Press FUNCTION to select REPEAT.
Press FUNCTION until REPEAT appears in the
display.
2 Press c or d to select the repeat
range.
Press c or d until the desired repeat range appears in the display.
! MCD Repeat all discs in the multi-CD
player
! TRK Repeat just the current track
! DSC Repeat the current disc
Notes
! If you select other discs during repeat play,
the repeat play range changes to MCD (multi-
CD player repeat).
! If you perform track search or fast forward/
reverse during TRK (one-track repeat), the
repeat play range changes to DSC (disc
repeat).
Playing tracks in a random
order
Random play lets you play back tracks in a
random order within the repeat range, MCD
(multi-CD player repeat) and DSC (disc repeat).
1 Select the repeat range.
Refer to Repeating play on this page.
2 Press FUNCTION to select RANDOM.
Press FUNCTION until RANDOM appears in
the display.
3 Press a to turn random play on.
RANDOM :ON appears in the display. Tracks
will play in a random order within the previously selected MCD (multi-CD player repeat)
or DSC (disc repeat) ranges.
4 Press b to turn random play off.
RANDOM :OFF appears in the display. Tracks
will continue to play in order.
Scanning CDs and tracks
While you are using DSC (disc repeat), the beginning of each track on the selected disc
plays for about 10 seconds. When you are
using MCD (multi-CD player repeat), the beginning of the first track of each disc is played
for about 10 seconds.
1 Select the repeat range.
Refer to Repeating play on this page.
2 Press FUNCTION to select SCAN.
Press FUNCTION until SCAN appears in the
display.
3 Press a to turn scan play on.
SCAN :ON appears in the display. The first 10
seconds of each track of the present disc (or
the first track of each disc) is played.
4 When you find the desired track (or
disc) press b to turn scan play off.
SCAN :OFF appears in the display. The track
(or disc) will continue to play.
If the display has automatically returned to
#
the playback display, select SCAN again by pressing FUNCTION.
English
En
29
Page 30
Section
07
Multi-CD Player
Note
After track or disc scanning is finished, normal
playback of the tracks will begin again.
Pausing CD playback
Pause lets you temporarily stop playback of
the CD.
1 Press FUNCTION to select PAUSE.
Press FUNCTION until PAUSE appears in the
display.
2 Press a to turn pause on.
PAUSE :ON appears in the display. Play of the
current track pauses.
3 Press b to turn pause off.
PAUSE :OFF appears in the display. Play will
resume at the same point that you turned
pause on.
Using ITS playlists
ITS (instant track selection) lets you make a
playlist of favorite tracks from those in the
multi-CD player magazine. After you have
added your favorite tracks to the playlist you
can turn on ITS play and play just those selections.
Creating a playlist with ITS
programming
You can use ITS to enter and playback up to 99
tracks per disc, up to 100 discs (with the disc
title). (With multi-CD players sold before the
CDX-P1250 and CDX-P650, up to 24 tracks can
be stored in the playlist.)
1 Play a CD that you want to
program.
Press a or b to select a CD.
2 Press FUNCTION and hold until
TITLE IN appears in the display, then press
FUNCTION to select ITS.
After TITLE IN is displayed, press FUNCTION
repeatedly, the following functions appear in
the display:
TITLE IN (disc title input)ITS (ITS programming)
3 Select a desired track by pressing c
or d.
4 Press a to store the currently
playing track in the playlist.
ITS IN is displayed briefly and the currently
playing selection is added to your playlist. The
display then shows ITS again.
5 Press BAND to return to the
playback display.
Note
After data for 100 discs has been stored in
memory, data for a new disc will overwrite the
oldest one.
Playback from your ITS playlist
ITS play lets you listen to the tracks that you
have entered into your ITS playlist. When you
turn on ITS play, tracks from your ITS playlist
in the multi-CD player will begin to play.
1 Select the repeat range.
Refer to Repeating play on the previous page.
2 Press FUNCTION to select ITS.P.
Press FUNCTION until ITS.P appears in the
display.
30
En
Page 31

Multi-CD Player
Section
07
3 Press a to turn ITS play on.
ITS.P :ON appears in the display. Playback be-
gins of those tracks from your playlist within
the previously selected MCD (multi-CD player
repeat) or DSC (disc repeat) ranges.
If no tracks in the current range are pro-
#
grammed for ITS play then ITS EMPTY is displayed.
4 Press b to turn ITS play off.
ITS.P :OFF appears in the display. Playback
will continue in normal order from the currently playing track and CD.
Erasing a track from your ITS
playlist
When you want to delete a track from your ITS
playlist, you can if ITS play is on.
If ITS play is already on, skip to step 2. If ITS
play is not already on, press FUNCTION.
1 Play a CD you want to delete a track
from your ITS playlist, and turn ITS play on.
Refer to Playback from your ITS playlist on the
previous page.
2 Press FUNCTION and hold until
TITLE IN appears in the display, then press
FUNCTION to select ITS.
After TITLE IN is displayed, press FUNCTION
until ITS appears in the display.
If there are no tracks from your playlist in the
#
current range, ITS EMPTY is displayed and normal play resumes.
5 Press BAND to return to the
playback display.
Erasing a CD from your ITS
playlist
When you want to delete all tracks of a CD
from your ITS playlist, you can if ITS play is off.
1 Play a CD that you want to delete.
Press a or b to select a CD.
2 Press FUNCTION and hold until
TITLE IN appears in the display, then press
FUNCTION to select ITS.
After TITLE IN is displayed, press FUNCTION
until ITS appears in the display.
3 Press b to erase all tracks on the
currently playing CD from your ITS playlist.
All tracks on the currently playing CD are
erased from your playlist and ITS CLEAR is displayed.
4 Press BAND to return to the
playback display.
English
3 Select a desired track by pressing c
or d.
4 Press b to erase a track from your
ITS playlist.
The currently playing selection is erased from
your ITS playlist and playback of the next track
from your ITS playlist begins.
Using disc title functions
You can input CD titles and display the title.
Then you can easily search for and select a desired disc for play.
Entering disc titles
Disc title input lets you input CD titles up to 10
letters long and up to 100 disc titles (with ITS
playlist) into the multi-CD player.
En
31
Page 32

Section
07
Multi-CD Player
1 Play a CD that you want to enter
the title.
Press a or b to select a CD.
2 Press FUNCTION and hold until
TITLE IN appears in the display.
After TITLE IN is displayed, press FUNCTION
repeatedly, the following functions appear in
the display:
TITLE IN (disc title input)ITS (ITS programming)
When playing a CD TEXT disc on a CD TEXT
#
compatible multi-CD player, you cannot switch to
TITLE IN The disc title will have already been recorded on a CD TEXT disc.
3 Press 1 numbered button to select
the desired character type.
Press 1 numbered button repeatedly to switch
between the following character type:
Alphabet (upper case), Numbers and Symbols
Alphabet (lower case)
You can select to input Numbers and Sym-
#
bols by pressing 2 numbered button.
4 Press a or b to select a letter of the
alphabet.
Each press of a will display a letter of the alphabet in A B C ... X Y Z, numbers and symbols in 1 2 3 ... @ # < order. Each press of b
will display a letter in the reverse order, such
as Z Y X ... C B A order.
5 Press d to move the cursor to the
next character position.
When the letter you want is displayed, press d
to move the cursor to the next position and
then select the next letter. Press c to move
backwards in the display.
6 Move the cursor to the last position
by pressing d after entering the title.
When you press d one more time, the entered
title is stored in memory.
7 Press BAND to return to the
playback display.
Notes
! Titles remain in memory, even after the disc
has been removed from the magazine, and
are recalled when the disc is reinserted.
! After data for 100 discs has been stored in
memory, data for a new disc will overwrite the
oldest one.
Displaying disc titles
You can display the title of any disc that has
had a disc title entered.
% Press DISPLAY.
Press DISPLAY repeatedly to switch between
the following settings:
Play timeDISC TITLE (disc title)
When you select DISC TITLE, the title of the
currently playing disc is shown in the display.
If no title has been entered for the currently
#
playing disc, NO TITLE is displayed.
Selecting discs from the disc
title list
Disc title list lets you see the list of disc titles
that have been entered into the multi-CD
player and select one of them to playback.
1 Press FUNCTION to select TITLE LIST.
Press FUNCTION until TITLE LIST appears in
the display.
32
En
Page 33

Multi-CD Player
Section
07
2 Press c or d to scroll through the
list of titles that have been entered.
If no title has been entered for a disc,
#
NO TITLE will be displayed.
3 Press a to play your favorite CD
title.
That selection will begin to play.
Using CD TEXT functions
You can use these functions only with a CD
TEXT compatible multi-CD player.
Some discs have certain information encoded
on the disc during manufacture. These discs
may contain such information as the CD title,
track title, artists name and playback time
and are called CD TEXT discs. Only these specially encoded CD TEXT discs support the
functions listed below.
Displaying titles on CD TEXT
discs
% Press DISPLAY when playing a CD
TEXT disc from the multi-CD player.
Press DISPLAY repeatedly to switch between
the following settings:
Play timeDISC TITLE (disc title)D.ARTIST
(disc artist)TRK TITLE (track title)
T.ARTIST (track artist)
If specific information has not been recorded
#
on a CD TEXT disc, NO XXXX will be displayed
(e.g., NO TA-NAME).
Scrolling titles in the display
This unit can display the first 10 letters only of
DISC TITLE, D.ARTIST, TRK TITLE and
T.ARTIST. When the recorded information is
longer than 10 letters, you can scroll the text
to the left so that the rest of the title can be
seen.
% Press DISPLAYand hold until the title
begins to scroll to the left.
The rest of the title will appear in the display.
Using compression and
bass emphasis
You can use these functions only with a multiCD player that supports them.
Using COMP (compression) and DBE (dynamic bass emphasis) functions let you adjust
the sound playback quality of the multi-CD
player. Each of the functions have a two-step
adjustment. The COMP function balances the
output of louder and softer sounds at higher
volumes. DBE boosts bass levels to give playback a fuller sound. Listen to each of the effects as you select through them and use the
one that best enhances the playback of the
track or CD that you are listening to.
1 Press FUNCTION to select COMP.
Press FUNCTION until COMP appears in the
display.
If the multi-CD player does not support
#
COMP/DBE, NO COMP is displayed when you at-
tempt to select it.
English
2 Press a or b to select your favorite
setting.
Press a or b repeatedly to switch between the
following settings:
COMP OFFCOMP 1COMP 2
COMP OFFDBE 1DBE 2
En
33
Page 34

Section
07
Multi-CD Player
50-disc multi-CD player
Only those functions described in this manual
are supported for 50-disc multi-CD players.
34
En
Page 35

6
4
Audio Adjustments
Section
08
Introduction of audio
adjustments
1
2
3
5
5
6
7
7
4 AUDIO button
Press to select an audio function.
5 BAND button
Press to return to the display of each
source.
6 c/d buttons
Press to adjust the selected audio function.
7 a/b buttons
Press to adjust the selected audio function
and turn it on/off.
% Press AUDIO to display the audio
function names.
Press AUDIO repeatedly to switch between
the following audio functions:
FADER (balance adjustment)LOUD (loudness)SLA (source level adjustment)
When selecting the FM tuner as the source,
#
you cannot switch to SLA.
To return to the display of each source, press
#
BAND.
Note
If you do not operate the audio function within
about 30 seconds, the display is automatically
returned to the source display.
English
4
1 Audio display
Shows the audio adjustments status.
2 LOUD indicator
Appears in the display when loudness is
turned on.
3 LOUD button
Press to turn loudness on or off.
Using balance adjustment
You can select a fader/balance setting that
provides an ideal listening environment in all
occupied seats.
1 Press AUDIO to select FADER.
Press AUDIO until FADER appears in the display.
If the balance setting has been previously ad-
#
justed, BAL will be displayed.
En
35
Page 36

Section
08
Audio Adjustments
2 Press a or b to adjust front/rear
speaker balance.
Each press of a or b moves the front/rear
speaker balance towards the front or the rear.
FADER :F25 FADER :R25 is displayed as the
front/rear speaker balance moves from front to
rear.
FADER : 0 is the proper setting when only
#
two speakers are used.
When the rear output setting is subwoofer,
#
you cannot adjust front/rear speaker balance. Refer to Switching the rear output setting on page
43.
3 Press c or d to adjust left/right
speaker balance.
When you press c or d, BAL : 0 is displayed.
Each press of c or d moves the left/right
speaker balance towards the left or the right.
BAL :L25 BAL :R25 is displayed as the left/
right speaker balance moves from left to
right.
Adjusting loudness
Loudness compensates for deficiencies in the
low- and high-sound ranges at low volume.
1 Press AUDIO to select LOUD.
Press AUDIO until LOUD appears in the display.
2 Press a to turn loudness on.
LOUD :ON appears in the display.
Adjusting source levels
SLA (Source level adjustment) lets you adjust
the volume level of each source to prevent radical changes in volume when switching between sources.
! Settings are based on the volume level of the
FM tuner, which remains unchanged.
1 Compare the FM tuner volume level
with the level of the source you wish to
adjust (e.g., built-in CD player).
2 Press AUDIO to select SLA.
Press AUDIO until SLA appears in the display.
3 Press a or b to adjust the source
volume.
Each press of a or b increases or decreases
the source volume.
SLA :+4 SLA :4 is displayed as the source
volume is increased or decreased.
Notes
! Since the FM tuner volume is the control, it
is not possible to apply source level
adjustments to the FM tuner.
! The AM tuner volume level can also be
adjusted with source level adjustments.
! The built-in CD and the multi-CD players are
both set to the same source level adjustment
volume automatically.
! External unit 1 and External unit 2 are both
set to the same source level adjustment
volume automatically.
3 Press b to turn loudness off.
LOUD :OFF appears in the display.
Note
You can also turn loudness on or off by pressing
LOUD.
36
En
Page 37

Digital Signal Processor
Section
09
Using the digital signal
processor
8
3
7
9
9
0
1
4
2
5
6
7
0
1 Position indicator
Shows which listening position is presently
selected.
2 Preset equalizer indicator
Shows which equalizer preset is presently
selected.
3 Function display
Shows the function status.
4 SW indicator
Shows when the subwoofer output is turned
on.
5 CUSTOM indicator
Shows when custom equalizer curve is presently selected.
6 DSP button
Press to select digital signal processor functions.
7 BAND button
Press to return to the display of each
source.
8 16 buttons
Press to recall equalization curves and
sound field programs.
9 c/d buttons
Press to choose the item (mode) of the selected function.
a a/b buttons
Press to adjust the selected function and
turn it on/off.
English
The digital signal processor lets you control
many aspects of sound output including
equalization, sound field control and listening
position.
% Press DSP to display the DSP function
names.
Press DSP repeatedly to switch between the
following functions:
PWFL (graphic equalizer)SFC (sound field
control)POSI (position selector)
To return to the display of each source, press
#
BAND.
Depending on the graphic equalizer and
#
subwoofer adjustments, pressing DSP repeatedly
switches between the following functions:
En
37
Page 38

Section
09
Digital Signal Processor
CUSTOM (graphic equalizer)50Hz (9-band
graphic equalizer)SFC (sound field control)
POSI (position selector)SUB.W (subwoofer)
80Hz (subwoofer setting)HPF (high pass filter)
Use the following instructions for more detail.
Note
If you do not operate the DSP function within
about 30 seconds, the display is automatically
returned to the source display.
Using the graphic equalizer
The graphic equalizer lets you adjust the
equalization to match car interior acoustic
characteristics as desired.
Recalling equalizer curves
There are six stored equalizer curves which
you can easily recall at any time. Here is a list
of the equalizer curves:
Button Display Equalizer curve
1 S-BASS Super bass
2PWFLPowerful
3 NTRL Natural
4 VOCAL Vocal
5 CUSTOM Custom
6 FLAT
! CUSTOM is an adjusted equalizer curve that
you create. Adjustments can be made with a
9-band graphic equalizer.
! When FLAT is selected no supplement or
correction is made to the sound. This is useful
to check the effect of the equalizer curves by
switching alternatively between FLAT and a
set equalizer curve.
Flat
1 Press DSP to select the graphic
equalizer.
Press DSP until PWFL appears in the display.
If the graphic equalizer has been previously
#
set to an equalizer curve other than PWFL then
the title of that previously selected equalizer curve
will be displayed, such as S-BASS, NTRL, VOCAL,
CUSTOM,orFLAT.
2 Select an equalizer curve by
pressing 16.
Select the desired equalizer curve by pressing
one of the numbered buttons, from 16, which
correspond to the different equalizer curves as
listed above.
You can also sequentially select an equalizer
#
curve by pressing c or d.
Adjusting equalizer curves
The factory supplied equalizer curves, with the
exception of FLAT, can be adjusted to a fine
degree (nuance control).
1 Recall an equalizer curve.
See Recalling equalizer cur ves on this page.
2 Press a or b to adjust the equalizer
curve.
Each press of a or b increases or decreases
the equalizer curve respectively.
+6 5 (or 6) is displayed as the equalizer
curve is increased or decreased.
The actual range of the adjustments are dif-
#
ferent depending on which equalizer curve is selected.
Note
You can store the adjusted equalizer curve in
CUSTOM by pressing and holding button 5 until
MEMORY appears in the display.
38
En
Page 39

Digital Signal Processor
Section
09
Adjusting 9-band graphic
equalizer
For CUSTOM equalizer curve, you can adjust
the level of each band.
1 Recall CUSTOM equalizer curve.
See Recalling equalizer cur ves on the previous
page.
2 Press DSP to select 9-band graphic
equalizer.
9-band graphic equalizer can only be selected
when you have selected CUSTOM equalizer
curve. Press DSP until 50Hz appears in the
display.
If 9-band graphic equalizer has been pre-
#
viously adjusted, the frequency of that previously
selected will be displayed instead of 50Hz.
3 Press c or d to select the equalizer
band to adjust.
Each press of c or d selects equalizer bands
in the following order:
501002004008001.6 k3.2 k
6.3 k12.5 k (Hz)
Press c or d until the desired equalizer band
appears in the display.
4 Press a or b to adjust the level of
the equalizer band.
Each press of a or b increases or decreases
the level of the equalization band.
+6 6 is displayed as the level is increased
or decreased.
You can then select another band and adjust
#
the level.
Notes
! You can create different CUSTOM curves for
different sources.
! The built-in CD player and the multi-CD
player are set to the same equalizer
adjustment setting automatically.
! External unit 1 and External unit 2 are set to
the same equalizer adjustment setting
automatically.
Using sound field control,
octaver and BBE sound
SFC (sound field control) incorporate three
programs for reproducing typical sound fields
of a studio, jazz or club. This function makes it
possible to reproduce the realistic sound fields
of the three programs in your car.
Octaver makes the bass sound louder. OCT2
is more effective than OCT1.
With BBE, playback very close to the original
sound can be obtained by correction with a
combination of phase compensation and
high-range boost for the delay of the high-frequency components and the amplitude deviation occurring during playback. This function
makes it possible to reproduce the dynamic
sound field as if you are listening to a live performance.
Note
Manufactured under license from BBE Sound,
Inc. The mark BBE is a trademark of BBE Sound,
Inc.
Recalling sound field programs
Here is a list of the sound field programs:
Button Display Effect
1 STUDIO Studio
2 JAZZ Jazz
3 CLUB Club
4 OCT1 Octaver 1
5 OCT2 Octaver 2
6 BBE
BBE
English
En
39
Page 40

Section
09
Digital Signal Processor
1 Press DSP to select the sound field
control.
Press DSP until SFC appears in the display.
If the sound field control has been previously
#
set to a sound field program then the title of that
previously selected sound field program will be
displayed, such as STUDIO, JAZZ, CLUB, OCT1,
OCT2,orBBE.
2 Select a sound field program by
pressing 16.
Select the desired sound field program by
pressing one of the numbered buttons, from
16, which correspond to the different sound
field programs as listed above.
You can also sequentially select a sound field
#
program by pressing c or d.
Adjusting BBE sound level
With BBE sound processing technology, you
can adjust the level of BBE.
1 Recall BBE.
See Recalling sound field programs on the previous page.
2 Press a or b to adjust the level of
BBE.
Each press of a or b increases or decreases
the level of BBE.
+4 4 is displayed as the level is increased
or decreased.
Using the position selector
One way to assure a more natural sound is to
clearly position the stereo image, putting you
right in the center of the sound field. The position selector adjusts the volume level of sound
from each speaker to match seat positions
and the number of people in the car and lets
you recall settings at the touch of a button.
Here is a list of the positions:
Button Display Indicator Position
a FRONT
b ALL
c FRONT-L
d FRONT-R
1 Press DSP to select the position
selector.
Press DSP until POSI appears in the display.
If the position selector has been previously
#
set to a listening position then the title of that previously selected listening position will be displayed, such as FRONT, ALL, FRONT-L or
FRONT-R.
2 Press c/d/a/b to select a listening
position.
Press one of these, c/d/a/b, to select a listening position as listed in the table.
To cancel the selected listening position,
#
press the same button again.
When the rear output setting is subwoofer,
#
you cannot select ALL. Refer to Switching the rear
output setting on page 43.
Front seat
All seats
Front seat left
Front seat right
40
En
Page 41

Digital Signal Processor
Section
09
Using subwoofer output
This unit is equipped with a subwoofer output
which can be switched on or off. When a subwoofer is connected to the rear output, first,
switch the rear output setting to subwoofer,
then turn the subwoofer output on. For more
details, see Switching the rear output setting
on page 43.
1 Press DSP to select SUB.W.
When the rear output setting is subwoofer,
you can select SUB.W. Press DSP until SUB.W
appears in the display.
2
Press a to turn subwoofer output on.
SUB.W :ON appears in the display. Subwoofer
output is now on.
You can turn off subwoofer output by press-
#
ing b.
3 Press c or d to select the phase of
subwoofer output.
Press c to select reverse phase and
pears in the display. Press d to select normal
phase and
appears in the display.
Adjusting subwoofer settings
When the subwoofer output is on, you can adjust the cut-off frequency and the output level
of the subwoofer.
1 Press DSP to select the subwoofer
setting.
When the subwoofer output is on, you can select the subwoofer setting. Press DSP until
80Hz appears in the display.
If the subwoofer setting has been previously
#
adjusted, the frequency of that previously selected will be displayed, such as 50Hz or 125Hz.
ap-
2 Press c or d to select cut-off
frequency.
Press c and 50Hz is displayed. Press d and
125Hz is displayed. Only frequencies lower
than those in the selected range are output
from the subwoofer.
3 Press a or b to adjust the output
level of the subwoofer.
Each press of a or b increases or decreases
the level of the subwoofer (e.g., +6 to 15).
Press a or b until you see the desired value
displayed.
Using the high pass filter
When you do not want low sounds from the
subwoofer output frequency range to play
from the front speakers, switch the HPF (high
pass filter) on. Only frequencies higher than
those in the selected range are output from
the front speakers.
1 Press DSP to select HPF.
When the rear output setting is subwoofer,
you can select HPF. Press DSP until HPF ap-
pears in the display.
2 Press a to turn high pass filter on.
HPF 80Hz appears in the display. High pass fil-
ter is now on.
To turn high pass filter off, press b.
#
3 Press c or d to select a high pass
filter range.
Press c and HPF 50Hz is displayed. Press d
and HPF 125Hz is displayed. Only frequencies
higher than those in the selected range are
output from the front speakers.
English
En
41
Page 42

5
2
Section
10
Initial Settings
Adjusting initial settings
1
4
3
4
3
5
6
7
6
4 BAND button
Press to cancel initial settings.
5 c/d buttons
Press to choose the item (mode) of the selected function.
6 a/b buttons
Press to adjust the selected function and
turn it on/off.
7 CD/CASSETTE/TUNER buttons
Press repeatedly to turn off the unit.
1 Press SOURCE and hold on the head
unit, or press CD, CASSETTE or TUNER on
the remote, repeatedly until the unit turns
off.
2 Press FUNCTION and hold until the
time setting appears in the display.
3 Press FUNCTION to select one of the
initial settings.
Press FUNCTION repeatedly to switch between the following settings:
TimeWARNAUXDIMMERREAR SP
DIG.ATTCONTRAST
Use the following instructions to operate each
particular setting.
To cancel initial settings, press BAND.
#
You can also cancel initial settings by hold-
#
ing down FUNCTION until the unit turns off.
Initial settings lets you perform initial set up of
different settings for this unit.
1 Function display
Shows the function status.
2 SOURCE button
Press and hold to turn off the unit.
3 FUNCTION button
Press to select a function of the initial settings.
42
En
Setting the time
This is used to set the time on the units clock
display.
1 Press FUNCTION to select the time.
Press FUNCTION until the time appears in the
display.
Page 43

Initial Settings
Section
10
2 Select the portion of the time
display you wish to set with c/d.
Pressing c/d will select a portion of the clock
display:
HourMinute
As you select portions of the clock display the
portion selected will blink.
3 Select the correct time with a/b.
Pressing a will increase the selected hour or
minute. Pressing b will decrease the selected
hour or minute.
Switching the warning
tone
If the front panel is not detached from the
head unit within five seconds of turning off the
ignition, a warning tone will sound. You can
turn off this warning tone.
1 Press FUNCTION to select WARN.
Press FUNCTION repeatedly until WARN appears in the display.
2 Select WARN on or off with a/b.
Pressing a/b will switch WARN between on
and off and that status will be displayed (e.g.,
WARN :ON).
Switching the auxiliary
setting
It is possible to use auxiliary equipment with
this unit. Activate the auxiliary setting when
using auxiliary equipment connected to this
unit.
1 Press FUNCTION to select AUX.
Press FUNCTION repeatedly until AUX appears in the display.
2 Select AUX on or off with a/b.
Pressing a/b will switch AUX between on
and off and that status will be displayed (e.g.,
AUX :ON).
Switching the dimmer
setting
To prevent the display from being too bright at
night, the display is automatically dimmed
when the cars headlights are turned on. You
can switch dimmer on or off.
1 Press FUNCTION to select DIMMER.
Press FUNCTION repeatedly until DIMMER
appears in the display.
2 Select DIMMER on or off with a/b.
Pressing a/b will switch DIMMER between
on and off and that status will be displayed
(e.g., DIMMER :ON).
Switching the rear output
setting
This units rear output (rear speaker leads output and RCA rear output) can be used for fullrange speaker or subwoofer connection. If you
switch the rear output setting to the subwoofer, you can connect a rear speaker lead directly to a subwoofer without using an
auxiliary amp.
! If you connect a subwoofer to the rear out-
put, set the output setting to subwoofer.
English
En
43
Page 44

Section
10
Initial Settings
! Even if you change this setting, there is no
output unless you switch the subwoofer output on (refer to Using subwoofer output on
page 41).
! Both rear speaker leads output and RCA rear
output are switched simultaneously in this
setting.
1 Press FUNCTION to select REAR SP.
Press FUNCTION repeatedly until REAR SP appears in the display.
2 Select full-range speaker or
subwoofer with c/d.
Pressing c/d will switch between
REAR SP:FUL (full-range speaker) and
REAR SP:S/W (subwoofer) and that status will
be displayed.
Selecting the digital
attenuator
When listening to a CD or other source on
which the recording level is high, setting the
equalizer curve level to high may result in distortion. You can switch the digital attenuator
to low to reduce distortion.
! Sound quality is better at the high setting so
this setting is usually used.
Adjusting display contrast
Display contrast adjustment lets you adjust
the display for easier viewing when lighting
conditions change.
1
Press FUNCTION to select CONTRAST.
Press FUNCTION repeatedly until CONTRAST
appears in the display.
2 Press c or d to adjust the contrast.
Each press of c or d increases or decreases
the contrast.
+7 7 is displayed as the contrast is increased or decreased.
1 Press FUNCTION to select DIG.ATT.
Press FUNCTION repeatedly until DIG.ATT appears in the display.
2
Select DIG.ATT high or low with c/d.
Pressing c/d will switch between DIG.ATT: H
(high) and DIG.ATT: L (low) and that status
will be displayed.
44
En
Page 45

Other Functions
Section
11
Introduction of other
functions
2
1
3
4
5
2
1
6
7
8
9
0
8
9
6 6 button
Press to turn on the demonstration mode.
7 CLOCK button
Press to change the clock display.
8 c/d buttons
Press to move the cursor in the display to
the next position.
9 a/b buttons
Press to select letters and numbers.
a CASSETTE button
Press to select a source.
Using the demonstration
Demonstration can be shown in the display
when the unit is off.
1 Press SOURCE to turn off the unit.
Press SOURCE and hold until the unit turns
off.
2 Press 6 to start the demonstration.
The demonstration can be cancelled by
#
pressing 6 again.
English
1 FUNCTION button
Press to select an advanced function.
2 BAND button
Press to return to normal display.
3 SOURCE button
Press to select a source.
4 ENTERTAINMENT button
Press to change to the entertainment display.
5 12 buttons
Press to change between letters or number/
symbol input.
Using different
entertainment displays
You can enjoy entertainment displays while listening to each sound source.
! These are different ways of displaying the
spectrum and do not affect sound output.
Press ENTERTAINMENT.
%
Each time you press ENTERTAINMENT the
display changes in the following order:
En
45
Page 46

Section
11
Other Functions
Entertainment mode 1 (default)Spectrum
analyzerLevel indicatorEntertainment
mode 2Entertainment mode 3Non-move
icon
Cellular telephone muting
Sound from this unit is muted automatically
when a call is made or received using a connected cellular telephone.
! The sound is turned off, MUTE is displayed
and no audio adjustments, except volume
control, are possible. Operation returns to normal when the phone call is ended.
Setting the time display on
or off
You can turn the time display on even when
the sources and the demonstration are off.
% Press CLOCK to select the time
display.
Each press of CLOCK turns time display on or
off.
The time display disappears temporarily
#
when you perform other operations, but the time
indication is displayed again after 25 seconds.
Using the AUX source
An IP-BUS-RCA Interconnector such as the
CD-RB20/CD-RB10 (sold separately) lets you
connect this unit to auxiliary equipment featuring RCA output. For more details, refer to
the IP-BUS-RCA Interconnector owners manual.
Selecting AUX as the source
% Press SOURCE on the head unit, or
CASSETTE on the remote, to select AUX as
the source.
Press SOURCE or CASSETTE until AUX appears in the display.
If the auxiliary setting is not switched on,
#
AUX cannot be selected. For more details, see
Switching the auxiliary setting on page 43.
Setting the AUX title
The title displayed for the AUX source can be
changed.
1 After you have selected AUX as the
source, press FUNCTION and hold until
TITLE IN appears in the display.
2 Press 1 numbered button to select
the desired character type.
Press 1 numbered button repeatedly to switch
between the following character type:
Alphabet (upper case), Numbers and Symbols
Alphabet (lower case)
You can select to input Numbers and Sym-
#
bols by pressing 2 numbered button.
3 Press a or b to select a letter of the
alphabet.
Each press of a will display a letter of the alphabet in A B C ... X Y Z, numbers and symbols in 1 2 3 ... @ # < order. Each press of b
will display a letter in the reverse order, such
as Z Y X ... C B A order.
46
En
Page 47

Other Functions
Section
11
4 Press d to move the cursor to the
next character position.
When the letter you want is displayed, press d
to move the cursor to the next position and
then select the next letter. Press c to move
backwards in the display.
5 Move the cursor to the last position
by pressing d after entering the title.
When you press d one more time, the entered
title is stored in memory.
6 Press BAND to return to the
playback display.
English
En
47
Page 48

Appendix
Additional Information
Understanding built-in CD
player error messages
When problems occur during CD play an error
message may appear on the display. If an error
message appears on the display refer to the table below to see what the problem is and the
suggested method of correcting the problem.
If the error cannot be corrected, contact your
dealer or your nearest Pioneer Service Center.
Message Cause Action
CD ERR11, 12, 17, 30
CD ERR11, 12, 17, 30
CD ERR-14 Blank disc Check the disc.
CD ERR10, 11, 12, 14,
17, 30, A0
CD ERR-44 All tracks are skip
HEAT CD player over-
Dirty disc Clean disc.
Scratched disc Replace disc.
Electrical or mechanical
tracks
heated
Turn the ignition ON
and OFF, or switch
to a different source,
then back to the CD
player.
Replace disc.
Turn off the CD
player until the CD
player cools down.
Cassette tapes
! A loose, torn or warped label on a cassette
tape can jam the cassette player. Do not use
cassette tapes with loose, torn or warped labels.
! Cassette tapes longer than C-90 (90-minute
tapes) can cause the tape to jam in the cassette player. Do not use tapes longer than C-
90.
! Cassette tapes exposed to high temperatures
may warp and jam the cassette player. Keep
cassettes out of direct sunlight or places
where there are high temperatures.
! Store unused tapes in a tape case where
there is no danger of them becoming loose,
dirty or dusty.
Cleaning the playback head
If the head becomes dirty, the sound quality
will get bad and there will be sound dropouts
and other problems. If you have any of these
problems the head may need cleaning.
Music search and repeat
functions during tape
playback
Music search and repeat functions may not
work with these tapes:
! A tape with a gap of 4 seconds or less be-
tween songs
! A tape containing dialog or other non-musi-
cal content, with pauses lasting 4 seconds or
longer
! A tape with an extremely quiet passage in
the music lasting for 4 seconds or longer
48
En
Page 49

Additional Information
Appendix
CD player and care
! Use only CDs that have either of the two
Compact Disc Digital Audio marks as show
below.
! Use only normal, round CDs. If you insert ir-
regular, non-round, shaped CDs they may jam
in the CD player or not play properly.
! Check all CDs for cracks, scratches or
warped discs before playing. CDs that have
cracks, scratches or are warped may not play
properly. Do not use such discs.
! Avoid touching the recorded (non-printed
side) surface when handling the disc.
! Store discs in their cases when not in use.
! Keep discs out of direct sunlight and do not
expose the discs to high temperatures.
! Do not attach labels, write on or apply che-
micals to the surface of the discs.
! To clean dirt from a CD, wipe the disc with a
soft cloth outward from the center of the disc.
CD-R/CD-RW discs
! CD-R (CD-Recordable)/CD-RW (CD-Rewrita-
ble) discs recorded on CD-R/CD-RW units
other than a music CD recorder may not play
properly on this CD player.
! Music CD-R/CD-RW discs, even recorded on
a music CD recorder, may not play properly on
this CD player due to differing disc characteristics, scratches or dirt on the disc. Dirt or
condensation on the lens inside this unit may
also prevent playback.
! Titles and other text information recorded on
a CD-R/CD-RW disc may not be displayed by
this unit.
! This unit conforms to the track skip function
of the CD-R/CD-RW disc. The tracks containing the track skip information are skipped
automatically.
! If you insert a CD-RW disc into this unit, time
to playback will be longer than when you insert a conventional CD or CD-R disc.
! Read the precautions with CD-R/CD-RW
discs before using them.
English
! If the heater is used in cold weather, moist-
ure may form on components inside the CD
player. Condensation may cause the CD player
to not operate properly. If you think that con-
densation is a problem turn off the CD player
for an hour or so to allow the CD player to dry
out and wipe any damp discs with a soft cloth
to remove the moisture.
! Road shocks may interrupt CD playback.
En
49
Page 50

Appendix
Additional Information
Specifications
General
Power source ............................. 14.4 V DC (10.8 15.1 V
allowable)
Grounding system ...................Negative type
Max. current consumption
..................................................... 10.0 A
Dimensions (W × H × D):
Chassis ............................... 178 × 100 × 160 mm
(7 × 3-7/8 × 6-1/4 in)
Nose .....................................170 × 94 × 13 mm
(6-3/4 × 3-3/4 × 1/2 in)
Weight .......................................... 2.0 kg (4.4 lbs)
Audio/DSP
Continuous power output is 22 W per channel minimum
into 4 ohms, both channels driven 50 to 15,000 Hz with
no more than 5% THD.
Maximum power output ....... 50 W × 4
50 W × 2/4 W + 70 W × 1/2
W (for subwoofer)
Load impedance ...................... 4 W (4 8 W [2 W for 1 ch]
allowable)
Preout max output level/output impedance
..................................................... 2.2 V/1 kW
Loudness contour ................... +10 dB (100 Hz), +7 dB (10
kHz) (volume: 30 dB)
Equalizer (9-Band Graphic Equalizer):
Frequency .......................... 50/100/200/400/800 Hz
1.6/3.15/6.3/12.5 kHz
Equalization range ........ ±12 dB
Network:
HPF:
Frequency ................ 50/80/125 Hz
Slope ..........................12 dB/oct
Subwoofer:
Frequency ................ 50/80/125 Hz
Slope ..........................18 dB/oct
Gain ............................ +6 15 dB
Phase ........................ Normal/Reverse
CD player
System .......................................... Compact disc audio system
Usable discs .............................. Compact disc
Signal format:
Sampling frequency ..... 44.1 kHz
Number of quantization bits
........................................... 16; linear
Frequency characteristics ... 5 20,000 Hz (±1 dB)
Signal-to-noise ratio ............... 94 dB (1 kHz) (IHF-A
network)
Dynamic range ......................... 92 dB (1 kHz)
Number of channels .............. 2 (stereo)
Cassette player
Tape ................................................ Compact cassette tape
(C-30 C-90)
Tape speed .................................. 4.8 cm/sec
Fast forward/rewinding time
..................................................... Approx. 100 sec (C-60)
Wow & flutter ............................. 0.09 % (WRMS)
Frequency response:
Metal ................................... 30 19,000 Hz (±3 dB)
Stereo separation .................... 45 dB
Signal-to-noise ratio:
Metal:
Dolby B NR IN ....... 67 dB (IHF-A network)
Dolby NR OUT .......61 dB (IHF-A network)
FM tuner
Frequency range ...................... 87.9 107.9 MHz
Usable sensitivity ..................... 9 dBf (0.8 µV/75 W, mono,
S/N: 30 dB)
50 dB quieting sensitivity .....15 dBf (1.5 µV/75 W, mono)
Signal-to-noise ratio ............... 70 dB (IHF-A network)
Distortion .....................................0.3 % (at 65 dBf, 1 kHz,
stereo)
Frequency response ............... 30 15,000 Hz (±3 dB)
Stereo separation .................... 40 dB (at 65 dBf, 1 kHz)
Selectivity .................................... 70 dB (2ACA)
Three-signal intermodulation (desired signal level)
..................................................... 30 dBf (two undesired
signal level: 100 dBf)
AM tuner
Frequency range ...................... 530 1,710 kHz (10 kHz)
Usable sensitivity ..................... 18 µV (S/N: 20 dB)
Selectivity .................................... 50 dB (±10 kHz)
Note
Specifications and the design are subject to
possible modifications without notice due to
improvements.
50
En
Page 51

Table des matières
Nous vous remercions
davoir acquis cet appareil Pioneer.
Veuillez lire attentivement ce mode demploi de manière à vous familiariser avec le
fonctionnement de lappareil. Cela fait, conservez ce mode demploi afin de pouvoir
vous y référer en cas de besoin.
Avant de commencer
Quelques mots sur cet appareil 5
Quelques mots sur ce mode demploi 5
Service après-vente des produits Pioneer 5
Précautions 5
Utilisation du boîtier de télécommande et
soins à lui apporter 6
Mise en place de la pile 6
Utilisation du boîtier de
télécommande 6
Protection de lappareil contre le vol 6
Dépose de la face avant 7
Pose de la face avant 7
Réinitialisation du microprocesseur 7
Quelques mots sur la marque XM READY 8
Description de lappareil
Appareil central 9
Boîtier de télécommande 10
Mise en service, mise hors service
Mise en service de lappareil 11
Choix dune source 11
Mise hors service de lappareil 11
Syntoniseur
Ecoute de la radio 12
Introduction au fonctionnement détaillé du
syntoniseur 14
Mise en mémoire et rappel des fréquences
des stations 15
Accord sur les signaux puissants 15
Mise en mémoire des fréquences des
émetteurs les plus puissants 15
Lecteur de cassette
Ecoute dune cassette 17
Introduction au fonctionnement détaillé du
lecteur de cassette 19
Répétition de la lecture 19
Saut des silences 20
Utilisation du réducteur de bruit 20
Lecteur de CD intégré
Ecoute dun CD 21
Introduction au fonctionnement détaillé du
lecteur de CD intégré 23
Répétition de la lecture 24
Ecoute des plages musicales dans un ordre
quelconque 24
Examen du contenu dun CD 24
Pause de la lecture dun CD 25
Utilisation des fonctions de titrage des
disques 25
Frappe du titre dun disque 25
Affichage du titre dun disque 26
Utilisation des fonctions CD TEXT 26
Affichage du titre dun disque CD
TEXT 26
Défilement du titre du disque sur
lafficheur 26
Lecteur de CD à chargeur
Ecoute dun CD 27
Introduction au fonctionnement détaillé du
lecteur de CD à chargeur 29
Répétition de la lecture 30
Ecoute des plages musicales dans un ordre
quelconque 30
Examen du contenu des disques 31
Pause de la lecture dun CD 31
Utilisation de la programmation en temps réel
(ITS) 31
Création dune liste par
programmation en temps réel (ITS) 32
Lecture commandée par la liste
ITS 32
Suppression dune plage musicale sur
la liste ITS 32
Suppression dun CD de la liste
ITS 33
Français
2
Fr
Page 52

Table des matières
Utilisation des fonctions de titrage des
disques 33
Frappe du titre dun disque 33
Affichage du titre dun disque 34
Choix dun disque sur la liste des
titres 34
Utilisation des fonctions CD TEXT 35
Affichage du titre dun disque CD
TEXT 35
Défilement du titre du disque sur
lafficheur 35
Utilisation de la compression et de
laccentuation dynamique des graves 35
Lecteur de CD 50 disques 36
Réglages sonores
Introduction aux réglages sonores 37
Réglage de léquilibre sonore 38
Réglage de la correction physiologique 38
Réglage du niveau sonore de la source 38
Processeur de signal numérique
Utilisation du processeur de signal
numérique 40
Utilisation de légaliseur graphique 41
Rappel dune courbe dégalisation 41
Réglage des courbes dégalisation 41
Réglage de légaliseur graphique à 9
bandes 42
Utilisation de la commande de champ sonore,
du réducteur doctave et de la technique
BBE 43
Rappel dune correction de champ
sonore 43
Réglage de lamplitude des sons
BBE 43
Utilisation du sélecteur de position 44
Utilisation de la sortie pour haut-parleur
dextrêmes graves 44
Réglages de la sortie vers le hautparleur dextrêmes graves 45
Utilisation du filtre passe-haut 45
Réglages initiaux
Ajustement des réglages initiaux 46
Réglage de lheure 47
Mise en service ou hors service du signal
sonore davertissement 47
Mise en service ou hors service de lentrée
auxiliaire 47
Mise en service ou hors service de
latténuateur de luminosité 48
Choix du réglage pour la sortie arrière 48
Réglage de latténuateur numérique 49
Réglage du contraste de lafficheur 49
Autres fonctions
Introduction aux autres fonctions 50
Utilisation de la démonstration 50
Utilisation des divers affichages
divertissants 51
Silencieux associé au téléphone cellulaire 51
Affichage ou non de lheure 51
Utilisation de la source AUX 51
Choix de lentrée AUX comme
source 51
Frappe du nom de lentrée AUX 51
Informations complémentaires
Signification des messages derreur du
lecteur de CD integre 53
Cassettes 53
Nettoyage de la tête de lecture 53
Fonctions de recherche et de répétition de
plage musicale pendant la lecture dune
cassette 54
Soins à apporter au lecteur de CD 54
Disques CD-R et CD-RW 54
Caractéristiques techniques 56
3
Fr
Page 53

La sélection d’un équipement audio de qualité comme l’unité que vous venez d’acheter n’est que
le début de votre plaisir musical. Maintenant, il est temps de penser à la manière de profiter au
maximum des plaisirs que vous offre votre équipement. Ce fabricant et le Groupe “Consumer
Electronics Group” de l’Association des Industries Electroniques veut que vous profitiez au maximum de votre équipement en l’utilisation à un niveau sûr. Un niveau qui permet au son d’être fort
et clair, sans beuglement ennuyant ou distorsion — et, ce qui est plus important, sans affecter votre
ouïe sensible.
Le son peut être décevant. Avec le temps, le “niveau de confort” de votre ouïe s’adapte aux volumes
sonores plus élevés. Ainsi, les sons “normaux” peuvent en fait être forts et affecter votre ouïe. Protégezvous contre cela en réglant votre équipement à un niveau sûr AVANT l’adaptation de votre ouïe.
Pour établir un niveau sûr:
• Démarrer votre commande de volume à un réglage bas.
• Augmentez lentement le son jusqu’à ce que vous l’entendiez confortablement et clairement, sans
distorsion.
Lorsque vous avez établi un niveau sonore confortable:
• Réglez le cadran et laissez-le tel quel.
En prenant une minute pour faire cela, vous pourrez éviter des dommages ou des pertes de sensibilités d’écoute dans le futur. Après tout, nous voulons que vous écoutiez pendant toute votre vie.
Nous voulons que vous écoutiez pendant toute votre vie
Utilisé avec sagesse, votre nouvel équipement sonore sera une source de plaisir pendant toute
votre vie. Comme les dommages de l’ouïe provenant d’un bruit fort ne sont souvent détectables que
lorsqu’il est trop tard, ce fabricant et le Groupe “Consumer Electronics Group” de l’Association des
Industries Electroniques vous recommandent d’éviter toute exposition prolongée à un bruit excessif.
Cette liste de niveaux sonores est incluse pour votre protection.
Niveau de
Décibels Exemple
30 Bibliothèque tranquille, chuchotement
40 Salon, réfrigérateur, chambre à distance de la circulation
50 Circulation légère, conversation normale, bureau tranquille
60 Climatiseur à 20 pieds, machine à coudre
70 Aspirateur, sèche-cheveux, restaurant bruyant
80 Circulation moyenne en ville, évacuateurs de déchets, réveils à deux pieds
LES BRUITS SUIVANTS PEUVENT ETRE DANGEREUX DANS LE CAS D’UNE EXPOSITION CONSTANTE
90 Métro, motocyclette, circulation de camion, tondeuse à gazon
100 Collecteurs de poubelle, scie à chaîne, perceuse pneumatique
120 Concert de groupe rock devant les haut-parleurs, coup de tonnerre
140 Coup de pistolet, avion à réaction
180 Aire de lancement d’une fusée
Ces informations ont été gracieusement fournies par la Fondation de la Recherche pour les Sourds.
Français
4
Fr
Page 54

Section
01
Avant de commencer
Quelques mots sur cet
appareil
La plage de fonctionnement du syntoniseur
correspond aux fréquences allouées à lAmé-
rique du Nord. Toute tentative dutilisation
dans une autre région peut conduire à une
impossibilité.
Quelques mots sur ce mode
demploi
Cet appareil est doté dun certain nombre de
fonctions qui permettent la réception et le
fonctionnement dans les meilleures condi-
tions. Ces fonctions ont été élaborées pour
que leur emploi soit aussi simple que pos-
sible, mais il exige toutefois quelques explica-
tions. Ce mode demploi a été rédigé pour
vous aider à profiter au mieux de ces fonctions
et à rendre votre plaisir de lécoute aussi
grand que possible.
Nous vous conseillons de vous familiariser
avec ces fonctions et avec leurs modes opéra-
toires en lisant complètement ce mode dem-
ploi avant de vous servir de lappareil. Il est
particulièrement important que vous lisiez et
respectiez les précautions mentionnées sur
cette page et dans les autres sections.
Service après-vente des
produits Pioneer
Pour toute question relative au service après-
vente (y compris les conditions de garantie),
veuillez consulter le distributeur, ou le reven-
deur, qui vous a fourni cet appareil. Si les in-
formations requises ne sont pas disponibles,
prenez contact avec les compagnies mention-
nées ci-dessous:
Nexpédiez pas lappareil pour réparation à
lune des adresses figurant ci-dessous sans
avoir pris un contact préalable.
U.S.A.
Pioneer Electronics (USA) Inc.
CUSTOMER SUPPORT DIVISION
P.O. Box 1760
Long Beach, CA 90801-1760
800-421-1404
CANADA
Pioneer électroniques du Canada, Inc.
Département de service aux consommateurs
300 Allstate Parkway
Markham, Ontario L3R OP2
(905) 479-4411
1-877-283-5901
Pour connaître les conditions de garantie, reportez-vous au document, Garantie limitée,
qui accompagne cet appareil.
Précautions
! Conservez ce mode demploi à portée de
main pour vous y référer pour ce qui touche
les modes opératoires et les précautions.
! Maintenez le niveau découte à une valeur
telle que vous puissiez entendre les sons émis
àlextérieur du véhicule.
! Protégez lappareil contre lhumidité.
! Si la batterie est débranchée, ou déchargée,
le contenu de la mémoire est effacé et une
nouvelle programmation est nécessaire.
5
Fr
Page 55

Avant de commencer
Section
01
Utilisation du boîtier de
télécommande et soins à
lui apporter
Mise en place de la pile
Sortez le porte-pile, au dos du boîtier de télécommande, et introduisez la pile en respectant les polarités (+) et ().
ATTENTION
Conservez la pile hors de portée des enfants. Si
un enfant avale la pile, consultez immédiatement
un médecin.
PRÉCAUTION
! Nutilisez quune pile CR2025 (3V) au
lithium.
! Retirez la pile si le boîtier de télécommande
ne doit pas être utilisé pendant un mois ou
plus.
! Ne rechargez pas la pile, ne la démontez
pas, ne la chauffez pas et ne la jetez pas dans
un feu.
! Ne manipulez pas la pile en la saisissant
avec un outil métallique.
! Ne conservez pas la pile avec des objets
métalliques.
! En cas de fuite de la pile, nettoyez
soigneusement le boîtier de télécommande
puis mettez en place une pile neuve.
! Lors de la mise au rebut des piles usagées,
respectez les règlements nationaux ou les
instructions locales en vigueur dans le pays
ou la région en matière de conservation ou de
protection de lenvironnement.
Utilisation du boîtier de
télécommande
Dirigez le boîtier de télécommande vers la face
de lappareil à commander.
Important
! Ne conservez pas le boîtier de
télécommande exposé aux températures
élevées ou à la lumière directe du soleil.
! Le boîtier de télécommande peut ne pas
donner satisfaction lorsquil est exposé à la
lumière directe du soleil.
! Veillez à ce que le boîtier de télécommande
ne tombe pas, car ce faisant il pourrait
empêcher le bon fonctionnement de la pédale
de frein ou daccélération.
Protection de lappareil
contre le vol
Afin de décourager le vol, la face avant peut
être retirée de lappareil central et rangée dans
le boîtier fourni.
! Si vous ne retirez pas la face avant de lap-
pareil central dans les cinq secondes qui suivent la coupure de lallumage, un signal
sonore davertissement se fait entendre.
! Vous pouvez mettre hors service ce signal
sonore davertissement. Reportez-vous à la
page 47, Mise en service ou hors ser vice du
signal sonore davertissement.
Français
6
Fr
Page 56

Section
01
Avant de commencer
Important
! Nexercez aucune force excessive, ne
saisissez pas lafficheur ni les touches pour
retirer ou fixer la face avant.
! Evitez de heurter la face avant.
! Conservez la face avant à labri des
températures élevées et de la lumière directe
du soleil.
Dépose de la face avant
1 Appuyez sur DETACH pour libérer la
face avant.
Appuyez sur DETACH; le côté gauche de la
face avant se trouve libéré de lappareil cen-
tral.
Touche DETACH
2 Saisissez la face avant et retirez-la.
Saisissez la face avant par le côté gauche et
retirez-la en la faisant tourner vers la droite. La
face avant se sépare alors de lappareil cen-
tral.
Pose de la face avant
1 Placez la face avant bien à plat sur
lappareil central.
2 Appuyez sur la face avant de
manière quelle se loge fermement dans
lappareil central.
Réinitialisation du
microprocesseur
Si une des conditions suivantes se présente,
le microprocesseur doit être réinitialisé:
! Avant dutiliser lappareil pour la première
fois après son installation
! Lappareil ne fonctionne pas convenable-
ment
! Des informations erronées ou fantaisistes
saffichent sur lécran
1 Retirez la face avant.
Reportez-vous à cette page, Dépose de la face
avant.
2 Sur lappareil central, appuyez sur
RESET au moyen dun stylo à bille ou dun
instrument pointu.
3 Rangez la face avant dans le boîtier
de protection fourni à cet effet.
7
Fr
Touche RESET
Page 57

Avant de commencer
Quelques mots sur la
marque XM READY
La marque XM READY, imprimée sur la face
avant, signifie que le syntoniseur Pioneer XM
(vendu séparément) peut être commandé par
cet appareil-ci. Pour connaitre précisément le
modèle de syntoniseur XM qui peut être
connecté à cet appareil, consultez un revendeur ou un centre dentretien Pioneer agréés.
Pour tout ce qui concerne le fonctionnement
du syntoniseur XM, reportez-vous au mode
demploi de ce syntoniseur.
Remarques
! XM Satellite Radio développe actuellement
de tout nouveaux moyens de radio aux ÉtatsUnis.
Section
01
Français
La technique de radiodiffusion directe du
satellite vers le récepteur sera utilisée pour
que lauditeur, quil soit dans sa voiture ou à
son domicile, puisse recevoir les émissions
dans des conditions parfaites, cela où quil se
trouve dans le pays. XM propose quelque 100
canaux numériques programmant de la
musique, des bulletins dinformation, des
reportages sportifs, des entretiens et des
émissions pour les enfants.
! Le nom XM et les logos qui laccompagnent
sont des marques déposées par XM Satellite
Radio Inc.
! Lorsque cet appareil est connecté à un
syntoniseur XM, un seul autre appareil
additionnel peut être également connecté.
Reportez-vous à la page 11 pour de plus
amples détails concernant lappareil
additionnel.
8
Fr
Page 58

7
0
-
Section
02
Description de lappareil
1
2
3
4
5
6
8
9
Appareil central
1 Touche DETACH
Appuyez sur cette touche pour libérer la
face avant de lappareil central.
2 Touche FUNCTION
Appuyez sur cette touche pour choisir des
fonctions.
3 Touche AUDIO
Appuyez sur cette touche pour choisir les diverses commandes de correction sonore.
4 Touche DSP
Appuyez sur cette touche pour choisir une
correction de champ sonore.
5 Touche TAPE EJECT
Appuyez sur cette touche pour éjecter la
cassette que contient le lecteur.
6 Touche SOURCE
Lappareil est mis en service par le choix
dune source. Appuyez sur cette touche
pour choisir lune après lautre les sources
disponibles.
7 Touche ENTERTAINMENT
Appuyez sur cette touche pour modifier laffichage divertissant.
~
!
@
=
8 Touche LOUD
Appuyez sur cette touche pour mettre en
service, ou hors service, la correction physiologique.
9 Touche DISPLAY
Appuyez sur cette touche pour choisir un affichage différent.
a Touches 16
Appuyez sur cette touche pour choisir une
fréquence en mémoire, ou un disque si
linstallation comprend un lecteur de CD à
chargeur.
b Touches a/b/c/d
Appuyez sur ces touches pour effectuer un
accord manuel, atteindre rapidement le début ou la fin du support, rechercher une
plage musicale. Ces touches servent également aux commandes des fonctions.
c Touche CLOCK
Appuyez sur cette touche pour modifier laffichage de lheure.
d Touche CD EJECT
Appuyez sur cette touche pour éjecter le CD
que contient le lecteur de CD intégré.
9
Fr
Page 59

Description de lappareil
!
Section
02
@
^
-
2
#
$
e Touche BAND
Appuyez sur cette touche pour choisir une
des trois gammes FM ou la gamme AM, ou
encore abandonner la commande des fonctions.
f Touche VOLUME
Appuyez sur cette touche pour augmenter
ou diminuer le niveau sonore.
Boîtier de télécommande
Le boîtier de télécommande fourni permet le
réglage à distance de lappareil central. Les
touches jouent le même rôle que celles de
lappareil central.
g Touche CD
Appuyez sur cette touche pour choisir le lecteur de CD intégré, ou le lecteur de CD à
chargeur, comme source.
h Touche CASSETTE
Appuyez sur cette touche pour choisir le lecteur de cassette comme source.
i Touche TUNER
Appuyez sur cette touche pour choisir le
syntoniseur comme source.
3
%
j Touche ATT
Appuyez sur cette touche pour atténuer rapidement le niveau sonore de près de 90%.
Appuyez une nouvelle fois sur cette touche
pour rétablir le niveau initial.
Français
10
Fr
Page 60

Section
03
Mise en service, mise
hors service
Mise en service de
lappareil
% Pour mettre en service lappareil,
appuyez sur SOURCE, sur lappareil central,
ou bien sur TUNER, CASSETTE ou CD, sur le
boîtier de télécommande.
Le fait de choisir une source met lappareil en
service.
Choix dune source
Vous pouvez choisir la source que vous dési-
rez. Pour écouter un disque, introduisez un
disque dans le lecteur de CD intégré (reportez-
vous à la page 21). Pour écouter une cassette,
introduisez une cassette dans lappareil (re-
portez-vous à la page 17).
% Pour choisir une source à partir de
lappareil central, appuyez sur SOURCE.
Appuyez de manière répétée sur SOURCE
pour choisir lune après lautre les sources sui-
vantes:
Lecteur de CD intégréTélévisionSynto-
niseurLecteur de cassetteLecteur de CD
à chargeurAppareil extérieur 1Appa-
reil extérieur 2AUX
Remarques
! Dans les cas suivants, une autre source
sonore nest pas sélectionnée:
Le produit correspondant à la source
nest pas connecté à cet appareil-ci.
Lappareil ne contient pas de disque.
Lappareil ne contient pas de cassette.
Le lecteur de CD à chargeur ne contient
pas de chargeur.
Lentrée AUX (entrée pour un appareil
auxiliaire) est hors service (reportez-vous à
la page 47).
! Source extérieure désigne un produit
Pioneer (qui pourra être disponible dans le
futur) qui nest pas à proprement parler une
source mais dont la gestion des fonctions de
base peut être assurée par cet appareil. Deux
sources extérieures peuvent être ainsi
commandées. Si deux sources extérieures
sont effectivement reliées à lappareil,
lattribution de leur rang, 1 et 2, est
automatiquement réalisée par lappareil.
! Si le fil bleu/blanc de lappareil est relié à la
prise de commande du relais de lantenne
motorisée, celle-ci sétend lorsque la source
est mise en service. Pour rétracter lantenne,
mettez la source hors service.
% Pour choisir une source à partir du
boîtier de télécommande, appuyez sur
TUNER, CASSETTE ou CD.
Appuyez de manière répétée sur chaque tou-
che pour choisir lune après lautre les sources
suivantes:
TUNER: TélévisionSyntoniseurMise
hors service des sources
CASSETTE: Lecteur de cassetteAUX
Mise hors service des sources
CD: Lecteur de CD intégréLecteur de CD à
chargeurMise hors service des sources
11
Fr
Mise hors service de
lappareil
% Appuyez, pendant au moins une
seconde, sur SOURCE pour mettre
lappareil hors service.
Dans le cas du boîtier de télécommande, appuyez de manière répétée sur TUNER,
CASSETTE ou CD.
Page 61

Syntoniseur
Section
04
Ecoute de la radio
1 3
2
4
5
5
6
7
6
7
3 Indicateur de fréquence
Il indique la valeur de la fréquence daccord.
4 Touche SOURCE
Appuyez sur cette touche pour choisir le
syntoniseur comme source.
5 Touche BAND
Appuyez sur cette touche pour choisir une
des trois gammes FM ou la gamme AM.
6 Touches c/d (Accord manuel ou
automatique)
Appuyez sur ces touches pour accorder
lappareil sur une station.
7 Touche VOLUME
Appuyez sur cette touche pour augmenter
ou diminuer le niveau sonore.
8 Touche TUNER
Appuyez sur cette touche pour choisir le
syntoniseur comme source.
1 Pour choisir le syntoniseur, appuyez
sur SOURCE, sur lappareil central, ou sur
TUNER, sur le boîtier de télécommande.
Appuyez sur SOURCE, ou sur TUNER, jusquà
ce que Tuner saffiche.
Français
8
Voici les opérations de base pour lécoute de
la radio. Le fonctionnement détaillé du syntoniseur est expliqué à partir de la page 14.
1 Indicateur de gamme
Il signale la gamme daccord choisie, AM
ou FM.
2 Indicateur de stéréophonie (5)
Il signale que la station émet en stéréophonie.
2 Utilisez VOLUME pour régler le
niveau sonore.
Lorsque vous appuyez sur VOLUME croissant/
+, le sonore niveau augmente; lorsque vous
appuyez sur VOLUME décroissant/, le niveau
diminue.
3 Appuyez sur BAND pour choisir la
gamme.
Appuyez sur BAND jusquà ce que la gamme
désirée, F1, F2, F3 en FM ou AM, soit affichée.
4 Pour effectuer laccord manuel,
appuyez à intervalles rapprochés sur c,ou
sur d.
La fréquence augmente ou diminue par pas.
Fr
12
Page 62

Section
04
Syntoniseur
5 Pour effectuer laccord
automatique, appuyez, pendant environ
une seconde, sur c, ou sur d.
Le syntoniseur examine les fréquences jusquà
ce que se présente une émission dont la ré-
ception est jugée satisfaisante.
Vous pouvez arrêter laccord automatique en
#
appuyant brièvement sur c, ou sur d.
Si vous maintenez la pression dun doigt sur
#
c, ou sur d, les fréquences sont ignorées. Lac-
cord automatique ne commence quau moment
où vous relâchez la pression sur la touche.
Remarque
Si la station émet en stéréophonie, lindicateur de
stéréophonie (5)séclaire.
13
Fr
Page 63

Syntoniseur
Section
04
Introduction au
fonctionnement détaillé du
syntoniseur
1
2
6
4
5
3
7
8
2 Indicateur de numéro de présélection
Il indique le numéro de la présélection choisie.
3 Indicateur LOC
Il séclaire lorsque laccord automatique sur
une station locale est en service.
4 Touche FUNCTION
Appuyez sur cette touche pour choisir une
fonction.
5 Touche BAND
Appuyez sur cette touche pour revenir à laffichage de la fréquence.
6 Touches 16 (Pour laccord sur les pré-
sélections)
Appuyez sur une de ces touches pour sélectionner une station dont la fréquence est en
mémoire. Pour mettre une fréquence en mémoire, maintenez la pression dun doigt sur
la touche.
7 Touches c/d
Appuyez sur ces touches pour choisir un
paramètre (mode) de la fonction.
8 Touches a/b
Appuyez sur ces touches pour choisir une
fréquence mise en mémoire, ou mettre en
service, ou hors service, une fonction.
Français
5
4
1 Afficheur de fonction
Il indique létat de la fonction.
7
8
% Appuyez sur FUNCTION pour afficher
le nom de chaque fonction.
Appuyez de manière répétée sur FUNCTION
pour choisir une des fonctions suivantes:
BSM (mémoire des meilleures stations)
LOCAL (accord automatique sur une station
locale)
Appuyez sur BAND pour revenir à laffichage
#
de la fréquence.
Remarque
Si vous ne réglez aucun paramètre de la fonction
pendant environ 30 secondes, lafficheur indique
à nouveau la fréquence daccord.
Fr
14
Page 64

Section
04
Syntoniseur
Mise en mémoire et rappel
des fréquences des stations
Grâce aux touches de présélection 16 vous
pouvez aisément mettre en mémoire six fré-
quences que vous pourrez ultérieurement rap-
peler par une simple pression sur la touche
convenable.
% Lorsque se présente une fréquence
que vous désirez mettre en mémoire,
maintenez la pression dun doigt sur une
des touches de présélection 16 jusquàce
que le numéro de la présélection cesse de
clignoter.
Le numéro de la touche sur laquelle vous avez
appuyé clignote alors sur lindicateur de nu-
méro de présélection, puis il demeure éclairé.
La fréquence de la station de radio est désor-
mais en mémoire.
Lorsque vous appuyez à nouveau sur cette
même touche de présélection 16, la fré-
quence en mémoire est rappelée.
Remarques
! La mémoire peut contenir 18 fréquences de
la gamme FM, 6 pour chacune des trois
bandes, et 6 fréquences de la gamme AM.
! Vous pouvez également utiliser les touches
a et b pour rappeler une fréquence mise en
mémoire grâce aux touches de présélection
16.
Accord sur les signaux
puissants
Laccord automatique sur une station locale
ne sintéresse quaux émetteurs dont le signal
reçu est suffisamment puissant pour garantir
une réception de bonne qualité.
1 Appuyez sur FUNCTION pour choisir
LOCAL.
Appuyez sur FUNCTION jusquà ce que
LOCAL apparaisse sur lafficheur.
2 Appuyez sur a pour mettre en
service laccord automatique sur les
stations locales.
Le niveau de sensibilité pour laccord automatique sur les stations locales (par exemple,
LOCAL 2) apparaît sur lafficheur.
3 Appuyez sur c, ou sur d, pour
préciser la sensibilité.
En FM, la sensibilité peut prendre quatre valeurs; en AM, deux valeurs:
FM: LOCAL 1LOCAL 2LOCAL 3
LOCAL 4
AM: LOCAL 1LOCAL 2
La valeur LOCAL 4 permet la réception des
seules stations très puissantes; les autres valeurs autorisent, dans lordre décroissant, la
réception de stations de moins en moins puissantes.
4 Pour revenir à laccord automatique
ordinaire, appuyez sur b de façon à mettre
hors service laccord automatique sur une
station locale.
LOCAL :OFF apparaît sur lafficheur.
Mise en mémoire des
fréquences des émetteurs
les plus puissants
La fonction BSM (Mémoire des meilleures stations) vous permet dutiliser automatiquement
les touches de présélection 16 pour mémoriser les six fréquences des émetteurs les plus
puissants, émetteurs que vous pouvez ultérieurement rappeler par une simple pression
sur une de ces touches.
15
Fr
Page 65

Syntoniseur
1 Appuyez sur FUNCTION pour choisir
BSM.
Appuyez sur FUNCTION jusquà ce que BSM
apparaisse sur lafficheur.
2 Appuyez sur a pour mettre en
service BSM.
BSM clignote. Tandis que BSM clignote, les
fréquences des six émetteurs les plus puissants sont mises en mémoire, par ordre décroissant de lamplitude du signal reçu, grâce
aux touches de présélection 16. Cela fait,
BSM cesse de clignoter.
Pour annuler la mise en mémoire, appuyez
#
sur b.
Remarque
La mise en mémoire de fréquences à laide de la
fonction BSM peut provoquer le remplacement
dautres fréquences déjà conservées grâce aux
touches 16.
Section
04
Français
16
Fr
Page 66

Section
05
Lecteur de cassette
Ecoute dune cassette
4
1
5
6
6
2
7
8
7
9
3
8
3 Indicateur MTL
Il indique si la bande de la cassette introduite est du type métallique ou chrome.
4 Touche TAPE EJECT
Appuyez sur cette touche pour éjecter la
cassette.
5 Touche SOURCE
Appuyez sur cette touche pour choisir le lecteur de cassette comme source.
6 Touche BAND
Appuyez sur cette touche pour changer le
sens de défilement de la bande, ou reprendre la lecture après un bobinage rapide
dans un sens ou dans lautre.
7 Touches c/d
Appuyez sur ces touches pour bobiner ou
rebobiner la bande.
8 Touche VOLUME
Appuyez sur cette touche pour augmenter
ou diminuer le niveau sonore.
9 Touche CASSETTE
Appuyez sur cette touche pour choisir le lecteur de cassette comme source.
1 Introduisez une cassette dans le
logement pour la cassette.
La lecture commence automatiquement.
Voici les opérations de base pour lécoute
dune cassette. Le fonctionnement détaillé du
lecteur de cassette est expliqué à partir de la
page 19.
1 Indicateur de sens de défilement
Il signale le sens de défilement de la bande.
2 Indicateur de temps écoulé
Il indique le temps écoulé depuis le début
de la face en cours de lecture.
17
Fr
Logement pour la cassette
Vous pouvez éjecter la cassette en appuyant
#
sur TAPE EJECT.
Page 67

Lecteur de cassette
Section
05
2 Après avoir introduit une cassette,
appuyez sur SOURCE, sur lappareil central,
ou CASSETTE, sur le boîtier de
télécommande, pour choisir le lecteur de
cassette.
Appuyez sur SOURCE, ou sur CASSETTE, jusquà ce que Cassette apparaisse sur lafficheur.
3 Utilisez VOLUME pour régler le
niveau sonore.
Lorsque vous appuyez sur VOLUME croissant/
+, le sonore niveau augmente; lorsque vous
appuyez sur VOLUME décroissant/, le niveau
diminue.
4 Pour bobiner rapidement la bande,
dans un sens ou dans lautre, appuyez sur
c, ou sur d.
FF,ouREW, apparaît sur lafficheur.
Pour abandonner le bobinage rapide, dans
#
un sens ou dans lautre, et revenir à la lecture, appuyez sur BAND.
Vous pouvez également abandonner le bobi-
#
nage rapide, dans un sens ou dans lautre, en appuyant deux fois sur la même touche c,oud.
5 Pour effectuer une recherche, dans
un sens ou dans lautre, appuyez deux fois
sur c , ou sur d.
F-MS (recherche de plage musicale vers la fin
de la bande), ou R-MS (recherche de plage
musicale vers le début de la bande), apparaît
sur lafficheur. Le lecteur de cassette bobine la
bande jusquau silence suivant, ou précédent,
puis la lecture commence.
Pour abandonner la recherche de plage mu-
#
sicale et revenir à la lecture, appuyez sur BAND.
Vous pouvez également abandonner la re-
#
cherche de plage musicale en appuyant sur la
même touche c,oud.
6 Pour changer le sens de défilement
de la bande, appuyez sur BAND.
Remarques
! Nintroduisez aucun objet dans le logement
pour la cassette autre quune cassette.
! Lindicateur de temps de lecture est remis à
0000 dans les cas suivants:
Vous introduisez la cassette
Vous changez le sens de défilement de
la cassette
Vous rebobinez la bande jusquau début
! Lindicateur de temps de lecture cesse de
décompter le temps dès que commence le
bobinage rapide, dans un sens ou dans
lautre, ou la recherche de plage musicale.
Français
18
Fr
Page 68

Section
05
Lecteur de cassette
Introduction au
fonctionnement détaillé du
lecteur de cassette
1
342
7
6
5
3 Indicateur B.SKIP
Il indique que la fonction de saut des silences est en service.
4 Indicateur RPT
Il indique que la fonction de répétition est
en service.
5 Touche FUNCTION
Appuyez sur cette touche pour choisir une
fonction.
6 Touche BAND
Appuyez sur cette touche pour revenir à laffichage des conditions de lecture.
7 Touches a/b
Appuyez sur ces touches pour mettre en
service, ou hors service, une fonction.
% Appuyez sur FUNCTION pour afficher
le nom de chaque fonction.
Appuyez de manière répétée sur FUNCTION
pour choisir une des fonctions suivantes:
REPEAT (répétition de la lecture)B.SKIP
(saut des silences)NR (réducteur de bruit
Dolby B)
Appuyez sur BAND pour revenir à laffichage
#
des conditions de lecture.
6
5
1 Afficheur de fonction
Il indique létat de la fonction.
2 Indicateur 2B
Il indique que le réducteur de bruit Dolby B
est en service.
19
Fr
7
Remarque
Si vous ne réglez aucun paramètre de la fonction
pendant environ 30 secondes, lafficheur indique
à nouveau les conditions de lecture.
Répétition de la lecture
La répétition de la lecture vous permet découter à nouveau la même plage musicale.
1 Appuyez sur FUNCTION pour choisir
REPEAT.
Appuyez sur FUNCTION jusquà ce que
REPEATapparaisse sur lafficheur.
Page 69

Lecteur de cassette
Section
05
2 Appuyez sur a pour mettre en
service la répétition de la lecture.
REPEAT:ON apparaît sur lafficheur. La plage
musicale en cours de lecture sera ensuite répétée.
3 Appuyez sur b pour mettre hors
service la répétition de la lecture.
REPEAT:OFF apparaît sur lafficheur. À la fin
de la lecture de la plage musicale commence
la lecture de la plage suivante.
Saut des silences
Lorsque se présente un silence de longue durée (au moins 12 secondes) entre deux plages
musicales, la bande est bobinée jusquau début de la plage musicale suivante.
1 Appuyez sur FUNCTION pour choisir
B.SKIP.
Appuyez sur FUNCTION jusquà ce que
B.SKIP apparaisse sur lafficheur.
2 Appuyez sur a pour mettre en
service le saut de silence.
B.SKIP :ON apparaît sur lafficheur. Les silen-
ces de longue durée entre deux plages musicales sont ignorés.
1 Appuyez sur FUNCTION pour choisir
NR.
Appuyez sur FUNCTION jusquà ce que NR apparaisse sur lafficheur.
2 Appuyez sur a pour mettre en
service le réducteur de bruit Dolby B.
B NR :ON apparaît sur lafficheur. Les enregis-
trements sont lus en tenant compte du réducteur de bruit Dolby B.
3 Appuyez sur b pour mettre hors
service le réducteur de bruit Dolby B.
NR :OFF apparaît sur lafficheur. Les enregis-
trements sont lus sans tenir compte du réducteur de bruit Dolby B.
Remarque
Fabriqué sous licence de Dolby Laboratories.
Dolby et le symbole double D sont des marques
de commerce de Dolby Laboratories.
Français
3 Appuyez sur b pour mettre hors
service le saut de silence.
B.SKIP :OFF apparaît sur lafficheur. La bande
est lue dans sa totalité.
Utilisation du réducteur de
bruit
Lors de la lecture dun enregistrement effectué
avec le réducteur de bruit Dolby B, mettez en
service le réducteur de bruit Dolby B.
20
Fr
Page 70

Section
06
Lecteur de CD intégré
Ecoute dun CD
1 2
4
5
6
5
3
6
2 Indicateur de temps écoulé
Il indique le temps écoulé depuis le début
de la plage musicale en cours de lecture.
3 Touche CD EJECT
Appuyez sur cette touche pour éjecter le CD
que contient le lecteur de CD intégré.
4 Touche SOURCE
Appuyez sur cette touche pour choisir le lecteur de CD intégré comme source.
5 Touches c/d (Recherche de plage
musicale et déplacement rapide dans les
deux sens)
Appuyez sur cette touche pour choisir une
plage musicale, ou déplacer rapidement le
capteur dans un sens ou dans lautre.
6 Touche VOLUME
Appuyez sur cette touche pour augmenter
ou diminuer le niveau sonore.
7 Touche CD
Appuyez sur cette touche pour choisir le lecteur de CD intégré comme source.
1 Introduisez un CD dans le logement
pour le CD.
La lecture commence automatiquement.
Logement pour le CD
7
Voici les opérations de base pour lécoute dun
CD à laide du lecteur intégré. Le fonctionne-
ment détaillé du lecteur de CD est expliqué à
partir de la page 23.
1 Indicateur de numéro de plage
Il indique la plage musicale en cours de lecture.
21
Fr
Vous pouvez éjecter le CD en appuyant sur
#
CD EJECT.
2 Après avoir introduit un CD,
appuyez sur SOURCE sur lappareil central,
ou sur CD, sur le boîtier de télécommande,
pour choisir le lecteur de CD intégré.
Appuyez sur SOURCE, ou sur CD, jusquàce
que CompactDisc apparaisse sur lafficheur.
Page 71

Lecteur de CD intégré
3 Utilisez VOLUME pour régler le
niveau sonore.
Lorsque vous appuyez sur VOLUME croissant/
+, le sonore niveau augmente; lorsque vous
appuyez sur VOLUME décroissant/, le niveau
diminue.
4 Pour déplacer rapidement le capteur
dans un sens ou dans lautre, maintenez la
pression dun doigt sur c, ou sur d.
5 Pour atteindre la plage précédente
ou suivante, appuyez sur c, ou sur d.
Une pression sur d permet datteindre le début de la plage suivante. Une pression sur c
permet datteindre le début de la plage en
cours de lecture. Une nouvelle pression permet datteindre la plage précédente.
Remarques
! Le lecteur de CD intégré permet la lecture
dun CD de 12 cm, ou dun CD de 8 cm
(Single). Nutilisez pas dadaptateur pour la
lecture des disques de 8 cm.
! Nintroduisez aucun objet dans le logement
pour le CD autre quun CD.
! Si vous ne parvenez pas à introduire
complètement le disque, ou encore si la
lecture du disque ne commence pas après
quil a été introduit, assurez-vous que
létiquette est bien tournée vers le haut.
Appuyez sur CD EJECT pour éjecter le disque
et avant de tenter une nouvelle introduction
du disque, assurez-vous quil nest pas
endommagé.
! Si le lecteur de CD intégré présente une
anomalie, un message derreur tel que
CD ERR-11 peut safficher. Reportez-vous à la
page 53, Signification des messages derreur
du lecteur de CD integre.
Section
06
Français
22
Fr
Page 72

Section
06
Lecteur de CD intégré
Introduction au
fonctionnement détaillé du
lecteur de CD intégré
1
2
4
3
5
4
3
6
7
8
7
8
2 Indicateur RPT
Il indique que la fonction de répétition est
en service.
3 Touche FUNCTION
Appuyez sur cette touche pour choisir une
fonction.
4 Touche BAND
Appuyez sur cette touche pour revenir à laffichage des conditions de lecture.
5 Touche DISPLAY
Appuyez sur cette touche pour choisir la nature des indications affichées.
6 Touches 12
Appuyez sur ces touches pour choisir la
frappe de lettres ou la frappe de chiffres ou
symboles.
7 Touches c/d
Appuyez sur ces touches pour choisir un
paramètre (mode) de la fonction.
8 Touches a/b
Appuyez sur ces touches pour mettre en
service, ou hors service, une fonction, et
pour choisir un chiffre, une lettre ou une espace lors de la frappe dun titre.
% Appuyez sur FUNCTION pour afficher
le nom de chaque fonction.
Appuyez de manière répétée sur FUNCTION
pour choisir une des fonctions suivantes:
REPEAT (répétition de la lecture)RANDOM
(lecture au hasard)T.SCAN (examen du disque)PAUSE (pause)
Appuyez sur BAND pour revenir à laffichage
#
des conditions de lecture.
1 Afficheur de fonction
Il indique létat de la fonction.
23
Fr
Remarque
Si vous ne réglez aucun paramètre de la fonction
pendant environ 30 secondes, lafficheur indique
à nouveau les conditions de lecture.
Page 73

Lecteur de CD intégré
Section
06
Répétition de la lecture
La répétition de la lecture vous permet découter à nouveau la même plage musicale.
1 Appuyez sur FUNCTION pour choisir
REPEAT.
Appuyez sur FUNCTION jusquà ce que
REPEATapparaisse sur lafficheur.
2 Appuyez sur a pour mettre en
service la répétition de la lecture.
REPEAT:ON apparaît sur lafficheur. La plage
musicale en cours de lecture sera ensuite répétée.
3 Appuyez sur b pour mettre hors
service la répétition de la lecture.
REPEAT:OFF apparaît sur lafficheur. À la fin
de la lecture de la plage musicale commence
la lecture de la plage suivante.
Remarque
La répétition de la lecture est automatiquement
abandonnée dès que commence la recherche
dune plage musicale ou le déplacement rapide
du capteur dans un sens ou dans lautre.
2 Appuyez sur a pour mettre en
service la lecture au hasard.
RANDOM :ON apparaît sur lafficheur. Les
plages musicales sont lues dans un ordre
quelconque.
3 Appuyez sur b pour mettre hors
service la lecture au hasard.
RANDOM :OFF apparaît sur lafficheur. Les
plages musicales sont lues dans lordre.
Examen du contenu dun
CD
Cette fonction vous permet découter les 10
premières secondes de chaque plage musicale gravée sur le CD.
1 Appuyez sur FUNCTION pour choisir
T.SCAN.
Appuyez sur FUNCTION jusquà ce que
T.SCAN apparaisse sur lafficheur.
2 Appuyez sur a pour mettre en
service lexamen du contenu du disque.
T.SCAN :ON apparaît sur lafficheur. Les 10
premières secondes de chaque plage musicale sont lues.
Français
Ecoute des plages
musicales dans un ordre
quelconque
Les plages musicales du CD sont joués dans
un ordre quelconque, choisi au hasard.
1 Appuyez sur FUNCTION pour choisir
RANDOM.
Appuyez sur FUNCTION jusquà ce que
RANDOM apparaisse sur lafficheur.
3 Lorsque la plage musicale que vous
désirez écouter se présente, appuyez sur b
pour arrêter lexamen du disque.
T.SCAN :OFF apparaît sur lafficheur. La lec-
ture de la plage musicale se poursuit.
Si les conditions de lecture se sont à nou-
#
veau affichées delles-mêmes, choisissez T.SCAN
une fois encore en appuyant sur FUNCTION.
Remarque
Lorsque lexamen du disque est terminé, la
lecture normale reprend.
Fr
24
Page 74

Section
06
Lecteur de CD intégré
Pause de la lecture dun CD
La pause est un arrêt momentané de la lecture
du CD.
1 Appuyez sur FUNCTION pour choisir
PAUSE.
Appuyez sur FUNCTION jusquà ce que
PAUSE apparaisse sur lafficheur.
2 Appuyez sur a pour mettre en
service la pause.
PAUSE :ON apparaît sur lafficheur. La lecture
de la plage musicale marque une pause.
3 Appuyez sur b pour mettre hors
service la pause.
PAUSE :OFF apparaît sur lafficheur. La lecture
reprend là où elle a été interrompue.
Utilisation des fonctions de
titrage des disques
Vous pouvez taper le titre dun CD et obtenir
son affichage. Lorsque vous introduisez un CD
pour lequel vous avez tapé le titre, ce titre saf-
fiche.
Frappe du titre dun disque
Le lecteur de CD intégré peut contenir 48 titres
de disque de 10 caractères.
1 Commandez la lecture du CD dont
vous désirez frapper le titre.
3 Appuyez sur la touche numérotée 1
pour choisir le type des caractères à utiliser.
Appuyez de manière répétée sur la touche numérotée 1 pour passer de lun à lautre des types de caractères suivants:
Lettres de lalphabet (en majuscules), Chiffres
et SymbolesLettre de lalphabet (en minuscules)
Vous pouvez choisir les chiffres dentrée et
#
les symboles en appuyant sur une touche numérotée 2.
4 Appuyez sur a, ou sur b, pour
choisir une lettre de lalphabet.
Chaque pression sur a provoque laffichage,
dans lordre, dune lettre A B C ... X Y Z,dun
chiffre puis dun symbole 1 2 3 ... @ # <.
Chaque pression sur b provoque laffichage
dans lordre inverse Z Y X ... C B A.
5 Appuyez sur d pour placer le
curseur sur la position suivante.
Lorsque la lettre que vous désirez utiliser est
affichée, appuyez sur d pour placer le curseur
sur la position suivante puis choisissez la lettre suivante. Appuyez sur c pour déplacer le
curseur vers le début.
6 Après avoir frappé le titre, placez le
curseur sur la dernière position en
appuyant sur la touche d.
Lorsque vous appuyez une nouvelle fois sur d,
le titre frappé est mis en mémoire.
2 Maintenez la pression dun doigt
sur FUNCTION jusquà ce que TITLE IN
apparaisse sur lafficheur.
Dans le cas dun disque CD TEXT, vous ne
#
pouvez pas afficher TITLE IN. En effet, le titre est
déjà gravé sur le disque CD TEXT.
25
Fr
Page 75

Lecteur de CD intégré
Section
06
7 Appuyez sur BAND pour revenir à
laffichage des conditions de lecture.
Remarques
! Le titre dun disque est conservé par la
mémoire même après que le disque a été
retiré du lecteur de CD intégré; ce titre est à
nouveau utilisé lorsque le disque est
réintroduit.
! Après la mise en mémoire des données
concernant 48 disques, toute donnée
concernant un nouveau disque remplace les
données les plus anciennes.
! Si vous connectez à lappareil un lecteur de
CD à chargeur qui ne prend pas en compte la
frappe des titres, vous ne pouvez pas utiliser
lappareil pour frapper les titres.
Affichage du titre dun disque
Vous pouvez afficher le titre de tout disque
dont le titre a été mis en mémoire.
% Appuyez sur DISPLAY.
Appuyez de manière répétée sur DISPLAY
pour passer dun des paramètres suivants à
lautre:
Temps de lectureDISC TITLE (titre du disque)
Lorsque vous choisissez DISC TITLE, le titre du
disque en cours de lecture saffiche.
Si le disque en cours de lecture na pas reçu
#
de titre, NO TITLE saffiche.
Utilisation des fonctions CD
TEXT
Des informations sont gravées sur certains
disques pendant leur fabrication. Ces informations peuvent être le titre du disque, le nom de
linterprète ou la durée de la lecture; ces disques sont appelés CD TEXT. Seuls les disques
CD TEXT sont concernés par les fonctions
mentionnées ci-dessous.
Affichage du titre dun disque
CD TEXT
% Appuyez sur DISPLAYpendant la
lecture du disque CD TEXT.
Appuyez de manière répétée sur DISPLAY
pour passer dun des paramètres suivants à
lautre:
Temps de lectureDISC TITLE (titre du disque)D.ARTIST (interprète du disque)
TRK TITLE (nom de la plage musicale)
T.ARTIST (interprète de la plage musicale)
Si aucune information spécifique na été gra-
#
vée sur le disque, NO XXXX saffiche (par exemple, NO TA-NAME).
Défilement du titre du disque
sur lafficheur
Lappareil ne peut afficher que les 10 premiers
caractères de DISC TITLE, D.ARTIST,
TRK TITLE et T.ARTIST.Silinformation gravée
comporte plus de 10 caractères, vous pouvez
la faire défiler vers la gauche de manière à en
prendre connaissance dans sa totalité.
Français
% Maintenez la pression dun doigt sur
DISPLAY jusquà ce que le titre commence à
défiler vers la gauche.
La partie masquée du titre saffiche peu à
peu.
Fr
26
Page 76

Section
07
Lecteur de CD à chargeur
Ecoute dun CD
1
2 3
4
9
5
6
8
6
7
7
8
2 Indicateur de numéro de plage
Il indique la plage musicale en cours de lecture.
3 Indicateur de temps écoulé
Il indique le temps écoulé depuis le début
de la plage musicale en cours de lecture.
4 Touche SOURCE
Appuyez sur cette touche pour choisir le lecteur de CD à chargeur comme source.
5 Touches 16 (Recherche dun disque
par son numéro)
Appuyez sur ces touches pour choisir un
disque du lecteur de CD à chargeur.
6 Touches c/d (Recherche de plage
musicale et déplacement rapide dans les
deux sens)
Appuyez sur cette touche pour choisir une
plage musicale, ou déplacer rapidement le
capteur dans un sens ou dans lautre.
7 Touches a/b (Recherche de disque)
Appuyez sur ces touches pour choisir un
disque du lecteur de CD à chargeur.
8 Touche VOLUME
Appuyez sur cette touche pour augmenter
ou diminuer le niveau sonore.
9 Touche CD
Appuyez sur cette touche pour choisir le lecteur de CD à chargeur comme source.
Vous pouvez utiliser cet appareil pour
commander un lecteur de CD à chargeur,
vendu séparément.
Voici les opérations de base pour lécoute dun
CD à laide du lecteur de CD à chargeur. Le
fonctionnement détaillé du lecteur de CD à
chargeur est expliqué à partir de la page 29.
1 Indicateur de numéro de disque
Il indique le disque en cours de lecture.
27
Fr
1 Appuyez sur SOURCE sur lappareil
central, ou CD sur le boîtier de
télécommande, pour choisir le lecteur de
CD à chargeur.
Appuyez sur SOURCE, ou sur CD, jusquàce
que Multi-CD apparaisse sur lafficheur.
2 Utilisez VOLUME pour régler le
niveau sonore.
Lorsque vous appuyez sur VOLUME croissant/
+, le sonore niveau augmente; lorsque vous
appuyez sur VOLUME décroissant/, le niveau
diminue.
Page 77

Lecteur de CD à chargeur
3 Choisissez le disque que vous
désirez écouter au moyen des touches 16.
Pour les disques occupant les positions 1 à 6,
appuyez simplement sur la touche correspondante.
Pour les disques occupant les positions 7 à
12, maintenez la pression dun doigt sur la
touche correspondante, cest-à-dire sur la
touche 1 pour le disque 7, et ainsi de suite,
jusquà ce que le numéro du disque saffiche.
Vous pouvez également utiliser les touches
#
a/b pour choisir les disques dans lordre.
4 Pour déplacer rapidement le capteur
dans un sens ou dans lautre, maintenez la
pression dun doigt sur c, ou sur d.
5 Pour atteindre la plage précédente
ou suivante, appuyez sur d, ou sur c.
Une pression sur d permet datteindre le début de la plage suivante. Une pression sur c
permet datteindre le début de la plage en
cours de lecture. Une nouvelle pression permet datteindre la plage précédente.
Section
07
Français
Remarques
! READY saffiche tandis que le lecteur de CD
à chargeur procède aux opérations préalables
à la lecture.
! Si le lecteur de CD à chargeur présente une
anomalie, un message derreur tel que
CD ERR-11 peut safficher. Reportez-vous au
mode demploi du lecteur de CD à chargeur.
! Lindication NO DISC saffiche si le lecteur
de CD à chargeur ne contient aucun
disque.
28
Fr
Page 78

Section
07
Lecteur de CD à chargeur
Introduction au
fonctionnement détaillé du
lecteur de CD à chargeur
1
32
5
4
7
6
5
4
1 Afficheur de fonction
Il indique létat de la fonction.
8
9
8
9
2 Indicateur DISC
Il indique la plage de répétition choisie pour
le disque en cours de lecture.
3 Indicateur RPT
Il indique que la plage de répétition choisie
pour la plage en cours de lecture.
4 Touche FUNCTION
Appuyez sur cette touche pour choisir une
fonction.
5 Touche BAND
Appuyez sur cette touche pour revenir à laffichage des conditions de lecture.
6 Touche DISPLAY
Appuyez sur cette touche pour choisir la nature des indications affichées.
7 Touches 12
Appuyez sur ces touches pour choisir la
frappe de lettres ou la frappe de chiffres ou
symboles.
8 Touches c/d
Appuyez sur ces touches pour choisir un
paramètre (mode) de la fonction.
9 Touches a/b
Appuyez sur ces touches pour mettre en
service, ou hors service, une fonction, et
pour choisir un chiffre, une lettre ou une espace lors de la frappe dun titre.
% Appuyez sur FUNCTION pour afficher
le nom de chaque fonction.
Appuyez de manière répétée sur FUNCTION
pour choisir une des fonctions suivantes:
REPEAT (répétition de la lecture)TITLE LIST
(liste des titres des disques)RANDOM (lecture au hasard)SCAN (examen des disques)
ITS.P (lecture ITS)PAUSE (pause)COMP
(compression et DBE)
Appuyez sur BAND pour revenir à laffichage
#
des conditions de lecture.
29
Fr
Page 79

Lecteur de CD à chargeur
Section
07
Remarque
Si vous ne réglez aucun paramètre de la fonction
pendant environ 30 secondes, lafficheur indique
à nouveau les conditions de lecture.
Répétition de la lecture
Trois modes de répétition sont prévus pour les
disques du lecteur de CD à chargeur: MCD
(répétition des disques que contient le lecteur), TRK (répétition dune plage musicale) et
DSC (répétition dun disque).
1 Appuyez sur FUNCTION pour choisir
REPEAT.
Appuyez sur FUNCTION jusquà ce que
REPEATapparaisse sur lafficheur.
2 Appuyez sur c, ou sur d pour
choisir le mode de répétition.
Appuyez sur c, ou sur d, jusquà ce que le
mode de répétition désiré apparaisse sur lafficheur.
! MCD Répétition des disques que conti-
ent le lecteur
! TRK Répétition de la plage musicale en
cours de lecture
! DSC Répétition du disque en cours de
lecture
Remarques
! Si vous choisissez un autre disque pendant
la répétition de la lecture, le mode de
répétition adopté est MCD (répétition des
disques que contient le lecteur).
! Si pendant la répétition TRK (répétition
dune plage musicale), vous recherchez une
plage musicale, ou commandez le
déplacement du capteur dans un sens ou
dans lautre, le mode de répétition adopté est
DSC (répétition dun disque).
Ecoute des plages
musicales dans un ordre
quelconque
Les plages musicales sont jouées dans un ordre quelconque à lintérieur du mode de répétition adopté: MCD (répétition des disques
que contient le lecteur) ou DSC (répétition
dun disque).
1 Choisissez le mode de répétition.
Reportez-vous à cette page, Répétition de la
lecture.
2 Appuyez sur FUNCTION pour choisir
RANDOM.
Appuyez sur FUNCTION jusquà ce que
RANDOM apparaisse sur lafficheur.
3 Appuyez sur a pour mettre en
service la lecture au hasard.
RANDOM :ON apparaît sur lafficheur. Les
plages musicales sont lues dans un ordre
quelconque à lintérieur du mode de répétition
adopté: MCD (répétition des disques que
contient le lecteur) ou DSC (répétition dun
disque).
4 Appuyez sur b pour mettre hors
service la lecture au hasard.
RANDOM :OFF apparaît sur lafficheur. Les
plages musicales sont lues dans lordre.
Français
30
Fr
Page 80

Section
07
Lecteur de CD à chargeur
Examen du contenu des
disques
Si vous avez choisi DSC (répétition dun
disque), les 10 premières secondes de chaque
plage musicale du disque concerné, sont lues.
Si vous avez choisi MCD (répétition des dis-
ques que contient le lecteur), les 10 premières
secondes de la première plage musicale de
chaque disque, sont lues.
1 Choisissez le mode de répétition.
Reportez-vous à la page précédente, Répétition
de la lecture.
2 Appuyez sur FUNCTION pour choisir
SCAN.
Appuyez sur FUNCTION jusquà ce que SCAN
apparaisse sur lafficheur.
3 Appuyez sur a pour mettre en
service lexamen du contenu du disque.
SCAN :ON apparaît sur lafficheur. Les 10 pre-
mières secondes de chaque plage musicale
du disque concerné (ou de la première plage
de chaque disque) sont lues.
4 Lorsque la plage musicale ou disque
que vous désirez écouter se présente,
appuyez sur b pour arrêter lexamen du
disque.
SCAN :OFF apparaît sur lafficheur. La lecture
de la plage musicale se poursuit.
Si les conditions de lecture se sont à nou-
#
veau affichées delles-mêmes, choisissez SCAN
une fois encore en appuyant sur FUNCTION.
Pause de la lecture dun CD
La pause est un arrêt momentané de la lecture
du CD.
1 Appuyez sur FUNCTION pour choisir
PAUSE.
Appuyez sur FUNCTION jusquà ce que
PAUSE apparaisse sur lafficheur.
2 Appuyez sur a pour mettre en
service la pause.
PAUSE :ON apparaît sur lafficheur. La lecture
de la plage musicale marque une pause.
3 Appuyez sur b pour mettre hors
service la pause.
PAUSE :OFF apparaît sur lafficheur. La lecture
reprend là où elle a été interrompue.
Utilisation de la
programmation en temps
réel (ITS)
La programmation en temps réel (ITS) vous
donne le moyen détablir la liste de vos plages
musicales favorites parmi toutes celles que
contiennent les disques du lecteur de CD à
chargeur. Lorsque la liste est terminée, il vous
suffit de mettre en service la fonction ITS pour
nécouter que les plages appartenant à cette
liste.
Remarque
Lorsque lexamen du disque, ou des disques, est
terminé, la lecture normale des plages musicales
reprend.
31
Fr
Page 81

Lecteur de CD à chargeur
Section
07
Création d une liste par
programmation en temps réel
(ITS)
Vous pouvez utiliser la fonction ITS pour choisir 99 plages musicales par disque sur un total
de 100 disques (avec titre). (Dans le cas des
lecteurs de CD à chargeurs commercialisés
avant les CDX-P1250 et CDX-P650, le nombre
de plages musicales est limité à 24.)
1 Commandez la lecture du disque
concerné par la programmation.
Appuyez sur a, ou sur b, pour choisir un CD.
2 Maintenez la pression dun doigt
sur FUNCTION jusquà ce que TITLE IN
apparaisse sur lafficheur puis appuyez sur
FUNCTION pour choisir ITS.
Lorsque TITLE IN est affiché, appuyez de manière répétée sur FUNCTION pour afficher les
fonctions suivantes:
TITLE IN (frappe du titre dun disque)ITS
(programmation en temps réel)
3 Choisissez la plage musicale en
appuyant sur c, ou sur d.
4 Appuyez sur a pour introduire la
plage musicale dans la liste.
ITS IN saffiche brièvement et la plage musi-
cale sélectionnée est ajoutée à la liste. ITS apparaît une nouvelle fois sur lafficheur.
5 Appuyez sur BAND pour revenir à
laffichage des conditions de lecture.
Lecture commandée par la liste
ITS
ITS vous donne le moyen de nentendre que
les plages musicales qui appartiennent à la
liste établie. Lorsque vous mettez en service la
fonction ITS, la lecture des plages musicales
des disques du lecteur de CD à chargeur qui
figurent sur la liste, commence.
1 Choisissez le mode de répétition.
Reportez-vous à la page 30, Répétition de la lecture.
2 Appuyez sur FUNCTION pour choisir
ITS.P.
Appuyez sur FUNCTION jusquà ce que ITS.P
apparaisse sur lafficheur.
3 Appuyez sur a pour mettre en
service ITS.
ITS.P :ON apparaît sur lafficheur. Commence
alors la lecture des plages musicales de la
liste établie en tenant compte du mode de répétition MCD (répétition des disques que
contient le lecteur) ou DSC (répétition dun
disque).
Si le mode de répétition actuel ne contient
#
aucune plage musicale programmée à laide de
la fonction ITS, ITS EMPTY saffiche.
4 Appuyez sur b pour mettre hors
service ITS.
ITS.P :OFF apparaît sur lafficheur. La lecture
se poursuit, dans lordre normal et à partir de
la plage musicale en cours.
Français
Remarque
Après la mise en mémoire des données
concernant 100 disques, toute donnée
concernant un nouveau disque remplace les
données les plus anciennes.
Suppression dune plage
musicale sur la liste ITS
Pour supprimer la référence à une plage musicale de la liste ITS, il faut que la fonction ITS
soit en service.
Fr
32
Page 82

Section
07
Lecteur de CD à chargeur
Si ITS est déjà en service, passez à lopération
2. Si ITS nest pas en service, appuyez sur
FUNCTION.
1 Commandez la lecture du CD pour
lequel la plage musicale doit être effacée,
puis mettez en service la fonction ITS.
Reportez-vous à la page précédente, Lecture
commandée par la liste ITS.
2 Maintenez la pression dun doigt
sur FUNCTION jusquà ce que TITLE IN
apparaisse sur lafficheur puis appuyez sur
FUNCTION pour choisir ITS.
Lorsque TITLE IN est affiché, appuyez sur
FUNCTION jusquà ce que ITS apparaisse sur
lafficheur.
3 Choisissez la plage musicale en
appuyant sur c, ou sur d.
4 Appuyez sur b pour supprimer la
plage musicale de la liste.
La référence à la plage musicale sélectionnée
est supprimée de la liste et la lecture
commence au début de la plage musicale sui-
vante de la liste.
Si le mode de répétition actuel ne contient
#
aucune plage musicale programmée à laide de
la fonction ITS, ITS EMPTY saffiche et la lecture
normale reprend.
1 Commandez la lecture du CD qui
doit être supprimé de la liste.
Appuyez sur a, ou sur b, pour choisir le CD.
2 Maintenez la pression dun doigt
sur FUNCTION jusquà ce que TITLE IN
apparaisse sur lafficheur puis appuyez sur
FUNCTION pour choisir ITS.
Lorsque TITLE IN est affiché, appuyez sur
FUNCTION jusquà ce que ITS apparaisse sur
lafficheur.
3 Appuyez sur b pour supprimer de la
liste ITS la référence à toutes les plages
musicales du CD en cours de lecture.
La référence à toutes les plages musicales du
CD en cours de lecture est supprimée et
ITS CLEAR saffiche.
4 Appuyez sur BAND pour revenir à
laffichage des conditions de lecture.
Utilisation des fonctions de
titrage des disques
Vous pouvez taper le titre dun CD et obtenir
son affichage. Cela fait, il est très facile de localiser un disque et den commander la lecture.
5 Appuyez sur BAND pour revenir à
laffichage des conditions de lecture.
Suppression dun CD de la liste
ITS
Pour supprimer la référence à toutes les pla-
ges musicales dun CD de la liste ITS, il faut
que la fonction ITS hors en service.
33
Fr
Frappe du titre dun disque
Le lecteur de CD à chargeur peut contenir 100
titres de disque de 10 caractères (avec liste
ITS).
1 Commandez la lecture du CD dont
vous désirez frapper le titre.
Appuyez sur a, ou sur b, pour choisir le CD.
Page 83

Lecteur de CD à chargeur
Section
07
2 Maintenez la pression dun doigt
sur FUNCTION jusquà ce que TITLE IN
apparaisse sur lafficheur.
Lorsque TITLE IN est affiché, appuyez de manière répétée sur FUNCTION pour afficher les
fonctions suivantes:
TITLE IN (frappe du titre dun disque)ITS
(programmation en temps réel)
Dans le cas dun disque CD TEXT et dun lec-
#
teur de CD à chargeur compatible CD TEXT, vous
ne pouvez pas afficher TITLE IN. En effet, le titre
est déjà gravé sur le disque CD TEXT.
3 Appuyez sur la touche numérotée 1
pour choisir le type des caractères à utiliser.
Appuyez de manière répétée sur la touche numérotée 1 pour passer de lun à lautre des types de caractères suivants:
Lettres de lalphabet (en majuscules), Chiffres
et SymbolesLettre de lalphabet (en minuscules)
Vous pouvez choisir les chiffres dentrée et
#
les symboles en appuyant sur une touche numérotée 2.
4 Appuyez sur a, ou sur b, pour
choisir une lettre de lalphabet.
Chaque pression sur a provoque laffichage,
dans lordre, dune lettre A B C ... X Y Z,dun
chiffre puis dun symbole 1 2 3 ... @ # <.
Chaque pression sur b provoque laffichage
dans lordre inverse Z Y X ... C B A.
6 Après avoir frappé le titre, placez le
curseur sur la dernière position en
appuyant sur la touche d.
Lorsque vous appuyez une nouvelle fois sur d,
le titre frappé est mis en mémoire.
7 Appuyez sur BAND pour revenir à
laffichage des conditions de lecture.
Remarques
! Le titre dun disque est conservé par la
mémoire même après que le disque a été
retiré du chargeur; ce titre est à nouveau
utilisé lorsque le disque est réintroduit.
! Après la mise en mémoire des données
concernant 100 disques, toute donnée
concernant un nouveau disque remplace les
données les plus anciennes.
Affichage du titre dun disque
Vous pouvez afficher le titre de tout disque
dont le titre a été mis en mémoire.
% Appuyez sur DISPLAY.
Appuyez de manière répétée sur DISPLAY
pour passer dun des paramètres suivants à
lautre:
Temps de lectureDISC TITLE (titre du disque)
Lorsque vous choisissez DISC TITLE, le titre du
disque en cours de lecture saffiche.
Si le disque en cours de lecture na pas reçu
#
de titre, NO TITLE saffiche.
Français
5 Appuyez sur d pour placer le
curseur sur la position suivante.
Lorsque la lettre que vous désirez utiliser est
affichée, appuyez sur d pour placer le curseur
sur la position suivante puis choisissez la lettre suivante. Appuyez sur c pour déplacer le
curseur vers le début.
Choix dun disque sur la liste
des titres
Vous pouvez choisir un disque sur la liste des
titres des disques que contient le lecteur de
CD à chargeur, puis commander la lecture du
disque.
Fr
34
Page 84

Section
07
Lecteur de CD à chargeur
1 Appuyez sur FUNCTION pour choisir
TITLE LIST.
Appuyez sur FUNCTION jusquà ce que
TITLE LIST apparaisse sur lafficheur.
2 Appuyez sur c, ou sur d, pour faire
défiler la liste des titres mis en mémoire.
Si un disque ne porte pas de titre, NO TITLE
#
saffiche.
3 Appuyez sur a pour commander la
lecture du disque choisi.
La lecture du disque sélectionné
commence.
Utilisation des fonctions CD
TEXT
Vous ne pouvez utiliser ces fonctions que si le
lecteur de CD à chargeur est compatible CD
TEXT.
Des informations sont gravées sur certains
disques pendant leur fabrication. Ces informa-
tions peuvent être le titre du disque, le nom de
linterprète ou la durée de la lecture; ces dis-
ques sont appelés CD TEXT. Seuls les disques
CD TEXT sont concernés par les fonctions
mentionnées ci-dessous.
Affichage du titre dun disque
CD TEXT
% Appuyez sur DISPLAYpendant la
lecture du disque CD TEXT par le lecteur de
CD à chargeur.
Appuyez de manière répétée sur DISPLAY
pour passer dun des paramètres suivants à
lautre:
Temps de lectureDISC TITLE (titre du dis-
que)D.ARTIST (interprète du disque)
TRK TITLE (nom de la plage musicale)
T.ARTIST (interprète de la plage musicale)
Si aucune information spécifique na été gra-
#
vée sur le disque, NO XXXX saffiche (par exemple, NO TA-NAME).
Défilement du titre du disque
sur lafficheur
Lappareil ne peut afficher que les 10 premiers
caractères de DISC TITLE, D.ARTIST,
TRK TITLE et T.ARTIST.Silinformation gravée
comprend plus de 10 caractères, vous pouvez
la faire défiler vers la gauche de manière à en
prendre connaissance dans sa totalité.
% Maintenez la pression dun doigt sur
DISPLAY jusquà ce que le titre commence à
défiler vers la gauche.
La partie masquée du titre saffiche peu à
peu.
Utilisation de la
compression et de
laccentuation dynamique
des graves
Vous pouvez utiliser ces fonctions lorsque le
lecteur de CD à chargeur en est pourvu.
La compression (COMP) et laccentuation dynamique des graves (DBE) permettent un réglage précis des sons fournis par le lecteur de
CD à chargeur. Chaque fonction possède deux
niveaux de réglage. La compression (COMP)
réduit lécart pouvant exister entre les sons
puissants et les sons faibles et agit pour les niveaux découte plutôt élevés. Laccentuation
dynamique des graves (DBE) donne des sons
plus amples. Faites lessai de chacune de ces
corrections puis choisissez, pour chaque disque, celle qui donne le meilleur effet.
35
Fr
Page 85

Lecteur de CD à chargeur
1 Appuyez sur FUNCTION pour choisir
COMP.
Appuyez sur FUNCTION jusquà ce que
COMP apparaisse sur lafficheur.
Si le lecteur de CD à chargeur ne possède la
#
fonction COMP/DBE, NO COMP saffiche quand
vous cherchez à utilisez la compression (COMP).
Section
07
2 Appuyez sur a, ou sur b, pour
choisir la correction désirée.
Appuyez de manière répétée sur a, ou sur b,
pour passer dun des paramètres suivants à
lautre:
COMP OFFCOMP 1COMP 2
COMP OFFDBE 1DBE 2
Lecteur de CD 50 disques
Seules les fonctions mentionnées dans ce
mode demploi sont prises en compte par les
lecteurs de CD 50 disques.
Français
36
Fr
Page 86

6
4
Section
08
Réglages sonores
Introduction aux réglages
sonores
1
2
3
5
5
7
6
7
4
3 Touche LOUD
Appuyez sur cette touche pour mettre en
service, ou hors service, la correction physiologique.
4 Touche AUDIO
Appuyez sur cette touche pour choisir une
fonction audio.
5 Touche BAND
Appuyez sur cette touche pour revenir à laffichage de létat de chaque source.
6 Touches c/d
Appuyez sur ces touches pour régler la
fonction audio.
7 Touches a/b
Appuyez sur ces touches pour régler la
fonction audio et la mettre en service ou
hors service.
% Appuyez sur AUDIO pour afficher le
nom des fonctions audio.
Appuyez de manière répétée sur AUDIO pour
choisir une des fonctions suivantes:
FADER (equilibre sonore)LOUD (correction
physiologique)SLA (réglage du niveau sonore de la source)
Si le syntoniseur FM a été choisi comme
#
source, vous ne pouvez pas afficher la fonction
SLA.
Appuyez sur BAND pour revenir à laffichage
#
de létat de chaque source.
1 Afficheur des réglages sonores
Il indique létat des réglages sonores.
2 Indicateur LOUD
Il séclaire lorsque la correction physiologique est en service.
37
Fr
Remarque
Si vous ne réglez aucun paramètre de la fonction
pendant environ 30 secondes, lafficheur indique
à nouveau létat de la source.
Page 87

Réglages sonores
Section
08
Réglage de léquilibre
sonore
Vous pouvez régler léquilibre avant-arrière et
droite-gauche de manière que lécoute soit optimale quel que soit le siège occupé.
1 Appuyez sur AUDIO pour choisir
FADER.
Appuyez sur AUDIO jusquà ce que FADER
apparaisse sur lafficheur.
Si le réglage de léquilibre sonore a déjà été
#
effectué, BAL saffiche.
2 Appuyez sur a, ou sur b, pour
régler léquilibre sonore entre les hautparleurs avant et arrière.
Chaque pression sur a, ou sur b, modifie léquilibre sonore entre les haut-parleurs avant
et arrière.
FADER :F25 FADER :R25 sont les valeurs extrêmes qui saffichent tandis que léquilibre
entre les haut-parleurs avant et arrière varie.
FADER : 0 est le réglage convenable dans le
#
cas où seulement deux haut-parleurs sont utilisés.
Si le réglage pour la sortie arrière est Haut-
#
parleur dextrêmes graves, vous ne pouvez pas
régler léquilibre sonore entre les haut-parleurs
avant et arrière. Reportez-vous à la page 48, Choix
du réglage pour la sortie arrière.
3 Appuyez sur c, ou sur d, pour
régler léquilibre entre les haut-parleurs
gauche et droit.
Lorsque vous appuyez sur c, ou sur d,
BAL : 0 saffiche. Chaque pression sur c,ou
sur d, modifie léquilibre sonore entre les
haut-parleurs gauche et droit.
BAL :L25 BAL :R25 sont les valeurs extrêmes
qui saffichent tandis que léquilibre entre les
haut-parleurs gauche et droit varie.
Réglage de la correction
physiologique
La correction physiologique a pour objet daccentuer les graves et les aigus à bas niveaux
découte.
1 Appuyez sur AUDIO pour choisir
LOUD.
Appuyez sur AUDIO jusquà ce que LOUD apparaisse sur lafficheur.
2 Appuyez sur a pour mettre en
service la correction physiologique.
LOUD :ON apparaît sur lafficheur.
3 Appuyez sur b pour mettre hors
service la correction physiologique.
LOUD :OFF apparaît sur lafficheur.
Remarque
Vous pouvez également mettre en service, ou
hors service, la correction physiologique en
appuyant sur LOUD.
Réglage du niveau sonore
de la source
Le réglage du niveau de la source au moyen
de la fonction SLA, évite que ne se produisent
de fortes variations damplitude sonore
lorsque vous passez dune source à lautre.
! Le réglage est basé sur le niveau du signal
FM qui, lui, demeure inchangé.
Français
38
Fr
Page 88

Section
08
Réglages sonores
1 Comparez le niveau sonore du
syntoniseur FM au niveau sonore de la
source concernée par le réglage (par
exemple, le lecteur de CD intégré).
2 Appuyez sur AUDIO pour choisir
SLA.
Appuyez sur AUDIO jusquà ce que SLA appa-
raisse sur lafficheur.
3 Appuyez sur a, ou sur b, pour
régler le niveau de la source.
Chaque pression sur a, ou sur b, augmente
ou diminue le niveau sonore de la source.
SLA :+4 SLA :4 sont les valeurs extrêmes
que peut prendre le niveau sonore tandis qu il
augmente ou diminue.
Remarques
! Étant donné que le niveau du syntoniseur
FM sert de référence, lemploi de la fonction
SLA nest pas possible pour le syntoniseur
FM.
! Le niveau du syntoniseur AM peut
également être réglé à laide de cette fonction.
! Le lecteur de CD intégré et le lecteur de CD à
chargeur sont automatiquement placés dans
les mêmes conditions de niveau sonore.
! La source extérieure 1 et la source extérieure
2 sont automatiquement placées dans les
mêmes conditions de niveau sonore.
39
Fr
Page 89

Processeur de signal
numérique
Section
09
Utilisation du processeur
de signal numérique
8
7
3
9
0
9
0
1
4
2
5
6
7
1 Indicateur de position découte
Il signale la position découte présentement
sélectionnée.
2 Indicateur de courbe dégalisation en
mémoire
Il signale la courbe dégalisation présentement sélectionnée.
3 Afficheur de fonction
Il indique létat de la fonction.
4 Indicateur SW
Il indique que la sortie du haut-parleur dextrêmes graves est en service.
5 Indicateur CUSTOM
Il indique quune courbe dégalisation personnalisée est actuellement utilisée.
6 Touche DSP
Appuyez sur cette touche pour choisir les
fonctions du processeur de signal numérique.
7 Touche BAND
Appuyez sur cette touche pour revenir à laffichage de létat de la source.
8 Touches 16
Appuyez sur ces touches pour rappeler une
courbe dégalisation ou une correction de
champ sonore.
9 Touches c/d
Appuyez sur ces touches pour choisir un
paramètre (mode) de la fonction.
a Touches a/b
Appuyez sur ces touches pour régler la
fonction choisie et la mettre en service ou
hors service.
Français
Le processeur de signal numérique vous
donne le moyen de contrôler divers paramètres de la sortie sonore, y compris légalisation et le champ sonore et de définir la
position découte.
% Appuyez sur DSP pour afficher le nom
des fonctions DSP.
Appuyez de manière répétée sur DSP pour
choisir une des fonctions suivantes:
PWFL (egaliseur graphique)SFC (commande de champ sonore)POSI (sélecteur de
position)
Fr
40
Page 90

Section
09
Processeur de signal
numérique
Appuyez sur BAND pour revenir à laffichage
#
de létat de la source.
En fonction des réglages de légaliseur gra-
#
phique et du haut-parleur dextrêmes graves, des
pressions successives sur DSP permettent dac-
céder aux fonctions suivantes:
CUSTOM (egaliseur graphique)50Hz (egali-
seur graphique à 9 bandes)SFC (commande de
champ sonore)POSI (sélecteur de position)
SUB.W (haut-parleur dextrêmes graves)80Hz
(réglage pour le haut-parleur dextrêmes graves)
HPF (filtre passe-haut)
Pour de plus amples détails, reportez-vous aux
instructions qui suivent.
Remarque
Si vous ne réglez aucun paramètre de la fonction
DSP pendant environ 30 secondes, lafficheur
indique à nouveau létat de la source.
Utilisation de légaliseur
graphique
Légaliseur graphique vous permet de corriger
les caractéristiques sonores de lhabitacle du
véhicule en fonction de vos goûts.
Rappel dune courbe
dégalisation
La mémoire contient six courbes dégalisation
que vous pouvez utiliser à nimporte quel mo-
ment. Voici la liste de ces six courbes.
Touche
4 VOCAL Chant
5 CUSTOM
6 FLAT
! CUSTOM est la courbe dégalisation que
vous avez créée. Vous pouvez en préciser les
éléments à laide de légaliseur graphique à 9
bandes.
! Si vous choisissez FLAT, aucune correction
nest apportée aux sons. Cette courbe est utile
pour apprécier leffet dune autre courbe en
basculant alternativement de la courbe FLAT
à la courbe considérée.
Indication affichée
Courbe dégalisation
Correction personnelle
Absence de correction
1 Appuyez sur DSP pour choisir
légaliseur graphique.
Appuyez sur DSP jusquà ce que PWFL apparaisse sur lafficheur.
Si une courbe de légaliseur graphique autre
#
que PWFL a précédemment été utilisée, par exemple S-BASS, NTRL, VOCAL, CUSTOM,ou
FLAT,cest le nom de cette courbe qui saffiche.
2 Choisissez une courbe dégalisation
au moyen des touches 16.
Choisissez la courbe dégalisation désirée en
appuyant sur la touche numérotée, 16, selon
le tableau ci-dessus.
Vous pouvez également sélectionner lune
#
après lautre les courbes dégalisation en appuyant sur c , ou sur d.
Touche
1 S-BASS
2PWFL
3 NTRL Sonorité naturelle
41
Fr
Indication affichée
Courbe dégalisation
Accentuation des
graves
Accentuation de la
puissance
Réglage des courbes
dégalisation
Les courbes dégalisation définies en usine
peuvent être lobjet dun réglage fin (réglage
de la nuance), à lexception de la courbe FLAT.
Page 91

Processeur de signal
numérique
Section
09
1 Rappelez une courbe dégalisation.
Reportez-vous à la page précédente, Rappel
dune courbe dégalisation.
2 Appuyez sur a, ou sur b, pour
régler la courbe dégalisation.
Chaque pression sur a, ou sur b, augmente
ou diminue lamplitude de la courbe dégalisation.
+6 5 (ou 6) sont les valeurs extrêmes que
peut prendre légalisation tandis quelle augmente ou diminue.
La plage de réglage dépend de la courbe dé-
#
galisation choisie.
Remarque
En appuyant sur 5 jusquà ce que MEMORY
apparaisse sur lafficheur, la courbe CUSTOM
peut être utilisée pour la sauvegarde de la courbe
modifié.
Réglage de légaliseur
graphique à 9 bandes
Vous pouvez régler lamplitude de chacune
des bandes de la courbe dégalisation
CUSTOM.
1 Choisissez la courbe dégalisation
CUSTOM.
Reportez-vous à la page précédente, Rappel
dune courbe dégalisation.
3 Appuyez sur c, ou sur d, pour
choisir la bande dégalisation à régler.
Chaque pression sur c, ou sur d, provoque la
sélection dune bande, dans lordre suivant:
501002004008001.6 k3.2 k
6.3 k12.5 k (Hz)
Appuyez sur c, ou sur d, jusquà ce que la valeur de la bande dégalisation désirée apparaisse sur lafficheur.
4 Appuyez sur a, ou sur b, pour
régler lamplitude de la bande
dégalisation.
Chaque pression sur a, ou sur b, augmente,
ou diminue, lamplitude de la bande dégalisation.
+6 6 sont les extrêmes que peut prendre
lamplitude tandis quelle augmente ou diminue.
Vous pouvez ensuite choisir une autre bande
#
dégalisation et régler son amplitude.
Remarques
! Vous pouvez créer une courbe CUSTOM
pour chaque source.
! Le lecteur de CD intégré et le lecteur de CD à
chargeur sont automatiquement placés dans
les mêmes conditions dégalisation.
! La source extérieure 1 et la source extérieure
2 sont automatiquement placées dans les
mêmes conditions dégalisation.
Français
2 Appuyez sur DSP pour choisir
légaliseur graphique à 9 bandes.
Légaliseur graphique à 9 bandes ne peut être
choisi quaprès sélection de la courbe dégalisation CUSTOM. Appuyez sur DSP jusquàce
que 50Hz apparaisse sur lafficheur.
Si légaliseur graphique à 9 bandes a déjà
#
été utilisé pour un réglage, la fréquence de la
bande précédemment choisie saffiche à la place
de 50Hz.
42
Fr
Page 92

Section
09
Processeur de signal
numérique
Utilisation de la commande
de champ sonore, du
réducteur doctave et de la
technique BBE
La commande de champ sonore (SFC) pro-
pose trois corrections correspondant à des
champs sonores typiques: studio, jazz et club.
Grâce à cette fonction, ces champs sonores
réalistes peuvent être recréés dans le véhicule.
Le réducteur doctave rend les sons plus
graves. La correction OCT2 est plus pronon-
cée que la correction OCT1.
La technique de traitement sonore BBE per-
met dobtenir une restitution très fidèle à l ori-
ginal en apportant une correction judicieuse
qui associe la compensation de phase et l ac-
centuation des fréquences aiguës de manière
à éliminer les effets de retard et datténuation
damplitude qui se produisent normalement
au cours de la lecture. Cette technique rend
possible la reproduction de champs sonores
très dynamiques qui simulent bien lécoute
dune interprétation live.
Remarque
Fabriqué sous la patente de BBE Sound, Inc. BBE
est une marque de BBE Sound, Inc.
Touche
5 OCT2
6 BBE
Indication affichée
Effet
Réducteur doctave
2
BBE
1 Appuyez sur DSP pour choisir la
commande de champ sonore.
Appuyez sur DSP jusquà ce que SFC apparaisse sur lafficheur.
Si une correction de champ sonore a précé-
#
demment été utilisée, par exemple STUDIO, JAZZ,
CLUB, OCT1, OCT2 ou BBE,cest le nom de cette
correction qui saffiche.
2 Choisissez une correction de champ
sonore au moyen des touches 16.
Choisissez la correction de champ sonore désirée en appuyant sur la touche numérotée,
16, selon le tableau ci-dessus.
Vous pouvez également sélectionner lune
#
après lautre les corrections de champ sonore en
appuyant sur c, ou sur d.
Réglage de lamplitude des
sons BBE
Avec la technique de traitement sonore BBE,
vous pouvez régler lamplitude des sons BBE.
Rappel dune correction de
champ sonore
Voici la liste des corrections de champ sonore:
Touche
1 STUDIO Studio
2 JAZZ Jazz
3 CLUB Club
4 OCT1
43
Fr
Indication affichée
Effet
Réducteur doctave
1
1 Rappelez BBE.
Reportez-vous à cette page, Rappel dune cor-
rection de champ sonore.
2 Appuyez sur a, ou sur b, pour
régler lamplitude de BBE.
Chaque pression sur a, ou sur b, augmente
ou diminue lamplitude de BBE.
+4 4 sont les valeurs extrêmes que peut
prendre lamplitude tandis quelle augmente
ou diminue.
Page 93

Processeur de signal
numérique
Utilisation du sélecteur de
position
Une bonne façon dobtenir des sons très naturels consiste à positionner très précisément limage stéréophonique et à se placer au centre
du champ sonore. Le sélecteur de position
agit sur le niveau sonore émis par chaque
haut-parleur en fonction du siège occupé et
permet de tenir compte du nombre de passagers ayant pris place dans le véhicule les réglages mis en mémoire peuvent être rappelés
par une simple pression sur une touche. Voici
la liste des positions:
Touche
a FRONT
b ALL
c FRONT-L
d FRONT-R
1 Appuyez sur DSP pour choisir le
sélecteur de position.
Appuyez sur DSP jusquà ce que POSI apparaisse sur lafficheur.
#
été utilisé pour choisir une position découte, par
exemple FRONT, ALL, FRONT-L ou FRONT-R,
cest le nom de cette position découte qui saffiche.
2 Utilisez c/d/a/b pour choisir la
position découte selon le tableau cidessus.
Appuyez sur une des touches c/d/a/b pour
choisir la position découte selon le tableau.
Indication
affichée
Si le sélecteur de position a précédemment
Indicateur Position
Siège avant
Tous les sièges
Siège avant
gauche
Siège avant
droit
Pour abandonner une position découte, ap-
#
puyez une nouvelle fois sur la même touche.
Lorsque le réglage pour la sortie arrière est
#
Haut-parleur dextrêmes graves, vous ne pouvez
pas choisir ALL. Reportez-vous à la page 48,
Choix du réglage pour la sortie arrière.
Utilisation de la sortie pour
haut-parleur dextrêmes
graves
Cet appareil est pourvu dune sortie vers un
haut-parleur dextrêmes graves qui peut être
mis en service, ou hors service. Lorsquun
haut-parleur dextrêmes graves est connecté à
la sortie arrière, choisissez tout dabord le réglage Haut-parleur dextrêmes graves pour
cette sortie puis mettez en service la sortie
vers le haut-parleur dextrêmes graves. Pour
de plus amples détails, reportez-vous à la page
48, Choix du réglage pour la sortie arrière.
1 Appuyez sur DSP pour choisir
SUB.W.
Si le réglage de la sortie arrière est Haut-parleur dextrêmes graves, vous pouvez sélectionner SUB.W. Appuyez sur DSP jusquà ce que
SUB.W apparaisse sur lafficheur.
2 Appuyez sur a pour mettre en
service la sortie vers le haut-parleur
dextrêmes graves.
SUB.W :ON apparaît sur lafficheur. La sortie
vers le haut-parleur dextrêmes graves est
maintenant en service.
Vous pouvez mettre hors service la sortie
#
vers le haut-parleur dextrêmes graves en appuyant sur b.
Section
09
Français
44
Fr
Page 94

Section
09
Processeur de signal
numérique
3 Appuyez sur c, ou sur d, pour
choisir la phase de la sortie vers le haut-
parleur dextrêmes graves.
Appuyez sur c pour choisir la phase inverse;
apparaît sur lafficheur. Appuyez sur d pour
choisir la phase normale;
cheur.
apparaît sur laffi-
Réglages de la sortie vers le
haut-parleur dextrêmes graves
Lorsque la sortie vers le haut-parleur dextrêmes graves est en service, vous ne pouvez pas
choisir la fréquence de coupure ni régler le niveau de sortie du haut-parleur dextrêmes graves.
1 Appuyez sur DSP pour choisir le
paramètre du haut-parleur dextrêmes
graves.
Lorsque la sortie vers le haut-parleur dextrêmes graves est en service , vous pouvez choisir le paramètre du haut-parleur dextrêmes
graves. Appuyez sur DSP jusquà ce que 80Hz
apparaisse sur lafficheur.
Si le réglage du haut-parleur dextrêmes
#
graves a précédemment été réalisé, cest le nom
de cette fréquence qui saffiche, par exemple
50Hz ou 125Hz.
2 Appuyez sur c, ou sur d, pour
choisir la fréquence de coupure.
Appuyez sur c et 50Hz saffiche. Appuyez sur
d et 125Hz saffiche. Seules les fréquences in-
férieures à la fréquence de coupure sont émises par le haut-parleur dextrêmes graves.
3 Appuyez sur a, ou sur b, pour
régler lamplitude de sortie du hautparleur dextrêmes graves.
Chaque pression sur a, ou sur b, augmente
ou diminue lamplitude de sortie du haut-parleur dextrêmes graves (par exemple, +6 à
15).
Appuyez sur sur a, ou sur b, pour obtenir la
valeur désirée.
Utilisation du filtre passehaut
Lorsque vous ne souhaitez pas que les fréquences, inférieures à la fréquence de coupure, émises par le haut-parleur dextrêmes
graves le soient aussi par les haut-parleurs
avant, mettez en service le filtre passe-haut
(HPF). Seules les fréquences supérieures à la
fréquence de coupure sont alors émises par
les haut-parleurs avant.
1 Appuyez sur DSP pour choisir HPF.
Lorsque le réglage pour la sortie arrière est
Haut-parleur dextrêmes graves, vous pouvez
choisir HPF. Appuyez sur DSP jusquà ce que
HPF apparaisse sur lafficheur.
2 Appuyez sur a pour mettre en
service le filtre passe-haut.
HPF 80Hz apparaît sur lafficheur. Le filtre
passe-haut est maintenant en service.
Pour mettre hors service le filtre passe-haut,
#
appuyez sur b.
3 Appuyez sur c, ou sur d, pour
choisir la fréquence de coupure du filtre
passe-haut.
Appuyez sur c et HPF 50Hz saffiche. Appuyez
sur d et HPF 125Hz saffiche. Seules les fréquences supérieures à la fréquence de coupure sont émises par les haut-parleurs
avant.
45
Fr
Page 95

5
2
Réglages initiaux
Section
10
Ajustement des réglages
initiaux
1
4
3
4
3
5
6
6
3 Touche FUNCTION
Appuyez sur cette touche pour choisir un
des réglages initiaux.
4 Touche BAND
Appuyez sur cette touche pour abandonner
les réglages initiaux.
5 Touches c/d
Appuyez sur ces touches pour choisir un
paramètre (mode) de la fonction.
6 Touches a/b
Appuyez sur ces touches pour régler la
fonction choisie et la mettre en service ou
hors service.
7 Touches CD/CASSETTE/TUNER
Appuyez sur cette touche de manière répétée pour mettre lappareil hors service.
1 Maintenez la pression dun doigt
sur SOURCE, sur lappareil central, ou
appuyez de manière répétée sur CD,
CASSETTE ou TUNER, sur le boîtier de
télécommande, jusquà ce que lappareil
soit hors service.
2 Maintenez la pression dun doigt
sur FUNCTION jusquà ce que le réglage de
lheure apparaisse sur lafficheur.
Français
Les réglages initiaux vous permettent détablir
les conditions de fonctionnement de base de
lappareil.
1 Afficheur de fonction
Il indique létat de la fonction.
2 Touche SOURCE
Maintenez la pression dun doigt sur cette
touche pour mettre hors service lappareil.
7
3 Appuyez sur FUNCTION pour choisir
un des réglages initiaux.
Appuyez de manière répétée sur FUNCTION
pour passer dun des paramètres suivants à
lautre:
HeureWARNAUXDIMMERREAR SP
DIG.ATTCONTRAST
Pour de plus amples détails sur chaque réglage, reportez-vous aux instructions qui suivent.
Appuyez sur BAND pour abandonner les ré-
#
glages initiaux.
Fr
46
Page 96

Section
10
Réglages initiaux
Vous pouvez également abandonner les ré-
#
glages initiaux en maintenant la pression dun
doigt sur FUNCTION jusquà ce que lappareil se
mette hors service.
Réglage de lheure
Procédez comme suit pour régler la pendulette de lappareil.
Mise en service ou hors
service du signal sonore
davertissement
Si vous ne retirez pas la face avant de lappareil central dans les cinq secondes qui suivent
la coupure de lallumage, un signal sonore
davertissement se fait entendre. Vous pouvez
mettre hors service ce signal sonore davertissement.
1 Appuyez sur FUNCTION pour le
réglage de lheure.
Appuyez sur FUNCTION jusquà ce que
lheure apparaisse sur lafficheur.
2Àlaide de c/d, choisissez la partie
de lheure à régler.
Une pression sur c/d permet de sélectionner
une partie de lheure affichée:
HeureMinute
La partie sélectionnée sur lheure affichée,
clignote.
3 Précisez lheure qui convient à laide
de a/b.
Une pression sur a augmente les heures ou
les minutes. Une pression sur b diminue les
heures ou les minutes.
1 Appuyez sur FUNCTION pour choisir
WARN.
Appuyez sur FUNCTION jusquà ce que
WARN apparaisse sur lafficheur.
2 Mettez en service ou hors service
WARN à laide de a/b.
Une pression sur a/b met alternativement
WARN en service ou hors service et létat du
signal (par exemple, WARN :ON) est
affiché.
Mise en service ou hors
service de lentrée
auxiliaire
Il est possible de relier un appareil auxiliaire à
cet appareil. Rendez actif la sortie pour appareil auxiliaire lorsque vous désirez utiliser lappareil auxiliaire relié à cet appareil.
1 Appuyez sur FUNCTION pour choisir
AUX.
Appuyez de manière répétée sur FUNCTION
jusquà ce que AUX apparaisse sur lafficheur.
47
Fr
Page 97

Réglages initiaux
Section
10
2 Mettez en service, ou hors service,
AUX à laide de a/b.
Une pression sur a/b met alternativement
AUX en service ou hors service et létat de
lentrée (par exemple, AUX :ON) est
affiché.
Mise en service ou hors
service de latténuateur de
luminosité
Pour éviter que lafficheur ne soit trop lumineux la nuit, son éclairage est automatiquement atténué dès que les feux de route sont
en service. Vous pouvez mettre en service, ou
hors service, latténuateur de luminosité.
1 Appuyez sur FUNCTION pour choisir
DIMMER.
Appuyez de manière répétée sur FUNCTION
jusquà ce que DIMMER apparaisse sur lafficheur.
2 Mettez en service, ou hors service,
DIMMER à laide de a/b.
Une pression sur a/b met alternativement
DIMMER en service ou hors service et létat
de latténuateur (par exemple, DIMMER :ON)
est affiché.
Choix du réglage pour la
sortie arrière
La sortie arrière de lappareil (conducteurs
vers les haut-parleurs arrière et sortie arrière
sur fiche Cinch (RCA)) peut être utilisée pour
exciter un haut-parleur pleine gamme ou un
haut-parleur dextrêmes graves. Lorsque vous
choisissez de régler la sortie arrière sur la valeur Haut-parleur dextrêmes graves, vous pouvez connecter le haut-parleur dextrêmes
graves sans faire usage dun amplificateur auxiliaire.
! Si vous avez relié un haut-parleur dextrêmes
graves à la sortie arrière, choisissez la valeur
haut-parleur dextrêmes graves pour cette sortie.
! Même si vous avez procédé ainsi, aucun sig-
nal nest émis aussi longtemps que la sortie
vers le haut-parleur dextrêmes graves nest
pas en service (reportez-vous à la page 44, Uti-
lisation de la sortie pour haut-parleur dextrêmes graves
! Les conducteurs vers les haut-parleurs ar-
rière et la sortie sur fiches Cinch (RCA) sont
tous deux concernés par le réglage effectué.
1 Appuyez sur FUNCTION pour choisir
REAR SP.
Appuyez de manière répétée sur FUNCTION
jusquà ce que REAR SP apparaisse sur lafficheur.
Français
2
Indiquez le haut-parleur, pleine
gamme ou extrêmes graves, à laide de c/d.
Une pression sur c/d permet de basculer du
haut-parleur pleine gamme (REAR SP:FUL)au
haut-parleur dextrêmes graves (REAR SP:S/W)
et le réglage est affiché.
Fr
48
Page 98

Section
10
Réglages initiaux
Réglage de latténuateur
numérique
Lors de lécoute dun CD ou dune autre
source dont le niveau sonore est élevé; régler
à une valeur importante le niveau de la courbe
dégalisation peut conduire à de la distorsion.
En ce cas, vous pouvez régler latténuateur numérique sur la valeur basse pour réduire la
distorsion.
! La qualité sonore est meilleure avec la valeur
élevée, cest pourquoi ce réglage est généralement préféré.
1 Appuyez sur FUNCTION pour choisir
DIG.ATT.
Appuyez de manière répétée sur FUNCTION
jusquà ce que DIG.ATT apparaisse sur lafficheur.
2 Choisissez pour DIG.ATT la valeur
élevée ou basse à laide de c/d.
Une pression sur c/d permet de basculer entre DIG.ATT: H (haut) et DIG.ATT: L (bas) et
dafficher létat sélectionné.
2 Appuyez sur c, ou sur d, pour
régler le contraste.
Chaque pression sur c, ou sur d, augmente,
ou diminue, le contraste.
+7 7 sont les valeurs extrêmes que peut
prendre le contraste tandis quil augmente ou
diminue.
Réglage du contraste de
lafficheur
Ce réglage permet une bonne lisibilité de lafficheur quelles que soient les conditions déclairement.
1 Appuyez sur FUNCTION pour choisir
CONTRAST.
Appuyez de manière répétée sur FUNCTION
jusquà ce que CONTRAST apparaisse sur lafficheur.
49
Fr
Page 99

Autres fonctions
Section
11
Introduction aux autres
fonctions
2
1
3
4
5
2
1
6
7
8
8
9
0
9
5 Touches 12
Appuyez sur ces touches pour choisir la
frappe de lettres ou la frappe de chiffres ou
symboles.
6 Touche 6
Appuyez sur cette touche pour mettre en
service la démonstration.
7 Touche CLOCK
Appuyez sur cette touche pour modifier laffichage de lheure.
8 Touches c/d
Appuyez sur ces touches pour placer le curseur sur la position voisine.
9 Touches a/b
Appuyez sur ces touches pour choisir une
lettre ou un chiffre.
a Touche CASSETTE
Appuyez sur cette touche pour choisir une
source.
Utilisation de la
démonstration
La démonstration se présente sur lafficheur
quand lappareil nest pas en service.
Français
1 Touche FUNCTION
Appuyez sur cette touche pour choisir une
fonction.
2 Touche BAND
Appuyez sur cette touche pour revenir à laffichage standard.
3 Touche SOURCE
Appuyez sur cette touche pour choisir une
source.
4 Touche ENTERTAINMENT
Appuyez sur cette touche pour obtenir laffichage divertissant.
1 Appuyez sur SOURCE pour mettre
lappareil hors service.
Maintenez la pression dun doigt sur SOURCE
jusquà ce que lappareil soit hors service.
2 Appuyez sur 6 pour commander la
démonstration.
La démonstration peut être abandonnée en
#
appuyant une nouvelle fois sur 6.
Fr
50
Page 100

Section
11
Autres fonctions
Utilisation des divers
affichages divertissants
Vous pouvez profiter des affichages divertissants tout en écoutant chaque source sonore.
! Ces images sont simplement diverses man-
ières de représenter le spectre sonore qui
nest pas modifié.
%
Appuyez sur ENTERTAINMENT.
Chaque pression sur la touche
ENTERTAINMENT modifie comme suit les indications affichées:
Mode de divertissement 1 (défaut)Analyseur
de spectreIndicateur de niveauMode de
divertissement 2Mode de divertissement 3
Icône dabsence de mouvement
Silencieux associé au
téléphone cellulaire
Lappareil devient automatiquement silencieux
quand vous placez un appel à laide du téléphone cellulaire, ou recevez un appel.
! Les sons sont coupés et MUTE saffiche; au-
cun réglage sonore nest possible à lexception du niveau de sortie. Le fonctionnement
redevient normal dès que la communication
est terminée.
Affichage ou non de
lheure
Vous pouvez afficher lheure même si les sources et la démonstration sont hors service.
Laffichage de lheure disparaît momentané-
#
ment quand une autre opération est réalisée; il
apparaît à nouveau 25 secondes plus tard.
Utilisation de la source AUX
Grâce à un interconnecteur IP-BUS-RCA tel
que le modèle CD-RB20/CD-RB10 (vendu séparément), vous pouvez relier cet appareil à
un équipement auxiliaire doté dune sortie
Cinch (RCA). Pour de plus amples détails, reportez-vous au mode demploi de linterconnecteur IP-BUS-RCA.
Choix de lentrée AUX comme
source
% Appuyez sur SOURCE, sur lappareil
central, ou sur CASSETTE, sur le boîtier de
télécommande, pour choisir AUX comme
source.
Appuyez sur SOURCE, ou sur CASSETTE, jusquà ce que AUX apparaisse sur lafficheur.
Si lentrée auxiliaire nest pas en service,
#
AUX ne peut pas être sélectionné. Pour de plus
amples détails, reportez-vous à la page 47, Mise
en service ou hors ser vice de lentrée auxiliaire.
Frappe du nom de lentrée AUX
Vous pouvez taper le nom de lentrée AUX.
1 Après avoir choisissez AUX comme
source, maintenez la pression dun doigt
sur FUNCTION jusquà ce que TITLE IN
apparaisse sur lafficheur.
% Appuyez sur CLOCK pour choisir un
affichage.
Chaque pression sur CLOCK provoque laffichage ou non de lheure.
51
Fr
2 Appuyez sur la touche numerotee 1
pour choisir le type des caracteres a utiliser.
Appuyez de maniere repetee sur la touche numerotee 1 pour passer de lun a lautre des types de caracteres suivants:
 Loading...