

Page 1
DVD Player
DV-585A-S
DV-585A-K
Operating Instructions
Page 2
IMPORTANT
)
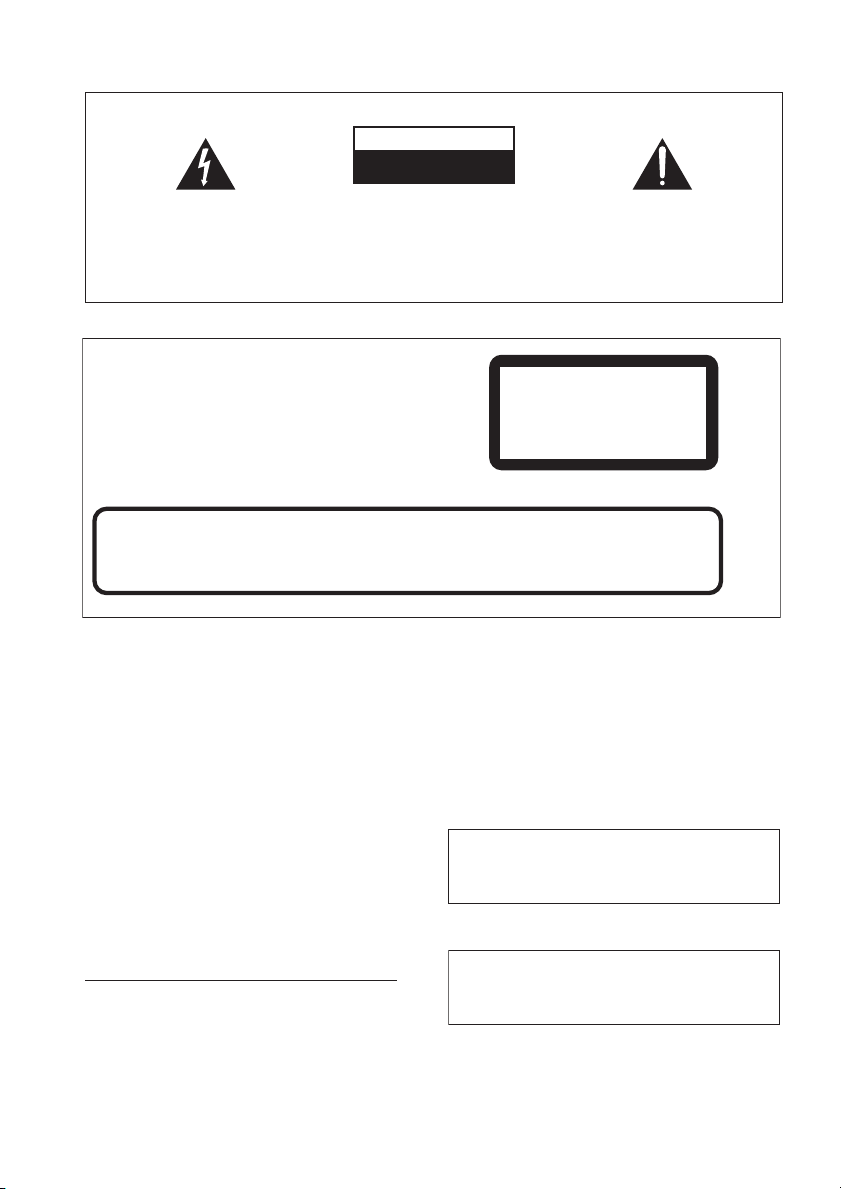
RISK OF ELECTRIC SHOCK
The lightning flash with arrowhead symbol,
within an equilateral triangle, is intended to
alert the user to the presence of uninsulated
"dangerous voltage" within the product's
enclosure that may be of sufficient
magnitude to constitute a risk of electric
shock to persons.
CAUTION
This product is a class 1 laser product, but this
product contains a laser diode higher than Class 1.
To ensure continued safety, do not remove any covers
or attempt to gain access to the inside of the product.
Refer all servicing to qualified personnel.
The following caution label appears on your unit.
Location: inside of the unit
CAUTION
VORSICHT
ADVARSEL
VARNING
VARO!
CUIDADO
: VISIBLE AND INVISIBLE LASER RADIATION WHEN OPEN. AVOID EXPOSURE TO BEAM.
: SICHTBARE UND UNSICHTBARE LASERSTRAHLUNG,WENNABDECKUNG GEÖFFNET NICHT DEM STRAHL AUSSETZEN!
: SYNLIG OG USYNLIG LASERSTRÅLING VED ÅBNING UNDGÅ UDSÆTTELSE FOR STRÀLING.
: SYNLIG OCH OSYNLIG LASERSTRÅLNING NÄR DENNA DEL ÄR ÖPPNAD BETRAKTA EJ STRÅLEN.
: AVATTAESSA ALTISTUT NÄKYVÄ JA NÄKYMÄTTÖMÄLLE LASERSATEIL YLLE. ÄLÄ KATSO SÄTEESEN.
: RADIACIÓN LÁSER VISIBLE E INVISIBLE AL ESTAR ABIERTO. EVITAR EXPOSICIÓN AL RAYO.
CAUTION:
TO PREVENT THE RISK OF ELECTRIC
SHOCK, DO NOT REMOVE COVER (OR
BACK). NO USER-SERVICEABLE PARTS
INSIDE. REFER SERVICING TO QUALIFIED
SERVICE PERSONNEL.
CAUTION
DO NOT OPEN
The exclamation point within an equilateral
triangle is intended to alert the user to the
presence of important operating and
maintenance (servicing) instructions in the
literature accompanying the appliance.
D3-4-2-1-1_En-A
CLASS 1
LASER PRODUCT
7260000356 SH
D3-4-2-1-8_A_En
WARNING
This equipment is not waterproof. To prevent a fire
or shock hazard, do not place any container filed
with liquid near this equipment (such as a vase or
flower pot) or expose it to dripping, splashing, rain
or moisture.
D3-4-2-1-3_A_En
WARNING
To prevent a fire hazard, do not place any naked
flame sources (such as a lighted candle) on the
equipment.
D3-4-2-1-7a_A_En
Operating Environment
Operating environment temperature and humidity:
+5 ºC – +35 ºC (+41 ºF – +95 ºF); less than 85 %RH
(cooling vents not blocked)
Do not install this unit in a poorly ventilated area, or in
locations exposed to high humidity or direct sunlight (or
strong artificial light)
D3-4-2-1-7c_A_En
WARNING
Slots and openings in the cabinet are provided for
ventilation to ensure reliable operation of the
product, and to protect it from overheating. To
prevent fire hazard, the openings should never be
blocked or covered with items (such as newspapers,
table-cloths, curtains) or by operating the
equipment on thick carpet or a bed.
When disposing of used batteries, please comply
with governmental regulations or
environmental public instruction’s rules that
apply in your country/area.
This product complies with the Low Voltage Directive
(73/23/EEC, amended by 93/68/EEC), EMC Directives
(89/336/EEC, amended by 92/31/EEC and
93/68/EEC).
D3-4-2-1-7b_A_En
D3-4-2-3-1_En
D3-4-2-1-9a_En
Page 3
WARNING
Before plugging in for the first time, read the following
section carefully.
The voltage of the available power supply differs
according to country or region. Be sure that the
power supply voltage of the area where this unit
will be used meets the required voltage (e.g., 230V
or 120V) written on the rear panel.
D3-4-2-1-4_A_En
If the AC plug of this unit does not match the AC
outlet you want to use, the plug must be removed
and appropriate one fitted. Replacement and
mounting of an AC plug on the power supply cord of
this unit should be performed only by qualified
service personnel. If connected to an AC outlet, the
cut-off plug can cause severe electrical shock. Make
sure it is properly disposed of after removal.
The equipment should be disconnected by removing
the mains plug from the wall socket when left
unused for a long period of time (for example, when
on vacation).
D3-4-2-2-1a_A_En
This product is for general household purposes. Any
failure due to use for other than household purposes
(such as long-term use for business purposes in a restaurant or use in a car or ship) and which requires repair
will be charged for even during the warranty period.
K041_En
This product incorporates copyright protection
technology that is protected by method claims of
certain U.S. patents and other intellectual property
rights owned by Macrovision Corporation and other
rights owners. Use of this copyright protection
technology must be authorized by Macrovision
Corporation, and is intended for home and other
limited viewing uses only unless otherwise
authorized by Macrovision Corporation. Reverse
engineering or disassembly is prohibited.
This product includes FontAvenue® fonts
licenced by NEC corporation. FontAvenue is a
registered trademark of NEC Corporation.
CAUTION
The POWER switch on this unit will not completely
shut off all power from the AC outlet. Since the
power cord serves as the main disconnect device for
the unit, you will need to unplug it from the AC outlet
to shut down all power. Therefore, make sure the
unit has been installed so that the power cord can
be easily unplugged from the AC outlet in case of an
accident. To avoid fire hazard, the power cord should
also be unplugged from the AC outlet when left
unused for a long period of time (for example, when
on vacation).
Replacement and mounting of an AC plug on the power supply cord of this unit should be performed only by qualified
service personnel.
IMPORTANT
FOR USE IN THE UNITED
KINGDOM
The wires in this mains lead are coloured in
accordance with the following code:
Blue : Neutral
Brown : Live
If the plug provided is unsuitable for your socket
outlets, the plug must be cut off and a suitable plug
fitted.
D3-4-2-2-2a_A_En
The cut-off plug should be disposed of and must
not be inserted into any 13 amp socket as this can
result in electric shock. The plug or adaptor or the
distribution panel should be provided with 5 A fuse.
As the colours of the wires in the mains lead of this
appliance may not correspond with coloured
markings identifying the terminals in your plug,
proceed as follows ;
The wire which is coloured blue must be connected
to the terminal which is marked with the letter N or
coloured black.
The wire which is coloured brown must be
connected to the terminal which is marked with the
letter L or coloured red.
POWER-CORD CAUTION
Handle the power cord by the plug. Do not pull out the
plug by tugging the cord and never touch the power
cord when your hands are wet as this could cause a
short circuit or electric shock. Do not place the unit, a
piece of furniture, etc., on the power cord, or pinch the
cord. Never make a knot in the cord or tie it with other
cords. The power cords should be routed such that they
are not likely to be stepped on. A damaged power cord
can cause a fire or give you an electrical shock. Check
the power cord once in a while. When you find it
damaged, ask your nearest PIONEER authorized
service center or your dealer for a replacement.
Do not connect either wire to the earth terminal of a
three pin plug.
NOTE
After replacing or changing a fuse, the fuse cover in
the plug must be replaced with a fuse cover which
corresponds to the colour of the insert in the base
of the plug or the word that is embossed on the
base of the plug, and the appliance must not be
used without a fuse cover. If lost replacement fuse
covers can be obtained from your dealer.
Only 5 A fuses approved by B.S.I or A.S.T.A to
B.S.1362 should be used.
D3-4-2-1-2-2_En
S002_En
Page 4

Contents
Contents
01 Contents
01 Before you start
Features
What’s in the box
Hints on installation
Disc / content format playback
compatibility
. . . . . . . . . . . . . . . . . . . . . . . . . . . 5
. . . . . . . . . . . . . . . . . . . . 6
. . . . . . . . . . . . . . . . . . 6
. . . . . . . . . . . . . . . . . . . . . . . 7
02 Connecting up
Easy connections
Connecting using a SCART AV cable
Connecting using the S-video output
Connecting using the component video
. . . . . . . . . . . . . . . . . . . . . . . . . . . 12
output
Connecting to an AV receiver
. . . . . . . . . . . . . . . . . . . 10
03 Controls and displays
Front panel
Remote control
. . . . . . . . . . . . . . . . . . . . . . . . 15
. . . . . . . . . . . . . . . . . . . . 16
04 Getting started
Switching on
Using the on-screen displays
Setting up the player for your TV
Setting the language of this player’s
on-screen displays
Playing discs
. . . . . . . . . . . . . . . . . . . . . . 17
. . . . . . . . . . . . . . . . . . 18
. . . . . . . . . . . . . . . . . . . . . . 19
05 Playing discs
Scanning discs
Playing in slow motion
Frame advance/frame reverse
Viewing a JPEG slideshow
Browsing DVD or Video CD/Super VCD
disc with the Disc Navigator
Browsing WMA, MP3, DivX video and
JPEG files with the Disc Navigator
Looping a section of a disc
4
En
. . . . . . . . . . . . . . . . . . . . 23
. . . . 11
. . . . 11
. . . . . . . . . . 13
. . . . . . . . . . 17
. . . . . . . . 18
. . . . . . . . . . . . . . . 23
. . . . . . . . . 24
. . . . . . . . . . . . 24
. . . . . . . . . . . 24
. . . . . . 25
. . . . . . . . . . . . 26
Using repeat play
Using random play
Creating a program list
Searching a disc
Switching subtitles
Switching audio language/channels
Zooming the screen
Switching camera angles
Displaying disc information
. . . . . . . . . . . . . . . . . . . .27
. . . . . . . . . . . . . . . . . .27
. . . . . . . . . . . . . . .28
. . . . . . . . . . . . . . . . . . . .29
. . . . . . . . . . . . . . . . . .30
. . . . .30
. . . . . . . . . . . . . . . . . .30
. . . . . . . . . . . . .31
. . . . . . . . . . . .31
06 Audio Settings and Video Adjust
menus
Audio Settings menu
Video Adjust menu
. . . . . . . . . . . . . . . . .32
. . . . . . . . . . . . . . . . . .33
07 Initial Settings menu
Using the Initial Settings menu
Digital Audio Out settings
Video Output settings
Language settings
Display settings
Options settings
Parental Lock
Speakers settings
. . . . . . . . . . . . . . . .35
. . . . . . . . . . . . . . . . . . .36
. . . . . . . . . . . . . . . . . . . . .36
. . . . . . . . . . . . . . . . . . . .37
. . . . . . . . . . . . . . . . . . . . . .37
. . . . . . . . . . . . . . . . . . .40
. . . . . . . . .34
. . . . . . . . . . . . .34
08 Additional information
Taking care of your player and discs
Screen sizes and disc formats
Setting the TV system
Resetting the player
DVD-Video regions
Selecting languages using the language
code list
Language code list . . . . . . . . . . . . . . . . . .48
Country/Area code list . . . . . . . . . . . . . . . .48
Troubleshooting . . . . . . . . . . . . . . . . . . . . 49
Glossary. . . . . . . . . . . . . . . . . . . . . . . . . . . 52
Specifications . . . . . . . . . . . . . . . . . . . . . . 54
. . . . . . . . . . . . . . . . . . . . . . . . . . .47
. . . . . . . . . . . . . . . .46
. . . . . . . . . . . . . . . . . .46
. . . . . . . . . . . . . . . . . .46
. . . . .44
. . . . . . . . . .45
Page 5
Before you start
Chapter 1
Before you start
01
Features
• DVD-Audio and SACD compatible
Experience the super high-quality audio performance of DVD-Audio and Super Audio CD
(SACD).
• Super VCD compatible
This player supports the IEC’s Super VCD standard. Compared to the Video CD standard,
Super VCD offers superior picture quality, and
allows two stereo soundtracks to be recorded.
Super VCD also supports the widescreen size.
• 24-bit/192kHz compatible DAC
The on-board 24-bit/192kHz DAC means that
this player is fully compatible with high
sampling-rate discs, capable of delivering
exceptional sound quality in terms of dynamic
range, low-level resolution and high-frequency
detail.
• Built-in Dolby*1 Digital and DTS*2
decoding with multichannel outputs
This player features multichannel analog
outputs for connection to an AV amplifier to
give you stunning surround sound from Dolby
Digital, DTS and multichannel DVD-Audio
discs.
• PureCinema Progressive Scan video
When connected to a progressive scancompatible TV or monitor using the
component video outputs, you can enjoy
extremely stable, flicker free images, with the
same frame refresh rate as the original movie.
• New Disc Navigator with moving
pictures
The new Disc Navigator enables you play the
first few seconds of each title or chapter in a
thumbnail image on screen.
• DSP effects for enhanced playback
See
Audio Settings and Video Adjust menus
page 32.
• Picture zoom
See
Zooming the screen
• MP3 and WMA compatibility
See
Compressed audio compatibility
• JPEG compatibility
See
JPEG file compatibility
• DivX video compatibility
See
DivX video compatibility
• Energy saving design
An auto power-off function switches the player
into standby if not used for about 30 minutes.
*1
Manufactured under license from Dolby
Laboratories. “Dolby” and the double-D symbol
are trademarks of Dolby Laboratories.
*2
“DTS” and “DTS Digital Surround” are
registered trademarks of Digital Theater
Systems Inc.
on page 30.
on page 9.
on page 9.
on
on page 8.
En
5
Page 6
Before you start01
What’s in the box
Please confirm that the following accessories
are in the box when you open it.
• Remote control
• AA/R6P dry cell batteries x2
• Audio/video cable (red/white/yellow plugs)
• Power cable
• Operating instructions
• Warranty card
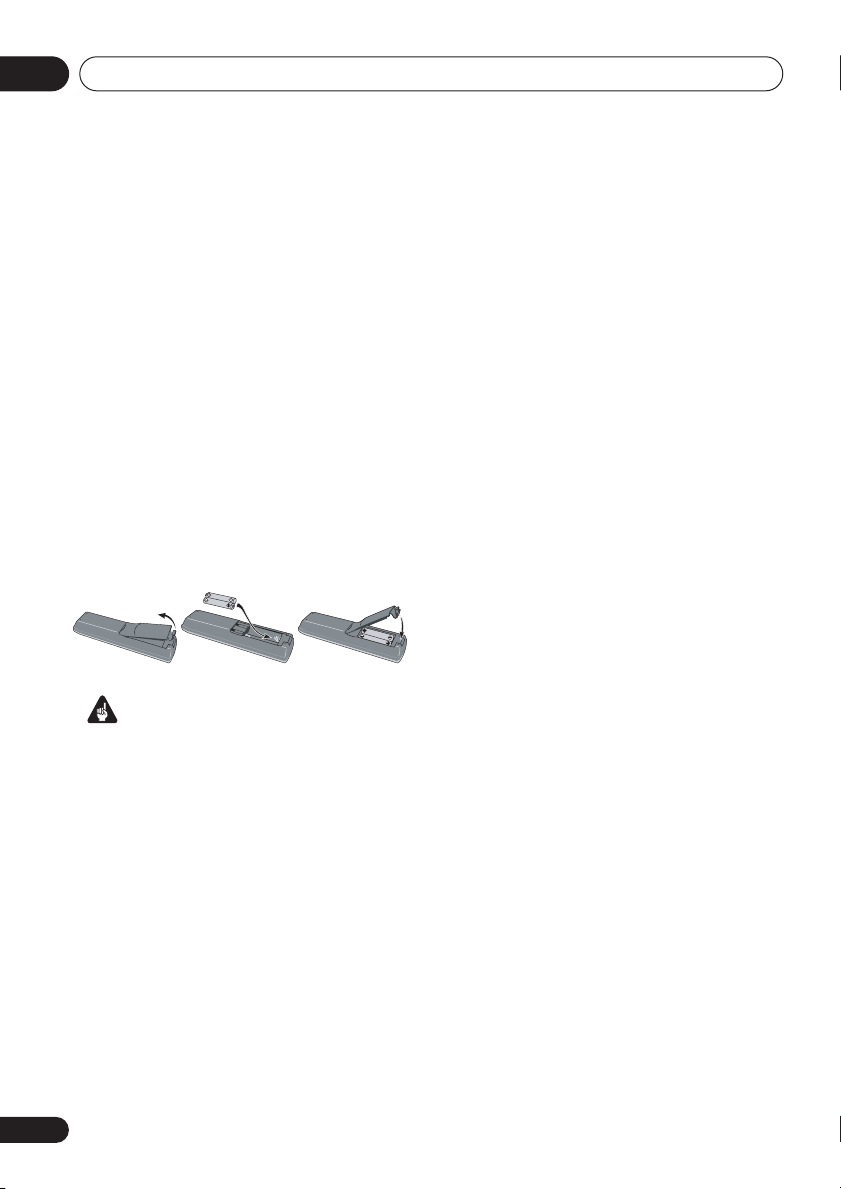
Putting the batteries in the remote
• Open the battery compartment cover
and insert the batteries as shown.
Use two AA/R6P batteries and follow the
indications (
Close the cover when you’re finished.
Incorrect use of batteries can result in hazards
such as leakage and bursting. Please observe
the following:
• Don’t mix new and old batteries together.
• Don’t use different kinds of battery
together—although they may look similar,
different batteries may have different
voltages.
• Make sure that the plus and minus ends of
each battery match the indications in the
battery compartment.
• Remove batteries from equipment that
isn’t going to be used for a month or more.
• When disposing of used batteries, please
comply with governmental regulations or
environmental public instruction’s rules
that apply in your country or area.
,
Important
) inside the compartment.
Hints on installation
We want you to enjoy using this product for
years to come, so please use the following
guidelines when choosing a suitable location:
Do...
• Use in a well-ventilated room.
• Place on a solid, flat, level surface, such as
a table, shelf or stereo rack.
Don’t...
• Use in a place exposed to high
temperatures or humidity, including near
radiators and other heat-generating
appliances.
• Place on a window sill or a place where the
player will be exposed to direct sunlight.
• Use in an excessively dusty or damp
environment.
• Place directly on top of an amplifier, or
other component in your stereo system
that becomes hot in use.
• Use near a television or monitor as you may
experience interference—especially if the
television uses an indoor antenna.
• Use in a kitchen or other room where the
player may be exposed to smoke or steam.
• Use on a thick rug or carpet, or cover with
cloth—this may prevent proper cooling of
the unit.
• Place on an unstable surface, or one that is
not large enough to support all four of the
unit’s feet.
6
En
Page 7
Before you start
01
Disc / content format playback
compatibility
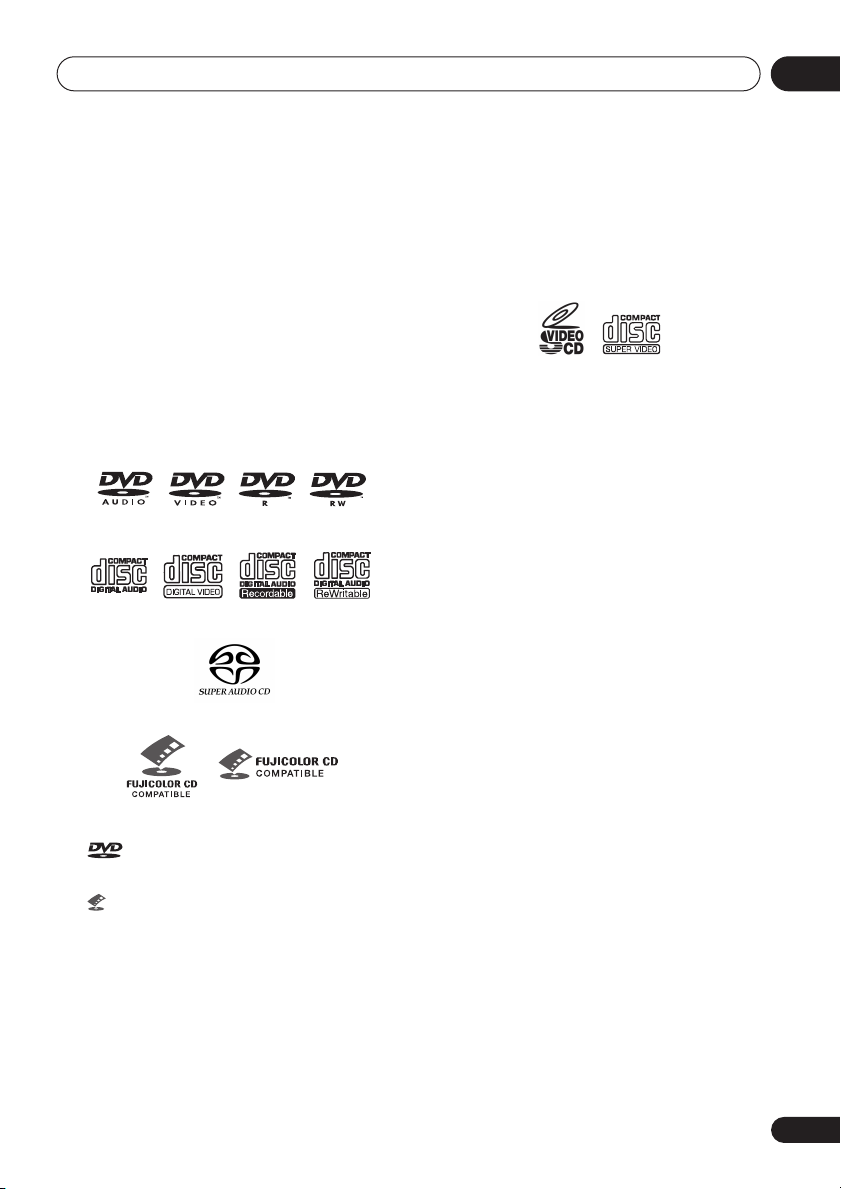
This player is compatible with a wide range of
disc types (media) and formats. Playable discs
will generally feature one of the following logos
on the disc and/or disc packaging. Note
however that some disc types, such as
recordable CD and DVD, may be in an
unplayable format—see below for further
compatibility information.
Please also note that recordable discs cannot be
recorded using this player.
DVD-Audio
•
Licensing Corporation.
• is a trademark of Fuji Photo Film Co. Ltd.
• Also compatible with KODAK Picture CD
DVD-Video DVD-R DVD-RW
Video CDAudio CD CD-R
Super Audio CD
Fujicolor CD
is a trademark of DVD Format/Logo
CD-RW
This player supports the IEC’s Super VCD standard. Compared to the Video CD standard,
Super VCD offers superior picture quality, and
allows two stereo soundtracks to be recorded.
Super VCD also supports the widescreen size.
Super VCD
CD-R/RW compatibility
• Compatible formats: CD-Audio, Video CD/
Super VCD, ISO 9660 CD-ROM* containing
MP3, WMA, JPEG or DivX video files
*
ISO 9660 Level 1 or 2 compliant. CD
physical format: Mode1, Mode2 XA Form1.
Romeo and Joliet file systems are both
compatible with this player.
• Multi-session playback: No
• Unfinalized disc playback: No
• File structure (may differ): Up to 299 folders
on a disc; up to 648 folders and files
(combined) within each folder
DVD-R/RW compatibility
• Compatible formats: DVD-Video, Video
Recording (VR)*
*
Edit points may not play exactly as edited;
screen may go momentarily blank at edited
points.
• Unfinalized playback: No
• WMA/MP3/JPEG file playback on DVD-R/
RW: No
En
7
Page 8
Before you start01
Compressed audio compatibility
• Compatible formats: MPEG-1 Audio Layer 3
(MP3), Windows Media Audio (WMA)
• Sampling rates: 32, 44.1 or 48kHz
• Bit-rates: Any (128Kbps or higher
recommended)
• VBR (variable bit rate) MP3 playback: No
• VBR WMA playback: No
• WMA lossless encoding compatible: No
• DRM (Digital Rights Management)
compatible: Yes (DRM-protected audio
files will
DRM
not
play in this player—see also
in the
Glossary
on page 52)
• File extensions: .mp3, .wma (these must be
used for the player to recognize MP3 and
WMA files – do not use for other file types)
About WMA
The Windows Media® logo printed on the box
indicates that this player can playback
Windows Media Audio content.
WMA is an acronym for Windows Media Audio
and refers to an audio compression technology
developed by Microsoft Corporation. WMA
content can be encoded by using Windows
®
Media
Player version 7, 7.1, Windows Media®
Player for Windows
Player 9 Series.
Microsoft, Windows Media, and the Windows
logo are trademarks, or registered trademarks of
Microsoft Corporation in the United States and/
or other countries.
®
XP, or Windows Media®
About DivX
DivX is a compressed digital video format
created by the DivX
DivXNetworks, Inc. This player can play DivX
video files burned on CD-R/RW/ROM discs.
Keeping the same terminology as DVD-Video,
individual DivX video files are called "Titles".
When naming files/titles on a CD-R/RW disc
prior to burning, keep in mind that by default
they will be played in alphabetical order.
Displaying DivX subtitle files
The font sets listed below are available for DivX
external subtitle files. You can see the proper
font set on-screen by setting the
Language
(in
to match the subtitle file.
This player supports the following language
groups:
Group 1: Albanian (sq), Basque (eu), Catalan (ca),
Danish (da), Dutch (nl), English (en), Faroese (fo),
Finnish (fi), French (fr), German (de), Icelandic (is), Irish
(ga), Italian (it), Norwegian (no), Portuguese (pt), RhaetoRomanic (rm), Scottish (gd), Spanish (es), Swedish (sv)
Group 2: Albanian (sq), Croatian (hr), Czech (cs),
Hungarian (hu), Polish (pl), Romanian (ro), Slovak (sk),
Slovenian (sl)
Group 3: Bulgarian (bg), Byelorussian (be), Macedonian
(mk), Russian (ru), Serbian (sr), Ukrainian (uk)
Group 4: Hebrew (iw), Yiddish (ji)
Group 5: Turkish (tr)
DivX, DivX Certified, and associated logos are
trademarks of DivXNetworks, Inc. and are used
under license.
• Some external subtitle files may be
displayed incorrectly or not at all.
• For external subtitle files the following
subtitle format filename extensions are
supported (please note that these files are
not shown within the disc navigation
menu): .srt, .sub, .ssa, .smi
• The filename of the movie file has to be
repeated at the beginning of the filename
for the external subtitle file.
®
video codec from
Language settings
Subtitle
on page 36)
8
En
Page 9
Before you start
01
• The number of external subtitle files which
can be switched for the same movie file is
limited to a maximum of 10.
DivX video compatibility
• Official DivX® Certified product.
• Plays DivX
VOD video content (in compliance with
DivX
• File extensions: .avi and .divx (these must
be used for the player to recognize DivX
video files).
extension are recognized as MPEG4, but not
all of these are necessarily DivX video files
and therefore may not be playable on this
player.
DivX, DivX Certified, and associated logos are
trademarks of DivXNetworks, Inc. and are used
under license.
®
5, DivX® 4, DivX® 3 and DivX®
®
Certified technical requirements).
Note that all files with the .avi
PC-created disc compatibility
Discs recorded using a personal computer
may not be playable in this unit due to the
setting of the application software used to
create the disc. In these particular instances,
check with the software publisher for more
detailed information.
Discs recorded in packet write mode (UDF
format) are not compatible with this player.
Check the DVD-R/RW or CD-R/RW software
disc boxes for additional compatibility
information.
JPEG file compatibility
• Compatible formats: Baseline JPEG and
EXIF 2.2* still image files up to a resolution
of 3072 x 2048.
*
File format used by digital still cameras
• Progressive JPEG compatible: No
• File extensions: .jpg (must be used for the
player to recognize JPEG files – do not use
for other file types)
9
En
Page 10
Connecting up02
Chapter 2
Connecting up
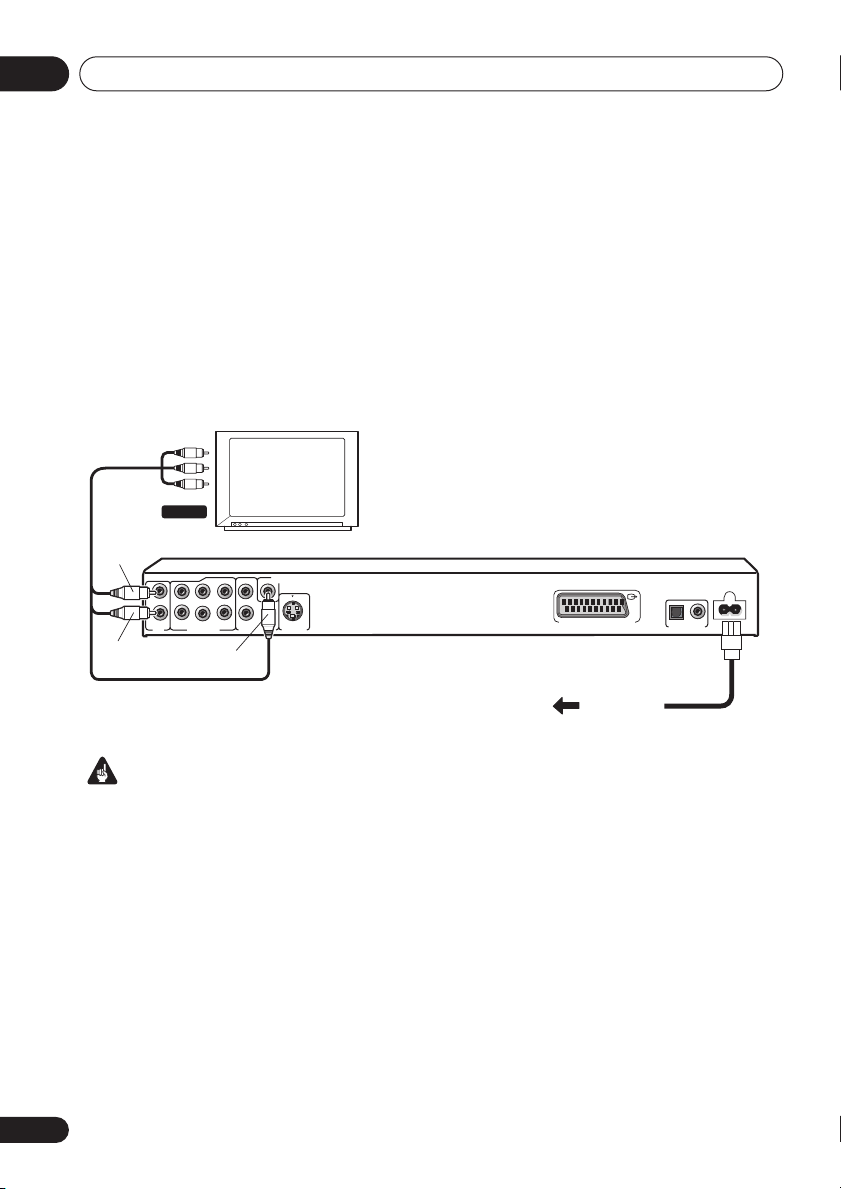
Easy connections
The setup described here is a basic setup that allows you to play discs using just the cables
supplied with the player. In this setup, stereo audio is played through the speakers in your TV.
A/V IN
SL
L
SR SW
R
AUDIO OUT (5.1ch)
Yel low
TV
C
PB
PR
COMPONENT VIDEO OUT
VIDEO OUT
Y
S-VIDEO OUT
AV CONNECTOR (RGB) TV/AV Receiver
AC IN
OPTICAL
COAXIAL
AUDIO OUT
DIGITAL
White
Red
L
R
R
L
AUDIO OUT
(2ch)
To power
outlet
Important
• This player is equipped with copy protection technology. Do not connect this player to your TV
via a VCR using audio/video or S-video cables, as the picture from this player will not appear
properly on your TV. (This player may also not be compatible with some combination TV/VCRs
for the same reason; refer to the manufacturer for more information.)
10
En
Page 11
Connecting up
COAXIAL
AUDIO OUT
OPTICAL
DIGITAL
AC IN
AV CONNECTOR (RGB) TV/AV Receiver
02
1 Connect the VIDEO OUT and AUDIO
OUT (2ch) jacks to a set of A/V inputs on
your TV.
Use the supplied audio/video cable,
connecting the red and white plugs to the
audio outputs and the yellow plug to the video
output. Make sure you match up the left and
right audio outputs with their corresponding
inputs for correct stereo sound.
See below if you want to use a component or
S-video cable for the video connection.
2 Connect the supplied AC power cable to
the AC IN inlet, then plug into a power
outlet.
Note
• Before unplugging the player from the
power outlet, make sure you first switch it
into standby using either the front panel
STANDBY/ON
control, and wait of the
button, or the remote
-OFF-
message to
disappear from the player’s display.
• For the above reasons, do not plug this
player into a switched power supply found
on some amplifiers and AV receivers.
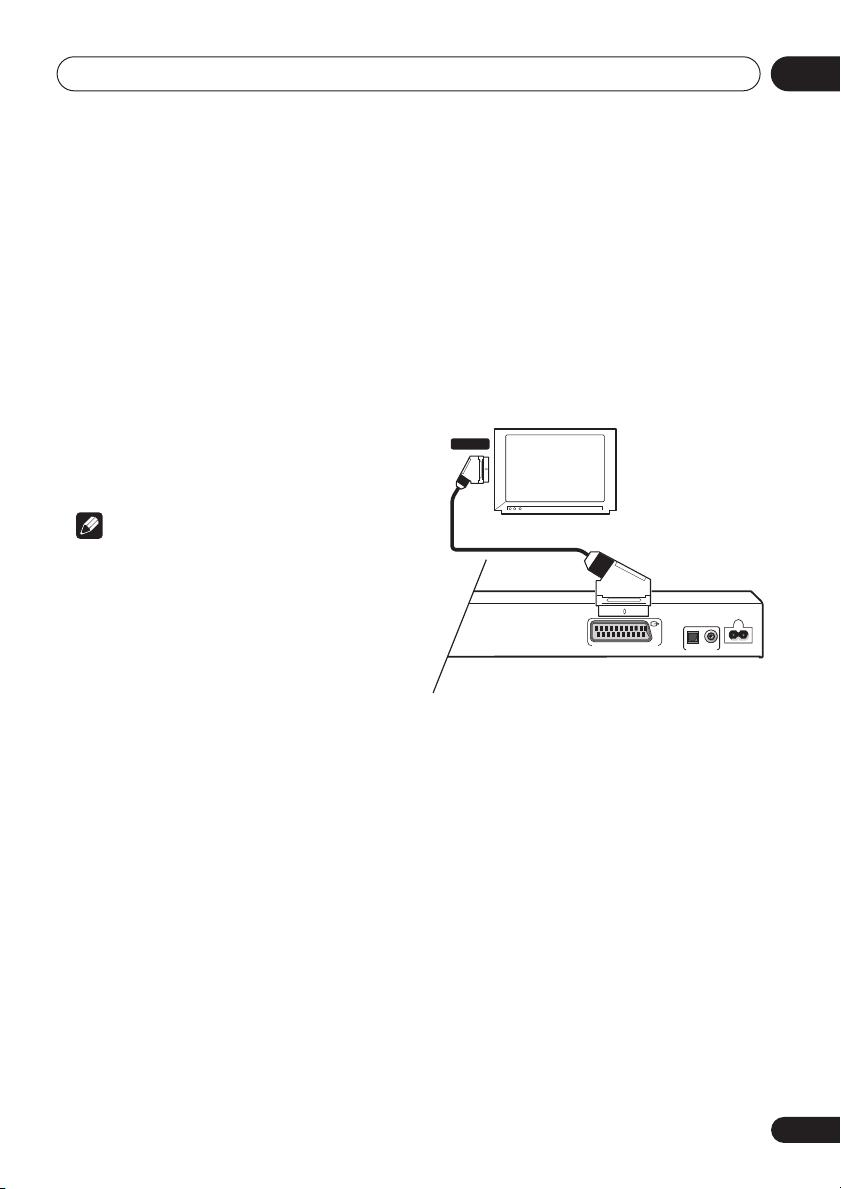
Connecting using a SCART AV
cable
A SCART-type AV connector is provided for
connection to a TV or AV receiver. The video
output is switchable between ordinary
composite, S-video and RGB. See
Out
on page 35 for how to set it.
The SCART AV connector also outputs analog
audio, so there is no need to also connect the
AUDIO OUT L/R
SCART
jacks.
TV
1 Use a SCART cable (not supplied) to
connect the AV CONNECTOR (RGB) output
to a SCART AV input on your TV (or AV
receiver).
AV Connector
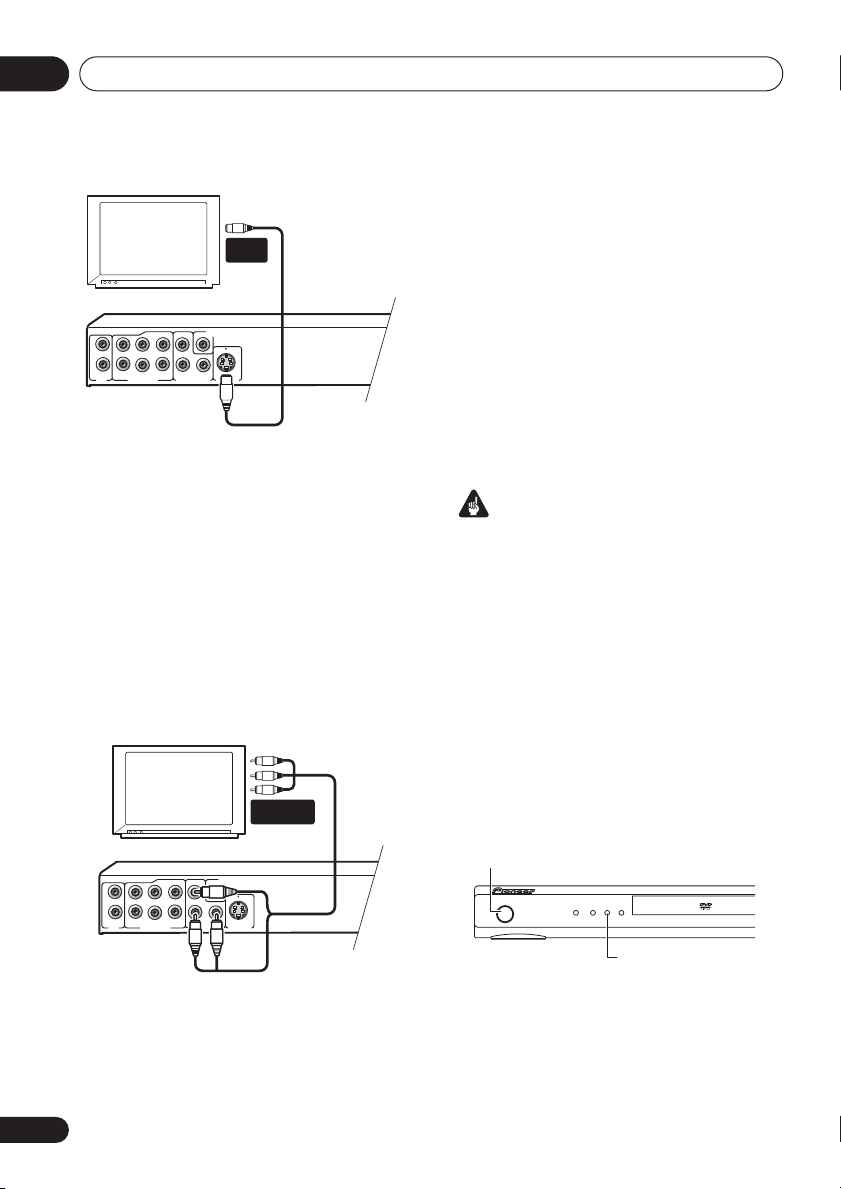
Connecting using the S-video
output
If your TV (or other equipment) has an S-video
(S1) input, you can use the S-video output on
this player instead of the standard (composite)
output for a better quality picture.
• Use an S-video cable (not supplied) to
connect the S-VIDEO OUT to an S-video
input on your TV (or monitor or AV
receiver).
Line up the small triangle above the jack with
the same mark on the plug before plugging in.
11
En
Page 12
Connecting up02
S-VIDEO OUT
AUDIO OUT (5.1ch)
COMPONENT VIDEO OUT
AUDIO OUT
(2ch)
VIDEO OUT
PR
PB
Y
SL
SR SW
C
L
L
R
R
S-VIDEO OUT
AUDIO OUT (5.1ch)
COMPONENT VIDEO OUT
AUDIO OUT
(2ch)
VIDEO OUT
PR
PB
Y
SL
SR SW
C
L
L
R
R
S-VIDEO
IN
TV
Connecting using the
component video output
You can use the component video output
instead of the standard video out jack to
connect this player to your TV (or other
equipment). This should give you the best
quality picture from the three types of video
output available.
• Use a component video cable (not
supplied) to connect the COMPONENT
VIDEO OUT jacks to a component video
input on your TV, monitor or AV receiver.
COMPONENT
VIDEO IN
TV
Watching progressive scan video
from the component video outputs
This player can output progressive scan video
from the component video output. Compared
to interlace video, progressive scan video
effectively doubles the scanning rate of the
picture, resulting in a very stable, flicker-free
image.
To set up the player for use with a progressive
scan TV, see
When the player is set to output progressive
scan video, the
front panel display.
• If you connect a TV that is not compatible
with a progressive scan signal and switch
the player to progressive, you will not be
able to see any picture at all. In this case,
switch everything off and reconnect using
the supplied video cable (see
connections
to
Switching the video output to interlace
using the front panel controls
Switch the player to standby then, using the
front panel controls, press
while pressing
Interlace
Video Output settings
PRGSVE
Important
on page 10), then switch back
Interlace
(see below).
.
STANDBY/ON
on page 35.
indicator lights in the
Easy
STANDBY/ON
to switch the player back to
STANDBY/ON
12
En
Page 13
Connecting up
S-VIDEO OUT
AUDIO OUT (5.1ch)
COMPONENT VIDEO OUT
AUDIO OUT
(2ch)
VIDEO OUT
PR
PB
Y
SL
SR SW
C
L
L
R
R
02
Compatibility of this player with
progressive-scan and high-definition TVs
This player is compatible with progressive
video Macro Vision System Copy Guard.
Consumers should note that not all highdefinition television sets are fully compatible
with this product and may cause artifacts to be
displayed in the picture. In case of 525/625
progressive scan picture problems, it is
recommended that the user switch the
connection to the ‘standard definition’ output
(Interlace). If there are questions regarding our
TV set compatibility with this model, please
contact our customer service center.
This player is compatible with the following
Pioneer displays and monitors:
PDP-505HDE, PDP-435HDE
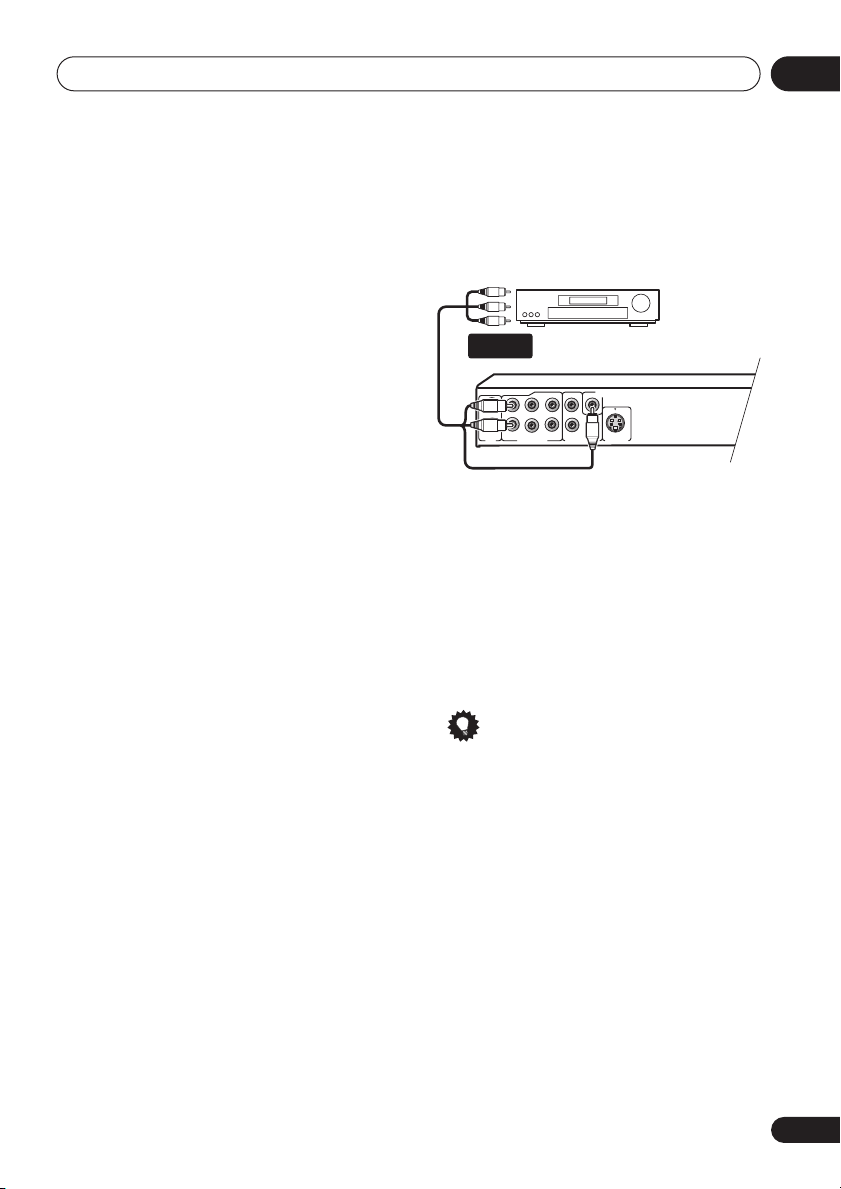
Connecting to an AV receiver
You can connect this player to your AV receiver
using the multichannel analog outputs or one
of the digital outputs.
In addition to these connections, you should
also connect the 2 channel analog outputs for
compatibility with all discs.
You’ll probably also want to connect a video
output to your AV receiver. You can use any of
the video outputs available on this player (the
illustration shows a standard (composite)
connection).
1 Connect the analog AUDIO OUT 2ch
and VIDEO OUTPUT jacks on this player to
a set of analog audio and video inputs on
your AV receiver.
AUDIO/
VIDEO IN
AV receiver
2 Connect the AV receiver’s video output
to a video input on your TV.
The diagram shows standard video connections, but you can alternatively use the S-Video
or component video connections if they’re available.
You can use the SCART AV connector, or the Svideo or component video jacks to connect to
the AV receiver if you prefer.
Tip
• You usually have to connect the same kind
of video cable between your DVD player
and AV receiver, and between your AV
receiver and TV.
13
En
Page 14
Connecting up02
S-VIDEO OUT
AUDIO OUT (5.1ch)
COMPONENT VIDEO OUT
AUDIO OUT
(2ch)
VIDEO OUT
PR
PB
Y
SL
SR SW
C
L
L
R
R
COAXIAL
AUDIO OUT
OPTICAL
DIGITAL
AC IN
AV CONNECTOR (RGB) TV/AV Receiver
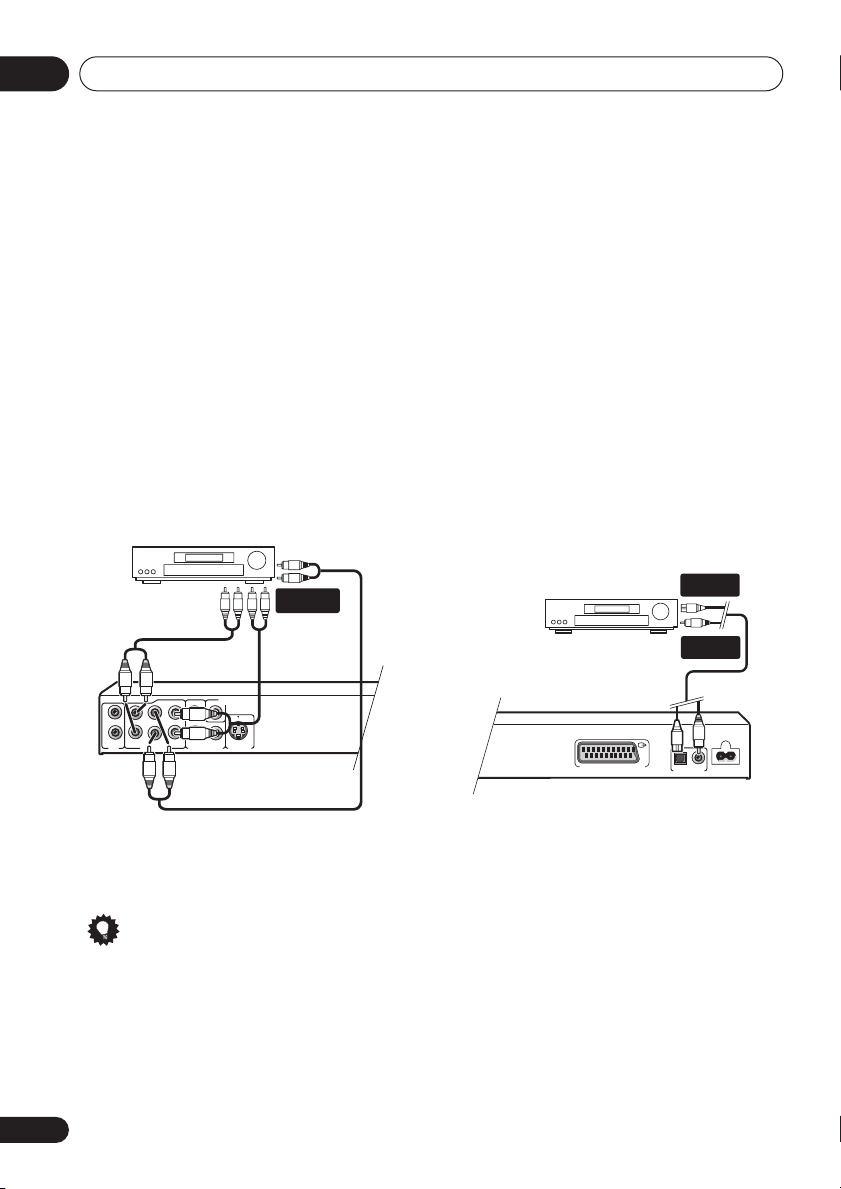
Connecting the multichannel analog
outputs
If your AV receiver has 5.1 channel analog
inputs, we recommend connecting this player
to it using the multichannel analog outputs.
Doing this will ensure that you can enjoy all
kinds of disc, including Dolby Digital and DTS
DVD-Video discs, as well as high sampling rate
and multichannel DVD-Audio and SACD discs.
• Connect the MULTICHANNEL AUDIO
outputs on this player to the multi-channel
audio inputs on your AV receiver.
It’s convenient to use three stereo audio
cables; one for the
SURROUND
SUBWOOFER
AV receiver
FRONT
, one for the
and one for the
channels.
CENTER
MULTI-
CH. INPUTS
and
Connecting the digital output
This player has both optical and coaxial-type
digital audio outputs for connection to an AV
receiver. Connect whichever is convenient.
Depending on the capabilities of your AV
receiver, you might have to set up this player to
output only digital audio in a compatible
format. See
page 34 and refer to the operating instructions
that came with your AV receiver.
Note that SACD audio is not output through
these jacks, so this connection should be in
addition to, rather than instead of, a 5.1
channel analog connection.
• Connect one of the DIGITAL AUDIO OUT
jacks on this player to a digital input on
your AV receiver.
Digital Audio Out settings
DIGITAL IN
(OPTICAL)
AV receiver
DIGITAL IN
(COAXIAL)
on
You can use the SCART AV connector, or the Svideo or component video jacks to connect to
the AV receiver if you prefer.
Tip
• After connecting up and switching on, you
should change the
Audio Output Mode
setting in the Initial Setup menu from the
default
2 Channel
also
Audio Output Mode
14
En
to
5.1 Channel
on page 40.
. See
For an optical connection, use an optical cable
(not supplied) to connect the
DIGITAL AUDIO OUT
OPTICAL
jack to an optical input
on your AV receiver.
For a coaxial connection, use a coaxial cable
(similar to the supplied video cable) to connect
the
COAXIAL DIGITAL AUDIO OUT
coaxial input on your AV receiver.
jack to a
Page 15
Controls and displays
Chapter 3
Controls and displays
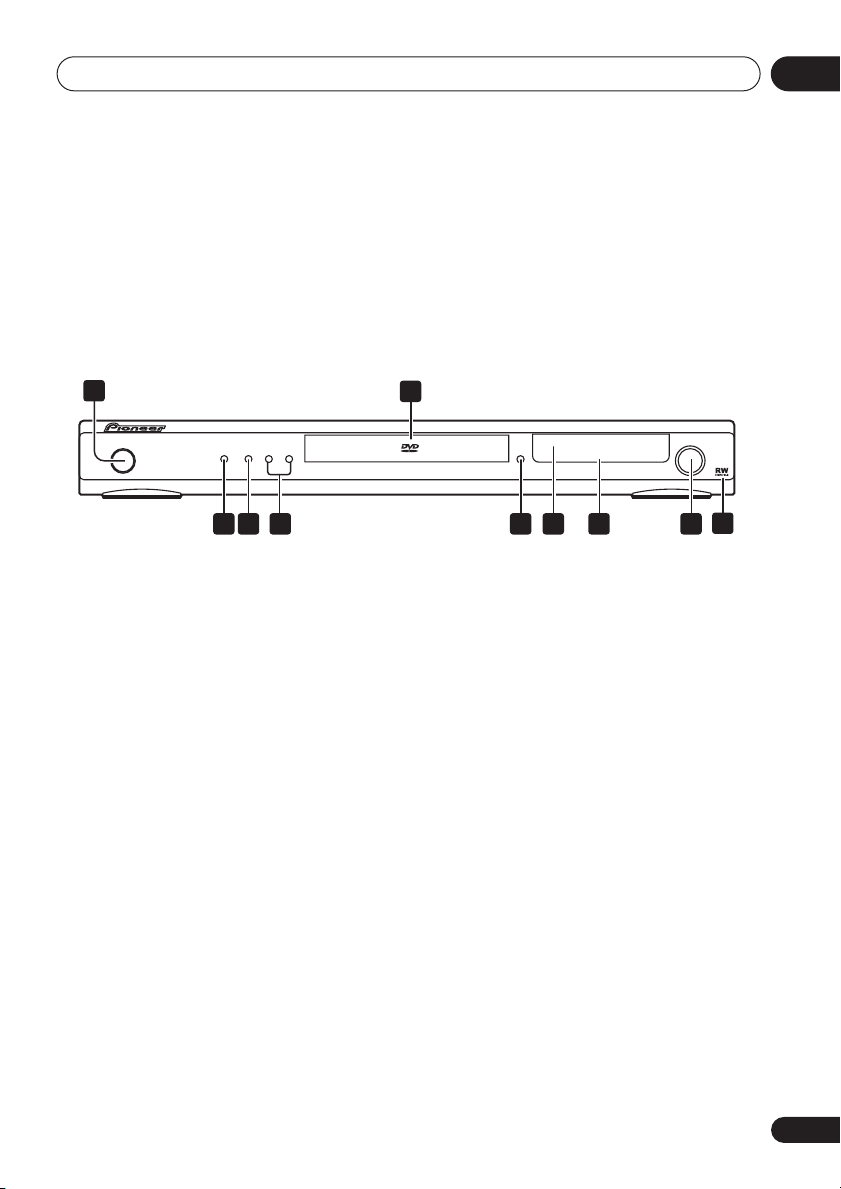
Front panel
03
1
STANDBY/ON
1 STANDBY/ON
2 Disc tray
(page 20)
3
4 (page 20)
5
and (page 20, 21)
6 OPEN/CLOSE
7 Remote control sensor
8 Display
(page 20)
9
10 RW Compatible
(page 17)
(page 19)
(page 7)
(page 16)
AUDIO/VIDEO
2
6 87 93 4 5
10
15
En
Page 16
Controls and displays03
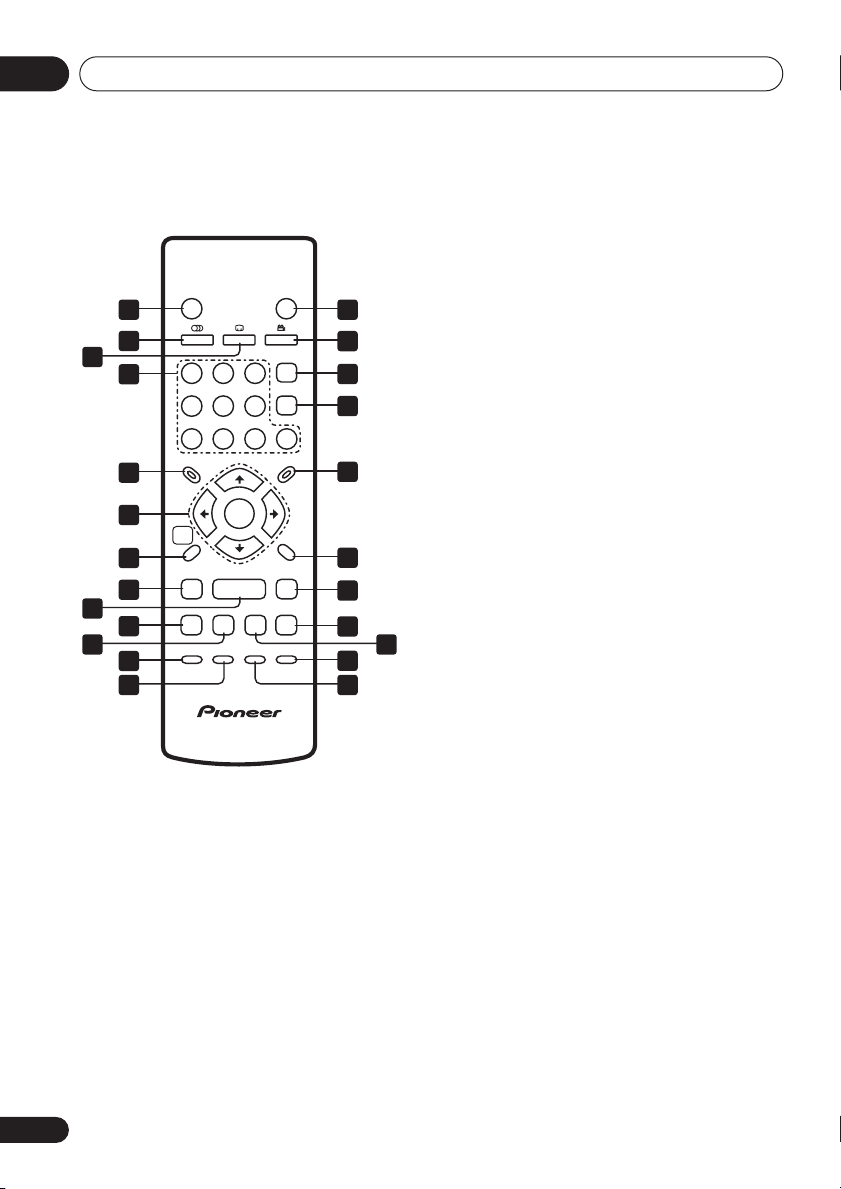
Remote control
STANDBY/ON
1 14
2
3
4
5
6
7
8
9
10
11 22
12
1
4
789
TOP MENU
HOME
MENU
/
PLAY MODE SURROUND
13
1 STANDBY/ON
2 AUDIO
3 SUBTITLE
(page 30)
(page 30)
4 Number buttons
5 TOP MENU
(page 21)
6 ENTER & cursor buttons
7 HOME MENU
8
and
(page 17)
/
9 (page 20)
10
(page 20)
OPEN/CLOSE
ANGLEAUDIO
SUBTITLE
CLEAR
23
ENTER
6
5
0
MENU
ENTER
RETURN
/
ZOOM DISPLAY
(page 17)
(page 20)
(page 17)
(page 20, 23)
15
16
17
18
19
20
21
23
24
11 (page 20)
12 PLAY MODE
13 SURROUND
14 OPEN/CLOSE
15 ANGLE
16 CLEAR
17 ENTER
18 MENU
19 RETURN
20 and
21
(page 20)
(page 26)
(page 32)
(page 31)
(page 28)
(page 17)
(page 21)
(page 17)
/
(page 19)
(page 20, 23)
22 (page 20)
23 DISPLAY
24 ZOOM
(page 31)
(page 30)
Using the remote control
Keep in mind the following when using the
remote control:
• Make sure that there are no obstacles
between the remote and the remote sensor
on the unit.
• The remote has a range of about 7m.
• Remote operation may become unreliable
if strong sunlight or fluorescent light is
shining on the unit’s remote sensor.
• Remote controllers for different devices
can interfere with each other. Avoid using
remotes for other equipment located close
to this unit.
• Replace the batteries when you notice a
fall off in the operating range of the remote.
16
En
Page 17
Getting started
ENTER
GUIDE
RETURN
ENTER
HOME
MENU
RETURN
Chapter 4
Getting started
04
Switching on
After making sure that everything is connected
properly and that the player is plugged in,
press
STANDBY/ON
remote control to switch the player on.
Also, switch on your TV and make sure that it is
set to the input you connected the DVD player
to.
STANDBY/ON
STANDBY/ON
FAQ
• My DVD player switches on but there is
nothing displayed on my TV.
Make sure that the TV is set to the correct
video input (not a TV channel). For
example, if you connected this player to the
VIDEO 1
to
• This player features a screen saver and an
auto power off function. If the player is
stopped and no button is pressed for
around five minutes, the screen saver
starts. If the disc tray is closed but no disc
is playing and no control is pressed for
about 30 minutes, the player automatically
goes into standby.
inputs on your TV, switch your TV
VIDEO 1
.
Note
on the front panel or
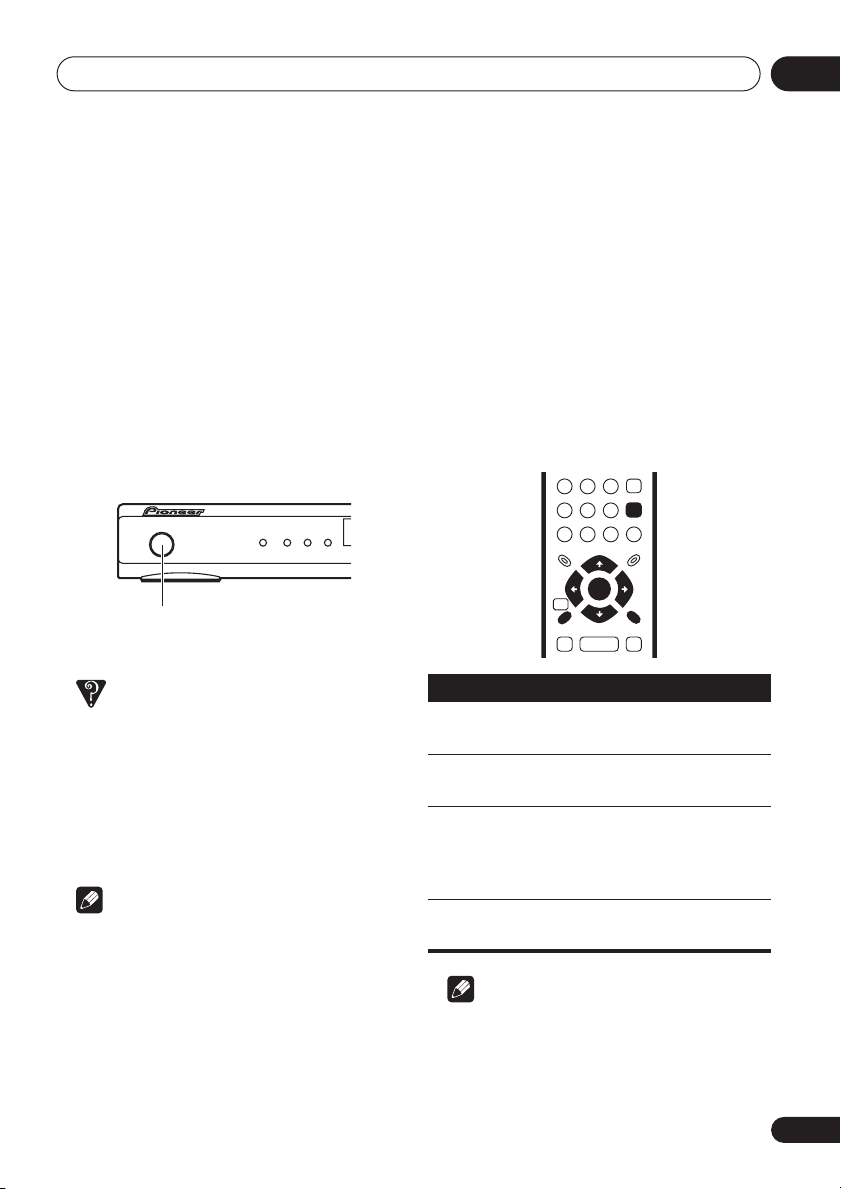
Using the on-screen displays
For ease of use, this player makes extensive
use of graphical on-screen displays (OSDs).
All the screens are navigated in basically the
same way, using the cursor buttons (
) to change the highlighted item and
pressing
Button
HOME
MENU
///
ENTER
RETURN
ENTER
to select it.
What it does
Display/exit the on-screen display.
Changes the highlighted menu
item.
Selects the highlighted menu
item (both
remote work in exactly the same
way).
Returns to the main menu
without saving changes.
ENTER
Note
• From here on in this manual, the word
‘select’ generally means use the cursor
buttons to highlight an item on-screen,
then press
ENTER
.
///
buttons on the
17
En
Page 18
Getting started04
Setting up the player for your
TV
If you have a widescreen (16:9) TV, you should
setup the player so that the picture will be
presented correctly. If you have a conventional
(4:3) TV, you can leave the player on the default
setting and move on to the next section.
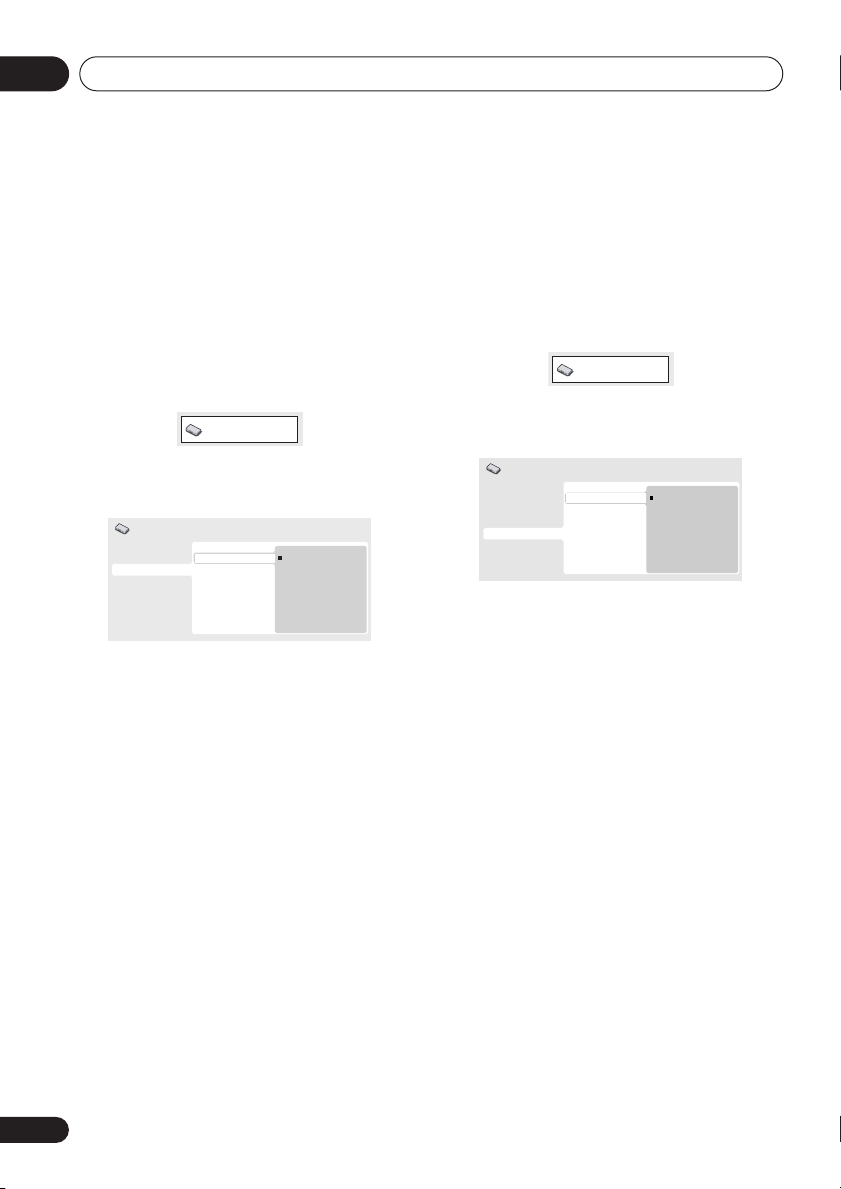
1 Press HOME MENU and select ‘Initial
Settings’.
Initial Settings
2 Select ‘TV Screen’ from the ‘Video
Output’ settings.
Initial Settings
Digital Audio Out
Video Output
Language
Display
Options
Speakers
TV Screen
Component Out
AV Connector Out
3 If you have a widescreen (16:9) TV,
select ‘16:9 (Wide)’.
If you have a conventional (4:3) TV, you can
change the setting from
(Pan & Scan)
settings
if you prefer. See
on page 35 for more details.
4 Press HOME MENU to exit the menu
screen.
4:3 (Letter Box)
4:3 (Pan&Scan)
16:9 (Wide)
4:3 (Letter Box)
Video Output
to
4:3
Setting the language of this
player’s on-screen displays
This sets the language of the player’s onscreen displays.
1 Press HOME MENU and select ‘Initial
Settings’.
Initial Settings
2 Select ‘OSD Language’ from the
‘Display’ settings.
Initial Settings
Digital Audio Out
Video Output
Language
Display
Options
Speakers
3 Select a language.
The on-screen language will change according
to your selection.
4 Press HOME MENU to exit the menu
screen.
OSD Language
Angle Indicator
English
français
Deutsch
Italiano
Español
18
En
Page 19
Getting started
04
Playing discs
The basic playback controls for playing DVD,
CD, SACD, Video CD/Super VCD, DivX video
and MP3/WMA discs are covered here. Further
functions are detailed in the next chapter.
For details on playing JPEG picture discs, see
Viewing a JPEG slideshow
Important
• Throughout this manual, the term ‘DVD’
means DVD-Video, DVD-Audio and DVD-R/
RW. If a function is specific to a particular
kind of DVD disc, it is specified.
STANDBY/ON
/
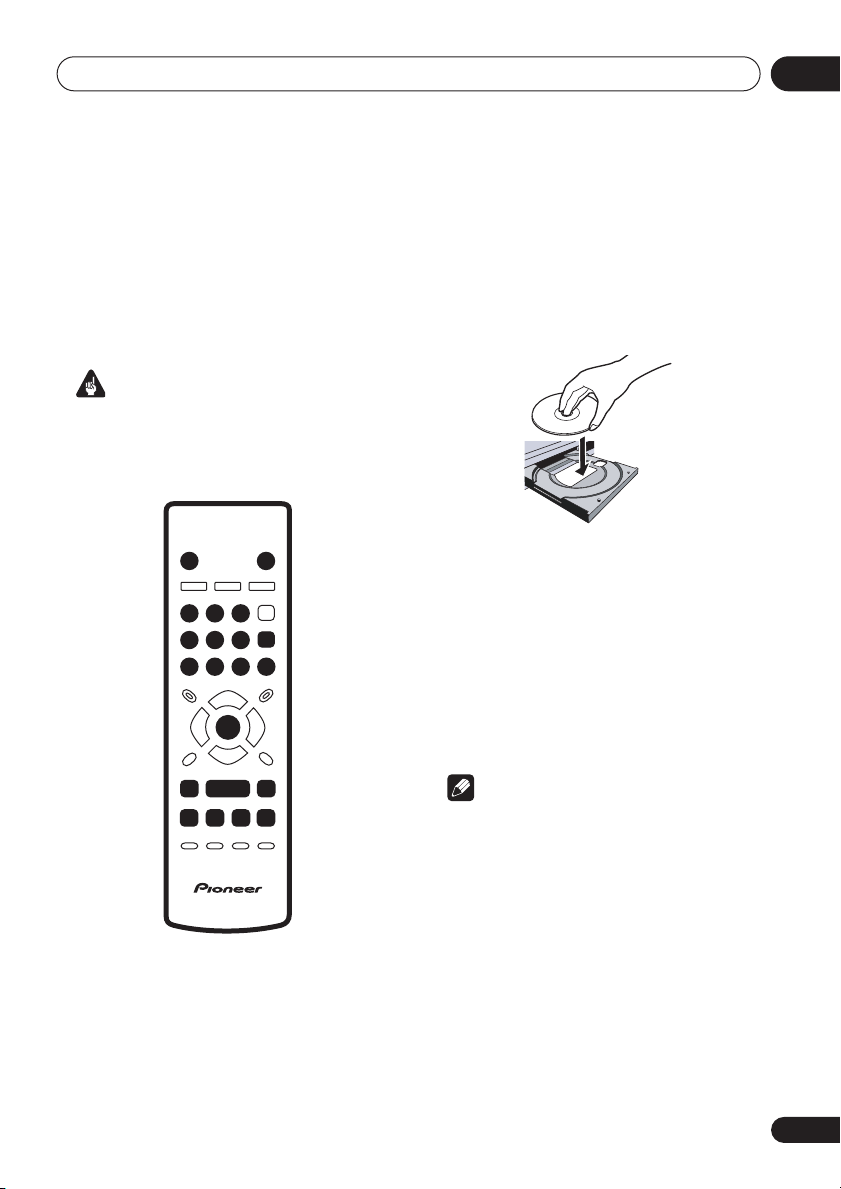
1 If the player isn’t already on, press
STANDBY/ON to switch it on.
If you’re playing a DVD, disc containing DivX
video files or Video CD/Super VCD, also turn on
your TV and make sure that it is set to the
correct video input.
on page 24.
23
1
56
4
789
ENTER
OPEN/CLOSE
ENTER
/
0
2 Press OPEN/CLOSE to open the disc
tray.
3 Load a disc.
Load a disc with the label side facing up, using
the disc tray guide to align the disc (if you’re
loading a double-sided DVD disc, load it with
the side you want to play face down).
4 Press (play) to start playback.
If you’re playing a DVD or Video CD/Super VCD,
an on-screen menu may appear. See
menus
on page 21 and
PBC menus
on page 21 for more on how to
Video CD/Super VCD
DVD disc
navigate these.
• If you’re playing a containing DivX video
files or MP3/WMA audio files, it may take a
few seconds before playback starts, etc.
This is normal.
Note
• You may find with some DVD discs that
some playback controls don’t work in
certain parts of the disc. This is not a
malfunction.
• If a disc contains a mixture of DivX video
and other media file types (MP3, for
example), first select whether to play the
DivX video files (
file types (
DivX
)or the other media
MP3 / WMA / JPEG
) from the
on-screen display.
19
En
Page 20
Getting started04
Basic playback controls
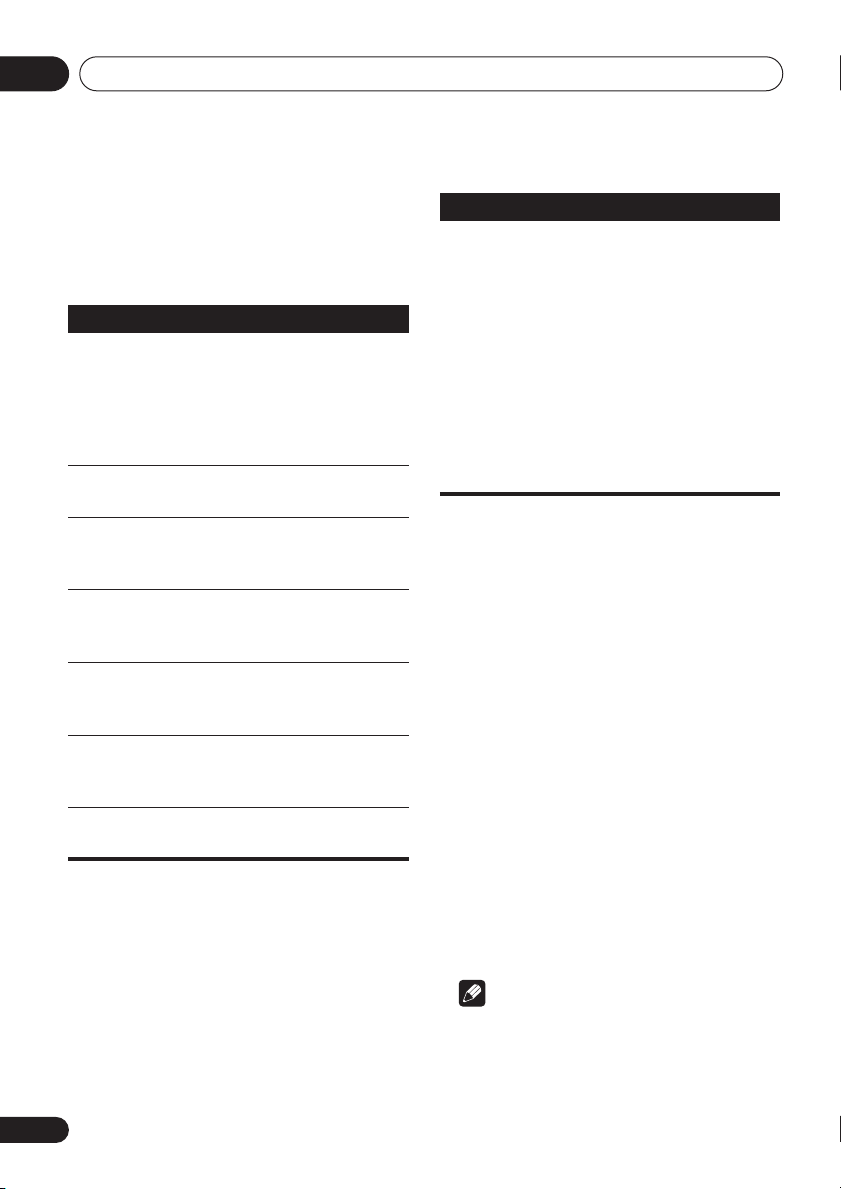
The table below shows the basic controls on
the remote for playing discs. The following
chapter covers other playback features in more
detail.
Button
(remote
only)
(remote
only)
What it does
Starts playback.
If the display shows
LAST MEM
resume or last memory point (see
also
below.)
Pauses a disc that’s playing, or
restarts a paused disc.
Stops playback.
See also
below.
Press to start fast reverse scanning.
Press
playback.
Press to start fast forward scanning.
Press
playback.
Skips to the start of the current
track, title or chapter, then to
previous tracks/titles/chapters.
Skips to the next track, title or
chapter.
playback starts from the
Resume and Last Memory
Resume and Last Memory
(play) to resume normal
(play) to resume normal
RESUME
or
Button
Numbers
(remote
only)
What it does
Use to enter a title/chapter/track
number. Press
• If the disc is stopped, playback
starts from the selected title (for
DVD), group (for DVD-Audio) or
track (for CD/SACD/Video CD
VCD
).
• If the disc is playing, playback
jumps to the start of the selected
title (VR mode DVD-RW), chapter
(DVD-Video) or track (DVD-Audio*/
SACD/CD/Video CD/Super VCD).
*within the current group
ENTER
to select.
/Super
Resume and Last Memory
With the exception of DVD-Audio and SACD
discs, when you stop playback of a DVD, CD,
Video CD/Super VCD or DivX video discs,
RESUME
that you can resume playback again from that
point.
If the disc tray is not opened, the next time you
start playback the display shows
playback resumes from the resume point. (If
you want to clear the resume point, press
(stop) while
With DVDs and Video CD/Super VCDs, if you
take the disc out of the player after stopping
playback, the last play position is stored in
memory. If the next disc you load is the same
one, the display shows
playback will resume. For DVD-Video discs,
the player stores the play position of the last
five discs. When one of these discs is next
loaded, you can resume playback.
is shown in the display indicating
RESUME
RESUME
is displayed.)
LAST MEM
and
and
20
En
Note
• The Last Memory function doesn’t work
with VR format DVD-RW, DVD-Audio or
SACD discs.
Page 21
Getting started
0
1
23
4
56
789
RETURN
ENTER
ENTER
04
• If you don’t need the Last Memory function
when you stop a disc, you can press
OPEN/CLOSE
to stop playback and open
the disc tray.
DVD disc menus
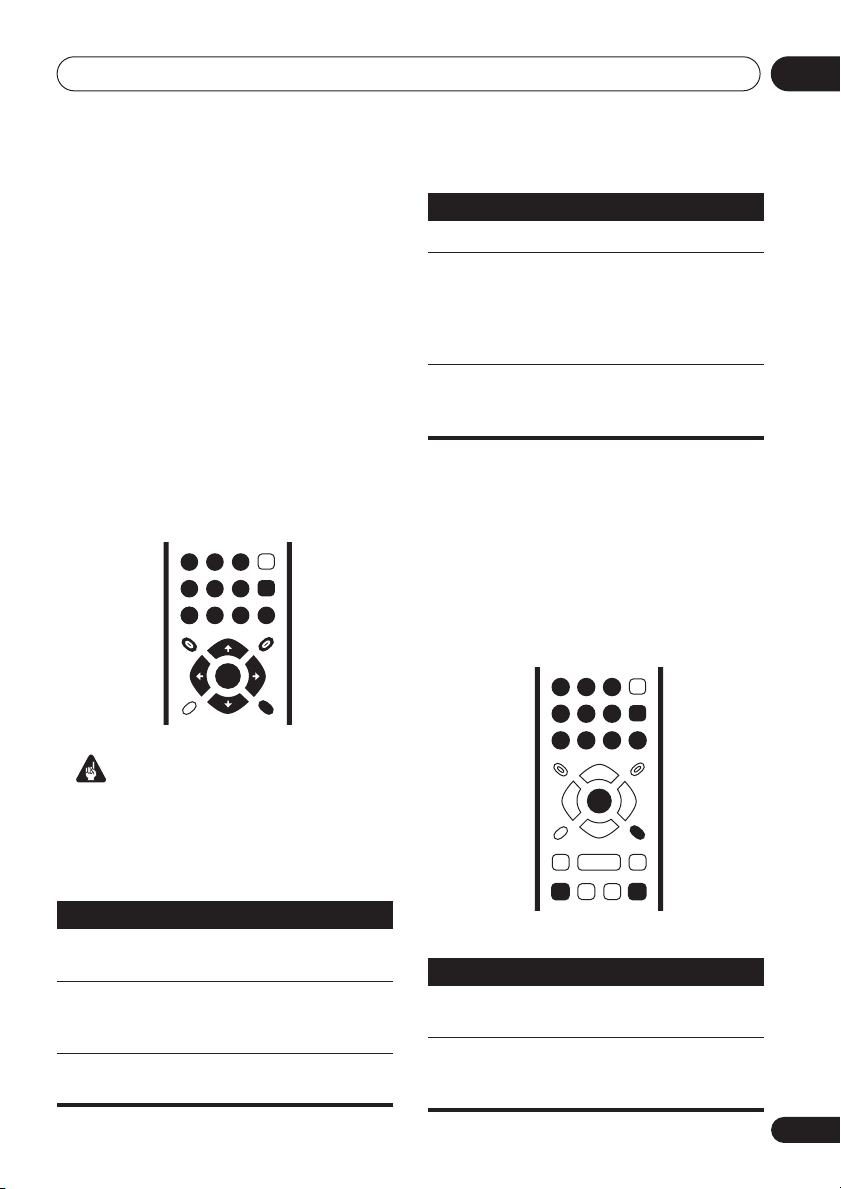
Many DVD-Video and DVD-Audio discs feature
menus from which you can select what you
want to watch. They may also give access to
additional features, such as subtitle and audio
language selection, or special features such as
slideshows. See the disc packaging for details.
Sometimes DVD-Video menus are displayed
automatically when you start playback; others
only appear when you press
MENU
.
1
4
789
TOP MENU MENU
Important
Some DVD-Audio discs feature a ‘bonus
group’. To play this group you first have to input
a password, which you can find on the disc’s
packaging. Use the number buttons to input
the password.
Button
TOP MENU
MENU
What it does
Displays the ‘top menu’ of a DVD
disc—this varies with the disc.
Displays a DVD disc menu—this
varies with the disc and may be
the same as the ‘top menu’.
///
Moves the cursor around the
screen.
23
56
ENTER
MENU
ENTER
0
RETURN
or
TOP
Button
ENTER
RETURN
What it does
Selects the current menu option.
Returns to the previously displayed menu screen. On some
DVD-Audio discs featuring
browsable pictures, press to display the browser screen.
Numbers
(remote
only)
Highlights a numbered menu
option (some discs only). Press
ENTER
to select.
Video CD/Super VCD PBC menus
Some Video CD/Super VCDs have menus from
which you can choose what you want to watch.
These are called PBC (Playback control)
menus.
You can play a PBC Video CD/Super VCD
without having to navigate the PBC menu by
starting playback using a number button to
select a track, rather than the
Button
RETURN
Numbers
(remote
only)
What it does
Displays the PBC menu.
Use to enter a numbered menu
option. Press
ENTER
(play) button.
to select.
21
En
Page 22
Getting started04
Button
What it does
Displays the previous menu page
(if there is one).
Displays the next menu page (if
there is one).
FAQ
• After I load a DVD disc, it ejects
automatically after a few seconds!
Most likely, the disc is the wrong region for
your player. The region number should be
printed on the disc; check it against the
region number of the player (which you can
find on the rear panel). See also
regions
on page 46.
DVD-Video
If the region number is OK, it may be that
the disc is damaged or dirty. Clean the disc
and look for signs of damage. See also
Taking care of your player and discs
on
page 44.
• Why won’t the disc I loaded play?
First check that you loaded the disc the
right way up (label side up), and that it’s
clean and undamaged. See
your player and discs
Taking care of
on page 44 for
information on cleaning discs.
If a disc loaded correctly won’t play, it’s
probably an incompatible format or disc
type, such as DVD-ROM. See
format playback compatibility
Disc / content
on page 7 for
more on disc compatibility.
•I have a widescreen TV so why are there
black bars at the top and bottom of the
screen when I play some discs?
Some movie formats are such that even
when played on a widescreen TV, black
bars are necessary at the top and bottom of
the screen. This is not a malfunction.
•I have a standard (4:3) TV and set the player
to show widescreen DVDs in pan & scan
format, so why do I still get black bars top
and bottom with some discs?
Some discs override the display
preferences of the player, so even if you
have
4:3 (Pan & Scan)
selected, those
discs will still be shown in letter box format.
This is not a malfunction.
• My AV receiver is definitely compatible with
96/88.2kHz Linear PCM audio, but it doesn’t
seem to work with this player. What’s
wrong?
For digital copy-protection purposes, some
96/88.2kHz DVD discs only output digital
audio downsampled to 48/44.1kHz. This is
not a malfunction.
To fully take advantage of the high
sampling rate audio, connect the analog
audio outputs to your amplifier/receiver.
• Why can’t I hear SACD audio through the
digital outputs?
SACD audio is only available through the
analog outputs. This is not a malfunction.
Some DVD-Audio discs too only output
audio through the analog outputs.
• Is it better to listen to DVD-Audio discs
through the analog outputs?
Some DVD-Audio discs do not output
anything through the digital outputs, and
multichannel discs are downmixed to
stereo for the digital output. In addition,
high sampling rate DVD-Audio discs
(higher than 96kHz) automatically
downsample audio output from the digital
outputs.
Using the multichannel analog audio
outputs for DVD-Audio have none of these
limitations.
• My DVD-Audio disc starts playing, but then
suddenly stops!
The disc may have been illegally copied.
22
En
Page 23
Playing discs
Chapter 5
Playing discs
05
Note
• Many of the functions covered in this
chapter apply to DVD and SACD discs,
Video CDs/Super VCDs, CDs, DivX video
and WMA/MP3 JPEG discs, although the
exact operation of some varies slightly with
the kind of disc loaded.
• Some DVDs restrict the use of some
functions (random or repeat, for example)
in some or all parts of the disc. This is not a
malfunction.
• When playing Video CD/Super VCDs, some
of the functions are not available during
PBC playback. If you want to use them,
start the disc playing using a number
button to select a track.
Scanning discs
You can fast-scan discs forward or backward at
four different speeds (DivX video only one
speed).
1 During playback, press or to
start scanning.
• There is no sound while scanning DVDs
(including DVD-Audio), DivX video and
Video CD/Super VCDs.
2 Press repeatedly to increase the
scanning speed.
• The scanning speed is shown on-screen.
3 To resume normal playback, press
(play).
• When scanning a Video CD/Super VCD
playing in PBC mode or a WMA/MP3 track,
playback automatically resumes at the end
or beginning of the track.
• Depending on the disc, normal playback
may automatically resume when a new
chapter is reached on a DVD disc.
Playing in slow motion
You can play DVD-Videos and DVD-R/RW at
four different slow motion speeds, forwards
and backwards. Video CD/Super VCDs and
DivX video can be played at four different
forward slow motion speeds.
1 During playback, press (pause).
/
or
/
2 Press and hold
slow motion playback starts.
• The slow motion speed is shown onscreen.
• There is no sound during slow motion
playback.
3 Press repeatedly to change the slow
motion speed.
4 To resume normal playback, press
(play).
• Depending on the disc, normal playback
may automatically resume when a new
chapter is reached.
until
23
En
Page 24
Playing discs05
Disc Navigator
Frame advance/frame reverse
You can advance or back up DVD-Video and
DVD-R/RW discs frame-by-frame. With Video
CD/Super VCDs and DivX video file you can
only use frame advance.
1 During playback, press (pause).
/
or
/
2 Press
advance a frame at a time.
3 To resume normal playback, press
(play).
• Depending on the disc, normal playback
may automatically resume when a new
chapter is reached.
to reverse or
Viewing a JPEG slideshow
After loading a CD/CD-R/RW containing JPEG
picture files, press
from the first folder/picture on the disc. The
player displays the pictures in each folder in
alphabetical order.
Pictures are automatically adjusted so that
they fill as much of the screen as possible (if
the aspect ratio of the picture is different to
your TV screen you may notice black bars at the
sides, or at the top and bottom of the screen).
While the slideshow is running:
Button
/
(play) to start a slideshow
What it does
Pauses the slideshow; press again to
restart.
Displays the previous picture.
Displays the next picture.
Pauses the slideshow and rotates the
displayed picture 90º (counter)
clockwise. (Press (play) to restart
slideshow.)
Button
/
ZOOM
MENU
• The time it takes for the player to load a file
What it does
Pauses the slideshow and flips the
displayed picture horizontally or
vertically. (Press (play) to restart
slideshow.)
Pauses the slideshow and zooms the
picture. Press again to toggle
between 1x, 2x and 4x zoom. (Press
(play) to restart slideshow.)
Displays the Disc Navigator screen
(see below).
Note
increases with large file sizes.
Browsing DVD or Video CD/
Super VCD disc with the Disc
Navigator
Use the Disc Navigator to browse through the
contents of a DVD-Video,DVD-RW or Video CD/
Super VCD disc to find the part you want to
play.
Important
• You can’t use the Disc Navigator with
Video CD/Super VCDs in PBC mode.
1 During playback, press HOME MENU
and select ‘Disc Navigator’ from the onscreen menu.
24
En
Page 25
Playing discs
05
2 Select a view option.
Disc Navigator
Title
Chapter
The options available depend on the kind of
disc loaded and whether the disc is playing or
not, but include:
•
Title
– Titles from a DVD-Video disc.
•
Chapter
– Chapters from the current title
of a DVD-Video disc.
•
Track
– Tracks from a Video CD/Super VCD
disc.
•
Time
– Thumbnails from a Video CD/Super
VCD disc at 10 minute intervals.
•
Original: Title
– Original titles from a VR
mode DVD-RW disc.
•
Playlist: Title
– Playlist titles from a VR
mode DVD-RW disc.
•
Original: Time
– Thumbnails from the
Original content at 10 minute intervals.
•
Playlist: Time
– Thumbnails from the
Playlist at 10 minute intervals.
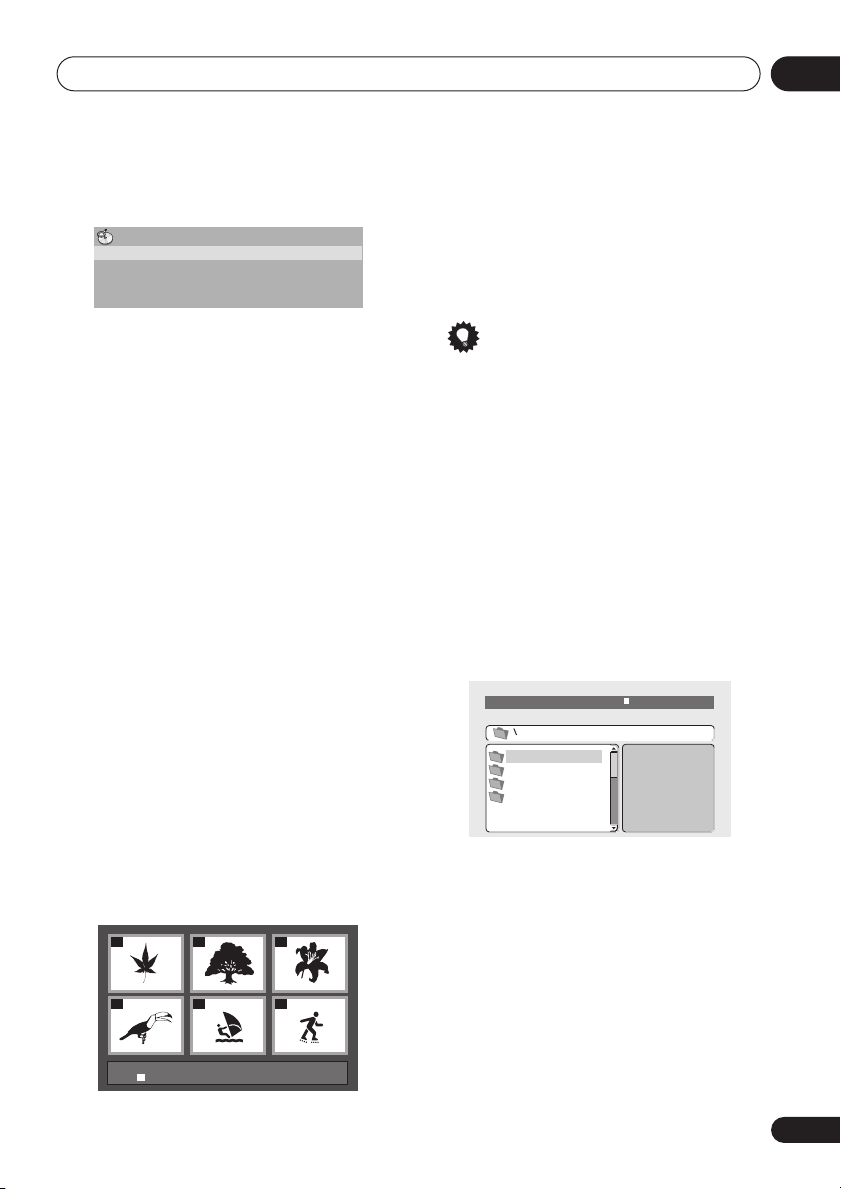
The screen shows up to six moving thumbnail
images displayed one after another. To display
the previous/next six thumbnails, press
(you don’t have to wait for all the
/
thumbnails to finish playing to display the
previous/next page).
3 Select the thumbnail image for what
you want to play.
01
04
Disc Navigator: Title
01- 49: - -
02
05
03
06
You can use either the cursor buttons (
/
) and
ENTER
to select a thumbnail, or the
//
number buttons.
To select using the number buttons, enter a
two-digit number then press
ENTER
.
Tip
• Another way to find a particular place on a
disc is to use one of the search modes. See
Searching a disc
on page 29.
Browsing WMA, MP3, DivX
video and JPEG files with the
Disc Navigator
Use the Disc Navigator to find a particular file
or folder by filename. Note that if there are
other types of files on the same disc, these will
not be displayed in the Disc Navigator.
1 Press HOME MENU and select ‘Disc
Navigator’ from the on-screen menu.
00:00/ 00:00 0kbps
Folder1
Folder2
Folder3
Folder4
2 Use the cursor buttons (
and ENTER to navigate.
Use the cursor up/down buttons (
move up and down the folder/file list.
Use the cursor left button (
parent folder.
Use
ENTER
or cursor right () to open a
highlighted folder.
• You can also return to the parent folder by
going to the top of the list to the ‘
then pressing
ENTER
///
/
) to return to the
.
) to
..
’ folder,
)
25
En
Page 26
Playing discs05
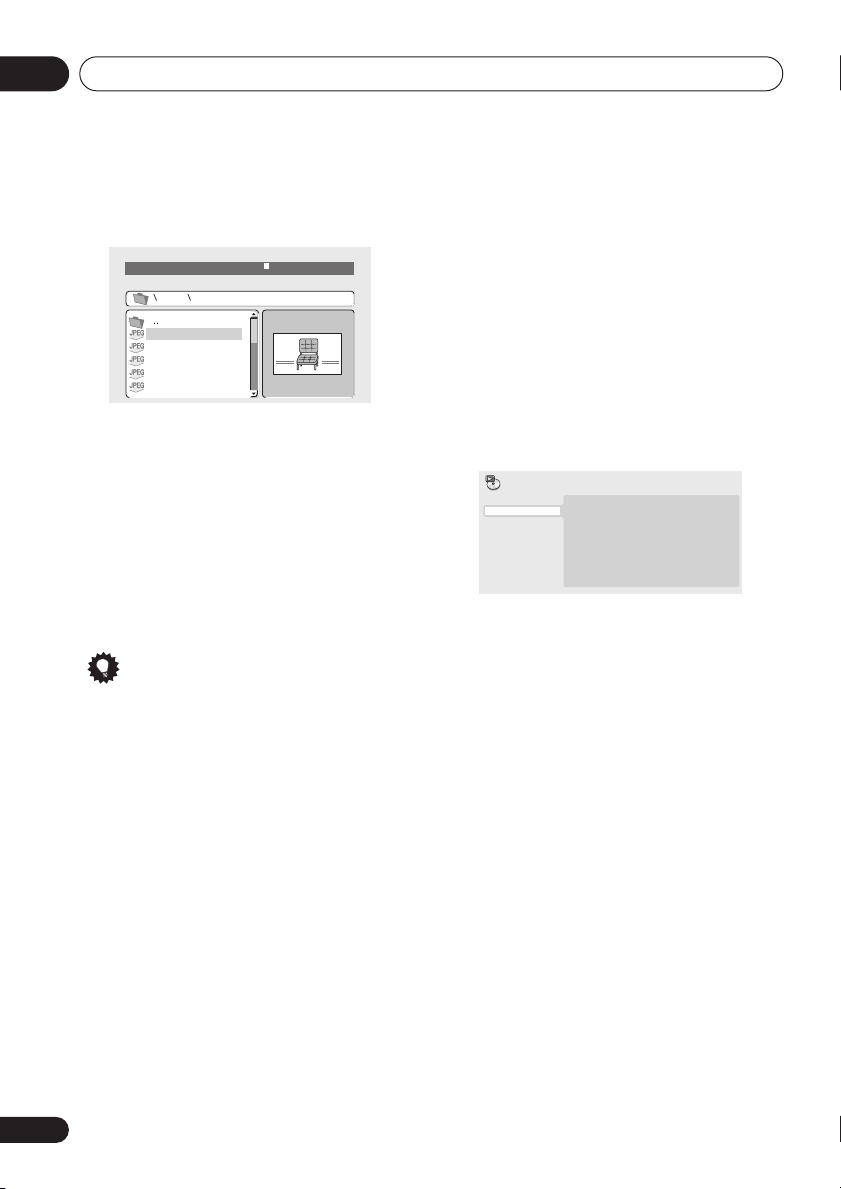
• When a JPEG file is highlighted, a
thumbnail image is displayed on the right.
00:00/ 00:00 0kbps
Folder2
File1
File2
File3
File4
File5
3 To play the highlighted track or DivX
video file or display the highlighted JPEG
file, press ENTER.
• When a WMA/MP3 or DivX video file is
selected, playback begins, starting with the
selected file, and continues until the end of
the folder.
• When a JPEG file is selected, a slideshow
begins, starting with that file, and
continues to the end of the folder.
Tip
• To play the contents of the whole disc
rather than just the current folder, exit the
Disc Navigator and start playback using
the
(play) button.
Looping a section of a disc
The A-B Repeat function allows you to specify
two points (A and B) within a track (CD, Video
CD/Super VCD) or title (DVD-Video and DVDRW) that form a loop which is played over and
over.
• You can’t use A-B Repeat with DVD-Audio,
SACD, Video CD/Super VCDs in PBC
mode, or WMA/MP3/DivX video files.
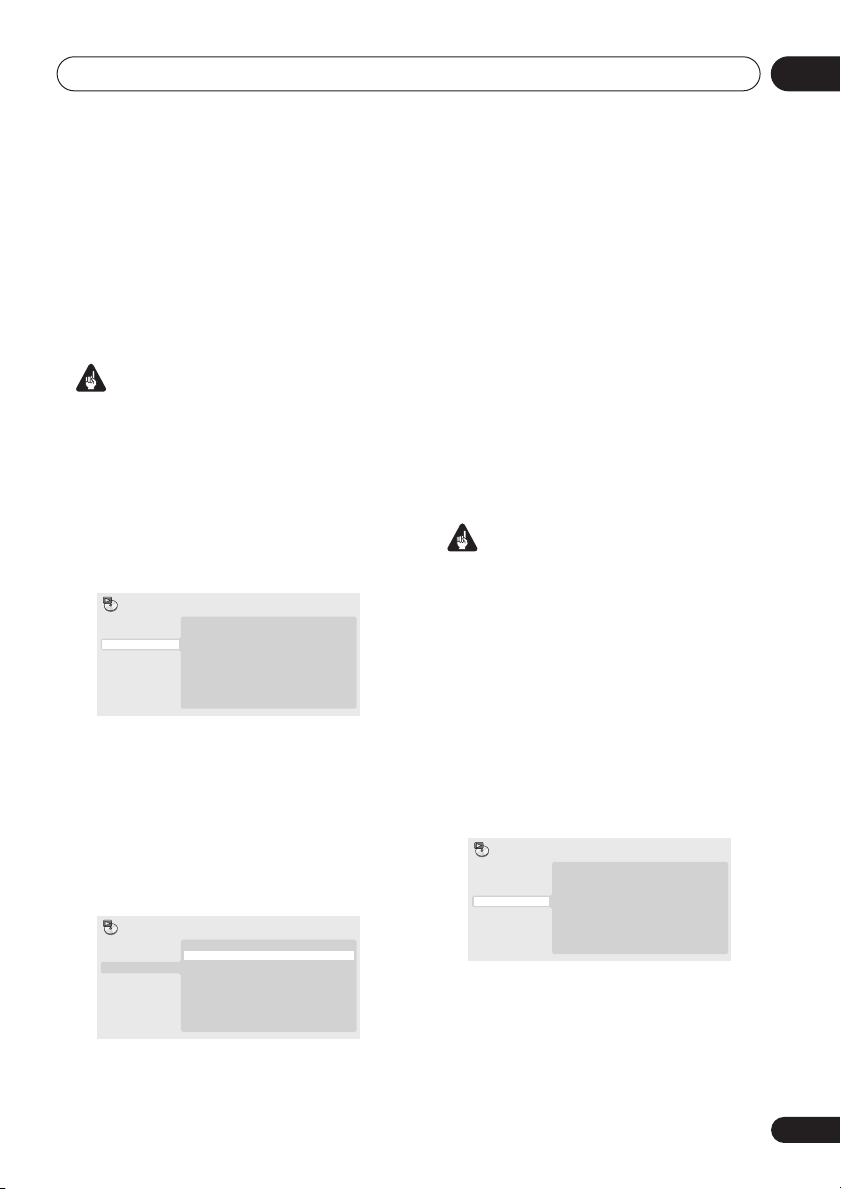
1 During playback, press PLAY MODE and
select ‘A-B Repeat’ from the list of
functions on the left.
Play Mode
A-B Repeat
Repeat
Random
Program
Search Mode
2 Press ENTER on ‘A(Start Point)’ to set
the loop start point.
3 Press ENTER on ‘B(End Point)’ to set the
loop end point.
After pressing
the start point and plays the loop.
4 To resume normal playback, select ‘Off’
from the menu.
A(Start Point)
B(End Point)
Off
ENTER
, playback jumps back to
26
En
Page 27
Playing discs
05
Using repeat play
There are various repeat play options,
depending on the kind of disc loaded. It’s also
possible to use repeat play together with
program play to repeat the tracks/chapters in
the program list (see
page 28).
Important
• You can’t use Repeat play with Video CD/
Super VCDs in PBC mode, or with WMA/
MP3 discs.
• You can’t use repeat and random play at
the same time.
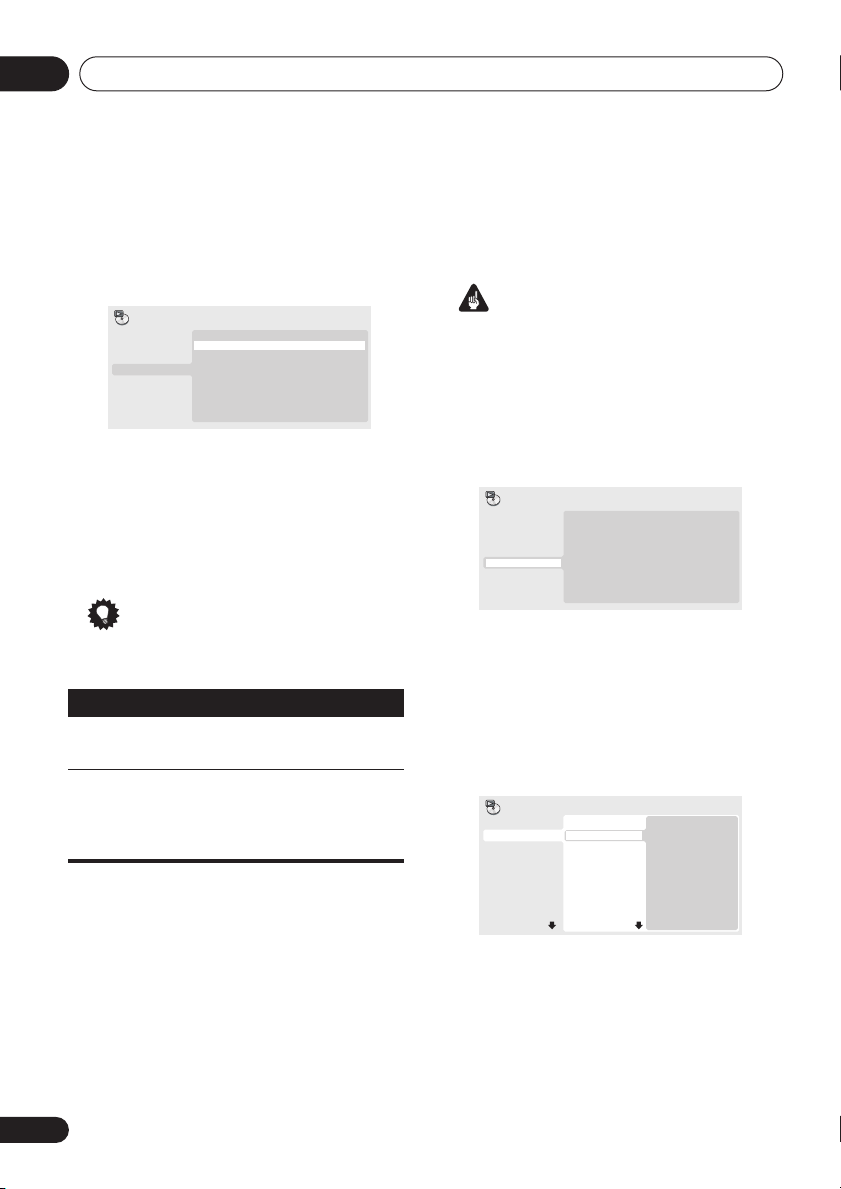
1 During playback, press PLAY MODE and
select ‘Repeat’ from the list of functions on
the left.
Play Mode
A-B Repeat
Repeat
Random
Program
Search Mode
2 Select a repeat play option.
If program play is active, select
Repeat
to repeat the program list, or
Off
to cancel.
The repeat options available depend on the
kind of disc loaded. For example, for DVDVideo and DVD-RW discs, you can select
Repeat
or
Chapter Repeat
Play Mode
A-B Repeat
Repeat
Random
Program
Search Mode
Creating a program list
Title Repeat
Chapter Repeat
Repeat Off
Program
(or
Repeat Off
Title Repeat
Chapter Repeat
Repeat Off
on
Repeat
Title
).
• For SACDs,CDs and Video CD/Super
VCDs, select
(or
Repeat Off
Disc Repeat
).
• For DivX video discs, select
(or
Repeat Off
).
or
Track Repeat
Title Repeat
Using random play
Use the random play function to play titles or
chapters (DVD-Video), Groups (DVD-Audio), or
tracks (DVD-Audio, SACD, CD, Video CD/
Super VCD) at random. (Note that the same
track/title/chapter may play more than once.)
You can set the random play option when a
disc is playing or stopped.
Important
• Random play remains in effect until you
select
Random Off
menu options.
• You can’t use random play with VR format
DVD-RW discs, Video CD/Super VCDs
playing in PBC mode, WMA/MP3 discs,
DivX video discs, or while a DVD disc menu
is being displayed.
• You can't use random play together with
program or repeat play.
1 Press PLAY MODE and select ‘Random’
from the list of functions on the left.
Play Mode
A-B Repeat
Repeat
Random
Program
Search Mode
from the random play
Random Title
Random Chapter
Random Off
• For DVD-Audio discs, select
Repeat
or
Track Repeat
(or
Group
Repeat Off
).
27
En
Page 28
Playing discs05
2 Select a random play option.
The random play options available depend on
the kind of disc loaded. For example, for DVDVideo discs, you can select
Random Chapter
Play Mode
A-B Repeat
Repeat
Random
Program
Search Mode
(or
Random Title
Random Chapter
Random Off
• For DVD-Audio discs, select
Group
or
Off
Random Track
).
Random Title
Random Off
Random
, (or
or
).
Random
• For CDs, SACDs and Video CD/Super
VCDs, select
On
or
Off
to switch random
play on or off.
Tip
• Use the following controls during random
play:
Button
What it does
Selects a new track/title/chapter
at random.
Returns to the beginning of the
current track/title/chapter;
further presses select another
random track/title/chapter.
Creating a program list
This feature lets you program the play order of
titles/chapters/groups/tracks on a disc.
Important
• You can’t use Program play with VR format
DVD-RW discs, Video CD/Super VCDs
playing in PBC mode, WMA/MP3 discs,
DivX video discs, or while a DVD disc menu
is being displayed.
1 Press PLAY MODE and select ‘Program’
from the list of functions on the left.
Play Mode
A-B Repeat
Repeat
Random
Program
Search Mode
2 Select ‘Create/Edit’ from the list of
program options.
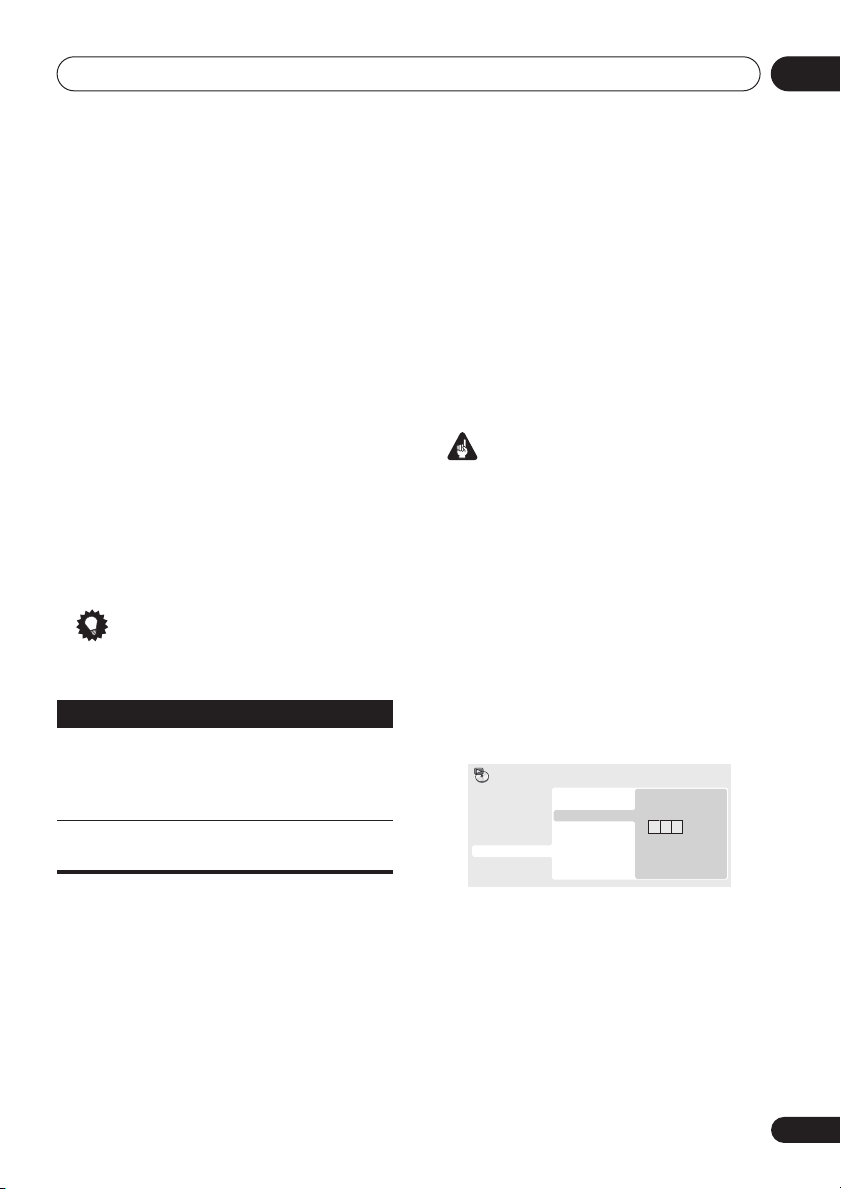
3 Use the cursor buttons and ENTER to
select a title, chapter or track for the
current step in the program list.
For a DVD-Video disc, you can add a title or a
chapter to the program list.
Program
Program Step
01. 01
02.
03.
04.
05.
06.
07.
08.
Create/Edit
Playback Start
Playback Stop
Program Delete
Title 1~38
Title 01
Title 02
Title 03
Title 04
Title 05
Title 06
Title 07
Title 08
Chapter 1~004
Chapter 001
Chapter 002
Chapter 003
Chapter 004
28
En
• For a DVD-Audio disc, you can add a whole
group, or a track within a group to the
program list.
• For a CD, SACD or Video CD/Super VCD,
select a track to add to the program list.
Page 29
Playing discs
05
After pressing
ENTER
to select the title/
chapter/group/track, the step number
automatically moves down one.
4 Repeat step 3 to build up a program list.
A program list can contain up to 24 titles/
chapters/tracks.
• You can insert steps into the middle of a
program list by just highlighting the
position where you want the new step to
appear and entering a title/chapter/group/
track number.
• To delete a step, highlight it and press
CLEAR
.
5 To play the program list, press (play).
Program play remains active until you turn off
program play (see below), erase the program
list (see below), eject the disc or switch off the
player.
Tip
• Use the following controls during program
play:
Button
PLAY
MODE
What it does
Save the program list and exit
the program edit screen without
starting playback (
does the same).
Skip to the next step in the
program list.
HOME MENU
•
Program Delete
– Erases the program list
and turns off program play
Searching a disc
You can search DVD-Video discs by title or
chapter number, or by time; DVD-Audio discs
can be searched by group or track number;
SACDs by track number, CDs and Video CD/
Super VCDs by track number or time; DivX
video discs by time.
Important
• Search functions are not available with
Video CD/Super VCDs in PBC mode, or
with WMA/MP3 discs.
1 Press PLAY MODE and select ‘Search
Mode’ from the list of functions on the left.
2 Select a search mode.
The search options available depend on the
kind of disc loaded.
• The disc must be playing in order to use
time search.
3 Use the number buttons to enter a title,
chapter or track number, or a time.
Play Mode
A-B Repeat
Repeat
Random
Program
Search Mode
Title Search
Chapter Search
Time Search
Input Chapter
0 0 1
Other functions available from the
program menu
There are a number of other options in the
program menu in addition to Create/Edit.
•
Playback Start
saved program list
•
Playback Stop
but does not erase the program list
– Starts playback of a
– Turns off program play,
• For a time search, enter the number of
minutes and seconds into the currently
playing title (DVD/ DivX video) or track (CD/
Video CD/Super VCD) you want playback to
resume from. For example, press
4, 5, 0, 0
to have playback start from 45 minutes into
the disc. For 1 hour, 20 minutes and 30
seconds, press
8, 0, 3, 0
.
29
En
Page 30
Playing discs05
• Some DVD-Audio discs feature pages of
browsable pictures. Enter the page
number you want.
4 Press ENTER to start playback.
Switching subtitles
Some DVD-Video and DivX video discs have
subtitles in one or more languages; the disc
box will usually tell you which subtitle
languages are available. You can switch
subtitle language during playback.
1 Press SUBTITLE repeatedly to select a
subtitle option.
Current / Total
Subtitle English1/2
Note
• Some discs only allow you to change
subtitle language from the disc menu.
Press
TOP MENU
• To set subtitle preferences, see
Language
• See
for more on DivX subtitles.
on page 36.
Displaying DivX subtitle files
or
MENU
to access.
Subtitle
on page 8
Switching audio language/
channels
When playing a DVD-Video and DivX video disc
recorded with dialog in two or more languages,
you can switch audio language during
playback.
When playing a VR format DVD-RW disc
recorded with dual-mono audio, you can
switch between the main, sub, and mixed
channels during playback.
When playing a DVD-Audio disc, you may be
able to switch channels—see the disc box for
details. (When you change the audio channel,
playback restarts from the beginning of the
current track.)
When playing a Video CD/Super VCD, you can
switch between stereo, just the left channel or
just the right channel.
1 Press AUDIO repeatedly to select an
audio language/channel option.
The language/channel information is shown
on-screen.
Note
• Some DVD discs only allow you to change
audio language from the disc menu. Press
TOP MENU
• To set DVD audio language preferences,
see
or
MENU
Language settings
to access.
on page 36.
Zooming the screen
Using the zoom feature you can magnify a part
of the screen by a factor of 2 or 4, while
watching a DVD, DivX video title or Video CD/
Super VCD or playing a JPEG disc.
1 During playback, use the ZOOM button
to select the zoom factor (Normal, 2x or
4x).
• Since DVD, Video CD/Super VCD, DivX
video title and JPEG pictures have a fixed
resolution, picture quality will deteriorate,
especially at 4x zoom. This is not a
malfunction.
2 Use the cursor buttons to change the
zoomed area.
You can change the zoom factor and the
zoomed area freely during playback.
• If the navigation square at the top of the
screen disappears, press
display it.
ZOOM
again to
30
En
Page 31
Playing discs
Switching camera angles
Some DVD discs feature scenes shot from two
or more angles—check the disc box for details.
When a multi-angle scene is playing, a
icon appears on screen to let you know that
other angles are available (this can be
switched off if you prefer—see
on page 36).
1 During playback (or when paused),
press ANGLE to switch angle.
Display settings
Displaying disc information
Various track, chapter and title information,
such as the elapsed and remaining playing
time can be displayed on-screen while a disc is
playing.
1 To show/switch/hide the information
displayed, press DISPLAY repeatedly.
• When a disc is playing, the information
appears at the top of the screen. Keep
pressing
information.
DISPLAY
to change the displayed
05
31
En
Page 32
Audio Settings and Video Adjust menus06
Chapter 6
Audio Settings and Video
Adjust menus
Audio Settings menu
The Audio Settings menu offers features for
adjusting the way discs sound.
1 Press HOME MENU and select ‘Audio
Settings’ from the on-screen display.
Audio Settings
2 Select and change settings using the
//
(cursor) buttons, and ENTER.
Audio Settings
Virtual Surround
Audio DRC
Dialog
On
Off
Audio DRC
• Settings:
(default)
When watching Dolby Digital DVDs at low
volume, it’s easy to lose the quieter sounds
completely—including some of the dialog.
Switching Audio DRC (Dynamic Range
Control) to on can help by bringing up the
quieter sounds, while controlling loud peaks.
How much of a difference you hear depends on
the material you’re listening to. If the material
doesn’t have wide variations in volume, you
may not notice much change.
High, Medium, Low, Off
/
Note
• Audio DRC is only effective with Dolby
Digital audio sources.
• Audio DRC is only effective through the
digital output when
On
, and
Digital > PCM
settings
• The effect of Audio DRC also depends on
your speakers and AV receiver settings.
Dolby Digital Out
on page 34).
Digital Out
(see
Digital Audio Out
is set to
is set to
Dolby
Virtual Surround
• Settings: On,
Switch on Virtual Surround to enjoy realistic
surround sound effects from just two speakers.
Tip
• You can also use the
on the remote control to switch Virtual
Surround on.
Note
• 96kHz linear PCM audio is automatically
downsampled to 48kHz if Virtual Surround
is switched on.
• The
Audio Output Mode
must be set to
able to use Virtual Surround.
Off
(default)
SURROUND
2 Channel
button
(see page 40)
in order to be
32
En
Page 33
Audio Settings and Video Adjust menus
06
• If the player is outputting Dolby Digital,
DTS or MPEG bitstream audio (in other
words, no conversion to PCM), Virtual
Surround has no effect on the audio from
the digital output. See
settings
on page 34 for how to set up the
Digital Audio Out
digital output formats.
• How good the surround effect is varies with
the disc.
Dialog
• Settings:
(default)
The Dialog feature is designed to make the
dialog stand out from other background
sounds in the soundtrack.
High, Medium, Low, Off
Video Adjust menu
From the Video Adjust screen you can adjust
various settings that affect how the picture is
presented.
1 Press HOME MENU and select ‘Video
Adjust’ from the on-screen display.
Video Adjust
2 Make settings using the
///
(cursor) buttons, and ENTER.
•
Brightness
brightness (
Contrast
•
light and dark (
•
Gamma
picture (
(default)
•
Hue
(
Green 9
•
Chroma Level
colors appear (
•
BNR
reduction (
– Adjusts the overall
–20
to
+20
).
– Adjusts the contrast between
–16
to
+16
).
– Adjusts the ‘warmth’ of the
High, Medium, Low, Off
).
– Adjusts the red/green balance
to
Red 9
).
– Adjusts how saturated
–9
to +9).
– Switches on/off block noise
On, Off
(default)
).
Adjust the Brightness, Contrast, Hue and
Chroma Level settings using the
/
(cursor
left/right) buttons.
Brightness min max 0
3 Press ENTER to return to the Video
Adjust screen, or HOME MENU to exit.
Video Adjust
Sharpness
Brightness
Contrast
Gamma
Hue
Chroma Level
BNR
Standard
0
0
Off
0
0
Off
You can adjust the following picture quality
settings:
•
Sharpness
edges in the picture (
(default), Soft
– Adjusts the sharpness of
Fine, Standard
).
33
En
Page 34
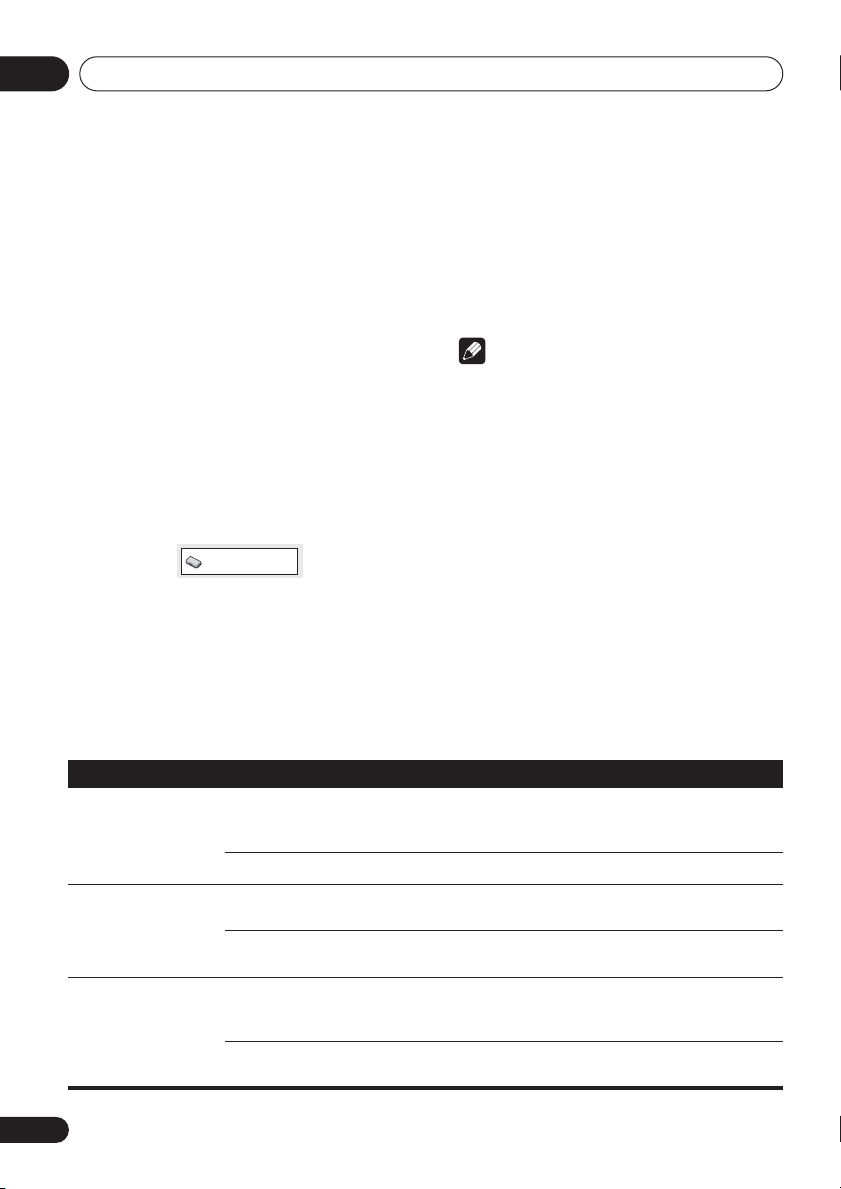
Initial Settings menu07
Chapter 7
Initial Settings menu
Using the Initial Settings menu
The Initial Settings menu provides audio and
video output settings, parental lock settings,
and display settings, among others.
If an option is grayed out it means that it
cannot be changed at the current time. This is
usually because a disc is playing. Stop the
disc, then change the setting.
1 Press HOME MENU and select ‘Initial
Settings’.
Initial Settings
2 Use the cursor buttons and ENTER to
select the setting and option you want to
set.
All the settings and options are explained on
the following pages.
Note
• In the table below, the default setting is
shown in
italics
• The Digital Audio Out settings only need to
be set if you have connected the digital
output of this player to an AV receiver, or
other equipment.
• Check the operating instructions supplied
with your other equipment to see which
digital audio formats it’s compatible with.
• Some settings, such as
Language
overridden by the DVD disc. Often these
settings can also be made from the DVD
disc menu.
bold
: other settings are shown in
.
and
TV Screen, Audio
Subtitle Language
may be
Digital Audio Out settings
Setting
Digital Out On
Dolby Digital Out Dolby Digital
DTS Out DTS
34
En
Option What it means
Off
Dolby Digital > PCM
DTS > PCM
Digital audio is output from the digital outputs.
Note that there is no digital output when playing SACDs and
DVD-Audio discs regardless of this setting.
No digital audio output.
Dolby Digital encoded digital audio is output when playing a
Dolby Digital DVD disc.
Dolby Digital audio is converted to PCM audio before being
output.
DTS encoded digital audio is output when playing a DTS disc.
(Noise will be output if your amplifier/receiver is not compatible
with DTS audio.)
No digital audio is output when playing a DTS disc.DTS audio
is converted to PCM audio before being output.
Page 35
Initial Settings menu
07
Setting
Linear PCM Out Down Sample On
MPEG Out MPEG > PCM
Option What it means
96kHz digital audio is converted to 48kHz for digital output.
Note that High sampling rate DVD-Audio discs (192kHz or
176.4kHz) automatically output down-sampled audio through
the digital outputs.
Down Sample Off
MPEG
96kHz digital audio is output as is at 96kHz.
MPEG encoded digital audio is converted to PCM audio for
digital output.
MPEG encoded digital audio is output as is.
Video Output settings
Setting Option What it means
TV Screen
(See also
Screen sizes
and disc formats
page 45.)
on
4:3 (Letter Box)
4:3 (Pan & Scan)
16:9 (Wide)
Component Out Interlace
Progressive
AV Connector Out Video
RGB
Set if you have a conventional 4:3 TV. Widescreen movies are
shown with black bars top and bottom.
Set if you have a conventional 4:3 TV. Widescreen movies are
shown with the sides cropped so that the image fills the screen.
Set if you have a widescreen TV.
Set if your TV is not compatible with progressive scan video.
Set if your TV is compatible with progressive scan video (see
your TV’s instruction manual for details). See also
the video output to interlace using the front panel controls
page 12.
Note that progressive scan video is only output from the
component video jacks.
Ordinary (composite) video output, compatible with all TVs.
If your TV is compatible, this setting gives the best picture
quality.
Note that there is no output from the component jacks when
this setting selected.
Switching
on
35
En
Page 36
Initial Settings menu07
Language settings
Setting
Option What it means
Audio Language English
Languages as displayed
Other Language
Subtitle Language
(See also
Displaying
DivX subtitle files
page 8.)
English
on
Languages as displayed
Other Language
DVD Menu
w/Subtitle Lang.
Language
Languages as displayed
Other Language
Subtitle Display On
Off
Display settings
If there is an English soundtrack on the disc then it will be
played.
If there is the language selected on the disc, then it will be
played.
Select to choose a language other than the ones displayed (see
page 47).
If there are English subtitles on the disc then they will be
displayed.
If there is the subtitle language selected on the disc, then it will
be displayed.
Select to choose a language other than the ones displayed (see
page 47).
DVD disc menus will be displayed in the same language as
your selected subtitle language, if possible.
DVD disc menus will be displayed in the selected language, if
possible.
Select to choose a language other than the ones displayed (see
page 47).
Subtitles are displayed according to your selected subtitle
language (see above).
Subtitles are always off by default when you play a DVD disc
(note that some discs override this setting).
Setting
OSD Language English
Angle Indicator On
36
En
Option What it means
On-screen displays of the player are in English.
Languages as displayed
Off
On-screen displays are shown in the language selected.
A camera icon is displayed on-screen during multi-angle
scenes on a DVD disc.
No multi-angle indication is shown.
Page 37
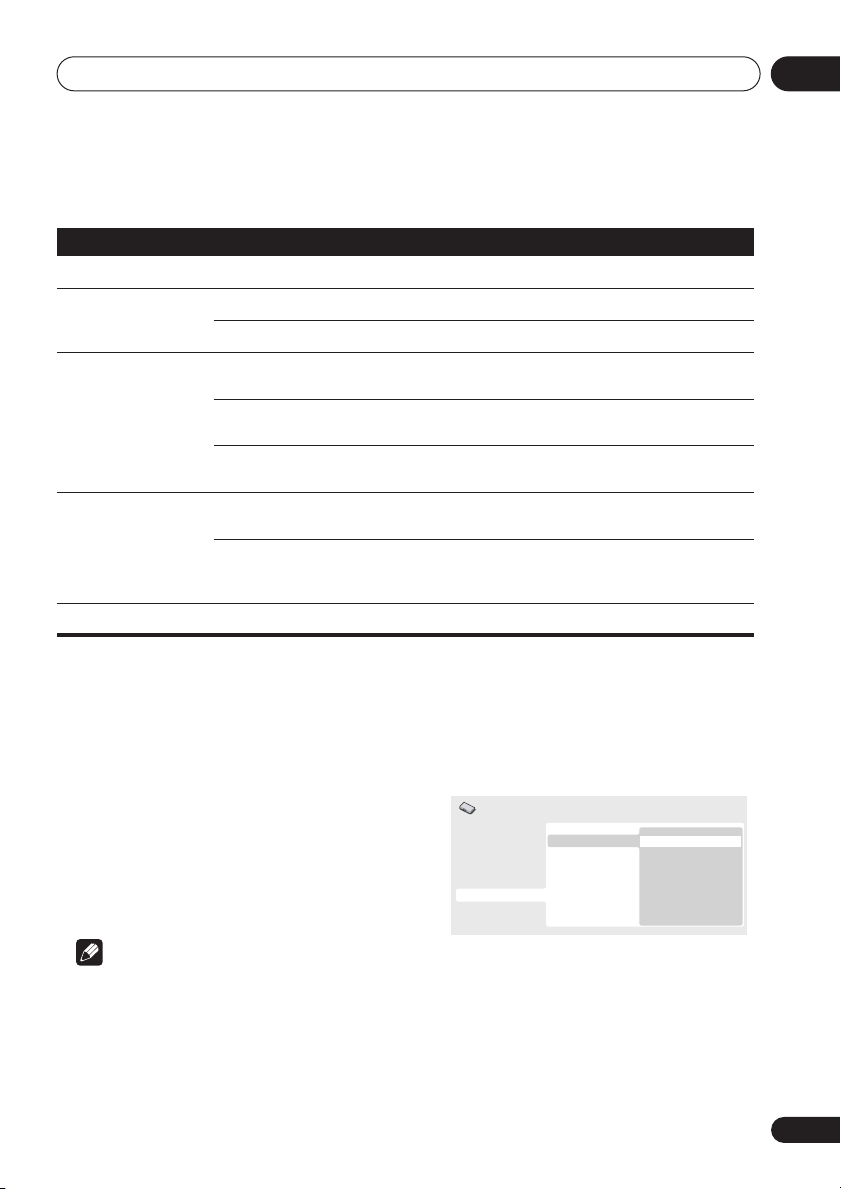
Initial Settings menu
Options settings
07
Setting
Option What it means
Parental Lock –
DVD Playback
Mode
DVD-Audio
DVD-Video
SACD Playback 2ch Area
Multi-ch Area
CD Area
DTS Downmix Stereo
Lt/Rt
DivX VOD Display
Parental Lock
• Default level:
Default Country/Area code:
To give you some control over what your
children watch on your DVD player, some DVDVideo discs feature a Parental Lock level. If
your player is set to a lower level than the disc,
the disc won’t play.
Some discs also support the Country/Area
Code feature. The player does not play certain
scenes on these discs, depending on the
Country/Area Code you set.
Off
; Default password:
us (2119)
none
See
Parental Lock
All material on a DVD-Audio disc is playable.
Only the DVD-Video part of a DVD-Audio disc is playable.
Selects the 2 channel (strereo) SACD audio area of the disc
for playback.
Selects the multi-channel SACD audio area of the disc for
playback.
Selects the standard CD audio area of an SACD/CD hybrid
disc for playback.
Downmixes DTS for 2 channel output to regular stereo. (See
also
DTS Downmix
Downmixes DTS for 2 channel output to be compatible with
Dolby Surround matrix decoders. (See also
page 38.)
See
About DivX® VOD content
on page 37.
on page 38.)
on page 39.
DTS Downmix
on
Registering a new password
You must register a password before you can
;
change the Parental Lock level or enter a
Country code.
1 Select ‘Options’, then ‘Password’.
Initial Settings
Digital Audio Out
Video Output
Language
Display
Options
Speakers
Parental Lock
DVD Playback Mode
SACD Playback
DTS Downmix
DivX VOD
Password
Level Change
Country Code
Note
• Not all discs use Parental Lock, and will
play without requiring the password first.
• If you forget your password, you’ll need to
reset the player to register a new password.
(see
Resetting the player
on page 46)
2 Use the number buttons to enter a 4digit password.
The numbers you enter show up as asterisks
(*) on-screen.
3 Press ENTER to register the password.
You will return to the Options menu screen.
37
En
Page 38
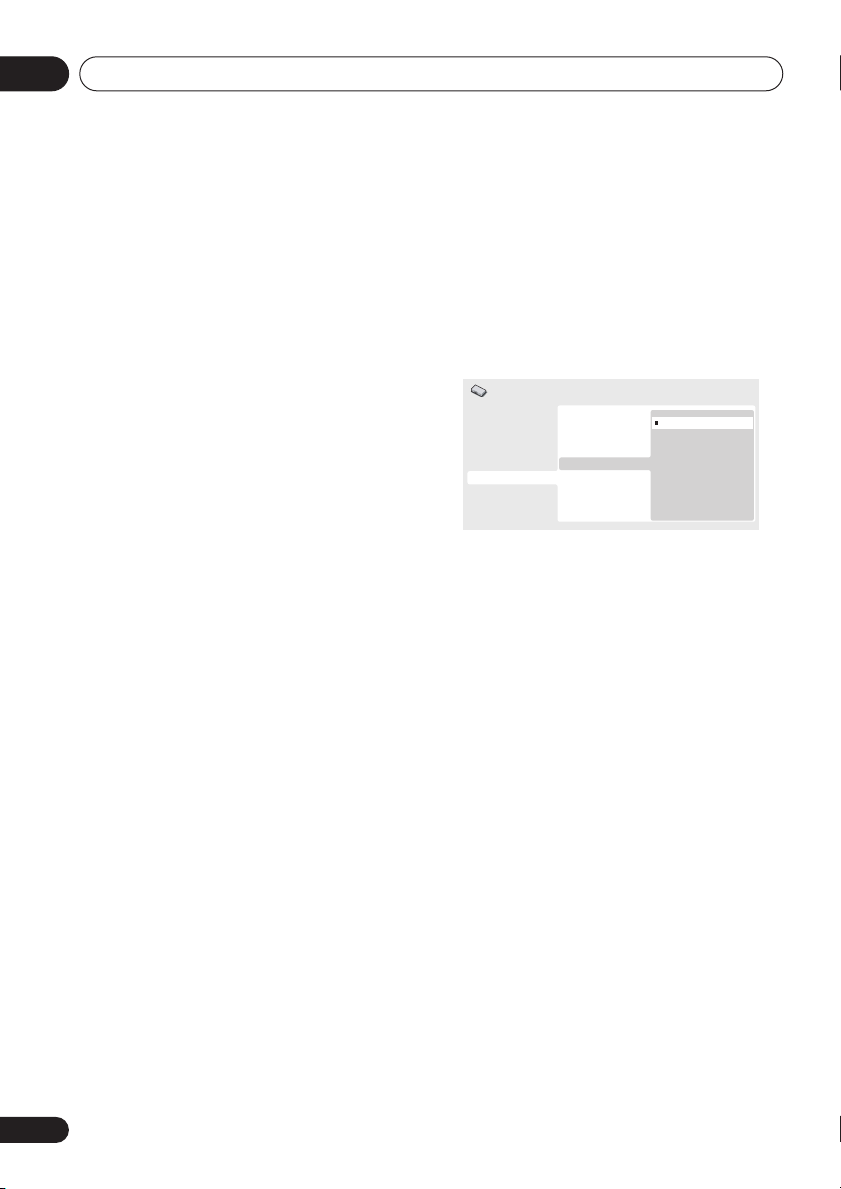
Initial Settings menu07
Changing your password
To change your password, confirm your
existing password then enter a new one.
1 Select ‘Password Change’.
2 Use the number buttons to enter your
existing password, then press ENTER.
3 Enter a new password and press ENTER.
This registers the new password and you will
return to the Options menu screen.
Setting/changing the Parental Lock
1 Select ‘Level Change’.
2 Use number buttons to enter your
password, then press ENTER.
3 Select a new level and press ENTER.
• Press (cursor left) repeatedly to lock
more levels (more discs will require the
password); press
(cursor right) to
unlock levels. You can’t lock level 1.
This sets the new level and you will return to the
Options menu screen.
Setting/changing the Country/Area
code
You can find the
page 48.
1 Select ‘Country Code’.
2 Use number buttons to enter your
password, then press ENTER.
3 Select a Country/Area code and press
ENTER.
There are two ways you can do this:
• Select by code letter: Use
down) to change the Country/Area code.
• Select by code number: Press
right) then use the number buttons to enter
the 4-digit Country/Area code.
Country/Area code list
/
(cursor up/
on
(cursor
The new Country/Area code is set and you will
return to the Options menu screen. Note that
the new Country/Area code doesn’t take effect
until the next disc is loaded (or the current disc
is reloaded).
DTS Downmix
• Default setting:
Initial Settings
Digital Audio Out
Video Output
Language
Display
Options
Speakers
If you’ve selected
page 34 or
2 Channel
page 40, you can choose the way the signal is
downmixed to PCM audio.
downmix the DTS signal to 2-channel stereo,
whereas
Lt/Rt
signal compatible with Dolby surround matrix
decoders. (This allows you to hear surround
sound if your AV receiver or amplifier has Dolby
Pro Logic capability.)
Stereo
Parental Lock
DVD Playback Mode
SACD Playback
DTS Downmix
DivX VOD
DTS > PCM
in
Stereo
Lt/Rt
in
DTS Out
on
Audio Output Mode
Stereo
will
will downmix to a 2-channel
on
38
En
Page 39
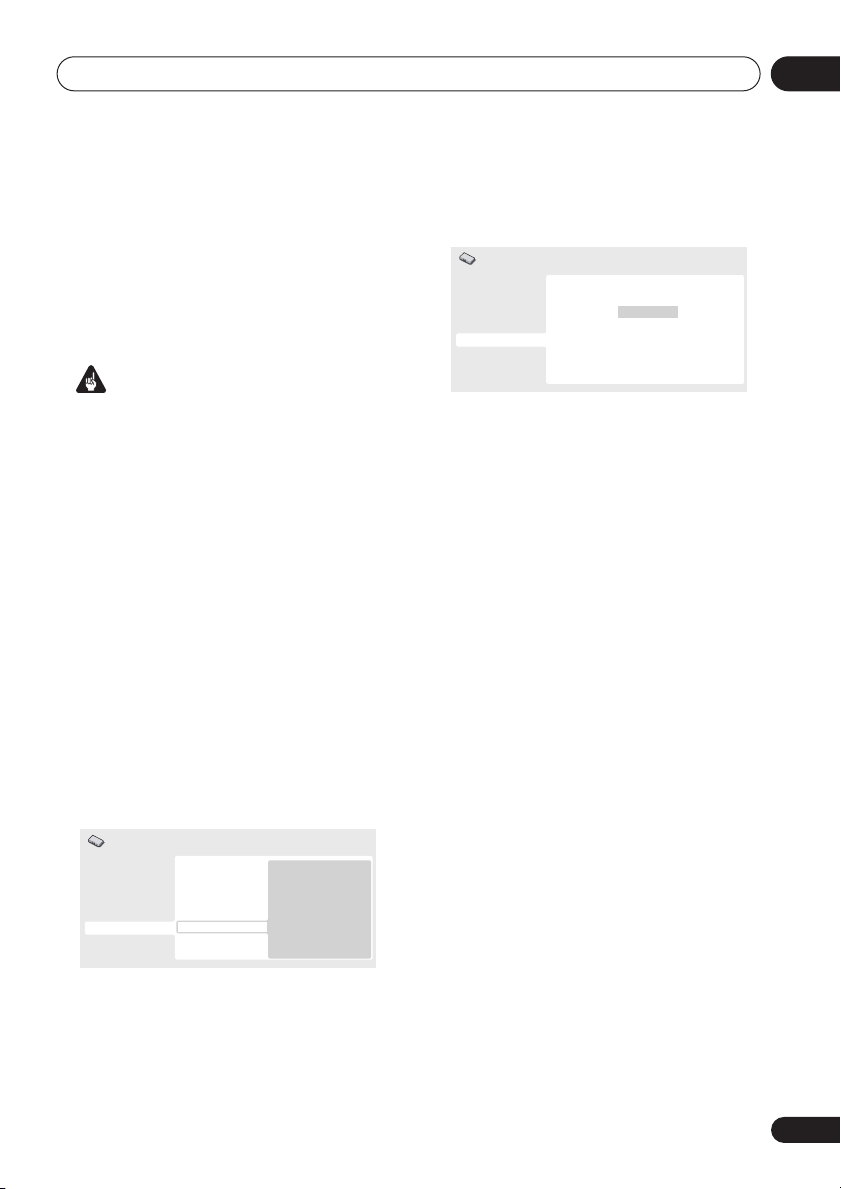
Initial Settings menu
07
About DivX® VOD content
In order to play DivX VOD (video on demand)
content on this player, you first need to register
the player with your DivX VOD content
provider. You do this by generating a DivX VOD
registration code, which you submit to your
provider.
Important
• DivX VOD content is protected by a DRM
(Digital Rights Management) system. This
restricts playback of content to specific,
registered devices.
• If you load a disc that contains DivX VOD
content not authorized for your player, the
message
Authorization Error
is displayed
and the content will not play.
• Resetting the player (as described in
Resetting the player
in the main Operating
Instructions) will not cause you to lose your
registration code.
Displaying your DivX VOD
registration code
1 Press HOME MENU and select ‘Initial
Settings’.
2 Select ‘Options’, then ‘DivX VOD’.
3 Select ‘Display’.
Your 8-digit registration code is displayed.
Initial Settings
Digital Audio Out
Video Output
Language
Display
Options
Speakers
DivX VOD Registration Code
0 1 2 3 4 5 6 7
Make a note of the code as you will need it
when you register with a DivX VOD provider.
Playing DivX® VOD content
Some DivX VOD content may only be playable
a fixed number of times. When you load a disc
containing this type of DivX VOD content, the
remaining number of plays is shown on-screen
and you then have the option of playing the
disc (thereby using up one of the remaining
plays), or stopping. If you load a disc that
contains expired DivX VOD content (for
example, content that has zero remaining
plays), the message
displayed.
If your DivX VOD content allows an unlimited
number of plays, then you may load the disc
into your player and play the content as often
as you like, and no message will be displayed.
Rental Expired
is
Initial Settings
Digital Audio Out
Video Output
Language
Display
Options
Speakers
Parental Lock
DVD Playback Mode
SACD Playback
DTS Downmix
DivX VOD
Display
39
En
Page 40
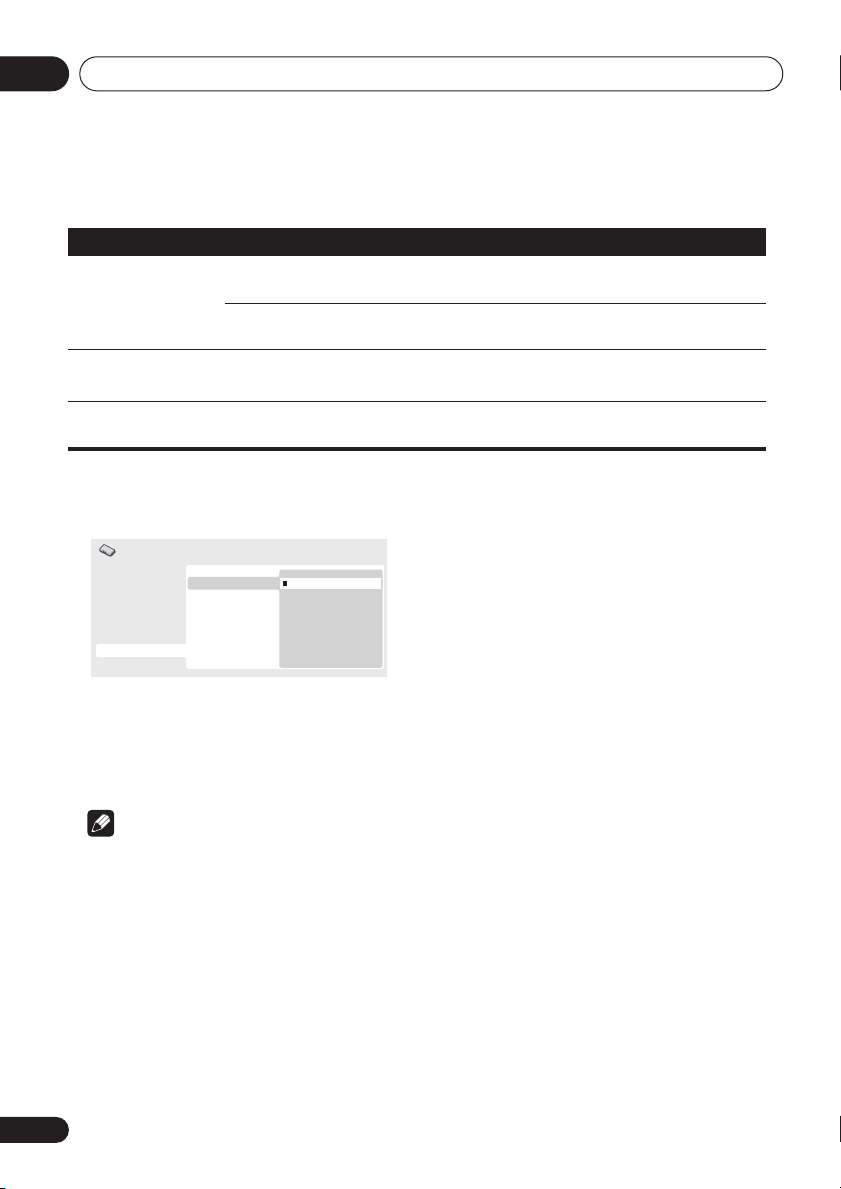
Initial Settings menu07
Speakers settings
Setting
Audio Output
Option What it means
2 Channel
Mode
5.1 Channel
Speaker
–
Installation
Speaker Distance –
Audio Output Mode
• Default setting:
Initial Settings
Digital Audio Out
Video Output
Language
Display
Options
Speakers
If you connected this player to your amplifier
using the 5.1 channel analog outputs (front,
surround, center and subwoofer outs), set this
to
5.1 Channel
stereo outs, set to
2 Channel
Audio Output Mode
Speaker Distance
Speaker Installation
2 Channel
5.1 Channel
; if you connected only the
2 Channel
.
The player outputs analog audio in stereo only. See also
Audio Output Mode
The player outputs 5.1 channel analog audio. See also
Output Mode
Specify the number and size of speakers in your system. See
also
Speaker Installation
Specify the distance of your speakers from your listening
position.
Speaker Distance
• When set to
below.
below.
on page 43.
on page 42.
5.1 Channel
Audio
there is no digital
output when playing DVD-Audio.
• If you set to
2 Channel
, Dolby Digital, DTS
and MPEG audio is mixed down to two
channels so you still hear all the audio
recorded on the disc. With DTS encoded
audio, you can choose how the signal is
downmixed to PCM audio. See
Downmix
on page 38 to change the
DTS
downmix setting.
• Some DVD-Audio discs don’t allow downmixing of audio. These discs always output
multi-channel audio regardless of the
setting made here.
• Even if you set
• When set to
40
En
Note
Channel
Audio Output Mode
, you’ll only get sound from all
to
5.1
speakers when playing a 5.1 channel multichannel disc.
5.1 Channel
, only the front
left/right channels are output from the
AUDIO OUT (2ch)
Channel
if you want to listen to downmixed
jacks. Change to
2
stereo audio (for example, because you are
listening through the TV’s built-in
speakers).
Page 41
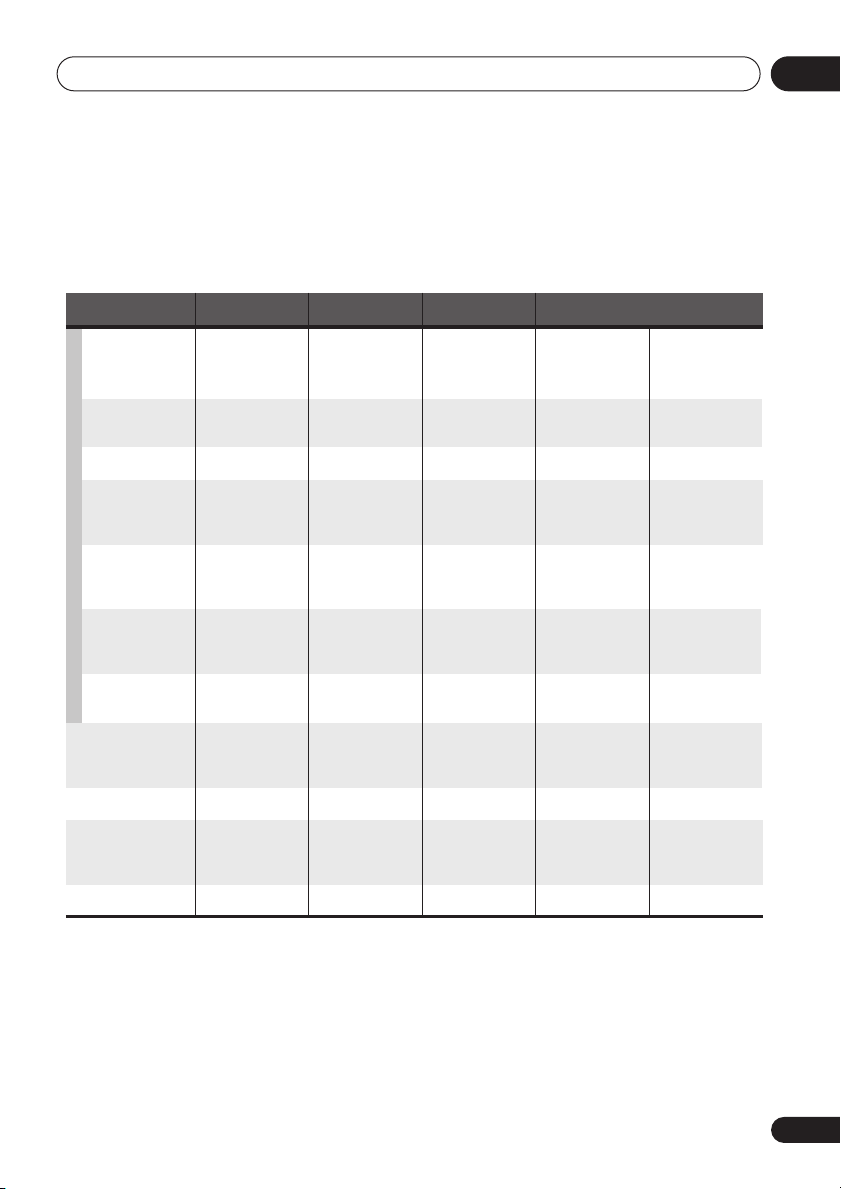
Initial Settings menu
About the audio output settings
The table below shows how the audio settings you make in the Initial Settings menu (see page 34)
affect the output from the 2 channel and the 5.1 channel analog outputs, and from the digital
outputs with various types of disc.
07
Disc audio format Player setting
Dolby Digital
2 Ch
5.1 Ch
Dolby Digital
2 Ch / 5.1 Ch
karaoke
Linear PCM
DTS
DVD
MPEG
2 Ch / 5.1 Ch
2 Ch
5.1 Ch
2 Ch
5.1 Ch
DVD-Audio
2 Ch
5.1 Ch
DVD-RW
2 Ch / 5.1 Ch
(VR mode)
Super Audio CD
2 Ch
5.1 Ch
CD
DTS CD
2 Ch / 5.1 Ch
2 Ch
5.1 Ch
Video CD
2 Ch / 5.1 Ch
Front L/R
analog outputs
2ch downmix
Front L / R
Left / Right Left / Right
Left / Right
2ch downmix
Front L / R
Left / Right
Front L / R
2ch downmix
Front L / R
Left / Right
2ch downmix
Front L / R
Left / Right
2ch downmix
Front L / R
Left / Right
Surround L/R
*1
Center, SW, outputs
–
Surround L/R,
Center, SW
–
–
–
Surround L/R,
Center, SW
–
Surround L/R,
Center, SW
*4
–
Surround L/R,
Center, SW
*6
–
–
Surround L/R,
Center, SW
–
–
Surround L/R,
Center, SW
–
Digital outputs
*1
PCM convert*2Bitstream
2ch downmix
Left / Right Left / Right
2ch downmix
Left / Right
2ch downmix
––
Left / Right
–
Left / Right Left / Right
2ch downmix
Left / Right Left / Right
Dolby Digital
Dolby Digital
DTS
MPEG
*5
2ch downmix
Dolby Digital
MPEG or PCM
–
DTS
*3
*5
*1
When
Audio Output Mode
of stereo audio outputs.
*2 Dolby Digital > PCM, MPEG > PCM
*3 Dolby Digital, MPEG
*4
Discs that prohibit downmixing will be output as 5.1 channel even if
Mode
setting (see page 40).
*5
Discs that prohibit downmixing also mute the digital output.
*6
When
Audio Output Mode
is set to
or
DTS
setting (pages 34–35)
is set to
2 Channel
or
DTS > PCM
5.1 Channel
, the
AUDIO OUT (5.1ch) FRONT L / R
setting (pages 34–35)
, mono sources are heard from the center speaker only.
2 Channel
jacks act as a second pair
is selected as the
Audio Output
41
En
Page 42
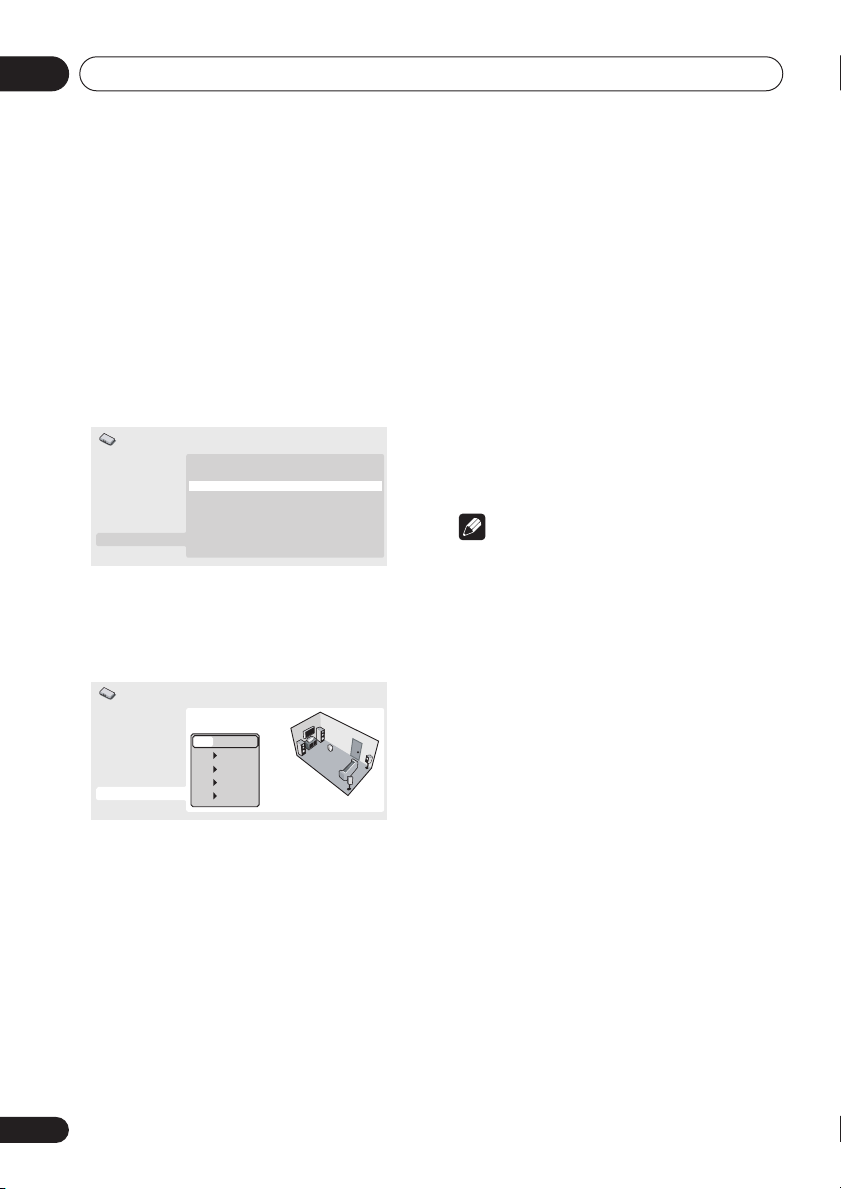
Initial Settings menu07
Speaker Distance
• Default settings: all speakers
You only need to make this setting if you
connected this player to your amplifier using the
5.1 channel analog outputs.
These settings do not affect any digital audio
output.
To get the best surround sound from your
system, you should set up the speaker
distances from your listening position.
Initial Settings
Digital Audio Out
Video Output
Language
Display
Options
Speakers
Audio Output Mode 5.1 Channel
Speaker Distance
Speaker Installation
1 Use the / (cursor up/down) to select
a speaker.
• The L and R speakers are paired; you can’t
set them differently.
Initial Settings
Digital Audio Out
Video Output
Language
Display
Options
Speakers
L
3.0m
C
3.0m
R
3.0m
SR
3.0m
SL
3.0m
3.0 m
• Front left/right (
L/R
) speaker distances can
be set from 30 cm to 9 m in 30 cm increments.
• The center speaker (
C
) can be set from –2.1
m to 0.0 m relative to the front left/right
speakers.
• Surround left/right (
SL/SR
) speakers can
be set from –6.0 m to 0.0 m relative to the
front left/right speakers.
• You can’t set the subwoofer (
SW
) distance.
4 Press (cursor left) to go back to the
speaker list if you want to modify another
speaker, or press ENTER to exit the Speaker
Distance screen.
Note
During playback of SACD and MPEG-audio
DVD-Video discs, the effective
C, SL
and SR
speaker distance settings are –0.9m to 0.0m
relative to the front left/right speakers.
2 Press (cursor right) to change the
speaker distance for the highlighted
speaker.
3 Use the
/ (cursor up/down) to
change the distance.
• When you change the distance settings of
the front left (
L
) or front right (R) speakers,
all the other speaker distances change
relative to it.
42
En
Page 43
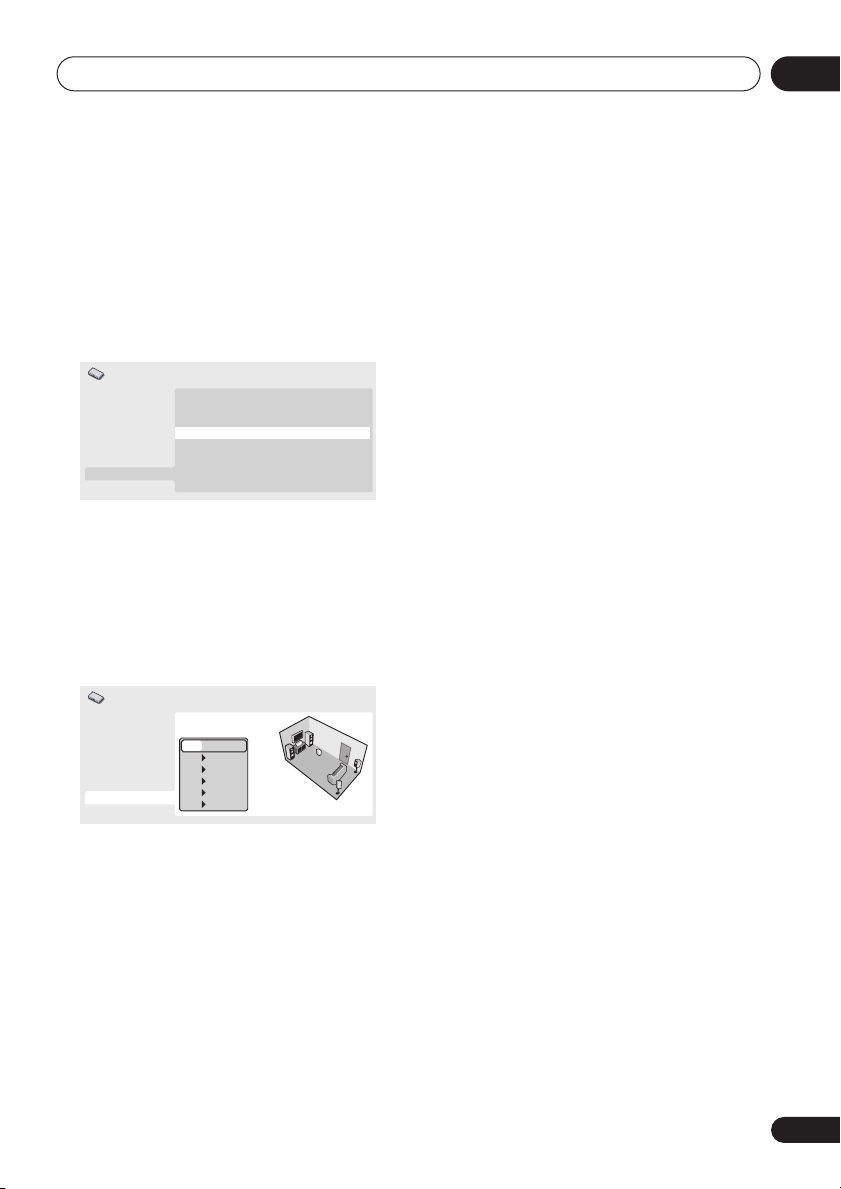
Initial Settings menu
Speaker Installation
• Default settings:
SR: Large
You only need to make this setting if you
connected this player to your amplifier using the
5.1 channel analog outputs.
This setting does not affect digital audio output.
Initial Settings
Digital Audio Out
Video Output
Language
Display
Options
Speakers
Use the Speaker Installation screen to tell the
player what kinds of speakers you have
connected.
1 Use the / (cursor up/down) buttons
to select a speaker.
• The L and R, and SR and SL speakers are
paired; you can’t set them differently.
L/R: Large
|
SW: On
Audio Output Mode 5.1 Channel
Speaker Distance
Speaker Installation
|
C: Large
|
SL/
L
• If you set the front
Small
, the center and surround speakers
are automatically set to
subwoofer to
• The subwoofer can only be set to
Off
.
and R speakers to
Small
On
.
and the
On
or
4 Press (cursor left) to go back to the
speaker list if you want to modify another
speaker, or press ENTER to exit the Speaker
Installation screen.
07
Initial Settings
Digital Audio Out
Video Output
Language
Display
Options
Speakers
L
Large
C
Large
R
Large
SR
Large
SL
Large
SW
On
2 Press (cursor right) to modify the
selected speaker.
3 Use the
/ (cursor up/down) buttons
to change the current setting.
• You can see the effect of your changes in
the room graphic on the right of the screen.
• Except for the subwoofer, you can set
speaker size to
Large
or
Small
. If the main
speaker cone in the speaker is 12cm or
more, set to
(or
Off
Large
, otherwise set to
if you don’t have that speaker).
Small
43
En
Page 44
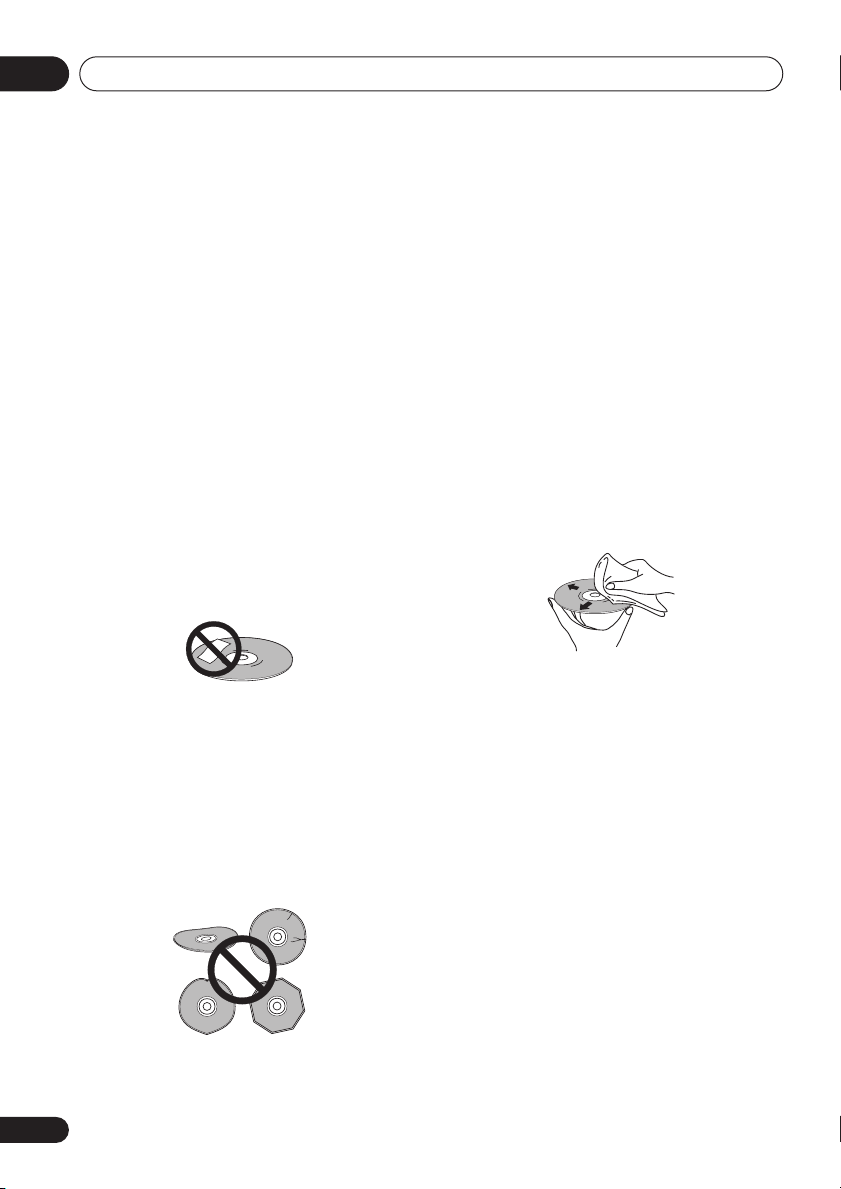
Additional information08
Chapter 8
Additional information
Taking care of your player and
discs
General
Hold discs by the edge or by the center hole
and edge.
When you're not using a disc, return it to its
case and store upright. Avoid leaving discs in
excessively cold, humid, or hot environments
(including under direct sunlight).
Don't glue paper or put stickers on to discs. Do
not use a pencil, ball-point pen or other sharptipped writing instrument to write on the disc.
Don’t use self-adhesive disc labels on discs as
these can cause the disc to warp slightly
during playback causing distortion in the
picture and/or sound.
Damaged and shaped discs
Do not use cracked, chipped, warped, or
otherwise damaged discs as they may damage
the player.
This player is designed to be used only with
conventional, fully circular discs. Do not use
shaped discs. Pioneer disclaims all liability
arising in connection with the use of shaped
discs.
Cleaning discs
Fingerprints and dust on discs can affect
playback performance. Clean using a soft, dry
cloth, wiping the disc lightly from the center to
the outside edge as shown below.
If necessary, use a cloth soaked in alcohol, or a
commercially available CD/DVD cleaning kit to
clean a disc more thoroughly. Never use
benzine, thinner or other cleaning agents,
including products designed for cleaning vinyl
records.
Cleaning the unit’s exterior
Unplug the unit before cleaning.
Use a dry cloth to wipe off dust and dirt. If the
surfaces are very dirty, wipe with a soft cloth
dipped in some neutral cleanser diluted five or
six times with water and wrung out well, then
wipe again with a dry cloth.
Do not use furniture wax or cleaners. Never
use thinners, benzine or insecticide sprays or
other chemicals on or near this unit.
44
En
Page 45
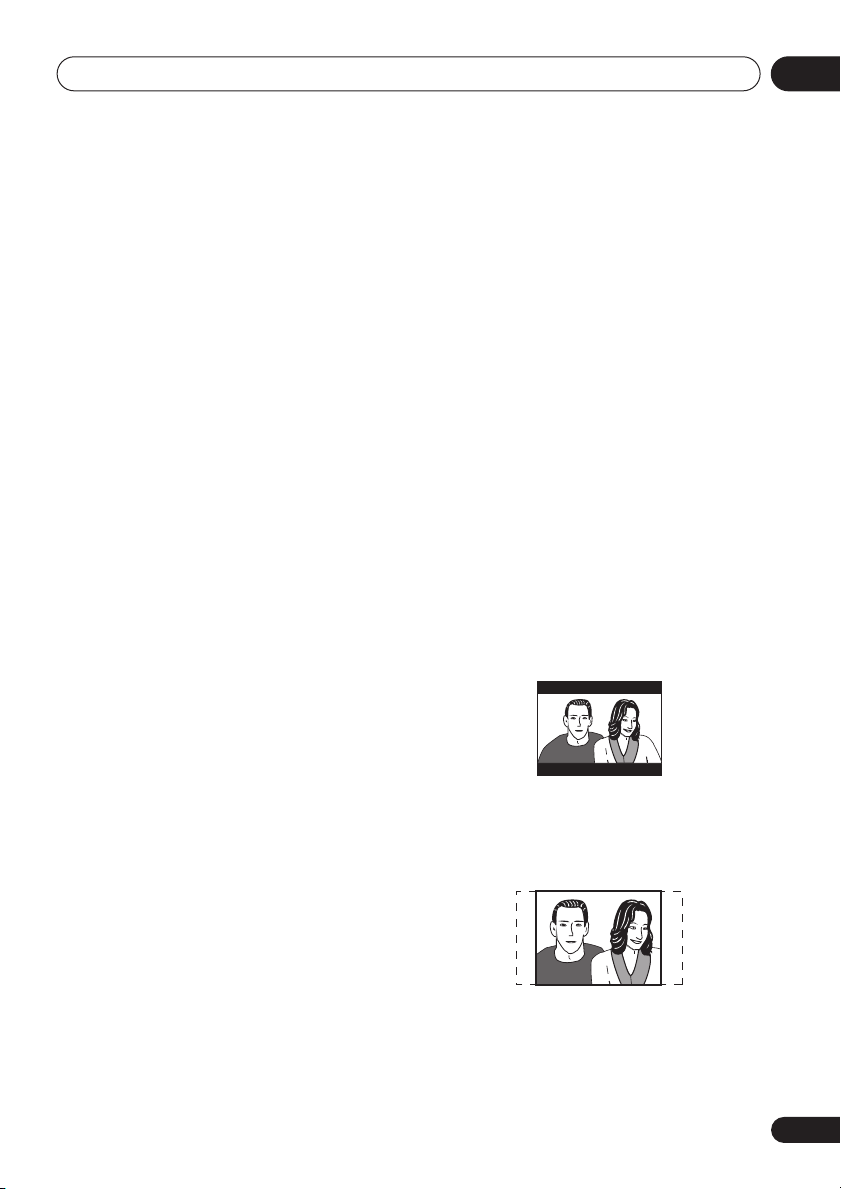
Additional information
08
If you use a chemical-impregnated cleaning
cloth, read the instructions carefully before
use. These cloths may leave smear marks on
half-mirror finish surfaces; if this happens,
finish with a dry cloth.
Cleaning the pickup lens
The DVD player’s lens should not become dirty
in normal use, but if for some reason it should
malfunction due to dust or dirt, consult your
nearest Pioneer-authorized service center. We
do not recommend using commercially
available lens cleaners for CD players.
Condensation
Condensation may form inside the player if it is
brought into a warm room from outside, or if
the temperature of the room rises quickly.
Although the condensation won’t damage the
player, it may temporarily impair its
performance. Leave it to adjust to the warmer
temperature for about an hour before
switching on.
Moving the player
If you need to move the player, first press
STANDBY/ON
player off. Wait for
display, then unplug the power cable. Never lift
or move the unit during playback—discs rotate
at a high speed and may be damaged.
on the front panel to turn the
-OFF-
to disappear from the
Screen sizes and disc formats
DVD-Video discs come in several different
screen aspect ratios, ranging from TV
programs, which are generally 4:3, to
CinemaScope widescreen movies, with an
aspect ratio of up to about 7:3.
Televisions, too, come in different aspect
ratios; ‘standard’ 4:3 and widescreen 16:9.
Widescreen TV users
If you have a widescreen TV, the
setting (page 35) of this player should be set to
16:9 (Wide)
When you watch discs recorded in 4:3 format,
you can use the TV controls to select how the
picture is presented. Your TV may offer various
zoom and stretch options; see the instructions
that came with your TV for details.
Please note that some movie aspect ratios are
wider than 16:9, so even though you have a
widescreen TV, these discs will still play in a
‘letter box’ style with black bars at the top and
bottom of the screen.
.
TV Screen
Standard TV users
If you have a standard TV, the
setting (page 35) of this player should be set to
4:3 (Letter Box)
depending on which you prefer.
Set to
4:3 (Letter Box)
shown with black bars top and bottom.
Set to
4:3 (Pan&Scan)
shown with the left and right sides cropped.
Although the picture looks larger, you don’t
actually see the whole picture.
Please note that many widescreen discs
override the player’s settings so that the disc is
shown in letter box format regardless of the
setting.
or
4:3 (Pan&Scan)
TV Screen
, widescreen discs are
, widescreen discs are
,
45
En
Page 46
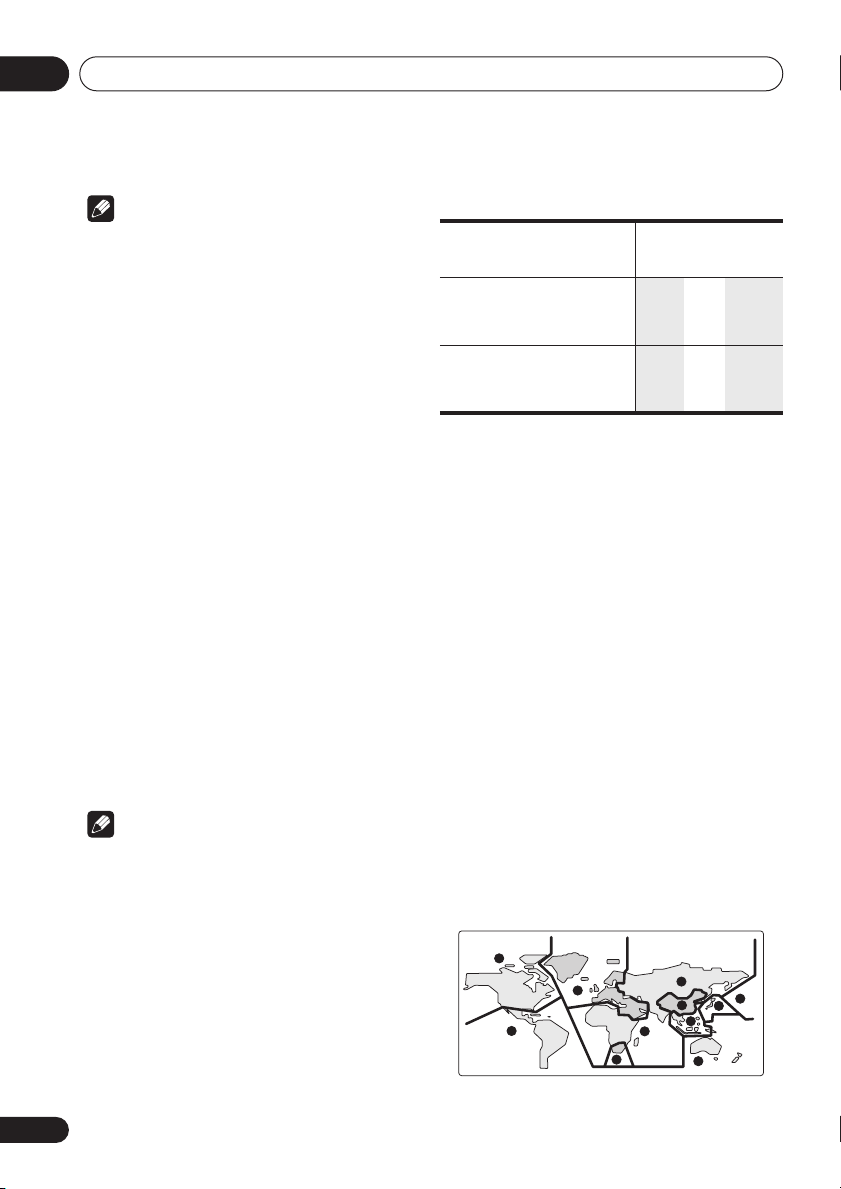
Additional information08
Note
• Using the
16:9 (Wide)
setting with a
standard 4:3 TV, or either of the 4:3 settings
with a widescreen TV, will result in a
distorted picture.
Setting the TV system
The default setting of this player is
unless you notice that the picture is distorted
when playing some discs, you should leave it
set to
AUTO
. If you experience picture distortion with some discs, set the TV system to
match your country or region’s system. Doing
this, however, may restrict the kinds of disc you
can watch. The table below shows what kinds
of disc are compatible with each setting
(
AUTO, PAL
and
NTSC
).
1 If the player is on, press STANDBY/
ON to switch it to standby.
2 Using the front panel controls, hold
down
then press STANDBY/ON to
switch the TV system.
The TV system changes as follows:
AUTO NTSC
•
•
NTSC PAL
•
PAL AUTO
Note
• You have to switch the player into standby
(press
STANDBY/ON
change.
AUTO
) before each
, and
Disc Player setting
Type Format NTSC PAL AUTO
DVD/Super
VCD/Video CD/
DivX Video
CD/MP3/WMA/
JPEG
no disc
NTSC
PAL NTSC PAL PAL
—
NTSC PAL NTSC
NTSC PAL
NTSC
or PAL
Resetting the player
Use this procedure to reset all the player’s
settings to the factory default.
1 Switch the player into standby.
2 Using the front panel buttons, hold
down the
STANDBY/ON to switch the player back
(stop) button and press
on.
All the player’s settings are now reset.
DVD-Video regions
All DVD-Video discs carry a region mark on the
case somewhere that indicates which
region(s) of the world the disc is compatible
with. Your DVD player also has a region mark,
which you can find on the rear panel. Discs
from incompatible regions will not play in this
player. Discs marked
player.
The diagram below shows the various DVD
regions of the world.
ALL
will play in any
46
En
1
2
4
2
5
1
6
2
3
5
4
Page 47

Additional information
Selecting languages using the
language code list
Some of the language options (such as ‘DVD
Language’ in the Setup Navigator) allow you to
set your preferred language from any of the 136
languages listed in the language code list on
page 48.
1 Select ‘Other Language’.
/
2 Use the
to select either a code letter or a code
number.
3 Use the
to select a code letter or a code number.
See
Language code list
complete list of languages and codes.
(cursor left/right) buttons
/
(cursor up/down) buttons
on page 48 for a
08
47
En
Page 48
Additional information08
Language code list
Language (Language code letter),
Japanese (ja),
English (en),
French (fr),
German (de),
Italian (it),
Spanish (es),
Chinese (zh),
Dutch (nl),
Portuguese (pt),
Swedish (sv),
Russian (ru),
Korean (ko),
Greek (el),
Afar (aa),
Abkhazian (ab),
Afrikaans (af),
Amharic (am),
Arabic (ar),
Assamese (as),
Aymara (ay),
Azerbaijani (az),
Bashkir (ba),
Byelorussian (be),
Bulgarian (bg),
Bihari (bh),
Bislama (bi),
Bengali (bn),
Tibetan (bo),
Breton (br),
Catalan (ca),
Corsican (co),
Czech (cs),
Welsh (cy),
Danish (da),
0618
0920
1412
0512
0101
0118
0208
0218
0319
0325
1001
0514
0405
0519
2608
1922
1821
1115
0106
0113
0125
0201
0209
0214
0215
0301
0315
0401
1620
0102
0119
0126
0207
0205
Bhutani (dz),
Esperanto (eo),
Estonian (et),
Basque (eu),
Persian (fa),
Finnish (fi),
Fiji (fj),
0610
Faroese (fo),
Frisian (fy),
Irish (ga),
Scots-Gaelic (gd),
Galician (gl),
Guarani (gn),
Gujarati (gu),
Hausa (ha),
Hindi (hi),
Croatian (hr),
Hungarian (hu),
Armenian (hy),
Interlingua (ia),
Interlingue (ie),
Inupiak (ik),
Indonesian (in),
Icelandic (is),
Hebrew (iw),
Yiddish (ji),
Javanese (jw),
Georgian (ka),
Kazakh (kk),
Greenlandic (kl), 1112
Cambodian (km), 1113
Kannada (kn), 1114
Kashmiri (ks), 1119
Kurdish (ku), 1121
Language code
0426
0515
0520
0521
0601
0609
0615
0625
0701
0704
0712
0714
0721
0801
0809
0818
0821
0825
0901
0905
0911
0914
0919
0923
1009
1023
1101
1111
Kirghiz (ky), 1125
Latin (la), 1201
Lingala (ln), 1214
Laothian (lo), 1215
Lithuanian (lt), 1220
Latvian (lv), 1222
Malagasy (mg), 1307
Maori (mi), 1309
Macedonian (mk), 1311
Malayalam (ml), 1312
Mongolian (mn), 1314
Moldavian (mo), 1315
Marathi (mr), 1318
Malay (ms), 1319
Maltese (mt), 1320
Burmese (my), 1325
Nauru (na), 1401
Nepali (ne), 1405
Norwegian (no), 1415
Occitan (oc), 1503
Oromo (om), 1513
Oriya (or), 1518
Panjabi (pa), 1601
Polish (pl), 1612
Pashto, Pushto (ps), 1619
Quechua (qu), 1721
Rhaeto-Romance (rm), 1813
Kirundi (rn), 1814
Romanian (ro), 1815
Kinyarwanda (rw), 1823
Sanskrit (sa), 1901
Sindhi (sd), 1904
Sangho (sg), 1907
Serbo-Croatian (sh), 1908
Sinhalese (si), 1909
Slovak (sk), 1911
Slovenian (sl), 1912
Samoan (sm), 1913
Shona (sn), 1914
Somali (so), 1915
Albanian (sq), 1917
Serbian (sr), 1918
Siswati (ss), 1919
Sesotho (st), 1920
Sundanese (su), 1921
Swahili (sw), 1923
Tamil (ta), 2001
Telugu (te), 2005
Tajik (tg), 2007
Thai (th), 2008
Tigrinya (ti), 2009
Turkmen (tk), 2011
Tagalog (tl), 2012
Setswana (tn), 2014
Tonga (to), 2015
Turkish (tr), 2018
Tsonga (ts), 2019
Tatar (tt), 2020
Twi (tw), 2023
Ukrainian (uk), 2111
Urdu (ur), 2118
Uzbek (uz), 2126
Vietnamese (vi), 2209
Volapük (vo), 2215
Wolof (wo), 2315
Xhosa (xh), 2408
Yoruba (yo), 2515
Zulu (zu), 2621
Country/Area code list
Country/Area,
Argentina, 0118, ar
Australia, 0121, au
Austria, 0120, at
Belgium, 0205, be
Brazil, 0218, br
Canada, 0301, ca
Chile, 0312, cl
China, 0314, cn
Denmark, 0411, dk
48
En
Country/Area code, Country/Area code letter
Finland, 0609, fi
France, 0618, fr
Germany, 0405, de
Hong Kong, 0811, hk
India, 0914, in
Indonesia, 0904, id
Italy, 0920, it
Japan, 1016, jp
Korea, Republic of, 1118, kr
Malaysia, 1325, my
Mexico, 1324, mx
Netherlands, 1412, nl
New Zealand, 1426, nz
Norway, 1415, no
Pakistan, 1611, pk
Philippines, 1608, ph
Portugal, 1620, pt
Russian Federation, 1821, ru
Singapore, 1907, sg
Spain, 0519, es
Sweden, 1905, se
Switzerland, 0308, ch
Taiwan, 2023, tw
Thailand, 2008, th
United Kingdom, 0702, gb
USA, 2119, us
Page 49
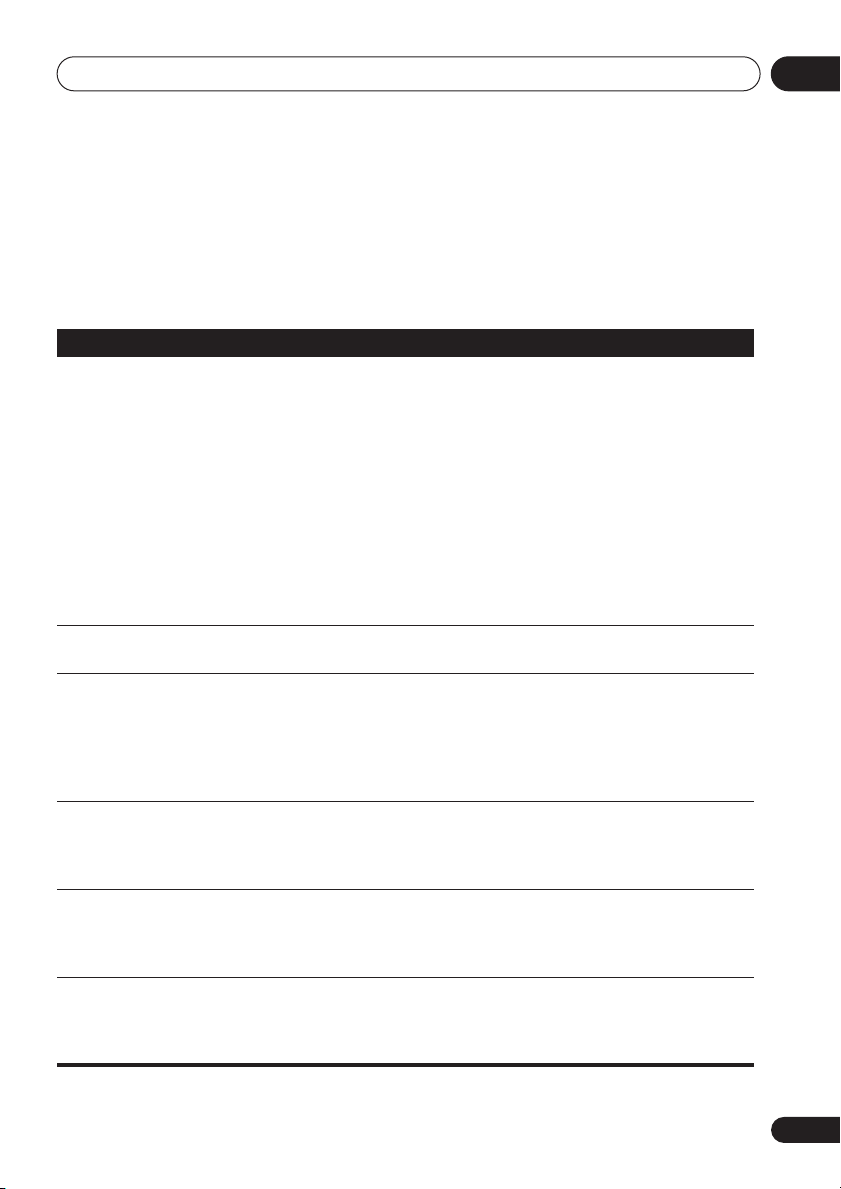
Additional information
Troubleshooting
Incorrect operation is often mistaken for trouble or malfunction. If you think that there is
something wrong with this component, check the points below. Sometimes the trouble may lie in
another component. Inspect the other components and electrical appliances being used. If the
trouble cannot be rectified after checking the items below, ask your nearest Pioneer authorized
service center or your dealer to carry out repair work.
Problem
The disc won’t play or is
automatically ejected
after loading.
DVD-Audio playback
stops.
Picture playback stops
and the operation
buttons cannot be used.
New settings made in the
Setup screen menus while
a disc is playing are
ineffective.
Settings are canceled.
The remote control
doesn't seem to work.
Remedy
• Make sure the disc is free from dirt and dust and is not damaged
(page 44).
• Make sure the disc is loaded with the label side face-up and aligned
properly in the disc tray guide.
• Incompatible region number: If the region number on a DVD-Video
disc does not match the number on the player, the disc cannot be
used (page 46).
• Condensation inside the player: Allow time for condensation to
evaporate. Avoid using the player near an air-conditioning unit.
• Disc is loaded upside down: Reload the disc with the label side face
up.
• A Super VCD that does not conform with the IEC standards might
not play normally.
• The disc may have been illegally copied.
• Press , then start playback again ().
• Press and hold the front panel STANDBY/ON
seconds to switch the unit off, then press again to switch back on.
• Switch the power off once, unplug from the wall socket, then plug
back in and switch on again using the front panel STANDBY/ON
button.
• Some settings can be changed while a disc is playing, but are not
effective until the disc is stopped then restarted: Press , then start
playback again ().
• When the power is cut due to power failure or by unplugging the
power cord, settings will be canceled: Press STANDBY/ON
front panel to turn the player off. Wait for
the display, then unplug the power cord.
• The remote control is too far from the player, or the angle with the
remote sensor is too wide: Use the remote within its operating range
(page 16).
• The batteries are exhausted: Put in new ones (page 6).
button for about 10
--OFF--
to disappear from
on the
08
49
En
Page 50
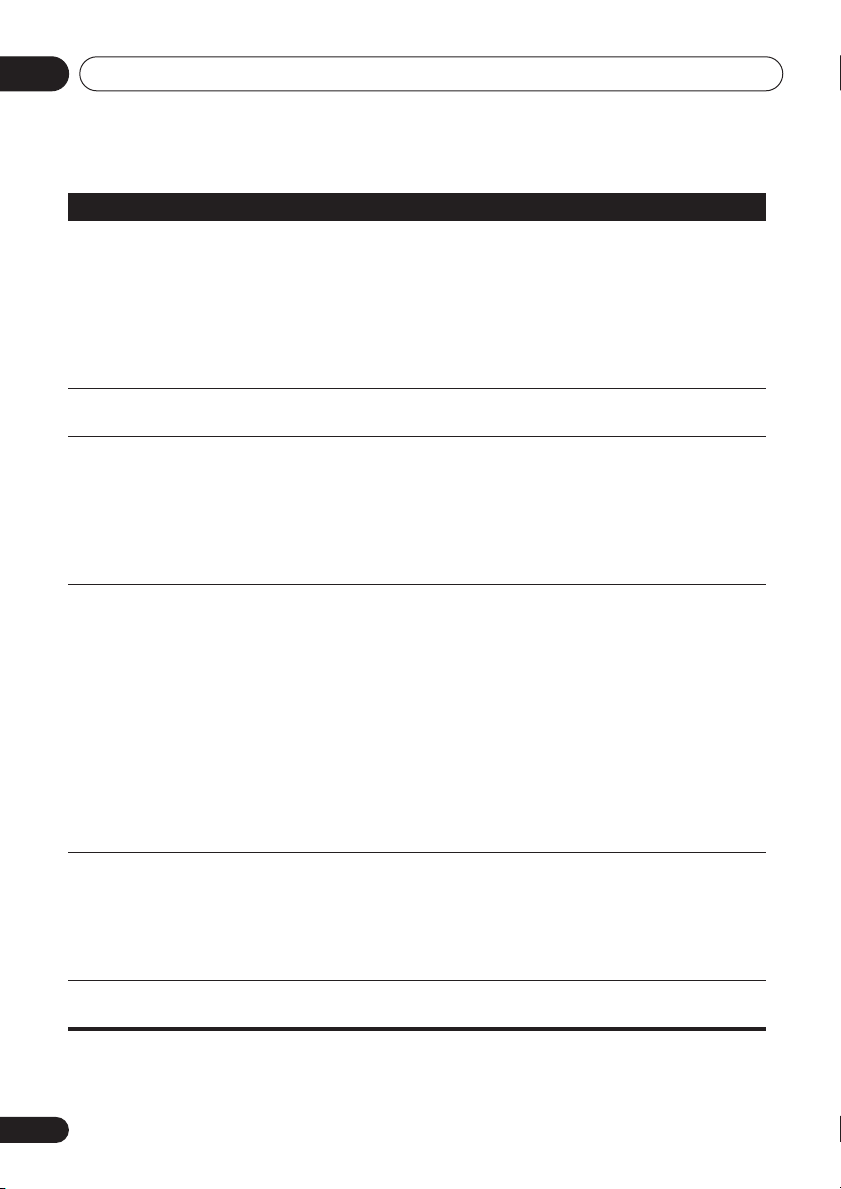
Additional information08
Problem
No picture/No color.
Screen is stretched or
aspect does not change.
Picture disturbance
during playback or the
picture is dark.
No audio, or audio is
distorted.
The analog audio is OK,
but there appears to be
no digital audio signal.
Noticeable difference in
DVD and CD volume.
Remedy
• Incorrect video connections: Check that connections are correct
and that plugs are inserted fully. Also check the video cable for
damage.
• TV/monitor or AV amplifier settings are incorrect: Check the
instruction manual of the connected equipment.
• The video output is set to progressive but your TV/monitor is not
compatible with progressive scan: See page 12 for how to set to
interlace.
• The
TV Screen
page 45 for how to set it correctly for your TV/monitor.
• This player is compatible with Macro-Vision System copy guard.
Some discs include a copy prevention signal, and when this type of
disc is played back, stripes etc., may appear on some sections of the
picture depending on the TV. This is not a malfunction.
• Due to the player’s copy protection circuits, connection of this
device through a VCR or an AV selector may prevent recording or
cause picture problems. This is not a malfunction.
• No audio is output during slow motion playback or when scanning
discs other than audio CDs and SACDs.
• Some DVD discs do not output digital audio: Switch your amplifier
to the player's analog outputs.
• Check that the disc is free from dust and dirt, and that it is not
damaged (page 44).
• Check that all interconnects are firmly inserted.
• Check that the plugs and terminals are free of dirt, oxide, etc. and
clean if necessary. Also check the cable for damage.
• Make sure the player's output is not connected to the amplifier's
phono (turntable) inputs.
• Check your amplifier/receiver’s settings (volume, input function,
speaker settings, etc.).
• Make sure that the
• Check that the Dolby Digital, DTS and MPEG out settings
(pages 34–35) are suitable for your amplifier/receiver—check the
instruction manual that came with your amplifier/receiver.
• SACDs and DVD-Audio discs do not output digital audio. Listen
through the player’s analog audio outputs.
• This is due to differences in the audio format and is not a
malfunction.
setting in the Initial Settings menu is incorrect. See
Digital Out
setting is set to On (page 34).
50
En
Page 51
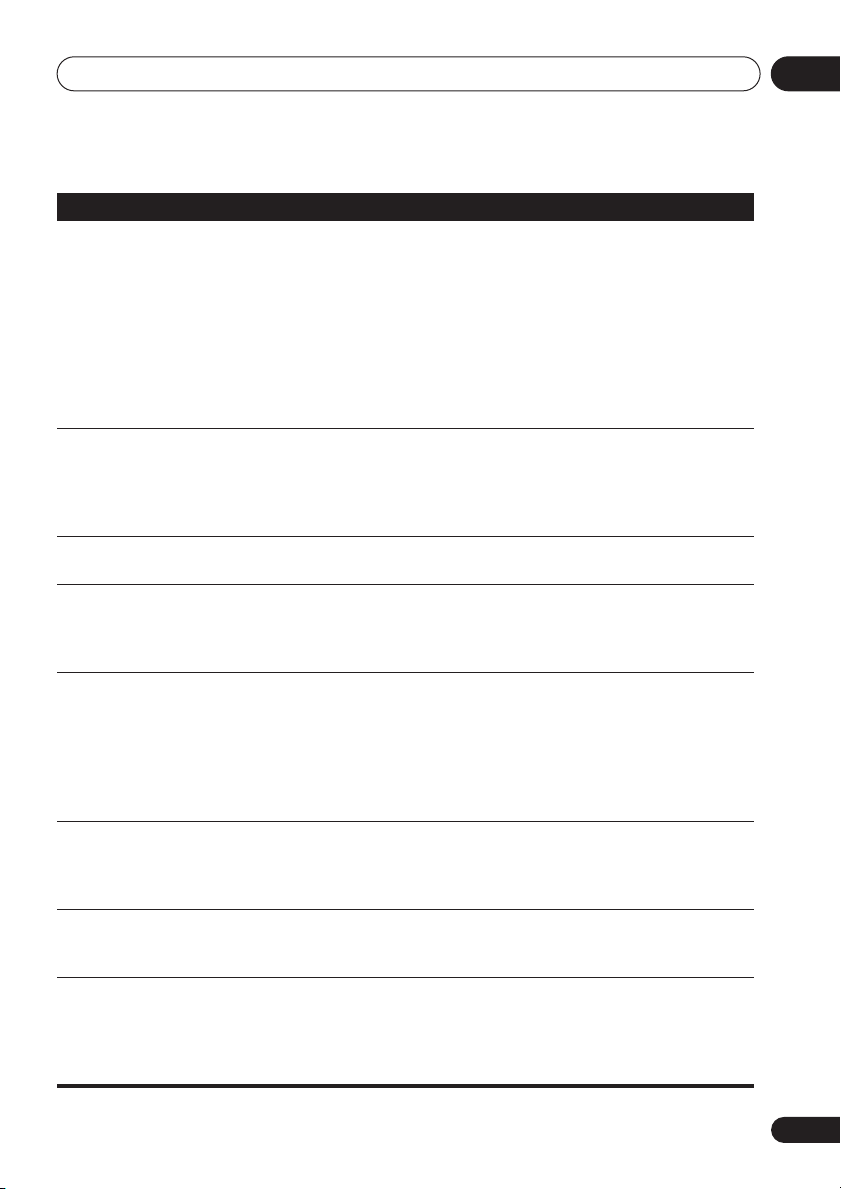
Additional information
08
Problem
Cannot play multichannel audio
Cannot listen to highsampling rate audio
through the digital
output.
Cannot output 192kHz or
176.4kHz digital audio.
Cannot output 96kHz or
88.2kHz digital audio.
No DTS audio output.
Audio mix does not
sound right or sounds
incomplete (for example,
inaudible dialog).
The audio recorded on a
Super VCD disc is not
output properly.
Can’t hear effect of
Virtual Surround
Remedy
• Make sure that
(page 40).
• Check that the Dolby Digital, DTS and MPEG Out settings
(pages 34–35) are suitable for your amplifier/receiver—check the
instruction manual that came with your amplifier/receiver.
• DVD-Audio and SACDs do not output multichannel digital audio.
Listen through the player’s analog outputs.
• Check that the settings in the Speaker Installation screen are
correct (page 43).
• Check the audio options available from the disc menu.
• Make sure that
(page 35).
• As a copy-protection measure, some DVDs do not output 96kHz
audio. In this case, even if set to
automatically outputs the audio at 48 kHz. This is not a malfunction.
• The player does not output digital audio at these sampling rates. The
digital output is automatically downsampled.
• Check that
• Some discs are digital copy protected and do not output high
sampling rate digital audio. In this case the output is automatically
downsampled.
• If this unit is connected to a non-DTS compatible amplifier or
decoder using a digital audio cable, set
(page 34). If you do not do this, noise will be output when you play a
DTS disc.
• If this unit is connected to a DTS-compatible amplifier or decoder
using a digital audio cable, check the amplifier settings, and that the
cable is properly connected.
• Make sure that
connected to the stereo inputs on your amplifier or TV (page 40).
• If the audio is switched to
contains only one stereo soundtrack, there may be no sound at all.
Press
AUDIO
• Virtual Surround does not work with SACD or DVD-Audio.
• The Virtual Surround effect is only output through the
(2ch)
analog audio outputs.
• Make sure that
• The effectiveness of Virtual Surround varies with the disc.
Audio Output Mode
Linear PCM Out
Linear PCM Out
Audio Output Mode
to change the soundtrack.
Audio Output Mode
is set to
Downsample Off
is set to
[2]
when playing a Super VCD that
is set to
Downsample Off
is set to
is set to
5.1 Channel
Downsample Off
, the player
DTS Out
to
DTS
2 Channel
2 Channel
(page 35).
>
PCM
if you've
AUDIO OUT
(page 40).
51
En
Page 52
Additional information08
Note
• Static electricity or other external influences may cause malfunctioning of this unit. In this
case, unplug the power cord and then plug back in. This will usually reset the unit for proper
operation. If this does not correct the problem, please consult your nearest Pioneer service
center.
Glossary
Analog audio
Aspect ratio
Bonus Group
(DVD-Audio
only)
Browsable
pictures
(DVD-Audio
only)
Digital audio
Dolby
*1
Digital
DRM
WMA)
((
((
Direct representation of sound by an
electrical signal. See also
The width of a TV screen relative to its
height. Conventional TVs are 4:3;
widescreen models are 16:9.
An ‘extra’ group on some DVD-Audio
discs that requires a key number to
access.
A feature of some DVD-Audio discs in
which the user can browse still pictures
recorded on the disc as the audio is
played. See also
Indirect representation of sound using
numbers. See also
and
Analog audio
A multi-channel audio encoding system
developed by Dolby Laboratories that
enables far more audio to be stored on a
disc than PCM encoding. See also
(Pulse Code Modulation)
DRM (Digital Rights Management) copy
protection is a technology designed to
prevent unauthorized copying by
restricting playback, etc. of material on
devices other the PC (or other WMA
recording equipment) used to record it.
For detailed information, please see the
instruction manuals or help files that
came with your PC (or other WMA
recording equipment) and/or software.
Digital audio
Slideshow
.
Sampling frequency
.
.
PCM
*2
DTS
.
EXIF
(Exchangeable
Image File)
File
extension
ISO 9660
format
JPEG
MP3
MPEG audio An audio format used on Video CD/
Packed PCM
(DVD-Audio
only)
PBC
(PlayBack
Control)
PCM
(Pulse Code
Modulation)
A multi-channel audio encoding system
developed by Digital Theater Systems
that enables far more audio to be stored
on a disc than PCM encoding. See also
PCM (Pulse Code Modulation) .
A file format developed by Fuji Photo
Film for digital still cameras. Digital
cameras from various manufacturers
use this compressed file format which
carries date, time and thumbnail
information, as well as the picture data.
A tag added to the end of a filename to
indicate the type of file. For example,
“.mp3” indicates an MP3 file.
International standard for the volume
and file structure of CD-ROM discs.
A standard file format used for still
images. JPEG files are identified by the
file extension “.jpg”.
MP3 (MPEG1 audio layer 3) is a
compressed stereo audio file format.
Files are recognized by their file
extension “.mp3”.
Super VCDs and some DVD discs.
A lossless compression system that
enables more PCM audio to be stored
on a DVD-Audio disc than would
otherwise be possible.
A system of navigating a Video CD/
Super VCD through on-screen menus
recorded onto the disc.
Digital audio encoding system found on
CDs. Good quality, but requires a lot of
data compared to Dolby Digital, DTS
and MPEG encoded audio. See also
Digital audio .
52
En
Page 53
Additional information
08
Progressive
scan video
Regions
(DVD-Video
only)
Sampling
frequency
WMA
Super Audio
CD (SACD)
*1
Manufactured under license from Dolby
All the lines that make up a video
picture are updated in one pass
(compared to interlace which takes two
passes to update the whole picture).
These associate DVD-Video discs and
players with particular areas of the
world. See
page 46 for more information.
The rate at which sound is measured to
be turned into digital audio data. The
higher the rate, the better the sound
quality. CD is 44.1 kHz; DVD can be up
to 96 kHz. See also
WMA is short for Windows Media Audio
and refers to an audio compression
technology developed by Microsoft
Corporation. Files are recognized by
their file extension “.wma”.
Microsoft, Windows Media, and the
Windows logo are trademarks, or
registered trademarks of Microsoft
Corporation in the United States and/or
other countries.
Super Audio CD is a high quality audio
disc format that can accommodate high
sampling rate stereo and multi-channel
audio, as well as conventional CD audio
all on the same disc.
DVD-Video regions
Digital audio
on
.
Laboratories. “Dolby” and the double-D symbol
are trademarks of Dolby Laboratories.
*2
“DTS” and “DTS Digital Surround” are
registered trademarks of Digital Theater
Systems, Inc.
53
En
Page 54
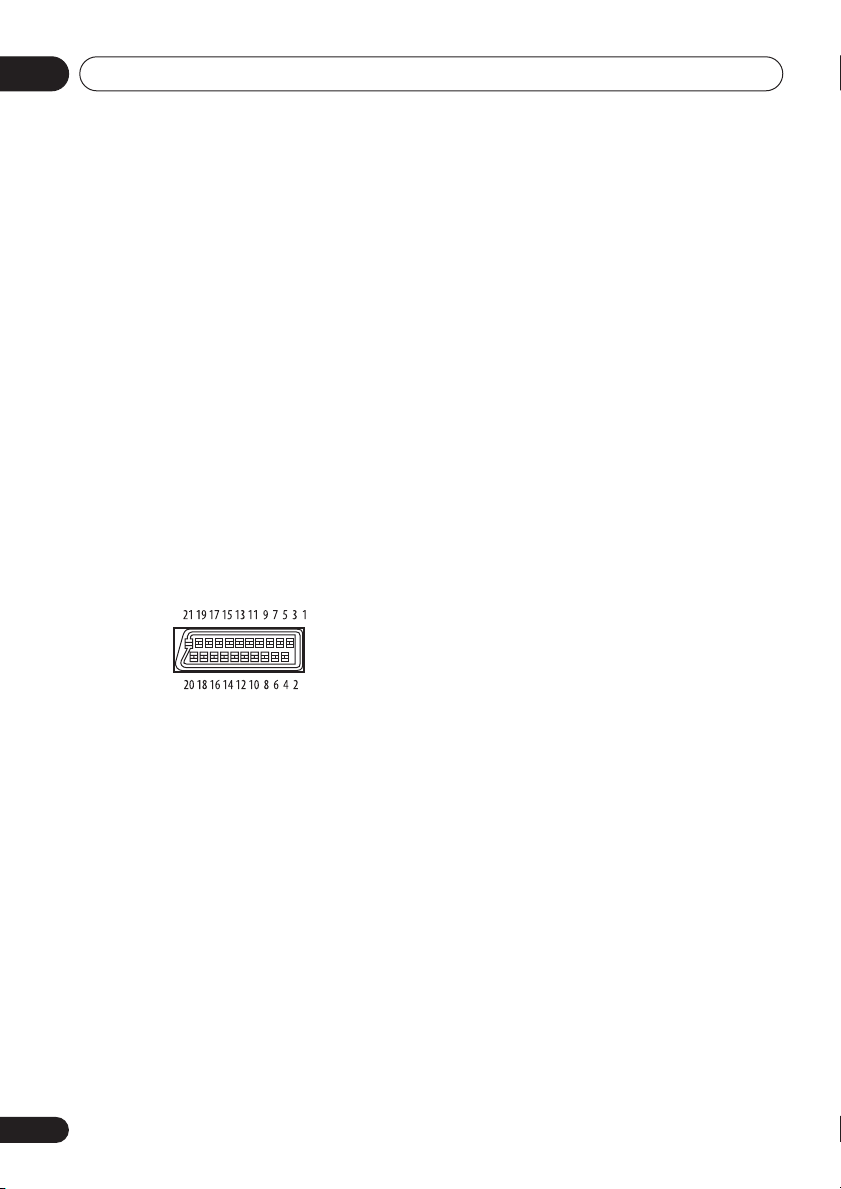
Additional information08
Specifications
General
System . . . . . . . . . . . . . . . . . . . . . . . . .DVD player
Power requirements . . . AC 220–240 V, 50/60 Hz
Power consumption . . . . . . . . . . . . . . . . . . . .8 W
Power consumption (standby) . . . . . . . . 0.85 W
Weight . . . . . . . . . . . . . . . . . . . . . . . . . . . . . 1.7 kg
Dimensions
. . . . . . . . . .420 (W) x 49.5 (H) x 214.9 (D) mm
Operating temperature . . . . . . . .+5°C to +35°C
Operating humidity. . . . . . . . . . . . . . . 5% to 85%
(no condensation)
AV connector output
AV Connector (21-pin connector assignment)
AV connector output . . . . . . . . 21-pin connector
This connector provides the video and audio
signals for connection to a compatible colour TV
or monitor.
PIN no.
1 . . . . . . . . . . . . . . . . . . . . . . . . . . . .Audio 2/R out
3 . . . . . . . . . . . . . . . . . . . . . . . . . . . . Audio 1/L out
4 . . . . . . . . . . . . . . . . . . . . . . . . . . . . . . . . . . . GND
7 . . . . . . . . . . . . . . . . . . . . . . . . . . . . . . . . . . . B out
8 . . . . . . . . . . . . . . . . . . . . . . . . . . . . . . . . . .Status
11 . . . . . . . . . . . . . . . . . . . . . . . . . . . . . . . . . . G out
15 . . . . . . . . . . . . . . . . . . . . . . . . . . . . . . . . . . R out
17 . . . . . . . . . . . . . . . . . . . . . . . . . . . . . . . . . . GND
19 . . . . . . . . . . . . . . . . . . . . . . . . . . . . . . Video out
21 . . . . . . . . . . . . . . . . . . . . . . . . . . . . . . . . . . GND
S-video output
Y (luminance) - Output level . . . . . . 1 Vp-p (75 Ω)
C (color) - Output level. . . . . . . 286 mVp-p (75 Ω)
Jack. . . . . . . . . . . . . . . . . . . . . . . . . . . . . . .S-video
Video output
Output level . . . . . . . . . . . . . . . . . . . 1 Vp-p (75 Ω)
Jack. . . . . . . . . . . . . . . . . . . . . . . . . . . . . . . . . RCA
Audio output (1 stereo pair)
Output level . . . . . . . . . . . . .During audio output
200 mVrms (1 kHz, –20 dB)
Number of channels . . . . . . . . . . . . . . . . . . . . . . 2
Jacks . . . . . . . . . . . . . . . . . . . . . . . . . . . . . . . RCA
Audio output (multi-channel / L, R, C, SW,
SL, SR)
Output level . . . . . . . . . . . . .During audio output
200 mVrms (1 kHz, –20 dB)
Number of channels . . . . . . . . . . . . . . . . . . . . . . 6
Jacks . . . . . . . . . . . . . . . . . . . . . . . . . . . RCA jack
Digital audio characteristics
Frequency response . . . . . . . . . . .4 Hz to 44 kHz
(DVD fs: 96 kHz)
4 Hz to 48 kHz (DVD-Audio fs: 192 kHz)
S/N ratio . . . . . . . . . . . . . . . . . . . . . . . . . . . 115 dB
Dynamic range. . . . . . . . . . . . . . . . . . . . . . 101 dB
Total harmonic distortion . . . . . . . . . . . 0.0023 %
Wow and flutter . . . . . . . . Limit of measurement
(±0.001% W. PEAK) or lower
Digital output
Coaxial digital output. . . . . . . . . . . . . . . RCA jack
Optical digital output. . . . . . . Optical digital jack
Component video output
Y (luminance) - Output level. . . . . . 1 Vp-p (75 Ω)
PB (color) - Output level . . . . . . . . 0.7 Vp-p (75 Ω)
PR (color) - Output level . . . . . . . . 0.7 Vp-p (75 Ω)
Jack . . . . . . . . . . . . . . . . . . . . . . . . . . . . . . . . RCA
54
En
Accessories
Audio/video cable . . . . . . . . . . . . . . . . . . . . . . . .1
Power cable . . . . . . . . . . . . . . . . . . . . . . . . . . . . . 1
Remote control . . . . . . . . . . . . . . . . . . . . . . . . . . 1
AA/R6P dry cell batteries . . . . . . . . . . . . . . . . . 2
Warranty card . . . . . . . . . . . . . . . . . . . . . . . . . . . 1
Operating Instructions
Page 55

Additional information
The specifications and design of this product are subject to
change without notice, due to improvement.
Published by Pioneer Corporation.
Copyright © 2005 Pioneer Corporation.
All rights reserved
08
55
En
Page 56
If you want to dispose this product, do not mix it with general household waste. There is a separate collection system for used
electronic products in accordance with legislation that requires proper treatment, recovery and recycling.
Private households in the 25 member states of the EU, in Switzerland and Norway may return their used electronic products free of charge to
designated collection facilities or to a retailer (if you purchase a similar new one).
For countries not mentioned above, please contact your local authorities for the correct method of disposal.
By doing so you will ensure that your disposed product undergoes the necessary treatment, recovery and recycling and thus prevent potential
negative effects on the environment and human health.
Published by Pioneer Corporation.
Copyright © 2005 Pioneer Corporation.
All rights reserved
PIONEER CORPORATION
4-1, Meguro 1-Chome, Meguro-ku, Tokyo 153-8654, Japan
PIONEER ELECTRONICS (USA) INC.
P.O. BOX 1540, Long Beach, California 90810-1540, U.S.A. TEL: (800) 421-1404
PIONEER ELECTRONICS OF CANADA, INC.
300 Allstate Parkway, Markham, Ontario L3R OP2, Canada TEL: 1-877-283-5901
PIONEER EUROPE NV
Haven 1087, Keetberglaan 1, B-9120 Melsele, Belgium TEL: 03/570.05.11
PIONEER ELECTRONICS ASIACENTRE PTE. LTD.
253 Alexandra Road, #04-01, Singapore 159936 TEL: 65-6472-7555
PIONEER ELECTRONICS AUSTRALIA PTY. LTD.
178-184 Boundary Road, Braeside, Victoria 3195, Australia, TEL: (03) 9586-6300
PIONEER ELECTRONICS DE MEXICO S.A. DE C.V.
Blvd.Manuel Avila Camacho 138 10 piso Col.Lomas de Chapultepec, Mexico,D.F. 11000 TEL: 55-9178-4270
<TPTZZ> Printed in Thailand <VRB1360-B>
K002_A_En
 Loading...