

Page 1

CD-R DRIVE UNIT
ENREGISTREUR DE CD
CD-R-LAUFWERK
CD-Rドライブユニット
DR-R102
Operating instructions
Mode d'emploi
Bedienungsanleitung
取扱説明書
Page 2
This product complies with the EMC Directives (89/336/EEC, 92/31/EEC) and CE
Marking Directive (93/68/EEC).
Ce produit est conforme aux directives relatives à la compatibilité électromagnétique
(89/336/CEE, 92/31/CEE) et à la directive CE relative aux marquages (93/68/CEE).
Dieses Produkt entspricht den EMV-Richtlinien (89/336/EEC, 92/31/EEC) und CEMarkierungsrichtlinien (93/68/EEC).
Questo prodotto è conforme alle direttive EMC (89/336/CEE, 92/31/CEE) e alla
direttiva sul marchio CE (93/68/CEE).
Dit produkt voldoet aan de EMC-richtlijnen (89/336/EEC en 92/31/EEC) en de CEmarkeringsrichtlijn (93/68/EEC).
Denna produkt uppfyller föreskrifterna i EMC-direktiv (89/336/EEC, 92/31/EEC) och
CE-märkningsdirektiv (93/68/EEC).
Este producto cumple con las Directivas EMC (89/336/CEE, 92/31/CEE) y Directiva
de Marcación CE (93/68/CEE).
Este produto cumpre com as Directivas EMC (89/336/CEE, 92/31/CEE) e Directiva
da Marcação CE (93/68/CEE).
Dette produkt er i overensstemmelse med direktiverne vedrørende
elektromagnetisk kompatibilitet (89/336/EEC, 92/31/EEC) og CE-direktivet
vedrørende mærkning (93/68/EEC).
VARNING!
Om apparaten används på annat sätt än i denna bruksanvisning spacificerats, kan
användaren utsättas för osynling laserstrålning som överskrider gränsen för
laserklass 1.
ADVARSEL:
Usynlig laserstråling ved åbning når sikkerhedsafbrydere er ude af funktion. Undgå
udsaettelse for stråling.
VAROITUS!
Laitten käyttäminen muulla kuin tässä käyttöohjeessa mainitulla tavalla saattaa
altistaa käuttäjän turvallisuusluokan 1 ylittävälle näkymättömälle lasersäteilylle.
LASER DIODE – This product contains a laser diode. To assure continued safety,
DO NOT remove any convers or attempt to gain access to the inside of the product.
CAUTION:
CAUTION:
USE OF CONTROLS OR ADJUSTMENTS OR PERFORMANCE OF
PROCEDURES OTHER THAN THOSE SPECIFIED HEREIN MAY RESULT IN
HAZARDOUS RADIATION EXPOSURE.
USE OF OPTICAL INSTRUMENTS WITH THIS PRODUCT WILL INCREASE EYE
HAZARD.
2
<DRC1128>
En
Page 3
Thank you for buying this Pioneer product.
Please read through these operating
instructions so you will know how to
operate your model properly.
The DR-R102 is an optional add-on drive
designed for use with the "DRM-1004" 100
disc changer, and as such it cannot be
used as a standalone product.
Warning: Installation
Installing add-on drives is a task which
requires advanced technical skills and
knowledge, and to ensure safety always
be sure to request that installation be
performed by trained Pioneer service
personnel. (For further information on how
to request such service, please contact a
retail dealer which handles the DR-R102
drive.)
WARNING: TO PREVENT FIRE OR
SHOCK HAZARD, DO NOT EXPOSE THIS
APPLIANCE TO RAIN OR MOISTURE.
IMPORTANT NOTICE:
RECORD THE MODEL NUMBER AND
SERIAL NUMBER OF THIS
EQUIPMENT BELOW. THE SERIAL
NUMBER IS ON THE TOP.
MODEL NO. DR-R102
SERIAL NO.
KEEP THESE NUMBERS FOR
FUTURE USE.
IMPORTANT
The lightning flash with arrowhead symbol,
within an equilateral triangle, is intended to
alert the user to the presence of uninsulated
"dangerous voltage" within the product's
enclosure that may be of sufficient
magnitude to constitute a risk of electric
shock to persons.
CAUTION
RISK OF ELECTRIC SHOCK
DO NOT OPEN
CAUTION:
TO PREVENT THE RISK OF ELECTRIC SHOCK, DO NOT
REMOVE COVER (OR BACK). NO USER-SERVICEABLE
PARTS INSIDE. REFER SERVICING TO QUALIFIED
SERVICE PERSONNEL.
The exclamation point within an equilateral
triangle is intended to alert the user to the
presence of important operating and
maintenance (servicing) instructions in the
literature accompanying the appliance.
English
IMPORTANT
CAUTION
This product contains a laser diode of higher
class than 1. To ensure continued safety, do not
remove any covers or attempt to gain access to
the inside of the product.
Refer all servicing to qualified personnel.
The following caution label appears on
your unit.
Location: on top of the cover
CLASS 1 LASER PRODUCT
LASER KLASSE 1
3
<DRC1128>
En
Page 4
This equipment has been tested and found to comply with the limits for a Class A digital
device, pursuant to Part 15 of the FCC Rules. These limits are designed to provide reasonable
protection against harmful interference when the equipment is operated in a commercial
environment. This equipment generates, uses, and can radiate radio frequency energy and, if
not installed and used in accordance with the instruction manual, may cause harmful interference
to radio communications. Operation of this equipment in a residential area is likely to cause
harmful interference in which case the user will be required to correct the interference at his
own expense.
[For Canadian model]
This Class A digital apparatus complies with Canadian ICES-003.
Information to User
Alteration or modifications carried out without appropriate authorization may invalidate the
user’s right to operate the equipment.
The Generation of Acoustical Noise Is Less Than 70dB.
(ISO7779/DIN45635)
FOR ENGLAND
Warning
This is a class A product. In a domestic
environment this product may cause radio
interference in which cause the user may
be required to take adequate measures.
FOR FRANCE
Attention
Ce produit est de classe A. Dans un
environnement domestique, il peut entraîner
des interférences et l’utilisateur peut alors
être améne à prendre les mesures qui
s’imposent.
FOR GERMANY
Warnung
Dies ist ein Produkt der Klasse A. In einer
häuslichen Umgebung kann dieses Produkt
Störgeräusche (Funkstörungen) verursachen.
In diesem Fall kann es erforderlich sein,
geeignete Maßnahmen zu ergreifen.
FOR ITALY
Avvertenza
Questo è un prodotto di classe A. In ambiente
domestico, questo prodotto può provocare
interferenze radio per le quali l’utente deve
adottare contromisure adeguate.
FOR SPAIN
Advertencia
Éste es un producto de clase A. En un entorno
doméstico, este producto Puede causar
radiointerferencias internas que obliguen al
usuario a tomar las medidas adecuadas.
FOR PORTUGAL
Aviso
Este produto pertence à classe A. Quando
num ambiente doméstico este produto pode
provocar rádio interferências para as quais o
utilizador pode ter que tomar medidas
adequadas.
FOR BELGIUM AND NETHERLANDS
Waarschuwing
Dit is een product dat tot klasse A behoort. In
woningen kan dit product radiostoringen
veroorzaken. In voorkomend geval moet de
gebruiker gepaste maatregelen nemen.
FOR DENMARK
Advarsel
Dette er et klasse A-produkt, som kan forårsage
radiointerferens ved brug i hjemmet. Hvis det
er tilfældet, kan brugeren blive nødt til tage
passende forholdsregler.
FOR SWEDEN
Varning
Det här är en klass A-produkt. I hemmiljö kan
radiostörningar uppstå och användaren bör då
vidta lämpliga åtgärder.
4
<DRC1128>
En
Page 5

SAFETY INSTRUCTIONS
To ensure your personal safety and to maximize the full operating potential of your Drive, read and
follow these safety precautions:
READ INSTRUCTIONS - Read all safety and operating instructions before the Drive is operated.
RETAIN INSTRUCTIONS - Retain the safety and operating instructions for future reference.
FOLLOW INSTRUCTIONS - Follow all operating and use instructions.
HEED WARNINGS - All warnings must be adhered to.
ENVIRONMENT - Please do not use the unit at place with much dust, high temperature, or high
humidity. Never turn off the power to the unit or allow it to become subjected to shocks or
vibrations during operation.
POWER - Turn off your system and attached hardware devices before installation.
WATER AND MOISTURE - DO NOT use this product near water.
OBJECT AND LIQUID ENTRY - Never push objects of any kind into this product. Touching
dangerous voltage points may cause a short resulting in fire or electric shock. Do not spill liquid of
any kind on this product.
CONDENSATION - Moisture will form in the operating section of the product causing performance
to be impaired if it is brought from cool surroundings into a warmer environment. If you are
moving the unit to a location with a warmer temperature, let the product stand for 1-2 hours in the
new location before turning it back on.
SERVICING - Do not attempt to repair this product yourself. Opening or removing covers may
expose you to dangerous voltage or other hazards. Refer all servicing to qualified service personnel.
FEATURES
English
¶ Maximum of 8X speed during recording, 24X speed during playback
¶ Transfer rate (sustained) during playback: Maximum of 3,600 Kbyte/sec
¶ SCSI 2 interface
¶ SCSI bus termination
¶ Buffer size: 4MB
CD-R disc
Use a disc recommended by our company.
When purchasing a disc, have the store confirm that it is a recommended CDR disc.
<DRC1128>
5
En
Page 6
A HARDWARE TOUR
12345
CD–R DRIVE
(when attached to changer)
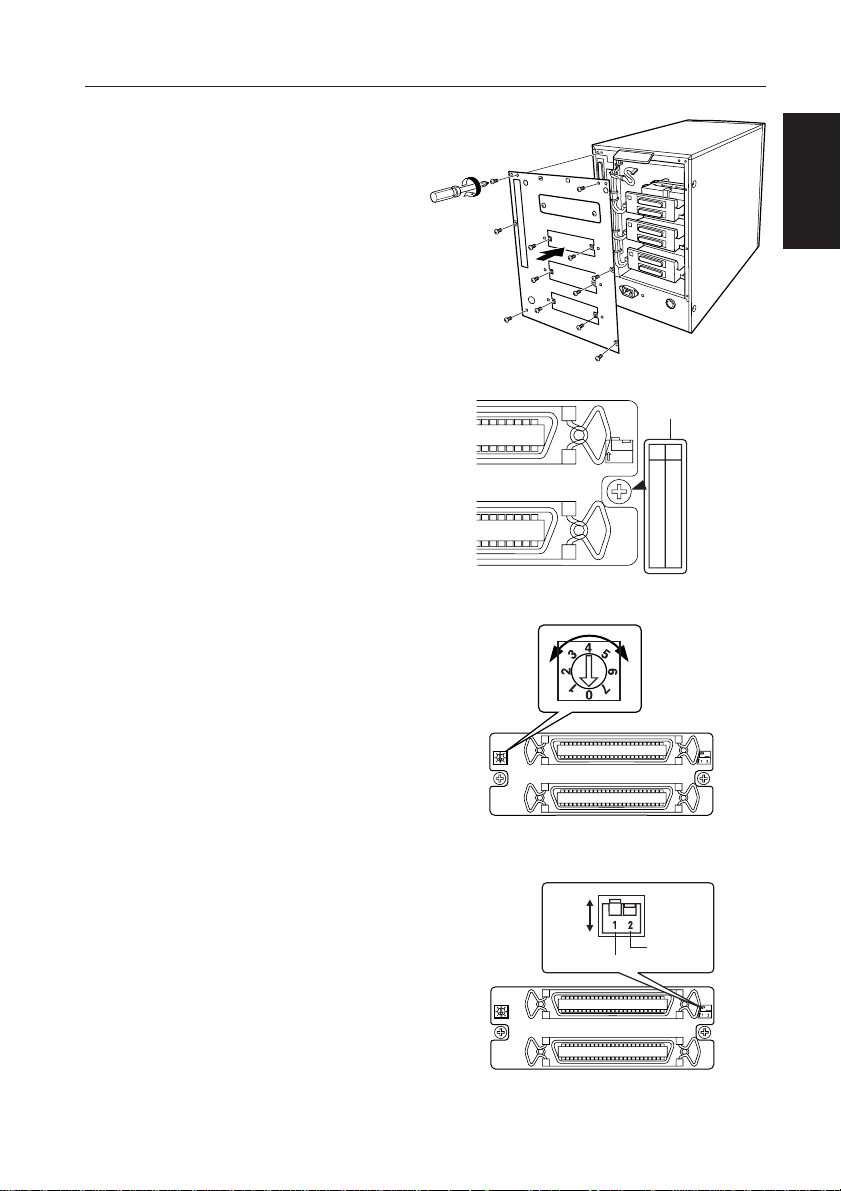
1 SCSI ID switch
Used to specify the SCSI ID to be assigned to the DR-R102 drive. When the drive is
to be used on the same SCSI bus as other devices (i.e., when the drive is to be
daisy-chained to other devices), different IDs must be assigned to all devices on the
same SCSI bus.
2 SCSI ports
3 SCSI termination switch
When components are connected through the SCSI connection, the terminator should
be attached to the last component in the connection. In case this drive is the last
component, set this switch to the on position.
4 Parity switch
When the parity switch is turned on odd parity checking is performed by the CD-R
drive for all data read in from the SCSI data bus, and when the parity switch is turned
off no parity checking is performed. Note that a parity bit is assigned to each byte of
output data transmitted from the CD-R drive whether the parity switch is turned on
or off.
5 Function switch label
Affix the label to the drive bay in which the CD-R drive has been inserted. (See No.6
of INSTALLING THE CD-R DRIVE on p. 9)
6
<DRC1128>
En
Page 7
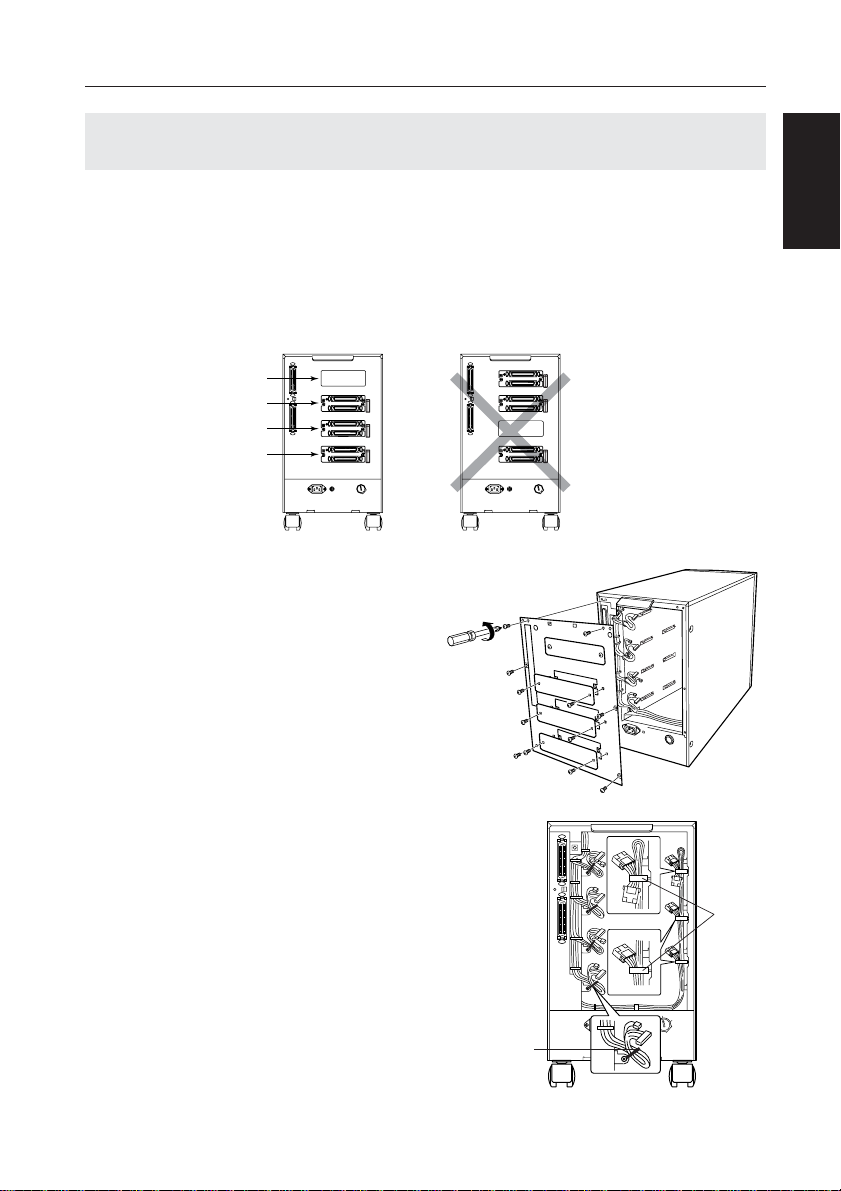
INSTALLING THE CD-R DRIVE
Warning about static electricity
Always be sure never to touch the contacts or ports when operating drives.
Warning
÷ Installing add-on drives is a task which requires advanced technical skills and knowledge, and
to ensure safety always be sure to request that installation be performed by trained Pioneer
service personnel. (For further information on how to request such service, please contact a
retail dealer which handles the DR-R102 drive.)
÷ Be sure to always link the drive positions, leaving no gaps between them. (i.e., first new add-
on drive in drive bay #1, second new add-on drive in drive bay #2, etc.). Note that failing to do
so may result in drives failing to operate properly.
4
5
O
6
N
2
7
1
Unused
4
5
O
6
N
2
7
1
DRIVE 3
DRIVE 2
DRIVE 1
0
4
5
O
6
N
2
7
1
0
4
5
O
6
N
2
7
1
0
(When three drives are installed)
1. Remove the rear plate covering the
drive bay(s) in which new drive(s) is/
are to be installed, and then remove
the rear panel of the changer.
(The example shown in the accompanying
illustration shows the rear plates to be
removed when installing three drives.)
0
4
5
O
6
N
2
7
1
0
4
5
O
6
N
2
7
1
0
English
2. Changer interface cable (left side)
Remove the cable located in the
drive bay where the drive is to be
installed and take the cord clamper
in hand.
÷ Do not remove cables in any other drive
bays.
Power cable (right side)
Unlock all cord holder locks and pull
the cable out towards you.
÷ If any drives have already been installed,
perform the above procedure only for
those drive bays above the drive bays in
which drives have already been installed.
Cord
holder
Cord clamper
7
<DRC1128>
En
Page 8

INSTALLING THE CD-R DRIVE
3. Insert the CD-R drive.
÷ Slide the drive along the left and right
guides of the Changer and insert into the
half of it.
÷ When installing more than one new add-
on drive at a single time, install each drive
from the bottommost empty drive bay
on upward. (Installing drives from the
upper drive bays on downward will make
it impossible to insert the necessary
connectors.)
4. Complete installation of the CD-R
drive:
÷ Reconnect the two wiring connectors on
the left, and the one on the right.
Note: Harness (wire) color
Drive No. 4 (top) ...................................... black
Drive No. 3 (third from the bottom) ............ blue
Drive No. 2 (second from the bottom) .... yellow
Drive No. 1 (bottom) .................................. red
÷ Be sure the drive has been fully inserted
into its slot, then secure it in place with
the two screws at left and right.
÷ Fix the right and left cables in place using
the cord holders, and then fix neatly into
place. Unused power cables to the right
must be returned to their original
position.
* When installing two or more drives,
repeat steps 3 and 4 for each drive to be
installed.
8
<DRC1128>
En
Warning
Adjust the cables carefully into position so
that they do not obstruct the rear panel.
Cord holder
Cord holder
Page 9
5. Attach the rear panel of the Changer.
CD–R DRIVE
INSTALLING THE CD-R DRIVE
English
6. Affix CD-R drive function switch
label
÷ As the printed instruction on the rear
panel is for a ROM drive, affix the label
to indicate the correct CD-R drive
functions. (Affix the label so that it covers
the original lettering.)
7. Set the SCSI ID.
÷ For futher details, see A Hardware Tour
(p. 6) and the changer operating manual.
Note:
When setting the SCSI IDs, be careful not
to leave the pointer arrow of the SCSI ID
switch between two figures; be sure to set
the switch so that the arrow points a single
figure.
8. Set the function switches (SCSI
terminator & parity switches)
÷ Set the terminator switch of the last drive
in the daisy-chain connection to ON.
For futher details, see A Hardware Tour
(p. 6) and the changer operating manual.
CD–R DRIVE
O
N
1
12
OFF
ON
Parity
SCSI Terminator
CD–R DRIVE
Function switch
label
2
OFF
OFF
-
ON
ON
TERM
PARITY
<DRC1128>
9
En
Page 10

SPECIFICATIONS
[ General specifications ]
Write speed Maximum of 8X
Transfer rate (sustained) during playback:
Maximum of 3,600 Kbyte/sec
NOTE: The data transfer rate may not be output due to disc conditions (scratches, etc.).
Access time Average random access time of 150 msec.
Buffer size 4 MB
SCSI 2 Interface
Compatible types of discs CD-ROM Mode-1, CD-DA
CD-ROM XA Mode-2 Form 1 & Form 2
Photo CD (multi-session)
Video CD
[ Other specifications ]
Power supply DC+ 12V, 1.0A
DC+ 5V, 1.0A
External dimensions 183.2 (W) x 66.5 (H) x 277 (D)
Weight 2.0 kg
Operating temperature (when used together with changer)
+5°C to +35°C
Operating humidity (when used together with changer)
20% to 60% (+5°C to +35°C)
20% to 80% (+5°C to +30°C)
Storage temperature –30°C to +55°C
Storage humidity 10% to 80%
[ Accessories ]
SCSI cable x 1
Screws (for use in installing drive) x 2
Function switch label x 1
NOTE:
Specifications and design subject to possible modifications without notice, due to improvements.
Published by Pioneer Corporation.
Copyright © 1999 Pioneer Corporation.
All rights reserved.
10
<DRC1128>
En
Page 11

Nous vous remercions de l'achat de ce
produit Pioneer.
Pour savoir comment fonctionne ce
modèle, veuillez lire attentivement ce
mode emploi.
Le DR-R102 est un lecteur supplémentaire
ATTENTION: AFIN DE PREVENIR
TOUS RISQUES DE CHOC ELECTRIQUE
OU DE DEBUT D’ENCENDIE, NE PAS
EXPOSER CET APPAREIL A L’HUMIDITE
OU A LA PLUIE.
facultatif conçu pour être utilisé avec le
changeur de 100 disques “DRM-1004”.
De ce fait, il ne peut pas être utilisé en
tant qu’appareil autonome.
Avertissement : Installation
L’installation de lecteurs supplémentaires
est une tâche qui requiert un savoir-faire et
des connaissances techniques avancées.
Par mesure de sécurité, veillez à demander
que l’installation soit réalisée par du
personnel d’entretien Pioneer qualifié (pour
avoir plus d’informations sur une telle
demande d’intervention, veuillez contacter
un fournisseur qui distribue le lecteur DRR102.)
[Pour le modèle Canadien]
Cet appareil numérique de la Classe A est conforme à la norme NMB-003 du Canada.
EnglishFrançais
La production de bruits acoustiques est inférieure à 70 dB.
(ISO7779/DIN45635)
ATTENTION
Ce produit renferme une diode à laser d’une
catégorie supérieure à 1. Pour garantir une
sécurité constante, ne pas retirer les couvercles
ni essayer d’accéder à l’intérieur de l’appareil.
Pour toute réparation, s’adresser à un personnel
qualifié.
L’étiquette d’avertissement suivante
apparaît sur votre appareil.
Emplacement: sur le dessus du
couvercle.
CLASS 1 LASER PRODUCT
LASER KLASSE 1
11
<DRC1128>
Fr
Page 12

INSTRUCTIONS DE SECURITE
Pour garantir votre sécurité personnelle et obtenir le maximum de votre lecteur, lire et suivre ces
consignes de sécurité:
LIRE LES INSTRUCTIONS - Lire toutes les instructions de sécurité et d’utilisation avant d’actionner
le lecteur.
CONSERVER LES INSTRUCTIONS - Garder les instructions de sécurité et d’utilisation pour une
future référence.
SUIVRE LES INSTRUCTIONS - Suivre toutes les instructions de fonctionnement et d’utilisation.
ATTENTION AUX AVERTISSEMENTS - Observer tous les avertissements.
ENVIRONNEMENT - Ne pas utiliser cet appareil dans des endroits avec beaucoup de poussière,
une température ou une humidité élevée. Ne jamais couper l’alimentation de l’appareil ou le soumettre
à des chocs ou des vibrations lorsqu’il fonctionne.
PUISSANCE - Couper l’alimentation du système et des dispositifs raccordés avant l’installation.
EAU ET HUMIDITE - NE PAS utiliser ce produit à proximité d’eau.
SURCHARGE - NE PAS surcharger les prises murales et les rallonges pour ne pas entraîner d’incendie
ou de secousse électrique.
PENETRATION D’OBJETS ET DE LIQUIDES - Ne jamais enfoncer d’objet d’aucune sorte dans ce
produit. Le contact avec des points de tension dangereux peut provoquer un court-circuit, entraînant
un incendie ou une secousse électrique. Ne pas verser de liquide d’aucune sorte sur ce produit.
CONDENSATION - De l’humidité se forme sur la section de fonctionnement du produit entraînant
une baisse de performances s’il est amené d’un endroit frais vers un environnement plus chaud. En
cas de déplacement de l’appareil vers un endroit ayant une température plus chaude, laisser le
produit pendant 1 à 2 heures dans le nouvel endroit avant de le remettre sous tension.
ENTRETIEN - Ne pas essayer de réparer soi-même ce produit. L’ouverture ou le retrait des capots
peut vous exposer à une tension dangereuse ou d’autres dangers. Pour tout entretien, demander à
un personnel d’entretien qualifié. (Se reporter à la carte d’entretien et de support jointe.)
CARACTERISTIQUES PRINCIPALES
¶ Vitesse maximale: 8X en enregistrement et 24X en lecture
¶ Taux de transfert (soutenu) en lecture : 3600 Ko/s maximum
¶ Interface SCSI 2
¶ Terminaison de bus SCSI
¶ Taille du tampon: 4MB
Disque CD-R
Utilisez des disques CD-R recommandés par notre société.
Lors de l’achat d’un disque, faites confirmer par le magasin qu’il s’agit bien
d’un disque CD-R recommandé.
12
<DRC1128>
Fr
Page 13

TOUR DU MATERIEL
12345
CD–R DRIVE
(lorsque le lecteur est relié au changeur)
1 Commutateur de numéro d’unité SCSI
Utilisé pour spécifier le numéro d’unité SCSI à attribuer au lecteur DR-R102. Lorsque
le lecteur doit être utilisé sur le même bus SCSI que d’autres périphériques (c’est-àdire lorsque le lecteur doit être relié en série à d’autres périphériques), un numéro
SCSI distinct doit être attribué à chaque périphérique.
2 Ports SCSI
3 Commutateur de terminaison SCSI
Lorsque des composants sont reliés par l’intermédiaire du bus SCSI, l’élément de
terminaison doit être relié au dernier composant de la chaîne. Si le lecteur est le
dernier composant, placez ce commutateur sur la position On.
4 Commutateur de parité
Lorsque ce commutateur est activé, un contrôle de parité impaire est exécuté par le
lecteur CD-R pour toutes les données lues provenant du bus de données SCSI.
Lorsque le commutateur de parité est désactivé, la parité n'est pas vérifiée. N'oubliez
pas qu'un bit de parité est affecté à chaque octet de données de sortie transmis par
le lecteur CD-R, que le commutateur de parité soit activé ou désactivé.
5 Étiquette du commutateur de fonction
Fixez l’étiquette sur l’emplacement de lecteur dans lequel le lecteur de CD-R est
inséré (voir le point n°6 de la section Installation du lecteur de CD-R, page 16).
Français
<DRC1128>
13
Fr
Page 14

INSTALLATION DU LECTEUR DE CD-R
Avertissement concernant l'électricité statique
Assurez-vous de ne jamais toucher les contacts ou les ports en manipulant les lecteurs.
Avertissement
÷ L’installation de lecteurs supplémentaires est une tâche qui requiert un savoir-faire et des
connaissances techniques avancées. Par mesure de sécurité, veillez à demander que l’installation
soit réalisée par du personnel d’entretien Pioneer qualifié (pour avoir plus d’informations sur une
telle demande d’intervention, veuillez contacter un fournisseur qui distribue le lecteur DR-R102).
÷ Veillez à toujours relier les lecteurs sans laisser d’emplacement vide entre eux (à savoir, premier
lecteur ajouté dans l’emplacement n°1, deuxième lecteur ajouté dans l’emplacement n°2, etc.).
Le non respect de cette règle peut se traduire par le mauvais fonctionnement de certains lecteurs.
4
5
O
6
N
2
7
1
Inutilisé
4
5
O
6
N
2
7
1
LECTEUR 3
LECTEUR 2
LECTEUR 1
0
4
5
O
6
N
2
7
1
0
4
5
O
6
N
2
7
1
0
(lorsque 3 lecteurs sont installés)
1. Déposez la plaque arrière qui
recouvre les emplacements dans
lesquels les nouveaux lecteurs
doivent être installés, puis déposer
le panneau arrière du changeur
(l’exemple représenté sur l’illustration cicontre montre les plaques arrière à déposer
lors de l’installation de trois lecteurs).
0
4
5
O
6
N
2
7
1
0
4
5
O
6
N
2
7
1
0
2.
Câble d’interface du changeur (côté gauche)
Déposez le câble situé dans
l’emplacement dans lequel le lecteur
doit être installé et prenez le serre-câble
en main.
÷ Ne retirez pas les câbles des autres
emplacements.
Câble d’alimentation (côté droit)
Déverrouillez tous les porte-câbles
et tirez le câble vers vous.
÷ Si des lecteurs sont déjà installés,
effectuez la procédure ci-dessus
uniquement pour les emplacements
situés au-dessus de ceux dans lesquels
des lecteurs sont déjà installés.
14
<DRC1128>
Fr
portecâble
serre-câble
Page 15

3. Insérez le lecteur de CD-R.
÷ Faites coulisser le lecteur dans les guides
gauche et droit du changeur et insérezle dans la moitié de celui-ci.
÷ Si vous installez plus d’un lecteur
supplémentaire à la fois, installez chacun
d’eux dans l’emplacement libre le plus
bas, en progressant de bas en haut (en
les installant de haut en bas, il serait
impossible d’insérer les connecteurs
nécessaires).
4. Terminez l’installation du lecteur de
CD-R :
÷ Reconnectez les deux connecteurs de
câblage de gauche et celui de droite.
Remarque : couleur du faisceau de fils
Lecteur n°4 (en haut) .................................noir
Lecteur n°3 (troisième en partant du bas) ... bleu
Lecteur n°2 (Seconde en partant du bas) .. jaune
Lecteur n°1 (en bas) ................................rouge
÷ Assurez-vous que le lecteur est
complètement inséré dans son
emplacement, puis fixez-le à l’aide des
deux vis sur la gauche et sur la droite.
INSTALLATION DU LECTEUR DE CD-R
Français
÷ Fixez avec soin les deux câbles de
gauche et de droite en place à l’aide des
porte-câbles. Les câbles d’alimentation
inutilisés à droite doivent être remis dans
leur position d’origine.
* Pour l’installation de deux lecteurs ou
plus, répétez les étapes 3 et 4 pour
chaque lecteur à installer.
Attention
Ajustez soigneusement les câbles en
position pour qu’ils n’obstruent pas le
panneau arrière.
Porte-câble
Porte-câble
15
<DRC1128>
Fr
Page 16

CD–R DRIVE
INSTALLATION DU LECTEUR DE CD-R
5. Fixez le panneau arrière du changeur.
6. Fixez l’étiquette du commutateur de
fonction du lecteur de CD-R.
÷ L’instruction imprimée sur le panneau
arrière étant destinée à un lecteur de CDROM, fixez l’étiquette pour indiquer les
fonctions correctes du lecteur de CD-R
(fixez-la de façon à ce qu’elle recouvre le
texte d’origine).
7. Réglez le numéro d’unité SCSI.
÷ Pour avoir plus de détails, reportez-vous
à la section Tour du matériel (p. 13) ainsi
qu’au manuel d’utilisation du changeur.
Remarque:
Lors du réglage du numéro d’unité SCSI,
prenez garde de ne pas laisser l’indicateur
en forme de flèche du commutateur de
numéro d’unité SCSI entre deux chiffres ;
veillez à régler le commutateur de sorte que
la flèche désigne un seul chiffre.
8. Réglez les commutateurs de
fonction (terminaison SCSI et parité)
÷ Réglez sur ON le commutateur de
terminaison du lecteur situé en dernière
position sur la liaison en série.
Pour avoir plus de détails, reportez-vous
à la section Tour du matériel (p. 13) ainsi
qu’au manuel d’utilisation du changeur.
CD–R DRIVE
Étiquette du
commutateur de
fonction
O
N
OFF
ON
Terminaison SCSI
1
12
Parité
CD–R DRIVE
2
OFF
ON
TERM
OFF
ON
PARITY
16
<DRC1128>
Fr
Page 17

FICHE TECHNIQUE
[Spécifications générales]
Vitesse en écriture 8X maximum
Taux de transfert (soutenu) en lecture 3600 Ko/s maximum
Remarque : le taux de transfert des données peut varier en fonction de l’état du
disque (rayures, etc.).
Temps d’accès 150 ms (temps d’accès aléatoire moyen)
Taille du tampon 4 Mo
Interface SCSI 2
Types de disques compatibles CD-ROM mode 1, CD-DA
CD-ROM XA mode 2 Forme 1 et forme 2
Photo CD (multi-session)
CD vidéo
[Autres spécifications]
Alimentation CC +12V, 1,0 A
CC +5V, 1,0 A
Dimensions extérieures 182,2 x 66,5 x 277 mm (L x H x P)
Poids 2,0 kg
Température admissible en fonctionnement
(en utilisation avec le changeur)
+5°C à +35°C
Humidité admissible en fonctionnement (en utilisation avec le changeur)
20% à 60% (+5°C à +35°C)
20% à 80% (+5°C à +30°C)
Température admissible en stockage –30°C à +55°C
Humidité admissible en stockage 10% à 80%
Français
[Accessoires]
Câble SCSI x 1
Vis (pour l’installation du lecteur) x 2
Étiquette de commutateur de fonction x 1
REMARQUE:
Aux fins d’amélioration, les caractéristiques techniques et la conception sont susceptibles de
modification sans préavis.
Publication de Pioneer Corporation.
© 1999 Pioneer Corporation.
Tour droits de reproduction et de traduction réservés.
<DRC1128>
17
Fr
Page 18

Vielen Dank für den Kauf dieses PioneerProdukts.
Bitte lesen Sie diese Bedienungsanleitung
sorgfältig durch, um sich mit der
Bedienung des Geräts vertraut zu machen.
WARNUNG: UM EINEN BRAND
ODER STROMSCHLAG ZU VERMEIDEN,
DIESES GERÄT NICHT REGEN ODER
FEUCHTIGKEIT AUSSETZEN.
DR-R102 ist ein optionales Add-onLaufwerk, das für den Einsatz im 100-DiscWechsler DRM-1004 entwickelt wurde
und somit nicht als selbstständiges Gerät
verwendet werden kann.
Warnung zur Installation
Zur Installation von Add-on-Laufwerken
sind technische Fertigkeiten und
Fachkenntnisse erforderlich, und um die
Sicherheit zu gewährleisten, muss die
Installation stets von qualifiziertem
Pioneer-Fachpersonal durchgeführt
werden. (Informationen über die
Anforderung eines solchen Dienstes
erhalten Sie beim Händler der DR-R102Laufwerke.)
Das Geräuschaufkommen beträgt weniger als 70 dB.
(ISO 7779/DIN 45635)
Warnung:
Dieses Produkt entspricht dem EMV-Standard der Klasse A.Produkte dieser Klasse sind nur
für den industriellen Einsatz geeignet und dürfen in Wohn- und Gewerbegebieten nicht ohne
ausreichende Entstörungsmaßnahmen betrieben werden.
VORSICHT
Dieses Gerät enthält eine Laserdiode mit einer
höheren Klasse als 1. Um einen stets sicheren
Betrieb zu gewährleisten, weder irgendwelche
Abdeckungen entfernen, noch versuchen, sich
zum Geräteinneren Zugang zu verschaffen. Alle
Wartungsarbeiten sollten qualifiziertem
Kundendienstpersonal überlassen werden.
18
<DRC1128>
Ge
Das nachstehende Hinweisschild
befindet sich am Gerät.
Anbringstelle: auf der Deckeloberseite.
CLASS 1 LASER PRODUCT
LASER KLASSE 1
Page 19

SICHERHEITSANWEISUNGEN
Um Ihre eigene Sicherheit sicherzustellen, und um die volle Funktion Ihres DVD-ROM-Laufwerks zu maximieren,
lesen Sie diese Sicherheitsvorschriften bitte sorgfältig durch:
LESEN SIE DIE ANLEITUNGSSCHRITTE - Vor der Inbetriebnahme des DVD-ROM-Laufwerks sind alle
Sicherheits- und Betriebsanleitungen durchzulesen.
AUFBEWAHRUNGSHINWEISE - Bewahren Sie die Sicherheits- und Betriebsanleitungen für zukünftige
Benutzung griffbereit auf.
BEFOLGUNG DER ANLEITUNGSSCHRITTE - Befolgen Sie bitte alle Bedienungs- und Handhabungshinweise.
BEACHTUNG ALLER WARNUNGEN - Sämtliche Warnhinweise müssen sorgfältig beachtet werden.
BETRIEBSBEDINGUNGEN - Betreiben Sie das Gerät nicht an Orten, wo starkes Staubaufkommen, hohe
Temperaturen und hohe Luftfeuchtigkeiten vorherrschen. Unterbrechen Sie niemals die
Netzspannungsversorgung zum Gerät, und setzen Sie das Gerät während des Betriebs keinen Schlägen oder
Vibrationen aus.
SPANNUNG - Vor dem Einbau des DVD-ROM-Laufwerks sind der Computer und sämtliche angeschlossenen
Peripheriegeräte auszuschalten.
WASSER UND FEUCHTIGKEIT - Betreiben Sie das Gerät NIEMALS in unmittelbarer Nähe von Wasser!
EINDRINGEN VON FLÜSSIGKEITEN UND FREMDKÖRPERN - Niemals Fremdkörper in das Geräteinnere
eindringen lassen. Das Berühren von unter Spannung stehenden Kontakten kann zu einem Kurzschluß führen,
was einen Brand oder Stromschlag auslösen kann. Vorsicht, damit keine Flüssigkeiten auf dem Gerät verschüttet
werden.
KONDENSATION - Wenn das Gerät von einem kalten in einen warmen Raum gebracht wird, verursacht der
Feuchtigkeitsniederschlag in Gerät eine merkliche Leistungsminderung. Betreiben Sie das Gerät deshalb nicht
für ca. 1 bis 2 Stunden, bis sich die Bauteile der Umgebungstemperatur angeglichen haben.
WARTUNG - Nicht den Versuch unternehmen, das Gerät selbst zu reparieren! Das Öffnen oder Entfernen von
Abdeckungen kann einen Stromschlag sowie andere Gefahren auslösen. Überlassen Sie sämtliche
Wartungsarbeiten unserem qualifizierten Kundendienstpersonal. (Beziehen Sie sich bitte auf das
miteingeschlossene Kundendienstverzeichnis.)
Deutsch
MERKMALE
¶ Maximale Geschwindigkeit während der Aufzeichnung: 8X; maximale
Geschwindigkeit während des Playback: 24X
¶ (Dauer-) Übertragungsrate während der Wiedergabe: maximal 3.600 KBytes/s
¶ SCSI 2-Schnittstelle
¶ SCSI-Bus-Abschluss
¶ Puffergröße: 4MB
CD-R-Platte (Disk)
Verwenden Sie die von uns empfohlenen Discs.
Lassen Sie sich beim Kauf vom Händler bestätigen, dass die Discs zu den von
Pioneer empfohlenen gehören.
<DRC1128>
19
Ge
Page 20

BESCHREIBUNG DER HARDWARE
12345
CD–R DRIVE
(wenn am Wechsler angeschlossen)
1 SCSI-ID-Schalter
Mit diesem Schalter wird die SCSI-ID festgelegt, die dem DR-R102-Laufwerk
zugewiesen werden soll. Wenn das Laufwerk mit anderen Geräten zusammen auf
demselben SCSI-Bus verwendet wird (d. h., wenn das Laufwerk mit anderen Geräten
in Kette geschaltet wird), muss jedem Gerät auf einem SCSI-Bus eine
unterschiedliche ID zugewiesen werden.
2 SCSI-Anschlüsse
3 SCSI-Abschluss-Schalter
Wenn Komponenten über eine SCSI-Verbindung miteinander verbunden werden,
muss der Abschluss an die letzte Komponente in der Kette angeschlossen werden.
Wenn dieses Laufwerk die letzte Komponente ist, schalten Sie diesen Schalter ein.
4 Paritätsschalter
Bei Einschalten des Paritätsschalters wird vom CD-R-Laufwerk eine Paritätsprüfung
für alle vom SCSI-Datenbus eingelesenen Daten vorgenommen. Wird der
Paritätsschalter ausgeschaltet, findet keine Paritätsprüfung statt. Beachten Sie bitte,
dass jedem Byte ausgegebener Daten, welches vom CD-R-Laufwerk übertragen
wird, ein Paritätsbit zugewiesen wird, ganz gleich, ob der Paritätsschalter ein- oder
ausgeschaltet ist.
5 Funktionsschalter-Aufkleber
Bringen Sie den Aufkleber an das Laufwerkfach an, in welches das CD-R-Laufwerk
eingesetzt wurde. (Siehe Schritt 6 in INSTALLATION DES CD-R-LAUFWERKS auf
Seite 23.)
20
<DRC1128>
Ge
Page 21

INSTALLATION DES CD-R-LAUFWERKS
Warnung vor elektrostatischer Aufladung
Beim Betrieb von Laufwerken dürfen Sie niemals die Kontakte oder Anschlüsse berühren.
Warnung
÷ Zur Installation von Add-on-Laufwerken sind technische Fertigkeiten und Fachkenntnisse
erforderlich, und um die Sicherheit zu gewährleisten, muss die Installation stets von
qualifiziertem Pioneer-Fachpersonal durchgeführt werden. (Informationen über die Anforderung
eines solchen Dienstes erhalten Sie beim Händler der DR-R102-Laufwerke.)
÷ Bauen Sie die Laufwerke der Reihe nach ein, und lassen Sie zwischen Laufwerken kein Fach
frei (d. h. erstes neues Add-on-Laufwerk in Fach 1, das zweite in Fach 2 usw.). Wird dies nicht
beachtet, funktionieren Laufwerke möglicherweise nicht richtig.
4
5
O
6
N
2
7
1
Nicht belegt
4
5
O
6
N
2
7
1
LAUFWERK 3
LAUFWERK 2
LAUFWERK 1
0
4
5
O
6
N
2
7
1
0
4
5
O
6
N
2
7
1
0
(Einbau von drei Laufwerken)
1. Montieren Sie die Abdeckungen der
Laufwerkfächer ab, in denen neue
Laufwerke installiert werden sollen,
und anschließend die Rückwand des
Wechslers.
(Im nebenstehenden Beispiel sind die
abzumontierenden Abdeckungen zum
Einbau von drei Laufwerken dargestellt.)
0
4
5
O
6
N
2
7
1
0
4
5
O
6
N
2
7
1
0
Deutsch
2. Wechsler-Schnittstellenkabel (linke Seite)
Entfernen Sie das Kabel aus dem
Fach, in welches das Laufwerk
eingebaut werden soll, und nehmen
Sie die Kabelklammer in die Hand.
÷ Entfernen Sie keine Kabel aus anderen
Laufwerkfächern.
Spannungsversorgungskabel (rechte Seite)
Lösen Sie alle Kabelbefestigungen,
und ziehen Sie das Kabel zu sich hin.
÷ Wenn bereits Laufwerke eingebaut sind,
führen Sie die obige Prozedur nur bei den
Laufwerkfächern aus, die oberhalb der
Fächer mit den eingebauten Laufwerken
liegen.
Kabelhalterung
Kabelklammer
21
<DRC1128>
Ge
Page 22

INSTALLATION DES CD-R-LAUFWERKS
3. Setzen Sie das CD-R-Laufwerk ein.
÷ Schieben Sie das Laufwerk entlang der
linken und rechten Schiene im
Wechslergehäuse bis zur Hälfte ein.
÷ Wenn mehrere neue Add-on-Laufwerke auf
einmal eingebaut werden sollen, verwenden
Sie zuerst das unterste freie Laufwerkfach
und dann das jeweils unmittelbar
darrüberliegende. (Wenn Laufwerke von
oben nach unten eingebaut werden, können
die erforderlichen Steckverbindungen nicht
hergestellt werden.)
4. Schließen Sie den Einbau des CD-RLaufwerks ab:
÷ Stecken Sie die beiden Stecker auf der
linken Seite und den einen Stecker auf
der rechten Seite ein.
Hinweis: Kabelbaumfarbe
Laufwerk 4 (oben) ........................ schwarz
Laufwerk 3 (drittes von unten) ............blau
Laufwerk 2 (zweites von unten) .......... gelb
Laufwerk 1 (unten) ............................... rot
÷ Achten Sie darauf, dass das Laufwerk
vollständig in dessen Einschubplatz
hineingeschoben ist, und befestigen Sie
es links und rechts mit den zwei
Schrauben.
÷ Verlegen Sie die rechten und linken Kabel
in deren Kabelhalterungen, und
befestigen Sie sie. Die nicht verwendeten
Spannungsversorgungskabel auf der
rechten Seite müssen in deren
ursprüngliche Position gebracht werden.
* Zum Einbau von zwei oder mehr
Laufwerken wiederholen Sie die Schritte
3 und 4 für jedes zu installierende
Laufwerk.
22
<DRC1128>
Ge
Warnung
Verlegen Sie die Kabel sorgfältig, so dass
sie nicht von der Rückwand eingeklemmt
werden können.
Kabelhalterung
Kabelhalterung
Page 23

5. Montieren Sie die Rückwand des
CD–R DRIVE
Wechslers.
NSTALLATION DES CD-R-LAUFWERKS
6. Bringen Sie den Aufkleber für den
CD-R-Laufwerks-Funktionsschalter
an.
÷ Da die auf der Rückwand angegebenen
Anweisungen für ROM-Laufwerke
gelten, bringen Sie den Aufkleber mit den
korrekten CD-R-Laufwerksfunktionen an.
(Bringen Sie den Aufkleber so an, dass
die ursprüngliche Beschriftung überdeckt
wird.)
7. Stellen Sie die SCSI-ID ein.
÷ Details hierzu finden Sie unter
“Beschreibung der Hardware” auf Seite
20 und der Bedienungsanleitung des
Wechslers.
Hinweis:
Achten Sie beim Einstellen der SCSI-IDs
darauf, dass der Pfeil des SCSI-ID-Schalters
nicht zwischen zwei Werten steht, sondern
immer auf einen einzelnen Wert.
8. Stellen Sie die Funktionsschalter ein
(SCSI-Abschluss- und Paritätsschalter)
÷ Stellen Sie den Abschluss-Schalter des
letzten Laufwerks in der Kette auf ON.
Weitere Details hierzu finden Sie unter
“Beschreibung der Hardware” auf Seite
20 und der Bedienungsanleitung des
Wechslers.
CD–R DRIVE
Funktionsschalteraufkleber
O
N
12
OFF
ON
Paritätsschalter
SCSI-Abschluss
CD–R DRIVE
1
OFF
ON
TERM
2
OFF
ON
PARITY
Deutsch
<DRC1128>
23
Ge
Page 24

TECHNISCHE DATEN
[Allgemeine Daten]
Schreibgeschwindigkeit Maximal 8-fach
(Dauer-) Übertragungsrate während der Wiedergabe
Maximal 3.600 KByte/s
HINWEIS: Die Datenübertragungsrate wird möglicherweise aufgrund des jeweiligen
Disczustands (Kratzer usw.) nicht erreicht.
Zugriffszeit Durchschnittliche Direktzugriffszeit von 150 ms
Puffergröße 4 MB
SCSI 2-Scnittstelle
Kompatible Disctypen CR-ROM Mode-1, CD-DA
CD-ROM XA Mode-2 Form 1 & Form 2
Foto-CD
Video-CD
[Weitere Daten]
Netzteil DC+ 12 V, 1,0 A
DC+ 5 V, 1,0 A
Abmessungen 183,2 (B) x 66,5 (H) x 277 (T)
Gewicht 2,0 kg
Betriebstemperatur (bei Einsatz zusammen mit Wechsler)
+5°C bis +35°C
Betriebsluftfeuchtigkeit (bei Einsatz zusammen mit Wechsler)
20 % bis 60 % (+5°C bis +35°C)
20 % bis 80 % (+5°C bis +30°C)
Lagerungstemperatur –30°C bis +55°C
Lagerungsluftfeuchtigkeit 10 % bis 80 %
[Zubehör]
SCSI-Kabe x 1
Schrauben (zur Laufwerksinstallation) x 2
Aufkleber für Funktionsschalter x 1
HINWEIS:
Technische Änderungen zum Zweck der Produktverbesserung ohne vorherige Bekanntmachung
vorbehalten.
Veröffentlicht von Pioneer Corporation.
Urheberrechtlich geschützt © 1999 Pioneer Corporation.
Alle Rechte vorbehalten.
24
<DRC1128>
Ge
Page 25

このたびは、パイオニアの製品をお買い求めい
ただきまして、まことにありがとうございま
す。本機の機能を十分に発揮させて効果的にご
利用いただくために、この取扱説明書を本機ご
使用の前に最後まで必ずお読みください。
本機は100 枚ディスクチェンジャー「DRM1004」用オプションドライブです。
したがって、本機単体での使用はできません。
この装置は、情報処理装置等電波障
害自主規制協議会(VCCI)の基準に基
づくクラスA情報技術装置です。
この装置を家庭環境で使用すると電
波妨害を引き起こすことがありま
す。この場合には使用者が適切な対
策を講ずるよう要求されることがあ
ります。
<ご注意>取り付けについて
オプションドライブの取り付けは高度な専門知
識が必要なことと安全のため、
取り付けは弊社サービスが行ないます。詳しく
は本機取扱店にご相談ください。
使用上の注意
● 本機を操作する前に、必ずこの取扱説明書をお読みください。
● お読みになった後は、必ず保管してください。使用中にわからないことや不具合が生じ
たとき、きっとお役にたちます。
● ホコリの多い場所や、高温・多湿の場所では使用しないでください。
● 動作中に衝撃や振動を加えたり、電源スイッチを切らないでください。
● 本機をシステムに組み込む際は、必ず本機とシステムの電源を切った状態で行ってくだ
さい。
● 異物や水が入らないよう注意してください。
● 結露に注意してください。結露した場合は、1〜2時間程度放置してから使用してくださ
い。
● 内部点検や改造はお止めください。
● ご使用中に本機から異常な音やにおいがしたときは、必ず電源を切ってから、点検を受
けてください。
Deutsch
日
本
語
特 長
¶ 8 倍速記録(MAX)/ 24 倍速再生(MAX)
¶ 再生時の転送レート(サステイン)
最大3,600Kbyte/sec
¶ SCSI2 インターフェース採用
¶ SCSI バスターミネータ搭載
¶ バッファーサイズ:4MB
CD-Rディスクについて
必ず弊社推奨ディスクをお使いください。
また、推奨CD-Rディスクは販売店にご確認ください。
<DRC1128>
25
Ja
Page 26

各部の名称と働き
12345
CD–R DRIVE
(チェンジャー取り付け時)
1 SCSIID スイッチ
ドライブのSCSIIDを設定します。
同じSCSIバスで使用する場合(デージーチェーンで使用する場合)は異なるID番
号にしてください。
2 SCSI 端子
3 SCSI ターミネートスイッチ
SCSI接続した機器で、一番最後の機器にターミネータが必要です。ドライブが最
後の機器の時は、このスイッチをON の位置にしてください。
4 パリティスイッチ
パリティスイッチがONの場合、CD-Rドライブ側でSCSIデータバス上の入力デー
タに対して奇数パリティチェックを行います。OFFの場合は行いません。CD-Rド
ライブからの出力データにはパリティスイッチのON/OFFに関係なくパリティビッ
トが付加されます。
5 ファンクションスイッチラベル
CD-Rドライブを入れたドライブベイに貼ります。(ドライブの取り付け方 6 項参
照)
26
<DRC1128>
Ja
Page 27

CD-Rドライブの取り付けかた
静電気に関する注意
ドライブを取り扱う場合、各コネクター端子部分には絶対に触れないでください。
<注意>
¶ オプションドライブの取り付けは高度な専門知識が必要なことと安全のため、取り付けは弊社
サービスが行ないます。詳しくは本機取扱店にご相談ください。
¶ ドライブの位置は必ず連続させ、間を空けないでください。
正しく行なわないと正常に動作しない場合があります。
(1台目はドライブ 1 の位置、2 台目はドライブ 2 の位置、‥‥‥‥)
4
5
O
6
N
2
7
1
空き
ドライブ3
ドライブ2
ドライブ1
4
5
O
6
N
2
7
1
0
4
5
O
6
N
2
7
1
0
4
5
O
6
N
2
7
1
0
(3台取り付け時)
1. ドライブ取り付け位置のリアプレート
を外してから、チェンジャーの裏板を
外す。
(イラストは3 台のドライブを取り付ける
場合)
0
4
5
O
6
N
2
7
1
0
4
5
O
6
N
2
7
1
0
日
本
語
2.
(チェンジャーインターフェースケーブル:左側)
ドライブ取り付け位置にある束線を外
しコード押えを取る。
¶ 他の取り付け位置の束線は外さないでく
ださい。
(電源ケーブル:右側)
全てのコードホルダのロックを外し、
線材を手前に引き出しておく。
¶ すでにドライブが取り付けられている場
合はそのドライブより上のみ行なう。
コード
ホルダ
コード押え
27
<DRC1128>
Ja
Page 28

CD-Rドライブの取り付けかた
3. 交換用CD-R ドライブを挿入する。
¶ チェンジャーの左右のガイドに合わせて
途中まで入れてください。
¶ 一度に複数のドライブを取り付ける場合
は下から順に作業を行なってください。
(上から行なうとコネクターの取り付け
ができません。)
4. CD-R ドライブを取り付ける。
¶ コネクターを左側 2 ケ所、右側 1 ケ所、
正しく取り付けてください。
ご注意:ハーネス(線材)色
ドライブ4(最上部)................................. 黒
ドライブ3(下から3番目).....................青
ドライブ2(下から2番目).....................黄
ドライブ1(最下部)................................. 赤
¶ ドライブを奥まで挿入し、付属のネジを
使って左右2ケ所ネジ止めをしてくださ
い。
¶ 左右の線材をコードホルダにより固定し、
スタイリングしてください。
使用しなかった右側の電源ケーブルは元
の状態に戻してください。
※2台以上取り付ける場合は3と4を繰り
返してください。
28
<DRC1128>
Ja
ご注意:
裏板との間に線材をはさまない様
スタイリングに気をつけてください。
コードホルダー
コードホルダー
Page 29

5. チェンジャーの裏板を取り付ける。
CD–R DRIVE
CD-Rドライブの取り付けかた
6.CD-R ドライブ用ファンクションス
イッチラベルを貼る。
¶ ROMドライブ用の機能表示になってい
るので、CD-Rドライブ用の機能表示に
するためラベルを貼ってください。(す
でに印刷されている内容を隠すようにし
てください。)
7. SCSIIDをセットする。
¶ 詳しくは、各部の名称と働き(26 ペー
ジ)およびチェンジャーの取扱説明書を
ご覧ください。
ご注意:
SCSIID設定時、SCSIIDの矢印を数字
と数字の間で止めないようにしてくださ
い。矢印が確実に数字に向くように設定
してください。
8. ファンクションスイッチをセットする。
(SCSIターミネータ、パリティー切り
換え)
¶ デージーチェーンにより、最後となった
ドライブのターミネータスイッチをON
にしてください。詳しくは、各部の名称
と働き(26ページ)およびチェンジャー
の取扱説明書をご覧ください。
CD–R DRIVE
O
N
12
OFF
ON
パリティー
SCSIターミネータ
CD–R DRIVE
ファンクション
スイッチラベル
2
1
OFF
OFF
-
ON
ON
TERM
PARITY
日
本
語
<DRC1128>
29
Ja
Page 30

仕 様
[一般性能]
記録速度 最高8倍速
転送レート(サステイン)
最大3,600Kbyte/sec
※使用するディスクの状態(キズ等)によっては、転送レートが低下します。
アクセスタイム ランダム平均150msec
バッファーサイズ 4MByte
SCSI2インターフェース
適応ディスク CD-ROMMode-1,CD-DA
CD-ROMXAMode-2Form-1,Form-2
PhotoCD(マルチセッション)
VideoCD
[その他]
電源 DC+12V,1.0A
DC+5V,1.0A
外形寸法 183.2(幅)×66.5(高さ)×277(奥行き)
質量 2.0kg
動作温度 (チェンジャーの動作環境においての規定)
+5℃〜+35℃
動作湿度 (チェンジャーの動作環境下においての規定)
20%〜60%(+5℃〜+35℃)
20%〜80%(+5℃〜+30℃)
保存温度 −30℃〜+55℃
保存湿度 10%〜80%
[付属品]
SCSIケーブル x1
ネジ(ドライブ取り付け時使用) x2
ファンクションスイッチラベル x1
¶ 仕様および外観は改良のため予告なく変更する場合があります。
30
<DRC1128>
Ja
Page 31

語
本
日
En
<DRC1128>
31
EnglishFrançaisDeutsch
Page 32

AFTER-SALES SERVICE FOR PIONEER PRODUCTS
Please contact the dealer or distributor from where you purchased the product for its aftersales service (including warranty conditions) or any other information. In case the necessary
information is not available, please contact the Pioneer’s subsidiaries (regional service
headquarters) listed below:
PLEASE DO NOT SHIP YOUR PRODUCT TO THE COMPANIES
at the addresses listed below for repair without advance contact, for these companies are
not repair locations.
AMERICA
PIONEER ELECTRONICS SERVICE, INC.
CUSTOMER SUPPORT DIVISION
P.O. BOX 1760, LONG BEACH, CA 90801-1760, U.S.A.
EUROPE
PIONEER ELECTRONIC (EUROPE) N.V.
EUROPEAN SERVICE DIVISION
HAVEN 1087, KEETBERGLAAN 1, B-9120 MELSELE, BELGIUM
ASEAN
PIONEER ELECTRONICS ASIACENTRE PET. LTD.
SERVICE DEPARTMENT
501 ORCHARD ROAD, #10-00
WHEELOCK PLACE, SINGAPORE 238880
JAPAN AND OTHERS
PIONEER ELECTRONIC CORPORATION (HEAD OFFICE)
CUSTOMER SUPPORT CENTER
4-1, MEGURO 1-CHOME, MEGURO-KU, TOKYO 153-8654 JAPAN
France : tapez 36 15 PIONEER
この取扱説明書は再生紙を使用しています。
C1999パイオニア株式会社 禁無断転載
153-8654東京都目黒区目黒1丁目4番1号
PIONEER CORPORATION 4-1, Meguro 1-Chome, Meguro-ku, Tokyo 153-8654, Japan
Business System Company: 15-5, Ohmorinishi 4-Chome, Ohta-ku, Tokyo 143-8564 Japan TEL: 81-3-3763-2369
PIONEER NEW MEDIA TECHNOLOGIES, INC.
Laser Optical Systems Division: 2265 East 220th Street, Long Beach, CA 90810, U.S.A. TEL: 1-310-952-2111
PIONEER ELECTRONIC [EUROPE] N.V.
PIONEER House, Hollybush Hill, STOKE POGES, SLOUCH SL2 4QP U.K. TEL: 44-1753-789-789
PIONEER ELECTRONICS OF CANADA, INC.
Industrial Products Department: 300 Allstate Parkway, Markham, Ontario L3R 0P2, Canada TEL: 905-479-4411
PIONEER ELECTRONICS AUSTRALIA PTY. LTD.
178-184 Boundary Road, Braeside, Victoria 3195, Australia TEL: 61-3-9586-6300
PIONEER ELECTRONICS ASIACENTRE PTE. LTD.
501 Orchard Road, #10-00, Wheelock Place, Singapore 238880 TEL: 65-735-9011
<99L00SZ0U00> Printed in Japan/Imprimé au Japon <DRC1128-A>
Published by Pioneer Corporation.
Copyright © 1999 Pioneer Corporation.
All rights reserved.
 Loading...