

Page 1
Page 2
Page 3
Page 4
Thank you for buying this Pioneer product.
Please read through these operating instructions so you will know how to operate your model
properly. After you have finished reading the instructions, put them away in a safe place for
future reference.
WARNING
This equipment is not waterproof. To prevent a fire
or shock hazard, do not place any container filed
with liquid near this equipment (such as a vase or
flower pot) or expose it to dripping, splashing, rain
or moisture.
D3-4-2-1-3_A_En
WARNING: Handling the cord on this product or
cords associated with accessories sold with the
product will expose you to lead, a chemical known to
the State of California and other governmental
entities to cause cancer and birth defects or other
reproductive harm.
Wash hands after handling
K015 En
D36-P4_En
The Generation of Acoustical Noise Is Less Than 70dB.
(ISO7779/DIN45635)
CAUTION
This product is a class 1 laser product, but this
product contains a laser diode higher than Class 1.
To ensure continued safety, do not remove any covers
or attempt to gain access to the inside of the product.
Refer all servicing to qualified personnel.
The following caution label appears on your unit.
Location: on top of the cover
IMPORTANT NOTICE – RECORD THE MODEL NUMBER AND SERIAL NUMBERS OF THIS EQUIPMENT BELOW.
THE NUMBERS ARE ON THE REAR.
MODEL NO.
SERIAL NO.
KEEP THESE NUMBERS FOR FUTURE USE.
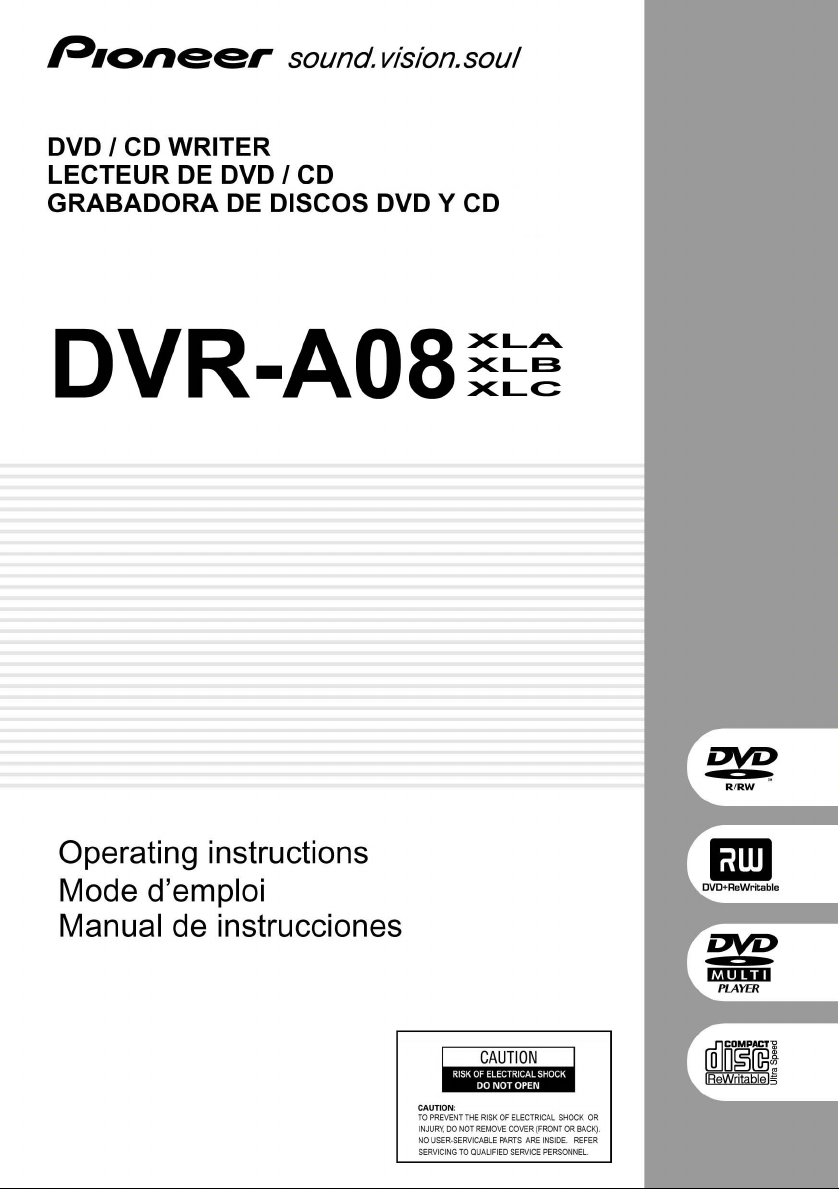
DVR-A08XLA, D VR-A08XLB, DVR-A08XLC
CLASS 1 LASER PRODUCT
LASER KLASSE 1
D3-4-2-1-8_A_En
D1-4-2-6-2_En
4
En
is a trademark of DVD Format/Logo Licensing Corporation.
Page 5
SAFETY INSTRUCTIONS
To ensure your personal safety and to maximize the full operating potential of your Drive, read and follow
these safety precautions:
ENVIRONMENT - Avoid installing the unit in a location that is exposed to high temperatures, high humidity,
large quantities of dust, or subject to excessive vibrations and shocks.
POWER - Turn off the system before installing this unit or any other hardware device.
READ AND RETAIN INSTRUCTIONS - Read all safety and operating instructions before operating the unit.
CLEANING - Use a damp cloth to clean the exterior housing. Avoid using any fluids including aerosol, liquid,
or alcohol-based cleaning products.
WATER AND MOISTURE - DO NOT use this product near open containers or other possible sources of liquid.
POWER SOURCES - Operate this product only from the recommended power sources. If you are unsure of the
type of power available, consult an Authorized Pioneer Dealer.
OVERLOADING - DO NOT overload wall outlets and extension cords. Doing so can result in fire or electric
shock.
OBJECT AND LIQUID ENTRY - Never push objects of any kind into this product. Touching dangerous voltage
points may cause a short resulting in fire or electric shock. Do not spill any type of liquid on this product.
CONDENSATION - Moisture can form inside of the unit if it is moved between cool surroundings and a warm
environment. If you are moving the unit to a different room, leave the product disconnected in the new location
for up to 2 hours before installing the unit or turning it back on.
SERVICING - Do not attempt to repair this product yourself. Opening or removing covers may expose you to
dangerous voltage or other hazards. Refer all servicing to qualified service personnel. (Refer to the enclosed
Service and Support Card.)
English
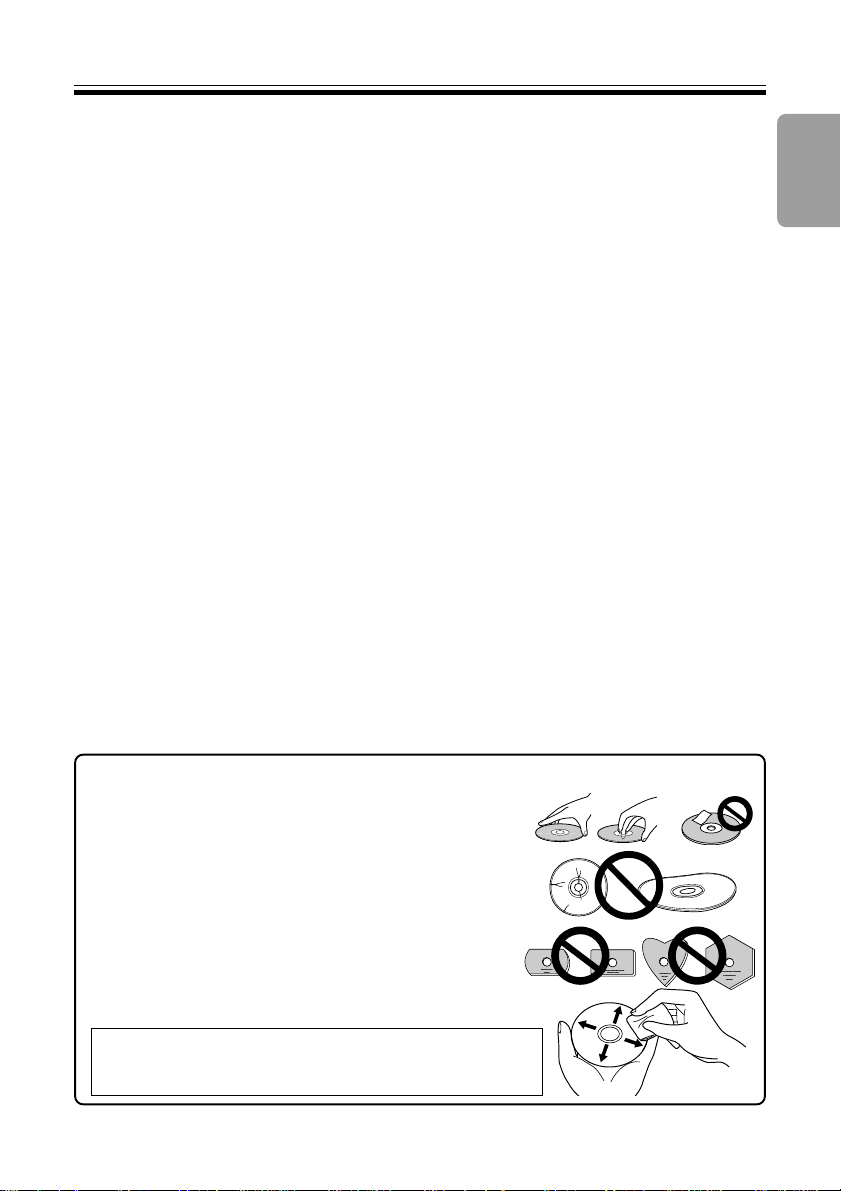
÷ Avoid touching or scratching the signal surface (shiny
side) of the disc.
÷ Hold the disc by the edges or by the center hold and one
edge.
÷ Do not affix paper or labels to the disc.
÷ Discard warped or cracked discs as they may cause
damage to the drive.
÷ Avoid specially shaped discs such as hearts or polygons.
÷ Remove dust or lint from the disc with a soft cloth by
wiping from the inside to the outside edge rather than in
a circular motion.
÷ Do not use record-cleaning or anti-static agents as the
solutions may damage a disc.
Always store discs in proper DVD-R storage cases when
not in use. Check for dirt, dust, or fingerprints on a disc's
recording side before inserting in to the unit
.
5
En
Page 6
Page 7
INTERFACE
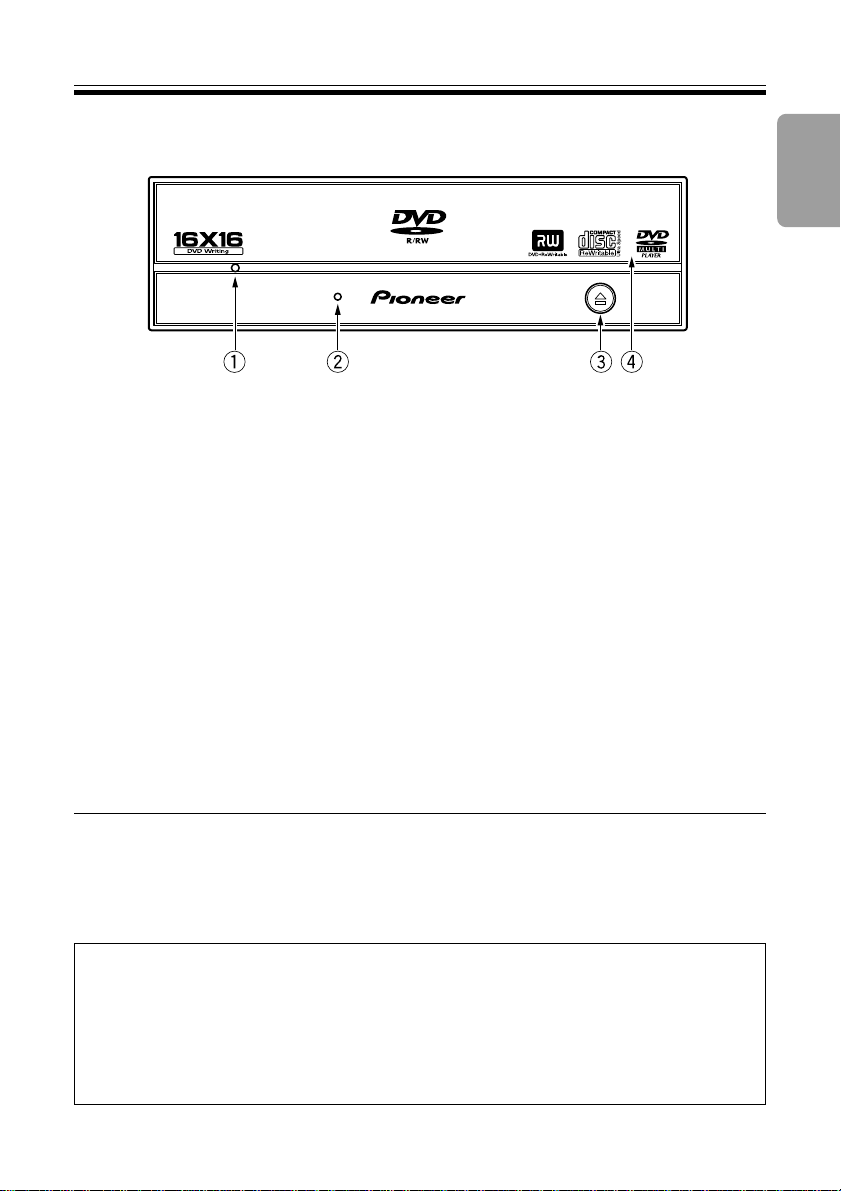
FRONT VIEW
1 Forced Ejection Hole
If the tray fails to eject when the Eject button is pressed, insert a stiff rod into the hole and
push to eject the tray. During normal operation, the eject button should be used to unload the
tray. Make sure the power to the drive is turned off and wait at least one minute until the disc
stops spinning when forcing the tray to eject using the eject hole.
2 BUSY Indicator
Operation status is indicated as follows.
During reading Lights
During writing Lights
3 Eject Button (0)
To unload /load the disc, press the button.
4 Disc Tray
Open the loading tray by pressing the eject button, then place a CD or DVD disc onto the tray
with the label facing up.
Press the eject button or push the front tray panel to load the disc.
Do not attempt to pull out the disc tray forcibly.
English
Precautions on playing 8 cm (3.15") Discs
An 8 cm (3.15") disc cannot be played when the drive isverticaleven if an adapter is attached.
ABOUT REGION CODES
The region code can only be changed 5 times, including the initial setting. Please be
aware that the fifth change becomes PERMANENT. Therefore, avoid changing the
region code unless absolutely necessary.
÷ Region codes are part of the DVD Standard. However, Region codes on DVD
discs are optional. DVD discs with no specified Region code can be played on all
players.
7
En
Page 8
INTERFACE
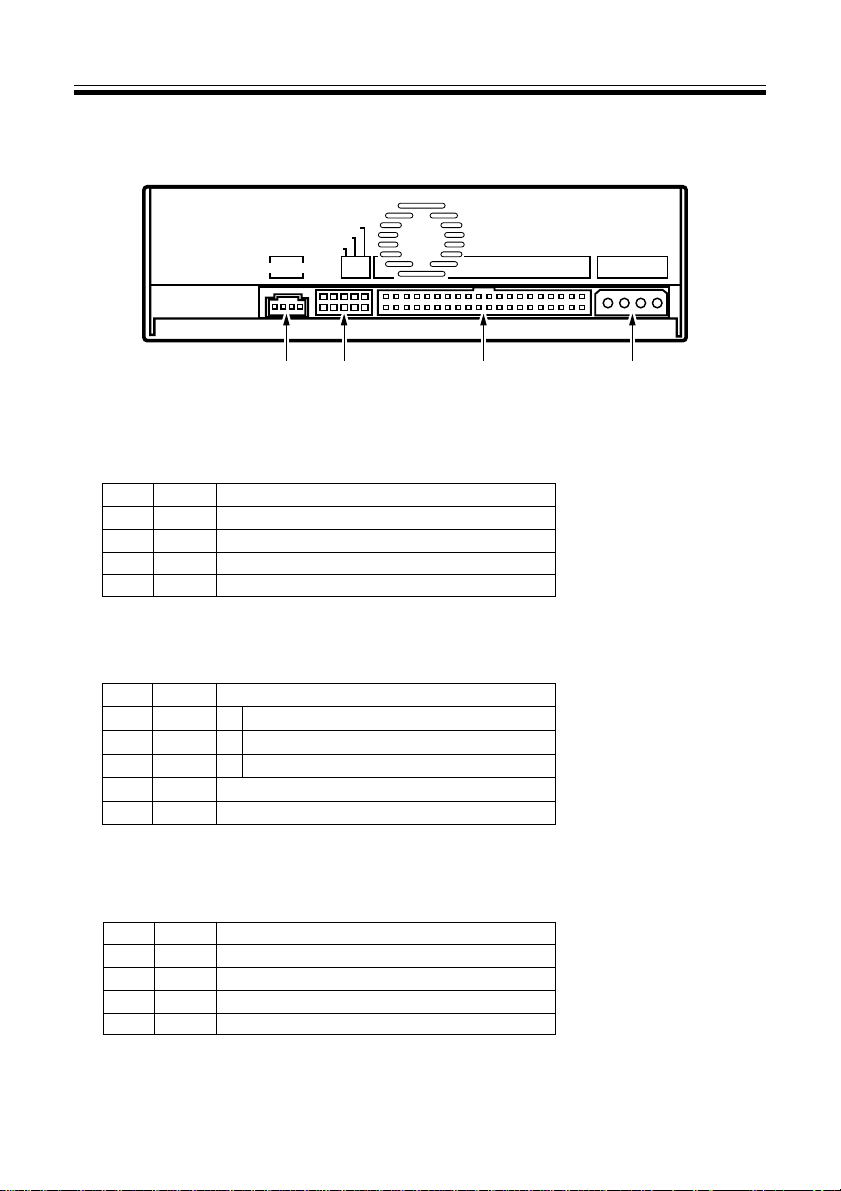
REAR VIEW
CABLE SELECT
ANLOG AUDIO
MASTER
SLAVE
SC
M
39
ALS
40
IDE INTERFACE
1
2
DC INPUT
5V G G 12V
5 6 7
8
5 Audio Output
This connector outputs analog audio.
This connector is compatible with `Molex 70553`, choose a suitable connection cable.
Pin Name Function
1 L Left channel audio output.
2 G Ground.
3 G Ground.
4 R Right channel audio output.
6 Device Configuration Jumper
Switch becomes ON when a jumper is added.
Make sure the power of the drive is OFF before changing the jumper setting.
Pin # 1 is ON when shipped from the factory.
Pin Name Function
1 MA on The drive is used in master mode.
2 SL on The drive is used in slave mode.
3 CS on Using Cable Select function.
4 Reserved.
5 Reserved.
7 Host IDE Interface
This is a 40 pin I/O connector according to the ATA specifications.
8 DC Input
Pin Name Function
1 +12 Power supply input for DC +12 V.
2 G Ground.
3 G Ground.
4 +5 Power supply input for DC +5 V.
8
En
Page 9

INSTALLATION
1 Turn OFF the computer's power and remove the power cord from the wall outlet
before removing the front panel cover.
2 Remove the blank panel from the front of the 5.25" bay slot.
3 Install the fixing slide rails on the drive. (When slide rails are required, please contact
the store where the drive was purchased.)
4 Insert the drive into the slot.
5 When anchoring is required, please refer to the computer's instruction manual.
÷ Please use screws measuring 5mm (3/16 in.) or less for mounting. Using
longer screws may damage the drive.
÷ When the mounting screws are loose, the vibrations from a spinning disc may
generate ripping noise. To prevent this noise, tighten the screws.
English
En
9
Page 10

Page 11

SPECIFICATIONS
[Setting]
This drive can be installed Horizontally or Vertically.
[Disc Size]
• 12 cm (4.72”) / 8 cm (3.15”)*
* 8 cm (3.15") discs cannot be used vertically..
[Data Transfer Rate]
Data Read (Sustained)
DVD Max. 22.16 MBytes/sec. (6.61-16X CAV Mode over 16 block transfer)
CD Max. 6.14 MBytes/sec. (17.1-40X CAV Mode over 16 block transfer)
Data Write (Sustained)
DVD Max. 22.16 MBytes/sec. (Max. 16X DVD-R)
CD Max. 4.92 MBytes/sec. (Max. 32X CD-R)
Host Interface specification
PIO Mode 4, Multi word DMA Mode 2 16.6 MBytes/sec.
Ultra DMA Mode 4 66.6 MBytes/sec.
Ultra DMA Mode 2 33.3 MBytes/sec.
• The data transfer rate may not be output due to disc conditions (scratches, etc.).
[
[Access Time/ Seek Time]
Access time (Random average)
Seek time (Random average)
[Audio Characteristic]
Line Out 0.70 ± 0.15 Vrms (at 10 kΩ load)
[Others]
Power Supply DC +12 V, 1.3 A
Dimensions 148 (W) x 42.3 (H) x 198 (D) mm
(including front panel)
Weight 1.1 kg (2.43 lb)
Operation temperature +5°C to +45°C (41°F to 113°F)
Operation humidity 5% to 85% (no condensation)
Storage temperature – 40°C to +60°C (– 40°F to 140°F)
Storage humidity 5% to 90% (no condensation)
[Accessories]
Short-circuit socket
Mounting screw x 4
Operating instructions x 1
NOTE:
• Specifications and design subject to possible modifications without notice, due to improvements.
(jumper) x 2
(17.1 – 40X CAV Mode over 16 block transfer)
DVD-ROM 140 ms CD-ROM 130 ms
DVD-ROM 130 ms CD-ROM 130 ms
DC +5 V, 1.4 A
5-27/32 (W) x 1-11/16 (H) x 7-25/32 (D) in.
English
Published by Pioneer Corporation.
Copyright C 2004 Pioneer Corporation.
All rights reserved.
11
En
Page 12

Nous vous remercions pour cet achat d’un produit Pioneer.
Nous vous demandons de lire soigneusement ce mode d’emploi ; vous serez ainsi à même de
faire fonctionner l’appareil correctement. Après avoir bien lu le mode d’emploi, le ranger dans un
endroit sûr pour pouvoir s’y référer ultérieurement.
K015 Fr
AVERTISSEMENT
Cet appareil n’est pas étanche. Pour éviter les
risques d’incendie et de décharge électrique, ne
placez près de lui un récipient rempli d’eau, tel
qu’un vase ou un pot de fleurs, et ne l’exposez pas
à des gouttes d’eau, des éclaboussures, de la pluie
ou de l’humidité.
D3-4-2-1-3_A_Fr
La production de bruits acoustiques est inférieure à 70 dB.
(ISO7779/DIN45635)
IMPORTANT
ATTENTION
DANGER D´ELECTROCUTION
NE PAS OUVRIR
Ce symbole de l’éclair, placé dans un
triangle équilatéral, a pour but d’attirer
l’attention de l’utilisateur sur la présence, à
l’intérieur du coffret de l’appareil, de
“tensions dangereuses” non isolées d’une
grandeur suffisante pour représenter un
risque d’électrocution pour les êtres
humains.
ATTENTION
Cet appareil est un produit laser de Classe 1, mais la
diode laser qu’il renferme est supérieure à la Classe 1.
Pour garantir une sécurité constante, ne retirez
aucun des couvercles et n’essayez pas d’avoir accès à
l’intérieur de l’appareil.
Confiez toute réparation à un personnel qualifié.
L’étiquette suivante se trouve sur votre appareil.
Emplacement : sur le dessus du couvercle
ATTENTION:
POUR ÉVITER TOUT RISQUE
D’ÉLECTROCUTION, NE PAS ENLEVER LE
COUVERCLE (NI LE PANNEAU ARRIÈRE).
AUCUNE PIÈCE RÉPARA BLE PA R
L’UTILISATEUR NE SE TROUVE À
L’INTÉRIEUR. CONFIER TOUT ENTRETIEN À
UN PERSONNEL QUALIFIÉ UNIQUEMENT.
Ce point d’exclamation, placé dans un
triangle équilatéral, a pour but d’attirer
l’attention de l’utilisateur sur la présence,
dans les documents qui accompagnent
l’appareil, d’explications importantes du
point de vue de l’exploitation ou de
l’entretien.
CLASS 1 LASER PRODUCT
LASER KLASSE 1
D3-4-2-1-1_Fr
D3-4-2-1-8_A_Fr
12
Fr
est une marque de fabrique de DVD Format/Logo Licensing Corporation.
Page 13

INSTRUCTIONS DE SECURITE
Pour garantir votre sécurité personnelle et obtenir le maximum de votre lecteur, lire et suivre ces consignes de
sécurité:
ENVIRONNEMENT - Ne pas utiliser cet appareil dans des endroits avec beaucoup de poussière, une
température ou une humidité élevée. Utiliser l’appareil à un endroit où il n’est pas soumis à des vibrations ou
des chocs.
PUISSANCE - Couper l’alimentation du système et des dispositifs joints avant l’installation.
LIRE LES INSTRUCTIONS - Lire toutes les instructions de sécurité et d’utilisation avant d’actionner le lecteur.
CONSERVER LES INSTRUCTIONS - Garder les instructions de sécurité et d’utilisation pour une future
référence.
SUIVRE LES INSTRUCTIONS - Suivre toutes les instructions de fonctionnement et d’utilisation.
ATTENTION AUX AVERTISSEMENTS - Observer tous les avertissements.
NETTOYAGE - NE PAS utiliser de liquides, de détachants en aérosol ou de l’alcool. N’utiliser qu’un chiffon
humide pour nettoyer les surfaces extérieures du boîtier.
EAU ET HUMIDITE - NE PAS utiliser ce produit à proximité d’eau.
SOURCES D’ALIMENTATION - Utiliser ce produit avec le type d’alimentation indiqué sur l’étiquette de
fabrication. En cas de doute à propos du type d’alimentation disponible, consulter un revendeur Pioneer agréé.
SURCHARGE - NE PAS surcharger les prises murales et les rallonges pour ne pas entraîner d’incendie ou de
secousse électrique.
PENETRATION D’OBJETS ET DE LIQUIDES - Ne jamais enfoncer d’objet d’aucune sorte dans ce produit. Le
contact avec des points de tension dangereux peut provoquer un court-circuit, entraînant un incendie ou une
secousse électrique. Ne pas verser de liquide d’aucune sorte sur ce produit.
CONDENSATION - De l’humidité se forme sur la section de fonctionnement du produit entraînant une baisse
de performances s’il est amené d’un endroit frais vers un environnement plus chaud. En cas de déplacement
de l’appareil vers un endroit ayant une température plus chaude, laisser le produit pendant 1 à 2 heures dans
le nouvel endroit avant de le remettre sous tension.
ENTRETIEN - Ne pas essayer de réparer soi-même ce produit. L’ouverture ou le retrait des capots peut vous
exposer à une tension dangereuse ou d’autres dangers. Pour tout entretien, demander à un personnel d’entretien
qualifié. (Se reporter à la carte d’entretien et de support jointe.)
Français
÷ Evitez de toucher ou de griffer la surface du disque sur
laquelle sont enregistrés les signaux (surface brillante).
÷ Saisissez le disque par les bords ou par le centre et un
bord.
÷ Ne collez pas de papier ou d’étiquette sur le disque.
÷ Jetez les disques fissurés ou voilés, car ils peuvent
endommager le lecteur.
÷ Evitez les disques de forme spéciale, notamment ceux
en forme de coeur ou de polygone.
÷ Eliminez la poussière ou les peluches du disque à l’aide
d’un linge doux en frottant de l’intérieur vers l’extérieur
et non en effectuant un mouvement circulaire.
÷ N’utilisez jamais de produit de nettoyage pour disque ou
d’ agent antistatique, car ces solutions peuvent
endommager le disque.
Rangez toujours vos disques dans les boîtes de rangement
de DVD-R prévues à cet effet lorsque nous ne les utilisez pas
et vérifiez s’ils ne sont pas couverts de saletés ou de
poussières (surtout sur la face enregistrée) avant de les utiliser.
13
Fr
Page 14

CARACTERISTIQUES
• Vitesse d’écriture ( ✻ : ZCLV )
DVD-R 1X, 2X, 4X, 6X, 8X
DVD-RW 1X, 2X, 4X
DVD+R 2,4X, 4X, 6X, 8X
DVD+R double couche 2,4X, 4X
DVD+RW 2,4X, 4X
CD-R 4X, 10X, 16X, 24X
CD-RW 4X, 10X, 16X, 20X✻, 24X
• Vitesse de lecture maximale
DVD-ROM (simple) 16X
DVD-ROM (dual) 12X
DVD-R, DVD+R 12X
DVD+R double couche 8X
DVD-RW, DVD+RW 8X
DVD-RAM 2X
CD-ROM, CD-R 40X
CD-RW 32X
• Taille de la mémoire tampon : 2 Mo (écriture, lecture)
• Mode de transfert de données IDE :PIO mode 4 / DMA multi-mot mode 2/Ultra DMA mode 4
• Type intégré 5,25 pouces demi-hauteur
• Sortie audio stéréo
• Servomécanisme de bascule d’écran à cristaux liquides
• Orientation horizontale / verticale au choix
• Mécanisme à faible vibration par système DRA
Format du disque (lecture/écriture)
• DVD simple couche/double couche /disque de 120 mm/disque de 80 mm
DVD-R (En cas d’écriture, disque 650 nm pour usage général seul)
•
• DVD-R VITESSE 4X • DVD-R VITESSE 8X
• DVD-RW • DVD-RW VITESSE 2X
• DVD-RW VITESSE 4X
• DVD+R • DVD+R VITESSE 4X
• DVD+R VITESSE 8X • DVD+R double couche
• DVD+RW • DVD+RW VITESSE 4X
• DVD-RAM (Version 2.0, Version 2.1) (lecture seul)
• CD-ROM Mode 1
• CD-ROM XA Mode 2 (forme 1, forme 2)
• CD Photo (une session ou plusieurs sessions)
• CD-DA • CD-Extra (CD PLUS)
• CD vidéo • CD text
• CD-R
• CD-RW, CD-RW haute vitesse, CD-RW Ultra rapide
✻
, 12X✻, 16X
✻
, 12X✻, 16X
✻
, 32X
✻
✻
✻
✻
Remarque :
•
Un programme d’application prenant en charge le format ci-dessus est nécessaire pour l’écriture.
•
Médias supportés requis pour les vitesses d’écriture DVD et CD spécifiques.
•
Pour effectuer une écriture sur DVD aux vitesses 12x ou 16x, utilisez des disques désignés par
Pioneer. Pour plus de détails, consultez les informations disponibles sur le site web de Pioneer.
14
Fr
Page 15

INTERFACE
VUE AVANT
1 Orifice d’éjection forcée
Insérer une tige rigide dans l’orifice et pousser pour éjecter le tiroir lorsque celui-ci ne s’ouvre
pas lors d’un appui sur la touche d’éjection. En fonctionnement, utiliser uniquement la touche
d’éjection pour ouvrir le tiroir. Veiller à ce que l’alimentation du lecteur soit coupée et attendre
l’arrêt de la rotation du disque pendant plus d’une minute avant de tenter d’éjecter le tiroir au
moyen de l’orifice d’éjection.
2 Voyant BUSY (occupé)
L'état de fonctionnement est signalé comme suit:
Pendant la lecture S'allume
Pendant l'écriture S'allume
3 Touche d’éjection (0)
Pour décharger / charger le disque, appuyer sur la touche.
4 Tiroir du disque
Ouvrir le tiroir de chargement en appuyant sur la touche d’éjection, puis placez un CD ou un
DVD dans l’emplacement prévu avec l’étiquette tournée vers le haut. Appuyer sur la touche
d’éjection ou sur la partie avant du tiroir pour charger le disque.
N'essayez pas de retirer de force le plateau du disque.
Français
Précautions à prendre lors de la lecture de disques de 8 cm
Les disques de 8 cm ne peuvent pas être lus par le lecteur même en utilisant un adaptateur intermédiaire
au disque lorsque le lecteur est placé en position verticale.
A PROPOS DES CODES REGIONAUX
Le code régional peut être modifié 5 fois SEULEMENT (premier réglage compris).
Comme la cinquième modification sera DÉFINITIVE, soyez particulièrement prudent
lorsque vous décidez de modifier les codes régionaux.
÷ Les codes régionaux sont couverts par la norme DVD. Toutefois, les codes régionaux
des disques DVD sont facultatifs. Les disques DVD qui ne possèdent pas de code
régional peuvent être reproduits sur tous les lecteurs.
15
Fr
Page 16

INTERFACE
5 6 7
8
VUE DE LA FACE ARRIERE
MASTER
SLAVE
CABLE SELECT
ANLOG AUDIO
39
M
SC
40
ALS
IDE INTERFACE
5 Sortie audio
Connecteur pour sortie analogique audio.
Ce connecteur est compatible avec la norme « Molex 70553 ».
Choisir un câble de connexion
approprié.
Broche
Nom Fonction
1
L
Sortie audio voie de droite (Left)
2GTerre
3GTerre
4 R Sortie audio voie de gauche (Right)
6 Cavalier de configuration
ON signifie que le cavalier réunit les deux broches de cette position.
Veiller à ce que l’alimentation du lecteur soit coupée avant de changer la configuration du cavalier.
La broche n° 1 est configurée sur ON en usine.
Broche
Nom Fonction
1MAon
2SLon
3 CS on Utilisation de la fonction de sélection par
4Réservé.
5Réservé.
Le lecteur est utilisé en mode maître (Master).
Le lecteur est utilisé en mode esclave (Slave).
câble (Cable Select).
1
2
DC INPUT
5V G G 12V
7 Interface IDE avec l’hôte
Connecteur d’E/S 40 broches conforme aux spécifications ATA.
8 Entrée cc (DC)
Broche
Nom Fonction
1 +12 Entrée cc +12 V
2GTerre
3GTerre
4 +5 Entrée cc +5 V
16
Fr
Page 17

INSTALLATION
1 Couper l’alimentation de l’ordinateur personnel, débrancher le cordon d’alimentation et
déposer le capot ou le panneau avant.
2 Retirer la plaque masquant de la fente de 5,25 pouces.
3 Poser les glissières de fixation sur le lecteur. (S'adresser au magasin ou au fabricant de
l’ordinateur lorsque des glissières sont nécessaires.)
4 Introduire le lecteur dans la fente.
5 Lorsqu’il est nécessaire de fixer le lecteur, se reporter au manuel d’instruction de
l’ordinateur.
÷ Utiliser des vis ayant une longueur inférieure ou égale à 5 mm. L’utilisation de vis plus
longues pourrait endommager le lecteur.
÷ Lorsque les vis de fixation ne sont pas suffisamment serrées, etc., les vibrations
provoquées par la rotation du disque peuvent générer un bruit de déchirure et il faut
donc serrer les vis solidement pour éliminer ce bruit.
Français
17
Fr
Page 18

RACCORDEMENT
Câble audio
Broche 1
Câble d’interface IDE
Cordon d’alimentation
1
5V G G 12V
2
DC INPUT
÷ Mettre l’ordinateur personnel hors tension.
÷ Connecter le cordon d’alimentation de l’ordinateur personnel. Respecter la polarité
du cordon lors du raccordement.
÷ Connecter le câble d’interface IDE. Confirmer que la broche 1 du connecteur IDE
du lecteur est bien connectée à la broche 1 du câble.
÷ En cas d’utilisation d’une carte de sons, connecter la sortie audio à la carte de son à
l’aide d’un câble audio.
N’oubliez pas que l’alimentation de cet appareil doit être fournie par l’ordinateur
auquel il est relié. N’utilisez aucune autre alimentation que celle de l’ordinateur
personnel.
18
Fr
Page 19

Page 20

Page 21

Page 22

Page 23

Page 24

Page 25

Page 26

Page 27

Page 28

 Loading...