

Page 1
C,!) PIONEER”
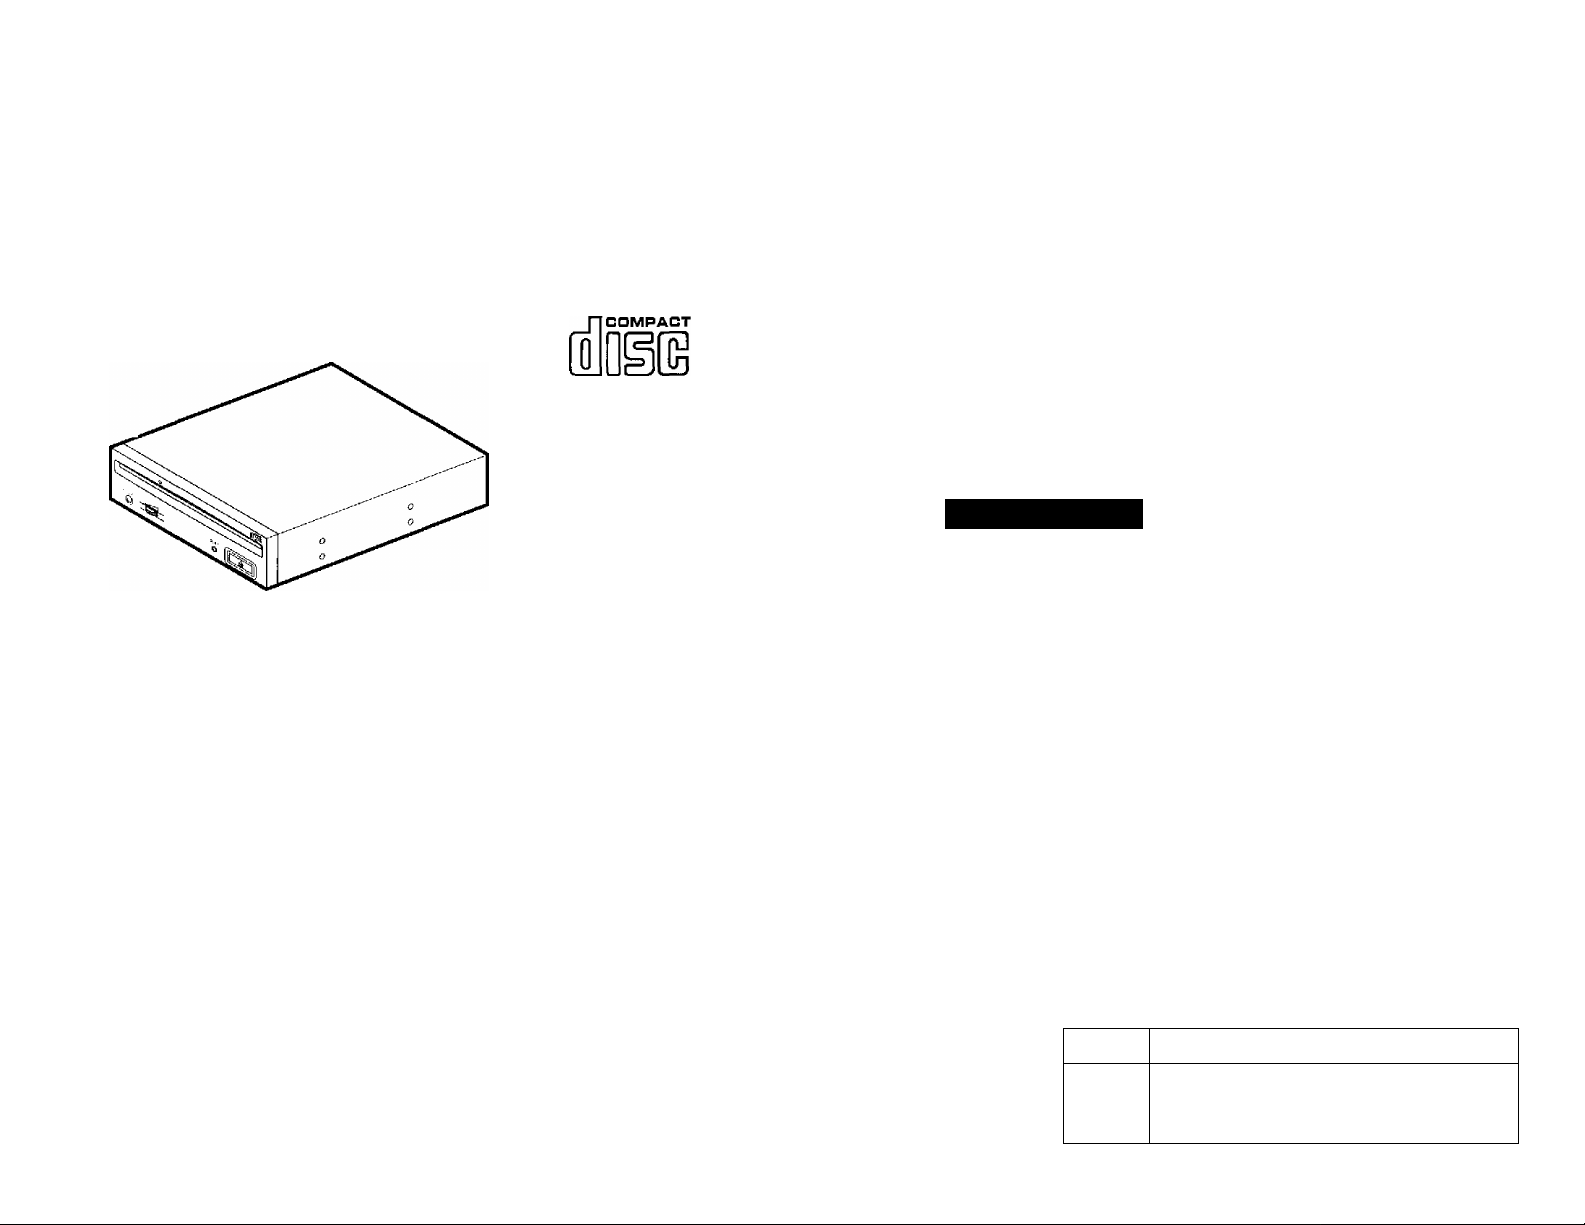
DR-SOBS
CD-ROM DRIVE UNIT
UNITE DE LECTEUR DE CD-ROM
CD-ROM -LAUFWERK
IMPORTANT
A
Tho lightning flaih with arrowhead syn'ibol. within an
oquilatcral triangle, is intended to alert the user to the
presence of uninsulated "dangerous voltage" within the
product's enclosure that may be of sufficient magnitude
to constitute a risk of electric shock to persons.
CAUTION
RISK OF ELECTRIC SHOCK
DO NOT OPEN
CAUTION:
TO PREVENT THE RISK OF ELECTRIC SHOCK, DO NOT
REMOVE COVER (OR BACK), NO USER-SERVICEABLE
PARTS INSIDE, REFER SERVICING TO OUAUFIEO
SERVICE PERSONNEL,
Operating instructions
Mode d'empioi
Bedienungsanleitung
A
The cyclamation point w'lthin an equilateral triangle is
intended to alert the user to the presence of important
operating and maintenance (servicing) instructions in
the literature accompanying the appliance.
ThanK you for buying tms PIONEER product. Please read
through these operating instructions so you will know
how to operate your unit properly. After you have finished
reading the instructions, put them away in a safe place
for future reference.
WARNING: TO prevent fire or shock hazard,
DO NOT EXPOSE THIS APPLIANCE TO RAIN OR
MOISTURE.
[For Canadian model]
This Class B digital apparatus meets all requirements of
the Canadian Interference-Causing Equipment
Regulations.
This product complies with the EMC Directives (89/336/EEC,
92/31/EEC} and CE Marking Directive (93/68/EEC).
Nous vous remercions pour cet achat d'un produit
Pioneer. Nous vous demandons de lire soigneusement
ce mode d'emploi; vous serez ainsi à même de faire
correctement fonctionner l'appareil. Après avoir bien lu
le mode d'emploi, le ranger dans un endroit sûr oour
pouvoir s'y référer ultérieurement.
ATTENTION: AFIN DE PREVENIR TOUS RISQUES DE
CHOC ELECTRIQUE OU DE DEBUT D'ENCENDIE, NE
PAS EXPOSER CET AAPPAREIL A L'HUMIDITE OU A
LA PLUIE.
[Pour le modèle Canadien]
Cet appareil numérique de la Classe B respecte toutes
les exigences du Règlement sur le matériel brouilleur du
Canada.
Ce produit est conforme aux directives relatives à la
conhpatibilité électromagnétique (89/336/CEE, 92/31/CEE) et
a la directive CE relative aux marquages (93/68/CEE).
1 —
Wir danken Ihnen für den Kauf dieses Pioneer-Produkts.
Lesen Sie sich bitte diese Bedienungsanleitung durch.
Dann wissen Sie, wie Sie ihr Gerät richtig bedienen.
Bewal'iren Sie sie an einem sicheren Platz auf, um auch
zukünftig nachschtagen zu können.
WARNUNG: UM EINEN BRAND ODER STOMSCHLAG
ZU VERMEIDEN, DIESES GERÄT NICHT REGEN ODER
FEUCHTIGKEIT AUSSETZEN
Dieses Produkt entspricht den EMV-Richtlinien (89/336/EEC,
92/31/EEC) und CE-Markierungsrichllinien (ЭЗ/68/ЕЕС).
û] 7]7]Ъ Fg-efl
ê: 7171S.AÍ 2.
Page 2

SPECIFICATIONS FICHE TECHNIQUE TECHNISCHE DATEN
[General functions]
Disc diameter 12 cm (4.72"), 8 cm (3.15")
Transfer rate
Sustained 2,100-4,950 kBytes/sec.*
’ The data transfer rate may not be output for some disc
conditions (scratches, etc.}.
Access time
Random (average) 70 ms
Seek time
Random (average) 60 ms
Data buffer capacity 128 kBytes
[Audio output part]
Line 0.7 Vrms ± 0.1 Vrms
(at 10 kQ load)
[Others]
Power supply DC +12 V, 0.9 A (peak)
0.55 A (normal)
DC +5 V, 1.8 A (peak)
0.75 A (normal)
External dimensions 148 (W) x 42.3 (H) x 207.5 (D) mm
5-27/32 (W) X1 -11 /16 (H) X 8-6/32 (D) in.
Weight 0.99 kg (2.2 1b)
Operation temperature -t-5°C to -r45°C
(4rF to113°F)
Operation humidity 5% to 85%
(no condensation!
Storage temperature -40'"C to -h60^C
(- 40“Fto 140°F)
Storage humidity 5% to 90%
(no condensation]
NOTE:
Specifications and design subject to possible modifications without
fK'ilice, due to improvements.
[Fonctions générales]
Diamètre du disque 12 cm, 8 cm
Vitesse de transfert
Continue 2.100 - 4.950 koctets/s “
^ Il SC peut que le taux de transfert de données ne soit pas
affiche à cause de l'état du disque (rayures, etc.).
Temps d'accès
Aléatoire (valeur moyenne) 70 msec
Durée de recherche
Aléatoire (valeur moyenne) 60 msec
Capacité du tampon de 128 koctets
données
[Section sortie audio]
Ligne 0,7 Vrnns ± 0,1 Vrms
(charge 10 kiTl
[Autres]
Alimentation +12 VCC, 0,9 A (crête)
0,55 A (normal)
+5 VCC, 1,8 A (crête)
0,75 A (normal)
Dimensions externes 148(L}x42,3 (FI}x207,5(P) nin
Poids 0,99 kg
Température de fonctionnement
+5°C à +45X
Humidité de fonctionnement
5% à 85%
(sans condensation)
Température de remisage - 40°C à +60°C
Humidité de remisage 5% à 90%
(sans condensation)
REMARQUE:
Les caractéristiques techniques et présentation de ce produit
sont sujets à des changements sans préavis pour améliorations
[Allgemeine Funktionen]
CD-ROM-Durchmesser 12 cm, 8 cm
Datentransferrate
Dauerbetrieb 2.100 - 4.950 kBytes/s*
* Die Datentransferrate kann möglicherweise bei einer
Beeinträchtigung der Disc (Kratzer usw.) nicht eingehalten
werden.
Zugriffszeit
Zufallszugriff (durchschn.) 70 ms
Suchzeit
Zufallszugriff (durchschn.) 60 ms
Datenpufferkapazität 128 KByte
[Audio-Ausgang]
Hochpegel 0,7 Vrms ± 0,1 Vrms
(bei 10 kU Last)
[Sonstiges]
Spannungsversorgung Gleichstrom +12 V, 0,9 A (Spitze)
0,55 A (normal)
Gleichstrom +5 V, 1,8 A (Spitze)
0,75 A (normal)
Außenabmessungen 148 (B) x42,3 (H) x 207,5 (T) mm
Gewicht 0,99 kg
Betriebstemperatur +5"C bis +45"C
Bethebsluftfeuchtigkeit 5% bis 85%
(keine Kondensation)
Lagertemperatur - 40“C bis +60°C
Lagerluftfeuchtigkeit 5% bis 90%
(keine Kondensation)
HINWEIS:
Technischo Änderungen zum Zweck der Produktverbesserung
ohne vorherige Bekanntmachung Vorbehalten.
Published by Pioneer Electronic Corporation.
Copyright 'C-1997 Pioneer Electronic Corporetion.
All right.s rttserved.
Publication de Pioneer Electronic Corporation.
Cl 1997 Pioneer Elctronic Corporation.
Tour droits de reproduction et de traduction réservés.
Veiü[Ieiitlk:h1 von Pioneer Flcctronic Corporation.
Urtieberreohtlich geschützt'C 1997 Pionrror Eloolronio
Corporatinri. Alle Rechte Vorbehalten.
PIONEER ELECTRONIC CORPORATION
Business Systems Company, Overseas Sales Department: 4-1, Mequro 1-Chôme, Meouro-ku, Tokyo 153-8654, Japan
PIONEER NEW MEDIA TECHNOLOGIES, INC.
Multimedia and Mass Storage Division: 2265 East 220th Street, Long Beach, СЛ 90810, U.S.A. TEL; 800-444-OPTI (6784)
PIONEER ELECTRONICS SERVICE, INC. 1925 East Dominguez St. Long Eoach, CA 90810, U.S.A. TEL: 310-952-2820
PIONEER ELECTRONIC [EUROPE] N.V.
Multimedia Division: PIONEER House, Hollybush Hill, Stoko Pogos, Slough SL2 4QP, U.K. TEL: -ь44-1753-789-789
PiONEER ELECTRONICS OF CANADA, INC.
Industrial Products Department; 300 Allslato Parkway, Markham, Ontario L3R 0P2, Canada I EL: 905-479-4411
PIONEER ELECTRONICS AUSTRALIA PTY. LTD. 178-184 Boundary Road, Braeside, Victoria 3195, Australia TEL: t-61-3'9586-6300
PIONEER ELECTRONICS ASIACENTRE PTE. LTD. 501 Orchard Road, #10-00, Lane Crawford Place, Singapore 0923 TEL: +69-735-9011
<98D04SF8W05> France: tapez 36 15 PIONEER Printed in Japan/lmprimé au Japon <DRC1075-A>
Page 3
INTERFACE
INTERFACE
SCHNITTSTELLE
FRONT VIEW/VUE AVANT/VORDERANSICHT
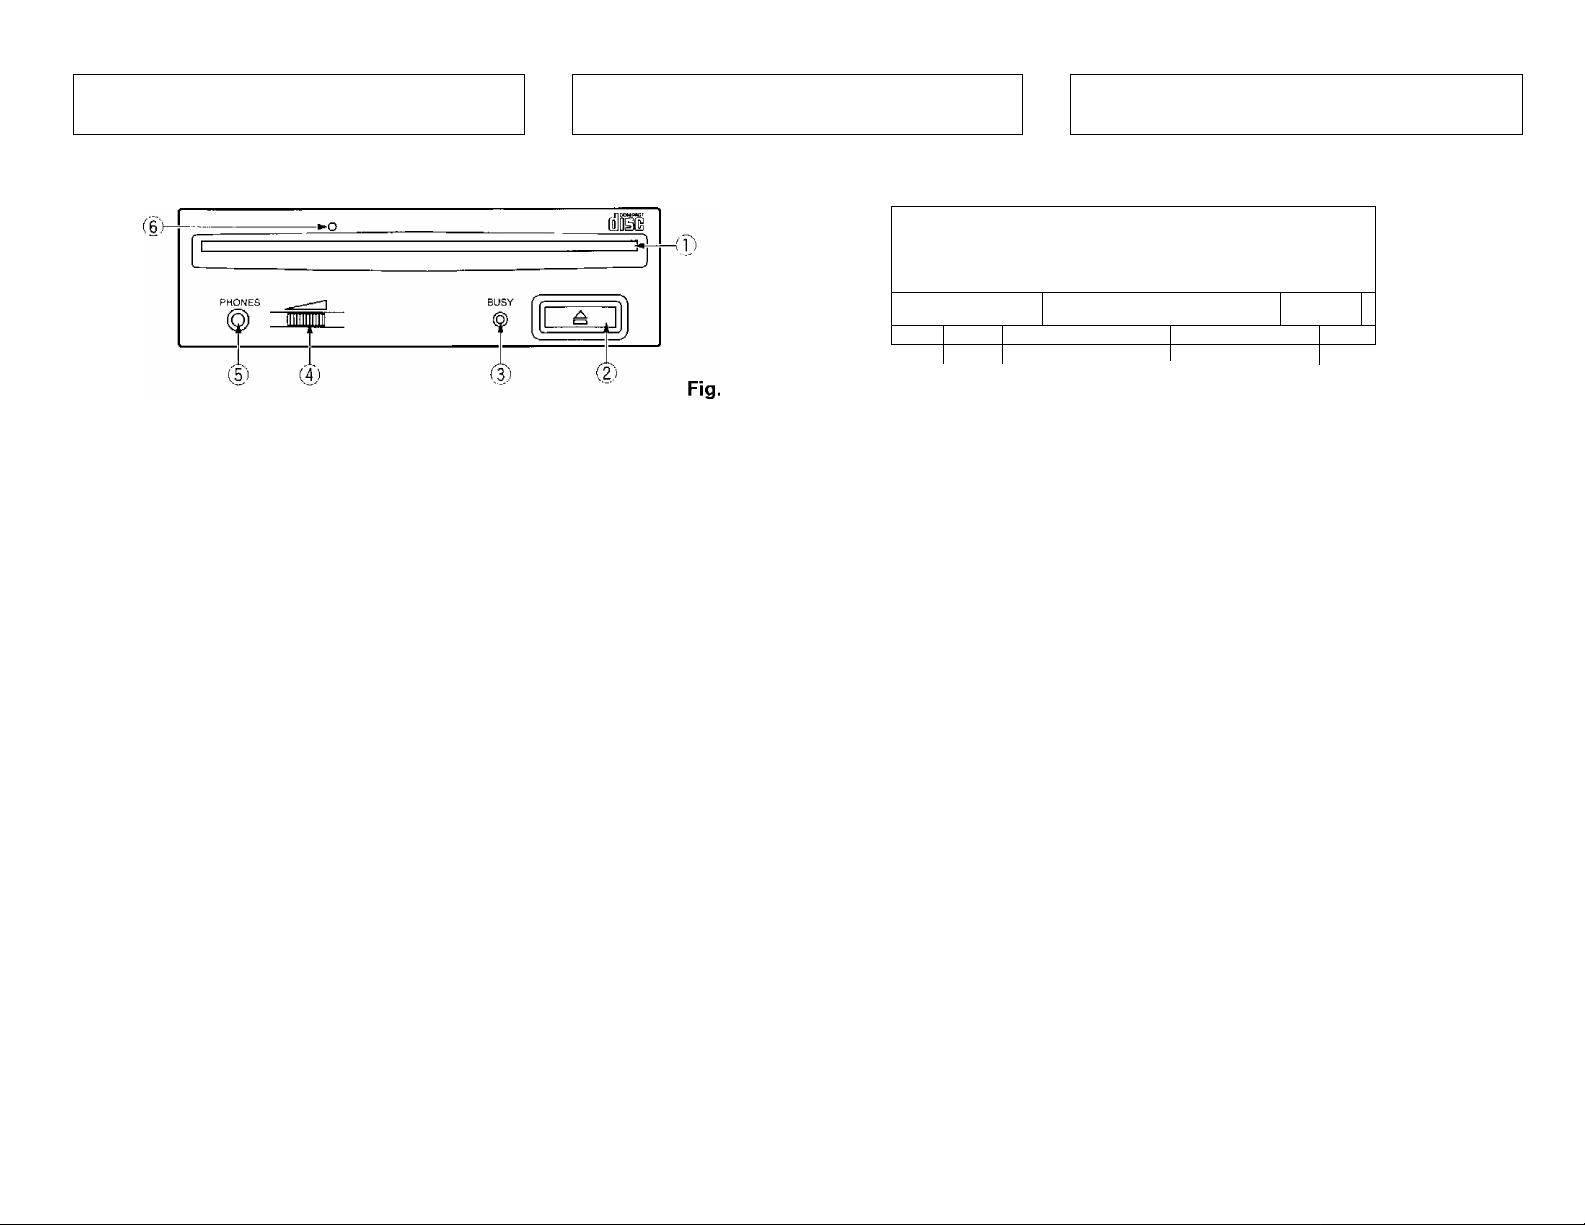
1) Disc loading slot
Insert the CD-ROM with the label facing up.
When using 8 cm discs, attach a CD adapter (available
at stores) to the disc.
WARNtNG:
Do not play a CD having other shape than a circular disc,
such as heart shaped disc. Otherwise malfunction may occur.
(2)
Eject button (^)
This button is used to eject the disc.
(3) BUSY indicator
Flashes during data access.
0 Volume control (headphone level)
This is used to adjust the volume for the headphone
jack.
0 Headphone jack (PHONES)
This is a stereo mini jack for connection of headphones.
@ Forced ejection hole
When the Eject button has lost its function, insert an
accessory pin for emergency ejection into this hole and
push to eject the disc.
WARNING:
• Before executing this operation, be sure to switch off the
power supply of the computer and confirm that the disc
loading is stopped. It takes approx. 60 seconds to stop
loading a disc after switching off the power supply.
• Always use the pin provided (Do not use other objects).
REAR VIEW/VUE DE LA FACE ARRIERE/RUCKANSICHT
4 18 1 50 2 +5 G G +12
1 |UÜDÜDQÜö|
1 !□□□□□□□□!
ao)
® Chargeur de disque
Insérez le CD-ROM l'étiquette vers le haut.
En utilisant des disques de 8 cm, montez un adaptateur
CD (disponible dans le commerce) sur le disque.
ATTENTION:
Sous peine de provoquer des défaillances, ne reproduisez
pas de CD ayant une forme autre que circulaire, telle que des
disques en forme de coeur.
(2) Touche d'éjection (^)
Cette touche sert à éjecter le disque.
0 Indicateur d'état de fonctionnement
(BUSY)
Clignote pendant l'accès des données.
0 Commande de réglage du volume
(niveau du casque d'ecoute)
Cette commande permet de régler le volume pour la
prise du casque d'écoute.
® Prise de casque d'écoute (PHONES)
Il s'agit d'une prise de minijack stéréo à laquelle peut
être branché un casque.
(6)
Orifice d'éjection forcée
Quand la touche d'éjection ne fonctionne plus, insérez
une tige d'éjection d'urgence dans ce trou et poussez
afin d'éjecter le disque,
ATTENTION:
• Avant d'effectuer cette opération, voiliez à mettre
l'ordinateur hors tension et assurez-vous de l'arrèl du
chargement de disque. Après mise hors tension du
matériel, l'arrêt du chargement de disque demande environ
60 secondes.
• Toujours utiliser la broche prévue (Ne pas utiliser d'autres
objets).
49 1 DC INPUT
(9)
OOOOOOOOOOOOO
ooooooooooooo
DOOÖOOOOOOOO
300000000000
('8)
0 0 0 o'
Ö)
Fig. 2
0 Disk-Schlitz
Die CD-ROM mit der Beschriftung nach ober
einführen.
Bei der Verwendung von 8 cm-Disks, einen Adapter
(im Handel erhältlich) an der Disk befestigen
WARNUNG:
Keine nicht kreisförmigen CDs (herzförmige, achteckige
Discs) abspielen. Anderenfalls kann eine Funktionsstörung
auf treten.
(I) Auswurftaste (^)
Mit dieser Taste wird die Disk ausgeworfen,
0 Betriebsanzeige (BUSY)
Diese Anzeige blinkt während des Zugriffs auf Daten.
CD Lautstärkeregler (für Kopfhörer)
Mit diesem Regler wird der Lautstärkepegel dei
Kopfhörerbuchse eingestellt.
(5) Kopfhörerbuchse (PHONES)
Diese Stereo-Minibuchse dient zum Anschließen eines
Kopfhörers.
0) Notauswurf
Falls die Auswurftaste keine Funktion mehr bewirkt,
durch dieses Loch einen Hilfsstift einführen und fesl
hineindrücken, um die Disk auszuwerfen.
WARNUNG:
• Vor diesem Vorgang immer sichersteilen, daß die
Siromversorgung dos Computers abgeschattet wurde, und
sich davon überzeugen, daß das Laden der Disk beendet
ist. Es dauert etwa 60 Sekunden, um das Laden der Disk
nach dem Abschalten der Stromversorgung zu beenden,
m Verwenden Sie immer den mitgelieferten Stift (Verwender
Sie keine anderen Gegenstände).
— 5 —
Page 4

INSTALLATION
INSTALLATION
EINBAU
(3) install the fixing slide rails on the drive. (When slide
rails are required, please contact vour shoo or the
computer manufacturer.)
W Insert the drive into the slot.
i'5’: When fixing is required, please refer to the instruction
manual for the computer.
• Please use screws with a length of 5 mm (3/16 in.) or
less for mounting. Use of long screws may damage
the drive.
• When the mounting screws are loose etc., the
vibrations from disc rotation can generate a ripping
noise, so that the screws should be tightened securely.
WiPoser les glissières de fixation sur le lecteur
(S'adresser au magasin ou au fabricant de l'ordinateui
lorsque des glissières sont nécessaires.)
Wi Introduire le lecteur dans la fente
(5: Lorsqu'il est nécessaire de fixer le lecteur, se reporter
au manuel d'instruction de l'ordinateur.
• Utiliser des vis ayant une longueur inférieure ou égale
à 5 mm. L'utilisation de vis plus longues pourrait
endommager le lecteur.
• Lorsque les vis de fixation ne sont pas suffisamment
serrées, etc., les vibrations émises par la rotation du
disque peuvent générer un bruit de déchirure et il faut
donc resserrer les vis solidement.
(3,' Befestigen Sie die Klemmschlebeschienen an das Laufwerk,
(Wenn Schiebeschienen benötigt werden, wenden Sie sich
an das Geschäft, wo Sie den Computer erworben haben,
oder an den Hersteller des Computers.)
Schieben Sie das Laufwerk in den Schacht ein.
:5jWenn eine Befestigung erforderlich ist, befestigen Sie das
Laufwerk gemäß den Anweisungen im Handbuch des
Computers.
• Verwenden Sie Montageschrauben mit einer Länge von
höchstens 5 mm.
Durch längere Schrauben kann das Laufwerk beschädigt
werden.
• Bei lockeren Befestigungsschrauben erzeugen die
Vibrationen durch die rotierende CD ein störendes
Geräusch.
Die Schrauben müssen daher gut festgezogen werden.
CONNECTIONS
Switch off the power supply of the personal computer.
Set the SCSI ID number.
Set the terminator switch to ON.
Connect the power supply cable from the personal
computer. At the time of connection, please pay
attention to the cable polarity.
Connect the SCSI interface cable.
At this time, confirm that the pin 1 of the SCSI
connector is connected correctly to pin 1 of the cable.
When a sound board is used, connect the audio output
with an audio cable to the sound board.
RACCORDEMENT ANSCHLÜSSE
Couper l'alimentation de l'ordinateur personnel.
Régler le numéro ID SCSI.
Placer le commutateur de termination sur ON.
Connecter le câble d'alimentation de l'ordinateur
personnel. Au moment de la connexion, faire attention
à la polarité des câbles.
Connecter le connecteur d'interface SCSI. A ce
moment, confirmer que la broche 1 du connecteur SCSI
est correctement connectée à la broche 1 du câble.
Lorsqu'une plaque sonore est utilisée, connecter la
sortie audio avec un câble audio à la plaque sonore.
7 —
Schalten Sie die Stromversorgung des PC ab,
Setzen Sie die SCSI-lD-Nummer.
Setzen Sie den Abschlußwiderstand auf ON.
Stecken Sie das Spannungskabel vom PC ein. Achten
Sie beim Anschluß auf die korrekte Polung,
Schließen Sie das SCSI-Schnittsteilenkabel an.
Achten Sie dabei darauf, daß Stift 1 der SCSI-Buchse
korrekt mit Stift 1 des Kabelsteckers verbunden wird.
Wird eine Sound-Karte verwendet, dann schließen Sie
den Audioausgang mit einem Audiokabel an die Sound-
Karte an.
Page 5

INTERFACE INTERFACE SCHNITTSTELLE
7} DC Input
This is the power supply input tor DC +6 V and +12 V,
(8) SCSI interface
This is a 50-pin I/O connector according to the SCSI-2
specifications. Use a flat ribbon SCSI connector to
connect to the SCSI host adapter.
9) Function switch
Use the accessory short-circuit sockets to set the SCSI
ID number and the drive function.
• ON : short circuited
• OFF : open
#1 ~ 3 : SCSI ID
Setting switch
O(LSB) (#1) OFF ON OFF ON OFF ON OFF ON
1 (#2) OFF OFF ON ON OFF OFF ON ON
2 (MSB) (#3) OFF OFF OFF OFF ON ON ON ON
* The factory setting is for ID No. 2.
#4 : Reserved #4 : Réservé
#5 : SCSI Terminator
#6 :
#/ :
#8 : Reserved
0 1 2* 3 4 5 6 7
ON = SCSI termination disable
OFF = SCSI termination enable
Default sector size
ON - 512 byte
OFF - 2048 byte
Disable the Eject button
ON = Disables the Eject button
OEE = Enables the Eject button
SCSI-ID
# Audio output (AUDIO OUT)
This is a connector for output of analog audio.
As a Molex 70553 type connecter is used, select a
matching connection cable.
(7) Prise d'entrée CC (DC INPUT)
Entrée d'alimentation CC de 5 V et 12 V.
(8) Interface SCSI
Cette interface est un connecteur E/S 50 broches selon
les spécifications SCSI-2. Utiliser un connecteur SCSI
à ruban plat pour connecter l'adaptateur hôte SCSI.
C?) Commutateur de fonction
Utiliser les cavaliers accessoires pour régler le numéro
d'identification SCSI et la fonction de lecteur.
• ON ; court-circuité
• OFE : ouvert
#1 ~ 3 : SCSI ID
Commutateur
de réglage
O(LSB) (#1) OFF ON OFF ON OFF ON OFF ON
1 (#2) OFF OFF ON ON OFF OFF ON ON
2 (MSB) (#3) OFF OFF OFF OFF ON ON ON ON
Le réglage d'usine est ID 2.
#5 : Terminaison SCSI
ON = Terminaison SCSI désactivée
OFF = Terminaison SCSI activeé
#6 : Taille de secteur par défaut
ON = 512 octets
#/ :
#8 : Réservé
OFF = 2048 octets
Désactiver la touche d'éjection
ON = Désactive la touche d'éjection
OFF = Active la touche d'éjection
# Sortie audio (AUDIO OUT)
Connecteur de sortie du signal audio analogique.
Du fait qu'un Molex 70553 est utilisé, sélectionner un
câble de raccordement correspondant.
SCSI-ID
0 1 2* 3 4 5 6 7
0 Gleichspannungseingang
Hier handelt es sich um den Eingangsstecker für
Gleichstromversorgung von -i-5 V und -i-12 V.
(0 SCSI-Schnittstelle
Hierbei handelt es sich um einen 50-poligen E/AAnschluß entsprechend der SCSI-2-Spezifikation.
Verwenden Sie ein SCSI-Flachbandkabel, um das Gerät
mit dem SCSl-Hostadapter zu verbinden.
c|) Funktionsschalter
Verwenden Sie die zusätzlichen
Überbrückungsschalter, um die SCSI-lD-Nummer und
die Funtionen des Laufwerkes einzustellen.
• ON : gesteckt
• OFF : offen
#1 ~ 3 : SCSI-ID
Einstellschalter
O(LSB) (#1)
1 (#2) OFF OFF ON ON OFF OFF ON ON
2 (MSB) (#3) OFF OFF OFF OFF ON ON ON ON
Die Werkseinstellung ist ID-Nr. 2.
#4
#5
#6
#7
#8
0 1 2*
OFF ON OFF ON OFF ON
Reserviert
SCSI-Abschlußwiderstand
ON - SCSI-Abschlußwiderstand ausgeschaltet
OFF - SCSI-Abschlußwiderstand eingeschaltet
Standard-Sektorgröße
ON = 512 Byte
OFF = 2048 Byte
Auswurftaste auf der Gerätefront deaktivieren
ON ^ Auswurftaste deaktiviert
OFF ^ Auswurftaste aktiviert
Reserviert
SCSI-ID
4 5 6 7
3
OFF
QQO Audioausgang (AUDIO OUT)
Es handelt sich hierbei um einen Anschluß für analoge
Audioausgabe. Falls ein Molex 70553-Anschluß benufzt
wird, wählen Sie ein entsprechendes Verbindungskabel.
ON
INSTALLATION INSTALLATION EINBAU
' Switch off the power supply of the personal computer,
and remove the cover or the front panel.
r2 Remove the blank panel installed on the front of the
5.25 inch slot.
H■'Mettre l'ordinateur hors tension et retirer le capot ou
la face avant.
<'2j Retirer la plaque masquant de la fente de 5,25 pouces
— 6
T’Schalten Sie die Spannungsversorgung des Personal
computers aus und nehmen Sie die Abdeckung oder die
Frontplatte ab.
(2’'Entfernen Sie die Blende von einem leeren 5,25-ZolL
Laufwerkschacht.
Page 6

FEATURES
CARACTERISTIQUES PRINCIPALES
MERKMALE
• High-speed reading
Transfer rate (sustained): 2,100 kBytes/sec. - 4,950
kBytes/sec. (CAV 32X)
• High-speed access
Random average: 75 ms
• Lowvibration mechanism
• SCSI-2 interface specifications
• Buffer size: 128kBytes
• Applicable discs
CD-ROM Mode 1
CD-ROM XA Mode 2 (Form 1, 2)
CD-DA (Digital audio output)
CD Extra, Video CD, CD-I Ready ana CD-XA Reaay
support, CD-RW'^^^'^^disc reading
• Correspondence to Kodak Photo CD (single and
multisession)
• Conforming to MPC-3 specifications
• Half-height size
• Slot in loading
• SCAM (Level i) supported
Precautions *Notes on CD-RW discs
This product can read out CD-RW disc data. Note the following:
П) A little longer time is needed to sense a CD-RW disc when
the operation starts, compared with normal CD-ROM discs.
(2) The read-out speed of CD-RW discs is almost quadruple
higher than that of normal ones. (Because the reproduced
signal level from CD-RW discs is lower than that of normal
discs.)
(3) Blank discs, discs where you failed fo write data or discs
where session close processing has not been made - these
discs cannot be used.
(4) The operations may not start or the data may not be road out
under the following conditions:
The quality of the recorded signal has deteriorated due to
the dirt or scratches on the disc, or frequently rewrote discs.
If you fail to start the operation, take out the disc and reinsert
it to try again to start.
Precautions on playing CD singles (8 cm Discs)
П) When playing CD singles (8 cm discs), always use the adapter
for 8 cm discs. Before loading the disc into the CD-ROM
drive unit, be sure to check that it is secured property by the
catches of the adaptor. If discs have been inserted without
the adapter by mistake, remove the disc immediately by
pressing the eject button. If the disc does not come out with
one press, press another time.
(2) Use 8 cm disc adapters labeled with the ЙЭЁ mark (recom
mended standard product). Do not use adapters which cause
the disc to idle, nor adapters which are bent or curved.
_
___
m Lecture à haute vitesse
Vitesse de transfert (continue): 2.100 KO/sec. -4.950
KO/sec. (CAVx32)
• Accès à haute vitesse
Moyenne aléatoire: 75 ms
• Mécanisme à vibrations réduites
• Spécifications d'interface SCSI-2
• Tampon de données: 128 koctets
• Disques utilisables
Disque optique CD-ROM Mode 1
Disque optique CD-ROM XA Mode 2 (Forme 1, 2)
CD-DA (Sortie audionumérique)
Support CD extra, CD vidéo, CD-I Ready et CD-XA
Ready, Lecture de disque CD-RW^^^'^'^^-'^
• Correspondance avec CD Kodak Photo (session simple
et multisession)
• Conforme aux spécifications MPC-3
• Format demi-hauteur
• Lecteur en charge
• SCAM (niveau i) pris en chargo
Précautions ^Remarques concernant les disques CD-RW
Cet appareil peut lire les données inscrites sur les CD-RW. Toutefois, veillez
noter ce qui suit.
(!) L'examen initial d'un CD-RW exige un temps légèrement plus long
que celui d'un CD-ROM.
(2) La wrasse de lecture d’un CD-RW est presque quatre fois supérieure
à celle d'un dieque normal. (Cekr tient à ce que le niveau des signaux
fournis par les CD-RW est plus faible que celui des disques habituels.)
(3) Vous ne pouvez pas utiliser les disques vierges, les disques sur lesquels
l'écriture des données a été infructueuse et les disques qui n 'ont pas
fait l'objet d'une fermeture de session.
{4} Dans les cas suivants, le fonctionnement peut être impossible et il
peut en être de même de la lecture des données.
La qualité du signal enregistré est altérée en raison des poussières ou
des rayures que porte 1e disque, ou bien le disque a fait l'objet de trop
nombreuses réécritures.
Si le fonctionnement n'esî pas possible, retirez te disque du lecteur
puis réintroduisez-le et effectuez une nouvelle tentative.
Precautions a prendre lors de la lecture de CD singles
(Disques de 8 cm)
(1) Lors de ta lecture de CD singles (disques de 8 cm), toujours utiliser
l'adaptateur pour ce type de disques. Avant de charger le disque dans
l'unité de lecture de CD-ROM, vérifier qu'il est bien maintenu en place
par les encoches de l'adaptateur. Si des disques ont été Insérés par
erreur sans utiliser l'adaptateur, il faut enlever ces disques
immédiatement en poussant sur le bouton d'éjection. Si le disque ne
réussit pas à sortir sous l'effet de la pression, répéter la manoeqwe.^
(2) Utiliser dos adaptateurs pour disques de 8 cm portant la marque
(produit standard recommandé). Ne pas utiliser d'adaptateurs qui
entraîne une rotation à vide du disque, ni non plus des adaptateurs
ondulés ou pliés.
— 4 —
• Datenabruf mit hoher Geschwindigkeit
Datentransferrate (Dauerbetrieb): 2.100 kBytes/sec ~ 4.950
kBytes/sec (CAV 32fach)
• Zugriff mit hoher Geschwindigkeit
Zufallszugriff (durchschn.): 75 ms
• Mechanismus zur Vibrationsreduzierung
• Entspricht den Anschlußspezifikationen für SCSI-2
• Datenpufferkapazität: 128 kBytes
• Verwendbare CD-ROMs
CD-ROM (Modus 1)
CD-ROM (XA-Modus 2; Lorm 1,2)
CD-DA (Digital-Aüdioausgang)
CD Extra-, Video CD-, CD-I Ready und CD-XA Ready-Unterstützung,
CD-RW'^'"''*’'""* -Lesemodus
• Entspricht dem Kodak Photo CD-Standard (Einfach und
Multisession)
• Konform mit MPC-3-Spezifikationen
• Halbe Einbauhöhe
• Disk-Schlitz
• SCAM (Level i) wird unterstützt.
Vorsichtshinweise ^Hinweise zu CD-RW-Discs
Dieses Gerät ist in der Lage, Daten auf CD-RW-Discs zu lesen. Hierzu
sind folgende Hinweise zu beachten:
(!) Im Vergleich zu herkömmlichen CD-ROM-Discs wird zum Erkennen
der Disc bei Arbeitsbeginn für CD-RW-Discs etwas m e h i
Zeit benötigt.
(2) Die Lesegeschwindigkeit bei CD-RW-Discs ist fast vier mal so hoch
wie bei Standard-Discs. (Dies ist durch den im Vergleich zu Standard-
Discs niedrigeren Wiedergabesignai-Pegel von CD-RW-Discs bedingt).
(3) Die folgenden Discs können nicht venvendet werden:
Leere Discs; Discs, bei denen keine Datenübertragung möglich wai
oder bei denen das Abschlußverzeichnis nicht eingegeben wurde.
(4) In den folgenden Fällen ist unter Umständen kein Zugriff oder ein
Auslesen der Daten möglich:
Die Qualität dos aufgenommenen Signals hat sich durch
Verschmutzung oder Kratzer der Disc verschlechtert, oder die Disc
wurde häufig erneut beschrieben.
Falls kein Zugriff möglich ist die Disc herausnehmen, wiedereinlegen
und den Computer erneut starten.
Vorsichtmassnahmen beim abspielen von CD-Singles
(8 cm CDs)
(1) Benutzen Sie immer den Adapter für 8 cm CDs wenn Sie CD-Singles
(8 cm CDs) abspielen. Bevor Sie die CD in das CD-ROM Laufwerk
einlegen, prüfen Sie bitte, ob sie ordnungsgemäß von den Haltern
des Adapters festgeklemmt wird. Wenn irrtümlich CDs eingelegt
wurden ohne den Adapter, nehmen Sie sie sofort heraus indem Sie
die drücken Sie ein zweites Mal.
(2) Benutzen Sie 8 cm CD-Adapter, die mit der (|®| Marke
gekennzeichnet sind (empfohlener Standard). Benutzen Sie wedei
Adapter die die CD Im Leerlauf lassen, noch krumme oder verbogene
Adapter.
___
Page 7

SAFETY INSTRUCTIONS
INSTRUCTIONS DE SECURITE
SICHERHEITSANWEISUNGEN
To ensure your personal safety and to maximize the full operating potential
of your Drive, read and follow these safety precautions:
ENVIRONMENT - Please do not use the unit at places with much dust,
high temperature, or high humidity. Please use the unit at a place where
it is not subjected to vibrations or shocks.
POWER - Power-oU your system and attached hardware devices before
installation.
READ INSTRUCTIONS - Read all safety and operating instructions before
the Drive is operated.
RETAIN INSTRUCTIONS - Retain the safety and operating instructions
for future reference.
FOLLOW INSTRUCTIONS - Follow all operating and use instruction;
HEED WARNINGS - All warnings must be adhered to.
CLEANING - DO NOT use liquid, aerosol cleaners, or alcohol. Use only
a damp cloth to clean the exterior housing.
WATER AND MOISTURE - DO NOT use this product near water.
POWER SOURCES - Operate this product from the type of power source
indicated on the marking label. If you are not sure o1 the type of power
available, consult your Authorized Pioneer Dealer.
OVERLOADING - DO NOT overload wall outlets and extension cords.
Doing so can result in fire or electric shock.
OBJECT AND LIQUID ENTRY - Never push objects o( any kind into this
product. Touching dangerous voltage points may cause a short resulting
in fire or electric shock. Do not spill liquid of any kind on this product.
CONDENSATION - Moisture will form in the operating section of the
product causing performance to be impaired if it is brought from cool
surroundings into a warmer environment. If you are moving the unit to a
location with a warmer temperature, let the product stand tor 1-2 hours
in the new location before turning it back on.
SERVICING - Do not attempt to repair this product yourself. Opening or
removing covers may expose you to dangerous voltage or other hazards.
Refer all servicing to qualified service personnel. (Refer to ttie enclosed
Service and Support Card.)
Pour garantir votre sécurité personnelle et obtenir le maximum de votre
lecteur, lire et suivre ces consignes de sécurité;
ENVIRONNEMENT - Ne pas utiliser cet appareil dans des endroits avec
beaucoup de poussière, une température ou une humidité élevée. Utiliser
l'appareil â un endroit orit il n'est pas sourdis à des vibrations ou des
chocs.
PUISSANCE - Couper l'alimentation du système et des dispositifs joints
avant l'installation.
LIRE LES INSTRUCTIONS - L ire toutes les instructions de sécurité e
d'utilisation avant d'actionner le lecteur.
CONSERVER LES INSTRUCTIONS - Garder les instructions de sécurité
et d'utilisation pour une future référence.
SUIVRE LES INSTRUCTIONS S uivre toutes les instructions de
fonctionnement et d'utilisation.
ATTENTION AUX AVERTISSEMENTS - Observer tous les
avertissements.
NETTOYAGE - NE PAS utiliser de liquides, de détachants en aérosol ou
de l'alcool. N'utilisez qu'un chiffon humide pour nettoyer les surfaces
extérieures du boîtier.
EAU ET HUMIDITE - NE PAS utiliser ce produit à proximité d'eau.
SOURCES D'ALIMENTATION - Utiliser cc produit avec le type
d'alimentation indique sur l'étiquette de fabrication. En cas de doute à
propos du type d'alimentation disponible, consulter un revendeur Pioneer
agréé.
SURCHARGE - NE PAS surcharger les prise.s murales et les rallonges
pour ne pas entraîner d'incendie ou de secousse électrique.
PENETRATION D'OBJETS ET DE LIQUIDES - Ne jamais enioncer d obiet
de toute sorte dans ce produit. Le contact avec des points de tension
dangeteu.x peut provoquer un court-circuit, entraînant un incendie ou
une secousse électrique. Ne pas verser de liquide de toute sorte sur ce
produit,
CONDENSATION - De l'humidité se forme sur la section opération du
produit entraînant une bai.sse de performances s'il est amené d'un endroit
frais vers un environnement plus chaud. En cas de déplacernenl de
l'appareil vers un endroit ayant une température plus chaude, laisser le
produit pendant I à 2 heures dans le nouvel endroit avant de le remettre
sous tension,
ENTRETIEN No pas essayer de réparer soi-mérne ce produit. L'ouverture
ou le retrait des capots peut vous exposer aune tension dangereuse ou
d'autres dangers. Pour tout entretien, demander à un personnel
d'entretien qualifié. (Se reporter â ta carte d'entretien et de sijpport jointe.)
Um Itire eigene Sicherheit sicherzustellen, und um die volle Funktion Ihres
CD ROM-Laufwerkszü maximieren, lesen Sie diese Sicherheitsvorschriften
bitte sorgfältig durch:
BETRIEBSBEDINGUNGEN - Betreiben Sie das Gerät nicht an Orten, wo
starkes Staubautkomrnen, fiohc Temperaturen und hohe Luftfeuchtigkeiten
vorherrscfien. Wählen Sic einen Ort, wo keine Vibrationen bzw. starke
Erschütterungen auf das Gerät einwirken können.
SPANNUNG - Vor dem Einbau des CD-ROM-Laufwerks sind der Computer
und sämtliche angeschlossenen Penpheriegeräie auszuschalten.
LESEN SIE DIE ANLEITUNGSSCHRITTE Vor der Inbetriebnahme des
CD-ROM-Laufwerks sind alle Sicherheits- und Betriebsanleitungen
durchzulesen.
AUFBEWAHRUNGSHINWEISE - Bewahren Sie die Sicherheits und
Betriebsanleitungen für zukünftige Benutzung griffbereit auf,
BEFOLGUNG DER ANLEITUNGSSCHRITTE Befolgen Sic bitte alle
Bedienungs- und Handhabungshinweise.
BEACHTUNG ALLER WARNUNGEN - Sämtliche Warnliinweise müssen
sorgfältig beachtet werden.
REINIGUNG - KEIN flüssiges Reinigungsmittel. Reinigungssprühmittel oder
Alkohol verwenden. Benutzen Sie zum Reinigen des äußeren Gehäuses
ausschließlich einen feuchten Lappen.
WASSER UND FEUCHTIGKEIT - Betreiben Sie das Gerät NIEMALS in
unmittelbarer Nähe von Wasserl
STROMVERSORGUNG - Betreiben Sie das Gerät nur mit dem
Stromversorgungstyp, der auf dem Aufkleber angegeben ist. Wenn Sie sich
über die vorliegenden Netzspannung nicht sicher sind, spiechen Sic bitte
mit Ihrem autorisierten Pioneer-Händler.
NETZÜBERLASTUNG - NIEMALS Wandsteckdosen und
Vertängerungskabel überlasten! Ein Brand oder Stromschlag können die
Folge sein.
EINDRINGEN VON FLÜSSIGKEITEN UND FREMDKÖRPERN Nrcmals
Frentdkörperindas Geräteinnere eindringen lassen. Das Berühren von unter
Spannung stehenden Kontakten kanrt zu einem Kurzschluß führen, was einen
Brand oder Stromschlag auslösen kann, \rorsicht, damit keine Flüssigkeiten
auf dem Gerät versetiüUct weiden.
KONDENSATION ■■ Wenn das Gerat von einem kalten in einen warmen
Raum gebracht wird, verursacht der Feuciitigkeifsnicdcrschlag in Gerät eine
merkliche Leistungsminderung. Betreiben Sic das Gerät deshalb nicht für
ca. 1 bis 2 Stunden, bis sicti die Bauteile der Umgebungstemperatui
angeglichen tiaben.
WARTUNG - Niqht den Versuch unternehmen, das Gerät selbst zu
reparieren I Das Offnen oder Entfernen von Abdeckungen kann einen
Slromschlag sowie andere Gefahren auslösen. Überlassen Sie sämtliche
Wartungsarbeiten unserem qualifizierten KundendiensTpersonal. (Bezietien
Sie sich bitte auf das miteingeschlossene Kundendienstverzeicfinis.)
DO NOT use damaged,cracked, or warped discs. If they break
inside the unit, tliey may damage tlie optics. Discs rotate at
higit speed inside the changing mechanism.
:©■
DO NOT uso non-standard discs, as these may adversely
influence this unit and other equipment.
NE PAS utiliser de disques endommagés, fissurés ou déformés.
S’ils se cassent à l'inférieur de l'appareil, ils risquent
d'endommager la lentille. Les disques fotjrnent à grande vitesse
à l'inférieur du mécanisme de changement.
NE PAS utiliser de disques non standard, car ils peuvent avoir
une mauvaise influence sur cet appareil et d'autres équipements
_ 3 „
Verwenden Sie keine beschädigten, gesprungenen oder
verzogenen CD-ROMs, Wenn eine CD-ROM im Gerät zerbricht,
können die optischen Teile beschädigt werden. Die CD-ROMs
rotieren mit hoher Drehzahl im Wechsler-Mechanismus.
Verwenden Sie keine nicht standardisierten CDs, da diese einen
nachteiligen Einfluß auf die Funktion dieses Geräts und andere
Komponenten ausüben können.
Page 8

This equipment has been tested and found to comply with the limits for a Class B digital device, pursuant to Part 15 of the
PCC Rules. Tfiese limits are designed to provide reasonable protection against harmful interference in a residential
installation. This equipment generates, uses, and can radiate radio frequency energy and, if not instalied and used in
accordance with the instructions, may cause harmful interference to radio communications. However, there is no guarantee
that interference will not occur in a particular installation. If this equipment does cause harmful interference to radio or
television reception, which can be determined by turning the equipment off and on, the user is encouraged to try to correct
the interference by one or more of the following measures:
- Reorient or relocate the receiving antenna.
- Increase the separation between the equipment and receiver,
- Connect the equipment into an outlet on a circuit different from that to which the receiver is connected.
- Consult the dealer or an experienced radio/TV technician for help.
Information to User
Alteration or modifications carried out without appropriate authorization may invalidate the user's right to operate the
equipment.
CAUTION: USE OF CONTROLS OR ADJUSTMENTS OR PERFORMANCE OF PROCEDURES OTHER
THAN THOSE SPECIFIED HEREIN MAY RESULT IN HAZARDOUS RADIATION
EXPOSURE.
CAUTION: USE OF OPTICAL INSTRUMENTS WITH THIS PRODUCT WILL INCREASE EYE HAZARD.
AFTER-SALES SERVICE FOR PIONEER PRODUCTS \
Please contact the dealer or distributer from wfiere you purohased tl'e
product for its after-sales service (including warranty conditions) ut any |
other information. In case the necessary information is not available, |
please contact the Pioneer's subsidiaries (regional service ,
headquarters) listed below: ,
PLEASE DO NOT SHIP YOUR PRODUCT TO 1 HE COMPANIES at ihc
addresses listed below for repair wllhout advance contact, for tfroso
companies are not repair locations.
AMERICA
PIONEER ELECTRONICS SERVICE, INC.
CUSTOMER SUPPORT DIVISION
P.O. BOX 1760, LONG BEACH, CA 90801-1760, U.S.A,
EUROPE
PIONEER ELECTRONIC (EUROPE) N.V.
EUROPEAN SERVICE DIVISION
HAVEN 1087, KFETBERGLAAN 1, 9520 MFI.SELE, BELGIUM
ASEAN
PIONEER ELECTRONICS ASIACENTRE PET. LID.
SERVICE DEPARTMENT
501 ORCHARD ROAD, #10-00
LANE CRAWFORD PLACE, SINGAPORE 0923
JAPAN AND OTHERS
PIONEER ELECTRONIC CORPORATION (HEAD OFFICE)
CUSTOMER SUPPORT CENTER
4-1. MEGURO 1-CHOME, MEGURO-KU. TOKYO 153 JAPAN
L
j
CAUTION
This product contains a laser diode of higher class
than 1. To ensure continued safety, do not remove
any covers or attempt to gain access to the inside of
the product.
Refer all servicing to qualified personnel.
The following caution label appears on
your unit.
Location: on top of the covei
CLASS 1 LASER PRODUCT |
LASER KLASSE 1
For pluggable equipment the socket-outlet shall be installed
near the equipment and shall be easily accessible.
ATTENTION
Ce produit renferme une diode à laser d'une catégorie
supérieure à 1. Pour garantir une sécurité constante,
ne pas retirer les couvercles ni essayer d'accéder à
l'intérieur de l'appareil.
Pour toute réparation, s'adresser à un personnel
qualifié.
L'étiquette d'avertissement suivante
apparaît sur votre appareil.
Emplacement: sur le dessus du de
couvercle.
CLASS 1 LASER PRODUCT |
LASER KLASSE 1
Dans le cas d'appareils enfichables, la prise doit être
facilement accessible et placée le plus près possible de
l'appareil.
VORSICHT
Dieses Gerät enthält eine Laserdiode mit einer
höheren Klasse als 1. Um einen stets sicheren Betrieb
zu gewährleisten, weder irgendwelche Abdeckungen
entfernen, noch versuchen, sich zum Geräteinneren
Zugang zu verschaffen. Alle Wartungsarbeiten sollten
qualifiziertem Kundendienstpersonal überlassen
werden.
Das nachstehende Hinweisschild
befindet sich am Gerät.
Anbringstelle: auf der Deckeloberseite.
Bei Geräten mit Steckern sollte sich der Ausgangsstecker
nahe dem anderen Gerät befinden und einfach zugänglich
sein.
 Loading...