

Page 1

DMH-ZF9350BT
DMH-ZS9350BT
DMH-Z6350BT
RDS AV RECEIVER
Operation Manual
English
Page 2

English
Important
Contents
Thank you for buying this Pioneer product.
Please read through these instructions so you will know how to operate your model
properly. After you have finished reading the instructions, keep this document in a safe
place for future refere nce.
The screen shown in the examples may differ from actual screens, which may be
changed without notice for performance and function improvements.
■Precaution ................................................................................... 4
■Parts and controls....................................................................... 9
■Basic operation ......................................................................... 11
■Bluetooth® ................................................................................. 22
■Wi-Fi® ......................................................................................... 32
■Browser...................................................................................... 37
■CarAVAssist................................................................................ 40
■Source/application ................................................................... 43
■Radio .......................................................................................... 46
■TV ............................................................................................... 51
■USB............................................................................................. 52
■iPhone® ...................................................................................... 59
■Apple CarPlay™ ......................................................................... 63
■Android Auto™ .......................................................................... 66
■Sports......................................................................................... 69
■Weather ..................................................................................... 71
■Amazon Alexa ........................................................................... 73
■HDMI .......................................................................................... 80
■AUX ............................................................................................ 81
- 2 -
Page 3

English
■External component ................................................................. 83
■Settings...................................................................................... 85
Displaying the s etting screen .................... ............................. ............................. ............................. .......... 85
System settings ..................... ................................ ............................... ................................ ............................ 85
Theme settings. ................................ ................................ ................................ ............................. ................... 95
Audio settings ........ ................................ ................................ ................................ ................................ .......... 96
Video settings .................. ............................. ............................. ............................. ................................ ........ 100
Communication setting s.............. ................................ ................................ ................................ .............. 102
■Favourite menu ....................................................................... 104
■Other functions....................................................................... 105
■Appendix ................................................................................. 107
- 3 -
Page 4

English
WAR NIN G
CAUTION
WAR NIN G
Precaution
Slots and openings in the cabinet are provided for ventilation to ensure reliable operation of the
product, and to protect it from overheating. To prevent fire hazard, the openings should never be
blocked or covered with items (such as papers , floor mat, cloths).
This product is evaluated in moderate and tropical climate condition under the Audio, video and
similar electronic apparatus - Safety requirements, IEC 60065.
Important safety information
• Do not attem pt to install or ser vice this product by yourself. Installation or servicing of this product by
persons without training and experience in electronic equipment and automotive accessories may
be dangerous and could expose you to the risk of electric shock, injury or other hazards.
• Do not allow this product to come into contact with liquids. Electrical shock could result. Also,
damage to the product, smoke, and overheating could result from contact with liquids.
• If liquid or foreign matter shou ld get inside this product, park your vehicle in a safe p lace, turn the
ignition switch off (ACC OFF) immediately and consult your dealer or the nearest authorised Pioneer
Service Station. Do not use this product in this condition because doing so may result in a fire, electric
shock, or oth er failure.
• If you notice smoke, a strange noise or odour from this product, or any other abnormal signs on the
LCD screen, turn off the power immediately and consult your dealer or the nearest authorised Pioneer
Service Station. Using this product in this condition may result in permanent damage to the system.
• Do not disas semble or modify this product, as there are h igh-voltage components in side which may
cause an electric shock. Be sure to consult your dealer or the nearest authorised Pioneer Service
Station for internal inspection, adjustments or repairs.
• Do not ingest the battery, Chemical Burn Hazard.
(The remote control supplied or sold separately with) This product contains a coin/button cell
battery. If the coin/button cell battery is swallowed, it can cause severe internal burns in just 2 hours
and can lead to death.
Keep new and used batteries away from children.
If the battery compartment does not close securely, stop using the product and keep it away from
children.
If you think batteries might have been swallowed or placed inside any part of the body, seek
immediate medical attention.
Before using this product, be sure to read and fully understand the following
safety information:
• Do not operate this product, any applications, or the rear view camera option (if
purchased) if doing so will divert your attention in any way from the safe operation of
your vehicle. Always observe safe driving rules and follow all existing traffic
regulations. If you experience difficulty in operating this product, pull over, park your
- 4 -
Page 5

English
vehicle in a safe location and apply the handbrake before making the necessary
WAR NIN G
WAR NIN G
adjustments.
• Never set the volume of this product so high that you cannot hear outside traffic and
emergency vehicles.
• To promote safety, certain functions are disabled unless the vehicle is stopped and the
handbrake is applied.
• Keep this manual handy as a reference for operating procedures and safety
information.
• Do not install this product where it may (i) obstruct the driver’s vision, (ii) impair the
performance of any of the vehicle’s operating systems or safety features, including air
bags or hazard lamp buttons or (iii) impair the driver’s ability to safely operate the
vehicle.
• Please remember to fasten your seat belt at all times while operating your vehicle. If
you are ever in an accident, your injuries can be considerably more severe if your seat
belt is not properly buckled.
• Never use headphones while driving.
To ensure safe driving
• LIGHT GREEN LEAD AT POWER CONNECTOR IS DESIGNED TO DETECT PARKED STATUS AND
MUST BE CONNECTED TO THE POWER SUPPLY SIDE OF THE HANDBRAKE SWITCH. IMPROPER
CONNECTION OR USE OF THIS LEAD MAY VIOLATE APPLICABLE LAW AND MAY RESULT IN
SERIOUS INJURY OR DAMAGE.
• To avoid the risk of damage and injury and the potential violation of applicable laws, this
product is not for use with a video image that is vis ible to the driver.
• In some countries the viewing of video image on a display inside a vehicle even by persons other
than the driver may be illegal. Where such regulations apply, they must be obeyed.
If you attempt to watch video image while driving, the warning “Viewing of front seat
video source while driving is strictly prohibited.” will appear on the screen. To watch
video image on this display, stop the vehicle in a safe place and apply the handbrake.
Please keep the brake pedal pushed down before releasing the handbrake.
When using a display connected to V OUT
The video output terminal (V OUT) is for connection of a display to e nable passengers in
the rear seats to watch video images.
NEVER install the rear display in a location that enables the driver to watch video images while driving.
- 5 -
Page 6

English
WAR NIN G
WAR NIN G
CAUTION
CAUTION
To avoid battery exhaustion
Be sure to run the vehicle engine while using this product. Using this product without
running the engine can drain the battery.
Do not install th is product in a vehicle that d oes not have an ACC wire or circuitry ava ilable.
Camera function
With an optional rear view camera, you are able to use this product as an aid to keep an
eye on trailers, or backing into a tight parking spot.
• SCREEN IMAGE MAY APPEAR REVERSED.
• USE INPUT ONLY FOR REVERSE OR MIRROR IMAGE REAR VIEW CAMERA. OTHER USE MAY RESULT IN
INJURY OR DAMAGE.
The rear view mode is to use this product as an aid to keep an eye on the trailers, or while backing up.
Do not use this fun ction for entertainment pur poses.
Handling the USB connector
• To prevent data loss and damage to the storage device, never remove it from this product while data
is being transferred.
• Pioneer cannot guarantee compatibility with all USB mass storage devices and assumes no
responsibility for any loss of data on media players, iPhone, smartphone, or other devices while using
this product .
• It may not be recognised properly by this product if a USB device that had been incorrectly
disconnected from the computer is connected.
In case of trouble
Should this product fail to operate properly, contact your dealer or nearest authorised
Pioneer Service Station. When taking this product to the dealer or authorised Pioneer
Service Station, make sure to bring both the unit and LCD display.*
* DMH-ZF9350BT/DMH-ZS9350BT
Visit our website
Visit us at the following site:
- 6 -
Page 7

English
In Mexico
http://www.pioneer-mexico.com.mx/
In Singapore
https://sg.pioneercarentertainment.com/
In Malaysia
https://my.pioneercarentertainment.com/
In Thailand
https://th.pioneercarentertainment.com/
In Indonesia
https://id.pioneercarentertainment.com/
In Australia
https://www.pioneer.com.au/
In Israel
http://www.pioneerisrael.co.il/
In Middle East/Africa
http://pioneer-mea.com/en/
In Latin
https://pioneer-latin.com/
In Hong Kong
http://www.pioneerhongkong.com.hk/ct/index.php
In Taiwan
http://www.pioneer-twn.com.tw/
In Russia
https://www.pioneer-car.eu/eur/
https://www.pioneer-rus.ru/
• We offer the latest information about PIONEER CORPORATION on our website.
• Pioneer regularly provides software updates to further improve it’s products. Please
check the support section of the Pioneer website for all available software updates.
Protecting the LCD panel and screen
• Do not expose the LCD screen to direct sunlight when this produc t is not used. This
may result in LCD screen malfunction due to the resulting high temperatures.
• When using a mobile phone, keep the aerial of the mobile phone away from the LCD
screen to prevent disruption of the video in the form of spots, coloured stripes, etc.
• To protect the LCD screen from damage, be sure to touch the touch panel keys only
with your finger and do so gently.
• A shatterproof film is attached to the unit's display. This film cannot be taken off or
replaced with an alternative film. There may be glue on the edge of the film. However,
this does not affect the usability of this unit.*
* DMH-ZF9350BT, DMH-ZS9350BT
- 7 -
Page 8
English
Notes on internal memory
0000BT
• The information will be erased by disconnecting the yellow lead from the battery (or
removing the battery itself ).
• Some of the settings and recorded contents will not be reset.
About this manual
• This manual uses diagrams of actual screens to describe operations. However, the
screens on some units may not match those shown in this manual depending on the
model used.
• When an iPhone is connected to the unit, the source name on the unit appears as
[iPod]. Please note that this unit only supports iPhone regardless of the source name.
For details of iPhone compatibility, refer to Compatible iPhone models (page 117).
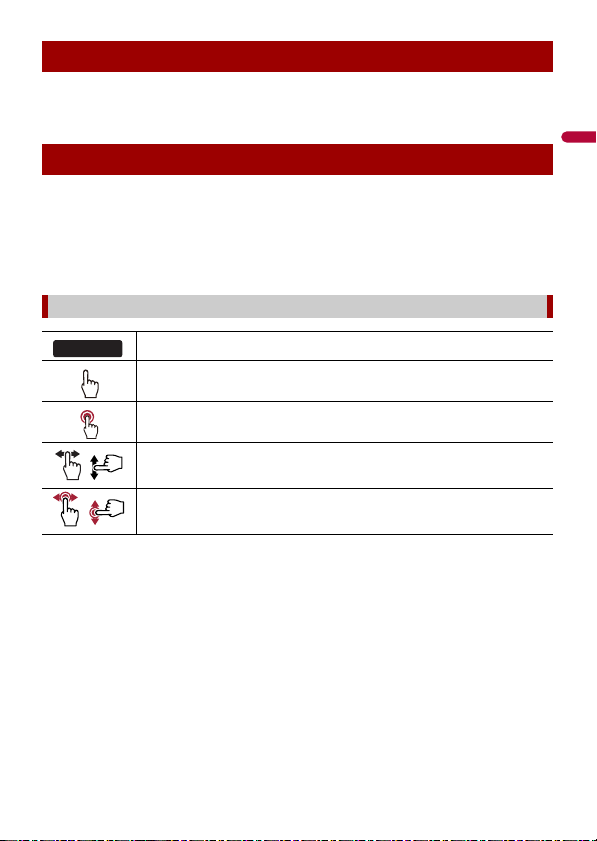
Meanings of symbols used in this manual
This indicates model names that are supported by the described operations.
This indicates to touch the appropriate soft key on the touch sc reen.
This indicates to touch and hold the appropr iate soft key on the touch s creen.
This indicates to swipe in the direction of the arrow on the touch screen.
This indicates to d rag in the direction of the arrow on the touch screen.
- 8 -
Page 9
English
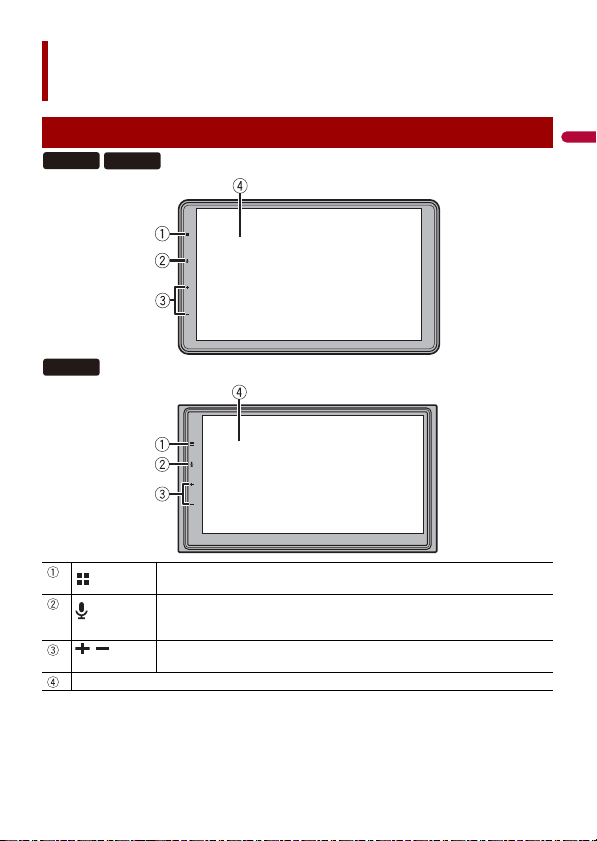
Parts and controls
ZF9350BT
ZS9350BT
Z6350BT
Main unit
Touch to display the home menu screen.
Touch and hold to power off. To power back on, touch any button.
Touch to activate the vo ice recognition mode such as Siri® when the iPhone is
connected to th e unit via Bluetooth or USB.
/Volume
LCD screen
Touch and hold to display mobile device search or select screen.
- 9 -
Page 10
English
Remote control
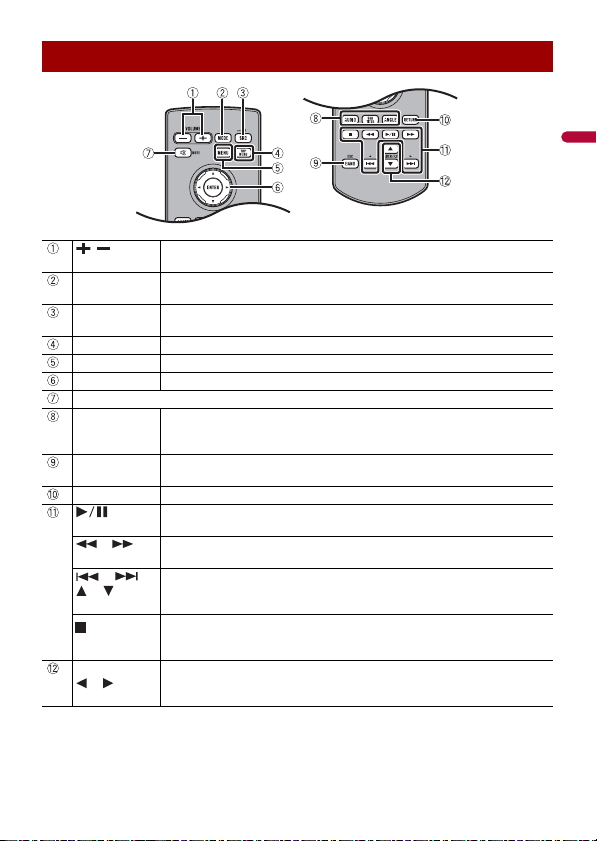
/
VOLUME
MODE Press to switch between the Application screen and the AV operation screen.
SRC/OFF Press to cycle through all the available sources.
TOP MENU Not used.
MENU Not used.
ENTER Not used.
MUTE
AUDIO
SUBTITLE
ANGLE
BAND/ESC Press to select the tuner band when tuner is selected as a source.
RETURN Not used.
or For audio: Press and hold to perform fast reverse or fast forwards.
or
or
FOLDER/P.CH
or
Volu me
Press and hold to turn off the display.
Press and hold to turn the source off.
Not used.
Press to cancel the control mode of functions.
Press to pause or resume playback or play from the beginning when resume is
off.
For video: Press to perform fast reverse or fast forwards.
Press to return to the previous track (file) or go to the next track (file).
Press to answer or end a call.
Press to stop playback.
If you resume playback, playback wi ll start from the po int where you stopped.
Press the button again to stop playback completely.
Press to select the next or previous folder.
Press to recall radio station frequencies assigned to preset channel keys.
Press to answer or end a call.
- 10 -
Page 11
English
WAR NIN G
CAUTION
NOTE
Important
Basic operation
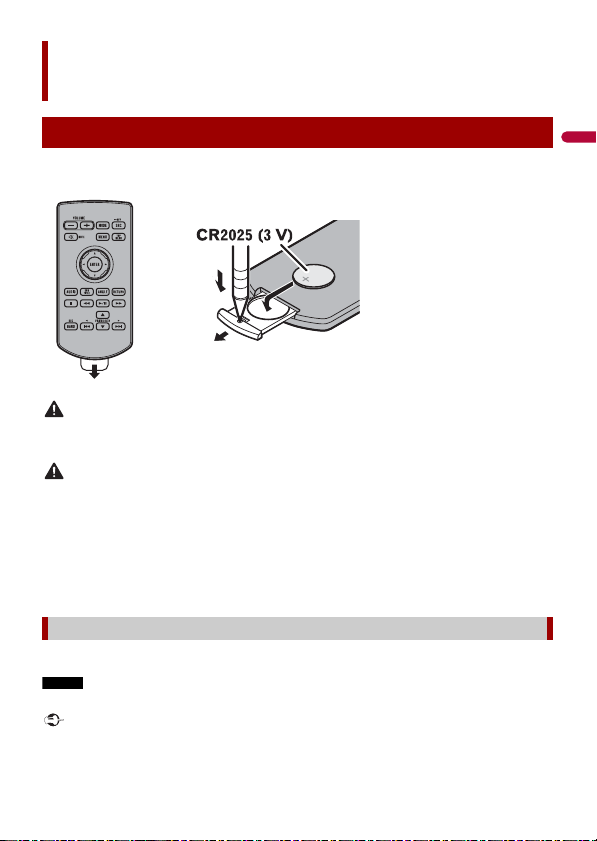
How to replace the battery
Insert the CR2025 (3 V) battery with the plus (+) and
minus (-) poles orientated properly.
Preparing the remote control
Remove the insulation sheet before use.
Batteries (battery pack or batteries installed) must not be exposed to excessive heat such as sunshine,
fire or the like.
• Remove the battery if the remote control is not used for a month or longer.
• There is a danger of explosion if the battery is incorrectly replaced. Replace only with the same or
equivalent type.
• Do not ha ndle the battery with metallic to ols.
• Do not store the battery with metallic objects.
• If the battery leaks, wipe the remote control completely clean and install a new battery.
• When disposing of used batteries, please comply with governmental regulations or environmental
public in stitution’s rules that ap ply in your countr y/area.
Using the remote control
Point the remote control in the direction of the front panel to operate.
The remote control may not function properly in direct sunlight.
• Do not store the remote control in high temperatures or direct sunlight.
- 11 -
Page 12
English
• Do not let the remote control fall onto the floor, where it may become jammed under the brake or
NOTE
WAR NIN G
NOTE
accelerator.
Starting up the unit
1 Start the engine to boot up the system.
The [Select Program Language] screen appears.
From the second time on, the screen shown will differ depending on the previous conditions.
2 Select the language.
3 Touch .
The [Location Setting] screen appears. (DMH-ZF9350BT/DMH-Z6350BT)
4 Select the location if required.
5 Touch .
The [Speaker Mode Settings] screen appears.
6 Select the speaker mode.
[Standard Mode]
4-speaker system with front and rear speakers, or a 6-speaker system with front and
rear speakers and subwoofers.
[Network Mode]
3-way system with a high range speaker, middle range speaker and subwoofer (low
range speaker) for reproduction of high, middle and low frequencies (bands).
Do not use the unit in Standard Mode when a speaker system for 3-way Network Mode is
connected to th e unit. This may cause damage to the speakers.
7 Touch [OK].
Initial Legal Disclaimer screen appears.
8 Touch [OK].
The home menu screen appears.
Once the speaker mode is set, the setting cannot be changed unless this product is restored to the
default settin gs. Restore the default settings to ch ange the speaker mode setting (page 106).
Switching the speaker mode
To change the speaker mode, you need to restore this product to the default settings.
- 12 -
Page 13

English
Restore the default setting (page 106).
NOTE
NOTE
1
Using the touch panel
You can operate this product by touching the keys on the screen directly with your
fingers.
To protect the LCD screen from damage, be sure to touch the screen only with your finger gently.
Common touch panel keys
: Returns to the previous screen.
: Close the screen.
Operating list screens
Touching an item on the list allows you to narrow down the options and
proceed to the next operation.
Appears when all characters are not displayed on the display area.
If you touch the key, the rests are scrolled for display.
This function is available only when you stop your vehicle in a safe place and apply
the handbrake.
Appears when items cannot be displayed on a single page.
Drag the side bar, the initial search bar or the list to view any hidden items.
- 13 -
Page 14
English
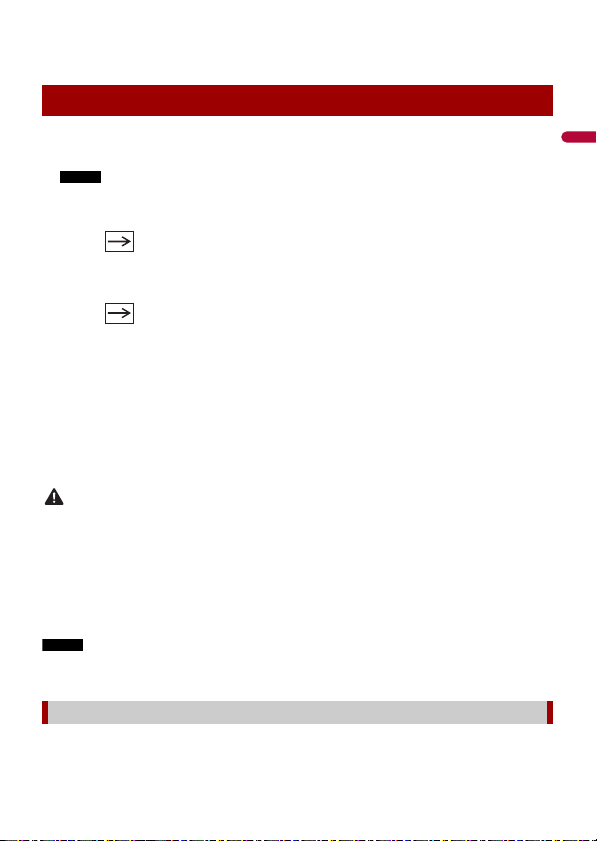
Operating the time bar
You can change the playback point by dragging the key.
The playback time co rresponding to the position of the key is displayed while
dragging the key.
Operating the on-screen keyboard
Displays the characte rs that are entered.
Enters the characters in the text box.
Confirms the entry and proceeds to the next step.
Deletes the input tex t to the left of the cursor one l etter at a time.
Enters a space.
Switches between alph abet and numbers/symbols.
Switches between capital and lower case letters.
- 14 -
Page 15

English
Home menu screen
Widget (page 20)
Touch to see the selected source/application.
Customising the wid get (page 20)
When you finish customising, touch .
Favourite source/applicatio n area
Touch to see the selected source/application.
Customisin g the home menu screen (page 16)
The following items can be customised.
• Changing the home menu screen layout (page 16)
• Rearranging the icons in the favourite source/application area
(page 16)
• Rearranging the displayed icons in the favourite source/application
area (page 16)
When you finish customising, touch .
Notification (page 19)
Source/appli cation (page 43)
Favourite radio stations (pa ge 16)
Suggested radio stations (page 18)
- 15 -
Page 16
English
NOTES
Customising the home menu screen
• The layout of the widgets and favourite icons on the home menu screen is saved for each mobile
device connected via Bluetooth. The layout changes depending on the mobile device that is
connected to this unit.
• This function is available only when you stop your vehicle in a safe place and apply the handbrake.
• The [Connectivity] icon cannot be removed from the favourite source/application area.
• The [Connectivity] icon changes to the Apple CarPlay icon or Android Auto icon depending on your
mobile device.
▶Changing the home menu screen layout
1 Touch and hold the favourite source/application area.
2 Touch .
3 Select [Lower Dock Area] or [Upper Dock Area].
▶Rearranging the icons in the favourite source/application area
1 Touch and hold the favourite source/application area.
2 Drag the icon to the desired position.
When you finish rear ranging, touch .
▶Rearranging the displayed icons in the favourite source/application area
1 Touch and hold the favourite source/application area.
The source/application list area appears on the screen.
2 Drag unneeded icon in the favourite source/application area to the source/
application list area if the favourite source/application area is full.
3 Drag the icon to the desired location in the favourite source/application area.
When you finish rear ranging, touch .
Favourite radio stations
Registering your favourite radio stations allows you to quickly jump to the registered
radio stations.
Displaying the favourite radio stations screen
1 Touch then swipe up on the screen.
Swipe down on the screen when you finish.
- 16 -
Page 17
English
Favourite radio stations
NOTE
Favourite radio stations screen
List screen
Touch to make changes to the selected radio statio n.
List of favourite radio stations
Touch to select the favourite radio station from the list screen (page 17).
Updates the favourite radi o stations.
The next 3 stations on the favourites list are displayed.
This function is only available when there are more than 4 favourite radio stations
on the list.
Adds/removes a favourite.
Available radio stations
Touch to tune in to the selected radi o station.
- 17 -
Page 18
English
Important
NOTE
TIP
Suggested radio stations
NOTE
ZF9350BT
Z6350BT
Suggested radio stations screen
This unit suggests radio stations to you according to your frequently listened music and
radio stations.
To use the suggested radio stations function, you may need to connect this unit to the Internet via a WiFi network and set [Suggestions] (page 85) to [On].
This function is only available when the device is used in certain areas and when certain countries are
selected in [Location Setting] (page 89).
Displaying the suggested radio stations screen
1 Touch then swipe down on the screen.
Swipe up on the screen when you finish.
Suggested radio stations
Touch to tune in to the selected radi o station.
List of suggested radio stations
Touch to select the suggested radio station from the list screen (page 19).
Updates the suggested radio stations.
The next 3 stations on the suggested list are displayed.
This function is only available when there are more than 4 suggested radio
stations on the list.
To reset the displayed suggested radio stations, it is necessary to restore all settings to the default
settings in [R estore Settings] in (p age 90).
- 18 -
Page 19
English
NOTES
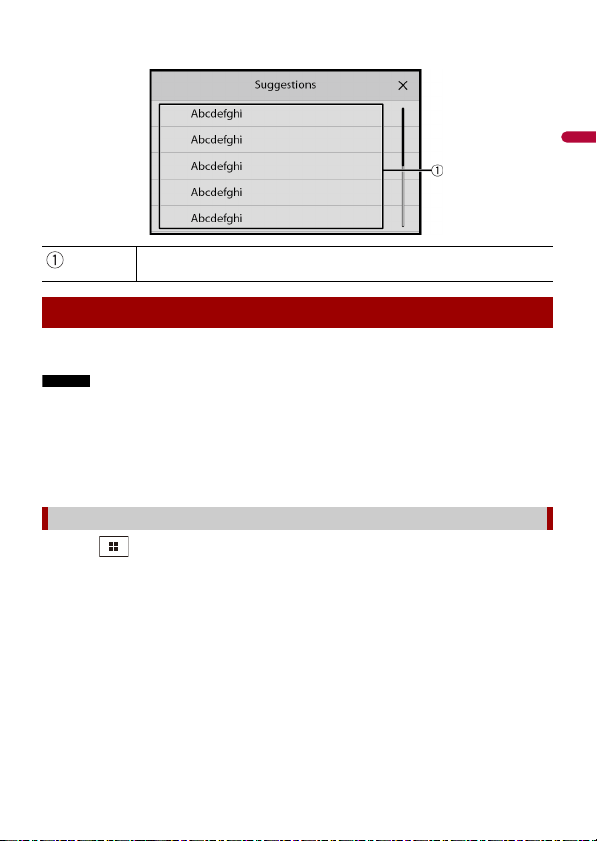
Available radio stations
List screen
Touch to tune in to the selected radi o station.
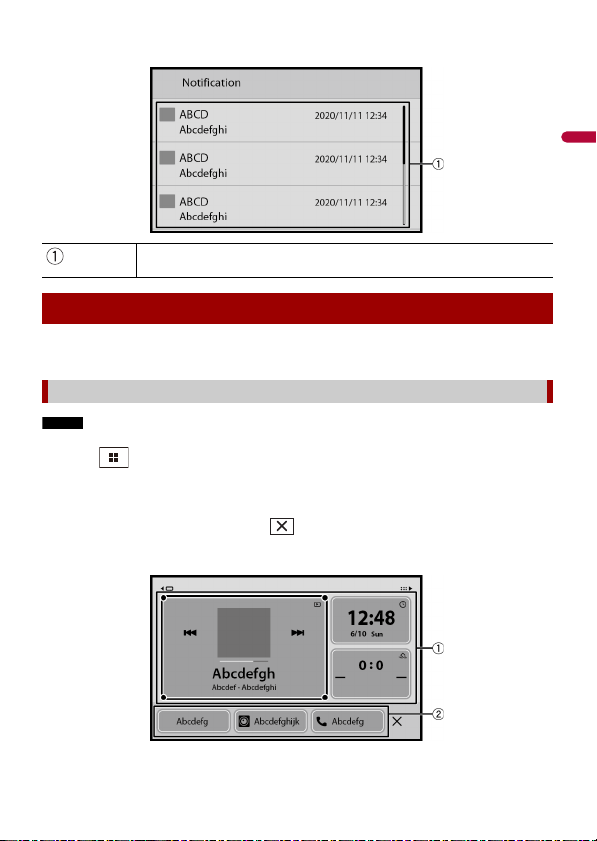
Notification
Notification displays the notifications from the connected iPhone or smartphone
(Android™) and sports information registered on CarAVAssist.
• This function needs to be connected via Bluetooth to an iPhone or a smartphone with CarAVAssist
installed (page 40). For details o n Bluetooth connection, refer to Bluetooth connection ( page 22).
• To use the sports notification function, you need to register a team in CarAVAssist and import it to this
unit (pa ge 41) in advance.
• To use the sports notification function, make sure that the GPS aerial is installed properly and this unit
is connected to the Internet via a Wi-Fi network (page 32). For details on GPS aerial installation, refer
to the Quick sta rt guide.
Displaying the notification screen
1 Touch then swipe right on the screen.
When you finish, swipe left on the screen.
- 19 -
Page 20
English
NOTE
Received notifications
Notification screen
Touch to display the details of the notification.
Widget
Widgets enable you to see your favourite sources and application information on the
home menu screen and access shortcuts to them.
Customising the widget
This func tion is available only when you stop your vehicle in a safe place and ap ply the handbrake.
1 Touch .
2 Touch and hold the widgets area.
3 Touch the widget that you want to customise.
When you finish customising, touch .
Widget customising screen
- 20 -
Page 21
English
NOTE
Widget area
TIP
NOTE
To rearrange the widgets, drag them to the desired locations.
To remove a widget, drag the widget to .
Available source/application lists for the widgets
Flick left/right to switch between widget lists.
Adjusts th e size of the widge ts
Touch a corner of the selected widget and drag it to adjust the size.
You can fit up to four widgets in the widgets area by adjusting their size.
The size can only be adjusted for widgets that display an adjustment key.
▶Switching the widgets
1 Touch .
2 Touch and hold the widgets area.
3 Drag unwanted source/application widgets to the source/application list area.
A maximum of four widgets can fit in the widgets area.
4 Drag the desired source/application to the widgets area.
When you finish switching, touch .
Some widgets cannot be placed together in the widgets area. Also, some widget functions may be
limited due to the combination of widgets.
- 21 -
Page 22

English
TIP
NOTES
TIPS
Bluetooth®
Bluetooth connection
1 Turn on the Bluetooth function on the device.
2 Touch then swipe left on the screen.
3 Touch then .
4 Touch [Connection].
5 Touch .
The unit starts to search for available devices, then displays them in the device list.
6 Touch in the list.
If you touch the device name, the Wi-Fi connection for Apple CarPlay is established.
• If five devices are already paired, a message prompting you to delete a paired device is displayed.
Delete a paired device first (page 23).
• If your device supports SSP (Secure Simple Pairing), a six-digit number appears on the display of this
product. M ake sure that the si x-digit number m atches the one that is displayed on the mobile device
before touching [Yes] to pair the device.
• If you try to con nect an unconnected mobil e phone while two mobile phones are already connected,
the first one of the two connected mobile phones will be disconnected and the unconnected mobile
phone will be connected instead.
• The Bluetooth connection can also be made by detecting this product from the Bluetooth device.
Before registration, make sure that [Visibility] in the [Bluetooth] menu is set to [On] (page23). For
details on Bluetooth device operations, refer to the operating instructions supplied with the
Bluetooth device.
• Two mobile phones can be connected to this product at the same time (page 23).
Bluetooth settings
1 Touch then swipe left on the screen.
2 Touch then .
3 Touch [Bluetooth Settings].
- 22 -
Page 23
English
CAUTION
Never turn this product off and disconnect the device while the Bluetooth setting operation is being
NOTE
processed.
Menu Item Description
[Auto Connect]
[On] [Off]
[Visibility]
[On] [Off]
[PIN Code Input] Change the PIN code for Bluetooth connection.
[Device Information] Displaying the device name and address of this product.
[Bluetooth Memory Clear] Touch [Clear] then [OK] to clear the Bluetooth memory.
[Sound Qua lity Settings]
[Quality] [Connectivity]
Select [On] to connect the last connecte d Bluetooth device
automatically when using the hands-free phone function.
If two Bluetooth devices were connected the last time, the two
devices are conne cted to this product automatica lly in the order
that they are registered in the device list.
Select [ On] to make this pro duct visible to the other device.
The default PIN code is “0000”.
1 Touch [0] to [9] to input the pin code (up to 8 digits).
2 Tou c h .
Select [Quality] to prioritise the Bluetooth sound quality.
Select [Connectivity] to prioritise the Bluetooth
connection.
Switching the connected Bluetooth device
After registering and connecting the Bluetooth devices to this product, you can switch
among the devices using the switch devices key in the phone function and some audio
sources.
• You can register up to five Bluetooth devices on this product (page 22).
• You can connect one of the registered devices to this product. In cases where the
registered device is equipped with a phone function, a total of two devices can be
connected at the same time when using the phone function. If two of the five
registered devices are already connected, you can connect the remaining third device
to use the audio function only from the switch devices key on the audio source screen.
• The icon for the mobile phone currently being used is displayed on the phone menu
screen. If you connect two mobile phones to this product at the same time, you can
switch between the mobile phones using the switch devices key. The contents of the
phone menu are memorised for each connected mobile phone (page 24).
• The switch devices key will appear for some audio sources. The audio source may
automatically switch to another source depending on the selected device.
- 23 -
Page 24

English
CAUTION
Hands-free phoning
To use this function, you need to connect your mobile phone to this product via
Bluetooth in advance (page 22).
For your safety, avoid talking on the phone as much as possible while driving.
Making a phone call
1 Touch then swipe left on the screen.
2 Touch [Phone].
The phone menu screen appears.
3 Touch one of the call icons on the phone menu screen.
- 24 -
Page 25
English
The following items are displayed.
TIP
NOTE
NOTE
TIPS
NOTES
• Name of the current mobile phone
• List number of the current mobile phone
• Reception st atus of the current mobile phone
• Battery status of the curre nt mobile phone
If you conne ct two mobile phone s to this product at t he same time, you can switch
between the mobile phones using the switch devices key.
When you switch the connected mobile phone, the following items are also
switched:
• Widgets on the home menu screen
• Favourite icons on the home menu screen
• Browser bookma rks
• Favourite sports teams
• Notificati on settings
• [Background] settings for the home menu screen and AV operation screen
For details, refer to CarAVAssist (page 40).
Switches the search language to English or system language.
It may not appear depending on the system language setting.
Using the preset dial lists (page 26)
Using phone book
Select a contac t from the phone book. Touch the desired name on the list then
select the phone number.
• The contacts on you r phone will be automatically transfer red to this product.
• Update the phone book manually.
• [Visibility] of the [Bluetooth] screen should be on (page 23).
• If two mobil e phones are autom atically connec ted to this product with the
Bluetooth device a uto connect function, the pho ne book of the first phone is
displayed.
Using call history
Make a phone call from the received call , dialled call , or missed call .
Direct phone n umber input
Touch the number keys to enter the phone number then touch to make a call.
▶To end the call
1 Touch .
- 25 -
Page 26
English
TIPS
Using the preset dial lists
▶Registering a phone number
You can easily store up to six phone numbers per device as presets.
1 Touch then swipe left on the screen.
2 Touch [Phone].
3 Touch or .
On the [Phone Book] screen, touch the desired name to display the contact’s phone
number.
4 Touch .
▶Dialling from the preset dial list
1 Touch then swipe left on the screen.
2 Touch [Phone].
3 Touch .
4 Touch the desired entry on the list to make a call.
The dial screen appears and dialling starts.
▶Deleting a phone number
1 Touch then swipe left on the screen.
2 Touch [Phone].
3 Touch .
4 Touch .
5 Touch [Yes].
Receiving a phone call
1 Touch to answer the call.
Touch to end the call.
• Touch while getting a call waiting, switch to the talking person.
• Touch while getting a call waiting to reject the call.
- 26 -
Page 27
English
NOTE
When two phones are connected at the same time, if an incoming call is received on the second phone
NOTE
TIPS
TIP
while you are talking on the first phone, the dial confirmation screen for the second phone will be
displayed.
Voice recognition function (for iPhone)
By connecting your iPhone to this product, you can use the voice recognition function
(Siri Eyes Free Mode) on this product.
When an iPhone is used, Siri Eyes Free Mode is available with this product.
1 Touch then swipe left on the screen.
2 Touch [Phone].
3 Touch .
The voice recognition function launches and the voice control screen appears.
• You can also launch the voice recognition function by touching button.
• If two mobile phones are automatically connected to this product with the Bluetooth device auto
connect function, the voice recognition function (Siri Eyes Free Mode) will be set on the first phone.
• If you want to use the voice recognition function (Siri Eyes Free Mode) on another connected iPhone,
touch with numbered to the other iPhone. The iPhone that you switch to will be set as the
current device.
Minimising the dial confirmation screen
This function is available only when an external navigation system (sold separately) is
connected and [Navi] is selected as the source.
1 Touch .
To display the dial confirmation screen again, touch on the home menu screen (page 15).
Phone settings
1 Touch then swipe left on the screen.
2 Touch then .
3 To uch [Blu et oot h Set ti ngs ].
- 27 -
Page 28
English
NOTES
Menu Item Description
[Auto Answer]
[On] [Off]
[Ring Tone]
[On] [Off]
[Invert Name] Select [Yes] to change the order of the first and last names
Select [On] to answer an incoming call automatically.
Select [Off] to use the ring tone of the paired device, or
select [On ] to use the rin g tone of this unit.
in the phone book.
Setting the private mode
During a conversation, you can switch to private mode (talk directly on your mobile
phone).
1 Touch or to turn private mode on or off.
• If two mobile ph ones are connected to this produc t and the first phone is set to priv ate mode, you
can receive incoming calls on the second phone while maintaining the call in progress on the first
phone.
• When two mobile phones are connected to this product and private mode of the first phone is turned
off, if an incoming call on the second phone is answered while a call is in progress on the first phone
or while dialling or receiving a call on the first phone, the call, dialling, or receiving on the first phone
is ended.
Adjusting the other party’s listening volume
This product can be adjusted to the other party’s listening volume.
1 Touch to switch between th e three volume levels.
Notes for hands-free phoning
▶General notes
• Connection to all mobile phones featuring Bluetooth wireless technology is not
guaranteed.
• The line-of-sight distance between this product and your mobile phone must be 10
metres or less when sending and receiving voice and data via Bluetooth technology.
• With some mobile phones, the ring sound may not be outpu t from the speakers.
• If private mode is selected on the mobile phone, hands-free phoning may be disabled.
▶Registration and connection
• Mobile phone operations vary depending on the type of mobile phone. Refer to the
instruction manual that came with your mobile phone for detailed instructions.
- 28 -
Page 29

English
• When phone book transfer does not work, disconnect your phone and then perform
NOTES
pairing again from your phone to this product.
▶Making and receiving calls
• You may hear a noise in the following situations:
– When you answer the phone using the button on the phone.
– When the person on the other end of the line hangs up the phone.
• If the person on the othe r end of the line cannot hear the conversation due to an echo,
decrease the volume level for hands-free phoning.
• With some mobile phones, even after you press the accept button on the mobile
phone when a call comes in, hands-free phoning may not be performed.
• The registered name will appear if the phone number is already registered in the
phone book. When multiple names are registered for the same phone number, the
names are displayed in the same order as in the phone book.
▶The received call and dialled number histories
• You cannot make a call to the entry of an unknown user (no phone number) in the
received call history.
• If calls are made by operating your mobile phone, no history data will be recorded in
this product.
▶Phone book transfers
• If there are more than 1 000 phone book entries on your mobile phone, not all entries
may download completely.
• Depending on the phone, this product may not display the phone book correctly.
• If the phone book in the phone contains image data, the phone book may not be
transferred correctly.
• Depending on the mobile phone, phone book transfer may not be available.
Bluetooth audio
Before using the Bluetooth audio player, register and connect the device to this product
(page 22).
• Depending on the B luetooth audio player connected to thi s product, the available operation s with
this product may be limited to the following two levels:
– A2DP (Advanced Audio Distribution Profile): Only playing back songs on your audio player is
possible.
– A2DP and AVRCP (Audio/Video Remote Control Profile): Playing back, pausing, selecting songs, etc.,
are possible.
• Depending on t he Bluetooth device connected to this product, th e available operations with thi s
product may be limited or differ from the descriptions in this manual.
• While you are listening to songs on your Bluetooth device, refrain from operating the phone function
as much as possible. If you try operating, the signal may cause noise for song playback.
• When you are talk ing on the Bluetooth device co nnected to this product via Bl uetooth, it may pause
playback.
- 29 -
Page 30
English
1 Touch then swipe left on the screen.
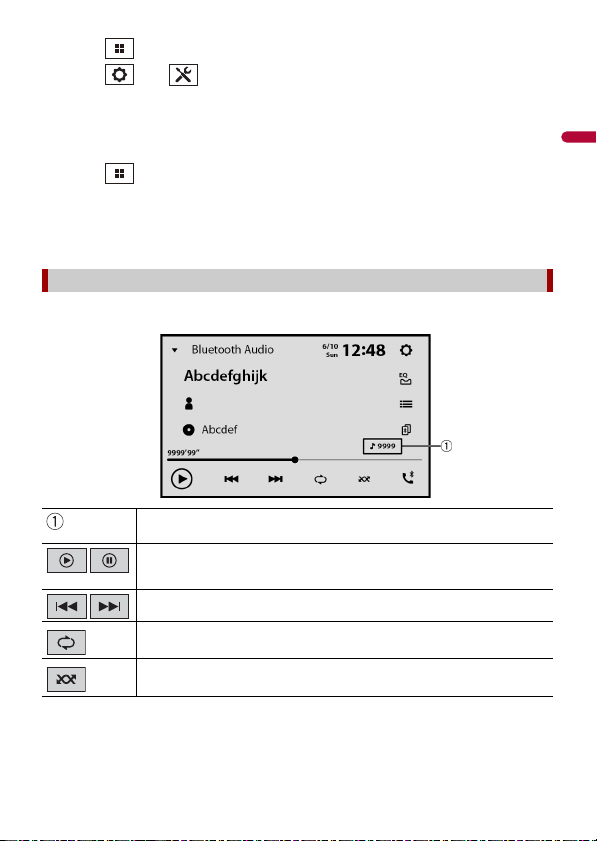
Bluetooth audio playback screen
2 Touch then .
The system setting screen appears.
3 Touch [AV Source Settings].
4 Confirm that [Bluetooth Audio] is turned on.
5 Touch then swipe left on the screen.
The source/application screen appears.
6 Touch [Bluetooth Audio].
The Bluetooth audio playback screen appears.
Basic operation
Track number indicator
Switches between playback an d pause.
Skips files forwards or backwards.
Sets a repeat play range.
Switches between random and normal file playback order.
- 30 -
Page 31

English
Selects a file or folder from the list to playback.
NOTE
This function is available only when the AVRCP version of the Bluetooth device is
1.4 or higher.
Switches among the Blue tooth devices when the devices are conn ected to
this product via Bluetooth (page 23).
- 31 -
Page 32

English
Important
TIP
Wi-Fi®
By connecting this unit to a Wi-Fi network, you can browse the Internet and use Apple
CarPlay via the wireless connection.
Wi-Fi connection
1 Turn on the Wi-Fi function on the device.
2 Touch then swipe left on the screen.
3 Touch then .
4 Touch [Wi-Fi Settings: Hotspot].
5 Set [Wi-Fi] to [On].
6 Touch [Hotspot setting].
7 Touch .
The available Wi-Fi networks appear on the list.
8 Touch one of the listed Wi-Fi networks on the list.
The network password input screen appears if a password is required.
9 Input the network password then touch [Connection].
When you connect this unit to the Internet via Wi-Fi for the first time, the Internet Communication
Service the Terms of Use and Privacy Policy is displayed. To use the Internet service, you need to accept
the polic y. Otherwise, most o f the applications that use the Inter net are not available. You can select to
accept or withdraw from the polic y at any time in [Terms of Use / Privacy] (page 9 5).
You can also connect easily to Wi-Fi via WPS (page 34).
Setting the Wi-Fi access point
1 Touch then swipe left on the screen.
2 Touch then .
3 Touch [Wi-Fi Settings: Hotspot].
4 Touch [Hotspot setting].
- 32 -
Page 33

English
Available network SSIDs
Access point setting screen
Adding access point screen
Touch to connec t selected net work.
Automatic connection s tatus
Touch to switch between th e network automatically or manually.
Network connection priority
Drag the network upwards to prioritise the connection by touching .
Searches for exist ing networks.
Touch to go to Adding access point screen (page 33).
Deletes the networks.
Wi-Fi network type
- 33 -
Page 34

English
Connects Wi-Fi network.
TIP
Touch to select d esired network the n enter the password if required.
If you want to connect to a network that is not listed on the screen, touch [Other
(Add network)] and enter the required information.
Searches again f or existing networks.
WPS Wi-Fi connection
You can connect easily to a Wi-Fi network, if WPS (Wi-Fi Protected Setup™) is available on
the connected device.
▶WPS connection with the push button
1 Touch then swipe left on the screen.
2 Touch then .
3 Touch [Wi-Fi Settings: Hotspot].
4 Touch [Easy setup].
5 Touch [Press the WPS button on the unit and the hotspot to connect them via Wi-
Fi.].
▶WPS connection with PIN code
1 Touch then swipe left on the screen.
2 Touch then .
3 Touch [Wi-Fi Settings: Hotspot].
4 Touch [Easy setup].
5 Touch [Enter PIN code to connect to the hotspot.].
6 Input the displayed PIN code from the device to be connected.
Wi-Fi settings
1 Touch then swipe left on the screen.
2 Touch then .
3 Touch [Wi-Fi Settings: Hotspot].
- 34 -
Page 35

English
NOTE
This setting is available only when you stop your vehicle in a safe place and apply the handbrake.
The menu items vary according to the source/application.
Menu Item Description
[Wi-Fi]
[On] [Off]
[Hotspot setting] Set up the Wi-Fi access point (page 32).
[Easy setu p] Set up the Wi-Fi connection via WPS access (page 34).
[MAC Address] Displays the MAC address.
[IP Address ] Displays the IP address.
Switch Wi-Fi connection on or off.
Access point via Wi-Fi
This unit can be an access point of the infrastructure mode network. Use this unit as an
access point to use Apple CarPlay via Wi-Fi network.
Access point settings
1 Touch then swipe left on the screen.
2 Touch then .
3 Touch [Wireless Settings: Smartphone].
Menu Item Description
[Access point]
[On] [Off]
[Device Information] Displays this unit's infrastructure mode network
[Password] Displays the infrastructure mode network password.
[Password reset] Touch [OK] to reset the infrastructure mode network
Select [On] to enable the access point of the infrastructure
mode network.
information.
password.
Wi-Fi audio
Before using the Wi-Fi audio player, connect the device to this product via Apple
CarPlay™ (page 64).
1 Touch then swipe left on the screen.
2 Touch [Apple CarPlay] instead of [Wi-Fi Audio].
- 35 -
Page 36

English
The Wi-Fi audio playback screen appears.
NOTE
[Wi-Fi Audio] is displayed as [Apple CarPlay] when the Apple CarPlay is in use.
Basic operation
Wi-Fi audio screen (Example: Apple CarPlay)
Wi-Fi audio with Apple CarPlay operation is same as the iPod® source function. For
details of the operation, refer to the iPhone operation (page 59).
- 36 -
Page 37

English
WAR NIN G
Important
Browser
The browser enables you to browse registered websites using CarAVAssist.
• Do not attempt to operate the web browser while driving. Make sure to pull off the road and park
your vehicle in a safe location before attempting to use the controls on t he web browser.
• When you use the browser, do not enter your important information such as credit card information,
bank account information and personal information.
• When you use the browser, do not install software or programmes that Pioneer is not involved with. If
you install such software or programmes, mechanical trouble may occur with this unit, or your
entered information and the personal information registered in this unit may be put at risk.
Using the browser
• To use the browser funct ion, you may need to connect this un it to the Internet via a Wi-Fi net work.
• To use the browser function, you need to register webpage URLs as your favourite webpages on
CarAVAssist, then import them to this unit in advance (page 41).
• To use the browser functio n, you need to accept the Internet Comm unication Service the Terms of
Use and Privacy Policy (page 95).
• The browser may not be able to access or display some webpages, and some characters may not be
displayed properly.
• It may take so me time to display webpages.
• The browser may display pages slowly depending on the video resolution.
• The browser may not be abl e to play some types of video and audio.
• The browser does not display content that uses plug-ins, such as PDF.
• The browser does not support some functions such as downloading files.
Starting procedure
1 Touch then swipe left on the screen.
2 Touch [Brow ser] .
3 Touch your desired registered website icon.
- 37 -
Page 38

English
TIP
Available website thumbnails
Web browser screen
Touch to go to th e selected websi te.
Swipe left/right to switch between registered webpage list.
Website screen
Browser toolbar
To display the toolbar, swipe down from the top of the screen.
Returns to the web browser screen.
Displays the previous page.
Displays the next page.
Refreshes the page.
- 38 -
Page 39

English
NOTE
When using the browser while Apple CarPlay, Android Auto or an external navigation system is in
operation, the browser is displayed on the connected rear monitor only when the browser is displayed
on the main monitor. Otherwise, a black screen is displayed on the connected rear monitor.
- 39 -
Page 40

English
WAR NIN G
CarAVAssist
CarAVAssist is an application that allows you to configure and transfer various settings of
this unit and register URLs as favourites so that you can browse them using this unit's
web browser. You can also update this unit's firmware wirelessly by using this
application.
Before you start
Do not attempt to op erate the application while dr iving. Make sure to pull off the road and pa rk your
vehicle in a safe location before attempting to use the controls on the application.
For iPhone use rs
This function is compatible with iOS 12.0 or later.
You can download CarAVAssist on the App Store®.
For smartphone (Android) users
This function is compatible with devices that have Android OS 6.0 or later installed.
You can download CarAVAssist on the Google Play Store.
What kind of functions does the application have?
Promoting the use of the unit
The interface of the unit can be changed by using your iPhone/smartphone (Android).
Examples
• Customising the home menu screen including the widget
• Customising the wallpaper
- 40 -
Page 41

English
• Registering your favourite webpage URLs to your bookmarks to see those webpages
NOTE
CAUTION
on the web browser
• Registering your favourite teams to receive information about them on the spor ts
application of the unit
• Organising notifications on your smartphone (Android) for displaying on the unit
• Downloading the latest firmware
For details, refer to “Help” in the CarAVAssist application.
Transferring the data
1 Connect your iPhone or smartphone with CarAVAssist installed on it to this
product via Bluetooth (page 22).
2 Open CarAVAssist on the connected iPhone or smartphone then touch the
connection button on the top menu screen of the application.
When the Bluetooth connection is disconnected or the main unit is turned off, perform step 1 and
step 2 again af ter re-establishing the Bluetooth connectio n or turning on the main unit.
3 Touch then swipe left on the screen.
4 Touch .
5 Touch one of the transfer modes.
iPhone/smartphone to main unit
Main unit to iPhone/smar tphone
Updating the firmware wirelessly
• Never turn this product or your iPhone/smartphone off while the firmware is being updated.
• You can only update the firmware when the vehicle is stopped and the handbrake is engaged.
• You cannot update the old fi rmware version once the latest firmware is updated.
1 Download the firmware update files into your iPhone or smartphone through
CarAVAssist.
2 Connect your CarAVAssist-installed iPhone or smartphone to this unit via Wi-Fi
network (page 32).
3 Touch then swipe left on the screen.
4 Touch then .
- 41 -
Page 42

English
5 Touch [System Information].
NOTES
6 Touch [Firmware Update].
7 Touch [CarAVAssist].
Follow the on-screen instructions to finish updating the firmware.
• This product wi ll reset automatically after the firmware update is c ompleted if the update is
successful.
• If an error message appears on the screen, touch the display and perform the above steps again.
- 42 -
Page 43

English
Source/application
Source/application list screen
Supported source and application
You can play or use the following sources or application with this product.
• Radio (page 46)
• USB (page 52)
The following sources or applications can be played back or used by connecting an
auxiliary device.
• iPhone® (page 59)
• Bluetooth audio (page 29)
• TV (page 51)
• Wi-Fi audio (page 35)
• AUX (page 81)
• HDMI (page 80)
• Browser (page 37)
• Sports (page 69)
• Weather (page 71)
• Amazon Alexa (page 73)
• Camera view (page 83)
Displaying the source/application list screen
1 Touch then swipe left on the screen.
The source/application screen appears.
- 43 -
Page 44

English
Source list
TIP
NOTE
Touch to see the selec ted source.
Selecting [Power OFF] will turn off most of the functions on this unit. The [Power
OFF] mode is released in the following cases:
• Footage from the rear view camera is input when the vehicle is in reverse.
• A button on this unit is touched.
• The ignition sw itch is turned off (ACC OFF), then turn ed on (ACC ON).
Connected Wi-Fi network
Touch to go to the Wi-Fi settings (page 34 ).
Connected mobile device
Touch to go to the preset list screen in the hands-free phone when a device is
connected with this unit via Bluetooth.
Touch to start searching or go to the device select screen, when the device is not
connected.
When Apple CarPlay or Android Auto is activated, the device select screen ap pears
even if a device is connected with this unit.
Applicati on list
Touch to see the selected application.
Displays the next items in the list if there are more.
Displays the previous sc reen.
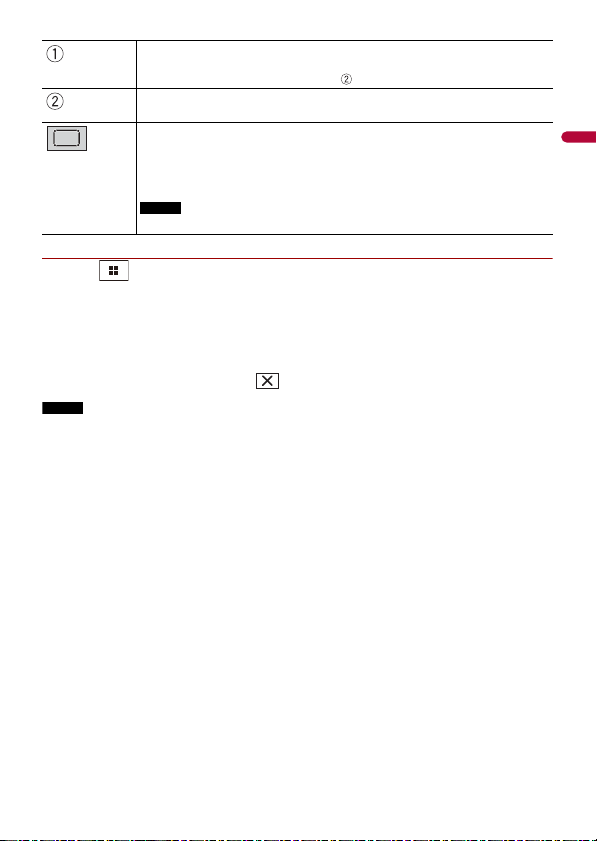
Displaying the AV operation screen
1 Touch then touch the AV operation key.
The AV operation screen appears.
- 44 -
Page 45

English
NOTE
NOTE
Displays the source/application list.
Settings (page 85) and Favourite menu (page 104)
Selects or customises the equaliser curve (page 99).
Hands-free phonin g (page 24)
Selecting a source/an application
[Source OFF] is only avail able for AV sources.
Source/application selection screen
1 Touch then swipe left on the screen.
2 Touch the source/application icon.
When you select [Source OFF], the AV source is turned off.
Source/application list
1 Touch when the AV source is in use.
2 Touch the source/application key.
When you select [Source OFF], the AV source is turned off.
Rearranging the display order of source
This func tion is available only when you stop your vehicle in a safe place and ap ply the handbrake.
1 Touch when the AV source is in use.
2 Touch .
3 Drag the source/application key to the desired position.
- 45 -
Page 46

English
Radio
NOTE
Starting procedure
1 Touch then swipe left on the screen.
2 Touch [Radio].
The radio screen appears.
Basic operation
Radio screen
Recalls the pres et channel stored to a key from memor y.
Stores the current broadc ast frequency to a key.
Displays the preset cha nnel list.
Select an item on the list ([1] to [6]) to switch to the preset channel.
Selects the FM1, FM2, FM3 o r AM band.
*
Selects the FM1, FM2, FM3 or MW/LW band.
The MW and LW bands are available only when [Russia] is selected in [Location
Setting] (page 89).
- 46 -
Page 47

English
NOTES
TIP
NOTES
Performs BSM (best stations memory) function (page 47).
NOTE
Displays area radio stations list (page48).
* DMH-ZF9350BT/DMH-Z6350BT
Manual tuning
Seek tuning or non stop see k tuning
Releasing the key in a few seconds skips to the nearest station from the
current frequency. Keep holding the key for long seconds to perform non
stop seek tuning.
Searches for a broa dcast by PTY information (page 47).
This function is available when [Australia] or [Other] is selected in [Location
Setting] (page 89). (DMH-ZF9350BT/DMH-Z6350BT)
Searching by PTY information
You can tune into a station using PTY (Programme Type Identification) information.
• This function is available when the FM tuner is selected.
• For DMH-ZF9350BT/DMH-Z6350BT, this function is available when [Australia] or [Other] is selected in
[Location Setting] (page 89).
1 Touch .
2 Touch or to select the item.
The following items are available:
[News&Info], [Popular], [Classics], [Others].
3 Touch to start searching.
If you touch [Can cel], the searching process is can celled.
Storing the strongest broadcast frequencies (BSM)
The BSM (best stations memory) function automatically stores the six strongest
broadcast frequencies under the preset channel keys [1] to [6].
• Storing broadcast frequencies with BSM may replace those you have already saved.
- 47 -
Page 48

English
• Previously stored broadcast frequencies may remain stored if the number of frequencies stored has
Important
NOTE
ZF9350BT
Z6350BT
not reached the limit.
1 Touch and hold to begin search.
The six strongest broadcast frequencies will be stored under the preset channel keys
in the order of their signal strength.
To cancel the storage process
1 Touch [Cancel].
Area radio stations list
This unit displays the radio stations that are available at your current location.
1 Touch .
To use the area radio stations list function, you may need to connect this unit to the Internet via a Wi-Fi
network and set [Suggestions] (page 85) to [On].
Limitations:
Depending on the availability of the Internet, you may not be able to receive the area
radio stations list service.
This function is only available when the device is used in certain areas and when certain countries are
selected in [Location Setting] (page 89).
Area radio stations list screen
Available radio stations
Touch to tune in to the selected radi o station.
- 48 -
Page 49

English
Radio settings
NOTES
NOTES
1 Touch then swipe left on the screen.
2 Touch then .
The system setting screen appears.
3 Touch [AV Source Settings].
4 Touch [Radio settings].
The menu items vary according to the source.
Menu Item Description
[Local]
[Off]
FM: [Level1] [Level2] [Level3] [Level4]
AM/MW/LW: [Level1] [Level2]
[FM Step]*1
[100kHz] [50kHz]
[AM Step]* 1
[9kHz] [10kHz]
[Regional] *2
[On] [Off]
[Alternative FREQ]*2
[On] [Off]
Local seek tuning allows you to only tune into
radio stations with sufficiently strong signals.
• The FM [Level4] (AM/MW/LW [Level2]) setting allows
reception o f only stations with the strongest signals.
• This setting is available only when [Radio] is
selected as the source.
• The MW and LW settings are available only when
[Russia] is selected in [Location Setting] (page 89).
(DMH-ZF9350BT/DMH-Z6350BT)
You can switch the seek tuning step for the FM
band, and the seek/manual tuning step for the
AM band.
• For the FM band, the manual tuning step is fixed to
50 kHz.
• [AM Step] is available only w hen [Australia] or
[Other] is selected in [Location Setting] (page 89).
(DMH-ZF9350BT/DMH-Z6350BT)
Switches whether the area code is checked
during the Auto PI search.
Allow the unit to retune to a different frequency
providing the same station.
- 49 -
Page 50

English
NOTE
NOTE
Menu Item Description
[Auto PI]*1
[On] [Off]
[ALARM Interrupt]*2
[On] [Off]
[TA Interrupt]*2
[On] [Off]
[NEWS Interrupt]*2
[On] [Off]
*1 This setting is available only when the source is off.
*2 This function is available only when you receive the FM band.
Searches for the same PI (Programme
Identification) code broadcast station from all
frequency bands automatically when the
broadcasting station contains RDS data.
Even if you set to [O ff], the PI search is automati cally
performed when the tuner cannot get a good
reception.
The alarm broadcast can be received from the
last selected frequency, interrupting the other
sources.
This setting is available only when [Australia] or
[Other] is selected in [Location Setting] (page 89).
(DMH-ZF9350BT/DMH-Z6350BT)
Receives the traffic announcement from the las t
selected frequency, interrupting the other
sources.
Interrupt the currently selected source with
news programmes.
- 50 -
Page 51

English
NOTES
TIP
TV
TV screen (Example)
You can watch the TV by connecting a compatible Pioneer TV tuner (sold separately) to
this product. For details of connection, refer to the TV tuner operation manual.
• The following description is different from the TV tuner operation manual.
• Depending on the TV tuner version, some features would have limitations or unavailability.
Starting procedure
1 Touch then swipe left on the screen.
2 Touch [TV].
The TV screen appears.
Basic operation
You can switch the TV screen mode (page 105).
- 51 -
Page 52

English
TIP
NOTES
NOTES
USB
Plugging/unplugging a USB storage device
You can play audio, video, or still image files stored in a USB storage device.
Plugging a USB storage device
1 Plug a USB Type-C® storage device into the USB Type-C cable.
When you use a USB Type-A storage device, use a USB Type-C to USB Type-A adaptor (supplied) for
plugging.
• This product may not achieve optimum performance with some USB storage devices.
• Connection via a USB hub is not possible.
• A USB Type-C cable is required for conn ection.
• The supplied USB Type-C cable and the adaptor are for connecting a USB storage device to this unit
only. Do not use the cable and the adaptor for other products or pu rposes.
USB Type-C cable
USB Type-C storage d evice
Unplugging a USB storage device
1 Pull out the USB Type-C storage device from the USB Type-C cable.
• Check that no data is being accessed before pulling out the USB storage device.
• Turn off (ACC OFF) the ignition switch before unplugging the USB storage device.
- 52 -
Page 53

English
TIP
Starting procedure
TIP
NOTE
1 Touch then swipe left on the screen.
2 Plug the USB Type-C storage device into the USB Type-C cable (page 52).
3 Touch [USB].
Playback is performed in order of folder numbers. Folders are skipped if they contain
no playable files.
Basic operation
You can set the screen size for the video and image files (page 105).
Audio source
Audio source screen 1
Displays the link search screen.
Touch the song to play back fol lowed by touching the song inform ation, after
switching to Music Browse mode (page 55).
If you touch the artwork, the list of songs in the album is displayed.
This function is available for the USB storage device only.
Switches between playback an d pause.
Skips files forwards or backwards.
- 53 -
Page 54

English
Sets a repeat play range for all files/the current folder/the c urrent file.
TIP
TIP
NOTE
TIP
Switches between random and normal file playback order.
Displays the hidden function bar.
You can also display the hidden function bar by flicking the bar from the right to
the left.
Switches the following media file types.
[Music]: Audio files
[Video]: Video files
[Photo]: Image files
Selects a file from the list.
Touch a file on the list to playback.
Touching a folder on the list shows its contents. You can play a file on the list by
touching it .
When you play audio files stored in a USB storage device, you can search for a file
using Music Browse (page 55).
Audio source screen 2
Displays the hidden function bar.
You can also display the hidden function bar by flicking the bar from the left to the
right.
Selects the p revious folder or the next folder.
- 54 -
Page 55

English
NOTES
TIP
CAUTION
Constructs the database for using the Music Browse mode (page 55).
Switches the current music information display.
▶Selecting a file using Music Browse mode
You can select files to play back using the categor y list if the files contain tag
information.
• This function is available for the USB storage device only.
• Music Browse mode cannot be held once the power is turned off.
1 Touch to create a database.
Music Browse mode will be available after the database has been created.
2 Touch .
3 Touch the desired category to display the file list.
4 Touch the item.
Refine the item until the desired song title or file name is displayed on the list.
5 Touch the desired song title or file name to play back.
If the selection made with Music Browse has been cancelled, you can switch to Music
Browse mode again by touching the [Tag] tab on the file/folder list screen and
touching the desired track.
Once the databas e is created in this unit, there is no need to create the database again as long as the
same content s are saved. To enter the Mus ic Browse mode direct ly, touch and then touch [Tag]
before selecting the song.
Video sou rce
For safety reasons, video images cannot be viewed while your vehicle is in motion. To view video
images, stop in a safe place and apply the handbrake.
- 55 -
Page 56

English
Video source screen
TIP
Hides the touch panel keys.
To display the keys again, touch anywhere on the screen.
Switches between playback an d pause.
Performs fast reverse or fast forwards.
Touch again to change the playback speed.
Stops playback.
Touch again to star t from the beginning next ti me.
Sets a repeat play range for all files/the current folder/the c urrent file.
Switches the audio lan guage.
Switches the following media file types.
[Music]: Audio files
[Video]: Video files
[Photo]: Image files
Selects a file from the list.
Touch a file on the list to playback.
Performs frame-by-frame playback.
Performs slow-motion playback.
Touching a folder on the list shows its contents. You can play a file on the list by
touching it .
- 56 -
Page 57

English
TIP
Skips files forwards or backwards.
NOTE
Still image screen
Still image source
Image files are not displayed in the rear display.
Hides the touch panel keys.
To display the keys again, touch anywhere on the screen.
Switches between playback an d pause.
Skips files forwards or backwards.
Selects the p revious folder or the next folder.
Saves the current ima ges as the wallpaper.
Touch the following items to overwrite the image.
[As AV Screen]: Saves the image as the wallpaper for the AV screen.
[As HomeScreen]: Saves the image as the wallpaper for the home menu screen.
[As Both]: Saves the image as the wallpaper for both the AV screen and home
menu screen.
If you save the new ima ge, the current wallpaper is overwritte n except for the
preset image.
Rotates the displayed picture 90° clockwise.
- 57 -
Page 58

English
Sets a repeat play range for all files/the current folder.
TIP
Plays all files in the current repeat play range or does not play th em in
random order.
Switches the following media file types.
[Music]: Audio files
[Video]: Video files
[Photo]: Image files
Selects a file from the list.
Touch a file on the list to playback.
Touching a folder on the list shows its contents. You can play a file on the list by
touching it .
- 58 -
Page 59

English
NOTE
NOTES
iPhone®
Audio source screen
iPhone may be referred to as iPod in this manual.
Connecting your iPhone
When connecting an iPhone to this product, the settings are automatically configured
according to the device to be connected. For details of the compatibility, refer to
Compatible iPhone models (page 117).
1 Connect your iPhone.
• iPhone via USB or Bluetooth
2 Touch then swipe left on the screen.
3 Touch [iPod].
• For USB connection, refer to the Quick start g uide.
• For Bluetoot h connection, see pag e 22.
Basic operation
Audio source
- 59 -
Page 60

English
Displays the link search screen.
TIP
NOTE
TIPS
NOTE
Select a song from the list related to the song currently playing.
If you touch the artwork, the list of songs in the album is displayed.
This function is not available while playing Apple Music® Radio.
Switches between playback an d pause.
Skips files forwards or backwards.
Sets a repeat play range for all in the selected list/the c urrent song.
Plays songs within the selected list/album randomly.
Switches among connected devices.
Selects a song from the list.
Touch the category then the title of the list to playback of the selected list.
• If you use English as the system language, the alphabet search function is
available. Touch the initial search bar to use this function.
• When you touch Apple Music Radio station in the list screen, Apple Music Radio
screen appears (page 61).
Only 15 000 songs in the iPhone are available in the list if the iPhone has more
than 15 000 songs. Available songs depend on the iPhone.
iPhone application screen
You can also play and control the music application in your iPhone in the iPhone source.
- 60 -
Page 61

English
iPhone application screen
Important
Apple Music Radio screen
Switches between playback an d pause.
Skips files forwards or backwards.
Apple Music Radio source
Apple Music R adio may not be available in your country or region. For details abo ut Apple Music Radio,
visit the following site: https://www.apple.com/music/
Switches between playback an d pause.
- 61 -
Page 62

English
Displays the pop-up menu for Apple Music Radio.
NOTE
• Touch [Play More Like This] to play back songs similar to the current song.
• Touch [Play Less Like Thi s] to set it not to play back the c urrent song again.
• Touch [Add to iTunes Wish List] to add the current song to the iTunes® wish list.
This functi on may not be used depending on you r Apple Music account status.
Skips tracks forwards.
- 62 -
Page 63

English
NOTES
WAR NIN G
Important
Apple CarPlay™
You can operate iPhone applications with finger gestures such as tapping, dragging,
scrolling, or flicking on the screen of this product.
Compatible iPhone models
For details about compatibility of iPhone models, refer to the following website.
https://www.apple.com/ios/carplay
• The compatible finger gestures vary depending on the application for the iPhone.
• To use the Apple CarPlay function, first turn off the Amazon Alexa or CarAVAssist function.
Certain uses of the iPhone may not be legal while driving in your jurisdiction, so you must be aware of
and obey any such restrictions. If in doubt as to a particular function, only per form it while the car is
parked. No feature should be used unless it is safe to do so under the driving conditions you are
experiencing.
Using Apple CarPlay
Apple CarPlay may not be available in your country or region.
For details about Apple CarPlay, visit the following site:
https://www.apple.com/ios/carplay
• The content and functionality of t he supported appli cations are the responsibi lity of the App
providers.
• In Apple CarPlay, usage is limited while driving, with availability of functions and content determined
by the App providers.
• Apple CarPlay allows access to applications other than those listed that are subject to limitations
while driving.
• PIONEER IS NOT RESPONSIBLE AND DISCLAIMS LIABILITY FOR THIRD PARTY (NON-PIONEER) APPS
AND CONTENT, INCLUDING WITHOUT LIMITATION ANY INACCURACIES OR INCOMPLETE
INFORMATION.
• Before using Apple CarPlay, make sure the GPS aerial and speed cable are properly connected and
installed, a nd the unit angle is properly set. For de tails on the ins tallation, refer to th e Quick start
guide.
Setting the driving position
To achieve optimum usability of Apple CarPlay, set the driving position setting correctly
according to the vehicle. The setting will be applied the next time an Apple CarPlay
compatible device is connected to this product.
1 Touch then swipe left on the screen.
- 63 -
Page 64

English
2 Touch then .
TIP
TIP
NOTE
The communication setting screen appears.
3 Touch [Driving Position].
4 Select the item.
[Left]
Select for a left-hand drive vehicle.
[Right]
Select for a right-hand drive vehicle.
Starting procedure
Wired connec tion
1 Connect an Apple CarPlay compatible device to this unit via USB.
2 Touch the Apple CarPlay icon.
The Apple CarPlay home screen appears.
You can also start the Apple CarPlay from the source/application list screen by swiping the screen to
the left on the home menu screen.
Wireles s connection
Before using Apple CarPlay wirelessly, turn on the Bluetooth function on the iPhone.
1 Turn on the Wi-Fi function (page 35).
2 Touch then .
You can skip the step 2 by touching and holding button.
3 Touch .
The available devices appear on the list.
The unit cannot detect the device unless the Bluetooth or Apple CarPlay setting menu is displayed
on the iPhone screen.
4 Touch the desired device on the screen.
The unit configures the connection then starts the application.
- 64 -
Page 65

English
TIP
If the device that you want to connect does not appear, touch on the screen again.
TIP
NOTES
NOTE
You can also start Apple CarPlay with the desired device by opening the Bluetooth or Apple
CarPlay setting menu while displaying the device search or device list screen.
You can use Siri function by touching button once Appl e CarPlay is activated.
• For details on USB connection, re fer to the Quick start guide.
• If an Apple CarPlay compatible device has been connected and another screen is displayed, touch
Apple CarPlay ico n on the source/application scre en to display the Application men u screen.
• The Bluetooth connection with the Apple CarPlay compatible device will be terminated automatically
if Apple CarPlay is turned on. While Ap ple CarPlay is turned on, onl y a Bluetooth audio connec tion will
be possible for devices other than the device connected via Apple CarPlay.
• Hands-free phoning via Bluetooth wireless technology is not available while Apple CarPlay is on. If
Apple CarPlay is tu rned on during a call on a mobile phone oth er than an Apple CarPlay compatible
device, the Bluetooth connection will be terminated after the call ends.
Adjusting the volume
You can adjust the guidance volume separately from the main sound volume when
Apple CarPlay is used.
1 While Apple CarPlay is activated, touch VOL (+/-).
The volume menu will be displayed on the screen.
Touch to mute. Touch again to cancel mute.
Touch [+]/[-] to adjust the guidance volume.
Displays the main sound volume. To adjust the main sound volume, touch
VOL (+/-) on the unit or touch [+]/[-].
The volume menu is displayed for four seconds. If the menu disappears, touch VOL (+/-) again. The
menu reappears.
- 65 -
Page 66

English
NOTES
WAR NIN G
Important
Android Auto™
You can operate Android applications with finger gestures such as tapping, dragging,
scrolling, or flicking on the screen of this product.
Compatible Android devices
For details about compatibility of Android models, refer to the following website.
https://support.google.com/androidauto
• [USB MTP] is set to [Off] to use Android Auto ( page 86).
• The compatible finger gestures vary depending on the application for the smartphone.
• To use the Android Auto function, first turn off the Amazon Alexa function.
Certain uses of the smartphone may not be legal while driving in your jurisdiction, so you must be
aware of and obey any such restrictions. If in doubt as to a particular func tion, only perform it while the
car is parked. No feature should be used unless it is safe to do so under the driving conditions you are
experiencing.
Using Android Auto
Android Auto may not be available in your country or region.
For details about Android Auto, please refer to the Google™ support site:
https://support.google.com/androidauto
• The content and functionality of t he supported appli cations are the responsibi lity of the App
providers.
• In Android Auto, usage is li mited while driving, with availability of functions an d content determined
by the App providers.
• Android Auto allows access to applications other than those listed that are subject to limitations
while driving.
• PIONEER IS NOT RESPONSIBLE AND DISCLAIMS LIABILITY FOR THIRD PARTY (NON-PIONEER) APPS
AND CONTENT, INCLUDING WITHOUT LIMITATION ANY INACCURACIES OR INCOMPLETE
INFORMATION.
• Before using Android Auto, make sure the GPS aerial and speed cable are properly connected and
installed, a nd the unit angle is properly set. For de tails on the ins tallation, refer to th e Quick start
guide.
Setting the driving position
To achieve optimum usability of Android Auto, set the driving position setting correctly
according to the vehicle. The setting will be applied the next time an Android Auto
compatible device is connected to this product.
- 66 -
Page 67

English
1 Touch then swipe left on the screen.
TIP
NOTES
2 Touch then .
The communication setting screen appears.
3 Touch [Driving Position].
4 Select the item.
[Left]
Select for a left-hand drive vehicle.
[Right]
Select for a right-hand drive vehicle.
Starting procedure
Wired connec tion
1 Connect an Android Auto™ compatible device to this unit via USB.
2 Touch the Android Auto icon.
The Android Auto home screen appears.
You can use voice recognition func tion by touching but ton once Android Auto is activated.
• For details on USB connection, re fer to the Quick start guide.
• When the device for Android Auto is connected to this unit, the device is also connected via
Bluetooth at the same time. If five devices are already paired, the message confirming whether to
delete the registered device is displayed. If you want to delete the device, touch [Agree]. If you want
to delete other device, touch [BT Settings] and delete the devices manually (page 23).
• If Android Auto i s turned on during a call on a mobile phone other than th e Android Auto compatible
device, the Bluetooth connection will switch to the A ndroid Auto compatible device after the call.
Adjusting the volume
You can adjust the guidance volume separately from the main sound volume when
Android Auto is used.
1 While Android Auto is activated, touch VOL (+/-).
The volume menu will be displayed on the screen.
- 67 -
Page 68

English
NOTE
NOTE
Touch to mute. Touch again to cancel mute.
Touch [+]/[-] to adjust the guidance volume.
Displays the main sound volume. To adjust the main sound volume, touch
VOL (+/-) on the unit or touch [+]/[-].
The volume menu is displayed for four seconds. If the menu disappears, touch VOL (+/-) again. The
menu reappears.
Setting the auto-launch function
If this function is set to on, the Android Auto screen is displayed automatically when an
Android Auto compatible device is connected to this unit.
The Android Auto screen is displayed automatically only when an Android Auto compatible device is
correctly connec ted to this product.
1 Touch then swipe left on the screen.
2 Touch then .
3 Touch [Android Auto Auto-launch] to switch [On] or [Off].
- 68 -
Page 69

English
Important
NOTE
Sports
Sports screen
Check team information such as the game scores and game information of your
favourite teams registered on CarAVAssist.
Using sports
The unit displays three days of sports information, for the previous, current, and next
day.
• To use the sports fun ction, you need to connect th is unit to the Internet via a Wi-Fi ne twork.
• To use the sports fun ction, you need to register a team i n CarAVAssist and import i t to this unit
(page 41) in advance.
• To use the sports function, you need to accept the I nternet Communication Service the Terms of Use
and Privacy Policy (page 95).
• Before connecting this unit to the Internet, make sure that the GPS aerial is installed properly to
obtain correct time and date. For details on GPS aerial installation, refer to the Quick start guide.
This function may not be availab le in your region or coun try due to availability of ser vice provider.
Starting procedure
1 Touch then swipe left on the screen.
2 Touch [Sports].
- 69 -
Page 70

English
Switches the game list between fixed and not fixed.
Switches to the displayed radio station.
- 70 -
Page 71

English
Important
Weather
Weather screen
Display the current temperature and daily or hourly forecast in your current location. The
weather function uses a location service to determine your current location.
Using weather
• To use the weather functio n, you need to connect this unit to th e Internet via a Wi-Fi network.
• To use the weather function, you need to accept the Internet Communication Service the Terms of
Use and Privacy Policy (page 95).
• Before connecting this unit to the Internet, make sure that the GPS aerial is installed properly so that
your correct loca tion and time can be used for the weath er service and location s ervice. For details on
GPS aerial installati on, refer to the Quick start guide.
Starting procedure
1 Touch then swipe left on the screen.
2 Touch [Weather].
Current temperature
Switches the temperature un it between Fahrenheit and Celsius.
Current hourly forecast
Current dail y forecast
- 71 -
Page 72

English
NOTE
If a data item is unknown or missing, “-” is displayed.
- 72 -
Page 73

English
Important
Amazon Alexa
You can talk to Amazon Alexa on the unit. With Alexa Built-in, you can ask to play music,
place calls, listen to audiobooks, hear the news, check the weather, control smart home
devices and more-all while you keep your hands on the wheel and eyes on the road.
For details, visit the Amazon website for your region.
• To use the Amazon Alexa function, you need to connect this unit to the Internet via a Wi-Fi network.
• This function is available in the following languages* and countries:
* All of the languages supported by Amazon Alexa are currently not available, but will be available
soon.
Languages*
– English (US), (CA), (UK), (AU), (IN)
– French
– Spanish (ES)
– German
– Italian
– Japanese
Count ries*
– USA
– UK
– Ireland
– Canada
– Germany
– Austria
– India
– Australia
– New Zealand
– France
– Italy
– Spain
– Mexico
– Japan
* Alexa is not available in all languages and countries.
How to use Amazon Alexa
Before using the Amazon Alexa function, it is necessary to authorise the unit.
1 Touch then swipe left on the screen.
- 73 -
Page 74

English
2 Touch then .
TIP
NOTES
TIP
TIP
3 Touch [Amazon Alexa setting].
4 Touch [Setup].
The introduction screen appears.
5 Touch [Get started].
6 Use your mobile device to go to the displayed URL or scan the QR code.
7 Enter your Amazon account Email address and password.
8 Enter the code that is shown in step 6.
A completion message is displayed when the unit is authorised.
If you scan th e QR code in step 6, you can sk ip this step.
• Make sure that you have an Amazon account.
• Amazon Alexa cannot recognise your voice in the following cases:
– Amazon Alexa authorisation is not completed.
– Data is being updated.
– The unit is sta rting.
– The monitor is showing the rearview camera image.
Starting procedure
When you receive noti fications from Amazon Alexa, the yel low visual indicator is displayed. To check
the notifi cations, ask “Alexa, w hat are my notific ations?”
Tou ch op er ati on
1 Touch then swipe left on the screen.
2 To uch [A lex a].
The visual indicator appears.
3 Talk to Amazon Alexa to perform the desired operation.
You can operate the Amazon Alexa function by touc hing the button once Amazon Alexa is
activated.
- 74 -
Page 75

English
NOTE
Important
Voice operation
1 Talk to Amazon Alexa to perform the desired operation by using “Alexa” as the
wake word.
Wake words other than “Alexa”, such as “Echo”, “Am azon”, or “Computer”, are not supported.
Entertainment
You can play content through Amazon Music, Kindle books text-to-speech, or Audible by
talking to Amazon Alexa.
To use the entertainment function, you need to subscribe to the A mazon service.
Starting procedure
▶Touch operation
1 Touch then swipe left on the screen.
2 To uch [A lex a].
3 Talk to Amazon Alexa to perform the desired AV operation.
▶Voice operation
1 Talk to Amazon Alexa to perform the desired AV operation by using “Alexa” as the
wake word.
Alexa screen 1 (Example: Amazon Music)
- 75 -
Page 76

English
Important
Switches between playback an d pause.
Skips songs forwards or backwards.
Switches the repeat fun ction ON/OFF.
Switches between random and norm al song playback order.
Alexa screen 2 (Example: Amazon Music)
Gives a Like to the currently playing song.
Gives a Dislike to the c urrently playing song.
Phone call control
Alexa allows you to use voice commands to place or answer calls using a mobile device
paired to this unit.
• To use this function, turn on the Amaz on Alexa function.
• To make a phone call usin g your contacts, you need to allow Ale xa to access the contact infor mation
on your mobile dev ice.
• To use this function, you need to insta ll the Amazon Alexa app on your mob ile device that is paired
with this unit, and sign in to the same Amazon acco unt as the one for this unit.
• To enable this function, you need to fill in all the required information in the Amazon Alexa app
installed on your mobile device.
- 76 -
Page 77

English
NOTE
Support for the Alexa Calling service will be available soon.
Before using phone call control
Before using this function, connect your mobile device to this unit via Bluetooth.
1 Touch then swipe left on the screen.
2 Touch then .
3 Touch [Amazon Alexa setting] then [Main Menu].
4 Touch [Settings] then [Contact list].
5 Select the desired mobile device.
Contact list screen
Device name list
Contact list upload status
Select [On], then select [Yes] on the permission screen to upload the contacts from
the selected mobile device.
Searches for avail able mobile devices.
Deletes the mobil e device.
- 77 -
Page 78

English
Starting procedure
▶Touch operation
1 Touch then swipe left on the screen.
2 To uch [A lex a].
3 Talk to Amazon Alexa to perform the desired hands-free phone operation.
▶Voice operation
1 Talk to Amazon Alexa to perform the desired hands-free phone operation by using
“Alexa” as the wake word.
For example, say “Alexa, call home” or “Alexa, answer the call”.
Amazon Alexa settings
1 Touch then swipe left on the screen.
2 Touch then .
3 Touch [Amazon Alexa setting].
[Setup]
[Setup] Set up the Amazon Alexa function to be activated.
[Main Menu]
[Settings ] Settings for Amazon Alexa for this unit (page 79).
[Things to try] Trial and examples of uses for Amazon Alexa.
[Help & Feedback] Displays the URL of Amazon Alexa help and feedback.
[Sign out] Signs out of your Amazon account and disables the Amazon
Alexa function.
- 78 -
Page 79

English
[Settings]
NOTE
TIP
NOTE
[Contact lis t] Displays the list of mobile devices that are connected to
[Hands-free listening] Switches whether or not to use the wake word (“Alexa”).
[Notification s] Switches whether or not notifications of received messages are
[Share location ] Switches whether or not Amazon Alexa has access to location
[Start of request
sound]
[End of reque st
sound]
[Language] Select the language for using Amazon Alexa.
Amazon Alexa (page 77).
The device search list screen is displayed when no mobile device is
paired via Bluetooth.
displayed.
information.
When you share your loc ation, Amazon Alexa provides more acc urate
service and information, s uch as weather, traffic information, etc.
You need to enable the location services for the Amazon Alexa app on
your mobile dev ice in order to search for nearby plac es.
Switches whether or not Amazon Alexa plays a sound when you
begin your request.
Switches whether or not Amazon Alexa plays a sound when you
finish your request.
Controlling the unit by Amazon Alexa
You can enable Alexa Skills and control this unit by using Amazon Alexa voice
commands. For details, visit the Alexa Skills Store website for your region.
- 79 -
Page 80

English
CAUTION
NOTE
HDMI
TIP
For safety reasons, video images cannot be viewed while your vehicle is in motion. To view video
images, stop in a safe place and apply the handbrake.
A micro HDMI® cable (sold separately) is required for connection. For details, refer to the Quick start
guide.
Starting procedure
1 Connect an HDMI device to this unit via a micro HDMI cable (sold separately) then
turn on the device.
2 Touch then swipe left on the screen.
3 Touch [HDMI].
The HDMI source screen appears.
Basic operation
HDMI source screen
Hides the touch panel keys.
To display the keys again, touch anywhere on the screen.
You can set the screen size for the video image (page 105).
- 80 -
Page 81

English
CAUTION
NOTE
AUX
AUX screen
You can display the video image output by the device connected to video input.
For safety reasons, video images cannot be viewed while your vehicle is in motion. To view video
images, stop in a safe place and apply the handbrake.
A Mini-jack AV cable (sold s eparately) is required for connection. For details, refer to the Quick s tart
guide.
Starting procedure
1 Touch then swipe left on the screen.
2 Touch then .
3 Touch [Input/Output settings].
4 Confirm that [AUX Input] is turned on.
5 Touch then swipe left on the screen.
6 Touch [AUX].
The AUX screen appears.
Basic operation
- 81 -
Page 82

English
Hides the touch panel keys.
TIP
To display the keys again, touch anywhere on the screen.
You can set the screen size for the video image (page 105).
Switches between the v ideo input and audio input.
- 82 -
Page 83

English
External component
Camera view
You can display the video image output using the device connected to the back camera
input or 2nd camera input. For details, refer to the Quick start guide.
Starting procedure
1 Touch then swipe left on the screen.
2 Touch [Camera View].
Video footage is displayed on the screen.
Displaying 2nd camera view
1 Touch then swipe left on the screen.
2 Touch then .
3 Touch [Input/Output settings].
4 Touch [AV Input].
5 Touch [2nd Camera].
6 Touch then swipe left on the screen.
7 Touch [Camera View].
8 Touch to switch the camera view.
The 2nd camera video footage is displayed on the screen.
Navigation system
By connecting the external navigation system (sold separately), you can use and display
the GPS navigation system on the screen. For details, refer to the Quick star t guide.
Starting procedure
1 Connect the external navigation system to this product.
2 Touch then swipe left on the screen.
- 83 -
Page 84

English
3 Touch [Navi].
- 84 -
Page 85

English
Settings
NOTE
You can adjust various settings in the main menu.
Displaying the setting screen
1 Touch then swipe left on the screen.
2 Touch .
3 Touch one of the following categories, then select the options.
System settings (page 85)
Theme settings (page 95)
Audio settings (page 96)
Video setti ngs (page 100)
Communication settings (page 102)
System settings
The menu items vary according to the source.
[AV Source Settings]
Menu Item Description
[Suggestion s]*
[On] [Off]
[Radio settings] (page 49)
[Bluetooth Audio]
[On] [Off]
* DMH-ZF9350BT/DMH-Z6350BT
Select [On] to activate the suggested radio stations or area
radio stations list function.
This setting is available only when [Russia] or [Australia] is selected
in [Location Setting] (page 89).
Setting Bluetooth audio source activation.
- 85 -
Page 86

English
NOTES
[Beep Tone]
Menu Item Description
[Beep Tone]
[On] [Off]
Select [Off] to disable the beep sound when the button or
the screen is touched.
[Input/Output settings]
Menu Item Description
[USB MTP]
[Off] [On]
[AV Input]
[2nd Camera] [Off]
[AUX Input]
[On] [Off]
Select [On] to use the USB MTP (Media Transfer Protocol)
connection.
Select [O ff] to use Android Auto.
Select AV input source.
Set to [On] for AUX source (page 81).
[Camera settings]
A separately sold rear view camera (e.g. ND-BC8) is required for utilising the rear view
camera function. (For details, consult your dealer.)
▶Rear view camera
This product features a function that automatically switches to the full-screen image of
the rear view camera installed on your vehicle when the gearstick is in the REVERSE (R)
position.
Camera View mode also allows you to check what is behind you while driving.
▶Camera for Cam era View mode
Camera View can be displayed at all times. Note that with this setting, the camera image
is not resized to fit, and that a portion of what is seen by the camera is not viewable.
To display the camera image, touch [Camera View] on the source/application selection
screen (page 45).
• To set the rear view camera as the camera for Camera View mode, set [Back Camera Input] to [On]
(page 87).
• When using the 2nd camera, set [AV I nput] to [2nd Camera] (page 86).
• When the camera view of both the rear view camera and 2nd camera are available, the key to switch
the display appears. Touch this key to switch the display between the rear view image and 2nd
camera image.
- 86 -
Page 87

English
CAUTION
Pioneer recommends the use of a camera which outputs mirror reversed images, otherwise the screen
NOTE
image may appear reversed.
• Immediately verify whether the display changes to the rear view camera image when the gearstick is
moved to REVERSE (R) from another position.
• When the screen changes to full-screen rear view camera image during normal driving, switch to the
opposite se tting in [Camera Polarity ].
• If you touch while the camera image is displayed, the displayed image turns off temporarily.
Menu Item Description
[Back Camera Input]
[Off] [On]
Setting rear view camera activation.
[Camera Polarity] Setting the polarity of the rear view camera.
[Battery] The polarity of the con nected lead is positive.
[Ground] The polarity of the connected lead is negative.
This functi on is available when [Back Came ra Input] is set to [On].
[Parking Assist Guide]
[On] [Off]
You can set whether to display the parking assist
guidelines on the rear view camera images when backing
up your vehicle.
- 87 -
Page 88

English
CAUTION
NOTES
Menu Item Description
2 m
Markings
Markings
50 cm
Rear bumper
25 cm
25 cm
[Parking Assist Guide
Adjust]
[Safe Mode]
Menu Item Description
[Safe Mode]
[On] [Off]
Adjusting the guidelines by dragging or touching / /
// / on the screen.
Touch [Default] to reset the settings.
• When adjusting the guidelines, be sure to park the vehicle in a
safe place and apply the handbrake.
• Before getting out of the car to place the markings, be sure to
turn the igniti on switch off (ACC OFF).
• The range projected by the rear view camera is limited. Also, the
vehicle width and distance guidelines displayed on the rear view
camera image may differ from the actual vehicle width and
distance. (The guidelines are straight lines.)
• The image quality may deteriorate depending on the usage
environment, such as at night or in dark surroundings.
• This setti ng is available only w hen you stop your vehicl e in a safe
place and apply the handbrake.
• Using packing tape or similar tape place markings as shown
below before setting up the guidelines so that the guidelines can
be overlaid to the markings.
Set to [Off] to enable operating some function that is
restricted while driving.
- 88 -
Page 89

English
[Demo Mode]
NOTES
NOTES
ZF9350BT
Z6350BT
Menu Item Description
[Demo Mode ]
[On] [Off]
Setting the demo mode.
[System Language]
Menu Item Description
[System Language] Select the system language.
• If the embedded language and the selected language setting are
not the same, the text information may not display properly.
• Some characte rs may not be displayed properly.
[Location Setting]
Menu Item Description
[Location Setti ng]
[Russia] [Australia]*
[Other]
* DMH-ZF9350BT
Select the using location.
[Steering Wheel Control]
Menu Item Description
[Steering Wh eel Control]
[With Adapter] [W/o
Adapter]
Select [With Adapter] or [W/o Adapter] according to your
wired remote control.
• This setting is available only when you stop your vehicle in a safe
place and apply the handbrake.
• Depending on your vehicle, this funct ion may not work properly.
In this case, contact your dealer or an authorised PIONEER
Service Station.
• Please use a PIONEER wiring harness for each car model when
[With Adapter] mode is engaged, otherwise select [W/o
Adapter].
- 89 -
Page 90

English
NOTE
[Restore Settings]
CAUTION
NOTES
Menu Item Description
[All Setting s] Touch [Restore] to restore the settings to the default
settings.
Do not turn off the engine while restoring the settings.
• This setti ng is available only w hen you stop your vehicl e in a safe
place and apply the handbrake.
• The source is turned off and the Bluetooth connection is
disconnected before the process starts.
• Before starting the restore process, disconnect any device that is
connected to the USB port. Ot herwise, some settings may not be
restored correctly.
[Clock Settings]
Menu Item Description
[Clock Settings] Setting or adjusting the following time and clock display.
• Date display format:
day-month-year, month-day-year, or year-month-day
• Time displ ay format:
[12hour] or [24hour]
• UTC (Universal Time Coordinated) time zone difference:
[UTC-12h] to [UTC+14h]
• Day-light saving time:
[On] or [Off]
[Dimmer Settings]
This setting is available only when you stop your vehicle in a safe place and apply the handbrake.
Menu Item Description
[Dimmer Trigger] Setting the dimmer brightness.
[Auto] Switches the dimmer to on or off automatically according
[Manual] Switches the dimmer to on or off manually.
[Time] Switches the dimmer to on or off at the time you adjusted.
to your vehicle’s headlight turning on or off.
- 90 -
Page 91

English
CAUTION
TIPS
NOTE
Menu Item Description
[Day/Night ] Setting the dimmer duration by day or night.
You can use this function when [Dimmer Trigger] is set to
[Manual].
[Day] Turns the dimmer function to off.
[Night] Turns the dimmer function to on.
[Dimmer D uration] Adjust the time that the dimmer is turned on or off by
dragging the c ursors or touching or .
You can use this function when [Dimmer Trigger] is set to
[Time].
• Each touch of or moves the cursor backwards or
forwards in the 15 minute width.
• When the cursors are placed on the same point, the dimmer
available time is 0 hours.
• When the cursor for off time setting is placed on the left end and
the cursor for on time setting is placed on the right end, the
dimmer available time is 0 hours.
• When the cu rsor for on time setting i s placed on the left en d and
the cursor fo r off time setting i s placed on the righ t end, the
dimmer available time is 24 hours.
The time display of the dimmer duration adjusti ng bar depends on
the clock display setting (page 105).
[Picture Adjustment]
You can adjust the picture for each source, rear view camera and navigation system.
For safety reasons, you cannot use some of these functions while your vehicle is in motion. To enable
these func tions, you must stop in a safe place and apply the handbra ke.
To adjust following menu, touch , , , to adjust.
Menu Item Description
[Brightnes s]
[-24] to [+24]
[Contrast]
[-24] to [+24]
[Colour]*
[-24] to [+24]
Adjust the black intensity.
Adjust the contrast.
Adjust the colour saturation.
- 91 -
Page 92

English
NOTES
Menu Item Description
[Hue]*
[-24] to [+24]
[Dimmer]
[+1] to [+48]
[Temperature]
[-3] to [+3]
* With some picture s, you cannot adjus t [Hue] and [Colour].
• The adjustments of [Brightness], [Contrast], and [Dimmer] are stored separately when your vehicle's
headlights are off (daytime) and on (nighttime).
• [Brightness] and [Contrast] are switched automatically depending on the setting of [Dimmer
Settings].
• [Dimmer] can be changed the setting or the time to switch it to on or off (page 90).
• The picture adjustment may not be available with some rear view cameras.
• The setting contents can be memorised separately.
Adjust the tone of colour (which colour is emphasised, red,
or green).
Adjust the brightness of the display.
Adjust the colour temperature, resulting in a better white
balance.
[System Information]
Menu Item Description
[Firmware Information] Displaying the firmware version.
- 92 -
Page 93

English
CAUTION
NOTES
Menu Item Description
[Firmware Update] Update to the l atest version of the firmwa re by using a USB
storage device or wireless connection. To update the
firmware via wireless connection, CarAVAssist is required.
For details on performing the wireless update, refer to
Updating the firmware wirelessly (page 41).
• The USB storage device for updating must contain only the
correct update f ile.
• Never turn this product off, disconnect the USB storage device
while the firmware is being updated.
• You can only update the firmware when the vehicle is stopped
and the handbrake is engaged.
1 Download the firmware update files into your
compu ter.
2 Connect a blank (formatted) USB storage device to
your computer then locate the correct update file and
copy it onto the USB storage device.
3 Connect the USB storage device to this product
(page 52).
4 Turn the source off (page 45).
5 Display the [System] setting screen (page 85).
6 Tou ch [ Sys te m In for mati on] .
7 Touch [Firmware Update].
8 Touch [USB].
9 Touch [Continue].
Follow the on-screen instructions to finish updating the
firmware.
• This product wi ll reset automatically after th e firmware
update is complete d if the update is successful.
• If an error message appears on the screen, touch the
display and perform the above steps agai n.
- 93 -
Page 94

English
TIP
NOTE
NOTE
Menu Item Description
[3D Calibratio n Status] Check the sensor learning status, such as the degree of
[Connection Status] Check that the leads are properly connected between this
[GPS Antenna] Displays the connection status of the GPS aerial ([OK] or
[Positioning Status] Displays the positioning status (3D positioning, 2D
[Installation] Indicates whether the installati on position of this product
learning. You can also check the current sensor values and
the total number of speed pulses.
To delete the learned results stored in the sensor, follow
the below instructions.
1 Touch [Distance] or [Speed Pulse], and then touch
[Yes].
2 Touch [Learning status] and then touch [Reset All].
Touch [Reset All] to reset the s ensor after changing the
installation position or angle.
If you touch [Reset Distance], all learned results stored in
[Distance] are cleared.
product and vehicle.
[NOK]) and the reception sensitivity.
If reception is poor, change the instal lation position of t he GPS
aerial.
positioning, or no positioning), the number of sat ellites
used for positioning (orange), and the number of satellit es
that have received signals (yellow). If signals from more
than three satell ites are received, the current location can
be measured.
is correct or not. If installed correctly, [OK] appears. When
this product is installed at an extreme angle exceeding the
limitation of the installing angle, [NOK(Inst. Angle)] is
displayed. If the installation of this product is continually
changed and it is not fi rmly fixed into place,
[NOK(Vibration)] is displayed.
[Speed Pulse] The speed pulse value detected by this product is shown.
[Back Signal] When the gearstick is gearchanged to “R” (reverse
position), the signal switches to [High] or [Low]. The signal
displayed varies depending on the vehicle.
[Licence] Displays the open source licence for this unit.
- 94 -
Page 95

English
[Amazon Alexa setting]
NOTES
TIP
NOTE
Setting the Amazon Alexa (page 78).
[Terms of Use / Privacy]
Menu Item Description
[Terms of Use / Privacy] Select to accept or withdraw from the Internet
Communication Service the Terms of Use and Privacy
Policy.
• The followin g functions are not activated unless you agree to the
Internet Communication Service the Terms of Use and Privacy
Polic y:
–Sports
– Browser
– Weather
–Amazon Alexa
• If you do not agree to the Internet Communication Service the
Terms of Use and Privacy Policy, the Wi-Fi connection cannot be
used to acquire the radio stations list data for the suggested
radio stations or area ra dio stations list function.
Theme settings
The menu items vary according to the source.
Menu Item Description
[Background ] Select the wall paper from the preset items in this product
or original pictures via the external device.
The wall paper can be set from selections for the home
menu screen and AV operation screen.
The colours of the centre image and the second image from the
right (for the AV operation screen) change randomly, or they
change to match th e colour used for the artwork im age.
The [Background] settings are saved for each mobile phone
connected via Bluetooth. The settings change depending on the
mobile phone that is connected to this unit. If two mobile phones
are connected to this unit at the same time, the settings of the first
phone are applied.
Preset Display Select the desired preset background display.
- 95 -
Page 96

English
TIP
Menu Item Description
(custom)*1 Displays the background display image imported from the
(off) H ides the background display.
[Illuminatio n]*2 Select an illumination colour from the colour list or create a
Coloured Keys Select the desired preset colour.
(custom) Displays the screen to customise the illumination colour.
(rainbow) Shifts gradually between the preset colours in sequence.
[Theme]*2 Select the theme colour.
[Clock] Select the style of the clock from the preset image for the
Preset Images Select the desired preset style for the clock.
(off ) Hides the clock display on the [AV] screen.
[Home Custom Setting] Customise the home menu screen of the following items.
*1 Refer to Still image source (page 57).
*2 You can preview the home menu screen or the AV operatio n screen by touching [Home] or [AV]
respectively.
USB storage device.
defined colour.
To customise the defined colour, touch then touch
or to adjust the brightness and the level of red, green
and blue to create favourite colour.
To store the customised colour in the memory, touch and
hold [Memo], and the customised colour will be available
at the next illumination setting by touching .
You can also adjust the colour tone by dragging the colour b ar.
[Home] or [AV] screen.
• Switch the favourite source/application area
• Customise the displayed favourite source/application and
widget
• Rearrange the displayed favourite source/application and
widget
• Adjust the size of the displayed widget
Audio settings
The menu items vary according to the source. Some of the menu items become
unavailable when the volume is set to mute.
- 96 -
Page 97

English
Menu Item Description
TIP
NOTE
TIP
NOTES
[Fader/Balance] Touch or to adjust the front/rear speaker balance.
[Loudness]
[Off] [Low] [Mid] [High]
[Source Level Adjuster]
[-4] to [+4]
[Master Sound Reviver]
[Off] [Mode1] [Mode2]
Set [Front] and [Rear] to [0] when using a dual speaker
system.
Touch or to adjust the left/right speaker balance.
You can also set the value by dragging the point on the di splayed
table.
This function is available when [Standard Mode] is selected as the
speaker mode and [Rear] is selecte d in [Rear Speaker Output].
Compensates for deficiencies in the low-frequency and
high-frequency ranges at low volume.
Adjust the volume level of each source to prevent radical
changes in volume when switching between sources other
than FM.
Touch or to adjust the source volume after
comparing the FM tuner volume level with the level of the
source.
If you directly touch the area wh ere the cursor can be moved, the
SLA (source level adjustment) setting will be changed to the value
of the touch ed point.
• Settings are based on the FM tuner volume level, which remains
unchanged.
• This function is not available when the FM tuner is selected as
the AV source.
Enhances and complements compressed audio and
restores it to High-Resolution Audio quality.
[Mode1]: Suitable for compressed audio at bitrates higher
than 256 kbps.
[Mode2]: Suitable for compressed audio at bitrates lower
than 256 kbps.
- 97 -
Page 98

English
NOTE
NOTE
TIP
NOTE
Menu Item Description
[Speaker Le vel]
Listening Positi on*1*2
[Off] [Front Left] [Front
Right] [Front] [All]
Standard Mode*3
[Front Left] [Front Right]
[Rear Left] [Rear Right]
[Subwoofer]
Network Mode*3
[High Left] [High Right]
[Mid Left] [Mid Right]
[Subwoofer]
Speaker output level
[-24] to [10]
[Listening Position]*1
[Off] [Front Left] [Front
Right] [Front] [All]
Adjust the speaker output level of the listening position.
1 Touch or to select the listening position then
select the output speaker.
2 Touch or to adjust the selected speaker output
level.
This function is available when [Subwoofer] is set to [On].
Select a listening position that you want to make as the
centre of sound effects.
[Balance] Touch or to adjust the left/right balance.
This function is available when [Network Mode] is selected as the
speaker mode, or when [Standard Mode] i s selected as the speaker
mode and [Subwoofer] is selected in [Rear Speaker Output].
[Time Alignment]
[On] [Off]
Listening Positi on*1*2
[Off] [Front Left] [Front
Right] [Front] [All]
Standard Mode*3*4
[Front Left] [Front Right]
[Rear Left] [Rear Right]
[Subwoofer]
Network Mode*3 *4
[High Left] [High Right]
[Mid Left] [Mid Right]
[Subwoofer]
Distance
[0] to [490]
Select or customise the time alignment settings to reflect
the distance between the listener’s position and each
speaker. You need to measure the distance between the
head of the listener and each speaker unit.
1 Touch or to select the listening position then
select the alignment speaker.
2 Touch or to input the distance between the
selected speaker and listening position.
If you touch [TA On], the time alignment is turned off mand atorily.
This function is available only when the listening position setting
is set to [Front Left] or [Front Right].
- 98 -
Page 99

English
TIPS
NOTE
TIP
Menu Item Description
[Graphic EQ]
[Super Bass (S.Bass)]
[Powerful] [Natural]
[Vocal] [Flat] [Dynamic]
[Vivid] [Custom1]
[Custom2]
[Subwoofer]
[On] [Off]
[Crossover]*5 Select a speaker unit (filter) to adjust the HPF or LPF cutoff
[Dynamic Bass Enhancer]
[Off] [Low] [High]
[Rear Speaker Output]
[Rear] [Subwoofer]
[Mute Level] Selec t mute or attenuate the AV source volume and iPhone
Select or customise the equaliser curve.
Select a curve that you want to use as the basis of
customising then touch the frequency that you want to
adjust.
• If you make adjustments when a curve [Super Bass (S.Bass)],
[Powerful], [Natural], [Vocal], [Flat], [ Dynamic] or [Vivid] is
selected, the equaliser curve settings will be changed to
[Custom1] ma ndatorily.
• If you make adjustments when the [Custom2] curve is selected
for example, the [Custom2] curve will be updated.
• [Custom1] and [Custom2] curves can be created common to all
sources.
• If you trail a finger across the bars of multiple equaliser bands,
the equaliser curve settings will be set to the value of the
touched point on each bar.
Select enable or disable rear subwoofer output from this
product.
frequency and the slope for each speaker unit (page 100).
Increases the bass boost level and gives sound a more
dynamic effect.
Select the rear speaker output.
This function is available when [Standard Mode] is selected as the
speaker m ode.
or smartphone application volume when the navigation
outputs the guidance voice.
[ATT] The volume becomes 10 dB lower than the current volume.
[Mute] The volume becomes 0.
[Off] The volume does not change.
[Subwoofer Se ttings]*5 Select the subwoofer phase (page 100).
[Save Settin gs] Save to recall the following current sound settings by
touching [OK]: slope, subwoofer phase, speaker level,
Graphic EQ, HPF/LPF, listening position, crossover, time
alignment.
When you touch [Cancel], return to the [Audio] setting screen.
- 99 -
Page 100

English
NOTE
NOTE
TIP
Menu Item Description
[Load Settings]
[Initial Settings] [Sound
Setting]
*1 [All] is not available when [Network Mode] is selected as the speaker mode.
*2 If you change the listening position setting, the set values for all speakers will change in conjunction
with this setting.
*3 To use this function, the vehicle’s acoustics must be measured in advance.
*4 This function is available only when the listening position setting is set to [Front Left] or [Front
Right].
*5 This function is not available when adjusting the High speaker in [ Network Mode].
Load the sound settings.
[Sound Setting] is available only when you have already saved the
sound setti ngs (page 99).
Adjusting the cutoff frequency value
You can adjust the cutoff frequency value of each speaker.
The following speakers can be adjusted:
[Standard Mode]: Front, Rear, Subwoofer.
[Network Mode]: High, Mid, Subwoofer.
[Subwoofer Settings] is available only when [Subwoofer] is [On].
1 Touch then swipe left on the screen.
2 Touch then .
3 Touch [Crossover] or [Subwoofer Settings].
4 Touch or to switch the speaker.
5 Drag the graph line to set the cutoff position.
6 Drag the lowest point of the graph to set the cutoff slope.
The following items can also be set.
Switches the subwoofer phase between normal and reverse position.
You can also adjust the [High] and [Mid] phase in [Network Mode].
[LPF]/[HPF]
Switches the [LPF]/[HPF] setting to [On] or [Off]. When it is turned off, the highpass filter or low-pass filter of each speaker can also be turned on by touching the
graph lines.
Video settings
The menu items vary according to the source.
- 100 -
 Loading...