

Page 1

Operating Instructions
Mode d’emploi
Bedienungsanleitung
DJM-T1
DJ MIXER
TABLE DE MIXAGE
DJ-MISCHPULT
http://www.prodjnet.com/support/
The Pioneer website shown above offers FAQs, information on software and various other types of information
and services to allow you to use your product in greater comfort.
Le site Pioneer ci-dessus offre une FAQ, des informations sur le logiciel et divers types d’informations et de
services permettant de tirer le meilleur parti de ce produit.
Die oben gezeigte Pioneer-Website enthält häufig gestellte Fragen, Informationen über Software und andere
wichtige Informationen und Dienste, die Ihnen helfen, Ihr Produkt optimal zu verwenden.
Page 2
En
2
Thank you for buying this Pioneer product. Please read through these operating instructions so you will know how to operate your model properly. After you have finished read-
The exclamation point within an equilateral
triangle is intended to alert the user to the
presence of important operating and
maintenance (servicing) instructions in the
literature accompanying the appliance.
The lightning flash with arrowhead symbol,
within an equilateral triangle, is intended to
alert the user to the presence of uninsulated
“dangerous voltage” within the product’s
enclosure that may be of sufficient
magnitude to constitute a risk of electric
shock to persons.
CAUTION:
TO PREVENT THE RISK OF ELECTRIC
SHOCK, DO NOT REMOVE COVER (OR
BACK). NO USER-SERVICEABLE PARTS
INSIDE. REFER SERVICING TO QUALIFIED
SERVICE PERSONNEL.
CAUTION
RISK OF ELECTRIC SHOCK
DO NOT OPEN
IMPORTANT
D3-4-2-1-1_A1_En
D3-4-2-1-2-2*_A2_En
Replacement and mounting of an AC plug on the power supply cord of this unit should be performed only by qualified
service personnel.
IMPORTANT: THE MOULDED PLUG
This appliance is supplied with a moulded three pin mains plug for your safety and convenience. A 10 amp fuse is fitted in this plug.
Should the fuse need to be replaced, please ensure that the replacement fuse has a rating of 10 amps and that it is approved by ASTA or BSI to
BS1362.
Check for the ASTA mark or the BSI mark on the body of the fuse.
If the plug contains a removable fuse cover, you must ensure that it is refitted when the fuse is replaced. If you lose the fuse cover the plug
must not be used until a replacement cover is obtained. A replacement fuse cover can be obtained from your local dealer.
If the fitted moulded plug is unsuitable for your socket outlet, then the fuse shall be removed and the plug cut off and disposed of
safely. There is a danger of severe electrical shock if the cut off plug is inserted into any 13 amp socket.
If a new plug is to be fitted, please observe the wiring code as shown below. If in any doubt, please consult a qualified electrician.
IMPORTANT: The wires in this mains lead are coloured in accordance with the following code:
Blue : Neutral Brown : Live
As the colours of the wires in the mains lead of this appliance may not correspond with the coloured markings identifying the terminals in
your plug, proceed as follows;
The wire which is coloured BLUE must be connected to the terminal which is marked with the
letter N or coloured BLACK.
The wire which is coloured BROWN must be connected to the terminal which is marked with the
letter L or coloured RED.
How to replace the fuse: Open the fuse compartment with a screwdriver and replace the fuse.
WARNING
This equipment is not waterproof. To prevent a fire or
shock hazard, do not place any container filled with
liquid near this equipment (such as a vase or flower
pot) or expose it to dripping, splashing, rain or
moisture.
D3-4-2-1-3_A1_En
WARNING
Before plugging in for the first time, read the following
section carefully.
The voltage of the available power supply differs
according to country or region. Be sure that the
power supply voltage of the area where this unit
will be used meets the required voltage (e.g., 230 V
or 120 V) written on the side panel.
D3-4-2-1-4*_A1_En
WARNING
To prevent a fire hazard, do not place any naked flame
sources (such as a lighted candle) on the equipment.
D3-4-2-1-7a_A1_En
Operating Environment
Operating environment temperature and humidity:
+5 °C to +35 °C (+41 °F to +95 °F); less than 85 %RH
(cooling vents not blocked)
Do not install this unit in a poorly ventilated area, or in
locations exposed to high humidity or direct sunlight (or
strong artificial light)
D3-4-2-1-7c*_A1_En
If the AC plug of this unit does not match the AC
outlet you want to use, the plug must be removed
and appropriate one fitted. Replacement and
mounting of an AC plug on the power supply cord of
this unit should be performed only by qualified
service personnel. If connected to an AC outlet, the
cut-off plug can cause severe electrical shock. Make
sure it is properly disposed of after removal.
The equipment should be disconnected by removing
the mains plug from the wall socket when left unused
for a long period of time (for example, when on
vacation).
D3-4-2-2-1a_A1_En
VENTILATION CAUTION
When installing this unit, make sure to leave space
around the unit for ventilation to improve heat radiation
(at least 5 cm at rear, and 3 cm at each side).
WARNING
Slots and openings in the cabinet are provided for
ventilation to ensure reliable operation of the product,
and to protect it from overheating. To prevent fire
hazard, the openings should never be blocked or
covered with items (such as newspapers, table-cloths,
curtains) or by operating the equipment on thick carpet
or a bed.
D3-4-2-1-7b*_A1_En
ing the instructions, put them away in a safe place for future reference.
In some countries or regions, the shape of the power plug and power outlet may sometimes differ from that shown in the explanatory drawings. However the method of connecting and operating the unit is the same.
Page 3
Before making or changing the connections,
switch off the power and disconnect the power
cord from the AC outlet.
D44-9-3_A1_En
POWER-CORD CAUTION
Handle the power cord by the plug. Do not pull out the
plug by tugging the cord and never touch the power
cord when your hands are wet as this could cause a
short circuit or electric shock. Do not place the unit, a
piece of furniture, etc., on the power cord, or pinch the
cord. Never make a knot in the cord or tie it with other
cords. The power cords should be routed such that they
are not likely to be stepped on. A damaged power cord
can cause a fire or give you an electrical shock. Check
the power cord once in a while. When you find it
damaged, ask your nearest PIONEER authorized
service center or your dealer for a replacement.
S002*_A1_En
CAUTION
The POWER switch on this unit will not completely
shut off all power from the AC outlet. Since the power
cord serves as the main disconnect device for the
unit, you will need to unplug it from the AC outlet to
shut down all power. Therefore, make sure the unit
has been installed so that the power cord can be
easily unplugged from the AC outlet in case of an
accident. To avoid fire hazard, the power cord should
also be unplugged from the AC outlet when left
unused for a long period of time (for example, when
on vacation).
D3-4-2-2-2a*_A1_En
If you want to dispose this product, do not mix it with general household waste. There is a separate collection system for used
electronic products in accordance with legislation that requires proper treatment, recovery and recycling.
Private households in the member states of the EU, in Switzerland and Norway may return their used electronic products free of charge to
designated collection facilities or to a retailer (if you purchase a similar new one).
For countries not mentioned above, please contact your local authorities for the correct method of disposal.
By doing so you will ensure that your disposed product undergoes the necessary treatment, recovery and recycling and thus prevent potential
negative effects on the environment and human health.
K058b_A1_En
En
3
Page 4

En
4
Contents
TRAKTOR
How to read this manual
! The names of displays, menus, and buttons in this manual are enclosed in
brackets. (e.g. [MASTER] channel, [ON/
! Descriptions of functions and procedures performed on the computer are
indicated [
! The TRAKTOR manual and TRAKTOR GETTING STARTED can be viewed from the
TRAKTOR help menu after TRAKTOR is installed.
].
Before start
Features ...........................................................................................................................5
What’s in the box .............................................................................................................5
Quick Start Guide
Operation overview .........................................................................................................6
Installing the TRAKTOR software ..................................................................................6
Launching TRAKTOR ...................................................................................................... 7
Performing product activation .......................................................................................7
Installing the driver software ..........................................................................................8
Connecting the input/ output terminals ......................................................................10
Setting this unit .............................................................................................................11
Changing the setting utility’s settings ........................................................................11
Playing tracks ................................................................................................................11
Operation
Browse section ..............................................................................................................13
Transport section ..........................................................................................................14
Mixer section .................................................................................................................16
Effect section .................................................................................................................18
Hot cue/ sampler section ..............................................................................................20
Global section ................................................................................................................22
AUX section ...........................................................................................................22
MIC/
MIDI section ..................................................................................................................22
OFF], [File] menu)
Changing the settings
Changing the TRAKTOR Preferences .........................................................................23
Changing the setting utility’s settings ........................................................................23
Changing this unit’s settings .......................................................................................25
List of MIDI Messages
List of MIDI Messages ..................................................................................................26
Additional information
Troubleshooting ............................................................................................................28
Block Diagram...............................................................................................................29
Disclaimer ......................................................................................................................29
Cautions on copyrights.................................................................................................29
Specifications ................................................................................................................30
Page 5

Before start
English
Features
This unit is a 2-channel mixer optimally designed for DJ performances using the
TRAKTOR SCRATCH DJ software by Native Instruments. Through a collaboration
with Native Instruments, it includes the “TRAKTOR SCRATCH DUO 2” DJ software
equipped with a number of features required for DJ performances. For the hardware, the unit comes with a built-in controller for operating the many functions of
TRAKTOR SCRATCH without hesitation and a sound card for simple connection to a
computer. A DVS (Digital Vinyl System) can be created by combining this unit with
your DJ player or analog player.
Also, this unit carries over the technology of the Pioneer DJM series which has
gained a high reputation for both quality and performance, offering powerful support for not only home use but also DJ performances in club scenes.
! An even greater variety of performance functions can be enjoyed by updating to
TRAKTOR SCRATCH PRO 2 (for a fee).
INTERNAL TRAKTOR CONTROLLER
This unit includes a controller optimized for TRAKTOR SCRATCH operations.
TRAKTOR SCRATCH can be operated accurately, without procuring a separate
controller in addition to this unit.
The section for operating the browse and transport functions is located at the top of
the mixer section in function of the series of operating procedures from selecting
tracks to mixing. The sections for operating the performance functions (EFFECT,
LOOP, HOT CUE and SAMPLER) are placed independently at the sides for the different channels in function of the player’s layout for intuitive operation.
PLUG AND PLAY
This unit is equipped with a built-in USB sound card for connecting a computer. A
computer can be connected simply using a single USB cable; there is no need to
procure a separate sound card in addition to this unit.
DJ performances using “TRAKTOR SCRATCH DUO 2” can be started immediately,
with no complicated settings.
What’s in the box
! TRAKTOR SCRATCH DUO 2 software DVD-ROM
! TRAKTOR SCRATCH CONTROL CD ×2
! TRAKTOR SCRATCH CONTROL VINYL ×2
! Driver software CD-ROM
! USB cable
! Power cord
! Warranty card
! Operating instructions (this document)
HIGH DURABILITY FADER
The crossfader uses a uniquely developed magnetic system. This improves durability, maintaining smooth operation for scratch playing over a long period of time.
Furthermore, the operating load, fader curve and cut lag can be adjusted to the
user’s tastes. The channel fader uses a sliding structure with the fader knob supported by two metal shafts. This provides smooth operation with no shakiness and
approximately 3 times the endurance as compared to previous Pioneer products. In
addition, a newly developed fader is used to minimize the influence of any liquids or
dust getting inside the fader.
HIGH SOUND QUALITY
Thanks to the built-in sound card, sound output from a computer can be input to
this unit in digital format, eliminating any decrease in sound quality. In addition, this
unit’s audio input/ output circuitry includes a high performance D/ A converter and
unique analog circuit technology reducing digital noise, faithfully reproducing the
original sound to provide powerful, high quality club sound.
En
5
Page 6
En
6
Quick Start Guide
TRAKTOR
This section describes the procedure for using this unit as a DVS (Digital Vinyl System).
! Descriptions of functions and procedures performed on the computer are indicated [
].
Operation overview
1 Installing the TRAKTOR software
= page 6
2 Launching TRAKTOR
= page 7
3 Performing product activation
= page 7
4 Installing the driver software
= page 8
5 Connecting the input/ output terminals
= page 10
6 Setting this unit
= page 11
7 Changing the setting utility’s settings
= page 11
8 Playing tracks
= page 11
Installing the TRAKTOR software
! This unit also supports TRAKTOR SCRATCH PRO 2.
If you own TRAKTOR SCRATCH PRO 2, update the software to the latest version.
Installation Procedure (Windows)
1 Insert the included TRAKTOR SCRATCH DUO 2 software
DVD-ROM into the computer’s DVD drive.
2 From the Windows [Start] menu, double-click the [Computer
(or My Computer)] > [Traktor] icon.
The contents of the DVD-ROM are displayed.
3 Double-click [Traktor 2 2.0.x Setup PC.exe].
The TRAKTOR installer is launched.
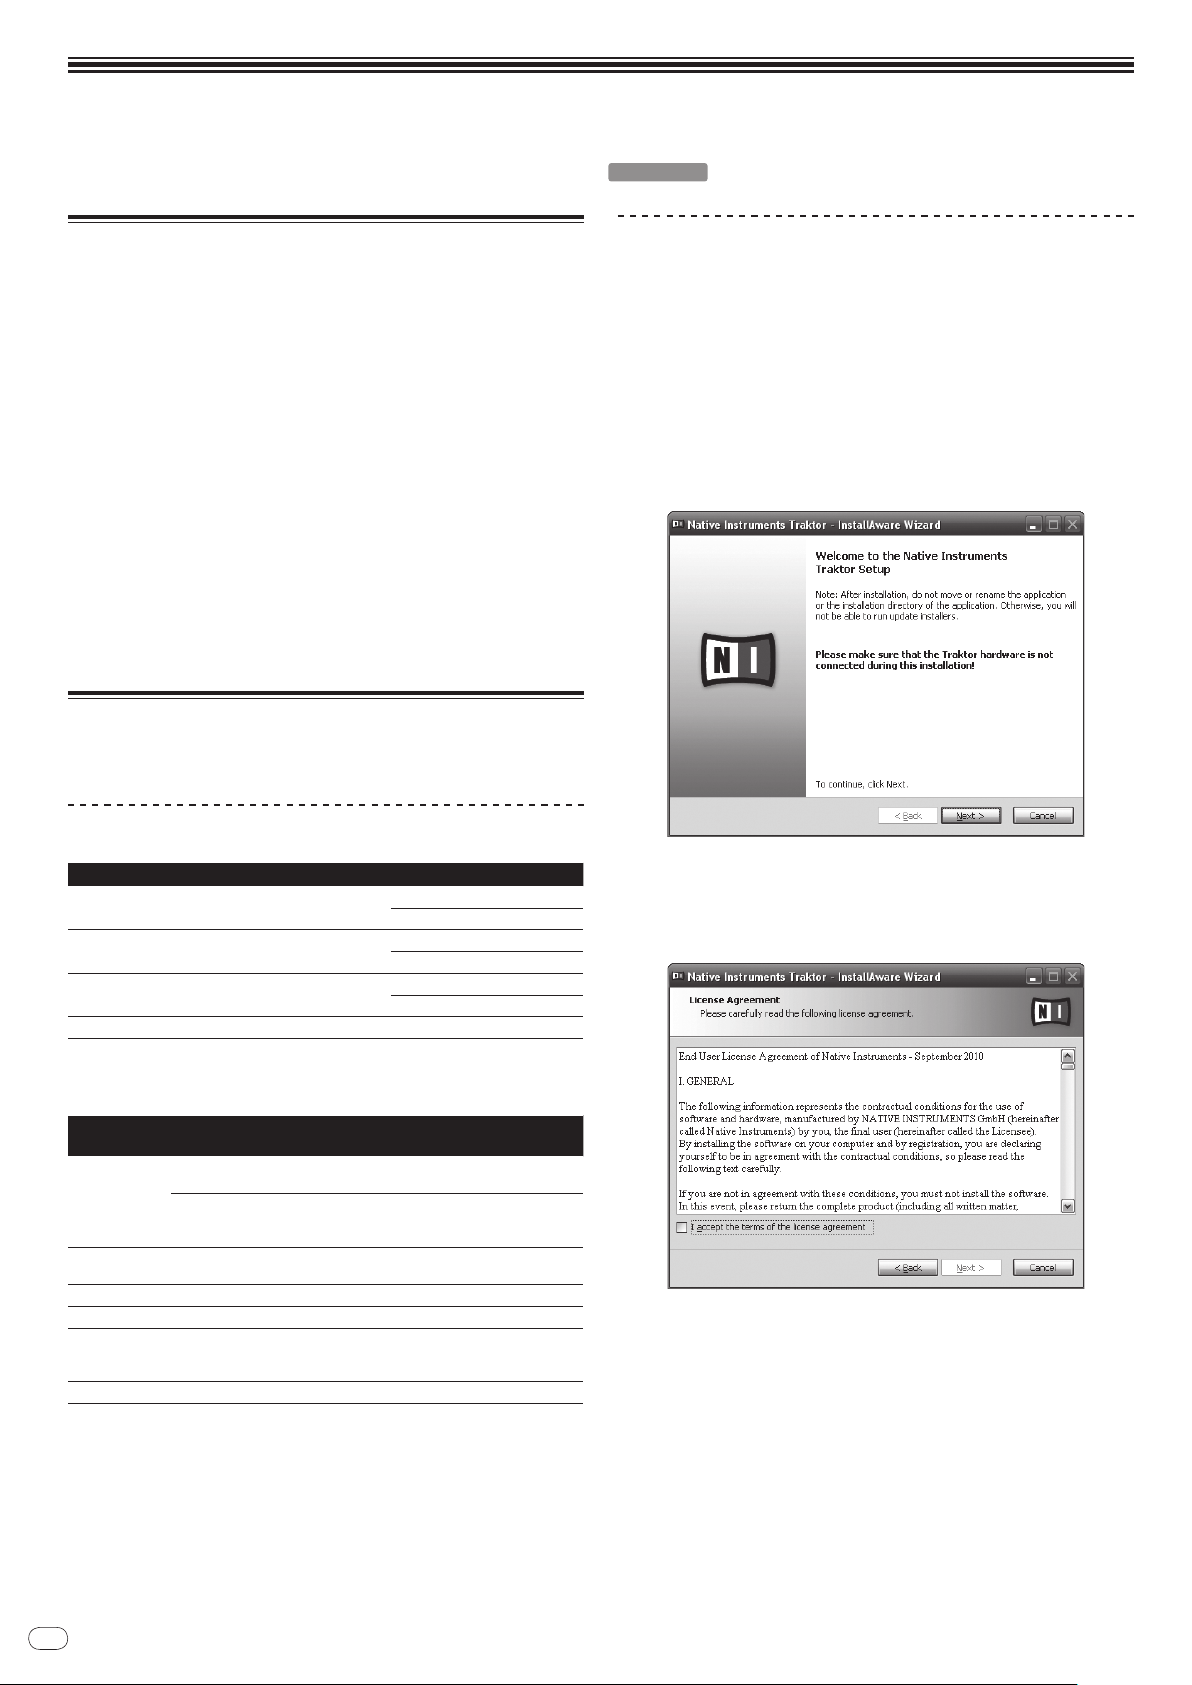
4 Once the TRAKTOR installer is launched, click [Next].
— To return to the previous screen: Click [Back].
— To cancel installation: Click [Cancel].
Cautions on installing the TRAKTOR software
®
Core™
1
1
1
1
1
1
1
Supported operating systems
Mac OS X
®
7 Home Premium/ Professional/ Ultimate
Windows
®
Windows Vista
Ultimate (SP1 or later)
Windows
For the latest information on the operating environment and compatibility, and to acquire the
latest operating system, please visit the following Native Instruments website:
http://www.native-instruments.com/traktor
Minimum operating
environment for TRAKTOR
CPU
Required
memory
Hard disk Free space of 500 MB or greater
DVD drive Optical disc drive on which DVD-ROMs are readable
Internet connection
USB 2.0 port A USB 2.0 port is required to connect the computer with this unit.
! Full functionality is not guaranteed on all computers, even those meeting the operating
environment requirements described above.
! Even with the required memory indicated for the operating environment above, lack of
memory due to resident programs, the number of services, etc., could prevent the software
from offering optimal functionality and performance. In such cases, free up sufficient
memory. We recommend installing additional memory for stable operation.
! Depending on the computer’s power-saving settings, etc., the CPU and hard disk may not
provide sufficient processing capabilities. For notebook computers in particular, make sure
the computer is in the proper conditions to provide constant high performance (for example
by keeping the AC power connected) when using TRAKTOR.
Home Basic/ Home Premium/ Business/
®
XP Home Edition/ Professional (SP3 or later) 32-bit version
For Mac OS X
For Windows® 7,
Windows Vista®
and Windows® XP
2 GB or more of RAM
An Internet connection environment is required for user registration with
Native Instruments, to update the TRAKTOR software, etc.
Use the most recent version of the web browser.
Macintosh computer equipped with an Intel
Duo processor
PC/ AT compatible computer equipped with a 2.4 GHz or
greater Intel® Pentium® 4, Intel® Core™ Duo or AMD
Athlon™ 64 processor
10.5
10.6
32-bit version
64-bit version
32-bit version
64-bit version
5 Read the contents of the [License Agreement] carefully, and
if you agree, check [I accept the terms of the license agreement],
then click [Next].
If you do not agree to the terms of the [License Agreement], click [Cancel] to cancel installation.
6 Choose the type of TRAKTOR installation, then click [Next].
Normally install all options, including [Controller Editor] and [Service Center].
7 Choose where to install TRAKTOR, then click [Next].
To choose the normal place of installation, simply click [Next].
To install in a different location, click [Change...], choose the place of installation,
then click [Next].
8 Select the Native Instruments hardware driver, then click
[Next].
Check the check box for your hardware.
9 To install the Traktor Kontrol X1 driver, check the check box,
then click [Next].
10 When the following screen appears, click [Next].
Installation begins.
Page 7

The installation completed screen appears once installation is completed.
11 Click [Finish].
This completes the installation procedure.
Installation Procedure (Macintosh)
1 Insert the included TRAKTOR SCRATCH DUO 2 software
DVD-ROM into the computer’s DVD drive.
The [Traktor] icon appears on the screen.
2 Double-click the [Traktor] icon.
The contents of the DVD-ROM are displayed.
3 Double-click [Traktor 2 2.0.x Installer Mac.mpkg].
The TRAKTOR installer is launched.
4 Once the TRAKTOR installer is launched, click [Continue].
English
7 Select the Native Instruments hardware driver, then click
[Continue].
Check the check box for your hardware.
8 Choose where to install TRAKTOR, then click [Install].
To choose the normal place of installation, simply click [Install].
To install in a different location, click [Change Install Location...], choose the place
of installation, then click [Install].
Installation begins.
The installation completed screen appears once installation is completed.
9 Click [Restart].
This completes the installation procedure.
Launching TRAKTOR
For Windows
5 Read the contents of the license agreement carefully, then
click [Continue].
From the Windows [Start] menu, open [All Programs] > [Native
Instruments] > [Traktor 2], then click the [Traktor 2] icon.
For Mac OS X
In Finder, open the [Application] folder, next open [Native
Instruments] > [Traktor 2], then double-click the [Traktor 2] icon.
Performing product activation
To use TRAKTOR SCRATCH DUO 2, first perform product activation (referred to
simply as “activation” below) using Native Instruments SERVICE CENTER (referred
to simply as “SERVICE CENTER” below).
Launching the SERVICE CENTER
There are three ways to do this:
— Launching from the dialog displayed when TRAKTOR is started up
— Launching from the TRAKTOR [Help] menu
— Launching SERVICE CENTER directly
To launch from the dialog displayed when TRAKTOR is
started up
1 Launching TRAKTOR
The screen below appears.
6 If you agree to the contents of the usage agreement, click
[Agree].
If you do not agree to the contents of the usage agreement, click [Disagree] to
cancel installation.
En
7
Page 8
En
8
! This dialog is displayed each time TRAKTOR is launched until the license is
acquired from SERVICE CENTER.
2 Select the method for acquiring the license, then click.
— [Run Demo]: Launch TRAKTOR in the demo mode.
— [Buy]: Purchase TRAKTOR from the Native Instruments online shop.
— [Activate]: Acquire the license immediately from the SERVICE CENTER.
To launch from the TRAKTOR [Help] menu
From the TRAKTOR [Help] menu, click [Launch Service Center].
To launch the SERVICE CENTER directly
For Windows
From the Windows [Start] menu, click the [Native Instruments] > [Service
Center] > [Service Center] icons.
For Mac OS X
In Finder, open the [Application] folder, then double-click the [Service Center] >
[Service Center] icons.
Activation procedure
— Online activation: When your computer is connected to the Internet
— Offline activation: When your computer is not connected to the Internet
Online activation
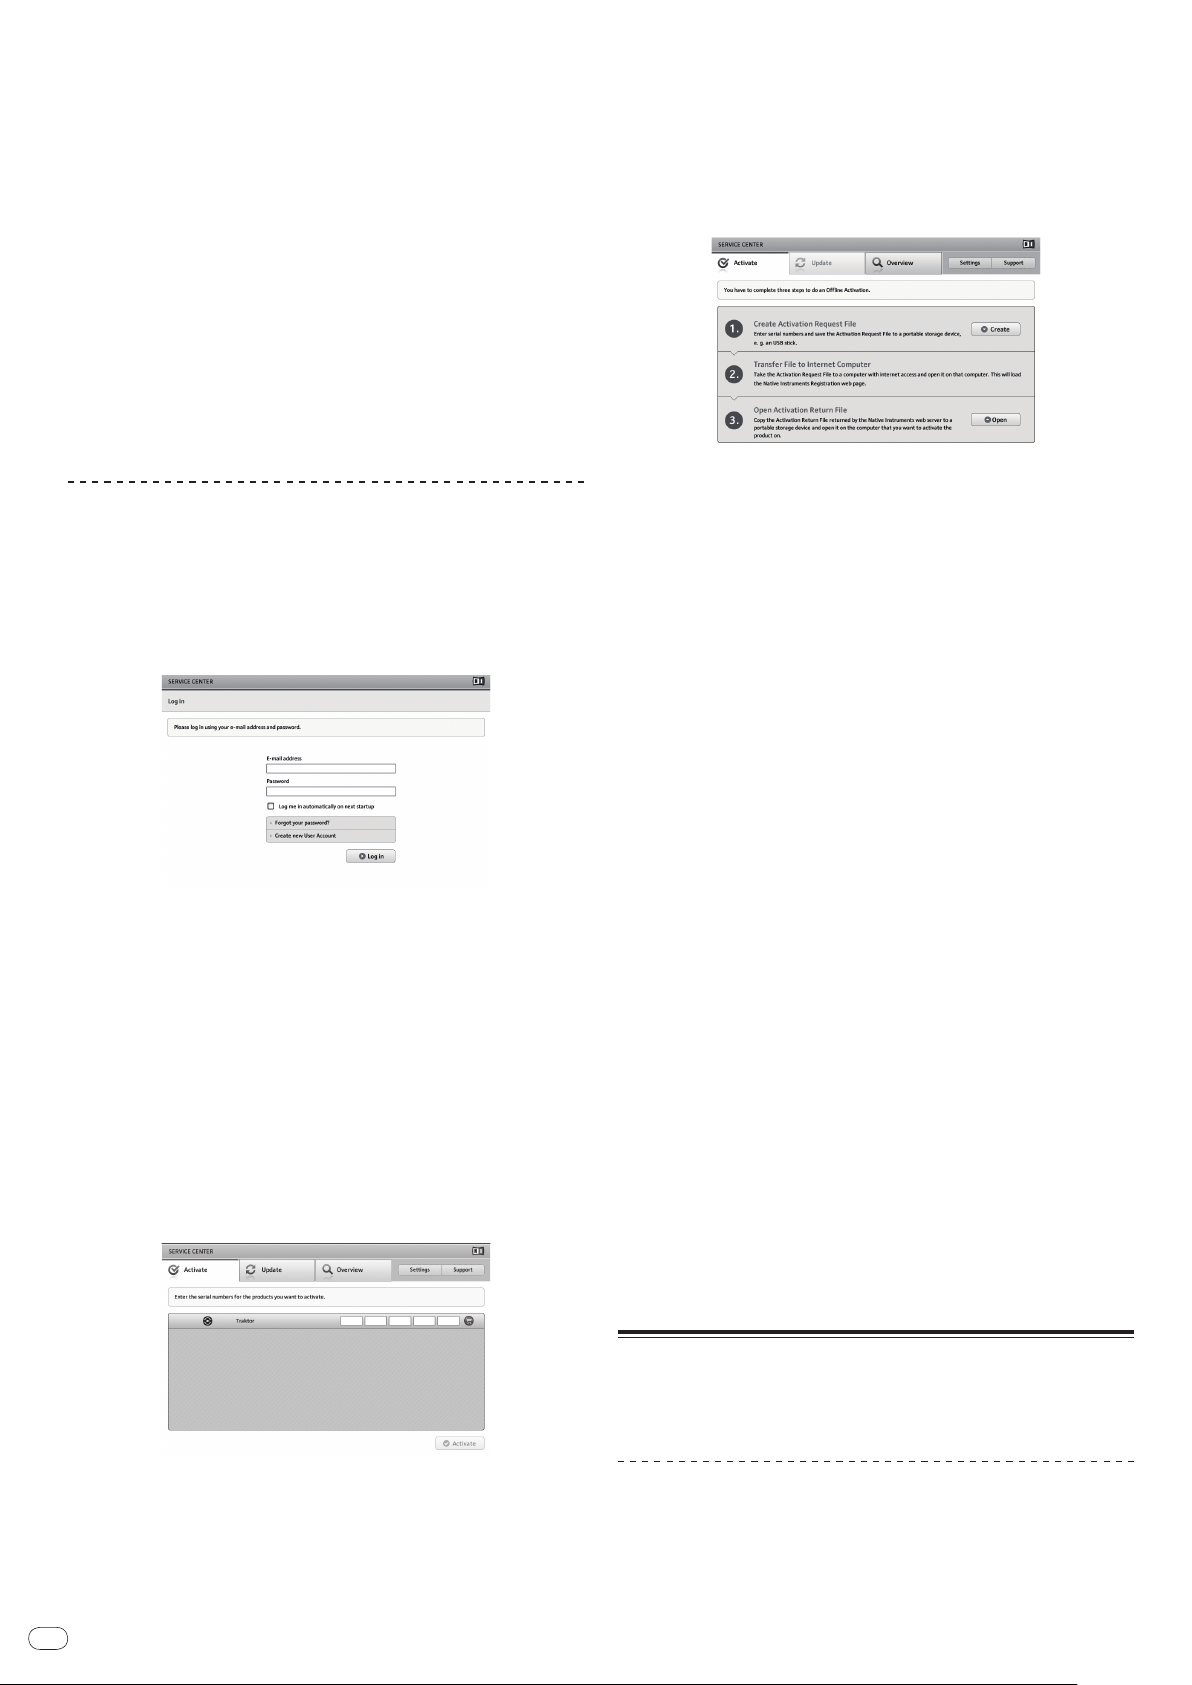
1 Launch the SERVICE CENTER.
The log-in screen is displayed.
2 Input your e-mail address and password, then click [Log in].
! When logging in for the first time, you must create a new user account.
When [Create new User Account] is clicked, the new user account registration
screen appears.
Input the required items (e-mail address, first and last names), select your coun-
region, then click [Next].
try/
When the registration information confirmation screen appears, check the
contents, then click [OK].
A password is sent to the e-mail address input on the form. Return to the log-in
screen and log in.
! The personal information input when registering a new user account may
be collected, processed and used based on the privacy policy on the Native
Instruments website.
Pioneer Corporation does not collect, process or use this personal information.
3 Input the serial number indicated on the package of the
TRAKTOR SCRATCH DUO 2 software DVD-ROM, then click
[Activate].
With this procedure, a second computer that can be connected to the Internet is
required.
1 Launch the SERVICE CENTER on the computer on which
TRAKTOR SCRATCH DUO 2 is to be installed.
2 Click [Offline] at
[Continue without connecting to the internet].
3 Click [Create] at [Create Activation Request File].
4 Input the serial number indicated on the package of the
TRAKTOR SCRATCH DUO 2 software DVD-ROM, then click
[Create].
A launch request file is created. Save this file on a USB device, etc.
5 Connect the USB device on which the launch request file is
saved to the computer that can be connected to the Internet.
6 Double-click the launch request file on the computer that can
be connected to the Internet.
The web browser is launched.
7 Once the product activation screen appears, click [Send].
8 Input your e-mail address and password, then click [SUBMIT].
! When logging in for the first time, you must create a new user account.
When [No - I do not have an NI account.] is checked and [SUBMIT] is clicked,
the new user account registration screen appears.
Input the required items (e-mail address, first and last names, street address,
city and postal code), select your country/ region, then click [NEXT].
When a survey screen appears, select answers to the various questions, then
click [SUBMIT].
A password is sent to the e-mail address input on the form. Return to the log-in
screen and log in.
! The personal information input when registering a new user account may
be collected, processed and used based on the privacy policy on the Native
Instruments website.
Pioneer Corporation does not collect, process or use this personal information.
9 When the [Service Center Activation Page] appears, click
[NEXT].
10 Check that [Product] is [TRAKTOR SCRATCH DUO 2] and
[Status] is [OK], then click [NEXT].
A launch return file is created. Save this file on a USB device, etc.
11 Launch the SERVICE CENTER on the computer on which
TRAKTOR SCRATCH DUO 2 is to be installed.
12 Click [Offline] at
[Continue without connecting to the internet].
13 Click [Open] at [Open Activation Return File].
The launch return file is loaded.
14 Check in the SERVICE CENTER that product activation has
completed.
4 Once the product license registration successful screen
appears, click [Exit].
Offline activation
To activate TRAKTOR SCRATCH DUO 2 installed on a computer that is not connected to the Internet, use SERVICE CENTER in the offline mode.
Installing the driver software
This driver software is designed exclusively for inputting and outputting sound from
the computer. To use this unit connected to a computer on which a Windows or
Mac OS is installed, first install this driver software on the computer.
Software end user license agreement
This Software End User License Agreement (“Agreement”) is between you (both the
individual installing the Program and any single legal entity for which the individual
is acting) (“You” or “Your”) and PIONEER CORPORATION (“Pioneer”).
TAKING ANY STEP TO SET UP OR INSTALL THE PROGRAM MEANS THAT YOU
ACCEPT ALL OF THE TERMS OF THIS LICENSE AGREEMENT. PERMISSION TO
DOWNLOAD AND/ OR USE THE PROGRAM IS EXPRESSLY CONDITIONED ON
Page 9
YOUR FOLLOWING THESE TERMS. WRITTEN OR ELECTRONIC APPROVAL IS
NOT REQUIRED TO MAKE THIS AGREEMENT VALID AND ENFORCEABLE. IF
YOU DO NOT AGREE TO ALL OF THE TERMS OF THIS AGREEMENT, YOU ARE
NOT AUTHORIZED TO USE THE PROGRAM AND MUST STOP INSTALLING IT OR
UNINSTALL IT, AS APPLICABLE.
1 Definitions
1 “Documentation” means written documentation, specifications and help
content made generally available by Pioneer to aid in installing and using
the Program.
2 “Program” means all or any part of Pioneer’s software licensed to You by
Pioneer under this Agreement.
2 Program license
1 Limited License. Subject to this Agreement’s restrictions, Pioneer grants to
You a limited, non-exclusive, nontransferable, license (without the right to
sublicense):
a To install a single copy of the Program on the hard disk drive of Your
computer, to use the Program only for Your personal purpose complying
with this Agreement and the Documentation (“Authorized Use”);
b To use the Documentation in support of Your Authorized Use; and
c To make one copy of the Program solely for backup purposes, provided
that all titles and trademark, copyright and restricted rights notices are
reproduced on the copy.
2 Restrictions. You will not copy or use the Program or Documentation except
as expressly permitted by this Agreement. You will not transfer, sublicense,
rent, lease or lend the Program, or use it for third-party training, commercial time-sharing or service bureau use. You will not Yourself or through
any third party modify, reverse engineer, disassemble or decompile the
Program, except to the extent expressly permitted by applicable law, and
then only after You have notified Pioneer in writing of Your intended activities. You will not use the Program on multiple processors without Pioneer’s
prior written consent.
3 Ownership. Pioneer or its licensor retains all right, title and interest in and
to all patent, copyright, trademark, trade secret and other intellectual property rights in the Program and Documentation, and any derivative works
thereof. You do not acquire any other rights, express or implied, beyond the
limited license set forth in this Agreement.
4 No Support. Pioneer has no obligation to provide support, maintenance,
upgrades, modifications or new releases for the Program or Documentation
under this Agreement.
3 Warranty disclaimer
THE PROGRAM AND DOCUMENTATION ARE PROVIDED “AS IS” WITHOUT ANY
REPRESENTATIONS OR WARRANTIES, AND YOU AGREE TO USE THEM AT
YOUR SOLE RISK. TO THE FULLEST EXTENT PERMISSIBLE BY LAW, PIONEER
EXPRESSLY DISCLAIMS ALL WARRANTIES OF ANY KIND WITH RESPECT TO THE
PROGRAM AND DOCUMENTATION, WHETHER EXPRESS, IMPLIED, STATUTORY,
OR ARISING OUT OF COURSE OF PERFORMANCE, COURSE OF DEALING OR
USAGE OF TRADE, INCLUDING ANY WARRANTIES OF MERCHANTABILITY,
FITNESS FOR A PARTICULAR PURPOSE, SATISFACTORY QUALITY, ACCURACY,
TITLE OR NON-INFRINGEMENT.
4 Damages and remedies for breach
You agree that any breach of this Agreement’s restrictions would cause Pioneer
irreparable harm for which money damages alone would be inadequate. In addition
to damages and any other remedies to which Pioneer may be entitled, You agree
that Pioneer may seek injunctive relief to prevent the actual, threatened or continued breach of this Agreement.
5 Termination
Pioneer may terminate this Agreement at any time upon Your breach of any provision. If this Agreement is terminated, You will stop using the Program, permanently
delete it from the computer where it resides, and destroy all copies of the Program
and Documentation in Your possession, confirming to Pioneer in writing that You
have done so. Sections 2.2, 2.3, 2.4, 3, 4, 5 and 6 will continue in effect after this
Agreement’s termination.
6 General terms
1 Limitation of Liability. In no event will Pioneer or its subsidiaries be liable in
connection with this Agreement or its subject matter, under any theory of
liability, for any indirect, incidental, special, consequential or punitive damages,
or damages for lost profits, revenue, business, savings, data, use, or cost of
substitute procurement, even if advised of the possibility of such damages or
if such damages are foreseeable. In no event will Pioneer’s liability for all damages exceed the amounts actually paid by You to Pioneer or its subsidiaries for
the Program. The parties acknowledge that the liability limits and risk allocation
in this Agreement are reflected in the Program price and are essential elements
of the bargain between the parties, without which Pioneer would not have
provided the Program or entered into this Agreement.
2 The limitations or exclusions of warranties and liability contained in this
Agreement do not affect or prejudice Your statutory rights as consumer and
shall apply to You only to the extent such limitations or exclusions are permitted under the laws of the jurisdiction where You are located.
3 Severability and Waiver. If any provision of this Agreement is held to be
illegal, invalid or otherwise unenforceable, that provision will be enforced to
the extent possible or, if incapable of enforcement, deemed to be severed
and deleted from this Agreement, and the remainder will continue in full
force and effect. The waiver by either party of any default or breach of this
Agreement will not waive any other or subsequent default or breach.
4 No Assignment. You may not assign, sell, transfer, delegate or otherwise
dispose of this Agreement or any rights or obligations under it, whether voluntarily or involuntarily, by operation of law or otherwise, without Pioneer’s
prior written consent. Any purported assignment, transfer or delegation by
You will be null and void. Subject to the foregoing, this Agreement will be
binding upon and will inure to the benefit of the parties and their respective
successors and assigns.
5 Entire Agreement. This Agreement constitutes the entire agreement
between the parties and supersedes all prior or contemporaneous agreements or representations, whether written or oral, concerning its subject
matter. This Agreement may not be modified or amended without Pioneer’s
prior and express written consent, and no other act, document, usage or
custom will be deemed to amend or modify this Agreement.
6 You agree that this Agreement shall be governed and construed by and
under the laws of Japan.
Before installing the driver software
! Read Software end user license agreement carefully.
! Turn off this unit’s power switch, then disconnect the USB cable connecting this
unit and the computer.
! If any other programs are running on the computer, quit them.
! To install or uninstall the driver software, you need to be authorized by the
administrator of your computer. Log on as the administrator of your computer
before proceeding with the installation.
! If you connect this unit to your computer without installing the driver soft-
ware first, an error may occur on your computer depending on the system
environment.
! If installation of the driver software is interrupted after it has started, start the
installation procedure over again from the beginning.
! The provided CD-ROM includes installation programs in the following 12
languages.
English, French, German, Italian, Dutch, Spanish, Portuguese, Russian, Chinese
(simplified characters), Chinese (traditional characters), Korean, Japanese.
When using an operating system in any language besides the ones listed above,
select [English] during the installation procedure.
Supported operating systems
Windows® 7 Home Premium/ Professional/ Ultimate
®
Windows Vista
Ultimate
Windows
Mac OS X 10.4.8 or later 32-bit version
Mac OS X 10.6
! Windows
Home Basic/ Home Premium/ Business/
®
XP Home Edition/ Professional (SP2 or later) 32-bit version
®
XP Professional x64 Edition is not supported.
32-bit version
64-bit version
32-bit version
64-bit version
32-bit version
64-bit version
1
1
1
1
1
1
1
1
Installation Procedure (Windows)
1 Insert the included driver software CD-ROM into the
computer’s DVD drive.
2 Once the CD-ROM’s menu is displayed, double-click [DJMT1_X.XXX.exe].
3 Proceed with installation according to the instructions on the
screen.
If [Windows Security] appears on the screen while the installation is in progress,
click [Install this driver software anyway] and continue with the installation.
! When installing on Windows XP
If [Hardware Installation] appears on the screen while the installation is in
progress, click [Continue Anyway] and continue with the installation.
! When the installation program is completed, a completion message appears.
Installation Procedure (Macintosh)
1 Insert the included driver software CD-ROM into the
computer’s DVD drive.
2 Once the CD-ROM’s menu is displayed, double-click [DJMT1AudioDriver.dmg].
3 Double-click [DJM-T1AudioDriver.pkg].
4 Proceed with installation according to the instructions on the
screen.
En
English
9
Page 10
En
10
Connecting the input/ output terminals
MIC
PHONES
LRAUX
OFF
PHONO CD
SIGNAL GND
ON
POWER
AC IN
220 - 240V
CH 2
USB
L
R
PHONOCD
CH 1
L
R
LR
RL
LR
1.GND 2.HOT
3.COLD
dB
-
6
0
dB
MASTER
ATT.
TRS
MASTER 1
MASTER 2
BOOTH
R
RLL
R
L
R
L
R
L
RL
Power amplifier
(for booth monitor)
Power amplifierPower amplifier
Analog player DJ player Analog player DJ player
Headphones
Computers
Portable
audio device
Microphones
To power outlet
1
2 3
4
2 3
5
6
7
d
e
f
8
9
a
b
c
USB
L
TER 2
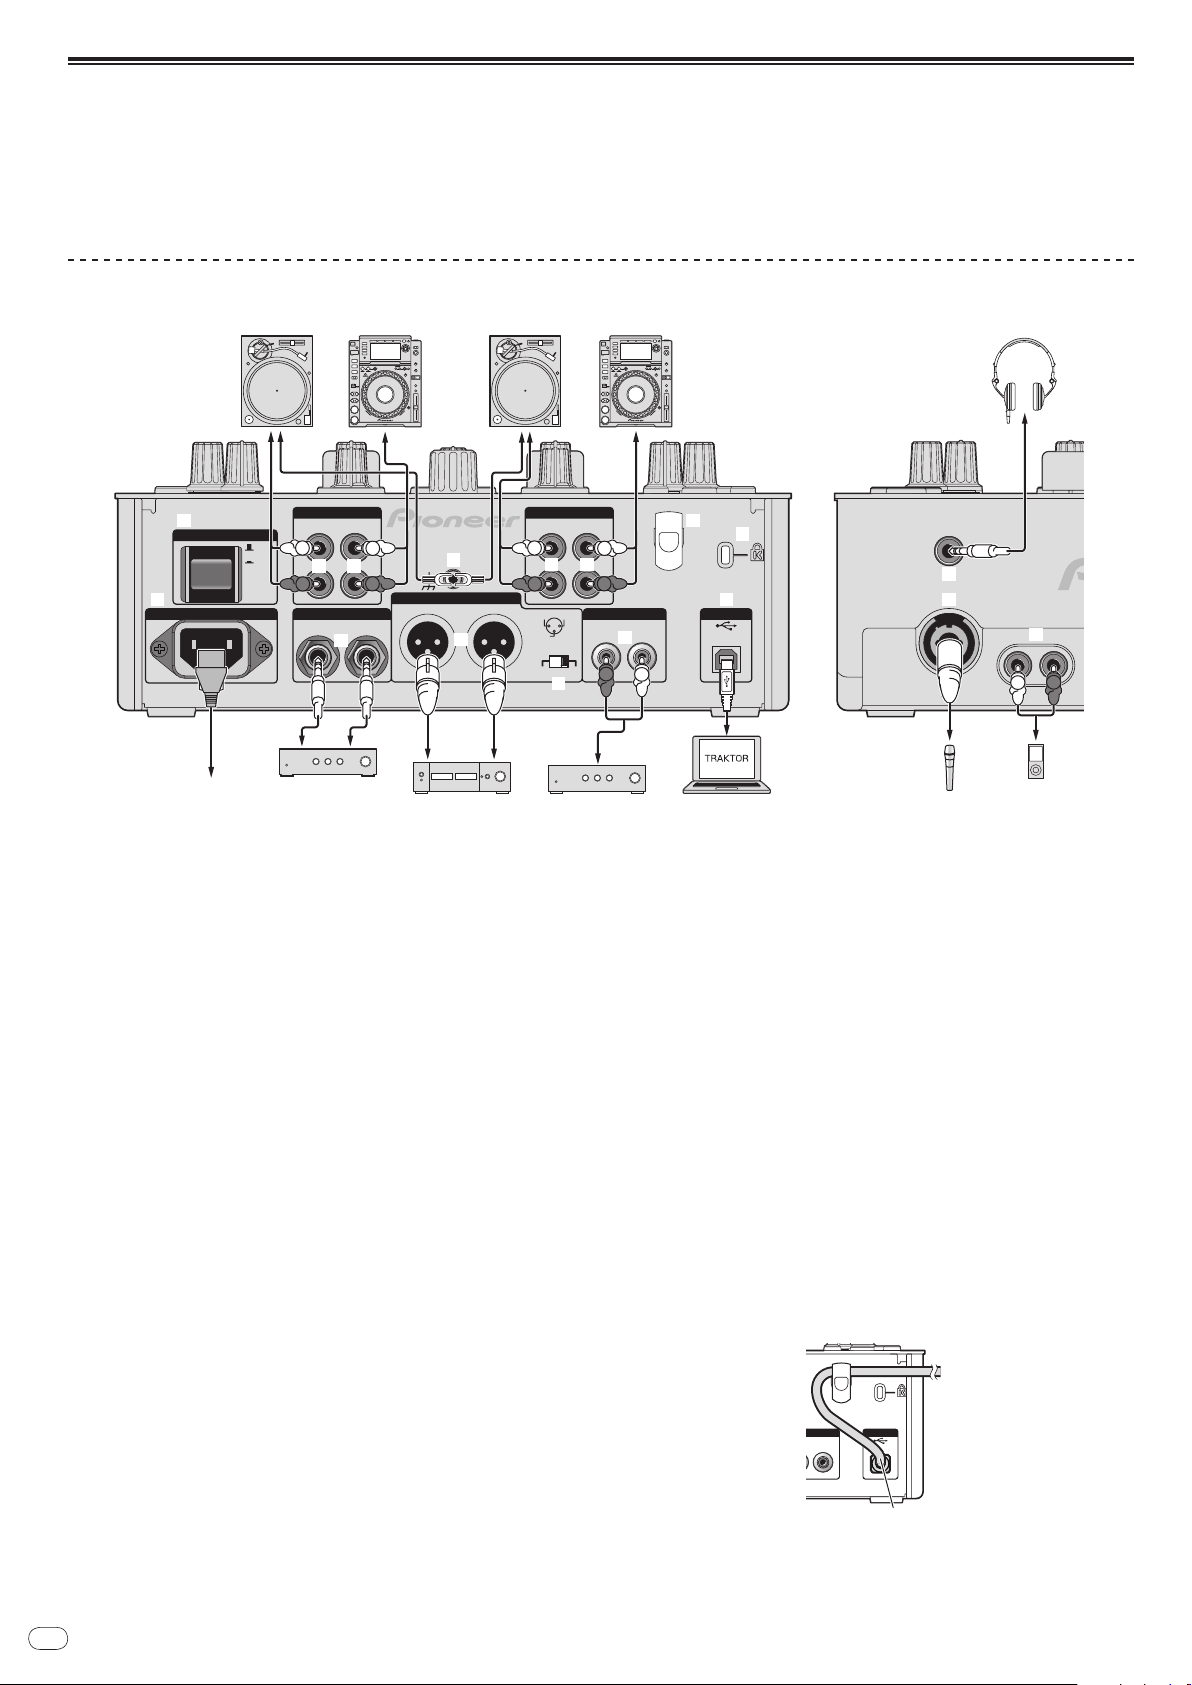
Be sure to turn off the power and unplug the power cord from the power outlet whenever making or changing connections.
Connect the power cord after all the connections between devices have been completed.
Be sure to use the included power cord.
Refer to the operating instructions for the component to be connected.
! When creating a DVS (Digital Vinyl System) combining a computer, audio interface, etc., be careful in connecting the audio interface to this unit’s input terminals and in
the settings of the input selector switches.
Also refer to the operating instructions of the DJ software and audio interface.
Rear panel, front panel
1 POWER button
Turns this unit’s power on and off.
2 PHONO terminals
Connect to a phono level (MM cartridge) output device. Do not input line level
signals.
To connect a device to the [PHONO] terminals, remove the short-circuit pin plug
inserted in the terminals.
Insert this short-circuit pin plug into the [PHONO] terminals when nothing is
connected to them to cut external noise.
3 CD terminals
Connect to a DJ player or a line level output component.
4 SIGNAL GND terminal
Connect an analog player’s ground wire here. This helps reduce noise when the
analog player is connected.
5 Cord hook
Hook the USB cable here.
! The sound will be interrupted if the USB cable is disconnected during
playback.
6 Kensington security slot
7 USB port
Connect to a computer.
! Connect this unit and the computer directly using the included USB cable.
! A USB hub cannot be used.
8 MASTER2 terminals
Connect to a power amplifier, etc.
9 MASTER ATT.
Sets the attenuation level of the sound output from the [MASTER1] and
[MASTER2] terminals.
When set to [–6 dB], the audio level output from the [MASTER1] and [MASTER2]
terminals is decreased by half.
a MASTER1 terminals
Connect to a power amplifier, etc.
b BOOTH terminals (page 17)
Output terminals for a booth monitor, compatible with balanced or unbalanced
output for a TRS connector.
! The sound will be distorted if the level is raised too high when using unbal-
anced outputs.
c AC IN
Connect to a power outlet using the included power cord. Wait until all connections between the equipment are completed before connecting the power cord.
Be sure to use the included power cord.
d PHONES terminal (page 16)
Connect headphones here.
e MIC terminal (page 22)
Connect a microphone here.
f AUX IN terminals (page 22)
Connect to the output terminal of an external device (sampler, portable audio
device, etc.)
Cord hook
The USB cable is fastened in place by catching it on the cord hook. This prevents the
USB cable from being pulled accidentally and its plug getting disconnected from
the port.
! The sound will be interrupted if the USB cable is disconnected during playback.
USB cable
Page 11
Setting this unit
USBCD
PHONO
TRAKTOR
BROWSE VIEW
PUSH
TREE FLD OPEN
LOAD
A
DUPLICATE
LOAD
B
DUPLICATE
Be sure to install this unit’s exclusive driver software before connecting this unit and
the a computer by USB cable.
1 Switch the [CD, PHONO, USB] input selector switch.
Set it to [USB].
2 Connect this unit to your computer via a USB cable.
This unit functions as an audio device conforming to the ASIO standards.
! This operation does not work with computers that do not support USB 2.0.
! When using applications supporting ASIO, [USB 1/ 2], [USB 3/ 4] and [USB 5/ 6]
can be used as inputs.
! The computer’s recommended operating environment depends on the DJ appli-
cation. Be sure to check the recommended operating environment for the DJ
application you are using.
! When another USB audio device is connected to the computer at the same time,
it may not operate or be recognized normally.
We recommend only connecting the computer and this unit.
! When connecting the computer and this unit, we recommend connecting
directly to this unit’s USB port.
3 Press [POWER] button.
Turn on the power of this unit.
! The message [Installing device driver software] may appear when this unit is
first connected to the computer or when it is connected to a different USB port
on the computer. Wait a while until the message [Your devices are ready for
use] appears.
! When installing on Windows XP
— [Can Windows connect to Windows Update to search for software?]
may appear while the installation is in progress. Select [No, not this time],
then click [Next] to continue installation.
— [What do you want the wizard to do?] may appear while the instal-
lation is in progress. Select [Install the software automatically
(Recommended)], then click [Next] to continue installation.
— If [Windows Security] appears on the screen while the installation is in
progress, click [Install this driver software anyway] and continue with
the installation.
Playing tracks
English
1 Set the CONTROL CD in the DJ player.
! To use an analog player, set the CONTROL VINYL.
2 Set TRAKTOR to the [Scratch Control] mode.
Check that the right section of the [d] button in TRAKTOR is displayed as shown
below.
! If [CUE] and [CUP] are displayed, operate the computer to switch TRAKTOR to
the [Scratch Control] mode.
3 Press the [f (REL.)] or [CUE (ABS.)] button while pressing
the [SHIFT] button.
Select the Relative or Absolute mode.
— Press the [f (REL.)] button while pressing the [SHIFT] button: Switches
to the Relative mode.
The Relative mode is a mode that ignores the playback position of the
CONTROL CD/ CONTROL VINYL.
— Press the [CUE (ABS.)] button while pressing the [SHIFT] button: Switches
to the Absolute mode.
The Absolute mode is a mode that reflects the playback position of the
CONTROL CD/ CONTROL VINYL on the playback position of the track.
4 Turn the rotary selector.
Select the track.
5 Press the [LOAD (DUPLICATE)] button.
The selected track is loaded in the deck.
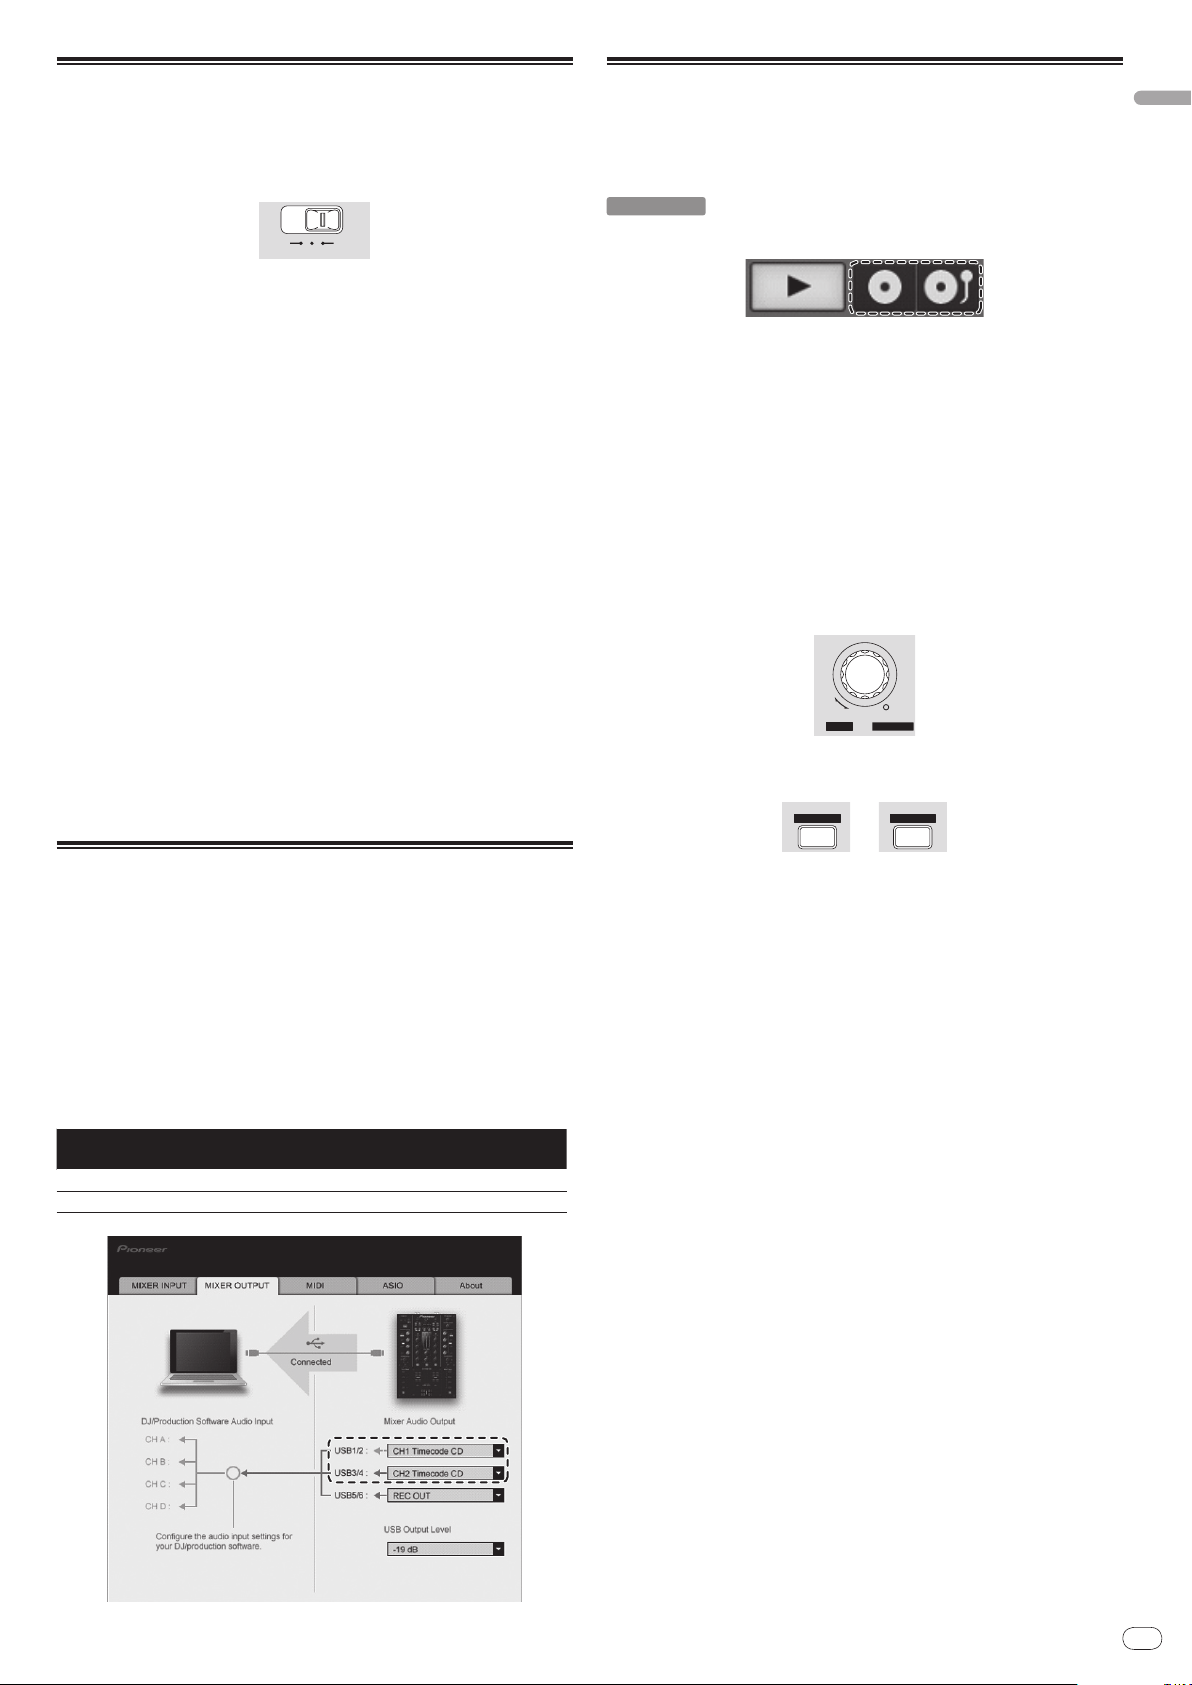
Changing the setting utility’s settings
1 Displaying the setting utility
! For Windows
Click [Start] menu > [All Programs] > [Pioneer] > [DJM-T1] > [DJM-T1
Setting Utility].
! For Mac OS X
Click [Macintosh HD] icon > [Application] > [Pioneer] > [DJM-T1] >
[DJM-T1 Setting Utility].
2 Click the [MIXER OUTPUT] tab.
3 Click the [Mixer Audio Output] pull-down menu.
Set as shown below, according to the devices connected to this unit.
USB 1/ 2 CH1 Timecode CD CH1 Timecode PHONO
USB 3/
When using a DJ player
(CONTROL CD)
4 CH2 Timecode CD CH2 Timecode PHONO
When using an analog player
(CONTROL VINYL)
! For detailed instructions on selecting tracks and loading tracks in decks, see
Browse section on page 13.
6 Play the CONTROL CD.
Playback of the track loaded in the TRAKTOR deck begins.
! To use an analog player, play the CONTROL VINYL.
En
11
Page 12
En
12
LOWLEVELINPUT SELECTMIC
PHONES
LRAUX
MIC AUXOFF
EQ HI
CROSS F. REVERSE
CROSS F. CURVE
THRU
ON OFF
121212120
MIDI
DECK ADECK B
FX ASSIGN
FX1
DRY/WET
DECK A /C
AUTO LOOP
HOT CUESAMPLER
ON
1
2
3
SELECT
GROUP
/ SINGLE
CH1 CH2
UTILITY
LOAD
DUPLICATE
WAKE UP
SNAP
FX
SELECT
LOOP
MOVE
SAMPLE
LEVEL
1
2
3
1
2
PLAY MODE
PHONES
4
3
ACTIVE
FX2
BOOTH MONITOR
MASTER
DRY/WET
DECK B /D
ON
1
2
3
FX
SELECT
1
2
3
CROSS F.
REVERSE
1
2
4
3
ACTIVE
A
CUE
LOAD
DUPLICATE
B
REL. REL.ABS. ABS.
LFO
LFO
LFO
GROUP
/ SINGLE
LFO
LFO
LFO
TAP
DEL DEL
CROSS.F. CONTROL
QUANTIZE
CUE
FX1 FX2 SYNC
CUE
TREE
BROWSE VIEW
PUSH
FLD OPEN
FX ASSIGN
FX1 FX2
MASTER
MASTER1
OVER
9
5
3
1
0
-
1
-
3
-
6
-
9
-
15
-
24
dB
OVER
9
5
3
1
0
-
1
-
3
-
6
-
9
-
15
-
24
dB
USBCD
PHONO
SYNC
MASTER
TRIM
9
TRIM
9
HI
6
MID
6
LOW
6
CUE
USBCD
PHONO
HI
6
MID
6
LOW
6
LEVEL
0
2
MIXING
MASTERCUE
HEADPHONES
0
CH 1CH 2
1
2
3
4
5
6
7
8
9
10
0
1
2
3
4
5
6
7
8
9
10
FEELING ADJ.
0
0
POWER
2 CHANNEL TRAKTOR MIXER
AUTO LOOP
SAMPLER HOT CUE
SELECT
LOOP
MOVE
SAMPLE
LEVEL
DEL DEL
CROSS.F. CONTROL
PLAY MODE
BEND BEND
SHIFT
LOCK
ON/OFF
MIDI
DECK A
FX ASSIGN
FX1
DRY/WET
ON
1
2
3
UTILITY
LOAD
WAKE UP
FX
SELECT
1
2
4
3
ACTIVE
FX2
BOOTH MONITOR
MASTER
DRY/WET
ON
1
2
3
FX
SELECT
1
2
4
3
ACTIVE
A
CUE
LOAD
B
FX1 FX2 SYNC
BROWSE VIEW
PUSH
FX ASSIGN
FX1 FX2
USBCD
PHONO
SYNC
USBCD
PHONO
HEADPHONES
MASTER1
9
5
3
1
0
-
1
-
3
-
6
-
9
-
15
dB
9
5
3
1
0
-
1
-
3
-
6
-
9
-
15
dB
2
DUPLICATE DUPLICATE
TREE FLD OPEN
MASTER MASTER
DECK A /C
GROUP
/ SINGLE
SNAP
LFO
LFO
LFO
GROUP
/ SINGLE
LFO
LFO
LFO
QUANTIZE
AUTO LOOP
HOT CUESAMPLER
SELECT
LOOP
MOVE
SAMPLE
LEVEL
DEL DEL DEL DEL
CROSS.F. CONTROL
REL. REL.ABS. ABS.
CUE CUE
BEND BEND
OVER
-
24
OVER
-
24
TAP
CUE
TAP
SHIFT
LOCK
0
1
2
3
4
5
6
7
8
9
10
0
1
2
3
4
5
6
7
8
9
10
CH 1CH 2
FEELING ADJ.
DJM -T1
2 CHANNEL TRAKTOR MIXER
DECK B /D
AUTO LOOP
SELECT
LOOP
MOVE
SAMPLE
LEVEL
CROSS.F. CONTROL
POWER
CROSS F.
REVERSE
PHONES
SAMPLER HOT CUE
CH1 CH2
ON/OFF
PLAY MODE PLAY MODE
DECK B
1
2
3
0
0
TRIM
9
HI
6
MID
6
LOW
6
TRIM
9
HI
6
MID
6
LOW
6
LEVEL
0
MIXING
MASTERCUE
1
2
3
3
8
3
3
4
5
4
7
5
1232
1
6
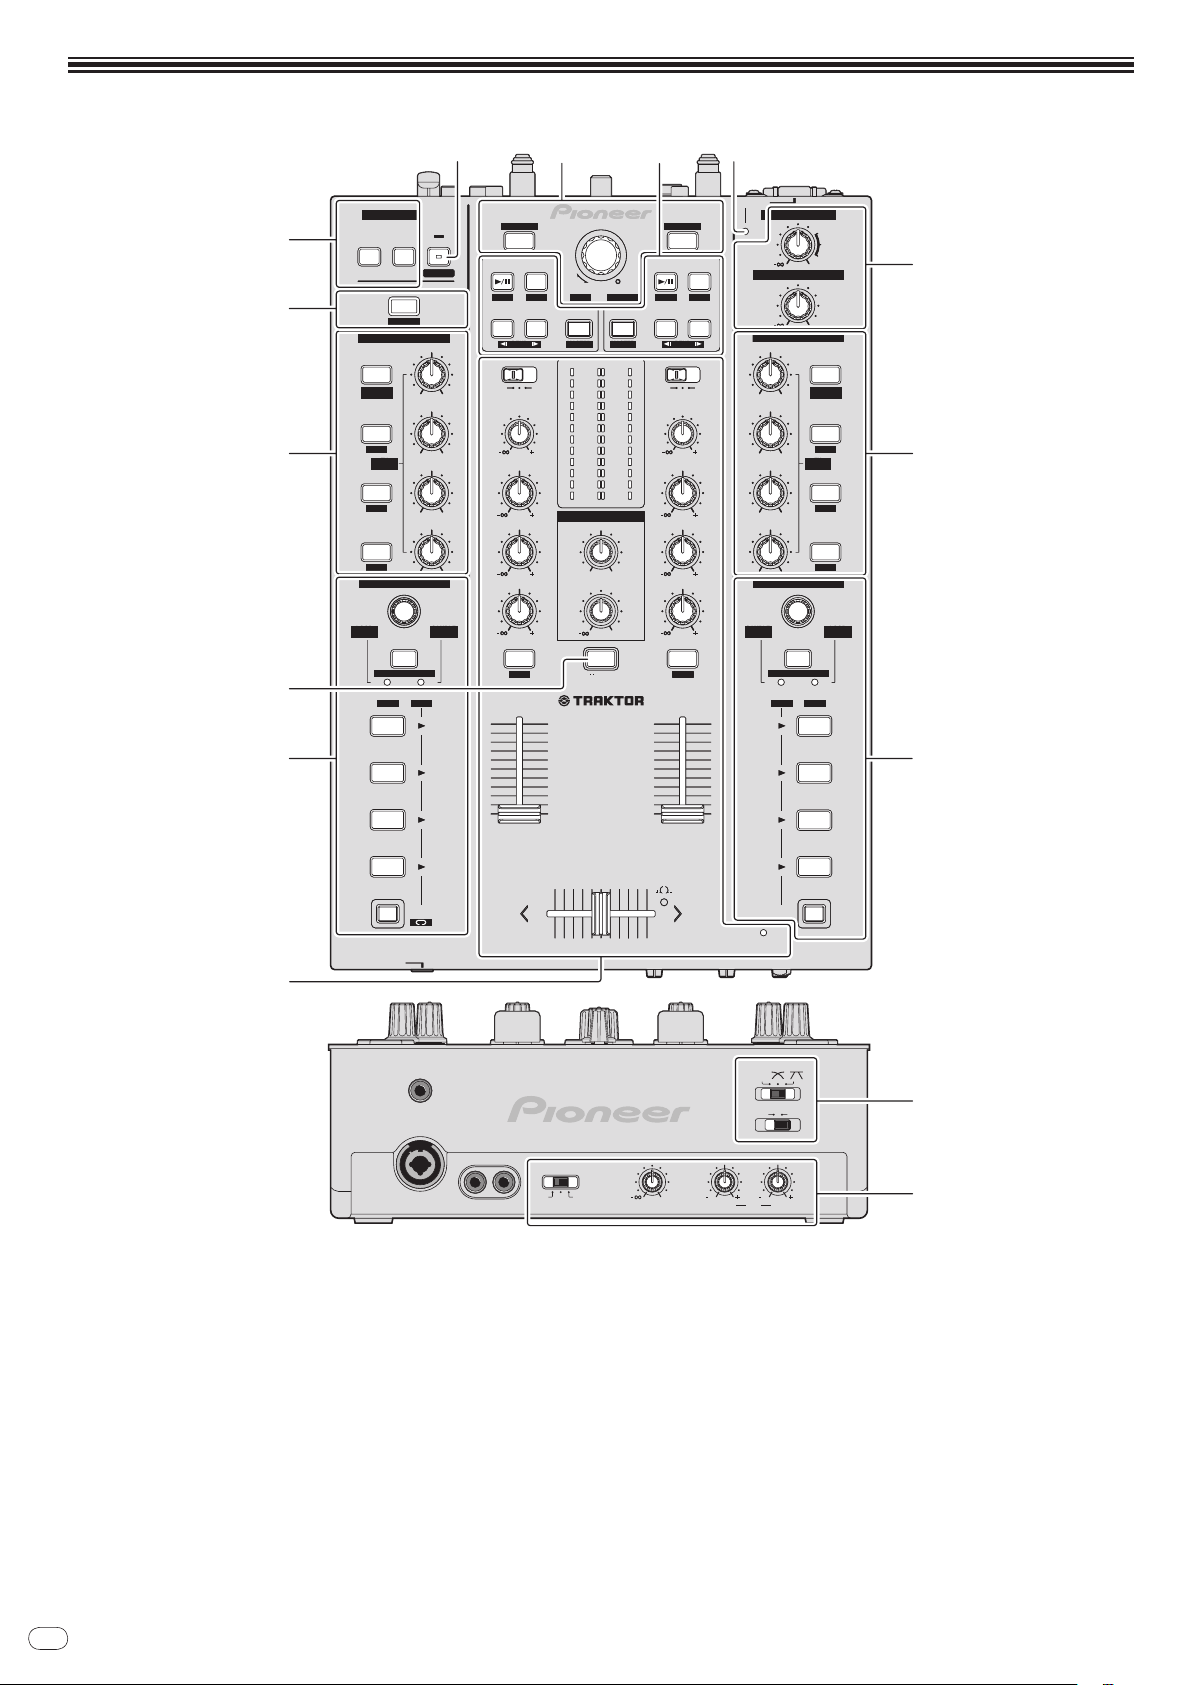
Operation
1 Browse section (page 13)
2 Transport section (page 14)
3 Mixer section (page 16)
4 Effect section (page 18)
5 Hot cue/
6 Global section (page 22)
sampler section (page 20)
7 MIDI section (page 22)
8 MIC/
AUX section (page 22)
1 SHIFT button
! Press another button while pressing the [SHIFT] button:
The other function assigned to the button that is pressed is called out.
! Press the [SHIFT] button twice:
The [SHIFT] button is locked in the pressed status. To unlock it, press the
[SHIFT] button again.
2 UTILITY (WAKE UP) button
! Press:
The auto standby mode is canceled (page 25).
! Press for over 1 second:
Switches to the mode for changing this unit’s settings (page 25).
3 POWER indicator
Lights when this unit’s power is on.
Page 13

Browse section
DECK ADECK B
LOAD
A
LOAD
B
REL. REL.
BROWSE VIEW
PUSH
DUPLICATE DUPLICATE
CUE ABS. CUEABS.TREE FLD OPEN
1
2
2
1
(SHIFT)+
2 2
(Press)
1
3
2
TRAKTOR
English
1 LOAD (DUPLICATE) button
! Press:
The track selected with the cursor is loaded in the respective deck.
! [SHIFT] + press:
The track loaded in the one deck is copied and loaded into the other deck.
2 Rotary selector
! Turn:
The cursor in the [TRACK] area moves.
! Press:
The [BROWSE] area’s magnified display turns on and off.
! [SHIFT] + turn:
The cursor in the [TREE] area moves.
! [SHIFT] + press:
The folder opens/
* Description of areas
— [TREE] area: Section 1 on the diagram above is called the [TREE] area.
— [TRACK] area: Section 2 on the diagram above is called the [TRACK]
area.
— [FAVORITES] area: Section 3 on the diagram above is called the
[FAVORITES] area.
— [BROWSE] area: Sections 1, 2 and 3 on the diagram above are collec-
tively called the [BROWSE] area.
closes.
Importing tracks to TRAKTOR
From Explorer or Finder, drag & drop music files or folders
containing music files to [Track Collection] in TRAKTOR’s [TREE]
area.
! Right-click [Track Collection] (on Mac OS X, click [Track Collection] while
pressing the [control] key), then select [Import Music Folders] from the menu.
All the music files in your system’s [My Music] or [Music] folder are imported.
Creating playlists
1 Right-click [Playlists] in TRAKTOR’s [TREE] area.
! For Mac OS X, click it while pressing the [control] key.
2 From the menu, select [Create Playlist].
3 Input the playlist name, then click [OK].
The playlist you have created is displayed at [Playlists].
4 Drag & drop music files to the playlist you have created to add
them.
Creating a FAVORITES
Loading tracks to decks
1 Turn the rotary selector while pressing the [SHIFT] button.
Select the playlist or folder.
2 Press the rotary selector while pressing the [SHIFT] button.
The folder opens/ closes.
! Items without the [+] mark cannot be opened/ closed.
3 Release the [SHIFT] button and turn the rotary selector.
Select the track.
4 Press the [LOAD (DUPLICATE)] button.
The selected track is loaded in the deck.
Playing iTunes music files
If you are managing music files with iTunes, the iTunes library and playlists can be
accessed directly with the TRAKTOR browser.
1 Turn the rotary selector while pressing the [SHIFT] button.
Select the [iTunes] folder.
2 Press the rotary selector while pressing the [SHIFT] button.
The folder opens/ closes.
3 Browsing the library and playlists in the same way as with
iTunes
! The iTunes library and playlists cannot be edited with the TRAKTOR browser.
! When played from the TRAKTOR browser, iTunes music files are automatically
imported to the TRAKTOR [Track Collection] list.
Using the duplicate function
This function allows you to easily copy tracks that are loaded in one of the decks
onto the other deck.
! The following describes the procedure for copying a track from deck [A] onto
deck [B].
1 Select the track, then press the [LOAD (DUPLICATE)] button of
the deck [A].
The track is loaded into deck [A].
2 Press the [LOAD (DUPLICATE)] button of the deck [B] while
pressing the [SHIFT] button.
The track loaded in deck [A] is copied and loaded into deck [B].
Drag and drop a playlist folder to an open slot in the [FAVORITES]
area.
En
13
Page 14
En
14
Transport section
DECK ADECK B
FX ASSIGN
FX1 FX2 SYNC
BROWSE VIEW
PUSH
FX ASSIGN
FX1 FX2SYNC
TREE FLD OPEN
MASTER MASTER
REL. REL.ABS. ABS.
CUE CUE
BEND BEND
Internal Playback mode
Scratch Control mode
1 2
4 4
1 2
3 3
4
(SHIFT)+
4
(SHIFT)+
3
12
(SHIFT)+
2
(SHIFT)+
1
3
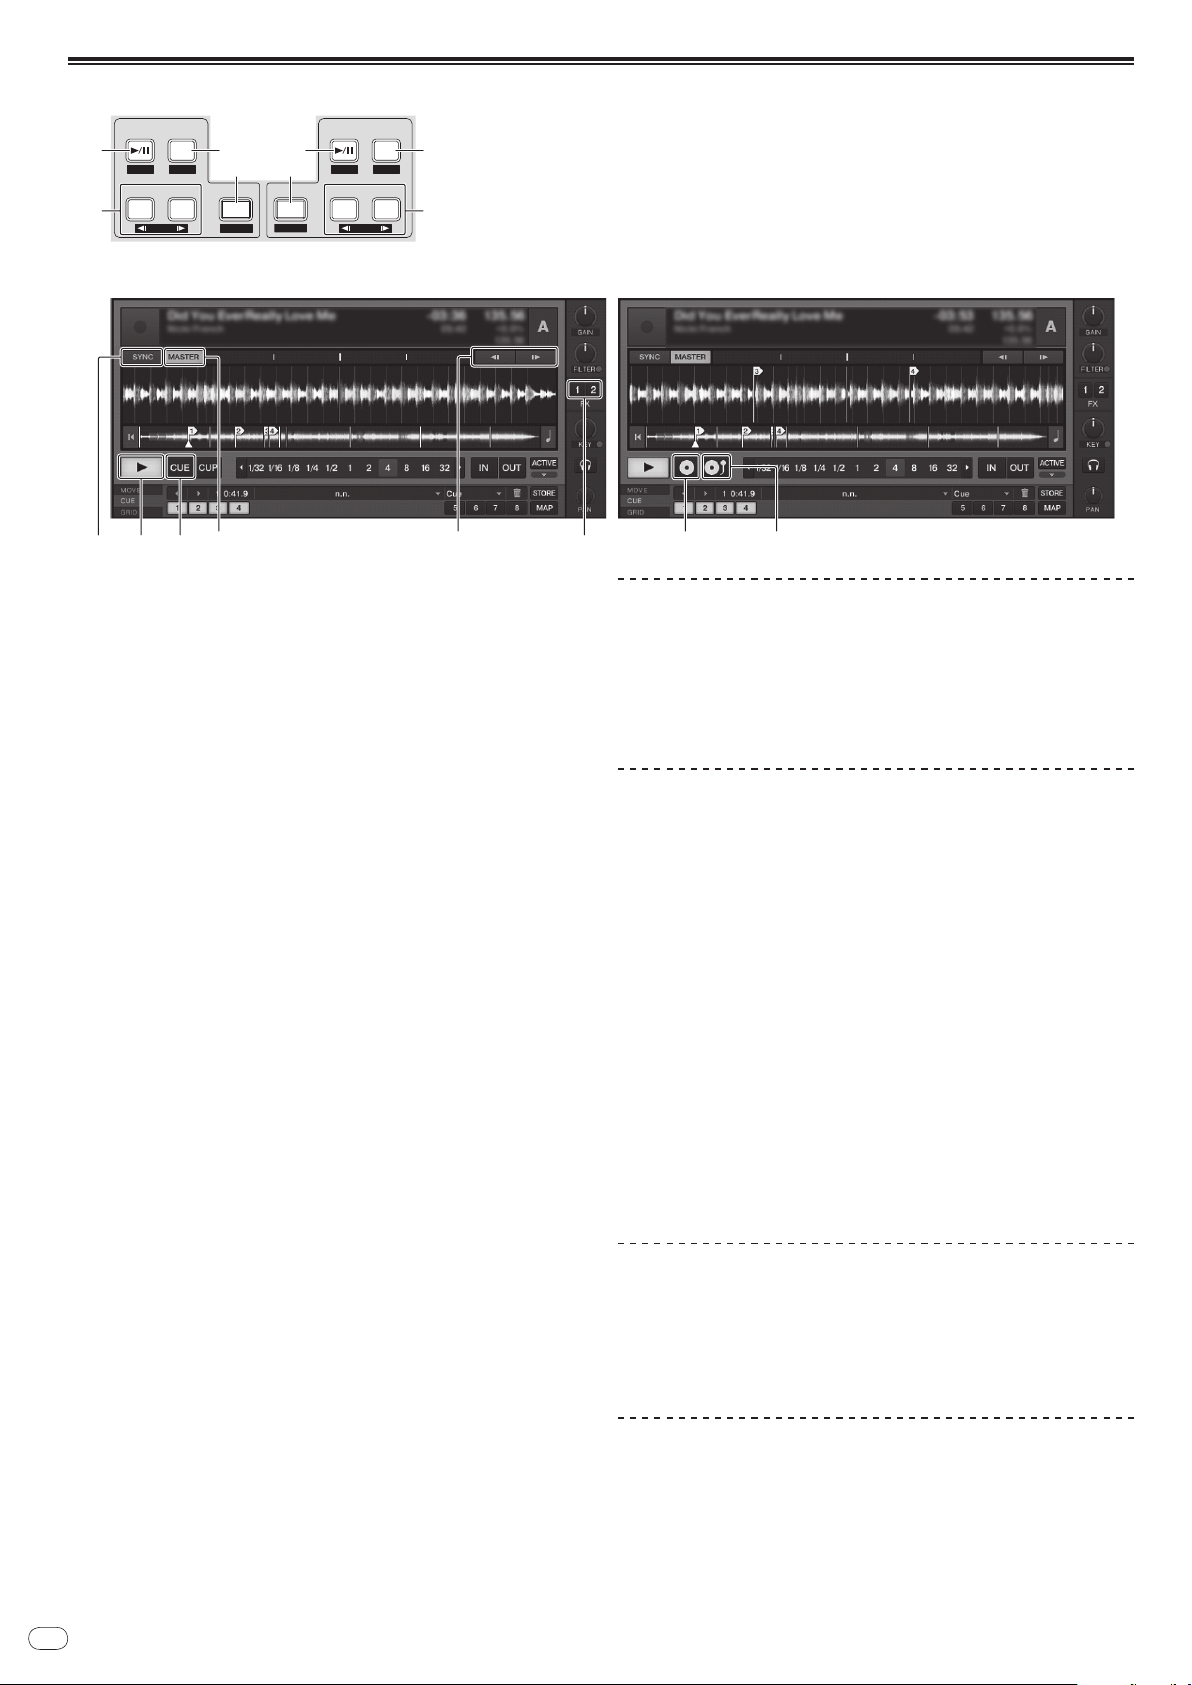
1 f (REL.) button
! Press:
Use this to play/ pause tracks.
! [SHIFT] + press:
The TRAKTOR playback tracking mode switches to the Relative mode.
The Relative mode is a mode that ignores the playback position of the
CONTROL CD/ CONTROL VINYL.
2 CUE (ABS.) button
While pausing
! Press:
A cue point is set at the paused position.
— When the [SNAP] function of TRAKTOR is off:
The cue point is set to the currently paused position, regardless of the
[Beat Grid].
— When the [SNAP] function of TRAKTOR is on:
The cue point is set to the same position as the nearest [Beat Grid].
During playback
! Press:
Playback returns to the set cue point and cues, and playback pauses (back
cue).
If the [CUE (ABS.)] button is pressed and held in after returning to the cue
point, playback continues as long as the button is held.
! [SHIFT] + press:
The TRAKTOR playback tracking mode switches to the Absolute mode.
The Absolute mode is a mode that reflects the playback position of the
CONTROL CD/ CONTROL VINYL on the playback position of the track.
3 FX ASSIGN (s BEND t) button
! Press the [FX 1] button:
TRAKTOR effect unit [FX 1] is assigned to the deck whose button is pressed.
! Press the [FX 2] button:
TRAKTOR effect unit [FX 2] is assigned to the deck whose button is pressed.
* When using TRAKTOR SCRATCH DUO 2, the assignment is fixed: [FX 1]
to deck [A], [FX 2] to deck [B].
If you upgrade to TRAKTOR SCRATCH PRO 2, [FX 1] and [FX 2] can be
assigned freely to the desired deck.
! Press the [SHIFT] + [FX 1] buttons:
The track’s playing speed temporarily slows down.
! Press the [SHIFT] + [FX 2] buttons:
The track’s playing speed temporarily speeds up.
4 SYNC (MASTER) button
! Press:
The [BPM] and [Beat Grid] of the track for the deck whose button was
pressed are synchronized to the master for synchronization.
! [SHIFT] + press:
The deck whose button was pressed is set as the master for
synchronization.
Playback
Press the [f (REL.)] button.
Pausing
During playback, press the [f (REL.)] button.
Set the cue
1 During playback, press the [f (REL.)] button.
Playback is paused.
2 Press the [CUE (ABS.)] button.
Cue point [a] is set at the position at which playback was paused.
No sound is output at this time.
! When a new Cue Point is set, the previously set Cue Point is deleted.
Returning to Cue Point (Back Cue)
During playback, press the [CUE (ABS.)] button.
The set immediately returns to the currently set cue point and pauses.
! When the [f (REL.)] button is pressed, playback starts from the cue point.
Checking Cue Point (Cue Point Sampler)
Press and hold the [CUE (ABS.)] button after returning to the cue
point.
Playback starts from the set cue point.
Playback continues while the [CUE (ABS.)] button is pressed.
Bending the pitch
Press the [FX 1] or [FX 2] button while pressing the [SHIFT] button.
— Press the [SHIFT] + [FX 1] buttons:
The track’s playing speed temporarily slows down.
— Press the [SHIFT] + [FX 2] buttons:
The track’s playing speed temporarily speeds up.
Synchronizing the playing speed with other
decks (beat sync)
1 Press the [SYNC (MASTER)] button while pressing the [SHIFT]
button on the currently playing deck.
The deck whose button was pressed is set as the master for synchronization.
Page 15
2 Press the [SYNC (MASTER)] button on the deck not set as the
TRAKTOR
master for synchronization.
The [BPM] and [Beat Grid] of the track for the deck not set as the master for syn-
chronization are synchronized to the [BPM] and [Beat Grid] of the track for the deck
set to the master for synchronization.
! For information about setting the master for synchronization, see Setting the
master for synchronization on page 15.
! The beat sync function may not operate properly in the following cases.
— When the loop length is under 1 beat.
— When the [BPM] of the track for the deck set as the master for synchroni-
zation is out of the adjustable tempo range of the track for the deck to be
synchronized.
— When the track has not been analyzed.
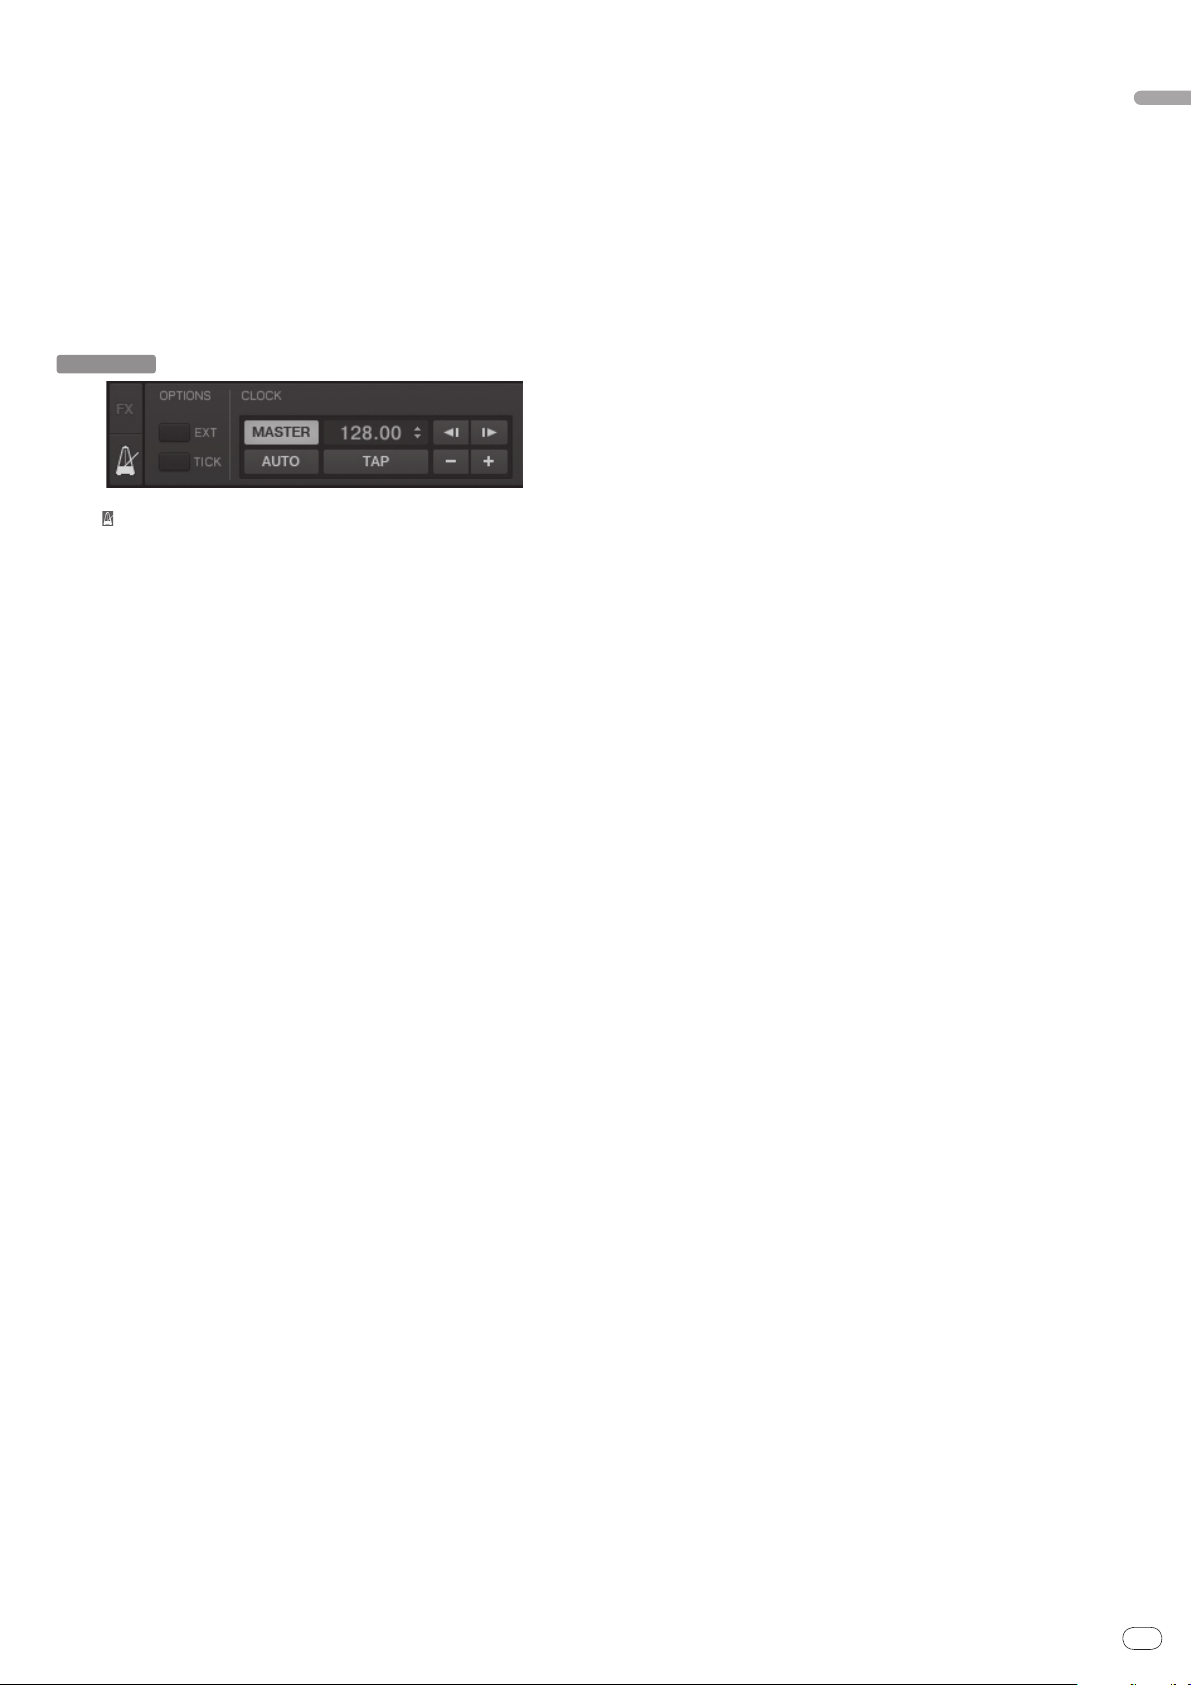
Setting the master for synchronization
Click [ ].
The master for synchronization can be selected from one of the two types below.
— [MASTER]: The BPM value input by the user or the BPM value set by tap-
ping is set as the master.
— [AUTO]: The master is set automatically. When two decks are playing and
the deck set as the master is paused, the other deck is automatically set as
the master.
! When using TRAKTOR SCRATCH DUO 2, this is always set to [AUTO]. If you
upgrade to TRAKTOR SCRATCH PRO 2, you can select [MASTER] or [AUTO].
English
En
15
Page 16
En
16
Mixer section
CUE
USBCD
PHONO
USBCD
PHONO
HEADPHONES
MASTER1
9
5
3
1
0
-
1
-
3
-
6
-
9
-
15
dB
9
5
3
1
0
-
1
-
3
-
6
-
9
-
15
dB
2
DE
OVER
-
24
OVER
-
24
TAP
CUE
TAP
SHIFT
LOCK
0
1
2
3
4
5
6
7
8
9
10
0
1
2
3
4
5
6
7
8
9
10
CH 1CH 2
FEELING ADJ.
DJM -T1
2 CHANNEL TRAKTOR MIXER
D
AU
SAMPLE
LEVEL
CRO
CROSS F.
REVERSE
SAMP
PLAY MO
1
2
3
TRIM
9
HI
6
MID
6
LOW
6
TRIM
9
HI
6
MID
6
LOW
6
LEVEL
0
MIXING
MASTERCUE
BOOTH MONITOR
MASTER
0
0
CROSS F. REVERSE
CROSS F. CURVE
THRU
ON OFF
1
2
3
4
6
7
8
5
3
4
6
7
d
5
f
g
b
c
99
a
e
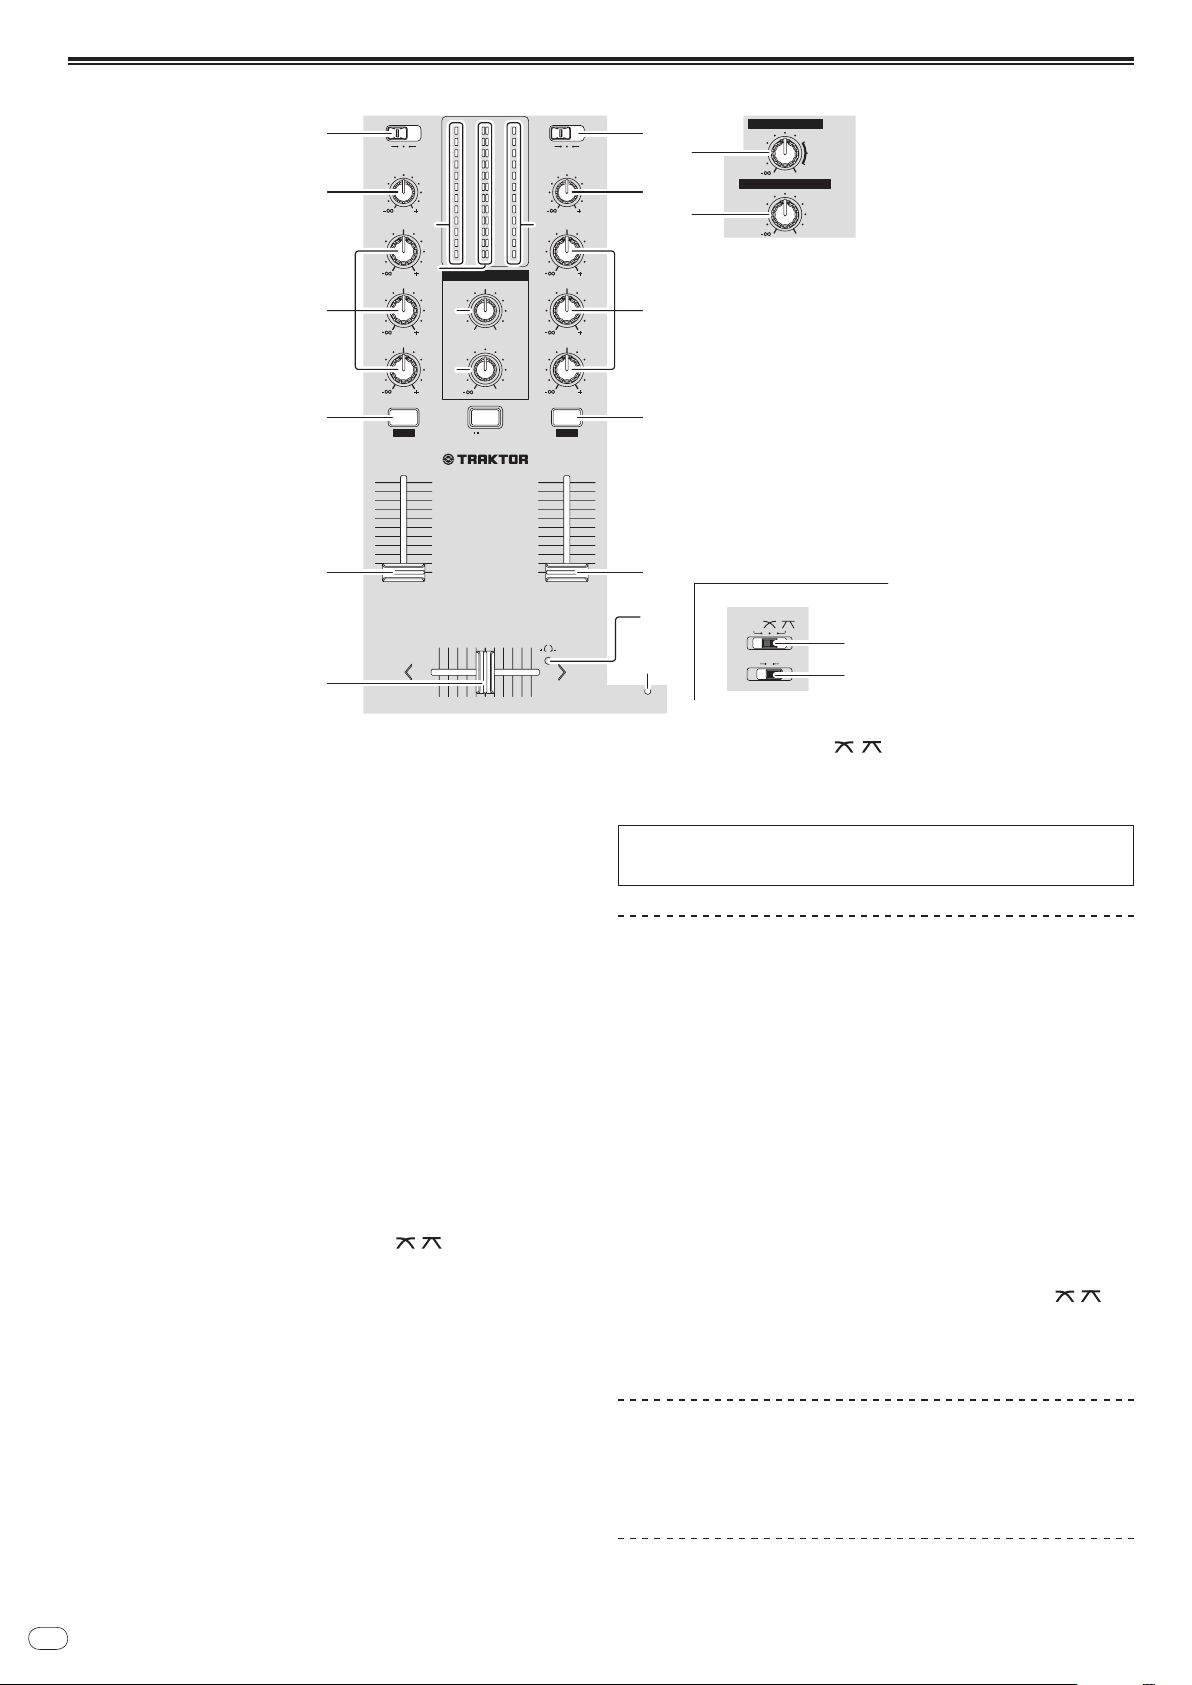
1 MASTER LEVEL control
Adjusts the audio level output from the [MASTER1] and [MASTER2] terminals.
2 BOOTH MONITOR control
Adjusts the level of audio signals output from the [BOOTH] terminal.
3 CD, PHONO, USB input selector switch
Select the input source of each channel from the components connected to this
unit.
— [CD]: Selects the DJ player connected to the [CD] terminals.
— [PHONO]: Selects the analog player connected to the [PHONO] terminals.
— [USB]: Selects the sound of the computer connected to the [USB] port.
4 TRIM control
Adjusts the level of audio signals input in each channel.
5 EQ (HI, MID, LOW) controls
These adjust the sound quality of the respective channels.
These adjust the [HI] (high range), [MID] (middle range) and [LOW] (low range),
respectively.
6 CUE (TAP) button
7 Channel fader
8 Crossfader
9 Channel Level Indicator
a Master Level Indicator
b HEADPHONES MIXING control
Press the [CUE (TAP)] button for the channel you want to monitor.
Adjusts the level of audio signals output in each channel.
The sound of the respective channels is output according to the curve characteristics selected with the [CROSS F. CURVE (THRU, , )] selector switch.
Displays the sound level of the respective channels before passing through the
channel faders.
Displays the audio level output from the [MASTER1] and [MASTER2] terminals.
Adjusts the monitor volume balance between the sound of the channel whose
[CUE (TAP)] button is pressed and the [MASTER] channel sound.
c HEADPHONES LEVEL control
Adjusts the audio level output from the [PHONES] terminal.
d FEELING ADJ. adjustment hole
This can be used to adjust the crossfader’s operating load.
e CROSS F. REVERSE indicator
Lights when the [CROSS F. REVERSE] switch is on.
f CROSS F. CURVE (THRU, , ) selector switch
This switches the crossfader curve characteristics.
g CROSS F. REVERSE switch
Turns the crossfader reverse function on and off.
Do not pull on the channel fader and crossfader knobs with excessive force. The
knobs are not designed to be removed. Pulling the knobs strongly may result in
damaging the unit.
Outputting sound
Set the volume of the power amplifiers connected to the [MASTER1] and
[MASTER2] terminals to a suitable level. Note that loud sound will be produced if
the volume is set too high.
1 Switch the [CD, PHONO, USB] input selector switch.
Select the input source of each channel from the components connected to this
unit.
2 Turn the [TRIM] control.
Adjusts the level of audio signals input in each channel.
3 Move the channel fader away from you.
Adjusts the level of audio signals output in each channel.
4 Set the crossfader.
Switch the channel whose sound is output from the speakers.
— Left edge: The [CH 1] sound is output.
— Center position: The sound of [CH 1] and [CH 2] is mixed and output.
— Right edge: The [CH 2] sound is output.
! This operation is not necessary when the [CROSS F. CURVE (THRU, , )]
selector switch is set to [THRU].
5 Turn the [MASTER LEVEL] control.
Audio signals are output from the [MASTER1] and [MASTER2] terminals.
Adjusting the sound quality
Turn the [EQ (HI, MID, LOW)] controls for the respective channels.
Refer to Specifications on page 30 for the range of sound that can be adjusted by
each control.
Monitoring sound with headphones
1 Connect headphones to the [PHONES] terminal.
Page 17

2 Press the [CUE (TAP)] button for the channel you want to
monitor.
3 Turn the [HEADPHONES MIXING] control.
Adjusts the monitor volume balance between the sound of the channel whose [CUE
(TAP)] button is pressed and the [MASTER] channel sound.
! To monitor only the sound of the [MASTER] channel, turn the
[HEADPHONES MIXING] control clockwise from the center position.
4 Turn the [HEADPHONES LEVEL] control.
The sound of the channel whose [CUE (TAP)] button is pressed and the sound of the
[MASTER] channel are mixed and output from the headphones.
! Monitoring is canceled when the [CUE (TAP)] button is pressed again.
Select the crossfader curve characteristics.
Switch the [CROSS F. CURVE (THRU, , )] selector switch.
— [THRU]: Choose this when you do not want to use the crossfader.
— [ ]: Set here for a curve that rises gradually.
— [ ]: Sets an abruptly rising curve. (When the crossfader is moved away
from the edge on the [CH 1] side, the sound of the [CH 2] side is output
immediately.)
Adjusting the crossfader’s operating load
The load (resistance) when the crossfader is operated can be adjusted using a
flathead screwdriver.
! The crossfader’s attenuation curve and the play at the two edges of the fader (the cut
lag) can be adjusted. For details, see Changing this unit’s settings on page 25.
1 Move the crossfader to the right ([CH 2]) edge.
2 Insert the flathead screwdriver into the [FEELING ADJ.]
adjustment hole and turn it.
— Turn clockwise: The load decreases (the resistance of fader movement gets
weaker).
— Turn counterclockwise: The load increases (the resistance of fader move-
ment gets stronger).
English
Using the fader reverse function
The crossfader’s operating direction can be reversed by turning the
[CROSS F. REVERSE] switch on.
Set the [CROSS F. REVERSE] switch to [ON].
Audio is output from the [BOOTH] terminal
Turn the [BOOTH MONITOR] control.
Adjusts the level of audio signals output from the [BOOTH] terminal.
En
17
Page 18
En
18
Effect section
FX1
DRY/WET
ON
1
2
3
FX
SELECT
GROUP
/ SINGLE
LFO
LFO
LFO
1
2
3
Group mode
Single mode
1 3
2 4
(SHIFT)+2
(SHIFT)+
4
3
4
2
(SHIFT)+2
(SHIFT)+
3
3 2
1 4
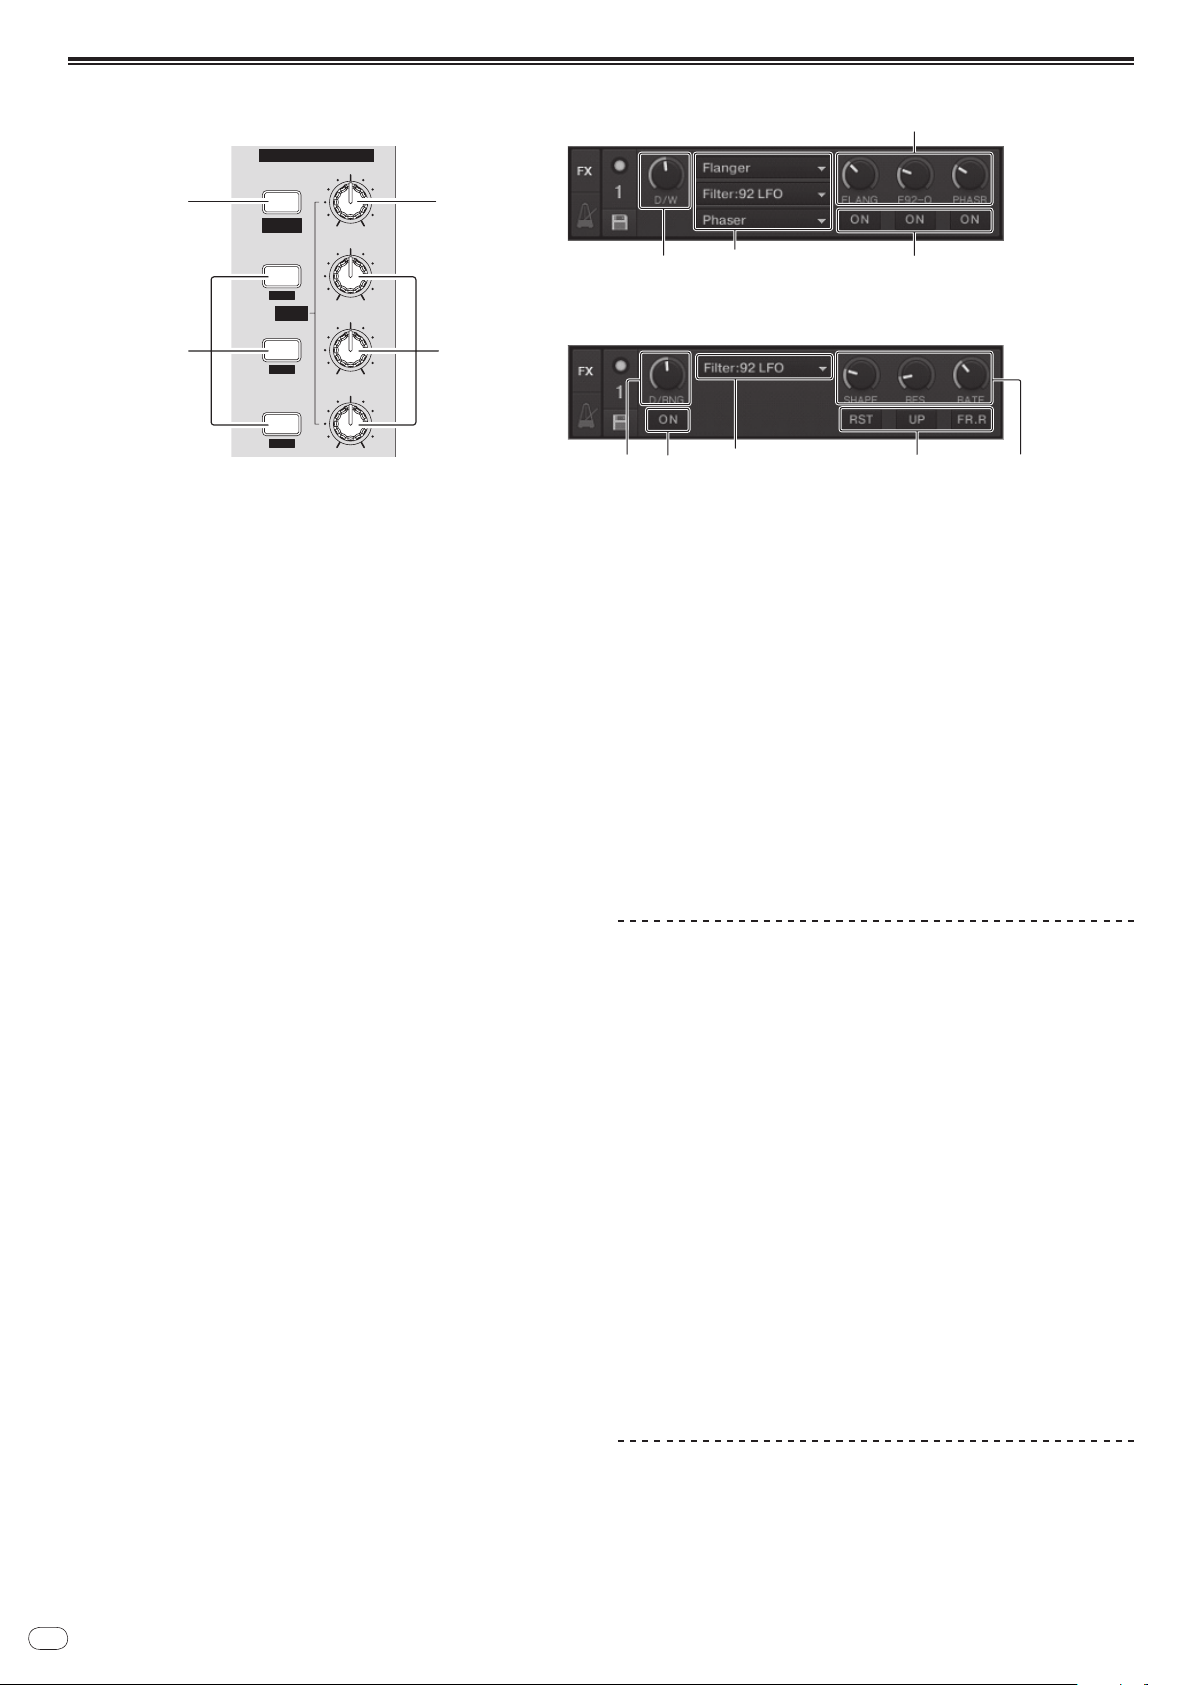
1 ON (GROUP/ SINGLE) button
When using in the [Group] mode
! Press:
Does not function.
! [SHIFT] + press:
Switches the effect panel mode.
[Group] mode h [Single] mode
When using in the [Single] mode
! Press:
Turns the effect on and off.
! [SHIFT] + press:
Switches the effect panel mode.
[Group] mode h [Single] mode
— [Group] mode:
Up to three effects can be selected and operated simultaneously per
effect panel.
— [Single] mode:
The parameters of the selected effect can be operated in detail.
The [Single] mode cannot be selected with TRAKTOR SCRATCH DUO 2.
If you upgrade to TRAKTOR SCRATCH PRO 2, the effect panel can be
switched to the [Single] mode.
2 Effect control buttons
When using in the [Group] mode
! Press:
Turns the effects on and off.
! [SHIFT] + press:
— When [Generic Controller Mode] is turned on in this unit’s settings:
Switches the effect type.
— When [Generic Controller Mode] is turned off in this unit’s settings:
Turns the LFO CONTROL function on and off.
When using in the [Single] mode
! Press the [1] button:
Restores the parameters of all the effects to the base settings.
! Press the [2] or [3] button:
Turns the respective effect on and off. The type of parameter differs accord-
ing to the effect.
! Press the [SHIFT] + [1] buttons:
— When [Generic Controller Mode] is turned on in this unit’s settings:
Switches the effect type.
— When [Generic Controller Mode] is turned off in this unit’s settings:
Turns the LFO CONTROL function on and off.
! Press the [SHIFT] + [2] or [SHIFT] + [3] buttons:
— When [Generic Controller Mode] is turned on in this unit’s settings:
Does not function.
— When [Generic Controller Mode] is turned off in this unit’s settings:
Turns the LFO CONTROL function on and off.
3 DRY/WET control
When using in the [Group] mode
! Turn:
Adjusts the balance between the effect sound and original sound.
! [SHIFT] + turn:
Does not function.
When using in the [Single] mode
! Turn:
Adjusts the balance between the effect sound and original sound.
! [SHIFT] + turn:
Switches the effect type.
4 Effect control dials
Using the effect function
! The following section describes the procedure for operating the effect function
1 Press the [FX 1] or [FX 2] button.
The TRAKTOR effect unit is assigned to the deck.
! When using TRAKTOR SCRATCH DUO 2, the assignment is fixed: [FX 1] to deck
If you upgrade to TRAKTOR SCRATCH PRO 2, [FX 1] and [FX 2] can be assigned
2 Turn an effect control dial while pressing the [SHIFT] button.
This selects the type of effect.
! When [Generic Controller Mode] is turned on in this unit’s settings, the type of
3 Turn the effect control dial.
Adjusts the degree of the effect sound.
4 Press the effect control button.
This turns the effect on.
! When the button is pressed again, the effect is turned off.
5 Turn the [DRY/WET] control.
Adjust the balance between the effect sound for all of the effects together and the
original sound.
Using the LFO CONTROL function
When the LFO CONTROL function is on, the parameter value of the effect sent to
TRAKTOR can be changed at the specified speed. This function allows you to create
unique effect sounds not possible through manual operation.
With the LFO CONTROL function, effect control buttons [1] – [3] can each be set
separately.
! First turn off [Generic Controller Mode] in this unit’s settings. For details, see
When using in the [Group] mode
! Turn:
Adjusts the degree of the respective effect.
! [SHIFT] + turn:
Switches the effect type.
* When the LFO CONTROL function is on
— Turn:
Adjusts the cycle for changing the degree of each effects.
— [SHIFT] + turn:
Does not function.
When using in the [Single] mode
! Turn:
Adjusts the respective parameter.
! [SHIFT] + turn:
Does not function.
* When the LFO CONTROL function is on
— Turn:
Adjusts the cycle at which the respective parameter changes.
— [SHIFT] + turn:
Does not function.
in the [Group] mode.
[A], [FX 2] to deck [B].
freely to the desired deck.
effect can also be selected by pressing an effect control button while pressing
the [SHIFT] button.
Changing this unit’s settings on page 25.
Page 19

! The following section describes the procedure for operating the LFO CONTROL
function in the [Group] mode.
1 Turn an effect control dial while pressing the [SHIFT] button.
This selects the type of effect.
2 Press an effect control button while pressing the [SHIFT]
button.
The LFO CONTROL function turns on.
If the effect is off, it turns on simultaneously.
! When the same button is pressed again, the LFO CONTROL function turns off
and the effect turns back on.
3 Turn the effect control dial.
Adjusts the cycle for changing the degree of each effects.
4 Turn the [DRY/WET] control.
Adjust the balance between the effect sound for all of the effects together and the
original sound.
English
En
19
Page 20
En
20
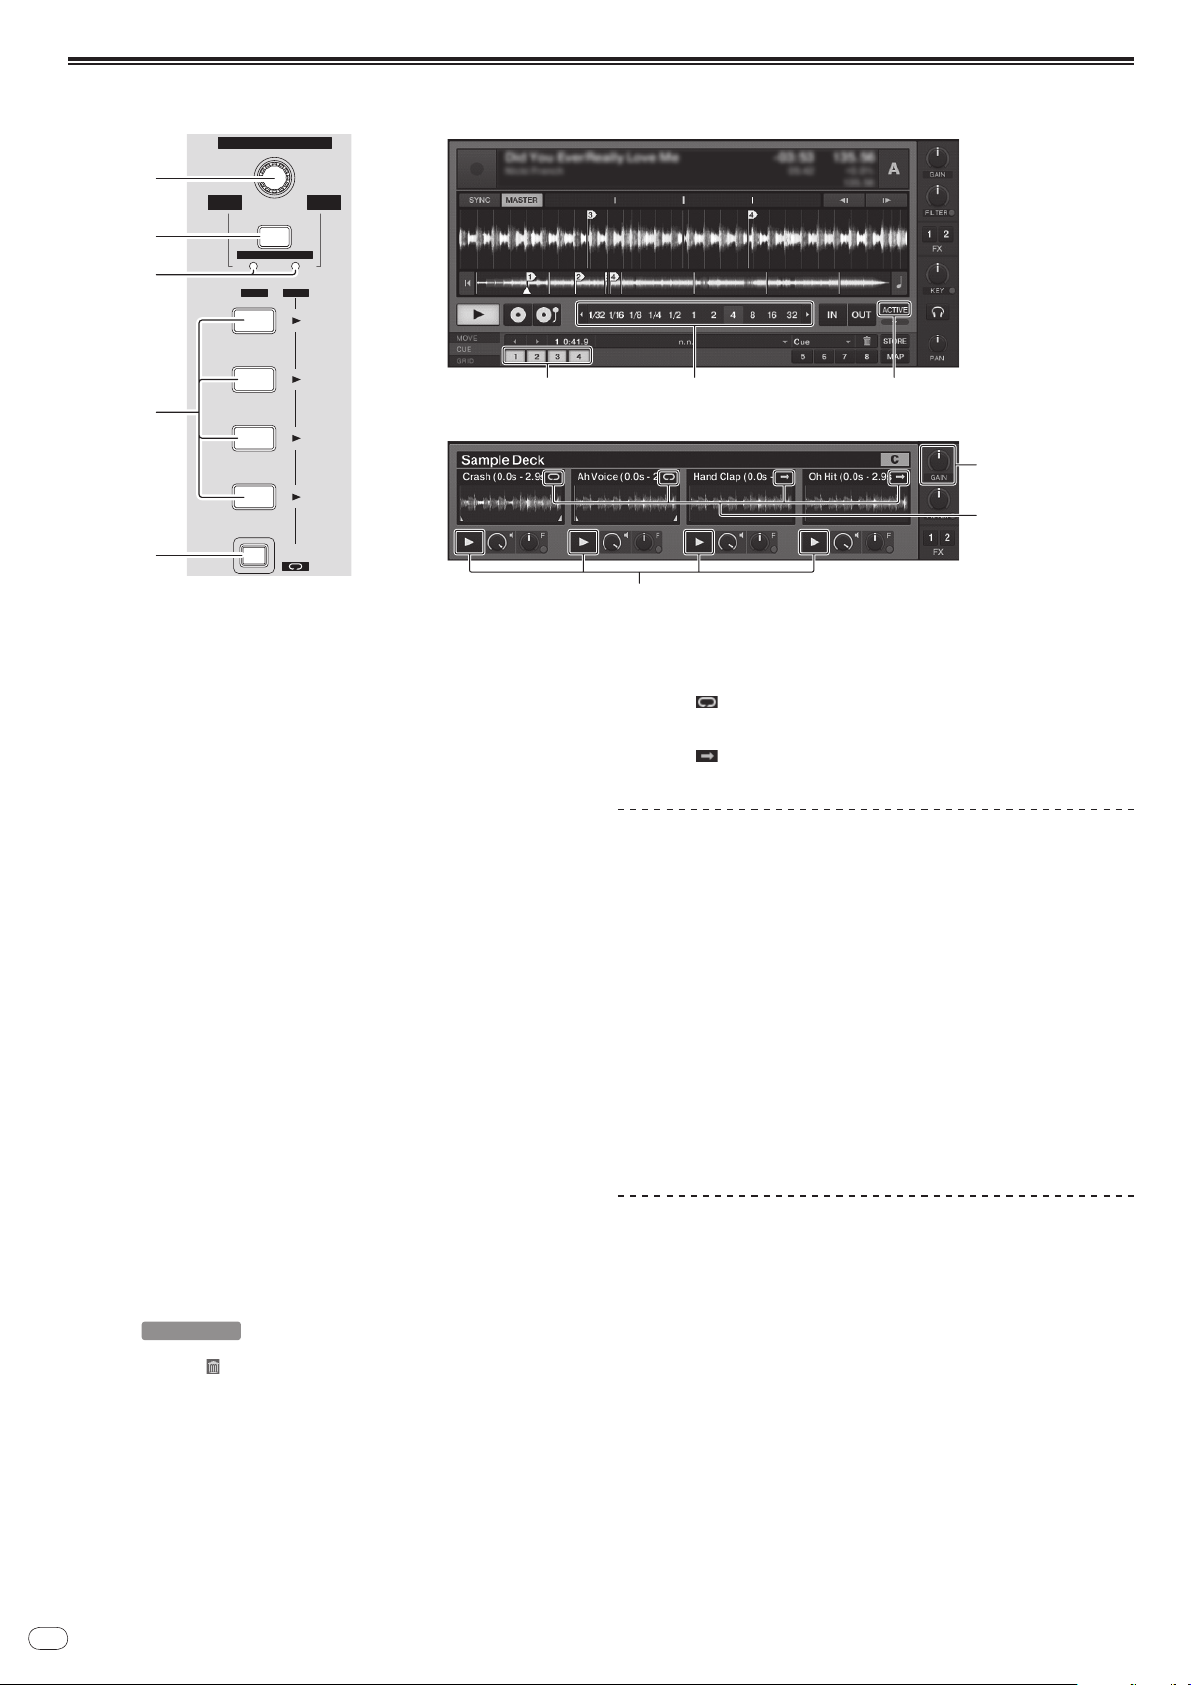
Hot cue/ sampler section
1
2
4
3
ACTIVE
DECK A /C
AUTO LOOP
HOT CUESAMPLER
SELECT
LOOP
MOVE
SAMPLE
LEVEL
DEL DEL
CROSS.F. CONTROL
PLAY MODE
HOT CUE mode
SAMPLER mode
1
2
3
5
4
1
54
(SHIFT)+
5
(SHIFT)+
1
4
TRAKTOR
1 AUTO LOOP (LOOP MOVE/ SAMPLE VOLUME) control
When using with the hot cue function
! Turn:
Changes the loop size.
! Press:
Turns loop playback on and off.
! [SHIFT] + turn:
Moves the position of the loop.
! [SHIFT] + press:
Does not function.
When using with the sampler function
! [SHIFT] + turn:
Adjusts the volume of the sample deck.
! [SHIFT] + press:
Resets the volume of the sample deck to the base setting.
2 SELECT button
! Press:
Switches the function of the hot cue/ sampler section with each press.
Hot cue function h Sampler function
! [SHIFT] + press:
Turns the CROSS FADER CONTROL function on and off.
3 SELECT indicator
Lights or flashes according to the hot cue/ sampler section’s function.
— When the hot cue function is set: Lights green.
— When the sampler function is set: Lights orange.
— When the CROSS FADER CONTROL function is on: Flashes green or
orange.
4 HOT CUE/ SAMPLER button
When using with the hot cue function
! Press:
— When no hot cue is set during playack or while pausing:
A hot cue is set at the position at which the button is pressed.
— When a hot cue is set during playback or while pausing:
Calls out the hot cue.
! [SHIFT] + press:
Deletes the hot cue.
When using with the sampler function
For details, see Table of HOT CUE/ SAMPLER button operations on page 21.
*
[CUE TYPE] (the type of hot cue) can be changed by clicking [b] to the
left of the [ ] icon.
5 ACTIVE button
When using with the hot cue function
! Press:
Switches the playing mode of the loop registered at the hot cue.
Loop is played h Loop is not played
When using with the sampler function
! Press:
Switches the button mode of the sample deck’s [HOT CUE/ SAMPLER]
button.
Sample play mode h Trigger play mode
For details, see Table of HOT CUE/ SAMPLER button operations on page 21.
! [SHIFT] + press:
Switches the loop mode of the sample on the sample deck.
Loop play mode h One shot play mode
— [ ] Loop play mode:
When the end of the sample is reached, sample playback returns to the
beginning and continues.
— [ ] One shot play mode:
When the end of the sample is reached, sample playback stops.
Using the hot cue function
1 Press the [SELECT] button.
The hot cue/ sampler section switches to the hot cue function.
Switches to the mode in which the [SELECT] indicator, [HOT CUE/ SAMPLER] button
and [ACTIVE] button light green.
2 Press the [HOT CUE/ SAMPLER] button.
The hot cue is set to the position playing when the button is pressed.
! When the [HOT CUE/ SAMPLER] button is pressed during loop playback, the
currently playing loop can be stored at the hot cue button.
! This operation is not necessary if a hot cue is already stored at the [HOT CUE/
SAMPLER] button.
3 During playback or while pausing, press the [HOT CUE/
SAMPLER] button.
The hot cue is called out.
! If a loop is stored at the [HOT CUE/ SAMPLER] button, press the [ACTIVE] button
to switch the loop playback mode.
Using the sampler function
Samples can be loaded into the sample deck [C] and sample deck [D] sampler slots
and played.
! When operating sample deck [C]:
— The deck [A] track is loaded into the sampler slot.
— The [HOT CUE/ SAMPLER] buttons on this unit’s [CH 1] side support the
respective sampler slots.
! When operating sample deck [D]:
— The deck [B] track is loaded into the sampler slot.
— The [HOT CUE/
respective sampler slots.
! The operation of the [HOT CUE/
sample’s loop mode and the [HOT CUE/ SAMPLER] button’s button mode. For
details, see Table of HOT CUE/ SAMPLER button operations.
! The following section explains the procedure for loading the deck [A] track in the
sample deck [C] sampler slot and playing it.
Operate the hot cue/ sampler section on this unit’s [CH 1] side.
1 Load the track in deck [A].
2 Press the [SELECT] button.
Switch the hot cue/ sampler section to the sampler function.
SAMPLER] buttons on this unit’s [CH 2] side support the
SAMPLER] buttons differ according to the
Page 21
Switches to the mode in which the [SELECT] indicator, [HOT CUE/ SAMPLER] button
and [ACTIVE] button light orange.
3 Press the [HOT CUE/ SAMPLER] button.
The track loaded in deck [A] is loaded into the sampler slot on sample deck [C].
! The track is sampled for 48 seconds from the position playing when the button
was pressed, and this is loaded into the sampler slot.
! The track selected with the cursor in the [TRACK] area can be loaded into the
sampler slot by pressing the [HOT CUE/
SAMPLER] button while pressing the
[SHIFT] button. (Tracks with a playing time longer than 48 seconds cannot be
loaded.)
4 Press the [ACTIVE] button while pressing the [SHIFT] button.
The sample’s loop mode switches.
— [ ] Loop play mode:
When the end of the sample is reached, sample playback returns to the
beginning and continues.
— [ ] One shot play mode:
When the end of the sample is reached, sample playback stops.
5 Press the [ACTIVE] button.
The [HOT CUE/ SAMPLER] button’s button mode switches.
— Sample play mode:
The sample is played or muted each time the button is pressed.
— Trigger play mode:
When the button is pressed, the sample is played from the beginning, and
stops when the button is released.
! For details, see Table of HOT CUE/ SAMPLER button operations on page 21.
6 Press the [HOT CUE/ SAMPLER] button or press and hold the
[HOT CUE/ SAMPLER] button.
The sample is played.
! When the [HOT CUE/ SAMPLER] button is pressed again or the [HOT CUE/
SAMPLER] button is release, output of the sample’s sound stops.
Using the CROSS FADER CONTROL function
CROSS FADER CONTROL is a function allowing you to call out hot cues and start
playing samples in association with operation of the crossfader.
! First make the following preparations.
— Turn off [Generic Controller Mode] in this unit’s settings.
= See Changing this unit’s settings on page 25.
— Register a hot cue in deck [A] or [B].
= See Using the hot cue function on page 20.
— Load a sample in sample deck [C] or [D].
= See Using the sampler function on page 20.
! The section operated differs according to the decks to be associated.
— To associate deck [A] and sample deck [C]:
Operate the hot cue/
sampler section on this unit’s [CH 1] side.
— To associate deck [B] and sample deck [D]:
Operate the hot cue/
sampler section on this unit’s [CH 2] side.
! When the [CROSS F. REVERSE] switch is on, the crossfader’s direction of operation
is inverted.
1 Press the [SELECT] button while pressing the [SHIFT] button.
The CROSS FADER CONTROL function turns on.
The [SELECT] indicator flashes.
! When the [SELECT] button is pressed again while pressing the [SHIFT] button,
the CROSS FADER CONTROL function turns off.
2 Press the [SELECT] button.
Select the function to be associated with the CROSS FADER CONTROL function (the
hot cue function or the sampler function).
— To associate the hot cue function:
Switches to the mode in which the [SELECT] indicator, [HOT CUE/
SAMPLER] button and [ACTIVE] button light and flash green.
— To associate the sampler function:
Switches to the mode in which the [SELECT] indicator, [HOT CUE/
SAMPLER] button and [ACTIVE] button light and flash orange.
! It is also possible to associate both the hot cue function and the sampler func-
tion with operation of the crossfader. (The hot cue and sample to be associated
with the crossfader must be selected separately for each function.)
3 Press the [HOT CUE/ SAMPLER] button.
Select the hot cue and sample to be associated with operation of the crossfader.
— To select a hot cue:
Press the [HOT CUE/ SAMPLER] button at which the hot cue is set. Only one
of hot cues [1] – [4] can be selected.
— To select a sample:
Press the [HOT CUE/ SAMPLER] button at which the sample is loaded. Up to
four of samples [1] – [4] can be selected.
! With this procedure, the hot cue and sample are not played.
! When the [HOT CUE/ SAMPLER] button is pressed again, the selection is
canceled.
4 Move the crossfader.
Move the crossfader to the side opposite the side to which the hot cue or sample to
be associated with the CROSS FADER CONTROL function is set.
5 Move the crossfader.
When the crossfader is moved to the right from the [CH 1] edge, the deck [B] hot cue
and sample deck [D] sample are played.
When the crossfader is moved to the left from the [CH 2] edge, the deck [A] hot cue
and sample deck [C] sample are played.
English
Table of HOT CUE/ SAMPLER button operations
! Press:
Sampler slot
When no sample is loaded The music file loaded in the deck is loaded into the sampler slot as a sample.
When a sample is loaded Playback of the sample begins.
While playing a sample
1 The mode can be switched using the [ACTIVE] button (page 20).
2 When the sample is muted, muting is canceled.
Loop play mode
Sample play mode
The sample is muted.
When pressed for over 1 second,
playback of the sample stops.
! [SHIFT] + press:
Sampler slot
When no sample is loaded The music file selected in the [TRACK] area is loaded in the sampler slot as a sample.
When a sample is loaded The sample is deleted.
While playing a sample The sample is deleted.
1 The mode can be switched using the [ACTIVE] button (page 20).
Loop play mode
Sample play mode
1
1
2
1
1
Trigger play mode
The sample is played while the button
is pressed.
When the button is released, playback of the sample stops.
The sample is cued and playback
continues.
Trigger play mode
1
1
One shot play mode
Sample play mode
Playback of the sample begins.
Playback of the sample stops.
One shot play mode
Sample play mode
1
1
1
1
Trigger play mode
The sample is played while the button
is pressed.
When the button is released, playback of the sample stops.
The sample is cued and playback
continues.
Trigger play mode
1
1
En
21
Page 22
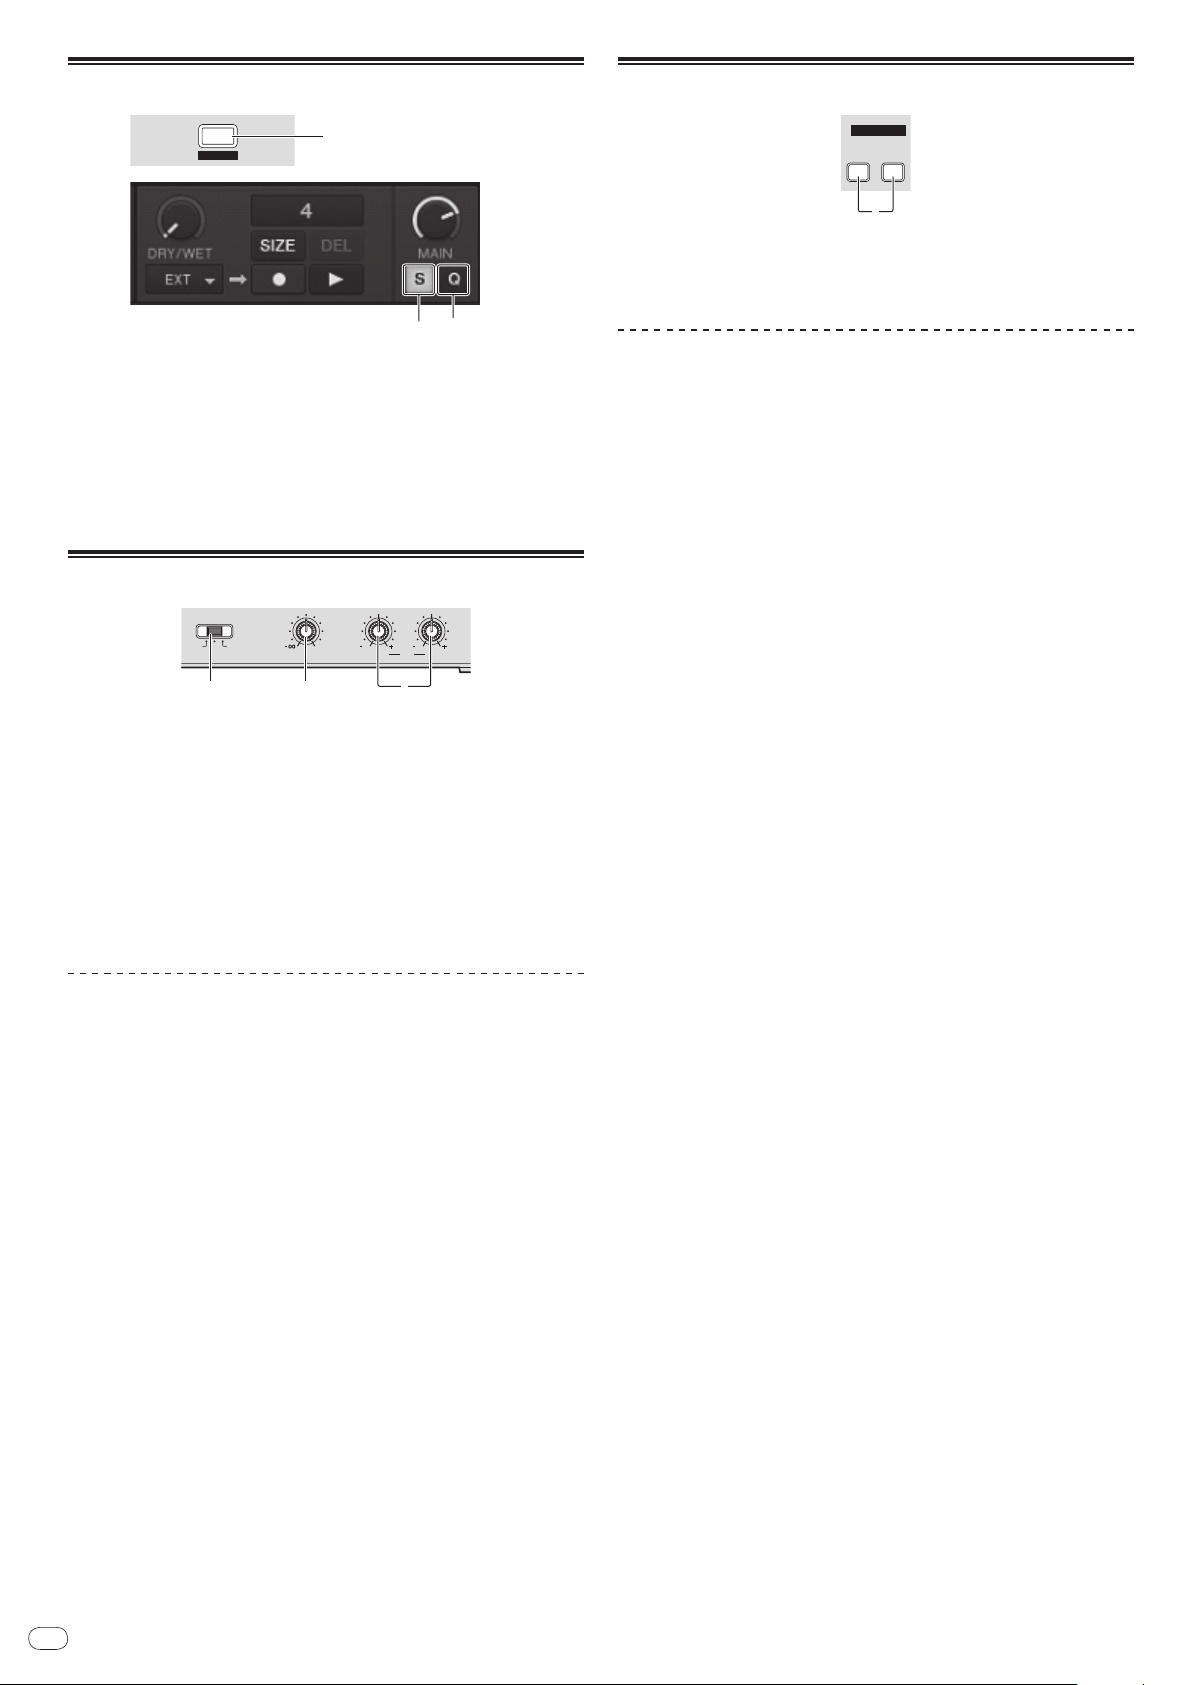
En
22
Global section
SNAP
QUANTIZE
1
1
(SHIFT)+
1
LOWLEVELINPUT SELECT
MIC AUXOFF
EQ HI
121212120
21 3
MIDI
CH1 CH2
ON/OFF
1
1 SNAP (QUANTIZE) button
! Press:
Turns the TRAKTOR snap function on and off.
When the snap function is on, the cue and loop points are set to the same
position as the nearest [Beat Grid].
! [SHIFT] + press:
Turns the TRAKTOR quantize function on and off.
When the quantize function is on, movement to the cue and loop points is
synchronized with the timing of the beats.
MIC/ AUX section
1 INPUT SELECT switch
Switches the audio input between the external device and the microphone.
— [AUX]: The external device connected to the [AUX] terminals is selected.
— [OFF]: The [MIC/ AUX] channel is turned off.
— [MIC]: The microphone connected to the [MIC] terminal is selected.
! The sound input to the [MIC] and [AUX] terminals is mixed with the [CH 1]
and [CH 2] sound that has passed through the crossfader.
2 LEVEL control
Adjusts the audio level input to the [MIC] and [AUX] terminals.
3 EQ (HI, LOW) controls
These adjust the tone of the [MIC/ AUX] channel.
MIDI section
This unit outputs the operation information of buttons and controls in universal MIDI
format.
When connected by USB cable to a computer on which a MIDI-compatible DJ software program is installed, the DJ software can be operated from this unit.
Operating DJ software using the MIDI function
Install the DJ software on your computer in advance. Also, adjust audio and MIDI
settings for the DJ software.
! For MIDI channel setting instructions, see Setting the MIDI channel on page 24.
! For the messages output by this unit, see List of MIDI Messages on page 26.
1 Connect this unit’s [USB] terminal to the computer.
For instructions on connections, see Connecting the input/ output terminals on page 10.
2 Start the DJ software.
3 Press the [CH 1] or [CH 2] button.
The mixer section’s MIDI function turns on.
Transmission of the mixer section’s MIDI messages begins.
! When a fader or control is moved, a message corresponding to the position is
sent.
! When the [CH 1] or [CH 2] button is pressed again, transmission of the mixer
section’s MIDI messages stops.
! The MIDI messages of the browse section, transport section, effect section and
hot cue/ sampler section are transmitted regardless of the [CH 1] and [CH 2]
buttons.
Inputting the sound of a microphone or
external device
1 Connect the external device to the [MIC] or [AUX] terminal.
2 Switch the [INPUT SELECT] switch.
3 Turn the [LEVEL] control.
Adjust the audio level input to the [MIC] or [AUX] terminal.
! Pay attention that rotating to the extreme right position outputs a very loud
sound.
Adjusting the sound quality
Turn the [EQ (HI, LOW)] controls.
Refer to Specifications on page 30 for the range of sound that can be adjusted by
each control.
Page 23
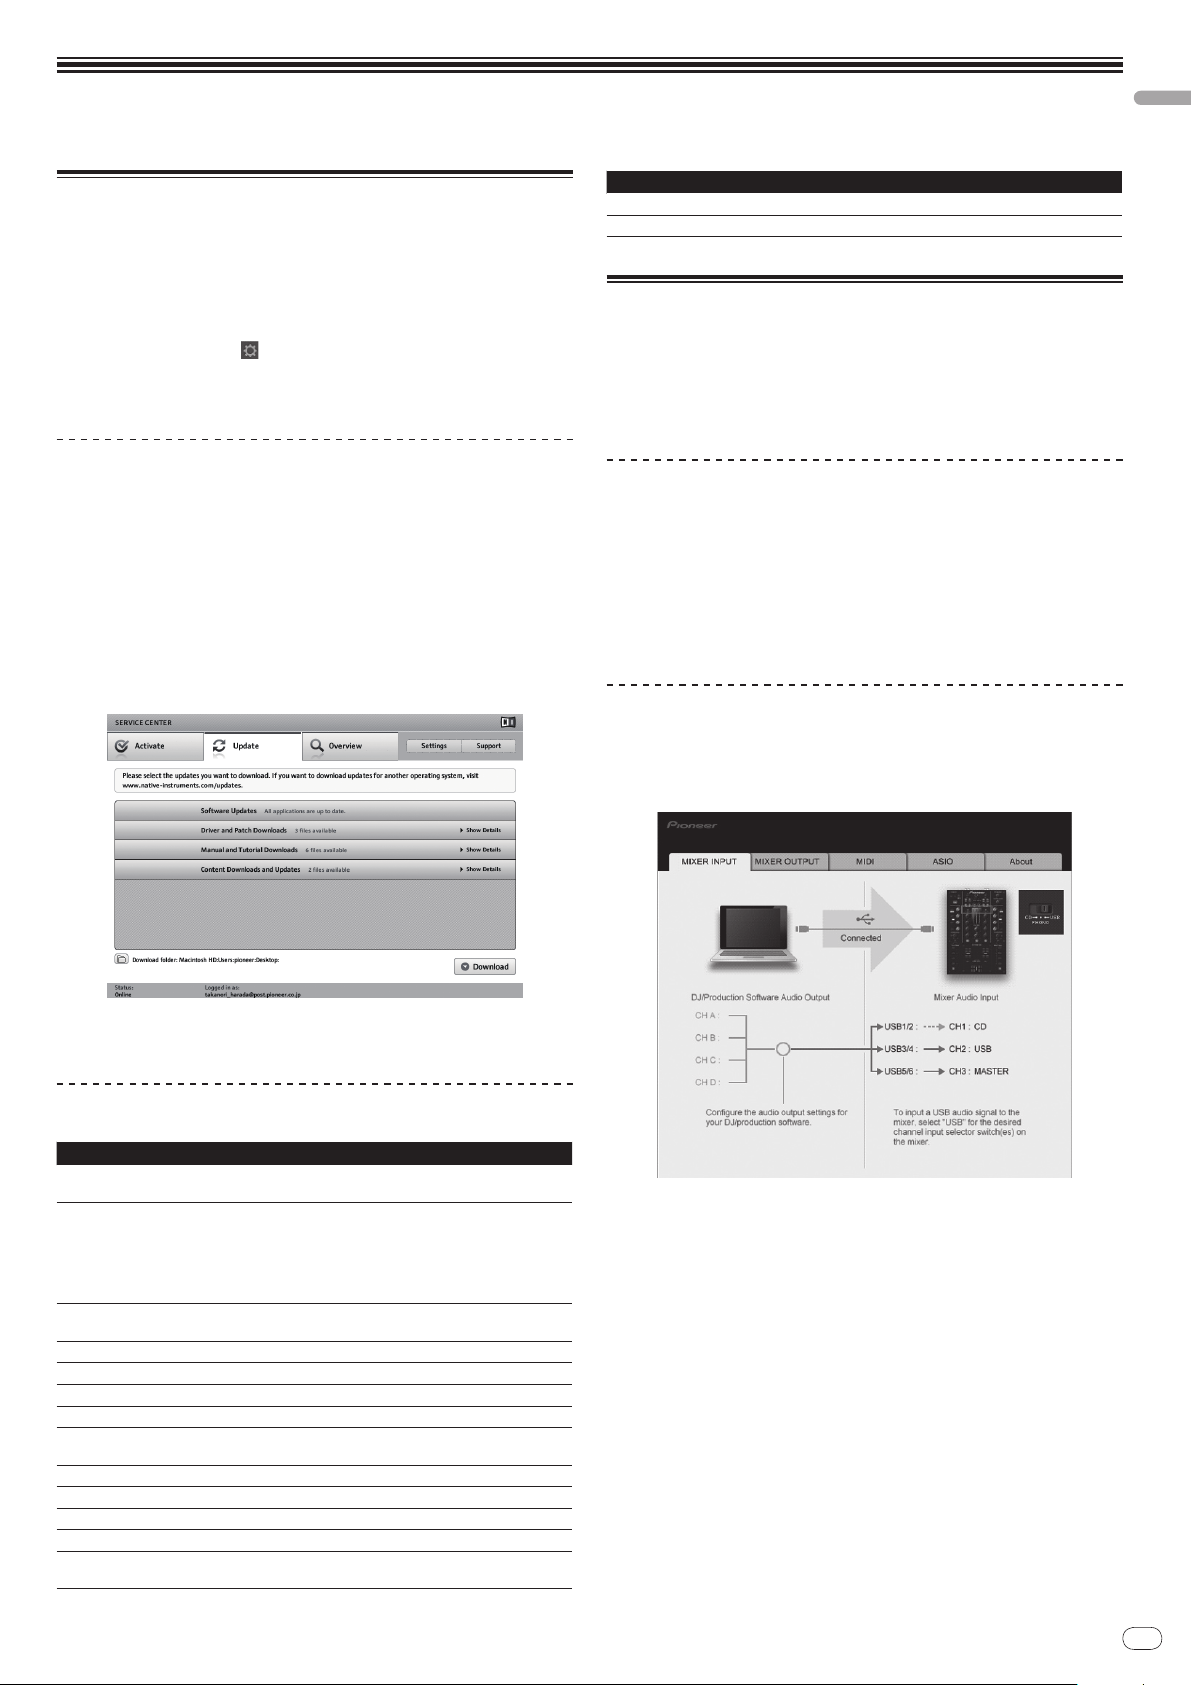
Changing the settings
English
Changing the TRAKTOR Preferences
Change TRAKTOR’s environmental settings according to the usage conditions of
your hardware.
For details on TRAKTOR’s environmental settings, see the TRAKTOR manual.
! If you wish to restore the changes to the environmental settings to their defaults,
please check the following website.
/
www.prodjnet.com/ support/
http:/
1 Click the TRAKTOR [ (Preferences Button)] button.
Open the TRAKTOR settings menu.
2 Select the category and make the settings.
Updating the TRAKTOR software
When the computer is connected to the Internet, TRAKTOR software can be updated
by accessing the Native Instruments SERVICE CENTER (referred to simply as
“SERVICE CENTER” below).
1 Launch the SERVICE CENTER and log in.
For instructions on launching the SERVICE CENTER and logging in, see Launching
the SERVICE CENTER on page 7.
2 Click the [Update] tab.
Available updates are checked.
3 Check the check box.
Specify the update to be downloaded.
Category Descriptions
Controller Manager
Traktor Kontrol X1
Assign TRAKTOR functions to this unit’s controls and buttons.
Set this when using Native Instruments’ Traktor Kontrol X1.
Changing the setting utility’s settings
The setting utility can be used to make the checks and settings described below.
— Checking the status of this unit’s [CD, PHONO, USB] input selector switch
— Setting the source of audio data output from this unit to the computer
— Adjusting the buffer size (when using Windows ASIO)
— Setting the MIDI channel
— Checking the version of the driver software
Displaying the setting utility
! When using TRAKTOR, be sure to quit the settings utility.
For Windows
Click [Start] menu > [All Programs] > [Pioneer] > [DJM-T1] > [DJM-T1 Setting
Utility].
For Mac OS X
Click [Macintosh HD] icon > [Application] > [Pioneer] > [DJM-T1] > [DJM-T1
Setting Utility].
Checking the status of this unit’s [CD, PHONO,
USB] input selector switch
Display the setting utility before starting.
Click the [MIXER INPUT] tab.
4 Click [Download].
Updating begins.
List of TRAKTOR SCRATCH DUO 2 setting items
Category Descriptions
Audio Setup
Output Routing
Input Routing
Timecode Setup
Loading
Transport
Decks
Mixer
Global Settings
Effects
Mix Recorder
Browser Details
File Management
Select the audio devices to be used for audio input/
Set the audio latency when using a Macintosh computer.
Select [Mixing Mode].
— [Internal]: Select this to control TRAKTOR mixer section from this
unit.
— [External]: Select this to use this unit.
Set the association between the TRAKTOR deck’s audio outputs and
this unit’s input channels.
Set the association between the TRAKTOR deck’s audio inputs and this
unit’s output channels.
Set this to use time codes (CONTROL CD/
Set the conditions and functions for loading tracks to the decks.
Make the settings related to the tempo and key lock functions.
Set the TRAKTOR deck section’s display method.
Set auto gain to on or off.
Set the TRAKTOR mixer section’s display method.
Set whether or not to display the global section.
Set the types of effects to be displayed when selecting effects.
Make the settings related to TRAKTOR recording functions.
Make the settings related to the [BROWSE] area and fonts.
Make the settings for track importing, auto analysis, the analysis BPM
range, etc.
output.
CONTROL VINYL).
En
23
Page 24
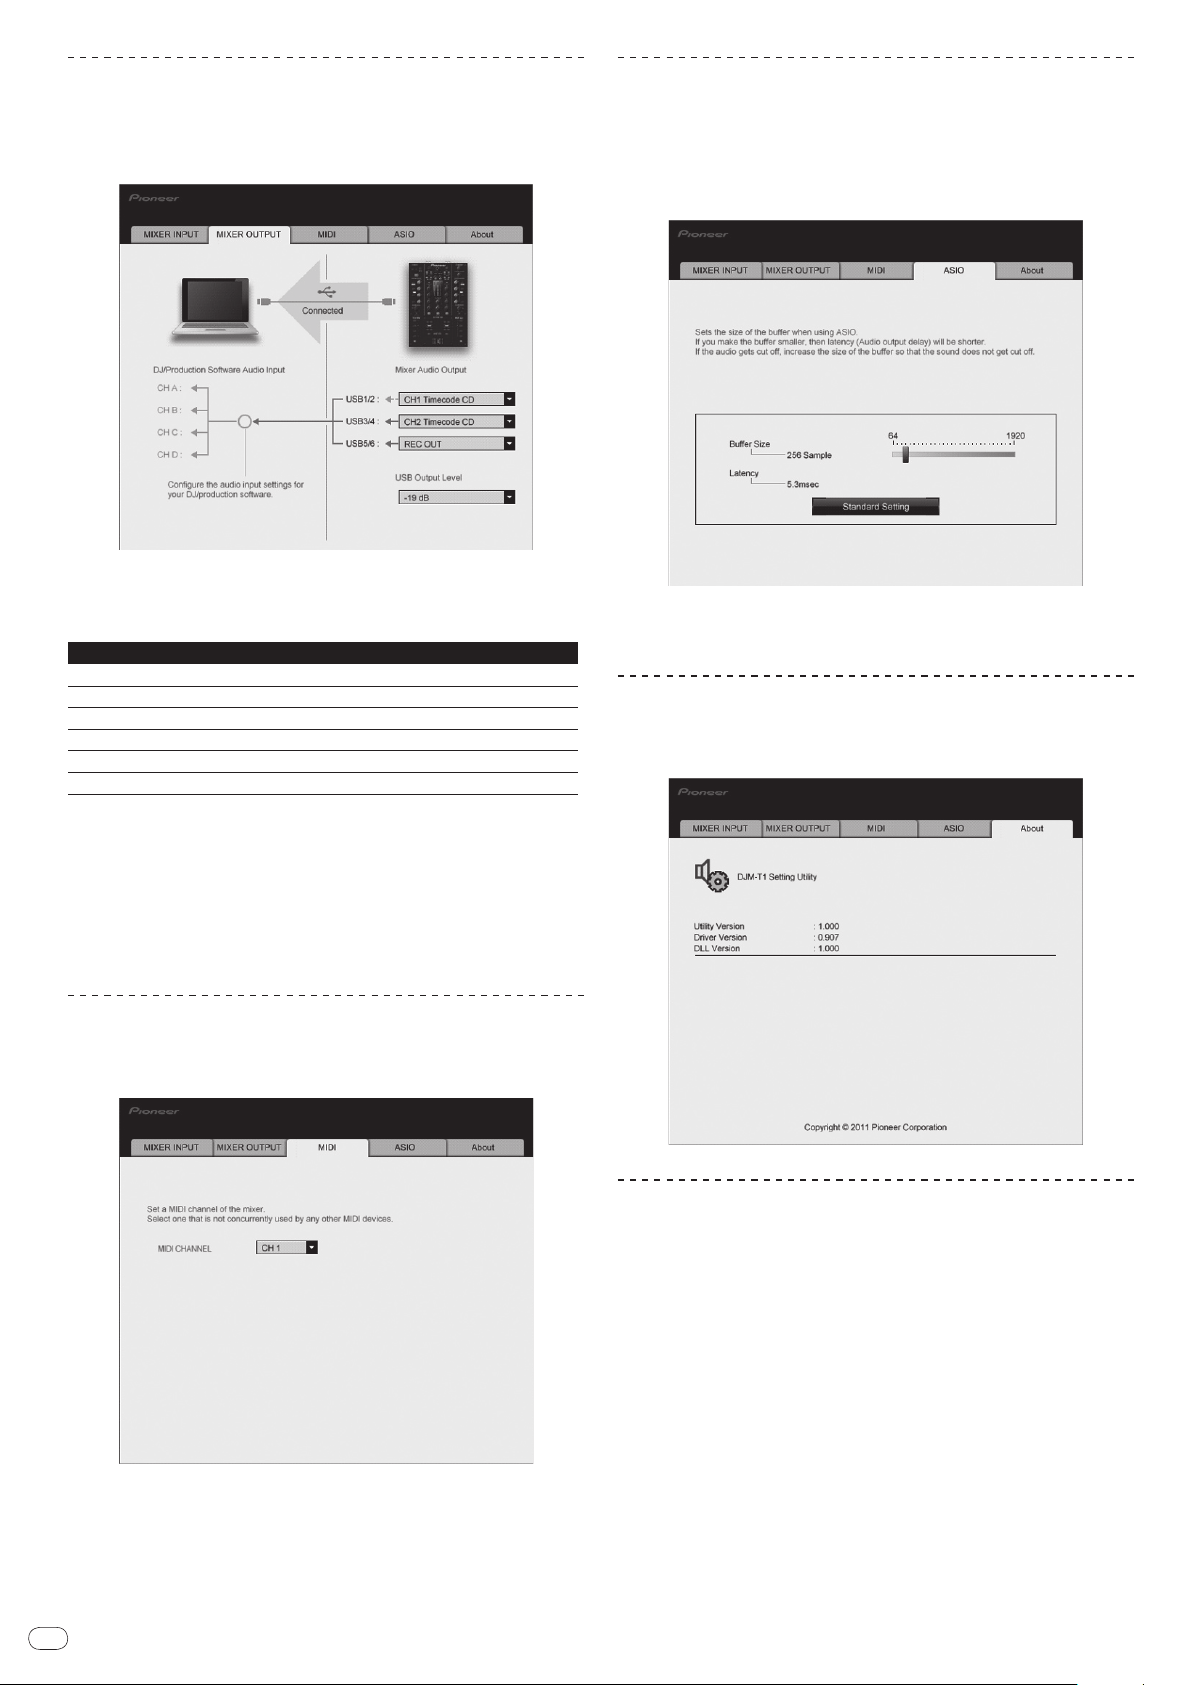
En
24
Setting the source of audio data output from
this unit to the computer
Display the setting utility before starting.
1 Click the [MIXER OUTPUT] tab.
2 Click the [Mixer Audio Output] pull-down menu.
Select and set the audio data to be output to the computer from the flow of audio
signals inside this unit.
USB 1/ 2 USB 3/ 4 USB 5/ 6
CH1 Timecode PHONO
CH1 Timecode CD
— —
— —
— —
— —
1: The sound output from [USB 1/
this unit, regardless of the [USB Output Level] setting.
1
1
CH2 Timecode PHONO
CH2 Timecode CD
2] and [USB 3/ 4] is output with the same volume as input to
1
1
Post CH1 Fader
Post CH2 Fader
Cross Fader A
Cross Fader B
MIC/
AUX Post EQ
REC OUT
Adjusting the buffer size (when using Windows
ASIO)
If an application using this unit as the default audio device (DJ software, etc.) is running, quit that application before adjusting the buffer size.
Display the setting utility before starting.
Click the [ASIO] tab.
! If the buffer size is made large, drops in audio data (breaks in the sound)
occur less easily, but the time lag due to the delay in the transfer of the
audio data (latency) increases.
Checking the version of the driver software
Display the setting utility before starting.
Click the [About] tab.
3 Click the [USB Output Level] pull-down menu.
Adjust the volume of the audio data output from [USB 5/ 6].
! If not enough volume can be achieved with the DJ software’s volume adjustment
alone, change the [USB Output Level] setting to adjust the volume of the audio
data output from this unit. Note that the sound will be distorted if the volume is
raised too high.
Setting the MIDI channel
Display the setting utility before starting.
1 Click the [MIDI] tab.
Checking the latest information on the driver
software
For the latest information on the driver software for exclusive use with this unit, visit
our website shown below.
http://www.prodjnet.com/support/
! Operation cannot be guaranteed when multiple units of this mixer are connected
to a single computer.
2 Click the [MIDI CHANNEL] pull-down menu.
Select the desired MIDI channel.
Page 25
Changing this unit’s settings
1 Press the [UTILITY (WAKE UP)] button for over 1 second.
The [UTILITY (WAKE UP)] indicator and the top of the [CH 1] channel level indicator
flash.
2 Press the [LOAD (DUPLICATE) B] button.
The setting item changes each time the [LOAD (DUPLICATE) B] button is pressed.
The flashing position of the [CH 1] channel level indicator moves downwards.
! When the [LOAD (DUPLICATE) A] button is pressed, the selection returns to the
previous setting item.
The flashing position of the [CH 1] channel level indicator moves upwards.
3 Turn the rotary selector.
Change the setting value.
! When the setting value can be switched on and off
— On: The green section of the [CH 2] channel level indicator lights.
— Off: The green section of the [CH 2] channel level indicator turns off.
! When the setting value can be switched in steps
— One’s place of setting value: Value indicated by the number of segments
of the [CH 2] channel level indicator that are lit.
— Ten’s place of setting value: Value indicated by the number of segments
of the master level indicator that are lit.
4 Press the rotary selector.
The settings are stored in this unit.
The [UTILITY (WAKE UP)] button flashes rapidly. Do not turn this unit’s power off
while the settings are being stored.
! Storing is completed when the [UTILITY (WAKE UP)] button switches from
flashing rapidly to flashing normally.
! Press the [UTILITY (WAKE UP)] button to return to normal operation.
English
About the auto standby function
When [Auto Standby] is set to [ON], the standby mode is set automatically if 4
hours pass with all of the conditions shown below met.
— That none of this unit’s buttons or controls are operated.
— That no audio signals are input to this unit’s input terminals.
— That no computer is connected by USB.
! When the [UTILITY (WAKE UP)] button is pressed, the standby mode is
canceled.
! This unit is shipped with the auto standby function turned on. If you do not want
to use the auto standby function, set [Auto Standby] to [OFF].
Setting preferences
Options settings
Cross Fader Cut Lag
Cross Fader Curve Slow A
Cross Fader Curve Slow B
Cross Fader Curve Fast A
Cross Fader Curve Fast B
Generic Controller Mode
Mic Output To Booth Monitor
Auto Standby
1 If the setting value is extremely small, the sound may not be completely muted even when the crossfader is positioned at the very edge.
2 Attenuation has an abrupt curve characteristic when the setting value is small, a gentle curve characteristic when the setting value is large.
Flashing position of [CH 1]
channel level indicator
Very top 0 to 52
Second from top 0 to 32
Third from top 0 to 32
Fourth from top 0 to 32
Fifth from top 0 to 32
Sixth from top ON/
Seventh from top ON/
Eighth from top ON/
Setting value Default value Descriptions
OFF
OFF
OFF
6
16
16
32
32
OFF
ON
ON
Adjusts the play at the edges of the crossfader (the cut lag). The cut lag can
be adjusted between 0.74 mm and 5.94 mm, in 0.1 mm units.1
Adjusts the [CH 1] side attenuation curve characteristics when the [CROSS F.
CURVE (THRU,
Adjusts the [CH 2] side attenuation curve characteristics when the [CROSS F.
CURVE (THRU,
Adjusts the [CH 1] side attenuation curve characteristics when the [CROSS F.
CURVE (THRU,
Adjusts the [CH 2] side attenuation curve characteristics when the [CROSS F.
CURVE (THRU,
Turns on and off the function for selecting effects using the effect control
buttons.
When off, the LFO CONTROL and CROSS FADER CONTROL functions can
be used.
Sets whether or not to output the microphone’s audio signals from [BOOTH]
terminals.
Turns the auto standby function on and off.
, )] switch is set to [ ].2
, )] switch is set to [ ].2
, )] switch is set to [ ].2
, )] switch is set to [ ].2
En
25
Page 26

En
26
List of MIDI Messages
List of MIDI Messages
Category SW Name SW Type
BTN 9n 00 dd 9n 40 dd — — — — — — OFF=0, ON=127
Transport section
Effect section
Rotary selector
DECK A LOAD (DUPLICATE)
button
DECK B LOAD (DUPLICATE)
button
DECK A f (REL.) button
DECK B f (REL.) button
DECK A SYNC (MASTER) button BTN 9n 05 dd 9n 45 dd 9n 05 dd 9n 45 dd OFF=0, ON=127
DECK B SYNC (MASTER) button BTN 9n 06 dd 9n 46 dd 9n 06 dd 9n 46 dd OFF=0, ON=127
DECK A FX ASSIGN FX1 button BTN 9n 07 dd 9n 47 dd 9n 07 dd 9n 47 dd OFF=0, ON=127
DECK B FX ASSIGN FX1 button BTN 9n 08 dd 9n 48 dd 9n 08 dd 9n 48 dd OFF=0, ON=127
DECK A FX ASSIGN FX2 button BTN 9n 09 dd 9n 49 dd 9n 09 dd 9n 49 dd OFF=0, ON=127
DECK B FX ASSIGN FX2 button BTN 9n 0A dd 9n 4A dd 9n 0A dd 9n 4A dd OFF=0, ON=127
DECK A CUE (ABS.) button BTN 9n 0B dd 9n 4B dd 9n 0B dd 9n 4B dd OFF=0, ON=127
DECK B CUE (ABS.) button BTN 9n 0C dd 9n 4C dd 9n 0C dd 9n 4C dd OFF=0, ON=127
WET control VR Bn 01 dd Bn 41 dd — — — — — — 0-127
FX1 DRY/
WET control VR Bn 02 dd Bn 42 dd — — — — — — 0-127
FX2 DRY/
FX1 ON (GROUP/
FX2 ON (GROUP/
FX1 EFFECT1 control VR Bn 03 dd Bn 43 dd — — — — — — 0-127
FX2 EF
FX1 EFFECT1 button BTN 9n 0F dd 9n 4F dd 9n 0F dd 9n 4F dd OFF=0, ON=127
FX2 EFFECT1 button BTN 9n 10 dd 9n 50 dd 9n 10 dd 9n 50 dd OFF=0, ON=127
FX1 EFFECT2 control VR Bn 05 dd Bn 45 dd — — — — — — 0-127
FX2 EFFECT2 control VR Bn 06 dd Bn 46 dd — — — — — — 0-127
FX1 EFFECT2 button BTN 9n 11 dd 9n 51 dd 9n 11 dd 9n 51 dd OFF=0, ON=127
FX2 EFFECT2 button BTN 9n 12 dd 9n 52 dd 9n 12 dd 9n 52 dd OFF=0, ON=127
FX1 EFFECT3 control VR Bn 07 dd Bn 47 dd — — — — — — 0-127
FX2 EFFECT3 control VR Bn 08 dd Bn 48 dd — — — — — — 0-127
FX1 EFFECT3 button BTN 9n 13 dd 9n 53 dd 9n 13 dd 9n 53 dd OFF=0, ON=127
FX2 EFFECT3 button BTN 9n 14 dd 9n 54 dd 9n 14 dd 9n 54 dd OFF=0, ON=127
SINGLE) button BTN 9n 0D dd 9n 4D dd 9n 0D dd 9n 4D dd OFF=0, ON=127
SINGLE) button BTN 9n 0E dd 9n 4E dd 9n 0E dd 9n 4E dd OFF=0, ON=127
FECT1 control VR Bn 04 dd Bn 44 dd — — — — — — 0-127
VR Bn 00 dd Bn 40 dd — — — — — —
BTN 9n 01 dd 9n 41 dd — — — — — — OFF=0, ON=127
BTN 9n 02 dd 9n 42 dd — — — — — — OFF=0, ON=127
BTN 9n 03 dd 9n 43 dd 9n 03 dd 9n 43 dd OFF=0, ON=127
BTN 9n 04 dd 9n 44 dd 9n 04 dd 9n 44 dd OFF=0, ON=127
MIDI message (this unit to computer) MIDI message (computer to this unit)
SHIFT OFF SHIFT ON SHIFT OFF SHIFT ON
Notes
Turn clockwise: 0 – +30
/ Turn counterclockwise:
-1 – -30
Page 27
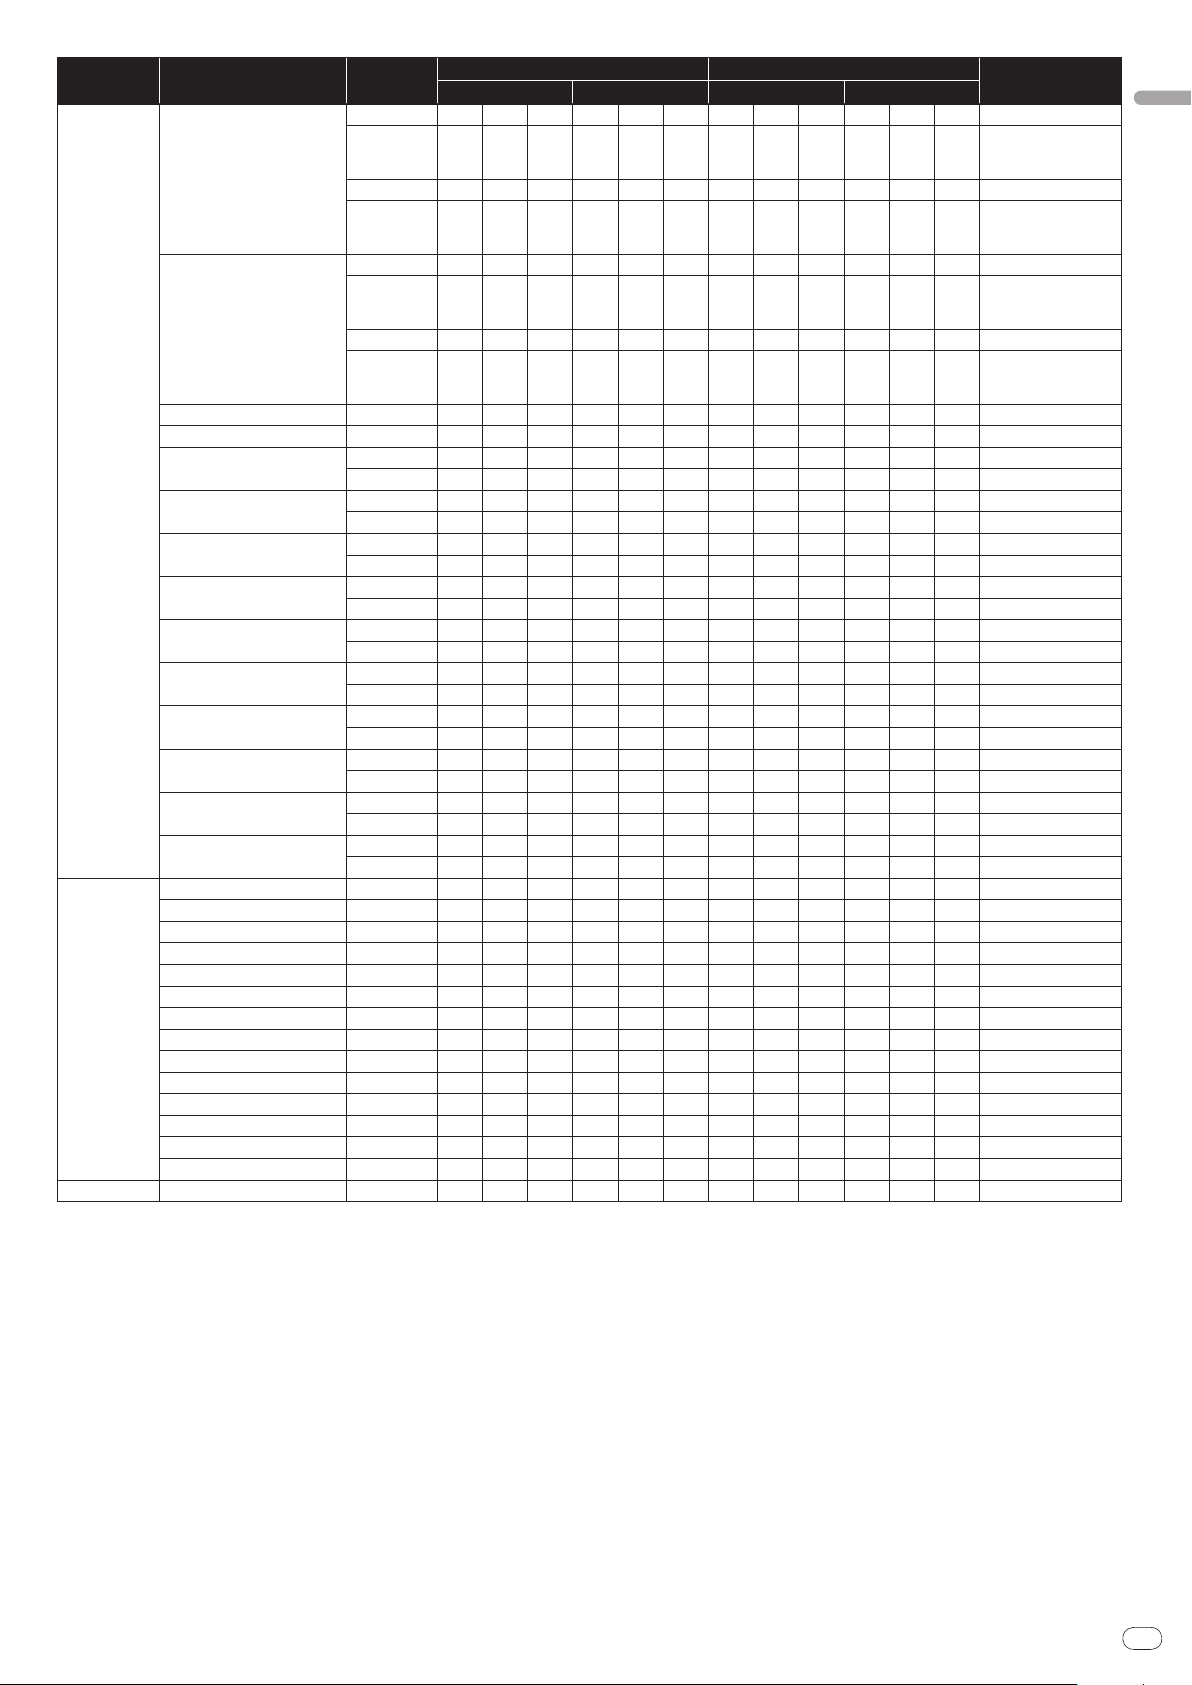
Category SW Name SW Type
MIDI message (this unit to computer) MIDI message (computer to this unit)
SHIFT OFF SHIFT ON SHIFT OFF SHIFT ON
BTN 9n 15 dd 9n 55 dd — — — — — — OFF=0, ON=127
DECK A AUTO LOOP (LOOP
MOVE/
SAMPLE VOLUME)
control
VR Bn 09 dd Bn 49 dd — — — — — —
BTN 9n 16 dd 9n 56 dd — — — — — — OFF=0, ON=127
VR Bn 0A dd Bn 4A dd — — — — — —
BTN 9n 17 dd 9n 57 dd — — — — — — OFF=0, ON=127
DECK B AUTO LOOP (LOOP
SAMPLE VOLUME)
MOVE/
control
VR Bn 0B dd Bn 4B dd — — — — — —
BTN 9n 18 dd 9n 58 dd — — — — — — OFF=0, ON=127
VR Bn 0C dd Bn 4C dd — — — — — —
DECK A SELECT button BTN 9n 19 dd 9n 59 dd — — — — — — OFF=0, ON=127
DECK B SELECT button BTN 9n 1A dd 9n 5A dd — — — — — — OFF=0, ON=127
BTN 9n 1B dd 9n 5B dd 9n 1B dd 9n 5B dd OFF=0, ON=127
BTN 9n 1C dd 9n 5C dd 9n 1C dd 9n 5C dd OFF=0, ON=127
BTN 9n 1D dd 9n 5D dd 9n 1D dd 9n 5D dd OFF=0, ON=127
BTN 9n 1E dd 9n 5E dd 9n 1E dd 9n 5E dd OFF=0, ON=127
BTN 9n 1F dd 9n 5F dd 9n 1F dd 9n 5F dd OFF=0, ON=127
BTN 9n 20 dd 9n 60 dd 9n 20 dd 9n 60 dd OFF=0, ON=127
BTN 9n 21 dd 9n 61 dd 9n 21 dd 9n 61 dd OFF=0, ON=127
BTN 9n 22 dd 9n 62 dd 9n 22 dd 9n 62 dd OFF=0, ON=127
BTN 9n 23 dd 9n 63 dd 9n 23 dd 9n 63 dd OFF=0, ON=127
BTN 9n 24 dd 9n 64 dd 9n 24 dd 9n 64 dd OFF=0, ON=127
BTN 9n 25 dd 9n 65 dd 9n 25 dd 9n 65 dd OFF=0,
BTN 9n 26 dd 9n 66 dd 9n 26 dd 9n 66 dd OFF=0, ON=127
BTN 9n 27 dd 9n 67 dd 9n 27 dd 9n 67 dd OFF=0, ON=127
BTN 9n 28 dd 9n 68 dd 9n 28 dd 9n 68 dd OFF=0, ON=127
BTN 9n 29 dd 9n 69 dd 9n 29 dd 9n 69 dd OFF=0, ON=127
BTN 9n 2A dd 9n 6A dd 9n 2A dd 9n 6A dd OFF=0, ON=127
BTN 9n 2B dd 9n 6B dd 9n 2B dd 9n 6B dd OFF=0, ON=127
BTN 9n 2C dd 9n 6C dd 9n 2C dd 9n 6C dd OFF=0, ON=127
BTN 9n 2D dd 9n 6D dd 9n 2D dd 9n 6D dd OFF=0, ON=127
BTN 9n 2E dd 9n 6E dd 9n 2E dd 9n 6E dd OFF=0, ON=127
Hot cue/ sampler
section
DECK A HOT CUE1 button
DECK B HOT CUE1 button
DECK A HOT CUE2 button
DECK B HOT CUE2 button
DECK A HOT CUE3 button
DECK B HOT CUE3 button
DECK A HOT CUE4 button
DECK B HOT CUE4 button
DECK A ACTIVE button
DECK B ACTIVE button
CH 1 TRIM control VR Bn 0D dd Bn 4D dd — — — — — — 0-127
CH 2 TRIM control VR Bn 0E dd Bn 4E dd — — — — — — 0-127
CH 1 HI control VR Bn 0F dd Bn 4F dd — — — — — — 0-127
CH 2 HI control VR Bn 10 dd Bn 50 dd — — — — — — 0-127
CH 1 MID control VR Bn 11 dd Bn 51 dd — — — — — — 0-127
CH 2 MID control VR Bn 12 dd Bn 52 dd — — — — — — 0-127
Mixer section
CH 1 LOW control VR Bn 13 dd Bn 53 dd — — — — — — 0-127
CH 2 LOW control VR Bn 14 dd Bn 54 dd — — — — — — 0-127
CH 1 CUE (TAP) button BTN 9n 2F dd 9n 6F dd — — — 9n 6F dd OFF=0, ON=127
CH 2 CUE (TAP) button BTN 9n 30 dd 9n 70 dd — — — 9n 70 dd OFF=0, ON=127
CH 1 channel fader VR Bn 15 dd Bn 55 dd — — — — — — 0-127
CH 2 channel fader VR Bn 16 dd Bn 56 dd — — — — — — 0-127
CROSS FADER A VR Bn 17 dd Bn 57 dd — — — — — — 0-127
CROSS FADER B VR Bn 18 dd Bn 58 dd
section SNAP (QUANTIZE) button BTN 9n 31 dd 9n 71 dd 9n 31 dd 9n 71 dd OFF=0, ON=127
Global
1 When using with the hot cue function
2 When using with the sampler function
— — — — — — 0-127
Notes
1
Turn clockwise: 0 – +30
/ Turn counterclockwise:
1
-1 – -30
Turn clockwise: 0 – +30
/ Turn counterclockwise:
-1 – -30
Turn clockwise: 0 – +30
/ Turn counterclockwise:
-1 – -30
Turn clockwise: 0 – +30
/ Turn counterclockwise:
-1 – -30
2
1
2
ON=127
2
1
2
1
2
1
2
1
2
1
2
1
2
1
2
1
2
1
2
1
2
1
2
English
En
27
Page 28

En
28
Additional information
Troubleshooting
! Incorrect operation is often mistaken for trouble or malfunction. If you think that there is something wrong with this component, check the points below. Sometimes the
trouble may lie in another component. Inspect the other components and electrical appliances being used. If the trouble cannot be rectified after checking the items
below, ask your nearest Pioneer authorized service center or your dealer to carry out repair work.
! The player may not operate properly due to static electricity or other external influences. In such cases, normal operation may be restored by unplugging the power cord
then plugging it back in.
Problem Check Remedy
The power is not turned on. Is the power cord properly connected? Plug in the power cord to an AC outlet.
This unit is not recognized. Is the [ON/
Music files cannot be played. Are the music files damaged? Play music files that are not damaged.
No tracks are displayed in the [TRACK] area. Have the music files been properly imported? Import the music files properly. (page 13)
Volume of device connected to [AUX IN] terminals is
low.
Distorted sound. Are the [MAIN VOL] and [GAIN] controls of TRAKTOR set to
Sound being played is interrupted. Are the included power cord and the included USB cable
Sound of an external device or microphone cannot be
output.
No sound is produced. Are the connection cables properly connected? Connect the connection cables properly. (page 10)
No sound or small sound. Is the [CD, PHONO, USB] input selector switch set to the
BPM or overall waveform is not displayed. Has the music file been analyzed? Put a check at [Preferences] > [File Management] > [Analyze new tracks
[SYNC] function does not work. Have the music files been properly imported? Reimport the music files and load them in the decks. (page 13)
[SYNC] function does not work even when files are
analyzed.
Deck area display is small. — Double-click the track information display section (the part where the track
OFF] switch for power supply set to [ON]? Set the [ON/ OFF] switch for power supply to [ON].
Is the included USB cable properly connected? Connect the included USB cable properly. (page 10)
Is [CTRL] lit in TRAKTOR? Press any button other than one in this unit’s mixer section and check that
— Check that [Pioneer. DJM-T1] is selected at [Preferences] > [Controller
Have you selected a [Playlists] or [FAVORITES] slot that
does not contain any tracks?
Is the [LEVEL] control on the front panel set to the proper
position?
the proper positions?
Is the audio level being input to the [AUX IN] and [MIC]
terminals set to a suitable level?
Is the sound level output from the [MASTER] channel
appropriately set?
Is the level of audio input to each channel properly set? Adjust the [TRIM] control so that the channel level indicator lights at about [0
properly connected?
Is the audio latency value suitable? When using Windows, open the [ASIO] tab in the settings utility and set the
Is the [INPUT SELECT] switch on the front panel set to the
[OFF] position?
Is the included USB cable properly connected? Connect the computer and this unit directly using the included USB cable.
Are terminals or plugs dirty? Wipe any dirt off terminals and plugs before connecting.
Is the driver software properly installed on your computer? Install the driver software properly on the computer. (page 8)
Are [Audio Setup], [Output Routing] and [Input Routing]
in TRAKTOR properly set?
Are the connected components and amplifiers properly set? Set the external input selection and volume on the components and amplifiers
proper position?
Is [MASTER ATT.] set to [–6 dB]? Set [MASTER ATT.] to [0 dB]. (page 10)
Has the music file been analyzed? If music files cannot be analyzed automatically, input the [Beat Grid] manu-
Is [BEAT MARKER (Grid)] set for hot cue? Set at least one [BEAT MARKER] to [Grid].
On the TRAKTOR operation screen, is the [BPM] of the track
for which the [MASTER] icon is lit too different from the
[BPM] of the track for which the [SYNC] icon is lit?
Are you scratching? The [SYNC] function is disabled when scratching.
[CTRL] lights in TRAKTOR.
Manager] > [Device Setup] > [Device]. (page 23)
Select a [Playlists] or [FAVORITES] slot that contains tracks.
Adjust the [LEVEL] control on the front panel according to the connected
device. (page 22)
Adjust the [MAIN VOL] and [GAIN] controls while watching the [MAIN] level
indicator in TRAKTOR.
Set the audio level input to the terminals to a suitable level for the connected
devices.
Adjust the [MASTER LEVEL] control so that the master channel level indicator
lights at around [0 dB] at the peak level. (page 16)
If the sound is distorted even when the [MASTER LEVEL] control is adjusted,
set [MASTER ATT.] to [–6 dB]. (page 10)
dB] at the peak level. (page 16)
The sound will be interrupted if the included power cord or the included USB
cable is disconnected from the main unit during playback.
Properly fasten the included USB cable to the cord hook on the main unit.
(page 10)
audio latency to a suitable value.
When using a Macintosh computer, set [Preferences] > [Audio Setup] >
[Latency] in TRAKTOR to a suitable value. (page 24)
Set the [INPUT SELECT] switch to the [AUX] position when using an external
device, to the [MIC] position when using a microphone. (page 22)
USB hubs cannot be used. (page 10)
Check that [Preferences] is set as shown below. (Page 23)
[Audio Setup] > [Audio Device] > [PIONEER DJM-T1 (Core Audio)] (Mac
OS X) or [PIONEER DJM-T1 ASIO (ASIO)] (Windows)
[Output Routing] > [Output Deck A] [L] > [1.PIONEER DJM-T1 OUT 1] and
[R] > [2.PIONEER DJM-T1 OUT 2]
[Output Routing] > [Output Deck B] [L] > [3.PIONEER DJM-T1 OUT 3] and
[R] > [4.PIONEER DJM-T1 OUT 4]
[Input Routing] > [Input Deck A] [L(Mono)] > [1.PIONEER DJM-T1 IN 1]
and [R] > [2.PIONEER DJM-T1 IN 2]
[Input Routing] > [Input Deck B] [L(Mono)] > [3.PIONEER DJM-T1 IN 3] and
[R] > [4.PIONEER DJM-T1 IN 4]
properly.
Switch the [CD, PHONO, USB] input selector switch and switch the channel’s
input source. (page 16)
when loading into deck], then reload the track in the deck.
ally.
Put a check at [Preferences] > [File Management] > [Set Beat-Grid when
detecting BPM], then reload the track in the deck.
The [SYNC] function will not operate normally if the [BPM] of the track for
which the [MASTER] icon is lit is out of the adjustable tempo range for the
track for which the [SYNC] icon is lit.
name, BPM, etc., are displayed) in the deck area.
Page 29

Problem Check Remedy
CH1
PHONO
USBCD
CH2
PHONO
TRIM
MIC/AUX
MIC
AUX
MIC_SEL_OUT
EQ ADC
SH2A
MIC_AUX
CH1_ana
USBCD
MIC
OFF
AUXMIC
PC Input 1/2
(CH1) Pre Trim CD
(CH1) Pre Trim PHONO
PC Input 3/4
(CH2) Pre Trim CD
(CH2) Pre Trim PHONO
PC Input 5/6
Rec OUT
MIC/AUX Post EQ
Post CH1 Fader
Post CH2 Fader
Post Cross Fader A
Post Cross Fader B
CH1
ADC
PHONO
CD
CH1_SEL_OUT
MUTE
CH2
ADC
PHONO
CD
CH2_SEL_OUT
MIC_Post
Rec_OUTCH1_Post
Post_CRS_A
Post_CRS_B
SAMPLER_USB
SAMPLER_USB
CH2_Post
CH1_Pre
CH1_USB
CH1_Pre
CH1
3Band
ISO
Subsonic
Filter
Subsonic
Filter
CH1_Fader
CH2_ana
CH2_Pre
CH2_USB
CH1_USB
CH2_USB
CH2
3Band
ISO
CH2_Fader
Cross_Fader
MASTER_VOL BOOTH_VOLHeadphone_M1
Headphone_VOL
CH1 CUE SW
CH2 CUE SW
MIC ON SW
OUT_ana
TDM_OUT
(8ch)
USB
USB
USB_AUDIO_IF
48kHz/24bit (6in/6out)
MUTE
CH2_Pre
MUTE
MUTE
Rec_OUT
MIC_Post
CH1_Post
CH2_Post
Post_CRS_A
Post_CRS_B
DAC
Booth
Master 1
Master 2
Phones
CH2_Digi_Trim CH1_Digi_Trim
[SINGLE/ GROUP] selector button does not work. — The [Single] mode cannot be selected with TRAKTOR SCRATCH DUO 2.
Back cue function does not work. Is a cue point set? Set a cue point. (page 14)
MIDI control does not work. Is the MIDI channel properly set? Set the MIDI channel from the [MIDI] tab in the settings utility. (page 24)
Are the MIDI settings properly set? To operate DJ software with this unit, this unit’s MIDI messages must be
This unit is not recognized after it has been connected
to a computer.
Is the driver software properly installed on your computer? Install the driver software. If it is already installed, uninstall it then reinstall it.
Sound of a computer cannot be output from this unit. Are this unit and computer properly connected? Connect this unit and computer using a USB cable. (page 10)
Are the audio output device settings properly set? Select this unit with the audio output device settings. For instructions on mak-
Is the [CD, PHONO, USB] input selector switch set to the
proper position?
Sound is distorted when an analog player is connected
to this unit’s [PHONO] terminals.
Or, lighting of the channel level indicator does not
change even when the [TRIM] control is turned.
Have you connected an analog player with a built-in phono
equalizer?
Is an audio interface for computers connected between the
analog player and this unit?
If you upgrade to TRAKTOR SCRATCH PRO 2, the effect panel can be switched
to the [Single] mode.
assigned to the DJ software you are using. For instructions on assigning messages, see your DJ software’s operating instructions.
(page 8)
ing settings for your application, see your application’s operating instructions.
Set the [CD, PHONO, USB] input selector switch to the [USB] position. (page
11) (page 16)
When using an analog player with a built-in phono equalizer, connect it to the
[CD] terminals. (page 10)
If the analog player with built-in phono equalizer has a PHONO/
switch, switch it to PHONO.
If the audio interface for computers has a line level output, connect it to the
[CD] terminals. (page 10)
If the analog player has a PHONO/
LINE selector switch, switch it to PHONO.
LINE selector
Block Diagram
English
Disclaimer
! Pioneer is a registered trademark of Pioneer Corporation.
! Microsoft®, Windows Vista®, Windows® and Internet Explorer® are either reg-
istered trademarks or trademarks of Microsoft Corporation in the United States
and/ or other countries.
! Apple, Macintosh, Mac OS, Safari, iTunes, and Finder are trademarks of Apple
Inc., registered in the U.S. and other countries.
! Intel and Pentium are trademarks of Intel Corporation in the U.S. and other
countries.
! ASIO is a trademark of Steinberg Media Technologies GmbH.
! TRAKTOR is a registered trademark of Native Instruments.
! AMD Athlon is a trademark of Advanced Micro Devices, Inc.
The names of companies and products mentioned herein are the trademarks of their
respective owners.
This product has been licensed for nonprofit use. This product has not been
licensed for commercial purposes (for profit-making use), such as broadcasting (terrestrial, satellite, cable or other types of broadcasting), streaming on the
Internet, Intranet (a corporate network) or other types of networks or distributing
of electronic information (online digital music distribution service). You need to
acquire the corresponding licenses for such uses. For details, see http://www.
mp3licensing.com.
Cautions on copyrights
Recordings you have made are for your personal enjoyment and according to copyright laws may not be used without the consent of the copyright holder.
! Music recorded from CDs, etc., is protected by the copyright laws of individual
countries and by international treaties. It is the full responsibility of the person
who has recorded the music to ensure that it is used legally.
! When handling music downloaded from the Internet, etc., it is the full respon-
sibility of the person who has downloaded the music to ensure that it is used in
accordance with the contract concluded with the download site.
En
29
Page 30

En
30
Specifications
General
Power requirements .......................................................AC 220 V to 240 V, 50 Hz/ 60 Hz
Power consumption ...................................................................................................25 W
Power consumption (standby) .................................................................................0.4 W
Main unit weight ...................................................................................................... 6.1 kg
Max. external dimensions ........................... 265 mm (W) x 107.9 mm (H) x 403 mm (D)
Tolerable operating temperature ........................................................... +5 °C to +35 °C
Tolerable operating humidity ..........................................5 % to 85 % (no condensation)
Audio Section
Sampling rate ..........................................................................................................48 kHz
A/ D, D/ A converter .................................................................................................. 24 bits
Frequency characteristic
CD .......................................................................................................20 Hz to 20 kHz
S/ N ratio (rated output)
PHONO ..............................................................................................................92 dB
CD .....................................................................................................................106 dB
MIC .....................................................................................................................84 dB
Total harmonic distortion (CD — MASTER1)...................................................... 0.004 %
Standard input level / Input impedance
PHONO ...............................................................................................–52 dBu/
CD ........................................................................................................ -12 dBu/
MIC ...................................................................................................... -52 dBu/ 47 kW
AUX .....................................................................................................–12 dBu/
Standard output level / Load impedance / Output impedance
MASTER1 ....................................................................+6 dBu/ 10 kW/ 10 W or lower
MASTER2 ................................................................................+2 dBu/ 10 kW/ 330 W
BOOTH ........................................................................+6 dBu/ 10 kW/ 10 W or lower
PHONES .................................................................... +5.4 dBu/ 32 kW/ 10 W or lower
Rated output level / Load impedance
MASTER1 .........................................................................................+24 dBu/ 10 kW
MASTER2 .........................................................................................+20 dBu/ 10 kW
Crosstalk (CD) ...........................................................................................................86 dB
Channel equalizer characteristic
HI ............................................................................................ –
MID ..........................................................................................–
LOW ......................................................................................... –
Microphone equalizer characteristic
HI ..................................................................................... –12 dB to +12 dB (10 kHz)
LOW ................................................................................ –12 dB to +12 dB (100 Hz)
∞ to +6 dB (13 kHz)
∞ to +6 dB (1 kHz)
∞ to +6 dB (70 Hz)
Input / Output terminals
PHONO input terminal
RCA pin jack ......................................................................................................2 sets
CD input terminal
RCA pin jack ......................................................................................................2 sets
MIC input terminal
XLR connector/
AUX input terminal
RCA pin jacks ..................................................................................................... 1 set
MASTER output terminal
XLR connector .................................................................................................... 1 set
RCA pin jacks ..................................................................................................... 1 set
BOOTH output terminal
TRS phone jack (Ø 6.3 mm) ............................................................................... 1 set
PHONES output terminal
Stereo phone jack (Ø 6.3 mm) ........................................................................... 1 set
USB terminal
B type .................................................................................................................. 1 set
phone jack (Ø 6.3 mm) ............................................................. 1 set
47 kW
47 kW
29 kW
! The specifications and design of this product are subject to change without notice.
! The software screens used in these operating instructions are from the
development stage and may differ from the actual screens.
! © 2011 PIONEER CORPORATION. All rights reserved.
Page 31

Page 32

Fr
2
Nous vous remercions d’avoir acquis un produit Pioneer. Veuillez lire attentivement ce mode d’emploi afin de connaître la manière d’utiliser l’appareil comme il convient. Cela
Ce point d’exclamation, placé dans un
triangle équilatéral, a pour but d’attirer
l’attention de l’utilisateur sur la présence,
dans les documents qui accompagnent
l’appareil, d’explications importantes du
point de vue de l’exploitation ou de
l’entretien.
Ce symbole de l’éclair, placé dans un
triangle équilatéral, a pour but d’attirer
l’attention de l’utilisateur sur la présence, à
l’intérieur du coffret de l’appareil, de
“tensions dangereuses” non isolées d’une
grandeur suffisante pour représenter un
risque d’électrocution pour les êtres
humains.
ATTENTION :
POUR ÉVITER TOUT RISQUE
D’ÉLECTROCUTION, NE PAS ENLEVER LE
COUVERCLE (NI LE PANNEAU ARRIÈRE).
AUCUNE PIÈCE RÉPARABLE PAR
L’UTILISATEUR NE SE TROUVE À
L’ INTÉRIEUR. CONFIER TOUT ENTRETIEN À
UN PERSONNEL QUALIFIÉ UNIQUEMENT.
ATTENTION
DANGER D´ELECTROCUTION
NE PAS OUVRIR
IMPORTANT
D3-4-2-1-1_A1_Fr
AVERTISSEMENT
Cet appareil n’est pas étanche. Pour éviter les risques
d’incendie et de décharge électrique, ne placez près de
lui un récipient rempli d’eau, tel qu’un vase ou un pot
de fleurs, et ne l’exposez pas à des gouttes d’eau, des
éclaboussures, de la pluie ou de l’humidité.
D3-4-2-1-3_A1_Fr
AVERTISSEMENT
Avant de brancher l’appareil pour la première, lisez
attentivement la section suivante.
La tension de l’alimentation électrique disponible
varie selon le pays ou la région. Assurez-vous que
la tension du secteur de la région où l’appareil sera
utilisé correspond à la tension requise (par ex. 230
V ou 120 V), indiquée sur la panneau latéral.
D3-4-2-1-4*_A1_Fr
AVERTISSEMENT
Pour éviter les risques d’incendie, ne placez aucune
flamme nue (telle qu’une bougie allumée) sur
l’appareil.
D3-4-2-1-7a_A1_Fr
Milieu de fonctionnement
Température et humidité du milieu de fonctionnement :
De +5 °C à +35 °C (de +41 °F à +95 °F) ; Humidité
relative inférieure à 85 % (orifices de ventilation non
obstrués)
N’installez pas l’appareil dans un endroit mal ventilé ou
un lieu soumis à une forte humidité ou en plein soleil
(ou à une forte lumière artificielle).
D3-4-2-1-7c*_A1_Fr
Si la fiche d’alimentation secteur de cet appareil ne
convient pas à la prise secteur à utiliser, la fiche doit
être remplacée par une appropriée. Ce
remplacement et la fixation d’une fiche secteur sur le
cordon d’alimentation de cet appareil doivent être
effectués par un personnel de service qualifié. En cas
de branchement sur une prise secteur, la fiche de
coupure peut provoquer une sérieuse décharge
électrique. Assurez-vous qu’elle est éliminée
correctement après sa dépose.
L’appareil doit être déconnecté en débranchant sa
fiche secteur au niveau de la prise murale si vous
prévoyez une période prolongée de non utilisation
(par exemple avant un départ en vacances).
D3-4-2-2-1a_A1_Fr
ATTENTION
L’ interrupteur POWER de cet appareil ne coupe pas
complètement celui-ci de sa prise secteur. Comme le
cordon d’alimentation fait office de dispositif de
déconnexion du secteur, il devra être débranché au
niveau de la prise secteur pour que l’appareil soit
complètement hors tension. Par conséquent, veillez à
installer l’appareil de telle manière que son cordon
d’alimentation puisse être facilement débranché de
la prise secteur en cas d’accident. Pour éviter tout
risque d’incendie, le cordon d’alimentation sera
débranché au niveau de la prise secteur si vous
prévoyez une période prolongée de non utilisation
(par exemple avant un départ en vacances).
D3-4-2-2-2a*_A1_Fr
NOTE IMPORTANTE SUR LE CABLE
D’ALIMENTATION
Tenir le câble d’alimentation par la fiche. Ne pas
débrancher la prise en tirant sur le câble et ne pas
toucher le câble avec les mains mouillées. Cela risque
de provoquer un court-circuit ou un choc électrique. Ne
pas poser l’appareil ou un meuble sur le câble. Ne pas
pincer le câble. Ne pas faire de noeud avec le câble ou
l’attacher à d’autres câbles. Les câbles d’alimentation
doivent être posés de façon à ne pas être écrasés. Un
câble abîmé peut provoquer un risque d’incendie ou un
choc électrique. Vérifier le câble d’alimentation de
temps en temps. Contacter le service après-vente
PIONEER le plus proche ou le revendeur pour un
remplacement.
S002*_A1_Fr
PRÉCAUTION DE VENTILATION
Lors de l’installation de l’appareil, veillez à laisser un
espace suffisant autour de ses parois de manière à
améliorer la dissipation de chaleur (au moins 5 cm à
l’arrière et 3 cm de chaque côté).
AVERTISSEMENT
Les fentes et ouvertures du coffret sont prévues pour la
ventilation, pour assurer un fonctionnement stable de
l’appareil et pour éviter sa surchauffe. Pour éviter les
risques d’incendie, ne bouchez jamais les ouvertures et
ne les recouvrez pas d’objets, tels que journaux, nappes
ou rideaux, et n’utilisez pas l’appareil posé sur un tapis
épais ou un lit.
D3-4-2-1-7b*_A1_Fr
fait, conservez le mode d’emploi de façon à pouvoir vous y référer en cas de nécessité.
Dans certains pays ou certaines régions, la forme de la fiche et de la prise d’alimentation est un peu différente de ce qui est montré dans les illustrations. Toutefois, l’appareil
se raccorde et fonctionne de la même façon.
Page 33

Si vous souhaitez vous débarrasser de cet appareil, ne le mettez pas à la poubelle avec vos ordures ménagères. Il existe un système de
collecte séparé pour les appareils électroniques usagés, qui doivent être récupérés, traités et recyclés conformément à la législation.
Les habitants des états membres de l’UE, de Suisse et de Norvège peuvent retourner gratuitement leurs appareils électroniques usagés aux
centres de collecte agréés ou à un détaillant (si vous rachetez un appareil similaire neuf).
Dans les pays qui ne sont pas mentionnés ci-dessus, veuillez contacter les autorités locales pour savoir comment vous pouvez vous débarrasser
de vos appareils.
Vous garantirez ainsi que les appareils dont vous vous débarrassez sont correctement récupérés, traités et recyclés et préviendrez de cette façon
les impacts néfastes possibles sur l’environnement et la santé humaine.
K058b_A1_Fr
Fr
3
Page 34

Fr
4
Sommaire
TRAKTOR
Comment lire ce manuel
! Les noms d’écrans, de menus et de touches sont entre crochets dans ce manuel.
(ex. canal [MASTER], menu [ON/
! Les descriptions des fonctions et des procédures effectuées sur l’ordinateur sont
désignées par [
! Le manuel TRAKTOR et TRAKTOR GETTING STARTED peuvent être affichés par
le menu d’aide de TRAKTOR après l’installation de TRAKTOR.
Informations préliminaires
Caractéristiques ..............................................................................................................5
Contenu du carton d’emballage ....................................................................................5
Guide de démarrage rapide
Aperçu des opérations ...................................................................................................6
Installation du logiciel TRAKTOR ..................................................................................6
Lancement de TRAKTOR ................................................................................................8
Activation du produit ......................................................................................................8
Installation du pilote .......................................................................................................9
Raccordement des prises d’entrée/ sortie ..................................................................11
Réglage de cet appareil ................................................................................................12
Changement des réglages de l’utilitaire de réglage ..................................................12
Lecture de morceaux ....................................................................................................12
Fonctionnement
Section d’exploration ....................................................................................................14
Section de transport .....................................................................................................15
Section de mixage .........................................................................................................17
Section des effets ..........................................................................................................19
Section de repères instantanés/ échantillonneur ......................................................21
Section globale ..............................................................................................................23
Section MIC/
Section MIDI ..................................................................................................................23
AUX ..........................................................................................................23
OFF], [File])
].
Changement des réglages
Changement des préférences de TRAKTOR ..............................................................24
Changement des réglages de l’utilitaire de réglage ..................................................24
Changement des réglages de cet appareil .................................................................26
Liste de messages MIDI
Liste de messages MIDI ...............................................................................................27
Informations supplémentaires
En cas de panne ............................................................................................................29
Schéma fonctionnel......................................................................................................30
Avis de non responsabilité ...........................................................................................30
Précautions concernant les droits d’auteur ...............................................................31
Spécifications ................................................................................................................31
Page 35

Informations préliminaires
Caractéristiques
Cet appareil est une table de mixage à 2 canaux optimisées pour réaliser des performances DJ avec le logiciel DJ TRAKTOR SCRATCH de Native Instruments. Conçu en
collaboration avec Native Instruments, il intègre le logiciel DJ “TRAKTOR SCRATCH
DUO 2” présentant de nombreuses fonctionnalités indispensables aux performances DJ. Le matériel proprement dit intègre une commande permettant d’actionner
les nombreuses fonctions de TRAKTOR SCRATCH sans hésitation et une carte son
pour une connexion simple à un ordinateur. Un DVS (Système vinyle numérique)
peut être créé en associant à cet appareil un lecteur DJ ou un lecteur analogique.
De plus, cet appareil intègre la technologie des DJM de Pioneer qui ont acquis une
grande réputation en matière de qualité et de performance et proposent un excellent
support non seulement pour l’usage domestique mais aussi pour les prestations DJ
professionnelles.
! La mise à jour avec TRAKTOR SCRATCH PRO 2 (payante) permet d’accéder à un
plus grand nombre de fonctionnalités.
CONTRÔLEUR TRAKTOR INTERNE
Cet appareil intègre un contrôleur optimisé pour le fonctionnement de TRAKTOR
SCRATCH. TRAKTOR SCRATCH peut être actionné avec plus de précision, sans
contrôleur supplémentaire.
La section réservée aux fonctions d’exploration et de transport se trouve au haut de
la section de mixage et dépend des opérations devant être effectuées pour sélectionner les morceaux à mixer. Les sections réservées aux manipulations (EFFECT,
LOOP, HOT CUE et SAMPLER) si situent indépendamment aux côtés des différents
canaux selon la présentation du lecteur pour un usage intuitif.
PLUG AND PLAY
Cet appareil contient une carte sonore USB pour la connexion à un ordinateur. Un
ordinateur peut être raccordé simplement à l’aide d’un câble USB ; il est inutile de
se procurer une autre carte son.
Avec “TRAKTOR SCRATCH DUO 2” les performances DJ peuvent être immédiatement lancées, sans avoir à réaliser des réglages compliqués.
Contenu du carton d’emballage
! DVD-ROM du logiciel TRAKTOR SCRATCH DUO 2
! TRAKTOR SCRATCH CONTROL CD ×2
! TRAKTOR SCRATCH CONTROL VINYL ×2
! CD-ROM du logiciel du pilote
! Câble USB
! Cordon d’alimentation
! Carte de garantie
! Mode d’emploi (ce document)
Français
FADER DE GRANDE RÉSISTANCE
Le crossfader utilise un système magnétique unique. Sa plus grande résistance permet
d’utiliser le scratching sans problème sur une plus longue période. En outre, la dureté
de glisse, la courbe du fader et le démarrage du point d’attaque peuvent être ajustés
selon les préférences de l’utilisateur. Le fader de canal possède une structure à glissière
et le bouton de fader est supporté par deux axes métalliques. Son fonctionnement est
plus souple et régulier et il est environ 3 fois plus résistant par rapport aux produits
Pioneer précédents. De plus, un nouveau type de fader est utilisé pour minimiser l’action
nocive des liquides ou de la poussière pénétrant dans le fader.
HAUTE QUALITÉ SONORE
Grâce à la carte son intégrée, le son peut être transmis d’un ordinateur à cet appareil sous forme numérique, éliminant ainsi la détérioration de la qualité sonore. De
plus, le circuit d’entrée/ sortie audio de cet appareil comprend un convertisseur N/
A haute performance et un circuit analogique unique réduisant le bruit numérique
et reproduisant fidèlement le son original pour produire un son puissant et d’excellente qualité, comparable à celui des clubs.
Fr
5
Page 36

Fr
6
Guide de démarrage rapide
TRAKTOR
Cette section décrit ce qu’il faut faire pour utiliser cet appareil comme DVS (Système vinyle numérique).
! Les descriptions des fonctions et des procédures effectuées sur l’ordinateur sont désignées par [
].
Aperçu des opérations
1 Installation du logiciel TRAKTOR
= page 6
2 Lancement de TRAKTOR
= page 8
3 Activation du produit
= page 8
4 Installation du pilote
= page 9
5 Raccordement des prises d’entrée/ sortie
= page 11
6 Réglage de cet appareil
= page 12
7 Changement des réglages de l’utilitaire de réglage
= page 12
8 Lecture de morceaux
= page 12
Installation du logiciel TRAKTOR
! Cet appareil prend également TRAKTOR SCRATCH PRO 2 en charge.
Si vous possédez TRAKTOR SCRATCH PRO 2, mettez à jour le logiciel à sa toute
dernière version.
Précautions à prendre lors de l’installation du
logiciel TRAKTOR
Environnement opérationnel
minimal pour TRAKTOR
Port USB 2.0
! Toutes les fonctionnalités ne sont pas garanties sur tous les ordinateurs, même si ceux-ci
remplissent les conditions décrites ci-dessus.
! Même si la mémoire indiquée ci-dessus, requise pour le fonctionnement, est présente, une
insuffisance de mémoire due aux programmes résidents, aux nombres de services, etc.
peut empêcher le logiciel de fonctionner de manière optimale. Dans ce cas, libérez de la
mémoire. Un ajout de mémoire permettra un fonctionnement plus stable.
! Selon les réglages d’économie d’énergie de l’ordinateur, etc. la capacité de traitement du
processeur et du disque dur peut être insuffisante. Lorsque vous utilisez TRAKTOR, assurez-vous que l’ordinateur est en état de fournir sa performance optimale (par exemple en
laissant le cordon d’alimentation raccordé), surtout s’il s’agit d’un ordinateur portable.
Un port USB 2.0 est indispensable pour raccorder cet ordinateur à cet
appareil.
Marche à suivre (Windows)
1 Insérez le DVD-ROM du logiciel TRAKTOR SCRATCH DUO 2
fourni dans le lecteur DVD de l’ordinateur.
2 Depuis le menu [Démarrer] de Windows, double-cliquez sur
l’icône [Ordinateur (ou Poste de travail)] > [Traktor].
Le contenu du DVD-ROM apparaît.
3 Double-cliquez sur [Traktor 2 2.0.x Setup PC.exe].
L’installateur de TRAKTOR démarre.
4 Lorsque l’installateur de TRAKTOR a démarré, cliquez sur
[Next].
— Pour revenir à l’écran précédent : Cliquez sur [Back].
— Pour annuler l’installation : Cliquez sur [Cancel].
Systèmes d’exploitation pris en charge
10.5
10.6
Version à 32
bits
Version à 64
bits
Version à 32
bits
Version à 64
bits
Version à 32
bits
Mac OS X
®
7 Édition Familiale Premium/ Professionnel/
Windows
Édition Intégrale
®
Windows Vista
Professionnel/ Intégrale (SP1 ou ultérieur)
Windows
(SP3 ou ultérieur)
Pour les toutes dernières informations sur l’environnement opérationnel et la compatibilité
ainsi que pour acquérir le tout dernier système d’exploitation, veuillez consulter le site Native
Instruments suivant :
http://www.native-instruments.com/traktor
Environnement opérationnel
minimal pour TRAKTOR
Processeur
Mémoire requise 2 Go ou plus de RAM
Disque dur Espace disponible de 500 Mo ou plus
Lecteur DVD Lecteur de disque optique pouvant lire les DVD-ROM
Connexion
Internet
Familiale Basique/ Familiale Premium/
®
XP Édition Familiale/ Édition Professionnelle
Pour Mac OS X
Pour Windows
7, Windows
Vista® et
Windows® XP
Une connexion Internet doit être possible pour l’enregistrement de l’utilisateur
auprès de Native Instruments, pour la mise à jour du logiciel TRAKTOR, etc.
Utilisez la version la plus récente du navigateur Internet.
Ordinateur Macintosh équipé d’un processeur Intel
Core™ Duo
®
Ordinateur compatible PC/ AT équipé d’un processeur
Intel® Pentium® 4, Intel® Core™ Duo ou AMD Athlon™
64 d’au moins 2,4 GHz
1
1
1
1
1
1
1
5 Lisez attentivement le contenu de [License Agreement]
et, si vous acceptez, cochez [I accept the terms of the license
agreement] puis cliquez sur [Next].
Si vous n’acceptez pas les termes de [License Agreement], cliquez sur [Cancel]
®
pour annuler l’installation.
Page 37

4 Lorsque l’installateur de TRAKTOR a démarré, cliquez sur
[Continuer].
Français
6 Choisissez le type d’installation de TRAKTOR, puis cliquez sur
[Next].
Normalement installez toutes les options, y compris [Controller Editor] et
[Service Center].
7 Choisissez l’emplacement où TRAKTOR doit être installé, puis
cliquez sur [Next].
Pour choisir l’emplacement normal, cliquez simplement sur [Next].
Pour installer le logiciel à un autre emplacement, cliquez sur [Change...], choisissez
l’emplacement, puis cliquez sur [Next].
8 Sélectionnez le pilote du matériel Native Instruments, puis
cliquez sur [Next].
Cochez la case de votre matériel.
9 Pour installer le pilote Traktor Kontrol X1, cochez la case puis
cliquez sur [Next].
10 Lorsque l’écran suivant apparaît, cliquez sur [Next].
L’installation commence.
Lorsqu’elle est terminée, l’écran de fin d’installation apparaît.
5 Lisez attentivement le contenu du contrat de licence, puis
cliquez sur [Continuer].
6 Si vous acceptez le contenu du contrat d’utilisation, cliquez
sur [Accepter].
Si vous n’acceptez pas le contenu du contrat d’utilisation, cliquez sur [Refuser]
pour annuler l’installation.
11 Cliquez sur [Finish].
La procédure est alors terminée.
Marche à suivre (Macintosh)
1 Insérez le DVD-ROM du logiciel TRAKTOR SCRATCH DUO 2
fourni dans le lecteur DVD de l’ordinateur.
L’icône [Traktor] apparaît à l’écran.
2 Double-cliquez sur l’icône [Traktor].
Le contenu du DVD-ROM apparaît.
3 Double-cliquez sur [Traktor 2 2.0.x Installer Mac.mpkg].
L’installateur de TRAKTOR démarre.
7 Sélectionnez le pilote du matériel Native Instruments, puis
cliquez sur [Continuer].
Cochez la case de votre matériel.
8 Choisissez l’emplacement où TRAKTOR doit être installé, puis
cliquez sur [Installer].
Pour choisir l’emplacement normal, cliquez simplement sur [Installer].
Pour installer le logiciel à un autre emplacement, cliquez sur
[Changer l'emplacement de l'installation...], choisissez l’emplacement, puis
cliquez sur [Installer].
L’installation commence.
Lorsqu’elle est terminée, l’écran de fin d’installation apparaît.
9 Cliquez sur [Redémarrer].
La procédure est alors terminée.
Fr
7
Page 38

Fr
8
Lancement de TRAKTOR
Pour Windows
Depuis le menu [Démarrer] de Windows, ouvrez [Tous les
programmes] > [Native Instruments] > [Traktor 2], puis cliquez sur
l’icône [Traktor 2].
Pour Mac OS X
Dans le Finder, ouvrez le dossier [Application], puis ouvrez [Native
Instruments] > [Traktor 2] et double-cliquez sur l’icône [Traktor 2].
Activation du produit
Pour utiliser la version TRAKTOR SCRATCH DUO 2 vous devez d’abord activer
le produit (appelé simplement “activation” ci-dessous) par le Native Instruments
SERVICE CENTER (appelé simplement le “SERVICE CENTER” ci-dessous).
Lancement du SERVICE CENTER
Ceci peut s’effectuer de trois façons :
— Lancement depuis la boîte de dialogue s’affichant au démarrage de TRAKTOR
— Lancement depuis le menu [Help] de TRAKTOR
— Lancement direct de SERVICE CENTER
Pour lancer depuis la boîte de dialogue s’affichant au
démarrage de TRAKTOR
1 Lancement de TRAKTOR
L’écran suivant apparaît.
Activation en ligne
1 Lancez le SERVICE CENTER.
L’écran de connexion apparaît.
2 Entrez votre adresse email et votre mot de passe, puis cliquez
sur [Connexion].
! Lors de la première connexion, vous devez créer un nouveau compte utilisateur.
Lorsque vous cliquez sur [Créer un nouveau Compte Utilisateur], l’écran
d’enregistrement du nouveau compte utilisateur apparaît.
Entrez les éléments requis (adresse email, prénom et nom), sélectionnez votre
pays ou région, puis cliquez sur [Suivant].
Lorsque l’écran de confirmation des informations de l’enregistrement apparaît,
vérifiez-en le contenu, puis cliquez sur [OK].
Un mot de passe est envoyé à l’adresse email indiquée dans le formulaire.
Retournez à l’écran de connexion et connectez-vous.
! Les informations personnelles entrées lors de l’enregistrement d’un nouveau
compte utilisateur peuvent être collectées, traitées et utilisées selon les règles
de la politique de confidentialité consultables sur le site de Native Instruments.
Pioneer Corporation ne collecte, traite et n’utilise pas ces informations
personnelles.
3 Entrez le numéro de série indiqué sur le carton du DVD-ROM
du logiciel TRAKTOR SCRATCH DUO 2, puis cliquez sur [Activer].
! Cette boîte de dialogue s’affiche chaque fois que TRAKTOR est lancé tant que la
licence n’est pas obtenue du SERVICE CENTER.
2 Sélectionnez la méthode que vous voulez utiliser pour obtenir
la licence, puis cliquez.
— [Run Demo] : Vous lancez TRAKTOR en mode démo.
— [Buy] : Vous achetez TRAKTOR du magasin en ligne Native Instruments.
— [Activate] : Vous obtenez directement la licence du SERVICE CENTER.
Lancer depuis le menu [Help] de TRAKTOR
Sur le menu [Help] de TRAKTOR, cliquez sur [Launch Service
Center].
Lancer le SERVICE CENTER directement
Pour Windows
Depuis le menu [Démarrer] de Windows, cliquez sur les icônes [Native
Instruments] > [Service Center] > [Service Center].
Pour Mac OS X
Dans le Finder, ouvrez le dossier [Application], puis double-cliquez sur les icônes
[Service Center] > [Service Center].
Marche à suivre
— Activation en ligne : Lorsque votre ordinateur est raccordé à Internet
— Activation hors ligne : Lorsque votre ordinateur n’est pas raccordé à Internet
4 Lorsque l’écran d’enregistrement du produit de licence
effectué avec succès apparaît, cliquez sur [Quitter].
Activation hors ligne
Pour activer TRAKTOR SCRATCH DUO 2 installé sur un ordinateur non connecté à
Internet, utilisez le SERVICE CENTER dans le mode hors ligne.
Dans ce cas, un second ordinateur doit être raccordé à Internet.
1 Lancez le SERVICE CENTER sur l’ordinateur sur lequel
TRAKTOR SCRATCH DUO 2 doit être installé.
2 Cliquez sur [Déconnecté] dans
[Continuer sans se connecter à Internet].
3 Cliquez sur [Créer] dans
[Créer le Fichier de Demande d'Activation].
4 Entrez le numéro de série indiqué sur le carton du DVD-ROM
du logiciel TRAKTOR SCRATCH DUO 2, puis cliquez sur [Créer].
Un fichier de demande de lancement est créé. Sauvegardez ce fichier sur une clé
USB, etc.
Page 39

5 Branchez la clé USB sur laquelle le fichier de demande de
lancement est sauvegardé sur l’ordinateur pouvant être connecté
à Internet.
6 Double-cliquez sur le fichier de demande de lancement sur
l’ordinateur pouvant être connecté à Internet.
La navigateur est lancé.
7 Lorsque l’écran d’activation du produit apparaît, cliquez sur
[Envoyer].
8 Entrez votre adresse email et votre mot de passe, puis cliquez
sur [SUBMIT].
! Lors de la première connexion, vous devez créer un nouveau compte utilisateur.
Lorsque [No - I do not have an NI account.] est coché et [SUBMIT] cliqué,
l’écran d’enregistrement du nouveau compte utilisateur apparaît.
Entrez les éléments requis (adresse email, prénom et nom, adresse, ville et code
postal), sélectionnez votre pays ou région, puis cliquez sur [NEXT].
Lorsque l’écran d’enquête apparaît, répondez aux différentes questions, puis
cliquez sur [SUBMIT].
Un mot de passe est envoyé à l’adresse email indiquée dans le formulaire.
Retournez à l’écran de connexion et connectez-vous.
! Les informations personnelles entrées lors de l’enregistrement d’un nouveau
compte utilisateur peuvent être collectées, traitées et utilisées selon les règles
de la politique de confidentialité consultables sur le site de Native Instruments.
Pioneer Corporation ne collecte, traite et n’utilise pas ces informations
personnelles.
9 Lorsque la [Service Center Activation Page] apparaît, cliquez
sur [NEXT].
10 Assurez-vous que [Product] est [TRAKTOR SCRATCH DUO 2] et
[Status] est [OK], puis cliquez sur [NEXT].
Un fichier de renvoi de lancement est créé. Sauvegardez ce fichier sur une clé USB,
etc.
11 Lancez le SERVICE CENTER sur l’ordinateur sur lequel
TRAKTOR SCRATCH DUO 2 doit être installé.
12 Cliquez sur [Déconnecté] dans
[Continuer sans se connecter à Internet].
13 Cliquez sur [Ouvrir] dans
[Ouvrir le Fichier de Retour d'Activation].
Le fichier de renvoi de lancement est chargé.
14 Vérifiez dans le SERVICE CENTER que l’activation du produit
est terminée.
Installation du pilote
Ce pilote permet uniquement de transmettre le son à l’entrée et à la sortie de l’ordinateur. Pour pouvoir utiliser cet appareil raccordé à un ordinateur intégrant le système d’exploitation Windows ou Mac OS, installez d’abord ce pilote sur l’ordinateur.
Accord de licence du logiciel
Cet accord de licence du logiciel (“accord”) est entre vous (aussi bien la personne
installant le programme que toute entité légale unique pour laquelle cette personne
agit) (“vous” ou “votre”) et PIONEER CORPORATION (“Pioneer”).
TOUTE MESURE PRISE EN VUE DE CONFIGURER OU D’INSTALLER LE
PROGRAMME SIGNIFIE QUE VOUS ACCEPTEZ TOUS LES TERMES DE CET
ACCORD DE LICENCE. L’AUTORISATION DE TÉLÉCHARGER ET/ OU D’UTILISER
LE PROGRAMME EST EXPRESSÉMENT CONDITIONNÉE À VOTRE RESPECT
DE CES TERMES. AUCUNE APPROBATION ÉCRITE OU ÉLECTRONIQUE N’EST
NÉCESSAIRE POUR VALIDER ET EXÉCUTER CET ACCORD. SI VOUS N’ACCEPTEZ
PAS LA TOTALITÉ DES TERMES DE CET ACCORD, VOUS N’ÊTES PAS AUTORISÉ À
UTILISER LE PROGRAMME ET VOUS DEVEZ ARRÊTER SON INSTALLATION OU LE
DÉSINSTALLER, COMME APPLICABLE.
1 Définitions
1 Le mot “documentation” signifie la documentation écrite, les spécifica-
tions et l’aide fournies par Pioneer pour aider à installer et à utiliser le
programme.
2 Le mot “programme” signifie la totalité ou toute partie du logiciel Pioneer et
dont Pioneer vous concède la licence par cet accord.
2 Licence de programme
1 Licence limitée. Sous réserve des restrictions stipulées dans cet accord,
Pioneer vous concède une licence limitée, nonexclusive, non-transférable
(sans le droit de sous-licencier) :
a Pour installer une seule copie du programme sur le disque dur de votre
ordinateur, pour utiliser le programme seulement pour votre besoin personnel conformément à cet accord et à la documentation (“Utilisation
autorisée”) ;
b Pour utiliser la documentation d’assistance à votre utilisation autorisée
; et
c Pour faire une copie du programme seulement à des fins de sauve-
garde, pourvu que tous les titres et marques, copyright et avertissements de droits limités soient reproduits sur cette copie.
2 Restrictions. Vous ne pouvez pas copier ou utiliser le programme ou la
documentation de façon autre que celle expressément permise par cet
accord. Vous ne pouvez pas transférer, sous-licencier, louer, louer à crédit
bail ou prêter le programmme, ou l’utiliser pour la formation d’une tierce
partie, dans une activité commerciale de service informatique en temps
partagé ou d’assistance. Vous ne pouvez pas, vous-même ou par l’intermédiaire d’une tierce partie, modifier, désosser, désassembler ou décompiler
le programme, sauf dans la limite expressément permise par la loi en
vigueur et, le cas échéant, seulement après que vous ayez informé Pioneer
par écrit de vos intentions. Vous ne pouvez pas utiliser le programme sur
plusieurs processeurs sans le consentement écrit préalable de Pioneer.
3 Propriété. Pioneer ou son concédant garde tout droit, titre et intérêt dans
et sur tout brevet, copyright, marque, secret commercial et autres droits de
propriété intellectuelle liés au programme et à la documentation, ainsi qu’à
tout produit qui en dérive. Vous ne faites l’acquisition d’aucun droit, explicite ou implicite, hors de la licence limitée décrite dans cet accord.
4 Pas d’assistance. Pioneer n’a aucune obligation de fournir une assistance,
une maintenance, des mises à niveau, des modifications ou des nouvelles
versions pour le programme ou la documentation liés à cet accord.
3 Exclusion de garantie
LE PROGRAMME ET LA DOCUMENTATION SONT FOURNIS “TELS QUELS” SANS
CONDITION OU GARANTIE D’AUCUNE SORTE, ET VOUS ACCEPTEZ DE LES
UTILISER À VOS RISQUES ET PÉRILS. DANS LA MESURE PERMISE PAR LA LOI,
PIONEER EXCLUT EXPLICITEMENT TOUTE GARANTIE DE TOUTE SORTE DU
PROGRAMME ET DE LA DOCUMENTATION, EXPRESSE, IMPLICITE, OFFICIELLE,
OU ÉMANANT DE L’UTILISATION, DE LA TRANSACTION OU DE L’ÉCHANGE,
Y COMPRIS LES GARANTIES DE QUALITÉ MARCHANDE, D’ADÉQUATION
À UN USAGE PARTICULIER, DE QUALITÉ, DE PRÉCISION, DE TITRE OU DE
NONCONTREFACON.
4 Dommages-intérêts et recours pour infraction
Vous acceptez que toute infraction aux restrictions de cet accord causerait à
Pioneer un mal irréparable pour lequel des dommages-intérêts seuls seraient inadéquats. En plus des dommages-intérêts et autres recours auxquels Pioneer peut avoir
droit, vous acceptez que Pioneer puisse saisir la justice pour empêcher toute infraction ou tout risque d’infraction ou pour faire cesser toute infraction à cet accord.
5 Résiliation
Pioneer peut résilier cet accord à tout moment sur votre infraction à n’importe
quelle de ses clauses. Si cet accord est résilié, vous devez arrêter d’utiliser le programme, le supprimer définitivement de l’ordinateur où il réside, et détruire toutes
les copies du programme et de la documentation en votre possession, avec confirmation écrite à Pioneer de l’exécution de ces obligations. Les sections 2.2, 2.3, 2.4,
3, 4, 5 et 6 resteront en vigueur après la résiliation de cet accord.
6 Conditions générales
1 Limitation de responsabilité. En aucun cas Pioneer ou ses filiales ne seront
responsables au sujet de cet accord ou de son contenu, quel que soit le
fondement invoqué, de quelque dommage que ce soit, indirect, direct,
spécial, induit ou à valeur répressive, ou de dommages en raison de perte
de bénéfices, de revenu, d’affaires, d’économies, de données, d’utilisation,
ou de coût d’acquisition d’un produit de substitution, même s’ils sont
prévenus de la possibilité de tels dommages ou si ces dommages sont
prévisibles. En aucun cas la responsabilité de Pioneer pour tous dommages
ne dépassera le montant que vous avez payé à Pioneer ou à ses filiales
pour le programme. Les parties admettent que les limites de responsabilité
et l’affectation de risque dans cet accord sont reflétées dans le prix du
programme et sont des éléments intrinsèques du marché entre les parties,
sans lesquels Pioneer n’aurait pas fourni le programme et n’aurait pas été
partie prenante de cet accord.
2 Les limitations ou exclusions de garantie et de responsabilité contenues
dans cet accord n’affectent ni n’entravent vos droits légaux comme
consommateur et vous seront applicables seulement dans la mesure où de
telles limitations ou exclusions sont permises sous les lois de la juridiction
où vous êtes situé.
3 Si une clause de cet accord s’avère être illégale, invalide ou inapplicable
d’une manière ou d’une autre, elle sera appliquée dans la mesure du possible ou, si elle est totalement inapplicable, sera considérée comme coupée
et supprimée de cet accord, et le reste continuera d’être en vigueur. La
renonciation par une partie ou l’autre à tout défaut ou manquement de cet
accord ne donnera pas lieu à la suppression d’un défaut ou manquement
autre ou ultérieur.
4 Pas de cession. Vous ne pouvez pas céder, vendre, transférer, déléguer ou
altérer d’une manière ou d’une autre cet accord ou tous droits ou obligations qui s’y rapportent, que ce soit volontairement ou involontairement,
par action légale ou autre, sans le consentement écrit préalable de Pioneer.
Toute cession, tout transfert ou toute délégation émanant de votre part sera
nul et non avenant. Sujet aux faits précités, cet accord engagera et liera les
parties et leurs successeurs et délégués respectifs.
5 Accord complet. Cet accord constitue l’intégralité de l’accord entre les
parties et remplace tous les accords ou propositions antérieurs ou actuels,
Fr
Français
9
Page 40

Fr
10
écrits ou verbaux, en ce qui concerne son contenu. Cet accord ne peut pas
être modifié ou amendé sans le consentement écrit préalable de Pioneer, et
aucun autre acte, document, usage ou convention ne pourra amender ou
modifier cet accord.
6 Vous acceptez que cet Accord soit régi par les lois du Japon et interprété
selon celles-ci.
Avant d’installer le pilote
! Lisez attentivement Accord de licence du logiciel.
! Éteignez cet appareil, puis débranchez le câble USB raccordé à cet appareil et à
l’ordinateur.
! Si des programmes sont ouverts sur l’ordinateur, fermez-les.
! Pour installer ou désinstaller le pilote, vous devez avoir l’autorisation de l’admi-
nistrateur de votre ordinateur. Connectez-vous comme administrateur de votre
ordinateur avant de procéder à l’installation.
! Le pilote doit être d’abord installé sur l’ordinateur puis cet appareil raccordé à
l’ordinateur sinon, selon l’environnement système, une erreur peut se produire.
! Si l’installation du pilote est interrompue après le démarrage, recommencez
l’installation depuis le début.
! Le CD-ROM fourni contient des programmes d’installation dans les 12 langues
suivantes.
Anglais, Français, Allemand, Italien, Hollandais, Espagnol, Portugais, Russe,
Chinois (caractères simplifiés), Chinois (caractères traditionnels), Coréen,
Japonais.
Si vous utilisez un système d’exploitation dans une autre langue que celles
mentionnées ci-dessus, sélectionnez [English (Anglais)] pendant l’installation.
Systèmes d’exploitation pris en charge
Windows® 7 Édition Familiale Premium/ Professionnel/
Édition Intégrale
®
Windows Vista
Professionnel/ Intégrale
Windows
(SP2 ou ultérieur)
Mac OS X 10.4.8 ou ultérieur
Mac OS X 10.6
! Windows
Familiale Basique/ Familiale Premium/
®
XP Édition Familiale/ Édition Professionnelle
®
XP Édition Professionnelle 64 bits n’est pas pris en charge.
Version à 32
bits
Version à 64
bits
Version à 32
bits
Version à 64
bits
Version à 32
bits
Version à 32
bits
Version à 32
bits
Version à 64
bits
1
1
1
1
1
1
1
1
Marche à suivre (Windows)
1 Insérez le CD-ROM du pilote fourni dans le lecteur DVD de
l’ordinateur.
2 Lorsque le menu du CD-ROM apparaît, double-cliquez sur
[DJM-T1_X.XXX.exe].
3 Procédez à l’installation en suivant les instructions qui
apparaissent à l’écran.
Si [Sécurité de Windows] apparaît à l’écran au cours de l’installation, cliquez sur
[Installer ce pilote quand même] et continuez l’installation.
! Installation sur Windows XP
Si [Installation matérielle] apparaît à l’écran au cours de l’installation, cliquez
sur [Continuer] et continuez l’installation.
! Lorsque le programme d’installation est terminé, le message Installation termi-
née apparaît.
Marche à suivre (Macintosh)
1 Insérez le CD-ROM du pilote fourni dans le lecteur DVD de
l’ordinateur.
2 Lorsque le menu du CD-ROM apparaît, double-cliquez sur
[DJM-T1AudioDriver.dmg].
3 Double-cliquez sur [DJM-T1AudioDriver.pkg].
4 Procédez à l’installation en suivant les instructions qui
apparaissent à l’écran.
Page 41

Raccordement des prises d’entrée/ sortie
MIC
PHONES
LRAUX
OFF
PHONO CD
SIGNAL GND
ON
POWER
AC IN
220 - 240V
CH 2
USB
L
R
PHONOCD
CH 1
L
R
LR
RL
LR
1.GND 2.HOT
3.COLD
dB
-
6
0
dB
MASTER
ATT.
TRS
MASTER 1
MASTER 2
BOOTH
R
RLL
R
L
R
L
R
L
RL
Amplificateur de
puissance (
pour le
contrôle en cabine
)
Amplificateur de
puissance
Amplificateur de
puissance
Lecteur analogique Lecteur DJ Lecteur analogique Lecteur DJ
Casques d’écoute
Ordinateurs
Dispositif
audio
portable
Microphones
À la prise
électrique
1
2 3
4
2 3
5
6
7
d
e
f
8
9
a
b
c
USB
L
TER 2
Veillez à toujours éteindre les appareils et à débrancher le cordon d’alimentation de la prise secteur avant de raccorder un appareil ou de changer les liaisons.
Lorsque tous les appareils ont été raccordés, vous pouvez brancher le cordon d’alimentation.
Veillez à utiliser le cordon d’alimentation fourni.
Reportez-vous au mode d’emploi de l’appareil devant être raccordé.
! Lorsque vous établissez un DVS (Système Vinyle Numérique) comprenant un ordinateur, une interface audio, etc., faites attention au raccordement de l’interface audio
aux prises d’entrée de cet appareil et aux réglages des sélecteurs d’entrée.
Reportez-vous aussi au mode d’emploi du logiciel DJ et de l’interface audio.
Panneau arrière, panneau avant
Français
1 Touche POWER
Pour allumer et éteindre cet appareil.
2 Prises PHONO
Pour raccorder un appareil de type tourne-disque (cartouche phono MM). Ne
pas pourvoir des signaux de ligne.
Pour raccorder un dispositif aux prises [PHONO], retirez la fiche de court-circuitage insérée dans les prises.
Insérez la fiche de court-circuitage dans les prises [PHONO] si rien ne leur est
raccordé pour couper le bruit externe.
3 Prises CD
Pour raccorder un lecteur DJ ou un appareil avec sortie niveau ligne.
4 Prise SIGNAL GND
Pour raccorder le fil de terre d’un lecteur analogique. Ceci permet de réduire le
bruit lorsqu’un lecteur analogique est raccordé.
5 Crochet de cordon
Accrochez le câble USB ici.
! Le son sera interrompu si le câble USB est débranché pendant la lecture.
6 Fente de sécurité Kensington
7 Port USB
Pour raccorder un ordinateur.
! Raccordez cet appareil et l’ordinateur directement avec le câble USB fourni.
! Un concentrateur USB ne peut pas être utilisé.
8 Prises MASTER2
À raccorder à un amplificateur de puissance, etc.
9 MASTER ATT.
Règle le niveau d’atténuation du son provenant des prises [MASTER1] et
[MASTER2].
Lorsqu’il est réglé sur [–6 dB], le niveau audio du son provenant des prises
[MASTER1] et [MASTER2] est réduit de moitié.
a Prises MASTER1
À raccorder à un amplificateur de puissance, etc.
b Prises BOOTH (page 18)
Prises de sortie pour moniteur de cabine, compatible avec une sortie symétrique
ou asymétrique pour connecteur TRS.
! Le son sera déformé si le niveau est trop augmenté lorsque des sorties
asymétriques sont utilisées.
c AC IN
À relier à une prise d’alimentation avec le cordon d’alimentation fourni. Avant de
brancher le cordon d’alimentation, assurez-vous que tous les autres appareils
sont raccordés.
Veillez à utiliser le cordon d’alimentation fourni.
d Prise PHONES (page 18)
Pour raccorder un casque d’écoute.
e Prise MIC (page 23)
Pour raccorder un microphone.
f Prises AUX IN (page 23)
Raccordez-le à la prise de sortie d’un dispositif externe (échantillonneur, dispositif audio portable, etc.)
Crochet de cordon
Le câble USB est maintenu en place lorsqu’il est pris dans le crochet de cordon.
Ceci empêche le câble USB d’être tiré accidentellement et sa fiche d’être débranchée du port.
! Le son sera interrompu si le câble USB est débranché pendant la lecture.
Câble USB
Fr
11
Page 42

Fr
12
Réglage de cet appareil
USBCD
PHONO
TRAKTOR
BROWSE VIEW
PUSH
TREE FLD OPEN
LOAD
A
DUPLICATE
LOAD
B
DUPLICATE
Veillez à installer le pilote exclusif de cet appareil avant de le raccorder à un ordinateur avec le câble USB.
1 Réglez le sélecteur d’entrée [CD, PHONO, USB].
Réglez-le sur [USB].
2 Raccordez cet appareil à votre ordinateur avec un câble USB.
Cet appareil est un dispositif audio conforme aux normes ASIO.
! Cette opération ne fonctionne pas avec les ordinateurs ne prenant pas en
charge l’USB 2.0.
! Lorsque des applications prenant en charge ASIO sont utilisées, [USB 1/
[USB 3/ 4] et [USB 5/ 6] peuvent être utilisées comme entrées.
! L’environnement opérationnel recommandé pour l’ordinateur dépend de l’ap-
plication DJ. Veillez à vérifier l’environnement opérationnel recommandé pour
l’application DJ que vous utilisez.
! Si un autre appareil audio USB est raccordé en même temps à l’ordinateur, il
peut ne pas fonctionner ou ne pas être reconnu normalement.
Il est conseillé de raccorder seulement l’ordinateur et cet appareil.
! L’ordinateur et cet appareil devraient être raccordés directement au port USB de
cet appareil.
3 Appuyez sur la touche [POWER].
Allumez cet appareil.
! Le message [Installation du pilote logiciel de périphérique] peut apparaître
la première fois que cet appareil est raccordé à l’ordinateur ou lorsqu’il est rac-
cordé à un autre port USB de l’ordinateur. Attendez un instant que le message
[Vos périphériques sont prêts à être utilisés.] apparaisse.
! Installation sur Windows XP
— [Autorisez-vous Windows à se connecter à Windows Update pour
rechercher des mise à jour ?] peut apparaître au cours de l’installation.
Sélectionnez [Non, pas pour cette fois] et cliquez sur [Suivant] pour
continuer l’installation.
— [Quelle tâche voulez-vous que l'Assistant exécute ?] peut apparaître
au cours de l’installation. Sélectionnez [Installer le logiciel automatique-
ment (recommandé)] et cliquez sur [Suivant] pour continuer l’installation.
— Si [Sécurité de Windows] apparaît à l’écran au cours de l’installation,
cliquez sur [Installer ce pilote quand même] et continuez l’installation.
2],
Lecture de morceaux
1 Spécifiez le CONTROL CD sur le lecteur DJ.
! Pour utiliser un lecteur analogique, spécifiez le CONTROL VINYL.
2 Réglez TRAKTOR sur le mode [Scratch Control].
Assurez-vous que la section droite du bouton [d] dans TRAKTOR apparaît de la
façon suivante.
! Si [CUE] et [CUP] apparaissent, réglez TRAKTOR sur le mode [Scratch Control]
sur l’ordinateur.
3 Appuyez sur la touche [f (REL.)] ou [CUE (ABS.)] tout en
appuyant sur la touche [SHIFT].
Sélectionnez le mode Relatif ou Absolu.
— Appuyez sur la touche [f (REL.)] tout en appuyant sur la touche [SHIFT] :
Bascule sur le mode Relatif.
Le mode Relatif est un mode qui ignore la position de lecture de CONTROL
CD/
CONTROL VINYL.
— Appuyez sur la touche [CUE (ABS.)] tout en appuyant sur la touche [SHIFT] :
Bascule sur le mode Absolu.
Le mode Absolu est un mode qui reflète la position de lecture de CONTROL
CONTROL VINYL à la position de lecture du morceau.
CD/
4 Tournez le sélecteur rotatif.
Sélectionnez le morceau.
5 Appuyez sur la touche [LOAD (DUPLICATE)].
Le morceau sélectionné est chargé sur la platine.
Changement des réglages de l’utilitaire
de réglage
1 Affichage de l’utilitaire de réglage
! Pour Windows
Cliquez sur le menu [Démarrer] > [Tous les programmes] > [Pioneer] >
[DJM-T1] > [Utilitaire de réglage du DJM-T1].
! Pour Mac OS X
Cliquez sur l’icône [Macintosh HD] > [Application] > [Pioneer] > [DJM-
T1] > [Utilitaire de réglage du DJM-T1].
2 Cliquez sur l’onglet [MIXER OUTPUT].
3 Cliquez sur le menu déroulant de [Mixer Audio Output].
Faites le réglage suivant, selon les dispositifs raccordés à cet appareil.
USB 1/ 2 CH1 Timecode CD CH1 Timecode PHONO
USB 3/
Lorsqu’un lecteur DJ est utilisé
(CONTROL CD)
4 CH2 Timecode CD CH2 Timecode PHONO
Lorsqu’un lecteur analogique
est utilisé (CONTROL VINYL)
! Pour le détail sur la sélection de morceaux et le chargement de morceaux sur
les platines, reportez-vous à la page 14, Section d’exploration.
6 Lisez le CONTROL CD.
La lecture du morceau chargé sur la platine TRAKTOR commence.
! Pour utiliser un lecteur analogique, lisez le CONTROL VINYL.
Page 43

Fonctionnement
LOWLEVELINPUT SELECTMIC
PHONES
LRAUX
MIC AUXOFF
EQ HI
CROSS F. REVERSE
CROSS F. CURVE
THRU
ON OFF
121212120
MIDI
DECK ADECK B
FX ASSIGN
FX1
DRY/WET
DECK A /C
AUTO LOOP
HOT CUESAMPLER
ON
1
2
3
SELECT
GROUP
/ SINGLE
CH1 CH2
UTILITY
LOAD
DUPLICATE
WAKE UP
SNAP
FX
SELECT
LOOP
MOVE
SAMPLE
LEVEL
1
2
3
1
2
PLAY MODE
PHONES
4
3
ACTIVE
FX2
BOOTH MONITOR
MASTER
DRY/WET
DECK B /D
ON
1
2
3
FX
SELECT
1
2
3
CROSS F.
REVERSE
1
2
4
3
ACTIVE
A
CUE
LOAD
DUPLICATE
B
REL. REL.ABS. ABS.
LFO
LFO
LFO
GROUP
/ SINGLE
LFO
LFO
LFO
TAP
DEL DEL
CROSS.F. CONTROL
QUANTIZE
CUE
FX1 FX2 SYNC
CUE
TREE
BROWSE VIEW
PUSH
FLD OPEN
FX ASSIGN
FX1 FX2
MASTER
MASTER1
OVER
9
5
3
1
0
-
1
-
3
-
6
-
9
-
15
-
24
dB
OVER
9
5
3
1
0
-
1
-
3
-
6
-
9
-
15
-
24
dB
USBCD
PHONO
SYNC
MASTER
TRIM
9
TRIM
9
HI
6
MID
6
LOW
6
CUE
USBCD
PHONO
HI
6
MID
6
LOW
6
LEVEL
0
2
MIXING
MASTERCUE
HEADPHONES
0
CH 1CH 2
1
2
3
4
5
6
7
8
9
10
0
1
2
3
4
5
6
7
8
9
10
FEELING ADJ.
0
0
POWER
2 CHANNEL TRAKTOR MIXER
AUTO LOOP
SAMPLER HOT CUE
SELECT
LOOP
MOVE
SAMPLE
LEVEL
DEL DEL
CROSS.F. CONTROL
PLAY MODE
BEND BEND
SHIFT
LOCK
ON/OFF
MIDI
DECK A
FX ASSIGN
FX1
DRY/WET
ON
1
2
3
UTILITY
LOAD
WAKE UP
FX
SELECT
1
2
4
3
ACTIVE
FX2
BOOTH MONITOR
MASTER
DRY/WET
ON
1
2
3
FX
SELECT
1
2
4
3
ACTIVE
A
CUE
LOAD
B
FX1 FX2 SYNC
BROWSE VIEW
PUSH
FX ASSIGN
FX1 FX2
USBCD
PHONO
SYNC
USBCD
PHONO
HEADPHONES
MASTER1
9
5
3
1
0
-
1
-
3
-
6
-
9
-
15
dB
9
5
3
1
0
-
1
-
3
-
6
-
9
-
15
dB
2
DUPLICATE DUPLICATE
TREE FLD OPEN
MASTER MASTER
DECK A /C
GROUP
/ SINGLE
SNAP
LFO
LFO
LFO
GROUP
/ SINGLE
LFO
LFO
LFO
QUANTIZE
AUTO LOOP
HOT CUESAMPLER
SELECT
LOOP
MOVE
SAMPLE
LEVEL
DEL DEL DEL DEL
CROSS.F. CONTROL
REL. REL.ABS. ABS.
CUE CUE
BEND BEND
OVER
-
24
OVER
-
24
TAP
CUE
TAP
SHIFT
LOCK
0
1
2
3
4
5
6
7
8
9
10
0
1
2
3
4
5
6
7
8
9
10
CH 1CH 2
FEELING ADJ.
DJM -T1
2 CHANNEL TRAKTOR MIXER
DECK B /D
AUTO LOOP
SELECT
LOOP
MOVE
SAMPLE
LEVEL
CROSS.F. CONTROL
POWER
CROSS F.
REVERSE
PHONES
SAMPLER HOT CUE
CH1 CH2
ON/OFF
PLAY MODE PLAY MODE
DECK B
1
2
3
0
0
TRIM
9
HI
6
MID
6
LOW
6
TRIM
9
HI
6
MID
6
LOW
6
LEVEL
0
MIXING
MASTERCUE
1
2
3
3
8
3
3
4
5
4
7
5
1232
1
6
Français
1 Section d’exploration (page 14)
2 Section de transport (page 15)
3 Section de mixage (page 17)
4 Section des effets (page 19)
5 Section de repère instantané/
6 Section globale (page 23)
7 Section MIDI (page 23)
8 Section MIC/
AUX (page 23)
échantillonneur (page 21)
1 Touche SHIFT
! Appuyez sur une autre touche tout en appuyant sur la touche [SHIFT] :
L’autre fonction attribuée à la touche pressée est rappelée.
! Appuyez deux fois sur la touche [SHIFT] :
La touche [SHIFT] reste pressée et se verrouille dans cet état. Pour la déver-
rouiller, appuyez une nouvelle fois sur la touche [SHIFT].
2 Touche UTILITY (WAKE UP)
! Appuyez :
Le mode de veille automatique est annulé (page 26).
! Appuyez plus de 1 seconde :
Commute le mode pour le changement de réglages de l’appareil (page 26).
3 Indicateur POWER
S’éclaire lorsque cet appareil est allumé.
Fr
13
Page 44
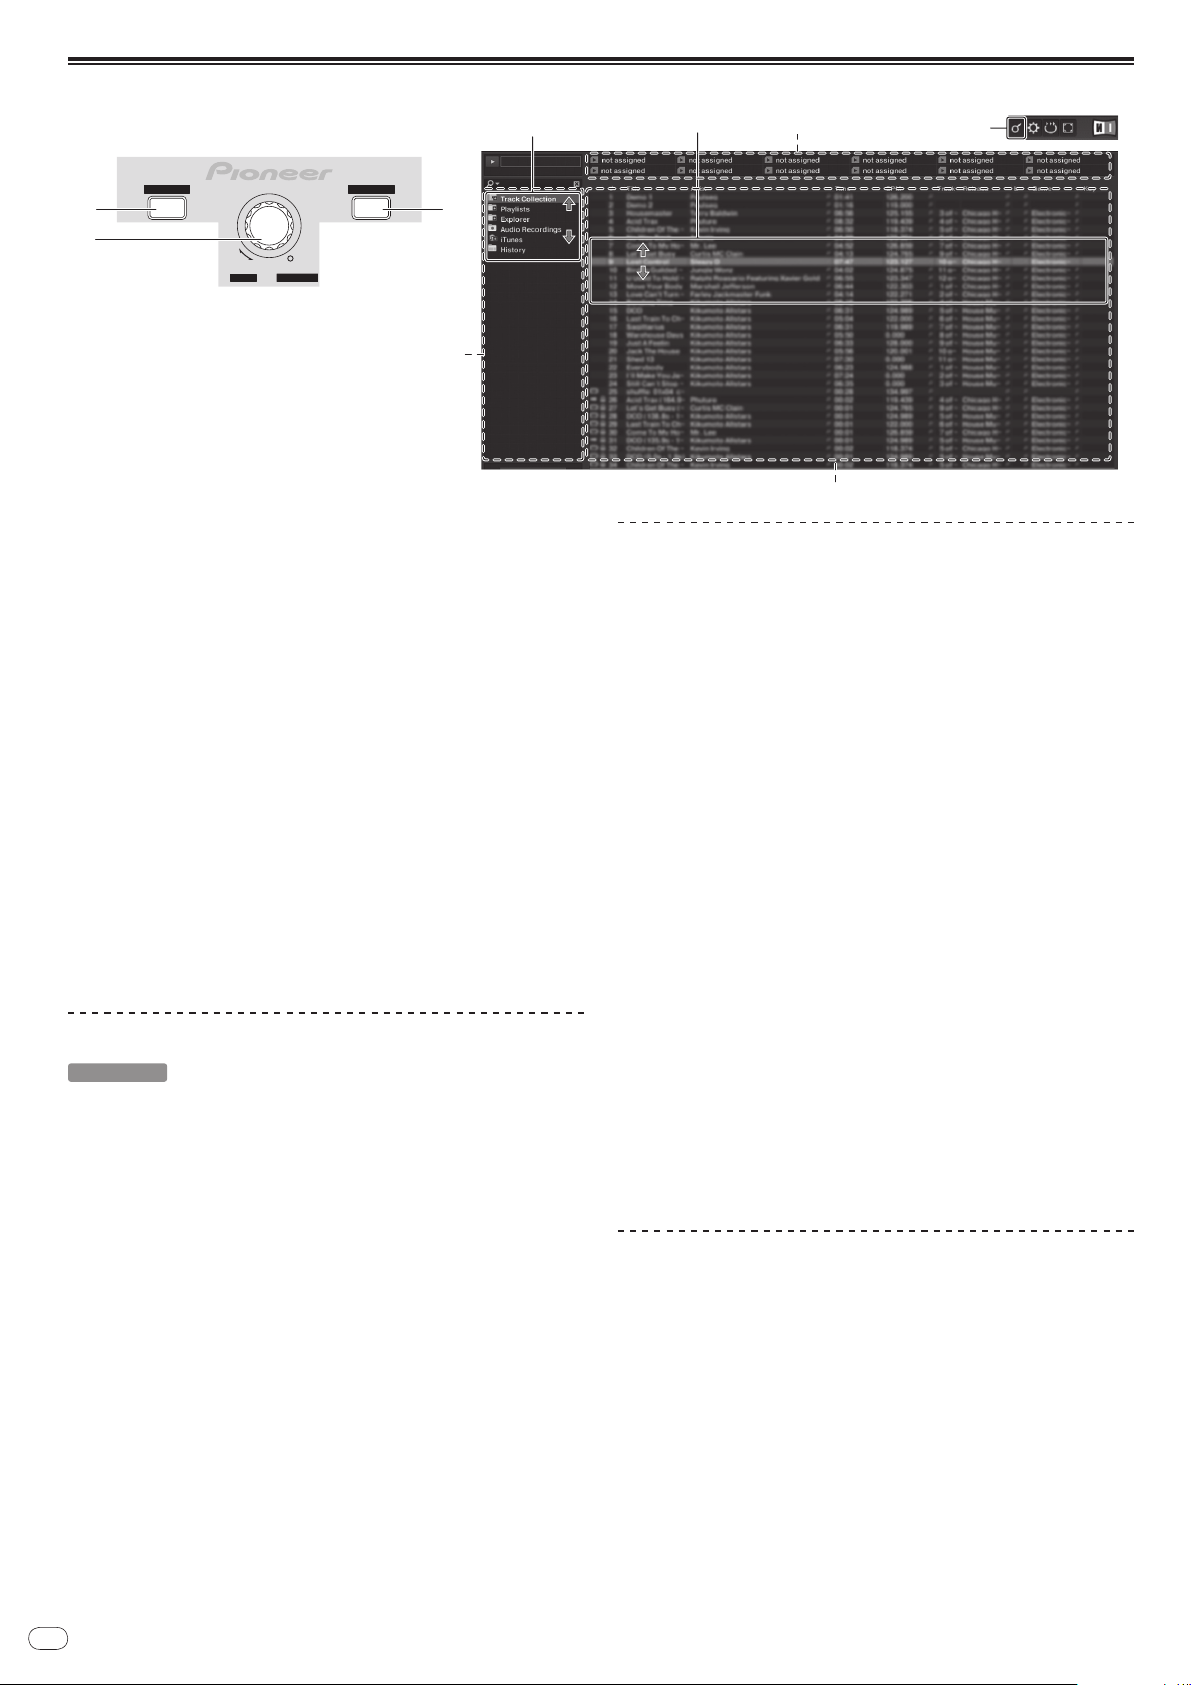
Fr
14
Section d’exploration
DECK ADECK B
LOAD
A
LOAD
B
REL. REL.
BROWSE VIEW
PUSH
DUPLICATE DUPLICATE
CUE ABS. CUEABS.TREE FLD OPEN
1
2
2
1
(SHIFT)+
2 2
(Pression)
1
3
2
TRAKTOR
1 Touche LOAD (DUPLICATE)
! Appuyez :
Le morceau sélectionné avec le curseur est chargé sur la platine
appropriée.
! [SHIFT] + pression :
Le morceau chargé sur l’une des platines est copié et chargé sur l’autre
platine.
2 Sélecteur rotatif
! Tournez :
Le curseur dans la section [TRACK] bouge.
! Appuyez :
L’affichage agrandi de la section [BROWSE] apparaît et disparaît.
! [SHIFT] + rotation :
Le curseur dans la section [TREE] bouge.
! [SHIFT] + pression :
Le dossier s’ouvre/
* Description des sections
— Section [TREE] : La section 1 sur le schéma ci-dessus est appelée la
section [TREE].
— Section [TRACK] : La section 2 sur le schéma ci-dessus est appelée la
section [TRACK].
— Section [FAVORITES] : La section 3 sur le schéma ci-dessus est appe-
lée la section [FAVORITES].
— Section [BROWSE] : Les sections 1, 2 et 3 sur le schéma ci-dessus
sont appelées collectivement la section [BROWSE].
se ferme.
Importation de morceaux dans TRAKTOR
Depuis Explorer ou Finder, tirez et déposez les fichiers de
musique ou les dossiers contenant les fichiers de musique dans
[Track Collection] dans la section [TREE] de TRAKTOR.
! Cliquez à droite sur [Track Collection] (sur Mac OS X, cliquez sur
[Track Collection] tout en appuyant sur la touche [control]), puis sélectionnez
[Import Music Folders] dans le menu. Tous les fichiers de musique se trouvant
dans le dossier [My Music] ou [Music] de votre système sont importés.
Chargement de morceaux sur les platines
1 Tournez le sélecteur rotatif tout en appuyant sur la touche
[SHIFT].
Sélectionnez la liste de lecture ou le dossier.
2 Appuyez sur le sélecteur rotatif tout en appuyant sur la
touche [SHIFT].
Le dossier s’ouvre/ se ferme.
! Les éléments sans signe [+] ne peuvent pas être ouverts/ fermés.
3 Relâchez la touche [SHIFT] et tournez le sélecteur rotatif.
Sélectionnez le morceau.
4 Appuyez sur la touche [LOAD (DUPLICATE)].
Le morceau sélectionné est chargé sur la platine.
Lecture de fichiers de musique iTunes
Si vous gérez vos fichiers de musique avec iTunes, vous pouvez accéder directement
à la bibliothèque et aux listes de lecture iTunes par le navigateur de TRAKTOR.
1 Tournez le sélecteur rotatif tout en appuyant sur la touche
[SHIFT].
Sélectionnez le dossier [iTunes].
2 Appuyez sur le sélecteur rotatif tout en appuyant sur la
touche [SHIFT].
Le dossier s’ouvre/ se ferme.
3 Parcourir la bibliothèque et les listes de lecture comme avec
iTunes
! La bibliothèque et les listes de lecture de iTunes peuvent être éditées avec le
navigateur de TRAKTOR.
! Lorsque les fichiers de musique de iTunes sont lus via le navigateur TRAKTOR,
ils sont automatiquement importés dans la liste [Track Collection] de
TRAKTOR.
Création de listes de lecture
1 Cliquez à droite sur [Playlists] dans la section [TREE] de
TRAKTOR.
! Pour Mac OS X, cliquez dessus tout en appuyant sur la touche [control].
2 Sur le menu, sélectionnez [Create Playlist].
3 Saisissez le nom de la liste de lecture, puis cliquez sur [OK].
La liste de lecture créée apparaît dans [Playlists].
4 Tirez et déposez les fichiers de musique dans la liste de lecture
que vous avez créée pour les ajouter.
Création d’un FAVORITES
Tirez et déposez le dossier d’une liste de lecture dans un slot
ouvert de la section [FAVORITES].
Utilisation de la fonction de copie
Cette fonction permet de copier facilement les morceaux chargés sur une des platines sur l’autre platine.
! La copie de la platine [A] sur la platine [B] s’effectue de la façon suivante.
1 Sélectionnez le morceau, puis appuyez sur le bouton [LOAD
(DUPLICATE)] de la platine [A].
Le morceau est chargé sur la platine [A].
2 Appuyez sur la touche [LOAD (DUPLICATE)] de la platine [B]
tout en appuyant sur la touche [SHIFT].
Le morceau chargé sur la platine [A] est copié et chargé sur la platine [B].
Page 45

Section de transport
DECK ADECK B
FX ASSIGN
FX1 FX2 SYNC
BROWSE VIEW
PUSH
FX ASSIGN
FX1 FX2SYNC
TREE FLD OPEN
MASTER MASTER
REL. REL.ABS. ABS.
CUE CUE
BEND BEND
Mode Internal Playback
Mode Scratch Control
1 2
4 4
1 2
3 3
4
(SHIFT)+
4
(SHIFT)+
3
12
(SHIFT)+
2
(SHIFT)+
1
3
Français
1 Touche f (REL.)
! Appuyez :
Sert à lire/ interrompre la lecture de morceaux.
! [SHIFT] + pression :
Le mode de suivi de lecture TRAKTOR bascule en mode Relatif.
Le mode Relatif est un mode qui ignore la position de lecture de CONTROL
CD/ CONTROL VINYL.
2 Touche CUE (ABS.)
Pendant la pause
! Appuyez :
Un point de repère est posé à la position de la pause.
— Lorsque la fonction [SNAP] de TRAKTOR est désactivée :
Le point de repère est posé à la position actuelle de la pause, quelle que
soit la [Beat Grid].
— Lorsque la fonction [SNAP] de TRAKTOR est activée :
Le point de repère est posé à la même position que la [Beat Grid] la plus
proche.
Pendant la lecture
! Appuyez :
La lecture revient au point de repère et repères posés et la lecture se met en
pause (retour au repère).
Si la touche [CUE (ABS.)] est pressée et maintenue enfoncée après le retour
au point de repère, la lecture continue tant que la touche est maintenue
enfoncée.
! [SHIFT] + pression :
Le mode de suivi de lecture TRAKTOR bascule en mode Absolu.
Le mode Absolu est un mode qui reflète la position de lecture de CONTROL
CD/ CONTROL VINYL à la position de lecture du morceau.
3 Touche FX ASSIGN (s BEND t)
! Appuyez sur la touche [FX 1] :
Le bloc d’effets [FX 1] de TRAKTOR est affecté à la platine dont la touche
est pressée.
! Appuyez sur la touche [FX 2] :
Le bloc d’effets [FX 2] de TRAKTOR est affecté à la platine dont la touche
est pressée.
* Lorsque TRAKTOR SCRATCH DUO 2 est utilisé, l’affectation est fixe :
[FX 1] à la platine [A], [FX 2] à la platine [B].
Si vous faites une mise à jour à TRAKTOR SCRATCH PRO 2, [FX 1] et
[FX 2] pourront être affectés librement à la platine souhaitée.
! Appuyez sur les touches [SHIFT] + [FX 1] :
La vitesse de lecture du morceau ralentit temporairement.
! Appuyez sur les touches [SHIFT] + [FX 2] :
La vitesse de lecture du morceau augmente temporairement.
4 Touche SYNC (MASTER)
! Appuyez :
Les [BPM] et [Beat Grid] du morceau destiné à la platine correspondant à
la touche pressée se synchronisent sur le maître de synchronisation.
! [SHIFT] + pression :
La platine dont la touche a été pressée sert de maître pour la
synchronisation.
Lecture
Appuyez sur la touche [f (REL.)].
Pause
Pendant la lecture, appuyez sur la touche [f (REL.)].
Spécifiez le repère
1 Pendant la lecture, appuyez sur la touche [f (REL.)].
La lecture se met en pause.
2 Appuyez sur la touche [CUE (ABS.)].
Un point de repère [a] est posé à la position où la lecture a été mise en pause.
À ce moment le son est coupé.
! Lorsqu’un nouveau point de repère est posé, le point de repère antérieur est
supprimé.
Retour au point de repère (Back Cue)
Pendant la lecture, appuyez sur la touche [CUE (ABS.)].
L’appareil revient immédiatement au point de repère actuellement posé et s’y arrête.
! Lorsque la touche [f (REL.)] est pressée, la lecture démarre au point de
repère.
Vérification du point de repère (Cue Point Sampler)
Appuyez sur la touche [CUE (ABS.)] et maintenez enfoncée après
le retour au point de repère.
La lecture commence au point de repère posé.
La lecture continue tant que la touche [CUE (ABS.)] est maintenue enfoncée.
Inflexion du pitch
Appuyez sur la touche [FX 1] ou [FX 2] tout en appuyant sur la
touche [SHIFT].
— Appuyez sur les touches [SHIFT] + [FX 1] :
La vitesse de lecture du morceau ralentit temporairement.
— Appuyez sur les touches [SHIFT] + [FX 2] :
La vitesse de lecture du morceau augmente temporairement.
Synchronisation de la vitesse de lecture avec
d’autres platines (beat sync)
1 Appuyez sur la touche [SYNC (MASTER)] tout en tenant la
touche [SHIFT] enfoncée sur la platine en cours de lecture.
La platine dont la touche a été pressée sert de maître pour la synchronisation.
Fr
15
Page 46

Fr
16
2 Appuyez sur la touche [SYNC (MASTER)] de la platine ne
TRAKTOR
servant pas de maître pour la synchronisation.
Les [BPM] et [Beat Grid] du morceau destiné à la platine ne servant pas de maître
pour la synchronisation se synchronisent sur les [BPM] et [Beat Grid] du morceau
destiné à la platine servant de maître pour la synchronisation.
! Pour le détail sur la spécification du maître pour la synchronisation, reportez-
vous à la page 16, Spécification du maître pour la synchronisation.
! La synchronisation de temps peut ne pas agir correctement dans certains cas.
— Lorsque la longueur de la boucle est inférieure à 1 temps.
— Lorsque le [BPM] du morceau destiné à la platine servant de maître pour
la synchronisation est hors de la plage de réglage du tempo du morceau
destiné à la platine devant être synchronisée.
— Lorsque le morceau n’a pas été analysé.
Spécification du maître pour la synchronisation
Cliquez sur [ ].
Un des deux types suivants peut être sélectionné comme maître pour la
synchronisation.
— [MASTER] : La valeur du BPM spécifié par l’utilisateur ou la valeur du BPM
spécifiée par des frappes sert de maître.
— [AUTO] : Le maître est spécifié automatiquement. Lorsque deux platines
sont en cours de lecture et que la platine spécifiée comme maître est en
pause, l’autre platine devient automatiquement maître.
! Lorsque TRAKTOR SCRATCH DUO 2 est utilisé, [AUTO] est toujours spécifié.
Après la mise à jour à TRAKTOR SCRATCH PRO 2, vous pourrez sélectionner
[MASTER] ou [AUTO].
Page 47

Section de mixage
CUE
USBCD
PHONO
USBCD
PHONO
HEADPHONES
MASTER1
9
5
3
1
0
-
1
-
3
-
6
-
9
-
15
dB
9
5
3
1
0
-
1
-
3
-
6
-
9
-
15
dB
2
DE
OVER
-
24
OVER
-
24
TAP
CUE
TAP
SHIFT
LOCK
0
1
2
3
4
5
6
7
8
9
10
0
1
2
3
4
5
6
7
8
9
10
CH 1CH 2
FEELING ADJ.
DJM -T1
2 CHANNEL TRAKTOR MIXER
D
AU
SAMPLE
LEVEL
CRO
CROSS F.
REVERSE
SAMP
PLAY MO
1
2
3
TRIM
9
HI
6
MID
6
LOW
6
TRIM
9
HI
6
MID
6
LOW
6
LEVEL
0
MIXING
MASTERCUE
BOOTH MONITOR
MASTER
0
0
CROSS F. REVERSE
CROSS F. CURVE
THRU
ON OFF
1
2
3
4
6
7
8
5
3
4
6
7
d
5
f
g
b
c
99
a
e
Français
1 Commande MASTER LEVEL
Ajuste le niveau du son provenant des prises [MASTER1] et [MASTER2].
2 Commande BOOTH MONITOR
Règle le niveau des signaux audio présents en sortie à la prise [BOOTH].
3 Sélecteur d’entrée CD, PHONO, USB
Sélectionnez la source d’entrée de chaque canal correspondant aux appareils
raccordés à cet appareil.
— [CD] : Sélectionne le lecteur DJ raccordé aux prises [CD].
— [PHONO] : Sélectionne le lecteur analogique raccordé aux prises [PHONO].
— [USB] : Sélectionne le son de l’ordinateur raccordé au port [USB].
4 Commande TRIM
Règle le niveau des signaux audio présents à l’entrée de chaque canal.
5 Commandes EQ (HI, MID, LOW)
Ajustent la qualité du son des différents canaux.
Elles ajustent respectivement [HI] (aigu), [MID] (médium) et [LOW] (grave).
6 Touche CUE (TAP)
Appuyez sur la touche [CUE (TAP)] du canal que vous voulez contrôler.
7 Fader de canal
Règle le niveau des signaux audio présents à la sortie de chaque canal.
8 Crossfader
Le son des canaux corresponds est restitué selon la courbe sélectionnée avec le
sélecteur [CROSS F. CURVE (THRU, , )].
9 Indicateur de niveau de canal
Indique le niveau sonore des différents canaux avant de passer par les faders de
canaux.
a Indicateur de niveau principal
Affiche le niveau du son provenant des prises [MASTER1] et [MASTER2].
b Commande HEADPHONES MIXING
Ajuste la balance du volume de contrôle entre le son du canal dont la touche
[CUE (TAP)] est pressée et le son du canal [MASTER].
c Commande HEADPHONES LEVEL
Ajuste le niveau du son provenant de la prise [PHONES].
d Orifice de réglage FEELING ADJ.
Permet d’ajuster la dureté de glisse du crossfader.
e Indicateur CROSS F. REVERSE
S’éclaire lorsque le commutateur [CROSS F. REVERSE] est activé.
f Sélecteur CROSS F. CURVE (THRU, , )
Les caractéristiques de la courbe du crossfader changent.
g Commutateur CROSS F. REVERSE
Active et désactive l’inversion de crossfader.
N’exercez pas de force excessive lorsque vous tirez les boutons de fader de canal
et de crossfader. Les boutons ne peuvent pas être détachés. L’appareil peut être
endommagé par une force excessive.
Restitution du son
Réglez le volume des amplificateurs de puissance raccordés aux prises [MASTER1]
et [MASTER2] au niveau approprié. Le son sera fort si le niveau sonore est réglé trop
haut.
1 Réglez le sélecteur d’entrée [CD, PHONO, USB].
Sélectionnez la source d’entrée de chaque canal correspondant aux appareils raccordés à cet appareil.
2 Tournez la commande [TRIM].
Règle le niveau des signaux audio présents à l’entrée de chaque canal.
3 Poussez le fader de canal loin de vous.
Règle le niveau des signaux audio présents à la sortie de chaque canal.
4 Réglez le crossfader
Basculez sur le canal dont le son est restitué par les enceintes.
— Côté gauche : Le son de [CH 1] est restitué.
— Position centrale : Le son de [CH 1] et [CH 2] est mixé et restitué.
— Côté droit : Le son de [CH 2] est restitué.
! Cette opération est inutile si le sélecteur [CROSS F. CURVE (THRU, , )] est
réglé sur [THRU].
5 Tournez la commande [MASTER LEVEL].
Les signaux audio sont restitués par les prises [MASTER1] et [MASTER2].
Réglage de la qualité du son
Tournez les commandes [EQ (HI, MID, LOW)] des différents
canaux.
Reportez-vous à la page 31, Spécifications pour la plage de réglage du son de chaque
commande.
Fr
17
Page 48

Fr
18
Contrôle du son par un casque
1 Raccordez le casque à la prise [PHONES].
2 Appuyez sur la touche [CUE (TAP)] du canal que vous voulez
contrôler.
3 Tournez la commande [HEADPHONES MIXING].
Ajuste la balance du volume de contrôle entre le son du canal dont la touche [CUE
(TAP)] est pressée et le son du canal [MASTER].
! Pour contrôler seulement le son du canal [MASTER], tournez la commande
[HEADPHONES MIXING] dans le sens horaire depuis la position centrale.
4 Tournez la commande [HEADPHONES LEVEL].
Le son du canal dont la touche [CUE (TAP)] est pressée et le son du canal [MASTER]
sont mélangés et restitués par le casque.
! Le contrôle s’annule par un nouvel appui sur la touche [CUE (TAP)].
Sélectionnez les caractéristiques de la courbe du
crossfader.
Commutez le sélecteur [CROSS F. CURVE (THRU, , )].
— [THRU] : Choisissez cette option si vous ne voulez pas utiliser le crossfader.
— [ ] : Sélectionnez cette option si vous voulez une courbe ascendante
douce.
— [ ] : Définit une courbe brusquement ascendante. (Alors que le cross-
fader est éloigné du côté [CH 1], le son du côté [CH 2] est immédiatement
restitué.)
Réglage de la dureté de glisse du crossfader
La dureté de glisse (résistance) du crossfader peut être ajustée avec un tournevis à
tête plate.
! La courbe d’atténuation du crossfader et le jeu aux deux extrémités du fader (le
démarrage du point d’attaque) peuvent être ajustés. Pour le détail, reportez-vous
à la page 26, Changement des réglages de cet appareil.
1 Déplacez le crossfader vers la droite ([CH 2]).
2 Insérez la tête du tournevis à tête plate dans l’orifice de
réglage [FEELING ADJ.] et tournez.
— Rotation horaire : La dureté de glisse diminue (la résistance du fader est
plus faible).
— Rotation antihoraire : La dureté de glisse augmente (la résistance du fader
est plus forte).
Utilisation de l’inversion de fader
Le sens opératoire du crossfader peut être inversé lorsque le commutateur
[CROSS F. REVERSE] est activé.
Réglez le commutateur [CROSS F. REVERSE] sur [ON].
Le son est restitué par la prise [BOOTH].
Tournez la commande [BOOTH MONITOR].
Règle le niveau des signaux audio présents en sortie à la prise [BOOTH].
Page 49

Section des effets
FX1
DRY/WET
ON
1
2
3
FX
SELECT
GROUP
/ SINGLE
LFO
LFO
LFO
1
2
3
Mode Group
Mode Single
1 3
2 4
(SHIFT)+2
(SHIFT)+
4
3
4
2
(SHIFT)+2
(SHIFT)+
3
3 2
1 4
Français
1 Touche ON (GROUP/ SINGLE)
Lorsque le mode [Group] est utilisé
! Appuyez :
Ne fonctionne pas.
! [SHIFT] + pression :
Active le mode panneau d’effets.
Mode [Group] h Mode [Single]
Lorsque le mode [Single] est utilisé
! Appuyez :
Active et désactive l’effet.
! [SHIFT] + pression :
Active le mode panneau d’effets.
Mode [Group] h Mode [Single]
— Mode [Group] :
Trois effets au maximum peuvent être sélectionnés et utilisés simultané-
ment pour chaque panneau d’effets.
— Mode [Single] :
Les paramètres de l’effet sélectionné peuvent être actionnés dans le
détail.
Le mode [Single] ne peut pas être sélectionné avec TRAKTOR SCRATCH
DUO 2.
Le panneau d’effets peut passer au mode [Single] après la mise à jour à
TRAKTOR SCRATCH PRO 2.
2 Touches de commande d’effet
Lorsque le mode [Group] est utilisé
! Appuyez :
Active et désactive les effets.
! [SHIFT] + pression :
— Lorsque [Generic Controller Mode] est activé dans les réglages de cet
appareil :
Commute le type d’effet.
— Lorsque [Generic Controller Mode] est désactivé dans les réglages de
cet appareil :
Active et désactive la fonction LFO CONTROL.
Lorsque le mode [Single] est utilisé
! Appuyez sur la touche [1] :
Rétablit les réglages de base des paramètres de tous les effets.
! Appuyez sur la touche [2] ou [3] :
Active et désactive l’effet correspondant. Le type de paramètre diffère selon
l’effet.
! Appuyez sur les touches [SHIFT] + [1] :
— Lorsque [Generic Controller Mode] est activé dans les réglages de cet
appareil :
Commute le type d’effet.
— Lorsque [Generic Controller Mode] est désactivé dans les réglages de
cet appareil :
Active et désactive la fonction LFO CONTROL.
! Appuyez sur les touches [SHIFT] + [2] ou [SHIFT] + [3] :
— Lorsque [Generic Controller Mode] est activé dans les réglages de cet
appareil :
Ne fonctionne pas.
— Lorsque [Generic Controller Mode] est désactivé dans les réglages de
Active et désactive la fonction LFO CONTROL.
3 Commande DRY/WET
Lorsque le mode [Group] est utilisé
! Tournez :
Règle la balance entre l’effet sonore et le son original.
! [SHIFT] + rotation :
cet appareil :
Lorsque le mode [Single] est utilisé
4 Molettes de commande d’effet
Lorsque le mode [Group] est utilisé
Lorsque le mode [Single] est utilisé
Utilisation de la fonction Effets
! La section suivante explique comment utiliser les effets en mode [Group].
1 Appuyez sur la touche [FX 1] ou [FX 2].
Le bloc d’effets TRAKTOR est affecté à la platine.
! Lorsque TRAKTOR SCRATCH DUO 2 est utilisé, l’affectation est fixe : [FX 1] à la
platine [A], [FX 2] à la platine [B].
Si vous faites une mise à jour à TRAKTOR SCRATCH PRO 2, [FX 1] et [FX 2]
pourront être affectés librement à la platine souhaitée.
2 Tournez un bouton de commande d’effet tout en appuyant
sur la touche [SHIFT].
Cette touche sélectionne le type d’effet.
! Lorsque [Generic Controller Mode] est activé dans les réglages de cet appa-
reil, le type d’effet peut aussi être sélectionné en maintenant la touche [SHIFT]
enfoncée et appuyant sur une touche de commande d’effet.
3 Tournez la molette de commande d’effet.
Ajuste le degré de l’effet sonore.
4 Appuyez sur la touche de commande d’effet.
L’effet est mis en service.
! L’effet se désactive par une nouvelle pression sur cette touche.
5 Tournez la commande [DRY/WET].
Ajustez la balance entre le son de tous les effets simultanés et le son original.
Ne fonctionne pas.
! Tournez :
Règle la balance entre l’effet sonore et le son original.
! [SHIFT] + rotation :
Commute le type d’effet.
! Tournez :
Ajuste le degré de l’effet correspondant.
! [SHIFT] + rotation :
Commute le type d’effet.
* Lorsque la fonction LFO CONTROL est activée
— Tournez :
Ajuste le cycle de changement de degré pour chaque effet.
— [SHIFT] + rotation :
Ne fonctionne pas.
! Tournez :
Ajuste le paramètre correspondant.
! [SHIFT] + rotation :
Ne fonctionne pas.
* Lorsque la fonction LFO CONTROL est activée
— Tournez :
Ajuste le cycle selon lequel le paramètre correspondant change.
— [SHIFT] + rotation :
Ne fonctionne pas.
Fr
19
Page 50

Fr
20
Utilisation de la fonction LFO CONTROL
Lorsque la fonction LFO CONTROL est activée, la valeur du paramètre de l’effet
envoyé à TRAKTOR peut être changée à la vitesse spécifiée. Ceci permet de créer
des effets sonores uniques, ce qui est impossible manuellement.
Avec la fonction LFO CONTROL, les touches de commande d’effet [1] – [3] peuvent
être réglées séparément.
! Désactivez d’abord [Generic Controller Mode] dans les réglages de cet appa-
reil. Pour le détail, reportez-vous à la page 26, Changement des réglages de cet
appareil.
! La section suivante explique comment utiliser la fonction LFO CONTROL en
mode [Group].
1 Tournez un bouton de commande d’effet tout en appuyant
sur la touche [SHIFT].
Cette touche sélectionne le type d’effet.
2 Appuyez sur une touche de commande d’effet tout en
appuyant sur la touche [SHIFT].
La fonction LFO CONTROL est activée.
Si l’effet est désactivé, il s’active simultanément.
! Si la même touche est pressée une nouvelle fois, la fonction LFO CONTROL se
désactive et l’effet s’active de nouveau.
3 Tournez la molette de commande d’effet.
Ajuste le cycle de changement de degré pour chaque effet.
4 Tournez la commande [DRY/WET].
Ajustez la balance entre le son de tous les effets simultanés et le son original.
Page 51

Section de repères instantanés/ échantillonneur
1
2
4
3
ACTIVE
DECK A /C
AUTO LOOP
HOT CUESAMPLER
SELECT
LOOP
MOVE
SAMPLE
LEVEL
DEL DEL
CROSS.F. CONTROL
PLAY MODE
Mode HOT CUE
Mode SAMPLER
1
2
3
5
4
1
54
(SHIFT)+
5
(SHIFT)+
1
4
TRAKTOR
Français
1 Commande AUTO LOOP (LOOP MOVE/ SAMPLE VOLUME)
Lorsqu’elle est utilisée avec la fonction de repère instantané
! Tournez :
Change la longueur de la boucle.
! Appuyez :
Active/ désactive la lecture en boucle.
! [SHIFT] + rotation :
Déplace la position de la boucle.
! [SHIFT] + pression :
Ne fonctionne pas.
Lorsqu’elle est utilisée avec la fonction d’échantillonneur
! [SHIFT] + rotation :
Ajuste le volume de la platine d’échantillons.
! [SHIFT] + pression :
Rétablit le réglage de base du volume de la platine d’échantillons.
2 Touche SELECT
! Appuyez :
Commute la fonction de la section de repère instantané/ échantillonneur à
chaque pression.
Fonction Repères instantanés h Fonction Échantillonneur
! [SHIFT] + pression :
Active et désactive la fonction CROSS FADER CONTROL.
3 Indicateur SELECT
S’éclaire ou clignote selon la fonction de la section de repère instantané/
échantillonneur.
— Lorsque la fonction Repères instantanés est spécifiée : S’éclaire en vert.
— Lorsque la fonction Échantillonneur est spécifiée : S’éclaire en orange.
— Lorsque la fonction CROSS FADER CONTROL est activée : Clignote en vert
ou orange.
4 Touche HOT CUE/ SAMPLER
Lorsqu’elle est utilisée avec la fonction de repère instantané
! Appuyez :
— Lorsqu’aucun repère instantané n’est posé pendant la lecture ou la
pause :
Un repère instantané est posé à la position où la touche est pressée.
— Lorsqu’un repère instantané est posé pendant la lecture ou la pause :
Rappelle le repère instantané.
! [SHIFT] + pression :
Supprime le repère instantané.
*
[CUE TYPE] (le type de repère instantané) peut être changé en cliquant
sur [b] à la gauche de l’icône [ ].
Lorsqu’elle est utilisée avec la fonction d’échantillonneur
Pour le détail, reportez-vous à la page 22, Tableau de fonctionnement des
touches HOT CUE/ SAMPLER.
5 Touche ACTIVE
Lorsqu’elle est utilisée avec la fonction de repère instantané
! Appuyez :
Commute le mode de lecture de la boucle enregistrée à un repère
instantané.
La boucle est lue h La boucle n’est pas lue
Lorsqu’elle est utilisée avec la fonction d’échantillonneur
! Appuyez :
Commute le mode de la touche [HOT CUE/ SAMPLER] de la platine
d’échantillons.
Mode de lecture d’échantillon h Mode de lecture par déclencheur
Pour le détail, reportez-vous à la page 22, Tableau de fonctionnement des
touches HOT CUE/ SAMPLER.
! [SHIFT] + pression :
Commute le mode de boucle de l’échantillon sur la platine d’échantillons.
Mode de lecture en boucle h Mode de lecture unique
— [ ] Mode de lecture en boucle :
À la fin de l’échantillon, la lecture revient au début de l’échantillon et se
poursuit.
— [ ] Mode de lecture unique :
À la fin de l’échantillon, la lecture de l’échantillon s’arrête.
Utilisation de la fonction de repère instantané
1 Appuyez sur la touche [SELECT].
La section de repère instantané/ échantillonneur bascule sur la fonction de repère
instantané.
Bascule sur le mode où l’indicateur [SELECT], la touche [HOT CUE/ SAMPLER] et la
touche [ACTIVE] s’éclairent en vert.
2 Appuyez sur la touche [HOT CUE/ SAMPLER].
Un repère instantané est posé à la position de lecture au moment où la touche est
pressée.
! Lorsque la touche [HOT CUE/ SAMPLER] est pressée pendant la lecture en
boucle, la boucle en cours de lecture est sauvegardée sur la touche de repère
instantané.
! Cette opération est inutile si un repère instantané a déjà été enregistré sur la
touche [HOT CUE/ SAMPLER].
3 Pendant la lecture ou pendant la pause, appuyez sur la touche
[HOT CUE/ SAMPLER].
Le repère instantané est rappelé.
! Si une boucle est enregistrée sur la touche [HOT CUE/ SAMPLER], appuyez sur
la touche [ACTIVE] pour changer de mode de lecture en boucle.
Utilisation de la fonction d’échantillonnage
Les échantillons peuvent être chargés dans les slots d’échantillonnage de la platine
d’échantillons [C] et de la platine d’échantillons [D] pour être lus.
! Lorsque la platine d’échantillons [C] est utilisée :
— Le morceau de la platine [A] est chargé dans la fente d’échantillon.
— Les touches [HOT CUE/ SAMPLER] sur le côté [CH 1] de cet appareil corres-
pondent à chaque slot d’échantillonnage.
! Lorsque la platine d’échantillons [D] est utilisée :
— Le morceau de la platine [B] est chargé dans la fente d’échantillon.
— Les touches [HOT CUE/ SAMPLER] sur le côté [CH 2] de cet appareil corres-
pondent à chaque slot d’échantillonnage.
! Le fonctionnement des touches [HOT CUE/
de boucle de l’échantillon et le mode de la touche [HOT CUE/ SAMPLER]. Pour
SAMPLER] diffère selon le mode
Fr
21
Page 52

Fr
22
le détail, reportez-vous à Tableau de fonctionnement des touches HOT CUE/
SAMPLER.
! La section suivante explique comment charger un morceau de la platine [A]
dans le slot d’échantillonnage de la platine d’échantillons [C] pour le lire.
Utilisez la section Repère instantané/ Échantillonneur du côté [CH 1] de cet
appareil.
1 Chargez le morceau sur la platine [A].
2 Appuyez sur la touche [SELECT].
Basculer la section Repère instantané/ Échantillonneur sur la fonction
d’échantillonneur.
Bascule sur le mode où l’indicateur [SELECT], la touche [HOT CUE/ SAMPLER] et la
touche [ACTIVE] s’éclairent en orange.
3 Appuyez sur la touche [HOT CUE/ SAMPLER].
Le morceau chargé sur la platine [A] est chargé dans la fente d’échantillonnage de
la platine d’échantillons [C].
! Le morceau est échantillonné pendant 48 secondes à partir de la position de
lecture au moment où la touche a été pressée, et il est chargé dans le slot
d’échantillonnage.
! Le morceau sélectionné avec le curseur dans la section [TRACK] peut être
chargé dans le slot d’échantillonnage en tenant la touche [SHIFT] et appuyant
sur la touche [HOT CUE/ SAMPLER]. (Les morceaux durant plus de 48 secondes
ne peuvent pas être chargés.)
4 Appuyez sur la touche [ACTIVE] tout en appuyant sur la
touche [SHIFT].
Le mode de boucle de l’échantillon change.
— [
] Mode de lecture en boucle :
À la fin de l’échantillon, la lecture revient au début de l’échantillon et se
poursuit.
— [ ] Mode de lecture unique :
À la fin de l’échantillon, la lecture de l’échantillon s’arrête.
5 Appuyez sur la touche [ACTIVE].
Le mode de la touche [HOT CUE/ SAMPLER] change.
— Mode de lecture d’échantillon :
L’échantillon est lu ou le son coupé chaque fois que la touche est pressée.
— Mode de lecture par déclencheur :
Lorsque la touche est pressée, l’échantillon est lu du début et s’arrête lors-
que la touche est relâchée.
! Pour le détail, reportez-vous à la page 22, Tableau de fonctionnement des touches
HOT CUE/ SAMPLER.
6 Appuyez sur la touche [HOT CUE/ SAMPLER] ou appuyez sur la
touche [HOT CUE/ SAMPLER] et maintenez-la enfoncée.
L’échantillon est lu.
! Lorsque la touche [HOT CUE/ SAMPLER] est à nouveau pressée ou la touche
[HOT CUE/ SAMPLER] relâchée, le son de l’échantillon est coupé.
Utilisation de la fonction CROSS FADER
CONTROL
CROSS FADER CONTROL est une fonction permettant de rappeler des repères
instantanés et de lancer la lecture d’échantillons avec le crossfader.
! Effectuez d’abord les préparatifs suivants.
— Désactivez [Generic Controller Mode] dans les réglages de cet appareil.
= Reportez-vous à la page 26, Changement des réglages de cet appareil.
— Enregistrez un repère instantané sur la platine [A] ou [B].
= Reportez-vous à la page 21, Utilisation de la fonction de repère instantané.
— Chargez un échantillon sur la platine d’échantillons [C] ou [D].
= Reportez-vous à la page 21, Utilisation de la fonction d’échantillonnage.
! La section fonctionne différemment selon les platines devant être associées.
— Pour associer la platine [A] et la platine d’échantillons [C] :
Utilisez la section Repère instantané/
Échantillonneur du côté [CH 1] de cet
appareil.
— Pour associer la platine [B] et la platine d’échantillons [D] :
Utilisez la section Repère instantané/ Échantillonneur du côté [CH 2] de cet
appareil.
! Lorsque le commutateur [CROSS F. REVERSE] est activé, la direction du crossfader
est inversée.
1 Appuyez sur la touche [SELECT] tout en appuyant sur la
touche [SHIFT].
La fonction CROSS FADER CONTROL est activée.
L’indicateur [SELECT] clignote.
! La fonction CROSS FADER CONTROL se désactive par une nouvelle pression sur
la touche [SELECT] tandis que la touche [SHIFT] est maintenue enfoncée.
2 Appuyez sur la touche [SELECT].
Sélectionnez la fonction devant être associée à la fonction CROSS FADER
CONTROL (la fonction de repère instantané ou la fonction d’échantillonneur).
— Pour associer la fonction de repère instantané :
Bascule sur le mode où l’indicateur [SELECT], la touche [HOT CUE/
SAMPLER] et la touche [ACTIVE] s’éclairent et clignotent en vert.
— Pour associer la fonction d’échantillonneur :
Bascule sur le mode où l’indicateur [SELECT], la touche [HOT CUE/
SAMPLER] et la touche [ACTIVE] s’éclairent et clignotent en orange.
! Il est également possible d’associer la fonction de repère instantané et la fonc-
tion d’échantillonneur au fonctionnement du crossfader. (Le repère instantané
et l’échantillon à associer au crossfader doivent être sélectionnés séparément
pour chaque fonction.)
3 Appuyez sur la touche [HOT CUE/ SAMPLER].
Sélectionnez le repère instantané et l’échantillon devant être associés au fonctionnement du crossfader.
— Pour sélectionner un repère instantané :
Appuyez sur la touche [HOT CUE/ SAMPLER] où le repère instantané doit
être posé. Seul un des repères instantanés [1] – [4] peut être sélectionné.
— Pour sélectionner un échantillon :
Appuyez sur la touche [HOT CUE/ SAMPLER] où l’échantillon est chargé.
Jusqu’à quatre échantillons [1] – [4] peuvent être sélectionnés.
! Cette procédure ne permet pas de lire le repère instantané et l’échantillon.
! La sélection s’annule par une nouvelle pression sur la touche [HOT CUE/
SAMPLER].
4 Bougez le crossfader.
Déplacez le crossfader vers le côté opposé au côté où est posé le repère instantané
ou l’échantillon devant être associé à la fonction CROSS FADER CONTROL.
5 Bougez le crossfader.
Lorsque le crossfader est déplacé vers la droite du côté [CH 1], le repère instantané
de la platine [B] et l’échantillon de la platine [D] sont lus.
Lorsque le crossfader est déplacé vers la gauche du côté [CH 2], le repère instantané de la platine [A] et l’échantillon de la platine [C] sont lus.
Tableau de fonctionnement des touches HOT CUE/ SAMPLER
! Appuyez :
Slot d’échantillonnage
Lorsqu’aucun échantillon n’est chargé Le fichier de musique chargé sur la platine est chargé dans le slotd’échantillonnage sous forme d’échantillon en tant qu’échantillon.
Lorsqu’un échantillon est chargé La lecture de l’échantillon commence.
Pendant la lecture d’un échantillon
1 Le mode peut être commuté avec la touche [ACTIVE] (page 21).
2 Si l’échantillon est coupé, la mise en sourdine est annulée.
Mode de lecture d’échantillon
Le son de l’échantillon est coupé.
Si la pression dure plus d’une
seconde, la lecture de l’échantillon
s’arrête.
Mode de lecture en boucle
1
Mode de lecteur par
1
déclencheur
L’échantillon est lu tant que la touche
est tenue enfoncée.
Lorsque la touche est relâchée, la
lecture de l’échantillon s’arrête.
2
L’échantillon est localisé et la lecture
continue.
1
Mode de lecture unique
Mode de lecture d’échantillon
La lecture de l’échantillon commence.
La lecture de l’échantillon s’arrête.
! [SHIFT] + pression :
Slot d’échantillonnage
Lorsqu’aucun échantillon n’est chargé Le fichier de musique sélectionné dans la section [TRACK] est chargé dans le slot d’échantillonnage sous forme d’échantillon.
Lorsqu’un échantillon est chargé L’échantillon est supprimé.
Pendant la lecture d’un échantillon L’échantillon est supprimé.
1 Le mode peut être commuté avec la touche [ACTIVE] (page 21).
Mode de lecture d’échantillon
Mode de lecture en boucle
1
Mode de lecteur par
1
déclencheur
1
Mode de lecture unique
Mode de lecture d’échantillon
1
1
1
1
Mode de lecteur par
déclencheur
L’échantillon est lu tant que la touche
est tenue enfoncée.
Lorsque la touche est relâchée, la
lecture de l’échantillon s’arrête.
L’échantillon est localisé et la lecture
continue.
Mode de lecteur par
déclencheur
1
1
Page 53

Section globale
SNAP
QUANTIZE
1
1
(SHIFT)+
1
LOWLEVELINPUT SELECT
MIC AUXOFF
EQ HI
121212120
21 3
MIDI
CH1 CH2
ON/OFF
1
Section MIDI
1 Touche SNAP (QUANTIZE)
! Appuyez :
Active et désactive la fonction Snap de TRAKTOR.
Lorsque la fonction Snap est activée, les points de repères et de boucle sont
posés à la même position que la [Beat Grid] la plus proche.
! [SHIFT] + pression :
Active et désactive la fonction Quantize de TRAKTOR.
Lorsque la fonction Quantize est activée, le passage aux points de repères
et de boucle se synchronise sur les temps.
Section MIC/ AUX
1 Commutateur INPUT SELECT
Bascule l’entrée audio sur le dispositif externe ou le microphone.
— [AUX] : Le dispositif externe raccordé aux prises [AUX] est sélectionné.
— [OFF] : Le canal [MIC/ AUX] est désactivé.
— [MIC] : Le microphone raccordé à la prise [MIC] est sélectionné.
! Le son provenant des prises [MIC] et [AUX] est mélangé au son de [CH 1] et
[CH 2] qui a transité par le crossfader.
2 Commande LEVEL
Ajuste le niveau sonore à l’entrée des prises [MIC] et [AUX].
3 Commandes EQ (HI, LOW)
Ajustent le timbre du canal [MIC/ AUX].
Cet appareil fournit les informations concernant le fonctionnement des touches et
des commandes dans le format universel MIDI.
Lorsqu’il est raccordé par un câble USB à un ordinateur sur lequel un logiciel DJ
compatible MIDI est installé, le logiciel DJ peut être utilisé depuis cet appareil.
Fonctionnement du logiciel DJ avec la fonction
MIDI
Installez le logiciel DJ au préalable sur votre ordinateur. Effectuez aussi les réglages
audio et MIDI pour le logiciel DJ.
! Pour les instructions sur le réglage du canal MIDI, reportez-vous à la page 25,
Réglage du canal MIDI.
! Pour les messages fournis par cet appareil, reportez-vous à la page 27, Liste de
messages MIDI.
1 Raccordez la prise [USB] de cet appareil à l’ordinateur.
Pour les instructions sur le raccordement, reportez-vous à la page 11, Raccordement
des prises d’entrée/ sortie.
2 Lancez le logiciel DJ.
3 Appuyez sur la touche [CH 1] ou [CH 2].
La fonction MIDI de la section de mixage est activée.
La transmission des messages MIDI de la section de mixage commence.
! Lorsqu’un fader ou une commande est bougé, un message correspond à la
nouvelle position est envoyé.
! Lorsque la touche [CH 1] ou [CH 2] est à nouveau pressée, la transmission des
messages MIDI de la section de mixage s’arrête.
! Les messages MIDI de la section d’exploration, de la section de transport, de
la section des effets et de la section de repère instantané/ échantillonneur sont
transmis sans tenir compte des touches [CH 1] et [CH 2].
Français
Restitution du son d’un microphone ou d’un
dispositif externe
1 Raccordez le dispositif externe à la prise [MIC] ou [AUX].
2 Changez la position du commutateur [INPUT SELECT].
3 Tournez la commande [LEVEL].
Ajuste le niveau sonore à l’entrée de la prise [MIC] ou [AUX].
! Attention, car une rotation jusqu’à la position extrême droite produit un son très
fort.
Réglage de la qualité du son
Tournez la commande [EQ (HI, LOW)].
Reportez-vous à la page 31, Spécifications pour la plage de réglage du son de chaque
commande.
Fr
23
Page 54

Fr
24
Changement des réglages
Changement des préférences de TRAKTOR
Changez les réglages d’environnement de TRAKTOR en fonction de l’emploi envisagé de votre matériel.
Pour le détail sur les réglages d’environnement de TRAKTOR, reportez-vous au
manuel de TRAKTOR.
! Pour rétablir les réglages d’environnement par défaut, veuillez consultez le site
suivant.
http:/ / www.prodjnet.com/ support/
1 Cliquez sur la touche TRAKTOR [ (Preferences Button)].
Ouvrez le menu de réglages de TRAKTOR.
2 Sélectionnez la catégorie et effectuez les réglages.
Mise à jour du logiciel TRAKTOR
Lorsque l’ordinateur est raccordé à Internet, le logiciel TRAKTOR peut être mis à
jour par le Native Instruments SERVICE CENTER (appelé simplement “SERVICE
CENTER” ci-dessous).
1 Lancez le SERVICE CENTER et connectez-vous.
Pour les instructions sur le lancement du SERVICE CENTER et la connexion, reportez-vous à la page 8, Lancement du SERVICE CENTER.
2 Cliquez sur l’onglet [Mise à jour].
Les mises à jour disponibles sont recherchées.
3 Cochez la case.
Spécifiez la mise à jour devant être téléchargées.
Catégorie Descriptions
Effects
Mix Recorder
Browser Details
File Management
Controller Manager
Traktor Kontrol X1
Spécifiez les types d’effets devant apparaître lors de la sélection d’effets.
Effectuez les réglages concernant les fonctions d’enregistrement de
TRAKTOR.
Effectuez les réglages concernant la section [BROWSE] et les polices.
Effectuez les réglages nécessaires pour l’importation de morceaux,
l’analyse automatique, la plage d’analyse du BPM, etc.
Affectez les fonctions de TRAKTOR aux commandes et touches de cet
appareil.
Spécifiez ceci lorsque Traktor Kontrol X1 de Native Instruments est
utilisé.
Changement des réglages de l’utilitaire
de réglage
L’utilitaire de réglage peut être utilisé pour effectuer les contrôles et réglages
suivants.
— Vérification de l’état du sélecteur d’entrée [CD, PHONO, USB] de cet appareil
— Réglage de la source des données audio transmis de cet appareil à l’ordinateur
— Réglage de la taille de la mémoire (lorsque ASIO de Windows est utilisé)
— Réglage du canal MIDI
— Vérification de la version du pilote
Affichage de l’utilitaire de réglage
! Lorsque TRAKTOR est utilisé, n’oubliez pas de sortir de l’utilitaire de réglages.
Pour Windows
Cliquez sur le menu [Démarrer] > [Tous les programmes] > [Pioneer] > [DJMT1] > [Utilitaire de réglage du DJM-T1].
Pour Mac OS X
Cliquez sur l’icône [Macintosh HD] > [Application] > [Pioneer] > [DJM-T1] >
[Utilitaire de réglage du DJM-T1].
4 Cliquez sur [Télécharger].
La mise à jour commence.
Listes des paramètres de TRAKTOR SCRATCH
DUO 2
Catégorie Descriptions
Audio Setup
Output Routing
Input Routing
Timecode Setup
Loading
Transport
Decks
Mixer
Global Settings
Sélectionnez les appareils audio devant être utilisés pour l’entrée et la
sortie audio.
Spécifiez la latence audio lorsqu’un ordinateur Macintosh est utilisé.
Sélectionnez [Mixing Mode].
— [Internal] : Sélectionnez cette option pour contrôler la section de
mixage de TRAKTOR depuis cet appareil.
— [External] : Sélectionnez cette option pour utiliser cet appareil.
Définissez le lien entre les sorties audio de la platine de TRAKTOR et les
canaux d’entrée de cet appareil.
Définissez le lien entre les entrées audio de la platine de TRAKTOR et
les canaux de sortie de cet appareil.
Définissez cette option pour utiliser les codes temporels (CONTROL
CONTROL VINYL).
CD/
Spécifiez les conditions et les fonctions pour le chargement des mor-
ceaux vers les platines.
Effectuez les réglages concernant le tempo et le verrouillage de tona-
lité.
Définissez la méthode d’affichage de la section platine de TRAKTOR.
Activez ou désactivez le gain automatique.
Définissez la méthode d’affichage de la section mixeur de TRAKTOR.
Précisez si la section globale doit être affichée ou masquée.
Vérification de l’état du sélecteur d’entrée [CD,
PHONO, USB] de cet appareil
Affichez l’utilitaire de réglage avant de commencer.
Cliquez sur l’onglet [MIXER INPUT].
Page 55

Réglage de la source des données audio
transmis de cet appareil à l’ordinateur
Affichez l’utilitaire de réglage avant de commencer.
1 Cliquez sur l’onglet [MIXER OUTPUT].
2 Cliquez sur le menu déroulant de [Mixer Audio Output].
Sélectionnez et spécifiez les données audio devant être transmises à l’ordinateur
parmi les signaux audio présents sur cet appareil.
USB 1/ 2 USB 3/ 4 USB 5/ 6
CH1 Timecode PHONO
CH1 Timecode CD
— —
— —
— —
— —
1 : Le son sortant de [USB 1/
appareil, quel que soit le réglage de [USB Output Level].
1
1
CH2 Timecode PHONO
CH2 Timecode CD
2] et [USB 3/ 4] est au même volume qu’à son entrée dans cet
1
1
Post CH1 Fader
Post CH2 Fader
Cross Fader A
Cross Fader B
MIC/
REC OUT
AUX Post EQ
Réglage de la taille de la mémoire (lorsque ASIO
de Windows est utilisé)
Si une application utilisant cet appareil comme appareil audio par défaut (logiciel
DJ, etc.) est ouverte, fermez-la avant de régler la taille de la mémoire.
Affichez l’utilitaire de réglage avant de commencer.
Cliquez sur l’onglet [ASIO].
Français
! Le risque de perte sonore (interruption du son) diminue si une mémoire
suffisamment grande est attribuée mais le retard (latence) dans la transmission du signal audio augmente.
Vérification de la version du pilote
Affichez l’utilitaire de réglage avant de commencer.
Cliquez sur l’onglet [About].
3 Cliquez sur le menu déroulant de [USB Output Level].
Réglez le volume des données audio sortant de [USB 5/ 6].
! Si le volume n’est pas suffisant avec le réglage de volume du logiciel DJ seu-
lement, changez le réglage de [USB Output Level] pour obtenir un volume
suffisant à la sortie de cet appareil. Notez toutefois que le son sera déformé si le
volume est trop augmenté.
Réglage du canal MIDI
Affichez l’utilitaire de réglage avant de commencer.
1 Cliquez sur l’onglet [MIDI].
Vérification des toutes dernières informations
concernant le pilote
Les toutes dernières informations sur le pilote dédié exclusivement à cet appareil se
trouve sur notre site à l’adresse suivante.
http://www.prodjnet.com/support/
! Le fonctionnement ne peut pas être garanti lorsque plusieurs modèles de cette
console de mixage sont raccordés à un seul ordinateur.
2 Cliquez sur le menu déroulant de [MIDI CHANNEL].
Sélectionnez le canal MIDI souhaité.
Fr
25
Page 56

Fr
26
Changement des réglages de cet appareil
1 Appuyez plus d’une seconde sur la touche [UTILITY
(WAKE UP)].
L’indicateur [UTILITY (WAKE UP)] et le haut de l’indicateur de niveau du canal
[CH 1] clignotent.
2 Appuyez sur la touche [LOAD (DUPLICATE) B].
Le paramètre change chaque fois que vous appuyez sur la touche [LOAD
(DUPLICATE) B].
La position clignotante de l’indicateur de niveau du canal [CH 1] se déplace vers le
bas.
! Lorsque la touche [LOAD (DUPLICATE) A] est pressée, la sélection revient au
paramètre précédent.
La position clignotante de l’indicateur de niveau du canal [CH 1] se déplace vers
le haut.
3 Tournez le sélecteur rotatif.
Changez la valeur du réglage.
! Lorsque la valeur du réglage peut être activée et désactivée
— Activée : La section verte de l’indicateur de niveau du canal [CH 2]
s’éclaire.
— Désactivée : La section verte de l’indicateur de niveau du canal [CH 2]
s’éteint.
! Lorsque la valeur de réglage peut être changée par incréments
— Place de l’unité de la valeur du réglage : Valeur indiquée par le nombre
de segments éclairés de l’indicateur de niveau du canal [CH 2].
— Place du dixième de la valeur du réglage : Valeur indiquée par le nombre
de segments éclairés de l’indicateur de niveau maître.
4 Appuyez sur le sélecteur rotatif.
Les réglages sont sauvegardés dans cet appareil.
La touche [UTILITY (WAKE UP)] clignote rapidement. N’éteignez pas cet appareil
pendant que les réglages sont sauvegardés.
! La sauvegarde est terminée lorsque la touche [UTILITY (WAKE UP)] passe d’un
clignotement rapide à un clignotement normal.
! Appuyez sur la touche [UTILITY (WAKE UP)] pour revenir au fonctionnement
normal.
À propos de la mise en veille automatique
Lorsque [Auto Standby] est réglé sur [ON], l’appareil se met automatiquement en
veille au bout de 4 heures dans la mesure où les conditions suivantes sont remplies.
— Aucune des touches ou commandes de l’appareil ne sont actionnées.
— Aucun signal audio n’est transmis aux prises d’entrée de cet appareil.
— Aucun ordinateur n’est raccordé par USB.
! Le mode de veille s’annule par une pression sur la touche [UTILITY (WAKE UP)].
! En usine, la veille automatique a été mise en service sur cet appareil. Si vous ne
voulez pas utiliser la veille automatique, réglez [Auto Standby] sur [OFF].
Réglage des préférences
Réglages des options
l’indicateur de niveau du canal
[CH 1]
Position du clignotement de
Cross Fader Cut Lag
Cross Fader Curve Slow A
Cross Fader Curve Slow B
Cross Fader Curve Fast A
Cross Fader Curve Fast B
Generic Controller Mode
Mic Output To Booth Monitor
Auto Standby
1 Si la valeur du réglage est extrêmement basse, le son peut ne pas être complètement coupé lorsque le crossfader est à l’extrémité.
2 L’atténuation a une courbe abrupte lorsque la valeur du réglage est basse, une courbe douce lorsque la valeur du réglage est élevée.
Tout en haut 0 à 52
Seconde depuis le haut 0 à 32
Troisième depuis le haut 0 à 32
Quatrième depuis le haut 0 à 32
Cinquième depuis le haut 0 à 32
Sixième depuis le haut ON/
Septième depuis le haut ON/
Huitième depuis le haut ON/
Valeur du
réglage
OFF
OFF
OFF
Valeur par
défaut
6
16
16
32
32
OFF
ON
ON
Descriptions
Ajuste le jeu aux extrémités du crossfader (démarrage du point d’attaque). Le
démarrage du point d’attaque peut être ajusté entre 0,74 mm et 5,94 mm, par
unités de 0,1 mm.1
Ajuste la courbe d’atténuation du côté [CH 1] lorsque le commutateur
[CROSS F. CURVE (THRU,
Ajuste la courbe d’atténuation du côté [CH 2] lorsque le commutateur
[CROSS F. CURVE (THRU,
Ajuste la courbe d’atténuation du côté [CH 1] lorsque le commutateur
[CROSS F. CURVE (THRU,
Ajuste la courbe d’atténuation du côté [CH 2] lorsque le commutateur
[CROSS F. CURVE (THRU,
Active et désactive la fonction permettant de sélectionner les effets avec les
touches de contrôle d’effets.
Lorsqu’elle est désactivée, les fonctions LFO CONTROL et CROSS FADER
CONTROL peuvent être utilisées.
Détermine si les signaux audio du microphone doivent provenir des prises
[BOOTH].
Met en et hors service la mise en veille automatique.
, )] est réglé sur [ ].2
, )] est réglé sur [ ].2
, )] est réglé sur [ ].2
, )] est réglé sur [ ].2
Page 57

Liste de messages MIDI
Liste de messages MIDI
Catégorie Nom SW Type SW
BTN 9n 00 dd 9n 40 dd — — — — — — OFF=0, ON=127
Section de
transport
Section des
effets
Sélecteur rotatif
Touche DECK A LOAD (DUPLI-
CATE)
Touche DECK B LOAD (DUPLI-
CATE)
Touche DECK A f (REL.)
Touche DECK B f (REL.)
Touche DECK A SYNC (MASTER) BTN 9n 05 dd 9n 45 dd 9n 05 dd 9n 45 dd OFF=0, ON=127
Touche DECK B SYNC (MASTER) BTN 9n 06 dd 9n 46 dd 9n 06 dd 9n 46 dd OFF=0, ON=127
Touche DECK A FX ASSIGN FX1 BTN 9n 07 dd 9n 47 dd 9n 07 dd 9n 47 dd OFF=0, ON=127
Touche DECK B FX ASSIGN FX1 BTN 9n 08 dd 9n 48 dd 9n 08 dd 9n 48 dd OFF=0, ON=127
Touche DECK A FX ASSIGN FX2 BTN 9n 09 dd 9n 49 dd 9n 09 dd 9n 49 dd OFF=0, ON=127
Touche DECK B FX ASSIGN FX2 BTN 9n 0A dd 9n 4A dd 9n 0A dd 9n 4A dd OFF=0, ON=127
Touche DECK A CUE (ABS.) BTN 9n 0B dd 9n 4B dd 9n 0B dd 9n 4B dd OFF=0, ON=127
Touche DECK B CUE (ABS.) BTN 9n 0C dd 9n 4C dd 9n 0C dd 9n 4C dd OFF=0, ON=127
Commande FX1 DRY/
Commande FX2 DRY/
Touche FX1 ON (GROUP/
SINGLE)
Touche FX2 ON (GROUP/
SINGLE)
Commande FX1 EFFECT1 VR Bn 03 dd Bn 43 dd — — — — — — 0-127
Commande FX
Touche FX1 EFFECT1 BTN 9n 0F dd 9n 4F dd 9n 0F dd 9n 4F dd OFF=0, ON=127
Touche FX2 EFFECT1 BTN 9n 10 dd 9n 50 dd 9n 10 dd 9n 50 dd OFF=0, ON=127
Commande FX1 EFFECT2 VR Bn 05 dd Bn 45 dd — — — — — — 0-127
Commande FX2 EFFECT2 VR Bn 06 dd Bn 46 dd — — — — — — 0-127
Touche FX1 EFFECT2 BTN 9n 11 dd 9n 51 dd 9n 11 dd 9n 51 dd OFF=0, ON=127
Touche FX2 EFFECT2 BTN 9n 12 dd 9n 52 dd 9n 12 dd 9n 52 dd OFF=0, ON=127
Commande FX1 EFFECT3 VR Bn 07 dd Bn 47 dd — — — — — — 0-127
Commande FX2 EFFECT3 VR Bn 08 dd Bn 48 dd — — — — — — 0-127
Touche FX1 EFFECT3 BTN 9n 13 dd 9n 53 dd 9n 13 dd 9n 53 dd OFF=0, ON=127
Touche FX2 EFFECT3 BTN 9n 14 dd 9n 54 dd 9n 14 dd 9n 54 dd OFF=0, ON=127
WET VR Bn 01 dd Bn 41 dd — — — — — — 0-127
WET VR Bn 02 dd Bn 42 dd — — — — — — 0-127
2 EFFECT1 VR Bn 04 dd Bn 44 dd — — — — — — 0-127
VR Bn 00 dd Bn 40 dd — — — — — —
BTN 9n 01 dd 9n 41 dd — — — — — — OFF=0, ON=127
BTN 9n 02 dd 9n 42 dd — — — — — — OFF=0, ON=127
BTN 9n 03 dd 9n 43 dd 9n 03 dd 9n 43 dd OFF=0, ON=127
BTN 9n 04 dd 9n 44 dd 9n 04 dd 9n 44 dd OFF=0, ON=127
BTN 9n 0D dd 9n 4D dd 9n 0D dd 9n 4D dd OFF=0, ON=127
BTN 9n 0E dd 9n 4E dd 9n 0E dd 9n 4E dd OFF=0, ON=127
Message MIDI (cet appareil vers
l’ordinateur)
Message MIDI (ordinateur vers cet
appareil)
SHIFT OFF SHIFT ON SHIFT OFF SHIFT ON
Remarques
Rotation horaire : 0
– +30 / Rotation antihoraire : -1 – -30
Français
Fr
27
Page 58

Fr
28
Catégorie Nom SW Type SW
Message MIDI (cet appareil vers
l’ordinateur)
Message MIDI (ordinateur vers cet
appareil)
Remarques
SHIFT OFF SHIFT ON SHIFT OFF SHIFT ON
BTN 9n 15 dd 9n 55 dd — — — — — — OFF=0, ON=127
Commande DECK A AUTO
LOOP (LOOP MOVE/
VOLUME)
SAMPLE
VR Bn 09 dd Bn 49 dd — — — — — —
BTN 9n 16 dd 9n 56 dd — — — — — — OFF=0, ON=127
VR Bn 0A dd Bn 4A dd — — — — — —
BTN 9n 17 dd 9n 57 dd — — — — — — OFF=0, ON=127
Commande DECK B AUTO
LOOP (LOOP MOVE/ SAMPLE
VOLUME)
VR Bn 0B dd Bn 4B dd — — — — — —
BTN 9n 18 dd 9n 58 dd — — — — — — OFF=0, ON=127
VR Bn 0C dd Bn 4C dd — — — — — —
Touche DECK A SELECT BTN 9n 19 dd 9n 59 dd — — — — — — OFF=0, ON=127
Touche DECK B SELECT BTN 9n 1A dd 9n 5A dd — — — — — — OFF=0, ON=127
Section de repères instantanés/
échantillonneur
Touche DECK A HOT CUE1
Touche DECK B HOT CUE1
Touche DECK A HOT CUE2
Touche DECK B HOT CUE2
Touche DECK A HOT CUE3
Touche DECK B HOT CUE3
Touche DECK A HOT CUE4
Touche DECK B HOT CUE4
Touche DECK A ACTIVE
Touche DECK B ACTIVE
BTN 9n 1B dd 9n 5B dd 9n 1B dd 9n 5B dd OFF=0, ON=127
BTN 9n 1C dd 9n 5C dd 9n 1C dd 9n 5C dd OFF=0, ON=127
BTN 9n 1D dd 9n 5D dd 9n 1D dd 9n 5D dd OFF=0, ON=127
BTN 9n 1E dd 9n 5E dd 9n 1E dd 9n 5E dd OFF=0, ON=127
BTN 9n 1F dd 9n 5F dd 9n 1F dd 9n 5F dd OFF=0, ON=127
BTN 9n 20 dd 9n 60 dd 9n 20 dd 9n 60 dd OFF=0, ON=127
BTN 9n 21 dd 9n 61 dd 9n 21 dd 9n 61 dd OFF=0, ON=127
BTN 9n 22 dd 9n 62 dd 9n 22 dd 9n 62 dd OFF=0, ON=127
BTN 9n 23 dd 9n 63 dd 9n 23 dd 9n 63 dd OFF=0, ON=127
BTN 9n 24 dd 9n 64 dd 9n 24 dd 9n 64 dd OFF=0, ON=127
BTN 9n 25 dd 9n 65 dd 9n 25 dd 9n 65 dd OFF=0,
BTN 9n 26 dd 9n 66 dd 9n 26 dd 9n 66 dd OFF=0, ON=127
BTN 9n 27 dd 9n 67 dd 9n 27 dd 9n 67 dd OFF=0, ON=127
BTN 9n 28 dd 9n 68 dd 9n 28 dd 9n 68 dd OFF=0, ON=127
BTN 9n 29 dd 9n 69 dd 9n 29 dd 9n 69 dd OFF=0, ON=127
BTN 9n 2A dd 9n 6A dd 9n 2A dd 9n 6A dd OFF=0, ON=127
BTN 9n 2B dd 9n 6B dd 9n 2B dd 9n 6B dd OFF=0, ON=127
BTN 9n 2C dd 9n 6C dd 9n 2C dd 9n 6C dd OFF=0, ON=127
BTN 9n 2D dd 9n 6D dd 9n 2D dd 9n 6D dd OFF=0, ON=127
BTN 9n 2E dd 9n 6E dd 9n 2E dd 9n 6E dd OFF=0, ON=127
Commande CH 1 TRIM VR Bn 0D dd Bn 4D dd — — — — — — 0-127
Commande CH 2 TRIM VR Bn 0E dd Bn 4E dd — — — — — — 0-127
Commande CH 1 HI VR Bn 0F dd Bn 4F dd — — — — — — 0-127
Commande CH 2 HI VR Bn 10 dd Bn 50 dd — — — — — — 0-127
Commande CH 1 MID VR Bn 11 dd Bn 51 dd — — — — — — 0-127
Commande CH 2 MID VR Bn 12 dd Bn 52 dd — — — — — — 0-127
Section de
mixage
Commande CH 1 LOW VR Bn 13 dd Bn 53 dd — — — — — — 0-127
Commande CH 2 LOW VR Bn 14 dd Bn 54 dd — — — — — — 0-127
Touche CH 1 CUE (TAP) BTN 9n 2F dd 9n 6F dd — — — 9n 6F dd OFF=0, ON=127
Touche CH 2 CUE (TAP) BTN 9n 30 dd 9n 70 dd — — — 9n 70 dd OFF=0, ON=127
Fader de canal CH 1 VR Bn 15 dd Bn 55 dd — — — — — — 0-127
Fader de canal CH 2 VR Bn 16 dd Bn 56 dd — — — — — — 0-127
CROSS FADER A VR Bn 17 dd Bn 57 dd — — — — —
CR
OSS FADER B VR Bn 18 dd Bn 58 dd — — — — — — 0-127
Section globale Touche SNAP (QUANTIZE) BTN 9n 31 dd 9n 71 dd 9n 31 dd 9n 71 dd OFF=0, ON=127
1 Lorsqu’elle est utilisée avec la fonction de repère instantané
2 Lorsqu’elle est utilisée avec la fonction d’échantillonneur
Rotation horaire : 0
– +30 / Rotation antihoraire : -1 – -30
Rotation horaire : 0
– +30 / Rotation antihoraire : -1 – -30
Rotation horaire : 0
– +30 / Rotation antihoraire : -1 – -30
Rotation horaire : 0
– +30 / Rotation antihoraire : -1 – -30
— 0-127
1
2
1
2
ON=127
1
2
1
2
1
2
1
2
1
2
1
2
1
2
1
2
1
2
1
2
1
2
1
2
Page 59

Informations supplémentaires
En cas de panne
! Une erreur de commande est souvent prise pour une anomalie de fonctionnement ou une panne. Si vous estimez que cet appareil ne fonctionne pas correctement, vérifiez
les points ci-dessous. Parfois, le problème peut provenir d’un autre composant. Examinez les autres composants et les appareils électriques utilisés. Si le problème persiste malgré les vérifications des points suivants, confiez les réparations au service après-vente Pioneer le plus proche ou à votre revendeur.
! De l’électricité statique ou des interférences externes ont peut être déréglé le lecteur. Dans ce cas, il suffit probablement de débrancher puis de rebrancher le cordon
d’alimentation pour que le lecteur fonctionne de nouveau.
Problème Vérification Solution
L’appareil ne s’allume pas. Est-ce que le cordon d’alimentation est correctement rac-
Cet appareil n’est pas reconnu. Est-ce que l’interrupteur d’alimentation [ON/
Les fichiers de musique ne peuvent pas être lus. Est-ce que les fichiers de musique sont endommagés ? Lisez des fichiers de musique non endommagés.
Aucun morceau n’apparaît dans la section [TRACK]. Est-ce que les fichiers de musique ont été importés correc-
Le volume de l’appareil raccordé aux prises [AUX IN]
est faible.
Distorsion du son. Est-ce que les commandes [MAIN VOL] et [GAIN] de TRAK-
Le son en cours de lecture est interrompu. Est-ce que cordon d’alimentation fourni et le câble USB
Le son d’un appareil externe ou du microphone ne peut
pas être émis.
Aucun son n’est produit.
Aucun son ou son faible. Est-ce que le sélecteur d’entrée [CD, PHONO, USB] est à la
Le BPM ou la forme d’onde générale n’apparaît pas. Est-ce que le fichier de musique a été analysé ? Cochez [Preferences] > [File Management] > [ Analyze new tracks when
La fonction [SYNC] n’agit pas. Est-ce que les fichiers de musique ont été importés correc-
cordé ?
sur [ON] ?
Est-ce que le câble USB fourni est correctement raccordé ? Raccordez le câble USB fourni correctement. (page 11)
Est-ce que [CTRL] est éclairé dans TRAKTOR ? Appuyez sur une autre touche que celles de la section de mixage de cet appa-
— Assurez-vous que [Pioneer. DJM-T1] est sélectionné dans [Preferences] >
tement ?
Avez-vous sélectionné un créneau [Playlists] ou [FAVORI-
TES] ne contenant aucun morceau ?
Est-ce que la commande [LEVEL] sur le panneau avant est à
la bonne position ?
TOR sont aux bonnes positions ?
Est-ce le niveau d’entrée aux prises [AUX IN] et [MIC] est
réglé de manière appropriée ?
Est-ce que le niveau du son provenant du canal [MASTER]
est réglé convenablement?
Est-ce que le niveau du son transmis à chaque canal est
réglé correctement ?
fourni sont raccordés correctement ?
Est-ce que la valeur de la latence audio est convenable ? Si Windows est utilisé, ouvrez l’onglet [ASIO] dans l’utilitaire de réglages et
Est-ce que la commande [INPUT SELECT] sur le panneau
avant est à la position [OFF] ?
Est-ce que les câbles de liaison sont correctement raccordés ?
Est-ce que le câble USB fourni est correctement raccordé ? Raccordez l’ordinateur et cet appareil directement avec le câble USB fourni.
Est-ce que les prises ou fiches sont sales ? Essuyez la saleté des prises et des fiches avant de les raccorder.
Est-ce que le pilote a été installé correctement sur votre
ordinateur ?
Est-ce que [Audio Setup], [Output Routing] et [Input
Routing] dans TRAKTOR sont réglés correctement ?
Est-ce que les composants et amplificateurs raccordés sont
réglés correctement ?
bonne position ?
Est-ce que [MASTER ATT.] est réglé sur [–6 dB] ? Réglez [MASTER ATT.] sur [0 dB]. (page 11)
tement ?
Est-ce que le fichier de musique a été analysé ? Si les fichiers de musique ne peuvent pas être analysés automatiquement,
OFF] est réglé
Branchez le cordon d’alimentation sur une prise secteur.
Réglez l’interrupteur d’alimentation [ON/ OFF] sur [ON].
reil et assurez-vous que [CTRL] s’éclaire dans TRAKTOR.
[Controller Manager] > [Device Setup] > [Device]. (page 24)
Importez les fichiers de musique correctement. (page 14)
Sélectionnez un créneau [Playlists] ou [FAVORITES] contenant des morceaux.
Réglez la commande [LEVEL] sur le panneau avant selon le dispositif raccordé.
(page 23)
Réglez les commandes [MAIN VOL] et [GAIN] tout en observant l’indicateur
de niveau [MAIN] dans TRAKTOR.
Spécifiez le niveau audio aux prises de manière appropriée pour les appareils
raccordés.
Réglez la commande [MASTER LEVEL] de sorte que l’indicateur de niveau du
canal maître s’éclaire autour de [0 dB] au niveau de crête. (page 17)
Si le son est déformé même lorsque la commande [MASTER LEVEL] est
ajustée, réglez [MASTER ATT.] sur [–6 dB]. (page 11)
Réglez la commande [TRIM] de sorte que l’indicateur de niveau du canal
s’éclaire à environ [0 dB] au niveau de crête. (page 17)
Le son sera interrompu si le cordon d’alimentation fourni ou le câble USB
fourni est débranché de l’appareil pendant la lecture.
Fixez correctement le câble USB fourni au crochet de cordon sur l’appareil.
(page 11)
spécifiez une valeur convenable pour la latence audio.
Si un ordinateur Macintosh est utilisé, réglez [Preferences] > [Audio Setup]
> [Latency] dans TRAKTOR sur une valeur convenable. (page 25)
Réglez le commutateur [INPUT SELECT] sur la position [AUX] lorsqu’un
appareil externe est utilisé, sur la position [MIC] lorsqu’un microphone est
utilisé. (page 23)
Raccordez correctement les câbles de liaison. (page 11)
Les concentrateurs USB ne peuvent pas être utilisés. (page 11)
Installez le pilote correctement sur l’ordinateur. (page 9)
Assurez-vous que [Preferences] est réglé comme indiqué ci-dessous. (Page 24)
[Audio Setup] > [Audio Device] > [PIONEER DJM-T1 (Core Audio)] (Mac
OS X) ou [PIONEER DJM-T1 ASIO (ASIO)] (Windows)
[Output Routing] > [Output Deck A] [L] > [1.PIONEER DJM-T1 OUT 1] et
[R] > [2.PIONEER DJM-T1 OUT 2]
[Output Routing] > [Output Deck B] [L] > [3.PIONEER DJM-T1 OUT 3] et [R]
> [4.PIONEER DJM-T1 OUT 4]
[Input Routing] > [Input Deck A] [L(Mono)] > [1.PIONEER DJM-T1 IN 1] et
[R] > [2.PIONEER DJM-T1 IN 2]
[Input Routing] > [Input Deck B] [L(Mono)] > [3.PIONEER DJM-T1 IN 3] et
[R] > [4.PIONEER DJM-T1 IN 4]
Sélectionnez l’entrée externe et réglez le volume correctement sur les composants et amplificateurs.
Réglez le sélecteur d’entrée [CD, PHONO, USB] et changez la source d’entrée
du canal. (page 17)
loading into deck], puis rechargez le morceau sur la platine.
Réimportez les fichiers de musique et chargez-les dans les platines. (page 14)
entrez-les manuellement [Beat Grid].
Français
Fr
29
Page 60

Fr
30
Problème Vérification Solution
CH1
PHONO
USBCD
CH2
PHONO
TRIM
MIC/AUX
MIC
AUX
MIC_SEL_OUT
EQ ADC
SH2A
MIC_AUX
CH1_ana
USBCD
MIC
OFF
AUXMIC
PC Input 1/2
(CH1) Pre Trim CD
(CH1) Pre Trim PHONO
PC Input 3/4
(CH2) Pre Trim CD
(CH2) Pre Trim PHONO
PC Input 5/6
Rec OUT
MIC/AUX Post EQ
Post CH1 Fader
Post CH2 Fader
Post Cross Fader A
Post Cross Fader B
CH1
ADC
PHONO
CD
CH1_SEL_OUT
MUTE
CH2
ADC
PHONO
CD
CH2_SEL_OUT
MIC_Post
Rec_OUTCH1_Post
Post_CRS_A
Post_CRS_B
SAMPLER_USB
SAMPLER_USB
CH2_Post
CH1_Pre
CH1_USB
CH1_Pre
CH1
3Band
ISO
Subsonic
Filter
Subsonic
Filter
CH1_Fader
CH2_ana
CH2_Pre
CH2_USB
CH1_USB
CH2_USB
CH2
3Band
ISO
CH2_Fader
Cross_Fader
MASTER_VOL BOOTH_VOLHeadphone_M1
Headphone_VOL
CH1 CUE SW
CH2 CUE SW
MIC ON SW
OUT_ana
TDM_OUT
(8ch)
USB
USB
USB_AUDIO_IF
48kHz/24bit (6in/6out)
MUTE
CH2_Pre
MUTE
MUTE
Rec_OUT
MIC_Post
CH1_Post
CH2_Post
Post_CRS_A
Post_CRS_B
DAC
Booth
Master 1
Master 2
Phones
CH2_Digi_Trim CH1_Digi_Trim
La fonction [SYNC] n’agit pas même lorsque les fichiers
sont analysés.
L’affichage de la section platine est petit. — Double-cliquez sur la section d’affichage d’information des morceaux (la partie
La touche [SINGLE/
GROUP] n’agit pas. —
La fonction de recherche arrière ne fonctionne pas. Est-ce qu’un point de repère a été posé ? Posez un point de repère. (page 15)
La commande MIDI ne fonctionne pas. Est-ce que le canal MIDI est réglé correctement ? Réglez le canal MIDI sur l’onglet [MIDI] dans l’utilitaire de réglages. (page 25)
Cet appareil n’est pas reconnu après avoir été raccordé
à un ordinateur.
Le son d’un ordinateur ne peut pas être restitué par cet
appareil.
Le son est déformé lorsqu’un lecteur analogique est
raccordé aux prises [PHONO] de cet appareil.
Ou bien, l’éclairage de l’indicateur de niveau du canal
ne change pas même lorsque la commande [TRIM] est
tournée.
Est-ce que [BEAT MARKER (Grid)] est spécifié pour un
repère instantané ?
Sur l’écran d’exploitation de TRAKTOR, est-ce que [BPM] du
morceau pour lequel l’icône [MASTER] est éclairée est trop
différent du [BPM] du morceau pour lequel l’icône [SYNC]
est éclairée ?
Spécifiez au moins un [BEAT MARKER] pour [Grid].
Cochez [Preferences] > [File Management] > [Set Beat-Grid when detec-
ting BPM], puis rechargez le morceau sur la platine.
La fonction [SYNC] n’agira pas correctement si le [BPM] du morceau pour
lequel l’icône [MASTER] est éclairée excède la plage de réglage de tempo du
morceau pour lequel l’icône [SYNC] est éclairée.
Faites-vous un scratching ? La fonction [SYNC] est désactivée pendant un scratching.
où le nom de morceau, BPM, etc., sont indiqués) dans la section platine.
Le mode [Single] ne peut pas être sélectionné avec TRAKTOR SCRATCH DUO 2.
Le panneau d’effets peut passer au mode [Single] après la mise à jour à
TRAKTOR SCRATCH PRO 2.
Est-ce que les réglages MIDI sont corrects ?
Est-ce que le pilote a été installé correctement sur votre
ordinateur ?
Est-ce que cet appareil et l’ordinateur sont raccordés correctement ?
Est-ce que les réglages du dispositif de sortie audio sont
corrects ?
Est-ce que le sélecteur d’entrée [CD, PHONO, USB] est à la
bonne position ?
Avez-vous raccordé un lecteur analogique avec égaliseur
phono ?
Est-ce qu’une interface audio pour ordinateurs est raccordée
entre le lecteur analogique et cet appareil ?
Pour employer un logiciel DJ avec cet appareil, les messages MIDI de cet appareil
doivent être affectés au logiciel DJ utilisé. Pour les instructions sur l’affectation des
messages, reportez-vous au mode d’emploi de votre logiciel DJ.
Installez le pilote. S’il est déjà installé, désinstallez-le et réinstallez-le. (page 9)
Raccordez cet appareil et l’ordinateur à l’aide d’un câble USB. (page 11)
Sélectionnez cet appareil dans les réglages de dispositif de sortie audio. Pour
les instructions sur les réglages à effectuer dans votre application, reportezvous au mode d’emploi de votre application.
Réglez le sélecteur d’entrée [CD, PHONO, USB] sur la position [USB]. (page
12) (page 17)
Lorsque le lecteur analogique utilisé intègre un égaliseur phono, raccordez-le
aux prises [CD]. (page 11)
Si le lecteur analogique pourvu d’un égaliseur phono présente un sélecteur
LINE, réglez celui-ci sur PHONO.
PHONO/
Si l’interface audio des ordinateurs a une sortie de ligne, reliez celle-ci aux
prises [CD]. (page 11)
Si le lecteur analogique présente un sélecteur PHONO/
sur PHONO.
LINE, réglez celui-ci
Schéma fonctionnel
Page 61

Avis de non responsabilité
! Pioneer est une marque déposée de Pioneer Corporation.
! Microsoft®, Windows Vista®, Windows® et Internet Explorer® sont des marques
déposées ou des marques commerciales de Microsoft Corporation aux États-
ou dans d’autres pays.
Unis et/
! Apple, Macintosh, Mac OS, Safari , iTunes et Finder sont des marques commer-
ciales d’Apple Inc. déposées aux États-Unis et dans d’autres pays.
! Intel et Pentium sont des marques commerciales d’Intel Corporation aux États-
Unis et dans d’autres pays.
! ASIO est une marque commerciale de Steinberg Media Technologies GmbH.
! TRAKTOR est une marque déposée de Native Instruments.
! AMD Athlon est une marque commerciale d’Advanced Micro Devices, Inc.
Les noms de sociétés et de produits mentionnés ici sont des marques commerciales de leurs détenteurs respectifs.
La licence de ce produit a été accordée pour un usage non lucratif. La licence n’a
pas été accordée à ce produit pour un usage commercial (but lucratif), comme
la diffusion radiotélévision (terrestre, satellite, câblée ou autre), la diffusion sur
Internet ou Intranet (réseau d’entreprise) ou sur tout autre type de réseaux ou de
services de distribution d’informations électroniques (services de distribution de
musique numérique en ligne). Pour de tels usages vous devez acquérir les licences appropriées. Pour le détail, consultez le site: http:/
/
www.mp3licensing.com.
Précautions concernant les droits d’auteur
Les enregistrements effectués sont destinés à votre usage personnel et, conformément aux lois sur les droits d’auteur, il se peut que leur utilisation soit soumise au
consentement du détenteur des droits.
! La musique enregistrée à partir de CD, etc. est protégée par les lois sur les droits
d’auteur de divers pays et par des traités internationaux. La personne qui effectue des enregistrements de musique est responsable de leur utilisation légale.
! Lorsque de la musique est téléchargée d’Internet, etc., la personne qui a effec-
tué le téléchargement est responsable de l’utilisation de cette musique conformément à l’accord conclus avec le site de téléchargement.
Spécifications
Général
Alimentation ......................................................................CA 220 V à 240 V, 50 Hz/ 60 Hz
Consommation ...........................................................................................................25 W
Consommation (en veille) .........................................................................................0,4 W
Poids de l’appareil principal .................................................................................... 6,1 kg
Dimensions maximales .............................. 265 mm (L) × 107,9 mm (H) × 403 mm (P)
Température de fonctionnement tolérée .................................................+5 °C à +35 °C
Humidité de fonctionnement tolérée ..........................5 % à 85 % (sans condensation)
Section audio
Fréquence d’échantillonnage ................................................................................ 48 kHz
Convertisseur A/ N, N/ A .........................................................................................24 bits
Caractéristiques des fréquences
CD ........................................................................................................ 20 Hz à 20 kHz
Rapport S/ B (sortie nominale)
PHONO ..............................................................................................................92 dB
CD .....................................................................................................................106 dB
MIC .....................................................................................................................84 dB
Distorsion harmonique totale (CD — MASTER1) ............................................... 0,004 %
Niveau d’entrée standard / Impédance d’entrée
PHONO ...............................................................................................–52 dBu/
CD ........................................................................................................ -12 dBu/
MIC ...................................................................................................... -52 dBu/ 47 kW
AUX .....................................................................................................–12 dBu/
Niveau de sortie standard / Impédance de charge / Impédance de sortie
MASTER1 ..............................................................+6 dBu/ 10 kW/ 10 W ou inférieur
MASTER2 ................................................................................+2 dBu/ 10 kW/ 330 W
BOOTH ..................................................................+6 dBu/ 10 kW/ 10 W ou inférieur
PHONES .............................................................. +5,4 dBu/ 32 kW/ 10 W ou inférieur
Niveau de sortie nominal / Impédance de charge
MASTER1 .........................................................................................+24 dBu/ 10 kW
MASTER2 .........................................................................................+20 dBu/ 10 kW
Diaphonie (CD) ..........................................................................................................86 dB
Caractéristiques de l’égaliseur de canal
HI ..............................................................................................–
MID ............................................................................................–
LOW .......................................................................................... –
Caractéristiques de l’égaliseur de microphone
HI .......................................................................................–12 dB à +12 dB (10 kHz)
LOW ................................................................................. –12 dB à +12 dB (100 Hz)
∞ à +6 dB (13 kHz)
∞ à +6 dB (1 kHz)
∞ à +6 dB (70 Hz)
Prises d’entrée/ sortie
Prise d’entrée PHONO
Prise RCA ...........................................................................................................2 jeux
Prise d’entrée CD
Prise RCA ...........................................................................................................2 jeux
Prise d’entrée MIC
Connecteur XLR/
Prise d’entrée AUX
Prises RCA .......................................................................................................... 1 jeu
Prise de sortie MASTER
Connecteur XLR .................................................................................................1 jeu
Prises RCA .......................................................................................................... 1 jeu
Prise de sortie BOOTH
Jack TRS (Ø 6,3 mm) .......................................................................................... 1 jeu
Prise de sortie PHONES
Jack stéréo (Ø 6,3 mm) ...................................................................................... 1 jeu
Prise USB
Type B ................................................................................................................. 1 jeu
jack (Ø 6,3 mm) ...................................................................... 1 jeu
47 kW
47 kW
29 kW
Français
! Les caractéristiques et la présentation peuvent être modifiées, sans avis préalable,
dans un souci d’amélioration.
! Les écrans de logiciel utilisés dans ce mode d’emploi sont en stade de
développement et peuvent différer des écrans réels.
! © 2011 PIONEER CORPORATION. Tous droits de reproduction et de traduction
réservés.
Fr
31
Page 62

De
2
Vielen Dank, dass Sie sich für dieses Pioneer-Produkt entschieden haben. Bitte lesen Sie diese Bedienungsanleitung gründlich durch, um sich mit der Bedienung des Geräts
Ein Ausrufezeichen in einem Dreieck weist
den Benutzer auf wichtige Bedienungs- und
Wartungsanweisungen in den Dokumenten
hin, die dem Gerät beiliegen.
Das Blitzsymbol in einem Dreieck weist den
Benutzer darauf hin, dass eine
Berührungsgefahr mit nicht isolierten Teilen
im Geräteinneren, die eine gefährliche
Spannung führen, besteht. Die Spannung
kann so hoch sein, dass sie die Gefahr eines
elektrischen Schlages birgt.
ACHTUNG:
UM SICH NICHT DER GEFAHR EINES
ELEKTRISCHEN SCHLAGES
AUSZUSETZEN, DÜRFEN SIE NICHT DEN
DECKEL (ODER DIE RÜCKSEITE)
ENTFERNEN. IM GERÄTEINNEREN
BEFINDEN SICH KEINE VOM BENUTZER
REPARIERBAREN TEILE. ÜBERLASSEN SIE
REPARATUREN DEM QUALIFIZIERTEN
KUNDENDIENST.
CAUTION
RISK OF ELECTRIC SHOCK
DO NOT OPEN
WICHTIG
D3-4-2-1-1_A1_De
WARNUNG
Dieses Gerät ist nicht wasserdicht. Zur Vermeidung der
Gefahr von Brand und Stromschlag keine Behälter mit
Flüssigkeiten (z.B. Blumenvasen und -töpfe) in die
Nähe des Gerätes bringen und dieses vor Tropfwasser,
Spritzwasser, Regen und Nässe schützen.
D3-4-2-1-3_A1_De
WARNUNG
Vor dem erstmaligen Anschluss des Gerätes an das
Stromnetz bitte den folgenden Hinweis sorgfältig
beachten.
Die Netzspannung ist je nach Land verschieden.
Vor der Inbetriebnahme des Gerätes sicherstellen,
dass die örtliche Netzspannung mit der auf dem
Ty penschild an der Seitenplatte des Gerätes
angegebenen Nennspannung (z.B. 230 V oder 120
V) übereinstimmt.
D3-4-2-1-4*_A1_De
WARNUNG
Keine Quellen offener Flammen (z.B. eine brennende
Kerze) auf dieses Gerät stellen.
D3-4-2-1-7a_A1_De
Betriebsumgebung
Betriebstemperatur und Betriebsluftfeuchtigkeit:
+5 °C bis +35 °C, 85 % rel. Feuchte max.
(Ventilationsschlitze nicht blockiert)
Eine Aufstellung dieses Gerät an einem unzureichend
belüfteten, sehr feuchten oder heißen Ort ist zu
vermeiden, und das Gerät darf weder direkter
Sonneneinstrahlung noch starken Kunstlichtquellen
ausgesetzt werden.
D3-4-2-1-7c*_A1_De
Falls der Netzstecker des Netzkabels dieses Gerätes
nicht in die Zusatzsteckdose einer anderen
Komponente passt, muss er gegen einen Netzstecker
der geeigneten Ausführung ausgewechselt werden.
Ein derartiger Austausch des Netzsteckers muss vom
Kundendienstpersonal vorgenommen werden. Wenn
der vom Netzkabel abgeschnittene ursprüngliche
Netzstecker in eine Netzsteckdose eingesteckt wird,
besteht akute Stromschlaggefahr! Daher ist
unbedingt dafür zu sorgen, dass der abgeschnittene
Netzstecker sofort vorschriftsmäßig entsorgt wird.
Vor einem längeren Nichtgebrauch des Gerätes,
beispielsweise während des Urlaubs, sollte der
Netzstecker aus der Netzsteckdose gezogen werden,
um das Gerät vollständig vom Netz zu trennen.
D3-4-2-2-1a_A1_De
ACHTUNG
Der POWER-Schalter dieses Gerätes trennt das Gerät
nicht vollständig vom Stromnetz. Um das Gerät
vollständig vom Netz zu trennen, muss der
Netzstecker aus der Netzsteckdose gezogen werden.
Daher sollte das Gerät so aufgestellt werden, dass
stets ein unbehinderter Zugang zur Netzsteckdose
gewährleistet ist, damit der Netzstecker in einer
Notsituation sofort abgezogen werden kann. Um
Brandgefahr auszuschließen, sollte der Netzstecker
vor einem längeren Nichtgebrauch des Gerätes,
beispielsweise während des Urlaubs, grundsätzlich
von der Netzsteckdose getrennt werden.
D3-4-2-2-2a*_A1_De
VORSICHT MIT DEM NETZKABEL
Fassen Sie das Netzkabel immer am Stecker. Ziehen Sie
nicht am Kabel selbst, und fassen Sie das Netzkabel
niemals mit nassen Händen an, da dies einen
Kurzschluss oder elektrischen Schlag verursachen
kann. Stellen Sie nicht das Gerät, Möbelstücke o.ä. auf
das Netzkabel; sehen Sie auch zu, dass es nicht
eingeklemmt wird. Machen Sie niemals einen Knoten
in das Netzkabel, und binden Sie es nicht mit anderen
Kabeln. Das Netzkabel sollte so gelegt werden, dass
niemand darauf tritt. Ein beschädigtes Netzkabel kann
einen Brand oder elektrischen Schlag verursachen.
Prüfen Sie das Netzkabel von Zeit zu Zeit. Sollte es
beschädigt sein, wenden Sie sich an Ihre nächste
autorisierte PIONEER-Kundendienststelle oder Ihren
Händler, um es zu ersetzen.
S002*_A1_De
VORSICHTSHINWEIS ZUR BELÜFTUNG
Bei der Aufstellung dieses Gerätes muss für einen
ausreichenden Freiraum gesorgt werden, um eine
einwandfreie Wärmeabfuhr zu gewährleisten
(mindestens 5 cm hinter dem Gerät und jeweils 3 cm
an der Seite des Gerätes).
WARNUNG
Im Gerätegehäuse sind Ventilationsschlitze und andere
Öffnungen vorgesehen, die dazu dienen, eine
Überhitzung des Gerätes zu verhindern und einen
zuverlässigen Betrieb zu gewährleisten. Um
Brandgefahr auszuschließen, dürfen diese Öffnungen
auf keinen Fall blockiert oder mit Gegenständen (z.B.
Zeitungen, Tischdecken und Gardinen) abgedeckt
werden, und das Gerät darf beim Betrieb nicht auf
einem dicken Teppich oder Bett aufgestellt sein.
D3-4-2-1-7b*_A1_De
vertraut zu machen. Nachdem Sie die Bedienungsanleitung gelesen haben, legen Sie sie griffbereit zum Nachschlagen ab.
In manchen Ländern oder Regionen können sich die Formen von Netzstecker und Netzsteckdose von denen in den Erklärungszeichnungen unterscheiden. Das Verfahren
zum Anschließen und Bedienen des Geräts sind aber gleich.
Page 63

Mischen Sie dieses Produkt, wenn Sie es entsorgen wollen, nicht mit gewöhnlichen Haushaltsabfällen. Es gibt ein getrenntes
Sammelsystem für gebrauchte elektronische Produkte, über das die richtige Behandlung, Rückgewinnung und Wiederverwertung
gemäß der bestehenden Gesetzgebung gewährleistet wird.
Privathaushalte in den Mitgliedsstaaten der EU, in der Schweiz und in Norwegen können ihre gebrauchten elektronischen Produkte an
vorgesehenen Sammeleinrichtungen kostenfrei zurückgeben oder aber an einen Händler zurückgeben (wenn sie ein ähnliches neues Produkt
kaufen).
Bitte wenden Sie sich in den Ländern, die oben nicht aufgeführt sind, hinsichtlich der korrekten Verfahrensweise der Entsorgung an die örtliche
Kommunalverwaltung.
Auf diese Weise stellen Sie sicher, dass das zu entsorgende Produkt der notwendigen Behandlung, Rückgewinnung und Wiederverwertung
unterzogen wird, und so mögliche negative Einflüsse auf die Umwelt und die menschliche Gesundheit vermieden werden.
K058b_A1_De
De
3
Page 64

De
4
Inhalt
TRAKTOR
Zum Lesen dieser Anleitung
! Die Namen von Anzeigen, Menüs und Tasten sind in dieser Anleitung in eckigen
Klammern angegeben. (z.B. Kanal [MASTER], Menü [ON/
! Beschreibung von Funktionen und Verfahren, die auf dem Computer ausgeführt
werden, werden angezeigt [
! Die Anleitungen TRAKTOR und TRAKTOR GETTING STARTED können aus dem
TRAKTOR-Hilfemenü nach der Installation von TRAKTOR betrachtet werden.
].
Vor der Inbetriebnahme
Merkmale .........................................................................................................................5
Lieferumfang ...................................................................................................................5
Kurzanleitung
Bedienungsübersicht ..................................................................................................... 6
Installieren der TRAKTOR Software ..............................................................................6
Starten von TRAKTOR.....................................................................................................8
Ausführen der Produktaktivierung ................................................................................8
Installieren der Treibersoftware .....................................................................................9
Anschließen an die Eingangs-/ Ausgangsbuchsen ...................................................11
Einstellen dieses Geräts ...............................................................................................12
Ändern der Einstellungen des Einstell-Dienstprogramms .......................................12
Abspielen von Tracks ....................................................................................................12
Bedienung
Durchsuchen-Sektion ...................................................................................................14
Transport-Sektion ..........................................................................................................15
Mixer-Sektion .................................................................................................................17
Effekt-Sektion .................................................................................................................19
Sektion Hot Cue/ Sampler .............................................................................................21
Global-Sektion ...............................................................................................................23
AUX-Sektion ..........................................................................................................23
MIC/
MIDI-Sektion ..................................................................................................................23
OFF], [File])
Ändern der Einstellungen
Ändern der Voreinstellungen von TRAKTOR ..............................................................24
Ändern der Einstellungen des Einstell-Dienstprogramms .......................................24
Ändern der Einstellungen dieses Geräts ....................................................................26
Liste von MIDI-Meldungen
Liste von MIDI-Meldungen ...........................................................................................27
Zusätzliche Informationen
Störungssuche ..............................................................................................................29
Blockdiagramm .............................................................................................................30
Haftungsausschluss .....................................................................................................30
Hinweise zum Urheberrechte ......................................................................................31
Technische Daten .........................................................................................................31
Page 65

Vor der Inbetriebnahme
Merkmale
Dieses Gerät ist ein 2-Kanal-Mixer, der optimal für DJ-Auftritte mit der mit der
TRAKTOR SCRATCH DJ Software von Native Instruments ausgelegt ist. Durch die
Zusammenarbeit mit Native Instruments enthält er “TRAKTOR SCRATCH DUO 2”,
eine DJ-Software, die mit einer Reihe von Merkmalen für DJ-Auftritte ausgestattet
ist. Hardwareseitig ist das Gerät mit einem eingebauten Controller zum sofortigen
Steuern der vielen Funktionen von TRAKTOR SCRATCH und einer Soundkarte
für einfachen Anschluss an einem Computer ausgestattet. Ein DVS (Digital Vinyl
System) kann erstellt werden, indem dieses Gerät mit Ihrem DJ-Player oder einem
Plattenspieler verbunden wird.
Außerdem führt dieses Gerät die Technologie der Pioneer DJM-Serie fort, die hohes
Ansehen für sowohl Qualität als auch Eignung für Auftritte erzielt hat und leistungsstarken Support nicht nur für Heimanwender sondern auch für DJ-Auftritte in Clubs
bietet.
! Eine noch größere Vielfalt von Funktionen für Auftritte können durch
Aktualisierung auf TRAKTOR SCRATCH PRO 2 (kostenpflichtig) genossen
werden.
INTERNER TRAKTOR CONTROLLER
Dieses Gerät enthält einen Controller, der für Bedienungen von TRAKTOR SCRATCH
optimiert ist. TRAKTOR SCRATCH kann präzise bedient werden, ohne dass ein
separater Controller erforderlich ist.
Die Sektion zur Bedienung der Durchsuchen- und Transportfunktionen liegt oben
an der Mixersektion in der Funktion der Serie von Bedienverfahren vom Wählen von
Tracks zum Mischen. Die Sektionen zur Bedienung der Auftrittfunktionen (EFFECT,
LOOP, HOT CUE und SAMPLER) sind getrennt an den Seiten für die verschiedenen
Kanäle angehordnet, in einem Layout des Players für intuitive Bedienung.
PLUG AND PLAY
Dieses Gerät ist mit einer eingebauten USB-Soundkarte zum Anschließen eines
Computers ausgestattet. Ein Computer kann einfach mit einem einzigen USBKabel angeschlossen werden; es ist nicht erforderlich eine separate Soundkarte zu
installieren.
DJ-Auftritte mit “TRAKTOR SCRATCH DUO 2” können sofort gestartet werden, ohne
dass komplizierte Einstellungen erforderlich sind.
Lieferumfang
! TRAKTOR SCRATCH DUO 2 Software DVD-ROM
! TRAKTOR SCRATCH CONTROL CD ×2
! TRAKTOR SCRATCH CONTROL VINYL ×2
! Treibersoftware CD-ROM
! USB-Kabel
! Netzkabel
! Garantiekarte
! Bedienungsanleitung (dieses Dokument)
Deutsch
HOCHBELASTBARER FADER
Der Crossfader arbeitet mit einem speziell entwickelten Magnetsystem. Dies verbessert die Halsbarkeit und sichert glatte Bedienung für Scratch-Wiedergabe über eine
lange Zeit. Desweiteren können die Betriebslast, die Faderkurve und Cut Lag entsprechend dem Geschmack des Anwenders justiert werden. Der Kanalfader verwendet eine Schiebestruktur, wobei der Faderknopf durch zwei Metallschäfte gestützt
ist. Dies bietet glatte Bedienung ohne Wackeligkeit und eine etwa 3 Mal größere
Haltbarkeit im Vergleich zu vorherigen Pioneer-Produkten. Außerdem wird ein neu
entwickelter Fader verwendet, um Auswirkungen von in den Fader eindringenden
Flüssigkeiten oder Staub zu minimieren.
HOHE KLANGQUALITÄT
Dank der eingebauten Soundkarte kann von einem Computer ausgegebener
Sound in digitalem Format in dieses Gerät eingegeben werden, wodurch jegliche Verschlechterung der Soundqualität eliminiert wird. Außerdem enthält die
Audio-Eingabe/ Ausgabe-Schaltung einen hochleistenden D/ A-Wandler und eine
einzigartige analoge Schaltungstechnik, die digitales Rauschen verringern und den
Originalsound treu reproduzieren, um leistungsstarken, hochwertigen Club-Sound
zu reproduzieren.
De
5
Page 66

De
6
Kurzanleitung
TRAKTOR
Dieser Abschnitt beschreibt das Verfahren zur Verwendung dieses Geräts als DVS (Digital Vinyl System).
! Beschreibung von Funktionen und Verfahren, die auf dem Computer ausgeführt werden, werden angezeigt [
].
Bedienungsübersicht
1 Installieren der TRAKTOR Software
= Seite 6
2 Starten von TRAKTOR
= Seite 8
3 Ausführen der Produktaktivierung
= Seite 8
4 Installieren der Treibersoftware
= Seite 9
5 Anschließen an die Eingangs-/ Ausgangsbuchsen
= Seite 11
6 Einstellen dieses Geräts
= Seite 12
7 Ändern der Einstellungen des Einstell-Dienstprogramms
= Seite 12
8 Abspielen von Tracks
= Seite 12
Installieren der TRAKTOR Software
! Dieses Gerät unterstützt auch TRAKTOR SCRATCH PRO 2.
Wenn Sie TRAKTOR SCRATCH PRO 2 besitzen, aktualisieren Sie die Software
auf die neueste Version.
Vorsichtshinweise zur Installation der TRAKTOR
Software
Minimale Betriebsumgebung
für TRAKTOR
USB
2.0-Anschluss
! Volle Funktionalität kann nicht auf allen Computern garantiert werden, auch wenn diese mit
den oben beschriebenen Betriebsanforderungen übereinstimmen.
! Auch wenn der erforderliche Speicherplatz für die oben beschriebene Betriebsumgebung
vorhanden ist, kann es wegen Mangel an Speicherplatz aufgrund von residenten Programmen, anzahl von Diensten usw. sein, dass die Software nicht die volle Funktionalität und
Leistung erzielt. Schaffen Sie in solchen Fällen ausreichend Speicherplatz. Wir empfehlen,
zusätzlichen Speicher für stabilen Betrieb zu installieren.
! Je nach den Energieeinstellungen des Computers, usw. kann die CPU und Festplatten nicht
ausreichende Verarbeitungs-Kapazität bieten. Besonders bei Notebook-Computern müssen
Sie sicherstellen, dass der Computer im richtigen Zustand ist, um konstante hohe Leistung
zu bieten (zum Beispiel indem die Netzstromversorgung angeschlossen bleibt), wenn Sie
TRAKTOR verwenden.
Ein USB 2.0-Anschluss ist zum Anschluss des Computers an dieses Gerät
erforderlich.
Installationsverfahren (Windows)
1 Setzen Sie die mitgelieferte TRAKTOR SCRATCH DUO 2
Software DVD-ROM in das DVD-Laufwerk Ihres Computers ein.
2 Doppelklicken Sie aus dem Windows [Start]-Menü auf das
Icon [Computer (oder Arbeitsplatz)] > [Traktor].
Die Inhalte der DVD-ROM werden angezeigt.
3 Doppelklicken Sie [Traktor 2 2.0.x Setup PC.exe].
Das Installationsprogramm TRAKTOR wird gestartet.
4 Wenn das Installationsprogramm TRAKTOR gestartet ist,
klicken Sie auf [Next].
— Zum Zurückkehren zum vorherigen Bildschirm: Klicken Sie auf [Back].
— Zum Abbrechen der Installation: Klicken Sie auf [Cancel].
®
Core™ Duo
1
1
1
1
1
1
1
Unterstützte Betriebssysteme
Mac OS X
®
7 Home Premium/ Professional/ Ultimate
Windows
®
Windows Vista
Ultimate (SP1 oder höher)
Windows
Für die neuesten Informationen über die Betriebsumgebung und Kompatibilität und zum
Übernehmen des neuesten Betriebssystems gehen Sie bitter zur folgenden Website von Native
Instruments:
http://www.native-instruments.com/traktor
Minimale Betriebsumgebung
für TRAKTOR
CPU
Arbeitsspeicher Mindestens 2 GB RAM
Festplatte Freier Speicherplatz von mindestens 500 MB
DVD-Laufwerk Optisches Disc-Laufwerk, auf dem DVD-ROMs gelesen werden können
Internet-Verbindung
Home Basic/ Home Premium/ Business/
®
XP Home Edition/ Professional (SP3 oder höher) 32-Bit-Version
Für Mac OS X
Für Windows® 7,
Windows Vista®
und Windows® XP
Eine Internetverbindung ist für Benutzerregistrierung bei Native Instruments
zum Aktualisieren der TRAKTOR Software usw. erforderlich.
Verwenden Sie die neueste Version des Webbrowsers.
Macintosh Computer mit einem Intel
Prozessor
PC/ AT-kompatibler Computer mit Intel® Pentium® 4 Prozessor und einer Taktfrequenz von mindestens 2,4 GHz
oder einem Intel® Core™ Duo oder AMD Athlon™ 64
Processor
10.5
10.6
32-Bit-Version
64-Bit-Version
32-Bit-Version
64-Bit-Version
5 Lesen Sie die Inhalte von [License Agreement] sorgfältig
durch, und wenn Sie zustimmen markieren Sie [I accept the terms
of the license agreement] und klicken dann auf [Next].
Wenn Sie den Bedingungen der [License Agreement] nicht zustimmen, klicken Sie
auf [Cancel], um die Installation abzubrechen.
Page 67

4 Wenn das Installationsprogramm TRAKTOR gestartet ist,
klicken Sie auf [Fortfahren].
6 Wählen Sie den Typ der TRAKTOR Installation, und klicken Sie
auf [Next].
Normalerweise installieren Sie alle Optionen, einschließlich [Controller Editor] und
[Service Center].
7 Wählen Sie den Ort der Installation von TRAKTOR, und klicken
Sie auf [Next].
Zum Wählen des normalen Installationsorts klicken Sie einfach auf [Next].
Zum Installieren an einem anderen Ort klicken Sie auf [Change...], wählen Sie den
Installationsort und klicken Sie dann auf [Next].
8 Wählen Sie den Native Instruments Hardware-Treiber, und
klicken Sie auf [Next].
Markieren Sie das Wahlkästchen für Ihre Hardware.
9 Zum Installieren des Traktor Kontrol X1 Treibers markieren Sie
das Wahlkästchen, und klicken Sie auf [Next].
10 Wenn der folgende Bildschirm erscheint, klicken Sie auf
[Next].
Die Installation beginnt.
Der Installation-Fertig-Bildschirm erscheint, wenn die Installation fertig gestellt ist.
Deutsch
5 Lesen Sie die Inhalte der Lizenzvereinbarung sorgfältig durch,
und klicken dann auf [Fortfahren].
6 Wenn Sie den Bestimmungen der Benutzungsvereinbarung
zustimmen, klicken Sie auf [Akzeptieren].
Wenn Sie den Bedingungen der Benutzungsvereinbarung nicht zustimmen, klicken
Sie auf [Ablehnen], um die Installation abzubrechen.
11 Klicken Sie auf [Finish].
Damit ist das Installationsverfahren fertig gestellt.
Installationsverfahren (Macintosh)
1 Setzen Sie die mitgelieferte TRAKTOR SCRATCH DUO 2
Software DVD-ROM in das DVD-Laufwerk Ihres Computers ein.
Das Icon [Traktor] erscheint auf dem Bildschirm.
2 Doppelklicken Sie auf das [Traktor]-Icon.
Die Inhalte der DVD-ROM werden angezeigt.
3 Doppelklicken Sie [Traktor 2 2.0.x Installer Mac.mpkg].
Das Installationsprogramm TRAKTOR wird gestartet.
7 Wählen Sie den Native Instruments Hardware-Treiber, und
klicken Sie auf [Fortfahren].
Markieren Sie das Wahlkästchen für Ihre Hardware.
8 Wählen Sie den Ort der Installation von TRAKTOR, und klicken
Sie auf [Installieren].
Zum Wählen des normalen Installationsorts klicken Sie einfach auf [Installieren].
Zum Installieren an einem anderen Ort klicken Sie auf
[Ort für die Installation ändern ...], wählen Sie den Installationsort und klicken Sie
dann auf [Installieren].
Die Installation beginnt.
Der Installation-Fertig-Bildschirm erscheint, wenn die Installation fertig gestellt ist.
9 Klicken Sie auf [Neustart].
Damit ist das Installationsverfahren fertig gestellt.
De
7
Page 68

De
8
Starten von TRAKTOR
Bei Windows
Aus dem Windows [Start] Menü öffnen Sie [Alle Programme] >
[Native Instruments] > [Traktor 2] und klicken Sie dann auf das
Icon [Traktor 2].
Für Mac OS X
Im Finder öffnen Sie den Ordner [Anwendung], öffnen Sie dann
[Native Instruments] > [Traktor 2], und doppelklicken Sie auf das
Icon [Traktor 2].
Ausführen der Produktaktivierung
Zur Verwendung von TRAKTOR SCRATCH DUO 2 führen Sie zuerst die
Produktaktivierung (im Folgenden einfach als “Aktivierung” bezeichnet) mit Native
Instruments SERVICE CENTER aus (im Folgenden einfach als “SERVICE CENTER”
bezeichnet).
Starten von SERVICE CENTER
Dies ist auf drei Weisen möglich:
— Starten aus dem Dialog, der beim Starten von TRAKTOR erscheint
— Starten aus dem TRAKTOR [Help] Menü
— Direktes Starten von SERVICE CENTER
Zum Starten aus dem Dialog, der beim Starten von
TRAKTOR erscheint
1 Starten von TRAKTOR
Der Bildschirm unten erscheint.
Aktivierungsverfahren
— Online-Aktivierung: Wenn Ihr Computer eine Internetverbindung hat
— Offline-Aktivierung: Wenn Ihr Computer keine Internetverbindung hat
Online-Aktivierung
1 Starten Sie SERVICE CENTER.
Der Login-Bildschirm wird angezeigt.
2 Geben Sie Ihre E-Mail-Adresse und Ihr Passwort ein und
klicken Sie auf [Einloggen].
! Beim ersten Anmelden müssen Sie ein neues Benutzerkonto erstellen.
Wenn [Neues Benutzerkonto anlegen] geklickt wird, erscheint ein neuer
Bildschirm zur Benutzerkonto-Registrierung.
Geben Sie die erforderlichen Punkte ein (E-Mail-Adresse, Vornamen und
Nachnamen), wählen Sie Land/
Wenn der Bildschirm zur Registrierungsinformation erscheint, prüfen Sie die
Inhalte und klicken Sie auf [OK].
Ein Passwort wird zur der von Ihnen im Formular angegebenen E-Mail-Adresse
gesandt. Gehen Sie zum Login-Bildschirm zurück und melden sich an.
! Die persönliche Information, die beim Registrieren eines neuen Benutzerkontos
eingegeben wird, kann entsprechend den auf der Website von Native
Instruments angegebenen Datenschutzregeln gesammelt, verarbeitet und
verwendet werden.
Pioneer Corporation sammelt, verarbeitet oder verwendet diese persönlichen
Informationen nicht.
3 Geben Sie die Seriennummer ein, die auf der Verpackung der
TRAKTOR SCRATCH DUO 2 Software DVD-ROM angegeben ist,
und klicken Sie auf [Aktivieren].
Region und klicken Sie auf [Weiter].
! Der Dialog erscheint bei jedem Starten von TRAKTOR bis die Lizenz von
SERVICE CENTER erhalten wird.
2 Wählen Sie das Verfahren zum Erhalten der Lizenz, und
klicken dann.
— [Run Demo]: Starten Sie TRAKTOR im Demomodus.
— [Buy]: Kauf von TRAKTOR von dem Native Instruments Online-Shop.
— [Activate]: Direktes Erhalten der Lizenz vom SERVICE CENTER.
Zum Starten von dem TRAKTOR [Help] Menü
Aus dem TRAKTOR [Help] Menü klicken Sie auf [Launch Service
Center].
Zum direkten Starten von SERVICE CENTER
Bei Windows
Klicken Sie aus dem Windows [Start]-Menü auf die Icons [Native Instruments] >
[Service Center] > [Service Center].
Für Mac OS X
Im Finder öffnen Sie den Ordner [Anwendung], und doppelklicken Sie dann auf die
Icons [Service Center] > [Service Center].
4 Wenn der Bildschirm zur erfolgreichen
Produktlizenz-Registrierung erscheint, klicken Sie auf [Beenden].
Offline-Aktivierung
Zum Aktivieren von TRAKTOR SCRATCH DUO 2 wenn auf einem Computer installiert, der nicht mit dem Internet verbunden ist, verwenden Sie SERVICE CENTER im
Offline-Modus.
Mit diesem Verfahren ist ein zweiter Computer, der mit dem Internet verbunden
werden kann, erforderlich.
1 Starten Sie SERVICE CENTER auf dem Computer, auf dem
TRAKTOR SCRATCH DUO 2 installiert werden soll.
2 Klicken Sie auf [Offline] bei
[Ohne Internet-Verbindung fortfahren].
Page 69

3 Klicken Sie auf [Erstellen] bei
[Activation Request File erstellen].
4 Geben Sie die Seriennummer ein, die auf der Verpackung der
TRAKTOR SCRATCH DUO 2 Software DVD-ROM angegeben ist,
und klicken Sie auf [Erstellen].
Eine Startanforderungsdatei wird erzeugt. Speichern Sie diese Datei auf einem
USB-Gerät usw.
5 Verbinden Sie das USB-Gerät, auf dem die
Startanforderungsdatei gespeichert ist, mit dem Computer, der
mit dem Internet verbunden werden kann.
6 Doppelklicken Sie auf die Startanforderungsdatei auf dem
Computer, der mit dem Internet verbunden werden kann.
Der Webbrowser ist gestartet.
7 Wenn der Bildschirm zur Produktaktivierung erscheint, klicken
Sie auf [Absenden].
8 Geben Sie Ihre E-Mail-Adresse und Ihr Passwort ein und
klicken Sie auf [SUBMIT].
! Beim ersten Anmelden müssen Sie ein neues Benutzerkonto erstellen.
Wenn [No - I do not have an NI account.] markiert ist und [SUBMIT] geklickt
wird, erscheint ein neuer Bildschirm zur Benutzerkonto-Registrierung.
Geben Sie die erforderlichen Punkte ein (E-Mail-Adresse, Vornamen und
Nachnamen, Straßenadresse, Stadt und Postleitzahl), wählen Sie Land/
und klicken Sie auf [NEXT].
Wenn ein Bildschirm zur Umfrage erscheint, wählen Sie die Antworten auf die
verschiedenen Antworten und klicken Sie auf [SUBMIT].
Ein Passwort wird zur der von Ihnen im Formular angegebenen E-Mail-Adresse
gesandt. Gehen Sie zum Login-Bildschirm zurück und melden sich an.
! Die persönliche Information, die beim Registrieren eines neuen Benutzerkontos
eingegeben wird, kann entsprechend den auf der Website von Native
Instruments angegebenen Datenschutzregeln gesammelt, verarbeitet und
verwendet werden.
Pioneer Corporation sammelt, verarbeitet oder verwendet diese persönlichen
Informationen nicht.
Region
9 Wenn der [Service Center Activation Page] erscheint, klicken
Sie auf [NEXT].
10 Prüfen Sie, ob [Product] die Anzeige [TRAKTOR SCRATCH DUO
2] aufweist und [Status] die Anzeige [OK], und klicken Sie dann
auf [NEXT].
Ein Startrückkehrdatei wird erzeugt. Speichern Sie diese Datei auf einem USB-Gerät
usw.
11 Starten Sie SERVICE CENTER auf dem Computer, auf dem
TRAKTOR SCRATCH DUO 2 installiert werden soll.
12 Klicken Sie auf [Offline] bei
[Ohne Internet-Verbindung fortfahren].
13 Klicken Sie auf [Öffnen] bei [Activation Return File öffnen].
Die Startrückkehrdatei wird geladen.
14 Prüfen Sie im SERVICE CENTER, dass die Produktaktivierung
fertig ist.
Installieren der Treibersoftware
Diese Treiber-Software ist speziell zur Eingabe und Ausgabe von Soundvom
Computer entworfen. Um dieses Gerät mit Anschluss an einen Computer, auf dem
Windows oder Mac OS installiert ist, zu verwenden, installieren Sie zuerst diese
Treiber-Software auf dem Computer.
Software-Lizenzvereinbarung
Diese Software-Lizenzvereinbarung („Vereinbarung“) wird zwischen Ihnen (sowohl
einem Einzelbenutzer, der das Programm installiert, und einer einzigen juristischen
Person, für die der Einzelbenutzer handelt) („Sie“ oder „Ihr“) und der PIONEER
CORPORATION („Pioneer“) abgeschlossen.
FALLS SIE SCHRITTE DURCHFÜHREN, DAS PROGRAMM EINZURICHTEN ODER
ZU INSTALLIEREN, BEDEUTET DIES, DASS SIE ALLEN BESTIMMUNGEN DIESER
LIZENZVEREINBARUNG ZUSTIMMEN. DIE ERLAUBNIS, DAS PROGRAMM
HERUNTERZULADEN UND/
IHRER BEFOLGUNG DIESER BESTIMMUNGEN AB. ES IST KEINE GESCHRIEBENE
ODER ELEKTRONISCHE GENEHMIGUNG ERFORDERLICH, DAMIT DIESE
VEREINBARUNG IN KRAFT TRITT UND DURCHSETZBAR IST. FALLS SIE NICHT
ALLEN BESTIMMUNGEN DIESER VEREINBARUNG ZUSTIMMEN, IST ES IHNEN
NICHT ERLAUBT, DIESES PROGRAMM ZU BENUTZEN UND SIE MÜSSEN DIE
INSTALLATION ABBRECHEN BZW. DAS PROGRAMM DEINSTALLIEREN.
ODER ZU BENUTZEN, HÄNGT AUSDRÜCKLICH VON
1 Definitionen
1 „Dokumentierung“ bedeutet die schriftliche Dokumentierung, die techni-
schen Daten und der Hilfe-Inhalt, die von Pioneer allgemein zur Verfügung
gestellt werden, um Ihnen bei den Installation und dem Gebrauchs des
Programms behilflich zu sein.
2 „Programm“ bedeutet die gesamte Pioneer-Software, oder einen Teil davon,
die Sie gemäß dieser Vereinbarung unter Lizenz von Pioneer erhalten.
2 Programmlizenz
1 Beschränkte Lizenz. Entsprechend den Einschränkungen dieser
Vereinbarung erteilt Ihnen Pioneer eine beschränkte, nicht ausschließliche,
nicht übertragbare Lizenz (ohne das Recht auf eine Unterlizenz):
a Zur Installation einer einzigen Kopie dieses Programms auf der
Festplatte Ihres Computers, um das Programm ausschließlich für Ihren
persönlichen Gebrauch entsprechend dieser Vereinbarung und der
Dokumentierung („Autorisierter Gebrauch“) zu verwenden;
b Zur Verwendung der Dokumentierung für die Unterstützung des autori-
sierten Gebrauchs; und
c Zur Anfertigung einer Programmkopie ausschließlich für
Sicherungszwecke, vorausgesetzt, dass alle Titel und Warenzeichen,
das Copyright und alle Hinweise auf eingeschränkte Rechte auf der
Kopie reproduziert werden.
2 Einschränkungen. Sie dürfen das Programm oder die Dokumentierung
nicht kopieren oder verwenden, außer wie ausdrücklich durch diese
Vereinbarung erlaubt. Sie dürfen das Programm nicht übertragen, unterlizenzieren, mieten, vermieten oder verleihen bzw. für das Training von
Dritten, das kommerzielle Timesharing oder die Verwendung in einem
Service-Büro gebrauchen. Sie dürfen das Programm weder selbst noch
durch Dritte abändern, rekonstruieren, auseinander nehmen oder dekompilieren, außer bis zu dem vom geltenden Gesetz zugelassenen Ausmaß, und
auch dann nur, nachdem Sie Pioneer schriftlich von ihren beabsichtigten
Tätigkeiten informiert haben. Sie dürfen das Programm nicht auf mehreren
Prozessoren installieren, ohne vorher die schriftliche Zustimmung von
Pioneer eingeholt zu haben.
3 Eigentum. Pioneer oder sein Lizenzgeber behält sich alle Rechte, Titel
und Anteile am gesamten Patent, das Urheberrecht, Warenzeichen,
Geschäftsgeheimnis und die Rechte des geistigen Eigentums am
Programm und der Dokumentierung, sowie allen Derivaten davon, vor.
Sie erwerben keine weiteren Rechte, weder ausdrücklich noch impliziert,
die über die beschränkte Lizenz, die in dieser Vereinbarung angeführt ist,
hinausgehen.
4 Keine Unterstützung. Pioneer ist nicht verpflichtet, das Programm oder die
Dokumentierung unter dieser Vereinbarung zu unterstützen, warten, aktualisieren, verändern oder neue Veröffentlichungen bekanntzugeben.
3 Garantie-Verzichtserklärung
DAS PROGRAMM UND DIE DOKUMENTIERUNG WERDEN „WIE VORHANDEN“
ANGEBOTEN, OHNE JEGLICHE DARSTELLUNGEN ODER GARANTIEN, UND SIE
STIMMEN DAMIT ÜBEREIN, SIE AUF EIGENES RISIKO ZU VERWENDEN. BIS ZU
DEM VOM GESETZ ZUGELASSENEN MASS STREITET PIONEER AUSDRÜCKLICH
ALLE GARANTIEN JEGLICHER ART MIT BEZUG AUF DAS PROGRAMM UND
DIE DOKUMENTIERUNG AB, SEIEN SIE AUSDRÜCKLICH, IMPLIZIERT,
SATZUNGSGEMÄSS ODER SICH AUS EINEM LEISTUNGSKURS ERGEBEND,
BZW. EINEM HANDELSKURS ODER GEBRAUCH, EINSCHLIESSLICH ALLER
GARANTIEN DER VERMARKTBARKEIT, EIGNUNG FÜR EINEN BESTIMMTEN
ZWECK, AUSREICHENDER QUALITÄT, GENAUIGKEIT, DES TITELS ODER DER
NICHTVERLETZUNG.
4 Schadensersatz und Rechtsbehelfe für Vertragsbruch
Sie stimmen damit überein, dass jede Verletzung der Einschränkungen
dieser Vereinbarung Pioneer irreparable Schäden zufügen würde, für die
eine monetäre Entschädigung allein unzureichend wäre. Zusätzlich zu den
Schadensersatzforderungen und anderen Rechtbehelfen, zu denen Pioneer berechtigt sein kann, stimmen Sie damit überein, dass Pioneer das Recht hat, eine richterliche Verfügung einzureichen, um den tatsächlichen, drohenden oder wiederholten
Vertragsbruch dieser Vereinbarung zu verhindern.
5 Beendigung
Pioneer kann diese Vereinbarung jederzeit beenden, falls Sie irgendwelche
Bestimmungen verletzt haben. Falls diese Vereinbarung beendet wird, dürfen Sie
das Programm nicht weiter verwenden und müssen es von dem Computer, auf dem
es installiert ist, dauerhaft löschen sowie alle in Ihrem Besitz befindlichen Kopien
des Programms und der Dokumentierung zerstören und Pioneer dann schriftlich
davon informieren. Die Abschnitte 2.2, 2.3, 2.4, 3, 4, 5 und 6 bleiben auch nach der
Beendigung dieser Vereinbarung weiterhin in Kraft.
De
Deutsch
9
Page 70

De
10
6 Allgemeine Bestimmungen
1 Beschränkung der Haftbarkeit. Unter keinen Umständen sind Pioneer oder
seine Tochtergesellschaften in Zusammenhang mit dieser Vereinbarung
oder ihrem Inhalt, unter keiner Haftbarkeitstheorie, haftbar für indirekte
Schäden, Folgeschäden, spezielle oder nachfolgende Schäden sowie
verschärften Schadensersatz oder für Schadensersatz für verlorene
Profite, Einkommen, Geschäfte, Ersparnisse, Daten, den Gebrauch oder
die Kosten für den Erwerb eines Ersatzprogramms, selbst wenn Pioneer
auf die Möglichkeit einer solchen Schadensersatzforderung aufmerksam
gemacht wurde bzw. eine solche Schadensersatzforderung vorhersehbar
ist. Unter keinen Umständen wird die Haftbarkeit von Pioneer für alle
Schadensersatzforderungen den Betrag überschreiten, den Sie Pioneer
oder seinen Tochtergesellschaften für den Erwerb des Programms bezahlt
haben. Die Vertragsparteien geben zu, dass die Haftbarkeitsgrenzen
und die Risikoverteilung, die in dieser Vereinbarung angeführt sind,
im Programmpreis widerspiegelt sind und einen wesentlichen Teil
des Abkommens zwischen den Parteien darstellen, da Pioneer dieses
Programm anderenfalls nicht angeboten noch auch diese Vereinbarung
abgeschlossen hätte.
2 Die in dieser Vereinbarung enthaltenen Beschränkungen oder Ausschlüsse
der Garantien und Haftbarkeit betreffen oder beeinträchtigen Ihre gesetzlichen Rechte als Kunde nicht und gelten für Sie nur in dem Maße, in
dem solche Beschränkungen oder Ausschlüsse unter den Gesetzen der
Gerichtsbarkeit an Ihrem Wohnort erlaubt sind.
3 Trennbarkeit und Verzicht. Falls irgendeine Bestimmung dieser
Vereinbarung als illegal, ungültig oder auf andere Weise nicht durchsetzbar eingestuft wird, wird diese Bestimmung bis zum erlaubten Maße
durchgesetzt oder, falls eine Durchsetzung nicht möglich ist, als trennbar
angesehen und daher aus dieser Vereinbarung ausgeschlossen, während
die restlichen Bestimmungen der Vereinbarung weiterhin voll in Kraft
bleiben. Der Verzicht einer der Parteien im Falle eines Versäumnisses oder
Vertragsbruchs dieser Vereinbarung bedeutet nicht, dass im Falle eines
späteren Versäumnisses oder Vertragsbruchs ebenfalls ein Verzicht erfolgt.
4 Keine Übereignung. Sie dürfen diese Vereinbarung oder irgendwelche darin
enthaltenen Rechte oder Pflichten nicht übereignen, verkaufen, übertragen,
delegieren oder sich ihrer auf andere Weise entledigen, weder gewollt
noch ungewollt, sei es gesetzmäßig oder auf andere Weise, ohne vorher die
schriftliche Zustimmung von Pioneer eingeholt zu haben. Jede angebliche
Übereignung, Übertragung oder Delegation durch Sie ist null und nichtig.
Vorbehaltlich des Obengenannten ist diese Vereinbarung für die Parteien
und ihre jeweiligen Nachfolger und Rechtsnachfolger bindend.
5 Gesamte Vereinbarung. Diese Vereinbarung stellt die gesamte
Vereinbarung zwischen den Parteien dar und löst alle vorherigen oder
gleichzeitigen Vereinbarungen oder Vertretungen bezüglich des Inhalts,
seien sie schriftlich oder mündlich, ab. Diese Vereinbarung darf ohne die
vorherige und ausdrückliche schriftliche Zustimmung von Pioneer nicht
modifiziert oder berichtigt werden, und keine weitere Akte, kein Dokument,
Verwendung oder Gewohnheitsrecht kann diese Vereinbarung berichtigen
oder modifizieren.
6 Sie erklären Ihr Einverständnis damit, dass diese Vereinbarung durch japa-
nische Gesetzgebung geregelt und gemäß dieser ausgelegt wird.
Unterstützte Betriebssysteme
Mac OS X 10.6
®
! Windows
XP Professional x64 Edition ist nicht unterstützt.
32-Bit-Version
64-Bit-Version
1
1
Installationsverfahren (Windows)
1 Setzen Sie die mitgelieferte CD-ROM mit Treibersoftware in
das DVD-Laufwerk Ihres Computers ein.
2 Sobald das CD-ROM-Menü angezeigt wird doppelklicken Sie
auf [DJM-T1_X.XXX.exe].
3 Fahren Sie mit der Installation entsprechend den
Anweisungen auf dem Bildschirm fort.
Wenn während der Installation [Windows-Sicherheit] auf dem Bildschirm
erscheint, klicken Sie auf [Diese Treibersoftware trotzdem installieren] und
fahren mit der Installation fort.
! Bei Installation unter Windows XP
Wenn während der Installation [Hardwareinstallation] auf dem Bildschirm
erscheint, klicken Sie auf [Installation fortsetzen] und fahren mit der
Installation fort.
! Wenn das Installationsprogramm fertiggestellt wird, erscheint eine
Fertigstellungsmeldung.
Installationsverfahren (Macintosh)
1 Setzen Sie die mitgelieferte CD-ROM mit Treibersoftware in
das DVD-Laufwerk Ihres Computers ein.
2 Sobald das CD-ROM-Menü angezeigt wird doppelklicken Sie
auf [DJM-T1AudioDriver.dmg].
3 Doppelklicken Sie [DJM-T1AudioDriver.pkg].
4 Fahren Sie mit der Installation entsprechend den
Anweisungen auf dem Bildschirm fort.
Vor dem Installieren der Treibersoftware
! Lesen Sie den Abschnitt Software-Lizenzvereinbarung sorgfältig durch.
! Schalten Sie den Netzschalter des Geräts aus, und trennen Sie das USB-Kabel
ab, das dieses Gerät mit dem Computer verbindet.
! Falls andere Programme auf dem Computer laufen, beenden Sie diese.
! Zum Installieren oder Deinstallieren der Treibersoftware müssen Sie
vom Administrator Ihres Computers autorisiert sein. Melden Sie sich als
Administrator Ihres computers an, bevor Sie mit der Installation fortfahren.
! Wenn Sie dieses Gerät an Ihren Computer anschließen, ohne vorher die
Treibersoftware zu installieren, kann ein Fehler auf Ihrem Computer je nach der
Systemumgebung auftreten.
! Wenn die Installation der Treibersoftware unterbrochen wird, nachdem sie
gestartet wurde, starten Sie das Installationsverfahren von Anfang an neu.
! Die mitgelieferte CD-ROM enthält Installationsprogramme in den folgenden 12
Sprachen.
Englisch, Französisch, Deutsch, Italienisch, Niederländisch, Spanisch,
Portugiesisch, Russisch, Chinesisch (vereinfachte Zeichen), Chinesisch (traditionelle Zeichen), Koreanisch, Japanisch.
Bei der Verwendung eines Betriebssystemes in einer andere Sprache als den
oben aufgeführten, wählen Sie die Option [English (Englisch)] während des
Installationsverfahrens.
Unterstützte Betriebssysteme
Windows® 7 Home Premium/ Professional/ Ultimate
®
Windows Vista
Ultimate
Windows
Mac OS X 10.4.8 oder höher 32-Bit-Version
Home Basic/ Home Premium/ Business/
®
XP Home Edition/ Professional (SP2 oder höher) 32-Bit-Version
32-Bit-Version
64-Bit-Version
32-Bit-Version
64-Bit-Version
1
1
1
1
1
1
Page 71

Anschließen an die Eingangs-/ Ausgangsbuchsen
MIC
PHONES
LRAUX
OFF
PHONO CD
SIGNAL GND
ON
POWER
AC IN
220 - 240V
CH 2
USB
L
R
PHONOCD
CH 1
L
R
LR
RL
LR
1.GND 2.HOT
3.COLD
dB
-
6
0
dB
MASTER
ATT.
TRS
MASTER 1
MASTER 2
BOOTH
R
RLL
R
L
R
L
R
L
RL
Endstufenverstärker
(
für Kabinenmonitor
)
EndstufenverstärkerEndstufenverstärker
Plattenspieler DJ-Player Plattenspieler DJ-Player
Kopfhörer
Computer
Tragbares
Audiogerät
Mikrofone
Zur
Netzsteckdose
1
2 3
4
2 3
5
6
7
d
e
f
8
9
a
b
c
USB
L
TER 2
Schalten Sie die Stromversorgung aus und ziehen Sie das Netzkabel aus der Netzsteckdose, bevor Sie Geräte anschließen oder die Anschlüsse ändern.
Schließen Sie das Netzkabel an, nachdem alle Anschlüsse zwischen den Geräten vorgenommen wurden.
Verwenden Sie immer das mitgelieferte Netzkabel.
Beachten Sie die Bedienungsanleitung der angeschlossenen Komponente.
! Beim Erstellen eines DVS (Digital Vinyl System) durch Kombination mit einem Computer, einer Audioschnittstele usw. seien Sie beim Anschließen der Audioschnittstelle
an die Eingänge dieses Geräts und den Einstellungen der Eingangswahlschalter vorsichtig.
Beachten Sie auch die Bedienungsanleitungen der DJ-Software und der Audioschnittstelle.
Rückseite, Vorderseite
Deutsch
1 POWER-Taste
Schalten Sie die Stromversorgung dieses Geräts ein und aus.
2 PHONO-Buchsen
Schließen Sie ein Ausgabegerät mit auf Phono-Ebene (MM-Tonabnehmer) an
dieses Gerät an. Legen Sie nicht Line-Signale an.
Zum Anschließen eines Geräts an die [PHONO]-Buchsen ziehen Sie den
Kurzschluss-Klinkenstecker ab, der in den Buchsen steckt.
Setzen Sie diesen Kurzschluss-Klinkenstecker in die [PHONO]-Buchsen wenn
nichts angeschlossen ist, um externes Rauschen abzublocken.
3 CD-Buchsen
Schließen Sie einen DJ-Player oder eine Komponente mit Line-Ausgangspegel an.
4 SIGNAL GND-Buchse
Schließen Sie hier den Massedraht eines Plattenspielers an. Dadurch wird
Rauschen beim angeschlossenem Plattenspieler vermieden.
5 Kabelhaken
Haken Sie hier das USB-Kabel ein.
! Der Ton wird unterbrochen, wenn das USB-Kabel während der Wiedergabe
abgetrennt wird.
6 Kensington-Diebstahlsicherung
7 Buchse USB
Schließen Sie einen Computer an.
! Verbinden Sie dieses Gerät und den Computer direkt mit dem mitgelieferten
USB-Kabel.
! Ein USB-Hub kann nicht verwendet werden.
8 MASTER2-Buchsen
Schließen Sie einen Endstufenverfstärker usw. an.
9 MASTER ATT.
Stellt den Dämpfungspegel des Tonausgangs von den Buchsen [MASTER1] und
[MASTER2] ein.
Bei Einstellung auf [–6 dB] wird die Audioausgabelautstärke von den
[MASTER1]- und [MASTER2]-Buchsen um die Hälfte gesenkt.
a MASTER1-Buchsen
Schließen Sie einen Endstufenverfstärker usw. an.
b BOOTH-Buchsen (Seite 18)
Ausgangsklemmen für einen Kabinenmonitor, kompatibel mit symmetrischer
oder unsymmetrischer Ausgabe für einen TRS-Anschluss.
! Der Ton kann verzerrt sein, wenn der Pegel bei unsymmetrischen
Ausgängen zu hoch angehoben wird.
c AC IN
Stellen Sie die Verbindung zum Stromnetz mit dem mitgelieferten Netzkabel her.
Warten Sie, bis alle Verbindungen zwischen den Geräten hergestellt sind, bevor
Sie das Netzkabel anschließen.
Verwenden Sie immer das mitgelieferte Netzkabel.
d PHONES-Buchse (Seite 18)
Schließen Sie hier Kopfhörer an.
e MIC-Buchse (Seite 23)
Schließen Sie ein Mikrofon an.
f AUX IN-Buchsen (Seite 23)
Schließen Sie an die Ausgangsbuchse eines externen Geräts (Sampler, portables Audiogerät usw.) an.
Kabelhaken
Das USB-Kabel wird durch Einhaken am Kabelhaken befestigt. Dadurch wird
verhindert, dass das USB-Kabel versehentlich gezogen wird und der Stecker vom
Anschluss getrennt wird.
! Der Ton wird unterbrochen, wenn das USB-Kabel während der Wiedergabe
abgetrennt wird.
USB-Kabel
De
11
Page 72

De
12
Einstellen dieses Geräts
USBCD
PHONO
TRAKTOR
BROWSE VIEW
PUSH
TREE FLD OPEN
LOAD
A
DUPLICATE
LOAD
B
DUPLICATE
Stellen Sie sicher, dass die exklusive Treibersoftware dieses Gerät vo dem
Anschließen dieses Gerät installiert und ein Computer mit USB-Kabel angeschlossen ist.
1 Schalten Sie den [CD, PHONO, USB]-Eingangswahl-Schalter um.
Stellen Sie auf [USB].
2 Schließen Sie dieses Gerät über ein USB-Kabel an Ihren
Computer an.
Dieses Gerät fungiert als ein Audiogerät, das den ASIO-Standards entspricht.
! Dieses Verfahren funktioniert nicht mit Computern, die nicht USB 2.0
unterstützen.
! Bei Verwendung von Anwendungen mit Unterstützung für ASIO können [USB 1/
2], [USB 3/ 4] und [USB 5/ 6] als Eingänge verwendet werden.
! Die empfohlene Betriebsumgebung des Computers hängt von der
DJ-Anwendung ab. Prüfen Sie immer die empfohlene Betriebsumgebung für die
verwendete DJ-Anwendung.
! Wenn ein anderes USB-Audiogerät gleichzeitig an den Computer angeschlos-
sen ist, kann es nicht arbeiten oder normal erkannt werden.
Wir empfehlen, nur den Computer und dieses Gerät anzuschließen.
! Beim Verbinden des Computers und dieses Geräts empfehlen wir, die
Verbindung direkt am USB-Anschluss dieses Geräts herzustellen.
3 Drücken Sie die Taste [POWER].
Schalten Sie die Stromversorgung dieses Geräts ein.
! Die Meldung [Installieren von Gerätetreibersoftware] kann erscheinen,
wenn Sie dieses Gerät zuerst an dem Computer anschließen oder wenn Sie die
Verbindung zu einem anderen USB-Anschluss am Computer herstellen. Warten
Sie kurz, bis die Meldung [Die Geräte können jetzt verwendet werden.]
erscheint.
! Bei Installation unter Windows XP
— [Soll eine Verbindung mit Windows Update hergestellt werden, um
nach Software zu suchen?] kann erscheinen, während die Installation
abläuft. Wählen Sie [Nein, diesmal nicht] und klicken Sie auf [Weiter], um
mit der Installation fortzufahren.
— [Wie möchten Sie vorgehen?] kann erscheinen, während die Installation
abläuft. Wählen Sie [Software automatisch installieren (empfohlen)]
und klicken Sie auf [Weiter], um mit der Installation fortzufahren.
— Wenn während der Installation [Windows-Sicherheit] auf dem Bildschirm
erscheint, klicken Sie auf [Diese Treibersoftware trotzdem installieren]
und fahren mit der Installation fort.
Ändern der Einstellungen des EinstellDienstprogramms
1 Anzeige der Einstellung-Dienstsoftware
! Bei Windows
Klicken Sie auf das [Start]-Menü > [Alle Programme] > [Pioneer] >
[DJM-T1] > [DJM-T1 Einstellung-Dienstprogramm].
! Für Mac OS X
Klicken Sie auf das [Macintosh HD]-Icon > [Application] > [Pioneer] >
[DJM-T1] > [DJM-T1 Einstellung-Dienstprogramm].
2 Klicken Sie auf das Register [MIXER OUTPUT].
3 Klicken Sie das Pulldown-Menü [Mixer Audio Output].
Stellen Sie ein, wie unten gezeigt, entsprechend den an diesem Gerät anzuschließenden Geräten.
USB 1/ 2 CH1 Timecode CD CH1 Timecode PHONO
USB 3/
Bei Verwendung eines DJPlayers (CONTROL CD)
4 CH2 Timecode CD CH2 Timecode PHONO
Bei Verwendung eines
Plattenspielers (CONTROL
VINYL)
Abspielen von Tracks
1 Stellen Sie CONTROL CD auf dem DJ-Player ein.
! Zur Verwendung eines Plattenspielers stellen Sie CONTROL VINYL ein.
2 Stellen Sie TRAKTOR auf den Modus [Scratch Control] ein.
Prüfen Sie, ob die rechte Sektion an der Taste [d] in TRAKTOR eingestellt ist wie
unten gezeigt.
! Wenn [CUE] und [CUP] angezeigt werden, bedienen Sie den Computer zum
Umschalten von TRAKTOR auf den Modus [Scratch Control].
3 Drücken Sie die Taste [f (REL.)] oder [CUE (ABS.)], während
Sie die Taste [SHIFT] drücken.
Wählen Sie den Relativ- oder Absolut-Modus.
— Drücken Sie die Taste [f (REL.)], während Sie die Taste [SHIFT] drücken:
Schaltet auf den Relativ-Modus um.
Der Relativ-Modus ist ein Modus, der die Wiedergabeposition des
CONTROL CD/ CONTROL VINYL ignoriert.
— Drücken Sie die Taste [CUE (ABS.)], während Sie die Taste [SHIFT] drücken:
Schaltet auf den Absolut-Modus um.
Der Absolut-Modus ist ein Modus, der die Wiedergabeposition des
CONTROL CD/ CONTROL VINYL auf der Wiedergabeposition des Tracks
reflektiert.
4 Drehen Sie den Drehregler.
Wählen Sie den Track.
5 Drücken Sie die Taste [LOAD (DUPLICATE)].
Der gewählte Track wird im Deck geladen.
! Detaillierte Anweisungen über das Wählen von Tracks und Laden von Tracks in
Decks finden Sie unter Durchsuchen-Sektion auf Seite 14.
6 Spielen Sie die CONTROL CD.
Wiedergabe des im TRAKTOR-Deck geladenen Tracks beginnt.
! Zur Verwendung eines Plattenspielers spielen Sie CONTROL VINYL ab.
Page 73

Bedienung
LOWLEVELINPUT SELECTMIC
PHONES
LRAUX
MIC AUXOFF
EQ HI
CROSS F. REVERSE
CROSS F. CURVE
THRU
ON OFF
121212120
MIDI
DECK ADECK B
FX ASSIGN
FX1
DRY/WET
DECK A /C
AUTO LOOP
HOT CUESAMPLER
ON
1
2
3
SELECT
GROUP
/ SINGLE
CH1 CH2
UTILITY
LOAD
DUPLICATE
WAKE UP
SNAP
FX
SELECT
LOOP
MOVE
SAMPLE
LEVEL
1
2
3
1
2
PLAY MODE
PHONES
4
3
ACTIVE
FX2
BOOTH MONITOR
MASTER
DRY/WET
DECK B /D
ON
1
2
3
FX
SELECT
1
2
3
CROSS F.
REVERSE
1
2
4
3
ACTIVE
A
CUE
LOAD
DUPLICATE
B
REL. REL.ABS. ABS.
LFO
LFO
LFO
GROUP
/ SINGLE
LFO
LFO
LFO
TAP
DEL DEL
CROSS.F. CONTROL
QUANTIZE
CUE
FX1 FX2 SYNC
CUE
TREE
BROWSE VIEW
PUSH
FLD OPEN
FX ASSIGN
FX1 FX2
MASTER
MASTER1
OVER
9
5
3
1
0
-
1
-
3
-
6
-
9
-
15
-
24
dB
OVER
9
5
3
1
0
-
1
-
3
-
6
-
9
-
15
-
24
dB
USBCD
PHONO
SYNC
MASTER
TRIM
9
TRIM
9
HI
6
MID
6
LOW
6
CUE
USBCD
PHONO
HI
6
MID
6
LOW
6
LEVEL
0
2
MIXING
MASTERCUE
HEADPHONES
0
CH 1CH 2
1
2
3
4
5
6
7
8
9
10
0
1
2
3
4
5
6
7
8
9
10
FEELING ADJ.
0
0
POWER
2 CHANNEL TRAKTOR MIXER
AUTO LOOP
SAMPLER HOT CUE
SELECT
LOOP
MOVE
SAMPLE
LEVEL
DEL DEL
CROSS.F. CONTROL
PLAY MODE
BEND BEND
SHIFT
LOCK
ON/OFF
MIDI
DECK A
FX ASSIGN
FX1
DRY/WET
ON
1
2
3
UTILITY
LOAD
WAKE UP
FX
SELECT
1
2
4
3
ACTIVE
FX2
BOOTH MONITOR
MASTER
DRY/WET
ON
1
2
3
FX
SELECT
1
2
4
3
ACTIVE
A
CUE
LOAD
B
FX1 FX2 SYNC
BROWSE VIEW
PUSH
FX ASSIGN
FX1 FX2
USBCD
PHONO
SYNC
USBCD
PHONO
HEADPHONES
MASTER1
9
5
3
1
0
-
1
-
3
-
6
-
9
-
15
dB
9
5
3
1
0
-
1
-
3
-
6
-
9
-
15
dB
2
DUPLICATE DUPLICATE
TREE FLD OPEN
MASTER MASTER
DECK A /C
GROUP
/ SINGLE
SNAP
LFO
LFO
LFO
GROUP
/ SINGLE
LFO
LFO
LFO
QUANTIZE
AUTO LOOP
HOT CUESAMPLER
SELECT
LOOP
MOVE
SAMPLE
LEVEL
DEL DEL DEL DEL
CROSS.F. CONTROL
REL. REL.ABS. ABS.
CUE CUE
BEND BEND
OVER
-
24
OVER
-
24
TAP
CUE
TAP
SHIFT
LOCK
0
1
2
3
4
5
6
7
8
9
10
0
1
2
3
4
5
6
7
8
9
10
CH 1CH 2
FEELING ADJ.
DJM -T1
2 CHANNEL TRAKTOR MIXER
DECK B /D
AUTO LOOP
SELECT
LOOP
MOVE
SAMPLE
LEVEL
CROSS.F. CONTROL
POWER
CROSS F.
REVERSE
PHONES
SAMPLER HOT CUE
CH1 CH2
ON/OFF
PLAY MODE PLAY MODE
DECK B
1
2
3
0
0
TRIM
9
HI
6
MID
6
LOW
6
TRIM
9
HI
6
MID
6
LOW
6
LEVEL
0
MIXING
MASTERCUE
1
2
3
3
8
3
3
4
5
4
7
5
1232
1
6
Deutsch
1 Durchsuchen-Sektion (Seite 14)
2 Transport-Sektion (Seite 15)
3 Mixer-Sektion (Seite 17)
4 Effekt-Sektion (Seite 19)
5 Sektion Hot Cue/
6 Global-Sektion (Seite 23)
7 MIDI-Sektion (Seite 23)
8 MIC/
AUX-Sektion (Seite 23)
Sampler (Seite 21)
1 SHIFT-Taste
! Drücken Sie eine andere Taste, während Sie die Taste [SHIFT] drücken:
Die andere der gedrückten Taste zugewiesene Funktion wird aufgerufen.
! Drücken Sie die Taste [SHIFT] zweimal:
Die Taste [SHIFT] ist im gedrückten Zustand verriegelt. Zum Freigeben
drücken Sie die Taste [SHIFT] erneut.
2 UTILITY (WAKE UP)-Taste
! Drücken Sie:
Der Auto-Standby-Modus wird aufgehoben (Seite 26).
! Drücken Sie länger als 1 Sekunde:
Schaltet den Modus zum Ändern der Einstellungen dieses Geräts um (Seite
26).
3 POWER-Anzeige
Leuchtet auf, wenn die Stromversorgung dieses Geräts eingeschaltet ist.
De
13
Page 74

De
14
Durchsuchen-Sektion
DECK ADECK B
LOAD
A
LOAD
B
REL. REL.
BROWSE VIEW
PUSH
DUPLICATE DUPLICATE
CUE ABS. CUEABS.TREE FLD OPEN
1
2
2
1
(SHIFT)+
2 2
(Drücken)
1
3
2
TRAKTOR
1 LOAD (DUPLICATE)-Taste
! Drücken Sie:
Der mit dem Cursor gewählte Track wird im jeweiligen Deck geladen.
! [SHIFT] + drücken:
Der in einem Deck geladene Track wird kopiert und im anderen Deck
geladen.
2 Drehregler
! Drehen:
Der Cursor im Bereich [TRACK] bewegt sich.
! Drücken Sie:
Die vergrößerte Anzeige des Bereichs [BROWSE] schaltet ein und aus.
! [SHIFT] + drehen:
Der Cursor im Bereich [TREE] bewegt sich.
! [SHIFT] + drücken:
Der Ordner öffnet/
* Beschreibung der Bereiche
— [TREE]-Bereich: Bereich 1 im obigen Diagramm wird als [TREE]-
Bereich bezeichnet.
— [TRACK]-Bereich: Bereich 2 im obigen Diagramm wird als [TRACK]-
Bereich bezeichnet.
— [FAVORITES]-Bereich: Bereich 3 im obigen Diagramm wird als
[FAVORITES]-Bereich bezeichnet.
— [BROWSE]-Bereich: Bereiche 1, 2 und 3 im obigen Diagramm wer-
den gemeinsam als [BROWSE]-Bereich bezeichnet.
schließt.
Tracks in TRAKTOR importieren
Von Explorer oder Finder Bewegen Sie Musikdateien oder Ordner
mit Ziehen und Ablegen zu [Track Collection] im Bereich [TREE]
von TRAKTOR.
! Rechtsklicken Sie auf [Track Collection] (bei Mac OS X klicken Sie auf
[Track Collection] während Sie die [control]-Taste gedrückt halten), und wählen Sie dann [Import Music Folders] aus dem Menü. Alle Musikdateien im
Ordner [My Music] oder [Music] werden importiert.
Einlegen von Tracks in Decks
1 Drehen Sie den Drehregler, während Sie die Taste [SHIFT]
drücken.
Wählen Sie die Playlist oder den Ordner.
2 Drücken Sie den Drehregler, während Sie die Taste [SHIFT]
drücken.
Der Ordner öffnet/ schließt.
! Elemente ohne die Markierung [+] können nicht geöffnet/ geschlossen werden.
3 Lassen Sie die Taste [SHIFT] los tund drehen Sie den
Drehregler.
Wählen Sie den Track.
4 Drücken Sie die Taste [LOAD (DUPLICATE)].
Der gewählte Track wird im Deck geladen.
Abspielen von iTunes-Musikdateien
Wenn Sie Musikdateien mit iTunes verwalten, können die iTunes-Bibliothek und die
Playlists direkt mit dem TRAKTOR-Browser aufgerufen werden.
1 Drehen Sie den Drehregler, während Sie die Taste [SHIFT]
drücken.
Wählen Sie den Ordner [iTunes].
2 Drücken Sie den Drehregler, während Sie die Taste [SHIFT]
drücken.
Der Ordner öffnet/ schließt.
3 Durchsuchen der Bibliothek und Playlists auf gleiche Weise
wie bei iTunes
! Die iTunes-Bibliothek und Playlists können nicht mit dem TRAKTOR-Browser
bearbeitet werden.
! Bei Wiedergabe vom TRAKTOR-Browser werden iTunes-Musikdateien automa-
tisch in die TRAKTOR [Track Collection]-Liste importiert.
Erstellen von Playlists
1 Rechtsklicken Sie [Playlists] im Bereich [TREE] von TRAKTOR.
! Bei Mac OS X klicken Sie darauf, während Sie die [control]-Taste gedrückt
halten.
2 Aus dem Menü wählen Sie [Create Playlist].
3 Geben Sie den Namen der Playlist ein und und klicken Sie
dann [OK].
Die von Ihnen erstellte Playlist wird bei [Playlists] angezeigt.
4 Verschieben Sie die Musikdateien mit Ziehen und Ablegen zur
erstellten Playlist, um sie hinzuzufügen.
Erstellen eines FAVORITES
Verschieben Sie einen Playlist-Ordner mit Ziehen und Ablegen zu
einem offenen Schlitz im [FAVORITES]-Bereich.
Verwendung der Duplizieren-Funktion
Diese Funktion erlaubt es Ihnen, leicht Tracks auf das andere Deck zu kopieren, die
in einem der Decks geladen sind.
! Im folgenden wird das Verfahren zum Kopieren eines Tracks von Deck [A] auf
Deck [B] beschrieben.
1 Wählen Sie den Track, und drücken Sie dann die Taste [LOAD
(DUPLICATE)] auf Deck [A].
Der Track wird in das Deck [A] geladen.
2 Drücken Sie die Taste [LOAD (DUPLICATE)] an Deck [B],
während Sie die Taste [SHIFT] drücken.
Der im Deck [A] geladene Track wird kopiert und im anderen Deck [B] geladen.
Page 75

Transport-Sektion
DECK ADECK B
FX ASSIGN
FX1 FX2 SYNC
BROWSE VIEW
PUSH
FX ASSIGN
FX1 FX2SYNC
TREE FLD OPEN
MASTER MASTER
REL. REL.ABS. ABS.
CUE CUE
BEND BEND
Modus Internal Playback
Modus Scratch Control
1 2
4 4
1 2
3 3
4
(SHIFT)+
4
(SHIFT)+
3
12
(SHIFT)+
2
(SHIFT)+
1
3
Deutsch
1 f (REL.)-Taste
! Drücken Sie:
Verwenden Sie dies, um Tracks auf Wiedergabe/ Pause zu schalten.
! [SHIFT] + drücken:
Der TRAKTOR Wiedergabe Tracking-Modus schaltet auf den Relativ-Modus um.
Der Relativ-Modus ist ein Modus, der die Wiedergabeposition des
CONTROL CD/ CONTROL VINYL ignoriert.
2 CUE (ABS.)-Taste
Im Pausebetrieb
! Drücken Sie:
Ein Cue-Punkt ist auf die Pause-Position eingestellt.
— Wenn die Funktion [SNAP] von TRAKTOR ausgeschaltet ist:
Der Cue-Punkt ist auf die aktuelle Pause-Position eingestellt, ungeach-
tet des [Beat Grid].
— Wenn die Funktion [SNAP] von TRAKTOR eingeschaltet ist:
Der Cue-Punkt ist auf die gleiche Position gestellt wie das nächste
[Beat Grid].
Während der Wiedergabe
! Drücken Sie:
Die Wiedergabe kehrt zum eingestellten Cue Point zurück, führt Cue aus,
und die Wiedergabe schaltet auf Pause (Back Cue).
Wenn die Taste [CUE (ABS.)] gedrückt wird und gedrückt gehalten wird,
nachdem Sie zum Cue-Punkt zurückgegangen sind, wird die Wiedergabe
fortgesetzt, solange die Taste gedrückt wird.
! [SHIFT] + drücken:
Der TRAKTOR Wiedergabe Tracking-Modus schaltet auf den Absolut-Modus um.
Der Absolut-Modus ist ein Modus, der die Wiedergabeposition des
CONTROL CD/ CONTROL VINYL auf der Wiedergabeposition des Tracks
reflektiert.
3 FX ASSIGN (s BEND t)-Taste
! Drücken Sie die Taste [FX 1]:
TRAKTOR Effekteinheit [FX 1] wird dem Deck zugewiesen, dessen Taste
gedrückt wird.
! Drücken Sie die Taste [FX 2]:
TRAKTOR Effekteinheit [FX 2] wird dem Deck zugewiesen, dessen Taste
gedrückt wird.
* Bei Verwendung von TRAKTOR SCRATCH DUO 2 ist die Zuweisung
festgelegt: [FX 1] auf Deck [A], [FX 2] auf Deck [B].
Wenn Sie einen Upgrade auf TRAKTOR SCRATCH PRO 2 vornehmen,
kann [FX 1] und [FX 2] beliebig dem gewünschten Deck zugewiesen
werden.
! Drücken Sie die Tasten [SHIFT] + [FX 1]:
Die Spielgeschwindigkeit des Tracks wird kurzzeitig verringert.
! Drücken Sie die Tasten [SHIFT] + [FX 2]:
Die Spielgeschwindigkeit des Tracks wird kurzzeitig erhöht.
4 SYNC (MASTER)-Taste
! Drücken Sie:
Das [BPM] und [Beat Grid] des Tracks für das Deck, dessen Taste gedrückt
wurde, werden auf den Master für Synchronisierung synchronisiert.
! [SHIFT] + drücken:
Das Deck, dessen Taste gedrückt wurde, wird als Master für die
Synchronisation eingestellt.
Wiedergabe
Drücken Sie die Taste [f (REL.)].
Pausieren
Während der Wiedergabe drücken Sie die Taste [f (REL.)].
Setzen Sie den Cue
1 Während der Wiedergabe drücken Sie die Taste [f (REL.)].
Die Wiedergabe wird auf Pause geschaltet.
2 Drücken Sie die Taste [CUE (ABS.)].
Cue-Punkt [a] ist auf die Position eingestellt, bei der die Wiedergabe gestoppt
wurde.
Zu diesem Zeitpunkt wird kein Ton ausgegeben.
! Wenn ein neuer Cue Point eingestellt wird, wird der vorher eingestellte Cue
Point gelöscht.
Zurückschalten zum Cue Point (Back Cue)
Während der Wiedergabe drücken Sie die Taste [CUE (ABS.)].
Der Set kehrt sofort zum aktuell eingestellten Cue-Punkt zurück und schaltet dort
auf Pause.
! Wenn die Taste [f (REL.)] gedrückt wird, beginnt die Wiedergabe vom Cue-
Punkt.
Markieren von Cue Point (Cue Point Sampler)
Halten Sie die Taste [CUE (ABS.)] gedrückt, nachdem Sie zum CuePunkt zurückgeschaltet haben.
Die Wiedergabe startet ab dem gesetzten Cue-Punkt.
Die Wiedergabe wird fortgesetzt, während die Taste [CUE (ABS.)] gedrückt wird.
Pitch-Bend
Drücken Sie die Taste [FX 1] oder [FX 2], während Sie die Taste
[SHIFT] drücken.
— Drücken Sie die Tasten [SHIFT] + [FX 1]:
Die Spielgeschwindigkeit des Tracks wird kurzzeitig verringert.
— Drücken Sie die Tasten [SHIFT] + [FX 2]:
Die Spielgeschwindigkeit des Tracks wird kurzzeitig erhöht.
De
15
Page 76

De
16
Synchronisieren der
TRAKTOR
Wiedergabegeschwindigkeit mit anderen Decks
(Beat Sync)
1 Drücken Sie die Taste [SYNC (MASTER)], während Sie die Taste
[SHIFT] gedrückt halten am aktuell spielenden Deck.
Das Deck, dessen Taste gedrückt wurde, wird als Master für die Synchronisation
eingestellt.
2 Drücken Sie die Taste [SYNC (MASTER)] an dem Deck, das
nicht als Master für die Synchronisation eingestellt ist.
Das [BPM] und [Beat Grid] des Tracks für das Deck, das nicht als Master zur
Synchroniation eingestellt ist, werden auf [BPM] und [Beat Grid] des Tracks für das
auf Master für Synchronisierung eingestellte Deck synchronisiert.
! Informationen zum Einstellen des Master für Synchronisation siehe Einstellen
des Master für Synchronisation auf Seite 16.
! Die Beat-Sync-Funktion kann in den folgenden Fällen nicht richtig arbeiten.
— Wenn die Loop-Länge unter 1 Beat eingestellt ist.
— Wenn [BPM] des Tracks für das als Master für Synchronisation eingestellte
Deck außerhalb des einstellbaren Tempobereichs des Tracks für das zu
synchronisierende Deck ist.
— Wenn der Track nicht analysiert wurde.
Einstellen des Master für Synchronisation
Klicken Sie auf [ ].
Der Master für Synchronisation kann unter den beiden unten gezeigten Typen
gewählt werden.
— [MASTER]: Der vom Anwender eingegebene BPM-Wert oder der durch
Antippen eingestellte BPM-Wert wird als Master eingestellt.
— [AUTO]: Der Master wird automatisch eingestellt. Wenn zwei Decks spielen
und das als Master eingestellte Deck auf Pause gestellt ist, wird das andere
Deck automatisch als Master eingestellt.
! Bei Verwendung von TRAKTOR SCRATCH DUO 2 ist dies immer auf [AUTO]
gestellt. Wenn Sie einen Upgrade auf TRAKTOR SCRATCH PRO 2 ausführen,
können Sie [MASTER] oder [AUTO] wählen.
Page 77

Mixer-Sektion
CUE
USBCD
PHONO
USBCD
PHONO
HEADPHONES
MASTER1
9
5
3
1
0
-
1
-
3
-
6
-
9
-
15
dB
9
5
3
1
0
-
1
-
3
-
6
-
9
-
15
dB
2
DE
OVER
-
24
OVER
-
24
TAP
CUE
TAP
SHIFT
LOCK
0
1
2
3
4
5
6
7
8
9
10
0
1
2
3
4
5
6
7
8
9
10
CH 1CH 2
FEELING ADJ.
DJM -T1
2 CHANNEL TRAKTOR MIXER
D
AU
SAMPLE
LEVEL
CRO
CROSS F.
REVERSE
SAMP
PLAY MO
1
2
3
TRIM
9
HI
6
MID
6
LOW
6
TRIM
9
HI
6
MID
6
LOW
6
LEVEL
0
MIXING
MASTERCUE
BOOTH MONITOR
MASTER
0
0
CROSS F. REVERSE
CROSS F. CURVE
THRU
ON OFF
1
2
3
4
6
7
8
5
3
4
6
7
d
5
f
g
b
c
99
a
e
Deutsch
1 MASTER LEVEL-Regler
Stellt den Audiopegelausgang von den Buchsen [MASTER1] und [MASTER2]
ein.
2 BOOTH MONITOR-Regler
Stellen Sie den Pegel der Audiosignale ein, die an der Buchse [BOOTH] ausgegeben werden.
3 CD, PHONO, USB Eingangswahl-Schalter
Wählen Sie die Eingangsquelle jedes Kanals unter den an dieses Gerät angeschlossenen Komponenten.
— [CD]: Wählt den DJ-Player, der an die Buchsen [CD] angeschlossen ist.
— [PHONO]: Wählt den Plattenspieler, der an die Buchsen [PHONO] ange-
schlossen ist.
— [USB]: Wählt den Ton des Computers, der an die Buchse [USB] angeschlos-
sen ist.
4 TRIM-Regler
Stellen Sie den Pegel der Audiosignale ein, die in jedem Kanal angelegt werden.
5 EQ (HI, MID, LOW)-Regler
Diese stellen die Soundqualität von verschiedenen Kanälen ein.
Diese stellen jeweils den [HI] (Höhenbereich), [MID] (Mittenbereich) und [LOW]
(Tiefenbereich) ein.
6 CUE (TAP)-Taste
Drücken Sie die Taste [CUE (TAP)] für den Kanal, den Sie mithören wollen.
7 Kanalfader
Stellt den Pegel der Audiosignale ein, die in jedem Kanal ausgegeben werden.
8 Crossfader
Der Sound des jeweiligen Kanals wird entsprechend der Kurven-Charakteristika
ausgegeben, die mit dem [CROSS F. CURVE (THRU, , )]-Wahlschalter
gewählt werden.
9 Kanalpegelanzeige
Zeigt den Soundpegel der verschiedenen Kanäle ein, bevor Sie durch die
Kanalfader gehen.
a Master-Pegelanzeige
Zeigt den Audiopegelausgang von den Buchsen [MASTER1] und [MASTER2] an.
b HEADPHONES MIXING Regler
Stellt die Balance der Mithörlautstärke zwischen dem Sound der Kanäle, deren
Taste [CUE (TAP)] gedrückt wird, und dem Kanalsound von [MASTER] ein.
c HEADPHONES LEVEL Regler
Stellt den Audiopegelausgang von der Buchse [PHONES] ein.
d FEELING ADJ. Einstellungsloch
Dies kann zum Einstellen der Betriebslast des Crossfaders verwendet werden.
e CROSS F. REVERSE-Anzeige
Leuchtet auf, wenn der Schalter [CROSS F. REVERSE] aktiviert ist.
f CROSS F. CURVE (THRU, , )-Wahlschalter
Dadurch werden die Crossfader-Curve-Eigenschaften umgeschaltet.
g CROSS F. REVERSE Schalter
Schaltet die Crossfader-Reverse-Funktion ein und aus.
Ziehen Sie nicht gewaltsam an den Kanal-Fader- und Crossfader-Knöpfen.
Die Knöpfe sind nicht zum Abziehen konstruiert. Durch starkes Ziehen an den
Knöpfen kann das Gerät beschädigt werden.
Tonausgabe
Stellen Sie die Lautstärke von Endstufenverstärkern, die an die [MASTER1]
und [MASTER2]-Buchsen angeschlossen sind, auf einen geeigneten Pegel ein.
Beachten Sie, dass lauter Sound erzeugt wird, wenn die Lautstärke zu hoch angehoben wird.
1 Schalten Sie den [CD, PHONO, USB]-Eingangswahl-Schalter um.
Wählen Sie die Eingangsquelle jedes Kanals unter den an dieses Gerät angeschlossenen Komponenten.
2 Drehen Sie den Regler [TRIM].
Stellen Sie den Pegel der Audiosignale ein, die in jedem Kanal angelegt werden.
3 Bewegen Sie den Kanal-Fader von Ihnen weg.
Stellt den Pegel der Audiosignale ein, die in jedem Kanal ausgegeben werden.
4 Stellen Sie den Crossfader ein
Schalten Sie den Kanal um, dessen Ton von den Lautsprechern ausgegeben wird.
— Linker Rand: Der [CH 1] Ton wird ausgegeben.
— Mittenposition: Der Ton von [CH 1] und [CH 2] wird gemischt und
ausgegeben.
— Rechter Rand: Der [CH 2] Ton wird ausgegeben.
! Diese Bedienung ist nicht erforderlich, wenn der [CROSS F. CURVE (THRU,
)]-Wahlschalter auf [THRU] gestellt ist.
5 Drehen Sie den Regler [MASTER LEVEL].
Audiosignale werden von den Buchsen [MASTER1] und [MASTER2] ausgegeben.
De
,
17
Page 78

De
18
Abstimmen der Tonqualität
Drehen Sie die Regler [EQ (HI, MID, LOW)] zum Steuern
unterschiedlicher Kanäle.
Siehe Technische Daten auf Seite 31 für den Bereich der Töne, die von jedem Regler
angepasst werden können.
Mithören von Ton mit Kopfhörern
1 Schließen Sie Kopfhörer an die Buchse [PHONES] an.
2 Drücken Sie die Taste [CUE (TAP)] für den Kanal, den Sie
mithören wollen.
3 Drehen Sie den Regler [HEADPHONES MIXING].
Stellt die Balance der Mithörlautstärke zwischen dem Sound der Kanäle, deren
Taste [CUE (TAP)] gedrückt wird, und dem Kanalsound von [MASTER] ein.
! Zum Mithören nur des Sounds vom Kanal [MASTER] drehen Sie den
Steuerregler [HEADPHONES MIXING] aus der Mittenposition im Uhrzeigersinn.
4 Drehen Sie den Regler [HEADPHONES LEVEL].
Der Sound des Kanals, dessen [CUE (TAP)]-Taste gedrückt ist, und dem Sound vom
Kanal [MASTER] werden gemischt und von den Kopfhörern ausgegeben.
! Mithören wird aufgehoben, wenn die Taste [CUE (TAP)] erneut gedrückt wird.
Wählen Sie die Crossfader-Kurve-Eigenschaften.
Schalten Sie den [CROSS F. CURVE (THRU, , )]-Wahlschalter um.
— [THRU]: Wählen Sie diese Option, wenn Sie den Crossfader nicht verwen-
den möchten.
— [ ]: Stellen Sie hier für eine allmählich ansteigende Kurve ein.
— [ ]: Stellt eine abrupt ansteigende Kurve ein. (Wenn der Crossfader vom
Rand wegbewegt an der Seite [CH 1] wegbewegt wird, nimmt der Sound
von der [CH 2]-Seite sofort ausgegeben.)
Einstellen der Betriebslast des Crossfaders
Die Last (Widerstand), wenn der Crossfader bedient wird, kann mit einem
Schlitzschraubenzieher eingestellt werden.
! Die Dämpfungskurve des Crossfaders und die Wiedergabe der beiden Ränder
des Faders (der Cut Lag) können eingestellt werden. Einzelheiten siehe Ändern
der Einstellungen dieses Geräts auf Seite 26.
1 Bewegen Sie den Crossfader zum rechten Rand ([CH 2]).
2 Stecken Sie das Schlitz-Schraubenzieher in das [FEELING ADJ.]Einstellungsloch und drehen Sie ihn.
— Im Uhrzeigersinn drehen: Die Last nimmt ab (der Widerstand der Fader-
Bewegung wird schwächer).
— Gegen den Uhrzeigersinn drehen: Die Last nimmt zu (der Widerstand der
Fader-Bewegung wird stärker).
Verwendung der Fader-Reverse-Funktion
Die Bedienrichtung des Crossfaders kann umgekehrt werden, indem der
[CROSS F. REVERSE]-Schalter eingeschaltet wird.
Stellen Sie den [CROSS F. REVERSE]-Schalter auf [ON].
Audio wird von der Buchse [BOOTH]
ausgegeben.
Drehen Sie den Regler [BOOTH MONITOR].
Stellen Sie den Pegel der Audiosignale ein, die an der Buchse [BOOTH] ausgegeben werden.
Page 79

Effekt-Sektion
FX1
DRY/WET
ON
1
2
3
FX
SELECT
GROUP
/ SINGLE
LFO
LFO
LFO
1
2
3
Group-Modus
Single-Modus
1 3
2 4
(SHIFT)+2
(SHIFT)+
4
3
4
2
(SHIFT)+2
(SHIFT)+
3
3 2
1 4
Deutsch
1 ON (GROUP/ SINGLE)-Taste
Bei Verwendung im Modus [Group]
! Drücken Sie:
Arbeitet nicht.
! [SHIFT] + drücken:
Schaltet den Effekt-Feld-Modus um.
[Group]-Modus h [Single]-Modus
Bei Verwendung im Modus [Single]
! Drücken Sie:
Schaltet den Effekt ein und aus.
! [SHIFT] + drücken:
Schaltet den Effekt-Feld-Modus um.
[Group]-Modus h [Single]-Modus
— [Group]-Modus:
Bis zu drei Effekte können gewählt und gleichzeitig pro Effekt-Feldern
gesteuert werden.
— [Single]-Modus:
Die Parameter des gewählten Effekts können detailliert bedient werden.
Der Modus [Single] kann nicht mit TRAKTOR SCRATCH DUO 2 gewählt
werden.
Bei Aktualisierung auf TRAKTOR SCRATCH PRO 2 kann das Effekt-Feld
auf den Modus [Single] umgeschaltet werden.
2 Effekt-Regeltasten
Bei Verwendung im Modus [Group]
! Drücken Sie:
Schaltet die Effekte ein und aus.
! [SHIFT] + drücken:
— Wenn [Generic Controller Mode] in den Einstellungen des Geräts
eingeschaltet ist:
Schaltet den Effekttyp um.
— Wenn [Generic Controller Mode] in den Einstellungen des Geräts
ausgeschaltet ist:
Schaltet die Funktion LFO CONTROL ein und aus.
Bei Verwendung im Modus [Single]
! Drücken Sie die Taste [1]:
Stellt die Parameter aller Effekte auf die Basis-Einstellungen zurück.
! Drücken Sie die Taste [2] oder [3]:
Schaltet den betreffenden Effekt ein und aus. Die Typen von Parametern
sind je nach Effekt unterschiedlich.
! Drücken Sie die Tasten [SHIFT] + [1]:
— Wenn [Generic Controller Mode] in den Einstellungen des Geräts
eingeschaltet ist:
Schaltet den Effekttyp um.
— Wenn [Generic Controller Mode] in den Einstellungen des Geräts
ausgeschaltet ist:
Schaltet die Funktion LFO CONTROL ein und aus.
! Drücken Sie die Tasten [SHIFT] + [2] oder [SHIFT] + [3]:
3 DRY/WET Regler
Bei Verwendung im Modus [Group]
! Drehen:
Stellt die Balance zwischen Effektsound und Originalsound ein.
! [SHIFT] + drehen:
Arbeitet nicht.
— Wenn [Generic Controller Mode] in den Einstellungen des Geräts
eingeschaltet ist:
Arbeitet nicht.
— Wenn [Generic Controller Mode] in den Einstellungen des Geräts
Schaltet die Funktion LFO CONTROL ein und aus.
ausgeschaltet ist:
Bei Verwendung im Modus [Single]
4 Effekt-Regelscheiben
Bei Verwendung im Modus [Group]
Bei Verwendung im Modus [Single]
Verwendung der Effekt-Funktion
! Der folgende Abschnitt erläutert das Verfahren zur Bedienung der Effektfunktion
im Modus [Group].
1 Drücken Sie die Taste [FX 1] oder [FX 2].
Die TRAKTOR Effekteinheit wird dem Deck zugewiesen.
! Bei Verwendung von TRAKTOR SCRATCH DUO 2 ist die Zuweisung festgelegt:
[FX 1] auf Deck [A], [FX 2] auf Deck [B].
Wenn Sie einen Upgrade auf TRAKTOR SCRATCH PRO 2 vornehmen, kann
[FX 1] und [FX 2] beliebig dem gewünschten Deck zugewiesen werden.
2 Drehen Sie einen Effektregler, während Sie die Taste [SHIFT]
drücken.
Dies wählt den Typ des Effekts.
! Wenn [Generic Controller Mode] in den Einstellungen dieses Geräts eingeschaltet
ist, kann der Effekttyp auch gewählt werden, indem eine Effektreglertaste gedrückt
wird, während die Taste [SHIFT] gedrückt gehalten wird.
3 Drehen Sie die Effekt-Regelscheibe.
Stellt den Grad des Effektsounds ein.
4 Drücken Sie die Effekt-Regeltaste.
Dadurch wird der Effekt eingeschaltet.
! Wenn die Taste erneut gedrückt wird, wird der Effekt ausgeschaltet.
5 Drehen Sie den Regler [DRY/WET].
Stellen Sie die Balance zwischen dem Effektsound für alle Effekte zusammen und
den Originalsound ein.
! Drehen:
Stellt die Balance zwischen Effektsound und Originalsound ein.
! [SHIFT] + drehen:
Schaltet den Effekttyp um.
! Drehen:
Stellt den Grad des betreffenden Effekts ein.
! [SHIFT] + drehen:
Schaltet den Effekttyp um.
* Wenn die Funktion LFO CONTROL eingeschaltet ist
— Drehen:
Stellt den Zyklus zum Ändern des Grad jedes Effekts ein.
— [SHIFT] + drehen:
Arbeitet nicht.
! Drehen:
Stellt die betreffenden Parameter ein.
! [SHIFT] + drehen:
Arbeitet nicht.
* Wenn die Funktion LFO CONTROL eingeschaltet ist
— Drehen:
Stellt den Zyklus ein, mit dem der betreffende Parameter wechselt.
— [SHIFT] + drehen:
Arbeitet nicht.
De
19
Page 80

De
20
Verwendung der LFO CONTROL-Funktion
Wenn die Funktion LFO CONTROL eingeschaltet ist, wird der Parameterwert des
zu TRAKTOR gesendeten Effekts mit der spezifizierten Geschwindigkeit geändert.
Diese Funktion erlaubt es Ihnen, einzigartige Effektsounds zu erzeugen, die mit
manueller Bedienung nicht möglich sind.
Mit der Funktion LFO CONTROL können die Effektreglertasten [1] – [3] alle separat
eingestellt werden.
! Schalten Sie zuerst [Generic Controller Mode] in den Einstellungen des Geräts
aus. Einzelheiten siehe Ändern der Einstellungen dieses Geräts auf Seite 26.
! Der folgende Abschnitt erläutert das Verfahren zur Bedienung der Funktion LFO
CONTROL im Modus [Group].
1 Drehen Sie einen Effektregler, während Sie die Taste [SHIFT]
drücken.
Dies wählt den Typ des Effekts.
2 Drücken Sie eine Effektreglertaste, während Sie die Taste
[SHIFT] drücken.
Die LFO CONTROL-Funktion schaltet sich ein.
Wenn der Effekt ausgeschaltet ist, schaltet er automatisch ein.
! Wenn die gleiche Taste erneut gedrückt wird, wird die Funktion LFO CONTROL
ausgeschaltet, und der Effekt schaltet wieder ein.
3 Drehen Sie die Effekt-Regelscheibe.
Stellt den Zyklus zum Ändern des Grad jedes Effekts ein.
4 Drehen Sie den Regler [DRY/WET].
Stellen Sie die Balance zwischen dem Effektsound für alle Effekte zusammen und
den Originalsound ein.
Page 81

Sektion Hot Cue/ Sampler
1
2
4
3
ACTIVE
DECK A /C
AUTO LOOP
HOT CUESAMPLER
SELECT
LOOP
MOVE
SAMPLE
LEVEL
DEL DEL
CROSS.F. CONTROL
PLAY MODE
HOT CUE-Modus
SAMPLER-Modus
1
2
3
5
4
1
54
(SHIFT)+
5
(SHIFT)+
1
4
TRAKTOR
Deutsch
1 AUTO LOOP (LOOP MOVE/ SAMPLE VOLUME)-Regler
Beim Verwenden der Hot Cue-Funktion
! Drehen:
Ändert die Loop-Größe.
! Drücken Sie:
Schaltet die Loop-Wiedergabe ein und aus.
! [SHIFT] + drehen:
Bewegt die Position des Loop.
! [SHIFT] + drücken:
Arbeitet nicht.
Beim Verwenden der Sampler-Funktion
! [SHIFT] + drehen:
Stellt die Lautstärke des Sample-Decks ein.
! [SHIFT] + drücken:
Setzt die Lautstärke des Sample-Decks auf die Basis-Einstellung zurück.
2 SELECT-Taste
! Drücken Sie:
Schaltet die Funktion der Sektion Hot Cue/ Sampler bei jedem Tastendruck um.
Hot Cue-Funktion h Sampler-Funktion
! [SHIFT] + drücken:
Schaltet die Funktion CROSS FADER CONTROL ein und aus.
3 SELECT-Anzeige
Leuchtet oder blinkt entsprechend der Funktion der Sektion Hot Cue/ Sampler.
— Wenn die Funktion Hot Cue eingeschaltet ist: Leuchtet grün.
— Wenn die Funktion Sampler eingeschaltet ist: Leuchtet orangefarben.
— Wenn die Funktion CROSS FADER CONTROL eingeschaltet ist: Blinkt grün
oder orangefarben.
4 HOT CUE/ SAMPLER-Taste
Beim Verwenden der Hot Cue-Funktion
5 ACTIVE-Taste
! Drücken Sie:
— Wenn kein Hot Cue bei Wiedergabe oder Pause eingestellt ist:
Ein Hot Cue wird bei der Position gesetzt, bei der die Taste gedrückt
wird.
— Wenn ein Hot Cue bei Wiedergabe oder Pause eingestellt ist:
Ruft den Hot Cue auf.
! [SHIFT] + drücken:
Löscht den Hot Cue.
*
[CUE TYPE] (der Typ von Hot Cue) kann geändert werden, indem auf [b]
Beim Verwenden der Sampler-Funktion
Einzelheiten siehe Tabelle der HOT CUE/ SAMPLER Tasten-Bedienungen auf
Seite 22.
Beim Verwenden der Hot Cue-Funktion
! Drücken Sie:
Schaltet den Wiedergabemodus des beim Hot Cue registrierten Loop um.
Loop wird gespielt h Loop wird nicht gespielt
Beim Verwenden der Sampler-Funktion
! Drücken Sie:
links vom Icon [ ] geklickt wird.
Schaltet den Tastenmodus der Taste [HOT CUE/ SAMPLER] des Sample-
Decks um.
Sample-Wiedergabemodus h Trigger-Wiedergabemodus
Einzelheiten siehe Tabelle der HOT CUE/ SAMPLER Tasten-Bedienungen auf
Seite 22.
! [SHIFT] + drücken:
Schaltet den Loop-Modus des Sample auf dem Sample-Deck um.
Loop-Wiedergabemodus h One-Shot-Wiedergabemodus
— [ ] Loop-Wiedergabemodus:
Wenn das Ende des Sample erreicht wird, geht die Sample-Wiedergabe
zum Anfang zurück und fährt fort.
— [ ] One-Shot-Wiedergabemodus:
Wenn das Ende des Sample erreicht wird, stoppt die Sample-
Wiedergabe.
Verwendung der Hot-Cue-Funktion
1 Drücken Sie die Taste [SELECT].
Die Sektion Hot Cue/ Sampler schaltet bei der Hot-Cue-Funktion um.
Schaltet auf den Modus um, in dem die Anzeige [SELECT], die Taste [HOT CUE/
SAMPLER] und die Taste [ACTIVE] grün leuchten.
2 Drücken Sie die Taste [HOT CUE/ SAMPLER].
Der Hot Cue wird auf die Position gesetzt, die beim Drücken der Taste spielt.
! Wenn die Taste [HOT CUE/ SAMPLER] während der Loop-Wiedergabe gedrückt
wird, kann der aktuell spielende Loop bei der Hot Cue-Taste gespeichert werden.
! Diese Bedienung ist nicht erforderlich, wenn ein Hot Cue bereits bei der Taste
[HOT CUE/ SAMPLER] gespeichert ist.
3 Während der Wiedergabe oder Pause drücken Sie die Taste
[HOT CUE/ SAMPLER].
Der Hot Cue wird aufgerufen.
! Wenn ein Loop bei der Taste [HOT CUE/
die Taste [ACTIVE], um den Loop-Wiedergabemodus umzuschalten.
SAMPLER] gespeichert ist, drücken Sie
Verwendung der Sampler-Funktion
Samples können im Sample-Deck [C] und Sample-Deck [D] Sample-Slots geladen
und abgespielt werden.
! Bei Bedienung des Sample-Deck [C]:
— Der Deck [A] Track wird im Sampler-Slot geladen.
— Die Tasten [HOT CUE/ SAMPLER] an Support der Seite [CH 1] des Geräts
unterstützen die betreffenden Sampler-Slots.
! Bei Bedienung des Sample-Deck [D]:
— Der Deck [B] Track wird im Sampler-Slot geladen.
— Die Tasten [HOT CUE/ SAMPLER] an Support der Seite [CH 2] des Geräts
unterstützen die betreffenden Sampler-Slots.
! Die Bedienung der Tasten [HOT CUE/ SAMPLER] ist je nach dem Loop-
Modus des Sample und dem Tastenmodus der Taste [HOT CUE/ SAMPLER]
unterschiedlich. Einzelheiten siehe Tabelle der HOT CUE/ SAMPLER Tasten-
Bedienungen.
! Der folgende Abschnitt erläutert das Verfahren zum Einlegen des Deck [A]
Tracks im Sample Deck [C] Sampler-Slog und der Wiedergabe.
De
21
Page 82

De
22
Bedienen Sie die Sektion Hot Cue/ Sampler an der Seite [CH 1] dieses Geräts.
1 Laden Sie den Track im Deck [A].
2 Drücken Sie die Taste [SELECT].
Schalten Sie die Sektion Hot Cue/ Sampler auf die Sampler-Funktion um.
Schaltet auf den Modus um, in dem die Anzeige [SELECT], die Taste [HOT CUE/
SAMPLER] und die Taste [ACTIVE] orangefarben leuchten.
3 Drücken Sie die Taste [HOT CUE/ SAMPLER].
Der im Deck [A] geladene Track wird im Sampler-Slot am Sample-Deck [C] geladen.
! Der Track wird für 48 Sekunden aus der spielenden Poisition gesampelt, wenn
die Taste gedrückt wurde, und dies wird im Sampler-Slot geladen.
! Der mit dem Cursor im Bereich [TRACK] gewählte Track kann im Sampler-Slot
durch Drücken der Taste [HOT CUE/
SAMPLER] eingelegt werden, während die
Taste [SHIFT] gedrückt gehalten wird. (Tracks mit einer Spielzeit von mehr als 48
Sekunden können nicht geladen werden.)
4 Drücken Sie die Taste [ACTIVE], während Sie die Taste [SHIFT]
drücken.
Der Loop-Modus des Sample schaltet um.
— [ ] Loop-Wiedergabemodus:
Wenn das Ende des Sample erreicht wird, geht die Sample-Wiedergabe
zum Anfang zurück und fährt fort.
— [
] One-Shot-Wiedergabemodus:
Wenn das Ende des Sample erreicht wird, stoppt die Sample-Wiedergabe.
5 Drücken Sie die Taste [ACTIVE].
Der Tastenmodus der Taste [HOT CUE/ SAMPLER] schaltet um.
— Sample-Wiedergabemodus:
Das Sample wird bei jedem Tastendruck abgespielt oder stummgeschaltet.
— Trigger-Wiedergabemodus:
Wenn die Taste gedrückt wird, wird das Sample von Anfang an abgespielt
und stoppt, wenn die Taste losgelassen wird.
! Einzelheiten siehe Tabelle der HOT CUE/ SAMPLER Tasten-Bedienungen auf Seite 22.
6 Drücken Sie die Taste [HOT CUE/ SAMPLER] oder halten Sie die
Taste [HOT CUE/
Das Sample wird abgespielt.
! Wenn die Taste [HOT CUE/ SAMPLER] erneut gedrückt wird oder die Taste
[HOT CUE/ SAMPLER] losgelassen wird, stoppt die Ausgabe des SampleSounds.
SAMPLER] gedrückt.
Verwendung der CROSS FADER CONTROLFunktion
CROSS FADER CONTROL ist eine Funktion, die es Ihnen erlaubt, Hot Cues aufzurufen und Samples in Zusammenhang mit der Bedienung des Crossfaders
abzuspielen.
! Führen Sie zuerst die folgenden Vorbereitungen aus.
— Schalten Sie [Generic Controller Mode] in den Einstellungen des Geräts
aus.
= Siehe Ändern der Einstellungen dieses Geräts auf Seite 26.
— Registrieren Sie einen Hot Cue im Deck [A] oder [B].
= Siehe Verwendung der Hot-Cue-Funktion auf Seite 21.
— Laden Sie ein Sample im Sample-Deck [C] oder [D].
= Siehe Verwendung der Sampler-Funktion auf Seite 21.
! Der bediente Abschnitt unterscheidet sich je nach den zugehörigen Decks.
— Zum Verknüpfen von Deck [A] und Sample-Deck [C]:
Bedienen Sie die Sektion Hot Cue/
Sampler an der Seite [CH 1] dieses Geräts.
— Zum Verknüpfen von Deck [B] und Sample-Deck [D]:
Bedienen Sie die Sektion Hot Cue/
Sampler an der Seite [CH 2] dieses Geräts.
! Wenn der Schalter [CROSS F. REVERSE] aktiviert ist, wird die Richtung des
Crossfaders umgekehrt.
1 Drücken Sie die Taste [SELECT], während Sie die Taste [SHIFT]
drücken.
Die CROSS FADER CONTROL-Funktion schaltet sich ein.
Die [SELECT]-Anzeige blinkt.
! Wenn die Taste [SELECT] erneut gedrückt wird, während die Taste [SHIFT]
gedrückt wird, schaltet die Funktion CROSS FADER CONTROL aus.
2 Drücken Sie die Taste [SELECT].
Wählen Sie die Funktion, die mit der Funktion CROSS FADER CONTROL verknüpft
werden soll (die Funktion Hot Cue oder Sampler).
— Zum Verknüpfen der Hot-Cue-Funktion:
Schaltet auf den Modus um, in dem die Anzeige [SELECT], die Taste
[HOT CUE/ SAMPLER] und die Taste [ACTIVE] leuchten und grün blinken.
— Zum Verknüpfen der Sampler-Funktion:
Schaltet auf den Modus um, in dem die Anzeige [SELECT], die Taste
[HOT CUE/ SAMPLER] und die Taste [ACTIVE] leuchten und orangefarben
blinken.
! Es ist auch möclich, sowohl die Hot-Cue-Funktion als auch die Sampler-
Funktion mit der Bedienung des Crossfaders zu verknüpfen. (Der Hot Cue und
Sample, die mit dem Crossfader verknüpft werden sollen, müssen separat für
jede Funktion gewählt werden.)
3 Drücken Sie die Taste [HOT CUE/ SAMPLER].
Wählen Sie Hot Cue und Sample, die mit der Bedienung des Crossfaders verknüpft
werden sollen.
— Zum Wählen eines Hot Cue:
Drücken Sie die Taste [HOT CUE/ SAMPLER], bei der der Hot Cue gesetzt
wird. Nur einer der Hot Cues [1] – [4] kann gewählt werden.
— Zum Wählen eines Sample:
Drücken Sie die Taste [HOT CUE/ SAMPLER], bei der das Sample geladen
wird. Bis zu vier Samples [1] – [4] können gewählt werden.
! Mit diesem Verfahren werden Hot Cue und Sample nicht abgespielt.
! Wenn die Taste [HOT CUE/ SAMPLER] erneut gedrückt wird, wird die Auswahl
aufgehoben.
4 Bewegen Sie den Crossfader.
Bewegen Sie den Crossfader zu der Gegenseite der Seite, zu der Hot Cue oder
Sample verknüpft werden sollen, wenn die Funktion CROSS FADER CONTROL
eingestellt ist.
5 Bewegen Sie den Crossfader.
Wenn der Crossfader nach rechts vom Rand [CH 1] bewegt wird, werden der Deck
[B] Hot Cue und Sample-Deck [D] abgespielt.
Wenn der Crossfader nach links vom Rand [CH 2] bewegt wird, werden der Deck [A]
Hot Cue und Sample-Deck [C] abgespielt.
Tabelle der HOT CUE/ SAMPLER Tasten-Bedienungen
! Drücken Sie:
Sampler-Slot
Wenn kein Sample geladen ist Die im Deck geladene Musikdatei wird als Sample im Sampler-Slot geladen.
Wenn ein Sample geladen ist Wiedergabe des Samples beginnt.
Während der Wiedergabe eines
Samples
1 Der Modus kann mit der Taste [ACTIVE] umgeschaltet werden (Seite 21).
2 Wenn das Sample stummgeschaltet ist, wird die Stummschaltung aufgehoben.
Loop-Wiedergabemodus
Sample-Wiedergabemodus 1Trigger-Wiedergabemodus 1Sample-Wiedergabemodus 1Trigger-Wiedergabemodus
Das Sample wird stummgeschaltet.
Wenn länger als 1 Sekunde lang
gedrückt, stoppt die Wiedergabe des
Samples.
! [SHIFT] + drücken:
Sampler-Slot
Wenn kein Sample geladen ist Die im Bereich [TRACK] gewählte Musikdatei wird als Sample im Sample-Slot geladen.
Wenn ein Sample geladen ist Das Sample wird gelöscht.
Während der Wiedergabe eines
Samples
1 Der Modus kann mit der Taste [ACTIVE] umgeschaltet werden (Seite 21).
Loop-Wiedergabemodus
Sample-Wiedergabemodus 1Trigger-Wiedergabemodus 1Sample-Wiedergabemodus 1Trigger-Wiedergabemodus
Das Sample wird gelöscht.
1
Das Sample wird abgespielt, während
die Taste gedrückt wird.
Wenn die Taste losgelassen wird,
stoppt die Wiedergabe des Samples.
2
Das Sample wird als Cue gesetzt, und
die Wiedergabe wird fortgesetzt.
1
One-Shot-Wiedergabemodus
Wiedergabe des Samples beginnt.
Wiedergabe des Samples stoppt.
One-Shot-Wiedergabemodus
1
Das Sample wird abgespielt, während
die Taste gedrückt wird.
Wenn die Taste losgelassen wird,
stoppt die Wiedergabe des Samples.
Das Sample wird als Cue gesetzt, und
die Wiedergabe wird fortgesetzt.
1
1
1
Page 83

Global-Sektion
SNAP
QUANTIZE
1
1
(SHIFT)+
1
LOWLEVELINPUT SELECT
MIC AUXOFF
EQ HI
121212120
21 3
MIDI
CH1 CH2
ON/OFF
1
1 SNAP (QUANTIZE)-Taste
! Drücken Sie:
Schaltet die TRAKTOR Snap-Funktion ein und aus.
Wenn die Snap-Funktion eingeschaltet ist, werden die Cue- und Loop-
Punkte auf die gleiche Position wie der nächste [Beat Grid] gesetzt.
! [SHIFT] + drücken:
Schaltet die TRAKTOR Quantisierungsfunktion ein und aus.
Wenn die Quantisierung-Funktion eingeschaltet ist, wird Bewegung zu den
Cue- und Loop-Punkten mit dem Timing der Beats synchronisiert.
MIC/ AUX-Sektion
1 INPUT SELECT Schalter
Schaltet den Audioeingang zwischen externem Gerät und Mikrofon um.
— [AUX]: Das an der Buchse [AUX] angeschlossene externe Gerät ist
gewählt.
— [OFF]: Der [MIC/ AUX]-Kanal wird ausgeschaltet.
— [MIC]: Das an der Buchse [MIC] angeschlossene Mikrofon ist gewählt.
! Die Soundeingabe zu den Buchsen [MIC] und [AUX] wird mit dem Sound
[CH 1] und [CH 2] gemischt, der durch den Cossfader geführt wurde.
2 LEVEL-Regler
Stellt den Audiopegeleingang für die Buchsen [MIC] und [AUX] ein.
3 EQ (HI, LOW)-Regler
Diese stellen die Klangqualität vom Kanal [MIC/ AUX] ein.
MIDI-Sektion
Dieses Gerät gibt die Bedienungsinformationen von Tasten und Reglern im universalen MIDI-Format aus.
Beim Anschluss über USB-Kabel an einen Computer, auf dem MIDI-kompatible
DJ-Software installiert ist, kann die DJ-Software von diesem Gerät gesteuert werden.
Bedienung der DJ-Software mit der MIDIFunktion
Installieren Sie die DJ-Software vorher auf Ihrem Computer. Stellen Sie außerdem
Audio- und MIDI-Einstellungen für die DJ-Software ein.
! Anweisungen zur MIDI-Kanaleinstellung siehe Einstellen des MIDI-Kanals auf
Seite 25.
! Für die von diesem Gerät ausgegebenen Meldungen siehe Liste von MIDI-
Meldungen auf Seite 27.
1 Verbinden Sie die Buchse [USB] dieses Geräts mit dem
Computer.
Anweisungen zu Verbindungen siehe Anschließen an die Eingangs-/
Ausgangsbuchsen auf Seite 11.
2 Starten der DJ-Software.
3 Drücken Sie die Taste [CH 1] oder [CH 2].
Die MIDI-Funktion der Mixer-Sektion wird eingeschaltet.
Übertragung der MIDI-Meldungen der Mixer-Sektion beginnt.
! Wenn ein Fader oder Regler bewegt wird, wird eine Meldung entsprechend der
Position ausgegeben.
! Wenn die Taste [CH 1] oder [CH 2] erneut gedrückt wird, stoppt die Übertragung
der MIDI-Meldungen der Mixer-Sektion.
! Die MIDI-Meldungen der Sektionen Durchsuchen, Transport, Effekt und Hot
Cue/ Sampler werden ungeachtet der Tasten [CH 1] und [CH 2] übertragen.
Deutsch
Eingabe des Tons von einem Mikrofon oder
externen Gerät
1 Schließen Sie das externe Gerät an die Buchse [MIC] oder
[AUX] an.
2 Schalten Sie den [INPUT SELECT]-Schalter um.
3 Drehen Sie den Regler [LEVEL].
Stellt den Audiopegeleingang an die Buchse [MIC] oder [AUX] ein.
! Achten Sie darauf, dass bei Drehen auf die ganz rechte Position ein sehr lauter
Ton kommt.
Abstimmen der Tonqualität
Drehen Sie die Regler [EQ (HI, LOW)].
Siehe Technische Daten auf Seite 31 für den Bereich der Töne, die von jedem Regler
angepasst werden können.
De
23
Page 84

De
24
Ändern der Einstellungen
Ändern der Voreinstellungen von
TRAKTOR
Ändern Sie die Umgebungseinstellungen von TRAKTOR entsprechend den
Verwendungsbedingungen Ihrer Hardware.
Einzelheiten zu den Umgebungseinstellungen von TRAKTOR siehe TRAKTORBedienungsanleitung.
! Wenn Sie die Änderungen an den Umgebungseinstellungen auf die Vorgaben
zurücksetzen wollen, beachten Sie bitte die folgende Website.
http:/
/
www.prodjnet.com/ support/
1 Klicken Sie auf die Schaltfläche TRAKTOR [
(Preferences Button)].
Öffnen Sie das Einstellungen-Menü von TRAKTOR.
2 Wählen Sie die Kategorie und nehmen Sie die Einstellung vor.
Aktualisieren der TRAKTOR Software
Wenn der Computer mit dem Internet verbunden ist, kann die TRAKTOR Software
aktualisiert werden, indem auf Native Instruments SERVICE CENTER zugegriffen
wird (im Folgenden einfach als “SERVICE CENTER” bezeichnet).
1 Starten Sie SERVICE CENTER und melden sich an.
Anweisungen zum Starten von SERVICE CENTER und Anmelden finden Sie in
Starten von SERVICE CENTER auf Seite 8.
2 Klicken Sie auf das Register [Update].
Verfügbare Updates werden geprüft.
3 Markieren Sie das Wahlkästchen.
Spezifizieren Sie den herunterzuladenden Update.
Kategorie Beschreibungen
Mixer
Global Settings
Effects
Mix Recorder
Browser Details
File Management
Controller Manager
Traktor Kontrol X1
Stellen Sie Auto Gain ein oder aus.
Stellen Sie die Anzeigemethode der TRAKTOR-Mixer-Sektion ein.
Stellen Sie ein, ob die Global-Sektion angezeigt werden soll oder nicht.
Stellen Sie die Typen der Effekte ein, die beim Wählen von Effekten
angezeigt werden.
Nehmen Sie die Einstellungen entsprechend den TRAKTOR Aufnahme-
Funktionen vor.
Nehmen Sie die Einstellungen entsprechend dem [BROWSE]-Bereich
und den Schriftarten vor.
Nehmen Sie die Einstellungen für Track-Import, Auto-Analyse, BPM-
Bereich zur Analyse usw. ein.
Weisen Sie TRAKTOR-Funktionen zu den Reglern und Tasten dieses
Geräts zu.
Stellen Sie dies ein, wenn Sie Native Instruments’ Traktor Kontrol X1
verwenden.
Ändern der Einstellungen des EinstellDienstprogramms
Die Einstellung-Dienstsoftware kann verwendet werden, um die unten aufgeführten
Prüfungen und Einstellungen auszuführen.
— Prüfen des Status des [CD, PHONO, USB]-Eingangswahl-Schalter dieses Geräts
— Einstellung der Quelle der Audiodaten-Ausgabe von diesem Gerät zum
Computer
— Einstellen der Puffergröße (bei Verwendung von Windows ASIO)
— Einstellen des MIDI-Kanals
— Prüfen der Version der Treibersoftware
Anzeige der Einstellung-Dienstsoftware
! Bei Verwendung von TRAKTOR stellen Sie sicher, dass Sie das Einstellungen-
Dienstprogramm beenden.
Bei Windows
Klicken Sie auf das [Start]-Menü > [Alle Programme] > [Pioneer] > [DJM-T1] >
[DJM-T1 Einstellung-Dienstprogramm].
Für Mac OS X
Klicken Sie auf das [Macintosh HD]-Icon > [Application] > [Pioneer] > [DJM-T1]
> [DJM-T1 Einstellung-Dienstprogramm].
4 Klicken Sie auf [Download].
Die Aktualisierung beginnt.
Liste der Einstellpunkte von TRAKTOR SCRATCH
DUO 2
Kategorie Beschreibungen
Ausgabe von Audio
CONTROL VINYL)
Audio Setup
Output Routing
Input Routing
Timecode Setup
Loading
Transport
Decks
Wählen Sie die Audiogeräte, die für Eingabe/
verwendet werden sollen.
Stellt die Audio-Lazenz ein, wenn ein Macintosh-Computer verwendet
wird.
Wählen Sie [Mixing Mode].
— [Internal]: Wählen Sie dies, um die TRAKTOR Mixer-Sektion von
diesem Gerät zu steuern.
— [External]: Wählen Sie dies zur Verwendung dieses Geräts.
Stellen Sie die Verknüpfung den Audioausgängen des TRAKTOR-Decks
und den Eingangskanälen dieses Geräts her.
Stellen Sie die Verknüpfung den Audioeingängen des TRAKTOR-Decks
und den Ausgangskanälen dieses Geräts her.
Stellen Sie dies ein, um die Zeitcodes (CONTROL CD/
zu verwenden.
Stellen Sie die Bedingungen und Funktionen zum Laden von Tracks zu
den Decks ein.
Nehmen Sie die Einstellungen entsprechend den Tempo- und Tonlagesperre-Funktionen vor.
Stellen Sie die Anzeigemethode der TRAKTOR-Deck-Sektion ein.
Prüfen des Status des [CD, PHONO, USB]Eingangswahl-Schalter dieses Geräts
Zeigen Sie die Einstellung-Dienstsoftware vor dem Start an.
Klicken Sie auf das Register [MIXER INPUT].
Page 85

Einstellung der Quelle der Audiodaten-Ausgabe
von diesem Gerät zum Computer
Zeigen Sie die Einstellung-Dienstsoftware vor dem Start an.
1 Klicken Sie auf das Register [MIXER OUTPUT].
2 Klicken Sie das Pulldown-Menü [Mixer Audio Output].
Wählen und bestimmen Sie die Audiodaten, die zum Computer aus dem Strom der
Audiosignale in diesem Gerät ausgegeben werden.
USB 1/ 2 USB 3/ 4 USB 5/ 6
CH1 Timecode PHONO
CH1 Timecode CD
— —
— —
— —
— —
1: Die Soundausgabe von [USB 1/
ben wie an diesem Gerät anliegt, ungeachtet der Einstellung von [USB Output Level].
1
1
CH2 Timecode PHONO
CH2 Timecode CD
2] und [USB 3/ 4] wird mit der gleichen Lautstärke ausgege-
1
1
Post CH1 Fader
Post CH2 Fader
Cross Fader A
Cross Fader B
MIC/
AUX Post EQ
REC OUT
Einstellen der Puffergröße (bei Verwendung
von Windows ASIO)
Wenn Anwendungen dieses Gerät verwenden, während das Standard-Audiogerät
läuft (DJ-Software usw.) läuft, beenden Sie diese Anwendung vor dem Anpassen der
Puffergröße.
Zeigen Sie die Einstellung-Dienstsoftware vor dem Start an.
Klicken Sie auf das Register [ASIO].
Deutsch
! Eine ausreichend großer Pufferspeicher verringert die Gefahr von
Sound-Droputs (Tonaussetzern), aber steigert die AudiosignalÜbertragungsverzögerung (Latenz).
Prüfen der Version der Treibersoftware
Zeigen Sie die Einstellung-Dienstsoftware vor dem Start an.
Klicken Sie auf das Register [About].
3 Klicken Sie das Pulldown-Menü [USB Output Level].
Stellen Sie die Lautstärke der Audiodaten-Ausgabe vom [USB 5/ 6] ein.
! Wenn nicht genug Lautstärke mit der Lautstärkeeinstellung der DJ-Software
alleine erreicht werden kann, ändern Sie die Einstellung [USB Output Level]
zum Einstellen der Lautstärke der Audiodaten-Ausgabe von diesem Gerät.
Beachten Sie, dass der Sound verzerrt ist, wenn die Lautstärke zu hoch angehoben wird.
Einstellen des MIDI-Kanals
Zeigen Sie die Einstellung-Dienstsoftware vor dem Start an.
1 Klicken Sie auf das Registerkarte [MIDI].
Prüfen der neuesten Informationen über die
Treibersoftware
Für die neuesten Informationen zur Treibersoftware zur exklusiven Verwendung mit
diesem Gerät besuchen Sie unsere Website wie unten gezeigt.
http://www.prodjnet.com/support/
! Betrieb kann nicht garantiert werden, wenn mehrere Einheiten dieses Mixers an
einen einzigen Computer angeschlossen sind.
2 Klicken Sie das Pulldown-Menü [MIDI CHANNEL].
Wählen Sie den gewünschten MIDI-Kanal.
De
25
Page 86

De
26
Ändern der Einstellungen dieses Geräts
1 Drücken Sie die Taste [UTILITY (WAKE UP)] länger als 1
Sekunde.
Die Anzeige [UTILITY (WAKE UP)] und der Oberteil der [CH 1] Kanalpegelanzeige
blinken.
2 Drücken Sie die Taste [LOAD (DUPLICATE) B].
Das Einstellelement schaltet bei jedem Drücken der Taste [LOAD (DUPLICATE) B] um.
Die Blinkposition der Kanalpegelanzeige [CH 1] bewegt sich nach unten.
! Wenn die Taste [LOAD (DUPLICATE) A] gedrückt wird, kehrt die Auswahl zum
vorherigen Einstellpunkt zurück.
Die Blinkposition der Kanalpegelanzeige [CH 1] bewegt sich nach oben.
3 Drehen Sie den Drehregler.
Ändern Sie den Einstellwert.
! Wenn der Einstellwert ein- und ausgeschaltet werden kann
— Ein: Die grüne Sektion der [CH 2]-Kanalpegelanzeige leuchtet.
— Aus: Die grüne Sektion der [CH 2]-Kanalpegelanzeige erlischt.
! Wenn der Einstellwert in Schritten umgeschaltet werden kann
— Einerstelle des Einstellwerts: Der Wert wird von der Anzahl der leuchten-
den Segmente in der [CH 2]-Kanalpegelanzeige angezeigt.
— Zehnerstelle des Einstellwerts: Der Wert wird von der Anzahl der leucht-
enden Segmente in der Master-Pegelanzeige angezeigt.
4 Drücken Sie den Drehregler.
Die Einstellungen werden in diesem Gerät gespeichert.
Die Taste [UTILITY (WAKE UP)] blinkt schnell. Schalten Sie nicht die
Stromversorgung dieses Geräts aus, während die Einstellungen gespeichert
werden.
! Die Speicherung ist abgeschlossen, wenn die Taste [UTILITY (WAKE UP)] von
schnellem Blinken auf normales Blinken umschaltet.
! Drücken Sie die Taste [UTILITY (WAKE UP)], um zum Normalbetrieb
zurückzukehren.
Über die Auto-Standby-Funktion
Wenn [Auto Standby] auf [ON] gestellt ist, wird der Standby-Modus automatisch
eingestellt, nachdem 4 Stunden mit allen im Folgenden gezeigten Bedingungen
abgelaufen sind.
— Das keine der Tasten oder Regler dieses Geräts bedient wird.
— Dass keine Audiosignale an die Eingangsbuchsen dieses Geräts angelegt
werden.
— Dass kein Computer über USB angeschlossen ist.
! Wenn die Taste [UTILITY (WAKE UP)] erneut gedrückt wird, wird der Standby-
Modus aufgehoben.
! Dieses Gerät ist werkseitig auf aktivierte Auto-Standby-Funktion eingestellt.
Wenn Sie die Auto-Standby-Funktion nicht verwenden wollen, stellen Sie [Auto
Standby] auf [OFF].
Bevorzugte Einstellungen
Sonstige Einstellungen
Cross Fader Cut Lag
Cross Fader Curve Slow A
Cross Fader Curve Slow B
Cross Fader Curve Fast A
Cross Fader Curve Fast B
Generic Controller Mode
Mic Output To Booth Monitor
Auto Standby
1 Wenn der Einstellwert extrem klein ist, kann der Sound nicht vollständig stummgeschaltet werden, auch wenn der Crossfader ganz am Rand positioniert ist.
2 Die Dämpfung hat eine abrupte Kurvencharakteristik, wenn der Einstellwert klein ist, und eine sanfte Kurvencharakteristik, wenn der Einstellwert groß ist.
Blinkposition [CH 1] der
Kanalpegelanzeige
Ganz oben 0 bis 52
Zweite Stelle von oben 0 bis 32
Dritte Stelle von oben 0 bis 32
Vierte Stelle von oben 0 bis 32
Fünfte Stelle von oben 0 bis 32
Sechste Stelle von oben ON/
Siebte Stelle von oben ON/
Achte Stelle von oben ON/
Einstellwert Standardwert Beschreibungen
OFF
OFF
OFF
6
16
16
32
32
OFF
ON
ON
Stellt die Wiedergabe an den Rändern des Crossfaders ein (Cut-Lag). Der CutLag kann zwischen 0,74 mm und 5,94 mm in Schritten von 0,1 mm eingestellt
werden.1
Stellt die Dämpfungskurveneigenschaften der [CH 1]-Seite ein, wenn der
Schalter [CROSS F. CURVE (THRU,
Stellt die Dämpfungskurveneigenschaften der [CH 2]-Seite ein, wenn der
Schalter [CROSS F. CURVE (THRU,
Stellt die Dämpfungskurveneigenschaften der [CH 1]-Seite ein, wenn der
Schalter [CROSS F. CURVE (THRU,
Stellt die Dämpfungskurveneigenschaften der [CH 2]-Seite ein, wenn der
Schalter [CROSS F. CURVE (THRU,
Schaltet die Funktion zum Wählen der Effekte mit den Effektsteuertasten ein
und aus.
Wenn ausgeschaltet, können die Funktionen LFO CONTROL und CROSS
FADER CONTROL verwendet werden.
Stellt ein, ob die Audiosignale des Mikrofons von den Buchsen [BOOTH]
ausgegeben werden oder nicht.
Schaltet die Auto-Standby-Funktion ein und aus.
, )] auf [ ] gestellt ist.2
, )] auf [ ] gestellt ist.2
, )] auf [ ] gestellt ist.2
, )] auf [ ] gestellt ist.2
Page 87

Liste von MIDI-Meldungen
Liste von MIDI-Meldungen
Kategorie SW Name SW Typ
BTN 9n 00 dd 9n 40 dd — — — — — — OFF=0, ON=127
TransportSektion
Effekt-Sektion
Drehregler
DECK A LOAD (DUPLICATE)Taste
DECK B LOAD (DUPLICATE)Taste
DECK A f (REL.)-Taste
DECK B f (REL.)-Taste
DECK A SYNC (MASTER)-Taste BTN 9n 05 dd 9n 45 dd 9n 05 dd 9n 45 dd OFF=0, ON=127
DECK B SYNC (MASTER)-Taste BTN 9n 06 dd 9n 46 dd 9n 06 dd 9n 46 dd OFF=0, ON=127
DECK A FX ASSIGN FX1-Taste BTN 9n 07 dd 9n 47 dd 9n 07 dd 9n 47 dd OFF=0, ON=127
DECK B FX ASSIGN FX1-Taste BTN 9n 08 dd 9n 48 dd 9n 08 dd 9n 48 dd OFF=0, ON=127
DECK A FX ASSIGN FX2-Taste BTN 9n 09 dd 9n 49 dd 9n 09 dd 9n 49 dd OFF=0, ON=127
DECK B FX ASSIGN FX2-Taste BTN 9n 0A dd 9n 4A dd 9n 0A dd 9n 4A dd OFF=0, ON=127
DECK A CUE (ABS.)-Taste BTN 9n 0B dd 9n 4B dd 9n 0B dd 9n 4B dd OFF=0, ON=127
DECK B CUE (ABS.)-Taste BTN 9n 0C dd 9n 4C dd 9n 0C dd 9n 4C dd OFF=0, ON=127
WET Regler VR Bn 01 dd Bn 41 dd — — — — — — 0-127
FX1 DRY/
WET Regler VR Bn 02 dd Bn 42 dd — — — — — — 0-127
FX2 DRY/
FX1 ON (GROUP/
FX2 ON (GROUP/
FX1 EFFECT1 Regler VR Bn 03 dd Bn 43 dd — — — — — — 0-127
2 EFFECT1 Regler VR Bn 04 dd Bn 44 dd — — — — — — 0-127
FX
FX1 EFFECT1-Taste BTN 9n 0F dd 9n 4F dd 9n 0F dd 9n 4F dd OFF=0, ON=127
FX2 EFFECT1-Taste BTN 9n 10 dd 9n 50 dd 9n 10 dd 9n 50 dd OFF=0, ON=127
FX1 EFFECT2 Regler VR Bn 05 dd Bn 45 dd — — — — — — 0-127
FX2 EFFECT2 Regler VR Bn 06 dd Bn 46 dd — — — — — — 0-127
FX1 EFFECT2-Taste BTN 9n 11 dd 9n 51 dd 9n 11 dd 9n 51 dd OFF=0, ON=127
FX2 EFFECT2-Taste BTN 9n 12 dd 9n 52 dd 9n 12 dd 9n 52 dd OFF=0, ON=127
FX1 EFFECT3 Regler VR Bn 07 dd Bn 47 dd — — — — — — 0-127
FX2 EFFECT3 Regler VR Bn 08 dd Bn 48 dd — — — — — — 0-127
FX1 EFFECT3-Taste BTN 9n 13 dd 9n 53 dd 9n 13 dd 9n 53 dd OFF=0, ON=127
FX2 EFFECT3-Taste BTN 9n 14 dd 9n 54 dd 9n 14 dd 9n 54 dd OFF=0, ON=127
SINGLE)-Taste BTN 9n 0D dd 9n 4D dd 9n 0D dd 9n 4D dd OFF=0, ON=127
SINGLE)-Taste BTN 9n 0E dd 9n 4E dd 9n 0E dd 9n 4E dd OFF=0, ON=127
VR Bn 00 dd Bn 40 dd — — — — — —
BTN 9n 01 dd 9n 41 dd — — — — — — OFF=0, ON=127
BTN 9n 02 dd 9n 42 dd — — — — — — OFF=0, ON=127
BTN 9n 03 dd 9n 43 dd 9n 03 dd 9n 43 dd OFF=0, ON=127
BTN 9n 04 dd 9n 44 dd 9n 04 dd 9n 44 dd OFF=0, ON=127
MIDI-Meldung (dieses Gerät zum
Computer)
MIDI-Meldung (Computer zu diesem
Gerät)
SHIFT OFF SHIFT ON SHIFT OFF SHIFT ON
Hinweise
Im Uhrzeigersinn drehen: 0 – +30 / Gegen
den Uhrzeigersinn
drehen: -1 – -30
Deutsch
De
27
Page 88

De
28
Kategorie SW Name SW Typ
BTN 9n 15 dd 9n 55 dd — — — — — — OFF=0, ON=127
VR Bn 09 dd Bn 49 dd — — — — — —
DECK A AUTO LOOP (LOOP
MOVE/ SAMPLE VOLUME)-Regler
DECK B AUTO LOOP (LOOP
MOVE/ SAMPLE VOLUME)-Regler
DECK A SELECT-Taste BTN 9n 19 dd 9n 59 dd — — — — — — OFF=0, ON=127
Sektion Hot Cue/
Sampler
DECK B SELECT-Taste BTN 9n 1A dd 9n 5A dd — — — — — — OFF=0, ON=127
DECK A HOT CUE1-Taste
DECK B HOT CUE1-Taste
DECK A HOT CUE2-Taste
DECK B HOT CUE2-Taste
DECK A HOT CUE3-Taste
DECK B HOT CUE3-Taste
DECK A HOT CUE4-Taste
DECK B HOT CUE4-Taste
DECK A ACTIVE-Taste
DECK B ACTIVE-Taste
CH 1 TRIM Regler VR Bn 0D dd Bn 4D dd — — — — — — 0-127
CH 2 TRIM Regler VR Bn 0E dd Bn 4E dd — — — — — — 0-127
CH 1 HI Regler VR Bn 0F dd Bn 4F dd — — — — — — 0-127
CH 2 HI Regler VR Bn 10 dd Bn 50 dd — — — — — — 0-127
CH 1 MID Regler VR Bn 11 dd Bn 51 dd — — — — — — 0-127
CH 2 MID Regler VR Bn 12 dd Bn 52 dd — — — — — — 0-127
Mixer-Sektion
CH 1 LOW Regler VR Bn 13 dd Bn 53 dd — — — — — — 0-127
CH 2 LOW Regler VR Bn 14 dd Bn 54 dd — — — — — — 0-127
CH 1 CUE (TAP)-Taste BTN 9n 2F dd 9n 6F dd — — — 9n 6F dd OFF=0, ON=127
CH 2 CUE (TAP)-Taste BTN 9n 30 dd 9n 70 dd — — — 9n 70 dd OFF=0, ON=127
CH 1 Kanalfader VR Bn 15 dd Bn 55 dd — — — — — — 0-127
CH 2 Kanalfader VR Bn 16 dd Bn 56 dd — — — — — — 0-127
CROSS FADER A VR Bn 17 dd Bn 57 dd — — — — — — 0-127
CROSS FADER B
Global-Sektion SN
1 Beim Verwenden der Hot Cue-Funktion
2 Beim Verwenden der Sampler-Funktion
AP (QUANTIZE)-Taste BTN 9n 31 dd 9n 71 dd 9n 31 dd 9n 71 dd OFF=0, ON=127
BTN 9n 16 dd 9n 56 dd — — — — — — OFF=0, ON=127
VR Bn 0A dd Bn 4A dd — — — — — —
BTN 9n 17 dd 9n 57 dd — — — — — — OFF=0, ON=127
VR Bn 0B dd Bn 4B dd — — — — — —
BTN 9n 18 dd 9n 58 dd — — — — — — OFF=0, ON=127
VR Bn 0C dd Bn 4C dd — — — — — —
BTN 9n 1B dd 9n 5B dd 9n 1B dd 9n 5B dd OFF=0, ON=127
BTN 9n 1C dd 9n 5C dd 9n 1C dd 9n 5C dd OFF=0, ON=127
BTN 9n 1D dd 9n 5D dd 9n 1D dd 9n 5D dd OFF=0, ON=127
BTN 9n 1E dd 9n 5E dd 9n 1E dd 9n 5E dd OFF=0, ON=127
BTN 9n 1F dd 9n 5F dd 9n 1F dd 9n 5F dd OFF=0, ON=127
BTN 9n 20 dd 9n 60 dd 9n 20 dd 9n 60 dd OFF=0, ON=127
BTN 9n 21 dd 9n 61 dd 9n 21 dd 9n 61 dd OFF=0, ON=127
BTN 9n 22 dd 9n 62 dd 9n 22 dd 9n 62 dd OFF=0, ON=127
BTN 9n 23 dd 9n 63 dd 9n 23 dd 9n 63 dd OFF=0, ON=127
BTN 9n 24 dd 9n 64 dd 9n 24 dd 9n 64 dd OFF=0, ON=127
BTN 9n 25 dd 9n 65 dd 9n 25 dd 9n 65 dd OFF=0,
BTN 9n 26 dd 9n 66 dd 9n 26 dd 9n 66 dd OFF=0, ON=127
BTN 9n 27 dd 9n 67 dd 9n 27 dd 9n 67 dd OFF=0, ON=127
BTN 9n 28 dd 9n 68 dd 9n 28 dd 9n 68 dd OFF=0, ON=127
BTN 9n 29 dd 9n 69 dd 9n 29 dd 9n 69 dd OFF=0, ON=127
BTN 9n 2A dd 9n 6A dd 9n 2A dd 9n 6A dd OFF=0, ON=127
BTN 9n 2B dd 9n 6B dd 9n 2B dd 9n 6B dd OFF=0, ON=127
BTN 9n 2C dd 9n 6C dd 9n 2C dd 9n 6C dd OFF=0, ON=127
BTN 9n 2D dd 9n 6D dd 9n 2D dd 9n 6D dd OFF=0, ON=127
BTN 9n 2E dd 9n 6E dd 9n 2E dd 9n 6E dd OFF=0, ON=127
VR Bn 18 dd Bn 58 dd — — — — — — 0-127
MIDI-Meldung (dieses Gerät zum
Computer)
MIDI-Meldung (Computer zu diesem
Gerät)
SHIFT OFF SHIFT ON SHIFT OFF SHIFT ON
Hinweise
1
Im Uhrzeigersinn drehen: 0 – +30 / Gegen
den Uhrzeigersinn
drehen: -1 – -30
Im Uhrzeigersinn drehen: 0 – +30 / Gegen
den Uhrzeigersinn
drehen: -1 – -30
Im Uhrzeigersinn drehen: 0 – +30 / Gegen
den Uhrzeigersinn
drehen: -1 – -30
Im Uhrzeigersinn drehen: 0 – +30 / Gegen
den Uhrzeigersinn
drehen: -1 – -30
ON=127
1
2
2
1
1
2
2
1
2
1
2
1
2
1
2
1
2
1
2
1
2
1
2
1
2
1
2
Page 89

Zusätzliche Informationen
Störungssuche
! Bedienungsfehler werden oft irrtümlich für Störungen oder Ausfälle gehalten. Wenn Sie den Eindruck haben, dass diese Komponente nicht ordnungsgemäß funkti-
oniert, überprüfen Sie bitte die folgenden Punkte. Manchmal wird eine Störung auch durch ein externes Gerät verursacht. Überprüfen Sie die anderen verwendeten
Komponenten und elektrischen Geräte. Wenn Sie die Störung nicht beheben können, wenden Sie sich an die nächste Pioneer-Kundendienststelle oder an Ihren Händler.
! Der Spieler kann möglicherweise aufgrund von statischer Elektrizität oder anderen externen Einflüssen nicht richtig arbeiten. In solchen Fällen kann normaler Betrieb
durch Abziehen des Netzsteckers und erneutes Einstecken wieder hergestellt werden.
Problem Prüfen Abhilfe
Das Gerät schaltet nicht ein. Ist das Netzkabel richtig angeschlossen? Stecken Sie den Netzstecker in eine Netzsteckdose.
Dieses Gerät wird nicht erkannt. Ist der Schalter [ON/
Musikdateien können nicht abgespielt werden. Sind die Musikdateien beschädigt? Spielen Sie Musikdateien ab, die nicht beschädigt sind.
Keine Tracks werden im Bereich [TRACK] angezeigt. Wurden die Musikdateien richtig importiert? Importieren Sie die Musikdateien richtig. (Seite 14)
Die Lautstärke des an den Buchsen [AUX IN] angeschlossenen Geräts ist niedrig.
Verzerrter Ton. Sind die Regler [MAIN VOL] und [GAIN] von TRAKTOR in
Der spielende Sound wird unterbrochen. Sind das mitgelieferte Netzkabel und das mitgelieferte USB-
Sound von einem externen Gerät oder Mikrofon kann
nicht ausgegeben werden.
Es wird kein Ton erzeugt. Sind die Verbindungskabel richtig angeschlossen? Schließen Sie die Verbindungskabel richtig an. (Seite 11)
Es wird kein oder nur sehr schwacher Ton erzeugt. Ist der [CD, PHONO, USB]-Eingangswahl-Schalter richtig
BPM oder gesamte Wellenform werden nicht angezeigt. Wurde die Musikdatei analysiert? Setzen Sie eine Wahlmarkierung bei [Preferences] > [File Management]
[SYNC]-Funktion arbeitet nicht. Wurden die Musikdateien richtig importiert?
gestellt?
Ist das mitgelieferte USB-Kabel richtig angeschlossen? Schließen Sie das mitgelieferte USB-Kabel richtig an. (Seite 11)
Leuchtet [CTRL] in TRAKTOR? Drücken Sie eine andere Taste als eine in der Mixer-Sektion des Geräts und
— Prüfen Sie, ob [Pioneer. DJM-T1] bei [Preferences] > [Controller Manager]
Haben Sie eine [Playlists] oder einen [FAVORITES] Schlitz
gewählt, der keine Tracks enthält?
Ist der Regler [LEVEL] an der Vorderseite in die richtige
Stellung gestellt?
die richtigen Stellungen gestellt?
Ist der angelegte Audiopegel für die Buchsen [AUX IN] und
[MIC] auf einen geeigneten Pegel eingestellt?
Ist der Soundpegelausgang vom Kanal [MASTER] richtig
eingestellt?
Ist der Pegel der Audioeingabe zu jedem Kanal richtig
eingestellt?
Kabel richtig angeschlossen?
Ist der Audio-Latenzwert geeignet? Bei Verwendung von Windows öffnen Sie die Registerkarte [ASIO] im Einstel-
Ist der Schalter [INPUT SELECT] an der Vorderseite in
Stellung [OFF] gestellt?
Ist das mitgelieferte USB-Kabel richtig angeschlossen? Verbinden Sie den Computer und dieses Gerät direkt mit dem mitgelieferten
Sind Buchsen oder Stecker verschmutzt? Wischen Sie vor dem Anschließen jegliche Verschmutzung von Buchsen und
Ist die Treibersoftware im Computer richtig installiert? Installieren Sie die Treibersoftware richtig im Computer. (Seite 9)
Sind [Audio Setup], [Output Routing] und [Input Rou-
ting] in TRAKTOR richtig eingestellt?
Sind die angeschlossenen Komponenten und Verstärker
richtig eingestellt?
eingestellt?
Ist [MASTER ATT.] auf [–6 dB] gestellt? Stellen Sie [MASTER ATT.] auf [0 dB]. (Seite 11)
Wurde die Musikdatei analysiert? Wenn Musikdateien nicht automatische analysiert werden können, geben Sie
OFF] für die Stromversorgung auf [ON]
Stellen Sie den Schalter [ON/ OFF] für die Stromversorgung auf [ON].
prüfen Sie, ob [CTRL] in TRAKTOR leuchtet.
> [Device Setup] > [Device] gewählt ist. (Seite 24)
Wählen Sie eine [Playlists] oder einen [FAVORITES] Schlitz, der Tracks enthält.
Stellen Sie den Regler [LEVEL] an der Vorderseite entsprechend dem angeschlossenen Gerät ein. (Seite 23)
Stellen Sie die Regler [MAIN VOL] und [GAIN] ein, während Sie die Pegelan-
zeige [MAIN] in TRAKTOR beobachten.
Stellen Sie den Audiopegeleingang für die Buchsen auf einen geeigneten
Pegel für die angeschlossenen Geräte ein.
Stellen Sie den Regler [MASTER LEVEL] so ein, dass die Masterpegel-Anzeige
bei etwa [0 dB] beim Spitzenpegel aufleuchtet. (Seite 17)
Wenn der Sound verzerrt ist, auch wenn der Regler [MASTER LEVEL] einge-
stellt ist, stellen Sie [MASTER ATT.] auf [–6 dB]. (Seite 11)
Stellen Sie den Regler [TRIM] so ein, dass die Kanalpegel-Anzeige bei etwa [0
dB] beim Spitzenpegel aufleuchtet. (Seite 17)
Der Sound wird unterbrochen, wenn das mitgelieferte Netzkabel oder das
mitgelieferte USB-Kabel während der Wiedergabe vom Hauptgerät abgetrennt
wird.
Befestigen Sie das mitgelieferte USB-Kabel richtig am Kabelhaken des Hauptgeräts. (Seite 11)
lungen-Diensprogramm und stellen die Audio-Latenz auf einen geeigneten
Wert ein.
Bei Verwendung eines Macintosh-Computers stellen Sie [Preferences] > [Audio
Setup] > [Latency] in TRAKTOR auf einen geeigneten Wert ein. (Seite 25)
Stellen Sie den Schalter [INPUT SELECT] auf Stellung [AUX] bei Verwendung
eines externen Geräts, und auf Stellung [MIC] bei Verwendung eines Mikrofons. (Seite 23)
USB-Kabel. USB-Hubs können nicht verwendet werden. (Seite 11)
Steckern ab.
Prüfen Sie, ob [Preferences] eingestellt ist wie unten gezeigt. (Seite 24)
[Audio Setup] > [Audio Device] > [PIONEER DJM-T1 (Core Audio)] (Mac
OS X) oder [PIONEER DJM-T1 ASIO (ASIO)] (Windows)
[Output Routing] > [Output Deck A] [L] > [1.PIONEER DJM-T1 OUT 1] und
[R] > [2.PIONEER DJM-T1 OUT 2]
[Output Routing] > [Output Deck B] [L] > [3.PIONEER DJM-T1 OUT 3] und
[R] > [4.PIONEER DJM-T1 OUT 4]
[Input Routing] > [Input Deck A] [L(Mono)] > [1.PIONEER DJM-T1 IN 1]
und [R] > [2.PIONEER DJM-T1 IN 2]
[Input Routing] > [Input Deck B] [L(Mono)] > [3.PIONEER DJM-T1 IN 3]
und [R] > [4.PIONEER DJM-T1 IN 4]
Stellen Sie die externe Eingangswahl und Lautstärke an den Komponenten
und Verstärkern richtig ein.
Stellen Sie den [CD, PHONO, USB]-Eingangswahl-Schalter um und ändern Sie
die Eingangsquelle des Kanals. (Seite 17)
> [Analyze new tracks when loading into deck], und laden Sie den Track
erneut im Deck.
Importieren Sie die Musikdateien erneut und laden Sie sie in die Decks. (Seite 14)
das [Beat Grid] manuell ein.
Deutsch
De
29
Page 90

De
30
Problem Prüfen Abhilfe
CH1
PHONO
USBCD
CH2
PHONO
TRIM
MIC/AUX
MIC
AUX
MIC_SEL_OUT
EQ ADC
SH2A
MIC_AUX
CH1_ana
USBCD
MIC
OFF
AUXMIC
PC Input 1/2
(CH1) Pre Trim CD
(CH1) Pre Trim PHONO
PC Input 3/4
(CH2) Pre Trim CD
(CH2) Pre Trim PHONO
PC Input 5/6
Rec OUT
MIC/AUX Post EQ
Post CH1 Fader
Post CH2 Fader
Post Cross Fader A
Post Cross Fader B
CH1
ADC
PHONO
CD
CH1_SEL_OUT
MUTE
CH2
ADC
PHONO
CD
CH2_SEL_OUT
MIC_Post
Rec_OUTCH1_Post
Post_CRS_A
Post_CRS_B
SAMPLER_USB
SAMPLER_USB
CH2_Post
CH1_Pre
CH1_USB
CH1_Pre
CH1
3Band
ISO
Subsonic
Filter
Subsonic
Filter
CH1_Fader
CH2_ana
CH2_Pre
CH2_USB
CH1_USB
CH2_USB
CH2
3Band
ISO
CH2_Fader
Cross_Fader
MASTER_VOL BOOTH_VOLHeadphone_M1
Headphone_VOL
CH1 CUE SW
CH2 CUE SW
MIC ON SW
OUT_ana
TDM_OUT
(8ch)
USB
USB
USB_AUDIO_IF
48kHz/24bit (6in/6out)
MUTE
CH2_Pre
MUTE
MUTE
Rec_OUT
MIC_Post
CH1_Post
CH2_Post
Post_CRS_A
Post_CRS_B
DAC
Booth
Master 1
Master 2
Phones
CH2_Digi_Trim CH1_Digi_Trim
[SYNC]-Funktion arbeitet nicht, auch wenn die Dateien
analysiert sind.
Die Deck-Bereichanzeige ist klein. — Doppelklicken Sie auf die Trackinformation-Anzeigesektion (den Teil, wo
GROUP]-Wahltaste arbeitet nicht. — Der Modus [Single] kann nicht mit TRAKTOR SCRATCH DUO 2 gewählt
[SINGLE/
Back-Cue-Funktion funktioniert nicht. Ist ein Cue-Punkt gesetzt? Setzen Sie einen Cue-Punkt. (Seite 15)
MIDI Control arbeitet nicht. Ist der MIDI-Kanal richtig eingestellt? Stellen Sie den MIDI-Kanal von der Registerkarte [MIDI] im Einstellungen-
Dieses Gerät wird nach dem Anschluss an einen Computer nicht erkannt.
Der Sound von einem Computer kann nicht von diesem
Gerät ausgegeben werden.
Sound wird verzerrt, wenn ein Plattenspieler an die
Buchsen [PHONO] dieses Geräts angeschlossen ist.
Oder die Beleuchtung der Kanalpegel-Anzeige ändert
sich nicht, auch wenn der Regler [TRIM] gedreht wird.
Ist [BEAT MARKER (Grid)] für Hot Cue gesetzt? Stellen Sie mindestens einen [BEAT MARKER] auf [Grid].
Setzen Sie eine Wahlmarkierung bei [Preferences] > [File Management] >
[Set Beat-Grid when detecting BPM], und laden Sie den Track erneut im
Deck.
Ist in der TRAKTOR Bedienungsbildschirmansicht der [BPM]
des Tracks, für den das Symbol [MASTER] leuchtet, zu
unterschiedlich vom [BPM] des Tracks, für das das Symbol
[SYNC] leuchtet?
Die Funktion [SYNC] arbeitet nicht normal, wenn der [BPM] des Tracks, für den
das Symbol [MASTER] leuchjtet, außerhalb des einstellbaren Tempobereichs
für den Tracks ist, für den das Symbol [SYNC] leuchtet.
Machen Sie Scratching? Die Funktion [SYNC] ist beim Scratching deaktiviert.
Trackname, BPM usw. angezeigt werden) im Deck-Bereich.
werden.
Bei Aktualisierung auf TRAKTOR SCRATCH PRO 2 kann das Effekt-Feld auf
den Modus [Single] umgeschaltet werden.
Diensprogramm ein. (Seite 25)
Sind die MIDI-Einstellungen richtig eingestellt? Zum Betreiben von DJ-Software mit diesem Gerät müssen die MIDI-Meldungen
Ist die Treibersoftware im Computer richtig installiert? Installieren Sie die Treibersoftware. Wenn sie bereits installiert ist, deinstallie-
dieses Geräts zur verwendeten DJ-Software zugewiesen werden. Anweisungen zum Zuweisen von Meldungen siehe Bedienungsanleitung für Ihre DJSoftware.
ren Sie sie und installieren Sie sie dann neu. (Seite 9)
Sind dieses Gerät und der Computer richtig verbunden? Verbinden Sie dieses Gerät und den Computer über ein USB-Kabel. (Seite 11)
Sind die Audio-Ausgabegerät-Einstellungen richtig einge-
stellt?
Ist der [CD, PHONO, USB]-Eingangswahl-Schalter richtig
eingestellt?
Haben Sie einen Plattenspieler mit eingebautem PhonoEntzerrer angeschlossen?
Ist eine Audioschnittstelle für Computer zwischen den
Plattenspieler und dieses Gerät geschaltet?
Wählen Sie dieses Gerät mit den Audio-Ausgabegerät-Einstellungen. Anwei-
sungen zum Vornehmen von Einstellungenen für Ihre Anwendunge siehe
Bedienungsanleitung für Ihre Anwendung.
Stellen Sie den [CD, PHONO, USB]-Eingangswahl-Schalter auf die Stellung
[USB]. (Seite 12) (Seite 17)
Bei Verwendung eines Plattenspielers mit einem eingebauten Phono-Entzerrer
ausgestattet ist, schließen Sie ihn an die Buchsen [CD] an. (Seite 11)
Wenn der Plattenspieler mit eingebautem Phono-Entzerrer einen PHONO/
LINE-Wahlschalter hat, stellen Sie diesen auf PHONO.
Wenn die Audioschnittstelle für Computer einen Line-Pegel-Ausgang hat,
schließen Sie diese an die Buchsen [CD] an. (Seite 11)
Wenn der Plattenspieler einen PHONO/
diesen auf PHONO.
LINE-Wahlschalter hat, stellen Sie
Blockdiagramm
Page 91

Haftungsausschluss
! Pioneer ist ein eingetragenes Markenzeichen der Pioneer Corporation.
! Microsoft®, Windows Vista®, Windows® und Internet Explorer® sind entweder
eingetragene Markenzeichen oder Markenzeichen von Microsoft Corporation in
den USA und/
! Apple, Macintosh, Mac OS, Safari, iTunes und Finder sind eingetragene
Markenzeichen von Apple Inc. in den USA und anderen Ländern.
! Intel und Pentium sind Warenzeichen der Intel Corporation in den USA und
anderen Ländern.
! ASIO ist ein Markenzeichen von Steinberg Media Technologies GmbH.
! TRAKTOR ist ein eingetragenes Warenzeichen von Native Instruments.
! AMD Atholon ist ein Warenzeichen von Advanced Micro Devices, Inc.
Die hier erwähnten Produkt- oder Firmennamen sind Markenzeichen der jeweiligen
Eigentümer.
Dieses Produkt wurde für Nonprofit-Verwendung lizensiert. Dieses Produkt ist nicht zu
den Handelszwecken (für Gewinn bringenden Gebrauch), wie Sendung (terrestrisch,
Satelliten-, Kabel oder andere Arten von Sendungen), streaming im Internet, Intranet
(ein privates Kommunikationsnetz) oder anderen Typen von Netzwerken oder zum
Vertrieb elektronischer Information (online digitale Musikvertriebsdienste) lizensiert
worden. Für derartige Verwendungszwecke müssen sie die entsprechenden Lizenzen
erhalten. Für Einzelheiten besuchen Sie http:/
oder anderen Ländern.
/
www.mp3licensing.com.
Hinweise zum Urheberrechte
Aufnahmen, die Sie vornehmen, sind für persönlichen Genuss gedacht und dürfen
nach dem Urheberrecht nicht ohne Zustimmung des Urheberrechtsinhabers anderweitig verwendet werden.
! Musik, die von CDs, usw. aufgenommen wurde, ist durch die
Urheberrechtsgesetze der einzelnen Länder sowie durch internationale
Abkommen geschützt. Es liegt in der vollen Verantwortung der Person, die die
Musik aufgenommen hat, sicherzustellen, dass die Aufnehmen nicht gesetzwidrig verwendet werden.
! Beim Umgang mit Musik, die aus dem Internet heruntergeladen wurde usw.,
liegt es in der vollen Verantwortung der Person, die den Musik-Download ausgeführt hat, sicherzustellen, dass die aufgenommenen Inhalte entsprechend den
Vorschriften auf der Download-Site verwendet werden.
Technische Daten
Allgemeine
Stromanforderungen .......................... 220 V bis 240 V Wechselspannung, 50 Hz/ 60 Hz
Leistungsaufnahme ...................................................................................................25 W
Leistungsaufnahme (Standby) ................................................................................. 0,4 W
Gewicht des Hauptgeräts ........................................................................................ 6,1 kg
Max. Abmessungen .................................... 265 mm (B) × 107,9 mm (H) × 403 mm (T)
Betriebstemperatur ...............................................................................+5 °C bis +35 °C
Betriebsluftfeuchtigkeit ............................................5 % bis 85 % (keine Kondensation)
Audio-Sektion
Abtastrate ................................................................................................................ 48 kHz
A/ D-, D/ A-Wandler .................................................................................................. 24 bits
Frequenzeigenschaften
CD ..................................................................................................... 20 Hz bis 20 kHz
Signalrauschabstand (Nennausgang)
PHONO ..............................................................................................................92 dB
CD .....................................................................................................................106 dB
MIC .....................................................................................................................84 dB
Gesamtklirrfaktor (CD — MASTER1) ................................................................... 0,004 %
Standard-Eingangspegel / Eingangsimpedanz
PHONO ...............................................................................................–52 dBu/
CD ........................................................................................................ -12 dBu/
MIC ...................................................................................................... -52 dBu/ 47 kW
AUX .....................................................................................................–12 dBu/
Standard-Ausgangspegel / Lastimpedanz / Ausgangsimpedanz
MASTER1 ..........................................................+6 dBu/ 10 kW/ 10 W oder niedriger
MASTER2 ................................................................................+2 dBu/ 10 kW/ 330 W
BOOTH ..............................................................+6 dBu/ 10 kW/ 10 W oder niedriger
PHONES ..........................................................+5.4 dBu/ 32 kW/ 10 W oder niedriger
Nenn-Ausgangspegel / Lastimpedanz
MASTER1 .........................................................................................+24 dBu/ 10 kW
MASTER2 .........................................................................................+20 dBu/ 10 kW
Übersprechen (CD) ...................................................................................................86 dB
Kanal-Equalizer-Eigenschaften
HI ...........................................................................................–
MID .........................................................................................–
LOW ....................................................................................... –
Mikrofon-Equalizer-Eigenschaften
HI ....................................................................................–12 dB bis +12 dB (10 kHz)
LOW .............................................................................. –12 dB bis +12 dB (100 Hz)
∞ bis +6 dB (13 kHz)
∞ bis +6 dB (1 kHz)
∞ bis +6 dB (70 Hz)
Eingangs- / Ausgangsbuchsen
PHONO Eingangsbuchse
Cinch-Buchse ................................................................................................. 2 Sätze
CD Eingangsbuchse
Cinch-Buchse ................................................................................................. 2 Sätze
MIC Eingangsbuchse
XLR-Anschluss/
AUX Eingangsbuchse
Cinch-Buchsen ................................................................................................. 1 Satz
MASTER Ausgangsbuchse
XLR-Anschluss .................................................................................................1 Satz
Cinch-Buchsen ................................................................................................. 1 Satz
BOOTH Ausgangsbuchse
TRS-Klinkenbuchse (Ø 6,3 mm) ...................................................................... 1 Satz
PHONES Ausgangsbuchse
Stereo-Klinkenbuchse (Ø 6,3 mm) .................................................................. 1 Satz
USB-Buchse
B-Typ .................................................................................................................1 Satz
Phone-Buchse (Ø 6,3 mm) ................................................... 1 Satz
47 kW
47 kW
29 kW
Deutsch
! Änderungen der technischen Daten und das Design dieses Geräts ohne vorherige
Ankündigung bleiben vorbehalten.
! Die in dieser Bedienungsanleitung gezeigten Software-Bildschirmansichten
stammen aus der Entwicklungsstufe und können sich von den tatsächlich
erscheinenden Bildschirmansichten unterscheiden.
! © 2011 PIONEER CORPORATION. Alle Rechte vorbehalten.
De
31
Page 92

© 2011 PIONEER CORPORATION.
All rights reserved.
PIONEER CORPORATION
1-1, Shin-ogura, Saiwai-ku, Kawasaki-shi, Kanagawa 212-0031, Japan
Корпорация Пайонир
1-1, Син-Огура, Сайвай-ку, г. Кавасаки, префектура Канагава, 212-0031, Япония
Импортер: ООО "ПИОНЕР РУС"
125040, Россия, г. Москва, ул. Правды, д.26 Тел.: +7(495) 956-89-01
PIONEER EUROPE NV
Haven 1087, Keetberglaan 1, B-9120 Melsele, Belgium TEL: 03/570.05.11
K002_PSV_SY
Printed in / Imprimé
Tous droits de reproduction et de traduction réservés.
© 2011 PIONEER CORPORATION.
<DRB1557-A>
 Loading...