

Pioneer DEH-P9600MP User Manual

Operation Manual
Mode demploi
Multi-CD control DSP High power CD/MP3/WMA
player with FM/AM tuner
Syntoniseur FM/AM et lecteur de CD/MP3/WMA avec
DSP, Puissance élevée, avec contrôleur pour lecteur
de CD à chargeur
DEH-P9600MP
English Français
Contents
Thank you for buying this Pioneer product.
Please read through these operating instructions so you will know how to operate
your model properly. After you have finished reading the instructions, keep this man-
ual in a safe place for future reference.
Before You Start
Information to User 6
For Canadian model 6
About this unit 6
About this manual 6
After-sales service for Pioneer products 6
Product registration 6
Precautions 7
Features 7
About WMA 7
About the XM READY mark 8
Protecting your unit from theft 8
Removing the front panel 9
Attaching the front panel 9
Resetting the microprocessor 9
Use and care of the remote control 9
Installing the battery 9
Using the remote control 10
Display indication 10
About the demo mode 10
Reverse mode 10
Feature demo 11
About basic displays 11
Whats What
Head unit (front panel close) 12
Head unit (front panel open) 13
Remote control 14
Power ON/OFF
Turning the unit on 15
Selecting a source 15
Turning the unit off 15
Tuner
Listening to the radio 16
Introduction of advanced tuner
operation 17
Storing and recalling broadcast
frequencies 17
Tuning in strong signals 17
Storing the strongest broadcast
frequencies 18
Selecting stations from the preset channel
list 18
Built-in CD Player
Playing a CD 19
Selecting a track directly 20
Introduction of advanced built-in CD player
operation 20
Repeating play 20
Playing tracks in a random order 21
Scanning tracks of a CD 21
Pausing CD playback 21
Using compression and BMX 22
Selecting the search method 22
Searching every 10 tracks in the current
disc 22
Using disc title functions 22
Entering disc titles 22
Displaying disc titles 23
Using CD TEXT functions 23
Displaying titles on CD TEXT
discs 24
Scrolling titles in the display 24
Selecting tracks from the track title list 24
MP3/WMA/WAV Player
Playing MP3/WMA/WAV 25
Selecting a track directly in the current
folder 26
Introduction of advanced built-in CD player
(MP3/WMA/WAV) operation 27
Repeating play 27
Playing tracks in a random order 27
Scanning folders and tracks 28
2
En
Contents
Pausing MP3/WMA/WAV playback 28
Using compression and BMX 28
Selecting the search method 28
Searching every 10 tracks in the current
folder 29
Switching the tag display 29
Displaying text information on MP3/WMA/
WAV disc 29
When playing back an MP3/WMA
disc 29
When playing back a WAV disc 30
Scrolling text information in the display 30
Selecting tracks from the file name list 30
Multi-CD Player
Playing a CD 32
Selecting a track directly 32
50-disc multi-CD player 33
Introduction of advanced multi-CD player
operation 33
Repeating play 33
Playing tracks in a random order 34
Scanning CDs and tracks 34
Pausing CD playback 34
Using compression and bass emphasis 35
Using ITS playlists 35
Creating a playlist with ITS
programming 35
Playback from your ITS playlist 36
Erasing a track from your ITS
playlist 36
Erasing a CD from your ITS
playlist 36
Using disc title functions 36
Entering disc titles 37
Displaying disc titles 37
Using CD TEXT functions 37
Displaying titles on CD TEXT
discs 38
Scrolling titles in the display 38
Selecting discs or tracks from the title
list 38
Audio Adjustments
Adjusting the audio easily 39
Adjusting the audio finely 39
Extra functions 39
Introduction of audio adjustments 39
Using the position selector 40
Using balance adjustment 40
Using the time alignment 40
Adjusting the time alignment 41
Using subwoofer output 41
Adjusting subwoofer settings 42
Adjusting low pass filter attenuation
slope 42
Using the high pass filter 42
Muting the speaker units (filters) 42
Setting the high pass filter for front
speakers 43
Setting the high pass filter for rear
speakers 43
Using the auto-equalizer 44
Recalling equalizer curves 44
Adjusting equalizer curves 44
Adjusting 13-band graphic equalizer 45
Using BBE sound 45
Adjusting loudness 45
Using automatic sound levelizer 46
Adjusting source levels 46
Auto TA and EQ (auto-time alignment and
auto-equalizing) 46
Before operating the auto TA and EQ
function 47
Carrying out auto TA and EQ 48
Initial Settings
Adjusting initial settings 50
English
En
3

Contents
Setting the clock 50
Switching the auxiliary setting 50
Switching the dimmer setting 51
Adjusting the brightness 51
Correcting distorted sound 51
Switching the sound muting/attenuation 51
Switching the warning tone 51
Switching the flap auto open 52
Using the feature demo 52
Using reverse mode 52
Switching the Ever Scroll 52
Other Functions
Turning the clock display on or off 53
Using the AUX source 53
Selecting AUX as the source 53
Setting the AUX title 53
Using different entertainment displays 54
Using the PGM button 54
Rewriting the entertainment displays 54
Introduction of XM operation 55
XM operation 55
Selecting the XM channel directly 56
Switching the XM display 56
Swiching the XM channel select
setting 56
Introduction of DVD operation 56
Operation 56
Function menu switching 57
Selecting discs from the disc list 57
Using ITS playlist and disc title
functions 57
Understanding error message on rewriting
the entertainment displays 58
CD player and care 59
CD-R/CD-RW discs 59
MP3, WMA and WAV files 60
MP3 additional information 60
WMA additional information 61
WAVadditional information 61
About folders and MP3/WMA/WAV files 61
Terms 63
Specifications 65
Additional Information
Understanding built-in CD player error
messages 58
Understanding auto TA and EQ error
messages 58
4
En
Selecting fine audio equipment such as the unit you’ve just purchased is only the start of your
p
.
bel
Leve
e
30
s
0
L
c
50
Lig
musical enjoyment. Now it’s time to consider how you can maximize the fun and excitement your
equipment offers. This manufacturer and the Electronic Industries Association’s Consumer
Electronics Group want you to get the most out of your equipment by playing it at a safe level. One
that lets the sound come through loud and clear without annoying blaring or distortion—and, most
importantly, without affecting your sensitive hearing.
Sound can be deceiving. Over time your hearing “comfort level” adapts to higher volumes of
sound. So what sounds “normal” can actually be loud and harmful to your hearing. Guard against
this by setting your equipment at a safe level BEFORE your hearing adapts.
To establish a safe level:
• Start your volume control at a low setting.
• Slowly increase the sound until you can hear it comfortably and clearly, and without distortion.
Once you have established a comfortable sound level:
• Set the dial and leave it there.
Taking a minute to do this now will help to prevent hearing damage or loss in the future. After
all, we want you listening for a lifetime.
We Want You Listening For A Lifetime
Used wisely, your new sound equipment will provide a lifetime of fun and enjoyment. Since
hearing damage from loud noise is often undetectable until it is too late, this manufacturer and the
Electronic Industries Association’s Consumer Electronics Group recommend you avoid prolonged
ex
osure to excessive noise. This list of sound levels is included for your protection
Deci
l Exampl
Quiet library, soft whisper
4
60 Air conditioner at 20 feet, sewing machine
70 Vacuum cleaner, hair dryer, noisy restaurant
80 Average city traffic, garbage disposals, alarm clock at two feet
THE FOLLOWING NOISES CAN BE DANGEROUS UNDER CONSTANT EXPOSURE
90 Subway, motorcycle, truck traffic, lawn mower
100 Garbage truck, chain saw, pneumatic drill
120 Rock band concert in front of speakers, thunderclap
140 Gunshot blast, jet plane
180 Rocket launching pad
Information courtesy of the Deafness Research Foundation.
iving room, refrigerator, bedroom away from traffi
ht traffic, normal conversation, quiet office
English
5
En
Section
01
Before You Start
Information to User
Alteration or modifications carried out without
appropriate authorization may invalidate the
users right to operate the equipment.
For Canadian model
This Class B digital apparatus complies with
Canadian ICES-003.
About this unit
The tuner frequencies on this unit are allocated for use in North America. Use in other
areas may result in poor reception.
Important (Serial number)
The serial number is located on the bottom of
this unit. For your own security and convenience,
be sure to record this number on the enclosed
warranty card.
About this manual
This unit features a number of sophisticated
functions ensuring superior reception and operation. All the functions have been designed
for the easiest possible use, but many are not
self-explanatory. This operation manual will
help you benefit fully from this units potential
and to maximize your listening enjoyment.
We recommend that you familiarize yourself
with the functions and their operation by reading through the manual before you begin
using this unit. It is especially important that
you read and observe precautions noted on
the next page and in other sections.
After-sales service for
Pioneer products
Please contact the dealer or distributor from
where you purchased this unit for after-sales
service (including warranty conditions) or any
other information. In case the necessary information is not available, please contact the
companies listed below:
Please do not ship your unit to the companies
at the addresses listed below for repair without
advance contact.
U.S.A.
Pioneer Electronics (USA) Inc.
CUSTOMER SUPPORT DIVISION
P.O. Box 1760
Long Beach, CA 90801-1760
800-421-1404
CANADA
Pioneer Electronics of Canada, Inc.
CUSTOMER SATISFACTION DEPARTMENT
300 Allstate Parkway
Markham, Ontario L3R OP2
(905) 479-4411
1-877-283-5901
For warranty information please see the Limited Warranty sheet included with this unit.
Product registration
Visit us at the following site:
1 Register your product. We will keep the details
of your purchase on file to help you refer to
this information in the event of an insurance
claim such as loss or theft.
6
En
Before You Start
Section
01
2 Receive updates on the latest products and
technologies.
3 Download owners manuals, order product
catalogues, research new products, and
much more.
Precautions
WARNING:
Handling the cord on this product or cords associated with accessories sold with the product will
expose you to lead, a chemical known to the
State of California and other governmental entities to cause cancer and birth defects or other reproductive harm. Wash hands after handling.
CAUTION:
USE OF CONTROL OR ADJUSTMENT OR
PERFORMANCE OF PROCEDURES
OTHER THAN THOSE SPECIFIED HEREIN
MAY RESULT IN HAZARDOUS RADIATION
EXPOSURE.
CAUTION:
THE USE OF OPTICAL INSTRUMENTS
WITH THIS PRODUCT WILL INCREASE
EYE HAZARD.
MP3 file playback
You can play back MP3 files recorded on CDROM/CD-R/CD-RW (ISO9660 Level 1/Level 2
standard recordings).
! Supply of this product only conveys a li-
cense for private, non-commercial use and
does not convey a license nor imply any
right to use this product in any commercial
(i.e. revenue-generating) real time broadcasting (terrestrial, satellite, cable and/or
any other media), broadcasting/streaming
via internet, intranets and/or other networks or in other electronic content distribution systems, such as pay-audio or
audio-on-demand applications. An independent license for such use is required.
For details, please visit
http://www.mp3licensing.com.
WMA file playback
You can play back WMA files recorded on CDROM/CD-R/CD-RW (ISO9660 Level 1/Level 2
standard recordings).
WAV file playback
You can play back WAV files recorded on CDROM/CD-R/CD-RW (Linear PCM (LPCM)/MS
ADPCM recordings).
English
! Keep this manual handy as a reference for
operating procedures and precautions.
! Always keep the volume low enough so
that you can hear sounds from outside the
car.
! Protect this unit from moisture.
! If the battery is disconnected or dis-
charged, the preset memory will be erased
and must be reprogrammed.
Features
CD playback
Music CD/CD-R/CD-RW playback is possible.
About WMA
The Windows Media" logo printed on the box
indicates that this unit can play back WMA
data.
En
7
Section
01
Before You Start
WMA is short for Windows Media Audio and
refers to an audio compression technology
that is developed by Microsoft Corporation.
WMA data can be encoded by using Windows
Media Player version 7 or later.
Microsoft, Windows Media, and the Windows
logo are trademarks, or registered trademarks
of Microsoft Corporation in the United States
and/or other countries.
Notes
! With some applications used to encode WMA
files, this unit may not operate correctly.
! With some applications used to encode WMA
files, album names and other text information
may not be correctly displayed.
About the XM READY mark
The XM READY mark printed on the front
panel indicates that the Pioneer XM tuner
(sold separately) can be controlled by this unit.
Please inquire to your dealer or nearest
authorized Pioneer service station regarding
the XM tuner that can be connected to this
unit. For XM tuner operation, please refer to
the XM tuner owners manual.
Notes
! XM Satellite Radio is developing a new band
of radio in the U.S.A.
gital-quality music, news, sports, talk and childrens programming.
! The XM name and related logos are trade-
marks of XM Satellite Radio Inc.
Protecting your unit from
theft
The front panel can be detached from the
head unit and stored in the protective case
provided to discourage theft.
! If the front panel is not detached from the
head unit within five seconds of turning off
the ignition, a warning tone will sound and
the front panel will open.
! You can turn off the warning tone. See
Switching the warning tone on page 51.
! You can turn off the flap auto open. See
Switching the flap auto open on page 52.
Important
! Never use force or grip the display and the
buttons too tightly when removing or attaching.
! Avoid subjecting the front panel to excessive
shocks.
! Keep the front panel out of direct sunlight and
high temperatures.
! A few seconds after turning the ignition
switch to on or off, the front panel automatically moves. When this happens, your fingers
may become jammed in the panel, so keep
your hands away from it.
! When removing the front panel, be sure to
hold the corrugated release button on the rear
of the front panel while pulling.
The system will use direct satellite-to-receiver
broadcasting technology to provide listeners
in their cars and at home with crystal-clear
sound seamlessly from coast to coast. XM will
create and package up to 100 channels of di-
8
En
Before You Start
Section
01
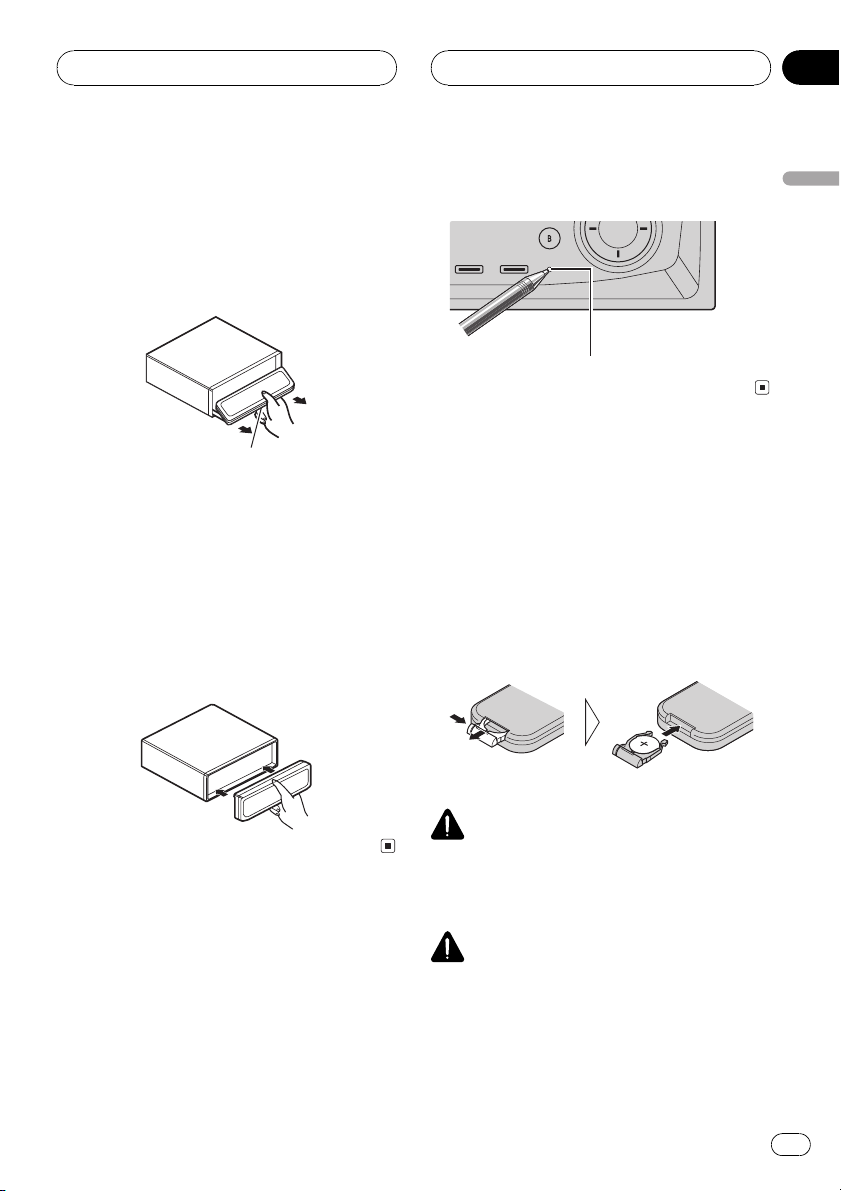
Removing the front panel
1 Press OPEN to open the front panel.
2 Slide and remove the front panel toward you.
Take care not to grip it too tightly or to drop it.
Release button
3 Put the front panel into the protective
case provided for safe keeping.
Attaching the front panel
1 Make sure the inner cover is closed.
2 Replace the front panel by clipping it
into place.
% Press RESET on the head unit with a
pen tip or other pointed instrument.
RESET button
Use and care of the remote
control
Installing the battery
Slide the tray out on the back of the remote
control and insert the battery with the plus (+)
and minus () poles pointing in the proper direction.
! When using for the first time, pull out the
film protruding from the tray.
English
Resetting the microprocessor
The microprocessor must be reset under the
following conditions:
! Prior to using this unit for the first time
after installation
! If the unit fails to operate properly
! When strange or incorrect messages ap-
pear on the display
WARNING
Keep the battery out of the reach of children.
Should the battery be swallowed, immediately
consult a doctor.
CAUTION
! Use only one CR2025 (3 V) lithium battery.
! Remove the battery if the remote control is not
used for a month or longer.
! Do not recharge, disassemble, heat or dispose
of the battery in fire.
! Do not handle the battery with metallic tools.
En
9
Section
01
Before You Start
! Do not store the battery with metallic materi-
als.
! In the event of battery leakage, wipe the re-
mote control completely clean and install a
new battery.
! When disposing of used batteries, please
comply with governmental regulations or environmental public institutions rules that
apply in your country/area.
Using the remote control
Point the remote control in the direction of the
front panel to operate.
! The remote control may not function prop-
erly in direct sunlight.
Important
! Do not store the remote control in high tem-
peratures or direct sunlight.
! Do not let the remote control fall onto the
floor, where it may become jammed under the
brake or accelerator pedal.
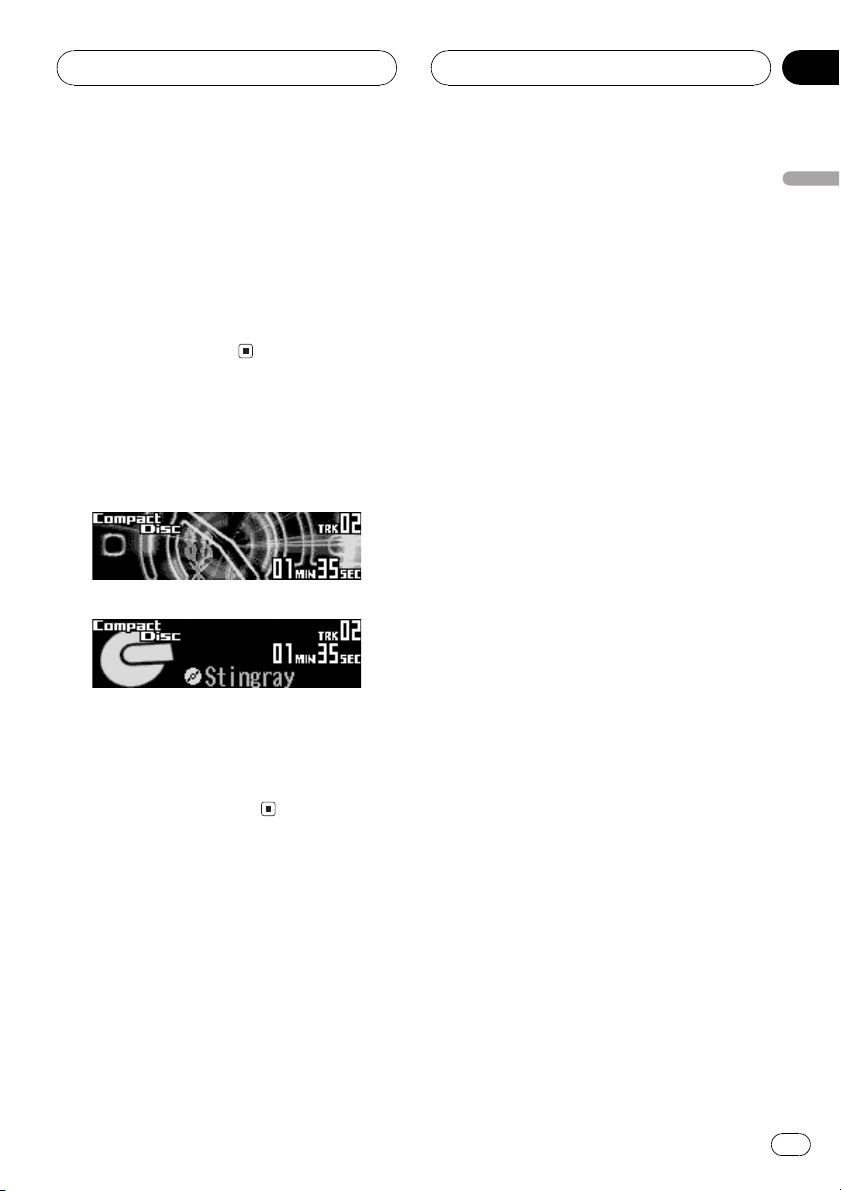
Display indication
This unit is equipped two types of display indications such as LCD display and OEL display.
This manual mainly explains using OEL display.
! LCD display contains basic information
about the each source and other settings
which is visible whenever the front panel is
opened or closed.
Track number that currently playing
! OEL display contains detailed information
about the each source and other settings
which is visible only when the front panel is
opened.
Track number that currently playing
Play time
OEL display (e.g. Built in CD
player)
About the demo mode
This unit features two demonstration modes.
One is the reverse mode, the other is the feature demo mode.
Important
The red lead (ACC) of this unit should be connected to a terminal coupled with ignition switch
on/off operations. If this is not done, the vehicle
battery may be drained.
Reverse mode
If you do not perform an operation within
about 30 seconds, screen indications start to
reverse, and then continue reversing every 10
seconds. Pressing button 5 when power to
this unit is turned off while the ignition switch
is set to ACC or ON cancels the reverse mode.
Press button 5 again to start the reverse
mode.
! Some entertainment displays may not oper-
ate the reverse mode.
10
Source which currently playing
LCD display (e.g. Built in CD player)
En
Before You Start
Section
01
Feature demo
Pressing button 6 when power to this unit is
turned off while the ignition switch is set to
ACC or ON starts the feature demo. Pressing
button 6 during feature demo operation cancels the feature demo mode.
Remember that if the feature demo continues
operating when the car engine is turned off, it
may drain battery power.
About basic displays
This unit has two forms of basic OEL display.
Choose the one you prefer.
Form 1
Form 2
1 Press OPEN to open the front panel.
English
2 Press and hold ENTERTAINMENT until
the display form changes.
En
11
6
Section
02
Whats What
1
2
5
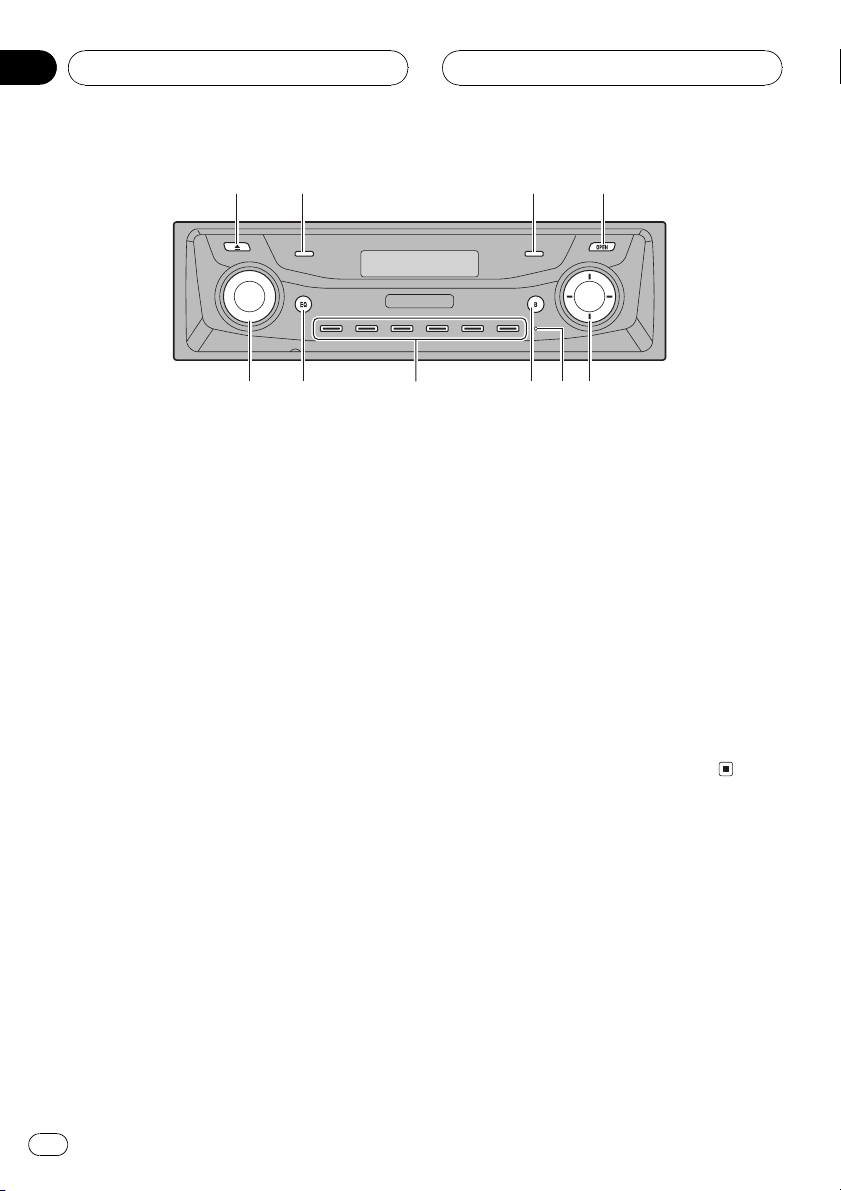
Head unit (front panel close)
1 EJECT button
Press to eject a CD from your built-in CD
player.
2 CLOCK button
Press to change to the clock display.
Press and hold to select the channel select
setting when using an XM tuner.
3 PAUSE button
Press to turn pause on or off.
4 OPEN button
Press to open or close the front panel.
When you want to operate buttons inside
the front panel, press OPEN to open the
front panel.
34
78
7 16 buttons
Press for preset tuning and disc number
search when using a multi-CD player.
8 BAND button
Press to select among three FM bands and
one AM band and to cancel the control
mode of functions.
9 RESET button
Press to reset the microprocessor.
a a/b/c/d buttons
Press to do manual seek tuning, fast forward, reverse and track search controls.
Also used for controlling functions.
9a
5 SOURCE button, VOLUME
This unit is turned on by selecting a source.
Press to cycle through all the available
sources.
Rotate it to increase or decrease the volume.
6 EQ button
Press to select various equalizer curves.
12
En
de
Whats What
Section
02
b
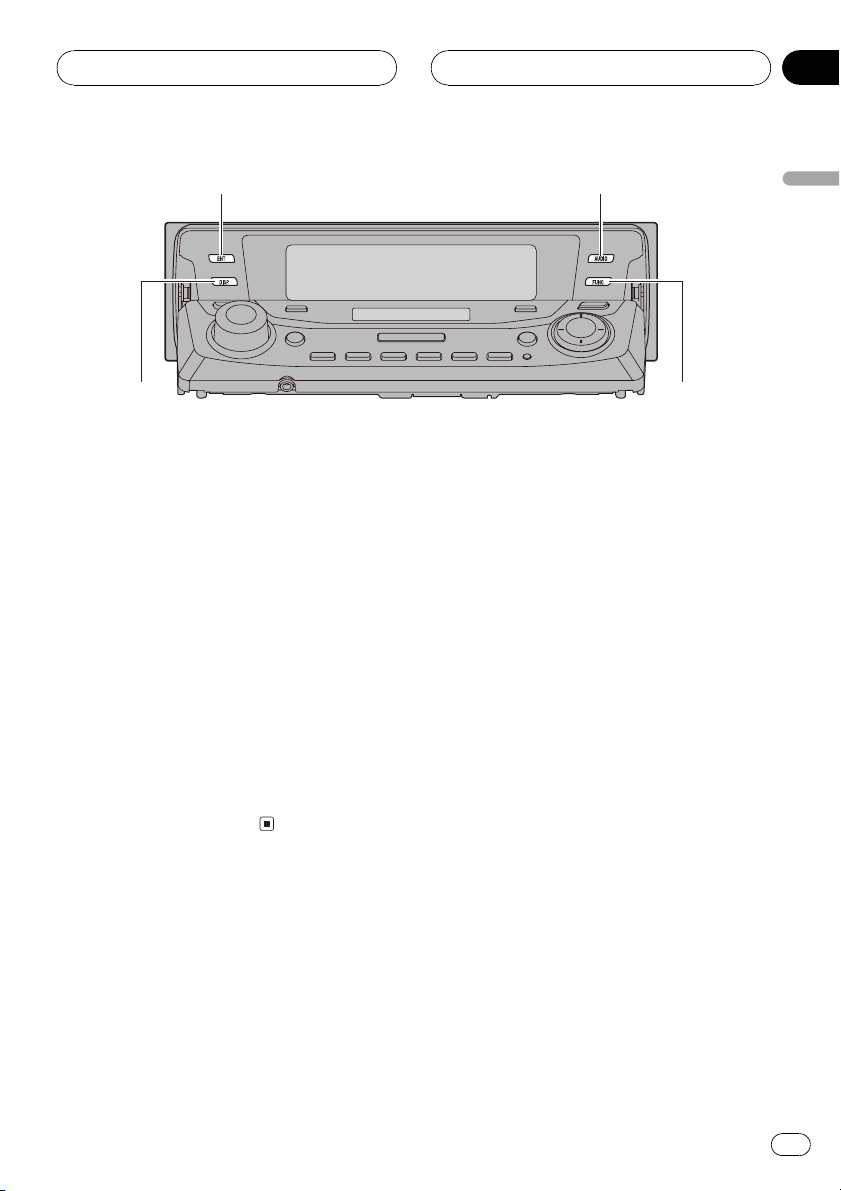
Head unit (front panel open)
These buttons listed below can be operated
only when the front panel opened.
b ENTERTAINMENT button
Press to change to the entertainment dis-
play.
Press and hold to change the display form.
c AUDIO button
Press to select various sound quality con-
trols.
d DISPLAY button
Press to select different displays.
c
English
e FUNCTION button
Press to select functions.
13
En
Section
02
Whats What
f c e
g
i
8
h
j
d
7
k
l
m
n
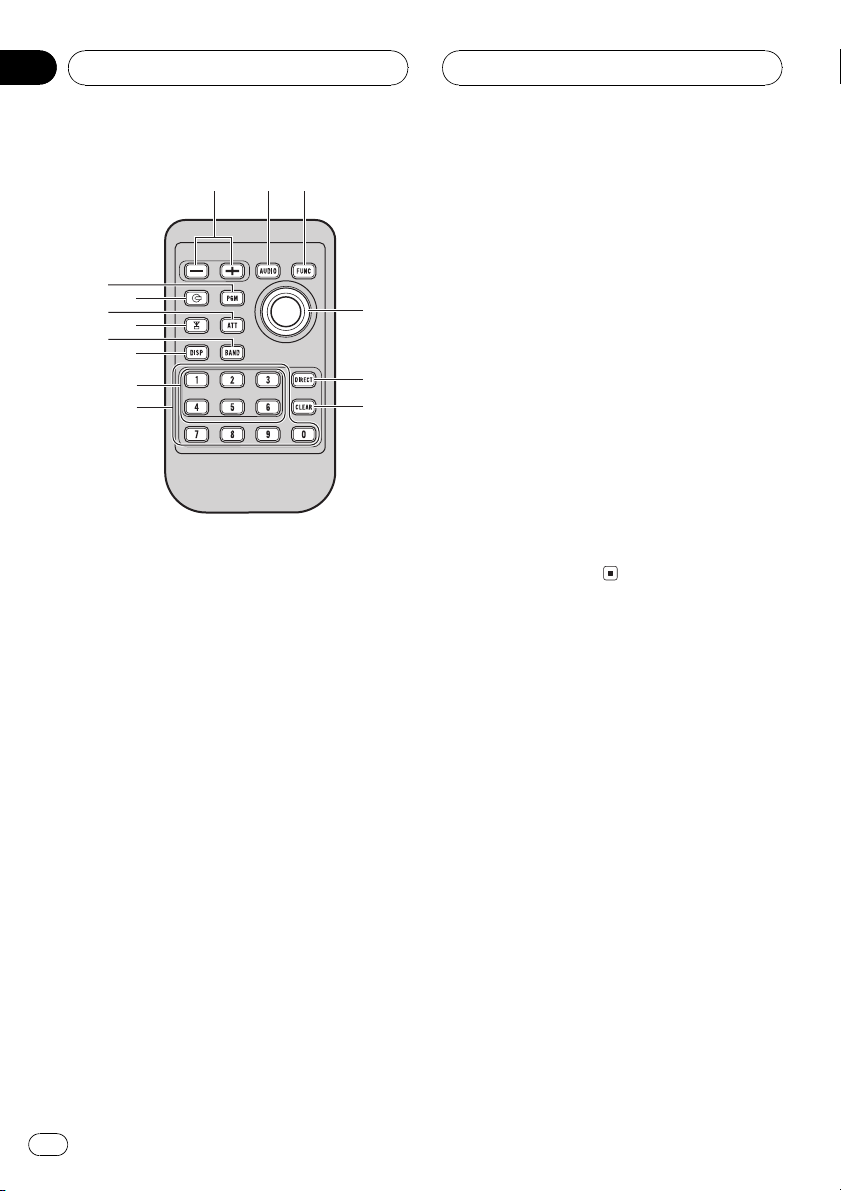
Remote control
Operation is the same as when using the buttons on the head unit.
f VOLUME buttons
Press to increase or decrease the volume.
g PGM button
Press to operate the preprogrammed functions for each source. (Refer to Using the
PGM button on page 54.)
k NUMBER buttons
Press to enter the number for selecting a desired track in direct track select mode.
Press to enter the number for selecting an
XM channel directly, in direct channel select
mode when using an XM tuner.
l Joystick
Move to do manual seek tuning, fast forward, reverse and track search controls.
Also used for controlling functions.
Functions are the same as a/b/c/d buttons.
m DIRECT button
Press to directly select the desired track.
n CLEAR button
Press to cancel the input number when
NUMBER are used.
h CD button
Press to select the built-in or multi-CD
player as the source.
i ATT button
Press to quickly lower the volume level, by
about 90%. Press once more to return to the
original volume level.
j TUNER button
Press to select the tuner as the source.
14
En
Power ON/OFF
Section
03
Turning the unit on
% Press SOURCE to turn the unit on.
When you select a source the unit is turned
on.
Selecting a source
You can select a source you want to listen to.
To switch to the built-in CD player, load a disc
in the unit (refer to page 19).
% Press SOURCE to select a source.
Press SOURCE repeatedly to switch between
the following sources:
XM tunerTunerTelevisionDVD
player/Multi-DVD playerBuilt-in CD
playerMulti-CD playerExternal unit 1
External unit 2AUX
% When using the remote control, press
TUNER or CD to select a source.
Press each button repeatedly to switch between the following sources:
TUNER: XM tunerTunerTelevision
Sources off
CD: DVD player/Multi-DVD playerBuilt-
in CD playerMulti-CD playerSources
off
! External unit refers to a Pioneer product (such
as one available in the future) that, although
incompatible as a source, enables control of
basic functions by this unit. Two external units
can be controlled by this unit. When two external units are connected, the allocation of
them to external unit 1 or external unit 2 is
automatically set by this unit.
! When this units blue/white lead is connected
to the cars auto-antenna relay control terminal, the cars antenna extends when this
units source is turned on. To retract the antenna, turn the source off.
Turning the unit off
% Press SOURCE and hold until the unit
turns off.
English
Notes
! In the following cases, the sound source will
not change:
When there is no unit corresponding to the
selected source connected to this unit.
When there is no disc in the unit.
When there is no disc in the DVD player.
When there is no magazine in the multi-
CD player.
When there is no magazine in the multi-
DVD player.
When the AUX (auxiliary input) is set to off
(refer to page 50).
En
15
5
Section
04
Tuner
Listening to the radio
1
4
These are the basic steps necessary to operate
the radio. More advanced tuner operation is
explained starting on the next page.
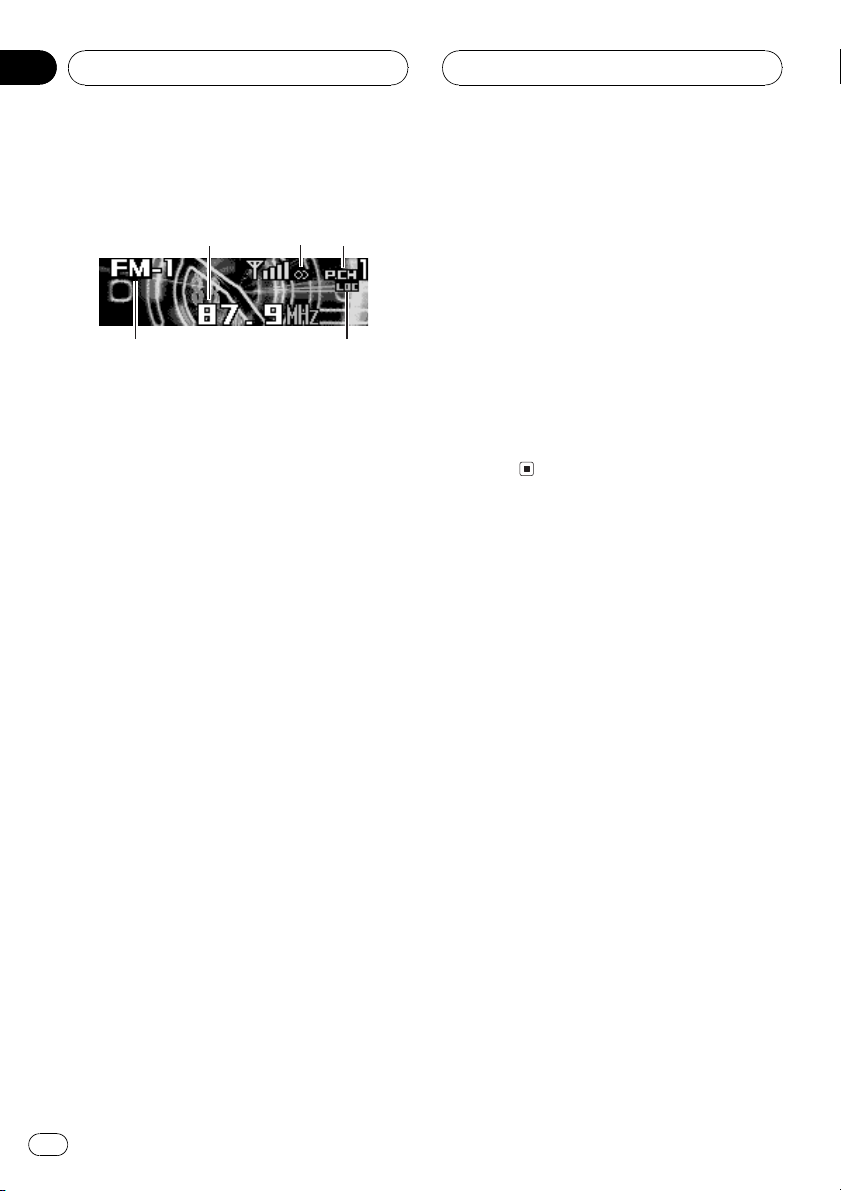
1 Frequency indicator
Shows to which frequency the tuner is
tuned.
2 Stereo (5) indicator
Shows that the frequency selected is being
broadcast in stereo.
3 Preset number indicator
Shows which preset has been selected.
4 Band indicator
Shows which band the radio is tuned to, AM
or FM.
23
4 To perform manual tuning, briefly press
c or d.
The frequencies move up or down step by
step.
5 To perform seek tuning, press and hold
c or d for about one second and release.
The tuner will scan the frequencies until a
broadcast strong enough for good reception is
found.
# You can cancel seek tuning by briefly pressing
either c or d.
# If you press and hold c or d you can skip sta-
tions. Seek tuning starts as soon as you release
the button.
5 LOC indicator
Shows when local seek tuning is on.
1 Press SOURCE to select the tuner.
Press SOURCE until you see Tuner displayed.
2 Use VOLUME to adjust the sound level.
Rotate it to increase or decrease the volume.
3 Press BAND to select a band.
Press BAND until the desired band is displayed, FM-1, FM-2, FM-3 for FM or AM.
16
En

1
Tuner
Section
04
Introduction of advanced
tuner operation
1 Function display
Shows the function status.
1 Press OPEN to open the front panel.
2 Press FUNCTION to display the function
names.
Press FUNCTION repeatedly to switch between the following functions:
BSM (best stations memory)Preset channel
listLocal (local seek tuning)
# To return to the frequency display, press
BAND.
Note
If you do not operate the function within about 30
seconds, the display is automatically returned to
the frequency display.
% When you find a frequency that you
want to store in memory press one of preset tuning buttons 16 and hold until the
preset number stops flashing.
The number you have pressed will flash in the
preset number indicator and then remain lit.
The selected radio station frequency has been
stored in memory.
The next time you press the same preset tuning button the radio station frequency is recalled from memory.
Notes
! Up to 18 FM stations, six for each of the three
FM bands, and six AM stations can be stored
in memory.
! You can also use a and b to recall radio sta-
tion frequencies assigned to preset tuning
buttons 16.
Tuning in strong signals
Local seek tuning lets you tune in only those
radio stations with sufficiently strong signals
for good reception.
1 Press FUNCTION to select Local.
Press FUNCTION until Local appears in the
display.
English
Storing and recalling
broadcast frequencies
If you press any of the preset tuning buttons
16 you can easily store up to six broadcast
frequencies for later recall with the touch of a
button.
2 Press a to turn local seek tuning on.
Local seek sensitivity (e.g., Level 2) appears in
the display.
3 Press c or d to set the sensitivity.
There are four levels of sensitivity for FM and
two levels for AM:
FM: Level 1Level 2Level 3Level 4
AM: Level 1Level 2
The Level 4 setting allows reception of only
the strongest stations, while lower settings let
you receive progressively weaker stations.
En
17
Section
04
Tuner
4 When you want to return to normal
seek tuning, press b to turn local seek tuning off.
Local OFF appears in the display.
Storing the strongest
broadcast frequencies
BSM (best stations memory) lets you automatically store the six strongest broadcast frequencies under preset tuning buttons 16 and
once stored there you can tune in to those frequencies with the touch of a button.
1 Press FUNCTION to select BSM.
Press FUNCTION until BSM appears in the
display.
2 Press a to turn BSM on.
Searching appears. The six strongest broad-
cast frequencies will be stored under preset
tuning buttons 16 in the order of their signal
strength.
When finished, Searching disappears and the
display switches to the preset channel list
mode.
# To cancel the storage process, press b.
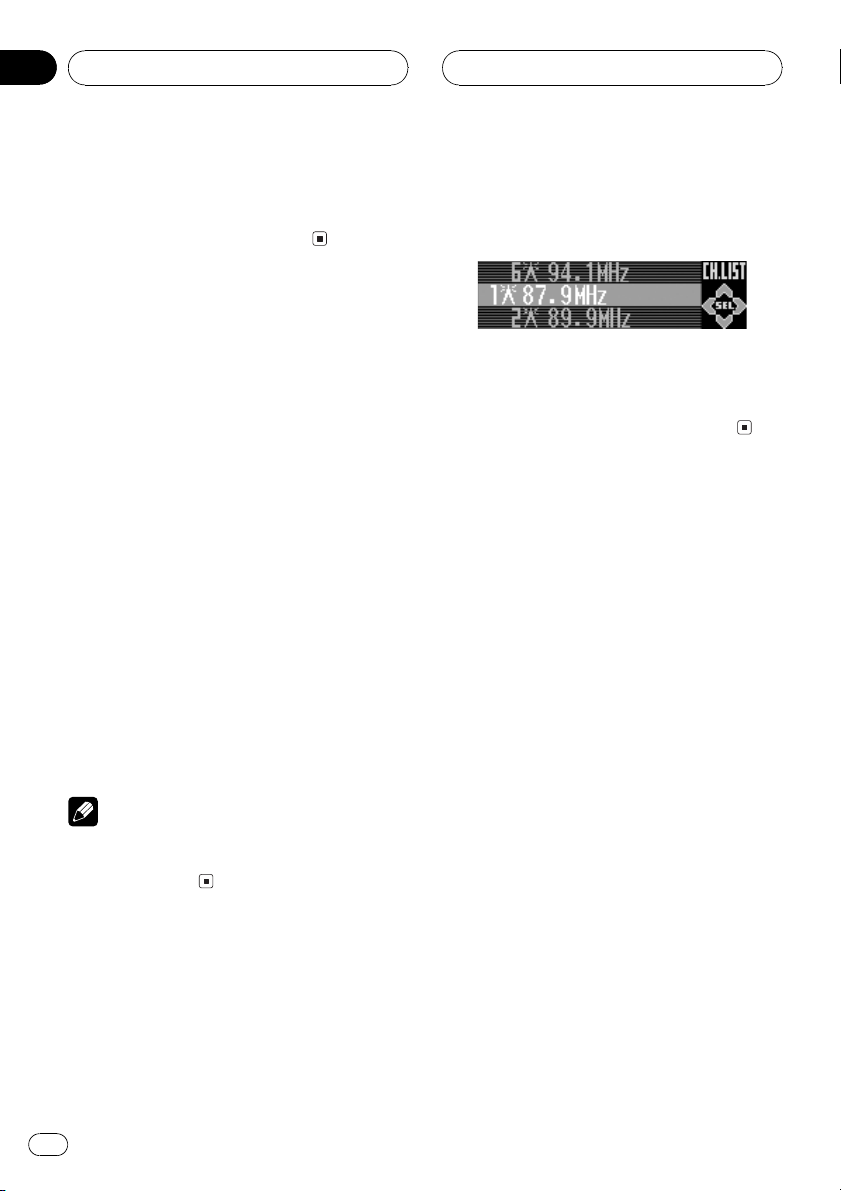
1 Press FUNCTION to select preset channel list.
Press FUNCTION until radio station frequency
list appears in the display.
2 Press a or b to scroll through the list of
frequencies.
3 Press d to recall the radio station.
Note
Storing broadcast frequencies with BSM may replace broadcast frequencies you have saved
using buttons 16.
Selecting stations from the
preset channel list
The preset channel list lets you see the list of
preset stations and select one of them to receive.
18
En
2
Built-in CD Player
Section
05
Playing a CD
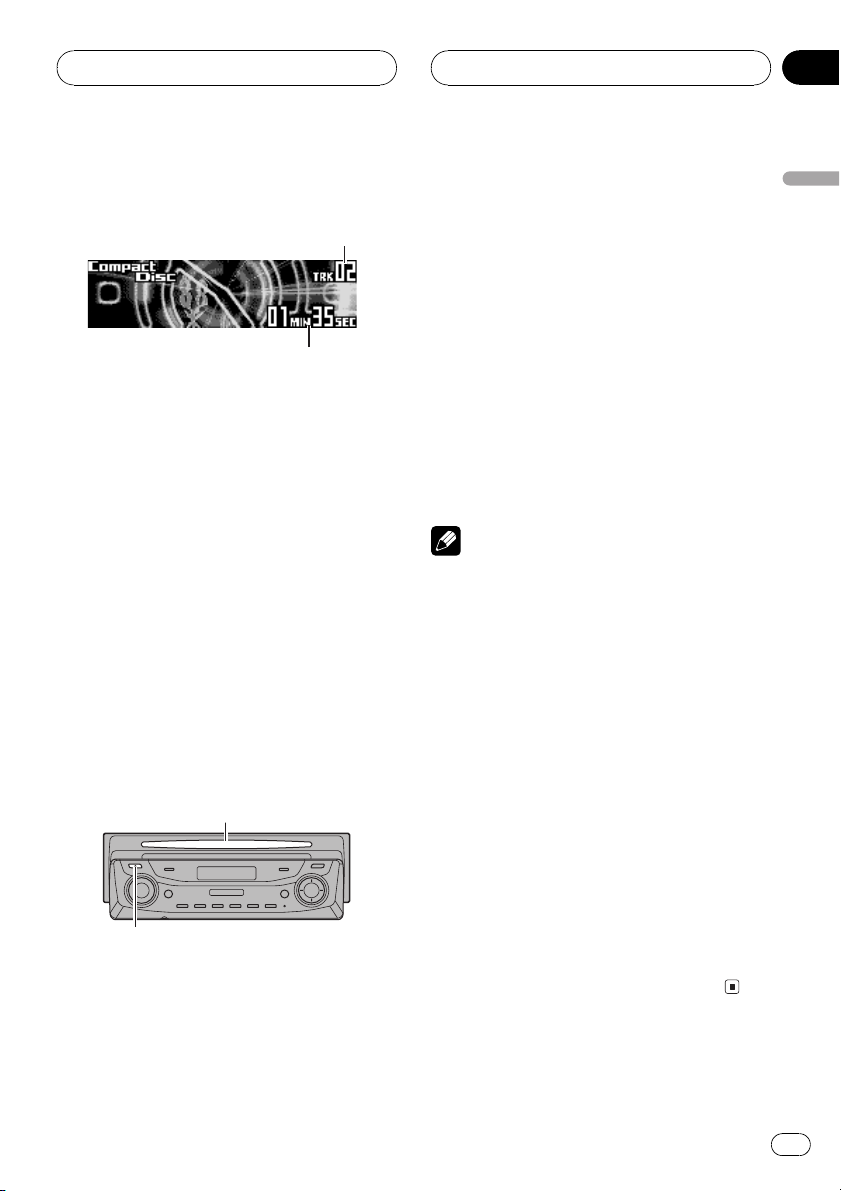
1
These are the basic steps necessary to play a
CD with your built-in CD player. More advanced CD operation is explained starting on
the next page.
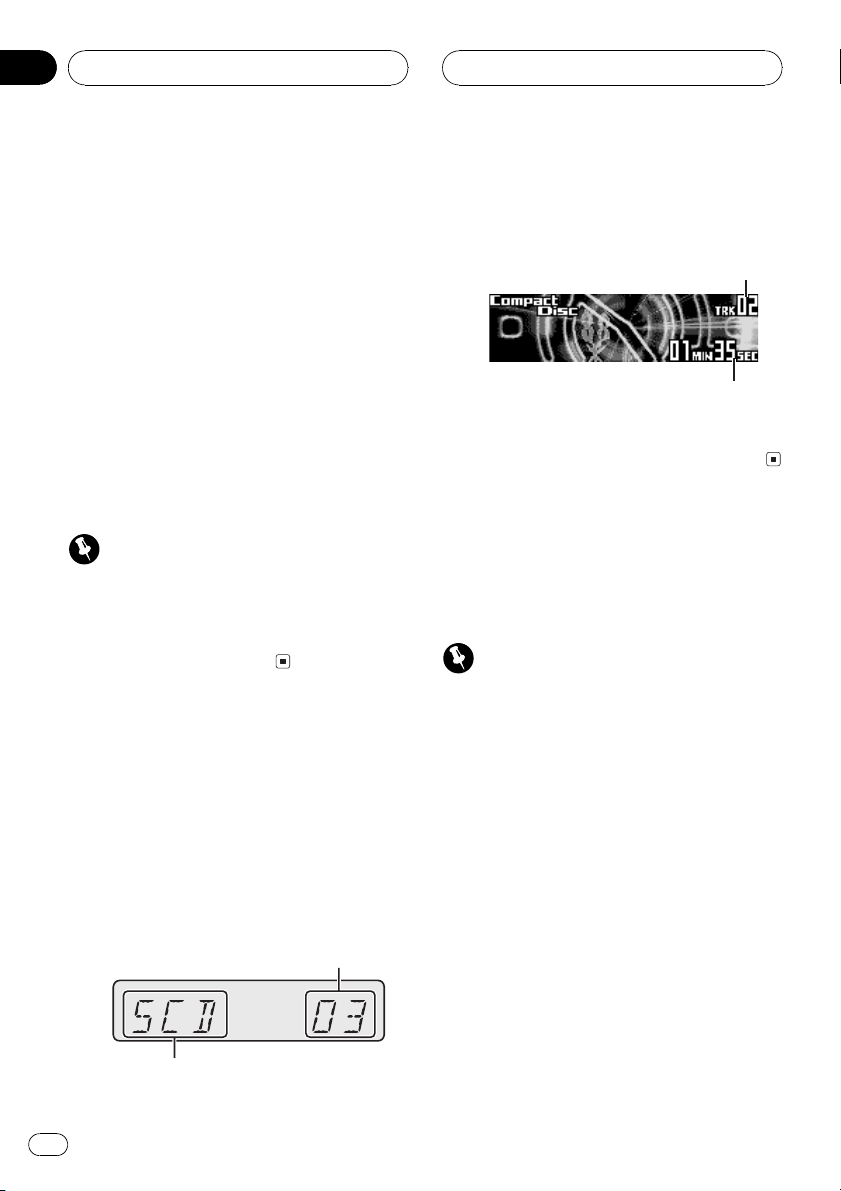
1 Track number indicator
Shows the track currently playing.
2 Play time indicator
Shows the elapsed playing time of the cur-
rent track.
1 Press EJECT.
CD loading slot appears.
# After a CD has been inserted, press SOURCE
to select the built-in CD player.
2 Insert a CD into the CD loading slot.
Playback will automatically start.
CD loading slot
EJECT button
# You can eject a CD by pressing EJECT.
# If the front panel is in the eject position
(shown above), buttons other than EJECT,
VOLUME, OPEN, and ATT (on the remote con-
trol) do not operate.
3 Use VOLUME to adjust the sound level.
Rotate it to increase or decrease the volume.
4 To perform fast forward or reverse,
press and hold c or d.
# If you select Rough search, pressing and
holding c or d enables you to search every 10
tracks in the current disc. (Refer to Selecting the
search method on page 22.)
5 To skip back or forward to another
track, press c or d.
Pressing d skips to the start of the next track.
Pressing c once skips to the start of the current track. Pressing again will skip to the previous track.
Notes
! The built-in CD player plays one, standard, 12-
cm or 8-cm (single) CD at a time. Do not use
an adapter when playing 8-cm CDs.
! Do not insert anything other than a CD into
the CD loading slot.
! There is sometimes a delay between starting
up CD playback and the sound being issued.
When being read in, Format read is displayed.
! If you cannot insert a disc completely or if
after you insert a disc the disc does not play,
check that the label side of the disc is up.
Press EJECT to eject the disc, and check the
disc for damage before inserting it again.
! If the built-in CD player does not operate prop-
erly, an error message such as ERROR-11
may be displayed. Refer to Understanding
built-in CD player error messages on page 58.
! You can eject the CD by pressing and holding
EJECT with eject position when the CD loading or ejecting cannot operate properly.
English
En
19
1
Section
05
Built-in CD Player
Selecting a track directly
When using the remote control, you can select
a track directly by entering the desired track
number.
1 Press DIRECT.
Track number input display appears.
2 Press NUMBER buttons to enter the desired track number.
# You can cancel the input number by pressing
CLEAR.
3 Press DIRECT.
The track of entered number will play.
Note
After entering the number input mode, if you do
not perform an operation within about eight seconds, the mode is automatically canceled.
Introduction of advanced
built-in CD player operation
1 Function display
Shows the function status.
1 Press OPEN to open the front panel.
2 Press FUNCTION to display the function
names.
Press FUNCTION repeatedly to switch between the following functions:
Track title listRepeat mode (repeat play)
Random mode (random play)Scan mode
(scan play)Pause (pause)Compression
(compression and BMX)Search mode
(search method)Tag read mode (tag dis-
play)
# To return to the playback display, press BAND.
Notes
! When playing audio data (CD-DA), tag display
is not effective even if you turn
Tag read mode (tag display) on. (Refer to
page 29.)
! If you do not operate the function within about
30 seconds, the display is automatically returned to the playback display.
20
Repeating play
Repeat play lets you hear the same track over
again.
En
Built-in CD Player
Section
05
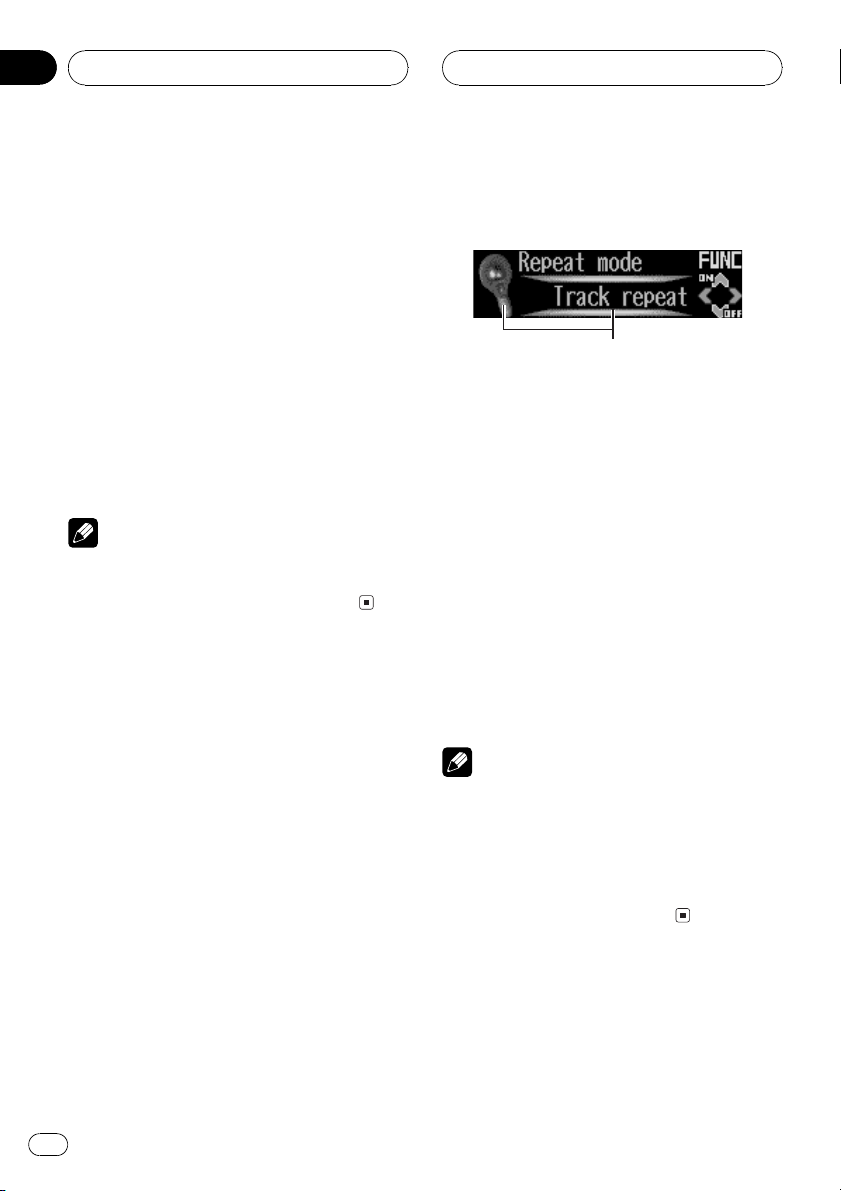
1 Press FUNCTION to select Repeat mode.
Press FUNCTION until Repeat mode appears
in the display.
2 Press a to turn repeat play on.
The light comes on. The track currently playing
will play to the end and then repeat.
# To turn repeat play off, press b.
Note
If you perform track search or fast forward/reverse, repeat play is automatically cancelled.
Playing tracks in a random
order
Random play lets you play back tracks on the
CD in a random order.
1 Press FUNCTION to select
Random mode.
Press FUNCTION until Random mode appears in the display.
2 Press a to turn random play on.
The light comes on. Tracks will play in a random order.
# To turn random play off, press b.
2 Press a to turn scan play on.
The light comes on. The first 10 seconds of
each track is played.
3 When you find the desired track press
b to turn scan play off.
The light goes off. The track will continue to
play.
# If the display has automatically returned to
the playback display, select Scan mode again by
pressing FUNCTION.
Note
After scanning of a CD is finished, normal playback of the tracks will begin again.
Pausing CD playback
Pause lets you temporarily stop playback of
the CD.
1 Press FUNCTION to select Pause.
Press FUNCTION until Pause appears in the
display.
2 Press a to turn pause on.
The light comes on. Play of the current track
pauses.
# To turn pause off, press b.
English
Scanning tracks of a CD
Scan play lets you hear the first 10 seconds of
each track on the CD.
1 Press FUNCTION to select Scan mode.
Press FUNCTION until Scan mode appears in
the display.
En
21
Section
05
Built-in CD Player
Using compression and BMX
Using the COMP (compression) and BMX
functions let you adjust the sound playback
quality of the CD player. Each of the functions
have a two-step adjustment. The COMP function balances the output of louder and softer
sounds at higher volumes. BMX controls
sound reverberations to give playback a fuller
sound. Listen to each of the effects as you select through them and use the one that best
enhances the playback of the track or CD that
you are listening to.
1 Press FUNCTION to select Compression.
Press FUNCTION until Compression appears
in the display.
2 Press a or b to select your favorite setting.
Press a or b repeatedly to switch between the
following settings:
COMP/BMX OFFCOMP 1COMP 2
COMP/BMX OFFBMX 1BMX 2
Selecting the search method
You can switch the search method between
fast forward/reverse and searching every 10
tracks.
1 Press FUNCTION to select Search mode.
Press FUNCTION until Search mode appears
in the display.
Searching every 10 tracks in
the current disc
If a disc contains over 10 tracks, you can
search every 10 tracks. When a disc contains
a lot of tracks, you can roughly search for the
track you want to play.
1 Select the search method Rough search.
Refer to Selecting the search method on this
page.
2 Press and hold c or d to search every
10 tracks on a disc.
# If a disc contains less than 10 tracks, pressing
and holding d recalls the last track of the disc.
Also, if the remaining number of tracks after
searching every 10 tracks is less than 10, pressing and holding d recalls the last track of the
disc.
# If a disc contains less than 10 tracks, pressing
and holding c recalls the first track of the disc.
Also, if the remaining number of tracks after
searching every 10 tracks is less than 10, pressing and holding c recalls the first track of the
disc.
Using disc title functions
You can input CD titles and display the title.
The next time you insert a CD for which you
have entered a title, the title of that CD will be
displayed.
2 Press c or d to select the search method.
Press c or d until the desired search method
appears in the display.
! FF / REV Fast forward and reverse
! Rough search Searching every 10
tracks
22
En
Entering disc titles
Use the disc title input feature to store up to
48 CD titles in the unit. Each title can be up to
10 characters long.
1 Play the CD that you want to enter a
title for.

Built-in CD Player
Section
05
2 Press OPEN to open the front panel.
3 Press FUNCTION and hold until
Title input appears in the display.
# When playing a CD TEXT disc, you cannot
switch to Title input. The disc title will have already been recorded on a CD TEXT disc.
4 Press button 1 to select the desired
character type.
Press button 1 repeatedly to switch between
the following character types:
Alphabet (upper case), numbers and symbols
Alphabet (lower case)European letters,
such as those with accents (e.g., á, à, ä, ç)
# You can select to input numbers and symbols
by pressing button 2.
5 Press a or b to select a letter of the alphabet.
Each press of a will display a letter of the alphabet in A B C ... X Y Z, numbers and symbols in 1 2 3 ... @ # < order. Each press of b
will display a letter in the reverse order, such
as Z Y X ... C B A.
6 Press d to move the cursor to the next
character position.
When the letter you want is displayed, press d
to move the cursor to the next position and
then select the next letter. Press c to move
backwards in the display.
7 Move the cursor to the last position by
pressing d after entering the title.
When you press d one more time, the entered
title is stored in memory.
8 Press BAND to return to the playback
display.
Notes
! Titles remain in memory, even after the disc
has been removed from the unit, and are recalled when the disc is reinserted.
! After data for 48 discs has been stored in
memory, data for a new disc will overwrite the
oldest one.
! If you connect a multi-CD player, you can
input disc titles for up to 100 discs.
! When a multi-CD player that does not support
disc title functions is connected, you cannot
enter disc titles in this unit.
Displaying disc titles
You can display the title of any disc that has
had a disc title entered.
1 Press OPEN to open the front panel.
2 Press DISPLAY.
Press DISPLAY repeatedly to switch between
the following settings:
Form 1
Play time
When you select disc title, the title of the currently playing disc is shown in the display.
# If no title has been entered for the currently
playing disc, No title is displayed.
: disc title
Using CD TEXT functions
Some discs have certain information encoded
on the disc during manufacture. These discs
may contain such information as the CD title,
track title, artists name and playback time
and are called CD TEXT discs. Only these specially encoded CD TEXT discs support the
functions listed below.
English
En
23
Section
05
Built-in CD Player
Displaying titles on CD TEXT discs
1 Press OPEN to open the front panel.
2 Press DISPLAY.
Press DISPLAY repeatedly to switch between
the following settings:
Form 1
Play time
: track title : track artist name
Form 2
Play time and
disc artist namePlay time and
Play time and
disc title and
name and
# If specific information has not been recorded
on a CD TEXT disc, No xxxx will be displayed
(e.g., No artist name).
: disc title : disc artist name
: disc titlePlay time and :
: track title
: track artist name :
: track title : disc artist
: track title
Scrolling titles in the display
This unit can display the first 22 letters of disc
title, disc artist name, track title and track artist name. When the text information is longer
than 22 letters, you can scroll the display as
follows.
1 Press OPEN to open the front panel.
! When you select the display form 2, the titles
are displayed up to 14 letters long (refer to
page 11).
Selecting tracks from the
track title list
Track title list lets you see the list of track titles
on a CD TEXT disc and select one of them to
play back.
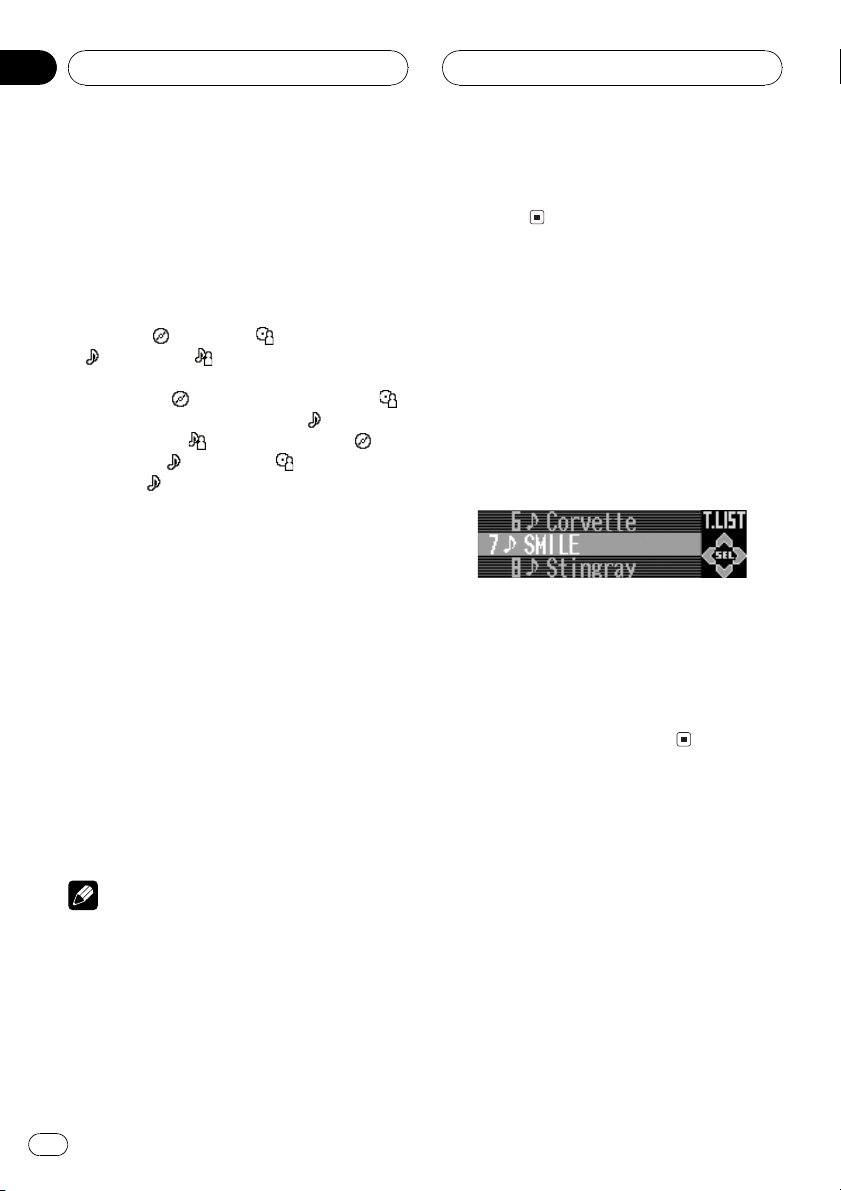
1 Press FUNCTION to select track title list.
Press FUNCTION until track title list appears
in the display.
2 Press a or b to scroll through the list of
track titles.
# If track title has not been recorded on a disc,
No T.Title will be displayed.
3 Press d to select the desired track title.
That selection will begin to play.
2 Press DISPLAY and hold until the title
begins to scroll through the display.
The titles scroll.
Notes
! When Ever Scroll is set to ON at the initial set-
ting, CD text information scrolls continuously
in the display. If you want to display the first
22 characters of text information temporarily
and scroll from the beginning, press and hold
DISPLAY. About Ever Scroll, refer to Switching
the Ever Scroll on page 52.
24
En
5
MP3/WMA/WAV Player
Section
06
Playing MP3/WMA/WAV
23
1
4
These are the basic steps necessary to play an
MP3/WMA/WAV with your built-in CD player.
More advanced MP3/WMA/WAV operation is
explained starting on page 27.
1 MP3/WMA/WAV indicator
Shows when the MP3/WMA/WAV file is
playing.
2 Folder number indicator
Shows the number of folder currently play-
ing.
3 Track number indicator
Shows the track (file) currently playing.
4 Bit rate/sampling frequency indicator
Shows the bit rate or sampling frequency of
the current track (file).
5 Play time indicator
Shows the elapsed playing time of the cur-
rent track (file).
1 Press EJECT.
CD loading slot appears.
# After a CD-ROM has been inserted, press
SOURCE to select the built-in CD player.
2 Insert a CD-ROM into the CD loading
slot.
Playback will automatically start.
CD loading slot
EJECT button
# You can eject a CD-ROM by pressing EJECT.
# If the front panel is in the eject position
(shown above), buttons other than EJECT,
VOLUME, OPEN, and ATT (on the remote con-
trol) do not operate.
3 Use VOLUME to adjust the sound level.
Rotate it to increase or decrease the volume.
4 Press a or b to select a folder.
# You cannot select a folder that does not have
an MP3/WMA/WAV file recorded in it.
# To return to folder 01 (ROOT), press and hold
BAND. However, if folder 01 (ROOT) contains no
files, playback commences with folder 02.
5 To perform fast forward or reverse,
press and hold c or d.
# This is fast forward and reverse operation only
for the file being played. This operation is canceled when the previous or next file is reached.
# If you select Rough search, pressing and
holding c or d enables you to search every 10
tracks in the current folder. (Refer to Selecting the
search method on page 28.)
6 To skip back or forward to another
track, press c or d.
Pressing d skips to the start of the next track.
Pressing c once skips to the start of the current track. Pressing again will skip to the previous track.
English
En
25
Section
06
MP3/WMA/WAV Player
Notes
! When playing discs with MP3/WMA/WAV files
and audio data (CD-DA) such as CD-EXTRA
and MIXED-MODE CDs, both types can be
played only by switching mode between MP3/
WMA/WAVand CD-DA with BAND.
! If you have switched between playback of
MP3/WMA/WAV files and audio data (CD-DA),
playback starts at the first track on the disc.
! The built-in CD player can play back an MP3/
WMA/WAV file recorded on CD-ROM. (Refer
to page 60 for files that can be played back.)
! Do not insert anything other than a CD into
the CD loading slot.
! There is sometimes a delay between starting
up CD playback and the sound being issued.
When being read in, Format read is displayed.
! If you cannot insert a disc completely or if
after you insert a disc the disc does not play,
check that the label side of the disc is up.
Press EJECT to eject the disc, and check the
disc for damage before inserting it again.
! Playback is carried out in order of file number.
Folders are skipped if they contain no files. (If
folder 01 (ROOT) contains no files, playback
commences with folder 02.)
! When playing back files recorded as VBR
(variable bit rate) files, the play time will not be
correctly displayed if fast forward or reverse
operations are used.
! If the inserted disc contains no files that can
be played back, No audio is displayed.
! If the inserted disc contains WMA files that
are protected by digital rights management
(DRM) , TRK SKIPPED is displayed while the
protected file is skipped.
! If all the files on the inserted disc are secured
by DRM, PROTECT is displayed.
! There is no sound on fast forward or reverse.
! If the built-in CD player does not operate prop-
erly, an error message such as ERROR-11
may be displayed. Refer to Understanding
built-in CD player error messages on page 58.
! You can eject the CD by pressing and holding
EJECT with eject position when the CD loading or ejecting cannot operate properly.
Selecting a track directly in
the current folder
When using the remote control, you can select
a track directly by entering the desired track
number.
1 Press DIRECT.
Track number input display appears.
2 Press NUMBER buttons to enter the desired track number.
# You can cancel the input number by pressing
CLEAR.
3 Press DIRECT.
The track of entered number will play.
Note
After entering the number input mode, if you do
not perform an operation within about eight seconds, the mode is automatically canceled.
26
En
1
MP3/WMA/WAV Player
Section
06
Introduction of advanced
built-in CD player (MP3/
WMA/WAV) operation
1 Function display
Shows the function status.
1 Press OPEN to open the front panel.
2 Press FUNCTION to display the function
names.
Press FUNCTION repeatedly to switch between the following functions:
File name listPlay mode (repeat play)
Random mode (random play)Scan mode
(scan play)Pause (pause)Compression
(compression and BMX)Search mode
(search method)Tag read mode (tag dis-
play)
# To return to the playback display, press BAND.
Note
If you do not operate the function within about 30
seconds, the display is automatically returned to
the playback display.
Repeating play
For MP3/WMA/WAV playback, there are three
repeat play ranges: Folder repeat (folder repeat), Track repeat (one-track repeat) and
Disc repeat (repeat all tracks).
1 Press FUNCTION to select Play mode.
Press FUNCTION until Play mode appears in
the display.
2 Press c or d to select the repeat range.
Press c or d until the desired repeat range appears in the display.
! Folder repeat Repeat the current folder
! Track repeat Repeat just the current
track
! Disc repeat Repeat all tracks
Notes
! If you select another folder during repeat play,
the repeat play range changes to Disc repeat.
! If you perform track search or fast forward/re-
verse during Track repeat, the repeat play
range changes to Folder repeat.
! When Folder repeat is selected, it is not pos-
sible to play back a subfolder of that folder.
Playing tracks in a random
order
Random play lets you play back tracks in a
random order within the repeat range,
Folder repeat and Disc repeat.
1 Select the repeat range.
Refer to Repeating play on this page.
2 Press FUNCTION to select
Random mode.
Press FUNCTION until Random mode appears in the display.
3 Press a to turn random play on.
The light comes on. Tracks will play in a random order within the previously selected
Folder repeat or Disc repeat ranges.
# To turn random play off, press b.
English
En
27
Section
06
MP3/WMA/WAV Player
Scanning folders and tracks
While you are using Folder repeat, the beginning of each track in the selected folder plays
for about 10 seconds. When you are using
Disc repeat, the beginning of the first track of
each folder is played for about 10 seconds.
1 Select the repeat range.
Refer to Repeating play on the previous page.
2 Press FUNCTION to select Scan mode.
Press FUNCTION until Scan mode appears in
the display.
3 Press a to turn scan play on.
The light comes on. The first 10 seconds of
each track of the current folder (or the first
track of each folder) is played.
4 When you find the desired track (or
folder) press b to turn scan play off.
The light goes off. The track (or folder) will continue to play.
# If the display has automatically returned to
the playback display, select Scan mode again by
pressing FUNCTION.
Note
After track or folder scanning is finished, normal
playback of the tracks will begin again.
2 Press a to turn pause on.
The light comes on. Play of the current track
pauses.
# To turn pause off, press b.
Using compression and BMX
Using the COMP (compression) and BMX
functions let you adjust the sound playback
quality of the CD player. Each of the functions
have a two-step adjustment. The COMP function balances the output of louder and softer
sounds at higher volumes. BMX controls
sound reverberations to give playback a fuller
sound. Listen to each of the effects as you select through them and use the one that best
enhances the playback of the track or CD that
you are listening to.
1 Press FUNCTION to select Compression.
Press FUNCTION until Compression appears
in the display.
2 Press a or b to select your favorite setting.
Press a or b repeatedly to switch between the
following settings:
COMP/BMX OFFCOMP 1COMP 2
COMP/BMX OFFBMX 1BMX 2
Pausing MP3/WMA/WAV
playback
Pause lets you temporarily stop playback of
the MP3/WMA/WAV.
1 Press FUNCTION to select Pause.
Press FUNCTION until Pause appears in the
display.
28
En
Selecting the search method
You can switch the search method between
fast forward/reverse and searching every 10
tracks.
1 Press FUNCTION to select Search mode.
Press FUNCTION until Search mode appears
in the display.
MP3/WMA/WAV Player
Section
06
2 Press c or d to select the search method.
Press c or d until the desired search method
appears in the display.
! FF / REV Fast forward and reverse
! Rough search Searching every 10
tracks
Searching every 10 tracks in
the current folder
If the current folder contains over 10 tracks,
you can search every 10 tracks. When one
folder contains a lot of tracks, you can roughly
search for the track you want to play.
1 Select the search method Rough search.
Refer to Selecting the search method on the
previous page.
2 Press and hold c or d to search every
10 tracks in the current folder.
# If the current folder contains less than 10
tracks, pressing and holding d recalls the last
track of the folder. Also, if the remaining number
of tracks after searching every 10 tracks is less
than 10, pressing and holding d recalls the last
track of the folder.
# If the current folder contains less than 10
tracks, pressing and holding c recalls the first
track of the folder. Also, if the remaining number
of tracks after searching every 10 tracks is less
than 10, pressing and holding c recalls the first
track of the folder.
Switching the tag display
It is possible to turn the tag display on or off, if
MP3/WMA disc contains text information
such as track title and artist name.
! If you turn the tag display off, time to play-
back will be shorter than when this function is turned on.
1 Press FUNCTION to select
Tag read mode.
Press FUNCTION until Tag read mode appears in the display.
2 Press a to turn tag display on.
ON appears in the display.
3 Press b to turn tag display off.
OFF appears in the display.
Note
When you turn the tag display on, the unit returns
to the beginning of the current track in order to
read the text information.
Displaying text information
on MP3/WMA/WAV disc
Text information recorded on an MP3/WMA/
WAV disc can be displayed.
When playing back an MP3/
WMA disc
1 Press OPEN to open the front panel.
2 Press DISPLAY.
Press DISPLAY repeatedly to switch between
the following settings:
Form 1
Play time
:track title :artist name : album
title
Form 2
: folder name : file name
:comment
English
En
29
Section
06
MP3/WMA/WAV Player
Play time and : folder namePlay time and
: file namePlay time and :track title
Play time and
: album titlePlay time and :comment
: folder name and : file name :
album title and
and
:track title
# When playing back MP3 files recorded as VBR
(variable bit rate) files, the bit rate value is not displayed even after switching to bit rate. (VBR will
be displayed.)
# When playing back WMA files recorded as
VBR (variable bit rate) files, the average bit rate
value is displayed.
# When you have turned tag display off, you
cannot switch to track title, artist name, album
title or comment.
# If specific information has not been recorded
on an MP3/WMA disc, No xxxx will be displayed
(e.g., No title).
# With some applications used to encode WMA
files, album names and other text information
may not be correctly displayed.
:artist namePlay time and
:track title :artist name
When playing back a WAV disc
1 Press OPEN to open the front panel.
2 Press DISPLAY.
Press DISPLAY repeatedly to switch between
the following settings:
Form 1
Play time
Form 2
Play time and
: file name : folder name and : file
name
# You can only play back WAV files in the frequencies 16, 22.05, 24, 32, 44.1 and 48 kHz
(LPCM), or 22.05 and 44.1 kHz (MS ADPCM). The
sampling frequency shown in the display may be
rounded.
: folder name : file name
: folder namePlay time and
Scrolling text information
in the display
This unit can display the first 22 letters only of
folder name, file name, track title, artist name,
album title and comment. When the recorded
information is longer than 22 letters, you can
scroll the text to the left so that the rest of the
text information can be seen.
1 Press OPEN to open the front panel.
2 Press DISPLAY and hold until the text
information begins to scroll through the
display.
The text information scrolls.
Notes
! Unlike MP3 and WMA file format, WAV files
display only folder name and file name.
! When Ever Scroll is set to ON at the initial set-
ting, CD text information scrolls continuously
in the display. If you want to display the first
22 characters of text information temporarily
and scroll from the beginning, press and hold
DISPLAY. About Ever Scroll, refer to Switching
the Ever Scroll on page 52.
! When you select the display form 2, the titles
are displayed up to 14 letters long (refer to
page 11).
Selecting tracks from the
file name list
File name list lets you see the list of file names
(or folder names) and select one of them to
playback.
1 Press FUNCTION to select file name list.
Press FUNCTION until names of files or
folders appears in the display.
30
En
 Loading...