

Pioneer DEH-P90DAB User Manual [en, es]

Multi-CD control High power
CD player with RDS/DAB tuner
Reproductor de CD de alta potencia con control de
múltiples CD con sintonizador RDS/DAB
Operation Manual
DEH-P90DAB
Manual de Operación
ENGLISH
ESPAÑOL DEUTSCH FRANÇAIS
ITALIANO NEDERLANDS

1
Contents
Key Finder .................................................... 3
-
Head Unit
-
Steering Remote Controller
Before Using This Product ...................... 5
About This Product .......................................... 5
About This Manual ............................................ 5
About DAB Tuner ............................................ 5
Resetting the Microprocessor ............................ 6
About the Demo Mode ...................................... 7
-
Reverse Demo
-
Feature Demo
Precaution .......................................................... 8
In Case of Trouble ............................................ 8
Remote Controller and Care .................... 9
Using the Steering Remote Controller .............. 9
-
Battery
Basic Operation ...................................... 11
To Listen to Music .......................................... 11
Basic Operation of Tuner ................................ 12
-
Manual and Seek Tuning
-
Preset Tuning
-
Band
Basic Operation of Built-in CD Player .......... 13
-
Eject
-
Changing the Display
(only for CD TEXT Discs)
-
Track Search and Fast Forward/Reverse
-
CD Loading Slot
-
Open
Basic Operation of Multi-CD Player .............. 15
-
Track Search and Fast Forward/Reverse
-
Disc Search
-
Changing the Display
(When playing a CD TEXT disc on a CD
TEXT compatible Multi-CD Player)
-
Disc Number Search
(for 6-Disc, 12-Disc types)
-
Disc Number Rough Search
(for 50-Disc type only)
Basic Operation of DAB ................................ 17
-
Changing the Display
-
Preset Tuning
-
DAB indicator
-
Selecting the Ensemble or Service
-
Band
Corresponding Display Indications and
Buttons ...................................................... 19
Entering the Function Menu ............................ 19
Function Menu Functions ................................ 20
Entering the Detailed Setting Menu ................ 22
Detailed Setting Menu Functions .................... 23
Tuner Operation ...................................... 24
-
Local Seek Tuning (LOCAL)
-
Best Stations Memory
(Best Stations Memory)
Using the RDS Functions ........................ 25
What is RDS? .................................................. 25
Program Service Name Display ...................... 25
AF Function (AlternativeFrequency) .............. 26
-
Activating/Deactivating the AF Function
PI Seek Function ............................................ 27
-
PI Seek
-
Auto PI Seek (for preset station)
Regional Function (Regional) ........................ 27
-
Activating/Deactivating
the Regional Function
Traffic Announcement Standby Function
(Traffic Announcement) .......................... 28
-
Activating/Deactivating the TA Function
-
Canceling Traffic Announcements
-
Adjusting the TA Volume
-
TP Alarm Function
PTY Function .................................................. 30
-
Searching the PTY
-
News Program Interruption Setting (News)
-
PTY Alarm
-
Canceling Announcements
-
PTY List
Radio Text ...................................................... 33
-
Radio Text Display
-
Storing Radio Text in Memory
-
Recalling Preset Radio Text
Using the DAB Functions ........................ 35
What is DAB? ................................................ 35
-
Outline
Announcement Support Function .................... 36
-
Announcement operated by the TA button
-
TP Alarm Function
-
Operating Announcement with the
Function Menu
-
Switching Interrupting Announcement

Service Follow Function ................................ 39
-
Service Follow Function (FM)
Service Component Function .......................... 40
Available Service List Function ...................... 40
Preset Service List Function ............................ 41
Available PTY Function .................................. 42
-
Searching the PTY
-
Cancelling the PTY Search Setting mode
Dynamic Label Function ................................ 43
-
Dynamic Label Display
-
Storing Dynamic Label in Memory
-
Recalling Preset Dynamic Label
Using the Built-in CD Player .................. 45
-
Repeat Play (Play Mode)
-
Random Play (RandomPlay)
-
Pause (Pause)
-
Disc Title Input (Title Input ABC)
Using Multi-CD Players .......................... 47
-
Repeat Play (Play Mode)
-
Random Play (RandomPlay)
-
Pause (Pause)
Compression and DBE (Compression) .......... 48
-
Comp./DBE ON/OFF Switching
Disc Title ........................................................ 49
-
Disc Title Input (Title Input ABC)
-
Selecting Discs by Disc Title List
(Disc List)
Audio Adjustment .................................... 52
Selecting the Equalizer Curve ........................ 52
Entering the Audio Menu ................................ 52
Audio Menu Functions .................................... 53
-
Balance Adjustment (FAD/BAL)
-
Equalizer Curve Adjustment (EqualizEr)
-
Equalizer Curve Fine Adjustment (EqualizEr)
-
Loudness Adjustment (LoudnEss)
-
Subwoofer Output (Sub W-1)
-
Subwoofer Setting Adjustment (Sub W-2)
-
Non Fading Output (Non FadE-1)
-
Non Fading Output Level Adjustment
(Non FadE-2)
-
High Pass Filter (High Pass)
-
Front Image Enhancer Function (FIE)
-
Source Level Adjustment (SLA) Function
-
Automatic Sound Levelizer (ASL) Function
Detaching and Replacing
the Front Panel .................................. 60
Theft Protection .............................................. 60
-
Detaching the Front Panel
-
Replacing the Front Panel
-
Warning Tone
Initial Setting ............................................ 62
Entering the Initial Setting Menu .................... 62
Initial Setting Menu Functions ........................ 63
-
Changing the FM Tuning Step
(FM Tuning Step)
-
Setting the DAB Priority Function
(DAB Priority)
-
Switching the Auto PI Seek (Auto PI Seek)
-
Setting the Warning Tone (Warning Tone)
-
Switching the AUX Mode (AUX)
-
Setting the Dimmer (Dimmer)
-
Selecting the Illumination Color
(Illumination Color)
-
Switching the Rear Speaker Output
(Rear Speaker Out)
-
Setting the Subwoofer Control
(Sub woofer control)
-
Flap auto open (FLAP AUTO)
-
Selecting the Wall Paper (Wall Paper)
-
Selecting the Brightness (Brightness)
Other Functions ........................................ 68
Switching the Entertainment Display .............. 68
Using the AUX Source .................................... 69
-
Selecting the AUX Source
-
AUX Title Input
Cellular Telephone Muting .............................. 69
CD Player and Care .................................. 70
Precaution ........................................................ 70
Built-in CD Player’s Error Message .............. 71
Specifications .......................................... 72
2
ENGLISH ESPAÑOL DEUTSCH FRANÇAIS
ITALIANO NEDERLANDS
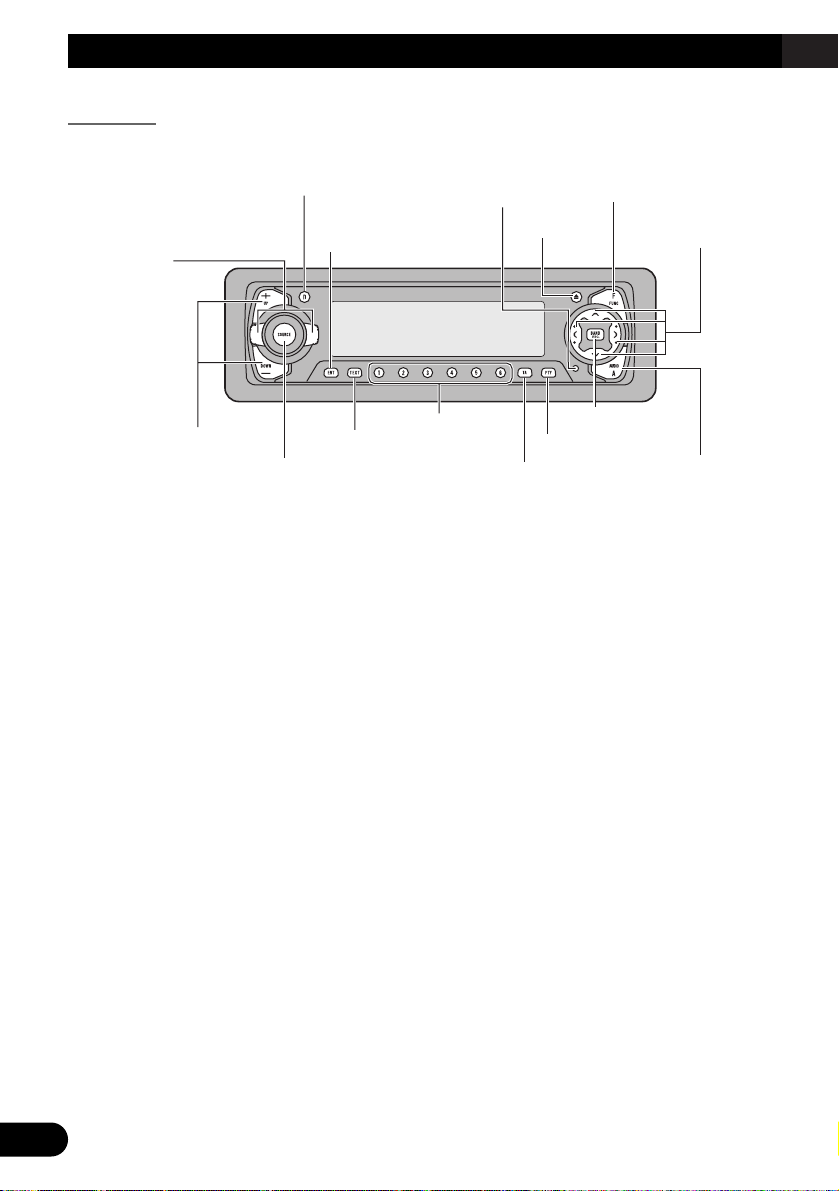
Key Finder
3
Head Unit
5/∞/2/3 buttons
SOURCE/OFF button
+/– button
AUDIO button
PTY button
Buttons 1–6
TAbutton
TEXT button
FUNCTION button
EQ selector
DISPLAY button
ENTERTAINMENT button
EJECT button
BAND button
RESET button
4
ENGLISH ESPAÑOL DEUTSCH FRANÇAIS
ITALIANO NEDERLANDS
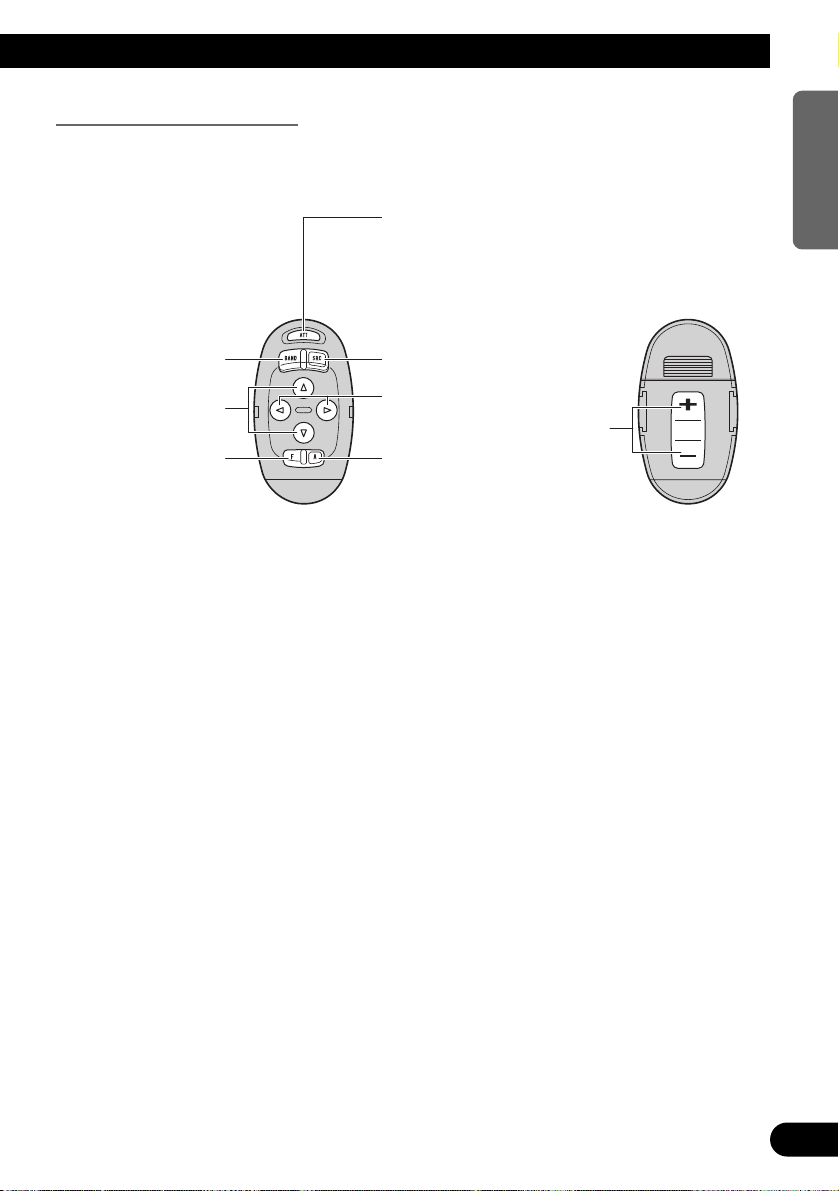
Steering Remote Controller
A steering remote controller that enables remote operation of the head unit is supplied.
Operation is the same as when using buttons on the head unit.
+/– button
Raise or
lower the
volume.
AUDIO button
2/3 buttons
BAND button
FUNCTION button
SOURCE/OFF button
ATT button
This lets you quickly
lower volume level
(by about 90%). Press
once more to return to
the original volume
level.
5/∞ buttons

5
Before Using This Product
About This Product
The tuner frequencies on this product are allocated for use in Western Europe, Asia, the
Middle East, Africa and Oceania. Use in other areas may result in improper reception. The
RDS function operates only in areas with FM stations broadcasting RDS signals.
About This Manual
This product features a number of sophisticated functions ensuring superior reception and
operation. All are designed for the easiest possible use, but many are not self-explanatory.
This operation manual is intended to help you benefit fully from their potential and to
maximize your listening enjoyment.
We recommend that you familiarize yourself with the functions and their operation by
reading through the manual before you begin using this product. It is especially important
that you read and observe the “Precaution” on page 8 and in other sections.
This manual explains head unit operation. You can perform the same operations with the
steering remote controller.
About DAB Tuner
Since this product is equipped with a DAB tuner, never connect an external DAB tuner. If
you do, it may cause malfunction.
• This product complies with the EMC Directives (89/336/EEC, 92/31/EEC) and CE Marking
Directive (93/68/EEC).

6
ENGLISH ESPAÑOL DEUTSCH FRANÇAIS
ITALIANO NEDERLANDS
Resetting the Microprocessor
The microprocessor must be reset under the following conditions:
When using this product for the first time after installation.
When the machine fails to operate properly.
When strange (incorrect) messages appear on the display.
• To reset the microprocessor, press the RESET button on the head unit with a
pen tip or other pointed instrument.

7
Before Using This Product
About the Demo Mode
This product features two demonstration modes. One is the Reverse Demo mode, the other
is the Feature Demo mode.
Reverse Demo
If you do not perform an operation within about 30 seconds, screen indications start to
reverse, and then continue reversing every 10 seconds. Pressing button 5 when power to
this product is switched OFF while the ignition switch is set to ACC or ON cancels the
Reverse Demo mode. Pressing button 5 again to start the Reverse Mode.
Feature Demo
The Feature Demo automatically starts when power to this product is switched OFF while
the ignition switch is set to ACC or ON. Pressing button 6 during Feature Demo operation
cancels the Feature Demo mode. Pressing button 6 again to start the Feature Mode.
Remember that if the Feature Demo continues operating when the car engine is switched
OFF, it may drain battery power.
Note:
• You cannot cancel a Demo mode when the front panel is open.
• The red lead (ACC) of this product should be connected to a terminal coupled with ignition switch
ON/OFF operations. If this is not done, the vehicle battery may be drained.

Precaution
• A “CLASS 1 LASER PRODUCT” label is affixed to the bottom of the player.
• The Pioneer CarStereo-Pass is for use only in Germany.
• Keep this manual handy as a reference for operating procedures and precautions.
• Always keep the volume low enough for outside sounds to be audible.
• Protect the product from moisture.
• If the battery is disconnected, the preset memory will be erased and must be reprogrammed.
In Case of Trouble
Should this product fail to operate properly, contact your dealer or nearest authorized
Pioneer Service Station.
8
ENGLISH ESPAÑOL DEUTSCH FRANÇAIS
ITALIANO NEDERLANDS
CLASS 1
LASER PRODUCT
9
Remote Controller and Care
Using the Steering Remote Controller
Precaution:
• Do not operate this unit while manipulating the steering wheel as it might result in a traffic accident.
• If you have to operate this unit unavoidably when driving, look ahead carefully to avoid the risk of
being involved in a traffic accident.
• If any of the following troubles occur, immediately stop using this unit and consult with the dealer
from whom you purchased it:
– the unit is smoking.
– the unit is emitting abnormal odor.
– a foreign object has entered the unit.
– liquid has been spilled on or into the unit.
If you continue to use this unit without finding a remedy, the unit may be damaged badly, resulting
in a serious accident or fire.
• Do not leave this unit free (unattached) inside the car. When the car stops or turns a curve, the unit
might drop on the floor. If the unit rolls under the brake pedal, it might prevent the driver from
braking well, causing serious trouble. Be sure to fix this unit to the steering wheel.
• Do not disassemble or modify this unit. To do so may cause a fault.
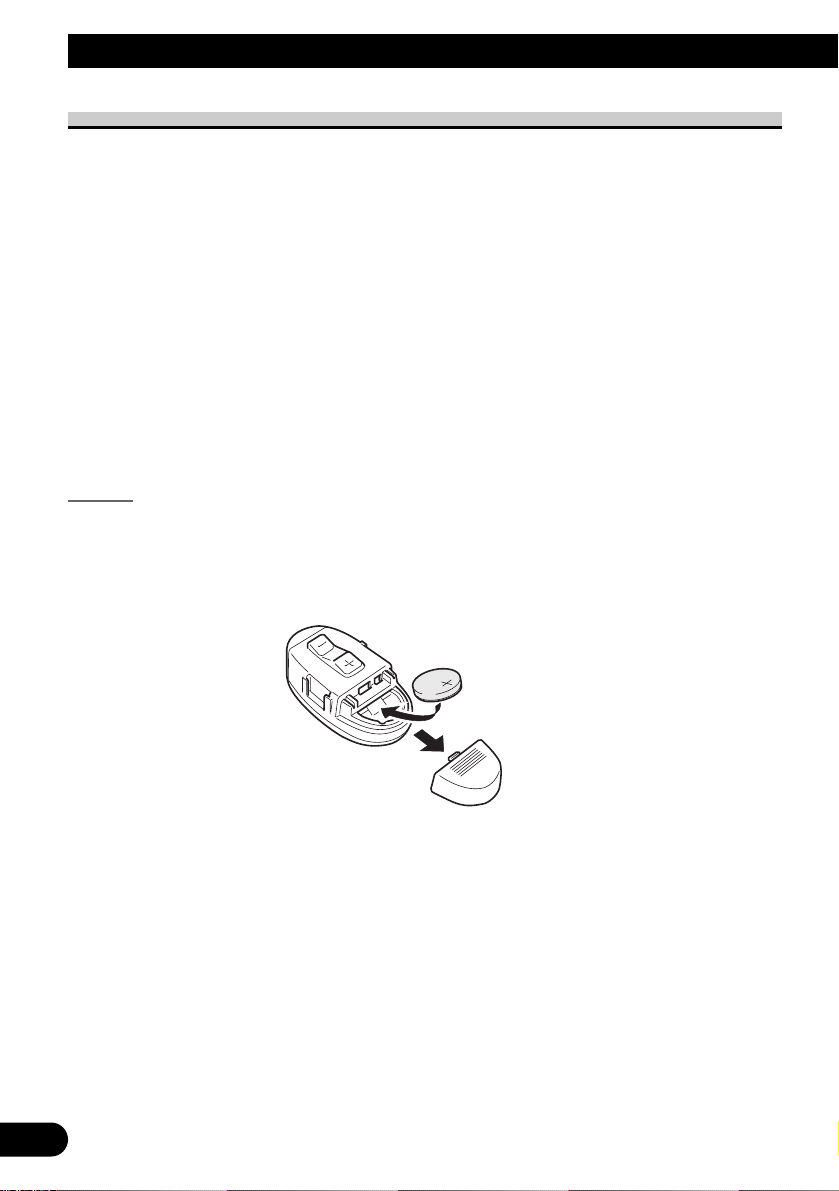
Battery
7 Install the Lithium Battery
• Remove the cover on the back of the steering remote controller and insert
the battery with the (+) and (–) poles pointing in the proper direction.
10
ENGLISH ESPAÑOL DEUTSCH FRANÇAIS
ITALIANO NEDERLANDS
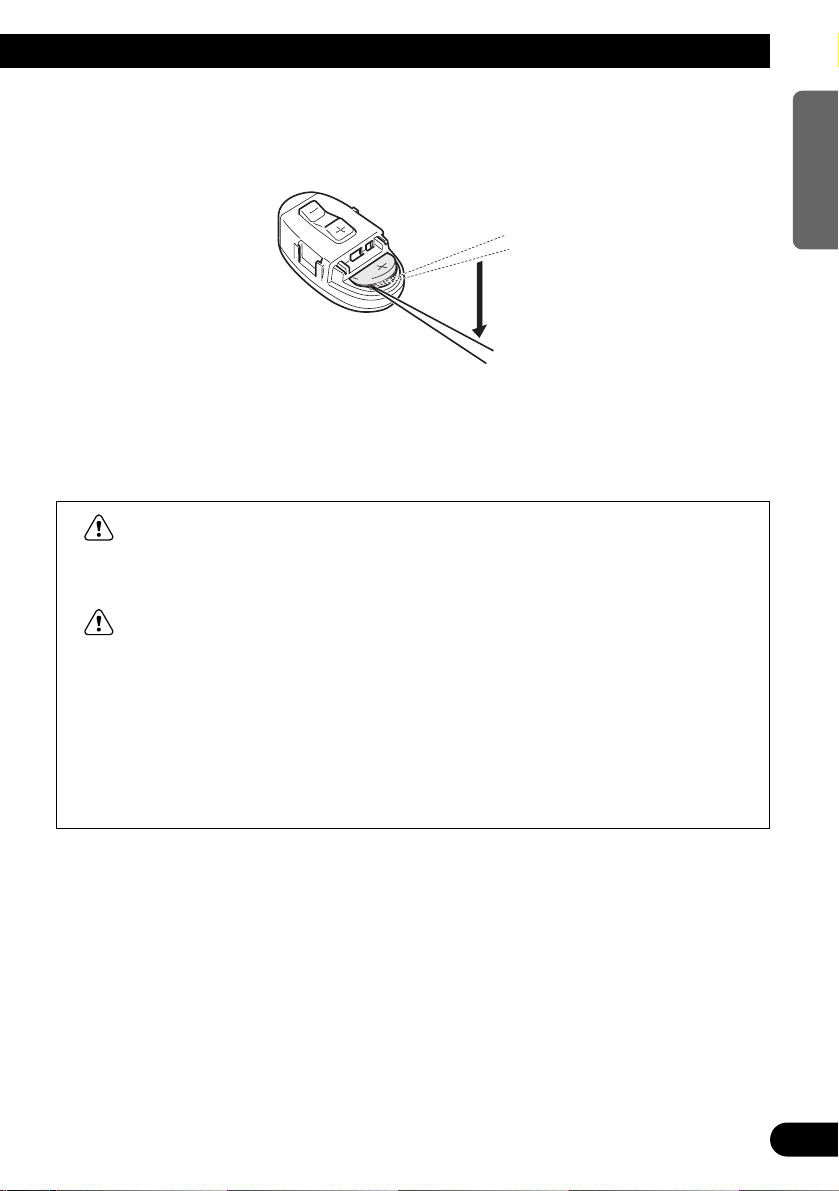
7 Replacing the Lithium Battery
• Remove the lithium battery.
Precaution:
• Replace the battery with a CR2032 lithium battery.
• Replace the battery in the unit using a non metallic tapered instrument.
WARNING:
• Keep the lithium battery out of reach of children. Should the battery be swallowed,
immediately consult a doctor.
CAUTION:
• Do not recharge, disassemble, heat or dispose of battery in a fire.
• Use a CR2032 (3 V) lithium battery only. Never use other types of battery with this unit.
• Do not handle the battery with metallic tools.
• Do not store the lithium battery with metallic materials.
• When disposing of used batteries, please comply with governmental regulations or
environmental public institution’s rules that apply in your country/area.
• Always check carefully that you are loading the battery with its (+) and (–) poles facing
in the proper directions.
11
Basic Operation
To Listen to Music
The following explains the initial of operations required before you can listen to music.
Note:
• Loading a disc in this product. (Refer to page 14.)
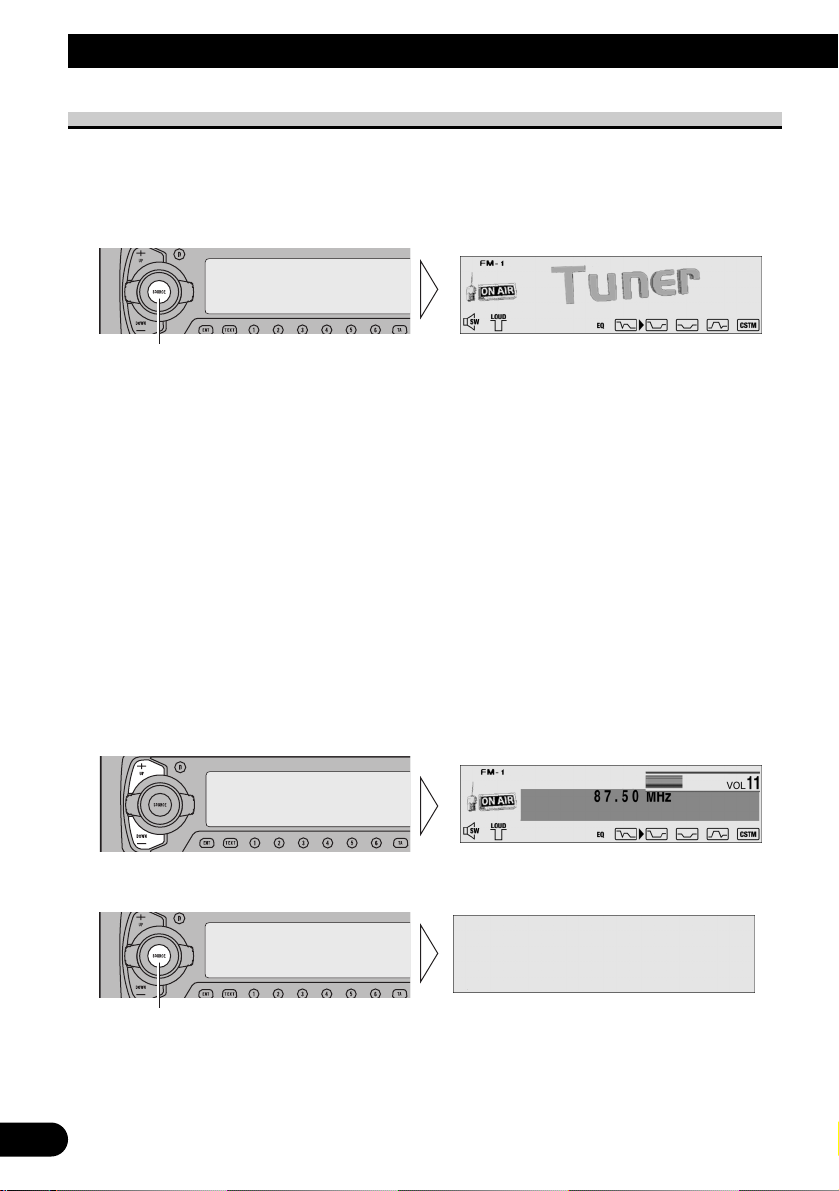
1. Select the desired source (e.g. Tuner).
Each press of the SOURCE/OFF button selects the desired source in the following order:
Built-in CD player (Compact Disc) = TV = Tuner = DAB (Digital Audio Broadcasting)
Tuner = Multi-CD player = External Unit 1 = External Unit 2 = AUX
Note:
• External Unit refers to a Pioneer product (such as one available in the future) that, although incompatible as a source, enables control of basic functions by this product. Two External Units can be
controlled by this product, although “External” is displayed whether you select External Unit 1 or
External Unit 2. When two External Units are connected, the allocation of them to External Unit 1
or External Unit 2 is automatically set by this product.
• In the following cases, the sound source will not change:
* When a product corresponding to each source is not connected to this product.
* No disc is set in this product.
* No magazine is set in the Multi-CD player.
* AUX (external input) is set to OFF. (Refer to page 64.)
• When this product’s blue/white lead is connected to the car’s Auto-antenna relay control terminal,
the car’s Auto-antenna extends when this product’s source is switched ON. To retract the antenna,
switch the source OFF.
2. Raise or lower the volume.
3. Turn the source OFF.
Hold for 1 second
Each press changes the Source ...
12
ENGLISH ESPAÑOL DEUTSCH FRANÇAIS
ITALIANO NEDERLANDS
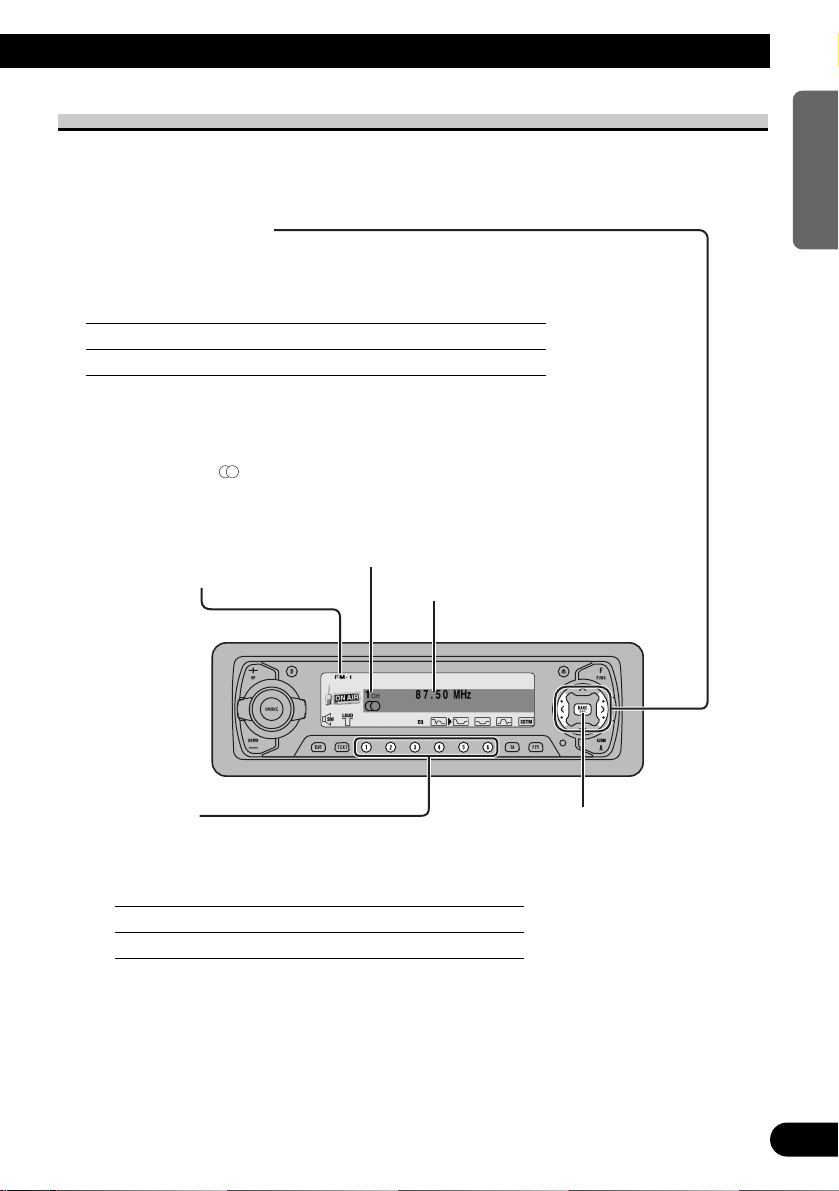
Basic Operation of Tuner
This product’s AF function can be switched ON and OFF. AF should be switched OFF for
normal tuning operations. (Refer to page 26.)
Manual and Seek Tuning
• You can select the tuning method by changing the length of time
you press the 2/3 button.
Manual Tuning (step by step) 0.5 seconds or less
Seek Tuning 0.5 seconds or more
Note:
• If you continue pressing the button for longer than 0.5 seconds, you can skip
broadcast stations. Seek Tuning starts as soon as you release the button.
• Stereo indicator “ ” lights when a stereo station is selected.
Preset Tuning
• You can memorize broadcast stations in buttons
1 through 6 for easy, one-touch station recall.
Preset station recall 2 seconds or less
Broadcast station preset memory 2 seconds or more
Note:
• Up to 18 FM stations (6 in FM-1, FM-2 and FM-3) and 6
MW/LW stations can be stored in memory.
• You can also use the 5 or ∞ buttons to recall broadcast
stations memorized in buttons 1 through 6.
Preset Number Indicator
Band Indicator
Band
FM-1 = FM-2 = FM-3
= MW/LW
Frequency Indicator
13
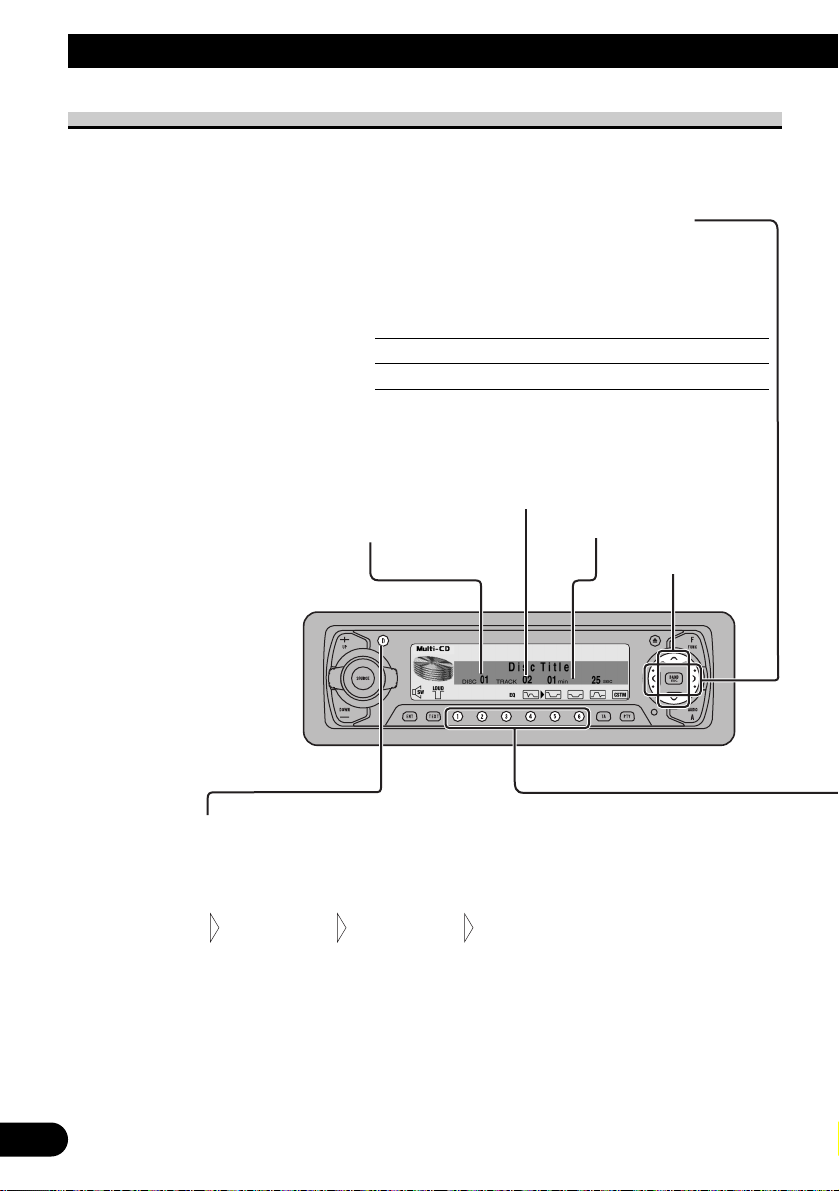
Basic Operation
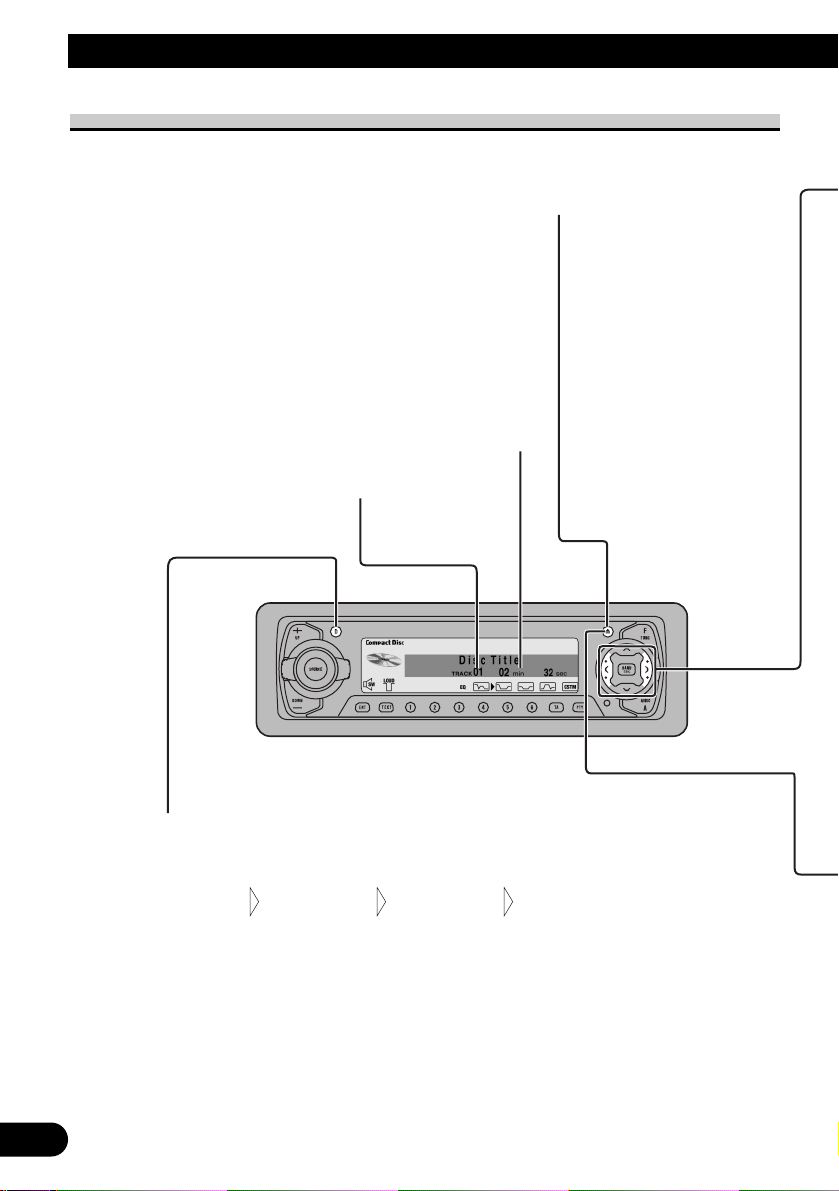
Basic Operation of Built-in CD Player
Changing the Display (only for CD TEXT Discs)
Each press of the DISPLAY button changes the display in the following order:
You can scroll to see the rest of the text by pressing the DISPLAY button for 2 seconds.
Note:
• A CD TEXT disc is a CD featuring recorded text information such as Disc Title, Artist Name
and Track Title.
• If certain text information is not recorded on a CD TEXT disc, “No ~” (e.g. “No Title”) is
displayed.
Disc Title
Track Artist
Disc Title
Track Title
Disc Title
Disc Artist
Disc Title
Play Time
Track Number Indicator
Play Time Indicator
Eject
Press the EJECT button one
time, the front panel opens
and then the disc is ejected.
In case of opening the
front panel, you can just
eject a CD.
Note:
• The CD function can be turned
ON/OFF with the disc remaining in this product. (Refer to
page 11.)
• A disc left partially inserted
after ejection may incur damage or fall out.
14
ENGLISH ESPAÑOL DEUTSCH FRANÇAIS
ITALIANO NEDERLANDS
Track Search and Fast Forward/Reverse
• You can select between Track Search or Fast Forward/Reverse by
pressing the 2/3 button for a different length of time.
Track Search 0.5 seconds or less
Fast Forward/Reverse Continue pressing
CD Loading Slot
If a CD is inserted, the front panel is closed automatically.
The Built-in CD player plays one standard 12 cm or 8 cm
(single) CD at a time. Do not use an adapter when playing 8 cm CD.
Note:
• If a disc cannot be inserted fully or playback fails, make sure the
recorded side is down. Push the EJECT button and check the disc for
damage before reinserting it.
• If the Built-in CD player cannot operate properly, an error message
(such as “ERROR-14”) appears on the display. Refer to “Built-in CD
Player’s Error Message” on page 71.
• Do not insert anything other than a CD into the CD Loading Slot.
Open
Press the EJECT button and hold momentarily, and the front
panel opens without ejecting a CD.
In case of opening the front panel, you can close it.
Note:
• When opening the front panel, the 1 to 6 buttons are not available.
WARNING:
• Do not use with the front panel left open. If you do leave it open,
it may result in injury in the event of an accident.
15
Basic Operation
Play Time Indicator
Disc Search
Disc Number Indicator
Track Number Indicator
Basic Operation of Multi-CD Player
This product can control a Multi-CD player (sold separately).
Changing the Display (When playing a CD TEXT disc on a CD TEXT compatible
Multi-CD Player)
Each press of the DISPLAY button changes the display in the following order:
You can scroll to see the rest of the text by pressing the DISPLAY button for 2 seconds.
Note:
• A CD TEXT disc is a CD featuring recorded text information such as Disc Title, Artist Name
and Track Title.
• If certain text information is not recorded on a CD TEXT disc, “No ~” (e.g. “No Title”) is
displayed.
• You cannot switch to the Disc Title Input mode in the Detailed Setting Menu.
Disc Title
Track Artist
Disc Title
Track Title
Disc Title
Disc Artist
Disc Title
Play Time
Track Search and Fast Forward/Reverse
• You can select between Track Search or
Fast Forward/Reverse by pressing the 2/3
button for a different length of time.
Track Search 0.5 seconds or less
Fast Forward/Reverse Continue pressing

16
ENGLISH ESPAÑOL DEUTSCH FRANÇAIS
ITALIANO NEDERLANDS
Disc Number Search (for 6-Disc, 12-Disc types)
• You can select discs directly with the 1 to 6 buttons. Just press the number
corresponding to the disc you want to listen to.
Note:
• When a 12-Disc Multi-CD Player is connected and you want to select disc 7 to 12, press the 1 to 6
buttons for 2 seconds.
Disc Number Rough Search (for 50-Disc type only)
This handy function lets you select discs loaded in a 50-Disc Multi-CD Player using the 1
to 5 buttons. The 50 discs are divided into five blocks, with each of the 1 to 5 buttons
assigned to a block.
• Select the desired block with the 1 to 5 buttons.
Note:
• After completing a rough search, use the 5 and ∞ buttons to select a desired disc.
Note:
• The Multi-CD player may perform a preparatory operation, such as verifying the presence of a disc
or reading disc information, when the power is turned ON or a new disc is selected for playback.
“READY” is displayed.
• When a magazine is loaded into a 50-Disc type Multi-CD Player, information on all the discs in
the magazine is read.
If you start playing a disc on a 50-Disc type Multi-CD Player before reading of information on all
discs has been completed, reading of information stops part way through. This will prevent you
from using the ITS function. (If you try and use this function, “Not Ready” is displayed.)
If this happens, reading of information begins again when you switch to a component other than
the 50-Disc Type Multi-CD Player.
• If the Multi-CD player cannot operate properly, an error message such as “ERROR-14” is dis-
played. Refer to the Multi-CD Player Owner’s Manual.
• If there are no discs in the Multi-CD player magazine, “No Disc” is displayed.
• “LOADING” will be displayed in the following cases:
* If the disc in the extra tray is selected.
* If the disc is moved from the extra tray to the magazine.
(Refer to the 50-Disc Type Multi-CD Player Owner’s Manual.)
• You cannot use the “Ejecting a Single Disc”, “Frequency Play”, “Music Group Play” or “ABC
Disc Title Search” functions with this product.
17
Basic Operation
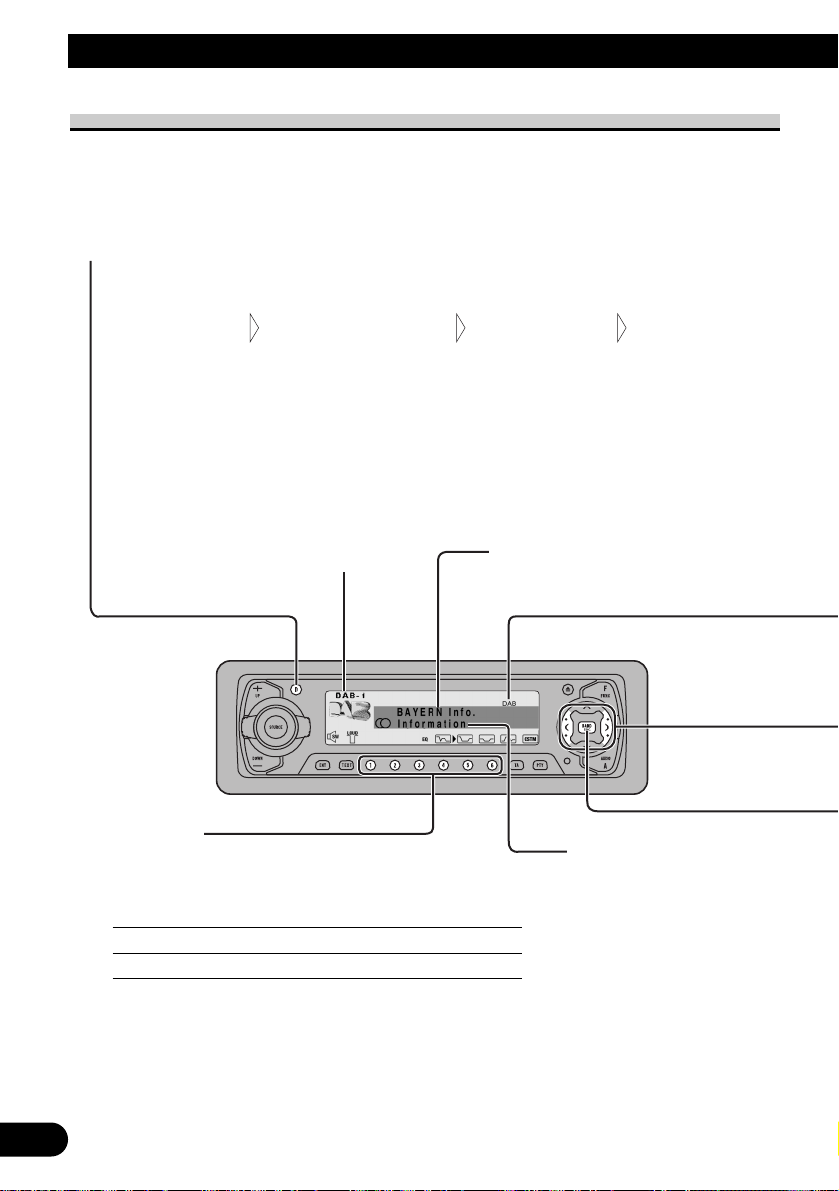
Basic Operation of DAB
Preset Tuning
• You can memorize Services in buttons 1 through
6 for easy, one-touch station recall.
Preset station recall 2 seconds or less
Broadcast station preset memory 2 seconds or more
Note:
• Up to 18 Service Components can be stored in memory.
• You can also use the 5 or ∞ buttons to recall Service
Components memorized in buttons 1 through 6.
Band Indicator
PTY Label
Changing the Display
Each press of the DISPLAY button changes the display in the following order:
Note:
• With a Service Component that has no Service Component Label or Dynamic Label, switching to
Service Component Label and Dynamic Label is not possible.
• With displays other than PTY Label, if you do not perform an operation within 8 seconds or press
a button other than the DISPLAY button, the display returns to PTY Label indications.
• The information is correlated with the list in the section “PTY List” on page 32.
Dynamic LabelService Label
Ensemble Label
Service Label
Service Component Label
Service Label
PTY Label
Service Label

18
ENGLISH ESPAÑOL DEUTSCH FRANÇAIS
ITALIANO NEDERLANDS
Band
DAB1 = DAB2 = DAB3
To enable this unit to memorize more Services, frequencies are stored in three
bands, 1, 2 and 3. (Frequencies (Ensemble) that can be received are the same for
1, 2 and 3.)
Note:
• When first switching to each of the bands, Auto Seek is performed for receivable
Ensembles. (The starting frequency for Auto Seek in each band differs. For this reason,
when multiple frequencies are receivable, a different frequency is automatically received
in each band.)
DAB indicator
There’s a “DAB” indicator in the display. This indicates DAB
reception is possible.
Note:
• If there’s no sound even when “DAB” is lit, switch Services. The Service you were
listening to may have ended.
7 When listening to DAB
Lights during Ensemble reception.
7 When listening to a non-DAB source
Lights when in an area where DAB reception is possible.
Selecting the Ensemble or Service
When you first switch to DAB, Auto Seek is performed to find a DAB
Ensemble.
(Auto Seek is also performed in the same way each time you switch bands.)
Once Ensemble is received, Auto Seek ends.
Select a desired Service 0.5 seconds or less
Tune to a high or low frequency (Ensemble) 0.5 seconds or more*
* By pressing the same button, search stops and the unit switches to standby for recep-
tion of that Ensemble frequency.
19
Basic Operation
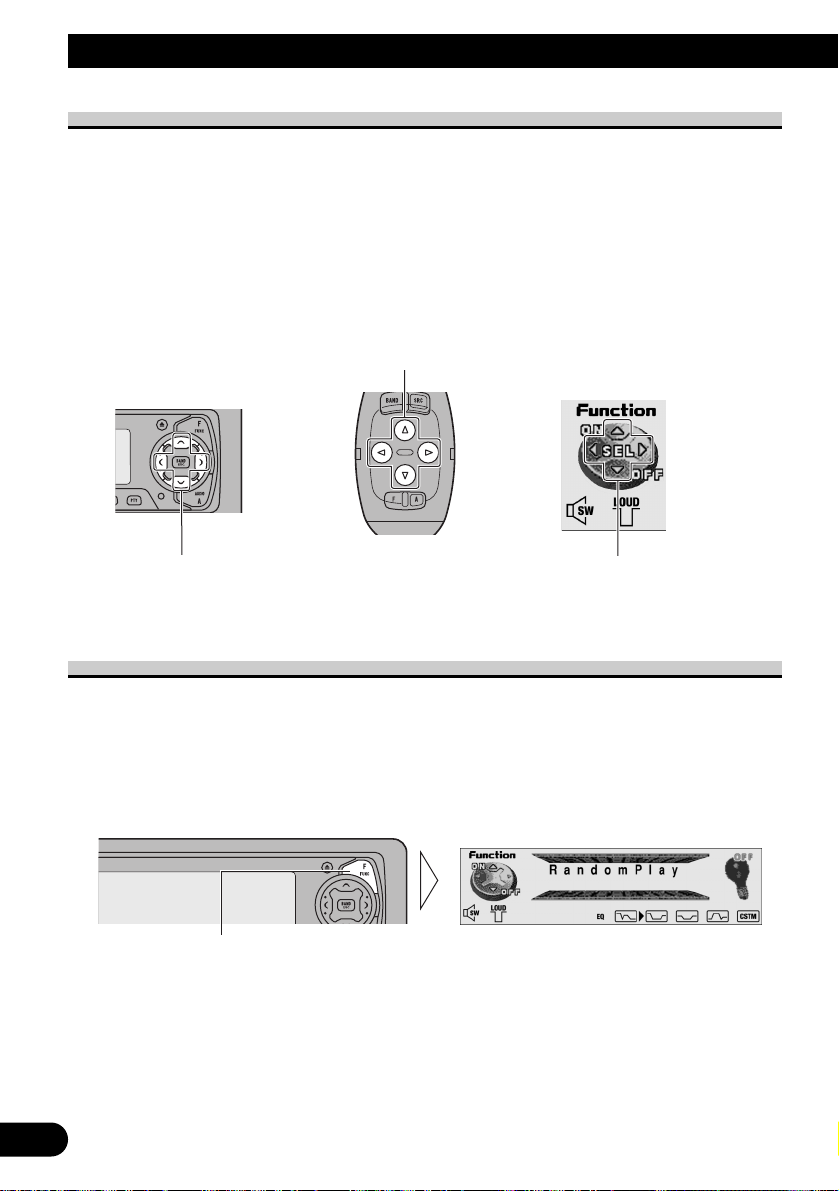
Corresponding Display Indications and Buttons
This product’s display features Key Guidance Indicators. These light to indicate which of
the 5/∞/2/3 buttons you can use. When you’re in the Function Menu (refer to next section), Detailed Setting Menu (refer to page 22), Initial Setting Menu (refer to page 62) or
Audio Menu (refer to page 52), they also make it easy to see which 5/∞/2/3 buttons you
can use to switch functions ON/OFF, switch repeat selections and perform other operations.
Indicator and corresponding buttons are shown below.
7 Head Unit 7 Steering Remote 7 Display
Controller
When 1 is lit in the display, perform appropriate operations with the z buttons.
Entering the Function Menu
The Function Menu lets you operate simple functions for each source.
Note:
• After entering the Function Menu, if you do not perform an operation within about 30 seconds, the
Function Menu is automatically canceled.
1. Select the desired mode in the Function Menu. (Refer to next section,
“Function Menu Functions”.)
Each press changes the Mode ...
z
1
z

2. Operate a mode. (e.g. Random Play)
3. Cancel the Function Menu.
Function Menu Functions
The following chart shows functions for each source in the Function Menu.
The chart also shows indications for each function, operations and buttons used to perform
operations. For more details, or when you want to know about an operation, refer to the
page number indicated in the chart.
7 Tuner
Function name (Display) Button: Operation Page
Best Stations Memory 5: ON 24
(Best Stations Memory) ∞: OFF
Regional Function (Regional) 5: ON 27
∞: OFF
Local Seek Tuning (LOCAL) 1 5: ON 24
3 ∞: OFF
2 2 or 3: Select (Sensitivity)
TA Function (Traffic Announcement) 5: ON 28
∞: OFF
AF Function (AlternativeFrequency) 5: ON 26
∞: OFF
News Program Interruption Setting 5: ON 31
(News) ∞: OFF
The button used and the operation it performs are
indicated by the key guidance indicator. Press the
5 button to switch the key guidance indicator ON,
and the ∞ button to switch it OFF.
20
ENGLISH ESPAÑOL DEUTSCH FRANÇAIS
ITALIANO NEDERLANDS

21
Basic Operation
7 DAB Tuner
Function name (Display) Button: Operation Page
Announcement Support 1 5: ON 36
(Announcement Support) 2 ∞: OFF
2 2 or 3: Select (Mode)
Service Follow (Service Follow) 5: ON 39
∞: OFF
Service Component (Primary/Secondary) 2 or 3: Select 40
Available Service List 1 2 or 3: Select (Service) 40
(Service List) 2 5: Play
Preset Service List 1 2 or 3: Select (Service) 41
(SRVC. List) 2 5: Play
7 Built-in CD Player
Function name (Display) Button: Operation Page
Repeat Play (Play Mode) 5: ON 45
∞: OFF
Random Play (RandomPlay) 5: ON 45
∞: OFF
Pause (Pause) 5: ON 46
∞: OFF
7 Multi-CD Player
Function name (Display) Button: Operation Page
Repeat Play (Play Mode) 2 or 3: Select (Play Range) 47
Selecting Discs by Disc Title List 1 2 or 3: Select (Disc Title) 51
(Disc List) 2 5: Play
Random Play (RandomPlay) 5: ON 47
∞: OFF
Pause (Pause) 5: ON 48
∞: OFF
Compression and DBE (Compression) 5 or ∞: Select 48
(Sound Quality Function)
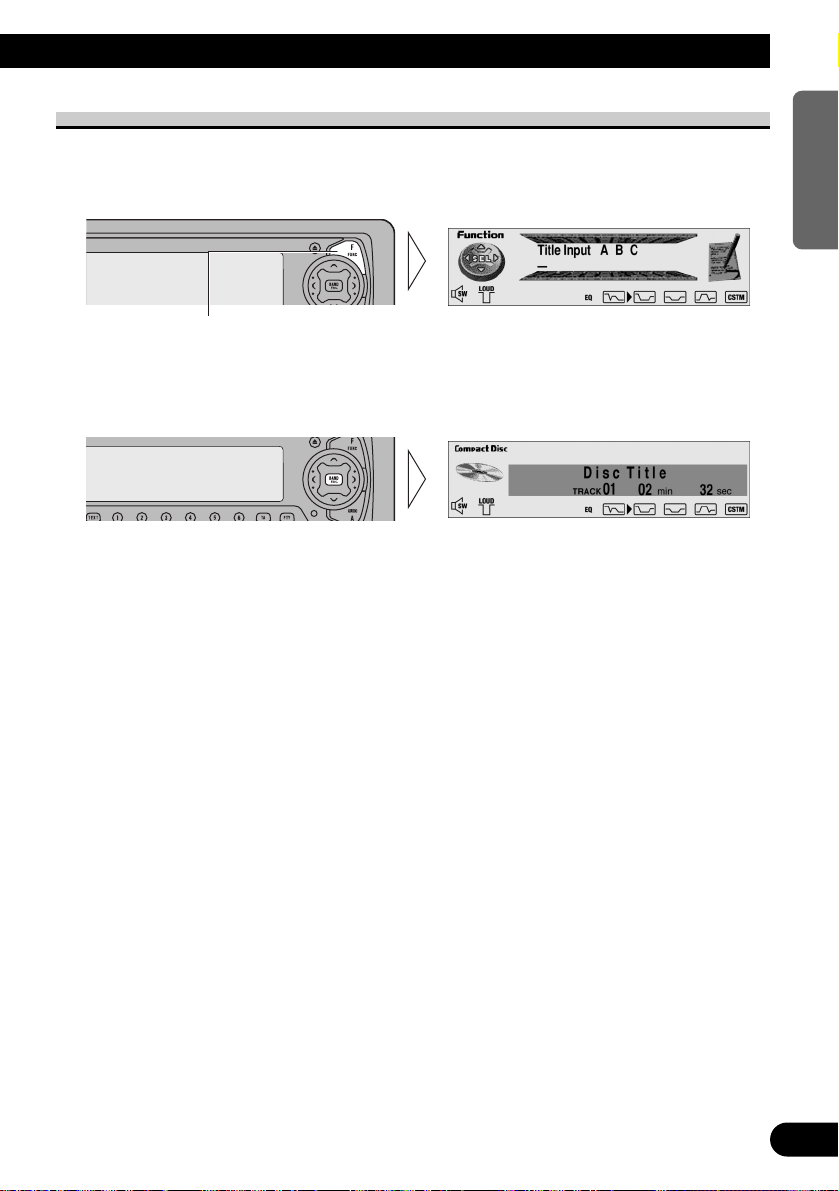
Entering the Detailed Setting Menu
In the Detailed Setting Menu, you can operate convenient, complex functions for each
source.
1. Enter the Detailed Setting Menu.
2. Operate a mode.
3. Cancel the Detailed Setting Menu.
Note:
• You can cancel the Detailed Setting Menu by pressing the FUNCTION button again for 2 seconds.
Hold for 2 seconds
22
ENGLISH ESPAÑOL DEUTSCH FRANÇAIS
ITALIANO NEDERLANDS

23
Basic Operation
Detailed Setting Menu Functions
The following chart shows functions for each source in the Detailed Setting Menu.
The chart also shows indications for each function, operations and buttons used to perform
operations. For more details, or when you want to know about an operation, refer to the
page number indicated in the chart.
7 Built-in CD Player
Function name (Display) Button: Operation Page
Disc Title Input (Title Input ABC) 1 5 or ∞: Select (Character) 46
2 2 or 3: Select (Position)
3 3: Memory
7 Multi-CD Player
Function name (Display) Button: Operation Page
Disc Title Input (Title Input ABC) 1 5 or ∞: Select (Character) 49
2 2 or 3: Select (Position)
3 3: Memory
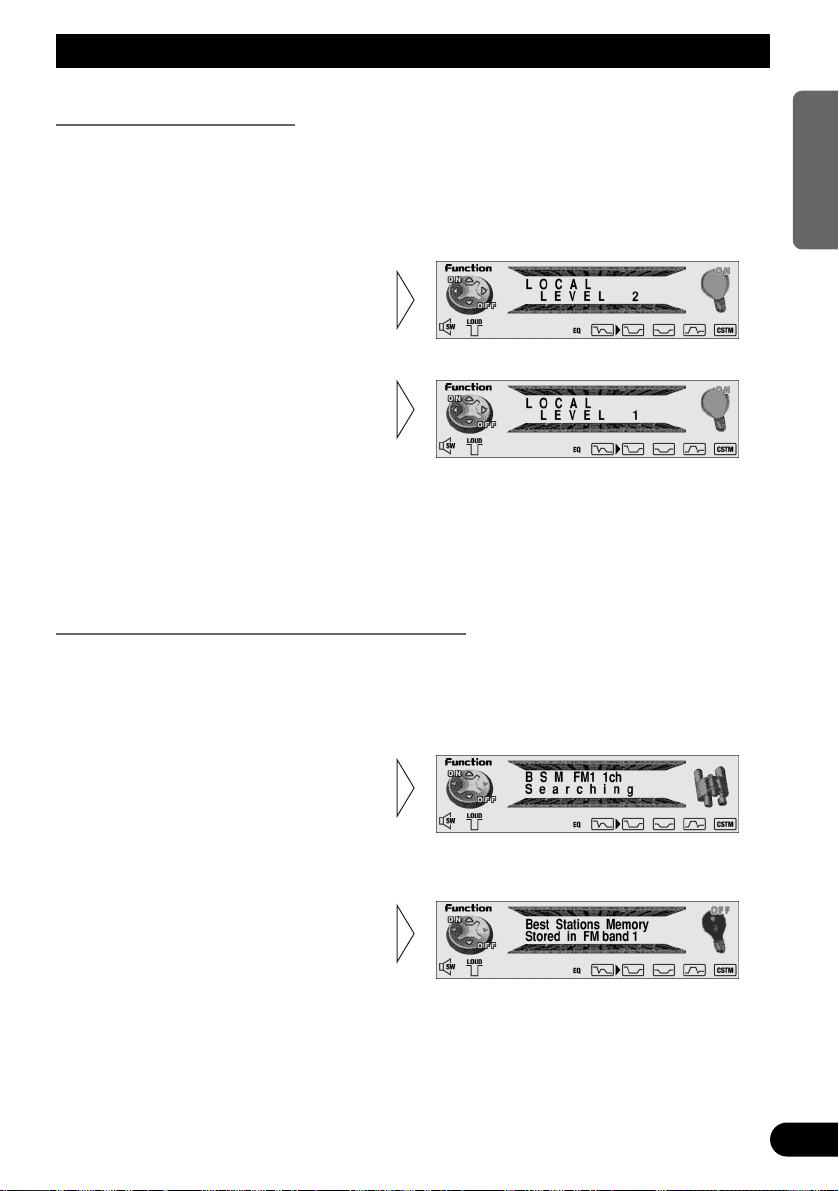
Tuner Operation
Local Seek Tuning (LOCAL)
When Local mode is ON (“LOC” indicator lights), you can only select broadcast stations
providing strong reception.
FM : LEVEL 1 Ô LEVEL 2 Ô LEVEL 3 Ô LEVEL 4
MW/LW: LEVEL 1 Ô LEVEL 2
Note:
• The LEVEL 4 setting allows reception of only the strongest stations, while lower settings let you
receive progressively weaker stations.
Best Stations Memory (Best Stations Memory)
The BSM (Best Stations Memory) function stores stations in memory automatically.
• To cancel the process, press the
∞ button in the Function
Menu before memorization is
complete.
2. Switch the BSM ON with the
5 button.
The stations with the strongest signals will be stored under buttons 1–6
and in order of their signal strength.
1. Press the FUNCTION button and select the BSM mode (Best Stations
Memory) in the Function Menu.
3. Select the desired Local Seek
sensitivity with the 2/3 but-
tons.
2. Switch the Local ON/OFF with
the 5/∞ buttons.
1. Press the FUNCTION button and select the Local mode (LOCAL) in the
Function Menu.
24
ENGLISH ESPAÑOL DEUTSCH FRANÇAIS
ITALIANO NEDERLANDS
25
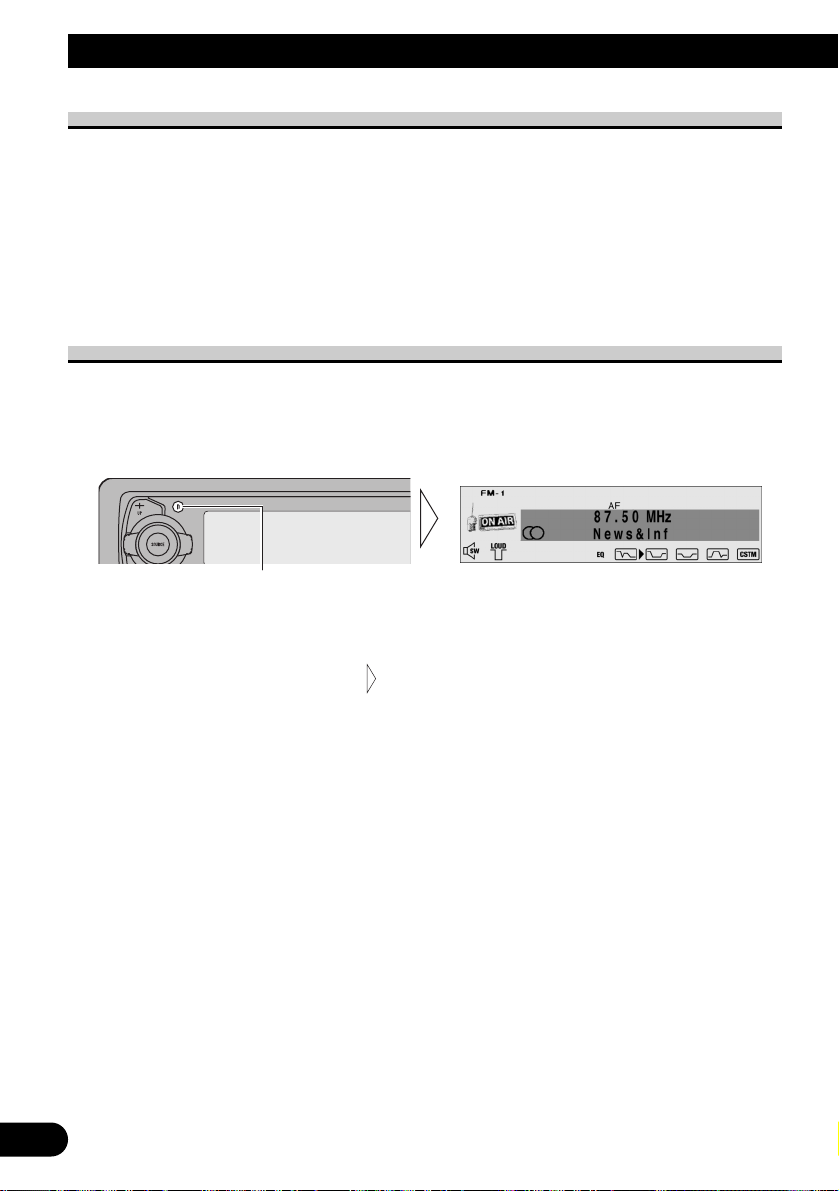
Using the RDS Functions
What is RDS?
RDS (Radio Data System) is a system for transmitting data along with FM programs. This
data, which is inaudible, provides a variety of features such as: program service name, program type display, traffic announcement standby, automatic tuning and program type tuning, intended to aid radio listeners in tuning to a desired station.
Note:
• RDS service may not be provided by all stations.
• RDS functions, like AF (Alternative Frequencies search) and TA (Traffic Announcement standby),
are only active when your radio is tuned to RDS stations.
Program Service Name Display
With this function, the names of networks/stations providing RDS services replace the frequency on the display a few seconds after they are tuned in.
• When you want to know the frequency of the current station, change
the display.
Each press of the DISPLAY button selects the display in the following order:
Note:
• After switching displays, if you do not perform an operation within 8 seconds, the Program Service
Name is automatically displayed.
7 PTY Information
PTY (Program Type ID code) information for the currently tuned station appears on the
display. The information is correlated with the list in the section “PTY List” on page 32.
Note:
• If a PTY code of zero is received from a station, “None” will be displayed. This indicates that the
station has not defined its program contents.
7 Frequency
The frequency of the current station appears on the display.
Frequency
PTY Information
Program Service Name
PTY Information
Each press changes the Display ...
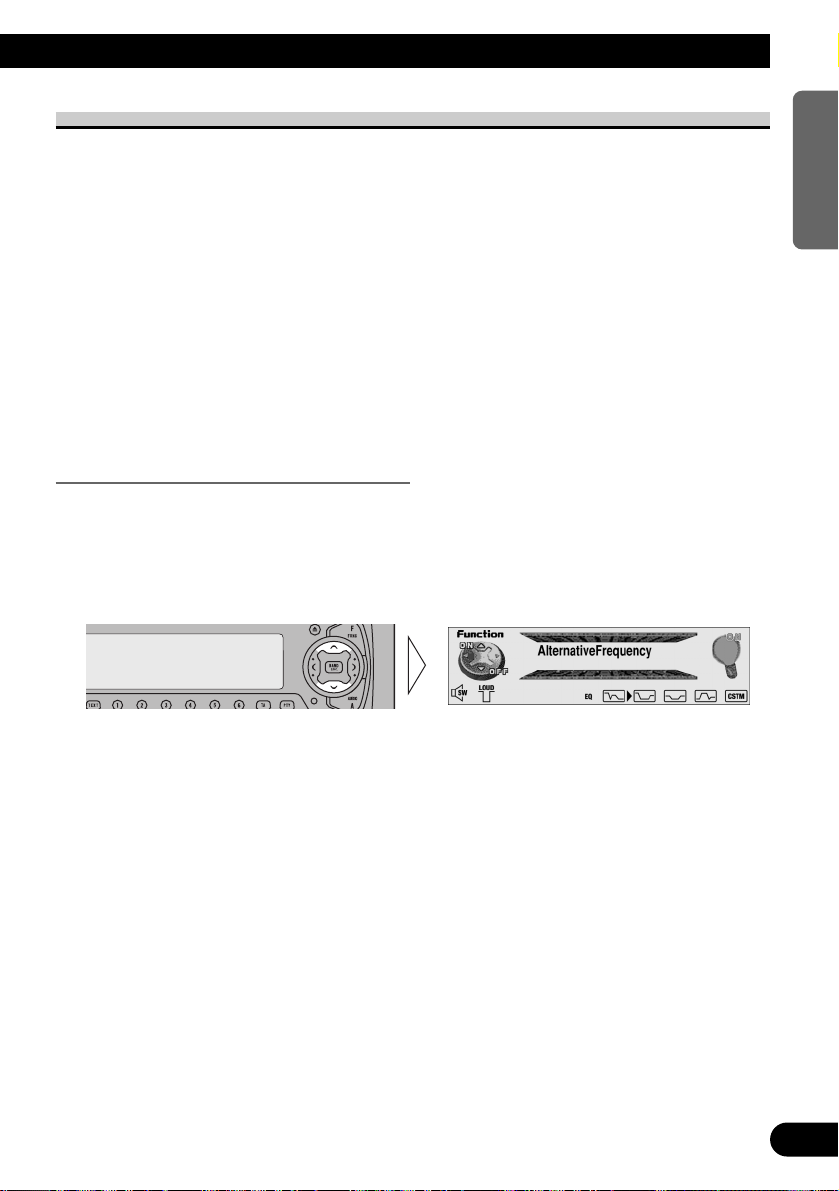
AF Function (AlternativeFrequency)
The AF (Alternative Frequencies search) function is used to search for other frequencies in
the same network as the currently tuned station. It automatically retunes the receiver to
another frequency in the network which is broadcasting a stronger signal when there are
problems with reception of the currently tuned station or better reception is possible on
a different frequency.
Note:
• AF tunes the receiver only to RDS stations when you use Seek tuning or BSM Auto Memory with
the “AF” indicator ON.
• When you recall a preset station, the tuner may update the preset station with a new frequency from
the station’s AF list. (This is only available when using presets on the FM-1 and FM-2 bands.) No
preset number appears on the display if the RDS data for the station received differs from that for
the originally stored station.
• Sound may be temporarily interrupted by another program during an AF frequency search.
• When the tuner is tuned to a non-RDS station, the “AF” indicator flashes.
• AF can be switched ON or OFF independently for each FM band.
Activating/Deactivating the AF Function
AF is set to ON by default.
1. Press the FUNCTION button and select the AF mode
(AlternativeFrequency) in the Function Menu.
2. Activate or deactivate AF while in an FM band.
26
ENGLISH ESPAÑOL DEUTSCH FRANÇAIS
ITALIANO NEDERLANDS
27
Using the RDS Functions
PI Seek Function
The tuner searches for another frequency broadcasting the same programming. “PI Seek”
appears on the display and the radio volume is muted during a PI Seek. The muting is discontinued after completion of the PI Seek, whether or not the PI seek has succeeded. If the
PI Seek is unsuccessful, the tuner returns to the previous frequency.
PI Seek
If the tuner fails to locate a suitable alternative frequency or if the broadcasting signal is
too weak for proper reception, the PI Seek will automatically start.
Auto PI Seek (for preset station)
When preset stations cannot be recalled, as when traveling long distances, the product can
be set to perform PI Seek also during preset recall.
The default setting for Auto PI Seek is OFF.
Note:
• Refer to “Initial Setting” for details on how to switch Auto PI Seek ON/OFF.
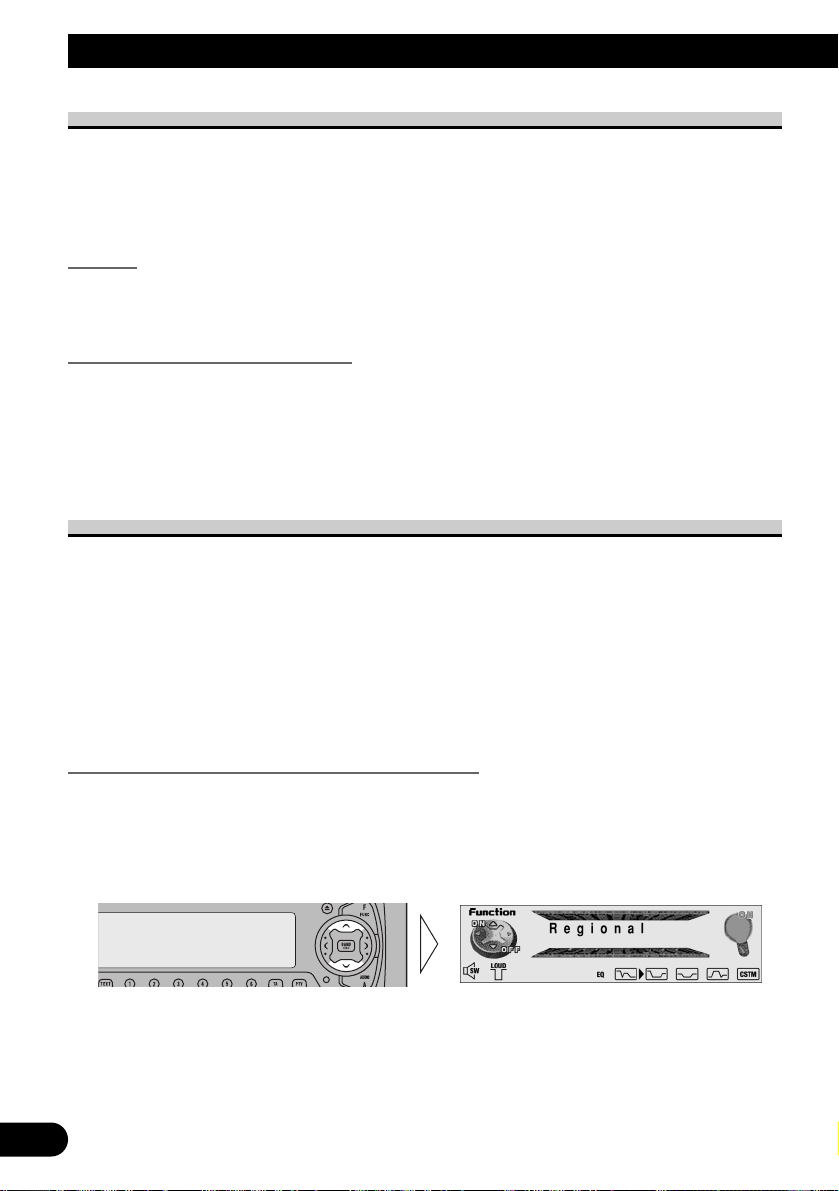
Regional Function (Regional)
When AF is used to retune the tuner automatically, the Regional function limits the selection to stations broadcasting regional programs.
Note:
• Regional programming and regional networks are organized differently depending on the country
(i.e., they may change according to the hour, state or broadcast area).
• The preset number may disappear on the display if the tuner tunes in a regional station which differs from the originally set station.
• Regional can be switched ON or OFF independently for each FM band.
• “REG” is displayed if you activate the Regional function when the Function Menu is canceled.
Activating/Deactivating the Regional Function
The Regional function is set to ON by default.
1. Press the FUNCTION button and select the Regional mode (Regional) in the
Function Menu.
2. Activate or deactivate Regional while in an FM band.
“REG”

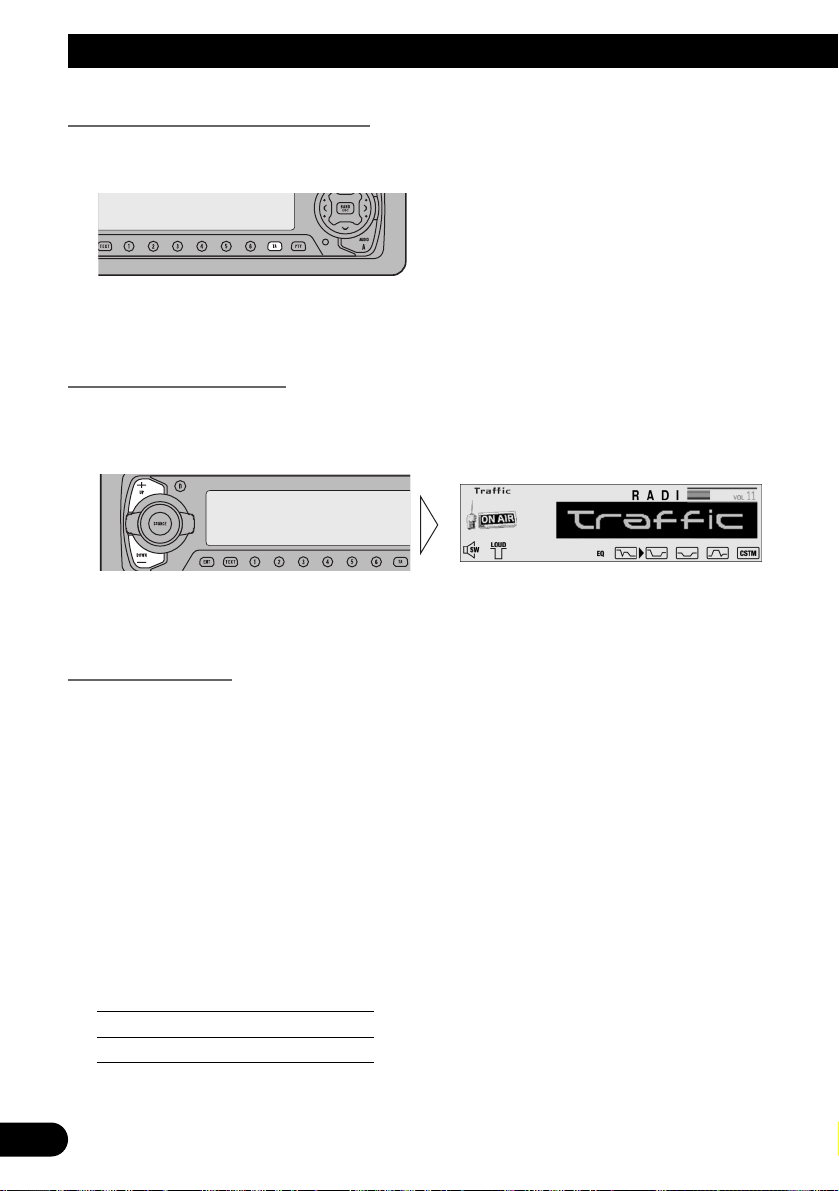
Traffic Announcement Standby Function (Traffic Announcement)
The TA (Traffic Announcement standby) function lets you receive traffic announcements
automatically, no matter what source you are listening to. The TA function can be activated for either a TP station (a station that broadcasts traffic information) or an enhanced
other network’s TP station (a station carrying information which cross-references TP stations).
Activating/Deactivating the TA Function
1. Tune in a TP or enhanced other network’s TP station.
The TP indicator (“TRFC”) lights when the tuner is tuned to a TP station or an enhanced
other network’s TP station.
2. Activate the TA function.
The “TRFC2” indicator lights, indicating that the tuner is waiting for traffic announce-
ments.
Note:
• If you switched TA Function ON when you are tuned in to neither a TP nor enhanced other network’s TP station, only “T” in “TRFC” indicator is displayed.
Repeat the preceding operation when no traffic announcement is being received to deactivate the TA function.
Note:
• You can also switch the TA function ON/OFF in the Function Menu.
• The system switches back to the original source following traffic announcement reception.
• The TA function can be activated from sources other than tuner if the tuner was last set to the FM
band but not if it was last set to the MW/LW band.
• If the tuner was last set to FM, turning on the TA function lets you operate other tuning functions
while listening to sources other than tuner.
• Only TP or enhanced other network’s TP stations are tuned in during the Seek Tuning mode when
the “TRFC2” or “T” indicator is ON.
• Only TP or enhanced other network’s TP stations are stored by BSM when the “TRFC2” or “T”
indicator is ON.
• When listening to DAB, turning ON/OFF the DAB TA function will simultaneously turn ON/OFF
the RDS Traffic Announcement.
“TRFC2”
28
ENGLISH ESPAÑOL DEUTSCH FRANÇAIS
ITALIANO NEDERLANDS
29
Using the RDS Functions
Canceling Traffic Announcements
• Press the TA button while a traffic announcement is being received to cancel
the announcement and return to the original source.
The announcement is canceled but the tuner remains in the TA mode until the TA button is
pressed again.
Adjusting the TA Volume
When a traffic announcement begins, the volume adjusts automatically to a preset level to
enable you to hear the announcement clearly.
• Set the volume by adjusting it during reception of a traffic announcement.
The newly set volume is stored in memory and recalled for subsequent traffic announcements.
TP Alarm Function
About 30 seconds after the “TRFC2” indicator turns to “T” due to a weak signal, a 5 second beep sounds to remind you to select another TP or enhanced other network’s TP station.
• When DAB’s Service Follow Function is ON.
• When this unit (during DAB reception) cannot clearly receive a Service Component
supporting Road Traffic Flash and Transport Flash.
• When this unit RDS cannot receive a TP or enhanced other network’s TP station broad-
cast.
• If you are listening to the tuner, tune in another TP station or enhanced
other network’s TP station.
In sources other than tuner, the tuner automatically seeks out the TP station with the
strongest signal in the current area 10 (or 30)* seconds after the “TRFC
2” indicator
turns to “T”.
* Time taken before Seek begins.
TA function ON 10 seconds
TA, AF functions ON 30 seconds
 Loading...