

Page 1

Operation Manual
Mode d’emploi
CD Receiver
Récepteur CD
DEH-P690UB
English Français
Page 2

Contents
Thank you for buying this Pioneer product.
Please read through these operating instructions so you will know how to operate
your model properly. After you have finished reading the instructions, keep this man-
ual in a safe place for future reference.
Before You Start
Information to User 5
For Canadian model 5
About this unit 5
After-sales service for Pioneer products 7
Visit our website 7
Protecting your unit from theft 7
– Removing the front panel 8
– Attaching the front panel 8
Resetting the microprocessor 8
About the demo mode 8
Use and care of the remote control 9
– Installing the battery 9
– Using the remote control 9
Operating this unit
What’s What 10
– Head unit 10
– Remote control 10
Basic Operations 11
– Power ON/OFF 11
– Selecting a source 11
– Adjusting the volume 12
Tuner 12
– Basic Operations 12
– Storing and recalling broadcast
frequencies 13
– Introduction of advanced
operations 13
– Storing the strongest broadcast
frequencies 13
– Tuning in strong signals 14
Built-in CD Player 14
– Basic Operations 14
– Selecting a track directly 15
– Introduction of advanced
operations 16
– Selecting a repeat play range 16
– Playing tracks in random order 16
– Scanning folders and tracks 16
– Pausing disc playback 17
– Using compression and BMX 17
– Searching every 10 tracks in the current
disc or folder 17
– Using disc title functions 17
– Displaying text information on disc 18
– Selecting tracks from the track title
list 18
– Selecting tracks from the file name
list 18
Playing songs on USB portable audio player/
USB memory 19
– Basic Operations 19
– Selecting an audio file directly in the
current folder 20
– Introduction of advanced
operations 20
– Selecting a repeat play range 20
– Playing files in random order 21
– Scanning folders and files 21
– Pausing playback 21
– Displaying text information of an audio
file 21
– Selecting files from the file name
list 21
Playing songs on iPod 22
– Basic Operations 22
– Browsing for a song 23
– Displaying text information on
iPod 23
– Introduction of advanced
operations 23
– Repeating play 24
– Playing songs in a random order
(shuffle) 24
– Playing all songs in a random order
(shuffle all) 24
– Pausing a song 24
2
En
Page 3

Contents
English
– Changing audiobook speed 24
Audio Adjustments 25
– Introduction of audio adjustments 25
– Using balance adjustment 26
– Using the equalizer 26
– Adjusting loudness 27
– Using subwoofer output 27
– Boosting the bass 28
– Using the high pass filter 28
– Adjusting source levels 28
Initial Settings 29
– Adjusting initial settings 29
– Selecting the display language 30
– Setting the clock 30
– Switching the warning tone 30
– Switching the face auto open 30
– Switching the auxiliary setting 30
– Switching the dimmer setting 30
– Adjusting the brightness 31
– Setting the rear output and subwoofer
controller 31
– Switching the sound muting/
attenuation 31
– Switching the feature demo 31
– Switching the reverse mode 32
– Switching the Ever Scroll 32
– Activating the BT Audio source 32
– Entering PIN code for Bluetooth
wireless connection 32
Other Functions 33
– Using the AUX source 33
– Turning the clock display on or off 34
– Using different entertainment
displays 34
– Using the PGM button 34
Available accessories
XM tuner 36
– Basic Operations 36
– Selecting an XM channel directly 36
– Switching the XM display 36
– Storing and recalling broadcast
stations 36
– Selecting a channel in the channel
category 37
– Displaying the Radio ID 37
SIRIUS Satellite Radio tuner 38
– Basic Operations 38
– Selecting a SIRIUS channel
directly 38
– Introduction of advanced
operations 38
– Switching the SIRIUS display 39
– Switching the scroll setting 39
– Storing and recalling broadcast
stations 39
– Selecting a channel in the channel
category 39
– Using the Game Alert function 40
– Displaying the Radio ID 41
Playing songs on iPod 41
– Listening to songs on your iPod 41
– Browsing for a song 42
– Displaying text information on
iPod 42
– Introduction of advanced iPod adapter
operation 42
Bluetooth Audio 43
– Basic Operations 43
– Introduction of advanced
operations 44
– Connecting a Bluetooth audio
player 44
– Playing songs on Bluetooth audio
player 45
– Pausing a song 45
– Stopping playback 45
– Disconnecting a Bluetooth audio
player 45
En
3
Page 4

Contents
– Displaying BD (Bluetooth Device)
address 45
– Displaying system version for
repair 45
Bluetooth Telephone 46
– Basic Operations 46
– Setting up for hands-free phoning 46
– Making a phone call 47
– Taking a phone call 47
– Introduction of advanced
operations 48
– Connecting a cellular phone 48
– Disconnecting a cellular phone 49
– Registering connected cellular
phone 49
– Deleting a registered phone 49
– Connecting to a registered cellular
phone 50
– Using the Phone Book 50
– Using the Call History 52
– Using preset numbers 53
– Making a call by entering phone
number 53
– Clearing memory 53
– Setting the automatic answering 54
– Setting the automatic rejecting 54
– Switching the ring tone 54
– Echo canceling and noise
reduction 54
– Displaying BD (Bluetooth Device)
address 54
– Displaying system version for
repair 54
Multi-CD Player 55
– Basic Operations 55
– Selecting a track directly 55
– Introduction of advanced
operations 55
– Using ITS playlists 56
– Using disc title functions 57
– Using CD TEXT functions 58
DVD Player 59
– Basic Operations 59
– Selecting a disc 59
– Selecting a folder 59
– Introduction of advanced
operations 59
TV tuner 61
– Basic Operations 61
– Storing and recalling broadcast
stations 61
– Storing the strongest broadcast
stations sequentially 62
Additional Information
Error messages 63
Handling guideline of discs and player 64
Dual Discs 64
USB audio player/USB memory 65
– USB audio player/USB memory
compatibility 65
– USB audio player/USB memory 65
– Compressed audio compatibility 66
iPod 66
– About handling the iPod 66
– About iPod settings 67
Compressed audio files on the disc 67
– Example of a hierarchy 67
– Compressed audio compatibility 67
Specifications 69
4
En
Page 5
Before You Start
Section
01
Information to User
Alteration or modifications carried out without
appropriate authorization may invalidate the
user’s right to operate the equipment.
For Canadian model
This Class B digital apparatus complies with
Canadian ICES-003.
About this unit
The tuner frequencies on this unit are allocated for use in North America. Use in other
areas may result in poor reception.
WARNING
Handling the cord on this product or cords associated with accessories sold with the product
may expose you to chemicals listed on proposition 65 known to the State of California and other
governmental entities to cause cancer and birth
defects or other reproductive harm. Wash hands
after handling.
CAUTION:
USE OF CONTROL OR ADJUSTMENT OR
PERFORMANCE OF PROCEDURES
OTHER THAN THOSE SPECIFIED HEREIN
MAY RESULT IN HAZARDOUS RADIATION
EXPOSURE.
CAUTION:
THE USE OF OPTICAL INSTRUMENTS
WITH THIS PRODUCT WILL INCREASE
EYE HAZARD.
Also, this unit damage, smoke, and overheat
English
could result from contact with liquids.
! Keep this manual handy as a reference for op-
erating procedures and precautions.
! Always keep the volume low enough so that
you can hear sounds from outside the vehicle.
! Protect this unit from moisture.
! If the battery is disconnected or discharged,
the preset memory will be erased and must be
reprogrammed.
Important (Serial number)
The serial number is located on the bottom of
this unit. For your own security and convenience,
be sure to record this number on the enclosed
warranty card.
About WMA
The Windows Media™ logo printed on the box
indicates that this unit can play back WMA
data.
WMA is short for Windows Media Audio and
refers to an audio compression technology
that is developed by Microsoft Corporation.
WMA data can be encoded by using Windows
Media Player version 7 or later.
Windows Media and the Windows logo are trademarks or registered trademarks of Microsoft
Corporation in the United States and/or other
countries.
! This unit may not operate correctly depend-
ing on the application used to encode
WMA files.
CAUTION
! Do not allow this unit to come into contact
with liquids. Electrical shock could result.
En
5
Page 6

Section
01
Before You Start
About MP3
Supply of this product only conveys a license
for private, non-commercial use and does not
convey a license nor imply any right to use
this product in any commercial (i.e. revenuegenerating) real time broadcasting (terrestrial,
satellite, cable and/or any other media), broadcasting/streaming via internet, intranets and/
or other networks or in other electronic content distribution systems, such as pay-audio or
audio-on-demand applications. An independent license for such use is required. For details, please visit
http://www.mp3licensing.com.
About AAC
AAC is short for Advanced Audio Coding and
refers to an audio compression technology
standard used with MPEG 2 and MPEG 4.
Several applications can be used to encode
AAC files, but file formats and extensions differ depending on the application which is
used to encode.
This unit plays back AAC files encoded by
®
iTunes
version 6.0.5 and earlier.
iTunes is a trademark of Apple Computer, Inc.,
registered in the U.S. and other countries.
Portable audio player compatibility
This unit controls portable audio player with
USB interface.
! This unit can play back a WMA/MP3/AAC
file on the USB audio player/USB memory.
! You can listen to songs by connecting USB
portable audio player/USB memory that is
USB Mass Storage Class compliant. For details about the supported USB memory,
refer to USB audio player/USB memory com-
patibility on page 65.
®
iPod
compatibility
This unit can control and listen to songs on an
iPod.
You can connect and listen to songs on an
iPod with Dock Connector or USB interface.
! When using an iPod with Dock Connector,
iPod Dock Connector to USB Cable is required.
— This unit controls the iPod listed below.
— iPod nano or 5 th generation iPod or
later
— Firmware Ver. 1.2 or later
! This unit can control previous generations
of iPod with a Pioneer iPod adapter (e.g.
CD-IB100N). In this case, most functions
are essentially the same as iPod connected
to USB interface of this unit. However,
functions related to Audiobooks and Podcast can not be used.
For details concerning operation with iPod
adapter, refer to Playing songs on iPod on
page 41.
! iPod is a trademark of Apple Computer,
Inc., registered in the U.S. and other countries.
About the SAT RADIO READY mark
The SAT RADIO READY mark printed on the
front panel indicates that the Satellite Radio
Tuner for Pioneer (i.e., XM tuner and Sirius satellite tuner which are sold separately) can be
controlled by this unit. Please inquire to your
dealer or nearest authorized Pioneer service
station regarding the satellite radio tuner that
can be connected to this unit. For satellite
radio tuner operation, please refer to the satellite radio tuner owner’s manual.
! The system will use direct satellite-to-recei-
ver broadcasting technology to provide listeners in their cars and at home with
crystal-clear sound seamlessly from coast
to coast. Satellite radio will create and
package over 100 channels of digital-quality
music, news, sports, talk and children’s
programming.
! “SAT Radio”, the SAT Radio logo and all re-
lated marks are trademarks of Sirius Satellite Radio inc., and XM Satellite Radio Inc.
6
En
Page 7

Before You Start
CAUTION
! Pioneer accepts no responsibility for data lost
on the USB portable audio player/USB memory even if that data is lost while using this
unit.
! Pioneer accepts no responsibility for data lost
on the iPod even if that data is lost while
using this unit.
After-sales service for
Pioneer products
Please contact the dealer or distributor from
where you purchased this unit for after-sales
service (including warranty conditions) or any
other information. In case the necessary information is not available, please contact the
companies listed below:
Please do not ship your unit to the companies
at the addresses listed below for repair without
advance contact.
U.S.A.
Pioneer Electronics (USA) Inc.
CUSTOMER SUPPORT DIVISION
P.O. Box 1760
Long Beach, CA 90801-1760
800-421-1404
CANADA
Pioneer Electronics of Canada, Inc.
CUSTOMER SATISFACTION DEPARTMENT
300 Allstate Parkway
Markham, Ontario L3R OP2
1-877-283-5901
For warranty information please see the Limited Warranty sheet included with this unit.
Section
01
English
Visit our website
Visit us at the following site:
1 Register your product. We will keep the details
of your purchase on file to help you refer to
this information in the event of an insurance
claim such as loss or theft.
2 Receive updates on the latest products and
technologies.
3 Download owner’s manuals, order product
catalogues, research new products, and
much more.
Protecting your unit from
theft
The front panel can be detached to deter theft.
! If the front panel is not detached from the
head unit within five seconds of turning off
the ignition, a warning tone will sound and
the front panel will open.
! You can turn off the warning tone. See
Switching the warning tone on page 30.
! You can turn off the face auto open. See
Switching the face auto open on page 30.
Important
! Handle gently when removing or attaching
the front panel.
! Avoid subjecting the front panel to excessive
shocks.
! Keep the front panel out of direct sunlight and
high temperatures.
! A few seconds after turning the ignition
switch to on or off, the front panel automatically moves. When this happens, your fingers
may become jammed in the panel, so keep
your hands away from it.
En
7
Page 8
Section
01
Before You Start
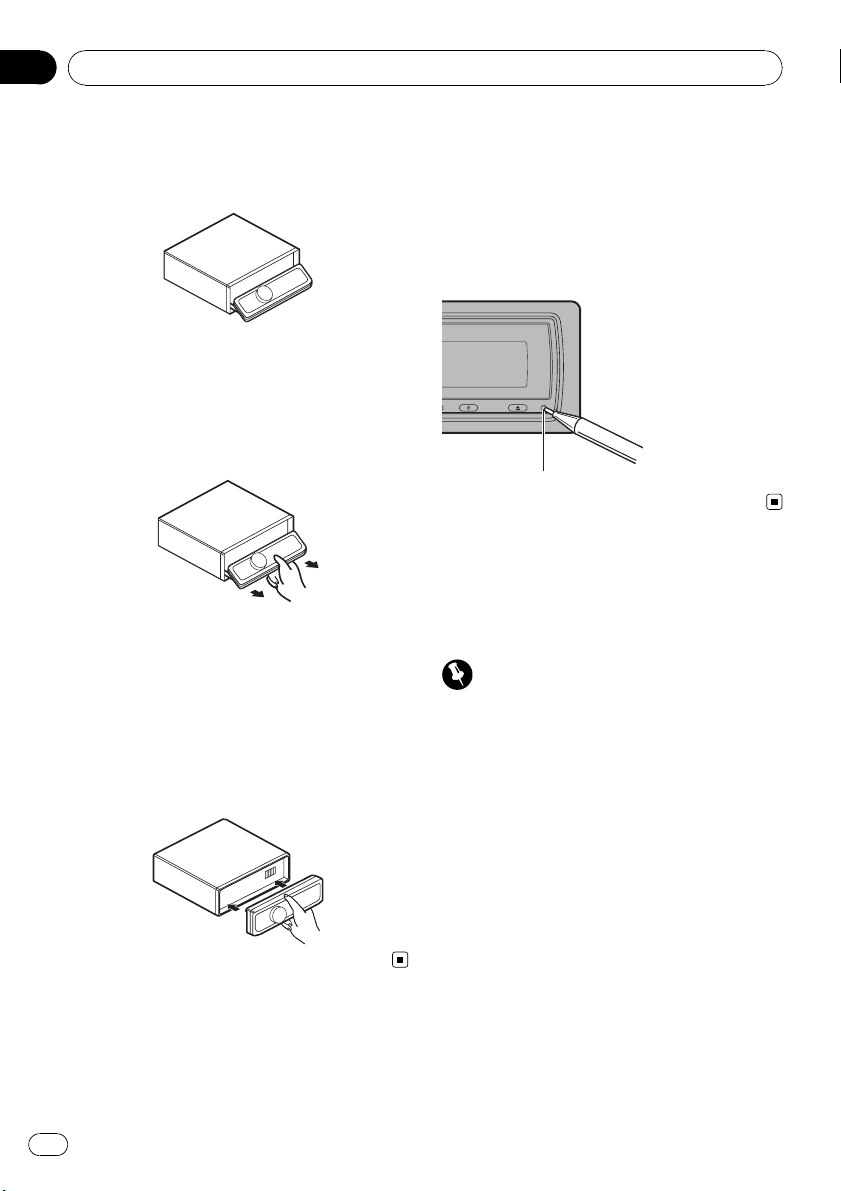
Removing the front panel
1 Press and hold EJECT to open the front
panel.
2 Slide and remove the front panel toward you.
Take care not to grip it too tightly or to drop
the front panel and protect it from contact
with water or other fluids to prevent permanent damage.
3 Put the front panel into provided protective case for safe keeping.
Attaching the front panel
1 Make sure the inner cover is closed.
2 Replace the front panel by clipping it
into place.
! Prior to using this unit for the first time
after installation
! If the unit fails to operate properly
! When strange or incorrect messages ap-
pear on the display
% Press RESET with a pen tip or other
pointed instrument.
RESET button
About the demo mode
This unit features two demonstration modes.
One is the reverse mode, the other is the feature demo mode.
Important
The red lead (ACC) of this unit should be connected to a terminal coupled with ignition switch
on/off operations. If this is not done, the vehicle
battery may be drained.
Reverse mode
If you do not perform an operation within
about 30 seconds, screen indications start to
reverse, and then continue reversing every 10
seconds. Pressing BAND when power to this
unit is turned off while the ignition switch is
set to ACC or ON cancels the reverse mode.
Press BAND again to start the reverse mode.
Resetting the microprocessor
The microprocessor must be reset under the
following conditions:
8
En
Page 9
Before You Start
Section
01
Feature demo mode
The feature demo automatically starts when
power to this unit is turned off while the ignition switch is set to ACC or ON. Pressing
DISPLAY during feature demo operation cancels the feature demo mode. Press DISPLAY
again to start the feature demo mode. Remember that if the feature demo continues operating when the car engine is turned off, it may
drain battery power.
Use and care of the remote
control
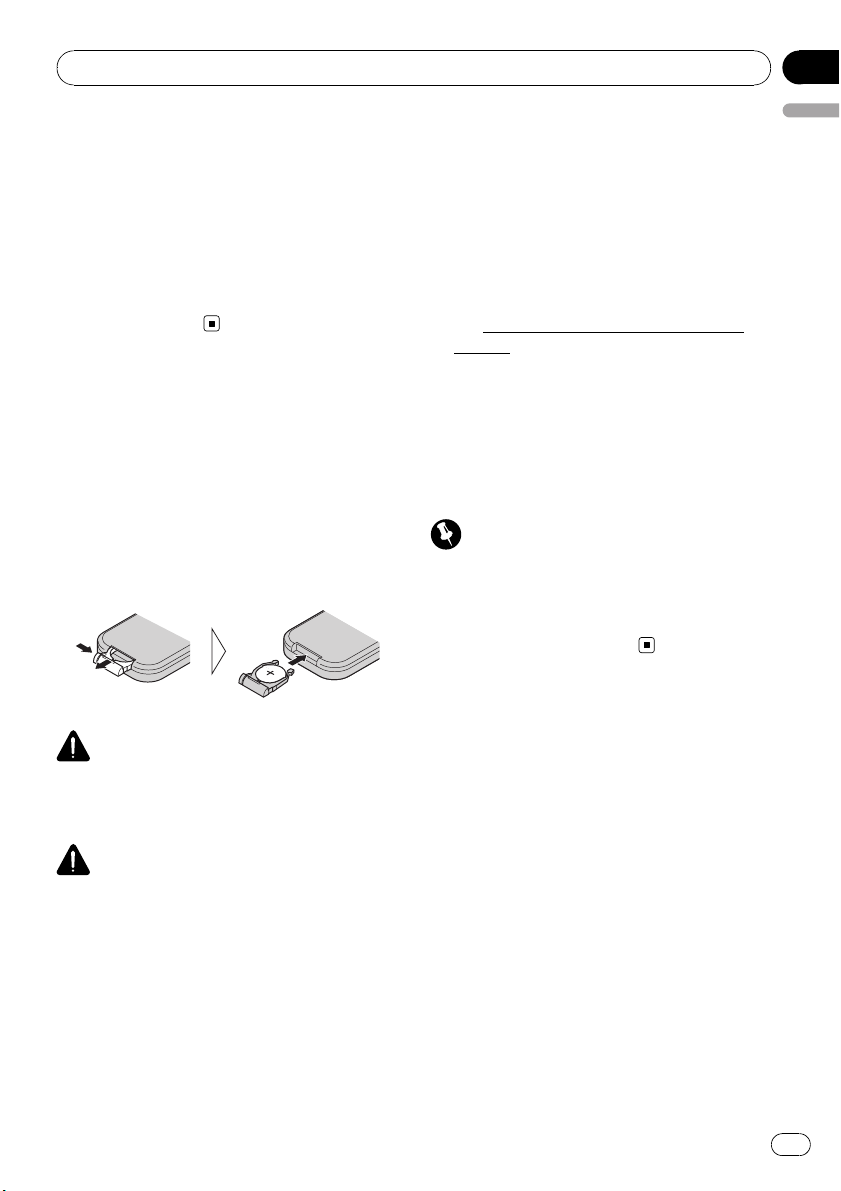
Installing the battery
Slide the tray out on the back of the remote
control and insert the battery with the plus (+)
and minus (–) poles pointing in the proper direction.
! When using for the first time, pull out the
film protruding from the tray.
! In the event of battery leakage, wipe the re-
mote control completely clean and install a
new battery.
! When disposing of used batteries, please
comply with governmental regulations or environmental public institutions’ rules that
apply in your country/area.
! “Perchlorate Material – special handling may
apply.
See
www.dtsc.ca.gov/hazardouswaste/per-
chlorate. (Applicable to California, U.S.A.)”
Using the remote control
Point the remote control in the direction of the
front panel to operate.
! The remote control may not function prop-
erly in direct sunlight.
Important
! Do not store the remote control in high tem-
peratures or direct sunlight.
! Do not let the remote control fall onto the
floor, where it may become jammed under the
brake or accelerator pedal.
English
WARNING
Keep the battery out of the reach of children.
Should the battery be swallowed, immediately
consult a doctor.
CAUTION
! Use only one CR2025 (3 V) lithium battery.
! Remove the battery if the remote control is not
used for a month or longer.
! Danger of explosion if battery is incorrectly re-
placed. Replace only with the same or equivalent type.
! Do not handle the battery with metallic tools.
! Do not store the battery with metallic materi-
als.
En
9
Page 10
132
4a56789
bac
d
e
fhj
k
g
7
i
i
1
1
Section
02
Operating this unit
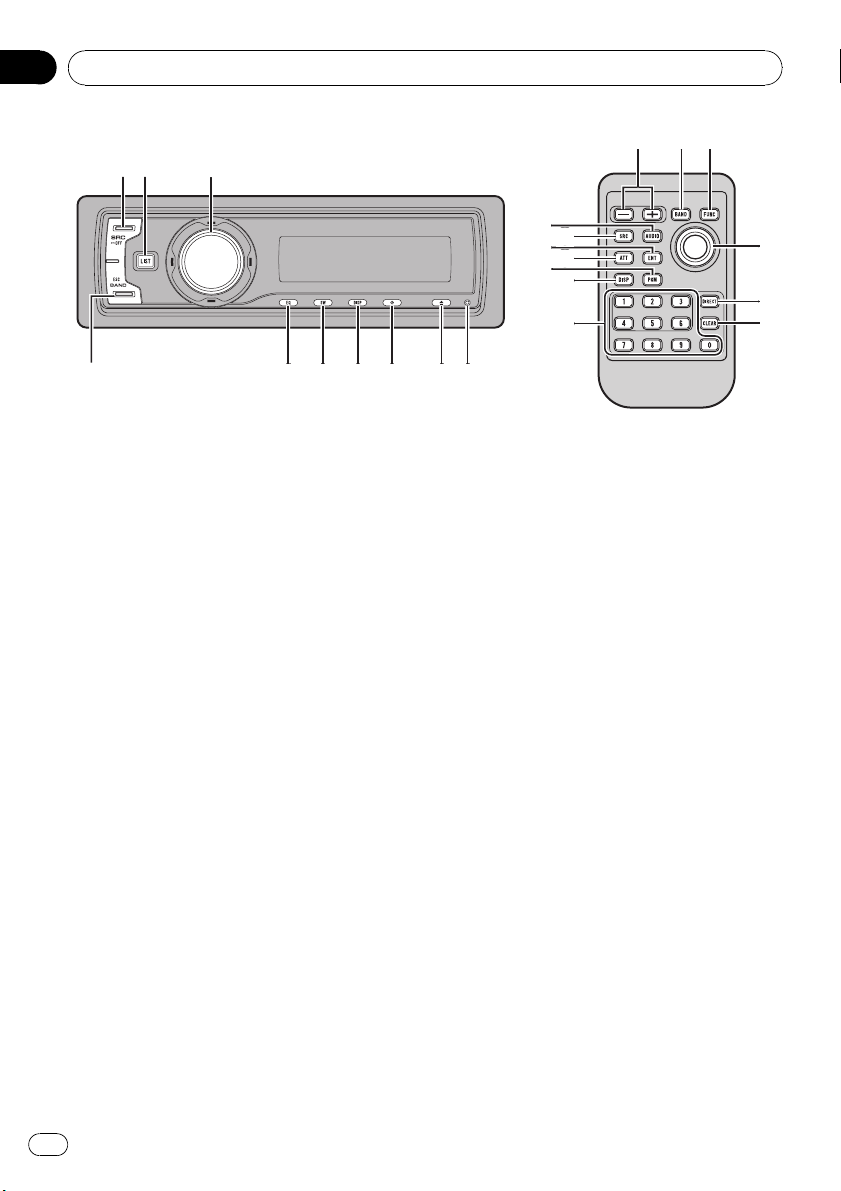
What’s What
Head unit
1 SOURCE button
This unit is turned on by selecting a source.
Press to cycle through all the available
sources.
2 LIST button
Press to display the disc title list, track title
list, folder list, file list or preset channel list
depending on the source.
3 MULTI-CONTROL
Move to perform manual seek tuning, fast
forward, reverse and track search controls.
Also used for controlling functions.
Turn to increase or decrease the volume.
4 RESET button
Press to reset the microprocessor.
5 EJECT button
Press to eject a CD from your built-in CD
player.
Press and hold to open or close the front
panel.
mode when XM tuner or SIRIUS tuner is selected as the source.
7 DISPLAY button
Press to select different displays.
8 SW button
Press to select the subwoofer setting menu.
Press and hold to select the bass boost setting menu.
9 EQ button
Press to select various equalizer curves.
a BAND button
Press to select among three FM bands and
one AM band and to cancel the control
mode of functions.
Remote control
Operation is the same as when using the buttons on the head unit.
b VOLUME buttons
Press to increase or decrease the volume.
c FUNCTION button
Press to select functions.
6 CLOCK button
Press to change to the clock display. Press
and hold to change the channel select
10
En
Page 11

Operating this unit
Section
02
d Joystick
Move to perform manual seek tuning, fast
forward, reverse and track search controls.
Also used for controlling functions.
Functions are the same as
MULTI-CONTROL except for volume control.
e DIRECT button
Press to directly select the desired track.
f CLEAR button
Press to cancel the input number when 0 to
9 are used.
g 0 to 9 buttons
Press to directly select the desired track,
preset tuning or disc. Buttons 1 to 6 can operate the preset tuning for the tuner or disc
number search for the multi-CD player.
h PGM button
Press to operate the preprogrammed functions for each source. (Refer to Using the
PGM button on page 34.)
i ATT button
Press to quickly lower the volume level, by
about 90%. Press once more to return to the
original volume level.
j ENTERTAINMENT button
Press to change to the entertainment display.
k AUDIO button
Press to select various sound quality controls.
English
Basic Operations
Power ON/OFF
Turning the unit on
% Press SOURCE to turn the unit on.
Turning the unit off
% Press SOURCE and hold until the unit
turns off.
Selecting a source
You can select a source you want to listen to.
To switch to the built-in CD player, load a disc
in the unit (refer to page 14).
% Press SOURCE to select a source.
Press SOURCE repeatedly to switch between
the following sources:
XM tuner—SIRIUS tuner—Tuner—Television—DVD player/Multi-DVD player—
Built-in CD player—Multi-CD player—
iPod—USB—External unit 1—External
unit 2—AUX1—AUX2—BT Audio—BT Telephone
Notes
! In the following cases, the sound source will
not change:
— When there is no unit corresponding to the
selected source connected to this unit.
— When there is no disc or magazine in the
player.
— When the AUX (auxiliary input) is set to off
(refer to page 30).
— When the BT Audio source is set to off
(refer to Activating the BT Audio source on
page 32).
! AUX1 is set to on by default. Turn off the AUX1
when not in use (refer to Switching the auxili-
ary setting on page 30).
! Charging the portable audio player using
car’s DC power source while connecting it to
AUX input may generate noise. In this case,
stop charging.
En
11
Page 12
6
12453
Section
02
Operating this unit
! External unit refers to a Pioneer product (such
as one available in the future) that, although
incompatible as a source, enables control of
basic functions by this unit. Two external units
can be controlled by this unit. When two external units are connected, the allocation of
them to external unit 1 or external unit 2 is
automatically set by this unit.
! When this unit’s blue/white lead is connected
to the vehicle’s auto-antenna relay control
terminal, the vehicle’s antenna extends when
this unit’s source is turned on. To retract the
antenna, turn the source off.
Adjusting the volume
% Use MULTI-CONTROL to adjust the
sound level.
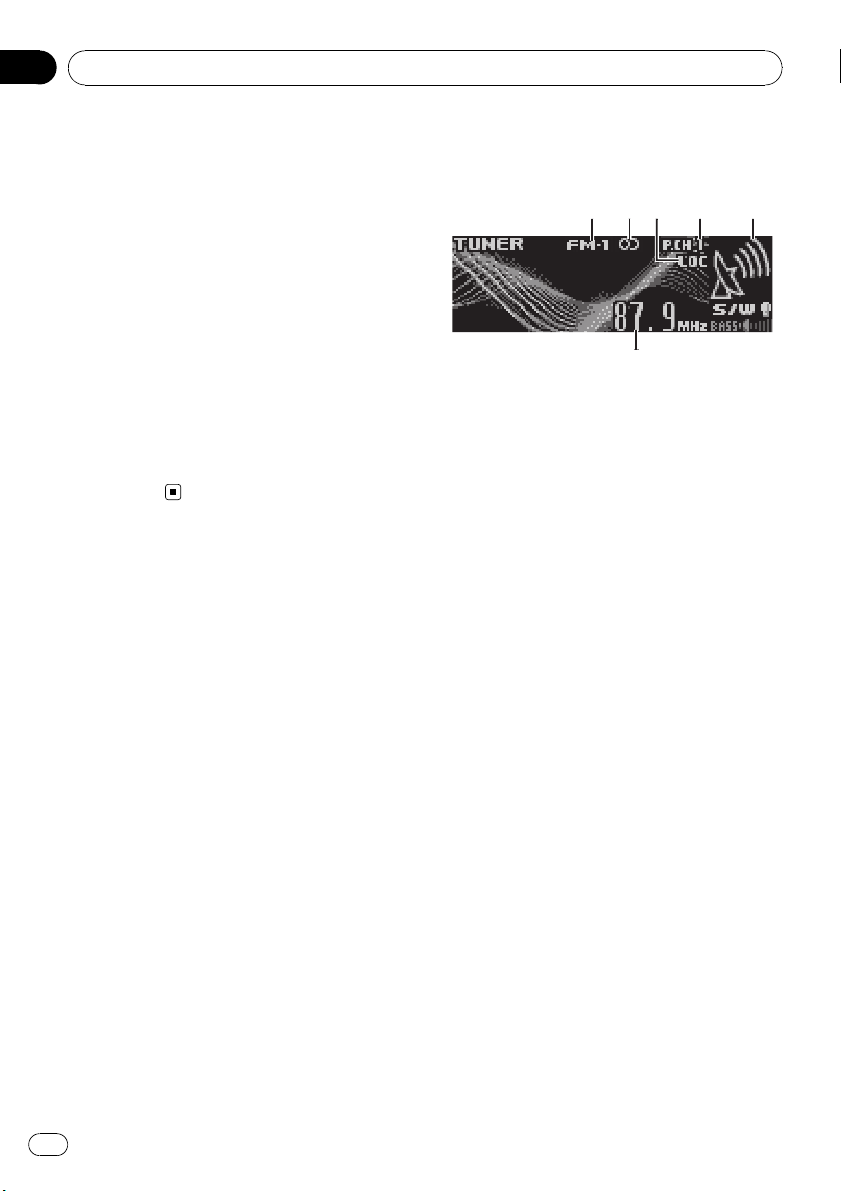
Tuner
Basic Operations
1 Band indicator
2 Stereo (5) indicator
Shows when the selected frequency is being
broadcast in stereo.
3 LOC indicator
Shows when local seek tuning is on.
4 Preset number indicator
5 Signal level indicator
Shows the radio wave strength.
6 Frequency indicator
1 Press SOURCE to select the tuner.
2 Press BAND to select a band.
Press BAND until the desired band (FM-1,
FM-2, FM-3 for FM or AM) is displayed.
12
3 To perform manual tuning, push
MULTI-CONTROL left or right.
4 To perform seek tuning, push and hold
MULTI-CONTROL left or right for about one
second and release.
The tuner will scan the frequencies until a
broadcast strong enough for good reception is
found.
# You can cancel seek tuning by pushing
MULTI-CONTROL left or right.
# If you push and hold MULTI-CONTROL left or
right you can skip stations. Seek tuning starts as
soon as you release MULTI-CONTROL.
En
Page 13

Operating this unit
Storing and recalling broadcast
frequencies
You can easily store up to six broadcast frequencies for later recall.
! Up to 18 FM stations, six for each of the
three FM bands, and six AM stations can
be stored in memory.
1 When you find a frequency that you
want to store in memory press LIST.
2 Use MULTI-CONTROL to store the selected frequency in memory.
Turn to change the preset number; press and
hold to store.
The preset number you have selected will
flash and then remain lit. The selected radio
station frequency has been stored in memory.
3 Use MULTI-CONTROL to select the desired station.
Turn to change the station; press to select.
# You can also change the station by pushing
MULTI-CONTROL up or down.
# If you do not operate the list within about 30
seconds, the display is automatically returned to
the ordinary display.
Section
02
English
Introduction of advanced
operations
1 Press MULTI-CONTROL to display the
main menu.
FUNCTION, AUDIO and ENTERTAINMENT
appear on the display.
2 Use MULTI-CONTROL to select
FUNCTION.
Turn to change the menu option; press to select.
The function name appears on the display.
3 Turn MULTI-CONTROL to select the
function.
Turn MULTI-CONTROL to switch between the
functions in the following order:
BSM (best stations memory)—Local (local
seek tuning)
# You can also select the function by pressing
FUNCTION on the remote control.
# To return to the frequency display, press
BAND.
# If you do not operate functions within about
30 seconds, the display is automatically returned
to the ordinary display.
Using the remote control
% When you find a frequency that you
want to store in memory, press one of preset tuning buttons 1 to 6 and hold until the
preset number stops flashing.
The number you have pressed will flash in the
preset number indicator and then remain lit.
The selected radio station frequency has been
stored in memory.
The next time you press the same preset tuning button the radio station frequency is recalled from memory.
# You can also recall radio station frequencies
assigned to preset tuning numbers by pushing
MULTI-CONTROL up or down during the frequency display.
Storing the strongest broadcast
frequencies
BSM (best stations memory) lets you automatically store the six strongest broadcast frequencies under 1 to 6 on the remote control
and once stored there you can tune in to those
frequencies with the touch of a button.
! Storing broadcast frequencies with BSM
may replace broadcast frequencies you
have saved using 1 to 6 on the remote control.
1 Use MULTI-CONTROL to select BSM in
the function menu.
2 Press MULTI-CONTROL to turn BSM on.
Six strongest broadcast frequencies will be
stored in the order of their signal strength.
En
13
Page 14
4
123
5
Section
02
Operating this unit
# To cancel the storage process, press
MULTI-CONTROL again.
3 Use MULTI-CONTROL to select the desired station.
Turn to change the station; press to select.
# You can also change the station by pushing
MULTI-CONTROL up or down.
Tuning in strong signals
Local seek tuning lets you tune in only those
radio stations with sufficiently strong signals
for good reception.
1 Use MULTI-CONTROL to select Local in
the function menu.
2 Press MULTI-CONTROL to turn local
seek tuning on.
# To turn local seek tuning off, press
MULTI-CONTROL again.
3 Push MULTI-CONTROL left or right to
set the sensitivity.
There are four levels of sensitivity for FM and
two levels for AM:
FM: Level 1—Level 2—Level 3—Level 4
AM: Level 1—Level 2
The Level 4 setting allows reception of only
the strongest stations, while lower settings let
you receive progressively weaker stations.
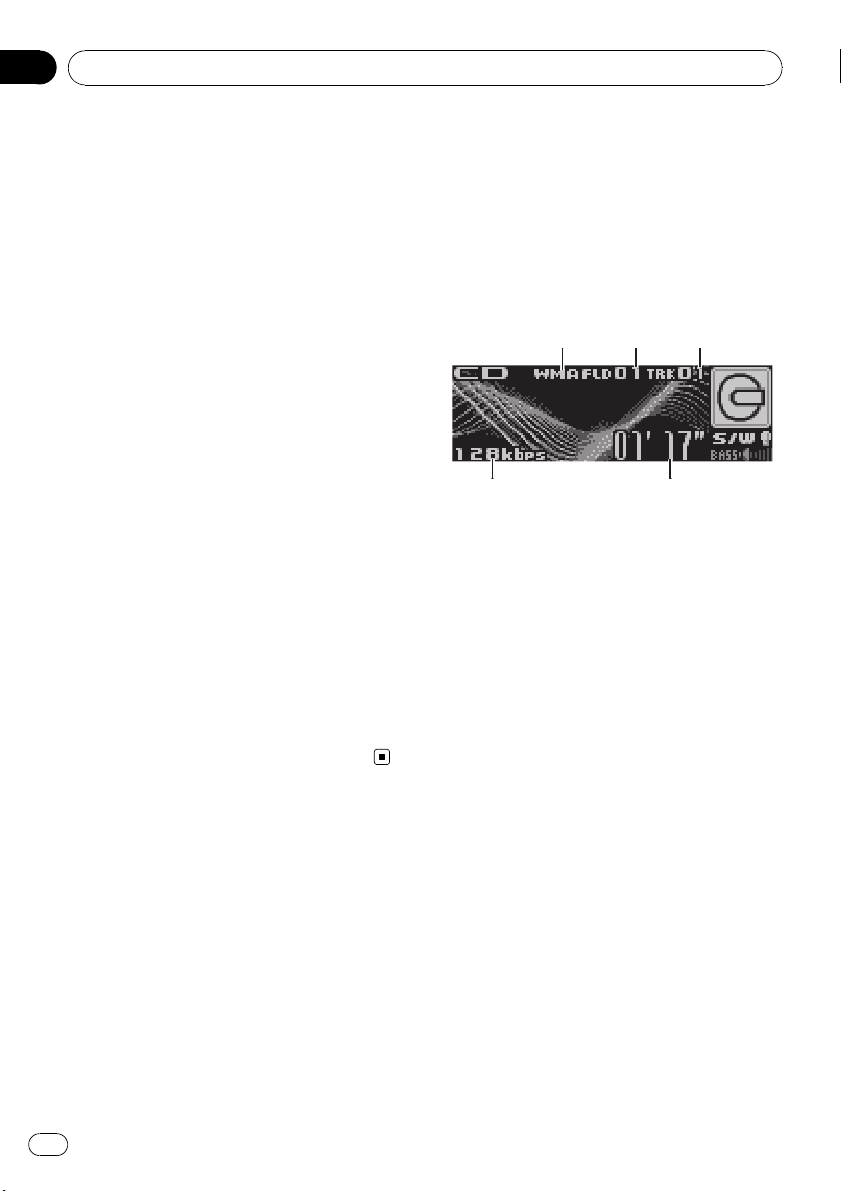
Built-in CD Player
Basic Operations
The built-in CD player can play back audio CD
(CD-DA) and compressed audio (WMA/MP3/
AAC/WAV) recorded on CD-ROM. (Refer to
page 67 for files that can be played back.)
Read the precautions with discs and player on
page 64.
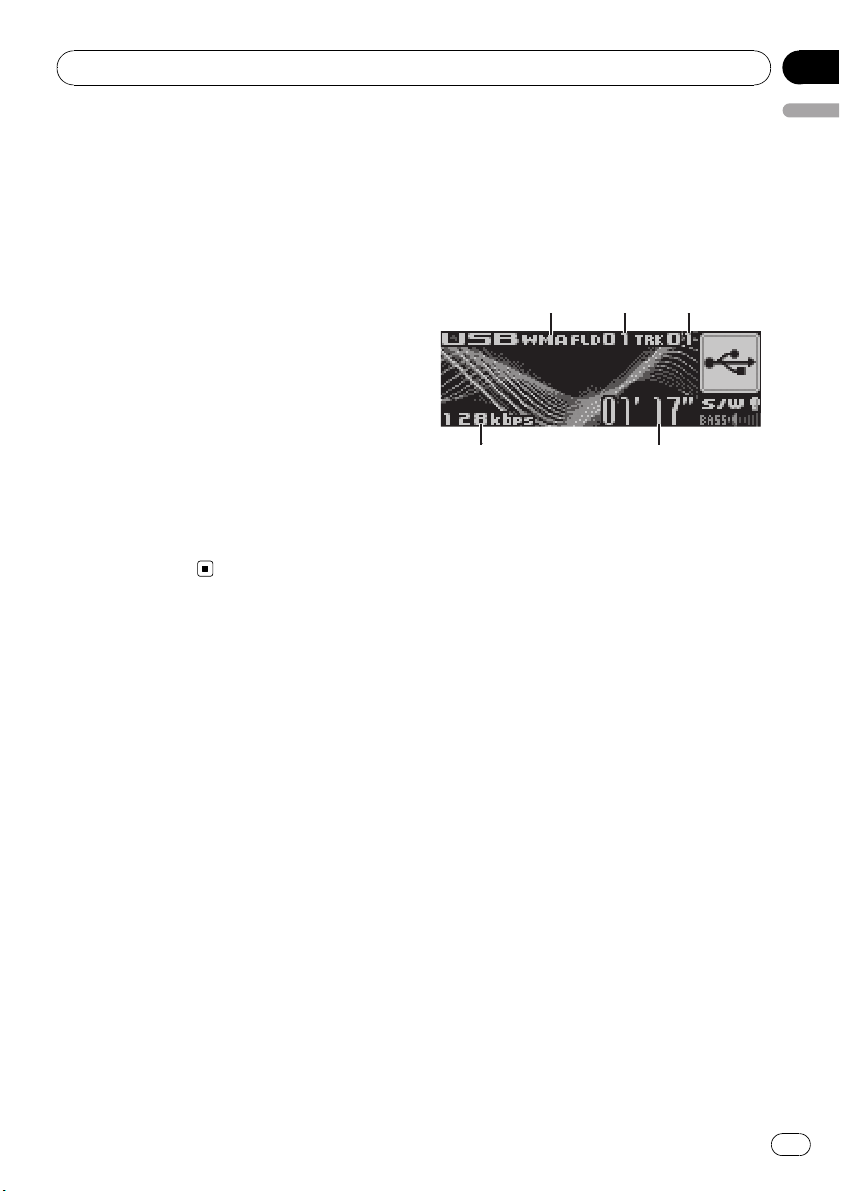
1 WMA/MP3/AAC/WAV indicator
Shows the type of audio file currently playing
when the compressed audio is playing.
2 Folder number indicator
Shows the folder number currently playing
when the compressed audio is playing.
3 Track number indicator
4 Play time indicator
5 Bit rate/sampling frequency indicator
Shows the bit rate or sampling frequency of
the current track (file) when the compressed
audio is playing.
! When playing back VBR (variable bit
rate)-recorded WMA files, the average
bit rate value is displayed.
! When playing back VBR (variable bit
rate)-recorded MP3 files, VBR is displayed instead of bit rate value.
14
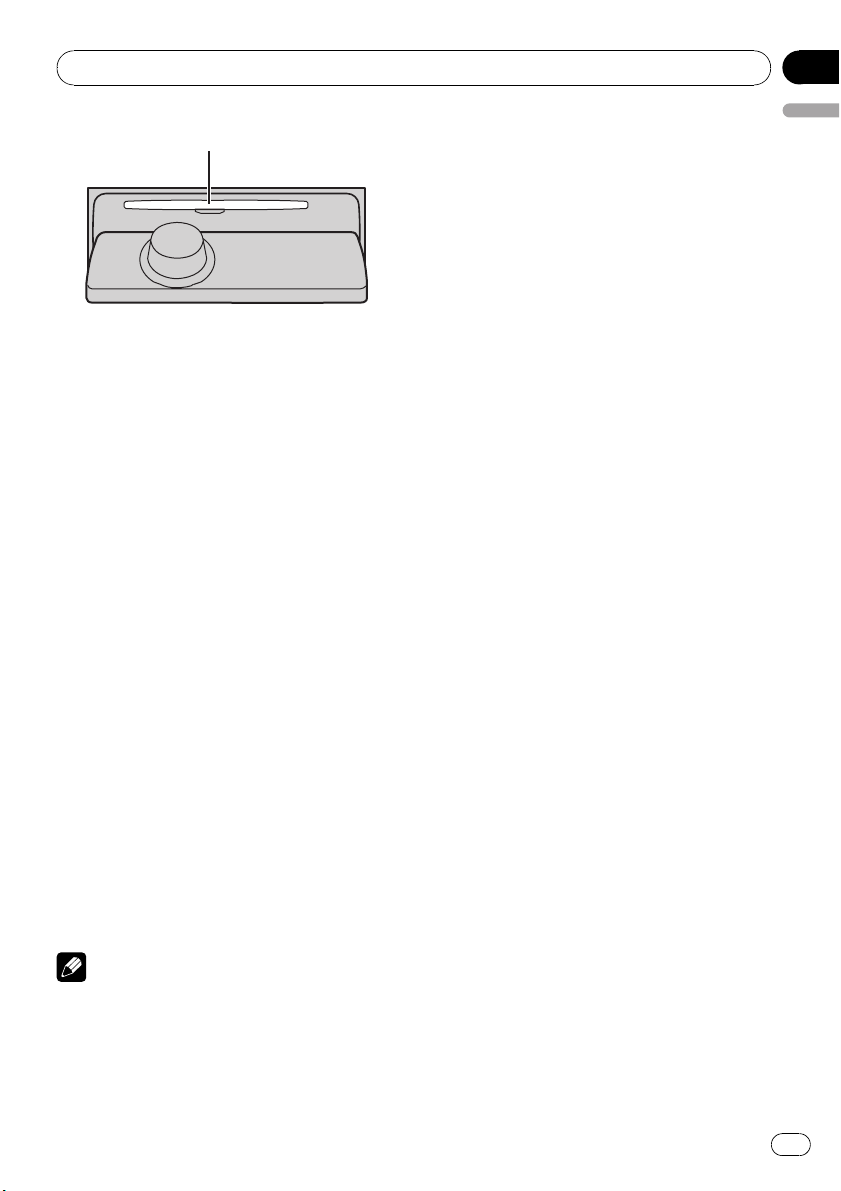
1 Press EJECT to open the front panel.
Disc loading slot appears.
En
Page 15
Operating this unit
Section
02
Disc loading slot
2 Insert a CD (CD-ROM) into the disc loading slot.
Front panel is closed automatically, and playback will start.
# Be sure to turn up the label side of a disc.
# After a CD (CD-ROM) has been inserted, press
SOURCE to select the built-in CD player.
# You can eject a CD (CD-ROM) by pressing
EJECT.
3 Push MULTI-CONTROL up or down to
select a folder when playing a compressed
audio.
# You cannot select a folder that does not have
a compressed audio file recorded in it.
# To return to folder 01 (ROOT), press and hold
BAND. However, if folder 01 (ROOT) contains no
files, playback commences with folder 02.
4 To perform fast forward or reverse,
push and hold MULTI-CONTROL left or
right.
# If you select Rough search, pushing and hold-
ing MULTI-CONTROL left or right enables you to
search every 10 tracks in the current disc (folder).
(Refer to Searching every 10 tracks in the current
disc or folder on page 17.)
5 To skip back or forward to another
track, push MULTI-CONTROL left or right.
Notes
! There is sometimes a delay between starting
up disc playback and the sound being issued.
When being read, Format read is displayed.
! If an error message such as ERROR-11 is dis-
played, refer to Error messages on page 63.
! When playing CD-EXTRA or MIXED-MODE
English
CDs, compressed audio and CD-DA can be
switched by pressing BAND.
! If you have switched between compressed
audio and CD-DA, playback starts at the first
track on the disc.
! When playing back VBR (variable bit rate) re-
corded files, elapsed play time may not be displayed correctly.
! When playing compressed audio, there is no
sound on fast forward or reverse.
! When a CD TEXT disc is inserted, the disc and
track titles automatically begin to scroll in the
display. When Ever Scroll is set to ON at the
initial setting, the disc and track titles scroll
continuously. About Ever Scroll, refer to
Switching the Ever Scroll on page 32.
! Playback is carried out in order of file number.
Folders are skipped if they contain no files. (If
folder 01 (ROOT) contains no files, playback
commences with folder 02.)
Selecting a track directly
When using the remote control, you can select
a track directly by entering the desired track
number.
! When audio files are being played back,
you can select track in the current folder.
1 Press DIRECT.
Track number input display appears.
2 Press 0 to 9 buttons to enter the desired
track number.
# You can cancel the input number by pressing
CLEAR.
3 Press DIRECT.
The track of entered number will play.
# After entering the number input mode, if you
do not perform an operation within about eight
seconds, the mode is automatically canceled.
En
15
Page 16

Section
02
Operating this unit
Introduction of advanced
operations
1 Press MULTI-CONTROL to display the
main menu.
FUNCTION, AUDIO and ENTERTAINMENT
appear on the display.
2 Use MULTI-CONTROL to select
FUNCTION.
Turn to change the menu option; press to select.
The function name appears on the display.
3 Turn MULTI-CONTROL to select the
function.
Turn MULTI-CONTROL to switch between the
functions in the following order:
Play mode (repeat play)—Random mode
(random play)—Scan mode (scan play)—
Pause (pause)—Compression (compression
and BMX)—Search mode (search method)—
TitleInput "A" (disc title input)
# You can also select the function by pressing
FUNCTION on the remote control.
# When playing a CD TEXT disc, you cannot
switch to disc title input display. The disc title will
have already been recorded on a CD TEXT disc.
# When playing compressed audio disc, you
cannot switch to disc title input display.
# To return to the ordinary display, press BAND.
# If you do not operate functions except for
TitleInput "A" within about 30 seconds, the display is automatically returned to the ordinary display.
2 Press MULTI-CONTROL to select the repeat range.
! Disc repeat – Repeat all tracks
! Track repeat – Repeat just the current
track
! Folder repeat – Repeat the current folder
# If you select another folder during repeat play,
the repeat play range changes to disc repeat.
# When playing CD, performing track search or
fast forward/reverse cancels the repeat play automatically.
# When playing compressed audio, performing
track search or fast forward/reverse during
Track repeat (track repeat) changes the repeat
play range to folder repeat.
# When Folder repeat (folder repeat) is se-
lected, it is not possible to play back a subfolder
of that folder.
Playing tracks in random order
Random play plays tracks in a random order
within the selected repeat range.
Refer to Selecting a repeat play range on this
page.
1 Use MULTI-CONTROL to select
Random mode in the function menu.
2 Press MULTI-CONTROL to turn random
play on.
Tracks will play in a random order.
# To turn random play off, press
MULTI-CONTROL again.
Selecting a repeat play range
Repeat play plays the same track/folder within
the selected repeat play range.
Also, the repeat range determines the range of
random play and scan play.
1 Use MULTI-CONTROL to select
Play mode in the function menu.
16
En
Scanning folders and tracks
Scan play searches the song within the selected repeat range.
Refer to Selecting a repeat play range on this
page.
1 Use MULTI-CONTROL to select
Scan mode in the function menu.
2 Press MULTI-CONTROL to turn scan play
on.
The first 10 seconds of each track is played.
Page 17

Operating this unit
Section
02
3 When you find the desired track press
MULTI-CONTROL to turn scan play off.
# If the display has automatically returned to
the playback display, select Scan mode again by
using MULTI-CONTROL.
# After scanning of a disc (folder) is finished,
normal playback of the tracks will begin again.
Pausing disc playback
1 Use MULTI-CONTROL to select Pause in
the function menu.
2 Press MULTI-CONTROL to turn pause
on.
Playback of the current track pauses.
# To turn pause off, press MULTI-CONTROL
again.
Using compression and BMX
Using the COMP (compression) and BMX
functions let you adjust the sound playback
quality of this unit.
1 Use MULTI-CONTROL to select
Compression in the function menu.
2 Press MULTI-CONTROL to select your favorite setting.
COMP/BMX OFF—COMP 1—COMP 2—
COMP/BMX OFF—BMX 1—BMX 2
Searching every 10 tracks in the
current disc or folder
You can switch the search method between
fast forward/reverse and searching every 10
tracks. Selecting Rough search enables you
to search every 10 tracks.
1 Use MULTI-CONTROL to select
Search mode in the function menu.
2 Press MULTI-CONTROL to select
Rough search.
! FF/REV – Fast forward and reverse
! Rough search – Searching every 10 tracks
# To select FF/REV, press MULTI-CONTROL
English
again.
3 Press BAND to return to the playback
display.
4 Push and hold MULTI-CONTROL left or
right to search every 10 tracks on a disc
(folder).
# If the rest of track number is less than 10,
pushing and holding MULTI-CONTROL recalls
the first (last) one.
Using disc title functions
You can input CD titles and display the title.
The next time you insert a CD for which you
have entered a title, the title of that CD will be
displayed.
Entering disc titles
Use the disc title input feature to store up to
48 CD titles in the unit. Each title can be up to
10 characters long.
1 Play the CD that you want to enter a
title for.
2 Use MULTI-CONTROL to select
TitleInput "A" in the function menu.
3 Press DISPLAY to select the desired
character type.
Press DISPLAY repeatedly to switch between
the following character types:
Alphabet (upper case), numbers and symbols
—Alphabet (lower case)—European letters,
such as those with accents (e.g. á, à, ä, ç)—
Numbers and symbols
4 Push MULTI-CONTROL up or down to
select a letter of the alphabet.
5 Push MULTI-CONTROL left or right to
move the cursor to the previous or next
character position.
En
17
Page 18
Section
02
Operating this unit
6 Move the cursor to the last position by
pushing MULTI-CONTROL right after entering the title.
When you push MULTI-CONTROL right one
more time, the entered title is stored in memory.
7 Press BAND to return to the playback
display.
Notes
! Titles remain in memory, even after the disc
has been removed from the unit, and are recalled when the disc is reinserted.
! After data for 48 discs has been stored in
memory, data for a new disc will overwrite the
oldest one.
! If you connect a multi-CD player, you can
input disc titles for up to 100 discs.
! When a multi-CD player that does not support
disc title functions is connected, you cannot
enter disc titles in this unit.
Displaying text information on
disc
% Press DISPLAY to select the desired text
information.
! For title entered CD
Play time—
! For CD TEXT discs
Play time—
track title—
disc title—
—
: track artist name and : track title
—
: track title and play time
! For WMA/MP3/AAC discs
Play time—
name—
—
: artist name and : album title— :
album title and
title and play time—
time
! For WAV discs
Play time—
name
: disc title and play time
: disc artist name and :
: disc artist name and :
: disc title and : track title
: folder name and : file
: artist name and : track title
: track title— : track
: comment and play
: folder name and : file
Notes
! You can scroll to the left of the title by pressing
and holding DISPLAY.
! Audio CD that contains certain information
such as text and/or number is CD TEXT.
! If specific information has not been recorded
on a disc, title or name is not displayed.
! Depending on the version of iTunes
write MP3 files onto a disc, comment information may not be correctly displayed.
! Depending on the version of Windows Media
Player used to encode WMA files, album
names and other text information may not be
correctly displayed.
! The sampling frequency shown in the display
may be abbreviated.
! When Ever Scroll is set to ON at the initial set-
ting, text information scrolls continuously in
the display. Refer to Switching the Ever Scroll
on page 32.
®
used to
Selecting tracks from the track
title list
Track title list lets you see the list of track titles
on a CD TEXT disc and select one of them to
play back.
1 Press LIST to switch to the track title list
mode.
2 Use MULTI-CONTROL to select the desired track title.
Turn to change the track title; press to play.
# You can also change the track title by pushing
MULTI-CONTROL up or down.
# If you do not operate the list within about 30
seconds, the display is automatically returned to
the ordinary display.
Selecting tracks from the file
name list
File name list lets you see the list of file names
(or folder names) and select one of them to
playback.
18
En
Page 19
4
123
5
Operating this unit
Section
02
1 Press LIST to switch to the file name list
mode.
Names of files and folders appear in the display.
2 Use MULTI-CONTROL to select the desired file name (or folder name).
Turn to change the name of file or folder;
press to play; push right to see a list of the
files (or folders) in the selected folder.
# You can also change the name of file or folder
by pushing MULTI-CONTROL up or down.
# To return to the previous list (the folder one
level higher), push MULTI-CONTROL left.
# If the folder/file number is more than 100, last
2-digit of the folder/file number is displayed.
# Number of the folders/files in the currently selected folder will be indicated on the right side of
the display.
# If you do not operate the list within about 30
seconds, the display is automatically returned to
the ordinary display.
English
Playing songs on USB portable
audio player/USB memory
Basic Operations
Optimum performance of this unit may not be
obtained depending on the connected USB
portable audio player/USB memory.
1 WMA/MP3/AAC indicator
Shows the type of file currently playing.
2 Folder number indicator
3 Track number indicator
4 Play time indicator
5 Bit rate indicator
1 Press SOURCE to select USB.
2 Push MULTI-CONTROL up or down to
select a folder.
# You cannot select a folder that does not have
a compressed audio file recorded in it.
# When playing playlists, you cannot select a
folder.
# When playing USB portable audio player or
USB memory, pressing and holding BAND returns to folder 01 (ROOT). However, if folder 01
(ROOT) contains no files, playback commences
with folder 02.
3 To perform fast forward or reverse,
push and hold MULTI-CONTROL left or
right.
En
19
Page 20

Section
02
Operating this unit
4 To skip back or forward to another
compressed audio file, push
MULTI-CONTROL left or right.
Pushing MULTI-CONTROL right skips to the
start of the next audio file. Pushing
MULTI-CONTROL left once skips to the start
of the current audio file. Pushing again will
skip to the previous audio file.
Notes
! When the USB portable audio player having
battery charging function connects to this
unit and the ignition switch is set to ACC or
ON, the battery is charged.
! You can disconnect the USB portable audio
player/USB memory anytime you want to finish listening to.
When disconnecting the USB portable audio
player/USB memory from this unit during
playback, No Device is displayed.
Selecting an audio file directly
in the current folder
When using the remote control, you can select
an audio file directly by entering the desired
track number.
! When playing playlists, this function can-
not be used.
1 Press DIRECT.
Audio file number input display appears.
2 Press 0 to 9 buttons to enter the desired
track number.
# You can cancel the input number by pressing
CLEAR.
3 Press DIRECT.
The audio file of entered number will play.
# After entering the number input mode, if you
do not perform an operation within about eight
seconds, the mode is automatically canceled.
Introduction of advanced
operations
1 Press MULTI-CONTROL to display the
main menu.
FUNCTION, AUDIO and ENTERTAINMENT
appear on the display.
2 Use MULTI-CONTROL to select
FUNCTION.
Turn to change the menu option; press to select.
The function name appears on the display.
3 Turn MULTI-CONTROL to select the
function.
Turn MULTI-CONTROL to switch between the
functions in the following order:
Play mode (repeat play)—Random mode
(random play)—Scan mode (scan play)—
Pause (pause)
# You can also select the function by pressing
FUNCTION on the remote control.
# To return to the playback display, press BAND.
# If you do not operate functions within about
30 seconds, the display is automatically returned
to the ordinary display.
Selecting a repeat play range
Repeat play plays the same track/folder within
the selected repeat play range.
1 Use MULTI-CONTROL to select
Play mode in the function menu.
2 Press MULTI-CONTROL repeatedly to select the repeat range.
Press MULTI-CONTROL repeatedly until the
desired setting appears in the display.
! Track repeat – Repeat just the current file
! Folder repeat – Repeat the current folder
! All repeat – Repeat all files
Notes
! When playing playlists, Playlists is displayed.
20
En
Page 21

Operating this unit
Section
02
! If you perform track search or fast forward/re-
verse during Track repeat, the repeat play
range changes to Folder repeat.
! When Folder repeat is selected, it is not pos-
sible to play back a subfolder of that folder.
Playing files in random order
Random play plays tracks in a random order
within the selected repeat range.
1 Select the repeat range.
2 Use MULTI-CONTROL to select
Random mode in the function menu.
3 Press MULTI-CONTROL to turn random
play on.
Audio files will play in a random order.
# To turn random play off, press
MULTI-CONTROL again.
Scanning folders and files
Scan play searches the file within the selected
repeat range.
1 Select the repeat range.
2 Use MULTI-CONTROL to select
Scan mode in the function menu.
3 Press MULTI-CONTROL to turn scan play
on.
The first 10 seconds of each file of the current
folder (or the first file of each folder) is played.
4 When you find the desired file (or
folder) press MULTI-CONTROL to turn scan
play off.
The file (or folder) will continue to play.
# If the display has automatically returned to
the playback display, select Scan mode again by
using MULTI-CONTROL.
# After file or folder scanning is finished, normal playback of the files will begin again.
Pausing playback
1 Use MULTI-CONTROL to select Pause in
the function menu.
2 Press MULTI-CONTROL to turn pause
on.
Playback of the current track pauses.
# To turn pause off, press MULTI-CONTROL
again.
Displaying text information of
an audio file
% Press DISPLAY to select the desired text
information.
Play time—
—
: artist name and : track title— :artist name and
and
time—
# If the characters recorded on the audio file are
not compatible with a head unit, those characters
will not be displayed.
# If specific information has not been recorded
on an audio file, title or name is not displayed.
# The text information of some audio files may
not be correctly displayed.
Notes
! You can scroll to the left the text information
by pressing and holding DISPLAY.
! When Ever Scroll is set to ON at the initial set-
ting, text information scrolls continuously in
the display. Refer to Switching the Ever Scroll
on page 32.
: folder name and : file name
: album title— : album title
: track title— : track title and play
: comment and play time
Selecting files from the file
name list
File name list lets you see the list of file names
(or folder names) and select one of them to
playback.
English
En
21
Page 22
213
Section
02
Operating this unit
1 Press LIST to switch to the file name list
mode.
Names of files and folders appear in the display.
2 Use MULTI-CONTROL to select the desired file name (or folder name).
Turn to change the name of file or folder;
press to play; push right to see a list of the
files (or folders) in the selected folder.
# When playlist is selected, pressing
MULTI-CONTROL starts playback of the files in
the selected playlist.
# You can also change the name of file or folder
by pushing MULTI-CONTROL up or down.
# To return to the previous list (the folder one
level higher), push MULTI-CONTROL left.
# If the folder/file number is more than 100, last
2-digit of the folder/file number is displayed.
# Number of the folders/files in the currently selected folder will be indicated on the right side of
the display.
# If you do not operate the list within about 30
seconds, the display is automatically returned to
the ordinary display.
Playing songs on iPod
You can connect and listen to songs on an
iPod with Dock Connector or USB interface.
When using an iPod with Dock Connector,
iPod Dock Connector to USB Cable or supplied interface cable is required.
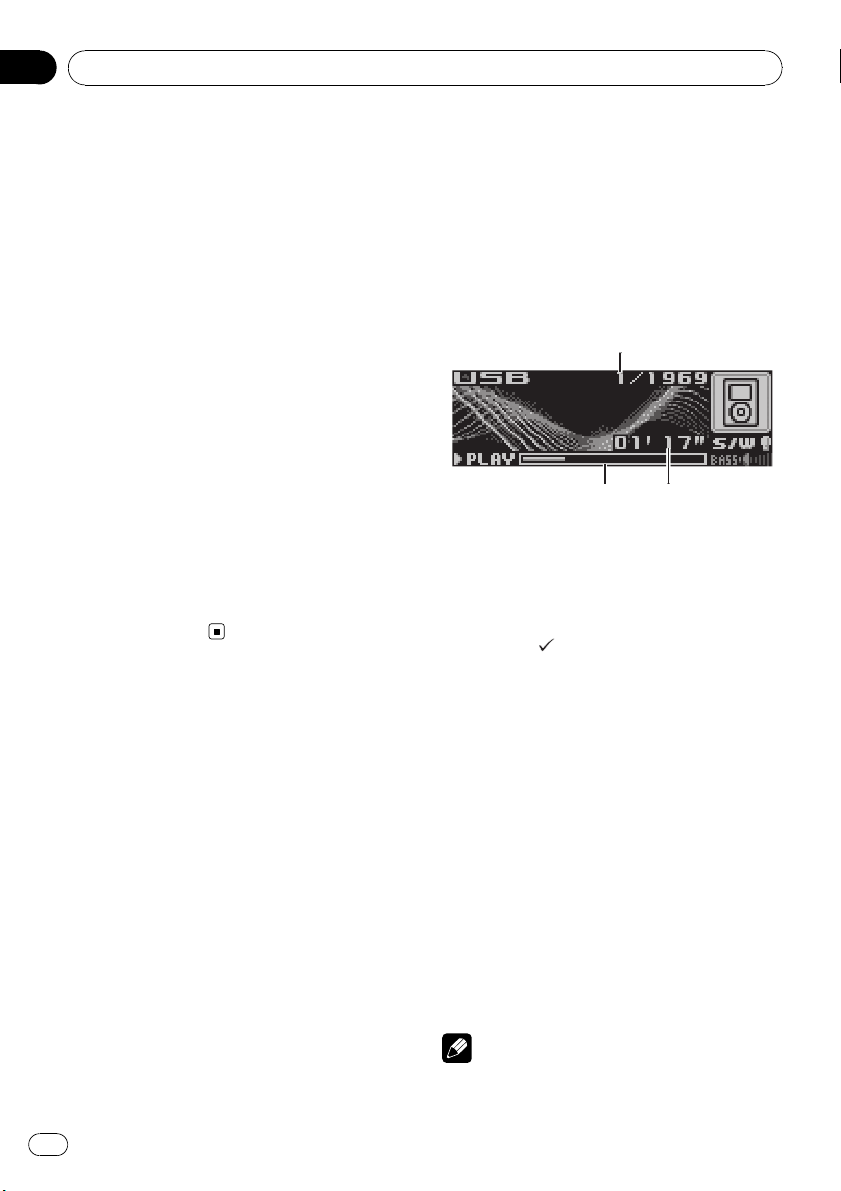
Basic Operations
1 Song number indicator
2 Play time indicator
3 Song time (progress bar)
1 Press SOURCE to select USB.
While the iPod is connected to this unit,
PIONEER (or
the iPod.
2 When playing Audiobook or Podcast
(with chapter) on iPod, pushing
MULTI-CONTROL up or down to select a
chapter.
(check mark)) is displayed on
22
3 To perform fast forward or reverse,
push and hold MULTI-CONTROL left or
right.
4 To skip back or forward to another
song, push MULTI-CONTROL left or right.
Pushing MULTI-CONTROL right skips to the
start of the next song. Pushing
MULTI-CONTROL left once skips to the start
of the current song. Pushing again will skip to
the previous song.
Notes
! Read the precautions with iPod on page 66.
En
Page 23
Operating this unit
Section
02
! If an error message such as ERROR-11 is dis-
played, refer to Error messages on page 63.
! When the ignition switch is set to ACC or ON,
the iPod’s battery is charged while the iPod is
connected to this unit.
! While the iPod is connected to this unit, the
iPod itself cannot be turned on or off.
! Before connecting the dock connector of this
unit to the iPod, disconnect the headphones
from the iPod.
! The iPod connected to this unit is turned off
about two minutes after the ignition switch is
set to OFF.
Browsing for a song
The operation of this unit to control an iPod is
designed to be as close to the operation of the
iPod as possible for easy operation and song
search.
! If playlist has been selected, first, this unit
shows playlist of your iPod’s name. This
playlist plays all songs in your iPod.
! If the characters recorded on the iPod are
not compatible with this unit, those characters will not be displayed.
1 Press LIST to switch to the top menu of
the list search.
2 Use MULTI-CONTROL to select a category.
Turn to change the category; press to select.
Playlists (playlists)—Artists (artists)—
Albums (albums)—Songs (songs)— Podcasts
(podcasts)—Genres (genres)—Audiobooks
(audiobooks)
List from the selected category is displayed.
# You can start playback throughout the selected category by pressing and holding
MULTI-CONTROL.
# You can also change the category by pushing
MULTI-CONTROL up or down.
# You can also select the category by pushing
MULTI-CONTROL right.
# To return to the previous list, push
MULTI-CONTROL left.
# To go to the top menu of the list search, push
and hold MULTI-CONTROL left.
# If you do not operate the list within about 30
seconds, the display is automatically returned to
the ordinary display.
3 Repeat step 2 to find a song you want
to listen to.
Displaying text information on
iPod
% Press DISPLAY to select the desired text
information.
Play time—
—
: artist name and : album name— :
album name and
: artist name and : song title
: song title— : song title
and play time
# If the characters recorded on the iPod are not
compatible with this unit, those characters will
not be displayed.
Notes
! You can scroll to the left the text information
by pressing and holding DISPLAY.
! When Ever Scroll is set to ON at the initial set-
ting, text information scrolls continuously in
the display. Refer to Switching the Ever Scroll
on page 32.
Introduction of advanced
operations
1 Press MULTI-CONTROL to display the
main menu.
FUNCTION, AUDIO and ENTERTAINMENT
appear on the display.
2 Use MULTI-CONTROL to select
FUNCTION.
Turn to change the menu option; press to select.
The function name appears on the display.
English
En
23
Page 24

Section
02
Operating this unit
3 Turn MULTI-CONTROL to select the
function.
Turn MULTI-CONTROL to switch between the
functions in the following order:
Play mode (repeat play)—Shuffle mode
(shuffle)—Shuffle all (shuffle all)—Pause
(pause)—Audiobooks (audiobook speed)
# You can also select the function by pressing
FUNCTION on the remote control.
# To return to the playback display, press BAND.
# If you do not operate functions within about
30 seconds, the display is automatically returned
to the ordinary display.
Repeating play
For playback of the songs on the iPod, there
are two repeat play ranges: Repeat One (repeat one song) and Repeat All (repeat all
songs in the list).
! While Play mode is set to Repeat One,
you cannot select the other songs.
1 Use MULTI-CONTROL to select
Play mode in the function menu.
2 Press MULTI-CONTROL repeatedly to select the repeat range.
Press MULTI-CONTROL repeatedly until the
desired setting appears in the display.
! Repeat One – Repeat just the current song
! Repeat All – Repeat all songs in the se-
lected list
2 Press MULTI-CONTROL to select your favorite setting.
Press MULTI-CONTROL repeatedly until the
desired setting appears in the display.
! Shuffle Songs – Play back songs in a ran-
dom order within the selected list
! Shuffle Albums – Select an album ran-
domly, and then play back all the songs in it
in order
! Shuffle OFF – Cancel the random play
Playing all songs in a random
order (shuffle all)
This method plays all songs on the iPod randomly.
1 Use MULTI-CONTROL to select
Shuffle all in the function menu.
2 Press MULTI-CONTROL to turn shuffle
all on.
Press MULTI-CONTROL repeatedly until the
desired setting appears in the display.
All songs on the iPod will play randomly.
# Pressing and holding MULTI-CONTROL dur-
ing the normal playback display can also control
this function.
Pausing a song
1 Use MULTI-CONTROL to select Pause in
the function menu.
Playing songs in a random
order (shuffle)
For playback of the songs on the iPod, there
are two random play methods: Shuffle Songs
(play back songs in a random order) and
Shuffle Albums (play back albums in a random order).
1 Use MULTI-CONTROL to select
Shuffle mode in the function menu.
24
En
2 Press MULTI-CONTROL to turn pause
on.
Playback of the current song pauses.
# To turn pause off, press MULTI-CONTROL
again.
Changing audiobook speed
While listening to an audiobook on iPod, playback speed can be changed.
1 Use MULTI-CONTROL to select
Audiobooks in the function menu.
Page 25
1
Operating this unit
Section
02
2 Press MULTI-CONTROL to select your favorite setting.
Press MULTI-CONTROL repeatedly until the
desired setting appears in the display.
! Faster – Playback faster than normal speed
! Normal – Playback in normal speed
! Slower – Playback slower than normal
speed
English
Audio Adjustments
Introduction of audio adjustments
1 Audio display
Shows the audio adjustment status.
1 Press MULTI-CONTROL to display the
main menu.
FUNCTION, AUDIO and ENTERTAINMENT
appear on the display.
2 Use MULTI-CONTROL to select AUDIO.
Turn to change the menu option; press to select.
The audio function name appears on the display.
3 Turn MULTI-CONTROL to select the
audio function.
Turn MULTI-CONTROL to switch between the
audio functions in the following order:
Fader (balance adjustment)—Powerful (graphic equalizer adjustment)—50Hz (7-band
graphic equalizer adjustment)—LOUD (loudness)—Sub W.1 (subwoofer on/off setting)—
Sub W.2 (subwoofer setting)—Bass (bass
boost)—HPF (high pass filter)—SLA (source
level adjustment)
# You can also select the audio function by
pressing AUDIO on the remote control.
# You can select the Sub W.2 only when sub-
woofer output is turned on in Sub W.1.
# When selecting the FM tuner as the source,
you cannot switch to SLA.
# To return to the display of each source, press
BAND.
# If you do not operate functions except for
50Hz within about 30 seconds, the display is
automatically returned to the ordinary display.
En
25
Page 26

Section
02
Operating this unit
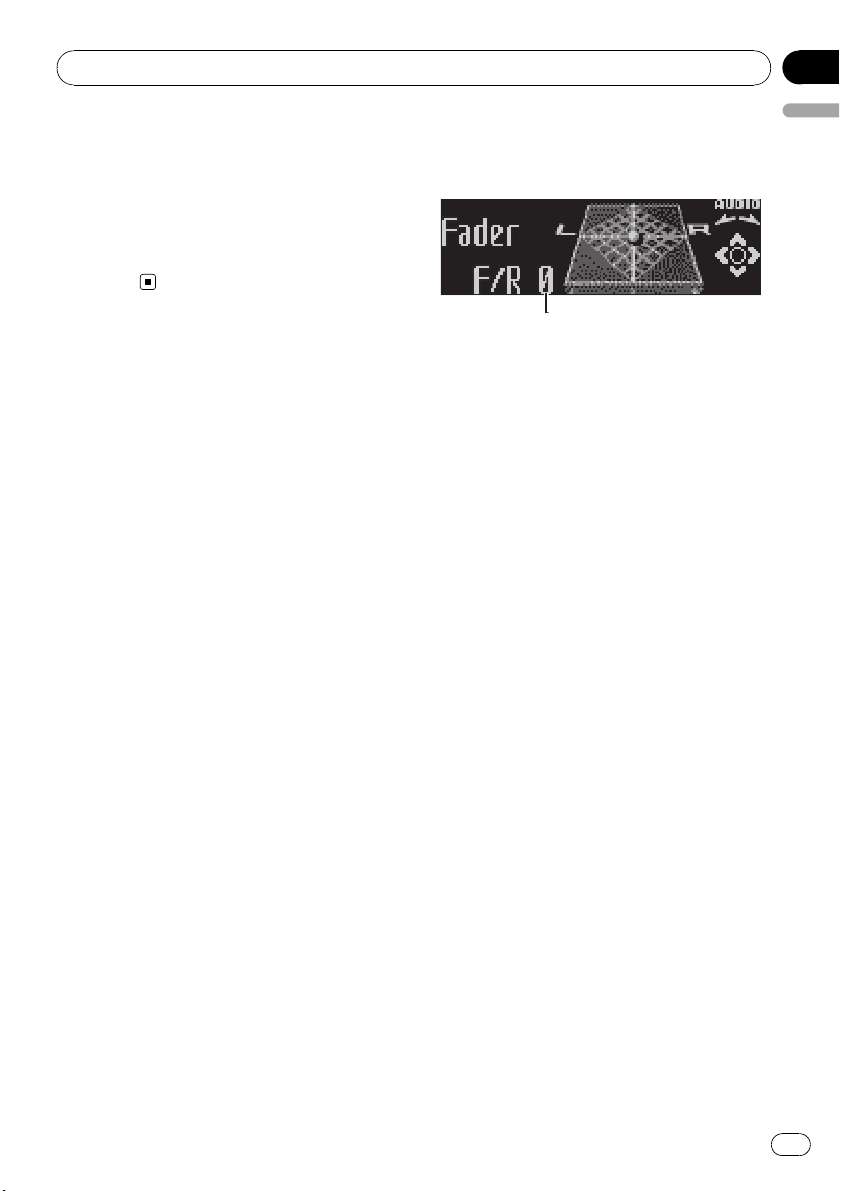
Using balance adjustment
You can change the fader/balance setting so
that it can provide you an ideal listening environment in all occupied seats.
1 Use MULTI-CONTROL to select Fader.
# If the balance setting has been previously adjusted, Balance will be displayed.
2 Push MULTI-CONTROL up or down to
adjust front/rear speaker balance.
Each time MULTI-CONTROL is pushed up or
down, the front/rear speaker balance moves
towards the front or rear.
F15to R15is displayed as the front/rear
speaker balance moves from front to rear.
# F/R 0 is the proper setting when only two
speakers are used.
# When the rear output setting is Rear SP :S/W,
you cannot adjust front/rear speaker balance.
Refer to Setting the rear output and subwoofer
controller on page 31.
3 Push MULTI-CONTROL left or right to
adjust left/right speaker balance.
Each time MULTI-CONTROL is pushed left or
right, the left/right speaker balance moves towards the left or right.
L15to R15is displayed as the left/right
speaker balance moves from left to right.
Using the equalizer
The equalizer lets you adjust the equalization
to match car interior acoustic characteristics
as desired.
Recalling equalizer curves
There are seven stored equalizer curves which
you can easily recall at any time. Here is a list
of the equalizer curves:
Custom1 Custom 1
Custom2 Custom 2
Flat Flat
S.Bass Super bass
! Custom1 and Custom2 are adjusted equal-
izer curves that you create. Adjustments
can be made with a 7-band graphic equalizer.
! When Flat is selected no supplement or
correction is made to the sound. This is
useful to check the effect of the equalizer
curves by switching alternatively between
Flat and a set equalizer curve.
% Press EQ to select the equalizer.
Press EQ repeatedly to switch between the following equalizers:
Powerful—Natural—Vocal—Custom1—
Custom2—Flat—S.Bass
Adjusting equalizer curves
The factory supplied equalizer curves, with the
exception of Flat, can be adjusted to a fine degree (nuance control).
1 Use MULTI-CONTROL to select the graphic equalizer adjustment.
Powerful appears in the display.
If the equalizer curve has been previously selected, the curve of that previously selected
will be displayed instead of Powerful.
2 Push MULTI-CONTROL left or right to
select an equalizer curve.
Each time MULTI-CONTROL is pushed left or
right, equalizer curves are selected in the following order:
Powerful—Natural—Vocal—Custom1—
Custom2—Flat—S.Bass
Display Equalizer curve
Powerful Powerful
Natural Natural
Vocal Vocal
26
En
3 Push MULTI-CONTROL up or down to
adjust the equalizer curve.
Each time MULTI-CONTROL is pushed up or
down, the equalizer curve increases or decreases respectively.
Page 27

Operating this unit
Section
02
+6 to –4 (or –6) is displayed as the equalizer
curve is increased or decreased.
# The actual range of the adjustments are different depending on which equalizer curve is selected.
# The equalizer curve with all frequencies set to
0 cannot be adjusted.
Adjusting 7-band graphic equalizer
For Custom1 and Custom2 equalizer curves,
you can adjust the level of each band.
! A separate Custom1 curve can be created
for each source. (The built-in CD player and
the multi-CD player are set to the same
equalizer adjustment setting automatically.) If you make adjustments when a
curve other than Custom2 is selected, the
equalizer curve settings will be memorized
in Custom1.
! A Custom2 curve can be created common
to all sources. If you make adjustments
when the Custom2 curve is selected, the
Custom2 curve will be updated.
1 Recall the equalizer curve you want to
adjust.
See Recalling equalizer curves on the previous
page.
2 Use MULTI-CONTROL to select 7-band
graphic equalizer adjustment.
Frequency and the level (e.g., 50Hz +4) appears in the display.
3 Push MULTI-CONTROL left or right to
select the equalizer band to adjust.
Each time MULTI-CONTROL is pushed left or
right, equalizer bands are selected in the following order:
50Hz—125Hz—315Hz—800Hz—2kHz—
5kHz—12.5kHz
4 Push MULTI-CONTROL up or down to
adjust the level of the equalizer band.
Each time MULTI-CONTROL is pushed up or
down, the level of the equalization band increases or decreases.
+6 to –6 is displayed as the level is increased
English
or decreased.
# You can then select another band and adjust
the level.
5 Press BAND to cancel the 7-band graphic equalizer adjustment.
Adjusting loudness
Loudness compensates for deficiencies in the
low- and high-sound ranges at low volume.
1 Use MULTI-CONTROL to select LOUD.
2 Press MULTI-CONTROL to turn loudness
on.
Loudness level (e.g., Mid) appears in the display.
# To turn loudness off, press MULTI-CONTROL
again.
3 Push MULTI-CONTROL left or right to
select a desired level.
Each time MULTI-CONTROL is pushed left or
right, level is selected in the following order:
Low (low)—Mid (mid)—High (high)
Using subwoofer output
This unit is equipped with a subwoofer output
which can be turned on or off.
1 Use MULTI-CONTROL to select Sub W.1.
# You can also select the subwoofer setting
menu by pressing SW on the unit.
2 Press MULTI-CONTROL to turn subwoofer output on.
Normal appears in the display. Subwoofer out-
put is now on.
# To turn subwoofer output off, press
MULTI-CONTROL again.
En
27
Page 28

Section
02
Operating this unit
3 Push MULTI-CONTROL left or right to
select the phase of subwoofer output.
Push MULTI-CONTROL left to select reverse
phase and Reverse appears in the display.
Push MULTI-CONTROL right to select normal
phase and Normal appears in the display.
Adjusting subwoofer settings
When the subwoofer output is on, you can adjust the cut-off frequency and the output level
of the subwoofer.
1 Use MULTI-CONTROL to select Sub W.2.
# You can also select the subwoofer setting
menu by pressing SW on the unit.
# When the subwoofer output is on, you can select Sub W.2.
2 Push MULTI-CONTROL left or right to
select cut-off frequency.
Each time MULTI-CONTROL is pushed left or
right, cut-off frequencies are selected in the
following order:
50Hz—63Hz—80Hz—100Hz—125Hz
Only frequencies lower than those in the selected range are outputted from the subwoofer.
3 Push MULTI-CONTROL up or down to
adjust the output level of the subwoofer.
Each time MULTI-CONTROL is pushed up or
down, subwoofer level increases or decreases.
+6 to –24 is displayed as the level is increased
or decreased.
Boosting the bass
Bass boost function boosts the bass level of
sound lower than 100 Hz. The more the bass
level is increased, the more the bass sound is
emphasized and the entire sound becomes
powerful. When using this function with the
subwoofer, the sound under the cut-off frequency is boosted.
1 Use MULTI-CONTROL to select Bass.
# You can also select the bass boost setting by
pressing and holding SW.
2 Push MULTI-CONTROL up or down to
select a desired level.
0 to +6 is displayed as the level is increased or
decreased.
Using the high pass filter
When you do not want low sounds from the
subwoofer output frequency range to play
from the front or rear speakers, turn on the
HPF (high pass filter). Only frequencies higher
than those in the selected range are outputted
from the front or rear speakers.
1 Use MULTI-CONTROL to select HPF.
2 Press MULTI-CONTROL to turn high
pass filter on.
80Hz appears in the display. High pass filter is
now on.
# If the high pass filter has been previously adjusted, the frequency of that previously selected
will be displayed instead of 80Hz.
# To turn high pass filter off, press
MULTI-CONTROL again.
3 Push MULTI-CONTROL left or right to
select cut-off frequency.
Each time MULTI-CONTROL is pushed left or
right, cut-off frequencies are selected in the
following order:
50Hz—63Hz—80Hz—100Hz—125Hz
Only frequencies higher than those in the selected range are outputted from the front or
rear speakers.
Adjusting source levels
SLA (source level adjustment) lets you adjust
the volume level of each source to prevent radical changes in volume when switching between sources.
! Settings are based on the FM tuner volume
level, which remains unchanged.
28
En
Page 29
1
Operating this unit
Section
02
1 Compare the FM tuner volume level
with the level of the source you wish to adjust.
2 Use MULTI-CONTROL to select SLA.
3 Push MULTI-CONTROL up or down to
adjust the source volume.
Each time MULTI-CONTROL is pushed up or
down, source volume increases or decreases.
SLA +4 to SLA –4 is displayed as the source
volume is increased or decreased.
Notes
! The AM tuner volume level can also be ad-
justed with source level adjustments.
! The built-in CD player and the multi-CD player
are set to the same source level adjustment
volume automatically.
! External unit 1 and external unit 2 are set to
the same source level adjustment volume
automatically.
English
Initial Settings
Adjusting initial settings
Using the initial settings, you can customize
various system settings to achieve optimal performance from this unit.
1 Function display
Shows the function status.
1 Press SOURCE and hold until the unit
turns off.
2 Press MULTI-CONTROL and hold until
Language select appears in the display.
3 Turn MULTI-CONTROL to select one of
the initial settings.
Turn MULTI-CONTROL to switch between the
functions in the following order:
Language select (language selection)—Clock
(clock)—Warning tone (warning tone)—
Face auto open (face auto open)—AUX1
(auxiliary input 1)—AUX2 (auxiliary input 2)—
Dimmer (dimmer)—Brightness (brightness)
—S/W control (rear output and subwoofer
controller)—Mute (sound muting/attenuation)—Demonstration (feature demo)—
Reverse mode (reverse mode)—Ever-scroll
(ever scroll)—BT AUDIO (Bluetooth audio)—
Pin code input (pin code input)
Use the following instructions to operate each
particular setting.
# You can also select the function by pressing
FUNCTION on the remote control.
# BT AUDIO and Pin code input can be se-
lected only when Bluetooth adapter (e.g., CDBTB100) is connected to this unit.
# To cancel initial settings, press BAND.
En
29
Page 30

Section
02
Operating this unit
Selecting the display language
For your convenience, this unit equips multiple language display. You can select the language best suited to your first language.
1 Use MULTI-CONTROL to select
Language select.
2 Press MULTI-CONTROL to select the language.
Each press of MULTI-CONTROL selects languages in the following order:
English—Français—Español
Setting the clock
Use these instructions to set the clock.
1 Use MULTI-CONTROL to select Clock.
2 Push MULTI-CONTROL left or right to
select the segment of the clock display you
wish to set.
Pushing MULTI-CONTROL left or right will select one segment of the clock display:
Hour—Minute
As you select segments of the clock display
the segment selected will blink.
3 Push MULTI-CONTROL up or down to
put a clock right.
Note
You can match the clock to a time signal by
pressing MULTI-CONTROL.
! If the minute is 00 to 29, the minutes are
rounded down. (e.g., 10:18 becomes 10:00.)
! If the minute is 30 to 59, the minutes are
rounded up. (e.g., 10:36 becomes 11:00.)
Switching the warning tone
If the front panel is not detached from the
head unit within four seconds of turning off
the ignition, a warning tone will sound. You
can turn off the warning tone.
1 Use MULTI-CONTROL to select
Warning tone.
2 Press MULTI-CONTROL to turn warning
tone on.
# To turn warning tone off, press
MULTI-CONTROL again.
Switching the face auto open
To protect against theft, this unit features detachable front panel. To detach the front panel
easily, the front panel opens automatically.
This function is on as a default.
1 Use MULTI-CONTROL to select
Face auto open.
2 Press MULTI-CONTROL to turn the face
auto open on.
# To turn the face auto open off, press
MULTI-CONTROL again.
Switching the auxiliary setting
Auxiliary equipments connected to this unit
can be activated individually. Set each AUX
source to ON when using. About connecting
or using auxiliary equipments, refer to Using
the AUX source on page 33.
1 Use MULTI-CONTROL to select AUX1/
AUX2.
2 Press MULTI-CONTROL to turn AUX1/
AUX2 on.
# To turn AUX off, press MULTI-CONTROL
again.
Switching the dimmer setting
To prevent the display from being too bright at
night, the display is automatically dimmed
when the car’s headlights are turned on. You
can turn the dimmer on or off.
1 Use MULTI-CONTROL to select Dimmer.
30
En
Page 31

Operating this unit
Section
02
2 Press MULTI-CONTROL to turn dimmer
on.
# To turn dimmer off, press MULTI-CONTROL
again.
Adjusting the brightness
You can adjust the display brightness. Initially
this mode is set to 12.
1 Use MULTI-CONTROL to select
Brightness.
2 Push MULTI-CONTROL left or right to
adjust the brightness level.
0 to 15 is displayed as the level is increased or
decreased.
# When dimmer is functioning, the brightness
level can be adjusted 0 to 10.
Setting the rear output and
subwoofer controller
This unit’s rear output (rear speaker leads output and RCA rear output) can be used for fullrange speaker (Rear SP :F.Range) or subwoo-
fer (Rear SP :S/W) connection. If you switch
the rear output setting to Rear SP :S/W, you
can connect a rear speaker lead directly to a
subwoofer without using an auxiliary amp.
Initially, the unit is set for rear full-range speaker connection (Rear SP :F.Range).
1 Use MULTI-CONTROL to select
S/W control.
2 Press MULTI-CONTROL to switch the
rear output setting.
Pressing MULTI-CONTROL will switch between Rear SP :F.Range (full-range speaker)
and Rear SP :S/W (subwoofer) and that status
will be displayed.
# When no subwoofer is connected to the rear
output, select Rear SP :F.Range.
# When a subwoofer is connected to the rear
output, set for subwoofer Rear SP :S/W.
English
Notes
! Even if you change this setting, there is no
output unless you turn the subwoofer output
on (refer to Using subwoofer output on page
27).
! If you change this setting, subwoofer output
in the audio menu return to the factory settings.
! Both rear speaker leads outputs and RCA rear
output are switched simultaneously in this
setting.
Switching the sound muting/
attenuation
Sound from this system is muted or attenuated automatically when the signal from the
equipment with mute function is received.
! The sound is muted or attenuated, MUTE
or ATT are displayed and no audio adjustment is possible.
! Sound from this system returns to normal
when the muting or attenuation is canceled.
1 Use MULTI-CONTROL to select Mute.
2 Press MULTI-CONTROL to switch the telephone muting/attenuation.
Pressing MULTI-CONTROL will switch between TEL ATT (attenuation) and TEL mute
(muting) and that status will be displayed.
Switching the feature demo
The feature demo automatically starts when
power to this unit is turned off while the ignition switch is set to ACC or ON.
1 Use MULTI-CONTROL to select
Demonstration.
2 Press MULTI-CONTROL to turn the feature demo on.
# To turn the feature demo off, press
MULTI-CONTROL again.
En
31
Page 32

Section
02
Operating this unit
Notes
! Remember that if the feature demo continues
operating when the car engine is turned off, it
may drain battery power.
! You can also turn on or off feature demo by
pressing DISPLAY while this unit is turned off.
For more details, see Feature demo mode on
page 9.
Switching the reverse mode
If you do not perform an operation within
about 30 seconds, screen indications start to
reverse, and then continue reversing every 10
seconds.
1 Use MULTI-CONTROL to select
Reverse mode.
2 Press MULTI-CONTROL to turn the reverse mode on.
# To turn the reverse mode off, press
MULTI-CONTROL again.
Note
You can also turn on or off reverse mode by pressing BAND while this unit is turned off. For more
details, see Reverse mode on page 8.
Switching the Ever Scroll
When Ever Scroll is set to ON, CD text information scrolls continuously in the display. Set
to OFF if you prefer the information to scroll
just once.
1 Use MULTI-CONTROL to select
Ever-scroll.
2 Press MULTI-CONTROL to turn the Ever
Scroll on.
# To turn the Ever Scroll off, press
MULTI-CONTROL again.
Activating the BT Audio source
You need to activate the BT Audio source in
order to use a Bluetooth audio player.
! Only when Bluetooth adapter (e.g. CD-
BTB100) is connected to this unit, you can
operate this function.
1 Use MULTI-CONTROL to select
BT AUDIO.
2 Press MULTI-CONTROL to turn the
BT Audio source on.
# To turn the BT Audio source off, press
MULTI-CONTROL again.
Entering PIN code for Bluetooth
wireless connection
To connect your cellular phone to this unit via
Bluetooth wireless technology, you need to
enter PIN code on your phone to verify the
connection. The default code is 0000, but you
can change this in this function.
! With some Bluetooth audio players, you
may be required to enter to this unit in advance PIN code of your Bluetooth audio
player, in order to set this unit ready for a
connection from your Bluetooth audio
player.
! Only when Bluetooth adapter (e.g. CD-
BTB100) is connected to this unit, you can
operate this function.
1 Use MULTI-CONTROL to select
Pin code input.
2 Push MULTI-CONTROL up or down to
select a number.
3 Push MULTI-CONTROL left or right to
move the cursor to the previous or next position.
4 After inputting PIN code (up to 16 digits), press MULTI-CONTROL.
PIN code you entered is now standby to be
stored in memory.
32
En
Page 33

Operating this unit
Section
02
When you press MULTI-CONTROL again on
the same display, the PIN code you entered is
stored in this unit.
# Pushing MULTI-CONTROL right in the confir-
mation display returns you to the PIN code input
display, and you can change the PIN code.
English
Other Functions
Using the AUX source
This unit can control up to two auxiliary equipments such as VCR or portable devices (sold
separately). When connected, auxiliary equipments are automatically read in as AUX
sources and assigned to AUX1 or AUX2. The
relationship between AUX1 and AUX2
sources is explained below.
About AUX1 and AUX2
You have two methods to connect auxiliary
equipments to this unit.
AUX1 source:
When connecting auxiliary equipment using a
stereo mini plug cable
% Insert the stereo mini plug into the
input jack on this unit.
For more details, refer to the installation manual.
The allocation of this auxiliary equipment is
automatically set to AUX1.
AUX2 source:
When connecting auxiliary equipment using an
IP-BUS-RCA Interconnector (sold separately)
% Use an IP-BUS-RCA Interconnector such
as the CD-RB20/CD-RB10 (sold separetely)
to connect this unit to auxiliary equipment
featuring RCA output.
For more details, refer to the IP-BUS-RCA Interconnector owner’s manual.
The allocation of this auxiliary equipment is
automatically set to AUX2.
# You can only make this type of connection if
the auxiliary equipment has RCA outputs.
En
33
Page 34

Section
02
Operating this unit
Selecting AUX as the source
% Press SOURCE to select AUX as the
source.
Press SOURCE until AUX appears in the display.
# If the auxiliary setting is not turned on, AUX
cannot be selected. For more details, see Switch-
ing the auxiliary setting on page 30.
Setting the AUX title
The title displayed for each AUX1 or AUX2
source can be changed.
1 After you have selected AUX as the
source, use MULTI-CONTROL and select
FUNCTION to display TitleInput "A".
2 Enter a title in the same way as the
built-in CD player.
For details concerning operation, refer to Entering disc titles on page 17.
Turning the clock display on or off
You can turn the clock display on or off.
! Even when the sources and the feature
demo are off, the clock display appears on
the display.
% Press CLOCK to turn the clock display
on or off.
Each press of CLOCK turns the clock display
on or off.
# The clock display disappears temporarily
when you perform other operations, but the clock
display appears again after 4 seconds.
Using different entertainment
displays
You can enjoy entertainment displays while listening to each sound source.
1 Press MULTI-CONTROL to display the
main menu.
FUNCTION, AUDIO and ENTERTAINMENT
appear on the display.
2 Use MULTI-CONTROL to select
ENTERTAINMENT.
Turn to change the menu option; press to select.
3 Use MULTI-CONTROL to change the display.
Turn to change the menu option; press to select.
BGV-1 (background visual 1)—BGV-2 (background visual 2)—BGP-1 (background picture
1)—BGP-2 (background picture 2)—BGP-3
(background picture 3)—BGP-4 (background
picture 4)—ENT. OFF1 (simple display 1)—
ENT. OFF2 (simple display 2)—LEVEL METER
(level meter)—VISUALIZER1 (visualizer 1)—
VISUALIZER2 (visualizer 2)—VISUALIZER3 (visualizer 3)—SPECTRUM ANALYZER 1 (spectrum analyzer 1)—SPECTRUM ANALYZER 2
(spectrum analyzer 2)—MOVIE (movie)—
ENT CLOCK (entertainment clock)
# You can also switch between the display by
pressing ENTERTAINMENT on the remote control.
# To return to the playback display, press BAND.
Using the PGM button
You can operate the preprogrammed functions
for each source by using PGM on the remote
control.
% Press PGM to turn pause on when selecting the following sources:
! CD – Built-in CD player
! Multi CD – Multi-CD player
! USB – USB portable audio player/USB
memory
! iPod – iPod
! BT Audio – Bluetooth audio player
! DVD – DVD player/multi-DVD player
# To turn pause off, press PGM again.
% Press PGM and hold to turn BSM on
when selecting tuner as the source.
Press PGM and hold until the BSM turns on.
34
En
Page 35

Operating this unit
Section
02
# To cancel the storage process, press PGM
again.
% Press PGM and hold to turn BSSM on
when selecting television as the source.
Press PGM and hold until the BSSM turns on.
# To cancel the storage process, press PGM
again.
% Press PGM to select the desired channel
select setting when selecting XM or SIRIUS
as the source.
Press PGM repeatedly to switch between the
following channel select settings:
Channel number (channel number select setting)—Category (channel category select
setting)
English
En
35
Page 36

12354
Section
03
Available accessories
XM tuner
Basic Operations
You can use this unit to control an XM satellite
digital tuner (GEX-P920XM), which is sold
separately.
For details concerning operation, refer to the
XM tuner’s operation manuals. This section
provides information on XM operations with
this unit which differs from that described in
the XM tuner’s operation manual.
! With this unit, you can operate two addi-
tional functions: XM channel direct selection and preset channel list.
1 XM band indicator
2 XM channel number indicator
3 XM preset number indicator
4 XM channel select setting indicator
Shows what channel select setting has been
selected. CH is displayed when
Channel number is selected, and CAT is displayed when Category is selected.
5 XM text information
Shows the text information of broadcast
channel.
1 Press SOURCE to select the XM.
2 Press BAND to select an XM band.
Press BAND until the desired XM band is displayed, XM-1, XM-2 or XM-3.
3 To perform tuning, push
MULTI-CONTROL left or right.
The channels move up or down step by step.
Channels that cannot currently be selected
are skipped, and the next channel is selected.
# If you push and hold MULTI-CONTROL left or
right, you can increase or decrease channel number continuously.
# You can also perform tuning from a desired
channel category. (Refer to Selecting a channel in
the channel category on the next page.)
Selecting an XM channel directly
When using the remote control, you can select
the XM channel directly by entering the desired channel number.
1 Press DIRECT.
Channel number input display appears.
2 Press 0 to 9 buttons to enter the desired
channel number.
# You can cancel the input number by pressing
CLEAR.
3 Press DIRECT.
The XM channel of entered number is
selected.
# After entering the number input mode, if you
do not perform an operation within about eight
seconds, the mode is automatically canceled.
Switching the XM display
% Press DISPLAY to switch the XM display.
Text information (channel name)—Artist name
and text information—Song title and text information—Category name and text information
Storing and recalling broadcast
stations
You can easily store up to six broadcast stations for later recall.
! Up to 18 stations, six for each of three XM
bands can be stored in memory.
1 When you find a station that you want
to store in memory press LIST.
36
En
Page 37

Available accessories
Section
03
2 Use MULTI-CONTROL to store the selected station in memory.
Turn to change the preset number; press and
hold to store.
The XM preset number you have selected will
flash and then remain lit. The selected station
has been stored in memory.
3 Use MULTI-CONTROL to select the desired station.
Turn to change the station; press to select.
# You can also change the station by pushing
MULTI-CONTROL up or down.
# If you do not operate the list within about 30
seconds, the display is automatically returned to
the ordinary display.
Using the remote control
% When you find a station that you want
to store in memory, press one of preset
tuning buttons 1 to 6 and hold until the
XM preset number stops flashing.
The number you have pressed will flash in the
XM preset number indicator and then remain
lit. The selected station has been stored in
memory.
The next time you press the same preset tuning button the station is recalled from memory.
# You can also recall stations assigned to preset
tuning numbers by pushing MULTI-CONTROL up
or down.
# To return to Channel number (channel num-
English
ber select setting), press and hold CLOCK again.
2 Push MULTI-CONTROL up or down to
select the desired channel category.
3 Push MULTI-CONTROL left or right to
select the desired channel in the selected
channel category.
Note
You can also select the XM channel select setting
in the menu that appears by using
MULTI-CONTROL.
Displaying the Radio ID
Channel number select setting
If you select CH 000, the ID code is displayed.
% Push MULTI-CONTROL left or right to
select CH 000.
Channel category select setting
RADIO ID is provided as a channel category
for displaying the ID code.
% Push MULTI-CONTROL up or down to
select RADIO ID from channel category.
# If you select another channel, display of the ID
code is canceled.
# Display of the ID code repeats displaying
RADIO ID and the ID code one after the other.
Selecting a channel in the
channel category
You have two methods for selecting a channel:
by number and by category. Selecting
Category enables you to narrow your search
down to only channels in a particular category.
1 Press and hold CLOCK to switch to
Category (channel category select setting).
CAT appears in the display.
En
37
Page 38

12354
Section
03
Available accessories
SIRIUS Satellite Radio tuner
Basic Operations
You can use this unit to control a SIRIUS Satellite Radio tuner, which is sold separately.
When the SIRIUS tuner is used together with
this unit, some operations differ slightly from
those described in the SIRIUS operation manual. This manual provides information on
these points. For all other information on
using the SIRIUS tuner, please refer to the SIRIUS operation manual.
! With this unit, you can operate one addi-
tional function: SIRIUS channel direct selection. Refer to Selecting a SIRIUS channel
directly on this page.
1 SIRIUS band indicator
2 SIRIUS channel number indicator
3 SIRIUS preset number indicator
4 SIRIUS channel select setting indicator
Shows what channel select setting has been
selected. CH is displayed when
Channel number is selected, and CAT is displayed when Category is selected.
5 SIRIUS channel name
Shows the channel name of broadcast
channel.
1 Press SOURCE to select SIRIUS.
3 To perform tuning, push
MULTI-CONTROL left or right.
The channels move up or down step by step.
Channels that cannot currently be selected
are skipped, and the next channel is selected.
# If you push and hold MULTI-CONTROL left or
right, you can increase or decrease channel number continuously.
# You can also perform tuning from a desired
channel category. (Refer to Selecting a channel in
the channel category on the next page.)
Note
It may take a few seconds before you can hear
anything while this unit acquires and processes
the satellite signal when you change the source
to SIRIUS tuner or select a channel.
Selecting a SIRIUS channel directly
When using the remote control, you can select
the SIRIUS channel directly by entering the desired channel number.
1 Press DIRECT.
Channel number input display appears.
2 Press 0 to 9 buttons to enter the desired
channel number.
# You can cancel the input number by pressing
CLEAR.
3 Press DIRECT.
The SIRIUS channel of entered number is
selected.
# After entering the number input mode, if you
do not perform an operation within about eight
seconds, the mode is automatically canceled.
2 Press BAND to select a SIRIUS band.
Press BAND until the desired SIRIUS band is
displayed, SR-1, SR-2 or SR-3.
38
En
Introduction of advanced
operations
1 Press MULTI-CONTROL to display the
main menu.
FUNCTION, AUDIO and ENTERTAINMENT
appear on the display.
Page 39

Available accessories
Section
03
2 Use MULTI-CONTROL to select
FUNCTION.
Turn to change the menu option; press to
select.
The function name appears on the display.
3 Turn MULTI-CONTROL to select the
function.
Turn MULTI-CONTROL to switch between the
functions in the following order:
Channel mode (channel select mode setting)
—Team setting (team setting)—Game info
(game info)
# You can also select the function by pressing
FUNCTION on the remote control.
# To return to the channel display, press BAND.
# If you do not operate functions within about
30 seconds, the display is automatically returned
to the ordinary display.
Switching the SIRIUS display
% Press DISPLAY to switch the SIRIUS display.
Channel number—Channel name — Category
name—Artist name—Song title/program title
—Composer name
Switching the scroll setting
You can select the scroll setting, one is the
continuous scroll, the other is one-time scroll.
% Press and hold DISPLAY to select the
scroll setting.
Press and hold DISPLAY selects scroll setting
in the following order:
Continuous scroll setting—One-time scroll
setting
Storing and recalling broadcast
stations
You can easily store up to six broadcast stations for later recall.
! Only the remote control can operate this
function.
! Up to 18 stations, six for each of three SIR-
English
IUS bands can be stored in memory.
% When you find a station that you want
to store in memory press one of preset tuning buttons 1 to 6 and hold until the SIRIUS
preset number stops flashing.
The number you have pressed will flash in the
SIRIUS preset number indicator and then remain lit. The selected station has been stored
in memory.
The next time you press the same preset tuning button the station is recalled from memory.
# You can also recall stations assigned to preset
tuning numbers by pushing MULTI-CONTROL up
or down.
Selecting a channel in the
channel category
You have two methods for selecting a channel:
by number and by category. Selecting
Category enables you to narrow your search
down to only channels in a particular category.
1 Press and hold CLOCK to switch to
Category (channel category select setting).
CAT appears in the display.
# To return to Channel number (channel num-
ber select setting), press and hold CLOCK again.
2 Push MULTI-CONTROL up or down to
select the desired channel category.
3 Push MULTI-CONTROL left or right to
select the desired channel in the selected
channel category.
Note
You can also select the SIRIUS channel select setting in the menu that appears by using
MULTI-CONTROL.
En
39
Page 40

Section
03
Available accessories
Using the Game Alert function
Only when SIR-PNR2/SIR-PNR2C is connected
to this unit, you can operate this function.
This unit can alert you when games involving
your favorite teams are about to start. To use
this function you need in advance to set up a
game alert for the teams.
Selecting teams for Game Alert
1 Use MULTI-CONTROL to select
Team setting in the function menu.
2 Push MULTI-CONTROL left or right to
select a desired league.
League names are switched in the display.
3 Push MULTI-CONTROL up or down to
select a desired team.
Teams in the selected category are switched in
the display.
4 Press MULTI-CONTROL to store the selected team in memory.
ON is displayed with the selected team, and
the Game Alert function will start on that
team.
# To turn the Game Alert off of the selected
team, press MULTI-CONTROL again.
# When you have already made 12 team selections, FULL is displayed and additional team selection is not possible. In this case, first delete
the team selection and then try again.
5 Repeat these steps for selecting other
teams.
Up to 12 teams can be selected.
2 Press and hold MULTI-CONTROL to turn
the Game Alert on.
The Game Alert function is now on.
# To turn the Game Alert function off, press and
hold MULTI-CONTROL again.
When the game of the selected team
starts
When a game of the selected team is about to
start (or is currently playing) on a different station, Game alert info is displayed. Press and
hold MULTI-CONTROL to switch to that station, and you can listen to that game.
! If you do not operate the function within
about 10 seconds, the display is automatically returned.
Displaying game information
If games of your selected teams are currently
playing, you can display information of the
games and tune to the broadcast channel.
You can display information of the games
while enjoying the sound from currently tuning station. You can also tune to the broadcast
channel when you wish to.
1 Use MULTI-CONTROL to select
Game info in the function menu.
The game information of your selected team is
displayed.
2 Push MULTI-CONTROL up or down to
select a game.
The game is displayed, followed by more detailed game information.
! Game score will be updated automatically.
Switching the Game Alert on or off
Once you made team selections, you need to
turn the Game Alert function on.
! The Game Alert function is on at the default
setting.
1 Use MULTI-CONTROL to select
Team setting in the function menu.
40
En
3 Press and hold MULTI-CONTROL to
switch to that station to listen to the
game.
Notes
! If you have not made any team selections,
NOT SET is displayed.
! When games involving your favorite teams are
not currently playing, NO GAME is displayed.
Page 41

213
Available accessories
Displaying the Radio ID
If you select CH 000, the ID code is displayed.
% Push MULTI-CONTROL left or right to
select CH 000.
Playing songs on iPod
Listening to songs on your iPod
You can use this unit to control an iPod adapter,
which is sold separately.
1 Song number indicator
2 Play time indicator
3 Song time (progress bar)
1 Press SOURCE to select iPod.
While the iPod is connected to this unit,
PIONEER (or
the iPod.
2 To perform fast forward or reverse,
push and hold MULTI-CONTROL left or
right.
(check mark)) is displayed on
Section
03
English
3 To skip back or forward to another
song, push MULTI-CONTROL left or right.
Pushing MULTI-CONTROL right skips to the
start of the next song. Pushing
MULTI-CONTROL left once skips to the start
of the current song. Pushing again will skip to
the previous song.
Notes
! Read the precautions with iPod on page 66.
! If an error message such as ERROR-11 is dis-
played, refer to Error messages on page 63.
! When the ignition switch is set to ACC or ON,
the iPod’s battery is charged while the iPod is
connected to this unit.
! While the iPod is connected to this unit, the
iPod itself cannot be turned on or off.
! Before connecting the dock connector of this
unit to the iPod, disconnect the headphones
from the iPod.
En
41
Page 42

Section
03
Available accessories
! The iPod connected to this unit is turned off
about two minutes after the ignition switch is
set to OFF.
Browsing for a song
The operation of this unit to control an iPod is
designed to be as close to the operation of the
iPod as possible for easy operation and song
search.
! If playlist has been selected, first, this unit
shows playlist of your iPod’s name. This
playlist plays all songs in your iPod.
! If the characters recorded on the iPod are
not compatible with this unit, those characters will not be displayed.
1 Press LIST to switch to the top menu of
the list search.
2 Use MULTI-CONTROL to select a category.
Turn to change the category; press to select.
Playlists (playlists)—Artists (artists)—
Albums (albums)—Songs (songs)— Genres
(genres)
List from the selected category is displayed.
# You can start playback throughout the selected category by pressing and holding
MULTI-CONTROL.
# You can also change the category by pushing
MULTI-CONTROL up or down.
# You can also select the category by pushing
MULTI-CONTROL right.
# To return to the previous list, push
MULTI-CONTROL left.
# To go to the top menu of the list search, push
and hold MULTI-CONTROL left.
# If you do not operate the list within about 30
seconds, the display is automatically returned to
the ordinary display.
3 Repeat step 2 to find a song you want
to listen to.
Displaying text information on
iPod
% Press DISPLAY to select the desired text
information.
Play time—
song title and play time—
play time—
—
: song title and : album title
# If the characters recorded on the iPod are not
compatible with this unit, those characters will
not be displayed.
Notes
! You can scroll to the left the text information
by pressing and holding DISPLAY.
! When Ever Scroll is set to ON at the initial set-
ting, text information scrolls continuously in
the display. Refer to Switching the Ever Scroll
on page 32.
: album title and play time— :
: artist name and
: artist name and : album title
Introduction of advanced iPod
adapter operation
1 Press MULTI-CONTROL to display the
main menu.
FUNCTION, AUDIO and ENTERTAINMENT
appear on the display.
2 Use MULTI-CONTROL to select
FUNCTION.
Turn to change the menu option; press to select.
The function name appears in the display.
3 Turn MULTI-CONTROL to select the
function.
Turn MULTI-CONTROL to switch between the
functions in the following order:
Play mode (repeat play)—Shuffle mode (random play)—Pause (pause)
# You can also select the function by pressing
FUNCTION on the remote control.
# To return to the playback display, press BAND.
# If you do not operate functions within about
30 seconds, the display is automatically returned
to the ordinary display.
42
En
Page 43

Available accessories
Section
03
Function and operation
Play mode, Shuffle mode and Pause operations are the same as that of iPod connected
to USB interface of this unit.
Function name Operation
Play mode Refer to Repeating play on page 24.
Shuffle mode
Pause
Refer to Playing songs in a random
order (shuffle) on page 24.
Refer to Pausing a song on page
24.
English
Bluetooth Audio
Basic Operations
If you connect Bluetooth adapter (e.g. CDBTB100) to this unit, you can control Bluetooth
audio player via Bluetooth wireless technology.
Important
! Depending on the Bluetooth audio player con-
nected to this unit, the available operations
with this unit are limited to the following two
levels:
— Lower level: Only playing back songs on
your audio player is possible.
— Higher level: Playing back, pausing, select-
ing songs, etc., are possible (all the operations illustrated in this manual).
! Since there are a number of Bluetooth audio
players available on the market, operations
with your Bluetooth audio player using this
unit vary in great range. Please refer to the instruction manual that came with your Bluetooth audio player as well as this manual
while operating your player on this unit.
! Information about songs (e.g. the elapsed
playing time, song title, song index, etc.) cannot be displayed on this unit.
! While you are listening to songs on your Blue-
tooth audio player, please refrain from operating on your cellular phone as much as
possible. If you try operating on your cellular
phone, the signal from your cellular phone
may cause a noise on the song playback.
! When you are talking on the cellular phone
connected to this unit via Bluetooth wireless
technology, the song playback from your Bluetooth audio player connected to this unit is
muted.
! Even if while you are listening to song on your
Bluetooth audio player you switch to another
source, the playback of song continues to
elapse.
En
43
Page 44

1
Section
03
Available accessories
For details concerning operation, refer to the
Bluetooth adapter’s operation manual. This
section provides brief information on Bluetooth audio player operations with this unit
which slightly differes or is cut short from that
described in the Bluetooth adapter’s operation
manual.
! Even though your audio player does not
contain a Bluetooth module, you can still
control it from this unit via Bluetooth wireless technology. To control your audio
player by using this unit, connect a product
featuring Bluetooth wireless technology
(available on the market) to your audio
player and connect Bluetooth adapter (e.g.
CD-BTB100) to this unit.
1 Device name
Shows the device name of the connected
Bluetooth audio player (or Bluetooth adapter).
1 Press SOURCE to select Bluetooth audio
player.
# If you cannot display BT Audio, first activate
the BT audio source in the initial setting. For detailes, refer to Activating the BT Audio source on
page 32.
# For this unit to control your Bluetooth audio
player it needs to establish a Bluetooth wireless
connection. (Refer to Connecting a Bluetooth
audio player on this page.)
2 To perform fast forward or reverse,
push and hold MULTI-CONTROL left or
right.
3 To skip back or forward to another
track, push MULTI-CONTROL left or right.
Introduction of advanced
operations
1 Press MULTI-CONTROL to display the
main menu.
FUNCTION, AUDIO and ENTERTAINMENT
appear on the display.
2 Use MULTI-CONTROL to select
FUNCTION.
Turn to change the menu option; press to select.
The function name appears in the display.
3 Turn MULTI-CONTROL to select the
function.
Turn MULTI-CONTROL to switch between the
functions in the following order:
Connection open (connection open)—
Disconnect audio (disconnect audio)—Play
(Play)—Stop (Stop)—Pause (pause)—
Device info (device information)
# If a Bluetooth audio player is connected via
lower level, only Disconnect audio and
Device info appear in the function menu.
# If a Bluetooth audio player has not been connected to this unit yet, Connection open and
Device info appear in the function menu and
other functions are not available.
# You can also select the function by pressing
FUNCTION on the remote control.
# To return to the playback display, press BAND.
# If you do not operate functions except for
Connection open and Disconnect audio within
about 30 seconds, the display is automatically returned to the ordinary display.
Connecting a Bluetooth audio
player
1 Use MULTI-CONTROL to select
Connection open in the function menu.
44
En
Page 45

Available accessories
Section
03
2 Press MULTI-CONTROL to open the connection.
Always waiting is displayed. This unit is now
on standby for connection from Bluetooth
audio player.
If your Bluetooth audio player is set ready for
Bluetooth wireless connection, the connection
to this unit will be automatically established.
Note
Before you can use audio players you may need
to enter the PIN code into this unit. If your player
requires a PIN code to establish a connection,
look for the code on the player or in its accompanying documentation. Enter the PIN code referring to Entering PIN code for Bluetooth wireless
connection on page 32.
Playing songs on Bluetooth
audio player
1 Use MULTI-CONTROL to select Play in
the function menu.
2 Press MULTI-CONTROL to start playback.
Pausing a song
Pause lets you temporarily stop playback of a
song.
1 Use MULTI-CONTROL to select Pause in
the function menu.
2 Press MULTI-CONTROL to turn pause
on.
Playback of the current song pauses.
# To turn pause off, press MULTI-CONTROL
again.
Stopping playback
1 Use MULTI-CONTROL to select Stop in
the function menu.
2 Press MULTI-CONTROL to stop the play-
English
back.
Playback of the current song stops.
Disconnecting a Bluetooth
audio player
1 Use MULTI-CONTROL to select
Disconnect audio in the function menu.
2 Press MULTI-CONTROL to disconnect
the Bluetooth audio player.
Disconnected is displayed. The Bluetooth
audio player is now diconnected from this
unit.
Displaying BD (Bluetooth
Device) address
1 Use MULTI-CONTROL to select
Device info in the function menu.
The device name (Pioneer BT Unit) of this
unit appears in the display.
2 Push MULTI-CONTROL left to switch to
the BD address.
12-digit hexadecimal string is displayed.
# Pushing MULTI-CONTROL right returns to the
device name.
Displaying system version for
repair
1 Use MULTI-CONTROL to select
Device info in the function menu.
The device name (Pioneer BT Unit) of this
unit appears in the display.
2 Push MULTI-CONTROL down to switch
to the system version of this unit.
The system (microprocessor) version of this
unit is displayed.
# Pushing MULTI-CONTROL left displays the
version of the Bluetooth module of this unit.
Pushing MULTI-CONTROL right returns to the
system version of this unit.
En
45
Page 46

132
4
567
Section
03
Available accessories
Bluetooth Telephone
Basic Operations
If you use Bluetooth adapter (e.g. CD-BTB100),
you can connect a cellular phone featuring
Bluetooth wireless technology to this unit for
hands-free, wireless calls, even while driving.
Important
! Since this unit is on standby to connect with
your cellular phones via Bluetooth wireless
technology, using this unit without running
the engine can result in battery drainage.
! Advanced operations that require your atten-
tion such as dialing numbers on the monitor,
using phone book, etc., are prohibited while
you are driving. When you need to use these
advanced operations, stop your vehicle in a
safe place and operate.
For details concerning operation, refer to the
Bluetooth adapter’s operation manual. This
section provides brief information on the
hands-free phoning operations with this unit
which slightly differes or is cut short from that
described in the Bluetooth adapter’s operation
manual.
Shows the battery strength of cellular phone.
! Battery strength indicator may differ
from the actual battery strength.
! If the battery strength is not available,
nothing is displayed in the battery
strength indicator area.
5 Incoming call notice indication
Shows when an incoming call has been received and not checked yet.
! Incoming call notice is not displayed for
calls made when your cellular phone is
disconnected from this unit.
6 Automatic answering/Automatic rejecting in-
dicator
Shows AUTO when the automatic answering
function is on (for more details, refer to Setting
the automatic answering on page 54).
Shows REJECT when the automatic rejecting
function is on (for more details, refer to Setting
the automatic rejecting on page 54).
7 Calendar display
Shows the date, and time (if connected with a
phone).
% Press SOURCE to select the telephone.
Note
Equalizer curve for the phone source is fixed.
When selecting the phone source, you cannot operate the equalizer function. Refer to Recalling
equalizer curves on page 26.
1 Device name
Shows the device name of the cellular phone.
2 Signal level indicator
Shows the signal strength of cellular phone.
! Signal level indicator may differ from
the actual signal level.
3 User number indicator
Shows the registration number of the cellular
phone.
4 Battery strength indicator
46
En
Setting up for hands-free phoning
Before you can use the hands-free phoning
function you will need to set up the unit for
use with your cellular phone. This entails establishing a Bluetooth wireless connection between this unit and your phone, registering
your phone with this unit, and adjusting the
volume level.
1 Connection
For detailed instructions on connecting your
phone to this unit via Bluetooth wireless technology, refer to Connecting a cellular phone on
page 48.
Page 47

Available accessories
Section
03
# Your phone should now be temporarily connected; however, to make best use of the technology, we recommend you register the phone to
this unit.
2 Registration
Refer to Registering connected cellular phone
on page 49 for instructions on how to register
your temporarily connected phone.
3 Volume adjustment
Adjust the earpiece volume on your cellular
phone for comfort. When adjusted, the volume
level is memorized in this unit as the default
setting.
# Caller’s voice volume and ring volume may
vary depending on the type of cellular phones.
# If the difference between the ring volume and
caller’s voice volume is big, overall volume level
may become unstable.
# Before disconnecting cellular phone from this
unit, make sure to adjust the volume to proper
level. If the volume has been muted (zero level)
on your cellular phone, the volume level of your
cellular phone remains muted even after the cellular phone is disconnected from this unit.
Making a phone call
Voice recognition
1 Press BAND and hold until Voice dial
appears in the display.
Voice dial appears in the display. When
Voice dial ON is displayed, voice recognition
function is now ready.
# If your cellular phone does not feature voice
recognition function, No voice dial appears in
the display and opearation is not available.
2 Pronounce the name of your contact.
English
Taking a phone call
Answering an incoming call
1 When a call comes in, push
MULTI-CONTROL up.
# If the private mode is selected on the cellular
phone, hands-free phoning may not be performed.
2 To end the call, push MULTI-CONTROL
down.
The estimated call time appears in the display
(this may differ slightly from the actual call
time).
Rejecting an incoming call
% When a call comes in, push
MULTI-CONTROL down.
The call is rejected.
Answering a call waiting
1 Push MULTI-CONTROL up to answer a
call waiting.
# Pushing MULTI-CONTROL up switches be-
tween callers on hold.
2 Push MULTI-CONTROL down to end all
calls.
Pushing MULTI-CONTROL down ends all calls
including a call waiting on line.
# The caller you have been talking to is now on
hold. To end the call, both you and your caller
need to hang up the phone.
# While your callers hold the line, pushing
MULTI-CONTROL up switches between callers.
Rejecting a call waiting
% Push MULTI-CONTROL down to reject a
call waiting.
En
47
Page 48

Section
03
Available accessories
Introduction of advanced
operations
1 Press MULTI-CONTROL to display the
main menu.
FUNCTION, AUDIO and ENTERTAINMENT
appear on the display.
2 Use MULTI-CONTROL to select
FUNCTION.
Turn to change the menu option; press to select.
Function names for hands-free phoning appear on the display.
3 Turn MULTI-CONTROL to change functions.
Turn MULTI-CONTROL to switch between the
functions.
Function names that appear in the display are
different depending on your cellular phone’s
connection and registration status.
If not connected yet
Search & Connect (search and connect)—
Connection open (connection open)—
Connect phone (connect phone)—
Delete phone (delete phone)—PH.B.Transfer
(phone book transfer)—Refuse calls (automatic reject setting)—Auto answer (automatic answer setting)—Ring tone (ring tone
select)—Auto connect (automatic connection
setting)—Echo cancel (echo cancel)—
Device info (device information)
If connected but not registered yet
Disconnect phone (disconnect phone)—
Set phone (registering phone)—
Delete phone (delete phone)—PH.B.Transfer
(phone book transfer)—Number dial (call by
entering number)—Refuse calls (automatic
reject setting)—Auto answer (automatic answer setting)—Ring tone (ring tone select)—
Auto connect (automatic connection setting)
—Echo cancel (echo cancel)—Device info
(device information)
If already connected and registered
Disconnect phone (disconnect phone)—
Delete phone (delete phone)—PH.B.Transfer
(phone book transfer)—PH.B.Name view
(phone book name view)—Clear memory
(clear memory)—Number dial (call by entering number)—Refuse calls (automatic reject
setting)—Auto answer (automatic answer
setting)—Ring tone (ring tone select)—
Auto connect (automatic connection setting)
—Echo cancel (echo cancel)—Device info
(device information)
# You can also select the function by pressing
FUNCTION on the remote control.
# PH.B.Name view (phone book name view)
cannot be selected for cellular phone registered
guest phone.
# If cellular phone is connected to this unit via
Bluetooth wireless technology with HSP (Head
Set Profile), PH.B.Name view, Clear memory,
Number dial and Refuse calls cannot be selected.
# To return to the playback display, press BAND.
# If you do not operate functions except for
Search & Connect, Connection open,
Connect phone, PH.B.Transfer,
Disconnect phone, Number dial and
Clear memory within about 30 seconds, the dis-
play is automatically returned to the ordinary display.
Connecting a cellular phone
Searching for available cellular phones
1 Use MULTI-CONTROL to select
Search & Connect in the function menu.
2 Press MULTI-CONTROL to search for
available cellular phones.
While searching, Searching flashes. When
available cellular phones featuring Bluetooth
wireless technology are found, device names
or Name not found (if names cannot be obtained) are displayed.
# If this unit fails to find any available cellular
phones, Not found is displayed.
3 Push MULTI-CONTROL up or down to
select a device name you want to connect.
48
En
Page 49

Available accessories
Section
03
4 Press MULTI-CONTROL to connect the
selected cellular phone.
While connecting, Connecting flashes. To
complete the connection, please check the device name (Pioneer BT Unit) and enter the
link code on your cellular phone. If the connection is established, Connected is displayed.
# The link code is set to 0000 as default. You
can change this code in the initial setting. Refer
to Entering PIN code for Bluetooth wireless con-
nection on page 32.
Using a cellular phone to initiate a
connection
1 Use MULTI-CONTROL to select
Connection open in the function menu.
2 Press MULTI-CONTROL to open the connection.
Always waiting is displayed and the unit is
now on standby for connection from cellular
phone.
3 Use cellular phone to connect to this
unit.
# The link code is set to 0000 as default. You
can change this code in the initial setting. Refer
to Entering PIN code for Bluetooth wireless con-
nection on page 32.
Disconnecting a cellular phone
1 Use MULTI-CONTROL to select
Disconnect phone in the function menu.
Device name of the connected phone appears
in the display.
2 Press MULTI-CONTROL to disconnect a
cellular phone from this unit.
After the disconnection is completed,
Disconnected is displayed.
English
Registering connected cellular
phone
1 Use MULTI-CONTROL to select
Set phone in the function menu.
2 Push MULTI-CONTROL up or down to
select a registration assignment.
P1 (user phone 1)—P2 (user phone 2)—P3
(user phone 3)—G1 (guest phone 1)—G2
(guest phone 2)
# As you select each assignment, you can see
whether or not a phone is already registered
there. If the assignment is empty, No data is displayed. If the assignment is already taken, the device name appears. To replace an assignment
with a new phone, first delete the current assignment. For more detailed instructions, see Deleting
a registered phone on this page.
3 Press MULTI-CONTROL to register the
currenctly connected phone.
When the registration is completed,
Reg. Completed is displayed.
# If the registration failed, Reg. ERROR is dis-
played. In this case, return to step 1 and try
again.
Deleting a registered phone
1 Use MULTI-CONTROL to select
Delete phone in the function menu.
2 Push MULTI-CONTROL up or down to
select a registration assignment.
P1 (user phone 1)—P2 (user phone 2)—P3
(user phone 3)—G1 (guest phone 1)—G2
(guest phone 2)
# If the assignment is empty, No data is dis-
played and the operation is not possible.
3 Push MULTI-CONTROL right to select
Delete YES.
Delete YES is displayed. Deleting phone is
now on standby.
En
49
Page 50

Section
03
Available accessories
4 Press MULTI-CONTROL to delete the
phone.
After the phone is deleted, Deleted is displayed.
Connecting to a registered
cellular phone
Connecting to a registered phone
manually
1 Use MULTI-CONTROL to select
Connect phone in the function menu.
2 Push MULTI-CONTROL up or down to
select a registration assignment.
P1 (user phone 1)—P2 (user phone 2)—P3
(user phone 3)—G1 (guest phone 1)—G2
(guest phone 2)
# If the assignment is empty, No data is dis-
played and the operation is not possible.
3 Press MULTI-CONTROL to connect the
selected cellular phone.
While connecting, Connecting is displayed.
After the connection is completed, Connected
is displayed.
Connecting to a registered phone
automatically
1 Use MULTI-CONTROL to select
Auto connect in the function menu.
2 Press MULTI-CONTROL to turn automatic connection on.
If your cellular phone is set ready for Bluetooth
wireless connection, the connection to this
unit will be automatically established.
# To turn automatic connection off, press
MULTI-CONTROL again.
Using the Phone Book
Transferring entries to the Phone Book
The Phone Book can hold a total of 500 entries; 300 from User 1, 150 from User 2, and 50
from User 3.
1 Use MULTI-CONTROL to select
PH.B.Transfer in the function menu.
2 Press MULTI-CONTROL to enter in the
phone book transfer standby mode.
Transfer appears in the display.
3 Use cellular phone to perform phone
book transfer.
Perform phone book transfer using the cellular phone. For detailed instruction on this,
refer to the instruction manual that came with
your cellular phone.
# The display indicates how many entries have
been transferred and the total number to be
transferred.
4 Data transferred is displayed and
phone book transfer is completed.
Changing the Phone Book display order
1 Use MULTI-CONTROL to select
PH.B.Name view in the function menu.
Invert Names YES appears in the display.
2 Press MULTI-CONTROL to change the
name view order.
Inverted is displayed and the name view
order is changed.
Pressing MULTI-CONTROL repeatedly
changes the name view order between first
name and last name.
Calling a number in the Phone Book
Important
You are required to park your vehicle and set the
parking brake in order to perform this operation.
After finding the number in the Phone Book
you want to call, you can select the entry and
make the call.
1 Press LIST to display the Phone Book.
2 Push MULTI-CONTROL left or right to
select the first letter of the name you are
looking for.
50
En
Page 51

Available accessories
Section
03
3 Press MULTI-CONTROL to display entries.
The display shows the first three Phone Book
entries starting with that letter (e.g. “Ben”,
“Brian” and “Burt” when “B” is selected).
4 Push MULTI-CONTROL up or down to
select a Phone Book entry you want to call.
5 Push MULTI-CONTROL right to display
the detailed list of the selected entry.
The phone number, name and genre (if assigned) of entries are displayed in the detailed
list.
# You can scroll the name and phone number
by holding DISPLAY.
# If several phone numbers are entered to an
entry, select one by turning MULTI-CONTROL.
# If you want to go back and select another
entry, push MULTI-CONTROL left.
6 Press MULTI-CONTROL to make a call.
7 To end the call, push MULTI-CONTROL
down.
Editing the name of a Phone Book entry
Important
You are required to park your vehicle and set the
parking brake in order to perform this operation.
You can edit the names of Phone Book entries.
Each name can be up to 16 characters long.
1 Display the detailed list of your desired
Phone Book entry.
See step 1 to 5 on Calling a number in the
Phone Book on the previous page for how to
do this.
2 Press and hold MULTI-CONTROL to display the name input screen.
Edit name is displayed.
3 Press DISPLAY to select the desired
character type.
Each press of DISPLAY switches the character
types in the following order:
Alphabet (upper case), numbers and symbols
English
—alphabet (lower case)—numbers and symbols—European characters, such as those
with accents (e.g., á, à, ä, ç) or Russian characters
# Pressing and holding DISPLAY enables you to
switch character set between ISO8859-1 (European characters) and ISO8859-5 (Russian characters) alternately.
# European characters and Russian characters
can’t be mixed.
4 Push MULTI-CONTROL up or down to
select a letter.
# To delete a character and leave a space, select
“_” (underbar).
5 Push MULTI-CONTROL left or right to
move the cursor to the previous or next
character position.
6 Press MULTI-CONTROL to store the new
name.
Editing phone numbers
Important
You are required to park your vehicle and set the
parking brake in order to perform this operation.
You can edit the numbers of Phone Book entries. Each phone number can be up to 24 digits long.
1 Display the detailed list of your desired
Phone Book entry.
See step 1 to 5 on Calling a number in the
Phone Book on the previous page for how to
do this.
2 Press and hold MULTI-CONTROL to display the name input screen.
Edit name is displayed.
3 Turn MULTI-CONTROL to switch to the
number input screen.
Edit name (name input screen)—
Edit number (number input screen)—
Clear memory (clear memory screen)
En
51
Page 52

Section
03
Available accessories
4 Push MULTI-CONTROL left or right to
move the cursor to the number you want
to change.
5 Push MULTI-CONTROL up or down to
change numbers.
Repeat these steps until you have finished
changing.
6 Press MULTI-CONTROL to store the new
number.
Clearing a Phone Book entry
Important
You are required to park your vehicle and set the
parking brake in order to perform this operation.
1 Display the detailed list of your desired
Phone Book entry.
See step 1 to 5 on Calling a number in the
Phone Book on page 50 for how to do this.
2 Press and hold MULTI-CONTROL to display the name input screen.
Edit name is displayed.
3 Turn MULTI-CONTROL to switch to the
clear memory screen.
Edit name (name input screen)—
Edit number (number input screen)—
Clear memory (clear memory screen)
4 Push MULTI-CONTROL right to show a
confirmation display.
Clear memory YES is displayed.
# If you do not want to clear memory that you
have selected, push MULTI-CONTROL left. The
display reverts.
5 Press MULTI-CONTROL to delete the
Phone Book entry.
Cleared is displayed.
The Phone Book entry is deleted. The display
returns to Phone Book entry list.
Using the Call History
Important
You are required to park your vehicle and set the
parking brake in order to perform this operation.
The 12 most recent calls made (dialled), received and missed, are stored in the Call History. You can browse the Call History and call
numbers from it.
1 Press LIST to display the list.
Press LIST repeatedly to switch between the
following lists:
Phone book—Missed call—Dialled call—Received call
# About the Phone Book list, refer to Using the
Phone Book on page 50.
# If no phone numbers have been stored in the
selected list, No data is displayed.
2 Turn MULTI-CONTROL to select a phone
number.
Turning MULTI-CONTROL to change the
phone numbers stored in the list.
# If the number is already in the Phone Book
the name is displayed.
# You can also change the phone number by
pushing MULTI-CONTROL up or down.
3 Push MULTI-CONTROL right to display
the detailed list.
Name and phone number are displayed in the
detailed list.
# If the number is already in the Phone Book
then the name is also displayed.
# Turning MULTI-CONTROL switches to the pre-
vious or next phone number diplayed in the detailed list.
# If you do not operate anything within about 30
seconds, the list display is canceled automatically.
4 Press MULTI-CONTROL to make a call.
# For an international call, press and hold
MULTI-CONTROL to add + to the phone number.
5 To end the call, push MULTI-CONTROL
down.
52
En
Page 53

Available accessories
Section
03
Using preset numbers
Important
You are required to park your vehicle and set the
parking brake in order to perform this operation.
Numbers that you dial frequently can be assigned to presets for quick recall.
1 Select a desired phone number from
the Phone Book or the Call History. Or directly enter a desired phone number.
To select a desired phone number from the
Phone Book or the Call History, see the instructions explained in previous pages. To directly enter a desired phone number, see
Making a call by entering phone number on
this page.
2 Press and hold one of 1 to 6 on the remote control to store the phone number.
The selected phone number has been stored
in memory. The next time you press the same
preset button, the phone number is recalled
from memory.
Making a call by entering
phone number
Important
You are required to park your vehicle and set the
parking brake in order to perform this operation.
1 Use MULTI-CONTROL to select
Number dial in the function menu.
# You can also enter in this menu from the
standby display by pressing DIRECT on the remote control.
2 Push MULTI-CONTROL up or down to
select a number.
# You can also input numbers by pressing 0 to 9
on the remote control.
3 Push MULTI-CONTROL left or right to
move the cursor to the previous or next position.
# Up to 24 digits can be entered.
4 When you completed entering the
English
number, press MULTI-CONTROL.
Call confirmation appears.
5 Press MULTI-CONTROL again to make a
call.
6 To end the call, push MULTI-CONTROL
down.
Clearing memory
1 Use MULTI-CONTROL to select
Clear memory in the function menu.
2 Push MULTI-CONTROL up or down to
select an item.
Each time MULTI-CONTROL is pushed up or
down, the items are switched in the following
order:
Phone book (phone book)—Missed calls
(missed call history)—Dialled calls (dialled
call history)—Received calls (received call history)—Dial preset (preset phone numbers)—
All clear (delete all memory)
# If you want to clear all the Phone Book,
dialled/received/missed call history list and preset phone number, select All clear.
# If guest phone is connected to this unit via
Bluetooth wireless technology, Phone book cannot be selected.
3 Push MULTI-CONTROL right to determine the item that you want to delete
from this unit.
Clear memory YES is displayed. Clearing
memory is now on standby.
# If you do not want to clear memory that you
have selected, push MULTI-CONTROL left. The
display reverts.
4 Press MULTI-CONTROL to clear the
memory.
Cleared is displayed and data on the selected
item is cleared from this unit’s memory.
En
53
Page 54

Section
03
Available accessories
Setting the automatic answering
1 Use MULTI-CONTROL to select
Auto answer in the function menu.
2 Press MULTI-CONTROL to turn automatic answering on.
# To turn automatic answering function off,
press MULTI-CONTROL again.
Setting the automatic rejecting
1 Use MULTI-CONTROL to select
Refuse calls in the function menu.
2 Press MULTI-CONTROL to turn automatic call rejection on.
# To turn automatic call rejection off, press
MULTI-CONTROL again.
Switching the ring tone
1 Use MULTI-CONTROL to select
Ring tone in the function menu.
2 Press MULTI-CONTROL to turn the ring
tone on.
# To turn the ring tone off, press
MULTI-CONTROL again.
2 Push MULTI-CONTROL left to switch to
the BD address.
12-digit hexadecimal string is displayed.
# Pushing MULTI-CONTROL right returns to the
device name.
Displaying system version for
repair
1 Use MULTI-CONTROL to select
Device info in the function menu.
The device name (Pioneer BT Unit) of this
unit appears in the display.
2 Push MULTI-CONTROL down to switch
to the system version of this unit.
The system (microprocessor) version of this
unit is displayed.
# Pushing MULTI-CONTROL left displays the
version of the Bluetooth module of this unit.
Pushing MULTI-CONTROL right returns to the
system version of this unit.
Echo canceling and noise reduction
1 Use MULTI-CONTROL to select
Echo cancel in the function menu.
2 Press MULTI-CONTROL to turn echo canceling on.
# To turn echo canceling off, press
MULTI-CONTROL again.
Displaying BD (Bluetooth
Device) address
1 Use MULTI-CONTROL to select
Device info in the function menu.
The device name (Pioneer BT Unit) of this
unit appears in the display.
54
En
Page 55

3
1
2
Available accessories
Multi-CD Player
Basic Operations
You can use this unit to control a multi-CD
player, which is sold separately.
! Only those functions described in this man-
ual are supported by 50-disc multi-CD
players.
! This unit is not designed to operate disc title
list functions with a 50-disc multi-CD player.
About the disc title list functions, please
refer to Selecting discs from the disc title list
on page 58.
1 Disc number indicator
2 Track number indicator
3 Play time indicator
1 Press SOURCE to select the multi-CD
player.
2 Push MULTI-CONTROL up or down to
select a disc you want to listen to.
# You can also select a disc by using 1 to 6 but-
tons on the remote control.
! For discs 1 to 6, press the corresponding
button number.
! For discs 7 to 12, press and hold the corre-
sponding numbers, such as 1 for disc 7,
until the disc number appears in the display.
3 To perform fast forward or reverse,
push and hold MULTI-CONTROL left or
right.
4 To skip back or forward to another
track, push MULTI-CONTROL left or right.
Section
03
English
Notes
! When the multi-CD player performs the pre-
paratory operations, Ready is displayed.
! If an error message such as ERROR-11 is dis-
played, refer to the multi-CD player owner’s
manual.
! If there are no discs in the multi-CD player ma-
gazine, No disc is displayed.
Selecting a track directly
The operation is basically the same as that of
the built-in CD player.
For details concerning operation, refer to Se-
lecting a track directly on page 15.
Introduction of advanced
operations
You can use Compression (compression and
DBE) only with a multi-CD player that supports
them.
1 Press MULTI-CONTROL to display the
main menu.
FUNCTION, AUDIO and ENTERTAINMENT
appear on the display.
2 Use MULTI-CONTROL to select
FUNCTION.
Turn to change the menu option; press to select.
The function name appears on the display.
3 Turn MULTI-CONTROL to select the
function.
Turn MULTI-CONTROL to switch between the
functions in the following order:
Play mode (repeat play)—Random mode
(random play)—Scan mode (scan play)—
Pause (pause)—Compression (compression
and DBE)—ITS play mode (ITS play)—
ITS memo (ITS programming)—
TitleInput "A" (disc title input)
# You can also select the function by pressing
FUNCTION on the remote control.
# To return to the playback display, press BAND.
En
55
Page 56

Section
03
Available accessories
# If you do not operate functions except for
ITS memo and TitleInput "A" within about 30
seconds, the display is automatically returned to
the ordinary display.
Function and operation
Play mode, Random mode, Scan mode,
Pause, Compression and TitleInput "A" op-
erations are basically the same as that of the
built-in CD player.
Function name Operation
Refer to Selecting a repeat play
range on page 16.
But the repeat play ranges you can
select are different from that of the
built-in CD player. The repeat play
ranges of the multi-CD player are
Play mode
Random mode
Scan mode
Pause
Compression
ITS play mode
ITS memo
TitleInput "A"
as below:
! M-CD repeat – Repeat all
discs in the multi-CD player
! Track repeat – Repeat just the
current track
! Disc repeat – Repeat the cur-
rent disc
Refer to Playing tracks in random
order on page 16.
Refer to Scanning folders and
tracks on page 16.
Refer to Pausing disc playback on
page 17.
Refer to Using compression and
BMX on page 17.
Multi-CD player has DBE (dynamic
bass emphasis) function instead
of BMX.
The settings can be switched as
below:
COMP OFF—COMP 1—COMP 2
—COMP OFF—DBE 1—DBE 2
Refer to Using ITS playlists on this
page.
Refer to Using ITS playlists on this
page.
Refer to Entering disc titles on
page 17.
Notes
! If you select other discs during repeat play,
the repeat play range changes to
M-CD repeat.
! If you perform track search or fast forward/re-
verse during Track repeat, the repeat play
range changes to Disc repeat.
! After track or disc scanning is finished, nor-
mal playback of the tracks will begin again.
! When playing a CD TEXT disc on a CD TEXT
compatible multi-CD player, you cannot
switch to TitleInput "A". The disc title has already been recorded on a CD TEXT disc.
Using ITS playlists
ITS (instant track selection) lets you make a
playlist of favorite tracks from those in the
multi-CD player magazine. After you have
added your favorite tracks to the playlist you
can turn on ITS play and play just those selections.
You can use ITS to enter and play back up to
99 tracks per disc from up to 100 discs (with
the disc titles). (With multi-CD players sold before the CDX-P1250 and CDX-P650, up to 24
tracks can be stored in the playlist.)
Creating a playlist with ITS programming
1 Play a CD that you want to program.
Push MULTI-CONTROL up or down to select
the CD.
2 Use MULTI-CONTROL to select
ITS memo in the function menu.
3 Select the desired track by pushing
MULTI-CONTROL left or right.
4 Push MULTI-CONTROL up to store the
currently playing track in the playlist.
Memory complete is displayed and the cur-
rently playing selection is added to your playlist.
56
En
Page 57

Available accessories
Section
03
5 Press BAND to return to the playback
display.
Note
After data for 100 discs has been stored in memory, data for a new disc will overwrite the oldest
one.
Playback from your ITS playlist
ITS play lets you listen to the tracks that you
have entered into your ITS playlist. When you
turn on ITS play, tracks from your ITS playlist
in the multi-CD player will begin to play.
1 Select the repeat range.
Refer to Playing tracks in random order on
page 16.
2 Use MULTI-CONTROL to select
ITS play mode in the function menu.
3 Press MULTI-CONTROL to turn ITS play
on.
ITS play mode appears in the display. Play-
back begins of those tracks from your playlist
within the previously selected M-CD repeat or
Disc repeat ranges.
# If no tracks in the current range are programmed for ITS play, then ITS empty is displayed.
# To turn ITS play off, press MULTI-CONTROL
again.
Erasing a track from your ITS playlist
You can delete a track from your ITS playlist if
ITS play is on.
If ITS play is already on, skip to step 2. If ITS
play is not already on, use MULTI-CONTROL.
1 Play the CD with the track you want to
delete from your ITS playlist, and turn ITS
play on.
Refer to Playback from your ITS playlist on this
page.
2 Use MULTI-CONTROL to select
English
ITS memo in the function menu.
3 Select the desired track by pushing
MULTI-CONTROL left or right.
4 Push MULTI-CONTROL down to erase
the track from your ITS playlist.
The currently playing selection is erased from
your ITS playlist and playback of the next track
from your ITS playlist begins.
# If there are no tracks from your playlist in the
current range, ITS empty is displayed and normal play resumes.
5 Press BAND to return to the playback
display.
Erasing a CD from your ITS playlist
You can delete all tracks of a CD from your ITS
playlist if ITS play is off.
1 Play the CD that you want to delete.
Push MULTI-CONTROL up or down to select
the CD.
2 Use MULTI-CONTROL to select
ITS memo in the function menu.
3 Push MULTI-CONTROL down to erase
all tracks on the currently playing CD from
your ITS playlist.
All tracks on the currently playing CD are
erased from your playlist and
Memory deleted is displayed.
4 Press BAND to return to the playback
display.
Using disc title functions
You can input CD titles and display the titles.
Then you can easily search for and play a desired disc.
En
57
Page 58

Section
03
Available accessories
Entering disc titles
Use the disc title input feature to store up to
100 CD titles (with ITS playlist) into the multiCD player. Each title can be up to 10 characters long.
For details concerning operation, refer to En-
tering disc titles on page 17.
! Titles remain in memory, even after the
disc has been removed from the magazine,
and are recalled when the disc is reinserted.
! After data for 100 discs has been stored in
memory, data for a new disc will overwrite
the oldest one.
Displaying disc titles
You can display the text information of any
disc that has had a disc title entered.
The operation is the same as that of the builtin CD player.
Refer to Displaying text information on disc on
page 18.
Selecting discs from the disc title list
Disc title list lets you see the list of disc titles
that have been entered into the multi-CD
player and select one of them to play back.
Using CD TEXT functions
You can use these functions only with a CD
TEXT compatible multi-CD player.
The operation is the same as that of the builtin CD player.
Refer to Displaying text information on disc on
page 18.
1 Press LIST to switch to the disc title list
mode during the playback display.
2 Use MULTI-CONTROL to select the desired disc title.
Turn to change the disc title; press to play.
# You can also change the disc title by pushing
MULTI-CONTROL up or down.
# When playing CD TEXT disc, push
MULTI-CONTROL right to see a list of the tracks
in the selected disc. Push MULTI-CONTROL left
to return to the disc list.
# If no title has been entered for a disc,
No D.Title will be displayed.
# No disc is displayed next to the disc number
when there is no disc in the magazine.
58
En
Page 59

5
134
2
Available accessories
DVD Player
Basic Operations
You can use this unit to control a DVD player or
multi-DVD player, which is sold separately.
For details concerning operation, refer to the
DVD player’s or multi-DVD player’s operation
manual. This section provides information on
DVD operations with this unit which differs
from that described in the DVD player’sor
multi-DVD player’s operation manual.
1 DVD.V/VCD/CD/MP3/WMA indicator
Shows the type of disc currently playing.
2 Disc number indicator
Shows the disc number currently playing
when using a multi-DVD player.
3 Title/Folder number indicator
Shows the title (when playing DVD video) or
folder (when playing compressed audio) of
the selection currently playing.
4 Chapter/track number indicator
Shows the chapter (when playing DVD video)
or track (when playing video CD, CD or compressed audio) currently playing.
5 Play time indicator
1 Press SOURCE to select the DVD player/
multi-DVD player.
2 To perform fast forward or reverse,
push and hold MULTI-CONTROL left or
right.
3 To skip back or forward to another
chapter/track, push MULTI-CONTROL left or
right.
Section
03
English
Selecting a disc
! You can operate this function only when a
multi-DVD player is connected to this unit.
% Press any of 1 to 6 on the remote control to select the desired disc.
Selecting a folder
! You can operate this function only when a
DVD player which is corresponding to compressed audio playback is connected to
this unit.
% Push MULTI-CONTROL up or down to
select a folder.
Introduction of advanced
operations
1 Press MULTI-CONTROL to display the
main menu.
FUNCTION, AUDIO and ENTERTAINMENT
appear on the display.
2 Use MULTI-CONTROL to select
FUNCTION.
Turn to change the menu option; press to select.
The function name appears on the display.
3 Turn MULTI-CONTROL to select the
function.
Turn MULTI-CONTROL to switch between the
functions in the following order:
During DVD video or Video CD playback
Play mode (repeat play)—Pause (pause)
During CD playback
Play mode (repeat play)—Random mode
(random play)—Scan mode (scan play)—
Pause (pause)—ITS play mode (ITS play)—
ITS memo (ITS input)—TitleInput "A" (disc
title input)
During compressed audio playback
Play mode (repeat play)—Random mode
(random play)—Scan mode (scan play)—
Pause (pause)
En
59
Page 60

Section
03
Available accessories
# You can also select the function by pressing
FUNCTION on the remote control.
# To return to the playback display, press BAND.
# If you do not operate functions except for
ITS memo and TitleInput "A" within about 30
seconds, the display is automatically returned to
the ordinary display.
Function and operation
Play mode, Random mode, Scan mode,
Pause and TitleInput "A" operations are basi-
cally the same as that of the built-in CD player.
Also, ITS play mode and ITS memo operations are basically the same as that the multiCD player.
Function name Operation
Refer to Selecting a repeat play
range on page 16.
But the repeat play range that you
can select is vary depending on
the type of disc or system. The repeat play ranges of the DVD
player/multi-DVD player are as
below:
During PBC playback of Video
CDs, this function cannot be oper-
Play mode
Random mode
Scan mode
Pause
ITS play mode
ated.
! Disc repeat – Repeat the cur-
rent disc
! Folder repeat – Repeat the
current folder
! Title repeat – Repeat just the
current title
! Chapter repeat – Repeat just
the current chapter
! Track repeat – Repeat just the
current track
Refer to Playing tracks in random
order on page 16.
Refer to Scanning folders and
tracks on page 16.
Refer to Pausing disc playback on
page 17.
Refer to Using ITS playlists on
page 56.
ITS memo
TitleInput "A"
Refer to Using ITS playlists on
page 56.
Refer to Entering disc titles on
page 17.
Notes
! If you select other discs during repeat play,
the repeat play range changes to Disc repeat.
! During video CD or CD playback, if you per-
form track search or fast forward/reverse during Track repeat, the repeat play range
changes to Disc repeat.
! During compressed audio playback, if you se-
lect another folder during repeat play, the repeat play range changes to Disc repeat.
! During compressed audio playback, if you per-
form track search or fast forward/reverse during Track repeat, the repeat play range
changes to Folder repeat.
! When using this unit with multi-DVD player,
you can switch to ITS play mode, ITS memo
and disc title input.
! The ITS function of a DVD player differs
slightly from ITS playback with a multi-CD
player. With multi-DVD player, ITS playback applies only to the CD playing. For details, refer
to Using ITS playlists on page 56.
60
En
Page 61

3
1
2
Available accessories
TV tuner
Basic Operations
You can use this unit to control a TV tuner,
which is sold separately.
For details concerning operation, refer to the
TV tuner’s operation manual. This section provides information on TV operations with this
unit which differs from that described in the
TV tuner’s operation manual.
1 Band indicator
2 Preset number indicator
3 Channel indicator
1 Press SOURCE to select the TV.
2 Press BAND to select a band.
Press BAND until the desired band is displayed, TV-1 or TV-2.
3 To perform manual tuning, push
MULTI-CONTROL left or right.
4 To perform seek tuning, push and hold
MULTI-CONTROL left or right for about one
second and release.
The tuner will scan the channels until a broadcast strong enough for good reception is
found.
# You can cancel seek tuning by pushing
MULTI-CONTROL left or right.
# If you push and hold MULTI-CONTROL left or
right, you can skip broadcasting channels. Seek
tuning starts as soon as you release
MULTI-CONTROL.
Section
03
English
Storing and recalling broadcast
stations
You can easily store up to 12 broadcast stations for later recall.
! Up to 24 stations, 12 for each of two TV
bands, can be stored in memory.
1 When you find a station that you want
to store in memory press LIST.
2 Use MULTI-CONTROL to store the selected station in memory.
Turn to change the preset number; press and
hold to store.
The preset number you have selected will
flash and then remain lit. The selected station
has been stored in memory.
3 Use MULTI-CONTROL to select the desired station.
Turn to change the station; press to select.
# You can also change the station by pushing
MULTI-CONTROL up or down.
# If you do not operate the list within about 30
seconds, the display is automatically returned to
the ordinary display.
Using the remote control
You can also store and recall stations assigned
to preset tuning numbers P1to P6by using
the remote control.
% When you find a station that you want
to store in memory, press one of preset
tuning buttons 1 to 6 and hold until the
preset number stops flashing.
The number you have pressed will flash in the
preset number indicator and then remain lit.
The selected station has been stored in memory.
The next time you press the same preset tuning button the station is recalled from memory.
# You can also recall stations assigned to preset
tuning numbers by pushing MULTI-CONTROL up
or down during the channel display.
En
61
Page 62

Section
03
Available accessories
Storing the strongest broadcast
stations sequentially
1 Press MULTI-CONTROL to display the
main menu.
FUNCTION, AUDIO and ENTERTAINMENT
appear on the display.
2 Use MULTI-CONTROL and select
FUNCTION to display BSSM.
Turn to change the menu option; press to select.
# You can also select the function by pressing
FUNCTION on the remote control.
3 Press MULTI-CONTROL to turn BSSM
on.
Searching is displayed. While Searching is
displayed, the 12 strongest broadcast stations
will be stored in order from the lowest channel
up. When finished, the preset channel list appears.
# To cancel the storage process, press
MULTI-CONTROL again.
4 Use MULTI-CONTROL to select the desired station.
Turn to change the station; press to select.
# You can also change the station by pushing
MULTI-CONTROL up or down.
# To return to the channel display, press BAND.
# If you do not operate the list within about 30
seconds, the display is automatically returned to
the ordinary display.
Note
Storing broadcast stations with BSSM may replace broadcast stations you have saved using
P1to P12.
62
En
Page 63

Additional Information
Error messages
When you contact your dealer or your nearest
Pioneer Service Center, be sure to record the
error message.
Built-in CD Player
Message Cause Action
ERROR-11, 12,
17, 30
ERROR-11, 12,
17, 30
ERROR-10, 11,
12, 15, 17, 30,
A0
ERROR-15 The inserted disc
ERROR-22, 23 The CD format
No Audio The inserted disc
TRK SKIPPED The inserted disc
PROTECT All the files on
USB audio player/USB memory
Message Cause Action
No Audio No songs Transfer the audio
Dirty disc Clean disc.
Scratched disc Replace disc.
Electrical or mechanical
does not contain
any data
cannot be played
back
does not contain
any files that can
be played back
contains WMA
files that are protected by DRM
the inserted disc
are secured by
DRM
USB memory
with security enabled is connected
No songs Transfer the songs
Switch the ignition
key, or switch to a
different source,
then back to the
CD player.
Replace disc.
Replace disc.
Replace disc.
Replace disc.
Replace disc.
files to the USB
portable audio
player/USB memory and connect.
Follow the USB
memory instructions to disable the
security.
to iPod.
The connected
TRK SKIPPED
PROTECT All the files on
N/A USB The USB device
CHECK USB The USB connec-
N/A PLAYLIST Selected m3u
USB portable
audio player/
USB memory
contains WMA
files that are protected by
Windows Media
DRM 9/10
the connected
USB portable
audio player/
USB memory are
protected by
Windows Media
DRM 9/10
connected to is
not supported by
this unit.
tor or USB cable
is short-circuited.
The connected
USB portable
audio player/
USB memory
consumes more
than 500 mA
(maximum allowable current).
playlist cannot
be played back.
All the files on
the selected m3u
playlist are protected by
Windows Media
DRM 9/10.
Appendix
English
Play an audio file
not protected by
Windows Media
DRM 9/10.
Transfer audio files
not protected by
Windows Media
DRM 9/10 to the
USB portable
audio player/USB
memory and connect.
Connect a USB
portable audio
player or USB
memory that is
USB Mass Storage
Class compliant.
Confirm that the
USB connector or
USB cable is not
caught in something or damaged.
Disconnect the
USB portable
audio player/USB
memory and do
not use it. Turn the
ignition switch to
OFF, then to ACC
or ON and then
connect the compliant USB portable audio player/
USB memory.
Select another
playlist.
Select another
playlist.
En
63
Page 64

Appendix
Additional Information
iPod
Message Cause Action
ERROR-11 Communication
failure
ERROR-21 Old version of
iPod
ERROR-30 iPod failure Reset the iPod.
ERROR-A0 iPod is not
charged but operates correctly
No Songs No songs Transfer the songs
STOP No songs in the
current list
Disconnect the
cable from iPod.
Once iPod main
menu is displayed,
connect the cable
again.
Reset the iPod.
Update the iPod
version.
Check if the connection cable for
iPod shorted out
(e.g., not caught in
metal objects).
After checking,
switch the ignition
key or disconnect
the iPod and connect again.
to iPod.
Select a list that
contains the
songs.
Handling guideline of discs
and player
! Use only discs featuring either of following
two logos.
! Use only conventional, fully circular discs.
Do not use shaped discs.
! Do not insert anything other than a CD into
the CD loading slot.
! Do not use cracked, chipped, warped, or
otherwise damaged discs as they may damage the player.
! Unfinalized CD-R/CD-RW disc playback is
not possible.
! Do not touch the recorded surface of the
discs.
! Store discs in their cases when not in use.
! Avoid leaving discs in excessively hot envir-
onments including under direct sunlight.
! Do not attach labels, write on or apply che-
micals to the surface of the discs.
! To clean a CD, wipe the disc with a soft
cloth outward from the center.
! Condensation may temporarily impair the
player’s performance. Leave it to adjust to
the warmer temperature for about one
hour. Also, wipe any dump discs with a soft
cloth.
! Playback of discs may not be possible be-
cause of disc characteristics, disc format,
recorded application, playback environment, storage conditions and so on.
! Text information may not be correctly dis-
played depending on the recorded environment.
! Road shocks may interrupt disc playback.
! Read the precautions with discs before
using them.
Dual Discs
! Dual Discs are two-sided discs that have a
recordable CD for audio on one side and a
recordable DVD for video on the other.
! Since the CD side of Dual Discs is not phy-
sically compatible with the general CD
standard, it may not be possible to play the
CD side with this unit.
! Use 12-cm or 8-cm CD. Do not use an
adapter when playing 8-cm CDs.
64
En
Page 65

Additional Information
Appendix
! Frequent loading and ejecting of a Dual
Disc may result in scratches on the disc.
Serious scratches can lead to playback problems on this unit. In some cases, a Dual
Disc may become stuck in the disc loading
slot and will not eject. To prevent this, we
recommend you refrain from using Dual
Disc with this unit.
! Please refer to the information from the
disc manufacturer for more detailed information about Dual Discs.
USB audio player/USB memory
USB audio player/USB memory
compatibility
! Specification: USB 2.0 full speed
! USB Class: MSC (Mass Storage Class) de-
vice
! Protocol: bulk
! Maximum amount of memory: 250 GB
! File system: FAT12, FAT16, FAT32
! Supply current: 500 mA
Notes
! Partitioned USB memory is not compatible
with this unit.
! Depending on the kind of USB portable audio
player/USB memory you use, this unit may
not recognize the USB audio player/USB
memory or audio files may not be played back
properly.
! You cannot connect a USB portable audio
player/USB memory to this unit via a USB
hub.
! This unit is compatible with m3u playlist
(.m3u). To obtain optimum performance of
this unit, we highly recommend to encode
m3u playlist with Windows Media Player
Ver.10.
extended amounts of time. Extended expo-
English
sure to direct sunlight can result in USB
portable audio player/USB memory malfunction due to the resulting high temperature.
! Do not leave the USB portable audio
player/USB memory in any location with a
high temperature.
! Firmly secure the USB portable audio
player/USB memory when driving. Do not
let the USB portable audio player/USB
memory fall onto the floor, where it may become jammed under the brake or accelerator pedal.
! There may be a slight delay when starting
playback of audio files encoded with image
data.
! Depending on the USB devices connecting
to this unit, it may generate noise in the
radio.
! Only 32 characters from the beginning can
be displayed as a file name (including the
extension) or a folder name when USB portable audio player/USB memory is selected
as a source.
! The text information of some audio files
may not be correctly displayed.
! File extensions must be used properly.
! Up to 15 000 files on a USB portable audio
player/USB memory can be played back.
! Up to 2 048 folders on a USB portable
audio player/USB memory can be played
back.
! There may be a slight delay when starting
playback of audio files on a USB portable
audio player/USB memory with numerous
folder hierarchies.
! Do not connect anything other than the
USB portable audio player/USB memory.
! Operations may vary depending on the
kind of USB audio player and a USB memory.
USB audio player/USB memory
! Do not leave the USB portable audio
player/USB memory in direct sunlight for
En
65
Page 66

1
2
5
6
Appendix
Additional Information
The sequence of audio files on USB
memory
For USB portable audio players, the sequence is
different from that of USB memory and depends on the player.
Example of a hierarchy
: Folder
: Compressed audio file
3
4
Level 1 Level 2 Level 3 Level 4
! 01 to 05 represent assigned folder num-
bers. 1 to 6 represent the playback sequence. The user cannot assign folder
numbers and specify the playback sequence with this unit.
! The sequence of audio files/folders to be
played back, selected by the scan play and
displayed in the file name list is determined
as follows:
— The sequence of files is given priority
over the sequence of subfolders.
— In a folder, the sequence of audio files/
subfolders is the character code order.
! If you want to specify the sequence of the
audio files, refer to Example of a hierarchy
on this page and copy the folders/files in
order.
— We recommend that you specify the file
names in the desired playback sequence (e.g., 001xxxxx.mp3 for the first,
099yyyyy.wma for 99th, etc.).
Compressed audio compatibility
WMA
! Compatible format: WMA encoded by
Windows Media Player Ver. 7, 7.1, 8, 9 or 10
! Bit rate: 5 kbps to 384 kbps (CBR), VBR
! Sampling frequency: 32 kHz, 44.1 kHz, 48
kHz
! Windows Media Audio 9 Professional, Loss-
less, Voice: No
MP3
! Compatible format: MPEG-1, 2, 2.5 Audio
Layer 3
! Bit rate: 8 kbps to 320 kbps (CBR), VBR
! Sampling frequency: 8 kHz to 48 kHz (32,
44.1, 48 kHz for emphasis)
! Compatible ID3 tag version: 1.0, 1.1, 2.2,
2.3, 2.4 (ID3 tag Version 2.x is given priority
than Version 1.x.)
! M3u playlist: Yes
! MP3i (MP3 interactive), mp3 PRO: No
AAC
! Compatible format: AAC encoded by
®
version 6.0.5 and earlier
iTunes
! Sampling frequency: 8 kHz to 48 kHz
! Transmission rate: 16 kbps to 320 kbps
! AAC file bought on the iTunes Music Store
(.m4p file extension): No
! Apple Lossless: No
iPod
About handling the iPod
! Do not leave the iPod in direct sunlight for
extended amounts of time. Extended exposure to direct sunlight can result in iPod
malfunction due to the resulting high temperature.
! Do not leave the iPod in any location with a
high temperature.
! Firmly secure the iPod when driving. Do
not let the iPod fall onto the floor, where it
may become jammed under the brake or
accelerator pedal.
! For details, refer to the iPod’s manuals.
66
En
Page 67

1
2
5
6
Additional Information
About iPod settings
! You cannot operate the iPod Equalizer on
the Pioneer products. We recommend that
you set the iPod Equalizer to off, before connecting the iPod to this unit.
! You cannot set Repeat to off on the iPod
when using this unit. Even if you set Repeat
to off on the iPod, Repeat is changed to All
automatically when connecting the iPod to
this unit.
Compressed audio files on
the disc
! Depending on the version of Windows
Media Player used to encode WMA files,
album names and other text information
may not be correctly displayed.
! There may be a slight delay when starting
playback of WMA/AAC files encoded with
image data.
! ISO 9660 Level 1 and 2 compliant. Romeo
and Joliet file systems are both compatible
with this player.
! Multi-session playback is possible.
! Compressed audio files are not compatible
with packet write data transfer.
! Only 64 characters from the beginning can
be displayed as a file name (including the
extension such as .wma, .mp3, .m4a or
.wav) or a folder name.
! Folder selection sequence or other opera-
tion may be altered depending on the encoding or writing software.
! Regardless of the length of blank section
between the songs of original recording,
compressed audio discs will play with a
short pause between songs.
! File extensions such as .wma, .mp3, .m4a
or .wav must be used properly.
Appendix
English
Example of a hierarchy
: Folder
: Compressed audio file
3
4
Level 1 Level 2 Level 3 Level 4
! This unit assigns folder numbers. The user
cannot assign folder numbers.
! Folder hierarchy is allowed up to eight tiers.
However, practical hierarchy of folder is
less than two tiers.
! Up to 99 folders on a disc can be played
back.
Compressed audio compatibility
WMA
! Compatible format: WMA encoded by
Windows Media Player Ver. 7, 7.1, 8, 9 or 10
! Bit rate: 48 kbps to 320 kbps (CBR), 48 kbps
to 384 kbps (VBR)
! Sampling frequency: 32 kHz to 48 kHz
! Windows Media Audio 9 Professional, Loss-
less, Voice: No
MP3
! Bit rate: 8 kbps to 320 kbps
! Sampling frequency: 16 kHz to 48 kHz (32,
44.1, 48 kHz for emphasis)
! Compatible ID3 tag version: 1.0, 1.1, 2.2,
2.3, 2.4 (ID3 tag Version 2.x is given priority
than Version 1.x.)
! M3u playlist: No
! MP3i (MP3 interactive), mp3 PRO: No
67
En
Page 68

Appendix
Additional Information
AAC
! Compatible format: AAC encoded by
! Sampling frequency: 11.025 kHz to 48 kHz
! Transmission rate: 16 kbps to 320 kbps
! Apple Lossless: No
WAV
! Compatible format: Linear PCM (LPCM),
! Quantization bits: 8 and 16 (LPCM), 4 (MS
! Sampling frequency: 16 kHz to 48 kHz
®
version 6.0.5 and earlier
iTunes
MS ADPCM
ADPCM)
(LPCM), 22.05 kHz to 44.1 kHz (MS ADPCM)
68
En
Page 69

Additional Information
Appendix
Specifications
General
Power source ............................. 14.4 V DC (10.8 V to 15.1 V
allowable)
Grounding system ................... Negative type
Max. current consumption
..................................................... 10.0 A
Dimensions (W × H × D):
DIN
Chassis ..................... 178 × 50 × 165 mm
(7 × 2 × 6-1/2 in.)
Nose ........................... 188 × 58 × 16 mm
(7-3/8 × 2-1/4 × 5/8 in.)
D
Chassis ..................... 178 × 50 × 165 mm
(7 × 2 × 6-1/2 in.)
Nose ........................... 170 × 45 × 16 mm
(6-3/4 × 1-3/4 × 5/8 in.)
Weight .......................................... 1.5 kg (3.3 lbs)
Audio
Maximum power output .......50 W × 4
50 W × 2/4 W + 70 W × 1/2
W (for subwoofer)
Continuous power output ...22 W × 4 (50 Hz to 15 000
Hz, 5% THD, 4 W load, both
channels driven)
Load impedance ...................... 4 W to 8 W ×4
4 W to 8 W ×2+2W ×1
Preout max output level/output impedance
..................................................... 4 V/100W
Equalizer (7-Band Graphic Equalizer):
Frequency .......................... 50/125/315/800/2k/5k/12.5k
Hz
Gain ...................................... ±12 dB
Loudness contour:
Low ....................................... +3.5 dB (100 Hz), +3 dB (10
kHz)
Mid ....................................... +10 dB (100 Hz), +6.5 dB
(10 kHz)
High ..................................... +11 dB (100 Hz), +11 dB
(10 kHz)
(volume: –30 dB)
HPF:
Frequency .......................... 50/63/80/100/125 Hz
Slope .................................... –12 dB/oct
Subwoofer (mono):
Frequency .......................... 50/63/80/100/125 Hz
Slope .................................... –18 dB/oct
Gain ...................................... +6 dB to –24 dB
Phase .................................. Normal/Reverse
Bass boost:
Gain ...................................... +12 dB to 0 dB
CD player
System .......................................... Compact disc audio system
Usable discs .............................. Compact disc
Signal format:
Sampling frequency ..... 44.1 kHz
Number of quantization bits
........................................... 16; linear
Frequency characteristics ...5 Hz to 20 000 Hz (±1 dB)
Signal-to-noise ratio ............... 94 dB (1 kHz) (IHF-A net-
Dynamic range ......................... 92 dB (1 kHz)
Number of channels .............. 2 (stereo)
MP3 decoding format ........... MPEG-1 & 2 Audio Layer 3
WMA decoding format ......... Ver. 7, 7.1, 8, 9, 10 (2ch
AAC decoding format ............ MPEG-4 AAC (iTunes
WAV signal format .................. Linear PCM & MS ADPCM
work)
audio)
(Windows Media Player)
coded only)
®
en-
USB
Specification .............................. USB 2.0 full speed
Supply current .......................... 500 mA
Maximum amount of memory
..................................................... 250 GB
File system .................................. FAT12, FAT16, FAT32
MP3 decoding format ........... MPEG-1, 2 & 2.5 Audio Layer
WMA decoding format ......... Ver. 7, 7.1, 8, 9, 10 (2ch
AAC decoding format ............ MPEG-4 AAC (iTunes
3
audio)
(Windows Media Player)
coded only)
®
en-
FM tuner
Frequency range ...................... 87.9 MHz to 107.9 MHz
Usable sensitivity ..................... 8 dBf (0.7 µV/75 W, mono,
Signal-to-noise ratio ............... 75 dB (IHF-A network)
Distortion ..................................... 0.3 % (at 65 dBf, 1 kHz,
Frequency response ............... 30 Hz to 15 000 Hz (±3 dB)
Stereo separation .................... 45 dB (at 65 dBf, 1 kHz)
S/N: 30 dB)
stereo)
0.1 % (at 65 dBf, 1 kHz,
mono)
AM tuner
Frequency range ...................... 530 kHz to 1 710 kHz (10
Usable sensitivity ..................... 18 µV (S/N: 20 dB)
Signal-to-noise ratio ............... 65 dB (IHF-A network)
kHz)
Note
Specifications and the design are subject to possible modifications without notice due to improvements.
English
En
69
Page 70

Table des matières
Nous vous remercions d’avoir acheté cet appareil
Pioneer.
Afin d’utiliser votre appareil correctement, veuillez lire ce mode d’emp loi entièrement. Après avoir lu ce mode d’emploi, conservez-le dans en endroit sûr pour pouvoir
vous y référer ultérieurement.
Avant de commencer
Pour le modèle canadien 74
Quelques mots sur cet appareil 74
Service après-vente des produits Pioneer 76
Visitez notre site Web 76
Protection de l’appareil contre le vol 76
– Détacher la face avant 77
– Pose de la face avant 77
Réinitialisation du microprocesseur 77
Quelques mots sur le mode
démonstration 77
Utilisation et soin de la télécommande 78
– Installation de la pile 78
– Utilisation de la télécommande 78
Utilisation de l’appareil
Description de l’appareil 79
– Appareil central 79
– Télécommande 80
Opérations de base 81
– Mise en service, mise hors service 81
– Choix d’une source 81
– Réglage du volume 81
Syntoniseur 82
– Opérations de base 82
– Mise en mémoire et rappel des
fréquences de stations 82
– Introduction aux opérations
avancées 83
– Mise en mémoire des fréquences les
plus puissantes 83
– Accord sur les signaux puissants 83
Lecteur de CD intégré 84
– Opérations de base 84
– Sélection directe d’une plage 85
– Introduction aux opérations
avancées 86
– Sélection d’une étendue de répétition
de lecture 86
– Écoute des plages musicales dans un
ordre aléatoire 87
– Examen du contenu des dossiers et des
plages 87
– Pause de la lecture 87
– Utilisation de la compression et de la
fonction BMX 87
– Recherche toutes les 10 plages sur le
disque ou dossier en cours 87
– Utilisation des fonctions de titre de
disque 88
– Affichage d’informations textuelles sur
le disque 88
– Choix de plages à partir de la liste des
titres de plages 89
– Choix des plages musicales à partir de
la liste des noms de fichiers 89
Lecture de plages musicales sur le lecteur
audio portable USB/la mémoire USB 90
– Opérations de base 90
– Sélection directe d’un fichier audio
dans le dossier en cours 91
– Introduction aux opérations
avancées 91
– Sélection d’une étendue de répétition
de lecture 91
– Lecture des fichiers dans un ordre
aléatoire 92
– Examen du contenu des dossiers et des
fichiers 92
– Pause de la lecture 92
– Affichage des informations textuelles
d’un fichier audio 93
– Choix des fichiers à partir de la liste des
noms de fichiers 93
Lecture de plages musicales sur l’iPod 94
– Opérations de base 94
– Recherche d’une plage musicale 94
– Affichage d’informations textuelles sur
l’iPod 95
– Introduction aux opérations
avancées 95
– Répétition de la lecture 96
70
Fr
Page 71

Table des matières
Français
– Lecture des plages musicales dans un
ordre aléatoire (shuffle) 96
– Lecture de toutes les plages musicales
dans un ordre aléatoire (shuffle all) 96
– Pause d’une plage musicale 96
– Modification de la vitesse d’un livre
audio 96
Réglages sonores 97
– Introduction aux réglages sonores 97
– Réglage de l’équilibre sonore 98
– Utilisation de l’égaliseur 98
– Réglage de la correction
physiologique 99
– Utilisation de la sortie haut-parleur
d’extrêmes graves 100
– Accentuation des graves 101
– Utilisation du filtre passe-haut 101
– Ajustement des niveaux des
sources 101
Réglages initiaux 102
– Ajustement des réglages initiaux 102
– Sélection de la langue
d’affichage 103
– Réglage de l’horloge 103
– Mise en service ou hors service du
signal sonore d’avertissement 103
– Mise en service ou hors service de
l’ouverture automatique de la face
avant 103
– Mise en service ou hors service de
l’entrée auxiliaire 104
– Mise en service ou hors service de
l’atténuateur de luminosité 104
– Réglage de la luminosité 104
– Réglage de la sortie arrière et du
contrôleur de haut-parleur d’extrêmes
graves 104
– Commutation de la coupure/
atténuation du son 105
– Mise en service/hors service de la
fonction démonstration des
fonctions 105
– Basculement du mode inverse 105
– Mise en service ou hors service de la
fonction Ever Scroll (défilement
permanent) 106
– Activation de la source BT Audio 106
– Saisie du code PIN pour la connexion
sans fil Bluetooth 106
Autres fonctions 107
– Utilisation de la source AUX 107
– Mise en service ou hors service de
l’affichage de l’horloge 107
– Utilisation des divers affichages
divertissants 108
– Utilisation de la touche PGM 108
Accessoires disponibles
Syntoniseur XM 109
– Opérations de base 109
– Sélection directe d’un canal XM 109
– Changement de l’affichage XM 110
– Mise en mémoire et rappel des stations
d’émission 110
– Sélection d’un canal dans la catégorie
de canal 110
– Affichage de l’ID de la radio 111
Syntoniseur Radio Satellite SIRIUS 111
– Opérations de base 111
– Sélection directe d’un canal
SIRIUS 112
– Introduction aux opérations
avancées 112
– Changement de l’affichage
SIRIUS 112
– Changer le mode de défilement 113
– Mise en mémoire et rappel des stations
d’émission 113
– Sélection d’un canal dans la catégorie
de canal 113
– Utilisation de la fonction Alerte
Match 113
– Affichage de l’ID de la radio 115
Lecture de plages musicales sur l’iPod 115
71
Fr
Page 72

Table des matières
– Écoute de plages musicales sur votre
iPod 115
– Recherche d’une plage musicale 116
– Affichage d’informations textuelles sur
l’iPod 116
– Introduction à l’utilisation avancée de
l’adaptateur iPod 117
Audio Bluetooth 117
– Opérations de base 117
– Introduction aux opérations
avancées 118
– Connexion d’un lecteur audio
Bluetooth 119
– Lecture de plages musicales sur un
lecteur audio Bluetooth 119
– Pause d’une plage musicale 119
– Arrêt de la lecture 119
– Déconnexion d’un lecteur audio
Bluetooth 119
– Affichage de l’adresse BD (Bluetooth
Device) 119
– Affichage de la version du système
pour les réparations 120
Téléphone Bluetooth 120
– Opérations de base 120
– Réglage pour la téléphonie mains
libres 121
– Exécution d’un appel 122
– Prise d’un appel 122
– Introduction aux opérations
avancées 122
– Connexion d’un téléphone
cellulaire 123
– Déconnexion d’un téléphone
cellulaire 124
– Enregistrement d’un téléphone
cellulaire connecté 124
– Suppression d’un téléphone
enregistré 124
– Connexion à un téléphone cellulaire
enregistré 125
– Utilisation de l’Annuaire 125
– Utilisation de l’Historique des
appels 128
– Utilisation des numéros de
présélection 128
– Exécution d’un appel par saisie d’un
numéro de téléphone 129
– Effacement de la mémoire 129
– Réglage de la réponse
automatique 130
– Réglage du rejet automatique 130
– Mise en service ou hors service de la
sonnerie 130
– Annulation d’écho et réduction de
bruit 130
– Affichage de l’adresse BD (Bluetooth
Device) 130
– Affichage de la version du système
pour les réparations 130
Lecteur de CD à chargeur 131
– Opérations de base 131
– Sélection directe d’une plage 131
– Introduction aux opérations
avancées 131
– Utilisation des listes ITS 133
– Utilisation des fonctions de titre de
disque 134
– Utilisation des fonctions CD TEXT 135
Lecteur DVD 135
– Opérations de base 135
– Sélection d’un disque 136
– Sélection d’un dossier 136
– Introduction aux opérations
avancées 136
Syntoniseur TV 138
– Opérations de base 138
– Mise en mémoire et rappel des stations
d’émission 138
– Mise en mémoire séquentielle des
stations les plus fortes 139
Informations complémentaires
Messages d’erreur 140
72
Fr
Page 73

Table des matières
Conseils sur la manipulation des disques et
du lecteur 141
Disques Duaux 142
Lecteur audio USB/mémoire USB 142
– Compatibilité du lecteur audio USB/de
la mémoire USB 142
– Lecteur audio USB/mémoire USB 143
– Compatibilité des formats audio
compressés 144
iPod 144
– Quelques mots sur la manipulation du
iPod 144
– Quelques mots sur les réglages de
l’iPod 144
Fichiers audio compressés sur un
disque 144
– Exemple de hiérarchie 145
– Compatibilité des formats audio
compressés 145
Caractéristiques techniques 146
Français
73
Fr
Page 74

Section
01
Avant de commencer
Pour le modèle canadien
Cet appareil numérique de la classe B est
conforme à la norme NMB-003 du Canada.
Quelques mots sur cet appareil
Les fréquences du syntoniseur de cet appareil
sont attribuées pour une utilisation en Amérique du Nord. Son utilisation dans d’autres
régions peut se traduire par une réception de
mauvaise qualité.
PRÉCAUTION
! Ne laissez pas cet appareil venir en contact
avec des liquides. Cela pourrait provoquer une
électrocution. Tout contact avec des liquides
pourrait aussi provoquer des dommages, de
la fumée et une surchauffe de l’appareil.
! Conservez ce mode d’emploi à portée de main
afin de vous y référer pour les modes d’opération et les précautions.
! Maintenez toujours le niveau d’écoute à une
valeur telle que vous puissiez entendre les
sons provenant de l’extérieur du véhicule.
! Protégez l’appareil contre l’humidité.
! Si la batterie est débranchée ou déchargée, le
contenu de la mémoire sera effacé et une
nouvelle programmation sera nécessaire.
Quelques mots sur WMA
Le logo Windows Media™ imprimé sur le coffret indique que ce produit peut lire les données WMA.
WMA est une abréviation pour Windows
Media Audio et fait référence à une technologie de compression développée par Microsoft
Corporation. Les données WMA peuvent être
encodées en utilisant Windows Media Player
version 7 ou ultérieure.
Windows Media et le logo Windows sont des
marques commerciales ou des marques
commerciales déposées de Microsoft
Corporation aux États-Unis et/ou dans d’autres pays.
! Cet appareil peut ne pas fonctionner cor-
rectement selon l’application utilisée pour
encoder les fichiers WMA.
Quelques mots sur MP3
La fourniture de ce produit comporte seulement une licence d’utilisation privée, non
commerciale, et ne comporte pas de licence
ni n’implique aucun droit d’utilisation de ce
produit pour une diffusion commerciale (c’està-dire générant des revenus) en temps réel
(terrestre, par satellite, câble et/ou tout autre
média), diffusion/streaming via internet, des
intranets et/ou d’autres systèmes électroniques de distribution de contenu, telles que les
applications audio payante ou audio sur demande. Une licence indépendante est requise
pour de telles utilisations. Pour les détails,
veuillez visiter le site
http://mp3licensing.com.
Quelques mots sur AAC
AAC est une abréviation pour Advanced Audio
Coding (Codage audio avancé) et fait référence à un standard de technologie de
compression audio utilisé avec MPEG 2 et
MPEG 4.
Plusieurs applications sont disponibles pour
encoder des fichiers AAC, mais les formats de
fichier et les extensions diffèrent selon les applications utilisées pour effectuer l’encodage.
Cet appareil lit les fichiers AAC encodés par
®
iTunes
version 6.0.5 et antérieures.
iTunes est une marque commerciale de Apple
Computer, Inc. déposée aux États-Unis et dans
d’autres pays.
74
Fr
Page 75

Avant de commencer
Section
01
Compatibilité avec un lecteur audio
portable
Cet appareil contrôle un lecteur audio portable
disposant d’une interface USB.
! Cet appareil peut lire un fichier WMA/MP3/
AAC sur le lecteur audio USB/la mémoire
USB.
! Vous pouvez écouter des plages musicales
en connectant un lecteur audio portable
USB/une mémoire USB conforme au standard USB Mass Storage Class. Pour des
détails sur les mémoires USB supportées,
reportez-vous à la page 142, Compatibilité
du lecteur audio USB/de la mémoire USB.
Compatibilité iPod
®
Cet appareil peut contrôler un iPod et écouter
des plages musicales de l’iPod.
Vous pouvez vous connecter et écouter des
plages musicales sur un iPod avec un connecteur Dock ou une interface USB.
! Quand vous utilisez un iPod avec un
connecteur Dock, un câble iPod Dock
Connector vers USB est requis.
— Cet appareil contrôle les iPod listés ci-des-
sous.
— iPod nano ou 5ème génération ou ulté-
rieure
— Firmware version 1.2 ou ultérieure
! Cet appareil peut contrôler les versions an-
térieures de l’iPod avec un adaptateur iPod
Pioneer (par exemple CD-IB100N). Dans ce
cas, la plupart des fonctions sont essentiellement les mêmes que celles de l’iPod
connecté à l’interface USB de cet appareil.
Toutefois, les fonctions liées aux livres
audio et aux podcasts ne peuvent pas être
utilisées.
Pour avoir des détails sur le mode de fonctionnement avec un adaptateur iPod, reportez-vous à la page 115, Lecture de plages
musicales sur l’iPod.
! iPod est une marque commerciale de
Apple Computer, Inc. déposée aux ÉtatsUnis et dans d’autres pays.
A propos de la marque SAT RADIO
READY
La marque SAT RADIO READY imprimée sur
la face avant indique que cet appareil peut
contrôler le Syntoniseur Radio Satellite (Satellite Radio Tuner) pour Pioneer (syntoniseur
XM, ou syntoniseur satellite Sirius, vendus séparément). Renseignez-vous auprès de votre
revendeur ou du Centre d’entretien agréé par
Pioneer le plus proche pour savoir quel syntoniseur radio satellite peut être connecté à cet
appareil. Pour avoir des informations sur l’utilisation du syntoniseur radio satellite, reportezvous au mode d’emploi du syntoniseur radio
satellite considéré.
! Ce système utilisera une technologie de dif-
fusion directe satellite à récepteur pour offrir un son de grande pureté aux auditeurs,
dans leur voiture et à leur domicile, sans interruption sur l’ensemble du territoire.La
radio satellite créera et rassemblera plus
de 100 canaux de programmes de musique, d’informations, de sports, de discussion et de programmes pour enfants de
qualité numérique.
! “SAT Radio”, le logo SAT Radio et toutes les
marques associées sont des marques
commerciales de Sirius Satellite Radio Inc.,
et de XM Satellite Radio Inc.
PRÉCAUTION
! Pioneer n’accepte aucune responsabilité pour
une perte de données sur le lecteur audio portable USB ou la mémoire USB même si cette
perte de données se produit pendant l’utilisation de cet appareil.
! Pioneer n’accepte aucune responsabilité pour
une perte de données sur l’iPod même si cette
perte de données se produit pendant l’utilisation de cet appareil.
Français
75
Fr
Page 76

Section
01
Avant de commencer
Service après-vente des
produits Pioneer
Veuillez contacter le revendeur ou le distributeur auprès duquel vous avez acheté cet appareil pour le service après vente (y compris les
conditions de garantie) ou pour toute autre information. Dans le cas où les informations nécessaires ne sont pas disponibles, veuillez
contacter les sociétés indiquées ci-dessous.
N’expédiez pas l’appareil pour réparation à
l’une des adresses figurant ci-dessous sans
avoir pris contact préalable.
ÉTATS-UNIS
Pioneer Electronics (USA) Inc.
CUSTOMER SUPPORT DIVISION
P.O. Box 1760
Long Beach, CA 90801-1760
800-421-1404
CANADA
Pioneer électroniques du Canada, Inc.
Département de service aux consommateurs
300 Allstate Parkway
Markham, Ontario L3R OP2
1-877-283-5901
Pour connaître les conditions de garantie, reportez-vous au document Garantie limitée qui
accompagne cet appareil.
Visitez notre site Web
Rendez-nous visite sur le site suivant :
3 Téléchargez les modes d’emploi, commandez
les catalogues des produits, recherchez de
nouveaux produits, et bien plus.
Protection de l’appareil
contre le vol
La face avant peut être enlevée pour décourager les vols.
! Si vous ne retirez pas la face avant de l’ap-
pareil central dans les cinq secondes qui
suivent la coupure du contact, un signal
sonore d’avertissement se fait entendre et
la face avant s’ouvre.
! Vous pouvez mettre hors service ce signal
sonore d’avertissement. Reportez-vous à la
page 103, Mise en service ou hors service
du signal sonore d’avertissement.
! Vous pouvez mettre hors service l’ouverture
automatique de la face avant. Reportezvous à la page 103, Mise en service ou hors
service de l’ouverture automatique de la face
avant.
Important
! Lorsque vous enlevez ou remontez la face
avant, manipulez-la doucement.
! Évitez de heurter la face avant.
! Conservez la face avant à l’abri des tempéra-
tures élevées et de la lumière directe du soleil.
! Quelques secondes après que vous ayez mis
ou coupé le contact, la face avant se déplace
automatiquement. À ce moment, vos doigts
pourraient être coincés dans la face avant,
vous devez donc tenir vos mains à l’écart de
celle-ci.
1 Enregistrez votre produit. Nous conserverons
les détails de votre achat dans nos fichiers
pour vous aider à faire référence à ces informations pour une déclaration d’assurance en
cas de perte ou de vol.
2 Recevez les mises à jour sur les derniers pro-
duits et les plus récentes technologies.
76
Fr
Page 77

Avant de commencer
Section
01
Détacher la face avant
1 Appuyez et maintenez la pression sur
EJECT pour ouvrir la face avant.
2 Faites glisser la face avant et retirez-la
en la tirant vers vous.
Faites attention de ne pas trop serrer la face
avant quand vous la saisissez, de ne pas la
faire tomber et de la protéger de tout contact
avec l’eau ou d’autres fluides pour éviter tout
dommage permanent.
3 Rangez la face avant dans le boîtier de
protection fourni à cet effet.
Pose de la face avant
1 Assurez-vous que le couvercle interne
est fermé.
Réinitialisation du
microprocesseur
Le microprocesseur doit être réinitialisé dans
les conditions suivantes :
! Avant la première utilisation de cet appareil
après son installation
! En cas d’anomalie de fonctionnement de
l’appareil
! Quand des messages étranges ou incor-
rects s’affichent sur l’écran
% Appuyez sur RESET avec la pointe d’un
stylo ou un autre instrument pointu.
Touche RESET
Quelques mots sur le mode
démonstration
Cet appareil possède deux modes de démonstration. L’un est le mode inverse, l’autre le
mode démonstration des fonctions.
Français
2 Remettez la face avant en place en l’enclipsant.
Important
Le fil rouge (ACC) de cet appareil doit être
connecté à une borne couplée avec les opérations de mise en/hors fonction du contact d’allumage. Ne pas respecter cette condition peut
conduire au déchargement de la batterie.
Fr
77
Page 78

Section
01
Avant de commencer
Mode inverse
Si vous n’effectuez pas une opération dans un
délai d’environ 30 secondes, les indications de
l’écran commencent à s’inverser, puis continuent à s’inverser toutes les 10 secondes. Appuyer sur la touche BAND quand
l’alimentation de cet appareil est coupée alors
que le contact d’allumage est dans la position
ACC ou ON annule le mode inverse. Appuyez
à nouveau sur la touche BAND pour démarrer
le mode inverse.
Mode démonstration des fonctions
La démonstration des fonctions démarre automatiquement quand l’alimentation de cet appareil est coupée alors que le contact
d’allumage est en position ACC ou ON. Appuyer sur DISPLAY pendant le fonctionnement
du mode démonstration des fonctions annule
ce mode. Appuyez à nouveau sur DISPLAY
pour démarrer le mode démonstration des
fonctions. Rappelez-vous que si la démonstration des fonctions continue à fonctionner
quand le moteur est coupé, cela peut décharger la batterie.
Utilisation et soin de la
télécommande
Installation de la pile
Sortez le porte-pile de l’arrière de la télécommande et insérez la pile en respectant les polarités (+) et (–).
! Lors de la première utilisation, retirez le
film qui dépasse du porte-pile.
ATTENTION
Conservez la pile hors de portée des enfants. Au
cas où la pile serait avalée, consultez immédiatement un médecin.
PRÉCAUTION
! Utilisez seulement une pile au lithium
CR2025 (3 V).
! Retirez la pile si la télécommande n’est pas
utilisée pendant un mois ou plus.
! Le remplacement de la pile par une pile inap-
propriée peut provoquer une explosion. Remplacez la pile uniquement par une pile
identique ou de type équivalent.
! Ne manipulez pas la pile avec un outil métal-
lique.
! Ne conservez pas la pile avec des objets mé-
talliques.
! En cas de fuite de la pile, nettoyez soigneuse-
ment la télécommande puis mettez en place
une pile neuve.
! Lors de la mise au rebut des piles usagées,
respectez les règlements nationaux ou les instructions locales en vigueur dans le pays ou la
région en matière de conservation ou de protection de l’environnement.
Utilisation de la télécommande
Pointez la télécommande dans la direction de
la face avant de l’appareil à télécommander.
! La télécommande peut ne pas fonctionner
correctement à la lumière directe du soleil.
Important
! Ne laissez pas la télécommande exposée à
des températures élevées ou à la lumière directe du soleil.
! Ne laissez pas la télécommande tomber sur le
plancher, où elle pourrait gêner le bon fonctionnement de la pédale de frein ou
d’accélérateur.
78
Fr
Page 79

132
4a56789
bac
d
e
fhj
k
g
7
i
i
1
1
Utilisation de l’appareil
Section
02
Français
Description de l’appareil
Appareil central
1 Touche SOURCE
Cet appareil est mis en service en sélectionnant une source. Appuyez sur cette touche
pour parcourir les différentes sources disponibles.
2 Touche LIST
Appuyez pour afficher la liste des titres des
disques, la liste des titres des plages, la liste
des dossiers, la liste des fichiers ou la liste
des canaux présélectionnés selon la source.
3 MULTI-CONTROL
Déplacez ce bouton pour exécuter les
commandes d’accord manuel, avance rapide, retour rapide et recherche de plage
musicale. Utilisé aussi pour contrôler les
fonctions.
Tournez ce bouton pour augmenter ou diminuer le niveau sonore.
4 Touche RESET
Appuyez sur cette touche pour réinitialiser
le microprocesseur.
5 Touche EJECT
Appuyez sur cette touche pour éjecter le CD
que contient le lecteur de CD intégré.
Appuyez et maintenez la pression sur cette
touche pour ouvrir ou fermer la face avant.
6 Touche CLOCK
Appuyez sur cette touche pour modifier l’affichage de l’horloge. Appuyez de façon prolongée sur cette touche pour changer de
mode de sélection du canal quand la source
sélectionnée est un syntoniseur XM ou SIRIUS.
7 Touche DISPLAY
Appuyez sur cette touche pour choisir un affichage différent.
8 Touche SW
Appuyez sur cette touche pour choisir le paramètre du haut-parleur d’extrêmes graves.
Appuyez sur cette touche de façon prolongée pour sélectionner le menu de réglage
de l’accentuation des graves.
9 Touche EQ
Appuyez sur cette touche pour choisir les diverses courbes d’égalisation.
a Touche BAND
Appuyez sur cette touche pour choisir une
des trois gammes FM ou la gamme AM, ou
encore abandonner la commande des fonctions.
79
Fr
Page 80

Section
02
Utilisation de l’appareil
Télécommande
Le fonctionnement est le même qu’avec l’utilisation des touches de l’appareil central.
b Touches VOLUME
Appuyez sur ces touches pour augmenter
ou diminuer le niveau sonore.
c Touche FUNCTION
Appuyez sur cette touche pour choisir des
fonctions.
d Joystick
Déplacez ce bouton pour exécuter les
commandes d’accord manuel, avance rapide, retour rapide et recherche de plage
musicale. Utilisé aussi pour contrôler les
fonctions.
Ses fonctions sont les mêmes que celles de
MULTI-CONTROL sauf pour la commande
du volume.
e Touche DIRECT
Appuyez sur cette touche pour choisir directement la plage désirée.
f Touche CLEAR
Appuyez pour annuler les chiffres entrés
quand vous utilisez les touches 0 à 9.
%. Appuyez à nouveau pour revenir au niveau de volume initial.
j Touche ENTERTAINMENT
Appuyez sur cette touche pour modifier l’affichage divertissant.
k Touche AUDIO
Appuyez sur cette touche pour choisir les diverses commandes de correction sonore.
g Touches 0 à 9
Appuyez pour sélectionner directement la
plage musicale, l’accord prédéfini ou le
disque désiré. Les touches 1 à 6 permettent
d’effectuer la sélection d’accord prédéfini
pour le syntoniseur ou la recherche de numéro de disque pour le lecteur de CD à
chargeur.
h Touche PGM
Appuyez sur cette touche pour utiliser les
fonctions préprogrammées pour chaque
source. (Reportez-vous à la page 108, Utili-
sation de la touche PGM.)
i Touche ATT
Appuyez sur cette touche pour diminuer rapidement le niveau du volume d’environ 90
80
Fr
Page 81

Utilisation de l’appareil
Section
02
Opérations de base
Mise en service, mise hors service
Mise en service de l’appareil
% Appuyez sur SOURCE pour mettre en
service l’appareil.
Mise hors tension de l’appareil
% Maintenez la pression sur SOURCE jusqu’à ce que l’appareil soit mis hors tension.
Choix d’une source
Vous pouvez sélectionner la source que vous
voulez écouter. Pour basculer sur le lecteur de
CD intégré, chargez un disque dans l’appareil
(reportez-vous à la page 84).
% Appuyez sur SOURCE pour choisir une
source.
Appuyez de manière répétée sur SOURCE
pour choisir l’une après l’autre les sources suivantes :
Syntoniseur XM—Syntoniseur SIRIUS—
Syntoniseur—Télévision—Lecteur de
DVD/Lecteur de DVD à chargeur—Lecteur
de CD intégré—Lecteur de CD à chargeur
—iPod—USB—Appareil externe 1—Appareil externe 2—AUX1—AUX2—Audio BT—
Téléphone BT
! Par défaut, l’entrée AUX1 est en service. Met-
tez l’entrée AUX1 hors service quand elle n’est
pas utilisée (reportez-vous à la page 104, Mise
en service ou hors service de l’entrée auxiliaire).
! Recharger le lecteur audio portable sur l’ali-
mentation CC du véhicule tout en le connectant à l’entrée AUX peut générer du bruit.
Dans ce cas, arrêtez de recharger.
! Source extérieure fait référence à un produit
Pioneer (par exemple disponible dans le futur)
qui, bien qu’incompatible en tant que source,
permet la commande de fonctions élémentaires par cet appareil. Cet appareil peut contrôler deux sources extérieures. Quand deux
sources extérieures sont connectées, leur affectation à la source extérieure 1 ou la source
extérieure 2 est effectuée automatiquement
par l’appareil.
! Si le fil bleu/blanc de l’appareil est relié à la
prise de commande du relais de l’antenne
motorisée du véhicule, celle-ci se déploie
lorsque la source est mise en service. Pour rétracter l’antenne, mettez la source hors service.
Réglage du volume
% Utilisez MULTI-CONTROL pour régler le
niveau sonore.
Français
Remarques
! Dans les cas suivants, la source sonore ne
pourra pas être sélectionnée :
— Aucun appareil correspondant à la source
sélectionnée n’est connecté à cet appareil.
— L’appareil ne contient pas de disque ou de
chargeur.
— L’entrée AUX (entrée pour un appareil auxi-
liaire) est hors service (reportez-vous à la
page 104).
— La source BT Audio est mise hors service
(reportez-vous à la page 106, Activation de
la source BT Audio).
81
Fr
Page 82

6
12453
Section
02
Utilisation de l’appareil
Syntoniseur
Opérations de base
1 Indicateur de gamme
2 Indicateur de stéréo (5)
Il signale que la station sélectionnée émet en
stéréo.
3 Indicateur LOC
Il indique quand l’accord automatique sur
une station locale est en service.
4 Indicateur de numéro de présélection
5 Indicateur de niveau du signal
Indique la force du signal radio.
6 Indicateur de fréquence
1 Pour choisir le syntoniseur, appuyez sur
SOURCE.
2 Appuyez sur BAND pour choisir la
gamme.
Appuyez sur BAND jusqu’à ce que la gamme
désirée, FM-1, FM-2, FM-3 en FM ou AM (PO/
GO), soit affichée.
3 Pour effectuer un accord manuel, poussez MULTI-CONTROL vers la gauche ou vers
la droite.
4 Pour effectuer un accord automatique,
poussez MULTI-CONTROL vers la gauche ou
vers la droite pendant environ une seconde
puis relâchez.
Le syntoniseur examine les fréquences jusqu’à
ce que se présente une émission dont la réception est jugée satisfaisante.
# Vous pouvez annuler l’accord automatique en
poussant MULTI-CONTROL vers la gauche ou
vers la droite.
# Si vous poussez MULTI-CONTROL vers la gau-
che ou vers la droite et maintenez la pression,
vous pouvez sauter des stations. L’accord automatique démarre dès que vous relâchez
MULTI-CONTROL.
Mise en mémoire et rappel des
fréquences de stations
Vous pouvez facilement mettre en mémoire
jusqu’à 6 fréquences d’émission pour les rappeler ultérieurement.
! Vous pouvez enregistrer en mémoire jus-
qu’à 18 stations FM, six pour chacune des
trois gammes FM, et six stations AM.
1 Quand vous trouvez une fréquence que
vous voulez mettre en mémoire, appuyez
sur LIST.
2 Utilisez MULTI-CONTROL pour enregistrer la fréquence sélectionnée en mémoire.
Tournez pour changer le numéro de présélection, appuyez de façon prolongée pour enregistrer.
Le numéro de présélection que vous avez choisi clignote, puis reste allumé. La fréquence de
la station de radio sélectionnée a été enregistrée en mémoire.
3 Utilisez MULTI-CONTROL pour choisir la
station désirée.
Tournez pour changer la station, appuyez pour
sélectionner.
# Vous pouvez aussi changer de station en
poussant MULTI-CONTROL vers le haut ou vers
le bas.
# Si vous ne réglez aucun paramètre de la liste
pendant environ 30 secondes, l’écran revient automatiquement à l’affichage ordinaire.
82
Fr
Page 83

Utilisation de l’appareil
Section
02
Utilisation de la télécommande
% Lorsque se présente une fréquence que
vous désirez mettre en mémoire, maintenez la pression sur une des touches de présélection 1 à 6 jusqu’à ce que le numéro de
la présélection cesse de clignoter.
Le nombre sur lequel vous avez appuyé clignote sur l’indicateur de numéro de présélection puis reste allumé. La fréquence de la
station de radio sélectionnée a été enregistrée
en mémoire.
Lorsque vous appuyez à nouveau sur cette
même touche de présélection, la fréquence en
mémoire est rappelée.
# Vous pouvez aussi rappeler les fréquences
des stations radio mises en mémoire dans les numéros de présélection en poussant
MULTI-CONTROL vers le haut ou vers le bas pendant l’affichage de la fréquence.
Introduction aux opérations
avancées
1 Appuyez sur MULTI-CONTROL pour afficher le menu principal.
FUNCTION, AUDIO et ENTERTAINMENT ap-
paraissent sur l’écran.
2 Utilisez MULTI-CONTROL pour choisir
FUNCTION.
Tournez pour changer l’option de menu, appuyez pour la sélectionner.
Le nom de la fonction s’affiche sur l’écran.
3 Tourner MULTI-CONTROL pour sélectionner la fonction.
Tournez MULTI-CONTROL pour parcourir les
fonctions dans l’ordre suivant :
BSM (mémoire des meilleures stations)—
Local (accord automatique sur une station lo-
cale)
# Vous pouvez aussi sélectionner la fonction en
appuyant sur FUNCTION de la télécommande.
# Appuyez sur BAND pour revenir à l’affichage
de la fréquence.
# Si vous ne réglez aucun paramètre des fonctions pendant environ 30 secondes, l’écran revient automatiquement à l’affichage ordinaire.
Mise en mémoire des
fréquences les plus puissantes
La fonction BSM (mémoire des meilleures stations) vous permet d’utiliser les touches 1 à 6
de la télécommande pour mémoriser automatiquement les six fréquences d’émission les
plus puissantes, fréquences que vous pouvez
ultérieurement rappeler par une simple pression sur une de ces touches.
! La mise en mémoire de fréquences à l’aide
de la fonction BSM peut provoquer le remplacement d’autres fréquences déjà enregistrées avec les touches 1 à 6 de
télécommande.
1 Utilisez MULTI-CONTROL pour sélectionner BSM dans le menu des fonctions.
2 Appuyez sur MULTI-CONTROL pour
mettre en service BSM.
Les six fréquences d’émission les plus fortes
seront mémorisées dans l’ordre de la force du
signal.
# Pour annuler la mise en mémoire, appuyez à
nouveau sur MULTI-CONTROL.
3 Utilisez MULTI-CONTROL pour choisir la
station désirée.
Tournez pour changer la station, appuyez pour
sélectionner.
# Vous pouvez aussi changer de station en
poussant MULTI-CONTROL vers le haut ou vers
le bas.
Accord sur les signaux puissants
L’accord automatique sur une station locale
ne s’intéresse qu’aux émetteurs dont le signal
reçu est suffisamment puissant pour garantir
une réception de bonne qualité.
1 Utilisez MULTI-CONTROL pour sélectionner Local dans le menu des fonctions.
Français
83
Fr
Page 84

4
123
5
Section
02
Utilisation de l’appareil
2 Appuyez sur MULTI-CONTROL pour
mettre en service l’accord automatique sur
les stations locales.
# Pour mettre l’accord automatique sur les sta-
tions locales hors service, appuyez à nouveau sur
MULTI-CONTROL.
3 Poussez MULTI-CONTROL vers la gauche ou vers la droite pour régler la sensibilité.
En FM, la sensibilité peut prendre quatre valeurs ; en AM, deux valeurs :
FM : Level 1—Level 2—Level 3—Level 4
AM : Level 1—Level 2
La valeur Level 4 permet la réception des seules stations très puissantes ; les autres valeurs
autorisent, dans l’ordre décroissant, la réception de stations de moins en moins
puissantes.
Lecteur de CD intégré
Opérations de base
Le lecteur de CD intégré peut lire un CD audio
(CD-DA) et des fichiers audio compressé
(WMA/MP3/AAC/WAV) enregistrés sur un CDROM. (Reportez-vous à la page 144 pour des
informations sur les fichiers qui peuvent être
lus.)
Lisez les précautions concernant les disques
et le lecteur à la page 141.
1 Indicateur WMA/MP3/AAC/WAV
Il indique le type de fichier audio en cours de
lecture lors de la lecture d’audio compressée.
2 Indicateur du numéro de dossier
Il indique le numéro du dossier en cours de
lecture lors de la lecture d’audio compressée.
3 Indicateur du numéro de plage
4 Indicateur du temps de lecture
5 Indicateur de fréquence d’échantillonnage/
débit binaire
Il indique le débit binaire ou la fréquence d’échantillonnage de la plage (du fichier) en
cours de lecture lors de la lecture d’audio
compressée.
! Lors de la lecture de fichiers WMA enre-
gistrés en VBR (débit binaire variable),
la valeur du débit binaire moyen est affichée.
! Lors de la lecture de fichiers MP3 enre-
gistrés en mode VBR (débit binaire variable), VBR est affiché au lieu de la
valeur de débit binaire.
84
1 Appuyez sur EJECT pour ouvrir la face
avant.
Le logement pour disque apparaît.
Fr
Page 85

Utilisation de l’appareil
Section
02
Fente de chargement des disques
2 Insérez un CD (CD-ROM) dans le logement pour le disque.
La face avant est fermée automatiquement et
la lecture commence.
# Assurez-vous de mettre le côté étiquette
du disque vers le haut.
# Après avoir inséré un CD (CD-ROM), appuyez
sur SOURCE pour sélectionner le lecteur de CD
intégré.
# Vous pouvez éjecter le CD (CD-ROM) en appuyant sur EJECT.
3 Poussez MULTI-CONTROL vers le haut
ou vers le bas pour sélectionner un dossier
lors de la lecture d’audio compressée.
# Vous ne pouvez pas sélectionner un dossier
qui ne contient pas de fichier audio compressé
enregistré.
# Pour retourner au dossier 01 (ROOT), appuyez
sur BAND et maintenez la pression. Toutefois, si
le dossier 01 (ROOT) ne contient pas de fichier, la
lecture commence au dossier 02.
4 Pour une avance rapide ou un retour rapide, poussez et maintenez
MULTI-CONTROL vers la gauche ou vers la
droite.
# Si vous sélectionnez Rough search, une pres-
sion prolongée sur MULTI-CONTROL vers la gauche ou vers la droite vous permet d’effectuer une
recherche par sauts de 10 plages dans le disque
(dossier) en cours. (Reportez-vous à la page 87,
Recherche toutes les 10 plages sur le disque ou
dossier en cours.)
5 Pour atteindre une plage précédente
ou suivante, poussez MULTI-CONTROL vers
la gauche ou vers la droite.
Remarques
! Il y a par fois un délai entre la commande de
lecture d’un disque et le début de l’émission
du son. Au moment de la lecture du format,
Format read s’affiche.
! Si un message d’erreur tel que ERROR-11
s’affiche, reportez-vous à la page 140, Messa-
ges d’erreur.
! Quand vous lisez des CDs CD-EXTRA ou
MIXED-MODE, vous pouvez basculer entre la
lecture d’audio compressée et celle d’un CDDA en appuyant sur BAND.
! Si vous avez basculé entre la lecture d’audio
compressée et celle de données audio (CDDA), la lecture commence à la première plage
du disque.
! Lors de la lecture de fichiers enregistrés en
VBR (débit binaire variable), la durée de lecture écoulée peut ne pas s’afficher correctement.
! Lors de la lecture d’un disque d’audio
compressée, aucun son n’est émis pendant
l’avance ou le retour rapide.
! Quand un disque CD TEXT est inséré, les titres
du disque et des plages commencent à défiler
automatiquement. Quand la fonction Ever
Scroll est mise en service lors du réglage initial, les titres du disque et des plages défilent
en permanence. À propos d’Ever Scroll, reportez-vous à la page 106, Mise en service ou hors
service de la fonction Ever Scroll (défilement
permanent).
! La lecture s’effectue dans l’ordre des numéros
de fichier. Les dossiers qui ne contiennent pas
de fichiers sont sautés. (Si le dossier 01
(ROOT) ne contient pas de fichier, la lecture
commence au dossier 02.)
Sélection directe d’une plage
Quand vous utilisez la télécommande, vous
pouvez sélectionner une plage directement en
saisissant le numéro de plage désiré.
! Lors de la lecture de fichiers audio, vous
pouvez sélectionner une plage musicale
dans le dossier en cours.
Français
85
Fr
Page 86

Section
02
Utilisation de l’appareil
1 Appuyez sur DIRECT.
L’écran de saisie du numéro de plage s’affi-
che.
2 Appuyez sur les touches 0 à 9 pour saisir le numéro de plage désiré.
# Vous pouvez annuler le numéro saisi en appuyant sur CLEAR.
3 Appuyez sur DIRECT.
La plage du numéro saisi est jouée.
# Après être passé en mode saisie de numéro,
ce mode est automatiquement annulé si vous
n’effectuez aucune opération dans les huit secondes environ.
Introduction aux opérations
avancées
1 Appuyez sur MULTI-CONTROL pour afficher le menu principal.
FUNCTION, AUDIO et ENTERTAINMENT ap-
paraissent sur l’écran.
2 Utilisez MULTI-CONTROL pour choisir
FUNCTION.
Tournez pour changer l’option de menu, appuyez pour la sélectionner.
Le nom de la fonction s’affiche sur l’écran.
3 Tourner MULTI-CONTROL pour sélectionner la fonction.
Tournez MULTI-CONTROL pour parcourir les
fonctions dans l’ordre suivant :
Play mode (répétition de la lecture)—
Random mode (lecture aléatoire)—
Scan mode (examen du disque)—Pause
(pause)—Compression (compression et BMX)
—Search mode (méthode de recherche)—
TitleInput "A" (saisie du titre du disque)
# Vous pouvez aussi sélectionner la fonction en
appuyant sur FUNCTION de la télécommande.
# Lors de la lecture d’un disque CD TEXT, vous
ne pouvez pas basculer sur l’écran de saisie de
titre du disque.Sur un disque CD TEXT, le titre du
disque a déjà été enregistré.
# Lors de la lecture d’un disque d’audio
compressée, vous ne pouvez pas basculer sur l’écran de saisie de titre du disque.
# Appuyez sur BAND pour revenir à l’affichage
ordinaire.
# Si vous n’utilisez pas de fonctions excepté
TitleInput "A" dans un délai d’environ 30 secon-
des, l’écran revient automatiquement à l’affichage ordinaire.
Sélection d’une étendue de
répétition de lecture
La fonction répétition de la lecture lit la même
plage/le même dossier à l’intérieur de l’étendue de répétition sélectionnée.
L’étendue de répétition détermine aussi l’éten-
due de lecture aléatoire et d’examen du
disque.
1 Utilisez MULTI-CONTROL pour sélectionner Play mode dans le menu des fonctions.
2 Appuyez sur MULTI-CONTROL pour
choisir l’étendue de répétition.
! Disc repeat – Répétition de toutes les pla-
ges
! Track repeat – Répétition de la plage en
cours de lecture seulement
! Folder repeat – Répétition du dossier en
cours de lecture
# Si vous choisissez un autre dossier pendant la
répétition de la lecture, le mode de répétition se
changera en répétition du disque.
# Lors de la lecture d’un CD, l’exécution d’une
recherche de plage ou d’une avance/d’un retour
rapide annule automatiquement la répétition de
la lecture.
# Lors de la lecture d’un disque d’audio
compressée, l’exécution d’une recherche de
plage ou d’une avance/d’un retour rapide pendant Track repeat (répétition de plage) change
l’étendue de répétition en répétition de dossier.
# Quand Folder repeat (répétition de dossier)
est sélectionné, il n’est pas possible de jouer un
sous-dossier de ce dossier.
86
Fr
Page 87

Utilisation de l’appareil
Section
02
Écoute des plages musicales
dans un ordre aléatoire
La lecture aléatoire lit les plages dans un
ordre aléatoire (au hasard) à l’intérieur de l’étendue de répétition sélectionnée.
Reportez-vous à la page précédente, Sélection
d’une étendue de répétition de lecture.
1 Utilisez MULTI-CONTROL pour sélectionner Random mode dans le menu des
fonctions.
2 Appuyez sur MULTI-CONTROL pour activer la lecture aléatoire.
Les plages musicales seront lues dans un
ordre aléatoire.
# Appuyez à nouveau sur MULTI-CONTROL
pour mettre hors service la fonction lecture aléatoire.
Examen du contenu des
dossiers et des plages
L’examen du disque recherche la plage à l’in-
térieur de l’étendue de répétition sélectionnée.
Reportez-vous à la page précédente, Sélection
d’une étendue de répétition de lecture.
1 Utilisez MULTI-CONTROL pour sélectionner Scan mode dans le menu des fonctions.
2 Appuyez sur MULTI-CONTROL pour activer la lecture du contenu du disque.
Les 10 premières secondes de chaque plage
sont lues.
3 Quand vous trouvez la plage désirée
appuyez sur MULTI-CONTROL pour arrêter
la lecture du contenu du disque.
# Si les conditions de lecture se sont affichées
d’elles-mêmes, choisissez Scan mode une fois
encore en utilisant MULTI-CONTROL.
# Lorsque l’examen du disque (dossier) est ter-
miné, la lecture normale reprend.
Pause de la lecture
1 Utilisez MULTI-CONTROL pour sélectionner Pause dans le menu des fonctions.
2 Appuyez sur MULTI-CONTROL pour activer la pause.
La lecture de la plage en cours se met en
pause.
# Appuyez à nouveau sur MULTI-CONTROL
pour mettre la pause hors service.
Utilisation de la compression et
de la fonction BMX
L’utilisation des fonctions COMP (compres-
sion) et BMX vous permet d’ajuster la qualité
sonore du son de l’appareil.
1 Utilisez MULTI-CONTROL pour sélectionner Compression dans le menu des
fonctions.
2 Appuyez sur MULTI-CONTROL pour
choisir votre réglage préféré.
COMP/BMX OFF—COMP 1—COMP 2—
COMP/BMX OFF—BMX 1—BMX 2
Recherche toutes les 10 plages
sur le disque ou dossier en cours
Vous pouvez choisir entre les méthodes recherche rapide avant, recherche rapide arrière
et recherche toutes les 10 plages. Sélectionner
Rough search vous permet d’effectuer une re-
cherche toutes les 10 plages.
1 Utilisez MULTI-CONTROL pour sélectionner Search mode dans le menu des
fonctions.
2 Appuyez sur MULTI-CONTROL pour
choisir Rough search.
! FF/REV – Recherche rapide avant et arrière
! Rough search – Recherche toutes les 10
plages
# Pour sélectionner FF/REV, appuyez à nouveau
sur MULTI-CONTROL.
Français
87
Fr
Page 88

Section
02
Utilisation de l’appareil
3 Appuyez sur BAND pour revenir à l’affichage des conditions de lecture.
4 Poussez et maintenez MULTI-CONTROL
vers la gauche ou vers la droite pour effectuer une recherche toutes les 10 plages sur
un disque (dossier).
# Si le nombre de plages restantes est inférieur
à 10, l’appui de façon prolongée sur
MULTI-CONTROL rappelle la première (la dernière) plage.
Utilisation des fonctions de
titre de disque
Vous pouvez saisir les titres des CDs et les afficher. La prochaine fois que vous insérez un
CD pour lequel vous avez saisi un titre, le titre
de ce CD sera affiché.
Saisie des titres de disque
Utilisez la fonction saisie de titre de disque
pour enregistrer jusqu’à 48 titres de CD dans
l’appareil. Chaque titre peut avoir une longueur maximum de 10 caractères.
1 Jouez un CD pour lequel vous voulez
entrer un titre.
2 Utilisez MULTI-CONTROL pour sélectionner TitleInput "A" dans le menu des
fonctions.
3 Appuyez sur DISPLAY pour choisir le
type de caractères désiré.
Appuyez de manière répétée sur la touche
DISPLAY pour passer d’un des types de carac-
tères suivants à l’autre :
Alphabet (majuscules), chiffres et symboles—
Alphabet (minuscules)—Lettres européennes,
telles que les lettres accentuées (exemple : á,
à, ä, ç)—Chiffres et symboles
5 Poussez MULTI-CONTROL vers la gauche ou vers la droite pour placer le curseur
sur la position précédente ou suivante.
6 Après avoir entré le titre, placez le curseur sur la dernière position en poussant
MULTI-CONTROL vers la droite.
Lorsque vous poussez une nouvelle fois
MULTI-CONTROL vers la droite, le titre saisi
est mis en mémoire.
7 Appuyez sur BAND pour revenir à l’affichage des conditions de lecture.
Remarques
! Les titres demeurent en mémoire même après
que vous ayez retiré le disque de l’appareil, et
sont rappelés quand le disque est réinséré.
! Après l’entrée des données de 48 disques
dans la mémoire, les données pour un nouveau disque écrasent les données les plus anciennes.
! Si vous connectez un lecteur de CD à char-
geur, vous pouvez entrer les titres de disque
pour 100 disques.
! Si vous connectez à l’appareil un lecteur de
CD à chargeur qui ne supporte pas la saisie
de titres, vous ne pouvez pas utiliser l’appareil
pour entrer des titres.
Affichage d’informations
textuelles sur le disque
% Appuyez sur DISPLAY pour choisir l’in-
formation textuelle désirée.
! Pour un CD avec un titre saisi
Temps de lecture—
temps de lecture
! Pour les disques CD TEXT
: titre du disque et
4 Poussez MULTI-CONTROL vers le haut
ou vers le bas pour choisir une lettre de l’alphabet.
88
Fr
Page 89

Utilisation de l’appareil
Section
02
Temps de lecture— : nom de l’interprète
du disque et
—
: nom de l’interprète du disque et :
titre du disque—
titre de la plage musicale—
terprète de la plage et
musicale—
lecture
! Pour les disques WMA/MP3/AAC
Temps de lecture—
: nom du fichier— : nom de l’artiste et
: titre de la plage musicale— : nom de
l’artiste et
l’album et
—
: titre de la plage et temps de lecture
—
: commentaire et temps de lecture
! Pour les disques WAV
Temps de lecture—
: nom du fichier
Remarques
! Vous pouvez faire défiler l’affichage vers la
gauche du titre en appuyant de façon prolongée sur DISPLAY.
! Un CD Audio qui contient des informations
telles que du texte et/ou des numéros est un
disque CD TEXT.
! Si aucune information spécifique n’a été enre-
gistrée sur un disque, aucun titre ni nom n’est
affiché.
! Selon la version de iTunes
gistrer les fichiers MP3 sur un disque, les informations de commentaire peuvent ne pas
s’afficher correctement.
! Selon la version de Windows Media Player uti-
lisée pour encoder les fichiers WMA, les
noms d’album et les autres informations textuelles peuvent ne pas s’afficher correctement.
! La fréquence d’échantillonnage affichée peut
être abrégée.
! Quand la fonction Ever Scroll est mise en ser-
vice lors du réglage initial, les informations
textuelles défilent en permanence. Reportezvous à la page 106, Mise en service ou hors
: titre de la plage musicale
: titre du disque et :
: nom de l’in-
: titre de la plage
: titre de la plage et temps de
: nom du dossier et
: titre de l’album— : titre de
: titre de la plage musicale
: nom du dossier et
®
utilisée pour enre-
service de la fonction Ever Scroll (défilement
permanent).
Choix de plages à partir de la
liste des titres de plages
La liste des titres de plages vous permet de
voir les titres de plages sur un CD TEXT et d’en
choisir une pour la lire.
1 Appuyez sur LIST pour passer en mode
liste des titres des plages.
2 Utilisez MULTI-CONTROL pour choisir le
titre de plage désiré.
Tournez pour changer de titre de plage, appuyez pour sélectionner.
# Vous pouvez aussi changer de titre de plage
en poussant MULTI-CONTROL vers le haut ou
vers le bas.
# Si vous ne réglez aucun paramètre de la liste
pendant environ 30 secondes, l’écran revient automatiquement à l’affichage ordinaire.
Choix des plages musicales à partir
de la liste des noms de fichiers
La fonction liste des noms des fichiers vous
permet de voir la liste des noms de fichiers (ou
de dossiers) et d’en choisir un pour le lire.
1 Appuyez sur LIST pour passer en mode
liste des noms de fichiers.
Les noms des fichiers et des dossiers apparaissent sur l’afficheur.
2 Utilisez MULTI-CONTROL pour sélectionner le nom de fichier (ou nom de dossier) désiré.
Tournez pour changer de nom de fichier ou de
dossier ; appuyez pour lire ; poussez vers la
droite pour voir une liste des fichiers (ou des
dossiers) contenus dans le dossier sélectionné.
# Vous pouvez aussi changer le nom du fichier
ou du dossier en poussant MULTI-CONTROL vers
le haut ou vers le bas.
Français
89
Fr
Page 90

4
123
5
Section
02
Utilisation de l’appareil
# Pour revenir à la liste précédente (le dossier
de niveau immédiatement supérieur), poussez
MULTI-CONTROL vers la gauche.
# Si le numéro de dossier/de fichier est supérieur à 100, les deux derniers chiffres du numéro
sont affichés.
# Le nombre de dossiers/fichiers dans le dossier
actuellement sélectionné sera affiché sur le côté
droit de l’écran.
# Si vous ne réglez aucun paramètre de la liste
pendant environ 30 secondes, l’écran revient automatiquement à l’affichage ordinaire.
Lecture de plages musicales
sur le lecteur audio portable
USB/la mémoire USB
Opérations de base
Selon le lecteur audio portable USB connecté
ou la mémoire USB connectée, les per formances optimales de cet appareil peuvent ne pas
être obtenues.
1 Indicateur WMA/MP3/AAC
Il indique le type du fichier en cours de lecture.
2 Indicateur du numéro de dossier
3 Indicateur du numéro de plage
4 Indicateur du temps de lecture
5 Indicateur de débit binaire
1 Appuyez sur SOURCE pour choisir USB.
90
2 Poussez MULTI-CONTROL vers le haut
ou vers le bas pour choisir un dossier.
# Vous ne pouvez pas sélectionner un dossier
qui ne contient pas de fichier audio compressé
enregistré.
# Lors de la lecture des listes de lecture, vous
ne pouvez pas sélectionner un dossier.
# Lors de la lecture sur un lecteur audio portable USB ou une mémoire USB, appuyer de
façon prolongée sur BAND ramène au dossier 01
(ROOT). Toutefois, si le dossier 01 (ROOT) ne
contient pas de fichier, la lecture commence au
dossier 02.
3 Pour une avance rapide ou un retour rapide, poussez et maintenez
MULTI-CONTROL vers la gauche ou vers la
droite.
Fr
Page 91

Utilisation de l’appareil
Section
02
4 Pour atteindre un autre fichier audio
compressé précédent ou suivant, poussez
MULTI-CONTROL vers la gauche ou vers la
droite.
Pousser MULTI-CONTROL vers la droite fait
sauter au début du fichier audio suivant. Pousser MULTI-CONTROL une fois vers la gauche
fait sauter au début du fichier audio en cours
de lecture. Pousser une nouvelle fois fera passer au fichier audio précédent.
Remarques
! Quand un lecteur audio portable USB dispo-
sant d’une fonction de charge de la batterie
se connecte à cet appareil et quand le contact
d’allumage est sur ACC ou ON, la batterie est
chargée.
! Vous pouvez déconnecter le lecteur audio por-
table USB ou la mémoire USB à n’importe
quel moment où vous voulez en cesser l’écoute.
Si vous déconnectez le lecteur audio portable
USB/la mémoire USB de cet appareil pendant
la lecture, No Device s’affiche.
Sélection directe d’un fichier
audio dans le dossier en cours
Quand vous utilisez la télécommande, vous
pouvez sélectionner un fichier audio directement en saisissant le numéro de plage désiré.
! Lors de la lecture des listes de lecture,
cette fonction ne peut pas être utilisée.
1 Appuyez sur DIRECT.
L’écran de saisie du numéro de fichier audio
s’affiche.
2 Appuyez sur les touches 0 à 9 pour saisir le numéro de plage désiré.
# Vous pouvez annuler le numéro saisi en appuyant sur CLEAR.
3 Appuyez sur DIRECT.
Le fichier audio du numéro saisi est lu.
# Après être passé en mode saisie de numéro,
ce mode est automatiquement annulé si vous
n’effectuez aucune opération dans les huit secondes environ.
Introduction aux opérations
avancées
1 Appuyez sur MULTI-CONTROL pour afficher le menu principal.
FUNCTION, AUDIO et ENTERTAINMENT ap-
paraissent sur l’écran.
2 Utilisez MULTI-CONTROL pour choisir
FUNCTION.
Tournez pour changer l’option de menu, appuyez pour la sélectionner.
Le nom de la fonction s’affiche sur l’écran.
3 Tourner MULTI-CONTROL pour sélectionner la fonction.
Tournez MULTI-CONTROL pour parcourir les
fonctions dans l’ordre suivant :
Play mode (répétition de la lecture)—
Random mode (lecture aléatoire)—
Scan mode (examen du disque)—Pause
(pause)
# Vous pouvez aussi sélectionner la fonction en
appuyant sur FUNCTION de la télécommande.
# Appuyez sur BAND pour revenir à l’affichage
des conditions de lecture.
# Si vous ne réglez aucun paramètre des fonctions pendant environ 30 secondes, l’écran revient automatiquement à l’affichage ordinaire.
Sélection d’une étendue de
répétition de lecture
La fonction répétition de la lecture lit la même
plage/le même dossier à l’intérieur de l’étendue de répétition sélectionnée.
1 Utilisez MULTI-CONTROL pour sélectionner Play mode dans le menu des fonctions.
Français
91
Fr
Page 92

Section
02
Utilisation de l’appareil
2 Appuyez de façon répétée sur
MULTI-CONTROL pour choisir l’étendue de
répétition.
Appuyez sur MULTI-CONTROL de façon répétée jusqu’à ce que le réglage désiré apparaisse sur l’afficheur.
! Track repeat – Répétition du fichier en
cours de lecture seulement
! Folder repeat – Répétition du dossier en
cours de lecture
! All repeat – Répétition de tous les fichiers
Remarques
! Lors de la lecture de listes de lecture, Playlists
s’affiche.
! Si pendant la répétition Track repeat, vous re-
cherchez une plage musicale ou commandez
une avance rapide ou un retour rapide, l’étendue de répétition changera en Folder repeat.
! Quand Folder repeat est sélectionné, il n’est
pas possible de jouer un sous-dossier de ce
dossier.
Lecture des fichiers dans un
ordre aléatoire
La lecture aléatoire lit les plages dans un
ordre aléatoire (au hasard) à l’intérieur de l’étendue de répétition sélectionnée.
1 Choisissez l’étendue de répétition.
2 Utilisez MULTI-CONTROL pour sélectionner Random mode dans le menu des
fonctions.
3 Appuyez sur MULTI-CONTROL pour activer la lecture aléatoire.
Les fichiers audio seront lus dans un ordre
aléatoire.
# Appuyez à nouveau sur MULTI-CONTROL
pour mettre hors service la fonction lecture aléatoire.
Examen du contenu des
dossiers et des fichiers
L’examen du disque recherche le fichier à l’in-
térieur de l’étendue de répétition sélectionnée.
1 Choisissez l’étendue de répétition.
2 Utilisez MULTI-CONTROL pour sélectionner Scan mode dans le menu des fonctions.
3 Appuyez sur MULTI-CONTROL pour activer la lecture du contenu du disque.
Les 10 premières secondes de chaque fichier
du dossier en cours (ou du premier fichier de
chaque dossier) sont lues.
4 Quand vous trouvez le fichier désiré
(ou le dossier désiré) appuyez sur
MULTI-CONTROL pour arrêter la lecture du
contenu du disque.
La lecture du fichier (ou du dossier) se poursuit.
# Si les conditions de lecture se sont affichées
d’elles-mêmes, choisissez Scan mode une fois
encore en utilisant MULTI-CONTROL.
# Lorsque l’examen des fichiers ou des dossiers
est terminé, la lecture normale des fichiers reprend.
Pause de la lecture
1 Utilisez MULTI-CONTROL pour sélectionner Pause dans le menu des fonctions.
2 Appuyez sur MULTI-CONTROL pour activer la pause.
La lecture de la plage en cours se met en
pause.
# Appuyez à nouveau sur MULTI-CONTROL
pour mettre la pause hors service.
92
Fr
Page 93

Utilisation de l’appareil
Section
02
Affichage des informations
textuelles d’un fichier audio
% Appuyez sur DISPLAY pour choisir l’in-
formation textuelle désirée.
Temps de lecture—
nom du fichier—
titre de la plage musicale—
prète et
bum et
: titre de l’album— : titre de l’al-
: titre de la plage musicale— :
titre de la plage et temps de lecture—
commentaire et temps de lecture
# Si les caractères enregistrés sur le fichier
audio ne sont pas compatibles avec l’appareil
central, ils ne seront pas affichés.
# Si aucune information spécifique n’a été enre-
gistrée sur fichier audio, aucun titre ni nom n’est
affiché.
# L’information textuelle de certains fichiers
audio peut ne pas être affichée correctement.
Remarques
! Vous pouvez faire défiler l’information tex-
tuelle vers la gauche en appuyant de façon
prolongée sur DISPLAY.
! Quand la fonction Ever Scroll est mise en ser-
vice lors du réglage initial, les informations
textuelles défilent en permanence. Reportezvous à la page 106, Mise en service ou hors
service de la fonction Ever Scroll (défilement
permanent).
: nom du dossier et :
: nom de l’interprète et :
: nom de l’inter-
:
2 Utilisez MULTI-CONTROL pour sélectionner le nom de fichier (ou nom de dossier) désiré.
Tournez pour changer de nom de fichier ou de
dossier ; appuyez pour lire ; poussez vers la
droite pour voir une liste des fichiers (ou des
dossiers) contenus dans le dossier sélectionné.
# Lorsque liste de lecture est sélectionnée, appuyer sur MULTI-CONTROL commencera la lecture des fichiers dans la liste de lecture
sélectionnée.
# Vous pouvez aussi changer le nom du fichier
ou du dossier en poussant MULTI-CONTROL vers
le haut ou vers le bas.
# Pour revenir à la liste précédente (le dossier
de niveau immédiatement supérieur), poussez
MULTI-CONTROL vers la gauche.
# Si le numéro de dossier/de fichier est supérieur à 100, les deux derniers chiffres du numéro
sont affichés.
# Le nombre de dossiers/fichiers dans le dossier
actuellement sélectionné sera affiché sur le côté
droit de l’écran.
# Si vous ne réglez aucun paramètre de la liste
pendant environ 30 secondes, l’écran revient automatiquement à l’affichage ordinaire.
Français
Choix des fichiers à partir de la
liste des noms de fichiers
La fonction liste des noms des fichiers vous
permet de voir la liste des noms de fichiers (ou
de dossiers) et d’en choisir un pour le lire.
1 Appuyez sur LIST pour passer en mode
liste des noms de fichiers.
Les noms des fichiers et des dossiers apparaissent sur l’afficheur.
93
Fr
Page 94

213
Section
02
Utilisation de l’appareil
Lecture de plages
musicales sur l’iPod
Vous pouvez vous connecter et écouter des
plages musicales sur un iPod avec un connecteur Dock ou une interface USB.
Quand vous utilisez un iPod avec un connecteur Dock, un câble iPod Dock Connector vers
USB ou le câble d’interface fourni est requis.
Opérations de base
1 Indicateur du numéro de plage musicale
2 Indicateur du temps de lecture
3 Temps écoulé de la plage (barre d’avance-
ment)
1 Appuyez sur SOURCE pour choisir USB.
Lorsque l’iPod est connecté à cet appareil,
PIONEER (ou
l’iPod.
2 Lors de la lecture d’un Audiobook ou
Podcast (avec chapitre) sur un iPod, poussez MULTI-CONTROL vers le haut ou vers le
bas pour sélectionner un chapitre.
3 Pour une avance rapide ou un retour rapide, poussez et maintenez
MULTI-CONTROL vers la gauche ou vers la
droite.
4 Pour atteindre une plage précédente
ou suivante, poussez MULTI-CONTROL vers
la gauche ou vers la droite.
Pousser MULTI-CONTROL vers la droite fait
passer au début de la plage suivante. Pousser
MULTI-CONTROL une fois vers la gauche fait
passer au début de la plage en cours. Pousser
(une coche)) est affiché(e) sur
une nouvelle fois fera passer à la plage précédente.
Remarques
! Lisez les précautions relatives à l’iPod sur la
page 144.
! Si un message d’erreur tel que ERROR-11
s’affiche, reportez-vous à la page 140, Messa-
ges d’erreur.
! Quand le contact d’allumage est sur ACC ou
ON, la batterie de l’iPod est chargée quand
celui-ci est connecté à cet appareil.
! Lorsque l’iPod est connecté à cet appareil, il
ne peut pas lui-même être mis en service ou
hors service.
! Avant de connecter le connecteur de station
d’accueil de cet appareil à l’iPod, déconnectez
les écouteurs de l’iPod.
! L’iPod connecté à cet appareil est mis hors
service environ deux minutes après que le
commutateur d’allumage est mis en position
OFF (coupé).
Recherche d’une plage musicale
Pour faciliter l’utilisation d’un iPod et la recherche de plages musicales, le mode de
contrôle de l’iPod par cet appareil est aussi
proche que possible de l’utilisation habituelle
d’un iPod.
! Si vous selectionnez liste de lecture, cet ap-
pareil indique d’abord la liste de lecture du
nom de votre iPod. La liste de lecture lit toutes les plages musicales de votre iPod.
! Si les caractères enregistrés sur l’iPod ne
sont pas compatibles avec cet appareil, ils
ne seront pas affichés.
1 Appuyez sur LIST pour passer au menu
principal de la recherche par liste.
2 Utilisez MULTI-CONTROL pour sélectionner une catégorie.
Tournez pour changer de catégorie, appuyez
pour sélectionner.
94
Fr
Page 95

Utilisation de l’appareil
Section
02
Playlists (listes de lecture)—Artists (interprètes)—Albums (albums)—Songs (plages musicales)—Podcasts (podcasts)—Genres
(genres)—Audiobooks (livres audio)
La liste de la catégorie sélectionnée est affichée.
# Vous pouvez démarrer la lecture dans la catégorie sélectionnée en appuyant de façon prolongée sur MULTI-CONTROL.
# Vous pouvez aussi changer de catégorie en
poussant MULTI-CONTROL vers le haut ou vers
le bas.
# Vous pouvez aussi sélectionner la catégorie
en poussant MULTI-CONTROL vers la droite.
# Pour revenir à la liste précédente, poussez
MULTI-CONTROL vers la gauche.
# Pour aller au menu principal de la recherche
par liste, poussez MULTI-CONTROL de façon prolongée vers la gauche.
# Si vous ne réglez aucun paramètre de la liste
pendant environ 30 secondes, l’écran revient automatiquement à l’affichage ordinaire.
3 Répétez l’étape 2 pour trouver la plage
musicale que vous voulez écouter.
Affichage d’informations
textuelles sur l’iPod
% Appuyez sur DISPLAY pour choisir l’in-
formation textuelle désirée.
Temps de lecture—
: titre de la plage musicale— : nom de
l’interprète et
de l’album et
—
: titre de la plage et temps de lecture
# Si les caractères enregistrés sur l’iPod ne sont
pas compatibles avec cet appareil, ils ne seront
pas affichés.
: nom de l’interprète et
: nom de l’album— : nom
: titre de la plage musicale
textuelles défilent en permanence. Reportezvous à la page 106, Mise en service ou hors
service de la fonction Ever Scroll (défilement
permanent).
Introduction aux opérations
avancées
1 Appuyez sur MULTI-CONTROL pour afficher le menu principal.
FUNCTION, AUDIO et ENTERTAINMENT ap-
paraissent sur l’écran.
2 Utilisez MULTI-CONTROL pour choisir
FUNCTION.
Tournez pour changer l’option de menu, appuyez pour la sélectionner.
Le nom de la fonction s’affiche sur l’écran.
3 Tourner MULTI-CONTROL pour sélectionner la fonction.
Tournez MULTI-CONTROL pour parcourir les
fonctions dans l’ordre suivant :
Play mode (répétition de la lecture)—
Shuffle mode (shuffle)—Shuffle all (shuffle
all)—Pause (pause)—Audiobooks (vitesse du
livre audio)
# Vous pouvez aussi sélectionner la fonction en
appuyant sur FUNCTION de la télécommande.
# Appuyez sur BAND pour revenir à l’affichage
des conditions de lecture.
# Si vous ne réglez aucun paramètre des fonctions pendant environ 30 secondes, l’écran revient automatiquement à l’affichage ordinaire.
Français
Remarques
! Vous pouvez faire défiler l’information tex-
tuelle vers la gauche en appuyant de façon
prolongée sur DISPLAY.
! Quand la fonction Ever Scroll est mise en ser-
vice lors du réglage initial, les informations
95
Fr
Page 96

Section
02
Utilisation de l’appareil
Répétition de la lecture
Pour la lecture de plages musicales sur l’iPod,
il existe deux étendues de répétition de la lecture : Repeat One (répétition d’une plage musicale) et Repeat All (répétition de toutes les
plages musicales de la liste).
! Si Play mode est positionné sur
Repeat One, vous ne pouvez pas sélection-
ner les autres plages.
1 Utilisez MULTI-CONTROL pour sélectionner Play mode dans le menu des fonctions.
2 Appuyez de façon répétée sur
MULTI-CONTROL pour choisir l’étendue de
répétition.
Appuyez sur MULTI-CONTROL de façon répétée jusqu’à ce que le réglage désiré apparaisse sur l’afficheur.
! Repeat One – Répétition de la plage en
cours de lecture seulement
! Repeat All – Répétition de toutes les pla-
ges musicales de la liste sélectionnée
Lecture des plages musicales
dans un ordre aléatoire (shuffle)
Pour la lecture de plages musicales sur l’iPod,
il existe deux méthodes de lecture aléatoire :
Shuffle Songs (lecture des plages musicales
dans un ordre aléatoire) et Shuffle Albums
(lecture des albums dans un ordre aléatoire).
1 Utilisez MULTI-CONTROL pour sélectionner Shuffle mode dans le menu des
fonctions.
2 Appuyez sur MULTI-CONTROL pour
choisir votre réglage préféré.
Appuyez sur MULTI-CONTROL de façon répétée jusqu’à ce que le réglage désiré apparaisse sur l’afficheur.
! Shuffle Songs – Lecture des plages musi-
cales dans un ordre aléatoire à l’intérieur
de la liste sélectionnée
! Shuffle Albums – Sélectionne un album
au hasard, puis lit toutes les plages musicales de cet album dans l’ordre
! Shuffle OFF – Annulation de la lecture
aléatoire
Lecture de toutes les plages
musicales dans un ordre
aléatoire (shuffle all)
Cette méthode joue toutes les plages de l’iPod
dans un ordre aléatoire.
1 Utilisez MULTI-CONTROL pour sélectionner Shuffle all dans le menu des fonctions.
2 Appuyez sur MULTI-CONTROL pour
mettre en service la fonction shuffle all
(lecture aléatoire de toutes les plages).
Appuyez sur MULTI-CONTROL de façon répétée jusqu’à ce que le réglage désiré apparaisse sur l’afficheur.
Toutes les plages de l’iPod seront jouées dans
un ordre aléatoire.
# L’appui de façon prolongée sur
MULTI-CONTROL pendant l’affichage de la lec-
ture normale peut aussi commander cette fonction.
Pause d’une plage musicale
1 Utilisez MULTI-CONTROL pour sélectionner Pause dans le menu des fonctions.
2 Appuyez sur MULTI-CONTROL pour activer la pause.
La lecture de la plage en cours se met en
pause.
# Appuyez à nouveau sur MULTI-CONTROL
pour mettre la pause hors service.
Modification de la vitesse d’un
livre audio
Pendant l’écoute d’un livre audio sur un iPod,
vous pouvez modifier la vitesse de lecture.
96
Fr
Page 97

1
Utilisation de l’appareil
Section
02
1 Utilisez MULTI-CONTROL pour sélectionner Audiobooks dans le menu des fonctions.
2 Appuyez sur MULTI-CONTROL pour
choisir votre réglage préféré.
Appuyez sur MULTI-CONTROL de façon répétée jusqu’à ce que le réglage désiré apparaisse sur l’afficheur.
! Faster – Lecture plus rapide que la vitesse
normale
! Normal – Lecture à la vitesse normale
! Slower – Lecture plus lente que la vitesse
normale
Réglages sonores
Introduction aux réglages sonores
Français
1 Affichage des réglages sonores
Il indique l’état des réglages sonores.
1 Appuyez sur MULTI-CONTROL pour afficher le menu principal.
FUNCTION, AUDIO et ENTERTAINMENT ap-
paraissent sur l’écran.
2 Utilisez MULTI-CONTROL pour choisir
AUDIO.
Tournez pour changer l’option de menu, appuyez pour la sélectionner.
Le nom de la fonction audio s’affiche sur l’écran.
3 Tourner MULTI-CONTROL pour sélectionner la fonction audio.
Tournez MULTI-CONTROL pour parcourir les
fonctions audio dans l’ordre suivant :
Fader (réglage d’équilibre sonore)—Powerful
(réglage de l’égaliseur graphique)—50Hz (réglage de l’égaliseur graphique à 7 bandes)—
LOUD (correction physiologique)— Sub W.1
(réglage en/hors fonction du haut-parleur d’extrêmes graves)—Sub W.2 (réglage du hautparleur d’extrêmes graves) —Bass (accentuation des graves)—HPF (HPF (filtre passe-haut))
—SLA (réglage du niveau de la source)
# Vous pouvez aussi sélectionner la fonction
audio en appuyant sur AUDIO de la télécommande.
# Vous pouvez sélectionner le Sub W.2 seule-
ment quand la sortie haut-parleur d’extrêmes graves est activée dans Sub W.1.
# Si le syntoniseur FM a été choisi comme
source, vous ne pouvez pas afficher la fonction
SLA.
97
Fr
Page 98

Section
02
Utilisation de l’appareil
# Appuyez sur BAND pour revenir à l’affichage
de l’état de chaque source.
# Si vous n’utilisez pas de fonctions excepté
50Hz dans un délai d’environ 30 secondes, l’é-
cran revient automatiquement à l’affichage ordinaire.
Réglage de l’équilibre sonore
Vous pouvez modifier l’équilibre avant-arrière/
droite-gauche afin d’obtenir un confort d’écoute idéal dans tous les sièges occupés.
1 Utilisez MULTI-CONTROL pour choisir
Fader.
# Si le réglage d’équilibre a été effectué précé-
demment, Balance est affiché.
2 Poussez MULTI-CONTROL vers le haut
ou vers le bas pour régler l’équilibre sonore
entre les haut-parleurs avant et arrière.
Chaque fois que vous poussez
MULTI-CONTROL vers le haut ou vers le bas,
l’équilibre des haut-parleurs avant-arrière se
déplace vers l’avant ou vers l’arrière.
Les valeurs F15à R15s’affichent tandis que
l’équilibre entre les haut-parleurs avant et arrière se déplace de l’avant à l’arrière.
# F/R 0 est le réglage convenable dans le cas où
seulement deux haut-parleurs sont utilisés.
# Si le réglage pour la sortie arrière est
Rear SP :S/W, vous ne pouvez pas régler l’équili-
bre des haut-parleurs avant-arrière. Reportezvous à la page 104, Réglage de la sortie arrière et
du contrôleur de haut-parleur d’extrêmes graves.
3 Poussez MULTI-CONTROL vers la gauche ou vers la droite pour ajuster l’équilibre
des haut-parleurs gauche-droite.
Chaque fois que vous poussez
MULTI-CONTROL vers la gauche ou vers la
droite, l’équilibre des haut-parleurs gauche/
droite se déplace vers la gauche ou vers la
droite.
Les valeurs L15à R15s’affichent tandis que
l’équilibre entre les haut-parleurs gauche et
droit se déplace de la gauche à la droite.
Utilisation de l’égaliseur
L’égaliseur vous permet de corriger les carac-
téristiques sonores de l’intérieur du véhicule
en fonction de vos goûts.
Rappel d’une courbe d’égalisation
Il existe sept courbes d’égalisation enregistrées que vous pouvez facilement rappeler à
n’importe quel moment. Voici une liste des
courbes d’égalisation :
Affichage Courbe d’égalisation
Powerful Accentuation de la puissance
Natural Sonorité naturelle
Vocal Chant
Custom1 Courbe personnalisée 1
Custom2 Courbe personnalisée 2
Flat Absence de correction
S.Bass Accentuation des graves
! Custom1 et Custom2 sont des courbes
d’égalisation préréglées que vous avez
créées. Des réglages peuvent être effectués
avec un égaliseur graphique 7 bandes.
! Quand Flat est sélectionné aucune addi-
tion ni correction n’est effectuée sur le son.
Ceci est utile pour tester l’effet des courbes
d’égalisation en basculant entre Flat et une
courbe d’égalisation définie.
% Appuyez sur EQ pour sélectionner l’é-
galiseur.
Appuyez de manière répétée sur EQ pour choisir l’un des égaliseurs suivants :
Powerful—Natural—Vocal—Custom1—
Custom2—Flat—S.Bass
Réglage des courbes d’égalisation
Les courbes d’égalisation définies en usine
peuvent être l’objet d’un réglage fin (réglage
de la nuance), à l’exception de la courbe Flat.
98
Fr
Page 99

Utilisation de l’appareil
Section
02
1 Utilisez MULTI-CONTROL pour choisir le
réglage de l’égaliseur graphique.
Powerful apparaît sur l’afficheur.
Si la courbe de l’égaliseur a été sélectionnée
précédemment, la courbe de cet égaliseur sélectionné s’affichera alors à la place de
Powerful.
2 Poussez MULTI-CONTROL vers la gauche ou vers la droite pour choisir une
courbe d’égalisation.
Chaque fois que vous poussez
MULTI-CONTROL vers la gauche ou vers la
droite, une courbe d’égalisation est sélectionnée dans l’ordre suivant :
Powerful—Natural—Vocal—Custom1—
Custom2—Flat—S.Bass
3 Poussez MULTI-CONTROL vers le haut
ou vers le bas pour ajuster la courbe d’égalisation.
Chaque fois que vous poussez
MULTI-CONTROL vers le haut ou vers le bas,
la courbe d’égalisation augmente ou diminue.
+6 à –4 (ou –6) sont les valeurs affichées tandis que la courbe d’égalisation augmente ou
diminue.
# La plage de réglage dépend de la courbe d’é-
galisation choisie.
# La courbe d’égalisation avec toutes les fré-
quences fixées à 0 ne peut pas être réglée.
Réglage de l’égaliseur graphique 7
bandes
Vous pouvez régler l’amplitude de chacune
des bandes des courbes d’égalisation
Custom1 et Custom2.
! Une courbe Custom1 distincte peut être
créée pour chaque source. (Le lecteur de
CD intégré et le lecteur de CD à chargeur
sont automatiquement placés dans les
mêmes conditions d’égalisation.) Si vous
effectuez des réglages quand une courbe
d’égalisation autre que Custom2 est sélectionnée, les paramètres de la courbe d’égalisation seront mémorisés dans Custom1.
! On peut aussi créer une courbe Custom2
commune à toutes les sources. Si vous effectuez des ajustements quand la courbe
Custom2 est sélectionnée, la courbe
Custom2 est mise à jour.
1 Rappelez la courbe d’égalisation que
vous voulez régler.
Reportez-vous à la page précédente, Rappel
d’une courbe d’égalisation.
2 Utilisez MULTI-CONTROL pour choisir le
réglage de l’égaliseur graphique 7 bandes.
La fréquence et le niveau (par exemple
50Hz +4) apparaissent sur l’afficheur.
3 Poussez MULTI-CONTROL vers la gauche ou vers la droite pour choisir la bande
de l’égalisateur à ajuster.
Chaque fois que vous poussez
MULTI-CONTROL vers la gauche ou vers la
droite, une bande de l’égaliseur est sélectionnée dans l’ordre suivant :
50Hz—125Hz—315Hz—800Hz—2kHz—
5kHz—12.5kHz
4 Poussez MULTI-CONTROL vers le haut
ou vers le bas pour régler le niveau de la
bande d’égalisation.
Chaque fois que vous poussez
MULTI-CONTROL vers le haut ou vers le bas,
le niveau de la bande d’égalisation augmente
ou diminue.
Les valeurs +6 à –6 s’affichent tandis que le niveau augmente ou diminue.
# Vous pouvez ensuite choisir une autre bande
et régler son amplitude.
5 Appuyez sur BAND pour annuler le réglage de l’égalisateur graphique 7 bandes.
Réglage de la correction
physiologique
La correction physiologique a pour objet d’accentuer les graves et les aigus à bas niveaux
d’écoute.
Français
99
Fr
Page 100

Section
02
Utilisation de l’appareil
1 Utilisez MULTI-CONTROL pour choisir
LOUD.
2 Appuyez sur MULTI-CONTROL pour
mettre en service la correction physiologique.
Le niveau de correction physiologique (par
exemple, Mid) apparaît sur l’afficheur.
# Appuyez à nouveau sur MULTI-CONTROL
pour mettre hors service la correction physiologique.
3 Poussez MULTI-CONTROL vers la gauche ou vers la droite pour sélectionner le
niveau désiré.
Chaque fois que vous poussez
MULTI-CONTROL vers la gauche ou vers la
droite, un niveau est sélectionné dans l’ordre
suivant :
Low (bas)—Mid (moyen)—High (élevé)
Utilisation de la sortie hautparleur d’ extrêmes graves
Cet appareil est équipé d’une sortie haut-parleur d’extrêmes graves qui peut être mise en
service ou hors service.
1 Utilisez MULTI-CONTROL pour choisir
Sub W.1.
# Vous pouvez aussi sélectionner le menu de réglage du haut-parleur d’extrêmes graves en appuyant sur la touche SW de l’appareil.
2 Appuyez sur MULTI-CONTROL pour
mettre en service la sortie haut-parleur
d’extrêmes graves.
Normal apparaît sur l’afficheur. La sortie haut-
parleur d’extrêmes graves est maintenant en
service.
# Pour mettre la sortie haut-parleur d’extrêmes
graves hors service, appuyez à nouveau sur
MULTI-CONTROL.
3 Poussez MULTI-CONTROL vers la gauche ou vers la droite pour choisir la phase
de la sortie haut-parleur d’extrêmes graves.
Poussez MULTI-CONTROL vers la gauche
pour choisir la phase inverse et Reverse apparaît sur l’afficheur. Poussez MULTI-CONTROL
vers la droite pour choisir la phase normale et
Normal apparaît sur l’afficheur.
Réglages du haut-parleur d’extrêmes
graves
Lorsque la sortie haut-parleur d’extrêmes graves est en service, vous pouvez choisir la fréquence de coupure et régler le niveau de
sortie du haut-parleur d’extrêmes graves.
1 Utilisez MULTI-CONTROL pour choisir
Sub W.2.
# Vous pouvez aussi sélectionner le menu de réglage du haut-parleur d’extrêmes graves en appuyant sur la touche SW de l’appareil.
# Quand la sortie haut-parleur d’extrêmes gra-
ves est en service, vous pouvez sélectionner
Sub W.2.
2 Poussez MULTI-CONTROL vers la gauche ou vers la droite pour choisir la fréquence de coupure.
Chaque fois que vous poussez
MULTI-CONTROL vers la gauche ou vers la
droite, une fréquence de coupure est sélectionnée dans l’ordre suivant :
50Hz—63Hz—80Hz—100Hz—125Hz
Seules les fréquences inférieures à celles de
la plage sélectionnée sont produites par le
haut-parleur d’extrêmes graves.
3 Poussez MULTI-CONTROL vers le haut
ou vers le bas pour régler le niveau de sortie du haut-parleur d’extrêmes graves.
Chaque fois que vous poussez
MULTI-CONTROL vers le haut ou vers le bas,
le niveau du haut-parleur d’extrêmes graves
augmente ou diminue. Les valeurs +6 à –24
s’affichent tandis que le niveau augmente ou
diminue.
100
Fr
 Loading...