

Page 1

Operation Manual
Manual de instrucciones
CD RDS RECEIVER
REPRODUCTOR DE CD CON RECEPTOR RDS
DEH-P6000UB
English Español
Page 2

Contents
Thank you for buying this Pioneer product.
Please read through these operating instructions so you will know how to operate
your model properly. After you have finished reading the instructions, keep this man-
ual in a safe place for future reference.
Before You Start
About this unit 5
Visit our website 6
In case of trouble 6
Protecting your unit from theft 6
– Removing the front panel 6
– Attaching the front panel 7
About the demo mode 7
Use and care of the remote control 7
– Installing the battery 7
– Using the remote control 8
Operating this unit
What’s What 9
– Head unit 9
– Remote control 10
– Display indication 10
Basic Operations 11
– Power ON/OFF 11
– Selecting a source 11
– Adjusting the volume 12
Tuner 12
– Basic Operations 12
– Storing and recalling broadcast
frequencies 12
– Receiving PTY alarm broadcasts 13
– Introduction of advanced
operations 13
– Storing the strongest broadcast
frequencies 13
– Tuning in strong signals 13
– Selecting alternative frequencies 13
– Receiving traffic announcements 14
– Using PTY functions 15
Built-in CD Player 16
– Basic Operations 16
– Displaying text information on disc 17
– Selecting tracks from the track title
list 17
2
En
– Selecting files from the file name
list 18
– Introduction of advanced
operations 18
– Selecting a repeat play range 18
– Playing tracks in random order 19
– Scanning folders and tracks 19
– Pausing playback 19
– Using Sound Retriever 19
– Using disc title functions 19
Playing songs on USB portable audio player/
USB memory 20
– Basic Operations 20
– Displaying text information of an audio
file 21
– Selecting files from the file name
list 21
– Introduction of advanced
operations 21
Playing songs on iPod 22
– Basic Operations 22
– Browsing for a song 22
– Displaying text information on
iPod 23
– Introduction of advanced
operations 23
– Playing songs in a random order
(shuffle) 24
– Playing all songs in a random order
(shuffle all) 24
– Selecting songs from album list of
currently playing artist 24
– Operating this unit’s iPod function
from your iPod 24
– Changing audiobook speed 25
Audio Adjustments
Introduction of audio adjustments 26
Using balance adjustment 26
Using the equalizer 27
Page 3

Contents
English
– Recalling equalizer curves 27
– Adjusting equalizer curves 27
– Fine-adjusting equalizer curve 27
Adjusting loudness 28
Using subwoofer output 28
– Adjusting subwoofer settings 28
Using the high pass filter 29
Boosting the bass 29
Adjusting source levels 29
Initial Settings
Adjusting initial settings 30
Setting the clock 30
Turning the off clock display on or off 30
Setting the FM tuning step 30
Switching Auto PI Seek 31
Switching the warning tone 31
Switching the auxiliary setting 31
Switching the dimmer setting 31
Setting the rear output and subwoofer
controller 31
Switching the feature demo 32
Switching the Ever Scroll 32
Activating the BT AUDIO source 32
Entering PIN code for Bluetooth wireless
connection 32
Displaying system version of Bluetooth
adapter for repair 33
Multi language display setting 33
Other Functions
Using the AUX source 34
– About AUX1 and AUX2 34
– AUX1 source: 34
– AUX2 source: 34
– Selecting AUX as the source 34
– Setting the AUX title 34
Using the external unit 34
– Selecting the external unit as the
source 34
– Basic operation 35
– Using the functions allocated to 1 to 6
keys 35
– Advanced operations 35
Available accessories
Playing songs on iPod 36
– Basic operation 36
– Displaying text information on
iPod 36
– Browsing for a song 36
– Function and operation 36
– Playing songs in a random order
(shuffle) 37
Bluetooth Audio 37
– Basic Operations 37
– Function and operation 37
– Connecting a Bluetooth audio
player 38
– Playing songs on Bluetooth audio
player 38
– Stopping playback 38
– Disconnecting a Bluetooth audio
player 38
– Displaying BD (Bluetooth Device)
address 39
Bluetooth Telephone 39
– Basic Operations 39
– Setting up for hands-free phoning 39
– Making a phone call 40
– Taking a phone call 40
– Introduction of advanced
operations 40
– Connecting a cellular phone 41
– Disconnecting a cellular phone 42
– Registering a connected cellular
phone 42
– Deleting a registered phone 42
– Connecting to a registered cellular
phone 42
En
3
Page 4

Contents
– Using the Phone Book 43
– Using the Call History 44
– Making a call by entering phone
number 44
– Clearing memory 44
– Setting automatic rejecting 45
– Setting automatic answering 45
– Switching the ring tone 45
– Echo canceling and noise
reduction 45
Multi-CD Player 45
– Basic Operations 45
– Using CD TEXT functions 45
– Introduction of advanced
operations 45
– Using compression and bass
emphasis 46
– Using ITS playlists 47
– Using disc title functions 48
TV tuner 48
– Basic Operations 48
– Storing and recalling broadcast
stations 49
– Storing the strongest broadcast
stations sequentially 49
Additional Information
Error messages 50
Handling guideline of discs and player 51
Dual Discs 52
Compressed audio compatibility 52
USB audio player/USB memory 52
– USB audio player/USB memory
compatibility 52
– USB audio player/USB memory 53
iPod 54
– About handling the iPod 54
– About iPod settings 54
Compressed audio files on the disc 54
– Example of a hierarchy 55
4
En
Russian character chart 55
Specifications 56
Page 5
Before You Start
Section
01
If you want to dispose this product, do not mix
it with general household waste. There is a separate collection system for used electronic
products in accordance with legislation that requires proper treatment, recovery and recycling.
Private households in the member states of
the EU, in Switzerland and Norway may return
their used electronic products free of charge
to designated collection facilities or to a retailer (if you purchase a similar new one).
For countries not mentioned above, please
contact your local authorities for the correct
method of disposal.
By doing so you will ensure that your disposed
product undergoes the necessary treatment,
recovery and recycling and thus prevent potential negative effects on the environment
and human health.
About this unit
The tuner frequencies on this unit are allocated for use in Western Europe, Asia, the
Middle East, Africa and Oceania. Use in other
areas may result in poor reception. The RDS
(radio data system) function operates only in
areas with FM stations broadcasting RDS signals.
CAUTION
! Do not allow this unit to come into contact
with liquids. Electrical shock could result.
Also, damage to this unit, smoke, and overheating could result from contact with liquids.
! “CLASS 1 LASER PRODUCT”
This product contains a laser diode of higher
class than 1. To ensure continued safety, do
not remove any covers or attempt to gain ac-
cess to the inside of the product. Refer all ser-
English
vicing to qualified personnel.
! The Pioneer CarStereo-Pass is for use only in
Germany.
! Keep this manual handy as a reference for op-
erating procedures and precautions.
! Always keep the volume low enough so that
you can hear sounds from outside the vehicle.
! Protect this unit from moisture.
! If the battery is disconnected or discharged,
the preset memory will be erased and must be
reprogrammed.
About WMA
The Windows Media™ logo printed on the box
indicates that this unit can play back WMA
data.
Windows Media and the Windows logo are trademarks or registered trademarks of Microsoft
Corporation in the United States and/or other
countries.
! This unit may not operate correctly depend-
ing on the application used to encode
WMA files.
About MP3
Supply of this product only conveys a license
for private, non-commercial use and does not
convey a license nor imply any right to use
this product in any commercial (i.e. revenuegenerating) real time broadcasting (terrestrial,
satellite, cable and/or any other media), broadcasting/streaming via internet, intranets and/
or other networks or in other electronic content distribution systems, such as pay-audio or
audio-on-demand applications. An independent license for such use is required. For details, please visit
http://www.mp3licensing.com.
En
5
Page 6
Section
01
Before You Start
About AAC
This unit plays back AAC files encoded by
®
iTunes
.
iTunes is a trademark of Apple Inc., registered
in the U.S. and other countries.
Portable audio player compatibility
! Inquire at the manufacturer about your
USB portable audio player/USB memory.
This unit corresponds to the following.
— USB MSC (Mass Storage Class) compliant
portable audio player and memory
— WMA, MP3, AAC and WAV file playback
For details about the compatibility, refer to
USB audio player/USB memory compatibility
on page 52.
®
iPod
compatibility
This unit can control and listen to songs on an
iPod.
! This unit can control the following iPod
models.
— iPod nano
— iPod fifth generation or later
For maximum performance, we recom-
mend that you use the latest version of the
iPod software.
! When using an iPod, iPod Dock Connector
to USB Cable is required.
! Pioneer CD-IU50 interface cable is also
available. For details, consult your dealer.
! This unit can control previous generations
iPod models with a Pioneer iPod adapter
(e.g. CD-IB100N). In this case, most func-
tions are essentially the same as an iPod
connected to USB interface of this unit.
However, functions related to Audiobooks
and Podcasts cannot be used.
For details concerning operation with the
iPod adapter, refer to Playing songs on iPod
on page 36.
! iPod is a trademark of Apple Inc., regis-
tered in the U.S. and other countries.
ory even if that data is lost while using this
unit.
! Pioneer accepts no responsibility for data lost
on the iPod even if that data is lost while
using this unit.
Visit our website
Visit us at the following site:
http://www.pioneer.co.uk
! Register your product. We will keep the de-
tails of your purchase on file to help you
refer to this information in the event of an
insurance claim such as loss or theft.
! We offer the latest information about
Pioneer Corporation on our website.
In case of trouble
Should this product fail to operate properly,
contact your dealer or nearest authorized
Pioneer Service Station.
Protecting your unit from
theft
The front panel can be detached to deter theft.
! If the front panel is not detached from the
head unit within five seconds of turning off
the ignition, a warning tone sounds.
! You can turn off the warning tone. See
Switching the warning tone on page 31.
Important
! Handle gently when removing or attaching
the front panel.
! Avoid subjecting the front panel to excessive
shock.
! Keep the front panel out of direct sunlight and
high temperatures.
CAUTION
! Pioneer accepts no responsibility for data lost
on the USB portable audio player/USB mem-
6
En
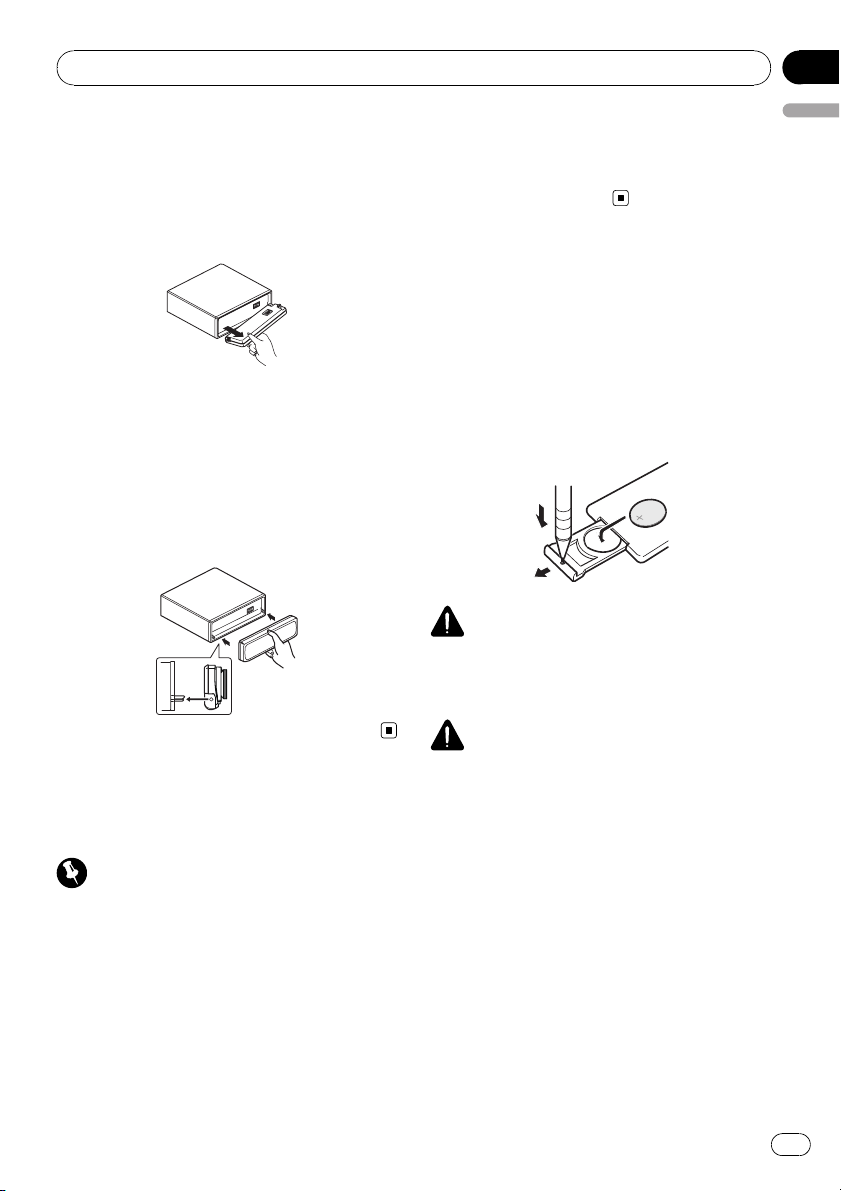
Removing the front panel
1 Press OPEN to open the front panel.
Page 7
Before You Start
Section
01
2 Grip the left side of the front panel and
pull it gently outward.
Take care not to grip it too tightly or to drop
the front panel and protect it from contact
with water or other fluids to prevent permanent damage.
3 Put the front panel into the provided
protective case for safe keeping.
Attaching the front panel
% Reattach the front panel by holding it
upright to the unit and clipping it securely
into the mounting hooks.
feature demo mode. Press DISP again to start.
English
Remember that if the feature demo continues
operating when the car engine is turned off, it
may drain battery power.
Use and care of the remote
control
Installing the battery
Slide the tray on the back of the remote control out and insert the battery with the plus (+)
and minus (–) poles aligned properly.
! When using for the first time, pull out the
film protruding from the tray.
WARNING
Keep the battery out of the reach of children.
Should the battery be swallowed, consult a doctor immediately.
About the demo mode
This unit features the feature demo mode.
Important
The red lead (ACC) of this unit should be connected to a terminal coupled with ignition switch
on/off operations. If this is not done, the vehicle
battery may be drained.
Feature demo mode
The feature demo automatically starts when
power to this unit is turned off while the ignition switch is set to ACC or ON. Press DISP
during feature demo operation to cancel the
CAUTION
! Use one CR2025 (3 V) lithium battery.
! Remove the battery if the remote control is not
used for a month or longer.
! There is a danger of explosion if the battery is
incorrectly replaced. Replace only with the
same or equivalent type.
! Do not handle the battery with metallic tools.
! Do not store the battery with metallic objects.
! If the battery leaks, wipe the remote control
completely clean and install a new battery.
! When disposing of used batteries, comply
with governmental regulations or environmental public institutions’ rules that apply in your
country/area.
En
7
Page 8

Section
01
Before You Start
Using the remote control
Point the remote control in the direction of the
front panel to operate.
! The remote control may not function prop-
erly in direct sunlight.
Important
! Do not store the remote control in high tem-
peratures or direct sunlight.
! Do not let the remote control fall onto the
floor, where it may become jammed under the
brake or accelerator pedal.
8
En
Page 9
b
a 9 8 76
Operating this unit
1
3
2 4 5
Section
02
English
What’s What
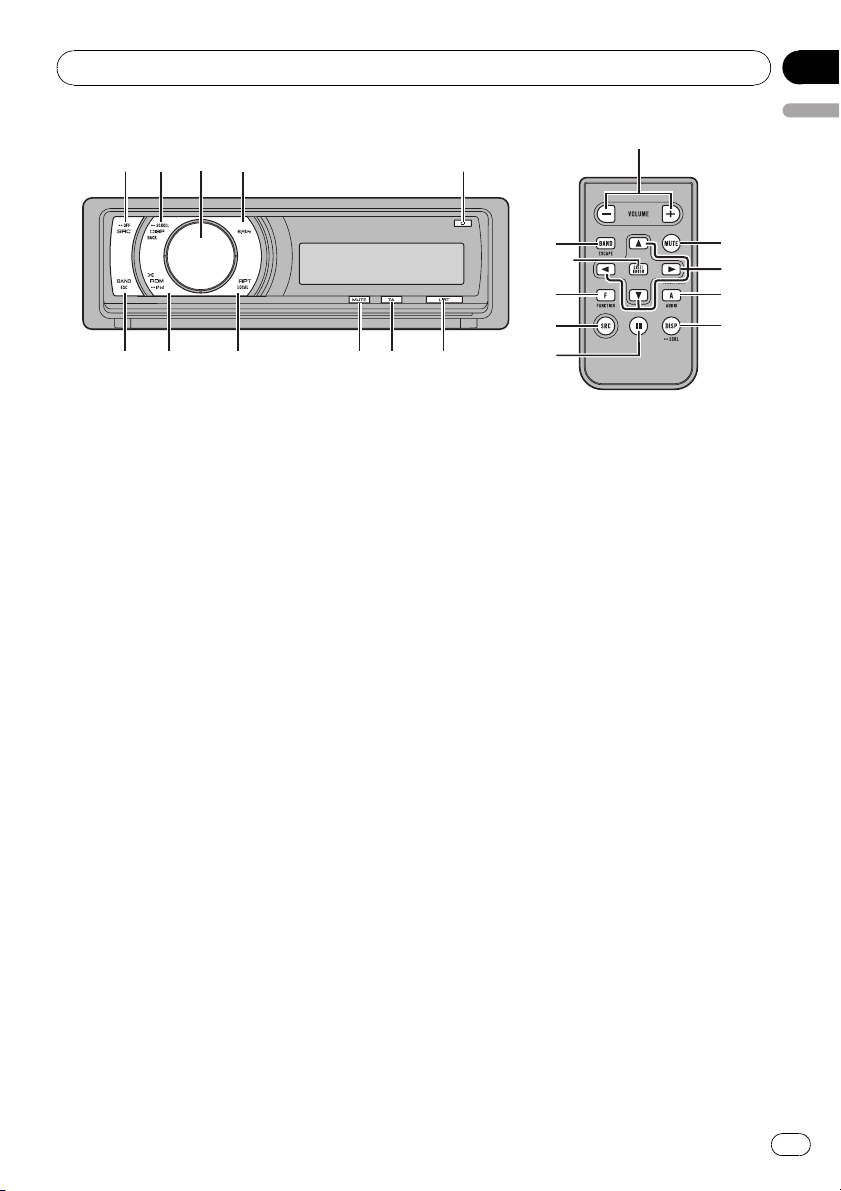
Head unit
1 SRC/OFF button
This unit is turned on by selecting a source.
Press to cycle through all the available
sources.
2 DISP/BACK/SCROLL button
Press to select different displays.
Press and hold to scroll the text information.
Press to return to the previous display when
operating the menu.
Press and hold to return to the main menu
when operating the menu.
3 MULTI-CONTROL
Move to perform manual seek tuning, fast
forward, reverse and track search controls.
Also used for controlling functions.
Turn to increase or decrease the volume.
4 S.Rtrv button
Press to turn Sound Retriever function on or
off.
5 OPEN button
Press to open the front panel.
6 LIST button
Press to display the disc title list, track title
list, folder list, file list or preset channel list
depending on the source.
7 TA/NEWS button
Press to turn TA function on or off. Press
and hold to turn NEWS function on or off.
8 MUTE button
Press to turn off the sound. To turn on the
sound, press again.
9 RPT/LOCAL button
Press to switch the repeat play range while
using CD, USB or iPod.
Press to turn local function on or off while
using tuner as the source.
a RDM/iPod button
Press to turn random function on or off
while using CD or USB.
While using iPod, press this button to shuffle all tracks.
Press and hold to switch the control mode
while using an iPod connected USB connector of this unit.
If using the iPod with an interface adapter
(CD-IB100N), press to switch the shuffle
function.
En
9
Page 10
a c
Section
02
Operating this unit
1
23456 7 89 b
b BAND/ESC button
Press to select among three FM bands and
MW/LW bands.
Press to return to the ordinary display when
operating menu.
d e f g
Remote control
Operation is the same as when using the buttons on the head unit.
c VOLUME buttons
Press to increase or decrease the volume.
d a/b/c/d buttons
Press to perform manual seek tuning, fast
forward, reverse and track search controls.
Also used for controlling functions.
e AUDIO button
Press to select an audio function.
f DISP button
Press to select different displays.
Press and hold to scroll the text information.
g e (pause) button
Press to turn pause on or off.
h FUNCTION button
Press to select functions.
i LIST/ENTER button
Press to display the disc title list, track title
list, folder list, file list or preset channel list
depending on the source.
While in the operating menu, press to control functions.
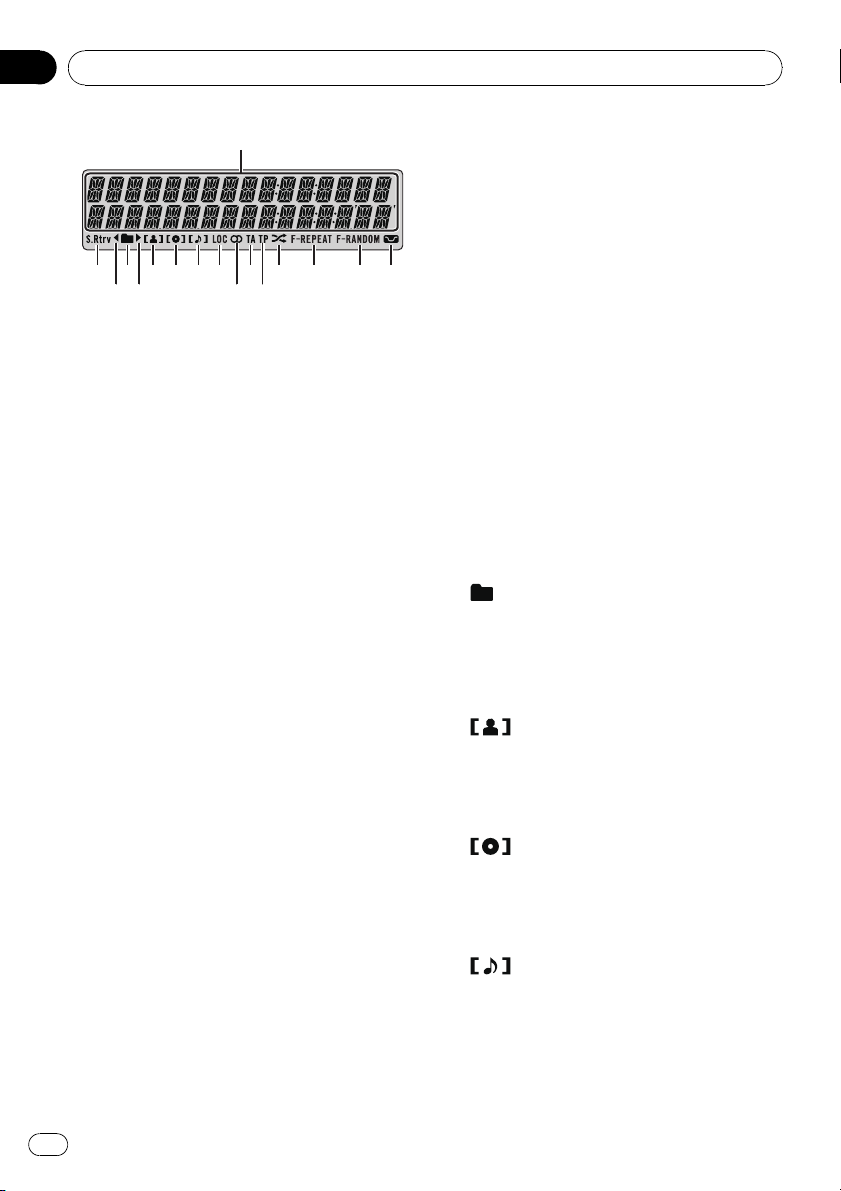
Display indication
1 Main display section
Displays band, frequency, elapsed playback
time and other settings.
! Tuner
Band and frequency are displayed.
! RDS
Program service name, PTY information
and other literal information are displayed.
! Bulit-in CD player, USB, iPod
Elapsed playback time and literal information are displayed.
2 S.Rtrv indicator
Appears when Sound Retriever function is
on.
3 c indicator
Appears when an upper tier of folder or
menu exists.
4
(folder) indicator
Appears when operating list function.
5 d indicator
Appears when a lower tier of folder or menu
exists.
6
7
8
(artist) indicator
Appears when the disc (track) artist name is
displayed on the main display section.
Appears when artist search refinement on
iPod browsing function is operated.
(disc) indicator
Appears when the disc (album) name is displayed on the main display section.
Appears when album search refinement on
iPod browsing function is operated.
(song) indicator
Appears when the track (song) name is displayed on the main display section.
Appears when song search refinement on
iPod browsing function is operated.
10
En
Page 11

Operating this unit
Section
02
9 LOC indicator
Appears when local seek tuning is on.
a 5 (stereo) indicator
Appears when the selected frequency is
being broadcast in stereo.
b TA indicator
Appears when TA (traffic announcement
standby) function is on.
c TP indicator
Appears when a TP station is tuned in.
d
(shuffle) indicator
Appears when shuffle function is on while
iPod source is being selected.
e F-REPEAT indicator
Appears when folder repeat is on.
When repeat function is on, only REPEAT is
displayed.
f F-RANDOM indicator
Appears when folder random is on.
When random function is on, only
RANDOM is displayed.
g
(loudness) indicator
Appears when loudness is on.
English
Basic Operations
Power ON/OFF
Turning the unit on
% Press SRC to turn the unit on.
Turning the unit off
% Press OFF and hold until the unit turns
off.
Selecting a source
You can select a source you want to listen to.
To switch to the built-in CD player, load a disc
in the unit (refer to page 16).
% Press SRC repeatedly to switch between the following sources.
TUNER (tuner)—TELEVISION (television)—
COMPACT DISC (built-in CD player)—
MULTI CD (multi-CD player)—IPOD (iPod)—
USB (USB)—EXTERNAL (external unit 1)—
EXTERNAL (external unit 2)—AUX1 (AUX1)—
AUX2 (AUX2)—BT AUDIO (BT audio)—
TELEPHONE (BT telephone)
Notes
! In the following cases, the sound source will
not change.
— When no unit corresponding to the se-
lected source is connected.
— When there is no disc or magazine in the
player.
— When the iPod is not connected to this
unit.
— When AUX (auxiliary input) is set to off
(refer to page 31).
— When the BT AUDIO source is set to off
(refer to Activating the BT AUDIO source
on page 32).
! AUX1 is set to on by default. Turn off the AUX1
when not in use (refer to Switching the auxili-
ary setting on page 31).
En
11
Page 12
Section
02
Operating this unit
! Charging the portable audio player using
car’s DC power source while connecting it to
AUX input may generate noise. In this case,
stop charging.
! External unit refers to a Pioneer product (such
as ones available in the future) that, although
incompatible as a source, enables control of
basic functions with this unit. Two external
units can be controlled with this unit. When
two external units are connected, the external
unit is automatically allocated to external unit
1 or external unit 2 by this unit.
! When this unit’s blue/white lead is connected
to the vehicle’s auto-antenna relay control
terminal, the vehicle’s antenna extends when
this unit’s source is turned on. To retract the
antenna, turn the source off.
Adjusting the volume
% Use MULTI-CONTROL to adjust the
sound level.
Tuner
Basic Operations
% Select a band
Press BAND/ESC.
# Band can be selected from among FM1, FM2,
FM3 or MW/LW.
% Manual tuning (step by step)
Push MULTI-CONTROL left or right.
% Seek tuning
Push and hold MULTI-CONTROL left or right
for about one second and release.
# You can cancel seek tuning by pushing
MULTI-CONTROL left or right.
# If you push and hold MULTI-CONTROL left or
right, you can skip stations. Seek tuning starts as
soon as you release MULTI-CONTROL.
Notes
! This unit’s AF (alternative frequencies search)
function can be turned on and off. AF should
be off for normal tuning operation (refer to the
next page).
! RDS service may not be provided by all sta-
tions.
! RDS functions such as AF and TA are only ac-
tive when your radio is tuned to an RDS station.
12
Storing and recalling broadcast
frequencies
You can easily store up to six broadcast frequencies for later recall.
! Six stations for each band can be stored in
memory.
1 Press LIST.
Preset screen is displayed.
2 Use MULTI-CONTROL to store the selected frequency in memory.
Turn to change the preset number. Press and
hold to store.
En
Page 13

Operating this unit
Section
02
# You can also store the frequency in memory
by pushing and holding MULTI-CONTROL right.
3 Use MULTI-CONTROL to select the desired station.
Turn to change the station. Press to select.
# You can also change the station by pushing
MULTI-CONTROL up or down.
# To return to the ordinary display, press
BAND/ESC or LIST.
# If you do not operate the list within about 30
seconds, the display automatically returns to the
ordinary display.
Receiving PTY alarm broadcasts
When the emergency PTY code broadcasts,
the unit receives it automatically (ALARM appears). When the broadcasting ends, the system returns to the previous source.
! An emergency announcement can be can-
celed by pressing TA.
Introduction of advanced
operations
1 Press MULTI-CONTROL to display the
main menu.
2 Use MULTI-CONTROL to select
FUNCTION.
Turn to change the menu option. Press to select.
3 Turn MULTI-CONTROL to select the
function.
BSM (best stations memory)—REGIONAL (re-
gional)—LOCAL (local seek tuning)—
PTY SEARCH (program type selection)—
TRAFFIC (traffic announcement standby)—AF
(alternative frequencies search)—NEWS
(news program interruption)
Notes
! You can also select the function by pressing
FUNCTION on the remote control.
! To return to the previous display, press BACK.
! To return to the main menu, press and hold
English
BACK.
! To return to the ordinary display, press
BAND/ESC.
! If MW/LW band is selected, you can only se-
lect BSM or LOCAL.
Storing the strongest broadcast
frequencies
BSM (best stations memory) lets you automatically store the six strongest broadcast frequencies.
1 Use MULTI-CONTROL to select BSM in
the function menu.
2 Press MULTI-CONTROL to turn BSM on.
The six strongest broadcast frequencies are
stored in the order of their signal strength.
# To cancel, press MULTI-CONTROL again.
Tuning in strong signals
Local seek tuning lets you tune in only those
radio stations with sufficiently strong signals
for good reception.
% Press LOCAL repeatedly to select the
desired setting.
FM: OFF—LEVEL 1—LEVEL 2—LEVEL 3—
LEVEL 4
MW/LW: OFF—LEVEL 1—LEVEL 2
The LEVEL 4 setting allows reception of only
the strongest stations, while lower settings let
you receive progressively weaker stations.
Note
You can also perform this operation in the menu
that appears by using MULTI-CONTROL.
Selecting alternative frequencies
When the tuner cannot get a good reception,
the unit automatically searches for a different
station in the same network.
En
13
Page 14

Section
02
Operating this unit
1 Use MULTI-CONTROL to select AF in the
function menu.
2 Press MULTI-CONTROL to turn AF on.
# To turn off, press MULTI-CONTROL again.
Notes
! Only RDS stations are tuned in during seek
tuning or BSM when AF is on.
! When you recall a preset station, the tuner
may update the preset station with a new fre-
quency from the station’s AF list. No preset
number appears on the display if the RDS
data for the station received differs from that
of the originally stored station.
! During AF search, sound may be temporarily
interrupted.
! AF can be turned on or off independently for
each FM band.
Using PI Seek
If the tuner cannot find a suitable station, or
reception status becomes bad, the unit automatically searches for a different station with
the same programming. During the search,
PI SEEK is displayed and the output is muted.
Using Auto PI Seek for preset stations
When preset stations cannot be recalled, the
unit can be set to perform PI Seek during preset recall.
! The default setting for Auto PI Seek is off.
See Switching Auto PI Seek on page 31.
Limiting stations to regional
programming
When AF is used, the regional function limits
the selection of stations broadcasting regional
programs.
1 Use MULTI-CONTROL to select
REGIONAL in the function menu.
2 Press MULTI-CONTROL to turn the regional function on.
# To turn off, press MULTI-CONTROL again.
Notes
! Regional programming and regional networks
are organized differently depending on the
country (i.e., they may change according to
the hour, state or broadcast area).
! The preset number may disappear from the
display if the tuner tunes in a regional station
which differs from the originally set station.
! The regional function can be turned on or off
independently for each FM band.
Receiving traffic announcements
TA (traffic announcement standby) lets you receive traffic announcements automatically, no
matter what source you are listening to. TA
can be activated for both a TP station (a station that broadcasts traffic information) or an
enhanced other network’s TP station (a station
carrying information which cross-references
TP stations).
1 Tune in a TP or enhanced other network’s TP station.
TP indicator lights.
2 Press TA to turn traffic announcement
standby on.
# To turn off, press TA again.
3 Use MULTI-CONTROL to adjust the TA
volume when a traffic announcement begins.
The newly set volume is stored in memory and
recalled for subsequent traffic announcements.
4 Press TA while a traffic announcement
is being received to cancel the announcement.
The tuner returns to the original source but remains in the standby mode until TA is pressed
again.
14
En
Page 15
Operating this unit
Section
02
Notes
! You can also turn this function on or off in the
menu that appears by using
MULTI-CONTROL.
! The system switches back to the original
source following traffic announcement reception.
! Only TP and enhanced other network’s TP sta-
tions are tuned in during seek tuning or BSM
when TA is on.
Using PTY functions
You can tune in a station by using PTY (program type) information.
Searching for an RDS station by PTY
information
You can search for general types of broadcasting programs, such as those listed on this
page.
1 Use MULTI-CONTROL to select
PTY SEARCH in the function menu.
2 Press MULTI-CONTROL to display the
setting mode.
3 Use MULTI-CONTROL to select the desired setting.
Turn to change the setting.
NEWS/INFO—POPULAR—CLASSICS—
OTHERS
4 Press MULTI-CONTROL to begin the
search.
The unit searches for a station broadcasting
that program type. When a station is found, its
program service name is displayed.
PTY (program type ID code) information is
listed on this page.
# To cancel the search, press MULTI-CONTROL
again.
# The program of some stations may differ from
that indicated by the transmitted PTY.
# If no station is broadcasting the type of pro-
English
gram you searched for, NOT FOUND is displayed
for about two seconds and then the tuner returns
to the original station.
Using news program interruption
When a news program is broadcast from a
PTY code news station, the unit automatically
switches to the news broadcast station. When
the news program ends, reception of the previous program resumes.
% Press NEWS and hold to turn on news
program interruption.
Press NEWS until NEWS ON appears in the
display.
# To turn off news program interruption, press
NEWS and hold until OFF appears in the display.
# A news program can be canceled by pressing
NEWS.
Note
You can also turn on or off news programs in the
menu that appears by using MULTI-CONTROL.
PTY list
General Specific Type of program
NEWS/INFO NEWS News
AFFAIRS Current affairs
INFO General information
and advice
SPORT Sports
WEATHER Weather reports/me-
teorological information
FINANCE Stock market reports,
commerce, trading,
etc.
En
15
Page 16
Section
02
Operating this unit
POPULAR POP MUS Popular music
ROCK MUS Contemporary modern
music
EASY MUS Easy listening music
OTH MUS Non-categorized
music
JAZZ Jazz
COUNTRY Country music
NAT MUS National music
OLDIES Oldies, golden oldies
FOLK MUS Folk music
CLASSICS L. CLASS Light classical music
CLASSIC Classical music
OTHERS EDUCATE Educational programs
DRAMA Radio plays and seri-
als
CULTURE National or regional
culture
SCIENCE Nature, science and
technology
VARIED Light entertainment
CHILDREN Children’s
SOCIAL Social affairs
RELIGION Religious affairs or ser-
vices
PHONE IN Phone in
TOURING Travel programs; not
for traffic announcements
LEISURE Hobbies and recrea-
tional activities
DOCUMENT Documentaries
Built-in CD Player
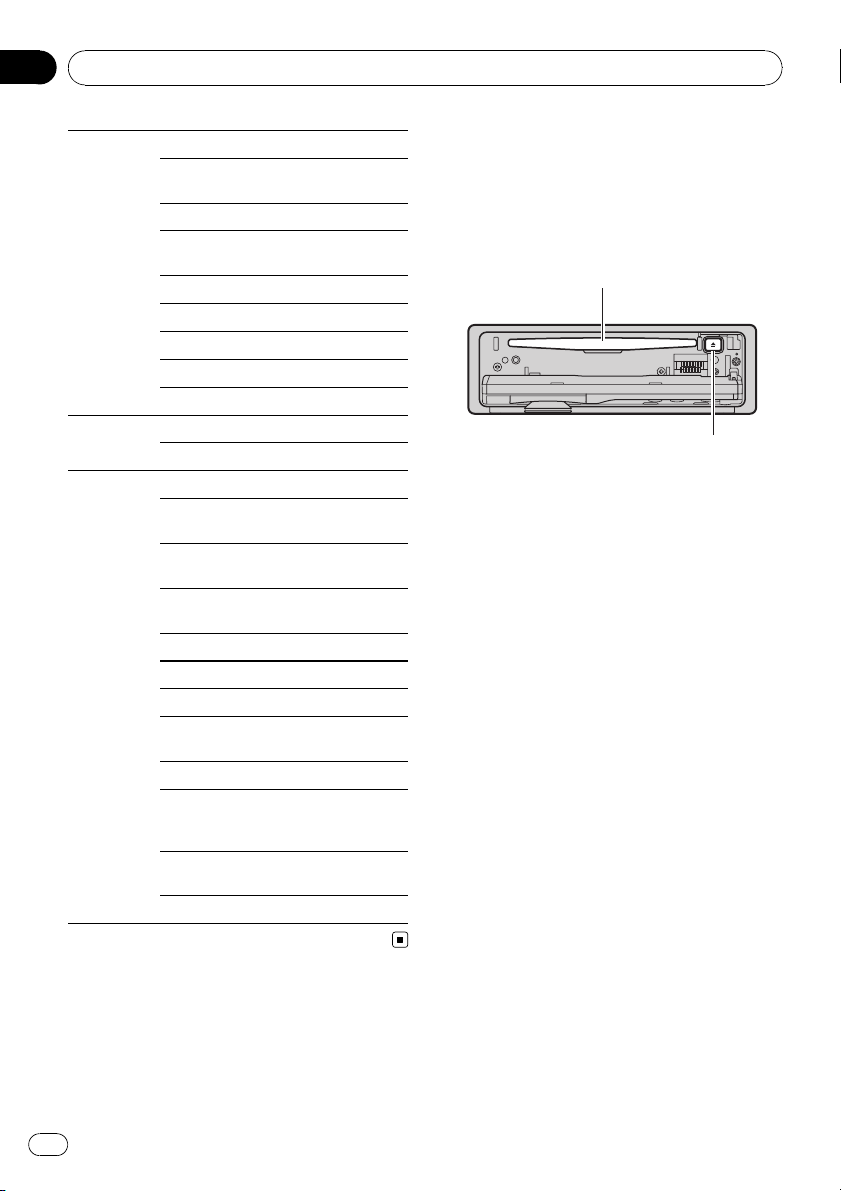
Basic Operations
% Open the front panel
Press OPEN .
Disc loading slot appears.
Disc loading slot
EJECT button
# When loading a disc, face the label side of
a disc up.
# To avoid a malfunction, make sure that no
metal objects come into contact with the terminals when the front panel is open.
% Eject a disc
Press EJECT.
% Select a folder
Push MULTI-CONTROL up or down.
# You cannot select a folder that does not have
a compressed audio file recorded in it.
% Select a track
Push MULTI-CONTROL left or right.
% Fast forward or reverse
Push and hold MULTI-CONTROL left or right
for about one second and release.
# When playing compressed audio, there is no
sound on fast forward or reverse.
% Return to root folder
Press and hold BAND/ESC.
# If folder 01 (ROOT) contains no files, playback
commences with folder 02.
16
% Switch between compressed audio and
CD-DA
Press BAND/ESC.
En
Page 17

Operating this unit
Section
02
# This operation is available only when playing
CD-EXTRA or MIXED-MODE CDs.
# If you have switched between compressed
audio and CD-DA, playback starts at the first
track on the disc.
Notes
! The built-in CD player can play back audio CD
and compressed audio recorded on a CDROM. (Refer to page 54 for files that can be
played back.)
! Read the precautions for discs and player on
page 51.
! After a disc has been inserted, press SRC to
select the built-in CD player.
! There is sometimes a delay between starting
up disc playback and the sound being issued.
When being read, FORMAT READ is displayed.
! If an error message such as ERROR-19 is dis-
played, refer to Error messages on page 50.
! Playback is carried out in order of file number.
Folders are skipped if they contain no files. (If
folder 01 (ROOT) contains no files, playback
commences with folder 02.)
Displaying text information on
disc
% Press DISP to select the desired text information.
For title entered CD
Play time—disc title and play time
For CD TEXT discs
Play time—disc artist name and track title—
disc artist name and disc title—disc title and
track title—track artist name and track title—
track title and play time
For WMA/MP3/AAC discs
Play time—folder name and file name—artist
name and track title—artist name and album
title—album title and track title—track title
and play time—comment and play time—bit
rate and play time
For WAV discs
Play time—folder name and file name—sampling frequency and play time
Notes
! You can scroll to the left of the title by pressing
and holding DISP.
! Audio CD that contains certain information
such as text and/or number is CD TEXT.
! If specific information is not recorded on a
disc, title or name is not displayed.
! Depending on the version of iTunes
write MP3 files onto a disc, comment information may not be correctly displayed.
— iTunes is a trademark of Apple Inc., regis-
tered in the U.S. and other countries.
! Depending on the version of Windows Media
Player used to encode WMA files, album
names and other text information may not be
correctly displayed.
! When playing back VBR (variable bit rate)-re-
corded WMA files, the average bit rate value is
displayed.
! When playing back VBR (variable bit rate)-re-
corded MP3 files, VBR is displayed instead of
bit rate value.
! The sampling frequency shown in the display
may be abbreviated.
! When Ever Scroll is set to ON at the initial set-
ting, text information scrolls continuously in
the display. Refer to Switching the Ever Scroll
on page 32.
®
used to
Selecting tracks from the track
title list
Track title list lets you see the list of track titles
on a CD TEXT disc and select one of them to
play back.
1 Press LIST to switch to the track title list
mode.
2 Use MULTI-CONTROL to select the desired track title.
Turn to change the track title. Press to play.
English
En
17
Page 18

Section
02
Operating this unit
# You can also change the track title by pushing
MULTI-CONTROL up or down.
# You can also play the track by pushing
MULTI-CONTROL right.
# To return to the ordinary display, press
BAND/ESC or LIST.
# If you do not operate the list within about 30
seconds, the display automatically returns to the
ordinary display.
Selecting files from the file
name list
File name list lets you see the list of file names
(or folder names) and select one of them to
playback.
1 Press LIST to switch to the file name list
mode.
Names of files and folders appear in the display.
2 Use MULTI-CONTROL to select the desired file name (or folder name).
Turn to change the name of file or folder.
— when a file is selected, press to play.
— when a folder is selected, press to see a list
of files (or folders) in the seleted folder.
— when a folder is selected, press and hold to
play a song in the selected folder.
# You can also play the file by pushing
MULTI-CONTROL right.
# You can also play a song in the selected folder
by pushing and holding MULTI-CONTROL right.
# To return to the previous list (the folder one
level higher), press BACK. You can also perform
this operation by pushing MULTI-CONTROL left.
# To return to the top tier of list, press and hold
BACK.
# To return to the ordinary display, press
BAND/ESC or LIST.
# If you do not operate the list within about 30
seconds, the display automatically returns to the
ordinary display.
Introduction of advanced
operations
1 Press MULTI-CONTROL to display the
main menu.
2 Use MULTI-CONTROL to select
FUNCTION.
Turn to change the menu option. Press to select.
3 Turn MULTI-CONTROL to select the
function.
REPEAT (repeat play)—RANDOM (random
play)—SCAN (scan play)—PAUSE (pause)—
SOUND RETRIEVER (advanced sound retrie-
ver)—TITLE INPUT (disc title input)
Notes
! You can also select the function by pressing
FUNCTION on the remote control.
! To return to the previous display, press BACK.
! To return to the main menu, press and hold
BACK.
! To return to the ordinary display, press
BAND/ESC.
! If you do not operate functions except for
TITLE INPUT within about 30 seconds, the display automatically returns to the ordinary display.
! When playing a compressed audio disc or CD
TEXT disc, you cannot switch to disc title input
display.
Selecting a repeat play range
% Press RPT repeatedly to select the desired setting.
! DISC – Repeat all tracks
! TRACK – Repeat the current track
! FOLDER – Repeat the current folder
# If you select another folder during repeat play,
the repeat play range changes to disc repeat.
# Performing track search or fast forward/reverse during TRACK (track repeat) changes the
repeat play range to disc/folder.
18
En
Page 19
Operating this unit
Section
02
# When FOLDER (folder repeat) is selected, it is
not possible to play back a subfolder of that
folder.
Note
You can also perform this operation in the menu
that appears by using MULTI-CONTROL.
Playing tracks in random order
Tracks in a selected repeat range are played in
random order.
% Press RDM to turn random play on.
Tracks play in a random order.
# To turn random play off, press RDM again.
Note
You can also turn this function on or off in the
menu that appears by using MULTI-CONTROL.
Scanning folders and tracks
Scan play searches the song within the selected repeat range.
1 Use MULTI-CONTROL to select SCAN in
the function menu.
2 Press MULTI-CONTROL to turn scan play
on.
The first 10 seconds of each track is played.
3 When you find the desired track press
MULTI-CONTROL to turn scan play off.
# If the display has automatically returned to
the playback display, select SCAN again by using
MULTI-CONTROL.
# After scanning of a disc (folder) is finished,
normal playback of the tracks begins.
Pausing playback
% Press e (pause) on the remote control
to turn pause on.
Playback of the current track pauses.
# To turn pause off, press e (pause) again.
English
Note
You can also turn this function on or off in the
menu that appears by using MULTI-CONTROL.
Using Sound Retriever
Sound Retriever function automatically enhances compressed audio and restores rich
sound.
% Press S.Rtrv repeatedly to select the desired setting.
OFF (off)—1—2
# 2 is more effective than 1.
Note
You can also perform this operation in the menu
that appears by using MULTI-CONTROL.
Using disc title functions
You can input CD titles and display the title.
The next time you insert a CD for which you
have entered a title, the title of that CD is displayed.
Entering disc titles
Use the disc title input feature to store up to
48 CD titles in the unit. Each title can be up to
10 characters long.
1 Play the CD that you want to enter a
title for.
2 Use MULTI-CONTROL to select
TITLE INPUT in the function menu.
3 Press MULTI-CONTROL to display the
title input mode.
4 Turn MULTI-CONTROL to select a letter
of the alphabet.
# You can also perform the same operations by
pushing MULTI-CONTROL up or down.
5 Press MULTI-CONTROL to move the cursor to the next character position.
En
19
Page 20
Section
02
Operating this unit
6 After entering the title, press and hold
MULTI-CONTROL to store it in memory.
Notes
! Titles remain in memory, even after the disc is
removed from the unit, and are recalled when
the disc is reinserted.
! After data for 48 discs are stored in the mem-
ory, data for a new disc overwrites the oldest
one.
! If you connect a multi-CD player, you can
input disc titles for up to 100 discs.
! When a multi-CD player that does not support
disc title functions is connected, you cannot
enter disc titles in this unit.
Playing songs on USB portable
audio player/USB memory
For details about the supported device, refer to
Portable audio player compatibility on page 6.
Basic Operations
% Select a folder
Push MULTI-CONTROL up or down.
% Fast forward or reverse
Push and hold MULTI-CONTROL left or right
for about one second and release.
% Select a track
Push MULTI-CONTROL left or right.
% Return to root folder
Press and hold BAND/ESC.
Notes
! Optimum performance of this unit may not be
obtained depending on the connected USB
portable audio player/USB memory.
! If folder 01 (ROOT) contains no files, playback
commences with folder 02.
! When the USB portable audio player having
battery charging function is connected to this
unit and the ignition switch is set to ACC or
ON, the battery is charged.
! You can disconnect the USB portable audio
player/USB memory anytime you want to finish listening to it.
! If USB portable audio player/USB memory is
connected to this unit, the source is changed
to USB automatically. If you do not use an
USB device, disconnect it from this unit. Depending on the connected USB device, turning on the ignition switch while USB device is
connected to this unit may change the source
automatically.
20
En
Page 21
Operating this unit
Section
02
Displaying text information of
an audio file
% Press DISP to select the desired text information.
For WMA/MP3/AAC discs
Play time—folder name and file name—artist
name and track title—artist name and album
title—album title and track title—track title
and play time—comment and play time—bit
rate and play time
For WAV discs
Play time—folder name and file name—sampling frequency and play time
# If the characters recorded on the audio file are
not compatible with the head unit, those characters are not displayed.
# If specific information is not recorded on an
audio file, title or name is not displayed.
# The text information of some audio files may
not be correctly displayed.
Notes
! You can scroll the text information to the left
by pressing and holding DISP.
! When Ever Scroll is set to ON at the initial set-
ting, text information scrolls continuously in
the display. Refer to Switching the Ever Scroll
on page 32.
Selecting files from the file
name list
The operation is the same as that of the builtin CD player. (Refer to Selecting files from the
file name list on page 18.)
Introduction of advanced
operations
1 Press MULTI-CONTROL to display the
main menu.
2 Use MULTI-CONTROL to select
FUNCTION.
Turn to change the menu option. Press to select.
3 Turn MULTI-CONTROL to select the
function.
REPEAT (repeat play)—RANDOM (random
play)—SCAN (scan play)—PAUSE (pause)—
SOUND RETRIEVER (advanced sound retrie-
ver)
Function and operation
REPEAT, RANDOM, SCAN, PAUSE and
SOUND RETRIEVER operations are basically
the same as that of the built-in CD player.
Function name Operation
Refer to Selecting a repeat play
range on page 18.
However, the repeat play
ranges you can select are different from that of the built-in
CD player. The repeat play
REPEAT
RANDOM
SCAN
PAUSE
SOUND RETRIEVER
Notes
! You can also select the function by pressing
FUNCTION on the remote control.
! To return to the previous display, press BACK.
! To return to the main menu, press and hold
BACK.
ranges of the USB portable
audio player/USB memory are:
! TRACK – Repeat just the
current file
! FOLDER – Repeat the cur-
rent folder
! ALL – Repeat all files
Refer to Playing tracks in ran-
dom order on page 19.
Refer to Scanning folders and
tracks on page 19.
Refer to Pausing playback on
page 19.
Refer to Using Sound Retriever
on page 19.
English
En
21
Page 22
Section
02
Operating this unit
! To return to the ordinary display, press
BAND/ESC.
! If you select another folder during repeat play,
the repeat play range changes to ALL.
! If you perform track search or fast forward/re-
verse during TRACK, the repeat play range
changes to FOLDER.
! When FOLDER is selected, it is not possible to
play back a subfolder of that folder.
! After file or folder scanning is finished, nor-
mal playback of the files begins again.
Playing songs on iPod
For details about the supported iPod, refer to
®
iPod
compatibility on page 6.
Basic Operations
% Fast forward or reverse
Push and hold MULTI-CONTROL left or right
for about one second and release.
% Select a track (chapter)
Push MULTI-CONTROL left or right.
Notes
! When using an iPod, iPod Dock Connector to
USB Cable is required.
! Read the precautions for iPod on page 54.
! While iPod is connected to this unit, PIONEER
(or
(check mark)) is displayed on the iPod.
! If an error message such as ERROR-19 is dis-
played, refer to Error messages on page 50.
! When the ignition switch is set to ACC or ON,
the iPod’s battery is charged while the iPod is
connected to this unit.
! While the iPod is connected to this unit, the
iPod cannot be turned on or off.
! Before connecting the dock connector of this
unit to the iPod, disconnect the headphones
from the iPod.
! The iPod is turned off about two minutes after
the ignition switch is set to OFF.
22
Browsing for a song
Operations to control an iPod with this unit is
designed to be as close to the iPod as possible
to make operation and song search easy.
! Depending on the number of files in the
iPod, there may be delay when displaying a
list.
! If the characters recorded on the iPod are
not compatible with this unit, those characters are not displayed.
1 Press LIST to switch to the top menu of
the list search.
En
Page 23

Operating this unit
Section
02
2 Use MULTI-CONTROL to select a category.
Turn to change the category; press to select.
PLAYLISTS (playlists)—ARTISTS (artists)—
ALBUMS (albums)—SONGS (songs)—
PODCASTS (podcasts)—GENRES (genres)—
COMPOSERS (composers)—AUDIOBOOKS
(audiobooks)
List for the selected category is displayed.
# Press and hold LIST displays the album list of
current selected artist. (This function can also be
operated from function menu.)
# You can start playback throughout the selected category by pressing and holding
MULTI-CONTROL. You can also perform this operation by pushing and holding
MULTI-CONTROL right.
# You can also change the category by pushing
MULTI-CONTROL up or down.
# You can also select the category by pushing
MULTI-CONTROL right.
# To return to the previous list, push
MULTI-CONTROL left.
3 Repeat step 2 to find a song you want
to listen to.
# To return to the previous category (one level
higher), press BACK. You can also perform this
operation by pushing MULTI-CONTROL left.
# To return to the top tier of categories, press
and hold BACK.
# To return to the ordinary display, press
BAND/ESC or LIST.
# If you do not operate the list within about 30
seconds, the display automatically returns to the
ordinary display.
# If the characters recorded on the iPod are not
English
compatible with this unit, those characters are
not displayed.
Notes
! You can scroll the text information to the left
by pressing and holding DISP.
! When Ever Scroll is set to ON at the initial set-
ting, text information scrolls continuously in
the display. Refer to Switching the Ever Scroll
on page 32.
Introduction of advanced
operations
1 Press MULTI-CONTROL to display the
main menu.
2 Use MULTI-CONTROL to select
FUNCTION.
Turn to change the menu option. Press to select.
3 Turn MULTI-CONTROL to select the
function.
REPEAT (repeat play)—SHUFFLE (shuffle)—
SHUFFLE ALL (shuffle all)—LINK SEARCH
(link search)—CONTROL (control mode)—
PAUSE (pause)—AUDIOBOOKS SPEED
(audiobook speed)—SOUND RETRIEVER
(sound retriever)
Function and operation
REPEAT, PAUSE and SOUND RETRIEVER op-
erations are basically the same as that of the
built-in CD player.
Displaying text information on
iPod
% Press DISP to select the desired text information.
Play time—artist name and song title—artist
name and album title—album title and song
title—song title and play time
En
23
Page 24
Section
02
Operating this unit
Function name Operation
Refer to Selecting a repeat play
range on page 18.
However, the repeat play
ranges you can select are different from that of the built-in
REPEAT
PAUSE
SOUND RETRIEVER
Notes
! You can also select the function by pressing
FUNCTION on the remote control.
! To return to the previous display, press BACK.
! To return to the main menu, press and hold
BACK.
! To return to the ordinary display, press
BAND/ESC.
! If you do not operate functions within about
30 seconds, the display automatically returns
to the ordinary display.
! CONTROL (control mode) function is available
only for iPod nano (second generation).
! When CONTROL is on, only CONTROL and
SOUND RETRIEVER can be operated.
CD player. The repeat play
ranges of the iPod are:
! ONE – Repeat the current
song
! ALL – Repeat all songs in
the selected list
Refer to Pausing playback on
page 19.
Refer to Using Sound Retriever
on page 19.
Playing songs in a random
order (shuffle)
1 Use MULTI-CONTROL to select SHUFFLE
in the function menu.
2 Press MULTI-CONTROL to display the
setting mode.
! ALBUMS – Play back songs from a ran-
domly selected album in order.
! OFF – Cancel random play.
Playing all songs in a random
order (shuffle all)
% Press iPod to turn shuffle all on.
All songs on the iPod play randomly.
# To turn shuffle all off, set SHUFFLE in the
FUNCTION menu to off.
Note
You can also turn this function on in the menu
that appears by using MULTI-CONTROL.
Selecting songs from album list
of currently playing artist
Album list of the currently selected artist is
displayed. You can select an album or song
from the artist name.
! Depending on the number of files in the
iPod, there may be delay when displaying a
list.
1 Press and hold LIST to turn link search
on.
Searches albums of the artist and displays the
list.
2 Use MULTI-CONTROL to select an album
or song from the list.
For more details about the selecting operation,
refer to step 2 of Browsing for a song on page
22.
Note
You can also turn this function on in the menu
that appears by using MULTI-CONTROL.
3 Use MULTI-CONTROL to select the desired setting.
Turn to change the setting.
! SONGS – Play back songs in the selected
list in random order.
24
En
Operating this unit’s iPod
function from your iPod
This function is available only for iPod nano
(second generation).
Page 25

Operating this unit
Section
02
This unit’s iPod function can be operated from
your iPod. Sound can be heard from car’s
speaker, and operation can be conducted from
your iPod.
! While this function is in use, even if the
ignition key is turned off, iPod is not turned
off. To turn off power, operate the iPod.
1 Press iPod and hold to switch the control mode.
# Each pressing and holding iPod switches the
control mode.
# While using this function, play time and titles
are not displayed on this unit.
# Even if this function is performed, track up/
down can be operated from this unit.
# While using this function, browse function
cannot be operated from this unit.
2 Operate the connected iPod to select a
song and play.
Note
You can also turn this function on or off in the
menu that appears by using MULTI-CONTROL.
Changing audiobook speed
While listening to an audiobook on iPod, playback speed can be changed.
English
1 Use MULTI-CONTROL to select
AUDIOBOOKS SPEED in the function menu.
2 Press MULTI-CONTROL to display the
setting mode.
3 Use MULTI-CONTROL to select the desired setting.
Turn to change the setting.
! FASTER – Playback faster than normal
speed
! NORMAL – Playback in normal speed
! SLOWER – Playback slower than normal
speed
En
25
Page 26
Section
03
Audio Adjustments
Introduction of audio
adjustments
1 Press MULTI-CONTROL to display the
main menu.
2 Use MULTI-CONTROL to select AUDIO.
Turn to change the menu option. Press to select.
3 Turn MULTI-CONTROL to select the
audio function.
Turn MULTI-CONTROL to switch between the
audio functions in the following order.
FADER/BALANCE (balance adjustment)—
PRESET EQUALIZER (graphic equalizer recall)
—EQ SETTING 1 (graphic equalizer adjust-
ment)—EQ SETTING 2 (graphic equalizer fine
adjustment)—LOUDNESS (loudness)—
SW SETTING 1 (subwoofer on/off setting)—
SW SETTING 2 (subwoofer setting)—HPF
(high pass filter)—BASS BOOST (bass boost)
—SRC LV ADJUST (source level adjustment)
4 Press MULTI-CONTROL to display the
setting mode of each function.
# Push MULTI-CONTROL left to display the
function selection menu.
# Push and hold MULTI-CONTROL left to dis-
play the main menu.
5 Adjust the each function.
Notes
! You can also select the audio function by
pressing AUDIO on the remote control.
! To return to the previous display, press BACK.
! To return to the main menu, press and hold
BACK.
! To return to the ordinary display, press
BAND/ESC.
! When the subwoofer controller setting is
PREOUT:REAR, you cannot switch to
SW SETTING 1 (subwoofer on/off setting).
(Refer to page 31.)
! You can select the SW SETTING 2 only when
subwoofer output is turned on in
SW SETTING 1.
! When selecting FM as the source, you cannot
switch to SRC LV ADJUST.
! If you do not operate functions within about
30 seconds, the display automatically returns
to the ordinary display.
Using balance adjustment
You can change the fader/balance setting so
that it can provide the ideal listening environment in all occupied seats.
1 Use MULTI-CONTROL to select
FADER/BALANCE.
2 Press MULTI-CONTROL to display the
setting mode.
3 Press MULTI-CONTROL to select the segment you wish to set.
Press MULTI-CONTROL repeatedly to switch
between fader and balance.
4 Turn MULTI-CONTROL to adjust speaker
balance.
Front/rear speaker balance can be adjusted
between FAD F15 and FAD R15.
Left/right speaker balance can be adjusted between BAL L15 and BAL R15.
# You can also perform the same operations by
pushing MULTI-CONTROL up or down.
# FAD 0 is the proper setting when only two
speakers are used.
# When the rear output setting is
REAR SP :SUB W, adjusting the front/rear speaker balance is not effective. Refer to Setting the
rear output and subwoofer controller on page
31.
26
En
Page 27
Audio Adjustments
Section
03
Using the equalizer
The equalizer lets you adjust the equalization
to match the car’s interior acoustic characteristics as desired.
Recalling equalizer curves
There are six stored equalizer curves which
you can easily recall at any time. Here is a list
of the equalizer curves.
Display Equalizer curve
POWERFUL Powerful
NATURAL Natural
VOCAL Vocal
CUSTOM Custom
FLAT Flat
SUPER BASS Super bass
! CUSTOM is an adjusted equalizer curve
that you create. If you make adjustments to
an equalizer curve, the equalizer curve setting is memorized in CUSTOM.
! When FLAT is selected, no supplement or
correction is made to the sound. This is
useful to check the effect of the equalizer
curves by switching alternatively between
FLAT and a set equalizer curve.
1 Use MULTI-CONTROL to select
PRESET EQUALIZER.
2 Press MULTI-CONTROL to display the
setting mode.
3 Turn MULTI-CONTROL to select the
equalizer.
# You can also perform the same operations by
pushing MULTI-CONTROL up or down.
Adjusting equalizer curves
The factory supplied equalizer curves, with the
exception of FLAT, can be adjusted to a fine
degree (nuance control).
1 Use MULTI-CONTROL to select
EQ SETTING 1.
2 Press MULTI-CONTROL to display the
setting mode.
3 Press MULTI-CONTROL to select the segment you wish to set.
Press MULTI-CONTROL repeatedly to switch
the segment in the following order:
L (low)—M (mid)—H (high)
4 Turn MULTI-CONTROL to adjust the
level of the equalization band.
+6 to –6 is displayed as the level is increased
or decreased.
# You can also perform the same operations by
pushing MULTI-CONTROL up or down.
# You can then select another band and adjust
the level.
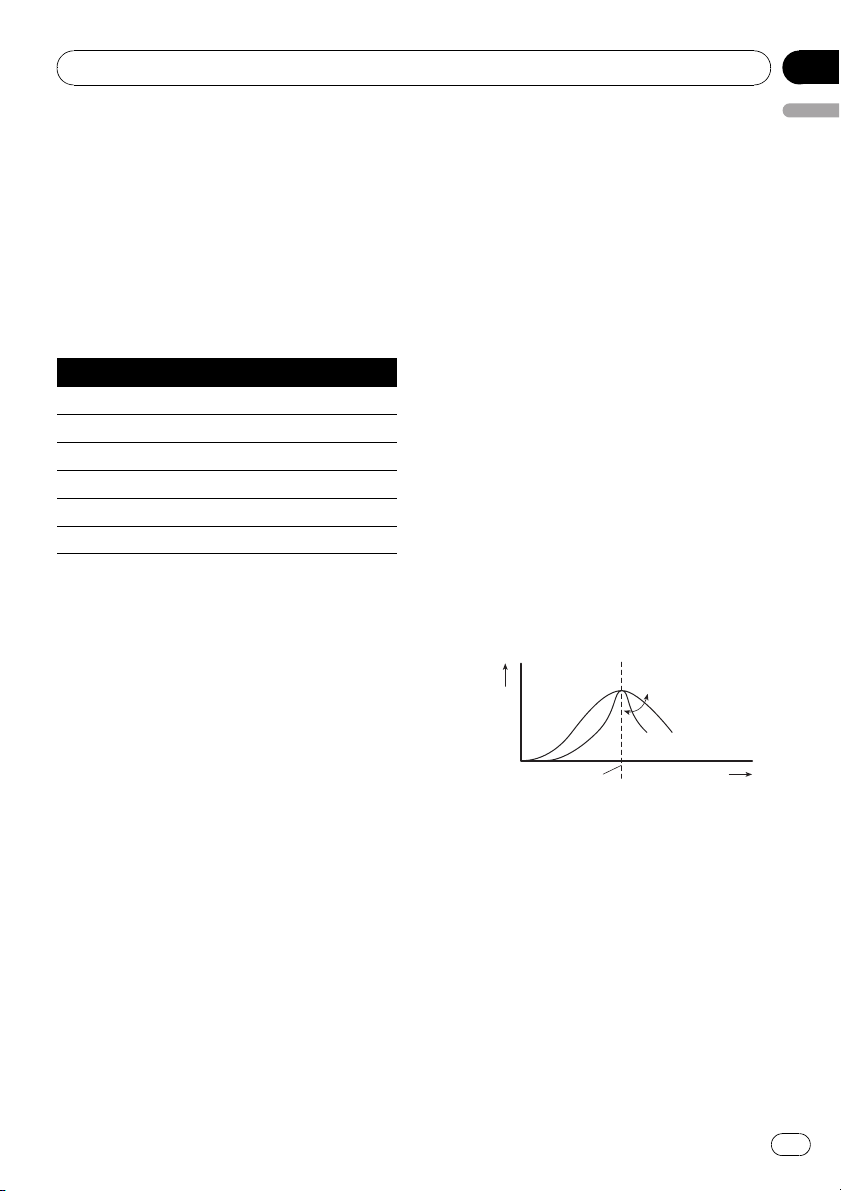
Fine-adjusting equalizer curve
You can adjust the center frequency and the Q
factor (curve characteristics) of each currently
selected curve band (LOW/MID/HI).
Level (dB)
Q=2W
Q=2N
Center frequency
1 Use MULTI-CONTROL to select
EQ SETTING 2.
2 Press MULTI-CONTROL to display the
setting mode.
3 Press MULTI-CONTROL to select the segment you wish to set.
Press MULTI-CONTROL repeatedly to switch
the segment in the following order:
Band—Frequency—Q factor
Frequency (Hz)
English
En
27
Page 28

Section
03
Audio Adjustments
4 Turn MULTI-CONTROL to adjust the selected segement.
Band
LOW (low)—MID (mid)—HI (high)
Frequency
Low: 40HZ—80HZ—100HZ—160HZ
Mid: 200HZ—500HZ—1KHZ—2KHZ
High: 3KHZ—8KHZ—10KHZ—12KHZ
Q factor
2N—1N—1W—2W
# You can also perform the same operations by
pushing MULTI-CONTROL up or down.
Adjusting loudness
Loudness compensates for deficiencies in the
low- and high-sound ranges at low volume.
1 Use MULTI-CONTROL to select
LOUDNESS.
2 Press MULTI-CONTROL to display the
setting mode.
3 Use MULTI-CONTROL to select the desired setting.
Turn to change the setting.
LOW (low)—MID (mid)—HIGH (high)—OFF
(off)
# You can also perform the same operations by
pushing MULTI-CONTROL up or down.
Using subwoofer output
This unit is equipped with a subwoofer output
which can be turned on or off.
Also, phase can be selected between normal
and reverse.
3 Use MULTI-CONTROL to select the desired setting.
Turn to change the setting.
NORMAL (normal phase)— REV (reverse
phase)—OFF (subwoofer off)
# You can also perform the same operations by
pushing MULTI-CONTROL up or down.
Adjusting subwoofer settings
When the subwoofer output is on, you can adjust the cut-off frequency and the output level
of the subwoofer.
! When the subwoofer output is on, you can
select SW SETTING 2.
1 Use MULTI-CONTROL to select
SW SETTING 2.
# When the subwoofer output is on, you can select SW SETTING 2.
2 Press MULTI-CONTROL to display the
setting mode.
3 Press MULTI-CONTROL to select the segment you wish to set.
Press MULTI-CONTROL repeatedly to switch
the segment in the following order:
Cut off frequency—Level
4 Turn MULTI-CONTROL to adjust the selected segement.
Cut off frequency
50HZ—63HZ—80HZ—100HZ—125HZ
Level
+6 to –24 is displayed as the level is increased
or decreased.
# You can also perform the same operations by
pushing MULTI-CONTROL up or down.
1 Use MULTI-CONTROL to select
SW SETTING 1.
2 Press MULTI-CONTROL to display the
setting mode.
28
En
Page 29
Audio Adjustments
Section
03
Using the high pass filter
When you do not want low sounds from the
subwoofer output frequency range to play
from the front or rear speakers, turn on the
HPF (high pass filter). Only frequencies higher
than those in the selected range are output
from the front or rear speakers.
1 Use MULTI-CONTROL to select HPF.
2 Press MULTI-CONTROL to display the
setting mode.
3 Use MULTI-CONTROL to select the desired setting.
Turn to change the setting.
OFF—50HZ—63HZ—80HZ—100HZ—125HZ
# You can also perform the same operations by
pushing MULTI-CONTROL up or down.
Boosting the bass
Bass boost function boosts the bass level of
sound.
1 Use MULTI-CONTROL to select
BASS BOOST.
1 Compare the FM volume level with the
English
level of the source you wish to adjust.
2 Use MULTI-CONTROL to select
SRC LV ADJUST.
3 Press MULTI-CONTROL to display the
setting mode.
4 Turn MULTI-CONTROL to adjust the
source volume.
SLA +4 to SLA –4 is displayed as the source
volume is increased or decreased.
# You can also perform the same operations by
pushing MULTI-CONTROL up or down.
Notes
! The MW/LW volume level can also be adjusted
with source level adjustments.
! The built-in CD player and the multi-CD player
are set to the same source level adjustment
volume automatically.
! External unit 1 and external unit 2 are set to
the same source level adjustment volume
automatically.
2 Press MULTI-CONTROL to display the
setting mode.
3 Turn MULTI-CONTROL to adjust the
level.
0 to +6 is displayed as the level is increased or
decreased.
# You can also perform the same operations by
pushing MULTI-CONTROL up or down.
Adjusting source levels
SLA (source level adjustment) lets you adjust
the volume level of each source to prevent radical changes in volume when switching between sources.
! Settings are based on the FM volume level,
which remains unchanged.
En
29
Page 30
Section
04
Initial Settings
Adjusting initial settings
1 Press SRC and hold until the unit turns
off.
2 Press MULTI-CONTROL and hold until
CLOCK SET appears in the display.
3 Turn MULTI-CONTROL to select one of
the initial settings.
CLOCK SET (clock)—OFF CLOCK (off clock)—
FM STEP (FM tuning step)—AUTO PI (auto PI
seek)—WARNING TONE (warning tone)—
AUX1 (auxiliary input 1)—AUX2 (auxiliary
input 2)—DIMMER (dimmer)—SW CONTROL
(rear output and subwoofer controller)—
DEMO MODE (feature demo)—EVER SCROLL
(ever scroll)—BT AUDIO (Bluetooth audio)—
PIN CODE INPUT (pin code input)—
BT VER INFO (Bluetooth version information)
—TITLE SETTING (multi language)
# You can also perform the same operations by
pushing MULTI-CONTROL up or down.
# You can also select the function by pressing
FUNCTION on the remote control.
# To cancel initial settings, press BAND/ESC.
# BT AUDIO, PIN CODE INPUT and
BT VER INFO can be selected only when Bluetooth adapter (e.g., CD-BTB200) is connected to
this unit.
Setting the clock
Use these instructions to set the clock.
1 Use MULTI-CONTROL to select
CLOCK SET.
2 Press MULTI-CONTROL to display the
setting mode.
# Press BACK to return to the previous display.
3 Press MULTI-CONTROL to select the segment of the clock display you wish to set.
Each time you press MULTI-CONTROL, one
segment of the clock display is selected.
Hour—Minute
As you select segments of the clock display,
the selected segment blinks.
4 Turn MULTI-CONTROL to put a clock
right.
# You can also perform the same operations by
pushing MULTI-CONTROL up or down.
Turning the off clock
display on or off
If the off clock display is turned on and the
sources and the feature demo are off, the
clock display appears on the display.
1 Use MULTI-CONTROL to select
OFF CLOCK.
2 Press MULTI-CONTROL to turn the off
clock display on.
# To turn the off clock display off, press
MULTI-CONTROL again.
Setting the FM tuning step
Normally the FM tuning step employed by
seek tuning is 50 kHz. When AF or TA is on,
the tuning step automatically changes to 100
kHz. It may be preferable to set the tuning step
to 50 kHz when AF is on.
1 Use MULTI-CONTROL to select FM STEP.
2 Press MULTI-CONTROL to display the
setting mode.
# Press BACK to return to the previous display.
3 Turn MULTI-CONTROL to select the FM
tuning step.
Turning MULTI-CONTROL switches the FM
tuning step between 50 kHz and 100 kHz while
AF or TA is on. The selected FM tuning step appears in the display.
# You can also perform the same operations by
pushing MULTI-CONTROL up or down.
Note
The tuning step remains at 50 kHz during manual
tuning.
30
En
Page 31

Initial Settings
Section
04
Switching Auto PI Seek
The unit can automatically search for a different station with the same programming, even
during preset recall.
1 Use MULTI-CONTROL to select AUTO PI.
2 Press MULTI-CONTROL to turn Auto PI
seek on.
# To turn Auto PI seek off, press
MULTI-CONTROL again.
Switching the warning tone
If the front panel is not detached from the
head unit within four seconds of turning off
the ignition, a warning tone sounds. You can
turn off the warning tone.
1 Use MULTI-CONTROL to select
WARNING TONE.
2 Press MULTI-CONTROL to turn warning
tone on.
# To turn warning tone off, press
MULTI-CONTROL again.
Switching the auxiliary setting
Auxiliary devices connected to this unit can be
activated individually. Set each AUX source to
ON when using. For more information about
connecting or using auxiliary devices, refer to
Using the AUX source on page 34.
1 Use MULTI-CONTROL to select AUX1/
AUX2.
2 Press MULTI-CONTROL to turn AUX1/
AUX2 on.
# To turn AUX off, press MULTI-CONTROL
again.
Switching the dimmer setting
To prevent the display from being too bright at
night, the display is automatically dimmed
when the car’s headlights are turned on. You
English
can turn the dimmer on or off.
1 Use MULTI-CONTROL to select DIMMER.
2 Press MULTI-CONTROL to turn dimmer
on.
# To turn dimmer off, press MULTI-CONTROL
again.
Setting the rear output and
subwoofer controller
This unit’s rear output (rear speaker leads output and RCA rear output) can be used for fullrange speaker (REAR SP :FULL/
PREOUT:REAR) or subwoofer
(REAR SP :SUB W/PREOUT :SUB W) connection. If you switch the rear output setting to
REAR SP :SUB W, you can connect a rear
speaker lead directly to a subwoofer without
using an auxiliary amp.
Initially, the unit is set for rear full-range speaker connection (REAR SP :FULL). When rear
output is connected to full range speakers
(when REAR SP :FULL is selected), you can
connect the RCA subwoofer output to a subwoofer. In this case, you can select whether to
use the subwoofer controller’s (low pass filter,
phase) built-in PREOUT :SUB W or the auxiliary PREOUT :REAR.
1 Use MULTI-CONTROL to select
SW CONTROL.
2 Press MULTI-CONTROL to display the
setting mode.
# Press BACK to return to the previous display.
3 Press MULTI-CONTROL to select the segment you wish to set.
Press MULTI-CONTROL repeatedly to switch
the segment in the following order:
REAR SP (rear speaker setting)—PREOUT
(RCA output setting)
4 Use MULTI-CONTROL to select the desired setting.
Turn to change the setting.
En
31
Page 32

Section
04
Initial Settings
When REAR SP (rear speaker setting) is selected.
REAR SP :SUB W (subwoofer)—
REAR SP :FULL (full-range speaker)
When PREOUT (RCA output setting) is selected.
PREOUT:SUB W (subwoofer)—
PREOUT:REAR (full-range speaker)
# When no subwoofer is connected to the rear
output, select REAR SP :FULL.
# When a subwoofer is connected to the rear
output, set for subwoofer REAR SP :SUB W.
Notes
! Even if you change this setting, there is no
output unless you turn the subwoofer output
on (refer to Using subwoofer output on page
28).
! If you change this setting, subwoofer output
in the audio menu return to the factory settings.
! Both rear speaker lead outputs and RCA rear
output are switched simultaneously in this
setting.
Switching the feature demo
The feature demo automatically starts when
power to this unit is turned off while the ignition switch is set to ACC or ON.
1 Use MULTI-CONTROL to select
DEMO MODE.
2 Press MULTI-CONTROL to turn the feature demo on.
# To turn the feature demo off, press
MULTI-CONTROL again.
Notes
! Remember that if the feature demo continues
operating when the car engine is turned off, it
may drain battery power.
! You can also turn on or off feature demo by
pressing DISP while this unit is turned off. For
more details, see About the demo mode on
page 7.
Switching the Ever Scroll
When Ever Scroll is set to ON, recorded text information scrolls continuously in the display.
Set to OFF if you prefer the information to
scroll just once.
1 Use MULTI-CONTROL to select
EVER SCROLL.
2 Press MULTI-CONTROL to turn the Ever
Scroll on.
# To turn the Ever Scroll off, press
MULTI-CONTROL again.
Activating the BT AUDIO source
You need to activate the BT AUDIO source in
order to use a Bluetooth audio player.
! You can only operate this function when
Bluetooth adapter (e.g. CD-BTB200) is connected to this unit.
1 Use MULTI-CONTROL to select
BT AUDIO.
2 Press MULTI-CONTROL to turn the
BT AUDIO source on.
# To turn the BT AUDIO source off, press
MULTI-CONTROL again.
Entering PIN code for
Bluetooth wireless connection
To connect your cellular phone to this unit via
Bluetooth wireless technology, you need to
enter PIN code on your phone to verify the
connection. The default code is 0000, but you
can change this in this function.
! With some Bluetooth audio players, you
may be required to enter the Bluetooth
audio player PIN code in advance to set
this unit for a connection.
! You can only operate this function when
Bluetooth adapter (e.g. CD-BTB200) is connected to this unit.
32
En
Page 33

Initial Settings
Section
04
1 Use MULTI-CONTROL to select
PIN CODE INPUT.
2 Press MULTI-CONTROL to display the
setting mode.
# Press BACK to return to the previous display.
3 Turn MULTI-CONTROL to select a number.
# You can also perform the same operations by
pushing MULTI-CONTROL up or down.
4 Press MULTI-CONTROL to move the cursor to the next position.
# You can also perform the same operations by
pushing MULTI-CONTROL right.
5 After inputting PIN code (up to 4 digits), press and hold MULTI-CONTROL.
PIN code can be stored in memory.
Displaying system version of
Bluetooth adapter for repair
Should this unit connecting Bluetooth adapter
fails to operate properly and you consult your
dealer for repair, you may be asked to indicate
the system version and Bluetooth module version of the adapter. You can display the versions and confirm them.
! You can only operate this function when
Bluetooth adapter (e.g. CD-BTB200) is connected to this unit.
1 Use MULTI-CONTROL to select
BT VER INFO.
2 Press MULTI-CONTROL to display the
setting mode.
# Press BACK to return to the previous display.
3 Use MULTI-CONTROL to select the desired setting.
Turn to change the setting.
System version—Bluetooth module version
# You can also perform the same operations by
pushing MULTI-CONTROL up or down.
English
Multi language display setting
Text information such as title name, artist
name or comment can be recorded on a compressed audio disc.
This unit can display them even if they are embedded in a European language or Russian.
! If the embedded language and the selected
language setting are not the same, text information may not be displayed properly.
! Some characters may not be displayed
properly.
1 Use MULTI-CONTROL to select TITLE.
2 Press MULTI-CONTROL to display the
setting mode.
# Press BACK to return to the previous display.
3 Use MULTI-CONTROL to select the desired setting.
Turn to change the setting.
EURO (European language)—RUSSIA (Russian language)
# You can also perform the same operations by
pushing MULTI-CONTROL up or down.
En
33
Page 34

Section
05
Other Functions
Using the AUX source
Up to two auxiliary devices such as VCR or
portable devices (sold separately) can be connected to this unit. When connected, auxiliar y
devices are automatically read as AUX sources
and assigned to AUX1 or AUX2. The relationship between AUX1 and AUX2 sources is explained below.
About AUX1 and AUX2
There are two methods to connect auxiliary devices to this unit.
AUX1 source:
When connecting auxiliar y equipment using a
stereo mini plug cable
% Insert the stereo mini plug into the
input jack on this unit.
For more details, refer to the installation manual.
This auxiliary device is automatically set to
AUX1.
AUX2 source:
When connecting auxiliar y equipment using an
IP-BUS-RCA Interconnector (sold separately)
% Use an IP-BUS-RCA Interconnector such
as the CD-RB20/CD-RB10 (sold separetely)
to connect this unit to auxiliary equipment
featuring RCA output.
For more details, refer to the IP-BUS-RCA Interconnector owner’s manual.
This auxiliary device is automatically set to
AUX2.
# You can only make this type of connection if
the auxiliary device has RCA outputs.
Selecting AUX as the source
% Press SRC to select AUX as the source.
# If the auxiliary setting is not turned on, AUX
cannot be selected. For more details, see Switching the auxiliary setting on page 31.
Setting the AUX title
The title displayed for the AUX1 or AUX2
source can be changed.
1 After you have selected AUX as the
source, use MULTI-CONTROL and select
FUNCTION to display TITLE INPUT.
2 Enter a title in the same way as the
built-in CD player.
For details concerning operation, refer to Entering disc titles on page 19.
Using the external unit
External unit refers to a Pioneer product (such
as ones available in the future) that, although
incompatible as a source, enables control of
basic functions with this unit. Two external
units can be controlled with this unit. When
two external units are connected, the external
unit is automatically allocated to external unit
1 or external unit 2 by this unit.
Basic operations of the external unit are explained below. Allocated functions are different depending on the connected external unit.
For details concerning functions, refer to external unit’s owner’s manual.
Selecting the external unit as
the source
% Press SRC to select EXTERNAL as the
source.
34
En
Page 35

Other Functions
Basic operation
Functions allocated to the following operations are different depending on the connected external unit. For details concerning
functions, refer to the connected external
unit’s owner’s manual.
% Press BAND/ESC.
% Press and hold BAND/ESC.
% Push MULTI-CONTROL left or right.
% Push and hold MULTI-CONTROL left or
right for about one second and release.
% Push MULTI-CONTROL up or down.
Using the functions allocated
to 1 to 6 keys
1 Press LIST.
2 Use MULTI-CONTROL to select 1 KEY to
6 KEY.
Turn to change 1 KEY to 6 KEY and press.
Section
05
English
Notes
! You can also select the function by pressing
FUNCTION on the remote control.
! To return to the previous display, press BACK.
! To return to the main menu, press and hold
BACK.
! To return to the ordinary display, press
BAND/ESC.
Advanced operations
1 Press MULTI-CONTROL to display the
main menu.
2 Use MULTI-CONTROL to select
FUNCTION.
Turn to change the menu option. Press to select.
3 Turn MULTI-CONTROL to select the
function.
FUNC1 (function 1)—FUNC2 (function 2)—
FUNC3 (function 3)—FUNC4 (function 4)—
AUTO/MANUAL (auto/manual)
! You can also turn FUNC1 on or off by press-
ing S.Rtrv.
! You can also turn FUNC2 on or off by press-
ing RDM/iPod.
! You can also turn FUNC3 on or off by press-
ing RPT/LOCAL.
En
35
Page 36

Section
06
Available accessories
Playing songs on iPod
Basic operation
You can use this unit to control an interface
adapter for iPod, which is sold separately.
% Fast forward or reverse
Push and hold MULTI-CONTROL left or right
for about one second and release.
% Select a track
Push MULTI-CONTROL left or right.
Notes
! Read the precautions for iPod on page 54.
! While iPod is connected to this unit, PIONEER
(or
(check mark)) is displayed on the iPod.
! If an error message such as ERROR-19 is dis-
played, refer to Error messages on page 50.
! When the ignition switch is set to ACC or ON,
the iPod’s battery is charged while the iPod is
connected to this unit.
! While the iPod is connected to this unit, the
iPod cannot be turned on or off.
! Before connecting the dock connector of this
unit to the iPod, disconnect the headphones
from the iPod.
! The iPod is turned off about two minutes after
the ignition switch is set to OFF.
Displaying text information on
iPod
The operation is the same as that of the iPod
connected to USB interface of this unit. (Refer
to Displaying text information on iPod on page
23.)
Browsing for a song
The operation is the same as that of the iPod
connected to USB interface of this unit. (Refer
to Browsing for a song on page 22.)
However, the selectable categories are slightly
different. Selectable categories are
PLAYLISTS (playlists)—ARTISTS (artists)—
ALBUMS (albums)—SONGS (songs)—
GENRES (genres)
Function and operation
1 Press MULTI-CONTROL to display the
main menu.
2 Use MULTI-CONTROL to select
FUNCTION.
Turn to change the menu option. Press to select.
3 Turn MULTI-CONTROL to select the
function.
REPEAT (repeat play)—SHUFFLE (shuffle)—
PAUSE (pause)
Function and operation
REPEAT is the same as that of iPod connected
to USB interface of this unit.
PAUSE is the same as that of the built-in CD
player.
Function name Operation
REPEAT
PAUSE
Notes
! You can also select the function by pressing
FUNCTION on the remote control.
! To return to the previous display, press BACK.
! To return to the main menu, press and hold
BACK.
! To return to the ordinary display, press
BAND/ESC.
! If you do not operate functions within about
30 seconds, the display automatically returns
to the ordinary display.
Refer to Function and operation on
page 23.
Refer to Pausing playback on page
19.
36
En
Page 37

Available accessories
Section
06
Playing songs in a random
order (shuffle)
% Press RDM repeatedly to select the desired setting.
! SONGS – Play back songs in the selected
list in random order.
! ALBUMS – Play back songs from a ran-
domly selected album in order.
! OFF – Cancel random play.
# To turn shuffle off, press RDM again.
Note
You can also perform this operation in the menu
that appears by using MULTI-CONTROL.
Bluetooth Audio
Basic Operations
If you connect a Bluetooth adapter (e.g. CDBTB200) to this unit, you can control Bluetooth
audio players via Bluetooth wireless technology.
Important
! Depending on the Bluetooth audio player con-
nected to this unit, the operations available
with this unit are limited to the following two
levels:
— Lower level: Only playing back songs on
your audio player is possible.
— Higher level: Playing back, pausing, select-
ing songs, etc., are possible (all the operations illustrated in this manual).
! Since there are a number of Bluetooth audio
players available on the market, operations
with your Bluetooth audio player using this
unit vary in great range. Refer to the instruction manual that came with your Bluetooth
audio player as well as this manual while operating your player on this unit.
! Information about songs (e.g. the elapsed
playing time, song title, song index, etc.) cannot be displayed on this unit.
! While you are listening to songs on your Blue-
tooth audio player, refrain from operating on
your cellular phone as much as possible. If
English
you try operating your cellular phone, the signal from your cellular phone may cause noise
on the song playback.
! When you are talking on a cellular phone con-
nected to this unit via Bluetooth wireless technology, song playback from your Bluetooth
audio player connected to this unit is muted.
! Even if while you are listening to a song on
your Bluetooth audio player and you switch to
another source, playback of song continues.
% Fast forward or reverse
Push and hold MULTI-CONTROL left or right
for about one second and release.
% Select a track
Push MULTI-CONTROL left or right.
Notes
! For details concerning operation, refer to the
Bluetooth adapter’s operation manual. This
section provides brief information on Bluetooth audio player operations with this unit,
which slightly differs or is abbreviated from
that described in the Bluetooth adapter’s operation manual.
! Even though your audio player does not con-
tain a Bluetooth module, you can still control
it from this unit via Bluetooth wireless technology. To control your audio player using this
unit, connect a product featuring Bluetooth
wireless technology (available on the market)
to your audio player and connect the Bluetooth adapter (e.g. CD-BTB200) to this unit.
Function and operation
1 Press MULTI-CONTROL to display the
main menu.
2 Use MULTI-CONTROL to select
FUNCTION.
Turn to change the menu option. Press to select.
En
37
Page 38

Section
06
Available accessories
3 Turn MULTI-CONTROL to select the
function.
CONNECTION OPEN (connection open)—
DISCONNECT AUDIO (disconnect audio)—
PLAY (Play)—STOP (Stop)—PAUSE (pause)—
DEVICE INFO (device information)
PAUSE is the same as that of the built-in CD
player. (Refer to Pausing playback on page 19.)
# You can also perform the same operations by
pushing MULTI-CONTROL up or down.
Notes
! You can also select the function by pressing
FUNCTION on the remote control.
! To return to the previous display, press BACK.
! To return to the main menu, press and hold
BACK.
! To return to the ordinary display, press
BAND/ESC.
! If a Bluetooth audio player is not connected to
this unit yet, CONNECTION OPEN and
DEVICE INFO appear in the function menu
and other functions are not available.
! If a Bluetooth audio player is connected via
higher level, CONNECTION OPEN does not
appear in the function menu and the other
functions are available.
! If a Bluetooth audio player is connected via
lower level, only DISCONNECT AUDIO and
DEVICE INFO appear in the function menu.
! If you do not operate functions other than
CONNECTION OPEN and
DISCONNECT AUDIO within about 30 sec-
onds, the display is automatically returned to
the ordinary display.
Connecting a Bluetooth audio
player
1 Use MULTI-CONTROL to select
CONNECTION OPEN in the function menu.
2 Press MULTI-CONTROL to open the connection.
ALWAYS WAITING is displayed. This unit is
now on standby for connection from Bluetooth
audio player.
If your Bluetooth audio player is set ready for
Bluetooth wireless connection, connection to
this unit is automatically established.
Note
Before you can use audio players you may need
to enter the PIN code into this unit. If your player
requires a PIN code to establish a connection,
look for the code on the player or in its accompanying documentation. Refer to Entering PIN code
for Bluetooth wireless connection on page 32.
Playing songs on Bluetooth
audio player
1 Use MULTI-CONTROL to select PLAY in
the function menu.
2 Press MULTI-CONTROL to start playback.
Stopping playback
1 Use MULTI-CONTROL to select STOP in
the function menu.
2 Press MULTI-CONTROL to stop the playback.
Disconnecting a Bluetooth
audio player
1 Use MULTI-CONTROL to select
DISCONNECT AUDIO in the function menu.
2 Press MULTI-CONTROL to disconnect
the Bluetooth audio player.
DISCONNECTED is displayed. The Bluetooth
audio player is now diconnected from this
unit.
38
En
Page 39

Available accessories
Displaying BD (Bluetooth
Device) address
1 Use MULTI-CONTROL to select
DEVICE INFO in the function menu.
2 Press MULTI-CONTROL to display the
setting mode.
3 Use MULTI-CONTROL to select the desired setting.
Turn to change the setting.
DEVICE NAME (Device name)—BD ADDRESS
(BD (Bluetooth Device) address)
Bluetooth Telephone
Basic Operations
If you use a Bluetooth adapter (e.g. CDBTB200), you can connect a cellular phone featuring Bluetooth wireless technology to this
unit for hands-free, wireless calls, even while
driving.
Important
! Since this unit is on standby to connect with
your cellular phone via Bluetooth wireless
technology, using this unit without running
the engine can result in battery drainage.
! Advanced operations that require your atten-
tion such as dialing numbers on the monitor,
using phone book, etc., are prohibited while
you are driving. When you need to use these
advanced operations, stop your vehicle in a
safe place.
Notes
! Equalizer curve for the phone source is fixed.
! When selecting the phone source, you can
only operate FADER/BALANCE (balance adjustment) in the audio menu.
Section
06
English
Setting up for hands-free phoning
Before you can use the hands-free phoning
function you must set up the unit for use with
your cellular phone. This entails establishing a
Bluetooth wireless connection between this
unit and your phone, registering your phone
with this unit, and adjusting the volume level.
1 Connection
For detailed instructions on connecting your
phone to this unit via Bluetooth wireless technology, refer to Connecting a cellular phone on
page 41.
# Your phone should now be temporarily connected. However, to make best use of the technology, we recommend you register the phone to
this unit.
2 Registration
To register your temporarily connected phone,
refer to Registering a connected cellular phone
on page 42.
3 Volume adjustment
Adjust the earpiece volume on your cellular
phone for comfort. When adjusted, the volume
level is memorized in this unit as the default
setting.
# Caller’s voice volume and ring volume may
vary depending on the type of cellular phone.
# If the difference between the ring volume and
caller’s voice volume is big, overall volume level
may become unstable.
# Before disconnecting the cellular phone from
this unit, make sure to adjust the volume to a
proper level. If the volume is muted (zero level) on
your cellular phone, the volume level of your cellular phone remains muted even after the cellular
phone is disconnected.
En
39
Page 40

Section
06
Available accessories
Making a phone call
Voice recognition
1 Press BAND/ESC and hold until
VOICE DIAL appears in the display.
VOICE DIAL appears in the display. When
VOICE DIAL ON is displayed, voice recogni-
tion function is now ready.
# If your cellular phone does not feature voice
recognition function, NO VOICE DIAL appears in
the display and opearation is not available.
2 Pronounce the name of your contact.
Taking a phone call
Answering or rejecting an incoming call
% Answering an incoming call
When a call comes in, press
MULTI-CONTROL.
# You can also perform this operation by pushing MULTI-CONTROL up.
% End a call
Push MULTI-CONTROL down.
% Rejecting an incoming call
When a call comes in, push MULTI-CONTROL
down.
Notes
! If private mode is selected on the cellular
phone, hands-free phoning may not be performed.
! The estimated call time appears in the display
(this may differ slightly from the actual call
time).
Operating a call waiting
% Answering a call waiting
When a call comes in, press
MULTI-CONTROL.
# You can also perform this operation by pushing MULTI-CONTROL up.
% End all calls
Push MULTI-CONTROL down.
% Switch between callers on hold
Press MULTI-CONTROL.
# You can also perform this operation by pushing MULTI-CONTROL up.
% Rejecting a call waiting
Push MULTI-CONTROL down.
Notes
! Pushing MULTI-CONTROL down ends all
calls including calls waiting on line.
! To end the call, both you and your caller need
to hang up the phone.
Introduction of advanced
operations
1 Press MULTI-CONTROL to display the
main menu.
2 Use MULTI-CONTROL to select
FUNCTION.
Turn to change the menu option. Press to select.
3 Turn MULTI-CONTROL to select the
function.
SEARCH PHONE (search and connect)—
CONNECTION OPEN (connection open)—
DISCONNECT PHONE (disconnect phone)—
CONNECT PHONE (connect phone)—
SET PHONE (registering phone)—
DELETE PHONE (delete phone)—
PH BOOK TRANSFER (phone book transfer)—
CLEAR MEMORY (clear memory)—
NUMBER DIAL (call by entering number)—
REFUSE CALLS (automatic reject setting)—
AUTO ANSWER (automatic answer setting)—
RING TONE (ring tone select)—
AUTO CONNECT (automatic connection set-
ting)—ECHO CANCEL (echo cancel)—
DEVICE INFO (device information)
If not connected yet
The following functions cannot be operated.
40
En
Page 41

Available accessories
Section
06
! DISCONNECT PHONE (disconnect phone)
! SET PHONE (registering phone)
! CLEAR MEMORY (clear memory)
! NUMBER DIAL (call by entering number)
If connected but not registered yet
The following functions cannot be operated.
! SEARCH PHONE (search and connect)
! CONNECTION OPEN (connection open)
! CONNECT PHONE (connect phone)
! CLEAR MEMORY (clear memory)
If already connected and registered
The following functions cannot be operated.
! SEARCH PHONE (search and connect)
! CONNECTION OPEN (connection open)
! CONNECT PHONE (connect phone)
! SET PHONE (registering phone)
Notes
! You can also select the function by pressing
FUNCTION on the remote control.
! To return to the previous display, press BACK.
! To return to the main menu, press and hold
BACK.
! To return to the playback display, press
BAND/ESC.
! DEVICE INFO is the same as that of the Blue-
tooth audio. (Refer to Displaying BD (Bluetooth
Device) address on page 39.)
! If a cellular phone is connected to this unit via
Bluetooth wireless technology with HSP
(Head Set Profile), CLEAR MEMORY and
NUMBER DIAL cannot be selected.
! If you do not operate functions other than
SEARCH PHONE, CONNECTION OPEN,
CONNECT PHONE, PH BOOK TRANSFER,
DISCONNECT PHONE, NUMBER DIAL and
CLEAR MEMORY within about 30 seconds,
the display automatically returns to the ordinary display.
Connecting a cellular phone
Searching for available cellular phones
1 Use MULTI-CONTROL to select
SEARCH PHONE in the function menu.
2 Press MULTI-CONTROL to search for
English
available cellular phones.
While searching, SEARCHING flashes. When
available cellular phones featuring Bluetooth
wireless technology are found, device name or
NAME NOT FOUND (if names cannot be obtained) is displayed.
# If this unit fails to find any available cellular
phones, NOT FOUND is displayed.
3 Turn MULTI-CONTROL to select a device
name you want to connect.
# You can also perform the same operations by
pushing MULTI-CONTROL up or down.
4 Press MULTI-CONTROL to connect the
selected cellular phone.
While connecting, CONNECTING flashes. To
complete the connection, check the device
name (PIONEER BT UNIT) and enter the link
code on your cellular phone. If the connection
is established, CONNECTED is displayed.
# The link code is set to 0000 as default. You
can change this code in the initial setting. Refer
to Entering PIN code for Bluetooth wireless con-
nection on page 32.
Using a cellular phone to initiate a
connection
1 Use MULTI-CONTROL to select
CONNECTION OPEN in the function menu.
2 Press MULTI-CONTROL to open the connection.
ALWAYS WAITING flashes and the unit is
now on standby for connection from a cellular
phone.
3 Use cellular phone to connect to this
unit.
# The link code is set to 0000 as default. You
can change this code in the initial setting. Refer
to Entering PIN code for Bluetooth wireless con-
nection on page 32.
En
41
Page 42

Section
06
Available accessories
Disconnecting a cellular phone
1 Use MULTI-CONTROL to select
DISCONNECT PHONE in the function menu.
Device name of the connected phone appears
in the display.
2 Press MULTI-CONTROL to disconnect a
cellular phone from this unit.
After disconnection is completed,
DISCONNECTED is displayed.
Registering a connected
cellular phone
1 Use MULTI-CONTROL to select
SET PHONE in the function menu.
2 Press MULTI-CONTROL to display the
setting mode.
3 Turn MULTI-CONTROL to select a registration assignment.
P1 (user phone 1)—P2 (user phone 2)—P3
(user phone 3)—G1 (guest phone 1)—G2
(guest phone 2)
# You can also perform the same operations by
pushing MULTI-CONTROL up or down.
# As you select each assignment, you can see
whether or not a phone is already registered. If
the assignment is empty, NO DATA is displayed.
If the assignment is already taken, the device
name appears. To replace an assignment with a
new phone, first delete the current assignment.
For more detailed instructions, see Deleting a re-
gistered phone on this page.
4 Press MULTI-CONTROL to register the
currently connected phone.
When registration is completed,
REG COMPLETED is displayed.
# If the registration fails, REG ERROR is dis-
played. In this case, return to step 1 and try
again.
Deleting a registered phone
1 Use MULTI-CONTROL to select
DELETE PHONE in the function menu.
2 Press MULTI-CONTROL to display the
setting mode.
3 Turn MULTI-CONTROL to select a registration assignment.
P1 (user phone 1)—P2 (user phone 2)—P3
(user phone 3)—G1 (guest phone 1)—G2
(guest phone 2)
# You can also perform the same operations by
pushing MULTI-CONTROL up or down.
# If the assignment is empty, NO DATA is dis-
played and operation is not possible.
4 Press MULTI-CONTROL to show the confirmation display.
5 Turn MULTI-CONTROL to select
DELETE OK? : YES.
The phone being deleted is now on standby.
# To cancel, select DELETE OK? : NO.
6 Press MULTI-CONTROL to delete the
phone.
After the phone is deleted, DELETED is displayed.
Connecting to a registered
cellular phone
Connecting to a registered phone
manually
1 Use MULTI-CONTROL to select
CONNECT PHONE in the function menu.
2 Press MULTI-CONTROL to display the
setting mode.
3 Turn MULTI-CONTROL to select a registration assignment.
P1 (user phone 1)—P2 (user phone 2)—P3
(user phone 3)—G1 (guest phone 1)—G2
(guest phone 2)
42
En
Page 43

Available accessories
Section
06
# You can also perform the same operations by
pushing MULTI-CONTROL up or down.
# If the assignment is empty, NO DATA is dis-
played and operation is not possible.
4 Press MULTI-CONTROL to connect the
selected cellular phone.
While connecting, CONNECTING is displayed.
After the connection is completed,
CONNECTED is displayed.
Connecting to a registered phone
automatically
1 Use MULTI-CONTROL to select
AUTO CONNECT in the function menu.
2 Press MULTI-CONTROL to turn automatic connection on.
If your cellular phone is ready for Bluetooth
wireless connection, connection to this unit is
automatically established.
# To turn automatic connection off, press
MULTI-CONTROL again.
Using the Phone Book
Transferring entries to the Phone Book
The Phone Book can hold a total of 500 entries. 300 from User 1, 150 from User 2, and 50
from User 3.
1 Use MULTI-CONTROL to select
PH BOOK TRANSFER in the function menu.
2 Press MULTI-CONTROL to show the confirmation display.
TRANSFER : YES appears in the display.
3 Press MULTI-CONTROL to enter in the
phone book transfer standby mode.
4 Use cellular phone to perform phone
book transfer.
Perform phone book transfer using the cellular phone. For detailed instructions, refer to
the instruction manual that came with your
cellular phone.
# The display indicates how many entries have
English
been transferred and the total number to be
transferred.
5 DATA TRANSFERRED is displayed and
phone book transfer is completed.
Calling a number in the Phone Book
Important
Be sure to park your vehicle and apply the parking brake when performing this operation.
After finding the number you want to call in
the Phone Book, you can select the entry and
make the call.
1 Press LIST to display the Phone Book.
2 Press MULTI-CONTROL to display
ABC SEARCH.
3 Turn MULTI-CONTROL to select the first
letter of the name you are looking for.
4 Press MULTI-CONTROL to display an
entry.
The display shows the first Phone Book entry
starting with that letter (e.g. “Ben”, “Brian”
and “Burt” when “B” is selected).
5 Turn MULTI-CONTROL to select an entry
you want to call.
6 Press MULTI-CONTROL to display a
phone number.
7 Turn MULTI-CONTROL to select a phone
number you want to call.
# If one phone number is entered in an entry,
this operation is not available.
# If you want to go back and select another
entry, press BACK.
8 Press MULTI-CONTROL to make a call.
# Press and hold MULTI-CONTROL to switch to
phone book delete display. For details, refer to
Clearing memory on the next page.
En
43
Page 44

Section
06
Available accessories
Using the Call History
Important
Be sure to park your vehicle and apply the parking brake when performing this operation.
The 12 most recent calls made (dialled), received and missed, are stored in the Call History. You can browse the Call History and call
numbers from it.
1 Press LIST to display the list.
2 Turn MULTI-CONTROL to select a list.
Phone book—MISSED CALLS (missed call)—
DIALED CALLS (dialed call)—
RECEIVED CALLS (received call)
# For more details about the Phone Book list,
refer to Using the Phone Book on the previous
page.
# If no phone numbers are stored in the selected list, NO DATA is displayed.
3 Press MULTI-CONTROL to display a registered name list.
4 Turn MULTI-CONTROL to select a phone
number.
# If the number is already in the Phone Book,
the name is displayed.
# You can also change the phone number by
pushing MULTI-CONTROL up or down.
5 Press MULTI-CONTROL to make a call.
# For an international call, press and hold
MULTI-CONTROL to add + to the phone number.
Making a call by entering
phone number
Important
Be sure to park your vehicle and apply the parking brake when performing this operation.
1 Use MULTI-CONTROL to select
NUMBER DIAL in the function menu.
2 Press MULTI-CONTROL to display the
number input screen.
3 Turn MULTI-CONTROL to select a number.
# You can also perform the same operations by
pushing MULTI-CONTROL up or down.
4 Press MULTI-CONTROL to move the cursor to the next position.
# Up to 24 digits can be entered.
5 When you completed entering the
number, press and hold MULTI-CONTROL to
make a call.
Call confirmation appears.
# If a 24-digit phone number is entered, press
MULTI-CONTROL. And then press and hold
MULTI-CONTROL to make a call.
Clearing memory
1 Use MULTI-CONTROL to select
CLEAR MEMORY in the function menu.
2 Press MULTI-CONTROL to display the
setting mode.
3 Turn MULTI-CONTROL to select an item.
PHONE BOOK (phone book)—MISSED
(missed call history)—DIALLED (dialled call
history)—RECEIVED (received call history)—
ALL (delete all memory)
# If you want to clear the Phone Book and
dialled/received/missed call history list, select
ALL.
# If guest phone is connected to this unit via
Bluetooth wireless technology, PHONE BOOK
cannot be selected.
4 Press MULTI-CONTROL to determine
the item that you want to delete.
5 Turn MULTI-CONTROL to select
CLEAR MEMORY: YES.
Clearing memory is now on standby.
# To cancel, select CLEAR MEMORY: NO.
44
En
Page 45

Available accessories
Section
06
6 Press MULTI-CONTROL to clear the
memory.
While clearing, CLEARING is displayed. After
the data on the selected item is cleared,
CLEARED is displayed.
Setting automatic rejecting
1 Use MULTI-CONTROL to select
REFUSE CALLS in the function menu.
2 Press MULTI-CONTROL to turn automatic call rejection on.
# To turn automatic call rejection off, press
MULTI-CONTROL again.
Setting automatic answering
1 Use MULTI-CONTROL to select
AUTO ANSWER in the function menu.
2 Press MULTI-CONTROL to turn automatic answering on.
# To turn automatic answering function off,
press MULTI-CONTROL again.
Switching the ring tone
1 Use MULTI-CONTROL to select
RING TONE in the function menu.
2 Press MULTI-CONTROL to turn the ring
tone on.
# To turn the ring tone off, press
MULTI-CONTROL again.
Echo canceling and noise reduction
1 Use MULTI-CONTROL to select
ECHO CANCEL in the function menu.
English
Multi-CD Player
Basic Operations
You can use this unit to control a multi-CD
player, which is sold separately.
! Only functions described in this manual are
supported by 50-disc multi-CD players.
! This unit is not designed to operate disc title
list functions with a 50-disc multi-CD player.
For information about the disc title list functions, refer to Selecting discs from the disc
title list on page 48.
% Select a disc
Push MULTI-CONTROL up or down.
% Fast forward or reverse
Push and hold MULTI-CONTROL left or right
for about one second and release.
% Select a track
Push MULTI-CONTROL left or right.
Notes
! When multi-CD player completes preparatory
operations, READY is displayed.
! If an error message such as ERROR-19 is dis-
played, refer to the multi-CD player owner’s
manual.
! If there are no discs in the multi-CD player ma-
gazine, NO DISC is displayed.
Using CD TEXT functions
You can use these functions only with a CD
TEXT compatible multi-CD player.
The operation is the same as that of the builtin CD player.
Refer to Displaying text information on disc on
page 17.
2 Press MULTI-CONTROL to turn echo canceling on.
# To turn echo canceling off, press
MULTI-CONTROL again.
Introduction of advanced
operations
You can only use COMP/DBE (compression
and DBE) with a multi-CD player that supports
them.
En
45
Page 46

Section
06
Available accessories
1 Press MULTI-CONTROL to display the
main menu.
2 Use MULTI-CONTROL to select
FUNCTION.
Turn to change the menu option. Press to select.
3 Turn MULTI-CONTROL to select the
function.
REPEAT (repeat play)—RANDOM (random
play)—SCAN (scan play)—PAUSE (pause)—
COMP/DBE (compression and DBE)—
ITS PLAY (ITS play)—ITS MEMORY (ITS pro-
gramming)—TITLE INPUT (disc title input)
# If you do not operate functions other than
ITS MEMORY and TITLE INPUT within about 30
seconds, the display automatically returns to the
ordinary display.
# When playing a CD TEXT disc on a CD TEXT
compatible multi-CD player, you cannot switch to
TITLE INPUT. The disc title is already recorded on
the CD TEXT disc.
Function and operation
REPEAT, RANDOM, SCAN, PAUSE,
COMP/DBE and TITLE INPUT operations are
basically the same as that of the built-in CD
player.
Function name Operation
Refer to Selecting a repeat play
range on page 18.
However, the repeat play ranges
you can select are different from
that of the built-in CD player. The
REPEAT
RANDOM
SCAN
repeat play ranges of the multi-CD
player are:
! MCD – Repeat all discs in the
multi-CD player
! TRACK – Repeat just the cur-
rent track
! DISC – Repeat the current disc
Refer to Playing tracks in random
order on page 19.
Refer to Scanning folders and
tracks on page 19.
PAUSE
TITLE INPUT
Refer to Pausing playback on page
19.
Refer to Entering disc titles on
page 19.
Notes
! You can also select the function by pressing
FUNCTION on the remote control.
! To return to the previous display, press BACK.
! To return to the main menu, press and hold
BACK.
! To return to the playback display, press
BAND/ESC.
! If you select other discs during repeat play,
the repeat play range changes to MCD.
! If you perform track search or fast forward/re-
verse during TRACK, the repeat play range
changes to DISC.
! After track or disc scanning is finished, nor-
mal playback of the tracks begins again.
Using compression and bass
emphasis
You can only use these functions with a multiCD player that supports them.
COMP (compression) and DBE (dynamic bass
emphasis) functions lets you adjust the sound
playback quality of the multi-CD player.
1 Use MULTI-CONTROL to select
COMP/DBE in the function menu.
# If the multi-CD player does not support
COMP/DBE, NO COMP is displayed when you attempt to select it.
2 Turn MULTI-CONTROL to select the desired setting.
OFF—COMP 1—COMP 2—OFF—DBE 1—
DBE 2
46
En
Page 47

Available accessories
Section
06
Using ITS playlists
ITS (instant track selection) lets you make a
playlist of favorite tracks from the multi-CD
player magazine. After you have added your favorite tracks to the playlist, you can turn on ITS
play and play just those selections.
You can use ITS to enter and play back up to
99 tracks per disc from up to 100 discs (with
the disc titles). (With multi-CD players sold before the CDX-P1250 and CDX-P650, up to 24
tracks can be stored in the playlist.)
Creating a playlist with ITS programming
1 Play a CD that you want to program.
Push MULTI-CONTROL up or down to select
the CD.
2 Use MULTI-CONTROL to select
ITS MEMORY in the function menu.
3 Press MULTI-CONTROL to display the
setting mode.
4 Press MULTI-CONTROL to select TRK.
5 Turn MULTI-CONTROL to select the desired track.
6 Press MULTI-CONTROL to select
MEMORY.
MEMORY COMPLETE is displayed and the
currently playing selection is added to your
playlist.
# If DELETE is displayed, turn MULTI-CONTROL
to display MEMORY.
Note
After data for 100 discs is stored in memory, data
for a new disc will overwrite the oldest one.
Playback from your ITS playlist
ITS play lets you listen to the tracks that you
have entered into your ITS playlist. When you
turn on ITS play, tracks from your ITS playlist
in the multi-CD player begin to play.
1 Select the repeat range.
English
2 Use MULTI-CONTROL to select ITS PLAY
in the function menu.
3 Press MULTI-CONTROL to turn ITS play
on.
ITS PLAY: ON appears in the display. Playback
begins of those tracks from your playlist within
the previously selected MCD or DISC ranges.
# If no tracks in the current range are programmed for ITS play, then EMPTY is displayed.
# To turn ITS play off, press MULTI-CONTROL
again.
Erasing a track from your ITS playlist
You can delete a track from your ITS playlist if
ITS play is on.
If ITS play is already on, skip to step 2. If ITS
play is not already on, use MULTI-CONTROL.
1 Play the CD with the track you want to
delete from your ITS playlist, and turn ITS
play on.
Refer to Playback from your ITS playlist on this
page.
2 Use MULTI-CONTROL to select
ITS MEMORY in the function menu.
3 Press MULTI-CONTROL to display the
setting mode.
4 Press MULTI-CONTROL to select TRK.
5 Turn MULTI-CONTROL to select the desired track.
6 Press MULTI-CONTROL to select
DELETE.
The currently playing selection is erased from
your ITS playlist and playback of the next track
begins.
# If MEMORY is displayed, turn
MULTI-CONTROL to display DELETE.
# If there are no tracks from your playlist in the
current range, EMPTY is displayed and normal
playback resumes.
En
47
Page 48

Section
06
Available accessories
Erasing a CD from your ITS playlist
You can delete all tracks of a CD from your ITS
playlist if ITS play is off.
1 Play the CD that you want to delete.
2 Use MULTI-CONTROL to select
ITS MEMORY in the function menu.
3 Press MULTI-CONTROL to display the
setting mode.
4 Press MULTI-CONTROL to select
DELETE.
All tracks on the currently playing CD are deleted from your playlist and
MEMORY DELETED is displayed.
# If MEMORY is displayed, turn
MULTI-CONTROL to display DELETE.
Using disc title functions
You can input CD titles and display the titles.
Then, you can easily search for and play a desired disc.
Entering disc titles
Use the disc title input feature to store up to
100 CD titles (with ITS playlist) into the multiCD player. Each title can be up to 10 characters long.
For details concerning operation, refer to En-
tering disc titles on page 19.
! Titles remain in the memory even after the
disc is removed from the magazine, and
are recalled when the disc is reinserted.
! After data for 100 discs is stored in mem-
ory, data for a new disc will overwrite the
oldest one.
Displaying disc titles
You can display the text information of any
disc that has the disc title entered.
The operation is the same as that of the builtin CD player.
Refer to Displaying text information on disc on
page 17.
Selecting discs from the disc title list
Disc title list lets you see the list of disc titles
entered in the multi-CD player and select one
of them to play back.
1 Press LIST to switch to the disc title list
mode during the playback display.
2 Use MULTI-CONTROL to select the desired disc title.
Turn to change the disc title. Press to play.
# You can also change the disc title by pushing
MULTI-CONTROL up or down.
# You can also play the disc by pushing
MULTI-CONTROL right.
# When playing CD TEXT disc, press
MULTI-CONTROL to see a list of the tracks in the
selected disc. Press BACK or push
MULTI-CONTROL left to return to the disc list.
# To return to the ordinary display, press
BAND/ESC or LIST.
# If you do not operate the list within about 30
seconds, the display automatically returns to the
ordinary display.
# If no title is entered for a disc, NO DISC TITLE
is displayed.
# NO DISC is displayed next to the disc number
when there is no disc in the magazine.
TV tuner
Basic Operations
You can use this unit to control a TV tuner,
which is sold separately.
For details concerning operation, refer to the
TV tuner’s operation manual. This section provides information on TV operations with this
unit, which differs from that described in the
TV tuner’s operation manual.
% Select a band
Press BAND/ESC.
% Select a channel (step by step)
Push MULTI-CONTROL left or right.
48
En
Page 49

Available accessories
Section
06
% Seek tuning
Push and hold MULTI-CONTROL left or right
for about one second and release.
Notes
! Band can be selected from TV-1 or TV-2.
! You can cancel seek tuning by pushing
MULTI-CONTROL left or right.
! If you push and hold MULTI-CONTROL left or
right, you can skip stations. Seek tuning starts
as soon as you release MULTI-CONTROL.
Storing and recalling broadcast
stations
You can easily store up to 12 broadcast stations for later recall.
! 12 stations for each band can be stored in
memory.
1 Press LIST.
Preset screen is displayed.
2 Use MULTI-CONTROL to store the selected station in memory.
Turn to change the preset number. Press and
hold to store.
# You can also store the station in memory by
pushing and holding MULTI-CONTROL right.
3 Use MULTI-CONTROL to select the desired station.
Turn to change the station. Press to select.
# You can also change the station by pushing
MULTI-CONTROL up or down.
# If you do not operate the list within about 30
seconds, the display automatically returns to the
ordinary display.
2 Use MULTI-CONTROL and select
English
FUNCTION to display BSSM.
# You can also select the function by pressing
FUNCTION on the remote control.
3 Press MULTI-CONTROL to turn BSSM
on.
SEARCH begins to flash. While SEARCH is
flashing, the 12 strongest broadcast stations
are stored in order from the lowest channel
up. When finished, the preset channel list appears.
# To cancel the storage process, press
MULTI-CONTROL again.
4 Use MULTI-CONTROL to select the desired station.
Turn to change the station. Press to select.
# You can also change the station by pushing
MULTI-CONTROL up or down.
# To return to the ordinary display, press
BAND/ESC.
# If you do not operate the list within about 30
seconds, the display automatically returns to the
ordinary display.
Storing the strongest broadcast
stations sequentially
1 Press MULTI-CONTROL to display the
main menu.
En
49
Page 50

Appendix
Additional Information
Error messages
When you contact your dealer or your nearest
Pioneer Service Center, be sure to have the
error message recorded.
Built-in CD Player
Message Cause Action
ERROR-11, 12,
17, 30
ERROR-11, 12,
17, 30
ERROR-10, 11,
12, 15, 17, 30,
A0
ERROR-15 The inserted disc
ERROR-22, 23 The CD format
NO AUDIO The inserted disc
TRK SKIPPED The inserted disc
PROTECT All the files on
USB audio player/USB memory
Message Cause Action
NO AUDIO No songs Transfer the audio
Dirty disc Clean disc.
Scratched disc Replace disc.
Electrical or mechanical
does not contain
any data
cannot be played
back
does not contain
any files that can
be played back
contains WMA
files that are protected by DRM
the inserted disc
are secured by
DRM
USB memory
with security enabled is connected
No songs Transfer the songs
Switch the ignition
key, or switch to a
different source,
then back to the
CD player.
Replace disc.
Replace disc.
Replace disc.
Replace disc.
Replace disc.
files to the USB
portable audio
player/USB memory and connect.
Follow the USB
memory instructions to disable the
security.
to iPod.
The connected
TRK SKIPPED
PROTECT All the files on
N/A USB The USB device
CHECK USB The USB connec-
USB portable
audio player/
USB memory
contains WMA
files that are protected by
Windows Media
DRM 9/10
the connected
USB portable
audio player/
USB memory are
protected by
Windows Media
DRM 9/10
connected to is
not supported by
this unit.
tor or USB cable
is short-circuited.
The connected
USB portable
audio player/
USB memory
consumes more
than 500 mA
(maximum allowable current).
Play an audio file
not protected by
Windows Media
DRM 9/10.
Transfer audio files
not protected by
Windows Media
DRM 9/10 to the
USB portable
audio player/USB
memory and connect.
Connect a USB
portable audio
player or USB
memory that is
USB Mass Storage
Class compliant.
Confirm that the
USB connector or
USB cable is not
caught in something or damaged.
Disconnect the
USB portable
audio player/USB
memory and do
not use it. Turn the
ignition switch to
OFF, then to ACC
or ON and then
connect the compliant USB portable audio player/
USB memory.
50
En
Page 51

Additional Information
Appendix
iPod
Message Cause Action
ERROR-19 Communication
N/A USB Old version of
ERROR-16 Old version of
ERROR-A1
CHECK USB
NO SONGS No songs Transfer the songs
STOP No songs in the
failure
iPod failure Disconnect the
iPod
iPod failure Reset the iPod.
iPod
iPod failure Disconnect the
iPod is not
charged but operates correctly
current list
Disconnect the
cable from iPod.
Once iPod main
menu is displayed,
connect the cable
again.
Reset the iPod.
cable from iPod.
Once iPod main
menu is displayed,
connect the cable
again.
Reset the iPod.
Update the iPod
version.
Update the iPod
version.
cable from iPod.
Once iPod main
menu is displayed,
connect the cable
again.
Reset the iPod.
Check if the connection cable for
iPod shorted out
(e.g., not caught in
metal objects).
After checking,
switch the ignition
key or disconnect
the iPod and connect again.
to iPod.
Select a list that
contains the
songs.
English
Handling guideline of discs
and player
! Use only discs featuring either of following
two logos.
! Use only conventional, fully circular discs.
Do not use shaped discs.
! Use 12-cm or 8-cm CD. Do not use an
adapter when playing 8-cm CDs.
! Do not insert anything other than a CD into
the CD loading slot.
! Do not use cracked, chipped, warped, or
otherwise damaged discs as they may damage the player.
! Unfinalized CD-R/CD-RW disc playback is
not possible.
! Do not touch the recorded surface of the
discs.
! Store discs in their cases when not in use.
! Avoid leaving discs in excessively hot envir-
onments including under direct sunlight.
! Do not attach labels, write on or apply che-
micals to the surface of the discs.
! To clean a CD, wipe the disc with a soft
cloth outward from the center.
! Condensation may temporarily impair the
player’s performance. Leave it to adjust to
the warmer temperature for about one
hour. Also, wipe any dump discs with a soft
cloth.
! Playback of discs may not be possible be-
cause of disc characteristics, disc format,
recorded application, playback environment, storage conditions, and so on.
! Text information may not be correctly dis-
played depending on the recorded environment.
En
51
Page 52

Appendix
Additional Information
! Road shocks may interrupt disc playback.
! Read the precautions for discs before
using them.
Dual Discs
! Dual Discs are two-sided discs that have a
recordable CD for audio on one side and a
recordable DVD for video on the other.
! Since the CD side of Dual Discs is not phy-
sically compatible with the general CD
standard, it may not be possible to play the
CD side with this unit.
! Frequent loading and ejecting of a Dual
Disc may result in scratches on the disc.
Serious scratches can lead to playback problems on this unit. In some cases, a Dual
Disc may become stuck in the disc loading
slot and will not eject. To prevent this, we
recommend you refrain from using Dual
Disc with this unit.
! Please refer to the information from the
disc manufacturer for more detailed information about Dual Discs.
Compressed audio
compatibility
WMA
! Compatible format: WMA encoded by
Windows Media Player
! Bit rate: 48 kbps to 320 kbps (CBR), 48 kbps
to 384 kbps (VBR)
! Sampling frequency: 32 kHz to 48 kHz
! Windows Media Audio 9 Professional, Loss-
less, Voice: No
MP3
! Bit rate: 8 kbps to 320 kbps
! Sampling frequency: 16 kHz to 48 kHz (32,
44.1, 48 kHz for emphasis)
! Compatible ID3 tag version: 1.0, 1.1, 2.2,
2.3, 2.4 (ID3 tag Version 2.x is given priority
than Version 1.x.)
! M3u playlist: No
! MP3i (MP3 interactive), mp3 PRO: No
AAC
! Compatible format: AAC encoded by
! Sampling frequency: 11.025 kHz to 48 kHz
! Transmission rate: 16 kbps to 320 kbps
! Apple Lossless: No
WAV
! Compatible format: Linear PCM (LPCM),
! Quantization bits: 8 and 16 (LPCM), 4 (MS
! Sampling frequency: 16 kHz to 48 kHz
®
iTunes
MS ADPCM
ADPCM)
(LPCM), 22.05 kHz to 44.1 kHz (MS ADPCM)
USB audio player/USB memory
USB audio player/USB memory
compatibility
! USB version: 2.0, 1.1 and 1.0
! USB data transfer rate: full speed
! USB Class: MSC (Mass Storage Class) de-
vice
! Protocol: bulk
! Minimum amount of memory: 250 MB
! Maximum amount of memory: 250 GB
! File system: FAT32 and FAT16
! Supply current: 500 mA
Notes
! Partitioned USB memory is not compatible
with this unit.
! Depending on the kind of USB portable audio
player/USB memory you use, this unit may
not recognize the USB audio player/USB
memory or audio files may not be played back
properly.
52
En
Page 53

1
2
5
6
Additional Information
Appendix
! This unit can play back files in the USB porta-
ble audio player/USB memory that is USB
Mass Storage Class. However, copyright protected files that are stored in above-mentioned
USB devices cannot be played back. (If the
iPod is connected to this unit, file playback
condition depends on the iPod specifications.)
! You cannot connect a USB portable audio
player/USB memory to this unit via a USB
hub.
USB audio player/USB memory
! Do not leave the USB portable audio
player/USB memory in direct sunlight for
extended amounts of time. Extended exposure to direct sunlight can result in USB
portable audio player/USB memory malfunction due to the resulting high temperature.
! Do not leave the USB portable audio
player/USB memory in high temperature.
! Firmly secure the USB portable audio
player/USB memory when driving. Do not
let the USB portable audio player/USB
memory fall onto the floor, where it may become jammed under the brake or accelerator pedal.
! There may be a slight delay when starting
playback of audio files encoded with image
data.
! Depending on the USB devices connected
to this unit, it may generate noise in the
radio.
! Only 32 characters from the beginning can
be displayed as a file name (including the
extension) or a folder name when USB portable audio player/USB memory is selected
as a source.
! The text information of some audio files
may not be correctly displayed.
! File extensions must be used properly.
! Up to 15 000 files on a USB portable audio
player/USB memory can be played back.
! Up to 500 folders on a USB portable audio
player/USB memory can be played back.
! Up to eight tiers directory on a USB porta-
English
ble audio player/USB memory can be
played back.
! There may be a slight delay when starting
playback of audio files on a USB portable
audio player/USB memory with numerous
folder hierarchies.
! Do not connect anything other than the
USB portable audio player/USB memory.
! Operations may vary depending on the
kind of USB audio player and a USB memory.
The sequence of audio files on USB
memory
For USB portable audio players, the sequence is
different from that of USB memory and depends on the player.
Example of a hierarchy
: Folder
: Compressed audio file
3
4
Level 1 Level 2 Level 3 Level 4
! 01 to 05 represent assigned folder num-
bers. 1 to 6 represent the playback sequence. The user cannot assign folder
numbers and specify the playback sequence with this unit.
! Playback sequence of the audio file is the
same as recorded sequence in the USB device.
! To specify the playback sequence, the fol-
lowing method is recommended.
53
En
Page 54

Appendix
Additional Information
1 Create the file name including numbers
that specify the playback sequence (e.g.,
001xxx.mp3 and 099yyy.mp3).
2 Put those files into a folder.
3 Record the folder containing files into the
USB device.
However, depending on the system environment, you cannot specify the file playback
sequence.
iPod
About handling the iPod
! Do not leave the iPod in direct sunlight for
extended amounts of time. Extended exposure to direct sunlight can result in iPod
malfunction due to the resulting high temperature.
! Do not leave the iPod in a high tempera-
ture.
! Connect directly the dock connector cable
to the iPod so that this unit works properly.
! Firmly secure the iPod when driving. Do
not let the iPod fall onto the floor, where it
may become jammed under the brake or
accelerator pedal.
! For details, refer to the iPod’s manuals.
About iPod settings
! You cannot operate the iPod Equalizer on
Pioneer products. We recommend that you
set the iPod Equalizer to off, before connecting to this unit.
! You cannot set Repeat to off on the iPod
when using this unit. Even if you set Repeat
to off on the iPod, Repeat is automatically
changed to All when connecting the iPod
to this unit.
album names and other text information
may not be correctly displayed.
! There may be a slight delay when starting
playback of WMA/AAC files encoded with
image data.
! ISO 9660 Level 1 and 2 compliant. Romeo
and Joliet file systems are both compatible
with this player.
! Multi-session playback is possible.
! Compressed audio files are not compatible
with packet write data transfer.
! Only 64 characters from the beginning can
be displayed as a file name (including the
extension such as .wma, .mp3, .m4a or
.wav) or a folder name.
! Folder selection sequence or other opera-
tion may be altered depending on the encoding or writing software.
! Regardless of the length of blank section
between the songs of original recording,
compressed audio discs play with a short
pause between songs.
! File extensions such as .wma, .mp3, .m4a
or .wav must be used properly.
! Russian text to be displayed on this unit
should be encoded with the following character sets:
— Unicode (UTF-8, UTF-16)
— Character sets other than Unicode that
are used in Windows environment and
are set to Russian in the multi-language
setting
! Only 32 characters from the beginning can
be displayed as a file name (including the
extension such as .wma, .mp3, .m4a or
.wav) or a folder name when using Russian
text.
Compressed audio files on
the disc
! Depending on the version of Windows
Media Player used to encode WMA files,
54
En
Page 55

1
2
5
6
Additional Information
Example of a hierarchy
: Folder
: Compressed audio file
3
4
Level 1 Level 2 Level 3 Level 4
! This unit assigns folder numbers. The user
cannot assign folder numbers.
! Folder hierarchy is allowed up to eight tiers.
However, a practical hierarchy of folder is
less than two tiers.
! Up to 99 folders on a disc can be played
back.
Appendix
English
У Ф
Х Ц
Ч Ш, Щ
Ъ Ы
Ь Э
Ю Я
Russian character chart
Display Character Display Character
А Б
В Г
Д Е, Ё
Ж З
И, Й К
Л М
Н О
П Р
С Т
En
55
Page 56

Appendix
Additional Information
Specifications
General
Power source ............................. 14.4 V DC (10.8 V to 15.1 V
allowable)
Grounding system ................... Negative type
Max. current consumption
..................................................... 10.0 A
Dimensions (W × H × D):
DIN
Chassis ..................... 178 mm × 50 mm × 162
mm
Nose ........................... 188 mm × 58 mm × 14 mm
D
Chassis ..................... 178 mm × 50 mm × 162
mm
Nose ........................... 170 mm × 46 mm × 14 mm
Weight .......................................... 1.5 kg
Audio
Maximum power output .......50 W × 4
50 W × 2/4 W + 70 W × 1/2
W (for subwoofer)
Continuous power output ...22 W × 4 (50 Hz to 15 000
Hz, 5% THD, 4 W load, both
channels driven)
Load impedance ...................... 4 W to 8 W ×4
4 W to 8 W ×2+2W ×1
Preout max output level ....... 2.2 V
Equalizer (3-Band Parametric Equalizer):
Low
Frequency ................ 40/80/100/160 Hz
Q Factor .................... 0.35/0.59/0.95/1.15 (+6 dB
when boosted)
Gain ............................ ±12 dB
Mid
Frequency ................ 200/500/1k/2k Hz
Q Factor .................... 0.35/0.59/0.95/1.15 (+6 dB
when boosted)
Gain ............................ ±12 dB
High
Frequency ................ 3.15k/8k/10k/12.5k Hz
Q Factor .................... 0.35/0.59/0.95/1.15 (+6 dB
when boosted)
Gain ............................ ±12 dB
HPF:
Frequency .......................... 50/63/80/100/125 Hz
Slope .................................... –12 dB/oct
Subwoofer (mono):
Frequency .......................... 50/63/80/100/125 Hz
Slope .................................... –18 dB/oct
Gain ...................................... +6 dB to –24 dB
Phase .................................. Normal/Reverse
Bass boost:
Gain ...................................... +12 dB to 0 dB
CD player
System .......................................... Compact disc audio system
Usable discs .............................. Compact disc
Signal-to-noise ratio ............... 94 dB (1 kHz) (IEC -A net-
Number of channels .............. 2 (stereo)
MP3 decoding format ........... MPEG-1 & 2 Audio Layer 3
WMA decoding format ......... Ver. 7, 7.1, 8, 9, 10, 11 (2ch
AAC decoding format ............ MPEG-4 AAC (iTunes
WAV signal format ..................Linear PCM & MS ADPCM
work)
audio)
(Windows Media Player)
coded only) (.m4a)
(Ver. 7.2 and earlier)
(Non-compressed)
®
en-
USB
Specification .............................. USB 2.0 full speed
Supply current .......................... 500 mA
Maximum amount of memory
..................................................... 250 GB
File system .................................. FAT16, FAT32
MP3 decoding format ........... MPEG-1, 2 & 2.5 Audio Layer
WMA decoding format ......... Ver. 7, 7.1, 8, 9, 10, 11 (2ch
AAC decoding format ............ MPEG-4 AAC (iTunes
WAV signal format ..................Linear PCM & MS ADPCM
3
audio)
(Windows Media Player)
coded only) (.m4a)
(Ver. 7.2 and earlier)
(Non-compressed)
®
en-
FM tuner
Frequency range ...................... 87.5 MHz to 108.0 MHz
Usable sensitivity ..................... 8 dBf (0.7 µV/75 W, mono,
Signal-to-noise ratio ............... 75 dB (IEC-A network)
S/N: 30 dB)
MW tuner
Frequency range ...................... 531 kHz to 1 602 kHz (9 kHz)
Usable sensitivity ..................... 18 µV (S/N: 20 dB)
Signal-to-noise ratio ............... 65 dB (IEC-A network)
LW tuner
Frequency range ...................... 153 kHz to 281 kHz
Usable sensitivity ..................... 30 µV (S/N: 20 dB)
Signal-to-noise ratio ............... 65 dB (IEC-A network)
Note
Specifications and the design are subject to modifications without notice due to improvements.
56
En
Page 57

Contenido
Gracias por haber comprado este producto Pioneer.
Lea con detenimiento estas instrucciones sobre el funcionamiento del aparato,
para utilizarlo correctamente. Una vez que las haya leído, conserve este manual en
un lugar seguro para consultas futuras.
Español
Antes de comenzar
Acerca de esta unidad 60
Visite nuestro sitio Web 61
En caso de problemas 62
Protección del producto contra robo 62
– Extracción de la carátula 62
– Colocación de la carátula 62
Acerca del modo demo 62
Uso y cuidado del mando a distancia 63
– Instalación de la pila 63
– Uso del mando a distancia 63
Utilización de esta unidad
Qué es cada cosa 64
– Unidad principal 64
– Mando a distancia 65
– Indicaciones de pantalla 65
Funciones básicas 67
– Encendido y apagado 67
– Selección de una fuente 67
– Ajuste del volumen 67
Sintonizador 68
– Funciones básicas 68
– Almacenamiento y recuperación de
frecuencias 68
– Recepción de transmisiones de alarma
PTY 68
– Introducción a las funciones
avanzadas 68
– Almacenamiento de las frecuencias de
radio de mayor intensidad 69
– Sintonización de señales intensas 69
– Selección de frecuencias
alternativas 69
– Recepción de anuncios de tráfico 70
– Uso de las funciones PTY 71
Reproductor de CD incorporado 73
– Funciones básicas 73
– Visualización de información de texto
en el disco 73
– Selección de pistas de la lista de títulos
de las pistas 74
– Selección de archivos de la lista de
nombres de archivos 74
– Introducción a las funciones
avanzadas 75
– Selección de una gama de repetición
de reproducción 75
– Reproducción de las pistas en orden
aleatorio 76
– Exploración de carpetas y pistas 76
– Pausa de la reproducción 76
– Utilización del Sound Retriever 76
– Uso de las funciones de títulos de
discos 76
Reproducción de canciones en el
reproductor de audio portátil USB/
memoria USB 77
– Funciones básicas 77
– Visualización de información de texto
de un archivo de audio 78
– Selección de archivos de la lista de
nombres de archivos 78
– Introducción a las funciones
avanzadas 78
Para reproducir canciones en el iPod 80
– Funciones básicas 80
– Para buscar una canción 80
– Visualización de información de texto
en el iPod 81
– Introducción a las funciones
avanzadas 81
– Reproducción de las canciones en
orden aleatorio (shuffle) 82
– Reproducción de todas las canciones
en un orden aleatorio (shuffle all) 82
– Selección de canciones de la lista de
álbumes del artista que se está
reproduciendo actualmente 82
– Uso de la función iPod de la unidad
desde el iPod 82
– Cambio de la velocidad del
audiolibro 83
57
Es
Page 58

Contenido
Ajustes de audio
Introducción a los ajustes de audio 84
Uso del ajuste del balance 84
Uso del ecualizador 85
– Recuperación de las curvas de
ecualización 85
– Ajuste de las curvas de
ecualización 85
– Ajuste preciso de la curva de
ecualización 85
Ajuste de la sonoridad 86
Uso de la salida de subgraves 86
– Configuración de los ajustes de
subgraves 86
Uso del filtro de paso alto 87
Intensificación de los graves 87
Ajuste de los niveles de la fuente 87
Ajustes iniciales
Configuración de los ajustes iniciales 88
Ajuste del reloj 88
Activación y desactivación del reloj de
apagado 88
Ajuste del paso de sintonía de FM 88
Cambio de la búsqueda PI automática 89
Cambio del tono de advertencia 89
Cambio del ajuste de un equipo auxiliar 89
Cambio del ajuste del atenuador de luz 89
Ajuste de la salida posterior y del controlador
de subgraves 90
Cambio de la demostración de
características 90
Cambio del desplazamiento continuo 91
Activación de la fuente BT AUDIO 91
Introducción del código PIN para la conexión
inalámbrica Bluetooth 91
Visualización de la versión del sistema del
adaptador Bluetooth para tareas de
reparación 92
Ajuste de la pantalla en varios idiomas 92
Otras funciones
Uso de la fuente AUX 93
– Acerca de AUX1 y AUX2 93
– Fuente AUX1: 93
– Fuente AUX2: 93
– Selección de AUX como la fuente 93
– Ajuste del título AUX 93
Uso de la unidad externa 93
– Selección de la unidad externa como
fuente 94
– Funcionamiento básico 94
– Utilización de las funciones asignadas
a las teclas 1 a 6 94
– Funciones avanzadas 94
Accesorios disponibles
Para reproducir canciones en el iPod 95
– Funcionamiento básico 95
– Visualización de información de texto
en el iPod 95
– Para buscar una canción 95
– Función y operación 95
– Reproducción de las canciones en
orden aleatorio (shuffle) 96
Bluetooth Audio 96
– Funciones básicas 96
– Función y operación 97
– Conexión de un reproductor de audio
Bluetooth 97
– Reproducción de canciones en el
reproductor de audio Bluetooth 98
– Para detener la reproducción 98
– Desconexión de un reproductor de
audio Bluetooth 98
– Visualización de la dirección BD
(Bluetooth Device) 98
Teléfono Bluetooth 98
– Funciones básicas 98
– Configuración de la función manos
libres 99
– Realización de una llamada
telefónica 99
– Aceptación de una llamada
telefónica 99
58
Es
Page 59

Contenido
Español
– Introducción a las funciones
avanzadas 100
– Conexión de un teléfono móvil 101
– Desconexión de un teléfono móvil 101
– Registro de un teléfono móvil
conectado 102
– Eliminación de un teléfono
registrado 102
– Conexión a un teléfono móvil
registrado 102
– Uso del Directorio de teléfonos 103
– Uso del Historial de llamadas 104
– Realización de una llamada
introduciendo el número de
teléfono 104
– Borrar memoria 104
– Ajuste del rechazo automático 105
– Ajuste de respuesta automática 105
– Cambio del tono de llamada 105
– Cancelación del eco y reducción de
ruido 105
Reproductor de CD múltiple 105
– Funciones básicas 105
– Uso de las funciones CD TEXT 106
– Introducción a las funciones
avanzadas 106
– Uso de la compresión y del enfatizador
de graves 107
– Uso de listas de reproducción ITS 107
– Uso de las funciones de títulos de
discos 108
Sintonizador de TV 109
– Funciones básicas 109
– Almacenamiento y recuperación de
emisoras 110
– Almacenamiento consecutivo de las
emisoras con las señales más
intensas 110
Información adicional
Mensajes de error 111
Pautas para el manejo de discos y del
reproductor 112
Discos dobles 113
Compatibilidad con audio comprimido 113
Reproductor de audio USB/memoria
USB 114
– Compatibilidad del reproductor de
audio USB/memoria USB 114
– Reproductor de audio USB/memoria
USB 114
iPod 115
– Acerca del manejo del iPod 115
– Acerca de los ajustes del iPod 115
Archivos de audio comprimidos en el
disco 116
– Ejemplo de una jerarquía 116
Tabla de caracteres rusos 116
Especificaciones 118
Es
59
Page 60

Sección
01
Antes de comenzar
Si desea deshacerse de este producto, no lo
mezcle con los residuos generales de su
hogar. De conformidad con la legislación vigente, existe un sistema de recogida distinto
para los productos electrónicos que requieren
un procedimiento adecuado de tratamiento,
recuperación y reciclado.
Las viviendas privadas en los estados miembros de la UE, en Suiza y Noruega pueden devolver gratuitamente sus productos
electrónicos usados en los centros de recolección previstos o bien en una tienda minorista
(si adquieren un producto similar nuevo).
En el caso de los países que no se han mencionado en el párrafo anterior, póngase en
contacto con las autoridades locales a fin de
conocer el método de eliminación correcto.
Al actuar siguiendo estas instrucciones, se
asegurará de que el producto eliminado se someta a los procesos de tratamiento, recuperación y reciclaje necesarios, evitando de este
modo efectos potencialmente negativos en el
entorno y la salud humana.
Acerca de esta unidad
Las frecuencias del sintonizador de esta unidad están asignadas para su uso en Europa
Occidental, Asia, Medio Oriente, África y
Oceanía. El uso en otras áreas puede causar
una recepción deficiente. La función RDS (sistema de datos de radio) opera sólo en áreas
con emisoras de FM que trasmiten señales de
RDS.
líquidos puede causar daños en la unidad,
humo y recalentamiento.
! “PRODUCTO LÁSER DE CLASE 1”
Este producto contiene un diodo de láser de
clase superior a 1. Para garantizar la seguridad continua, no extraiga ninguna tapa ni intente acceder a la parte interna del producto.
Solicite a personal cualificado que realice el
servicio técnico.
! El CarStereo-Pass Pioneer debe utilizarse úni-
camente en Alemania.
! Conserve este manual a mano para que
pueda consultar los procedimientos de funcionamiento y las precauciones a seguir.
! Mantenga siempre el volumen lo suficiente-
mente bajo como para que pueda escuchar
los sonidos procedentes del exterior del vehículo.
! Proteja esta unidad de la humedad.
! Si se desconecta o se descarga la batería, la
memoria preajustada se borrará y deberá ser
reprogramada.
Acerca de WMA
El logo de Windows Media™ impreso en la
caja indica que esta unidad puede reproducir
datos WMA.
Windows Media y el logo de Windows son
marcas comerciales o registradas de
Microsoft Corporation en los EE.UU. y/o en
otros países.
! Esta unidad puede no funcionar correcta-
mente, dependiendo de la aplicación utilizada para codificar archivos WMA.
PRECAUCIÓN
! No permita que esta unidad entre en contacto
con líquidos, ya que podría desencadenar una
descarga eléctrica. Además, el contacto con
60
Es
Page 61

Antes de comenzar
Sección
01
Acerca de MP3
La venta de este producto sólo otorga una licencia para su uso privado, no comercial. No
otorga ninguna licencia ni concede ningún
derecho a utilizar este producto en transmisiones comerciales (es decir, lucrativas) en tiempo real (terrestres, vía satélite, por cable y/o
por cualquier otro medio), transmisiones/
streaming por Internet, Intranets y/u otras
redes o en otros sistemas de distribución de
contenido electrónico, como por ejemplo, aplicaciones de pago por escucha (pay-audio) o
audio bajo demanda (audio-on-demand). Se
necesita una licencia independiente para su
uso comercial. Para obtener más información,
visite
http://www.mp3licensing.com.
Acerca de AAC
Esta unidad reproduce archivos AAC codificados con iTunes
®
.
iTunes es una marca comercial de Apple Inc.,
registrada en los EE.UU. y en otros países.
Compatibilidad con reproductores de
audio
! Póngase en contacto con el fabricante
para obtener información sobre su reproductor de audio portátil USB/memoria
USB.
La unidad corresponde a lo siguiente.
— Memoria y reproductor de audio portátil
compatible USB MCS (clase de almacena-
miento masivo)
— Reproducción de ficheros WMA, MP3, AAC
yWAV
Para obtener detalles sobre la compatibilidad,
consulte Compatibilidad del reproductor de
audio USB/memoria USB en la página 114.
Compatibilidad con iPod
®
Esta unidad permite el control y la escucha de
canciones en un iPod.
! Esta unidad permite el control de los si-
guientes modelos iPod.
— iPod nano
— iPod de quinta generación o posterior
Para obtener el máximo rendimiento, se recomienda utilizar la última versión del software iPod.
! Cuando utiliza un iPod, se requiere un co-
nector del Dock del iPod para el cable
USB.
! El cable de la interfaz CD-IU50 de Pioneer
también está disponible. Para obtener información, consulte con su proveedor.
! Esta unidad puede controlar modelos de
iPod de generaciones anteriores con un
adaptador iPod de Pioneer (p. ej., CDIB100N). En este caso, la mayoría de las
funciones son fundamentalmente las mismas que las de un iPod conectado a la interfaz USB de esta unidad. Sin embargo,
no pueden utilizarse las funciones relacionadas con los audiolibros o los podcasts.
Para obtener más información sobre el funcionamiento del adaptador de iPod, consulte Para reproducir canciones en el iPod en la
página 95.
! iPod es una marca comercial de Apple
Inc., registrada en los EE.UU. y en otros
países.
PRECAUCIÓN
! Pioneer no asume ninguna responsabilidad
por la pérdida de datos en el reproductor de
audio portátil USB/memoria USB, incluso si
la pérdida ocurre durante el uso de esta unidad.
! Pioneer no asume ninguna responsabilidad
por la pérdida de datos en el iPod, incluso si
la pérdida ocurre durante el uso de esta
unidad.
Visite nuestro sitio Web
Visítenos en la siguiente dirección:
Español
61
Es
Page 62

Sección
01
Antes de comenzar
http://www.pioneer.es
! Registre su producto. Conservaremos los
datos de su compra archivados para que
pueda consultar esta información en caso
de que deba efectuar una reclamación a la
compañía de seguros por pérdida o robo.
! En nuestro sitio Web ofrecemos la informa-
ción más reciente acerca de Pioneer
Corporation.
En caso de problemas
En caso de que este producto no funcione correctamente, póngase en contacto con su proveedor o con el Servicio técnico oficial Pioneer
más próximo a su domicilio.
Protección del producto
contra robo
Se puede extraer la carátula como medida
antirrobo.
! Si no se extrae la carátula de la unidad
principal trascurridos cinco segundos después de desconectar la llave de contacto
del automóvil, escuchará un sonido de advertencia.
! Puede desactivar este tono de advertencia.
Consulte Cambio del tono de advertencia en
la página 89.
2 Sujete el lado izquierdo de la carátula y
retírela con cuidado.
No sujete la carátula con fuerza ni permita
que caiga. Evite que entre en contacto con
agua u otros líquidos para que no sufra daños
permanentes.
3 Coloque la carátula en la funda protectora provista para guardarla de manera segura.
Colocación de la carátula
% Vuelva a colocar la carátula; para ello,
sujétela verticalmente respecto a la unidad
y encájela con firmeza en los ganchos de
montaje.
Importante
! Proceda con cuidado al retirar o colocar la ca-
rátula.
! Evite someter la carátula a impactos excesi-
vos.
! Mantenga la carátula fuera del alcance de la
luz solar directa y no la exponga a temperaturas elevadas.
Extracción de la carátula
1 Presione OPEN para abrir la carátula.
62
Es
Acerca del modo demo
Esta unidad incluye el modo de demostración
de características.
Importante
El cable rojo (ACC) de esta unidad se debe conectar al terminal acoplado con las funciones de
activación/desactivación del contacto para el
arranque del automóvil. En caso contrario, se
puede descargar la batería del vehículo.
Page 63

Antes de comenzar
Sección
01
Modo de demostración de
características
La demostración de características se inicia
automáticamente cuando se apaga la unidad
mientras el contacto de arranque está en ACC
o en ON. Presione el botón DISP durante la demostración de características para cancelar
este modo de demostración. Vuelva a presionar DISP para comenzar. Recuerde que si este
modo de demostración sigue funcionando
cuando el motor del vehículo está apagado, se
puede descargar la batería.
Uso y cuidado del mando a
distancia
Instalación de la pila
Deslice y extraiga la bandeja de la parte posterior del mando a distancia e inserte la pila con
los polos positivo (+) y negativo (–) en la dirección correcta.
! Al utilizar el mando a distancia por primera
vez, extraiga la película que sobresale de la
bandeja.
! No manipule la pila con herramientas metáli-
cas.
! No guarde la pila junto a objetos metálicos.
! En el caso de que se produzcan fugas de la
pila, limpie completamente el mando a distancia e instale una pila nueva.
! Para desechar las pilas usadas, cumpla con
los reglamentos gubernamentales o las normas ambientales pertinentes de las instituciones públicas aplicables en su país/zona.
Uso del mando a distancia
Posicione el mando a distancia hacia la carátula para que funcione la unidad.
! Es posible que el mando a distancia no
funcione correctamente si lo expone a la
luz solar directa.
Importante
! No guarde el mando a distancia en lugares ex-
puestos a altas temperaturas o a la luz solar
directa.
! No deje caer el mando a distancia al suelo, ya
que puede quedar atascado debajo del freno
o del acelerador.
Español
ADVERTENCIA
Mantenga la pila fuera del alcance de los niños.
En caso de ingestión accidental de ésta, consulte
a un médico de inmediato.
PRECAUCIÓN
! Utilice una sola pila de litio CR2025 (3 V).
! Extraiga la pila si no piensa utilizar el mando
a distancia durante un mes o más tiempo.
! Si la pila se sustituye de forma incorrecta exis-
te riesgo de explosión. Reemplácela sólo con
una del mismo tipo, o equivalente.
63
Es
Page 64

b
a 9 8 76
Sección
02
Utilización de esta unidad
1
3
2 4 5
Qué es cada cosa
Unidad principal
1 Botón SRC/OFF
Esta unidad se enciende al seleccionar una
fuente. Presione este botón para visualizar
todas las fuentes disponibles.
2 Botón DISP/BACK/SCROLL
Presione este botón para seleccionar las diferentes pantallas.
Manténgalo presionado para desplazarse
por la información de texto.
Presione este botón para volver a la pantalla
anterior cuando utilice el menú.
Presione este botón durante varios segundos para volver al menú principal cuando
utilice el menú.
3 MULTI-CONTROL
Mueva el dedo para utilizar los controles de
sintonización: búsqueda manual, avance rápido, retroceso y búsqueda de pista. También se usan para controlar las funciones.
Gire el control para aumentar o disminuir el
volumen.
4 Botón S.Rtrv
Presiónelo para activar o desactivar la función Sound Retriever.
5 Botón OPEN
Presione este botón para abrir la carátula.
6 Botón LIST
Presione este botón para visualizar la lista
de títulos de los discos, títulos de las pistas,
carpetas, archivos o canales presintonizados, según la fuente de que se trate.
7 Botón TA/NEWS
Presione este botón para activar o desactivar la función TA. Mantenga presionado
este botón para activar o desactivar la función NEWS.
8 Botón MUTE
Presione para desactivar el sonido. Para volver a activar el sonido, presione de nuevo.
9 Botón RPT/LOCAL
Presione para cambiar la gama de repetición de reproducción mientras utiliza CD,
USB o iPod.
Presione para activar o desactivar la función
local cuando utiliza el sintonizador como
fuente.
a Botón RDM/iPod
Presione para activar o desactivar la función
de orden aleatorio al utilizar el CD, USB o
iPod.
64
Es
Page 65

Utilización de esta unidad
Sección
02
1
23456 7 89 b
d e f g
a c
Cuando utilice el iPod, presione este botón
para reproducir todas las pistas en orden
aleatorio.
Mantenga presionado para cambiar el
modo de control cuando utilice un iPod conectado al conector USB de la unidad.
Si utiliza el iPod con un adaptador de interfaz (CD-IB100N), presione para cambiar la
función de selección aleatoria.
b Botón BAND/ESC
Presione para seleccionar entre tres bandas
FM y bandas MW/LW.
Presione este botón para volver a la visualización normal cuando utilice el menú.
Mando a distancia
Las funciones se utilizan de la misma manera
que al usar los botones de la unidad principal.
c Botones VOLUME
Presione este botón para aumentar o disminuir el volumen.
d Botones a/b/c/d
Presione estos botones para utilizar los controles de sintonización: búsqueda manual,
avance rápido, retroceso y búsqueda de
pista. También se usan para controlar las
funciones.
e Botón AUDIO
Presione para seleccionar una función de
audio.
f Botón DISP
Presione este botón para seleccionar las diferentes pantallas.
Manténgalo presionado para desplazarse
por la información de texto.
g Botón e (pausa)
Presione este botón para activar o desactivar la pausa.
h Botón FUNCTION
Presione este botón para seleccionar las
funciones.
i Botón LIST/ENTER
Presione este botón para visualizar la lista
de títulos de los discos, títulos de las pistas,
carpetas, archivos o canales presintonizados, según la fuente de que se trate.
Cuando esté en el menú de funcionamiento,
presione para controlar las funciones.
Indicaciones de pantalla
1 Sección principal de la pantalla
Muestra la banda, frecuencia, tiempo de reproducción transcurrido y otros ajustes.
! Sintonizador
Se muestran la banda y la frecuencia.
! RDS
Se muestra el nombre del servicio del
programa, información PTY y otro tipo de
información de texto.
! Reproductor de CD incorporado, USB,
iPod
Se muestra el tiempo de reproducción
transcurrido e información de texto.
2 Indicador S.Rtrv
Aparece cuando la función de Sound Retriever está activada.
3 Indicador c
Aparece cuando existe un nivel, carpeta o
menú superior.
4 Indicador
Aparece cuando utiliza la función de lista.
(carpeta)
Español
65
Es
Page 66

Sección
02
Utilización de esta unidad
5 Indicador d
Aparece cuando existe un nivel, carpeta o
menú inferior.
6 Indicador
Aparece cuando se muestra el nombre del
artista del disco (pista) en la sección principal de la pantalla.
Aparece durante la búsqueda precisa del intérprete en la función de exploración del
iPod.
7 Indicador
Aparece cuando se muestra el nombre del
disco (álbum) en la sección principal de la
pantalla.
Aparece durante la búsqueda precisa de
álbum en la función de exploración del
iPod.
8 Indicador
Aparece cuando se muestra el nombre de la
pista (canción) en la sección principal de la
pantalla.
Aparece durante la búsqueda precisa de
canción en la función de exploración del
iPod.
9 Indicador LOC
Aparece cuando la sintonización por búsqueda local está activada.
(intérprete)
(disco)
(canción)
e Indicador F-REPEAT
Aparece cuando la repetición de carpeta
está activada.
Cuando la función de repetición está activada, sólo aparecerá REPEAT.
f Indicador F-RANDOM
Aparece cuando orden aleatorio de carpeta
está activado.
Cuando la función de orden aleatorio está
activada, sólo aparecerá RANDOM.
g Indicador
Aparece cuando la sonoridad está
activada.
(sonoridad)
a Indicador (estéreo) 5
Aparece cuando la frecuencia seleccionada
se está transmitiendo en estéreo.
b Indicador TA
Aparece cuando la función TA (espera por
anuncio de tráfico) está activada.
c Indicador TP
Aparece cuando una emisora TP está sintonizada.
d Indicador
Aparece cuando la función de reproducción
aleatoria está activada mientras se selecciona la fuente iPod.
66
Es
(selección aleatoria)
Page 67

Utilización de esta unidad
Sección
02
Funciones básicas
Encendido y apagado
Encendido de la unidad
% Presione SRC para encender la unidad.
Apagado de la unidad
% Mantenga presionado OFF hasta que se
apague la unidad.
Selección de una fuente
Puede seleccionar una fuente que desee escuchar. Para cambiar al reproductor de CD incorporado, cargue un disco en la unidad
(consulte la página 73).
% Presione SRC varias veces para cambiar
entre las siguientes fuentes.
TUNER (sintonizador)—TELEVISION (televi-
sor)—COMPACT DISC (reproductor de CD incorporado)—MULTI CD (reproductor de CD
múltiple)—IPOD (iPod)—USB (USB)—
EXTERNAL (unidad externa 1)—EXTERNAL
(unidad externa 2)—AUX1 (AUX1)—AUX2
(AUX2)—BT AUDIO (audio BT)—TELEPHONE
(teléfono BT)
Cambio del ajuste de un equipo auxiliar en la
página 89).
! Si el reproductor de audio portátil se carga
mediante la fuente de alimentación CC del vehículo mientras se conecta a la entrada AUX,
puede generarse ruido. En este caso, detenga
la carga.
! Por unidad externa se entiende un producto
Pioneer (como el que pueda estar disponible
en el futuro) que, si bien es incompatible
como fuente, permite el control de funciones
básicas con esta unidad. Dos unidades externas se pueden controlar con este sistema.
Cuando se conectan dos unidades externas,
la unidad les asigna automáticamente la unidad externa 1 o la unidad externa 2.
! Si el cable azul/blanco de esta unidad está co-
nectado al terminal de control del relé de la
antena automática del vehículo, la antena se
extiende cuando se enciende el equipo. Para
retraer la antena, apague la fuente.
Ajuste del volumen
% Utilice MULTI-CONTROL para ajustar el
nivel de sonido.
Español
Notas
! En los siguientes casos, la fuente sonora no
cambiará.
— Cuando no hay conectada ninguna unidad
correspondiente a la fuente seleccionada.
— Cuando no hay disco o cargador en el re-
productor.
— Cuando el iPod no está conectado a esta
unidad.
— Cuando AUX (entrada auxiliar) está apaga-
da (consulte la página 89).
— Cuando la fuente BT AUDIO está desacti-
vada (consulte Activación de la fuente
BT AUDIO en la página 91).
! AUX1 está activada de forma predeterminada.
Desactive AUX1 cuando no la utilice (consulte
67
Es
Page 68

Sección
02
Utilización de esta unidad
Sintonizador
Funciones básicas
% Seleccione una banda
Presione BAND/ESC.
# Puede seleccionar la banda entre FM1, FM2,
FM3 o MW/LW.
% Sintonización manual (paso a paso)
Pulse MULTI-CONTROL izquierda o derecha.
% Sintonización por búsqueda
Presione MULTI-CONTROL y mantenga presionado hacia la izquierda o hacia la derecha
durante cerca de un segundo y luego suelte.
# Se puede cancelar la sintonización por búsqueda pulsando MULTI-CONTROL izquierda o
derecha.
# Mantenga presionado MULTI-CONTROL iz-
quierda o derecha para saltar las emisoras. La
sintonización por búsqueda comienza inmediatamente después de que suelte MULTI-CONTROL.
Notas
! Se puede activar y desactivar la función AF
(búsqueda de frecuencias alternativas) de
esta unidad. Se debe desactivar la función AF
para la sintonización normal (consulte la página siguiente).
! Es posible que no todas las emisoras ofrezcan
el servicio RDS.
! Las funciones RDS como AF y TA sólo se acti-
van cuando la radio está sintonizada en una
emisora RDS.
Almacenamiento y
recuperación de frecuencias
Se pueden almacenar con facilidad hasta seis
frecuencias de emisoras para recuperarlas
posteriormente.
! Se pueden almacenar en la memoria seis
emisoras de cada banda.
2 Utilice el MULTI-CONTROL para almacenar la frecuencia seleccionada en la memoria.
Haga girar el control para cambiar el número
de presintonía. Presione durante varios segundos para almacenarla.
# Tambien puede almacenar la frecuencia en la
memoria manteniendo presionado
MULTI-CONTROL derecha.
3 Utilice MULTI-CONTROL para seleccionar la emisora deseada.
Haga girar el control para cambiar de emisora. Presione para seleccionar.
# También puede cambiar la emisora pulsando
MULTI-CONTROL arriba o abajo.
# Para volver a la visualización normal, presione
BAND/ESC o LIST.
# Si no se utiliza la lista en unos 30 segundos,
la pantalla volverá automáticamente a la visualización normal.
Recepción de transmisiones de
alarma PTY
Cuando se emite el código PTY de emergencia, la unidad lo recibe automáticamente (aparece ALARM). Una vez finalizada la
transmisión, el sistema vuelve a la fuente anterior.
! Se puede cancelar un anuncio de emer-
gencia presionando TA.
Introducción a las funciones
avanzadas
1 Presione MULTI-CONTROL para visualizar el menú principal.
2 Utilice MULTI-CONTROL para seleccionar FUNCTION.
Haga girar el control para cambiar la opción
de menú. Presione para seleccionar.
1 Presione LIST.
Se muestra la pantalla de presintonías.
68
Es
Page 69

Utilización de esta unidad
Sección
02
3 Haga girar MULTI-CONTROL para seleccionar la función.
BSM (memoria de las mejores emisoras)—
REGIONAL (regional)—LOCAL (sintonización
por búsqueda local)—PTY SEARCH (selección
de tipo de programa)—TRAFFIC (espera por
anuncio de tráfico)—AF (búsqueda de frecuencias alternativas)—NEWS (interrupción
por programa de noticias)
Notas
! También se puede seleccionar la función pre-
sionando FUNCTION en el mando a distancia.
! Para volver a la pantalla anterior, presione
BACK.
! Para volver al menú principal, presione duran-
te varios segundos BACK.
! Para volver a la visualización normal, presione
BAND/ESC.
! Si se elige la banda MW/LW, sólo se puede se-
leccionar BSM o LOCAL.
Almacenamiento de las
frecuencias de radio de mayor
intensidad
La función BSM (memoria de las mejores emisoras) permite guardar automáticamente las
seis frecuencias de las emisoras de mayor intensidad.
1 Utilice MULTI-CONTROL para seleccionar BSM en el menú de funciones.
2 Presione MULTI-CONTROL para activar
la función BSM.
Las seis frecuencias de las emisoras de mayor
intensidad se almacenarán en orden según la
intensidad de las señales.
# Para cancelar, presione MULTI-CONTROL de
nuevo.
Sintonización de señales intensas
La sintonización por búsqueda local le permite
sintonizar sólo las emisoras de radio con seña-
les lo suficientemente intensas como para
asegurar una buena recepción.
% Presione LOCAL repetidamente para seleccionar el ajuste deseado.
FM: OFF—LEVEL 1—LEVEL 2—LEVEL 3—
LEVEL 4
MW/LW: OFF—LEVEL 1—LEVEL 2
El ajuste LEVEL 4 sólo permite recibir las emisoras con las señales más intensas, mientras
que los ajustes más bajos permiten recibir de
manera progresiva las emisoras con las señales más débiles.
Nota
También puede realizar esta operación en el
menú que aparece al utilizar el
MULTI-CONTROL.
Selección de frecuencias
alternativas
Si el sintonizador no puede obtener una
buena recepción, la unidad busca automáticamente otra emisora de la misma red.
1 Utilice MULTI-CONTROL para seleccionar AF en el menú de funciones.
2 Presione MULTI-CONTROL para activar
AF.
# Para desactivar AF, presione
MULTI-CONTROL de nuevo.
Notas
! Sólo se sintonizan las emisoras RDS durante
la sintonización por búsqueda o BSM cuando
la función AF está activada.
! Cuando se recupera una emisora presintoni-
zada, el sintonizador puede actualizarla con
una nueva frecuencia de la lista AF de emisoras. En la pantalla no aparece ningún número
de presintonía si los datos RDS de la emisora
recibida son distintos de los de la emisora almacenada originalmente.
Español
69
Es
Page 70

Sección
02
Utilización de esta unidad
! Durante la búsqueda de AF, el sonido podría
interrumpirse temporalmente.
! La función AF se puede activar y desactivar in-
dependientemente en cada banda FM.
Uso de la búsqueda PI
Si el sintonizador no puede encontrar una
emisora adecuada o el estado de la recepción
empeora, la unidad buscará automáticamente
otra emisora con la misma programación. Durante la búsqueda aparece PI SEEK y la salida
se silencia.
Uso de la búsqueda PI automática
para emisoras presintonizadas
Cuando no se puede acceder a las emisoras
presintonizadas, se puede ajustar la unidad
para realizar la búsqueda PI durante la llamada de las emisoras presintonizadas.
! El ajuste predefinido de la función de bús-
queda PI automática se desactiva. Consulte Cambio de la búsqueda PI automática en
la página 89.
Limitación de las emisoras para
programación regional
Cuando se usa la función AF, la función regional limita la selección de las emisoras que
transmiten programas regionales.
1 Utilice MULTI-CONTROL para seleccionar REGIONAL en el menú de funciones.
2 Presione MULTI-CONTROL para activar
la función regional.
# Para desactivar AF, presione
MULTI-CONTROL de nuevo.
! El número de presintonía puede desaparecer
de la pantalla si se sintoniza una emisora regional que es diferente de la emisora almacenada originalmente.
! La función regional se puede activar o desacti-
var de forma independiente en cada banda
FM.
Recepción de anuncios de tráfico
TA (espera por anuncio de tráfico) permite recibir anuncios de tráfico automáticamente, al
margen de la fuente que se escuche. La función TA se puede activar tanto para una emisora TP (una emisora que transmite
información de tráfico) como para una emisora TP de otra red realzada (una emisora que
brinda información que remite a emisoras TP).
1 Sintonice una emisora TP o la emisora
TP de otra red realzada.
El indicador TP se iluminará.
2 Presione TA para activar la espera por
anuncio de tráfico.
# Para desactivar AF, presione TA de nuevo.
3 Utilice MULTI-CONTROL para ajustar el
volumen de TA cuando comienza un anuncio de tráfico.
El volumen recién ajustado se almacena en la
memoria y se recupera para los siguientes
anuncios de tráfico.
4 Presione TA mientras se está recibiendo
el anuncio de tráfico para cancelarlo.
El sintonizador vuelve a la fuente original pero
sigue en el modo de espera hasta que se vuelva a presionar TA.
Notas
! La programación regional y las redes regiona-
les se organizan de distinta manera según el
país (es decir, pueden cambiar de acuerdo
con la hora, el estado o la provincia de que se
trate, o el área de transmisión).
70
Es
Notas
! También puede activar o desactivar esta fun-
ción en el menú que aparece mediante el
MULTI-CONTROL.
! El sistema cambia de nuevo a la fuente origi-
nal después de la recepción del anuncio de
tráfico.
Page 71

Utilización de esta unidad
Sección
02
! Sólo se sintonizan las emisoras TP y las emi-
soras TP de otra red realzada durante la sinto-
nización por búsqueda o BSM cuando la
función TA está activada.
Uso de las funciones PTY
Se puede sintonizar una emisora usando la información PTY (tipo de programa).
Búsqueda de una emisora RDS por
información PTY
Se pueden buscar tipos generales de programas, como los que se indican en la página siguiente.
1 Utilice MULTI-CONTROL para seleccionar PTY SEARCH en el menú de funciones.
2 Presione MULTI-CONTROL para mostrar
el modo de ajuste.
3 Utilice MULTI-CONTROL para seleccionar el ajuste deseado.
Haga girar el control para cambiar de ajuste.
NEWS/INFO—POPULAR—CLASSICS—
OTHERS
4 Presione MULTI-CONTROL para comenzar la búsqueda.
La unidad busca una emisora que transmita
ese tipo de programa. Cuando encuentra la
emisora, se visualiza el nombre del servicio de
programa.
En la página siguiente se indica la información PTY (código de identificación de tipo de
programa).
# Para cancelar la búsqueda, vuelva a presionar
MULTI-CONTROL.
# El programa de algunas emisoras puede ser
distinto del programa indicado por el PTY transmitido.
# Si ninguna emisora está transmitiendo el tipo
de programa buscado, se visualiza NOT FOUND
durante unos dos segundos, y el sintonizador
vuelve a la emisora original.
Uso de la interrupción por programa
de noticias
Cuando se transmite un programa de noticias
de una emisora de noticias con código PTY, la
unidad cambia automáticamente a la emisora
que transmite las noticias. Cuando finaliza el
programa de noticias, se reanuda la recepción
del programa anterior.
% Mantenga presionado NEWS para activar la interrupción por programa de noticias.
Presione NEWS hasta que NEWS ON aparezca en la pantalla.
# Para desactivar la interrupción por programa
de noticias, mantenga presionado NEWS hasta
que OFF aparezca en el display.
# Se puede cancelar un programa de noticias
pulsando NEWS.
Nota
También se pueden activar o desactivar programas de noticias en el menú que aparece, usando
MULTI-CONTROL.
Español
71
Es
Page 72

Sección
02
Utilización de esta unidad
Lista PTY
Generales Específico Tipo de programa
NEWS/INFO NEWS Noticias
AFFAIRS Temas de actualidad
INFO Información general y
consejos
SPORT Programas deportivos
WEATHER Informes del tiempo/
información meteorológica
FINANCE Informes del mercado
de valores, comercio,
transacciones, etc.
POPULAR POP MUS Música popular
ROCK MUS Música moderna con-
temporánea
EASY MUS Música “fácil de escu-
char”
OTH MUS Música alternativa
JAZZ Jazz
COUNTRY Música country
NAT MUS Música nacional
OLDIES Música antigua y de la
“Edad de Oro”
FOLK MUS Música folklórica
CLASSICS L. CLASS Música clásica ligera
CLASSIC Música clásica
OTHERS EDUCATE Programas educativos
DRAMA Comedias y series ra-
diofónicas
CULTURE Cultura nacional o re-
gional
SCIENCE Naturaleza, ciencia y
tecnología
VARIED Entretenimiento ligero
CHILDREN Programas para niños
SOCIAL Temas sociales
RELIGION Programas o servicios
de asuntos religiosos
PHONE IN Entrada por teléfono
TOURING Programas de viaje; no
para anuncios de tráfico
LEISURE Pasatiempos favoritos
y actividades recreativas
DOCUMENT Programas documen-
tales
72
Es
Page 73

Utilización de esta unidad
Sección
02
Reproductor de CD
incorporado
Funciones básicas
% Abrir la carátula.
Presione OPEN.
Aparece la ranura de inserción de discos.
Ranura de inserción de discos
Botón EJECT
# Cuando inserte un disco, coloque el lado
de la etiqueta hacia arriba.
# Para evitar fallos en el funcionamiento, asegúrese de que ningún objeto metálico entre en contacto con los terminales mientras la carátula está
abierta.
% Expulsión de un disco
Presione EJECT.
% Seleccionar una carpeta
Pulse MULTI-CONTROL arriba o abajo.
# No se puede seleccionar una carpeta que no
tenga un archivos de audio comprimido grabado
en ella.
% Cambio entre audio comprimido y CDDA
Presione BAND/ESC.
# Esta operación sólo está disponible cuando
reproduce un CD-EXTRA o CD de MODO MIXTO.
# Si se cambia entre audio comprimido y CDDA, la reproducción comienza en la primera pista
del disco.
Notas
! El reproductor de CD incorporado puede re-
producir CD de audio y audio comprimido grabado en CD-ROM. (Consulte la página 116
para los archivos que se pueden reproducir).
! Lea las precauciones sobre los discos y el re-
productor en la página 112.
! Después de insertar un disco, presione SRC
para seleccionar el reproductor de CD incorporado.
! A veces se produce cierto retraso entre el co-
mienzo de la reproducción de un disco y la
emisión del sonido. Durante la lectura inicial,
se visualiza FORMAT READ.
! Si aparece un mensaje de error como
ERROR-19, consulte Mensajes de error en la
página 111.
! Los discos se reproducen según el orden del
número de archivo. Se saltan las carpetas que
no contienen archivos. (Si la carpeta 01 (RAÍZ)
no contiene archivos, la reproducción comienza en la carpeta 02).
Español
% Selección de una pista
Pulse MULTI-CONTROL izquierda o derecha.
% Avance rápido o retroceso
Presione MULTI-CONTROL y mantenga presionado hacia la izquierda o hacia la derecha
durante cerca de un segundo y luego suelte.
# Al reproducir audio comprimido, no hay sonido en el avance rápido o en el retroceso.
% Regreso a la carpeta raíz
Presione y mantenga presionado BAND/ESC.
# Si la carpeta 01 (RAÍZ) no contiene archivos,
la reproducción comienza en la carpeta 02.
Visualización de información
de texto en el disco
% Presione DISP para seleccionar la información de texto deseado.
Para CD con título introducido
Tiempo de reproducción—título del disco y
tiempo de reproducción
Es
73
Page 74

Sección
02
Utilización de esta unidad
Para discos CD TEXT
Tiempo de reproducción—nombre del intérprete del disco y título de la pista—nombre del
intérprete del disco y título del disco—título
del disco y título de la pista—nombre del intérprete de la pista y título de la pista— título de
la pista y tiempo de reproducción
Para discos WMA/MP3/AAC
Tiempo de reproducción—nombre de la carpeta y nombre del archivo—nombre del intérprete y título de la pista—nombre del intérprete y
título del álbum—título del álbum y título de la
pista—título de la pista y tiempo de reproducción—comentario y tiempo de reproducción—
velocidad de grabación y tiempo de reproducción
Para discos WAV
Tiempo de reproducción—nombre de la carpeta y nombre del archivo—frecuencia de muestreo y tiempo de reproducción
Notas
! Puede desplazarse hacia la izquierda del título
manteniendo presionado DISP.
! Un CD de audio que contiene determinada in-
formación como texto y/o números es un CD
TEXT.
! Si la información específica no se graba en
un disco, no se visualizará el título o el nombre.
! Según sea la versión de iTunes
grabar archivos MP3 en un disco, es posible
que no se visualice correctamente la información de los comentarios.
— iTunes es una marca comercial de Apple
Inc., registrada en los EE.UU. y en otros
países.
! Según la versión del Windows Media Player
utilizada para codificar los archivos WMA, es
posible que no se visualicen correctamente
los nombres de álbumes y demás información
de texto.
! Al reproducir archivos WMA grabados como
VBR (velocidad de grabación variable), se visualizará el valor medio de la velocidad de grabación.
®
utilizada para
! Al reproducir archivos MP3 grabados con
VBR (velocidad de grabación variable), aparece VBR en lugar del valor de velocidad de grabación.
! La frecuencia de muestreo que se visualiza en
la pantalla puede estar abreviada.
! Si se activa la función de desplazamiento con-
tinuo en el ajuste inicial, la información de
texto se desplazará de manera ininterrumpida
por la pantalla. Consulte Cambio del desplaza-
miento continuo en la página 91.
Selección de pistas de la lista
de títulos de las pistas
Esta función le permite ver la lista de los títulos de las pistas en un disco CD TEXT y seleccionar uno de ellos para su reproducción.
1 Presione LIST para cambiar al modo de
lista de títulos de las pistas.
2 Utilice MULTI-CONTROL para seleccionar el título de la pista deseada.
Haga girar el control para cambiar el título de
la pista. Presione para iniciar la reproducción.
# También puede cambiar el título de la pista
pulsando MULTI-CONTROL arriba o abajo.
# También puede reproducir la pista presionando MULTI-CONTROL derecha.
# Para volver a la visualización normal, presione
BAND/ESC o LIST.
# Si no se utiliza la lista en unos 30 segundos,
la pantalla volverá automáticamente a la visualización normal.
Selección de archivos de la lista
de nombres de archivos
Esta función le permite ver la lista de los nombres de los archivos (o de las carpetas) y seleccionar uno de ellos para su reproducción.
1 Presione LIST para cambiar al modo de
lista de nombres de archivos.
Los nombres de los archivos y carpetas aparecen en la pantalla.
74
Es
Page 75

Utilización de esta unidad
Sección
02
2 Utilice MULTI-CONTROL para seleccionar el nombre del archivo deseado (o de la
carpeta deseada).
Haga girar el control para cambiar el nombre
del archivo o carpeta.
— tras seleccionar un archivo, presione para
reproducirlo.
— presione para ver una lista de archivos (o
carpetas) de una carpeta seleccionada.
— presione y mantenga presionado para re-
producir una canción de una carpeta selec-
cionada.
# También puede reproducir el archivo presionando MULTI-CONTROL derecha.
# También puede reproducir una canción en la
carpeta seleccionada manteniendo presionado
MULTI-CONTROL derecha.
# Para volver a la lista anterior (la carpeta de un
nivel superior), presione BACK. También puede
realizar esta operación presionando
MULTI-CONTROL izquierda.
# Para volver al nivel superior de la lista, mantenga presionado BACK.
# Para volver a la visualización normal, presione
BAND/ESC o LIST.
# Si no se utiliza la lista en unos 30 segundos,
la pantalla volverá automáticamente a la visualización normal.
Introducción a las funciones
avanzadas
1 Presione MULTI-CONTROL para visualizar el menú principal.
2 Utilice MULTI-CONTROL para seleccionar FUNCTION.
Haga girar el control para cambiar la opción
de menú. Presione para seleccionar.
3 Haga girar MULTI-CONTROL para seleccionar la función.
REPEAT (repetición de reproducción)—
RANDOM (reproducción aleatoria)— SCAN
(reproducción con exploración)— PAUSE
(pausa)—SOUND RETRIEVER (advanced
sound retriever)—TITLE INPUT (introducción
de títulos de discos)
Notas
! También se puede seleccionar la función pre-
sionando FUNCTION en el mando a distancia.
! Para volver a la pantalla anterior, presione
BACK.
! Para volver al menú principal, presione duran-
te varios segundos BACK.
! Para volver a la visualización normal, presione
BAND/ESC.
! Si no se utilizan las funciones exceptuando
TITLE INPUT en unos 30 segundos, la pantalla
volverá automáticamente a la visualización
normal.
! Durante la reproducción de un disco de audio
comprimido o disco CD TEXT, no se puede
cambiar a la pantalla de introducción de títulos de discos.
Selección de una gama de
repetición de reproducción
% Presione RPT repetidamente para seleccionar el ajuste deseado.
! DISC– Repite todas las pistas
! TRACK – Repite la pista actual
! FOLDER – Repite la carpeta actual
# Si selecciona otra carpeta durante la repeti-
ción de reproducción, la gama de repetición cambia a repetición de disco.
# Si realiza una búsqueda de pista o utiliza la
función de avance rápido/retroceso durante
TRACK (repetición de pista), la gama de repetición de reproducción cambiará a disco/carpeta.
# Cuando se selecciona FOLDER (repetición de
carpeta), no se puede reproducir una subcarpeta
de esa carpeta.
Nota
También puede realizar esta operación en el
menú que aparece al utilizar el
MULTI-CONTROL.
Español
75
Es
Page 76

Sección
02
Utilización de esta unidad
Reproducción de las pistas en
orden aleatorio
Las pistas de una gama de repetición seleccionada se reproducen en orden aleatorio.
% Presione RDM para activar la reproducción aleatoria.
Las pistas se reproducirán en orden aleatorio.
# Vuelva a pulsar RDM para desactivar la repro-
ducción aleatoria.
Nota
También puede activar o desactivar esta función
en el menú que aparece mediante el
MULTI-CONTROL.
Exploración de carpetas y pistas
La reproducción con exploración busca la
canción dentro de la gama de repetición seleccionada.
1 Utilice MULTI-CONTROL para seleccionar SCAN en el menú de funciones.
2 Presione MULTI-CONTROL para activar
la reproducción con exploración.
Se reproducirán los primeros 10 segundos de
cada pista.
3 Cuando encuentre la pista deseada,
presione MULTI-CONTROL para desactivar
la reproducción con exploración.
# Si la pantalla vuelve automáticamente a la
pantalla de reproducción, seleccione SCAN de
nuevo usando MULTI-CONTROL.
# Una vez finalizada la exploración de un disco
(carpeta), comenzará la reproducción normal de
las pistas.
Pausa de la reproducción
% Presione e (pausa) en el mando a dis-
tancia para activar la función de pausa.
Se detiene temporalmente la reproducción de
la pista actual.
# Para desactivar la pausa, vuelva a presionar e
(pausa).
Nota
También puede activar o desactivar esta función
en el menú que aparece mediante el
MULTI-CONTROL.
Utilización del Sound Retriever
La función Sound Retriever mejora automáticamente el audio comprimido y restaura el sonido óptimo.
% Presione S.Rtrv varias veces para seleccionar el ajuste deseado.
OFF (desactivado)—1—2
# 2 es más eficaz que 1.
Nota
También puede realizar esta operación en el
menú que aparece al utilizar el
MULTI-CONTROL.
Uso de las funciones de títulos
de discos
Es posible introducir títulos de CD y visualizar
el título. La próxima vez que se inserte un CD
para el que haya introducido un título, se visualizará el título de ese CD.
Introducción de títulos de discos
Utilice la función de introducción de títulos de
discos para almacenar hasta 48 títulos de CD
en la unidad. Cada título puede tener una longitud de hasta 10 caracteres.
1 Reproduzca el CD cuyo título desea introducir.
2 Utilice MULTI-CONTROL para seleccionar TITLE INPUT en el menú de funciones.
3 Presione MULTI-CONTROL para mostrar
el modo de entrada de título.
76
Es
Page 77

Utilización de esta unidad
Sección
02
4 Gire MULTI-CONTROL para seleccionar
una letra del alfabeto.
# También puede realizar estas operaciones pulsando MULTI-CONTROL arriba o abajo.
5 Presione MULTI-CONTROL para desplazar el cursor hacia el siguiente carácter.
6 Una vez introducido el título, mantenga
presionado MULTI-CONTROL para almacenarlo en la memoria.
Notas
! Los títulos se conservan en la memoria, aun
después de extraer el disco de la unidad, y se
recuperan cuando se vuelve a insertar el disco
correspondiente.
! Una vez que los datos de 48 discos se han al-
macenado en la memoria, los datos de un
nuevo disco se escribirán sobre los datos más
antiguos.
! Si conecta un reproductor de CD múltiple,
podrá introducir los títulos de hasta 100 discos.
! Cuando se conecta un reproductor de CD
múltiple que no es compatible con las funciones de título de disco, no es posible introducir
títulos en esta unidad.
Reproducción de canciones
en el reproductor de audio
portátil USB/memoria USB
Para obtener detalles sobre dispositivos compatibles, consulte Compatibilidad con reproductores de audio en la página 61.
Funciones básicas
% Seleccionar una carpeta
Pulse MULTI-CONTROL arriba o abajo.
% Avance rápido o retroceso
Presione MULTI-CONTROL y mantenga presionado hacia la izquierda o hacia la derecha
durante cerca de un segundo y luego suelte.
% Selección de una pista
Pulse MULTI-CONTROL izquierda o derecha.
% Regreso a la carpeta raíz
Presione y mantenga presionado BAND/ESC.
Notas
! Es posible que esta unidad no ofrezca un ren-
dimiento óptimo dependiendo del reproductor
de audio portátil USB/memoria USB que se
conecte.
! Si la carpeta 01 (RAÍZ) no contiene archivos,
la reproducción comienza en la carpeta 02.
! Si el reproductor de audio portátil USB tiene
una función de carga de la batería y se conecta a esta unidad, la batería se cargará al
poner el contacto para el arranque en su posición ACC o en ON.
! Podrá desconectar el reproductor de audio
portátil USB/memoria USB en cualquier momento para dejar de escucharlo.
Español
77
Es
Page 78

Sección
02
Utilización de esta unidad
! Si se conecta un reproductor de audio portátil
USB/memoria USB a esta unidad, la fuente
cambia a USB automáticamente. Si no utiliza
un dispositivo USB, desconéctelo de esta unidad. Según el dispositivo USB conectado, colocar la llave de encendido en posición de
activación mientras el dispositivo USB esté
conectado a esta unidad puede cambiar la
fuente automáticamente.
Visualización de información
de texto de un archivo de audio
% Presione DISP para seleccionar la información de texto deseado.
Para discos WMA/MP3/AAC
Tiempo de reproducción—nombre de la carpeta y nombre del archivo—nombre del intérprete y título de la pista—nombre del intérprete y
título del álbum—título del álbum y título de la
pista—título de la pista y tiempo de reproducción—comentario y tiempo de reproducción—
velocidad de grabación y tiempo de reproducción
Para discos WAV
Tiempo de reproducción—nombre de la carpeta y nombre del archivo—frecuencia de muestreo y tiempo de reproducción
# Si los caracteres grabados en el archivo de
audio no son compatibles con una unidad principal, no aparecerán en la pantalla.
# Si la información específica no se graba en
un disco, no se visualizará el título o el nombre.
# Es posible que la información de texto de algunos archivos de audio no se visualice correctamente.
Selección de archivos de la lista
de nombres de archivos
Es la misma operación que la del reproductor
de CD incorporado. (Consulte Selección de ar-
chivos de la lista de nombres de archivos en la
página 74.)
Introducción a las funciones
avanzadas
1 Presione MULTI-CONTROL para visualizar el menú principal.
2 Utilice MULTI-CONTROL para seleccionar FUNCTION.
Haga girar el control para cambiar la opción
de menú. Presione para seleccionar.
3 Haga girar MULTI-CONTROL para seleccionar la función.
REPEAT (repetición de reproducción)—
RANDOM (reproducción aleatoria)— SCAN
(reproducción con exploración)— PAUSE
(pausa)—SOUND RETRIEVER (advanced
sound retriever)
Función y operación
Las operaciones REPEAT, RANDOM, SCAN,
PAUSE y SOUND RETRIEVER son básicamen-
te las mismas que las del reproductor de CD
incorporado.
Notas
! Puede desplazar la información de texto hacia
la izquierda manteniendo presionado DISP.
! Si se activa la función de desplazamiento con-
tinuo en el ajuste inicial, la información de
texto se desplazará de manera ininterrumpida
por la pantalla. Consulte Cambio del desplaza-
miento continuo en la página 91.
78
Es
Page 79

Utilización de esta unidad
Sección
02
Nombre de la función Operación
Consulte Selección de una
gama de repetición de reproducción en la página 75.
Sin embargo, las gamas de
repetición para la reproducción que puede seleccionar son diferentes a las
del reproductor de CD in-
REPEAT
RANDOM
SCAN
PAUSE
SOUND RETRIEVER
corporado. Las gamas de
repetición para el reproductor de audio portátil USB/
memoria USB son:
! TRACK – Sólo repite el
fichero actual
! FOLDER – Repite la car-
peta actual
! ALL – Repite todos los
ficheros
Consulte Reproducción de
las pistas en orden aleatorio
en la página 76.
Consulte Exploración de car-
petas y pistas en la página
76.
Consulte Paus a d e la repro -
ducción en la página 76.
Consulte Utilización del
Sound Retriever en la página 76.
! Cuando se selecciona FOLDER, no se puede
reproducir una subcarpeta de esa carpeta.
! Una vez finalizada la exploración de archivos
o carpetas, volverá a comenzar la reproducción normal de los archivos.
Español
Notas
! También se puede seleccionar la función pre-
sionando FUNCTION en el mando a distancia.
! Para volver a la pantalla anterior, presione
BACK.
! Para volver al menú principal, presione duran-
te varios segundos BACK.
! Para volver a la visualización normal, presione
BAND/ESC.
! Si se selecciona otra carpeta durante la repeti-
ción de reproducción, la gama de repetición
cambia a ALL.
! Si se realiza una búsqueda de pistas o un
avance/retroceso rápido durante TRACK,la
gama de repetición de reproducción cambia a
FOLDER.
79
Es
Page 80

Sección
02
Utilización de esta unidad
Para reproducir canciones
en el iPod
Para obtener detalles sobre iPod compatibles,
consulte Compatibilidad con iPod
61.
Funciones básicas
% Avance rápido o retroceso
Presione MULTI-CONTROL y mantenga presionado hacia la izquierda o hacia la derecha
durante cerca de un segundo y luego suelte.
% Selección de una pista (capítulo)
Pulse MULTI-CONTROL izquierda o derecha.
Notas
! Cuando utiliza un iPod, se requiere un conec-
tor del Dock del iPod para el cable USB.
! Lea las precauciones sobre el iPod en la pági-
na 115.
! Mientras el iPod está conectado a esta uni-
dad, aparece en él PIONEER (o
verificación)).
! Si aparece un mensaje de error como
ERROR-19, consulte Mensajes de error en la
página 111.
! Cuando el contacto para el arranque está en
ACC o en ON, la batería del iPod se carga
mientras esté conectado a esta unidad.
! Cuando el iPod está conectado a esta unidad,
no se puede encender ni apagar.
! Antes de conectar el conector del Dock de
esta unidad al iPod, desconecte los auriculares del iPod.
! El iPod se apaga aproximadamente dos minu-
tos después de que el contacto para el arranque esté en OFF.
Para buscar una canción
Las operaciones para controlar un iPod con
esta unidad se han diseñado para ser lo más
parecidas posibles al funcionamiento del
®
en la página
(marca de
iPod, para facilitar el funcionamiento y la búsqueda de canciones.
! dependiendo del número de archivos en el
iPod, puede haber un retraso al mostrar
una lista.
! Si los caracteres grabados en el iPod no
son compatibles con esta unidad, no aparecerán en la pantalla.
1 Para ir al menú superior de la búsqueda
de listas, presione LIST.
2 Utilice MULTI-CONTROL para seleccionar una categoría.
Haga girar el control para cambiar la categoría y presiónelo para seleccionarla.
PLAYLISTS (listas de reproducción)—ARTISTS
(intérpretes)—ALBUMS (álbumes)—SONGS
(canciones)—PODCASTS (podcasts)—
GENRES (géneros)—COMPOSERS (compositores)—AUDIOBOOKS (audiolibros)
Se visualiza la lista de la categoría seleccionada.
# Si presiona y mantiene presionado LIST se
mostrará la lista de álbumes del intérprete seleccionado actualmente. (Esta función no se puede
utilizar desde el menú de funciones.)
# Puede comenzar la reproducción por la categoría seleccionada manteniendo presionado
MULTI-CONTROL. También puede realizar esta
operación manteniendo presionando
MULTI-CONTROL derecha.
# También puede cambiar de categoría pulsando MULTI-CONTROL arriba o abajo.
# También puede seleccionar la categoría pulsando MULTI-CONTROL derecha.
# Para volver a la lista anterior, pulse
MULTI-CONTROL izquierda.
3 Repita el paso 2 para encontrar una
canción que desee escuchar.
# Para volver a la categoría anterior (un nivel
más arriba), presione BACK. También puede realizar esta operación presionando
MULTI-CONTROL izquierda.
# Para volver al nivel superior de las categorías,
mantenga presionado BACK.
80
Es
Page 81

Utilización de esta unidad
Sección
02
# Para volver a la visualización normal, presione
BAND/ESC o LIST.
# Si no se utiliza la lista en unos 30 segundos,
la pantalla volverá automáticamente a la visualización normal.
Visualización de información
de texto en el iPod
% Presione DISP para seleccionar la información de texto deseado.
Tiempo de reproducción—nombre del artista y
título de la canción—nombre del artista y título del álbum—título del álbum y título de la
canción—título de la canción y tiempo de reproducción
# Si los caracteres grabados en el iPod no son
compatibles con esta unidad, no aparecerán en
la pantalla.
Notas
! Puede desplazar la información de texto hacia
la izquierda manteniendo presionado DISP.
! Si se activa la función de desplazamiento con-
tinuo en el ajuste inicial, la información de
texto se desplazará de manera ininterrumpida
por la pantalla. Consulte Cambio del desplaza-
miento continuo en la página 91.
—AUDIOBOOKS SPEED (velocidad del audio-
libro)—SOUND RETRIEVER (sound retriever)
Función y operación
Las operaciones REPEAT, PAUSE y
SOUND RETRIEVER son básicamente las mis-
mas que las del reproductor de CD incorporado.
Nombre de la función Operación
Consulte Selección de una
gama de repetición de reproducción en la página 75.
Sin embargo, las gamas de
repetición para la reproducción que puede seleccionar son diferentes a las
REPEAT
PAUSE
SOUND RETRIEVER
del reproductor de CD incorporado. Las gamas de
repetición para la reproducción del iPod son:
! ONE – Repite la can-
ción actual
! ALL – Repite todas las
canciones de la lista seleccionada
Consulte Paus a d e la repro -
ducción en la página 76.
Consulte Utilización del
Sound Retriever en la página 76.
Español
Introducción a las funciones
avanzadas
1 Presione MULTI-CONTROL para visualizar el menú principal.
2 Utilice MULTI-CONTROL para seleccionar FUNCTION.
Haga girar el control para cambiar la opción
de menú. Presione para seleccionar.
3 Haga girar MULTI-CONTROL para seleccionar la función.
REPEAT (repetición de reproducción)—
SHUFFLE (shuffle)—SHUFFLE ALL (shuffle all)
—LINK SEARCH (búsqueda de enlace)—
CONTROL (modo de control)—PAUSE (pausa)
Notas
! También se puede seleccionar la función pre-
sionando FUNCTION en el mando a distancia.
! Para volver a la pantalla anterior, presione
BACK.
! Para volver al menú principal, presione duran-
te varios segundos BACK.
! Para volver a la visualización normal, presione
BAND/ESC.
! Si no se utiliza ninguna función en aprox. 30
segundos, la pantalla volverá automáticamente a la visualización normal.
! La función CONTROL (modo de control) sólo
está disponible para el iPod nano (segunda
generación).
Es
81
Page 82

Sección
02
Utilización de esta unidad
! Cuando CONTROL está activado, sólo se po-
drán utilizar CONTROL y SOUND RETRIEVER.
Reproducción de las canciones
en orden aleatorio (shuffle)
1 Utilice MULTI-CONTROL para seleccionar SHUFFLE en el menú de funciones.
2 Presione MULTI-CONTROL para mostrar
el modo de ajuste.
3 Utilice MULTI-CONTROL para seleccionar el ajuste deseado.
Haga girar el control para cambiar de ajuste.
! SONGS – Reproduce canciones siguiendo
un orden aleatorio dentro de la lista.
! ALBUMS – Reproduce canciones siguiendo
un orden aleatorio dentro del álbum.
! OFF – Cancela la reproducción aleatoria.
Reproducción de todas las
canciones en un orden
aleatorio (shuffle all)
% Presione iPod para activar la función de
shuffle all.
Todas las canciones en el iPod se reproducirán de forma aleatoria.
# Para desactivar la función de shuffle all, desactive SHUFFLE en el menú FUNCTION.
Nota
También puede activar esta función en el menú
que aparece utilizando MULTI-CONTROL.
Selección de canciones de la lista
de álbumes del artista que se
está reproduciendo actualmente
Se mostrará la lista de álbumes del intérprete
seleccionado actualmente. Puede seleccionar
un álbum o canción desde el nombre del intérprete.
! dependiendo del número de archivos en el
iPod, puede haber un retraso al mostrar
una lista.
1 Mantenga presionado LIST para activar
la función búsqueda de enlace.
Buscará álbumes del intérprete y los mostrará
en una lista.
2 Utilice MULTI-CONTROL para seleccionar un álbum o canción de la lista.
Para obtener detalles sobre la operación de selección, consulte el paso 2 de Para buscar una
canción en la página 80.
Nota
También puede activar esta función en el menú
que aparece utilizando MULTI-CONTROL.
Uso de la función iPod de la
unidad desde el iPod
Esta función sólo está disponible en el iPod
nano (segunda generación).
La función iPod de la unidad se puede utilizar
desde el iPod. Puede oír el sonido desde el altavoz del coche y controlar las funciones
desde el iPod.
! Cuando se está utilizando esta función,
aunque la llave de encendido del vehículo
se coloque en posición de apagado, el iPod
no se desactiva. Para desactivar la alimentación, manipule el iPod.
1 Mantenga presionado iPod para cambiar el modo de control.
# Cada vez que se mantiene presionado iPod se
cambia el modo de control.
# Mientras se utiliza esta función, el tiempo de
reproducción y los títulos no se muestran en la
unidad.
# Incluso cuando se lleva a cabo esta función,
se podrá subir y bajar de pista desde la unidad.
# Mientras se utiliza esta función, la función de
exploración no se puede usar desde la unidad.
82
Es
Page 83

Utilización de esta unidad
2 Ponga en funcionamiento el iPod conectado para seleccionar una canción y reproducirla.
Nota
También puede activar o desactivar esta función
en el menú que aparece mediante el
MULTI-CONTROL.
Cambio de la velocidad del
audiolibro
Mientras escucha un audiolibro en el iPod,
puede modificar la velocidad de reproducción.
1 Utilice MULTI-CONTROL para seleccionar AUDIOBOOKS SPEED en el menú de
funciones.
2 Presione MULTI-CONTROL para mostrar
el modo de ajuste.
3 Utilice MULTI-CONTROL para seleccionar el ajuste deseado.
Haga girar el control para cambiar de ajuste.
! FASTER – Reproducción con velocidad su-
perior a la normal
! NORMAL – Reproducción con velocidad
normal
! SLOWER – Reproducción con velocidad in-
ferior a la normal
Sección
02
Español
83
Es
Page 84

Sección
03
Ajustes de audio
Introducción a los ajustes
de audio
1 Presione MULTI-CONTROL para visualizar el menú principal.
2 Utilice MULTI-CONTROL para seleccionar AUDIO.
Haga girar el control para cambiar la opción
de menú. Presione para seleccionar.
3 Haga girar MULTI-CONTROL para seleccionar la función de audio.
Haga girar MULTI-CONTROL para cambiar
entre las funciones de audio en el siguiente
orden.
FADER/BALANCE (ajuste del balance)—
PRESET EQUALIZER (recuperación de ecuali-
zador gráfico)—EQ SETTING 1 (ajuste del
ecualizador gráfico)—EQ SETTING 2 (ajuste
de precisión del ecualizador gráfico)—
LOUDNESS (sonoridad)—SW SETTING 1
(ajuste de subgraves activado/desactivado)—
SW SETTING 2 (ajuste de subgraves)—HPF
(filtro de paso alto)—BASS BOOST (intensificación de graves)—SRC LVADJUST (ajuste
del nivel de fuente)
4 Presione MULTI-CONTROL para mostrar
el modo de ajuste de cada función.
# Pulse MULTI-CONTROL izquierda para mos-
trar el menú de selección de funciones.
# Pulse MULTI-CONTROL izquierda y mantenga
pulsado para mostrar el menú principal.
5 Ajuste cada función.
Notas
! También se puede seleccionar la función de
audio presionando AUDIO en el mando a distancia.
! Para volver a la pantalla anterior, presione
BACK.
! Para volver al menú principal, presione duran-
te varios segundos BACK.
! Para volver a la visualización normal, presione
BAND/ESC.
! Cuando el ajuste del controlador de subgraves
es PREOUT:REAR, no se puede cambiar a
SW SETTING 1 (altavoz de subgraves activado/desactivado). (Consulte la página 90.)
! Se puede seleccionar SW SETTING 2 sólo
cuando la salida de subgraves se activa en
SW SETTING 1.
! Al seleccionar FM como fuente, no se puede
cambiar a SRC LV ADJUST.
! Si no se utiliza ninguna función en aprox. 30
segundos, la pantalla volverá automáticamente a la visualización normal.
Uso del ajuste del balance
Se puede cambiar el ajuste de fader/balance,
de manera que proporcione un entorno de
audio ideal en todos los asientos ocupados.
1 Utilice MULTI-CONTROL para seleccionar FADER/BALANCE.
2 Presione MULTI-CONTROL para mostrar
el modo de ajuste.
3 Presione MULTI-CONTROL para seleccionar el segmento que desea ajustar.
Presione MULTI-CONTROL varias veces para
cambiar entre fader y balance.
4 Gire MULTI-CONTROL para ajustar el
balance entre los altavoces.
El balance entre los altavoces delanteros y traseros se puede ajustar entre FAD F15 y
FAD R15.
El balance entre los altavoces de la parte izquierda y derecha se puede ajustar entre
BAL L15 y BAL R15.
# También puede realizar estas operaciones pulsando MULTI-CONTROL arriba o abajo.
# FAD 0 es el ajuste apropiado cuando se usan
sólo dos altavoces.
# Cuando el ajuste de la salida posterior es
REAR SP :SUB W, no se puede ajustar el balance
entre los altavoces delanteros/traseros. Consulte
Ajuste de la salida posterior y del controlador de
subgraves en la página 90.
84
Es
Page 85

Ajustes de audio
Sección
03
Uso del ecualizador
El ecualizador le permite ajustar la ecualización de acuerdo con las características acústicas del interior del automóvil.
Recuperación de las curvas de
ecualización
Hay seis tipos de curvas de ecualización memorizadas que se pueden recuperar con facilidad en cualquier momento. A continuación se
ofrece una lista de estas curvas de ecualización.
Pantalla Curva de ecualización
POWERFUL Potente
NATURAL Natural
VOCAL Vocal
CUSTOM Personalizada
FLAT Plana
SUPER BASS Supergraves
! CUSTOM es una curva de ecualización
ajustada creada por el usuario. Si realiza
ajustes, la configuración de la curva de
ecualización se memorizará en CUSTOM.
! Cuando se selecciona FLAT no se introdu-
ce ningún suplemento ni corrección en el
sonido. Esto es útil para verificar el efecto
de los ajustes de ecualización al cambiar
alternativamente entre FLAT y una curva de
ecualización ajustada.
1 Utilice MULTI-CONTROL para seleccionar PRESET EQUALIZER.
2 Presione MULTI-CONTROL para mostrar
el modo de ajuste.
3 Haga girar el MULTI-CONTROL para seleccionar el ecualizador.
# También puede realizar estas operaciones pulsando MULTI-CONTROL arriba o abajo.
Ajuste de las curvas de
ecualización
Las curvas de ecualización que vienen predefinidas de fábrica, con la excepción de FLAT,se
pueden ajustar a un nivel preciso (control de
matiz).
1 Utilice MULTI-CONTROL para seleccionar EQ SETTING 1.
2 Presione MULTI-CONTROL para mostrar
el modo de ajuste.
3 Presione MULTI-CONTROL para seleccionar el segmento que desea ajustar.
Presione MULTI-CONTROL varias veces para
cambiar el segmento en el siguiente orden:
L (bajo)—M (medio)—H (alto)
4 Haga girar el control MULTI-CONTROL
para ajustar el nivel de la banda de ecualización.
Se visualiza +6 a –6 mientras se aumenta o
disminuye el nivel.
# También puede realizar estas operaciones pulsando MULTI-CONTROL arriba o abajo.
# Se puede seleccionar otra banda y ajustar su
nivel.
Ajuste preciso de la curva de
ecualización
Se puede ajustar la frecuencia central y el factor Q (características de las curvas) de cada
banda de curvas seleccionada (LOW/MID/HI).
Nivel (dB)
Q=2W
Q=2N
Frecuencia central
1 Utilice MULTI-CONTROL para seleccionar EQ SETTING 2.
2 Presione MULTI-CONTROL para mostrar
el modo de ajuste.
Frecuencia (Hz)
Español
85
Es
Page 86

Sección
03
Ajustes de audio
3 Presione MULTI-CONTROL para seleccionar el segmento que desea ajustar.
Presione MULTI-CONTROL varias veces para
cambiar el segmento en el siguiente orden:
Banda—Frecuencia—Factor Q
4 Haga girar MULTI-CONTROL para
ajustar el segmento seleccionado.
Banda
LOW (bajo)—MID (medio)—HI (alto)
Frecuencia
Baja: 40HZ—80HZ—100HZ—160HZ
Media: 200HZ—500HZ—1KHZ—2KHZ
Alta: 3KHZ—8KHZ—10KHZ—12KHZ
Factor Q
2N—1N—1W—2W
# También puede realizar estas operaciones pulsando MULTI-CONTROL arriba o abajo.
Ajuste de la sonoridad
La sonoridad compensa las deficiencias en
las gamas de sonido bajas y altas cuando se
escucha a un volumen bajo.
1 Utilice MULTI-CONTROL para seleccionar LOUDNESS.
2 Presione MULTI-CONTROL para mostrar
el modo de ajuste.
3 Utilice MULTI-CONTROL para seleccionar el ajuste deseado.
Haga girar el control para cambiar de ajuste.
LOW (bajo)—MID (medio)—HIGH (alto)—
OFF (desactivado)
# También puede realizar estas operaciones pulsando MULTI-CONTROL arriba o abajo.
Uso de la salida de subgraves
Esta unidad está equipada con una salida de
subgraves que se puede activar o desactivar.
Además, se puede seleccionar la fase entre
normal e inversa.
1 Utilice MULTI-CONTROL para seleccionar SW SETTING 1.
2 Presione MULTI-CONTROL para mostrar
el modo de ajuste.
3 Utilice MULTI-CONTROL para seleccionar el ajuste deseado.
Haga girar el control para cambiar de ajuste.
NORMAL (fase normal)—REV (fase inversa)—
OFF (subgraves desactivados)
# También puede realizar estas operaciones pulsando MULTI-CONTROL arriba o abajo.
Configuración de los ajustes de
subgraves
Cuando la salida de subgraves está activada,
se puede ajustar la frecuencia de corte y el
nivel de salida del altavoz de subgraves.
! Cuando la salida de subgraves está activa-
da, se puede seleccionar SW SETTING 2.
1 Utilice MULTI-CONTROL para seleccionar SW SETTING 2.
# Cuando la salida de subgraves está activada,
se puede seleccionar SW SETTING 2.
2 Presione MULTI-CONTROL para mostrar
el modo de ajuste.
3 Presione MULTI-CONTROL para seleccionar el segmento que desea ajustar.
Presione MULTI-CONTROL varias veces para
cambiar el segmento en el siguiente orden:
Frecuencia de corte—Nivel
4 Haga girar MULTI-CONTROL para
ajustar el segmento seleccionado.
Frecuencia de corte
50HZ—63HZ—80HZ—100HZ—125HZ
Nivel
Se visualiza +6 a –24 mientras se aumenta o
disminuye el nivel.
# También puede realizar estas operaciones pulsando MULTI-CONTROL arriba o abajo.
86
Es
Page 87

Ajustes de audio
Sección
03
Uso del filtro de paso alto
Si no desea que se generen los sonidos bajos
de la gama de frecuencias de salida de subgraves a través de los altavoces delanteros o
traseros, active el filtro de paso alto (HPF).
Sólo las frecuencias más altas que aquellas
en la gama seleccionada se generan a través
de los altavoces delanteros o traseros.
1 Utilice MULTI-CONTROL para seleccionar HPF.
2 Presione MULTI-CONTROL para mostrar
el modo de ajuste.
3 Utilice MULTI-CONTROL para seleccionar el ajuste deseado.
Haga girar el control para cambiar de ajuste.
OFF—50HZ—63HZ—80HZ—100HZ—125HZ
# También puede realizar estas operaciones pulsando MULTI-CONTROL arriba o abajo.
Intensificación de los graves
La función de intensificación de graves intensifica el nivel de sonido grave.
1 Utilice MULTI-CONTROL para seleccionar BASS BOOST.
2 Presione MULTI-CONTROL para mostrar
el modo de ajuste.
3 Haga girar MULTI-CONTROL para
ajustar el nivel.
Se visualiza 0 a +6 mientras se aumenta o disminuye el nivel.
# También puede realizar estas operaciones pulsando MULTI-CONTROL arriba o abajo.
! Los ajustes se basan en el nivel de volumen
de FM, que se mantiene inalterado.
1 Compare el nivel de volumen de FM
con el de la fuente que desea ajustar.
2 Utilice MULTI-CONTROL para seleccionar SRC LV ADJUST.
3 Presione MULTI-CONTROL para mostrar
el modo de ajuste.
4 Haga girar MULTI-CONTROL para
ajustar el volumen de la fuente.
Se visualiza SLA +4 a SLA –4 mientras se aumenta o disminuye el volumen de la fuente.
# También puede realizar estas operaciones pulsando MULTI-CONTROL arriba o abajo.
Notas
! El nivel del volumen de MW/LW también se
puede ajustar con el ajuste del nivel de fuente.
! El reproductor de CD incorporado y el repro-
ductor de CD múltiple se definen automáticamente con el mismo ajuste del nivel de
fuente.
! La unidad externa 1 y la unidad externa 2 se
definen automáticamente con el mismo ajuste del nivel de fuente.
Español
Ajuste de los niveles de la
fuente
La función SLA (ajuste del nivel de fuente) le
permite ajustar el nivel de volumen de cada
fuente para evitar cambios radicales en el volumen cuando se cambia entre las fuentes.
87
Es
Page 88

Sección
04
Ajustes iniciales
Configuración de los
ajustes iniciales
1 Presione y mantenga presionado SRC
hasta que se apague la unidad.
2 Mantenga presionado MULTI-CONTROL
hasta que CLOCK SET aparezca en la pantalla.
3 Haga girar MULTI-CONTROL para seleccionar uno de los ajustes iniciales.
CLOCK SET (reloj)—OFF CLOCK (reloj apaga-
do)—FM STEP (paso de sintonía de FM)—
AUTO PI (búsqueda PI automática)—
WARNING TONE (tono de advertencia)—
AUX1 (entrada auxiliar 1)—AUX2 (entrada au-
xiliar 2)—DIMMER (atenuador de luz)—
SW CONTROL (salida posterior y controlador
de subgraves)—DEMO MODE (demostración
de características)—EVER SCROLL (desplazamiento continuo)—BT AUDIO (Bluetooth
audio)—PIN CODE INPUT (introducción del
código PIN)—BT VER INFO (información de
versión de Bluetooth)—TITLE SETTING (idiomas múltiples)
# También puede realizar estas operaciones pulsando MULTI-CONTROL arriba o abajo.
# También se puede seleccionar la función presionando FUNCTION en el mando a distancia.
# Para cancelar los ajustes iniciales, presione
BAND/ESC.
# BT AUDIO, PIN CODE INPUT y BT VER INFO
sólo se puede seleccionar cuando el adaptador
Bluetooth (p. ej., CD-BTB200) está conectado a la
unidad.
2 Presione MULTI-CONTROL para mostrar
el modo de ajuste.
# Presione BACK para volver a la visualización
anterior.
3 Presione MULTI-CONTROL para seleccionar el segmento de la pantalla del reloj que
desea ajustar.
Cada vez que se presiona MULTI-CONTROL,
se selecciona un solo segmento de la pantalla
del reloj.
Hora—Minuto
Al seleccionar las horas o los minutos del
reloj, el segmento seleccionado parpadeará.
4 Haga girar MULTI-CONTROL para poner
el reloj en hora.
# También puede realizar estas operaciones pulsando MULTI-CONTROL arriba o abajo.
Activación y desactivación
del reloj de apagado
Si activa el reloj de apagado, cuando las fuentes y la demostración de características estén
desactivadas, el reloj aparecerá en la pantalla.
1 Utilice MULTI-CONTROL para seleccionar OFF CLOCK.
2 Presione MULTI-CONTROL para activar
la visualización del reloj de apagado.
# Para desactivar la visualización del reloj de
apagado, presione MULTI-CONTROL de
nuevo.
Ajuste del reloj
Siga estas instrucciones para ajustar el reloj.
1 Utilice MULTI-CONTROL para seleccionar CLOCK SET.
88
Es
Ajuste del paso de sintonía
de FM
Normalmente, el paso de sintonía de FM empleado por la sintonización por búsqueda es
de 50 kHz. Si la función AF o TA está activada,
el paso de sintonía cambia automáticamente
a 100 kHz. Puede ser conveniente ajustar el
paso de sintonía a 50 kHz si la función AF está
activada.
Page 89

Ajustes iniciales
Sección
04
1 Utilice MULTI-CONTROL para seleccionar FM STEP.
2 Presione MULTI-CONTROL para mostrar
el modo de ajuste.
# Presione BACK para volver a la visualización
anterior.
3 Haga girar MULTI-CONTROL para seleccionar el paso de sintonía de FM.
Al hacer girar MULTI-CONTROL se cambiará
el paso de sintonía de FM entre 50 kHz y 100
kHz mientras la función AF o TA está activada.
El paso de sintonía de FM seleccionado aparecerá en la pantalla.
# También puede realizar estas operaciones pulsando MULTI-CONTROL arriba o abajo.
Nota
El paso de sintonía es de 50 kHz durante la sintonización manual.
Cambio de la búsqueda PI
automática
La unidad puede buscar automáticamente
una emisora diferente con el mismo programa, aun durante la recuperación de emisoras
presintonizadas.
1 Utilice MULTI-CONTROL para seleccionar AUTO PI.
2 Presione MULTI-CONTROL para activar
la función de búsqueda PI automática.
# Para desactivar la función de búsqueda PI
automática, vuelva a presionar
MULTI-CONTROL.
Cambio del tono de
advertencia
Si no se extrae la carátula de la unidad principal trascurridos cuatro segundos después de
desconectar la llave de contacto del automó-
vil, escuchará un sonido de advertencia.
Puede desactivar este tono de advertencia.
1 Utilice MULTI-CONTROL para seleccionar WARNING TONE.
2 Presione MULTI-CONTROL para activar
el tono de advertencia.
# Para desactivar el tono de advertencia, vuelva
a presionar MULTI-CONTROL.
Cambio del ajuste de un
equipo auxiliar
Los dispositivos auxiliares conectados a esta
unidad se pueden activar por separado. Al utilizarla, fije en ON cada fuente AUX. Para obtener más información sobre la conexión y el
uso de dispositivos auxiliares, consulte Uso de
la fuente AUX en la página 93.
1 Utilice MULTI-CONTROL para seleccionar AUX1/AUX2.
2 Presione MULTI-CONTROL para activar
AUX1/AUX2.
# Para desactivar la función AUX, vuelva a presionar MULTI-CONTROL.
Cambio del ajuste del
atenuador de luz
Para evitar que la pantalla quede muy brillante
durante la noche, ésta se atenúa automáticamente cuando se encienden las luces del
automóvil. Se puede activar y desactivar el atenuador de luz.
1 Utilice MULTI-CONTROL para seleccionar DIMMER.
2 Presione MULTI-CONTROL para activar
el atenuador de luz.
# Para desactivar el atenuador de luz, vuelva a
presionar MULTI-CONTROL.
Español
89
Es
Page 90

Sección
04
Ajustes iniciales
Ajuste de la salida posterior y
del controlador de subgraves
La salida posterior de esta unidad (salida de
cables de altavoces traseros y salida RCA posterior) se puede usar para la conexión de altavoces de toda la gama (REAR SP :FULL/
PREOUT:REAR) o subgraves
(REAR SP :SUB W/PREOUT :SUB W). Si se
cambia el ajuste de la salida posterior a
REAR SP :SUB W, se podrá conectar el cable
de altavoces traseros directamente al altavoz
de subgraves sin necesidad de usar un amplificador auxiliar.
Inicialmente, la unidad está ajustada para una
conexión de altavoces traseros de toda la
gama (REAR SP :FULL). Cuando se conectan
las salidas posteriores a altavoces de toda la
gama (cuando se selecciona REAR SP :FULL),
se puede conectar la salida RCA de subgraves
a un altavoz de subgraves. En este caso,
puede optar por usar la función
PREOUT:SUB W incorporada (fase del filtro
de paso bajo) del controlador de subgraves o
la función PREOUT :REAR auxiliar.
1 Utilice MULTI-CONTROL para seleccionar SW CONTROL.
2 Presione MULTI-CONTROL para mostrar
el modo de ajuste.
# Presione BACK para volver a la visualización
anterior.
3 Presione MULTI-CONTROL para seleccionar el segmento que desea ajustar.
Presione MULTI-CONTROL varias veces para
cambiar el segmento en el siguiente orden:
REAR SP (ajuste del altavoz trasero)—
PREOUT (ajuste de la salida RCA)
4 Utilice MULTI-CONTROL para seleccionar el ajuste deseado.
Haga girar el control para cambiar de ajuste.
Cuando REAR SP (ajuste de altavoz trasero) está seleccionado.
REAR SP :SUB W (subgraves)—
REAR SP :FULL (Altavoz de toda la gama)
Cuando PREOUT (ajuste salida RCA) está
seleccionado.
PREOUT:SUB W (subgraves)—
PREOUT:REAR (altavoz de toda la gama)
# Cuando no se conecta el altavoz de subgraves
a la salida posterior, seleccione REAR SP :FULL.
# Cuando se conecta el altavoz de subgraves a
la salida posterior, seleccione REAR SP :SUB W
para el altavoz.
Notas
! Aunque cambie este ajuste, no se producirá
ningún sonido a menos que active la salida
de subgraves (consulte Uso de la salida de
subgraves en la página 86).
! Si cambia este ajuste, la salida de subgraves
vuelve a los ajustes de fábrica en el menú de
audio.
! Las salidas de cables de altavoces traseros y
la salida RCA posterior se cambian simultáneamente en este ajuste.
Cambio de la demostración
de características
La demostración de características se inicia
automáticamente cuando se apaga la unidad
mientras el contacto de arranque está en ACC
o en ON.
1 Utilice MULTI-CONTROL para seleccionar DEMO MODE.
2 Presione MULTI-CONTROL para activar
la demostración de características.
# Para desactivar la demostración de características, vuelva a presionar MULTI-CONTROL.
Notas
! Recuerde que si este modo de demostración
sigue funcionando cuando el motor del vehículo está apagado, se puede descargar la
batería.
90
Es
Page 91

Ajustes iniciales
Sección
04
! También puede activar o desactivar la demos-
tración de características, presionando DISP
mientras la unidad está apagada. Para obtener más detalles, consulte Acerca del modo
demo en la página 62.
Cambio del
desplazamiento continuo
Si la función de desplazamiento continuo está
activada (ON), la información de texto grabada
se desplaza de manera ininterrumpida. Desactive la función (OFF) si desea que la información se desplace una sola vez.
1 Utilice MULTI-CONTROL para seleccionar EVER SCROLL.
2 Presione MULTI-CONTROL para activar
la función de desplazamiento continuo.
# Para desactivar la función de desplazamiento
continuo, vuelva a presionar
MULTI-CONTROL.
Activación de la fuente
BT AUDIO
Es necesario activar la fuente BT AUDIO para
utilizar un reproductor de audio Bluetooth.
! Sólo puede utilizar esta función cuando un
adaptador Bluetooth (p. ej. CD-BTB200)
está conectado a la unidad.
1 Utilice MULTI-CONTROL para seleccionar BT AUDIO.
2 Presione MULTI-CONTROL para encender la fuente BT AUDIO.
# Para apagar la fuente BT AUDIO, vuelva a pre-
sionar MULTI-CONTROL.
Introducción del código PIN
para la conexión
inalámbrica Bluetooth
Para conectar su teléfono móvil a esta unidad
a través de tecnología inalámbrica Bluetooth,
debe introducir el código PIN en su teléfono
para verificar la conexión. El código predefinido es 0000, aunque puede cambiarlo en esta
función.
! Con algunos reproductores de audio Blue-
tooth, es posible que tenga que introducir
previamente el código PIN de su reproductor de audio para conectarlo a esta unidad.
! Sólo puede utilizar esta función cuando un
adaptador Bluetooth (p. ej. CD-BTB200)
está conectado a la unidad.
1 Utilice MULTI-CONTROL para seleccionar PIN CODE INPUT.
2 Presione MULTI-CONTROL para mostrar
el modo de ajuste.
# Presione BACK para volver a la visualización
anterior.
3 Haga girar MULTI-CONTROL para seleccionar un número.
# También puede realizar estas operaciones pulsando MULTI-CONTROL arriba o abajo.
4 Presione MULTI-CONTROL para mover
el cursor a la posición siguiente.
# También puede realizar las mismas operaciones pulsando MULTI-CONTROL derecha.
5 Después de introducir el código PIN
(hasta 4 dígitos), mantenga presionado
MULTI-CONTROL.
El código PIN se puede almacenar en la
memoria.
Español
91
Es
Page 92

Sección
04
Ajustes iniciales
Visualización de la versión
del sistema del adaptador
Bluetooth para tareas de
reparación
Si se produce un fallo de funcionamiento del
adaptador de conexión de Bluetooth y debe
ponerse en contacto con un concesionario
para que realice la reparación, es posible que
tenga que indicar la versión del sistema y la
versión del módulo Bluetooth del adaptador.
Puede visualizar las versiones y confirmarlas.
! Sólo puede utilizar esta función cuando un
adaptador Bluetooth (p. ej. CD-BTB200)
está conectado a la unidad.
1 Utilice MULTI-CONTROL para seleccionar BT VER INFO.
2 Presione MULTI-CONTROL para mostrar
el modo de ajuste.
# Presione BACK para volver a la visualización
anterior.
3 Utilice MULTI-CONTROL para seleccionar el ajuste deseado.
Haga girar el control para cambiar de ajuste.
Versión del sistema—Versión del módulo
Bluetooth
# También puede realizar estas operaciones pulsando MULTI-CONTROL arriba o abajo.
! Es posible que algunos caracteres no se vi-
sualicen correctamente.
1 Utilice MULTI-CONTROL para seleccionar TITLE.
2 Presione MULTI-CONTROL para mostrar
el modo de ajuste.
# Presione BACK para volver a la visualización
anterior.
3 Utilice MULTI-CONTROL para seleccionar el ajuste deseado.
Haga girar el control para cambiar de ajuste.
EURO (idioma europeo)—RUSSIA (ruso)
# También puede realizar estas operaciones pulsando MULTI-CONTROL arriba o abajo.
Ajuste de la pantalla en
varios idiomas
En un disco de audio comprimido se puede
grabar información de texto, como el nombre
del título, nombre del intérprete o un comentario.
Esta unidad puede mostrar esta información
tanto si está integrada en un idioma europeo
como en ruso.
! Si el idioma integrado y el idioma seleccio-
nado no coinciden, puede que la información de texto no se muestre correctamente.
92
Es
Page 93

Otras funciones
Sección
05
Uso de la fuente AUX
En esta unidad, se pueden conectar hasta dos
dispositivos auxiliares como VCR o dispositivos portátiles (se venden por separado). Cuando están conectados, los dispositivos
auxiliares se identifican automáticamente
como fuentes AUX y se asignan a AUX1 o
AUX2. La relación entre las fuentes AUX1 y
AUX2 se explica a continuación.
Acerca de AUX1 y AUX2
Existen dos métodos para conectar dispositivos auxiliares a esta unidad.
Fuente AUX1:
Al conectar un equipo auxiliar utilizando un
cable miniconector estéreo
% Inserte el miniconector estéreo en el conector de entrada de esta unidad.
Para obtener más información, consulte el
manual de instalación.
Este dispositivo auxiliar se ajusta automáticamente como AUX1.
Fuente AUX2:
Al conectar equipos auxiliares usando un Interconector IP-BUS-RCA (se vende por separado)
% Use un Interconector IP-BUS-RCA como
el CD-RB20/CD-RB10 (se vende por separado) para conectar esta unidad a un equipo
auxiliar provisto de una salida RCA.
Para más información, consulte el manual de
instrucciones del Interconector IP-BUS-RCA.
Este dispositivo auxiliar se ajusta automáticamente como AUX2.
# Sólo puede hacer este tipo de conexión si el
dispositivo auxiliar tiene salidas RCA.
Selección de AUX como la fuente
% Presione SRC para seleccionar AUX
como la fuente.
# Si el ajuste auxiliar no está activado, no es posible seleccionar AUX. Para obtener más detalles, consulte Cambio del ajuste de un equipo
auxiliar en la página 89.
Ajuste del título AUX
Se puede cambiar el título que se visualiza
para cada fuente AUX1 o AUX2.
1 Después de haber seleccionado AUX
como la fuente, utilice MULTI-CONTROL y
seleccione FUNCTION para visualizar
TITLE INPUT.
2 Introduzca un título siguiendo el mismo
procedimiento que con el reproductor de
CD incorporado.
Para obtener más información sobre el funcionamiento, consulte Introducción de títulos de
discos en la página 76.
Uso de la unidad externa
Por unidad externa se entiende un producto
Pioneer (como el que pueda estar disponible
en el futuro) que, si bien es incompatible
como fuente, permite el control de funciones
básicas con esta unidad. Dos unidades externas se pueden controlar con este sistema.
Cuando se conectan dos unidades externas,
la unidad les asigna automáticamente la unidad externa 1 o la unidad externa 2.
Las funciones básicas de la unidad externa se
explican a continuación. Las funciones asignadas varían dependiendo de la unidad externa conectada. Para obtener más información
sobre las funciones, consulte el manual de
instrucciones de la unidad externa.
Español
93
Es
Page 94

Sección
05
Otras funciones
Selección de la unidad externa
como fuente
% Presione SRC para seleccionar
EXTERNAL como la fuente.
Funcionamiento básico
Las funciones asignadas a las siguientes operaciones varían dependiendo de la unidad externa conectada. Para obtener más
información sobre las funciones, consulte el
manual de instrucciones de la unidad externa
conectada.
% Presione BAND/ESC.
% Presione y mantenga presionado
BAND/ESC.
% Pulse MULTI-CONTROL izquierda o derecha.
% Presione MULTI-CONTROL y mantenga
presionado hacia la izquierda o hacia la derecha durante cerca de un segundo y luego
suelte.
% Pulse MULTI-CONTROL arriba o abajo.
3 Haga girar MULTI-CONTROL para seleccionar la función.
FUNC1 (función 1)—FUNC2 (función 2)—
FUNC3 (función 3)—FUNC4 (función 4)—
AUTO/MANUAL (automático/manual)
! También puede activar o desactivar FUNC1
presionando S.Rtrv.
! También puede activar o desactivar FUNC2
presionando RDM/iPod.
! También puede activar o desactivar FUNC3
presionando RPT/LOCAL.
Notas
! También se puede seleccionar la función pre-
sionando FUNCTION en el mando a distancia.
! Para volver a la pantalla anterior, presione
BACK.
! Para volver al menú principal, presione duran-
te varios segundos BACK.
! Para volver a la visualización normal, presione
BAND/ESC.
Utilización de las funciones
asignadas a las teclas 1 a 6
1 Presione LIST.
2 Utilice MULTI-CONTROL para seleccionar 1 KEY a 6 KEY.
Gire para cambiar 1 KEY a 6 KEY y presione.
Funciones avanzadas
1 Presione MULTI-CONTROL para visualizar el menú principal.
2 Utilice MULTI-CONTROL para seleccionar FUNCTION.
Haga girar el control para cambiar la opción
de menú. Presione para seleccionar.
94
Es
Page 95

Accesorios disponibles
Sección
06
Para reproducir canciones
en el iPod
Funcionamiento básico
Puede utilizar esta unidad para controlar un
adaptador de interfaz para iPod, que se vende
por separado.
% Avance rápido o retroceso
Presione MULTI-CONTROL y mantenga presionado hacia la izquierda o hacia la derecha
durante cerca de un segundo y luego suelte.
% Selección de una pista
Pulse MULTI-CONTROL izquierda o derecha.
Notas
! Lea las precauciones sobre el iPod en la pági-
na 115.
! Mientras el iPod está conectado a esta uni-
dad, aparece en él PIONEER (o
verificación)).
! Si aparece un mensaje de error como
ERROR-19, consulte Mensajes de error en la
página 111.
! Cuando el contacto para el arranque está en
ACC o en ON, la batería del iPod se carga
mientras esté conectado a esta unidad.
! Cuando el iPod está conectado a esta unidad,
no se puede encender ni apagar.
! Antes de conectar el conector del Dock de
esta unidad al iPod, desconecte los auriculares del iPod.
! El iPod se apaga aproximadamente dos minu-
tos después de que el contacto para el arranque esté en OFF.
Visualización de información
de texto en el iPod
El funcionamiento es el mismo que el del iPod
conectado a la interfaz de esta unidad. (Consulte Visualización de información de texto en el
iPod en la página 81.)
(marca de
Para buscar una canción
El funcionamiento es el mismo que el del iPod
conectado a la interfaz de esta unidad. (Consulte Para buscar una canción en la página 80.)
Sin embargo, las categorías seleccionables varían ligeramente. Las categorías que se pueden seleccionar son
PLAYLISTS (listas de reproducción)—ARTISTS
(intérpretes)—ALBUMS (álbumes)—SONGS
(canciones)—GENRES (géneros)
Función y operación
1 Presione MULTI-CONTROL para visualizar el menú principal.
2 Utilice MULTI-CONTROL para seleccionar FUNCTION.
Haga girar el control para cambiar la opción
de menú. Presione para seleccionar.
3 Haga girar MULTI-CONTROL para seleccionar la función.
REPEAT (repetición de reproducción)—
SHUFFLE (reproducción aleatoria)—PAUSE
(pausa)
Función y operación
REPEAT es la misma que las del iPod conectado a la interfaz USB de esta unidad.
PAUSE es la misma que la del reproductor de
CD incorporado.
Nombre de la función Operación
REPEAT
PAUSE
Notas
! También se puede seleccionar la función pre-
sionando FUNCTION en el mando a distancia.
! Para volver a la pantalla anterior, presione
BACK.
Consulte Función y opera-
ción en la página 81.
Consulte Paus a d e la repro -
ducción en la página 76.
Español
95
Es
Page 96

Sección
06
Accesorios disponibles
! Para volver al menú principal, presione duran-
te varios segundos BACK.
! Para volver a la visualización normal, presione
BAND/ESC.
! Si no se utiliza ninguna función en aprox. 30
segundos, la pantalla volverá automáticamente a la visualización normal.
Reproducción de las canciones
en orden aleatorio (shuffle)
% Presione RDM repetidamente para seleccionar el ajuste deseado.
! SONGS – Reproduce canciones siguiendo
un orden aleatorio dentro de la lista.
! ALBUMS – Reproduce canciones siguiendo
un orden aleatorio dentro del álbum.
! OFF – Cancela la reproducción aleatoria.
# Para desactivar la función de shuffle off, vuel-
va a presionar RDM.
Nota
También puede realizar esta operación en el
menú que aparece al utilizar el
MULTI-CONTROL.
Bluetooth Audio
Funciones básicas
Al conectar un adaptador Bluetooth (p. ej., CDBTB200) a esta unidad, es posible controlar reproductores de audio Bluetooth a través de tecnología inalámbrica Bluetooth.
Importante
! Según el reproductor de audio Bluetooth co-
nectado a esta unidad, las operaciones que
puede realizar con la misma se limitan a los
dos niveles siguientes:
— Nivel inferior: Es posible reproducir única-
mente canciones en su reproductor de
audio.
— Nivel superior: Es posible reproducir, dete-
ner, seleccionar canciones, etc. (todas las
operaciones descritas en este manual).
! Ya que hay varios reproductores de audio
Bluetooth disponibles en el mercado, las funciones que puede realizar su reproductor de
audio Bluetooth mediante esta unidad pueden variar considerablemente. Consulte el
manual de instrucciones de su reproductor de
audio Bluetooth, así como este manual, mientras utilice su reproductor con esta unidad.
! No es posible mostrar en esta unidad informa-
ción sobre las canciones (p. ej.: tiempo de reproducción transcurrido, título de la canción,
índice de canciones, etc.).
! Mientras escucha canciones en su reproduc-
tor de audio Bluetooth, no realice operaciones
innecesarias en su teléfono móvil. Si intenta
realizar una operación en su teléfono móvil, la
señal de su teléfono móvil puede ocasionar
ruido en la reproducción de canciones.
! Cuando habla con el teléfono móvil conectado
a esta unidad a través de tecnología inalámbrica Bluetooth, la reproducción de canciones
del reproductor de audio Bluetooth conectado
a esta unidad se silencia.
! Incluso si está escuchando un canción en su
reproductor de audio Bluetooth y cambia a
otra fuente, la reproducción de la canción
continúa.
% Avance rápido o retroceso
Presione MULTI-CONTROL y mantenga presionado hacia la izquierda o hacia la derecha
durante cerca de un segundo y luego suelte.
% Selección de una pista
Pulse MULTI-CONTROL izquierda o derecha.
96
Es
Page 97

Accesorios disponibles
Sección
06
Notas
! Para obtener más información, consulte el
manual de instrucciones del adaptador Bluetooth. Esta sección proporciona información
básica sobre las funciones del reproductor de
audio Bluetooth con esta unidad que difieren
ligeramente o son un resumen de las instrucciones incluidas en el manual de funcionamiento del adaptador Bluetooth.
! Aunque su reproductor de audio no esté pro-
visto de un módulo Bluetooth, lo puede controlar desde esta unidad a través de
tecnología inalámbrica Bluetooth. Para controlar su reproductor de audio con esta unidad, conecte un producto que incluya
tecnología inalámbrica Bluetooth (disponible
en el mercado) en su reproductor de audio y
conecte el adaptador Bluetooth (p. ej., CDBTB200) en esta unidad.
Función y operación
1 Presione MULTI-CONTROL para visualizar el menú principal.
2 Utilice MULTI-CONTROL para seleccionar FUNCTION.
Haga girar el control para cambiar la opción
de menú. Presione para seleccionar.
3 Haga girar MULTI-CONTROL para seleccionar la función.
CONNECTION OPEN (conexión abierta)—
DISCONNECT AUDIO (desconectar audio)—
PLAY (Reproducir)—STOP (Parar)—PAUSE
(pausa)—DEVICE INFO(información del dispositivo)
La función PAUSE es igual que en el reproductor de CD incorporado. (Consulte Pausa de la
reproducción en la página 76.)
# También puede realizar estas operaciones pulsando MULTI-CONTROL arriba o abajo.
! Para volver a la pantalla anterior, presione
BACK.
! Para volver al menú principal, presione duran-
te varios segundos BACK.
! Para volver a la visualización normal, presione
BAND/ESC.
! Si todavía no se ha conectado un reproductor
de audio Bluetooth a esta unidad, se mostrará
CONNECTION OPEN y DEVICE INFO en el
menú de funciones y el resto de funciones no
estará disponible.
! Si un reproductor de audio Bluetooth conecta
vía un nivel superior, no aparece
CONNECTION OPEN en el menú de funciones y las otras funciones están disponibles.
! Si el reproductor de audio Bluetooth está co-
nectado a través de un nivel inferior, en el
menú de funciones sólo se visualizará
DISCONNECT AUDIO y DEVICE INFO.
! Si no se utilizan funciones diferentes a
CONNECTION OPEN y DISCONNECT AUDIO
en unos 30 segundos, la pantalla volverá automáticamente a la visualización normal.
Conexión de un reproductor de
audio Bluetooth
1 Utilice MULTI-CONTROL para seleccionar CONNECTION OPEN en el menú de funciones.
2 Presione MULTI-CONTROL para abrir la
conexión.
Se visualiza ALWAYS WAITING. La unidad es-
tará en espera de conexión desde el reproductor de audio Bluetooth.
Si su reproductor de audio Bluetooth está preparado para la conexión inalámbrica Bluetooth, se establecerá automáticamente la
conexión a esta unidad.
Español
Notas
! También se puede seleccionar la función pre-
sionando FUNCTION en el mando a distancia.
97
Es
Page 98

Sección
06
Accesorios disponibles
Nota
Antes de que pueda utilizar algunos reproductores de audio, es necesario que introduzca el código PIN en esta unidad. Si su reproductor requiere
un código PIN para establecer una conexión, localice el código en el reproductor o en su documentación. Consulte Introducción del código PIN
para la conexión inalámbrica Bluetooth en la página 91.
Reproducción de canciones en el
reproductor de audio Bluetooth
1 Utilice MULTI-CONTROL para seleccionar PLAY en el menú de funciones.
2 Presione MULTI-CONTROL para comenzar la reproducción.
Para detener la reproducción
1 Utilice MULTI-CONTROL para seleccionar STOP en el menú de funciones.
2 Presione MULTI-CONTROL para detener
la reproducción.
Desconexión de un reproductor
de audio Bluetooth
1 Utilice MULTI-CONTROL para seleccionar DISCONNECT AUDIO en el menú de
funciones.
2 Presione MULTI-CONTROL para desconectar el reproductor de audio Bluetooth.
Se visualiza DISCONNECTED. El reproductor
de audio Bluetooth se desconecta de la unidad.
2 Presione MULTI-CONTROL para mostrar
el modo de ajuste.
3 Utilice MULTI-CONTROL para seleccionar el ajuste deseado.
Haga girar el control para cambiar de ajuste.
DEVICE NAME (Nombre del dispositivo)—
BD ADDRESS (Dirección BD (Dispositivo
Bluetooth))
Teléfono Bluetooth
Funciones básicas
Si utiliza un adaptador Bluetooth (p. ej., CDBTB200), puede conectar a esta unidad un teléfono móvil que posea tecnología inalámbrica
Bluetooth para hacer llamadas inalámbricas de
manos libres, incluso mientras conduce.
Importante
! Puesto que esta unidad se encuentra en espe-
ra, si se conecta con su teléfono móvil mediante la tecnología inalámbrica Bluetooth sin
encender el motor puede descargar la batería.
! Las operaciones avanzadas que exigen con-
centración, tales como marcar números en la
pantalla, usar el directorio de teléfonos, etc.,
están prohibidas mientras conduce. Cuando
tenga que utilizar estas funciones avanzadas,
detenga su vehículo en un lugar seguro.
Notas
! Se establece la curva de ecualización para la
fuente telefónica.
! Cuando seleccione la fuente telefónica, sólo
podrá utilizar FADER/BALANCE (ajuste del
balance) en el menú de audio.
Visualización de la dirección BD
(Bluetooth Device)
1 Utilice MULTI-CONTROL para seleccionar DEVICE INFO en el menú de funciones.
98
Es
Page 99

Accesorios disponibles
Sección
06
Configuración de la función
manos libres
Antes de poder hacer uso de la función
manos libres, deberá configurar la unidad
para su utilización con el teléfono móvil. Esto
conlleva establecer una conexión inalámbrica
Bluetooth entre esta unidad y su teléfono, registrar su teléfono en esta unidad, y ajustar el
nivel de volumen.
1 Conexión
Para ver instrucciones detalladas sobre cómo
conectar su teléfono a esta unidad mediante
la tecnología inalámbrica Bluetooth, consulte
Conexión de un teléfono móvil en la página
101.
# Ahora el teléfono debe estar conectado temporalmente. Sin embargo, para hacer un mejor
uso de la tecnología, recomendamos que registre
el teléfono en esta unidad.
2 Registro
Para registrar el teléfono conectado temporalmente, consulte Registro de un teléfono móvil
conectado en la página 102.
3 Ajuste del volumen
Ajuste el volumen del audífono de su teléfono
móvil hasta que le resulte cómodo. Una vez
ajustado, el nivel de volumen se memorizará
en la unidad como el ajuste predefinido.
# El volumen de voz del autor de la llamada y el
volumen del timbre pueden variar según el tipo
de teléfono móvil.
# Si la diferencia entre el volumen del timbre y
el volumen del autor de la llamada es demasiado
grande, el nivel de volumen general puede volverse inestable.
# Antes de desconectar el teléfono móvil de
esta unidad, no olvide ajustar el volumen a un
nivel adecuado. Si el volumen ha sido silenciado
(nivel cero) en su teléfono móvil, permanecerá silenciado incluso después de que desconecte
dicho teléfono.
Realización de una llamada
telefónica
Reconocimiento de voz
1 Mantenga presionado BAND/ESC hasta
que VOICE DIAL aparezca en la pantalla.
VOICE DIAL aparece en la pantalla. Cuando
se visualiza VOICE DIAL ON, se activa la función de reconocimiento de voz.
# Si su teléfono móvil no tiene la función de reconocimiento de voz, en la pantalla aparece
NO VOICE DIAL y la operación no está disponible.
2 Pronuncie el nombre de su contacto.
Aceptación de una llamada
telefónica
Respuesta o rechazo de una llamada
entrante
% Atender una llamada entrante
Cuando entre una llamada, presione
MULTI-CONTROL.
# También puede realizar esta operación presionando MULTI-CONTROL arriba.
% Finalización de una llamada
Pulse MULTI-CONTROL hacia abajo.
% Rechazo de una llamada entrante
Cuando entre una llamada, presione
MULTI-CONTROL abajo.
Notas
! Si en el teléfono móvil está seleccionado el
modo privado, puede que la función manos libres no esté disponible.
! El tiempo estimado de la llamada aparece en
la pantalla (esto puede diferir ligeramente del
tiempo de llamada real).
Español
99
Es
Page 100

Sección
06
Accesorios disponibles
Manejo de una llamada en espera
% Atender una llamada en espera
Cuando entre una llamada, presione
MULTI-CONTROL.
# También puede realizar esta operación presionando MULTI-CONTROL arriba.
% Finalización de todas las llamadas
Pulse MULTI-CONTROL hacia abajo.
% Cambio entre los autores de llamadas
en espera
Pulse MULTI-CONTROL.
# También puede realizar esta operación presionando MULTI-CONTROL arriba.
% Rechazo de una llamada en espera
Pulse MULTI-CONTROL hacia abajo.
Notas
! Presione MULTI-CONTROL abajo para finali-
zar todas las llamadas incluso las llamadas
en espera.
! Para finalizar la llamada, tanto usted como el
autor de la llamada deben colgar el teléfono.
Introducción a las funciones
avanzadas
1 Presione MULTI-CONTROL para visualizar el menú principal.
2 Utilice MULTI-CONTROL para seleccionar FUNCTION.
Haga girar el control para cambiar la opción
de menú. Presione para seleccionar.
3 Haga girar MULTI-CONTROL para seleccionar la función.
SEARCH PHONE (buscar y conectar)—
CONNECTION OPEN (conexión abierta)—
DISCONNECT PHONE (desconectar teléfono)
—CONNECT PHONE (conectar teléfono)—
SET PHONE (registro de teléfono)—
DELETE PHONE (eliminar teléfono)—
PH BOOK TRANSFER (transferencia del direc-
torio de teléfonos)—CLEAR MEMORY (borrar
memoria)—NUMBER DIAL (llamar introduciendo un número)—REFUSE CALLS (ajuste
de rechazo automático)—AUTO ANSWER
(ajuste de respuesta automática)—
RING TONE (selección de tono de llamada)—
AUTO CONNECT (ajuste de conexión automá-
tica)—ECHO CANCEL (cancelación de eco)—
DEVICE INFO (información del dispositivo)
Si aún no está conectado
No se pueden utilizar las siguientes funciones.
! DISCONNECT PHONE (desconectar teléfo-
no)
! SET PHONE (registro de teléfono)
! CLEAR MEMORY (borrar memoria)
! NUMBER DIAL (llamar introduciendo un
número)
Si está conectado, pero aún no se ha registrado
No se pueden utilizar las siguientes funciones.
! SEARCH PHONE (buscar y conectar)
! CONNECTION OPEN (conexión abierta)
! CONNECT PHONE (conectar teléfono)
! CLEAR MEMORY (borrar memoria)
Si ya está conectado y registrado
No se pueden utilizar las siguientes funciones.
! SEARCH PHONE (buscar y conectar)
! CONNECTION OPEN (conexión abierta)
! CONNECT PHONE (conectar teléfono)
! SET PHONE (registro de teléfono)
Notas
! También se puede seleccionar la función pre-
sionando FUNCTION en el mando a distancia.
! Para volver a la pantalla anterior, presione
BACK.
! Para volver al menú principal, presione duran-
te varios segundos BACK.
! Para volver a la pantalla de reproducción, pre-
sione BAND/ESC.
! La función DEVICE INFO es igual que en el
Bluetooth audio. (Consulte Visualización de la
dirección BD (Bluetooth Device) en la página
98.)
100
Es
 Loading...