


CT-W505R
Table of contents
 Loading...
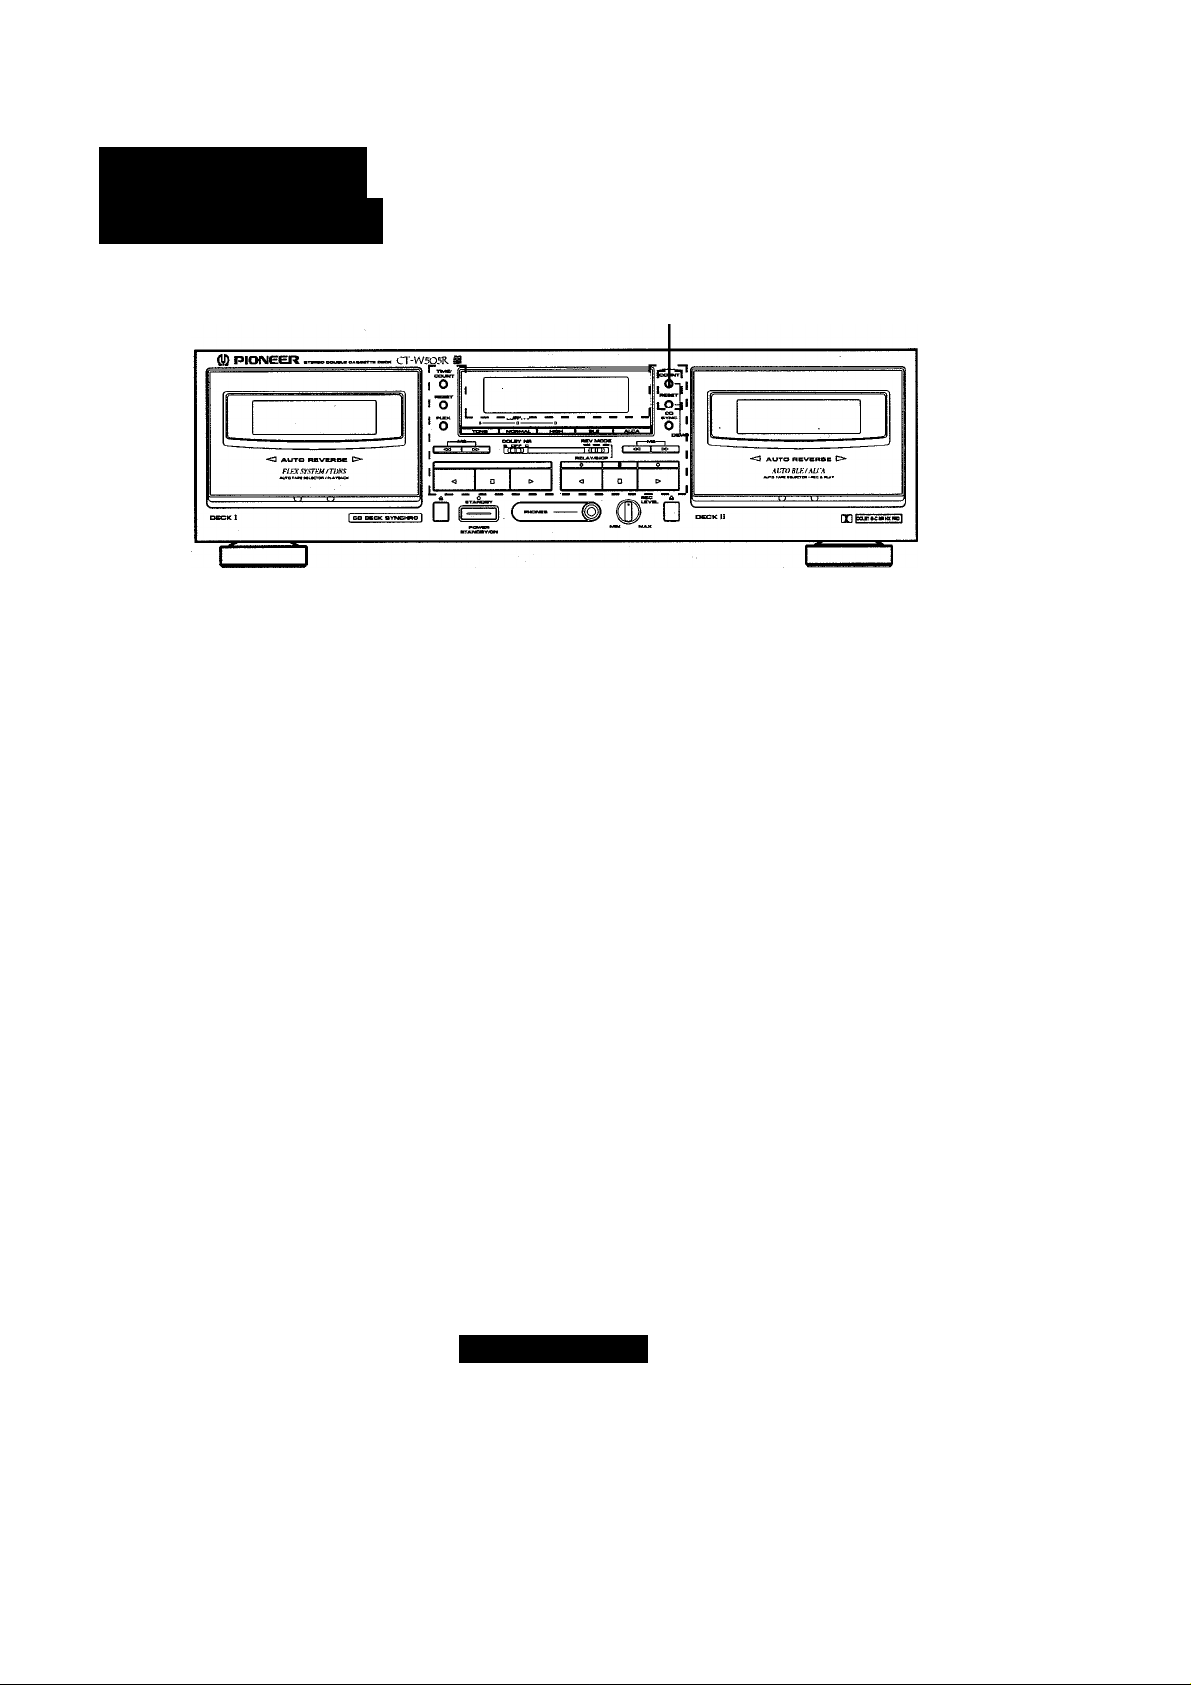
Operating
STEREO DOUBLE CASSETTE DECK
Instructions
CT-W505R
About the Demo mode (*)
Press the Deck II counter reset button (RESET) and the DECK II time counter
button (TIME/COUNT) simultaneously to set the demonstration mode. To
cancel the demonstration mode, press any one of the buttons enclosed in
the dotted lines above.
Thank you for buying this Pioneer product.
Please read through these operating instructions so you will
know how to operate your unit properly. After you have fin
ished reading the instructions, keep them in a safe place for
future reference.
In some countries or regions, the shape of the power plug
and power outlet may sometimes differ from that shown in
the explanatory drawings. However, the method of connect
ing and operating the unit is the same.
WARNING: to prevent fire or shock hazard,
DO NOT EXPOSE THIS APPLIANCE TO RAIN OR MOIS
TURE.
IMPORTANT NOTICE
[For U.S. model]
The serial number for this equipment is located on the rear
panel. Please write this serial number on your enclosed war
ranty card and keep it in a secure area) This is for your secu
rity.
CAUTION
This product satisfies FCC regulations when shielded
cables and connectors are used fp connect the unit to
other equipment. To prevent electromagnetic interference
with electric appliances such as radios and televisions,
use shielded cables and connectors for connections.
This product complies with the Low Voltage Directive (73/23/
EEC), EMC Directives (89/336/EEC, 92/31/EEC) and CE Marking
Directive (93/68/EEC).
THE POWER SWITCH IS SECONDARY CONNECTED
AND THEREFORE DOES NOT SEPARATE THE UNIT
FROM MAINS POWER IN STANDBY POSITION.
IMPORTANT 1
A
The lightning flash with arrowhead, within an
equilateral triangle, is intended to alert the user to the
presence of uninsulated ’dangerous voltage' within the
product's enclosure that may be of sufficient
magnitude to constitute a risk of electric shock to
persons.
CAUTION
RISK OF ELECTRIC SHOCK
DO NOT OPEN
CAUTION:
TO PREVENT THE RISK OF ELECTRIC SHOCK. DO
NOT REMOVE COVER (OR BACK). NO USER-SER
VICEABLE PARTS INSIDE. REFER SERVICING TO
QUALIFIED SERVICE PERSONNEL.
CiD PIONEER'
The Art of Entertainment
A
The exclamation point within an equilateral triangle is
intended to alert the user to the presence of important
operating and maintenance (servicing) instructions in
the literature accompanying the appliance.
IMPORTANT 2
FOR USE IN THE UNITED KINGDOM
The wires in this miains lead are coloured in
accordance with the following code:
If the plug provided is unsuitable for your socket out
lets. the plug must be cut off and a suitable plug fit
ted.
blue neutral
brown live
SAFETY INSTRUCTIONS
The cut-off plug should be disposed of and must not be
inserted into any 13 amp socket as this can result in elec
tric shock. The plug or adaptor or the distribution panel
should be provided with 5 amp fuse. As the colours of
the wires in the mains lead of this appliance may not cor
respond with coloured markings identifying the terminals
in your plug, proceed as follows :
The wire which is coloured blue must be connected to
the terminal which is marked with the letter N or coloured
black.
The wire which is coloured brown must be connected
to the terminal .which is marked with the letter L or
coloured red.
Do not connect either wire to the earjh terminal of a
three pin plug.
NOTE
After replacing or changing a fuse, the fuse cover in the
plug must be replaced with a fuse cover which corre
sponds to the colour of the insert in the base of the plug
or the word that is embossed on the base of the plug,
and the appliance must not be used without a fuse
cover. If lost replacement fuse covers can be obtained
from: your dealer.
Only 5 A fuses approved by B.S.I. or A.S.T.A to B.S.
1362 should be used.
READ INSTRUCTIONS - All the safety and operating
instructions should be read before the appliance is
operated.
RETAIN INSTRUCTIONS - The safety and operating
instructions should be retained for future refer
ence.
HEED WARNING - All warnings on the appliance and
in the operating instructions should be adhered to.
FOLLOW INSTRUCTIONS-All operating and use in
structions should be followed.
WATER AND MOISTURE - The appliance should not
be used near water - for example, near a bathtub,
washbowl, kitchen sink, laundry tub, in a wet base
ment, or near a swimming pool, etc.
LOCATION - The appliance should be installed in a
stable location.
WALL OR CEILING MOUNTING - The appliance
should not be mounted to a wall or ceiling.
VENTILATION - The appliance should be situated so
that its location or position does not interfere with
its proper ventilation. For example, the appliance
should not be situated on a bed, sofa, rug, or simi
lar surface that may block the ventilation openings;
or, placed in a built-in installation, such as a book
case or cabinet that may impede the flow of air
through the ventilation openings.
HEAT - The appliance should be situated away from
heat sources such as radiators, heat registers,
stoves, or other appliances (including amplifiers)
that produce heat.
POWER SOURCES - The appliance should be con
nected to a power supply only of the type de
scribed in the operating instructions or as marked
on the appliance.
POWER-CORD PROTECTION - Power-supply cords
should be routed so that they are not likely to be
walked on or pinched by items placed upon or
against them. Pay particular attention to cords at
plugs, convenience receptacles, and the point
where they exit from the appliance.
POLARIZATION - If your purchased product is pro
vided with a polarized power plug, please read the
following instructions. This product is equipped
with a polarized alternating current line plug (a plug
having one blade wider than the other). This plug
will fit into the power outlet only one way. This is a
safety feature, if you are unable to insert the plug
fully into the outlet, try reversing the plug. If the
plug should still fail to fit, contact your electrician to
replace your obsolete outlet. Do not defeat the
safety purpose of the polarized plug.
CLEANING - The appliance should be cleaned only
with a polishing cloth or a soft dry cloth. Never
clean with furniture wax, benzine, insecticides or
other volatile liquids since they may corrode the
cabinet.
POWER LINES - An outdoor antenna should be lo
cated away from power lines.
NONUSE PERIODS - The power cord of the appliance
should be unplugged from the outlet when left un
used for a long period of time.
OBJECT AND LIQUID ENTRY - Care should be taken
so that objects do not fall and liquids are not spilled
into the enclosure through openings.
DAMAGE REQUIRING SERVICE - The appliance
should be serviced by a Pioneer authorized service
center or qualified service personnel when:
• The power-supply cord or the plug has been dam
aged.
• Objects have fallen, or liquid has been spilled into
the appliance.
• The appliance has been exposed to rain.
• The appliance does not appear to operate normally
or exhibits a marked change in performance.
• The appliance has been dropped or the enclosure
damaged.
SERVICING - The user should not attempt to service
the appliance beyond that described in the operat
ing instructions. All other servicing should be re
ferred to qualified service personnel.
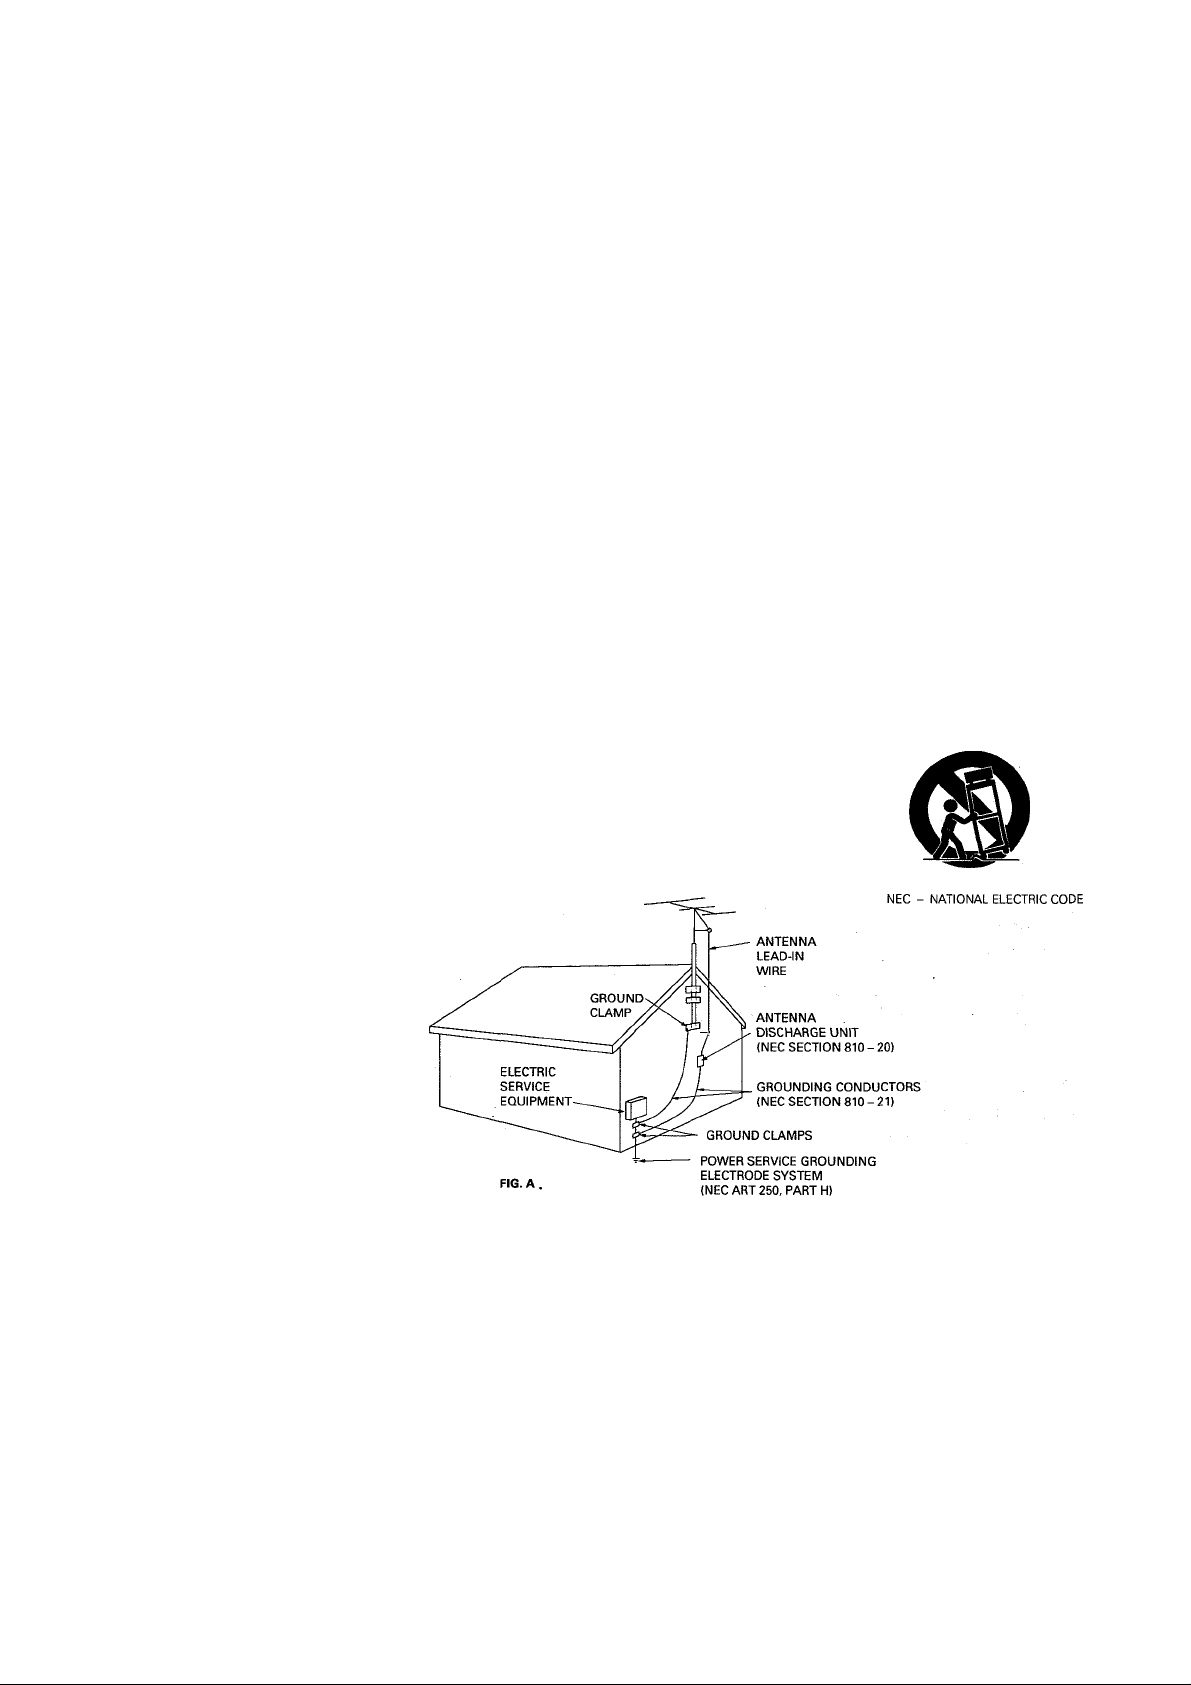
OUTDOOR ANTENNA GROUNDING - If an outside
antenna is connected to the antenna terminal, be
sure the antenna system is grounded so as to pro
vide some protection against voltage surges and
built-up static charges.
in the U.S.A. section 810 of the National Electri
cal Code, ANSI/NFPA 70. provides information
with respect to proper grounding of the mast and
supporting structure, grounding of the lead-in
wire to an antenna discharge unit, size of ground
ing conductors, location of antenna discharge
unit, connection to grounding electrodes, and re
quirements for the grounding electrode. See Fig.
A.
CART - An appliance and cart combination should be
moved with care. Quick stops, excessive force,
and uneven surfaces may cause the appliance and
cart combination to overturn.
CONDENSATION
When the unit is brought into a warm room from previously cold conditions or when the room temperature is suddenly increased, condensation
may from inside and the unit may not be able to attain its full performance. If this occurs, allow the unit to stand for about an hour or raise the
room temperature gradually.
<RRB1170>
En
This equipment has been tested and found to comply with the limits for a Class B digital device, pursuant to Part 15 of the FCC Rules.
These limits are designed to provide reasonable protection against harmful interference in a residential installation. This equipment
generates, uses, and can radiate radio frequency energy and, if not installed and used in accordance with the instructions, may cause
harmful interference to radio communications. However, there is no guarantee that interference will not occur in a particular installa
tion. If this equipment does cause harmful interference to radio or television reception, which can be determined by turning the equip
ment off and on, the user is encouraged to try to correct the interference by one or more of the following measures:
-Reorient or relocate the receiving antenna.
-Increase the separation between the equipment and receiver.
-Connect the equipment into an outlet on a circuit different from that to which the receiver is connected.
-Consult the dealer or an experienced radio/TV technician for help.
Information to User
Alteration or modifications carried out without appropriate authorization may invalidate the user's right to operate the equipment.
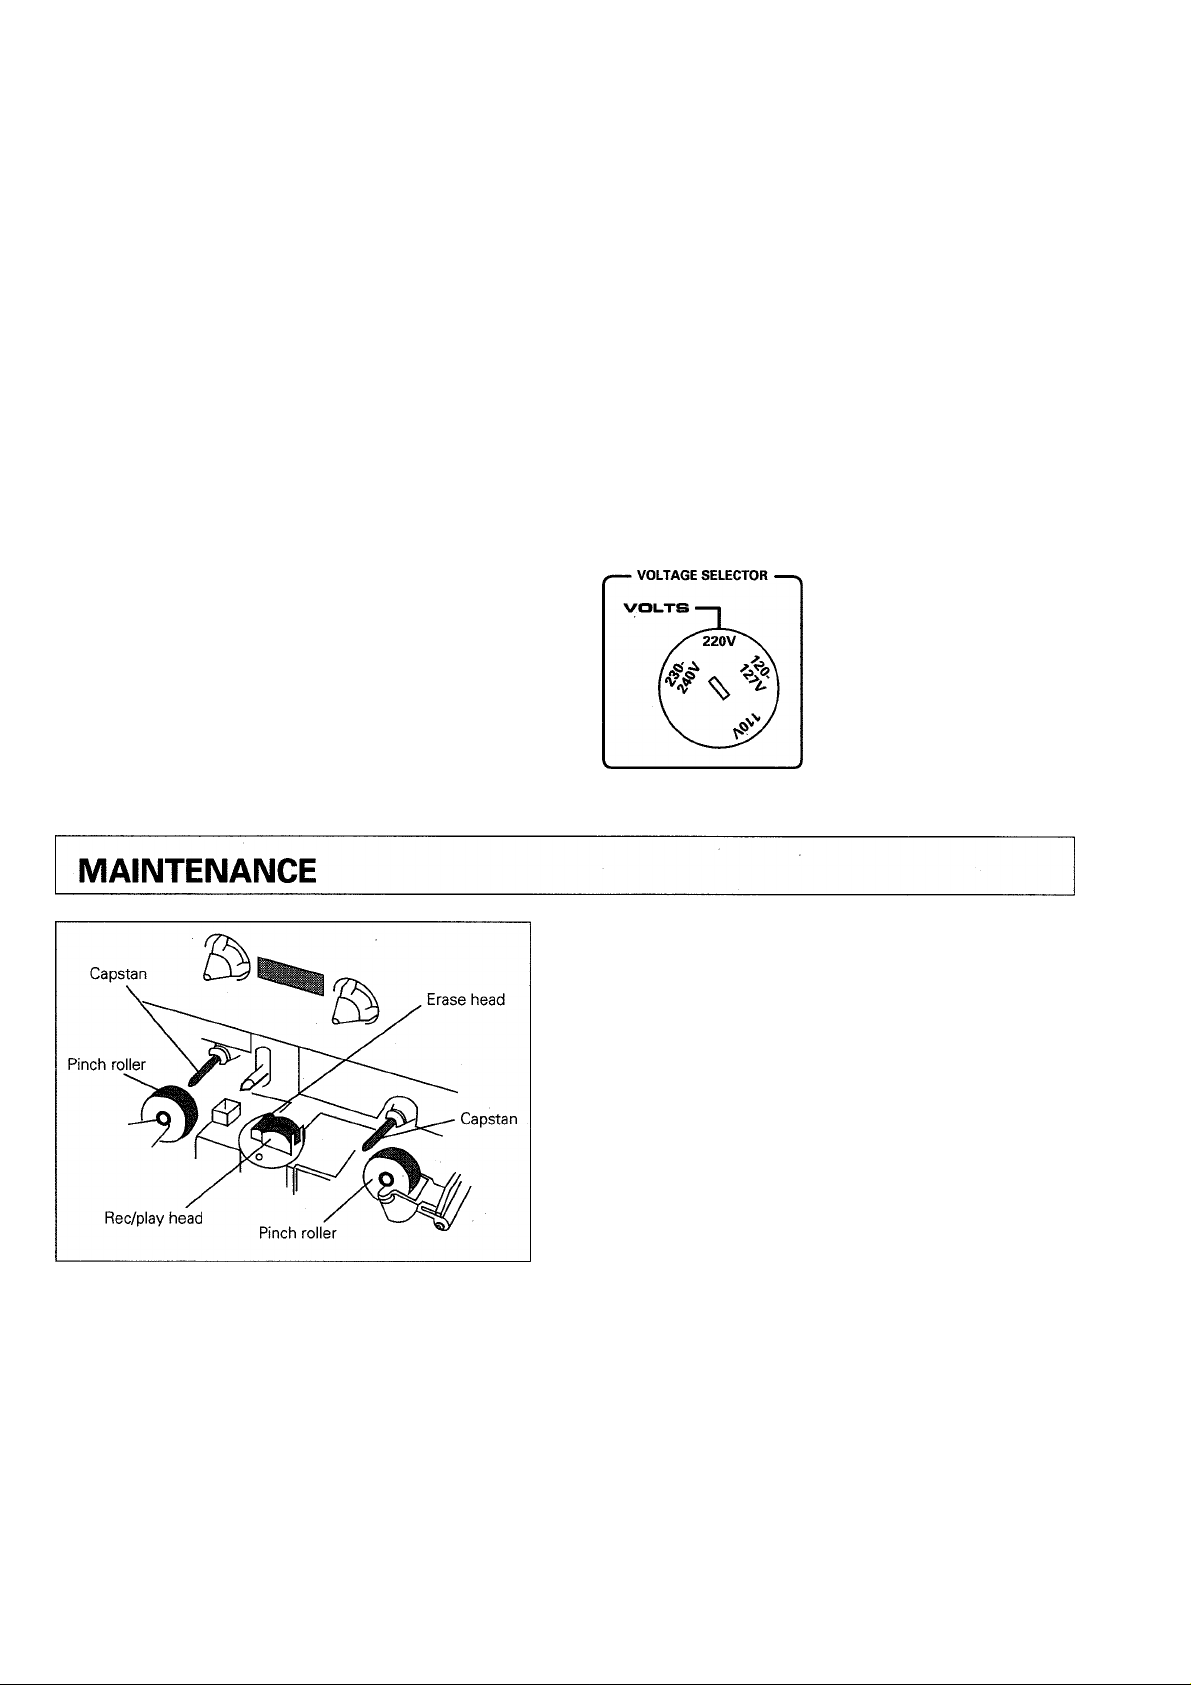
LINE VOLTAGE SELECTOR SWITCH
Only multi-voltage models are provided with this switch. U.S.,
U.K., and Australian models are not provided with this switch.
Main voltages in Saudi Arabia are 127 V and 220 V only. Never
use this model with 110 V setting in Saudi Arabia.
Check that it is set properly before plugging the power cord into the
wall outlet.
CLEANING THE HEADS, PINCH ROLLERS AND
CAPSTANS
The heads, pinch rollers and capstans are likely to get dirty quite
easily. If these parts, particularly the heads, get dirty, the high fre
quency components of a recording will not be reproduced and the
stereo balance will be impaired, resulting in a deterioration of the
playback sound. It is therefore recommended that the head section
be cleaned regularly.
1. Set the POWER switch to STANDBY.
2. Press the eject button to open the cassette door.
3. Dip a cleaning swab in cleaning fluid and use it to wipe the heads,
capstans and pinch rollers.
1. Disconnect the power cord.
2. Use a screwdriver with a tip
that fits neatly in the groove.
3. Insert the screwdriver into
the groove on the voltage
selector and adjust accord
ing to the voltage value of
your area.
NOTE:
After cleaning the head section, do not load a tape until the cleaning
fluid has dried completely (about two or three minutes).
DEMAGNETIZING THE HEADS
After using the cassette deck for a period of time, the heads will
become magnetized. The same effect will occur if a magnetized
screwdriver, magnet or other magnetized object is brought too
close to the heads. When the heads become magnetized,
highfrequency sounds will be lost during recording or playback, and
interference noise may also occur. The heads should be regularly de
magnetized with a head demagnetizes which can be purchased at
most audio stores.
When demagnetizing the heads, make sure that the POWER switch
of the cassette deck is set to ON. However, be sure to turn down
the amplifier's volume control to its lower position, and discon
nect any headphones from their headphones jack. For detailed in
structions, refer to the operating instructions of the head demagnetizer.
CLEANING THE FRONT PANEL
Clean the deck regularly with a soft cloth. If the front panel becomes
soiled, moisten a soft cloth with a weak solution of neutral detergent
(diluted in five to six parts water),wring the cloth well, and wipe the
panel clean. Never use volatile cleaners like thinners, benzine or alco
hol because they will damege the panel finish.
<RRB1170>
En
When installing the deck, avoid locations with high tem
peratures or humidity, and make sure that the deck re
ceives adequate ventilation.
H Do not install the deck in locations subject to direct sunlight, or
near a space heater or other heating device, as this may cause
damage to the finish or internal parts,
■ Malfunctions may also result if the deck is installed in an exces
sively humid or dusty location. Avoid installing the deck next to
kitchen counters or other locations subject to oily smoke or hu
midity.
If the deck is placed directly on top of an amplifier, it may pick up
humming or other noise. Also, if the amplifier generates a large
amount of heat, the deck may malfunction.
If the deck is located near a television set, it may pick up interfer
ence noise, which will be recorded as a whistling sound on the
tape. If this happens, move the deck further away from the tele
vision set or turn the television set off when operating the deck.
Do not place a cloth over the deck, or block the ventilation slots in
any way. The ventilation slots on this deck are necessary to keep
internal parts cool. If they are blocked, the deck may malfunction.
Because over the C-90 tapes are very thin, they can easily jam in the pinch rollers and capstan, and they often are subject to other problems
such as irregular winding.
TIPS ON CASSETTE TAPES
Leader tape (which cannot be recorded on) is provided at the be
ginning of a cassette tape. Let the tape run for about 5 seconds
before starting to record, to allow the leader tape to clear the re
cording head.
Do not leave a cassette tape exposed to the environment. Store
the cassette in its case after use so that dust and dirt do not ad
here to the tape, and so the tape will not get slack. Store tapes in
a location free from magnetism, dust, dirt, oil, heat and humidity.
If cassette tapes are irregularly wound, the tape may get jammed
in the rollers. This can cause damage to both the tape and the
deck. If you are not certain whether the tape is wound evenly,
fast forward or rewind the tape from beginning to end, to make
sure that the tape is properly wound.
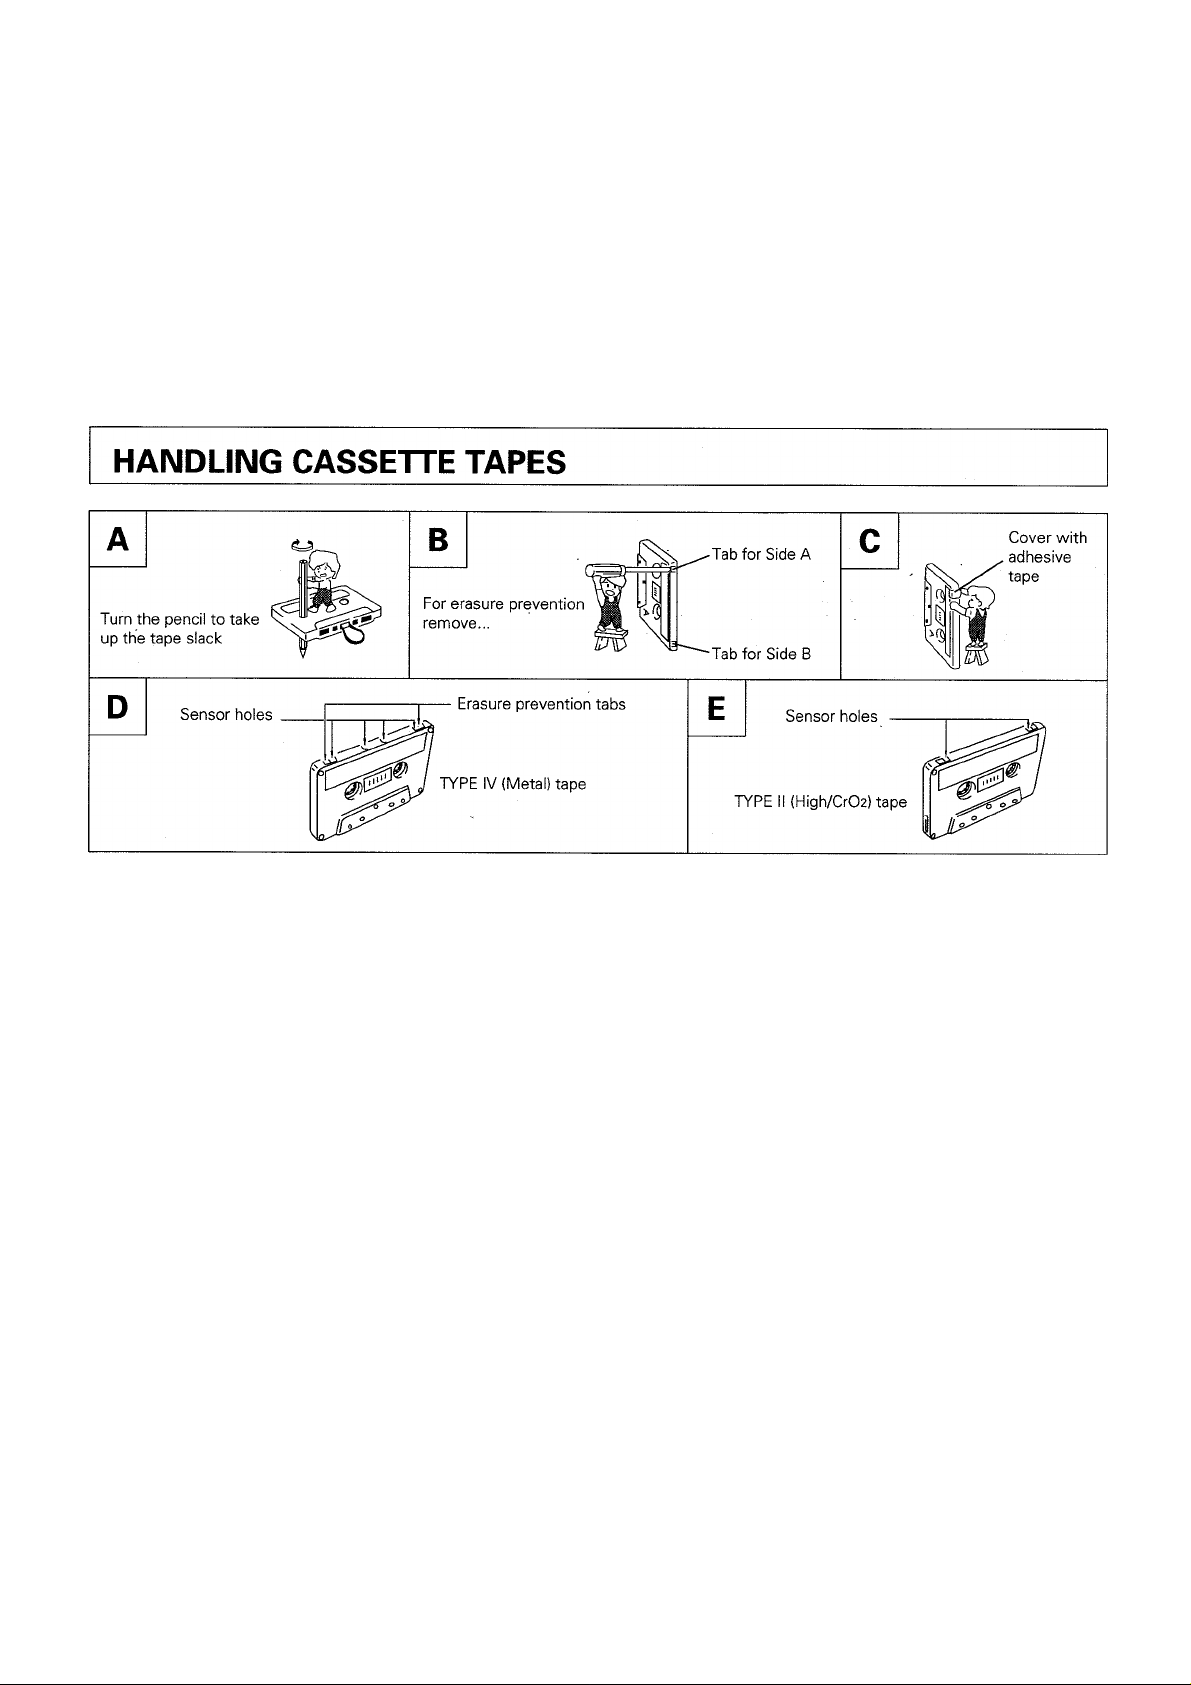
Are the accidental erasure prevention tabs intact?
These tabs allow you to prevent important recordings from being
erased accidentally. When the tab on the cassette shell is broken off
(Fig. B), it is not possible to activate the recording function, so valu
able recordings will not be erased by mistake.
To rerecord on a cassette whose tab has been broken off, simply
stick a piece of doubled adhesive tape over the hole (Fig. C).
When using TYPE IV (Metal) or TYPE II (High/Cr02) tapes, be careful
not to block the sensor holes with the tape (Fig. D, Fig. E). If the
holes are blocked, the automatic tape selector mechanism will not
operate correctly.
NOTES:
• The accidental erasure tab for each side is the one located on the
top left when the side that you want to protect is facing you.
• When breaking off the tab, do not use a magnetized screwdriver.
CHECK CASSETTE BEFORE USE
AUTOMATIC TAPE SELECTOR FUNCTION
Check the following items before loading a cassette tape:
Is the tape loose, or is some of the tape outside the cassette?
If some of the tape is loose or projecting outside the cassette shell,
the tape may not load properly between the capstan and pinch roller.
This will prevent the tape from operating properly, and may even
damage the tape itself. To prevent this, insert a pencil into the reel
hole and take up the slack (Fig. A).
Some cassette tapes come with a plastic or thick paper stopper to
prevent the tape from becoming slack. Remove this stopper when
loading the cassette and replace it after using the cassette.
4
<RRB1170>
En
This cassette deck is equipped with an automatic tape selector func
tion which utilizes the sensor holes on the tape cassette to deter
mine the type of tape being used. The deck is then set to match the
tape recording bias and equalization.
NOTES:
• When using TYPE IV (Metal) tapes, make sure that the tapes
have sensor holes.
• Make sure that the sensor holes on the cassette are not blocked;
otherwise the tape selector mechanism will not function properly.
• Do not use TYPE III (FeCr) tapes.
POWER-CORD CAUTION
Handle the power cord by the plug. Do not pull out the plug by tug
ging the cord and never touch the power cord when your hands are
wet as this could cause a short circuit or electric shock. Do not place
the unit, a piece of furniture, etc., on the power cord, or pinch the
cord. Never make a knot in the cord or tie it with other cords. The
power cords should be routed such that they are not likely to be
stepped on. A damaged power cord can cause a fire or give you an
electrical shock. Check the power cord once in a while. When you
find it damaged, ask your nearest PIONEER authorized service cen
ter or your dealer for a replacement.
CONNECTIONS
CONTENTS
CONNECTIONS................................................................................... 5
FRONT PANEL FACILITIES............................................................:....?
PLAYBACK......................................................................................... 10
SINGLE PLAYBACK......................................................................10
BLANK SKIP................................................................................. 10
RELAY PLAYBACK..................................................................... 10
MUSIC SEARCH
RECORDING...................................................................................... 12
RECORDING................................................................................ 12
•AUTO BLE TUNING.......................................................................12
ALCA............................................................................................. 13
USING ALCA EFFECTIVELY........................................................13
RECORDING MUTE......................................................................14
ERASING A TAPE.........................................................................14
CD»DECK SYNCHRO RECORDING
TAPE COPYING................................................................................. 15
LAST MEMORY FEATURE
TROUBLESHOOTING.........................................................................16
SPECIFICATIONS ............................................................................. 18
..............
............................................................ 11
...........................................
..................................................................
14
15
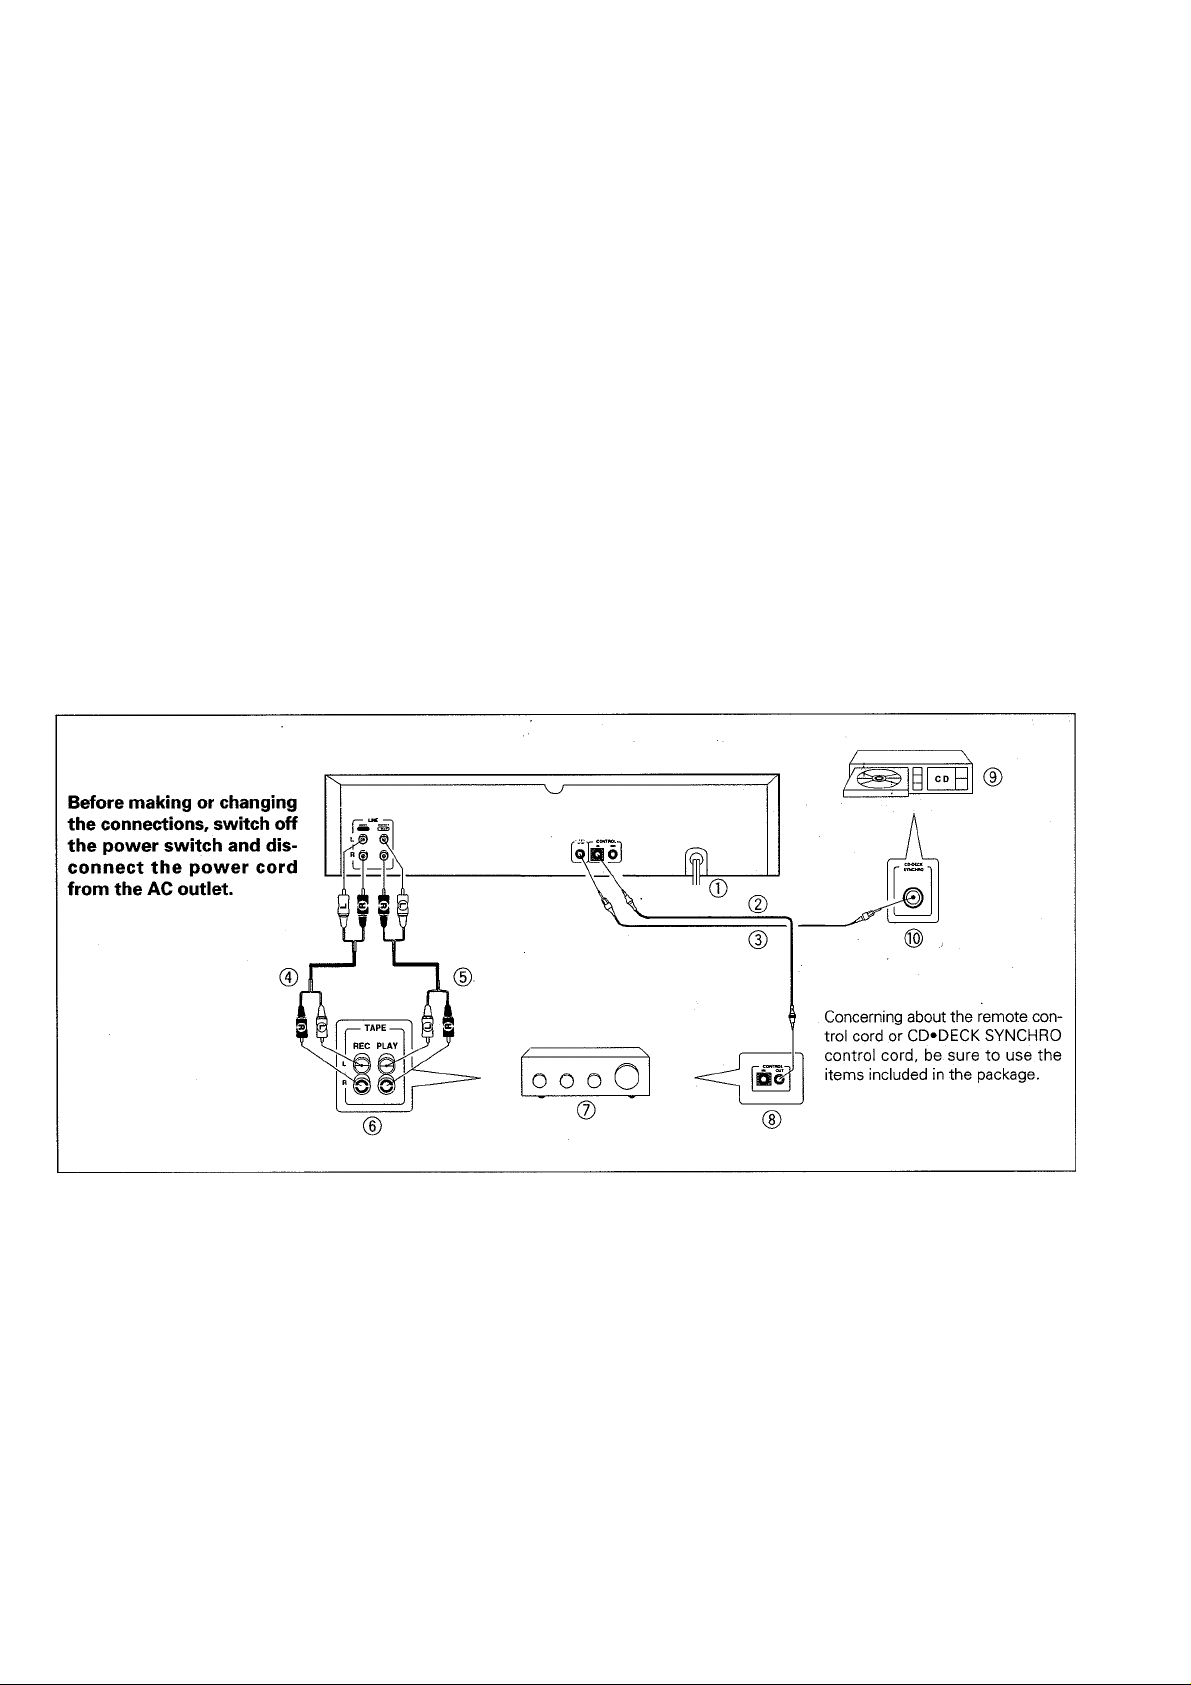
© Power cord
® Remote control cord
® CD»DECK SYNCHRO control cord
© Recording connection cord
® Playback connection cord
® TAPE REC/PLAY jacks
® Stereo Amplifier
©CONTROL OUT jack
® Compact Disc Player
® CD»DECK SYNCHRO jack
Read through the operating instructions of the stereo compo
nents which you intend to connect to this unit.
Make sure that all of the connection plugs are inserted securely,
as improper connections may generate noise.
<RRB1170>
En
CONNECTING THE POWER CORD (®)
Insert the power cord of the cassette deck into the accessory AC
outlet of your amplifier, or into a normal household outlet.
PIONEER SYSTEM REMOTE CONTROL (®)
CONTROL IN jack
Use the enclosed Remote Control Cord to connect this jack to the
CONTROL OUT jack of another component which bears the H mark
(indicating that it is equipped with PIONEER System Remote Con
trol). You will then be able to operate this unit using the Pioneer sys
tem remote control unit, if the remote control unit does not have
separate buttons for deck I and deck II, or a selection button to
choose deck I or deck II, the buttons will only operate deck II. To
operate deck I with a remote control unit which was not designed
for double cassette deck, see page 9.
CONTROL OUT jack
Intermediary jack which outputs signals from the CONTROL IN jack
of this unit to the input jack of another unit. Connect this jack to the
CONTROL IN jack of another component compatible with PIONEER
System Remote Control.
NOTE:
Be sure to connect both of the control cord's plugs securely to the
CONTROL IN and CONTROL OUT jacks. Do not connect only one
end of the cable.
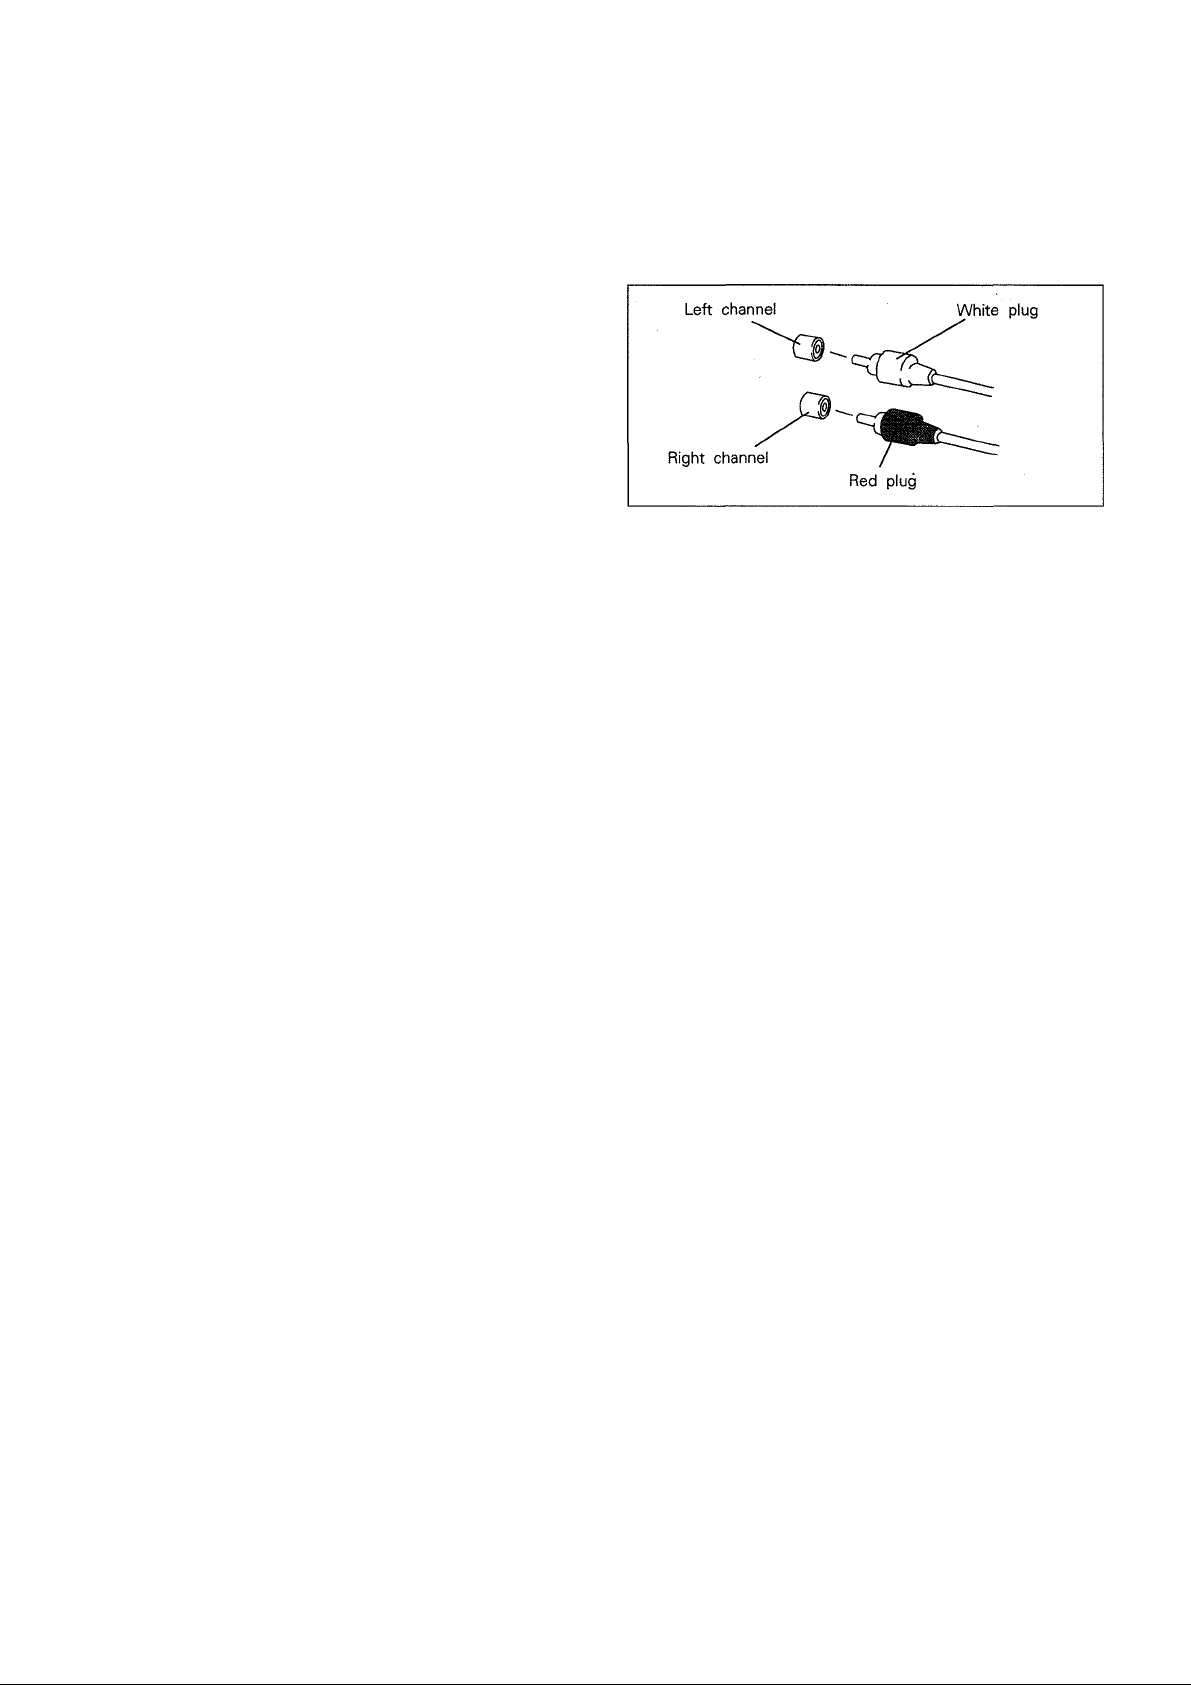
CONNECTING THE RECORDING AND
PLAYBACK CORDS (
Connect the TAPE jacks of your amplifier to the LINE jacks of the
cassette deck. Be sure to connect the REC (INPUT) jacks of the deck
to the recording (output) jacks of the amplifier, and the PLAY (OUT
PUT) jacks of the deck to the play (input) jacks of the amplifier.
• Connect the plugs properly:
Left channel - White plug
Right channel - Red plug
0
, ®)
CD'DECK SYNCHRO RECORDING ((D)
• CD»DECK SYNCHRO recording can be carried out when this unit
is connected to a Pioneer CD player equipped with a CD»DECK
SYNCHRO jack.
NOTES:
• Keep the input and output jacks connected between the amplifier
and this unit, otherwise, the CD»DECK SYNCHRO recording can
not be carried out.
• Even when the CD player is connected to the amplifier with an
optical fiber cable, connect the CD player to the amplifier or this
unit with the input and output cords that have pin plugs.
m Do not use any cords other than the supplied accessory cord.
(Use only the supplied accessory cord.)
<RRB1170>
En
Loading...