

Page 1

BDP-100-
K
Blu-ray Disc PLAYER
Blu-ray Disc SPIELER
Discover the benefits of registering your product online at
http://www.pioneer.co.uk
Download an electronic version of this manual from our website.
Bitte nutzen Sie die Möglichkeit zur Registrierung Ihres Produktes unter
http://www.pioneer.de
Laden Sie eine elektronische Version dieser Anleitung von unserer Website.
(or
http://www.pioneer.eu
(oder
http://www.pioneer.eu
)
)
Operating Instructions
Bedienungsanleitung
Page 2

Thank you for buying this Pioneer product. Please read through these operating instructions so you will know how to
operate your model properly. After you have finished reading the instructions, put them away in a safe place for future
reference.
CAUTION
TO PREVENT THE RISK OF ELECTRIC SHOCK, DO NOT
REMOVE COVER (OR BACK). NO USER-SERVICEABLE
PARTS INSIDE. REFER SERVICING TO QUALIFIED
SERVICE PERSONNEL.
CAUTION
This product is a class 1 laser product classified
under the Safety of laser products, IEC 60825-1:2007,
but this product contains a laser diode higher than
Class 1. To ensure continued safety, do not remove
any covers or attempt to gain access to the inside of
the product.
Refer all servicing to qualified personnel.
D3-4-2-1-1_B1_En
CLASS 1 LASER PRODUCT
The following caution label appears on your unit.
Location: inside of the unit
D58-5-2-2b*_B1_En
WARNING
To prevent a fire hazard, do not place any naked flame
sources (such as a lighted candle) on the equipment.
VENTILATION CAUTION
When installing this unit, make sure to leave space
around the unit for ventilation to improve heat radiation
(at least 10 cm at top, 10 cm at rear, and 10 cm at each
side).
WARNING
Slots and openings in the cabinet are provided for
ventilation to ensure reliable operation of the product,
and to protect it from overheating. To prevent fire
hazard, the openings should never be blocked or
covered with items (such as newspapers, table-cloths,
curtains) or by operating the equipment on thick carpet
or a bed.
D3-4-2-1-7a_A1_En
D3-4-2-1-7b*_A1_En
Operating Environment
Operating environment temperature and humidity:
+5 °C to +35 °C (+41 °F to +95 °F); less than 85 %RH
(cooling vents not blocked)
Do not install this unit in a poorly ventilated area, or in
locations exposed to high humidity or direct sunlight (or
strong artificial light)
This product is for general household purposes. Any
failure due to use for other than household purposes
(such as long-term use for business purposes in a
restaurant or use in a car or ship) and which requires
repair will be charged for even during the warranty
period.
POWER-CORD CAUTION
Handle the power cord by the plug. Do not pull out the
plug by tugging the cord and never touch the power
cord when your hands are wet as this could cause a
short circuit or electric shock. Do not place the unit, a
piece of furniture, etc., on the power cord, or pinch the
cord. Never make a knot in the cord or tie it with other
cords. The power cords should be routed such that they
are not likely to be stepped on. A damaged power cord
can cause a fire or give you an electrical shock. Check
the power cord once in a while. When you find it
damaged, ask your nearest PIONEER authorized
service center or your dealer for a replacement.
WARNING
This equipment is not waterproof. To prevent a fire or
shock hazard, do not place any container filled with
liquid near this equipment (such as a vase or flower
pot) or expose it to dripping, splashing, rain or
moisture.
D3-4-2-1-7c*_A1_En
K041_A1_En
S002*_A1_En
D3-4-2-1-3_A1_En
Page 3

CAUTION
Theġ
STANDBY/ON switch on this unit will not
completely shut off all power from the AC outlet.
Since the power cord serves as the main disconnect
device for the unit, you will need to unplug it from the
AC outlet to shut down all power. Therefore, make
sure the unit has been installed so that the power
cord can be easily unplugged from the AC outlet in
case of an accident. To avoid fire hazard, the power
cord should also be unplugged from the AC outlet
when left unused for a long period of time (for
example, when on vacation).
D3-4-2-2-2a*_A1_En
Condensation
If the player is moved suddenly from a cold place into a
warm room (in winter, for example) or if the
temperature in the room in which the player is installed
rises suddenly due to a heater, etc., water droplets
(condensation) may form inside (on operating parts and
the lens). When condensation is present, the player will
not operate properly and playback is not possible. Let
the player stand at room temperature for 1 or 2 hours
with the power turned on (the time depends on the
extent of condensation). The water droplets will
dissipate and playback will become possible.
Condensation can also occur in the summer if the
player is exposed to the direct wind from an
air-conditioner. If this happens, move the player to a
different place.
Information for users on collection and disposal of old equipment and used batteries
Symbol for
equipment
Symbol examples
for batteries
Pb
These symbols on the products, packaging, and/or accompanying documents mean
that used electrical and electronic products and batteries should not be mixed with
general household waste.
For proper treatment, recovery and recycling of old products and used batteries,
please take them to applicable collection points in accordance with your national
legislation.
By disposing of these products and batteries correctly, you will help to save valuable
resources and prevent any potential negative effects on human health and the
environment which could otherwise arise from inappropriate waste handling.
For more information about collection and recycling of old products and batteries,
please contact your local municipality, your waste disposal service or the point of sale
where you purchased the items.
These symbols are only valid in the European Union.
For countries outside the European Union:
If you wish to discard these items, please contact your local authorities or dealer and
ask for the correct method of disposal.
K058a_A1_En
S005_A1_En
Page 4

“Blu-ray Disc”, “Blu-ray” and “Blu-ray Disc” logo
are trademarks of Blu-ray Disc Association.
is a trademark of DVD Format/Logo
Licensing Corporation.
The terms HDMI and HDMI High-Defi nition
Multimedia Interface, and the HDMI Logo are
trademarks or registered trademarks of HDMI
Licensing, LLC in the United States and other
countries.
“BONUSVIEW” is trademark of Blu-ray Disc
Association.
The player support the BD-ROM profi le version 2,
you can use bonusview functions, such as the
secondary Video (Picture-in-Picture) play and the
secondary Audio. With bonusview function (the
secondary Video (Picture-in-Picture) and the
secondary Audio) may be stored in memory
together the data.
“BD-LIVE” logo is trademark of Blu-ray Disc
Association.
For BD-ROM format, You can use the BD-J
(Java) application to create a highly interactive
title.
Oracle and Java are registered trademarks of
Oracle and/or its affi liates. Other names may be
trademarks of their respective owners
“AVCHD” and the “AVCHD” logo are trademarks
of Panasonic Corporation and Sony Corporation.
For DTS patents, see http://patents.dts.com.
Manufactured under license from DTS Licensing
Limited. DTS, DTS-HD, the Symbol, & DTS and
the Symbol together are registered trademarks,
and DTS-HD Master Audio | Essential is a
trademark of DTS, Inc. © DTS, Inc. All Rights
Reserved.
DivX Plus® HD devices have been tested for highquality DivX® (.divx, .avi) and DivX Plus HD (.mkv)
video playback. When you see the DivX logo, you
know you have the freedom to play your favorite
DivX movies.
This DivX Certifi ed® device has passed rigorous
testing to ensure it plays DivX® video. To play
purchased DivX movies, fi rst register your device
at vod.divx.com. To obtain your registration code,
locate the DivX VOD section in your device setup
menu.
DivX®, DivX Certifi ed®, DivX Plus® HD and
associated logos are trademarks of DivX, LLC
and are used under license.
“x.v.Color” and are trademarks of
Sony Corporation.
Manufactured under license from Dolby
Laboratories. “Dolby” and the double-D symbol
are trademarks of Dolby Laboratories.
Page 5

Contents
Chapter 1 Before you start
Check the Accessories ................................ 6
Prepare the remote control .......................... 6
Types of discs/fi les that can be played ........ 7
Playable discs ......................................... 7
Playable fi les ........................................... 9
Part Names and Functions .........................11
Remote control ........................................11
Front panel ..............................................12
Rear panel ...............................................12
Chapter 2 Connecting up
Connecting using an HDMI cable ...............13
About HDMI .............................................13
About others makers’s discreteness of
connection (Supporting Control
function) ..................................................13
Connecting a TV .....................................14
Connecting an AV receiver or
amplifi er ...................................................14
Connecting an AV receiver or amplifi er using
an optical digital audio cable ......................15
Connecting components to the USB port ...15
About USB devices .................................15
Connecting the USB device ....................15
Network connection ....................................16
Connecting with a LAN cable .................16
Connecting the power cord ..........................16
Chapter 3 Getting Started
Making settings using the Setup Navigator
menu ............................................................17
Chapter 4 Playback
Playing discs or fi les ...................................18
Stop .........................................................18
Quick View (Quick view with audio) ........19
Slow-view play (slow play with audio) ......19
Fast Forward and Fast Reverse ..............19
Playing specifi c chapters, tracks or fi les ...19
Previous and Next ...................................19
To return to a position a short while ago ... 19
To advance to a position slightly ahead ...19
Step .........................................................19
A-B ...........................................................20
Repeat .....................................................20
Zoom .......................................................20
Playing photos as slideshows ..................20
Switching the camera angles ..................20
Switching the subtitles ............................20
Moving subtitles ......................................21
Switching the audio .................................21
Displaying the disc information ...............21
Continuing playback from a specifi ed
position (Continued Viewing Playback) ....21
Playback functions ..................................22
Using the FUNCTION menu ........................23
Using the Play Mode functions ...................24
Playing a specifi c title, chapter or track
(Search) ...................................................24
Playing in random order
(Random Play) .........................................24
Playing from the Source function ...............25
Playing discs ...........................................25
Playing video fi les ...................................25
Playing image fi les ..................................26
Playing audio fi les ...................................26
Playing in the desired order (Playlist) .......27
Changing the Video options .....................27
Chapter 5 Advanced settings
General Setting ...........................................28
System ......................................................28
Language ................................................. 29
Playback ................................................... 30
Parental Lock ...........................................30
Networ k ....................................................31
Video Output ...............................................32
Display Setting .........................................32
Audio Output ...............................................33
Audio Setting ............................................33
System Information .....................................34
About how digital audio formats are
output ...........................................................35
Chapter 6 Additional information
Cautions on use ...........................................36
Moving the player ....................................36
Place of installation ..................................36
Turn the power off when not using the
player .......................................................36
About Condensation ................................36
Cleaning the player ..................................36
Caution for when the unit is installed in a
rack with a glass door ..............................36
Cleaning the pickup lens ..........................37
Handling discs .........................................37
Troubleshooting ...........................................38
Playback ..................................................38
Control Function ......................................40
Network ....................................................41
Others ......................................................41
Glossary .......................................................43
Specifi cations ..............................................45
Page 6

Chapter 1
01
Before you start
Check the Accessories
• Remote control unit x 1
• AAA/R03 size battery x 2
• Power cord x 1
• Warranty card
• Operating instrusctions (this document)
Prepare the remote control
The batteries included with the player have
been provided to allow you to check product
operation and may not last long. We
recommend using alkaline batteries that have
a longer life.
Warning
• Do not use or store batteries in direct
sunlight or other excessively hot place,
such as inside a car or near a heater. This
can cause batteries to leak, overheat,
explode or catch fi re. It can also reduce the
life or performance of batteries.
Notes:
• Do not use any battery other than the ones
specifi ed. Also, do not use a new battery
together with an old one.
• When loading the batteries into the remote
control, set them in the proper directin, as
indicated by the polarity marks(/).
• When inserting the batteries, make sure
not to damage the springs on the battery’s
() terminals. This can cause batteries to
leak or overheat.
• Do not heat batteries, disassemble them,
or throw them into fl ames or water.
• Batteries may have different voltages, even
if they look similar. Do ot use different
kinds of batteries together.
• To prevent leakage of battery fl uid, remove
the batteries if you do not plan to use the
remote control for a long period of time (1
month or more). If the fl uid should leak,
wipe it carefully off the inside of the case,
then insert new batteries. If a battery
should leak and the fl uid should get on
your skin, fl ush it off with large quantities of
water.
• When disposing of used batteries, please
comply with governmental regulations or
environmental pubic institution's rules that
apply in your country/area.
1. Open the rear cover.
2. Insert (2 x AAA 700 size) batteries that are
supplied.
Insert fi rst from the side.
3. Close the rear cover.
Close securely (a click should be heard).
6
Page 7

Types of discs/fi les that can be played
Playable discs
Discs with the logo marks below indicated on the disc label, package or jacket can be played.
Notes:
• Only the discs that have been fi nalized can be played.
Application format
Disc types Logo
BD-ROM
2
BD
BD-R
BD-RE
BDMV BDAV
DVDVideo
DVD VR
CD-DA
DTS-CD
DATA DISC
xxxx
xxx
xxx
01
1
DVD
CD
DVD-ROM
2,3,4
DVD-R
DVD-RW
DVD+R
DVD+RW
CD-DA
(Audio CD)
3
CD-R
CD-RW
5
3,7
2,3
3
8
5
xxxx
xxxx
3
xxxx
x
6
6
x
x
CD-ROM x x x x
1. Discs on which video, image or audio fi les are recorded.
2. Including dual-layered discs.
3. Finalize them before playing them on this player.
4. DVD-R for Authoring discs (3.95 and 4.7 GB) cannot be played.
5. Including the AVCHD format.
6. Including the AVCREC format.
7. Version 1.0 DVD-RW discs cannot be played.
8. Including Video CDs.
xx
x
x
xx
xx
x
7
Page 8

* Discs that cannot be played
01
FUJICOLOR-CD
•
• Kodak Picture Discs
•
DVD-RAM Discs
• SACD Discs
It is possible that some discs other than the
ones listed above may not be playable either.
Notes:
• Some discs cannot be played, even if one
of the logo marks on the previous page is
indicated.
• When playing a 8 cm disc, set the disc in
the disc tray’s 8 cm ring. No adapter is
necessary. Do not play 8 cm BD-ROM
discs.
* About playback of unauthorized copies
Cinavia Notice
This product uses Cinavia technology to
limit the use of unauthorized copies of
some commercially-produced fi lm and
videos and their soundtracks. When a
prohibited use of an unauthorized copy is
detected, a message will be displayed and
playback or copying will be interrupted.
More information about Cinavia technology
is provided at the Cinavia Online Consumer
Information Center at http://www.cinavia.
com. To request additional information
about Cinavia by mail, send a postcard with
your mailing address to: Cinavia Consumer
Information Center, P.O. Box 86851, San
Diego, CA, 92138, USA.
Copyright 2004-2013 Verance Corporation.
Cinavia™ is a Verance Corporation
trademark. Protected by U.S. Patent
7,369,677 and worldwide patents issued
and pending under license from Verance
Corporation. All rights reserved.
* About copyright protection
Copyright protection technology is used for
some Blu-ray Discs™, DVDs and contents
played over the Internet or other networks.
Copyright protection technology restricts
playback and analog output. Due to
updates in copyright protection provisions,
the restrictions may differ depending on the
date this product was purchased.
Furthermore, the restrictions may be
updated when the software is updated after
purchase.
* For Audio formats
The following audio formats are supported on
this player:
• Dolby TrueHD
• Dolby Digital Plus
• Dolby Digital
8
• DTS-HD Master Audio
• DTS-HD High Resolution Audio
• DTS Digital surround
• MPEG audio (AAC)
• Linear PCM
To enjoy the surround sound of Dolby TrueHD,
Dolby Digital Plus, DTS-HD Master Audio and
DTS-HD High Resolution Audio, it is
recommended to connect the player to an AV
receiver or amplifi er compatible with these
audio formats using an HDMI cable. After
loading a BD containing sound in one of these
audio formats, select the audio format on the
menu screen.
* Playing BDs
• BDs (BDMV) compatible with the formats
below can be played.
- Blu-ray Disc Read-Only (ROM) Format
Version 2
- Blu-ray Disc Recordable (R) Format
Version 2
- Blu-ray Disc Rewritable (RE) Format
Version 3
• BDs (BDAV) compatible with the formats
below can be played.
- Blu-ray Disc Recordable (R) Format
Version 1
- Blu-ray Disc Rewritable (RE) Format
Version 2
* Playing DVDs
This label indicates playback compatibility with
DVD-RW discs recorded in VR format (Video
Recording format). However, for discs
recorded with a record-only-once encrypted
program, playback can only be achieved using
a CPRM compatible device.
The AVCHD is a high defi nition (HD) digital
video camera recorder format recording highdefi nition onto certain media by using highly
effi cient codec technologies.
* About region numbers
Blu-ray Disc Player and BD-ROM or DVDVideo discs are assigned region numbers
according to the region in which they are sold.
This player's region numbers are:
• BD-ROM: B
• DVD-Video: 2
Discs not including these numbers cannot be
played. Discs playable on this player are as
shown below.
• BD: B (Include B) and ALL
• DVD: 2 (Include 2) and ALL
Page 9

* Playing CDs
Regarding copy protected CDs: This player is
designed to conform to the specifi cations
of
the Audio CD format. This player does not
support the playback or function of discs that
do not conform to these specifi cations.
* DualDisc playback
A DualDisc is a new two-sided disc, one side
of which contains DVD content — video,
audio, etc. — while the other side contains
non-DVD content such as digital audio
material.
The DVD side of a DualDisc can be played on
this player (excluding any DVD-Audio content).
The non-DVD, audio side of the disc is not
compatible with this player.
It is possible that when loading or ejecting a
DualDisc, the opposite side to that being
played will be scratched. Scratched discs may
not be playable.
For more detailed information on the DualDisc
specifi cation, please refer to the disc
manufacturer or disc retailer.
* Playing discs created on computers or
BD/DVD recorders
• It may not be possible to play discs
recorded using a computer due to the
application settings or computer’s
environment settings. Record discs in a
format playable on this player. For details,
contact the dealer.
• It may not be possible to play discs
recorded using a computer or a BD/DVD
recorder, if burn quality is not good due to
characteristics of the disc, scratches, dirt
on the disc, dirt on the recorder’s lens, etc.
* About video, audio, and image fi les and
folders
Audio and image fi les can be played on this
player when the folders on the disc or USB
device are created as described below.
Example of folder structure:
Root
001.jpg/001.mp3
xxx.jpg/xxx.mp3
01 Folder
XX Folder
*
Folder
001.jpg/001.mp3
xxx.jpg/xxx.mp3
001.jpg/001.mp3
xxx.jpg/xxx.mp3
*
001.jpg/001.mp3
xxx.jpg/xxx.mp3
*
*
* The number of folders and fi les within a
single folder (including the root directory) is
limited to a maximum of 256. Also, keep the
number of folder layers to a maximum of 5.
Notes:
• The fi le and folder names displayed on this
player may differ from those displayed on a
computer.
• Files are played in ASCII code order for
discs, in the order in which they were
recorded for USB devices.
• For discs and USB devices, it is not
possible to play fi les in different folders.
Playable fi les
Video, image and audio fi les recorded on BDs,
DVDs, CDs or USB devices can be played.
* Supported video fi le formats
• DivX Plus HD
DivX Certifi ed
HD (H.264/MKV) video up to 1080p HD,
including premium content.
Note:
• This DivX
registered in order to play DivX Video-onDemand (VOD) content. First generate the
DivX VOD registration code for your device
and submit it during the registration
process. [Important: DivX VOD content is
protected by a DivX DRM (Digital Rights
Management) system that restricts
playback to registered DivX Certifi ed
devices. If you try to play DivX VOD
content not authorized for your device, the
message Authorization Error will be
displayed and your content will not play.]
Learn more at www.divx.com/vod.
- This player’s DivX VOD registration code
can be checked at General setting
Playback DivX® VOD Registration
Code
- The number of views is restricted for
some DivX VOD fi les. When such fi les are
played on this player, the remaining
number of views is displayed. Files for
which the remaining number of views has
reached 0 cannot be played (Rental
Expired is displayed). Files for which the
number of views is not restricted can be
played as many times as you like (the
remaining number of views is not
displayed).
®
to play DivX® and DivX Plus
®
Certifi ed device must be
®
01
9
Page 10

* Table of Playable Files
01
Playable media
Playable fi les
(Extensions)
MP3
(.mp3)
WMA2
(.wma)
3
AAC
(.m4a)
MPEG2 AAC
(.aac)
LPCM
(.wav)
FLAC
(.fl ac)
JPEG
(.jpg/.jpeg)
DivX
(.avi/.divx/.
mkv)
MP4
(.mp4)
WMV
(.wmv)
AVI
(.avi)
3GP
(.3gp)
FLV
(.fl v)
BD-R/RE/-R DL/
RE DL/-R LTH,
DVD-R/RW/-R DL/
USB devices
+R/+RW/+R DL,
CD-R/RW
1
•
Sampling frequencies: Up to 48 kHz
•
Bit rate: Up to 320 kbps
•
Audio type: MPEG-1 Audio Layer 3
•
Sampling frequencies: Up to 48 kHz
•
Bit rate: Up to 192 kbps
•
Audio type: WMA version 9
•
Sampling frequencies: Up to 96 kHz
•
Bit rate: Up to 192 kbps
•
Audio type: MPEG4 -AAC
•
Sampling frequencies: Up to 48 kHz
•
Bit rate: Up to 320 kbps
•
Audio type: MPEG2-AAC
•
Sampling frequencies: Up to 192 kHz
•
Quantization bitrate: 16 bit, 24 bit
•
Channel: 2ch
•
Sampling frequencies: Up to 192 kHz
•
Quantization bitrate: 16 bit, 24 bit
•
Channel: 2ch
•
Maximum resolution: 4 000 x 3 000 pixels
•
Suppor ted versions: Through DivX Plus® HD
•
Maximum resolution:
•
Up to 1 920 x 1 080 (DivX Plus® HD)
•
Maximum resolution: Up to 1 920 x 1 080
•
Video: MPEG4, MPEG -4 AVC (level 4.1)
•
Audio: AAC, MP3
•
Maximum resolution: Up to 1 280 x 720
•
Video: WMV9, WMV9AP (VC-1)
•
Audio: WMA
•
Maximum resolution: Up to 1 920 x 1 080
•
Video: MPEG4
•
Audio: MP3, AAC
•
Maximum resolution: Up to 1 920 x 1 080, 8 Mbps
•
Video: H.263, MPEG4, H.264
•
Audio: MPEG-4 AAC
•
Video: Sorenson H. 263 (FLV1), VP6 (FLV4), H.264
•
Audio: MP3, AAC
File specifi cations
1. This unit supports FAT16, FAT32 and NTFS fi le systems.
2. WMA Pro, Lossless and Voice are not supported.
3. Apple lossless encoding is not supported.
Note:
• Depending on the fi le structure, it may not be possible to play certain fi les, even for fi les indicated on the table of playable fi les
above.
• Files protected by DRM (Digital Rights Management) cannot be played (not including DivX VOD fi les).
10
Page 11

Part Names and Functions
Remote control
1
2
3
4
5
6
7
8
9
10
11
12
13
14
15
16
1 STANDBY/ON – Press to turn the power
on and off.
2 SUBTITLE – (page 20)
3 AUDIO – (page 21)
4 SOURCE – (page 25)
17
18
19
20
21
22
23
24
25
26
27
28
29
30
5 REPEAT – (page 20)
6 A-B – (page 20)
7 PAUSE – (page 18)
8 – (page 19)
9 STOP – (page 18)
10 REV – (page 19)
11 TOP MENU – Press to display the top
menu of the BD-ROM or DVD-Video.
12 – Use to select items, change
settings and move the cursor.
ENTER – Press to execute the selected
item or enter a setting that has been
changed, etc.
HOME MENU – (page 28)
13
14 Color buttons – Use these to navigate
BD-ROM menus.
PROGRAM – To set track/chapter in a
favourite order during CD/DVD/VCD
playback.
BOOK MARK – To bookmark at any point
during playback.
ZOOM – During playback to zoom out/in.
Press repeatedly to select different picture
available in your player. (page 20)
INDEX – During playback a JPEG disc,
press to view a page of 12 thumbnail
images. This button is only available in
JPEG mode. (page 20)
15 Number buttons – Use these to select and
play the title/chapter/track you want to view
or listen to and to select items from menus.
16 CLEAR – Press to clear the numeric
number, etc.
17 OPEN/CLOSE – Press to open and
close the disc tray.
18 CONTINUED – Use to continue playback
from a specifi ed position. (page 21)
19 DISPLAY – (page 21)
20 VIDEO P. – (page 27)
21 HDMI – Use to switch the resolution of the
video signals output from the HDMI OUT
terminal (page 32).
22 SHORT SKIP – Press during playback to
forward to a position 30 seconds later.
(page 19)
23 REPLAY – Press during playback to return
to a position 10 seconds earlier. (page 19)
24 – (page 19)
25 – (page 19)
26 – (page 19)
27 FWD – (page 22)
28 POP UP MENU/MENU – Press to display
the BD-ROM or DVD-Video menus.
29 RETURN – Press to return to the
previous screen.
30 FUNCTION – (page 23)
11
01
Page 12

Front panel
01
1 2 3 54 6 7 8
1 STANDBY/ON - Press to turn the
power on and off.
2 Disc tray
3 Front panel display
4 Reset button - If the power cannot be
turned off (set to standby), use a thin rod
to press this button. When the Reset button
is pressed, power to the unit is turned off
(standby status). When the STANDBY/ON
button is pressed to turn on the power, the
unit becomes operational again.
5 Remote control sensor - Point the
remote control to this, then operate it within
approximately 7 m.The player may have
trouble capturing remote control signals if
there is a fl uorescent light nearby. If this
happens, move the player away from the
fl uorescent light.
6 OPEN/CLOSE - Press to open and
close the disc tray.
7 - Press to stop playback.
8 USB port - (page 15)
9 - Press to start playback.
Rear panel
31 2 54
1 LAN (10/100) terminal - Use this to
connect to a network with an always-on
broadband connection.
2 HDMI OUT terminal - Outputs video/audio
signals.
3 AUDIO OUT terminal - Outputs audio
signals.
4 DIGITAL OUT (OPTICAL) terminal -
Output digital audio signals when
connecting the optical digital cable.
5 AC IN - Connect the supplied power cord.
9
12
Page 13

Chapter 2
Connecting up
Be sure to turn off the power and unplug the
power cord from the power outlet whenever
making or changing connections.
Also refer to the operating instructions of the
device being connected.
Connecting using an HDMI
cable
The audio and video signals can be transferred
to HDMI-compatible devices as digital signals
with no loss of sound or video quality.
Notes:
• Make the settings at the Setup menu
according to connected HDMI-compatible
device.
• 1080p video signals may not be output,
depending on the HDMI cable being used.
About HDMI
This player incorporates High-Defi nition Multi-
media Interface (HDMI™) technology.
The player supports Deep Color.The conventional players can transmit a video signal with
8 bit color depth in the YCbCr 4:4:4 or RGB
formats, the players supporting Deep Color
can transmit a video signal with a color bit
depth of greater than 8 bits per color component. Subtle color gradations can be reproduced when connected to a TV that supports
Deep Color.
This product is compatible with “x.v.Color” that
have the capability to realize a wide-gamut
color space based on the xvYCC specifi ca-
tions. Playing video signals conforming to
“xvYCC” standards on this player when
connected to an “x.v.Color”-compatible TV,
etc., expands color reproduction capabilities,
allowing natural colors to be reproduced more
faithfully than ever.
“x.v.Color” is a promotion name given to the
products that have the capability to realize a wide-gamut color space based on the
international standard specifi cations defi ned
as xvYCC.
* Audio signals that can be transferred
with the player’s HDMI OUT terminal
• Dolby TrueHD
• Dolby Digital Plus
• Dolby Digital
• DTS-HD Master Audio
• DTS-HD High Resolution Audio
• DTS Digital Surround
• MPEG-2 AAC
• Linear PCM
* About the HDMI high speed transmission
This player outputs 1080p and Deep Color
video signals. If your TV supports 1080/50p,
1080/60p or Deep Color signals, use a
High Speed HDMI
advantage of the maximum performance the
player and TV can offer.
High Speed HDMI
carry signals up to 1080/24p. 1080i, 1080p
and 720p video signals that are capable of
Deep Color can also be carried.
* When connected to a DVI device
• It is not possible to connect DVI devices
(computer displays, for example) that are
not compatible with HDCP. HDCP is a
specifi cation to protect audiovisual content
across the DVI/HDMI interface.
• No audio signals are output. Connect using
an audio cable, etc.
• This player is designed for connection with
HDMI-compatible devices. When
connected to a DVI device, it may not
operate properly depending on the DVI
device.
®
/™ cable in order to take
®
/™ cables are tested to
About others makers’s discreteness of
connection (Supporting Control function)
Supporting Control function of TV or AV
Systems (AV receiver or amplifi er, etc.)
Converter is connected to the player using an
HDMI cable. And use below function.
• Functions to be operated from TV
• Auto-select function
• Power interlock function
Note:
• Some TV or AV system (AV receiver or
amplifi er, etc.) maybe be not used above
all function.
02
13
Page 14
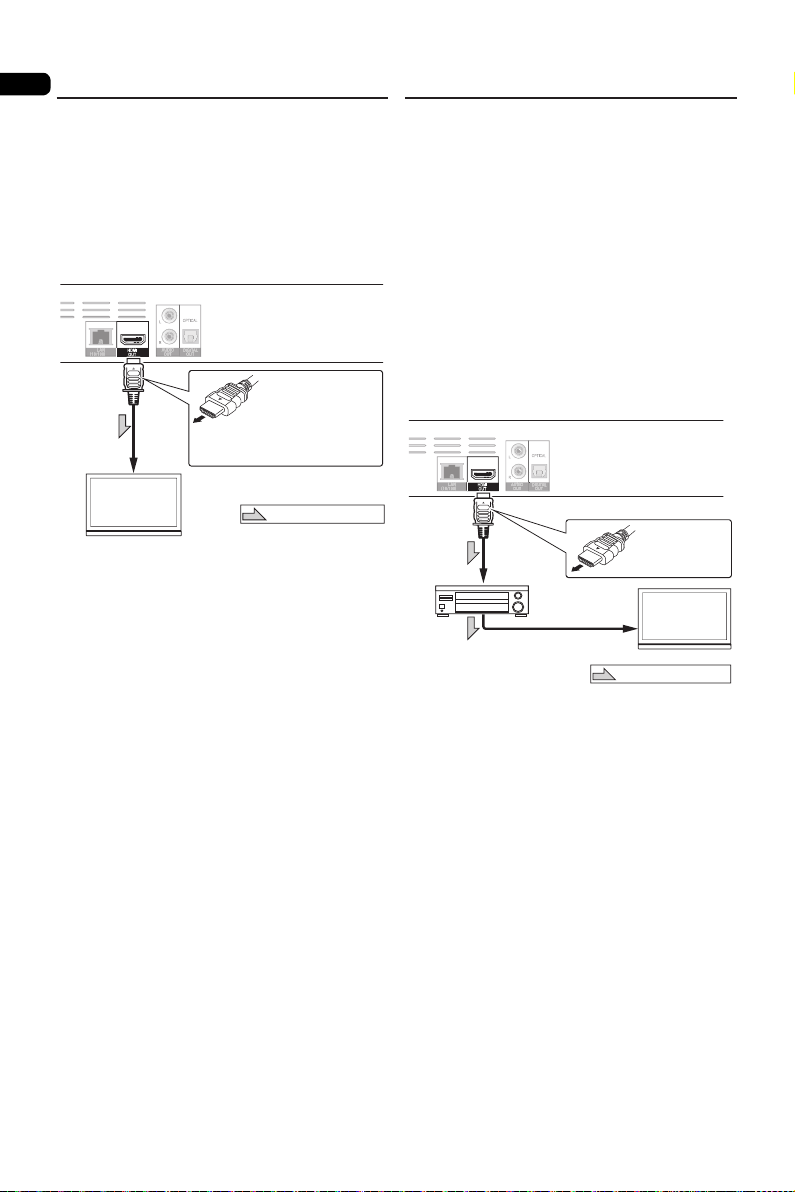
Connecting a TV
02
See Connecting an AV receiver or amplifi er
below to connect an AV receiver or amplifi er
using an HDMI cable.
Notes:
• Hold the plug when connecting and
disconnecting the cable.
• Placing a load on the plug could result in
faulty contact and no video signals being
output.
Rear panel
HDMI cable
(commercially
available)
To HDMI
input terminal
It is also possible to connect to an
AV receiver or amplifier using an
HDMI cable.
TV
Match the direction
of the plug to the
terminal and insert
straight.
Direction of signal flow
Connecting an AV receiver or amplifi er
Connect to an AV receiver or amplifi er in order
to enjoy the surround sound of Dolby TrueHD,
Dolby Digital Plus, Dolby Digital, DTS-HD
Master Audio, DTS-HD High Resolution
Audio, DTS Digital Surround, LPCM or AAC.
For instructions on connecting the TV and
speakers to the AV receiver or amplifi er, refer
to the operating instructions for AV receiver or
amplifi er.
Notes:
• Hold the plug when connecting and
disconnecting the cable.
• Placing a load on the plug could result in
faulty contact and no video signals being
output.
Rear panel
HDMI cable
(commercially
available)
Match the direction
of the plug to the
terminal and
insert straight.
terminal
Direction of signal flow
TV
HDMI cable
(commercially
available)
To HDMI
input terminal
From HDMI
output
terminal
AV receiver
or amplifier
To HDMI input
14
Page 15

Connecting an AV receiver
or amplifi er using an optical
digital audio cable
Rear panel
White
UT
Red
Audio cable
(commercially available)
2-channel
analog audio
can also be
connected.
AV receiver
or amplifier
To audio
input
terminals
Optical digital audio
cable (commercially
available)
Direction of signal flow
To optical digital
audio input terminal
Connecting components to
the USB port
About USB devices
The USB devices that can be connected to the
player are as shown below.
• USB 2.0-compatible USB fl ash drive
(capacity of 1 GB or greater, 2 GB or
greater recommended) or HDD (capacity 2
TB or less)
• File system: FAT16, FAT32 or NTFS
Notes:
• It cannot be used when initialization is done
with a fi le system other than FAT16, FAT32
or NTFS.
• USB devices may not be recognized if they
contain multiple partitions.
• Some USB devices may not operate with
this player.
• Operation of USB devices is not
guaranteed.
Connecting the USB device
Notes:
• Be sure to turn the player’s power off
before connecting or disconnecting USB
devices.
• When using an external hard disk as the
external storage device, be sure to turn on
the hard disk’s power before turning on the
player's power.
• If the USB device is write-protected, be
sure to disable the write-protection.
• When connecting the USB cable, hold onto
the plug, set the plug in the proper direction
for the port and insert it horizontally.
• Placing excessive loads on the plug may
result in poor contact, making it impossible
to write data on the USB device.
• When a USB device is connected and the
player’s power is turned on, do not unplug
the power cord.
Notes:
• Devices may not work if connected to the
USB port via a memory card reader or USB
hub.
• Use a USB cable with a length of 2 meters
or less.
02
15
Page 16

02
Network connection
Connecting the power cord
You can enjoy BD-LIVE function such as
downloading trailer videos and additional
audio/subtitle language, and playing online
games by connecting to the Internet. Connect
the router, which is connected to the Internet,
with the device. When there is an active
DHCP server in the network environment
to be connected, the IP address will be set
automatically. And when there is no active
DHCP server, set the IP address manually
(page 31).
Connecting with a LAN cable
Connect the device to the router with a
commercially available LAN cable.
Player’s rear panel
LAN cable
(commercially
available)
Internet
Modem
WAN
LAN
123
Ethernet hub
(router with hub
functionality)
Connect the power cord after all the
connections between devices have been
completed.
Notes:
• For some Internet service providers, you
may have to set the individual network
confi guration manually.
• Pioneer is not responsible for any
malfunction of the player due to
communication error/malfunctions
associated with your network connection
and/or your connected equipment. Please
contact your Internet service provider or
network device manufacturer.
16
Page 17

Chapter 3
Getting Started
Making settings using the Setup Navigator menu
Be sure to perform these settings when using
the player for the fi rst
time.
Notes:
• Before turning on the power, check that the
connections between the player and other
devices are correct. Also, turn on the power
of the devices connected to the player
before turning on the player’s power.
• When using a Flat Screen TV or front
projector compatible with the Control
function, set Control with HDMI to On on
the connected device before turning on the
player’s power.
1 Turn on the TV’s power and switch the
input.
See the TV’s operating instructions for
instructions on operating the TV.
2 Turn on the player’s power.
Press STANDBY/ON.
Check that the Setup Navigator menu is
displayed.
* If the Setup Navigator menu is not
displayed
Press HOME MENU to display the Home
Menu, select General setting System
Setup Navigator, then press ENTER.
3 Select the OSD language.
Use to select, then press ENTER.
page:2/5 Setup Navigator
Choose
an OSD language before starting.
The language selected will be applied not only here
but aslo in other OSD windows, menus etc.
Previous
English
Deutsch
Hungarian
Czech
Slovak
Polish
OK Next
When a Pioneer Flat Screen TV that is
compatible with Control is connected to
this player’s HDMI OUT terminal, language
settings are imported from the Pioneer Flat
Screen TV’s language settings before Setup
Navigator begins.
4 Select and set the video and audio
output terminals.
Use to select, then press ENTER. See
page 32.
page:3/5 Setup Navigator
Choose
a resolution that fit your TV.
Change will be applied immediately, you have 15s to
determine whether to save the setting or rollback to
prior resolution. Better performance will be provided
by a HDMI connection!
Previous
5 Select the aspect ratio of your TV.
Use to select, then press ENTER. See
page 32.
page:4/5 Setup Navigator
Choose
an aspect retio that fit your TV.
Change will be applied in next page, you should
determine whether to save the setting or rollback to
prior aspect ratio.
Previous
6 Finish the Setup Navigator menu.
Press ENTER.
To redo the settings from the start, select Go
Back.
page:5/5 Setup Navigator
Setting
wizard is to be finished!
Now press Finish button to go to Home Menu. Please
enjoy it.
Previous
Auto
480p/576p
720p
1080i
1080p
1080/24p
OK Next
16:9 Full
16:9 Normal
4:3 Pan&Scan
4:3 Letterbox
OK Next
OK Finish
03
17
Page 18

Chapter 4
04
Playback
Playing discs or fi les
This section describes the player’s main
operations. For the types of discs that can be
played, see Playable discs on page 7. For the
types of fi les that can be played, see Playable
fi les on page 9. Video, image and audio fi les
recorded on discs are played with the Source
function.
1 Press STANDBY/ON to turn on the
power.
Turn the TV’s power on and switch its input
beforehand.
2 Press OPEN/CLOSE to open the disc
tray and load the disc.
Notes:
• Load the disc with the printed side facing up.
• Several dozen seconds are required to
read the disc. Once reading is completed,
the type of disc is displayed on the player’s
front panel display.
3 Press to play the disc.
• To pause, press during
playback. on the player’s front panel
display lights when playback is paused.
• To stop, press during playback.
Notes:
• Some discs start playing automatically
when the disc tray is closed.
• In BD-R/-RE and DVD-R/-RW (VR format),
the SOURCE appears automatically
(page 25).
• DVD-Video discs have parental lock
features. Input the password registered in
the player’s settings to unlock the parental
lock.
• For some BD-R/-RE, playback protection is
set for the disc or titles. Input the code
number set for the disc to unlock the
protection.
• Check Troubleshooting on page 38 if video
or audio signals are not being output
properly.
* If the disc menu is displayed
For some discs, the disc menu is displayed
automatically when playback starts. The
contents of the disc menu and the way to
operate differ from disc to disc.
* Resuming playback from where it was
stopped (resume playback function)
• When is pressed during playback,
the point at which the disc stopped is
stored in the memory. When is pressed,
playback resumes from that point.
• If the stop mode was set while playing a
slideshow of image fi les, playback starts
from the image fi le last displayed.
• To cancel the resume playback function,
press again while playback is stopped.
Notes:
• The resume playback function is canceled
automatically in the following cases:
- When you switch to the standby mode.
- When the disc tray is opened.
- When the fi le list window is switched.
• When you want to continue playback from a
position you specify to be played next time,
see Continuing playback from a specifi ed
position (Continued Viewing Playback) on
page 21.
• The resume playback function cannot be
used for some discs.
• If [Last Memory] is turned [ON], the fi le can
be resumed even after the disc tray has
been opened or power has been turned off
(page 30).
Stop
During playback, press .
• Press button once to go to Prestop mode, the TV screen will show the
Pre-stop logo.
• Press twice to stop the playback
completely.
• In the stop mode, playback picture fi les.
Press to resume playback from the point
where playback is pre-stopped or from the
beginning of the disc after the playback is
completely stopped.
• When playback function is canceled, please
press again.
Note:
• Not all Blu-ray Discs support the resume
feature.
18
Page 19

Quick View (Quick view with audio)
Audio is being output while the video images
are played back at about 1.5 times the normal
speed.
Press while playing back BD-ROM or
DVD video images.
• If is pressed during step play, it will
switch to fast forward.
* To return to normal playback
Press .
• When you cancel pause mode, it returns to
normal playback.
Note:
• During step play, it will become PCM
output.
• It is not possible to switch the audio during
step play.
• Depending on the audio format, such as
Dolby TrueHD and DTS-HD Master Audio,
there may be instances in which step play
cannot be performed.
Slow-view play (slow play with audio)
Audio is being output while the video images
are played back at about 0.8 times the normal
speed.
Press while playing back BD-ROM
or DVD video images.
• If you press during slow-view play, it
will switch to step play.
* To return to normal playback
Press .
• When you cancel pause mode, it returns to
normal playback.
Note:
• During Slow-view play, it will become PCM
output.
• It is not possible to switch the audio during
Slow-view play.
• Depending on the audio format, such as
Dolby TrueHD and DTS-HD Master Audio,
there may be instances in which step play
cannot be performed.
Fast Forward and Fast Reverse
During playback, press or.
• The speed will be switched everytime it is
pressed (speed will be displayed on the TV
screen). The stages of speed vary
depending on the disk or fi le.
* To resume normal playback
Press .
Playing specifi c chapters, tracks or fi les
During playback, input the number of the
chapter/track/fi le you want to select.
• Use the number buttons (0 to 9) to input
the number, then press ENTER.
• Press CLEAR to clear the values you have
input.
Previous and Next
Press or .
• During playback, press , it will
allow you to skip the playback to next
chapter/track/title/fi le of beginning.
• When is pressed while an image fi le
is playing, playback returns to the previous
fi le.
Note:
• Cannot go to the next title or back to the
previous title. Select the title from the Menu
screen or SOURCE screen.
To return to a position a short while ago
Press during playback to return to a position
10 seconds earlier.
During playback, press REPLAY.
To advance to a position slightly ahead
Press during playback to forward to a position
30 seconds later.
During playback, press SHORT SKIP.
Step
During , press.
• The step playback switches each time the
button is pressed.
• Reverse Step Playback is not supported.
• Press to resume playback.
During playback, press.
• The speed switches each time the button is
pressed (the speed is displayed on the TV
screen).
• Reverse Step Playback is not supported.
• Press to resume playback.
04
19
Page 20

A-B
04
During playback, Press A-B.
• Press A-B to set the start-point.
The point is A(start-point).
• Press A-B again to set the end-point.
The point is B (end-point).
Start A-B repeat.
* Cancel A-B repeat
• Press A-B the third time to cancel.
• During playback, press .
Note:
• During below thing, cancel A-B repeat.
- During begin other repeat or random
repeat.
Repeat
Playing photos as slideshows
This function plays the photos, switching them
automatically.
During playback, press INDEX.
• Display the thumbnail of image fi les. The
maximum number is 12 at once.
• If you select one of the image and press
ENTER, slideshow will start from the image
you selected.
* Rotating/inverting photos
When a slideshow is playing or paused, the
display switches as shown below when the
buttons are pressed.
button: Rotates 90° clockwise
button: Rotates 90° counterclockwise
button: Flips horizontally
button: Flips vertically
Switching the camera angles
During playback, Press REPEAT.
• Press REPEAT repeatedly to select
different repeat modes.
as the BD/DVD following looped
sequences: CH, TT and All.
as the CD/JPEG/MP3 following looped
sequences: Only repeat normal or ALL.
Notes:
CH-Chapter
TT-Title
All-All
Zoom
During playback, press ZOOM.
• Press ZOOM button repeatedly to Zoom in/
out playback in the video (the zoom model
is displayed on the TV screen).
[Zoom 2x] [Zoom 3x] [Zoom 4x]
[Zoom 1/2] [Zoom 1/3] [Zoom 1/4]
Normal (not displayed)
Note:
• Not all Blu-ray Discs support the Zoom
function.
20
For BD-ROM and DVD-Video discs on which
multiple angles are recorded, the angles can
be switched during playback.
During playback, select Angle from the
FUNCTION menu.
• The current angle and total number of
recorded angles are displayed on the TV
screen and on the player’s front panel
display.
Switching the subtitles
For discs or fi les on which multiple subtitles
are recorded, the subtitles can be switched
during playback.
Note
• Captions are not displayed for a disc on
which closed captions are recorded using
the recorder. Also, captions recorded using
the recorder cannot be replaced. Refer to
the operating instructions for the recording
equipment.
During playback, press SUBTITLE.
• The current subtitle and total number
of recorded subtitles are displayed on
the TV screen and on the player’s front
panel display.To switch the subtitle, press
SUBTITLE again.
• If the subtitles are not switched when
SUBTITLE is pressed, switch them from
the menu screen.
Page 21

* Turning the subtitles off
Press FUNCTION to select Subtitle
Language, and then select OFF.
* About displaying external subtitle fi les
while playing DivX media fi les
In addition to the subtitles recorded in DivX
media fi les, this player also supports the
display of external subtitle fi les. If a fi le has the
same name as a DivX media fi le aside from
the fi le extension and the extension is one of
the extensions listed below, the fi le is treated
as an external subtitle fi le. Note that DivX
media fi les and external subtitle fi les must be
located in the same folder.Only one external
subtitle fi le can be displayed on this player.
Use a computer, etc., to delete any external
subtitle fi les you do not want to display from
the disc.
Text fi les with the extensions “.smi”, “.srt”, “.
sub” and “.txt”are supported.
Note
• Depending on the fi le, the external subtitles
may not be displayed properly.
Moving subtitles
The position of the subtitles displayed while
playing BD-ROMs or DVDs can be moved.
1 Play the BD-ROM or DVD video and
display the subtitles on the TV screen.
2 Press and hold the SUBTITLE for at
least 2 seconds.
• The Subtitle shift mode is set.
• [Subtitle shift mode] is displayed on the TV
screen.
3 Use the to move the position of the
subtitles.
• Use the ▲/▼ to move the position of the
subtitles.
• Once the setting is complete, press ENTER.
Switching the audio
For discs or fi les on which multiple audio
streams/channels are recorded, audio
streams/channels can be switched during
playback.
During playback, press AUDIO.
• The current audio and total number of
recorded audio streams are displayed on
the TV screen. To switch the audio, press
AUDIO again.
• The audio can also be switched by
selecting Audio from the FUNCTION menu.
• If the audio is not switched when AUDIO is
pressed, switch it from the disc menu
screen.
Displaying the disc information
Press DISPLAY.
The disc information appears on the TV
screen. To switch off the information display,
press DISPLAY again. The information
display differs during playback and when
playback is stopped.
Continuing playback from a specified
position (Continued Viewing Playback)
This function allows you to continue playback
from a position you specify to be played next
time, even after turning the power off.
* Setting
During playback, press CONTINUED at
the position from which you want to start
continued viewing playback.
The elapsed playing time at the specifi ed
position is displayed on the TV screen.
* Playing
1 Press to play the title for which you
have set continued viewing playback.
The continued viewing playback confi rmation
screen appears.
• In the cases below, the continued viewing
playback confi rmation screen is displayed.
For BD videos
- The screen is displayed after the main
featured has been played.
For recorded discs
- The screen is displayed after the folder
is selected and the title set for continued
viewing playback has been played.
2 Use to select Yes, then press
ENTER.
Playback starts from the specifi ed position.
Notes:
• The continued viewing playback setting is
canceled when OPEN/CLOSE is
pressed.
• Continued viewing playback may not work
properly with some discs.
21
04
Page 22

Playback functions
04
The functions that can be used differ according to the type of disc and fi le. In some cases, some
of the functions cannot be used. Check the usable functions on the table below.
1
Function
BD-
BD-R
DVD-
ROM
/-RE
Step play/
Slow-view
2
play
Fast Forward
and Fast
3
Reverse
Short Skip/
Replay
Playing
specifi c titles,
chapters or
tracks
Previous and
Next
Slow motion
6,7
play
3,8
Step
3
A-B
Repeat
ZOOM Files
Switching the
camera
9
angles
Switching the
10
subtitles
Switching the
11
audio
Displaying the
disc
information
1. Some functions may not work for some discs or fi les, even if indicated [] on the table.
2. Depending on the audio format, such as Dolby TreHD and DTS-HD Master Audio, there may be instances in
which quick playback or step play cannot be performed.
3. For some discs, normal playback resumes automatically when the chapter switches.
4. No sound is produced during forward and reverse scanning.
5. Sound is produced during forward and reverse scanning.
6. No sound is output during slow motion playback.
7. Reverse slow motion playback is not possible.
8. Reverse step playback is not possible.
9. There are also disks that do not store more than one angle.
10. • The types of recorded subtitles depend on the disc and fi le.
• In some cases the subtitle may switch or the switching screen provided on the disc may be displayed
immediately, without the current subtitle or the total number of subtitles recorded on the disc being displayed.
11. The types of recorded audio streams depend on the disc and fi le.
4
4
x
Video
DVD-R
/-RW
(VR
format)
4
Disc/fi le type
AVCREC
AVCHD
Video
fi le
Image
fi le
Audio
fi le
xxxx
4
4
4
4
x
x
5
xxx
xxx
xxx
x
xx
xxxxxxx
xxx
xxx
Audio
CD
5
22
Page 23

Using the FUNCTION menu
Various functions can be called out according
to the player’s operating status.
1 Display the FUNCTION menu.
Press FUNCTION. (EX: BDMV Discs)
2 Select and set the item.
Use to select, then press ENTER.
Note:
• Items that cannot be changed are displayed
in gray. The items that can be selected
depend on the player’s status.
* To change the setting of the selected item
Use to change.
* To close the FUNCTION menu
Press FUNCTION.
* FUNCTION menu item list
Item Description
Title Display current title information.
Chapter
File Display current fi le information.
Time Display time of information. Select
Mode Switch play mode.
Audio Language Switch audio language in the
Angle Switch the BD-ROM/DVD-Video
Subtitle Language Switch Subtitle language.
Subtitle Style Select subtitle style.
Code Page Switch the subtitle code page.
Secondary Video Open/Close Second Video.
Secondary Audio Open/Close Second Audio.
Bitrat e Switc h to Audio/V ideo Bitrate.
Still Off Switch off the BD-ROM’s still picture.
Short Skip Forward to a position 30 seconds
Replay Return to a position 10 seconds
Slide Show Switch the playback speed while
Transition Change the style of the slide show
Select your favorite title.
Display current chapter information.
Select your favorite chapter.
Select your favorite fi le.
your playing time.
BD-ROM and DVD discs. Use
selecting your language.
disc’s camera angles.
later.
earlier.
playing the picture slide show.
while playing the picture slide show.
04
Note
• The item of operating will be changed for
disc type. when the disc is only supported,
some item can be operated.
• The types of recorded secondary audio
streams depend on the disc and fi le.
• Some discs do not include secondary
audio/secondary video.
• In some cases, the secondary audio/
secondary video may switch or the
switching screen provided on the disc may
be displayed immediately, without the
current secondary audio/secondary video
or the total number of secondary audio/
secondary video streams recorded on the
disc being displayed.
• Secondary audio mark is displayed for
scenes at which secondary audio is
recorded if Angle/Secondary Indicator is
set to On.
23
Page 24

04
Using the Play Mode
functions
Playing a specifi c title, chapter or track
(Search)
1 Press FUNCTION to display the Play
Mode screen.
2 Select the type of search.
Use to select, then press ENTER.
3 Input the number.
Use the number buttons (0 to 9) or to
input the number. Use to move the
cursor.
• To search for title 32, input 3 and 2, then
press ENTER.
4 Starting playback from the specifi ed
title, chapter or track.
Use to select Search, then press ENTER.
Playing in random order (Random Play)
Use this procedure to play the tracks or fi les in
random order.
1 During playback, press FUNCTION to
display the Play Mode screen.
2 Select Normal/Random.
Use to select, then press ENTER.
3 Select Random.
Use to select, then press ENTER.
* To cancel Random Play
• Select Normal from the Random screen,
then press ENTER.
• During playback, press .
Note
• Random Play is canceled in the following
cases:
– When you use the search function.
– When you start Repeat Play.
24
Page 25

Playing from the Source function
04
The titles/folders/tracks/fi les of the images,
sound tracks or videos stored on the USB or
disk can be displayed in a list format. The
discs that can be played from the Source
function are as shown below (see also page
7).
• BD-R/-RE discs
• DVD-R/-RW (VR format) discs
• Audio CD (CD-DA and DTS-CD)
• DVDs/CDs on which only data fi les of
video, image or audio fi les, etc. are recorded.
Notes:
• Depending on the connected devices and
conditions, some time may be required for
playback to start and for the image to
switch.
Playing discs
1 Press SOURCE to display the Source
function.
2 Select discs.
Use to select, then press ENTER.
Item: 1/3
BDMV
USB1
Playlist
3 Select folders.
4 Select titles.
Use to select, then press ENTER.
Playback starts.
SOURCE
Type:Disc
Size:20321.562M
FS:UDF
Media
Exit
Gallery
* Closing the Source function
Press SOURCE.
Notes:
• When playing an audio CD (CD-DA or
DTS-CD), the Now Playing screen is
displayed.
• Some BD-R/-RE discs have playback
protection. To cancel the protection, input
the password set for the disc.
Playing video fi les
1 Press SOURCE to display the Source
function.
2 Select discs or USB devices.
Use to select, then press ENTER.
Item: 3/10
USB1/Video/MPEG1
Streams
Layer3
f11
f12
f13
f14
3 Select [video] folders.
Use to select video fi les, then press
ENTER.
4 Select the folder or containing the video
fi le you want to play.
Use to select, then press ENTER.
• Folders - The fi les in the selected folder
are displayed.
• Video fi le - Playback starts video fi les.
Playback starts from the selected fi le, and
continues until the end of the list is reached.
Use to play the previous or next fi le.
SOURCE
Type:
MP3
Total Time:
Video Resolution:
Frame Rate:
Media
Exit
Gallery
Notes:
• It may take a few seconds before playback
starts. This is normal.
• It may not be possible to play some fi les
properly.
• The number of views may be restricted.
25
Page 26

Playing image fi les
04
1 Press SOURCE to display the Source
function.
Playing audio fi les
1 Press SOURCE to display the Source
function.
2 Select discs or USB devices.
Use to select, then press ENTER .
3 Select [Image] folders.
Use to select video fi les, then press
ENTER.
4 Select the folder or containing the image
fi le you want to play.
Use to select, then press ENTER.
• Folders - The fi les in the selected folder
are displayed.
• Image fi le - Playback starts slide show.
Item: 3/10
USB1/Photo
ANEW_FOL
Font test
0
1
2
3
SOURCE
Type:
JPG
Size: 0.173M
Video Resolution: 640X480
Media
Exit
Gallery
A slide show starts from the selected file, and
continues until the end of the list is reached.
Use to display the previous or next
file.
* About Slideshow
A display of the files on the disc or in the folder
that switches automatically.
2 Select discs or USB devices.
Use to select, then press ENTER .
3 Select [Music] folders.
Use to select video fi les, then press
ENTER.
4 Select the folder or containing the music
fi le you want to play.
Use to select, then press ENTER.
• Folders - The fi les in the selected folder
are displayed.
• Music fi le - Playback starts music.
Playback starts from the selected file, and
continues until the end of the list is reached.
Use to play the previous or next file.
The now playing screen (shown below) is
display.
1MBZ
5ZQF.1
5PUBM5JNF
5JNFBNBOUF
"SUJTU"NBEB
"MCVN
(FOSF
26
Page 27

Playing in the desired order (Playlist)
The discs that can add tracks and fi les to the
Playlist are as shown below.
• DVDs/CDs/USB devices on which audio
fi les are recorded.
* Adding tracks/fi les
Use this procedure to add tracks and fi les, and
create the Playlist.
* Deleting tracks/fi les from the Playlist
1 Select the track/fi le to be deleted, then
press POP UP MENU to display the POP UP
MENU menu.
2 Use to select Remove from Playlist,
then press ENTER.
Changing the Video options
04
1 Press SOURCE to display the Source
function.
The Source function can also be displayed by
selecting Source from Home Menu, then
pressing ENTER.
2 Select Disc or USB.
Load the disc beforehand.
Use to select, then press ENTER.
3 Select the track/fi le to be added.
Use to select.
4 Press POP UP MENU to display the POP
UP MENU menu.
5 Select Add to Playlist to add to Playlist.
Use to select, then press ENTER.
The track or fi le selected in step 3 is added to
the Playlist.
• To add more tracks or fi les, repeat steps 3
to 5.
* Playing the Playlist
1 Press SOURCE to display the Source
function.
The Source function can also be displayed by
selecting Source from Home Menu, then
pressing ENTER.
You can adjust the setting of the screen
according to your liking.
1 Press VIDEO P. to display the Video
Parameter screen.
2 Select the item and change the setting.
Use to select the item, then use to
change the setting. Once the setting is
completed, press
RETURN to close the
settings screen.
List of setting items
Item Description
Brightness Adjust the brightness.
Contrast
Hue Adjust the balance of green and red.
Saturation Adjust the color saturation.
Adjust the shade of color.
* Closing the Video Parameter screen
Press VIDEO P. or
RETURN.
Note:
• It is not possible to open the Video
Parameter screen when any of the Home
Menu (Source, Web Contents, Initial
Setup), Function Menu or Disc Menu is
being displayed.
2 Select Playlist.
Use to select, then press ENTER.
3 Select the track/fi le to be played.
Use to select, then press ENTER.
Playback starts from the selected track/fi le and
continues until the end of the list is reached.
Use to play the previous or next
track/fi le. The Now Playing screen is
displayed.
27
Page 28

Chapter 5
05
Advanced settings
General Setting
1 When playback is stopped or open Bluray disc player , display the Home Menu
screen.
Press HOME MENU.
2 Select and set Initial Setup.
Use to select, then press ENTER.
3 Select the item and change the setting.
Use to select, then press ENTER.
General Setting
System
Language
Playback
Parental Lock
Network
Use cursor key to move focus, use “Enter” key
to select
Exit
* Closing the Initial Setup screen
Press HOME MENU.
Note:
• If the item is gray, then it cannot select.
Screen Saver
Auto Power Off
Disc Auto Playback
Control with HDMI
Setup Navigator
On
Off
On
On
More...
Return
• [Auto Power Off]
{Off} - Select this if you do not want the power
to turn off automatically.
{15 min}, {30 min} - The power will be
automatically turned off if no operation has
been performed for more than 15 minutes/
30 minutes.
• [Disc Auto Playback]
{On} - Turn on disc auto playback mode.
{Off} - Turn off disc auto playback mode.
• [Control with HDMI]
This player supports Easylink which uses the
HDMI CEC (Consumer Electronics Control)
protocol. You can use one single remote
control to control all Control functions of
devices that are connected through HDMI
connectors.
{On} - Turn on Control features.
{Off} - Turn off Control features.
• [Setup Navigator]
Set BD player’s language, Resolution and
TV’S Aspect ratio.
• [Load Default]
Reset all settings of BD player to intial default
state.
- Follow the instruction on the TV screen to
confi rm the default setting operation.
1. Select Load Default.
2. A dialog box pops up shown as below.
Select OK.
System
To change the following system option to
personalize your BD player.
• [Screen Saver]
Turn on or Off the screen saver mode. It helps
to protect the TV screen.
{ On } - Turn on the screen saver mode: the
screen saver mode will be automatic turn on
after 10 minutes no operating program.
{ Off } - Turn off the screen saver mode.
28
Load Default
Do you want to load default?
OK Cancel
3. Load Default it in progress, which may take
a while. Please wait...
Load Default
Loading default, please wait...
4. When Load Default will be completed. TV
will display as follows:
page:1/5 Setup Navigator
Welcome
to use BD Player Setting Wizard!
Some simple settings are needed before you enjoy it.
Please make detail settings of home menu later.
OK Next
Page 29

5. Press EN
TER to enter language setting.
Press select to language.
page:2/5 Setup Navigator
Choose
an OSD language before starting.
The language selected will be applied not only here
but aslo in other OSD windows, menus etc.
Previous
English
Deutsch
Hungarian
Czech
Slovak
Polish
OK Next
6. Press ENTER to enter Resolution setting.
page:3/5 Setup Navigator
Choose
a resolution that fit your TV.
Change will be applied immediately, you have 15s to
determine whether to save the setting or rollback to
prior resolution. Better performance will be provided
by a HDMI connection!
Previous
Auto
480p/576p
720p
1080i
1080p
1080/24p
OK Next
Press to select an option. Press ENTER.
Use to select an “Yes” or “No”.
page:3/5 Setup Navigator
Video Resolution
has been changed!
Does everything locks all right with this resolution?
Press Yes if you want to apply it. Press No to
rollback to previous one.
Previous
14s
Yes
No
OK Next
7. Press ENTER to enter Aspect ratio setting.
page:4/5 Setup Navigator
Choose
an aspect retio that fit your TV.
Change will be applied in next page, you should
determine whether to save the setting or rollback to
prior aspect ratio.
Previous
16:9 Full
16:9 Normal
4:3 Pan&Scan
4:3 Letterbox
OK Next
Press to select an option. Press ENTER.
page:5/5 Setup Navigator
Setting
wizard is to be finished!
Now press Finish button to go to Home Menu. Please
enjoy it.
8. Press ENTER to return Gereral Setting
Menu.
• [Upgrade]
You may select to Upgrade the software from
the USB fl ash drive.
1. Connect the USB fl ash drive which contains
the upgrade fi le package.
2. Follow the instruction on the TV screen to
confi rm upgrade operation.
- Upgrade complete the software, the
system will reboot after 5s or Enter key is
pressed.
Notes:
• Do not unplug the power cord or remove
the USB fl ash drive/disc during software
updating. Also, do not press the reset button
during updating. Otherwise, the updating will
be aborted and malfunction may occur with
the player.
• If the upgrade fi le package did not pass
the verifi cation, error prompt is displayed ,
check the package again (such as the
package is not complete)
• Make sure the fi rmware version is not an
old version.
• [BUDA]
During insert more than 1GB empty USB
device, you can operate BD-Live function.
And Blu-ray DVD system will be automatic
name a BUDA content.
BUDA will display Information.
1. Press ENTER.
2. Follow the instruction on the TV screen to
select {BUDA Information}.
(FOFSBM4FUUJOH
4ZTUFN
-BOHVBHF
1MBZCBDL
1BSFOUBM-PDL
/FUXPSL
6TFDVSTPSLFZUPNPWFGPDVTVTFþ&OUFSÿLFZ
UPTFMFDU
&YJU
#6%"*OGPSNBUJPO
'SFFTJ[F.#
'NUCVEB
3FUVSO
3. Press ENTER to select “Fmt buda”, BUDA
of fi les will be cleaned.
• [Quick Start]
{ On } - Select to shorten the required time to
boot up.
{ Off } - Select to perform normal bootup.
Language
Select the OSD(On-Screen Display)
Language, Disc Menu Language, Audio
Language, Subtitle Language default
language for the player.
05
Previous
OK Finish
29
Page 30

05
General Setting
System
Language
Playback
Parental Lock
Network
Use cursor key to move focus, use “Enter” key
to select
Exit
OSD Language
Disc Menu Language
Audio Language
Subtitle Language
English
English
English
English
Return
• [OSD Language]
Select the default on-screen display
language.
• [Disc Menu Language]
Select the Disc Menu Language.
• [Audio Language]
Select the default audio language.
• [Subtitle Language]
Select the default subtitle language.
Playback
(FOFSBM4FUUJOH
4ZTUFN
-BOHVBHF
1MBZCBDL
1BSFOUBM-PDL
/FUXPSL
6TFDVSTPSLFZUPNPWFGPDVTVTFþ&OUFSÿLFZ
UPTFMFDU
&YJU
• [Angle Mark]
Some DVDs/BDs contain the scenes
recorded with multiple angles, which allow
you to enjoy the videos with your desired
angles, therefore the angle mark is displayed
only when the
DVD/BD disc is supportable for multi-angle
and Angle Mark is set to ON.
{On} – Dispaly the angle mark.
{Off} –Hide the angle mark.
• [PIP Mark]
The Picture -In- Picture (PIP) mode display
two pictures on the TV screen at the same
time, the full screen picture is called Main
Window and the small inset windows is called
Sub Windows. The PIP mark is displyed when
in PIP mode and PIP Mark is set to ON.
{On} – Dispaly the PIP mark.
{Off} – Hide the PIP mark.
• [Secondary Audio Mark]
{On} – Dispaly Secondary Audio Mark.
{Off} – Hide the Secondary Audio Mark.
"OHMF.BSL
1*1.BSL
4FDPOEBSZ"VEJP.BSL
-BTU.FNPSZ
1#$.FOV 0O
3FUVSO
0O
0O
0O
0O
• [Last Memory]
If you open a disc or switch this player to
standby state during normal playback, the BD
Player can memory the end playing point, the
player will start playback from the memory
point next time.
{On} – Active Last Memory feature.
{Off} – Disable Last Memory feature.
Note:
• Not all Blu-ray Discs support the function.
• [PBC Menu]
VCD2.0 has PBC control (Playback Control)
menu, which allow you to interact with the
system via menu.
{On} – Open PBC and Display playback
control menu, use NUMBER keys to select
desired option.
{Off} – Close PBC and Hiden playback
control menu and start playback from track1
automatically.
®
• [DivX
VOD DRM]
Select DivX® VOD DRM option to see your
registration code in order to view DivX®
Video.
Parental Lock
(FOFSBM4FUUJOH
4ZTUFN
-BOHVBHF
1MBZCBDL
1BSFOUBM-PDL
/FUXPSL
6TFDVSTPSLFZUPNPWFGPDVTVTFþ&OUFSÿLFZ
UPTFMFDU
&YJU
• [Change password]
Follow the instruction on the TV set or change
the password for locked discs and play
restricted DVDs/BDs.
(FOFSBM4FUUJOH
4ZTUFN
-BOHVBHF
1MBZCBDL
1BSFOUBM-PDL
/FUXPSL
6TFDVSTPSLFZUPNPWFGPDVTVTFþ&OUFSÿLFZ
UPTFMFDU
&YJU
$IBOHF1BTTXPSE
1BSFOUBM$POUSPM
$PVOUSZ$PEF
$IBOHF1BTTXPSE
1MFBTFFOUFSDVSSFOUQBTTXPSEὉ
.PSF
.PSF
.PSF
3FUVSO
3FUVSO
30
Page 31

1. Use number keys to enter four digit old
pas
sword.
2. Enter the new password.
General Setting
System
Language
Playback
Parental Lock
Network
Use cursor key to move focus, use “Enter” key
to select
Exit
Change Password
New password:
Confirm password:
Return
3. Enter the new password again to confi rm.
• [Parental Control]
Restricts access to discs that are unsuitable
for children. These discs must be recorded
with rating.
1. Press ENTER.
2. Use number keys to enter the password.
(FOFSBM4FUUJOH
4ZTUFN
-BOHVBHF
1MBZCBDL
1BSFOUBM-PDL
/FUXPSL
6TFDVSTPSLFZUPNPWFGPDVTVTFþ&OUFSÿLFZ
UPTFMFDU
&YJU
1BSFOUBM$POUSPM
&OUFS1BTTXPSEὉ
3FUVSO
3. Select a rating level, then press ENTER.
(FOFSBM4FUUJOH
4ZTUFN
-BOHVBHF
1MBZCBDL
1BSFOUBM-PDL
/FUXPSL
6TFDVSTPSLFZUPNPWFGPDVTVTFþ&OUFSÿLFZ
UPTFMFDU
&YJU
Items Description
Off
KID SAFE
Safe for kids
G All children and general guidance
PG Parental guidance
PG-13 Parental guidance for children under 13
PGR Parental guidance Recommended
R Restricted viewing
NC-17 No one 17 and under allowed
ADULT Adult only
1BSFOUBM$POUSPM
4FMFDU-FWFMὉ
0GG
,*%4"'&
(2)G
3FUVSO
Notes:
• Rated discs above the level you set in
[Parental Control] require a password to
be played
• The ratings are country-depended. To
allow all disc to play, select ‘Off’.
• [Country Code]
This ensures you see the scenes intended for
your current residential region/country.
Network
(FOFSBM4FUUJOH
4ZTUFN
-BOHVBHF
1MBZCBDL
1BSFOUBM-PDL
/FUXPSL
6TFDVSTPSLFZUPNPWFGPDVTVTFþ&OUFSÿLFZ
UPTFMFDU
&YJU
To setup the network connection, enjoy BDDVD additional content.
Note:
• Ensure that the network cable is properly
connected and the router is switched on.
1. Connect the disc player to the broadband
modem or router.
2. Insert a BD disc with Bonus View/BD-Live.
3. In the Setup menu, Select [Network], then
press .
4. Select [IP Setting] in the menu, then press
ENTER to select [Auto]. An IP address is
obtained automatically.
If no IP address is obtained, select [Manual]
input IP Address, Subnet Mask, Default
Gateway, DNS and press ENTER to re-
connect again to the network. It will be try to
obtain the IP address again.
5. Press [Return] or press ENTER to exit.
Notes:
• Use internet Connection between provider.
• This player does not support automatic
detection of cross-cables. Use the straight
(standard) LAN cable.
• Loading BD-Live content from the internet
may take some time, depending on the fi le
size and the speed of the internet
connection.
• [Information]
Display the Network Information page. In this
page, you can view the info of Interface,
Address Type, IP Address, Subnet Mask,
Default Gateway and DNS.
*OUFSOFU$POOFDUJPO
*OGPSNBUJPO
$POOFDUJPO5FTU
*14FUUJOH
#%-JWF$POOFDUJPO
&OBCMF
1FSNJUUFE
3FUVSO
31
05
Page 32

• [Connection Test]
05
Display network connection message.
• [IP Setting]
{Auto} – Auto obtain network information.
{Manual} – Manual setup network
information.
• [BD-Line Connection]
{Permitted} – During playback BD-Live disc,
the disc may automatically downloading all
information from appointed network.
{Partial Permitted} – During playback BDLive disc, the disc may automatically
downloading the part of information from
appointed network.
{Prohibited} – Disable downloading
information from network.
Video Output
1. Press HOME MENU.
[General Setting] menu is displayed.
2. Press to select [Video Output], then
press .
3. Select an option, press to access.
Video Output
Display Setting
Use cursor key to move focus, use “Enter” key
to select
Exit
4. Press to select a setup option and
press .
5. Select the setting you wish to change
and press OK to confi rm.
- Press to return to the previous menu.
- Press HOME MENU to exit the menu.
Display Setting
• [TV Aspect Ratio]
Select Video output Aspect Ratio according
to your TVs spec.
{16:9 Full} – Select this when connecting to a
wide (16:9) TV.
{16:9 Normal} – Select this when connected
to a wide (16:9) TV. 4:3 pictures are displayed
with vertical black bars along the sides.
TV Aspect Ratio
Video Resolution
Color Space
HDMI Deep Color Off
16:9
720p
YCbCr422
Return
{4:3 Pan&Scan} – Select this when
connecting to a 4:3 screen TV and playing a
16:9 video. The video will be played with the
left and right sides of the image cut off to
display on the 4:3 screen. (This function works
if the disc is labeled for 4:3PS.)
{4:3 Letterbox} – Select this when connecting
to a 4:3 screen TV and playing a 16:9 video.
The video will be played with black bands at
the top and bottom.
• [Video Resolution]
Select a video output resolution that is
compatible with your TV display capability.
You can change the resolution by using the
HDMI button on the remote control. The
resolution changes each time the HDMI button
is pressed.
{Auto} – Select the most suitable resolution
according to the input video. You can enjoy
Blu-ray Discs and also videos on DVD with
great picture quality using the Upscaling
function.
{480p/576p}, {720p}, {1080i}, {1080p},
{1080/24p} – Select a video resolution setting
that is best supported by the TV, See TV
manual for details.
Note:
• When 1080/24p is selected, the movement
may be unnatural or the picture unclear,
depending on the contents being played
back. In such cases, set the resolution to
something other than 1080/24p.
• [Color Space]
Select a predefi ned color space of picture.
{RGB} – Select this to output the video
signals as RGB signals. Choose FULL RGB if
the colors seem too dense and all the dark
colors are displayed in a uniform black when
RGB is selected.
{YCbCr444} – Select the video output
YCbCr4:4:4 color space.
{YCbCr422} – Select the video output
YCbCr4:2:2 color space.
{Full RGB} – Select this to output the video
signals as RGB signals. Choose this if the
colors seem too faint and the black seems too
bright when FULL RGB is selected.
• [HDMI Deep Color]
This feature is available only when the display
device is connected by a HDMI cable, and
when it supports deep color feature.
{Auto} – Select when you want to
automatically output the optimal bit color.
{Off} – Output standard 24 bit color.
32
Page 33

Audio Output
1. Press HOME MENU.
[General Setting] menu is displayed.
2. Press to select [Audio Output],
then press .
3. Select an option, press to access.
Audio Output
Audio Setting
Use cursor key to move focus, use “Enter” key
to select
Exit
4. Press to select a setup option and
press .
5. Select the setting you wish to change
and press OK to confi rm.
- Press to return to the previous menu.
- Press HOME MENU to exit the menu.
Sound Retriever Off
Digital output
HDMI Audio
Max Sampling Freque...
DRC Auto
PCM
PCM
48Kz
Reture
Audio Setting
• [Sound Retriever]
When compressed audio is subjected to
compression process, some parts may be
deleted. When you turn on the Sound
Retriever function, sound quality will be
improved by making up for the part that had
been deleted.
{On} – Turn on the Sound Retriever function.
{Off} – Turn off the Sound Retriever function.
• [Digital output]
Select the output mode of optical jack, options
include Bitstream, PCM, Reencode and Off.
{Bitstream} – Output digital signal without
any processing.
{PCM} – Select this to output digital audio
signals converted to 2-channel audio signals.
{Reencode} – When a BD containing
secondary audio and interactive audio is
played, the two audio signals are mixed and
converted to Dolby Digital audio or DTS audio
for output.
{Off} – Select this function when digital audio
signals are not used.
05
33
Page 34

• [
HDMI Audio]
05
Select the output mode of HDMI Digital Out
jack, options include Bitstream, PCM,
Reencode and Off.
{Bitstream} – Output HDMI digital signal
without any processing.
{PCM} – Select this to output HDMI audio
signals converted to PCM audio signals.
{Reencode} – When a BD containing
secondary audio and interactive audio is
played, the two audio signals are mixed and
converted to Dolby Digital audio or DTS audio
for output.
{Off} – Select this function when HDMI audio
signals are not used.
• [Max Sampling Frequency]
Select the digital audio signal sampling
frequency.
{48K}, {96K}, {192K} – Outputs audio signals
that are limited to a sampling frequency below
the set sampling frequency from the Digital
Out jack. Select according to the
performance of the connected device.
Note:
• When playing back a sampling frequency
file or a disk having a lower than or equal
setting compared to the present setting,
you can output it at the unchanged
sampling frequency.
• Sources with sampling frequencies of over
192 kHz cannot be played.
• When playing copyright-protected discs or
files, the signals are output with the
sampling frequency limited to 48 kHz or
below, regardless of this setting.
• [DRC]
{Off} – Select this to output audio signals
without using the DRC function.
{On} – Select this to adjust the range between
the loudest and softest sounds (dynamic
range) for playback at average volume. Use
this when it is hard to hear dialog or when
watching movies at midnight.
{Auto} – Select to switch the DRC setting On/
Off automatically according to the input audio
signal from the disc. This only affects Dolby
TrueHD signals.
Note:
• This affects such audio signals as Dolby
Digital, Dolby TrueHD, and Dolby Digital
Plus.
• DRC affects audio signals output from the
following audio output terminals:
– Analog audio signals output from the
AUDIO OUT terminals
– Linear PCM audio signals output from
the DIGITAL OUT or HDMI OUT
terminals
• Depending on the disc, the effect may be
weak.
• The effect may differ depending on the
speakers, the AV amplifier settings, etc.
• [Downmix]
{Stereo}-Surround audio signals converted to
linear PCM audio signals are converted into
2-channel (stereo) signals for output.
{Lt/Rt}-Surround audio signals converted to
linear PCM audio signals are converted into
2-channel signals compatible with Dolby
Surround for output (when the connected AV
receiver or amplifi er, etc., is compatible with
Dolby Pro Logic, the AV receiver or amplifi er
outputs the linear PCM audio signals as
surround audio signals).
System Information
1. Press HOME MENU.
[General Setting] menu is displayed.
2. Press to select [System
Information],
- The current software version and MAC
address display
- Press to return to the previous menu.
- Press HOME MENU to exit the menu.
System Information
Software Version: XXXXXXXXXXXX
MAC:XXXXXXXXXXXX
License
Use cursor key to move focus, use “Enter” key
to select
Exit
• When you want to display the license of the
software that you are using in the device,
select “License”.
Home Menu
34
Page 35

About how digital audio formats are output
Setting Bitstream PCM Reencode
The primary audio,
secondary audio and
interactive audio are
converted into PCM
audio then converted
again into Dolby Digital
audio or DTS audio and
output simultaneously
OUT
HDMI OUT
terminal
Digital
Dolby
Method of
conversion
Output
terminal(s)
Audio type
Dolby Digital
Dolby Digital
Plus
Dolby TrueHD
DTS Digital
Surround
Only the primary audio
(the main sound for
movies, etc.) is output.
The secondary audio
and interactive audio are
not output.
HDMI OUT
terminal
Dolby
Digital
Dolby
Digital Plus
Dolby
3
TrueHD
DTS Digital
Surround
DIGITAL
OUT
terminal
Dolby
Digital
Dolby
Digital
Dolby
Digital
DTS Digital
Surround
The primary audio,
secondary audio and
interactive audio are
converted into PCM
audio and output
simultaneously.
HDMI OUT
terminal
1
DIGITAL
terminal
PCM 5.1ch
PCM 7.1ch
PCM 7.1ch
PCM 5.1ch
DIGITAL
OUT
terminal
Dolby
Digital
2
.
05
AUDIO
OUTPUT
terminal
DTS-HD High
Resolution
3
Audio
DTS-HD
Master Audio
PCM
AAC
1 During quick-view and slow-view play, sound is output at the same time with PCM setting, regardless of
the setting. However, LFE channel is not output. (5.1 → 5.0, 7.1 → 7.0)
2 If there is no secondary audio or interactive audio, depending on the disc the signals may be output
without being reencoded.
3 Quick-view play and slow-view play are not enabled.
4 For multi-channel audio, the sound is converted into 2-channel audio for output.
DTS-
HD High
Resolution
DTS-HD
3
Audio
Master
Audio
DTS Digital
Surround
DTS Digital
Surround
PCM 7.1ch
PCM 7.1ch
PCM 7.1ch PCM 2ch4PCM 7.1ch
AAC AAC PCM 5.1ch AAC AAC
PCM 2ch
4
DTS Digital
Surround
Dolby
Digital
DTS Digital
Surround
Dolby
Digital
2ch
4
Note:
• Depending on the disc, the number of channels may differ.
• Depending on the connected HDMI device, the HDMI output audio and number of channels
may differ.
• The HDMI output audio and number of channels may differ when Resolution is set to
480p/576p, as well as when set to Auto if the connected device only supports 480p or 576p.
• Three types of audio are recorded on BD video discs.
– Primary audio: The main sound.
– Secondary audio: Additional sound added supplementarily, such as comments by
directors, actors, etc.
– Interactive audio: Sounds such as clicks heard when operations are performed. The
interactive audio differs from disc to disc.
35
Page 36

Chapter 6
Additional information
06
Cautions on use
Moving the player
If you need to move this unit, fi rst remove the
disc if there’s one loaded, and close the disc
tray. Next, press STANDBY/ON to switch
the power to standby, checking that the
POWER OFF indication on the front panel
display goes off. Wait at least 10 seconds.
Lastly, disconnect the power cord.Never lift or
move the unit during playback — discs rotate
at a high speed and may be damaged.
Place of installation
Select a stable place near the TV and AV
system to which the unit is connected.Do not
place the player on top of a TV or color
monitor. Keep it away from cassette decks or
other components easily affected by
magnetism.Avoid the following types of places:
• Places exposed to direct sunlight
• Humid or poorly ventilated places
• Extremely hot or cold places
• Places subject to vibration
• Places in which there is much dust or
cigarette smoke
• Places exposed to soot, steam or heat (in
kitchens, etc.)
* Do not place objects on top
Do not place objects on top of the player.
* Do not obstruct the ventilation holes
Do not use the player on a shaggy rug, bed, or
sofa, and do not cover the player with a cloth,
etc. Doing so will prevent heat dissipation and
could lead to damage.
* Keep away from heat
Do not place the player on top of an amplifi er
or other device generating heat. When
installing in a rack, to avoid the heat generated
by the amplifi er and other devices, place it on
a shelf below the amplifi er whenever possible.
Turn the power off when not using the
player
Depending on the conditions of the TV
broadcast signals, striped patterns may
appear on the screen when the TV is turned
on while the player’s power is turned on. This
is not a malfunction with the player or TV. If
this happens, turn the player’s power off. In
the same way, noise may be heard in the
sound of a radio.
About Condensation
If the player is moved suddenly from a cold
place into a warm room (in winter, for
example) or if the temperature in the room in
which the player is installed rises suddenly
due to a heater, etc., water droplets
(condensation) may form inside (on operating
parts and the lens). When condensation is
present, the player will not operate properly
and playback is not possible. Let the player
stand at room temperature for 1 or 2 hours
with the power turned on (the time depends on
the extent of condensation). The water
droplets will dissipate and playback will
become possible.Condensation can also occur
in the summer if the player is exposed to the
direct wind from an air-conditioner. If this
happens, move the player to a different place.
Cleaning the player
Normally, wipe the player with a soft cloth. For
tough dirt, apply some neutral detergent
diluted in 5 to 6 parts water to a soft cloth,
wring out thoroughly, wipe off the dirt, then
wipe again with a dry cloth.
Note that getting alcohol, thinner, benzene or
insecticide on the player could cause the print
and coating to peel off. Also, avoid leaving
rubber or vinyl products in contact with the
player for long periods of time, as this could
damage the cabinet.
When using chemical-impregnated wipes, etc.,
read the wipe’s cautions carefully.Unplug the
power cord from the power outlet when
cleaning the player.
Caution for when the unit is installed in a
rack with a glass door
Do not press the OPEN/CLOSE on the
remote control to open the disc tray while the
glass door is closed. The door will hamper the
movement of the disc tray, and the unit could
be damaged.
36
Page 37

Cleaning the pickup lens
The player’s lens should not become dirty in
normal use, but if for some reason it should
malfunction due to dust or dirt, consult your
nearest Pioneer authorized service center.
Although lens cleaners for players are
commercially available, we advise against
using them since some may damage the lens.
Handling discs
Do not use damaged (cracked or warped)
discs.Do not scratch the disc’s signal surface
or let it get dirty.Do not load more than one
disc into the player at a time.
Do not glue paper or put stickers onto the disc,
or use a pencil, ball-point pen or other sharptipped writing instrument. These could all
damage the disc.
06
Do not use benzene, thinner or other volatile
chemicals. Also do not use record spray or
antistatic agents.For tough dirt, apply some
water to a soft cloth, wring out thoroughly,
wipe off the dirt, then wipe off the moisture
with a dry cloth.
* Specially shaped discs
Specially shaped discs (heart-shaped,
hexagonal, etc.) cannot be used on this player.
Never use such discs, as they will damage the
player.
* Storing discs
Always store discs in their cases, and place
the cases vertically, avoiding places exposed
to high temperature or humidity, direct sunlight
or extremely low temperatures.Be sure to read
the cautions included with the disc.
* Cleaning discs
It may not be possible to play the disc if there
are fi ngerprints or dust on it. In this case, using
a cleaning cloth, etc., to wipe the disc gently
from the center toward the outer edge. Do not
use a dirty cleaning cloth.
* Condensation on discs
If the disc is moved suddenly from a cold place
into a warm room (in winter, for example),
water droplets (condensation) may form on the
disc surface. Discs will not play properly if
there is condensation on them. Carefully wipe
off the water droplets from the disc surface
before using the disc.
37
Page 38

06
Troubleshooting
Incorrect operation is often mistaken for trouble or malfunction. If you think that there is
something wrong with this component, check the points below. Sometimes the trouble may lie in
another component. Inspect the other components and electrical appliances being used. If the
trouble cannot be rectifi ed even after checking the points below, ask your nearest Pioneer
authorized service center or your dealer to carry out repair work.
Playback
Problem Check Remedy
• Disc does not play.
• Disc tray opens
automatically.
No picture is displayed
or the picture is not
displayed properly.
Is the disc one that is playable on
this player?
Is the fi le one that is playable on this
player?
Is the disc scratched? It may not be possible to play scratched
Is the disc dirty? Clean the disc (page 37).
Is there a piece of paper or sticker
attached to the disc?
Is the disc properly set in the disc
tray?
Is the region number correct? See About region numbers on page 7 for
Is the HDMI cable properly
connected?
Is the HDMI cable damaged? If the cable is damaged, replace it with a
Is the input setting on the connected
TV or AV receiver or amplifi er right?
Is the output video resolution
properly set?
Is the player connected with an
HDMI cable other than a High Speed
®
/™ cable (with a Standard
HDMI
®
HDMI
/™ cable)?
Is a DVI device connected? The picture may not be displayed
Is HDMI Color Space properly set? Change the HDMI Color Space setting.
Check whether the disc is one that can
be played on this player (page 7).
• Check whether the fi le is one that can
be played on this player (page 9).
• Check whether or not the fi le is
damaged.
discs.
The disc may be warped and unplayable.
• Set the disc with the printed side facing
up.
• Set the disc properly in the depression
in the disc tray.
the region numbers of discs that can be
played on this player.
• Connect the cable properly according to
the connected devices (page 13).
• Insert the cable fi rmly and all the way in.
new one.
Read the operating instructions of the
connected components and switch to the
proper input.
Use HDMI to switch to a resolution at
which the video and audio signals are
output.
Connect the player to the TV using a
High Speed HDMI
properly if a DVI device is connected.
®
/™ cable.
Playback stops. • Playback may stop if the unit is subject to shocks or set in an unstable place.
• Playback may stop when a USB device is connected or disconnected during
playback. Do not connect or disconnect USB devices during playback.
38
Page 39

Problem Check Remedy
Picture freezes and the
front panel and remote
control buttons stop
working.
• Picture is stretched.
• Picture is cropped.
• Aspect ratio cannot
be switched.
Picture is interrupted. The picture may be interrupted when the
The subtitles cannot
be switched.
Sound and picture are
not synchronized.
• No sound is output.
• Sound is not output
properly.
Multi-channel sound is
not output.
Is the TV’s aspect ratio properly set?
Is TV Aspect Ratio properly set? Set TV Aspect Ratio properly.
Is Output Terminal properly set? Set Output Terminal properly.
Is the disc played back in slow motion?
Is the disc played back in fast
forward or fast reverse?
Are the audio cables properly
connected?
Is the audio cable damaged? If the cable is damaged, replace it with a
Are the connected components (AV
receiver or amplifier, etc.) properly
set?
Is HDMI Audio Out properly set? Set HDMI Audio Out to PCM or
Is a DVI device connected? The sound will not be output from the
Is the audio output of the connected
AV receiver or amplifi er, etc.,
properly set?
Is multi-channel sound selected? Use the menu screen or AUDIO to switch
• Press to stop playback, then restart
playback.
• If the playback cannot be stopped,
press STANDBY/ON on the player’s
front panel to turn off the power, then turn
the power back on.
• If the power cannot be turned off (set to
standby), use a thin rod to press the reset
button on the main unit’s front panel.
When the Reset button is pressed, power
to the unit is turned off (standby status).
When the STANDBY/ON button is
pressed to turn on the power, the unit
becomes operational again.
Read the TV’s operating instructions and
set the TV’s aspect ratio properly.
When video signals with a resolution of
1080i, 1080p, 1080/24p or 720p are being
output from the HDMI OUT terminal, they
may be output with an aspect ratio of 16:9
even if TV Aspect Ratio is set to 4:3.
resolution of the recorded video signal
switches. Press HDMI to select a setting
other than Auto.
The subtitles cannot be switched for
discs recorded on a DVD or BD recorder.
No sound is output during slow motion
play and forward and reverse scanning.
• Connect the cable properly according to
the connected devices (page 15)
• Insert the cable firmly and all the way in.
new one.
Read the operating instructions of the
connected components and check the
volume, input, speaker settings, etc.
Reencode.
HDMI OUT terminal if a DVI device is
connected. Connect the device to a
DIGITAL OUT terminal or the AUDIO
OUT terminals.
For some BDs, audio signals are only
output from DIGITAL OUT terminal or the
HDMI OUT terminal.
Read the operating instructions of the
connected AV receiver or amplifi er and
check the audio output settings of AV
receiver or amplifi er.
the disc’s sound to multi-channel.
06
39
Page 40

06
Problem Check Remedy
Noise can be heard
when outputting
DTS Digital
Surround signals
from the DIGITAL
OUT terminal.
192 kHz or 96 kHz
digital audio signals
cannot be output
from the DIGITAL
OUT terminal.
Secondary audio or
interactive audio is
not output.
After a disc is
inserted, Loading
stays displayed and
playback does not
start.
■ is displayed in fi le
names, etc.
A message
indicating low
memory appears
while playing a
BD-ROM disc.
Is the connected AV
receiver or amplifi er
compatible with DTS
Digital Surround?
Is HDMI Audio properly
set?
Are Digital Output
properly set?
Are there too many fi les
recorded on the disc?
If an AV receiver or amplifi
DTS Digital Surround is connected to the DIGITAL OUT
terminal, set DTS Digital Surround and HDMI Surround
to PCM.
• Copyright-protected audio is converted to 48 kHz or
less before output.
• Set Max Sampling Frequency to 96 kHz or 192 kHz.
When listening to the sound from an HDMI OUT
terminal, set HDMI Audio to Reencode or PCM.
When listening to the sound from an DIGITAL OUT
terminal, set Digital Output to Reencode or PCM.
When a disc on which fi les are recorded is inserted,
depending on the number of fi les recorded on the disc,
loading may take several dozen minutes.
The characters that cannot be displayed on this player
are displayed in ■. When you are input characters via
media and peripheral equipment ,etc. The characters
which include simplifi ed character of part or all simplifi ed
character is no true display.
• Connect a USB device.
• Erase the data stored on the connected USB device
from BUDA Setup.
er that is not compatible with
Control Function
Problem Check Remedy
Control function
does not work.
40
Is the HDMI cable
properly connected?
Is the HDMI cable you
are using a High Speed
®/ TM
HDMI
Is Control with HDMI set
to On on the player?
Does the connected
device support the
Control function?
Cable?
To use the Control function, connect the Flat Screen TV,
and AV system (AV receiver or amplifi er, etc.) and HD
AV Converter to the HDMI OUT terminal.
Use a High Speed HDMI
may not work properly if an HDMI cable other than a
High Speed HDMI
Set Control with HDMI to On on the player.
• The Control function will not work with devices of other
brands that do not support the Control function, even
when connected using an HDMI cable.
• The Control function will not work if devices that do not
support the Control function are connected between the
Control-compatible device and the player.
• See About connections to components of other makes
supporting the Control function on page13.
• Even when connected to a Pioneer product compatible
with the Control function, some of the functions may not
work. Also refer to the operating instructions of the
connected device.
®/ TM
®/ TM
Cable is used.
Cable. The Control function
Page 41

Problem Check Remedy
Is Control with HDMI
set to On on the
connected device?
Are multiple players
connected?
Set Control with HDMI to On on the connected device. The
Control function operates when Control with HDMI is set to
On for all devices connected to the HDMI OUT terminal.
Once connections and settings of all the devices are
nished, be sure to check that the player’s picture is output
fi
to the Flat Screen TV. (Also check after changing the
connected devices and connecting and/or disconnecting
HDMI cables.) If the player’s picture is not being output to
the Flat Screen TV, the Control function may not work
properly. For details, refer to the operating instructions of
the connected device.
The Control function may not work if 4 or more players,
including this player, are connected by HDMI cable.
Network
Problem Check Remedy
BD-LIVE function
(connection to the
Internet) cannot be
used.
A message other than
“Networks is OK.” is
displayed when
Connection Test is
performed.
Is “Network is
FAILED.”
displayed?
Is the Ethernet hub
(or router with a
hub functionality)
operating properly?
• Check your network connection or confi
settings.
• The USB fl ash drive of fi les have been cleaned.
• Confi rm BD-ROMs to support BD-Live function.
• Check that this player and the Ethernet hub (or router
with a hub functionality) are properly connected.
• If the IP address is obtained using the DHCP server
function, check the setting is correct at the Information. For
details on the DHCP server function, see the operating
instructions for the Ethernet hub (or router with a hub
functionality).
• Set the IP address manually.
• Check the operation and settings of the DHCP server
function of the Ethernet hub (or router with hub
functionality). For details on the DHCP server function, see
the operating instructions for the Ethernet hub (or router
with a hub functionality).
• If this player has been set manually, reset the IP address
of this player or other components.
• Check the settings and operation the Ethernet hub (or
router with a hub functionality). For details, see the
operating instructions for the Ethernet hub.
• Reboot the Ethernet hub (or router with a hub
functionality).
06
rm your network
Others
Problem Check Remedy
The player’s power
turns off automatically.
The player’s power
turns on automatically.
Is Control with
HDMI set to On?
Is Auto Power Off
set to 15 min/
30 min?
Is Control with
HDMI set to On?
The player’s power may turn on together with the power of
the TV connected to the HDMI OUT terminal. If you do not
want the player’s power to turn off when the TV’s power is
turned on, set Control with HDMI to Off.
If Auto Power Off is set to 15 min/30 min, the player’s
power turns off automatically if no operation is performed
for over 15 minutes/30 minutes.
The player’s power may turn on together with the power of
the TV connected to the HDMI OUT terminal. If you do not
want the player’s power to turn off when the TV’s power is
turned on, set Control with HDMI to Off.
41
Page 42

06
Problem Check Remedy
This unit cannot be
operated.
Player cannot be
operated with remote
control.
Input of connected TV,
and AV system and HD
AV Converter switches
automatically.
Settings you have
made have been
cleared.
USB (external storage)
device does not work
with this player
properly.
Are you operating
the remote control
from a point too far
away from the
player?
Are the batteries
dead?
Is Control with
HDMI set to On?
• Have you
disconnected the
power cord while
the player
was on?
• Has there been a
power failure?
Is the USB device
properly
connected?
Is the USB device
connected via an
extension cable?
Is the external
storage device
connected to the
USB port via a
memory card
reader or USB
hub?
Does the external
storage device
contain multiple
partitions?
Is the external
storage device
write-protected?
Is the external
storage device’s
file system FAT32,
FAT16 or NTFS?
’s power
• Use within the specified usage temperature range.
• If the power cannot be turned off (set to standby), use a
thin rod to press the reset button on the main unit’s front
panel. When the Reset button is pressed, power to the
unit is turned off (standby status). When the
STANDBY/ON button is pressed to turn on the power,
the unit becomes operational again.
Operate from within 7 m of the remote control sensor.
Replace the batteries.
The input of the TV, and AV system (AV receiver or
amplifier, etc.) and HD AV Converter connected to the
HDMI OUT terminal may automatically switch to the player
when playback starts on the player or the menu screen
(Source function etc.) is displayed. If you do not want the
inputs of the connected TV, and AV system (AV receiver
or amplifier, etc.) and HD AV Converter to switch
automatically, set Control with HDMI to Off.
Always press STANDBY/ON on the player’s front panel
or STANDBY/ON on the remote control and check that
POWER OFF has turned off from the player’s front panel
display before disconnecting the power cord. Be
particularly careful when the power cord is connected to
the AC outlet on another device because the player turns
off in conjunction with the device.
• Turn the player’s power off, then turn the power back on.
• Turn the player’s power off, then reconnect the external
storage device.
Do not use an extension cable. The player may not work
properly with it.
External storage device may not work if connected to the
USB port via a memory card reader or USB hub.
External storage devices may not be recognized if they
contain multiple partitions.
Some external storage devices may not operate.
Turn the player’s power off, then disable the writeprotection.
USB devices formatted in the FAT32, FAT16 or NTFS file
system can be used.
42
Page 43

Glossary
06
* Angle (Multi angle)
Up to 9 camera angles can be recorded
simultaneously on BD-ROM or DVD-Video
discs, letting you view the same scene from
different angles.
* AVCHD (Advanced Video Codec High
Defi nition)
See page 4.
* BDAV
Of the BD format, the Audio Visual Format
Specifi
cations for HD digital broadcast
recording is referred to as BDAV on this player
and in this operating instructions.
* BD-LIVE
See page 4.
* BDMV
Of the BD format, the Audio Visual Format
Specifi cations designed for pre-packaged high
defi nition (HD) movie contents is referred to as
BDMV on this player and in this operating
instructions.
* BONUSVIEW
See page 4.
* Deep Color
See About HDMI on page13.
* Default Gateway
A default gateway is a communication device
such as a router which passes data between
networks. It is used to direct data to networks
on which the destination gateway is not
explicitly specifi ed.
* Dolby Digital
Dolby Digital is an audio format to record the
sound in up to 5.1 channels with a fraction of
the amount of data as compared to linear PCM
audio signals.
* Dolby Digital Plus
Dolby Digital Plus is an audio format for highdefi nition media. Built on Dolby Digital, it
combines the effi ciency and fl exibility to
provide high quality multi-channel audio. With
BD-ROMs, up to 7.1 channels of digital sound
can be recorded.
* Dolby TrueHD
Dolby TrueHD is an audio format using
lossless coding. With BD-ROMs, up to 8
channels can be recorded at 96 kHz/24 bits, or
up to 6 channels at 192 kHz/24 bits.
* DRM
A technology for protecting copyrighted digital
data. Digitized videos, images and audio retain
the same quality even when they are copied or
transferred repeatedly. DRM is a technology
for restricting the distribution or playback of
such digital data without the authorization of
the copyright holder.
* DTS Digital Surround
DTS Digital Surround is an audio format to
record 48 kHz/24 bits audio signals in 5.1
channels.
* DTS-HD High Resolution Audio
DTS-HD High Resolution Audio is an audio
format using lossy coding. It can record 7.1
channels at 96 kHz/24 bits.
* DHCP (Dynamic Host Confi guration
Protocol)
This protocol provides confi guration
parameters (IP address, etc.) for computers
and other devices connected to the network.
* DivX
See page 4.
* DNS (Domain Name System)
This is a system for associating Internet host
names with IP addresses.
* DTS-HD Master Audio
DTS-HD Master Audio is an audio format
using lossless coding. With BD-ROMs, 7.1
channels can be recorded at 96 kHz/24 bits, or
5.1 channels at 192 kHz/24 bits.
* Ethernet
A standard for local area networks (LANs)
used to connect multiple computers, etc. in the
same location. This player supports
10BASE-T/100BASE-TX.
43
Page 44

* Frames and fi elds
06
A frame is the unit for one of the still pictures
which compose motion pictures. One frame
consists of a picture of odd lines and a picture
of even lines called fi
interlaced scan method (1080i, etc.).
* HDMI (High-Defi nition Multimedia
Interface)
See page 4.
* Interactive audio
The audio signals recorded in the titles of BDROMs. They include for example the clicking
sound made when the menu screen is
operated.
* Interlaced scan
With this method, one picture is displayed by
scanning it twice. The odd lines are displayed
in the fi rst pass, the even lines are displayed in
the second, to form a single picture (frame).
Interlaced scan is indicated in this player and
operating instructions by an “i” after the
resolution value (for example, 1080i).
elds in video signal with
* Picture-in-Picture (P-in-P)
This is a function for superimposing a sub
video on the main video. Some BD-ROMs
include secondary video, which can be
superimposed on the primary video.
* Port number
This is a sub-address provided below the IP
address for simultaneously connecting to
multiple parties during Internet
communications.
* Progressive scan
With this method, one picture is consisted of a
single picture, without dividing it in two
pictures. Progressive scan provides clear
pictures with no fl icker, in particular for still
pictures that contain much text, graphics, or
horizontal lines. Progressive scan is indicated
in this player and operating instructions by a
“p” after the resolution value (for example,
576p).
* Region number
See About region numbers on page 8.
* IP address
An address that identifi es a computer or other
device connected to the Internet or local area
network. It is represented a number in four
sections.
* PCM
This is referred as the audio signals that are
not compressed.
* MAC (Media Access Control) address
A hardware identifi cation number assigned
specifi cally to the network device (LAN card,
etc.).
* MPEG (Moving Picture Experts Group)
The name of a family of standards used to
encode video and audio signals in a digital
compressed format. The video encoding
standards include MPEG-1 Video, MPEG-2
Video, MPEG-4 Visual, MPEG-4 AVC, etc.
The audio encoding standards include MPEG1 Audio, MPEG-2 Audio, MPEG-2 AAC, etc.
* Parental Lock
See Changing the Parental Lock level for
viewing DVDs and Changing the Age
Restriction for viewing BD-ROMs on page 30.
44
* Secondary audio
Some BD-ROMs include sub audio streams
mixed with the main audio stream. These sub
audio streams are called “secondary audio”.
On some discs this secondary audio is
recorded as the audio for the secondary video.
* Secondary video
Some BD-ROMs include sub videos
superimposed on the main videos using the
Picture-in-Picture function. These sub videos
are called “secondary video”.
* Subnet mask
This is used to identify which part of the IP
address corresponds to the subnet (a
separately managed network). The subnet
mask is expressed as ‘255.255.255.0’.
* USB(Universal Serial Bus)
USB is the industry standard for connecting
peripherals to PCs.
* x.v.Color
See page 4.
Page 45

Specifi cations
Model BDP-100-K
Type Blu-ray Disc PLAYER
Rated voltage AC 110 V to 240 V
Rated frequency 50 Hz/60 Hz
Power consumption 13 W
Power consumption
(standby)
Power consumption (when
HDMI control is On)
Power consumption
(When Quick Start is On)
Power consumption
(When HDMI control is On,
Quick Start is On)
Weight 2.0 Kg
External dimensions
(including projecting parts)
Tolerable operating
temperature
Tolerable operating humidity 5 % to 85 % (no condensation)
Output terminals HDMI 1set, 19pin: 5 V, 250 mA
Audio
outputs
Digital
audio
outputs
LAN 1set, Ethernet jack (10BASE-T/
USB 1 set, Type A
2-channel (left/
right)
Audio output level 200 mVrms (1 kHz, -20 dB)
Frequency
response
Optical 1 set, Optical digital jack
0.3 W
0.3 W
1 W
1 W
435 mm (W) x 58 mm (H) x 250 mm (D)
+5 °C to +35 °C
1set, RCA jack
4 Hz to 88 kHz (192 kHz sampling)
100BASE-TX)
06
Notes:
• The specifi cations and design of this product are subject to change without notice.
• This item incorporates copyright protection technology that is protected by U.S. patents and
other intellectual property rights of Rovi Corporation.
Reverse engineering and disassembly are prohibited.
Do not connect the unit through a VCR. Video signals fed through VCRs may be affected by
copyright protection systems and the picture will be distorted on the television.
• Corporation and product names mentioned herein are trademarks or registered trademarks
of the respective corporations.
45
Page 46

Lesen Sie sich bitte diese Bedienungsanleitung durch. Dann wissen Sie, wie Sie lhr Gerät richtig
bedienen. Bewahren Sie sie an einem sicheren Platz auf, um auch zukünftig nachschlagen zu können.
ACHTUNG
UM SICH NICHT DER GEFAHR EINES ELEKTRISCHEN
SCHLAGES AUSZUSETZEN, DÜRFEN SIE NICHT DEN
DECKEL (ODER DIE RÜCKSEITE) ENTFERNEN. IM
GERÄTEINNEREN BEFINDEN SICH KEINE VOM
BENUTZER REPARIERBAREN TEILE. ÜBERLASSEN
SIE REPARATUREN DEM QUALIFIZIERTEN
KUNDENDIENST.
ACHTUNG
Bei diesem Gerät handelt es sich zwar um ein
Laserprodukt der Klasse 1, das entsprechend dem
Standard Sicherheit für Laserprodukte IEC
60825-1:2007 klassifiziert ist, doch enthält es eine
Laserdiode einer höheren Klasse als 1. Um einen
stets sicheren Betrieb zu gewährleisten, weder
irgendwelche Abdeckungen entfernen, noch
versuchen, sich zum Geräteinneren Zugang zu
verschaffen.
Wartungsarbeiten sind grundsätzlich dem
Kundendienstpersonal zu überlassen.
D3-4-2-1-1_B1_De
LASER KLASSE 1
Das Gehäuse ist mit dem unten abgebildeten
Warnaufkleber versehen.
Lage des Aufklebers: im Inneren des Geräts
D58-5-2-2b*_B1_De
VORSICHTSHINWEIS ZUR BELÜFTUNG
Bei der Aufstellung dieses Gerätes muss für einen
ausreichenden Freiraum gesorgt werden, um eine
einwandfreie Wärmeabfuhr zu gewährleisten
(mindestens 10 cm oberhalb des Gerätes, 10 cm hinter
dem Gerät und jeweils 10 cm an der Seite des Gerätes).
WARNUNG
Im Gerätegehäuse sind Ventilationsschlitze und andere
Öffnungen vorgesehen, die dazu dienen, eine
Überhitzung des Gerätes zu verhindern und einen
zuverlässigen Betrieb zu gewährleisten. Um
Brandgefahr auszuschließen, dürfen diese Öffnungen
auf keinen Fall blockiert oder mit Gegenständen (z.B.
Zeitungen, Tischdecken und Gardinen) abgedeckt
werden, und das Gerät darf beim Betrieb nicht auf
einem dicken Teppich oder Bett aufgestellt sein.
D3-4-2-1-7b*_A1_De
Betriebsumgebung
Betriebstemperatur und Betriebsluftfeuchtigkeit:
+5 °C bis +35 °C, 85 % rel. Feuchte max.
(Ventilationsschlitze nicht blockiert)
Eine Aufstellung dieses Gerät an einem unzureichend
belüfteten, sehr feuchten oder heißen Ort ist zu
vermeiden, und das Gerät darf weder direkter
Sonneneinstrahlung noch starken Kunstlichtquellen
ausgesetzt werden.
WARNUNG
Dieses Gerät ist nicht wasserdicht. Zur Vermeidung der
Gefahr von Brand und Stromschlag keine Behälter mit
Flüssigkeiten (z.B. Blumenvasen und -töpfe) in die
Nähe des Gerätes bringen und dieses vor Tropfwasser,
Spritzwasser, Regen und Nässe schützen.
ACHTUNG
STANDBY/ON-Schalter dieses Gerätes trennt
Der
das Gerät nicht vollständig vom Stromnetz. Um das
Gerät vollständig vom Netz zu trennen, muss der
Netzstecker aus der Netzsteckdose gezogen werden.
Daher sollte das Gerät so aufgestellt werden, dass
stets ein unbehinderter Zugang zur Netzsteckdose
gewährleistet ist, damit der Netzstecker in einer
Notsituation sofort abgezogen werden kann. Um
Brandgefahr auszuschließen, sollte der Netzstecker
vor einem längeren Nichtgebrauch des Gerätes,
beispielsweise während des Urlaubs, grundsätzlich
von der Netzsteckdose getrennt werden.
Dieses Gerät ist für den Heimgebrauch vorgesehen.
Falls bei Einsatz zu einem anderem Zweck (z.B.
Langzeitgebrauch zu gewerblichen Zwecken in einem
Restaurant oder Betrieb in einem Fahrzeug bzw.
Schiff) eine Funktionsstörung auftritt, die eine
Reparatur des Gerätes erforderlich macht, werden
die Reparaturkosten dem Kunden selbst dann in
Rechnung gestellt, wenn die Garantiefrist noch nicht
abgelaufen ist.
WARNUNG
Keine Quellen offener Flammen (z.B. eine brennende
Kerze) auf dieses Gerät stellen.
D3-4-2-1-7c*_A1_De
D3-4-2-1-3_A1_De
D3-4-2-2-2a*_A1_De
K041_A1_De
D3-4-2-1-7a_A1_De
Page 47

VORSICHT MIT DEM NETZKABEL
Fassen Sie das Netzkabel immer am Stecker. Ziehen Sie
nicht am Kabel selbst, und fassen Sie das Netzkabel
niemals mit nassen Händen an, da dies einen
Kurzschluss oder elektrischen Schlag verursachen
kann. Stellen Sie nicht das Gerät, Möbelstücke o.ä. auf
das Netzkabel; sehen Sie auch zu, dass es nicht
eingeklemmt wird. Machen Sie niemals einen Knoten
in das Netzkabel, und binden Sie es nicht mit anderen
Kabeln. Das Netzkabel sollte so gelegt werden, dass
niemand darauf tritt. Ein beschädigtes Netzkabel kann
einen Brand oder elektrischen Schlag verursachen.
Prüfen Sie das Netzkabel von Zeit zu Zeit. Sollte es
beschädigt sein, wenden Sie sich an Ihre nächste
autorisierte PIONEER-Kundendienststelle oder Ihren
Händler, um es zu ersetzen.
S002*_A1_De
Kondensation
Wenn der Player plötzlich aus der Kälte in einen
warmen Raum gebracht wird (z. B. im Winter) oder
wenn die Temperatur in dem Raum, in dem der Player
aufgestellt ist, plötzlich aufgrund eines Heizlüfters usw.
ansteigt, können sich im Inneren des Geräts
Wassertropfen (Kondensation) bilden (auf beweglichen
Teilen und der Linse). Wenn es zu Kondensation
kommt, arbeitet der Player nicht ordnungsgemäß, und
die Wiedergabe ist nicht möglich. Lassen Sie den
Player für 1 bis 2 Stunden bei Raumtemperatur
eingeschaltet (die erforderliche Dauer hängt vom
Ausmaß der Kondensation ab). Die Wassertropfen
verdampfen und die Wiedergabe ist wieder möglicht.
Zu Kondensation kann es auch im Sommer kommen,
wenn der Player direkt dem Luftzug aus einer
Klimaanlage ausgesetzt wird. Stellen Sie den Player in
diesem Fall an einem anderen Ort auf.
Informationen für Anwender zur Sammlung und Entsorgung von Altgeräten und
gebrauchten Batterien
Symbol für
Geräte
Symbolbeispiele
für Batterien
Pb
Diese Symbole auf den Produkten, der Verpackung und/oder Begleitdokumenten
bedeuten, dass gebrauchte elektrische und elektronische Produkte und Batterien
nicht über den Haushaltsmüll entsorgt werden dürfen.
Zur richtigen Handhabung, Rückgewinnung und Wiederverwertung von Altprodukten
und gebrauchten Batterien bringen Sie diese bitte zu den gemäß der nationalen
Gesetzgebung dafür zuständigen Sammelstellen.
Mit der korrekten Entsorgung dieser Produkte und Batterien helfen Sie dabei,
wertvolle Ressourcen zu schonen und vermeiden mögliche negative Auswirkungen
auf die Gesundheit und die Umwelt, die durch eine unsachgemäße Behandlung des
Abfalls entstehen könnten.
Weitere Informationen zur Sammlung und Wiederverwertung von Altprodukten und
Batterien erhalten Sie von Ihrer örtlichen Gemeindeverwaltung, Ihrem Müllentsorger
oder dem Verkaufsort, an dem Sie die Waren erworben haben.
Diese Symbole gelten ausschließlich in der Europäischen Union.
Für Länder außerhalb der Europäischen Union:
Wenn Sie diese Gegenstände entsorgen wollen, wenden Sie sich bitte an Ihre
lokalen Behörden oder Händler und fragen Sie dort nach der korrekten
Entsorungsweise.
S005_A1_De
K058a_A1_De
Page 48

„Blu-ray Disc“, „Blu-ray“ und das „Blu-ray Disc“
Logo sind Markenzeichen der Blu-ray Disc
Association.
ist ein Warenzeichen der DVD Format/
Logo Licensing Corporation.
Die Begriffe HDMI und HDMI High-Defi nition
Multimedia Interface sowie das HDMI-Logo sind
Marken oder eingetragene Marken von HDMI
Licensing, LLC in den Vereinigten Staaten und
anderen Ländern.
„BONUSVIEW“ ist eine Marke der Blu-ray Disc
Association.
Der Player unterstützt das BD-ROM-Profi l Version
2; Sie können Bonusfunktionen wie SekundärVideo (Bild-im-Bild) und Sekundär-Audio
wiedergeben. Inhalte der Bonusfunktion
(Sekundär-Audio (Bild-im-Bild) und SekundärAudio) können gemeinsam mit den Daten im
Speicher abgelegt werden.
„BD-LIVE“ Logo ist eine Marke der Blu-ray Disc
Association.
Beim BD-ROM-Format können Sie die BD-J(Java) Applikation zur Erstellung eines
hochinteraktiven Titels verwenden.
Oracle und Java sind eingetragene Marken der
Oracle Corporation und/oder ihrer verbundenen
Unternehmen. Andere Namen und
Bezeichnungen können Marken ihrer jeweiligen
Inhaber sein.
„AVCHD“ und das „AVCHD“-Logo sind Marken
der Panasonic Corporation und der Sony
Corporation.
Hinsichtlich von DTS-Patenten siehe
http://patents.dts.com. Hergestellt unter Lizenz
von DTS Licensing Limited. DTS, DTS-HD, das
Symbol und DTS-HD und das Symbol
gemeinsam sind eingetragene Marken, und
DTS-HD Master Audio | Essential ist eine Marke
der DTS, Inc. © DTS, Inc. Alle Rechte
vorbehalten.
DivX Plus®-HD-Geräte wurden auf hochwertige
DivX®- (.divx, .avi) und DivX Plus HD- (.mkv)
Videowiedergabe getestet. Wenn Sie das DivXLogo sehen, wissen Sie, dass Sie Ihre liebsten
DivX-Videos wiedergeben können.
Dieses DivX Certifi ed®-Gerät hat erfolgreich
verschiedene strenge Tests zur Gewährleistung
der Wiedergabe von DivX®-Videos durchlaufen.
Zur Wiedergabe erworbener DivX-Filme
registrieren Sie Ihr Gerät zunächst unter
vod.divx.com. Anleitungen zum Abruf Ihres
Registrierungscodes fi nden Sie im DivX-VOD-
Abschnitt unter Menübedienung.
DivX®, DivX Certifi ed®, DivX Plus® HD und
zugehörige Logos sind Marken von DivX, LLC
und werden unter Lizenz verwendet.
„x.v.Color“ und sind Warenzeichen
der Sony Corporation.
In Lizenz von Dolby Laboratories gefertigt.
„Dolby“ und das Doppel-D-Symbol sind
Warenzeichen von Dolby Laboratories.
Page 49

Inhalt
Kapitel 1 Vor der Inbetriebnahme
Zubehör prüfen ............................................. 6
Fernbedienung vorbereiten .......................... 6
Abspielbare Disc- und Dateitypen ................ 7
Abspielbare Discs ..................................... 7
Abspielbare Dateien ................................. 9
Bezeichnungen und Funktionen der
Komponenten ...............................................11
Fernbedienung..........................................11
Frontplatte.................................................12
Rückseite ..................................................12
Kapitel 2 Anschluss
Anschluss mit einem HDMI-Kabel ................13
Über HDMI ................................................13
Über den Anschluss an Komponenten
anderer Marken mit Unterstützung der
Steuerfunktion...........................................13
Anschluss eines Fernsehgeräts................14
Anschluss an einen AV-Receiver
oder -Verstärker ........................................14
Anschluss an einen AV-Receiver oder
-Verstärker mit einem optischen Digital-
Audiokabel ....................................................15
Anschließen von Komponenten an die
USB-Buchse .................................................15
Über USB-Geräte .....................................15
Anschluss des USB-Geräts ......................15
Netzwerkverbindung .....................................16
Anschließen über ein LAN-Kabel .............16
Anschließen des Netzkabels ........................16
Kapitel 3 Die ersten Schritte
Vornehmen von Einstellungen mithilfe des
Setup Navigator-Menüs....................................17
Kapitel 4 Wiedergabe
Abspielen von Discs oder Dateien................18
Stop ..........................................................18
Schnellansicht (Schnellansicht mit Ton) ...19
Zeitlupenwiedergabe (langsame
Wiedergabe mit Ton) .................................19
Schneller Vorlauf und Schneller
Rücklauf ....................................................19
Abspielen von bestimmten Kapiteln, Tracks
oder Dateien .............................................19
Vorheriges und Nächstes..........................19
Rückkehr zu einer Position, die nicht weit
zurückliegt ................................................. 19
Sprung zu einer Position, die nicht weit
voraus liegt ..............................................19
Schritt........................................................19
A-B ...................................................................20
Wiederholung .................................................20
Zoom.........................................................20
Wiedergabe von Fotos als Diashows ........20
Umschalten der Kamerawinkel .................20
Umschalten der Untertitel .........................20
Bewegen von Untertiteln...........................21
Umschalten des Audios ............................21
Anzeigen der Disc-Informationen .............21
Fortgesetzte Wiedergabe von einer
spezifi zierten Position (Fortgesetzte
Betrachtungswiedergabe) ...........................21
Wiedergabe-Funktionen ...........................22
FUNCTION-Menü verwenden ......................23
Wiedergabe-Funktionen nutzen ...................24
Abspielen eines bestimmten Titels, Kapitels
bzw. Tracks (Suche) .................................24
In zufälliger Reihenfolge wiedergeben
(Zufallsiwedergabe) ..................................24
Über die Quelle-Funktion wiedergeben ........25
Discs abspielen.........................................25
Videodateien wiedergeben .......................25
Bilddateien wiedergeben ..........................26
Audiodateien wiedergeben .......................26
Abspielen in der gewünschten Reihenfolge
(Wiedergabeliste)......................................27
Videooptionen ändern ...............................27
Kapitel 5 Erweiterte Einstellungen
Allgemeine Einstellung .................................28
System ......................................................28
Sprache ....................................................30
Wiedergabe ..............................................30
Sicherheit ..................................................30
Netzwerk ...................................................31
Display-Einstellungen ...................................32
Display-Einstellung ...................................32
Ton-Einstellungen ......................................... 33
Audio Ausgang..........................................33
System Informationen...................................34
Hinweis zur Ausgabe von digitalen
Audioformaten ..............................................35
Kapitel 6 Zusätzliche Informationen
Vorsichtshinweise .........................................36
Transportieren des Players .......................36
Installationsort...........................................36
Schalten Sie den Player aus, wenn Sie ihn
nicht verwenden........................................36
Über Kondensation ...................................36
Reinigen des Players ................................36
Vorsichtsmaßnahme, wenn das Gerät in
einem Regal mit Glastür aufgestellt ist .....37
Reinigen der Abtastlinse ...........................37
Handhabung von Discs.............................37
Störungssuche..............................................38
Wiedergabe ..............................................38
Steuerungsfunktion ...................................40
Netzwerk ...................................................41
Sonstiges ..................................................41
Glossar .........................................................43
Technische Daten .........................................45
Page 50

Kapitel 1
01
Vor der Inbetriebnahme
Zubehör prüfen
• Fernbedienung x 1
• AAA/R03-Batterie x 2
• Netzkabel x 1
• Garantiekarte
• Bedienungsanleitung (dieses Dokument)
Fernbedienung vorbereiten
Die mit dem Player mitgelieferten Batterien
sollen dazu dienen, die Produktfunktion zu
prüfen und haben möglicherweise keine lange
Lebensdauer. Wir empfehlen die Verwendung
von Alkalibatterien, da diese eine längere
Lebensdauer haben.
Warnung
• Verwenden oder lagern Sie Batterien nicht
in direktem Sonnenlicht oder an sehr
heißen Orten wie im Inneren eines
Fahrzeugs oder in der Nähe von
Heizkörpern. Dadurch können die Batterien
auslaufen, sich überhitzen, explodieren
oder in Brand geraten. Auch kann dies die
Lebensdauer der Batterien verringern.
Hinweise:
• Verwenden Sie ausschließlich den
angegebenen Batterietyp. Kombinieren Sie
zudem keine neuen und alten Batterien.
• Achten Sie beim Einlegen der Batterien in
die Fernbedienung auf die richtige
Ausrichtung entsprechend den
Polaritätskennzeichnungen (/).
• Stellen Sie beim Einsetzen der Batterien
sicher, dass nicht die Federn nicht an den
Polen () der Batterie beschädigt werden.
Dadurch können die Batterien auslaufen
oder sich überhitzen.
• Erhitzen und demontieren Sie die Batterien
nicht, werden Sie sie nicht in Feuer oder
Wasser.
• Batterien können unterschiedliche
Spannungsangaben haben, auch wenn sie
ähnlich aussehen. Verwenden Sie keine
unterschiedlichen Batterietypen
zusammen.
• Um ein Austreten von Batteriefl üssigkeit zu
vermeiden, entnehmen Sie die Batterien,
wenn Sie die Fernbedienung längere Zeit
nicht verwenden (1 Monat oder mehr).
Wenn Batteriefl üssigkeit ausgetreten ist,
wischen Sie die Innenseite des Fachs
sorgfältig sauber, und legen Sie dann neue
Batterien ein. Falls eine Batterie leck wird
und Batteriefl üssigkeit auf die Haut gerät,
spülen Sie sie mit viel fl ießendem Wasser
ab.
• Bitte halten Sie sich bei der Entsorgung
verbrauchter Batterien an die örtlichen
Vorschriften und Anweisungen der
Umweltschutzbehörden.
1. Öffnen Sie die rückseitige Abdeckung.
2. Legen Sie die mitgelieferten Batterien ein
(2 x AAA-700).
Auf der Seite beginnend einsetzen.
3. Schließen Sie die rückseitige Abdeckung.
Die Abdeckung muss hörbar einrasten.
6
Page 51

Abspielbare Disc- und Dateitypen
Abspielbare Discs
Es können Discs abgespielt werden, deren Beschriftung, Verpackung oder Außenhülle eines
der folgenden Logos aufweist.
Hinweise:
• Nur fi nalisierte Discs können abgespielt werden.
Disc-Typen Logo
BD-ROM
2
BD
BD-R
BD-RE
BDMV BDAV
Anwendungsformat
DVDVideo
DVD VR
CD-DA
DTS-CD
DATA DISC
xxxx
xxx
xxx
01
1
DVD
CD
DVD-ROM
2,3,4
DVD-R
DVD-RW
DVD+R
DVD+RW
CD-DA
(Audio-CD)
3
CD-R
CD-RW
5
3,7
2,3
3
8
5
xxxx
x
6
6
x
x
xxxx
3
xxxx
xx
xx
xx
CD-ROM x x x x
1. Discs, auf denen Video, Bild- oder Audiodateien aufgenommen sind.
2. Einschließlich doppelschichtige Discs.
3. Finalisieren Sie diese Discs, bevor Sie sie auf diesem Player abspielen.
4. DVD-R für Authoring-Discs (3,95 und 4,7 GB) können nicht abgespielt werden.
5. Einschließlich AVCHD-Format.
6. Einschließlich AVCREC-Format.
7. Version 1.0 DVD-RW-Discs können abgespielt werden.
8. Einschließlich Video-CDs.
x
x
x
7
Page 52

* Nicht abspielbare Discs
01
• FUJICOLOR-CD
Kodak Picture-Discs
•
•
DVD-RAM-Discs
• SACD-Discs
Es ist möglich, dass einige andere als die
oben aufgeführten Discs ebenfalls nicht
abspielbar sind.
Hinweise:
• Einige Discs können nicht abgespielt
werden, selbst wenn sie mit einem der
Logos auf der vorherigen Seite
gekennzeichnet sind.
• Bei WIedergabe einer 8-cm-Disc setzen Sie
die Disc am 8-cm-Ring der Schublade ein.
Es ist kein Adapter erforderlich. Spielen Sie
keine 8-cm-BD-ROM-Discs ab.
* Über die Wiedergabe nicht autorisierter
Kopien
Cinavia-Hinweis
Dieses Produkt nutzt Cinavia-Technologie,
um die Verwendung von unbefugten
Kopien von manchen kommerziell
hergestellten Filmen und Videos und ihrer
Tonspuren zu beschränken. Wenn eine
verbotene Verwendung einer unbefugten
Kopie erkannt wird, wird eine Meldung
angezeigt und die Wiedergabe oder das
Kopieren werden unterbrochen.
Weitere Informationen über die CinaviaTechnologie erhalten Sie über das OnlineKundeninformationscenter von Cinavia
unter http://www.cinavia.com. Sie können
zusätzliche Informationen über Cinavia
auch per Post anfragen, indem Sie eine
Postkarte mit Ihrer Anschrift an folgende
Adresse senden: Cinavia Consumer
Information Center, P.O. Box 86851, San
Diego, CA, 92138, USA.
Urheberrecht 2004-2013 Verance
Corporation. Cinavia™ ist eine Marke der
Verance Corporation. Geschützt durch
US-Patent 7.369.677 und weltweit erteilten
und angemeldeten Patenten unter Lizenz
von Verance Corporation. Alle Rechte
vorbehalten.
* Über Kopierschutz
Kopierschutztechnologie wird bei manchen
Blu-ray Discs™, DVDs und über das
Internet oder andere Netzwerke gespielten
Inhalten verwendet.
Kopierschutztechnologie beschränkt die
Wiedergabe und analoge Ausgabe.
Aufgrund von Aktualisierungen in
Kopierschutzbedingungen können sich die
Beschränkungen je nach dem Kaufdatum
dieses Produkts unterscheiden. Außerdem
können die Beschränkungen aktualisiert
werden, wenn die Software nach dem Kauf
aktualisiert wird.
* Über Audioformate
Von diesem Player werden folgende
Audioformate unterstützt:
• Dolby TrueHD
• Dolby Digital Plus
8
• Dolby Digital
• DTS-HD Master Audio
• DTS-HD High Resolution Audio
• DTS Digital surround
• MPEG audio (AAC)
• Linear PCM
Um den Surround-Klang von Dolby TrueHD,
Dolby Digital Plus, DTS-HD Master Audio und
DTS-HD High Resolution Audio genießen zu
können, wird empfohlen, den Player mit einem
HDMI-Kabel an einen mit diesen
Audioformaten kompatiblen AV-Receiver oder
-Verstärker anzuschließen. Nachdem Sie eine
BD mit Aufnahmen in einem dieser
Audioformate eingelegt haben, wählen Sie das
Audioformat auf dem Menübildschirm aus.
* Abspielen von BDs
• Mit den nachstehenden Formaten
kompatible BDs (BDMV) können
wiedergegeben werden.
- Blu-ray Disc Read-Only (ROM) Format
Version 2
- Blu-ray Disc Recordable (R) Format
Version 2
- Blu-ray Disc Rewritable (RE) Format
Version 3
• Mit den nachstehenden Formaten
kompatible BDs (BDAV) können
wiedergegeben werden.
- Blu-ray Disc Recordable (R) Format
Version 1
- Blu-ray Disc Rewritable (RE) Format
Version 2
* Wiedergabe von DVDs
Dieses Zeichen gibt an, dass das Produkt mit
DVD-RW-Discs, die im VR-Format (Video
Recording-Format) aufgenommen wurden,
kompatibel ist. Allerdings können Discs, die
beim Aufnehmen mit einer Einmal-AufnahmeBeschränkung versehen wurden, nur auf
einem CPRM-kompatiblen Gerät
wiedergegeben werden.
AVCHD ist ein hochaufl ösendes (HD) digitales
Videokamerarecorder-Format, das
hochaufl ösende Aufnahmen auf bestimmten
Medien mithilfe hocheffi zienter Codec-
Technologien erstellt.
* Über Regionalcodes
Blu-ray Disc-Playern und BD-ROM- oder
DVD-Video-Discs sind je nach der Region, in
der sie verkauft werden, Regionalcodes
zugeordnet.
Die Regionalcodes dieses Players sind:
• BD-ROM: B
• DVD-Video: 2
Discs, die diese Codes nicht enthalten, können
nicht abgespielt werden. Auf diesem Player
können die folgenden Discs abgespielt
werden.
• BD: B (einschließlich B) und ALL
• DVD: 2 (einschließlich 2) und ALL
Page 53

* Abspielen von CDs
Über kopiergeschützte CDs: Dieser Player ist
auf Übereinstimmung mit den Spezifi kationen
Audio-CD-Formats ausgelegt. Dieser
des
Player unterstützt nicht die Wiedergabe oder
Funktionen von Discs, die diesen
Spezifi kationen nicht entsprechen.
* DualDisc-Wiedergabe
Die DualDisc ist ein neues zweiseitiges
Medium. Die eine Seite enthält DVD-Material
– Video, Audio usw., die andere enthält
Nicht-DVD-Material wie Digitalton.
Die DVD-Seite einer DualDisc lässt sich mit
diesem Player abspielen (mit Ausnahme
jeglicher DVD-Audioinhalte).
Die Nicht-DVD-Audioseite der Disc ist mit
diesem Player nicht kompatibel.
Beim Einlegen und Herausnehmen der
DualDisc kann die andere Seite verkratzt
werden. Eine verkratzte Disc lässt sich
möglicherweise nicht abspielen.
Bitte wenden Sie sich für weiterführende
Informationen zu den DualDisc-Spezifi kationen
an den Disc-Hersteller oder den Händler.
* Abspielen von Discs, die auf Computern
oder BD/DVD-Recordern erstellt wurden
• Discs, die mit einem Computer
aufgenommen wurden, können
möglicherweise aufgrund von
Anwendungseinstellungen oder den
Computer-Umgebungseinstellungen nicht
abgespielt werden. Nehmen Sie Discs in
einem Format auf, das auf diesem Player
abspielbar ist. Nähere Informationen
erhalten Sie von Ihrem Fachhändler.
• Mit einem Computer oder BD/DVDRecorder aufgenommene Discs können
möglicherweise nicht abgespielt werden,
wenn die Brennqualität aufgrund der
Eigenschaften der Disc, Kratzer, Schmutz
auf der Disc, Schmutz auf der Linse des
Recorders usw. mangelhaft ist.
* Hinweise zu Video, Audio und Bilddateien
und Ordnern
Audio- und Bilddateien können auf diesem
Player abgespielt werden, wenn die Ordner
auf der Disc oder im USB-Gerät angelegt
werden, wie unten beschrieben.
Beispiel der Ordnerstruktur:
Hauptverzeichn
001.jpg/001.mp3
xxx.jpg/xxx.mp3
01 Ordner
XX Ordners
*
Ordner
001.jpg/001.mp3
xxx.jpg/xxx.mp3
001.jpg/001.mp3
xxx.jpg/xxx.mp3
*
001.jpg/001.mp3
xxx.jpg/xxx.mp3
*
*
* Die Anzahl der Ordner und Dateien innerhalb
eines einzelnen Ordners (einschließlich des
Grundverzeichnisses) ist auf maximal 256
begrenzt. Halten Sie auch die Anzahl der
Ordnerebenen auf maximal 5.
Hinweise:
• Die auf diesem Player angezeigten Dateiund Ordnernamen können sich von den auf
dem Computer angezeigten unterscheiden.
• Dateien werden bei Discs in ASCIICodereihenfolge und bei USB-Geräten in
der aufgenommenen Reihenfolge
wiedergegeben.
• Bei Discs und USB-Geräten können
Dateien in verschiedenen Ordnern nicht
wiedergegeben werden.
Abspielbare Dateien
Video-, Bild- und Audiodateien, die auf BDs,
DVDs, CDs oder USB-Geräten aufgenommen
wurden, können abgespielt werden.
* Unterstützte Videodateiformate
• DivX Plus HD
DivX Certifi ed® zur Wiedergabe von DivX®
und DivX Plus® HD (H.264/MKV) Video bis
zu 1080p HD einschließlich Premium-Inhalt.
Hinweis:
• Dieses DivX® Certifi ed-Gerät muss
zur WIedergabe von DivX-Video-OnDemand- (VOD) Inhalten registriert werden.
Generieren Sie zuerst den DivX VOD
Registrierungscode für Ihr Gerät und
reichen Sie diesen beim
Registrierungsvorgang ein. [Wichtig: DivX
VOD-Inhalte sind durch ein DivX DRMSystem (Digital Rights Management)
geschützt, welches Wiedergabe auf
registrierte DivX Certifi ed Geräte
beschränkt. Wenn Sie eine Disc mit DivXVOD-Inhalten einlegen, die nicht für Ihr
Gerät autorisiert sind, erscheint die
Meldung Fehler bei der Autorisierung und
die Inhalte werden nicht abgespielt.]
Erfahren Sie mehr bei www.divx.com/vod.
- Den DivX-VOD-Registrierungscode
dieses Playser fi nden Sie unter Allgemeine
Einstellung Wiedergabe DivX® VOD
Registrierungs-Code
- Bei bestimmten DivX-VOD-Dateien ist die
Wiedergabeanzahl beschränkt. Wenn
solche Dateien auf diesem Player
abgespielt werden, wird die verbleibende
Wiedergabeanzahl angezeigt. Dateien, bei
denen die Wiedergabeanzahl 0 erreicht
hat, können nicht abgespielt werden
(Leihvertrag ist abgelaufen wird angezeigt).
Dateien mit unbeschränkter
Wiedergabeanzahl können beliebig oft
abgespielt werden (es wird keine
verbleibende Wiedergabeanzahl
angezeigt).
01
9
Page 54

* Tabelle abspielbarer Dateien
01
Abspielbare Medien
Abspielbare
Dateien
(Erweiterungen)
BD-R/RE/-R DL/
RE DL/-R LTH,
DVD-R/RW/-R DL/
+R/+RW/+R DL,
USB-Geräte
1
Dateispezifi kationen
CD-R/RW
•
MP3
(.mp3)
2
WMA
(.wma)
3
AAC
(.m4a)
MPEG2 AAC
(.aac)
LPCM
(.wav)
FLAC
(.fl ac)
JPEG
(.jpg/.jpeg)
DivX
(.avi/.divx/.mkv)
MP4
(.mp4)
WMV
(.wmv)
AVI
(.avi)
3GP
(.3gp)
FLV
(.fl v)
1. Das Gerät unterstützt FAT16-, FAT32- und NTFS-Dateisysteme.
2. WMA Pro, Lossless und Voice sind nicht unterstützt.
3. Apple Lossless-Enkodierung wird nicht unterstützt.
Hinweis:
• Je nach der Dateistruktur ist es evebtuell nicht möglich, bestimmte Dateien abzuspielen, einschließlich Dateien, die in der
Tabelle abspielbarer Dateien oben angegeben sind.
• Dateien, die durch DRM (Digital Rights Management) geschützt sind, können nicht abgespielt werden (gilt nicht für
DivX-VOD-Dateien).
Abtastfrequenzen: Bis zu 48 kHz
•
Bit-Rate: Bis zu 320 kbps
•
Audio-Typ: MPEG-1 Audio Layer3
•
Abtastfrequenzen: Bis zu 48 kHz
•
Bit-Rate: Bis zu 192 kbps
•
Audio-Typ: WMA Version 9
•
Abtastfrequenzen: Bis zu 96 kHz
•
Bit-Rate: Bis zu 192 kbps
•
Audio-Typ: MPEG4-AAC
•
Abtastfrequenzen: Bis zu 48 kHz
•
Bit-Rate: Bis zu 320 kbps
•
Audio-Typ: MPEG2-AAC
•
Abtastfrequenzen: Bis zu 192 kHz
•
Quantisierung-Bitrate: 16 Bit, 24 Bit
•
Kanal: 2-Kanal
•
Abtastfrequenzen: Bis zu 192 kHz
•
Quantisierung-Bitrate: 16 Bit, 24 Bit
•
Kanal: 2-Kanal
•
Maximale Aufl ösung: 4 000 x 3 000 Pixel
•
Unterstützte Versionen: Durch DivX Plus® HD
•
Maximale Aufl ösung:
•
Bis zu 1 920 x 1 080 (DivX Plus® HD)
•
Maximale Aufl ösung: Bis zu 1 920 x 1 080
•
Video: MPEG4, MPEG-4 AVC (Level 4.1)
•
Audio: AAC, MP3
•
Maximale Aufl ösung: Bis zu 1 280 x 720
•
Video: WMV9, WMV9AP (VC-1)
•
Audio: WMA
•
Maximale Aufl ösung: Bis zu 1 920 x 1 080
•
Video: MPEG4
•
Audio: MP3, AAC
•
Maximale Aufl ösung: Bis zu 1 920 x 1 080, 8 Mb/s
•
Video: H.263, MPEG4, H.264
•
Audio: MPEG-4 AAC
•
Video: Sorenson H.263 (FLV1), VP6 (FLV4), H.264
•
Audio: MP3, AAC
10
Page 55

Bezeichnungen und Funktionen der Komponenten
Fernbedienung
5 REPEAT – (Seite 20)
-B – (Seite 20)
6 A
1
2
3
4
5
6
7
8
9
10
11
12
13
14
15
16
1 STANDBY/ON – Zum Ein- und
Ausschalten des Gerätes drücken.
2 SUBTITLE – (Seite 20)
3 AUDIO – (Seite 21)
4 SOURCE – (Seite 25)
7 PAUSE – (Seite 18)
8 – (Seite 19)
17
9 STOP – (Seite 18)
18
10 REV – (Seite 19)
19
11 TOP MENU – Drücken Sie diese Taste, um
20
21
22
23
24
25
26
27
28
29
30
das Top- Menü der BD-ROM- oder DVDVideo-Disc anzuzeigen.
12 – Verwenden Sie diese Tasten,
um Einträge auszuwählen, Einstellungen
zu ändern und den Cursor zu bewegen.
ENTER– Drücken Sie diese Taste, um
einen ausgewählten Eintrag auszuführen
oder eine geänderte Einstellung usw.
einzugeben.
13 HOME MENU – (Seite 28)
14 Farbtasten – Verwenden Sie diese Tasten,
um in BD-ROM-Menüs zu navigieren.
PROGRAM – Zum Festlegen von Track/
Kapitel in einer bevorzugten Reihenfolge
während der CD/DVD/VCD-Wiedergabe
verwenden.
BOOK MARK – Zum Setzen eines
Lesezeichens bei einem beliebigen Punkt
während der Wiedergabe.
ZOOM – Zum Vergrößern/Verkleinern
während der Wiedergabe. Zur Auswahl
zwischen verschiedenen in Ihrem Player
verfügbaren Bildern wiederholt drücken.
(Seite 20)
INDEX – Während der Wiedergabe einer
JPEG-Disc zur Anzeige einer Seite mit 12
Miniaturbildern drücken. Diese Taste ist nur
im JPEG-Modus verfügbar. (Seite 20)
15 Zifferntasten – Verwenden Sie diese
Tasten, um den Titel/das Kapitel/den Track
zu wählen, den bzw. das Sie betrachten
oder hören möchten und Einträge aus
Menüs auszuwählen.
16 CLEAR – Drücken Sie diese Taste, um
eine Ziffer usw. zu löschen.
17 OPEN/CLOSE – Drücken Sie diese
Taste zum Öffnen der Disc-Lade.
18 CONTINUED – Verwenden, um die
Wiedergabe aus einer festgelegten
Position fortzusetzen. (Seite 21)
19 DISPLAY – (Seite 21)
20 VIDEO P. – (Seite 27)
21 HDMI – Verwenden Sie diese Taste, um die
Aufl ösung der Videosignale, die von der
Buchse HDMI OUT ausgegeben werden,
umzuschalten. (Seite 32).
22 SHORT SKIP – Während der Wiedergabe
zum Vorwärtsspringen um 30 Sekunden
drücken. (Seite 19)
01
11
Page 56

23 REPLAY – Während der Wiedergabe zum
01
Rückwärtsspringen um 10 Sekunden
drücken. (Seite 19)
24 – (Seite 19)
25 – (Seite 19)
26 – (Seite 19)
27 FWD – (Seite 22)
Frontplatte
28 POP UP MENU/MENU – Drücken Sie
diese Taste, um die BD-ROM- oder DVDVideo-Menüs anzuzeigen.
29 RETURN – Drücken Sie die Taste, um
zum vorherigen Bildschirm
zurückzukehren.
30 FUNCTION – (Seite 23)
1 2 3 54 6 7 8
1 STANDBY/ON – Zum Ein- und
Ausschalten drücken.
2 Disc-Lade
3 Frontplattendisplay
4 Reset-Knopf – Wenn sich das Gerät nicht
ausschalten (auf Standby schalten) lässt,
verwenden Sie einen dünnen Stift, um
diesen Knopf zu drücken. Bei Betätigung
der Reset-Taste schaltet sich das Gerät aus
(Bereitschaftsmodus). Wenn die
STANDBY/ON um Einschalten gedrückt
wird, gelangt das Gerät wieder in den
Betriebsmodus.
5 Fernbedienungssensor – Richten Sie die
Fernbedienung auf diesen Sensor,
verwenden Sie sie dann innerhalb einer
Reichweite von etwa 7 m. Der Player hat
möglicherweise Probleme, die
Fernbedienungssignale zu empfangen, wenn
sich eine Fluoreszenzlampe in der Nähe
befi ndet. Stellen Sie den Player in dem Fall
weiter entfernt von der Leuchtstoffröhre auf.
6 OPEN/CLOSE – Zum Öffnen und
Schließen der Disc-Schublade drücken.
7 – Drücken Sie diese Taste, um die
Wiedergabe zu stoppen.
8 USB-Port – (Seite 15)
9 – Drücken Sie diese Taste, um die
Wiedergabe zu starten.
Rückseite
31 2 54
1 LAN (10/100)-Anschluss – Hier können Sie
eine Verbindung zu einem ständig aktiven
Breitbandnetzwerk herstellen.
2 HDMI OUT-Anschluss – Gibt Video-/
Audiosignale aus.
3 AUDIO OUT-Anschluss – Gibt Audiosignale
aus.
4 DIGITAL OUT (OPTICAL)-Anschluss –
Gibt digitale Audiosignale bei Anschluss des
optischen digitalen Kabels aus.
5 AC IN – Hier schließen Sie das mitgelieferte
Netzkabel an.
9
12
Page 57

Kapitel 2
Anschluss
Schalten Sie die Stromversorgung aus
und ziehen Sie das Netzkabel aus der
Netzsteckdose, bevor Sie Geräte anschließen
oder die Anschlüsse ändern.
Beachten Sie auch die Bedienungsanweisungen
der Geräte, die Sie anschließen möchten.
Anschluss mit einem HDMIKabel
Die Audio- und Videosignale können an HDMIkompatible Geräte in Form von verlustfreien
digitalen Video- und Audiosignalen gesendet
werden.
Hinweise:
• Nehmen Sie die Einstellungen im SetupMenü entsprechend dem angeschlossenen
HDMI-kompatiblen Gerät vor.
• 1080p-Videosignale werden je nach
eingesetztem HDMI-Kabel möglicherweise
nicht angezeigt.
Über HDMI
Dieser Player verwendet die High-Defi nition
Multimedia Interface-Technologie (HDMI™).
Der Player unterstützt Deep Color. Herkömmliche Player können ein Videosignal
mit 8-Bit-Farbtiefe im Format YCbCr 4:4:4
oder RGB übertragen. Player mit Deep
Color-Unterstützung können Videosignale mit
einer Farbbittiefe von über 8 Bit je Farbkomponente übertragen. Beim Anschluss an ein
Fernsehgerät mit Deep Color-Unterstützung
können feine Farbabstufungen wiedergegeben
werden.
Dieses Produkt ist mit „x.v.Color“ kompatibel
und hat dadurch die Fähigkeit einen wide-gamut-Farbraum basierend auf den xvYCC-Spezifi kationen zu verwirklichen. Bei Wiedergabe
von den „xvYCC“-Standards entsprechenden
Videosignalen an diesem Player bei Anschluss
an ein mit „x.v.Color“ kompatibles Fernsehgerät usw. werden die Farbreproduktionsfähigkeiten erweitert und natürliche Farben können
treuer denn je reproduziert werden.
„x.v.Color“ ist ein Promotionsname für die
Produkte, die die Fähigkeit haben, einen
wide-gamut Farbraum basierend auf internationalen Standardspezifi kationen wie xvYCC zu
verwirklichen.
* Audiosignale können über den HDMI OUTAnschluss des Playerts übertragen werden
• Dolby TrueHD
• Dolby Digital Plus
• Dolby Digital
• DTS-HD Master Audio
• DTS-HD High Resolution Audio
• DTS Digital Surround
• MPEG-2 AAC
• Linear PCM
* Über die HDMI-High-Speed-Übertragung
Der Player gibt 1080p- und Deep ColorVideosignale aus. Falls Ihr Fernseher
1080/50p-, 1080/60p oder Deep Color-Signale
unterstützt, verwenden Sie zur Erzielung
maximaler Leistung von Player und TV ein
High-Speed-HDMI
High-Speed-HDMI
Übertragung von Signalen mit bis zu 1080/24p
getestet. 1080i, 1080p- und 720p-Videosignale,
die Deep Color unterstützen, können ebenfalls
übertragen werden.
* Bei Anschluss an ein DVI-Gerät
• Es ist nicht möglich, DVI-Geräte
(bspw. Computerdisplays) anzuschließen,
die nicht mit HDCP kompatibel sind.
HDCP ist eine Spezifi kation zum Schützen
audiovisuellen Inhalts über die DVI/HDMISchnittstelle.
• Es werden keine Audiosignale ausgegeben.
Über ein Audiokabel etc. anschließen
• Dieser Player ist für den Anschluss an
HDMI-kompatible Geräte vorgesehen.
Beim Anschluss an ein DVI-Gerät
funktioniert der Player je nach dem
DVI-Gerät möglicherweise nicht
ordnungsgemäß.
®
/™-Kabel.
®
/™-Kabel werden auf
Über den Anschluss an Komponenten
anderer Marken mit Unterstützung der
Steuerfunktion
Mit Unterstützung einer Steuerfunktion über
Fernseher oder AV-Systeme (AV-Empfänger
oder -Verstärker usw.) ist über ein HDMI-Kabel
ein Converter am Player angeschlossen.
Verwenden Sie die nachstehende Funktion.
• Funktionen zur Bedienung vom Fernseher
aus
• Auto-Wahl-Funktion
• Betriebssperrfunktion
Hinweis:
• Einige Fernseher oder AV-Systeme
(AV-Empfänger oder Verstärker usw.)
nutzen möglicherweise nicht alle oben
aufgeführten Funktionen.
02
13
Page 58

Anschluss eines Fernsehgeräts
02
Beachten Sie zum Anschließen eines AVEmpfängers oder -Verstärkers über ein HDMIKabel Einen AV-Empfänger oder -Verstärker
anschließen weiter unten.
Hinweise:
• Greifen Sie beim Anschließen und
Ziehen des Netzkabels am Stecker.
• Wenn Sie den Stecker einer Last
aussetzen, kann dies zu einem
fehlerhaften Kontakt führen und es werden
möglicherweise keine Videosignale
ausgegeben.
Anschlussbereich auf der Rückseite
HDMI-Kabel
(im
Fachhandel
erhältlich)
Zur HDMIEingangsbuchse
Fernsehgerät
Sie können den Player mit einem
HDMI-Kabel auch an einen AVReceiver
oder -Verstärker anschließen.
Richten Sie den
Stecker auf die Buchse
aus, und führen Sie ihn
gerade ein.
Richtung der
Signalübertragung
Anschluss an einen AV-Receiver oder
-Verstärker
Schließen Sie den Player an einen AVEmpfänger oder -Verstärker an, wenn Sie
den Surround-Klang von Dolby TrueHD,
Dolby Digital Plus, Dolby Digital, DTS-HD
Master Audio, DTS-HD High Resolution Audio
oder DTS Digital Surround, LPCM oder AAC
genießen möchten. Hinweise zum Anschließen
des Fernsehgeräts und der Lautsprecher an
den AV-Empfänger oder -Verstärker fi nden
Sie in der Bedienungsanleitung für den AVEmpfänger oder -Verstärker.
Hinweise:
• Greiten Sie beim Anschließen und
Ziehen des Netzkabels am Stecker.
• Wenn Sie den Stecker einer Last aussetzen, kann dies zu einem fehlerhaften Kontakt führen und es werden möglicherweise
keine Videosignale ausgegeben.
Anschlussbereich auf der Rückseite
HDMI-Kabel
(im
Fachhandel
erhältlich)
Richten Sie den
Stecker auf die
Buchse aus, und
führen Sie ihn gerade
Zur HDMI
Richtung der
Signalübertragung
ein.
Fernsehgerät
HDMI-Kabel
(im Fachhandel
erhältlich)
Ausgangsbuchse
Zur HDMI
Eingangsbuchse
Von der HDMI
AV-Receiver oder Verstärker
Eingangsbuchse
14
Page 59

Anschluss an einen AVReceiver oder -Verstärker
mit einem optischen DigitalAudiokabel
Anschlussbereich auf der Rückseite
Weiß
UT
Rot
Audiokabel
(im Fachhandel erhältlich)
2-Kanal-AnalogAudio kann
ebenfalls
angeschlossen
werden.
Zu den Audio-
AV-Receiver
oder Verstärker
Eingangsbuchsen
Optisches digitales
Audiokabel (im
Fachhandel erhältlich)
Richtung der
Signalübertragung
An optischen digitalen
Audioeingang
Anschließen von
Komponenten an die USBBuchse
Über USB-Geräte
Anschluss des USB-Geräts
Hinweise:
• Stellen Sie sicher, dass der Player
ausgeschaltet wird, bevor USB-Geräte
angeschlossen oder abgetrennt werden.
• Bei Verwendung einer externen Festplatte
als externes Speichergerät schalten Sie
immer erst die Festplatte und dann den
Player ein.
• Wenn das USB-Gerät schreibgeschützt ist,
deaktivieren Sie immer den Schreibschutz.
• Beim Anschließen des USB-Kabels greifen
Sie immer am Stecker und setzen den
Stecker in der richtigen Richtung und
horizontal in den Anschluss ein.
• Extreme Belastung des Steckers kann zu
schlechtem Kontakt führen, wodurch es
unmöglich wird, Daten auf dem USB-Gerät
zu schreiben.
• Wenn ein USB-Gerät angeschlossen und
der Player eingeschaltet ist, ziehen Sie
nicht den Netzstecker ab.
02
Die USB-Geräte, die sich an den Player
anschließen lassen, sind wie unten gezeigt.
• USB 2.0-kompatibler USB-Flashdrive
(Kapazität von 1 GB oder mehr, 2 GB oder
mehr empfohlen) oder HDD (Kapazität
2 TB oder weniger)
• Dateisystem: FAT16, FAT32 oder NTFS
Hinweise:
• Eine Verwendung ist nicht möglich, wenn
die Initialisierung mit einem anderen
Dateisystem als FAT16, FAT32 oder NTFS
durchgeführt wurde.
• USB-Geräte können nicht erkannt werden,
wenn sie mehrere Partitionen enthalten.
• Manche USB-Geräte können nicht mit
diesem Player arbeiten.
• Die Funktion der USB-Geräte wird nicht
garantiert.
Hinweise:
• Geräte arbeiten möglicherweise nicht,
wenn sie über einen Speicherkartenleser
oder USB-Hub an den USB-Port
angeschlossen sind.
• Verwenden Sie ein USB-Kabel mit einer
Länge von 2 Metern oder weniger.
15
Page 60

02
Netzwerkverbindung
Anschließen des Netzkabels
Über eine Internetverbindung können Sie die
BD-LIVE-FUnktion genießen, wie zum Beispiel
das Herunterladen von Trailer-Videos und
zusätzlichen Audio-/Untertitelsprachen und
das Spielen von Online-Spielen. Verbinden
Sie den mit dem Internet verbundenen Router
mit dem Gerät. Wenn sich ein aktiver DHCPServer in der Netzwerkumgebung befi ndet, zu
der Sie eine Verbindung herstellen möchten,
wird die IP-Adresse automatisch festgelegt.
Wenn kein aktiver DHCP-Server vorhanden
ist, legen Sie die IP-Adresse manuell fest
(Seite 31).
MAnschließen über ein LAN-Kabel
Verbinden Sie das Gerät über ein
handelsübliches LAN-Kabel mit dem Router.
Anschlussbereich auf der Rückseite
LAN-Kabel
(im
Fachhandel
erhältlich)
Internet
Modem
LAN
123
WAN
Ethernet-Hub
(Router mit Hub-Funktionalität)
Schließen Sie das Netzkabel an, nachdem
alle Anschlüsse zwischen den Geräten
vorgenommen wurden.
Hinweise:
• Bei einigen Internetanbietern müssen Sie
die jeweilige Netzwerkkonfi guration
möglicherweise manuell festlegen.
• Pioneer übernimmt keine Verantwortung
für jegliche Fehlfunktionen des Players
aufgrund von Kommunikationsfehlern/
Störungen in Verbindung mit Ihrer
Netzwerkverbindung und/oder Ihrem
angeschlossenen Gerät. Bitte wenden
Sie sich an Ihren Internetanbieter oder
Netzwerkgerätehersteller.
16
Page 61

Kapitel 3
Die ersten Schritte
03
Vornehmen von Einstellungen mithilfe des Setup Navigator-Menüs
Achten Sie darauf, diese Einstellungen
durchzuführen, wenn Sie den Player in Betrieb
nehmen.
Hinweise:
• Prüfen Sie vor Einschalten des Gerätes, ob
erbindungen zwischen PLayer und
die V
anderen Geräten stimmen. Schalten Sie
auch die Stromversorgung der Geräte ein,
die am Player angeschlossen sind, bevor
Sie den Player einschalten.
• Wenn Sie einen mit der Steuerfunktion
kompatiblen Flachbildschirm oder
Frontprojektor verwenden, setzen Sie CEC
am angeschlossenen Gerät auf Ein, bevor
Sie den Player einschalten.
1 Schalten Sie das Fernsehgerät ein und
schalten Sie den Eingang um.
Anweisungen zur Bedienung des
Fernsehgeräts fi nden Sie in der
Bedienungsanleitung des Fernsehgeräts.
2 Schalten Sie den Player ein.
Drücken Sie STANDBY/ON.
Vergewissern Sie sich, dass das Menü
Leichtes Setup angezeigt wird.
* Wenn das Leichtes Setup-Menü nicht
angezeigt wird
Drücken Sie zur Anzeige des Startmenüs
die HOME MENU-Taste, wählen Sie
Allgemeine Einstellung System Leichtes
Setup, drücken Sie dann ENTER.
3 Wählen Sie die OSD-Menüsprache.
Wählen Sie den gewünschten Eintrag mit
aus, und drücken Sie anschließend ENTER.
Seite: 2/5 Leichtes Setup
Wählen
Wählen Sie vor dem Start eine
Menü-Sprache.
Die gewählte Sprache wird nicht nur hier sondern
auch in anderen Menüs und Dialogen verwendet.
Vorheriges
English
Deutsch
Hungarian
Czech
Slovak
Polish
OK Nächstes
4 Wählen und konfi gurieren Sie die Video-
und Audioausgänge.
Wählen Sie den gewünschten Eintrag mit
aus, und drücken Sie anschließend ENTER.
Siehe Seite 32.
Seite: 3/5 Leichtes Setup
Wählen
Wählen Sie eine Auflösung die Ihrem
TV entspricht.
Änderungen werden sofort übernommen. Sie haben
15 s, um zu entscheiden, ob die Einstellung
gespeichert oder zur vorherigen Auflösung
zurückgekehrt werden soll. Bessere Leistung wird
durch eine HDMI-Verbindung erzielt!
Vorheriges
Auto
480p/576p
720p
1080i
1080p
1080/24p
OK Nächstes
5 Wählen Sie das Seitenverhältnis Ihres
Fernsehers.
Wählen Sie den gewünschten Eintrag mit
aus, und drücken Sie anschließend ENTER.
Siehe Seite 32.
Seite: 4/5 Leichtes Setup
Wählen
Wählen Sie ein Seitenverhältnis das
zu Ihrem TV passt.
Änderungen werden auf der nächsten Seite
übernommen. Sie müssen entscheiden, ob die
Einstellung gespeichert oder zum vorherigen
Seitenverhältnis zurückgekehrt werden soll.
Vorheriges
16:9 Voll
16:9 Normal
4:3 Pan&Scan
4:3 Letterbox
OK Nächstes
6 Schließen Sie das Menü Leichtes Setup
ab.
Drücken Sie ENTER.
Wählen Sie Zurückkehren, wenn Sie die
Einstellungen von vorne wiederholen möchten.
Seite: 5/5 Leichtes Setup
Einstellung
Einrichtungsassistent ist beendet!
Now press Finish button to go to Home Menu. Viel Vergnügen.
Wenn ein mit der Steuerfunktion kompatibler
Pioneer-Flachbildfernseher am HDMI OUTAnschluss dieses Players angeschlossen wird,
werden die Spracheinstellungen vom PioneerFlachbildfernseher importiertt, bevor Leichtes
Setup startet.
Vorheriges
OK Fertig!
17
Page 62

Kapitel 4
04
Wiedergabe
Abspielen von Discs oder Dateien
Dieses Kapitel beschreibt die
Hauptbedienfunktionen des Players. Hinweise
zur Art der abspielbaren Discs fi nden Sie unter
Abspielbare Discs auf Seite 7. Hinweise zur
Art der abspielbaten Dateien fi nden Sie unter
Abspielbare Dateien auf Seite 9. Auf Discs
aufgenommene Video-, Bild- und Audiodateien
werden mit Source-Funktion wiedergegeben.
1 Drücken Sie zum Einschalten des
Gerätes STANDBY/ON Bereitschaft/Ein.
Schalten Sie das Fernsehgerät ein und
schalten Sie zuerst dessen Eingang um.
2 Drücken Sie zum Öffnen des DiscSchublade OPEN/CLOSE, wenn Sie eine
Disc einlegen möchten.
Hinweise:
• Legen Sie die Disc mit der bedruckten
Seite nach oben ein.
• Das Einlesen der Discs nimmt einige Zeit in
Anspruch. Wenn der Einlesevorgang
abgeschlossen ist, wird der Disc-Typ auf
dem Frontplattendisplay des Players
angezeigt.
3 Drücken Sie zur Wiedergabe der Disc .
• Drücken Sie während der Wiedergabe ,
um sie anzuhalten. am Display an der
Frontblende des Players leuchtet, wenn die
Wiedergabe angehalten ist.
• Drücken Sie zum Beenden während der
Wiedergabe .
Hinweise:
• Einige Discs starten die Wiedergabe
automatisch, wenn die Disc-Schublade
geschlossen wird.
• Bei BD-R/-RE und DVD-R/-RW (VR-Format)
erscheint automatisch die SOURCE
(Seite 25).
• DVD-Video-Discs haben keine
Kindersicherungsfunktion. Geben Sie das
in den Einstellungen des Players
gespeicherte Passwort ein, um die
Kindersicherung zu entsperren.
• Bei einigen BD-R/-RE ist der
WIedergabeschutz für die Disc oder Titel
eingestellt. Geben Sie die für die Disc
eingestellte Codenummer zur Freigabe der
Schutzfunktion ein.
• Prüfen Sie Problemlösung auf Seite 38,
falls Video- oder Audiosignale nicht richtig
ausgegeben werden.
18
* Wenn das Disc-Menü angezeigt wird
Bei einigen Discs wird das Disc-Menü beim
Starten der Wiedergabe automatisch
angezeigt. Inhalt und Bedienung des DiscMenüs sind je nach Disc unterschiedlich.
* Fortsetzen der Wiedergabe an dem Punkt,
an dem sie gestoppt wurde
(Wiedergabefortsetzungs-Funktion)
• Wenn während der Wiedergabe gedrückt
wird, speichert der Player die Stelle, an der
die Wiedergabe gestoppt wurde. Wenn Sie
drücken, wird die Wiedergabe an der
Stelle fortgesetzt.
• Falls der Stoppmodus während der
Wiedergabe einer Diashow von Bilddateien
eingestellt wurde, beginnt die Wiedergabe
bei der zuletzt angezeigten Bilddatei.
• Drücken Sie zum Abbrechen der
Wiedergabefortsetzung erneut , während
die Wiedergabe gestoppt ist.
Hinweise:
• Die Wiedergabefortsetzung wird in
folgenden Fällen automatisch
abgebrochen:
- Wenn Sie in den Bereitschaftsmodus
wechseln.
- Wenn die Disc-Lade ausgefahren wird.
- Wenn das Dateilistenfenster umgeschaltet
wird.
• Wenn Sie die Wiedergabe beim nächsten
Mal an der angegebenen Stelle fortsetzen
möchten, beachten Sie Wiedergabe bei
einer angegebenen Stelle fortsetzen
(Wiedergabefortsetzung) auf Seite 21.
• Die Wiedergabefortsetzung kann bei
einigen Discs nicht verwendet werden.
• Falls [Letzte Position] auf [Ein] gesetzt ist,
kann die Datei auch nach Öffnen der
Disc-Schublade oder Abschalten des
Gerätes fortgesetzt werden (Seite 30).
Stop
Drücken Sie während der Wiedergabe .
• Drücken Sie zum Aufrufen des
Vorstoppmodus einmal ; das VorstoppLogo wird am Fernsehbildschirm angezeigt.
• Durch zweimaliges Drücken von
beenden Sie die Wiedergabe vollständig.
• Geben Sie im Stoppmodus Bilddateien
wieder. Drücken Sie zum Fortsetzen der
Wiedergabe an der Stelle, an der die
Wiedergabe zuvor gestoppt wurde, oder zum
Starten vom Anfang der Disc nach
vollständiger Beendigung der Wiedergabe .
• Bitte drücken Sie bei Abbruch der Wiedergabefunktion erneut .
Hinweis:
• Nicht alle Blu-ray-Discs unterstützen die
Fortsetzungsfunktion.
Page 63

Schnellansicht (Schnellansicht mit Ton)
Audio wird ausgegeben, während Videobilder
beim etwa 1,5-Fachen der
Normalgeschwindigkeit wiedergegeben
werden.
Drücken Sie während der Wiedergabe von
BD-ROM- oder DVD-Video-Bildern .
• Falls während der schrittweisen
Wiedergabe gedrückt wird, wechseln
Sie zum Schnellvorlauf.
* Fortsetzen der normalen Wiedergabe
Drücken Sie .
• Wenn Sie den Pausemodus abbrechen,
gelangen Sie zur normalen Wiedergabe
zurück.
Hinweis:
• Während der schrittweisen Wiedergabe
erfolgt die PCM-Ausgabe.
• Während der schrittweisen Wiedergabe
kann der Ton nicht umgeschaltet werden.
• Je nach Audioformat, wie Dolby TrueHD
und DTS-HD Master Audio, gibt es
möglicherweise Fälle, in denen die
schrittweise Wiedergabe nicht durchgeführt
werden kann.
Zeitlupenwiedergabe (langsame
Wiedergabe mit Ton)
Audio wird ausgegeben, während Videobilder
beim etwa 0,8-Fachen der
Normalgeschwindigkeit wiedergegeben
werden.
Drücken Sie während der Wiedergabe von
BD-ROM- oder DVD-Video-Bildern .
• Wenn Sie während der
Zeitlupenwiedergabe drücken,
wechseln Sie zur schrittweisen
Wiedergabe.
* Fortsetzen der normalen Wiedergabe
Drücken Sie .
• Wenn Sie den Pausemodus abbrechen,
gelangen Sie zur normalen Wiedergabe
zurück.
Hinweis:
• Während der Zeitlupenausgabe erfolgt die
PCM-Ausgabe.
• Es ist während der LangsamansichtWiedergabe nicht möglich, den Ton zu
wechseln.
• Je nach Audioformat, wie Dolby TrueHD
und DTS-HD Master Audio, gibt es
möglicherweise Fälle, in denen die
schrittweise Wiedergabe nicht durchgeführt
werden kann.
Schneller Vorlauf und Schneller Rücklauf
Drücken Sie während der Wiedergabe
oder.
• Die Geschwindigkeit wechselt sich mit jeder
Betätigung (Geschwindigkeit wird am
Fernsehbildschirm angezeigt). Die
Geschwindigkeitsstufen variieren je nach
Disc oder Datei.
* Fortsetzen der normalen Wiedergabe
Drücken Sie .
Abspielen von bestimmten Kapiteln,
Tracks oder Dateien
Geben Sie während der Wiedergabe die
Nummer von Kapitel/Track/Datei zur Wahl ein.
• Geben Sie die Nummer mit den
Zifferntasten (0 bis 9) ein, und drücken Sie
dann ENTER.
• Drücken Sie zum Löschen der
eingegebenen Werte CLEAR.
Vorheriges und Nächstes
Drücken Sie oder .
• Drücken Sie während der Wiedergabe
, dadurch können Sie zum Anfang des/
der nächsten Kapitels/Tracks/Titels/Datei
springen.
• Wenn während der Wiedergabe einer
Bilddatei gedrückt wird, kehrt die
Wiedergabe zur vorherigen Datei zurück.
Hinweis:
• Sie können nicht zum nächsten oder
vorherigen Titel springen. Wählen Sie den
Titel aus dem Menübildschirm oder
SOURCE-Bildschirm.
Rückkehr zu einer Position, die nicht weit
zurückliegt
Während der Wiedergabe zum
Rückwärtsspringen um 10 Sekunden drücken.
Drücken Sie während der Wiedergabe
REPLAY.
Sprung zu einer Position, die nicht weit
voraus liegt
Während der Wiedergabe zum
Vorwärtsspringen um 30 Sekunden drücken.
Drücken Sie während der Wiedergabe
SHORT SKIP.
Schritt
Drücken Sie und dann .
• Die schrittweise Wiedergabe wechselt mit
jeder Betätigung der Taste.
• Die rückwärtsgerichtete schrittweise
Wiedergabe wird nicht unterstützt.
• Drücken Sie zum Fortsetzen der
Wiedergabe .
Drücken Sie während der Wiedergabe
.
19
04
Page 64

• Die Geschwindigkeit schaltet bei jedem
04
Drücken der Taste um (die Geschwindigkeit
wird auf dem Fernsehbildschirm
angezeigt).
• Die rückwärtsgerichtete schrittweise
Wiedergabe wird nicht unterstützt.
• Drücken Sie zum Fortsetzen der
Wiedergabe .
A-B
Drücken Sie während der Wiedergabe A-B.
• Legen Sie mit A-B den Startpunkt fest.
Dies ist Punkt A (Startpunkt).
• Legen Sie durch erneutes Drücken von A-B
den Endpunkt fest.
Dies ist Punkt B (Endpunkt).
Starten Sie die wiederholte Wiedergabe
von A bis B.
* A-B-Wiederholung abbrechen
• Drücken Sie zum Abbrechen ein drittes Mal
A-B.
• Drücken Sie während der Wiedergabe .
Hinweis:
• Im nachstehenden Fall wird die A-BWiederholung abgebrochen.
- Während des Starts einer anderen
Wiederholung oder zufälligen Wiederholung.
Wiederholung
Drücken Sie während der Wiedergabe
REPEAT.
• Wählen Sie durch wiederholtes Drücken
der REPEAT-Taste zwischen
verschiedenen Wiederholungsmodi.
Folgende Schleifensequenzen gelten bei
BD/DVD: CH, TT und All.
Folgende Schleifensequenzen gelten bei
CD/JPEG/MP3: Nur normale oder
vollständige Wiederholung.
Hinweise:
CH - Kapitel
TT - Titel
All - Alles
Zoom
Drücken Sie während der Wiedergabe
ZOOM.
• Drücken Sie zum Vergrößern/Verkleinern
des Videos wiederholt die ZOOM-Taste
(der Zoommodus wird am
Fernsehbildschirm angezeigt).
[Zoom 2x] [Zoom 3x] [Zoom 4x]
[Zoom 1/2] [Zoom 1/3] [Zoom 1/4]
Normal (nicht angezeigt)
Hinweis:
• Nicht alle Blu-ray-Discs unterstützen die
Zoomfunktion.
20
Wiedergabe von Fotos als Diashows
Diese Funktion spielt die Fotos ab und schaltet
sie automatisch um.
Drücken Sie während der Wiedergabe
INDEX.
• Zeigen Sie die Miniaturbilder der
Bilddateien an. Die maximale Anzahl
beträgt 12 auf einmal.
• Wenn Sie eines der Bilder wählen und
ENTER drücken, beginnt die Diashow mit
dem gewählten Bild.
* Drehen/Invertieren von Fotos
Wenn eine Diashow wiedergegeben oder
angehalten wird, schaltet die Anzeige bei
Betätigung der Tasten wie
nachstehend gezeigt um.
-Taste: Dreht 90° im Uhrzeigersinn
-Taste: Dreht 90° gegen den Uhrzeigersinn
-Taste: Klappt horizontal um
-Taste: Klappt vertikal um
Umschalten der Kamerawinkel
Bei BD-ROM- und DVD-Video-Discs, die mit
mehreren Kamerawinkeln aufgenommen
wurden, können die Kamerawinkel während
der Wiedergabe umgeschaltet werden.
Wählen Sie während der Wiedergabe
Winkel aus dem FUNCTION-Menü.
• Der aktuelle Winkel und die Gesamtzahl
aufgenommener Winkel werden am
Fernsehbildschirm und am Display an der
Frontblende des Players angezeigt.
Umschalten der Untertitel
Bei Discs oder Dateien, für die mehrere
Untertitel aufgenommen wurden, können
die Untertitel während der Wiedergabe
umgeschaltet werden.
Hinweis
• Untertitel werden bei einer Disc,
auf der mittels Rekorder Closed
Captions aufgezeichnet wurden, nicht
angezeigt. Zudem können mittels
Rekorders aufgezeichnete Untertitel
nicht ersetzt werden. Beachten Sie die
Bedienungsanleitung des Aufnahmegerätes.
Drücken Sie während der Wiedergabe
SUBTITLE.
• Der aktuelle Untertitel und die
Gesamtanzahl aufgezeichneter Untertitel
werden am Fernsehbildschirm und am
Display an der Frontblende des Players
angezeigt. Drücken Sie zum Umschalten
des Untertitels erneut SUBTITLE.
• Falls die Untertitel bei Betätigung der
SUBTITLE-Taste nicht gewechselt werden,
wechseln Sie sie über den Menübildschirm.
Page 65

* Ausschalten der Untertitel
Drücken Sie zur Auswahl von Untertitel
FUNCTION, wählen Sie dann OFF.
* Über das Anzeigen von externen
Untertiteldateien während der Wiedergabe
von DivX-Mediendateien
Zusätzlich zu den in DivX-Mediendateien
aufgezeichneten Untertiteln unterstützt dieser
Player auch die Anzeige externer
Untertiteldateien. Wenn eine Datei den gleichen
Namen wie eine DivX-Mediendatei neben der
Dateierweiterung hat und es sich bei der
Erweiterung um eine der unten aufgeführten
Erweiterungen handelt, wird die Datei als eine
externe Untertiteldatei betrachtet. Beachten
Sie, dass sich DivX-Mediendateien und externe
Untetiteldateien in demselben Ordner befi nden
müssen. Es kann immer nur eine externe
Untertiteldatei an diesem Player angezeigt
werden. Verwenden Sie einen Computer usw.,
um ungewünschte externe Untertiteldateien von
der Disc zu löschen.
Text-Dateien mit den Erweiterungen „.smi“,
„.srt“, „.sub“ und „.txt“ werden unterstützt.
Hinweis
• Je nach Datei werden die externen Untertitel
möglicherweise nicht richtig angezeigt.
Bewegen von Untertiteln
Die Position der angezeigten Untertitel bei der
Wiedergabe von BD-ROMs oder DVDs kann
verschoben werden.
1 Spielen Sie BD-ROM oder DVD-Video
ab und zeigen Sie die Untertitel auf dem
Fernsehbildschirm an.
2 Halten Sie die SUBTITLE-Taste
mindestens 2 Sekunden gedrückt.
• Der Untertitel-Verschieben-Modus wird
eingestellt.
• [Untertitel-Verschieben-Modus] wird am
Fernsehbildschirm angezeigt.
3 Verschieben Sie die Position der
Untertitel mit .
• Verschieben Sie die Position der Untertitel
mit ▲/▼.
• Drücken Sie bei Abschluss der Einstellung
ENTER.
Umschalten des Audios
Bei Discs oder Dateien, für die mehrere
Audiostreams/Kanäle aufgenommen wurden,
können die Audiostreams/Kanäle während der
Wiedergabe umgeschaltet werden.
Drücken Sie während der Wiedergabe
AUDIO.
• Der aktuelle Winkel und die Gesamtanzahl
der aufgenommenen Kamerawinkel werden
auf dem Fernsehbildschirm angezeigt.
Drücken Sie zum Umschalten des
Audiostreams erneut AUDIO.
• Der Audiostream kann auch durch Auswahl
von Audio aus dem FUNCTION-Menü
umgeschaltet werden.
• Wenn der Audiostream durch Drücken von
AUDIO nicht umgeschaltet wird, schalten
Sie ihn über den Disc-Menübildschirm um.
Anzeigen der Disc-Informationen
Drücken Sie DISPLAY.
Die Disc-Informationen erscheinen auf dem
Fernsehbildschirm. Drücken Sie zum Abschalten der Informationsanzeige erneut die
DISPLAY-Taste. Während der Wiedergabe
und bei gestoppter Wiedergabe werden
unterschiedliche Informationen angezeigt.
Fortgesetzte Wiedergabe von einer
spezifi zierten Position (Fortgesetzte
Betrachtungswiedergabe)
Diese Funktion erlaubt es Ihnen, die
Wiedergabe von einer von Ihnen spezifi zierten
Position zur Wiedergabe beim nächsten Mal
fortzusetzen, auch nach dem Ausschalten der
Stromversorgung.
* Einstellung
Drücken Sie während der Wiedergabe
bei der Position, bei der Sie die
Wiedergabefortsetzung starten möchten, die
CONTINUED-Taste.
Die verfl ossene Spielzeit nach der spezifi zierten
Position wird im Fernsehbildschirm angezeigt.
* Wiedergabe
1 Drücken Sie zur WIedergabe des Titels,
für den Sie die Wiedergabefortsetzung
festgelegt haben .
Der Bestätigungsbildschirm für fortgesetzte
Betrachtungswiedergabe erscheint.
• In den unten aufgeführten Fällen wird der
Bestätigungsbildschirm für fortgesetzte
Betrachtungswiedergabe angezeigt.
Für BD-Videos
- Der Bildschirm wird angezeigt, nachdem
der Hauptinhalt abgespielt wurde.
Für bespielte Discs
- Der Bildschirm wird angezeigt, nachdem der Ordner gewählt ist und der für
fortgesetzte Wiedergabe eingestellt Titel
abgespielt wurde.
2 Verwenden Sie , um Ja zu wählen,
und drücken Sie dann ENTER.
Die Wiedergabe beginnt ab der festgelegten
Position.
Hinweise:
• Die Einstellung der Wiedergabefortsetzung
wird bei Betätigung der Taste OPEN/
CLOSE abgebrochen.
• Fortgesetzte Betrachtungswiedergabe
arbeitet möglicherweise nicht mit allen
Discs.
21
04
Page 66

Wiedergabe-Funktionen
04
Die verwendbaren Funktionen hängen vom Typ der Disc und der Datei ab. In bestimmten Fällen
können einige der Funktionen verwendet werden. Die jeweils verwendbaren Funktionen fi nden
Sie in der nachstehenden Tabelle.
Schrittweise
Wiedergabey/
Zeitllupenwiedergabe
Schnellvorlauf und
Schnellrücklauf
Short Skip/Replay
Abspielen von
bestimmten Titeln,
Kapiteln oder Tracks
Vorheriges und
Nächstes
Zeitlupenwiedergabe
Schritt
3
A-B
Wiederholung
Zoom-Dateien
Umschalten der
Kamerawinkel
Umschalten der
Untertitel
Umschalten des
Audios
Anzeigen der
Disc-Informationen
1. Manche Funktionen arbeiten möglicherweise nicht bei bestimmten Discs oder Dateien, auch wenn mit [] in der
Tabelle gekennzeichnet.
2. Je nach Audioformat, wie Dolby True HD und DTS-HD Master Audio, können Situationen auftreten, in denen
Schnellwiedergabe oder schrittweise Wiedergabe nicht verfügbar sind.
3. Bei einigen Discs setzt die normale Wiedergabe automatisch fort, wenn das Kapitel wechselt.
4. Während des Vorwärts- und Rückwärtssuchlauf swird kein Ton ausgegeben.
5. Während des Vorwärts- und Rückwärtssuchlaufs erfolgt Tonausgabe.
6. Während der Zeitlupenwiedergabe erfolgt keine Tonausgabe.
7. Die Zeitlupenwiedergabe in Rückwärtsrichtung ist nicht möglich.
8. Die Schrittwiedergabe in Rückwärtsrichtung ist nicht möglich.
9. Es gibt auch Discs, die nicht mehr als einen Winkel gespeichert haben.
10. • Die aufgenommenen Untertiteltypen hängen von der Disc oder Datei ab.
• In einigen Fällen kann der Untertitel wechseln oder der Wechselbildschirm auf der Disc sofort angezeigt werden,
ohne dass der aktuelle Untertitel oder die Gesamtanzahl der auf der Disc aufgenommenen Untertitel angezeigt
werden.
11. Die Typen der aufgenommenen Audiostreams/Kanäle hängen von der Disc oder Datei ab.
Funktion
3,8
10
11
1
BD-
BD-R
DVD-
ROM
/-RE
2
3
4
4
Video
DVD-R
/-RW
(VR-
Format)
4
4
Disc/Dateityp
AVCREC
4
AVCHD
4
Video-
datei
Bilddatei
Audio
datei
xxxx
4
x
x
5
xxx
6,7
xxx
xxx
x
x
9
xxxxxxx
xx
xxx
xxx
Audio-
CD
5
22
Page 67

FUNCTION-Menü verwenden
Je nach Betriebsstatus des Players können
verschiedene Funktionen aufgerufen werden.
1 Rufen Sie das FUNCTION-Menü auf.
Drücken Sie FUNCTION. (Bsp.: BDMV-Discs)
2 Wählen Sie den Eintrag, und stellen Sie
ihn ein.
Wählen Sie den gewünschten Eintrag mit
aus, und drücken Sie anschließend ENTER.
Hinweis:
• Einträge, die nicht geändert werden
können, werden in grau angezeigt. Welche
Einträge ausgewählt werden können, hängt
vom Status des Players ab.
* Zum Ändern der Einstellungen des
gewählten Elements
Nehmen Sie die Änderung mit vor.
* So schließen Sie das FUNCTION-Menü
Drücken Sie FUNCTION.
* Liste der Einträge im FUNCTION-Menü
Eintrag Beschreibung
Titel Aktuelle Titelinformationen anzeigen.
Kapitel Aktuelle Kapitelinformationen
Datei Aktuelle Datei-Informationen anzeigen.
Zeit Zeit der Informationen anzeigen. Ihre
Betriebsart Wiedergabemodus wechseln.
Audio Audiosprache in BD-ROM- und
Winkel Zum Umschalten des Kamerawinkels
Untertitel Zum Umschalten der Untertitelsprache.
Untertitel Stil Zur Auswahl des Untertitelstils.
Code Page Schaltet die Untertitel-Codepage um.
Sekundär-Video Zum Öffnen/Schließen des zweiten
Sekundär-Audio Zum Öffnen/Schließen des zweiten
Bitrate Zum Umschalten der Audio-/
Standbild aus Schaltet das Standbild der BD-ROM/
Short Skip Springt 30 Sekunden weiter.
Replay Springt 10 Sekunden zurück.
Diashow Schalten Sie die
Übergang Ändern Sie den Stil der Diashow
Wählen Sie Ihre nbevorzugten
anzeigen. Wählen Sie Ihr bevorzugtes
Kapitel.
Wählen Sie Ihre bevorzugte Datei.
Wiedergabezeit wählen.
DVD-Discs wechseln. Wählen Sie mit
Ihre Sprache.
der BD-ROM/DVD-Video-Disc.
Videos.
Audios.
Videobitrate.
DVD aus.
Wiedergabegeschwindigkeit während
der Bild-Diashow um.
während der Wiedergabe der BildDiashow.
Titel.
Hinweis
• Das Betriebselement ändert sich je nach
Disc-Typ, wenn die Disc nur unterstützt
wird, können einige Einträge nicht genutzt
werden.
• Die Typen der aufgenommenen
sekundären Audiostreams hängen von der
Disc und Datei ab.
• Manche Discs enthalten kein sekundäres
Video/sekundäres Video.
• In manchen Fällen kann das sekundäre
Audio/Video umschalten oder der
Umschalten-Bildschirm auf der Disc kann
sofort angezeigt werden, ohne das aktuelle
Sekundär-Audio/Sekundär-Video oder die
Gesamtzahl der Sekundär-Audio/
Sekundär-Videostreams auf der spielenden
Disc anzuzeigen.
• Das Sekundär-Audio-Zeichen wird bei
Szenen angezeigt, für die Sekundär-Audio
aufgezeichnet ist, wenn Winkel/SekundärAnzeige auf Ein gesetzt ist.
04
23
Page 68

04
Wiedergabe-Funktionen
nutzen
Abspielen eines bestimmten Titels,
Kapitels bzw. Tracks (Suche)
1 Drücken Sie zum Aufrufen des
Wiedergabe-BildschirmsFUNCTION.
2 Wählen Sie die Art der Suche.
Treffen Sie Ihre Auswahl mit , drücken Sie
dann ENTER.
3 Geben Sie die Nummer ein.
Geben Sie die Nummer mit den Zifferntasten
(0 bis 9) oder ein. Bewegen Sie den
Cursor mit .
• Um nach Titel 32 zu suchen, geben Sie 3
und 2 ein, und drücken Sie dann.
Drücken Sie ENTER.
4 Starten Sie die Wiedergabe mit dem
festgelegten Titel, Kapitel oder Track.
Wählen Sie mit Suche, drücken Sie dann
ENTER.
In zufälliger Reihenfolge wiedergeben
(Zufallswiedergabe)
Verwenden Sie dieses Verfahren, wenn Sie
Tracks oder Dateien in zufälliger Reihenfolge
wiedergeben möchten.
1 Drücken Sie während der Wiedergabe zur
Anzeige des Wiedergabe-Bildschirms
FUNCTION.
2 Wählen Sie Normal/Zufall.
Wählen Sie den gewünschten Eintrag mit
aus, und drücken Sie anschließend ENTER.
3 Wählen Sie Zufall.
Wählen Sie den gewünschten Eintrag mit
aus, und drücken Sie anschließend ENTER.
* So beenden Sie die Zufallswiedergabe
• Wählen Sie Normal am Zufall-Bildschirm.,
drücken Sie dann ENTER.
• Drücken Sie während der Wiedergabe .
Hinweis
• Die Zufallswiedergabe wird in folgenden
Fällen abgebrochen:
– Bei Verwendung der Suchfunktion.
– Bei Start der Wiederholungswiedergabe.
24
Page 69

Über die Quelle-Funktion wiedergeben
04
Die Titel/Ordner/Tracks/Dateien der auf dem
USB-Gerät oder Laufwerk gespeicherten
Bilder, Soundtracks oder Videos können in
einem Listenformat angezeigt werden. Die
Discs können wie nachstehend gezeigt über
die Quelle-Funktion wiedergegeben werden
(siehe auch Seite 7).
• BD-R/-RE-Discs
• DVD-R/-RW-Discs (VR-Format)
• Audio-CD (CD-DA und DTS-CD)
• DVDs/CDs, auf denen nur Datendateien
von Video-, Bild- oder Audiodateien
aufgenommen wurden.
Hinweise:
• Je nach den angeschlossenen Geräten
und Bedingungen kann eine gewisse Zeit
für den Start der Wiedergabe und das
Umschalten des Bildes erforderlich sein.
Discs abspielen
1 Rufen Sie mit SOURCE die QuelleFunktion auf.
2 Wählen Sie Discs.
Wählen Sie den gewünschten Eintrag mit
aus, und drücken Sie anschließend ENTER.
Objekt: 1/3
BDMV
USB1
Playlist
3 Wählen Sie Ordner.
4 Wählen Sie Titel.
Wählen Sie den gewünschten Eintrag mit
aus, und drücken Sie anschließend ENTER.
Die Wiedergabe startet.
SOURCE
Typ:Disc
Grösse:20321.562M
FS:UDF
Media
Beenden
Center
* Quelle-Funktion schließen
Drücken Sie SOURCE.
Hinweise:
• Bei Wiedergabe einer Audio-CD (CD-DA
oder DTS-CD) wird der Bildschirm zur
aktuellen Wiedergabe angezeigt.
• Einige BD-R/-RE-Discs haben einen
Wiedergabeschutz. Um den Schutz zu
deaktivieren, geben Sie das für die Disc
festgelegte Passwort ein.
Videodateien wiedergeben
1 Rufen Sie mit SOURCE die QuelleFunktion auf.
2 Wählen Sie Discs oder USB-Geräte.
Wählen Sie den gewünschten Eintrag mit
aus, und drücken Sie anschließend ENTER.
Objekt: 3/10
USB1/Video/MPEG1
Streams
Layer3
f11
f12
f13
f14
3 Wählen Sie [Video]-Ordner.
Verwenden Sie , um Auto zu wählen, und
drücken Sie dann ENTER.
4 Wählen Sie den Ordner, in dem sich die
Videodatei befi ndet, die Sie wiedergeben
möchten.
Wählen Sie den gewünschten Eintrag mit
aus, und drücken Sie anschließend ENTER.
• Ordner - Die Dateien im ausgewählten
Ordner werden angezeigt.
• Videodatei - Die Wiedergabe der
Videodateien startet.
Die Wiedergabe beginnt bei der gewählten
Datei und wird bis zum Ende der Liste
fortgesetzt. Drücken Sie zur Wiedergabe der
vorherigen oder nächsten Datei .
Hinweise:
• Es kann einige Sekunden dauern, bis die
Wiedergabe startet. Dies ist normal.
• Einige Dateien können möglicherweise
nicht richtig abgespielt werden.
• Die Wiedergabeanzahl kann beschränkt
sein.
Typ:
MP3
Gesamtzeit:
Auflösung:
Bildrate:
Media
Center
SOURCE
Beenden
25
Page 70

Bilddateien wiedergeben
04
1 Rufen Sie mit SOURCE die QuelleFunktion auf.
Audiodateien wiedergeben
1 Rufen Sie mit SOURCE die QuelleFunktion auf.
2 Wählen Sie Discs oder USB-Geräte.
Wählen Sie den gewünschten Eintrag mit
aus, und drücken Sie anschließend ENTER.
3 Wählen Sie [Bild]-Ordner.
Wählen Sie mit Videodateien, drücken
Sie dann ENTER.
4 Wählen Sie den Ordner, in dem sich die
Bilddatei befi ndet, die Sie wiedergeben
möchten.
Wählen Sie den gewünschten Eintrag mit
aus, und drücken Sie anschließend ENTER.
• Ordner - Die Dateien im ausgewählten
Ordner werden angezeigt.
• Bilddatei - Wiedergabe startet Diashow.
Objekt: 3/10
USB1/Poto
ANEW_FOL
Font test
0
1
2
3
SOURCE
Typ:
JPG
Grösse: 0.173M
Auflösung: 640X480
Media
Beenden
Center
Die Diashow beginnt bei der gewählten Datei
und wird bis zum Ende der Liste fortgesetzt.
Drücken Sie zur Anzeige der vorherigen oder
nächsten Datei .
2 Wählen Sie Discs oder USB-Geräte.
Wählen Sie den gewünschten Eintrag mit
aus, und drücken Sie anschließend ENTER .
3 Wählen Sie [Musik]-Ordner.
Wählen Sie mit Videodateien, drücken
Sie dann ENTER.
4 Wählen Sie den Ordner, in dem sich die
Musikdatei befi ndet, die Sie wiedergeben
möchten.
Wählen Sie den gewünschten Eintrag mit
aus, und drücken Sie anschließend ENTER.
• Ordner - Die Dateien im ausgewählten
Ordner werden angezeigt.
• Musikdatei - PWiedergabe startet Musik.
Die Wiedergabe beginnt bei der gewählten
Datei und wird bis zum Ende der Liste
fortgesetzt. Drücken Sie zur Wiedergabe der
vorherigen oder nächsten Datei . Der
Bildschirm der aktuellen Wiedergabe
(nachstehend gezeigt) erscheint.
Wiedergabe
3/11
Typ: MP3
Gesamtzeit: 03:22
Zeit: amante
Künstler: Amada
Album:
Genre:
00:01:11
* Über die Diashow
Eine Anzeige von Dateien auf der Disc oder in
dem Ordner schaltet automatisch um.
26
Page 71

Abspielen in der gewünschten
Reihenfolge (Wiedergabeliste)
Die Discs, bei denen Tracks und Dateien zur
Wiedergabeliste hinzugefügt werden können,
sind nachstehend aufgeführt.
• DVDs/CDs/USB-Geräte, auf denen
Audiodateien aufgenommen wurden.
* Hinzufügen von Tracks/Dateien
Verwenden Sie dieses Verfahren zum
Hinzufügen von Tracks und Dateien, und
erstellen Sie die Wiedergabeliste.
1 Rufen Sie mit der SOURCE-Taste die
Quelle-Funktion auf.
Die Source-Funktion kann auch angezeigt
werden, indem Sie Source aus dem
Startmenü wählen und dann ENTER drücken.
2 Wählen Sie Disc oder USB.
Legen Sie zuvor die Disc ein.
Wählen Sie den gewünschten Eintrag mit
aus, und drücken Sie anschließend ENTER.
3 Wählen Sie den Track oder die Datei, den/
die Sie hinzufügen möchten.
Drücken Sie zur Auswahl .
4 Drücken Sie POP UP MENU zur Anzeige
des Menüs POP UP MENU.
5 Wählen Sie zum Hinzufügen zur
Wiedergabeliste die Option Zur
Wiedergabeliste hinzufügen.
Wählen Sie den gewünschten Eintrag mit
aus, und drücken Sie anschließend ENTER.
Der Track oder die Datei, der/die in Schritt 3
ausgewählt wurde, wird der Wiedergabeliste
hinzugefügt.
• Um weitere Tracks oder Dateien
hinzuzufügen, wiederholen Sie die Schritte
3 bis 5.
* Wiedergabeliste wiedergeben
1 Rufen Sie mit der SOURCE-Taste die
Quelle-Funktion auf.
Die Source-Funktion kann auch angezeigt
werden, indem Sie Source aus dem
Startmenü wählen und dann ENTER drücken.
2 Wählen Sie Wiedergabeliste.
Wählen Sie den gewünschten Eintrag mit
aus, und drücken Sie anschließend ENTER.
3 Wählen Sie den Track oder die Datei, den
bzw. die Sie abspielen möchten.
Wählen Sie den gewünschten Eintrag mit
aus, und drücken Sie anschließend ENTER.
Die Wiedergabe beginnt ab dem/der
gewählten Track/Datei und wird bis zum Ende
der Liste fortgesetzt. Geben Sie mit
den/die vorherige(n) oder nächste(n) Track/
Datei wieder. Der Now Playing-Bildschirm wird
angezeigt.
* Tracks/Dateien aus der Wiedergabeliste
löschen
1 Wählen Sie den Track/die Datei, der/die
gelöscht werden soll; drücken Sie dann zur
Anzeige des Menüs POP UP MENU die
Taste POP UP MENU.
2 Wählen Sie mit die Option Aus
Wiedergabeliste entfernen, drücken Sie
dann ENTER.
Videooptionen ändern
Sie können die Einstellung am Bildschirm wie
gewünscht anpassen.
1 Rufen Sie mit VIDEO P. den Video
Parameter-Bildschirm auf.
2 Wählen Sie den Eintrag, und ändern Sie
die Einstellung.
Wählen Sie mit das Element, ändern Sie
dann mit die Einstellung. Drücken Sie
nach Abschluss der Einstellung zum Schließen
des Einstellungsbildschirms
Liste der Einstellelemente
Eintrag Beschreibung
Helligkeit Stellen Sie die Helligkeit ein.
Kontrast
Farbton Stellen Sie die Balance von Grün und
Sättigung Stellen Sie die Farbsättigung ein.
Stellen Sie den Farbton ein.
Rot ein.
* Video Parameter-Bildschirm schließen
Drücken Sie VIDEO P. oder
Hinweis:
• Es ist nicht möglich, den Videoparameter-
Bildschirm zu öffnen, wenn Startmenü
(Source, Web Inhalte, Ersteinrichtung),
Funktionsmenü oder Disc-Menü angezeigt
werden.
RETURN.
RETURN.
04
27
Page 72

Kapitel 5
05
Erweiterte Einstellungen
Allgemeine Einstellungen
1 Wenn die Wiedergabe gestoppt oder der
Blu-ray-Player geöffnet wird, erscheint der
Startmenü-Bildschirm.
Drücken Sie HOME MENU.
2 Wählen Sie Grundeinstellungen, und
nehmen Sie die Einstellung vor.
Wählen Sie den gewünschten Eintrag mit
aus, und drücken Sie anschließend
ENTER.
3 Wählen Sie den Eintrag, und ändern Sie
die Einstellung.
Wählen Sie den gewünschten Eintrag mit
aus, und drücken Sie anschließend
ENTER.
Allgemeine Einstellung
System
Language
Wiedergabe
Sicherheit
Netzwerk
Die Position mit der Cursortaste verschieben, und die
"ENTER"-Taste zur Auswahl drücken
Beenden
* Schließen des GrundeinstellungenBildschirms
Drücken Sie HOME MENU.
Hinweis:
• Wenn ein Eintrag ausgegraut ist, kann er
nicht ausgewählt werden.
System
So ändern Sie die folgende Systemoption zur
Personalisierung Ihres BD-Players.
• [Schirmschoner]
Schalten Sie den Bildschirmschonermodus ein
oder aus. Er dient dem Schutz des TVBildschirms.
{Ein} - Schaltet den Bildschirmschonermodus
ein: Der Bildschirmschonermodus schaltet sich
nach 10 Minuten ohne Programm automatisch
ein.
{Aus} - Schaltet den Bildschirmschonermodus
aus.
• [Autom. Abschaltung]
{Aus} - Wählen Sie diese Option, wenn das
Gerät nicht automatisch ausgeschaltet werden
soll.
Schirmschoner
Autom. Abschaltung
Autom. Disc-Wiedergabe
CEC
Leichtes Setup
Ein
Aus
Ein
Ein
Nächster Bildschirm
Zurück
{15 min}, {30 min} -Die Stromversorgung wird
automatisch ausgeschaltet, wenn länger als
15 Minuten oder 30 Minuten lang keine
Bedienung ausgeführt wird.
• [Autom. Disc-Wiedergabe]
{Ein} - Schaltet die automatische DiscWiedergabe ein.
{Aus} - Schaltet die automatische DiscWiedergabe aus.
• [CEC]
Dieser Player unterstützt EasyLink, welches
das Protokoll HDMI-CEC (Consumer
Electronics Control) nutzt. Sie können mit
einer einzigen Fernbedienung alle Funktionen
der über HDMI-Anschlüsse verbundenen
Geräte steuern.
{Ein} - Schaltet die Steuerfunktionen ein.
{Aus} - Schaltet die Steuerfunktionen aus.
• [Leichtes Setup]
Legen Sie die Sprache des BD-Players und
das Seitenverhältnis des Fernsehers fest.
• [Standardeinstellung laden]
Setzt alle Einstellungen des BD-Players auf
die Standardparameter zurück.
- Befolgen Sie die Anweisungen am
Fernsehbildschirm zur Bestätigung der
Rücksetzung auf die Standardeinstellungen.
1. Wählen Sie Standardeinstellung laden.
2. Ein Dialogfenster erscheint wie
nachstehend dargestellt. Wählen Sie OK.
Standardeinstellung laden
Standard laden?
OK
Abbrechen
3. Die Rücksetzung auf die
Standardeinstellungen wird durchgeführt; dies
kann eine Weile dauern. Bitte warten...
Standardeinstellung laden
Standard wird geladen, bitte warten...
4. Wenn die Rücksetzung auf die
Standardeinstellungen abgeschlossen ist, wird
Folgendes am Fernseher
angezeigt:
Seite: 1/5 Leichtes Setup
Willkommen
zum BD-Player Einrichtungsassistenten!
Zunächst sind einige einfache Einstellungen erforderlich.
Bitte nehmen Sie detaillierte Einstellungen später im Home-Menü vor.
28
OK Nächstes
Page 73

5. Drücken Sie zum Aufrufen der
Spracheinstellung ENTER.
Wählen Sie mit die gewünschte Sprache.
Seite: 2/5 Leichtes Setup
Wählen
Wählen Sie vor dem Start eine
Menü-Sprache.
Die gewählte Sprache wird nicht nur hier sondern
auch in anderen Menüs und Dialogen verwendet.
Vorheriges
English
Deutsch
Hungarian
Czech
Slovak
Polish
OK Nächstes
6. Drücken Sie zum Aufrufen der
Auflösungseinstellung ENTER.
Seite: 3/5 Leichtes Setup
Wählen
Wählen Sie eine Auflösung die Ihrem
TV entspricht.
Änderungen werden sofort übernommen. Sie haben
15 s, um zu entscheiden, ob die Einstellung
gespeichert oder zur vorherigen Auflösung
zurückgekehrt werden soll. Bessere Leistung wird
durch eine HDMI-Verbindung erzielt!
Vorheriges
Auto
480p/576p
720p
1080i
1080p
1080/24p
OK Nächstes
Wählen Sie mit eine Option. Drücken Sie ENTER.
Wählen Sie mit „Ja“ oder „Nein“.
Seite: 3/5 Leichtes Setup
Auflösung
wurde geändert!
Sieht bei dieser Auflösung alles in Ordnung aus?
Drücken Sie [Ja], um die Einstellung zu
übernehmen. Drücken Sie [Nein], um zur
vorherigen zurückzugehen.
Vorheriges
14s
Ja
Nein
OK Nächstes
7. Drücken Sie zum Aufrufen der
Seitenverhältniseinstellung ENTER.
Seite: 4/5 Leichtes Setup
8. Drücken Sie zum Aufrufen des Allgemeine
Einstellungen-Menüs ENTER .
• [Update]
Sie können die Software über ein USB-FlashLaufwerk aktualisieren.
1. Schließen Sie das USB-Flash-Laufwerk an,
auf dem sich das Aktualisierungsdateipaket
befi ndet.
2. Befolgen Sie die Anweisungen am
Fernsehbildschirm zum Bestätigen der
Aktualisierung.
- Wenn die Softwareaktualisierung
abgeschlossen ist, startet das System nach
5 Sekunden bzw. nach Betätigung der
Enter-Taste neu.
Hinweise:
• Während der Softwareaktualisierung dürfen
Sie weder den Netzstecker ziehen noch
das USB-Flash-Laufwerk/die Disc
entfernen. Drücken Sie während der
Aktualisierung außerdem nicht die ResetTaste. Andernfalls wird die Aktualisierung
abgebrochen und es kann eine
Fehlfunktion des Players auftreten.
• Falls das Aktualisierungsdateipaket die
Verifi zierung nicht besteht, erscheint eine
Fehlermeldung. Prüfen Sie das Paket
(beispielsweise auf Vollständigkeit).
• Stellen Sie sicher, dass die FirmwareVersion auf dem neuesten Stand ist.
• [BUDA]
Wenn ein USB-Gerät mit mehr als 1 GB freiem
Speicherplatz eingesteckt ist, können Sie die
Funktion BD-Live verwenden. Und das
Blu-ray-DVD-System benennt automatisch
einen BUDA-Inhalt.
BUDA wird angezeigt.
1. Drücken Sie ENTER.
2. Befolgen Sie die Anweisungen am
Fernsehbildschirm zur Auswahl von
[BUDA-Information].
05
Wählen
Wählen Sie ein Seitenverhältnis das
zu Ihrem TV passt.
Änderungen werden auf der nächsten Seite
übernommen. Sie müssen entscheiden, ob die
Einstellung gespeichert oder zum vorherigen
Seitenverhältnis zurückgekehrt werden soll.
Vorheriges
16:9 Voll
16:9 Normal
4:3 Pan&Scan
4:3 Letterbox
OK Nächstes
Wählen Sie mit eine Option. Drücken Sie ENTER.
Seite: 5/5 Leichtes Setup
Einstellung
Einrichtungsassistent ist beendet!
Now press Finish button to go to Home Menu. Viel Vergnügen.
Vorheriges
OK Fertig!
Allgemeine Einstellung
System
Language
Wiedergabe
Sicherheit
Netzwerk
Die Position mit der Cursortaste verschieben, und die
"ENTER"-Taste zur Auswahl drücken
Beenden
BUDA-Information
Freie Größe : 0MB
Format
Zurück
3. Drücken Sie zur Auswahl von „Format“
ENTER, die BUDA-Dateien werden gelöscht.
• [Schnellstart]
{Ein} - Wählen Sie diese Option, um die
erforderliche Zeit zum Systemstart zu
verkürzen.
{Aus} - Wählen Sie diese Option zum
normalen Systemstart.
29
Page 74

Sprache
05
Wählen Sie die Standardeinstellungen bei
OSD-Sprache, Disc-Menüsprache,
Audiosprache und Untertitelsprache des
Players.
Allgemeine Einstellung
System
Language
Wiedergabe
Sicherheit
Netzwerk
Die Position mit der Cursortaste verschieben, und die
"ENTER"-Taste zur Auswahl drücken
Beenden
OSD
Menü
Audio
Untertitel
English
English
English
English
Zurück
• [OSD]
Wählen Sie die Standard-OSD-Sprache.
• [Menü]
Wählen Sie die Menüsprache.
• [Audio]
Wählen Sie die Standardaudiosprache.
• [Untertitel]
Wählen Sie die Standarduntertitelsprache.
Wiedergabe
Allgemeine Einstellung
System
Language
Wiedergabe
Sicherheit
Netzwerk
Die Position mit der Cursortaste verschieben, und die
"ENTER"-Taste zur Auswahl drücken
Beenden
• [Winkelmarkierung]
Einige DVDs/BDs enthalten Szenen, die aus
mehreren Winkeln aufgenommen wurden;
dadurch können Sie Videos aus Ihrer
gewünschten Perspektive betrachten. Das
Winkelzeichen wird nur angezeigt, wenn die
DVD/BD-Disc mehrere Winkel unterstützt und
Winkelmarkierung auf ON gesetzt ist.
{Ein} – Zeigt die Winkelmarkierung.
{Aus} –Blendet die Winkelmarkierung aus.
• [PIP-Markierung]
Der Bild-im-Bild-Modus (BiB) zeigt zwei Bilder
gleichzeitig am Fernsehbildschirm. Die im
Vollbildmodus dargestellte Anzeige wird als
Hauptfenster, die kleinen eingefügten Fenster
werden als Subfenster bezeichnet. Wenn
BiB-Modus und BiB-Markierung auf Ein
gesetzt sind, wird das BiB-Zeichen angezeigt.
{Ein} – BiB-Zeichen wird angezeigt.
{Aus} – BiB-Zeichen wird ausgeblendet.
• [Sekundär-Audio-Markierung]
{Ein} – Sekundär-Audio-Zeichen wird
angezeigt.
30
Winkelmarkierung
PIP-Markierung
Sekundär-Audio-Markierung
Letzte Position
PBC-Menü Ein
Zurück
Ein
Ein
Ein
Ein
{Aus} – Sekundär-Audio-Zeichen wird
ausgeblendet.
• [Letzte Position]
Wenn Sie während der normalen Wiedergabe
die Disc-Schublade öffnen oder den Player in
den Bereitschaftsmodus versetzen, kann der
BD-Player den abschließenden
Wiedergabepunkt speichern; bei der nächsten
Inbetriebnahme startet der Player die
Wiedergabe bei dem gespeicherten Punkt.
{Ein} – Aktiviert die Funktion Letzte Position.
{Aus} – Deaktiviert die Funktion Letzte
Position.
Hinweis:
• Nicht alle Blu-ray-Discs unterstützen die
Funktion.
• [PBC-Menü]
VCD2.0 bietet ein PBC-Steuerungsmenü
(Wiedergabesteuerung), das Ihnen die
Interaktion mit dem System über ein Menü
ermöglicht.
{Ein} – Öffnet PBC- und
Anzeigewiedergabesteuerungsmenü;
verwenden Sie die Zifferntasten zur Auswahl
der gewünschten Option.
{Aus} – Schließt das PBC-Menü und blendet
das WIedergabesteuerungsmenü aus; startet
die Wiedergabe automatisch bei Track 1.
• [DivX
Wählen Sie die Option DivX
wenn Sie zur Betrachtung von DivX
®
VOD DRM]
®
VOD DRM,
®
-Videos
Ihren Registrierungscode in Erfahrung bringen
möchten.
Sicherheit
Allgemeine Einstellung
System
Passwort ändern
Language
Altersbegrenzung
Wiedergabe
Landescode
Sicherheit
Netzwerk
Die Position mit der Cursortaste verschieben, und die
"ENTER"-Taste zur Auswahl drücken
Beenden
• [Passwort ändern]
Befolgen Sie die Anweisungen am
Fernsehbildschirm oder ändern Sie das
Passwort für gesperrte Discs und geben Sie
beschränkte DVDs/BDs wieder.
Allgemeine Einstellung
System
Language
Wiedergabe
Sicherheit
Netzwerk
Die Position mit der Cursortaste verschieben, und die
"ENTER"-Taste zur Auswahl drücken
Beenden
Nächster Bildschirm
Nächster Bildschirm
Nächster Bildschirm
Zurück
Passwort ändern
Bitte aktuelles Passwort eingeben:
Zurück
Page 75

1. Geben Sie mit den Zifferntasten das
vierstellige alte Passwort ein.
2. Geben Sie das neue Passwort ein.
Allgemeine Einstellung
System
Language
Wiedergabe
Sicherheit
Netzwerk
Die Position mit der Cursortaste verschieben, und die
"ENTER"-Taste zur Auswahl drücken
Beenden
Passwort ändern
Neues Passwort:
Passwort bestätigen:
Zurück
3. Geben Sie das neue Passwort zur
Bestätigung erneut ein.
• [Altersbegrenzung]
Beschränkt den Zugriff auf Discs, die nicht für
Kinder geeignet sind. Diese Discs müssen mit
eine Einstufung enthalten.
1. Drücken Sie ENTER.
2. Geben Sie mit den Zifferntasten das
Passwort ein.
Allgemeine Einstellung
System
Language
Wiedergabe
Sicherheit
Netzwerk
Die Position mit der Cursortaste verschieben, und die
"ENTER"-Taste zur Auswahl drücken
Beenden
Altersbegrenzung
Passwort eingeben:
Zurück
3. Wählen Sie die Einstufung, drücken Sie
dann ENTER.
Allgemeine Einstellung
System
Language
Wiedergabe
Sicherheit
Netzwerk
Die Position mit der Cursortaste verschieben, und die
"ENTER"-Taste zur Auswahl drücken
Beenden
Element Beschreibung
Aus
Kindersicher
G Alle Kinder und allgemeine Aufsicht
PG Elternaufsicht
PG-13 Elternaufsicht für Kinder unter 13
PGR Elternaufsicht empfohlen
R Beschränkte Betrachtung
NC-17 Nicht für 17 und jünger zugelassen
Erwachsene Nur Erwachsene
Sicher für Kinder
Pegel wählen:
Altersbegrenzung
Aus
Kindersicher
G
Zurück
Hinweise:
• Oberhalb der in [Altersbegrenzung]
festgelegten Stufe eingestufte Discs
erfordern zur Wiedergabe ein Passwort.
• Die Einstufungen sind länderabhängig.
Wählen Sie „Aus“, damit alle Discs
wiedergegeben werden können.
• [Ländercode]
Diese Funktion gewährleistet, dass Sie die für
Ihren aktuellen Wohnort vorgesehenen
Szenen sehen.
Netzwerk
Allgemeine Einstellung
System
Language
Wiedergabe
Sicherheit
Netzwerk
Die Position mit der Cursortaste verschieben, und die
"ENTER"-Taste zur Auswahl drücken
Beenden
Internetverbindung
Information
Verbindungstest
Einstellung der IP-Adresse
BD-Live-Verbindung
Richten Sie die Netzwerkverbindung ein, damit
Sie zusätzliche Inhalte an Ihrem BD-DVDPlayer genießen können.
Hinweis:
• Stellen Sie sicher, dass das Netzwerkkabel
richtig angeschlossen und der Router
eingeschaltet ist.
1. Verbinden Sie den Disc-Player mit dem
Breitbandmodem oder Router.
2. Legen Sie eine BD-Disc mit Bonusmaterial/
BD-Live ein.
3. Wählen Sie eim Setup-Menü [Netzwerk],
drücken Sie dann .
4. Wählen Sie im Menü [Einstellung der
IP-Adresse], drücken Sie dann zur Auswahl
von [Auto] ENTER. Eine IP-Adresse wird
automatisch bezogen.
Falls keine IP-Adresse bezogen wird, wählen
Sie [Manuell]; geben Sie IP-Adresse, SubnetzMaske, Gateway und DNS ein und drücken
Sie zur erneuten Verbindung mit dem
Netzwerk ENTER. Das Gerät versucht noch
einmal, eine IP-Adresse zu beziehen.
5. Drücken Sie zum Verlassen [Zurück] oder
ENTER.
Hinweise:
• Verwenden Sie die Internetverbindung
zwischen dem Anbieter.
• Dieser Player unterstützt keine
automatische Erkennung von gekreuzten
Kabeln. Verwenden Sie das
standardmäßige gerade LAN-Kabel.
• Das Laden von BD-Live-Inhalten aus dem
Internet kann je nach Dateigröße und
Geschwindigkeit der Internetverbindung
eine Weile dauern.
• [Information]
Zeigt die Seite Netzwerk-Informationen an. Auf
dieser Seite fi nden Sie Informationen zu
Schnittstelle, Adresstyp, IP-Adresse, SubnetzMaske, Gateway und DNS.
Aktivieren
Zugelassen
Zurück
31
05
Page 76

• [Verbindungstest]
05
Zeigt die Netzwerkverbindungsmeldung.
• [Einstellung der IP-Adresse]
{Auto} – Netzwerkinformationen automatisch
beziehen.
{Manuell} – Netzwerkinformationen manuell
eingeben.
• [BD-Line-Verbindung]
{Zugelassen} – Während der Wiedergabe
einer BD-Live-Disc könnte die Disc
automatisch sämtliche Informationen aus dem
eingestellten Netzwerk herunterladen.
{Teilweise zugelassen} – Während der
Wiedergabe einer BD-Live-Disc könnte die
Disc automatisch einen Teil der Informationen
aus dem eingestellten Netzwerk
herunterladen.
{Verboten} – Herunterladen von Informationen
aus dem Netzwerk verbieten.
Display-Einstellungen
1. Drücken Sie HOME MENU.
Das Menü [Allgemeine Einstellung] wird
angezeigt.
2. Wählen Sie mit die Option [DisplayEinstellungen], drücken Sie dann .
3. Wählen Sie eine Option, drücken Sie zum
Aufrufen .
Display-Einstellungen
TV
Die Position mit der Cursortaste verschieben, und die
"ENTER"-Taste zur Auswahl drücken
Beenden
4. Wählen Sie mit eine Einrichtungsoption
und drücken Sie .
5. Wählen Sie die Einstellung, die Sie ändern
möchten, und drücken Sie zum Bestätigen
OK.
- Drücken Sie zum Zurückkehren zum
vorherigen Menü .
- Drücken Sie zum Verlassen des Menüs
HOME MENU.
Display-Einstellung
• [Fernsehbildschirm]
Wählen Sie das Seitenverhältnis der
Videoausgabe entsprechend den
Spezifi kationen Ihres Fernsehers.
{16:9 Voll} – Wählen Sie diese Option, wenn
ein Breitbild-Fernsehgerät (16:9)
angeschlossen wird.
32
Fernsehbildschirm
Auflösung
Farbraum
HDMI Deep Colour Aus
16:9
720P
YCbCr422
Zurück
{16:9 Normal} – Wählen Sie diese Option,
wenn ein Breitbild-Fernsehgerät (16:9)
angeschlossen ist. 4:3-Bilder werden mit
vertikalen schwarzen Balken an den Seiten
angezeigt.
{4:3 Pan & Scan} – Wählen Sie diese Option
beim Anschluss an ein Fernsehgerät mit
einem Seitenverhältnis von 4:3 und
Wiedergabe von Video im Seitenverhältnis von
16:9. Das Video wird angezeigt, wobei die
linke und rechte Seite des Bildes beim
4:3-Bildschirm beschnitten sind. (Diese
Funktion arbeitet, wenn die Disc das Label
4:3PS trägt.)
{4:3 Letterbox} – Wählen Sie diese Option
beim Anschluss an ein Fernsehgerät mit
einem Seitenverhältnis von 4:3 und
Wiedergabe von Video im Seitenverhältnis von
16:9. Das Video wird mit schwarzen Streifen
am oberen und unteren Rand angezeigt.
• [Aufl ösung]
Wählen Sie eine Videoausgabeaufl ösung, die
mit Ihrem Fernseher kompatibel ist. Sie
können die Aufl ösung über die
HDMI-Taste an der Fernbedienung ändern.
Bei jedem Drücken der HDMI-Taste wird die
Aufl ösung geändert.
{Auto} – Wählen Sie die entsprechend dem
eingehenden Video am besten geeignete
Aufl ösung. Sie können Blu-ray-Discs sowie
Videos auf DVD mit großartiger Bildqualität
dank Upscaling-Funktion wiedergeben.
{480p/576p}, {720p}, {1080i}, {1080p},
{1080/24p} – Wählen Sie die vom Fernseher
am besten unterstützte Videoauslösung.
Beachten Sie dazu die Anleitung des
Fernsehers
Hinweis:
• Wenn 1080/24p ausgewählt ist, erscheinen
je nach Wiedergabeinhalt Bewegungen
möglicherweise unnatürlich und Bilder
undeutlich. Wählen Sie in solchen Fällen
eine andere Aufl ösung als 1080/24p.
• [Farbraum]
Wählen Sie einen vordefi nierten Farbraum.
{RGB} – Wählen Sie diese Option, um die
Videosignale als RGB-Signale auszugeben.
Wählen Sie RGB-Vollbereich, wenn die
Farben bei Auswahl von RGB zu dicht
erscheinen und alle dunklen Farben in einem
gleichförmigen Schwarz angezeigt werden.
{YCbCr444} – Wählt die Videoausgabe mit
YCbCr4:4:4-Farbraum.
{YCbCr422} – Wählt die Videoausgabe mit
YCbCr4:2:2-Farbraum.
{RGB-Vollbereich} – Wählen Sie diese Option,
um die Videosignale als RGB-Signale
auszugeben. Wählen Sie diese Option, wenn
die Farben bei Auswahl von RGB-Vollbereich zu
blass erscheinen und schwarz zu hell aussieht.
Page 77

• [HDMI Deep Color]
Diese Funktion ist nur verfügbar, wenn das
Anzeigegerät über ein HDMI-Kabel
angeschlossen ist und die Deep ColorFunktion unterstützt.
{Auto} – Wählen, wenn Sie automatisch die
optimale Bitfarbe ausgeben möchten.
{Aus} – Zur Ausgabe standardmäßiger 24-BitFarbtiefe.
Ton-Einstellungen
1. Drücken Sie HOME MENU.
Das Menü [Allgemeine Einstellung] wird
angezeigt.
2. Wählen Sie mit das Element [Ton-
Einstellungen].
drücken Sie dann .
3. Wählen Sie eine Option, drücken Sie zum
Aufrufen .
Ton-Einstellungen
Audio-Einstellung
Die Position mit der Cursortaste verschieben, und die
"ENTER"-Taste zur Auswahl drücken
Beenden
4. Wählen Sie mit eine Einrichtungsoption
und drücken Sie .
5. Wählen Sie die Einstellung, die Sie ändern
möchten, und drücken Sie zum Bestätigen
OK.
- Drücken Sie zum Zurückkehren zum
vorherigen Menü .
- Drücken Sie zum Verlassen des Menüs
HOME MENU.
Sound-Retriever Aus
SPDIF
HDMI
Max. Abtastfrequenz
DRC Auto
Zurück
PCM
PCM
48Kz
Audio Ausgang
• [Sound-Retriever]
Wenn komprimiertes Audio komprimiert wird,
können einige Teile verlorengehen. Wenn Sie
die Funktion Sound-Retriever einschalten, wird
die Klangqualität durch Auffüllen der
gelöschten Teile verbessert.
{Ein} – Schaltet die Funktion Sound-Retriever
ein.
{Aus} – Schaltet die Funktion Sound-Retriever
aus.
• [SPDIF]
Wählen Sie den Ausgangsmodus des
optischen Anschlusses. Zu den Optionen
zählen Bitstream, PCM, Neu codieren und
Aus.
{Bitstream} – Gibt das digitale Signal ohne
Verarbeitung aus.
{PCM} – Wählen Sie diese Option, um digitale
Audiosignale umgewandelt in 2-KanalAudiosignale auszugeben.
{Neu codieren} – Wenn eine BD mit
Sekundär-Audio und interaktivem Audio
abgespielt wird, werden die beiden
Audiosignale gemischt und in Dolby Digital
Audio oder DTS-Audio zur Wiedergabe
umgewandelt.
{Aus} – Wählen Sie diese Option, wenn keine
digitalen Audiosignale verwendet werden.
• [HDMI]
Wählen Sie den Ausgangsmodus des digitalen
HDMI-Ausgangs. Zu den Optionen zählen
Bitstream, PCM, Neu codieren und Aus.
{Bitstream} – Gibt digitale HDMI-Signale ohne
Verarbeitung aus.
{PCM} – Wählen Sie diese Option, um HDMIAudiosignale umgewandelt in PCMAudiosignale auszugeben.
{Neu codieren} – Wenn eine BD mit
Sekundär-Audio und interaktivem Audio
abgespielt wird, werden die beiden
Audiosignale gemischt und in Dolby Digital
Audio oder DTS-Audio zur Wiedergabe
umgewandelt.
{Aus} – Wählen Sie diese Option, wenn keine
HDMI-Audiosignale verwendet werden.
05
• [Max. Abtastfrequenz]
Wählen Sie die Abtastfrequenz digitaler
Audiosignale.
33
Page 78

{48K}, {96K}, {192K} – Gibt
05
die auf eine Abtastrate unterhalb der
Audiosignale aus,
eingestellten Abtastfrequenz vom digitalen
Ausgang begrenzt sind. Treffen Sie Ihre
Auswahl entsprechend der Leistung des
angeschlossenen Gerätes.
Hinweis:
• Bei Wiedergabe einer Abtastfrequenzdatei
oder eines Mediums mit einer Einstellung,
die unter der vorhandenen Einstellung liegt
oder mit dieser identisch ist, können Sie
diese(s) bei einer unveränderten
Abtastfrequenz ausgeben.
• Quellen mit Abtastfrequenzen von über
192 kHz können nicht abgespielt werden.
• Beim Abspielen von urheberrechtlich
geschützten Discs oder Dateien werden die
Signale mit einer auf 48 kHz oder weniger
begrenzten Abtastfrequenz ausgegeben,
ungeachtet dieser Einstellung.
• [DRC]
{Aus} – Wählen Sie diese Option, um
Audiosignale ohne Verwendung der DRCFunktion auszugeben.
{Ein} – Wählen Sie diese Option, um den
Bereich zwischen den lautesten und weichsten
Sounds (Dynamikumfang) für Wiedergabe mit
durchschnittlicher Lautstärke einstellen.
Verwenden Sie dies, wenn es schwer ist, den
Dialog zu hören oder wenn Sie Spielfi lme spät
in der Nacht sehen.
{Auto} – Wählen Sie diese Option, um die
DRC-Einstellung automatisch entsprechend
dem Audio-Eingangssignal von der Disc
zwischen Ein und Aus umzuschalten. Dies
wirkt sich nur auf Dolby TrueHD-Signale aus.
Hinweis:
• Dies hat eine Auswirkung auf Audiosignale
wie Dolby Digital, TrueHD und Dolby Digital
Plus.
• DRC wirkt sich auf die Audiosignale aus,
die über folgende Audioausgänge
ausgegeben werden:
– Analoge Audiosignale, die über die
AUDIO OUT-Buchsen ausgegeben
werden
– Linear PCM-Audiosignale, die über die
DIGITAL OUT-Buchsen oder die HDMI
OUT-Buchsen ausgegeben werden
• Bei einigen Discs können die Effekte
schwach sein.
• Der Effekt kann je nach den Lautsprechern,
den Einstellungen des AV-Verstärkers usw.
unterschiedlich sein.
• [Downmix]
{Stereo}-Surround-Audiosignale, die in Linear
PCM-Audiosignale umgewandelt wurden,
werden für die Ausgabe in 2-Kanal (Stereo)Signale umgewandelt.
{Lt/Rt}-In Linear-PCM-Ausiosignale
konvertierte Surround-Audiosignale werden
zur Ausgabe in mit Dolby Surroung kompatible
2-Kanal-Signale umgewandelt (bei Anschluss
an einen mit Dolby Pro Logic kompatiblen
AV-Empfänger oder -Verstärker etc. gibt der
AV-Empfänger oder -Verstärker die LinearPCM-Audiosignale als Surround-Audiosignale
aus).
System Informationen
1. Drücken Sie HOME MENU.
Das Menü [Allgemeine Einstellung] wird
angezeigt.
2. Wählen Sie mit die Option [System
Informationen].
- Aktuelle Softwareversion und MAC-Adresse
werden angezeigt
- Drücken Sie zum Zurückkehren zum
vorherigen Menü .
- Drücken Sie zum Verlassen des Menüs
HOME MENU.
System Informationen
Software-Version: XXXXXXXXXXXX
MAC: XXXXXXXXXXXX
License
Die Position mit der Cursortaste verschieben, und die
"ENTER"-Taste zur Auswahl drücken
Beenden
• Wenn Sie die Lizenz der Software, die Sie
am Gerät verwenden, anzeigen möchten,
wählen Sie „Lizenz“.
Home Menu
34
Page 79

Hinweis zur Ausgabe von digitalen Audioformaten
Einstellung Bitstream PCM Neu codieren
Wandlungsverfahren
Ausgangsbuchse(n)
Audio-Typ
Dolby Digital
Dolby Digital Plus
Dolby TrueHD
DTS Digital
Surround
3
Nur das Primär-Audio
(der Hauptton für
Spielfi lme usw.) wird
ausgegeben. Das
Sekundär-Audio und das
interaktive Audio wird
nicht ausgegeben.
HDMI OUT-
Buchse
Dolby
Digital
Dolby
Digital Plus
Dolby
TrueHD
DTS Digital
Surround
DIGITAL
OUT-
Buchse
Dolby
Digital
Dolby
Digital
Dolby
Digital
DTS Digital
Surround
Das Primär-Audio,
das Sekundär-Audio
und das interaktive
Audio werden in PCMAudio umgewandelt
und gleichzeitig
ausgegeben.
HDMI OUT-
Buchse
1
DIGITAL
OUT-
Buchse
PCM 5.1ch
PCM 7.1ch
PCM 7.1ch
PCM 5.1ch
Das Primär-Audio,
das Sekundär-Audio
und das interaktive
Audio werden in PCMAudio umgewandelt
und erneut in Dolby
Digital-Audio oder DTSAudio konvertiert und
gleichzeitig ausgegeben.
HDMI OUT-
Buchse
DIGITAL
Buchse
Dolby
Digital
OUT-
Dolby
Digital
05
2
AUDIO
OUTPUT-
Buchse
DTS-HD High
Resolution Audio
DTS-HD Master
3
Audio
PCM
AAC
1 Während der Schnellansicht und der Zeitlupenwiedergabe wird Ton gleichzeitig mit der PCM-Einstellung
ausgegeben, unabhängig von der Einstellung. Der LFE-Kanal wird jedoch nicht ausgegeben. (5.1 → 5.0,
7.1 → 7.0)
2 Wenn je nach Disc kein Sekundär-Audio oder interaktives Audio vorhanden ist, können die Signale ohne
erneute Verschlüsselung ausgegeben werden.
3 Schnellansicht und Zeitlupenwiedergabe sind nicht aktiviert.
4 Für Mehrkanal-Audio wird der Ton in 2-Kanal-Audio zur Ausgabe umgewandelt.
DTS-
HD High
3
Resolution
Audio
DTS-HD
Master
Audio
DTS Digital
Surround
DTS Digital
Surround
PCM 7.1ch
PCM 7.1ch
PCM 7.1ch PCM 2ch4PCM 7.1ch
AAC AAC PCM 5.1ch AAC AAC
PCM 2ch
4
DTS Digital
Surround
Dolby
Digital
DTS Digital
2ch
Surround
Dolby
Digital
Hinweis:
• Je nach Disc kann sich die Anzahl der Kanäle unterscheiden.
• Je nach dem angeschlossenen HDMI-Gerät können sich das HDMI-Ausgabe-Video und die
Anzahl der Kanäle unterscheiden.
• Der HDMI-Ausgabeton und die Anzahl der Kanäle können sich unterscheiden, wenn
Aufl ösung auf 480p/576p gesetzt ist, ebenso wie bei Einstellung auf Auto, wenn das
angeschlossene Audiogerät nur 480p oder 576p unterstützt.
• Drei Typen von Audio werden auf BD-Video Discs aufgenommen.
– Primär-Audio: Der Hauptklang.
– Sekundär-Audio: Zusätzlicher Ton kann ergänzend hinzugefügt werden, wie etwa
Kommentare eines Regisseurs oder Schauspielers usw.
– Interaktives Audio: Geräusche wie Klicken können beim Ausführen von Bedienungen
gehört werden. Das interaktive Audio ist je nach Disc unterschiedlich.
4
35
Page 80

Kapitel 6
Zusätzliche Informationen
06
Vorsichtshinweise
Transportieren des Players
Wenn Sie dieses Gerät transportieren
müssen, nehmen Sie zuerst die Disc heraus,
falls eine eingelegt ist, und schließen Sie die
Disc-Lade. Schalten Sie das Gerät
anschließend mit der Taste STANDBY/ON
in den Bereitschaftsmodus; stellen Sie sicher,
dass die POWER OFF-Anzeige am Display an
der Frontblende erlischt. Warten Sie
mindestens 10 Sekunden. Ziehen Sie
anschließend das Netzkabel. Während der
Wiedergabe darf das Gerät nicht angehoben
oder bewegt werden – Medien rotieren mit
hoher Drehzahl und können beschädigt
werden.
Installationsort
Wählen Sie einen stabilen Ort in der Nähe des
TV- und AV-Systems, an dem das Gerät
angeschlossen werden kann. Stellen Sie den
Player nicht auf einen Fernseher oder
Farbbildschirm. Halten Sie den Player von
Kassettendecks oder anderen Komponenten
mit starken Magnetfeldern fern. Vermeiden Sie
folgende Orte:
• Orte, die direkter Sonneneinstrahlung
ausgesetzt sind
• Feuchte oder schlecht belüftete Orte
• Orte mit extrem hohen oder niedrigen
Temperaturen
• Orte, die Vibrationen ausgesetzt sind
• Orte mit viel Staub oder Zigarettenrauch
• Orte, die Ruß, Dampf oder Hitze ausgesetzt
sind (in Küchen usw.)
* Stellen Sie keine Gegenstände auf das
Gerät
Stellen Sie keine Gegenstände auf den Player.
* Blockieren Sie nicht die
Lüftungsöffnungen
Verwenden Sie den Player nicht auf dicken
Teppichen, Betten oder Sofas, und decken Sie
ihn nicht mit Kleidung usw. ab. Dies verhindert
die Wärmeableitung und kann zu
Beschädigungen führen.
* Von Hitze fernhalten
Stellen Sie den Player nicht auf einen
Verstärker oder ein anderes Gerät, das Hitze
erzeugt. Wenn Sie den Player in einem Rack
platzieren, stellen Sie ihn nach Möglichkeit auf
ein Fach unterhalb des Verstärkers, um ihn
keiner durch den Verstärker erzeugten Hitze
auszusetzen.
Schalten Sie den Player aus, wenn Sie
ihn nicht verwenden
Je nach den Empfangsbedingungen des
Fernsehsignals können auf dem Bildschirm
Streifenmuster erscheinen, wenn das
Fernsehgerät bei eingeschaltetem Player
eingeschaltet wird. Dies ist keine Fehlfunktion
des Players oder Fernsehgeräts. Schalten Sie
in diesem Fall den Player aus. Ähnlich kann es
zu Rauschen beim Radioempfang kommen.
Über Kondensation
Wenn der Player plötzlich aus der Kälte in
einen warmen Raum gebracht wird (z. B. im
Winter) oder wenn die Temperatur in dem
Raum, in dem der Player aufgestellt ist,
plötzlich aufgrund eines Heizlüfters usw.
ansteigt, können sich im Inneren des Geräts
Wassertropfen (Kondensation) bilden (auf
beweglichen Teilen und der Linse). Wenn es
zu Kondensation kommt, arbeitet der Player
nicht ordnungsgemäß, und die Wiedergabe ist
nicht möglich. Lassen Sie den Player für 1 bis
2 Stunden bei Raumtemperatur eingeschaltet
(die erforderliche Dauer hängt vom Ausmaß
der Kondensation ab). Wassertropfen
verdunsten und das Gerät ist wieder
einsatzbereit. Zu Kondensation kann es auch
im Sommer kommen, wenn der Player direkt
dem Luftzug aus einer Klimaanlage
ausgesetzt wird. Stellen Sie den Player in
diesem Fall an einem anderen Ort auf.
Reinigen des Players
In der Regel genügt es, den Player mit einem
weichen Tuch abzuwischen. Tragen Sie bei
hartnäckigen Verschmutzungen ein wenig in
5 bis 6 Teilen Wasser verdünnten
Neutralreiniger auf ein weiches Tuch auf.
Wringen Sie das Tuch sorgfältig aus, wischen
Sie den Schmutz ab, und wischen Sie mit
einem trockenen Tuch nach.
Beachten Sie, dass das Auftragen von Alkohol,
Verdünner, Benzin oder Insektiziden auf den
Player dazu führen kann, dass sich
Beschriftungen und Beschichtungen ablösen.
36
Page 81

Vermeiden Sie außerdem, dass Gummi- oder
Vinylprodukte längere Zeit in Kontakt mit dem
Player geraten, da dies das Gehäuse
beschädigen könnte.
Wenn Sie chemisch imprägnierte Wischtücher
usw. verwenden, lesen Sie sich die
Vorsichtshinweise zu den Produkten sorgfältig
durch. Ziehen Sie den Netzstecker aus der
Steckdose, wenn Sie den Player reinigen.
Vorsichtsmaßnahme, wenn das Gerät in
einem Regal mit Glastür aufgestellt ist
Achten Sie darauf, die Disc-Schublade nicht
mit der Taste OPEN/CLOSE zu öffnen,
während die Glastür geschlossen ist. Die Tür
behindert die Bewegung der Disc-Lade, und
das Gerät könnte beschädigt werden.
Reinigen der Abtastlinse
Die Linse des Players verschmutzt bei
normalem Gebrauch praktisch nicht. Sollte sie
dennoch auf Grund von Staub oder Schmutz
versagen, wenden Sie sich an die nächste
Pioneer-Kundendienstvertretung. Von der
Verwendung im Fachhandel erhältlicher
Linsen-Reiniger wird abgeraten, da einige
dieser Reiniger die Linse beschädigen
können.
Handhabung von Discs
* Reinigen der Discs
Wenn sich auf einer Disc Fingerabdrücke oder
Staub befi nden, kann sie möglicherweise nicht
abgespielt werden. Reinigen Sie die Disc in
diesem Fall mit einem Reinigungstuch usw.
von der Mitte zum Rand. Verwenden Sie keine
verschmutzen Reinigungstücher.
Verwenden Sie weder Benzin, Verdünner noch
andere fl üchtige Chemikalien. TrVerwenden
Sie kein Schallplattenspray oder
Antistatikspray. agen Sie bei hartnäckigen
Verschmutzungen ein wenig Wasser auf ein
weiches Tuch auf. Wringen Sie das Tuch
sorgfältig aus, wischen Sie den Schmutz ab,
und wischen Sie mit einem trockenen Tuch
nach.
* Speziell geformte Discs
Speziell geformte Discs (Herzform,
sechseckig, usw.) können mit diesem Player
nicht abgespielt werden. Verwenden Sie keine
solchen Discs, da diese den Player
beschädigen.
06
Verwenden Sie keine beschädigten
(gesprungenen oder verformten) Discs.
Verkratzen Sie die Datenfl äche der Disc nicht;
achten Sie darauf, dass sie nicht schmutzig
wird. Legen Sie nie mehr als eine Disc auf
einmal in den Player ein.
Bekleben Sie Discs nicht mit Papier oder
Aufklebern, und beschriften Sie sie nicht mit
einem Bleistift, Kugelschreiber oder einem
anderen spitzen Schreibgerät. Diese könnten
die Disc beschädigen.
* Lagern von Discs
Bewahren Sie Discs stets in ihren Hüllen auf,
und lagern Sie die Hüllen senkrecht.
Vermeiden Sie die Aufbewahrung an Orten,
die hohen Temperaturen, direktem Sonnenlicht
oder sehr niedrigen Temperaturen ausgesetzt
sind. Denken Sie daran, die Warnhinweise der
Discs zu lesen.
* Kondensation auf Discs
Wenn die Disc plötzlich von einem kalten Ort
in einen warmen Raum gebracht wird (z. B. im
Winter), können sich auf der Disc-Oberfl äche
Wassertropfen (Kondensation) bilden. In
diesem Fall können Discs nicht
ordnungsgemäß abgespielt werden. Wischen
Sie die Wassertropfen sorgfältig von der
Disc-Oberfl äche ab, bevor Sie die Disc
verwenden.
37
Page 82

06
Störungssuche
Bedienungsfehler werden oft irrtümlich für Störungen oder Ausfälle gehalten. Wenn Sie den
Eindruck haben, dass diese Komponente nicht ordnungsgemäß funktioniert, überprüfen Sie
bitte die folgenden Punkte. Manchmal wird eine Störung auch durch ein externes Gerät
verursacht. Überprüfen Sie die anderen verwendeten Komponenten und elektrischen Geräte.
Falls sich die Störung selbst nach einer Überprüfung der unten aufgelisteten Punkte nicht
beheben lässt, wenden Sie sich bezüglich einer Reparatur an die nächste autorisierte PioneerKundendienststelle.
Wiedergabe
Problem Prüfen Abhilfe
• Disc-Wiedergabe
startet nicht.
• Disc-Lade öffnet sich
automatisch.
Es wird kein Bild
angezeigt oder das Bild
wird nicht korrekt
angezeigt.
Die Wiedergabe stoppt. • Die Wiedergabe kann stoppen, wenn das Gerät Erschütterungen ausgesetzt oder
38
Kann der Disc-Typ an diesem Player
abgespielt werden?
Kann der Dateityp an diesem Player
abgespielt werden?
Ist die Disc zerkratzt? Zerkratzte Discs können möglicherweise
Ist die Disc verschmutzt? Reinigen Sie die Disc (Seite 37).
Ist ein Stück Papier oder ein Aufkleber
an den Discs angebracht?
Ist die Disc ordnungsgemäß in die
Disc-Lade eingelegt?
Ist der Regionalcode korrekt? Hinweise zu Regionalcodes von Discs, die
Ist das HDMI-Kabel richtig
angeschlossen?
Ist das HDMI-Kabel beschädigt? Wenn das Kabel beschädigt ist, ersetzen
Ist die Eingangseinstellung am
angeschlossenen Fernsehgerät bzw.
AV-Empfänger oder -Verstärker
korrekt?
Ist die Videoausgabeaufl ösung richtig
eingestellt?
Ist der Player mti einem anderen
HDMI-Kabel als einem High-Speed-
®
/™-Kabel angeschlossen (mit
HDMI
einem Standard-HDMI
Ist ein DVI-Gerät angeschlossen? Das Bild wird möglicherweise nicht korrekt
Ist der HDMI-Farbraum richtig
eingestellt?
an einem instabilen Ort aufgestellt ist.
• Die Wiedergabe kann stoppen, wenn ein USB-Gerät bei laufender Wiedergabe
angeschlossen oder abgetrennt wird. Schließen Sie nicht USB-Geräte bei
laufender Wiedergabe an oder trennen sie ab.
®
/™-Kabel)?
Prüfen Sie, ob der Disc-Typ an diesem
Player abgespielt werden kann (Seote 7).
• Prüfen Sie, ob der Dateityp an diesem
Player abgespielt werden kann (Seite 9).
• Prüfen Sie, ob die Datei beschädigt ist.
nicht abgespielt werden.
Die Disc ist möglicherweise verwellt und
nicht abspielbar.
• Legen Sie die Disc mit der bedruckten
Seite nach oben ein.
• Legen Sie die Disc ordnungsgemäß in die
Vertiefung in der Disc-Lade ein.
mit diesem Player wiedergegeben werden
können, fi nden Sie unter Über
Regionalcodes auf Seite 7.
• Schließen Sie das Kabel ordnungsgemäß
an die zu verbindenden Geräte an (Seite
13).
• Stecken Sie das Kabel fest und
vollständig ein.
Sie es durch ein neues.
Lesen Sie in den Bedienungsanleitungen
der angeschlossenen Komponenten nach,
und schalten Sie auf den richtigen Eingang
um.
Wechseln Sie mit der HDMI-Taste zu einer
Aufl ösung, bei der Video- und Audiosignale
ausgegeben werden.
Schließen Sie den Player mit einem
High-Speed-HDMI
Fernsehgerät an.
angezeigt, wenn ein DVI-Gerät
angeschlossen ist.
Ändern Sie die Einstellung des HDMIFarbraums.
®
/™-Kabel am
Page 83

Problem Prüfen Abhilfe
Das Bild erstarrt, und die
tasten an der Frontplatte
und der Fernbedienung
lassen sich überhaupt
nicht mehr bedienen.
• Das Bild ist gestreckt.
• Das Bild ist
beschnitten.
• Das Seitenverhältnis
kann nicht umgeschaltet
werden.
Das Bild ist
unterbrochen.
Das Seitenverhältnis
kann nicht umgeschaltet
werden.
Ton und Bild sind nicht
synchron.
• Kein Ton.
• Ton wird nicht richtig
ausgegeben.
Es wird kein
Mehrkanalton
ausgegeben.
Ist das Seitenverhältnis des
Fernsehgeräts richtig eingestellt?
Ist die Option Fernsehbildschirm
richtig eingestellt?
Ist der Ausgang richtig eingestellt? Stellen Sie den Ausgang richtig ein.
Wird die Disc in Zeitlupe abgespielt?
Wird die Disc im schnellen Vorlauf
oder Rücklauf abgespielt?
Sind die Audiokabel richtig
angeschlossen?
Ist das Audiokabel beschädigt? Wenn das Kabel beschädigt ist, ersetzen
Sind die angeschlossenen
Komponenten (AV-Receiver oder
-Verstärker, usw.) richtig eingestellt?
Ist die HDMI-AUdioausgabe richtig
eingestellt?
Ist ein DVI-Gerät angeschlossen? Der Ton wird nicht über die HDMI-Anschluss
Ist der Audio-Ausgang des
angeschlossenen AV-Empfängers oder
-Verstärkers, usw. richtig eingestellt?
Ist Mehrkanalton ausgewählt? Verwenden Sie den Menübildschirm oder
Drücken Sie zum Beenden der Wiedergabe
•
, starten Sie die Wiedergabe dann neu.
• Wenn die Wiedergabe nicht gestoppt
werden kann, drücken Sie zum Abschalten
die Taste STANDBY/ON an der
Frontblende des Players. Schalten Sie das
Gerät dann wieder ein.
• Falls das Gerät nicht ausgeschaltet (in
den Bereitschaftsmodus versetzt) werden
kann, betätigen Sie die Reset-Taste an der
Frontblende des Hauptgerätes mit einem
schmalen, langen Gegenstand. Bei
Betätigung der Reset-Taste schaltet sich
das Gerät aus (Bereitschaftsmodus). Wenn
die Taste STANDBY/ON zum
Einschalten gedrückt wird, ruft das Gerät
wieder den Betriebsmodus auf.
Lesen Sie in der Bedienungsanleitung des
Fernsehgeräts nach, und stellen Sie das
Seitenverhältnis des Fernsehgeräts richtig ein.
Stellen Sie die Option Fernsehbildschirm
richtig ein.
Wenn Videosignale mit einer Aufl ösung von
1080i, 1080p, 1080/24p oder 720p vom
HDMI OUT-Anschluss ausgegeben werden,
werden sie möglicherweise selbst dann mit
einem 16:9-Seitenverhältnis angezeigt,
wenn die Option auf 4:3 eingestellt ist.
Das Bild kann unterbrochen werden, wenn
die Aufl ösung der aufgezeichneten
Videosignale umschaltet. Wählen Sie mit der
HDMI-Taste eine andere Einstellung als Auto.
Die Untertitel können nicht für auf einem
DVD- oder BD-Recorder aufgenommene
Discs umgeschaltet werden.
Während der Zeitlupenwiedergabe und
dem Vorwärts- und Rückwärtssuchlauf
erfolgt keine Tonausgabe.
• Schließen Sie das Kabel ordnungsgemäß
an die zu verbindenden Geräte an (Seite 15)
• Stecken Sie das Kabel fest und
vollständig ein.
Sie es durch ein neues.
Lesen Sie in den Bedienungsanleitungen
der angeschlossenen Komponenten nach,
und prüfen Sie die Lautstärke, den
Eingang, die Lautsprechereinstellungen
usw.
Stellen Sie die HDMI-Audioausgabe auf
PCM oder Neu codieren ein.
ausgegeben, wenn ein DVI-Gerät
angeschlossen ist. Schließen Sie das Gerät
an einen DIGITAL OUT-Anschluss oder die
AUDIO OUT-Anschlüsse an.
Bei bestimmten BDs werden die
Audiosignale nur vom DIGITAL OUT- oder
HDMI OUT-Anschluss ausgegeben.
Lesen Sie in der Bedienungsanleitung des
angeschlossenen AV-Emfpängers oder
-Verstärkers nach, und prüfen Sie die
Audio-Ausgabeeinstellungen des AVEmpfängers oder -Verstärkers.
AUDIO, um den Ton der Disc auf
Mehrkanal-Ton umzuschalten.
06
39
Page 84

Problem Prüfen Abhilfe
06
Bei der Ausgabe von
DTS Digital SurroundSignalen vom
AL OUT-
DIGIT
Anschluss kann
Rauschen auftreten.
Digitale 192-kHz- oder
96-kHz-Audiosignale
können nicht über die
DIGITAL OUTAnschluss
ausgegeben werden.
Der sekundäre
Audiostream oder der
interaktive
Audiostream wird
nicht ausgegeben.
Nach dem Einlegen
einer Disc wird
weiterhin Laden
angezeigt, und die
Wiedergabe beginnt
nicht.
Ein ■ wird in
Dateinamen usw.
angezeigt.
Beim Abspielen einer
BD-ROM-Disc
erscheint eine
Meldung, die auf zu
wenig Speicherplatz
(lokaler Speicher)
verweist.
Ist der angeschlossene
AV-Empfänger oder
-Verstärker mit DTS
Digital Surround
kompatibel?
Ist die HDMIAudioausgabe richtig
eingestellt?
Ist die digitale Ausgabe
richtig eingestellt?
Befi nden sich auf der Disc
sehr Dateien?
Wenn ein nicht mit DTS Digital Surround kompatibler
AV-Empfänger oder -Verstärker am DIGITAL OUTAnschluss angeschlossen ist, stellen Sie DTS Digital
Surround und HDMI Surround auf PCM ein.
• Urheberrechtlich geschütztes Audio wird vor der
Ausgabe automatisch in Signale mit 48 kHz oder weniger
umgewandelt.
• Stellen Sie Max. Abtastfrequenz auf 96 kHz oder
192 kHz ein.
Wenn Ton über einen HDMI OUT-Anschluss ausgegeben
wird, setzen Sie die HDMI-Audioausgabe auf Neu
codieren oder PCM.
Wenn Ton über einen DIGITAL OUT-Anschluss
ausgegeben wird, setzen Sie die digitale Ausgabe auf Neu
codieren oder PCM.
Wenn eine Disc eingelegt wird, auf der Dateien
aufgenommen wurden, kann das Laden je nach Anzahl
der Dateien auf der Disc längere Zeit dauern.
Die Zeichen, die an diesem Player nicht angezeigt werden
können, werden als ■ angezeigt. Wenn Sie Zeichen über
Medien und Peripheriegeräte etc. eingeben, werden
Zeichen, die vereinfachte Zeichen beinhalten bzw.
komplett darauf bestehen, nicht richtig angezeigt.
• Schließen Sie ein USB-Gerät an.
• Löschen Sie die auf dem angeschlossenen USB-Gerät
gespeicherten Daten per BUDA-Setup.
Steuerungsfunktion
Problem Prüfen Abhilfe
Steuerungsfunktion
funktioniert nicht.
40
Ist das HDMI-Kabel richtig
angeschlossen?
Handelt es sich bei dem
verwendeten HDMI-Kabel
um ein High-Speed-
®/TM
-Kabel?
HDMI
Ist CEC am Player auf Ein
eingestellt?
Unterstützt das
angeschlossene Gerät die
Steuerungsfunktion?
Zur Verwendung der Steuerfunktion schließen Sie den
Flachbildfernseher und dsa AV-System (AV-Empfänger
oder -Verstärker etc.) und den HD-AV-Converter am HDMI
OUT-Anschluss an.
Verwenden Sie ein High-Speed-HDMI
HDMI Control- Funktion arbeitet möglicherweise nicht
ordnungsgemäß, wenn Sie ein anderes HDMI-Kabel als
ein High-Speed-HDMI
Stellen Sie CEC am Player auf Ein ein.
• Die Steuerungsfunktion kann nicht mit Geräten anderer
Hersteller verwendet werden, die die Steuerungsfunktion
nicht unterstützen, auch wenn sie über ein HDMI-Kabel
angeschlossen sind.
• Die Steuerungsfunktion arbeitet nicht, wenn Geräte,
welche die Steuerungsfunktion nicht unterstützen,
zwischen dem mit Steuerung kompatiblen Gerät und dem
Player angeschlossen sind.
• Beachten Sie Über den Anschluss an Komponenten
anderer Marken mit Unterstützung der Steuerfunktion auf
Seite 13.
• Auch bei Anschluss an ein mit der Steuerungsfunktion
kompatibles Pioneer-Produkt können einige der
Funktionen nicht arbeiten. Beachten Sie auch die
Bedienungsanleitung der angeschlossenen Komponente.
®/TM
-Kabel verwenden.
®/TM
-Kabel. Die
Page 85

Problem Prüfen Abhilfe
Ist CEC am
angeschlossenen Gerät
aktiviert?
Sind mehrere Player
angeschlossen?
Aktivieren Sie die CEC-Funktion am angeschlossenen Gerät.
Die Steuerfunktion arbeitet, wenn CEC für alle am HDMIAusgang angeschlossenen Geräte auf Ein gesetzt ist. W
die Anschlüsse und Einstellungen aller Geräte
abgeschlossen sind, vergewissern Sie sich, dass das Bild
des Players an den Flachbildfernseher ausgegeben wird.
(Überprüfen Sie dies auch, nachdem Sie die
angeschlossenen Geräte gewechselt und HDMI-Kabel
angeschlossen und/oder abgezogen haben.) Wenn das Bild
des Players nicht an den Flachbildfernseher ausgegeben
wird, arbeitet die Steuerungsfunktion möglicherweise nicht
korrekt. Einzelheiten fi nden Sie in der Bedienungsanleitung
der angeschlossenen Komponente.
Die Steuerungsfunktion arbeitet unter Umständen nicht,
wenn 4 oder mehr Player (einschließlich dieses Players) per
HDMI-Kabel verbunden sind.
Netzwerk
Problem Prüfen Abhilfe
BD-LIVE-Funktion
(Verbindung zum
Internet) kann nicht
verwendet werden.
Wenn der
Verbindungstest
durchgeführt wird,
erscheint eine andere
Meldung als „Netzwerk
ist OK“.
Wird „Netzwerk ist
FEHLGESCHLAGEN“
angezeigt?
Arbeitet der EthernetHub (oder Router mit
Hub-Funktionalität)
richtig?
• Prüfen Sie Ihre Netzwerkverbindung bzw. Ihre
Netzwerkeinstellungen.
• Das USB-Flash-Laufwerk mit Dateien wurde gelöscht.
• Stellen Sie sicher, dass die BD-ROMs die BD-LiveFunktion unterstützen.
• Prüfen Sie, ob dieser Player und der Ethernet-Hub (oder
Router mit Hub-Funktionalität) richtig verbunden sind.
• Wenn die IP-Adresse über die DHCP-Serverfunktion
bezogen wird, prüfen Sie, ob die Einstellung bei Information
korrekt ist. Für Details über die DHCP-Serverfunktion, siehe
Bedienungsanweisungen für den Ethernet-Hub (oder Router
mit Hub-Funktionalität).
• Stellen Sie die IP-Adresse manuell ein.
• Prüfen Sie die Funktion und die Einstellungen der
DHCP-Serverfunktion des Ethernet-Hubs (oder Router mit
Hub-Funktionalität). Für Details über die DHCPServerfunktion, siehe Bedienungsanweisungen für den
Ethernet-Hub (oder Router mit Hub-Funktionalität).
• Wenn die IP-Adresse dieses Players manuell eingestellt
wurde, setzen Sie diese oder die anderer Komponenten
zurück.
• Prüfen Sie die Einstellungen und Funktion des EthernetHubs (oder Router mit Hub-Funktionalität). Einzelheiten
finden Sie in der Bedienungsanleitung für den Ethernet-Hub.
• Starten Sie den Ethernet-Hub (oder Router mit HubFunktionalität) neu.
06
enn
Sonstiges
Problem Prüfen Abhilfe
Die Stromversorgung
des Players schaltet
automatisch aus.
Die Stromversorgung
des Players schaltet
automatisch aus.
Ist CEC aktiviert? Der Player schaltet sich möglicherweise gemeinsam mit
Ist Autom.
Abschaltung auf
15 min/30 min
eingestellt?
Ist CEC auf Ein
gesetzt?
dem am HDMI-Ausgang angeschlossenen Fernsehgerät ein
und aus. Wenn Sie nicht möchten, dass der Player beim
Ein- oder Ausschalten des Fernsehgeräts ebenfalls einoder ausgeschaltet wird, setzen Sie CEC auf Aus.
Wenn Autom. Abschaltung auf 15 min/30 min eingestellt ist,
schaltet sich der Player automatisch aus, wenn
15/30 Minuten lang keine Bedienung erfolgt.
Der Player schaltet sich möglicherweise gemeinsam mit
dem am HDMI-Ausgang angeschlossenen Fernsehgerät ein
und aus. Wenn Sie nicht möchten, dass der Player beim
Ein- oder Ausschalten des Fernsehgeräts ebenfalls einoder ausgeschaltet wird, setzen Sie CEC auf Aus.
41
Page 86

06
Problem Prüfen Abhilfe
Dieses Gerät kann nicht
bedient werden.
Der Player kann nicht
mit der Fernbedienung
bedient werden.
Geben Sie das
verbundene TV- und
AV-System ein und der
HD-AV-Converter
wechselt automatisch.
Einstellungen, die Sie
vorgenommen haben,
wurden gelöscht.
USB-Gerät (externer
Speicher) arbeitet nicht
richtig mit diesem Player.
Befindet sich die
Fernbedienung zu
weit vom Player
entfernt?
Sind die Batterien
verbraucht?
Ist CEC aktiviert? Die Eingänge des TV- und AV-Systems (AV-Empfänger oder
• Haben Sie das
Netzkabel
abgezogen, während
der Player
eingeschaltet war?
• Gab es einen
Stromausfall?
Ist das USB-Gerät
richtig
angeschlossen?
Ist das USB-Gerät
über ein
Verlängerungskabel
angeschlossen?
Ist das externe
Speichergerät an
den USB-Anschluss
über einen
Speicherkartenleser
oder USB-Hub
angeschlossen?
Enthält das externe
Speichergerät
mehrere Partitionen?
Ist das externe
Speichergerät
schreibgeschützt?
Ist das Dateisystem
des externen
Speichergeräts
FAT32, FAT16 oder
NTFS?
erwenden Sie das Gerät innerhalb des vorgeschriebenen
• V
Temperaturbereichs.
• Falls das Gerät nicht ausgeschaltet (in den
Bereitschaftsmodus versetzt) werden kann, betätigen Sie
die Reset-Taste an der Frontblende des Hauptgerätes mit
einem schmalen, langen Gegenstand. Bei Betätigung der
Reset-Taste schaltet sich das Gerät aus
(Bereitschaftsmodus). Wenn das Gerät über die Taste
STANDBY/ON eingeschaltet wird, wird das Gerät wieder
einsatzbereit.
Verwenden Sie die Fernbedienung in einer Entfernung von
maximal 7 m zum Fernbedienungssensor.
Tauschen Sie die Batterien aus.
-Verstärker etc.) und des mit dem HDMI OUT-Anschluss
verbundenen HD-AV-Converters wechseln möglicherweise
automatisch zum Player, wenn die Wiedergabe am Player
startet oder der Menübildschirm (Quelle-Funktion etc.)
angezeigt wird. Wenn Sie nicht möchten, dass die Eingänge
des angeschlossenen TV- und AV-Systems (AV-Empfänger
und -Verstärker etc.) und des HD-AV-Converters
automatisch wechseln, setzen Sie CEC auf Aus.
Drücken Sie immer die Taste STANDBY/ON an der
Frontblende des Players bzw. STANDBY/ONan der
Fernbedienung und prüfen Sie, ob die POWER OFFAnzeige im Display an der Frontblende des Players
erloschen ist, bevor Sie den Netzstecker ziehen. Seien Sie
insbesondere vorsichtig, wenn das Netzkabel an eine
Netzsteckdose eines anderen Geräts angeschlossen ist, da
der Player in diesem Fall gemeinsam mit dem Gerät
ausgeschaltet wird.
• Schalten Sie den Player aus und dann wieder ein.
• Schalten Sie den Player aus, schließen Sie dann das
externe Speichergerät an.
Verwenden Sie kein Verlängerungskabel. Der Player
arbeitet möglicherweise nicht richtig damit.
Externe Speichergeräte arbeiten möglicherweise nicht,
wenn sie an den USB-Anschluss über einen
Speicherkartenleser oder USB-Hub angeschlossen sind.
Externe Speichergeräte können nicht erkannt werden, wenn
sie mehrere Partitionen enthalten.
Manche externen Speichergeräte können nicht arbeiten.
Schalten Sie den Player aus und deaktivieren Sie den
Schreibschutz.
USB-Geräte, die im Dateisystem FAT32, FAT16 oder NTFS
formatiert sind, können verwendet werden.
42
Page 87

Glossar
06
* Abtastung mit Zeilensprungverfahren
(Interlaced Scan)
Bei diesem V
indem es zweimal abgetastet wird. Die
ungeraden Zeilen werden im ersten
Durchgang, die geraden Zeilen im zweiten
Durchgang angezeigt, um gemeinsam ein Bild
(Frame) zu ergeben. Interlaced Scan wird für
diesen Player und in der Bedienungsanleitung
durch ein i nach dem Aufl ösungswert
angegeben (z. B. 1080i).
* AVCHD (Advanced Video Codec High
Defi nition)
Siehe Seite 4.
* BDAV
Im Zusammenhang mit dem BD-Format
werden die audiovisuellen
Formatspezifi kationen für digitale HD-
Aufnahmen von Ausstrahlungen auf diesem
Player und in dieser Bedienungsanleitung als
BDAV bezeichnet.
* BD-LIVE
Siehe Seite 4.
* BDMV
Im Zusammenhang mit dem BD-Format
werden die audiovisuellen
Formatspezifi kationen für vorproduzierte
HD-Filminhalte auf diesem Player und in
dieser Bedienungsanleitung als BDMV
bezeichnet.
* Bild-im-Bild (BiB)
Diese Funktion ermöglicht die Einbettung
eines Untervideos in das Hauptvideo. Einige
BD-ROMs umfassen einen zweiten
Videostream, der über dem primären
Videostream angezeigt werden kann.
* BONUSVIEW
Siehe Seite 4.
* Deep Color
Siehe Über HDMI auf Seite 13.
* Standard-Gateway
Ein Standard-Gateway ist eine
Kommunikationsvorrichtung wie ein Router,
das Daten zwischen Netzwerken austauscht.
Es dient zum Lenken von Daten zu
Netzwerken, bei denen das Ziel-Gateway nicht
ausdrücklich festgelegt ist.
* DHCP (Dynamic Host Confi guration
Protocol)
Dieses Protokoll bietet
Konfi gurationsparameter (IP-Adresse usw.) für
Computer und andere an das Netzwerk
angeschlossene Geräte.
erfahren wird ein Bild angezeigt,
* DivX
Siehe Seite 4.
* DNS (Domain Name System)
Dies ist ein System zum Übersetzen von
Internet-Hostnamen in ihre IP-Adressen.
* Dolby Digital
Dolby Digital ist ein Audioformat zur Aufnahme
von Ton auf bis zu 5.1-Kanälen, wobei im
Vergleich zu Linear PCM-Audiosignalen nur
ein Bruchteil der Datenmengen anfällt.
* Dolby Digital Plus
Dolby Digital Plus ist ein Audioformat für
hochaufl ösende Medien. Es basiert auf Dolby
Digital und kombiniert Effi zienz mit Flexibilität
zu einem hochwertigen MehrkanalAudiosystem. Mit BD-ROMs können bis zu
7.1-Kanäle mit digitalem Ton aufgenommen
werden.
* Dolby TrueHD
Dolby TrueHD ist ein Audioformat, das eine
verlustfreie Codierung verwendet. Mit BDROMs können bis zu 8 Kanäle bei 96 kHz/24
Bits oder bis zu 6 Kanäle bei 192 kHz/24 Bits
aufgenommen werden.
* DRM
Eine Technologie zum Schutz von digitalen
Daten, die Urheberrechten unterliegen.
Digitalisierte Videos, Bilder und Audiodateien
verlieren auch bei mehrfachem Kopieren nicht
an Qualität. DRM ist eine Technologie zur
Beschränkung der Weitergabe oder
Wiedergabe solcher digitalen Daten ohne die
Zustimmung des Urheberrechtsinhabers.
* DTS Digital Surround
DTS Digital Surround ist ein Audioformat, mit
dem 48 kHz/24 Bit-Audiosignale auf
5.1-Kanälen aufgenommen werden können.
* DTS-HD High Resolution Audio
DTS-HD High Resolution Audio ist ein
Audioformat, das eine verlustbehaftete
Codierung verwendet. Damit können
7.1-Kanäle bei 96 kHz/24 Bits aufgenommen
werden.
* DTS-HD Master Audio
DTS-HD Master Audio ist ein Audioformat, das
eine verlustfreie Codierung verwendet. Mit BDROMs können 7.1 Kanäle bei 96 kHz/24 Bits
oder 5.1 Kanäle bei 192 kHz/24 Bits
aufgenommen werden.
* Ethernet
Ein Standard für lokale Netzwerke (LANs), mit
dem mehrere Computer usw. am gleichen Ort
verbunden werden. Dieser Player unterstützt
10BASE-T/100BASE-TX.
43
Page 88

* Frames (Bilder) und Fields (Halbbilder)
06
Ein Frame (Bild) ist die Einheit für eines der
Standbilder
zusammensetzen. Ein Frame (Bild) besteht
aus einem Bild aus einer ungeraden Anzahl
von Zeilen und einem Bild aus einer geraden
Anzahl von Zeilen, die in einem Videosignal
mit Abtastung mit Zeilensprung (Interlaced
Scan) als Fields (Felder) bezeichnet werden
(1080i, usw.).
* HDMI (High-Defi nition Multimedia
Interface)
Siehe Seite 4.
* Interaktives Audio
Die Audiosignale, die in den Titeln von BDROMs aufgezeichnet werden. Sie umfassen
beispielsweise das Klickgeräusch, das bei
Eingaben auf dem Menü-Bildschirm ertönt.
* IP-Adresse
Eine Adresse, die einen Computer oder ein
anderes mit dem Internet oder einem LAN
verbundenes Gerät identifi ziert. Sie besteht
aus Zahlen in vier Gruppen.
* MAC- (Media Access Control) Adresse
Eine Hardware-Identifi kationsnummer, die
spezifi sch zu einem Netzwerkgerät
zugewiesen ist (LAN-Karte usw.).
* MPEG (Moving Picture Experts Group)
Die Bezeichnung einer Familie von Standards,
die zur Codierung von Video- und
Audiosignalen in einem digital komprimierten
Format verwendet werden. Die Standards für
die Codierung von Videodaten umfassen
MPEG-1 Video, MPEG-2 Video, MPEG-4
Visual, MPEG-4 AVC usw. Die Standards für
die Codierung von Audiodaten umfassen
MPEG-1 Audio, MPEG-2 Audio, MPEG-2 AAC
usw.
* PCM
Dies bezieht sich auf nicht komprimierte
Audiosignale.
* Port-Nummer
Dies ist eine Sub-Adresse, die unter der
IP-Adresse für simultanen Anschluss an
mehrere Parteien bei Internet-Kommunikation
geboten wird.
* Progressive Abtastung (Progressive
Scan)
Bei diesem Verfahren besteht ein Bild aus
einem einzelnen Bild. Die progressive
Abtastung bietet scharfe, fl immerfreie Bilder,
insbesondere für Standbilder mit viel Text,
Grafi ken oder horizontalen Linien. Progressive
Scan wird für diesen Player und in der
Bedienungsanleitung durch ein p nach dem
Aufl ösungswert angegeben (z. B. 576p).
44
, aus denen sich Filme
* Regionalcode
Siehe Über Reagionalcodes auf Seite 8.
* Sekundär-Audio
Einige BD-ROMs umfassen unterlegte
Audiostreams, die mit dem Haupt-Audiostream
abgemischt sind. Diese unterlegten
Audiostreams werden als sekundäre
Audiostreams bezeichnet. Bei einigen Discs ist
dieser sekundäre Audiostream als Ton für den
sekundären Videostream aufgezeichnet.
* Sekundär-Video
Einige BD-ROMs enthalten unterlegte
Videostreams, die mit der Bild-in-Bild-Funktion
(P-in-P) über dem Haupt-Videostream
angezeigt werden können. Diese unterlegten
Videostreams werden als sekundäre
Videostreams bezeichnet.
* Sicherheit
Beachten Sie Alterseinstufung beim
Betrachten von DVDs ändern und
Alterseinschränkung beim betrachten von
BD-ROMs ändern auf Seite 30.
* Subnet mask (Subnet-Maske)
Dies dient zum Identifi zieren, welcher Teil der
IP-Adresse dem Subnet entspricht (ein
separat verwaltetes Netzwerk). Die
Subnetzmaske wird als 255.255.255.0
ausgedrückt.
* USB (Universal Serial Bus)
USB ist der Industriestandard zum
Anschließen von Peripheriegeräten an PCs.
* Winkel (Multi-Winkel)
Auf BD-ROM- oder DVD-Video-Discs können
bis zu 9 Kamerawinkel gleichzeitig
aufgenommen werden, sodass Sie dieselbe
Szene aus mehreren Betrachtungswinkeln
betrachten können.
* x.v.Color
Siehe Seite 4.
Page 89

Technische Daten
Modell BDP-100-K
Typ Blu-ray Disc SPIELER
Nennspannung 110 V bis 240 V Wechselspannung
Nennfrequenz 50 Hz/60 Hz
Leistungsaufnahme 13 W
Leistungsaufnahme
(Bereitschaft)
Leistungsaufnahme (bei aktiver
HDMI-Steuerung)
Leistungsaufnahme
(bei aktivem Schnellstart)
Leistungsaufnahme
(bei aktiver HDMI-Steuerung
und aktivem Schnellstart)
Gewicht 2,0 kg
Außenabmessungen
(einschließlich vorstehender
T
eile)
Betriebstemperatur +5 °C bis +35 °C
Betriebsluftfeuchtigkeit 5 % bis 85 % (keine Kondensation)
Ausgangsbuchsen
LAN 1 Satz, Ethernet-Anschluss (10BASE-T/
USB 1 Satz, Typ A
HDMI 1 Satz, 19 Pins: 5 V, 250 mA
Audioausgänge
Digitale
Audioausgänge
2-Kanal (links/
rechts)
AudioAusgangspegel
Frequenzgang 4 Hz bis 88 kHz (Abtastrate 192 kHz)
Optisch 1 Satz, optischer Digitalanschluss
0,3 W
0,3 W
1 W
1 W
435 mm (B) x 58 mm (H) x 250 mm (T)
1 Satz, Cinch-Anschluss
200 mVrms (1 kHz, –20 dB)
100BASE-TX)
06
Hinweise:
• Änderungen der technischen Daten und das Design dieses Geräts ohne vorherige
Ankündigung bleiben vorbehalten.
• Dieser Artikel enthält Urheberrechtsschutztechnologie, die durch US-Patente und andere
Rechte der Rovi Corporation an geistigem Eigentum geschützt ist.
Reverse Engineering und Zerlegung sind verboten.
Nehmen Sie den Anschluss nicht über einen Videorecorder vor. Über Videorecorder
eingespeiste Videosignale können durch Kopierschutz-Systeme beeinträchtigt werden, und
das Bild wird auf dem Fernsehgerät verzerrt.
• Hierin genannte Unternehmens- und Produktnamen sind Marken oder eingetragene Marken
ihrer jeweiligen Unternehmen.
45
Page 90

06
46
Page 91

06
47
Page 92

http://www.pioneer.eu
http://www.pioneer.de
© 2015 PIONEER HOME ELECTRONICS CORPORATION.
All rights reserved.
PIONEER HOME ELECTRONICS CORPORATION
1-1, Shin-ogura, Saiwai-ku, Kawasaki-shi, Kanagawa 212-0031, Japan
PIONEER ELECTRONICS (USA) INC.
P.O. BOX 1540, Long Beach, California 90801-1540, U.S.A. TEL: (800) 421-1404
PIONEER EUROPE NV
Haven 1087, Keetberglaan 1, B-9120 Melsele, Belgium TEL: 03/570.05.11
PIONEER ELECTRONICS ASIACENTRE PTE. LTD.
253 Alexandra Road, #04-01, Singapore 159936 TEL: 65-6472-7555
K002_B3_En
Printed in China
<72-BDP100-EURB1>
 Loading...