

Page 1
DVD RDS AV RECEIVER
AUTORADIO AV RDS LECTEUR DE DVD
RADIO AV RDS CON DVD
AVH-X5500BHS
AVH-X4500BT
AVH-X3500BHS
AVH-X2500BT
AVH-X1500DVD
English EspañolFrançais
Owner’s Manual
Mode d’emploi
Manual de instrucciones
Page 2

Contents
Contents
Precautions
IMPORTANT SAFEGUARDS 4
To ensure safe driving 4
To avoid battery exhaustion 4
Before you start
Information to User 5
The Safety of Your Ears is in Your
Hands 5
About this unit 5
DVD video disc region numbers 6
About this manual 6
After-sales service for Pioneer
products 6
Visit our website 6
Use and care of the remote control 6
Demo mode 6
What’s what
Head unit 7
Home display 7
Turning the source ON/OFF 8
Selecting a source 8
Adjusting the volume 8
Remote control 8
Common operations
Common operations for menu settings/
lists 9
Operating the scroll icon and the scrubber
bar 9
Activating the touch panel keys 10
Using the rear view 10
Using the rear monitor 10
Using sound retriever 10
Changing the wide-screen mode 10
Basic operations
Adjusting the angle of the LCD panel and
ejecting media 11
Setting the clock 11
2
En
HD Radioä tuner
About HD Radioä stations 11
HD Radio tuner operations 11
Storing and recalling stations 12
Storing the strongest stations 12
Tuning in to strong signals 12
Using iTunes tagging 12
Switching the seek mode 12
Switching the reception mode 12
Tuner
Tuner operations 13
Storing and recalling stations 13
Storing the strongest stations 13
Tuning in to strong signals 13
Using iTunes tagging 13
SiriusXM tuner
Introducing SiriusXM tuner
operations 14
Storing and recalling channels 14
Selecting a channel from the list
screen 14
Switching the list display 15
Selecting a SiriusXM channel directly 15
Replayä 15
Using iTunes tagging 15
Setting Parental Control 15
Setting SiriusXM Tune Startä 16
Scan options 16
Disc (CD/DVD)
Introducing movie operations 17
Sound playback operations 18
Switching the media file type 18
Operating the DVD menu 18
Random play (shuffle) 19
Repeating playback 19
Searching for the part you want to
play 19
Selecting audio output 19
PBC playback 19
Selecting tracks from the track title
list 19
Selecting files from the file name list 19
Playing DivXâ VOD content 20
iPod
Moving images operations 20
Sound playback operations 21
Using this unit’s iPod function from your
iPod 21
Shuffle play 21
Repeating playback 21
Playing videos from your iPod 21
Browsing for a video/music on the
iPod 22
Changing audiobook speed 22
Displaying lists related to the song currently
playing (link search) 22
Advanced App Mode
Advanced App Mode operation 23
Starting procedure 23
Setting the Keyboard 23
Setting the App sound mixing 23
USB
Moving images operations 24
Sound playback operations 24
Music browse mode 25
Still image playback operations 25
Switching the media file type 25
Random play (shuffle) 25
Repeating playback 25
Selecting files from the file name list 26
Displaying lists related to the song currently
playing (link search) 26
Playing DivXâ VOD content 26
Capture an image in JPEG files 26
Bluetooth Audio
Sound playback operations 26
Setting up for Bluetooth audio 26
Random play (shuffle) 27
Repeating playback 27
Using MIXTRAX
MIXTRAX operation 27
MIXTRAX EZ operation 27
Starting MIXTRAX EZ operation 27
Setting MIXTRAX mode 27
Setting the effect 27
Using Pandoraâ internet radio
Pandora operations 28
Selecting and playing Pandoraâ stations/
shuffle 29
Bluetooth telephone
Bluetooth telephone operations 30
Calling a number in the phone book 31
Selecting a number by alphabet search
mode 31
Inverting names in phone book 31
Using the missed, received and dialed call
lists 31
Setting automatic answering 31
Adjusting the other party’s listening
volume 31
Switching the ring tone 32
Using the preset dial lists 32
Making a call by entering phone
number 32
Setting the private mode 32
Voice control 32
Settings
Menu operations 33
Audio adjustments
Using fader/balance adjustment 33
Using balance adjustment 33
Using the equalizer 33
Using the auto-equalizer 34
Using sonic center control 34
Adjusting loudness 34
Using subwoofer output 34
Boosting the bass 34
Using the high pass filter 34
Adjusting source levels 35
Page 3

Contents
Contents
Setting up the video player
Setting the subtitle language 35
Setting the audio language 35
Setting the menu language 35
Setting the multi-angle DVD display 36
Setting the aspect ratio 36
Setting the slideshow interval 36
Setting parental lock 36
Setting the DivX subtitle file 37
Displaying the DivXâ VOD registration
code 37
Automatic playback of DVDs 37
System settings
Switching the auxiliary setting 38
Setting AV input 38
Setting the RGB Input 38
Setting the App sound mixing 38
Setting MIXTRAX mode 38
Changing the picture adjustment 38
Selecting the system language 38
Setting SiriusXM Tune Startä 38
Setting Demo Mode 38
Switching sound muting/attenuation 39
Setting the rear output and subwoofer
controller 39
Using the keyboard 39
Setting the ever scroll 39
Setting the Pandora connect mode 39
Setting the Bluetooth audio 39
Clearing Bluetooth memory 39
Updating Bluetooth connection
software 39
Displaying the Bluetooth system
version 40
Setting the rear view camera (back up
camera) 40
Auto EQ (auto-equalizing) 40
Setting the video signal 41
Favorite menu
Using the Favorite menu 42
Bluetooth connection menu
Bluetooth connection menu
operations 42
Theme menu
Selecting the illumination color 43
Selecting the OSD (on-screen display)
color 43
Selecting the background display 43
Other functions
Adjusting the response positions of the
touch panels (Touch Panel
Calibration) 44
Using an AUX source 44
Resetting the microprocessor 44
Connection
Connecting the power cord 46
When connecting to separately sold power
amp 47
When connecting the external video
component and the display 47
When connecting with a rear view
camera 48
Optional SiriusXM Tuner connection 48
Installation
Installation using the screw holes on the
side of the unit 49
Installing the microphone 50
Additional information
Troubleshooting 51
Error messages 53
Understanding auto EQ error
messages 56
Understanding messages 56
Indicator list 57
Handling guidelines 58
Compressed audio compatibility
(USB) 59
Compressed audio compatibility (disc,
USB) 59
iPod compatibility 60
Sequence of audio files 61
Using the display correctly 61
Bluetooth profiles 61
License, Warranty Disclaimer & Limitation of
Liability 62
Language code chart for DVD 64
Specifications 65
English
3
En
Page 4

Section
01
Precautions
Precautions
Thank you for purchasing this PIONEER
product.
To ensure proper use, please read through this
manual before using this product. It is especially
important that you read and observe WARN-
INGs and CAUTIONs in this manual. Please
keep the manual in a safe and accessible place for
future reference.
IMPORTANT SAFEGUARDS
Please read all of these instructions regarding
your display and retain them for future reference.
1 Do not install the display where it may
(i) obstruct the driver’s vision, (ii) impair
the performance of any of the vehicle’s
operating systems or safety features, including air bags, hazard lamp buttons or
(iii) impair the driver’s ability to safely
operate the vehicle.
2 Do not operate this display if doing so in
any way will divert your attention from
the safe operation of your vehicle. Always observe safe driving rules and follow all existing traffic regulations. If you
experience difficulty in operating the
system or reading the display, park your
vehicle in a safe location and make necessary adjustments.
3 Please remember to wear your seat belt
at all times while operating your vehicle.
If you are ever in an accident, your injuries can be considerably more severe if
your seat belt is not properly buckled.
4 Never use headphones while driving.
5 To promote safety, certain functions are
disabled unless the parking brake is on,
and the vehicle is not in motion.
6 Never set the volume of your display so
high that you cannot hear outside traffic
and emergency vehicles.
WARNING
Do not attempt to install or service your display by yourself. Installation or servicing of
the display by persons without training and
experience in electronic equipment and automotive accessories may be dangerous
and could expose you to the risk of electric
shock or other hazards.
To ensure safe driving
WARNING
! LIGHT GREEN LEAD AT POWER CONNEC-
TOR IS DESIGNED TO DETECT PARKED
STATUS AND MUST BE CONNECTED TO
THE POWER SUPPLY SIDE OF THE PARKING BRAKE SWITCH. IMPROPER CONNECTION OR USE OF THIS LEAD MAY
VIOLATE APPLICABLE LAW AND MAY RESULT IN SERIOUS INJURY OR DAMAGE.
! To avoid the risk of damage and injury and the
potential violation of applicable laws, this unit is
not for use with a video screen that is visible to
the driver.
! To avoid the risk of accident and the potential vio-
lation of applicable laws, no viewing of front seat
video should ever occur while the vehicle is
being driven.
! In some countries or states the viewing of images
on a display inside a vehicle even by persons
other than the driver may be illegal. Where such
regulations apply, they must be obeyed and this
unit’s video features should not be used.
When you attempt to watch a video image while
driving, the warning “Viewing of front seat
video source while driving is strictly prohibited.” will appear on the front display.
To watch a video image on the front display, park
your vehicle in a safe place and apply the parking brake.
Parking brake interlock
Certain functions (Video viewing and certain
touch panel keys) offered by this unit could be
dangerous and/or unlawful if used while driving.
To prevent such functions from being used while
the vehicle is in motion, there is an interlock system that senses when the parking brake is set. If
you attempt to use the functions described
above while driving, they will become disabled
until you stop the vehicle in a safe place, and (1)
apply the parking brake, (2) release the parking
brake, and then (3) apply the parking brake
again. Please keep the brake pedal pushed
down before releasing the parking brake.
When using a display connected
to rear monitor output
The rear monitor output on this unit (V OUT)is
used to connect a rear display that allows passengers in the rear seats to watch videos.
WARNING
NEVER install the rear display in a location
where the driver can watch videos while driving.
When using the rear view camera
With an optional rear view camera, this unit can
be used as an aid to keep an eye on trailers, or
when backing into a tight parking spot.
WARNING
! SCREEN IMAGE MAY APPEAR RE-
VERSED.
! USE INPUT ONLY FOR REVERSE OR
MIRROR IMAGE REAR VIEW CAMERA.
OTHER USE MAY RESULTIN INJURY
OR DAMAGE.
CAUTION
! The rear view camera function is to be used
as an aid to keep an eye on trailers, or while
backing up. Do not use for entertainment
purposes.
! Please note that the edges of the rear view
camera images may differ slightly according
to whether full screen images are displayed
when backing up, and whether the images
are used for checking the rear when the vehicle is moving forward.
To avoid battery exhaustion
Keep the vehicle engine running when using
this unit to avoid draining the battery power.
! When no power is supplied to this unit, such
as when the vehicle battery is being replaced, the microcomputer of this unit returns to its initial condition. We recommend
that you transcribe the audio adjustment
data.
WARNING
Do not use with vehicles that do not feature an
ACC position.
4
En
Page 5
Before you start
Before you start
Section
02
Information to User
FCC ID: AJDK058
MODEL NO.: AVH-X5500BHS, AVH-X4500BT,
AVH-X3500BHS, AVH-X2500BT
IC: 775E-K058
This device complies with Part 15 of FCC
Rules and Industry Canada licence-exempt
RSS standard(s). Operation is subject to the
following two conditions: (1) this device may
not cause interference, and (2) this device
must accept any interference, including interference that may cause undesired operation
of this device.
This transmitter must not be co-located or operated in conjunction with any other antenna
or transmitter.
The antenna for Bluetooth cannot be removed
(or replaced) by user.
This equipment complies with FCC/IC radiation exposure limits set forth for an uncontrolled environment and meets the FCC radio
frequency (RF) Exposure Guidelines in Supplement C to OET65 and RSS-102 of the IC
radio frequency (RF) Exposure rules. This
equipment has very low levels of RF energy
that it deemed to comply without maximum
permissive exposure evaluation (MPE). But it
is desirable that it should be installed and operated keeping the radiator at least 20 cm or
more away from person’s body (excluding extremities: hands, wrists, feet and ankles).
MODEL NO.: AVH-X1500DVD
This device complies with Part 15 of the FCC
Rules. Operation is subject to the following
two conditions:
(1) this device may not cause harmful interference, and (2) this device must accept any interference received, including interference
that may cause undesired operation.
Alteration or modifications carried out without appropriate authorization may invalidate
the user’ s right to operate the equipment.
Note
This equipment has been tested and found
to comply with the limits for a Class B digital
device, pursuant to Part 15 of the FCC Rules.
These limits are designed to provide reasonable protection against harmful interference
in a residential installation. This equipment
generates, uses and can radiate radio frequency energy and, if not installed and used
in accordance with the instructions, may
cause harmful interference to radio communications. However, there is no guarantee
that interference will not occur in a particular installation. If this equipment does cause
harmful interference to radio or television reception, which can be determined by turning
the equipment off and on, the user is encouraged to try to correct the interference by one
or more of the following measures:
- Reorient or relocate the receiving antenna.
- Increase the separation between the equipment and receiver.
- Connect the equipment into an outlet on a
circuit different from that to which the receiver is connected.
- Consult the dealer or an experienced radio/
TV technician for help.
The Safety of Your Ears is in
Your Hands
Get the most out of your equipment by playing it
at a safe level—a level that lets the sound come
through clearly without annoying blaring or distortion and, most importantly, without affecting
your sensitive hearing. Sound can be deceiving.
Over time, your hearing “comfort level” adapts to
higher volumes of sound, so what sounds “normal” can actually be loud and harmful to your
hearing. Guard against this by setting your
equipment at a safe level BEFORE your hearing
adapts.
ESTABLISH A SAFE LEVEL:
! Set your volume control at a low setting.
! Slowly increase the sound until you can hear
it comfortably and clearly, without distortion.
! Once you have established a comfortable
sound level, set the dial and leave it there.
BE SURE TO OBSERVE THE
FOLLOWING GUIDELINES:
! Do not turn up the volume so high that you
can’t hear what’s around you.
! Use caution or temporarily discontinue use
in potentially hazardous situations.
! Do not use headphones while operating a
motorized vehicle; the use of headphones
may create a traffic hazard and is illegal in
many areas.
About this unit
The tuner frequencies on this unit are allocated
for use in North America. Use in other areas
may result in poor reception.
WARNING
Handling the cord on this product or cords associated with accessories sold with the product
may expose you to chemicals listed on proposition 65 known to the State of California and
other governmental entities to cause cancer and
birth defect or other reproductive harm. Wash
hands after handling.
CAUTION:
USE OF CONTROL OR ADJUSTMENT OR
PERFORMANCE OF PROCEDURES
OTHER THAN THOSE SPECIFIED HEREIN
MAY RESULT IN HAZARDOUS RADIATION
EXPOSURE.
CAUTION:
THE USE OF OPTICAL INSTRUMENTS
WITH THIS PRODUCT WILL INCREASE
EYE HAZARD.
CAUTION
! Do not allow this unit to come into contact
with liquids. Electrical shock could result.
Also, damage to this unit, smoke, and overheating could result from contact with
liquids.
! Keep this manual handy for future reference.
! Always keep the volume low enough to hear
outside sounds.
! Avoid exposure to moisture.
! If the battery is disconnected or discharged,
any preset memory will be erased.
Important (Serial number)
The serial number is located on the bottom of
this unit. For your own security and convenience, be sure to record this number on the enclosed warranty card.
English
5
En
Page 6
Section
Before you start
02
Before you start
DVD video disc region numbers
Only DVD video discs with compatible region
numbers can be played on this player. You can
find the region number of the player on the bottom of this unit and in this manual (refer to
Specifications on page 65).
About this manual
! This unit features a number of sophisticated
functions to ensure superior reception and
operation. All the functions have been designed for the easiest possible use, but many
are not self-explanatory. This operation manual will help you benefit fully from this unit’s
potential and to maximize your listening enjoyment.
! This manual uses diagrams of actual screens
to describe operations. However, the screens
on some units may not match those shown
in this manual depending on the model
used.
! In the following instructions, USB memory
sticks and USB audio players are collectively
referred to as “USB storage device”.
! In this manual, iPod and iPhone will be re-
ferred to as “iPod”.
After-sales service for
Pioneer products
Please contact the dealer or distributor from
where you purchased this unit for after-sales
service (including warranty conditions) or any
other information. In case the necessary information is not available, please contact the companies listed below:
Please do not ship your unit to the companies at
the addresses listed below for repair without advance contact.
6
En
U.S.A.
Pioneer Electronics (USA) Inc.
CUSTOMER SUPPORT DIVISION
P.O. Box 1760
Long Beach, CA 90801-1760
800-421-1404
CANADA
Pioneer Electronics of Canada, Inc.
CUSTOMER SATISFACTION DEPARTMENT
340 Ferrier Street
Unit 2
Markham, Ontario L3R 2Z5, Canada
1-877-283-5901
905-479-4411
For warranty information please see the Limited
Warranty sheet included with this unit.
Visit our website
Visit us at the following site:
http://www.pioneerelectronics.com
in Canada
http://www.pioneerelectronics.ca
1 Register your product. We will keep the de-
tails of your purchase on file to help you refer
to this information in the event of an insurance claim such as loss or theft.
2 Receive updates on the latest products and
technologies.
3 Download owner’s manuals, order product
catalogues, research new products, and
much more.
4 Your feedback is important in our continual
effort to design and build the most advanced,
consumer-focused product in the industry.
Use and care of the remote
control
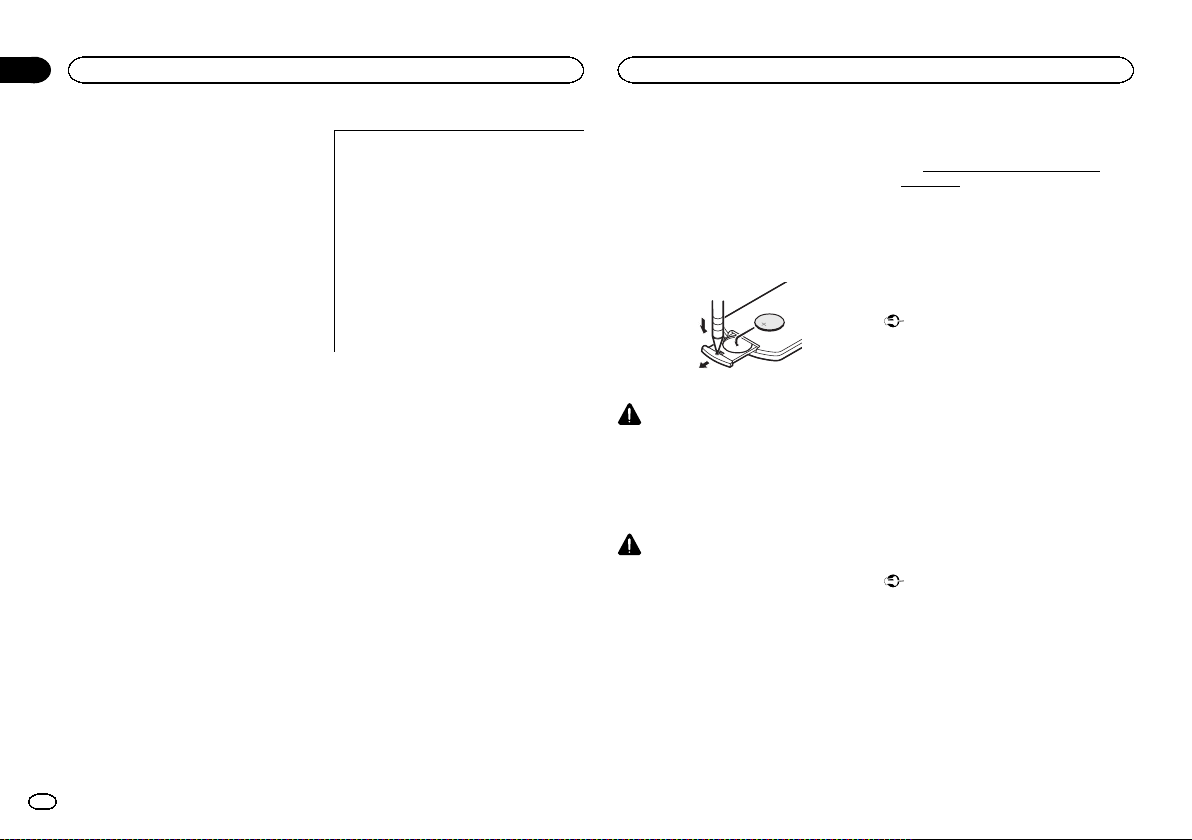
Installing the battery
Slide the tray on the back of the remote control
out and insert the battery with the plus (+) and
minus (–) poles aligned properly.
! When using for the first time, pull out the
film protruding from the tray.
WARNING
! Keep the battery out of the reach of children.
Should the battery be swallowed, consult a
doctor immediately.
! Batteries (battery pack or batteries installed)
must not be exposed to excessive heat such
as sunshine, fire or the like.
CAUTION
! Use one CR2025 (3 V) lithium battery.
! Removethe battery if the remote control is
not used for a month or longer.
! There is a danger of explosion if the battery is
incorrectly replaced. Replace only with the
same or equivalent type.
! Do not handle the battery with metallic tools.
! Do not store the battery with metallic ob-
jects.
! If the battery leaks, wipe the remote control
completely clean and install a new battery.
! When disposing of used batteries, comply
with governmental regulations or environmental public institutions’ rules that apply in
your country/area.
! “Perchlorate Material – special handling may
apply.
See
www.dtsc.ca.gov/hazardouswaste/
perchlorate. (Applicable to California,
U.S.A.)”
Using the remote control
Point the remote control in the direction of the
front panel to operate.
! The remote control may not function properly
in direct sunlight.
Important
! Do not store the remote control in high tem-
peratures or direct sunlight.
! Do not let the remote control fall onto the
floor, where it may become jammed under
the brake or accelerator pedal.
Demo mode
The feature demo automatically starts when you
select Off for the source and continues while
the ignition switch is set to ACC or ON. To cancel the feature demo, press and hold MUTE.
Press and hold MUTE again to restart. Operating the feature demo while the car engine is
turned off it may drain the battery power.
Important
The red lead (ACC) of this unit should be connected to the ignition on/off function. Failure to
do so may result in battery drain.
Page 7
1 2 3 5 6 74
8
567
ppr
What’s what
What’s what
Section
03
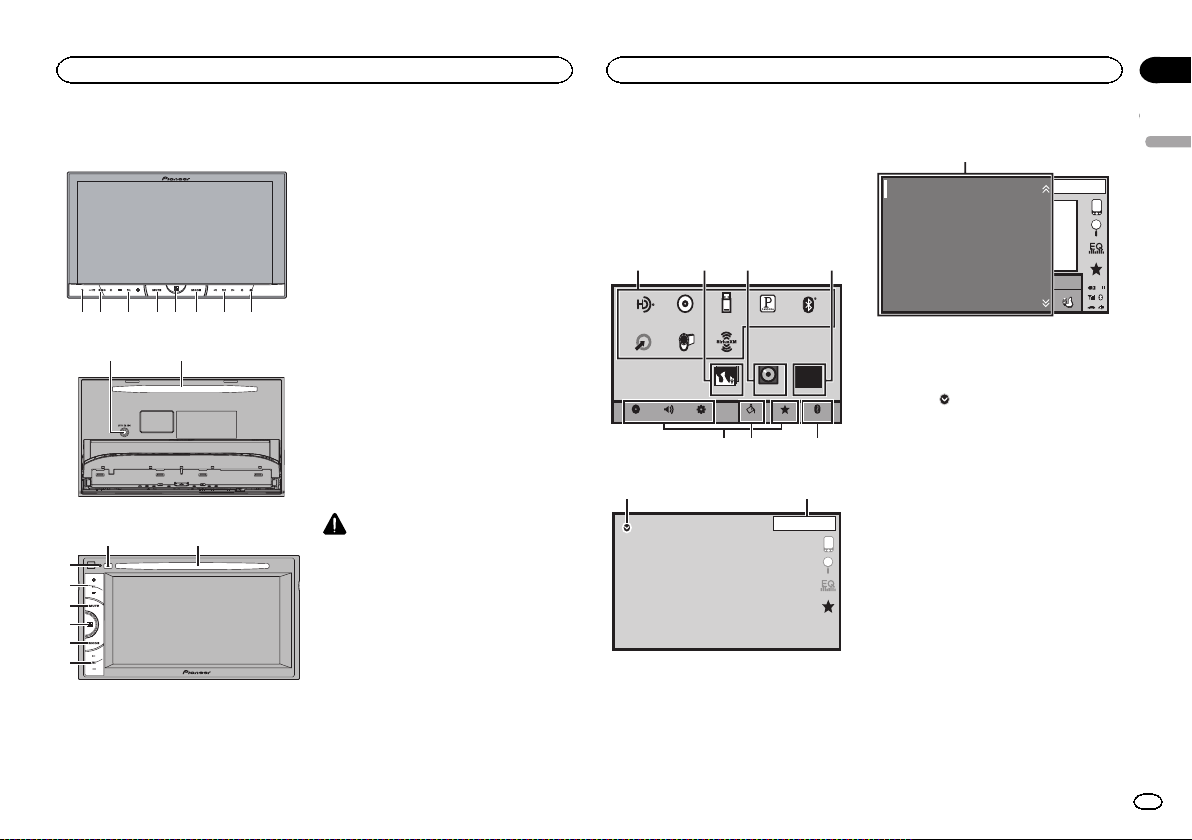
Head unit
AVH-X5500BHS and AVH-X4500BT
9 a
AVH-X3500BHS, AVH-X2500BTand AVH-X1500DVD
8a
1
3
4
5
6
7
1 RESET
For details refer to Resetting the microprocessor on page 44.
2 SRC/OFF
3 +/– (VOLUME/VOL)
4 MUTE
Press to mute. Press again to unmute.
5 Home button
Displaying the home display.
The display returns to the Launcher screen
while a 3rd-party application is being used in
Advanced App Mode.
Double-clicking the icon on the Launcher
screen returns the display to the home display.
6 MODE
Turning the information display off.
7 c/d (TRK)
8 h (eject)
9 Auto EQ microphone input jack
Use to connect an auto EQ microphone.
a Disc loading slot
CAUTION
Do not use unauthorized products.
Notes
! When the navigation system is connected,
press MODE to switch to the navigation display. Press MODE and hold to turn the display off.
Press MODE again to turn the display on.
! For details on how to operate a navigation
system from this unit, refer to its operation
manual.
! When an iPhone that is running an applica-
tion that supports Advanced App Mode is
connected, press MODE to switch to the application display. You can use the application
by touching the display.
! For details on how to connect an iPod or
USB storage device to this unit, refer to
When connecting with optional CD-IU201V
cable on page 48.
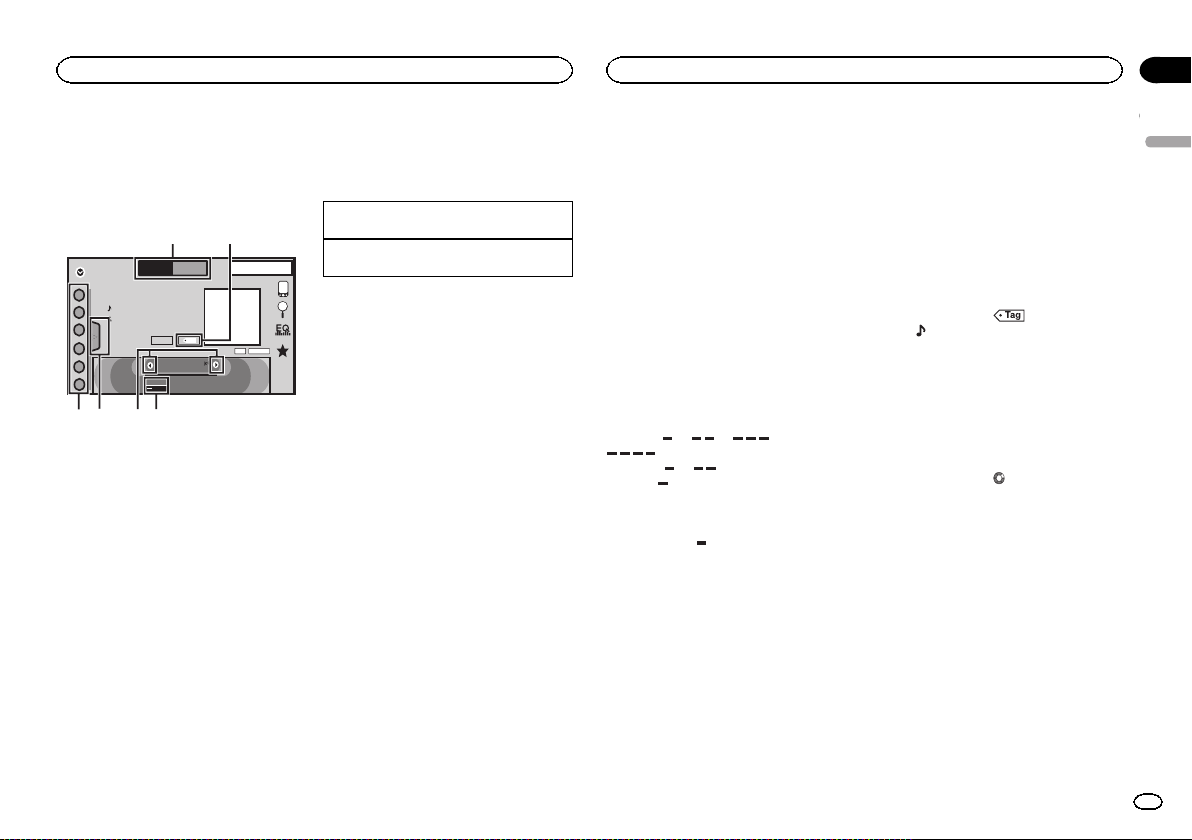
Home display
Home display
1324
Source on display
SiriusXM
Digital Radio
Disc
USB/iPod
Pandora
Disc USB/iPod1
Digital Radio
AUX
AV SiriusXM
AudioVideo
Source off display
Apps
Settings
Pandora
RearView
ON
Bluetooth Audio
OFF
BluetoothFavoriteThemeSystem
89
1 JAN
AM
12:12
OFF
Bluetooth Audio
1 Source icon
Selecting a favorite source.
When the source icon is not displayed, it can
be displayed by pressing the home key or
touching
2 Apps key
Switching to Advanced App Mode.
3 Rear view key
Displaying the rear view image.
For details refer to Using the rear view on
page 10.
4 Source off key
Turning the source off.
5 Bluetooth key
Displaying the Bluetooth connection menu.
6 Theme key
Displaying the Theme menu.
7 Menu icon
Displaying the menu.
8 Source key
Displaying the source menu.
1
JAN
AM
12:22
Dolby PLII
S.Rtrv
Appr
AppppApp
.
English
DB
7
En
Page 8
Section
03
What’s what
What’s what
9 Clock key
Switching to clock adjustment display.
Turning the source ON/OFF
(Function of AVH-X5500BHS/AVH-X4500BT)
Turning the source on using the buttons
1 Press SRC/OFF to turn the source on.
Turning the source off using the buttons
1 Press SRC/OFF and hold until the source turns
off.
8
En
Selecting a source
Available source modes
! SiriusXM – SiriusXM tuner
(AVH-X5500BHS/AVH-X3500BHS)
! Digital Radio – Digital Radio tuner
(AVH-X5500BHS/AVH-X3500BHS)
! Radio – Radio tuner
(AVH-X4500BT/AVH-X2500BT/AVH-X1500DVD)
! Disc – Built-in DVD and CD player
! USB/iPod – USB/iPod
! Pandora – Pandora
! Bluetooth Audio – Built-in Bluetooth audio
(AVH-X5500BHS/AVH-X4500BT/AVHX3500BHS/AVH-X2500BT)
! AUX – AUX
! AV – AV input
Selecting a source
! Using SRC/OFF
(Function of AVH-X5500BHS/AVH-X4500BT)
1 Press SRC/OFF.
! Using the touch panel keys on the home dis-
play
1 Touch the source icon and then touch the
desired source name.
! When the source icon is not displayed, it
can be displayed by touching the screen.
! While operating the menu, you cannot se-
lect a source by touching the source icon.
Note
The USB/iPod icon will change as follows:
! USB is displayed when a USB storage device is
connected to USB input.
! iPod is displayed when an iPod is connected to
USB input.
! USB/iPod is displayed when no device is con-
nected.
â
internet radio
Adjusting the volume
% Press +/– (VOLUME/VOL) to adjust the
volume.
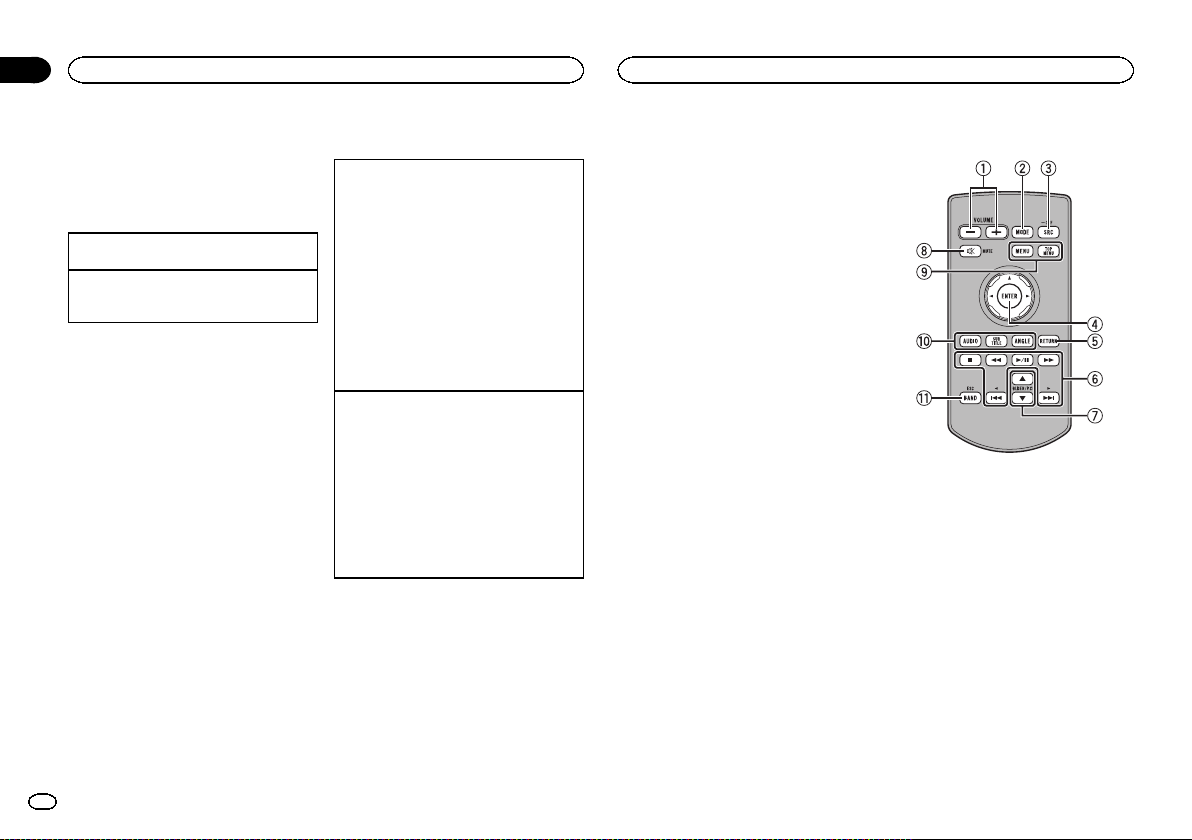
Remote control
1 +/– (VOLUME/VOL)
2 MODE
Turning the information display off.
3 SRC/OFF
Refer to Source off key on the previous
page.
4 Thumb pad
Use to select a menu on the DVD menu.
5 RETURN
Press to display the PBC (playback control)
menu during PBC playback.
6 f
Press to pause or resume playback.
m
Press to perform fast reverse.
Press to change the fast reverse speed.
Page 9
What’s what
Common operations
Section
03
n
Press to perform fast forward.
Press to change the fast forward speed.
o
Press to return to the previous track (chapter).
p
Press to go to the next track (chapter).
g
Press to stop playback.
If you resume playback, playback will start
from the point where you stopped. Touch the
key again to stop playback completely.
7 FOLDER/P.CH
Press to select the next or previous disc or
folder.
Press to recall radio station frequencies assigned to preset tuning keys.
8 MUTE
Press to mute. Press again to unmute.
9 MENU
Press to display the DVD menu during DVD
playback.
TOP MENU
Press to return to the top menu during DVD
playback.
a AUDIO
Press to change the audio language during
DVD playback.
Press to switch audio output for DivX/
MPEG-4.
SUBTITLE
Press to change the subtitle language during
DVD/DivX/MPEG-4 playback.
ANGLE
Press to change the viewing angle during
DVD playback.
b BAND/ESC
Press to select the tuner band when tuner is
selected as a source. Also used to cancel the
control mode of functions.
Press to switch between modes when playing the following types of data:
! Disc
Compressed audio and audio data (CDDA) such as with CD-EXTRA and MIXEDMODE CDs
! USB storage device
Audio data, video data, and photo data
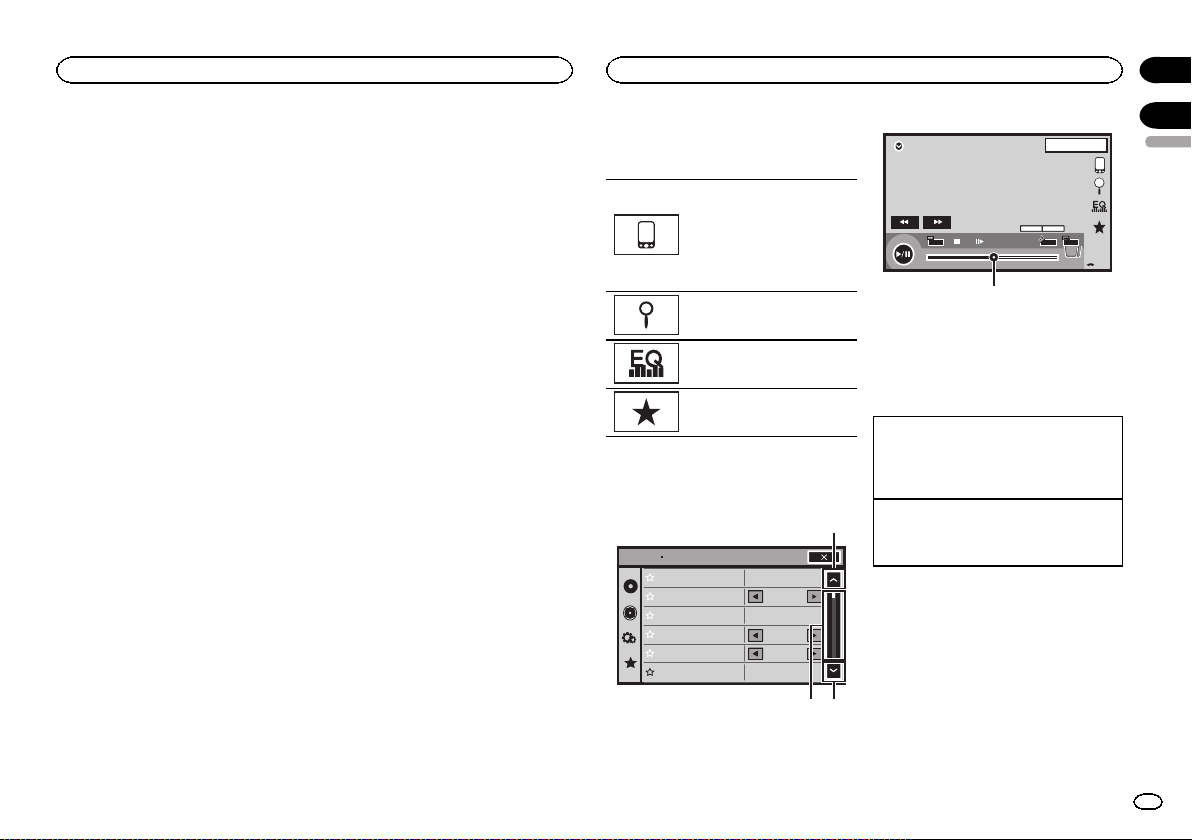
Common operations for
menu settings/lists
(Function of AVH-X5500BHS/
AVH-X4500BT/AVH-X3500BHS/
AVH-X2500BT)
Starting the Bluetooth telephone
menu.
For details refer to Bluetooth tele-
phone on page 30.
Displaying the list menu.
Starting the search function.
Displaying the EQ (Audio function menu).
Displaying the Favorite menu.
Operating the scroll icon
and the scrubber bar
Audio
Sonic Center Control
Loudness
Subwoofer
Bass Booster
High Pass Filter
Source Level Adjuster
L/R 0
Low
On
0
125Hz
0
DVD-V
FULL
00'20'' -119'51''
2
1 Scroll icon
Appears when selectable items are hidden.
2 Scrubber bar
Appears when items cannot be displayed on
a single page only.
Viewing the hidden items
1 Touch the scroll icon or drag the scrubber bar
to view any hidden items.
! Also, you can drag the list to view any hidden
items.
Specifying the playback point
1 Drag the scrubber bar on the screen.
1
12
(Not available when the scrubber bar is grayed
out.)
MENU
01 01
48kHz 16bit
Dolby D
TOP
MENU
1JAN
PM
12:43
Dolby DMulti ch
11
1/2
04
English
9
En
Page 10
Section
Common operations
04
Common operations
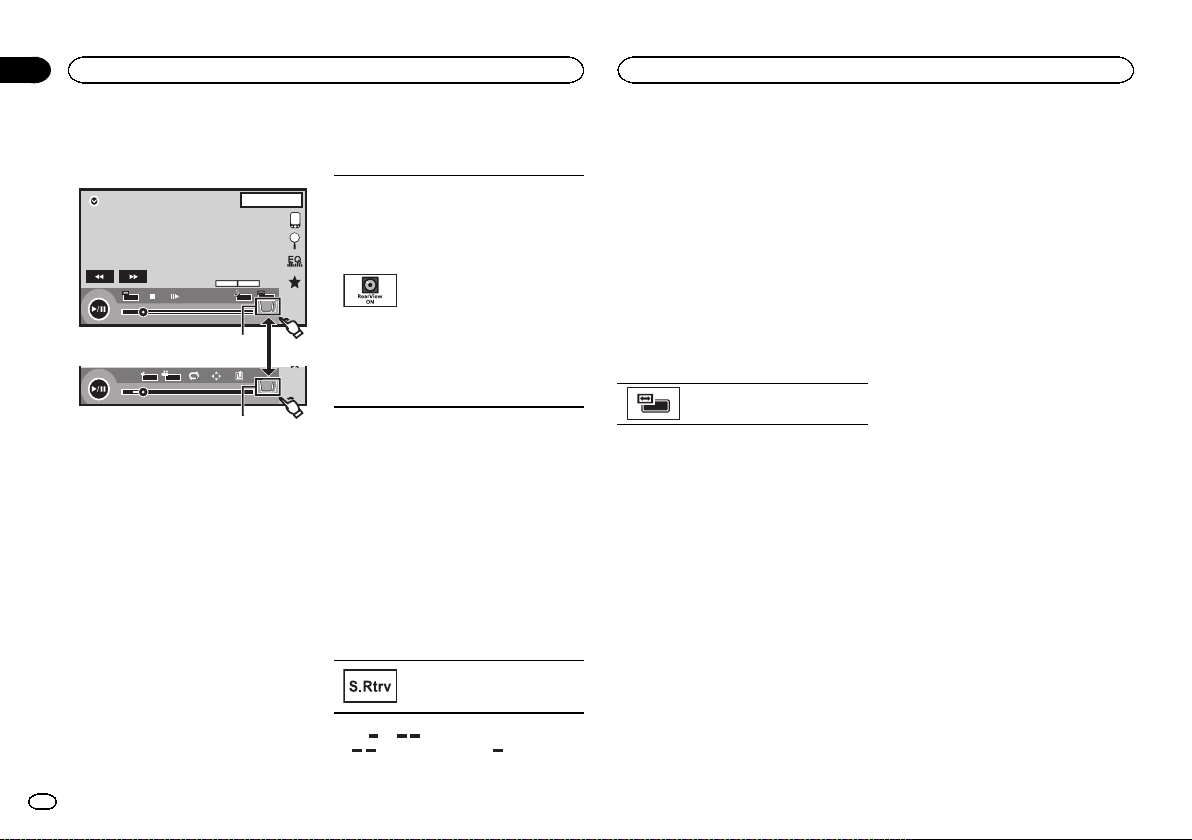
Activating the touch panel keys
Touch panel keys
MENU
01 01
48kHz 16bit
Dolby D
TOP
MENU
DVD-V
FULL
00'20'' -119'51''
1
L+R
1
07'24'' -112'47''
1
1 Tab key
Switching the touch keys on the display.
Using the rear view
The below functions are available. Use of the
rear view camera feature requires a rear view
camera sold separately.
! Rear view camera
This unit can be setup to display the rear
view image automatically when you move
the shift lever to the REVERSE (R) position.
! Camera for rear view mode
The rear view can be turned on to display at
all times.
The rear view camera needs to be set to a setting other than Off to turn on rear view
mode.
For details about the settings, refer to Setting the
rear view camera (back up camera) on page 40.
10
En
1JAN
Dolby DMulti ch
1 1
Return
PM
12:43
1/2
2/2
Using the rear view key to
display the rear view
Displaying the rear view image by
turning the rear view image on.
When the rear view image is displayed, you can switch to the
source display by touching the display. You can operate from the
source display temporarily at this
time. If you do not perform any operations within a few seconds, the
display will return to the rear view
image.
To turn off the rear view image,
press the home button to return to
the home display and then press
this key again.
Using the rear monitor
Connecting a rear monitor, sold separately, to
this unit allows images and videos to be viewed
from the rear seats.
Notes
! Touch keys and operation screens do not dis-
play on the rear monitor.
! Images and video will continue to be dis-
played whether the vehicle is in motion or
stopped.
Using sound retriever
Automatically enhances compressed audio and restores rich
sound.
Off — —
! is more effective than .
Notes
! This function is enabled for playback on the
sources listed below.
— CD-DA
— MP3/WMA/AAC/WAV files on USB storage
devices
— MP3/WMA/AAC files on CD media
— iPod
— Pandora
! The sound retriever setting is turned Off
when the MIXTRAX function is used in USB
source mode.
Changing the wide-screen
mode
Selecting the appropriate screen
ratio for the playback video.
1 Display the screen mode.
2 Touch the desired wide mode setting.
FULL (full screen)
The 4:3 picture is enlarged in the horizontal direction only, granting viewers a 4:3 TV picture
(normal picture) without any omissions.
ZOOM (zoom)
The 4:3 picture is enlarged in the same proportion both vertically and horizontally; ideal for a
cinema sized picture (wide screen picture).
NORMAL (normal)
The 4:3 picture is displayed as is, granting viewers no sense of disparity as the proportions are
the same as that of the normal picture.
Notes
! You cannot operate this function while driv-
ing.
! Different settings can be stored for each
video source.
! When a video is viewed in a wide screen
mode that does not match its original aspect
ratio, it may appear different.
! Remember that using the wide mode feature
of this system for commercial or public viewing purposes may constitute an infringement
on the author’s rights protected by the Copyright Law.
! The video image will appear coarser when
viewed in ZOOM mode.
! This function is enabled for playback on the
sources listed below.
— Disc: DVD-V, Video-CD, DivX, MPEG-1,
MPEG-2, MPEG-4, JPEG
— USB: DivX, MPEG-1, MPEG-2, MPEG-4, JPEG
— iPod: Video
— AV Input: A/V data
— AUX: A/V data
Page 11
Basic operations
Adjusting the angle of the
LCD panel and ejecting media
CAUTION
Keep hands and fingers clear of the unit when
opening, closing, or adjusting the LCD panel. Be
especially cautious of children’s hands and fingers.
Adjusting the LCD panel angle
(Function of AVH-X5500BHS/AVH-X4500BT)
1 Press h(eject) to display the ejecting
menu.
2 Adjust the LCD panel to an easily viewable angle.
Ejecting a disc
(Function of AVH-X3500BHS/AVH-X2500BT/AVHX1500DVD)
% Press h to eject a disc.
Setting the clock
1 Touch the Clock key.
The Clock Adjustment screen appears.
For details refer to Home display on page 7.
2 Select the item to set.
3 Touch a or b to set the correct date and
time.
HD Radioä tuner
About HD Radioä stations
(Function of AVH-X5500BHS/AVH-X3500BHS)
HD Radioä stations offer high-quality audio and
data services. HD Radio stations are brought to
you by local FM/AM stations.
HD Radio stations feature the following:
! High quality audio
! FM multicasting
! Data services
iTunesâTagging provides you the opportunity to discover
a wide range of content and the means to “tag” that content for later review and purchase from the iTunesâStore.
Visual information related to content being played on
your HD Radio receiver,such as Album Art, historical photographs, still art from live broadcasts, among other related content.
HD Radioä Technology
! HD Radio Technology manufactured under li-
cense from iBiquity Digital Corporation. U.S.
and Foreign Patents. HD Radioä and the
HD, HD Radio, and “Arc” logos are proprietary trademarks of iBiquity Digital Corp.
Section
05
06
English
Laying the panel down.
Returning the panel to the upright
position.
# As the set angle is saved, the LCD panel will automatically be adjusted to the same position the next
time the LCD panel is opened.
Ejecting a disc
(Function of AVH-X5500BHS/AVH-X4500BT)
1 Press h(eject) to display the ejecting
menu.
2 Eject a disc.
Ejecting a disc.
Program Service Data: Contributes to the superior user
experience of HD Radio Technology. Presents song name,
artist, station IDs, HD2/HD3 Channel Guide, and other relevant data streams.
Adjacent to traditional main stations are extra local FM
channels. These HD2/HD3 Channels provide new, original
music as well as deep cuts into traditional genre.
Digital, CD-quality sound. HD Radio Technology enables
local radio stations to broadcast a clean digital signal.
AM sounds like today’s FM and FM sounds like a CD.
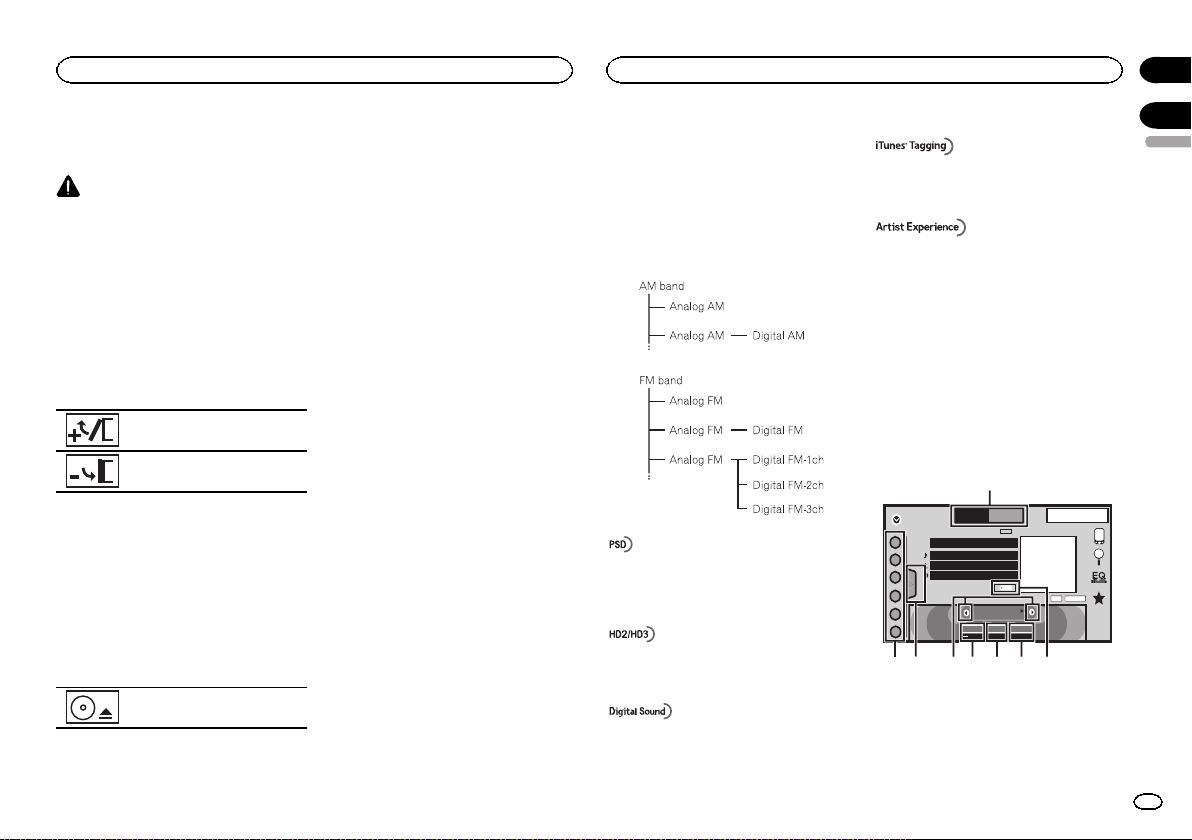
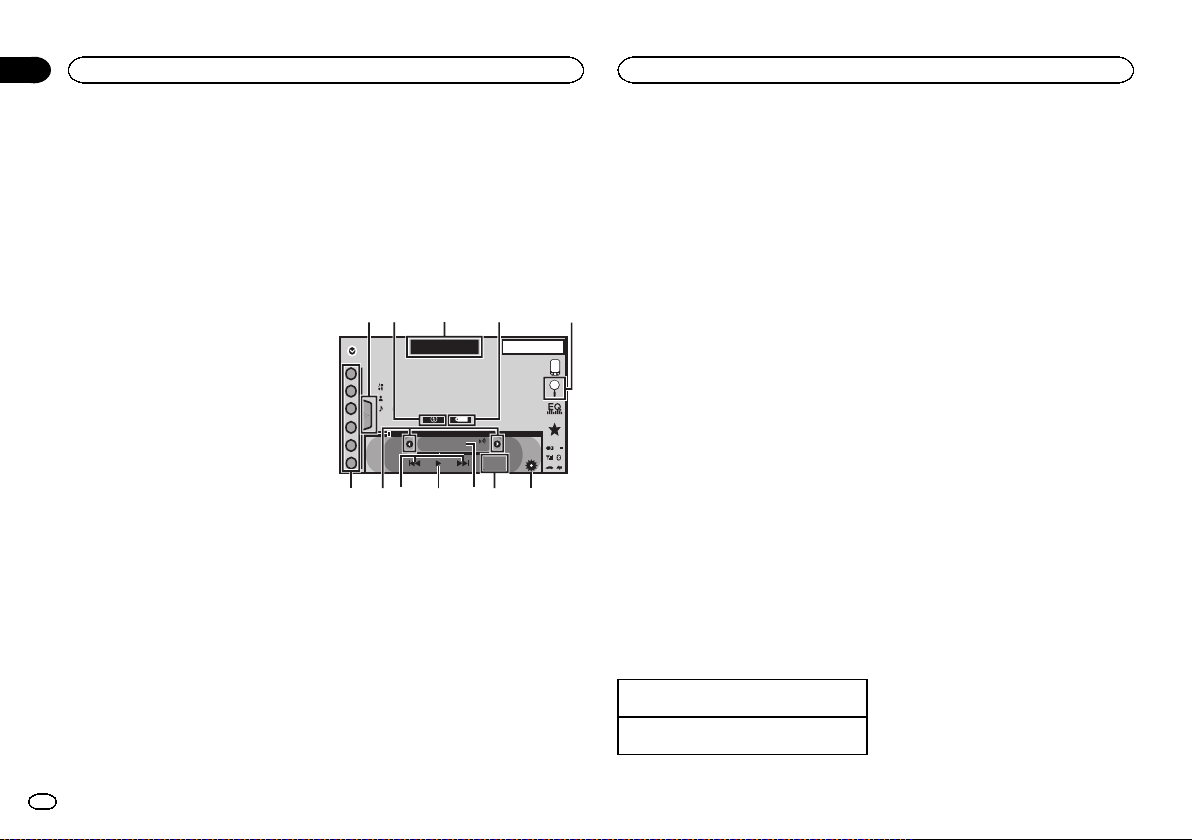
HD Radio tuner operations
Touch panel keys
1
Radio
1
2
3
4
5
6
FM AM1
PS Data
Song Data
Artist Data
Album Data
Local Seek
87.5
8 AUG
PM
HD8
Tag
Blending
ALL
D/A Auto
12:05
HD
DIGITAL
MHz
2345678
1 Band key
Selecting a band (FM or AM) by touching the
band key.
The touch panel key for the selected band is
highlighted.
11
En
Page 12
3
4
5
Section
HD Radioä tuner
06
HD Radioä tuner
Switching between FM1, FM2, and FM3 by
touching the band key.
When AM is selected, you cannot switch to
another AM band by touching the band key.
2 Tag key
Saving song information (tag) from the
broadcasting station to your iPod.
3 Reception mode key
Switching to the analog broadcast of the
same frequency.
4 Seek mode key
Switching between Digital broadcasting station seek and normal seek.
5 Local key
Setting the local seek level.
6 Tuning key
Tuning up or down manually.
Touch and hold down for more than two seconds to skip stations. Seek tuning starts as
soon as you release. Touch again to cancel
seek tuning.
When an analog station is received, tuning
down operation is conducted within the analog broadcasting. (6 d 2)
If a digital broadcast is not yet received, tuning-up operation tunes in the next analog station. (2 d 6)
Analog FM 1
Analog FM 2
Analog FM 6
7 List key
Displaying the preset channel list.
12
En
Digital FM-1ch
Digital FM-2ch
Digital FM-3ch
8 Preset channel key
Select a preset channel.
Basic operations
Switching preset channels using the buttons
1 Press c or d (TRK).
Seek tuning using the buttons
1 Press and hold c or d (TRK).
Note
Touch panel keys not listed under HD Radio
tuner operations may appear on the display.
Refer to Indicator list on page 57.
Storing and recalling stations
You can easily store up to six stations for each
band as presets.
! Six stations for each band can be stored in
memory.
1 Display the preset channel list screen.
Refer to HD Radio tuner operations on the previous page.
The preset channel list appears in the display.
2 Touch and hold down one of the preset
tuning keys to store the selected frequency
to the memory.
The selected radio station frequency has been
stored in the memory.
3 Touch the appropriate preset tuning key
to select the desired station.
Storing the strongest stations
BSM (best stations memory) automatically
stores the six strongest stations in the order of
their signal strength.
Storing broadcast frequencies with BSM may replace broadcast frequencies you have saved
using the preset tuning keys.
1 Display the preset channel list screen.
Refer to HD Radio tuner operations on the previous page.
The preset channel list appears in the display.
2 Touch BSM to turn BSM on.
The six strongest broadcast frequencies will be
stored under preset tuning keys in order of their
signal strength.
# To cancel the storage process, touch Cancel.
Tuning in to strong signals
Local seek tuning allows you to tune in to only
those radio stations with sufficiently strong signals for good reception.
FM: Off —
AM: Off — —
The more there are on the screen, the fewer
the stations that can be selected. Only stations
with the strongest signals in your local area can
be selected.
If there are fewer
ceive broadcasts from weaker stations.
Using iTunes tagging
Note
For more details about iTunes tagging, refer to
About iTunes tagging on page 60.
Storing the tag information to
this unit
1 Tune in to the broadcast station.
2 Store the tag information to this unit.
Refer to HD Radio tuner operations on the previous page.
You can store the information if the Tag indicator is displayed while the desired song is being
broadcast.
— — —
, this unit will be able to re-
# While storing the tag data on this unit, Ta g
flashes.
# The tag information for up to 50 songs can be
stored on this unit.
# Depending on the timing of when the tag information is stored, the tag information for the song
played before or after the currently playing song may
also be stored.
3 When completed, indicator turns
off and
indicator is displayed.
Storing the tagged information
to your iPod
1 Connect your iPod.
When your iPod is connected to this unit, your
iPod starts storing the tagged information automatically.
2 When completed,
and the tagged information is stored on
your iPod.
indicator turns off
Switching the seek mode
There are two seek tuning settings, one is HD
(Digital broadcasting stations seek) and the
other is ALL (normal seek).
ALL—HD
Switching the reception mode
If the reception for a digital broadcast becomes
poor, this unit automatically switches to the analog broadcast of the same frequency. If this
function is set to D/A AUTO, the tuner switches
between digital broadcast and analog broadcast
automatically. If this function is set to ANALOG,
the tuner will only receive analog broadcasts.
D/A AUTO—ANALOG
Page 13
Tuner
Tuner
Section
07
Tuner operations
(Function of AVH-X4500BT/AVH-X2500BT/AVHX1500DVD)
Touch panel keys
1
2
Radio
1
2
3
4
5
6
FM AM1
WWWWWWWW
WWWWWWWW
WWWWWWWW
Local
Text
87.5
8 AUG
PM
12:05
Tag
DIGITAL
HD
MHz
3456
1 Band key
Selecting a band (FM1, FM2 or FM3)by
touching the left icon. Switching to the AM
band by touching the right icon.
The icon for the selected band is highlighted.
2 Tag key
Saving song information (tag) from the
broadcasting station to your iPod.
3 Local key
Setting the local seek level.
4 Tuning key
Tuning up or down manually.
Touch and hold down for more than two seconds to skip stations. Seek tuning starts as
soon as you release. Touch again to cancel
seek tuning.
5 List key
Displaying the preset channel list.
6 Preset channel key
Selecting a preset channel.
Basic operations
Switching preset channels using the buttons
1 Press c or d (TRK).
Seek tuning using the buttons
1 Press and hold c or d (TRK).
Notes
! Listening AM radio while an iPod is charged
from this unit may generate noise. In this
case, disconnect the iPod from this unit.
! Touch panel keys not listed under Tuner oper-
ations may appear on the display.
Refer to Indicator list on page 57.
Storing and recalling stations
You can easily store up to six stations for each
band as presets.
1 Display the preset screen.
Refer to Tuner operations on this page.
The preset screen appears in the display.
2 Touch and hold down one of the preset
tuning keys to store the selected frequency
to the memory.
The selected radio station frequency has been
stored in the memory.
3 Touch the appropriate preset tuning key
to select the desired station.
Storing the strongest stations
BSM (best stations memory) automatically
stores the six strongest stations in the order of
their signal strength.
Storing broadcast frequencies with BSM may replace broadcast frequencies you have saved
using the preset tuning keys.
1 Display the preset screen.
Refer to Tuner operations on this page.
The preset screen appears in the display.
2 Touch BSM to turn BSM on.
The six strongest broadcast frequencies will be
stored under preset tuning keys in order of their
signal strength.
# To cancel the storage process, touch Cancel.
Tuning in to strong signals
Local seek tuning allows you to tune in to only
those radio stations with sufficiently strong signals for good reception.
FM: Off —
AM: Off — —
The more there are on the screen, the fewer
the stations that can be selected. Only stations
with the strongest signals in your local area can
be selected.
If there are fewer
ceive broadcasts from weaker stations.
Using iTunes tagging
Note
For more details about iTunes tagging, refer to
About iTunes tagging on page 60.
Storing the tag information to
this unit
1 Tune in to the broadcast station.
2 Store the tag information to this unit.
Refer to Tuner operations on this page.
— — —
, this unit will be able to re-
You can store the information if the Tag indicator is displayed while the desired song is being
broadcast.
# While storing the tag data on this unit, Ta g
flashes.
# The tag information for up to 50 songs can be
stored on this unit.
# Depending on the timing of when the tag information is stored, the tag information for the song
played before or after the currently playing song may
also be stored.
3 When completed, indicator turns
indicator is displayed.
off and
Storing the tagged information
to your iPod
1 Connect your iPod.
When your iPod is connected to this unit, your
iPod starts storing the tagged information automatically.
2 When completed,
and the tagged information is stored on
your iPod.
indicator turns off
English
13
En
Page 14
Section
08
SiriusXM tuner
SiriusXM tuner
Introducing SiriusXM tuner
operations
(Function of AVH-X5500BHS/AVH-X3500BHS)
You can use this unit to control SiriusXM Connect Vehicle Tuner,which is sold separately.
For more information on how to install SiriusXM
Connect Vehicle Tuner,consult the installation
guide included with the tuner.
Everything worth listening to is on SiriusXM, getting over 130 channels, including the most commercial‐free music, plus the best sports, news,
talk and entertainment. A SiriusXM Vehicle
Tuner and Subscription are required. For more
information, visit www.siriusxm.com.
To subscribe to the SiriusXM
Satellite Radio service
1 Select SiriusXM as a source.
You should be able to tune in to Channel 1. If
you cannot get Channel 1, make sure that your
SiriusXM Connect Vehicle Tuner is installed correctly as described in the tuner installation
guide.
2 Switch to Channel 0 and check the Radio
ID.
The SiriusXM Radio ID can be found by tuning
to Channel 0. In addition, the Radio ID is located
on the bottom of the SiriusXM Connect Vehicle
Tuner.
Please note that the SiriusXM Radio ID does not
include the letters I, O, S or F.
You will need this number to activate your subscription.
3 Activate the service either online or by
phone.
! Visit the website, www.siriusxm.com/activate-
now
! Call SiriusXM Listener Care at 1-866-635-2349
to activate.
# The SiriusXM satellites will send an activation
message to your tuner.When the tuner has received
the message, “Subscription Updated” is displayed.
Once you have subscribed, SiriusXM will send an activation message to your tuner.
The activation process usually takes 10 to 15 minutes
but may take up to an hour in some cases. Do not
turn off the unit while the activation message is displayed.
Touch panel keys
9
SiriusXM
1
2
3
4
5
6
34215
SXM 1
CH
Channel Name
Category Name
Artist Name / Content Info
Song Title / -
CH
888
22 JAN
AM
12:22
Tag
Dolby PLII
Live
-01’ 00”
DB
6798bac
1 List key
Displaying the preset channel list.
2 Information key
Switching the SiriusXM information.
Category name—Content information
Touch and hold for more than two seconds to
scroll the text.
3 Band key
Selecting a band from SXM1, SXM2 or
SXM3.
â
4 iTunes
song tagging key
Saving iTunes
casting station to your iPod.
â
song tagging from the broad-
5 Search key
Selecting a channel from the list screen.
6 Parental control key
The Parental Control screen appears.
7 Live key
Use to return to the live broadcast while in
Instant Replay mode.
8 Direct key
A numeric keypad appears, allowing you to
enter SiriusXM channel numbers directly.
9 Pause and play key
Use while in Instant Replay mode.
a Forward/Backward key
While in Instant Replay mode, use to skip up
or down or press and hold to fast forward or
fast rewind.
b Tuning key
Tuning up or down manually.
Touch and hold down for more than two seconds to skip stations. Seek tuning starts as
soon as you release. Touch again to cancel
seek tuning.
c Preset channel key
Recalling the preset channels by touching
the key.
Storing the current station in the preset
channel list by touching and holding the key.
Basic operations
Manual tuning (step by step) using the buttons
1 Press c or d (TRK).
Seek tuning using the buttons
1 Press and hold c or d (TRK).
Note
Touch panel keys not listed under Introducing
SiriusXM tuner operations may appear on the dis-
play.
Refer to Indicator list on page 57.
Storing and recalling channels
You can easily store up to six channels for each
band as presets.
! Six channels for each band can be stored in
memory.
1 Display the preset channel list screen.
Refer to Introducing SiriusXM tuner operations on
this page.
The preset channel list appears in the display.
2 Touch and hold down one of the preset
tuning keys to store the selected channel to
the memory.
The selected channel has been stored in the
memory.
3 Touch the appropriate preset channel key
to select the desired station.
Selecting a channel from the
list screen
Selecting a channel from the all
channel list
You can select a channel from any of the available channels.
1 Touch the search key to open the list
screen.
2 Select the all channels.
3 Select the desired channel.
14
En
Page 15

SiriusXM tuner
SiriusXM tuner
Section
08
4 Touch the close key to close the list
screen.
Display is closed.
Selecting a channel from the
category list
You can select a channel from the available categories.
The types of categories available will depend on
the types of channels available.
1 Touch the search key to open the list
screen.
2 Select a category from the list.
3 Select the desired channel.
4 Touch the close key to close the list
screen.
Display is closed.
Switching the list display
You can switch between list types while a list is
showing.
% Touch Info while a list is showing to
switch between list types.
The list displayed will switch between the below
types in the order given.
Channel Name—Artist Name—Song Title—Content Info
Selecting a SiriusXM
channel directly
You can select a SiriusXM channel directly by
entering the desired channel number.
1 Touch the direct key to switch to direct
input display.
2 Touch 0 to 9 to input the desired channel
number.
# To cancel the input numbers, touch C.
3 Select the SiriusXM channel of the entered number.
The SiriusXM channel of the entered number is
selected.
Selecting the SiriusXM channel
of the entered number.
Replayä
You can pause, rewind or replay the channel you
are currently listening to.
! Touch Pause/Play key to pause or play.
! Touch Forward or Backward keys to skip
through content. Press and hold the Forward
or Backwards keys to fast scan through the
content.
! Touch Live key to exit Replay mode and go to
the live point in the broadcast.
Using iTunes tagging
Note
For more details about iTunes tagging, refer to
About iTunes tagging on page 60.
iTunes tagging of SiriusXM songs
1 Tune in to the broadcast station.
2 Touch the iTunesâsong tagging key.
Store the tag information to this unit.
You can store the information if the Tag indicator is displayed while the desired song is being
broadcast.
# While storing the tag data on this unit, Ta g
flashes.
# The tag information for up to 50 songs can be
stored on this unit.
# Depending on the timing of when the tag information is stored, the tag information for the song
played before or after the currently playing song may
also be stored.
3 When completed, indicator turns
off and
indicator is displayed.
Storing the tagged information
to your iPod
1 Connect your iPod.
When your iPod is connected to this unit, your
iPod starts storing the tagged information automatically.
2 When completed,
and the tagged information is stored on
your iPod.
indicator turns off
Setting Parental Control
The SiriusXM Parental Control feature allows
you to control access to channels that you consider inappropriate for younger listener.
When enabled, the Parental Control feature requires you to enter a passcode to tune to the
locked channels.
1 Touch the parental control key to open
the passcode confirmation screen.
2 Use the numeric keypad to enter the
four-digit passcode and then touch the Enter
key.
Touch to confirm the passcode.
The default passcode is 0000.
If a valid passcode is entered, the channel list
appears on the Parental Control screen together
with a lock or unlock icon.
3 The below operations can be completed
from the Parental Control screen.
Locking channels
Access to the current broadcast channel can be
locked. You will need to input your passcode
later on to listen to a locked channel.
% To lock a specific channel, touch the
name of the desired channel on the list.
A locked lock icon will appear next to the name
of a locked channel.
Touch the name of a locked channel a second
time to unlock the channel.
Clear All (clearing the locks from
all channels)
You can clear the locks from all locked channels
at the same time.
% Touch Clear All to unlock all locked channels at the same time.
Edit Code (changing the passcode)
You can change your passcode.
1 Touch Edit Code to switch to the passcode edit screen.
English
15
En
Page 16
1 2 3
Section
08
SiriusXM tuner
SiriusXM tuner
2 Use the numeric keypad to enter a new
four-digit passcode and then touch the Enter
key.
Touch to confirm the passcode.
Once the new passcode is set, the Parental Control screen will open.
Note
If Check Tuner displays instead, refer to
SiriusXM Satellite Radio on page 53.
Setting SiriusXM Tune Startä
SiriusXM Tune Start can be used to set the start
position for playback of the audio content being
broadcast when the channel is changed.
1 Press the home button to switch to the
home display.
2 Touch the system key to open the system
menu.
3 Touch SiriusXM Tune Start on the system
menu to turn SiriusXM Tune Start on or off.
On: The current broadcast audio song is played
back from the start of the song.
Off: The live broadcast is played for the current
audio channel.
Scan options
Channels and songs can be played back on this
unit by scan play.
Tune Scanä
Scan through short previews of songs you may
have missed on your preset music channels.
1 Touch the list key to display the preset
channel list.
2 Touch Tune Scan.
Each song in the current channel
plays for eight seconds at a time.
Refer to Scan play operations on this page for a
list of functions that can be used during scan
play.
Note
Tune Start and Tune Scan are compatible with
SXV200 tuner but not available to SXV100.
Category scan
Scan through each channel in a category.
1 Touch the search key.
2 Touch the desired category.
3 Touch Scan.
The live broadcast for each channel in the current category plays
for five seconds at a time.
Refer to Scan play operations on this page for a
list of functions that can be used during scan
play.
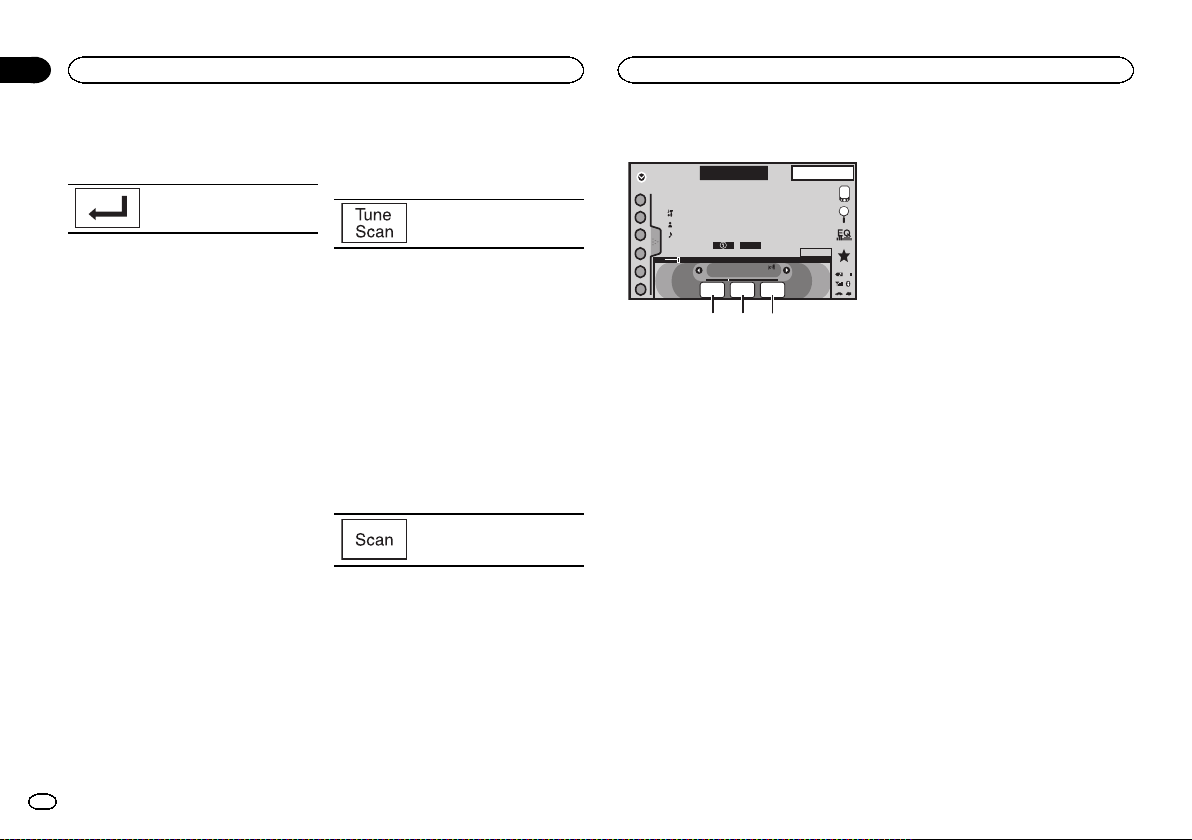
Scan play operations
SXM 1
SiriusXM
1
CH
WWWWWWWWWWWWW
WWWWWWWWWWWWWWWW
2
WWWWWWWWWWWWWWWW
WWWWWWWWWWWWWWWW
3
4
5
6
1 Scan play key
Selecting the channel or song playing
2 Scan next key
Switching to the next song during the Tune
Scan
Switching to the next channel during the category scan
3 Scan escape key
Quitting scan play
888
CH
Scan
Play
22 JAN
AM
Scanning
Scan
Scan
Next
Esc
12:22
Dolby PLII
DB
16
En
Page 17
y
y
Disc (CD/DVD)
Disc (CD/DVD)
Section
09
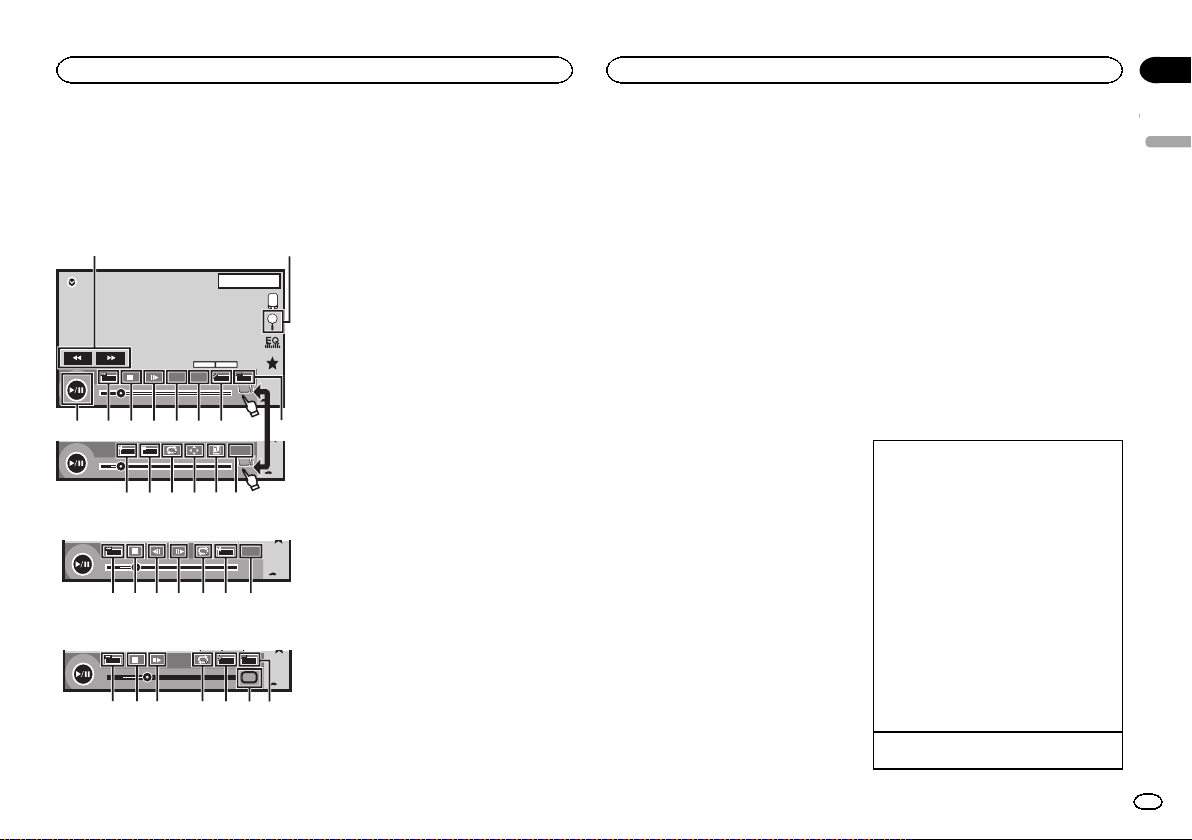
Introducing movie operations
You can use this unit to view DVD/DVD-R/DVDRW/CD/CD-R/CD-RW movie files.
Touch panel keys
DVD video
21
1JAN
PM
12:43
DVD-V
FULL
00'20'' -119'51''
a 987654
L+R
07'24'' -112'47''
Video CD
FULL
00'20'' -119'51''
01 01
48kHz 16bit
Dolby D
Dolby DMulti ch
TOP
MENU
11
MENU
1/2
3
1
fedcg
Return
2/2
b
Return
L+R
98h7eg b
When playing a disc containing a mixture of various media file types
FULL
00'15'' -00'59''
1
OFF
Media
987 i3e4
1 Fast forward key/Reverse key
Fast forwarding or reversing
Touch to change the fast forward and reverse
speed.
2 Search key
Starting the search function.
3 Switch subtitle language key
With DVDs/DivX files featuring multi-subtitle
recordings, you can switch between subtitle
languages during playback.
4 Switch audio language key
With DVDs/DivX files that provides audio
playback in different languages and different
audio systems (Dolby Digital, DTS, etc.), you
can switch between languages/audio systems during playback.
Depending on the setting, the video may not
be played back with the audio system used
to record the DVD.
5 TOP MENU key
Returning to the top menu during DVD playback.
6 MENU key
Displaying the DVD menu during DVD playback.
7 Slow-motion playback key
Moving the selection ahead one frame at a
time during playback.
Touch and hold down the key for more than
two seconds to slow down playback speed.
Touching the key increases the playback
speed over four incremental settings during
slow motion playback from DVD video/Video
CD.
8 Stop key
Stopping playback.
If you resume playback, playback will start
from the point where you stopped. Touch the
key again to stop playback completely.
9 Screen mode key
Changing the screen mode.
Refer to Changing the wide-screen mode on
page 10.
a Pause and play key
Pausing playback.
Returning to normal playback during
paused, slow motion, or frame-by-frame playback.
b Return key
Returning to the specified scene to which
the DVD currently being played has been preprogrammed to return.
This function cannot be used if a specified
scene has not been preprogrammed on the
DVD disc.
c Bookmark key
During playback, touch the point at which
you want to resume playback the next time
the disc is loaded.
! You can set one bookmark per DVD video.
You can set up to five bookmarks total.
! To clear the bookmark on a disc, touch
and hold the key during playback.
! The oldest bookmark is replaced by the
new one.
d Arrow key
Displaying arrow keys to operate the DVD
menu.
e Repeat key
Selecting the repeat range.
f Viewing angle key
With DVDs featuring multi-angle (scenes
shot from multiple angles) recordings, you
can switch among viewing angles during
playback.
g Audio output key
Switching the audio output, when playing
video discs recorded with LPCM audio.
h Slow key
Speeding down the playback speed in four
steps, during slow motion playback on DVD
video/Video CD.
! There is no sound during slow motion
playback.
! Images during slow motion playback may
be unclear for some discs.
! Reverseslow motion playback is not avail-
able.
i Media key
Switching between media file types to play
on DVD/CD/USB.
Basic operations
Playing back videos
1 Insert the disc into the disc loading slot with
the label side up.
Playback will automatically start.
! If you are playing a DVD or Video CD, a menu
may appear. Refer to Operating the DVD menu
on the next page and PBC playback on page
19.
! When the automatic playback function is on,
the unit will skip the DVD menu and automatically start playback from the first chapter of
the first title. Refer to Automatic playback of
DVDs on page 37.
! When the source icon is not displayed, it can
be displayed by touching the screen.
! If a message is displayed after loading a disc
containing DivX VOD content, touch Play.
Refer to Playing DivX
20.
Ejecting a disc
! Refer to Ejecting a disc on page 11.
â
VOD content on page
English
17
En
Page 18

Section
09
Disc (CD/DVD)
Disc (CD/DVD)
Selecting a chapter using the buttons
1 Press c or d (TRK).
Fast forwarding or reversing using the buttons
1 Press and hold c or d (TRK).
! Fast forward/fast reverse may not always be
possible on some discs. In such cases, normal
playback will automatically resume.
! The fast forward/fast reverse speed depends
on the length of time you press and hold down
c or d (TRK). This function is not available for
Video CD.
Notes
! This DVD player can play back a DivX file re-
corded on CD-R/RW, DVD-R/RW, or MPEG-1/
MPEG-2/MPEG-4. (Please see the following
section for files that can be played back.
Refer to DivX video files on page 59.)
! Do not insert anything other than a DVD-R/
RW or CD-R/RW into the disc loading slot.
! Some operations may not be available while
watching a media due to the programming
of the disc. In such cases, the
pears on the screen.
! There may be touch panel keys not listed
under Introducing movie operations on the
previous page that appear on the screen.
Refer to Indicator list on page 57.
! With some DVDs, switching between lan-
guages/audio systems may only be possible
using a menu display.
! You can also switch between languages/
audio systems using Video Setup menu. For
details, refer to Setting the audio language on
page 35.
! This unit will return to normal playback if you
change the audio language during fast forward/fast reverse, pause or slow motion playback.
! With some DVDs, switching between subtitle
languages may only be possible using a
menu display.
icon ap-
! You can also switch between subtitle lan-
guages using Video Setup menu. For details, refer to Setting the subtitle language on
page 35.
! This unit will return to normal playback if you
change the subtitle language during fast forward/fast reverse, pause or slow motion playback.
! During playback of a scene shot from multi-
ple angles, the angle icon is displayed. Use
the Video Setup menu to turn the angle
icon display on or off. For details, refer to Set-
ting the multi-angle DVD display on page 36.
! You will return to normal playback if you
change the viewing angle during fast forward/fast reverse, pause or slow motion playback.
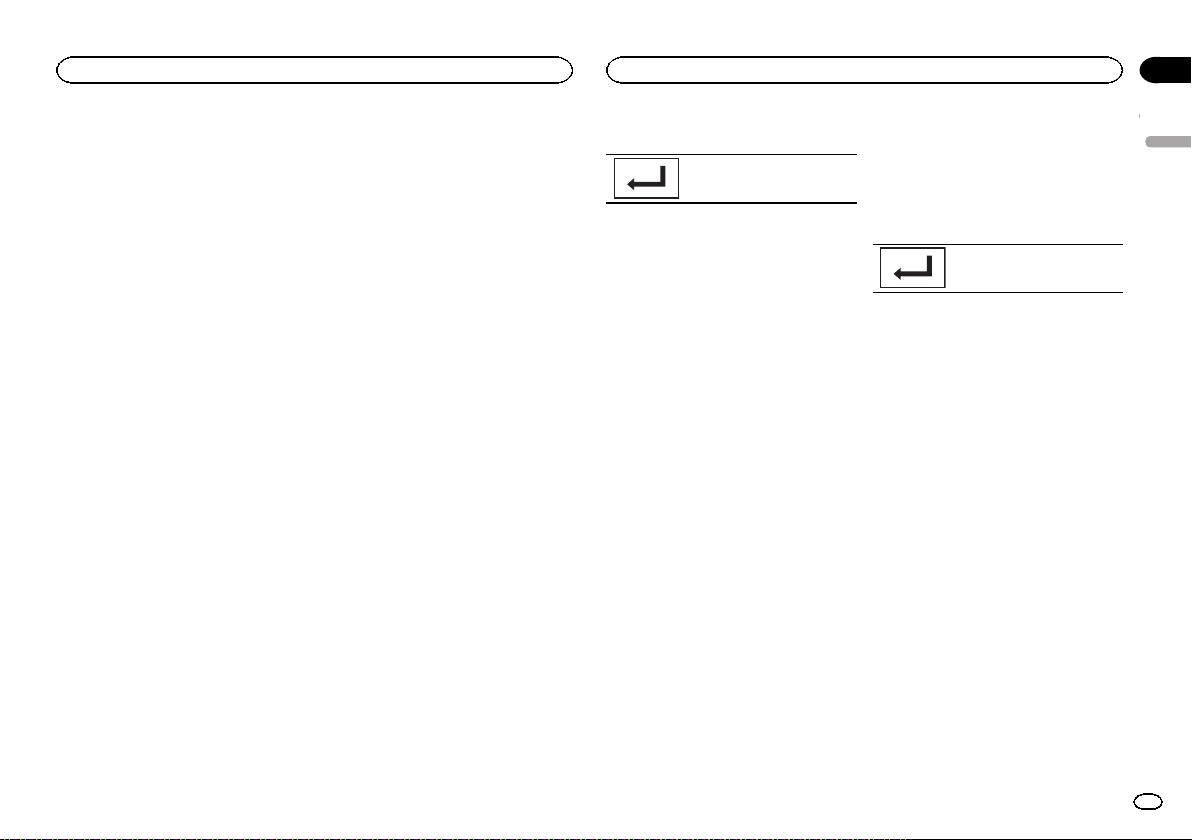
Sound playback operations
You can use this unit to listen to DVD-R/DVDRW/CD/CD-R/CD-RW sound files.
Touch panel keys
12
1JAN
PM
12:43
S.Rtrv
Dolby PLll
Media
45678
3
Abcdefghi
Abcdefghi
Abcdefghi
Abcdefghi
11
ROM
00'37'' -08'43''
1 Information key
Switching the text information to display on
this unit when playing MP3/WMA/AAC files.
2 Search key
Displaying a list of track titles/file names to
select songs on a CD.
Displaying the file name list to select the
files.
3 Media key
Switching between media file types on a
DVD or CD.
4 Sound retriever key
Refer to Using sound retriever on page 10.
5 Random key
Playing songs in random order.
6 Repeat key
Selecting the repeat range.
7 Previous folder key/Next folder key
Selecting a folder.
8 Pause and play key
Pausing and starting playback.
Switching the media file type
When playing a digital media containing a mixture of various media file types, such as DivX,
MPEG-1, MPEG-2, MPEG-4 and MP3, you can
switch between media file types to play.
% Touch Media to switch media file types.
CD (audio data (CD-DA))—Music/ROM (compressed audio)—Video (DivX, MPEG-1, MPEG-2,
MPEG-4 video files)
Note
Audio data (CD-DA) and JPEG picture files on
DVD-R/RW/ROM cannot be played back on this
unit.
Operating the DVD menu
(Function for DVD video)
Some DVDs allow you to make a selection from
the disc contents using a menu.
Using the arrow keys
1 Display arrow keys to operate the DVD
menu.
2 Select the desired menu item.
Returning to the normal DVD
video display.
Displaying arrow keys.
Selecting the desired menu item.
Starting playback from the selected menu item.
Operating the DVD menu by directly touching the menu item.
Back to Previous display.
# When operating the DVD menu by directly touching the menu item, touch the icon to operate.
18
En
Page 19
Disc (CD/DVD)
Disc (CD/DVD)
Section
09
# Ways to display the menu will differ depending
on the disc.
# Depending on the contents of the DVD disc, this
function may not work properly. In such cases, use
the touch panel keys to operate the DVD menu.
Random play (shuffle)
% Touch the random key.
! Songs – Play back videos/songs in the se-
lected list in random order.
! Albums – Play back videos/songs from a ran-
domly selected album in order.
! Folder – Play back songs/tracks in the se-
lected folder in random order.
! Disc – Play back songs/tracks in the selected
disc in random order.
! On – Play back files in random order within
the repeat range, Folder and Disc.
! Off – Cancel random play.
Repeating playback
% Touch the repeat key.
! Disc – Play through the current disc
! Chapter – Repeat the current chapter
! Title – Repeat the current title
! Track – Repeat the current track
! File – Repeat the current file
! Folder – Repeat the current folder
! One – Repeat just the current video/song
Notes
! This function cannot be operated during
Video CD playback featuring PBC (playback
control).
! If you perform chapter search, fast forward/
reverse, frame-by-frame playback or slow motion playback, the repeat play will stop.
! When playing discs with compressed audio
and audio data (CD-DA), playback is repeated within the type of data currently playing even if Disc is selected.
! If you select another folder during repeat
play, the repeat play range changes to Disc.
! If you perform track search or fast forward/
reverse during File, the repeat play range
changes to Folder.
! If you perform title/chapter search or fast for-
ward/reverse during Chapter, the repeat play
is set to off automatically.
! If you perform track search or fast forward/
reverse during Track, the repeat play range
changes to Disc.
! When Folder is selected, it is not possible to
play back a subfolder of that folder.
Searching for the part you
want to play
You can use the search function to find the part
you want to play.
For DVD videos, you can select Title (title),
Chapter (chapter) or 10key (numeric keypad).
For video CDs, you can select Track (track) or
10key (numeric keypad).
! Chapter search is not available when disc
playback is stopped.
! This function cannot be operated during
some DVD videos or Video CD playback featuring PBC (playback control).
1 Start the search function.
Refer to Introducing movie operations on page
17.
2 Touch the desired search option (e.g.,
Chapter).
3 Touch 0 to 9 to input the desired number.
# To cancel the entered numbers, touch C.
4 Start playback from the selected part.
Registering the numbers and
starting playback.
Note
With discs featuring a menu, you can also use
the DVD menu to make your selection.
Refer to Introducing movie operations on page
17.
Selecting audio output
When playing DVD video discs recorded with
LPCM audio, you can switch the audio output.
When playing video CDs, you can switch between stereo and monaural audio output.
! This function is not available when disc play-
back is stopped.
% Touch the audio output key to switch
audio output types.
! L+R – Left and right
! Left – Left
! Right – Right
! Mix – Mixing left and right
Note
You may not be able to select or use this function depending on the disc and the playback location.
PBC playback
(Function for Video CDs)
During playback of Video CDs featuring PBC
(playback control), PBC On is displayed.
1 Start the search function.
Refer to Introducing movie operations on page
17.
2 Touch 10key to display the numeric keypad.
3 Touch 0 to 9 corresponding to a menu
number.
4 Start playback from the selected part.
Registering the numbers and
starting playback.
Notes
! You can display the menu by touching
Return during PBC playback. For details,
refer to the instructions provided with the
disc.
! PBC playback of a Video CD cannot be can-
celed.
! During playback of Video CDs featuring PBC
(playback control), you cannot select the repeat play range or use the search function.
Selecting tracks from the
track title list
You can select tracks to playback using the track
title list which is a list of the tracks recorded on
a disc.
1 Display the track title list.
Refer to Sound playback operations on the previous page.
2 Touch your favorite track title.
Playback begins.
Selecting files from the file
name list
(Function for compressed audio/DivX/MPEG-1/
MPEG-2/MPEG-4)
English
19
En
Page 20
ppr
Section
09
Disc (CD/DVD)
iPod
10
File name list is a list of file names (or folder
names) from which you can select a file (or folder) to play back.
1 Touch the search key to display the file
(or folder) name list.
2 Touch your favorite file (or folder) name.
# When you have selected a folder, a list of the
names of the files (or the folders) in it can be viewed.
Repeat this operation to select the desired file name.
# If folder 1 (ROOT) contains no files, playback
commences with folder 2.
Note
If part of the recorded information does not display, a scroll key appears on the right side of list.
Touch the scroll key to scroll.
Playing DivXâVOD content
Some DivX video on demand (VOD) content may
only be playable a fixed number of times. When
you load a disc containing this type of content,
the number of times it has been played will be
shown on-screen. You can then decide whether
or not to play the disc.
! For DivX VOD content without this restriction,
you can load the disc into your player and
play the content as often as you like, with no
message displayed.
! You can confirm the number of times that
the content can be played by checking the
message, This DivX rental has used
out of views..
Important
! In order to play DivX VOD contents on this
unit, you first need to register the unit with
your DivX VOD contents provider.For details
on your registration code, refer to Displaying
â
the DivX
VOD registration code on page 37.
20
En
! DivX VOD content is protected by a DRM
(Digital Rights Management) system. This restricts playback of content to specific, registered devices.
% If a message is displayed after loading a
disc containing DivX VOD content, touch
Play.
Playback of the DivX VOD content will start.
# To skip to the next file, touch Next Play.
# If you do not want to play the DivX VOD content,
touch Stop.
Moving images operations
You can use the unit to view iPod movie files.
! Depending on your iPod, there may not be
any output unless you use CD-IU201S/CDIU201V (sold separately). Be sure to use CDIU201S/CD-IU201V to connect your iPod.
Touch panel keys
1
1JAN
PM
12:43
2/3
iPod
FULL
02'35'' -21'54''
2
1
Appr
AppppApp
654 37
1 Fast forward key/Reverse key
Fast forwarding or reversing
Touch to change the fast forward and reverse
speed.
2 Search key
Displaying iPod menus.
3 iPod control mode key
Conducting operation from your iPod and listening to it using your car’s speakers.
4 Shuffle key
Playing the video on your iPod in a random
order.
5 Repeat key
Selecting the repeat range.
6 Screen mode key
Changing the screen mode.
Refer to Changing the wide-screen mode on
page 10.
7 Pause and play key
Pausing playback.
Returning to normal playback during
paused, slow motion, or frame-by-frame playback.
2
Basic operations
Playing back videos
1 Touch the search key to pull up the iPod
menus.
2 Select a movie to play.
Refer to Playing videos from your iPod on the
next page.
! When the source icon is not displayed, it
can be displayed by touching the screen.
! Disconnect headphones from the iPod be-
fore connecting it to this unit.
! Depending on the iPod model and the
amount of data stored in the iPod, it may
take some time for playback to begin.
! Use the touch panel keys to select the iPod
after connecting it to this unit.
! No Device is displayed when disconnect-
ing the iPod.
Fast forwarding or reversing using the buttons
1 Press and hold c or d (TRK).
Notes
! To ensure proper operation, connect the
dock connector cable from the iPod directly
to this unit.
! While the iPod is connected to this unit, the
iPod cannot be turned on or off.
! Touch panel keys not listed under Moving im-
ages operations may appear on the display.
Refer to Indicator list on page 57.
Page 21
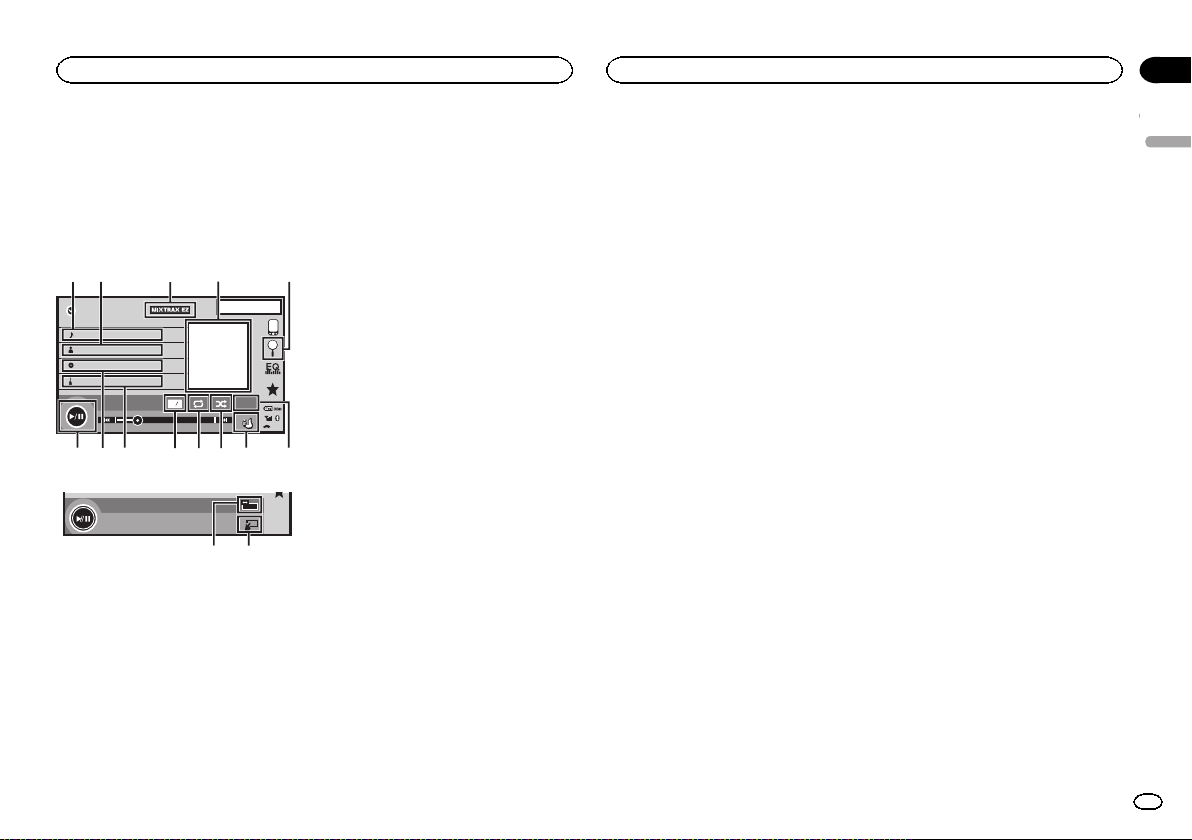
ppr
All
iPod
iPod
Section
10
Sound playback operations
You can use the unit to listen iPod sound files.
Note
The play time may not display correctly.
Touch panel keys
iPod audio (Control Audio)
1JAN
PM
12:43
S.Rtrv
All
All
Appr
AppppApp
iPod
Abcdefghi
Abcdefghi
Abcdefghi
Abcdefghi
01'17'' -05'29''
1/9
1
x
2
dcb a987 6
iPod audio (App Mode)
FULL
ef
1 Song title
Displaying the Songs list on the iPod.
2 Artist name
Displaying the Artists list on the iPod.
3 MIXTRAX EZ key
Starting MIXTRAX EZ.
Refer to MIXTRAX EZ operation on page 27.
4 Artwork
Starting link search on your iPod when you
touch the artwork display.
5 Search key
Displaying iPod menus.
6 Sound retriever key
Refer to Using sound retriever on page 10.
7 iPod control mode key
Conducting operation from your iPod and listening to it using your car’s speakers.
54321
8 Shuffle key
Playing songs on the iPod in random order.
9 Repeat key
Selecting the repeat range.
a Change speed key
Changing the speed of audiobook playback
on the iPod.
b Genre
Displaying the Genres list on the iPod.
c Album title
Displaying the Albums list on the iPod.
d Pause and play key
Pausing and starting playback.
e Unit operation key
Performing operations from this unit and listening to the music on your iPod using your
car’s speakers.
f Screen mode key
Changing the screen mode.
Using this unit’s iPod
function from your iPod
You can listen to sound from applications on
your iPod using the car’s speakers when
App Mode is selected.
This function is not compatible with the following iPod models.
! iPod nano 1st generation
! iPod with video
Note
While this function is in use, the iPod will not
turn off even if the ignition key is turned off. Operate the iPod to turn off the power.
1 Switch the control mode to App Mode.
Refer to Moving images operations on the previous page.
Refer to Sound playback operations on this page.
2 Operate the connected iPod to select a
video/song and play.
Notes
! The following functions are still accessible
from the unit even if the control mode is set
to App Mode.
However,the operation will depend on your
applications.
— Playing/pausing
— Fast forwarding/reversing
— Tracking up/down
— Moving to a chapter up/down
! App Mode is compatible with the following
iPod models.
— iPod touch 4th generation
— iPod touch 3rd generation
— iPod touch 2nd generation
— iPod touch 1st generation
— iPod classic 160GB
— iPod classic 120GB
— iPod classic
— iPod nano 6th generation
— iPod nano 5th generation
— iPod nano 4th generation
— iPod nano 3rd generation
— iPod nano 2nd generation
— iPhone 4S
— iPhone 4
— iPhone 3GS
— iPhone 3G
— iPhone
Shuffle play
% Touch the shuffle key.
! Songs – Play back videos/songs in the se-
lected list in random order.
! Albums – Play back videos/songs from a ran-
domly selected album in order.
! Folder – Play back songs/tracks in the se-
lected folder in random order.
! On – Play back files in random order within
the repeat range.
! Off – Turn off shuffle play.
Repeating playback
% Touch the repeat key.
! One – Repeat just the current video/song
! All – Repeat all videos/songs in the selected
list on the iPod
Playing videos from your iPod
Videos can be played on this unit if an iPod with
video capabilities is connected.
! This unit can play back “Movies”, “Music vid-
eos”, “Video Podcast” and “TV show” which
are downloaded from the iTunes store.
1 Touch Search to display iPod menus.
Refer to Moving images operations on the previous page.
English
21
En
Page 22
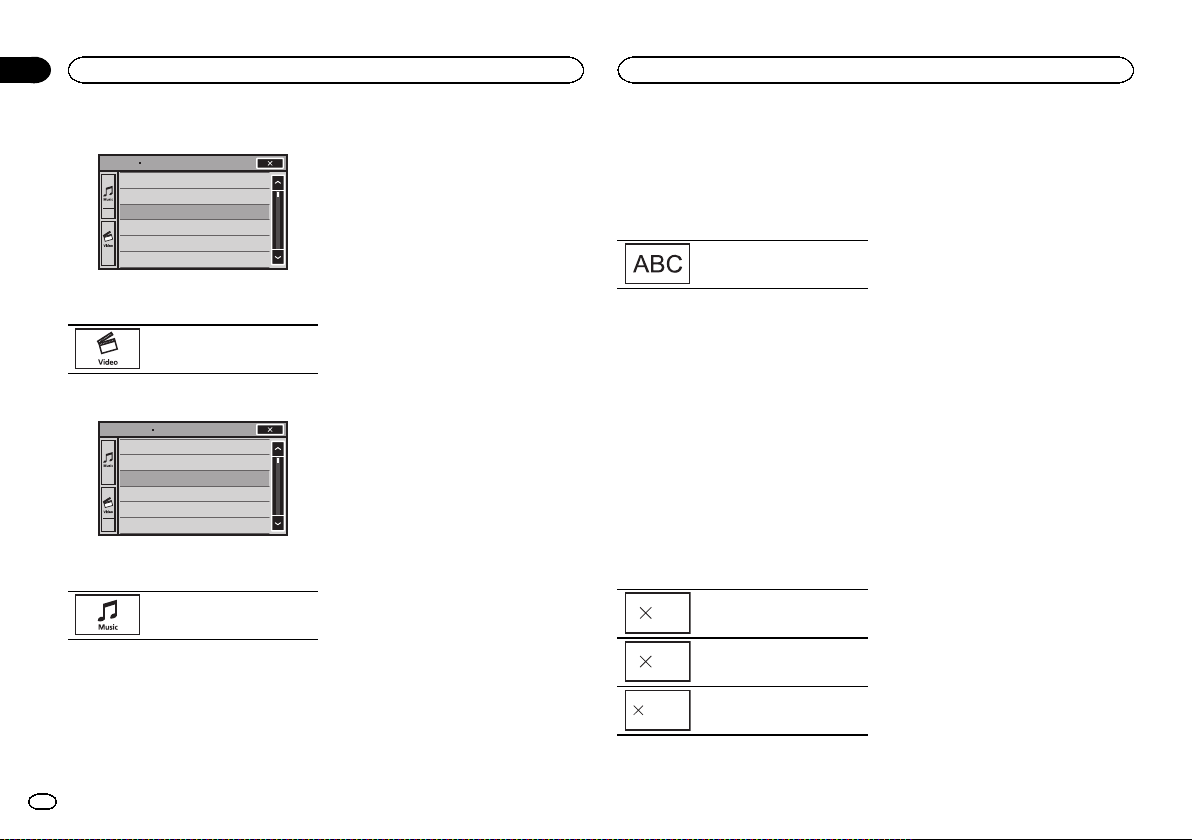
Section
10
iPod
iPod
2 Switch to iPod video mode.
ROOT
Playlists
Artists
Albums
Songs
Podcasts
Genres
# If you want to switch to iPod video mode, touch
the icon.
Switching to iPod video mode.
3 Play the video from the iPod.
ROOT
Video Playlists
Movies
Music Videos
Video Podcasts
TV Shows
Rentals
# If you want to switch to iPod music mode, touch
the icon.
Switching to iPod music mode.
Browsing for a video/music
on the iPod
To make operating and searching easy, operations to control an iPod with this unit are designed to be as similar to the iPod as possible.
Searching for a video/music by
category
1 Touch the search key to pull up the iPod
menus.
Refer to Sound playback operations on the previous page.
2 Touch one of the categories in which you
want to search for a video/music.
! Video Playlists (video playlists)
! Movies (movies)
! Music Videos (music videos)
! Video Podcasts (video podcasts)
! TV Shows (TV shows)
! Rentals (rentals)
! Playlists (playlists)
! Artists (artists)
! Albums (albums)
! Songs (songs)
! Podcasts (podcasts)
! Genres (genres)
! Composers (composers)
! Audiobooks (audiobooks)
3 Touch the title of the list that you want
to play.
Repeat this operation until you find the desired
video/music.
Notes
! Depending on the generation or version of
the iPod, some functions may not be available.
! You can play playlists created with the
MusicSphere application. The application
will be available on our website.
! Playlists that you created with the
MusicSphere application are displayed in abbreviated form.
Searching the list by alphabet
1 Select a category.
Refer to Searching for a video/music by category
on this page.
2 Switch to alphabet search mode.
Switching to alphabet search
mode.
Alphabet search mode is displayed.
3 Touch the first letter of the title of the
video/song you are looking for.
While searching, touch panel key operation is
not available.
# To refine the search with a different letter, touch
Cancel.
4 Touch the title of the list that you want
to play.
Repeat this operation until you find the desired
song/video.
Changing audiobook speed
% Touch the change speed key to change
the speed.
Playback at a speed faster than
2
normal
Playback at normal speed
1
Playback at a speed slower than
1/2
normal
Displaying lists related to
the song currently playing
(link search)
Touch the artwork to open a list of the names of
songs on the album currently playing. Touch the
name of the song you want to play to start playing that song.
Note
If part of the recorded information does not display, a scroll key appears on the right side of list.
Touch the scroll key to scroll.
22
En
Page 23
Advanced App Mode
Advanced App Mode
Section
11
Advanced App Mode operation
This system can switch to the Advanced App
Mode, which you can display and operate the
application for iPhone on the screen.
In Advanced App Mode, you can operate applications with finger gestures such as tapping,
dragging, scrolling or flicking on the screen of
the system.
WARNING
Certain uses of a smartphone may not be
legal while driving in your jurisdiction, so
you must be aware of and obey any such restrictions.
If in doubt as to a particular function, only
perform it while the car is parked.
No feature should be used unless it is safe
to do so under the driving conditions you
are experiencing.
! Pioneeris not liable for any issues that
may arise from incorrect or flawed appbased content.
! The content and functionality of the sup-
ported applications are the responsibility
of the App providers.
! In Advanced App Mode, functionality
through the product is limited while driving, with available functions determined
by the App providers.
! Availability of Advanced App Mode func-
tionality is determined by the App provider,
and not determined by Pioneer.
! Advanced App Mode allows access to ap-
plications other than those listed (subject
to limitations while driving), but the extent
to which content can be used is determined by the App providers.
Advanced App Mode is compatible with the following iPod models.
! iPhone 4S
! iPhone 4
! iPod touch 4th generation
— Applications operable by switching this sys-
tem to Advanced App Mode are only those
available for Advanced App Mode.
— Please check iPhone applications supported
Advanced App Mode at
http://www.pioneerelectronics.com/
AppRadio
Important
! Use the CD-IU201S (sold separately) when you
use this function.
! The only port that supports Advanced App Mode
is USB input.
! When listening to music and sounds from appli-
cation simultaneously, see the following section.
Refer to Setting the App sound mixing on this
page.
CAUTION
! While driving, you cannot enter text on your iPod.
! Use the connected iPod to open an application.
Starting procedure
1 Install the AppRadio app on your iPhone.
2 Set the RGB Input to iPhone under System settings.
When you use this function, set the RGB input
to iPhone. For details, refer to Setting the RGB
Input on page 38.
3 Start an application available for Advanced App Mode from the iPhone.
An image of the application is displayed on the
screen of this system.
! Youcan start an application available for Ad-
vanced App Mode also from a launcher application.
4 Press the home button to switch to the
home display.
5 Touch the Apps key.
6 Operate the application.
Setting the Keyboard
CAUTION
For your safety, the keyboard functionality is only
available when the vehicle is stopped and the
parking brake is engaged.
Depending on the application, you can input
text on the display. In order to input text correctly
using keyboard which appears on this unit, you
need to set the language setting in this function.
When the Advanced App Mode is used, the language setting for the keyboard set for the function and the language setting for the iPhone
keyboard need to be the same.
! Keyboard is available only in Advanced App
Mode.
When you tap a text input area of an application
for iPhone, a keyboard will be displayed onscreen. You can input the desired text directly
from this system.
! The language preference for the keyboard of
this system should be same as the setting on
your iPhone.
If the settings for this product and the
iPhone are different, you may not be able to
enter characters properly.
1 Press the home button to switch to the
home display.
2 Touch the system key to open the system
menu.
3 Touch Keyboard on the System menu to
select desired language.
4 Touch the desired language.
French (French)—German (German)—Greek
(Greek)—Russian (Russian)—English (US English)—English (UK) (UK English)—Dutch
(Dutch)—Italian (Italian)—Norwegian (Norwegian)—Swedish (Swedish)—Finnish (Finnish)
—Spanish (Spanish)—Portuguese (Portu-
guese)
5 Tap the text input area on the application
screen of the iPhone.
Touch
to hide the keyboard.
Setting the App sound mixing
You cannot turn on or off Mixing when this unit
is playing a song of iPod.
The sound of application during Advanced App
Mode can be adjusted.
Enable this setting when you want to mix the
App sound with the sound from a built-in source
(such as the radio). The volume of the App
sound can be selected from 3 levels.
1 Press the home button to switch to the
home display.
2 Touch the system key to open the system
menu.
3 Touch App sound mixing on the System
menu to select desired setting.
OFF (off)—Low (low)—Mid (mid)—High (high)
English
23
En
Page 24

All
Section
12
USB
USB
Moving images operations
You can use this unit to view USB storage device
files.
Touch panel keys
1
USB
FULL
00'20'' -119'51''
a987 5
1 Fast forward key/Reverse key
Fast forwarding or reversing
Touch to change the fast forward and reverse
speed.
2 Search key
Displaying USB menus.
3 Switch subtitle language key
With DivX files featuring multi-subtitle recordings, you can switch between subtitle
languages during playback.
4 Media key
Switching between media file types to play
on Music/Video/Photo.
5 Switch audio language key
With DivX files that provides audio playback
in different languages and different audio
systems (Dolby Digital, DTS, etc.), you can
switch between languages/audio systems
during playback.
24
En
01 01
Dolby DMulti ch
11
643
1JAN
PM
12:43
Media
6 Repeat key
Selecting the repeat range.
Refer to Repeating playback on the next page.
7 Slow-motion playback key
(Function for DivX file/MPEG-1/MPEG-2/
MPEG-4)
2
Moving the selection ahead one frame at a
time during playback.
Touch and hold down the key for more than
two seconds to slow down playback speed.
8 Stop key
Stopping playback.
If you resume playback, playback will start
from the point where you stopped. Touch the
key again to stop playback completely.
9 Screen mode key
Changing the screen mode.
Refer to Changing the wide-screen mode on
page 10.
a Pause and play key
Pausing playback.
Returning to normal playback during
paused, slow motion, or frame-by-frame playback.
Basic operations
Playing back videos
1 Connect the USB device.
Playback will automatically start.
When the source icon is not displayed, it can
be displayed by touching the screen.
Fast forwarding or reversing using the buttons
1 Press and hold c or d (TRK).
Notes
! Touch panel keys not listed under Moving im-
ages operations may appear on the display.
Refer to Indicator list on page 57.
! You can also switch between languages/
audio systems using Video Setup menu. For
details, refer to Setting the audio language on
page 35.
! This unit will return to normal playback if you
change the audio language during fast forward/fast reverse, pause or slow motion playback.
! You can also switch between subtitle lan-
guages using Video Setup menu. For details, refer to Setting the subtitle language on
page 35.
! This unit will return to normal playback if you
change the subtitle language during fast forward/fast reverse, pause or slow motion playback.
Sound playback operations
You can use this unit to listen to USB audio files.
Notes
! The play time may not display correctly.
! When playing back files recorded as VBR
(variable bit rate) files, the play time will not
be correctly displayed if fast forward or reverse operations are used.
! To ensure proper operation, connect the
dock connector cable from the iPod directly
to this unit.
! While the iPod is connected to this unit, the
iPod cannot be turned on or off.
! If the characters recorded on the disc are not
compatible with this unit, those characters
will not be displayed.
! Text information may not be correctly dis-
played depending on the recorded environment.
! Disconnect the USB portable audio player/
USB memory when you are done using it.
! When you select Speana on Selecting the
background display on page 43, the artwork is
not displayed.
Touch panel keys
21
JAN
PM
12:43
S.Rtrv
All
All
Media
USB
Abcdefghi
Abcdefghi
Abcdefghi
Abcdefghi
00'01'' -00'03''
61
a987654
1 MIXTRAX EZ key
Starting MIXTRAX EZ.
2 Information key
Switching the text information to display on
this unit when playing MP3/WMA/AAC/WAV
files.
3 Search key
Displaying the file name list to select the
files.
4 Media key
Switching between media file types to play
on USB.
5 Sound retriever key
Refer to Using sound retriever on page 10.
6 Random key
Playing songs in random order.
7 Repeat key
Selecting the repeat range.
3
Page 25
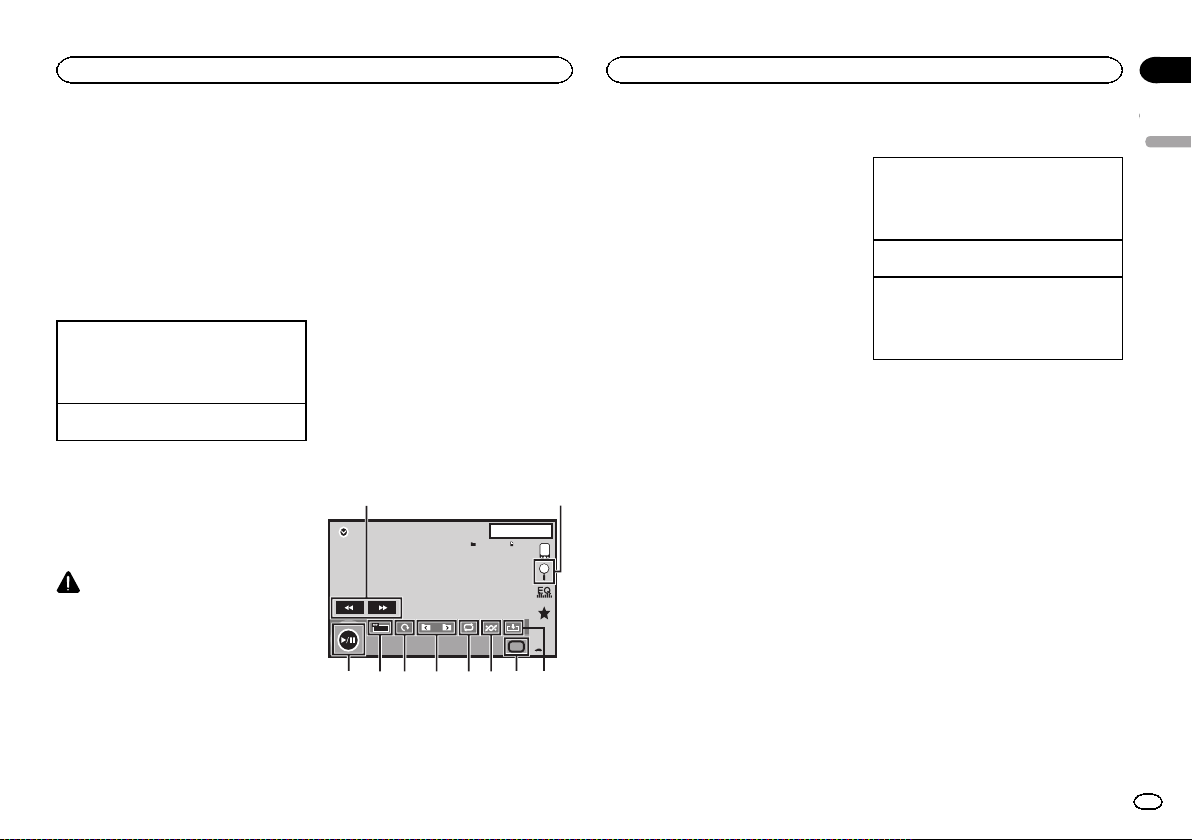
All
USB
USB
Section
12
8 DB key
Creating a database that enables searches
by artist name, genre, and other options.
Refer to Music browse mode on this page.
9 Previous folder key/Next folder key
Selecting a folder.
a Pause and play key
Pausing and starting playback.
Basic operations
Playing back tracks
1 Connect the USB device.
Playback will automatically start.
When the source icon is not displayed, it can
be displayed by touching the screen.
Fast forwarding or reversing using the buttons
1 Press and hold c or d (TRK).
Music browse mode
(Function for USB)
This unit creates an index in order to facilitate
browsing for a song. You can search by the categories such as Albums and Artists.
CAUTION
! This function is not available when the USB
storage device is locked.
! This function is not available when the free
space of USB storage device is less than
5MB.
! While this unit creates an index, do not turn
the unit off. It may cause loss of data on your
USB storage device.
! If you switch to video or JPEG image display
while a database is being created, or when a
database could not be created, a message
appears and database creation stops.
1 Touch DB to create a database in Music
browse mode.
Refer to Sound playback operations on the previous page.
2 When “Save the Database to memory?”
is displayed, touch “Yes”.
Saving of the database is completed. If you do
not save it, touch “No”.
When the saving is completed, “Database save
to memory was completed.” appears.
Music browse mode will start.
3 Display a list and touch the tag key.
4 Select a file.
Still image playback operations
You can use this unit to view still images saved
on a USB storage device.
Touch panel keys
12
1JAN
PM
12:43
USB
NORMAL
44
All
All
Media
2 Search key
Displaying the file name list to select the
files.
3 Capture key
Capturing an image in JPEG files.
4 Media key
Switching between media file types when
there is more than one media file type saved
to the USB device. This key does not appear
if there is only one media file type saved to
the USB device.
5 Random key
Playing files in a random order.
6 Repeat key
Selecting the repeat range.
7 Previous folder key/Next folder key
Selecting a folder.
8 Rotate key
Rotating the displayed picture 90° clockwise.
9 Screen mode key
Changing the screen mode.
Refer to Changing the wide-screen mode on
page 10.
a Pause and play key
Starting or pausing the slideshow.
3456789a
1 Fast forward key/Reverse key
Selecting a picture.
Basic operations
Playing still images
1 Connect the USB device.
Playback will automatically start.
! When the source icon is not displayed, it can
be displayed by touching the screen.
Selecting a file using the buttons
1 Press c or d (TRK).
Fast file searching
1 Press and hold c or d (TRK).
! Youcan search 10 JPEG files at a time.
If there are fewer than 10 files, the search will
cover the first or last file.
Notes
! Filesare played back in file number order
and folders are skipped if they contain no
files. (If folder 1 (ROOT) contains no files,
playback commences with folder 2.)
! Touch panel keys not listed under Still image
playback operations may appear on the dis-
play.
Refer to Indicator list on page 57.
Switching the media file type
% Touch Media to switch between media
file types.
Random play (shuffle)
% Touch the random key.
! On – Play back files in random order within
the repeat range, Folder and Media.
! Off – Cancel random play.
Repeating playback
% Touch the repeat key.
! Folder – Repeat the current folder
English
25
En
Page 26
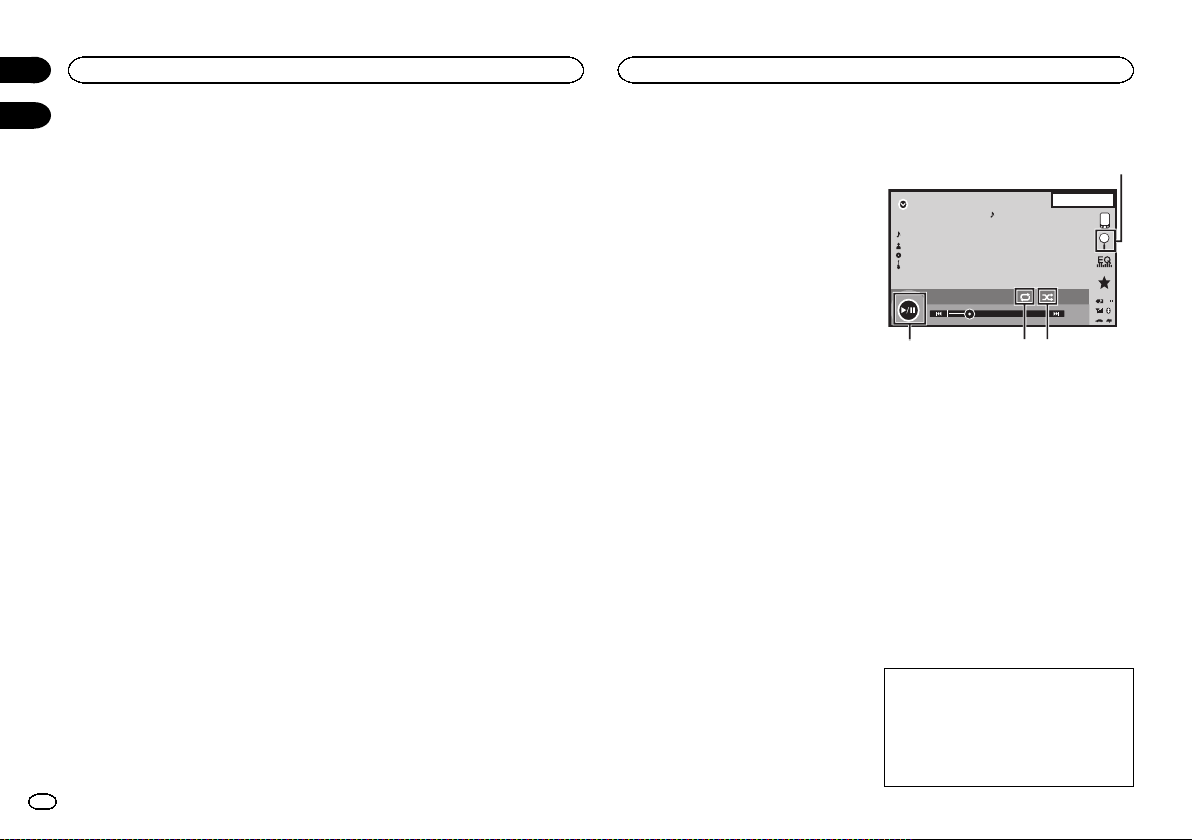
Section
USB
12
13
! All – Repeat all files
! When Folder is selected, it is not possible to
play back a subfolder of that folder.
! If you select USB source, the repeat play
range changes to All.
Selecting files from the file
name list
(Function for compressed audio/DivX/MPEG-1/
MPEG-2/MPEG-4)
Operation is the same as that for Disc.
Refer to Selecting files from the file name list on
page 19.
Displaying lists related to
the song currently playing
(link search)
Touch the artwork to open a list of the names of
songs on the album currently playing. Touch the
name of the song you want to play to start playing that song.
Notes
! If part of the recorded information does not
display, a scroll key appears on the right side
of list. Touch the scroll key to scroll.
! This function is available for USB devices in
Music browse mode.
Playing DivXâVOD content
Operation is the same as that for Disc.
Refer to Playing DivX
â
VOD content on page 20.
Capture an image in JPEG files
You can capture image data and use it as wallpaper. Images can be stored and recalled easily
in this unit.
26
En
! Only one image can be stored on this unit.
Old image is overwritten with the new one.
1 Touch f to pause the slide show when
the desired image is displayed.
2 Touch Capture to capture the desired
image.
3 When “Do you save this image? ” is displayed, touch Yes.
While storing the image to this unit, “Saving
the image. Don’t switch off the battery.” is
displayed. When the process is finished, “Image
saved.” is displayed.
# To cancel the storage process, touch No.
Bluetooth Audio
Sound playback operations
(Function of AVH-X5500BHS/AVH-X4500BT/AVHX3500BHS/AVH-X2500BT)
You can use this unit to listen to Bluetooth audio
files.
Notes
! Depending on the Bluetooth audio player
connected to this unit, the available operations will be limited to the following two levels:
— A2DP profile (Advanced Audio Distribution
Profile): You can only playback songs on your
audio player.
— AVRCP profile (Audio/Video Remote Control
Profile): You can perform playback, pause
playback, select songs, etc.
! As there is a wide variety of Bluetooth audio
players available on the market, operations
available with specific models may vary extensively. When attempting to run a
Bluetooth audio player using this unit, refer
to the instruction manual that came with the
player as well as to this manual for assistance.
! As the signal from your cellular phone may
cause noise, avoid using it when you are listening to songs on your Bluetooth audio
player.
! The sound from a Bluetooth audio player
connected to this unit will be muted while a
call is in progress on a cellular phone connected to this unit via Bluetooth wireless
technology.
! The play time may not display correctly.
! Depending on the type of Bluetooth audio
player you have connected to this unit, operation and information display may not be
available for some functions.
Touch panel keys
1
22 JAN
AM
Bluetooth
Abcdefghi
8888
Abcdefgh
Abcdefgh
Abcdefgh
88'88'' -88'88''
12:22
DB
432
1 Search key
Displaying the file name list to select the
files.
2 Random key
Playing songs in random order.
3 Repeat key
Selecting the repeat range.
4 Pause and play key
Pausing and starting playback.
Setting up for Bluetooth audio
Before you can use the Bluetooth audio function
you must establish a Bluetooth wireless connection between the unit and your Bluetooth audio
player.
1 Connection
First, you need to connect a Bluetooth audio to
this unit.
For detailed instructions on connecting your
Bluetooth audio to this unit via Bluetooth wireless technology, refer to Bluetooth connection
menu on page 42.
Page 27

Bluetooth Audio
Using MIXTRAX
Section
13
Notes
! When playing back files recorded as VBR
(variable bit rate) files, the play time will not
be correctly displayed if fast forward or reverse operations are used.
! To ensure proper operation, connect the
dock connector cable from the iPod directly
to this unit.
! While the iPod is connected to this unit, the
iPod cannot be turned on or off.
! If the characters recorded on the disc are not
compatible with this unit, those characters
will not be displayed.
! Text information may not be correctly dis-
played depending on the recorded environment.
Random play (shuffle)
% Touch the random key.
! On – Play back files in random order.
! Off – Cancel random play.
Repeating playback
% Touch the repeat key.
! One – Repeat the current song only
! All – Repeat all songs
MIXTRAX operation
MIXTRAX is original technology for creating
non-stop mixes of selections from your audio library, complete with DJ effects that make them
sound as if a DJ is right there with you playing
the music.
MIXTRAX EZ operation
You can use this unit to play iPod/USB audio
files.
MIXTRAX EZ is used to add a variety of sound effects between songs for arranging the pauses
between songs. It allows you to enjoy listening
to music non-stop.
! This function is only available when a file on
a USB storage device or a song on an iPod is
being played.
! This function is not available when the con-
trol mode is set to App Mode.
! Depending on the file/song, sound effects
may not be available.
! Depending on the file/song, non-stop play-
back may not be available.
Starting MIXTRAX EZ operation
% Touch MIXTRAX EZ.
Setting MIXTRAX mode
Turn on this function to play back audio files
using MIXTRAX.
1 Press the home button to switch to the
home display.
2 Touch the system key to open the system
menu.
3 Touch MIXTRAX Setup on the system
menu.
MIXTRAX setting items are displayed.
! Short Playback Mode – When turned on, se-
lect an audio track playback length. When
this mode is turned off, the audio track will
play all the way to the end.
60s (60 sec.)—90s (90 sec.)—120s (120 sec.)
—150s (150 sec.)—180s (180 sec.)—Random
(random)—Off (off)
When Random is selected, the playback time
varies between 60 s, 90 s, 120 s, 150 s, and
180 s selected at random when the playback
song changes.
! Display Effect – When Display Effect is set
to on, the artwork display can be moved according to the music type.
! Cut-In Effect – When Cut-In Effect is set to
on, sound effects will play between tracks.
! Effect Setting – Use Effect Setting to set up
the sound effect you want to insert between
tracks.
Setting the effect
You can change the settings for fixed sounds
and sound effects.
There are six different fixed sounds available
that can be inserted for playback between
tracks.
The sound effects are used as effects to signal
the end of a song being played and the beginning of the next song in series.
The fixed sounds and sound effects are set as
combinations as MIXTRAX sounds.
Fixed sounds
! Phaser – A fixed sound that sounds like surg-
ing waves.
! Roll – A fixed sound that repeats playback of
a certain sound.
! Turntable – A fixed sound that mimics DJ
scratching.
14
English
27
En
Page 28

Section
Using MIXTRAX
14
Using Pandoraâinternet radio
15
! Flanger2 – A rushing sound that mimics
that rising and falling sounds of a jet engine.
! Reverb – A fixed sound effect that creates a
reverberation effect.
! Echo2 – A fixed sound effect that creates an
echoing effect.
Sound effects
! Cross Fade – A sound effect that creates a
fade in and fade out effect between songs.
! Flanger1 – A rushing sound that mimics
that rising and falling sounds of a jet engine.
! Echo1 – A sound effect that creates an echo-
ing effect.
! Loop – A sound effect that repeats playback
of one section of a song track.
Setting sounds and sound effects
as presets using the preset key
The Standard and Simple sound effects are set
already as default presets.
% Touch Standard or Simple to check the
settings.
The registered preset sound effect for the key
that was touched is set as a preset.
Registering sounds and sound
effects as presets
Registers a desired combination of sounds and
sound effects to Custom.
Touch Custom to easily set the desired sound or
sound effect.
1 Touch Custom.
2 Add a check mark to the desired sound
effect by touching the option.
The marked sound effect is registered as a preset in Custom.
28
En
Notes
! If a sound effect is touched in the selection
screen for Standard or Simple, the Custom
screen is automatically displayed and the
sound effect is registered to Custom.
! You can listen to fixed sounds to hear exam-
ples by touching the speaker icon.
Pandora operations
To play Pandora on the Pioneer car audio/video
products, connect an iPod, iPhone, Androidä
device or BlackBerry device with the most recent Pandora application installed, and start the
Pandora application.
Important
Requirements to access Pandora using the
Pioneer car audio/video products:
Connect an iPod to USB input or an Android device or a BlackBerry device using Bluetooth to
play Pandora on this unit.
! iPod and iPhone compatibility
Apple iPhone (first generation), iPhone 3G,
iPhone 3GS, iPhone 4, iPhone 4S, iPod touch 1G,
iPod touch 2G, iPod touch 3G or iPod touch 4G
(firmware version 3.0 or later)
Certain firmware versions for the iPhone may not
be compatible with the Pandora application. If
this appears to be the case, please update the
firmware to a version that is compatible with
Pandora.
! Android compatibility
Android OS Version 2.2 or later
! BlackBerry compatibility
BlackBerry OS Version 4.3 or later
! Latest version of the Pandora application, down-
loaded to your device (Search Apple iTunes App
Store or Android market for “Pandora”).
! Current Pandora account (Free account and paid
accounts available from Pandora; create a free
account online at
http://www.pandora.com/register or through the
Pandora application for the iPhone).
! Data Plan
Note: If the Data Plan for your iPhone or
Android device does not provide for unlimited
data usage, additional charges from your carrier
may apply for accessing the Pandora service via
3G and/or EDGE networks.
! Connection to the Internet via 3G, EDGE or Wi-Fi
network.
! Optional Pioneer adapter cable connecting your
iPhone to the Pioneer car audio/video products.
Limitations:
! Access to the Pandora service will depend on the
availability of a cellular and/or Wi-Fi network for
purposes of allowing your device to connect to
the Internet.
! Ability of the Pioneer car audio/video products to
access the Pandora service is subject to change
without notice and could be affected by any of
the following: compatibility issues with future
firmware versions of iPhones or Android devices;
compatibility issues with future firmware versions of the Pandora application for them;
changes to the Pandora music service by
Pandora; discontinuation of the Pandora music
service by Pandora.
! Certain functions of the Pandora service are not
available when accessing the service through the
Pioneer car audio/video products, including, but
not limited to, creating new stations, deleting stations, emailing current stations, buying tracks
from iTunes, viewing additional text information,
logging in to Pandora, and adjusting Cell Network Audio Quality.
Pandora internet radio is a music service not affiliated with Pioneer. More information is available at http://www.pandora.com.
Setting the Pandora connect mode
Set the Pandora connection mode appropriately
to notify the system whether you are streaming
Pandora over an iPod via USB or over an
Android device or a BlackBerry device via
Bluetooth.
Notes
! The iPod must have iOS 3.0 or later installed
in order to use Pandora.
! The Android device must have Android OS
Version 2.2 or later installed to use Pandora.
Page 29
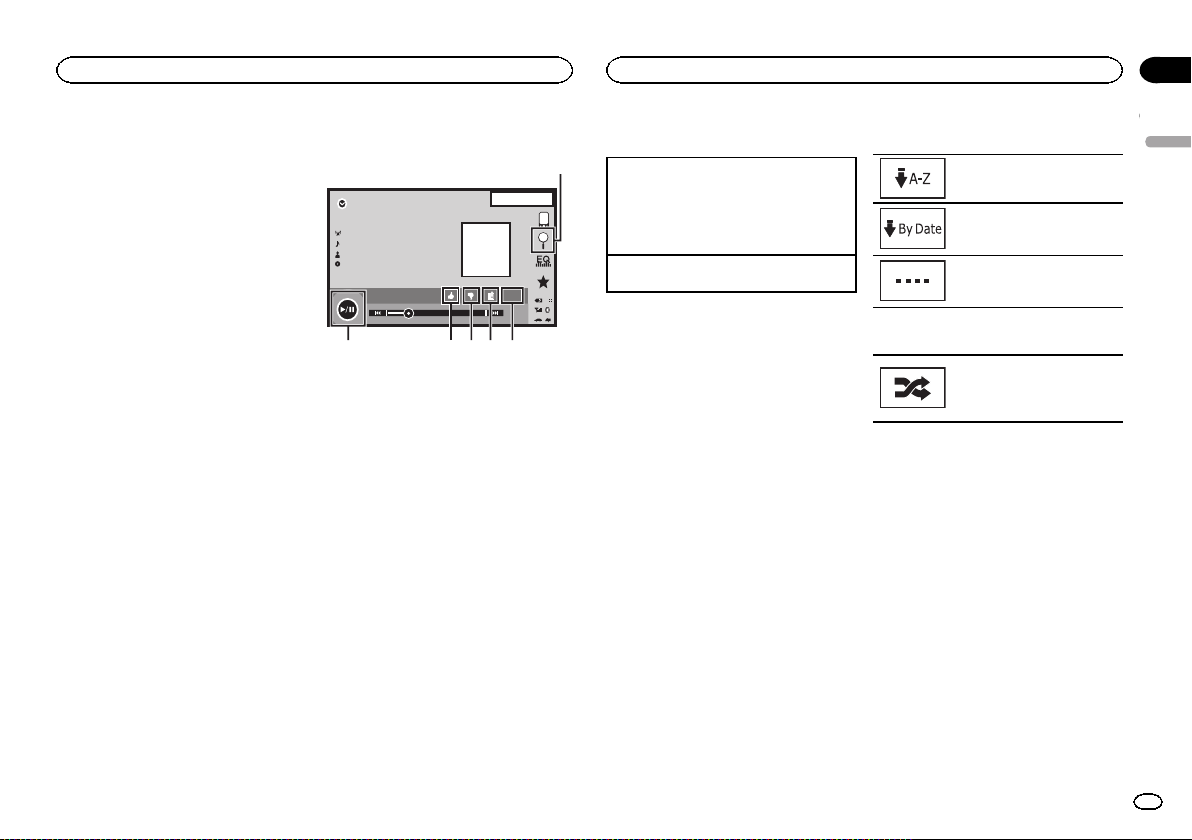
Using Pandoraâinternet radio
Using Pandoraâinternet radio
Section
15
! An Internet connection is required to use an
iPod, an Android device, or a BlackBerry device.
! Only iPods can be connected to the AVH-
X1500DVD.
1 Press the home button to switch to the
home display.
2 Touch the system key to open the system
menu.
3 Touch Pandora connect mode repeatedly
until the desired setting appears on the
screen.
Wired: An iPod is connected using an actual
cable.
Bluetooth: An Android device or a BlackBerry
device is connected using Bluetooth.
Touch panel keys
22 JAN
AM
12:22
Pandora
Abcdefghi
Abcdefghi
Abcdefghi
Abcdefghi
S.Rtrv
88'88'' -88'88''
23456
1 Search key
Displays the shuffle/station list. Select the
desired station or shuffle mode.
2 Sound retriever key
(Only available on iPod)
Refer to Using sound retriever on page 10.
3 Bookmark key
Stores track information (Bookmark).
Bookmarks are viewable in your profile.
4 Thumbs-down key
Giving a “thumbs-down” tells Pandora you do
not like the current track. Pandora will skip to
the next track, and will not play that track on
the station again.
5 Thumbs-up key
Giving a “thumbs-up” tells Pandora that you
like the current track. Pandora will continue
to play that track and tracks like it on the station.
6 Pause and play key
Pausing and starting playback.
Dolby PLII
Basic operations
1
DB
Playing tracks
1 Connect an iPod to USB input with a USB
cable using an iPod or iPhone Dock Connector,or an Android device or BlackBerry device
using Bluetooth.
2 Switch the source to Pandora.
Skipping tracks
1 Press d (TRK).
Notes
! Touch panel keys not listed under Pandora op-
erations may appear on the display.
Refer to Indicator list on page 57.
! Pandora limits the number of skips allowed
on their service. If you attempt to skip tracks
beyond the limit, "SKIP LIMIT REACHED" is
displayed. If you have reached the skip limit
and you give a "thumbs-down", the current
track will continue to play, but your feedback
will be registered.
Selecting and playing
Pandora
Touch the list for your Pandora stations to select
one of them to play.
1 Display the shuffle/station list.
Refer to Pandora operations on the previous
page.
â
stations/shuffle
2 Change the sort order.
You can sort the items in the list
alphabetically.
You can sort the items in the list
in order of the dates on which the
items were created.
You can scroll the titles in the list
while you touch and hold down
the scroll icon.
3 Select shuffle or the desired station.
Shuffle mode will play tracks
from your selected stations. You
an edit shuffle preferences on
your mobile device.
English
29
En
Page 30
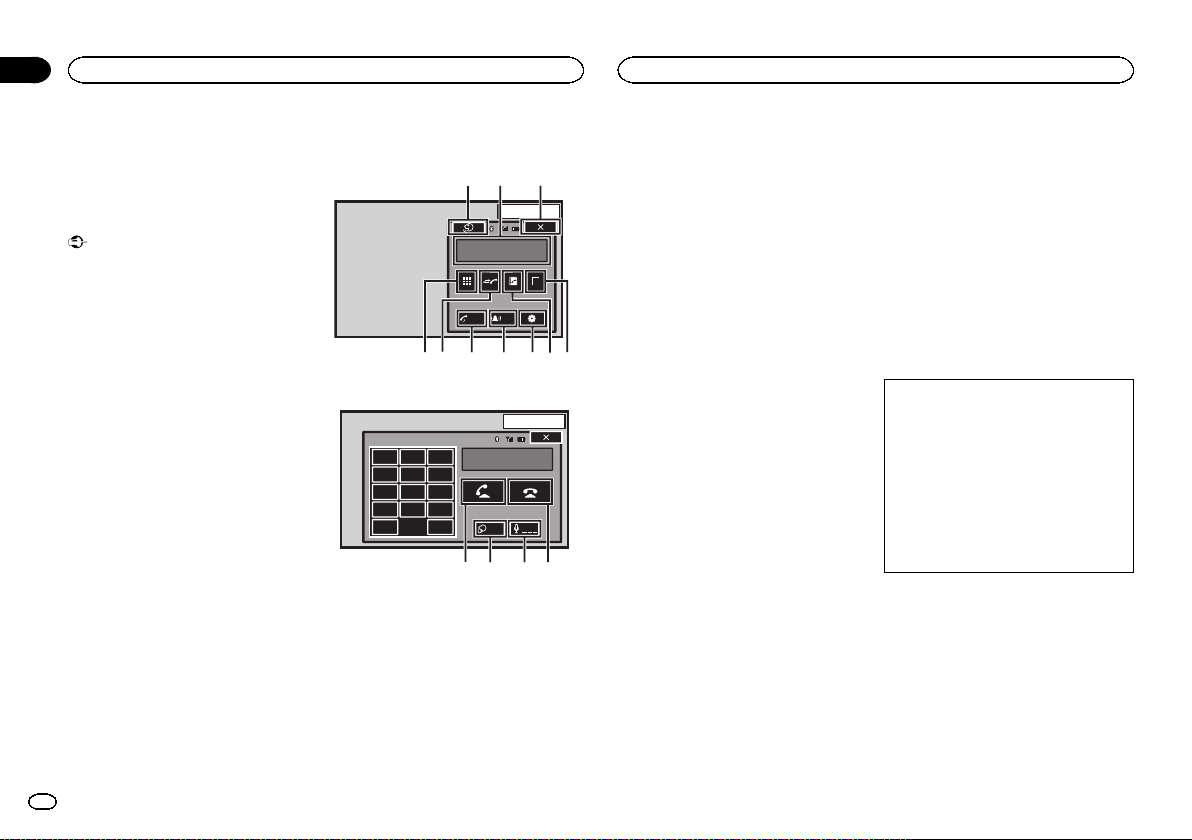
Section
Bluetooth telephone
16
Bluetooth telephone
Bluetooth telephone
operations
(Function of AVH-X5500BHS/AVH-X4500BT/AVHX3500BHS/AVH-X2500BT)
You can use Bluetooth telephone.
Important
! Leaving the unit on standby to connect to
your phone via Bluetooth while the engine is
not running can drain the battery.
! Advanced operations that require attention
such as dialing numbers on the monitor,
etc., are prohibited while driving. Park your
vehicle in a safe place when using these advanced operations.
! Bluetooth connection menu cannot be se-
lected while driving.
! Operations available may be limited depend-
ing on the cellular phone connected to this
unit.
! Be sure to park your vehicle in a safe place
and apply the parking brake when performing this operation.
! If you are unable to complete the connection
using this unit, use the device to connect to
the unit.
! If you connect more than one device at a
time, connected device may not operate
properly. Connecting one device at a time is
recommended.
Touch panel keys
Telephone standby display
e1
d
13 ARP
PM
12:25
1
Abcdefghi
1234567890123456
AutoONTone
OFF
When switching to the entering phone number
mode
123
456
789
*0#
C+
1 Close key
Display is closed.
2 Preset dial key
Displaying the preset dial screen.
3 Phone book key
Switching to the phone book mode.
4 Setting key
Displaying the Bluetooth connection menu.
13 APR
PM
1
Abcdefghi
XXXXXXXXXXXXXXXX
PrivateONVol
12:25
5 Tone key
Turning the ring tone for incoming calls on
or off.
6 Auto-answer key
Turning automatic answering on or off.
7 History key
Switching to the missed, received and dialed
call lists.
8 Key pad key
Switching the mode to enter the phone number directly.
9 On-hook key
2345678
9abc
Ending a call.
Rejecting an incoming call.
Canceling call waiting.
a Volume key
Adjusting the other party’s listening volume.
b Private mode key
Turning private mode on or off.
c Off-hook key
Accepting an incoming call.
Making a phone call, when selecting a
phone number.
Switching between callers on hold.
d Voice control key
Notes
! Private mode can only be operated while you
are talking on the phone.
! To end the call, both you and the other caller
must hang up your phones.
! Touch panel keys not listed under Bluetooth
telephone operations may appear on the dis-
play.
Refer to Indicator list on page 57.
Text information
e Incoming call notice
Indicates that an incoming call has been received and has not been checked yet.
! Not displayed for calls made when your
cellular phone is disconnected from this
unit.
Setting up for hands-free phoning
Before you can use the hands-free phoning
function you must set up the unit for use with
your cellular phone. This entails establishing a
Bluetooth wireless connection between this unit
and your phone, registering your phone with
this unit, and adjusting the volume level.
1 Connection
First, you need to connect a Bluetooth telephone to this unit.
For detailed instructions on connecting your
phone to this unit via Bluetooth wireless technology, refer to Pairing from this unit on page
42.
2 Volume adjustment
Adjust the earpiece volume of your cellular
phone to your preference. The unit will record
the adjusted volume level as the default setting.
Notes
! The volume of the caller’s voice and ring
tone may vary depending on the type of cellular phone.
! If there is a large volume difference between
the ring tone and caller’s voice, the overall
volume level may become unstable.
30
En
Page 31

Bluetooth telephone
Bluetooth telephone
Section
16
! Make sure to adjust the volume to a proper
level before disconnecting the cellular phone
from the unit. If the volume is muted (zero
level) on your cellular phone, the volume
level of your cellular phone remains muted
even after the cellular phone is disconnected.
Calling a number in the
phone book
The contacts on your phone will normally be
transferred automatically when the phone is
connected. If it is not, use your phone menu to
transfer the contacts. The visibility of this unit
should be on when you use the phone menu.
Refer to Switching visible unit on page 43.
After finding the number you want to call in the
phone book, you can select the entry and make
the call.
1 Touch the phone book key to switch to
the phone book mode.
2 Select the phone number list.
The detailed phone number list of the selected
entry is displayed.
3 Select the phone number.
# If you want to store the phone number, touch and
hold the list.
4 Touch the off-hook key to make the call.
5 Touch the on-hook key to end the call.
Note
The contacts on your phone will normally be
transferred automatically when the phone is
connected. If it is not, use your phone menu to
transfer the contacts. The visibility of this unit
should be on when you use the phone menu.
Refer to Switching visible unit on page 43.
Selecting a number by
alphabet search mode
If a lot of numbers are registered in the phone
book, you can search for the phone number by
alphabet search mode.
1 Touch the phone book key to switch to
the phone book mode.
2 Touch ABC to switch to alphabet search
mode.
3 Touch the first letter of the entry you are
looking for.
The Phone Book entries starting with that letter
(e.g. “Ben”, “Brian” and “Burt” when “B” is selected) will be displayed.
# If you want to change the character to Russian,
touch the icon. To return to English, touch the icon
again.
Changing the character to Russian.
# The order of the first name and last name may be
different from that of the cellular phone.
4 Touch the list to display the phone number list of the selected entry.
# If several phone numbers are included in an
entry, select one by touching the list.
# If you want to switch to the call history list, touch
the icon.
Switching to the call history list.
5 Touch the off-hook key to make the call.
6 Touch the on-hook key to end the call.
Inverting names in phone book
When your cellular phone is connected to this
unit, the first and last names of your contacts
may be registered to the phone book in reverse
order. Youcan use this function to change the
order back.
(Inverting the names in the phone book)
1 Touch the phone book key to switch to
the phone book mode.
2 Invert names in phone books.
Inverting names in phone books.
3 “Would you like to invert all names?” appears. Touch Yes to continue.
While the names are inverted,
# If the inversion fails, “Invert Name Error” ap-
pears. In such cases, try again from the beginning.
Note
Inverting the names of your contacts from this
unit does not affect the data on your Bluetooth
device.
is displayed.
Using the missed, received
and dialed call lists
The 80 most recent calls dialed, received, and
missed are stored in the memory. You can
browse them and call numbers from these lists.
1 Touch the history key to display the call
history list.
2 Select Missed Calls, Dialed Calls or
Received Calls.
Displaying the received call list.
Displaying the dialed call list.
Displaying the missed call list.
3 Touch the list number to select a phone
number.
Name and phone number are displayed in the
detailed list.
# If you want to store the phone number, touch and
hold the list.
4 Touch the off-hook key to make the call.
5 Touch the on-hook key to end the call.
Setting automatic answering
If this function is on, this unit automatically answers all incoming calls.
% Touch the auto-answer key to turn automatic answering on or off.
Adjusting the other party’s
listening volume
To maintain the good sound quality, this unit
can adjust the other party’s listening volume. If
the volume is not loud enough for the other
party, use this function.
English
31
En
Page 32

Section
Bluetooth telephone
16
Bluetooth telephone
% Touch the volume key to select
Far-End VOL.
1—2—3
# This function can be performed even while talking on the phone.
# Settings can be stored for each device.
Switching the ring tone
You can select whether or not to use this unit’s
ring tone. If this function is set to on, the ring
tone for this unit will sound.
1 Connect your cellular phone to this unit.
2 Touch the tone key to turn the ring tone
on or off.
Using the preset dial lists
You can easily store up to six phone numbers as
presets.
1 Touch the preset dial key to display the
preset screen.
2 Touch one of the phone numbers to select.
# If you want to delete a preset phone number,
touch and hold the phone number you wish to delete.
3 Touch the off-hook key to make the call.
4 Touch the on-hook key to end the call.
Making a call by entering
phone number
13 APR
PM
12:25
1
+
Abcdefghi
XXXXXXXXXXXXXXXX
PrivateONVol
123
456
789
*0#
C
Important
Be sure to park your vehicle in a safe place and
apply the parking brake when performing this
operation.
1 Touch the key pad key to start entering
the phone number.
2 Touch the number icons to input the
numbers.
# Up to 24 digits can be entered.
3 Touch the off-hook key to make the call.
4 Touch the on-hook key to end the call.
Note
Entering phone number mode cannot be operated unless a Bluetooth telephone is connected
to this unit.
Setting the private mode
During a conversation, you can switch to private
mode (talk directly on your cellular phone).
% Touch the private mode key to turn private mode on or off.
Voice control
If your cellular phone is equipped with the voice
control feature, you can use voice commands to
make calls, for example.
! Operation varies depending on the type of
cellular phone. Refer to the instruction manual that came with your cellular phone for detailed instructions.
! For details on cellular phone models that are
compatible with this feature, refer to the information on our website.
1 Touch the voice control key.
The display switches to the voice control screen.
You can also switch to the voice control screen
by pressing and holding down the home button
while the source is on.
13 ARP
PM
12:25
1
Voice control
2 Start voice control.
Indicates that continuous calls
can be made uninterrupted.
Indicates that the display is
closed.
Notes
! In order for your voice commands to be rec-
ognized and interpreted correctly, ensure
that conditions are suitable for recognition.
! Please note that wind blowing through the
vehicle windows and noise coming from outside the vehicle can interfere with voice command operation.
! For optimum pick-up, the microphone should
be placed directly in front of the driver at a
suitable distance.
! Speaking too soon after the start of the com-
mand may cause voice recognition to fail.
! Speak slowly, deliberately, and clearly.
32
En
Page 33

Settings
Audio adjustments
Section
17
Menu operations
Touch panel keys
1
23
Audio
Sonic Center Control
Loudness
Subwoofer
Bass Booster
High Pass Filter
Source Level Adjuster
L/R 0
Low
On
0
125Hz
0
! You cannot display the Audio function menu
when the mute function is on or a JPEG file
is playing.
1 Press the home button to switch to the
home display.
2 Touch any of the following touch panel
keys to select the menu to be adjusted.
54
1 Video setup key
Refer to Setting up the video player on page
35.
2 Audio function key
Refer to Audio adjustments on this page.
3 Close key
Returning to the current source display.
4 System key
Refer to System settings on page 38.
5 Favorite key
You can choose menus within each menu
(Audio function menu, etc.) and register
them to this favorite menu.
Refer to Favorite menu on page 42.
Notes
! You can display the Video Setup menu
when a Disc or USB source is selected.
! If you start the Video Setup menu, playback
is stopped.
Using fader/balance adjustment
Fader/Balance displays when Rear Speaker is
set to Full on the System Menu.
You can change the fader/balance setting to provide an ideal listening environment for all of the
occupied seats.
1 Press the home button to switch to the
home display.
Settings
AudioVideo
BluetoothFavoriteThemeSystem
2 Touch the audio function key to open the
audio menu.
3 Touch Fader/Balance on the audio function menu.
4 Touch
speaker balance.
Range: Front 15 to Rear 15
# Select F/R 0 L/R 0 when only using two speak-
ers.
5 Touch or to adjust the left/right
speaker balance.
Range: Left 15 to Right 15
or to adjust the front/rear
Note
You can also set the fader/balance by dragging
the dot on the displayed table.
Using balance adjustment
Balance displays when Rear Speaker is set to
Subwoofer on the System Menu. This setting
will allow you to adjust the balance between
right/left sound output.
1 Press the home button to switch to the
home display.
2 Touch the audio function key to open the
audio menu.
3 Touch Balance on the audio function
menu.
4 Touch
speaker balance.
Range: Left 15 to Right 15
or to adjust the left/right
Note
You can also set the balance by dragging the dot
on the displayed table.
Using the equalizer
You can adjust the equalization to match the
car’s interior acoustic characteristics as desired.
Recalling equalizer curves
There are seven stored equalizer curves which
you can easily recall at any time. Here is a list of
the equalizer curves.
Display Equalizer curve
S.Bass Super bass
Powerful Powerful
Natural Natural
Vocal Vocal
Flat Flat
Custom1 Custom 1
Custom2 Custom 2
! The equalizer curves for Custom1 and
Custom2 can be adjusted.
! You cannot select Custom1 and Custom2
when using the auto-equalizer.
! When Flat, no changes are made to the
sound. You can check the effects of the
equalizer curves by switching alternatively
between Flat and another equalizer curve.
English
18
33
En
Page 34

Section
Audio adjustments
18
Audio adjustments
1 Press the home button to switch to the
home display.
2 Touch the audio function key to open the
audio menu.
3 Touch Graphic EQ on the audio function
menu.
# Youcannot select or adjust the equalizer curves
of Custom1 and Custom2 when using the autoequalizer.
4 Touch the desired setting.
S.Bass—Powerful—Natural—Vocal—Flat—
Custom1—Custom2
Adjusting the 8-band graphic
equalizer
You can adjust the level of each band for the
equalizer curves.
! A separate Custom1 curve can be created
for each source. If you make adjustments
when a curve other than Custom2 is selected, the equalizer curve settings will be
stored in Custom1.
! A Custom2 curve that is common for all
sources can be created. If you make adjustments when the Custom2 curve is selected,
the Custom2 curve will be updated.
1 Press the home button to switch to the
home display.
2 Touch the audio function key to open the
audio menu.
3 Touch Graphic EQ on the audio function
menu.
4 Touch the desired setting.
S.Bass—Powerful—Natural—Vocal—Flat—
Custom1—Custom2
5 Touch the table to adjust the level of the
equalizer band.
Range: +12dB to –12dB
Using the auto-equalizer
The auto-equalizer is an equalizer curve created
by auto EQ (refer to Auto EQ (auto-equalizing) on
page 40).
You can turn the auto-equalizer on or off.
If you connect an optional microphone to this
unit, you can use this function.
1 Press the home button to switch to the
home display.
2 Touch the audio function key to open the
audio menu.
3 Touch Auto EQ to turn the auto-equalizer
on or off.
# Youcannot use this function if auto EQ has not
been carried out.
Using sonic center control
Sound that is suited for the listening position
can easily be created with this function.
1 Press the home button to switch to the
home display.
2 Touch the audio function key to open the
audio menu.
3 Touch Sonic Center Control on the audio
function menu.
4 Touch
Range: Left 7 to Right 7
or to select a listening position.
Adjusting loudness
Loudness compensates for deficiencies in the
low-frequency and high-frequency ranges at low
volume.
1 Press the home button to switch to the
home display.
2 Touch the audio function key to open the
audio menu.
3 Touch c or d to select a desired level for
loudness.
Off (off)—Low (low)—Mid (mid)—High (high)
Using subwoofer output
This unit is equipped with a subwoofer output
which can be turned on or off.
! The cut-off frequency and output level can be
adjusted when the subwoofer output is on.
1 Press the home button to switch to the
home display.
2 Touch the audio function key to open the
audio menu.
3 Touch Subwoofer on the audio function
menu.
4 Touch On or Off next to Subwoofer to
turn the subwoofer output on or off.
5 Touch Normal or Reverse next to Phase
to select the phase of subwoofer output.
6 Touch c or d next to Level to adjust the
output level of the subwoofer.
Range: +6 to –24
7 Touch c or d next to Frequency to select
the cut-off frequency.
50Hz—63Hz—80Hz—100Hz—125Hz
Only frequencies lower than those in the selected range are outputted from the subwoofer.
Boosting the bass
You can boost the bass level.
1 Press the home button to switch to the
home display.
2 Touch the audio function key to open the
audio menu.
3 Touch c or d to select a desired level.
Range: 0 to +6
Using the high pass filter
When you do not want low sounds from the subwoofer output frequency range to play from the
front or rear speakers, turn on the HPF (high
pass filter). Only frequencies higher than those
in the selected range are output from the front
or rear speakers.
1 Press the home button to switch to the
home display.
2 Touch the audio function key to open the
audio menu.
3 Touch c or d next to the frequency to select cut-off frequency.
Off (off)—50Hz—63Hz—80Hz—100Hz—
125Hz
Only frequencies higher than those in the selected range are output from the front or rear
speakers.
34
En
Page 35

Audio adjustments
Adjusting source levels
With SLA (source level adjustment), the volume
levels of each source can be adjusted to prevent
significant differences between sources.
! Settings are based on the FM volume level,
which remains unchanged.
1 Press the home button to switch to the
home display.
2 Touch the audio function key to open the
audio menu.
3 Compare the FM volume level with the
level of the source you wish to adjust.
4 Touch Source Level Adjuster on the audio
function menu.
5 Touch
ume.
Range: +4 to –4
Notes
! Source Level Adjuster is not available when
! The AM volume level can also be adjusted
! VideoCD, CD, compressed audio, DivX,
or to adjust the source vol-
FM is selected as the source.
with this function.
MPEG-1, MPEG-2 and MPEG-4 are automatically set to the same source level adjustment
volume.
Setting up the video player
Setting the subtitle language
You can set a desired subtitle language. When
available, the subtitles will be displayed in the
selected language.
1 Press the home button to switch to the
home display.
2 Touch the video setup key to open the
video setup menu.
3 Touch Subtitle Language on the
Video Setup menu.
A subtitle language menu is displayed.
4 Touch the desired language.
The subtitle language is set.
# If you have selected Others, refer to When you se-
lect Others on this page.
Notes
! If the selected language is not available, the
language specified on the disc is displayed.
! You can also switch the subtitle language by
touching the switch subtitle languages key
during playback.
! The setting made here will not be affected
even if the subtitle language is switched dur-
ing playback using the switch subtitle lan-
guages key.
When you select Others
A language code input display is shown when
Others is selected. Refer to Language code chart
for DVD on page 64.
% Touch 0 to 9 to input the language code.
# To cancel the entered numbers, touch C.
# To register the code, touch the following touch
panel key.
Registering the code.
Setting the audio language
You can set the preferred audio language.
1 Press the home button to switch to the
home display.
2 Touch the video setup key to open the
video setup menu.
3 Touch Audio Language on the Video
Setup menu.
An audio language menu is displayed.
4 Touch the desired language.
The audio language is set.
# If you have selected Others, refer to When you se-
lect Others on this page.
Notes
! If the selected language is not available, the
language specified on the disc is used.
! You can also switch the audio language by
touching the switch audio languages key
during playback.
! The setting made here will not be affected
even if the audio language is switched during playback using the switch audio languages key.
Setting the menu language
You can set the preferred language in which the
menus recorded on a disc are displayed.
1 Press the home button to switch to the
home display.
Section
18
19
English
35
En
Page 36

Section
Setting up the video player
19
Setting up the video player
2 Touch the video setup key to open the
video setup menu.
3 Touch Menu Language on the
Video Setup menu.
A menu language menu is displayed.
4 Touch the desired language.
The menu language is set.
# If you have selected Others, refer to When you se-
lect Others on the previous page.
Note
If the selected language is not available, the language specified on the disc is displayed.
Setting the multi-angle DVD
display
The angle icon can be set so it appears on
scenes where the angle can be switched.
1 Press the home button to switch to the
home display.
2 Touch the video setup key to open the
video setup menu.
3 Touch Multi Angle on the Video Setup
menu to turn angle icon display on or off.
Setting the aspect ratio
There are two kinds of display: a wide screen display that has a width-to-height ratio (TV aspect
ratio) of 16:9, and regular display that has a TV
aspect of 4:3. Be sure to select the correct TV aspect for the display connected to V OUT.
! When using regular display, select either
Letter Box or Pan Scan. Selecting 16:9 may
result in an unnatural picture.
! If you select the TV aspect ratio, the unit’s
display will change to the same setting.
36
En
1 Press the home button to switch to the
home display.
2 Touch the video setup key to open the
video setup menu.
3 Touch TV Aspect on the Video Setup
menu to select the TV aspect ratio.
Touch TV Aspect repeatedly until the desired aspect ratio appears.
! 16:9 – Wide screen picture (16:9) is displayed
as is (initial setting)
! Letter Box – The picture is the shape of a let-
terbox with black bands on the top and bottom of the screen
! Pan Scan – The picture is cut short on the
right and left sides of the screen
Notes
! When playing discs that do not specify
Pan Scan, the disc is played back in
Letter Box display even if you select the
Pan Scan setting. Confirm whether the disc
package bears the
! The TV aspect ratio cannot be changed for
some discs. For details, refer to the disc’s instructions.
16 : 9 LB
mark.
Setting the slideshow interval
JPEG files can be viewed as a slideshow on this
unit. In this setting, the interval between each
image can be set.
1 Press the home button to switch to the
home display.
2 Touch the video setup key to open the
video setup menu.
3 Touch Time Per Photo Slide on the
Video Setup menu to select the slideshow interval.
Touch Time Per Photo Slide repeatedly until the
desired setting appears.
! 5sec – JPEG images switch at intervals of 5
seconds
! 10sec – JPEG images switch at intervals of 10
seconds
! 15sec – JPEG images switch at intervals of 15
seconds
! Manual – JPEG images can be switched
manually
Setting parental lock
Some DVD video discs let you use parental lock
to restrict children from viewing violent and
adult-oriented scenes. You can set parental lock
to the desired level.
! When you have a parental lock level set and
play a disc featuring parental lock, code
number input indications may be displayed.
In such cases, playback will begin when the
correct code number is entered.
Setting the code number and level
A code number must be registered in order to
play back discs with parental lock.
1 Press the home button to switch to the
home display.
2 Touch the video setup key to open the
video setup menu.
3 Touch Parental on the Video Setup menu.
4 Touch 0 to 9 to input a four digit code
number.
# To cancel the entered numbers, touch C.
# To register the code, touch the following touch
panel key.
Registering the code.
The code number is set, and the level can now be
set.
5 Touch 1 to 8 to select the desired level.
6 Touch Enter.
The parental lock level is set.
! 8 – Playback of the entire disc is possible (ini-
tial setting)
! 7 to 2 – Playback of discs for children and
non-adult-oriented discs is possible
! 1 – Playback of discs for children only is pos-
sible
Notes
! We recommend to keep a record of your
code number in case you forget it.
! The parental lock level is stored on the disc.
Look for the level indication written on the
disc package, included literature or on the
disc itself. Parental lock of this unit is not
possible if a parental lock level is not stored
on the disc.
! With some discs, the parental lock may be
active only for certain levels of scenes. The
playback of those scenes will be skipped. For
details, refer to the instruction manual that
came with the disc.
Changing the level
You can change the set parental lock level.
1 Press the home button to switch to the
home display.
2 Touch the video setup key to open the
video setup menu.
3 Touch Parental on the Video Setup menu.
Page 37

Setting up the video player
Setting up the video player
Section
19
4 Touch 0 to 9 to input the registered code
number.
5 Registering the code.
Registering the code.
This sets the code number, and the level can
now be changed.
# If you enter an incorrect code number, the
icon is displayed. Touch C and enter the correct code
number.
# If you forget your code number, refer to If you for-
get your code number on this page.
6 Touch 1 to 8 to select the desired level.
7 Touch Enter.
The new parental lock level is set.
If you forget your code number
% Press RESET.
Setting the DivX subtitle file
You can select whether or not to display DivX external subtitles.
! The DivX subtitles will be displayed even
when Custom is selected if no DivX external
subtitle files exist.
1 Press the home button to switch to the
home display.
2 Touch the video setup key to open the
video setup menu.
3 Touch DivX® Subtitle on the Video Setup
menu to select the desired subtitle setting.
! Original – Display the DivX subtitles
! Custom – Display the DivX external subtitles
Notes
! Up to 42 characters can be displayed on one
line. If more than 42 characters are set, the
line breaks and the characters are displayed
on the next line.
! Up to 126 characters can be displayed on
one screen. If more than 126 characters are
set, the excess characters will not be displayed.
Displaying the DivXâVOD
registration code
In order to play DivX VOD (video on demand)
contents on this unit, the unit must first be registered with a DivX VOD contents provider. For
registration, generate a DivX VOD registration
code and submit it to your provider.
! Keep a record of the code as you will need it
when you register your unit to the DivX VOD
provider.
1 Press the home button to switch to the
home display.
2 Touch the video setup key to open the
video setup menu.
3 Touch DivX® VOD on the Video Setup
menu.
Registration Code and Deregistration Code
appear.
4 Touch Registration Code.
Your registration code is displayed.
Displaying the deregistration code
If your device is already registered, deregister it
by entering the deregistration code.
1 Press the home button to switch to the
home display.
2 Touch the video setup key to open the
video setup menu.
3 Touch DivX® VOD on the Video Setup
menu.
4 Touch Deregistration Code.
# To cancel deregistration, touch Cancel.
5 Touch OK.
The deregistration is complete.
Automatic playback of DVDs
When a DVD disc with a DVD menu is inserted,
this unit will cancel the menu automatically and
start playback from the first chapter of the first
title.
! Some DVDs may not operate properly. If this
function is not fully operated, turn this func-
tion off and start playback.
1 Press the home button to switch to the
home display.
2 Touch the video setup key to open the
video setup menu.
3 Touch DVD Auto Play to turn automatic
playback on.
# To turn automatic playback off, touch
DVD Auto Play again.
English
37
En
Page 38

Section
System settings
20
System settings
Switching the auxiliary setting
Activate this setting when using an auxiliary device connected to this unit.
1 Press the home button to switch to the
home display.
2 Touch the system key to open the system
menu.
3 Touch AUX Input on the system menu to
turn AUX Input on or off.
Setting AV input
Activate this setting when using an external
video component connected to this unit.
1 Press the home button to switch to the
home display.
2 Touch the system key to open the system
menu.
3 Touch AV Input on the system menu to
turn AV Input on or off.
Setting the RGB Input
You can switch the setting of RGB input.
1 Press the home button to switch to the
home display.
2 Touch the system key to open the system
menu.
3 Touch RGB Input on the system menu to
turn iPhone or NAVI.
Note
If you use Advanced App Mode, set to iPhone.
38
En
Setting the App sound mixing
Refer to Setting the App sound mixing on page
23.
Setting MIXTRAX mode
Refer to Setting MIXTRAX mode on page 27.
Changing the picture
adjustment
You can adjust the Brightness (brightness),
Contrast (contrast), Color (color) , Hue (hue),
Dimmer (dimmer), and Temperature (tempera-
ture) for each source and rear view camera.
! You cannot adjust Color, Hue and Contrast
for the audio source.
1 Press the home button to switch to the
home display.
2 Touch the system key to open the system
menu.
3 If you are adjusting the
Picture Adjustment, select the unit.
Completing Picture Adjustment for the Navigation system
NAVI
Apps
Source
when the RGB input setting is
set to NAVI.
Completing Picture Adjust-
ment for the Advanced App
Mode when the RGB input setting is set to iPhone.
Adjusting the Picture Adjust-
ment for the rear view camera.
Adjusting the Picture Adjust-
ment for the source.
4 Touch any of the following touch panel
keys to select the function to be adjusted.
Picture Adjustment items are displayed.
! Brightness – Adjusts the black intensity
! Contrast – Adjusts the contrast
! Color – Adjusts the color saturation
! Hue – Adjusts the tone of color (red or green
is emphasized)
! Dimmer – Adjusts the brightness of the dis-
play
! Temperature – Adjusts the color tempera-
ture, resulting in a better white balance
# Youcan adjust Hue only when the color system
is set to NTSC.
# With some rear view cameras, picture adjustment may not be possible.
5 Touch c or d to adjust the selected item.
Each time you touch c or d, the level of the selected item increases or decreases.
# Dimmer can be adjusted from +1 to +48.
# Temperature can be adjusted from +3 to –3.
Notes
! You cannot operate this function while driv-
ing.
! Different Brightness/Contrast/Dimmer set-
tings can be set for when the illumination
switch is on and when it is off.
Selecting the system language
The system language can be selected.
If text information such as the title name, artist
name or a comment is embedded in a European
language, they can also be displayed on this
unit.
! The language can be changed for the follow-
ing:
— Audio menu
— System menu
— Video Setup menu
— Bluetooth menu
— On-screen display
(English and Russian only)
— Multi language setting for DivX
(English and Russian only)
— Language for cautions
Some operations on this unit are prohibited from use while driving or require
careful attention when operated. In such
cases, a caution will appear on the display. You can change the language for
caution messages with this setting.
! If the embedded language and the selected
language setting are not the same, text information may not display properly.
! Some characters may not be displayed prop-
erly.
1 Press the home button to switch to the
home display.
2 Touch the system key to open the system
menu.
3 Touch System Language on the system
menu to select the desired language.
4 Touch the desired language.
English (English)—Français (French)—Español
(Spanish)—Portuguese (Portuguese)—中文
(Simplified Chinese)
Setting SiriusXM Tune Startä
Refer to Setting SiriusXM Tune Startä on page
16.
Setting Demo Mode
Once Demo Mode is turned on, the Demo
screen appears.
Refer to Demo mode on page 6.
1 Press the home button to switch to the
home display.
Page 39

System settings
System settings
Section
20
2 Touch the system key to open the system
menu.
3 Touch Demo mode on the system menu
to turn Demo mode on or off.
! On – The Demo screen appears.
! Off – The Demo screen does not appear.
Switching sound muting/
attenuation
Sound from this system is automatically muted
or attenuated when a signal from equipment
with a mute function is received.
! Sound from this system returns to normal
when the muting or attenuation is canceled.
1 Press the home button to switch to the
home display.
2 Touch the system key to open the system
menu.
3 Touch Mute/ATT until the desired setting
appears.
Touch Mute/ATTuntil the desired setting appears in the display.
! Mute – Muting
! ATT –20dB – Attenuation (ATT –20dB has a
stronger effect than ATT –10dB)
! ATT –10dB – Attenuation
! Off – Turns the sound muting/attenuation off
Notes
! When Mute is displayed, the sound is turned
off and no audio adjustments can be made.
! When ATT is displayed, the sound is attenu-
ated and only the volume can be adjusted.
(No other audio adjustments can be made.)
! Operation returns to normal when the phone
connection is ended.
Setting the rear output and
subwoofer controller
This unit’s rear output (rear speaker leads output and RCA rear output) can be used for fullrange speaker (Full) or subwoofer (Subwoofer)
connection. If you switch the rear output setting
to Subwoofer, you can connect a rear speaker
lead directly to a subwoofer without using an
auxiliary amp.
Initially, the unit is set for a rear full-range speaker connection (Full).
1 Turn the source off.
Refer to Turning the source ON/OFF on page 8.
2 Press the home button to switch to the
home display.
3 Touch the system key to open the system
menu.
4 Touch Rear Speaker on the system menu
to switch the subwoofer output or full-range
speaker.
# When no subwoofer is connected to the rear output, select Full (full-range speaker).
# When a subwoofer is connected to the rear output, select Subwoofer (subwoofer).
Notes
! Even if you change this setting, there will be
no output unless you turn the subwoofer output on (refer to Using subwoofer output on
page 34).
! Both rear speaker lead outputs and RCA rear
output are switched simultaneously in this
setting.
Using the keyboard
Keyboard is available only in Advanced App
Mode.
Refer to Setting the Keyboard on page 23.
Setting the ever scroll
When ever scroll is set to On, recorded text information scrolls continuously in the display. Set to
Off if you prefer the information to scroll just
once.
1 Press the home button to switch to the
home display.
2 Touch the system key to open the system
menu.
3 Touch Ever Scroll on the system menu to
turn ever scroll on or off.
Setting the Pandora connect
mode
Refer to Setting the Pandora connect mode on
page 28.
Setting the Bluetooth audio
(Function of AVH-X5500BHS/AVH-X4500BT/AVHX3500BHS/AVH-X2500BT)
You need to activate the Bluetooth Audio
source in order to use a Bluetooth audio player.
1 Press the home button to switch to the
home display.
2 Touch the system key to open the system
menu.
3 Touch Bluetooth Audio on the system
menu to turn Bluetooth audio on or off.
Clearing Bluetooth memory
Important
Never turn the unit off while the Bluetooth memory is being cleared.
1 Turn the source off.
Refer to Turning the source ON/OFF on page 8.
2 Press the home button to switch to the
home display.
3 Touch the system key to open the system
menu.
4 Touch Bluetooth Memory Clear on the
system menu.
5 Touch Clear.
After selecting a desired item, a confirmation
display appears. Touch OK to delete the memory.
# If you do not want to clear the memory, touch
Cancel.
Updating Bluetooth
connection software
This function is used to update this unit with the
latest Bluetooth software. For about Bluetooth
software and updating, refer to our website.
Important
Never turn the unit off and never disconnect the
phone while the software is being updated.
1 Turn the source off.
Refer to Turning the source ON/OFF on page 8.
2 Press the home button to switch to the
home display.
3 Touch the system key to open the system
menu.
4 Touch BT Software Update.
English
39
En
Page 40

Section
System settings
20
System settings
5 Touch Start to display the data transfer
mode.
# Follow the on-screen instructions to finish updating the Bluetooth software.
Displaying the Bluetooth
system version
If this unit fails to operate properly, you may
need to consult your dealer for repair. In such
cases, you may be asked to specify the system
version. Perform the following procedure to
check the version on this unit.
1 Turn the source off.
Refer to Turning the source ON/OFF on page 8.
2 Press the home button to switch to the
home display.
3 Touch the system key to open the system
menu.
4 Touch Bluetooth Version Information to
display to the version of the Bluetooth module of this unit.
Setting the rear view
camera (back up camera)
CAUTION
Pioneer recommends the use of a camera
which outputs mirror-reversed images. Otherwise, the screen image will appear reversed.
This unit features a function that automatically
switches to the rear view camera video (R.C IN)
when a rear view camera is installed on your car
and the shift lever is moved to the REVERSE
(R) position. (For more details, consult your
dealer.)
40
En
You can also switch the rear view image by
pressing the touch key.
For details refer to Using the rear view on page
10.
! After you set up the rear view camera setting,
move the shift lever to REVERSE (R) and
confirm that the rear view camera video is
shown on the display.
! Change this setting if the display switches to
the rear view camera video by error while you
are driving forward.
! To stop watching the rear view camera video
and return to the source display, press and
hold MUTE.
! Touch the RearView source icon to display
the rear view camera image while driving.
Touch the source icon again to turn the rear
view camera off. For details, refer to Selecting
a source on page 8.
1 Press the home button to switch to the
home display.
2 Touch the system key to open the system
menu.
3 Touch Camera Polarity on the system
menu to select the appropriate setting.
! Battery – When the polarity of the connected
lead is positive while the shift lever is in RE-
VERSE (R) position
! Ground – When the polarity of the connected
lead is negative while the shift lever is in RE-
VERSE (R) position
! Off – When a rear view camera is not con-
nected to this unit
! The rear view key setting also turns off on the
home display screen.
Auto EQ (auto-equalizing)
The auto-equalizer automatically measures the
car’s interior acoustic characteristics, and then
creates an auto- equalizer curve based on that information.
! To perform this function, dedicated micro-
phone (e.g. CD-MC20) is required.
WARNING
As a loud tone (noise) may be emitted from the
speakers when measuring the car ’s interior
acoustic characteristics, never perform auto EQ
while driving.
CAUTION
! Thoroughly check the conditions before per-
forming auto EQ as the speakers may be
damaged if these functions are performed
when:
— The speakers are incorrectly connected. (For
example, when a rear speaker is connected
as a subwoofer output.)
— A speaker is connected to a power amp deliv-
ering output higher than the speaker’s maxi-
mum input power capability.
! If the microphone is placed in an unsuitable
position the measurement tone may become
loud and measurement may take a long
time, resulting in battery drainage. Be sure
to place the microphone in the specified location.
Before operating the auto EQ
function
! Carry out auto EQ in as quiet a place as pos-
sible, with the car engine and air conditioning switched off. Also cut power to car
phones or portable telephones in the car, or
remove them from the car before carrying
out auto EQ. Sounds other than the measurement tone (surrounding sounds, engine
sound, telephones ringing etc.) may prevent
correct measurement of the car interior
acoustic characteristics.
! Be sure to carry out auto EQ using the op-
tional microphone. Using another microphone may prevent measurement, or result
in incorrect measurement of the car interior
acoustic characteristics.
! In order to perform auto EQ, the front speak-
er must be connected.
! When this unit is connected to a power amp
with input level control, auto EQ may not be
possible if the power amp’s input level is set
below the standard level.
! When this unit is connected to a power amp
with an LPF, turn this LPF off before performing auto EQ. Also set the cut-off frequency
for the built-in LPF of an active subwoofer to
the highest frequency.
! The distance has been calculated by com-
puter to be the optimum delay to give accurate results for the circumstances, so please
continue to use this value.
— The reflected sound within the car is
strong and delays occur.
— The LPF on active subwoofers or external
amps delay the lower sounds.
! Auto EQ changes the audio settings as fol-
lows:
— The fader/balance settings return to the
center position. (Refer to Using fader/bal-
ance adjustment on page 33.)
Page 41

System settings
System settings
Section
20
— The equalizer curve switches to Flat.
(Refer to Recalling equalizer cur ves on
page 33.)
— The front, center and rear speakers will
automatically be adjusted to a high pass
filter setting.
! Previous settings for auto EQ will be overwrit-
ten.
! If using an AVH-X3500BHS, AVH-X2500BT, or
AVH-X1500DVD, connect a microphone extension cable (sold separately) to the AUX
input in advance.
Performing auto EQ
1 Stop the car in a place that is quiet, close
all the doors, windows and sun roof, and
then turn the engine off.
If the engine is left running, engine noise may
prevent correct auto EQ.
2 Fix the optional microphone in the center
of the headrest of the driver’s seat, facing
forward.
The auto EQ may differ depending on where you
place the microphone. If desired, place the microphone on the front passenger seat to carry
out auto EQ.
3 Turn the ignition switch to ON or ACC.
If the car’s air conditioner or heater is turned on,
turn it off. Noise from the fan in the air conditioner or heater may prevent correct auto EQ.
4 Press the home button to switch to the
home display.
5 Touch the system key to open the system
menu.
6 Touch Auto EQ Measurement to enter
auto EQ measurement mode.
7 Plug the microphone into the microphone input jack on this unit.
AVH-X5500BHS and AVH-X4500BT
AVH-X3500BHS, AVH-X2500BTand AVHX1500DVD
Extension Cable
(Sold separately)
AUX input
(AUX)
Microphone
8 Touch Start to start auto EQ.
9 When the 10-second countdown starts,
get out of the car and close the door within
10 seconds.
A measurement tone (noise) is emitted from the
speakers, and auto EQ measurement begins.
When auto EQ is completed, The measurement
has finished. Please disconnect the microphone and then push HOME key. is displayed.
When the car’s interior acoustic characteristics
cannot be measured correctly, an error message
will be displayed. (Refer to Understanding auto
EQ error messages on page 56.)
# It takes about nine minutes for auto EQ measurement to be completed when all the speakers are connected.
# To stop auto EQ, touch Stop.
10 Store the microphone carefully in the
glove compartment or another safe place.
If the microphone is subjected to direct sunlight
for an extended period, high temperatures may
cause distortion, color change or malfunction.
Setting the video signal
When you connect this unit to an AV equipment
to this unit, select the suitable video signal setting.
! As this function is initially set to Auto, the
unit will automatically adjust the video signal
setting.
! You can operate this function only for the
video signal input into the AV input.
1 Press the home button to switch to the
home display.
2 Touch the system key to open the system
menu.
3 Touch Video Signal Setting on the function menu.
Video Signal Setting items are displayed.
! AV – Adjusts the AV video signal
! AUX – Adjusts the AUX video signal
! Camera – Adjusts the rear view camera video
signal
4 Touch c or d to select the desired video
signal appears.
Auto—PAL —NTSC—PAL-M—PAL-N—SECAM
English
41
En
Page 42

Section
Favorite menu
21
22
Using the Favorite menu
1 Display menu columns to register.
Refer to Menu operations on page 33.
# Youcan customize menus except Video Setup
menu.
2 Touch the star icon in the menu column
for the desired menu to register the menu.
The star icon for the selected menu is filled in.
# To cancel the registration, touch the star icon in
the menu column again.
3 Display the favorite menu and choose a
registered menu.
Refer to Menu operations on page 33.
Note
You can register up to 12 columns.
Bluetooth connection menu
Bluetooth connection menu
operations
(Function of AVH-X5500BHS/AVH-X4500BT/AVHX3500BHS/AVH-X2500BT)
Note
If you are using a cellular phone that can be
connected via Bluetooth wireless technology, we
recommend that you use your phone to search
for this unit and establish a connection between
it and your phone. The PIN code is set to 0000
as default. The product name for this unit will
display on your phone as the device name. For
details, refer to Entering PIN code for Bluetooth
wireless connection on the next page. For further
details concerning the procedures for establishing Bluetooth wireless connections, refer to the
instruction manual for the phone.
Pairing from this unit
1 Press the home button to switch to the
home display.
2 Touch the Bluetooth key to open the
Bluetooth connection menu.
3 Touch Connection to select a device.
4 Start to search.
Starting to search.
Switching between the device
names and Bluetooth device addresses.
# To cancel searching, touch Stop.
# If three devices are already paired, Memory Full
is displayed and pairing cannot be per formed. In
such cases, delete a paired device first. Refer to this
page.
# If no device can be found, Not Found is dis-
played. In such cases, check the status of the
Bluetooth device and search again.
5 Touch a device name to select the device
you want to connect to.
While connecting, Pairing is displayed. If the
connection is established, Paired is displayed.
# If your device support SSP (Secure Simple Pairing), 6-digit number appears on the display of this
unit. Once the connection is established, this number disappears.
# If the connection fails, Error is displayed. In such
cases, try again from the beginning.
# The PIN code is set to 0000 as the default, but
can be changed. Refer to Entering PIN code for
Bluetooth wireless connection on the next page.
# Once the connection is established, the device
name is displayed.
Touch the device name to disconnect.
# If you want to delete a paired Bluetooth telephone, display Delete OK?. Touch Yes to delete the
device.
While searching, is displayed and when available devices are found, the device names or
Bluetooth device addresses (if names cannot be
obtained) are displayed.
# If you want to switch between the device names
and Bluetooth device addresses, touch the icon.
42
En
# Never turn the unit off while the paired Bluetooth
telephone is being deleted.
Deleting a paired device.
Page 43

Bluetooth connection menu
Theme menu
Section
22
Connecting to a Bluetooth
device automatically
If this function is set to on, a connection between your Bluetooth device and this unit will
take place automatically as soon as the two devices are less than a few meters apart.
Initially, this function is set to on.
1 Press the home button to switch to the
home display.
2 Touch the Bluetooth key to open the
Bluetooth connection menu.
3 Touch Auto Connect to turn automatic
connection on.
If your Bluetooth device is ready for a Bluetooth
wireless connection, a connection to this unit
will automatically be established.
# To turn automatic connection off, touch
Auto Connect again.
If connection fails, “ Auto connection failed.
Retry?” appears. Touch Yes to reconnect.
4 Once you turn your vehicle’s ACC switch
on again, a connection is established automatically.
Switching visible unit
This function sets whether or not to make this
unit visible to the other device.
Initially, this function is set to on.
1 Press the home button to switch to the
home display.
2 Touch the Bluetooth key to open the
Bluetooth connection menu.
3 Touch Visibility to select visibility off.
# To turn visibility on, touch Visibility again.
Entering PIN code for Bluetooth
wireless connection
To connect your Bluetooth device to this unit via
Bluetooth wireless technology, you need to enter
a PIN code on your Bluetooth device to verify the
connection. The default code is 0000, but you
can change it with this function.
1 Press the home button to switch to the
home display.
2 Touch the Bluetooth key to open the
Bluetooth connection menu.
3 Touch PIN Code Input to select
PIN Code Input.
4 Touch 0 to 9 to input pin code.
5 After inputting PIN code (up to 8 digits),
store in this unit.
Storing the PIN code in this unit.
Displaying Bluetooth Device
address
This unit displays its Bluetooth device address.
1 Press the home button to switch to the
home display.
2 Touch the Bluetooth key to open the
Bluetooth connection menu.
3 Touch Device Information to display device information.
The Bluetooth device address is displayed.
Selecting the illumination color
This unit is equipped with multiple-color illumination.
Direct selection from preset
illumination colors
You can select an illumination color from the
color list.
1 Press the home button to switch to the
home display.
2 Touch the theme key to open the theme
settings.
3 Touch Illumination and then touch a color
on the list.
Customizing the illumination color
1 Press the home button to switch to the
home display.
2 Touch the theme key to open the theme
settings.
3 Touch Illumination and then touch
Custom.
4 Display the customizing menu.
Displaying the customizing
menu.
5 Touch the color bar to customize the
color.
6 Touch c or d to fine-tune the color.
7 Touch the icon and hold to store the customized color in the memory.
Memo
Storing the customized color in
the memory.
The customized color has been stored in the
memory.
The set color will be recalled from the memory
the next time you touch the same icon.
Selecting the OSD (on-screen
display) color
The OSD color can be changed.
1 Press the home button to switch to the
home display.
2 Touch the theme key to open the theme
settings.
3 Touch Screen.
4 Touch one of the colors on the list.
Selecting the background
display
You can switch the background that is displayed
when listening to a source.
1 Press the home button to switch to the
home display.
2 Touch the theme key to open the theme
settings.
3 Touch Background.
4 Touch the desired setting.
# If no JPEG images are stored in this unit, you
cannot select photo. To store a JPEG image to this
unit, refer to Capture an image in JPEG files on page
26.
# If you want to delete the captured JPEG image,
touch and hold the key of the JPEG image.
# Youcan view the hidden settings by flicking the
display.
23
English
43
En
Page 44

Section
Other functions
24
Other functions
Adjusting the response
positions of the touch panels
(Touch Panel Calibration)
If you feel that the touch panel keys on the
screen deviate from the actual positions that respond to your touch, adjust the response positions of the touch panel. There are two
adjustment methods: 4-point adjustment, in
which you touch four corners of the screen; and
16-point adjustment, in which you make fine-adjustments on the entire screen.
! Park your car in a safe place and use this
function. Do not operate it while driving.
! Touch the screen gently for adjustment.
Forcefully pressing the touch panel may
damage the touch panel. Do not use a sharp
pointed tool such as a ballpoint pen or mechanical pen. Doing so may damage the
screen.
! If the touch panel cannot be adjusted prop-
erly, consult your local Pioneer dealer.
1 Turn the source off.
Refer to Turning the source ON/OFF on page 8.
2 Press and hold the home button to start
Touch Panel Calibration.
The 4-point touch panel adjustment screen appears. When 2-point appears at once, touch
both.
3 Touch each of the arrows on the four corners of the screen.
# To cancel the adjustment, press and hold the
home button.
4 Press the home button to complete 4point adjustment.
Data for the adjusted position is saved.
# Do not turn off the engine while the data is being
saved.
5 Press the home button to proceed to 16point adjustment.
The 16-point touch panel adjustment screen appears.
# To cancel the adjustment, press and hold the
home button.
6 Gently touch the center of the + mark displayed on the screen.
After you touch all the marks, the data for the
adjusted position is saved.
# Do not turn off the engine while the data is being
saved.
7 Press and hold the home button to complete the adjustment.
Using an AUX source
An auxiliary device or portable device sold separately can be connected to this unit.
About AUX connection methods
You can connect auxiliary devices to this unit.
Mini pin plug cable (AUX)
When connecting an auxiliary device using a mini
plug cable
iPods and portable audio/video players can be
connected to this unit via mini plug cable.
! If an iPod with video capabilities is con-
nected to this unit via 3.5 mm plug (4 pole)
cable (such as the CD-V150M), you can enjoy
the video contents of the connected iPod.
! A portable audio/video player can be con-
nected by using a 3.5 mm plug (4 pole) with
an RCA cable (sold separately). However, depending on the cable, a reverse connection
between the red (right side audio) cable and
yellow (video) cable may be required in order
for the sound and video image to be reproduced correctly.
% Insert the stereo mini plug into the AUX
input jack on this unit.
Refer to Connection on page 46.
Resetting the microprocessor
By pressing RESET, you can reset the microprocessor to its initial settings without changing the
bookmark information.
The microprocessor must be reset in the following situations:
! Before using this unit for the first time after
installation
! If the unit fails to operate properly
! When strange or incorrect messages appear
on the display
1 Turn the ignition switch OFF.
2 Press RESET with a pen tip or other
pointed instrument.
Refer to What’s what on page 7.
Note
Switch your engine ON or set the ignition switch
to ACC ON before pressing RESET in the following situations:
! After completing connections
! When erasing all stored settings
! When resetting the unit to its initial (factor y) set-
tings
44
En
Page 45

Connection
Connection
Section
25
WARNING
! In some countries or states the viewing of images
on a display inside a vehicle even by persons
other than the driver may be illegal. Where such
regulations apply, they must be obeyed and this
unit’s DVD features should not be used.
CAUTION
! Do not drill a hole into the engine compart-
ment to connect the yellow cable of the display unit to the vehicle battery. Engine
vibration may eventually cause the insulation
to fail at the point where the wire passes
from the passenger compartment into the
engine compartment. Take extra care in securing the wire at this point.
! Make sure that cables will not interfere with
moving parts of the vehicle, such as the shift
lever, parking brake or seat sliding mechanism.
WARNING
! Use speakers over 50 W (output value) and
between 4 W to 8 W (impedance value). Do
not use 1 W to 3 W speakers for this unit.
! The black cable is ground. When installing
this unit or power amp (sold separately),
make sure to connect the ground wire first.
Make sure that the ground cable is properly
connected to metal parts of the car body
using a spade terminal sold commercially.
The ground wire of the power amp and the
one of this unit or any other device must be
connected to the car separately with different
screws. If the screw for the ground wire loosens or falls out, it could result in fire, generation of smoke or malfunction.
Ground wire
Other devices
(Another electronic
device in the car)
POWER AMP
Metal parts of car’s body
Important
! This unit cannot be installed in a vehicle
without ACC (accessory) position on the ignition switch.
O
F
N
F
O
S
T
A
R
T
ACC position No ACC position
! Use this unit with a 12-volt battery and nega-
tive grounding only. Failure to do so may result in a fire or malfunction.
! To prevent a short-circuit, overheating or mal-
function, be sure to follow the directions
below.
— Disconnect the negative terminal of the bat-
tery before installation.
— Secure the wiring with cable clamps or adhe-
sive tape. Wrap adhesive tape around wiring
that comes into contact with metal parts to
protect the wiring.
— Place all cables away from moving parts,
such as the shift lever and seat rails.
— Place all cables away from hot places, such
as near the heater outlet.
— Do not connect the yellow cable to the battery
by passing it through the hole to the engine
compartment.
— Cover any disconnected cable connectors
with insulating tape.
— Do not shorten any cables.
— Never cut the insulation of the power cable of
this unit in order to share the power with
other devices. The current capacity of the
cable is limited.
— Use a fuse of the rating prescribed.
— Never wire the negative speaker cable directly
to ground.
— Never band together negative cables of multi-
ple speakers.
! When this unit is on, control signals are sent
through the blue/white cable. Connect this
cable to the system remote control of an external power amp or the vehicle’s auto-antenna relay control terminal (max. 300 mA
12 VDC). If the vehicle is equipped with a
glass antenna, connect it to the antenna
booster power supply terminal.
! Never connect the blue/white cable to the
power terminal of an external power amp.
Also, never connect it to the power terminal
of the auto antenna. Doing so may result in
battery drain or a malfunction.
English
45
En
Page 46

Section
Connection
25
Connecting the power cord
Navigation system
(AVIC-U220(sold
separately))
Please contact your dealer to
inquire about the connectable
navigation unit.
Yellow
Connect to the constant 12 V supply terminal.
Orange/white
Connect to lighting switch terminal.
Red
Connect to terminal controlled by ignition switch (12 V DC).
Black (chassis ground)
Connect to a clean, paint-free metal location.
Front speaker Front speaker
Left Right
Rear speaker or
Subwoofer (4 Ω)
When using a subwoofer of 70 W (2 Ω), be sure to connect with Violet and Violet/black leads of this unit.
Do not connect anything to Green and Green/black leads.
26 pin cable (Supplied with navigation unit)
Insert the 26 pin cable in the direction
indicated in the figure.
This product
Antenna input
Fuse (10 A)
AUX jack (3.5 ø)
Use a mini plug cable to connect with auxiliary
device.
White Gray
Gray/blackWhite/black
Green Violet
Green/black Violet/black
Violet
Not used.
Green
Green/black
Violet/black
RGB input
Rear speaker or
Subwoofer (4 Ω)
Subwoofer (4 Ω)
× 2
Connection
4 m (13 ft. 1 in.)
Microphone input
(Function of AVH-X5500BHS/AVH-X4500BT/AVH-X3500BHS/AVH-X2500BT)
Wired remote input
Hard-wired remote control adapter can be connected
(sold separately).
Connection method
Note:
· The position of the parking brake switch depends on the vehicle model. For details,
consult the vehicle Owner’s Manual or dealer.
Light green
Used to detect the ON/OFF status of the parking
brake. This lead must be connected to the power
supply side of the parking brake switch.
Blue/white
Connect to system control terminal of the power amp or
auto-antenna relay control terminal (max. 300 mA 12 V DC).
With a 2 speaker system, do not connect anything to the speaker leads
that are not connected to speakers.
Microphone
(Function of AVH-X5500BHS/AVH-X4500BT/AVH-X3500BHS/AVH-X2500BT)
Violet/white
Of the two lead wires connected to the back lamp, connect the one
in which the voltage changes when the gear shift is in the
REVERSE (R) position. This connection enables the unit to
sense whether the car is moving forwards or backwards.
Yellow/black
If you use an equipment with Mute function, wire this lead to
the Audio Mute lead on that equipment. If not, keep the Audio
Mute lead free of any connections.
1. Clamp the lead.
Power supply side
Ground side
Note:
· Change the initial setting of this unit. The
subwoofer output of this unit is monaural.
2. Clamp firmly with
needle-nosed pliers.
Parking brake
switch
46
En
Page 47

T
Connection
Connection
Section
25
When connecting to separately sold power amp
Rear output
Subwoofer
output
Blue/white
Connect to system control terminal of the
power amp or auto-antenna relay control
terminal (max. 300 mA 12 V DC).
Front output
To front output
To rear output
This product
Perform these connections when
using the optional amplifier.
To subwoofer
output
Left Right
Subwoofer
Rear speaker
Front speaker Front speaker
Power amp
(sold separately)
Connect with RCA cables
(sold separately)
System remote control
Subwoofer
Rear speaker
Power amp
(sold separately)
Power amp
(sold separately)
When connecting the external video component and the display
External video component
(sold separately)
To video
output
To video
input
Audio inputs
his product
! It is necessary to change AV Input in the
system menu when connecting the external
video component.
Refer to Setting AV input on page 38.
This product’s rear video output is for connection of a display to enable passengers in the rear
seats to watch the DVD, etc.
WARNING
! Never install a rear display in a location that is
visible to the driver while the vehicle is in motion.
(R IN, L IN)
Rear monitor output
(V OUT)
Video input (V IN)
To audio outputs
RCA cables
(sold separately)
Display with RCA input
jacks (sold separately)
English
47
En
Page 48

T
T
Section
25
Connection
Connection
When connecting with a rear
view camera
If you switch the shift lever to REVERSE (R), the
display on this unit will automatically switch to
the rear view image. You need to set the
Camera Polarity properly in the system unit to
use. For details on settings, refer to Setting the
rear view camera (back up camera) on page 40.
You can also switch to the rear view image by
pressing the Touch key. For details, refer to
Using the rear view on page 10.
WARNING
USE INPUT ONLY FOR REVERSE OR MIRROR IMAGE REAR VIEW CAMERA. OTHER
USE MAY RESULT IN INJURY OR DAMAGE.
CAUTION
! You must use a camera which outputs
mirror reversed images.
! The screen image may appear reversed.
! The rear view camera function is to be used
as an aid to keep an eye on trailers, or while
backing up. Do not use for entertainment
purposes.
! Objects in the rear view may appear closer or
more distant than they actually are.
Rear view camera input (R.C IN)
This product
RCA cable
(sold separately)
To video output
Rear view camera
(sold separately)
Violet/white
Of the two lead wires
connected to the back lamp,
connect the one in which the
voltage changes when the
gear shift is in the REVERSE
(R) position. This connection
enables the unit to
sense whether the car is
moving forwards or
backwards.
Optional SiriusXM Tuner
connection
(Function of AVH-X5500BHS/AVH-X3500BHS)
his product
SiriusXM BUS input
SiriusXM BUS cable
(Supplied with SiriusXM tuner)
SiriusXM tuner
(sold separately)
When connecting with optional
CD-IU201V cable
USB/iPod input
his product
AUX input
(AUX)
1.5 m (4 ft. 11 in.)
USB cable
(Supplied with this unit)
Connect to separately sold
USB device.
Interface cable
(CD-IU201V) (sold separately)
iPod with video
capabilities
(sold separately)
Dock connector
48
En
Page 49

5cmcm
Connection
Installation
Section
25
When connecting with optional
CD-IU201S cable
This product
RGB input
Interface cable
(CD-IU201S) (sold separately)
USB/iPod input
Dock connector
1.5 m (4 ft. 11 in.)
USB cable
(Supplied with this unit)
Connect to separately sold
USB device.
iPod with video
capabilities
(sold separately)
Notes
! Check all connections and systems before
final installation.
! Do not use unauthorized parts as this may
cause malfunctions.
! Consult your dealer if installation requires
drilling of holes or other modifications to the
vehicle.
! Do not install this unit where:
— it may interfere with operation of the vehicle.
— it may cause injury to a passenger as a result
of a sudden stop.
! The semiconductor laser will be damaged if
it overheats. Install this unit away from hot
places such as near the heater outlet.
! Optimum performance is obtained when the
unit is installed at an angle of less than 30°.
! When installing, to ensure proper heat dis-
persal when using this unit, make sure you
leave ample space behind the rear panel and
wrap any loose cables so they are not blocking the vents.
Leave ample
space
5 cm
5 cm
Installation using the screw
holes on the side of the unit
% Fastening the unit to the factory radiomounting bracket.
Position the unit so that its screw holes are
aligned with the screw holes of the bracket, and
tighten the screws at 3 locations on each side.
1
2
3
4
1 If the pawl gets in the way, bend it down.
2 Factory radio mounting bracket
3 Use either truss (5 mm × 8 mm) or flush sur-
face (5 mm × 9 mm) screws, depending on
the bracket screw holes.
4 Dashboard or console
26
English
! To some types of vehicles, this unit cannot be
properly installed. In such case, use the optional installation kit (ADT-VA133).
49
En
Page 50

2
Section
26
Installation
Installation
Installing the microphone
(Function of AVH-X5500BHS/AVH-X4500BT/AVHX3500BHS/AVH-X2500BT)
CAUTION
It is extremely dangerous to allow the microphone lead to become wound around the steering column or shift lever. Be sure to install the
unit in such a way that it will not obstruct driving.
Note
Install the microphone in a position and orientation that will enable it to pick up the voice of the
person operating the system.
When installing the microphone
on the sun visor
1 Fit the microphone lead into the groove.
1
2
1 Microphone lead
2 Groove
2 Install the microphone clip on the sun
visor.
With the sun visor up, install the microphone
clip. (Lowering the sun visor reduces the voice
recognition rate.)
1
1 Microphone clip
2 Clamp
Use separately sold clamps to secure the
lead where necessary inside the vehicle.
When installing the microphone
on the steering column
1 Detach the microphone base from the microphone clip.
To detach the microphone base from the microphone clip, slide the microphone base.
1
2
1 Microphone
2 Microphone clip
3 Microphone base
3
2 Install the microphone on the steering
column.
1
2
3
1 Double-sided tape
2 Install the microphone on the rear side of the
steering column.
3 Clamp
Use separately sold clamps to secure the
lead where necessary inside the vehicle.
Adjusting the microphone angle
The microphone angle can be adjusted.
50
En
Page 51

Additional information
Appendix
Additional information
Troubleshooting
Common
Symptom Cause Action (Refer-
The power
will not turn
on.
The unit will
not operate.
Operation
with the remote control
is not possible.
The unit does
not operate
correctly even
when the appropriate remote control
buttons are
pressed.
Leads and connectors are incorrectly connected.
The fuse is
blown.
Noise and/or
other factors
are causing the
built-in microprocessor to operate incorrectly.
Battery power is
low.
Some operations are prohibited with certain
discs.
ence page)
Confirm once
more that all connections are correct.
Rectify the cause
and then replace
the fuse. Be sure
to install a fuse
with the same rating.
Press RESET.
(Page 44)
Load a new battery.
Try operating with
another disc.
Symptom Cause Action (Refer-
Playback is
not possible.
There is no
sound.
The volume
level will not
rise.
There is no
image displayed.
The
displayed,
and operation
is not possible.
The disc is dirty. Clean the disc.
The type of disc
loaded cannot
be played on
this unit.
The disc loaded
is not compatible with this
video system.
Cables are not
connected correctly.
The unit is performing still,
slow motion or
frame-by-frame
playback.
The parking
brake cable is
not connected.
The parking
brake is not applied.
icon is
The operation is
prohibited for
the disc.
The operation is
not compatible
with the configuration of the
disc.
ence page)
Check the disc
type.
Change the disc
to one that is
compatible with
your video system.
Connect the cables correctly.
There is no sound
during still, slow
motion or frameby-frame playback.
Connect the parking brake cable,
and apply the
parking brake.
Connect the parking brake cable,
and apply the
parking brake.
This operation is
not possible.
This operation is
not possible.
Symptom Cause Action (Refer-
The image
displayed
stops
(pauses) and
the unit cannot be operated.
There is no
sound.
The volume
level is low.
The sound
and video
skip.
The aspect
ratio is incorrect and the
image is
stretched.
The motor
sounds when
the ignition
switch is
turned ON (or
is turned to
ACC).
The data could
no longer be
read during
playback.
The volume
level is low.
The attenuator
is on.
The unit is not
firmly secured.
File size and
transmission
rate are above
recommended
rates.
The aspect ratio
setting is incorrect for the display.
The unit is confirming whether
or not a disc is
loaded.
ence page)
Stop playback
once, and start
playback again.
Adjust the volume
level.
Turn the attenuator off.
Firmly secure the
unit.
Create a DivX file
that is within the
recommended
size and transmission rate.
Select the appropriate setting for
your display.
(Page 36)
This is a normal
operation.
Symptom Cause Action (Refer-
Nothing is
displayed.
The touch
panel keys
cannot be
used.
No xxxx appears when a
display is
changed (No
Title, for example).
Subfolders
cannot be
played back.
The repeat
range
changes automatically.
The rear view
camera is not
connected.
Camera Polarity is at incor-
rect setting.
There is no embedded text information.
Folder repeat
play has been
selected.
Another folder
was selected
during repeat
play.
Track search or
fast forward/reverse was performed during
file repeat play.
ence page)
Connect a rear
view camera.
Press the home
button to return
to the source display and then select the correct
setting for Cam-
era Polarity.
(Page 40)
Switch the display
or play another
track/file.
Select the repeat
range again.
Select the repeat
range again.
Select the repeat
range again.
English
51
En
Page 52

Appendix
Additional information
Additional information
DVD
Symptom Cause Action (Refer-
Playback is
not possible.
A parental
lock message
is displayed
and playback
is not possible.
Parental lock
cannot be
canceled.
Dialog language (and
subtitle language) cannot be
switched.
No subtitles
are displayed.
The loaded disc
has a different
region number
from this unit.
Parental lock is
activated.
The code number is incorrect.
You have forgotten your code
number.
The DVD being
played does not
feature multiple
language recordings.
You can only
switch between
items indicated
in the disc
menu.
The DVD being
played does not
feature subtitles.
You can only
switch between
items indicated
in the disc
menu.
ence page)
Replace the disc
with one featuring
the same region
number as this
unit.
Turn parental lock
off or change the
level. (Page 36)
Enter the correct
code number.
(Page 36)
Press RESET.
(Page 44)
The language
cannot be
switched if they
are not recorded
on the disc.
Switch the language using the
disc menu.
Subtitles are not
displayed if they
are not recorded
on the disc.
Switch the language using the
disc menu.
Symptom Cause Action (Refer-
Playback is
not performed
with the
audio language and
subtitle language settings selected
in Video
Setup menu.
The viewing
angle cannot
be switched.
The DVD being
played does not
feature dialog
or subtitles in
the selected language.
The DVD being
played does not
feature scenes
shot from multiple angles.
You are trying to
switch to multiangle viewing
for a scene that
was not recorded from
multiple angles.
ence page)
The language
cannot be
switched if the selected language
is not recorded on
the disc.
The viewing angle
cannot be
switched if the
DVD does not feature scenes recorded from
multiple angles.
Switch between
multiple angles
when watching
scenes recorded
from multiple angles.
Symptom Cause Action (Refer-
The image is
extremely unclear/distorted and
dark during
playback.
Video CD
Symptom Cause Action
The PBC
(playback
control) menu
cannot be
called up.
Repeat play
and track/
time search
are not possible.
Some discs feature a signal to
prohibit copying.
The Video CD
being played
does not feature
PBC.
The Video CD
being played
features PBC.
ence page)
Since this unit is
compatible with
the analog copy
generation management system,
when playing a
disc that has a
signal prohibiting
copying, horizontal stripes or
other imperfections may appear
when viewed on
some displays.
This is not a malfunction.
This operation is
not available for
Video CDs that do
not feature PBC.
This operation is
not available for
Video CDs that
feature PBC.
iPod
Symptom Cause Action
The iPod does
not operate
correctly.
Sound from
the iPod cannot be heard.
The cables are
incorrectly connected.
The iPod version
is old.
The audio output direction
may switch automatically
when the
Bluetooth and
USB connections are used
at the same
time.
Disconnect the
cable from the
iPod. Once the
iPod’s main
menu is displayed, reconnect
the iPod and reset
it.
Update the iPod
version.
Use the iPod to
change the audio
output direction.
52
En
Page 53

Additional information
Appendix
Additional information
Bluetooth audio/telephone
Symptom Cause Action
The sound
from the
Bluetooth
audio source
is not played
back.
There is a call in
progress on a
Bluetooth connected cellular
phone.
A Bluetooth
connected cellular phone is
currently being
operated.
A call was
made with a
Bluetooth connected cellular
phone and then
immediately terminated. As a
result, communication between this unit
and the cellular
phone was not
terminated
properly.
The sound will be
played back when
the call is terminated.
Do not use the
cellular phone at
this time.
Reconnect the
Bluetooth connection between
this unit and the
cellular phone.
Error messages
When you contact your dealer or your nearest
Pioneer Service Center, be sure to note the error
message.
Common
Message Cause Action
AMP Error This unit fails to
Tuner
Message Cause Action
No Data Provided
No Data This unit cannot
SiriusXM Satellite Radio
Message Cause Action
Check Antenna
operate or the
speaker connection is incorrect;
the protective
circuit is activated.
This unit cannot
receive artist
name/song title
information.
receive program
service name information.
The antenna
connection is
incorrect.
Check the speaker connection. If
the message fails
to disappear even
after the engine is
switched off/on,
contact your dealer or an authorized Pioneer
Service Station
for assistance.
Move to the desirable location with
good reception.
Move to the desirable location with
good reception.
Check the antenna connection. If
the message fails
to disappear even
after the engine is
switched off/on,
contact your dealer or an authorized Pioneer
Service Station
for assistance.
Message Cause Action
Check Tuner The SiriusXM
No Signal The SiriusXM
Subscription
Updated
Not Available
Connect Vehicle
Tuner connection is incorrect.
Connect Vehicle
Tuner is having
difficulty receiving the
SiriusXM satellite signal.
This unit has detected a change
in your
SiriusXM subscription status.
The channel
that you have
requested is not
a valid SiriusXM
channel.
Check the tuner
connection. If the
message fails to
disappear even
after the engine is
switched off/on,
contact your dealer or an authorized Pioneer
Service Station
for assistance.
! Verify that your
vehicle is outdoors with a clear
view of the southern sky.
! Verify that the
SiriusXM magnetic mount antenna is mounted
on a metal surface on the outside the vehicle.
! Move the
SiriusXM antenna
away from any obstructions.
Press any keys to
clear the message.
Check the
SiriusXM channel
lineup.
Message Cause Action
Not Subscribed
Channel
Locked
DVD
Message Cause Action (Refer-
Different Region Disc
Error-02-XX/
FF-FF
Unplayable
Disc
The channel
that you have
requested is not
included in your
SiriusXM subscription package.
Locked by the
radio Parental
Control feature.
The disc does
not have the
same region
number as this
unit.
The disc is dirty. Clean the disc.
The disc is
scratched.
The disc is
loaded upside
down.
There is an electrical or mechanical error.
This type of disc
cannot be
played on this
unit.
The inserted
disc does not
contain any
playable files.
Check the content of your
SiriusXM subscription package.
Release the channel lock.
ence page)
Replace the DVD
with one bearing
the correct region
number. (Reference page)
Replace the disc.
Check that the
disc is loaded correctly.
Press RESET.
(Page 44)
Replace the disc
with one that can
be played on this
unit.
Replace the disc.
English
53
En
Page 54

Appendix
Additional information
Additional information
Message Cause Action (Refer-
Protect All the files on
Skipped The inserted
TEMP The tempera-
This DivX
rental has
expired.
Video resolution not supported
It is not possible to write
it in the
flash.
Your device
is not authorized to
play this
DivX protected video.
the inserted
disc are embedded with
DRM.
disc contains
DRM protected
files.
ture of the unit
is outside the
normal operating range.
The inserted
disc contains
expired DivX
VOD content.
The inserted
disc contains a
high definition
DivX/MPEG-1/
MPEG-2/
MPEG-4 file.
This unit’s flash
memory used
as the temporary storage
area is full.
This unit’s DivX
registration
code has not
been authorized
by the DivX
VOD contents
provider.
ence page)
Replace the disc.
Play an audio file
not embedded
with Windows
Mediaä DRM 9/
10.
Wait until the unit
returns to a temperature within
the normal operating limits.
Select a file that
can be played.
Select a file that
can be played.
Select a file that
can be played.
Register this unit
to the DivX VOD
contents provider.
Message Cause Action (Refer-
Unplayable
File
Format Read Sometimes
Video frame
rate not supported
Audio Format not supported
External storage device (USB)
Message Cause Action (Refer-
Unplayable
File
This type of file
cannot be
played on this
unit.
there is a delay
between the
start of playback
and when you
start to hear any
sound.
DivX file’s frame
rate is more
than 30 fps.
This type of file
is not supported
on this unit.
This type of file
cannot be
played on this
unit.
There are no
songs.
Security for the
connected USB
memory is enabled.
ence page)
Select a file that
can be played.
Wait until the
message disappears and you
hear sound.
Select a file that
can be played.
Select a file that
can be played.
ence page)
Select a file that
can be played.
Transfer the audio
files to the USB
portable audio
player/USB memory and connect.
Follow the USB
memory instructions to disable
security.
Message Cause Action (Refer-
Format Read Sometimes
Skipped The connected
Protect All the files on
Incompatible
USB
there is a delay
between the
start of playback
and when you
start to hear any
sound.
USB portable
audio player/
USB memory
contains WMA
files that are
protected by
Windows
Mediaä
DRM 9/10.
the connected
USB portable
audio player/
USB memory
are protected by
Windows Media
DRM 9/10.
The USB device
connected to is
not supported
by this unit.
The USB device
is not formatted
with FAT12,
FAT16 or FAT32.
ence page)
Wait until the
message disappears and you
hear sound.
Play an audio file
not embedded
with Windows
Mediaä
DRM 9/10.
Transfer audio
files not protected
by Windows
Media DRM 9/10
to the USB portable audio player/
USB memory and
connect.
Connect a USB
portable audio
player or USB
memory that is
USB Mass Storage Class compliant.
The connected
USB device
should be formatted with FAT12,
FAT16 or FAT32.
Message Cause Action (Refer-
Check USB The USB con-
Error-02-9X/-DXCommunication
nector or USB
cable has shortcircuited.
The connected
USB storage device consumes
more than maximum allowable
current.
failed.
ence page)
Check that the
USB connector or
USB cable is not
caught in something or damaged.
Disconnect the
USB portable
audio player/USB
memory and do
not use it. Turn
the ignition
switch to OFF,
then to ACC or
ON and then connect a compliant
USB portable
audio player/USB
memory.
Perform one of
the following operations.
–Turn the ignition
switch OFF and
back ON.
–Disconnect the
USB portable
audio player/USB
memory.
–Change to a different source.
Then, return to
the USB portable
audio player/USB
memory.
54
En
Page 55

Additional information
Appendix
Additional information
Message Cause Action (Refer-
This DivX
rental has
expired.
Video resolution not supported
It is not possible to write
it in the
flash.
Your device
is not authorized to
play this
DivX protected video.
Format Read Sometimes
Video frame
rate not supported
Audio Format not supported
The inserted external storage
device contains
expired DivX
VOD content.
The inserted external storage
device contains
a high definition
DivX/MPEG-1/
MPEG-2/
MPEG-4 file.
This unit’s flash
memory used
as the temporary storage
area is full.
This unit’s DivX
registration
code has not
been authorized
by the DivX
VOD contents
provider.
there is a delay
between the
start of playback
and when you
start to hear any
sound.
DivX file’s frame
rate is more
than 30 fps.
This type of file
is not supported
on this unit.
ence page)
Select a file that
can be played.
Select a file that
can be played.
Select a file that
can be played.
Register this unit
to the DivX VOD
contents provider.
Wait until the
message disappears and you
hear sound.
Select a file that
can be played.
Select a file that
can be played.
Message Cause Action (Refer-
Creating the
Database
has failed.
iPod
Message Cause Action
Format Read Sometimes
Error-02-6X/9X/-DX
Error-02-67 The iPod firm-
The mode was
switched to
video or JPEG
image display
while the database was being
created.
there is a delay
between the
start of playback
and when you
start to hear any
sound.
Communication
failed.
iPod failure. Disconnect the
ware version is
old.
ence page)
Create the database again. (Page
25)
Wait until the
message disappears and you
hear sound.
Disconnect the
cable from the
iPod. Once the
iPod’s main
menu is displayed, reconnect
the iPod and reset
it.
cable from the
iPod. Once the
iPod’s main
menu is displayed, reconnect
the iPod and reset
it.
Update the iPod
version.
Message Cause Action
Stop There are no
Not Found No related
iTunes tagging
Message Cause Action
iPod full.
Tags not
transferred.
Memory full.
Tags not
stored. Connect iPod.
Tag transfer
failed. Reconnect your
iPod.
Tag store
failed.
Error-8D Built-in FLASH
songs.
There are no
songs in the
current list.
songs.
Memory used
for tag information on the iPod
is full.
This unit’s flash
memory used
as the temporary storage
area is full.
This unit’s tag
information
cannot transfer
to the iPod.
Tag information
cannot be
stored in this
unit.
ROM encountered an error
Transfer songs to
the iPod.
Select a list that
contains songs.
Transfer songs to
the iPod.
Sync the iPod
with iTunes and
clean up the
tagged playlist.
The tag information on this unit is
transferred to the
iPod automatically when an
iPod is connected.
Check the iPod
and try again.
Try again.
Turn the ignition
OFF or ON.
Message Cause Action
Already
stored
Bluetooth
Message Cause Action
Error-10 The power failed
Pandora
Message Cause Action
Error-19 Communication
â
This tag information is already stored in
memory.
for the
Bluetooth module of this unit.
failed.
Tag information
can only be saved
once for any
given song. Tag
information cannot be saved for
the same song
more than once.
Turn the ignition
switch OFF and
then to ACC or
ON.
If the error message is still displayed after
performing the
above action,
please contact
your dealer or an
authorized
Pioneer Service
Station.
Disconnect the
cable from the
iPod. Once the
iPod’s main
menu is displayed, reconnect
the iPod and reset
it.
English
55
En
Page 56

Appendix
Additional information
Additional information
Message Cause Action
Start up the
Pandora Application
from your
Device.
Unable to
save thumb
rating. Try
again later.
Unable to
save Bookmark. Try
again later.
Pandora system maintenance. Try
again later.
Skip limit
reached.
This version
of the
Pandora Application is
not supported.
Check Device Device error
Pandora is
unable to
play music.
Please see
your Device.
The Pandora application has
not started running yet.
Unable to save
thumb rating.
Unable to save
Bookmark.
Pandora system
is undergoing
maintenance.
Skip limit
reached.
This version of
the Pandora application is not
supported.
message displayed in the
Pandora application.
Unable to play
music from
Pandora.
Start up the
Pandora application from your
iPhone.
Try again later.
Try again later.
Try again later.
Do not exceed the
skip limit.
Connect an
iPhone that has a
compatible version of the
Pandora application installed.
Please check your
iPhone.
Please check your
iPhone.
Message Cause Action
Create station within
the Pandora
Application
on Device.
No Active
Station
Communication error occured. Please
reconnect
your device.
Device has
not been
registered.
Go to
Bluetooth
Connection
Menu to
register.
BT error.
Press BAND
key to retry.
Start up
Pandora.
Press BAND
key to retry.
Check
Pandora.
Press BAND
key to retry.
No station
found.
No station selected.
If there is no
ACK after 10 attempted retries
at 750 ms, the
accessory
should assume
that communication is interrupted and
disconnect
from
PandoraLink.
No Bluetooth
device found.
Bluetooth connection failed.
Connection to
the Pandora application failed.
Connection to
the Pandora application failed.
Create a station
in the Pandora
application on
your iPhone.
Select a station.
Please reconnect
your iPhone and
try again.
Follow the instructions that appear on the
screen.
Follow the instructions that appear on the
screen.
Follow the instructions that appear on the
screen.
Follow the instructions that appear on the
screen.
Message Cause Action
Disconnected.Press
BAND key to
retry.
Bluetooth connection lost.
Follow the instructions that appear on the
screen.
Understanding auto EQ error
messages
When correct measurement of the car’s interior
acoustic characteristics is not possible using
auto EQ, an error message may appear on the
display. In such cases, refer to the table below to
see what the problem is and how it may be corrected. After checking, try again.
Message Cause Action
Please connect the microphone for
measurement. When
finished,
please push
HOME key.
Error. Please
check xxxx
speaker.
The microphone
is not connected.
The microphone
cannot pick up
the measuring
tone of a speaker.
Plug the optional
microphone securely into the
jack.
! Confirm that
the speakers are
connected correctly.
! Correct the
input level setting
of the power amp
connected to the
speakers.
! Plug the microphone securely
into the jack.
Message Cause Action
Error. Please
check noise.
Error. Please
check battery.
The surrounding noise level
is too high.
Power is not
being supplied
from the battery
to this unit.
! Stop your car in
a place that is
quiet, and switch
off the engine, air
conditioner and
heater.
! Set the microphone correctly.
! Connect the
battery correctly.
! Check the battery voltage.
Understanding messages
Messages Translation
Pioneer recommends
the use of a camera
Screen image may
appear reversed.
which outputs mirrorreversed images. Otherwise, the screen
image will appear reversed.
56
En
Page 57

Additional information
Appendix
Additional information
Indicator list
Area 1 Area 2
Area 3
Area 1
Indicates that the volume is adjusted.
Indicates that the mute function
is on.
Indicates that the sound is attenuated.
Area 2
Shows when downloadable song
information (tag) from a radio station is received.
Disabled while song information
(tag) from an HD Radio station is
being saved to this unit.
Indicates that the digital format is
Dolby Digital.
Indicates that the digital format is
MPEG Audio.
Indicates that the digital format is
Linear PCM.
Indicates the sampling frequency.
Indicates that the digital format is
DTS.
Indicates the audio channel.
Indicates that a disc with PBC On
is being played.
! Indicates that a cellular
phone is connected.
! Indicates that an incoming
call has been received and
has not been checked yet.
Indicates the battery strength of
the cellular phone.
! The level shown on the indica-
tor may differ from the actual
battery strength.
! If the battery strength is not
available, nothing is displayed
in the battery strength indicator area.
Indicates that the connected
Bluetooth device only supports
Bluetooth telephone.
Indicates that the connected
Bluetooth device only supports
Bluetooth audio.
Show the album title when receiving the tag information.
Shows the album title of the song
currently being played for MP3/
WMA/AAC/WAV files.
Shows the song title when receiving the tag information.
Shows the song title of the song
currently being played for MP3/
WMA/AAC/WAV files.
Shows the comment currently
being played.
Shows the station name currently
tuned in to.
Shows the artist name when receiving the tag information.
Shows the artist name of the artist currently being played for
MP3/WMA/AAC/WAV files.
Shows cellular phone information.
Shows general phone information.
Shows home phone information.
Shows office phone information.
Shows other phone information.
Shows the composer name.
Shows the category name.
Shows the folder name of the
folder containing the MP3/WMA/
AAC file currently being played.
Shows the file name of the MP3/
WMA/AAC file currently being
played.
Shows the preset number of the
station currently being tuned in
to.
Shows the channel currently
being tuned in to.
Shows SiriusXM information.
Shows the title number currently
being played.
Shows the chapter number currently being played.
Shows the replay time currently
being played.
Shows when the game alert function is on while receiving
SiriusXM stations.
Shows the genre of the track/
song currently being played.
English
57
En
Page 58

Appendix
Additional information
Additional information
Area 3
ANALOG
DIGITAL
DB
DB
Shows when radio signal is received.
Shows when analog audio of HD
Radio signal is received.
Shows when digital audio of HD
Radio signal is received.
Shows when HD Radio station information is received.
Touch to turn BSM on.
Indicates that Auto EQ is on.
Shows when this unit has the
song information (tag).
Indicates that the unit is currently
processing an operation such as
search.
Shows when creating the database in Music browse mode.
Shows when saving the database
in Music browse mode.
Indicates the signal strength of
the cellular phone.
Indicates that a Bluetooth telephone is connected.
Handling guidelines
Discs and playe r
Use discs featuring any of the following logos.
Use 12-cm discs. Do not use 8-cm discs or an
adapter for 8-cm discs.
Use only conventional, fully circular discs. Do not
use shaped discs.
Do not insert anything other than a DVD-R/RW or
CD-R/RW into the disc loading slot.
Do not use cracked, chipped, warped, or otherwise damaged discs as they may damage the player.
Unfinalized CD-R/RW discs cannot be played
back.
Do not touch the recorded surface of the discs.
Store discs in their cases when not in use.
Do not attach labels, write on or apply chemicals
to the surface of the discs.
To clean a disc, wipe the disc with a soft cloth outward from the center.
Condensation may temporarily impair the player’s
performance. Let it rest for about one hour to adjust to a warmer temperature. Also, wipe any
damp discs off with a soft cloth.
Playback of discs may not be possible because of
disc characteristics, disc format, recorded application, playback environment, storage conditions,
and so on.
Road shocks may interrupt disc playback.
Certain functions may not be available for some
DVD video discs.
It may not be possible to play back some DVD
video discs.
It is not possible to play back DVD-RAM discs.
This unit is not compatible with discs recorded in
AVCHD (Advanced Video Codec High Definition)
format. Do not insert AVCHD discs as you may not
be able to eject the disc.
When using discs that can be printed on label surfaces, check the instructions and the warnings of
the discs. Depending on the discs, inserting and
ejecting may not be possible. Using such discs
may result in damage to this equipment.
Do not attach commercially available labels or
other materials to the discs.
! The discs may warp making the disc unplay-
able.
! The labels may come off during playback and
prevent ejection of the discs, which may result
in damage to the equipment.
External storage device (USB)
Depending on the external storage device (USB),
the following problems may occur.
! Operations may vary.
! The storage device may not be recognized.
! Files may not be played back properly.
USB storage device
Connections via USB hub are not supported.
Do not connect anything other than a USB storage device.
Firmly secure the USB storage device when driving. Do not let the USB storage device fall onto the
floor, where it may become jammed under the
brake or accelerator pedal.
Depending on the USB storage device, the device
may cause noise to occur in the radio.
Copyright protected files that are stored in the
USB devices cannot be played back.
You cannot connect a USB portable audio player/
USB memory to this unit via USB hub.
Partitioned USB memory is not compatible with
this unit.
Depending on the kind of USB portable audio
player/USB memory you use, the device may not
be recognized or audio files may not be played
back properly.
Do not leave the USB portable audio player/USB
memory in direct sunlight for extended amounts
of time. Doing so may cause the device to malfunction from the extreme rise in temperature.
iPod
To ensure proper operation, connect the dock connector cable from the iPod directly to this unit.
Firmly secure the iPod when driving. Do not let the
iPod fall onto the floor, where it may become
jammed under the brake or accelerator pedal.
58
En
Page 59

Additional information
Appendix
Additional information
About iPod settings
! When an iPod is connected, this unit changes
the EQ (equalizer) setting of the iPod to off in
order to optimize the acoustics. When you disconnect the iPod, the EQ returns to the original
setting.
! Youcannot set Repeat to off on the iPod when
using this unit. Repeat is automatically
changed to All when the iPod is connected to
this unit.
Incompatible text saved on the iPod will not be displayed by the unit.
DVD-R/RW discs
Unfinalized DVD-R/RW discs which have been recorded in the Video format (video mode) cannot
be played back.
Playback of DVD-R/RW discs may not be possible,
due to disc characteristics, scratches or dirt on
the disc, or dirt, condensation, etc. on the lens of
this unit.
Depending on the application settings and the environment, playback of discs recorded on a personal computer may not be possible. (For details,
contact the manufacturer of the application.)
CD-R/RW discs
When CD-R/RW discs are used, playback is possible only for discs which have been finalized.
Playback of CD-R/RW discs recorded on a music
CD recorder or a personal computer may not be
possible due to disc characteristics, scratches or
dirt on the disc, or dirt, condensation, etc., on the
lens of this unit.
Depending on the application settings and the environment, playback of discs recorded on a personal computer may not be possible. (For details,
contact the manufacturer of the application.)
Playback of CD-R/RW discs may become impossible in case of direct exposure to sunlight, high
temperatures, or the storage conditions in the vehicle.
Titles and other text information recorded on a
CD-R/RW disc may not be displayed by this unit
(in the case of audio data (CD-DA)).
DualDiscs
DualDiscs are two-sided discs that have a recordable CD for audio on one side and a recordable
DVD for video on the other.
Playback of the DVD side is possible with this unit.
However, since the CD side of DualDiscs is not
physically compatible with the general CD standard, it may not be possible to play the CD side with
this unit.
Frequent loading and ejecting of a DualDisc may
result in scratches on the disc. Serious scratches
can lead to playback problems on this unit. In
some cases, a DualDisc may become stuck in the
disc loading slot and will not eject. To prevent this,
we recommend you refrain from using DualDisc
with this unit.
Please refer to the information from the disc manufacturer for more detailed information about
DualDiscs.
JPEG picture files
JPEG is short for Joint Photographic Experts
Group and refers to a still image compression
technology standard.
Files are compatible with Baseline JPEG and EXIF
2.1 still images up to a resolution of 8 192 × 7 680.
(EXIF format is used most commonly with digital
still cameras.)
Playback of EXIF format files that were processed
by a personal computer may not be possible.
There is no progressive JPEG compatibility.
DivX video files
Depending on the composition of the file information, such as the number of audio streams or file
size, there may be a slight delay when playing
back discs.
Some special operations may be prohibited due to
the composition of the DivX files.
Only DivX files downloaded from a DivX partner
site are guarantee for proper operation. Unauthorized DivX files may not operate properly.
DRM rental files cannot be operated until playback is started.
Recommended file size: 2 GB or less with a transmission rate of 2 Mbps or less.
The ID code of this unit must be registered to a
DivX VOD provider in order to playback DivX VOD
files. For information on ID codes, refer to Display-
â
ing the DivX
For more details about DivX, visit the following
site:
http://www.divx.com/
VOD registration code on page 37.
MPEG-1/MPEG-2/MPEG-4 video files
Elapsed playback time may not be displayed correctly.
Important
! When naming a JPEG image file, add the
corresponding file name extension (.jpg,
.jpeg or .jpe).
! This unit plays back files with these file name
extensions (.jpg, .jpeg or .jpe) as a JPEG
image file. To prevent malfunctions, do not
use these extensions for files other than
JPEG image files.
Compressed audio
compatibility (USB)
WAV
File extension: .wav
Quantization bits: 8 and 16 (LPCM), 4 (MS
ADPCM)
Sampling frequency: 16 kHz to 48 kHz (LPCM),
22.05 kHz and 44.1 kHz (MS ADPCM)
Compressed audio
compatibility (disc, USB)
WMA
File extension: .wma
Bit rate: 48 kbps to 320 kbps (CBR), VBR
Sampling frequency: 32 kHz to 48 kHz
Windows Mediaä Audio Professional, Lossless,
Voice/DRM Stream/Stream with video: Not compatible
MP3
File extension: .mp3
Bit rate: 8 kbps to 320 kbps (CBR), VBR
Sampling frequency: 8 kHz to 48 kHz (32 kHz,
44.1 kHz, 48 kHz for emphasis)
Compatible ID3 tag version: 1.0, 1.1, 2.2, 2.3, 2.4
(ID3 tag Version 2.x is given priority over Version
1.x.)
M3u playlist: Not compatible
MP3i (MP3 interactive), mp3 PRO: Not compatible
English
59
En
Page 60

Appendix
Additional information
Additional information
AAC
Compatible format: AAC encoded by iTunes
File extension: .m4a
Sampling frequency: 11.025 kHz to 48 kHz
Bit rate: 16 kbps to 320 kbps
Apple Lossless: Not compatible
AAC file bought from the iTunes Store (.m4p file
extension): Not compatible
DivX compatibility
Compatible format: DivX video format implemented in relation to DivX standards
File extensions: .avi or .divx
DivX Ultra format: Not compatible
DivX HD format: Not compatible
DivX files without video data: Not compatible
DivX plus: Not compatible
Compatible audio codec: MP2, MP3, Dolby Digital
LPCM: Compatible
Bit rate: 8 kbps to 320 kbps (CBR), VBR
Sampling frequency: 8 kHz to 48 kHz
Compatible external subtitle file extension: .srt
MPEG-1/MPEG-2/MPEG-4 video
File extensions: .mpg or .mpeg (MPEG-1/MPEG-2),
.avi (MPEG-4)
Compatible audio codec: MP2 (MPEG-1/MPEG-2),
MP2, MP3, Dolby Digital (MPEG-4)
H.264 (MPEG-4AVC): Compatible
LPCM: Not compatible
60
En
Bit rate: 8 kbps to 320 kbps (CBR), VBR
Sampling frequency: 8 kHz to 48 kHz
Supplemental information
Some characters in a file name (including the file
extension) or a folder name may not be displayed.
This unit may not work properly depending on the
application used to encode WMA files.
There may be a slight delay at the start of playback
of audio files embedded with image data or audio
files stored on a USB storage device that has numerous folder hierarchies.
Disc (CD/DVD)
Playable folders: up to 99 for CD-R/RW
Playable folders: up to 700 for DVD-R/RW
Playable files: up to 999 for CD-R/RW
Playable files: up to 3 500 for DVD-R/RW
File system: ISO 9660 Level 1 and 2, Romeo, Joliet,
UDF 1.02 (DVD-R/RW)
Multi-session playback: Compatible
Packet write data transfer: Not compatible
Regardless of the length of blank sections between the songs from the original recording, compressed audio discs play with a short pause
between songs.
External storage device (USB)
Playable folders: up to 1 500 (up to 700 for DivX/
MPEG-1/MPEG-2/MPEG-4)
Playable files: up to 15 000
Playback of copyright-protected files: Not compatible
Partitioned external storage device (USB): Only the
first playable partition can be played.
There is no compatibility for Multi Media Cards
(MMC).
CAUTION
! Pioneer accepts no responsibility for data
lost on the USB memory/USB portable audio
player even if that data is lost while using
this unit.
! Pioneer cannot guarantee compatibility with
all USB mass storage devices and assumes
no responsibility for any loss of data on
media players, smart phones, or other devices while using this product.
! Do not leave the discs/external storage de-
vice (USB) or iPod in places with high temperatures.
iPod compatibility
This unit supports only the following iPod models. Supported iPod software versions are shown
below. Older versions may not be supported.
Made for
! iPod touch 4th generation (soft ware version
5.1.1)
! iPod touch 3rd generation (software version
5.1.1)
! iPod touch 2nd generation (software version
4.2.1)
! iPod touch 1st generation (soft ware version
3.1.3)
! iPod classic 160GB (software version 2.0.4)
! iPod classic 120GB (software version 2.0.1)
! iPod classic (software version 1.1.2)
! iPod with video (software version 1.3)
! iPod nano 6th generation (software version
1.2)
! iPod nano 5th generation (software version
1.0.2)
! iPod nano 4th generation (software version
1.0.4)
! iPod nano 3rd generation (software version
1.1.3)
! iPod nano 2nd generation (software version
1.1.3)
! iPod nano 1st generation (software version
1.3.1)
! iPhone 4S (software version 5.1.1)
! iPhone 4 (software version 5.1.1)
! iPhone 3GS (software version 5.1.1)
! iPhone 3G (software version 4.2.1)
! iPhone (software version 3.1.3)
Depending on the generation or version of the
iPod, some functions may not be available.
Operations may vary depending on the software
version of iPod.
When using an iPod, an iPod Dock Connector to
USB Cable is required.
When you use Pioneer CD-IU51V/CD-IU201V interface cable, consult your dealer for details.
About the file/format compatibility, refer to the
iPod manuals.
Audiobook, Podcast: Compatible
CAUTION
Pioneer accepts no responsibility for data lost
on the iPod, even if that data is lost while this
unit is used.
About iTunes tagging
This function can be performed with the following
iPod models.
— iPod touch 4th generation
— iPod touch 3rd generation
— iPod touch 2nd generation
Page 61

Additional information
Appendix
Additional information
— iPod touch 1st generation
— iPod classic 160GB
— iPod classic 120GB
— iPod classic
— iPod with video
— iPod nano 6th generation
— iPod nano 5th generation
— iPod nano 4th generation
— iPod nano 3rd generation
— iPhone 4S
— iPhone 4
— iPhone 3GS
— iPhone 3G
— iPhone
The song information (tag) can be saved from
the broadcasting station to your iPod. The songs
will show up in a playlist called “Tagged playlist”
in iTunes the next time you sync your iPod. Then
you can directly buy the songs you want from
the iTunes Store.
The tagged songs and the song that you can buy
from the iTunes Store may be different. Make
sure to confirm the song before you make the
purchase.
If you cannot use this function normally, update
your iPod firmware.
Sequence of audio files
The user cannot assign folder numbers and
specify playback sequences with this unit.
Example of a hierarchy
01
02
03
04
05
Level 1 Level 2 Level 3 Level 4
audio file
01 to 05: Folder
number
1 to 6: Playback
sequence
: Folder
: Compressed
Disc
Folder selection sequence or other operation
may differ depending on the encoding or writing
software.
External storage device (USB)
The playback sequence is the same as the recorded sequence in the external storage device
(USB).
To specify the playback sequence, the following
method is recommended.
1 Create a file name that includes numbers
that specify the playback sequence (e.g.,
001xxx.mp3 and 099yyy.mp3).
2 Put those files into a folder.
3 Save the folder that contains the files to the
external storage device (USB).
However,depending on the system environment,
you may not be able to specify the playback sequence.
For USB portable audio players, the sequence is
different and depends on the player.
Using the display correctly
CAUTION
! If liquid or foreign matter should get inside
this unit, turn off the power immediately and
consult your dealer or the nearest authorized
PIONEER Service Station. Do not use the
unit in this condition because doing so may
result in fire, electric shock, or other failure.
! If you notice smoke, a strange noise or smell,
or any other abnormal signs from the display,
turn off the power immediately and consult
your dealer or the nearest authorized
PIONEER Service Station. Using this unit in
this condition may result in permanent dam-
age to the system.
! Do not disassemble or modify this unit, as
there are high-voltage components inside
which may cause electric shock. Be sure to
consult your dealer or the nearest authorized
PIONEER Service Station for internal inspection, adjustments, or repairs.
Handling the display
! Never touch the screen with anything be-
sides your finger when operating the touch
panel function. The screen can scratch
easily.
! When the display is subjected to direct sun-
light for a long period of time, it will become
very hot resulting in possible damage to the
LCD screen. You should avoid exposing the
display unit to direct sunlight as much as
possible.
! The display should be used within the tem-
perature range of 14 °F to 140 °F.
At temperatures higher or lower than this operating temperature range, the display may
not operate normally.
! The LCD screen is exposed in order to in-
crease its visibility within the vehicle. Do not
press it strongly on it as this may damage it.
! Do not push the LCD screen forcefully as
this may scratch it.
Liquid crystal display (LCD) screen
! Heat from the heater may damage the LCD
screen, and cool air from the cooler may
cause moisture to form inside the display resulting in possible damage.
! Small black dots or white dots (bright dots)
may appear on the LCD screen. These are
due to the characteristics of the LCD screen
and do not indicate a malfunction.
! When using a cellular phone, keep the an-
tenna away from the display to prevent disruption of the video image by the
appearance of spots, colored stripes, etc.
LED (light-emitting diode) backlight
! At low temperatures, using the LED backlight
may increase image lag and degrade the
image quality due to the characteristics of
the LCD screen. Image quality will improve
with an increase in temperature.
! To protect the LED backlight, the display will
darken in the following environments:
— In the direct sunlight
— Near the heater vent
! The product lifetime of the LED backlight is
more than 10 000 hours. However, it may decrease if used in high temperatures.
! If the LED backlight reaches the end of its
product lifetime, the screen will become dark
and the image will no longer be projected. In
such cases, please consult your dealer or the
nearest authorized PIONEER Service Station.
Keeping the display in good
condition
! When removing dust from the screen or
cleaning the display, first turn the system
power off, then wipe with a soft dry cloth.
! When wiping the screen, take care not to
scratch the surface. Do not use harsh or
abrasive chemical cleaners.
Bluetooth profiles
In order to use Bluetooth wireless technology,
devices must be able to interpret certain profiles. This unit is compatible with the following
profiles.
! GAP (Generic Access Profile)
! SDP (Service Discovery Protocol)
! OPP (Object Push Profile)
! HFP (Hands Free Profile)
! HSP (Head Set Profile)
! PBAP (Phone Book Access Profile)
! A2DP (Advanced Audio Distribution Profile)
English
61
En
Page 62

Appendix
Additional information
Additional information
! AVRCP(Audio/Video Remote Control Profile)
1.3
! SPP (Serial Port Profile) 1.1
License, Warranty Disclaimer
& Limitation of Liability
This item incorporates copy protection technology that is protected by U.S. patents and other
intellectual property rights of Rovi Corporation.
Reverse engineering and disassembly are prohibited.
SAFETY PROVISIONS
Disclaimer
THE WARRANTIES SET FORTH IN PIONEER’S
LIMITED WARRANTY ARE THE ONLY WARRANTIES MADE BY PIONEER OR ANY OF ITS LICENSORS, AS APPLICABLE. PIONEER AND ITS
LICENSORS EXPRESSLY DISCLAIM ALL OTHER
WARRANTIES, EXPRESS OR IMPLIED, INCLUDING, WITHOUT LIMITATION,WARRANTIES OF
MERCHANTABILITY AND FITNESS FOR A PARTICULAR PURPOSE.
Limitation of Li ability
TO THE MAXIMUM EXTENT PERMISSIBLE
UNDER APPLICABLE LAW, NEITHER PIONEER
NOR ITS LICENSORS WILL BE LIABLE TO YOU
OR TO ANY OTHER PARTY FOR ANY INDIRECT,
CONSEQUENTIAL, INCIDENTAL, PUNITIVE, OR
SPECIAL DAMAGES, REGARDLESS OF THE
FORM OF ACTION, WHETHER IN CONTRACT
OR IN TORT, INCLUDING NEGLIGENCE, EVEN IF
SUCH PARTIES HAVE BEEN ADVISED OF THE
POSSIBILITY OF SUCH DAMAGES.
TO THE MAXIMUM EXTENT PERMISSIBLE
UNDER APPLICABLE LAW, PIONEER’S, OR ITS
LICENSORS’, TOTAL LIABILITY OF ANY KIND
ARISING OUT OF OR RELATED TO YOUR USE
OF THE PRODUCTS, INCLUDING, BUT NOT LIMITED TO, ANY WARRANTY CLAIMS, OR ANY
62
En
CLAIMS FOR PROPERTY DAMAGE, DEATH OR
DISABILITY, REGARDLESS OF THE FORUM
AND REGARDLESS OF WHETHER ANY ACTION
OR CLAIM IS BASED ON CONTRACT, TORT, (INCLUDING NEGLIGENCE), STRICT PRODUCT LIABILITY, OR ANY OTHER LEGAL THEORY, WILL
NOT EXCEED ONE THOUSAND DOLLARS (USD
$1 000).
SOME JURISDICTIONS DO NOT ALLOW THE
EXCLUSION OF DAMAGES OR LIMITATION OF
LIABILITY, SO THE ABOVE EXCLUSIONS OR
LIMITATIONS,TO THE EXTENT PROHIBITED BY
APPLICABLE LAW, MAY NOT APPLY TO YOU.
YOUR SPECIFIC RIGHTS MAY VARY FROM JURISDICTION TO JURISDICTION.
Bluetooth
The Bluetoothâword mark and logos are registered trademarks owned by Bluetooth SIG, Inc.
and any use of such marks by PIONEER
CORPORATION is under license. Other trademarks and trade names are those of their respective owners.
DVD video
is a trademark of DVD Format/Logo
Licensing Corporation.
iTunes
Apple and iTunes are trademarks of Apple Inc.,
registered in the U.S. and other countries.
MP3
Supply of this product only conveys a license for
private, non-commercial use and does not convey a license nor imply any right to use this product in any commercial (i.e. revenue-generating)
real time broadcasting (terrestrial, satellite,
cable and/or any other media), broadcasting/
streaming via internet, intranets and/or other
networks or in other electronic content distribution systems, such as pay-audio or audio-on-demand applications. An independent license for
such use is required. For details, please visit
http://www.mp3licensing.com.
WMA
Windows Media is either a registered trademark
or trademark of Microsoft Corporation in the
United States and/or other countries.
This product includes technology owned by
Microsoft Corporation and cannot be used or
distributed without a license from Microsoft
Licensing, Inc.
iPod & iPhone
iPhone, iPod, iPod classic, iPod nano, and iPod
touch are trademarks of Apple Inc., registered in
the U.S. and other countries.
“Made for iPod” and “Made for iPhone” mean
that an electronic accessory has been designed
to connect specifically to iPod or iPhone, respectively, and has been certified by the developer to
meet Apple performance standards. Apple is
not responsible for the operation of this device
or its compliance with safety and regulatory
standards. Please note that the use of this accessory with iPod or iPhone may affect wireless
performance.
Androidä
Android is a trademark of Google Inc.
BlackBerryâ
The Trademark BlackBerryâis owned by Research In Motion Limited and is registered in the
United States and may be pending or registered
in other countries. PIONEER CORPORATION is
not endorsed, sponsored, affiliated with or otherwise authorized by Research In Motion Limited.
Dolby Digital
Manufactured under license from Dolby
Laboratories. Dolby and the double-D symbol
are trademarks of Dolby Laboratories.
DivX
DivXâ, DivX Certifiedâand associated logos are
trademarks of Rovi Corporation or its subsidiaries and are used under license.
ABOUT DIVX VIDEO: DivX
format created by DivX, LLC, a subsidiary of Rovi
Corporation. This is an official DivX Certified
device that plays DivX video. Visit divx.com for
more information and software tools to convert
your files into DivX videos.
ABOUT DIVX VIDEO-ON-DEMAND: This
DivX Certified
order to play purchased DivX Video-on-Demand
(VOD) movies. To obtain your registration code,
locate the DivX VOD section in Displaying the
DivX
for more information on how to complete your
registration.
â
device must be registered in
â
VOD registration code. Go to vod.divx.com
â
is a digital video
â
SiriusXM Satellite Radio
SiriusXM and all related marks and logos are
trademarks of Sirius XM Radio, Inc. All rights reserved.
Pandoraâ internet radio
PANDORA, the PANDORA logo, and the
Pandora trade dress are trademarks or registered trademarks of Pandora Media, Inc. Used
with permission.
MIXTRAX
MIXTRAX is a trademark of the PIONEER
CORPORATION.
Page 63

Additional information
Appendix
Additional information
libpng
Please be aware in advance that Pioneer will not
respond to questions concerning the contents
of the source code.
This licence was originally written in English
and translated here only to help the reader
understand its content. Therefore, please note
that translated licence is NOT legally identified
with the original English text.
This copy of the libpng notices is provided for
your convenience. In case of any discrepancy
between this copy and the notices in the file
png.h that is included in the libpng distribution,
the latter shall prevail.
COPYRIGHT NOTICE, DISCLAIMER, and LICENSE:
If you modify libpng you may insert additional
notices immediately following this sentence.
This code is released under the libpng license.
libpng versions 1.2.6, August 15, 2004, through
1.5.0, January 6, 2011, are Copyright (c) 2004,
2006-2010 Glenn Randers-Pehrson, and are distributed according to the same disclaimer and license as libpng-1.2.5 with the following
individual added to the list of Contributing Authors
Cosmin Truta
libpng versions 1.0.7, July 1, 2000, through 1.2.5
- October 3, 2002, are Copyright (c) 2000-2002
Glenn Randers-Pehrson, and are distributed according to the same disclaimer and license as
libpng-1.0.6 with the following individuals added
to the list of Contributing Authors
Simon-Pierre Cadieux
Eric S. Raymond
Gilles Vollant
and with the following additions to the disclaimer:
There is no warranty against interference with
your enjoyment of the library or against infringement. There is no warranty that our efforts or
the library will fulfill any of your particular purposes or needs. This library is provided with all
faults, and the entire risk of satisfactory quality,
performance, accuracy, and effort is with the
user.
libpng versions 0.97, January 1998, through
1.0.6, March 20, 2000, are Copyright (c) 1998,
1999 Glenn Randers-Pehrson, and are distributed according to the same disclaimer and license as libpng-0.96, with the following
individuals added to the list of Contributing Authors:
Tom Lane
Glenn Randers-Pehrson
Willem van Schaik
libpng versions 0.89, June 1996, through 0.96,
May 1997, are Copyright (c) 1996, 1997 Andreas
Dilger Distributed according to the same disclaimer and license as libpng-0.88, with the following individuals added to the list of
Contributing Authors:
John Bowler
Kevin Bracey
Sam Bushell
Magnus Holmgren
Greg Roelofs
Tom Tanner
libpng versions 0.5, May 1995, through 0.88, January 1996, are Copyright (c) 1995, 1996 Guy Eric
Schalnat, Group 42, Inc.
For the purposes of this copyright and license,
"Contributing Authors" is defined as the following set of individuals:
Andreas Dilger
Dave Martindale
Guy Eric Schalnat
Paul Schmidt
Tim Wegner
The PNG Reference Library is supplied "AS IS".
The Contributing Authors and Group 42, Inc. disclaim all warranties, expressed or implied, including, without limitation, the warranties of
merchantability and of fitness for any purpose.
The Contributing Authors and Group 42, Inc. assume no liability for direct, indirect, incidental,
special, exemplary, or consequential damages,
which may result from the use of the PNG Reference Library, even if advised of the possibility of
such damage.
Permission is hereby granted to use, copy, modify, and distribute this source code, or portions
hereof, for any purpose, without fee, subject to
the following restrictions:
1. The origin of this source code must not be
misrepresented.
2. Altered versions must be plainly marked as
such and must not be misrepresented as being
the original source.
3. This Copyright notice may not be removed or
altered from any source or altered source distribution.
The Contributing Authors and Group 42, Inc.
specifically permit, without fee, and encourage
the use of this source code as a component to
supporting the PNG file format in commercial
products. If you use this source code in a product, acknowledgment is not required but would
be appreciated.
A "png_get_copyright" function is available, for
convenient use in "about" boxes and the like:
printf("%s",png_get_copyright(NULL));
Also, the PNG logo (in PNG format, of course) is
supplied in the files "pngbar.png" and
"pngbar.jpg (88x31) and "pngnow.png" (98x31).
Libpng is OSI Certified Open Source Software.
OSI Certified Open Source is a certification
mark of the Open Source Initiative.
Glenn Randers-Pehrson
glennrp at users.sourceforge.net
January 6, 2011
English
63
En
Page 64

Appendix
Additional information
Additional information
Language code chart for DVD
Language (code), input code
Japanese (ja), 1001 Dzongkha (dz), 0426 Kurdish (ku), 1121 Kinyarwanda (rw), 1823
English (en), 0514 Ewe (ee), 0505 Komi (kv), 1122 Sanskrit (sa), 1901
French (fr), 0618 Esperanto(eo), 0515 Cornish (kw), 1123 Sardinian (sc), 1903
Spanish (es), 0519 Estonian (et), 0520
German (de), 0405 Basque (eu), 0521 Latin (la), 1201
Italian (it), 0920 Persian (fa), 0601
Chinese (zh), 2608 Fulah (ff), 0606 Ganda (lg), 1207 Sinhala (si), 1909
Dutch, Flemish (nl),
1412
Portuguese (pt), 1620 Fijian (fj), 0610 Lingala (ln), 1214 Slovenian (sl), 1912
Swedish (sv), 1922 Faroese (fo), 0615 Lao (lo), 1215 Samoan (sm), 1913
Russian (ru), 1821
Korean (ko), 1115 Irish(ga), 0701 Luba-Katanga (lu), 1221 Somali (so), 1915
Greek (el), 0512 Gaelic (gd), 0704 Latvian (lv), 1222 Albanian (sq), 1917
Afar (aa), 0101 Galician (gl), 0712 Malagasy (mg), 1307 Serbian (sr), 1918
Abkhazian (ab), 0102 Guarani (gn), 0714 Marshallese (mh), 1308 Swati (ss), 1919
Avestan (ae), 0105 Gujarati (gu), 0721 Maori (mi), 1309
Afrikaans (af), 0106 Manx (gv), 0722 Macedonian (mk), 1311 Sundanese (su), 1921
Akan (ak), 0111 Hausa (ha), 0801 Malayalam (ml), 1312 Swahili (sw), 1923
Amharic (am), 0113 Hebrew (he), 0805 Mongolian (mn), 1314 Tamil (ta), 2001
Aragonese (an), 0114 Hindi (hi), 0809 Marathi (mr), 1318 Telugu (te), 2005
Arabic (ar), 0118 Hiri Motu (ho), 0815 Malay (ms), 1319 Tajik (tg), 2007
Assamese (as), 0119 Croatian (hr), 0818 Maltese (mt), 1320 Thai (th), 2008
Avaric (av), 0122 Haitian (ht), 0820 Burmese (my), 1325 Tigrinya (ti), 2009
Aymara (ay), 0125 Hungarian (hu), 0821 Nauru (na), 1401 Turkmen (tk), 2011
Azerbaijani (az), 0126 Armenian (hy), 0825 Bokmal (nb), 1402 Tagalog (tl), 2012
Bashkir (ba), 0201 Herero (hz), 0826
Belarusian (be), 0205 Interlingua (ia), 0901 Nepali (ne), 1405 Tonga (to), 2015
Bulgarian (bg), 0207 Indonesian (id), 0904 Ndonga (ng), 1407 Turkish(tr), 2018
Bihari (bh), 0208 Interlingue (ie), 0905 Nynorsk (nn), 1414 Tsonga (ts), 2019
Bislama (bi), 0209 Igbo (ig), 0907 Norwegian (no), 1415 Tatar (tt), 2020
Bambara (bm), 0213 Sichuan Yi (ii), 0909
64
En
Finnish (fi), 0609 Limburgan (li), 1209 Slovak (sk), 1911
Western Frisian (fy),
0625
Kirghiz, Kyrgyz (ky),
1125
Luxembourgish (lb),
1202
Lithuanian (lt), 1220 Shona (sn), 1914
Ndebele, North (nd),
1404
Ndebele, South (nr),
1418
Sindhi (sd), 1904
Northern Sami (se),
1905
Sangho (sg), 1907
Sotho, Southern (st),
1920
Tswana (tn), 2014
Twi (tw), 2023
Language (code), input code
Bengali (bn), 0214 Inupiaq (ik), 0911
Tibetan (bo), 0215 Ido (io), 0915 Chichewa (ny), 1425
Breton (br), 0218 Icelandic (is), 0919 Occitan (oc), 1503 Ukrainian (uk), 2111
Bosnian (bs), 0219 Inuktitut (iu), 0921 Ojibwa (oj), 1510 Urdu (ur), 2118
Catalan (ca), 0301 Javanese (jv), 1022 Oromo(om), 1513 Uzbek (uz), 2126
Chechen (ce), 0305 Georgian (ka), 1101 Oriya (or), 1518 Venda (ve), 2205
Chamorro (ch), 0308 Kongo (kg), 1107 Ossetian (os), 1519 Vietnamese (vi), 2209
Corsican (co), 0315 Kikuyu, Gikuyu (ki), 1109
Cree (cr), 0318 Kuanyama (kj), 1110 Pali (pi), 1609 Walloon(wa), 2301
Czech (cs), 0319 Kazakh (kk), 1111 Polish (pl), 1612 Wolof (wo), 2315
Church Slavic (cu), 0321 Kalaallisut (kl), 1112
Chuvash (cv), 0322
Welsh (cy), 0325 Kannada (kn), 1114 Romansh (rm), 1813 Yoruba(yo), 2515
Danish (da), 0401 Kanuri (kr), 1118 Rundi (rn), 1814
Divehi (dv), 0422 Kashmiri (ks), 1119 Romanian (ro), 1815 Zulu (zu), 2621
Central Khmer (km),
1113
Navajo, Navaho (nv),
1422
Panjabi, Punjabi (pa),
1601
Pashto, Pushto (ps),
1619
Quechua (qu), 1721 Yiddish (yi), 2509
Tahitian (ty), 2025
Uighur, Uyghur (ug),
2107
Volapük (vo), 2215
Xhosa (xh), 2408
Zhuang, Chuang (za),
2601
Page 65

Additional information
Appendix
Additional information
Specifications
General
Power source ................... 14.4 V DC (10.8 V to 15.1 V al-
Grounding system ............ Negative type
Maximum current consumption
................................... 10.0 A
Dimensions (W × H × D):
D
Chassis .............. 178 mm × 100 mm ×
Nose .................. 171mm × 97 mm ×
(AVH-X5500BHS/AVH-X4500BT)
Nose .................. 171mm ×97 mm× 9 mm
(AVH-X3500BHS/AVH-X2500BT/AVH-
X1500DVD)
Weight ............................. 2.0kg (4.4 lbs)
(AVH-X5500BHS/AVH-X4500BT)
Weight ............................. 1.7 kg (3.7 lbs)
(AVH-X3500BHS/AVH-X2500BT/AVH-X1500DVD)
Display
Screen size/aspect ratio .. . 6.95 inch wide/16:9
(AVH-X5500BHS/AVH-X4500BT)
Screen size/aspect ratio .. . 6.1 inch wide/16:9
(AVH-X3500BHS/AVH-X2500BT/AVH-X1500DVD)
Pixels ............................... 1 152 000(2 400× 480)
Display method ................ TFT active matrix, driving type
Color system .................... NTSC/PAL/PAL-M/PAL-N/
Durable temperature range (power off)
................................... –4 °F to +176 °F
Audio
Maximum power output ... 50 W × 4
lowable)
165 mm
(7 in. × 3-7/8 in. × 6-1/2in.)
18 mm
(6-3/4 in. × 3-7/8 in. × 3/4in.)
(6-3/4 in.× 3-7/8 in. ×3/8 in.)
(effective display area:
156.6 mm × 81.6 mm)
(effective display area:
136.2 mm × 72.0 mm)
SECAM compatible
70 W × 1/2 W (for subwoofer)
Continuous power output
................................... 22 W × 4 (50 Hz to 15000 Hz,
Load impedance .............. 4 W (4 W to 8 W (2W for 1 ch)
Preout maximum output level
................................... 4.0V
(AVH-X5500BHS/AVH-X4500BT)
Preout maximum output level
................................... 2.0V
(AVH-X3500BHS/AVH-X2500BT/AVH-X1500DVD)
Equalizer (8-Band Graphic Equalizer):
Frequency ................. 40 Hz/80 Hz/200 Hz/400 Hz/
Gain ......................... ±12 dB
HPF:
Frequency ................. 50 Hz/63 Hz/80 Hz/100 Hz/
Slope ........................ –12 dB/ oct
Subwoofer (mono):
Frequency ................. 50 Hz/63 Hz/80 Hz/100 Hz/
Slope ........................ –18 dB/oct
Gain ......................... +6 dB to –24 dB
Phase ....................... Normal/Reverse
Bass boost:
Gain ......................... +12 dB to 0 dB
DVD Player
System ............................ DVD video, Video CD, CD,
Usable discs .................... DVD video, Video CD, CD, CD-
Region number ................ 1
Frequency response ......... 5 Hz to 44 000 Hz (with DVD,
Signal-to-noise ratio ......... 96 dB (1 kHz) (IHF-A network)
(AVH-X5500BHS/AVH-X4500BT)
Signal-to-noise ratio ......... 91 dB (1kHz) (IHF-A network)
(AVH-X3500BHS/AVH-X2500BT/AVH-X1500DVD)
Output level:
Video ........................ 1.0 Vp-p/75 W (±0.2 V)
Number of channels ........ 2 (stereo)
MP3 decoding format ...... MPEG-1 & 2 Audio Layer 3
5 %THD, 4 Wload, both channels driven)
allowable)
1 kHz/2.5kHz/8 kHz/10 kHz
125 Hz
125 Hz
WMA, MP3, AAC, DivX, JPEG,
MPEG player
R/RW, DVD-R/RW/RDL
at sampling frequency 96 kHz)
(RCA level)
(RCA level)
WMA decoding format ..... Ver. 7, 7.1, 8, 9, 10, 11, 12 (2 ch
AAC decoding format ....... MPEG-4 AAC (iTunes encoded
JPEG:
JPEG decoding format
............................ .jpeg, .jpg, .jpe
Pixel Sampling .......... 4:2:2, 4:2:0
Decode Size .............. MAX:8192(H) x 7 680(W),
DivX decoding format ....... Home Theater Ver.3, 4, 5.2, 6
MPEG video decoding format
................................... MPEG1, MPEG2, MPEG4
USB
USB standard specification
................................... USB 1.1, USB 2.0 full speed
Maximum current supply
................................... 1.0A
USB Class ....................... MSC (Mass Storage Class)
File system ....................... FAT16, FAT32
MP3 decoding format ...... MPEG-1 & 2 Audio Layer 3
WMA decoding format ..... Ver. 7, 7.1, 8, 9, 10, 11, 12 (2 ch
AAC decoding format ....... MPEG-4 AAC (iTunes encoded
WAV:
WAV signal format .... Linear PCM, MS ADPCM
Sampling Frequency
............................ Linear PCM:16 kHz,
JPEG:
JPEG decoding format
............................ .jpeg, .jpg, .jpe
Pixel Sampling .......... 4:2:2, 4:2:0
Decode Size .............. MAX:8192(H) x 7 680(W),
audio)
(Windows Media Player)
only) (.m4a)
(Ver.10.6 and earlier)
MIN:32(H) x 32(W)
(Except ultra and HD) (.avi,
.divx)
(For video files)
USB 2.0 high speed (For
audio files)
audio)
(Windows Media Player)
only)
(Ver.10.6 and earlier)
(.wav)
22.05 kHz, 24 kHz, 32kHz,
44.1 kHz, 48kHz
MS ADPCM:22.05 kHz,
44.1 kHz
MIN:32(H) x 32(W)
DivX decoding format ....... Home Theater Ver.3, 4, 5.2, 6
MPEG video decoding format
................................... MPEG1, MPEG2, MPEG4
FM tuner
Frequency range .............. 87.9 MHz to 107.9 MHz
Usable sensitivity ............. 9 dBf(0.8 µV/75 W, mono, S/N:
Signal-to-noise ratio ......... 80 dB (digital broadcasting)
(AVH-X5500BHS/AVH-X3500BHS)
Signal-to-noise ratio ......... 72 dB (analog broadcasting)
AM tuner
Frequency range .............. 530kHz to 1710 kHz(10 kHz)
Usable sensitivity ............. 25 µV (S/N: 20 dB)
Signal-to-noise ratio ......... 80 dB (digital broadcasting)
(AVH-X5500BHS/AVH-X3500BHS)
Signal-to-noise ratio ......... 62 dB (analog broadcasting)
Bluetooth
(AVH-X5500BHS/AVH-X4500BT/AVH-X3500BHS/AVHX2500BT)
Version ............................ Bluetooth 3.0 certified
Output power ................... +4 dBm Maximum
(Except ultra and HD) (.avi,
.divx)
30 dB)
(IHF-A network)
(IHF-A network)
(IHF-A network)
(IHF-A network)
(Power class 2)
CEA2006 Specifications
Power output ................... 14 W RMS × 4 Channels (4 W
S/N ratio .......................... 91 dBA(reference: 1 W into
and ≦ 1 % THD+N)
4 W)
Note
Specifications and the design are subject to
modifications without notice.
English
65
En
Page 66

Table des matières
Table des matières
Précautions
RÈGLES DE PROTECTION
IMPORTANTES 68
Pour une conduite en toute sécurité 68
Pour éviter l’épuisement de la
batterie 69
Avant de commencer
La protection de votre ouïe est entre vos
mains 69
Quelques mots sur cet appareil 69
Numéros de région des disques DVD
vidéo 70
Quelques mots sur ce mode d’emploi 70
Service après-vente des produits
Pioneer 70
Visitez notre site Web 70
Utilisation et entretien de la
télécommande 70
Mode de démonstration 71
Description de l’ appareil
Appareil central 71
Afficheur d’accueil 72
Mise en/hors service de la source 72
Choix d’une source 72
Réglage du volume 73
Télécommande 73
Opérations communes
Utilisation standard des éléments de menu/
listes 74
Utilisation de l’icône de défilement et de la
barre de lecture 74
Activation des touches du clavier
tactile 74
Utilisation de la vue arrière 74
Utilisation du moniteur arrière 74
Utilisation du correcteur de son 75
Changer le mode écran large 75
Opérations de base
Réglage de l’ angle du panneau LCD et
éjection du support 75
Réglage de l’ horloge 75
66
Fr
Syntoniseur HD Radioä
À propos des stations HD Radioä 76
Utilisation du syntoniseur HD Radio 76
Mise en mémoire et rappel des
stations 77
Mise en mémoire des stations les plus
fortes 77
Accord sur les signaux puissants 77
Utilisation de l’étiquetage iTunes 77
Changement de mode de recherche 77
Changement de mode de réception 77
Syntoniseur
Utilisation du syntoniseur 78
Mise en mémoire et rappel des
stations 78
Mise en mémoire des stations les plus
fortes 78
Accord sur les signaux puissants 78
Utilisation de l’étiquetage iTunes 78
Syntoniseur SiriusXM
Présentation des opérations du syntoniseur
SiriusXM 79
Mise en mémoire et rappel des
canaux 80
Sélection d’un canal dans l’écran de la
liste 80
Changement de l’affichage de la liste 80
Sélection directe d’ un canal SiriusXM 80
Replayä 81
Utilisation de l’étiquetage iTunes 81
Réglage du contrôle parental 81
Réglage de SiriusXM Tune Startä 81
Options d’examen 81
Disque (CD/DVD)
Présentation de l’utilisation vidéo 82
Utilisation de la lecture audio 84
Changement de type de fichier média 84
Utilisation du menu DVD 84
Lecture aléatoire (shuffle) 84
Répétition de la lecture 85
Recherche de la partie que vous souhaitez
lire 85
Choix de la sortie audio 85
Lecture PBC 85
Choix des plages à partir de la liste des titres
de plages 85
Choix des fichiers à partir de la liste des
noms de fichiers 85
Lecture du contenu VOD d’un DivXâ 86
iPod
Utilisation des images de vidéos 86
Utilisation de la lecture audio 87
Utilisation de la fonction iPod de cet
appareil sur votre iPod 87
Lecture aléatoire 87
Répétition de la lecture 88
Lecture de vidéos à partir de votre
iPod 88
Recherche d’une vidéo/musique sur
l’iPod 88
Modification de la vitesse d’un livre
audio 88
Affichage de listes liées à la plage musicale
en cours de lecture (recherche de
liaison) 89
Mode Advanced App
Utilisation du mode App avancée 89
Démarrage de la procédure 90
Réglage du clavier 90
Réglage du mixage audio de
l’application 90
USB
Utilisation des images de vidéos 91
Utilisation de la lecture audio 91
Mode de navigation Musique 92
Utilisation de la lecture d’images
fixes 92
Changement de type de fichier média 93
Lecture aléatoire (shuffle) 93
Répétition de la lecture 93
Choix des fichiers à partir de la liste des
noms de fichiers 93
Affichage de listes liées à la plage musicale
en cours de lecture (recherche de
liaison) 93
Lecture du contenu VOD d’un DivXâ 93
Capture d’une image dans des fichiers
JPEG 93
Audio Bluetooth
Utilisation de la lecture audio 94
Réglage de l’ audio Bluetooth 94
Lecture aléatoire (shuffle) 94
Répétition de la lecture 94
Utilisation de la touche MIXTRAX
Utilisation de MIXTRAX 95
Utilisation de MIXTRAX EZ 95
Exécution de MIXTRAX EZ 95
Réglage du mode MIXTRAX 95
Réglage de l’ effet 95
Utilisation de la radio Pandoraâ sur
Internet
Utilisation de Pandora 96
Sélection et lecture de stations de radio
Pandoraâ/aléatoire 97
Téléphone Bluetooth
Utilisation du téléphone Bluetooth 97
Appel d’un numéro de l’annuaire 98
Sélection d’un numéro à l’aide du mode de
recherche par ordre alphabétique 98
Inversion des noms dans l’annuaire 99
Utilisation des listes des appels reçus,
manqués et composés 99
Réglage de la réponse automatique 99
Réglage du volume d’écoute du
destinataire 99
Mise en service ou hors service de la
sonnerie 99
Utilisation des listes de présélection des
numéros d’appel 99
Exécution d’un appel par saisie d’un
numéro de téléphone 99
Réglage du mode privé 100
Contrôle vocal 100
Page 67

Table des matières
Table des matières
Réglages
Utilisation des menus 100
Réglages sonores
Utilisation du réglage de l’ équilibre avant-
arrière/droite-gauche 101
Réglage de l’ équilibre sonore 101
Utilisation de l’égaliseur 101
Utilisation de l’égalisation
automatique 101
Utilisation du sonic center control 101
Réglage de la correction
physiologique 102
Utilisation de la sortie haut-parleur
d’extrêmes graves 102
Accentuation des graves 102
Utilisation du filtre passe-haut 102
Ajustement des niveaux des
sources 102
Configuration du lecteur vidéo
Choix de la langue des sous-titres 103
Choix de la langue audio 103
Choix de la langue des menus 103
Réglage de l’ affichage des DVD sous
plusieurs angles 103
Définition du ratio d’aspect 103
Réglage de l’ intervalle du
diaporama 104
Réglage du verrouillage parental 104
Paramétrage du fichier de sous-titres
DivX 104
Affichage de votre code d’enregistrement
VOD DivXâ 105
Lecture automatique des DVD 105
Réglages système
Mise en service ou hors service de l’entrée
auxiliaire 105
Réglage de l’ entrée AV 105
Réglage de l’ entrée RGB 105
Réglage du mixage audio de
l’application 105
Réglage du mode MIXTRAX 105
Modification des réglages de
l’image 105
Sélection de la langue du système 106
Réglage de SiriusXM Tune Startä 106
Réglage du mode démonstration 106
Mise en service ou hors service de la
coupure/atténuation du son 106
Réglage de la sortie arrière et du contrôleur
de haut-parleur d’extrêmes graves 107
Utilisation du clavier 107
Réglage du défilement permanent 107
Réglage du mode de connexion
Pandora 107
Réglage de l’ audio Bluetooth 107
Effacement de la mémoire
Bluetooth 107
Mise à jour du logiciel de connexion
Bluetooth 107
Affichage de la version du système
Bluetooth 107
Réglage de la caméra de vue arrière
(caméra de recul) 108
EQ auto (égalisation automatique) 108
Réglage du signal vidéo 109
Menu Favori
Utilisation du menu Favori 110
Menu de connexion Bluetooth
Utilisation du menu de connexion
Bluetooth 110
Menu de thème
Choix de la couleur de l’éclairage 111
Choix de la couleur OSD (affichage à
l’écran) 111
Choix de l’affichage d’arrière-plan 111
Autres fonctions
Réglage des positions de réponse des
claviers tactiles (calibrage du clavier
tactile) 112
Utilisation d’une source AUX 112
Réinitialisation du microprocesseur 113
Connexion
Connexion du cordon
d’alimentation 115
Lors de la connexion à un amplificateur de
puissance vendu séparément 116
Lors de la connexion du composant vidéo
externe et de l’écran 116
Lors de la connexion à une caméra de vue
arrière 117
Connexion du syntoniseur SiriusXM en
option 117
Installation
Installation à l’aide des trous de vis sur les
côtés de l’appareil 118
Installation du microphone 119
Informations complémentaires
Dépannage 120
Messages d’erreur 122
Signification des messages d’erreur du
réglage EQ auto 126
Signification des messages 126
Liste des indicateurs 126
Conseils sur la manipulation 128
Formats audio compressés compatibles
(USB) 130
Formats audio compressés compatibles
(disque, USB) 130
Compatibilité iPod 131
Séquence des fichiers audio 131
Utilisation correcte de l’afficheur 131
Profils Bluetooth 132
Licence, Avis de non-responsabilité de
garantie et Limites de
responsabilité 132
Tableau des codes de langue pour les
DVD 134
Caractéristiques techniques 135
Français
67
Fr
Page 68

Section
01
Précautions
Précautions
Nous vous remercions d’avoir acheté cet ap-
pareil PIONEER.
Pour garantir une utilisation correcte, lisez bien
ce mode d’emploi avant d’utiliser cet appareil. Il
est particulièrement important que vous lisiez et
respectiez les indications ATTENTION et PRÉ-
CAUTION de ce mode d’emploi. Conservez-le
dans un endroit sûr et facilement accessible pour
toute consultation ultérieure.
RÈGLES DE PROTECTION
IMPORTANTES
Veuillez lire toutes les instructions concernant
votre écran et les conserver pour référence ultérieure.
1 N’installez pas l’écran là où il peut (i)
gêner la vision du conducteur, (ii) dégrader le fonctionnement de systèmes d’utilisation ou les dispositifs de sécurité du
véhicule, incluant les airbags, les
commandes du signal de détresse, ou
(iii) dégrader la capacité du conducteur à
utiliser le véhicule en sécurité.
2 N’utilisez pas cet écran si cela peut dé-
tourner votre attention de la conduite du
véhicule en toute sécurité. Observez toujours des règles de conduite sûre et respectez toutes les régulations existantes
du code de la route. Si l’utilisation du
système ou la lecture de l’écran vous posent des difficultés, garez votre véhicule
dans un endroit sûr et effectuez les réglages nécessaires.
3 N’oubliez pas de toujours mettre votre
ceinture de sécurité lorsque vous conduisez votre véhicule. Si vous avez un accident, vos blessures peuvent être
considérablement plus graves si votre
ceinture n’est pas bouclée correctement.
4 N’utilisez jamais des écouteurs en
conduisant.
5 Pour renforcer la sécurité, certaines fonc-
tions sont désactivées si le frein de parking n’est pas serré et si le véhicule n’est
pas à l’arrêt.
6 Ne réglez jamais le volume de votre
écran à un niveau tel que vous ne puissiez pas entendre la circulation extérieure et les véhicules de secours.
ATTENTION
N’essayez pas d’installer votre écran ou
d’en faire l’entretien vous-même. L’installation ou l’entretien de l’écran par des personnes sans formation et sans expérience en
équipement électronique et en accessoires
automobiles peut être dangereux et vous exposer à des risques d’électrocution ou à
d’autres dangers.
Pour une conduite en toute
sécurité
ATTENTION
! LE FIL VERT CLAIR DU CONNECTEUR D’A-
LIMENTATION EST PRÉVU POUR DÉTECTER L’ÉTAT STATIONNÉ ET DOIT ÊTRE
CONNECTÉ À L’ALIMENTATIONDU
COMMUTATEUR DU FREIN DE PARKING.
UNE MAUVAISE CONNEXION OU UNE UTILISATION INCORRECTE DU FIL PEUT VIOLER LA LOI APPLICABLE ET SE TRADUIRE
PAR DES DOMMAGES CORPORELS OU
MATÉRIELS GRAVES.
! Pour éviter les risques de dommages matériels
ou corporels et une violation éventuelle des lois
applicables, cet appareil ne doit pas être utilisé
avec un écran vidéo visible par le conducteur.
! Pour éviter le risque d’accident et une violation
potentielle des lois applicables, l’écran du siège
avant ne doit en aucun cas être regardé pendant
la conduite du véhicule.
! Dans certains états ou pays, il peut être illégal
même pour des personnes autres que le conducteur de regarder des images sur un écran à l’intérieur d’un véhicule. Quand cette réglementation
est applicable, elle doit être respectée, et les
fonctions vidéo de cet appareil ne doivent pas
être utilisées.
Si vous essayez de regarder une image vidéo
pendant que vous conduisez, l’avertissement
“Regarder la vidéo à l'avant en roulant est interdit” s’affiche sur l’écran avant.
Pour regarder une image vidéo sur l’écran
avant, garez votre voiture dans un endroit sûr et
serrez le frein de parking.
Verrouillage par le frein de parking
L’utilisation pendant la conduite de certaines
des fonctions offertes par cet appareil (visualisation d’une vidéo ou l’utilisation de certaines touches du clavier tactile) peut être dangereuse et/
ou illégale. Pour empêcher l’utilisation de ces
fonctions quand le véhicule est en mouvement,
il existe un système de blocage qui détecte la
position serrée du frein de parking. Si vous essayez d’utiliser les fonctions mentionnées cidessus pendant que vous conduisez, elles seront désactivées jusqu’à ce que vous arrêtiez le
véhicule dans un endroit sûr, et (1) serriez le
frein de parking, (2) le desserriez, puis (3) le serriez à nouveau. Maintenez la pédale de frein enfoncée avant de relâcher le frein de parking.
Lors de l’utilisation d’un écran
connecté à la sortie moniteur
arrière
La sortie moniteur arrière de cet appareil (V
OUT) est utilisée pour connecter un écran ar-
rière qui permet aux passagers assis à l’arrière
de regarder des vidéos.
ATTENTION
NE JAMAIS installer l’écran arrière dans un
emplacement où le conducteur peut regarder
des vidéos pendant qu’il conduit.
Quand vous utilisez la caméra
de vue arrière
Avec une caméra de vue arrière optionnelle, cet
appareil peut être utilisé pour vous aider à garder un œil sur une remorque ou faire une marche arrière dans un emplacement de parking
étroit.
ATTENTION
! L’IMAGE À L’ÉCRAN PEUT APPARAÎ-
TRE INVERSÉE.
! UTILISEZ CETTE ENTRÉE SEULEMENT
POUR UNE CAMÉRA DE VUE ARRIÈRE
DONNANT UNE IMAGE INVERSÉE OU
MIROIR. TOUTE AUTRE UTILISATION
PEUT PROVOQUER DES BLESSURES
OU DES DOMMAGES.
PRÉCAUTION
! La fonction caméra de vue arrière doit être
utilisée comme une aide pour avoir un œil
sur une remorque ou lors d’une marche arrière. Ne l’utilisez pas à des fins de divertissement.
! Veuillez noter que les bords des images de la
caméra de vue arrière peuvent différer légèrement selon que des images plein écran sont
affichées pendant une marche arrière, ou
que ces images sont utilisées pour surveiller
l’arrière quand le véhicule est en marche
avant.
68
Fr
Page 69

Avant de commencer
Avant de commencer
Section
01
Pour éviter l ’épuisement de
la batterie
Laissez tourner le moteur du véhicule lorsque
vous utilisez cet appareil pour éviter de décharger la batterie.
! Quand cet appareil n’est plus alimenté, no-
tamment lors d’un remplacement de la batterie de la voiture, le microprocesseur de
l’appareil revient à sa condition initiale. Nous
vous recommandons de noter les données
de réglage audio.
ATTENTION
N’utilisez pas cet appareil avec des véhicules
qui ne possèdent pas de position ACC.
ID FCC : AJDK058
MODÈLE Nº : AVH-X5500BHS, AVH-X4500BT,
AVH-X3500BHS, AVH-X2500BT
IC : 775E-K058
Le présent appareil est conforme aux la partie
15 des règles de la FCC et CNR d’Industrie Canada applicables aux appareils radio exempts
de licence. L’exploitation est autorisée aux
deux conditions suivantes: (1) l’appareil ne
doit pas produire de brouillage, et (2) l’utilisateur de l’appareil doit accepter tout brouillage
radioélectrique subi, même si le brouillage
est susceptible d’en compromettre le fonctionnement.
L’antenne de Bluetooth ne peut pas être sup-
primé (ou remplacé) par l’utilisateur.
Cet équipement est conforme aux limites
d’exposition aux rayonnements énoncées
pour un environnement non contrôlé et respecte les règles les radioélectriques (RF) de la
FCC lignes directrices d'exposition dans le
Supplément C à OET65 et d’exposition aux fréquences radioélectriques (RF) CNR-102 de
l’IC. Cet équipement émet une énergie RF très
faible qui est considérée conforme sans évaluation de l’exposition maximale autorisée.
Cependant, cet équipement doit être installé
et utilisé en gardant une distance de 20 cm
ou plus entre le dispositif rayonnant et le
corps (à l’exception des extrémités : mains,
poignets, pieds et chevilles).
La protection de votre ouïe
est entre vos mains
Pour assurer le rendement optimal de votre matériel et – plus important encore – la protection
de votre ouïe, réglez le volume à un niveau raisonnable. Pour ne pas altérer votre sens de la
perception, le son doit être clair mais ne produire aucun vacarme et être exempt de toute
distorsion. Votre ouïe peut vous jouer des tours.
Avec le temps, votre système auditif peut en
effet s’adapter à des volumes supérieurs, et ce
qui vous semble un « niveau de confort normal
» pourrait au contraire être excessif et contribuer à endommager votre ouïe de façon permanente. Le réglage de votre matériel à un volume
sécuritaire AVANT que votre ouïe s’adapte vous
permettra de mieux vous protéger.
CHOISISSEZ UN VOLUME
SÉCURITAIRE:
! Réglez d’abord le volume à un niveau infé-
rieur.
! Montez progressivement le volume jusqu’à
un niveau d’écoute confortable ; le son doit
être clair et exempt de distorsions.
! Une fois que le son est à un niveau confor-
table, ne touchez plus au bouton du volume.
N’OUBLIEZ PAS DE RESPECTER LES
DIRECTIVES SUIVANTES:
! Lorsque vous montez le volume, assurez-
vous de pouvoir quand même entendre ce
qui se passe autour de vous.
! Faites très attention ou cessez temporaire-
ment l’utilisation dans les situations pouvant
s’avérer dangereuses.
! N’utilisez pas des écouteurs ou un casque
d’écoute lorsque vous opérez un véhicule
motorisé ; une telle utilisation peut créer des
dangers sur la route et est illégale à de nombreux endroits.
Quelques mots sur cet appareil
Les fréquences du syntoniseur de cet appareil
sont attribuées pour une utilisation en Amérique
du Nord. Son utilisation dans d’autres régions
peut se traduire par une réception de mauvaise
qualité.
Français
69
Fr
Page 70

Section
Avant de commencer
01
Avant de commencer
PRÉCAUTION
! Ne laissez pas cet appareil entrer en contact
avec des liquides. Cela pourrait provoquer
une électrocution. Tout contact avec des liquides pourrait également provoquer des
dommages, de la fumée et une surchauffe
de l’appareil.
! Conservez ce mode d’emploi à portée de
main pour référence ultérieure.
! Maintenez le niveau d’écoute à une valeur
telle que vous puissiez entendre les sons provenant de l’extérieur.
! Évitez tout contact avec l’humidité.
! Si la batterie est débranchée ou déchargée,
le contenu de la mémoire sera effacé.
Numéros de région des
disques DVD vidéo
Seuls les disques DVD vidéo qui ont des numéros de région compatibles peuvent être lus sur
ce lecteur. Vous trouverez le numéro de région
du lecteur sur le fond de l’appareil et dans ce
mode d’emploi (reportez-vous à la page 135, Ca-
ractéristiques techniques).
Quelques mots sur ce mode
d’emploi
! Cet appareil possède des fonctions sophisti-
quées permettant d’assurer une réception et
un fonctionnement de haute qualité. Toutes
ces fonctions ont été conçues pour en faciliter au maximum l’utilisation, mais un grand
nombre d’entre elles ne sont pas auto-explicatives. Ce mode d’emploi vous aidera à profiter pleinement du potentiel de cet appareil
et à maximiser votre plaisir d’écoute.
! Ce manuel utilise des illustrations d’écrans
réels pour décrire les opérations. Cependant,
en fonction du modèle utilisé, les écrans de
certains appareils ne correspondent pas aux
illustrations présentées dans ce manuel.
! Dans les instructions suivantes, les cartes
mémoires USB et les lecteurs audio USB
sont collectivement appelés « périphériques
de stockage USB ».
! Dans ce mode d’emploi, iPod et iPhone sont
désignés par le terme “iPod”.
Service après-vente des
produits Pioneer
Veuillez contacter le revendeur ou le distributeur
auprès duquel vous avez acheté cet appareil
pour le service après-vente (y compris les conditions de garantie) ou pour toute autre information. Dans le cas où les informations
nécessaires ne sont pas disponibles, veuillez
contacter les sociétés indiquées ci-dessous :
N’expédiez pas l’appareil pour réparation à l’une
des adresses figurant ci-dessous sans avoir pris
contact au préalable.
États-Unis
Pioneer Electronics (USA) Inc.
CUSTOMER SUPPORT DIVISION
P.O. Box 1760
Long Beach, CA 90801-1760
800-421-1404
CANADA
Pioneer Électroniques du Canada, Inc.
DÉPARTEMENT DE SERVICE AUX CONSOMMATEURS
340 Ferrier Street
Unit 2
Markham, Ontario L3R 2Z5, Canada
1-877-283-5901
905-479-4411
Pour connaître les conditions de garantie, reportez-vous au document Garantie limitée qui accompagne cet appareil.
Visitez notre site Web
Rendez-nous visite sur le site suivant :
http://www.pioneerelectronics.com
au Canada
http://www.pioneerelectronics.ca
1 Enregistrez votre produit. Nous conserverons
les détails de votre achat dans nos fichiers
pour vous aider à faire référence à ces informations pour une déclaration d’assurance
en cas de perte ou de vol.
2 Recevez les mises à jour sur les derniers pro-
duits et les technologies les plus récentes.
3 Téléchargez les modes d’emploi, comman-
dez les catalogues des produits, recherchez
de nouveaux produits, et bien plus.
4 Vos retours d’informations sont importants
pour garantir nos efforts continus en matière
de conception et de fabrication optimales de
produits répondant aux attentes des clients.
Utilisation et entretien de la
télécommande
Installation de la pile
Sortez le porte-pile en le faisant glisser par l’arrière de la télécommande et insérez la pile en
respectant les polarités (+) et (–).
! Lors de la première utilisation, retirez le film
qui dépasse du porte-pile.
ATTENTION
! Conservez la pile hors de portée des enfants.
Au cas où la pile serait avalée, consultez immédiatement un médecin.
! Les piles ne doivent pas être exposées à des
températures élevées telles que la lumière directe du soleil, des flammes ou toute autre
source de chaleur similaire.
PRÉCAUTION
! Utilisez une pile au lithium CR2025 (3 V).
! Retirez la pile si la télécommande n’est pas
utilisée pendant un mois ou plus.
! Remplacer la pile de manière incorrecte peut
créer un risque d’explosion. Remplacez la
pile uniquement par une pile identique ou de
type équivalent.
! Ne manipulez pas la pile avec un outil métal-
lique.
! Ne conservez pas la pile avec des objets mé-
talliques.
! Si la pile fuit, nettoyez soigneusement la télé-
commande, puis insérez une pile neuve.
! Lors de la mise au rebut des piles usagées,
respectez les règlements nationaux ou les
instructions locales en vigueur dans le pays
ou la région en matière de conservation ou
de protection de l’environnement.
Utilisation de la télécommande
Pointez la télécommande dans la direction de la
face avant de l’appareil à télécommander.
! La télécommande peut ne pas fonctionner
correctement à la lumière directe du soleil.
Important
! Ne laissez pas la télécommande exposée à
des températures élevées ou à la lumière directe du soleil.
70
Fr
Page 71

1 2 3 5 6 74
8
Avant de commencer
Description de l’appareil
Section
02
! Ne laissez pas la télécommande tomber sur
le plancher, où elle pourrait gêner le bon
fonctionnement de la pédale de frein ou d’accélérateur.
Mode de démonstration
La démonstration des fonctions démarre automatiquement lorsque vous sélectionnez Off
pour la source alors que le contact d’allumage
est en position ACC ou ON. Pour annuler la démonstration des fonctions, appuyez de façon
prolongée sur MUTE. Appuyez à nouveau de
façon prolongée sur la touche MUTE pour redémarrer. Utiliser la démonstration des fonctions
lorsque le moteur du véhicule est coupé peut décharger la batterie.
Important
Le fil rouge (ACC) de cet appareil doit être
connecté à la fonction de mise en/hors service.
Ne pas le faire peut entraîner le déchargement
de la batterie.
Appareil central
AVH-X5500BHS et AVH-X4500BT
9 a
AVH-X3500BHS, AVH-X2500BTet AVH-X1500DVD
8a
1
3
4
5
6
7
1 RESET
Pour les détails, reportez-vous à la page 113,
Réinitialisation du microprocesseur.
2 SRC/OFF
3 +/– (VOLUME/VOL)
4 MUTE
Appuyez sur cette touche pour couper le
son. Appuyez à nouveau pour réactiver le
son.
5 Toucheaccueil
Affichage de l’écran d’accueil.
L’affichage revient à l’écran de lancement
lorsqu’une application tierce est utilisée en
mode d’application avancée.
Double-cliquez sur l’ icône sur l’écran de lancement pour revenir à l’affichage de l’afficheur d’accueil.
6 MODE
Mise hors service de l’écran d’information.
7 c/d (TRK)
8 h (éjection)
9 Jack d’entrée du microphone EQ auto
Utilisez ce jack pour connecter un microphone EQ auto.
a Fente de chargement des disques
PRÉCAUTION
N’utilisez pas de produits non autorisés.
Remarques
! Quand le système de navigation est
connecté, appuyez sur MODE pour afficher
l’écran de navigation. Maintenez la pression
sur MODE pour désactiver l’affichage.
Appuyez de nouveau sur MODE pour activer
l’affichage.
! Pour plus de détails sur le fonctionnement
du système de navigation à partir de cette
unité, consultez le mode d’emploi approprié.
03
Français
71
Fr
Page 72

567
ppr
Section
Description de l’appareil
03
Description de l’appareil
! Quand un iPhone exécutant une application
qui prend en charge le mode Advanced App
est connecté, appuyez sur MODE pour basculer sur l’écran des applications. Vous pouvez utiliser l’application en touchant l’écran.
! Pour plus de détails sur la connexion d’un
iPod ou d’un périphérique de stockage USB
à cet appareil, reportez-vous à la page 117,
Lors de la connexion avec le câble CD-IU201V
en option.
Afficheur d’accueil
Afficheur d’accueil
1324
Disc USB/iPod1
Digital Radio
AUX
AV SiriusXM
AudioVideo
Affichage de la source hors service
Apps
Settings
Pandora
RearView
ON
Bluetooth Audio
OFF
BluetoothFavoriteThemeSystem
89
1 JAN
AM
12:12
OFF
Affichage de la source en service
SiriusXM
Digital Radio
Disc
USB/iPod
Pandora
Bluetooth Audio
1 Icône de la source
Sélection d’une source préférée.
Lorsque l’icône de la source n’est pas affichée, elle peut être affichée en appuyant sur
la touche d’accueil ou en touchant
2 ToucheApps
Activation du mode App avancée.
3 Touchede la vue arrière
Affichage de l’image de la vue arrière.
Pour les détails, reportez-vous à la page 74,
Utilisation de la vue arrière.
4 Source off touche
Mise hors service de la source.
5 Bluetooth touche
Affichage du menu de connexion Bluetooth.
6 thème touche
Affichage du menu thème.
7 Icône du menu
Affichage du menu.
8 Source touche
Affichage du menu source.
1
JAN
AM
S.Rtrv
Appr
AppppApp
12:22
Dolby PLII
.
9 Clock touche
Passage à l’écran de réglage de l’horloge.
Mise en/hors service de la
source
(Fonction de AVH-X5500BHS/AVH-X4500BT)
Mise sous tension de la source à l’aide des tou-
DB
ches
1 Appuyez sur SRC/OFF pour mettre la source
en service.
Mise hors tension de la source à l’aide des touches
1 Maintenez la pression sur SRC/OFF jusqu’àce
que la source soit mise hors service.
Choix d’une source
Modes sources disponibles
! SiriusXM – Syntoniseur SiriusXM
(AVH-X5500BHS/AVH-X3500BHS)
! Digital Radio – Syntoniseur radio numérique
(AVH-X5500BHS/AVH-X3500BHS)
! Radio – Syntoniseur radio
(AVH-X4500BT/AVH-X2500BT/AVH-X1500DVD)
! Disc – Lecteur de DVD et CD intégré
! USB/iPod – USB/iPod
! Pandora – Radio Pandora
! Bluetooth Audio – Audio Bluetooth intégré
(AVH-X5500BHS/AVH-X4500BT/AVHX3500BHS/AVH-X2500BT)
! AUX – AUX
! AV – Entrée AV
Choix d’une source
! Utilisation de la touche SRC/OFF
(Fonction de AVH-X5500BHS/AVH-X4500BT)
1 Appuyez sur SRC/OFF.
! Utilisation des touches du clavier tactile de
l’afficheur d’accueil
1 Touchez l’icône de la source, puis touchez
le nom de la source souhaitée.
! Quand l’icône de la source n’est pas affi-
chée, vous pouvez l’afficher en touchant
l’écran.
! Pendant que vous utilisez le menu, vous
ne pouvez pas sélectionner une source en
touchant son icône.
Remarque
L’icône USB/iPod change comme suit :
! USB est affiché quand un périphérique de stoc-
kage USB est connecté à l’entrée USB.
! iPod est affiché quand un iPod est connecté à
l’entrée USB.
! USB/iPod est affiché quand aucun appareil n’est
connecté.
â
sur Internet
72
Fr
Page 73

Description de l’appareil
Description de l’appareil
Section
03
Réglage du volume
% Appuyez sur +/– (VOLUME/VOL) pour ré-
gler le volume.
Télécommande
1 +/– (VOLUME/VOL)
2 MODE
Mise hors service de l’écran d’information.
3 SRC/OFF
Reportez-vous à la page précédente, Source
off touche.
4 Sélecteur multidirectionnel
Permet de sélectionner un menu dans le
menu DVD.
5 RETURN
Appuyez sur cette touche pour afficher le
menu PBC (contrôle de la lecture) pendant
la lecture PBC.
6 f
Appuyez sur cette touche pour mettre en
pause ou reprendre la lecture.
m
Appuyez sur cette touche pour effectuer un
retour rapide.
Appuyez sur cette touche pour changer la vitesse du retour rapide.
n
Appuyez sur cette touche pour effectuer une
avance rapide.
Appuyez sur cette touche pour changer la vitesse de l’avance rapide.
o
Appuyez sur cette touche pour revenir à la
plage précédente (au chapitre précédent).
p
Appuyez sur cette touche pour aller à la
plage suivante (au chapitre suivant).
g
Appuyez sur cette touche pour arrêter la lecture.
Si vous reprenez la lecture, cette dernière reprend là où vous l’aviez arrêtée. Touchez de
nouveau la touche pour arrêter totalement la
lecture.
7 FOLDER/P.CH
Appuyez sur cette touche pour choisir le
disque ou dossier suivant ou précédent.
Appuyez pour rappeler les fréquences des
stations de radio attribuées aux touches de
présélection.
8 MUTE
Appuyez sur cette touche pour couper le
son. Appuyez à nouveau pour réactiver le
son.
9 MENU
Appuyez sur cette touche pour afficher le
menu DVD pendant la lecture d’un DVD.
TOP MENU
Appuyez sur cette touche pour revenir au
menu principal pendant la lecture d’un DVD.
a AUDIO
Appuyez sur cette touche pour changer la
langue audio pendant la lecture d’un DVD.
Appuyez pour changer de sortie audio pour
les DivX/MPEG-4.
SUBTITLE
Appuyez sur cette touche pour changer la
langue des sous-titres pendant la lecture
d’un DVD/DivX/fichier MPEG-4.
ANGLE
Appuyez sur cette touche pour changer l’angle de vue pendant la lecture d’un DVD.
b BAND/ESC
Appuyez sur cette touche pour choisir la
bande du syntoniseur quand le syntoniseur
est sélectionné comme source. Utilisée aussi
pour annuler le mode commande des fonctions.
Appuyez sur cette touche pour basculer d’un
mode à l’autre lors de la lecture des types de
données suivants :
! Disque
Audio compressé et données audio (CDDA) tels que les disques CD-EXTRA et
MIXED-MODE
! Périphérique de stockage USB
Données audio, données vidéo et données photo
Français
73
Fr
Page 74

Section
Opérations communes
04
Opérations communes
Utilisation standard des
éléments de menu/listes
(Fonction de AVH-X5500BHS/
AVH-X4500BT/AVH-X3500BHS/
AVH-X2500BT)
Ouverture du menu du téléphone
Bluetooth.
Pour les détails, reportez-vous
à la page 97, Téléphone Bluetooth.
Affichage du menu de listes.
Exécution de la fonction de recherche.
Affichage du réglage EQ (menu
des fonctions audio).
Affichage du menu Favori.
Utilisation de l ’icône de
défilement et de la barre de
lecture
Audio
Sonic Center Control
Loudness
Subwoofer
Bass Booster
High Pass Filter
Source Level Adjuster
74
Fr
L/R 0
Low
On
125Hz
Activation des touches du
clavier tactile
DVD-V
1JAN
01 01
PM
12:43
Touches du clavier tactile
1JAN
PM
48kHz 16bit
Dolby D
Dolby DMulti ch
TOP
FULL
MENU
MENU
00'20'' -119'51''
11
1/2
DVD-V
2
1 Icône de défilement
Apparaît lorsque des éléments sélectionnables sont masqués.
2 Barre de lecture
Apparaît lorsque les éléments ne peuvent
pas être affichés sur une seule page.
Affichage des éléments masqués
1 Touchez l’icône de défilement ou faites glisser
la barre de lecture pour afficher tout élément
caché.
! Vous pouvez également faire glisser la liste
pour afficher tout élément caché.
Spécification du point de lecture
1
1 Faites glisser la barre de lecture à l’écran.
(Non disponible quand la barre de lecture est
grisée.)
0
0
12
FULL
1 Touched’onglet
Basculer sur les touches tactiles à l’écran.
Utilisation de la vue arrière
Les fonctions ci-après sont disponibles. L’utilisation de la fonction Caméra de vue arrière nécessite une caméra de vue arrière vendue
séparément.
! Caméra de vue arrière
Cet appareil peut être configuré pour afficher
automatiquement l’image de la vue arrière
lorsque vous placez le levier de vitesse en position MARCHE ARRIÈRE (R).
! Caméra pour le mode vue arrière
Vous pouvez activer la vue arrière à l’écran à
tout moment.
Pour activer le mode vue arrière, la caméra
de vue arrière peut être réglée sur n’importe
quel réglage mais ne doit surtout pas être
éteinte.
MENU
00'20'' -119'51''
L+R
1
07'24'' -112'47''
01 01
48kHz 16bit
Dolby D
Dolby DMulti ch
TOP
1 1
MENU
1
1
Return
12:43
1/2
2/2
Pour des détails sur les réglages, reportez-vous
à la page 108, Réglage de la caméra de vue arrière
(caméra de recul).
Utilisation de la touche de la vue
arrière pour afficher la vue arrière
Affichage de l’image de la vue arrière via la mise en service de l’image de la vue arrière.
Lorsque l’image de la vue arrière
s’affiche, vous pouvez basculer sur
l’affichage de la source en touchant l’écran. Vous pouvez alors
temporairement effectuer des opérations à partir de l’affichage de la
source à ce stade. Si vous n’effectuez aucune opération pendant
quelques secondes, l’écran revient
àl’image de la vue arrière.
Pour mettre l’image de la vue arrière hors service, appuyez sur la
touche accueil pour revenir à l’écran d’accueil, puis appuyez à nouveau sur cette touche.
Utilisation du moniteur arrière
La connexion d’ un moniteur arrière (vendu séparément) à cet appareil permet d’afficher des
images et des vidéos à partir des sièges arrière.
Remarques
! Les touches tactiles et les écrans d’utilisation
ne s’affichent pas sur le moniteur arrière.
! Les images et vidéos continuent d’être affi-
chées que le véhicule soit en mouvement ou
arrêté.
Page 75

Opérations communes
Opérations de base
Section
04
Utilisation du correcteur de son
Améliore automatiquement l’audio
compressé et restaure un son
riche.
Hors service — —
! est plus efficace que .
Remarques
! Cette fonction est activée pour la lecture des
sources répertoriées ci-dessous.
— CD-DA
— Fichiers MP3/WMA/AAC/WAV sur des péri-
phériques de stockage USB
— Fichiers MP3/WMA/AAC sur un support CD
— iPod
— Pandora
! Le réglage de correction du son est désactivé
lorsque la fonction MIXTRAX est utilisée en
mode source USB.
Changer le mode écran large
Sélection du format d’écran approprié pour la lecture vidéo.
1 Afficher le mode écran.
2 Touchez le réglage du mode écran large
désiré.
FULL (plein écran)
L’image 4:3 est agrandie dans la direction hori-
zontale seulement, ce qui aux utilisateurs de bénéficier d’une image TV 4:3 (image normale)
sans en perdre une partie.
ZOOM (zoom)
L’image 4:3 est agrandie dans la même propor-
tion verticalement et horizontalement ; idéal
pour une image de taille cinéma (image écran
large).
NORMAL (normal)
L’image 4:3 est affichée telle quelle, ce qui ne
donne aux utilisateurs aucune sensation de disparité puisque ses proportions sont les mêmes
que celles de l’image normale.
Remarques
! Vous ne pouvez pas utiliser cette fonction
pendant la conduite.
! Des réglages différents peuvent être enregis-
trés pour chaque source vidéo.
! Quand une source vidéo est visualisée dans
un mode écran large qui ne correspond pas
à son ratio d’aspect original, elle peut apparaître différente.
! Rappelez-vous que l’utilisation de la fonction
écran large de ce système dans un but
commercial ou de présentation publique
peut constituer une violation des droits d’auteur protégés par les lois sur le copyright.
! L’image vidéo apparaîtra plus grossière
quand elle est visualisée en mode ZOOM.
! Cette fonction est activée pour la lecture des
sources répertoriées ci-dessous.
— Disc : DVD-V,Video-CD, DivX, MPEG-1,
MPEG-2, MPEG-4, JPEG
— USB : DivX, MPEG-1, MPEG-2, MPEG-4, JPEG
— iPod : Vidéo
— Entrée Audio/Vidéo : Données A/V
— AUX : Données A/V
Réglage de l’angle du panneau
LCD et éjection du support
PRÉCAUTION
Prenez garde à vos mains et à vos doigts lorsque
vous ouvrez, fermez ou réglez le panneau LCD.
Faites tout particulièrement attention aux mains
et aux doigts des enfants.
Réglage de l’angle du panneau LCD
(Fonction de AVH-X5500BHS/AVH-X4500BT)
1 Appuyez sur h (éjection) pour afficher le
menu d’éjection.
2 Réglez le panneau LCD suivant un angle
offrant une visibilité aisée.
Abaisser l’écran.
Remettre l’écran à la verticale.
# Une fois l’angle mémorisé, le panneau LCD retro-
uvera automatiquement la même position à sa prochaine ouverture.
Éjection d’un disque
(Fonction de AVH-X5500BHS/AVH-X4500BT)
1 Appuyez sur h (éjection) pour afficher le
menu d’éjection.
2 Éjectez un disque.
Éjecter un disque.
Éjection d’un disque
(Fonction de AVH-X3500BHS/AVH-X2500BT/
AVH-X1500DVD)
% Appuyez sur h pour éjecter un disque.
Réglage de l’horloge
1 Touchez Clock.
L’écran Clock Adjustment s’affiche.
Pour les détails, reportez-vous à la page 72, Affi-
cheur d’accueil.
2 Sélectionnez l’élément à régler.
3 Touchez a ou b pour régler la date et
l’heure correctes.
05
Français
75
Fr
Page 76

Section
Syntoniseur HD Radioä
06
Syntoniseur HD Radioä
À propos des stations
HD Radioä
(Fonction de AVH-X5500BHS/AVH-X3500BHS)
Les stations HD Radioä offre des services de
transmission audio et de données de haute qualité. Les stations HD Radio vous sont fournies
par vos stations locales FM/AM.
Les caractéristiques des stations HD Radio sont
les suivantes :
! Audio de haute qualité
! Multidiffusion FM
! Services de données
Données du service de programme :
- Permettent à l'utilisateur de bénéficier de la technologie
avancée de HD Radio.
- Indiquent le titre des plages musicales, le nom de l'interprète, les codes d’identification des stations, le guide des
canaux HD2/HD3, ainsi que d'autres flux de données utiles.
Les canaux HD2/HD3, canaux FM locaux adjacents au
canal principal, offrent une musique nouvelle et originale,
ainsi qu'une grande variété de genres musicaux.
76
Fr
Son numérique de qualité CD. La technologie HD Radio
permet aux stations de radio locales d'émettre un signal
numérique clair. Le son de la bande AM s’apparente au
son de la bande FM et le son de la bande FM s’apparente
à celui d'un CD.
La fonction iTunesâTagging vous permet de découvrir
une large gamme de contenus et également d’« étiqueter
» ce contenu pour consultation ultérieure et l’achat dans
la boutique iTunesâ.
Informations visuelles relatives au contenu lu sur votre récepteur HD Radio, comme les pochettes d’album, les
photographies anciennes, les captures d’émissions en direct, entre autres contenus connexes.
Technologie HD Radioä
! Technologie HD Radio fabriquée sous li-
cence possédée par iBiquity Digital
Corporation U.S. et des brevets étrangers.
HD Radioä et les logos HD, HD Radio et «
Arc » sont des marques commerciales de
iBiquity Digital Corp.
Utilisation du syntoniseur
HD Radio
Touches du clavier tactile
1
Radio
1
2
3
4
5
6
FM AM1
PS Data
Song Data
Artist Data
Album Data
Local Seek
87.5
8 AUG
PM
HD8
Tag
Blending
ALL
D/A Auto
12:05
HD
DIGITAL
MHz
2345678
1 Touchede bande
Sélection d’une bande (FM ou AM) en sélectionnant la touche correspondante.
La touche de la bande sélectionnée est mise
en surbrillance sur l’écran tactile.
Basculement entre FM1, FM2 et FM3 en appuyant sur la touche de la bande.
Lorsque AM est sélectionné, vous ne pouvez
pas basculer sur une autre bande AM en appuyant sur la touche de la bande.
2 Touched’étiquette
Enregistrement sur votre iPod des informations sur la plage musicale (étiquette) de la
station d’émission.
3 Touchede mode de réception
Commutation vers la diffusion analogique de
la même fréquence.
4 Touchede mode de recherche
Commutation entre la recherche d’accord
sur les stations d’émission numériques et la
recherche normale.
5 Touchede station locale
Réglage de l’ accord automatique sur une
station locale.
6 Touchede présélection
Accord manuel vers le haut ou le bas.
Enfoncez la touche de façon prolongée pendant plus de deux secondes pour ignorer des
stations. L’accord automatique démarre dès
que vous relâchez la touche. Appuyez à nouveau sur la touche pour annuler l’accord automatique.
Lorsqu’une station analogique est reçue,
l’accord vers le bas est exécuté lors de l’émission analogique. (6 d 2)
Si une émission numérique n’est pas encore
reçue, l’accord vers le haut est exécuté au niveau de la station analogique suivante. (2
d 6)
FM analogique 1
FM numérique-1ca 3
FM analogique 2
FM numérique-2ca 4
FM numérique-3ca 5
FM analogique 6
7 Touchede liste
Affichage de la liste des canaux présélectionnés.
8 Touchede canal présélectionné
Sélectionnez un canal présélectionné.
Opérations de base
Basculement entre des canaux présélectionnés à
l’aide des touches
1 Appuyez sur c ou d (TRK).
Accord automatique à l’aide des touches
1 Appuyez de façon prolongée sur c ou d
(TRK).
Page 77

Syntoniseur HD Radioä
Syntoniseur HD Radioä
Section
06
Remarque
Les touches du clavier tactile non indiquées à
Utilisation du syntoniseur HD Radio peuvent s’af-
ficher à l’écran.
Reportez-vous à la page 126, Liste des indica-
teurs.
Mise en mémoire et rappel
des stations
Vous pouvez facilement mettre en mémoire jusqu’à six stations pour chaque gamme.
! Vous pouvez mettre en mémoire six stations
pour chaque gamme.
1 Affichez l’écran de la liste des canaux
présélectionnés.
Reportez-vous à la page précédente, Utilisation
du syntoniseur HD Radio.
La liste des canaux présélectionnés apparaît à
l’écran.
2 Touchez de façon prolongée l’une des
touches de présélection pour mettre en mémoire la fréquence sélectionnée.
La fréquence de la station de radio sélectionnée
a été mise en mémoire.
3 Touchez la touche de présélection appropriée pour sélectionner la station désirée.
Mise en mémoire des
stations les plus fortes
La fonction BSM (mémoire des meilleures stations) mémorise automatiquement les six stations les plus fortes dans l’ordre de la force du
signal.
La mise en mémoire de fréquences à l’aide de la
fonction BSM peut provoquer le remplacement
d’autres fréquences déjà conservées grâce aux
touches d’accord sur présélection.
1 Affichez l’écran de la liste des canaux
présélectionnés.
Reportez-vous à la page précédente, Utilisation
du syntoniseur HD Radio.
La liste des canaux présélectionnés apparaît à
l’écran.
2 Touchez BSM pour mettre en service
BSM.
Les six stations d’émission des plus fortes sont
enregistrées dans les touches d’ accord sur présélection dans l’ordre de la force du signal.
# Pour annuler la mise en mémoire, touchez
Cancel.
Accord sur les signaux
puissants
L’accord automatique sur une station locale ne
s’intéresse qu’aux stations de radio dont le signal reçu est suffisamment puissant pour garantir une réception de bonne qualité.
FM : Hors service —
AM : Hors service — —
Plus le nombre de affichés à l’écran est important, et plus le nombre de stations pouvant
être sélectionnées est faible. Seules les stations
avec les signaux les plus forts dans votre zone
locale peuvent être sélectionnés.
Si le nombre de
en mesure de recevoir des émissions de stations
plus faibles.
— — —
est inférieur, cet appareil sera
Utilisation de l ’étiquetage
iTunes
Remarque
Pour plus d’informations sur l’étiquetage iTunes,
reportez-vous à la page 131, Quelques mots sur
l’étiquetage iTunes.
Enregistrement des informations
d’étiquette sur cet appareil
1 Réglez la station de diffusion.
2 Enregistrez les informations d’étiquette
sur cet appareil.
Reportez-vous à la page précédente, Utilisation
du syntoniseur HD Radio.
Vous pouvez enregistrer les informations si l’indicateur Ta g s’affiche alors que la plage musicale désirée est en cours de diffusion.
# Quand vous enregistrez les données d’étiquette
sur cet appareil, Tag clignote.
# Il est possible d’enregistrer sur cet appareil des
informations d’étiquettes pour 50 plages musicales.
# En fonction du moment de l’enregistrement des
informations d’étiquettes, les informations d’étiquettes de la plage musicale lue avant ou après la plage
musicale en cours de lecture peuvent également
être enregistrées.
3 Lorsque l’enregistrement est terminé,
l’indicateur
s’affiche.
s’éteint et l’indicateur
Enregistrement des informations
étiquetées sur votre iPod
1 Connectez votre iPod.
Lorsque votre iPod est connecté à cet appareil,
votre iPod commence à enregistrer automatiquement les informations étiquetées.
2 Lorsque le transfert est terminé, l’indicateur
s’éteint et les informations étiquetées
sont enregistrées sur votre iPod.
Changement de mode de
recherche
Il existe deux réglages de recherche d’accord,
HD (recherche d’accord sur les stations d’émis-
sion numériques) et ALL (recherche d’accord
normale).
ALL—HD
Changement de mode de
réception
Si la réception d’une émission numérique devient médiocre, cet appareil passe automatiquement sur l’émission analogique du même
niveau de fréquence. Si cette fonction est réglée
sur D/A AUTO, le syntoniseur bascule automatiquement entre émission numérique et émission
analogique. Si cette fonction est réglée sur
ANALOG, le syntoniseur ne recevra que les
émissions analogiques.
D/A AUTO—ANALOG
Français
77
Fr
Page 78

Section
07
Syntoniseur
Syntoniseur
Utilisation du syntoniseur
(Fonction de AVH-X4500BT/AVH-X2500BT/AVHX1500DVD)
Touches du clavier tactile
1
2
Radio
1
2
3
4
5
6
FM AM1
WWWWWWWW
WWWWWWWW
WWWWWWWW
Local
Text
87.5
8 AUG
PM
12:05
Tag
DIGITAL
HD
MHz
3456
1 Touchede bande
Sélection d’une bande (FM1, FM2 ou FM3)
en touchant l’icône gauche. Basculement
sur la bande AM en touchant l’icône droite.
L’icône de la bande sélectionnée est mise en
surbrillance.
2 Touched’étiquette
Enregistrement sur votre iPod des informations sur la plage musicale (étiquette) de la
station d’émission.
3 Touchede station locale
Réglage de l’ accord automatique sur une
station locale.
4 Touchede présélection
Accord manuel vers le haut ou le bas.
Enfoncez la touche de façon prolongée pendant plus de deux secondes pour ignorer des
stations. L’accord automatique démarre dès
que vous relâchez la touche. Appuyez à nouveau sur la touche pour annuler l’accord automatique.
5 Touchede liste
Affichage de la liste des canaux présélectionnés.
6 Touchede canal présélectionné
Sélection d’un canal présélectionné.
Opérations de base
Basculement entre des canaux présélectionnés à
l’aide des touches
1 Appuyez sur c ou d (TRK).
Accord automatique à l’aide des touches
1 Appuyez de façon prolongée sur c ou d
(TRK).
Remarques
! L’écoute de la radio AM pendant qu’un iPod
est chargé à partir de cet appareil peut générer du bruit. Dans ce cas, déconnectez l’iPod
de cet appareil.
! Les touches du clavier tactile non indiquées
à Utilisation du syntoniseur peuvent s’afficher à l’écran.
Reportez-vous à la page 126, Liste des indica-
teurs.
Mise en mémoire et rappel
des stations
Vous pouvez facilement mettre en mémoire jusqu’à six stations pour chaque gamme.
1 Affichage de l’écran de présélection.
Reportez-vous à cette page, Utilisation du syntoniseur.
L’écran de présélection s’affiche.
2 Touchez de façon prolongée l’une des
touches de présélection pour mettre en mémoire la fréquence sélectionnée.
La fréquence de la station de radio sélectionnée
a été mise en mémoire.
3 Touchez la touche de présélection appropriée pour sélectionner la station désirée.
Mise en mémoire des
stations les plus fortes
La fonction BSM (mémoire des meilleures stations) mémorise automatiquement les six stations les plus fortes dans l’ordre de la force du
signal.
La mise en mémoire de fréquences à l’aide de la
fonction BSM peut provoquer le remplacement
d’autres fréquences déjà conservées grâce aux
touches d’accord sur présélection.
1 Affichage de l’écran de présélection.
Reportez-vous à cette page, Utilisation du syntoniseur.
L’écran de présélection s’affiche.
2 Touchez BSM pour mettre en service
BSM.
Les six stations d’émission des plus fortes sont
enregistrées dans les touches d’ accord sur présélection dans l’ordre de la force du signal.
# Pour annuler la mise en mémoire, touchez
Cancel.
Accord sur les signaux
puissants
L’accord automatique sur une station locale ne
s’intéresse qu’aux stations de radio dont le signal reçu est suffisamment puissant pour garantir une réception de bonne qualité.
FM : Hors service —
AM : Hors service — —
Plus le nombre de affichés à l’écran est important, et plus le nombre de stations pouvant
être sélectionnées est faible. Seules les stations
avec les signaux les plus forts dans votre zone
locale peuvent être sélectionnés.
Si le nombre de
en mesure de recevoir des émissions de stations
plus faibles.
— — —
est inférieur, cet appareil sera
Utilisation de l ’étiquetage
iTunes
Remarque
Pour plus d’informations sur l’étiquetage iTunes,
reportez-vous à la page 131, Quelques mots sur
l’étiquetage iTunes.
Enregistrement des informations
d’étiquette sur cet appareil
1 Réglez la station de diffusion.
2 Enregistrez les informations d’étiquette
sur cet appareil.
Reportez-vous à cette page, Utilisation du syntoniseur.
Vous pouvez enregistrer les informations si l’indicateur Ta g s’affiche alors que la plage musicale désirée est en cours de diffusion.
# Quand vous enregistrez les données d’étiquette
sur cet appareil, Tag clignote.
78
Fr
Page 79

Syntoniseur
Syntoniseur SiriusXM
Section
07
# Il est possible d’enregistrer sur cet appareil des
informations d’étiquettes pour 50 plages musicales.
# En fonction du moment de l’enregistrement des
informations d’étiquettes, les informations d’étiquettes de la plage musicale lue avant ou après la plage
musicale en cours de lecture peuvent également
être enregistrées.
3 Lorsque l’enregistrement est terminé,
l’indicateur
s’affiche.
s’éteint et l’indicateur
Enregistrement des informations
étiquetées sur votre iPod
1 Connectez votre iPod.
Lorsque votre iPod est connecté à cet appareil,
votre iPod commence à enregistrer automatiquement les informations étiquetées.
2 Lorsque le transfert est terminé, l’indica-
s’éteint et les informations étiquetées
teur
sont enregistrées sur votre iPod.
Présentation des opérations
du syntoniseur SiriusXM
(Fonction de AVH-X5500BHS/AVH-X3500BHS)
Vous pouvez utiliser cet appareil pour commander un syntoniseur de véhicule SiriusXM
Connect Vehicle Tuner,vendu séparément.
Pour plus d’informations sur l’installation d’un
syntoniseur de véhicule SiriusXM Connect Vehicle Tuner, consultez le guide d’installation fourni
avec le syntoniseur.
Toutes les nouveautés à écouter sont sur
SiriusXM grâce à plus de 130 canaux, notamment le plus large choix de musique gratuite, de
sports, d’informations, de discussion et de divertissements. Un syntoniseur de véhicule
SiriusXM et un abonnement sont nécessaires.
Pour plus d’informations, visitez www.siriusxm.
com.
Pour vous abonner au service
Radio Satellite SiriusXM
1 Sélectionnez SiriusXM comme source.
Vous devez être en mesure d’accorder sur le
canal 1. Si vous ne parvenez pas à obtenir le
canal 1, vérifiez que le syntoniseur de véhicule
SiriusXM Connect Vehicle Tuner est correctement installé comme décrit dans le guide d’installation du syntoniseur.
2 Basculez sur le canal 0 et vérifiez l’ID de
la radio.
L’ID de la radio SiriusXM peut être trouvé en ac-
cédant au canal 0. Il est également indiqué au
bas du syntoniseur de véhicule SiriusXM
Connect Vehicle Tuner.
Notez que cet ID de radio SiriusXM Radio ID
n’inclut pas les lettres I, O, S et F.
Ce numéro est obligatoire pour activer votre
abonnement.
3 Activez le service en ligne ou par téléphone.
! Visitez le site Web : www.siriusxm.com/activa-
tenow
! Appelez SiriusXM Listener Care au 1-866-635-
2349 pour l’activation.
# Les satellites SiriusXM envoient un message
d’activation à votre syntoniseur. Lorsque le syntoniseur reçoit le message, « Abonnement mis à jour »
s’affiche.
Une fois que vous êtes abonné, SiriusXM envoie un
message d’activation à votre syntoniseur.
Le processus d’activation prend généralement 10 à
15 minutes mais peut, dans certains cas, prendre
jusqu’à une heure. Ne mettez pas l’appareil hors tension lorsque le message d’activation est affiché.
Touches du clavier tactile
9
SiriusXM
1
2
3
4
5
6
34215
SXM 1
CH
Channel Name
Category Name
Artist Name / Content Info
Song Title / -
CH
888
22 JAN
AM
12:22
Tag
Dolby PLII
Live
-01’ 00”
DB
6798bac
1 Touchede liste
Affichage de la liste des canaux présélectionnés.
2 Touched’informations
Changement des informations SiriusXM.
Nom de la catégorie—Informations sur le
contenu
Touchez de façon prolongée pendant plus de
deux secondes pour faire défiler le texte.
08
Français
79
Fr
Page 80

Section
Syntoniseur SiriusXM
08
Syntoniseur SiriusXM
3 Touchede bande
Sélection d’une bande à partir de SXM1,
SXM2 ou de SXM3.
4 Touched’étiquetage des plages musicales
â
iTunes
Enregistrement de l’ étiquetage des plages
musicales iTunes
diffusion sur votre iPod.
5 Touchede recherche
Sélection d’un canal dans l’écran de la liste.
6 Touchede contrôle parental
L’écran Parental Control s’affiche.
7 ToucheLive
Utilisez pour revenir à l’émission en direct
lorsque vous êtes en mode Relecture instantanée.
8 Touchede direct
Un clavier numérique s’affiche et vous permet de saisir directement les numéros de canaux SiriusXM.
9 Touchede pause et lecture
Utilisez lorsque vous êtes en mode Relecture
instantanée.
a Touched’avance/de retour
Lorsque vous êtes en mode Relecture instantanée, utilisez pour avancer ou reculer ou appuyez de façon prolongée pour avancer ou
reculer rapidement.
b Touchede présélection
Accord manuel vers le haut ou le bas.
Enfoncez la touche de façon prolongée pendant plus de deux secondes pour ignorer des
stations. L’accord automatique démarre dès
que vous relâchez la touche. Appuyez à nouveau sur la touche pour annuler l’accord automatique.
80
Fr
â
à partir de la station de
c Touchede canal présélectionné
Rappel des canaux présélectionnés en touchant la touche.
Mise en mémoire de la station actuelle dans
la liste des canaux présélectionnés en touchant de façon prolongée la touche.
Opérations de base
Accord manuel (pas à pas) à l’aide des touches
1 Appuyez sur c ou d (TRK).
Accord automatique à l’aide des touches
1 Appuyez de façon prolongée sur c ou d
(TRK).
Remarque
Les touches du clavier tactile non indiquées à
Présentation des opérations du syntoniseur
SiriusXM peuvent s’afficher à l’écran.
Reportez-vous à la page 126, Liste des indicateurs.
Mise en mémoire et rappel
des canaux
Vous pouvez facilement mettre en mémoire jusqu’à six canaux pour chaque gamme.
! Sixcanaux peuvent être mis en mémoire
pour chaque gamme.
1 Affichez l’écran de la liste des canaux
présélectionnés.
Reportez-vous à la page précédente, Présentation des opérations du syntoniseur SiriusXM.
La liste des canaux présélectionnés apparaît à
l’écran.
2 Touchez de façon prolongée l’une des
touches de présélection pour mettre en mémoire le canal sélectionné.
Le canal sélectionné a été mis en mémoire.
3 Touchez la touche de présélection appropriée pour sélectionner le canal désiré.
Sélection d’un canal dans
l’écran de la liste
Sélection d’un canal à partir de
la liste de tous les canaux
Vous pouvez sélectionner un canal parmi les canaux disponibles.
1 Touchez la touche de recherche pour ouvrir l’écran de la liste.
2 Sélectionnez le réglage Tousles canaux.
3 Sélectionnez le canal souhaité.
4 Touchez la touche de fermeture pour fermer l’écran de la liste.
L’écran est fermé.
Sélection d’un canal à partir de
la liste de catégories
Vous pouvez sélectionner un canal parmi les catégories disponibles.
Les types de catégories disponibles dépendent
des types de canaux disponibles.
1 Touchez la touche de recherche pour ouvrir l’écran de la liste.
2 Sélectionnez une catégorie dans la liste.
3 Sélectionnez le canal souhaité.
4 Touchez la touche de fermeture pour fermer l’écran de la liste.
L’écran est fermé.
Changement de l ’affichage
de la liste
Vous pouvez basculer entre les types de liste
lorsqu’une liste s’affiche.
% Touchez Info lorsqu’une liste apparaît
pour basculer entre les types de liste.
La liste affichée bascule entre les types suivants
dans l’ordre donné.
Nom du canal—Nom de l’interprète—Titre de la
plage musicale—Informations sur le contenu
Sélection directe d’un canal
SiriusXM
Vous pouvez sélectionner un canal SiriusXM directement en saisissant le numéro de canal souhaité.
1 Touchez la touche de direct pour basculer
sur l’écran de saisie directe.
2 Touchez 0 à 9 pour saisir le numéro de
canal désiré.
# Pour annuler les chiffres entrés, touchez C.
3 Sélectionnez le canal SiriusXM correspondant au numéro saisi.
Le canal SiriusXM ayant le numéro saisi est sélectionné.
Sélection du canal SiriusXM correspondant au numéro saisi.
Page 81

Syntoniseur SiriusXM
Syntoniseur SiriusXM
Section
08
Replayä
Vous pouvez mettre en pause, rebobiner ou relire le canal écouté.
! Touchez Pause/Lecture pour mettre en pause
ou lire.
! Touchez les touches d’avance ou de retour
pour ignorer le contenu. Appuyez de façon
prolongée sur les touches d’avance et de retour pour parcourir rapidement le contenu.
! Touchez Live pour quitter le mode Relecture
et accéder au point en direct de l’émission.
Utilisation de l ’étiquetage
iTunes
Remarque
Pour plus d’informations sur l’étiquetage iTunes,
reportez-vous à la page 131, Quelques mots sur
l’étiquetage iTunes.
Étiquetage iTunes des plages
musicales SiriusXM
1 Réglez la station de diffusion.
2 Touchez la touche d’étiquetage des plages musicales iTunes
Enregistrez les informations d’étiquette sur cet
appareil.
Vous pouvez enregistrer les informations si l’indicateur Ta g s’affiche alors que la plage musicale désirée est en cours de diffusion.
# Quand vous enregistrez les données d’étiquette
sur cet appareil, Tag clignote.
# Il est possible d’enregistrer sur cet appareil des
informations d’étiquettes pour 50 plages musicales.
# En fonction du moment de l’enregistrement des
informations d’étiquettes, les informations d’étiquettes de la plage musicale lue avant ou après la plage
musicale en cours de lecture peuvent également
être enregistrées.
â
.
3 Lorsque l’enregistrement est terminé,
l’indicateur
s’affiche.
s’éteint et l’indicateur
Enregistrement des informations
étiquetées sur votre iPod
1 Connectez votre iPod.
Lorsque votre iPod est connecté à cet appareil,
votre iPod commence à enregistrer automatiquement les informations étiquetées.
2 Lorsque le transfert est terminé, l’indicateur
s’éteint et les informations étiquetées
sont enregistrées sur votre iPod.
Réglage du contrôle parental
La fonction de contrôle parental SiriusXM vous
permet de contrôler l’accès aux canaux que
vous jugez inappropriés pour les plus jeunes.
Lorsqu’elle est activée, la fonction Contrôle parental vous demander d’entrer un code pour
pouvoir vous accorder sur les canaux verrouillés.
1 Touchez la touche de contrôle parental
pour ouvrir l’écran de confirmation du code
de passe.
2 Utilisez le clavier numérique pour saisir le
code de passe à quatre chiffres, puis effleurez la touche Enter.
Touchez pour confirmer le code
de passe.
Le code par défaut est 0000.
Si un code de passe correct est saisi, la liste des
canaux s’affiche sur l’écran Contrôle parental
ainsi qu’une icône de verrouillage ou de déverrouillage.
3 Les opérations ci-dessous peuvent être
effectuées dans l’écran Contrôle parental.
Verrouillage de canaux
L’accès au canal d’émission en cours peut être
verrouillé. Vous devrez saisir votre code de passe
ultérieurement pour écouter un canal verrouillé.
% Pour verrouiller un canal spécifique, touchez le nom du canal souhaité dans la liste.
Une icône de verrouillage verrouillée s’affiche
en regard du nom d’un canal verrouillé.
Touchez une seconde fois le nom d’un canal verrouillé pour le déverrouiller.
Clear All (suppression des
verrous de tous les canaux)
Vous pouvez supprimer les verrous de tous les
canaux verrouillés simultanément.
% Touchez Clear All pour déverrouiller tous
les canaux verrouillés simultanément.
Editer code (changement de code)
Vous pouvez modifier votre code de passe.
1 Touchez Editer code pour passer à l’écran
d’édition du code de passe.
2 Utilisez le clavier numérique pour saisir
un nouveau code de passe à quatre chiffres,
puis effleurez la touche Enter.
Touchez pour confirmer le code
de passe.
Une fois le nouveau code de passe défini, l’écran Contrôle parental s’affiche.
Remarque
Si Vérification Tuner apparaît, reportez-vous à
la page 122, Radio Satellite SiriusXM.
Réglage de SiriusXM Tune Startä
SiriusXM Tune Start peut être utilisé pour définir
la position de départ de la lecture du contenu
musical en cours lorsque le canal est modifié.
1 Appuyez sur la touche accueil pour passer à l’écran d’accueil.
2 Touchez la touche système pour ouvrir le
menu système.
3 Touchez SiriusXM Tune Start sur le menu
système pour mettre SiriusXM Tune Start en
ou hors service.
Marche : la plage musicale en cours est lue à
partir du début de la plage.
Off : L’émissionen direct est lue pour le canal
audio en cours.
Options d’examen
Les canaux et les plages musicales peuvent être
lus sur cette unité à l’aide d’un examen du
disque.
Tune Scanä
Parcourez de courts extraits des plages musicales que vous avez peut-être raté sur vos canaux
musicaux présélectionnés.
1 Touchez la touche de liste pour afficher la
liste des canaux présélectionnés.
2 Touchez Examen de l’accord.
Chaque plage dans le canal en
cours est joué pendant huit secondes.
Reportez-vous à la page suivante, Utilisation du
balayage pour obtenir une liste des fonction que
vous pouvez utiliser pendant le balayage.
Français
81
Fr
Page 82

1 2 3
y
y
Section
Syntoniseur SiriusXM
08
Disque (CD/DVD)
09
Remarque
Tune Start et Tune Scan sont compatibles avec
le syntoniseur SXV200 mais non disponibles
avec SXV100.
Examen de la catégorie
Parcourez chaque canal d’une catégorie.
1 Touchez la touche de recherche.
2 Touchez la catégorie désirée.
3 Touchez Examen.
L’émission en direct de chaque
canal de la catégorie en cours est
lue pendant cinq secondes à tour
de rôle.
Reportez-vous à cette page, Utilisation du ba-
layage pour obtenir une liste des fonction que
vous pouvez utiliser pendant le balayage.
Utilisation du balayage
SXM 1
SiriusXM
1
CH
WWWWWWWWWWWWW
WWWWWWWWWWWWWWWW
2
WWWWWWWWWWWWWWWW
WWWWWWWWWWWWWWWW
3
4
5
6
1 Touched’examen du disque
Sélection du canal ou de la plage musicale
en cours de lecture
82
Fr
888
CH
Scan
Scan
Play
Next
2 Touched’examen suivant
Passage à la plage musicale suivante pendant Tune Scan
Passage au canal suivant pendant l’examen
de la catégorie
3 Touchede sortie d’examen
Sortie de l’examen du disque
Présentation de l’utilisation
vidéo
Vous pouvez utiliser cet appareil pour visualiser
les fichiers vidéo DVD/DVD-R/DVD-RW/CD/CDR/CD-RW.
Touches du clavier tactile
DVD vidéo
1JAN
PM
12:43
MENU
01 01
48kHz 16bit
Dolby D
Dolby DMulti ch
TOP
11
MENU
1/2
DVD-V
FULL
00'20'' -119'51''
a 987654
L+R
1
22 JAN
AM
12:22
Scanning
Dolby PLII
Scan
Esc
DB
07'24'' -112'47''
fedcg
CD Vidéo
FULL
00'20'' -119'51''
98h7eg b
Lors de la lecture d’un disque contenant un mélange de divers types de fichiers média
FULL
00'15'' -00'59''
Return
2/2
b
Return
L+R
1
OFF
Media
987 i3e4
1 Touched’avant rapide/Touche de retour
rapide
Avance ou retour rapide
Touchez pour modifier la vitesse d’avance rapide/de retour rapide.
2 Touchede recherche
Exécution de la fonction de recherche.
3 Touchede changement de langue des
sous-titres
21
Avec les DVD/DivX supportant des enregistrements multi-sous-titres, vous pouvez changer de langue des sous-titres pendant la
lecture.
4 Touchede changement de langue audio
Avec les DVD/DivX pouvant offrir la lecture
audio en différentes langues et dans différents systèmes audio (Dolby Digital, DTS,
etc.), vous pouvez changer de langue/de système audio pendant la lecture.
3
Suivant le réglage, la vidéo peut ne pas être
lue avec le système audio utilisé pour enregistrer le DVD.
5 Touchedu menu principal
Retour au menu principal pendant la lecture
d’un DVD.
6 ToucheMENU
Affichage du menu DVD pendant la lecture
d’un DVD.
7 ToucheLecture au ralenti
Avance image par image dans la sélection
pendant la lecture.
Touchez de façon prolongée pendant plus de
deux secondes pour ralentir la vitesse de lecture.
Le fait de toucher augmente la vitesse de lecture entre quatre réglages incrémentiels pendant la lecture au ralenti d’un DVD Vidéo/CD
Vidéo.
Page 83

Disque (CD/DVD)
Disque (CD/DVD)
Section
09
8 Touched’arrêt
Arrêt de la lecture.
Si vous reprenez la lecture, cette dernière reprend là où vous l’aviez arrêtée. Touchez de
nouveau la touche pour arrêter totalement la
lecture.
9 Touchede mode d’écran
Changement du mode écran.
Reportez-vous à la page 75, Changer le mode
écran large.
a Touchede pause et lecture
Pause de la lecture.
Retour en mode de lecture normal pendant
une lecture en pause, au ralenti ou image
par image.
b Touchede retour
Retour à la scène spécifiée pour laquelle un
retour a été préprogrammé sur le DVD en
cours de lecture.
Cette fonction ne peut pas être utilisée si une
scène spécifiée n’a pas été préprogrammée
sur le disque DVD.
c Touchede signet
Pendant la lecture, touchez le point où vous
voulez reprendre la lecture au prochain chargement du disque.
! Vous pouvez définir un signet par DVD
vidéo. Vous pouvez définir jusqu’à cinq signets au total.
! Pour supprimer le signet sur un disque,
maintenez la pression sur la touche pendant la lecture.
! Le signet le plus ancien est remplacé par
le nouveau.
d Touchefléchée
Affichage des touches fléchées pour utiliser
le menu DVD.
e Touchede répétition
Sélection de l’étendue de répétition.
f Touched’angle de vue
Avec les DVD offrant des enregistrements
multi-angle (scènes filmées sous plusieurs
angles), vous pouvez changer d’angle de vue
pendant la lecture.
g Touchede sortie audio
Changement de sortie audio lors de la lecture de disques vidéo enregistrés avec audio
LPCM.
h Touchede ralenti
Ralentissement de la vitesse de lecture en
quatre pas pendant la lecture au ralenti d’un
DVD/CD vidéo.
! Il n’y a pas de son pendant la lecture au
ralenti.
! Il est possible que les images ne soient
pas nettes en lecture au ralenti avec certains disques.
! La lecture au ralenti en arrière n’est pas
disponible.
i Touchede support
Commutation entre les types de fichiers
média pour lire les informations des supports DVD/CD/USB.
Opérations de base
Lecture de vidéos
1 Introduisez un disque, l’étiquette vers le haut,
dans le logement de chargement des disques.
La lecture commence automatiquement.
! Si vous lisez un DVD ou un CD Vidéo, un
menu peut s’afficher. Reportez-vous à la page
suivante, Utilisation du menu DVD et la page
85, Lecture PBC.
! Quand la fonction de lecture automatique est
en service, l’appareil ignore le menu DVD et
démarre automatiquement la lecture à partir
du premier chapitre du premier titre. Reportezvous à la page 105, Lecture automatique des
DVD.
! Quand l’icône de la source n’est pas affichée,
vous pouvez l’afficher en touchant l’écran.
! Si un message est affiché après le charge-
ment d’un disque contenant un contenu VOD
DivX, touchez Play.
Reportez-vous à la page 86, Lecture du contenu
VOD d’un DivX
Éjection d’un disque
! Reportez-vous à la page 75, Éjection d’un
disque.
Sélection d’un chapitre à l’aide des touches
1 Appuyez sur c ou d (TRK).
Avance ou retour rapide à l’aide des touches
1 Appuyez de façon prolongée sur c ou d
(TRK).
! L’avance/le retour rapide n’est pas toujours
disponible sur certains disques. Le cas
échéant, la lecture normale reprend automatiquement.
! L’avance/le retour rapide dépend de la durée
pendant laquelle vous maintenez la pression
sur c ou d (TRK). Cette fonction n’est pas disponible pour les CD vidéo.
â
.
Remarques
! Ce lecteur DVD peut lire un fichier DivX enre-
gistré sur un CD-R/RW, DVD-R/RW ou un fichier MPEG-1/MPEG-2/MPEG-4. (Veuillez
vous reporter à la section suivante pour
connaître les fichiers qui peuvent être lus.
Reportez-vous à la page 129, Fichiers vidéo
DivX.)
! Insérez uniquement un DVD-R/RW ou un
CD-R/RW dans le logement de chargement
des disques.
! Certaines opérations peuvent ne pas être dis-
ponibles lors du visionnage d’un média du
fait de la programmation du disque. Le cas
échéant, l’icône
! Des touches du panneau tactile non réperto-
riées dans la page précédente, Présentation
de l’utilisation vidéo peuvent également s’affi-
cher sur l’écran.
Reportez-vous à la page 126, Liste des indica-
teurs.
! Avec certains DVD, le changement de lan-
gue/système audio ne peut être possible
qu’en utilisant l’affichage d’un menu.
! Vous pouvez aussi utiliser le menu
Réglage vidéo pour changer de langue/système audio. Pour les détails, reportez-vous à
la page 103, Choix de la langue audio.
! Cet appareil revient en lecture normale si
vous modifiez la langue audio pendant l’avance/le retour rapide, la pause ou la lecture
au ralenti.
! Avec certains DVD, le changement de langue
des sous-titres ne peut être possible qu’en
utilisant l’affichage d’un menu.
! Vous pouvez aussi utiliser le menu
Réglage vidéo pour changer la langue des
sous-titres. Pour les détails, reportez-vous à
la page 103, Choix de la langue des sous-ti-
tres.
apparaît à l’ écran.
Français
83
Fr
Page 84

Section
Disque (CD/DVD)
09
Disque (CD/DVD)
! Cet appareil revient en lecture normale si
vous modifiez la langue des sous-titres pendant l’avance/le retour rapide, la pause ou la
lecture au ralenti.
! Pendant la lecture d’une scène prise sous
plusieurs angles, l’icône d’angle est affichée.
Utilisez le menu Réglage vidéo pour mettre
l’affichage de l’icône d’angle en service ou
hors service. Pour les détails, reportez-vous à
la page 103, Réglage de l’affichage des DVD
sous plusieurs angles.
! Vous reviendrez en lecture normale si vous
modifiez l’angle d’ affichage pendant l’avance/le retour rapide, la pause ou la lecture
au ralenti.
Utilisation de la lecture audio
Vous pouvez utiliser cet appareil pour écouter
les fichiers audio DVD-R/DVD-RW/CD/CD-R/CDRW.
Touches du clavier tactile
12
1JAN
PM
12:43
S.Rtrv
Dolby PLll
Media
45678
3
Abcdefghi
Abcdefghi
Abcdefghi
Abcdefghi
11
ROM
00'37'' -08'43''
1 Touched’informations
Modification des informations à afficher sur
cet appareil lors de la lecture de fichiers
MP3/WMA/AAC.
2 Touchede recherche
Affichage d’une liste de titres de plages/
noms de fichiers pour sélectionner les plages musicales sur un CD.
Affichage de la liste de noms de fichiers pour
sélectionner les fichiers.
3 Touchede support
Commutation entre les types de fichiers
média pour lire les informations des supports DVD ou CD.
4 ToucheSound Retriever
Reportez-vous à la page 75, Utilisation du correcteur de son.
5 ToucheAléatoire
Écoute de plages musicales dans un ordre
aléatoire.
6 Touchede répétition
Sélection de l’étendue de répétition.
7 Touchede dossier précédent/Touche de
dossier suivant
Sélection d’un dossier.
8 Touchede pause et lecture
Pause et démarrage de la lecture.
Changement de type de
fichier média
Lors de la lecture d’un média numérique contenant un mélange de divers types de fichiers
média tels que DivX, MPEG-1, MPEG-2, MPEG-4
et MP3, vous pouvez basculer entre les types de
fichiers média à lire.
% Touchez Média pour changer de type de
fichier média.
CD (données audio (CD-DA))—Musique/ROM
(audio compressé)—Vidéo (fichiers vidéo DivX,
MPEG-1, MPEG-2, MPEG-4)
Remarque
Il est impossible de lire les fichiers de données
audio (CD-DA) et les fichiers image JPEG enregistrés sur CD-R/RW/ROM à partir de cet appareil.
Utilisation du menu DVD
(Fonction pour les DVD vidéo)
Certains DVD vous permettent d’effectuer une
sélection dans le contenu du disque à l’aide
d’un menu.
Utilisation des touches fléchées
1 Affichage des touches fléchées pour utiliser le menu DVD.
2 Sélectionnez l’élément de menu désiré.
Retour à l’affichage normal de
vidéo DVD.
Affichage des touches fléchées.
Sélection de l’élément de menu
désiré.
Démarrage de la lecture à partir
de l’élément de menu sélectionné.
Utilisation du menu DVD en touchant directement l’élément de
menu.
Retour à l’affichage précédent.
# Quand vous utilisez le menu DVD en touchant directement l’élément de menu, touchez l’icône pour
exécuter la fonction souhaitée.
# La façon d’afficher le menu diffère selon le
disque.
# Selon le contenu du disque DVD, cette fonction
peut ne pas fonctionner correctement. Le cas
échéant, l’utilisation des touches du clavier tactile
permet d’accéder au menu DVD.
Lecture aléatoire (shuffle)
% Touchez la touche de lecture aléatoire.
! Morceaux – Lecture des vidéos/plages musi-
cales dans un ordre aléatoire à l’ intérieur de
la liste sélectionnée.
! Albums – Lecture dans l’ordre de vidéos/pla-
ges musicales à partir d’un album sélectionné au hasard.
! Folder – Lecture des plages musicales dans
un ordre aléatoire à l’intérieur du dossier sélectionné.
! Disc – Lecture des plages musicales dans un
ordre aléatoire sur le disque sélectionné.
! On – Lecture de fichiers dans un ordre aléa-
toire à l’intérieur de l’étendue de répétition
Folder ou Disc.
! Off – Annulation de la lecture aléatoire.
84
Fr
Page 85

Disque (CD/DVD)
Disque (CD/DVD)
Section
09
Répétition de la lecture
% Touchez la touche de répétition.
! Disc – Lecture continue du disque en cours
! Chapter – Répétition du chapitre en cours de
lecture
! Title – Répétition du titre en cours de lecture
! Track – Répétition de la plage en cours de
lecture
! File – Répétition du fichier en cours de lec-
ture
! Folder – Répétition du dossier en cours de
lecture
! One – Répétition uniquement de la vidéo/
plage musicale en cours de lecture
Remarques
! Cette fonction ne peut pas être utilisée pen-
dant la lecture de CD Vidéo disposant de la
fonction PBC (contrôle de la lecture).
! Si vous effectuez une recherche de chapitre,
une avance rapide/un retour rapide, une lecture image par image ou une lecture au ralenti, la répétition de lecture s’arrêtera.
! Lors de la lecture de disques comportant de
l’audio compressé et des données audio
(CD-DA), la répétition de lecture s’effectue à
l’intérieur du type de données en cours de
lecture même si Disc est sélectionné.
! Si vous choisissez un autre dossier pendant
la répétition de la lecture, l’étendue de répétition changera en Disc.
! Si pendant la répétition File, vous recherchez
une plage ou commandez une avance rapide
ou un retour rapide, l’étendue de répétition
de la lecture changera en Folder.
! Si, pendant la répétition Chapter, vous effec-
tuez une recherche de titre/chapitre ou
commandez une avance rapide ou un retour
rapide, la plage de répétition est mise automatiquement hors service.
! Si pendant la répétition Track, vous recher-
chez une plage ou commandez une avance
rapide ou un retour rapide, l’étendue de répétition de la lecture changera en Disc.
! Quand Folder est sélectionné, il n’est pas
possible de lire un sous-dossier de ce dossier.
Recherche de la partie que
vous souhaitez lire
Vous pouvez utiliser la fonction de recherche
pour trouver la partie que vous souhaitez lire.
Pour les DVD vidéo, vous pouvez sélectionner
Title (titre), Chapter (chapitre) ou 10key (pavé
numérique).
Pour les CD vidéo, vous pouvez sélectionner
Track (plage) ou 10key (pavé numérique).
! La recherche de chapitre n’est pas dispo-
nible quand la lecture est arrêtée.
! Cette fonction ne peut pas être utilisée pen-
dant la lecture de vidéo DVD ou CD vidéo disposant de la fonction PBC (contrôle de la
lecture).
1 Exécutez la fonction de recherche.
Reportez-vous à la page 82, Présentation de l’uti-
lisation vidéo.
2 Touchez l’option de recherche désirée
(par exemple, Chapter).
3 Touchez 0 à 9 pour saisir le numéro désiré.
# Pour annuler les chiffres saisis, touchez C.
4 Démarrez la lecture à partir de la partie
sélectionnée.
Enregistrement des numéros et
démarrage de la lecture.
Remarque
Avec les disques qui offrent un menu, vous pouvez également appuyer sur le menu DVD pour
effectuer votre sélection.
Reportez-vous à la page 82, Présentation de l’uti-
lisation vidéo.
Choix de la sortie audio
Lors de la lecture de disques DVD vidéo enregistrés avec audio LPCM, vous pouvez changer de
sortie audio.
Pendant la lecture de CD Vidéo, vous pouvez
basculer entre sortie audio stéréo et monaurale.
! Cette fonction n’est pas disponible quand la
lecture est arrêtée.
% Touchez la touche de sortie audio pour
basculer entre les types de sortie audio.
! L+R – Gauche et droite
! G. – Gauche
! Dr – Droite
! Mix – Mixage gauche et droite
Remarque
Il se peut que vous ne puissiez pas sélectionner
ou utiliser cette fonction en fonction du disque
et de l’emplacement de la lecture.
Lecture PBC
(Fonction pour les CD vidéo)
Pendant la lecture de CD Vidéo disposant de la
fonction PBC (contrôle de la lecture), PBC On
est affiché.
1 Exécutez la fonction de recherche.
Reportez-vous à la page 82, Présentation de l’uti-
lisation vidéo.
2 Touchez 10key pour afficher le pavé numérique.
3 Touchez une des touches 0 à 9 correspondant à un numéro de menu.
4 Démarrez la lecture à partir de la partie
sélectionnée.
Enregistrement des numéros et
démarrage de la lecture.
Remarques
! Vous pouvez afficher le menu en touchant
Return pendant la lecture PBC. Pour les détails, reportez-vous aux instructions fournies
avec le disque.
! La lecture PBC d’un CD Vidéo ne peut pas
être annulée.
! Pendant la lecture de CD vidéo supportant la
fonction PBC (contrôle de la lecture), vous
ne pouvez pas sélectionner l’étendue de la
répétition de lecture ni utiliser la fonction de
recherche.
Choix des plages à partir de
la liste des titres de plages
Vous pouvez sélectionner des plages musicales
à écouter à l’aide de la liste des titres de plage
enregistrés sur un disque.
1 Affichez la liste des titres des plages.
Reportez-vous à la page précédente, Utilisation
de la lecture audio.
2 Touchez le titre de votre plage favorite.
La lecture commence.
Choix des fichiers à partir de
la liste des noms de fichiers
(Fonction pour l’audio compressé/DivX/MPEG-1/
MPEG-2/MPEG-4)
Français
85
Fr
Page 86

ppr
Section
Disque (CD/DVD)
09
iPod
10
La fonction liste des noms des fichiers permet
d’accéder à la liste des noms de fichiers (ou de
dossiers) depuis laquelle vous pouvez sélectionner un fichier (dossier) à lire.
1 Touchez la touche de recherche pour afficher la liste des noms de fichiers (dossiers).
2 Touchez votre nom de fichier (ou de dossier) favori.
# Quand vous avez sélectionné un dossier, une
liste des noms des fichiers (ou des dossiers) qu’il
contient peut être visualisée. Répétez cette opération
pour sélectionner le nom de fichier désiré.
# Si le dossier 1 (ROOT) ne contient pas de fichier,
la lecture commence au dossier 2.
Remarque
Si une partie des informations enregistrées ne
s’affichent pas, une touche de défilement apparaît à droite de la liste. Touchez la touche de défilement pour parcourir.
Lecture du contenu VOD
d’un DivX
Certains contenus VOD (vidéo à la demande)
DivX peuvent être lus un nombre de fois défini
uniquement. Lorsque vous chargez un disque
contenant ce type de contenu, le nombre de lectures effectuées apparaît à l’écran. Vous pouvez
choisir de lire ou non le disque.
! Pour le contenu VOD DivX sans cette restric-
tion, vous pouvez charger le disque dans
votre lecteur et en jouer le contenu aussi
souvent que vous le voulez, et aucun message n’est affiché.
! Vous pouvez vérifier le nombre de lectures
restantes du contenu en consultant le message Ce DivX de location a été vu
parmis les autorisés..
86
Fr
â
Important
! Pour pouvoir jouer des contenus VOD DivX
sur cet appareil, vous devez d’abord enregistrer l’appareil auprès de votre fournisseur de
contenu VOD DivX. Pour les détails sur votre
code d’enregistrement, reportez-vous à la
page 105, Affichage de votre code d’enregistre-
ment VOD DivX
! Le contenu VOD DivX est protégé par un sys-
tème DRM (Digital Rights Management).
Ceci restreint la lecture du contenu à des appareils spécifiques et enregistrés.
% Si un message est affiché après le chargement d’un disque contenant un contenu
VOD DivX, touchez Play.
La lecture du contenu VOD DivX démarrera.
# Pour sauter au fichier suivant, touchez
Next Play.
# Si vous ne voulez pas jouer le contenu VOD DivX,
touchez Stop.
â
.
Utilisation des images de
vidéos
Vous pouvez utiliser cet appareil pour afficher
les fichiers vidéos d’un iPod.
! Selon le type de votre iPod, l’absence de sor-
tie est possible si vous n’utilisez pas un CDIU201S/CD-IU201V (vendu séparément). Veillez à utiliser un CD-IU201S/CD-IU201V pour
connecter votre iPod.
Touches du clavier tactile
1
1JAN
PM
12:43
2/3
iPod
FULL
02'35'' -21'54''
2
1
Appr
AppppApp
654 37
1 Touched’avant rapide/Touche de retour
rapide
Avance ou retour rapide
Touchez pour modifier la vitesse d’avance rapide/de retour rapide.
2 Touchede recherche
Affichage des menus de l’iPod.
3 Touchede mode de commande iPod
Exécution d’opérations à partir de votre iPod
et écoute de plage audio depuis les haut-parleurs de votre véhicule.
4 ToucheShuffle
Lecture de la vidéo de votre iPod dans un
ordre aléatoire.
5 Touchede répétition
Sélection de l’étendue de répétition.
6 Touchede mode d’écran
Changement du mode écran.
Reportez-vous à la page 75, Changer le mode
écran large.
7 Touchede pause et lecture
Pause de la lecture.
2
Retour en mode de lecture normal pendant
une lecture en pause, au ralenti ou image
par image.
Opérations de base
Lecture de vidéos
1 Touchez la touche de recherche pour dérouler
les menus de l’iPod.
2 Sélectionnez une vidéo à lire.
Reportez-vous à la page 88, Lecture de vidéos à
partir de votre iPod.
! Quand l’icône de la source n’est pas affi-
chée, vous pouvez l’afficher en touchant
l’écran.
! Débranchez les écouteurs de l’iPod avant
de le connecter à cet appareil.
! Suivant le modèle de l’iPod et la quantité
de données enregistrées sur l’iPod, le lancement de la lecture peut prendre un certain temps.
! Utilisez les touches du clavier tactile pour
sélectionner l’iPod, une fois ce dernier
connecté à cet appareil.
! pas de dispositif s’affiche lors de la dé-
connexion de l’iPod.
Avance ou retour rapide à l’aide des touches
1 Appuyez de façon prolongée sur c ou d
(TRK).
Page 87

ppr
All
iPod
iPod
Section
10
Remarques
! Pour garantir un fonctionnement correct, re-
liez le câble du connecteur de la station d’accueil de l’iPod directement à cet appareil.
! Lorsque l’iPod est connecté à cet appareil, il
ne peut pas être mis en service ou hors service.
! Les touches du clavier tactile non indiquées
à Utilisation des images de vidéos peuvent
s’afficher à l’écran.
Reportez-vous à la page 126, Liste des indica-
teurs.
Utilisation de la lecture audio
Vous pouvez utiliser cet appareil pour écouter
les fichiers audio d’un iPod.
Remarque
Le temps de lecture peut ne pas s’afficher correctement.
Touches du clavier tactile
Audio iPod (contrôle de l’audio)
54321
1JAN
PM
12:43
S.Rtrv
All
All
Appr
AppppApp
iPod
Abcdefghi
Abcdefghi
Abcdefghi
Abcdefghi
01'17'' -05'29''
1/9
1
x
2
dcb a987 6
Audio iPod (App Mode)
FULL
ef
1 Titre de la plage musicale
Affichage de la liste Morceaux sur l’iPod.
2 Nom de l’interprète
Affichage de la liste Artistes sur l’iPod.
3 ToucheMIXTRAX EZ
Démarrage de MIXTRAX EZ.
Reportez-vous à la page 95, Utilisation de
MIXTRAX EZ.
4 Pochettes d’album
Démarrage de la recherche de liaison sur
votre iPod lorsque vous touchez l’affichage
des pochettes d’album.
5 Touchede recherche
Affichage des menus de l’iPod.
6 ToucheSound Retriever
Reportez-vous à la page 75, Utilisation du correcteur de son.
7 Touchede mode de commande iPod
Exécution d’opérations à partir de votre iPod
et écoute de plage audio depuis les haut-parleurs de votre véhicule.
8 ToucheShuffle
Écoute des plages musicales de l’iPod dans
un ordre aléatoire.
9 Touchede répétition
Sélection de l’étendue de répétition.
a Touchede changement de vitesse
Modification de la vitesse de lecture du livre
audio sur l’iPod.
b Genre
Affichage de la liste Genres sur l’iPod.
c Titre de l’album
Affichage de la liste Albums sur l’iPod.
d Touchede pause et lecture
Pause et démarrage de la lecture.
e Touched’utilisation de l’appareil
Exécution d’opérations depuis cet appareil et
écoute de musique sur votre iPod via les
haut-parleurs de votre véhicule.
f Touchede mode d’écran
Changement du mode écran.
Utilisation de la fonction iPod
de cet appareil sur votre iPod
Vous pouvez écouter l’audio des applications de
votre iPod depuis les haut-parleurs du véhicule
lorsque App Mode est sélectionné.
Cette fonction n’est pas compatible avec les modèles d’iPod suivants.
! iPod nano 1ère génération
! iPod avec vidéo
Remarque
Quand cette fonction est en cours d’utilisation,
l’iPod n’est pas mis hors service même lorsque
le contact est coupé. Pour le mettre hors service, utilisez l’iPod.
1 Changez le mode de commande sur
App Mode.
Reportez-vous à la page précédente, Utilisation
des images de vidéos.
Reportez-vous à cette page, Utilisation de la lecture audio.
2 Utilisez l’iPod connecté pour sélectionner
une vidéo/une plage musicale et la jouer.
Remarques
! Les fonctions suivantes sont toujours acces-
sibles à partir de l’appareil même si le mode
de commande est réglé sur App Mode.
Cependant, le fonctionnement dépend de
vos applications.
— Lecture/pause
— Avance/retour rapide
— Avance/retour d’une plage
— Avance/retour d’un chapitre
! App Mode est compatible avec les modèles
d’iPod suivants.
— iPod touch 4ème génération
— iPod touch 3ème génération
— iPod touch 2ème génération
— iPod touch 1ère génération
— iPod classic 160 Go
— iPod classic 120 Go
— iPod classic
— iPod nano 6ème génération
— iPod nano 5ème génération
— iPod nano 4ème génération
— iPod nano 3ème génération
— iPod nano 2ème génération
— iPhone 4S
— iPhone 4
— iPhone 3GS
— iPhone 3G
— iPhone
Lecture aléatoire
% Touchez la touche de lecture aléatoire.
! Morceaux – Lecture des vidéos/plages musi-
cales dans un ordre aléatoire à l’ intérieur de
la liste sélectionnée.
Français
87
Fr
Page 88

Section
10
iPod
iPod
! Albums – Lecture dans l’ordre de vidéos/pla-
ges musicales à partir d’un album sélectionné au hasard.
! Folder – Lecture des plages musicales dans
un ordre aléatoire à l’intérieur du dossier sélectionné.
! On – Lecture de fichiers dans un ordre aléa-
toire à l’intérieur de l’étendue de répétition.
! Off – Désactivez la lecture aléatoire.
Répétition de la lecture
% Touchez la touche de répétition.
! One – Répétition uniquement de la vidéo/
plage musicale en cours de lecture
! All – Répétition de toutes les vidéos/plages
musicales de la liste sélectionnée sur l’iPod
Lecture de vidéos à partir de
votre iPod
Cet appareil peut lire des vidéos si un iPod disposant de fonctions vidéo est connecté.
! Cet appareil peut lire des “Films”, “Vidéos
musicales”, “Podcasts vidéo” et “Émissions
TV” qui peuvent être téléchargés à partir du
magasin iTunes Store.
1 Touchez Search pour afficher les menus
iPod.
Reportez-vous à la page 86, Utilisation des images de vidéos.
2 Basculez vers le mode vidéo de l’iPod.
ROOT
Playlists
Artists
Albums
Songs
Podcasts
Genres
# Si vous voulez basculer sur le mode vidéo de
l’iPod, touchez l’icône.
Commutation vers le mode vidéo
de l’iPod.
3 Lisez la vidéo à partir de l’iPod.
ROOT
Video Playlists
Movies
Music Videos
Video Podcasts
TV Shows
Rentals
# Si vous voulez afficher le mode musique de
l’iPod, touchez l’icône.
Commutation vers le mode musique de l’iPod.
Recherche d’une vidéo/
musique sur l’iPod
Pour faciliter son utilisation et la recherche des
plages musicales, les opérations à effectuer
pour contrôler un iPod avec cet appareil sont
conçues pour être aussi semblables que possible à celles de l’iPod.
Recherche d’une vidéo/musique
par catégorie
1 Touchez la touche de recherche pour dérouler les menus de l’iPod.
Reportez-vous à la page précédente, Utilisation
de la lecture audio.
2 Touchez une des catégories dans laquelle
vous voulez rechercher une vidéo/musique.
! Video Playlists (listes de lecture vidéo)
! Movies (films)
! Music Videos (vidéos musicales)
! Video Podcasts (podcasts vidéo)
! TV Shows (émissions TV)
! Rentals (fichiers de location)
! Listes (listes de lecture)
! Artistes (interprètes)
! Albums (albums)
! Morceaux (plages musicales)
! Podcasts (podcasts)
! Genres (genres)
! Compositeurs (compositeurs)
! Livres audio (livres audio)
3 Touchez le titre de la liste que vous voulez lire.
Répétez cette opération jusqu’à ce que vous
trouviez la vidéo/musique désirée.
Remarques
! Selon la génération ou la version de l’iPod,
certaines fonctions peuvent ne pas être disponibles.
! Vous pouvez lire les listes de lecture crées à
l’aide de l’application MusicSphere. L’application sera disponible sur notre site web.
! Les listes de lecture créées à l’aide de l’appli-
cation MusicSphere sont affichées sous
forme abrégée.
Recherche par ordre
alphabétique dans la liste
1 Sélectionnez une catégorie.
Reportez-vous à cette page, Recherche d’une
vidéo/musique par catégorie.
2 Passez en mode de recherche par ordre
alphabétique.
Commutation vers le mode de recherche par ordre alphabétique.
Le mode recherche par ordre alphabétique s’affiche.
3 Touchez la première lettre du titre de la
vidéo/plage musicale que vous recherchez.
Lors de cette recherche, l’utilisation des touches
du clavier tactile n’est pas disponible.
# Pour affiner la recherche avec une autre lettre,
touchez Annuler.
4 Touchez le titre de la liste que vous voulez lire.
Répétez cette opération jusqu’à ce que vous
trouviez la plage musicale/la vidéo désirée.
Modification de la vitesse
d’un livre audio
% Touchez la touche de changement de vitesse pour modifier la vitesse.
Lecture plus rapide que la vitesse
2
normale
Lecture à la vitesse normale
1
Lecture plus lente que la vitesse
1/2
normale
88
Fr
Page 89

iPod
Affichage de listes liées à la
plage musicale en cours de
lecture (recherche de liaison)
Touchez la pochette d’album pour afficher la
liste des noms des plages musicales de l’album
en cours de lecture. Touchez le nom de la plage
musicale que vous souhaitez lire pour en démarrer la lecture.
Remarque
Si une partie des informations enregistrées ne
s’affichent pas, une touche de défilement apparaît à droite de la liste. Touchez la touche de défilement pour parcourir.
Mode Advanced App
Utilisation du mode App
avancée
Ce système peut basculer en mode App avancée
qui permet d’afficher et d’utiliser l’application
pour iPhone à l’écran.
En mode App avancée, vous pouvez utiliser les
applications de façon tactile (frappe, glissement
ou déplacement) à partir de l’écran du système.
ATTENTION
Certaines utilisations d’un smartphone en
conduisant peuvent être interdites dans
votre juridiction. Vous devez connaître et
respecter ces restrictions.
En cas de doute pour une fonction spécifique, ne l ’exécutez que si le véhicule est
stationné.
Aucune fonction ne doit être utilisée que si
cela est fait en toute sécurité par rapport à
votre conduite.
! Pioneerne pourra être tenu responsable
des problèmes résultant d’un contenu incorrect ou reposant sur une mauvaise application.
! Le contenu et les fonctionnalités des appli-
cations prises en charge sont de la responsabilité des fournisseurs de l’application.
! En mode App avancée, les fonctionnalités
du produit sont limitées pendant que vous
conduisez, les fonctions disponibles étant
déterminées par les fournisseurs de l’application.
! La disponibilité de la fonctionnalité du
mode App avancée est déterminée par le
fournisseur de l’application et non par
Pioneer.
! Le mode App avancée permet d’accéder
aux applications qui ne figurent pas sur la
liste (conformément aux limitations en vigueur pendant la conduite), mais l’utilisation du contenu est déterminée par les
fournisseurs de l’application.
Le mode Advanced App est compatible avec les
modèles d’iPod suivants.
! iPhone 4S
! iPhone 4
! iPod touch 4ème génération
— Seules les applications compatibles avec le
mode App avancée fonctionnement par
commutation de ce système en mode App
avancée.
— Veuillez vérifier les applications iPhone pri-
ses en charge en mode App avancée à l’adresse :
http://www.pioneerelectronics.com/
AppRadio
Important
! Utilisez le CD-IU201S (vendu séparément)
lorsque vous utilisez cette fonction.
Section
10
11
Français
89
Fr
Page 90

Section
Mode Advanced App
11
Mode Advanced App
! Seule l’entrée USB prend en charge le mode Ad-
vanced App.
! Lorsque vous écoutez simultanément de la mu-
sique et des sons depuis une application, consultez la section suivante. Reportez-vous à cette
page, Réglage du mixage audio de l’application.
PRÉCAUTION
! Pendant que vous conduisez, vous ne pouvez pas
saisir de texte sur votre iPod.
! Utilisez l’iPod connecté pour ouvrir une applica-
tion.
Démarrage de la procédure
1 Installez l’application AppRadio sur votre
iPhone.
2 Réglez Entrée RVB sur iPhone dans les paramètres du système.
Lorsque vous utilisez cette fonction, définissez
l’entrée RGB sur iPhone. Pour les détails, reportez-vous à la page 105, Réglage de l’entrée RGB.
3 Démarrez une application disponible en
mode App avancée à partir de l’iPhone.
Une image de l’application apparaît sur l’écran
de ce système.
! Vous pouvez également démarrer une appli-
cation disponible en mode App avancée à
partir d’une application de démarrage.
4 Appuyez sur la touche accueil pour passer à l’écran d’accueil.
5 Touchez Apps.
6 Utilisez l’application.
Réglage du clavier
PRÉCAUTION
Pour votre sécurité, le clavier est uniquement
disponible lorsque le véhicule est à l’arrêt et le
frein à main serré.
Selon l’application, vous pouvez saisir du texte
sur l’écran. Pour saisir du texte correctement à
l’aide du clavier qui s’affiche sur cet appareil,
vous devez définir le paramètre de langue de
cette fonction.
Lorsque le mode d’application avancée est utilisé, le réglage de la langue du clavier défini
pour la fonction et le réglage de la langue du
clavier de l’iPhone doivent être identiques.
! Le clavier est uniquement disponible en
mode App avancée.
Lorsque vous renseignez une zone de texte
d’une application pour iPhone, un clavier apparaît à l’écran. Vous pouvez saisir le texte souhaité directement depuis ce système.
! La préférence de langue du clavier de ce sys-
tème doit être identique à la configuration de
votre iPhone.
Si la configuration de ce produit et de
l’iPhone sont différentes, vous ne pourrez
pas saisir les caractères correctement.
1 Appuyez sur la touche accueil pour passer à l’écran d’accueil.
2 Touchez la touche système pour ouvrir le
menu système.
3 Touchez Clavier sur le menu Système
pour sélectionner la langue désirée.
4 Touchez la langue désirée.
Français (Français)—Allemand (Allemand)—
Grec (Grec)—Russe (Russe)—Anglais (Anglais
américain)—Anglais (Royaume-Uni) (Anglais RU)—Néerlandais (Néerlandais)—Italien (Italien)—Norvégien (Norvégien)—Suédois (Suédois)—Finnois (Finnois)—Espagnol (Espagnol)
—Portugais (Portugais)
5 Renseignez la zone de texte à partir de
l’écran de l’application de l’iPhone.
Touchez
pour masquer le clavier.
Réglage du mixage audio de
l’application
Vous ne pouvez pas activer ou désactiver la
fonction Mixage lorsque cet appareil lit une
plage musicale d’ un iPod.
L’audio de l’application en mode App avancée
peut être réglé.
Activez ce paramètre lorsque vous souhaitez
mixer le son de l’application avec le son d’une
source intégrée (comme la radio). Le volume du
son de l’application est réglable sur 3 niveaux.
1 Appuyez sur la touche accueil pour passer à l’écran d’accueil.
2 Touchez la touche système pour ouvrir le
menu système.
3 Touchez App sound mixing sur le menu
Système pour sélectionner le réglage désiré.
off (hors service)—Bas (faible)—Moy (moyen)
—Haut (élevé)
90
Fr
Page 91

All
USB
USB
Section
12
Utilisation des images de
vidéos
Vous pouvez utiliser cet appareil pour visualiser
les fichiers d’un périphérique de stockage USB.
Touches du clavier tactile
1
1JAN
PM
12:43
USB
FULL
00'20'' -119'51''
a987 5
1 Touched’avant rapide/Touche de retour
rapide
Avance ou retour rapide
Touchez pour modifier la vitesse d’avance rapide/de retour rapide.
2 Touchede recherche
Affichage des menus USB.
3 Touchede changement de langue des
sous-titres
Avec les fichiers DivX supportant des enregistrements multi-sous-titres, vous pouvez
changer de langue des sous-titres pendant la
lecture.
4 Touchede support
Commutation entre les types de fichiers
média pour lire les informations des supports Musique/Vidéo/Photo.
01 01
Dolby DMulti ch
11
Media
643
5 Touchede changement de langue audio
Avec les fichiers DivX pouvant offrir la lecture
audio en différentes langues et dans différents systèmes audio (Dolby Digital, DTS,
etc.), vous pouvez changer de langue/de système audio pendant la lecture.
6 Touchede répétition
Sélection de l’étendue de répétition.
2
Reportez-vous à la page 93, Répétition de la
lecture.
7 ToucheLecture au ralenti
(Fonction pour les fichiers DivX/MPEG-1/
MPEG-2/MPEG-4)
Avance image par image dans la sélection
pendant la lecture.
Touchez de façon prolongée pendant plus de
deux secondes pour ralentir la vitesse de lecture.
8 Touched’arrêt
Arrêt de la lecture.
Si vous reprenez la lecture, cette dernière reprend là où vous l’aviez arrêtée. Touchez de
nouveau la touche pour arrêter totalement la
lecture.
9 Touchede mode d’écran
Changement du mode écran.
Reportez-vous à la page 75, Changer le mode
écran large.
a Touchede pause et lecture
Pause de la lecture.
Retour en mode de lecture normal pendant
une lecture en pause, au ralenti ou image
par image.
Opérations de base
Lecture de vidéos
1 Connectez le périphérique USB.
La lecture commence automatiquement.
Quand l’icône de la source n’est pas affichée,
vous pouvez l’afficher en touchant l’écran.
Avance ou retour rapide à l’aide des touches
1 Appuyez de façon prolongée sur c ou d
(TRK).
Remarques
! Les touches du clavier tactile non indiquées
à Utilisation des images de vidéos peuvent
s’afficher à l’écran.
Reportez-vous à la page 126, Liste des indica-
teurs.
! Vous pouvez aussi utiliser le menu
Réglage vidéo pour changer de langue/système audio. Pour les détails, reportez-vous à
la page 103, Choix de la langue audio.
! Cet appareil revient en lecture normale si
vous modifiez la langue audio pendant l’avance/le retour rapide, la pause ou la lecture
au ralenti.
! Vous pouvez aussi utiliser le menu
Réglage vidéo pour changer la langue des
sous-titres. Pour les détails, reportez-vous à
la page 103, Choix de la langue des sous-ti-
tres.
! Cet appareil revient en lecture normale si
vous modifiez la langue des sous-titres pendant l’avance/le retour rapide, la pause ou la
lecture au ralenti.
Utilisation de la lecture audio
Vous pouvez utiliser cet appareil pour écouter
des fichiers audio USB.
Remarques
! Le temps de lecture peut ne pas s’afficher
correctement.
! Lors de la lecture de fichiers enregistrés
comme des fichiers VBR (débit binaire variable), le temps de lecture n’est pas affiché
correctement si on utilise des opérations d’avance rapide ou de retour rapide.
! Pour garantir un fonctionnement correct, re-
liez le câble du connecteur de la station d’accueil de l’iPod directement à cet appareil.
! Lorsque l’iPod est connecté à cet appareil, il
ne peut pas être mis en service ou hors service.
! Si les caractères enregistrés sur le disque ne
sont pas compatibles avec cet appareil, ils
ne seront pas affichés.
! Les informations textuelles peuvent ne pas
s’afficher correctement en fonction de leur
environnement d’enregistrement.
! Déconnectez le lecteur audio portable USB/
la mémoire USB lorsque vous ne l’utilisez
plus.
! Lorsque vous sélectionnez Speana à la page
111, Choix de l’affichage d’arrière-plan, les pochettes d’album ne s’affichent pas.
Touches du clavier tactile
USB
Abcdefghi
Abcdefghi
Abcdefghi
Abcdefghi
00'01'' -00'03''
61
21
All
All
JAN
S.Rtrv
PM
12:43
Media
3
a987654
1 ToucheMIXTRAX EZ
Démarrage de MIXTRAX EZ.
Français
91
Fr
Page 92

All
Section
12
USB
USB
2 Touched’informations
Modification des informations à afficher sur
cet appareil lors de la lecture de fichiers
MP3/WMA/AAC/WAV.
3 Touchede recherche
Affichage de la liste de noms de fichiers pour
sélectionner les fichiers.
4 Touchede support
Commutation entre les types de fichiers
média pour lire les informations des supports USB.
5 ToucheSound Retriever
Reportez-vous à la page 75, Utilisation du correcteur de son.
6 ToucheAléatoire
Écoute de plages musicales dans un ordre
aléatoire.
7 Touchede répétition
Sélection de l’étendue de répétition.
8 ToucheDB
Création d’une base de données qui permet
d’effectuer des recherches par noms d’artiste, genre et d’autres options.
Reportez-vous à cette page, Mode de naviga-
tion Musique.
9 Touchede dossier précédent/Touche de
dossier suivant
Sélection d’un dossier.
a Touchede pause et lecture
Pause et démarrage de la lecture.
92
Fr
Opérations de base
Lecture des plages
1 Connectez le périphérique USB.
La lecture commence automatiquement.
Quand l’icône de la source n’est pas affichée,
vous pouvez l’afficher en touchant l’écran.
Avance ou retour rapide à l’aide des touches
1 Appuyez de façon prolongée sur c ou d
(TRK).
Mode de navigation Musique
(Fonction pour les périphériques USB)
Cet appareil crée un index afin de simplifier la
recherche d’une plage musicale. Vous pouvez
rechercher par catégories, Albums et Artistes
par exemple.
PRÉCAUTION
! Cette fonction n’est pas disponible lorsque le
périphérique de stockage USB est verrouillé.
! Cette fonction n’est pas disponible lorsque
l’espace libre sur le périphérique de stockage
USB est inférieur à 5MB.
! Lorsque cet appareil crée un index, ne le
mettez pas hors tension. Ceci peut entraîner
une perte de données sur votre périphérique
de stockage USB.
! Si vous activez la lecture vidéo ou l’affichage
d’images JPEG alors qu’une base de don-
nées est en cours de création ou si la base
de données n’a pu être créée, un message
s’affiche et la création de la base de données
s’arrête.
1 Touchez DB pour créer une base de données en mode de navigation Musique.
Reportez-vous à la page précédente, Utilisation
de la lecture audio.
2 Quand Souvegarde de la base de données sur la mémoire? est affiché, touchez
“Oui”.
L’enregistrement de la base de données est ter-
miné. Si vous ne l’enregistrez pas, touchez
“Non”.
Lorsque l’enregistrement est terminé, “Data-
base save to memory was completed.” s’affi-
che.
Le mode de navigation Musique démarre.
3 Affichez une liste et touchez la touche
Étiquette.
4 Sélectionnez un fichier.
Utilisation de la lecture
d’images fixes
Vous pouvez utiliser cet appareil pour afficher
les images fixes enregistrées sur un périphérique de stockage USB.
Touches du clavier tactile
12
1JAN
PM
12:43
USB
NORMAL
44
All
All
Media
2 Touchede recherche
Affichage de la liste de noms de fichiers pour
sélectionner les fichiers.
3 Touchede capture
Capture d’une image dans des fichiers JPEG.
4 Touchede support
Basculement entre les types de fichiers
média lorsque plusieurs types de fichiers
média sont enregistrés sur le périphérique
USB. Cette touche ne s’affiche pas si un seul
type de fichier média est enregistré sur le périphérique USB.
5 ToucheAléatoire
Lecture de fichiers dans un ordre aléatoire.
6 Touchede répétition
Sélection de l’étendue de répétition.
7 Touchede dossier précédent/Touche de
dossier suivant
Sélection d’un dossier.
8 Touchede rotation
Rotation de l’image affichée de 90° dans le
sens des aiguilles d’une montre.
9 Touchede mode d’écran
Changement du mode écran.
Reportez-vous à la page 75, Changer le mode
écran large.
a Touchede pause et lecture
Exécution ou interruption du diaporama.
3456789a
1 Touched’avant rapide/Touche de retour
rapide
Sélection d’une image.
Page 93

USB
USB
Section
12
Opérations de base
Lecture d’images fixes
1 Connectez le périphérique USB.
La lecture commence automatiquement.
! Quand l’icône de la source n’est pas affichée,
vous pouvez l’afficher en touchant l’écran.
Sélection d’un fichier à l’aide des touches
1 Appuyez sur c ou d (TRK).
Recherche rapide de fichier
1 Appuyez de façon prolongée sur c ou d
(TRK).
! Vous pouvez rechercher 10 fichiers JPEG à la
fois.
S’il y a moins de 10 fichiers, la recherche couvrira le premier ou le dernier fichier.
Remarques
! Les fichiers sont lus suivant l’ordre de numé-
rotation des fichiers et les dossiers ne contenant aucun fichier sont ignorés. (Si le
dossier 1 (ROOT) ne contient pas de fichier,
la lecture commence au dossier 2.)
! Les touches du clavier tactile non indiquées
à Utilisation de la lecture d’images fixes peuvent s’afficher à l’écran.
Reportez-vous à la page 126, Liste des indica-
teurs.
Changement de type de
fichier média
% Touchez Media pour changer de type de
fichier média.
Lecture aléatoire (shuffle)
% Touchez la touche de lecture aléatoire.
! On – Lecture de fichiers dans un ordre aléa-
toire à l’intérieur de l’étendue de répétition
Folder ou Media.
! Off – Annulation de la lecture aléatoire.
Répétition de la lecture
% Touchez la touche de répétition.
! Folder – Répétition du dossier en cours de
lecture
! All – Répétition de tous les fichiers
! Quand Folder est sélectionné, il n’est pas
possible de lire un sous-dossier de ce dossier.
! Si vous sélectionnez une source USB, l’éten-
due de répétition de la lecture changera en
All.
Choix des fichiers à partir de
la liste des noms de fichiers
(Fonction pour l’audio compressé/DivX/MPEG-1/
MPEG-2/MPEG-4)
L’opération est la même que pour Disque.
Reportez-vous à la page 85, Choix des fichiers à
partir de la liste des noms de fichiers.
Affichage de listes liées à la
plage musicale en cours de
lecture (recherche de liaison)
Touchez la pochette d’album pour afficher la
liste des noms des plages musicales de l’album
en cours de lecture. Touchez le nom de la plage
musicale que vous souhaitez lire pour en démarrer la lecture.
Remarques
! Si une partie des informations enregistrées
ne s’affichent pas, une touche de défilement
apparaît à droite de la liste. Touchez la touche de défilement pour parcourir.
! Cette fonction est disponible avec les péri-
phériques USB en mode de navigation Musique.
Lecture du contenu VOD
d’un DivX
L’opération est la même que pour Disque.
Reportez-vous à la page 86, Lecture du contenu
VOD d’un DivX
â
â
.
Capture d’une image dans
des fichiers JPEG
Vous pouvez capturer des données image et les
utiliser en papier peint. Ces images peuvent être
stockées dans cet appareil, et rappelées facilement.
! Seule une image peut être enregistrée sur
cet appareil. L’ancienne image est écrasée
par la nouvelle.
1 Touchez f pour mettre le diaporama
en pause lorsque l’image souhaitée est affichée.
2 Touchez Capture pour capturer l’image
souhaitée.
3 Quand “ Voulez-vous souvegarder
l'image?” est affiché, touchez Oui.
Pendant le stockage de l’image sur l’appareil,
“Saving the image. Don’t switch off the bat-
tery.” s’affiche. Une fois le processus terminé,
“Image sauvegardée.” s’affiche.
# Pour annuler la mise en mémoire, touchez Non.
Français
93
Fr
Page 94

Section
Audio Bluetooth
13
Audio Bluetooth
Utilisation de la lecture audio
(Fonction de AVH-X5500BHS/AVH-X4500BT/
AVH-X3500BHS/AVH-X2500BT)
Vous pouvez utiliser cet appareil pour écouter
des fichiers audio Bluetooth.
Remarques
! Selon le lecteur audio Bluetooth connecté à
cet appareil, les opérations disponibles sont
limitées aux deux niveaux suivants :
— Profil A2DP (Advanced Audio Distribution
Profile): Vous pouvez seulement écouter des
plages musicales sur votre lecteur audio.
— Profil AVRCP (Audio/Video Remote Control
Profile): Vous pouvez écouter, interrompre la
lecture, sélectionner des plages musicales,
etc.
! Comme il existe une grande variété de lec-
teurs audio Bluetooth disponibles sur le marché, les opérations disponibles avec certains
modèles peuvent varier sensiblement.
Lorsque vous tentez d’exécuter un lecteur
audio Bluetooth avec cet appareil, reportezvous au mode d’emploi livré avec le lecteur
ainsi qu’au présent mode d’emploi pour obtenir de l’aide.
! Le signal provenant de votre téléphone cellu-
laire pouvant occasionner des interférences,
évitez de l’utiliser lorsque vous écoutez des
plages musicales sur votre lecteur audio
Bluetooth.
! Le son d’un lecteur audio Bluetooth
connecté à cet appareil est coupé lorsque
vous passez un appel sur avec un téléphone
cellulaire connecté à cet appareil via la technologie sans fil Bluetooth.
! Le temps de lecture peut ne pas s’afficher
correctement.
! Selon le type de lecteur audio Bluetooth
connecté à cet appareil, l’affichage des opérations et informations de certaines fonctions peut ne pas être disponible.
94
Fr
Touches du clavier tactile
1
22 JAN
AM
Bluetooth
Abcdefghi
8888
Abcdefgh
Abcdefgh
Abcdefgh
88'88'' -88'88''
12:22
DB
432
1 Touchede recherche
Affichage de la liste de noms de fichiers pour
sélectionner les fichiers.
2 ToucheAléatoire
Écoute de plages musicales dans un ordre
aléatoire.
3 Touchede répétition
Sélection de l’étendue de répétition.
4 Touchede pause et lecture
Pause et démarrage de la lecture.
Réglage de l’audio Bluetooth
Avant de pouvoir utiliser la fonction audio
Bluetooth, vous devez établir une connexion
sans fil Bluetooth entre l’appareil et votre lecteur
audio Bluetooth.
1 Connexion
Vous devez, tout d’abord, connecter un lecteur
audio Bluetooth à cet appareil.
Pour des instructions détaillées sur la connexion de votre lecteur audio Bluetooth à cet appareil via la technologie sans fil Bluetooth,
reportez-vous à la page 110, Menu de conne-
xion Bluetooth.
Remarques
! Lors de la lecture de fichiers enregistrés
comme des fichiers VBR (débit binaire variable), le temps de lecture n’est pas affiché
correctement si on utilise des opérations d’avance rapide ou de retour rapide.
! Pour garantir un fonctionnement correct, re-
liez le câble du connecteur de la station d’accueil de l’iPod directement à cet appareil.
! Lorsque l’iPod est connecté à cet appareil, il
ne peut pas être mis en service ou hors service.
! Si les caractères enregistrés sur le disque ne
sont pas compatibles avec cet appareil, ils
ne seront pas affichés.
! Les informations textuelles peuvent ne pas
s’afficher correctement en fonction de leur
environnement d’enregistrement.
Lecture aléatoire (shuffle)
% Touchez la touche de lecture aléatoire.
! On – Lecture des fichiers dans un ordre aléa-
toire.
! Off – Annulation de la lecture aléatoire.
Répétition de la lecture
% Touchez la touche de répétition.
! One – Répétition de la plage musicale en
cours de lecture uniquement
! All – Répétition de toutes les plages musica-
les
Page 95

Utilisation de la touche MIXTRAX
Utilisation de la touche MIXTRAX
Section
14
Utilisation de MIXTRAX
MIXTRAX est une technologie originale de création de mixage sans interruption à partir d’une
sélection audio de votre bibliothèque audio, qui
comprend des effets DJ qui permet d’obtenir
des sons de qualité DJ professionnelle.
Utilisation de MIXTRAX EZ
Vous pouvez utiliser cet appareil pour lire des fichiers audio iPod/USB.
MIXTRAX EZ permet d’ajouter divers effets sonores entre les plages musicales afin d’organiser
les pauses entre chaque plage musicale. Il permet d’écouter de la musique en boucle.
! Cette fonction n’est disponible que lorsqu’un
fichier sur un périphérique de stockage USB
ou une plage musicale sur un iPod est en
cours de lecture.
! Cette fonction n’est pas disponible lorsque le
mode de commande est défini sur
App Mode.
! Selon le fichier/la plage musicale, des effets
sonores peuvent ne pas être disponibles.
! Selon le fichier/la musique, la lecture sans
interruption peut ne pas être disponible.
Exécution de MIXTRAX EZ
% Touchez MIXTRAX EZ.
Réglage du mode MIXTRAX
Activez cette fonction pour lire des fichiers
audio à l’aide de MIXTRAX.
1 Appuyez sur la touche accueil pour passer à l’écran d’accueil.
2 Touchez la touche système pour ouvrir le
menu système.
3 Touchez Réglages MIXTRAX sur le menu
système.
Les éléments de réglage MIXTRAX s’affichent.
! Mode lecture courte – Lorsque ce mode est
en service, sélectionnez la durée de lecture
de la plage musicale. Lorsqu’il est hors service, la plage musicale est lue dans son intégralité.
60s (60 sec.)—90s (90 sec.)—120s (120 sec.)
—150s (150 sec.)—180s (180 sec.)—
Aléatoire (aléatoire)—Off (désactivé)
Lorsque le réglage Aléatoire est sélectionné,
le temps de lecture varie entre 60 s, 90 s,
120 s, 150 s et 180 s de manière aléatoire à
chaque changement de plage musicale pendant la lecture.
! Effet affichage – Lorsque Effet affichage
est activé, l’affichage des pochettes d’album
peut être modifié en fonction du type de musique.
! Effet coupure – Lorsque Effet coupure est
en service, des effets sonores sont lus entre
les plages musicales.
! Réglages effets – Utilisez Réglages effets
pour régler l’effet sonore que vous souhaitez
insérer entre les plages musicales.
Réglage de l’effet
Vous pouvez modifier les réglages des sons fixes
et des effets sonores.
Six sons fixes différents sont disponibles et peuvent être insérés afin d’être lus entre les plages.
Les effets sonores sont utilisés pour signaler la
fin d’une plage musicale en cours de lecture et
le début de la plage musicale suivante.
Les sons fixes et les effets sonores sont définis
comme des combinaisons comme les sons MIXTRAX.
Sons fixes
! Phaser – Un son fixe qui ressemble à la
houle.
! Roll – Un son fixe qui répète la lecture d’un
son donné.
! Turntable – Un son fixe qui imite le scratch
d’un DJ.
! Flanger2 – Un son strident qui imite le vrom-
bissement d’un réacteur.
! Reverb – Un son fixe qui crée un effet de ré-
verbération.
! Echo2 – Un son fixe qui crée un effet d’écho.
Effets sonores
! Cross Fade – Un effet sonore qui crée un
effet de fondu entrant et sortant entre les plages musicales.
! Flanger1 – Un son strident qui imite le vrom-
bissement d’un réacteur.
! Echo1 – Un son qui crée un effet d’écho.
! Loop – Un effet sonore qui répète la lecture
d’une section d’une piste musicale.
Présélection de sons et d’effets
sonores à l’aide de la touche de
présélection
Les effets sonores Standard et Simple sont déjà
réglés comme présélections par défaut.
% Touchez Standard ou Simple pour vérifier
les réglages.
L’effet sonore présélectionné enregistré sous la
touche qui a été effleurée est réglé en tant que
présélection.
Enregistrement des sons et des
effets sonores en tant que
présélections
Enregistre une combinaison de sons et d’ effets
sonores souhaitée dans Custom.
Touchez Custom pour régler facilement le son
ou l’effet sonore souhaité.
1 Touchez Custom.
2 Sélectionnez l’effet sonore souhaité en
touchant l’option.
L’effet sonore indiqué est enregistré en tant que
présélection sous Custom.
Remarques
! Si vous touchez un effet sonore sur l’écran
de sélection Standard ou Simple,l’écran
Custom s’affiche automatiquement et l’effet
sonore est enregistré sous Custom.
! Vous pouvez écouter des sons fixes à titre
d’exemple en touchant l’icône haut-parleur.
Français
95
Fr
Page 96

Section
Utilisation de la radio Pandoraâsur Internet
15
Utilisation de la radio Pandoraâsur Internet
Utilisation de Pandora
Pour écouter la radio Pandora sur des appareils
audio/vidéo pour véhicule Pioneer, connectez
un iPod, un périphérique Androidä ou un périphérique BlackBerry à la dernière application
Pandora installée, puis démarrez l’application
Pandora.
Important
Conditions requises pour l’accès à la radio
Pandora à l’aide d’appareils audio/vidéo pour véhicule Pioneer :
Connectez un iPod à l’entrée USB ou un périphérique Android ou BlackBerry via la technologie Bluetooth pour écouter Pandora sur cet
appareil.
! Compatibilité iPod et iPhone
Apple iPhone (première génération), iPhone 3G,
iPhone 3GS, iPhone 4, iPhone 4S, iPod touch 1G,
iPod touch 2G, iPod touch 3G ou iPod touch 4G
(version de firmware 3.0 ou ultérieure)
Il est possible que certaines versions de firmware
de l’iPhone ne soient pas compatibles avec l’application Pandora. Dans ce cas, veuillez mettre à
jour le firmware vers une version compatible
avec l’application Pandora.
! Compatibilité Android
SE Android version 2.2 ou ultérieure
! Compatibilité BlackBerry
SE BlackBerry version 4.3 ou ultérieure
! Dernière version de l’application Pandora télé-
chargée sur votre appareil (recherchez “Pandora”
dans Apple iTunes App Store ou dans Android
market).
! Compte Pandora actuel (compte gratuit ou
payant disponible sur Pandora ; création d’un
compte gratuit en ligne à l’adresse
http://www.pandora.com/register ou via l’application Pandora de l’iPhone).
! Forfait “Data Plan”
Remarque : si le forfait “Data Plan” de votre
iPhone ou périphérique Android ne fournit pas
une utilisation de données illimitée, votre fournis-
seur peut appliquer des frais supplémentaires
pour l’accès au service Pandora via les réseaux
3G et/ou EDGE.
! Connexion à l’Internet via un réseau 3G, EDGE
ou Wi-Fi.
! Câble adaptateur Pioneer en option pour la
connexion de votre iPhone aux appareils audio/
vidéo pour véhicule Pioneer.
Restrictions :
! L’accès au service Pandora dépend de la disponi-
bilité du réseau de téléphonie mobile et/ou Wi-Fi
dans le but d’autoriser la connexion de votre ap-
pareil à Internet.
! La capacité d’accès au ser vice Pandora des ap-
pareils audio/vidéo pour véhicule Pioneer peut
être modifiée sans avis préalable et peut être af-
fectée par une des conditions suivantes : problè-
mes de compatibilité avec les versions futures de
firmware iPhone ou périphériques Android, pro-
blèmes de compatibilité avec les versions futures
de l’application Pandora pour ceux-ci, modifica-
tions du service de musique Pandora par
Pandora, interruption du service de musique
Pandora par Pandora.
! Certaines fonctions du service Pandora ne sont
pas disponibles lors de l’accès au ser vice via les
appareils audio/vidéo pour véhicule Pioneer, tel-
les que par exemple la création de nouvelles sta-
tions, la suppression de stations, l’envoi de
messages électroniques des stations actuelles,
l’achat de plages sur iTunes, l’affichage d’infor-
mations textuelles additionnelles, la connexion à
Pandora et le réglage de la qualité sonore du ré-
seau de téléphonie mobile.
La radio Pandora sur Internet est un service de
musique non affilié à Pioneer. Plus d’informations sont disponibles à l’adresse
http://www.pandora.com.
Réglage du mode de connexion
Pandora
Réglez le mode de connexion à la radio Pandora
de manière appropriée pour notifier le type d’appareil utilisé : un iPod via USB ou un périphérique Android ou un périphérique BlackBerry via
Bluetooth.
Remarques
! iOS 3.0 ou version ultérieure doit être installé
sur l’iPod pour pouvoir utiliser Pandora.
! Le système d’exploitation Android version 2.2
ou ultérieure doit être installé sur le périphérique Android pour pouvoir utiliser Pandora.
! Une connexion Internet est requise pour utili-
ser un iPod, un périphérique Android ou un
périphérique BlackBerry.
! Seuls les iPod peuvent être connectés simul-
tanément au AVH-X1500DVD.
1 Appuyez sur la touche accueil pour passer à l’écran d’accueil.
2 Touchez la touche système pour ouvrir le
menu système.
3 Touchez Mode connexion Pandora de
manière répétée jusqu’à ce que le réglage
souhaité apparaisse sur l’écran.
Wired : Un iPod est connecté à l’aide d’un câble
physique.
Bluetooth : un périphérique Android ou BlackBerry est connecté via la technologie Bluetooth.
Touches du clavier tactile
22 JAN
AM
12:22
Pandora
Abcdefghi
Abcdefghi
Abcdefghi
Abcdefghi
S.Rtrv
88'88'' -88'88''
23456
1 Touchede recherche
Affiche la liste aléatoire/de stations. Sélectionnez le mode aléatoire ou la station désirée.
2 ToucheSound Retriever
(Uniquement disponible iPod)
Reportez-vous à la page 75, Utilisation du cor-
recteur de son.
3 Touchede signet
Met en mémoire des informations sur la
plage (signet).
Les signets sont visibles dans votre profil.
4 Touchede pouce tourné vers le bas
Un « pouce tourné vers le bas » indique à
Pandora que vous n’aimez pas la piste actuelle. Pandora passe à la piste suivante et
ne rejouera plus la piste ignorée sur la station.
5 Touchede pouce tourné vers le haut
Un « pouce tourné vers le haut » indique à
Pandora que vous aimez la piste actuelle.
Pandora continue de lire la piste et la relira
sur la station.
Dolby PLII
1
DB
96
Fr
Page 97

Utilisation de la radio Pandoraâsur Internet
Téléphone Bluetooth
Section
15
6 Touchede pause et lecture
Pause et démarrage de la lecture.
Opérations de base
Lecture des plages
1 Connectez un iPod à l’entrée USB à l’aide
d’un câble USB et d’un connecteur Dock iPod
ou iPhone, ou un périphérique Android ou
BlackBerry via la technologie Bluetooth.
2 Basculez la source sur Pandora.
Saut de plage
1 Appuyez sur d (TRK).
Remarques
! Les touches du clavier tactile non indiquées
à Utilisation de Pandora peuvent s’afficher à
l’écran.
Reportez-vous à la page 126, Liste des indica-
teurs.
! Pandora limite le nombre de sauts autorisés
sur son service. Si vous tentez de passer des
plages musicales au-delà de cette limite,
“SKIP LIMIT REACHED” s’affiche. Si vous
avez atteint la limite de sauts et que vous
donnez un avis défavorable à la plage musicale, la plage en cours continue à être lue
mais vos retours d’informations sont enregistrés.
Sélection et lecture de stations
de radio Pandora
Touchez la liste de vos stations Pandora pour sélectionner celle à écouter.
1 Affichage de la liste aléatoire/de stations.
Reportez-vous à la page précédente, Utilisation
de Pandora.
â
/aléatoire
2 Modifiez l’ordre de tri.
Vous pouvez trier les éléments de
la liste par ordre alphabétique.
Vous pouvez trier les éléments de
la liste par ordre de date de création.
Vous pouvez parcourir les titres
de la liste tout appuyant de manière prolongée sur l’icône de défilement.
3 Sélectionnez la lecture aléatoire ou la station souhaitée.
Le mode aléatoire lit les pistes
sur les stations sélectionnées.
Vous pouvez modifier les préférences de lecture aléatoire sur
votre périphérique mobile.
Utilisation du téléphone
Bluetooth
(Fonction de AVH-X5500BHS/AVH-X4500BT/
AVH-X3500BHS/AVH-X2500BT)
Vous pouvez utiliser le téléphone Bluetooth.
Important
! Laisser l’appareil en attente d’une connexion
à votre téléphone via Bluetooth alors que le
moteur est arrêté peut décharger la batterie.
! Les opérations avancées qui requièrent votre
attention, telles que composer des numéros
sur le moniteur, etc. sont interdites pendant
que vous conduisez. Garez correctement
votre voiture lorsque vous utilisez ces opérations avancées.
! Le menu de connexion Bluetooth ne peut
pas être sélectionné pendant la conduite.
! Les opérations disponibles peuvent être limi-
tées en fonction du téléphone cellulaire
connecté à cet appareil.
! Lorsque vous effectuez cette opération, assu-
rez-vous de garer votre véhicule dans un endroit sûr et de mettre le frein à main.
! Si vous ne parvenez pas à exécuter la conne-
xion à l’aide de cet appareil, utilisez le périphérique à connecter à l’appareil.
! Si vous connectez plusieurs appareils simul-
tanément, l’appareil connecté peut ne pas
fonctionner correctement. La connexion d’ un
seul appareil à la fois est recommandée.
Touches du clavier tactile
Affichage de l’attente téléphone
e1
d
13 ARP
PM
12:25
1
Abcdefghi
1234567890123456
AutoONTone
OFF
Quand vous passez en mode de saisie du numéro de téléphone
123
456
789
*0#
C+
1 Touchede fermeture
L’écran est fermé.
2 Touchede présélection
Affichage de l’écran de présélection des numéros d’appel.
3 Touched’annuaire
Commutation vers le mode d’ annuaire téléphonique.
13 APR
PM
1
Abcdefghi
XXXXXXXXXXXXXXXX
PrivateONVol
12:25
16
Français
2345678
9abc
97
Fr
Page 98

Section
Téléphone Bluetooth
16
Téléphone Bluetooth
4 Touchede réglage
Affichage du menu de connexion Bluetooth.
5 Touchede tonalité
Mise en service ou hors service de la sonnerie pour les appels entrants.
6 Touchede réponse automatique
Mise en ou hors service du répondeur automatique.
7 Touched’historique
Commutation entre les listes des appels
reçus, manqués et composés.
8 Touchedu clavier
Commutation vers le mode pour saisir directement le numéro de téléphone.
9 Toucheraccroché
Fin d’un appel.
Rejet d’un appel entrant.
Annulation des appels en attente.
a Touchede volume
Réglage du volume d’écoute du destinataire.
b Touchede mode privé
Mise en ou hors service du mode privé.
c Touchedécroché
Acceptation d’un appel entrant.
Exécution d’un appel lors de la sélection
d’un numéro de téléphone.
Commutation entre les appelants en attente.
d Touchede contrôle vocal
Remarques
! Vous ne pouvez utiliser le mode privé que
lorsque vous parlez au téléphone.
! Pour terminer l’appel, vous et l’appelant doi-
vent raccrocher le téléphone.
98
Fr
! Les touches du clavier tactile non indiquées
à Utilisation du téléphone Bluetooth peuvent
s’afficher à l’écran.
Reportez-vous à la page 126, Liste des indica-
teurs.
Informations textuelles
e Notification d’appel entrant
Indique qu’un appel entrant a été reçu et
qu’il n’a pas encore été pris en compte.
! Pas d’affichage pour les appels effectués
alors que votre téléphone cellulaire est
déconnecté de cet appareil.
Réglage pour la téléphonie
mains libres
Avant de pouvoir utiliser la fonction téléphonie
mains libres, vous devez préparer l’appareil pour
une utilisation avec votre téléphone cellulaire.
Ceci implique d’établir une connexion sans fil
Bluetooth entre l ’appareil et votre téléphone,
d’enregistrer votre téléphone sur l’appareil, et de
régler le niveau du volume sonore.
1 Connexion
Vous devez, tout d’abord, connecter un téléphone Bluetooth à cet appareil.
Pour des instructions détaillées sur la connexion de votre téléphone à cet appareil via la
technologie sans fil Bluetooth, reportez-vous
à la page 110, Appairage à partir de cet appareil.
2 Réglage du volume
Réglez le volume de l’écouteur sur votre téléphone cellulaire à votre convenance. L’appareil
enregistrera le niveau de volume défini
comme réglage par défaut.
Remarques
! Le volume de la voix de l’appelant et de la
sonnerie peut varier en fonction du type de
téléphone cellulaire.
! Si la différence entre le volume de la sonne-
rie et celui de la voix de l’appelant est importante, le niveau de volume global peut
devenir instable.
! Assurez-vous de régler correctement le vo-
lume avant de déconnecter le téléphone cellulaire de l’appareil. Si le volume est réglé
sur silencieux (niveau zéro) sur votre téléphone cellulaire, ce volume reste sur silencieux même après la déconnexion de votre
téléphone cellulaire.
Appel d’un numéro de
l’annuaire
Les contacts sur votre téléphone sont généralement et automatiquement transférés lorsque le
téléphone est connecté. Si ce n’est pas le cas,
utilisez le menu de votre téléphone pour transférer les contacts. La visibilité de cet appareil doit
être activée lorsque vous utilisez le menu du téléphone. Reportez-vous à la page 111, Commu-
tation vers un appareil visible.
Après avoir trouvé dans l’annuaire le numéro
que vous voulez appeler, vous pouvez sélectionner l’entrée et effectuer l’appel.
1 Touchez la touche d’annuaire pour activer le mode d’annuaire téléphonique.
2 Sélectionnez la liste des numéros de téléphone.
La liste détaillée des numéros de téléphone de
l’entrée sélectionnée est affichée.
3 Sélectionnez le numéro de téléphone.
# Si vous voulez enregistrer le numéro de téléphone, touchez de façon prolongée la liste.
4 Touchez la touche décroché pour passer
un appel.
5 Touchez la touche raccroché pour mettre
fin à l’appel.
Remarque
Les contacts sur votre téléphone sont généralement et automatiquement transférés lorsque le
téléphone est connecté. Si ce n’est pas le cas,
utilisez le menu de votre téléphone pour transférer les contacts. La visibilité de cet appareil doit
être activée lorsque vous utilisez le menu du téléphone. Reportez-vous à la page 111, Commu-
tation vers un appareil visible.
Sélection d’un numéro à
l’aide du mode de recherche
par ordre alphabétique
Si un grand nombre de numéros sont enregistrés dans l’annuaire, vous pouvez rechercher le
numéro de téléphone à l’aide du mode de recherche par ordre alphabétique.
1 Touchez la touche d’annuaire pour activer le mode d’annuaire téléphonique.
2 Touchez ABC pour passer en mode de recherche par ordre alphabétique.
3 Touchez la première lettre de l’entrée recherchée.
Les entrées de l’annuaire commençant par cette
lettre (par exemple “Ben”, “Brian” et “Burt”
quand “B” est sélectionné) s’affichent.
# Si vous voulez basculer en caractères russes,
touchez l’icône. Touchez de nouveau l’icône pour revenir à l’affichage en français.
Basculer en caractères russes.
# L’ordre du prénom et du nom peut être différent
de celui du téléphone cellulaire.
Page 99

Téléphone Bluetooth
Téléphone Bluetooth
Section
16
4 Touchez la liste pour afficher la liste des
numéros de téléphone de l’entrée sélectionnée.
# Si une entrée comporte plusieurs numéros de téléphone, sélectionnez-en un en touchant la liste.
# Si vous voulez afficher la liste de l’historique des
appels, touchez l’icône.
Commutation vers la liste de
l’historique des appels.
5 Touchez la touche décroché pour passer
un appel.
6 Touchez la touche raccroché pour mettre
fin à l’appel.
Inversion des noms dans
l’annuaire
Lorsque votre téléphone portable est connecté à
cet appareil, les noms et prénoms de vos
contacts peuvent être enregistrés dans l’annuaire dans l’ordre inverse. Vous pouvez utiliser
cette fonction pour restaurer l’ordre.
(Inversion des noms dans l’annuaire)
1 Touchez la touche d’annuaire pour activer le mode d’annuaire téléphonique.
2 Inversez les noms dans les annuaires.
Inversion des noms dans les annuaires.
3 “Voulez vous inverser tous les noms?”
s’affiche. Touchez Oui pour continuer.
s’affiche lorsque les noms sont inversés.
# Si l’inversion échoue, “Inversion Nom Erreur”
s’affiche. Le cas échéant, réessayez depuis le début.
Remarque
L’inversion des noms de vos contacts à partir de
cet appareil n’affecte pas les données contenues sur votre appareil Bluetooth.
Utilisation des listes des appels
reçus, manqués et composés
Les 80 appels les plus récents composés, reçus
et manqués sont enregistrés dans la mémoire.
Vous pouvez les parcourir et appeler des numéros à partir de ces listes.
1 Touchez la touche d’historique pour afficher la liste de l’historique des appels.
2 Sélectionnez Appels manqués,
Appels composés ou Appels reçus.
Affichage de la liste des appels
reçus.
Affichage de la liste des appels
effectués.
Affichage de la liste des appels
manqués.
3 Touchez un numéro de téléphone dans la
liste pour le sélectionner.
Le nom et numéro de téléphone sont affichés
dans la liste détaillée.
# Si vous voulez enregistrer le numéro de téléphone, touchez de façon prolongée la liste.
4 Touchez la touche décroché pour passer
un appel.
5 Touchez la touche raccroché pour mettre
fin à l’appel.
Réglage de la réponse
automatique
Si cette fonction est en service, cet appareil répond automatiquement à tous les appels entrants.
% Touchez la touche de réponse automatique pour activer ou désactiver le répondeur
automatique.
Réglage du volume d’écoute
du destinataire
Pour conserver une excellente qualité audio, cet
appareil peut régler le volume d’écoute du destinataire. Si le volume n’est pas assez fort côté
destinataire, utilisez cette fonction.
% Touchez la touche de volume pour sélectionner Far-End VOL.
1—2—3
# Cette fonction peut être exécutée même pendant
que vous parlez au téléphone.
# Il est possible de mémoriser les réglages pour
chaque appareil.
Mise en service ou hors
service de la sonnerie
Vous pouvez choisir d’utiliser ou non la sonnerie
de cet appareil. Si cette fonction est activée, la
sonnerie de cet appareil retentira.
1 Connectez votre téléphone cellulaire à
cet appareil.
2 Touchez la touche de tonalité pour activer ou désactiver la sonnerie.
Utilisation des listes de
présélection des numéros
d’appel
Vous pouvez facilement mettre en mémoire jusqu’à six numéros de téléphone.
1 Touchez la touche de présélection pour
afficher l’écran de présélection.
2 Touchez un des numéros de téléphone
pour le sélectionner.
# Si vous souhaitez supprimer un numéro de téléphone présélectionné, touchez de façon prolongée
le numéro de téléphone que vous souhaitez supprimer.
3 Touchez la touche décroché pour passer
un appel.
4 Touchez la touche raccroché pour mettre
fin à l’appel.
Exécution d’un appel par saisie
d’un numéro de téléphone
13 APR
PM
12:25
1
+
Abcdefghi
XXXXXXXXXXXXXXXX
PrivateONVol
123
456
789
*0#
C
Important
Lorsque vous effectuez cette opération, assurezvous de garer votre véhicule dans un endroit sûr
et de mettre le frein à main.
1 Touchez la touche du clavier pour saisir le
numéro de téléphone.
Français
99
Fr
Page 100

Section
Téléphone Bluetooth
16
Réglages
17
2 Touchez les icônes de numéro pour saisir
les numéros.
# Vous pouvez entrer un maximum de 24 chiffres.
3 Touchez la touche décroché pour passer
un appel.
4 Touchez la touche raccroché pour mettre
fin à l’appel.
Remarque
Le mode de saisie du numéro de téléphone ne
peut être utilisé, sauf si un téléphone Bluetooth
est connecté à cet appareil.
Réglage du mode privé
Pendant une conversation, vous pouvez passer
en mode privé (discussion directe sur votre téléphone cellulaire).
% Touchez la touche de mode privé pour activer ou désactiver le mode privé.
Contrôle vocal
Si votre téléphone cellulaire est équipé d’une
fonction de contrôle vocal, vous pouvez utiliser
les commandes vocales pour passer des appels,
par exemple.
! Le mode opératoire dépend du type de télé-
phone cellulaire. Reportez-vous au mode
d’emploi fourni avec votre téléphone cellulaire pour les instructions détaillées.
! Pour plus de détails sur les modèles de télé-
phone cellulaire compatibles avec cette fonction, consultez les informations sur notre site
Web.
1 Touchez la touche de contrôle vocal.
L’affichage bascule sur l’écran de contrôle
vocal.
Vous pouvez également passer à l’écran de
contrôle vocal en appuyant de façon prolongée
sur le bouton d’accueil lorsque la source est en
service.
13 ARP
PM
12:25
1
Voice control
2 Démarrez le contrôle vocal.
Indique que vous pouvez passer
des appels continus sans interruption.
Indique que l’affichage est fermé.
Remarques
! Pour que les commandes vocales soient cor-
rectement reconnues et interprétées, veillez
à ce que les conditions soient appropriées
pour la reconnaissance vocale.
! Veuillez noter que le vent soufflant à travers
les vitres du véhicule et le bruit provenant de
l’extérieur du véhicule peuvent provoquer
des interférence avec le fonctionnement de
la commande vocale.
! Pour une reconnaissance optimale, le micro
doit être placé directement devant le conduc-
teur à une distance appropriée.
! Parler trop tôt après l’exécution de la
commande peut provoquer l’échec de la re-
connaissance vocale.
! Parlez lentement, posément et clairement.
Utilisation des menus
Touches du clavier tactile
1
23
Audio
Sonic Center Control
Loudness
Subwoofer
Bass Booster
High Pass Filter
Source Level Adjuster
L/R 0
Low
On
0
125Hz
0
! Si vous lancez le menu Réglage vidéo,la
lecture est arrêtée.
! Il est impossible d’afficher le menu des fonc-
tions Audio lorsque la fonction silencieux est
en service ou lors de la lecture d’un fichier
JPEG.
1 Appuyez sur la touche accueil pour passer à l’écran d’accueil.
2 Touchez n’importe quelle touche du clavier tactile pour sélectionner le menu à régler.
54
1 Touchede configuration vidéo
Reportez-vous à la page 103, Configuration
du lecteur vidéo.
2 Touchede fonction audio
Reportez-vous à la page suivante, Réglages
sonores.
3 Touchede fermeture
Retour à l’affichage de la source actuelle.
4 Touchesystème
Reportez-vous à la page 105, Réglages système.
5 Touchede favori
Vous pouvez choisir les menus dans chaque
menu (menu des fonctions audio, etc.) et les
enregistrer dans ce menu favori.
Reportez-vous à la page 110, Menu Favori.
Remarques
! Vous pouvez afficher le menu Réglage vidéo
lorsque la source Disc ou USB est sélectionnée.
Settings
AudioVideo
BluetoothFavoriteThemeSystem
100
Fr
 Loading...