

Page 1

DVD RDS AV RECEIVER
RADIO AV RDS CON DVD
DVD PLAYER COM RDS
AVH-X5650BT
AVH-X4650DVD
AVH-X2650BT
AVH-X1650DVD
English
Español
Português (B)
Owner’s Manual
Manual de instrucciones
Manual do Proprietário
Page 2

Contents
Contents
Precautions
IMPORTANT SAFEGUARDS 3
To ensure safe driving 3
To avoid battery exhaustion 4
Before you start
About this unit 4
DVD video disc region numbers 4
About this manual 4
If you experience problems 4
Use and care of the remote control 4
Demo mode 5
What’s what
Head unit 5
Home display 6
Turning the source ON/OFF 6
Selecting a source 6
Adjusting the volume 6
Remote control 7
Common operations
Common operations for menu settings/
lists 8
Operating the scroll icon and the scrubber
bar 8
Activating the touch panel keys 8
Using the rear view 8
Using the rear monitor 8
Using sound retriever 8
Changing the wide-screen mode 9
Basic operations
Adjusting the angle of the LCD panel and
ejecting media 9
Setting the clock 9
Tuner
Tuner operations 10
Storing and recalling stations 10
Displaying radio text 10
Storing and recalling radio text 10
Storing the strongest stations 10
Tuning in to strong signals 10
Receiving traffic announcements 10
2
En
Receiving alarm broadcasts interrupting
regular broadcasts 11
Using PTY functions 11
Setting the FM tuning step 11
RDS setting 11
Switching Auto PI Seek 11
Setting the AM tuning step 11
Disc (CD/DVD)
Introducing movie operations 12
Sound playback operations 13
Switching the media file type 13
Operating the DVD menu 13
Random play (shuffle) 14
Repeating playback 14
Searching for the part you want to
play 14
Selecting audio output 14
PBC playback 14
Selecting tracks from the track title
list 14
Selecting files from the file name list 14
Playing DivXâ VOD content 15
iPod
iPod control 15
Sound playback operations 15
Moving images operations 16
Using this unit’s iPod function from your
iPod 16
Shuffle play 17
Repeating playback 17
Playing videos from your iPod 17
Browsing for a video/music on the
iPod 17
Changing audiobook speed 18
Displaying lists related to the song currently
playing (link search) 18
AppRadio Mode
AppRadio Mode operation 18
Starting procedure 19
Setting the Keyboard 19
Smartphone link adaptor operations
Starting procedure 20
USB
Moving images operations 20
Sound playback operations 21
Music browse mode 21
Still image playback operations 22
Switching the media file type 22
Random play (shuffle) 22
Repeating playback 22
Selecting files from the file name list 22
Displaying lists related to the song currently
playing (link search) 22
Playing DivXâ VOD content 23
Capture an image in JPEG files 23
Bluetooth Audio
Sound playback operations 23
Setting up for Bluetooth audio 23
Random play (shuffle) 24
Repeating playback 24
Using MIXTRAX
MIXTRAX operation 24
MIXTRAX EZ operation 24
Starting MIXTRAX EZ operation 24
Setting MIXTRAX mode 24
Setting the effect 24
Bluetooth telephone
Bluetooth telephone operations 25
Calling a number in the phone book 26
Selecting a number by alphabet search
mode 26
Inverting names in phone book 26
Using the missed, received and dialed call
lists 27
Setting automatic answering 27
Adjusting the other party’s listening
volume 27
Switching the ring tone 27
Using the preset dial lists 27
Making a call by entering phone
number 27
Setting the private mode 27
Voice control 27
TV tuner
TV tuner operations 28
Changing the wide-screen mode 28
Storing stations 28
EPG function 28
Settings
Menu operations 29
Audio adjustments
Using fader/balance adjustment 29
Using balance adjustment 29
Using the equalizer 29
Using the auto-equalizer 30
Using sonic center control 30
Adjusting loudness 30
Using subwoofer output 30
Boosting the bass 30
Using the high pass filter 30
Adjusting source levels 31
Setting up the video player
Setting the subtitle language 31
Setting the audio language 31
Setting the menu language 31
Setting the multi-angle DVD display 32
Setting the aspect ratio 32
Setting the slideshow interval 32
Setting parental lock 32
Setting the DivX subtitle file 33
Displaying the DivXâ VOD registration
code 33
Automatic playback of DVDs 33
System settings
Switching the auxiliary setting 34
Setting AV input 34
Setting the navigation system 34
Selecting MirrorLink Mode 34
Updating the firmware for the smartphone
link adaptor 34
Page 3
Contents
Precautions
Section
01
Displaying the smartphone link adaptor
firmware version 34
Updating firmware 34
Displaying the firmware version 35
Setting MIXTRAX mode 35
Changing the picture adjustment
(Brightness, Contrast, Color, Hue, Dimmer
and Temperature) 35
Selecting the system language 35
Setting Demo Mode 36
Switching sound muting/attenuation 36
Setting the rear output and subwoofer
controller 36
Using the keyboard 36
Setting the ever scroll 36
Setting the Bluetooth audio 36
Clearing Bluetooth memory 36
Updating Bluetooth software 37
Displaying the Bluetooth software
version 37
Setting the rear view camera (back up
camera) 37
Auto EQ (auto-equalizing) 37
Selecting the video format 38
Setting the video signal 38
Setting the steering wheel control 39
Favorite menu
Using the Favorite menu 40
Bluetooth connection menu
Bluetooth connection menu
operations 40
Theme menu
Selecting the illumination color 41
Selecting the OSD (on-screen display)
color 41
Selecting the background display 41
Other functions
Adjusting the response positions of the
touch panels (Touch Panel
Calibration) 42
Using an AUX source 42
Resetting the microprocessor 43
Operating the sound mixer 43
Connection
Connecting the power cord 45
When connecting to separately sold power
amp 46
When connecting the external video
component and the display 46
When connecting with a rear view
camera 47
iPod with lightning connector 47
iPod with 30-pin connector 48
Optional Smartphone link adaptor (CD-
ML100) connection 48
Installation
Installation using the screw holes on the
side of the unit 49
Installing the microphone 49
Additional information
Troubleshooting 50
Error messages 52
Understanding auto EQ error
messages 54
Understanding messages 54
Indicator list 54
Handling guidelines 55
Audio compatibility (USB) 57
Compressed file compatibility (disc,
USB) 57
iPod compatibility 58
Sequence of audio files 58
Using the display correctly 58
Bluetooth profiles 59
License, Warranty Disclaimer & Limitation of
Liability 59
Language code chart for DVD 61
Specifications 62
Thank you for purchasing this PIONEER
product.
To ensure proper use, please read through this
manual before using this product. It is especially
important that you read and observe WARN-
INGs and CAUTIONs in this manual. Please
keep the manual in a safe and accessible place for
future reference.
IMPORTANT SAFEGUARDS
Please read all of these instructions regarding
your display and retain them for future reference.
1 Do not install the display where it may
(i) obstruct the driver’s vision, (ii) impair
the performance of any of the vehicle’s
operating systems or safety features, including air bags, hazard lamp buttons or
(iii) impair the driver’s ability to safely
operate the vehicle.
2 Do not operate this display if doing so in
any way will divert your attention from
the safe operation of your vehicle. Always observe safe driving rules and follow all existing traffic regulations. If you
experience difficulty in operating the
system or reading the display, park your
vehicle in a safe location and make necessary adjustments.
3 Please remember to wear your seat belt
at all times while operating your vehicle.
If you are ever in an accident, your injuries can be considerably more severe if
your seat belt is not properly buckled.
4 Never use headphones while driving.
5 To promote safety, certain functions are
disabled unless the parking brake is on,
and the vehicle is not in motion.
6 Never set the volume of your display so
high that you cannot hear outside traffic
and emergency vehicles.
WARNING
! Do not attempt to install or service this
product by yourself. Installation or servicing of this product by persons without
training and experience in electronic
equipment and automotive accessories
may be dangerous and could expose you
to the risk of electric shock, injury or
other hazards.
! Do not attempt to operate the unit while driv-
ing. Make sure to pull off the road and park
your vehicle in a safe location before attempting to use the controls on the device.
To ensure safe driving
WARNING
! LIGHT GREEN LEAD AT POWER CONNEC-
TOR IS DESIGNED TO DETECT PARKED
STATUS AND MUST BE CONNECTED TO
THE POWER SUPPLY SIDE OF THE PARKING BRAKE SWITCH. IMPROPER CONNECTION OR USE OF THIS LEAD MAY
VIOLATE APPLICABLE LAW AND MAY RESULTIN SERIOUS INJURY OR DAMAGE.
! To avoid the risk of damage and injury and the
potential violation of applicable laws, this unit is
not for use with a video screen that is visible to
the driver.
! To avoid the risk of accident and the potential vio-
lation of applicable laws, no viewing of front seat
video should ever occur while the vehicle is
being driven.
! In some countries or states the viewing of images
on a display inside a vehicle even by persons
other than the driver may be illegal. Where such
regulations apply, they must be obeyed and this
unit’s video features should not be used.
English
3
En
Page 4
Section
01
Precautions
Before you start
02
When you attempt to watch a video image while
driving, the warning “Viewing of front seat
video source while driving is strictly prohibited.” will appear on the front display.
To watch a video image on the front display, park
your vehicle in a safe place and apply the parking brake.
When using a display connected
to rear monitor output
The rear monitor output on this unit (V OUT)is
used to connect a rear display that allows passengers in the rear seats to watch videos.
WARNING
NEVER install the rear display in a location
where the driver can watch videos while driving.
When using the rear view camera
With an optional rear view camera, this unit can
be used as an aid to keep an eye on trailers, or
when backing into a tight parking spot.
WARNING
! SCREEN IMAGE MAY APPEAR RE-
VERSED.
! USE INPUT ONLY FOR REVERSE OR
MIRROR IMAGE REAR VIEW CAMERA.
OTHER USE MAY RESULT IN INJURY
OR DAMAGE.
CAUTION
! The rear view camera function is to be used
as an aid to keep an eye on trailers, or while
backing up. Do not use for entertainment
purposes.
4
En
! Please note that the edges of the rear view
camera images may differ slightly according
to whether full screen images are displayed
when backing up, and whether the images
are used for checking the rear when the vehicle is moving forward.
To avoid battery exhaustion
Keep the vehicle engine running when using
this unit to avoid draining the battery power.
! When no power is supplied to this unit, such
as when the vehicle battery is being replaced, the microcomputer of this unit returns to its initial condition. We recommend
that you transcribe the audio adjustment
data.
WARNING
Do not use with vehicles that do not feature an
ACC position.
About this unit
CAUTION
This product is a class 1 laser product classified under the Safety of laser products, IEC
60825-1:2007, and contains a class 1M laser
module. To ensure continued safety, do not remove any covers or attempt to gain access to
the inside of the product. Refer all servicing to
qualified personnel.
CAUTION—CLASS 1M VISIBLE AND INVISIBLE
LASER RADIATION WHEN OPEN, DO NOT VIEW
DIRECTLY WITH OPTICAL INSTRUMENTS.
CAUTION:
USE OF CONTROL OR ADJUSTMENT OR
PERFORMANCE OF PROCEDURES
OTHER THAN THOSE SPECIFIED HEREIN
MAY RESULT IN HAZARDOUS RADIATION
EXPOSURE.
CAUTION:
THE USE OF OPTICAL INSTRUMENTS
WITH THIS PRODUCT WILL INCREASE
EYE HAZARD.
CAUTION
! Do not allow this unit to come into contact
with liquids. Electrical shock could result.
Also, damage to this unit, smoke, and overheating could result from contact with
liquids.
! Keep this manual handy for future reference.
! Always keep the volume low enough to hear
outside sounds.
! Avoid exposure to moisture.
! If the battery is disconnected or discharged,
any preset memory will be erased.
DVD video disc region numbers
Only DVD video discs with compatible region
numbers can be played on this player. You can
find the region number of the player on the bottom of this unit and in this manual (refer to
Specifications on page 62).
About this manual
! This unit features a number of sophisticated
functions to ensure superior reception and
operation. All the functions have been designed for the easiest possible use, but many
are not self-explanatory. This operation manual will help you benefit fully from this unit’s
potential and to maximize your listening enjoyment.
! This manual uses diagrams of actual screens
to describe operations. However, the screens
on some units may not match those shown
in this manual depending on the model
used.
If you experience problems
Should this product fail to operate properly,
please contact your dealer or nearest authorized
Pioneer Service Station.
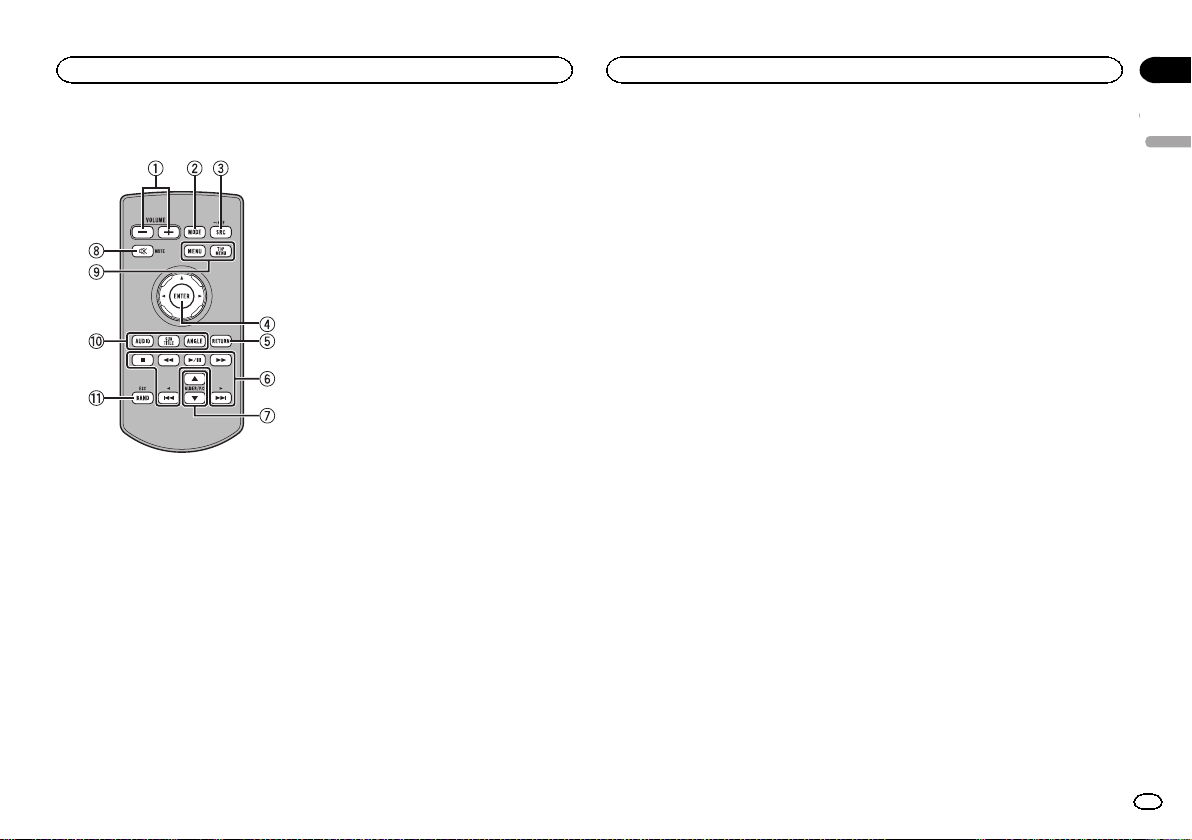
Use and care of the remote
control
Installing the battery
Slide the tray on the back of the remote control
out and insert the battery with the plus (+) and
minus (–) poles aligned properly.
! When using for the first time, pull out the
film protruding from the tray.
Page 5
1 2 3 5 6 74
8
Before you start
What’s what
Section
02
WARNING
! Keep the battery out of the reach of children.
Should the battery be swallowed, consult a
doctor immediately.
! Batteries (battery pack or batteries installed)
must not be exposed to excessive heat such
as sunshine, fire or the like.
CAUTION
! Removethe battery if the remote control is
not used for a month or longer.
! There is a danger of explosion if the battery is
incorrectly replaced. Replace only with the
same or equivalent type.
! Do not handle the battery with metallic tools.
! Do not store the battery with metallic ob-
jects.
! If the battery leaks, wipe the remote control
completely clean and install a new battery.
! When disposing of used batteries, comply
with governmental regulations or environmental public institutions’ rules that apply in
your country/area.
Using the remote control
Point the remote control in the direction of the
front panel to operate.
! The remote control may not function properly
in direct sunlight.
Important
! Do not store the remote control in high tem-
peratures or direct sunlight.
! Do not let the remote control fall onto the
floor, where it may become jammed under
the brake or accelerator pedal.
Demo mode
The feature demo automatically starts when you
select Off for the source and continues while
the ignition switch is set to ACC or ON. To cancel the feature demo, press and hold MUTE.
Press and hold MUTE again to restart. Operating the feature demo while the car engine is
turned off it may drain the battery power.
Important
The red lead (ACC) of this unit should be connected to the ignition on/off function. Failure to
do so may result in battery drain.
Head unit
AVH-X5650BTand AVH-X4650DVD
9 a
AVH-X2650BTand AVH-X1650DVD
8a
1
3
4
5
6
7
1 RESET
For details refer to Resetting the microprocessor on page 43.
2 SRC/OFF
3 +/– (VOLUME/VOL)
4 MUTE
Press to mute. Press again to unmute.
5 Home button
Displaying the home display.
The display returns to the Launcher screen
while a 3rd-party application is being used in
AppRadio Mode.
Double-clicking the icon on the Launcher
screen returns the display to the home display.
6 MODE
When RGB input is not used
! Press MODE to turn the display off. Press
MODE again to turn the display on.
When RGB input is used
! Press and hold MODE to turn the display
off. Press MODE again to turn the display
on.
! When the navigation system is con-
nected, press MODE to switch to the navigation display.
! When an iPhone that is running an appli-
cation that supports AppRadio Mode is
connected, press MODE to switch to the
application display. You can use the application by touching the display.
! When a smartphone work with the Mirror-
Link function is connected, press MODE
to switch to the application display. You
can use the application by touching the
display.
7 c/d (TRK)
8 h (eject)
9 Auto EQ microphone input jack
Use to connect an auto EQ microphone.
a Disc loading slot
Notes
! For details on how to operate a navigation
system from this unit, refer to its operation
manual.
03
English
5
En
Page 6
567
App
Section
03
What’s what
What’s what
! For details on how to connect an iPod or
USB storage device to this unit, refer to
When connecting with optional CD-IU201V
cable on page 48.
! For details on how to connect a smartphone
with the MirrorLink function to this unit, refer
to Optional Smartphone link adaptor (CD-
ML100) connection on page 48.
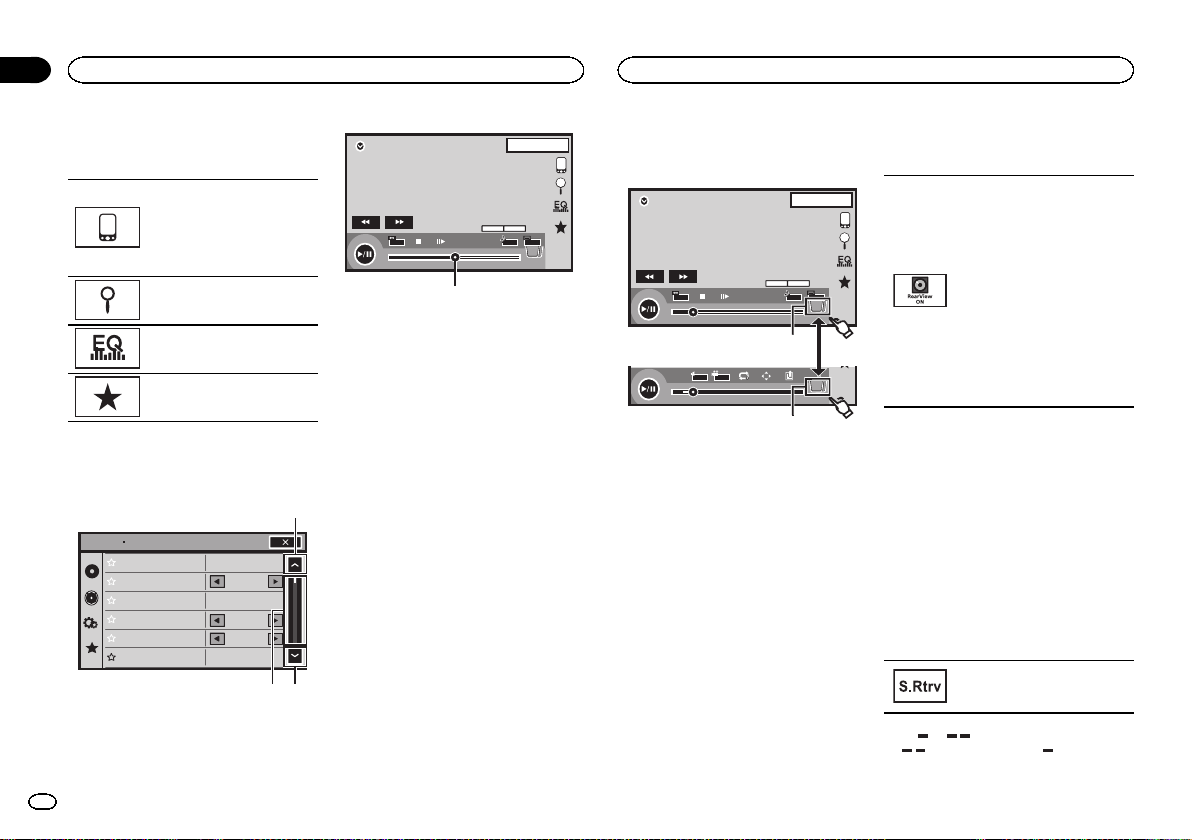
Home display
Home display
1 23 4
Disc USB/iPod Bluetooth Audio
Radio
TV
AV
AudioVideo
Source off display
Apps
Settings
RearView
AUX
OFF
ON
BluetoothFavorite sThemeSystem
89
1 JAN
AM
12:12
OFF
6
En
Source on display
1
JAN
AM
Radio
12:22
Disc
iPod
Bluetooth Audio
AUX
AV
1 Source icon
Selecting a favorite source.
When the source icon is not displayed, it can
be displayed by pressing the home key or
touching
.
2 Apps/MirrorLink key
Switching to AppRadio Mode/MirrorLink
Mode.
3 Rear view key
Displaying the rear view image.
For details refer to Using the rear view on
page 8.
4 Source off key
Turning the source off.
5 Bluetooth key
Displaying the Bluetooth connection menu.
6 Theme key
Displaying the Theme menu.
7 Menu icon
Displaying the menu.
8 Source key
Displaying the source menu.
9 Clock key
Switching to clock adjustment display.
S.Rtrv
App
App
Turning the source ON/OFF
(Function of AVH-X5650BT/AVH-X4650DVD)
Turning the source on using the buttons
1 Press SRC/OFF to turn the source on.
Turning the source off using the buttons
1 Press and hold SRC/OFF until the source turns
DB
off.
— iPod is displayed when an iPod is connected
to USB input.
— USB MTP is displayed when an MTP-compati-
ble Android device (running Android OS 4.0
or higher) is connected by MTP connection
using a USB cable.
! TV is displayed when a TV tuner is connected
via the RGB connection.
Adjusting the volume
Selecting a source
Available source modes
! Radio – Radio tuner
! Disc – Built-in DVD and CD player
! USB, iPod,orUSB MTP – USB/iPod/MTP
! Bluetooth Audio – Built-in Bluetooth audio
(Function of AVH-X5650BT/AVH-X2650BT)
! AUX – AUX
! AV – AV input
! TV – Television
Selecting a source
! Using SRC/OFF
(Function of AVH-X5650BT/AVH-X4650DVD)
1 Press SRC/OFF.
! Using the touch panel keys on the home dis-
play
1 Touch the source icon and then touch the
desired source name.
! When the source icon is not displayed, it
can be displayed by touching the screen.
! While operating the menu, you cannot se-
lect a source by touching the source icon.
Notes
! The USB/iPod icon will change as follows:
— USB/iPod is displayed when no device is con-
nected.
— USB is displayed when a USB storage device
is connected to USB input.
% Press +/– (VOLUME/VOL) to adjust the
volume.
Page 7
What’s what
What’s what
Section
03
Remote control
1 +/– (VOLUME/VOL)
2 MODE
Turning the information display off.
3 SRC/OFF
Press to cycle through all the available sources. Press and hold to turn the source off.
4 Thumb pad
Use to select a menu on the DVD menu.
5 RETURN
Press to display the PBC (playback control)
menu during PBC playback.
6 f
Press to pause or resume playback.
m
Press to perform fast reverse.
Press to change the fast reverse speed.
n
Press to perform fast forward.
Press to change the fast forward speed.
o
Press to return to the previous track (chapter).
p
Press to go to the next track (chapter).
g
Press to stop playback.
If you resume playback, playback will start
from the point where you stopped. Touch the
key again to stop playback completely.
7 FOLDER/P.CH
Press to select the next or previous disc or
folder.
Press to recall radio station frequencies assigned to preset tuning keys.
8 MUTE
Press to mute. Press again to unmute.
9 MENU
Press to display the DVD menu during DVD
playback.
TOP MENU
Press to return to the top menu during DVD
playback.
a AUDIO
Press to change the audio language during
DVD playback.
Press to switch audio output for DivX/
MPEG-4.
SUBTITLE
Press to change the subtitle language during
DVD/DivX/MPEG-4 playback.
ANGLE
Press to change the viewing angle during
DVD playback.
b BAND/ESC
Press to select the tuner band when tuner is
selected as a source. Also used to cancel the
control mode of functions.
Press to switch between modes when playing the following types of data:
! Disc
Compressed audio and audio data
(CD-DA) such as with CD-EXTRA and
MIXED-MODE CDs
! USB storage device
Audio data, video data and photo data
English
7
En
Page 8
Section
Common operations
04
Common operations
Common operations for
menu settings/lists
(Function of AVH-X5650BT/AVHX2650BT)
Starting the Bluetooth telephone
menu.
For details refer to Bluetooth tele-
phone on page 25.
Displaying the list menu.
Starting the search function.
Displaying the EQ (Audio function menu).
Displaying the Favorite menu.
Operating the scroll icon
and the scrubber bar
Audio
Sonic Center Control
Loudness
Subwoofer
Bass Booster
High Pass Filter
Source Level Adjuster
L/R 0
Low
On
0
125Hz
0
1
12
1JAN
PM
MENU
01 01
48kHz 16bit
Dolby D
TOP
MENU
Dolby DMulti ch
11
1/2
DVD-V
FULL
00'20'' -119'51''
3
1 Scroll icon
Appears when selectable items are hidden.
Touch the scroll icon to view any hidden
items.
2 Scrubber bar
Appears when items cannot be displayed on
a single page only.
Drag the scrubber bar to view any hidden
items.
Also, you can drag the list to view any hidden
items.
3 Playback point
Specifying the playback point
Drag the playback point on the screen.
12:43
Activating the touch panel keys
Touch panel keys
1JAN
PM
12:43
MENU
01 01
48kHz 16bit
Dolby D
TOP
MENU
Dolby DMulti ch
1 1
1/2
DVD-V
FULL
00'20'' -119'51''
1
L+R
1
07'24'' -112'47''
Return
2/2
1
1 Tab key
Switching the touch panel keys on the display.
Using the rear view
A rear view camera sold separately is required
for using the rear view mode. The below functions are available.
! Rear view camera
This unit can be setup to display the rear
view image automatically when you move
the shift lever to the REVERSE (R) position.
! Camera for rear view mode
The rear view can be turned on to display at
all times.
The rear view camera needs to be set to a setting other than Off to turn on rear view
mode.
For details about the settings, refer to Setting the
rear view camera (back up camera) on page 37.
Using the rear view key to
display the rear view
Displaying the rear view image by
turning the rear view image on.
When the rear view image is displayed, you can switch to the
source display by touching the display. You can operate from the
source display temporarily at this
time. If you do not perform any operations within a few seconds, the
display will return to the rear view
image.
To turn off the rear view image,
press the home button to return to
the home display and then press
this key again.
Using the rear monitor
Connecting a rear monitor, sold separately, to
this unit allows images and videos to be viewed
from the rear seats.
Notes
! You cannot use touch panel keys and opera-
tion screens from the rear monitor.
! Images and video will continue to be dis-
played whether the vehicle is in motion or
stopped.
Using sound retriever
Automatically enhances compressed audio and restores rich
sound.
Off — —
! is more effective than .
8
En
Page 9
Common operations
Basic operations
Section
04
Notes
! This function is enabled for playback on the
sources listed below.
— CD-DA
— MP3/WMA/AAC files on USB MTP storage
devices
— MP3/WMA/AAC/WAV files on USB storage
devices
— MP3/WMA/AAC files on CD media
— iPod
! The sound retriever setting is turned off
when the MIXTRAX function is used in USB
source mode.
Changing the wide-screen
mode
Selecting the appropriate screen
ratio for the playback video.
1 Display the screen mode.
2 Touch the desired wide mode setting.
FULL (full screen)
The 4:3 picture is enlarged in the horizontal direction only, granting viewers a 4:3 TV picture
(normal picture) without any omissions.
ZOOM (zoom)
The 4:3 picture is enlarged in the same proportion both vertically and horizontally; ideal for a
cinema sized picture (wide screen picture).
NORMAL (normal)
The 4:3 picture is displayed as is, granting viewers no sense of disparity as the proportions are
the same as that of the normal picture.
Notes
! You cannot operate this function while driv-
ing.
! Different settings can be stored for each
video source.
! When a video is viewed in a wide screen
mode that does not match its original aspect
ratio, it may appear different.
! Remember that using the wide mode feature
of this system for commercial or public viewing purposes may constitute an infringement
on the author’s rights protected by the Copyright Law.
! The video image will appear coarser when
viewed in ZOOM mode.
! FULL/NORMAL is used for TV tuner of RGB
connection.
! This function is enabled for playback on the
sources listed below.
— Disc: DVD-V, Video-CD, DivX, MPEG-1,
MPEG-2, MPEG-4
— USB: DivX, MPEG-1, MPEG-2, MPEG-4, JPEG
— iPod: Video
— AV: A/V data
— AUX: A/V data
— TV: RGB connection
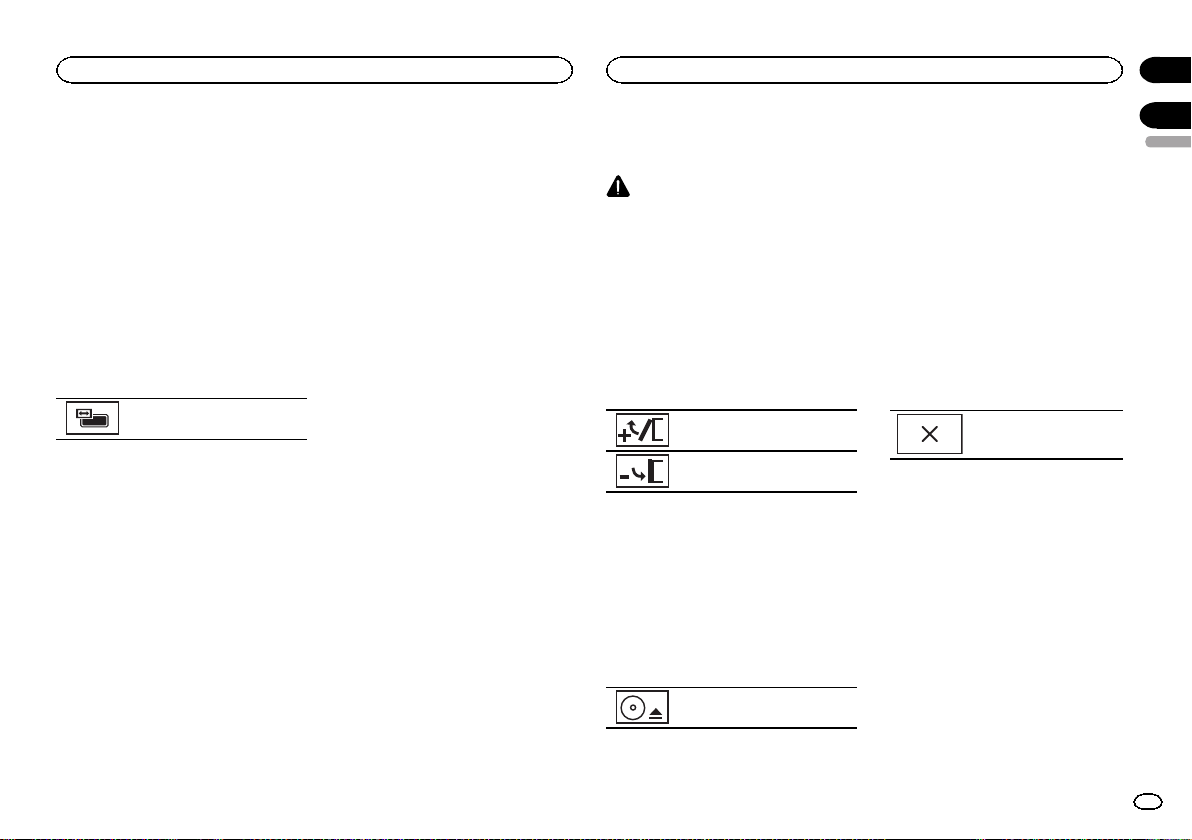
Adjusting the angle of the
LCD panel and ejecting media
CAUTION
Keep hands and fingers clear of the unit when
opening, closing, or adjusting the LCD panel. Be
especially cautious of children’s hands and fingers.
Adjusting the LCD panel angle
(Function of AVH-X5650BT/AVH-X4650DVD)
1 Press h(eject) to display the ejecting
menu.
2 Adjust the LCD panel to an easily viewable angle.
Laying the panel down.
Returning the panel to the upright
position.
# As the set angle is saved, the LCD panel will automatically be adjusted to the same position the next
time the LCD panel is opened.
Ejecting a disc
(Function of AVH-X5650BT/AVH-X4650DVD)
1 Press h(eject) to display the ejecting
menu.
2 Eject a disc.
Ejecting a disc.
Ejecting a disc
(Function of AVH-X2650BT/AVH-X1650DVD)
% Press h to eject a disc.
Setting the clock
1 Touch the Clock key.
The Clock Adjustment screen appears.
Refer to Clock key on page 6.
2 Select the item to set.
3 Touch a or b to set the correct date and
time.
Notes
! You can select the date format. Touch
dd/mm/yy, yy/mm/dd or mm/dd/yy.
! You can select the time clock format. Touch
12hr (12-hour clock) or 24hr (24-hour clock).
Indicates that the display is
closed.
05
English
9
En
Page 10

Section
06
Tuner
Tuner
Tuner operations
Touch panel keys
12
FM
WWWWWWWW
WWWWWWWW
Text
Local
87.5
AM1
TA
OFF
3456789
Radio
1
2
3
4
5
6
1 Band key
Selecting a band (FM1, FM2 or FM3)by
touching the left icon. Switching to the AM
band by touching the right icon.
The icon for the selected band is highlighted.
2 Search key
Displaying the PTY information.
3 News key
Turning news program interruption on or off.
4 TA key
Turning TA (traffic announcement standby)
on or off.
5 Local key
Setting the local seek level.
6 Tuning key
Tuning up or down manually.
Touch and hold down for more than two seconds to skip stations. Seek tuning starts as
soon as you release. Touch again to cancel
seek tuning.
7 Text key
Displaying radio text.
10
En
# To cancel the storage process, touch Cancel.
Tuning in to strong signals
Local seek tuning allows you to tune in to only
those radio stations with sufficiently strong signals for good reception.
FM: Off —
AM: Off — —
The more there are on the screen, the fewer
the stations that can be selected. Only stations
with the strongest signals in your local area can
be selected.
If there are fewer
ceive broadcasts from weaker stations.
— — —
, this unit will be able to re-
Receiving traffic
announcements
(Only available on FM stations)
Regardless of the source you are listening to,
you can receive traffic announcements automatically with TA (traffic announcement standby).
1 Tune in to a TP or enhanced other network’s TP station.
indicator lights up.
2 Turn Traffic announcement on.
Refer to Tuner operations on page 10.
# If the TA function is turned on when you are not
tuned in to a TP or enhanced other network’s TP station, the
3 Press +/– (VOLUME/VOL) to adjust the TA
volume when a traffic announcement begins.
The newly set volume is stored in the memory
and will be recalled for subsequent traffic announcements.
indicator lights up dimly.
8 AUG
PM
12:05
Storing and recalling radio text.
8 List key
Displaying the preset channel list.
9 Preset channel key
Selecting a preset channel.
Displaying radio text
(Only available on FM stations)
Radio text data transmitted by RDS stations,
such as station information, can be displayed
on this tuner.
! When no radio text is received, No Text ap-
pears in the display.
Basic operations
MHz
News
OFF
Switching preset channels using the buttons
1 Press c or d (TRK).
Seek tuning using the buttons
1 Press and hold c or d (TRK).
Notes
! Listening AM radio while an iPod is charged
from this unit may generate noise. In this
case, disconnect the iPod from this unit.
! Touch panel keys not listed under Tuner oper-
ations may appear on the display.
Refer to Indicator list on page 54.
Storing and recalling stations
You can easily store up to six stations for each
band as presets.
1 Display the preset screen.
Refer to Tuner operations on page 10.
The preset screen appears in the display.
2 Touch and hold down one of the preset
tuning keys to store the selected frequency
to the memory.
The selected radio station frequency has been
stored in the memory.
3 Touch the appropriate preset tuning key
to select the desired station.
Storing and recalling radio text
You can store data from up to six radio text
transmissions to the Memo1 to Memo6 keys.
1 Display the radio text you want to store
in the memory.
Refer to Tuner operations on page 10.
2 Touch and hold one of the keys to store
the selected radio text.
The memory number is displayed and the selected radio text will be stored in the memory.
The next time you press the same key in radio
text display the stored text will be recalled from
the memory.
Storing the strongest stations
BSM (best stations memory) automatically
stores the six strongest stations in the order of
their signal strength.
Storing broadcast frequencies with BSM may replace broadcast frequencies you have saved
using the preset tuning keys.
1 Display the preset screen.
Refer to Tuner operations on page 10.
The preset screen appears in the display.
2 Touch BSM to turn BSM on.
The six strongest broadcast frequencies will be
stored under preset tuning keys in order of their
signal strength.
Page 11

Tuner
Tuner
Section
06
4 Turn off the announcement while a traffic announcement is being received.
Refer to Tuner operations on page 10.
The tuner returns to the original source but remains in the TA function standby mode until the
icon is touched again.
Receiving alarm broadcasts
interrupting regular broadcasts
(Only available on FM stations)
You can choose to receive the alarm broadcast
automatically regardless of the source being listened to.
Reception of the previous program resumes
once the alarm broadcast ends.
Using PTY functions
(Only available on FM stations)
You can tune in to a station using PTY (program
type) information.
Searching for an RDS station by
PTY information
You can search for general types of broadcasting
programs.
1 Touch the search key.
2 Touch
There are four program types:
News&Info—Popular—Classics—Others
3 Touch Start to begin the search.
The unit searches for a station broadcasting that
type of program. When a station is found, its
program service name is displayed.
# To cancel the search, touch Cancel.
# The program of some stations may differ from
that indicated by the transmitted PTY.
or to select a program type.
# If no station is broadcasting the type of program
you searched for, Not Found is displayed for about
two seconds and then the tuner returns to the original station.
Using news program interruption
When a news program is broadcast from a PTY
code news station, the unit can switch from any
station to the news broadcast station. When the
news program ends, reception of the previous
program resumes.
Setting the FM tuning step
The tuning step remains at 50 kHz during manual tuning.
1 Turn the source off.
Refer to Turning the source ON/OFF on page 6.
2 Display the system menu.
Refer to Menu operations on page 29.
3 Touch FM Step on the system menu to select the FM tuning step.
Touching FM Step will switch the FM tuning
step between 50 kHz and 100 kHz. The selected
FM tuning step will appear.
RDS setting
(Only available on FM stations)
Limiting stations to regional
programming
When AF is used, the regional function limits
the selection of stations to those broadcasting
regional programs.
1 Press the home button to switch to the
home display.
2 Touch the system key to open the system
menu.
3 Touch RDS Setup on the system menu.
4 Touch Regional on the menu to turn the
regional function on.
# To turn the regional function off, touch Regional
again.
Selecting alternative frequencies
When the tuner cannot get a good reception,
the unit automatically searches for a different
station in the same network.
1 Press the home button to switch to the
home display.
2 Touch the system key to open the system
menu.
3 Touch RDS Setup on the system menu.
4 Touch Alternative FREQ to turn AF on.
# To turn AF off, touch Alternative FREQ again.
Notes
! Sound may be temporarily interrupted by an-
other program during an AF frequency
search.
! The AF feature can be set for FM1, FM2, and
FM3.
Switching Auto PI Seek
The unit can automatically search for a different
station with the same programming, even during preset recall.
1 Press the home button to switch to the
home display.
2 Touch the system key to open the system
menu.
3 Touch Auto PI on the system menu to
turn Auto PI Seek on.
# To turn Auto PI Seek off, touch Auto PI again.
Setting the AM tuning step
% Touch AM Step on the initial menu to select the AM tuning step.
Touching AM Step will switch the AM tuning
step between 9 kHz and 10 kHz. The selected
AM tuning step will appear in the display.
English
11
En
Page 12
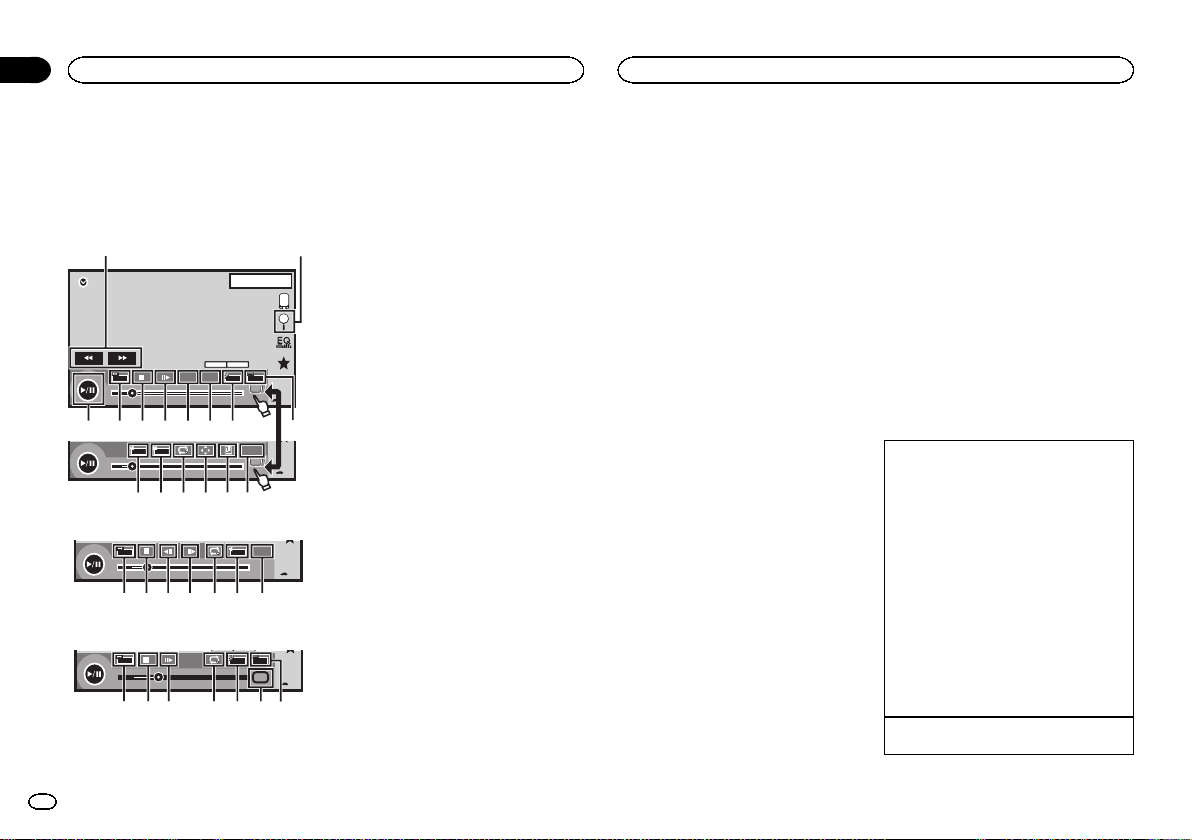
y
y
Section
07
Disc (CD/DVD)
Disc (CD/DVD)
Introducing movie operations
You can use this unit to view DVD/DVD-R/DVDRW/CD/CD-R/CD-RW movie files.
Touch panel keys
DVD video
1JAN
MENU
01 01
48kHz 16bit
Dolby D
Dolby DMulti ch
TOP
11
MENU
DVD-V
FULL
00'20'' -119'51''
a 987654
L+R
1
07'24'' -112'47''
fedcg
Video CD
FULL
00'20'' -119'51''
b
L+R
98h7eg b
When playing a disc containing a mixture of various media file types
FULL
00'15'' -00'59''
1
987 i3e4
1 Fast forward key/Reverse key
Fast forwarding or reversing
12
En
Return
PM
12:43
1/2
2/2
Return
OFF
Media
Touch to change the fast forward and reverse
speed.
2 Search key
Starting the search function.
3 Switch subtitle language key
With DVDs/DivX files featuring multi-subtitle
21
recordings, you can switch between subtitle
languages during playback.
4 Switch audio language key
With DVDs/DivX files that provides audio
playback in different languages and different
audio systems (Dolby
you can switch between languages/audio
systems during playback.
Depending on the setting, the video may not
be played back with the audio system used
3
to record the DVD.
5 TOP MENU key
Returning to the top menu during DVD playback.
6 MENU key
Displaying the DVD menu during DVD playback.
7 Slow-motion playback key
Moving the selection ahead one frame at a
time during playback.
Touch and hold down the key for more than
two seconds to slow down playback speed.
Touching the key increases the playback
speed over four incremental settings during
slow motion playback from DVD video/Video
CD.
8 Stop key
Stopping playback.
If you resume playback, playback will start
from the point where you stopped. Touch the
key again to stop playback completely.
â
Digital, DTS, etc.),
9 Screen mode key
Changing the screen mode.
Refer to Changing the wide-screen mode on
page 9.
a Pause and play key
Pausing playback.
Returning to normal playback during
paused, stopped, slow motion, or frame-by-
frame playback.
b Return key
Returning to the specified scene to which
the DVD currently being played has been pre-
programmed to return.
This function cannot be used if a specified
scene has not been preprogrammed on the
DVD disc.
c Bookmark key
During playback, touch the point at which
you want to resume playback the next time
the disc is loaded.
! You can set one bookmark per DVD video.
You can set up to five bookmarks total.
! To clear the bookmark on a disc, touch
and hold the key during playback.
! The oldest bookmark is replaced by the
new one.
d Arrow key
Displaying arrow keys to operate the DVD
menu.
e Repeat key
Selecting the repeat range.
f Viewing angle key
With DVDs featuring multi-angle (scenes
shot from multiple angles) recordings, you
can switch among viewing angles during
playback.
g Audio output key
Switching the audio output, when playing
video discs recorded with LPCM audio.
h Slow key
Speeding down the playback speed in four
steps, during slow motion playback on Video
CD.
! There is no sound during slow motion
playback.
! Images during slow motion playback may
be unclear for some discs.
! Reverseslow motion playback is not avail-
able.
i Media key
Switching between media file types to play
on DVD/CD.
Basic operations
Playing back videos
1 Insert the disc into the disc loading slot with
the label side up.
Playback will automatically start.
! If you are playing a DVD or Video CD, a menu
may appear. Refer to Operating the DVD menu
on page 13 and PBC playback on page 14.
! When the automatic playback function is on,
the unit will skip the DVD menu and automatically start playback from the first chapter of
the first title. Refer to Automatic playback of
DVDs on page 33.
! When the source icon is not displayed, it can
be displayed by touching the screen.
! If a message is displayed after loading a disc
containing DivX VOD content, touch Play.
Refer to Playing DivX
15.
Ejecting a disc
! Refer to Ejecting a disc on page 9.
â
VOD content on page
Page 13
Disc (CD/DVD)
Disc (CD/DVD)
Section
07
Selecting a chapter using the buttons
1 Press c or d (TRK).
Fast forwarding or reversing using the buttons
1 Press and hold c or d (TRK).
! Fast forward/fast reverse may not always be
possible on some discs. In such cases, normal
playback will automatically resume.
! The fast forward/fast reverse speed depends
on the length of time you press and hold down
c or d (TRK). This function is not available for
Video CD.
Notes
! This DVD player can play back a DivX file re-
corded on CD-R/RW, DVD-R/RW, or MPEG-1/
MPEG-2/MPEG-4. (Please see the following
section for files that can be played back.
Refer to DivX video files on page 56.)
! Do not insert anything other than a DVD-R/
RW or CD-R/RW into the disc loading slot.
! Some operations may not be available while
watching a media due to the programming
of the disc. In such cases, the
pears on the screen.
! There may be touch panel keys not listed
under Introducing movie operations on page
12 that appear on the screen.
Refer to Indicator list on page 54.
! With some DVDs, switching between lan-
guages/audio systems may only be possible
using a menu display.
! You can also switch between languages/
audio systems using Video Setup menu. For
details, refer to Setting the audio language on
page 31.
! This unit will return to normal playback if you
change the audio language during fast forward/fast reverse, pause or slow motion playback.
! With some DVDs, switching between subtitle
languages may only be possible using a
menu display.
icon ap-
! You can also switch between subtitle lan-
guages using Video Setup menu. For details, refer to Setting the subtitle language on
page 31.
! This unit will return to normal playback if you
change the subtitle language during fast forward/fast reverse, pause or slow motion playback.
! During playback of a scene shot from multi-
ple angles, the angle icon is displayed. Use
the Video Setup menu to turn the angle
icon display on or off. For details, refer to Set-
ting the multi-angle DVD display on page 32.
! You will return to normal playback if you
change the viewing angle during fast forward/fast reverse, pause or slow motion playback.
Sound playback operations
You can use this unit to listen to DVD-R/DVDRW/CD/CD-R/CD-RW sound files.
Touch panel keys
12
1JAN
PM
12:43
S.Rtrv
Dolby PLll
Media
45678
3
Abcdefghi
Abcdefghi
Abcdefghi
Abcdefghi
11
ROM
00'37'' -08'43''
1 Information key
Switching the text information to display on
this unit when playing MP3/WMA/AAC files.
2 Search key
Displaying a list of track titles/file names to
select songs on a CD.
Displaying the file name list to select the
files.
3 Media key
Switching between media file types on a
DVD or CD.
4 Sound retriever key
Refer to Using sound retriever on page 8.
5 Random key
Playing songs in random order.
6 Repeat key
Selecting the repeat range.
7 Previous folder key/Next folder key
Selecting a folder.
8 Pause and play key
Pausing and starting playback.
Switching the media file type
When playing a digital media containing a mixture of various media file types, such as DivX,
MPEG-1, MPEG-2, MPEG-4 and MP3, you can
switch between media file types to play.
% Touch Media to switch media file types.
CD-DA (audio data)—Music/ROM (compressed
audio)—Video (DivX, MPEG-1, MPEG-2, MPEG-4
video files)
Note
Audio data (CD-DA) files on DVD-R/RW/ROM
cannot be played back on this unit.
Operating the DVD menu
(Function for DVD video)
Some DVDs allow you to make a selection from
the disc contents using a menu.
Using the arrow keys
1 Display arrow keys to operate the DVD
menu.
2 Select the desired menu item.
Selecting the desired menu item.
Starting playback from the selected menu item.
Operating the DVD menu by directly touching the menu item.
Back to previous display.
# When operating the DVD menu by directly touching the menu item, touch the icon to operate.
Returning to the normal DVD
video display.
Displaying arrow keys.
English
13
En
Page 14
Section
07
Disc (CD/DVD)
Disc (CD/DVD)
# Ways to display the menu will differ depending
on the disc.
# Depending on the contents of the DVD disc, this
function may not work properly. In such cases, use
the touch panel keys to operate the DVD menu.
Random play (shuffle)
% Touch the random key.
! On – Play back files in random order within
the repeat range, Folder and Disc.
! Off – Cancel random play.
Repeating playback
% Touch the repeat key.
! Disc – Play through the current disc
! Chapter – Repeat the current chapter
! Title – Repeat the current title
! Track – Repeat the current track
! File – Repeat the current file
! Folder – Repeat the current folder
! Disc/All – Repeat all files in the current disc
! All – Repeat all files
Notes
! This function cannot be operated during
Video CD playback featuring PBC (playback
control).
! If you perform chapter search, fast forward/
reverse, frame-by-frame playback or slow motion playback, the repeat play will stop.
! When playing discs with compressed audio
and audio data (CD-DA), playback is repeated within the type of data currently playing even if Disc is selected.
! If you select another folder during repeat
play, the repeat play range changes to
Disc/All.
! If you perform track search or fast forward/
reverse during File, the repeat play range
changes to Folder.
14
En
! If you perform title/chapter search or fast for-
ward/reverse during Chapter, the repeat play
is set to off automatically.
! If you perform track search or fast forward/
reverse during Track, the repeat play range
changes to Disc.
! When Folder is selected, it is not possible to
play back a subfolder of that folder.
Searching for the part you
want to play
You can use the search function to find the part
you want to play.
For DVD videos, you can select Title (title),
Chapter (chapter) or 10key (numeric keypad).
For video CDs, you can select Track (track) or
10key (numeric keypad).
! Chapter search is not available when disc
playback is stopped.
! This function cannot be operated during
some DVD videos or Video CD playback featuring PBC (playback control).
1 Start the search function.
Refer to Introducing movie operations on page
12.
2 Touch the desired search option (e.g.,
Chapter).
3 Touch 0 to 9 to input the desired number.
# To cancel the entered numbers, touch C.
4 Start playback from the selected part.
Registering the numbers and
starting playback.
Note
With discs featuring a menu, you can also use
the DVD menu to make your selection.
Refer to Introducing movie operations on page
12.
Selecting audio output
When playing DVD video discs recorded with
LPCM audio, you can switch the audio output.
When playing video CDs, you can switch between stereo and monaural audio output.
! This function is not available when disc play-
back is stopped.
% Touch the audio output key to switch
audio output types.
! L+R – Left and right
! Left – Left
! Right – Right
! Mix – Mixing left and right
Note
You may not be able to select or use this function depending on the disc and the playback location.
PBC playback
(Function for Video CDs)
During playback of Video CDs featuring PBC
(playback control), PBC On is displayed.
1 Start the search function.
Refer to Introducing movie operations on page
12.
2 Touch 10key to display the numeric keypad.
3 Touch 0 to 9 corresponding to a menu
number.
4 Start playback from the selected part.
Registering the numbers and
starting playback.
Notes
! You can display the menu by touching
Return during PBC playback. For details,
refer to the instructions provided with the
disc.
! PBC playback of a Video CD cannot be can-
celed.
! During playback of Video CDs featuring PBC
(playback control), you cannot select the repeat play range or use the search function.
Selecting tracks from the
track title list
You can select tracks to playback using the track
title list which is a list of the tracks recorded on
a disc.
1 Display the track title list.
Refer to Sound playback operations on page 13.
2 Touch your favorite track title.
Playback begins.
Selecting files from the file
name list
(Function for compressed audio/DivX/MPEG-1/
MPEG-2/MPEG-4)
File name list is a list of file names (or folder
names) from which you can select a file (or folder) to play back.
1 Touch the search key to display the file
(or folder) name list.
Page 15
ppr
All
Disc (CD/DVD)
iPod
Section
07
2 Touch your favorite file (or folder) name.
# When you have selected a folder, a list of the
names of the files (or the folders) in it can be viewed.
Repeat this operation to select the desired file name.
# If folder 1 (ROOT) contains no files, playback
starts from folder 2.
Note
If part of the recorded information does not display, a scroll key appears on the right side of list.
Touch the scroll key to scroll.
Playing DivXâVOD content
Some DivX video on demand (VOD) content may
only be playable a fixed number of times. When
you load a disc containing this type of content,
the number of times it has been played will be
shown on-screen. You can then decide whether
or not to play the disc.
! For DivX VOD content without this restriction,
you can load the disc into your player and
play the content as often as you like, with no
message displayed.
! You can confirm the number of times that
the content can be played by checking the
message, This DivX rental has used
out of views..
Important
! In order to play DivX VOD contents on this
unit, you first need to register the unit with
your DivX VOD contents provider. For details
on your registration code, refer to Displaying
â
the DivX
! DivX VOD content is protected by a DRM
VOD registration code on page 33.
(Digital Rights Management) system. This restricts playback of content to specific, registered devices.
% If a message is displayed after loading a
disc containing DivX VOD content, touch
Play.
Playback of the DivX VOD content will start.
# To skip to the next file, touch Next Play.
# If you do not want to play the DivX VOD content,
touch Stop.
iPod control
This manual applies to the following iPod models.
iPod with 30-pin connector
— iPod touch 4th generation
— iPod touch 3rd generation
— iPod touch 2nd generation
— iPod touch 1st generation
— iPod classic 160GB
— iPod classic 120GB
— iPod classic
— iPod with video
— iPod nano 6th generation
— iPod nano 5th generation
— iPod nano 4th generation
— iPod nano 3rd generation
— iPod nano 2nd generation
— iPod nano 1st generation
— iPhone 4S
— iPhone 4
— iPhone 3GS
— iPhone 3G
— iPhone
iPod with lightning connector
— iPod touch 5th generation
— iPod nano 7th generation
— iPhone 5
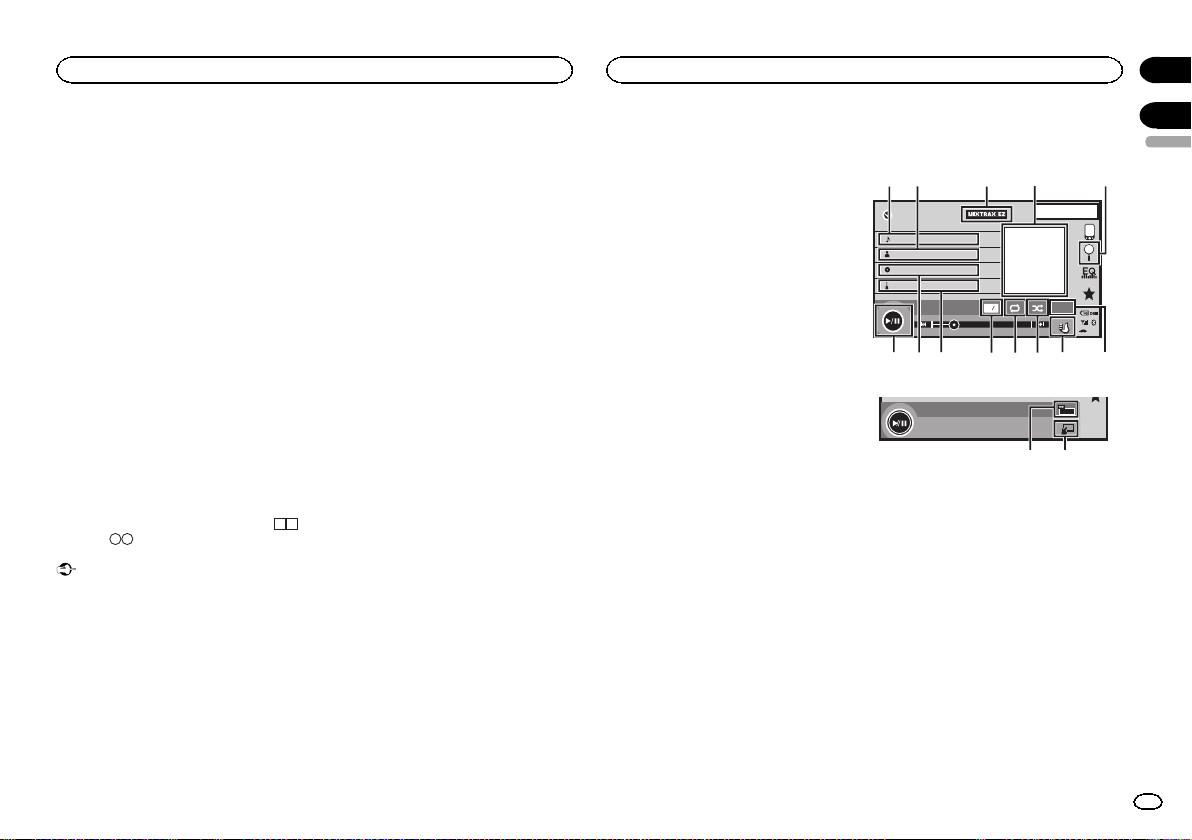
Sound playback operations
You can use the unit to listen iPod sound files.
Notes
! The play time may not display correctly.
! Display is changed when you listen to music
other than iPod music.
Touch panel keys
iPod audio (Control Audio)
1JAN
PM
12:43
S.Rtrv
All
All
Appr
AppppApp
iPod
Abcdefghi
Abcdefghi
Abcdefghi
Abcdefghi
01'17'' -05'29''
1/9
1
x
2
dcb a987 6
iPod audio (App Mode)
FULL
ef
1 Song title
Displaying the Songs list on the iPod.
The application name is displayed when you
listen to music other than iPod music.
2 Artist name
Displaying the Artists list on the iPod.
The song title is displayed when you listen to
music other than iPod music.
3 MIXTRAX EZ key
Starting MIXTRAX EZ.
Refer to MIXTRAX EZ operation on page 24.
4 Artwork
Starting link search on your iPod when you
touch the artwork display.
5 Search key
Displaying iPod menus.
08
English
54321
15
En
Page 16

ppr
Section
08
iPod
iPod
6 Sound retriever key
Refer to Using sound retriever on page 8.
7 iPod control mode key
Conducting operation from your iPod and listening to it using your car’s speakers.
8 Shuffle key
Playing songs on the iPod in random order.
9 Repeat key
Selecting the repeat range.
a Change speed key
Changing the speed of audiobook playback
on the iPod.
b Genre
Displaying the Genres list on the iPod.
The album title is displayed when you listen
to music other than iPod music.
c Album title
Displaying the Albums list on the iPod.
The artist name is displayed when you listen
to music other than iPod music.
d Pause and play key
Pausing and starting playback.
e Unit operation key
Performing operations from this unit and listening to the music on your iPod using your
car’s speakers.
f Screen mode key
Changing the screen mode.
Sound playback operations for Bluetooth
(Function of AVH-X5650BT/AVH-X2650BT)
When all of the following settings are made,
audio can be enjoyed on this unit using a
Bluetooth connection.
16
En
1 Set Device connection.
Device connection can be set when all of the
following conditions are met.
— The iPhone is not connected.
— No Bluetooth connection.
— The source is turned off.
1 Turn the source off.
Refer to Source off key on page 6.
2 Press the home button to switch to the home
display.
3 Touch the system key to open the system
menu.
4 Touch Device connection on the system
menu.
5 Touch iPhone via Bluetooth to select.
2 Connect the iPhone and this unit via
Bluetooth connection.
Refer to Bluetooth connection menu on page 40.
Note
Artwork will not be displayed when sound playback operations are performed using a
Bluetooth connection.
Moving images operations
For iPod with 30-pin connector users
You can use the unit to view iPod movie files.
! Depending on your iPod, there may not be
any output unless you use CD-IU201S/CDIU201V (sold separately). Be sure to use CDIU201S/CD-IU201V to connect your iPod.
For iPod with lightning connector users
! To play movie files in iPod with this unit, con-
nect a CD-IV203 (sold separately) and Lightning Digital AV Adapter (Apple Inc. products)
(sold separately) and install the CarMediaPlayer app on your iPod. Refer to the CarMediaPlayer manual for more information.
Refer to AppRadio Mode operation on page
18.
Touch panel keys
1
1JAN
PM
12:43
iPod
FULL
02'35'' -21'54''
2/3
1
Appr
AppppApp
654 37
1 Fast forward key/Reverse key
Fast forwarding or reversing
Touch to change the fast forward and reverse
speed.
2 Search key
Displaying iPod menus.
3 iPod control mode key
Conducting operation from your iPod and lis-
tening to it using your car’s speakers.
4 Shuffle key
Playing the video on your iPod in a random
order.
5 Repeat key
Selecting the repeat range.
6 Screen mode key
Changing the screen mode.
Refer to Changing the wide-screen mode on
page 9.
7 Pause and play key
Pausing playback.
Returning to normal playback during
paused, slow motion, or frame-by-frame playback.
2
Basic operations
2
Playing back videos
1 Touch the search key to pull up the iPod
menus.
2 Select a movie to play.
Refer to Playing videos from your iPod on page
17.
! When the source icon is not displayed, it
can be displayed by touching the screen.
! Disconnect headphones from the iPod be-
fore connecting it to this unit.
! Depending on the iPod model and the
amount of data stored in the iPod, it may
take some time for playback to begin.
! Use the touch panel keys to select the iPod
after connecting it to this unit.
! No Device is displayed when disconnect-
ing the iPod.
Fast forwarding or reversing using the buttons
1 Press and hold c or d (TRK).
Notes
! To ensure proper operation, connect the
dock connector cable from the iPod directly
to this unit.
! While the iPod is connected to this unit, the
iPod cannot be turned on or off.
! Touch panel keys not listed under Moving im-
ages operations may appear on the display.
Refer to Indicator list on page 54.
Using this unit’s iPod
function from your iPod
You can listen to sound from applications on
your iPod using the car’s speakers when
App Mode is selected.
Page 17
iPod
iPod
Section
08
This function is not compatible with the following iPod models.
! iPod nano 1st generation
! iPod with video
Notes
! Video-related functions are not available to
iPod with lightning connector users.
! While this function is in use, the iPod will not
turn off even if the ignition key is turned off.
Operate the iPod to turn off the power.
1 Touch the iPod control mode key to
switch to App Mode.
2 Operate the connected iPod to select a
video/song and play.
Notes
! The following functions are still accessible
from the unit even if the control mode is set
to App Mode.
However,the operation will depend on your
applications.
— Playing/pausing
— Fast forwarding/reversing
— Tracking up/down
— Moving to a chapter up/down
! App Mode is compatible with the following
iPod models.
— iPod touch 4th generation
— iPod touch 3rd generation
— iPod touch 2nd generation
— iPod touch 1st generation
— iPod classic 160GB
— iPod classic 120GB
— iPod classic
— iPod nano 6th generation
— iPod nano 5th generation
— iPod nano 4th generation
— iPod nano 3rd generation
— iPod nano 2nd generation
— iPhone 4S
— iPhone 4
— iPhone 3GS
— iPhone 3G
— iPhone
Shuffle play
% Touch the shuffle key.
! Songs – Play back videos/songs in the se-
lected list in random order.
! Albums – Play back videos/songs from a ran-
domly selected album in order.
! Off – Turn off shuffle play.
Repeating playback
% Touch the repeat key.
! One – Repeat just the current video/song
! All – Repeat all videos/songs in the selected
list on the iPod
Playing videos from your iPod
Videos can be played on this unit if an iPod with
video capabilities is connected.
! This unit can play back “Movies”, “Music vid-
eos”, “TV show”, “Video Podcast” and “Rented Movies” which are downloaded from the
iTunes store.
Note
This function is not available to iPod with lightning connector users.
1 Touch Search to display iPod menus.
Refer to Search key on page 16.
2 Switch to iPod video mode.
ROOT
Playlists
Artists
Albums
Songs
Podcasts
Genres
# If you want to switch to iPod video mode, touch
the icon.
Switching to iPod video mode.
3 Play the video from the iPod.
ROOT
Video Playlists
Movie s
Music V ideo s
TV Shows
Video Podcasts
Rente d Movi es
# If you want to switch to iPod music mode, touch
the icon.
Switching to iPod music mode.
Browsing for a video/music
on the iPod
To make operating and searching easy, operations to control an iPod with this unit are designed to be as similar to the iPod as possible.
Note
Video-related functions are not available to iPod
with lightning connector users.
Searching for a video/music by
category
1 Touch the search key to pull up the iPod
menus.
Refer to Search key on page 16.
2 Touch one of the categories in which you
want to search for a video/music.
Category lists (for video)
! Video Playlists (video playlists)
! Movies (movies)
! Music Videos (music videos)
! TV Shows (TV shows)
! Video Podcasts (video podcasts)
! Rented Movies (rented movies)
! Video ITunesU (video ITunesU)
Category lists (for music)
! Playlists (playlists)
! Artists (artists)
! Albums (albums)
! Songs (songs)
! Podcasts (podcasts)
! Genres (genres)
! Composers (composers)
! Audiobooks (audiobooks)
3 Touch the title of the list that you want
to play.
Repeat this operation until you find the desired
video/music.
Notes
! Depending on the generation or version of
the iPod, some functions may not be available.
! You can play playlists created with the com-
puter application (MusicSphere). The application will be available on our website.
English
17
En
Page 18
Section
iPod
08
09
! Playlists that you created with the computer
application (MusicSphere) are displayed in
abbreviated form.
Searching the list by alphabet
1 Select a category.
Refer to Searching for a video/music by category
on page 17.
2 Switch to alphabet search mode.
Switching to alphabet search
mode.
Alphabet search mode is displayed.
3 Touch the first letter of the title of the
video/song you are looking for.
While searching, touch panel key operation is
not available.
# To refine the search with a different letter, touch
Cancel.
4 Touch the title of the list that you want
to play.
Repeat this operation until you find the desired
song/video.
18
En
Changing audiobook speed
% Touch the change speed key to change
the speed.
Playback at a speed faster than
2
normal
Playback at normal speed
1
Playback at a speed slower than
1/2
normal
Displaying lists related to
the song currently playing
(link search)
Touch the artwork to open a list of the names of
songs on the album currently playing. Touch the
name of the song you want to play to start playing that song.
Note
If part of the recorded information does not display, a scroll key appears on the right side of list.
Touch the scroll key to scroll.
AppRadio Mode
AppRadio Mode operation
This system can switch to the AppRadio Mode,
which you can display and operate the application for iPhone on the screen.
In AppRadio Mode, you can operate applications with finger gestures such as tapping, dragging, scrolling or flicking on the screen of the
system.
Install the AppRadio app on your iPhone.
WARNING
Certain uses of an iPhone or smartphone
may not be legal while driving in your jurisdiction, so you must be aware of and obey
any such restrictions.
If in doubt as to a particular function, only
perform it while the car is parked.
No feature should be used unless it is safe
to do so under the driving conditions you
are experiencing.
CAUTION
While driving, you cannot enter text on your
iPod.
! Pioneeris not liable for any issues that
may arise from incorrect or flawed appbased content.
! The content and functionality of the sup-
ported applications are the responsibility
of the App providers.
! In AppRadio Mode, functionality through
the product is limited while driving, with
available functions determined by the App
providers.
! Availability of AppRadio Mode functional-
ity is determined by the App provider, and
not determined by Pioneer.
! AppRadio Mode allows access to applica-
tions other than those listed (subject to
limitations while driving), but the extent to
which content can be used is determined
by the App providers.
Important
! When listening to music and sounds from appli-
cation simultaneously, see the following section.
Refer to Operating the sound mixer on page 43.
Notes
! Applications operable by switching this sys-
tem to AppRadio Mode are only those available for AppRadio Mode.
! Please check applications supported
AppRadio Mode at
http://www.pioneerelectronics.com/
AppRadioMode
iPhone compatibility
AppRadio Mode is compatible with the following iPod models.
! iPod touch 5th generation (only with AVH-
X5650BT/AVH-X2650BT)
! iPod touch 4th generation
! iPhone 5 (only with AVH-X5650BT/AVH-
X2650BT)
! iPhone 4S
Page 19
AppRadio Mode
AppRadio Mode
Section
09
! iPhone 4
Starting procedure
1 Install the AppRadio app on your iPhone.
2 Set Device connection.
Device connection can be set when all of the
following conditions are met.
— The iPhone is not connected.
— No Bluetooth connection.
— The source is turned off.
1 Turn the source off.
Refer to Source off key on page 6.
2 Press the home button to switch to the home
display.
3 Touch the system key to open the system
menu.
4 Touch Device connection on the system
menu.
5 Touch the desired setting.
— iPhone via Bluetooth (for iPod with light-
ning connector users)
— iPhone via USB (for iPod with 30-pin con-
nector users)
3 After configuring Device connection, connect the iPhone to this unit.
# For iPod with lightning connector users
(Function of AVH-X5650BT/AVH-X2650BT)
— A Bluetooth connection is required for iPod
with lightning connector. Refer to Bluetooth
connection menu on page 40.
— Use the CD-IV203 (sold separately) and Light-
ning to VGA adapter (Apple Inc. products)
(sold separately) when you use this function.
— Refer to When connecting with optional CD-
IV203 cable on page 47.
# For iPod with 30-pin connector users
— Use the CD-IU201S (sold separately) when
you use this function.
— Refer to When connecting with optional CD-
IU201S cable on page 48.
4 Start an application available for
AppRadio Mode from the iPhone.
An image of the application is displayed on the
screen of this system.
! Youcan start an application available for
AppRadio Mode also from a launcher application.
5 Press MODE.
# Press the home button to switch to the home display and then touch the Apps key to start the launcher application.
6 Operate the application.
Setting the Keyboard
CAUTION
For your safety, the keyboard functionality is only
available when the vehicle is stopped and the
parking brake is engaged.
Depending on the application, you can input
text on the display. In order to input text correctly
using keyboard which appears on this unit, you
need to set the language setting in this function.
When the AppRadio Mode is used, the language setting for the keyboard set for the function and the language setting for the iPhone
keyboard need to be the same.
! Keyboard is available only in AppRadio
Mode.
When you tap a text input area of an application
for iPhone, a keyboard will be displayed onscreen. You can input the desired text directly
from this system.
! The language preference for the keyboard of
this system should be same as the setting on
your iPhone.
If the settings for this product and the
iPhone are different, you may not be able to
enter characters properly.
1 Press the home button twice to switch
from the AppRadio Mode display to the
home display.
2 Touch the system key to open the system
menu.
3 Touch Keyboard on the System menu to
select desired language.
4 Touch the desired language.
French (French)—German (German)—Greek
(Greek)—Russian (Russian)—English (US English)—English (UK) (UK English)—Dutch
(Dutch)—Italian (Italian)—Norwegian (Norwegian)—Swedish (Swedish)—Finnish (Finnish)
—Spanish (Spanish)—Portuguese (Portu-
guese)—Chinese(Simplified) (Simplified Chinese)—Chinese(Traditional) (Traditional
Chinese)—Arabic (Arabic)—Hebrew (Hebrew)
—Thai (Thai)
5 Tap the text input area on the application
screen of the iPhone.
Touch
to hide the keyboard.
English
19
En
Page 20
Section
Smartphone link adaptor operations
10
11
You can operate your smartphone on the unit’s
display by using this function.
Only compatible smartphones work with the
MirrorLink function.
— For details on how to connect with smart-
phone link adaptor (CD-ML100) (sold separately), refer to Optional Smartphone link
adaptor (CD-ML100) connection on page 48.
— For details about MirrorLink setting, refer to
Selecting MirrorLink Mode on page 34.
— For details about the sound mixer, refer to
Operating the sound mixer on page 43.
Starting procedure
1 Connect your smartphone to the smartphone link adaptor (CD-ML100) (sold separately) with the RGB input.
2 Press MODE.
# Press the home button to switch to the home display and then touch the MirrorLink key to start the
launcher application.
# The smartphone’s screen appears on the unit’s
display when you select MirrorLink and you can then
operate your smartphone on the display.
3 Operate the application.
— Press home button: Displays the home
screen for MirrorLink.
— Press home button twice: Displays the home
screen for the unit.
— Press d (TRK): Displays the menu screen for
MirrorLink.
— Press c (TRK): Displays the previous screen
for MirrorLink.
For details, refer to Head unit on page 5.
# Youcan operate the applications on the touch
panel screen as well as on your smartphone screen.
CAUTION
! Do not operate your smartphone while driv-
ing. Obey all relevant laws in your area.
20
En
! You must agree to obey the above rule on the
caution screen. Be sure to follow the onscreen instructions.
USB
This unit is compliant with USB MSC (Mass
Storage Class) and USB MTP (Media Transfer
Protocol).
You can also use USB MTP (connecting to MTPcompatible Android devices using a USB cable);
however some functions are not supported for
MTP connection.
USB MSC USB MTP
MP3 11
WMA 11
WAV 1 —
AAC 11
DivX 1 —
MPEG-1 1 —
MPEG-2 1 —
MPEG-4 1 —
JPEG 1 —
Music browse mode 1 —
MIXTRAX EZ 1 —
Moving images operations
(Function of USB MSC)
You can use this unit to view USB storage device
files.
Touch panel keys
1
1JAN
PM
12:43
USB
FULL
00'20'' -119'51''
a987 5
1 Fast forward key/Reverse key
Fast forwarding or reversing
Touch to change the fast forward and reverse
speed.
2 Search key
Displaying the file name list to select the
files.
3 Switch subtitle language key
With DivX files featuring multi-subtitle recordings, you can switch between subtitle
languages during playback.
4 Media key
Switching between media file types to play
on Music/Video/Photo.
5 Switch audio language key
With DivX files that provides audio playback
in different languages and different audio
systems (Dolby Digital, DTS, etc.), you can
switch between languages/audio systems
during playback.
6 Repeat key
Selecting the repeat range.
01 01
Dolby DMulti ch
11
Media
643
2
Page 21
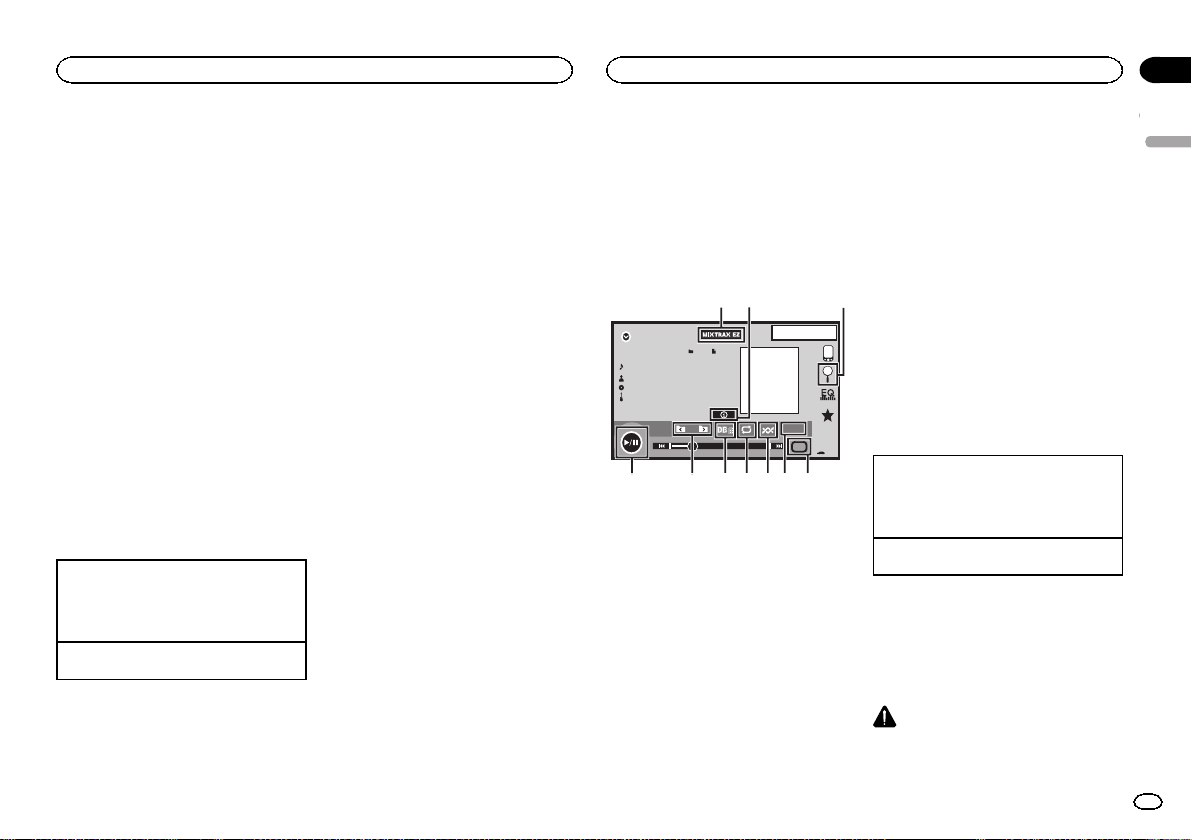
All
USB
USB
Section
11
Refer to Repeating playback on page 22.
7 Slow-motion playback key
(Function for DivX file/MPEG-1/MPEG-2/
MPEG-4)
Moving the selection ahead one frame at a
time during playback.
Touch and hold down the key for more than
two seconds to slow down playback speed.
8 Stop key
Stopping playback.
If you resume playback, playback will start
from the point where you stopped. Touch the
key again to stop playback completely.
9 Screen mode key
Changing the screen mode.
Refer to Changing the wide-screen mode on
page 9.
a Pause and play key
Pausing playback.
Returning to normal playback during
paused, slow motion, or frame-by-frame playback.
Basic operations
Playing back videos
1 Connect the USB device.
Playback will automatically start.
When the source icon is not displayed, it can
be displayed by touching the screen.
Fast forwarding or reversing using the buttons
1 Press and hold c or d (TRK).
Notes
! Touch panel keys not listed under Moving im-
ages operations may appear on the display.
Refer to Indicator list on page 54.
! You can also switch between languages/
audio systems using Video Setup menu. For
details, refer to Setting the audio language on
page 31.
! This unit will return to normal playback if you
change the audio language during fast forward/fast reverse, pause or slow motion playback.
! You can also switch between subtitle lan-
guages using Video Setup menu. For details, refer to Setting the subtitle language on
page 31.
! This unit will return to normal playback if you
change the subtitle language during fast forward/fast reverse, pause or slow motion playback.
Sound playback operations
You can use this unit to listen to USB audio files.
MTP connection
USB MTP (connecting to MTP-compatible
Android devices using a USB cable) is supported only for MP3/WMA/AAC files in this function.
Notes
! The play time may not display correctly.
! When playing back files recorded as VBR
(variable bit rate) files, the play time will not
be correctly displayed if fast forward or reverse operations are used.
! To ensure proper operation, connect the
dock connector cable from the iPod directly
to this unit.
! While the iPod is connected to this unit, the
iPod cannot be turned on or off.
! If the characters recorded on the USB stor-
age device are not compatible with this unit,
those characters will not be displayed.
! Text information may not be correctly dis-
played depending on the recorded environment.
! Disconnect the USB portable audio player/
USB memory when you are done using it.
! When you select Speana on Selecting the
background display on page 41, the artwork is
not displayed.
Touch panel keys
21
JAN
PM
12:43
S.Rtrv
All
All
Media
USB
Abcdefghi
Abcdefghi
Abcdefghi
Abcdefghi
00'01'' -00'03''
61
a987654
1 MIXTRAX EZ key
Starting MIXTRAX EZ.
(Except for USB MTP)
2 Information key
Switching the text information to display on
this unit when playing MP3/WMA/AAC/WAV
files.
3 Search key
Displaying the file name list to select the
files.
4 Media key
Switching between media file types to play
on USB.
5 Sound retriever key
Refer to Using sound retriever on page 8.
6 Random key
Playing songs in random order.
7 Repeat key
Selecting the repeat range.
8 DB key
Creating a database that enables searches
by artist name, genre, and other options.
3
Refer to Music browse mode on page 21.
9 Previous folder key/Next folder key
Selecting a folder.
a Pause and play key
Pausing and starting playback.
Basic operations
Playing back tracks
1 Connect the USB device.
Playback will automatically start.
When the source icon is not displayed, it can
be displayed by touching the screen.
Fast forwarding or reversing using the buttons
1 Press and hold c or d (TRK).
Music browse mode
(Function for USB MSC)
This unit creates an index in order to facilitate
browsing for a song. You can search by the categories such as albums and artists.
CAUTION
! This function is not available when the USB
storage device is locked.
English
21
En
Page 22
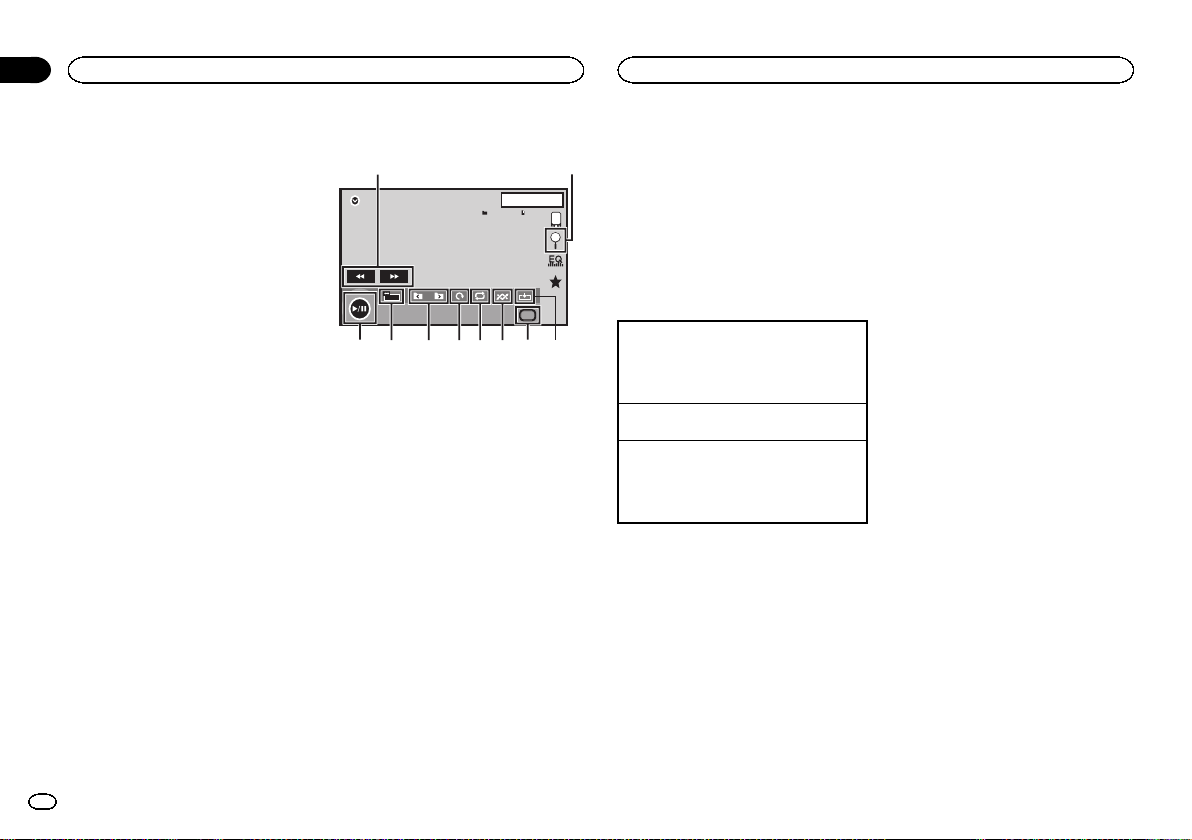
All
Section
11
USB
USB
! This function is not available when the free
space of USB storage device is less than
5 MB.
! While this unit creates an index, do not turn
the unit off. It may cause loss of data on your
USB storage device.
! If you switch to video or JPEG image display
while a database is being created, or when a
database could not be created, a message
appears and database creation stops.
1 Touch DB to create a database in Music
browse mode.
Refer to Sound playback operations on page 21.
2 When “Save the Database to memory?”
is displayed, touch “Yes”.
Saving of the database is completed. If you do
not save it, touch “No”.
When the saving is completed, “Completed
saving Database to memory.” appears.
Music browse mode will start.
3 Display a list and touch the tag key.
4 Select a file.
Still image play back operations
(Function for USB MSC)
You can use this unit to view still images saved
on a USB storage device.
22
En
Touch panel keys
12
1JAN
PM
12:43
USB
NORMAL
44
All
All
Media
3456789a
1 Fast forward key/Reverse key
Selecting a picture.
2 Search key
Displaying the file name list to select the
files.
3 Capture key
Capturing an image in JPEG files.
4 Media key
Switching between media file types when
there is more than one media file type saved
to the USB device. This key does not appear
if there is only one media file type saved to
the USB device.
5 Random key
Playing files in a random order.
6 Repeat key
Selecting the repeat range.
7 Rotate key
Rotating the displayed picture 90° clockwise.
8 Previous folder key/Next folder key
Selecting a folder.
9 Screen mode key
Changing the screen mode.
Refer to Changing the wide-screen mode on
page 9.
a Pause and play key
Starting or pausing the slideshow.
Basic operations
Playing still images
1 Connect the USB device.
Playback will automatically start.
! When the source icon is not displayed, it can
be displayed by touching the screen.
Selecting a file using the buttons
1 Press c or d (TRK).
Fast file searching
1 Press and hold c or d (TRK).
! Youcan search 10 JPEG files at a time.
If there are fewer than 10 files, the search will
cover the first or last file.
Notes
! Filesare played back in file number order
and folders are skipped if they contain no
files. (If folder 1 (ROOT) contains no files,
playback commences with folder 2.)
! Touch panel keys not listed under Still image
playback operations may appear on the dis-
play.
Refer to Indicator list on page 54.
Switching the media file type
% Touch Media to switch between media
file types.
Random play (shuffle)
% Touch the random key.
! On – Play back files in random order within
the repeat range, Folder and Media.
! Off – Cancel random play.
Repeating playback
% Touch the repeat key.
! Folder – Repeat the current folder
! All – Repeat all files
! When Folder is selected, it is not possible to
play back a subfolder of that folder.
! If you select USB source, the repeat play
range changes to All.
Selecting files from the file
name list
(Function for compressed audio/DivX/MPEG-1/
MPEG-2/MPEG-4)
Operation is the same as that for Disc.
Refer to Selecting files from the file name list on
page 14.
Displaying lists related to
the song currently playing
(link search)
Touch the artwork to open a list of the names of
songs on the album currently playing. Touch the
name of the song you want to play to start playing that song.
Notes
! If part of the recorded information does not
display, a scroll key appears on the right side
of list. Touchthe scroll key to scroll.
! This function is available for USB devices in
Music browse mode.
Page 23
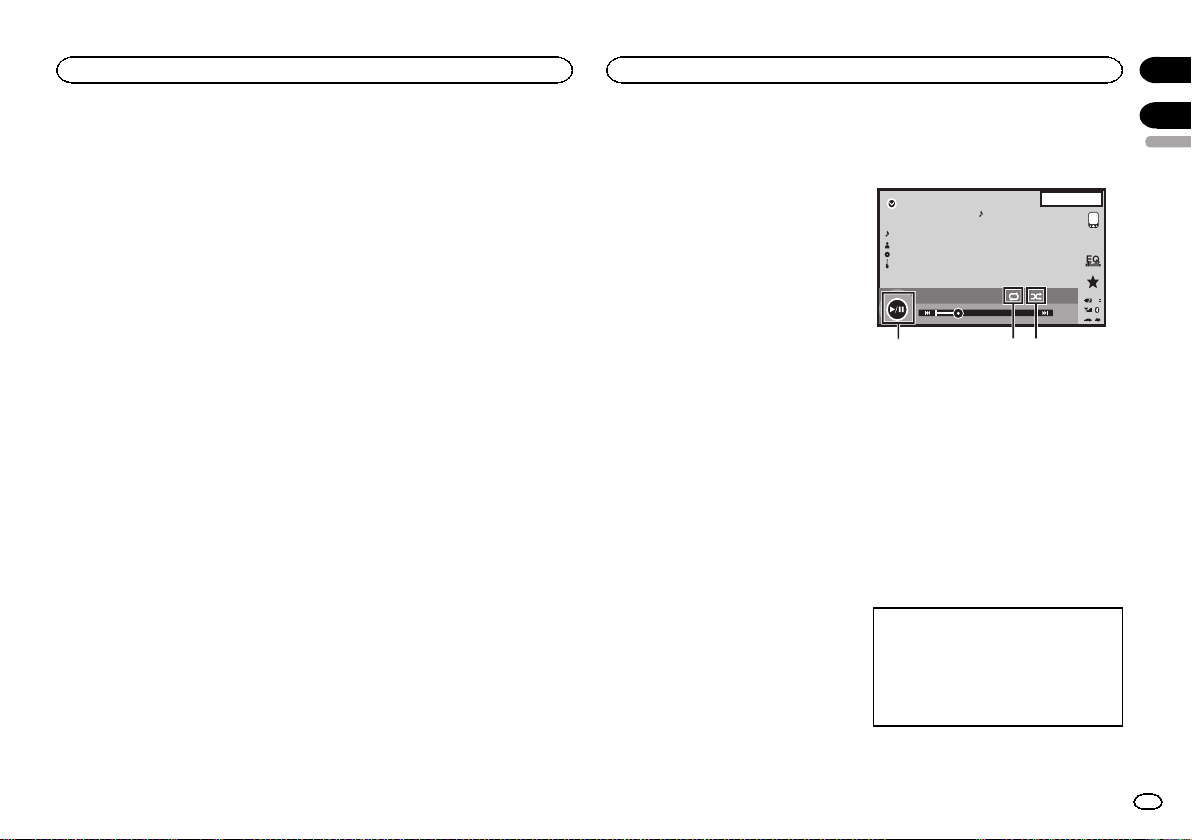
USB
Playing DivXâVOD content
Operation is the same as that for Disc.
Refer to Playing DivX
â
VOD content on page 15.
Capture an image in JPEG files
You can capture image data and use it as wallpaper. Images can be stored and recalled easily
in this unit.
! Only one image can be stored on this unit.
Old image is overwritten with the new one.
1 Touch f to pause the slide show when
the desired image is displayed.
2 Touch Capture to capture the desired
image.
3 When “Do you save this image?” is displayed, touch Yes.
While storing the image to this unit, “Saving
the image. During the save, please don’t
turn off the engine.” is displayed. When the
process is finished, “Image saved.” is displayed.
# To cancel the storage process, touch No.
Bluetooth Audio
Sound playback operations
(Function of AVH-X5650BT/AVH-X2650BT)
You can use this unit to listen to Bluetooth audio
files.
Notes
! Depending on the Bluetooth audio player
connected to this unit, the available operations will be limited to the following two levels:
— A2DP profile (Advanced Audio Distribution
Profile): You can only playback songs on your
audio player.
— AVRCP profile (Audio/Video Remote Control
Profile): You can perform playback, pause
playback, select songs, etc.
! As there is a wide variety of Bluetooth audio
players available on the market, operations
available with specific models may vary extensively. When attempting to run a
Bluetooth audio player using this unit, refer
to the instruction manual that came with the
player as well as to this manual for assistance.
! As the signal from your cellular phone may
cause noise, avoid using it when you are listening to songs on your Bluetooth audio
player.
! The sound from a Bluetooth audio player
connected to this unit will be muted while a
call is in progress on a cellular phone connected to this unit via Bluetooth wireless
technology.
! The play time may not display correctly.
! Depending on the type of Bluetooth audio
player you have connected to this unit, operation and information display may not be
available for some functions.
Touch panel keys
22 JAN
AM
Bluetooth
8888
Abcd efghi
Abcde fgh
Abcde fgh
Abcde fgh
88'88'' -88'88''
32
1 Random key
Playing songs in random order.
2 Repeat key
Selecting the repeat range.
3 Pause and play key
Pausing and starting playback.
12:22
DB
1
Setting up for Bluetooth audio
Before you can use the Bluetooth audio function
you must establish a Bluetooth wireless connection between the unit and your Bluetooth audio
player.
1 Connection
First, you need to connect a Bluetooth audio to
this unit.
For detailed instructions on connecting your
Bluetooth audio to this unit via Bluetooth wireless technology, refer to Bluetooth connection
menu on page 40.
Section
11
12
English
23
En
Page 24

Section
Bluetooth Audio
12
Using MIXTRAX
13
Notes
! When playing back files recorded as VBR
(variable bit rate) files, the play time will not
be correctly displayed if fast forward or reverse operations are used.
! To ensure proper operation, connect the
dock connector cable from the iPod directly
to this unit.
! While the iPod is connected to this unit, the
iPod cannot be turned on or off.
! If the characters recorded on your Bluetooth
audio player are not compatible with this
unit, those characters will not be displayed.
! Text information may not be correctly dis-
played depending on the recorded environment.
Random play (shuffle)
% Touch the random key.
! On – Play back files in random order.
! Off – Cancel random play.
Repeating playback
% Touch the repeat key.
! One – Repeat the current song only
! All – Repeat all songs
MIXTRAX operation
MIXTRAX is original technology for creating
non-stop mixes of selections from your audio library, complete with DJ effects that make them
sound as if a DJ is right there with you playing
the music.
MIXTRAX EZ operation
You can use this unit to play iPod/USB audio
files.
MIXTRAX EZ is used to add a variety of sound effects between songs for arranging the pauses
between songs. It allows you to enjoy listening
to music non-stop.
! This function is only available when a file on
a USB storage device or a song on an iPod is
being played.
! This function is not available when the con-
trol mode is set to App Mode.
! Depending on the file/song, sound effects
may not be available.
! Depending on the file/song, non-stop play-
back may not be available.
Note
You cannot use this function with USB MTP.
Starting MIXTRAX EZ operation
% Touch MIXTRAX EZ.
Refer to MIXTRAX EZ key on page 15 and 21.
Setting MIXTRAX mode
Turn on this function to play back audio files
using MIXTRAX.
1 Press the home button to switch to the
home display.
2 Touch the system key to open the system
menu.
3 Touch MIXTRAX Setup on the system
menu.
MIXTRAX setting items are displayed.
! Short Playback Mode – When turned on, se-
lect an audio track playback length.
60s (60 sec.)—90s (90 sec.)—120s (120 sec.)
—150s (150 sec.)—180s (180 sec.)—Random
(random)—Off (off)
When Random is selected, the playback time
varies between 60 s, 90 s, 120 s, 150 s, and
180 s selected at random when the playback
song changes.
! Display Effect – When Display Effect is set
to on, the artwork display can be moved according to the music type.
! Cut-In Effect – When Cut-In Effect is set to
on, sound effects will play between tracks.
! Effect Setting – Use Effect Setting to set up
the sound effect you want to insert between
tracks.
Setting the effect
You can change the settings for fixed sounds
and sound effects.
There are six different fixed sounds available
that can be inserted for playback between
tracks.
The sound effects are used as effects to signal
the end of a song being played and the beginning of the next song in series.
The fixed sounds and sound effects are set as
combinations as MIXTRAX sounds.
Fixed sounds
! Phaser – A fixed sound that sounds like surg-
ing waves.
! Roll – A fixed sound that repeats playback of
a certain sound.
24
En
Page 25
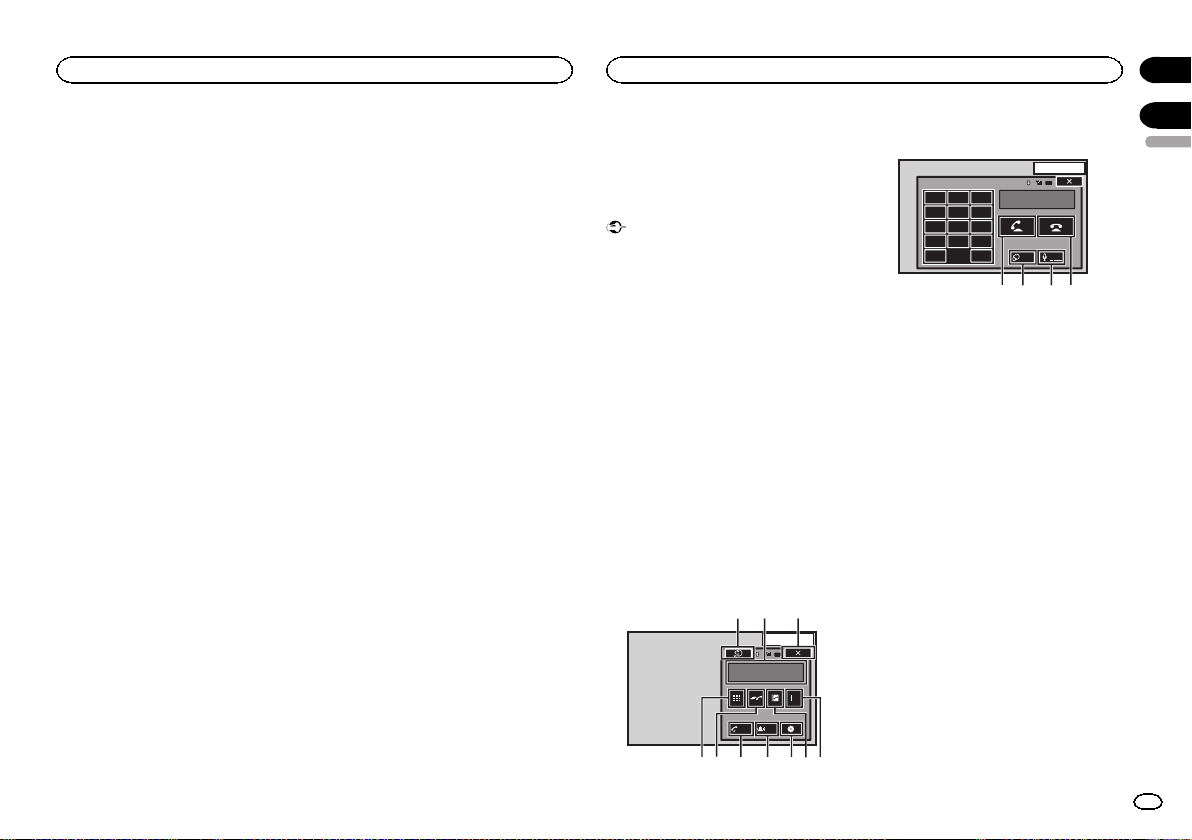
Using MIXTRAX
Bluetooth telephone
Section
13
! Turntable – A fixed sound that mimics DJ
scratching.
! Flanger2 – A rushing sound that mimics
that rising and falling sounds of a jet engine.
! Reverb – A fixed sound effect that creates a
reverberation effect.
! Echo2 – A fixed sound effect that creates an
echoing effect.
Sound effects
! Cross Fade – A sound effect that creates a
fade in and fade out effect between songs.
! Flanger1 – A rushing sound that mimics
that rising and falling sounds of a jet engine.
! Echo1 – A sound effect that creates an echo-
ing effect.
! Loop – A sound effect that repeats playback
of one section of a song track.
Note
Cross Fade cannot be selected for iPod audio
files.
Setting sounds and sound effects
as presets using the preset key
The Standard and Simple sound effects are set
already as default presets.
% Touch Standard or Simple to check the
settings.
The registered preset sound effect for the key
that was touched is set as a preset.
Registering sounds and sound
effects as presets
Registers a desired combination of sounds and
sound effects to Custom.
Touch Custom to easily set the desired sound or
sound effect.
1 Touch Custom.
2 Add a check mark to the desired sound
effect by touching the option.
The marked sound effect is registered as a preset in Custom.
Notes
! If a sound effect is touched in the selection
screen for Standard or Simple, the Custom
screen is automatically displayed and the
sound effect is registered to Custom.
! You can listen to fixed sounds to hear exam-
ples by touching the speaker icon.
Bluetooth telephone
operations
(Function of AVH-X5650BT/AVH-X2650BT)
You can use Bluetooth telephone.
Important
! Leaving the unit on standby to connect to
your phone via Bluetooth while the engine is
not running can drain the battery.
! Advanced operations that require attention
such as dialing numbers on the monitor,
using the phone book, etc., are prohibited
while driving. Be sure to park your vehicle in
a safe place and apply the parking brake before proceeding.
! Bluetooth connection menu cannot be se-
lected while driving.
! Operations available may be limited depend-
ing on the cellular phone connected to this
unit.
! If you are unable to complete the connection
using this unit, use the device to connect to
the unit.
! If you connect more than one device at a
time, connected device may not operate
properly. Connecting one device at a time is
recommended.
Touch panel keys
Telephone standby display
e1
d
1
Abcdefghi
1234567890123456
AutoONTone
13 ARP
OFF
PM
12:25
2345678
When switching to the entering phone
number mode
123
456
789
*0#
C+
13 APR
PM
1
Abcdefghi
XXXXXXXXXXXXXXXX
PrivateONVol
12:25
9abc
1 Close key
Display is closed.
2 Preset dial key
Displaying the preset dial screen.
3 Phone book key
Switching to the phone book mode.
4 Setting key
Displaying the Bluetooth connection menu.
5 Tone key
Turning the ring tone for incoming calls on
or off.
6 Auto-answer key
Turning automatic answering on or off.
7 History key
Switching to the missed, received and dialed
call lists.
8 Key pad key
Switching the mode to enter the phone number directly.
9 On-hook key
Ending a call.
Rejecting an incoming call.
Canceling call waiting.
14
English
25
En
Page 26
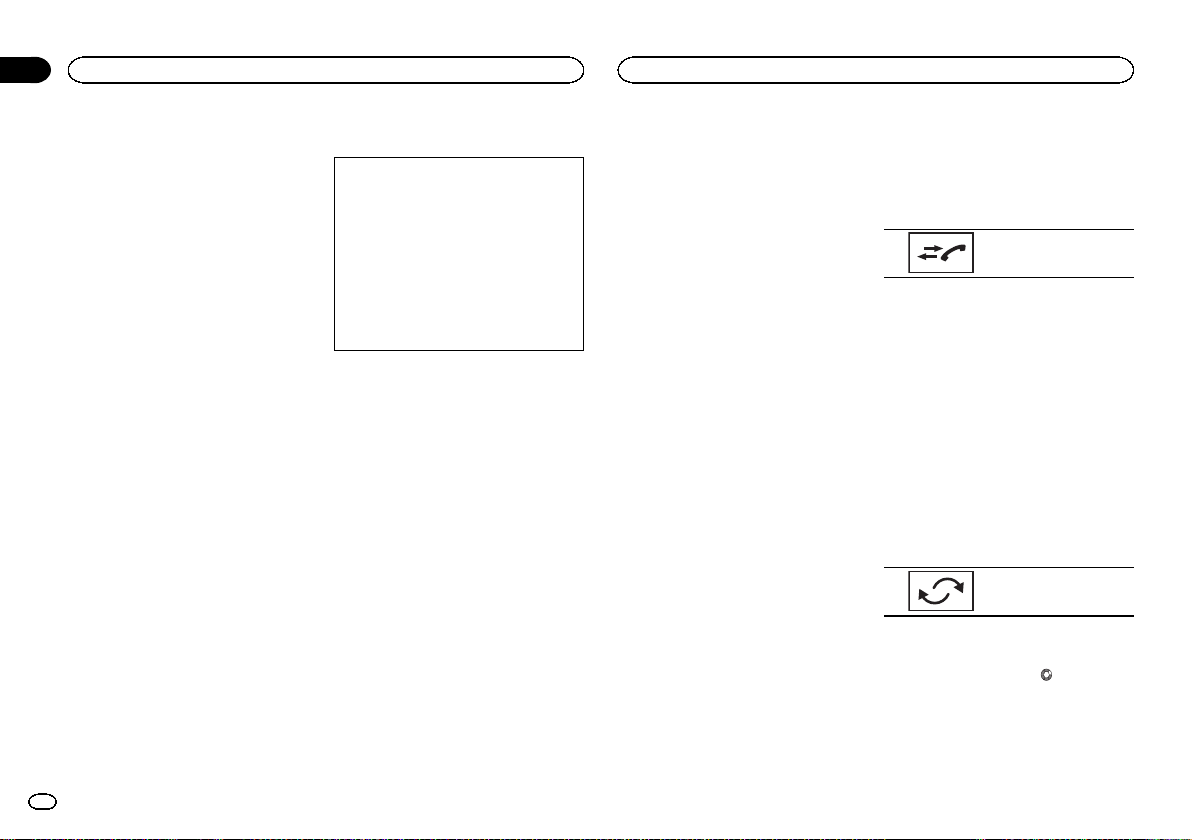
Section
Bluetooth telephone
14
Bluetooth telephone
a Volume key
Adjusting the other party’s listening volume.
b Private mode key
Turning private mode on or off.
c Off-hook key
Accepting an incoming call.
Making a phone call, when selecting a
phone number.
Switching between callers on hold.
d Voice control key
Notes
! Private mode can only be operated while you
are talking on the phone.
! To end the call, both you and the other caller
must hang up your phones.
! Touch panel keys not listed under Bluetooth
telephone operations may appear on the dis-
play.
Refer to Indicator list on page 54.
Text information
e Incoming call notice
Indicates that an incoming call has been received and has not been checked yet.
! Not displayed for calls made when your
cellular phone is disconnected from this
unit.
26
En
Setting up for hands-free phoning
1 Connection
First, you need to connect a Bluetooth telephone to this unit.
For detailed instructions on connecting your
phone to this unit via Bluetooth wireless technology, refer to Pairing from this unit on page
40.
2 Volume adjustment
Adjust the earpiece volume of your cellular
phone to your preference. The unit will record
the adjusted volume level as the default setting.
Notes
! The volume of the caller’s voice and ring
tone may vary depending on the type of cellular phone.
! If there is a large volume difference between
the ring tone and caller’s voice, the overall
volume level may become unstable.
! Make sure to adjust the volume to a proper
level before disconnecting the cellular phone
from the unit. If the volume is muted (zero
level) on your cellular phone, the volume
level of your cellular phone remains muted
even after the cellular phone is disconnected.
Calling a number in the
phone book
The contacts on your phone will normally be
transferred automatically when the phone is
connected. If it is not, use your phone menu to
transfer the contacts. The visibility of this unit
should be on when you use the phone menu.
Refer to Switching visible unit on page 41.
After finding the number you want to call in the
phone book, you can select the entry and make
the call.
1 Touch the phone book key to switch to
the phone book mode.
2 Select the phone number list.
The detailed phone number list of the selected
entry is displayed.
3 Select the phone number.
# If you want to store the phone number, touch and
hold the list.
4 Touch the off-hook key to make the call.
5 Touch the on-hook key to end the call.
Note
The contacts on your phone will normally be
transferred automatically when the phone is
connected. If it is not, use your phone menu to
transfer the contacts. The visibility of this unit
should be on when you use the phone menu.
Refer to Switching visible unit on page 41.
Selecting a number by
alphabet search mode
If a lot of numbers are registered in the phone
book, you can search for the phone number by
alphabet search mode.
1 Touch the phone book key to switch to
the phone book mode.
2 Touch ABC to switch to alphabet search
mode.
3 Touch the first letter of the entry you are
looking for.
The Phone Book entries starting with that letter
(e.g. “Ben”, “Brian” and “Burt” when “B” is selected) will be displayed.
# The order of the first name and last name may be
different from that of the cellular phone.
4 Touch the list to display the phone number list of the selected entry.
# If several phone numbers are included in an
entry, select one by touching the list.
# If you want to switch to the call history list, touch
the icon.
Switching to the call history list.
5 Touch the off-hook key to make the call.
6 Touch the on-hook key to end the call.
Inverting names in phone book
When your cellular phone is connected to this
unit, the first and last names of your contacts
may be registered to the phone book in reverse
order. Youcan use this function to change the
order back.
(Inverting the names in the phone book)
1 Touch the phone book key to switch to
the phone book mode.
2 Invert names in phone books.
Inverting names in phone
books.
3 “Would you like to invert all names?” appears. Touch Yes to continue.
While the names are inverted,
# If the inversion fails, “Invert Name Error” ap-
pears. In such cases, try again from the beginning.
Note
Inverting the names of your contacts from this
unit does not affect the data on your Bluetooth
device.
is displayed.
Page 27
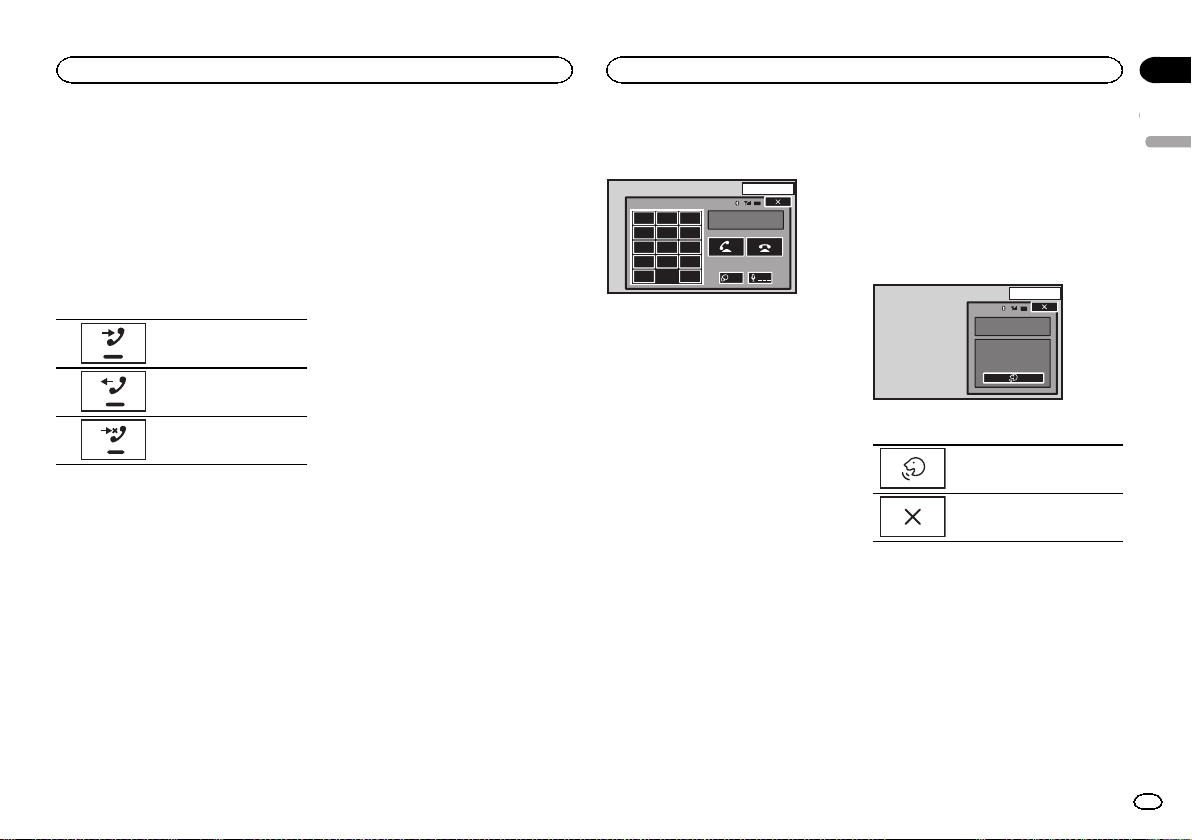
Bluetooth telephone
Bluetooth telephone
Section
14
Using the missed, received
and dialed call lists
The 80 most recent calls dialed, received, and
missed are stored in the memory. You can
browse them and call numbers from these lists.
1 Touch the history key to display the call
history list.
2 Select Missed Calls, Dialed Calls or
Received Calls.
Displaying the received
call list.
Displaying the dialed call
list.
Displaying the missed call
list.
3 Touch the list number to select a phone
number.
Name and phone number are displayed in the
detailed list.
# If you want to store the phone number, touch and
hold the list.
4 Touch the off-hook key to make the call.
5 Touch the on-hook key to end the call.
Setting automatic answering
If this function is on, this unit automatically answers all incoming calls.
% Touch the auto-answer key to turn automatic answering on or off.
Adjusting the other party’s
listening volume
To maintain the good sound quality, this unit
can adjust the other party’s listening volume. If
the volume is not loud enough for the other
party, use this function.
% Touch the volume key to select
Far-End VOL.
1—2—3
# This function can be performed even while talking on the phone.
# Settings can be stored for each device.
Switching the ring tone
You can select whether or not to use this unit’s
ring tone. If this function is set to on, the ring
tone for this unit will sound.
1 Connect your cellular phone to this unit.
2 Touch the tone key to turn the ring tone
on or off.
Using the preset dial lists
You can easily store up to six phone numbers as
presets.
1 Touch the preset dial key to display the
preset screen.
2 Touch one of the phone numbers to select.
# If you want to delete a preset phone number,
touch and hold the phone number you wish to delete.
3 Touch the off-hook key to make the call.
4 Touch the on-hook key to end the call.
Making a call by entering
phone number
13 APR
PM
12:25
1
+
Abcdefghi
XXXXXXXXXXXXXXXX
PrivateONVol
123
456
789
*0#
C
1 Touch the key pad key to start entering
the phone number.
2 Touch the number icons to input the
numbers.
# Up to 32 digits can be entered.
3 Touch the off-hook key to make the call.
4 Touch the on-hook key to end the call.
Note
Entering phone number mode cannot be operated unless a Bluetooth telephone is connected
to this unit.
Setting the private mode
During a conversation, you can switch to private
mode (talk directly on your cellular phone).
% Touch the private mode key to turn private mode on or off.
Voice control
If your cellular phone is equipped with the voice
control feature, you can use voice commands to
make calls, for example.
! Operation varies depending on the type of
cellular phone. Refer to the instruction manual that came with your cellular phone for detailed instructions.
! When an iPhone running iOS 6.1 or later is
used.
Siri Eyes Free Mode is available with this
product.
1 Touch the voice control key.
The display switches to the voice control screen.
You can also switch to the voice control screen
by pressing and holding down the home button
while the source is on.
13 ARP
PM
12:25
1
I'm Listening...
2 Start voice control.
Indicates that continuous calls
can be made uninterrupted.
Indicates that the display is
closed.
Notes
! In order for your voice commands to be rec-
ognized and interpreted correctly, ensure
that conditions are suitable for recognition.
! Please note that wind blowing through the
vehicle windows and noise coming from outside the vehicle can interfere with voice command operation.
! For optimum pick-up, the microphone should
be placed directly in front of the driver at a
suitable distance.
! Speaking too soon after the start of the com-
mand may cause voice recognition to fail.
! Speak slowly, deliberately, and clearly.
English
27
En
Page 28
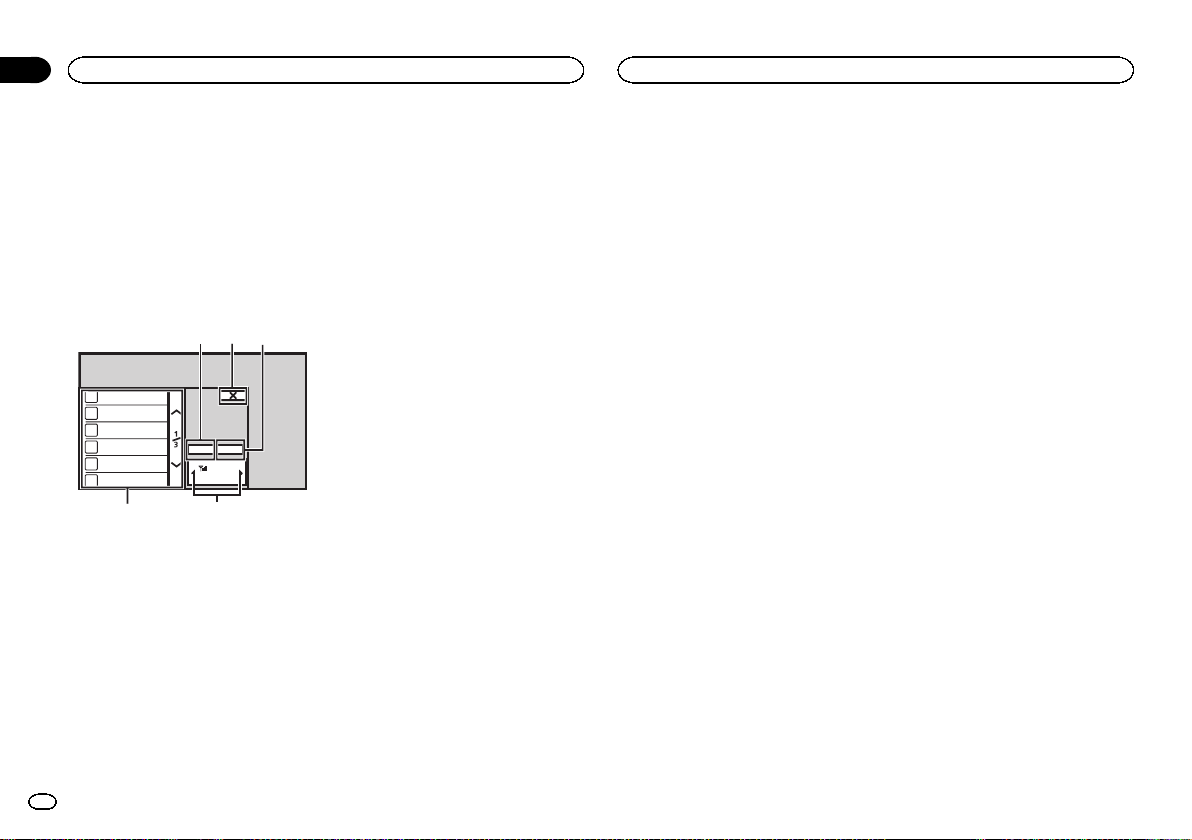
54
Section
15
TV tuner
TV tuner
TV tuner operations
This unit can be used to control a TV tuner such
as the GEX-1550DTV (sold separately).
Note
Text may not display correctly depending on the
language selected in the language settings. If
this occurs, text will display in the default lan-
guage of the TV tuner instead. For details, refer
to Selecting the system language on page 35.
Touch panel keys
231
1 111 wwwww
2 222 wwwww
3 333 wwwww
4 444 wwwww
5 555 wwwww
6 666 wwwww
1 EPG key
Opens the channel programming broadcast
schedule.
2 Close key
Closes the display of the broadcast schedule.
3 Menu key
4 Channel select key
Used to switch between preset channels.
5 Preset channel key
Used to select a preset channel.
ProgramTitle
Menu
EPG
222
CH
Changing the wide-screen
mode
You can select a desired mode to enlarge a 4:3
picture to a 16:9 picture.
% Press c or d (TRK) to change the wide-
screen mode.
! FULL (full screen)
The 4:3 picture is enlarged in the horizontal
direction only, granting viewers a 4:3 TV picture (normal picture) without any omissions.
! NORMAL (normal)
The 4:3 picture is displayed as is, granting
viewers no sense of disparity as the proportions are the same as that of the normal picture.
Storing stations
This function stores stations that you listen to
automatically.
Broadcast frequencies stored during this step
may replace broadcast frequencies saved previously with the preset channel keys.
1 Touch the menu key to open the menu
display.
2 Touch Channel Search to start channel
searching.
Preset channels are listed in order of channel
frequency.
! To cancel storing the broadcast frequencies,
touch Cancel.
EPG function
You can use this function to view the channel
programming broadcast schedule.
1 Touch the EPG key to display the EPG list.
2 Touch one of the list items to display the
channel programming schedule for the selected item.
Note
This function is not available for stations that do
not transmit programming schedules.
28
En
Page 29
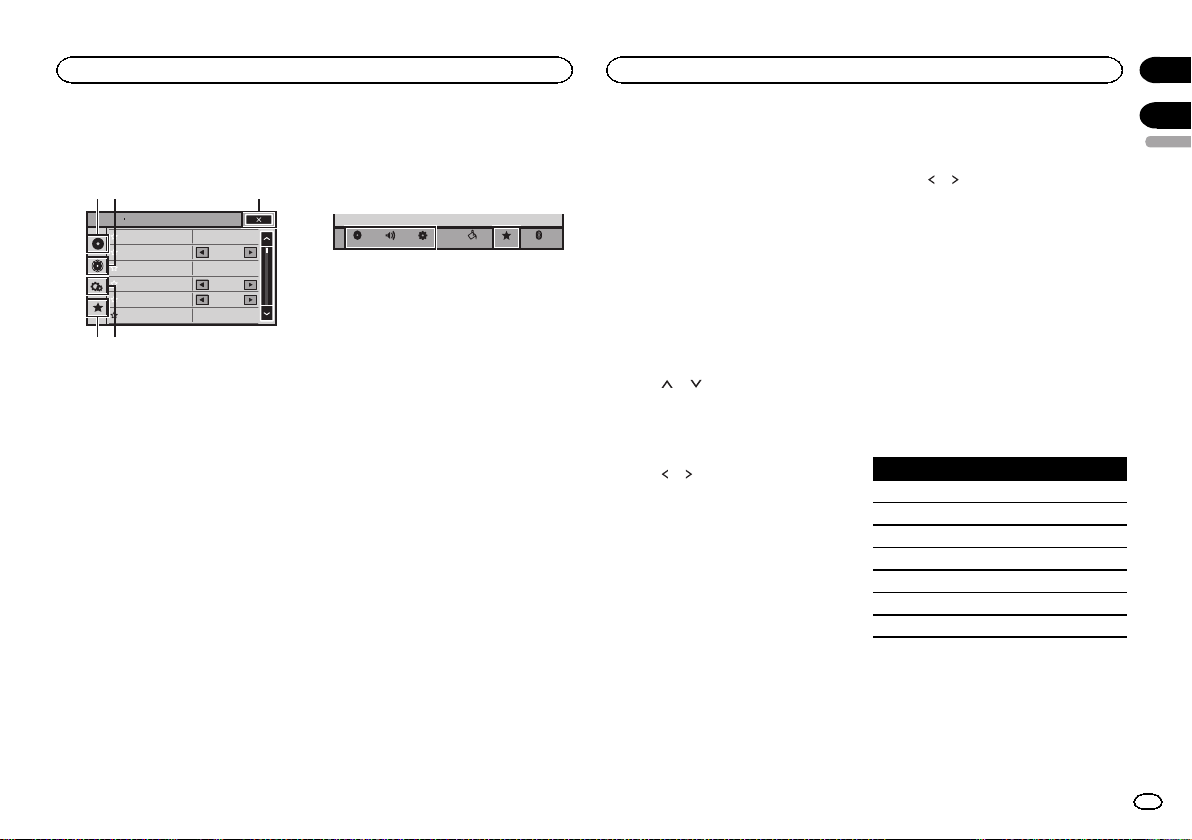
Settings
Audio adjustments
Section
16
Menu operations
Touch panel keys
15423
Audio
Sonic Center Control
Loudness
Subwoofer
Bass Booster
High Pass Filter
Source Level Adjuster
1 Video setup key
Refer to Setting up the video player on page
31.
2 Audio function key
Refer to Audio adjustments on page 29.
3 Close key
Returning to the current source display.
4 System key
Refer to System settings on page 34.
5 Favorite key
You can choose menus within each menu
(Audio function menu, etc.) and register
them to this favorite menu.
Refer to Favorite menu on page 40.
Notes
! You can display the Video Setup menu
when a Disc or USB source is selected.
! If you start the Video Setup menu, playback
is stopped.
! You cannot display the Audio function menu
when the mute function is on or a JPEG file
is playing.
L/R 0
125Hz
Low
On
0
0
1 Press the home button to switch to the
home display.
2 Touch any of the following touch panel
keys to select the menu to be adjusted.
Settings
AudioVideo
BluetoothFavoriteThemeSystem
Using fader/balance adjustment
Fader/Balance displays when Rear Speaker is
set to Full on the System Menu.
You can change the fader/balance setting to provide an ideal listening environment for all of the
occupied seats.
1 Press the home button to switch to the
home display.
2 Touch the audio function key to open the
audio menu.
3 Touch Fader/Balance on the audio function menu.
4 Touch
speaker balance.
Range: F 15 L/R 0 to R 15 L/R 0
# Select F/R 0 L/R 0 when only using two speak-
ers.
5 Touch or to adjust the left/right
speaker balance.
Range: F/R 0 L 15 to F/R 0 R 15
or to adjust the front/rear
Note
You can also set the fader/balance by dragging
the dot on the displayed table.
Using balance adjustment
Balance displays when Rear Speaker is set to
Subwoofer on the System Menu. This setting
will allow you to adjust the balance between
right/left sound output.
1 Press the home button to switch to the
home display.
2 Touch the audio function key to open the
audio menu.
3 Touch Balance on the audio function
menu.
4 Touch
speaker balance.
Range: L15to R15
or to adjust the left/right
Note
You can also set the balance by dragging the dot
on the displayed table.
Using the equalizer
You can adjust the equalization to match the
car’s interior acoustic characteristics as desired.
Recalling equalizer curves
There are seven stored equalizer curves which
you can easily recall at any time. Here is a list of
the equalizer curves.
Display Equalizer curve
S.Bass Super bass
Powerful Powerful
Natural Natural
Vocal Vocal
Flat Flat
Custom1 Custom 1
Custom2 Custom 2
! The equalizer curves for Custom1 and
Custom2 can be adjusted.
! You cannot select Custom1 and Custom2
when using the auto-equalizer.
! When Flat, no changes are made to the
sound. You can check the effects of the
equalizer curves by switching alternatively
between Flat and another equalizer curve.
17
English
29
En
Page 30

Section
Audio adjustments
17
Audio adjustments
1 Press the home button to switch to the
home display.
2 Touch the audio function key to open the
audio menu.
3 Touch Graphic EQ on the audio function
menu.
# Youcannot select or adjust the equalizer curves
of Custom1 and Custom2 when using the auto-
equalizer.
4 Touch the desired setting.
S.Bass—Powerful—Natural—Vocal—Flat—
Custom1—Custom2
Adjusting the 8-band graphic
equalizer
You can adjust the level of each band for the
equalizer curves.
! A separate Custom1 curve can be created
for each source. If you make adjustments
when a curve other than Custom2 is selected, the equalizer curve settings will be
stored in Custom1.
! A Custom2 curve that is common for all
sources can be created. If you make adjustments when the Custom2 curve is selected,
the Custom2 curve will be updated.
1 Press the home button to switch to the
home display.
2 Touch the audio function key to open the
audio menu.
3 Touch Graphic EQ on the audio function
menu.
4 Touch the desired setting.
S.Bass—Powerful—Natural—Vocal—Flat—
Custom1—Custom2
5 Touch the table to adjust the level of the
equalizer band.
Range: +12dB to –12dB
Using the auto-equalizer
The auto-equalizer is an equalizer curve created
by auto EQ (refer to Auto EQ (auto-equalizing) on
page 37).
You can turn the auto-equalizer on or off.
If you connect an optional microphone to this
unit, you can use this function.
1 Press the home button to switch to the
home display.
2 Touch the audio function key to open the
audio menu.
3 Touch Auto EQ to turn the auto-equalizer
on or off.
# Youcannot use this function if auto EQ has not
been carried out.
Using sonic center control
Sound that is suited for the listening position
can easily be created with this function.
1 Press the home button to switch to the
home display.
2 Touch the audio function key to open the
audio menu.
3 Touch Sonic Center Control on the audio
function menu.
4 Touch
Range: Left 7 to Right 7
or to select a listening position.
Adjusting loudness
Loudness compensates for deficiencies in the
low-frequency and high-frequency ranges at low
volume.
1 Press the home button to switch to the
home display.
2 Touch the audio function key to open the
audio menu.
3 Touch c or d to select a desired level for
loudness.
Off (off)—Low (low)—Mid (mid)—High (high)
Using subwoofer output
This unit is equipped with a subwoofer output
which can be turned on or off.
! The cut-off frequency and output level can be
adjusted when the subwoofer output is on.
1 Press the home button to switch to the
home display.
2 Touch the audio function key to open the
audio menu.
3 Touch Subwoofer on the audio function
menu.
4 Touch On or Off next to Subwoofer to
turn the subwoofer output on or off.
5 Touch Normal or Reverse next to Phase
to select the phase of subwoofer output.
6 Touch c or d next to Level to adjust the
output level of the subwoofer.
Range: +6 to –24
7 Touch c or d next to Frequency to select
the cut-off frequency.
50Hz—63Hz—80Hz—100Hz—125Hz
Only frequencies lower than those in the selected range are outputted from the subwoofer.
Boosting the bass
You can boost the bass level.
1 Press the home button to switch to the
home display.
2 Touch the audio function key to open the
audio menu.
3 Touch c or d to select a desired level.
Range: 0 to +6
Using the high pass filter
Use this function when wanting to listen only to
high-frequency sounds. Only frequencies higher
than the high-pass filter (HPF) cutoff are output
from the speakers.
1 Press the home button to switch to the
home display.
2 Touch the audio function key to open the
audio menu.
3 Touch c or d next to High Pass Filter to
select cut-off frequency.
Off (off)—50Hz—63Hz—80Hz—100Hz—
125Hz
Only frequencies higher than those in the selected range are output from the front or rear
speakers.
30
En
Page 31

Audio adjustments
Adjusting source levels
With SLA (source level adjustment), the volume
levels of each source can be adjusted to prevent
significant differences between sources.
! Settings are based on the FM volume level,
which remains unchanged.
1 Press the home button to switch to the
home display.
2 Touch the audio function key to open the
audio menu.
3 Compare the FM volume level with the
level of the source you wish to adjust.
4 Touch Source Level Adjuster on the audio
function menu.
5 Touch
ume.
Range: +4 to –4
Notes
! Source Level Adjuster is not available when
! The AM volume level can also be adjusted
! VideoCD, CD, compressed audio, DivX,
or to adjust the source vol-
FM is selected as the source.
with this function.
MPEG-1, MPEG-2 and MPEG-4 are automatically set to the same source level adjustment
volume.
Setting up the video player
Setting the subtitle language
You can set a desired subtitle language. When
available, the subtitles will be displayed in the
selected language.
1 Press the home button to switch to the
home display.
2 Touch the video setup key to open the
video setup menu.
3 Touch Subtitle Language on the
Video Setup menu.
A subtitle language menu is displayed.
4 Touch the desired language.
The subtitle language is set.
# If you have selected Others, refer to When you se-
lect Others on page 31.
Notes
! If the selected language is not available, the
language specified on the disc is displayed.
! You can also switch the subtitle language by
touching the switch subtitle languages key
during playback.
! The setting made here will not be affected
even if the subtitle language is switched during playback using the switch subtitle languages key.
When you select Others
A language code input display is shown when
Others is selected. Refer to Language code chart
for DVD on page 61.
% Touch 0 to 9 to input the language code.
# To cancel the entered numbers, touch C.
# To register the code, touch the following touch
panel key.
Registering the code.
Setting the audio language
You can set the preferred audio language.
1 Press the home button to switch to the
home display.
2 Touch the video setup key to open the
video setup menu.
3 Touch Audio Language on the Video
Setup menu.
An audio language menu is displayed.
4 Touch the desired language.
The audio language is set.
# If you have selected Others, refer to When you se-
lect Others on page 31.
Notes
! If the selected language is not available, the
language specified on the disc is used.
! You can also switch the audio language by
touching the switch audio languages key
during playback.
! The setting made here will not be affected
even if the audio language is switched during playback using the switch audio languages key.
Setting the menu language
You can set the preferred language in which the
menus recorded on a disc are displayed.
1 Press the home button to switch to the
home display.
Section
17
18
English
31
En
Page 32

Section
Setting up the video player
18
Setting up the video player
2 Touch the video setup key to open the
video setup menu.
3 Touch Menu Language on the
Video Setup menu.
A menu language menu is displayed.
4 Touch the desired language.
The menu language is set.
# If you have selected Others, refer to When you se-
lect Others on page 31.
Note
If the selected language is not available, the lan-
guage specified on the disc is displayed.
Setting the multi-angle DVD
display
The angle icon can be set so it appears on
scenes where the angle can be switched.
1 Press the home button to switch to the
home display.
2 Touch the video setup key to open the
video setup menu.
3 Touch Multi Angle on the Video Setup
menu to turn angle icon display on or off.
Setting the aspect ratio
There are two kinds of display: a wide screen dis-
play that has a width-to-height ratio (TV aspect
ratio) of 16:9, and regular display that has a TV
aspect of 4:3. Be sure to select the correct TV as-
pect for the display connected to V OUT.
! When using regular display, select either
Letter Box or Pan Scan. Selecting 16:9 may
result in an unnatural picture.
! If you select the TV aspect ratio, the unit’s
display will change to the same setting.
32
En
1 Press the home button to switch to the
home display.
2 Touch the video setup key to open the
video setup menu.
3 Touch TV Aspect on the Video Setup
menu to select the TV aspect ratio.
Touch TV Aspect repeatedly until the desired aspect ratio appears.
! 16:9 – Wide screen picture (16:9) is displayed
as is (initial setting)
! Letter Box – The picture is the shape of a let-
terbox with black bands on the top and bottom of the screen
! Pan Scan – The picture is cut short on the
right and left sides of the screen
Notes
! When playing discs that do not specify
Pan Scan, the disc is played back in
Letter Box display even if you select the
Pan Scan setting. Confirm whether the disc
package bears the
! The TV aspect ratio cannot be changed for
some discs. For details, refer to the disc’s instructions.
16 : 9 LB
mark.
Setting the slideshow interval
JPEG files can be viewed as a slideshow on this
unit. In this setting, the interval between each
image can be set.
1 Press the home button to switch to the
home display.
2 Touch the video setup key to open the
video setup menu.
3 Touch Time Per Photo Slide on the
Video Setup menu to select the slideshow interval.
Touch Time Per Photo Slide repeatedly until the
desired setting appears.
! 5sec – JPEG images switch at intervals of 5
seconds
! 10sec – JPEG images switch at intervals of 10
seconds
! 15sec – JPEG images switch at intervals of 15
seconds
! Manual – JPEG images can be switched
manually
Setting parental lock
Some DVD video discs let you use parental lock
to restrict children from viewing violent and
adult-oriented scenes. You can set parental lock
to the desired level.
! When you have a parental lock level set and
play a disc featuring parental lock, code
number input indications may be displayed.
In such cases, playback will begin when the
correct code number is entered.
Setting the code number and level
A code number must be registered in order to
play back discs with parental lock.
1 Press the home button to switch to the
home display.
2 Touch the video setup key to open the
video setup menu.
3 Touch Parental on the Video Setup menu.
4 Touch 0 to 9 to input a four digit code
number.
# To cancel the entered numbers, touch C.
# To register the code, touch the following touch
panel key.
Registering the code.
The code number is set, and the level can now be
set.
5 Touch 1 to 8 to select the desired level.
6 Touch Enter.
The parental lock level is set.
! 8 – Playback of the entire disc is possible (ini-
tial setting)
! 7 to 2 – Playback of discs for children and
non-adult-oriented discs is possible
! 1 – Playback of discs for children only is pos-
sible
Notes
! We recommend to keep a record of your
code number in case you forget it.
! The parental lock level is stored on the disc.
Look for the level indication written on the
disc package, included literature or on the
disc itself. Parental lock of this unit is not
possible if a parental lock level is not stored
on the disc.
! With some discs, the parental lock may be
active only for certain levels of scenes. The
playback of those scenes will be skipped. For
details, refer to the instruction manual that
came with the disc.
Changing the level
You can change the set parental lock level.
1 Press the home button to switch to the
home display.
2 Touch the video setup key to open the
video setup menu.
3 Touch Parental on the Video Setup menu.
Page 33

Setting up the video player
Setting up the video player
Section
18
4 Touch 0 to 9 to input the registered code
number.
5 Registering the code.
Registering the code.
This sets the code number, and the level can
now be changed.
# If you enter an incorrect code number, the
icon is displayed. Touch C and enter the correct code
number.
# If you forget your code number, refer to If you for-
get your code number on page 33.
6 Touch 1 to 8 to select the desired level.
7 Touch Enter.
The new parental lock level is set.
If you forget your code number
% Press RESET.
Setting the DivX subtitle file
You can select whether or not to display DivX external subtitles.
! The DivX subtitles will be displayed even
when Custom is selected if no DivX external
subtitle files exist.
1 Press the home button to switch to the
home display.
2 Touch the video setup key to open the
video setup menu.
3 Touch DivX® Subtitle on the Video Setup
menu to select the desired subtitle setting.
! Original – Display the DivX subtitles
! Custom – Display the DivX external subtitles
Notes
! Up to 42 characters can be displayed on one
line. If more than 42 characters are set, the
line breaks and the characters are displayed
on the next line.
! Up to 126 characters can be displayed on
one screen. If more than 126 characters are
set, the excess characters will not be displayed.
Displaying the DivXâVOD
registration code
In order to play DivX VOD (video on demand)
contents on this unit, the unit must first be registered with a DivX VOD contents provider. For
registration, generate a DivX VOD registration
code and submit it to your provider.
! Keep a record of the code as you will need it
when you register your unit to the DivX VOD
provider.
1 Press the home button to switch to the
home display.
2 Touch the video setup key to open the
video setup menu.
3 Touch DivX® VOD on the Video Setup
menu.
Registration Code and Deregistration Code
appear.
4 Touch Registration Code.
Your registration code is displayed.
Displaying the deregistration code
If your device is already registered, deregister it
by entering the deregistration code.
1 Press the home button to switch to the
home display.
2 Touch the video setup key to open the
video setup menu.
3 Touch DivX® VOD on the Video Setup
menu.
4 Touch Deregistration Code.
# To cancel deregistration, touch Cancel.
5 Touch OK.
The deregistration is complete.
Automatic playback of DVDs
When a DVD disc with a DVD menu is inserted,
this unit will cancel the menu automatically and
start playback from the first chapter of the first
title.
! Some DVDs may not operate properly. If this
function is not fully operable, turn this function off and start playback.
1 Press the home button to switch to the
home display.
2 Touch the video setup key to open the
video setup menu.
3 Touch DVD Auto Play to turn automatic
playback on.
# To turn automatic playback off, touch
DVD Auto Play again.
English
33
En
Page 34

Section
System settings
19
System settings
Switching the auxiliary setting
Activate this setting when using an auxiliary de-
vice connected to this unit.
1 Press the home button to switch to the
home display.
2 Touch the system key to open the system
menu.
3 Touch AUX Input on the system menu to
turn AUX Input on or off.
Setting AV input
Activate this setting when using an external
video component connected to this unit.
1 Press the home button to switch to the
home display.
2 Touch the system key to open the system
menu.
3 Touch AV Input on the system menu to
turn AV Input on or off.
Setting the navigation system
Activate this setting when connecting a Pioneer
Add-on Navigation system (sold separately).
Device connection can be set when all of the
following conditions are met.
— The iPhone is not connected.
— No Bluetooth connection.
— The source is turned off.
1 Turn the source off.
Refer to Source off key on page 6.
2 Press the home button to switch to the
home display.
3 Touch the system key to open the system
menu.
4 Touch Device connection on the system
menu.
5 Touch NAVI to select.
NAVI – Navigation system
Selecting MirrorLink Mode
You can select the MirrorLink Mode setting
whether you use third party applications in your
smartphone or not.
1 Press the home button to switch to the
home display.
2 Touch the system key to open the system
menu.
3 Touch the desired setting next to
CD-ML100 Setting.
! Car Mode – You can use the launcher appli-
cations in your smartphone on the unit’s
screen.
! App List Mode – You can use the third party
applications in your smartphone on the unit’s
screen.
Updating the firmware for
the smartphone link adaptor
This function is used to update the smartphone
link adaptor firmware with the latest firmware.
For about smartphone link adaptor firmware
and updating, refer to our website.
You can update only when smartphone link
adaptor is available.
Important
! The USB storage device for updating must
contain only the correct update file. If the
USB storage device contains multiple files,
the update will fail.
! Never turn the unit off and never disconnect
the USB storage device while the firmware is
being updated.
! You can only start the firmware update when
the vehicle is stopped and the parking brake
is engaged.
1 Downloading the firmware update files.
2 Connect a blank (formatted) USB storage
device to your computer, and then locate
and copy the correct update file onto the
USB storage device.
3 Turn the source off.
Refer to Turning the source ON/OFF on page 6.
4 Press the home button to switch to the
home display.
5 Touch the system key to open the system
menu.
6 Touch CD-ML100 Update on the system
menu.
7 Connect the USB storage device to the
smartphone link adaptor.
Refer to Connection for updating Smartphone
link adaptor firmware on page 48.
8 Touch Continue to display the update
mode.
Follow the on-screen instructions to finish updating the smartphone link adaptor.
9 Remove the USB storage device from the
smartphone link adaptor.
10 Turn the ignition switch OFF and then to
ACC or ON.
Notes
! If update failed, please consult your dealer or
the nearest authorized PIONEER Service Station.
! You cannot update while connected to
Bluetooth.
Displaying the smartphone
link adaptor firmware version
If smartphone link adaptor fails to operate properly, you may need to consult your dealer for repair. In such cases, you may be asked to specify
the firmware version. Perform the following procedure to check the version on smartphone link
adaptor.
1 Turn the source off.
Refer to Turning the source ON/OFF on page 6.
2 Press the home button to switch to the
home display.
3 Touch the system key to open the system
menu.
4 Touch CD-ML100 Firmware Info to display
to the version of the firmware of smartphone link adaptor.
Updating firmware
This function is used to update this unit with the
latest firmware.
For about firmware and updating, refer to our
website.
34
En
Page 35

System settings
System settings
Section
19
Important
! The USB storage device for updating must
contain only the correct update file. If the
USB storage device contains multiple files,
the update will fail.
! Never turn the unit off and never disconnect
the USB storage device while the firmware is
being updated.
! You can only start the firmware update when
the vehicle is stopped and the parking brake
is engaged.
1 Downloading the firmware update files.
2 Connect a blank (formatted) USB storage
device to your computer, and then locate
and copy the correct update file onto the
USB storage device.
3 Turn the source off.
Refer to Turning the source ON/OFF on page 6.
4 Press the home button to switch to the
home display.
5 Touch the system key to open the system
menu.
You can check the current version of your unit’s
firmware. Touch Firmware Information on the
system menu to open the
Firmware Information screen.
6 Touch Firmware Update on the system
menu.
The confirmation screen appears on the display.
7 Connect the USB storage device according to the on-screen messages.
8 Touch Continue to display the read file
mode.
Check any messages if warning screens appear
on the display.
9 Touch Start to display the data transfer
mode.
# Follow the on-screen instructions to finish updating the firmware.
# This unit will reset automatically after the firmware update is completed if the update is successful.
Note
If “Update Failed!” appears on the screen, turn
the ignition switch to OFF, then turn the ignition
switch to the ACC position to proceed and start
the recovery sequence.
Displaying the firmware
version
If this unit fails to operate properly, you may
need to consult your dealer for repair.In such
cases, you may be asked to specify the firmware
version. Perform the following procedure to
check the version on this unit.
1 Turn the source off.
Refer to Turning the source ON/OFF on page 6.
2 Press the home button to switch to the
home display.
3 Touch the system key to open the system
menu.
4 Touch Firmware Information to display to
the version of the firmware of this unit.
Setting MIXTRAX mode
Refer to Setting MIXTRAX mode on page 24.
Changing the picture
adjustment (Brightness,
Contrast, Color, Hue,
Dimmer and Temperature)
You can adjust the Brightness (brightness),
Contrast (contrast), Color (color) , Hue (hue),
Dimmer (dimmer), and Temperature (tempera-
ture) for each source and rear view camera.
! You cannot adjust Color and Hue for the
audio source.
! You cannot adjust Color and Hue for NAVI,
Apps and MirrorLink.
1 Press the home button to switch to the
home display.
2 Touch the system key to open the system
menu.
3 If you are adjusting the
Picture Adjustment, select the unit.
Completing Picture Adjust-
NAVI
Apps
MirrorLink
Source
ment for the Navigation system
when Device connection is set
to NAVI.
Completing Picture Adjust-
ment for the AppRadio Mode
when Device connection is set
to iPhone via USB or iPhone
via Bluetooth.
Completing Picture Adjust-
ment for the MirrorLink
Mode.
Adjusting the Picture Adjustment for the rear view camera.
Adjusting the Picture Adjustment for the source.
4 Touch any of the following touch panel
keys to select the function to be adjusted.
Picture Adjustment items are displayed.
! Brightness – Adjusts the black intensity
! Contrast – Adjusts the contrast
! Color – Adjusts the color saturation
! Hue – Adjusts the tone of color (red or green
is emphasized)
! Dimmer – Adjusts the brightness of the dis-
play
! Temperature – Adjusts the color tempera-
ture, resulting in a better white balance
# Youcan adjust Hue only when the color system
is set to NTSC.
# With some rear view cameras, picture adjustment may not be possible.
5 Touch c or d to adjust the selected item.
Each time you touch c or d, the level of the selected item increases or decreases.
# Brightness, Contrast, Color, and Hue can be ad-
justed from +24 to -24.
# Dimmer can be adjusted from +1 to +48.
# Temperature can be adjusted from +3 to –3.
Notes
! You cannot operate this function while driv-
ing.
! Different Brightness/Contrast/Dimmer set-
tings can be set for when the illumination
switch is on and when it is off.
Selecting the system language
The system language can be selected.
If text information such as the title name, artist
name or a comment is embedded in a European
language, they can also be displayed on this
unit.
! The language can be changed for the follow-
ing:
— Audio menu
— System menu
— Video Setup menu
En
English
35
Page 36

Section
System settings
19
System settings
— Bluetooth menu
— Language for cautions
Some operations on this unit are prohibited from use while driving or require
careful attention when operated. In such
cases, a caution will appear on the display. You can change the language for
caution messages with this setting.
! If the embedded language and the selected
language setting are not the same, text information may not display properly.
! Some characters may not be displayed prop-
erly.
1 Press the home button to switch to the
home display.
2 Touch the system key to open the system
menu.
3 Touch System Language on the system
menu to select the desired language.
4 Touch the desired language.
English (English)—Français (French)—Español
(Spanish)—Português (Portuguese)—繁體中文
(Traditional Chinese)
Setting Demo Mode
Once Demo Mode is turned on, the Demo
screen appears.
Refer to Demo mode on page 5.
1 Press the home button to switch to the
home display.
2 Touch the system key to open the system
menu.
3 Touch Demo Mode on the system menu
to turn Demo Mode on or off.
! On – The Demo screen appears.
36
En
! Off – The Demo screen does not appear.
Switching sound muting/
attenuation
In order to use this function, the unit’s yellow/
black lead must be connected to equipment
with a mute function.
Refer to Connecting the power cord on page 45.
Sound from this system is automatically muted
or attenuated when a signal from equipment
with a mute function is received.
! Sound from this system returns to normal
when the muting or attenuation is canceled.
1 Press the home button to switch to the
home display.
2 Touch the system key to open the system
menu.
3 Touch Mute/ATT until the desired setting
appears.
Touch Mute/ATTuntil the desired setting appears in the display.
! Mute – Muting
! ATT –20dB – Attenuation (ATT –20dB has a
stronger effect than ATT –10dB)
! ATT –10dB – Attenuation
! Off – Turns the sound muting/attenuation off
Notes
! When Mute is displayed, the sound is turned
off and no audio adjustments can be made.
! When ATT is displayed, the sound is attenu-
ated and only the volume can be adjusted.
(No other audio adjustments can be made.)
! Operation returns to normal when the phone
connection is ended.
Setting the rear output and
subwoofer controller
This unit’s rear output (rear speaker leads output and RCA rear output) can be used for fullrange speaker (Full) or subwoofer (Subwoofer)
connection. If you switch the rear output setting
to Subwoofer, you can connect a rear speaker
lead directly to a subwoofer without using an
auxiliary amp.
Initially, the unit is set for a rear full-range speaker connection (Full).
1 Turn the source off.
Refer to Turning the source ON/OFF on page 6.
2 Press the home button to switch to the
home display.
3 Touch the system key to open the system
menu.
4 Touch Rear Speaker on the system menu
to switch the subwoofer output or full-range
speaker.
# When no subwoofer is connected to the rear output, select Full (full-range speaker).
# When a subwoofer is connected to the rear output, select Subwoofer (subwoofer).
Notes
! Even if you change this setting, there will be
no output unless you turn the subwoofer output on (refer to Using subwoofer output on
page 30).
! Both rear speaker lead outputs and RCA rear
output are switched simultaneously in this
setting.
Using the keyboard
Keyboard is available only in AppRadio Mode.
Refer to Setting the Keyboard on page 19.
Setting the ever scroll
When ever scroll is set to On, recorded text information scrolls continuously in the display. Set to
Off if you prefer the information to scroll just
once.
1 Press the home button to switch to the
home display.
2 Touch the system key to open the system
menu.
3 Touch Ever Scroll on the system menu to
turn ever scroll on or off.
Setting the Bluetooth audio
(Function of AVH-X5650BT/AVH-X2650BT)
You need to activate the Bluetooth Audio
source in order to use a Bluetooth audio player.
1 Press the home button to switch to the
home display.
2 Touch the system key to open the system
menu.
3 Touch Bluetooth Audio on the system
menu to turn Bluetooth audio on or off.
Clearing Bluetooth memory
Important
Never turn the unit off while the Bluetooth memory is being cleared.
1 Turn the source off.
Refer to Turning the source ON/OFF on page 6.
2 Press the home button to switch to the
home display.
3 Touch the system key to open the system
menu.
Page 37

System settings
System settings
Section
19
4 Touch Bluetooth Memory Clear on the
system menu.
5 Touch Clear.
After selecting a desired item, a confirmation
display appears. Touch OK to delete the memory.
# If you do not want to clear the memory, touch
Cancel.
Updating Bluetooth software
This function is used to update this unit with the
latest Bluetooth software. For about Bluetooth
software and updating, refer to our website.
Important
Never turn the unit off and never disconnect the
phone while the software is being updated.
1 Turn the source off.
Refer to Turning the source ON/OFF on page 6.
2 Press the home button to switch to the
home display.
3 Touch the system key to open the system
menu.
4 Touch BT Software Update.
5 Touch Start to display the data transfer
mode.
# Follow the on-screen instructions to finish updating the Bluetooth software.
Displaying the Bluetooth
software version
If this unit fails to operate properly, you may
need to consult your dealer for repair.In such
cases, you may be asked to specify the software
version. Perform the following procedure to
check the version on this unit.
1 Turn the source off.
Refer to Turning the source ON/OFF on page 6.
2 Press the home button to switch to the
home display.
3 Touch the system key to open the system
menu.
4 Touch Bluetooth Version Information to
display to the version of the Bluetooth module of this unit.
Setting the rear view
camera (back up camera)
CAUTION
Pioneer recommends the use of a camera
which outputs mirror-reversed images. Otherwise, the screen image will appear reversed.
This unit features a function that automatically
switches to the rear view camera video (R.C IN)
when a rear view camera is installed on your car
and the shift lever is moved to the REVERSE
(R) position. (For more details, consult your
dealer.)
You can also switch the rear view image by
pressing the touch panel key.
For details refer to Using the rear view on page 8.
! After you set up the rear view camera setting,
move the shift lever to REVERSE (R) and
confirm that the rear view camera video is
shown on the display.
! Change this setting if the display switches to
the rear view camera video by error while you
are driving forward.
! To stop watching the rear view camera video
and return to the source display, press and
hold MUTE.
! Touch the RearView source icon to display
the rear view camera image while driving.
Touch the source icon again to turn the rear
view camera off. For details, refer to Selecting
a source on page 6.
1 Press the home button to switch to the
home display.
2 Touch the system key to open the system
menu.
3 Touch Camera Polarity on the system
menu to select the appropriate setting.
! Battery – When the polarity of the connected
lead is positive while the shift lever is in RE-
VERSE (R) position
! Ground – When the polarity of the connected
lead is negative while the shift lever is in RE-
VERSE (R) position
! Off – When a rear view camera is not con-
nected to this unit
! The rear view key setting also turns off on the
home display screen.
Auto EQ (auto-equalizing)
The auto-equalizer automatically measures the
car’s interior acoustic characteristics, and then
creates an auto- equalizer curve based on that information.
! To perform this function, dedicated micro-
phone (e.g. CD-MC20) is required.
WARNING
As a loud tone (noise) may be emitted from the
speakers when measuring the car ’s interior
acoustic characteristics, never perform auto TA
or auto EQ while driving.
CAUTION
! Thoroughly check the conditions before per-
forming auto EQ as the speakers may be
damaged if these functions are performed
when:
— The speakers are incorrectly connected. (For
example, when a rear speaker is connected
as a subwoofer output.)
— A speaker is connected to a power amp deliv-
ering output higher than the speaker’s maxi-
mum input power capability.
! If the microphone is placed in an unsuitable
position the measurement tone may become
loud and measurement may take a long
time, resulting in battery drainage. Be sure
to place the microphone in the specified location.
Before operating the auto EQ
function
! Carry out auto EQ in as quiet a place as pos-
sible, with the car engine and air conditioning switched off. Also cut power to car
phones or portable telephones in the car, or
remove them from the car before carrying
out auto EQ. Sounds other than the measurement tone (surrounding sounds, engine
sound, telephones ringing etc.) may prevent
correct measurement of the car interior
acoustic characteristics.
! Be sure to carry out auto EQ using the op-
tional microphone. Using another microphone may prevent measurement, or result
in incorrect measurement of the car interior
acoustic characteristics.
! In order to perform auto EQ, the front speak-
er must be connected.
! When this unit is connected to a power amp
with input level control, auto EQ may not be
possible if the power amp’s input level is set
below the standard level.
English
37
En
Page 38

Section
System settings
19
System settings
! When this unit is connected to a power amp
with an LPF, turn this LPF off before performing auto EQ. Also set the cut-off frequency
for the built-in LPF of an active subwoofer to
the highest frequency.
! The distance has been calculated by com-
puter to be the optimum delay to give accurate results for the circumstances, so please
continue to use this value.
— The reflected sound within the car is
strong and delays occur.
— The LPF on active subwoofers or external
amps delay the lower sounds.
! Auto EQ changes the audio settings as fol-
lows:
— The fader/balance settings return to the
center position. (Refer to Using fader/bal-
ance adjustment on page 29.)
— The equalizer curve switches to Flat.
(Refer to Recalling equalizer cur ves on
page 29.)
— The front, center and rear speakers will
automatically be adjusted to a high pass
filter setting.
! Previous settings for auto EQ will be overwrit-
ten.
! If using an AVH-X2650BT or AVH-X1650DVD,
connect a microphone extension cable (sold
separately) to the AUX input in advance.
Performing auto EQ
1 Stop the car in a place that is quiet, close
all the doors, windows and sun roof, and
then turn the engine off.
If the engine is left running, engine noise may
prevent correct auto EQ.
2 Fix the optional microphone in the center
of the headrest of the driver’s seat, facing
forward.
The auto EQ may differ depending on where you
place the microphone. If desired, place the microphone on the front passenger seat to carry
out auto EQ.
38
En
3 Turn the ignition switch to ON or ACC.
If the car’s air conditioner or heater is turned on,
turn it off. Noise from the fan in the air conditioner or heater may prevent correct auto EQ.
4 Press the home button to switch to the
home display.
5 Touch the system key to open the system
menu.
6 Touch Auto EQ Measurement to enter
auto EQ measurement mode.
7 Plug the microphone into the microphone input jack on this unit.
AVH-X5650BTand AVH-X4650DVD
AVH-X2650BTand AVH-X1650DVD
Extension Cable
(sold separately)
AUX input
(AUX)
8 Touch Start to start auto EQ.
9 When the 10-second countdown starts,
get out of the car and close the door within
10 seconds.
A measurement tone (noise) is emitted from the
speakers, and auto EQ measurement begins.
When auto EQ is completed, Please connect
the microphone for measurement. When finished, please push HOME key. is displayed.
When the car’s interior acoustic characteristics
cannot be measured correctly, an error message
will be displayed. (Refer to Understanding auto
EQ error messages on page 54.)
# It takes about nine minutes for auto EQ measurement to be completed when all the speakers are connected.
# To stop auto EQ, touch Stop.
10 Store the microphone carefully in the
glove compartment or another safe place.
If the microphone is subjected to direct sunlight
for an extended period, high temperatures may
cause distortion, color change or malfunction.
Microphone
Selecting the video format
You can switch the video output format of V
OUT between NTSC and PAL.
1 Press the home button to switch to the
home display.
2 Touch the system key to open the system
menu.
3 Touch Video Output Format on the system menu to select the video output format.
NTSC—PAL
Note
You can switch the video output format only for
the source from this unit.
Setting the video signal
When you connect this unit to an AV equipment
to this unit, select the suitable video signal setting.
! As this function is initially set to Auto, the
unit will automatically adjust the video signal
setting.
! You can operate this function only for the
video signal input into the AV input.
1 Press the home button to switch to the
home display.
2 Touch the system key to open the system
menu.
3 Touch Video Signal Setting on the system
menu.
Video Signal Setting items are displayed.
! AV – Adjusts the AV video signal
! AUX – Adjusts the AUX video signal
! Camera – Adjusts the rear view camera video
signal
! TV – Adjusts the TV tuner signal
4 Touch c or d to select the desired video
signal appears.
Auto—PAL —NTSC—PAL-M—PAL-N—SECAM
Page 39

2
System settings
System settings
Section
19
Setting the steering wheel
control
You can set the steering wheel control on the
unit’s display via a wired remote cable. Refer to
Connecting the power cord on page 45.
This setting is required in order to use the steering wheel remote control function.
Important
! In some cases this function may not work
correctly.
For details please contact your dealer or an
authorized Pioneer Service Station.
! Park your car in a safe place and use this
function. Do not operate it while driving.
1 Press the home button to switch to the
home display.
2 Touch the system key to open the system
menu.
3 Touch Steering Wheel Control on the system menu.
The Steering Wheel Control screen appears.
Steering Wheel Control
This function allows you to control this In-Dash
Receiver from your steering wheel control.
If you have a connected steering wheel control adapter
for Pioneer, please choose "With Adapter". If you are
connected to your steering wheel control directly,
please choose "Without Adapter".
With Adapter
Without Adapter
1
1 With Adapter key
Touch this key when connecting a steering
wheel control adapter for Pioneer.
2 Without Adapter key
Touch this key when directly connecting to
the car’s steering wheel control harness.
4 Select settings according to the connection method being used.
# For steering wheel control adapter for
Pioneer users
1 Touch With Adapter.
Follow the on-screen instructions for subsequent steps.
# For users directly connecting the unit to the
car’s steering wheel control harness
1 Touch Without Adapter.
Proceed to the next step to continue.
5 Touch Clear.
The confirmation screen appears.
When it is unnecessary to clear the settings,
such as when changing key assignment, proceed to step 7.
6 Touch OK.
You must clear all default settings before you
use this function.
7 Touch the desired function key on the
screen.
Steering Wheel Control
N/A
Source BAND/ESC VOLUME+ VOLUME-
Left Right Up Down
PLAY/PAUSE STOP FF REV
MUTE ATT MODE Off Hook
Clear
SOURCE
Press to cycle through all the available sources.
Press and hold to turn the source off.
BAND/ESC
Press to select the tuner band when tuner is selected
as a source. Also used to cancel the control mode of
functions.
Press to switch between modes.
VOLUME+
VOLUME-
Press to increase or decrease volume.
Left
Press to return to the previous track (chapter).
Right
Press to go to the next track (chapter).
Up
Down
Press to select the next or previous disc or folder.
Press to recall radio station frequencies assigned to
preset tuning keys.
PLAY/PAUSE
Press to pause or resume playback.
STOP
Press to stop playback.
FF
Press to perform fast forward.
Press to change the fast forward speed.
REV
Press to perform fast reverse.
Press to change the fast reverse speed.
MUTE
Press to mute. Press again to unmute.
ATT
Press to attenuate the sound. Press again to cancel.
MODE
Turning the information display off.
Press to switch to the connected device.
Off Hook
(Function of AVH-X5650BT/AVH-X2650BT)
Ending a call.
Rejecting an incoming call.
Canceling call waiting.
On Hook
(Function of AVH-X5650BT/AVH-X2650BT)
Accepting an incoming call.
Making a phone call, when selecting a phone number.
Switching between callers on hold.
VR
(Function of AVH-X5650BT/AVH-X2650BT)
Press and hold to switch to the voice control mode.
Press again to cancel the voice control mode.
8 Touch and hold down the key for your
vehicle’s steering wheel.
The key on the screen becomes active.
Touch N/A if you wish to cancel.
Notes
! You can set a function key to more than one
steering wheel key.
! If you set multiple function keys to the same
steering wheel key, only the last one you set
is enabled.
English
39
En
Page 40

Section
Favorite menu
20
21
Using the Favorite menu
1 Display menu columns to register.
Refer to Menu operations on page 29.
# Youcan customize menus except Video Setup
menu.
2 Touch the star icon in the menu column
for the desired menu to register the menu.
The star icon for the selected menu is filled in.
# To cancel the registration, touch the star icon in
the menu column again.
3 Display the favorite menu and choose a
registered menu.
Refer to Menu operations on page 29.
Note
You can register up to 12 columns.
Bluetooth connection menu
Bluetooth connection menu
operations
(Function of AVH-X5650BT/AVH-X2650BT)
Note
If you are using a cellular phone that can be
connected via Bluetooth wireless technology, we
recommend that you use your phone to search
for this unit and establish a connection between
it and your phone. The PIN code is set to 0000
as default. The product name for this unit will
display on your phone as the device name. For
details, refer to Entering PIN code for Bluetooth
wireless connection on page 41. For further details concerning the procedures for establishing
Bluetooth wireless connections, refer to the instruction manual for the phone.
Pairing from this unit
1 Press the home button to switch to the
home display.
2 Touch the Bluetooth key to open the
Bluetooth connection menu.
3 Touch Connection to select a device.
4 Start to search.
Starting to search.
Switching between the device names and Bluetooth
device addresses.
# To cancel searching, touch Stop.
# If three devices are already paired, Memory Full
is displayed and pairing cannot be performed. In
such cases, delete a paired device first. Refer to
page 40.
# If no device can be found, Not Found is dis-
played. In such cases, check the status of the
Bluetooth device and search again.
5 Touch a device name to select the device
you want to connect to.
While connecting, Pairing is displayed. If the
connection is established, Paired is displayed.
# If your device support SSP (Secure Simple Pairing), six-digit number appears on the display of this
unit. Once the connection is established, this number disappears.
# If the connection fails, Error is displayed. In such
cases, try again from the beginning.
# The PIN code is set to 0000 as the default, but
can be changed. Refer to Entering PIN code for
Bluetooth wireless connection on page 41.
# Once the connection is established, the device
name is displayed.
Touch the device name to disconnect.
# If you want to delete a paired Bluetooth telephone, display Delete OK?. TouchYes to delete the
device.
While searching, is displayed and when available devices are found, the device names or
Bluetooth device addresses (if names cannot be
obtained) are displayed.
# If you want to switch between the device names
and Bluetooth device addresses, touch the icon.
40
En
# Never turn the unit off while the paired Bluetooth
telephone is being deleted.
Deleting a paired device.
Page 41

Bluetooth connection menu
Theme menu
Section
21
Connecting to a Bluetooth
device automatically
If this function is set to on, a connection between your Bluetooth device and this unit will
take place automatically as soon as the two devices are less than a few meters apart.
Initially, this function is set to on.
1 Press the home button to switch to the
home display.
2 Touch the Bluetooth key to open the
Bluetooth connection menu.
3 Touch Auto Connect to turn automatic
connection on.
If your Bluetooth device is ready for a Bluetooth
wireless connection, a connection to this unit
will automatically be established.
# To turn automatic connection off, touch
Auto Connect again.
If connection fails, “ Auto connection failed.
Retry?” appears. Touch Yes to reconnect.
4 Once you turn your vehicle’s ACC switch
on again, a connection is established automatically.
Switching visible unit
This function sets whether or not to make this
unit visible to the other device.
Initially, this function is set to on.
1 Press the home button to switch to the
home display.
2 Touch the Bluetooth key to open the
Bluetooth connection menu.
3 Touch Visibility to select visibility off.
# To turn visibility on, touch Visibility again.
Entering PIN code for Bluetooth
wireless connection
To connect your Bluetooth device to this unit via
Bluetooth wireless technology, you need to enter
a PIN code on your Bluetooth device to verify the
connection. The default code is 0000, but you
can change it with this function.
1 Press the home button to switch to the
home display.
2 Touch the Bluetooth key to open the
Bluetooth connection menu.
3 Touch PIN Code Input to select
PIN Code Input.
4 Touch 0 to 9 to input pin code.
5 After inputting PIN code (up to 8 digits),
store in this unit.
Storing the PIN code in
this unit.
Displaying Bluetooth Device
address
This unit displays its Bluetooth device address.
1 Press the home button to switch to the
home display.
2 Touch the Bluetooth key to open the
Bluetooth connection menu.
3 Touch Device Information to display device information.
The Bluetooth device address is displayed.
Selecting the illumination color
This unit is equipped with multiple-color illumination.
Direct selection from preset
illumination colors
You can select an illumination color from the
color list.
1 Press the home button to switch to the
home display.
2 Touch the theme key to open the theme
settings.
3 Touch Illumination and then touch a color
on the list.
Red—Amber—Green—Blue—White—
Custom—Rainbow
# When Rainbow is selected, the illumination
color automatically changes.
Customizing the illumination color
1 Press the home button to switch to the
home display.
2 Touch the theme key to open the theme
settings.
3 Touch Illumination and then touch
Custom.
4 Display the customizing menu.
Displaying the customizing menu.
5 Touch the color bar to customize the
color.
6 Touch c or d to fine-tune the color.
7 Touch and hold the icon to store the customized color in the memory.
Memo
The customized color has been stored in the
memory.
The set color will be recalled from the memory
the next time you touch the same icon.
Storing the customized
color in the memory.
Selecting the OSD (on-screen
display) color
The OSD color can be changed.
1 Press the home button to switch to the
home display.
2 Touch the theme key to open the theme
settings.
3 Touch Screen.
4 Touch one of the colors on the list.
Selecting the background
display
You can switch the background that is displayed
when listening to a source.
1 Press the home button to switch to the
home display.
2 Touch the theme key to open the theme
settings.
3 Touch Background.
22
English
41
En
Page 42

Section
22
Theme menu
Other functions
23
4 Touch the desired setting.
# Youcan view the hidden settings by flicking the
display.
# If no JPEG images are stored in this unit, you
cannot select photo. To store a JPEG image to this
unit, refer to Capture an image in JPEG files on page
23.
# If you want to delete the captured JPEG image,
touch and hold the key of the JPEG image.
42
En
Adjusting the response
positions of the touch panels
(Touch Panel Calibration)
If you feel that the touch panel keys on the
screen deviate from the actual positions that respond to your touch, adjust the response positions of the touch panel. There are two
adjustment methods: four-point adjustment, in
which you touch four corners of the screen; and
16-point adjustment, in which you make fine-adjustments on the entire screen.
! Park your car in a safe place and use this
function. Do not operate it while driving.
! Touch the screen gently for adjustment.
Forcefully pressing the touch panel may
damage the touch panel. Do not use a sharp
pointed tool such as a ballpoint pen or mechanical pen. Doing so may damage the
screen.
! If the touch panel cannot be adjusted prop-
erly, consult your local Pioneer dealer.
1 Turn the source off.
Refer to Turning the source ON/OFF on page 6.
2 Press and hold the home button to start
Touch Panel Calibration.
The four-point touch panel adjustment screen
appears. When two-point appears at once,
touch both.
3 Touch each of the arrows on the four corners of the screen.
# To cancel the adjustment, press and hold the
home button.
4 Press the home button to complete fourpoint adjustment.
Data for the adjusted position is saved.
# Do not turn off the engine while the data is being
saved.
5 Press the home button to proceed to 16point adjustment.
The 16-point touch panel adjustment screen appears.
# To cancel the adjustment, press and hold the
home button.
6 Gently touch the center of the + mark displayed on the screen.
After you touch all the marks, the data for the
adjusted position is saved.
# Do not turn off the engine while the data is being
saved.
7 Press and hold the home button to complete the adjustment.
Using an AUX source
An auxiliary device or portable device sold separately can be connected to this unit.
About AUX connection methods
You can connect auxiliary devices to this unit.
Mini pin plug cable (AUX)
When connecting an auxiliary device using a
mini plug cable
iPods and portable audio/video players can be
connected to this unit via mini plug cable.
! If an iPod with video capabilities is con-
nected to this unit via 3.5 mm plug (four
pole) cable (such as the CD-V150M), you can
enjoy the video contents of the connected
iPod.
! A portable audio/video player can be con-
nected by using a 3.5 mm plug (four pole)
with an RCA cable (sold separately). However, depending on the cable, a reverse connection between the red (right side audio)
cable and yellow (video) cable may be required in order for the sound and video
image to be reproduced correctly.
% Insert the stereo mini plug into the AUX
input jack on this unit.
Refer to Connecting the power cord on page 45.
Page 43

ppr
All
23
Other functions
Connection
Section
23
Resetting the microprocessor
By pressing RESET, you can reset the microprocessor to its initial settings without changing the
bookmark information.
The microprocessor must be reset in the following situations:
! Before using this unit for the first time after
installation
! If the unit fails to operate properly
! When strange or incorrect messages appear
on the display
1 Turn the ignition switch OFF.
2 Press RESET with a pen tip or other
pointed instrument.
Refer to What’s what on page 5.
Note
Switch your engine ON or set the ignition switch
to ACC ON before pressing RESET in the following situations:
! After completing connections
! When erasing all stored settings
! When resetting the unit to its initial (factory) set-
tings
Operating the sound mixer
You can listen to audio from the unit and your
iPhone or smartphone simultaneously. The
main sound is from the unit. The sub sound is
from the iPhone or smartphone. You can control
the volume of the sub sound on the screen.
1 Connect your iPhone or smartphone to
the unit with the RGB input.
Refer to When connecting with optional CD-IV203
cable on page 47.
Refer to When connecting with optional CDIU201S cable on page 48.
Refer to Optional Smartphone link adaptor (CDML100) connection on page 48.
2 Press +/– (VOLUME/VOL) to display the
sound mixer control bar.
The sound mixer screen appears.
1JAN
PM
All
All
App Sound
Vol.12
12:43
S.Rtrv
Appr
AppppApp
iPod
Abcdefghi
Abcdefghi
Abcdefghi
Abcdefghi
iPod
Vol.12
01'17'' -05'29''
1/9
1
x
2
Mix
ON
OFF
1
1 Source sound – Press +/– (VOLUME/VOL)to
adjust the volume of the main sound. The
main sound volume level is displayed on the
Source sound screen.
2 Mix – Touch ON or OFF to switch the sound
mixer on or off. The sub sound is mute when
Mix is OFF.
Set to ON when you wish to output sound for
AppRadio Mode, such as the navigation
sound, from the unit.
Set to OFF when you wish to output sound for
AppRadio Mode, such as music, as the
main sound.
3 App Sound – Touch + or – on the screen to
adjust the sub sound volume. The sub sound
volume level is displayed on the App Sound
screen.
Notes
! This function is not supported for TV tuner.
! You cannot adjust the volume of the main
sound on the screen.
! The sound mixer control bar is displayed for
four seconds. If the screen disappears, press
+/– (VOLUME/VOL) again. The screen reappears.
WARNING
In some countries or states the viewing of images on a display inside a vehicle even by persons other than the driver may be illegal. Where
such regulations apply, they must be obeyed
and this unit’s DVD features should not be used.
CAUTION
! Do not drill a hole into the engine compart-
ment to connect the yellow cable of the display unit to the vehicle battery. Engine
vibration may eventually cause the insulation
to fail at the point where the wire passes
from the passenger compartment into the
engine compartment. Takeextra care in securing the wire at this point.
! Make sure that cables will not interfere with
moving parts of the vehicle, such as the shift
lever, parking brake or seat sliding mechanism.
WARNING
! Use speakers over 50 W (output value) and
between 4 W to 8 W (impedance value). Do
not use 1 W to 3 W speakers for this unit.
! The black cable is ground. When installing
this unit or power amp (sold separately),
make sure to connect the ground wire first.
Make sure that the ground cable is properly
connected to metal parts of the car body
using a spade terminal sold commercially.
The ground wire of the power amp and the
one of this unit or any other device must be
connected to the car separately with different
screws. If the screw for the ground wire loosens or falls out, it could result in fire, generation of smoke or malfunction.
Ground wire
Other devices
(Another electronic
device in the car)
POWER AMP
Metal parts of car’s body
Important
! This unit cannot be installed in a vehicle
without ACC (accessory) position on the ignition switch.
O
F
N
F
O
S
T
A
R
T
ACC position No ACC position
! Use this unit with a 12-volt battery and nega-
tive grounding only. Failure to do so may result in a fire or malfunction.
! To prevent a short-circuit, overheating or mal-
function, be sure to follow the directions
below.
— Disconnect the negative terminal of the bat-
tery before installation.
24
English
43
En
Page 44

Section
Connection
24
— Secure the wiring with cable clamps or adhe-
sive tape. Wrap adhesive tape around wiring
that comes into contact with metal parts to
protect the wiring.
— Place all cables away from moving parts,
such as the shift lever and seat rails.
— Place all cables away from hot places, such
as near the heater outlet.
— Do not connect the yellow cable to the battery
by passing it through the hole to the engine
compartment.
— Cover any disconnected cable connectors
with insulating tape.
— Do not shorten any cables.
— Never cut the insulation of the power cable of
this unit in order to share the power with
other devices. The current capacity of the
cable is limited.
— Use a fuse of the rating prescribed.
— Never wire the negative speaker cable directly
to ground.
— Never band together negative cables of multi-
ple speakers.
! When this unit is on, control signals are sent
through the blue/white cable. Connect this
cable to the system remote control of an external power amp or the vehicle’s auto-antenna relay control terminal (max. 300 mA
12 VDC). If the vehicle is equipped with a
glass antenna, connect it to the antenna
booster power supply terminal.
! Never connect the blue/white cable to the
power terminal of an external power amp.
Also, never connect it to the power terminal
of the auto antenna. Doing so may result in
battery drain or a malfunction.
Connection
44
En
Page 45

Connection
Connection
Section
24
Connecting the power cord
Hideaway 1 seg
digital TV tuner
(GEX-1550DTV
(sold separately))
Yellow
Connect to the constant 12 V supply terminal.
Orange/white
Connect to lighting switch terminal.
Red
Connect to terminal controlled by ignition switch (12 V DC).
Black (chassis ground)
Connect to a clean, paint-free metal location.
Front speaker Front speaker
Left Right
Rear speaker or
Subwoofer (4 Ω)
When using a subwoofer of 70 W (2 Ω), be sure to connect with Violet and Violet/black leads of this
unit. Do not connect anything to Green and Green/black leads.
RGB cable (Supplied with
Hideaway 1 seg digital TV tuner)
Antenna input
Green/black Violet/black
Not used.
Green
Green/black
Fuse (10 A)
AUX jack (3.5 ø)
Use a mini plug cable to connect with auxiliary
device.
White Gray
Gray/blackWhite/black
Green Violet
Violet
Violet/black
Subwoofer (4 Ω)
× 2
This product
RGB input
Rear speaker or
Subwoofer (4 Ω)
4 m
Microphone input
(Function of AVH-X5650BT/AVH-X2650BT)
Wired remote input
Hard-wired remote control adapter can be connected
(sold separately).
Violet/white
Of the two lead wires connected to the back lamp, connect the one in which the voltage changes
when the gear shift is in the REVERSE (R) position. This connection enables the unit to
sense whether the car is moving forwards or backwards.
Yellow/black
If you use an equipment with Mute function, wire this lead to the Audio Mute lead on that
equipment. If not, keep the Audio Mute lead free of any connections.
Light green
Used to detect the ON/OFF status of the parking
brake. This lead must be connected to the power
supply side of the parking brake switch.
Blue/white
Connect to system control terminal of the power amp or
auto-antenna relay control terminal (max. 300 mA 12 V DC).
With a 2 speaker system, do not connect anything to the speaker leads
that are not connected to speakers.
Microphone (Function of AVH-X5650BT/AVH-X2650BT)
Power supply side
Ground side
Note:
· Change the initial setting of this unit.
The subwoofer output of this unit is
monaural.
Parking brake
switch
English
45
En
Page 46

T
Section
24
Connection
Connection
When connecting to separately sold power amp
Front output
Rear output
Subwoofer
output
This product
To front output
To rear output
To subwoofer
output
Blue/white
Connect to system control terminal of the
power amp or auto-antenna relay control
terminal. (max. 300 mA 12 V DC).
Perform these connections when
using the optional amplifier.
Power amp
(sold separately)
Power amp
(sold separately)
Power amp
(sold separately)
Connect with RCA cables
(sold separately)
System remote control
Left Right
Subwoofer
Rear speaker
Front speaker Front speaker
Subwoofer
Rear speaker
When connecting the external video component and the display
External video component
(sold separately)
To video
output
To video
input
Audio inputs
his product
! It is necessary to change AV Input in the
system menu when connecting the external
video component.
Refer to Setting AV input on page 34.
This product’s rear video output is for connection of a display to enable passengers in the rear
seats to watch the DVD, etc.
WARNING
Never install a rear display in a location that is
visible to the driver while the vehicle is in motion.
(R IN, L IN)
Rear monitor output
(V OUT)
Video input (V IN)
To audio outputs
RCA cables
(sold separately)
Display with RCA input
jacks (sold separately)
46
En
Page 47

Connection
Connection
Section
24
When connecting with a rear
view camera
If you switch the shift lever to REVERSE (R), the
display on this unit will automatically switch to
the rear view image. You need to set the
Camera Polarity properly in the system unit to
use. For details on settings, refer to Setting the
rear view camera (back up camera) on page 37.
You can also switch to the rear view image by
pressing the touch panel key. For details, refer to
Using the rear view on page 8.
WARNING
USE INPUT ONLY FOR REVERSE OR MIRROR IMAGE REAR VIEW CAMERA. OTHER
USE MAY RESULT IN INJURY OR DAMAGE.
CAUTION
! You must use a camera which outputs
mirror reversed images.
! The screen image may appear reversed.
! The rear view camera function is to be used
as an aid to keep an eye on trailers, or while
backing up. Do not use for entertainment
purposes.
! Objects in the rear view may appear closer or
more distant than they actually are.
Rear view camera input (R.C IN)
This product
RCA cable
(sold separately)
To video output
Rear view camera
(sold separately)
Violet/white
Of the two lead wires
connected to the back lamp,
connect the one in which the
voltage changes when the
gear shift is in the REVERSE
(R) position. This connection
enables the unit to
sense whether the car is
moving forwards or
backwards.
iPod with lightning connector
When connecting with optional
CD-IU52 cable
This product
USB cable
(Supplied with this unit)
Connect to separately sold
USB device.
Lightning to USB Cable
(CD-IU52) (sold separately)
USB/iPod input
iPod with lightning
connector
(sold separately)
When connecting with optional
CD-IV203 cable
This product
RGB input
RGB to VGA Cable
(CD-IV203) (sold separately)
Lightning to USB Cable
(CD-IV203) (sold separately)
iPod with lightning connector
(sold separately)
USB/iPod input
USB cable
(Supplied with this unit)
Connect to separately sold
USB device.
Lightning to VGA Adapter
(Apple Inc. products)
(sold separately)
English
47
En
Page 48

Section
24
Connection
Connection
iPod with 30-pin connector
When connecting with optional
CD-IU201V cable
This product
AUX input
(AUX)
Interface cable
(CD-IU201V) (sold separately)
USB/iPod input
Dock connector
1.5 m
USB cable
(Supplied with this unit)
Connect to separately sold
USB device.
This is wired
remote
input.
Please note
that this is
not AUX
input.
iPod with video
capabilities
(sold separately)
When connecting with optional
CD-IU201S cable
This product
RGB input
Interface cable
(CD-IU201S) (sold separately)
USB/iPod input
Dock connector
1.5 m
USB cable
(Supplied with this unit)
Connect to separately sold
USB device.
iPod with video
capabilities
(sold separately)
Optional Smartphone link adaptor (CD-ML100) connection
RGB input
Interface cable
(Supplied with
Smartphone
link adaptor)
Connection for updating Smartphone link adaptor firmware
Even if music and/or image files are saved on the USB storage device, they cannot be played back.
RGB input
Interface cable
(Supplied with
Smartphone
link adaptor)
This product
Smartphone link
adaptor
(CD-ML100) (sold
separately)
This product
Smartphone link
adaptor
(CD-ML100) (sold
separately)
USB cable (Supplied
with Smartphone
link adaptor)
Fuse (2 A)
Power cord (Supplied with Smartphone link
adaptor)
USB cable (Supplied with
Smartphone link adaptor)
Fuse (2 A)
Power cord (Supplied with Smartphone link
adaptor)
USB - micro USB cable (Type USB A
- micro USB B) (Supplied with
Smartphone link adaptor)
Smartphone with micro
USB connector (sold
separately)
Black (ground)
To vehicle (metal) body
Yellow
To electric terminal controlled by
ignition switch (12 V DC) ON/OFF
USB storage device
(sold separately)
Black (ground)
To vehicle (metal) body
Yellow
To electric terminal controlled by
ignition switch (12 V DC) ON/OFF
48
En
Page 49

5cmcm
5
Installation
Installation
Section
25
Notes
! Check all connections and systems before
final installation.
! Do not use unauthorized parts as this may
cause malfunctions.
! Consult your dealer if installation requires
drilling of holes or other modifications to the
vehicle.
! Do not install this unit where:
— it may interfere with operation of the vehicle.
— it may cause injury to a passenger as a result
of a sudden stop.
! The semiconductor laser will be damaged if
it overheats. Install this unit away from hot
places such as near the heater outlet.
! Optimum performance is obtained when the
unit is installed at an angle of less than 30°.
! When installing, to ensure proper heat dis-
persal when using this unit, make sure you
leave ample space behind the rear panel and
wrap any loose cables so they are not blocking the vents.
Leave ample
space
! To some types of vehicles, this unit cannot be
properly installed. In such case, use the optional installation kit (ADT-VA133).
5 cm
5 cm
Installation using the screw
holes on the side of the unit
% Fastening the unit to the factory radiomounting bracket.
Position the unit so that its screw holes are
aligned with the screw holes of the bracket, and
tighten the screws at three locations on each
side.
1
2
3
4
1 If the pawl gets in the way, bend it down.
2 Factory radio mounting bracket
3 Truss (5 mm × 8 mm) screws
4 Frame
In some types of vehicles, discrepancy may
occur between the unit and the dashboard. If
this happens, use the supplied frame to fill
the gap.
5 Dashboard or console
Installing the microphone
(Function of AVH-X5650BT/AVH-X2650BT)
CAUTION
It is extremely dangerous to allow the microphone lead to become wound around the steering column or shift lever. Be sure to install the
unit in such a way that it will not obstruct driving.
Notes
! Install the microphone in a position and ori-
entation that will enable it to pick up the
voice of the person operating the system.
! Use separately sold clamps to secure the
lead where necessary inside the vehicle.
When installing the microphone
on the sun visor
1 Fit the microphone lead into the groove.
1
2
1 Microphone lead
2 Groove
2 Install the microphone clip on the sun
visor.
With the sun visor up, install the microphone
clip. (Lowering the sun visor reduces the voice
recognition rate.)
1
1 Microphone clip
When installing the microphone
on the steering column
1 Detach the microphone base from the microphone clip.
To detach the microphone base from the microphone clip, slide the microphone base.
1
2
1 Microphone
2 Microphone clip
3 Microphone base
3
English
49
En
Page 50

Section
25
Installation
Additional information
2 Install the microphone on the steering
column.
1
2
1 Double-sided tape
2 Install the microphone on the rear side of the
steering column.
Adjusting the microphone angle
Troubleshooting
Symptoms are written in bold and causes in regular, non-indented text. Regular, indented text is
used to indicate actions to be taken.
Common
The power will not turn on.
The unit will not operate.
Leads and connectors are incorrectly connected.
Confirm once more that all connections are
correct.
The fuse is blown.
Rectify the cause and then replace the fuse. Be
sure to install a fuse with the same rating.
Noise and/or other factors are causing the built-in
microprocessor to operate incorrectly.
Press RESET. (Page 43)
Operation with the remote control is not possible.
The unit does not operate correctly even when
the appropriate remote control buttons are
pressed.
Battery power is low.
Load a new battery.
Some operations are prohibited with certain discs.
Try operating with another disc.
Playback is not possible.
The disc is dirty.
Clean the disc.
The type of disc loaded cannot be played on this
unit.
Check the disc type.
The disc loaded is not compatible with this video system.
Change the disc to one that is compatible with
your video system.
There is no sound.
The volume level will not rise.
Cables are not connected correctly.
Connect the cables correctly.
The unit is performing still, slow motion or frame-byframe playback.
There is no sound during still, slow motion or
frame-by-frame playback.
There is no image displayed.
The parking brake cable is not connected.
Connect the parking brake cable, and apply the
parking brake.
The parking brake is not applied.
Connect the parking brake cable, and apply the
parking brake.
icon is displayed, and operation is not
The
possible.
The operation is prohibited for the disc.
This operation is not possible.
The operation is not compatible with the configuration of the disc.
This operation is not possible.
The image displayed stops (pauses) and the unit
cannot be operated.
The data could no longer be read during playback.
Stop playback once, and start playback again.
There is no sound.
The volume level is low.
The volume level is low.
Adjust the volume level.
The attenuator is on.
Turn the attenuator off.
The sound and video skip.
The unit is not firmly secured.
Firmly secure the unit.
50
En
Page 51

Additional information
Appendix
Additional information
File size and transmission rate are above recommended rates.
Create a DivX file that is within the
recommended size and transmission rate.
The aspect ratio is incorrect and the image is
stretched.
The aspect ratio setting is incorrect for the display.
Select the appropriate setting for your display.
(Page 32)
The motor sounds when the ignition switch is
turned ON (or is turned to ACC).
The unit is confirming whether or not a disc is
loaded.
This is a normal operation.
Nothing is displayed.
The touch panel keys cannot be used.
The rear view camera is not connected.
Connect a rear view camera.
Camera Polarity is at incorrect setting.
Press the home button to return to the source
display and then select the correct setting for
Camera Polarity. (Page 37)
No xxxx appears when a display is changed
(No Title, for example).
There is no embedded text information.
Switch the display or play another track/file.
Subfolders cannot be played back.
Folder repeat play has been selected.
Select the repeat range again.
The repeat range changes automatically.
Another folder was selected during repeat play.
Select the repeat range again.
Track search or fast forward/reverse was performed
during file repeat play.
Select the repeat range again.
DVD
Playback is not possible.
The loaded disc has a different region number from
this unit.
Replace the disc with one featuring the same
region number as this unit.
A parental lock message is displayed and playback is not possible.
Parental lock is activated.
Turn parental lock off or change the level. (Page
32)
Parental lock cannot be canceled.
The code number is incorrect.
Enter the correct code number. (Page 32)
You have forgotten your code number.
Press RESET. (Page 43)
Dialog language (and subtitle language) cannot
be switched.
The DVD being played does not feature multiple language recordings.
The language cannot be switched if they are not
recorded on the disc.
You can only switch between items indicated in the
disc menu.
Switch the language using the disc menu.
No subtitles are displayed.
The DVD being played does not feature subtitles.
Subtitles are not displayed if they are not
recorded on the disc.
You can only switch between items indicated in the
disc menu.
Switch the language using the disc menu.
Playback is not performed with the audio
language and subtitle language settings selected
in Video Setup menu.
The DVD being played does not feature dialog or subtitles in the selected language.
The language cannot be switched if the selected
language is not recorded on the disc.
The viewing angle cannot be switched.
The DVD being played does not feature scenes shot
from multiple angles.
The viewing angle cannot be switched if the DVD
does not feature scenes recorded from multiple
angles.
You are trying to switch to multi-angle viewing for a
scene that was not recorded from multiple angles.
Switch between multiple angles when watching
scenes recorded from multiple angles.
The image is extremely unclear/distorted and
dark during playback.
Some discs feature a signal to prohibit copying.
Since this unit is compatible with the analog
copy generation management system, when
playing a disc that has a signal prohibiting
copying, horizontal stripes or other imperfections
may appear when viewed on some displays. This
is not a malfunction.
Video CD
The PBC (playback control) menu cannot be
called up.
The Video CD being played does not feature PBC.
This operation is not available for Video CDs that
do not feature PBC.
Repeat play and track/time search are not
possible.
The Video CD being played features PBC.
This operation is not available for Video CDs that
feature PBC.
iPod
The iPod does not operate correctly.
The cables are incorrectly connected.
Disconnect the cable from the iPod. Once the
iPod’s main menu is displayed, reconnect the
iPod and reset it.
The iPod version is old.
Update the iPod version.
Sound from the iPod cannot be heard.
The audio output direction may switch automatically
when the Bluetooth and USB connections are used
at the same time.
Use the iPod to change the audio output
direction.
Bluetooth audio/telephone
The sound from the Bluetooth audio source is
not played back.
There is a call in progress on a Bluetooth connected
cellular phone.
The sound will be played back when the call is
terminated.
A Bluetooth connected cellular phone is currently
being operated.
Do not use the cellular phone at this time.
A call was made with a Bluetooth connected cellular
phone and then immediately terminated. As a result,
communication between this unit and the cellular
phone was not terminated properly.
Reconnect the Bluetooth connection between
this unit and the cellular phone.
English
51
En
Page 52

Appendix
Additional information
Additional information
Error messages
When you contact your dealer or your nearest
Pioneer Service Center, be sure to note the error
message.
Error messages are written in bold and causes
in regular, non-indented text. Regular,indented
text is used to indicate actions to be taken.
Common
AMP Error
This unit fails to operate or the speaker connection is
incorrect; the protective circuit is activated.
Check the speaker connection. If the message
fails to disappear even after the engine is
switched off/on, contact your dealer or an
authorized Pioneer Service Station for
assistance.
Tuner
No Data Provided
This unit cannot receive artist name/song title information.
Move to the desirable location with good
reception.
No Data
This unit cannot receive program service name information.
Move to the desirable location with good
reception.
DVD
Different Region Disc
The disc does not have the same region number as
this unit.
Replace the DVD with one bearing the correct
region number.
52
En
Error-02-XX/FF-FF
The disc is dirty.
Clean the disc.
The disc is scratched.
Replace the disc.
The disc is loaded upside down.
Check that the disc is loaded correctly.
There is an electrical or mechanical error.
Press RESET. (Page 43)
Unplayable Disc
This type of disc cannot be played on this unit.
Replace the disc with one that can be played on
this unit.
The inserted disc does not contain any playable files.
Replace the disc.
Protect
All the files on the inserted disc are embedded with
DRM.
Replace the disc.
Skipped
The inserted disc contains DRM protected files.
Play an audio file not embedded with Windows
Mediaä DRM 9/10.
TEMP
The temperature of the unit is outside the normal operating range.
Wait until the unit returns to a temperature
within the normal operating limits.
This DivX rental has expired.
The inserted disc contains expired DivX VOD content.
Select a file that can be played.
Video resolution not supported
The inserted disc contains a high definition DivX/
MPEG-1/MPEG-2/MPEG-4 file.
Select a file that can be played.
It is not possible to write it in the flash.
This unit’s flash memory used as the temporary storage area is full.
Select a file that can be played.
Your device is not authorized to play this DivX
protected video.
This unit’s DivX registration code has not been authorized by the DivX VOD contents provider.
Register this unit to the DivX VOD contents
provider.
Unplayable File
This type of file cannot be played on this unit.
Select a file that can be played.
Format Read
Sometimes there is a delay between the start of playback and when you start to hear any sound.
Wait until the message disappears and you hear
sound.
Video frame rate not supported
DivX file’s frame rate is more than 30 fps.
Select a file that can be played.
Audio Format not supported
This type of file is not supported on this unit.
Select a file that can be played.
External storage device (USB)
Unplayable File
This type of file cannot be played on this unit.
Select a file that can be played.
There are no songs.
Transfer the audio files to the USB portable audio
player/USB memory and connect.
Security for the connected USB memory is enabled.
Follow the USB memory instructions to disable
security.
Format Read
Sometimes there is a delay between the start of playback and when you start to hear any sound.
Wait until the message disappears and you hear
sound.
Skipped
The connected USB portable audio player/USB
memory contains WMA files that are protected by
Windows Mediaä DRM 9/10.
Play an audio file not embedded with Windows
Mediaä DRM 9/10.
Protect
All the files on the connected USB portable audio
player/USB memory are protected by Windows
Media DRM 9/10.
Transfer audio files not protected by Windows
Media DRM 9/10 to the USB portable audio
player/USB memory and connect.
Incompatible USB
The connected USB device is not supported by this
unit.
Connect a USB portable audio player or USB
memory that is USB Mass Storage Class
compliant.
The USB device is not formatted with FAT12, FAT16
or FAT32.
The connected USB device should be formatted
with FAT12, FAT16 or FAT32.
Page 53

Additional information
Appendix
Additional information
Check USB
The USB connector or USB cable has shortcircuited.
Check that the USB connector or USB cable is
not caught in something or damaged.
The connected USB storage device consumes more
than maximum allowable current.
Disconnect the USB portable audio player/USB
memory and do not use it. Turn the ignition
switch to OFF, then to ACC or ON and then
connect a compliant USB portable audio player/
USB memory.
Error-02-9X/-DX
Communication failed.
Perform one of the following operations.
–Turn the ignition switch OFF and back ON.
–Disconnect the USB portable audio player/USB
memory.
–Change to a different source.
Then, return to the USB portable audio player/
USB memory.
This DivX rental has expired.
The inserted external storage device contains expired
DivX VOD content.
Select a file that can be played.
Video resolution not supported
The inserted external storage device contains a high
definition DivX/MPEG-1/MPEG-2/MPEG-4 file.
Select a file that can be played.
It is not possible to write it in the flash.
This unit’s flash memory used as the temporary storage area is full.
Select a file that can be played.
Your device is not authorized to play this DivX
protected video.
This unit’s DivX registration code has not been authorized by the DivX VOD contents provider.
Register this unit to the DivX VOD contents
provider.
Format Read
Sometimes there is a delay between the start of playback and when you start to hear any sound.
Wait until the message disappears and you hear
sound.
Video frame rate not supported
DivX file’s frame rate is more than 30 fps.
Select a file that can be played.
Audio Format not supported
This type of file is not supported on this unit.
Select a file that can be played.
Creating the Database has failed.
The mode was switched to video or JPEG image display while the database was being created.
Create the database again. (Page 21)
iPod
Format Read
Sometimes there is a delay between the start of playback and when you start to hear any sound.
Wait until the message disappears and you hear
sound.
Error-02-6X/-9X/-DX
Communication failed.
Disconnect the cable from the iPod. Once the
iPod’s main menu is displayed, reconnect the
iPod and reset it.
iPod failure.
Disconnect the cable from the iPod. Once the
iPod’s main menu is displayed, reconnect the
iPod and reset it.
Error-02-67
The iPod firmware version is old.
Update the iPod version.
Stop
There are no songs.
Transfer songs to the iPod.
There are no songs in the current list.
Select a list that contains songs.
Not Found
No related songs.
Transfer songs to the iPod.
Bluetooth
Error-10
The power failed for the Bluetooth module of this
unit.
Turn the ignition switch OFF and then to ACC or
ON.
If the error message is still displayed after
performing the above action, please contact your
dealer or an authorized Pioneer Service Station.
MirrorLink
The application list could not be read out.
Failed to load the application list.
! Disconnect the cable from the smartphone,
and then connect the smartphone again after a
few seconds.
! Turn the ignition switch OFF and then to ACC
or ON.
If the error message is still displayed after
performing the above action, reset the
smartphone.
If the error message is still displayed after
performing the above action, please contact your
dealer or an authorized Pioneer Service Station.
There is no supported application on your MirrorLink device.
No supported applications can be found.
! Disconnect the cable from the smartphone,
and then connect the smartphone again after a
few seconds.
! Turn the ignition switch OFF and then to ACC
or ON.
If the error message is still displayed after
performing the above action, reset the
smartphone.
If the error message is still displayed after
performing the above action, please contact your
dealer or an authorized Pioneer Service Station.
Communication error occurred.
There was a communication error.
! Disconnect the cable from the smartphone,
and then connect the smartphone again after a
few seconds.
! Turn the ignition switch OFF and then to ACC
or ON.
If the error message is still displayed after
performing the above action, reset the
smartphone.
If the error message is still displayed after
performing the above action, please contact your
dealer or an authorized Pioneer Service Station.
Launching the application failed.
Failed to launch the application.
! Disconnect the cable from the smartphone,
and then connect the smartphone again after a
few seconds.
English
53
En
Page 54

Appendix
Additional information
Additional information
! Turn the ignition switch OFF and then to ACC
or ON.
If the error message is still displayed after
performing the above action, reset the
smartphone.
If the error message is still displayed after
performing the above action, please contact your
dealer or an authorized Pioneer Service Station.
USB connection was temporarily disabled for device protection. Do not connect this USB device
to the unit. Torestart USB, restart the unit.
There is an over current error. Do not use this USB
storage device.
Turn the ignition switch OFF and then to ACC or
ON.
If the error message is still displayed after
performing the above action, please contact your
dealer or an authorized Pioneer Service Station.
Understanding auto EQ error
messages
When correct measurement of the car’s interior
acoustic characteristics is not possible using
auto EQ, an error message may appear on the
display. In such cases, refer to the table below to
see what the problem is and how it may be corrected. After checking, try again.
Error messages are written in bold and causes
in regular, non-indented text. Regular,indented
text is used to indicate actions to be taken.
Please connect the microphone for
measurement. When finished, please push
HOME key.
The microphone is not connected.
Plug the optional microphone securely into the
jack.
54
En
Error. Please check xxxx speaker.
The microphone cannot pick up the measuring tone
of a speaker.
! Confirm that the speakers are connected
correctly.
! Correct the input level setting of the power
amp connected to the speakers.
! Plug the microphone securely into the jack.
Error. Please check noise.
The surrounding noise level is too high.
! Stop your car in a place that is quiet, and
switch off the engine, air conditioner and heater.
! Set the microphone correctly.
Error. Please check battery.
Power is not being supplied from the battery to this
unit.
! Connect the batter y correctly.
! Check the battery voltage.
Understanding messages
Messages Translation
Pioneer recommends
the use of a
camera
which out-
Screen image may appear reversed.
puts mirrorreversed images. Otherwise, the
screen
image will
appear reversed.
Indicator list
Area 1 Area 2
Area 3
Area 1
Indicates that the mute function is on.
Indicates that the sound is attenuated.
Area 2
Indicates that the digital format is Dolby Digital.
Indicates that the digital format is MPEG Audio.
Indicates that the digital format is Linear PCM.
Indicates the sampling frequency.
Indicates that the digital format is DTS.
Indicates the audio channel.
Indicates that a disc with PBC
On is being played.
! Indicates that a cellular
phone is connected.
! Indicates that an incoming
call has been received and
has not been checked yet.
Indicates the battery strength
of the cellular phone.
! The level shown on the indi-
cator may differ from the
actual battery strength.
! If the battery strength is not
available, nothing is displayed in the batter y
strength indicator area.
Indicates that the connected
Bluetooth device only supports
Bluetooth telephone.
Indicates that the connected
Bluetooth device only supports
Bluetooth audio.
Indicates that the unit is currently processing an operation
such as search.
Page 55

Additional information
Appendix
Additional information
Show the album title when receiving the tag information.
Shows the album title of the
song currently being played for
MP3/WMA/AAC/WAV files.
Shows the song title when receiving the tag information.
Shows the song title of the
song currently being played for
MP3/WMA/AAC/WAV files.
Shows the comment currently
being played.
Shows the station name currently tuned in to.
Shows the artist name when
receiving the tag information.
Shows the artist name of the
artist currently being played for
MP3/WMA/AAC/WAV files.
Shows cellular phone information.
Shows general phone information.
Shows home phone information.
Shows office phone information.
Shows other phone information.
Shows the folder name of the
folder containing the MP3/
WMA/AAC file currently being
played.
Area 3
STEREO
DB
DB
Shows the file name of the
MP3/WMA/AAC file currently
being played.
Shows the preset number of
the station currently being
tuned in to.
Shows the title number currently being played.
Shows the chapter number
currently being played.
Shows the genre of the track/
song currently being played.
Indicates that the volume is adjusted.
Shows when radio signal is received.
Indicates that the selected frequency is being broadcast in
stereo.
Touch to turn BSM on.
Indicates that Auto EQ is on.
Shows when creating the database in Music browse mode.
Shows when saving the database in Music browse mode.
Indicates the signal strength of
the cellular phone.
Indicates that a Bluetooth telephone is connected.
Indicates that TA (traffic announcement standby) is on.
Indicates that the news program interruption is on.
Handling guidelines
Discs and player
Use discs featuring any of the following logos.
Use 12-cm discs.
The following types of discs cannot be used with
this unit:
! DualDiscs
! 8-cm discs: Attempts to use such discs with
an adapter may cause the unit to malfunction.
! Oddly shaped discs
! Damaged discs, including discs that are
cracked, chipped or warped
! CD-R/RW and DVD-R/RW discs that have not
been finalized
! DVD-RAM
Do not touch the recorded surface of the discs.
Store discs in their cases when not in use.
Do not attach labels, write on or apply chemicals
to the surface of the discs.
To clean a disc, wipe the disc with a soft cloth outward from the center.
English
55
En
Page 56

Appendix
Additional information
Additional information
Condensation may temporarily impair the player’s
performance. Let it rest for about one hour to adjust to a warmer temperature. Also, wipe any
damp discs off with a soft cloth.
Playback of discs may not be possible because of
disc characteristics, disc format, recorded application, playback environment, storage conditions,
and so on.
Road shocks may interrupt disc playback.
Certain functions may not be available for some
DVD video discs.
It may not be possible to play back some DVD
video discs.
This unit is not compatible with discs recorded in
AVCHD (Advanced Video Codec High Definition)
format. Do not insert AVCHD discs as you may not
be able to eject the disc.
When using discs that can be printed on label surfaces, check the instructions and the warnings of
the discs. Depending on the discs, inserting and
ejecting may not be possible. Using such discs
may result in damage to this equipment.
Do not attach commercially available labels or
other materials to the discs.
! The discs may warp making the disc unplay-
able.
! The labels may come off during playback and
prevent ejection of the discs, which may result
in damage to the equipment.
USB storage device
Depending on the external storage device (USB),
the following problems may occur.
! Operations may vary.
! The storage device may not be recognized.
! Files may not be played back properly.
Connections via USB hub are not supported.
Do not connect anything other than a USB storage device.
Firmly secure the USB storage device when driving. Do not let the USB storage device fall onto the
floor, where it may become jammed under the
brake or accelerator pedal.
Depending on the USB storage device, the device
may cause noise to occur in the radio.
Copyright protected files that are stored in the
USB devices cannot be played back.
You cannot connect a USB portable audio player/
USB memory to this unit via USB hub.
Partitioned USB memory is not compatible with
this unit.
Depending on the kind of USB portable audio
player/USB memory you use, the device may not
be recognized or audio files may not be played
back properly.
Do not leave the USB portable audio player/USB
memory in direct sunlight for extended amounts
of time. Doing so may cause the device to malfunction from the extreme rise in temperature.
iPod
To ensure proper operation, connect the dock connector cable from the iPod directly to this unit.
Firmly secure the iPod when driving. Do not let the
iPod fall onto the floor, where it may become
jammed under the brake or accelerator pedal.
About iPod settings
! When an iPod is connected, this unit changes
the EQ (equalizer) setting of the iPod to off in
order to optimize the acoustics. When you disconnect the iPod, the EQ returns to the original
setting.
! Youcannot set Repeat to off on the iPod when
using this unit. Repeat is automatically
changed to All when the iPod is connected to
this unit.
Incompatible text saved on the iPod will not be displayed by the unit.
DVD-R/RW discs
Unfinalized DVD-R/RW discs which have been recorded in the Video format (video mode) cannot
be played back.
Playback of DVD-R/RW discs may not be possible,
due to disc characteristics, scratches or dirt on
the disc, or dirt, condensation, etc. on the lens of
this unit.
Depending on the application settings and the environment, playback of discs recorded on a computer may not be possible. (For details, contact the
manufacturer of the application.)
CD-R/RW discs
When CD-R/RW discs are used, playback is possible only for discs which have been finalized.
Playback of CD-R/RW discs recorded on a music
CD recorder or a computer may not be possible
due to disc characteristics, scratches or dirt on
the disc, or dirt, condensation, etc., on the lens of
this unit.
Depending on the application settings and the environment, playback of discs recorded on a computer may not be possible. (For details, contact the
manufacturer of the application.)
Playback of CD-R/RW discs may become impossible in case of direct exposure to sunlight, high
temperatures, or the storage conditions in the vehicle.
Titles and other text information recorded on a
CD-R/RW disc may not be displayed by this unit
(in the case of audio data (CD-DA)).
JPEG picture files
JPEG is short for Joint Photographic Experts
Group and refers to a still image compression
technology standard.
Files are compatible with Baseline JPEG and EXIF
2.1 still images up to a resolution of 8 192 × 7 680.
(EXIF format is used most commonly with digital
still cameras.)
Playback of EXIF format files that were processed
by a computer may not be possible.
There is no progressive JPEG compatibility.
DivX video files
Depending on the composition of the file information, such as the number of audio streams or file
size, there may be a slight delay when playing
back discs.
Some special operations may be prohibited due to
the composition of the DivX files.
Only DivX files downloaded from a DivX partner
site are guarantee for proper operation. Unauthorized DivX files may not operate properly.
DRM rental files cannot be operated until playback is started.
Recommended file size: 2 GB or less with a transmission rate of 2 Mbps or less.
56
En
Page 57

Additional information
Appendix
Additional information
The ID code of this unit must be registered to a
DivX VOD provider in order to playback DivX VOD
files. For information on ID codes, refer to Display-
â
ing the DivX
For more details about DivX, visit the following
site:
http://www.divx.com/
VOD registration code on page 33.
MPEG-1/MPEG-2/MPEG-4 video files
Elapsed playback time may not be displayed correctly.
Important
! When naming a JPEG image file, add the
corresponding file name extension (.jpg,
.jpeg or .jpe).
! This unit plays back files with these file name
extensions (.jpg, .jpeg or .jpe) as a JPEG
image file. Toprevent malfunctions, do not
use these extensions for files other than
JPEG image files.
Audio compatibility (USB)
WAV
File extension: .wav
Quantization bits: 8 and 16 (LPCM), 4 (MS
ADPCM)
Sampling frequency: 16 kHz to 48 kHz (LPCM),
22.05 kHz and 44.1 kHz (MS ADPCM)
Compressed file
compatibility (disc, USB)
WMA
File extension: .wma
Bit rate: 48 kbps to 320 kbps (CBR), VBR
Sampling frequency: 32 kHz to 48 kHz
Windows Mediaä Audio Professional, Lossless,
Voice/DRM Stream/Stream with video: Not compatible
MP3
File extension: .mp3
Bit rate: 8 kbps to 320 kbps (CBR), VBR
Sampling frequency: 8 kHz to 48 kHz (32 kHz,
44.1 kHz, 48 kHz for emphasis)
Compatible ID3 tag version: 1.0, 1.1, 2.2, 2.3, 2.4
(ID3 tag Version 2.x is given priority over Version
1.x.)
M3u playlist: Not compatible
MP3i (MP3 interactive), mp3 PRO: Not compatible
AAC
Compatible format: AAC encoded by iTunes
File extension: .m4a
Sampling frequency: 11.025 kHz to 48 kHz
Bit rate: 16 kbps to 320kbps
Apple Lossless: Not compatible
AAC file bought from the iTunes Store (.m4p file
extension): Not compatible
DivX compatibility
Compatible format: DivX video format implemented in relation to DivX standards
File extensions: .avi or .divx
DivX Ultra format: Not compatible
DivX HD format: Not compatible
DivX files without video data: Not compatible
DivX plus: Not compatible
Compatible audio codec: MP2, MP3, Dolby Digital
LPCM: Compatible
Bit rate: 8 kbps to 320 kbps (CBR), VBR
Sampling frequency: 8 kHz to 48 kHz
Compatible external subtitle file extension: .srt
MPEG-1/MPEG-2/MPEG-4 video
File extensions: .mpg or .mpeg (MPEG-1/MPEG-2),
.avi (MPEG-4)
Compatible audio codec: MP2 (MPEG-1/MPEG-2),
MP2, MP3, Dolby Digital (MPEG-4)
H.264 (MPEG-4AVC): Not compatible
LPCM: Not compatible
Bit rate: 8 kbps to 320 kbps (CBR), VBR
Sampling frequency: 8 kHz to 48 kHz
Supplemental information
Some characters in a file name (including the file
extension) or a folder name may not be displayed.
This unit may not work properly depending on the
application used to encode WMA files.
There may be a slight delay at the start of playback
of audio files embedded with image data or audio
files stored on a USB storage device that has numerous folder hierarchies.
Disc (CD/DVD)
Playable folders: up to 99 for CD-R/RW
Playable folders: up to 700 for DVD-R/RW
Playable files: up to 999 for CD-R/RW
Playable files: up to 3 500 for DVD-R/RW
File system: ISO 9660 Level 1 and 2, Romeo, Joliet,
UDF 1.02 (DVD-R/RW)
Multi-session playback: Compatible
Packet write data transfer: Not compatible
Regardless of the length of blank sections between the songs from the original recording, compressed audio discs play with a short pause
between songs.
External storage device (USB)
Playable folders: up to 1 500 (up to 700 for DivX/
MPEG-1/MPEG-2/MPEG-4)
Playable files: up to 15 000
Playback of copyright-protected files: Not compatible
English
57
En
Page 58

Appendix
Additional information
Additional information
Partitioned external storage device (USB): Only the
first playable partition can be played.
There is no compatibility for Multi Media Cards
(MMC).
CAUTION
! Pioneer accepts no responsibility for data
lost on the USB memory/USB portable audio
player even if that data is lost while using
this unit.
! Pioneer cannot guarantee compatibility with
all USB mass storage devices and assumes
no responsibility for any loss of data on
media players, smart phones, or other devices while using this product.
! Do not leave the discs/external storage de-
vice (USB) or iPod in places with high temperatures.
iPod compatibility
This unit supports only the following iPod models.
Made for
! iPod touch (5th generation)
! iPod touch (4th generation)
! iPod touch (3rd generation)
! iPod touch (2nd generation)
! iPod touch (1st generation)
! iPod classic
! iPod with video
! iPod nano (7th generation)
! iPod nano (6th generation)
! iPod nano (5th generation)
! iPod nano (4th generation)
! iPod nano (3rd generation)
! iPod nano (2nd generation)
! iPod nano (1st generation)
! iPhone 5
! iPhone 4S
! iPhone 4
58
En
! iPhone 3GS
! iPhone 3G
! iPhone
Depending on the generation or version of the
iPod, some functions may not be available.
Operations may vary depending on the software
version of iPod.
About the file/format compatibility, refer to the
iPod manuals.
Audiobook, Podcast: Compatible
CAUTION
Pioneer accepts no responsibility for data lost
on the iPod, even if that data is lost while this
unit is used.
Sequence of audio files
The user cannot assign folder numbers and
specify playback sequences with this unit.
Example of a hierarchy
01
02
03
04
05
Level 1 Level 2 Level 3 Level 4
Disc
Folder selection sequence or other operation
may differ depending on the encoding or writing
software.
: Folder
: Compressed
audio file
01 to 05: Folder
number
1 to 6: Playback
sequence
External storage device (USB)
The playback sequence is the same as the recorded sequence in the external storage device
(USB).
To specify the playback sequence, the following
method is recommended.
1 Create a file name that includes numbers
that specify the playback sequence (e.g.,
001xxx.mp3 and 099yyy.mp3).
2 Put those files into a folder.
3 Save the folder that contains the files to the
external storage device (USB).
However,depending on the system environment,
you may not be able to specify the playback sequence.
For USB portable audio players, the sequence is
different and depends on the player.
Using the display correctly
CAUTION
! If liquid or foreign matter should get inside
this unit, turn off the power immediately and
consult your dealer or the nearest authorized
PIONEER Service Station. Do not use the
unit in this condition because doing so may
result in fire, electric shock, or other failure.
! If you notice smoke, a strange noise or smell,
or any other abnormal signs from the display,
turn off the power immediately and consult
your dealer or the nearest authorized
PIONEER Service Station. Using this unit in
this condition may result in permanent dam-
age to the system.
! Do not disassemble or modify this unit, as
there are high-voltage components inside
which may cause electric shock. Be sure to
consult your dealer or the nearest authorized
PIONEER Service Station for internal inspec-
tion, adjustments, or repairs.
Handling the display
! Never touch the screen with anything be-
sides your finger when operating the touch
panel function. The screen can scratch
easily.
! When the display is subjected to direct sun-
light for a long period of time, it will become
very hot resulting in possible damage to the
LCD screen. You should avoid exposing the
display unit to direct sunlight as much as
possible.
! The display should be used within the tem-
perature range of –10 °C to +60 °C.
At temperatures higher or lower than this operating temperature range, the display may
not operate normally.
! The LCD screen is exposed in order to in-
crease its visibility within the vehicle. Do not
press it strongly on it as this may damage it.
! Do not push the LCD screen forcefully as
this may scratch it.
Liquid crystal display (LCD) screen
! Heat from the heater may damage the LCD
screen, and cool air from the cooler may
cause moisture to form inside the display resulting in possible damage.
! Small black dots or white dots (bright dots)
may appear on the LCD screen. These are
due to the characteristics of the LCD screen
and do not indicate a malfunction.
! When using a cellular phone, keep the an-
tenna away from the display to prevent disruption of the video image by the
appearance of spots, colored stripes, etc.
LED (light-emitting diode) backlight
! At low temperatures, using the LED backlight
may increase image lag and degrade the
image quality due to the characteristics of
the LCD screen. Image quality will improve
with an increase in temperature.
Page 59

Additional information
Appendix
Additional information
! To protect the LED backlight, the display will
darken in the following environments:
— In the direct sunlight
— Near the heater vent
! The product lifetime of the LED backlight is
more than 10 000 hours. However, it may decrease if used in high temperatures.
! If the LED backlight reaches the end of its
product lifetime, the screen will become dark
and the image will no longer be projected. In
such cases, please consult your dealer or the
nearest authorized PIONEER Service Station.
Keeping the display in good
condition
! When removing dust from the screen or
cleaning the display, first turn the system
power off, then wipe with a soft dry cloth.
! When wiping the screen, take care not to
scratch the surface. Do not use harsh or
abrasive chemical cleaners.
Bluetooth profiles
In order to use Bluetooth wireless technology,
devices must be able to interpret certain profiles. This unit is compatible with the following
profiles.
! GAP (Generic Access Profile)
! SDP (Service Discovery Protocol)
! OPP (Object Push Profile)
! HFP (Hands Free Profile)
! HSP (Head Set Profile)
! PBAP (Phone Book Access Profile)
! A2DP (Advanced Audio Distribution Profile)
! AVRCP(Audio/Video Remote Control Profile)
1.3
License, Warranty Disclaimer
& Limitation of Liability
SAFETY PROVISIONS
Disclaimer
THE WARRANTIES SET FORTH IN PIONEER’S
LIMITED WARRANTY ARE THE ONLY WARRANTIES MADE BY PIONEER OR ANY OF ITS LICENSORS, AS APPLICABLE. PIONEER AND ITS
LICENSORS EXPRESSLY DISCLAIM ALL OTHER
WARRANTIES, EXPRESS OR IMPLIED, INCLUDING, WITHOUT LIMITATION, WARRANTIES OF
MERCHANTABILITY AND FITNESS FOR A PARTICULAR PURPOSE.
Limitation of Liability
TO THE MAXIMUM EXTENT PERMISSIBLE
UNDER APPLICABLE LAW, NEITHER PIONEER
NOR ITS LICENSORS WILL BE LIABLE TO YOU
OR TO ANY OTHER PARTY FOR ANY INDIRECT,
CONSEQUENTIAL, INCIDENTAL, PUNITIVE, OR
SPECIAL DAMAGES, REGARDLESS OF THE
FORM OF ACTION, WHETHER IN CONTRACT
OR IN TORT, INCLUDING NEGLIGENCE, EVEN IF
SUCH PARTIES HAVE BEEN ADVISED OF THE
POSSIBILITY OF SUCH DAMAGES.
TO THE MAXIMUM EXTENT PERMISSIBLE
UNDER APPLICABLE LAW, PIONEER’S, OR ITS
LICENSORS’, TOTAL LIABILITY OF ANY KIND
ARISING OUT OF OR RELATED TO YOUR USE
OF THE PRODUCTS, INCLUDING, BUT NOT LIMITED TO, ANY WARRANTY CLAIMS, OR ANY
CLAIMS FOR PROPERTY DAMAGE, DEATH OR
DISABILITY, REGARDLESS OF THE FORUM
AND REGARDLESS OF WHETHER ANY ACTION
OR CLAIM IS BASED ON CONTRACT, TORT,(INCLUDING NEGLIGENCE), STRICT PRODUCT LIABILITY, OR ANY OTHER LEGAL THEORY, WILL
NOT EXCEED ONE THOUSAND DOLLARS (USD
$1 000).
SOME JURISDICTIONS DO NOT ALLOW THE
EXCLUSION OF DAMAGES OR LIMITATION OF
LIABILITY, SO THE ABOVE EXCLUSIONS OR
LIMITATIONS,TO THE EXTENT PROHIBITED BY
APPLICABLE LAW, MAY NOT APPLY TO YOU.
YOUR SPECIFIC RIGHTS MAY VARY FROM JURISDICTION TO JURISDICTION.
libpng
Please be aware in advance that Pioneer will not
respond to questions concerning the contents
of the source code.
This licence was originally written in English
and translated here only to help the reader
understand its content. Therefore, please note
that translated licence is NOT legally identified
with the original English text.
This copy of the libpng notices is provided for
your convenience. In case of any discrepancy
between this copy and the notices in the file
png.h that is included in the libpng distribution,
the latter shall prevail.
COPYRIGHT NOTICE, DISCLAIMER, and LICENSE:
If you modify libpng you may insert additional
notices immediately following this sentence.
This code is released under the libpng license.
libpng versions 1.2.6, August 15, 2004, through
1.5.0, January 6, 2011, are Copyright (c) 2004,
2006-2010 Glenn Randers-Pehrson, and are distributed according to the same disclaimer and license as libpng-1.2.5 with the following
individual added to the list of Contributing Authors
Cosmin Truta
libpng versions 1.0.7, July 1, 2000, through 1.2.5
- October 3, 2002, are Copyright (c) 2000-2002
Glenn Randers-Pehrson, and are distributed according to the same disclaimer and license as
libpng-1.0.6 with the following individuals added
to the list of Contributing Authors
Simon-Pierre Cadieux
Eric S. Raymond
Gilles Vollant
and with the following additions to the disclaimer:
There is no warranty against interference with
your enjoyment of the library or against infringement. There is no warranty that our efforts or
the library will fulfill any of your particular purposes or needs. This library is provided with all
faults, and the entire risk of satisfactory quality,
performance, accuracy, and effort is with the
user.
libpng versions 0.97, January 1998, through
1.0.6, March 20, 2000, are Copyright (c) 1998,
1999 Glenn Randers-Pehrson, and are distributed according to the same disclaimer and license as libpng-0.96, with the following
individuals added to the list of Contributing Authors:
Tom Lane
Glenn Randers-Pehrson
Willem van Schaik
libpng versions 0.89, June 1996, through 0.96,
May 1997, are Copyright (c) 1996, 1997 Andreas
Dilger Distributed according to the same disclaimer and license as libpng-0.88, with the following individuals added to the list of
Contributing Authors:
John Bowler
Kevin Bracey
Sam Bushell
Magnus Holmgren
Greg Roelofs
Tom Tanner
libpng versions 0.5, May 1995, through 0.88, January 1996, are Copyright (c) 1995, 1996 Guy Eric
Schalnat, Group 42, Inc.
For the purposes of this copyright and license,
"Contributing Authors" is defined as the following set of individuals:
English
59
En
Page 60

Appendix
Additional information
Additional information
Andreas Dilger
Dave Martindale
Guy Eric Schalnat
Paul Schmidt
Tim Wegner
The PNG Reference Library is supplied "AS IS".
The Contributing Authors and Group 42, Inc. disclaim all warranties, expressed or implied, including, without limitation, the warranties of
merchantability and of fitness for any purpose.
The Contributing Authors and Group 42, Inc. assume no liability for direct, indirect, incidental,
special, exemplary, or consequential damages,
which may result from the use of the PNG Reference Library, even if advised of the possibility of
such damage.
Permission is hereby granted to use, copy, modify, and distribute this source code, or portions
hereof, for any purpose, without fee, subject to
the following restrictions:
1. The origin of this source code must not be
misrepresented.
2. Altered versions must be plainly marked as
such and must not be misrepresented as being
the original source.
3. This Copyright notice may not be removed or
altered from any source or altered source distribution.
The Contributing Authors and Group 42, Inc.
specifically permit, without fee, and encourage
the use of this source code as a component to
supporting the PNG file format in commercial
products. If you use this source code in a product, acknowledgment is not required but would
be appreciated.
A "png_get_copyright" function is available, for
convenient use in "about" boxes and the like:
printf("%s",png_get_copyright(NULL));
Also, the PNG logo (in PNG format, of course) is
supplied in the files "pngbar.png" and
"pngbar.jpg (88x31) and "pngnow.png" (98x31).
Libpng is OSI Certified Open Source Software.
OSI Certified Open Source is a certification
mark of the Open Source Initiative.
60
En
Glenn Randers-Pehrson
glennrp at users.sourceforge.net
January 6, 2011
Copyright and trademark notice
This item incorporates copy protection technology that is protected by U.S. patents and other
intellectual property rights of Rovi Corporation.
Reverse engineering and disassembly are prohibited.
Bluetooth
The Bluetoothâword mark and logos are registered trademarks owned by Bluetooth SIG, Inc.
and any use of such marks by PIONEER
CORPORATION is under license. Other trademarks and trade names are those of their respective owners.
DVD video
is a trademark of DVD Format/Logo
Licensing Corporation.
iTunes
Apple and iTunes are trademarks of Apple Inc.,
registered in the U.S. and other countries.
MP3
Supply of this product only conveys a license for
private, non-commercial use and does not convey a license nor imply any right to use this product in any commercial (i.e. revenue-generating)
real time broadcasting (terrestrial, satellite,
cable and/or any other media), broadcasting/
streaming via internet, intranets and/or other
networks or in other electronic content distribution systems, such as pay-audio or audio-on-demand applications. An independent license for
such use is required. For details, please visit
http://www.mp3licensing.com.
WMA
Windows Media is either a registered trademark
or trademark of Microsoft Corporation in the
United States and/or other countries.
This product includes technology owned by
Microsoft Corporation and cannot be used or
distributed without a license from Microsoft
Licensing, Inc.
iPod & iPhone
iPhone, iPod, iPod classic, iPod nano, and iPod
touch are trademarks of Apple Inc., registered in
the U.S. and other countries.
Lightning is a trademark of Apple Inc.
“Made for iPod” and “Made for iPhone” mean
that an electronic accessory has been designed
to connect specifically to iPod or iPhone, respectively, and has been certified by the developer to
meet Apple performance standards. Apple is
not responsible for the operation of this device
or its compliance with safety and regulatory
standards. Please note that the use of this accessory with iPod or iPhone may affect wireless
performance.
Androidä
Android is a trademark of Google Inc.
Dolby Digital
Manufactured under license from Dolby
Laboratories. Dolby and the double-D symbol
are trademarks of Dolby Laboratories.
DivX
DivXâ, DivX Certifiedâand associated logos are
trademarks of Rovi Corporation or its subsidiaries and are used under license.
ABOUT DIVX VIDEO: DivX
format created by DivX, LLC, a subsidiary of Rovi
Corporation. This is an official DivX Certified
device that plays DivX video. Visit divx.com for
more information and software tools to convert
your files into DivX videos.
â
is a digital video
â
ABOUT DIVX VIDEO-ON-DEMAND: This
DivX Certified
order to play purchased DivX Video-on-Demand
(VOD) movies. To obtain your registration code,
locate the DivX VOD section in Displaying the
DivX
for more information on how to complete your
registration.
MIXTRAX
MIXTRAX is a trademark of the PIONEER
CORPORATION.
MirrorLink
MirrorLink Certifiedä, the Design Onlyä Certification Logo, MirrorLinkä and the MirrorLinkä
Logo are certification marks and trademarks of
the Car Connectivity Consortium LLC. Unauthorized use is strictly prohibited.
â
device must be registered in
â
VOD registration code. Go to vod.divx.com
Page 61

Additional information
Appendix
Additional information
Language code chart for DVD
Language (code), input code
Japanese (ja), 1001 Dzongkha (dz), 0426 Kurdish (ku), 1121 Kinyarwanda (rw), 1823
English (en), 0514 Ewe (ee), 0505 Komi (kv), 1122 Sanskrit (sa), 1901
French (fr), 0618 Esperanto(eo), 0515 Cornish (kw), 1123 Sardinian (sc), 1903
Spanish (es), 0519 Estonian (et), 0520
German (de), 0405 Basque (eu), 0521 Latin (la), 1201
Italian (it), 0920 Persian (fa), 0601
Chinese (zh), 2608 Fulah (ff), 0606 Ganda (lg), 1207 Sinhala(si), 1909
Dutch, Flemish (nl),
1412
Portuguese (pt), 1620 Fijian (fj), 0610 Lingala (ln), 1214 Slovenian (sl), 1912
Swedish (sv), 1922 Faroese (fo), 0615 Lao (lo), 1215 Samoan (sm), 1913
Russian (ru), 1821
Korean (ko), 1115 Irish (ga), 0701 Luba-Katanga (lu), 1221 Somali (so), 1915
Greek (el), 0512 Gaelic (gd), 0704 Latvian (lv), 1222 Albanian (sq), 1917
Afar (aa), 0101 Galician (gl), 0712 Malagasy (mg), 1307 Serbian (sr), 1918
Abkhazian (ab), 0102 Guarani (gn), 0714 Marshallese (mh), 1308 Swati (ss), 1919
Avestan (ae), 0105 Gujarati (gu), 0721 Maori (mi), 1309
Afrikaans (af), 0106 Manx (gv), 0722 Macedonian (mk), 1311 Sundanese (su), 1921
Akan (ak), 0111 Hausa (ha), 0801 Malayalam (ml), 1312 Swahili (sw), 1923
Amharic (am), 0113 Hebrew (he), 0805 Mongolian (mn), 1314 Tamil (ta), 2001
Aragonese (an), 0114 Hindi (hi), 0809 Marathi (mr), 1318 Telugu (te), 2005
Arabic (ar), 0118 Hiri Motu (ho), 0815 Malay (ms), 1319 Tajik (tg), 2007
Assamese (as), 0119 Croatian (hr), 0818 Maltese (mt), 1320 Thai (th), 2008
Avaric (av), 0122 Haitian (ht), 0820 Burmese (my), 1325 Tigrinya (ti), 2009
Aymara (ay), 0125 Hungarian (hu), 0821 Nauru (na), 1401 Turkmen (tk), 2011
Azerbaijani (az), 0126 Armenian (hy), 0825 Bokmal (nb), 1402 Tagalog (tl), 2012
Bashkir (ba), 0201 Herero (hz), 0826
Belarusian (be), 0205 Interlingua (ia), 0901 Nepali (ne), 1405 Tonga (to), 2015
Bulgarian (bg), 0207 Indonesian (id), 0904 Ndonga (ng), 1407 Turkish (tr), 2018
Bihari (bh), 0208 Interlingue (ie), 0905 Nynorsk (nn), 1414 Tsonga (ts), 2019
Bislama (bi), 0209 Igbo (ig), 0907 Norwegian (no), 1415 Tatar (tt), 2020
Bambara (bm), 0213 Sichuan Yi (ii), 0909
Finnish (fi), 0609 Limburgan (li), 1209 Slovak (sk), 1911
Western Frisian (fy),
0625
Kirghiz, Kyrgyz (ky),
1125
Luxembourgish (lb),
1202
Lithuanian (lt), 1220 Shona (sn), 1914
Ndebele, North (nd),
1404
Ndebele, South (nr),
1418
Sindhi (sd), 1904
Northern Sami (se),
1905
Sangho (sg), 1907
Sotho, Southern (st),
1920
Tswana (tn), 2014
Twi (tw), 2023
Language (code), input code
Bengali (bn), 0214 Inupiaq (ik), 0911
Tibetan (bo), 0215 Ido (io), 0915 Chichewa (ny), 1425
Breton (br), 0218 Icelandic (is), 0919 Occitan (oc), 1503 Ukrainian (uk), 2111
Bosnian (bs), 0219 Inuktitut (iu), 0921 Ojibwa (oj), 1510 Urdu (ur), 2118
Catalan (ca), 0301 Javanese (jv), 1022 Oromo (om), 1513 Uzbek (uz), 2126
Chechen (ce), 0305 Georgian (ka), 1101 Oriya (or), 1518 Venda (ve), 2205
Chamorro (ch), 0308 Kongo (kg), 1107 Ossetian (os), 1519 Vietnamese (vi), 2209
Corsican (co), 0315 Kikuyu, Gikuyu (ki), 1109
Cree (cr), 0318 Kuanyama (kj), 1110 Pali (pi), 1609 Walloon (wa), 2301
Czech (cs), 0319 Kazakh (kk), 1111 Polish (pl), 1612 Wolof (wo), 2315
Church Slavic (cu), 0321 Kalaallisut (kl), 1112
Chuvash (cv), 0322
Welsh (cy), 0325 Kannada (kn), 1114 Romansh (rm), 1813 Yoruba (yo), 2515
Danish (da), 0401 Kanuri (kr), 1118 Rundi (rn), 1814
Divehi (dv), 0422 Kashmiri (ks), 1119 Romanian (ro), 1815 Zulu (zu), 2621
Central Khmer (km),
1113
Navajo, Navaho (nv),
1422
Panjabi, Punjabi (pa),
1601
Pashto, Pushto (ps),
1619
Quechua (qu), 1721 Yiddish (yi), 2509
Tahitian (ty), 2025
Uighur, Uyghur (ug),
2107
Volapük (vo), 2215
Xhosa (xh), 2408
Zhuang, Chuang (za),
2601
English
61
En
Page 62

Appendix
Additional information
Additional information
Specifications
General
Power source ................... 14.4 V DC (12.0 V to 14.4 V al-
Grounding system ............ Negative type
Maximum current consumption
................................... 10.0 A
Dimensions (W × H × D):
D
Chassis ............................ 178mm × 100mm × 165mm
Nose ................................ 171mm × 97 mm × 18 mm
(AVH-X5650BT/AVH-X4650DVD)
Nose ................................ 171mm × 97 mm × 9 mm
(AVH-X2650BT/AVH-X1650DVD)
Weight ............................. 2.0kg
(AVH-X5650BT/AVH-X4650DVD)
Weight ............................. 1.7 kg
(AVH-X2650BT/AVH-X1650DVD)
Display
Screen size/aspect ratio ... 6.95 inch wide/16:9
(AVH-X5650BT/AVH-X4650DVD)
Screen size/aspect ratio ... 6.1 inch wide/16:9
(AVH-X2650BT/AVH-X1650DVD)
Pixels ............................... 1152 000(2 400 × 480)
Display method ................ TFT active matrix, driving type
Color system .................... NTSC/PAL/PAL-M/PAL-N/
Durable temperature range (power off)
................................... –20 °C to +80 °C
Audio
Maximum power output ... 50 W × 4
Continuous power output
................................... 22 W × 4 (50 Hz to 15000 Hz,
Load impedance .............. 4 W (4 W to 8 W (2W for 1 ch)
Preout maximum output level
................................... 4.0V
(AVH-X5650BT/AVH-X4650DVD)
62
En
lowable)
(effective display area:
156.6 mm × 81.6 mm)
(effective display area:
136.2 mm × 72.0 mm)
SECAM compatible
70 W × 1/2 W (for subwoofer)
5 %THD, 4 Wload, both channels driven)
allowable)
Preout maximum output level
................................... 2.0V
(AVH-X2650BT/AVH-X1650DVD)
Equalizer (8-Band Graphic Equalizer):
Frequency ........................ 40 Hz/80 Hz/200 Hz/400 Hz/
Gain ................................ ±12 dB
HPF:
Frequency ........................ 50 Hz/63 Hz/80 Hz/100 Hz/
Slope ............................... –12 dB/ oct
Subwoofer (mono):
Frequency ........................ 50 Hz/63 Hz/80 Hz/100 Hz/
Slope ............................... –18 dB/oct
Gain ................................ +6 dB to –24 dB
Phase .............................. Normal/Reverse
Bass boost:
Gain ................................ +12 dB to 0 dB
DVD Player
System ............................ DVD video, Video CD, CD,
Usable discs .................... DVD video, Video CD, CD, CD-
Region number ................ 4
Frequency response ......... 5 Hz to 44 000Hz (with DVD,
Signal-to-noise ratio ......... 96 dB (1 kHz) (IEC-A network)
Output level:
Video ............................... 1.0 Vp-p/75 W (±0.2 V)
Number of channels ........ 2 (stereo)
MP3 decoding format ...... MPEG-1 & 2 Audio Layer 3
WMA decoding format ..... Ver. 7, 7.1, 8, 9, 10, 11,12 (2 ch
AAC decoding format ....... MPEG-4 AAC (iTunes encoded
DivX decoding format ....... Home Theater Ver.3, 4, 5.2, 6
MPEG video decoding format
................................... MPEG1, MPEG2, MPEG4
1 kHz/2.5kHz/8 kHz/10 kHz
125 Hz
125 Hz
WMA, MP3, AAC, DivX,
MPEG player
R/RW, DVD-R/RW/RDL
at sampling frequency 96 kHz)
(RCA level)
audio)
(Windows Media Player)
only) (.m4a)
(Ver.10.6 and earlier)
(Except ultra and HD) (.avi,
.divx)
(part2), MS-MPEG4 (ver. 3)
USB
USB standard specification
................................... USB 1.1, USB 2.0 full speed
Maximum current supply
................................... 1.0A
USB Class ....................... MSC (Mass Storage Class),
File system ....................... FAT16,FAT32
MP3 decoding format ...... MPEG-1 & 2 Audio Layer 3
WMA decoding format ..... Ver. 7, 7.1, 8, 9, 10, 11,12 (2 ch
AAC decoding format ....... MPEG-4 AAC (iTunes encoded
WAV (MSC Mode only):
WAV signal format ........... Linear PCM, MS ADPCM
Sampling Frequency ........ Linear PCM:16 kHz, 22.05 kHz,
JPEG (MSC Mode only):
JPEG decoding format ..... .jpeg, .jpg, .jpe
Pixel Sampling ................. 4:2:2, 4:2:0
Decode Size ..................... MAX:8192(H) x 7 680(W),
DivX decoding format (MSC Mode only)
................................... Home Theater Ver. 3, 4, 5.2, 6
MPEG video decoding format (MSC Mode only)
................................... MPEG1, MPEG2, MPEG4
FM tuner
Frequency range .............. 87.5 MHz to 108.0 MHz
Usable sensitivity ............. 9 dBf(0.8 µV/75 W, mono, S/N:
Signal-to-noise ratio ......... 72 dB (IEC-A network)
AM tuner
Frequency range .............. 530kHz to 1640 kHz (10kHz)
Usable sensitivity ............. 25 µV (S/N: 20 dB)
(For video files)
USB 2.0 high speed (For
audio files)
MTP (Media Transfer Protocol)
audio)
(Windows Media Player)
only)
(Ver.10.6 and earlier)
(.wav)
24 kHz, 32kHz, 44.1kHz,
48 kHz
MS ADPCM:22.05 kHz,
44.1 kHz
MIN:32(H) x 32(W)
(Except ultra and HD) (.avi,
.divx)
(part2), MS-MPEG4 (ver. 3)
30 dB)
531 kHz to 1 602kHz (9 kHz)
Signal-to-noise ratio ......... 62 dB (IEC-A network)
Bluetooth
(AVH-X5650BT/AVH-X2650BT)
Version ............................ Bluetooth 3.0 certified
Output power ................... +4 dBm Maximum
(Power class 2)
Note
Specifications and the design are subject to
modifications without notice.
Page 63

English
63En
Page 64

Índice
Índice
Precauciones
INSTRUCCIONES DE SEGURIDAD
IMPORTANTES 66
Para garantizar la conducción segura del
vehículo 66
Para evitar la descarga de la batería 66
Antes de comenzar
Acerca de esta unidad 67
Números de región de discos DVD
vídeo 67
Acerca de este manual 67
En caso de problemas con el
dispositivo 67
Uso y cuidado del mando a distancia 67
Modo de demostración 67
Qué es cada cosa
Unidad principal 68
Pantalla de inicio 68
Activación y desactivación de la
fuente 69
Selección de una fuente 69
Ajuste del volumen 69
Mando a distancia 69
Operaciones comunes
Operaciones comunes para listas o ajustes
de menú. 70
Manejo del icono de desplazamiento y de la
barra de tiempo 70
Activación del teclado táctil 71
Uso de la vista trasera 71
Uso del monitor trasero 71
Utilización del sound retriever 71
Cambio del modo panorámico 71
Funcionamiento básico
Ajuste del ángulo de panel LCD y expulsión
de medios 72
Ajuste del reloj 72
Sintonizador
Funciones del sintonizador 72
Almacenamiento y recuperación de
emisoras 72
Visualización de radio texto 73
64
Es
Almacenamiento y recuperación de radio
texto 73
Almacenamiento de las emisoras con las
señales más intensas 73
Sintonización de señales potentes 73
Recepción de anuncios de tráfico 73
Recepción de transmisiones de alarma que
interrumpen las transmisiones
habituales 73
Uso de las funciones PTY 73
Ajuste del paso de sintonía de FM 74
Ajuste RDS 74
Cambio de la búsqueda PI
automática 74
Ajuste del paso de sintonía de AM 74
Disco (CD/DVD)
Introducción de funciones para
películas 75
Funciones de reproducción de
sonido 76
Cambio del tipo de archivo
multimedia 76
Uso del menú de DVD 77
Reproducción aleatoria (shuffle) 77
Repetición de reproducción 77
Búsqueda de la parte que desea
reproducir 77
Selección de la salida de audio 77
Reproducción PBC 78
Selección de pistas de la lista de títulos de
las pistas 78
Selección de ficheros de la lista de nombres
de ficheros 78
Reproducción del contenido DivXâ
VOD 78
iPod
Control de iPod 79
Funciones de reproducción de
sonido 79
Funciones de imágenes en
movimiento 79
Uso de la función iPod de la unidad desde el
iPod 80
Tecla de selección aleatoria 81
Repetición de reproducción 81
Reproducción de vídeos desde su
iPod 81
Búsqueda de un vídeo/tema musical en el
iPod 81
Cambio de la velocidad del audiolibro 82
Visualización de listas relacionadas con la
canción que se está reproduciendo
(búsqueda de enlace) 82
AppRadio Mode
Operación de AppRadio Mode 82
Procedimiento de inicio 83
Configuración del teclado 83
Funciones del adaptador de conexión de
teléfonos inteligentes
Procedimiento de inicio 84
USB
Funciones de imágenes en
movimiento 84
Funciones de reproducción de
sonido 85
Modo de búsqueda de música 86
Funciones de reproducción de imágenes
fijas 86
Cambio del tipo de archivo
multimedia 86
Reproducción aleatoria (shuffle) 87
Repetición de reproducción 87
Selección de ficheros de la lista de nombres
de ficheros 87
Visualización de listas relacionadas con la
canción que se está reproduciendo
(búsqueda de enlace) 87
Reproducción del contenido DivXâ
VOD 87
Captura de una imagen en archivos
JPEG 87
Audio Bluetooth
Funciones de reproducción de
sonido 87
Ajuste de audio Bluetooth 87
Reproducción aleatoria (shuffle) 88
Repetición de reproducción 88
Uso de MIXTRAX
Función MIXTRAX 88
Función MIXTRAX EZ 88
Inicio de la función MIXTRAX EZ 88
Configuración del modo MIXTRAX 88
Configuración del efecto 88
Teléfono Bluetooth
Funciones del teléfono Bluetooth 89
Llamada a un número del directorio de
teléfonos 90
Selección de número por modo de
búsqueda alfabético 90
Inversión de nombres en el directorio de
teléfonos 90
Uso de las listas de llamadas perdidas,
recibidas y marcadas 91
Ajuste de respuesta automática 91
Ajuste del volumen de escucha del
interlocutor 91
Cambio del tono de llamada 91
Uso de las listas de marcaciones
predefinidas 91
Realización de una llamada ingresando el
número de teléfono 91
Ajuste del modo privado 91
Control de voz 92
Sintonizador de TV
Funciones del sintonizador de TV 92
Cambio del modo panorámico 92
Almacenamiento de emisoras 92
Función EPG 93
Configuración
Funcionamiento del menú 93
Ajustes de audio
Uso del ajuste del fader/balance 94
Uso del ajuste del balance 94
Uso del ecualizador 94
Uso del autoecualizador 94
Uso del control central de sonido 94
Ajuste de la sonoridad 95
Uso de la salida de subgraves 95
Intensificación de los graves 95
Uso del filtro de paso alto 95
Page 65

Índice
Índice
Ajuste de los niveles de la fuente 95
Configuración del reproductor de vídeo
Ajuste del idioma de los subtítulos 96
Ajuste del idioma del audio 96
Ajuste del idioma de menús 96
Ajuste de la visualización multiángulo del
DVD 96
Ajuste del formato 96
Ajuste del intervalo del slideshow 97
Ajuste del control de padres 97
Ajuste del archivo de subtítulos DivX 97
Visualización del código de registro de
DivXâ VOD 98
Reproducción automática de DVD 98
Ajustes del sistema
Cambio del ajuste de un equipo
auxiliar 98
Ajuste de la entrada de AV 98
Establecimiento del sistema de
navegación 98
Selección del modo MirrorLink 98
Actualización del firmware para el
adaptador de conexión del teléfono
inteligente 99
Visualización de la versión del firmware del
adaptador de conexión del teléfono
inteligente 99
Actualización del firmware 99
Visualización de la versión del
firmware 100
Configuración del modo MIXTRAX 100
Cambio del ajuste de la imagen (Brillo,
Contraste, Color, Matiz, Intensidad y
Temperatura) 100
Selección del idioma del sistema 100
Configuración del modo de
demostración 101
Cambio del silenciamiento/atenuación del
sonido 101
Ajuste de la salida posterior y del
controlador de subgraves 101
Uso del teclado 101
Ajuste del desplazamiento continuo 101
Ajuste de audio Bluetooth 101
Borrado de la memoria Bluetooth 101
Actualización del software de
Bluetooth 102
Visualización de la versión del software de
Bluetooth 102
Ajuste de la cámara retrovisora (cámara
posterior) 102
EQ automático (ecualización
automática) 102
Selección del formato de vídeo 104
Ajuste de la señal de vídeo 104
Configurar el control del volante 104
Menú de favoritos
Utilización del menú de favoritos 105
Menú de conexión Bluetooth
Funciones del menú de conexión
Bluetooth 106
Menú de tema
Selección de la iluminación en color 107
Selección del color OSD (on-screen
display) 107
Selección de la visualización de
fondo 107
Otras funciones
Ajuste de las posiciones de respuesta del
panel táctil (calibración del panel
táctil) 108
Uso de una fuente AUX 108
Reinicio del microprocesador 108
Utilización del mezclador de sonido 108
Conexión
Conexión del cable de alimentación 111
Conexión a un amplificador de potencia
comprado por separado 112
Conexión con el componente de vídeo
externo y el display 112
Conexión con una cámara
retrovisora 113
iPod con conector Lightning 113
iPod con conector de 30 patillas 114
Conexión opcional del adaptador de
conexión de teléfono inteligente (CD-
ML100) 114
Instalación
Instalación usando los agujeros para
tornillos ubicados en ambos costados de
la unidad 115
Instalación del micrófono 115
Información adicional
Solución de problemas 116
Mensajes de error 118
Comprensión de los mensajes de error del
ajuste EQ automático 120
Comprensión de los mensajes 120
Lista de indicadores 121
Pautas para el manejo 122
Compatibilidad con audio (USB) 123
Compatibilidad con archivo comprimido
(disco, USB) 124
Compatibilidad con iPod 124
Secuencia de archivos de audio 125
Uso correcto del display 125
Perfiles Bluetooth 126
Licencia, exención de responsabilidad sobre
la garantía y limitación de
responsabilidad 126
Tabla de códigos de idioma para el
DVD 128
Especificaciones 129
Español
65
Es
Page 66

Sección
01
Precauciones
Precauciones
Gracias por haber adquirido este producto
PIONEER.
Lea con detenimiento este manual antes de utilizar el producto por primera vez para que pueda
darle el mejor uso posible. Es muy importante
que lea y cumpla con la información que aparece bajo los mensajes de ADVERTENCIA y
PRECAUCIÓN de este manual. Una vez leído,
guarde el manual en un lugar seguro y a mano
para poder consultarlo en el futuro.
INSTRUCCIONES DE
SEGURIDAD IMPORTANTES
Lea íntegramente estas instrucciones sobre el
display y consérvelas para consultarlas en el futuro.
1 No instale el display en un lugar que (i)
pueda obstaculizar la visión del conductor; (ii) pueda alterar el funcionamiento
de los sistemas operativos o los dispositivos de seguridad del vehículo, en particular los airbags y los botones de las
luces de emergencia o (iii) pueda afectar
a la capacidad del conductor para conducir el vehículo de manera segura.
2 No haga funcionar el display si al hacerlo
desvía de alguna manera su atención de
la conducción segura de su vehículo. Observe siempre las reglas de conducción
segura y obedezca todas las leyes de tráfico existentes. Si tiene dificultades para
hacer funcionar el sistema o leer el display, estacione el vehículo en un lugar
seguro y haga los ajustes necesarios.
3 Recuerde usar siempre el cinturón de se-
guridad cuando conduzca el vehículo. En
caso de accidente, las lesiones pueden
ser mucho más graves si el cinturón de
seguridad no está debidamente abrochado.
4 Nunca use auriculares mientras conduce.
66
Es
5 Para promover la seguridad, ciertas fun-
ciones permanecerán desactivadas a
menos que se active el freno de mano y
el vehículo no esté en movimiento.
6 Nunca suba el volumen del display de tal
manera que no pueda escuchar el tráfico
exterior y los vehículos de emergencia.
ADVERTENCIA
! No trate de instalar o reparar este pro-
ducto usted mismo. La instalación o la
reparación de este producto por parte de
personas sin cualificación ni experiencia
en equipos electrónicos y accesorios
para automóviles puede ser peligrosa y
puede exponerle al riesgo de sufrir una
descarga eléctrica u otros peligros.
! No intente utilizar la unidad mientras esté
conduciendo. Asegúrese de salir de la carretera y aparcar su vehículo en un lugar seguro
antes de intentar utilizar los controles del dispositivo.
Para garantizar la conducción
segura del vehículo
ADVERTENCIA
! EL CABLE VERDE CLARO DEL CONECTOR
DE ALIMENTACIÓN ESTÁ DISEÑADO
PARA DETECTAR SI EL VEHÍCULO ESTÁ
ESTACIONADO Y DEBE CONECTARSE
CON EL LADO DE LA FUENTE DE ALIMENTACIÓN DEL INTERRUPTOR DEL FRENO
DE MANO. LA CONEXIÓN O EL USO INCORRECTO DE ESTE CABLE PUEDE INFRINGIR LAS LEYES PERTINENTES Y
OCASIONAR LESIONES FÍSICAS O
DAÑOS GRAVES.
! Para evitar el riesgo de daños y lesiones y la posi-
ble violación de las leyes pertinentes, esta unidad
no debe usarse con una pantalla que sea visible
para el conductor.
! Para evitar el riesgo de accidentes y la posible
violación de las leyes pertinentes, no se debe
nunca visualizar el vídeo en el asiento delantero
mientras se esté conduciendo el vehículo.
! En algunos países o estados, puede ser ilícita la
visualización de imágenes en un display dentro
de un vehículo, incluso por otras personas que
no sean el conductor.En los casos en que resulten aplicables, estas normas deben respetarse y
no deben usarse las funciones de vídeo de esta
unidad.
Cuando intente ver un vídeo mientras esté conduciendo, aparecerá el aviso “Queda estricta-
mente prohibido ver la fuente de video del
asiento delantero al conducir.” en el display
delantero.
Para ver una imagen de vídeo en el display delantero, estacione el automóvil en un lugar seguro y active el freno de mano.
Uso de un display conectado a la
salida de monitor trasero
La salida del monitor trasero en esta unidad (V
OUT) se utiliza para conectar un display poste-
rior que permite ver vídeos a los pasajeros de
los asientos traseros.
ADVERTENCIA
NUNCA instale el display trasero en un lugar
en donde el conductor pueda ver vídeos mientras conduce.
Al utilizar la cámara retrovisora
Con una cámara retrovisora opcional, esta unidad puede utilizarse como ayuda extra para, por
ejemplo, tener siempre vigilado un remolque o
dar marcha atrás de manera segura al aparcar
en un espacio reducido.
ADVERTENCIA
! LA IMAGEN EN PANTALLA PUEDE APA-
RECER AL REVÉS.
! UTILICE SÓLO ENTRADAS PARA
VISTA AL REVÉS O IMAGEN DE ESPEJO EN LA CÁMARA RETROVISORA.
OTROS USOS PODRÍAN PROVOCAR
HERIDAS O DAÑOS.
PRECAUCIÓN
! la función de cámara retrovisora se debe uti-
lizar para tener siempre vigilados los trailers,
o al dar marcha atrás. No la utilice para fines
lúdicos.
! Tenga en cuenta que los bordes de las imá-
genes de la cámara retrovisora pueden ser ligeramente diferentes dependiendo de si se
muestran las imágenes a pantalla completa
al dar marcha atrás y de si las imágenes se
utilizan para comprobar la parte trasera
cuando el vehículo se mueve hacia adelante.
Para evitar la descarga de la
batería
Mantenga el motor del vehículo encendido
mientras use esta unidad para evitar descargar
la batería.
! Si se interrumpe la alimentación eléctrica de
esta unidad, por motivos como la sustitución
de la batería del vehículo, el microprocesador de la unidad vuelve a su estado inicial.
Le recomendamos que transcriba los datos
de ajuste de audio.
ADVERTENCIA
No utilice la unidad con un vehículo que carezca de la posición ACC.
Page 67

Antes de comenzar
Antes de comenzar
Sección
02
Acerca de esta unidad
PRECAUCIÓN
Este producto contiene un diodo de láser de
clase 1, clasificado en la directiva IEC 608251:2007 concerniente a la Seguridad de los productos láser. Para garantizar la seguridad
continua, no extraiga ninguna tapa ni intente
acceder a la parte interna del producto. Solicite a personal cualificado que realice todos los
trabajos de mantenimiento.
PRODUCTO LASER CLASE 1
PRECAUCIÓN—LOS PRODUCTOS LÁSER CLASE 1M EMITEN
RADIACIÓN VISIBLE E INVISIBLE UNA VEZ ABIERTOS. NO
LOS MIRE DIRECTAMENTE CON INSTRUMENTOS ÓPTICOS.
La operación de este equipo está sujeta a las siguientes dos condiciones: (1) es posible que
este equipo o dispositivo no cause interferencia
perjudicial y (2) este equipo o dispositivo debe
aceptar cualquier interferencia, incluyendo la
que pueda causar su operación no deseada.
PRECAUCIÓN
! Evite que esta unidad entre en contacto con
líquidos, ya que puede producir una descarga eléctrica. Además, el contacto con líquidos puede causar daños en la unidad, humo
y recalentamiento.
! Conserve este manual a mano para consul-
tarlo en el futuro.
! Mantenga siempre el volumen lo suficiente-
mente bajo como para poder escuchar los
sonidos que provienen del exterior.
! Evite la exposición a la humedad.
! Si se desconecta o se descarga la batería,
todas las memorias preajustadas se borrarán.
Números de región de discos
DVD vídeo
Este reproductor sólo admite discos DVD vídeo
con números de región compatibles. Podrá encontrar el número de región del reproductor en
la parte inferior de esta unidad y en este manual
(consulte Especificaciones en la página 129).
Acerca de este manual
! Esta unidad incluye diversas funciones sofis-
ticadas que garantizan una recepción y un
funcionamiento de calidad superior. Por sus
características de diseño, todas las funciones se pueden usar con gran facilidad; sin
embargo, muchas de ellas necesitan una explicación. Este manual le ayudará a aprovechar todo el potencial que ofrece esta unidad
y a disfrutar al máximo del placer de escuchar.
! En este manual se emplean diagramas de
pantallas reales para describir las funciones.
Sin embargo, las pantallas de algunas unidades pueden no coincidir con aquellas mostradas en el manual en función del modelo
empleado.
En caso de problemas con el
dispositivo
En caso de que este producto no funcione correctamente, contacte con su distribuidor o con
el servicio técnico oficial Pioneer más próximo a
su domicilio.
Uso y cuidado del mando a
distancia
Instalación de la pila
Deslice y extraiga la bandeja de la parte posterior del mando a distancia e inserte la pila con
los polos positivo (+) y negativo (–) en la dirección correcta.
! Al utilizar el mando a distancia por primera
vez, extraiga la película que sobresale de la
bandeja.
ADVERTENCIA
! Mantenga la pila fuera del alcance de los
niños. En caso de ingestión accidental de
ésta, consulte a un médico de inmediato.
! Las pilas o baterías no deben exponerse a
altas temperaturas ni fuentes de calor como
el sol, el fuego, etc.
PRECAUCIÓN
! Extraiga la batería si no piensa utilizar el
mando a distancia durante un mes o más
tiempo.
! Si la pila se sustituye de forma incorrecta,
existe cierto riesgo de explosión. Reemplácela sólo por una del mismo tipo o equivalente.
! No manipule la batería con herramientas
metálicas.
! No guarde la pila junto a objetos metálicos.
! En el caso de que se produzcan fugas de la
pila, limpie completamente el mando a distancia e instale una pila nueva.
! Para desechar las pilas usadas, cumpla con
los reglamentos gubernamentales o las normas ambientales pertinentes de las instituciones públicas aplicables en su país/zona.
Uso del mando a distancia
Apunte el mando a distancia hacia la carátula
para hacer funcionar la unidad.
! Es posible que el mando a distancia no fun-
cione correctamente si lo expone a la luz
solar directa.
Importante
! No guarde el mando a distancia en lugares
expuestos a altas temperaturas o a la luz
solar directa.
! No deje caer el mando a distancia al suelo,
ya que puede quedar atascado debajo del
freno o del acelerador.
Modo de demostración
La demostración de características se inicia
automáticamente cuando selecciona la fuente
OFF y continúa mientras la llave de encendido
esté en la posición ACC u ON. Para cancelar la
demostración de características, mantenga presionado MUTE. Para reiniciar, mantenga presionado MUTE. Si este modo de demostración
sigue funcionando cuando el motor del vehículo
está apagado, se puede descargar la batería.
Importante
El cable rojo (ACC) de esta unidad debe conectarse a la función de activación/desactivación
de encendido. De lo contrario, puede descargarse la batería.
Español
67
Es
Page 68

1 2 3 5 6 74
8
567
App
Sección
Qué es cada cosa
03
Qué es cada cosa
68
Unidad principal
AVH-X5650BTy AVH-X4650DVD
9 a
AVH-X2650BTy AVH-X1650DVD
8a
1
3
4
5
6
7
1 RESET
Para obtener más información, consulte Reinicio del microprocesador en la página 108.
2 SRC/OFF
3 +/– (VOLUME/VOL)
4 MUTE
Pulse para silenciar. Pulse de nuevo para desactivar el silenciamiento.
Es
5 Botón de inicio
Visualización de la pantalla de inicio.
La visualización vuelve a la pantalla de la
aplicación de arranque mientras una aplicación de terceros se utiliza en AppRadio
Mode.
Al hacer doble clic en el icono de la pantalla
de la aplicación de arranque se cambia la visualización a la pantalla de inicio.
6 MODE
Cuando no se utiliza la entrada RGB
! Pulse MODE para apagar la pantalla.
Vuelva a pulsar MODE para encenderla.
Cuando se utiliza la entrada RGB
! Mantenga pulsado MODE para apagar la
pantalla. Vuelva a pulsar MODE para encenderla.
! Cuando el sistema de navegación esté
conectado, pulse MODE para cambiar a
la visualización del sistema de navegación.
! Si se conecta un iPhone que está ejecu-
tando una aplicación compatible con
AppRadio Mode, pulse MODE para
cambiar a la pantalla de la aplicación.
Puede utilizar la aplicación tocando la
pantalla.
! Cuando tenga conectado un teléfono in-
teligente con la función MirrorLink, pulse
MODE para cambiar a la pantalla de la
aplicación. Puede utilizar la aplicación tocando la pantalla.
7 c/d (TRK)
8 h (expulsar)
9 Toma de entrada del micrófono EQ auto-
mático
Utilícela para conectar un micrófono EQ
automático.
a Ranura de carga de discos
Notas
! Si desea obtener más información sobre
cómo manejar un sistema de navegación
desde esta unidad, consulte el manual de
instrucciones respectivo.
! Para información adicional sobre cómo co-
nectar un iPod o un dispositivo de almacenamiento USB a esta unidad, consulte
Conexión con un cable CD-IU201V opcional en
la página 114.
! Para más información sobre cómo conectar
un teléfono inteligente con la función MirrorLink a esta unidad, consulte Conexión opcio-
nal del adaptador de conexión de teléfono
inteligente (CD-ML100) en la página 114.
Pantalla de inicio
Pantalla de inicio
1 23 4
Disc USB/iPod Bluetooth Audio
Radio
TV
AV
Pantalla de fuente desactivada
Apps
Settings
AudioVideo
RearView
AUX
OFF
ON
BluetoothFavorite sThemeSystem
89
1 JAN
AM
12:12
OFF
Pantalla de fuente activada
1
JAN
AM
Radio
12:22
Disc
iPod
Bluetooth Audio
AUX
AV
1 Icono de fuente
Seleccione la fuente deseada.
Cuando no se visualice el icono de fuente, se
podrá visualizar pulsando la tecla de inicio o
tocando
.
2 Tecla Apps/MirrorLink
Cambio a AppRadio Mode/MirrorLink
Mode.
3 Tecla de vista trasera
Se muestra la imagen de la vista trasera.
Para obtener más información, consulte Uso
de la vista trasera en la página 71.
4 Tecla Source off
Desactivación de la fuente.
5 Tecla Bluetooth
Visualización del menú de conexión de
Bluetooth.
6 Tecla Tema
Visualización del menú Tema.
7 Icono de menú
Visualización del menú.
8 Tecla Source
Visualización del menú de fuente.
S.Rtrv
App
App
DB
Page 69

Qué es cada cosa
Qué es cada cosa
Sección
03
9 Tecla Clock
Cambio a la pantalla de ajuste del reloj.
Activación y desactivación
de la fuente
(Función de AVH-X5650BT/AVH-X4650DVD)
Activación de la fuente usando los botones
1 Pulse SRC/OFF para activar la fuente.
Desactivación de la fuente usando los botones
1 Mantenga pulsado SRC/OFF hasta que se apa-
gue la fuente.
Selección de una fuente
Modos de fuente disponibles
! Radio – Sintonizador de radio
! Disc – Reproductor de DVD y CD incorporado
! USB, iPod o USB MTP – USB/iPod/MTP
! Bluetooth Audio – Audio Bluetooth incorpo-
rado
(Función de AVH-X5650BT/AVH-X2650BT)
! AUX – AUX
! AV – Entrada de AV
! TV – Televisor
Selección de una fuente
! Utilización de SRC/OFF
(Función de AVH-X5650BT/AVH-X4650DVD)
1 Presione SRC/OFF.
! Uso de las teclas del teclado táctil en la panta-
lla de inicio
1 Toque el icono de fuente y, a continuación,
toque el nombre de la fuente deseada.
! Si no se muestra el icono de fuente, toque
la pantalla para poder visualizarlo.
! Al utilizar el menú, no puede seleccionar
una fuente tocando el icono de fuente.
Notas
! El icono USB/iPod cambiará de la siguiente
manera:
— USB/iPod aparece cuando no hay conectado
ningún dispositivo.
— USB aparece cuando hay un dispositivo de al-
macenamiento USB conectado a la entrada
USB.
— iPod aparece cuando hay un iPod conectado
a la entrada USB.
— Aparece USB MTP cuando hay un dispositivo
Android compatible con MTP (con sistema
operativo Android 4.0 o superior) conectado a
través de una conexión MTP utilizando un
cable USB.
! TV se visualiza cuando hay un sintonizador
de TV conectado a través de la conexión de
RGB.
Ajuste del volumen
% Pulse +/– (VOLUME/VOL) para ajustar el
volumen.
Mando a distancia
1 +/– (VOLUME/VOL)
2 MODE
Desactivación de la visualización de información.
3 SRC/OFF
Pulse para visualizar todas las fuentes disponibles. Manténgalo pulsado para apagar la
fuente.
4 Thumb pad
Úselo para seleccionar un menú en el menú
del DVD.
5 RETURN
Pulse para visualizar el menú PBC (control
de reproducción) durante la reproducción
con la función PBC.
6 f
Pulse este botón para pausar o reanudar.
m
Pulse para utilizar el retroceso rápido.
Pulse para cambiar la velocidad de retroceso
rápido.
n
Pulse para utilizar el avance rápido.
Pulse para cambiar la velocidad de avance
rápido.
o
Pulse para volver a la pista (capítulo) anterior.
p
Pulse para ir a la siguiente pista (capítulo).
g
Pulse para detener la reproducción.
Si reanuda la reproducción, ésta se iniciará
desde el punto en el que se detuvo. Vuelva a
tocar la tecla para detener totalmente la reproducción.
7 FOLDER/P.CH
Pulse este botón para seleccionar la carpeta
o disco siguiente/anterior.
Púlselos también para recuperar frecuencias
de emisoras de radio asignadas a teclas de
ajuste de presintonías.
8 MUTE
Pulse para silenciar. Pulse de nuevo para desactivar el silenciamiento.
9 MENU
Pulse para visualizar el menú de DVD durante la reproducción de un DVD.
TOP MENU
Pulse para volver al menú superior durante
la reproducción de un DVD.
a AUDIO
Púlselo para cambiar el idioma del audio durante la reproducción de un DVD.
Español
69
Es
Page 70

Sección
Qué es cada cosa
03
04
Púlselo para cambiar la salida de audio a
DivX/MPEG-4.
SUBTITLE
Pulse para cambiar el idioma de los subtítulos durante la reproducción de un DVD/DivX/
MPEG-4.
ANGLE
Pulse para cambiar el ángulo de visión durante la reproducción de un DVD.
b BAND/ESC
Presione este botón para seleccionar la
banda del sintonizador cuando se selecciona
el sintonizador como fuente. También sirve
para cancelar el modo de control de funciones.
Pulse este botón para cambiar entre modos
cuando se reproducen los siguientes tipos
de datos:
! Disco
Audio comprimido y datos de audio
(CD-DA), tales como CD-EXTRA y CDs de
MODO MIXTO (MIXED-MODE CD)
! Dispositivo de almacenamiento USB
Datos de audio, datos de vídeo y datos de
fotos
Operaciones comunes
Operaciones comunes para
listas o ajustes de menú.
(Función de AVH-X5650BT/AVHX2650BT)
Inicio del menú del teléfono
Bluetooth.
Para obtener más información,
consulte Teléfono Bluetooth en la
página 89.
Visualización del menú de listas.
Inicio de la función de búsqueda.
Visualización del EQ (menú de
funciones de audio).
Visualización del menú de favoritos.
Manejo del icono de
desplazamiento y de la
barra de tiempo
Audio
Sonic Center Control
Loudness
Subwoofer
Bass Booster
High Pass Filter
Source Level Adjuster
L/R 0
Low
On
0
125Hz
0
DVD-V
1 Icono de desplazamiento
Aparece cuando los elementos seleccionables permanecen ocultos.
Toque el icono de desplazamiento para ver
cualquier elemento oculto.
2 Barra de tiempo
Aparece cuando no se pueden mostrar elementos en una única página.
Arrastre la barra de tiempo para visualizar
cualquier elemento oculto.
Puede también arrastrar la vista para ver
cualquier elemento oculto.
3 Punto de reproducción
1
Especificación del lugar de reproducción
Arrastre el punto de reproducción en la pantalla.
01 01
Dolby D
TOP
FULL
MENU
MENU
00'20'' -119'51''
3
1JAN
PM
48kHz 16bit
Dolby DMulti ch
11
1/2
12:43
12
70
Es
Page 71

Operaciones comunes
Operaciones comunes
Sección
04
Activación del teclado táctil
Teclas del teclado táctil
1JAN
PM
12:43
MENU
01 01
48kHz 16bit
Dolby D
TOP
MENU
Dolby DMulti ch
1 1
1/2
DVD-V
FULL
00'20'' -119'51''
1
L+R
1
07'24'' -112'47''
Return
2/2
1
1 Tecla de pestaña
Conmutación del teclado del panel táctil en
la pantalla.
Uso de la vista trasera
El uso del modo de vista trasera requiere una cámara retrovisora, que se vende por separado.
Están disponibles las siguientes funciones.
! Cámara retrovisora
Esta unidad se puede configurar para mostrar la imagen de vista trasera automáticamente cuando cambia la palanca de
cambios a la posición MARCHA ATRÁS
(R).
! Cámara para modo de vista trasera
La vista trasera se puede encender para ver
las imágenes en cualquier momento.
La cámara retrovisora deberá configurarse a
un ajuste que no sea OFF para encender el
modo de vista trasera.
Para obtener detalles sobre los ajustes, consulte
Ajuste de la cámara retrovisora (cámara posterior)
en la página 102.
Uso de la tecla que muestra la
vista trasera
Visualización de la imagen retrovisora activándola.
Cuando se visualiza la imagen retrovisora, puede cambiar a la visualización de la fuente tocando la
pantalla. En esta situación, podrá
operar temporalmente desde la
pantalla fuente. Si no realiza ninguna operación en unos segundos, la
pantalla volverá a la imagen retrovisora.
Para apagar la imagen de vista trasera, pulse el botón de inicio para
regresar a la pantalla de inicio y
pulse, a continuación, esta tecla de
nuevo.
Uso del monitor trasero
Si se conecta un monitor trasero (se vende por
separado) a esta unidad, se pueden ver imágenes y vídeos desde los asientos traseros.
Notas
! No se puede utilizar el teclado del panel táctil
y las pantallas de funciones desde el monitor
trasero.
! Las imágenes y el vídeo se seguirán mostran-
do tanto si el vehículo está detenido como en
movimiento.
Utilización del sound retriever
Mejora automáticamente el audio
comprimido y restaura el sonido
óptimo.
Apagar — —
! es más eficaz que .
Notas
! Esta función está disponible para la repro-
ducción en las fuentes enumeradas a continuación.
— CD-DA
— Archivos MP3/WMA/AAC en dispositivos de
almacenamiento USB/MTP
— Archivos MP3/WMA/AAC/WAV en dispositi-
vos de almacenamiento USB
— Archivos MP3/WMA/AAC en medios CD
— iPod
! El ajuste de Sound Retriever (recuperador de
sonido) se apaga si se utiliza la función
MIXTRAX en el modo de fuente USB.
Cambio del modo panorámico
Selección de la relación de pantalla adecuada para la reproducción
de vídeo.
1 Visualice el modo de pantalla.
2 Toque el ajuste de modo panorámico deseado.
FULL (pantalla completa)
La imagen de 4:3 se amplía en sentido horizontal solamente, lo que permite obtener una imagen de TV de 4:3 (imagen normal) sin
omisiones.
ZOOM (zum)
La imagen de 4:3 se amplía en la misma proporción en sentido vertical y horizontal; es ideal
para imágenes de tamaño cine (imágenes panorámicas).
NORMAL (normal)
La imagen de 4:3 se visualiza como es, por lo
que no se perciben disparidades, ya que sus
proporciones son iguales a las de la imagen normal.
Notas
! No puede usar esta función al conducir.
! Se pueden almacenar los distintos ajustes
para cada fuente de vídeo.
! Cuando se ven imágenes en un modo pano-
rámico que no coincide con la relación de
aspecto original, es posible que aparezcan
de manera diferente.
! Recuerde que el uso del modo panorámico
de este sistema con fines comerciales o para
su exhibición al público puede constituir una
violación de los derechos de autor protegidos
por la legislación relativa a la propiedad intelectual.
! La imagen de vídeo aparecerá con menor ca-
lidad cuando se visualice en el modo ZOOM.
! FULL/NORMAL se utiliza para sintonizadores
de TV de la conexión RGB.
! Esta función está disponible para la repro-
ducción en las fuentes enumeradas a continuación.
— Disc: DVD-V, CD de vídeo, DivX, MPEG-1,
MPEG-2, MPEG-4
— USB: DivX, MPEG-1, MPEG-2, MPEG-4, JPEG
— iPod: Vídeo
— AV: Datos A/V
— AUX: Datos A/V
— TV: conexión RGB
Español
71
Es
Page 72

Sección
Funcionamiento básico
05
Sintonizador
06
Ajuste del ángulo de panel
LCD y expulsión de medios
PRECAUCIÓN
Mantenga sus manos y dedos alejados de la
unidad mientras abre, cierra o ajusta el panel
LCD. Sea especialmente cauteloso con las de
los niños.
Ajuste del ángulo del panel LCD
(Función de AVH-X5650BT/AVH-X4650DVD)
1 Pulse h (expulsar) para visualizar el
menú de expulsión.
2 Ajuste el panel LCD a un ángulo que se
pueda ver con facilidad.
Bajada del panel.
Puesta en posición vertical del
panel.
# Ya que el ángulo ajustado se guarda, el panel
LCD adquiere automáticamente la misma posición
al abrirlo la próxima vez.
Expulsión de un disco
(Función de AVH-X5650BT/AVH-X4650DVD)
1 Pulse h (expulsar) para visualizar el
menú de expulsión.
2 Expulse el disco.
Expulsión de un disco.
Expulsión de un disco
(Función de AVH-X2650BT/AVH-X1650DVD)
72
Es
% Presione h para expulsar el disco.
Ajuste del reloj
1 Toque la tecla Clock.
Aparece la pantalla Clock Adjustment.
Consulte Tecla Clock en la página 69.
2 Seleccione el elemento que desea ajustar.
3 Toque a o b para ajustar la fecha y hora
correctas.
Notas
! Puede seleccionar el formato de fecha.
Toque dd/mm/aa, aa/mm/dd o mm/dd/aa.
! Puede seleccionar el formato de reloj. Toque
12hr (reloj de 12 horas) o 24hr (reloj de 24
horas).
Indica que el display está cerrado.
Funciones del sintonizador
Teclas del teclado táctil
12
87.5
8 AUG
AM1
PM
12:05
MHz
TA
News
OFF
OFF
3456789
FM
Radio
1
WWWWWWWW
WWWWWWWW
2
3
4
5
6
1 Tecla de bandas
Selección de una banda (FM1, FM2 o FM3)
tocando el icono de la izquierda. Cambio a la
banda de AM tocando el icono de la derecha.
El icono de la banda seleccionada aparece
resaltado.
2 Tecla de búsqueda
Visualización de información PTY.
3 Tecla Noticias
Activación o desactivación de la interrupción
por programa de noticias.
4 Tecla TA
Activación o desactivación de la función TA
(espera por anuncio de tráfico).
5 Tecla local
Ajuste del nivel de búsqueda local.
6 Tecla de sintonía
Sintonización en sentido ascendente o descendente de forma manual.
Text
Local
Mantenga la tecla pulsada durante más de
dos segundos para saltarse emisoras. La sintonización por búsqueda comienza en cuanto se suelta la tecla. Vuelva a tocarla para
cancelar la sintonización por búsqueda.
7 Tecla Texto
Visualización de radio texto.
Almacenamiento y recuperación de radio
texto.
8 Tecla de lista
Visualización de la lista de canales presintonizados.
9 Tecla de canal presintonizado
Selección de un canal presintonizado.
Funcionamiento básico
Cambio de los canales de presintonía mediante
los botones
1 Pulse c o d (TRK).
Sintonización por búsqueda usando los botones
1 Mantenga presionado c o d (TRK).
Notas
! Escuchar radio en AM mientras un iPod se
carga desde esta unidad puede generar
ruido. Si esto ocurre, desconecte el iPod de
esta unidad.
! Las teclas del teclado táctil no mencionadas
en el apartado Funciones del sintonizador podrían aparecer en la pantalla.
Consulte Lista de indicadores en la página
121.
Almacenamiento y
recuperación de emisoras
Se pueden guardar con facilidad hasta seis emisoras presintonizadas por banda.
Page 73

Sintonizador
Sintonizador
Sección
06
1 Acceda a la pantalla de presintonías.
Consulte Funciones del sintonizador en la página
72.
La pantalla de presintonías aparece en el display.
2 Mantenga pulsada una de las teclas de
ajuste de presintonías para almacenar la frecuencia seleccionada en la memoria.
La frecuencia de la emisora de radio seleccionada se ha almacenado en la memoria.
3 Toque la tecla apropiada de ajuste de presintonías para seleccionar la emisora deseada.
Visualización de radio texto
(Sólo disponible en emisoras de FM)
Este sintonizador puede mostrar los datos de
radio texto transmitidos por emisoras RDS,
como por ejemplo, la información de la emisora.
! Cuando no se recibe radio texto, se visualiza
No Text en el display.
Almacenamiento y
recuperación de radio texto
Se pueden almacenar los datos de hasta seis
transmisiones de radio texto en las teclas
Memo1 a Memo6.
1 Acceda al radio texto que desea almacenar en la memoria.
Consulte Funciones del sintonizador en la página
72.
2 Mantenga presionada una de las teclas
para almacenar el radio texto seleccionado.
Se visualizará el número de la memoria y el
radio texto seleccionado se almacenará en la
memoria.
La próxima vez que pulse la misma tecla en la visualización de radio texto, el texto almacenado
se recuperará de la memoria.
Almacenamiento de las
emisoras con las señales
más intensas
BSM (memoria de las mejores emisoras) guarda
automáticamente las seis emisoras más fuertes
ordenadas por la intensidad de la señal.
Al almacenar frecuencias con la función BSM,
se pueden reemplazar las frecuencias que se almacenaron con las teclas de ajuste de presintonías.
1 Acceda a la pantalla de presintonías.
Consulte Funciones del sintonizador en la página
72.
La pantalla de presintonías aparece en el display.
2 Toque BSM para activar la función BSM.
Las seis frecuencias de las emisoras más fuertes se almacenarán en las teclas de ajuste de
presintonías ordenadas según la intensidad de
las señales.
# Para cancelar el proceso de almacenamiento,
toque Cancel.
Sintonización de señales
potentes
La sintonización por búsqueda local le permite
sintonizar sólo las emisoras de radio con señales lo suficientemente intensas como para asegurar una correcta recepción.
FM: desactivado —
AM: desactivado — —
— — —
Cuantas más haya en la pantalla, menor será
el número de emisoras que se pueden seleccionar. Solo se pueden seleccionar emisoras con
las señales más intensas en su área local.
Si hay pocas
bir emisiones de emisoras más débiles.
, esta unidad será capaz de reci-
Recepción de anuncios de
tráfico
(Sólo disponible en emisoras de FM)
Al margen de la fuente que esté escuchando,
puede recibir automáticamente anuncios de tráfico con la función TA (espera por anuncio de
tráfico).
1 Sintonice una emisora TP o la emisora TP
de otra red realzada.
El indicador
2 Active la función de anuncios de tráfico.
Consulte Funciones del sintonizador en la página
72.
# Si la función TA se activa sin estar sintonizada
una emisora TP o una emisora TP de otra red realzada, el indicador
mente.
3 Pulse +/– (VOLUME/VOL) para ajustar el
volumen de TA cuando comience un anuncio
de tráfico.
El volumen recién ajustado se almacena en la
memoria y se recupera para los siguientes
anuncios de tráfico.
4 Desactive el anuncio de tráfico mientras
se esté recibiendo.
Consulte Funciones del sintonizador en la página
72.
El sintonizador vuelve a la fuente original, pero
sigue en el modo de espera de la función TA
hasta que se vuelva a tocar el icono.
se iluminará.
sólo se iluminará tenue-
Recepción de transmisiones
de alarma que interrumpen
las transmisiones habituales
(Sólo disponible en emisoras de FM)
Se puede seleccionar la recepción de transmisiones de alarma de forma automática independientemente de la fuente que se escuche.
La recepción del programa anterior se reanuda
una vez finalizada la transmisión de alarma.
Uso de las funciones PTY
(Sólo disponible en emisoras de FM)
Se puede sintonizar una emisora utilizando la
información PTY (tipo de programa).
Búsqueda de una emisora RDS
por información PTY
Puede buscar programas de tipo general.
1 Toque la tecla de búsqueda.
2 Toque
programa.
Hay cuatro tipos de programa:
News&Info—Popular—Classics—Others
3 Toque Comenzar para comenzar la búsqueda.
La unidad busca una emisora que transmita ese
tipo de programa, cuando la encuentra, se visualiza el nombre del servicio de programa.
# Para cancelar la búsqueda, toque Cancelar.
# El programa de algunas emisoras puede ser dis-
tinto al programa indicado por el PTY transmitido.
# Si ninguna emisora está transmitiendo el tipo de
programa que busca, se visualizará No Encontrado
durante unos dos segundos y el sintonizador volverá
a la emisora original.
o para seleccionar un tipo de
Español
73
Es
Page 74

Sección
06
Sintonizador
Sintonizador
Uso de la interrupción por
programa de noticias
Cuando se transmite un programa de noticias
de una emisora de noticias con código PTY, la
unidad puede cambiar de cualquier emisora a
la emisora que transmite las noticias. Cuando finaliza el programa de noticias, se reanuda la recepción del programa anterior.
Ajuste del paso de sintonía
de FM
El paso de sintonía se mantiene en 50 kHz durante la sintonización manual.
1 Apague la fuente.
Consulte Activación y desactivación de la fuente
en la página 69.
2 Acceda al menú del sistema.
Consulte Funcionamiento del menú en la página
93.
3 Toque Paso FM en el menú del sistema
para seleccionar el paso de sintonía de FM.
Al tocar Paso FM se cambiará el paso de sintonía de FM entre 50 kHz y 100 kHz. Aparece el
paso de sintonización de FM que se ha seleccionado.
Ajuste RDS
(Sólo disponible en emisoras de FM)
Limitación de las emisoras para
programación regional
Cuando se usa la función AF, la función regional
limita la selección de las emisoras a aquellas
que transmiten programas regionales.
1 Pulse el botón de inicio para cambiar a la
pantalla de inicio.
74
Es
2 Toque la tecla de sistema para abrir el
menú del sistema.
3 Toque Ajuste RDS en el menú del sistema.
4 Toque Regional en el menú para activar
la función regional.
# Para desactivar la función regional, vuelva a
tocar Regional.
Selección de frecuencias
alternativas
Si el sintonizador no consigue obtener una recepción adecuada, la unidad buscará automáticamente otra emisora de la misma red.
1 Pulse el botón de inicio para cambiar a la
pantalla de inicio.
2 Toque la tecla de sistema para abrir el
menú del sistema.
3 Toque Ajuste RDS en el menú del sistema.
4 Toque Frecuencia Alterna para activar la
función AF.
# Para desactivar la función AF, vuelva a tocar
Frecuencia Alterna.
Notas
! Otro programa puede interrumpir temporal-
mente el sonido durante la búsqueda de una
frecuencia AF.
! La función AF se puede ajustar para FM1,
FM2 y FM3.
Cambio de la búsqueda PI
automática
La unidad puede buscar automáticamente una
emisora diferente con el mismo programa, incluso durante la recuperación de emisoras presintonizadas.
1 Pulse el botón de inicio para cambiar a la
pantalla de inicio.
2 Toque la tecla de sistema para abrir el
menú del sistema.
3 Toque Auto PI en el menú del sistema
para activar la búsqueda PI automática.
# Para desactivar la función de búsqueda PI automática, vuelva a tocar Auto PI.
Ajuste del paso de sintonía
de AM
% Toque Paso AM en el menú inicial para
seleccionar el paso de sintonía de AM.
Al tocar Paso AM se cambiará el paso de sintonía de AM entre 9 kHz y 10 kHz. El paso de sintonía de AM seleccionado aparecerá en el display.
Page 75

y
y
Disco (CD/DVD)
Disco (CD/DVD)
Sección
07
Introducción de funciones
para películas
Esta unidad se puede utilizar para ver archivos
de película DVD/DVD-R/DVD-RW/CD/CD-R/CDRW.
Teclas del teclado táctil
DVD vídeo
21
1JAN
PM
12:43
DVD-V
FULL
00'20'' -119'51''
a 987654
L+R
07'24'' -112'47''
Vídeo CD
FULL
00'20'' -119'51''
01 01
48kHz 16bit
Dolby D
Dolby DMulti ch
TOP
MENU
11
MENU
1/2
3
1
fedcg
Return
2/2
b
Return
L+R
98h7eg b
Al reproducir un disco que contiene una mezcla
de varios tipos de archivos de medios
FULL
00'15'' -00'59''
1
OFF
Media
987 i3e4
1 Tecla de avance rápido/Tecla de retroceso
Avance rápido o retroceso
Toque para cambiar entre avance rápido y retroceso.
2 Tecla de búsqueda
Inicio de la función de búsqueda.
3 Tecla de cambio del idioma de los subtítulos
En el caso de los archivos DVD/DivX que vienen con grabaciones multi-subtítulos, se
puede cambiar entre los idiomas de los subtítulos durante la reproducción.
4 Tecla de cambio del idioma de audio
Con los archivos de DVD/DivX que permitan
la reproducción del audio en distintos idiomas y con distintos sistemas de sonido
â
(Dolby
Digital, DTS, etc.), se puede cambiar
entre los idiomas/sistemas de audio durante
la reproducción.
De acuerdo con el ajuste realizado, es posible que el vídeo no se pueda reproducir con
el sistema de audio usado para grabar el
DVD.
5 Tecla MENÚ SUPERIOR
Regreso al menú superior durante la reproducción de un DVD.
6 Tecla MENÚ
Visualización del menú de DVD durante la reproducción de un DVD.
7 Tecla de reproducción en cámara lenta
La selección avanza un cuadro cada vez durante la reproducción.
Mantenga pulsada la tecla durante más de
dos segundos para disminuir la velocidad de
reproducción.
Al tocar la tecla aumenta la velocidad de reproducción en cuatro ajustes graduales durante la reproducción a cámara lenta en
DVD vídeo/Vídeo CD.
8 Tecla de detención
Detención de la reproducción.
Si reanuda la reproducción, ésta se iniciará
desde el punto en el que se detuvo. Vuelva a
tocar la tecla para detener totalmente la reproducción.
9 Tecla de modo de pantalla
Cambio del modo de pantalla.
Consulte Cambio del modo panorámico en la
página 71.
a Tecla de pausa y reproducción
Interrupción de la reproducción.
Restablecimiento de la reproducción normal
durante la pausa o parada o la reproducción
en cámara lenta / cuadro por cuadro.
b Tecla de retorno
Regreso a la escena especificada adonde se
ha preprogramado que vuelva el DVD que
está reproduciendo.
Esta función no se puede usar si no se ha
preprogramado una escena específica en el
disco DVD.
c Tecla de marcador
Durante la reproducción, toque el lugar
donde desea que se reanude la reproducción
la próxima vez que se cargue el disco.
! Se puede establecer un marcador para
cada DVD vídeo. En total, se pueden establecer hasta cinco marcadores.
! Para borrar la marca de un disco, toque y
mantenga pulsada la tecla durante la reproducción.
! La nueva marca reemplazará a la más
antigua.
d Tecla de flecha
Visualización de flechas para utilizar el menú
de DVD.
e Tecla de repetición
Selección de gama de repetición.
f Tecla de ángulo de visión
En el caso de los DVD que vienen con grabaciones multi-ángulo (escenas filmadas desde
múltiples ángulos), se puede cambiar entre
los ángulos de visión durante la reproducción.
g Tecla de salida de audio
Cambio de las salidas de audio al reproducir
discos de vídeo grabados con audio LPCM.
h Tecla de cámara lenta
Disminución de la velocidad de reproducción en cuatro pasos durante la reproducción en cámara lenta en vídeo CD.
! No se emiten sonidos durante la repro-
ducción en cámara lenta.
! Con algunos discos, las imágenes pue-
den aparecer borrosas durante la reproducción en cámara lenta.
! La reproducción en cámara lenta hacia
atrás no está disponible.
i Tecla de medio
Cambio entre tipos de archivos multimedia
para reproducir en DVD/CD.
Español
75
Es
Page 76

Sección
Disco (CD/DVD)
07
Disco (CD/DVD)
Funcionamiento básico
Reproducción de vídeos.
1 Inserte el disco en la ranura de carga de dis-
cos con el lado de la etiqueta hacia arriba.
La reproducción comenzará automáticamente.
! Si está reproduciendo un DVD o un vídeo CD,
puede aparecer un menú. Consulte Uso del
menú de DVD en la página 77 y Reproducción
PBC en la página 78.
! Cuando la función de reproducción automáti-
ca está activada, la unidad pasará por alto el
menú de DVD y comenzará automáticamente
la reproducción desde el primer capítulo del
primer título. Consulte Reproducción automáti-
ca de DVD en la página 98.
! Si no se muestra el icono de fuente, toque la
pantalla para poder visualizarlo.
! Si se muestra el mensaje después de cargar
un disco que tenga contenido DivX VOD,
toque Play.
Consulte Reproducción del contenido DivX
VOD en la página 78.
Expulsión de un disco
! Consulte Expulsión de un disco en la página
72.
Selección de capítulo usando los botones
1 Pulse c o d (TRK).
Avance rápido o rebobinado usando los botones
1 Mantenga presionado c o d (TRK).
! Es posible que el rebobinado/avance rápido
no sea siempre posible en algunos discos. En
tal caso, la reproducción normal se reanudará
automáticamente.
! La velocidad de avance rápido / retroceso rápi-
do depende del tiempo que mantenga pulsado
c o d (TRK). Esta función no está disponible
para Vídeo CD.
Notas
! Este reproductor de DVD puede reproducir
archivos DivX grabados en CD-R/RW, DVD-R/
RW,o MPEG-1/MPEG-2/MPEG-4. (Consulte
Archivos de vídeo DivX en la página 123 para
comprobar los archivos que se pueden reproducir).
! No introduzca otra cosa que no sea un DVD-
R/RW o CD-R/RW por la ranura de carga de
discos.
! Algunas operaciones pueden no estar dispo-
nibles al ver un medio debido a la propia programación del disco. En tal caso, el icono
aparece en pantalla.
! Puede haber teclas del teclado táctil no men-
cionadas en el apartado Introducción de fun-
ciones para películas en la página 75 que
aparecen en la pantalla.
Consulte Lista de indicadores en la página
121.
! Con algunos DVD, sólo se podrá cambiar
â
entre los idiomas/sistemas de audio usando
una visualización de menú.
! También se puede cambiar entre los idio-
mas/sistemas de audio utilizando el menú
Ajuste de Video. Para obtener más información, consulte Ajuste del idioma del audio en
la página 96.
! Esta unidad volverá a la reproducción normal
si cambia el idioma de audio durante el avance rápido/retroceso rápido, una pausa o la reproducción a cámara lenta.
! Con algunos DVD, sólo se podrá cambiar
entre los idiomas de los subtítulos usando
una visualización de menú.
! También se puede cambiar entre los idiomas
de los subtítulos utilizando el menú
Ajuste de Video. Para obtener más información, consulte Ajuste del idioma de los subtí-
tulos en la página 96.
! Esta unidad volverá a la reproducción normal
si cambia el idioma de los subtítulos durante
el avance rápido/retroceso rápido, una pausa
o la reproducción a cámara lenta.
! Durante la reproducción de una escena fil-
mada desde múltiples ángulos, se visualiza
el icono de ángulo. Use el menú
Ajuste de Video para activar o desactivar la
visualización del icono de ángulo. Para obtener más información, consulte Ajuste de la
visualización multiángulo del DVD en la página 96.
! Volverá a la reproducción normal si cambia
el ángulo de visión durante el avance rápido/
retroceso rápido, una pausa o la reproducción en cámara lenta.
Funciones de reproducción
de sonido
Esta unidad se puede utilizar para escuchar archivos de sonido DVD-R/DVD-RW/CD/CD-R/CDRW.
Teclas del teclado táctil
12
1JAN
PM
ROM
Abcdefghi
Abcdefghi
Abcdefghi
Abcdefghi
00'37'' -08'43''
11
12:43
S.Rtrv
Dolby PLll
Media
45678
3
1 Tecla de información
Cambio de la información de texto que se visualiza en esta unidad cuando se reproducen archivos MP3/WMA/AAC.
2 Tecla de búsqueda
Visualización de una lista de títulos de pista /
nombres de archivo entre los que seleccionar canciones de un CD.
Visualización de la lista de nombres de archivos para la selección de estos.
3 Tecla de medio
Cambio entre tipos de archivos multimedia
en DVD o CD.
4 Tecla de restauración de sonido
Consulte Utilización del sound retriever en la
página 71.
5 Tecla de reproducción aleatoria
Reproducción de las canciones en orden
aleatorio.
6 Tecla de repetición
Selección de gama de repetición.
7 Tecla de carpeta anterior/carpeta siguiente
Selección de una carpeta.
8 Tecla de pausa y reproducción
Pausa e inicio de la reproducción.
Cambio del tipo de archivo
multimedia
Cuando reproduzca un medio digital que tenga
una combinación de varios tipos de ficheros de
multimedia, tales como DivX, MPEG-1, MPEG-2,
MPEG-4 y MP3, puede cambiar entre los tipos
de ficheros multimedia que desee reproducir.
76
Es
Page 77

Disco (CD/DVD)
Disco (CD/DVD)
Sección
07
% Toque Media para cambiar entre los tipos
de archivos multimedia.
CD-DA (datos de audio (CD-DA))—Música/ROM
(audio comprimido)—Vídeo (archivos de vídeo
DivX, MPEG-1, MPEG-2, MPEG-4)
Nota
Esta unidad no permite reproducir datos de
audio (CD-DA) en discos DVD-R/RW/ROM.
Uso del menú de DVD
(Función para DVD vídeo)
Algunos DVD le permiten seleccionar una opción del contenido del disco utilizando un
menú.
Uso de las flechas
1 Visualice las flechas para utilizar el menú
de DVD.
2 Seleccione el elemento de menú que
desea utilizar.
Selección del elemento de menú
que desea utilizar.
Inicio de la reproducción desde
el elemento del menú seleccionado.
Uso del menú de DVD tocando
directamente el elemento del
menú.
Vuelta a la pantalla anterior.
# Para utilizar el menú de DVD tocando directamente el elemento de menú, toque este icono para
activar la opción.
Para volver a la visualización normal de DVD vídeo.
Visualización de las flechas.
# La manera en que se visualiza el menú varía
según el disco.
# Según el contenido de los discos DVD, es posible
que esta función no se ejecute correctamente. En tal
caso, las teclas del teclado táctil permitirán utilizar
el menú DVD.
Reproducción aleatoria
(shuffle)
% Toque la tecla de reproducción aleatoria.
! On – Reproducción de archivos en orden
aleatorio dentro de la gama de repetición,
Folder y Disc.
! Off – Cancela la reproducción aleatoria.
Repetición de reproducción
% Toque la tecla de repetición.
! Disc– Reproduce todo el disco actual
! Chapter – Repite el capítulo actual
! Title – Repite el título actual
! Track – Repite la pista actual
! File – Repite el archivo actual
! Folder – Repite la carpeta actual
! Disc/All – Repetir todos los archivos del
disco actual
! All – Repite todos los archivos
Notas
! Esta función no se puede utilizar durante la
reproducción de un vídeo CD con función
PBC (control de reproducción).
! Si se realiza una búsqueda de capítulos, el
avance rápido/retroceso, la reproducción
cuadro a cuadro o en cámara lenta, la repetición de reproducción se detendrá.
! Al reproducir discos con audio comprimido y
datos de audio (CD-DA), la reproducción se
repite dentro del tipo de datos que se está reproduciendo, aunque se haya seleccionado
Disc.
! Si se selecciona otra carpeta durante la repe-
tición de reproducción, la gama de repetición cambia a Disc/All.
! Si se realiza una búsqueda de pista o un
avance rápido/retroceso durante File,la
gama de repetición de reproducción cambia
a Folder.
! Si se realiza una búsqueda de capítulos o tí-
tulos o el avance/retroceso rápido durante la
repetición Chapter, la repetición de reproducción se desactiva automáticamente.
! Si se realiza una búsqueda de pista o un
avance rápido/retroceso durante Track,la
gama de repetición de reproducción cambia
a Disc.
! Cuando se selecciona Folder, no se puede
reproducir una subcarpeta de esa carpeta.
Búsqueda de la parte que
desea reproducir
Puede utilizar la función de búsqueda para buscar la parte que desee reproducir.
Para DVD vídeo, puede seleccionar Title (título),
Chapter (capítulo) o 10key (teclado numérico).
Para vídeo CD, puede seleccionar Track (pista) o
10key (teclado numérico).
! La función de búsqueda por capítulo no está
disponible una vez detenida la reproducción
del disco.
! Esta función no se puede utilizar durante la
reproducción de algunos DVD vídeos o vídeos CD con función PBC (control de reproducción).
1 Inicie la función de búsqueda.
Consulte Introducción de funciones para películas en la página 75.
2 Toque la opción de búsqueda deseada (p.
ej., Chapter).
3 Toque 0 a 9 para introducir el número deseado.
# Para cancelar los números introducidos, toque
C.
4 Inicie la reproducción a partir de la parte
seleccionada.
Registro de números e inicio de
la reproducción.
Nota
Con los discos que presenten un menú, también
se puede usar el menú del DVD para realizar su
selección.
Consulte Introducción de funciones para pelícu-
las en la página 75.
Selección de la salida de audio
Cuando se reproducen discos de DVD vídeo grabados con audio LPCM, es posible cambiar la
salida de audio.
Español
77
Es
Page 78

Sección
Disco (CD/DVD)
07
Disco (CD/DVD)
Cuando se reproducen discos de vídeo CDs,
puede cambiar entre la salida de audio estéreo y
monocanal.
! Esta función no está disponible una vez dete-
nida la reproducción del disco.
% Toque la tecla de salida de audio para
cambiar entre los tipos de salida de audio.
! L+R – izquierda y derecha
! Left – izquierda
! Right – derecha
! Mix – mezcla izquierda y derecha
Nota
Es posible que no se pueda seleccionar o usar
esta función, en función del tipo de disco y la
sección del mismo que se está reproduciendo.
Reproducción PBC
(Función para vídeo CD)
Durante la reproducción de un vídeo CD que
viene con la función PBC (control de reproducción), se visualiza PBC On.
1 Inicie la función de búsqueda.
Consulte Introducción de funciones para películas en la página 75.
2 Toque 10key para mostrar el teclado numérico.
3 Toque 0 a 9 que corresponda al menú deseado.
4 Inicie la reproducción a partir de la parte
seleccionada.
Registro de números e inicio de
la reproducción.
78
Es
Notas
! Se puede visualizar el menú tocando Return
durante la reproducción PBC. Para obtener
detalles, consulte las instrucciones suministradas con el disco.
! No se puede cancelar la reproducción PBC
de un vídeo CD.
! Durante la reproducción de un vídeo CD que
viene con la función PBC (control de reproducción), no se puede utilizar la función de
búsqueda ni se puede seleccionar la gama
de repetición de reproducción.
Selección de pistas de la
lista de títulos de las pistas
Puede seleccionar pistas para su reproducción
usando la lista de títulos de pistas, que consiste
en una lista de las pistas grabadas en un disco.
1 Acceda a la lista de títulos de las pistas.
Consulte Funciones de reproducción de sonido
en la página 76.
2 Toque el título de la pista favorita.
Se inicia la reproducción.
Selección de ficheros de la
lista de nombres de ficheros
(Funciona con audio comprimido/DivX/MPEG-1/
MPEG-2/MPEG-4)
La lista de nombres de archivos es una lista con
los nombres de archivos (o nombres de carpetas) entre los que puede seleccionar un archivo
(o carpeta) para su reproducción.
1 Toque la tecla de búsqueda para acceder
a la lista de nombres de archivos (o carpetas).
2 Toque el nombre del archivos (o carpeta)
favorito.
# Si se ha seleccionado una carpeta, se podrá visualizar una lista de los nombres de los archivos (o
las carpetas) en ella. Repita este procedimiento para
seleccionar el nombre del archivo deseado.
# Si la carpeta 1 (RAÍZ) no contiene archivos, la re-
producción comienza en la carpeta 2.
Nota
Si no se visualiza parte de la información grabada, aparecerá una tecla de desplazamiento a la
derecha de la lista. Toque la tecla de desplazamiento para desplazarse.
Reproducción del contenido
â
VOD
DivX
Es posible que parte del contenido de DivX bajo
demanda (VOD) se pueda reproducir solamente
un número fijo de veces. Cuando cargue un
disco que contenga este tipo de contenido, el
número de reproducciones realizadas se muestra en la pantalla y luego tiene la opción de reproducir el disco o bien detenerlo.
! Para el contenido DivX VOD sin esta restric-
ción, usted podrá cargar el disco en su reproductor y reproducir el contenido tantas veces
como usted quiera, y no se visualizará ningún mensaje.
! Puede confirmar el número de veces que se
puede reproducir un contenido comprobando el mensaje: Este Alquiler DivX ha
usado
Importante
! Para reproducir el contenido DivX VOD en
esta unidad, tendrá que registrar primero la
unidad con el proveedor del contenido de
DivX VOD. Consulte Visualización del código
de registro de DivX
obtener información sobre su código de registro.
de vistas..
â
VOD en la página 98 para
! El contenido de DivX VOD está protegido por
un sistema DRM (administración de derechos digitales). Esto limita la reproducción
del contenido a los dispositivos específicos
registrados.
% Si se muestra el mensaje después de cargar un disco que tenga contenido DivX VOD,
toque Play.
Se iniciará la reproducción del contenido DivX
VOD.
# Para saltar al siguiente archivo, toque Next Play.
# Si no desea reproducir el contenido DivX VOD,
toque Stop.
Page 79

ppr
All
iPod
iPod
Sección
08
Control de iPod
Este manual se aplica a los siguientes modelos
iPod.
iPod con conector de 30 patillas
— iPod touch de 4ª generación
— iPod touch de 3ª generación
— iPod touch de 2ª generación
— iPod touch de 1ª generación
— iPod classic de 160 GB
— iPod classic de 120 GB
— iPod classic
— iPod con vídeo
— iPod nano de 6ª generación
— iPod nano 5ª generación
— iPod nano de 4ª generación
— iPod nano de 3ª generación
— iPod nano de 2ª generación
— iPod nano 1ª generación
— iPhone 4S
— iPhone 4
— iPhone 3GS
— iPhone 3G
— iPhone
iPod con conector Lightning
— iPod touch de 5ª generación
— iPod nano de 7ª generación
— iPhone 5
Funciones de reproducción
de sonido
Se puede utilizar la unidad para escuchar archivos de sonido de iPod.
Notas
! Podría no mostrarse el tiempo de reproduc-
ción correcto.
! La pantalla cambia al escuchar a música
que no sea del iPod.
Teclas del teclado táctil
Audio de iPod (Audio de control)
1JAN
PM
12:43
S.Rtrv
All
All
Appr
AppppApp
iPod
Abcdefghi
Abcdefghi
Abcdefghi
Abcdefghi
01'17'' -05'29''
1/9
1
x
2
dcb a987 6
Audio de iPod (App Mode)
FULL
ef
1 Título de la canción
Visualización de la lista Canciones en el
iPod.
El nombre de la aplicación se muestra cuando se escucha música que no sea del iPod.
2 Nombre del artista
Visualización de la lista Artistas en el iPod.
El título de la canción se muestra cuando se
escucha música que no sea del iPod.
3 Tecla MIXTRAX EZ
Inicio de MIXTRAX EZ.
Consulte Función MIXTRAX EZ en la página
88.
4 Material gráfico
Inicio de búsqueda de enlace en su iPod
cuando toca la visualización de material gráfico.
5 Tecla de búsqueda
Visualización de los menús del iPod.
6 Tecla de restauración de sonido
54321
Consulte Utilización del sound retriever en la
página 71.
7 Tecla de modo de control de iPod
Realización de operaciones desde su iPod y
escucha a través de los altavoces de su automóvil.
8 Tecla de selección aleatoria
Reproducción de las canciones del iPod en
orden aleatorio.
9 Tecla de repetición
Selección de gama de repetición.
a Tecla de cambio de velocidad
Cambio de la velocidad de reproducción del
audiolibro en el iPod.
b Género
Visualización de la lista Géneros en el iPod.
El título del álbum se muestra cuando se escucha música que no sea del iPod.
c Título del álbum
Visualización de la lista Álbumes en el iPod.
El nombre del artista se muestra cuando se
escucha música que no sea del iPod.
d Tecla de pausa y reproducción
Pausa e inicio de la reproducción.
e Tecla de operación de la unidad
Operaciones desde esta unidad y reproducción de música en el iPod mediante los altavoces del coche.
f Tecla de modo de pantalla
Cambio del modo de pantalla.
Funciones de reproducción de sonido
para Bluetooth
(Función de AVH-X5650BT/AVH-X2650BT)
Al realizar los siguientes ajustes, puede disfrutar
de audio en esta unidad utilizando una conexión
Bluetooth.
1 Ajuste Conexión de dispositivo.
Conexión de dispositivo se puede ajustar
cuando se cumplen todas las condiciones siguientes.
— El iPhone no está conectado.
— Sin conexión Bluetooth.
— La fuente está apagada.
1 Apague la fuente.
Consulte Tecla Source off en la página 68.
2 Pulse el botón de inicio para cambiar a la
pantalla de inicio.
3 Toque la tecla de sistema para abrir el menú
del sistema.
4 Toque Conexión de dispositivo en el menú
del sistema.
5 Toque iPhone via Bluetooth para seleccio-
nar.
2 Conecte el iPhone y esta unidad a través
de Bluetooth.
Consulte Menú de conexión Bluetooth en la página 106.
Nota
El material gráfico no se mostrará cuando las
funciones de reproducción de sonido se realicen a través de una conexión Bluetooth.
Funciones de imágenes en
movimiento
Para usuarios de iPod con conector de 30
patillas
Se puede utilizar la unidad para ver archivos de
película de iPod.
Español
79
Es
Page 80

ppr
Sección
08
iPod
iPod
! Según su iPod, es posible que no se produz-
ca ninguna emisión, a menos que utilice CDIU201S/CD-IU201V (se vende por separado).
Asegúrese de que utiliza CD-IU201S/CDIU201V para conectar el iPod.
Para usuarios de iPod con conector Lightning
! Para reproducir archivos de película en iPod
con esta unidad, conecte un CD-IV203 (se
vende por separado) y un adaptador AV digital Lightning (productos de Apple Inc.) (se
vende por separado) e instale la aplicación
CarMediaPlayer en su iPod. Consulte el manual de CarMediaPlayer para información
adicional.
Consulte Operación de AppRadio Mode en la
página 82.
Teclas del teclado táctil
1
iPod
FULL
1
02'35'' -21'54''
654 37
1 Tecla de avance rápido/Tecla de retroceso
Avance rápido o retroceso
Toque para cambiar entre avance rápido y retroceso.
2 Tecla de búsqueda
Visualización de los menús del iPod.
80
Es
1JAN
PM
12:43
2/3
Appr
AppppApp
3 Tecla de modo de control de iPod
Realización de operaciones desde su iPod y
escucha a través de los altavoces de su automóvil.
4 Tecla de selección aleatoria
Reproducción del vídeo en su iPod en orden
aleatorio.
5 Tecla de repetición
Selección de gama de repetición.
6 Tecla de modo de pantalla
Cambio del modo de pantalla.
Consulte Cambio del modo panorámico en la
página 71.
7 Tecla de pausa y reproducción
Interrupción de la reproducción.
Restablecimiento de la reproducción normal
durante la pausa o la reproducción en cáma-
2
ra lenta / cuadro por cuadro.
2
Funcionamiento básico
Reproducción de vídeos.
1 Toque la tecla de búsqueda para que aparez-
can los menús de iPod.
2 Seleccione una película para reproducirla.
Consulte Reproducción de vídeos desde su iPod
en la página 81.
! Si no se muestra el icono de fuente, toque
la pantalla para poder visualizarlo.
! Desconecte los auriculares del iPod antes
de conectarlo a esta unidad.
! En función del modelo de iPod y la canti-
dad de datos guardados en él, es posible
que la reproducción tarde un tiempo en
comenzar.
! Use el teclado táctil para seleccionar el
iPod tras conectarlo a esta unidad.
! Se muestra Sin dispositivo al desconectar
el iPod.
Avance rápido o rebobinado usando los botones
1 Mantenga presionado c o d (TRK).
Notas
! Para asegurar un funcionamiento correcto,
conecte el cable conector del Dock del iPod
directamente a esta unidad.
! Cuando el iPod está conectado a esta uni-
dad, no se puede encender ni apagar.
! Las teclas del teclado táctil no mencionadas
en el apartado Funciones de imágenes en mo-
vimiento podrían aparecer en la pantalla.
Consulte Lista de indicadores en la página
121.
Uso de la función iPod de la
unidad desde el iPod
Puede escuchar el sonido de las aplicaciones
que tenga en el iPod a través de los altavoces
del automóvil cuando está seleccionado
App Mode.
Esta función no es compatible con los siguientes modelos de iPod.
! iPod nano 1ª generación
! iPod con vídeo
Notas
! Las funciones relacionadas con el vídeo no
están disponibles para usuarios de iPod con
conector Lightning.
! MIentras se utiliza esta función, aunque la
llave de encendido del vehículo se coloque
en posición de apagado, no se desactivará el
iPod. Para apagarlo, use el iPod.
1 Toque la tecla del modo de control de
iPod para cambiar a App Mode.
2 Utilice el iPod conectado para seleccionar
un vídeo/canción y reproducirlo.
Notas
! Las siguientes funciones estarán disponibles
en esta unidad incluso si se ajusta el modo
de control en App Mode:
Sin embargo, dicho funcionamiento dependerá de las aplicaciones.
— Reproducción/pausa
— Avance rápido/retroceso
— Avance/retroceso de pista
— Avance/retroceso de capítulo
! App Mode es compatible con los siguientes
modelos de iPod:
— iPod touch de 4ª generación
— iPod touch de 3ª generación
— iPod touch de 2ª generación
— iPod touch de 1ª generación
— iPod classic de 160 GB
— iPod classic de 120 GB
— iPod classic
— iPod nano de 6ª generación
— iPod nano 5ª generación
— iPod nano de 4ª generación
— iPod nano de 3ª generación
— iPod nano de 2ª generación
Page 81

iPod
iPod
Sección
08
— iPhone 4S
— iPhone 4
— iPhone 3GS
— iPhone 3G
— iPhone
Tecla de selección aleatoria
% Toque la tecla de selección aleatoria.
! Songs – Reproduce canciones/vídeos si-
guiendo un orden aleatorio dentro de la lista
seleccionada.
! Albums – Reproduce canciones/vídeos en
orden desde un álbum seleccionado aleatoriamente.
! Off – Desactiva la reproducción aleatoria.
Repetición de reproducción
% Toque la tecla de repetición.
! One – Sólo repite la canción/vídeo actual
! All – Repite todas las canciones/vídeos de la
lista seleccionada en el iPod
Reproducción de vídeos
desde su iPod
Los vídeos se pueden reproducir en esta unidad
si se conecta un iPod con funciones de vídeo.
! Esta unidad puede reproducir “películas”, “ví-
deos musicales”, “ podcasts de vídeo”, “programas de TV” y “películas alquiladas”
descargados desde la tienda de iTunes.
Nota
Esta función no está disponible para usuarios
de iPod con conector Lightning.
1 Toque Search para visualizar los menús
del iPod.
Consulte Tecla de búsqueda en la página 80.
2 Cambie al modo vídeo del iPod.
ROOT
Playlists
Artists
Albums
Songs
Podcasts
Genres
# Toque el icono si quiere cambiar al modo de
vídeo del iPod.
Cambio al modo vídeo del iPod.
3 Reproduzca el vídeo en el iPod.
ROOT
Video Playlists
Movie s
Music V ideo s
TV Shows
Video Podcasts
Rente d Movi es
# Toque el icono si quiere cambiar al modo de música del iPod.
Cambio al modo música del iPod.
Búsqueda de un vídeo/tema
musical en el iPod
Para facilitar el funcionamiento y la búsqueda,
las operaciones para controlar un iPod con esta
unidad se han diseñado para ser lo más parecidas posibles al funcionamiento del iPod.
Nota
Las funciones relacionadas con el vídeo no
están disponibles para usuarios de iPod con conector Lightning.
Búsqueda de un vídeo/tema
musical por categoría
1 Toque la tecla de búsqueda para que aparezcan los menús de iPod.
Consulte Tecla de búsqueda en la página 80.
2 Toque una de las categorías en que desee
buscar un vídeo/tema musical.
Listas de categoría (para vídeo)
! Video Playlists (listas de reproducción de
vídeo)
! Movies (películas)
! Music Videos (vídeos musicales)
! TV Shows (programas de TV)
! Video Podcasts (podcasts de vídeo)
! Rented Movies (películas alquiladas)
! Video ITunesU (vídeo ITunesU)
Listas de categoría (para música)
! Playlists (listas de reproducción)
! Artistas (artistas)
! Álbumes (álbumes)
! Canciones (canciones)
! Podcasts (podcasts)
! Géneros (géneros)
! Compositores (compositores)
! Audiolibros (audiolibros)
3 Toque el título de una lista que desee reproducir.
Repita este procedimiento hasta encontrar el
vídeo/tema musical deseado.
Notas
! Según la generación o versión del iPod, es
posible que algunas funciones no estén disponibles.
! Es posible reproducir listas de reproducción
creadas con el programa de ordenador
(MusicSphere). Dicho programa estará disponible en nuestro sitio web.
! Las listas de reproducción creadas con el
programa de ordenador (MusicSphere) se
muestran de forma abreviada.
Búsqueda alfabética en las listas
1 Seleccione una categoría.
Consulte Búsqueda de un vídeo/tema musical
por categoría en la página 81.
2 Cambie al modo de búsqueda alfabético.
Cambio al modo de búsqueda alfabético.
Se muestra el modo de búsqueda alfabética.
3 Toque la primera letra del título del
vídeo/canción que está buscando.
Mientras se está realizando la búsqueda, no se
puede utilizar el teclado táctil.
# Para refinar la búsqueda con una letra diferente,
toque Cancel.
4 Toque el título de una lista que desee reproducir.
Repita este procedimiento hasta encontrar la
canción/vídeo deseado.
Español
81
Es
Page 82

Sección
iPod
08
09
Cambio de la velocidad del
audiolibro
% Toque la tecla de cambio de velocidad
para cambiar la velocidad.
Reproducción con velocidad su-
2
perior a la normal
Reproducción con velocidad nor-
1
mal
Reproducción con velocidad infe-
1/2
rior a la normal
Visualización de listas
relacionadas con la canción
que se está reproduciendo
(búsqueda de enlace)
Toque el material gráfico para abrir una lista de
los nombres de canciones del álbum que se
está reproduciendo. Toque el nombre de la canción que desea reproducir para empezar su reproducción.
Nota
Si no se visualiza parte de la información grabada, aparecerá una tecla de desplazamiento a la
derecha de la lista. Toque la tecla de desplazamiento para desplazarse.
82
Es
AppRadio Mode
Operación de AppRadio Mode
Este sistema se puede cambiar a AppRadio
Mode, que se puede visualizar y permite mane-
jar la aplicación para iPhone en la pantalla.
En AppRadio Mode se pueden manejar las
aplicaciones mediante gestos de los dedos,
como pulsar, arrastrar, desplazar o sacudir la
pantalla del sistema.
Instale la app AppRadio en su iPhone.
ADVERTENCIA
Ciertos usos de un teléfono inteligente pueden no ser legales en su jurisdicción durante la conducción, de modo que tendrá que
tener en cuenta y obedecer tales restricciones.
Si tiene alguna duda sobre una función en
particular, ejecútela solamente con el vehículo aparcado.
No se deberá utilizar ninguna función a no
ser que sea seguro bajo las condiciones actuales de conducción.
PRECAUCIÓN
Durante la conducción, no se puede introducir
texto en el iPod.
! Pioneerno se responsabiliza de cualquier
problema que pueda surgir a causa de un
contenido incorrecto o defectuoso de la
aplicación.
! El contenido y funcionamiento de las apli-
caciones compatibles son responsabilidad
de los proveedores de las mismas.
! En AppRadio Mode, el funcionamiento
del producto queda limitado durante la
conducción; algunas funciones estarán
disponibles según los proveedores de la
aplicación.
! La disponibilidad de la función en
AppRadio Mode viene determinada por el
proveedor de la aplicación, no por Pioneer.
! AppRadio Mode permite acceder a apli-
caciones diferentes a las que aparecen listadas (sujetas a limitaciones durante la
conducción), pero el nivel de uso del contenido lo determinan los proveedores de
las aplicaciones.
Importante
! Cuando se estén reproduciendo música y soni-
dos simultáneamente desde una aplicación, consulte la sección siguiente. Consulte Utilización
del mezclador de sonido en la página 108.
Notas
! Las aplicaciones que se pueden manejar
cambiando este sistema a AppRadio Mode
sólo están disponibles en AppRadio Mode.
! Compruebe las aplicaciones compatibles
con AppRadio Mode en
http://www.pioneerelectronics.com/
AppRadioMode
Compatibilidad con iPhone
AppRadio Mode es compatible con los siguientes modelos de iPod:
! iPod touch de 5.ª generación (solo con AVH-
X5650BT/AVH-X2650BT)
Page 83

AppRadio Mode
AppRadio Mode
Sección
09
! iPod touch de 4ª generación
! iPhone 5 (solo con AVH-X5650BT/AVH-
X2650BT)
! iPhone 4S
! iPhone 4
Procedimiento de inicio
1 Instale la app AppRadio en su iPhone.
2 Ajuste Conexión de dispositivo.
Conexión de dispositivo se puede ajustar
cuando se cumplen todas las condiciones siguientes.
— El iPhone no está conectado.
— Sin conexión Bluetooth.
— La fuente está apagada.
1 Apague la fuente.
Consulte Tecla Source off en la página 68.
2 Pulse el botón de inicio para cambiar a la
pantalla de inicio.
3 Toque la tecla de sistema para abrir el menú
del sistema.
4 Toque Conexión de dispositivo en el menú
del sistema.
5 Toque el ajuste deseado.
— iPhone via Bluetooth (para usuarios de
iPod con conector Lightning)
— iPhone via USB (para usuarios de iPod
con conector de 30 patillas)
3 Después de haber configurado
Conexión de dispositivo, conecte el iPhone a
esta unidad.
# Para usuarios de iPod con conector Lightning
(Función de AVH-X5650BT/AVH-X2650BT)
— Se requiere una conexión Bluetooth para el
conector Lightning de iPod. Consulte Menú
de conexión Bluetooth en la página 106.
— Utilice el CD-IV203 (se vende por separado) y
el adaptador Lightning a VGA (productos de
Apple Inc.) (se vende por separado) cuando
utilice esta función.
— Consulte Conexión con el cable opcional CD-
IV203 en la página 113.
# Para usuarios de iPod con conector de 30 patillas
— Cuando utilice esta función, utilice el CD-
IU201S (se vende por separado).
— Consulte Conexión con un cable CD-IU201S
opcional en la página 114.
4 Inicio de una aplicación disponible para
AppRadio Mode desde el iPhone.
Se visualiza una imagen de la aplicación en la
pantalla del sistema.
! También se puede iniciar una aplicación dis-
ponible para AppRadio Mode desde una
aplicación de arranque.
5 Pulse MODE.
# Pulse el botón de inicio para cambiar a la pantalla de inicio y a continuación toque la tecla Apps
para iniciar la aplicación de arranque.
6 Operación de la aplicación.
Configuración del teclado
PRECAUCIÓN
Por seguridad, el teclado solo está disponible
con el vehículo parado y con el freno de mano
activado.
Según la aplicación, se podrá introducir texto en
la pantalla. Para hacerlo correctamente, mediante el teclado que aparece en esta unidad,
deberá ajustar el idioma en esta función.
Cuando se utiliza AppRadio Mode, la configuración de idioma para el teclado ajustada para
la función y la configuración de idioma para el
teclado del iPhone han de ser las mismas.
! El teclado sólo está disponible en AppRadio
Mode.
Al pulsar sobre el área de introducción de texto
de una aplicación de iPhone, aparecerá un teclado en la pantalla; entonces se podrá introducir el texto deseado directamente en el sistema.
! El idioma preferente para el teclado del siste-
ma deberá ser el mismo que el del iPhone.
Si la configuración de este producto difiere
de la del iPhone, no se podrán introducir caracteres correctamente.
1 Pulse el botón de inicio dos veces para
cambiar desde la pantalla de AppRadio
Mode a la pantalla de inicio.
2 Toque la tecla de sistema para abrir el
menú del sistema.
3 Toque Teclado en el menú del sistema,
para seleccionar el idioma deseado.
4 Toque el idioma deseado.
Francés (francés)—Alemán (alemán)—Griego
(griego)—Ruso (ruso)—Inglés (inglés de EE.
UU.)—Inglés (Reino Unido) (inglés de Reino
Unido)—Neerlandés (holandés)—Italiano (italiano)—Noruego (noruego)—Sueco (sueco)—
Finlandés (finés)—Español (español)—
Portugués (portugués)—Chino (simplificado)
(chino simplificado)—Chino (tradicional)
(chino tradicional)—árabe (árabe)—hebreo
(hebreo)—tailandés (tailandés)
5 Pulse sobre el área de introducción de
texto en la pantalla de la aplicación del
iPhone.
Toque
para ocultar el teclado.
Español
83
Es
Page 84

Sección
Funciones del adaptador de conexión de teléfonos
10
inteligentes
11
Puede utilizar su teléfono inteligente en la pantalla de la unidad gracias a esta función.
Con la función MirrorLink solo funcionan los teléfonos inteligentes compatibles.
— Para más información sobre cómo conectar-
se con el adaptador de conexión de teléfono
inteligente (CD-ML100) (se vende por separado), consulte Conexión opcional del adaptador
de conexión de teléfono inteligente (CDML100) en la página 114.
— Para obtener detalles sobre los ajustes de Mi-
rrorLink, consulte Selección del modo Mirror-
Link en la página 98.
— Para obtener información sobre el mezclador
de sonido, consulte Utilización del mezclador
de sonido en la página 108.
Para obtener más información, consulte Unidad
principal en la página 68.
# Puede manejar las funciones en la pantalla táctil
así como en la pantalla de su teléfono inteligente.
PRECAUCIÓN
! No maneje el teléfono inteligente mientras
conduce. Obedezca toda la normativa pertinente de su región.
! En la pantalla de precaución debe acceder a
obedecer la norma anterior. Asegúrese de seguir las instrucciones que aparecen en pantalla.
Procedimiento de inicio
1 Conecte su teléfono inteligente al adaptador de conexión de teléfonos inteligentes
(CD-ML100) (se vende por separado) con la
entrada de RGB.
2 Pulse MODE.
# Pulse el botón de inicio para cambiar a la pantalla de inicio y luego toque la tecla MirrorLink iniciar
la aplicación de arranque.
# Al seleccionar MirrorLink, la pantalla del teléfono
inteligente aparece en la pantalla de la unidad;
ahora puede manejar su teléfono inteligente en la
pantalla de la unidad.
3 Operación de la aplicación.
— Pulse el botón de inicio: se visualiza la panta-
lla de inicio de MirrorLink.
— Pulse dos veces el botón de inicio: se visuali-
za la pantalla de inicio de la unidad.
— Pulse d (TRK): se visualiza la pantalla de
menú de MirrorLink.
— Pulse c (TRK): se visualiza la pantalla ante-
rior de MirrorLink.
USB
Esta unidad es compatible con USB MSC (Mass
Storage Class) y USB MTP (Media Transfer Protocol).
También puede utilizar USB MTP (conexión a
dispositivos Android compatibles con MTP a través de un cable USB); sin embargo, algunas
funciones no son compatibles con la conexión
MTP.
USB
USB
MSC
MTP
MP3 11
WMA 11
WAV 1 —
AAC 11
DivX 1 —
MPEG-1 1 —
MPEG-2 1 —
MPEG-4 1 —
JPEG 1 —
Modo de búsqueda de música 1 —
MIXTRAX EZ 1 —
Funciones de imágenes en
movimiento
Función de USB MSC
Puede utilizar esta unidad para visualizar archivos de almacenamiento USB.
Teclas del teclado táctil
1JAN
PM
12:43
Media
2
1
USB
FULL
00'20'' -119'51''
a987 5
1 Tecla de avance rápido/Tecla de retroceso
Avance rápido o retroceso
Toque para cambiar entre avance rápido y retroceso.
2 Tecla de búsqueda
Visualización de la lista de nombres de archivos para la selección de estos.
3 Tecla de cambio del idioma de los subtítulos
En el caso de los archivos DivX que vienen
con grabaciones multi-subtítulos, se puede
cambiar entre los idiomas de los subtítulos
durante la reproducción.
4 Tecla de medio
Cambio entre tipos de archivo multimedia
para reproducir música/vídeo/fotografías.
5 Tecla de cambio del idioma de audio
Con los archivos de DivX que permitan la reproducción del audio en distintos idiomas y
con distintos sistemas de sonido (Dolby Digital, DTS, etc.), se puede cambiar entre los
idiomas/sistemas de audio durante la reproducción.
01 01
Dolby DMulti ch
11
643
84
Es
Page 85

All
USB
USB
Sección
11
6 Tecla de repetición
Selección de gama de repetición.
Consulte Repetición de reproducción en la página 87.
7 Tecla de reproducción en cámara lenta
(Función para archivos DivX/MPEG-1/
MPEG-2/MPEG-4)
La selección avanza un cuadro cada vez durante la reproducción.
Mantenga pulsada la tecla durante más de
dos segundos para disminuir la velocidad de
reproducción.
8 Tecla de detención
Detención de la reproducción.
Si reanuda la reproducción, ésta se iniciará
desde el punto en el que se detuvo. Vuelva a
tocar la tecla para detener totalmente la reproducción.
9 Tecla de modo de pantalla
Cambio del modo de pantalla.
Consulte Cambio del modo panorámico en la
página 71.
a Tecla de pausa y reproducción
Interrupción de la reproducción.
Restablecimiento de la reproducción normal
durante la pausa o la reproducción en cámara lenta / cuadro por cuadro.
Funcionamiento básico
Reproducción de vídeos.
1 Conecte el dispositivo USB.
La reproducción comenzará automáticamente.
Si no se muestra el icono de fuente, toque la
pantalla para poder visualizarlo.
Avance rápido o rebobinado usando los botones
1 Mantenga presionado c o d (TRK).
Notas
! Las teclas del teclado táctil no mencionadas
en el apartado Funciones de imágenes en mo-
vimiento podrían aparecer en la pantalla.
Consulte Lista de indicadores en la página
121.
! También se puede cambiar entre los idio-
mas/sistemas de audio utilizando el menú
Ajuste de Video. Para obtener más información, consulte Ajuste del idioma del audio en
la página 96.
! Esta unidad volverá a la reproducción normal
si cambia el idioma de audio durante el avance rápido/retroceso rápido, una pausa o la reproducción a cámara lenta.
! También se puede cambiar entre los idiomas
de los subtítulos utilizando el menú
Ajuste de Video. Para obtener más información, consulte Ajuste del idioma de los subtí-
tulos en la página 96.
! Esta unidad volverá a la reproducción normal
si cambia el idioma de los subtítulos durante
el avance rápido/retroceso rápido, una pausa
o la reproducción a cámara lenta.
Funciones de reproducción
de sonido
Puede utilizar esta unidad para escuchar archivos de audio USB.
Conexión MTP
En esta función, USB MTP (la conexión a dispositivos Android compatibles con MTP a través de
un cable USB) es compatible solo para archivos
MP3/WMA/AAC.
Notas
! Podría no mostrarse el tiempo de reproduc-
ción correcto.
! Al reproducir archivos grabados como VBR
(velocidad de grabación variable), el tiempo
de reproducción no se visualizará correctamente si se utilizan las funciones de avance
rápido o retroceso.
! Para asegurar un funcionamiento correcto,
conecte el cable conector del Dock del iPod
directamente a esta unidad.
! Cuando el iPod está conectado a esta uni-
dad, no se puede encender ni apagar.
! Si los caracteres grabados en el dispositivo
de almacenamiento USB no son compatibles con esta unidad, no aparecerán en la
pantalla.
! Dependiendo del entorno en que se grabó la
información de texto, puede que no se visualice correctamente.
! Desconecte el reproductor de audio portátil
USB / memoria USB cuando no los esté utilizando.
! Al seleccionar Speana en Selección de la vi-
sualización de fondo en la página 107, no se
visualiza el material gráfico.
Teclas del teclado táctil
USB
Abcdefghi
Abcdefghi
Abcdefghi
Abcdefghi
00'01'' -00'03''
61
21
All
All
JAN
S.Rtrv
PM
12:43
Media
3
a987654
1 Tecla MIXTRAX EZ
Inicio de MIXTRAX EZ.
Excepto para USB MTP
2 Tecla de información
Cambio de la información de texto que se visualiza en esta unidad cuando se reproducen archivos MP3/WMA/AAC/WAV.
3 Tecla de búsqueda
Visualización de la lista de nombres de archivos para la selección de estos.
4 Tecla de medio
Cambio entre tipos de archivos multimedia
para reproducir en USB.
5 Tecla de restauración de sonido
Consulte Utilización del sound retriever en la
página 71.
6 Tecla de reproducción aleatoria
Reproducción de las canciones en orden
aleatorio.
7 Tecla de repetición
Selección de gama de repetición.
8 Tecla DB
Creación de una base de datos que permite
búsquedas por nombre del artista, género y
otras opciones.
Consulte Modo de búsqueda de música en la
página 86.
9 Tecla de carpeta anterior/carpeta siguiente
Selección de una carpeta.
a Tecla de pausa y reproducción
Pausa e inicio de la reproducción.
Español
85
Es
Page 86

All
Sección
11
USB
USB
Funcionamiento básico
Reproducción de pistas
1 Conecte el dispositivo USB.
La reproducción comenzará automáticamente.
Si no se muestra el icono de fuente, toque la
pantalla para poder visualizarlo.
Avance rápido o rebobinado usando los botones
1 Mantenga presionado c o d (TRK).
Modo de búsqueda de música
Función para USB MSC
Esta unidad crea un índice para facilitar la búsqueda de una canción. Se puede buscar por categorías como álbumes y artistas.
PRECAUCIÓN
! Esta función no está disponible cuando el
dispositivo de almacenamiento USB está
bloqueado.
! Esta función no está disponible cuando el es-
pacio libre del dispositivo de almacenamiento USB es inferior a 5 MB.
! Mientras esta unidad crea un índice, no de-
sactive la unidad; podría provocar la pérdida
de datos de su dispositivo de almacenamiento USB.
! Si cambia a visualización de imagen JPEG o
vídeo mientras se está creando una base de
datos, o si no se ha podido crear una base
de datos, aparece un mensaje y se detiene la
creación de la base de datos.
1 Toque DB para crear una base de datos
en modo Búsqueda de música.
Consulte Funciones de reproducción de sonido
en la página 85.
86
Es
2 Cuando se visualice “Salvar la base de
datos a la memoria?”, toque “Si”.
Se ha terminado de guardar la base de datos. Si
no quiere guardarla, pulse “No”.
Cuando se termine de guardar, aparecerá “Se
guardó la Base de Datos en la memoria.”.
Se iniciará el modo Búsqueda de música.
3 Visualice una lista y toque la tecla de etiqueta.
4 Seleccione un archivo.
Funciones de reproducción
de imágenes fijas
Función para USB MSC
Puede utilizar esta unidad para visualizar imágenes fijas guardadas en un dispositivo de almacenamiento USB.
Teclas del teclado táctil
12
1JAN
PM
12:43
USB
NORMAL
44
All
All
Media
3 Tecla de captura
Captura de una imagen en archivos JPEG.
4 Tecla de medio
Cambio entre tipos de archivos multimedia
cuando hay más de un tipo en el dispositivo
USB. Esta tecla no aparecerá cuando solo
haya un tipo de archivo multimedia en el dispositivo USB.
5 Tecla de reproducción aleatoria
Reproducción de los archivos en un orden
aleatorio.
6 Tecla de repetición
Selección de gama de repetición.
7 Tecla de giro
Giro de la imagen mostrada 90° hacia la derecha.
8 Tecla de carpeta anterior/carpeta siguiente
Selección de una carpeta.
9 Tecla de modo de pantalla
Cambio del modo de pantalla.
Consulte Cambio del modo panorámico en la
página 71.
a Tecla de pausa y reproducción
Inicio o pausa del slideshow.
3456789a
1 Tecla de avance rápido/Tecla de retroceso
Selección de una imagen.
2 Tecla de búsqueda
Visualización de la lista de nombres de archivos para la selección de estos.
Funcionamiento básico
Reproducción de imágenes fijas
1 Conecte el dispositivo USB.
La reproducción comenzará automáticamente.
! Si no se muestra el icono de fuente, toque la
pantalla para poder visualizarlo.
Selección de archivo usando los botones
1 Pulse c o d (TRK).
Búsqueda rápida de archivos
1 Mantenga presionado c o d (TRK).
! Puede buscar 10 archivos JPEG a la vez.
Si hay menos de 10 archivos, la búsqueda cubrirá el primer o el último archivo.
Notas
! Los archivos se reproducen por orden del nú-
mero de archivo y se saltan las carpetas que
no tienen archivos. (Si la carpeta 1 (RAÍZ) no
contiene archivos, la reproducción comienza
en la carpeta 2.)
! Las teclas del teclado táctil no mencionadas
en el apartado Funciones de reproducción de
imágenes fijas podrían aparecer en la pantalla.
Consulte Lista de indicadores en la página
121.
Cambio del tipo de archivo
multimedia
% Toque Media para cambiar entre los tipos
de archivos de medios.
Page 87

USB
Audio Bluetooth
Sección
11
Reproducción aleatoria
(shuffle)
% Toque la tecla de reproducción aleatoria.
! On – Reproduce archivos en orden aleatorio
dentro de la gama de repetición, Folder y
Media.
! Off – Cancela la reproducción aleatoria.
Repetición de reproducción
% Toque la tecla de repetición.
! Folder – Repite la carpeta actual
! All – Repite todos los archivos
! Cuando se selecciona Folder, no se puede re-
producir una subcarpeta de esa carpeta.
! Si se selecciona una fuente USB, la gama de
repetición cambia a All.
Selección de ficheros de la
lista de nombres de ficheros
(Funciona con audio comprimido/DivX/MPEG-1/
MPEG-2/MPEG-4)
El funcionamiento es el mismo que para Disco.
Consulte Selección de ficheros de la lista de nom-
bres de ficheros en la página 78.
Visualización de listas
relacionadas con la canción
que se está reproduciendo
(búsqueda de enlace)
Toque el material gráfico para abrir una lista de
los nombres de canciones del álbum que se
está reproduciendo. Toque el nombre de la canción que desea reproducir para empezar su reproducción.
Notas
! Si no se visualiza parte de la información gra-
bada, aparecerá una tecla de desplazamiento a la derecha de la lista. Toque la tecla de
desplazamiento para desplazarse.
! Esta función está disponible para dispositi-
vos USB en el modo Búsqueda de música.
Reproducción del contenido
â
DivX
VOD
El funcionamiento es el mismo que para Disco.
Consulte Reproducción del contenido DivX
en la página 78.
â
VOD
Captura de una imagen en
archivos JPEG
Puede capturar datos de imagen para utilizarlos
como papel tapiz. Las imágenes pueden almacenarse en esta unidad y recuperarse fácilmente.
! Esta unidad sólo puede almacenar datos de
una imagen. La imagen nueva sobrescribe la
anterior.
1 Toque f para poner en pausa el slideshow cuando aparezca la imagen deseada.
2 Toque Capture para capturar la imagen
deseada.
3 Cuando se visualice “Guardar esta imagen?”, toque Si.
Mientras se almacena la imagen en esta unidad, se visualiza “Guardando la imagen. Mien-
tras guarda,No apague el motor”. Al finalizar
el proceso se mostrará “Imagen Guardada”.
# Para cancelar el proceso de almacenamiento,
toque No.
Funciones de reproducción
de sonido
(Función de AVH-X5650BT/AVH-X2650BT)
Puede utilizar esta unidad para escuchar archivos de audio Bluetooth.
Notas
! Según el reproductor de audio Bluetooth co-
nectado a esta unidad, las operaciones disponibles se limitan a los dos niveles
siguientes:
— Perfil A2DP (Advanced Audio Distribution
Profile): solo se pueden reproducir canciones
en su reproductor de audio.
— Perfil AVRCP (Audio/Video Remote Control
Profile): puede reproducir, detener la reproducción, seleccionar canciones, etc.
! Como hay diversos reproductores de audio
Bluetooth disponibles en el mercado, las funciones disponibles pueden variar ampliamente en función del modelo específico.
Consulte el manual de instrucciones de su
reproductor, así como este manual, mientras
utilice un reproductor de audio Bluetooth
con esta unidad.
! Puesto que la señal de su teléfono móvil
puede ocasionar ruido, procure no utilizarlo
mientras esté escuchando canciones en su
reproductor de audio Bluetooth.
! Mientras habla con el teléfono móvil conec-
tado a esta unidad a través de tecnología inalámbrica Bluetooth, el sonido del
reproductor de audio Bluetooth conectado a
esta unidad se silencia.
! Podría no mostrarse el tiempo de reproduc-
ción correcto.
! Según el tipo de reproductor de audio
Bluetooth que haya conectado a esta unidad,
es posible que la pantalla de funcionamiento
e información no tenga disponibles algunas
de las funciones.
Teclas del teclado táctil
22 JAN
AM
Bluetooth
8888
Abcd efghi
Abcde fgh
Abcde fgh
Abcde fgh
88'88'' -88'88''
32
1 Tecla de reproducción aleatoria
Reproducción de las canciones en orden
aleatorio.
2 Tecla de repetición
Selección de gama de repetición.
3 Tecla de pausa y reproducción
Pausa e inicio de la reproducción.
12:22
DB
1
Ajuste de audio Bluetooth
Antes de utilizar la función de audio Bluetooth,
deberá establecer una conexión inalámbrica
Bluetooth entre la unidad y su reproductor de
audio Bluetooth.
1 Conexión
Primero debe conectar un dispositivo de audio
Bluetooth.
Para ver instrucciones detalladas sobre cómo
conectar su dispositivo de audio Bluetooth a
esta unidad mediante la tecnología inalámbrica Bluetooth, consulte Menú de conexión
Bluetooth en la página 106.
12
Español
87
Es
Page 88

Sección
Audio Bluetooth
12
13
Notas
! Al reproducir archivos grabados como VBR
(velocidad de grabación variable), el tiempo
de reproducción no se visualizará correctamente si se utilizan las funciones de avance
rápido o retroceso.
! Para asegurar un funcionamiento correcto,
conecte el cable conector del Dock del iPod
directamente a esta unidad.
! Cuando el iPod está conectado a esta uni-
dad, no se puede encender ni apagar.
! Si los caracteres grabados en el reproductor
de audio Bluetooth no son compatibles con
esta unidad, no aparecerán en la pantalla.
! Dependiendo del entorno en que se grabó la
información de texto, puede que no se visualice correctamente.
Reproducción aleatoria
(shuffle)
% Toque la tecla de reproducción aleatoria.
! On – Reproducción de los archivos en orden
aleatorio.
! Off – Cancela la reproducción aleatoria.
Repetición de reproducción
% Toque la tecla de repetición.
! One – Repite sólo la canción actual
! All – Repite todas las canciones
Uso de MIXTRAX
Función MIXTRAX
MIXTRAX es una tecnología original para crear
mezclas sin pausas de selecciones de la biblioteca de audio, que incluye efectos de DJ y proporciona un sonido que hace pensar que el DJ
está ahí mezclando la música.
Función MIXTRAX EZ
Puede utilizar esta unidad para reproducir archivos de audio USB/iPod.
MIXTRAX EZ se utiliza para añadir una serie de
efectos de sonido y para organizar pausas entre
canciones; permite disfrutar de la reproducción
de música sin pausas.
! Esta función solo está disponible si se está
reproduciendo un archivo en un dispositivo
de almacenamiento USB o una canción en
un iPod.
! Esta función no está disponible cuando el
modo de control se ajusta a App Mode.
! Según el archivo/canción, es posible que los
efectos de sonido no estén disponibles.
! Según el archivo/canción, es posible que la
reproducción sin pausas no esté disponible.
Nota
No puede utilizar esta función con USB MTP.
Inicio de la función MIXTRAX EZ
% Toque MIXTRAX EZ.
Consulte Tecla MIXTRAX EZ en la página 79 y
85.
Configuración del modo
MIXTRAX
Active esta función para reproducir archivos de
audio mediante MIXTRAX.
1 Pulse el botón de inicio para cambiar a la
pantalla de inicio.
2 Toque la tecla de sistema para abrir el
menú del sistema.
3 Toque Configurar MIXTRAX en el menú
del sistema.
Se muestran los elementos de configuración de
MIXTRAX.
! Modo Short Playback – Al activar este
modo, seleccione la longitud de reproducción de la pista de audio.
60s (60 seg.)—90s (90 seg.)—120s (120 seg.)
—150s (150 seg.)—180s (180 seg.)—Al azar
(aleatorio)—Off (desactivado)
Si se selecciona Al azar, el tiempo de reproducción varía entre 60s, 90s, 120s, 150s y
180 s seleccionado en aleatorio cuando cambia la canción reproducida.
! Desplegar efecto – Cuando
Desplegar efecto está activado, la visualiza-
ción de material gráfico se puede mover
según el tipo de música.
! Efecto de Corte de entrada – Al activar
Efecto de Corte de entrada, se insertan
efectos de sonido entre las pistas.
! Ajuste de Efecto – Utilice Ajuste de Efecto
para configurar el efecto de sonido que
desea insertar entre las pistas.
Configuración del efecto
Puede cambiar la configuración de sonidos fijos
y efectos de sonido.
Hay disponibles seis sonidos fijos diferentes que
se pueden insertar para la reproducción entre
pistas.
Los efectos de sonido se utilizan como efectos
para señalizar el final de una canción que se
está reproduciendo y el comienzo de la próxima
canción en serie.
88
Es
Page 89

Uso de MIXTRAX
Teléfono Bluetooth
Sección
13
Los sonidos fijos y los efectos de sonido se ajustan como combinaciones como sonidos de
MIXTRAX.
Sonidos fijos
! Phaser – Un sonido fijo que suena como el
surcar de las olas.
! Roll – Un sonido fijo que repite la reproduc-
ción de un sonido específico.
! Turntable – Un sonido fijo que imita el raya-
do de los DJ.
! Flanger2 – Un sonido torrencial que imita
los sonidos de incremento y disminución de
un motor a reacción.
! Reverb – Un efecto de sonido fijo que crea
un efecto de reverberación.
! Echo2 – Un efecto de sonido fijo que crea un
efecto de eco.
Efectos de sonido
! Cross Fade – Un efecto de sonido que crea
un efecto de acercamiento y alejamiento sonoro entre las canciones.
! Flanger1 – Un sonido torrencial que imita
los sonidos de incremento y disminución de
un motor a reacción.
! Eco1 – Un efecto de sonido que crea un efec-
to de eco.
! Loop – Un efecto de sonido que repite la re-
producción de una sección de una pista de
canción.
Nota
Cross Fade no se puede seleccionar para archivos de audio iPod.
Ajuste de sonidos y efectos de
sonidos como preajustes
mediante la tecla de preajuste
Los efectos de sonido Standard y Simple ya
están ajustados como preajustes predeterminados.
% Toque Standard o Simple para comprobar
los ajustes.
El efecto de sonido registrado preajustado para
la tecla que se ha tocado se ajusta como preajuste.
Registro de sonidos y efectos de
sonido como preajustes
Registra una combinación deseada de sonidos y
efectos de sonido en Custom.
Toque Personalizar para ajustar fácilmente el
sonido o el efecto de sonido deseados.
1 Toque Personalizar.
2 Añada una marca de verificación al efecto de sonido deseado tocando la opción.
El efecto de sonido marcado se registra como
preajustado en Custom.
Notas
! Si se toca un efecto de sonido en la pantalla
de selección para Standard o Simple,la
pantalla Custom se muestra automáticamente y el efecto de sonido se registra en
Custom.
! Puede escuchar sonidos fijos como ejemplos
tocando el icono de altavoz.
Funciones del teléfono
Bluetooth
(Función de AVH-X5650BT/AVH-X2650BT)
Se puede usar un teléfono Bluetooth.
Importante
! Si deja la unidad en espera para conectar su
teléfono por Bluetooth mientras el motor no
está encendido puede agotar la batería.
! Las operaciones avanzadas que exigen con-
centración, como marcar números en la pantalla, usar el directorio de teléfonos, etc.,
están prohibidas mientras se conduce. Aparque el vehículo en un lugar seguro y accione
el freno de mano antes de continuar.
! El menú de conexión Bluetooth no se puede
seleccionar durante la conducción.
! Según el tipo de teléfono móvil conectado a
esta unidad, las operaciones disponibles
pueden estar limitadas.
! Si no puede completar la conexión utilizando
esta unidad, utilice el dispositivo para conectarlo a la misma.
! Si conecta más de un dispositivo al mismo
tiempo, es posible que el dispositivo conectado no funcione correctamente. Se recomienda conectar un dispositivo por vez.
Teclas del teclado táctil
Visualización de la espera telefónica
e1
d
1
Abcdefghi
1234567890123456
AutoONTone
13 ARP
OFF
PM
12:25
2345678
Cuando cambie al modo de introducción
de número de teléfono
123
456
789
*0#
C+
13 APR
PM
1
Abcdefghi
XXXXXXXXXXXXXXXX
PrivateONVol
12:25
9abc
1 Tecla de cierre
Se cierra la pantalla.
2 Tecla de marcación predefinida
Visualización de la pantalla de marcaciones
predefinidas.
3 Tecla de directorio de teléfonos
Cambio al modo directorio de teléfonos.
4 Tecla de configuración
Visualización del menú de conexión de
Bluetooth.
5 Tecla de tono
Activación o desactivación del tono de las llamadas entrantes.
6 Tecla de respuesta automática
Activación o desactivación de la respuesta
automática.
7 Tecla de historial
Cambio a las listas de llamadas perdidas, recibidas y marcadas.
8 Tecla de teclado
Cambio de modo para introducir directamente el número de teléfono.
14
Español
89
Es
Page 90

Sección
Teléfono Bluetooth
14
Teléfono Bluetooth
9 Tecla de conectado
Finalización de una llamada.
Rechazo de una llamada entrante.
Cancelación de una llamada en espera.
a Tecla de volumen
Ajuste del volumen de escucha del interlocutor.
b Tecla de modo privado
Activación o desactivación del modo privado.
c Tecla de desconectado
Aceptar una llamada entrante.
Realización de una llamada seleccionando
un número de teléfono.
Cambio entre los interlocutores de llamadas
en espera.
d Tecla de control de voz
Notas
! El modo privado sólo se puede utilizar mien-
tras se habla por teléfono.
! Para finalizar la llamada, tanto usted como
su interlocutor deben colgar los teléfonos.
! Las teclas del teclado táctil no mencionadas
en el apartado Funciones del teléfono
Bluetooth podrían aparecer en la pantalla.
Consulte Lista de indicadores en la página
121.
Información de texto
e Aviso de llamada entrante
Indica que se ha recibido una llamada entrante que no ha sido revisada todavía.
! No se muestra para las llamadas reali-
zadas cuando el teléfono móvil está desconectado de la unidad.
Configuración de la función
manos libres
1 Conexión
Primero debe conectar un teléfono Bluetooth
a esta unidad.
Para ver instrucciones detalladas sobre cómo
conectar su teléfono a esta unidad mediante
la tecnología inalámbrica Bluetooth, consulte
Emparejado desde esta unidad en la página
106.
2 Ajuste del volumen
Ajuste a su antojo el volumen del audífono de
su teléfono móvil. Una vez ajustado, el nivel de
volumen se graba en la unidad como el valor
predefinido.
Notas
! El volumen de voz del autor de la llamada y
del tono pueden variar según el tipo de teléfono móvil.
! Si la diferencia entre el volumen del tono y el
volumen de voz de la persona que llama es
considerable, el nivel de volumen general
puede volverse inestable.
! No olvide ajustar el volumen a un nivel ade-
cuado antes de desconectar el teléfono móvil
de esta unidad. Si el volumen ha sido silenciado (nivel cero) en su teléfono móvil, permanecerá silenciado incluso después de que
desconecte dicho teléfono.
Llamada a un número del
directorio de teléfonos
Al conectar el teléfono, se deberán transferir
automáticamente los contactos del mismo. Si
no, utilice el menú del teléfono para transferirlos. La visibilidad de la unidad deberá estar activada cuando utilice el menú del teléfono.
Consulte Cambio de visibilidad de la unidad en la
página 106.
Una vez encontrado el número al que desea llamar en el directorio de teléfonos, puede seleccionar la entrada y hacer la llamada.
1 Toque la tecla de directorio de teléfonos
para cambiar al modo de directorio de teléfonos.
2 Selección de la lista de números de teléfono.
Aparece la lista detallada de números de teléfonos de la entrada seleccionada.
3 Seleccione el número de teléfono.
# Si quiere almacenar el número de teléfono,
toque la lista sin levantar el dedo.
4 Toque la tecla de descolgar para realizar
la llamada.
5 Toque la tecla de colgar para finalizar la
llamada.
Nota
Al conectar el teléfono, se deberán transferir
automáticamente los contactos del mismo. Si
no, utilice el menú del teléfono para transferirlos. La visibilidad de la unidad deberá estar activada cuando utilice el menú del teléfono.
Consulte Cambio de visibilidad de la unidad en la
página 106.
Selección de número por
modo de búsqueda alfabético
Si se registran muchos números en el directorio
de teléfonos, puede buscar el número empleando el modo de búsqueda alfabético.
1 Toque la tecla de directorio de teléfonos
para cambiar al modo de directorio de teléfonos.
2 Toque ABC para cambiar al modo de búsqueda alfabética.
3 Toque la primera letra de la entrada que
está buscando.
Se mostrarán las entradas del Directorio de teléfonos que empiecen por dicha letra (p. ej.: “Bárbara”, “Beatriz” y “Bruno” cuando “B” está
seleccionado).
# El orden del primer nombre y del último puede
variar respecto al del teléfono móvil.
4 Toque la lista para visualizar la lista de
números de teléfono de la entrada seleccionada.
# Si una entrada incluye varios números de teléfono, seleccione uno de ellos tocando la lista.
# Toque el icono si quiere cambiar a la lista del historial de llamadas.
Cambio a la lista del historial de llamadas.
5 Toque la tecla de descolgar para realizar
la llamada.
6 Toque la tecla de colgar para finalizar la
llamada.
Inversión de nombres en el
directorio de teléfonos
Cuando se conecte a esta unidad su teléfono
móvil, el nombre y los apellidos de sus contactos podrían registrarse en el directorio de teléfonos en orden inverso. Se puede utilizar esta
función para volver a cambiar el orden.
(Inversión de los nombres en el directorio de teléfonos)
90
Es
Page 91

Teléfono Bluetooth
Teléfono Bluetooth
Sección
14
1 Toque la tecla de directorio de teléfonos
para cambiar al modo de directorio de teléfonos.
2 Invierta los nombres en el directorio de
teléfonos.
Inversión de los nombres
en el directorio de teléfonos.
3 Aparece el mensaje “Le gustaría invertidos todos los nombres?”. Toque Si para continuar.
Mientras se invierten los nombres, aparece
# Si la inversión, aparece “Error al invertir nom-
bre.”. En tal caso, vuelva a intentarlo desde el princi-
pio.
Nota
Invertir los nombres de sus contactos desde
esta unidad no afecta a los datos de su dispositivo Bluetooth.
Uso de las listas de llamadas
perdidas, recibidas y marcadas
Las 80 últimas llamadas marcadas, recibidas y
perdidas se almacenan en la memoria. Puede
realizar una búsqueda dentro de ellas y llamar a
los números desde estas listas.
1 Toque la tecla de historial para mostrar la
lista del historial de llamadas.
2 Seleccione Llamadas Perdidas,
Llamadas salientes o Llamadas entrantes.
Visualización de la lista de
llamadas recibidas.
Visualización de la lista de
llamadas marcadas.
Visualización de la lista de
llamadas perdidas.
3 Toque el número de lista para seleccionar
.
un número de teléfono.
El nombre y el número de teléfono se visualizan
en la lista detallada.
# Si quiere almacenar el número de teléfono,
toque la lista sin levantar el dedo.
4 Toque la tecla de descolgar para realizar
la llamada.
5 Toque la tecla de colgar para finalizar la
llamada.
Ajuste de respuesta automática
Si esta función está activada, la unidad contestará automáticamente todas las llamadas entrantes.
% Toque la tecla de respuesta automática
para activar o desactivar la función de respuesta automática.
Ajuste del volumen de
escucha del interlocutor
Para mantener la calidad del sonido, esta unidad puede ajustar el volumen de escucha del interlocutor. Si el volumen no es suficiente para el
interlocutor, use esta función.
% Toque la tecla de volumen para seleccionar Far-End VOL.
1—2—3
# Esta función puede utilizarse incluso mientras se
habla por teléfono.
# Los ajustes se pueden almacenar para cada dispositivo.
Cambio del tono de llamada
Puede seleccionar si desea utilizar el tono de llamada de esta unidad. Si se activa esta función,
sonará el tono de llamada de esta unidad.
1 Conecte su teléfono móvil a esta unidad.
2 Toque la tecla de tono para activar o desactivar el tono de llamada.
Uso de las listas de
marcaciones predefinidas
Se pueden almacenar con facilidad hasta seis
números de teléfono como predefinidos.
1 Toque la tecla de marcación predefinida
para mostrar la pantalla de presintonías.
2 Toque uno de los números de teléfono
para seleccionarlo.
# Si desea borrar un número de teléfono predefinido, mantenga pulsado el número de teléfono que
desea borrar.
3 Toque la tecla de descolgar para realizar
la llamada.
4 Toque la tecla de colgar para finalizar la
llamada.
Realización de una llamada
ingresando el número de
teléfono
13 APR
PM
12:25
1
+
Abcdefghi
XXXXXXXXXXXXXXXX
PrivateONVol
123
456
789
*0#
C
1 Toque la tecla de teclado para empezar a
introducir el número de teléfono.
2 Toque los iconos de los números para introducir los números deseados.
# Se pueden ingresar hasta 32 dígitos.
3 Toque la tecla de descolgar para realizar
la llamada.
4 Toque la tecla de colgar para finalizar la
llamada.
Nota
El modo de introducción de número de teléfono
solo se puede utilizar si hay un teléfono
Bluetooth conectado a esta unidad.
Ajuste del modo privado
Durante una conversación puede cambiar al
modo privado (hablar directamente por su teléfono móvil).
Español
91
Es
Page 92

54
Sección
Teléfono Bluetooth
14
Sintonizador de TV
15
% Toque la tecla de modo privado para activar o desactivar el modo privado.
Control de voz
Si su teléfono móvil está equipado con la función de control de voz, se pueden utilizar, por
ejemplo, comandos de voz para realizar llamadas.
! El funcionamiento es diferente según el tipo
de teléfono móvil. Consulte el manual de su
teléfono móvil para ver más instrucciones.
! Cuando se utiliza un iPhone con iOS 6.1 o
posterior.
Siri Eyes Free Mode está disponible con este
producto.
1 Toque la tecla de control de voz.
El display cambia a la pantalla de control de voz.
También puede cambiar a la pantalla de control
de voz manteniendo pulsado el botón de inicio
mientras la fuente esté activada.
13 ARP
PM
1
I'm Listening...
2 Inicie el control de voz.
Indica que se pueden realizar llamadas continuas ininterrumpidamente.
Indica que el display está cerrado.
12:25
Notas
! Para que sus comandos de voz puedan ser
reconocidos e interpretados correctamente,
asegúrese de las condiciones son aptas para
el reconocimiento.
! Observe que el viento que sopla a través de
las ventanas del vehículo y el ruido proveniente del exterior del vehículo pueden interferir con la función de comando de voz.
! Para una captación óptima, se deberá colo-
car el micrófono directamente delante del
conductor a una distancia adecuada.
! Si se habla demasiado pronto tras el inicio
del comando, puede fallar el reconocimiento
de voz.
! Hable lenta, pausada y claramente.
Funciones del sintonizador
de TV
Esta unidad se puede utilizar para controlar un
sintonizador de TV, como el GEX-1550DTV (de
venta por separado).
Nota
El texto puede no mostrarse correctamente en
función del idioma seleccionado en la configuración de idioma. Si éste es el caso, el texto se
mostrará por el contrario en el idioma por defecto del sintonizador de TV. Para más información,
consulte Selección del idioma del sistema en la
página 100.
Teclas del teclado táctil
231
1 111 wwwww
2 222 wwwww
3 333 wwwww
4 444 wwwww
5 555 wwwww
6 666 wwwww
1 Tecla EPG
Abre el horario de emisión de programación
de canales.
2 Tecla de cierre
Cierra el display del horario de emisión.
3 Tecla de menú
4 Tecla de selección de canal
Se utiliza para cambiar entre canales presintonizados.
ProgramTitle
Menu
EPG
222
CH
5 Tecla de canal presintonizado
Se utiliza para seleccionar un canal presintonizado.
Cambio del modo panorámico
Puede seleccionar el modo deseado para ampliar una imagen de 4:3 a una de 16:9.
% Pulse c o d (TRK) para cambiar al modo
panorámico.
! FULL (pantalla completa)
La imagen de 4:3 se amplía en sentido horizontal solamente, lo que permite obtener una
imagen de TV de 4:3 (imagen normal) sin
omisiones.
! NORMAL (normal)
La imagen de 4:3 se visualiza como es, por lo
que no se perciben disparidades, ya que sus
proporciones son iguales a las de la imagen
normal.
Almacenamiento de emisoras
Esta función guarda automáticamente las emisoras que está escuchando.
Las frecuencias de emisión guardadas durante
este paso pueden reemplazar las frecuencias de
emisión almacenadas previamente con las teclas de canales presintonizados.
1 Toque la tecla de menú para abrir la visualización de menú.
2 Toque Channel Search para comenzar la
búsqueda de canal.
Los canales presintonizados se escuchan en el
orden de la frecuencia del canal.
! Para cancelar el almacenamiento de las fre-
cuencias de emisión, toque Cancel.
92
Es
Page 93

Sintonizador de TV
Configuración
Sección
15
Función EPG
Puede utilizar esta función para ver el horario de
emisión de programación de canales.
1 Toque la tecla EPG para mostrar la lista
EPG.
2 Toque uno de los elementos de la lista
para ver el horario de programación de canales para el elemento seleccionado.
Nota
Esta función no está disponible para emisoras
que no transmiten horarios de programación.
Funcionamiento del menú
Teclas del teclado táctil
15423
Audio
Sonic Center Control
Loudness
Subwoofer
Bass Booster
High Pass Filter
Source Level Adjuster
1 Tecla de configuración de vídeo
Consulte Configuración del reproductor de
vídeo en la página 96.
2 Tecla de función de audio
Consulte Ajustes de audio en la página 94.
3 Tecla de cierre
Retorno a la visualización de fuente actual.
4 Tecla de sistema
Consulte Ajustes del sistema en la página 98.
5 Tecla de favoritos
Puede elegir menús dentro de cada menú
(menú de funciones de audio, etc.) y registrarlos en este menú de favoritos.
Consulte Menú de favoritos en la página 105.
Notas
! Puede visualizar el menú Ajuste de Video al
seleccionar la fuente Disc o USB.
! Si inicia el menú Ajuste de Video, se deten-
drá la reproducción.
! No puede visualizar el menú de funciones de
audio cuando la función de silenciamiento
está activada o se está reproduciendo un archivo JPEG.
L/R 0
125Hz
Low
On
0
0
1 Pulse el botón de inicio para cambiar a la
pantalla de inicio.
2 Toque cualquiera de las siguientes teclas
del teclado táctil para seleccionar el menú
que desea ajustar.
Settings
AudioVideo
BluetoothFavoriteThemeSystem
16
Español
93
Es
Page 94

Sección
Ajustes de audio
17
Ajustes de audio
Uso del ajuste del fader/balance
Fader/Balance muestra si el altavoz trasero está
ajustado en Lleno en el menú del sistema.
Se puede cambiar el ajuste de fader/balance
para proporcionar un entorno de audio ideal
para todos los asientos ocupados.
1 Pulse el botón de inicio para cambiar a la
pantalla de inicio.
2 Toque la tecla de función de audio para
abrir el menú de audio.
3 Toque Fader/Balance en el menú de funciones de audio.
4 Toque
entre los altavoces delanteros/traseros.
Gama: F 15 L/R 0 a R 15 L/R 0
# Seleccione F/R 0 L/R 0 en caso de usar sólo dos
altavoces.
5 Toque o para ajustar el balance entre
los altavoces izquierdos/derechos.
Gama: F/R 0 L 15 a F/R 0 R 15
Nota
También puede ajustar el fader/balance, arrastrando el punto de la tabla que se muestra.
o para ajustar el balance
Uso del ajuste del balance
Balance muestra si el altavoz trasero está ajustado en Sub bajo en el menú del sistema. Este
ajuste le permite configurar el balance entre la
salida de sonido izquierda/derecha.
1 Pulse el botón de inicio para cambiar a la
pantalla de inicio.
2 Toque la tecla de función de audio para
abrir el menú de audio.
94
Es
3 Toque Balance en el menú de funciones
de audio.
4 Toque
los altavoces izquierdos/derechos.
Gama: L15a R15
Nota
También se puede ajustar el balance arrastrando el punto en la tabla mostrada.
o para ajustar el balance entre
Uso del ecualizador
Puede ajustar la ecualización de acuerdo con
las características acústicas del interior del
automóvil.
Recuperación de las curvas de
ecualización
Hay siete tipos de curvas de ecualización memorizadas que se pueden recuperar con facilidad en cualquier momento. A continuación se
ofrece una lista de estas curvas de ecualización.
Pantalla Curva de ecualización
S.bajo Supergraves
Potente Potente
Natural Natural
Vocal Vocal
Plano Plana
Pers1 Personalizada 1
Pers2 Personalizada 2
! Se pueden ajustar las curvas de ecualización
para Pers1 y Pers2,
! No se puede seleccionar Pers1 y Pers2 cuan-
do se utiliza el autoecualizador.
! En el caso de Plano, no se hacen ajustes al
sonido. Puede verificar el efecto de las curvas de ecualización al alternar entre Plano y
otra curva de ecualización.
1 Pulse el botón de inicio para cambiar a la
pantalla de inicio.
2 Toque la tecla de función de audio para
abrir el menú de audio.
3 Toque EQ Gráfico en el menú de funciones de audio.
# Cuando se está utilizando el autoecualizador, no
se pueden seleccionar ni ajustar las curvas del ecualizador Pers1 y Pers2.
4 Toque el ajuste deseado.
S.bajo—Potente—Natural—Vocal—Plano—
Pers1—Pers2
Ajuste del ecualizador gráfico
de 8 bandas
Se puede ajustar el nivel de cada banda para las
curvas de ecualización.
! Se puede crear una curva Pers1 separada
por cada fuente. Si se realizan ajustes cuando una curva distinta a Pers2 está seleccionada, los ajustes de la curva de ecualización
se guardarán en Pers1.
! Se puede crear una curva Pers2 común a
todas las fuentes. Si se realizan ajustes cuando la curva Pers2 está seleccionada, la curva
Pers2 se actualizará.
1 Pulse el botón de inicio para cambiar a la
pantalla de inicio.
2 Toque la tecla de función de audio para
abrir el menú de audio.
3 Toque EQ Gráfico en el menú de funciones de audio.
4 Toque el ajuste deseado.
S.bajo—Potente—Natural—Vocal—Plano—
Pers1—Pers2
5 Toque la tabla para ajustar el nivel de la
banda de ecualización.
Gama: +12dB a –12dB
Uso del autoecualizador
El autoecualizador memoriza la curva de ecualización creada por la función EQ automática
(consulte EQ automático (ecualización automáti-
ca) en la página 102).
Se puede activar o desactivar el autoecualizador.
Puede emplear esta función al conectar un micrófono opcional a esta unidad.
1 Pulse el botón de inicio para cambiar a la
pantalla de inicio.
2 Toque la tecla de función de audio para
abrir el menú de audio.
3 Toque Ecual. auto. para activar o desactivar el autoecualizador.
# No se puede usar esta función si no se ha realizado el ajuste EQ automático.
Uso del control central de
sonido
Mediante esta función se puede crear fácilmente el sonido adecuado para la posición del oyente.
1 Pulse el botón de inicio para cambiar a la
pantalla de inicio.
2 Toque la tecla de función de audio para
abrir el menú de audio.
Page 95

Ajustes de audio
Ajustes de audio
Sección
17
3 Toque Control de Centro Sónico en el
menú de funciones de audio.
4 Toque
del oyente.
Gama: Izquierdo 7 a Derecho 7
o para seleccionar una posición
Ajuste de la sonoridad
La sonoridad compensa las deficiencias en los
intervalos de frecuencias bajas y altas cuando
se escucha a un volumen bajo.
1 Pulse el botón de inicio para cambiar a la
pantalla de inicio.
2 Toque la tecla de función de audio para
abrir el menú de audio.
3 Toque c o d para seleccionar el nivel de
sonoridad deseado.
Off (desactivado)—Baj (bajo)—Media (medio)
—Alto (alto)
Uso de la salida de subgraves
Esta unidad está equipada con una salida de
subgraves que se puede activar o desactivar.
! Se puede ajustar la frecuencia de corte y el
nivel de salida cuando la salida de subgraves
está activada.
1 Pulse el botón de inicio para cambiar a la
pantalla de inicio.
2 Toque la tecla de función de audio para
abrir el menú de audio.
3 Toque Sub bajo en el menú de funciones
de audio.
4 Toque On o Off junto a Sub bajo para activar o desactivar la salida del altavoz de subgraves.
5 Toque Normal o Retroceso junto a Fase
para seleccionar la fase de la salida de subgraves.
6 Toque c o d junto a Nivel para ajustar el
nivel de salida del altavoz de subgraves.
Gama: +6 a –24
7 Toque c o d junto a Frecuencia para seleccionar la frecuencia de corte.
50Hz—63Hz—80Hz—100Hz—125Hz
Solo las frecuencias más bajas que aquellas en
el intervalo seleccionado se generan por el altavoz de subgraves.
Intensificación de los graves
Puede intensificar el nivel de graves.
1 Pulse el botón de inicio para cambiar a la
pantalla de inicio.
2 Toque la tecla de función de audio para
abrir el menú de audio.
3 Toque c o d para seleccionar el nivel deseado.
Gama: 0 a +6
Uso del filtro de paso alto
Utilice esta función si desea escuchar solo sonidos de alta frecuencia. Solamente se emiten por
los altavoces frecuencias más altas que el corte
del filtro de paso alto (HPF).
1 Pulse el botón de inicio para cambiar a la
pantalla de inicio.
2 Toque la tecla de función de audio para
abrir el menú de audio.
3 Toque c o d junto a Filtro Pasa Altos
para seleccionar la frecuencia de corte.
Off (desactivado)—50Hz—63Hz—80Hz—
100Hz—125Hz
Sólo las frecuencias más altas que aquellas en
la gama seleccionada se generan a través de los
altavoces delanteros o traseros.
Ajuste de los niveles de la
fuente
La función SLA (ajuste del nivel de fuente) permite ajustar el nivel de volumen de cada fuente
para evitar cambios considerables entre fuentes.
! Los ajustes se basan en el nivel de volumen
de FM, que se mantiene inalterado.
1 Pulse el botón de inicio para cambiar a la
pantalla de inicio.
2 Toque la tecla de función de audio para
abrir el menú de audio.
3 Compare el nivel de volumen de FM con
el de la fuente que desea ajustar.
4 Toque Nivel de ajuste de fuente en el
menú de funciones de audio.
5 Toque
la fuente.
Gama: +4 a –4
Notas
! Nivel de ajuste de fuente no está disponi-
! El nivel del volumen de AM también se
o para ajustar el volumen de
ble si se ha seleccionado FM como fuente.
puede ajustar con esta función.
! Las unidades de vídeo CD, CD, audio compri-
mido, DivX, MPEG-1, MPEG-2 y MPEG-4 se
definen automáticamente con el mismo
ajuste del nivel de fuente.
Español
95
Es
Page 96

Sección
Configuración del reproductor de vídeo
18
Configuración del reproductor de vídeo
Ajuste del idioma de los
subtítulos
Se puede definir el idioma de los subtítulos deseado. Si está disponible, los subtítulos se visualizarán en el idioma seleccionado.
1 Pulse el botón de inicio para cambiar a la
pantalla de inicio.
2 Toque la tecla de configuración de vídeo
para abrir el menú de configuración de
vídeo.
3 Toque Lenguaje de Subtítulos en el menú
Ajuste de Video.
Se visualizará un menú de idiomas de los subtítulos.
4 Toque el idioma deseado.
El idioma de los subtítulos está definido.
# Si ha seleccionado la opción Otros, consulte Al
seleccionar Otros en la página 96.
Notas
! Si el idioma seleccionado no está disponible,
se visualizará el idioma especificado en el
disco.
! También se puede cambiar el idioma de los
subtítulos tocando la tecla de cambio del
idioma de los subtítulos durante la reproducción.
! La configuración realizada aquí no se verá
afectada aunque el idioma de los subtítulos
se cambie durante la reproducción usando
la tecla de cambio del idioma de los subtítulos.
Al seleccionar Otros
Se muestra una pantalla de introducción de código de idioma al seleccionar Otros. Consulte
Tabla de códigos de idioma para el DVD en la página 128.
% Toque 0 a 9 para introducir el código de
idioma.
# Para cancelar los números introducidos, toque
C.
# Para registrar el código, toque la siguiente tecla
del panel táctil.
Registro del código.
Ajuste del idioma del audio
Se puede definir el idioma del audio preferido.
1 Pulse el botón de inicio para cambiar a la
pantalla de inicio.
2 Toque la tecla de configuración de vídeo
para abrir el menú de configuración de
vídeo.
3 Toque Lenguaje de Audio en el menú de
configuración de vídeo.
Se visualiza un menú de idiomas de audio.
4 Toque el idioma deseado.
El idioma del audio está definido.
# Si ha seleccionado la opción Otros, consulte Al
seleccionar Otros en la página 96.
Notas
! Si el idioma seleccionado no está disponible,
se usará el idioma especificado en el disco.
! También se puede cambiar el idioma de
audio tocando la tecla de cambio del idioma
de audio durante la reproducción.
! La configuración efectuada aquí no se verá
afectada aunque el idioma de audio se cambie durante la reproducción usando la tecla
de cambio del idioma de audio.
Ajuste del idioma de menús
Se puede definir el idioma preferido para la visualización de los menús grabados en un disco.
1 Pulse el botón de inicio para cambiar a la
pantalla de inicio.
2 Toque la tecla de configuración de vídeo
para abrir el menú de configuración de
vídeo.
3 Toque Menú de Lenguaje en el menú
Ajuste de Video.
Se visualiza un menú de idiomas de menús.
4 Toque el idioma deseado.
El idioma de menús está definido.
# Si ha seleccionado la opción Otros, consulte Al
seleccionar Otros en la página 96.
Nota
Si el idioma seleccionado no está disponible, se
visualizará el idioma especificado en el disco.
Ajuste de la visualización
multiángulo del DVD
Se puede ajustar el icono de ángulo para que
aparezca en las escenas en que el ángulo se
puede cambiar.
1 Pulse el botón de inicio para cambiar a la
pantalla de inicio.
2 Toque la tecla de configuración de vídeo
para abrir el menú de configuración de
vídeo.
3 Toque Multi ángulos en el menú
Ajuste de Video para activar o desactivar la
visualización del icono de ángulo.
Ajuste del formato
Hay dos tipos de display: uno panorámico con
una relación de anchura/altura (formato de TV)
de 16:9, y uno normal con un formato de TV de
4:3. Asegúrese de seleccionar el formato de TV
correcto para el display conectado a la salida V
OUT.
! Al utilizar un display normal, seleccione
Letter Box o Pan Scan. Si selecciona 16:9,
puede aparecer una imagen poco natural.
! Si selecciona el formato de TV, el display de
la unidad cambiará al mismo ajuste.
1 Pulse el botón de inicio para cambiar a la
pantalla de inicio.
2 Toque la tecla de configuración de vídeo
para abrir el menú de configuración de
vídeo.
3 Toque Aspecto TV en el menú
Ajuste de Video para seleccionar la relación
de aspecto de TV.
Toque Aspecto TV repetidamente hasta que la
relación de aspecto deseada aparezca en el display.
! 16:9 – La imagen panorámica (16:9) se visua-
liza tal y como es (ajuste inicial)
! Letter Box – La imagen tiene la forma de un
buzón con bandas negras en las partes superior e inferior de la pantalla
! Pan Scan – La imagen se reduce en los lados
derecho e izquierdo de la pantalla
Notas
! Al reproducir discos que no especifican
Pan Scan, el disco se reproduce en el display
Letter Box incluso al seleccionar el ajuste
Pan Scan. Verifique si la caja del disco tiene
16 : 9 LB
la marca
! Algunos discos no permiten cambiar el for-
mato de TV. Para obtener más información,
consulte las instrucciones que se brindan
con el disco.
.
96
Es
Page 97

Configuración del reproductor de vídeo
Configuración del reproductor de vídeo
Sección
18
Ajuste del intervalo del
slideshow
Los archivos JPEG pueden visualizarse en forma
de slideshow en esta unidad. En este ajuste
puede definirse el intervalo entre cada imagen.
1 Pulse el botón de inicio para cambiar a la
pantalla de inicio.
2 Toque la tecla de configuración de vídeo
para abrir el menú de configuración de
vídeo.
3 Toque Diapositiva por Tiempo en el menú
Ajuste de Video para seleccionar el intervalo
del slideshow.
Toque Diapositiva por Tiempo repetidamente
hasta que el ajuste deseado aparezca en el display.
! 5seg. – Las imágenes JPEG cambian en in-
tervalos de 5 segundos
! 10seg. – Las imágenes JPEG cambian en in-
tervalos de 10 segundos
! 15seg. – Las imágenes JPEG cambian en in-
tervalos de 15 segundos
! Manual – Las imágenes JPEG pueden cam-
biarse manualmente
Ajuste del control de padres
Algunos discos de DVD vídeo permiten utilizar
el control de padres para impedir que los niños
vean escenas violentas u orientadas a adultos.
Se puede ajustar el nivel de control de padres al
nivel deseado.
! Cuando se ajusta un nivel de control de pa-
dres y se reproduce un disco que viene con
este control, se pueden visualizar indicaciones para la introducción de un código. En
tales casos, la reproducción comenzará
cuando se introduzca el código correcto.
Ajuste del código y del nivel
Debe registrarse un código para reproducir discos con control de padres.
1 Pulse el botón de inicio para cambiar a la
pantalla de inicio.
2 Toque la tecla de configuración de vídeo
para abrir el menú de configuración de
vídeo.
3 Toque Parental en el menú
Ajuste de Video.
4 Toque 0 a 9 para introducir un número de
código de cuatro dígitos.
# Para cancelar los números introducidos, toque
C.
# Para registrar el código, toque la siguiente tecla
del panel táctil.
Registro del código.
El código ha quedado definido y ahora se puede
ajustar el nivel.
5 Toque 1 o 8 para seleccionar el nivel deseado.
6 Toque Enter.
Así quedará definido el nivel de control de padres.
! 8 – Se puede reproducir todo el disco (ajuste
inicial)
! 7 a 2 – Se pueden reproducir discos para
niños y aquellos no destinados a adultos
! 1 – Sólo se pueden reproducir discos para
niños
Notas
! Se recomienda anotar el código, por si acaso
llega a olvidarlo.
! El nivel de control de padres está almacena-
do en el disco. Compruebe la marca de nivel
que se indica en la caja del disco, en el material impreso incluido o en el propio disco. No
es posible utilizar el control de padres en
esta unidad si el disco no tiene almacenado
un nivel de control de padres.
! En algunos discos, el control de padres
puede estar activo sólo en las escenas con
niveles determinados. No se realizará la reproducción de estas escenas. Para obtener
detalles, consulte el manual de instrucciones
que se incluye con el disco.
Cambio del nivel
Se puede cambiar el nivel de control de padres
definido.
1 Pulse el botón de inicio para cambiar a la
pantalla de inicio.
2 Toque la tecla de configuración de vídeo
para abrir el menú de configuración de
vídeo.
3 Toque Parental en el menú
Ajuste de Video.
4 Toque 0 a 9 para introducir el número de
código registrado.
5 Registro del código.
Registro del código.
Así se definirá el código, y ahora podrá cambiar
el nivel.
# Si se introduce un número de código incorrecto,
se visualizará el icono
número de código correcto.
# Si no recuerda el código, consulte En caso de ol-
vidar el código en la página 97.
. Toque C para introducir el
6 Toque 1 o 8 para seleccionar el nivel deseado.
7 Toque Enter.
El nuevo nivel de control de padres está definido.
En caso de olvidar el código
% Pulse RESET.
Ajuste del archivo de
subtítulos DivX
Puede seleccionar si desea visualizar los subtítulos externos DivX o no.
! Los subtítulos DivX se visualizarán, aunque
esté seleccionado Personalizado, si no existen archivos de subtítulos externos DivX.
1 Pulse el botón de inicio para cambiar a la
pantalla de inicio.
2 Toque la tecla de configuración de vídeo
para abrir el menú de configuración de
vídeo.
3 Toque Subtítulos DivX® en el menú
Ajuste de Video para seleccionar el ajuste de
subtítulos deseado.
! Original – Se visualizan los subtítulos DivX
! Personalizado – Se visualizan los subtítulos
externos DivX
Notas
! Se pueden mostrar hasta 42 caracteres en
una línea. Si se usan más de 42 caracteres,
los saltos de línea y los caracteres restantes
se visualizan en la siguiente línea.
! Se pueden mostrar hasta 126 caracteres en
una pantalla. Si se usan más de 126 caracteres, los caracteres sobrantes no se visualizarán.
Español
97
Es
Page 98

Sección
Configuración del reproductor de vídeo
18
Ajustes del sistema
19
Visualización del código de
registro de DivX
Para reproducir contenidos DivX VOD (vídeo
bajo demanda) en esta unidad, tendrá que registrar primero la unidad con el proveedor de contenidos DivX VOD. Esto se realiza generando un
código de registro DivX VOD que debe enviar a
su proveedor.
! Anote el código, ya que lo necesitará cuando
registre su unidad con un proveedor de DivX
VOD.
1 Pulse el botón de inicio para cambiar a la
pantalla de inicio.
2 Toque la tecla de configuración de vídeo
para abrir el menú de configuración de
vídeo.
3 Toque VOD DivX® en el menú
Ajuste de Video.
Aparece Código de Registro y
Código de Desactivación.
4 Toque Código de Registro.
Se mostrará su código de registro.
Visualización del código de
anulación del registro
Si su dispositivo ya se ha registrado, anule su registro introduciendo el código de anulación del
registro.
1 Pulse el botón de inicio para cambiar a la
pantalla de inicio.
2 Toque la tecla de configuración de vídeo
para abrir el menú de configuración de
vídeo.
3 Toque VOD DivX® en el menú
Ajuste de Video.
â
VOD
4 Toque Código de Desactivación.
# Para detener el proceso, toque Cancelar.
5 Toque Listo.
La cancelación se completa.
Reproducción automática de
DVD
Cuando se introduce un disco DVD que viene
con un menú DVD, esta unidad cancela automáticamente el menú y comienza la reproducción desde el primer capítulo del primer título.
! Es posible que algunos DVD no funcionen
correctamente. Si no puede utilizar esta función, desactívela y comience la reproducción.
1 Pulse el botón de inicio para cambiar a la
pantalla de inicio.
2 Toque la tecla de configuración de vídeo
para abrir el menú de configuración de
vídeo.
3 Toque Reproducción Auto. de DVD para
activar la reproducción automática.
# Para desactivar la reproducción automática,
vuelva a tocar Reproducción Auto. de DVD.
Cambio del ajuste de un
equipo auxiliar
Active este ajuste si utiliza un dispositivo auxiliar
conectado a esta unidad.
1 Pulse el botón de inicio para cambiar a la
pantalla de inicio.
2 Toque la tecla de sistema para abrir el
menú del sistema.
3 Toque Entrada Auxiliar en el menú del
sistema para activar o desactivar
Entrada Auxiliar.
Ajuste de la entrada de AV
Active este ajuste si utiliza un componente de
vídeo externo conectado a esta unidad.
1 Pulse el botón de inicio para cambiar a la
pantalla de inicio.
2 Toque la tecla de sistema para abrir el
menú del sistema.
3 Toque Entrada A/V en el menú del sistema para activar o desactivar Entrada A/V.
Establecimiento del sistema
de navegación
Active este ajuste al conectarse a un sistema de
navegación Pioneer Add-on (se vende por separado).
Conexión de dispositivo se puede ajustar
cuando se cumplen todas las condiciones siguientes.
— El iPhone no está conectado.
— Sin conexión Bluetooth.
— La fuente está apagada.
1 Apague la fuente.
Consulte Tecla Source off en la página 68.
2 Pulse el botón de inicio para cambiar a la
pantalla de inicio.
3 Toque la tecla de sistema para abrir el
menú del sistema.
4 Toque Conexión de dispositivo en el
menú del sistema.
5 Toque NAV. para seleccionar.
NAV. – Sistema de navegación
Selección del modo MirrorLink
Puede seleccionar el ajuste del modo MirrorLink
tanto si usa aplicaciones de terceras partes en
su teléfono inteligente como si no.
1 Pulse el botón de inicio para cambiar a la
pantalla de inicio.
2 Toque la tecla de sistema para abrir el
menú del sistema.
3 Toque la opción deseada junto a
Ajustes de CD-ML100.
! Modo de Auto – Puede utilizar las aplicacio-
nes de arranque de su teléfono inteligente en
la pantalla de la unidad.
! Modo Lista de APP – Puede utilizar las apli-
caciones de terceras partes de su teléfono inteligente en la pantalla de la unidad.
98
Es
Page 99

Ajustes del sistema
Ajustes del sistema
Sección
19
Actualización del firmware
para el adaptador de conexión
del teléfono inteligente
Esta función se utiliza para actualizar el firmware del adaptador de conexión del teléfono inteligente con la última versión disponible.
Para más detalles sobre el firmware y la actualización, consulte nuestro sitio web.
Solo puede realizar la actualización cuando el
adaptador de conexión del teléfono inteligente
está disponible.
Importante
! El dispositivo de almacenamiento USB para
la actualización ha de tener el archivo de actualización correcto. Si hubiera varios archivos, la actualización no se llevará a cabo.
! No apague nunca la unidad ni desconecte el
dispositivo de almacenamiento USB mientras se esté actualizando el firmware.
! Sólo se puede iniciar la actualización de
firmware cuando se detiene el vehículo y
está activado el freno de mano.
1 Descarga de los archivos de actualización
del firmware.
2 Conecte a su ordenador un dispositivo de
almacenamiento USB vacío (formateado) y
luego seleccione y copie el archivo de actualización correcto en el dispositivo de almacenamiento USB.
3 Apague la fuente.
Consulte Activación y desactivación de la fuente
en la página 69.
4 Pulse el botón de inicio para cambiar a la
pantalla de inicio.
5 Toque la tecla de sistema para abrir el
menú del sistema.
6 Toque Actualiz. De CD-ML100 en el menú
del sistema.
7 Conecte el dispositivo de almacenamiento USB al adaptador de conexión del teléfono inteligente.
Consulte Conexión para actualizar el firmware del
adaptador de conexión de teléfono inteligente en
la página 114.
8 Toque Continuar para visualizar el modo
de actualización.
Para finalizar la actualización del adaptador de
conexión del teléfono inteligente, siga las instrucciones en pantalla.
9 Retire el dispositivo de almacenamiento
USB del adaptador de conexión del teléfono
inteligente.
10 Apague (posición OFF) la llave de encendido y después cámbiela a ACC u ON.
Notas
! Si no puede realizar la actualización, consul-
te a su concesionario o al servicio técnico
oficial de PIONEER más próximo a su domicilio.
! No podrá realizar la actualización mientras
esté conectado al Bluetooth.
Visualización de la versión
del firmware del adaptador
de conexión del teléfono
inteligente
Si el adaptador de conexión del teléfono inteligente no funcionara correctamente, es posible
que deba ponerse en contacto con un concesionario para que realice la reparación. En ese
caso, probablemente tenga que indicar la versión del firmware. Realice el siguiente procedimiento para comprobar la versión del adaptador
de conexión del teléfono inteligente.
1 Apague la fuente.
Consulte Activación y desactivación de la fuente
en la página 69.
2 Pulse el botón de inicio para cambiar a la
pantalla de inicio.
3 Toque la tecla de sistema para abrir el
menú del sistema.
4 Toque CD-ML100 Firmware Info para visualizar la versión del firmware del adaptador de conexión del teléfono inteligente.
Actualización del firmware
Esta función se utiliza para actualizar esta unidad con la última versión del firmware disponible.
Para más detalles sobre el firmware y la actualización, consulte nuestro sitio web.
Importante
! El dispositivo de almacenamiento USB para
la actualización ha de tener el archivo de actualización correcto. Si hubiera varios archivos, la actualización no se llevará a cabo.
! No apague nunca la unidad ni desconecte el
dispositivo de almacenamiento USB mientras se esté actualizando el firmware.
! Sólo se puede iniciar la actualización de
firmware cuando se detiene el vehículo y
está activado el freno de mano.
1 Descarga de los archivos de actualización
del firmware.
2 Conecte a su ordenador un dispositivo de
almacenamiento USB vacío (formateado) y
luego seleccione y copie el archivo de actualización correcto en el dispositivo de almacenamiento USB.
3 Apague la fuente.
Consulte Activación y desactivación de la fuente
en la página 69.
4 Pulse el botón de inicio para cambiar a la
pantalla de inicio.
5 Toque la tecla de sistema para abrir el
menú del sistema.
Puede comprobar la versión actual del firmware
de la unidad. Toque Información de Firmware
en el menú del sistema para abrir la pantalla
Información de Firmware.
6 Toque Actualizar Firmware en el menú
del sistema.
Aparece la pantalla de confirmación en la pantalla.
7 Conecte el dispositivo de almacenamiento USB según los mensajes que aparecen en
pantalla.
8 Toque Continuar para visualizar el modo
de lectura de archivos.
Si en la pantalla aparecen mensajes de advertencia, márquelos.
Español
99
Es
Page 100

Sección
Ajustes del sistema
19
Ajustes del sistema
9 Toque Comenzar para mostrar el modo
de transferencia de datos.
# Para finalizar la actualización de firmware, siga
las instrucciones en pantalla.
# Esta unidad se restablecerá automáticamente
una vez que se haya completado la actualización del
firmware si la actualización se ha efectuado con
éxito.
Nota
Si en la pantalla aparece
“Falla en actualizacion!”, cambie la llave de encendido del automóvil a la posición de desactivación, luego a la posición ACC para continuar
y finalmente, inicie la secuencia de recuperación.
Visualización de la versión
del firmware
Si se produce un fallo de funcionamiento en la
unidad, es posible que deba ponerse en contacto con un concesionario para que realice la reparación. En ese caso, probablemente tenga
que indicar la versión del firmware. Realice el siguiente procedimiento para comprobar la versión de esta unidad.
1 Apague la fuente.
Consulte Activación y desactivación de la fuente
en la página 69.
2 Pulse el botón de inicio para cambiar a la
pantalla de inicio.
3 Toque la tecla de sistema para abrir el
menú del sistema.
4 Toque Información de Firmware para
mostrar la versión del firmware de esta unidad.
Configuración del modo
MIXTRAX
Consulte Configuración del modo MIXTRAX en la
página 88.
Cambio del ajuste de la imagen
(Brillo, Contraste, Color, Matiz,
Intensidad y Temperatura)
Puede ajustar las funciones de Brillo (brillo),
Contraste (contraste), Color (color) , Matiz
(tono), Intensidad (reductor de luz) y
Temperatura(temperatura) para cada fuente y
la cámara retrovisora.
! No se puede ajustar Color y Matiz para la
fuente de audio.
! No se puede ajustar Color y Matiz para
NAV., Aplicaciones y MirrorLink.
1 Pulse el botón de inicio para cambiar a la
pantalla de inicio.
2 Toque la tecla de sistema para abrir el
menú del sistema.
3 Si desea ajustar Ajuste de Imagen, seleccione la unidad.
Completar Ajuste de Imagen
NAVI
Apps
MirrorLink
para el sistema de navegación
cuando Conexión de dispositi-
vo está en NAV.
Completar Ajuste de Imagen
para AppRadio Mode cuando
Conexión de dispositivo está
en iPhone via USB o iPhone
via Bluetooth.
Completar Ajuste de Imagen
para el MirrorLink Mode.
Ajuste de Ajuste de Imagen
para la cámara retrovisora.
Source
4 Toque cualquiera de las siguientes teclas
del teclado táctil para seleccionar la función
que desea ajustar.
Se muestran los elementos de
Ajuste de Imagen.
! Brillo – Ajusta la intensidad del color negro
! Contraste – Ajusta el contraste
! Color – Ajusta la saturación de color
! Matiz – Ajusta el tono del color (se realza el
! Intensidad – Ajusta el brillo del display
! Temperatura – Ajusta la temperatura del
# Sólo se puede ajustar Matiz cuando la codifica-
ción de colores seleccionada sea NTSC.
# Con algunas cámaras retrovisoras, es posible
que no se pueda ajustar la imagen.
5 Toque c o d para ajustar el elemento seleccionado.
Cada vez que toca c o d, aumenta o disminuye
el nivel del elemento seleccionado.
# Brillo, Contraste, Color y Matiz se pueden
ajustar de +24 a -24.
# Intensidad se puede ajustar de +1 a +48.
# Temperatura se puede ajustar de +3 a –3.
Notas
! No puede usar esta función al conducir.
! Se pueden establecer ajustes diferentes para
Brillo/Contraste/Intensidad para cuando el
interruptor de iluminación esté encendido o
apagado.
Ajuste de Ajuste de Imagen
para la fuente.
rojo o el verde)
color para obtener un mejor balance de blancos
Selección del idioma del
sistema
Es posible seleccionar el idioma del sistema.
Si hay integrada información de texto, como el
nombre del título, el nombre del artista o el comentario en un idioma europeo, también se
pueden mostrar en esta unidad.
! El idioma se puede cambiar para las siguien-
tes opciones:
— Menú de audio
— Menú del sistema
— Menú de configuración de vídeo
— Menú de Bluetooth
— Idioma de avisos
Esta prohibido el uso de algunas operaciones de esta unidad mientras se conduce, o bien es necesario prestar especial
atención cuando se utilizan. En esos
casos, se mostrará una advertencia en el
display. Con este ajuste puede cambiar el
idioma en que se muestran los mensajes
de advertencia.
! Si el idioma integrado y el idioma selecciona-
do no coinciden, puede que la información
de texto no se muestre correctamente.
! Es posible que algunos caracteres no se vi-
sualicen correctamente.
1 Pulse el botón de inicio para cambiar a la
pantalla de inicio.
2 Toque la tecla de sistema para abrir el
menú del sistema.
3 Toque Lenguaje de Sistema en el menú
del sistema para seleccionar el idioma deseado.
4 Toque el idioma deseado.
English (Inglés)—Français (Francés)—Español
(Español)—Português (Portugués)—繁體中文
(Chino tradicional)
100
Es
 Loading...