

Page 1
DVD RDS AV RECEIVER
AUTORADIO AV RDS LECTEUR DE DVD
AV
RADIO
RDS CON DVD
AVH-200BT
AVH-100DVD
rr'IDOLBY
I...A..J
DIGITAL
DIVX~
DY2
VIDEO
0
Bluetooth®
Made for
~
iPod
OJ
iPhone
Owner's Manual
Mode d'emploi
Manual de instrucciones
~
Important
The serial number
convenience, be sure to record this number
~
Important
Le numero de serie se trouve
commodite, veillez
~
lmportante
El
numero de serie se encuentra en
propia seguridad y comodidad, asegurese de anotar este numero
garantfa que se adjunta.
(Serial
number)
is
located on the bottom of this unit. For your own security and
(Numero
de
serie)
au
a noter ce numero sur
(Numero
bas de cet appareil. Pour votre securite et votre
de
serie)
on
the enclosed warranty card.
Ia
carte de garantie fournie.
Ia
parte inferior de esta unidad. Por su
en
Ia
tarjeta de
Page 2
•
(Contents
)
(Contents
)
G Precautions
IMPORTANT SAFEGUARDS 3
To
ensure safe driving 3
To
avoid battery exhaustion 4
~
Before you start
Information to User 4
The
Safety of Your Ears is in Your
Hands
About
DVD video disc region
About
After-sales service
products
Demo mode 5
~
What's what
Head
Home display 6
Selecting a source 6
Adjusting the volume 6
Optional remote control 6
~
Common operations
Common
lists 7
Operating the scroll1con and
bar
Activating the
Using the rear view 7
Using the rear
Using sound retriever 7
Changing the wide-screen mode 8
~
Basic operations
Ejecting a disc 8
Setting the clock 8
(i
Tuner
Tuner operations 9
Storing and recalling
Storing the strongest stations 9
Tuning
5
this
unit
this
manual 5
5
for
Pioneer
5
unit
6
operations
for
7
touch
panel keys 7
monitor
stations
in
to strong signals 9
numbers
menu
7
settings/
the
scrubber
9
Using
1Tunes
tagging 9
G Disc
5
(CD/DVD)
Introducing
Sound playback operations
Switching the media file type
Operating the DVD menu
Random play (shuffle)
Repeating playback
Searching for the part you
play
Selecting audio
PBC playback
Selecting tracks from the
list
Selecting files from the file
Playing DivX® VOD
12
12
mov1e
output
operat1ons
12
12
want
12
track
content
11
12
title
name
11
to
13
10
11
I ist
12
~iPod
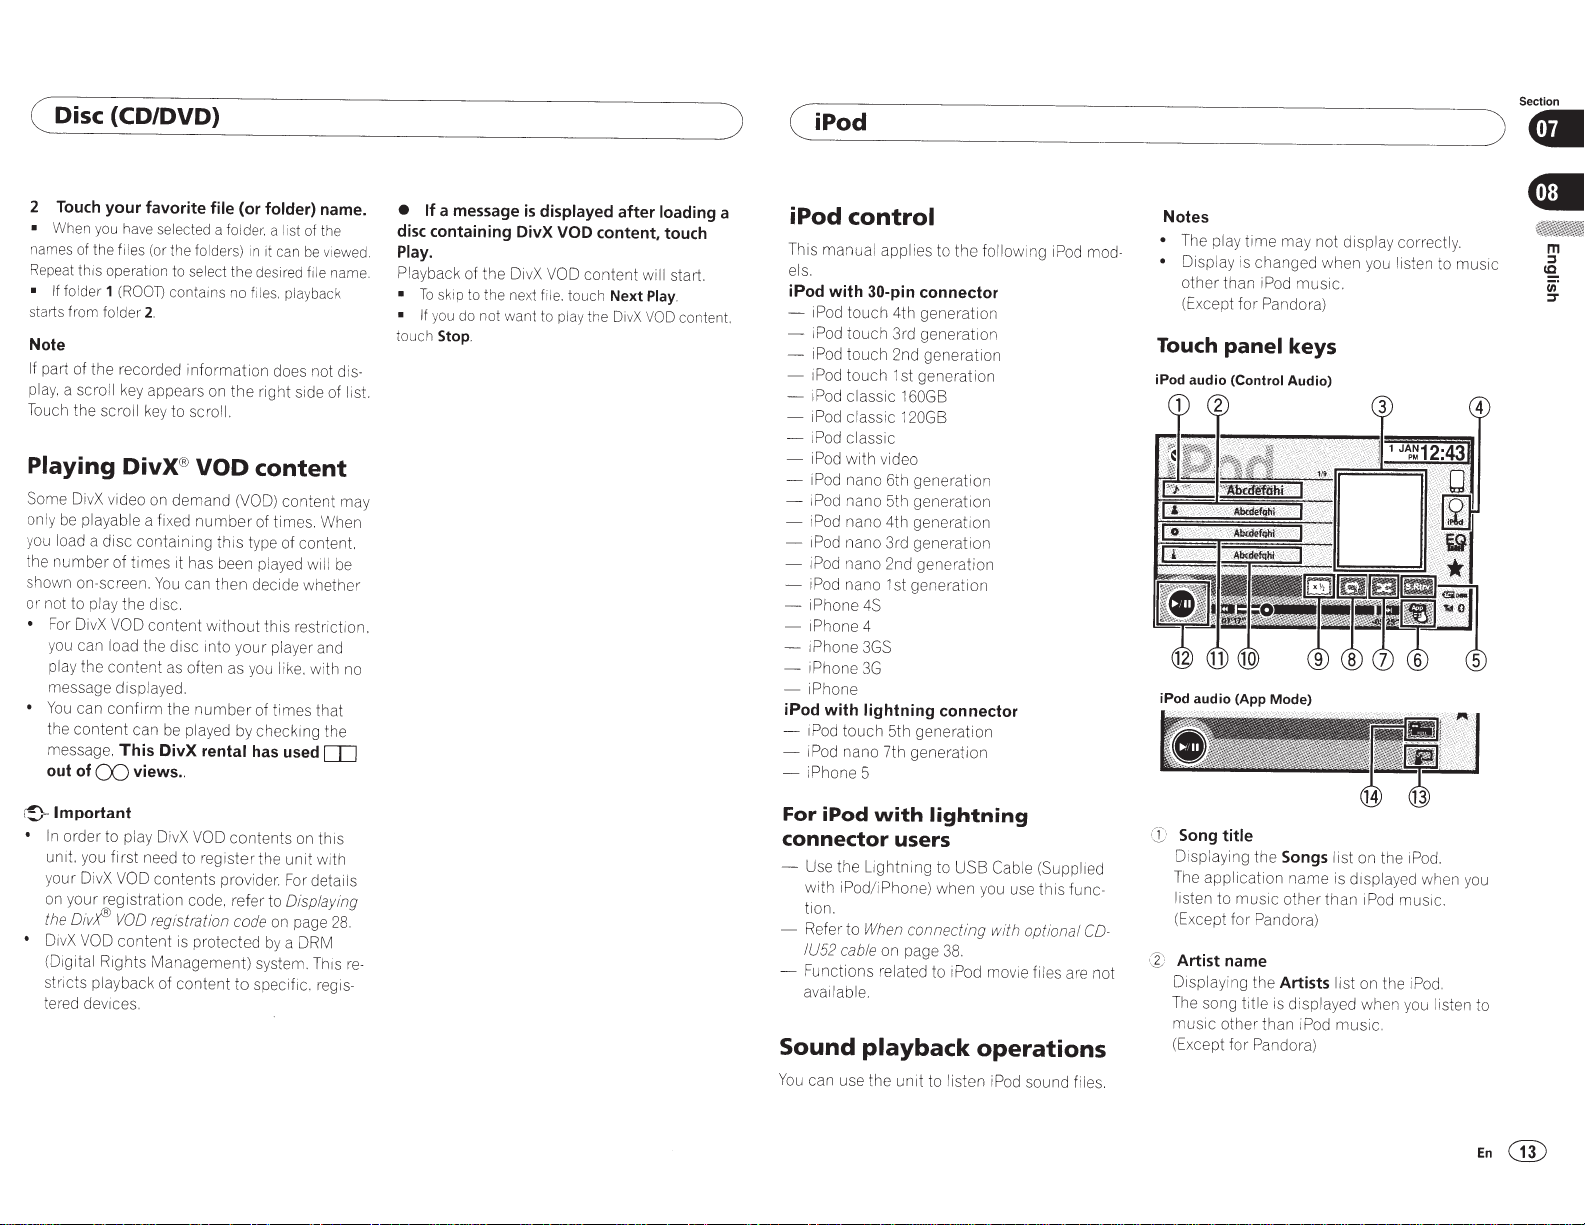
i
Pod
control
Sound playback operations
Moving images operations
Using this
iPod
Shuffle play
Repeating playback
Playing videos from your iPod
Browsing
iPod
Changing audiobook speed
Displaying lists related to the song currently
playing
13
unit's
iPod
function
14
15
15
for
a video/music on the
15
(link search)
13
14
from your
15
16
16
~USB
Moving images operations
Sound playback operations
Music browse mode
Still image playback operations
Switching the media file type
Random play (shuffle)
Repeating playback
Selecting files from the file
Displaying lists related to
(link search)
playing
16
17
18
18
name
the
song currently
18
17
18
list
18
18
Playing DivX® VOD content
Capture an image
~
Bluetooth Audio
Sound playback operations
Setting up
Random play (shuffle)
Repeating playback
4D
Streaming Pandora®
Pandora operations
Selecting and playmg Pandora®
shuffle
41)
Bluetooth telephone
Bluetooth telephone operations
Calling a
Selecting a
Inverting names in phone book 23
Using the missed, received and dialed call
Setting automatic answenng
Adjusting the other party's listening
Switching the ring tone
Using the preset dial lists 24
Making a call
Setting the private mode 24
Voice control
G)
Settings
Menu operations
number
mode
lists
volume
number
in
JPEG
for
Bluetooth audio
21
in
the phone book
number
by
23
23
23
by
entering phone
24
24
20
alphabet search
25
e Audio adjustments
Using fader/balance
Using balance adjustment
Using the equalizer
Adjusting loudness 26
Using subwoofer
Boosting the bass 26
Using the high pass
Adjusting source levels 26
adjustment
output
filter
20
25
files
20
23
18
19
25
26
26
18
19
stations/
22
23
25
23
49
Setting
Setting the subtitle language
Setting the audio language
Setting the menu language
Setting the multi-angle DVD display
Setting the aspect ratio
Settmg the slideshow mterval
Setting parental lock 28
Setting the DivX subtitle file
Displaying the DivX® VOD registration
Automatic
4D
System settings
Switching the auxiliary setting 29
Changing the p1cture
Selectmg the system language
Setting Demo Mode 30
Setting the rear
Setting the
Settmg the Pandora
Setting the ever scroll 30
Setting the Bluetooth audio
Clearing Bluetooth
Updating Bluetooth software
Displaying the Bluetooth software
Setting the rear view camera (back up
Setting the video signal
f)
Favorite menu
Using the Favorite menu
4D
G)
up
the video player
27
code
(Brightness.
and Temperature) 29
controller
version
camera)
Bluetooth connection menu
Bluetooth connection
operations
Theme
Selecting the OSD (on-screen display)
color
28
playback of DVDs
adjustment
Contrast
output
30
RCA
rear
output
connect
memory
31
31
32
menu
33
Color, Hue,
and subwoofer
31
menu
27
27
28
30
mode
30
30
32
27
27
27
29
Dimmer
29
30
31
(DEn
Page 3
( Contents
)
( Precautions
Section
)Gil
Selecting th e background disp lay
~Other
functions
Adjusting the response positions of the
touch pan els
Calibration)
Using an AUX source
Re
setting the micro processor
(Tou
34
ch
Panel
34
~Connection
Connecting
When connecting to separately sold power
amp
When connect ing the display
When connecting with a rear view
camera
iPod
i
Pod
E)
Installation
Installation
side of the
Installing
e
Additional information
Troubleshoot ing
Error messages
Unde
Indicator
Handlmg gu1delines
Audio compatibility (USB)
Compressed
USB)
i
Pod
Sequence of aud
Usi
ng
Bluetooth
License, Warranty
Liability
Language code chart
Specifications
the power cord
37
38
with
li
ghtning
with
30-pin
the
rs
tanding messages
list
connector
connector
using the
un1t
microphone
40
42
44
file
compatibility
47
compatibi lit y
io
files
the display correctly
profiles
Disclaimer
49
for
52
36
38
scr
ew holes on the
39
39
44
46
47
(di
48
48
49
49
&
Limitation of
DVD
sc.
34
37
38
51
33
Thank you
product.
To ensure proper use.
manual before using this product.
1mportant
INGs
keep
future
IMPORTANT
Please
your displ
ence.
1
Do not install the display where it
(i) obstruct the driver's vision, (ii) impair
the performance of any of the
operating systems
cluding
(iii) impair the driver's ability to safely
operate the
2
Do not operate this display if doing so
any way
the safe operation of your
ways observe safe driving rules and
low all
experience difficulty
system
vehicle
essary adjustments.
3
Please
at
If
ries
your seat
4
Never use headphones while driving.
5
To
disabled unless
and the vehicle
6
Never set the
high that you cannot hear outside traffic
and emergency vehicles.
for purchasing this
please
that you read and observe
and
the
CAUTION
manual
s
in this
in
a
safe
and
PIONEER
read
manua
acce
through
It
is
WARN-
l.
ssib
reference.
SAFEGUARDS
read
all
of these instructions regarding
ay
and re:ain them
air bags, hazard
vehicle.
will
divert
existing traffic regulations.
or
reading the display, park your
in
a safe location and make
remember to wear your seat
all
times
while
you are ever
can
promote safety, certain functions are
in
be considerably more severe if
belt
is
the parking brake
is
volume
for
futu
re
vehicle's
or
safety features,
lamp
buttons
your attention from
vehicle. Al-
in
operating the
operating your
an
accident, your
not properly buckled.
not
in
motion.
of your display
this
especially
Please
le
place for
refer-
may
in-
or
in
fol-
If
you
nec-
belt
vehicle.
inju-
is
on,
so
A
wARNING
•
Do not attempt to
product by yourself.
icing of this product by persons without
training and experience
equipment and automotive accessories
may be dangerous and
to the risk of electric shock, injury
other hazards.
•
Do not attempt to operate the
ing. Make sure to
your
vehicle
te
mpt
ing to use the
To
ensure safe
A
wARNING
• LIGHT
•
•
• In
GREEN
TOR IS DESIGNED
STATUS AND
THE POWER SUPPLY SIDE OF
ING
BRAKE
NECTION
VIOLATE APPLICABLE
SULT
To
po
tential violat
no
t for
the driv
To
lation of applicable l
vid
be
1ng
some cou nt
on
other than the
regulations
unit's video features should not
IN SERIOUS
avo
id the
use
er.
avoid
the
eo
sho
ul
dnven.
a display
OR
r-is
w1
risk
d ev
ins1de
apply.
install
or
service this
Installation
in
electronic
could
expose you
unit
pull
off the road and park
in
a safe locat1on
co ntrols on the device.
befo
driving
LEAD
AT
POWER CONNEC-
TO
DETECT PARKED
MUST
BE
CONNECTED
THE
SWITCH. IMPROPER CON-
USE
OF
THIS
LEAD MAY
LAW
AND
INJURY
k of damage and injury and
io
n
of
applicable laws, this unit is
th
a
v1
deo
of
acc1dent
aws.
er
occur whi
ri
es or stat
a
veh
dnver
ma
t
he
y must
screen
and
no
le
es
the vi
icle
even
y
be
OR
DAMAGE.
that
1s
the
v1
ewing
the vehicle
ew
ing of images
by
11/eg
al.
Wher-e
be
obeye
be
used.
v1s
potent1
of front seat
persons
d and this
or
or
while
re
at-
PARK-
MAY
ible
is
serv-
driv-
TO
RE-
th
e
to
al
vio-
such
En
G)
Page 4
Section
( Precautions
When you
driving. the
video source while
will
ited."
watch
To
ehic
v
our
y
ing brake.
Parking
Certain
touch
dangerous
prevent
To
ehicle
the v
that
tem
attempt
you
above
until you stop the
apply the parking brake,
brake. and then
again. Please keep the brake pedal pushed
down
When
rear
to
The rear
to
used
sengers in the rear seats to watch videos.
wARNING
A
NEVER
where the
When
With an optional rea r view camera. this un it can
used as an aid to keep an
be
when
to watch a video im
attempt
Viewing
warning
appear on the
a video
le
brake
funct
panel
and/
su
is in motion. the re
senses when the parking brake
while
before releasing the parking brake.
'
is
driving
front
on the
1mage
in a safe place and
interlock
ideo viewing and certain
(V
ons
i
this
by
offered
keys)
un lawf ul
or
funct1ons
ch
to use the fu
d1·iving.
eh
v
(3)
if used whi
from being used
ions
nct
will become
they
in a safe place,
1cle
release the parking
(2)
the parking brake
apply
displ
ag
front seat
of
strictly prohib-
ay.
display, park
front
the
ly
app
could be
unit
le
mterlock
an
1s
ibed
descr
disabled
using a display connected
monitor
monitor
connect
instal l the rear display
iver can watch videos
dr
using
backing into a
output
this
on
output
a rear display
rear
the
parking spot.
tight
(V
un it
allows pas-
that
a location
1n
while
view
on trailers. or
eye
OUT
camera
while
e
park-
ving.
dri
while
sys-
set.
is
and
)
driving.
wARNING
A
SCREEN
•
IMAGE MAY APPEAR
VERSED.
INPUT
USE
•
MIRROR
OTHER
DAMAGE.
OR
cAUTION
A
re
The
•
as an aid to keep an eye on trailers.
backing up. Do not use
purposes.
If
• Please note
camera images
whether
(1)
is
to
when backing up. and
are used
hicle
avoid
To
Keep the
unit
this
• When no power is supplied to
as when the vehicle battery
placed, the
turns
you
that
data.
wARNING
A
Do not use
position.
ACC
ONLY FOR
IMAGE REAR
MAY RESULT
USE
camera
v1ew
ar
that
full
checking the rear when the
for
is moving forward.
battery
engine running when using
vehicle
to avoid draining the battery power.
microcomputer
to its initial
transcnbe
vehicles
with
RE-
REVERSE
VIEW
on
ct1
fun
entertainment
for
the edges of the rear view
y differ slight
ma
screen images are displayed
whether
OR
CAMERA.
INJURY
IN
used
be
to
is
whi le
or
according
ly
the images
ve-
exhaustion
such
unit.
this
re-
being
is
re-
unit
this
of
recommend
We
ion.
condit
adjustment
aud1o
the
do not feature an
that
)
start
( Before
Information
ID:
FCC
MODEL NO.: AVH-200BT
775E-K073
IC:
This device
Rules and
standard(s). Operation is subject to the
RSS
following
cause interference. and (
not
must
ference
this
of
transmitter
This
erated
transmitter.
or
The Bluetooth
replaced)
is equ i
Th
exposure
tion
trolled
frequency
ement
pl
rad1o
pment
equ i
it deemed to
that
perm issive exposure evaluation (MPE).
is desirable
erated keeping the radiator at least
more away
tremities: hands. wrists. feet and ankles).
MODEL NO.:
This device
es.
l
Ru
cond itions:
two
this device may not cause harmful
(1)
ence. and
terference received ,
that
you
User
to
AJDK073
rt
Pa
complies
Industry
two
accept any int erference.
ma
that
device.
conjunction
in
by
pment
ronment
env i
(RF)
to
C
frequency
has very l
that
from
complies
Operation is subject to the
(2)
y cause undesired operation.
ma
with
licence-exempt
nada
Ca
th1s
(1)
ns:
t1o
condi
2)
y cause undesired operation
co-located
be
not
must
with any other antenna
antenna
user.
limits
OET65
AVH-1
th is
cannot
with
es
i
compl
set forth for an
and meets the
Exposure
(RF)
Gu1de
RSS-
and
Exposure rules. This
levels of
ow
w1thout
comply
it should
person's body (excluding
be
OODVD
with Part 15 of the
must
1ce
dev
including
15 of
device may
this
including
removed (or
be
FCC
lmes
of the
02
1
RF
maximum
installed
following
accept any
mterference
FCC
device
or
/IC mdi
uncon-
FCC
Sup-
1n
energy
and
em or
20
interfer-
mter-
op-
a-
radio
IC
But
op-
ex-
FCC
in-
mod1f1cations
Alterat1on
out
the
or
iate aut horization may invalidate
appropr
user' s right to operate the
Note
1s equ1pment
Th
wi th the limits
ly
comp
to
pursuant
dev1ce.
These lim its
able
in a residential
generates. uses and can radiate
quenc
accordance
in
cause
nications.
that
installation.
lar
harmful
ception.
the
aged
more
or
-Reorient
-Increase
it
ment
-Connect
circuit
cei v
-Consult
technician
1V
me
protect1on
y energ y and. if not
harmfu
However. there
interference
interference to rad io
1ch
wh
pment
equ i
try to correct the interference
to
of the
re
or
the separation betw
and receiver.
the
different
is connected.
er
the dealer or an experienced
out
ed
carri
equ1pment.
has been tested and fou nd
for
of the
15
1i
Pa
to
designed to provide
against harmful
occur
not
ll
uipm
eq
determined
be
measures:
ing
that
Th
installed
1s
into
to which
installation.
with the instructions. may
l interference to
wi
this
If
can
off and on. the user is
follow
locate the receiving
equipment
from
for help.
B digital
Class
a
FCC
reaso n-
Interference
is equipment
rad1o
and us ed
com
io
rad
no guarantee
particu-
a
in
ent does cause
television
or
by
antenna
the
een
tlet on a
ou
an
there-
With-
Rules.
fre-
mu-
returning
encour-
one
by
p-
ui
eq
rad1o/
)
.
CD
En
Page 5
( Before
The
Safety
you
of
start
Your
Ears
is
Your Hands
Get
the most
at a safe
through clearly
tortion and,
y
our
sensitive hearing.
Over
higher volumes of sound,
mal'' can actually
hearing. Guard against
equipment at a safe level BEFORE your hearing
adapts.
ESTABLISH A SAFE LEVEL:
• Set
• Slowly
1t comfortably and clearly. w1thout distort ion.
• Once
sound
BE
SURE
FOLLOWING GUIDELINES:
•
Do not turn up the volume so high that
ca
•
Use caution
in
•
Do
motor
may create a traffic hazard and
many areas.
About
The
tuner
fo
r use in North America. Use in other areas
may result in poor reception.
out
of your
le
ve
l-a
without
most
time
,
yo
ur
hearing
your volume control at a low setting.
increase the sound
you have established a co
le
vel. set the dial and lea
TO
OBSERVE THE
n't
hear what's around you.
potentially hazardous si
not use headphones while operating a
or
i
zed
vehicle: the u
this
frequencies
equipment
level
that
lets the sound come
annoying blaring
importantl
Sound
"comfort level"
so
be
loud and harmful to your
this
by
temporarily discontinue use
se
unit
on
thi s
by
y,
without affecti
can
be
deceiving.
what
sounds
setting
unt
il
you can hear
mf
ortable
ve
it there.
tuat
ions.
of
headphones
is
illegal in
un1t
are allocated
playing it
adapts to
yo
ur
or
"nor-
yo
in
AwARNING
Handling the cord on this product
ciated with accessories sold with the product
may expose
tion
dis-
other governmental entities to cause cancer and
ng
birth defect
hands after handling.
CAUTION:
USE OF CONTROL OR
PERFORMANCE
OTHER THAN
MAY RESULT
EXPOSURE.
CAUTION:
THE USE
WITH THIS PRODUCT WILL INCREASE
EYE HAZARD.
you
65
known to the
to
or
other reproductive harm.
THOSE SPECIFIED HEREIN
IN HAZARDOUS
OF OPTICAL INSTRUMENTS
CAUTION
u
This product
fi
ed
under the
60825-1:2007,
module.
move any covers
the inside of the product. Refer
qualified personnel.
I
is
a class 1 laser product classi-
Safety
and conta1ns a class 1M laser
To
ensure
ClASS
CAUTION-CLASS
LASER
RADIATION
DIRECTLY
WITH
.
chemicals
State
of California and
ADJUSTMENT
OF
PROCEDURES
of laser products,
continued
or
attempt
1
lASER
1M
WHEN
OPTICAL
to gain access to
PRODUCT
VISIBLE
AND
OPEN,
DO
INSTRUMENTS
or
cords asso-
l
is
ted on proposi-
Wash
RADIATION
IEC
safety, do
all
servicing to
notre-
I
INVISIBLE
NOT
VIEW
.
OR
)
( Before
A
cAUTION
•
Do not allow
with liquids. Electrical shock could result.
Also. damage to
heating could resu
liquids.
• Keep this manual handy
•
Always keep the
outside sounds.
•
Avoid exposure to moisture.
• If
the battery is
any preset
you
this
un
th
vo
disconnected
memory
start
it to
come
is unit. smoke, and over-
It
from
contact
for
lume
low enough to hear
will
be
erased.
DVD video disc region numbers
Only DVD video d1scs
numbers can
find
the
tom
reg1on
of this
unit
Specifications
About
•
•
this
This
unit
funct
operat1on.
signed for the easiest possible use, but many
are not self-explanatory. This operation manual wi
potent i
joyment.
Th
to describe operations. However, the screens
on some
in
used.
features a
ions to ensure superior reception and
ll
help
al
and to maximize your listening en-
1s manual uses
unit
this
manual depending on the model
with
be
played on
number
and in this manual (refer to
on page
compatible
this
of
the
52).
player on the bot-
manual
number
All
the
functions
yo
u benefit fully from
diagrams
s may not
match
~nto
contact
with
future reference.
or
discharged.
region
player.
You
can
of sophisticated
have been de-
this
unit
's
of actual screens
those shown
After-sales service
for
Pioneer products
Please
contact
where
yo
service (including warranty conditions)
other information.
mation
panies listed below:
Please do not ship your
the addresses listed below
va
nce contact.
the dealer
u purchased
is not available. please contact the com-
U.S.A.
Pioneer Electronics
CUSTOMER SUPPORT DIVISION
PO.
Box
Long Beach,
800-421-1404
1760
CA 90801-1760
CANADA
Pioneer Electronics of
CUSTOMER SATISFACTION
340
Ferrier
Unit
Markham,
1-877-283-5901
905-4
For
warranty
Warranty sheet included with this unit.
Demo
The feature demo
select
the ignit1on switch is set to ACC
cel the feature demo, press and hold
Press and ho ld
Ing
the feature demo
turned off it may drain the battery power.
Street
2
Ontario
79-4411
information
mode
Off
automat
for the source and
MUTE
or
distributor
this
un
it for after-sales
In
case the necessary infor-
unit
to
the companies at
for
repair w1thout
(USA) Inc.
Canada, Inc.
DEPARTMENT
L3R
2Z5.
Canada
please see the Limited
ically starts when you
continues
or
ON.
MUTE.
again to restart.
wh1le
the
car
engine
from
or
any
while
To
can-
Operat-
1s
Section
) 8
ad-
c!)=
Important
The
red lead
nected to the ignition
do so may result
(ACC)
in
of this
unit
on/off
battery drain.
should
function.
be
con-
Failure to
En
(D
Page 6
Section
What's
what
)
What's
(
what
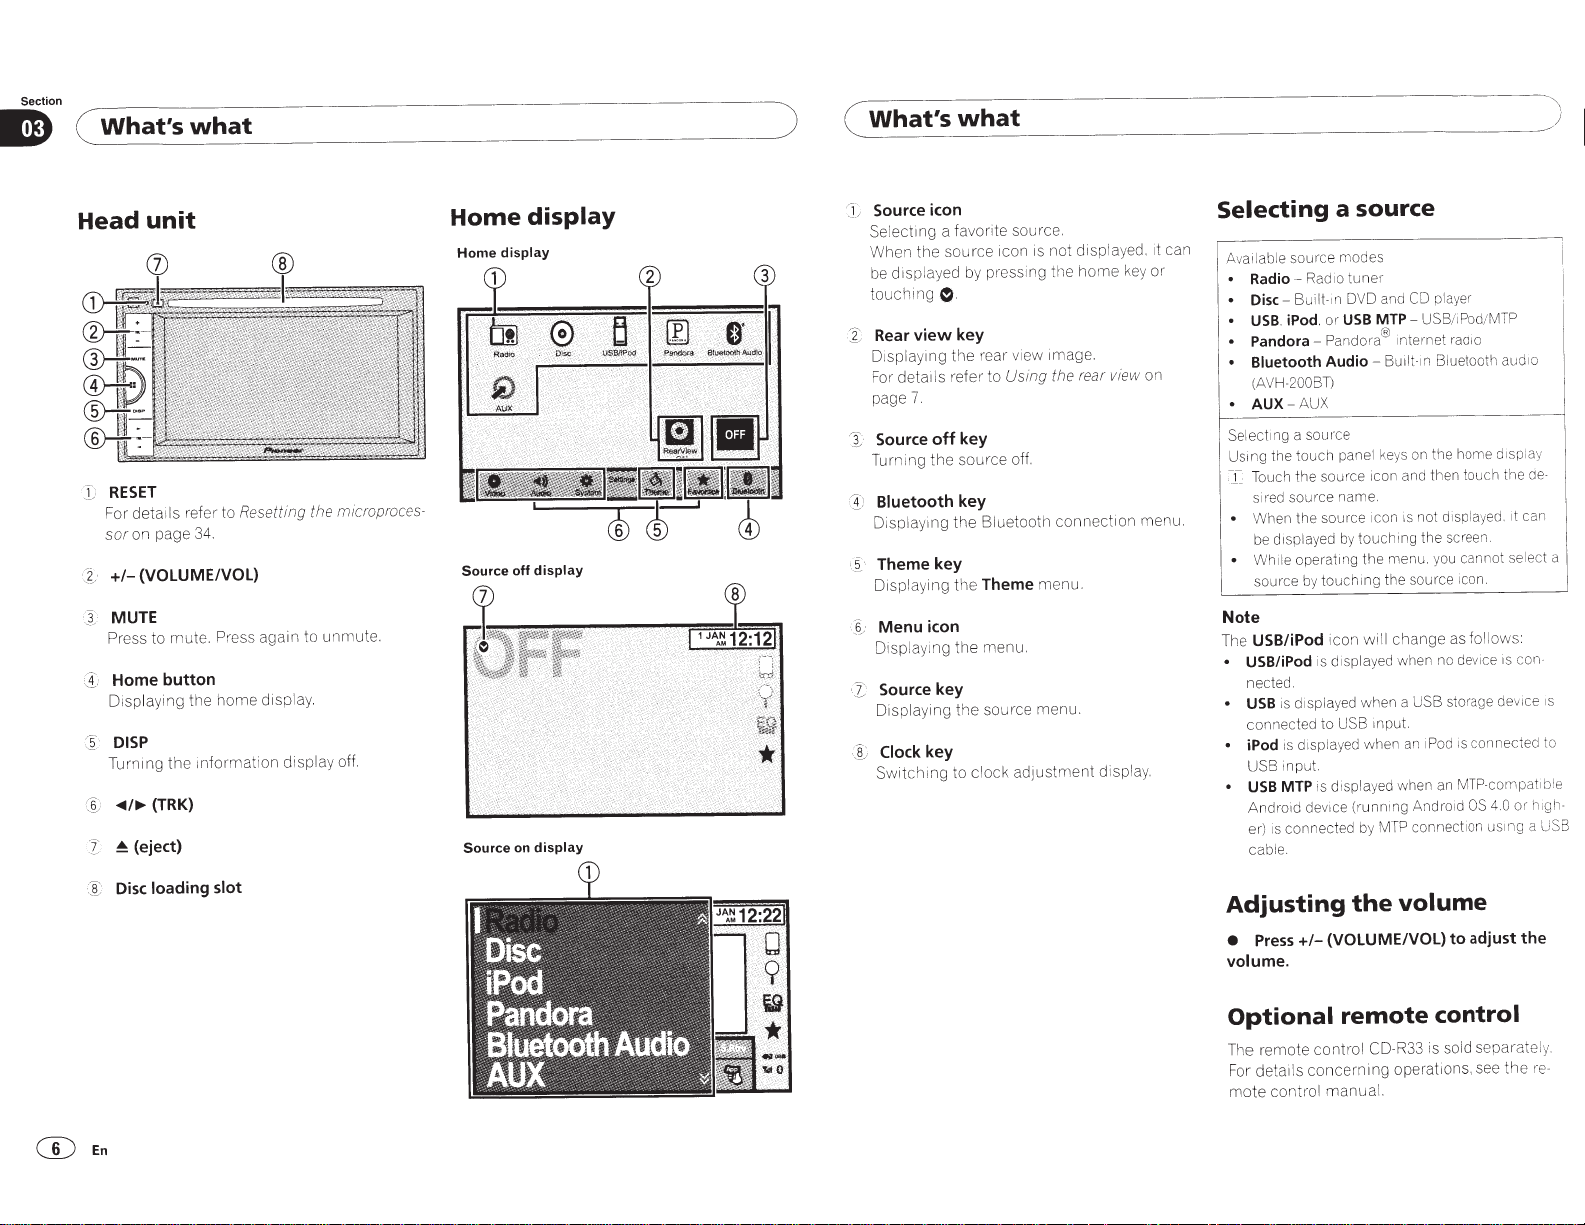
Head
l:
~
I
:I
CK
'
unit
RESET
deta1ls
For
on page
sor
(VOLUME/VOL)
+1-
?/
MUTE
Press
Home button
:
Disp laying the
DISP
·
Turnmg
"'4/~
~
~(eject)
'2
refer to
34.
to mute.
mformation
th e
(TRK)
Resetting
again to unmute.
Press
disp
home
the
ay.
l
display
microproces-
off.
Home
display
Home
Source off
Source
display
display
display
on
Source icon
ecting
l
Se
When the
displayed
be
touchmg
Rear
X
Displaying
For
page
Source
/I
rn ing
Tu
Bluetooth
1)
Displaying
Theme key
, 5 ·
Displaying
Menu
.:
_
6
~
Disp laying
Source key
:r
Displaying
'[; Clock
Switch
a favorite source.
source
pr
by
0 .
key
view
deta1ls refer to
7.
,-ear
the
key
off
source off.
the
key
Bluetooth connect1on
the
Theme
e
th
icon
the menu.
the source menu.
key
clock
ing to
not
is
1con
sing the
es
view image.
Using the
menu.
adjustme
disp
home
ar
re
display.
nt
layed. 1t
y
ke
on
view
menu.
or
Selecting a source
can
Av
•
•
•
•
•
Se
Us1ng
•
Note
Th
•
•
•
source
le
ailab
l
l_
• W1
e
USB/iPod
nected.
USB
co
iPod
Rad1o
Radio-
Bu ilt-in
Disc-
. iPod.
USB
PandoraBluetooth Audio -
H-200BT)
(AV
AUX
AUX-
sou1·ce
a
ing
ect
touch
the
the
ch
Tou
source
red
si
the
When
be displayed by
e operatmg
il
source by
USB/iPod
is displayed when no
displayed
is
nnected
is displayed
nput.
i
USB
USB
Android
er)
cable.
is displayed when an
MTP
de
connected
1s
modes
1·
ne
tu
DVD and CD
USB
or
Pandora®
panel
icon an d then touch the de-
source
name.
1c
ce
ur
so
touching
the
touching
will
icon
when
USB mput.
to
when
unn
ce (r
vi
by
player
USB
MTP-
internet raaio
Bluetooth
Built-in
keys on the home
not
1s
on
the screen.
menu. you cannot selec t a
the source icon.
change
SB
U
a
iPod is connected to
an
Andro
ing
MTP connect1on us1ng
/MTP
Pod
/i
aud
d1sp iay
1t
ayed.
spl
di
fol lows:
as
con-
IS
dev1ce
storage de
id
vi
MTP-compatib!e
m
4.0
OS
1o
can
ce 1s
high-
U
a
SB
G)
E
En
loading slot
Disc
Adjusting
Press+/-
e
volume.
(VOLUME/VOL)
Optional
deta1ls
control
con
concerning
manua
The remote
For
mote
volume
the
remote
CD-R33 is
trol
operat1ons,
l.
adjust
to
control
sold sepa rate
there
ee
s
the
.
ly
-
Page 7
(
Common
operations
)
(
Common
operations
Section
) 8
Common
menu
setti
rn
Operating
and
the
scrubber
operations
ngs/1
ists
(
Fu
nct ion of AVH-200BD
Start ing the Bluetooth telephone
menu.
For
details refer
ph
on
e
on
page 2
Displayin g the
Starting the
Displayi
ng
the
ti
on
menu
).
D1splaymg
the
the
scroll
to
Bluetooth
2.
li
st
menu.
sea
rch function.
EO
(Audio
Favonte
icon
for
tele-
func-
menu.
bar
CD
Scroll
Appears
Touch
items.
·
%!
Scrubber bar
Appears
a
single
Drag
items.
Also, you
items.
G)
Playback
Specify1ng
Dr
ag
icon
when
the
w
pag e only.
the
scrubber
can
the
pl
selectable i
scroll
icon to view any hidden
hen
i
tems
cannot
bar
to
drag
the
list to view any hidden
point
the
pl
ayback
point
ayback
point
on
tems
are
be di
spla
view any h i
the
screen.
hidden.
yed
dden
on
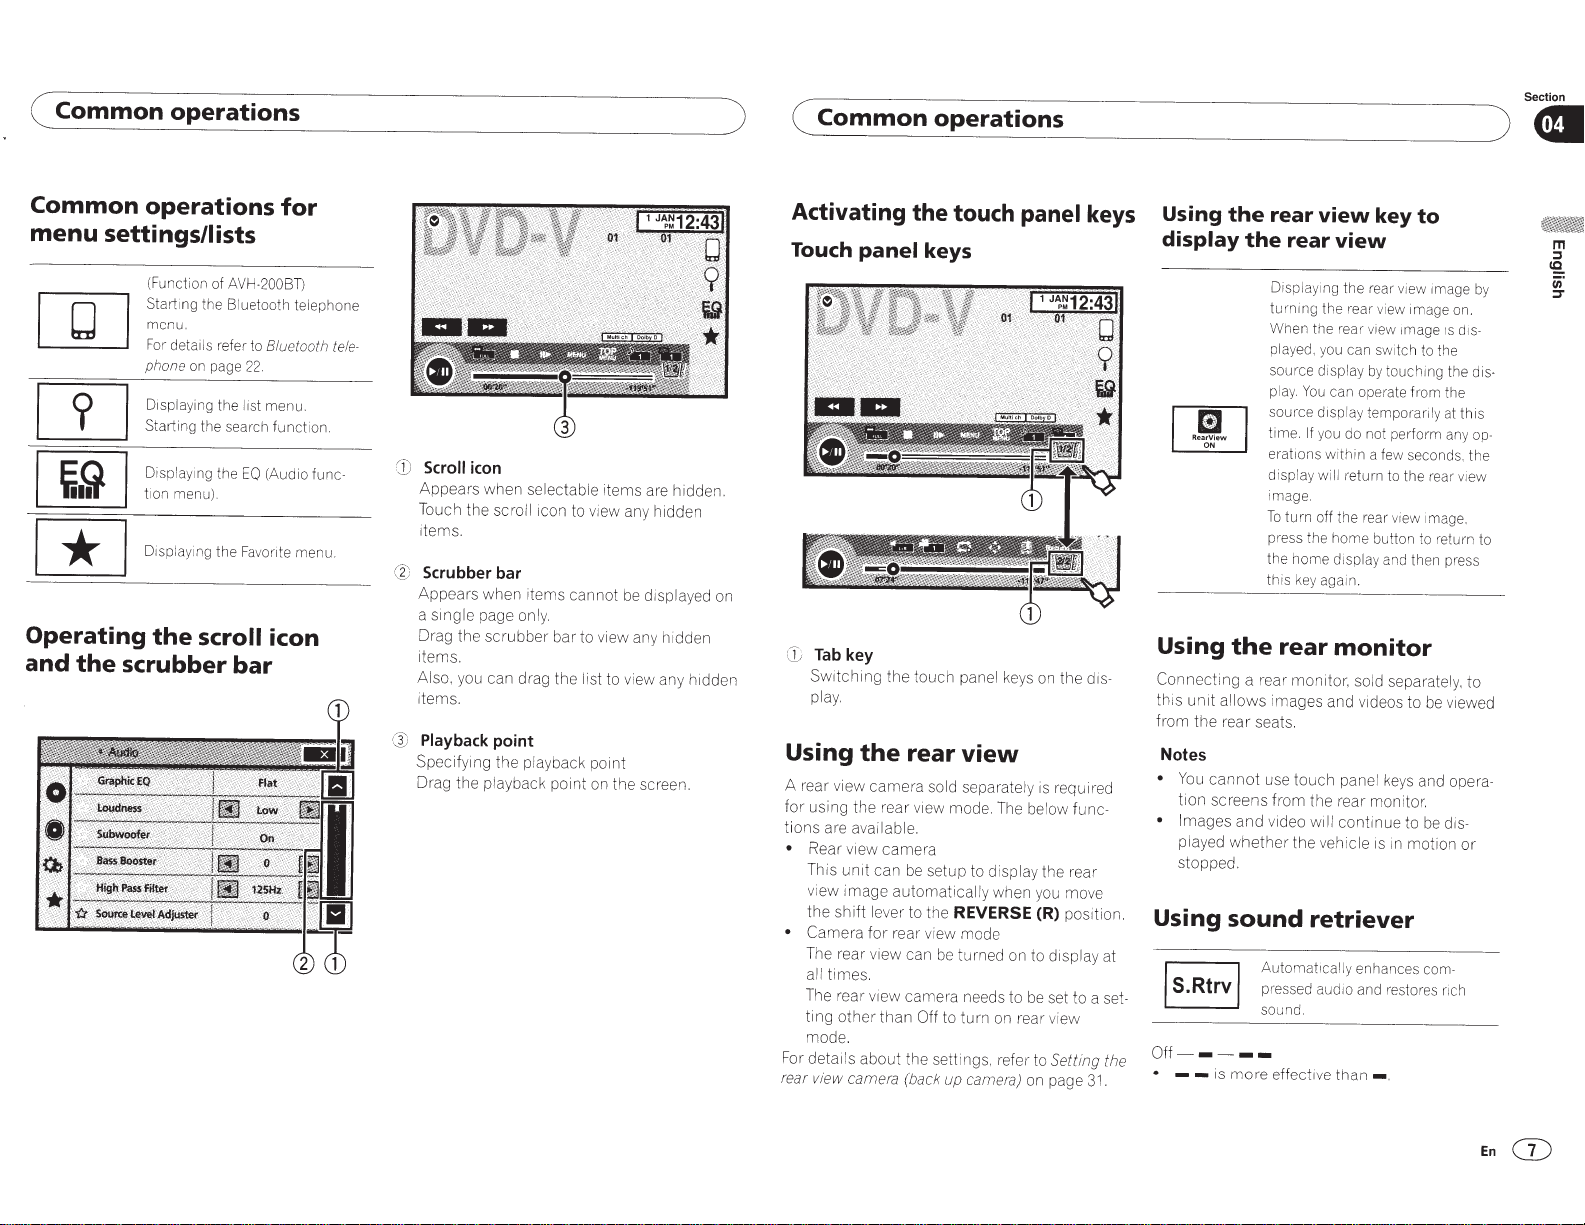
Activating the touch
Touch
CD
Using
A rear
for
tions
•
•
For
rear
panel
Tab key
Switching
play.
the
vi
ew ca
using
the
are available.
Rear
view
This
unit
view
image
the
shift
Camera
The rear
all
times.
Th
e rear
ting
other
mode.
details
abo
view cam
keys
the
touch
panel keys on
rear
view
mer
a sold separately is requ
rear view mode.
camera
can
be
setup
to
au to
ma
ti
lev
for
view
v
1e
w
than
ut
era
er
rear vi
cally
to the
REVERSE (R}
ew
mode
can
be
turned
camera
need s to be set to a
Off
to
turn
the
setting
(
bac
k
up
ca
s.
m
panel keys
the
Th
e be low
func-
di
spla
y
the
rear
wh en you move
position.
on to
display
on rea r vi
refer to
era)
ew
Setting the
on page
dis
ir
31.
Using
display
[]!]
Using
-
Connecting
th
is
fr
om
Notes
•
ed
at
set-
You
tion
•
Im
pla
stopped.
Using sound
Off-----
•
--
unit
the
age
yed w
the
rear
the
rear
Di
sp
laying the
turning the
Wh
en
the
pl
ay
ed
, y
source display
pla
y.
You
source d
time.
If
w
N
the
a rear
all
ows
re
ar
cannot
screens
s
and video
hether
se ats.
you do not perform
erations within a few second
display
will
ima
ge
.
To
turn off the rear view
pr
ess
the home button to return to
the home d1splay
this
key
rear
monitor,
i
mages
use
touch
from
the
will
th
e veh i
retriever
Automat1cal
pressed audi
sound .
is
more
effective
view
key
view
rea
r view image by
rea
r view image
re
ar v
ie
w image is
ou
c
an
sw1tch
by
touchi
can operate from t
1s
play temporanly
return to the rear
an
d then press
again.
monitor
so ld separately,
and
videos to be viewed
panel
keys
rear
mon
itor.
continu
e to be dis-
cle
is in
mo
ly
enhances
o and restores ri
than-·
to
to the
ng
1mage.
and
tion
com-
on.
di
the
he
at
this
an
y
s.
vi
to
opera-
or
ch
s-
dis-
opthe
ew
EnG")
Page 8
Section
Note
This f
sources listed below.
•
• MP3/WMA!AAC
•
•
•
•
Changing
mode
2 Touch
FULL
The
rection only.
(normal picture)
ZOOM
The
tion both vertically
cmema
NORMAL (normal)
The
ers no sense of disparity as the proportions are
the same as that of
Common
ion is enabled
unct
A
-D
CO
ces
MP3/WMA!AAC/WAV
ces
MP3/WMA!AAC
Pod
i
ndora
Pa
operations
f11e
tes
f1
with
(iPod
the
tmg
ec
Sel
for t
io
r·at
screen
Display
the
the
screen)
(full
picture
4:3
grantmg
(zoom)
picture
4:3
d
s1ze
p1cture is displa
4:3
desired
enlarged in the horizontal
is
without
enlarged
is
and
picture
the
playback on the
for
storage
MTP
USB
on
s
storage
USB
on
s
f1ie
media
CO
on
30
-pln
connector
only)
wide-screen
the appropriate screen
eo.
playback
he
mode.
wide
ewers a
vi
any
horizontally: ideal for a
(w1de
d as
ye
normal
vid
setting.
mode
picture
4:31V
issions.
om
the same
1n
screen p1cture).
grant
is.
picture.
devi-
devi-
propor-
view-
ing
in
viewed
that
author's
ZOOM
1n
V.
O-
OV
MPEG-4
.
vX
Oi
:
V1deo
data
AN
IS
match
not
using the
commercia
for
tute
i
const
rights protected
mode.
for
deo-CO.
Vi
1. MP
G-
MPE
When a video
•
mode that does
it may appear different.
mtio.
Remember
•
of this system
Ing purposes may
on the
Law.
nght
• The video image w ill appear coarser when
v1ewed
This function is enabled
•
sources listed below.
- Disc
MPEG-2.
USB
-
iPod:
-
AUX:
-
di-
a wide screen
its original aspect
mode feature
wide
public
or
l
infnngement
an
the
by
playback on the
.
PEG-1
M
.
vX
Oi
4.
EG-
MP
EG-2.
view-
Copy-
JPEG
)
( Basic
operations
Ejecting a disc
eject a disc.
to
~
Press
•
clock
Setting
Touch
Clock
The
Refer to
Select
2
3 Touch
time.
Notes
You
•
dd/mm/yy.
You
•
12hr
the
Clock
the
Adjustment
on page
key
Clock
item
the
to
or •
.A.
can select the date
yy/mm/dd
can select the time
ock)
cl
hour
(12-
~
~
key.
to
lnd1cates
c
screen appears.
6.
set.
correct
the
set
Touch
t.
forma
mm/dd/yy
or
format. Touch
clock
(24-h
24hr
or
that the
osed.
l
date
clock
our
d1splay
)
and
.
).
is
CD
Notes
this
operate
cannot
You
•
Ing.
Different settings can be stored
•
source.
v1deo
En
funct
ion
wh
for
le
i
each
driv-
Page 9
( Tuner
)
(Tuner
Section
).
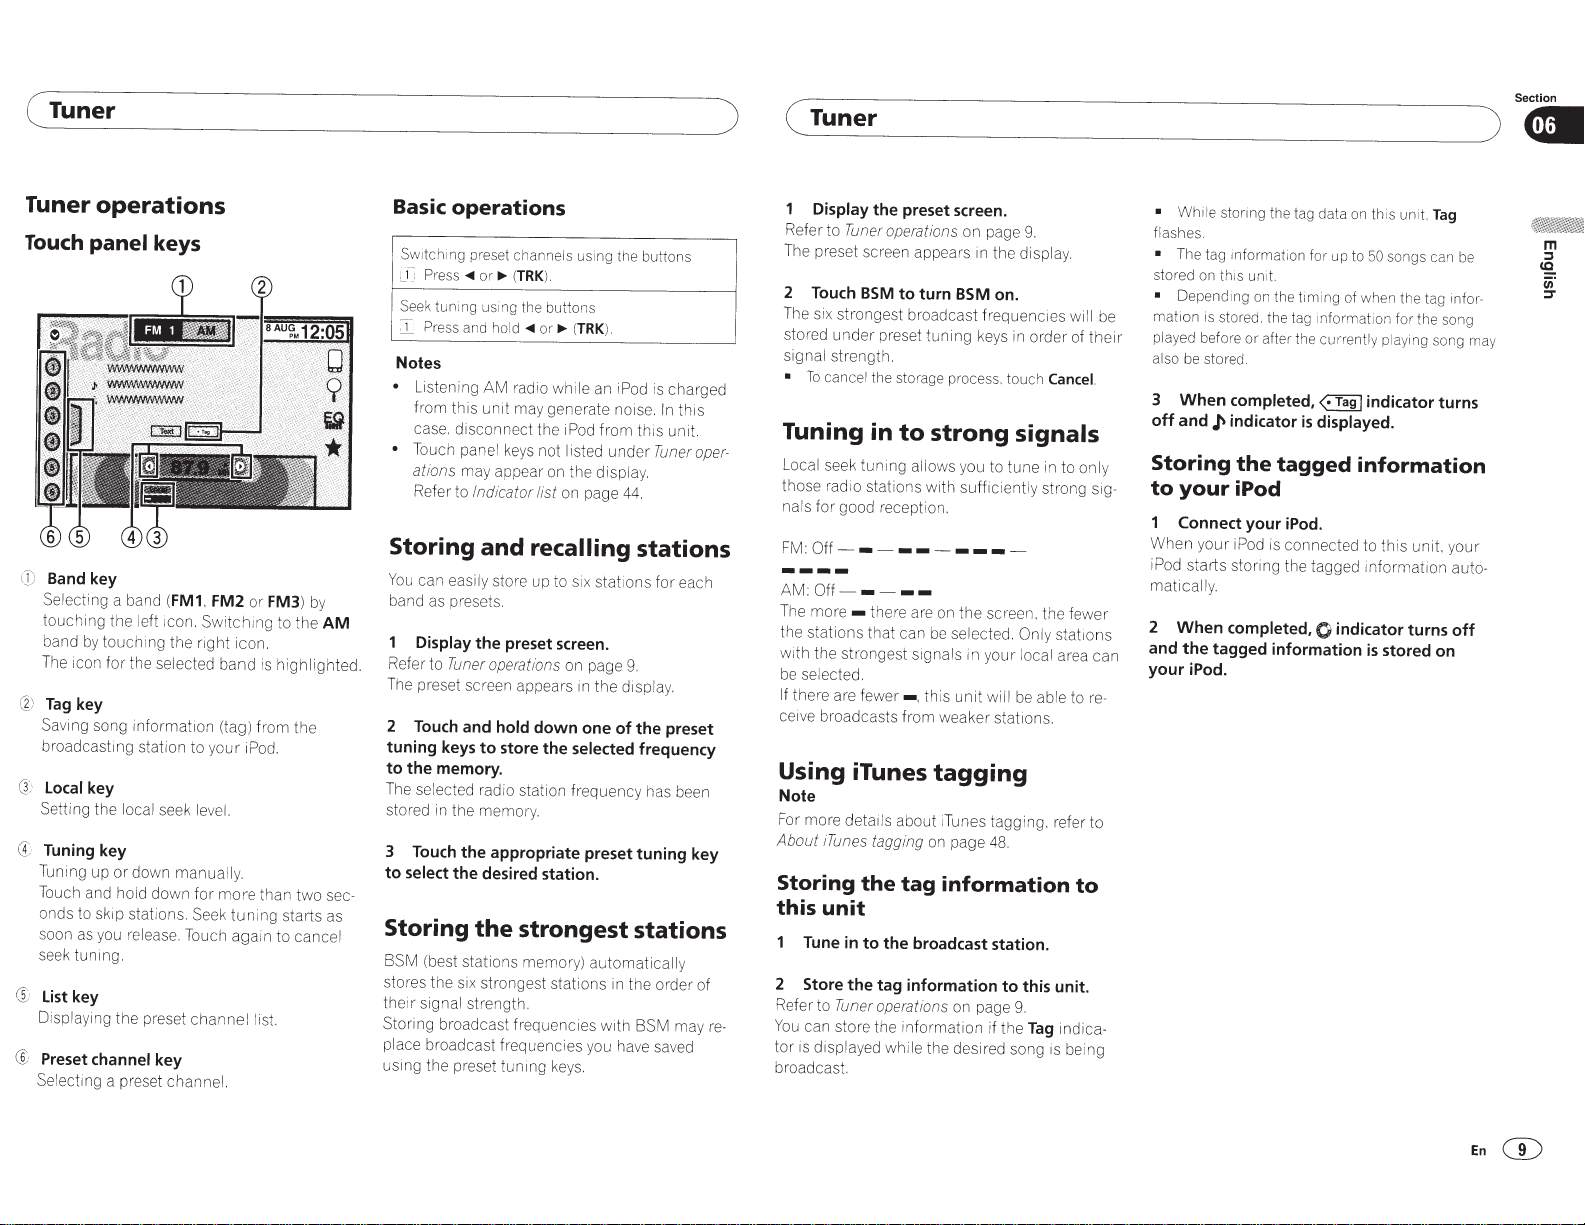
Tuner operations
Touch
@
G,
(f
®
®
panel
Band
key
Selecting
touching the left
band
by
The
icon for the
Tag
key
Saving song
broadcasting station to your i
localkey
Setting the
Tuning key
Tun
i
ng
up or down
Touch and
onds
to
soon
as
se
ek
tuning.
list
key
Displaying
Preset
channel
Se
lecting a preset
keys
a band
(FM1. FM2
1con.
touchi
ng
the right icon.
selected
informat1on
lo
cal
seek
le
manually.
hold
down for more than two
skip stations.
you
release. Touch again to
the preset
Seek
channel list.
key
channel.
or
FM3)
Switchmg
band is
(tag) from the
Pod.
v
el.
tuni
ng
by
to the
AM
highlighted.
sec-
starts
as
cancel
Basic operations
Switchi
ng
pres
et
ch
annels
us
i
ng
~
(
TRK
).
le
an
from this unit.
isted under
the display.
on page
the
iPod
44.
Press~
or
~
(TRK).
Seek
tuning us
I
Press
Notes
•
Listeni
from this unit may generate noise.
case. disconnect the iPod
•
Touch
ations
Refer to
ing
the
and
ho
ld
~
ng
AM
radio
panel
keys
may appear
Indicator list
buttons
o
r
whi
not I
on
Storing and recalling
You
can easily
ba
nd as pr
Display
Refer to
The
preset screen appears
2
Touch
tuning keys
to
the memory.
The
selected
stored
3
Touch
to
select
Storing
BSM (best stations memory)
stores the
the ir
signal strength.
Storing broadcast frequencies with B
place
broadcast frequencies y
usmg
the preset
store up to
ese
t
s.
the preset screen.
Tuner
operations
and
hold
to
store the selected frequency
radio station frequency has
in
the
memo1y
the appropriate preset tuning key
the desired station.
the
six
strongest stations
tunmg
si
x stations for each
on page
down
1n
one
the
9.
d1splay.
of
strongest stations
automatically
in
the order of
ou
have
keys.
bu
ttons
is charged
In
this
Tuner
oper-
stations
the preset
been
SM
may
re-
sa
v
ed
Display
Refer to
The
2
Touch
The
stored under preset tuning
signal
•
To
Tuning in
Local
those
nals
FM:
Off----------
AM:
T
he
morethe stations that can
w1th
be
se
If
there are
ceive broadcasts from weaker stations.
Using iTunes
Note
For
more details
About !
Storing
this
Tune
2 Store the tag information
Refer to
You
can store the
tor
is
broadcast.
the preset screen.
Tuner
operations
preset screen appears
BSM
to
turn
six
strongest broadcast
strength.
cancel
the
storage
seek tuni
rad
for good reception.
Off-
the strongest
lected.
ng
1o
stations with
----
there
fewer-.
BSM
process.
to
strong signals
allows
are
on
the screen. the fewer
be
selected. Only
s1gnals
this unit
tagging
ab
out iTunes tagging. r
Tunes
tagg
i
ng
on
page
the
tag
information
unit
in
to
the broadcast station.
Tuner
operations
displayed wh i
on
in
formation if the
le
the desired song
on
page
9.
m
the
display.
on.
frequenc1es
keys
in
touch
y
ou
to tune
suffic iently
in
your local
will
be
48.
to
this unit.
page
9.
order of their
Tag
Cancel.
in
to only
strong
stations
area can
able
efe
indica-
is
wi
tore-
r to
to
be
i
ll
Sig-
ng
be
• While stonng
flashes.
•
The
tag
stored
on
•
Depend
mation is
played
before
al
so
be
store
3
When
off
and
Storing
to
your
Connect your iPod.
When your
i
Pod
starts storing the tagged information
matically.
2
When
and
the
your iPod.
the tag
data
informati
on
f
or
th1s
untt.
i
ng
on
stored
.
or
after
d.
completed,
~
indicator
the
the
up
t
he
timi
ng
tag
1nformat1on
the
currently
<·Tag
is
displayed.
tagged
of
iPod
iPod
is
connected to this unit,
completed,
tagged information
O
indicator turns
on
to
information
th
is
un
i
t.
Tag
50
so
ngs
can
when
the
tag
infol--
for
the
song
playing
song
I
indicator turns
yo
auto-
is
stored on
be
may
ur
off
En
G)
Page 10
Section
( Disc {CD/DVD)
Introducing
can use
You
RW/CD/CD-R/CD-RW
video
CD
Video
playing
When
ous media
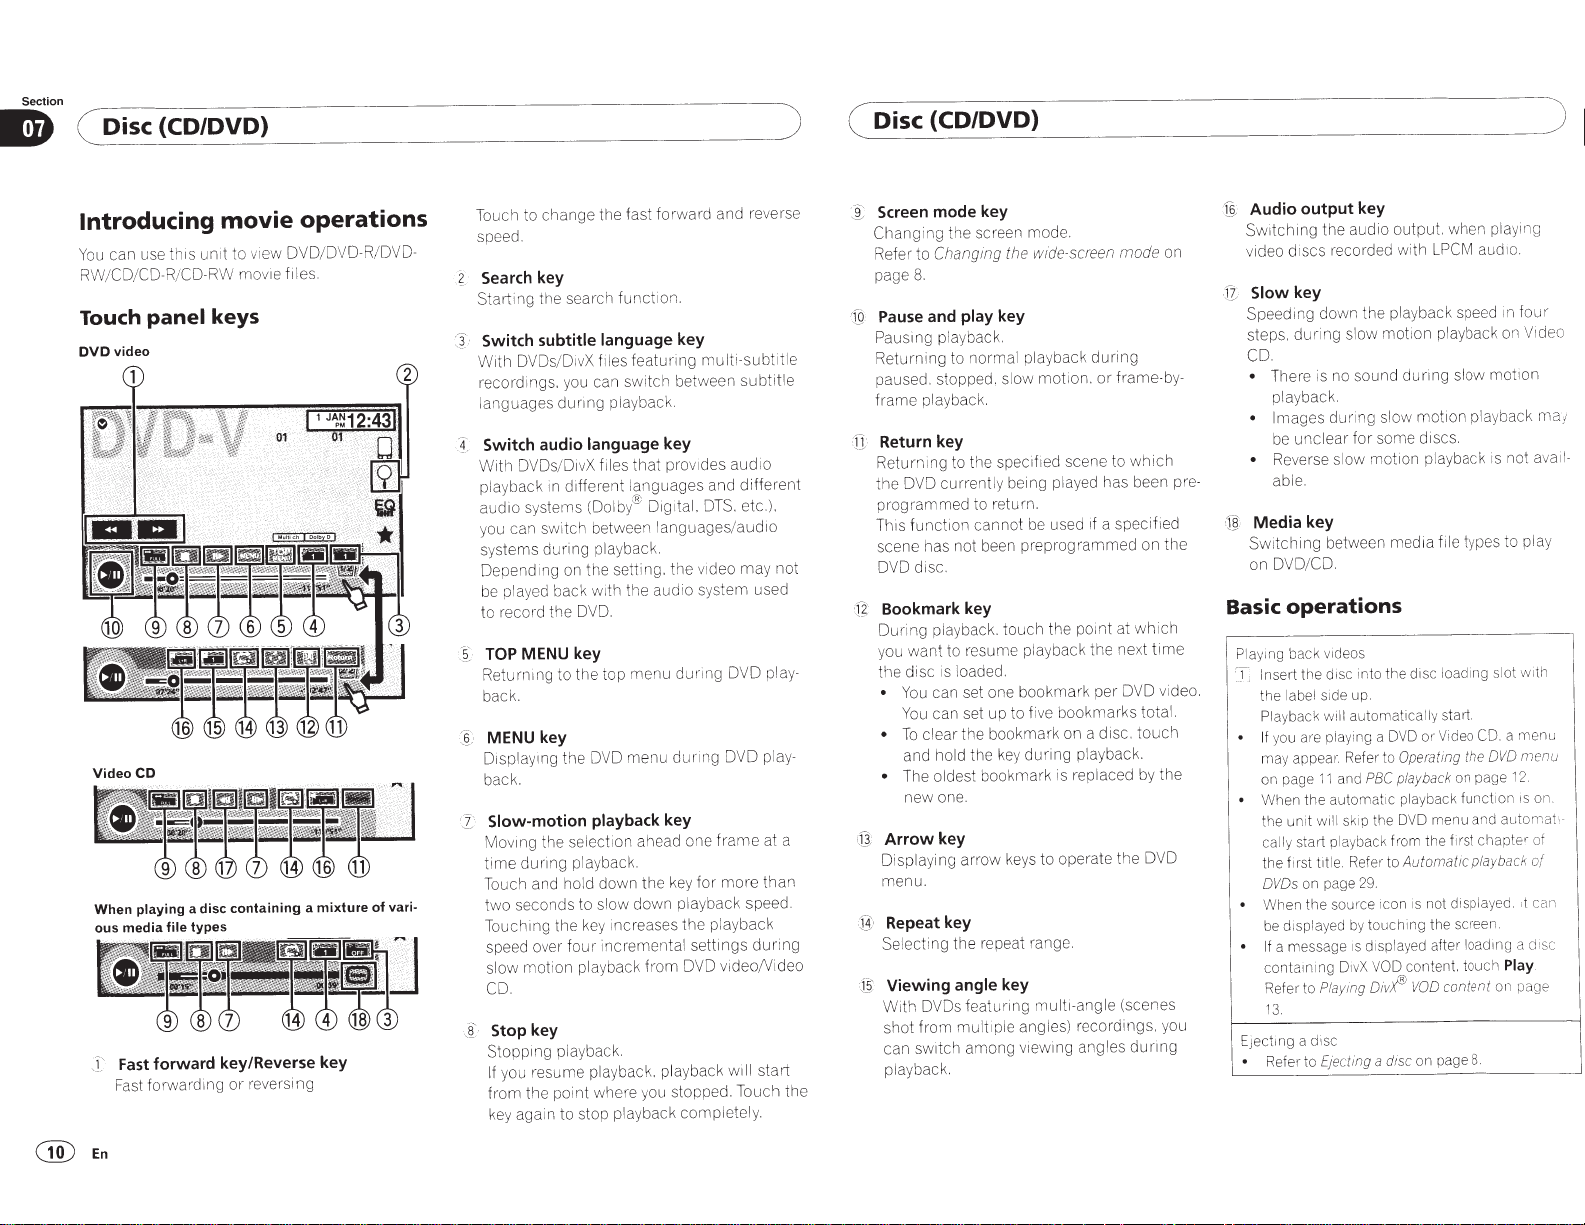
Fast
T
Fast
panel keys
forward
Touch
DVD
movie
unit to
this
mo
a disc containing a mixture of
types
file
operations
OVD/DVD-R/DVO-
v1ew
s.
vie fi le
forward key/Reverse key
ng
reversi
or
mg
vari-
Touch to change the fast forward and reverse
speed.
Search key
?_
Sta1iing t
Switch
OVDs/ O
With
recordings. you can switch
languages
Switch audio
:1.
OVOs
W1th
playback in d1fferent languages and different
audio systems (Dolby® Dig ital. D
you can sw i
systems
Oependmg
play
be
to record the
MENU key
TOP
-
~
Returning to the top
back.
MENU key
§.
·,
Displaying the DVO
k.
bac
rc
sea
he
subtitle language
f
X
iv
dunng
language
files
D1vX
/
h between
tc
playback.
during
on the setting. the v1deo
back with the audio sy
ed
OVO.
Slow-motion playback
ving the selection ahead one
Mo
playback.
dunng
time
and ho ld
ouch
T
seconds to slow down playback
two
ing the
ouch
T
ov
ed
spe
mot
ow
sl
.
CO
Stop key
i
Stopping playback.
you resume playback. playback
If
the poi
from
ain to stop playback completely.
ag
key
down
y i
ke
inuem
our
er f
ion playback
where you stopped . T
nt
on.
functi
h
featuri ng
es
il
playback.
key
that
languages/audio
menu
menu
key
the key
reases the play
nc
en
from
key
mu
tween
be
provides
TS.
stem
ing OVO pla y-
dur
ing OVO play-
dur
fr
for
tings
et
s
tal
DVO
ti-subt
l
subtitle
aud
etc.).
may
ame
more
back
video
will
ouch
sp
io
used
at a
than
eed.
urin
d
ideo
/V
start
)
itle
not
the
( Disc {CD/DVD)
Screen mode key
i
Changing the
to
Refe1·
8.
page
Pause
.iQ
'
Pausing playba ck.
urning
t
Re
paused. stopped, slow
frame playback.
Return key
·il
Returni
OVO
the
programmed
funct1on cannot
h1s
T
scene has not been preprog r
disc.
OVO
Bookmark key
[~
·
ing playback.
Dur
u wan t to resume
yo
the disc is loaded.
You can set one bookmark
•
You
To
•
and hold the
Th
•
new one.
Arrow
(g
ayi
Displ
menu.
Repeat key
·
[4
C
ecting the repeat
g
Sel
Viewing
j:§'
With
shot
can
pl
ay
fr
sw
back .
mode.
sueen
wide-screen
e
th
ing
ang
Ch
key
play
and
l playback
norma
to
to the specifi
ng
currently being
re
to
touch
can set up to f
clear the boo
ke
bookmark is replaced by the
oldest
e
mot
turn.
be
playback
iv
kmar
during
y
ion. or
scene to
ed
played
1f
ed
us
ammed
the point at
the next
bookma
e
k on a
playback.
key
ng arrow keys to operate the
nge.
ra
key
angle
ngle (scenes
1-a
lt
OVOs
om
1tch
feat uring
mu
among
mu
ang les) recordings, you
ltiple
v1ewing angles
mode
during
-b
ame
fr
which
has been pre-
f1ed
a speci
on
ch
i
wh
tim
video.
OVO
r
pe
total.
ks
r
uch
to
d1sc.
OVO
dunng
on
y-
the
)
Audio output key
1],
:
Switchin g
video discs recorded with
Slow
f?,
.
Speeding
steps,
CD.
• The
•
• Reverse slow
Media key
@
Swi
on OVD/C
Basic
e
Play
lnse1
T
the
Playback
If
ma
on page
When
•
the
•
ct1ng a d1sc
EJe
the audio output. when playing
LPCM
key
down the playback speed 1n
ing slow
dur
is no sound
re
playback.
Images during slow
unclear
be
e.
bl
a
ing between media file types to play
tch
O.
ion playback on
mot
slow motion
during
motion
some discs.
for
ion playback is not avail-
mot
operations
v1deos
back
1ng
c into
dis
the
i
de up.
s1
el
lab
tomatica
au
will
u are playing a
yo
Refer to
·.
appea1
y
PBC
and
11
omat
aut
the
1p
sk
w1ll
unit
bac k from
ay
start pl
cally
Refer to
title.
rst
f1
the
29.
on page
DVDs
the
Wh en
be displayed by to
a messa ge 1s displayed after
If
containing D
to
Refet·
3.
1
to
Refer
e
rc
sou
X
1v
Playing Divr
ting a disc
ec
Ej
c loading slot with
dis
the
lly start.
eo
Vid
or
DVD
the
ting
Opera
on page
ack
yb
pla
ic playback
DVD
the
on
1c
uch
VOD
fu
menu
rst
fi
the
Automatic playback of
not displayed.
is
sueen
ing the
lo
content. tou
nt
co
VOD
on page 8.
o.
aud1
fo
playback
me
a
CD.
menu
DVD
2.
1
ion is o
nct
aut
and
haptw
c
,t
.
a
g
adlll
Play
ch
on page
ent
V1
om
d:sc
ur
deo
ma;
nu
n.
at.-
of
can
.
®En
Page 11
( Disc (CD/DVD}
Selecting a
rl_
Fast
T
•
•
Notes
•
This DVD pla
corded on CD-R/RW, DVD-R/RW.
MPEG-2/MPEG-4. (Please see
section
Refer to
•
Do not insert anything
RW
•
Some operations
watching a media
of the
pears on the screen.
•
There may be
under
10
Refer to
•
With some DVDs.
guages/audio sys
using a menu display.
•
You
audio systems using
detai I
page
•
This
change the
war
back.
• With some
languages
menu display.
chapter
Pre
ss
~
forwa
rd
Press and hold
Fa
st f
orwar
possible on some discs.
playback
The fast
on
the
length of
~
or
..,..
Video CD.
for
or
CD-R/RW into
d1sc.
Introdu
that
appear on th e screen.
Indi
can also swi
s,
refer to
27.
unit
d/fast
using
or..,..
(
TRK
ing or reve
~or..,..
d/fast
re
w1l
l
aut
omat
for
ward/fast
t1
me you press and hold
(
TRK
).
This fu
ye
r can play
files
that
DivX
video
ma
In
such cases,
touch
cin
g movie operations
ca
tor list
switching
tems
tch
Setting
will
return
aud1o
language
re
ve
r
se.
pause
D
VOs
.
sw
ma
y on ly be
).
rs
verse
re
nct
can be played
files
y not be availab le while
due
panel ke
on
between la
Video Setup
to
itchi
the
ing
(
TRK
In
1cally
verse speed depends
ion is not ava
on page 47.)
other
the
to
page
may only be possible
the
normal
possible
butt
ons
using
the
butt
ons
).
ma
y
not
always be
such cases.
re
sum
back
than
dis
c loa ding slot.
th
e
programming
the
ys
between
audio
dur
or
slow
ng between subtit
normal
e.
down
il
able fo r
a Di
vX
fi
le
or
MPEG-1
the
f
ollow
ba
c
k.
a OVD-R/
0
1con
ap-
not
listed
on page
44.
la
n-
ngua
ges/
menu. For
lan
guage
playback if you
ing fast
for-
mot
ion
using a
ing
pla
•
You
guag es using
tails. refer to
page
Th
change the
ward/fast r
back.
•
During playback of a scene shot
ple
the
ic
on
ting
•
re-
You
change the viewing ang le
/
ward/fast reverse, pause
back.
Sound
You
can use
RW/CD/CD-R/CD-RW
Touch
on
y-
CD
le
Information
Swi
this
can also swi
27.
1s
un1t
angle
Video Setup
displa
the
multi
wi
ll
return to normal playback if you
playback
panel
tch
ing the te
unit
when playing
tc
h between
Video Setup
Setting
the
subtitle language
will
return to
subtitle
ev
erse. pause
s,
the angle icon is displaye
y on
-an
normal
l
anguage
menu
or
off. For deta i
gle
DVD
or
to
turn
displ
during
or
operations
this
unit
to
l1st
en
to DVD-R/DVD-
sound files.
keys
key
xt
information
MP3/WMNAAC
subtit
le
lan-
menu. For de-
playback
d
uring
fast
sl
ow
motion
from
d.
the angle
ls.
re
fer
ay
on page
fast
fo
slow
motion
to
display on
mu
to
fi
1f
U
r-
play-
l
on
yo
for-
play-
lti-
se
Set-
27.
es.
)
u
(
Disc(C
@
Search
Di
splaying a list of track titles/file
select
Displaying the file name
f1
les.
~
t
Media key
Sw itch1ng between me dia file types on a
DVD or CD.
CD
Sound retriever key
Refer to
®
Random key
Pl
ay
®
Repeat key
Sel
e
(
J)
Previous
Select~ng
:Jl)
Pause
Pausing and starting playbac
Switching
When pl
ture of
M
PEG-
switch between
•
Touch
CO-DA (audio dat
au
d
io)
- Video
vide o files)
Note
Audio data
cannot
~
D/
~
D
~
V
~
D~}
~~~~~~~~~~~~
key
songs
on a
CD.
li
st to sele
Using sound retr
ing songs in random
cting
the repeat
folder
a folder.
and
play
the
ay
ing a digital media containing a
va
nou s
med1a
1. MPEG-2, MPEG-4 and MP3. you can
media
Media
to
a)-
(O
i
vX
. M
be
(CO-DA)
pl
fil
ayed back on
ieve
r
on page 7.
order
ra
ng
e.
key/Next
key
folder
k.
media
f1le
types. such as DivX.
fi
le
types to
switch media
Music/ROM
PEG-
1. MPEG-2. MPEG-4
es
on DVD-R/RW/
th1
s
un1t.
nam
es to
ct
the
.
key
file
type
mix-
pl
ay
.
file
types.
(compressed
RO
M
Operating
(F
un
ction
Some DVDs
the disc
Using
menu.
2
conten:s
the
Display
Select the desired menu item.
the
for DVD video)
allow
yo
u to make a selecti
using a menu.
arrow
arrow
keys
DVD
keys
to
~
'../
Select1ng
<
>
Starting playback fr
lected
menu
Operating
rectly
to
uch~ng
~
•
When
ing the
menu
I
~:
Back
operating
~
the
item.
touch
Return ing to the no
v1deo
I
Displayin g arrow keys.
to
DVD
th
displ
pre
e i
menu
operate the DVD
the
des 1red
menu
om
the se-
1tem.
the
DV
D
me
nu
the
men
u
v1
ou
s d1splay
menu
by
di
1·ectl
con
ay
to ope rat
.
rm
al
e.
DVD
~)
on
fro m
1
tem.
by
di-
1tem.
y
to
uch-
Section
~
En@
Page 12
Section
( Disc (CD/DVD)
)
( Disc (CD/DVD)
)
Ways to disp
•
disc.
the
on
Dependrng on
•
function may no t
touch
the
la
panel
Random
•
•
•
Pl
~
On
repeat range.
the
Cancel
Off~
ay
the random key.
Touch
Repeating
the repeat
Touch
•
Play
Disc~
•
Chapter
•
Repeat the cun·ent trtle
Title~
•
Repeat the
Track~
•
Repeat
File~
•
~
Folder
•
Disc/All~
•
Repeat
~
• All
Notes
functr on cannot
• Thrs
playback
CO
Video
control).
perform
you
• If
ame-by-frame playback or
fr
e.
revers
playback.
tron
playing discs with
When
•
data
audio
and
within
peated
rf
even
rng
you select
• If
the repeat pl
ay.
pl
Disc/All.
perform
you
If
•
dur
reverse
changes
to
will differ·
menu
the
y
the
contents
the
work
to operate the DVD menu.
ys
ke
play
back
random
of
In
rly.
pr-ope
(shuffle)
ndom
ra
in
files
and
Folder
ay.
pl
such case s. use
playback
key.
urrent
c
the
ugh
thro
Repeat the cu rrent
~
rent track
cur
le
fi
current
the
Repeat the
Repeat all fries in the
Disc
another
ing
Folder.
current
es
il
f
ll
a
operated
be
featunng
chapter
repeat play
the
(CO-DA). playback
the type of
is selected.
ay
track search or fast
the
.
File
PBC
search, fast
comp
data
during
folder
range changes to
repeat pl
depending
D disc.
DV
order
Disc.
disc
chapter·
folder
cur-rent
dunng
ll
wr
ressed
curr
ay
thrs
Ill
with
disc
(playback
forward
ma-
slow
stop.
audio
re-
is
pla
ently
repeat
forward/
range
• If
ward/reverse
rs
• If
re
changes
When
•
pl
Searching
want
can use
You
want
you
OVO
For
Chapter
r video
Fo
10key
Chapter
•
playback is stopped.
Th
•
some
tunng
Start
Refer to
10.
Touch
2
/
Chapter).
Touch
3
To
•
y-
4
Note
With
the
Start
OVO
perform
you
set to off
perform
u
yo
verse
back a
ay
videos. you
(chapter)
(numeric
functi
is
tit
during
automat
track
Track,
ing
dur
Disc.
to
selected.
is
Folder
subfolder
for
play
to
search
the
to play.
or
can
you
COs.
keypad).
search is
cannot
on
videos
OVO
(playba ck control).
PBC
Chapter,
rcally.
search or fast
the repeat play range
is
rt
fol
that
of
part
the
function
can
10key
se
not
or
to find the part
Title
select
(numer
Track
lect
available when
be operated
CO
Video
search or fast
chapter
le/
the search function.
operations
Introducing
the desired
0
l the entered numbe r
cance
movie
option (e.g.,
search
input the desired number.
to
9
to
s.
playback from the selected part.
numbers
the
ing
ster
r
Reg
starting playback.
featuring a menu, you can also use
discs
your selection.
make
to
menu
for-
the repeat play
/
forward
not possible to
der.
you
(title).
ic keypad).
(track) or
disc
during
playback
touch
fea-
on page
C.
and
Introducing
Refer to
0.
1
Selecting
OVO
playing
When
audio. you can
CM
LP
vi
playing
When
tween stereo and
function
is
Th
•
stop ped.
is
back
the audio output key
Touch
•
types.
output
audio
~Left
l+R
•
Left
left~
•
Ri
Right~
•
ix
M
Mix~
•
Note
not be able to select
may
You
depending
tion
cation.
playback
PBC
Video
(Function
During
(playback
Refer to
10.
2
pad.
3
number.
for·
play back of Video
contro
search function.
the
Start
Introducing
10key
Touch
to
0
Touch
aud
to
use this
or
featuring
to
on page
with
output.
ro
be
t.
switch
fun
PBC
on page
a menu
operations
movie
audio
deo
monaura
is
and
ght
ing left and ri
on the disc and the playback
l).
to
output
video discs recorded
the
swrtch
you can switc h
COs.
l audio outpu
able when disc play-
il
not ava
rrght
ght
COs)
COs
is displayed.
On
PBC
movie operations
display the numeric key-
9 corresponding
-
c-
o-
l
playback from
Start
4
Regrsterrng
stariing
the
the
playback.
Notes
•
Return
to
refer
.
diSC
playback of a Video
• PBC
ce led .
uring
D
•
(playback control
peat play range
Selecting
track
You
title list
a
Refer
title
select
can
which
.
diSC
Display the track
Sound
to
PBC playback.
ing
dur
instructions
the
playback of Video
you cannot select the
).
the
use
or
tracks
list
playback us ing the
to
tracks
is a list of
playback operations
the
title list.
prov i
from
menu
the
ay
displ
can
You
2 Touch your favorite track
begins.
back
Play
from
list
com
for
PEG-4)
list is a list
which
m
fro
name
files
pressed
you
search
list.
audro/DivX
file names (or fol
of
can
key to display
Selecting
name
(Function
EG-2/M
MP
name
le
Fi
names)
play back.
to
er)
Touch the
folder)
(or
selected
by
CO
COs
search
part.
numbers and
g
~n
touch
deta
For
with the
ded
be
cannot
turing
fea
funct
il
s.
can-
PBC
r·e-
ron.
the
track
tracks recorded on
file
MPEG
/
the
:!
-
der
(or· fol
file
on page
title.
the
select a file
.
~
d-
@En
Page 13
( Disc (CD/DVD)
2
Touch
your favorite
•
When you have
names of
Repeat
• If fo l
starts
Note
If
play.
Touch
Playing
So
on
y
the
s
or
•
•
the
fi les
this
operation to
der
1 (ROOT)
from
fo l
der
2.
part of the recorded information
a scroll
key
appears
the
scroll
ke
DivX
me
Di
vX video
ly
be
playable
ou
load
number of times
ho
wn on-screen.
not
to
For
Di
you
can
pla
y
the content
message
You
can confirm the number
the content
message.
out of
a fixed number
a disc containi
play
the di
vX
VOD
content without this restriction.
load
the disc
displayed.
can
This
CD
views ..
selected
(or
the
contains
y to
® VOD
on
demand
1t
You
can
sc.
as
be
played
DivX
file
a
fo lders)
select
on
scrol
l.
ng
th
has
been
then decide wheth
mto
often
rental
(or
folder)
folder.
a
in
it can
the
desired
no
f
il
es.
does
the right
content
(VOD)
of
times. When
is
type
played
your
player
as
y
ou
li
of
times that
by
check1ng
has
name.
I
ist of the
be
viewed.
fi le
playback
not di
s1de
content
of
content.
w1ll
and
ke.
wi
th
the
used[[]
name.
s-
of
list.
may
be
er
no
• If
a message
disc
containing DivX VOD
Play.
Playback
•
• If
touch
of
t
To
skip to the next
you do not w
Stop.
he
Di
is
displayed
vX
V
file.
ant
to
content, touch
OD
content
touch
Next
play
th e
Di
after
will
vX
loading
start.
Play.
VOD
content.
Section
)
a
( iPod
iPod
control
This manual applies
els.
iPod with
-
- i
-
-
-
-
- i
-
-
- iPod n
- i
-
-
-
- iPhone
- iPhone 4
-
- iPhone 3G
- iPhone
iPod with
-
1Pod
- i
- iPhone 5
30-pin
iPod
touch 4th generation
Pod
touch
3rd
iPod
touch
2nd
iPod
touch 1
st
1
Pod
classic
160GB
iPod
classic 1
Pod
classic
iPod
with video
iPod
nano 6th generation
Pod
nano 4th generation
iPod
nan
iPod
nano
iPod
na
1Phone
touch 5th generation
Pod
nano 7th generation
20GB
an
o 5th generation
o
3rd
2nd
no 1
st
4S
3GS
lightning connector
to
the
connector
generation
generation
generation
generation
gene
ra
tion
generation
following
iPod
mod-
Notes
•
The
pla
y
time
ma
• Display
Touch
iPod audio
iPod audio (App Mode)
is changed when
other than i
(Except for Pandora)
Pod
panel
(Control
keys
Audio)
y not
display correctly.
music.
you
listen
) 8
•
to music
r!}=
Important
• In
order
un1t.
you
your DivX
on
your registration
the
D
i
v
~
•
D1vX
VOD
(Digital
stricts playback
ter
ed
de
to
play
D
iv
X
V
OD
contents
first
need
to register the unit
VOD
contents pro
VOO
reg
istration
content
Rights Management) system.
vices.
of
is
con
vi
der.
code.
re
fe
r
to
code
protected
tent to specific.
by
For
Displaying
on
page
a
on
details
DRM
This
this
w1th
28.
regis-
re-
For iPod
with
lightning
connector users
-
Use
the
Lightnmg
with
iPod
/iPhone) when
tion.
-
Refer
to
When
connecting with optional
IU52
cable
on
- Functions
avat
l
able.
Sound
You
can
use
page
related
to
playback
the
un1t
to
to
USB
Cab
you
use
38.
iPod
mov
ie
operations
listen
i
Pod
le (Supplied
th
is
func-
CD-
fi
l
es
are
sound
fi
les.
not
CD
Song title
Dtsplaying the
The
application name
listen to music other than
(Except for Pandora)
C
%)
Artist name
D1splaying
Th
e song
music other than
(E
xcept for Pandora)
the
title
Songs
Artists
is
display
iPod
list
is
display
list
ed
mu
on
iPod
on
w
si
the
he
c.
ed
mus1c.
the
n y
1Pod.
w
hen
iPod.
ou
listen
y
ou
to
En@
Page 14
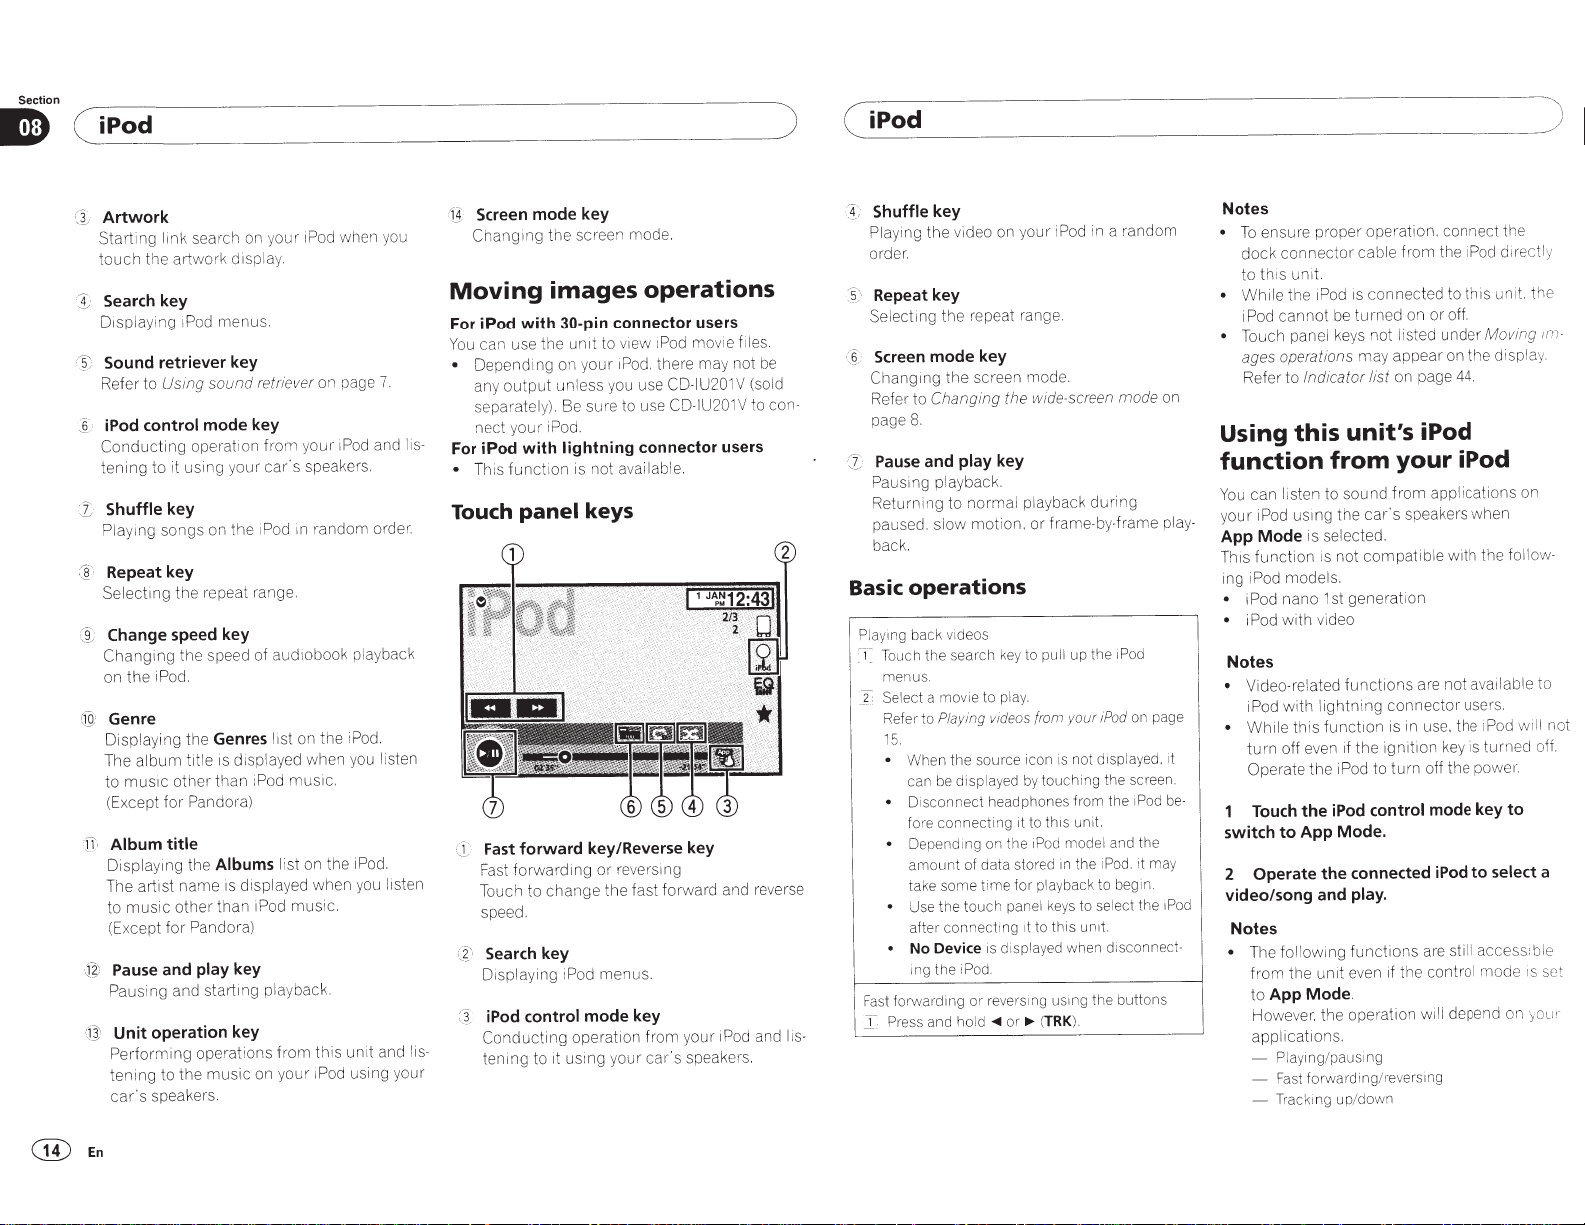
Section
(~iP_o_d
__________________________
~)
( iPod
)
Artwork
search on
Startmg
touch
I
Displaying iPod menus.
~)
(
Refer to
:§
Conduct
tening
1
·
:8
@
,-
CiQ
j}
_g;
J
H'
link
1spl
d
artwork
the
Search key
Sound retriever key
Using sound retriever
iPod control mode key
ing operat1on
to it using your
Shuffle key
on the
songs
Play1ng
Repeatkey
Selecting
Change
Changing
on the iPod.
the repeat range.
speed key
the speed of
Genre
Displaying the Genres
is displayed when
title
album
The
for
than
Pandora)
mus1c othet·
to
(Except
Album title
Albums
artist
the
name
other
Pandora)
for
is
than
displa
Displaymg
The
music
to
(Except
Pause and play key
Pausing and starting playback.
Unit operation key
Performing
tening
car's
operations fro m this unit and l
music
to the
speakers.
iPod when you
your
ay.
on page
your iPod and
m
ho
speakers.
car's
random order.
1n
1 Pod
aud1obook
on the iPod.
1st
I
mus1c.
1Pod
list on the iPod.
d when
ye
sic.
mu
iPod
iPod using your
your
on
7.
playback
u listen
yo
u listen
yo
Screen mode key
4;
(i_
Changing
Moving
the screen mode.
images
operations
For iPod with 30-pin connector users
can use the
You
• Depend ing on yo
output
any
separate l
your
s-
li
nect
For iPod with lightning connector users
function
This
•
Touch
Fast
·
r5
Fast forward1ng
Touch
speed.
unit
iPod. there may not
ur
unless you use
. Be sure to use
y)
iPod.
is not available.
panel
keys
forward key/Reverse key
reverstng
or
the fast forward and
change
to
1Pod
v1ew
to
Search key
Displaying iPod menus.
mode key
control
iPod
:I
ope
cting
du
is-
Con
tening
to it us ing
rat1
on
your
om your
fr
car's
mov1e
CD-IU201
201
IU
CD-
1Pod
speakers.
f1les.
(sold
V
to con-
V
on
play-
be-
1Pod
Notes
ensure proper operation. connect the
To
•
connector
dock
unit.
th 1s
to
the iPod is
While
•
cannot
iPod
Touch panel keys not list
•
be
turned
ages operations
Refer to
Using
function
You
you r iPod
App
Th1s
ing iPod models.
• i Pod nano 1st
•
Indicator list
this
can listen to
us1ng
is selected.
Mode
function
vi
with
i Pod
unit's iPod
from
sound
the
not
1s
generat1on
deo
from
cable
connected
on or off.
may appear on the display.
on page
your
from
speakers when
car's
compatible
ed
the i
under
app
Pod
to this un i
44.
iPod
cations on
li
with the
Notes
Video-related
•
with
iPod
this
While
•
off even if
turn
Operate
the iPod
Touch
App Mode.
to
switch
2 Operate
functions
ightn
l
function
the
the iPod to
the connected
are not available to
connector
in g
is in use. the iPod wi ll not
ignition
turn
control
use
is
key
powe1·.
off the
mode key
to select a
iPod
turned
video/song and play.
Notes
access:ble
ill
followmg
e
Th
•
the
from
App
to
However. the operation wil l depend on you 1·
applications.
- Playing/ pausing
Fast
Tracking
-
functions
even if the contro l
unit
.
Mode
forwarding/l"evers1ng
down
/
up
are st
mode
dit·ectly
t.
Moving
follo
.
rs
to
IS
th e
;m
w-
off.
set
-
I
deo on y
vi
ng the
yi
Pla
order.
Repeat key
3·
Selecting the repeat range.
Screen mode key
~
liS-
·-
Changing
Refer
page
Pause
Cl
Pausing playback.
Returning
paused.
back.
Basic
Playing back videos
Touch
~
-,-
menu
Select a movie to play .
X
Refer
15
•
st
Fa
I
the
Cha
to
8.
and
to
slow
operations
search
the
s.
Playin g videos (rom
to
.
the
n
Whe
be
can
sconnect
Di
•
connecting
fore
Depending on
amount
some
ke
ta
the
Use
•
connect
after
No Device
•
the
ing
ding
a1·
forw
Press and hold
nging
play
displayed
of data stored
touch
iPod.
be
rse
ve
re
d
an
our
screen mode.
the wide-screen mode
key
playback during
normal
ion, or frame-by-frame
mot
to pull up the
key
source icon is not displayed. it
by
headphones
it to
the
for
e
im
t
panel keys to
ing it to
d1spl
1s
reverstng ustng
or
..,.
or
..,..
in a random
Pod
i
1Pod
/Pod
your
th1s
this
ed
TRK
from
unit.
the
in
when
).
un1t.
the
the
iPod. it may
ect the
sel
disconnect-
butt
the
touching
iPod model and
playback to begi
ay
(
on page
screen.
d
Po
i
the
n.
ons
key
Shuffle
@En
Page 15

( iPod
- Movi
ng
to a chapter up/down
• App Mode
iPod
-
iPod
1
i
i
iPod
-
i
Pod
-
iPod
i
Pod
i
Pod
1
Pod
i
Pod
- i
Pod
iPhone
iPhone
iPhone
iPhone
- i
Ph
Shuffle
•
Touch
•
Songs-
lected
•
Albums -
domly
• Off-
is
co
models.
touch
4th
Pod
touch
3r·d
Pod
touch
2nd
Pod
touch 1
st
claSS
IC 1
60GB
classic
120GB
classic
nano
6th
generati
nano 5th generation
nan
o
4th
gen
nano 3
rd
gener
nano
2nd
4S
4
3GS
3G
one
play
the
shuffle
Pla
y
bac
list
in
random
Pl
ay
selected
Tu
rn
off shuffle
mp
atib
le
with
generati
on
generation
generati
on
genera
t1
on
on
erat1
on
at
ion
generation
key.
k videos/songs
ord
er.
back videos
album
in
order.
play.
/s
Repeating playback
•
Touch
the repeat
•
One-
Re
•
All-
Repeat
list
on
the
Playing videos
Videos can
video capabi lities is connected.
be
peat
all v
i
Pod
played
key.
JUSt
the current
ide
on
os
/songs
from
this
unit if an iPod
th e
following
in
these-
ongs from a
vid
in
the
eo
/song
se
lected
ran-
your iPod
with
• This unit can
eos".
"1V
ed
Mo
vies"
iTunes store.
Note
This
function
ntng
connec
Touch
Search
Refer to
Search
2 Switch to
•
If
you
want to
the ico
n.
~
u;_j
3
Play
the video from the
•
If
y
ou
want to switch
the icon.
play back
show". "Video
which
are downloaded
is
not
availabl e to i
tor users.
to
display
key
on page
iPod
video mode.
sw
itch
to
Switching to
to
i
''
Mo
vi
es", ''Music
Podcasr
Po
d
iPod
menus.
14.
iPod
vid
eo
mode, tou
iPod
vid
eo
iPod.
Pod
music mode. touch
and
from
with
mode.
"R
light-
videntthe
ch
)
(iPod
~
L..;;_J
Browsing
on
the
To
make opera
tions
to
control
signed
to be as
Note
Video-related fu
with
light
Searching
category
Touch
menus.
Refer to
2
want
Category
Category
Search key
Touch
to search for a video/music.
•
Video Playlists
•
Movies
•
Music Videos
•
TV Shows
•
Video Podcasts
• Rented Movies
•
Video
•
Playlists
•
Artists
•
Albums
•
Songs
•
Podcasts
•
Genres
• Composers
•
Audiobooks
iPod
n1n
the
one
liSts
lists
g
ITunesU
(artists)
(s
Sw1tch1
for
ting
and searching easy.
an
Pod
sim
il
ar
nc
tions are not
co nn
ector
for
a video/music
search
on page
of
the categories
(for
v1deo)
(movi
es
(mus1c
(TV
shows)
(for music)
(p
la
yl
ist
(al
bu
ms)
ongs)
(
pod
cas
(genres)
(composer
(audiobooks)
ng
to
1Pod
mu
s
ic
mode.
a video/music
opera-
with
th1s
unit
are
to
the iPod as possible.
key to
(vi
deo
)
(vid
eo
(ren
(video
s)
ts)
users.
pla
v1deos)
podcasts)
ted
mov
ITunes
s)
available
pull
1
4.
yli
sts)
up
the
in
which you
1
es)
U)
to iPod
de-
by
iPod
3
Touch
the
title
of the list that you
to
play.
Repeat
this
operation
video/music.
until
yo
u find the des ired
Notes
•
Depending
the
able.
•
Yo
u can play playl ists
puter
cation
• Play I
app
abbreviated form.
Searching
on the generation
iPod,
some
functions
created with the
application
will
ists
that
li
cation
(MusicSphere). The
be
avai lable
you created with the co
(MusicSphere) are displayed in
the
list
on
by
may not
ou1·
Select a category.
Refer
to
Searching (or a v
on page
2 Switch
~
~
Alphabet
3
Touch
15.
to
search
the
alphabet
first letter
id
search
Sw
itching
mode
.
mode
is displayed.
eo
/
music
to
alphabet search
of
the title of the
video/song you are looking for.
While
not
available.
•
To
Cancel.
4
Touch
searching.
ref1
ne
touch
panel
key
the
se
ar
-c
h
with a
d1fferent
the title of the list that you
to play.
Repeat
this
operation
song/video.
unt
il
yo
u find the desired
want
or
version of
be
avail-
co m-
appli-
website.
mput
alphabet
by category
mode.
operation is
letter.
touc h
want
Section
) 8
er
m
::::s
ce..
c;;·
::::T
En@
Page 16
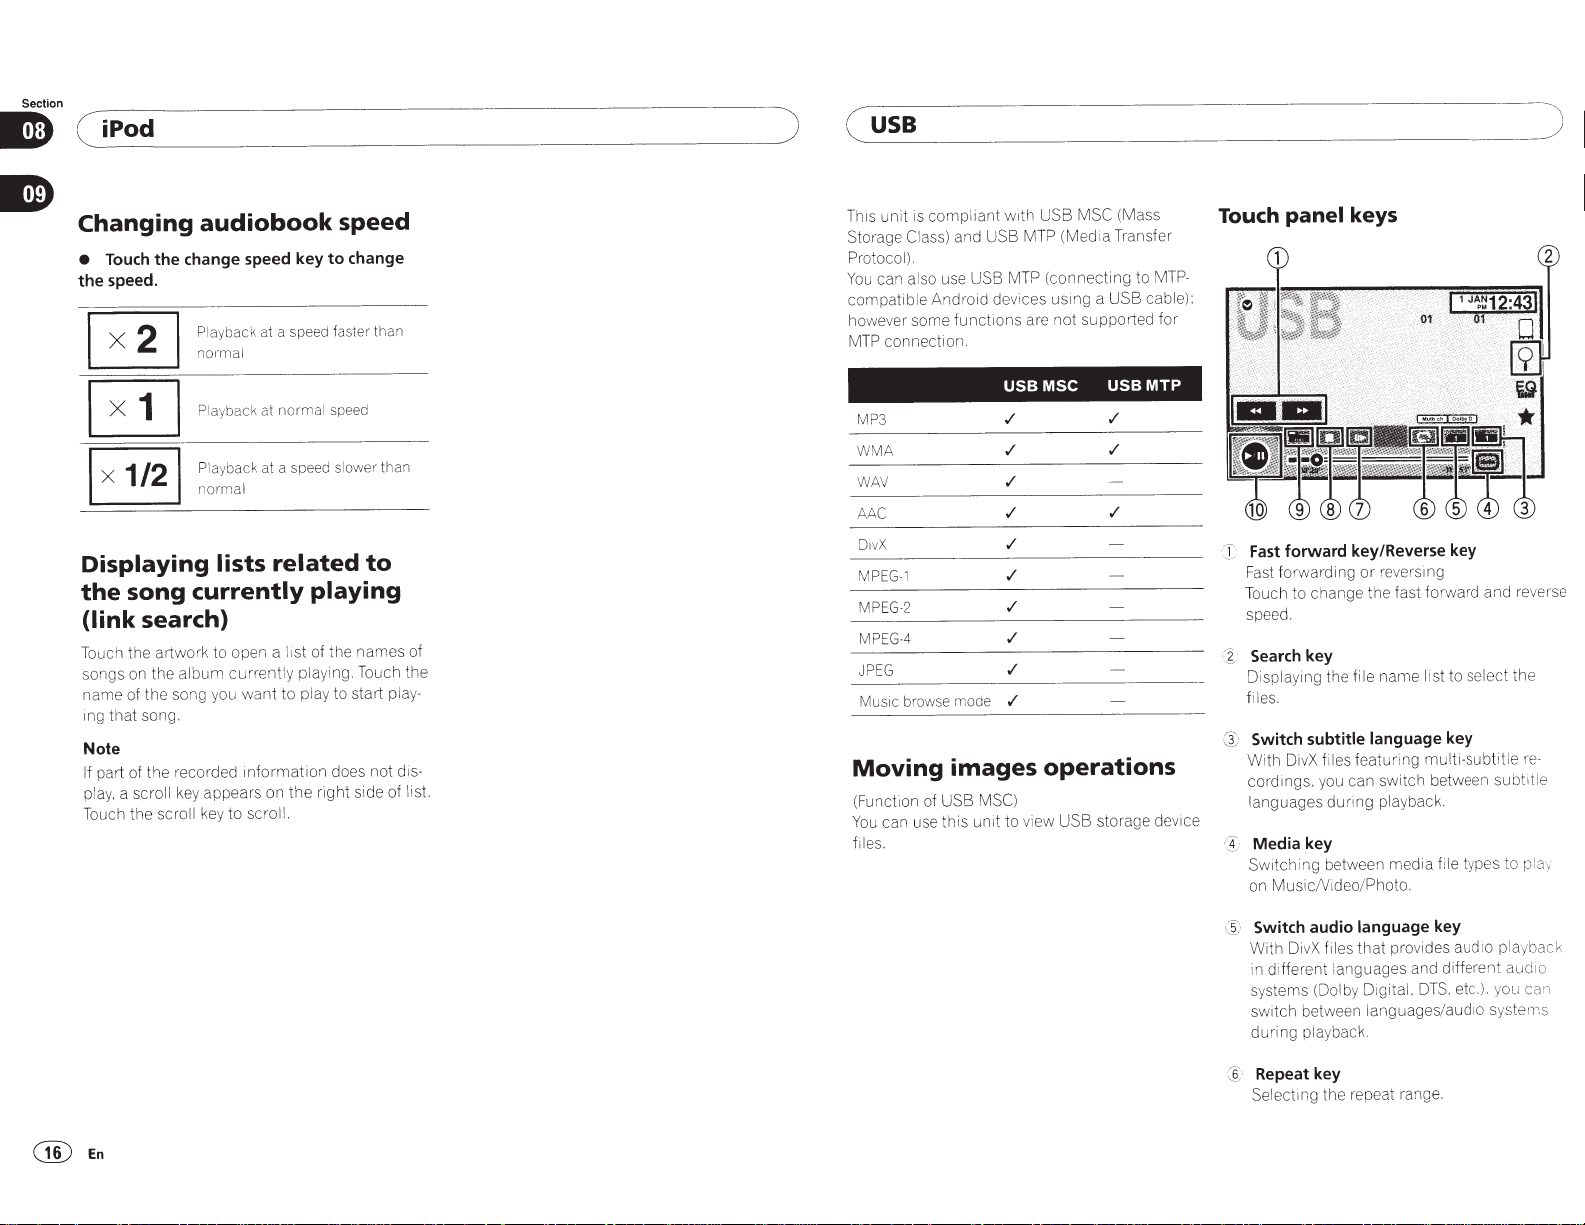
Section
~iP_o_d
(
__________________
________
__
__
usa
)
(
)
Changing
Touch
•
speed.
the
Displaying
song
the
(link
Touch the artwo rk to open a
songs on the
name of the song you
that
ing
Note
part of the recorded
If
play. a scroll
Touch the scroll
audiobook
change speed key
the
Playback
not·mal
Playback
Playback
not·mal
lists
currently
search)
album
song.
appears on
key
key
at a speed faster than
at
at
current
want
informatio
scroll.
to
speed
change
to
speed
normal
a speed slower
related
than
to
playing
names
the
of
I 1st
ly playing. Touch the
play to start play-
to
not
n does
right side of list.
the
dis-
of
This
Storage
Protoco l
can also use USB
You
compatib
however some
conne ction.
MTP
3
MP
WMA
WAV
AAC
vX
Di
G-1
MPE
G-2
E
MP
MPEG-4
PEG
J
ic
s
Mu
Moving
(Function of USB
can use this unit to view USB storage device
You
es.
fil
and USB
s)
Clas
).
le Android devices
function
browse m
images
MTP (Med
(connecting
MTP
using
s are not supported for
MSC
USB
./
./
./
./
./
./
./
./
./
./
ode
operations
MSC)
Transfer
1a
a USB cable):
USB
./
./
./
MSC (Ma
USB
with
pliant
com
is
unit
ss
to
MTP
MTP-
Touch panel
forward
Fast
:·
G
Fast forwarding
Touch to change the fast
speed.
Search key
~
·
Displa
files.
Switch
Ct
With DivX files featuring
cordings. you can
languages
1
Media
:
-l
Sw1tching
Music
on
keys
key/Reverse key
the file name list
g
ym
subtitle language key
during
key
between media file types to pl
deo/Photo.
Ni
or
ersmg
rev
switch
aybac
pl
rd and
forwa
lect the
se
to
multi-subtitle
between
subtit
k.
re
re
verse
-
le
av
@En
Switch audio language
)
~
(
that
es
fil
vX
Di
With
in different languages and different
systems (Dolby
switch
during
Repeat key
'
~
C§
Selectmg
D1gital.
between languages/audio systems
ayback.
pl
the repeat rang
key
provides aud io playback
DTS
e.
. etc
audio
can
you
.).
Page 17
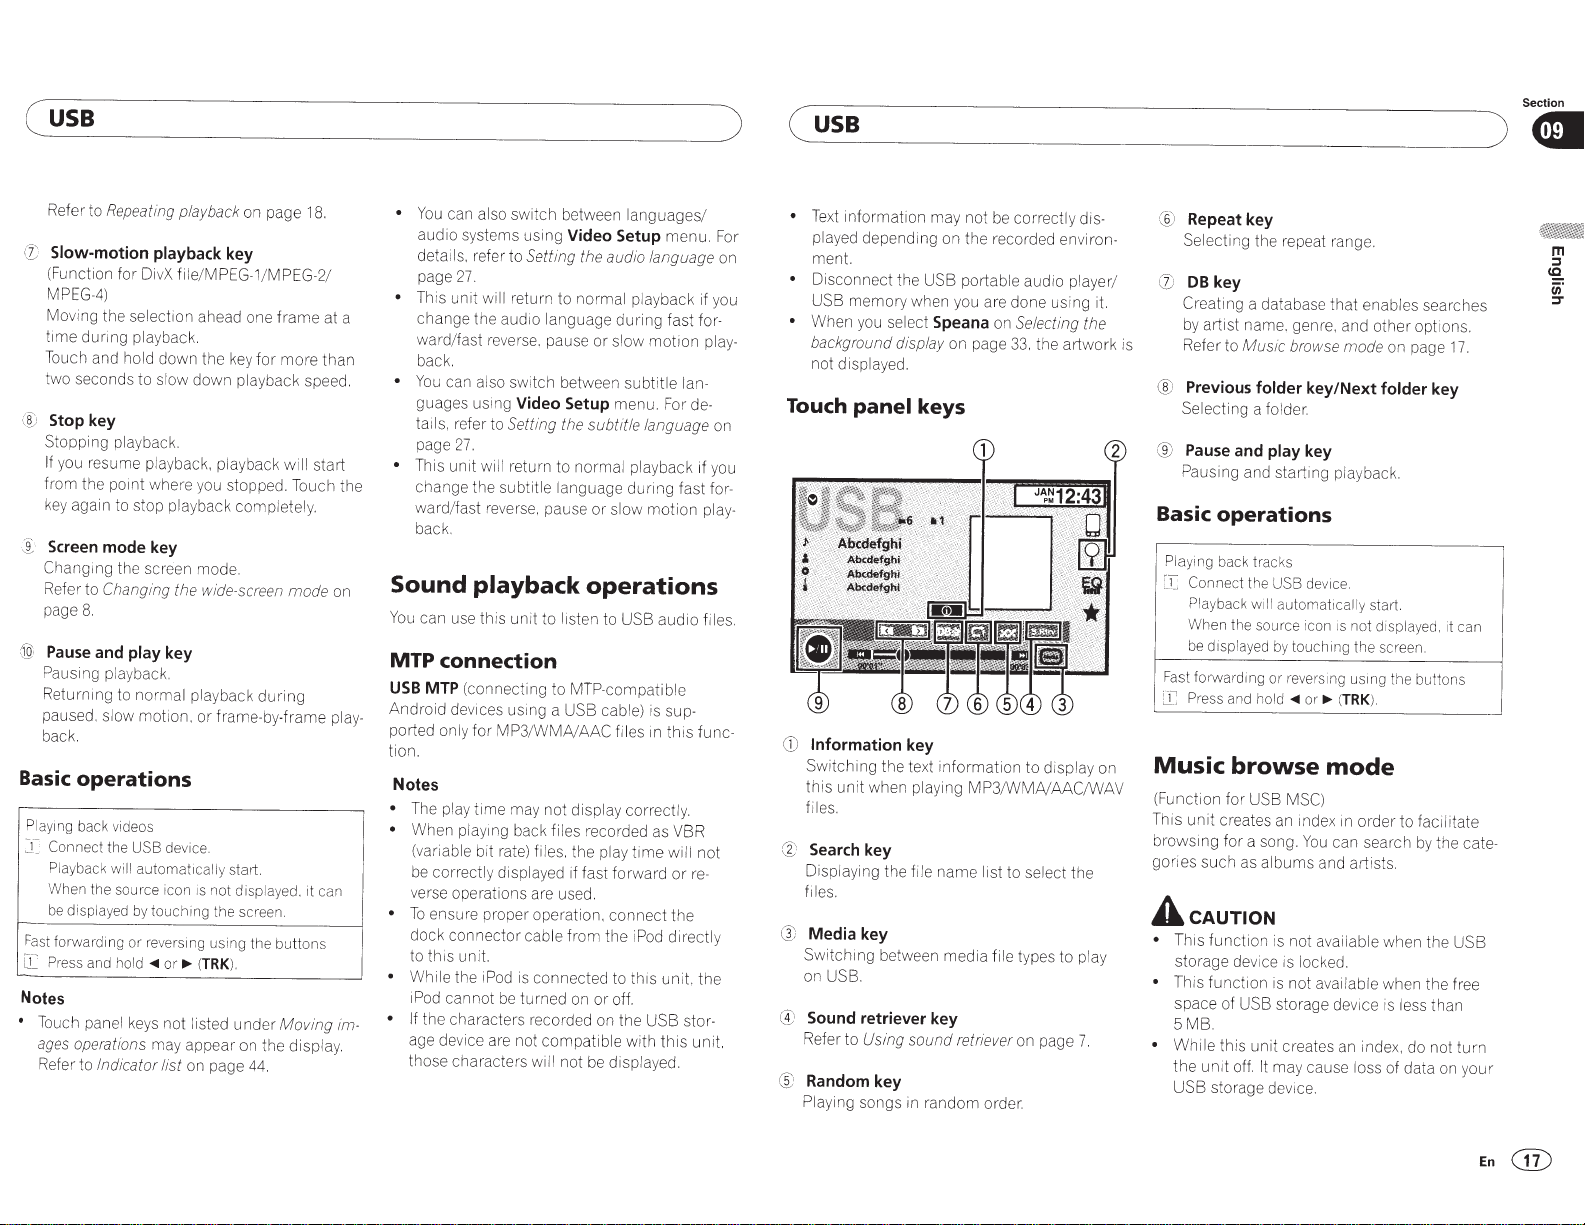
(
USB
Re
fer to
R
ep
eating play
Q;
Slow-motion playback key
(F
unc
tion f
or
Di
MPEG
-4)
Mo
vi
ng the selection ahead one
time
during playback.
Touch and hold down the
two seconds to slow down
@
Stop key
Stopping playback.
If
you resume playback, playback
from
the
key
again to stop playback
·
~
·
Screen mode key
Changmg
Refer to
page
8.
@·
Pause and play key
Pausing playback.
Returnmg
paused . slow
bac
k.
Basic
operations
Playmg
back videos
Jc
Connect
Playback
When the
be
displayed by
Fast
forwardin
[[
P
re
ss and
Notes
•
Touch panel keys not listed
ages
operations
Refer to
vX file/
po1nt
whe re you stopped. T
the screen mode.
Chang
i
ng
the
to normal playback
mo
tion.
the USB device.
will
automatically
sour
ce icon is
touching
g
or·
reversing u
hold
..,..
or
.,...
may appear on the displ
Indicator list
on page
ba
ck
on page
MP
E
G-1
/
MP
key
for
pl
ayback spee
comp
wide-screen
during
or
frame-by-frame
start.
not
disp
layed. it can
the screen.
sing
the b
(
TRK
).
under
44
.
18.
E
G-2
frame
more
wi
ll
start
ouch
letely.
mode
utt
ons
Moving
/
at a
than
d.
the
on
pl
im-
ay.
•
You can al
audio systems using
detai ls, refer to
page
•
Th
change the audio language
ward/f
back.
•
You can also switch betw een subtitle
guages using
tai
page
•
This
change the subtitle language
ward/fast
back.
Sound
You
can use this unit
so
27.
is u
ni
t
wi
as
t
rev
Is,
re
fer to
27
.
unit
wi
rev
playback
switc h betw
Video Setup
Set
ting
th
ll
re
turn to norm al playback if you
er
se
. pause
Video Setup
Setting
the
ll
return to normal playback if you
e
rse,
pause or slow motion
to
listen to USB audio fil
MTP connection
USB
MTP
(c
onnect ing to M
Andro
ay
-
id devices using a USB cable) is
port
ed
only for MP3/W M
tion .
Notes
•
The play
•
When
(variable bit rate)
be
verse operations are used.
•
To
dock
to
•
Whi
iPod
• If the characters recorded on the USB
age device are not
those characters
time
playmg
correctly displayed if fast forward or
ensure proper operation,
connector
th1s
uni
t.
le the iPod is connected to
cannot
be
A/A
may not display correctly.
back files recorded as VBR
fi
l
es
. the play
cable
from
turned on
compa
will
not
ee
n lan
gua
ge
s/
men
u. F
e audio lang
dur
or
slow
menu. For de-
subtitle lang
ing fast
mot
dur
ing fast
ua
ion
lan-
ua
ge
for-
ge
play-
operations
TP
-compatib
AC fi les m
connect
the iPod directly
or
off.
tible
be displayed.
time
this
with
le
sup-
this
will
the
un i
this
re
t.
stor
unit.
func -
not
the
on
play-
on
for-
es.
-
-
)
or
(
usa
•
Te
xt informa
play
men
Di
sconnect the USB portab le aud io player/
USB memo
•
When
b
ackg
not display
Touch
CD
Information key
S
witching
this
unit when pl
files.
@
Search key
Displaying the f
files.
G)
Media
S
witchmg
on USB.
@
Sound retriever key
Refer to
([
Random key
Pl
ay
ing songs in random order.
ti
on
ma
ed
depending on
t.
yo
u
se
ro
und di
ed
panel
th e text
key
between
y no t be c
ry
when you are don e usi ng i
lect
Speana
spla
y
on p
.
keys
information
ay
ing MP3/
il
e
name
media
Using sound retriever
the
recorded environ-
on
ag
e
WMNAAC/WAV
list to select the
file types to play
or
rect
ly
dis-
Selecting the
33
. the artwo
to display on
on page
7.
@
Repeat key
Se
lecti ng the repea t range.
(j)
DB
key
t.
rk
is
C
re
ating a dat abase th at enable s searches
by artist name, genre , and
Refer to
Music b
®
Previous folder
Selecting a folder.
®
Pause and play key
Pa
using an d starting playback.
Basic
Music
(F
This unit
browsing
gories such as albums and arti sts.
A
•
•
•
operations
Playrng
bac k
track
:
_r
Conne
ct
the
USB
Playback
When the source ico n is
be
Fast
[}~
Press and
wrll au
drspla
yed
forwarding
by
or
hold
browse
unctio
n f
or
USB
cr
ea
tes an
f
or
a song.
cAUTION
Thi s
function
storage de
This
function
space of USB storage de
5MB.
While
the
unit off.
USB storage
is not available wh
vi
ce is locked.
is not available when the
this
unit
It
may cau
dev1ce.
other
row
se
mo
de
key/Next
s
d
ev
ice.
toma
tical
ly
start.
not
touc
hi ng the screen .
reversing
..,..
using
or
.,...
(
TRK
).
mode
MSC)
mdex m
o
rd
You
can search
vi
ce is less than
creates an inde
se
loss of data on
opt
ions.
on pa
ge
17.
folder
key
displayed,
er to facilitate
the
en
x,
buttons
by
thecate-
the USB
do
not
it
fr
) GI
can
ee
turn
your
Section
m
::::s
<£
u;·
:::r
En@
Page 18
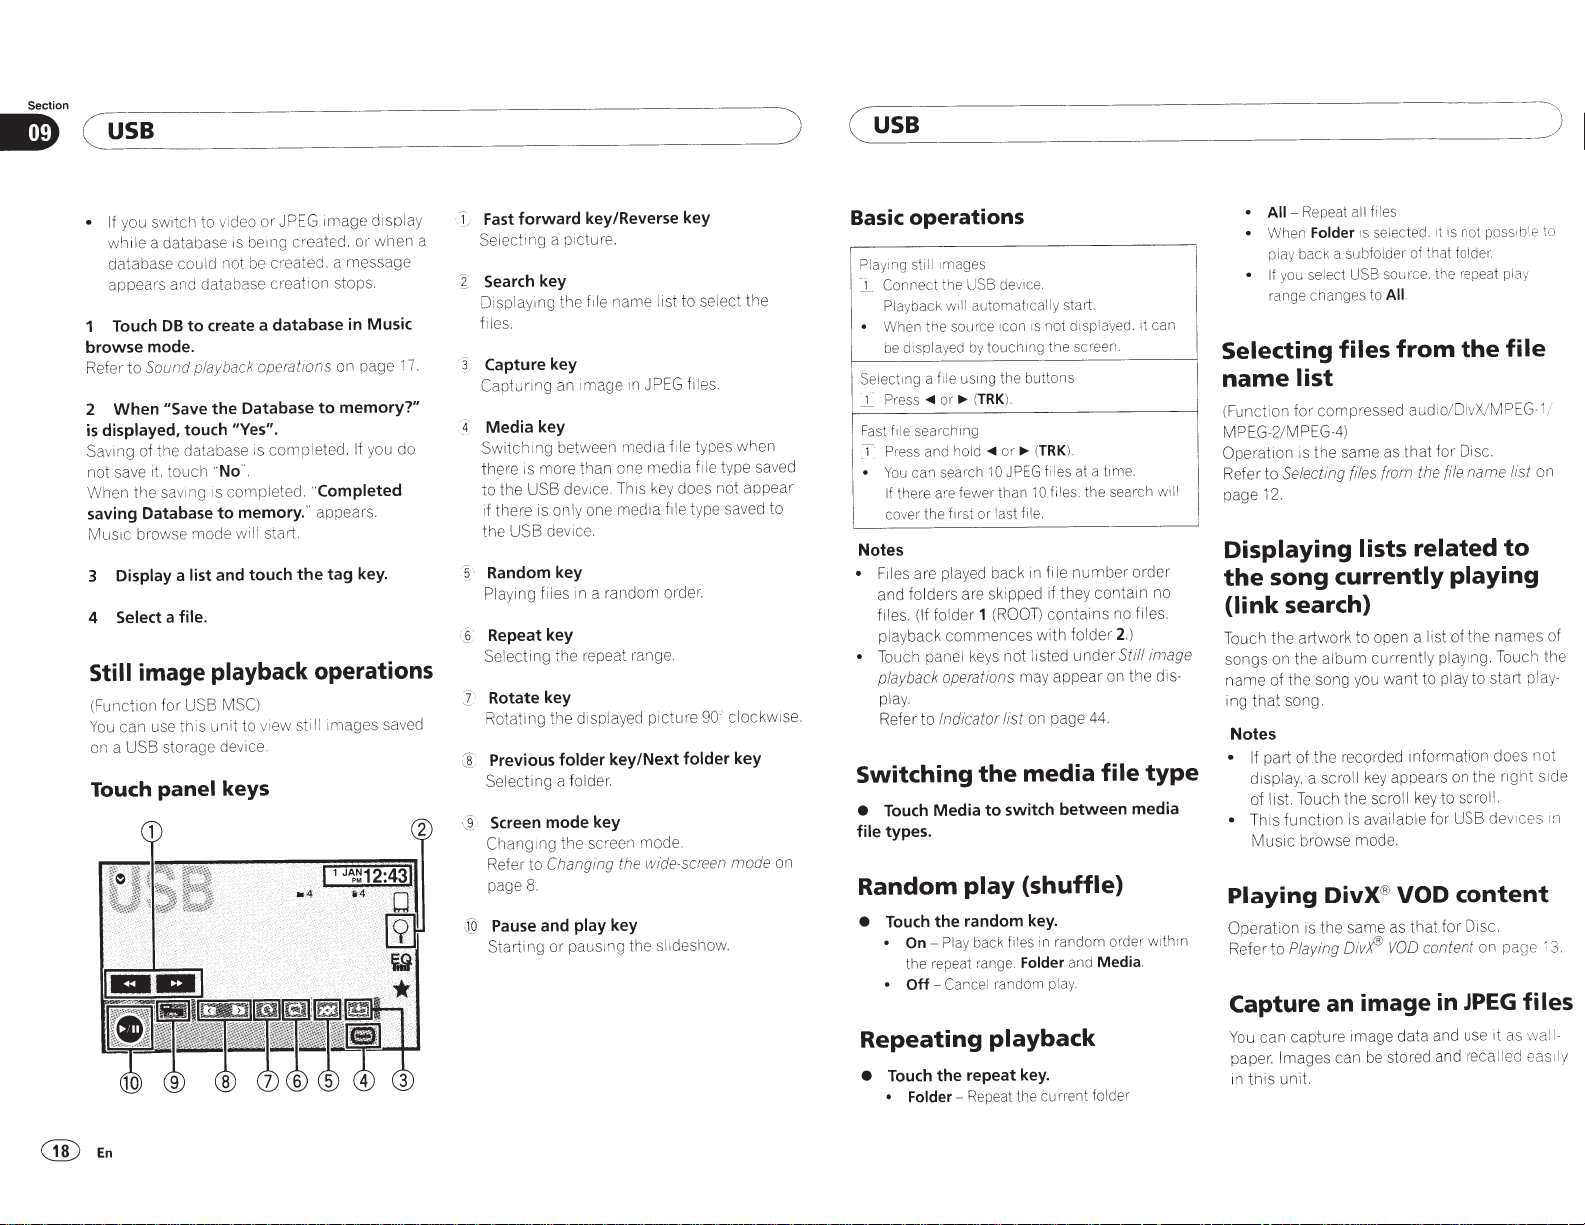
Section
____________________________
sB
_
u
C~
you switch to
• If
a database
while
database could not
appears and database
to
DB
Touch
browse mode.
Sound playback operations
to
Refe1,
"Save
When
2
displayed,
is
Saving
not save it.
When the
saving Database
Music
Display
3
4 Select
Still
(Funct ion for
can use
You
on a
Touch
touch
of the database is
touch
ving is completed.
sa
mode
browse
list
a
file.
a
image playback
USB MSC)
this
storage device.
USB
panel
JPEG 1mage
or
v1deo
being created.
is
created . a message
be
creat1on
create a database
com
the
to
pleted.
"Completed
appears.
tag
the Database
"Yes".
"No".
memory. "
to
will sta rt.
and touch
operations
still images saved
v1ew
to
unit
keys
display
when
or
stops.
Music
in
on page 1
memory?"
do
you
If
key.
!e
sdJ
pos
t-.
t play
file
/MPEG- 1/
on
list
to
names
Touch the
not
s1de
nght
ces
dev1
files
wall-
as
1t
ed eas
ll
)
to
of
1n
3.
y
1l
usa
)
Fast forward key/Reverse key
a
7.
Selectlllg
Search
?:
~
Display1ng the
files.
Capture
j-
~
Capturing
Media
4
Sw
there
to the
if there is only one media file type saved to
the
Random key
/·
5
Playing
Repeat key
~6
(
Se
Rotate key
Rotating the displayed pi
Previous
([
Selecting a folder.
·j
Chang1ng
Refe1,
page
·
;[a
Starting
a picture.
key
name list to sel ect
file
key
an image
key
itching between media fi
more
is
de
USB
device.
USB
files in a random order.
the repeat range.
ecting
l
folder
Screen mode key
the screen mode.
Changing
to
8.
Pause and
or
1n
one
than
This key does not
ce.
v1
key/Next
the
key
play
pauslll g the sl1deshow.
f1les.
JPEG
types
le
f1le
media
90
cture
folder
wide,screen
the
n
whe
type saved
appear
clockw
'
key
on
mode
i
se.
(
operations
Basic
ges
1ma
st1ll
Play1ng
--
_)_
Connect
yback
Pla
.
When the source icon is not display
displayed
be
f
Selecting
_i
Fa
CT
.
Notes
• Touch panel keys not listed
a
<Ill
s
Pres
a1"ch1ng
se
f1le
st
and
-ess
p,
n search
ca
You
there are
If
cover the
Files are played back in file
folders
and
fo
(If
files.
playback
playback operations
play.
Indicator list
Refer to
Switching
Media
Touch
•
types.
file
Random
the
Touch
•
On-
•
the repeat range.
Off-
•
Repeating
the
Touch
•
Folder-
•
device.
SB
U
the
automatically start.
w1ll
touch1n
by
).
TRK
(
or
<111
JPEG
10
wer than
last
or
(ROOT)
1
the
switch
to
files
back
random
bu
..,..
10
f1le.
may appear on
on page
media
{shuffle)
key.
Folder
using the
e
1l
..,..
or
hold
fe
·st
f11
are skipped if they
lder
commences
play
random
Play
Cancel
playback
repeat key.
Repeat the cur
g the screen.
TRK
(
with
in
ttons
)
at
files
. the search
es
il
f
number
contains
folder
under
between
random
and
play.
t folder
ren
ed
t1me.
a
contain
no files.
2
Still image
44.
file
ord
Media.
can
it
.
order
no
.)
di
the
type
media
within
er
will
f1les
all
Repeat
All-
•
se
1s
Folder
n
he
W
•
back a
play
you
• If
range changes to
bfo
su
USB
lect
se
Selecting files
ct
ion f
12.
list
compressed audio/Di
or
from
Selecting
files
name
(Fun
MPEG-2/MPEG-4)
Operation is the same as
Refer to
page
Displaying lists related
currently
search)
to open a
artwork
currently
album
the
song.
recorded
the
key
scroll
the
funct1on is available for USB
browse mode.
® VOD
DivX
same as
the
is
ion
DivfFJ
Playing
an image in
image
capture
Images can
unit.
be
s-
song
the
{link
Touch the
on
songs
of the song you
name
that
ing
Notes
part of
• If
display, a scroll
list. Touch
of
h1s
• T
Music
Playing
Operat
Refer to
Capture
can
You
.
paper
this
1n
ot
n
is
1t
lected.
foid
that
of
r
lde
that
the
for
file
repea
the
vX
Disc.
name
source. the
All.
from
playing
ist of the
I
play1ng.
to play to start play-
want
ormation does
inf
on
appears
y to scroll.
ke
content
for Disc.
that
content
VOD
JPEG
use
and
data
stored and reca
e
the
on page
@En
Page 19

(
USB
• Only
one image can be stored on
Old
image
is
overwritten
1
Touch
.,../II
to
pause the slide show when
the desired image
2
Touch
Capture
image.
3 When
played, touch
While storing the i
the image. During the save, please don't
turn
process is finished,
play
•
"Do
off
the
ed.
To
cancel the storage process, touch
is
to
you save this
Yes.
mage
engine."
"Image saved."
with
displayed.
capture the desired
to
this
is displayed. When the
this
the new one.
image?"
unit,
"Saving
is dis-
No
unit.
is
.
dis-
)
(
Bluetooth
Audio
Sound playback
(Function of
You
files.
Notes
•
Depending on the Bluetooth
connected to this unit.
t
io
els:
-
-
•
As there is a
players avai
available with specific
tensively. When
Bluetooth
to the i
player
tan ce .
•
As the signal from y
cause noi
tening
player.
•
The sound
connected
call
nected to
techno
•
The play
•
Depending on the ty
player you h
ation and
ava
AVH-2oosn
can use
this
unit to listen to
ns will
be
limited to
A2
DP
profile (Advanced Audio
Profile):
You
can
only playba
aud1o
player.
AV
RCP
profile (AudioNideo
Profile):
You
can
pe
t-form
playback, select songs, etc.
wide
va
riety of
I
able on the
attempting
audio
player using
nstruction
as
well
to
songs on yo
is
in progress on a ce
logy.
time
ilab
le
for
manual
as
to thi s
our
se.
avotd using
ur
from
a Bluetooth audio player
to
this
unit
this
untt v
ia
ma
y not dtspl
pe
av
e
connected
information
some
func
operations
Bluetooth
audio
player
the
av
ailable opera-
the
following
play
Bluetooth
market
models
to
that
manual
cellul
tt
when you are lis-
Bluetooth
w
il
l
be
ll
ular
Bluetooth wtreless
ay
of Bluetoo
to
display
tions.
Di
stribution
ck
songs
Rem
o
te
ba
ck.
operations
ma
y vary
t-un
a
this
unit.
came
for
ar
phone
audio
mu
ted w hi
phone
cor
rectly.
th
this
unit. oper-
ma
y
not
two
on
Control
pause
audio
with the
assis-
may
con-
audio
be
audio
le
your
ex-
refet-
le
Touch
v-
CD
C1)
@
panel
Random key
Playing songs
Repeat key
Selecting the repeat range.
Pause
and play key
Pa
ustng and starting playback.
Setting up for
Before you can u
you
must
establtsh a
tion between the unit and your
a
player.
~
~
Connecti
on
F1
rst.
yo
u
need
th1s u
ni
t.
For
deta1ied
instructions
Biuetooth
less
menu
technol
on
aud1
pag
og
e
keys
in
random
ord
et-.
Bluetooth
se
the Bluetooth
Bl
uetooth wi t-eless connec-
Bluetooth
to
connect a Bluetooth
on
conn
o to this unit
y.
t-efer
32.
v1a
Bluetooth
to
Bluetooth connecti
audio
ec
ting
)8
audio
function
audio
aud1o
to
you
t-
wit
-e-
on
Section
•
m
::I
12.
c;;·
:r
En@
Page 20

Section
Bluetooth
Audio
Notes
back files recorded as
playtng
en
Wh
•
fi l
bit rate)
le
iab
ar
(v
displayed
be correct
ly
verse operations are used.
ensure proper operation.
To
•
dock co nnector cable
t.
this uni
to
e the iPod is connected to this
Whil
•
turned
be
cannot
1Pod
reco rded on y
the characte
• If
audio player
those characte
unit
• Text i
nforma
played
t.
men
Random
Touch
•
On-
•
Off-
•
Repeating
Touch
•
One-
•
All-
•
rs
not
ar·e
ma
tion
depending
play
random key.
the
back fil
Play
random
Cancel
playback
repeat
the
the
peat
Re
Repeat all songs
es.
the play
time
if fast forward or
connect
1Pod
the
from
ff.
o
or
on
our
compatible
wrl l
rs
y not be
with th is
be
not
correct ly dis-
on the recorded
(shuffle)
order.
om
rand
m
es
ay.
pl
key.
song on
ent
r
ur
c
VBR
not
l
il
w
re-
the
directly
1t
un
Bluetooth
yed.
displa
ron-
vi
en
ly
the
)
Streaming
(
Pandora
Pandora
operations
For iPhone users
Connect
-
- Set
(Function of
(Th
an iPod to USB input.
Pandora Connection
AVH-200BT)
is setting is not required for
100DVD.)
For smartphone users
0BT)
(Function of AVH
Pandora Connection
- Set
Bluetooth
- A
Android
tion menu
Important
c!)=
-20
connect
ces. Refer to
dev1
on page
ion is requ ired for
32.
Requirements to access Pando
P1oneer
1Pod
Connect
vice
• Please
•
• Create
• If
•
an
Bluetooth to
using
te
upda
latest version before use.
the
to
ion
cat
The latest version of the
downloaded
be
Play.
or
a free
account
the
create
iPhone
your
from
fo llowmg :
the
pandora.
www
://
tp
ht
Plan
Data
the
ited data usage. addit ion
lim
un
for
carrier may apply f
your
from
rv1ce
se
Pandora
u need to con
Yo
work
i net
-F
Wi
or
to USB
fir
the
Tu
on i
a paid
in the
or
you r
for
3G
v1a
nect
to use the
tnput
play
re
a
mw
Pandora appl1cat1on
App
nes
account
Pandma
the
on
/regi ster
com
1Phone
and
the
to
audio/v ideo products:
car
Limitations:
ailabilit
av
not
on the
ab le to rec
be
ve
ei
Depending
•
may
®
iPhone.
to
AVH-
Android.
to
8/uetooth
Pando
of the
website. The URL in
or
/o
Internet via 3G.
se
y to the
Pandora
connec-
using the
ra
Android
an
or
on this
ra
app
Pandora
Store and Google
can
You
onl1ne.
cation
li
app
charges
al
networks.
Internet.
service.
prov1de
th
EDGE
ndora.
Pa
does not
accessing
EDGE
r
rvice from
e
subject to change wi
is
service
dora
• Pan
could be affected
ce
serv1
ons
vers i
re
firmwa
owmg:
ll
Pandora appl ication. changes
of
rv1ce.
ons of the Pandora
ti
c
fun
car
oneer
P1
ted
mi
not li
deleting
s.
on
nt
curre
ut
ewing
vi
iTunes.
Pa
to
1n
Qing
ity.
ra internet radio
do
P1o
with
www.pa ndora.com.
://
at http
accessmg
aud1o/
to
stat1ons.
stat1ons. buymg
addition
ndora. adju s
neer.
the
products
deo
vi
following: creat ing new sta-
the
nding
se
text i
al
t1ng
music
a
is
1nformat1on
More
mobile application is available
iPhone and smartphone. please
st
ndora.com
compatibility
/everywhere/m
informati on.
Pandora connect mode
the
AVH-200BT)
home button
the
Press
display.
system key
the
to
de-
li-
can
tice. The
fo
vers1ons
Pandora mus1c se
Certam
•
available when
but
ti
abo
Qual
Pan
filiated
able
The Pandora
mo
www.pa
latest
Setting
(Funct ion of
home
2 Touch
menu.
3 Touch Pandora Connection repeatedly
desired setting appears on the
the
until
screen.
iPhone:
An
connected
rs
iPhone
cable.
Android device
Android :
An
Bluetooth.
u
yo
thout
the
y of
an
by
11·mwa
ne. f
ho
iP
of
to
·e
ar
ce
vi
er-
s
service thro ugh the
. They rnclude
on
1nformat1
m
ro
acks f
tr
Network
rvice not
is
log-
Aud:o
avai
ormat ion.
nf
Cell
se
v1s1t
the
for
le
obi
the
to
switch
to
system
the
open
an actual
us1ng
connected
rs
u
no-
the
not
for
sn
(e
afl-
g
@En
Page 21

(
Streaming
Touch
rJ)
ct·
G)
®
C£··
CI:
;
panel
Search key
Displays the shuffle/station
des1red station or shuffle mode .
Sound retriever key
(Only
available on
Refer to
Stores
Bookmarks
Thumbs-down key
G1ving
not
the next track. and
the station again.
Thumbs-up key
Giving a
like
to play
tion.
Add station key
A
Using sound retriever
Bookmark key
track
a
"thumbs
like the
"thumbs
the
current
that
new
station is created.
Pandora®
keys
iPod)
information
are viewable in your profile.
-
down"
current
track
w1l
l
not
-up''
tells Pandora
tr
ack.
Pan
track and tracks
I
ist.
Select
on page
(Bookmark).
tells
Pandora
.
Pandora
pl
ay
that track on
dora will
I
ike it
on
the
7.
you do
will skip to
that you
contin ue
the sta-
(
j)
Pause and play key
Pausing
Basic
Playing
T
:I
Skippin g tracks
I
Add station
A new station
for the artist or track
played .
I
]J
Deleting stat1on s
[
_1
~
) !
Notes
•
Touch panel ke
erations
Re
• Pand
on
be
played. If
you give a
will
be
•
When the
ually
and starti ng playbac
operations
tracks
Connect
an
Fo
1-
an
Android
is required as well.
Ref
er to
Pan
Switch
the
source
Press
~
(
TRK
will
Touch the
To
A new
•
Display
Touch the
Touch
The stat ion
•
f
yond
Add
uch
Track
stat1on
To
cance
the
Delete
Yes
.
wi
To
cancel.
may appear on the display.
er
to
Indicator list
or
a
l
imi
their
service.
the
limit,
yo
u have
"
thumbs-dow
cont
inue to pl
registered.
Connect
co
nnect
iPhone
to
USB
1np
device. a
do
ra
).
be
station
(f
r
om
1s
l
the Add station. touch
shuffle
ll
be
touch
ys
ts the n
a registe
Bluetooth
opera
ti
ons
on page
to
Pandora
created
from
of
the stat ion
ke
y.
trac
k)
or
Artist
created .
/stat1on
li
s
t.
station key.
deleted.
No
.
not listed
If you
"Skip
re
ay
under
on page
um
ber of
attempt
limit
reached."
ached the skip
n",
the cu rrent track
. but your feedback
ke
y is display
red
Bl
uetooth device.
k.
u
t.
connection
20.
.
the informat1on
currently
being
(from artist).
Cancel
Pandora
44.
sk
ips
al
lo
wed
to skip tracks
is di
li
mit and
wi ll
ed.
man-
Section
(
)
Streaming
Selecting
Pandora®
Touch the list
one of
them
to play.
Display
the
Refer to
Search
2
Change
the
EJ
.
3
Select shuffle
op-
s-
Stations indicated
Adding a
station
Touch
2
Touch
you wish
3 A
new
Note
station
list
Genre
the
to
add.
station
Pandora®
and
playing
stations/shuffle
for
your
Pandora
shuffle/station list.
key
on page
sort order.
You can sort the items
alphabet
You can sort the item s in the
in
order
i
tems
were created.
You
can
while
you
the
scroll 1con.
or
the
Shuffle
fro m your selected stat1ons. You
can ed 1t shuffle preferences on
your
mob1le
in
the
station in
is
created.
by
D
stations to
21.
in
icall y.
of the dates on which the
scroll
the
titl
es
m
touch
and
hold
desired station.
mode
w1
ll
pl
ay
tracks
dev1ce
from
the
station list.
the
genre list
are
shared stations.
se
the
the
down
that
list
li
I
).
lect
st
1st
En@
Page 22

Section
Bluetooth
operations
(Functi on
You
:!}=Important
•
•
•
•
• If
• If
Bluetooth
telephone
AVH-200BT)
of
can use B l
Leavi
your
not
Advanced
such as
using
wh ile
a safe
fore proceeding.
Bluetooth
lected
Operations
ing on
unit.
you are unable to co
us1ng
the
you
tim
properly.
recommended.
uetooth
the unit on stan
ng
via Bluetooth
phone
runn1ng
e.
can
operati
ling
d1a
phone
the
ing. Be sure to park your veh icle in
driv
ace and ap ply the
pl
connection
dnv
wh1le
available may be li
cellular
the
unit, use the device to
is
th
unit.
connect
co
more
nn ected
Connecting
telephone
telephone.
y to
db
le
i
wh
dram the battery.
that requi
ons
numbers
book, etc
1ng
dev1ce
on the monitor,
are prohibited
..
parkm g
cannot
menu
.
connected
phone
the
mplete
one device at a
than
y not op erate
ma
one device at a time is
connect
the engine
attention
re
brake
be
depend-
mited
to this
connect
connect
to
se-
Touch
Telephone standby display
is
-
be
ion
to
T
panel
When switching to the entering phone number
mode
Close
Display is closed.
Preset dial key
Displa
Phone book key
tching
i
Sw
Setting key
~·
G_
Displaying the
keys
key
ng the preset di
yi
phone book mode.
the
to
Bluetooth
sueen
al
connect
.
ion menu.
)
Bluetooth
(
Tone key
·I
:he
Turn1ng
ff.
o
or
Auto-answer key
1
automat
Turn ing
History key
};
Switching
call lists.
Key pad key
:]:·
Switching
ber directl
On-hook
~)
Ending a cal l.
Rejecting an
Cance lmg
Volume key
lQ·
ting the
Adjus
Private mode key
JJ
rning private
Tu
Off-hook key
@
ting an
Accep
Making a phone call, when selecting a
phone number.
tching
i
Sw
Voice control key
'
Q~
telephone
lllCOm1ng cal ls on
for
tone
nng
ic answering on
to the missed. received and d ial
the mode to enter the phone
y.
key
incoming
wa1t
ll
ca
other
incom
between callers on hold.
call.
ing.
party's listening
on
mode
ing ca
or
ll
off.
.
Notes
only be operated
can
mode
Private
•
are talking on
d the cal
en
To
•
hang
must
uc h panel keys
To
•
telephone operations
play.
Indicator list
Refer to
phone.
the
both you and the other caller
l.
phones.
your
up
listed
not
may app
on page
under
ea
44.
off.
or
l
vo
wh 1le
Bluetooth
r on the
ed
num-
ume
you
dis-
information
Text
notice
d and has
ve
disp
Not
cellular
un1t.
you need to
to th
to
~-e
me
lu
the
St
JU
to
adjusted
call
incoming
t an
tha
been check
not
calls made when
for
layed
phone is disconnected fro m th is
hands-free phoning
for
connect
is unit.
tions on connecting your
instruc
v1a
un1t
is
th
Pairing
to
er
t
ustment
adj
volume
earpiece
ence.
fer
pl-e
your
level as
lume
vo
Incoming
1:1
Indicates
cei
•
Setting up
-
::T
I
.
Connection
F1rst.
phone
For detailed
phone
nology.
32.
Vo
Ad
phone
the
ting.
Notes
of the cal ler's voice and
volume
The
•
tone may vary depending on the type of
lar phone.
e is a large
ther
If
•
the ring tone and
level may
ume
l
vo
sur
Make
•
level before
the
from
level) on your cellu lar phone, the vol u
level of yo
even after the
nected.
volume
caller's
become
e to adjust the v
disconnecting
vo
the
If
unit.
cellular phone
ur
cellular
as
call h
yet.
ed
a Bluetooth
w1reless
uetooth
Bl
(rom this unit
of your cel lular
w1ll
The unit
defau lt
the
difference between
voice. the
unstable.
e to a
olum
the cellula!- phone
is muted
lume
ains
m
re
isco n-
d
is
phone
been
yout-
tele-
tech
on page
co
re
set-
nn g
cellu-
em
ov
prope
(zem
nle
ted
mu
)
-e
t
1-d
ll
-
-
l-
@En
Page 23

(
Bluetooth
Calling a
phone
The
transfer
connected.
transfer the contacts. The
should
Re
fer to
After finding the
phone book, you can
the
the phone book mode.
2 Select the phone number list.
The
entry
3 Select the phone number.
• If
hold
4
Touch
Touch
Note
The
tr
ansferred
connected. If
transfer the contacts. The
should
Refer to
book
contacts on your phone will
red
automatically
If
be
on when you use the phone menu.
Switching visible
ca ll.
Touch
the phone book key
detailed
contacts on
phone
is
displayed.
you want to store the phone number.
the
lis
t.
the off-hook key
the on-hook key
automatica
be
on when you use the phone menu.
Switching visible
Selecting
alphabet
If
a
lot
of numbers are registered
book. you can search f
alphabet
search mode.
telephone
number
it is not. use your phone menu
number
select
number
yo
ur
phone
it
is
not, use your phone menu to
a
number
search
or
in
wh
en
the phone
visibility of this
unit
on page
yo
u want to
the entry and make
list
of the
to
make the
to
end the
w1ll
normally
ll
y when
th
visi
bilit
unit
on page
mode
the phone
the
norma
ll
33.
call
to
switch to
selected
touch
e phone is
y
of
this
33.
by
1n
the phone
number
y
be
unit
in
call.
call.
be
unit
is
Touch
the phone book key
the phone book mode.
2
Touch
ABC
to switch to alphabet search
mode.
to
3
Touch
the first letter of the entry you are
looking for.
The Phone Book entri
(e.g. ''Ben", ''Brian"
the
lected) will
•
The order of the
different from that of the
4
Touch
ber list
• If
several phone numbers are
entr
y. select one
• If
you want to switch to the call
the
icon .
and
..............-
1~,.1
5
Touch
6
Touch
be
the list to display the phone num-
of
the selected entry.
~
the off-hook key to make the
the on-hook key to end the
es
starting with
and "Burt"
displayed.
fir
st name and
ce
llular
by
tou ching the
Switchin g to the
phone.
list.
Inverting names in phone book
When
yo
ur
cellular
phone
is
unit,
the
may be regist e
order.
You
order
back.
(Inverting the names
Touch
the phone book mode.
by
first and
last
red
to the
can use this fun ction to change the
the phone book key to switch
connected to
names of y
ph
one book
in
the phone book)
to
switch to
that
when
"B"
is
last
name m
included in an
histo
ry
I
1st.
call
his
tor
y
call.
our
co ntact s
in
reverse
lette r
se-
ay
touch
lis
t.
call.
th1s
to
)
be
(
Bluetooth
2 Invert names
I
0
3
"Would
pears.
Whi
le
• If
pears.
Note
Inverting
unit does not affect the data on
device.
Using
and
The
80
missed are sto red in th e
brow
Touch
history list.
2 Select Missed
Received
you like to invert
Touch
the names are inverted.
the
1nver
s1on
In
such cas
the name s of y
the
dialed
most recent calls dialed.
se
them and
the history key to display the
Calls.
rn
e/
I
I
+_-·
_._,
I
I
telephone
in
phone books.
!I
nverting
names in pho ne boo
Yes
to continue.
fa1
ls.
'·Invert
es.
tr
y again
fr
our
contacts
missed, received
call lists
memor
call numbers
Calls,
Dialed
Displaying
Displaying the dial
Displaying the miss
the rece
ks
all
names?" ap-
O
is
displayed.
Name
Error"
ap-
om the beginning.
from
this
yo
ur
Bluetooth
received. and
y.
Yo
u can
from
th
es
e
lists.
call
Calls
or
iv
ed
call l
1st.
ed
call lis
t.
ed
call lis
t.
3
Touch
number.
Name
and phone
.
detailed
• If
hold the
4
5
you
list.
Touch
Touch
li
want
Setting
If
this
funct
swers
all
•
Touch
matic answering
Adjusting
listening
To
maintain the good sound
can
adjust
the
volume
party, use th is
•
Touch
Far-End
VOL
1-2-3
•
Th1s
fun
ing on
the
pho
•
Settings can
Switching
You
can
select
ring tone.
ton e
for
this
Connect
the list number to select a phone
numb
er are
display
ed
st.
to store the phone
the off-hook key to make the
the on-hook key to end the
automatic
ion is on, this unit
incoming
the auto-answer key to turn auto-
calls.
on
or off.
the
nu
answering
automatical ly
other
in the
mber. touch and
call.
call.
party's
volume
quality,
thi s
even
n,
unit
wh1le
ce.
th1s
unit's
the ring
talk-
the other party's listening volu me. If
is not loud
funct1on.
the volume key to select
ct1
on
ne
whether
If
this function is
unit
your cellular
enough for the other
c
an
be
pe
rform
.
be
stored f
or
the
ring
or
not to use
will
sound.
ed
each devi
tone
se
t to o
phone to this unit.
Section
)8
an-
En@
Page 24

Section
Bluetooth
(
the tone key
Touch
2
or off.
on
Using
You
preset
preset
2
the
can eas i
s.
the preset
Touch
screen.
one of the phone numbers to
Touch
lect.
you want to
If
•
touch and
lete.
3
4
hold
the off-hook key
Touch
the on-hook key
Touch
Making
phone
telephone
preset
e up to six
tor
s
ly
dial
a preset
te
le
de
the phone nu
by
call
a
number
turn the ring tone
to
lists
dial
numbers
phone
display
to
key
number.
phone
w1sh
u
yo
er
mb
make the
to
end the
to
entering
the
se-
to de-
call.
call.
Note
Entenng phone
ated unless a Bluetooth telep
uni
this
to
as
Setting
During a con versat1on . you
(t
mode
Touch
•
vate mode
number
t.
private
the
alk directly on your
the private mode key
or off.
on
Voice control
cellular phone is equipped with the voice
our
y
If
control feature. you can use voice co
make calls.
Operation varies
•
cellular phone. Refer to
ual
tailed instr
Touch
The disp l
can also switch to the
You
by pressing and
while the source is on.
that
the voice
ay
example.
for
came
uctions
tch
swi
depending
with
control key.
es to the
holding
mode
can
cellular
the
your
.
vo1ce
down
be
cannot
is connected
hone
mode
switch to private
phone).
turn pri-
to
mmand
on the type of
instruction
phone
cellular
ice control scree
vo
control screen
home
the
)
oper-
s to
man-
for de-
button
Bluetooth
(
Start voice control.
2
telephone
that
es
Indicat
made
be
can
Indicates
closed.
that the display
nuous
ti
con
uninterrupted.
is
calls
)
Notes
recognit io
for
through
coming
with
to be rec-
the
out-
from
com-
o1ce
v
should
at a
er
com-
the
fail.
to
n.
order for y
In
•
ognized and interpreted correctly, ensure
that
• Please note that wind blowing
vehicle windows and noi
side the v
mand operation.
optimum
For
•
placed di rectly in front of the driv
be
1table
su
Speak~ng
•
mand may cause voice recognition
Speak slowly, de
•
n.
our
ions are
dit
con
eh
distance.
too soon after the start of
su1table
icle can interfere
p1ck-up, the m1crophone
berately. and clearly.
li
se
commands
ice
vo
Touch
the phone number.
Touch
2
numbers.
Up to
•
3
4
@En
the key pad key
the number
d1gits can
32
the off-hook key
Touch
the on-hook key
Touch
icons
entered.
be
start entering
to
input the
to
make the
to
end the
to
call.
call.
Page 25

( Settings
)
(
Audio
adjustments
)
Section
Gl
Menu
Touch
CD
operations
panel keys
Video setup key
Refer to
Setting
27.
(%)
Audio function key
Refer to
Audio adjustments
(J'
Close
key
Returnmg
,CD
System key
Refer to
®
Favorite key
You
(Audio
them
Refer to
Notes
•
You
when a
• If
yo
is stopped.
to the
System settings
can choose
function
to this
Favorite
can disp lay the
Disc
u start the
up
the
current
menus
menu. etc.)
favonte
menu.
menu
Video Setup
or
USB
source is sele
Video Setup
video
p
la
yer
on
page
source
on page
within each
and
on pag e
32.
menu.
on page
25.
display.
29.
men
reg ister
menu
ct
ed.
playback
do
Gil
t
•
Yo
u
cannot
display the
whe n the
is pla
Press
home display.
2
Touch
keys
u
mut
e
yi
ng.
the home button
any
of
to
select
the menu
the
fun
ct
1on
following
Aud
io
function
is
on
or
to
switch
touch
to
be adjusted.
a JPEG
to
panel
menu
f1le
the
Using fader/balance adjustment
Fader/Balance
set to
Full
You
can change the fader/balance settmg
vide an ideal
occupied seats .
Press
home
display.
2
Touch
audio menu.
3
Touch
tion menu.
4
Touch
speaker balance.
Ra
nge:
F
• Select
ers.
5
Touch
speaker balance.
Range:
F/R
Note
You
can also set the fader/balance
the dot on the displayed table.
Using
Balance
Subwoofer
will allow you to adjust the balance between
right/left sound output.
Press
home
display.
2
Touch
audio menu.
displays when Rear Speaker is
on the System Menu.
listening envi
the
home button
the audio function key
Fader/Balance
A
or
V
15l/R
0
to R
F/R
0
L/R 0
<or>
to
0
L15
to
balance
displays when Rear Speaker is set to
on the System Menu.
the
home button
the audio function key
ronment
to
switch
on
the audio func-
to
adjust the front/rear
15
l/R
0
when only usmg
adjust the
F/R
0
left/right
R 15
adjustment
Th
to
switch
for
to
open
tw
o spea
by
dragging
1s
se
to
to
open
all of
to
ttin
the
to pro-
the
the
the
k-
g
the
3
Touch
Balance
menu.
4
Touch
<or>
speaker
Range:
Note
You
on the displayed table.
Using
You
car's
Sired.
balance.
l15
can also
the
can adjust the equalization to
interior acoustic charact eri stics as de-
Recalling
Th
ere are seven stored equal izer
you can easi
the equalizer curves.
Display
S.Bass
Powerful
Natural
Vocal
Flat
Custom1
Custom2
•
The equa
Custom2
•
You
cannot
when using the auto-equal
•
When
Flat,
sound.
You
equalizer curves by
between
on
the
audio function
to
adjust
the
toR
15
se
t the balance
equalizer
equalizer
ly
recall at an y time. Here
Equalizer
Su
Powerful
Natural
Vocal
Flat
Custom
Custom
li
zer curves
can
be
adjust
se
lect
no cha nges are made to the
can check the eff ects of the
Flat
and
per
bass
2
for
Custom1
e
d.
Custom1
switch
another
curves
1
ing alternatively
equalizer cu
left/right
by
dragg ing
ma
cur
curve
and
izer.
th
tch
the
ves
which
is
a list of
and
Custom2
rve.
e
En@
Page 26

Section
Audio
Press
home
Touch
2
adjustments
home button
the
display.
the audio function key
audio menu.
3
Touch
Graphic
EQ
menu.
or
select
nnot
ca
ou
• Y
Custom2
Custom1
of
equa
4
and
.
er
liz
the desired setting.
Touch
S.Bass-Powerfui-Naturai-Vocai-FiatCustom
Adjusting
1-Custom2
the
5-band
equalizer
el
can adjust the
You
equalizer
•
•
curv
A separate
each sou r
or
f
a
en
wh
lected. the equa
stored in
Custom2
A
sources can
when the
ments
Custom2
the
the
Press
home display.
lev
s.
e
Custom1
you make adj
If
ce.
ther
o
ve
cur
zer
l1
Custom1 .
that
rve
cu
created. If you make adjust-
be
Custom2
ve
cm
home button
switch
to
audio function
the
on
the
adjust
hen us
vv
of each band
curve can be
Custom2
than
settings
ve
cur
omm
c
1s
ur
c
upda
will be
to
to
open
to
curves
e1·
iz
equa!
auto-
e
th
1ng
graphic
the
for
nea
ustments
se-
is
will
for
on
selected.
ve is
ted.
to
switch
the
ted
be
all
the
adjust
to
table
the
Touch
5
equalizer
Range:
band.
+12dB to
-12d8
the
Adjusting
Loudness
low-frequency and high-frequency ranges at l
volume.
Press
display.
home
Touch
2
loudness
pensates
com
home button
the
the audio function key
for
audio menu.
select
to
...,.
or
..,..
Touch
3
loudness.
-Mid
w)
(lo
-low
(off)
Off
Using
This
wh1ch
•
home
2
subwoofer
is equipped with a subwoofer
un1t
tumed
be
can
e cut-off f requency and ou
Th
when the subwoo
ed
adjust
home button
the
Press
display.
audio function key
the
Touch
on
or
off.
audio menu.
level
the
deficiencies in
to
switch
to
open
to
a desired
(m1d)
level
-High
output
output
level can be
ut
tp
ut
outp
fer
to
switch
to
open
to
the
of
the
the
for
(high)
on.
is
the
)
ow
the
the
Audio
(
Touch
6
output
Rang e:
Touch
7
adjustments
next to
...,.
or
..,..
the subwoofer.
of
level
-24
to
+6
next
...,.
or
..,..
Level
Frequency
to
the cut-off frequency.
50Hz-63Hz-80Hz--100Hz-125Hz
frequen cies lower than those in
Only
utted from the subwooter.
lected range are o
Boosting
can boost the
You
Press
display.
home
Touch
2
utp
bass
the
level.
ss
ba
the home button
audio function key
the
to
switch
audio menu.
a desired
select
to
or...,.
..,..
Touch
3
+6
to
0
Range:
Using
Use
high
than
from
home
the
ction when
fun
this
-frequency sounds.
the high
ea
sp
the
the home button
Press
display.
high
ass filt er (HPF) cu toff are out
-p
kers.
pass
wanting
frequencies
Only
to
switch
adjust the
to
to
these-
open
to
level.
filter
to listen
select
the
to
on ly to
higher
to
the
put
the
Adjusting
SLA (sou rce
th
W1
levels of each sou rce can be adjusted to p
ant
n1f1c
sig
• Settings are based on the
which
Press
display.
home
Touch
2
source
el
v
le
differenc
remains unchanged.
the
the audio function key to open the
es
home button
levels
adjustmen
between sources.
t). the volume
lume
vo
FM
switch
to
to
audio menu.
3 Compare the
the source you wish
of
level
Source
Touch
4
volume level
FM
Adjuster
Level
to
with
adjust.
the
on
function menu.
source
the
adjust
to
V
or
A
Touch
5
ume.
-4
to
+4
Range:
Notes
I able when
ai
av
th e sou rce.
can
level
ress
omp
is not
so
al
ed
aud
-4
adjusted
be
Di
io.
are
aut
Adjuster
level
Source
•
as
ed
lect
se
is
FM
e AM volu me
Th
•
with this function.
c
• Video CD,
MPEG-1. MPEG-2 and MPEG
cal
volum
CD.
the same source level ad j ustment
to
set
ly
e.
re
level.
the
the
audio
vol-
vX.
omati-
)
vent
the audio function key
Touch
2
audio menu.
on
3
Touch
Graphic
EQ
menu.
desired setting.
the
Touch
4
S.Bass-Powerfui-Naturai-Vocai-FiatCustom1-Custom2
@En
to
audio function
the
open
Subwoofer on the audio function
Touch
3
the
menu.
next
Off
or
On
Touch
4
turn the subwoofer output on or off.
5
to
Touch
select
Normal
the
or Reverse next
of
phase
to
to
Phase
Subwoofer
to
subwoofer output.
the audio function key
Touch
2
audio menu.
..,..
Touch
3
cut-off frequency.
select
-50Hz-63Hz-80Hz-1
off)
(
Off
125Hz
frequencies
Onl y
range are
ed
lect
rs.
speake
or
next
...,.
higher
output
Pass
High
to
than those in
front
the
from
open
to
Filter
00Hz-
theseor rear
the
to
Page 27

( Setting
Setting
You
can set a desired
a
va
ilabl
e,
selected language.
Press
home
display.
2
Touch
up
the
the
subtitle
the subtitles
subtitle
wi
the home button to switch to the
the video setup key to open the
video setup menu.
3
Touch
Subtitle Language on the
Video Setup menu.
A
subt
itle language
4
Touch
The subtitle l
• If
you have selected
lect
Others
on page
the desired
anguage
27.
menu
language.
is set.
Others.
Notes
• If
the
se
lected la
language specified on the
•
You
can also switch
touching
during playback.
•
The setting made here will
even if the
ing playback
guages
key.
When
A language code i
Others
for
•
•
•
panel
you
is
selected. Refe r to
OVO
on page
Touch
0
To
cancel the entered numbers. touch
To
reg
ister the code.
key.
the
switch
subtit
us1ng
select
nput
51.
to 9
to input the
nguage
the
subtitle languages
le l
anguage
the
display is shown wh en
touch
video
language
language. When
ll
be
displa
is
disp
layed.
refer to
is
not
disc
subtitle
not
is switched
switch
su
Others
La
nguage
language
the
fo
ll
player
ye
d in the
Whe
availabl
is
displayed.
language
be
affected
bt1tl
code
C.
owing
n you
e.
key
e lan-
chart
code.
touch
I
Setting
You
home
2
video setup menu.
3
Setup menu.
An audio language
se-
4
Th
• If
the
lect
by
Notes
• If
•
dur-
•
Setting
You
menus
home
1
I
I
Reg
isten ng the code.
the
audio
can set the preferred
Press
the home button
language
audio
language.
to
switch
display.
Touch
the video setup key
Touch
Audio Language on the Video
menu
is displayed.
Touch
the desired
e audio language
you ha
ve
se
Others
on page
the
se
lected language is not
language specified on
You
can also
touching
during
The setting made here wi
even if the audio
ing playback using
guages
the
playback.
key.
the
can set the preferred language in
recorded on a
Press
the home button to switch
IS
lected
27.
switch
switch
language
menu
language.
set.
Others.
the
the
audio
audio
II
the
switch
disc
are displa
refer to
d1sc
languages
not
is
sw1tched dur-
language
display.
to
to
open the
When
availab
is
used.
language
be
affected
audio
la
wh1ch
ye
d.
to
the
you
le.
key
n-
the
the
by
the
se-
(
)
Setting
2
Touch
up
the video setup key
video setup menu.
3
Touch
Menu Language on
Video Setup menu.
A men u language
4
Touch
The
menu
•
If
you have
lect
Others
on page
menu
the desired language.
language is set.
se
lected
27.
Note
If
the
se
lected language is not available. the
guage specified on the
Setting
the
display
The ang
le
icon can
scenes
wher
e the angle can
Press
the home button to switch
home
display.
2
Touch
the video setup key
video setup menu.
3
Touch
Multi Angle on the Video Setup
menu
to
turn
angle
Setting
There are
play that has a
ratio) of
aspe
ct
pect for the display
• When using regul ar display. select
Letter
result in an
•
If
display will
the
aspect
tw
o kinds of display: a wide
width
16:9.
and
regular
of
4:
3.
Be
sur
connected
Box
or
Pan
unnatural
you select the
TV
change
the
video
to
open the
the
is displayed.
Others.
refer
to
Whe
disc
is displayed.
multi-angle
be
set so it appears on
be
switched.
to
open the
icon
display
on or off.
ratio
-t
o-height
e to select the
Scan.
aspect ratio. th e
to
display
to
Selecting
picture.
the
same
ratio
that
V
(TV
correct
OUT.
settmg.
player
n you
DVD
to
the
scr
een
dis-
aspect
has a
TV
TV
eithe1·
16:9
may
unit's
Press
the home button
home
display.
2
Touch
the video setup key
video setup menu.
3
Touch
TV Aspect on
menu
to
select
the TV aspect ratio.
Touch
se
lan-
-
pect ratio ap
TV Aspect
•
16:9 -
as is (initial setting)
•
letter
terbox with black ba
tom
•
Pan
ri
ght
repeatedly
pe
ars.
W
id
e screen
Box
-
of the screen
Scan-
The
and left sides of the screen
Notes
• When playing discs that do not
Pan
Scan,
th e
d1sc
Letter
Box
d1spl
Pan
Scan
setting.
pa
ckage bears
•
Th
e
TV
aspect rat io
as-
some discs.
structions.
Setting
JPEG
fi
les
unit.
In
thi s setting. the
image can
Press
home
display.
2
Touch
For
the
can
be
viewed as a
be
set.
the home button
the video setup key to open the
video setup menu.
to
switch to the
to
open the
the
Video Setup
un
til
t
he
desired
as-
picture
(16:9)
The
picture
nds
p1
cture
is
is played back in
ay
even if you
Confirm
the~
cannot
detai
ls.
refer to
1s
the
on th e
cut
sho
se
whether
mark.
be
changed
is display
shape
top
rt on the
spec
lect the
the
of a
and
bot-
ify
the disc
for
disc's
ed
let-
in-
slideshow interval
1nterval
to
slideshow
between each
switch to the
on
this
Section
) GI
En@
Page 28

Section
Setting
(
up
the
video
player
)
Setting
(
up
the
video
player
)
Per
Time
Touch
3
Video Setup menu
terval.
Photo
Per
Time
Touch
ng appea
sett1
red
des1
mages
JPEG i
Ssec-
•
seconds
i
EG
JP
10sec-
•
seconds
1mages
JPEG
15sec-
•
econds
s
EG
Manual-
•
manu
Setting
DVD video
Some
to restnct
adult-oriented scenes.
to the desired leve l.
When
•
play a disc feat
number
such
In
correct
Setting
A code nu
back discs
play
Press
display.
home
Touch
2
JP
ly
al
parental
discs
ch1ldren
you have a parental
the home button
fro m
urin
indi cations m
1nput
cases . playback w1ll
mber
code nu
code number and level
the
must
er
mb
with
the video setup key to open the
video setup menu.
Parental
Touch
3
to input a four digit code
to 9
0
Touch
4
number.
entered
the
l
cance
To
•
the code.
reg1ster
To
•
y.
ke
panel
on the
Slide
Photo
slideshow
the
select
to
repeatedly unti l the
Slide
rs.
mtervals
at
ch
it
sw
nter
at i
witch
s
mages
1nter
ch at
sw1t
sw1tched
be
s can
mage
i
lock
let you use parental lock
viewm g
can set parental l
You
parent
g
is
registe
be
parental lock.
the
on
number
touch
ent
v1ol
lock level
al lock , code
displayed.
be
ay
begin when
entered.
d in order
re
switch to the
to
Video Setup menu.
ouch
t
s.
owing
foll
the
vals
va
and
se
C.
of
of
of
ls
ock
t and
the
to
touch
in-
I
The
5
set.
10
5
15
6
The par
Notes
•
•
•
Changing
You can
home
2
video setup menu.
3
the
ering
Reg1st
I
I
1
the
and
is set.
number
code
the desired level.
select
8 to
to
1
Touch
Enter.
Touch
l lock lev
enta
back of the
ay
Pl
8-
•
setting)
tial
Playback of
2-
to
7
•
ult-onented
-ad
non
layback
-P
1
•
ble
si
ecommend
We r
number
code
e parental
Th
the
for
Look
package.
d1sc
Pa
f.
el
disc its
possible if a parental
d1sc.
the
on
some
With
only
ve
acti
playback of those scenes
details. refer to the instru
with
me
ca
change
the
Press
is set.
el
entir
discs
cs
d1s
for
discs
of
to keep a record of your
you forget
se
ca
1n
lock level
level i
rental lock of
discs. the parental
for
the
the
the
is stored on the disc.
ndication
luded l1terature
1nc
lock level
levels
certa in
disc.
level
set parenta l
home button
display.
the video setup key to open the
Touch
Touch
Parental
on the Video Setup menu.
code.
level can n
possible
!S
disc
e
dren and
il
ch
or
f
is po ssible
ldre n only is pos-
chi
1t.
en
writt
or on the
unit is no t
this
not stor
is
lock
of scene
skipped. For
be
will
ion manual
ct
lock le
switch to the
to
be
ow
on the
y
ma
The
s.
that
.
vel
be
(i
ed
4
Touch
to input the registered
to 9
0
code
number.
5 Registering the code.
code
the
stering
Reg1
I
I
1
I
can
level
Th
changed
be
ow
n
you e
ni-
• If
IS
1con
number.
you
If
•
your
get
Touch
6
Touch
7
new
The
you
If
Press
e
d1splayed.
code
Setting
can select
You
ternal subtitles.
The Di
•
when
ubtit
s
Press
display.
home
Touch
2
.
orrect code number. the
nc
an i
nter
C
ch
Tou
code nu
ur
yo
get
for
ber on page
num
select
8 to
to
1
Enter.
ck level
lo
ental
par
forget
your
RESET.
DivX
the
whether
wi
itles
subt
vX
se
home button
the
is
Custom
le fi les exist.
the video setup key to open the
e code number. and
th
sets
1s
the
0
and enter the co rrect code
!(you
refer to
r.
mbe
28.
the desired
se
IS
code
subtitle
not to display DivX
or
displa
be
ll
1f
lected
to
level.
t.
number
file
d even
ye
no DivX external
switch to the
video setup menu.
Touch
3
menu to
Original -
•
• Custom -
DivX®
select
Subtitle
the desired
D1
sp
D1
on the Video Setup
subtitle
Di
the
ay
spl
iv
the D
lay
subt
vX
X external
setting.
itles
subtitles
Notes
di
to
Up
•
If
e.
n
li
breaks and
line
on t he next line.
Up to
•
one scree
set. the excess ch ara cters
played.
Displaying
registration
orde r to play Di
In
(or-
tents
con
istered wi th a DivX
registration . generate a D
and
de
co
Keep a record of the code as you w ill need
•
when
provider.
Press
display.
home
Touch
2
racters can
cha
42
than 42 characters are set. the
more
the
rac
cha
126
mo
If
n.
the
vX
unit. the unit
s
th1
on
it to your provider.
submit
ister your
reg
u
yo
the home button
the video setup key to open the
be
characters are di splayed
be
s can
ter
126
than
re
il
w
DivX
code
ideo on
(v
VOD
mu
contents
VOD
VO
ivX
to the DivX VOD
unit
to
video setup menu.
ex-
3
DivX® VOD on the Video Setup
Touch
menu.
Deregistration Code
Registration Code
appear.
Registration Code.
Touch
4
Your registrat ion
and
code
is d isplayed
Displaying the deregistration code
ice is already registered.
ev
d
ur
yo
If
entering
by
Press
the
the
home display.
deregistrat1on
home button to switch to the
cod
layed on one
sp
displayed on
character
l
s are
s-
di
be
t
no
® VOD
nd)
dema
reg-
be
f1rst
st
provider. For
istration
reg
D
switch to the
e1-
dereg ist
e.
1t
it
@En
Page 29

(
Setting
up
the
video
player
)
(
System
settings
Section
) GI
2 Touch
the
video setup key
video setup menu.
3
Touch DivX®
VOD
on
the
menu.
4
Touch Deregistration
•
To
cancel deregrstratron.
5
Touch
The deregistration is complete.
Automatic
When a
this
start
title.
•
home
2 Touch
video
3 Touch DVD
OK.
playback
DVD disc with a
unit
will cancel
playback
Some
function
tion off and start playback.
Press
setup menu.
DVDs
is
the
display.
the
f
ro
m the first
ma
not
fully operable,
home
video setup
Auto
Code.
touch
DVD
the menu
y not operate
button
key
Play
to
playback on.
•
To
turn
automat
ic
DVD
Auto
Play
playback
again.
to
open
Video
Setup
Cancel.
of
DVDs
menu is inserted.
automatically
chapter
of the first
properl
y.
turn
th1s
to
switch
to
to
open
the
turn
automatic
off. touch
the
and
If
this
func-
the
Switching
Activate this
vice connected to this
Press
home
display.
2
Touch
the
se
tting when using an
the
home
the
system key
menu.
3
Touch AUX
turn
AUX
Changing
Input
Input
on
the
adjustment
Contrast,
Dimmer
You
can
Contrast
Dimmer
ture)
for
•
You
canno
au
d1o
Press
home
display.
2 Touch
menu.
Color,
and
adjust
the
Brightness
(contrast).
(dimmer). and
each sou rce
t adjust
so
urc
e.
the
home
the
system key
auxiliary
un1t.
button
to
to
on
the
or
off.
setting
auxi
switch
to
open
the
system menu
picture
{Brightness,
Hue,
Temperature)
(brightness),
Color
(color) ,
Hue
(hue),
Temperature
an
d rear view camer
Color
and
button
to
to
Hue
switch
open
(tempera-
for the
to
the
li
a1·
y de-
the
system
to
a.
the
system
4
Touch
any
keys
to
select
Picture
Adjustment
Brightness-
•
Contrast-
•
Color-
•
Hue-
Adjusts
is
emp
hasized)
•
Dimmer-
play
•
Temperature-
ture.
resulting
•
You
can adjust
is set to
N
TSC.
•
With
some
ment
may not
be
5
Touch
.,..
or
Each time you
lected
1tem
mc
•
Brightness.
J
USted
from
+24
•
Dimmer
can
• Temperature
Notes
•
You
cannot
mg.
•
Different
tings ca n
switch is on and
Brightness/Contrast/Dimmer
be
of
the
following
the
function
items
AdJ
usts the
Adjusts
AdJusts
the
the
tone of
Adjusts
the
A
djusts
in
a better white
Hue
only
rear vi
ew
cameras. picture
possible.
..,..
to
adjust
touch
.,..
or
rea
ses
or
decreases.
Contrast
to
be
operate
se
Color.
-24.
ad
ju
st
ed
can be adjusted
this
t f
or
wh
whe
n it is off.
to
be adjusted.
ar
e
displayed.
black
the
contrast
co lor
saturation
color
br
ightness of the d
the color
whe n
the
the
selected
..,..
.
the
le
and
from
+1
fr
om
funct
ion
en
the
illumination
touch panel
i
nt
ens ity
(red or green
temper
a-
balance
color
sy
stem
adjust-
item.
ve
l
of
these-
Hue
can
be
to
+48.
+3
to
-3
.
while driv-
set-
is
ad
Cl
-
-
3
If
Picture
I
Rear
you
are adjusting
Adjustment,
View!
select
Ad
jus
+ing the
ment
for·
AdJustrng
ment
for
the
the
unit.
Picture Adjust-
the rear view camera.
the
Picture Adjust-
the
source.
Selecting
The system
If
text inf
name
or
language. they ca n
unit.
• The
ing:
-A
- S
-
Video
the
language
ormation
a
comment
language
udio menu
ys
tem menu
Setup
system
can
su
ch
as
is embedded in a European
also
be
can
be
changed for the
menu
be
selected.
the
d
1spl
title
aye
language
name,
d on
art1
th1s
follow-
st
En@
Page 30

Section
System
(
- Bluetooth
Language for cautions
-
Some operations
ited from
ca
cases. a cauti
play.
caution messages
the embedded
If
•
language setting
on
mati
Some character-s may
•
erly.
Press
display.
home
Touch
2
menu.
Touch System
3
to
menu
Touch
4
English
(Spanish)-
(Simplified Chinese)
Setting
Demo Mode
Once
screen appears.
Refer to
Press
display.
home
Touch
2
menu.
3 Touch
turn
to
• On -
settings
use
reful attent1on
can ch ange
You
no
may
home
the
system
the
select
desired language.
the
(English)
Portugues
Demo
Demo mode
home
the
system
the
Demo
Mode
Demo
e Demo screen appears.
Th
menu
this unit
on
while dnving
when operated.
appe
will
on
th
w1th
language
a
disp
t
button
Language
desired language.
the
-Franc;ais
and the
th
not
re
ro
p
lay
be
t
no
to
to
key
(Fr
(Portuguese)-
Mode
on.
turned
is
on page
to
button
to
key
the
on
Mode
off.
or
on
are
or require
ar on the
language
e
this setti
e.
am
e s
rly.
pe
display
switch
the
open
the
on
ench)-
Demo
he
t
5.
switch
open
system
prohi
such
In
dis-
for
.
ng
lected
se
xt
te
ed
the
to
system
system
Espanol
$~
to
system
the
menu
b-
infor-
prop-
the
The
-
Off
•
Setting
the
subwoofer
rear output (
unit's
is
Th
rear output) can
A
put and
range speaker
connecti
to
au
RC
on.
Subwoofer
direct ly to a
lead
amp.
xiliary
he
t
ly.
al
iti
In
er connecti
Turn
Source
to
er
Ref
Press
2
display.
home
Touch
3
menu.
Touch Rear
4
switch
to
speaker.
When no
•
put. select
When a
•
put. select
Notes
en
Ev
•
output unless y
no
on
put
page
th rear speaker
Bo
•
output
ng.
setti
(Full)
you
If
,
unit
(Full).
on
source
the
home
the
the
the
subwoofe1·
Full
subwoofer is co
Subwoofer
you
if
fer to
re
(
26).
are
mo screen does not appear.
De
output
rear
controller
r speaker
rea
or subwoofer (
the rear output sett i
ch
it
sw
connect a
an
c
you
oofer without usi
bw
su
for a rear ful l-range
et
s
is
off.
on
key
off
button
key
system
connected to
is
subw
(
ou
Using
ead
l
on
output
nne
tum
subw
outputs and
Speaker
subwoofer
(full-range speaker).
change this
switched simultaneously
leads out-
used for
be
Subwoofer
ar speaker
re
6.
page
switch
to
the
open
to
system
the
or
th
cted to the rear
}
fe1
oo
tt ing, there
se
subwoofe1·
the
oo(er output
)
and
full-
ng
an
ng
ak-
e
sp
the
to
system
menu
full-range
out-
r
rea
e
out-
be
will
out-
on
rear
RCA
in this
)
System
(
Setting
ec
l
se
can
You
wo
sub
for the
the
Turn
Source
to
·
Refer
the
Press
2
display.
home
the
Touch
3
menu.
4 Touch
switch
Notes
•
•
Preout
Subwoofer
settrng
This
system menu is set to
he
on t
When Rear
Subwoofer
to
set
Subwoofer
Setting
mode
Setting the Pandora
r to
Refe
20.
page
Setting
When ever scroll
scrolls continuously
mation
prefer the information to
you
if
Off
once.
the
Press
display.
home
2 Touch
menu.
the
settings
RCA
the
whether to use
t
rear speakers.
he
or t
ofer·
off.
source
on
key
off
button
home
key
system
the
on
Rear.
or
ailab
av
is
Speaker
Preout
.
cannot
It
.
Pandora
the
ever
the
is set to
button
home
key
system
rear
RCA
page
to
open
to
system
when Rear
le
the
on
1s
changed
be
nnect mode
co
scroll
recor
.
On
the
in
to
open
to
output
rear output
6.
to
switch
the
menu
Speaker
Full.
em
syst
set
also
to
connect
ded
display.
scroll
switch
the
the
system
to
nu
me
to
Rear.
on
i
xt
te
Set
JUSt
the
to
system
is
nfor-
to
3 Touch Ever
scroll
ever
turn
Setting
unction of
(F
need
You
source
Press
home
Touch
2
menu.
Touch
3
menu
the
AV
activate the
to
order
in
the
display.
the
Bluetooth
turn
to
home
Clearing
Important
c!)=
ver turn the unit off
Ne
cl
being
is
ory
source
the
Turn
Source
to
Refer
the
Press
2
display.
home
the
Touch
3
menu.
Bluetooth
Touch
4
menu.
system
Touch Clear.
5
ng
lecti
se
After
appears. Touch
display
ry.
you do not want to
• If
Cancel.
the
on
Scroll
off.
or
on
Bluetooth
0BT)
0
H-2
Bluetooth
uetooth aud1o pl
Bl
a
se
u
to
button
key
system
Audio
Bluetooth
audio
Bluetooth
le
hi
w
ed.
ear
off.
on
key
off
button
home
key
system
Memory
item. a
red
a desi
OK
clear
system
switch
to
open
to
on
the
page 6.
switch
to
open
to
Clear
dele
to
the m
the
Bluetooth
menu
audio
Audio
ay
the
to
system
the
system
off.
or
on
memory
me
the
to
system
the
the
on
firmat 1on
on
c
mem
he
t
te
ory. touch
em
)
to
er.
m-
o-
@En
Page 31

( System settings
)
( System settings
)
Section
CI
Updating
Th
is
functi
latest Bluetooth soft
software and updating, refer to
Q
Important
Never turn the
phone while the
Turn
Refer to
2
Press
home display.
3
Touch
menu.
4
Touch
5
Touch Start
mode.
•
Follow the on-screen
ing the Bluet
Displaying
software
If
th1s
unit
need
to
consu lt your dealer for repair.
ca
se
s.
you may
ve
rsion. Perform the followi ng procedure
chec k the version on
Turn
Refer to
Source
2
Press
home display.
3 Touch
menu.
Bluetooth
on is used to update this
war
e.
For ab
un1t
off and never
so
ftwa
re
is being updated.
the
source
off.
Source
off
key
on page
the
home
button
to
the
system
key
to
BT
Software Update.
to
display
the
in
struct
oo
th
so
ftware.
the
Bluetooth
version
fa1ls
to operat e properly,
be
the
the
the
source
home
asked to
off
system key
this
off.
key
on page
button
spec1fy
unit.
to
to
out
our
disconn
6.
switch
open
data
io
ns
6.
switch
open
software
unit
with
the
Bluetooth
website.
ect
th
e
to
the
the
system
transfer
to finish updat-
yo
u
ma
y
In
such
the software
to
to
the
the
system
4 Touch Bluetooth Version Information
display
to
the
version
of
the
ule
of
this unit.
Setting
the
rear
camera (back
A
cAUTION
Pioneer recommends the use
which outputs mirror-reversed images.
erwise,
the
screen
image
versed.
This
unit
featu
re
swi tches to the rear view ca me
when a rear view camera is inst
and the
(R)
position.
dealer.)
You can also switch the
pressing the touch panel
For details refer to
•
Aft
er you set up the rear view
move the
con firm that th e rear v
shown on the display.
• Change
the rear view came
are driving forwar
•
To
stop watch1ng the rear view camera video
and re
hold
MUTE.
•
Tou
ch the
the rear
Touch
view camera off.
a
source
Press
home
display.
s a fun ction that
shift
l
ev
er
is
moved to the
(Fo
r more details.
Using
sh1ft
l
eve
r to
this
se
tting
ra
d.
turn
to the source
RearView
vi
ew camera image
th
e source icon aga in to turn the rear
For
on page
the
6.
home button
Bluetooth mod-
view
up
camera)
of
a camera
will
appear re-
automatically
ra
v
1de
o
(
R.C
al
led on your
REVERSE
cons
ult
yo
re
ar
v1ew
image by
ke
y.
the
rear
view
on page
camera
REVERSE
ie
w
if the disp lay sw i
video by error
displa
source ico n to display
details.
to
came
y. press and
while
refedo
switch
(R)
ra
video is
while
driving.
Selecting
to
tch
to
Oth-
IN
)
car
ur
7.
setting,
and
es
to
you
the
2
Touch
the
system key
menu.
3
Touch Camera Polarity on
menu
to
select
the
•
Battery-
l
ead
VERSE
•
Ground-
lead
VERSE
• Off -
nect
•
The
home di
Setting
When
yo
to
th1
s
uni
ting.
•
As
th1s
unit will
setting.
•
You
can operate
v1d
eo
Press
home
display.
2 Touch
menu.
3
Touch Video Signal Setting on
menu.
Video Signal Setting
•
AUX-
• Camera-
signal
4 Touch
signal appears.
Auto-PAL-NTSC-PAL-M-PAL-N-SECAM
When the
is
pos
i
ti
ve
(R)
pos
When the polarity of the connected
IS
negat1
ve
(R)
positron
Wh
en a rear
ed
to th
is
rear
v1
ew
sp
lay screen.
the
u conne
ct
t.
select the suitable v
fun
ct1on
automa
s1g
na l
in
put
the
home button
the
system key
Adjus
ts
Adjusts the rear
.,..
or
.,..
to
to
open
the
the
system
appropriate setting.
po
larrty
of
the connected
while the shift lever is
1t1
on
wh
1le
the shift lever
v1
ew
camera
un
it
key
sett1
ng
video
this unit to an
1s
in1t1ally
tically adjust the vid
this
f
unctio
1nt o
the
to
item s are displ
th
e AUX
select
the
is
also turns off
signal
AV
eq
1de
o s1gnal
se
t to
Auto
n only
AV
1nput.
to
switch
open
the
the
ay
vi
deo sign
al
v
1ew
ca
desired video
1s
not
ui
eo
for
to
system
system
ed.
mera
system
in
RE-
in
RE-
con
-
on
the
pment
set-
,
the
signal
the
the
v
1deo
En@
Page 32

Section
Favorite
(
menu
)
Bluetooth
(
connection
menu
)
Favorite
Using
Refer to
•
menu.
2
for the desired menu
The star icon for the selected
•
the menu
3
the
Display
Yo
Touch
To
menu
operations
Menu
u can customize m
the star icon
cance l the
column
the favorite menu and choose a
Display
columns
us except
en
in
to
reg1Stmt1on.
.
1n
aga
on page
register
registered menu.
Refer to
Menu
operations
on page
Note
co
You
can
reg
ter up to
is
12
to
the
menu
touch
mns
lu
menu
register.
25.
Video
column
menu
the
is fille d in.
the star icon
25.
.
Setup
menu.
that
this
for
ce name. F
vi
de
for
Fo
for
switch
to
open
to
a device.
rch.
menu
be
can
search
to
0000
will
un1t
Bluetooth
de-
urther
r f
establishmg
the
the
to
the
cancel searchin g.
To
•
three de vices are already pa ired.
• If
d
1s
such
page
• If
played.
Bluetooth device and search again.
or
5
you
Whi
n-
i
conn ect
• If
ing). six
un
ber disappears.
• If
cases. try again from
•
can be changed. Refer to
Bluetooth wtreless connection
•
name
Touch the device name to
• If
phone. disp l
device.
and painng
ed
ay
l
1sp
delete a paired devic e f
es.
cas
32.
ce ca n be found .
vi
no de
cases. check the stat
such
In
a device name
Touch
connect to.
to
want
connecting,
le
established.
is
n
io
dev1ce
u1-
yo
number
-d1g1t
the connection 1s establ ished. this num-
Once
it.
connec
the
code is set to
PIN
The
connection is estab
the
Once
is d isplayed.
to delete a paired Bluetooth tele-
want
you
Delete OK?.
ay
s.
touc
cannot
Pairing
SS
appears on
Error
begi
the
0000
Entering
disconnect.
between the
Stop.
h
be pe rformed.
1rst.
Found
Not
us
select
to
layed.
disp
is
is
Paired
P (Secure
display of
the
is displayed.
.
nning
the
as
PIN
on page
she
li
Yes
Touch
Memory
d,
Sw1tchmg
names and Bluetooth de
dresse
support
tion fai ls.
ce
dev1
ad-
v1ce
Full
In
Refer to
-
iS
IS d
of th e
the device
If the
disp layed.
Pa
Simple
th1s
In
but
defau lt.
code (or
33.
device
the
delete
to
r-
i
such
the
Bluetooth
connection
operations
(Funct 1on of
Note
you are using a ce
If
connected via Bluetooth wireless technology, we
recommend that
th1s
for
in
it and your phone. The
as default. The product
displ
eta1
d
wireless connection
ta ils conce
Bluetooth wi
structi on manual for the phone.
Pairing
home
2
Bluetooth
3
4 Start
I
AVH-200BT)
ular phone
ll
u use your phone
yo
and establish a connect1on between
un1t
ur
yo
on
ay
ls, refer to
ng the procedures
rn1
less connections. refer to
re
from
the home button
Press
phone
Entering
PIN
name
as
PI
on page
this
code is set to
the
N code
33.
unit
display.
the Bluetooth key
Touch
connection menu.
select
Starti
ng
to
sea
to
Touch
Q
Connection
search.
to
I
@En
is displayed and
displayed.
re
switch
to
dev1
O
ce add
dev1ce
between
sses. t
re
searching .
While
able devices are found. the
Bluetooth device addresses (if
obta1ned) a
you want
• If
and Bluetooth
names
names
device
the
ouch
when
or
cannot
names
the icon.
avail-
be
turn
Deleting
the
oft while the p
un1t
00
Never
•
telephone is being deleted.
de"ce.
red
i
pa
a
ooth
Bluet
a1red
Page 33

(
Bluetooth
connection
menu
)
( Theme
menu
Section
) 8
Connecting
device
If
th
1s
function
tween
yo
ur Bluetooth device and this unit
take
pla
ce automati cally as soon
ces
are
less
Initi
ally,
this function
Press
home display.
2
Touch
Bluetooth connection menu.
3
Touch
connection on.
If
your Bluetooth device
wirel
ess
connect i
will
automatically
•
To
turn
Auto
Connect
If
co
n
nection
Retry?"
appears.
4
Once
you turn your
on
again, a connection
matically.
Switching
This function sets whether or not to make th is
unit visible to the other device.
Initially.
th
Press
the home button
home display.
2
Touch
Bluetooth connection menu.
3
Touch
•
To
turn
visibility
to
a
Bluetooth
automatically
is
set
to
on.
a connection
than a
fe
w meters apart.
is
se
t
to
the home button
the Bluetooth key
Auto Connect to
is
ready for a Bluetooth
on,
a connection to this un it
be
established.
a
utoma
tic
connect
i
ag
ain
.
fa
il
s.
·'
Auto
connection
Touch
Yes
to
vehicle's
is
established auto-
visible
is funct
the Bluetooth key
Visibility
on
unit
ion
is
set
to
to
select visibility off.
.
touch
Visibility
as
on.
to
switch
to
open
turn
automatic
on
o
ff
. touch
failed.
reconnect.
ACC
on.
to
switch
to
open
the two
to
the
to
the
again.
be-
will
the
switch
the
Entering
PIN
wireless connection
To
connect your Bluetooth
Bluetooth wi
devi-
a
PIN
connection.
can
change
Press
home display.
2
Touch
Bluetooth connection menu.
3
Touch
PIN
Code Input.
4
Touch
5 After inputting
store
I
~
re
code
on
Th
1t
the home button
the Bluetooth key
PIN
0
to
in
this unit.
I
I
Displaying
address
This
un
it displays its Bluetooth device address.
Press
the home button
home display.
2
Touch
the Bluetooth key
Bluetooth connection menu.
3
Touch
Device
vice information.
The
Bluetooth device address
code
for
dev1ce
l
ess
technology,
your Bluetooth
e default code is
w1th
this function.
Code Input
9
to
Storing the
to
input pin code.
PIN
code (up
PI
Bluetooth
to
Information
Bluetooth
to this unit
you
need
dev1ce
to verify the
0000,
to
switch
to
open
select
to
8 digits),
N
code
1n
this
Device
switch
to
open
to
display de-
1s
d1splayed.
to enter
but
to
the
to
the
yo
the
un it
the
u
via
Selecting
the
display) color
T
he
OSD
co
lor can
be
Press
the home button
home
display.
2
Touch
the
theme
settings.
3
Touch
Screen.
4
Touch
one
of
the
Selecting
the
display
You
can
switch
th
wh
en
listeni
Press
home display.
2
Touch
settings.
3
Touch
4
Touch
•
You
can
di
splay
.
•
If
no
JPEG
ca
nn
ot
select
unit.
refer
to
1
8.
•
If
you
want
touch
and
e background that
ng
to a source.
the home button
the
theme
Background.
the desired setting.
view
the
hidden
images
are
photo.
To
Cap
ture
an
to
de
let
e
ho
ld
the
k
ey
OSD (on-screen
changed.
to
switch
to
key
to
open
the
theme
colors on
the
list.
background
1s
displayed
to
switch
to
the
key
to
open
the
theme
settings
by
flicking
s
tored
in
st
ore
image
the
of
a
in
captured
the
JPEG
JP
JPEG
this unit,
EG
image
im
age
files
JPEG
to
on
image
.
you
this
the
th
page
•
e
,
En@
Page 34

Section
Other
(
Adjusting
positions
(Touch
u f
yo
If
screen deviate from the
spond to
trons
djustm
a
which you touch
!6-point
justments
Pa
•
fun
Touch the
•
Forcefu
damage
pointed
chanical p
screen.
If
•
rl
e
Turn
r to
fe
Re
Press
2
Touch
The four-po
appears.
touch both.
3 Touch each
ners
To
•
home butto
Press
4
point
Data for
Do not
•
save
functions
response
the
touch
the
of
Panel Calibration)
the touch panel
that
eel
ur touch. a
yo
the touch panel. There are two
of
methods: four-point
nt
e
adjustment.
on the
car
your
rk
Do no t operate it while driving.
n.
io
ct
y
ll
th e touch panel. Do not use a shar p
too
touch
the
consu
y.
the
Source
and
djust
corn e
ur-
fo
rn
tr(e screen.
en
a safe place and use
1n
een gently for a
scr
pressillg
l such as a
ing so m
Do
.
en
cannot
panel
lt your local
source off.
key
off
the home button
hold
Panel Calibration .
panel ad
touch
int
o1
two-p
When
the
of
screen.
the
of
justment. press and h
cancel the
ad
n.
home button
the
adjustment.
adjusted
the
turn off the engine
d.
ke
l posi
actua
es
the r
adjustment.
of the
r·s
whrch you make
dj
the touch panel
ballpo1nt
damage
ay
ad
be
P1oneer· dealer.
on page
s
ju
appears at once.
nt
arrows on
to
wh
is save
e
il
pos1t1on
panels
the
on
ys
that
tions
se
pon
sueen
fine
th1s
ent.
ustm
may
or-
pen
the
ed
just
6.
to
t screen
tmen
four
the
d the
ol
complete
d.
the data is
posi-
:
me-
prop-
start
four-
Press
5
point adjustment.
16
The
pears.
To cancel the adju st
•
home button.
-
re
Gently
6
played on
in
Afte r
and
adjusted pos ition is sa
d-
-a
•
sav
7
Do
ed.
Press
plete
Using
aux1liary
An
rately can be
About
You
Mini
When
mini plug cab le
iPods and portab
connected
If
•
cor-
be
ing
nected to this unit
pole) cable (such as the CD-V150M).
en
A portable
•
w
home button
the
pa
touch
-point
the
touch
screen.
the
the
all
touch
u
yo
off the
turn
not
hold
and
adjustment.
the
AUX
an
or
ce
dev1
connected
connection
AUX
connect
can
pin
connecting
iPod
an
joy
d.
iPo
nected by using a
an
rth
r.
eve
nection between the r
cabl e and
quired in order
image to be
auxiliary devic
plug
an
le
un
to this
vi
with
contents
video
the
audio
cable
RCA
depending on the cable. a reverse
llow (video) cab
ye
for
produced correctly.
re
to
l adju st me nt
ne
press and ho!d the
ment
of
center
the data for the
ks.
mar·
d.
ve
eng1ne wh1
the
le
home button
source
portable device sold sepa-
to this unit.
cable
audio/video playe
rt via
deo capabiliti
/v1deo player can
(AUX)
auxil1ary
v1a
3.5
device using a
i plug cable.
min
3.5 mm plug (four
of the connected
plug (fo
mm
separately).
ld
(so
r1ght
(
ed
the sound and video
16-
proceed
to
sueen
ap-
the + mark dis-
be1n
to
IS
com-
the data
methods
unit.
h1s
t
to
es
be
can
rs
con-
is
es
you can
n-
co
be
pole)
ur
How-
co
side audio)
re-
may be
le
)
n-
Other
(
• Insert
input jack on this unit.
Refer to
Resetting
By pressing
essor to its
bookma
e m icroprocesso r m ust be reset in the
Th
situat
ing
g
Before using
•
insta llatio n
the
If
•
When strange or
•
on
Turn
Press
2
pointed instrument.
Refer to
Note
tch
Swi
to ACC ON be
situat
ing
After completing connections
•
When erasing
•
Wh
•
trngs
functions
into
stereo mini
the
Connecting
the
RESET.
in1tial sett1ngs w1thout
nformat
i
k
r·
ions:
th 1s
unit fails to operate properly
display
the
ignition switch
the
with
RESET
wh
's
What
engine
your
e pressing
for
ions:
all
resett ing the unit to its initial (facto
en
plug
power cord
the
microprocessor
you can reset the
ion.
the
for
unit
rect messages appear
incor
OFF.
a pen tip or
on page
at
ON
stored settings
6.
set the ignition
or
RESET
the
on page
microproc-
changing
time
t
rs
fi
other
in the
AUX
36.
the
follow-
after
switch
ow-
ll
fo
set-
)
ry
)
@En
Page 35

( Connection
A
wARNING
In
some
countries
ages on a
sons
such
and
A
•
•
A
•
display
other
regulations
this
unit's
cAUTION
Do not
ment
to
play
uni
vibration
to
fail at
from
the
engine
curing
the
Make
sure
moving
le
v
er.
park ing brake
nism.
wARNING
Use speakers over
between 4
not
use 1
or
inside
than
the
apply,
DVD features
drill
a
hole
connect
t
to
the
vehicle
may
eventually
the
point
passenger
compartment.
wire
at
that
cables
parts
of
the
Q
to 8
n
to
3
n
states
the
a
vehicle even
driver
may
they
must
should
into
the
engine
the
yellow
battery. Engine
cause
where
the
co
mpartment
Take extra care in
this
point.
will
not
vehicle,
or
seat
sliding
50
W
(output
Q
(impedance
speakers
vie
wing
be
illegal.
be obeyed
cable
the
wire
interfere
such
va
value). Do
for
this unit.
of
by
per-
Where
not
be used.
compart-
of
the
in
su lation
passes
int
o
the
as
the
mecha-
lue) and
im-
dis-
se-
with
shift
•
The black
th
make
Make
connected
using
The
one
connected
screws. If
ens
tion
is
unit
sure
sure
a spade
ground
of
th
or
falls
of
smoke
Ground wire
cable
or
to
that
to
is
un
to
the
out.
power
connect
the
metal
terminal
wire
it
or
the
screw
it
or
is
ground.
amp
ground
parts of
of
the
any
car
separately
for
could
malfunct
the
other
~!V
L
~b
b
Other
devices
(Another electronic
dev1ce
in
the
*1
Non supplied for this unit
c!)=
Important
•
Th
1s
unit
cannot
without
ACC
(accessory) position on
ti
on
switch.
ACC
position
•
Us
e
th
is
unit
with
tive
grounding
sult
in a fire
bef
be s
ore
or
ur
in
•
To
prevent a short-circu1t. overheating
function.
below.
- Disconnect the negat
tery
Metal parts of
car)
be
insta
a
12-volt
only. Failure to do so may
malfunction.
e
to
fo
llow
iv
stallati
on.
)
When
installing
(sold separately).
ground
wire
fii"St.
cable
is
proper
ly
the
car
body
sold
commercially.
power
amp
and
the
device
must
be
with
different
the
ground
wire
loos-
resu lt in fire,
ion.
POWER
genera-
AMP
'~
\-
car's
body
lled
1n
a veh1cle
the
igni-
No
ACC
posit
ion
battery and
the
directions
e termi
na
l of the
nega-
or
bat-
re
mal-
-
( Connection
-
Se
cure the wiring with cable
s
iv
e tape. Wrap adhesive tape around wiri
that comes into contact with metal parts to
protect the wiring.
- Place all
compartment.
- Cover
with insulati
-
Do
- Never cut the insu l
th1s
other
cable
-
Use
- Never
to ground.
- Never band together
ple speakers
•
When
through
cable
terna
na relay
12
V
glass antenna,
booster
•
Never
power
Als
o,
of
the
battery
ca
bles aw
ay
such
as
the
sh
Place all cables aw
as
near the heater outl
Do
not connect the yellow cable to the battery
by passing it through the
any
disconnected cable connectors
ng
not shorten
un
1t 1n
order to share the power with
dev
i
ces.
IS
l
im
1ted.
a fuse of the rating prescribed.
w1re
the negat1
this
unit
is on,
the
blue
to
the
sy
stem
l
power
amp
con
trol
DC). If
the
ve
co
power
supply
connect
never
auto
ter
mina
dram
connect
antenna.
the
l of an external
or
a
from moving parts.
ift lever and seat
ay
from hot places, such
et.
tape.
an
y cables.
at
i
on
of the power cable
The
current capacity of the
ve
speaker cable direct
neg
a
control
/
white
cable.
remote
or
the
vehicle's
terminal
(max.
hicl
e is
equipped
nne
ct
it
to
terminai.
blue/white
it to
the
Doing so
malfunction.
cl
am
ho
le to the
t1ve
cables
si
gnals
Connec
control
300
the
antenna
cable
power
power
ma
ps
o1·
adhe-
rai
l
s.
eng
i
of
multi-
are sent
t
this
of
an
ex-
auto-anten-
mA
w
it
h a
to
the
amp.
terminal
y result in
ne
ng
Section
)GI
m
:::s
ce.
u;·
::r
of
ly
En@
Page 36

Section
Connection
)
Connection
(
)
Connecting
Yel
Conne
Orange.\vh
Conne
ed
R
or~n
C
Black (chaS
Connect
Front speaker
the
low
ect
to
ct
to
ct
to
to a
power
nstant
co
the
ite
sw1tc
ght1ng
li
al
m1n
ter
wound)
SIS
clean. paint-f
~
con tro
cord
Ante nna
sup
V
12
h term1n al
ed by
ll
met
e
re
ply term
lio
n1
1g
locat ion
al
Ti
mal
n sw1tch
lS
l
product
V DC)
12
(
remote in put
ed
l-
Wi
Hard -w
USB/ i
AUX
U
remote control adapter can
11ed
input
d
Po
50)
(3
k
Jac
i plug cabl e to connect
min
a
se
~
ophone input (Function of
icr
M
with a
B cable (S
US
AVH-200B
co nnected (so
be
ice
ev
d
il1m y
ux
with
plied
up
TJ
et/
V1ol
the t
Of
when
nse whether the car is moving forwards or backwards .
se
ght green
Li
de
to
ed
Us
This lead must be con
brake.
supply side of the
ly)
separate
ld
this unit) Conn ect to separ
1te
tect
wh
the
wo
gear s
the
conn
lead wi res
IS
hift
s
OFF
/
ON
parklllg bl-ake
1n
tatus
nect
ly
e
at
ected to the back
ERSE
V
RE
the
park1ng
of the
to the power
ed
switc h
sold USB de
am
l
1on
posit
R)
(
p.
vi
conn
This
.
ce .
ect the one
1o
connect
which the voltage changes
1n
enables the un it to
n
@En
Blue/white
Connect to system control terminal of the power amp or
auto-
re
antenna
a 2 speaker system. do not connect
VV!th
are not connec ted to speakers
that
lay con
ol
tr
terminal
ax
(m
300
mA
anyt
2 V
';
h1n
C)
D
to the speake r leads
g
Page 37

( Connection
)
( Connection
)
Section
GI
When
Rear ou
connecting
tput/
Su
bwoofe r
output
Blue/whrte
Connect
to system
power am p or auto
termina
l.
(max
300
to
separately
Se
to the preout setti ng.
cont r
ol
term in
-a
ntenna
mA
al
rel
ay
control
12
V
DC
)
lect
of the
a
cable
Left
sold
Connect
(sold
accord ing
System remote
power
with
RCA cables
se
paratel
y)
con
amp
tr
ol
Right
When
Thr
This
product's
tion of a
seats to
A
Never
vis1ble to the
tion.
display
watch
wARNING
install
connecting
s
prod
uc
t
rear video ou
to
enable
the
OVO,
a rear
disp
dn
ve
r
while
tput
passengers in the rear
etc.
lay
in a
the vehicle
the
display
is for connec-
location
that
1s
1n
Rear
(
VOUT
mo-
monitor
)
is
out
put
To video
v
~
pul
Pedorm
using the
the
se
connections when
optional
amp
lifier.
......---:
:
Subwoofer
Rea
r spea ker
Front speaker
Subwoofer
Rear speaker
Fr
o
nt
speaker
En@
Page 38

Section
Connection
(
)
( Connection
)
When
view
you sw itch the shift lever to
If
di
the rear view image.
Camera Polarity
use. For details on
ear
r
Yo
pressing the
Using the
A
USE
ROR IMAGE
USE
connecting
camera
au
will
unit
s
splay on
th1
You
ly
proper
settings
up camera)
(back
camera
view
u can also switch to the rear v
rear
touch
view
panel
on page
wARNING
ONLY FOR
INPUT
RESULT
MAY
REAR
VIEW
IN
AGE.
cAUTION
A
must use a camera which outputs
You
•
mirror reversed images.
may appear reversed.
The screen
•
The rear
•
as an aid to
backing up. Do
purposes.
Objects in
•
more
image
camera
ew
vi
ep an
ke
e rear view may ap
th
than
distant
ey
use for entertai
not
the
rear
call y
Setting the
on page
1ew
detai
or
1m
a
sw
age
ls.
(R)
ch
1t
unit
refer to
with
REVERSE
tomati
need to set the
the system
1n
, refer to
y. F
ke
7.
REVERSE OR MIR-
CAMERA. OTHER
unction
tr
e on
OR DAM-
be
to
1s
or
s.
ailer
nment
ar closer or
pe
INJURY
f
y actuall y are.
the
.
to
to
31.
by
used
while
era in put
Rear view c
V'olet/wlltte
Of
conne
connect
vo
gear shift is 'n the
(R)
enables t he
sen
movtng
backwat·ds.
am
wires
ad
le
the two
cted to t he ba
1n
the one
ltage changes when the
stt1
po
whe
se
s connec
Th1
on.
to
unit
r the car
\11e
forvvards or
REVERSE
ck
wh;ch
lam
1s
(R.C
the
t1on
)
IN
iPod
with
When
lightning
connecting
connector
optional
with
CD-IU52 cable
cable
" RCA
old
(s
vtdeo
To
p.
se
pat·atel
output
y)
USB cable
(Supplied
nnect
Co
USB device.
Lightning to
2)
5
IU
D-
(C
is
with th
to separate
USB
sep
(sold
unit)
ly
Cable
at·
sold
ately)
with
iPod
When
CD-IU201V cable
30-pin
connecting
1?1
...;;. '
' USB ca
Supp
(
Connect
USB device
cable
Interface
201V) (sold
IU
(CD-
connector
with
(4ft
m
5
1.
·-~----'
I
ble/
lied with th is
to separate
7
separat
y)
el
optional
11 in.)
it)
un
sold
ly
@En
Page 39

( Installation
)
(
Installation
Section
)fl
Notes
• Check all
final installation.
•
Do not use unauthorized parts as
cause malfunctions.
• Consult
drilling
vehicle.
•
Do
- it
- it may cause injury to a passenger as a result
•
The sem i
it overheats.
places such
•
Optimum
un it is
When in stallin
persal when using
leave
wrap any loose cables
ing the
•
To
some types of vehicles,
properl y installed.
tional installation kit (ADT-VA
connections and systems before
y
our
dealer if installation requ ires
of holes
or
other
modifications
not
install
this
unit
where:
ma
y interfere with operation of
of a sudden stop.
conductor
performance is obtained
installed
ample
ve
nts.
Leave
amp
space
laser
will
In
stall
th is
unit
as
near the heater outlet.
at
an
angle of
g,
to ensure proper heat dis-
this
unit. make sure you
space behind
le
In
so
such
the
they are
this
case, use
this
the
be
damaged
away
from
when
less
than
rear panel and
not
unit
cannot
the
133).
ma
y
to
the
vehi cl e.
if
hot
the
30
°.
block-
be
op-
Installation
holes on
•
Fastening
mounting bracket.
Position the
aligned with the screw holes of the bracket. and
tigh
ten the screws at three locat ions on each
side.
CD
If
the
pawl
@
Factory radio
·
J::
.
Use eithe r tru
face
(5
the kind of
screw ho l
C4)
Dashboard or console
using
the
side
the
unit
unit
so
that
l;J
~
gets in the way, bend it down.
mounting
ss
(5
mm
x 9 mm) screws. depending on
sc
rews
es
wi
ll
accept.
the
of
the
to
the
factory radio-
its screw holes are
~--....._
r;J&
c~@
bracket
mm
x 8
mm)
that
the
mount
screw
unit
p,.,
1---
or flush
ing bracket
sur
Installing
(Function of
A
It
is extremely dangerous to a
phone
ing
unit
ing.
Notes
• Install the
entation
voice of the person operating the
• Use separately
lead where necessary inside the vehicle.
When
on
Fit
CD
:1)
2
Install
visor.
-
With the
clip. (Lowering the sun
recognition rate.)
AVH-200BD
cAUTION
lead
to become
column
or
sh
in such a way
micr
that
installing
the
sun visor
the
microphone
Mi
cr
oph one
Groove
the microphone
su
n visor
the
microphone
ll
ow
wound
around the steer-
i
ft
lever. Be sure to
that
it
will
not
obstruct
ophone
1n
a
posit1on
will
enable it to pick up the
so
ld
clamps
to secure the
the
microphone
lead
into the groove.
lead
clip
on the
up
,
install
the mi
v1sm
reduces the
the micro-
install
and ori-
sy
stem.
sun
crophone
vo1c
the
driv-
e
(D
Micr
When
on
the
Detach
crophone
To
detach the
phone
cli
Microph
:I
.·
Microphone
Q·
Mic
'
oph one
cl
ip
installing
steering column
the
clip.
microphone
p,
slide the
one
r-oph
one base
the
microphone
microphone base from the mi-
base from the micro-
microphone
clip
base.
En@
Page 40

Section
Installation
the microphone on the steering
Install
2
column.
le-stded
ub
Do
L
th e
ll
Insta
'
'?
steering
Adjusting
tape
microphone
mn.
lu
co
microphone
the
on
rear side of
the
the
angle
)
Additional
(
information
Troubleshooting
itten in bold and causes in reg-
wr
Symptom
ul
used to indicate actions to
Common
The
The unit
Leads and conn
The fuse is blown .
Not
mi
Operation
ble.
The unit does not operate correctly even
the appropriate remote control buttons are
pressed.
Battery
Some
Playback
The
The ty
The disc loaded is
s are
non-indented text. Regular.
ar.
not turn on.
will
power
not operate.
will
s are tncorr-ectly
ector
tha
more
once
Conf1rm
rect.
cor
e cause and
th
Rectify
to install a
re
su
r
/o
and
se
rocessor to operate
crop
RESET.
Press
with
power
Load a new batte
operations are
operatmg
Try
not possible.
is
is di
disc
the
Clean
of disc loaded
pe
untt.
the di
Check
tem.
the
Change
your vtdeo system.
e w1th
fus
factor
other
(Page 3
the remote control
is low.
ry.
prohib
another
wtth
rty.
sc.
dt
type.
sc
compat
not
to one
dtsc
mdented
taken.
be
con
to
ct
nne
co
t all
the
place
·e
1
then
rat
same
the
re
dtsc.
be
ible
ctl y.
ts
the
not
is
played on
this
wtth
compat
e caustng
ar
s
incor
4)
ited wi th certain d iscs.
cannot
that
nected.
ns
fuse. Be
ing
built
tble
text
e
ar
.
possi-
when
thi
deo
vi
wt
There
The volume level
Cables
IS
Con ne ct the cables
The
ame
fr
Ther
fr
There
The parktng brake cable
The parking brake is
-In
The
possible.
The
The
tion
The image displayed stops (pauses) and
cannot be operated.
The
There
The volume level
s
The vol
he
T
sys-
The sound and video skip.
th
The
no sound.
is
not con nected
re
a
performmg
is
untt
.
ck
playba
no sound
IS
·e
ame
-by-fr
ame
no image displayed.
is
par
the
Connect
ing brake.
park
the parktng brake cable. and appi y
ect
onn
C
ki
par
t$l
operation
ts
Th
operat
of
Thts
data
Stop
Adjust
attenua
Turn
un
rmly secure the
Ft
e.
br-ak
ng
displayed, and operation
is
icon
is prohi bited
operatton
ion is not co
the disc.
operation is
no long
could
playback
no sound.
is
level is low.
ume
volume
the
is on.
or·
t
attenua
the
firm
not
it is
rise.
not
will
cot-rectl y
correct
sttll. slow
g
dunn
k.
playbac
not
tS
ake cable. and
br
ing
-k
appl
not
not posstble.
ts
mpa
possrbl
not
be
er
. and start playback agatn.
once
low.
is
level.
off.
tor
secut·ed.
ly
un1t.
ly
fra me-
or-
tton
mo
sttll. slow mot1on or
d.
ecte
onn
c
app
d.
ie
is
.
sc
di
the
for
nf
co
he
t
wtth
tible
e.
the
playback
dunng
read
ly
not
gu
i
by-
the
th
r-a-
unit
)
e
.
@En
Page 41

( Additional
File
sr
ze
and transmissron rate are above
mended rates.
Create
a
DrvX
fi
le
tha
re
commen
d
The aspect ratio
stretched.
The aspect ratio setting is i
Select
the
(Page
ap propnate
27)
The motor sounds
turned
ON
(or
The
unit
is
co
nf
loaded.
This is a
Nothing
The touch
Th
e r
ea
Co
nnect
Camera
Press the
displ
irmi ng
no
rmal operation .
is
displayed.
panel
r- v
rew
camera
a rear view camer
Polarity
home
ay
and then
Camera Polarity.
No
xxxx appears
(No
Title,
for
example).
There
rs
no embedded text
Switch the di splay
Subfolders cannot be
Folder repeat
Sele
ct
the
pl
ay
repeat range
The repeat range changes
Another fol der was
Se
lect
the repeat
Track search
during fi
Se
or
fast forward/ reverse was
le
repeat play.
lect
the repeat range again.
t is
ed
s
ize
and
is
incorrect and
when
is
turned
whe
keys cannot be used.
rs
not
is at
inco
button
se
lect
(Page
when
a
or
play another·
played back.
has been
se
lected
mnge
information
recom-
withrn
the
tr
a
nsmi
ssion rate.
the
image
ncorrect
fo
r the
not
a disc is
in
g.
to
is
changed
track/fil
displa
our
display.
the so
setting
play.
perfor·m
urc
e.
settrng
for y
the
ignition switch
to
ACC).
ther
or
connected.
·a
.
rrect
sett
to
re
turn
the
correct
31
)
display
rnf
or
matron.
se
l
ected
again
.
automatically.
du
ri
ng repeat
agarn
for-
)
the
is
ll
ts
resu
en
that
ar·
It
Ap.
-
(
)
Playback
The loaded
this
is
y.
A
back
Par·en
is
Parental lock
The code
You
Dialog language
be switched.
The DVD berng
e
guage
You ca n
disc menu.
No subtitles
The
You
disc menu.
ed
is
not
possible.
disc
uni
Replace the
region
parental lock
is
tal lock
Tum
28)
Enter the
ha
ve
P
r·e
ss
re
The language ca n
re
corded on the
Swrtch the langu
has a different region
t
disc
number
message
not
possible.
is acti
parental
lock
cannot be
number
cor-rect
forgotten
RESET.
(Page
(and
play
co
rd
ings
.
only
swi
tch
wrth one
as th is unit
va
te
d.
off or ch ange the
canceled.
is i
ncor
rect
code
you
r·
c
od
34)
subtitle language)
ed
does not fea
not
be swit
drs
c.
between
ag
e usrng
are displayed.
DV
D
berng played does not featu
Subtitles are not displayed
recorded on the disc.
can only swrtch between
Swrtch
the
language
usrng
featunng
is
displayed
numbe
e number.
ched
items
the
rf
the
items
the
number
the
and
level.
r.
(Pa
ge
28)
ture
mu
if
the
indicated
disc menu.
re
subt
y are
not
indrcated
d
rsc
menu.
same
play-
(Page
cannot
lt
rp
le
y are
in
rtl
es.
in
the
from
lan-
not
the
Additional
Playback
language
in Video Setup
The D
tit
The viewing
The DVD
fmm
You
scene that was not
The image
dark during
Some discs feat ure a
Video
The
called
The
is
not
performed
and
subtitle language
menu.
VD
berng play
le
s
in
the selected language.
Th
e l
anguage
languag e
be
m
ult
iple angles.
The
vi
ewing
does not feature scenes
angles.
ar
·e
trying
Switch
scen
es
ed
cannot
rs
not recorded on
angle
cannot be switched.
rng
pl
ay
ed
angle
to
switch to
recor·ded
between
mu
recorded
fr
is
extremely unclear/distorted
playback.
Since
th is
un
it is
compa
copy generatron ma
playing a disc
copy rng.
may appear when viewed on
is not a
honzont
malfunct
that
al
ion.
CD
PBC
(playback control)
up.
Vi
deo
CD
being pla
Th
is ope
ra
tion is
a
ture
not
PBC
do not
fe
information
with
the
settings
does not f
does not
canno
ltiple angles when
om
signa
nagement
has a signal
stripes
ye
a
eatur
be sw itched if
the
dr
feature
t be swi
tched
recor·ded
multi
mu
l to
tible w
-angle
from
ltiple
pr-oh
or
multiple
ang
ibit copyr
ith
system.
prohib
ot
her
so
me
fr
the
menu cannot
d doe s not fe at ure
va
ilable
f
or
Vi
audio
e di
alog
the
sc.
scenes
om
vi
ewi
watc
les.
an
when
i
ting
r
mpe
display
deo
selected
or
su
selected
shot
if the DVD
mul
tr
ple
ng
f
or
a
angles.
hing
and
ng.
alo
g
rfectrons
s.
This
be
PBC
COs
that
Repeat
play
and track/time search are
possible.
The Video
b-
CD
Th
is operation is not a
feature
P
BC
iPod
The iPod does
The cables a
The i
Sound
Th
e
when the Bluetooth and
at the same
Use the
direct ion.
Bluetooth
The sound from
not
played
There is a
cellul ar
The sound
te
A
Bluetooth
be
rng
Do
A
call
phone and then rmmedr at
commun
phone was not term r
Reconnect the
this unit and
re
Di
sconnect
iPod·s
marn
iPod and reset
Po
d version is
Update the iPod
from the iPod cannot be heard.
audro
output
trme.
iP
od
audio/telephone
back.
call
in
phone.
wrll
rmin
ate
d.
connected
oper·ated.
not
use the
was
made
ication between
being played featu
not
operate
incorrectly connected.
the cable from the iPod.
menu
rs
it
old.
vers
dire
ctr
on may
to c
hange
the
Bluetooth
pr
og
re
ss on a
be play
cellular
c
el
lul
ar
with a
Blue
nat
ed
Bluet
ooth co
the
cell
ular
re
s
va
il
able f
or
correctly.
displ
ay
ed.
ron.
switch
USB
connect
the audio
audio source
Bluetooth
ed
back
when
phone
phone at th is time.
tooth connec ted
ei
y
terminated. As a
this
unit and the
proper
ly.
nnection
phone
not
PB
C.
Video
COs
Once
reconn ect the
au
tom
atrcal ly
i
ons
are used
output
connected
the
ca
is c
ur
rently
cellul
cellular
betwe
En@
Page 42

Appendix
Additional
(
information
)
Additional
(
information
)
The Bluetooth device cannot be paired
with
unit.
The
Bluetooth
stered
reg1
Delete
e Bluetooth
th
device register-ed to this unit. if not deleted
already. Then.
un1t
th1s
dev1ce.
th1s
to
i
the
again.
or
un1t.
nformation
dev1ce
try
the Bluetoot h
for
that
was deleted somehow.
this
r
fo
that
d
an
patring the Bl
unit
the
for
uetooth
dev1ce
registered
Bluetooth
device
to the
ed
r·egister
this unit
for
tion
ma
for
in
Error messages
dealer or your nearest
your·
When you
Pioneer
message.
Error messages are written in bold and causes
in regular,
text
Common
AMP Error
This
incorrect: the protecti
Tuner
No Data Provided
Th
mation.
contact
sure to note the
Service Center.
non-rndented
used to indicate actions to
is
to oper
fa1ls
unit
speaker
the
Check
disappear
to
fails
switched
authonzed Pioneer Serv1ce Stat1on
assistance.
is
off/on.
cannot
unit
Move to the desirable location
1on.
recept
be
text. Regular, rndented
te or the speaker
·a
circuit
ve
connect1on. If
after
even
our
y
contact
name
artist
e
iv
rece
is act ivated.
the
dealer
taken.
be
connection
the message
is
engrne
an
or
for
/song title
good
with
this
to
to
error
nfo
i
No Data
cannot
unit
Th1s
tion .
ma
Move to the
reception.
Different Region
The d isc does not have
unit.
this
Replace the DVD
region number.
Error-02-XX/FF-FF
The dtsc
The disc is scratched.
The
1s
is dirt
the
Clean
Replace
IS
d1sc
Check
There is an electrical
RESET
Press
Unplayable
type of
1s
Th
Replace
is uni
th
The inserted disc does
Replace
Protect
the ftles
All
DRM.
r-
Replace the
Skipped
ert
1ns
The
an
Play
a™
Med i
name
t1on
service
th
w1
good
program
receive
des1rab le loca
Disc
number
reg ion
same
the
with
y.
disc.
disc.
the
loaded ups1de
disc
the
that
or
(Page
.
one bearing the
down.
is loaded correctl
ical error.
mechan
34)
correct
y.
Disc
unit.
1s
that
can
th
played on
be
any playable
ftles.
d1sc
disc
the
t.
disc.
the
on the inserted d isc are embedded w i
disc
ed
audio
DRM
with
d1sc.
contarns
le
fi
/1
9
one
contam
not
DRM protecte d
embedded with W
not
0.
be played on
cannot
indo
info
as
f1les.
th
ws
TEMP
r-
temperature
The
erating range .
until the
Wa1t
the
thin
wi
This DivX rental
The inserted disc
.
tent
ect a file
el
S
Video resolution not supported
e inserted disc
Th
1/MPEG-2/MPEG-4
EG-
MP
Select a ftle
possible
not
is
It
flash
untt's
Thts
age area is fu l
Select a file
Your device
is
protected video.
D1vX
unit's
This
thorized by the Di
th1s
Register
provider.
Unplayable
This type of file
Format
Somet
back
File
Select a file
Read
imes there is a delay between the start of
and when you start to hear any sound.
Wait unti l the message disappears and you hear
sound.
Video frame rate not supported
DivX file's
frame
Select a file
is outside the
unit
of the
returns to a
un 1t
opet·ating
normal
expired.
has
contains
at can
th
contarns
can be played
that
write
to
memory
l.
can
that
not authorized to
registration code has not been
D
VO
vX
to the
unit
be played on
cannot
can be played .
that
is
r-ate
can
that
temperature
mits.
li
expired DivX VOD con-
played.
be
finition
a high de
e.
il
f
the flash.
in
it
temporary
the
as
used
be played.
play
vX
D1
than
played.
provid
VOD
30
contents
this
fps
contents
more
be
l
norma
DivX/
this DivX
a
er·.
un1t.
Audio Format not supported
is not
op-
This type of fi
Select a f
le
e that can be play
il
External storage device (USB)
File
type of f1le
a1·e
ity f
k and when you s
a1
W
sound.
connec
Play
Med1
the
ia
Transfer
Media
player/USB
cannot
that
le
a fi
songs
no
aud1o fi les to the USB portable
the
fer
con nected USB
the
or
USB
the
low
there is a delay between the start of
mes
i
the message disappears and you
t unt1l
ted USB portab le audio player
ms
conta
™
ia
Med
an aud io f
DRM
a™
files on the connected USB
memory
/USB
0.
/1
9
DRM
audio
DRM
memory
stor-
u-
play-
Unplayable
Th1s
Select
There
Trans
player/USB memor-y and connect.
Secur
Fol
secur·ity.
Format Read
Somet
bac
Skipped
The
memory
Windows
Protect
All
ayer
pl
Med
suppotied
be played on
can be played.
rnstructions
memory
hear
to
tart
that
files
WMA
10.
9/
DRM
embedded wi
not
e
il
9/10.
are protected by Wi
protected
not
files
to the USB
10
9/
and connec
on th s unit.
.
ed
1s un1
th
y is enabled.
memor
to d
any sound.
/U
are protected by
Windows
th
rtable
po
ndows
Windows
by
aud1o
able
pori
t.
t.
1sa
SB
aud1
aud1o
bie
pla
heat-
o
y-
@En
Page 43

(
Additional
information
)
(
Additional
information
Incompatible
The co nnected USB de
un
i
t.
Co
memory
comp
The
USB device
or FAT
The connected USB device should
with
Check
The
USB connector or USB
ci
rcuited.
Check that the
not ca
The
connect
than maximum
D1
sc
memor
sw1tch
connect a
USB me
USB
vi
ce is not support
nne
ct
a USB portable au
that
is
USB Mass Storage Class
liant.
is
not formatted
32.
FA
T1
2.
F
AT
16 or FAT
USB
US
B connect
ugh
t in something
ed
USB storage de vice con sumes
allowab le
onnect
the USB portab
y and do no t use i
to
O
FF.
comp
mo
ry.
current.
then to
A
li
ant
USB portable audio player/
32.
cable
or
t.
CC
T
dio
pl
ayer
with
has
or
or USB
damaged.
le
aud
1o
urn
the i
or
ON and th
ed
or
FA
T12.
be
form atted
sh
ort-
player/USB
gn
Error-02-9X/-DX
Commun icatio n f
Perfo1·m
-Turn the i
-Di
sconnec t the USB portable audio player/USB
memory.
-C
hange
Th
en.
USB me
This
DivX
The
inserted external storage device contains expired
OivX
VOD
Select a
ai
led.
one of the
to a
re
tu
rn to the USB portable audio
mo
rental
content.
fi le
gn
ition
d1fferent
ry.
has
that can
follow1ng
switch
source.
expired.
be
played.
OFF
operat ions.
and back
by
USB
FA
cable
itio n
en
ON.
pl
aye
this
T16
m
r/
is
or·e
Video resolution
The inserted external storage device conta ins a high
definition
Select
It
is
not
possible
Th1s
unit's flash
age area is
Select
Your device
not
supported
DivX/MPEG-1/MPEG-2/MPEG-4 file.
a
fi
le
that
can
be
play
ed
.
to
write
it
in
the
flash.
mem
o
ry
used as the tem
ful
l.
a
file
that
is
not
can be pla
authorized
yed
to
.
play
po
this DivX
rary
protected video.
This
un1
t's
D
1vX
th
or
i
zed
by
Reg
1ste
provider.
registr-at1on code has not
the Di
vX
V
OD
contents provide
r thi s
unit
to the
D1vX
VOD
be
en
r.
co ntent s
au-
Format Read
Sometimes there is a
back and when you
Wait
until
sound.
Video frame rate
Di
vX
file's frame rate is more than 30 fp
Se
lect a
fi
Audio Format
This type of
Select a
file
file
Creating the Database has
The mode was sw
pl
ay
whi
le
the database was berng
Create
the database again.
delay
start
to hear any sound.
the message d
not
supported
le
that
can be pla
not
supported
is
not
supported on this unit.
that
can
be
itched
to
between the start of play-
rs
appears and you hear
s.
yed.
play
ed.
failed.
vi
deo
or
JPEG
image di
created.
(Page
17)
stor-
s-
iPod
Format Read
Somet
1me s
there
1s
a
de lay between
back and when you start to
Wa
rt
until
the message
sound.
hear
d1sappears
Error-02-6X/-9X/-DX
Communicat
Disconnect
iPod's
i
iPod
Disconne
iPod's
i
Pod
and reset i
failure.
Po
d
and reset it.
ion
ma in
ct
ma
in
failed.
the
cable
fr
om the i
men
u is displayed. reconnec t the
t.
the
ca ble
fmm
menu
is d i
sp
lay
Error-02-67
The
iPod fir
mwar
Upda te the
e version is
1Pod
versio
old.
n.
Stop
The
r·e
are no songs.
Tr·a
nsfer
song s to the
There are no songs in the current
Select a
lrst
that
Not
Found
No
related so ngs .
T
ra
nsfer songs
iPod .
contains songs.
to
the iPod .
iTunes tagging
iPod
full.
Tags
not
transferred.
Me
mor
y used f
or
tag
informat
Sync the
tagged
pla
iPod
yl
with
ist.
ion on the
iTunes and
a
the i
ed
list.
clean
th
e sta
ny
sound.
and you hear
Pod.
Once the
Pod.
Once the
. r
econnect
iPod is
up th e
Memory
This uni
play-
age area
rt
of
Tag transfer
Th
iPod.
Tag
Ta
the
full.
Tags
t's
flash
memory used as the
IS
full.
The tag i
nform
ation on this unit is
the
iPod automatically
connec
t
ed.
failed.
1s
unit'
s
tag
in
formation
Ch
eck
the iPod
store
failed.
g information cann
Tr
y
agarn.
not
stored.
Connect
temp
when
an
iPod
Reconnect your iPod.
cann
ot transfer to the
and try
aga1n.
ot
be stored in this unit.
iPod.
or
ar
y
tr
ansferred to
is
sto
r-
Error-SO
Built-in FLASH
T
urn
ROM
the ignition
enco
O
FF
or
unt
er
ON.
ed
an error.
Already stored
Th1
s
tag inform atio n
Tag
infor
gi
ven
song. T
the same song
ma
tron can
ag
mo
IS
rnf
or
re
already stored
on ly
be sav
mat
ron
cannot be saved for
than
once.
ed
in
memory
once
for
any
Bluetooth
Error-10
Th
e po wer
failed
f
or
the
ition swit
sa
ge
Bluetooth
ch
is
unit.
Turn the i
ON.
If
pe
fu
ll
dealer
.
gn
the error mes
rfor
min
g the above acti o
or an authorized
OFF
st
ill
display
n.
Pioneer
mo
du
le
and then to
ed
after
pl
ease
contact
Service Station.
of th
A
CC
is
or
you
r
En@
Page 44

Appendix
Additional
(
unica
sconnect
Di
,Pod' s
d and
Po
1
up
Pand o
art
St
Phone
i
to
y again
Tr
to
e
bl
Try a
ma
the
up the Pando
to
to
gain
r'R
tion
1·a
.
save
save
save Bookmark.
sa
Pandora
Error-19
Comm
Start
vice.
The
Unable
Unable
Unable
Una
information
.
fa1ied
1Pod.
from the
cab le
the
in menu is
set
re
Pandora Application from your De-
app
later.
ve
later.
displayed.
:t
has not
cat:on
!1
applicat1on
ra
rating. Try again later.
thumb
:·ating.
mb
thu
Bookmark.
sta1i
again later.
Try
reconnect the
On
runn:ng
ed
om your
fr
ce
the
Pandora
Device.
Unab
Please
No
et.
y
No Active Station
No stat1on
Communication error occured. Please reconnect
your device.
is
mus:c fmm
ay
pl
to
le
yo
k
chec
se
ea
Pl
create station. Application on Device.
found.
stat1on
a station in
Create
hone.
1P
you:·
selecte
stat:on.
a
ect
l
Se
ACK
1s no
there
If
accessor
e
th
ms.
750
nicat:on is
andoralink.
P
Please
up
interr
reconnect y
Pandora.
e.
iPhon
ur
Pandora
the
d.
emp
att
10
fter
a
assume
shou ld
y
ted and disconne
iPhone and t
our
ted
music.
play
to
unable
see
Please
appl:cation
retnes
commu-
that
from
ct
agai
ry
at
your
on
n.
)
Additional
(
Understanding
Messages Translation
Screen image may
appear reversed.
information
messages
Pioneer recommends
the use of a camera
which outputs mirror-
reversed images.
erwise, the screen
image
versed.
will
appear
Oth-
re-
Indicator
a 1
Are
3
ea
Ar
1
Area
list
1cat
lnd
USted
J
es
.
that th e
vo
Are
lume
a 2
IS
)
-
ad
Pandora system maintenance. Try again
system is unde r
andora
P
aga m lat e:
Try
reached.
limit
Skip
reached.
im:t
:p l
Sk
exceed
not
Do
This version
supported.
Th:s vers
1on
po:i ed.
onnec
C
vers1on
Check Device
rm
er
ce
Devi
cat:on.
Please check you r
of
of the
an iPhone
t
of the Pandora
me
going
·.
skip
the
the Pandora Application
Pando:·a app l
that
ssage display
1Phone.
@En
lim it
h
appl
main
as
1cat
ed
tenanc
1cat1on
com
a
1on instal l
the
in
later.
e.
is
not sup-
1s
pat:ble
ed.
Pando ra
not
appli-
to
low
l
Fo
screen.
th
ow
l
ol
F
screen.
ow
Foll
screen
not
oth de
the
conn
the
connectio
the in
Device has
Connection
No Blue
Connection
uetoo
Bl
Disconnected.
device.
Bluetooth
been registered. Go
register.
to
Menu"
d.
foun
e
v1c
instructions
failed.
ect1
Instr
Press
struct
that appear on the
"Connect"
Press
1led.
on fa
that appear on the
ctions
u
"Connect"
lost.
n
that
ions
"Biuetooth
to
retry.
to
reconnect the
to
appear on the
Area2
lnd1cates
n.
o
is
when
Shows
ion (tag ) fr om a
nformat
i
rece:ved.
t:on is
Indicates
D:gital.
by
Dol
es
1cat
lnd
Aud:o.
MPEG
lnd:cates
Linear PCM.
t the
tha
down,oadable
that the
that the
that the
mute funct1on
song
rad:o sta-
fonllat
ital
1g
ci
orma
f
1tal
01g
mat
for
al
it
d1g
is
1s
t
:s
Page 45

(
Additional
1
ch
1+1ch
2ch
Multi
ch
information
In
dicates
th e
quen
cy.
Indicates that
DTS.
Indicates
the audio channe
sampling fr
th
e digital f
e-
orm
(
)
Show
the al
bum
title when rece
1ng
the tag
mforma
ay
fi
ing pl
ay
/W
AV
f
1l
comment
t1on.
ed for
l
es.
of the song
ed
f
es
.
cur-rently
at is
rn
l.
00
I
««~»»
1©1
Shows the album title of the
currently being pl
WMNAA
Shows the song title when receiv1ng the tag information.
Shows the song title
cur
WMNAA
Shows the
being played.
Shows the station name cu rrent
I
tuned
rent ly
in
C;WAV
be
C
to.
or
so
MP3/
MP
3/
ng
iv
-
ly
Additional
Shows the categor-y name.
Shows the folder name
folder
AAC file
Shows the
WM
NAAC
played.
Shows t
station current
to.
Shows the
being tuned
information
conta1n1
currently
fi
le
fi
le
he
pre
se
channel cu rrently
in
of
ng
the
MP3
/
be
ing
played.
name of the
currently being
t
number
of the
ly
be
ing tu ned in
to.
the
WMN
MP3/
I
ndicates
that
the unit
processlllg
se
arc
Shows when
base in
Shows when
in Music browse mode.
lnd1c
the
lnd1c
phone is connected.
an operat ion such as
h.
creatillg
Music
savlllg the database
ates the
si
ce
ll
ular
phone.
ates
that a Bluet ooth
browse mode.
gna
l strength of
is
the
current
data-
tele-
ly
In
dicates
that a
disc with
is
be
ing play
ed.
• Indicates
ph
•
In
call has been rece
has not
Indicates the
the ce
•
Th
tor
battery strength.
• If the
a
va
1n
tor
Indicates
Bluetooth de
Bluetooth telephone.
Indicates that
Bluetooth de
Bluetooth
that a
one
1s
connected.
dicates
that
an
be
en
c
batte
ll
ular
phon
e.
e level
shown
may differ from the actual
battery str
ilable.
nothing
the battery
a
rea.
that
vi
vi
audio.
the
ce
the
ce
strength llldlca-
connecte d
only
con
only
cellular
incoming
iv
ed and
he
ck
ed
r-y
strength of
on
the llldlca-
en
gt
h is not
is displayed
supports
ne
cted
supports
PBC On
yet.
Shows the art1st name wh
w
rn
ceivi ng the tag
Shows the artist name of the
tist
curr
MP3
/WMNAAC/WAV
Shows
tion.
Shows
tion.
Shows home phone
in
formation.
-e
ntly being pla
cellular phon e informa-
general
ye
d for
fi
l
es.
phone informa-
1nf
ormat!on.
~
0
Shows off ice
Shows o
ther
pho
ne
phone
informat1on.
mf
or·mation.
rn Shows the com poser name.
en
re
-
ar-
rn
Sho ws th e
being pla
Shows the chapter n
r-ent
Shows the repl
being played .
Shows the genre of the
song currently being played.
ye
ly
being play
title
d.
number
ed.
ay
t1me
current
umbe
current
track/
r
ly
cur-
ly
Area3
Sho ws when radio
ceived.
Touch to turn BSM on.
Shows wh
song inform ation (tag).
en
th1
s
unit has the
s1gn
al
IS
r
e-
En@
Page 46

Appendix
Additional
(
Handling
and
Discs
Use discs featuring any of
guidelines
player
[illoo§~
AUDIO
DIGITAL
DVD
dtscs.
cm
-
12
Use
The followmg
unit:
this
Dual
8-cm dtscs
•
an adapter
• Oddl y shaped dt
Damaged discs.
cracked. ch tpped
• CD
been
DVD-RAM
Do not
Store discs
Do not attach
to the surface of
clean a disc.
To
war-d
types of dtscs
Discs
Attempts
may cause
0 0
®~
and DVD-R/RW discs tha t have not
/RW
-R
tzed
fmal
the recorded
touch
the ir ca ses
in
labels.
the
wtpe
center.
the
from
information
ing l
low
fol
the
[Q]oo§@
VIDEO
!DIGITAL
o "
DE
VI
be
cannot
such discs wtth
se
to u
it to mal
un
the
scs
that
warped
surface
when
te on or apply
ri
w
dtsc wtth
the
discs
of the discs.
not in u
a soft
including
or
dtscs.
og
I
used
fun
ar-e
se
chem
cloth
os.
.
wtth
ct
icals
ion.
out-
r
Condensation may
performance. Let
warmer
to a
JUSt
dtscs off
damp
Playback of dtscs
·act
ar
ch
sc
dt
playbac k en
tron.
on.
so
and
Road shocks m
functton s may not be
Certain
DVD video discs.
may not be possible to
It
CS.
deo diS
VI
is
This uni t
(Advanced
AVCHD
form at. Do not
to eject the disc.
able
be
When usi ng discs
faces. check the tnstr
the discs.
ejecting may not be possible.
may result
Do not attach
other materials to
The dtscs may warp
•
able.
The labels may
•
prevent
in damage
storage
USB
ding
Depen
following
the
• Operations may vary.
stor·age
e
Th
•
s
le
Ft
ct
Conne
tempo
rest f
1t
temperatur-e. A lso. wi
wtth a soft c loth.
y not be possible
ma
dtsc
s.
·istic
er
ronmen
vr
'nter
ay
compatible
not
De
tn
deo
Vi
rnsert AVCHD
that
uc
pending on
damage to
commer
the
come
of th e discs. whic h may result
ction
ew
to
the
equipment.
device
extet
on the
problems m
device
pl
be
may not
via USB
ions
or
format.
pt
ru
pl
Codec
can
ons
tt
the
thts
cially
discs.
maktng
o
al
-n
ma
ed
ay
hub
ir the
mpa
ily i
ar
hour
one
about
any
pe
cause of
be
corded
re
ition
cond
stor-age
t.
k.
ayba c
pl
dtsc
available
back
ay
with
discs
be print
and
disc
equtpment.
av
during
ff
stor·age
occu
ay
not
y
back
are not supported.
for
some
discs rec
Defi
gh
Hi
you may not
as
on
ed
warnrngs
the
inserting an d
s.
such
Usrng
labels
le
ailab
disc
the
playback and
device (USB
r.
be recogntzed.
oper
pr
DVD
or
unplay-
ly
player's
ad-
to
applica-
s.
some
in
ded
ion)
nit
label sur-
of
discs
or
.
)
).
Additional
(
Do not connect anything other
age
fl
e.
c
devt
re
secu
·mly
Fir
let
Do not
g.
in
oor.
brake or accelerator peda l.
Depending on the USB storage device,
may cause not
Copynght
US
You
USB
Parttttoned USB
is
th
Depending on
player/USB
be recognized or audio
back properly.
Do not
memory
of time. Doing so may cause the device to
funct
1t
where
protected
B devices
cannot
connect
cannot
memory
unit.
memory
the
leave
dtrect
tn
ion from the extreme nse
information
than
the USB storage device wh en driv-
the USB storage device
may become Jammed
radio.
the
in
occur
to
se
stored
re
a
that
s
le
ft
played ba
be
a USB
untt
to this
memory
kind of USB portable aud io
the
u use,
yo
files
USB portable
sunligh
ck
poriable
via USB hub.
compattb
not
ts
device
the
not
may
audio
tend
ex
for
t
temperature
rn
iPod
ensure proper operatton.
To
ca ble
nector
Firmly secu
ll
fa
Pod
i
Jammed
o
under
the iPod d irectly to this unit.
from
the iPod
re
o the floor. where
nt
the brake or
connect
en driv ing. Do not let
wh
may become
tt
elera
acc
or
t
s
a USB
onto
fall
the
under
device
the
the
tn
.
audio player/
le with
y not
ma
played
be
player/USB
mounts
a
ed
ma
the dock
peda l.
tor
-
the
l-
con-
iPod settings
About
When an iPod is connect
•
(equa
EO
the
opttmtze
order to
connect the i
tting.
se
u cannot set Repeat to off on the iPod when
Yo
•
ncompat
I
played
is
using th
changed to
this unit.
ible
the
by
DVD-RIRW
Unfinaltzed DVD-R/RW discs wh ich have been
corded in the
played back.
be
Playback of DVD-R/RW discs may not
to disc characteristics. scratches
due
dtsc, or di
the
t.
this un i
Dependtng on the app lication settings and the
vironment.
puter
manu
pl
may not
facturer of the appltcation.)
CD-RIRW
CD-R/RW
When
for
the
ble only
ayback of
Pl
recorder
CD
dtsc
to
due
disc. or dirt. cond
the
t.
uni
this
Depend ing on the appltcation settin gs and th e
ronment. playback of discs recorded on a
vi
may not
puter
turer
manu fac
setting of the
r)
ze
li
acoustt cs. When you
the
EO
the
Pod,
unit. Repeat is automat ically
All when the iPod
text saved on the i
unrt.
discs
t
orma
deo f
Vi
sa
conden
rt.
ayback of discs rec
possible. (For
be
discs
discs are used. pl
have been ftn
discs whi
ch
CD-R/RW
or-
charactenstics. scratches
discs
computer
a
sation. etc
en
possible. (For
be
of th e application.)
this unit ch anges
ed.
to off
Pod
i
returns to the original
ed
connect
IS
not
ll
wi
d
Po
.
tc
ded
or
deta
ot·ded
not
deta
on
tl
ayb
..
be
or
the
on a
conta
s,
ack
ized.
al
on a
possible
be
or
the
on
contact
ls.
canno
possibl
dirt
lens
com-
is
mu
dirt
lens of
ideo mode)
(v
tion . e
c
re
may
tn
dt
be
on
ct
possi-
on
com-
to
di
ret
of
sic
)
s-
s-
e.
en-
the
en-
the
@En
Page 47

(
Additional
information
)
(
Additional
information
Playback
ble in case of direct exposure to
temp
hicle.
Titles and other text inf
CD-R/RW
(
JPEG
JP
Group and refers
technology standard.
F1l
2.
(EX
still cameras.)
Playback
by a
There is no progressi
DivX
Depending on the c
t1on.
size.
back discs.
Some speci al
the com posit ion of the D
Only
site are gu arantee for proper operation.
i
zed
DRM rental files ca
back is start
Reco
miss
of
CD-R/RW
eratur
es,
disc may
in
the case of audio dat a
or
the
discs may b
stor
age co
orma
tion recorded on a
not
be displayed by
(C
D-DA)).
ndition
picture files
EG
is short f
or
Joint
Ph
ot
og
ra
to
a still image
es
are
com
pa
t1ble
with
Baseline
1 still images
IF
for
compute
such
th
DivX fi les
DivX fil
mmend
ion
up
to a
resolut1on
ma
t is used
most
common
of
EX
IF
format f1les tha t were
r may not be possibl
ve
J
PEG
compat
video
files
omp
osition of the file
as
the n
umber
of audi o
ere may be a slight delay w hen playing
operat1ons
downloaded
es
may not operate properl
ed.
ed
file
ra
te of 2
nn
s1ze:
Mbps
ot be opera t
may be prohi
ivX
f1les.
from a Di
2GB or less wi
or
less.
ecome
sunlight.
phic
compressio
JPEG
of 8 1
ly wi
e.
str
ed
s in
th
Experts
and
92
th
proce
i
bi
lity.
eams
bi
t
ed
vX
partn
Unau
y.
unt
il play-
th
a
im possihigh
the
ve-
is
unit
n
EXIF
x
7
68
digital
ssed
1n
fo rma-
or
file
due
er
tho r-
trans-
The
ID
code of this
DivX
VOD
prov ider
f
1les.
For
mf
or
mat1on
ing the
Oiv;tJ
VOO
For more details
site:
h
ttp
://www.dlvx. com/
about
MPEG-1/MPEG-2/MPEG-4
0.
Elapsed pl
rectly.
c!)=
• Wh
• This
Audio
ay
back time
Important
en
nam
in
g a J
correspondi
.jpeg
ex
tensions (.jpg, .j
image f
use
J
PE
ng
or
.JP
e).
un
it pl
ays
ile.
To prevent malfunct
th
es
e extensions for files other than
G i
mage
f
iles.
compatibility
WAV
File extensio
to
Qua
ADPCM)
Sam pling freq uenc
22
.05
n:
.wav
nt
ization bits: 8 and 16
kH
z and
44.1
kH
un
it
must
in
order
to
on
I
D
code
registration
DivX. visit the
be reg istered
pl
ayback Div X
s.
code
refer to
on page
follow
Dis
to
i
ng
video
ma
y
no
t be
disp
layed
PE
G
image
fi
le,
add
the
file name extension (.jpg.
back
fi
l
es
wi
th t
hese
file name
peg
or .j
pe)
as
a JP
EG
ions,
do
(USB}
(LPCM).
4 (MS
y:
16k
Hz
to
4
8k
Hz (LPCM).
z (MS
ADPC
M)
a
VOD
pl
ay-
28.
files
co
r-
not
Compressed
compatibility
WMA
File
ex
tension: .wma
Bit
ra
t
e:
48
kbps to
320
Sampl
ing
f
1·eq
uency:
Wi
ndo
ws
Media™
A
udio
Vo
ice/DRM Stream/Stre
patible
MP3
F
il
e
ex
tension: m p3
B
1t
ra
te: 8 kbps to
Samp
ling
44.1 kH
z.
Compa
tible I
(I
D3
tag
Ve
1.x.)
M3u
pl
ay
MP3i
(M
P3
AAC
Compa
tible format:
Fi
le extension: .m4a
Samp
ling
Bit
rate:
16
Apple
Lo
ssless: Not
AAC
file bought
extension
32
frequenc
48
k
Hz
f
or
D3
tag version: 1
rsion
2.x
li
st: Not
com
mteractive
fr
equency: 11.0
kbps
to
from
):
Not
compa
0
y:
emphas
1s
AAC encoded by iTunes
320
compatible
file
(disc,
kbps
32kHz
Professional,
am
kbps
8kHz
g
iv
en priority over Version
pa
tib
),
mp3
25
kbps
the
1Tunes
tible
(CBR
to
48k
with
(C
BR). VBR
to
48k
1s)
.0,
le
PR
kHz to
USB}
).
VBR
Hz
v1de
o:
Hz (32kHz.
1
.1,
2.
O: Not
48kH
S
tor
e (.m4p
Lossles
Not
2.
2.3.
compa
z
com
2
f
1le
s.
-
.4
t1ble
DivX
compatibility
Co
mpati
ble format:
mented
in
re
Fi
le
ex
tens ions:
D
ivX
Ultr
a format: Not
Di
vX
HD format: Not
Di
vX
fi les wi
DivX plus: Not compatible
Compa
tible
LPCM:
Compa
Bit
ra
t
e:
8 kbps to
Sampl
ing frequency: 8 kHz
C
ompati
ble
Di
vX
lation to DivX
.av
i
or
compa
thou
t video data: Not
audio codec:
tib
le
320
kbps (CB R
ex
ternal
sub
v1d
eo
standards
.di
vx
comp
atible
tible
MP2. MP3.
to
t1
tle
f1le
form at
J,
48kHz
extension .srt
MPEG-1/MPEG-2/MPEG-4
File extensions: .
.avi (MP
Com patib le
M
P2.
MP
H.264
(MP EG-4AVC
LPCM:
Not
B
1t
rate: 8 kbps to
Samp
ling frequency:
EG-4
)
audio codec:
3,
Dolby
compat
mp
g
or
.mpeg
MP2 (MP E
D1gital (MPEG-4)
):
Not
compat
ible
320
kbps
(C
BR
8kHz
to
48kHz
(MPEG-1/M
ible
).
im ple-
compat
Do lby Digital
VBR
video
G-1
/MP EG-
VBR
ible
PEG
-2),
2).
En@
Page 48

Appendix
Supplemental
Some
ex
Th
application
There
of aud io
files stored on a USB storage device
merous
Disc (CD/DVD}
Play
Playable folder
Playable
Play
File
UDF
Mult
Packet write data transfer:
Regardless of
tween the songs from
pressed audio
between songs.
External
Playable folders:
M
Playable files:
Playback
Additional
characters
ion) or a
tens
unit
is
ma
folder hierarch1es.
able
able
system:
1.02
i-session playbac
PEG-1
ble
1n
fold
may not work
used to encode
ight
sl
y be a
embe
les
fi
folders: up to
up
s:
up to 999
f1les:
to 3
up
es:
fil
ISO 9660
(OVD-R/RW)
the
discs
storage
/MPEG-2/ MPEG-4)
up
of copyright-protected
information
information
(includmg
name
le
f1
a
may n
name
er
depend
y
pmpe1·1
WMA
delay at the st
image
th
wi
ed
dd
CD-R/RW
for
99
DVD-R/RW
or
f
700
to
CD-R/RW
for
for DVD-R/ RW
500
and
1
el
v
Le
Compatib
k:
compatible
Not
blank sect1ons be-
of
length
original
the
s
with a
play
device
to
(up
1 500
up to
000
to 15
f1les:
disp
be
ot
ing on the
f1les.
of
art
data
that
Romeo.
2.
le
recording.
pause
ti
ho
(USB}
for
700
Not
le
f1
the
d.
laye
playback
udio
a
or
nu-
has
Joliet.
com-
OivX/
compati-
storage device (USB):
Partitioned
f1rst playable part1tion
There is no c
(MMC).
A
• Pioneer
external
ompat
cAUTION
accepts no responsibility
USB memory/USB portable
the
on
lost
player even if
that
can be
ibility fo r
data
played.
Multi
lost
1s
Med ia
while
th is unit.
any
compatib
of data on
loss
guarantee
• Pioneer
cannot
USB mass storage devices and
all
for
l1ty
no responsi
bi
media players. smart phones.
product.
this
using
while
ces
Do not leave the discs/external storage
•
in
VICe
(USB) or
iPod
places
w1th
peratures.
compatibility
iPod
following iPod mod-
the
This un it supports
only
els.
for
Made
tou ch (5th
1Pod
•
(4th generation)
touch
• iPod
(3rd generation)
touch
• iPod
(2nd generat ion)
touch
• iPod
tou ch (1st generati on)
Pod
i
•
classic
• iPod
video
with
• iPod
nano (7th generation)
• iPod
• iPod nan o (6th
generat1on)
genera
t1
on)
• iPod nano (5th generation)
nano (4th generation)
• iPod
nano (3rd generation)
• 1Pod
• iPod nan o (2nd generation)
nano (1st generation)
Pod
i
•
• iPhone
• iPhone
• iPhone
5
4S
4
or
Only
Cards
for
usmg
ility wi
assum
other
high
data
audio
devi-
de-
tem-
the
es
)
th
Additional
(
• iPhone
• iPhone
3GS
3G
information
• iPhone
may not be
depend 1ng
compatibi
ible
mpat
Co
or
lity. refer to
pending on the generation
De
iPod. some
Operat1ons
version of iPod.
About
1Pod
udiob
A
A
functions
may vary
/fo r
le
the fi
s.
manual
ook. Podcas
cAUTION
mat
t:
Pioneer accepts no responsibility
even if that data is
iPod.
on the
is used.
un1t
About
This {unction can
!Pod models.
-
-
-
-
-
-
-
-
-
-
-
- !Pod
-!P
- /Pho ne 45
- !Phone 4
-!
-!P
- /Phone
iTunes
touch 4th generation
!Pod
touch 3rd generation
/Pod
touch
!Pod
touch 1st generation
!Pod
classic
!Pod
classic
/Pod
classic
/Pod
with video
!Pod
nano 6th generation
!Pod
nano
/Pod
nano 4th generation
/Pod
nano 3rd generation
5
hone
3GS
Phone
3G
hone
tagging
performed with the following
be
generation
2nd
160GB
120GB
5th generation
version of the
e.
availab l
software
the
on
the
data
for
le
whi
lost
lost
this
tion (tag) can
The song i
nforma
the broadcasting station to your
playl1st called "Tagged playlist"
a
1n
up
show
will
in
iTu
nes the next
time
be
iPod.
you sync your
The songs
Then
Pod.
i
from
ed
v
sa
you can direct ly buy the songs you want from
the iTunes Store.
songs and the song that you can buy
The tagg
from
sure to
ed
the
confirm
iTu
nes Store may
the song before y
be
differen
ou
Make
t.
make the
purchase.
this unit.
Folder
e
il
f
Fo
05:
Playback
update
lder
fu nct 1on normally.
th1s
use
cannot
you
If
firmware.
1Pod
your
audio
cannot
of
folder numbers and
ass1gn
Sequence
user
he
T
specify playback sequences
Example of a hierarchy
l 4
ve
Le
3
el
v
Le
l 2
ve
Le
l 1
Leve
files
with
D:
Compressed
:
J1
audio
to
01
number
[to
(
sequence
Disc
selection sequence or other
der
l
Fo
differ depending on the encoding
may
software.
External
storage device
The playback sequence is the same as
the external storage device
corded sequence
in
(USB).
specify the playback sequence, the
To
method
is recommended.
operat1on
or
(USB}
there-
followmg
wr
)
it ing
@En
Page 49

(
Additional
[]
Create
a file name that includes numbers
that specify the playback sequence
001xxx.mp3
[I]
Put
t
hose
fi
[I]
Save
the folder that contains the files
external storage device (USB).
However,
y
ou
quence.
Fo
different
Using
A
•
•
•
Handling
•
depending
may
not
be
r
USB
portable audio players, the
and
depends
the
cAUTION
If
liquid or for
this
un
i
t.
turn off the power immediately
consult
yo
ur dealer or the nearest
PIONEER
un
result
If
or
turn off the power immediately
your dealer
PIONEER
th1s
age
Do
there
which
consult
PIONEER
tion, adjustments, or
Never
sides your finger when operati
p
anel
easily.
Service Station.
it
in
this condition because
in
fire. electric shock. or other f
you
notice smoke. a strange noise or
any
other abnormal signs f
or
Service Station. Using this unit in
condition
to
th
e
system.
not disassemble or
are
high-voltage components inside
may
cause
yo
ur
Servi
the
touch the screen with any
function.
information
and
099yyy.mp3).
les
into a folder.
on
the system environment,
able
to specify the p
on
the
display
eign
matter should get inside
the nearest authori
ma
y result
in
mod
electric shock.
dea
l
er
or t
he
ce Station for internal Inspec-
repa
display
The
screen can scratch
(e.g.,
to
the
la
y
ba
ck
se-
se
que
nce
player.
correctly
and
au
thoriz
Do
not
use
the
do
i
ng
so
may
ai
l
ure
smel
rom
the display,
an
d consult
zed
permanent
ify this unit,
nearest authorized
i
rs.
ng
Be
th
ing
th
dam-
as
sure
be-
e touch
to
ed
.
•
When
the display
light for a
very
hot resulting
LCD
screen.
display unit
possible.
•
The
display should
perature
At temperatures higher or lower than
is
erating temperatu
not operate normally.
•
The
crease its
pre
•
Do
th
Liquid
•
Heat
screen. and cool
cause
sulting
l,
• Small
ma
due
and
•
When
tenna
ruption
appearance of spots, colored stripes.
LED
•
At
may
1mage
the
with
•
To
darken
-
-
ra
LCD
sc
vi
ss
it strongly
not
push
is
ma
y
sc
crystal display
from the
moi
in
possible damage.
black dots or
y appear
to
the c
do
not indicate a malfunct i
using a
away
of
the
(light-emitting
low
temperatures,
in
c
rease
quality due
LCD
sc
an
mc
protect the
in
the
In
t
he
direct sunlight
Near the heater
is
long
period of time, it
in
You
should avoid exposing the
to
direct sunlight
nge
of
14
re
ree
n
is
exposed
sibility within the vehicle.
on
th
e
LCD
ratch
it.
he
ater
air from the cooler
sture
to
form
on
th
e
LCD
hara
ct
eristics of the
cellular
from the display to p
video
image
to
reen.
Image qualit y
rease
in
temperature.
LEO
back
following
vent
subjected
possible dam
be
used
oF to
range. t
it
as
screen forcefully
may
wh1te
phone.
image
to
direct sun-
will
become
ag
e
to
as
much
withm the tem-
1
40
°
F.
th1s
he
display
in order
to
in-
Do
this may damage i
(LCD)
screen
damage the
ma
mside
the display
dots (bnght dot
sc
reen.
These
are
LCD
screen
on.
keep
the
reve
nt di
by
the
etc.
diode) backlight
usmg
the
LED
backlight
lag
and degra
the characteristics of
light, the display
environments:
will
de
the
improve
the
as
may
not
as
LCD
y
s)
an-
s-
wi
op-
re-
ll
t.
)
(
Additional
•
The
product lifetime of the
more than
crease
•
If
the
product lifetime, the scr
and
such
nearest authorized
Keeping
10
if
used
LEO
back
the image
ca
ses
,
please
the
000
ho
in
high temperatures.
lig
ht reaches the
will no longer
display
condition
•
When
re
moving dust from the screen
cleanmg
po
•
When
scratch the surfac
abrasive chemical cleaners.
Bluetooth
In
order
devices must
flies.
profiles.
•
GAP
•
SOP
•
OPP
•
HFP
•
HSP
•
PBAP
•
A2DP
•
AVRC
1.3
•
SPP
the display, first turn the system
wer
off.
then
wi
pe
w1ping
the screen , take care not
e.
profiles
to
use
B
lue
tooth
be
able
to
Th
is unit
is
compat
(Generic Acc
(Service Discovery Prot
(
Obje
(Hands
(Head
(
Ph
(Advanced Audio
P
(A
(Ser
ial
es
ct
Push
Prof
Fre
e
Prof
Set
Profile)
one
B
ook
udi
oNideo Remote
Po
rt
Profi
information
LEO
backlight
urs.
Howev
er.
it
may
en
d
of
een
will become dark
be
projected.
consult
yo
ur dealer
PIONEER
with a soft dry cloth.
Do not
interpret certain
1ble
s
Access
l
e)
Ser
in
good
use
harsh or
wi
reless technolog
wi
th
t
he
Profi
le)
oc
ol
)
il
e)
i
le)
Profi
l
Oistnbution
Control
1.1
vi
ce
followi
e)
pro-
Pr
Prof
i
or
Stat
or
to
ofile)
is
License,
de
-
&
ts
In
the
ion.
SAFETY
Disclaimer
THE
LIMITE
TIES
SORS,
LICENSORS
WAR
ING
M
TICULAR
Limitation
TO
UNDER
NOR
OR
y,
CONSEQUENTIAL,
SPECIAL
ng
FORM
OR
SUCH
POSSIBILITY
TO
UNDER
LICEN
ARISING
OF
i
le)
ITED
CLAIMS
DISABILITY,
AND
OR
CLUDING
ABILITY,
NOT
$1
Warranty
Limitation
PROVISIONS
WARRANTIES
D
WAR
RA
MADE
BY
PIONEER
AS
A
PPLIC
EX
PRESSLY
RA
NTIES
,
E
,
WITHOUT
ERCH
THE
ITS
TO
ANY
OF
IN
TORT.
PARTIES
THE
SO
THE
TO,
REGARDLESS
CLAIM
E
XC
000)
.
LIMITATION.
A
NT
AB
ILITY
PURPOSE.
of
MAX
IMUM EX
APPLICABLE
LICENSORS
OTHER
DAMAGES,
AC
TION.
INCLUDING
H
OF
MAX
IMUM
APPLICABLE
RS',
TOT
OUT
OF
PRODUCT
ANY
WARRANTY
FO
R
PROPERTY
REGARDLESS
IS
BASED
NEGLIGE
OR
ANY
EED
ONE
of
S
ET
NTY
AR
A
BLE.
XPR
E
SS
AND
Liability
TENT
LAW.
W
PARTY
INCI
REGARDLE
W
HETHER
AV
E
BEEN
SUCH
DAMAGES.
EX
TENT
LAW
AL
LI
A
OR
RELATED
S,
INCLUDING
OF
W
ON
NC
E
).
OTHER
THOU
Disclaimer
Liability
FORTH
IN
E THE
ONLY
OR
ANY
P
IONEER
DISCLAIM
OR
IMPLIED, INCLUD-
WARRANTIES
FITNE
SS
PERM
NEITHER
ILL
BE
LI
AB
FOR
ANY
D
ENT
AL.
PUNITI
SS
IN
CONTRACT
NEGLIGENCE
ADV
ISED
PERMISSIBLE
PIONEER'
BILITY
OF
ANY
TO
.
CLAIMS.
DAMA
GE
OF
THE
HETHER
CONTRACT.
S
TRICT
PRODUCT
LEGAL
THEORY
SAND
DOLLARS
PIONEER'S
WA
RR
OF
ITS
LICEN-
A
ND
ITS
ALL
OTHER
FOR
A
P
ISSIBLE
PIONEER
LE
TO
YO
INDIRECT.
VE,
OF
THE
,
EVEN
OF
THE
S,
OR
Kl
NO
YOUR
USE
BUT
NOT
OR
ANY
,
DEATH
FORUM
ANY
AC
TION
TORT.
WILL
(USO
AN
OF
AR
OR
ITS
LIM-
OR
(
IN-
LI-
-
-
U
IF
En@
Page 50

Appendix
Additional
information
)
Additional
(
information
)
JURISDICTIONS
SOME
CLUSION
EX
LIABILITY
LIMIT
APPLICABLE
YOUR
RISDICTION
SO
ONS.
I
AT
SPECIFIC
OF
THE
TO
LAW.
TO
DO
EXTENT
MAY
OR
EXCLUSIONS
NOT
MAY
DAMAGES
ABOVE
THE
RIGHTS
JURISDICTION.
LIMITATION
PROHIBITED
TO
APPLY
ROM
F
ARY
V
OR
YOU.
THE
ALLOW
NOT
libpng
advance that Pioneer
m
re
awa
be
Please
respond to questions concern i
of the source code.
This licence
and transl
understand
that translated licence is
th the orig in
wi
This
your convenience.
between
png
he
t
COPYR
EN
C
you
If
notices immediately following th is sentence.
This code
libpng versions
.0
1.5
2006-2010
tributed according to the sa
cense
dr
in
thors
Cosmin
libpng versions
-October
Glenn Randers-Pehrson.
cording
libpng-1.0.6
the
to
was
ated
rts
of the
py
co
thrs copy and the
is
that
.h
latter shall prevai
NOTICE.
IGHT
SE:
modify libpng y
released under the libpng license.
is
January
.
Glenn Randers-Pehrson.
libpng-
as
dd
vidual a
uta
Tr
2002.
3,
the
to
ist of
I
nally
gi
on
here only
content.
Englr
al
png notrees
rb
l
In
included
l.
ou
1.2.6.
1.
1
20
6.
2.5 with the follo
1.
the list
to
ed
1.0.7.
are
disclaimer and license
same
Contri
following
bu
with the
ng
written
help the
to
Ther-efore.
legally identified
NOT
t.
x
te
sh
rs
an
of
case
ees
notr
the libpng distribution.
in
DISCLAIMER.
insert additional
may
15.
August
Copyright
are
me
Contributlllg
of
2000
1.
July
yright
Cop
are
and
Authors
tlll g
ntents
co
the
English
in
reade
please note
provided for
y discrepancy
the
rn
d
an
through
2004.
2004.
(c)
are
and
disclaimer
ng
wi
. through
2000-2002
(c)
d1stnbuted
individuals added
wrll
r
frle
LI-
OF
BY
JU-
not
dis-
and
Au
1.2.5
ac-
as
eu
i
Simon-Pierre
S.
ic
Er
les
l
Gi
and with the
er:
There is
en
your
ment. There is
the library will
es or
pos
faults. and t
performanc
user.
libpng versions
1.0.6.
1999
ted
u
cense
vi
i
nd
i
thors:
Tom
Glenn Randers-Pehrson
Willem
libpng versions
May
Dilger Distributed according to t
claimer and license
lowing individuals added
tributing Authors:
Con
John Bowler
in Bracey
Kev
i-
l
Sam
Magnus Holmgren
Greg
Tom
libpng versions
uary
Schalnat. Group
t
For
"Contributing
set of individual
ing
Cad
Raymond
ant
ll
Vo
followillg
warranty against interference with
no
Joyment
March
Glenn Randers-Pehrson.
according
as
duals added to the list of Contributing
Lane
199
Bushell
Roelofs
Tanner
1996
he
of
no
lfill
fu
This
needs.
enti
he
accur
e.
0.97.
00
. 2
20
to the same
libpng-0.96.
aik
ch
S
van
0.89
Copyright
are
7.
0.5.
Cop
are
.
purposes of this copyright
Authors"
x
sc
d1
the
additions
librar-y
the
warranty that our efforts or
y of your
an
l1brary
risk of satisfactory qua
re
.
acy
January 1
are
0.
with the
ne
, Ju
libpng-0.88. with the
as
May
yright
Inc.
42.
s:
to
or against lnfnnge-
icular pur-
rt
pa
provided with
IS
IS
effort
and
through
998.
t
gh
yri
op
C
are
and
drscla1mer
llowing
fo
, through
996
1
1997
1996.
(c)
same dis-
he
of
the list
to
through
1995,
c)
(
defined
IS
995.
1
1
and
as
996
wrth
19
(c)
distrib-
and
An
the foll
the
98
0.
dr
0.88.
Guy
license.
a1m-
l
li
.
li-
Au-
96.
eas
fo
E
ow
al
ty.
Jan-
ri
l
l-
c
-
Andreas Dilger
Martlllda
ve
Da
Er
y
Gu
Schm1dt
l
Pau
Wegner
Tim
PNG
e
Th
on
C
The
claim all warranties. expressed or impl
cluding.
mer-chantability
Contnbuting
e
Th
sume no
specia
wh1ch
Li
ce
en
such damage.
Permrssron
and distribute th
fy.
hereof, for
the following restrictions:
he
1. T
mrsrepresented.
2. Altered versions must
such and must not
the original
This
3.
altered from
bution.
Cont ributi
The
specifically permit, without
use of this source code
he
t
supporting the P
products.
uct. acknowledgment
appr
be
"png_get_copyright"
A
en
conv
pri ntf("%s".
Also. the
supplied
"pngbar.j
Libpng is
Certified O
OS!
mark of the
le
ic Schalnat
is suppli
brary
Reference
tnbutmg
w1thout
liabrl1ty
exemplary. or consequential damages.
l,
may result fr
brary,
an
origin of this source code must
yright
Cop
If
at
ecr
ient
PNG
in
pg
OSI
Li
oup
Gr
Authors
limitation. the warranties
and
Au
for direc
en
ev
eby
er
h
is
y purpose, without
rce.
sou
source or altered source
any
ng
NG
use
you
.
ed
in "about"
use
png_get_ copyright(NULL)):
logo (in
the files
x31) and
(88
Certrfr
pe
Open
and
any
fo1-
fitness
of
rs
o
th
t.
the
om
vis
ad
if
granted
source
is
be
misrepresented
be
notice may not
Authors and Group
format
le
fi
this source code in a prod-
not
is
functi
PNG
"pngbar.png"
"pngno
Open
ed
Source
n
Source
up
ro
and G
ect,
indir
the
of
use
the possibility of
of
ed
use.
to
or portions
code,
fee.
plainly marked
be
d
an
fee.
a component
as
commercial
rn
red
i
requ
avai
is
on
and
es
x
bo
format. of course) is
and
png"
w.
Source Software.
a certification
is
e.
itiativ
In
AS
"
ed
42,
ied.
purpose.
42,
dental.
ci
in
PNG
copy,
subject
no
as
remov
42,
enc
but
lable.
the li
(98
".
IS
di
c.
In
-
in
of
as-
Inc.
Refer-
modr-
to
be
t
as
ng
i
be
or
ed
tr
drs
.
nc
I
ourage
to
wou
for
:
ke
).
x31
Glenn Randers-Pehrson
users.sourceforge.net
at
11
20
6.
nuary
Copyright
is item incorpor
that
ogy
illtellectual property rights of
se
ver
Re
hibited.
and
protected
rs
engrneenng
s-
glennrp
Ja
Th
Bluetooth
ooth® word mark
et
Blu
The
tered trademarks ow
d
an
CORPORA
rks
rna
ective own
sp
of such marks
use
any
is
ON
TI
and trade names
.
ers
DVDvideo
a trademark
s
i
~
Licensing Corporati
iTunes
unes
1T
the
in
i-
Apple and
registered
MP3
Supply of this product only
non-commerc i
ate.
v
pri
y a lice
ve
t
uc
real ti
ld
bl
ca
streaming
t
ne
tion
mand applicati
ch
su
http://www.mp31icensing.com.
e nor imply
ns
y commercial
an
rn
broadcasting (terrestrial, satellrte.
me
e and/or
wo
sy
any
lllternet.
a
vi
other electronic content
rn
s or
rk
stems. such
required.
users
ons
trademark
ec
prot
py
co
ates
under license.
on
are
U.S.
other
.
patents
S.
U.
by
Rovi
and disassembly are
logos
and
by Bluetooth S
ned
DVD
of
.
trademar
and oth
al
any
(i.e
med
intranets
pa
as
An
For
ON
PI
by
thos e of
are
Format/L
ks
countr-ies.
er
conveys
and
use
nght
venue-generating)
re
.
broadcasting/
a).
i
y-audio
pendent license for
de
in
details.
notice
techno
on
ti
and
rati
o
Corp
are
IG
EER
r trade-
Othe
the1r
ogo
of Apple
a license for
no
does
thrs
use
to
other
/or
ar"Jd
distribu-
io-on-de-
aud
or
e visit
as
ple
other-
on
ro
p
eg
r-
nc.
. I
re-
Inc
t con-
pr
l-
.
-
s-
i
..
od-
@En
Page 51

(
Additional
information
)
(
Additional
information
)
..•
WMA
Windows Media is either a registered trademark
or trademark of Microsoft Corpo
Uni
ted
States
and
This
tv1
icrosoft
pro
du
/or other countries.
ct includes technology
Corporati
on
and
cannot
rati
on
own
be
in
ed
used
the
by
or
distributed without a license from Microsoft
Licensing,
iPod
iPhone,
touch
t
he
Lightning
''
Made for
that
to
connect specifically to
ti
ve
meet
not
or
it
sta
ce
ssory with
performa
Android™
An
droid
Google
Dolby
In
c.
&
iPhone
iPod.
iPod
classic,
iPod
na
are
trademarks of Ap
U.S.
an
d other countries.
is
a trademark of Apple
iPod
"
and
an
electronic accessory
l
y.
and has
been
''Made for
i
Pod
certified
ple
has
by
no.
I
nc
..
Inc.
iPhone"
been
or
iP
the
Apple performance standards. Apple
responsi
s
nda
ble
co
m
pi
iance with safety
rds.
Plea
iPod
for t
he
o
se
note that the
or
iPhone
pera
ti
on
of
and
regulatory
use
may
affect wireless
nce.
&
Google Play
and
Google
Pla
y
are
trademarks
Inc.
Digital
an
regis
mea
designed
ho
ne.
de
veloper to
this
de
of
this
d
iPod
te
red
respe
vice
ac
of
is
Manufactured under license from Dolby
Labo
ra
are
trademarks
tories. Dolby
and
the double-D symbol
of
Dolby Laboratories.
DivX
Di
vX®,
D1vX
trademarks of
ries
and
are
Certified®
Ro
used
and
associ
vi
Corporation or its
under license.
ated
logos
subsidia-
ABOUT
format created by
Corpor
de
vi
more information
your fi
ABOUT
DivX
order to
(VOD)
locate the
Div,:f5J
in
for more information
reg
is
n
Pandora®
PANDORA,
c-
P
an
dora
tered trad
with permission.
-
are
at
ion.
ce
that plays
le
s into
Certif
pl
mov
VOD
t
ra
t
ion.
trade dress
DIVX
VIDEO:
T
hi
s
Di
vX
DIVX
VIDEO-ON-DEMAND:
1ed®
de
ay
pur
ch
ie
s. To obtain your registration
Di
vX
VOD
registration
internet
the
PANDORA l
em
ark
s of
DivX
®
is
Di
vX,
LLC.
is
an official
Di
vX
and
a subsidiary of
DivX
vi
deo.
Visit
software tools to convert
videos.
vi
ce
must
be
reg
ased
DivX
Video
s
ec
tion
in
Displaying
code.
Go
to vod.divx.com
on
how
to
complete your
radio
og
o,
and
are
tradema
Pandora
rks
Medi
a digital
Certified®
d
ivx
.com for
istered
-on-D
the
or
regi
a.
Inc.
v1de
This
in
em
code.
the
s-
Used
an
Ro
o
vi
d
LanguagecodechartforDVD
Language (code),
Japanese (ja),
Engltsh (en
Fren
ch
(fr
).
Spanish (es
Ge
rman (de).
It
al
ian
(it
).
0920
Chmese
(zh
Dutch. Fl
em
1412
Po
rt ug ue
se
Sw
edish
(sv
Russ ian (ru).
Korean
(k
o)
Greek
(e
l)
,
0512
Afar (aa) .
Abkhaztan (ab),
Avestan (ae).
Afrikaans (af).
Akan
Amha
Aragonese (an) .
Ar
Assamese (as).
Av
Aymara
Azerbaijani
Bashkir (ba).
Belarusian (be).
Bulgarian (bg),
Bihari (bh
Bislama (bi).
Bambara
(a
k),
ric (am).
abic (ar),
ar
ic
(av)
(ay),
0101
0111
.
),
0208
(bm) .
).
0514
0618
).
0519
0405
),
2608
ish (nl
(pt
),
1922
1821
.
1115
0105
0106
0118
0122
0125
(a
z).
0201
0209
1001
).
1620
0102
0113
0114
0119
0126
0205
0207
0213
input
).
code
Dz
ongkha(dz),
Ewe
(e
e).
0505
Esper
anto
(eo).
Estonia n
Basque (eu).
Persian (fa).
Fulah
Finni
FiJian (fj
Faroese (fo).
Western
0625
lr·ish
Gael ic (gd).
Galic ian (gl).
Guarani (gn).
GuJ
Manx
Hau
Hebrew
Htndt
Hi
Croat ian
Haitian (ht).
Hung
Armenian (hy) .
Herero (hz).
lnterlingua
Ind onesi an (id) .
ln
lgbo
Si
sh
(ga).
ara
sa
ri
Motu
arian (hu).
ter
lingue (
(i
chuan
(
tt
(g
(hi).
g),
ff).
(fi),
),
Fr·
(gu
v).
(ha),
(he).
(
0907
Yi (
(e
t).
0606
0609
0610
isian
0701
0704
).
0722
0801
0809
(ho).
hr
).
0820
0826
(i
a).
ie
ii
).
0426
0520
0521
0601
0615
0712
0714
0721
0805
0815
0818
0821
0825
0901
0904
),
0905
0909
0515
(fy).
Kurdish (ku),
Kom 1
Cornish
Ktrgh
1125
Latin
Luxem bou
1202
Ganda (lg).
Li
mbu
L
inga
La
o (l
Lithuanian
Lu
ba-Katanga (lu),
Latvran
Ma
l
ag
Marshal
Maorr
Ma
c
edonian
Ma
layalam (ml),
Mongolian
Marathi (mr
Malay (ms).
Maltese (mt
Bur
me
Naur
u (na).
Bokmal
Ndebele,
1404
Nepa li (n
Ndonga
Nyno rsk (nn).
Norwegian
Ndebele, South (nr).
1418
(kv).
1122
(kw),
iz.
Kyrgyz (ky).
(Ia).
1201
rg
1207
rg
an (li) .
la
(In).
o).
1215
(It).
(lv).
1222
asy (mg),
lese (mh),
(mi
).
1309
(mn).
).
1319
).
se
(my).
1401
(nb),
Nort
e).
1405
(ng).
(n
1121
1123
tsh (lb).
1209
1214
1220
1307
(mk).
1312
1314
1318
1320
1325
1402
h (nd).
1407
1414
o),
1415
1221
1308
1311
Kiny
arw
a
nda
Sansknt
(sa).
Sardinian
Sindhi
Northern
1905
Sangha
Sinhala
Slovak (sk) ,
Sl
Samoan
Shon
Somali (so).
Alban
Serbi
Swat1
So
1920
Sundanese(su),
Swah
Tam
T
elugu
T
aJik
Thai (th),
Tigr
Tu
Tagalog (tl) .
T
swana
T
onga
Tur
T
songa
Tatar
Tw i (tw),
ov
enian (sl).
a (sn).
ian (sq).
an
(ss).
th
o.
Southern
il
i (sw).
il
(ta).
(te).
(tg).
inya (t
rk
men (tk),
(tn).
(t
o).
ki
sh (tr),
(ts).
(tt).
(sc),
(s
d).
1904
Samr (se),
(sg),
(s
r
).
1911
(s
m
1914
1915
(s
r),
1919
2001
2005
2007
2008
i)
.
2009
2012
2014
2015
2018
2019
2020
2023
(rw).
1901
1903
1907
1909
1912
).
1913
1917
1918
1923
2011
(s
t),
1921
1823
En@
Page 52

Appendix
Additional
information
)
Additional
(
information
)
Language (code), input code
0321
lnupiaq
do
l
Iceland ic
lnuktitut
Javanese (jv),
Geor
Kongo
Kikuyu. Giku
Kua
Kazakh (kk).
Kalaall
Central
1113
Kannada
Kanuri
Kashmiri
(bn).
Bengali
Trbetan (bo).
(br).
Br·eton
Bosnran (bs).
(ca).
Catalan
Chechen
(ce).
Chamorro
Corsrcan
Cree (cr).
(co).
0318
Czech (cs),
Slavic (cu).
Church
Chuvash
Welsh
(cv).
(cy).
Danish (da) .
Divehi (dv),
0214
0215
0218
0301
(ch).
0319
0325
0401
0422
0219
0305
0308
0315
0322
0915
(ro).
an
·gr
(k
nyama
isut
(k
0911
(ik).
(is).
(ru).
(ka).
1107
g).
yu
(kj).
1111
(kl
Khmer
(kn).
1118
r).
(ks).
0919
0921
1022
1101
(ki
1110
1112
).
(km).
1114
1119
).
Navajo.
1422
Chichewa
Occitan
bw
0Jr
romo
O
Or·iya
Ossetian (os)
PanJabi. Punjabi (pa).
1109
1601
Pali
Polish
shto.
Pa
1619
Ouechua~u).
Romansh
Rundi (rn).
Romanian
a
(or).
(pi).
(pi).
ho
Nava
(ny).
1503
(oc).
1510
(OJ).
1513
(om).
1518
1609
1612
Pushto (p
(rm),
1814
(ro).
(n
1425
1519
s)
1721
1813
1815
v)
.
.
Tahit ian (ty).
Uighur. Uy
2025
ghur
2107
Ukrainian (uk) .
2118
(ur).
Urdu
(ve),
(vo).
2126
2205
(v
2215
Uzbek (uz).
Venda
etnamese
Vi
Volapuk
Walloon (wa).
(x
(yo).
h
).
2315
2408
2509
2515
Wolof (wo).
Xhosa
Yiddish (yi),
Yoruba
Zhuang, Chuang
2601
2621
u).
(z
lu
Zu
(ug) .
2111
2209
i).
2301
(za).
Specifications
General
source
Power
Grounding system Negatrve ty
Maximum
Drmensrons (W
current
consump
x H x D):
D
Chassrs
Nose
Werght
Display
/aspect ratio
ze
Screen si
els
ix
P
method ..... TFTactrve
Drsplay
or
Col
Durable te
system
mpe
.................
range (power off)
re
ratu
Audio
output
power
um
Maxim
output
Contrnuous
Load
Preout
Eq
Frequency
Gain
HPF
Freq
Slope
power
dance
pe
rm
maximum
ualizer (5-Band Graphic Equalizer
uency
output
DC
V
4.4
1
e)
lowabl
tion
A
.0
10
178mmx100mmx165mm
(7in x 3
mm
1
17
/4 in. x 3-7/8 i
(6-3
(3
kg
.6
1
inch wide
61
..
(effective disp
mm
136.2
000
52
1
1
NTSC/PAUPAL-M/PAL-N/
SECAM
OF to
-4
x 4
W
50
..
x 1/2 0
W
70
x 4
22W
THO.
5%
ri
d
nels
(40
40
owab
all
level
2.0V
/3
Hz
100
3.15 kHz/
:t::12dB
Hz/63
50
125Hz
dB
- 12
8 V
0
(1
pe
/8 in x
-7
mm
97
x
s)
.51b
6:9
/1
y area
la
72.0
x
x 480)
400
(2
matnx
compatible
oF
+176
(for subwoofer)
Hz
(50
load.
40
ven)
(2
80
to
e)
l
):
Hz/1.25 kHz/
15
8kHz
Hz/1
/80
Hz
/oct
Val-
15.1
to
)
2in
1/
6-
mm
x 9
x 3/8 in.)
n.
mm)
. drivrng type
Hz.
15000
to
chan-
both
for 1 ch)
0
Hz/
00
Subwoofer (mono)
Frequency
pe
Slo
in
Ga
Phase
Bass boost:
in
Ga
DVD
System
Usable
Region
Frequency response
Signal-to-noise rat io
Output
Video
Number
MP3
WMA
C
AA
DivX decoding format . .
MPEG
.....
.
...
Player
discs
number
l:
leve
..
nnels
cha
of
format
decoding
decodrng format .....
decod ing
format...
video decoding
format
USB
current
ngformat
i
ficat
supply
standard specr
USB
mum
i
Max
Class
USB
system
le
Fr
MP3decod
Hz/1
80
/
Hz
Hz/63
50
Hz
125
/oct
B
18d
. -
+6dB
Nor"lai/Reverse
.
+
DVD
WMA
MPEG player·
DVD
R/RW. DVD-R/RW/R
5
at
91
(RCA
2 (ste
.
..
.
on
i
.....
....
24dB
to -
dB
0
to
dB
12
Video CD. CD.
vrdeo.
. MP3. AAC. D
deo CD. CD. CD-
Vi
deo.
vi
Hz
000
44
to
Hz
1.0
MPEG-1
Ver.
audio)
(Win do ws Medra Player)
MPEG-4 AAC
only)
(Ver
Home
(Except
di
MPEG1.
(part2).
USB
(For vrdeo fries)
USB 2.0 high speed (For
aud
1.0A
MSC (Mass Storage
MTP
FAT16.
M
sampl rng
kHz)
(1
dB
vel)
le
Vp-p/75
o)
re
&
7.1.
7.
(.m4a)
6 and earlier)
10
Theater
ultra
vx)
MPEG
MS-NIPEG4
11
frie
ro
(Media
FAT32
&2~ud
PEG-1
frequency 96kHz)
(IHF-A
(:t0.2
Q
2 Audio
10.
9.
8.
(rTunes encoded
V
and HD)
2.
2
USB
s)
Tran
00
(with
La
11.
3.
er.
MPEG4
0 full
sfer
o
i
/
Hz
X.
rv
DL
DVD.
network)
V)
yer 3
12
5.2. 6
4.
(avr.
3)
(ver
speed
Class).
Protocol)
er3
y
a
l
ch
(2
@En
Page 53

(
Additional
WMA
decoding format
AAC
d
ec
oding fo
rma
WAV
(MS
C M
od
e
WAV
sig
Sam
pling
JP
EG
(MS
JPEG decoding format
Pi
xe
l Sampli
Decode Size
Di
vX
d
eco
M
PEG
video decoding
onl
nal format
Fre
quency Linear
C Mode
onl
ng
di
ng
fo
rm
information
....
Ver.
7.
audi
o)
(W
indows
t
...
.. ..
MPE
G-4 A
only)
(
Ve
r
1
Li
nea
(.
w
av)
24kH
48kHz
MS
ADPCM:22.
44
.1
kHz
.j
peg
..
4:2:
2.
M
AX
8192(H)
MIN:32(H)
C
M
ode
Home Theater
(Excep
. div
x)
rmat
(M
SC
MPEG1.
(part2).
0.
r
z.
jpg
4:
t
y)
y)
:
at
(
MS
fo
7.1.
6
P
CM.
P
CM
32
2:0
only)
ult
Mode
MP
MS
8,
AC
and
kHz
.
.JP
X
ra
-MPEG4
9.
10.
1
M
ed
1a Pl
ayer)
(
iTun
es
ea
rli
er)
MS
AD
:
16
k
Hz.
. 44
.1
kH
05
kHz.
e
X
7
68
0
32(W)
Ver. 3. 4. 5.2. 6
and
HD
only)
EG2.
MPE
(ver
1.
en
PCM
2205
(W)
)
(.avi
G4
12
z.
)
(2
ch
CEA2006 Specifications
c
od
ed
Power
ou
tput
kH
z.
S/N
ratio
14
W
RMS
and
~
1%
91 dBA (refer
40 )
TH
x
4
D+N
en
Cha
ce:
n
ne
ls
)
1 W into
(4
0
Note
Spec ifications and the design are subject to
modifications with
.
.
3)
ou
t notice.
m
::::s
ce.
c;;·
:::r
FM
tuner
Frequ
e
ncy
Us
able
se
nsitivity
Signa
l-t
o
-n
AM
tuner
F
requ
ency range
Usabl
e
se
nsi
Signa
l-
to-noise
Bluetooth
(AV
H-
200BD
Ve
rs
1o
n
Output
po
we
range
oise
tivity
r
ratio
ratio
87.9
M
9dBf
30
d
B)
72
dB
(
IH
F-A
530k
Hz
2
5f../
V
62
dB (analog
(
IHF-
A
B
lu
et
ooth 3.0
+4d
Bm
(
Pow
er class
Hz
to 1
(
0.
8
f..1V/
(ana
l
networ
to 17
(S/
N:
network)
Maxim um
07.9
MHz
75
D..
mon
og
broadcastin
k)
10
kHz
20d
B)
broadcasting)
certif1e
2)
o.
S/
N:
g)
(1
0k
Hz)
d
En@
Page 54

des
matieres
)
Table des
(
matieres
)
Precautions
~
REGLES
Pour une
Pour
Avant de commencer
Q)
La
Quelqu
Numeros de
Quelques
Service apr
DE
IMPORTANTES
conduite
ter
vi
e
batterie
protection de votre
mains
mo
es
video
mots
Pioneer
de de de
Mo
~Description
Appareil central
Afficheur
Choix
Reglage du vol ume
elecommande
T
d'accueil
d'une
~Operations
Utilisation standard des
istes
I
Utilisation de
barre de lectu re
Activation des
tactile
Utilisation de
Utilisation du
Utilisation du
Changer
Operations de base
~
Ejection
Reglage
Syntoniseur
~
Utilisation du
Mise
M1se
d'un
memoire
en
stations
en
fortes
le
de
memoire
CTION
TE
PRO
55
toute
en
epuisement
l'
56
oufe
57
cet appare il
ur
ts s
des disques DVD
ion
reg
57
mode
sur ce
vente des produ1ts
es-
57
tio n
monstra
l'appareil
de
58
source
option
en
communes
60
de
l'icone
touches
60
arnere
vue
Ia
moniteur
correcteur
ecran large
mode
disque
l'horloge
syntoniseur
et rappel des
62
des stations les plus
62
securite
Ia
de
est entre vos
emplo
d'
58
58
59
59
59
elements
defilement
60
du clavier
arriere
de son
61
61
62
60
57
i
de
et de
60
61
55
menu
61
G
57
/
Ia
x
Accord sur les
Ut1l1sation
Disque
Presentation de l'
Utilisation de
ngement
a
Ch
sation du menu DVD
li
Uti
Lecture aleatoire (shuffle)
Repetition
Recherche de
lire
ix
Cho
Lecture
Choix
de plages
X
ChOI
noms
ture du contenu
Lec
signau
de l'etiquetage iTunes
(CD/DVD)
ilisat1on
ut
lecture aud io
Ia
de type de
lecture
Ia
de
part1e
Ia
66
de
PBC
des plages
66
partir de
a
audio
sort ie
Ia
66
partir
des fichiers
de fichiers
a
VOD
~iPod
fonction
votre
re
ectu1-e
l
Ia
a
vitesse
Ia
70
67
1Pod
69
partir
liees
Pod
de l'i
l-61e
Cont
tion de Ia lecture
sa
Utili
Utilisation des images de videos
Utilisation de
appareil
Lecture
Repetition
Lecture de videos
iPod
Recherche d'une video/
l'iPod
Modification de
audio
Affichage de listes
en
liaison)
Ia
sur
aleatoi
de
69
69
70
cours de lecture (recherche de
~USB
Utilisation des images de videos
Utilisation de
Mode de navigation
Utilisation de
es
fix
Changement de type de fi
Lecture aleatoire (shuffle)
Repetit ion
72
de
lecture
Ia
lecture
Ia
lecture
Ia
Musique
puissants
video
media
fichier
65
65
65
vous souhaitez
que
66
liste des titres
Ia
Ia
de
66
Di
d'un
audio
de cet
Pod
i
69
69
de votre
musique
d'un
plage musicale
Ia
a
audio
d'images
chier
73
62
62
63
65
llste des
vX®
67
68
sur
livre
70
71
72
med1a
73
65
67
73
Choix
noms de fichiers
Affic hage
en cou rs de
liaison)
Lecture du contenu
Capture
JPEG
(!)Audio
isat1on
Ut1l
Reglage
Lecture aleatoire (shuffle)
Repetition
$Lecture
Utilisation de Pandora
lection et lecture de stations de radio
Se
Pandora®/aleatoire
Telephone
C!}
Utilisation du telephone Bluetooth
Appel
Selection
recherche par ordre
Inversion des
Utilisation des listes des appels
manques et
Reglage de
Reglage
destinataire
se
Mi
sonnerie
isation des listes de preselection des
il
Ut
numeros d'appel
Execution d'un appel par
numero de telephone
Reglage
Controle vocal
- Reglages
Utilisation des
Reglages
~
Utilisation du
arriere/droite-gauche
Reglage
listes
de
lectur
73
image
d'une
73
Bluetooth
Ia
de
l'audio Bluetooth
de
Ia
de
continu de Pandora®
en
Bluetooth
numero
d'un
d'un
noms
reponse
Ia
du volume
service ou hors service de
en
du mode
sonores
l'equil1bre sonore
de
73
a
ees
li
e (recherche de
VOD
dans des
lecture audio
lecture
l'annuaire
de
numero
composes
a
alphabetique
dans
automatique
d'ecoute
78
78
ive
pr
79
menus
de
reglage
part1r
a
s
1-
f1Ch1e
des
iste des
Ia I
de
icale
mus
plage
Ia
DivX®
d'un
fichiers
73
73
74
74
74
75
76
77
l'aide du mode de
l'annuaire
rer;us.
78
du
Ia
78
d'un
sa1sie
78
79
79
l'equilibre
avant-
80
80
73
77
78
78
Ut111sat1on
Reglage de
Util1sat1on
Accentuation des graves
Utilisation du
Ajustement des niveaux des sources
Configuration
G)
Choix
Choix
Choix
Reg
Definition du ratio
Reglage de l'intervalle du diaporama
Reglage du verrou illage parental
Paramet rage du fi
Affichage de votre code d'enregistreme nt
Lecture
Reglages systeme
~
Mise
Modification des reglages de l'i mage
Selection de
Reglage du mode demonstration
Reglage
Reglage
Reglage du mode de
Reglage
Reglage de l'audio
Effacement de
Mise
Affichage de
Reglage
Reglage du signal video
de l'egal iseur
correction
Ia
physiologique
d'extremes graves
de
Ia
de
Ia
de
Ia
de
lage de l'affichage des
plusieurs angles
DivX
X®
v
D1
VOD
automatique
service ou
en
auxiliaire
(Luminosite, Contrast,
Dimmer
de
de haut-parleur
de
Pandora
du defi
JOUr
a
Bluetooth
de
(camera de recul)
ie
sort
Ia
passe-haut
f1ltre
lecteur video
du
langue des sous-titres
langue audio
langue des menus
d'aspect
ch
83
84
84
et Temperature couleur)
langue
Ia
sortie arr iere et
Ia
d'e
sortie
Ia
85
lement
memo
Ia
du logiciel Bluetooth
version du l
Ia
86
camera de vue arriere
Ia
80
80
haut-pa rleur
80
81
82
DVD
82
ier de sous-titres
des DVD
service de
hors
Couleur.
systeme
du
du
graves
tremes
x
RCA
amere
ion
x
conne
permanent
Bluetooth
lu
B
re
i
og
86
86
81
82
sous
82
84
!'entree
Teinte.
controleur
86
etooth
iciel
81
82
83
83
84
85
85
85
85
85
86
86
@
Fr
Page 55

Visit
our
website I Visitez
Register your product
notre
at
site
Web I Vi
site
nuestro
sitio
Enregistrez votre produit au
Registre su producto en
http://www.pioneerelectronics.com
in Canada
au Canada
en Canada
Register your product. We will keep the details of your purchase on file to
help you refer to this information in the event of an insurance claim such
as
2 Receive updates on the
3 Download owner's manuals, order product catalogues, research new
products, and much more.
Your feedback is important
4
most advanced, consumer-focused product in the industry.
Enregistrez votre produit. Nous conserverons
dans
pour une
2 Recevez les mises a jour sur les derniers produits et les technologies les
plus
3
Telechargez les modes d'emploi,
produits, recherchez
4 Vos retours d'informations sont importants pour garantir nos efforts
continus en matiere
produits repondant aux attentes des clients.
Registre su producto. Los datos de su compra permaneceran archivados
para que
campania
2 Reciba informes
3 Descargue manuales
busque nuevas productos y disfrute
4 Su opinion es importante en nuestro continuo esfuerzo a
diseiiar
consumidor
http://www.pioneerelectroniCS.C8
loss
or
theft.
nos fichiers pour vous aider a faire reference
declaration d'assurance en cas
recentes.
pueda
de
seguros
y construir los productos mas avanzados y mas orientados
de
latest products and technologies.
in
our continual effort to design and build the
les details
aces
de
perte ou
devol.
de
de
consultar esta informacion en caso
por
actualizados sobre los ultimos productos y tecnologfas.
de
Ia industria.
commandez
nouveaux produits, et bien plus.
conception et
perdida o robo.
instrucciones, solicite catalogos
de
les catalogues
de
fabrication optimales
de
muchos beneficios mas.
de
votre achat
informations
des
de
reclamar a
de
productos,
Ia
hora
Ia
de
al
Web
PIONEER CORPORATION
1-1, Shin-ogura, Saiwai-ku, Kawasaki-shi,
Kanagawa 212-0031, JAPAN
PIONEER ELECTRONICS (USA) INC.
P.O.
Box 1540, Long Beach, California 90801-1540, U.S.A.
TEL: (800) 421-1404
PIONEER EUROPE NV
Haven 1087, Keetberglaan
TEL: (0) 3/570.05.11
PIONEER ELECTRONICS ASIACENTRE PTE. LTD.
253 Alexandra Road, #04-01, Singapore 159936
TEL: 65-6472-7555
PIONEER ELECTRONICS AUSTRALIA
5 Arco Lane, Heatherton, Victoria, 3202 Australia
TEL: (03) 9586-6300
PIONEER ELECTRONICS OF CANADA, INC.
340 Ferrier Street, Unit
TEL: 1-877-283-5901
TEL: 905-479-4411
PIONEER ELECTRONICS DE MEXICO, S.A. de
Blvd.Manuel Avila Camacho 138 10 piso
Col. Lomas de Chapultepec, Mexico,
TEL: 55-9178-4270
$ti*HiH5l'fl"IJR11
i:i-~tr!JP1~M~Ifffi:7C~~4075m8ft
~~~:
$ti*~~
~~)Lft~~5~ifl3l9095.Jft5ft
~~~
: 852-2848-6488
6J
886-(0)2-2657-3588
(
=i=5t!)
1,
B-9120 Melsele, Belgium/Belgique
PTY.
2,
Markham, Ontario L3R 225, Canada
D.F.
11000
fl"~N11
6J
LTD.
C.V.
©
2013 PIONEER CORPORATION. All rights reserved.
© 2013 PIONEER CORPORATION. Tous droits de reproduction et de traduction reserves.
<KOKZ131>
<YRD5383-B>
UC
Page 56

PIONEER ELECTRONICS
GARANTIE
Pioneer
Electronics
avoir
ete
installes
vice
de
fabrication,
Les
unites
LA
A
OU
LA
PAYS
PUSAOU
ou
PRESENTE
CONDITION
UNE
AUTRE PREUVE D'ACHAT
PREMIERE
OU
L'ACHAT A
POC,
PERIODE
Produits
La
peri
ode
de
(USA)
Inc.
et
utilises
seront
pieces
de
GARANTIE LIMITEE S'APPLIQUE
QUE
LE
PRODUIT
LOCATION
ETE
LE
CAS
DE
GARANTIE
stereo
pour
garantie
pour
conformement
repares
rechange
.
51
JAMAIS
EFFECTUE
ECHEANT,
l'auto
les clients
(PUSA)
ou
fournies
AIT
ETE
VALIDE INDIQUANT
PAIERA
DES PRODUITS
qui
ELEMENTS NON COUVERTS
UN
PRODUIT ACHETE
IMPLICITE
"AVEC
PIONEER N'EST PAS RESPONSABLE
PIONEER
DE
LA
DOCUMENTS
LA
PENDANT
LA
DISQUES
PAR
LES
CONFORMES A
LA
PRESENTE
PIONEER.
NON AUTORISEES,
LES NUMEROS
DE
TOUS SES DEFAUTS EVENTUELS " .
NE
TOUTE
PRESENTE
PRESENTE
PRESENTE
ECRIT
DOMMAGES
PRESENTE
GARANTIT
APPLICATION
S'Y
DE
OU
AUX
PAR
GARANTIE,
LA
PRESENTE
INVALIDITE
AUX
ETATS;UNIS -
DE
QUALITE
APRES
L'EXCLUSION
S'APPLIQUER A
ETAT
AU
CANADAQU'ELLE
LA
A
L'AUTRE.
SOIT
MARCHANDE
PERIODE
CHEZ
QUALITE
GARANTIE
APPLIQUANT.
GARANTIE
LONGUES
GARANTIE
RUBANS
PIONEER,
SUBSEQUENTS
CELLES
GARANTIE
Nl D'UN
DE
SERlE MODIFIES, OBLITERES
DE
TOUTE
PIONEER LIMITE SES
OU
LA
VOUS .
SOUS RESERVE
IMPLICITE,
UN
MARCHANDE
PAS LES
INDUSTRIELLE
NE
S'APPLIQUE
NE
COUVRE
PERIODES
NE
COUVRE
OU
DISQUES
D'UN
QUI
SONT
NE
COUVRE PAS LE
Sl
ELLES
GARANTIE
ENTRETIEN
AUTRE
OU D'ADAPTATION A
DE
GARANTIE. CERTAINS ETATS
LIMITATION DES DOMMAGES CONSECUTIFS
LA
PRESENTE GARANTIE VOUS DONNE DES DROITS
DE
OBLIGATOIRE
SERVICE
Pour
profiter du service en vertu
indiquant
AUX
Votre
de
Votre
Veuillez
Ia
Pioneer
ci-dessous
AU
Communiquez
Expedition
en
pendant
Pour
Satisfaction
Pour
REGLEMENT DES
AUX
recours
de
Improvement
Pour
probleme
distributeur
resolution
par
a
AU
No. du
Dated'achat
l'endroit et
ETATS-UNIS
marchand
caisse
devrait
societe
de
acceder
plus proche
Customer
pour
CANADA
port
toutes les plaintes et
le
ETATS-UNIS
resolution
avoir
ecrit
votre
CANADA-
communiquer
-
POC
avec
de
votre
prepaye
le transport.
de
Ia
raccordement
au
Programme
des
Act, 15
recours
auquel
I
marchand
vous
pour
vous
plainte
par
Communiquez
modele
:
:
__
Ia
date
de
Ia
-
Communiquez
Pioneer
enumerer
service
au site
Support
a
Pioneer
unite
et
selon
lncluez
clientele au 1-877-283-5901 .
ou le
transaction
autorise-
ses
coordonnees
autorisee
Web
de
Pioneer
-
Ce
service
avec
desig~e
un certain
Electronique
aux
fins
une
methode
votre
problemes
fonctionnement
PIONEER
LONG
http
CONFLITS
-
Si
un
conflit
de
resolution
plaintes
avant de
U.S.C.
2301
au
Programme
vous
faites
face
autorise
sera
communique.
aviser
des
ecrit
pour
vous
avec le
_____________
(USA)
INC.
GARANTIE
et
Pioneer
au
manuel
remplaces
ACHETE
UN
SEULEMENT,
louent
DISTRIBUTEUR NON AUTORISE N'EST COUVERT
PRODUITS
ACCIDENT
DECOULANT
SONT
par
en vertu
AU
PROPRIETAIRE INITIALAINSI
CHEZ
SERVICE
DE
TEL
POUR
VOUS
le
produit
PAR
LA
OU
D'ADAPTATION
DE
QUELQUE
OU
PAS
PAS LES
(IMAGES
PAS LE
D'ENREGISTREMENT,
,
D'UN
SPECIFIEES
OBTENUES
NE
COUVRE
INADEQUAT.
VALIDE
SEULEMENT
Electronique
une
de
Ia
UN
REPARATION
QU'IL
RETOURNER
commence
du
de
l'utilisateur
unite
de
valeur
presente
DISTRIBUTEUR
LA
DATE
DE
EST
EXPLIQUE
LE
le
jour
Canada,
inclus
garantie
L'ACHAT
EST
REQUIS,
PRODUIT
ou le
produit
GARANTIE
A
UN
USAGE PARTICULIER
DOMMAGE CONSECUTIF ET(OU) INDIRECT
ENUMERES
COMMERCIALE
Sl
TELEVISEURS
REMANENTES)
COFFRAGE
DE
DANS
COOT DES PIECES
OU
CI-DESSUS
LE
PRODUIT
OU LES
USAGE
INAPPROPRIE
FUITES, LES
LE
MANUEL
AUPRES
PAS LES
ENLEVES
DEFECTUOSITES
ANNULENT
QUE CE SOIT.
A ETE
OU LES
.
LES
DOMMAGES
D'UNE
GARANTIE LIMITEE
DANS
Inc.
(POC)
avec
l'unite,
comparable,
peuvent
OU
DANS
ELEMENTS
DE
OU
SOURCE
au
etre
QU'A
TOUT
MARCHAND
INITIAL
OU,
LE
PRODUIT
LE
PRESENT
REPARE
OU
est
ut1lise
pour
LORSQU'ILS
SOUMIS
ECRANS
DOMMAGES
OU D'UN
DECOULANT
L'UTILISATEUR
DE
LA
MAIN-D'CEUVRE QUI
AUTRE
OU LES
LA
PRESENTE GARANTIE DANS SA TOTALITE.
GARANTIE
OBLI~ATIONS
CE QUI EST
OU
AUTRE,
de
Ia
garantie
aux
par
avec
un
des
Votre
-
Celle-ci
Pioneer
de
nom
aux
CUSTOMER
BEACH,
://
www.pioneerelectronics.com
se
vous
et s.s.
de
et
aupres
Pioneer
demarches
indiquer
directeur
partenaires
marchand
(numeros
peut
a
www.pioneerelectronics
peut
vous
par
telephone
nombre
du
Canada
service
de
transport
.
vo~re
adresse
Etats-Unis
de
votre
AUX
ETATS-UNIS
ELECTRONICS
PO
BOX
CALIFORNIA
1-800-421-1404
produit
entre
des
plaintes
prevaloir
resolution
les
demarches
duquel
etudiera
qu'elle
les
de
Ia
ENREGISTREZ
PRENEZ SOIN
EN
UN
EXPRESSEMENT
le
premier
reparer
aviser
de
-
Si
unite
SUPPORT
vous vous
raisons
Satisfaction
__
VERTU
USAGE PARTICULIER,
NE
PERMETTENT
NE
S'APPLIQUE
Etats-Unis
Pioneer
societes
(les
vous
pouvant
,
1720
vous
de
de
des
entreprendra
et
proprietaire.
Pioneer
peut
de
telephone
Ia
plupart
des
options
,
par
courrier
de
coordonnees
expediez
etre
et
un
numero
communiquez
. ou
pour
(USA)
90801
et
Pioneer
Pioneer
vos
droits
plaintes,
que
vous
etes
le
conflit
pour
lesquelles
de
LE
_________
DE GARDER
DE
TOL!TE GAR.ANTIE
A UNE
PAS
LA
OU
INDIRECTS. LES LIMITATIONS
LEGAUX SPECIFIQUES. VOUS POUVEZ JOUIR D'AUTRES DROITS, QUI PEUVENT VARIER
STIPULE
au
suivants
reparer
.c
om
de service
service
suivie
trouver
INC.
pour
ou de
appelez
avez
et,
Ia
clientele au
LIEU
CETTE INFORMATION
ACE
Canada,
ou
et
de
des
produits
,
cliquer
ou
par
se
trouvent
l'unite,
et
de
telephone
avec
une
apres
resoudre
chercher
entreprises
procure
dans
pour
ET
DANS
PRODUIT
vous
pour
remplacer
telecopieur
sur
optimales
le biais
autorisees
vous
assuree
le
service
societe
Ia
reponse
le
au
1
le
produit
un
delai
resoudre
elle
n'entreprendra
(905)
LA
DATE D'
__
electroniques
800
LE
PAYS
OU
LE
garantissent
ne
choix
neuves
PROPRIETAIRE SUBSEQUENT
PIONEER
51
VOUS
REMPLACE, A
Ia
premiere
A UNE
ENDOMMAGES
ESTHETIQUES,
AU
USAGE
PERIODE
LIMITATION
LES
devez
le service :
l'onglet"
de
son site
partout
ci-dessous)
devez
.
Emballez
ou
nous
de
de
conflit
reparation en
421-1404
pour
de
le
946-7412
No
.
Achetede
que
fonctionnent
de
PUSAou
ou
remises
AUTORISE
LOUEZ
DOlT
ETRE
DOCUMENT.
fois (a)
PAR
AUCUNE
QUE
CE SOIT.
QUE
SONT
UTILISES
PUISSANCE
PRODUIT
ABUSIF
DE
.
QU'UNE
DOMMAGES
IMPLICI!E
N'EXCEDANT
DE
PRESENTES,
.
presenter
votre
unite
,
courriel
,
etc
pour
Support"
pour
votre
Web
au
Canada
pour
l'emballer
le
pouvons
Soutien
service
autorisee
a
une
demande
.
Ce
programme
et
faire
reparer
Pioneer.
quarante
conflit,
et
aucune
pour
ACHAT
POUR
de
serie
:
:
________
ET
VOTRE
les
produits
pas
de
de
POC,
a
neuf, au
AUX
LE
PRODUIT,
EXPEDIE
VOUS
L'INTERIEUR
pendant
GARANTIE
CE
SOIT.
NOMINALE
EN
LES
ANTENNES
DECOULANT
, LES
PILES
SERAIENT
SOCIETE
CAUSES
QUE
LA
DUREE
AUCUNE
votre
, ou
bien
.).
l'auto et
et
choisir"
modele
.
trouver
soigneusement
produit
vous
a
Ia
clientele
vertu
du
expliquez
le
Une
fois
(40)
jours
indiquera
discuter
REFERENCE
--
-----------------------------
RE<;U
D'ACHAT
PIONEER ELECTRONIQUE
PRODUIT
fac;:on
ETATS-UNIS
PENDANT LA
ETES
Ia
DE
A
DES FINS
RAISON
DEFECTUEUSES
PAS
releve
vous
et
si
jamais
une
au
joindre
.
appelez
GROUPE
initiale
vous
Titre I
produit
demarche.
de
A
ETE
ACHETE
distribues
sans
choix
VOTRE
DU
peri
ode
PLUS,
DOMMAGES
DE
SERVICE OU
CE
LA
D'UNE
ET
vous
votre
societe
moyen
au
PIONEER
au
que
a
pres
combien
votre
par
appropriee
que
DU
PRESENT
RESPONSABLE
PAYS
de
EXPRESSE OU IMPLICITE,
EXCEDANT
DE
D'UNE
AUTREMENT
PAR
SOIT
PERIODE
EXCLUSIONS ETABLIES CI-DESSUS PEUVENT DONC
REPRESENTATION,
de
diriger
aviser
Find a
emplacement
vous
et
pendant
1-800-421-1404.
ou
faite au
est
de
representant
pendant
votre
DANS
PUSAaux
dans
vous
deviez
de
PUSAou
PRODUIT
OU
AU
CANADA.
CONTRAT
PERIODE
OU
L'ACHAT A
location ou (b) a
CE
PRODUIT EST STRICTEMENT
COMMERCIALES
L'APPLICATION
INSTALLEES
RETOUCHE,
PRODUITS
OU
AUTRE
L'UTILISATION
Y
COMPRIS
1
DE
GARANTIE IMPLICITE,
caisse
ou,
vers
une
des
Service
avez
besoin
de
service
l'envoyer
de
materiaux
les
ecrivez
a
AU
DE
SATISFACTION
ELECTRONIQUE
340
FERRIER
MARKHAM,
(905)
1-877-283-5901
http:
//www.pioneerelectron
service
offert
sans
Ia
loi
Magnuson-Moss
Ia
plainte
Ia
reception
de
temps
plainte
et
resoudre
ULTERIEURE
__
_________________________________
UN
EN
DROIT SUR
Etats-Unis
des
conditions
payer
pour
de
POC.
PIONEER
VOUS
DE
LOCATION INDIQUANT L'ENDROIT
DE
GARANTIE,
DU
DEMONTAGE
ETE
EFFECTUE.
pres
Ia
vente
CELLE
QUI
D'IMAGES
PAR
L'UTILISATEUR,
D'UNE
PAR
DE
L'UTILISATION
OFFERTES
AUTORISEE
D'UNE
ENTRE
GARANTIE. AUCUNE GARANTIE
GARANTIE,
si
vous
louez
societe
options
supplementaires
Center"
pour
geographique
de
services
autorisee.
a
une
societe
coussines
heures
de
Au
Canada
et
par
d'utilisation
les
pieces
ou les
PENDANT LA
DEVREZ
FOURNIR
EN
PORT
PREPAYE,
ET
DE
L'INSTALLATION
Pieces
1
an
au
detail, selon
Y
COMPRIS
VENDU
OU
PROFESSIONNELLES,
A
ETE
ETABLIE
STATIQUES
MODIFICATION
LA
FOUDRE
SANS
MAIN-D'CEUVRE OU
AUTRES LES GARANTIES IMPLICITES
ET
de
service
trouver
adequats
bureau
OU
DE
PILES
FRAIS
OU
DESIGNEE
CERTAINS NE PERMETTENT PAS
OBLIGATION
le produit,
Pioneer
Ia
societe
.
Veuillez
de reparation
de
service
pour
,
communiquez
:
CANADA
DE
LA
CLIENTELE
DU
STREET,
ON
4 79-4411
de
frais
du
service
periode
a
ete
de
ces
CANADA,
UNIT
L3R
2Z5
i
Soutien
.
Vous
devez
Warranty-Federal Trade
a
de
garantie,
expliquee
votre
plainte,
demarches
rapidement
2
cs.ca
a
Ia
avoir
Ia
clientele
au
representant,
(1)
prendront
le probleme.
INC.
clientele,
puis
DU
CANADA,
POC
au
Canada
normales
travaux
PERIODE
UN
RELEVE
A
Main-d'ceuvre
ce
qui se
QUELQUE
"
DANS
ET
LES
DOMMAGES
NON
LA
SURTENSION,
NON
EN
VERTU
votre
contra!
autorisee
qui
pourraient
de
consulter
pour
autorisee
eviler
avec
vous
recours
qui
vous
donnez-lui
repondra
;
ou
<
QRY3001-B/N
lmprime
INC.
qui,
en raison
de
reparation.
DE
GARANTIE,
DE
ET
LA
DATE
L'INTERIEUR
DU
PRODUIT.
1
an
produit
en
premier
GARANTIE
TEL QUEL
OU
AU
LES
IMMOBILES
AUTORISEE
DE
LA
PAR
DE
PIECES
NE
S'APPLIQUE
NE
OU
CONDITION,
de
.
Votre
s'appliquer
service
les
coordonnees
votre
ou
a
Pioneer,
les
dommages
le
groupe
pouvez
au
Programme
Commission
repondra
le
nom
un
numero
a
votre
(2)
repondra
en
Tha'flande
apres
d'un
CAISSE
DE
DU
" ET
SEIN
AUX
PAS
D'UN
location
rec;:u
Pi
oneer
produit.
de
avoir
du
de
plainte
>
.
.
le
_
Page 57

PIONEER ELECTRONICS (USA) INC.
PIONEER ELECTRONICS OF
CANADA,
INC.
LIMITED WARRANTY
WARRANTY VALID ONLY
WARRANTY
Pioneer Electronics (USA) Inc. (PUSA), and Pioneer Electronics
function properly under normal use due to a manufacturing defect when installed and operated according to the owner's manual enclosed with the unit will be repaired or replaced with
a unit
of
comparable value, at the option
new or rebuilt at the option
THIS LIMITED
PRODUCT
RECEIPT
AND
PREPAID, ONLY FROM WITHIN THE COUNTRY OF
THE PRODUCT.
PRODUCT
Car Stereo
The warranty period for retail customers who rent the product commences upon the date product is first put into use (a) during the rental period or (b) retail sale, whichever occurs
WARRANTY
WAS
OR
OTHER
DATE OF FIRST RENTAL. IN
WARRANTY
Products
of
PUSAor
PURCHASED
PUSAOR
APPLIES
VALID PROOF OF
POC,AS
POC.
FROM
THE
APPROPRIATE,
PERIOD
ofPUSAor
TO THE
AN
AUTHORIZED
PURCHASE
EVENT
POC, without charge to you for parts or actual repairwork. Replacement units and/or parts supplied under this warranty may be
ORIGINAL
SERVICE IS REQUIRED,
PURCHASE
Of
Canada, Inc. (POC), warrant that products distributed by PUSAin the
OR
ANY
SUBSEQUENT
PIONEER
SHOWING
WILL
PAY TO RETURN THE REPAIRED
DISTRIBUTOR/DEALER
THE
AS
EXPLAINED
WHAT IS NOT COVERED
IF
THIS PRODUCT WAS PURCHASED FROM AN UNAUTHORIZED DISTRIBUTOR, THERE ARE NO WARRANTIES, EXPRESS OR IMPLIED, INCLUDING THE IMPLIED
OF MERCHANTABILITY AND THE IMPLIED
PIONEER
PIONEER DOES NOT
THIS
THIS
THIS WARRANTY DOES NOT COVER THE CABINET OR ANY APPEARANCE ITEM, USER ATTACHED ANTENNA, ANY DAMAGE TO RECORDS OR RECORDING TAPES OR DISCS, ANY
DAMAGE TO THE PRODUCT RESULTING FROM ALTERATIONS, MODIFICATIONS NOT AUTHORIZED
LIGHTNING OR TO POWER SURGES, SUBSEQUENT DAMAGE FROM LEAKING, DAMAGE FROM INOPERATIVE BATTERIES, OR THE USE OF BATTERIES NOT CONFORMING TO THOSE
SPECIFIEDINTHEOWNER'SMANUAL.
THIS
OBTAINED FROM
DEFECTS OR
ALTERED, DEFACED, OR
SHALL
WARRANTY
WARRANTY
WARRANTY
DAMAGE
NOT
BE
LIABLE
WARRANT
DOES
NOT
DOES
NOT
DOES
NOT
ANY
SOURCE OTHER
CAUSED
REMOVED
APPLY
COVER
COVER
WARRANTY
FOR
ANY
CONSEQUENTIALAND/OR
ANY
PRODUCT
IF THE
PRODUCT
DISPLAY SCREENS
THE
COST
THAN
BY
THE USE OF UNAUTHORIZED PARTS OR
SERIAL
OF FITNESS
LISTED
ABOVE
HAS
OF
PARTS
A PIONEER AUTHORIZED SERVICE COMPANY
NUMBERS
VOID
FORA
WHEN
BEEN
SUBJECTED
DAMAGED
OR
LABOR
THIS ENTIRE
NO OTHER WARRANTIES
IN
THE
U.S.A.MERCHANTABILITY AND FITNESS
WARRANTY
OR LIMITATIONS OF INCIDENTAL
YOUSPECIFICLEGALRIGHTSANDYOUMAYHAVEOTHERRIGHTSWHICHMAYVARYFROMSTATETOSTATE.
IN
CANADA-
OR OTHERWISE,
PIONEER
PERIOD. SOME STATES DO
EXCEPT
APPLICABLE
LIMITS
ITS
OBLIGATIONS
FORA
PARTICULAR PURPOSE,
NOT
OR
AS
EXPRESSLY PROVIDED HEREIN, THERE
TO THIS PRODUCT.
ALLOW
CONSEQUENTIAL
UNDER
LIMITATIONS ON
DAMAGES,
ANY
TO OBTAIN SERVICE
In
the U.S.A. or Canada to receive warranty service you need to present your sales receipt or your rental contract showing place and date
USA-
Please
contact
one
of
the
following
Your Authorized Pioneer
list the contact information (phone number, fax, email, etc.) for your Dealer.
Your Authorized Pioneer
Pioneer website at
Pioneer Customer
access
email or
CANADAShipping
Use adequate padding material
POC has a number
Your
Unit
Dealer-
Your
Service
www.pioneerelectronics.com
Support-
the Pioneer website to contact Pioneer.
for
Service-
Company-
Can advise the optimal
of
Authorized Service Companies should your product require service. Contact Pioneer
Please package
to
prevent damage
On all complaints and concerns
For hook-up and operation
Pioneer
partners
Pioneer
Dealer may repair or replace your unit, or refer you to an Authorized
Can
perform
and click on
service
it
carefully and send
in
transit
in
the U.S.A. call Customer Support at 1-800-421-1404,
IN
THE U.S.A.
of
your unit or to locate
to
obtain
repairs for most
"Support"
option for your model and
Include your name, address and telephone number where you can be reached during business hours.
it,
Authorized Service Company, please call or write: CUSTOMER SATISFACTION GROUP
CUSTOMER SUPPORT
I PIONEER ELECTRONICS (USA) INC. PIONEER ELECTRONICS OF CANADA, INC.
P.O.
BOX 1720 340 FERRIER STREET, UNIT 2
LONG BEACH, CALIFORNIA 90801 MARKHAM, ON L3R 2Z5
1-800-421-1404 (905) 479-4411 1-877-283-5901
http://www. pioneerelectron ics. com
DISPUTE RESOLUTION
IN
THE
U.S.A. - Following our response to any initial request to Customer Support, should a dispute arise between you and Pioneer, Pioneer makes available its Complaint
Resolution Program to resolve the dispute. The Complaint Resolution Program is available to you without charge. You are required to use the Complaint Resolution Program
before you exercise any rights under, or seek any remedies, created by Title I
To
use the Complaint Resolution Program
have the product repaired during the warranty period and the name
has been explained to the representative, a resolution number will be issued. Within 40 days
(1) respond to your complaint
informing you why
IN
CANADA-
it
will not take any action.
Call the Customer Satisfaction Manager at (905) 946-7 412 to discuss your complaint and to obtain a prompt resolution.
in
writing informing you what action Pioneer will take, and
call1-800-421-1404
and explain to the customer service representative the problem you are experiencing, steps you have taken to
IN
COUNTRY OF PRODUCT PURCHASE
U.S.A,
and by POC
OWNER
OF THIS PIONEER
DATE OF
TOA
ARE
transportation prepaid by a traceable, insured method, to an Authorized Service Company or Pioneer.
ORIGINAL
THE
PRODUCT
IN THIS DOCUMENT. YOU
PARTICULAR PURPOSE AND THIS PRODUCT
INCIDENTAL
IT IS USED
BY
STATIC, NON-MOVING,
IMPLIED
PERIOD NOT TO EXCEED THE
HOW
SO THE
NO REPRESENTATIONS,
service:
INA
TO POWER
WHICH
LABOR
WARRANTY
WARRANTIES
LONGAN
ABOVE
Car
Electronics products and can advise
and select
an
IN THE U.S.A.
PURCHASE
MUST
BE
OR
REPLACEMENT
DAMAGES.
TRADE
OR BUSINESS OR
IN
EXCESS OF ITS
IMAGES
IN
WOULD
BE
OTHERWISE
OR
OR FROM IMPROPER MAINTENANCE.
IMPLIED
LIMITATIONS OR EXCLUSIONS MAY
"Find a Service
geographic
OTHER DESIGNATED LOCATION. THIS
INCLUDING,
WARRANTY
WARRANTIES,
location. Please reference the information listed below and phone,
For additional information on this warranty, please call or write:
PRODUCT
OR
OR, IF RENTED,
DELIVERED
WILL
APPLIED
WRITING
or,
BY
WARRANTY
LASTS
Center"
in
Canada, call Customer Satisfaction at (905) 479-4411.
DURING
THE
CANADA.
BE
PRODUCT
PUBLISHED
PROVIDED
BUT
YOU
YOUR
WITHIN
THE
RESPONSIBLE
TO YOU WITHIN THE COUNTRY OF
IS
SOLD
IN
ANY
INDUSTRIAL
POWER
FOR
LENGTHY
PIONEER, ACCIDENT, MISUSE OR ABUSE, DAMAGE DUE TO
WITHOUT
NOT
LIMITED
PERIOD. NO WARRANTIES
AND
SOME STATES
OBLIGATIONS
Pioneer
other
options as applicable. Please
to find the nearest
of
Canada as listed below to obtain a local service location.
IN
WARRANTY
WILL
BE
RENTAL
NOT
Service
REQUIRED
CONTRACT
WARRANTY
FOR
REMOVAL
STRICTLY"
OR
COMMERCIALAPPLICATION.
RATING.
PERIODS (BURN-IN).
CHARGE
TO,
THE
DO
APPLY TO YOU. THIS
OR
CONDITIONS, IMPLIED, STATUTORY
of
original owner's transaction.
Company. Your sales receipt should
Pioneer
CANADA
in
PERIOD
TO
SHOWING
PERIOD,
AND
Parts
1 Year
AS
IS"
AND
UNDER
WARRANTY
IMPLIED
SHALL
NOT
ALLOW
servicer.
Canada that fail to
PROVIDED
PROVIDE A
THE
TRANSPORTATION
INSTALLATION OF
PURCHASE.
Labor
1 Year
WARRANTY
"WITH
ALL
FAULTS".
THIS
WARRANTY
DOES
NOT
WARRANTIES
APPLY
AFTER
THE EXCLUSIONS
WARRANTY
access
the
http://www.pioneerelectronics.ca
of
the Magnuson-Moss Warranty-Federal Trade Commission Improvement Act, 15 U.S. C. 2301
of
the authorized Distributor/Dealer from whom the Pioneer product was purchased After the complaint
of
receiving your complaint, Pioneer will investigate the dispute and will either:
in
what time period,
to
resolve the dispute; or (2) respond to your complaint
in
THE
SALES
PLACE
first
COVER
OF
THE
GIVES
et
seq.
writing
Model No.
PurchasedFrom
UCC0212
___________________
RECORD THE PLACE AND DATE OF PURCHASE FOR FUTURE REFERENCE
Serial No.
______________________________________________________
KEEP THIS INFORMATION AND YOUR SALES RECEIPT
__________________
IN
A SAFE PLACE
Purchase Date
__________
< QRY3001-B/N >
_
__
Pirnted in Thailand
 Loading...