

Page 1

176 S. New Holland Road
Gordonville, PA 17529
Tel: 717-768-0804
Fax: 717-768-8569
ASSEMBLY MANUAL
TreehouseLoft
Page 2
Treehouse Loft
Assembly Manual
Dear Customer,
This manual is designed to clearly explain the assembly process, however for best results we strongly
recommend having a carpenter involved in the project. Please read through the entire manual before
starting!!
For 2 men, it took 4 hours, using the tools listed below, to assemble this unit. However, it will probably take you a little longer since it will be a new project for you.
Take a deep breath and get at it, the satisfaction and enjoyment of playing in this unit is only a few
hours away. Have Fun!!!!!
Remember, it is very important that you have a level site for your Treehouse Loft, and that the floor is
level prior to setting the walls.
TOOLS NEEDED:
-7/16”,1/2”,9/16”, and 3/4” deep sockets with 1/2”
drive
-3/4” wrench
-Hammer
-Medium vise grip pliers
-#2 phillips and square drive screwdrivers or bits
-Screw gun
-Paint brushes (for touch-up)
-Utility knife
-8’ step ladder
-Level
-Square
HELPFUL TOOLS:
-Impact wrench with 1/2” drive
-Finish nail gun
-Roof nailer
-Air compressor
revised 4/18/08
Page 3
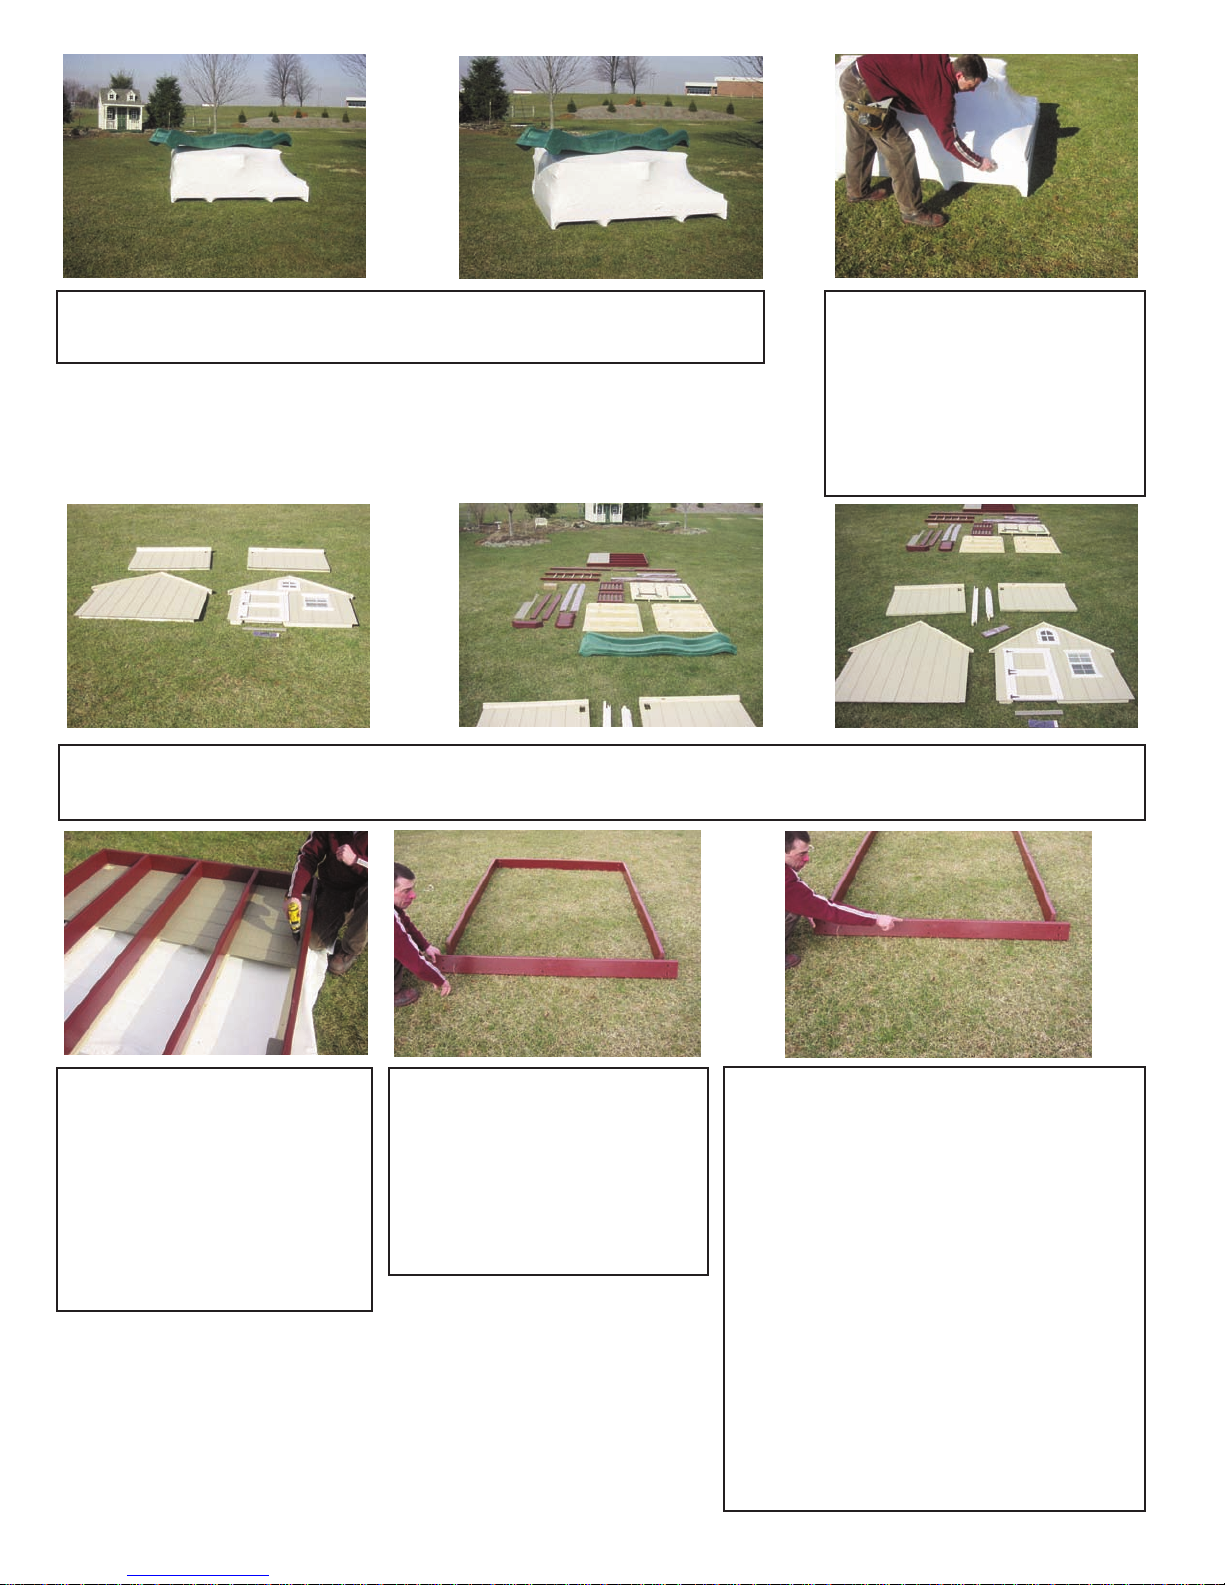
Step 1: This shows a wrapped swing set kit as it will
arrive to your destination.
Step 2: Start by cutting
open plastic shrink wrap;
slice all way around the
kit and then vertically at
each corner to remove
plastic.
Step 3: Remove all the parts from the kit and systematically lay them out on the
ground surface. Remove plastic wrapping from all parts.
Step 4: The last part in
the kit is the floor of the
play set; it may be
necessary to remove
some screws that attach
the floor to the shipping
Step 5: To start construction of your play set find
the four 2 x 6's that
make up the base. Two
are 72" and two are
86-1/4" long.
pallet.
© Pinnacle Play Systems page 3
Step 6: At the specific location
where you intend to erect your
play set, arrange the four pieces
as follows: the 72” piece with six
holes will be placed to the front,
the 72” piece with four holes will
be placed to the back, and the
two 86-1/4” pieces with no holes
will make up the sides of the
base. The 5/8” holes in the midsection of the front piece must
be left of center, to line up with
the holes in the floor.
Page 4
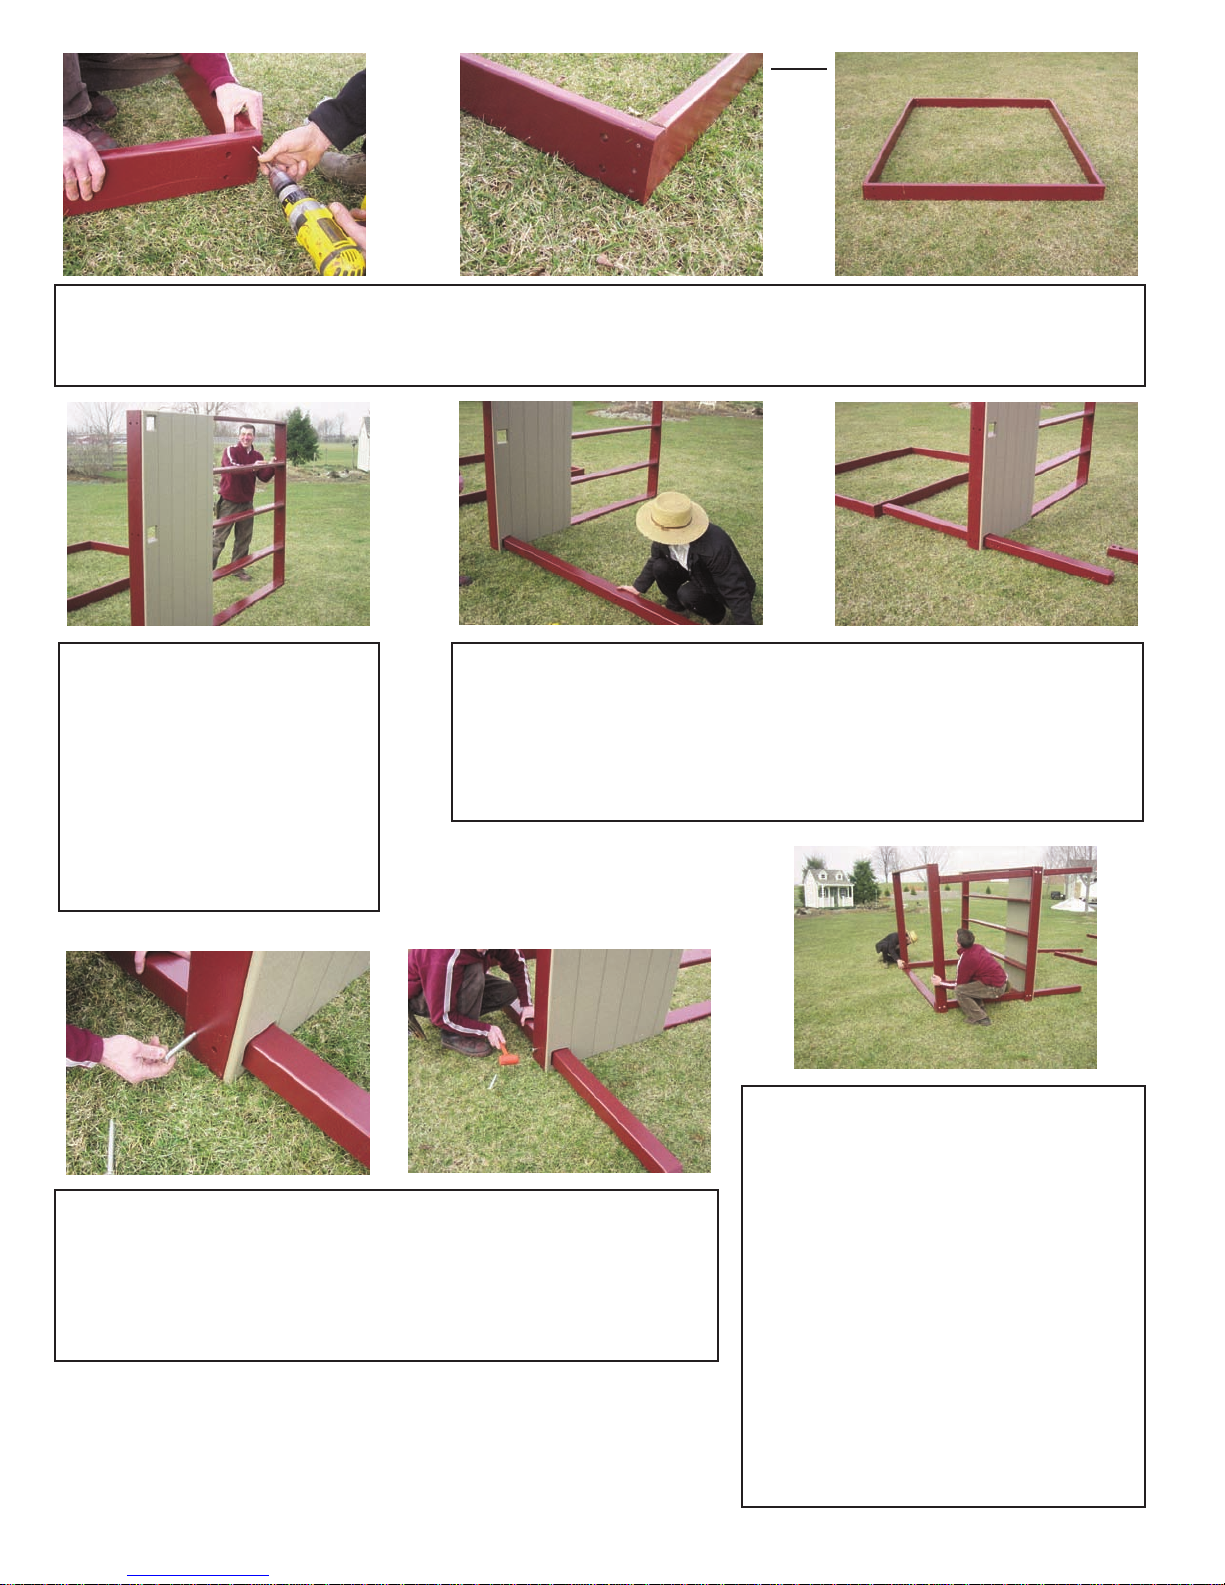
Step 7: Assemble the base by securing each corner of the base with three 2-1/2"
deck screws through the predrilled holes in the 72" front and back pieces into the
86-1/4" sides, keeping the 2 x 6's flush on the outside.
Step 8: When base is
completed stand floor
upright on its right side,
approximately 4-1/2' to
the right side of the base
Step 9: Insert three 90-1/2" 4x4 posts through the front
three post holes in the poly decking; keep the larger
recessed portion of the bolt holes in the post facing
towards the back of the play set. Also keep the
chipped top end of each post facing to the right.
with the poly decking
facing away from
base.
Step 10: When you insert posts, promptly insert 1/2"
x 4-3/4" carriage bolts through 5/8" holes in the floor
into 5/8" recessed holes in posts; line up the two
holes in floor with second set in posts, and insert
bolts.
© Pinnacle Play Systems page 4
Step 11: Install the two 54-1/2"
back posts at back corners of
your play set with the recessed
holes in the post facing towards
the front. Stand the base on the
right side as you are installing
4-3/4" carriage bolts through
the 2 x 6s in the floor and base
into the posts. The bottom
holes in the posts will line up
with the holes in the 2x6s of
the base.
Page 5

Step 12: When you have installed four 1/2" x 4-3/4" carriage bolts in each post ( twenty
total), secure bolts with 1/2" washer, lock washer, and nut on the threads of the carriage
bolts inside the recessed holes of the posts.
Step 13: Tighten 1/2" nuts with 3/4" socket wrench making sure that base and floor are square to posts. Be
careful not to over tighten, stop tightening when head of
carriage bolts start to sink into 2 x 6's.
Step 15: Check to make sure structure is square and
level. It may be necessary to add some blocks or fill
under posts to make level. Confirm that the unit is rotated exactly as you want it to be positioned in your yard.
Step 14: When all twenty
bolts are tightened the play
set is ready to stand up.
With a person on each side
stand structure upright on
base.
Step 16: Install 5'x6' floor
to playhouse, the 2x3
joists on the floor drop
down beside 2x6 joists
of the loft floor. Keep the
2x3s that are cut short
towards the back.
© Pinnacle Play Systems page 5
Page 6

Step 17: Secure 2x3s of
playhouse floor to 2x6s
with 2" deck screws,
making sure plywood is
down tight against
2x6's.
Step 18: Secure two 16" 4x4 corner braces to each corner post
underneath floor and against the
post, making sure to keep the
1/2" recessed hole towards the
post. Secure with 3/8"x 3" lag
bolts with washers at bottom.
Step 19: Secure top of
16" corner braces with
two 3" deck screws
through 2x6 floor joists
into the top of each corner brace.
Step 20: Secure 3/4" x 1-1/4" poly capping on top
of 2x6 base with 2-1/2" decking screws. Keep
screws about 2" from ends and about 18" apart.
Step 22: position 5-rung ladder at
front right opening keeping top
rung level with poly decking
Step 23: Secure 5-rung ladder with two 3/8"x 4" lag
bolts with washers through top holes in ladder into
4x4 posts.
(make sure that the top rung is
less than 3-1/2" away from floor to
leave no room for entrapment).
Step 21: Secure 28" 2x6 sand box
seat at each corner of the base.
Install two 2-1/2" deck screws
through each end of sandbox seat
through poly capping and into 2x6s
of the base. This completes the
floor and base of your play set.
© Pinnacle Play Systemspage 6
Page 7

Step 24: Position slide at front left opening of floor keeping centered between posts and no deeper than 8" from
edge of poly decking. Secure with two 1" pan head
screws through the top of slide into poly decking.
Step 25: You are ready to
start assembling your playhouse. Grab back wall with
no window and gable top.
Position at back of floor
with siding overlapping
floor at bottom.
Step 26: Keep end wall
studs 2 1/2" from each
side of the floor.
Step 29: Make sure
sidewall fits tight at back
corner, and secure bottom 2 x 3 of sidewall to
floor with four 3" deck
screws through 2x3 into
2 x 6 joist.
Step 27: Secure back wall
to floor with four 3" deck
screws through 2 x 3 bottom plate into 2 x 6 floor
joist.
Step 30: Position left sidewall on
left side of base making sure it
fits tight up against the back
wall and secure to loft with four
3" deck screws. The left sidewall will also have a 3" x 5-1/2"
opening at the top back corner
Step 28: Position right
side sidewall with the 3" x
5-1/2" opening (see step
#52) at the top back corner for the swing arm.
Step 31: Install the
front wall by lifting up
on to loft and position
be-tween sidewalls;
make sure corners fit
tightly.
for the swing arm.
© Pinnacle Play Systems page 7
Page 8

Step 32: Secure to
floor with 3" deck
screws at 18" and
36" from inside siding of right sidewall.
Step 33: Finish
securing walls with
3" deck screws at
bottom of rafters at
each corner.
Step 34: Secure
each corner where
walls meet with five
3" deck screws.
Step 35: Secure poly
strip at bottom of door
opening where plywood meets poly
decking with two 1"
screws.
Step 36: Position roof panels by lifting over sidewalls keeping 1 x 3's towards
the peak. Roof panels are interchangeable and will fit on either side.
Step 37: Make sure
rafters line up at peak
with rafters on gable
end walls and down
tight against top of side-
Step 38: Secure roof
panels with three 3"
deck screws through
each outside rafter
into gable rafters.
walls.
© Pinnacle Play Systems page 8
Step 39: Secure bottoms of each rafter with
a 3" deck screw
through 2 x 6 of sidewalls up into bottom of
rafters.
Page 9

Step 40: Secure door
handle to bottom right
corner of top door with
three screws provided
with handles.
Step 41: Secure shutters
to the left and right side
of window with eight
screws provided with
shutters. Keep contour in
shutters towards the top.
Step 42: Install plugs in
screw holes to complete
shutter installation.
Step 43: Install handles
on ladder with four 1
1/4" lag bolts using a
1/2" socket. Position
handle 2" down from top
of ladder and centered
on 4 x 4's.
Step 44: Install trim on outside of
playhouse with finish nails. Start
with four corner trim pieces
which each consist of two 1 x 3s
that are nailed together. One
piece on the corner trim will have
an angle cut that fits up against
angle on the gable end walls.
Step 46: Install the four peak
trim pieces to gable end
walls with finish nails. Start at
the peaks and keep the top
of the trim flush with the top
of the plywood roof panels.
Step 47: Install the soffit
trim keeping the ends
flush with bottom corners of the peak trim.
Step 45: Two pieces
have a notch cut out at
the bottom to fit over
poly decking on loft.
Step 48: Secure bottom
ends of peak trim to soffit trim keeping corners
flush.
© Pinnacle Play Systemspage 9
Page 10

Step 49: Position railing at front side openings of loft
between front posts and playhouse. Secure each railing
with three 2" deck screws through each end cap on the
railing and into the post and the playhouse wall.
Step 50: Layout both sections
of two piece swing arm on
ground to install two cast
iron swing hangers at each
end. You will see how they
will overlap in the middle.
Step 51: Secure swing hangers to bottom of swing arm with 1/2" x 6-1/2" carriage bolts
through the top of swing arm and swing hanger. Install 1/2" lock washer and nut on to
threads of 6 1/2" carriage bolts and tighten with 3/4" socket wrench.
Step 52: Slide one section of swing arm through 3" x 51/2" holes in each side wall.
© Pinnacle Play Systems page 10
Page 11

Step 53: Overlap swing
arm inside playhouse and
line up two 5/8" recessed
holes toward center of
swing arm.
Step 54: Secure two sections together with 1/2" x 2-1/2"
carriage bolts through 5/8" recessed holes and install
1/2" washer, lock washer, and nuts on threads of 2-1/2"
long carriage bolts. Tighten with 3/4" socket wrench.
Step 55: Line up swing
arm on back wall so
that the 1/2" recessed
holes on both sides are
centered on the outside
studs on the back wall.
Congratulations, this completes the construction of your kit! Follow
manufacturer’s instructions for applying roof shingles and paint to your
liking. It will be necessary to check for splinters and screws that protrude
through surfaces during and after the entire assembly process. Be sure to
remove sharp objects and check play set periodically for loose hardware.
Step 56: Secure swing
arm to back wall with
four 3/8" x 4" lag bolts
with washers, there are
two holes at each side.
Step 57: Install spring
clips and swings on to
swing hangers.
© Pinnacle Play Systems page 11
Page 12

© Pinnacle Play Systems
Instructions for paint touch up on a
Pinnacle Playset
A major benefit of purchasing a painted playset is that damage to the set via a pocket
knife, etc. can be rectified with caulk and touch up paint. This also applies to the splitting and checking found in all outdoor wood products made from cedar, redwood,
pine, etc. The splits seen in larger dimensional lumber are also known as checks and
are more of a cosmetic concern than a structural concern. These generally occur in
large lumber such as 4x4’s and 4x6’s.
We have constructed this manual to assist you in repairing damages, general touch
up associated with a painted set, and in filling checks that are less than 1/4” wide.
Tools Needed
- Paint scraper or putty knife
- Touch-up paint
- Sanding pad with 80 grit sandpaper
- Paintbrush or small roller
- Caulking gun with tube of acrylic latex caulk
(fast drying non shrinking formulas work best)
Page 13

Step 1: After cleaning the surface, slowly apply caulking into the
check of the wood from one end to the other. The caulking
should penetrate into the check and fill it up leaving little excess
on the outside of the wood.
Step 2: Remove excess
caulking from wood with putty
knife or scraper leaving a
smooth surface over the
check. . .
Step 2 cont... leaving minimal
excess caulk.
Step 3: Allow caulking to dry
according to manufacturer’s recommendation. If the repaired surface
of the caulking seems to have
shrunk into the check, apply a second coat of caulk and allow time to
dry.
Step 4: When caulking has
dried, sand surface lightly with
sanding pad to remove
excess caulk. The acrylic
latex paint we use tends to
stay soft and pliable. Sand
with light quick strokes, being
careful not to remove original
coat of paint.
Step 5: When applying touch-up paint to wood, apply a thick coat of paint to cover area, smooth out
with brush or roller and allow time to dry (generally less than 6 hours). The touch-up paint will work
as a primer and a topcoat. Apply a second coat of paint after the first coat has dried. The second
coat of paint is essential to provide long lasting protection and restore the repaired area to the same
luster as the original paint.
© Pinnacle Play Systems
 Loading...