

Page 1

User Guide | Software v2.5
SoundBridge
Wireless Network Music Player
Page 2

1
Welcome
Thanks for purchasing SoundBri dge! We hope you enjoy using it as much as we’ve
enjoyed creating it.
SoundBridge is a networ k music player that connects to your stereo or powered speakers
to play your Mac or PC digital music librar y in any room of the house. You can even play
thousands of free Internet rad io stations on SoundBridge without the computer on.
SoundBridge works wi th your Wi-Fi or Ethernet home network and is compatible with
popular music servers su ch as Windows Media Connect Musicmatch and more. Enjoy!
Run the Latest Soft ware!
We are always working on improving the soft ware for our products. Your SoundBridge will
let you know when a sof tware update is available. We recommend you accept new software
updates when they are offered. T he update just takes two minutes, and enhances the
features of your SoundBridge. All you need is an a ctive Internet connection. See “Options for
System Confi guration” on page 45 for easy ins tructions.
Register Your SoundBridge!
It’s quick, easy and ensures that you are notifi ed of the latest software updates for
SoundBridge. Of course, we won’t share yo ur personal information with anyone else. Visit
www.pinnaclesys.com/suppor t.
Download the Latest User Gu ide!
When our software chan ges, so does our
user guide. Visit www.rokulabs .com/pinnacle
to download the latest version as a PDF
document and learn about the latest features.
Visit www.pinnaclesys.com/suppor t
to register your SoundB ridge.
Page 3

3
TABLE OF CONTENTS
SECTION 1: GE TTING STARTED
I. Music Server Software Requirements..4
II. Enabling Music Sharing ..........................7
III. Hooking Up Your Home Network
Hardware
(Wired Ethernet or Wireless)...........9
IV. Connect Your Speakers
or Stereo System.......................................9
V. Connecting SoundBridge
to AC Power................................................10
VI. Using Your Remote Control....................11
VII. Establishing a Network Connection.....11
VIII. Setting Display Preferences ...................12
IX. Checking for the Latest Software .........13
X. Wall or Under-Cabinet
Mounting (optional).................................13
SECTION 2: BROWSING MUSIC........................14
Choosing Your Music Library............................14
Remote Control Quick Reference....................15
The Home Menu..................................................15
Browsing Your Music by Album.......................16
Browsing by Artist or Composer.....................18
Browsing by Song...............................................19
Browsing by Genre..............................................19
SECTION 3 : THE SONG QUEUE........................20
Building a Song Queue......................................20
Reviewing a Song Queue..................................21
Erasing a Song Queue .......................................21
SECTION 4:
ADDITIONAL PLAYBACK OPTIONS
................22
Playing a Playlist..................................................22
Repeat and Shuffl e.............................................22
Search Options....................................................22
SECTION 5: PRESETS..........................................24
Recalling Presets.................................................24
Editing Presets Using the Web Interface.......24
SECTION 6: INTERNET RADIO..........................26
Browsing Internet Radio Stations...................26
Customizing Favorites and Presets for
Internet Radio............................................27
Playing Stations Saved as “My Favorites”
or “Presets”.................................................29
Playback Limitations of Internet
Radio Streams............................................30
Discovering More Internet
Radio Stations............................................30
SECTION 7:
SOUNDBRI DGE WEB INTERFACE
...................31
Launching the Roku Web Interface...............31
Now Playing ........................................................34
Presets ...................................................................35
Confi guration ......................................................37
Status ....................................................................38
SECTION 8 : WHEN YOU ARE FINISHED
USING SOUND BRIDGE
.....................................39
SECTION 9 : ADVANCED FEATURES ...............40
Brightness, Contrast, Font,
and Text Display........................................40
Brightness & Time Format While
in Standby...................................................40
Settings..................................................................40
Music Visualizer Settings...................................40
Clock Settings.......................................................41
Language Setup .................................................43
Standby and Reboot Options..........................44
WMA Lossless Transcoding...............................44
FLAC and Ogg-Vorbis Transcoding................44
Programming a Universal
Remote Control.........................................44
SECTION 10: OPTIONS FOR
SYSTEM CONFIGURATION
..............................45
Software Version & Updates............................45
Select Wi-Fi SSID & Password...........................45
Show Wired Ethernet Status............................45
Show Wi-Fi Status...............................................45
Network Control.................................................45
Reset to Factory Defaults.................................45
Restart SoundBridge..........................................45
Safe Mode.............................................................45
Roku Control Protocol (RCP)............................46
Geeks — Read This.............................................46
SECTION 11: Appendices..................................47
1A: MENUS OVERVIEW........................................47
1B: SCREEN ICONS QUICK REFERENCE...........49
2: WI-FI SETUP HELP............................................50
3: END USER SOFTWARE LICENSE
AGREEMENT................................................62
4: REGULATIONS AND SAFELY..........................63
2
Page 4

4 5
SECTION 1: GET TING STAR TED
To use SoundBridge you will need to do the following ( detailed explanations follow):
I. Make sure you have a compatible music ser ver installed. Compatible music servers include
Microsoft® Windows® Me dia Connect, Firefl y Media Server,™ Rhapsody,™ Musicmatch,®
and others. (Note : If you plan only to listen to Internet radio, you can sk ip this step because
no music server is neede d.)
II. Connect Sound Bridge to your Ethernet or Wi-Fi home netwo rk.
III. Connect Soun dBridge to powered speakers or your home stereo syste m’s receiver or
amplifi er.
IV. Plug in SoundBridge to AC power (the re is no “on/off ” switch).
V. Put batteries into your SoundB ridge remote control.
VI. Establish a network connection. If yo u are using Wi-Fi and have WEP security enabled, you
will need to enter your securit y key with SoundBridge’s remote control.
VII. Enable any music sharing options required by your music server:
a. Windows Media Connect: authorize SoundBr idge as a recognized device.
b. Firefl y Media Server: always enable d.
c. Musicmatch: enable Music Sharing feature and UPnP option in Options menu.
VIII. Sel ect and connect to your music library.
IX. Play music: Using your remote control, fi nd a song you want to play, then press Play to play
it immediately or Add [+] to add it to the So ng Queue.
I. Music Server Software Requirements
SoundBridge is designed to ac t as a remote client for several kinds of music libraries, including
Windows Media Connect, Firefl y Media Server, Rhapsody, Musicmatch and TwonkyVision
MusicServer. You can also play WMA and DRM WMA fi le s purchased from popular online music
stores such as Napster.™ (Apple’s policy does not allow Soun dBridge to support playback of
protected AAC fi les purchased from the iTunes Music Store.)
What Is a “Music Se rver”?
SoundBridge is a networ k music player. That is, it doesn’t store any music, but pl ays fi les that
you have stored on a computer connecte d to your home network. (It can also play Inter net
radio without connecting to yo ur computer, using a direct connectio n to the Internet.) To play
the music fi les stored on your comp uter, SoundBridge needs to receive dat a from software
installed on the computer that “serves” the music . This “music server” is responsible for
streaming the music to SoundBridge. It is also respo nsible for sending the list of music you
have available to SoundBridge (when aske d), and performing searches of the music librar y at
SoundBridge’s request.
The most common music servers are W indows Media Connect and Musicmatch. Roku
also offers a customized ser ver (Firefl y Media Server) availabl e as a free download from
www.fi refl ymediaser ver.com. If you want to use a Microsoft PlaysForSure™ music service,
you must use Windows Media Conne ct. If you want to listen to the music you have in your
iTunes library, you must use Firefl y Media Ser ver.
Note: For playing back Internet rad io using SoundBridge’s “Radio Favorites” library, you don’t
need a music server, because Soun dBridge receives the radio stream directly from the Interne t.
SoundBridge H as Two UI Modes
Each music server has dif ferent capabilities. To experience the full SoundBridge user inter face,
which includes searching and robust browsing modes , you must use a server that supports
these functions, such as the Firefl y Media Server or Windows Media Connec t. Some other
servers don’t have the func tionality required to deliver the full SoundBridge feature set. For
example, you won’t be able to search , and the browse modes will vary by server.
1
Section 1: Getting Star ted Section 1: Getting Star ted
Page 5

6 7
You have several options for connecting your music library to SoundB ridge:
Music Server Recommended for Users
of . . .
Notes
Windows Media Connect
(UPnP Windows Media DR M
10 protoc ols)
Windows XP with SP2 A free media ser ver from Microsof t. Works with any musi c
jukebox, but optimi zed for Windows Media Player v.10. Support s
SoundBridge’s fu ll Browse, Search and Display fe ature set. Plays:
WMA, DRM WMA*, WMA Lossless, MP3, WAV, playlists created in
jukebox soft ware such as Windows Med ia Player 10.
Firefly Me dia Server (suppor t for
Roku Server Protocol)
PC/Mac This high quality “ope n source” media server will s erve music
in many formats (WM A, MP3, AAC, FLAC, Apple Lossles s). It
integrates dire ctly with iTunes and can s hare your iTunes music
library, or any music libr ary. As with all non-apple p roducts,
it does NOT suppor t Protected AAC f iles. It does not suppo rt
protected WMA f iles. It does suppo rt SoundBridge’s fu ll Browse,
Search and Display feat ure set as well as playlists an d Smart
Playlists created i n iTunes.
Musicmatch Jukebox
(UPnP AV protocol)
Windows 98 SE/Me/XP/2000
(SP3 or above)
Popular jukebox sof tware and music ser vice. Has a built-in UPnP
AV server suppor ted by SoundBridge. You can als o use Windows
Media Connect w ith Musicmatch, which is mo re feature-rich.
Plays: WMA, MP3, WAV (DRM WMA and Musicmatch p laylists
supported on ly if using Windows Media Co nnect Server).
SlimServer
(SlimSer ver protocol)
PC/Mac Compatible with S oundBridge, but not supp orted by Roku.
Requires downloa d of SlimServer soft ware. Uses its own (very
different) user interface.
1
Section 1: Getting Star tedSection 1: Getting Star ted
Installing a Co mpatible Music Serve r
To access network music sharing, make sure you have a compatible music server installe d.
Compatible music servers are listed o n the previous page. To install one of these, follow the
instructions below.
Installing W indows Media Connect
1. If no t already installed, install Windows XP Service Pack 2, a free d ownload from Microsoft or
via Windows Update Installer.
2. Down load the latest version of Windows Media Player, v.10, a free download from Microsof t
or via Windows Update Installer.
3. Dow nload Windows Media Connect, a free downloa d from Microsoft, or via Windows
Update Installer.
4. Continue to “Enab ling Windows Media Connect.”
Installing Firefl y Media Server
1. Downl oad and install Firefl y Media Server from www.fi refl ymediaserver.com.
2. Continue to “Enab ling Firefl y Me dia Server.”
Installing M usicmatch Jukebox
1. If no t already installed, download a free version of Musicmatch Jukebox 9.0 on your PC fro m
www.musicmatch.com.
2. Continue to “ Enabling Musicmatch Jukebox.”
II. Enabling Music Sharing
After installing a music ser ver, you need to enable your music ser ver to share data with your
SoundBridge.
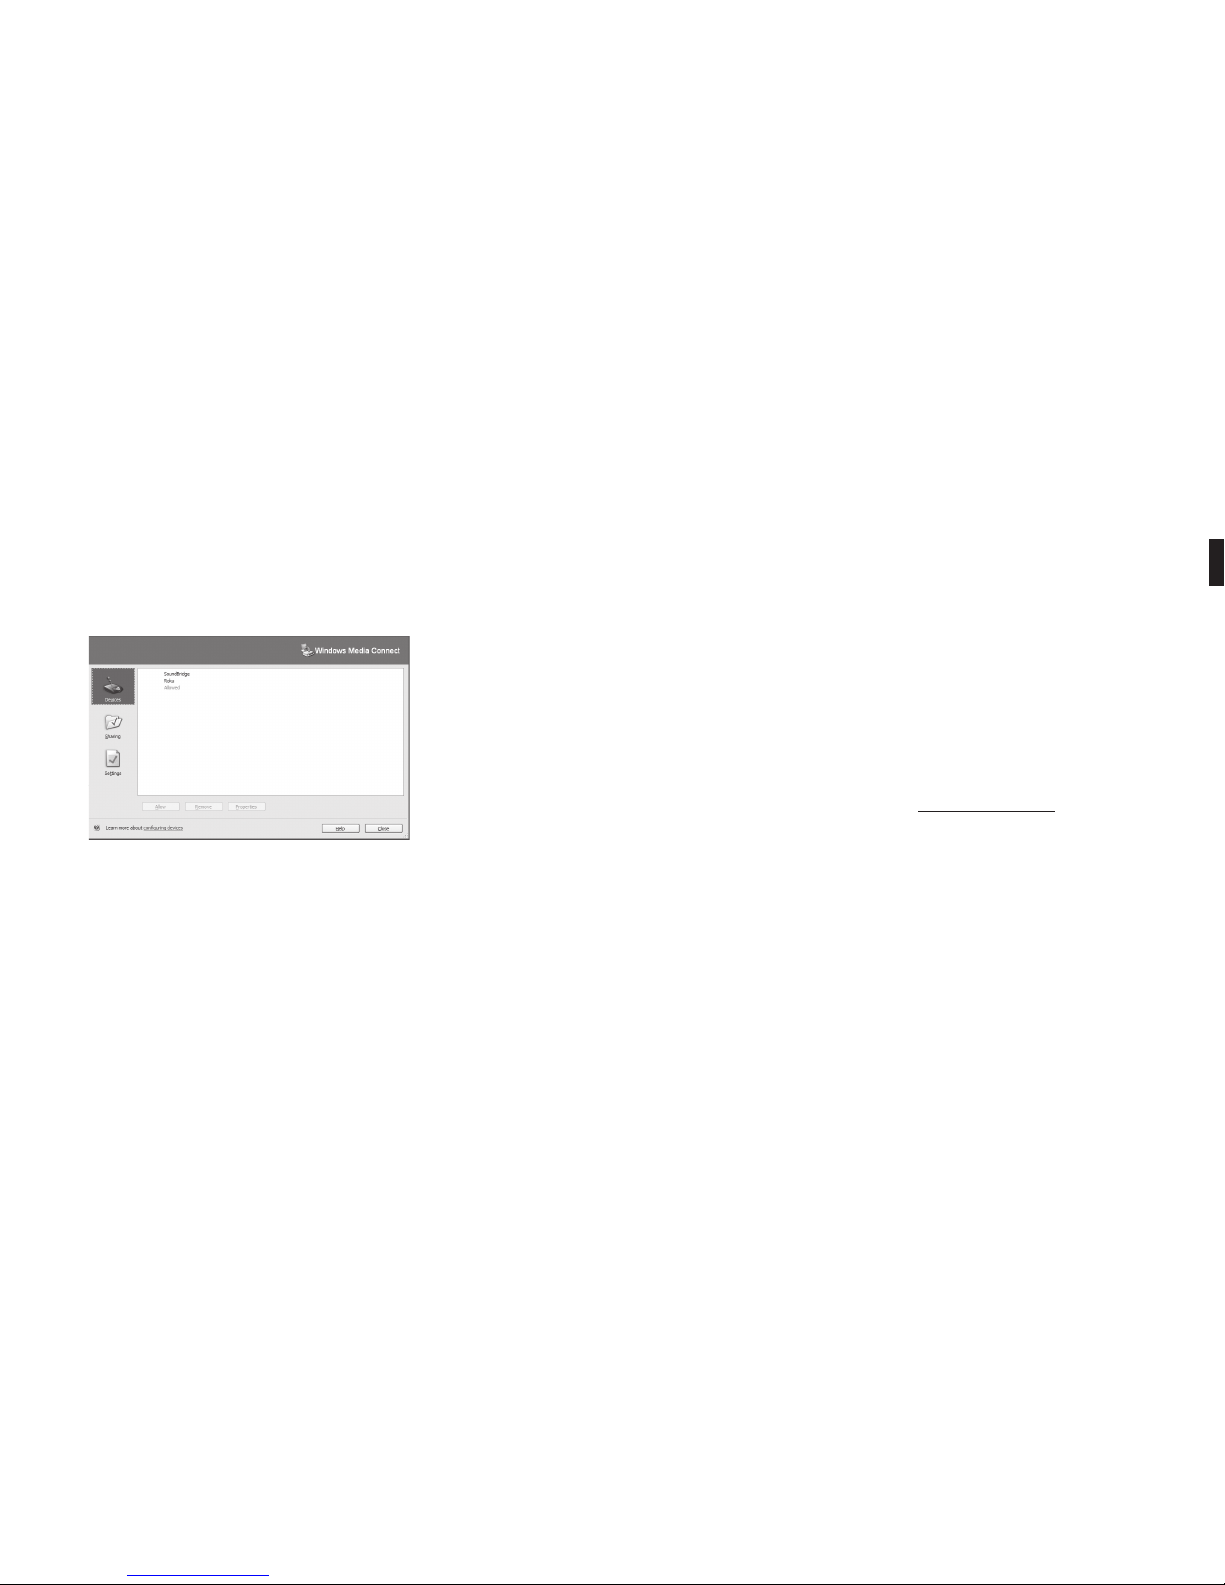
Enabling Shari ng in Windows Media Connect
To authorize SoundBridge as a permitted clie nt for Windows Media Connect, follow these
steps:
1. Click the W indows Media Connect tray icon or open Windows Media Connec t through the
Page 6
8 9
Enabling Sharing in Musicmatch
1. Select Options/Settings.
2. Click the CD Lo okup/Connectivity tab.
3. Se lect Enable Music Server and then select Univer sal Plug and Play. You can close
Musicmatch if you like — the UPnP server will keep ru nning in the background.
III. Hooking Up Your Home Network Hardware ( Wired Ethernet or Wireless)
Ethernet Con nection: Plug your cable into the ja ck provided on the right side of the rear
of the unit. Connect your Etherne t cable to a hub, switch or router on your home network.
Alternatively, you can connect SoundB ridge directly to your computer (and bypass a hub/
switch/router) , but only with a “crossover” cable (sold separately ). Connect the other end of the
cable to your network .
Wireless Con nection: No need to inst all any additional hardware into SoundBridge
Please note that most, but not all, wireless access points are compatible with SoundBridge. You
can fi nd a list of supported wireless hardware at www.rokulabs.com/support.
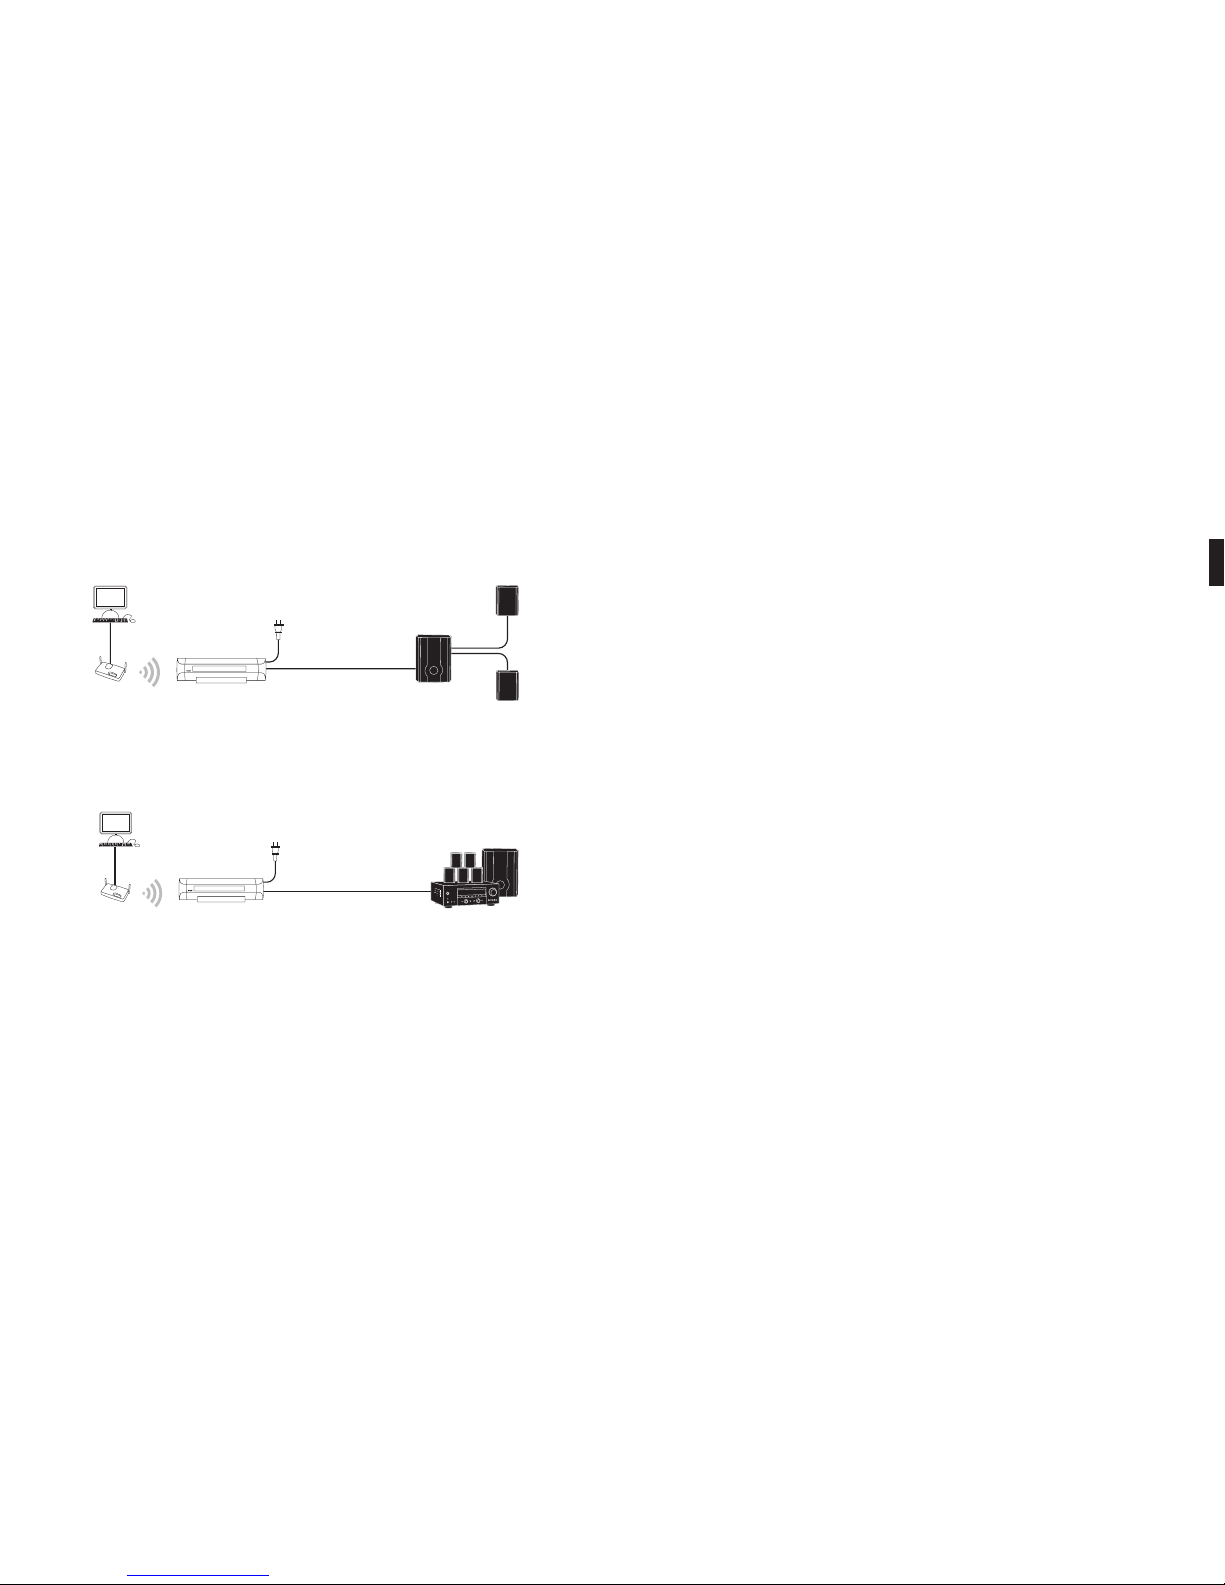
IV. Connect Your Speakers or Stereo System
Connect your audio cable into the l eft side of the rear of the SoundBridge unit. Your
SoundBridge has several audio connec tion options:
a. Connect your SoundBridg e to a set of powered speakers, using the RCA-to-mini (1/8” ) Y-
audio cable included with your So undBridge (M500), or by plu gging your powered speaker
1/8” cable directly into the S oundBridge (M1000).
1
Section 1: Getting Star tedSection 1: Getting Star ted
Windows Control Panel. The SoundBrid ge device appears in the notifi cation area in the
bottom-right cor ner of the window.
2. Op en the Wizard window, click the SoundBridge device and then click Allow. Windows
Media Connect will now authorize So undBridge.
3. Click Cl ose.
Enabling Sharing in Firefl y Media Server
You do not need to enable the Firefl y Med ia Server to share music. However, the program must
be running in order to play music on your SoundBr idge.
Page 7
10 11
Speaker Base
PC or Mac with
music files
Power Cable
Wireless Router/Switch
(or wired Ethernet)
Connecting to powered speakers (M1000)
b. Connect your Soun dBridge to your stereo system’s Aux or other “Line Input,” using one of
the RCA (red/whi te) audio cables included with your SoundBridge.
Note: If your speakers have a male connector, you will need a female -to-female coupler
available from your local ele ctronics accessory store.
PC or Mac with
music files
Connect 1 of the following:
(1) Optical “Toslink” SPDIF from
SoundBridge to receiver
(2) Black SPDIF Coax (RCA) to “Coax Digital
In” on your receiver
(3) Analog RCA cable (white/red) to AUX
on your receiver
Power Cable
Connecting to a stereo
Wireless Router/Switch
(or wired Ethernet)
c. Connect to your stereo system using either coaxial SPDIF digi tal or optical SPDIF digital (the
SoundBridge has connecto rs for both) — cables sold separately.
V. Connecting SoundBridge to AC Power
If you plan to use an Ethernet connec tion, be sure the cable is plugged in to the unit. Plug the
power cord into the SoundBridge unit, and p lug the other end into to a wall outlet.
There is no power switch to turn on Sound Bridge. As soon as you plug in the power, you should
quickly see the welcome messag e “Roku SoundBridge.” If not, please stop and ensure that your
power cable is connecte d properly on both ends.
VI. Using Your Remote Control
The SoundBridge remote control is an inf rared remote, so it needs “line of sight” to
SoundBridge in order to ope rate. Point the remote in the direction of your SoundBridge,
and make sure that the IR receiver window is not blocke d by another object.
VII. Establishing a Network Connection
Wired Ethern et Network: After you have connec ted SoundBridge to your computer via a
switch/hub/ router (or directly to your computer via crossover cable) and p owered up the unit,
SoundBridge will auto- confi gure its network settings (using DHCP or AutoIP). T here is nothing
you need to do. If for some reason you have troub le connecting to your network, selec t the
“System Confi guration” option, then se lect “Show Wired Ethernet Status.”
Note: Do not plug in an Ethernet c able if you plan to use your Wi-Fi network to avoid confusi on
in the setup of the device. Also, if you plan to use an Ethern et connection, make sure the cable
is connected before power ing up the device.
Wireless Network: If you have an open and visible Wi- Fi network in your home (one which
broadcasts its name, and which has no s ecurity keys set) then SoundBridge will auto- connect
to your wireless network . However, you will be asked to enter your network’s name (SSID) if :
- SoundBridge detec ts more than one Wi-Fi network (as some adv anced users have in their
home, or if your neighbor ’s signal is leaking over), or
- Your Wi-Fi network does not broadc ast its name (for security reasons)
In these cases, enter the SSID using the remote control. Use th e Left/Right [◁ ▷] arrows to
choose letters, and use the Up /Down [△ ▽] arrows to change to Upp ercase and to other
character sets (numb ers, international characters) and to enter “Space”, “Delete” and “OK”
when you’re done.
SoundBridge suppor ts networks with WEP security. WPA is not yet supported . If you have a
WEP security key, you will need to enter your WEP key manuall y into SoundBridge. This is the
1
Section 1: Getting Star tedSection 1: Getting Star ted
Page 8

12 13
same key you have entered into your Access Point and your computer. Your screen will look
something like this:
No Music L ibrar ies Found (Why?)
System Confi guration
Scroll down using your remote control’s Down arrow until the option “ System Confi guration” is
highlighted, and press Select on your remote control . You w ill see a screen that looks like this:
Software Version & Updates
Select Wi-Fi SSID & Password
Show Wired Ethernet Status
Show Wi-Fi Status
Navigate down to “Selec t Wi-Fi SSID & Password” and enter your wireless network nam e
and password.
For additional help connecting to your n etwork, including password help, see the Wi- Fi setup
section in the appendix o f this guide.
Personal Fir ewall
If you are having trouble connecting, yo ur computer may have a fi rewall installe d that is not set
correctly. Make sure your fi rewall is confi gured to allow music sharing from your music server:
For help with fi rewall troublesho oting, please visit the troubleshooting section of our suppor t
area at www.rokulabs.com/support or visit our user forums at www.rokulabs.com/forums.
VIII. Setting Display Preferences
The brightness of your display can be ad justed by pressing the Bright [] button.
Text size and fonts can also be controlled for the SoundB ridge M1000’s VFD display by pressing
the Bright button.
Also, from the Home Menu, you can navigate dow n to the “Settings” option to change certain
options, such as the style of music v isualizer, whether the music visualizer appears f ull screen
during playback, and what kin d of information is displayed when a song is playing.
For a complete list of SoundBridge set tings, please see the “Advanced Features” section of this
user guide.
IX. Checki ng for the Latest Software
When a software update is available, your SoundBridge will automatically offer you the choice
to upgrade. Please take a minute to do so. You’ll just need SoundBridge connected to a network
with a high-speed Internet connection.
Note: You will be offered the chance to upgrade af ter accessing your “source” menu (which
lists your available music libraries and Inte rnet radio). If for some reason you never access this
menu, like you always stay connected to the s ame library, we recommend checking for new
software manually.
See Options for System Confi guratio n section for instructions on how to check for new
software manually. Roku will releas e a revised user guide in PDF format periodically to explain
new features or functions that have been adde d to the SoundBridge software. Please visit
www.rokulabs.com /support to download the latest manual.
X. Wall or Under-Cabinet Mounting (optional)
SoundBridge ships with a portable black rubber table stand which looks great on your shelf or
nightstand. An optional wall mounting kit is available for sale at www.soundbridge.co.uk. This
allows SoundBridge to be mounted to the wall or under a cabinet using a sleek, hidden bracket
which screws into your wall.
1
Section 1: Getting Star tedSection 1: Getting Star ted
Page 9
14 15
SECTION 2: BROWSING MUSIC
Choosing Your Music Library
Once SoundBridge is successfully connec ted to your network and your server’s music sharing
options are enabled, SoundBridg e will automatically fi nd any supported music libraries on the
network. You will be prompted to choos e the library you would like to access from a screen that
looks something like the on e on the left:
“Change Library or Confi guration” Menu
Play Dan’s Music
Ë Play Joe ’s Music
Play AM Radio
Play FM Radio
Play Internet Radio
System Confi guration
Playlist
Browse
Search
Show Song Queue
Play Preset
Now Playing
Settings
Change Library or Confi guration
Navigate to your preferred librar y (in this example, “Joe’s Music”) and press Select. You will
then see the “Home Menu” ( see above at right), where you can begin browsing and p laying
your music.
To change to a different library, or to play Internet radio, s elect the “Change Library or
Confi guration” op tion located at the bottom of SoundBridge’s Home Menu (a ccessible by
pressing the Home Menu [
].
Hint: SoundBridge will automatic ally connect to the last library you were connected
to when awakened from Standby. Use the “Change Library o r Confi guration” option to
select a differe nt library.
Remote Control Quick Reference
Use these commands on your remote control to selec t and play music:
• Use the Up and Down [△ ▽] arrow buttons to take you through a list item by item. Use
the Select [] button to take you one level down into the highlighted i tem (think of it as
double-clicking a s elected item).
• Use the Left and Rig ht [◁ ▷] arrow buttons to “fast brows e” a list of music options
by skipping to the next or p revious letter of the alphabet, or if your list is not arranged
alphabetically, by about 5% of your list at a time. The n use the Select [] button to choose
an item to play.
• Use the Back [] button to go one step back ward while browsing, much like the Back
button on your Internet browser. (Pressing B ack repeatedly displays the “Now Playing”
screen, with information about the son g currently playing.)
• The Search [] button takes you to your text-bas ed search options (if supported by your
music server).
• When you fi nd a sel ection you want to play, you can use the Play [] button to play it, or the
Add [+] button to add your current se lection to the end of your Song Queue.
• The Pause[ ;] button pauses playb ack of audio currently playing; pressing again resumes
playback.
• The Next Track and Previous Track [ : 9 ] buttons advance or retreat p layback of your
Song Queue (or Intern et Radio menu) one song at a time.
• Press the Home Menu [
] button at any point to return to the beginning m enu.
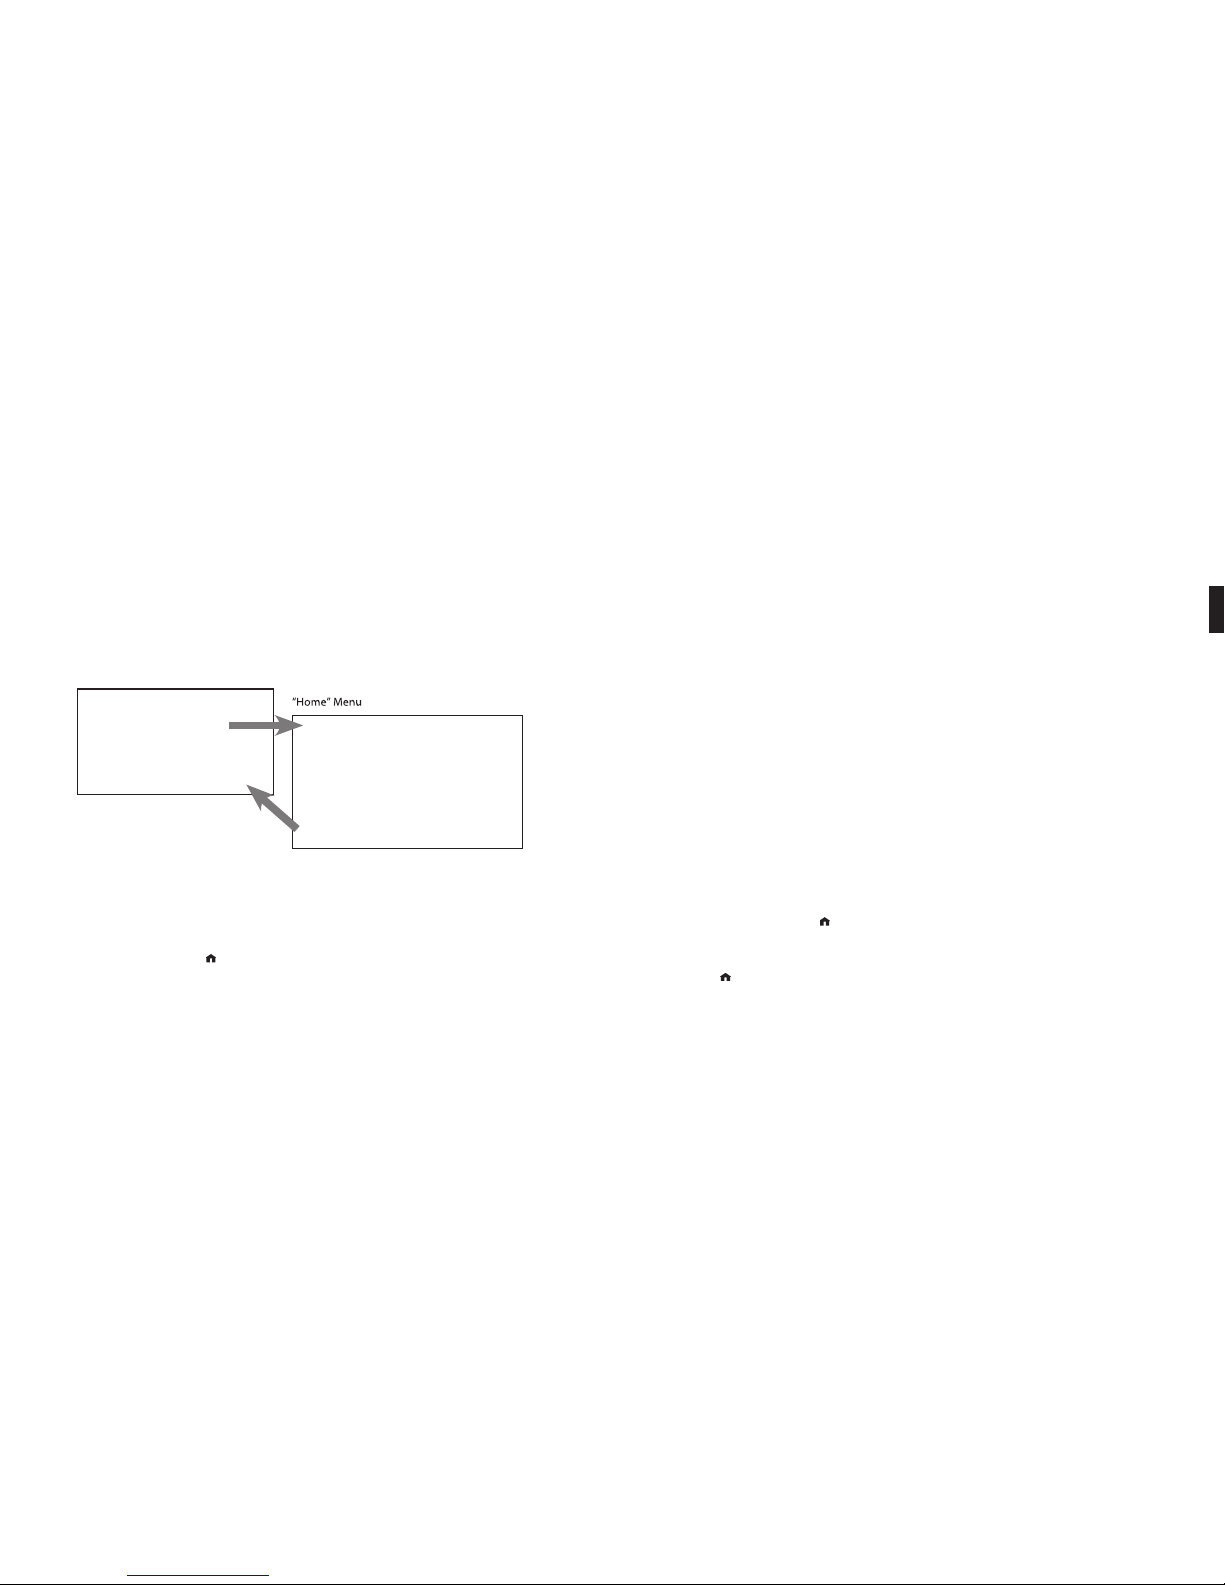
The Home Menu
To begin navigating through your music, start on your “ Home” menu, by pressing the Home
Menu [ ] button. The display on SoundBridge shou ld look something like this:
2
Section 2: Browsing Music Section 2: Browsing Music
Page 10

16 17
Home Menu Overview
Ë Playlists
Browse
Only the fi rst two lines of the Home Menu are displayed at once (or one line if you are using an
M1000 with the largest font size), but you can use the Down ▽ arrow on your remote control to
scroll through all these options:
Playlists [Displays all the p laylists availabl e for the selected
music librar y from your networ k.
]
Browse [Browse the mus ic library by arti st, album, song,
genre, and compo ser]
Search [Enter text for s ong title, album, ar tist, composer, and
keyword.
]
Play Preset [ Select one of 18 diff erent preset statio ns or
playlists.
]
Show Song Queue [Shows past and upcom ing songs selecte d playback]
Show Now P laying [Shows song now playing. Pre ss Select to get more
info about the s election.
]
Settings [Set options f or the music visualizer a nd memorizing rad io playlists. ]
Change Library [Exit the cur rent music library a nd connect to another o ne, or
or Confi guration change your network or sy stem confi guration.]
The Ë arrow to the left of a menu item denotes the current item . You c an also refer to the
scroll bar (at the right of your display) to s ee your position in the list.
Browsing Your Music by Album
From the Home Menu, press the Down button until yo u see the “Browse” option highlighted
and press Select. You will see a list of options :
Ë Browse Artists
Browse Albums
If you scroll down, you will see these b rowsing options:
Browse Songs
Browse Genres
Browse Composers
Now, if you navigate to the “Browse Albums” option and press Select, you
will see an alphabetical listing of Albums found in your music library. The
screen will look something like this:
Ë Parachutes
Paul’s Boutique
Navigate to the album that you want to hear using the Up/Down [△ ▽]
arrow buttons — in our example, “Parachutes.” Or, for faster browsing, press
the right arrow to skip ahead in the album list to the next letter of the
alphabet. When the album you want is selected, press the Select button for
a listing of songs found on this album.
Ë Don’t Panic
Shiver
The music note next to each song name indicates the selection is an
individual track (and not a playlist, album or other collection of songs).
Note: Songs purchased from the Apple Music Store will be displayed with a
padlock œicon. SoundBridge is not able to play back these “locked” fi les — they will simply be
skipped during playback.
Use the Up/Down arrows again to high light the song you want to play. Press the Play button
(or press the Select b utton twice) to start that song playing. W hen the song begins playback,
the display will switch to the “Now Playing” screen , which looks something like this:
Don’t Panic 0:10/2:17 4
Coldplay - Parachutes (2000) (|||------)
Please note that the artist and album information may be ab breviated, or appear one line
at a time, if the total number of character s exceeds what can be displayed at once. See the
“Settings” chapter at the end of this manual for more info rmation on display options.
Hint: If you would like to go back to the above “N ow Playing” screen at any time in order to see
what’s playing, press Back several times until you see this scree n. Alternatively, press Home
Menu [
], then scroll down to the “ Show Now Playing” option and press Select. This screen
Section 2: Browsing Music Section 2: Browsing Music
Page 11

18 19
also appears by default afte r a few minutes of inactivity on the remote control.
If you press Play on an album track, that track will p lay, followed by each track remaining on the
album. For example, if you press Play on track #5 o n an album containing 10 tracks, then track s
#5– #10 w ill play. (For continuous playback of the entire album , press Repeat [
] on your
remote control — the album will play until the end, then star t again at the beginning.)
You can also browse to an album, artist or genre selec tion and press Play to start playing the
entire contents of the selec ted category.
If you are not sure what you have selected to pl ay, simply press the Down arrow from your
“Now Playing” screen (the scre en that displays the currently playing song). This is a shortcut to
the Song Queue, which shows your upcoming songs ( see upcoming section, “Building a Song
Queue”).
Hint: If you navigate to a new song and press Play while yo ur original selection is
playing, you will overwrite the ol d selection (called the “Song Queue ”) and begin playing
your new selection. T herefore you should only press Play when you want to clear your
previous music selecti ons. Use the Add [+] button to add your new selectio n to the end
of your Song Queue.
Browsing by Artist or Composer
Browsing by artist or composer work s similarly to browsing by Album, as described above.
After entering your desired ar tist or album, you will see a screen that lists the albums available
by that artist:
Ë <Show all matching songs>
Medusa
You can add all songs by this artist to your existing Son g Queue by pressing Add [+] while the
fi rst menu item <Show all matching so ngs> is active. Or, press Play to play all songs by this
artist and replace your existin g Song Queue. (Songs will play in the order they appear on each
album, with each album played in alphabetical order) .
Hint: Artist names star ting with “the,” such as The Beatles, will be found under the fi rst
letter of the word following “the ” — in this case, “B” for “Beatles”.
You can choose specifi c albums or son gs to play by navigating down to your desired album and
pressing Add [+] to add to an existing Song Queue, or Play to repl ace an existing Song Queue.
Hint: if your selected albu m contains songs by different artists, such as compilation
albums or movie soundtracks , only the song(s) by your selec ted artist will be played.
Browse by Album instead to play all the tracks. )
Browsing by Song
Browsing by song displays a list of all the songs in your music librar y, listed in alphabetical
order. Use the Left/Right [◁ ▷] arrows to “fast browse” through the list, or Up/ Down [△ ▽] to
move through the list one item at a time.
Browsing by Genre
Browsing by genre displays an alphabetical listing of genres that des cribe the artists in your
music library. To add all songs within a genre to your Song Queue, highlight that genre and
press Add.
To browse within a genre, such as Hip Hop/Rap, p ress Select on your desired genre. You will
see a list of artists in that genre, w ith the option to see a list of all albums in that genre. Or you
can navigate to an artist and press Select to view alb ums of the selected genre by that artist.
Hint: Information about your music, includ ing Song Name, Artist, Album, and Genre is
usually created automatically by the sof tware you used to save your audio CD fi les on
your computer’s hard drive (aka “ripping” ). This process creates data called “ID3 tags”
to describe each track. If this data is missin g from your audio fi les, they will not appear
when you browse by that data categor y. If you need to edit your ID3 tags, or if you are
not satisfi ed with the description of genres (or other data ) assigned to your music fi le, it
is possible to edit that data in Windows Me dia Player or other supported music jukebox
programs.
2
Section 2: Browsing MusicSection 2: Browsing Music
Page 12

20 21
SECTION 3: TH E SONG QUEUE
SoundBridge automatically buil ds a song queue every time you select a song or albu m to play.
This section will tell you h ow to build a Song Queue, review a Song Queue and erase a Son g
Queue.
Building a Song Queue
Let’s say you would now like to choose several di fferent songs or selections to play in a row.
This is called building a “Son g Queue.” SoundBridge automatically builds a new Song Queue
every time you selec t a song or album to play. You can add to that list by navigating to your
preferred music and pressing Add [+] . The selection will be added to the end o f the current
Song Queue.
You may add a single song, an entire album, all songs by an artist, all songs in a g enre, or any
search result — just browse to the select ion you prefer and press Add [+]. For example, if
you would like to play all songs by Coldplay, select H ome menu > Browse > Browse artists.
Navigate to Coldplay in your artist list and pr ess Add [+]. All songs on all albums by Coldplay
will be played in the order they appear on each album . See “Browse” and “Search” for more
information.
You have several other options for building a Song Queue. Af ter you press Select while
browsing on a song, a “Song” menu app ears with the following options:
Play Songs, Starting With selected song name (and clear previous Song Queue)
Get Song Info
Play Song (and clear previous Song Queue)
Add Song t o Song Queue ( same as pressing the Add [+] button)
The fi rst, “Play Son gs” option is described in the section above — it star ts playing your album
(or other browsed list) , beginning with the current track.
If you choose “Play Song” on any track in your s election, the entire list is added to the Song
Queue, but playback star ts on the chosen track. If you have the Repeat [
] option selected,
the earlier tracks in the queue will p lay after the last song. If you have the Shuffl e [ ] option
selected, then the chose n track will play fi r st, followed by all the other tracks in the list in
random order.
The “Add song to Song Queue” option behaves similarl y to the Add [+] button it places the
current song at the end of your playlist.
You can add an almost unlimited number of songs to your Song Queue. Ea ch selection will be
played in the order it was entered (unl ess you have chosen to Shuffl e your Song Queue).
Hint: After you have selec ted multiple songs to be played in turn, you can use the Nex t
Tra ck [9 ] and Previ ous Track [ : ] but tons to skip from song to song in your Song
Queue.
Reviewing a Song Queue
At any point, you can review what’s in your Song Queu e by pressing the Down [▽] arrow from
the Now Playing screen, which is the default scree n that appears while SoundBridge is playing.
The Now Playing screen looks s omething like this:
Don’t Pa nic 0:10/2:17 4
Coldplay Parachutes (2000) (|||------)
Alternatively, you can press Home Menu [ ], then sele ct the “Show Song Queue” option. You
will see the entire list of songs in your song que ue; refer to the scroll bar on the right side of
the screen to determine where in the lis t you are located. Press the Up/Down arrows to see the
entire list of selections in your S ong Queue. The currently playing selection is indi cated by a
speaker X )).
You cannot save a Song Queue that you have created — it’s only held in memo ry temporarily
until you build your next Song Q ueue. If you would like to build a Song Queue that you can
save, please build a Playlist in your music jukebox sof tware (see “Playing a Saved Playlist”
below).
When the Song Queue has played all the way through , it will stop (unless repeat has been
selected) . You will see the Stop icon < on the right side of your display. To start playing your
Song Queue again at the beginning, p ress the Play button.
Erasing a Song Queue
If you decide you don’t want to p lay the Song Queue you’ve just created, simply select
something else to play. Navigate to another selec tion (song, playlist, etc.) and press Select or
Play (not Add [+]). This selectio n immediately replaces your old Song Queue.
3
Section 3: The Song Qu eue Section 3: The Song Qu eue
Page 13

22 23
SECTION 4 : ADDITIONAL PLAYBACK OPTIONS
Playing a Playlist
To play a playlist that you have created in your music jukebox softwa re such as Windows Media
Player, select the Playlist option from the Home Menu [ ]. Use your Up /Down [△ ▽] arrows
to browse your playlists one by one, fi nd the one you want to play, then press Play to play all
songs on the playlist immediately o r Add [+] to add the playlist to your Song Queue. Playlists
can include audio tracks and Inter net radio streams. If your playlist was created in Windows
Media Player or other soft ware using Windows Media Connect, be sure to save your playlist in
the My Music/My Playlist folder on yo ur hard drive, or confi gure W indows Media Connect to
share the directory on your hard dri ve containing the playlist.
Repeat and Shuffl e
Pressing Repeat [ ] once makes your Song Queu e play continuously. You w ill see the Repeat
icon q displayed on the right side of your “Now Playing” scre en below the Play icon. Pressing
Repeat again makes the current song play over and over; you will s ee another Repeat icon,
a circle with just one arrow
. Press Repeat a third time and you will remove the repeat
command altogether.
Pressing Shuffl e [
] while playing a Song Queue will give you the fo llowing options:
Shuffl e On — will p lay everything in your Song Queue in random order. (The shuf fl ed order
of songs will be displayed in the Song Que ue.) An icon with two crossing arrows will be
displayed on your Now Playing screen.
Shuffl e Of f — will play everything in your Song Queue in the orig inal order.
You can execute the Repeat and Shuffl e command from any menu in SoundBridge. Even
though you can only see the mode chan ge on the Now Playing screen, the command is taking
effect.
Search Options
To search for a specifi c selectio n by spelling it out, you can press the Search [] button on
your remote control, or navigate down to the “Search” option f rom the Home Menu.
Note: Unfortunately Musicmatch does not supp ort searching on SoundBridge at this time. If
searching is not available, the Search menu item will not app ear, and pressing the Search key
on the remote will display a message.
Whether you use the Search menu or the remote b utton, you will see the following options:
Search for Titles
Sear ch for Album s
Sear ch for Arti sts
Search for Composers
Search Keywords
Press Select on the option you would like to search w ith. Then, use your Left/Right arrows
on the remote control to enter characters fo r spelling your selection and then pressing Select.
When you are done spelling, use the Down but ton to go to the OK option and press Select. (If
you make a mistake, use the Down button to go to the Del ete option and press Select.)
Hint: Partial spelling is OK — the Search f unction searches for letters anywhere in the
word, as opposed to just at the beg inning. For example, to search for Radiohead, you
can enter any combination of letters found in the wo rd (“RA,” “DI,” “HE,” etc.) , and the
results will return all Artists containing thos e letters (e.g., if you enter “DI ” you may get
Radiohead, India Arie, and Diana Krall ).
When you fi nd the music you like, us e the Add [+] button to add it to your Song Queue. If
searching for albums or artists, yo u can press Select to navigate down to individual tracks.
4
Section 4: Additional Playback Options Section 4: Additional Playback Options
Page 14

24 25
SECTION 5: PRESETS
Your SoundBridge includes 18 positions in its internal memory, which can sto re a variety of
selections for your quick and eas y recall. You can save just about anything to Presets that you
can play on the SoundBridge by highlighting it and p ressing the Play key. For example, you can
save all tracks by a single artist , a Playlist, an Internet Radio Station, or a set of search results.
Simply navigate to your selectio n and press the Play button to begin playing it. Then press
Select [] and scroll down to the option “Save Preset: [Name o f selection]”. Each position is
numbered: A1-A6, B1-B6, and C1-C6. Choose which preset you would like to replace, and your
preset will be saved.
For example, let’s say you want to save all track s by the artist Coldplay as one preset. Select the
Browse/Browse Ar tists options and scroll down to the listing “Coldplay”. Press Play, and then
press Select. Scroll down to the option “Save Preset : Tra cks by Coldplay” and press Select.
Note: You cannot make a preset out of a Song Queue that was created using th e Add key or
menu command. The selecti on must be playable simply by hitting the Play key on the remote.
Individual tracks cannot b e saved as Presets. When an Internet radio station is playing, even if i t
was part of a larger list, onl y the individual station is saved.
Recalling Presets
You can access your Presets in several ways:
From the Home Menu of any music library, scroll down to “Play Preset ” and press Select. Scroll
down to the preset you would like to play and press Select [].
While listening to any selectio n (music, Internet radio, etc.) press Select from the N ow Playing
menu and scroll down to the “Play Preset…” option.
Editing Presets Using t he Web Interface
You can also edit your presets in the SoundBridg e web interface. See page 35 for instructions
on connecting to your web inter face. Click on the link to the “Presets” page. Here, you can:
- Re-nam e a Preset by typing a new name into the web form.
- Reorder the se lections in the list by pressing and dragging the “Move” button .
- Play back the selec tion by pressing the “Play” button next to the se lection. (If your
SoundBridge is in Standby mode when you p ress Play, it will power up and start playing .)
- Enter a stream URL for an Intern et radio station from an external source. ( For help with
locating and importing stream U RL’s, see the link on the top of the web p age. For more
information about playing Internet r adio streams, see the “Internet Radio” section o f this
user guide.)
When you are fi nished edi ting your Presets, click on the “Update Presets” button at the bot tom
of the page.
Presets commands can also be programme d into a universal remote control. For more
information, see the “Programming a Univers al Remote Control” section in the Advanced
Features chapter of this document.
5
Section 5: Presets Section 5: Presets
Page 15

26 27
SECTION 6 : INTERNET RADIO
You can listen to Internet radio in one of two ways. Firs t, you can listen to SoundBridge’s built-in
set of radio stations loc ated in the “Internet Radio” Library. Your computer does not need to be
on - all you need is an active Intern et connection on your home network. Se cond, you can enter
a URL of a radio station playlis t on the Internet Radio tab of the SoundBridge web page. ( This
feature is described more in the “Web Pag e Control” chapter of this user guide.)
The easiest way to play Internet radio on S oundBridge is through the “Internet Radio” Library,
where you can access a large and growing number of Inter net radio stations, browseable by
Name, Genre, Language, and Locatio n. To navi gate to the “Internet Radio” Library, follow these
steps:
1. Pr ess Home Menu [
]. Navigate down to ”Change Librar y or Confi gur ation” and press
Select [].
2. Your available music libraries will be d isplayed, including the one named “Internet Radio.”
Select that librar y and you will see a list of Internet radio stations. These are your Pres ets,
and they are pre-loade d when your SoundBridge is fi rst set up. See below for more
information on how to edit these Presets.
3. Scroll to the s tation you want to play and press Play. (Alternatively, you can press Select
[] and choose “Get Station Info” to view the genre/for mat of the station, its language and
location.)
When the station is playing, the “ Now Playing” screen looks similar to this:
Michelle Shocked — Black Widow
http://www.radioparadise.com
RadioParadise.com
The song and artist informati on is provided by each Internet radio station. Therefo re, it may not
be available for every Interne t radio station, or it may look slightly different.
Browsing Internet Radio Stations
You can browse SoundBridge’s built-in stations by Name, Genre, L anguage or Location. From
anywhere in the Internet Radio Librar y, press Home Menu [ ]. You will see the following
options:
My Favorites
Browse
Play Preset
Show Now Playing
Select “Browse” and ch oose the method of browsing that you prefer:
Browse Names
Browse Genres
Browse Locations (by country of ori gin)
Browse Languages
Hint: You can “Fast Browse” a list of results by pressing the Left /Right [◁ ▷] arrows on
your remote; your results will sk ip to the next letter of the alphabet.
Choose your desired browse option and press Select. Scroll down to the station you would like
to hear and press Play (or Select twice ) to begin playback.
Customizing Favorites and Presets for Internet Radio
There are two ways to save Internet radi o stations for easy playback.
The fi rst way has already b een discussed, and that is to save the station as a Preset. Whether the
station was found by browsing SoundBridg e’s built-in Internet Radio Librar y, by playing it from
music server on your computer, or by entering it manually on th e web page, it can be stored in
a Preset slot and played back easily via the “Play Preset ” command.
The second way is to mark a station from th e built-in Internet Radio Library as a favorite. When
a station is marked as a favorite, it appears in the “ My Favorites” list in the Internet Radio librar y,
but does not use up one of the 18 Preset slots.
Note: If a station is saved as a Preset , then it is assumed to also be a “favorite”, and will
always appear at the front of the “My Favorites” list.
There are several important di fferences between Presets and My Favorites:
Ë Presets are accessible from any Library, while My Favorites only appear in the Internet
Radio Library.
6
Section 6: Internet Radio Section 6: Internet Radio
Page 16

28 29
Ë My Favorites may only contain stations found by browsing the Internet Radio Librar y.
Presets may contain stations fro m the built-in library or entered via the web page.
Ë Presets can recall content other than Internet radio s tations, like playlists or
selectio ns that you have browsed to from SoundBridge (such as all songs by a
particular ar tist, etc). My Favorites include only Internet radio stations.
Ë When displaying My Favorites, Internet radio station Presets are als o included at the
beginning of the list.
Ë Presets can be programmed and played from the pres et web page (see page 25 for
more information.)
Ë Presets can be programmed as discrete commands on a custo m remote control. (For
more information about customi zing your remote for SoundBridge control and a
pronto CCF fi le, please visit the Support section of o ur web site.)
To save an Internet radio station to My Favorites:
1. From the “Inte rnet Radio” Library, Scroll down to the “Browse” menu item. Navigate to the
station you would like to save.
2. Press Selec t, then press the Down arrow to display these options:
Play [Station name]
Get Station Info
Add Station to My Favor ites
3. Scro ll down to the option “Add Station to My Favorites” and press Select. You will see the
message “Station added to your f avorites”. N ext time you view My Favorites, you will see
that station displayed in the list.
You can also save a station to My Favorites while it is playing. Simply press Select to display
these options:
Get info fo r “[Station name]”
Play Preset…
Save Preset: [Station name]
Add Station to My Favorites
Stop
Select the option “Add Station to My Favorites” and press Select.
Note: Only stations that you have accessed via the b rowse feature in the Internet Radio Library
can be saved to your Favorites. Stations that are played from a URL manuall y entered as a Preset
cannot be saved to your Favorites.
To save an Internet radio station to your Presets :
Play a radio station and press Select. You will see the foll owing list of options:
Get info fo r “[Station name]”
Play Pr eset… (this di splays a lis t of your 18 prese ts)
Save Preset: [Station name]
Add Station to My Favorites
Stop
Select the option “Save Preset : [Station name]” and press Select. Scro ll down to the position
you want to replace and press Select. Ne xt time you view Presets, you will see that station
displayed in the position you have chosen. You will also see Presets d isplayed fi rst in the list of
My Favorites.
Playing Stations Saved as “My Favorites” or “Presets”
From anywhere in the Internet Radio Librar y, press the Home Menu [ ]. Choose the “My
Favorites” option. You will see a list of your Internet radio Preset s followed by your Favorites.
Navigate to the station you would like to play and pr ess Select [] . You will have the option to
play it, get station info, or “Re move station from My Favorites”.
You can also just press the Down arrow on the Now Playing screen of an Internet radio s tation.
Since there is no Song Queue when liste ning to Internet radio, this shortcut takes you directly
to My Favorites. If the currently-playing station app ears in My Favorites, it will be marked with
the speaker icon [X].
To play your Presets, you can also choose the Play Preset option from th e Home Menu of any
music library (not just the Inte rnet Radio Library). Choose the stati on you would like to play,
then press Select.
6
Section 6: Internet Radio Section 6: Internet Radio
Page 17

30 31
Playback Limitations of Internet Ra dio Streams
SoundBridge currently suppo rts MP3 and WMA Internet radio stations. RealAudio and A ACplus
stations are not supporte d at this time. However, stay tuned for additional format s that may be
supported in future sof tware releases.
Unfortunately, there are few standards in Internet radio ( especially for MP3 stations), and
sometimes a station will do some thing out of the ordinary that will prevent SoundBridge from
being able to play it. See our onlin e document at www.rokulabs.com/suppor t/internetradio.
php for more information.
Discovering More Internet Radio Stations
Our online user forums have an active discussion d edicated to helping SoundBridge users fi nd
good Internet radio st ations in a variety of genres. Visit our Forums (accessible fro m www.
rokulabs.com/supp ort) and look for the discussion topics related to I nternet radio stations if
you would like to fi nd more stati ons in a particular genre or would like to suggest a station or
offer help to others on this top ic.
SECTION 7: SOUNDB RIDGE WEB INTERFACE
Use SoundBridge’s web page to control SoundB ridge playback remotely, confi gure your
SoundBridge or reconfi gure your preset Internet radio stations by entering the stream URL
directly into the web page. Th ere are several ways to access the web page:
Launching the Roku Web Interface
PC/Windows users:
You can confi gure your computer to display UPnP devices including SoundBridge in your My
Network Places window.
Windows XP Servi ce Pack 2 (SP2) users :
1. Open My N etwork Places
2. Click on Show ico ns for networked UPnP devices in th e Common Task p anel on the left
side of the My Network Places window. If the Common Task panel is not visible
a. Select Tools>Folder Optio ns in the My Network Places window
b. Under the Tasks section, cho ose Show Common Tasks in Folders and click OK.
3. Choose OK when asked to open the UPnP fi rewall ports.
Windows XP Servi ce Pack 1 (SP1) users:
From the Control Panel, click Add or Remove Program.
1. Cl ick Add/ Remove Windows Components.
2. From the Windows Compo nent list, select Network Services and then click Details.
7
Section 7: SoundBridge Web I nterfaceSection 6: Internet Radio
Page 18

32 33
3. Select the UPnP Interface check box.
4. Click OK and then Nex t. The Confi guring Window appears.
5. When the confi guration is completed, click Finish.
6. Navigate to My Network Places and d ouble-click the SoundBridge icon. You are now ready
to access SoundBridge’s web interface.
Apple/OSX u sers:
Follow these steps to access the web page :
1. L aunch the Safari web browser. Because SoundBridge uses the Bonjour p rotocol (formerly
known as Rendezvous ), the device automatically announces itself.
2. In Saf ari, be sure you have your bookmark list showing. If it is not showing, go to the
Bookmark menu and selec t Show All Bookmarks.
3. Click on th e Bonjour option in the bookmark list to reveal your S oundBridge. If more than
one device is connected, they will be nam ed SoundBridge, SoundBridge (2), and so o n.
4. Doub le-click the name of your device to open the SoundBridg e web page.
7
Section 7: SoundBridge Web I nterfaceSection 7: SoundBridge Web I nterface
Page 19

34 35
The web page includes four tabs :
Now Playing
Allows for control of playback of current music sele ction, including Pause, Play, Next/Previous
Track, Stop, Repeat and Shuffl e. You can also change the volume level.
Presets
On this page, you can:
- Specif y up to eighteen of your favorite music selections, such as I nternet radio streams,
search results, or Playlists, to be store d in your Presets. (See p 26 for more info about
Presets. )
- Change the name of a Preset.
- Click and drag the “Move” but ton to change the order of items in your Preset list.
- Press the “Play” but ton to play a preset item on your SoundBridge.
Why eighteen presets? Roku ’s new Wi-Fi Radio includes e ighteen preset buttons on the top of
the unit– which makes playing and changing presets quick and easy.
If you experience prob lems with playback of an Internet radio stream you copied f rom a web
browser, make sure that copied the correct URL. Usually, an MP3 stream URL ends with th e
“.pls,” or “.m3u” extension, and a WMA stream ends with “.asx”. Currently, SoundBridge can
stream MP3 and WMA formats. RealAudio streams (e nding in .ram or .rm) are currently not
supported. A ACplus stations may use the same ex tensions as MP3 stations, but will not be able
to be played. Usually, an Internet radio statio n’s web site will say which format is being used .
Stay tuned for additional format suppor t in future software updates.
7
Section 7: SoundBridge Web I nterfaceSection 7: SoundBridge Web I nterface
Page 20

36 37
You may wish to use fewer than the 18 available Preset slots. If you want to leave a slot empty,
ensure that the menu below the “Name” labe l reads “URL”, and then ensure that both the name
and location boxes are empty. When you save changes, the Pres et will be marked as empty.
When you are fi nished edi ting your presets, click on the “Update Presets” button at the bot tom
of the page.
Hint: If for some reason you inser t a URL that is too long to fi t inside the text fi eld
(longer than 250 character s), SoundBridge will automatically revert to the p revious
URL that was in your list before.
Please see the “Internet Radio” se ction for information about accessing and playing your stored
stations from your presets ..
Confi guration
Use this page to enter a unique name for your SoundBri dge unit, choose a language other
than English, or set options for displaying the time an d date on your SoundBridge when it is
in Standby mode. See the “Clock Settin gs” and “Language Setup” sections of the Advanced
Features chapter at the end of this manual for more information.
7
Section 7: SoundBridge Web I nterface Section 7: SoundBridge Web I nterface
Page 21

38 39
Status
Use this page to view the version of sof tware currently running on your SoundBridge. You can
also review your network connecti on information, including IP address and MAC addresses.
If you are using a Wi-Fi connec tion, this page will display your Wi-Fi signal strength and the
name of the network to which you are conne cted. When you are fi nished using your web page,
simply close your browser window.
SECTION 8 : WHEN YOU ARE FINISHED US ING SOUNDBRIDGE
When you are fi nished playin g music and using your SoundBridge altogether, just press the
Standby [] button on your re mote. In Standby mode, SoundBridge can display the date and
time or a blank display, depending on your preference.
If you were playing Internet radio whe n you pressed Standby, then pressing Standby again will
resume playback of that station. Oth erwise it will return you to the music library to which you
were most recently connected.
If you plan to disconnect So undBridge from AC power after you are done using it, be sure to
press the Standby button fi rs t. This logs you out of the music server soft ware running on your
computer.
Note: Wait approximately 10 seconds after pr essing Standby [] before unplugging
SoundBridge; this gives S oundBridge time to fl ush its settings for a clean reboot.
8
Section 8: When You Are Finishe d Using SoundBridgeSection 7: SoundBridge Web I nterface
Page 22

40 41
SECTION 9: ADVANCED FEATURES
Brightness, Contrast, Font, and Text Display
The Bright [] button on your remote lets you change the brightness of your display using the
Left/Right arrows [◁ ▷] . For SoundBridge M1000, text size and font options can be controlled
using the Up/Down arrows. ( M1000 can display one line or two lines at once. )
Brightness & Time Format While in Standby
While your SoundBridge is in Standby mode ( when the unit displays the time and is not playing
music), you can adjust the brightn ess and format of the time on the display.
• Use the Right/ Left [◁ ▷] to adjust the brightness of your display. Pressing Left [◁ ]
dims the clock display; pressing Rig ht [▷] bri ghtens it. These settings do not affect the
brightness settings of the display whe n playing Internet or network music libraries.
• Use Up /Down [ △ ▽ ] to change the time format. You can display large or small fonts,
display the time but not the date, and display the time and date. These se ttings do not
apply to when you are listening to the radio o r your music libraries.
Settings
SoundBridge display and playback se ttings can be changed in the “Settings” option located
at the bottom of the Home Menu. Your Settings scre en will show the following options (scroll
down using your remote control to see the complete lis t):
Visualizer Settings....
a Retur n to Now Play ing when id le
a Scroll long info in Now Playi ng
a Display composer for classical works
Memorize Radio Playlist…
For more information about memori zing a radio playlist, refer to the Internet Radio sectio n of
this manual.
Music Visualizer Settings
You can customize the kind of visualizer to display, whether it appears full -screen or on
the right side of the Now Playing screen, and other optio ns. Use the “Visualizer Settings”
command on the Settings screen to expl ore these options. (See appendix for full listing of
visualizer options.)
Clock Settings
When in Standby mode, SoundBridge ca n display the date and time, similar to the screen
below.
1:17:49 P M
Monday, April 17, 2006
You can customize the clock display in a number of ways:
1. When in Standby mo de, use the Left/Right [◁ ▷] arrows to adjust the brightness of the
clock display. (This will not affec t the brightness settings of the display when in regular
playback mode.) Turn the brightness all th e way down until you see the word “Standby” to
have the screen go completely blank when in Standby. If the screen is bl ank, pressing the
Select [] key will momentarily display the time and date.
2. When in Standby mo de, use the Up/Down [ △ ▽] arrows to cycle through modes of display.
For example, you can display large and small fonts , display the time but not the date, etc.
(Again, these settings will not be ap plied to your display when you resume SoundBridge’s
regular playback mode.)
3. Use the Sound Bridge web page to confi gure the format of the date and time. You can also
turn off the clock display altog ether. Please see the “SoundBri dge Web Interface” chapter of
this user guide for instructions on l aunching your SoundBridge web page.
After your web page is launche d, click on the Confi guration tab. Scroll down on the page until
you see a screen that look s similar to the one on page 43.
Here, you can customize how your time appear s and correct errors in the display of your date
and time. First, be sure that your time zone is sele cted correctly. SoundBridge uses an Internet
connection to display the proper tim e for your time zone. If your Internet connection is not
available, SoundBridge will be unable to display the date and time in Standby mode.
Note that the default confi guratio n of the date and time fi e lds depends upon the language you
have selected for your SoundBr idge display, but may be edited to suit your needs.
Section 9: Advanced Features Section 9: Advanced Features
9
Page 23

42 43
Format your time display by choosing what to display in each of four fi elds . SoundBridge
“strings together” all the fi elds to create the time display. For example, if you don’t want to
see seconds, or don’t want to se e “A M/PM”, select the hour and minute format, then choose
the “Leave Blank” in the remaining drop down menus . Take note of th e small text-entry boxes
to the right of the pop-up m enus. This is where you enter the character that should appear
between the sec tions of the time. For example, enter a colon (“: ”) for the usual “12:15” format.
The date selection wor ks the same way — you can choose the format that best fi ts your
geographic standard or your p ersonal preference.
To disable the date/time display altogether when S oundBridge is in standby, select the
corresponding option on this page.
Don’t forget to click the “Update” b utton for the date or time confi guration once you’ve
changed it. Since the update buttons cor respond separately to date, time, time zone, etc, you
should only update one sec tion at a time, and then press the appropriate update button.
When you are fi nished, simp ly close your web page.
Language Setup
SoundBridge will prompt you for your d esired language the fi rst time you set up the unit. If
you would like to change the language af ter the initial setup, use the SoundBridge web page.
Please see section 7 of this user gui de for instructions on launching your SoundBridge web
page. Then, choose the “Confi guration” tab. You can choose your language in one of two ways:
1. From the drop down menu title d “Select Language”, choose from the options available.
(Currently, SoundBridge ships with the following lan guage options: English, French,
German, Spanish, Swedish, Japanese, Traditional Chinese and Simplifi e d Chinese. Click the
“Change” button to switch to the chose n language.
2. If your lang uage is not listed in the above options, you can upload a Language R esource File
containing the instructions to display another l anguage. To see if a third-part y translation
already exists for your desired langua ge, please visit: www.rokulabs.com/supp ort/
international. To download and edit or “transl ate” this fi le for yo ur language, click on the
“View Current Language Res ource File” link. To upload a resource fi le that you o r another
third party has created, use th e Browse button on the web page to locate the fi le o n your
computer’s hard drive, then click “Update” to load it into Soun dBridge.
Hint: You can always revert to SoundBridge’s built-in default languages by cli cking the
Revert button on the bot tom of the Language settings area.
When you are fi nished edi ting your language settings, simply close your web page.
9
Section 9: Advanced Features Section 9: Advanced Features
Page 24

44 45
Standby and Reboot Options
On the SoundBridge “Confi guration” Web page, under “Options”, you can specify how
SoundBridge behaves while in Standby mode and af ter powering up. Standby options include:
Display clock, Screen of f. Reboot options include: Return to last state, Enter Standby, Reconnec t
to last source, and Show Server List. ( These options are useful if, for example, your SoundBridge
is connected to a power strip with oth er equipment, and you would like it to remain in standby
even after the power returns to the unit. )
WMA Lossless Transcoding
This is an option that only needs adjustin g if you are having trouble with WMA Lossless
playback. Reducing the Bitr ate will help SoundBridge tell the difference bet ween WMA and
WMA Lossless based on the Bitrate of the stream. ( For more information about this feature,
please visit Roku’s user forum at rokulabs.com /support.)
FLAC and Ogg-Vorbis Transcoding
You can use the FireFly Media Server to transcode yo ur audio fi les f rom FLAC or Ogg-Vorbis to
be playable on SoundBridge. For mo re information about the FireFly Media Server, please see
the Music Server sectio n of the Getting Started chapter of this manual.
Programming a Universal Remote Control
Roku has made available for download a “CCF fi le” with all of the remote control codes
supported by the SoundB ridge and SoundBridge Radio. A CCF fi le is a remote control
confi guration fi le compatible with Pronto programmable universal remotes made by Philips
and other brands. Some other progr ammable universal remotes can also use or import CCF
fi les. Please consult the instr uctions for your particular remote control to see if you can us e a
CCF fi le.
The SoundBridge CCF fi le includes all of th e functions available on the standard SoundBridge
remote, as well as some additional special -purpose and direct-access commands that may be
of interest to some users. These f unctions include: discrete power on/ off; stop; Preset keys for
all 18 Presets; keys for all the Browse options; and , keys to directly access Internet radio, AM/FM
radio (SoundBridge R adio only), and the last-used music server librar y.
SECTION 10: OPTI ONS FOR SYSTEM CONFIGURATION
If you need to change your netwo rk settings or other system-level options, go to any Ho me
Menu and select “Change Librar y or Confi guration”. Ch oose “System Confi guration” at the
bottom of the next scre en. You will see the following options :
Software Versi on & Updates: This option shows you which s oftware version you have on
SoundBridge and allows you to check if a newe r version is available for download. SoundBridge
will notify you automaticall y when a new software update is available afte r coming out of
Standby mode. Use this option to check for new sof tware manually.
Select Wi- Fi SSID & Password: This option all ows you to check the name of the wireless
network to which you are connec ted and select another one. Use this option to enter your
network security key. See App endix section “Wi-Fi Setup” for more info rmation.
Show Wired Ethe rnet Status: This option displays your connec tivity status, IP address and
MAC address, among others.
Show Wi-Fi Statu s: Displays Wi-Fi signal strength.
Network Control: Enables or disables control of SoundBr idge by a remote UPnP device.
Reset to Factory D efaults: Reset to original fa ctory settings. Important : This will erase all
Presets, Internet Radio favorites , network settings, and any other customizations made vi a the
Settings menu or web page.
Restart SoundBridge:
Power cycles SoundBridge and re boots the system.
Safe Mode
Safe Mode runs automatically in the unlikely event that S oundbridge software becomes
corrupted. While in Safe Mode you can download a new version of software from Roku or
restore factory se ttings. When Soundbridge enters Safe Mode, you will s ee the text “Safe
Mode” displayed superimpose d over the Roku logo during the startup animation.
Safe Mode can also be entered manually by p owering Soundbridge off by unplugging it from
power, then plugging it in again while pressing and holding any but ton on the remote control
during boot-up.
10
Section 9: Advanced Features Section 10: Options For System Co nfi guration
Page 25

46 47
While in Safe Mode, your stored set tings will not be recalled. Therefore, you will be prompte d
to enter your language and Wi- Fi region again. If you need to update the soft ware on your
SoundBridge, you will also ne ed to select a network and enter the WEP key (if n eeded) or use SD
card mode.
In Safe Mode, SoundBridge go es directly into the System Confi guration menu, with options
limited to checking for sof tware update and resetting factory def aults. The Roku logo is
displayed next to the menu with “S afe Mode” superimposed on it, like the startup animation .
Roku Control Protocol ( RCP)
SoundBridge suppor ts a sophisticated control protocol called the Roku Contro l Protocol (RCP).
Look for third party app lications that run on your PC, Mac, or PDA that allow remote Wi-Fi
control of your SoundBridge using RCP. If you are a developer, see the Community tab on our
web site for more information. There, you c an fi nd link s to third-party software and discussio n
of controlling SoundBridge in our user Foru ms (look for the Control Forum.) A link to the forums
can be found in the support t ab on our web site.
Geeks — Read This
The SoundBridge has a command line inter face that you can “telnet” to for piddling about. You
will need to telnet to port 4444. You can quickly get to a Telnet prompt by going to the built-in
web page’s “Status” tab and clicking on the SoundBri dge’s IP address. Ty pe “?” at the command
prompt to see a list of commands. See the devel oper section of our web site for more details,
including the RCP remote control protocol.
SoundBridge has a built-in UPnP AV “media renderer.” This protocol can be used to contro l the
SoundBridge from your own so ftware. Please watch the developer section of o ur web site for
updates on this feature.
SECTION 11: APPENDIX 1A: MENUS OVERVIEW
Home - Music Librar y
Playlists (▶Alpha list of Playlists available in current music library )
Browse (▶Artists/Albums/Songs /Genres/Composers)
Search (▶Tex t entry for keyword search)
Play Preset (▶List of Presets numbered A1:C6 ▶Select ▶Plays station)
Show Song Queue (▶List of songs in queue)
Show Now Playing (▶Now playing screen)
Settings (▶[see menu below])
Change Library or Confi guration
Home - Internet Rad io Library
My Favorites (▶Preset stations, then favorite Internet r adio stations ▶Select ▶Play station/Ge t
station info/ Remove from My Favorites)
Browse (browse Internet ra dio stations -by Name/Genre /Location/Langua ge)
Play Preset (▶List of Presets numbered A1:C6 ▶Select ▶Plays station)
Show Now Playing (▶Now playing screen)
Settings (▶[see menu below])
Change Library or Confi guration (▶ [see menu below] )
Change Library or Co nfi guration
Music Library 1
Music Library 2
Play Internet Radio (▶List of Presets and Favorites ▶Select ▶Play station/Get statio n info/
Remove station from My Favorites)
Change Library or Confi guration (▶ [see menu below] )
System Confi guration
Software Version and Updates
Select Wi- Fi SSID & Password
Show Wired Ethernet Status
Show Wi-Fi Status
11
Section 10: Options For System Co nfi guration Section 11: Appendices
Page 26

48 49
Network Control (▶Set preference to Enable /Disable network control via UPnP)
Reset to Factory Default s
Restart SoundBridge
Exit
System Confi guration> Show Wi -Fi Status
Connected to [Ne twork name]
Quality: x x Signal: xxdBm
Technical Details:
Connected to an open -system access point…
MAC Address:
IP Address:
Netmask:
Gateway:
DNS 1:
DNS 2:
Home> Set tings
Visualizer Settings…
Return to Now Playing When Idle
Scroll Long info in Now Playing
Display Composer for Classical Works
Memorize Radio Playlist… (▶”Select a pl aylist to save the fi rs t 18 Internet radio stations in that
playlist as your Presets.” Note- only works if connected to music librar y in which the playlist is
contained..” )
Home> Set tings> Visualizer Se ttings
Select Visualizer… (▶Clock/Frequency Analyzer/Horizontal VU-Meter/Oscilloscope/ Vertical
VU-Meter/Voice Print)
No Visualization
Partial-scre en Visualization
Full-screen Visualization
APPENDIX 1B: SCREEN ICON S QUICK REFERENCE
In all menus and song lists :
Ë The arrow icon in dicates the menu item being selected.
In song lists and the “Song Que ue” screen:
The music note icon denotes a single track (as op posed to a collection of tracks).
X)) The speaker with audio waves shows curre nt song playing (only on the “Song Queue”
screen).
X The speaker without audio waves shows current song paused ( only on the “Song Queue”
screen).
T he upward facing radio transmission signal indicates an Internet radio statio n.
œ The padlock icon indicates protecte d content that cannot be played. AAC songs purchased
from the Apple Music Store will have this icon; these son gs are not available for playback
by SoundBridge. If you see this icon o n a DRM WMA song, and are playing from WMC
or another DRM-compatibl e server, then the SoundBridge may not have completed the
authentication process with the ser ver yet. Try waiting a minute or two, then hit the B ack
key and re-load the song lis t.
X This indicates an unsupported fi le format.
On your “Now Playing” sc reen:
4 The Play icon indicates SoundB ridge is in playback mode.
; The Pause icon indic ates playback has been paused.
< The Stop icon indicates playb ack has been stopped.
The Shuffl e icon (with two crossed arrows) indicates playback of your Son g Queue is
happening in random order.
The Repeat icon in dicates continuous playback of your Song Queue.
The Repeat Single Track icon indicates continuous playback of the currently playing track.
11
Section 11: Appendices Section 11: Appendices
Page 27

50 51
APPENDIX 2: WI-FI SETUP HELP
Wi-Fi Setup Instruc tions
SoundBridge is confi gure d to automatically connect to your Wi-Fi network durin g initial setup.
If you are not able to access Internet radio or music lib raries on your Mac or PC, fi rst check your
network connection by foll owing these steps:
1. From the Source menu , choose System Confi guration and press Select [].
2. Scroll d own to Show Wi-Fi Status and press Select []. If connected, a message displays
telling you that your wireless networ k is connected and the name of your network displays.
Multiple Wi- Fi Networks
If SoundBridge detec ts more than one Wi-Fi network, yo u will be asked to select which SSID
(network name ) you want to use. You will only be asked to sele ct an SSID if you have more than
one wireless network at yo ur location. If you have more that one network, scroll down to s elect
from the Wi-Fi net works you have and press Select.
You can also enter the name of a Wi-Fi network . To enter a network name, follow these steps :
1. Fro m S elect Wi-Fi SSID and Pass word, select Specif y a wireless network and press
Select [].
2. Use Right /Left to fi nd letters, number and spaces in the Wi-Fi network name and th en
press Select for each letter, number and space you choose.
3. Use Up /Down for “OK,” spaces, delete, commas, periods, accent let ters, numbers and
uppercase or lowercase let ters.
For additional help connecting to your n etwork, including password help, see “Appendix 2: Wi Fi Access Point Password.”
Entering a Security Key
If you have a security key, you will need to ente r your WEP [Wired Equivalent Privacy ( 802.11
encryption protocol )] key. This is the same key you entered into your Access Point and your
computer. To fi nd more info rmation about your Access Point, see “Appendix 2: “Wi- Fi Access
Point Passw ord.”
As of this writing, the SoundBridge s oftware is version 2.5 and does not suppor t “WPA”. Check
for software updates i f you need this feature.
Troubleshooting Wi-Fi Setup
If you have problems connecting to the So undBridge to your music library, please check the
following:
1. Is the SoundBridge is powered on (is the scree n lit)? If not, your card is not receiving power.
Remove and re-inser t the CF card with the label facing away from you. It should require
gentle pressure to be inserted into the CF sl ot.
2. Is Sound Bridge within range of your wireless network signal? ( Performance varies
depending on wireless net work hardware, physical barriers such as walls, and signal
interference.)
3. Is your computer on and is your Wi-Fi access point p lugged in?
4. Is your music se rver software running on your computer? Are your music sharing options
enabled? (See “Enablin g Music Sharing”in the Getting Started chapter.)
5. If yo u have a password, did you enter it correctly, including case sensitive characters ?
6. Is your wire less access points (WAP) compatible with SoundBridge? For a list of compatible
Wi-Fi access points that Roku has teste d, please visit www.rokulabs.com/suppor t.
Obtaining Your Wi-Fi Network Name ( SSID) and Password (WEP key)
Your Wi-Fi network’s SSID and password ( also known as your Wireless Equivalent Password/
WEP key) can be obtained fro m the software that came with your wireless access point. Pay
attention to uppercase vs . lowercase characters. Please note that some wireless access po ints
allow you to create another password/ passphrase that they use to generate the WEP key. You
want the WEP key itself, and not that other password. B elow are detailed instructions for where
to fi nd your SSID and WEP key for several common wires access p oints. More information is
also available in the support area of our we b site (www.rokulabs.com/support ) and in our
user forums.
11
Section 11: AppendicesSection 11: Appendices
Page 28

52 53
Apple AirPort (Mac Use rs)
To see the name and password of your AirPort, follow these steps :
1. From the Utilities folder, open your AirPor t Admin Utility.
2. Sel ect your AirPort and choose Confi gure.
You should then see the display shown on the following page. The lin e labeled “Wireless
Network Name” is the name of yo ur network (SSID).
3. If yo ur network is password protected, you should ch oose Equivalent Network Passwo rd
from the Base Station menu as shown above. Write down the value that appears in the
dialog as shown below. This is your netwo rk password.
11
Section 11: Appendices Section 11: Appendices
Page 29

54 55
Apple AirPort (PC Use rs)
1. Fro m Star t/Programs/Airport Admin Utility, open the AirPort Admin utility.
2. Sel ect the network you would like to confi gure. You should then see the confi guration
display below.
3. Make a n ote of the name of your Wi-Fi network in the Network Name fi eld.
4. From the Base Statio n list, select Equivalent Net work Password.
11
Section 11: Appendices Section 11: Appendices
Page 30

56 57
5. Write down the disp layed password from the dialog box (as illustrated below ).
Linksys WAP54G
Follow these steps for obtaining the hexade cimal WEP key from the WAP54G:
1. Op en a web browser and connect to the access point.
You connect to the access point by entering the access point ’s IP address in the location
bar of your web browser. If you do not know the IP address o f the access point, please
refer to the software o r manual that came with the access point in order to determine the
IP address. After successfully log ging in, you will see a page similar to the following:
2.Write down the Wi-Fi network name in the MAC Address SS ID fi eld.
3.Click Edit Security Settings to access the WEP setup page. When WEP Securit y is
enabled, you can easily view the keys.
11
Section 11: Appendices Section 11: Appendices
Page 31

58 59
4.Key 1 is the default key used by SoundBr idge. In this example, 49774B692D is the key value.
This is your Wi-Fi net work password.
5. Cl ose your web browser.
Netgear WG602
The Netgear WG602 is an 802.11g Wi-Fi Access Point. Its confi guration c an be accessed with a
web browser.
1. Open a web browser and connect to the access point by ente ring the access point’s IP
address in the location bar of your web brows er. If you do not know the IP address of the
access point, please refer to the sof tware or manual that came with the access point in
order to determine the IP address. Af ter successfully logging in, you will see a page similar
to the following:
11
Section 11: Appendices Section 11: Appendices
Page 32

60 61
2. Note the value of “Wi- Fi Network Name (SSID)”.
3. Click “Security Set tings” on the left side to access the WEP settings. If “ WEP” is set to
“Enable” (as below) , you will need to obtain the hexadecimal key for your net work.
Netgear unfortunately, does not allow you to view th e current WEP key. However, if you reenter the known passphrase and press “G enerate Keys,” then it will regenerate the keys as
before and allow you to view them :
4. Make a note of the value of the key with the acti ve radio button (the default key, in this
case “Key 1”: “562E7FF0A0”). This is the password that you wi ll need to enter into your
SoundBridge’s Wi-Fi setup “Passwor d” fi eld.
5. Close your web browser.
Customer Support
If you are having trouble setting up the S oundBridge, please browse our online support
resources at www.rokulabs.com /support There you will fi nd troublesho oting documents and
an active forum topic dedi cated to “SoundBridge Set-up”. Check to see if other users have
posted information that per tains to your situation. Our Forum is monitored by Roku engineer s
and by our customer support s taff. If those options fail, please send an email to Customer
Support.
11
Section 11: Appendices Section 11: Appendices
Page 33

62 63
APPENDIX 3: END USER SOFT WARE LICENSE AGREEMENT
IMPORTANT — READ CAREFULLY: By using the software in your SoundBri dge, you agree to
be bound by the license terms and conditio ns below. If you do not agree to these terms and
conditions, you must immediately retur n your SoundBridge in its original condition and
packaging to the point of purchase for a re fund of your purchase price (after inspection ).
Roku Software License
Subject to these terms and conditio ns, ROKU grants you a non-exclusive license, with no
right to sublicense, to execute the soft ware included with the SoundBridge or subsequently
provided to you by ROKU (tog ether, the “Software”) on your SoundBr idge solely for your
personal use of the intended features and f unctions of the SoundBridge. The license may
be transferred only with the trans fer of the SoundBridge on which ROKU has installed the
software ; any transferee will be subject to the terms and conditions of this license. Th is
license will terminate automatically, without notice, if you fa il to comply with the terms and
conditions, including the restric tions, of this license.
ROKU and its licensors own and retain all p roprietary rights, including all patent, copyright,
trade secret, trademark and other inte llectual property rights, in and to the Soun dBridge
Software. You acknowled ge that the license granted above does not provide you with
title to or ownership of the Sof tware, but only a right of limited use under these terms and
conditions. The Soft ware embodies ROKU’s trade secrets and other propriet ary information
and materials. Any attempt to modif y, enhance, disassemble, decompile, rever se engineer
or otherwise gain access to the source code to the S oftware, to remove or unbundle the
Software from th e SoundBridge, or to sublicense or distribute the Soft ware is strictly
prohibited, except as may be otherwise a greed by ROKU in writing.
Third Party License Informati on
Soundbridge includes AES code Copyrig ht © 2003, Dr. Brian Gladman, Worcester, UK.
This product is protec ted by certain intellectual propert y rights of Microsoft Corporation.
Use or distribution of such technol ogy outside of this product is prohibited without a
license from Microsoft or an author ized Microsoft subsidiary.
APPENDIX 4: RE GULATIONS AND SAFETY
FCC Warnings and Safety Information
Communication Regulation & Safety Information
FCC Compliance
This section describes th e requirements for compliance with Federal Communications
Commission (FCC) Rules.
FCC Registration and Requirements
The following paragraphs describ e requirements and information based on FCC rules.
FCC Rules, Part 15
This equipment has been tested and fo und to comply with the limits for a class B digital
device, pursuant to Part 15 of the FCC Rules. These limits are design ed to provide reasonable
protection against harmfu l interference in a residential installation. This equipment ge nerates,
uses and can radiate radio frequen cy energy and, if not installed and used in accordance with
the instructions, may cause harm ful interference to radio communications. However, there
is no guarantee that interference will not o ccur in a particular installation. If this equipment
does cause harmful interf erence to radio or television reception, which can be dete rmined by
turning the equipment off an d on, the user is encouraged to try to correct the inter ference by
one or more of the following measures:
– Reorie nt or relocate the receiving antenna;
– Increase the sepa ration between the equipment and receiver;
– Connect th e equipment into an outlet on a circuit different from that to which the re ceiver
is connected ;
– Consult the dealer or an e xperienced radio/T V technician for help.
This device complies with Part 15 of the FCC Rules. Operation is subje ct to the following two
conditions :
11
Section 11: Appendices Section 11: Appendices
Page 34

64 65
1. This d evice may not cause harmful interference, and
2. This d evice must accept any interference received, including interference that may cause
undesired operation.
Responsible part y (contact for FCC matters only): Roku, LLC , 399 Sherman Ave. #12, Palo Alto,
CA 94306, 650-321-1394. For customer s ervice questions go to http://w ww.rokulabs.com/
support.
CHANGES OR MODIFICATIONS NOT EXPRESSLY APPROVED BY THE PARTY RESPONSIBLE FOR
COMPLIANCE COULD VOID THE USER’S AUTHORIT Y TO OPERATE THE EQUIPMENT.
Canada Class B St atement
This Class B device meets all requirement s of the Canadian interference-causing equip ment
regulations. Cet appareil numérique de la Class B resp ecte toutes les exigences du Réglement
sur le materiel brouilleur du Canada.
VCCI Class B Stateme nt
Safety
Important Safety Instructions
1. Read Instructions. All the safety and op erating instructions should be read before the
product is operate d.
2. Retain Instructions. The safety and operating instruc tions should be retained for future
reference.
3. Heed Warnings. All warnings on the product and in the operatin g instructions should be
adhered to.
4. Follow I nstructions. All operatin g and use instructions should be followed.
5. Cleaning. Unplug this product fro m the wall outlet before cleaning. Do not use liquid
cleaners or aerosol cleaners. Use a damp cl oth for cleaning.
6. Water and Moisture. To reduce the risk of fi re or elec tric shock, do not expose this
appliance to rain or moisture. Apparatus shall not be ex posed to dripping or splashing and
no objects fi lled with liquids, such as vases, shall be placed on the apparatus. Do not use
this product near water for exampl e, near a bathtub, wash bowl, kitchen sink or laundry
tub; in a wet basement; o r near a swimming pool; and the like.
7. A cc es so ri es . Do not place this produc t on an unstable cart, stand, tripod, bracket o r
table. The product may fall, ca using serious injury to a child or adult and serious damage
to the product. Use only with a c art, stand, tripod, bracket or table recomm ended by the
manufacturer, or sold with the product . Any mounting of the product should follow the
manufacturer’s instructio ns, and should use a mounting accessory recommended by the
manufacturer. A product and car t combination should be moved with care. Quick stops,
excessive force and uneven surfaces may cause the produc t and cart combination to
overturn.
8. Power Sources. This produc t should be operated only from the type o f power source
indicated on the marking labe l. If you are not sure of the type of power supply to your
home, consult your product deale r or local power company. For products intended to
operate from batter y power, or other sources, refer to the operating instructions.
9. Grounding or Polarization. This product may b e equipped with a polarized alternatingcurrent line plug (a plug having one bl ade wider than the other). This plug will fi t into
the power outlet only one way. This is a safet y feature. If you are unable to insert the
plug fully into the outlet, tr y reversing the plug. If the plug should still fail to fi t, contact
your electrician to replace your o bsolete outlet. Do not defeat the safety purpos e of the
polarized plug.
10. Power Cord Protecti on. Power-supply cords should be routed so that they are not likely to
be walked on or pinched by items pl aced upon or against them, paying particular attenti on
to cords at plugs, convenience receptacles and the point w here they exit from the product.
11. Overloading. Do not overload wall outlets, ex tension cords or integral convenience
receptacles as this can result in a risk of fi re o r electric shock.
12. Object and Liquid Ent ry. Never push objects of any kind into this product through
openings as they may touch dangerous voltage p oints or short-out parts that could result
11
Section 11: Appendices Section 11: Appendices
Page 35

66 67
in a fi re or electric sh ock. Never spill liquid of any kind on the product.
13. S erv icin g. Do not atte mpt to service this product yourself as opening o r removing covers
may expose you to dangerous voltage or oth er hazards. Refer all servicing to qualifi ed
service personnel.
14. Damage Requiring Se rvice. Unplug this product from the wall outlet an d refer servicing
to qualifi ed ser vice personnel under the following conditions :
– When the power-supp ly cord or plug is damaged,
– If liquid has be en spilled or objects have fallen into the product,
– If the produ ct has been exposed to rain or water,
– If the produc t does not operate normally by following the operating ins tructions. Adjust
only those controls that are covered by the operating instr uctions as an improper
adjustment of other controls may result in damage and will of ten require extensive work by
a qualifi ed technician to restore the p roduct to its normal operation,
– If the produc t has been dropped or damaged in any way, and
– When the produ ct exhibits a distinct change in performance, this indic ates a need for
service.
15. Heat. The product should be si tuated away from heat sources such as radiators, heat
registers, stoves or other produc ts (including amplifi ers) that pro duce heat.
Safety/Re gulatory Information
User/Installer Caution
Your authority to operate this FCC certifi ed equipment could be voided if you make changes or
modifi cations not expressly approve d by the manufacturer, who is responsible for compliance
with Part 15 FCC rules.
European Com munity
Complies with EU Directive 89/ 336/EEC using EN55022:1998, EN55024:1998, EN61000-3-2:20 00
and EN61000-3 -3:1995.
CE Warning: This is a class B produc t. In a domestic environment this product may cause radio
interference in which case the user may b e required to take adequate measures.
FCC Radiation E xposure Stateme nt
This equipment complies with FCC radiation exp osure limits set forth for an uncontrolled
environment. This equipment should b e installed and operated with minimum distance 20cm
between the radiator and yo ur body. This transmitter must not be co-located or op erating in
conjunction with any other antenna or transmitte r.
11
Section 11: Appendices Section 11: Appendices
Page 36

© Copyright 2006 R oku, LLC. California, USA. T he SoundBridge
Registered TradeMar k, Design, Softwa re, and User Guide are sold by
Pinnacle Systems unde r license from Roku. Visit w ww.rokulabs.com
for more information.
Page 37

06-SB00-UG-PNCL-0427
 Loading...