

Page 1

COMPREHENSIVE OWNERS MANUAL
We congratulate you on your choice of PINNACLE® Speakers. They have been
designed and built to provide you with many years of outstanding sound reproduction.
To complement the high standards of performance achieved by PINNACLE® Speakers,
we have prepared what we believe to be the best and most comprehensive
(as well as comprehensible) speaker owners' manual ever offered to consumers. All
important concepts pertinent to a gratifying listening experience are explained fully, but
in non-technical language. Certain necessary terminologies are introduced simply and
several illustrations further clarify important points.
Please take the time to familiarize yourself with the contents of your Pinnacle owners'
manual. We are confident that your reward will be increased enjoyment from your
speakers in particular and from your sound system overall.
We can be contacted at:
1 Fairchild Court, Suite 140, Plainview, NY 11803
Tel: (516) 576-9052; Fax: (516) 576-0826
E-mail: pinnacle@pinnaclespeakers.com
For up-to-date information on all of our designs, please checkout our website at:
Http://www.pinnaclespeakers.com
© 2009 Pinnacle® Speakers
• The first section of this manual provides useful and important information about
your speakers and how their performance relates to the amplifier used and the
chosen room placement.
• The second section explains how to best connect (wire) your new speakers to your
system and provides some troubleshooting hints.
• The last page explains our Warranty.
POWER RATINGS
Your new speakers come with specifications which detail their normal operative power
range. As an example, an operative power range of 10-60 Watts approximates the
amplifier power output region within which the speaker will perform optimally. This
does not mean, however, that the speakers cannot be played safely by an amplifier or
receiver whose power output capability is greater than 60 Watts. As long as the system
is used properly much greater power sources can be considered. Speakers can tolerate
brief high power surges called peaks.
NOTE: The above example does not suggest that the SPEAKER ITSELF will produce 60
Watts of power. Speakers don't produce power in the same sense that amplifiers do. A
speaker's power rating only refers to the amount of amplifier power that can be safely
accommodated.
Page 2
All amplifiers and receivers, like all speakers, are provided with power ratings. An
amplifier that is rated at 60 Watts RMS per channel, continuous output, at a low THD
(total harmonic distortion) level (such as less than 0.1%) will produce, upon request, at
least 60 Watts of continuous, undistorted power. However, all amplifiers and receivers
are capable of generating much more power than they are rated for, but at increasingly
unacceptable distortion levels. Problems occur as you exceed the maximum safe power
rating of an amplifier, which usually happens when you move the volume control past
1/3 to 1/2 of the way up. (Lower level source signals will require somewhat higher
volume control settings to achieve adequate output level.) The distortion levels
increase dramatically, resulting in the condition known as "clipping" and this will
produce harmful electronic signals that can damage your speakers.
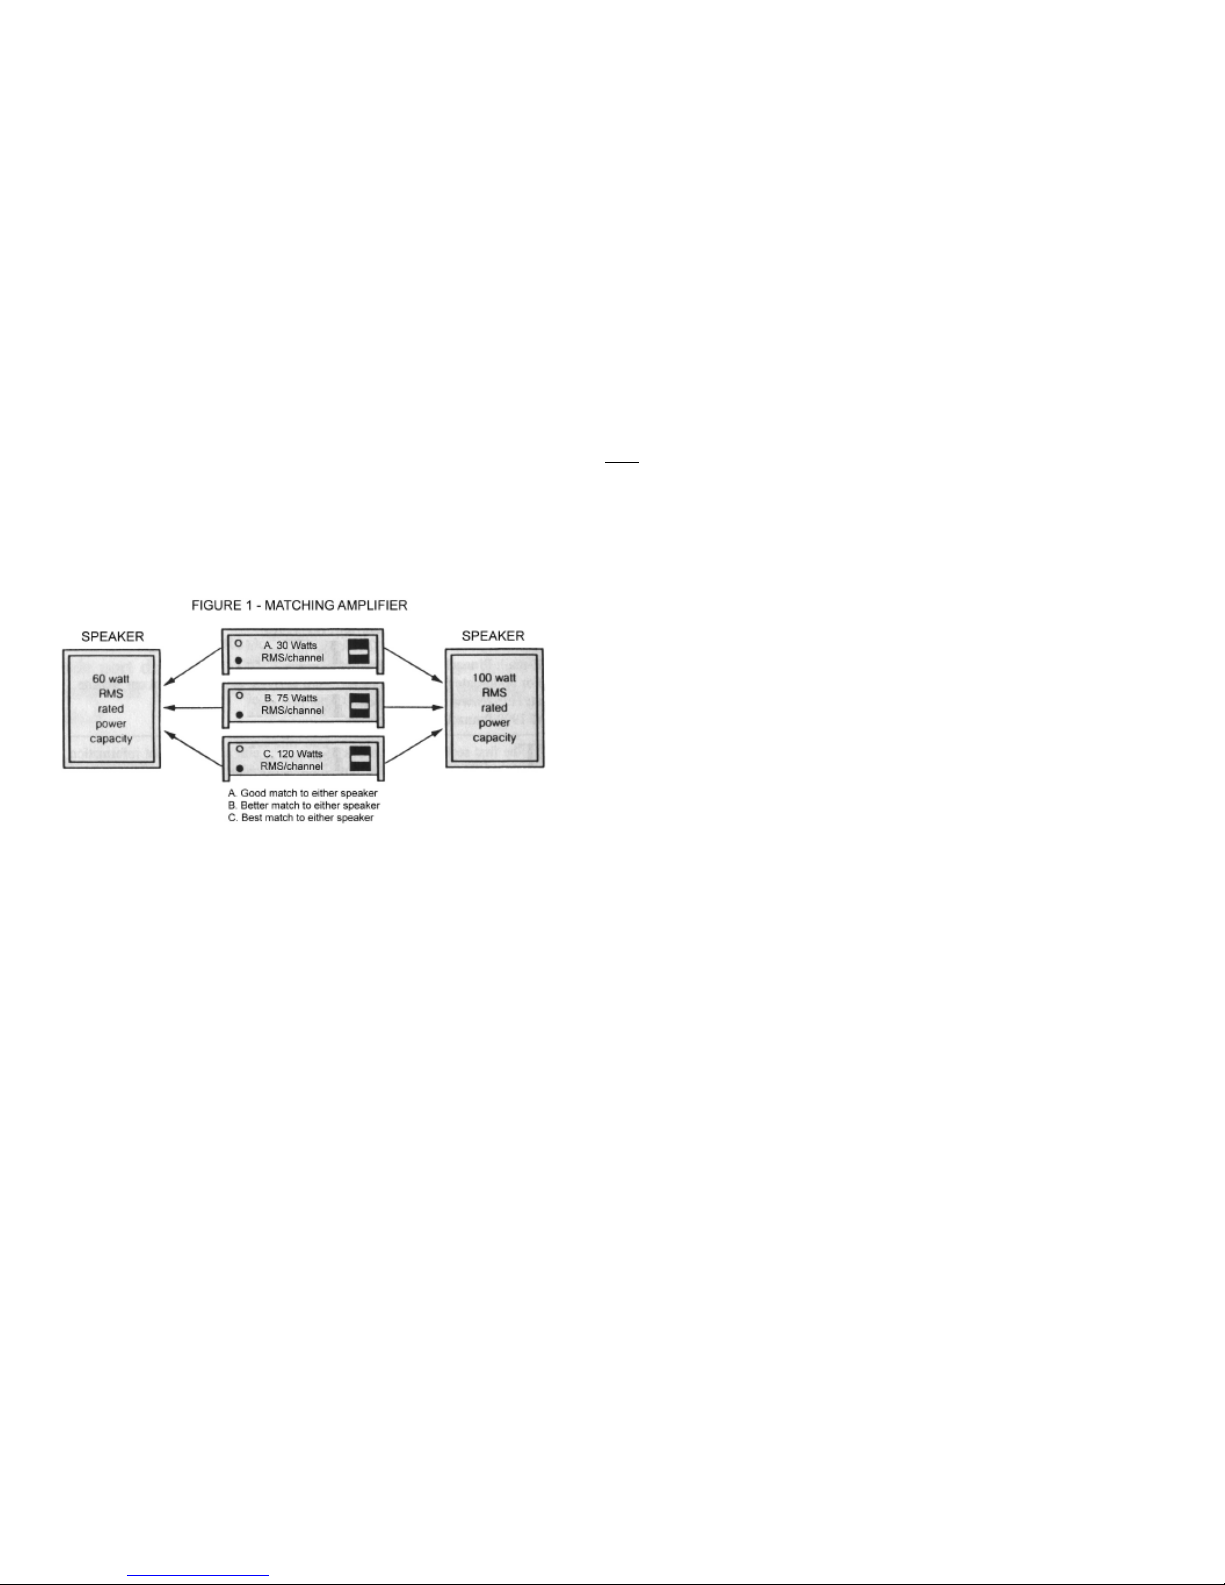
A WIDE RANGE OF COMBINATIONS IS ACCEPTABLE BUT A MORE POWERFUL
AMPLIFIER MAY BE BETTER AND SAFER FOR YOUR SPEAKERS BECAUSE THEY
ARE LESS LIKELY TO DISTORT AT HIGH VOLUME LEVELS. DISTORTION FROM
UNDER-POWERED AMPLIFIERS IS THE MOST COMMON CAUSE OF SPEAKER
DAMAGE.
Analogy to Figure:
The same automobile body can be used to successfully house several different kinds of
engines. Capabilities will vary, but reasonable performance can be achieved by getting
to know how to best use the controls available with a particular engine. SPEAKERS
CAN LIKEWISE WORK WELL WITH A VARIETY OF AMPLIFIERS IF THE
AVAILABLE CONTROLS ARE USED APPROPRIATELY.
THE VOLUME CONTROL
There are times when program material has been recorded too softly, or a radio station's
signal is weak, etc., and it is necessary to increase the volume control towards the end
of its range in order to achieve adequate sound levels. Otherwise, under normal
operating conditions, most amplifiers will attain their maximum safe output levels at a
much lower setting of the volume control. This setting will vary with the particulars of
the amplifier, speakers and program material.
MUSICAL CONTENT vs. POWER DEMAND
An amplifier's output does not remain constant. A 60 Watt per channel (maximum rated)
amplifier, running at approximately 60 Watts, will "clip" frequently since there is no
power reserve (headroom) left for complex, bass heavy, or otherwise demanding musical
passages. If, for example, amplifier volume setting during a light string symphony is 1/3
up the volume dial, the presence of amplifier distortion should be unlikely. However, if
the program material is suddenly switched to thundering rock and roll, rap or reggae (all
of which feature demanding bass content), and the volume control setting is left at the
same point, there is a good chance that the amplifier may now begin to "clip". There is a
very strong correlation between how hard an amplifier must work and the kind of
program material it is being called upon to reproduce.
AMPLIFIER SPECIFICATIONS
Some modern solid state (transistor) amplifiers specifications may offer a continuous
output power rating at both 4 and 8 Ohms. This is preferable to an amplifier having just
an 8 Ohm rating because ratings at 4 and 8 Ohms are a strong indication of a more
robust power supply. Also, make sure that the frequency response bandwidth covers
the entire human hearing range, 20-20 kHz at less than 0.1% THD. Such an amplifier will
ensure that your Pinnacle Speakers perform to their utmost potential.
Note: If your amplifier or receiver has a 4/8 Ohm speaker impedance selector switch, we
recommend the 4 Ohm position for the best system performance.
TO BE SURE NOT TO EXCEED THE AMPLIFIER'S NORMAL CAPABILITIES:
A) Do not move the volume control past the point of just noticeable distortion (fuzzy or
raspy sound quality), usually occurring 1/3 to 1/2 of the way up. (Lower level source
signals may require somewhat higher volume control settings.)
B) Use bass, treble, and equalizer boost with caution, since these are actually
specialized volume controls affecting particular frequency ranges. Their use contributes
to the overall demand for power that the amplifier is called upon to provide. Bass boost,
in particular, draws the most power from the amplifier and generally puts the biggest
demand on your speakers.
C) Engage the loudness compensation switch (present on many amplifiers and
receivers) only at low volume levels since it increases the output in the very low, and to
a lesser extent, very high frequency ranges.
Page 3

D) Use equalization boost (↑) with caution to avoid overload; reduction (↓) can be
used freely as desired.
IF YOUR SPEAKER COMES WITH RUBBER FEET:
To prevent the speaker cabinet from vibrating and/or moving, please attach the four
rubber feet to the bottom of your speaker's cabinet near the corners.
IF YOUR SPEAKER COMES WITH SOLID BRASS ISOLATION CONES:
With the speaker lying down, simply screw the cones into their receptacles on the
bottom of the cabinet. Then, with the speaker standing, adjust the cones individually
as needed to level the cabinet. If you intend to place your speakers on wooden or
vinyl floors, we suggest placing a penny under each cone to prevent any indentations.
THE LISTENING ROOM ENVIRONMENT
The overall performance of any speaker system is significantly affected by the
acoustical properties of the listening environment. A well balanced soundroom is one
that is neither square nor extremely long and narrow. Non-parallel walls and high or
vaulted ceilings are usually beneficial, though by no means vital. In most cases you will
not have a choice of soundrooms, but you may have some control over other aspects of
the acoustical environment.
A mixture of some hard (reflective) with mostly soft (absorbent) surfaces is very
desirable. Combinations of carpeting, wall paneling, padded furniture, brick and other
contrasting surfaces provide excellent results. Acoustical ceiling tile is also usually
beneficial. The larger the listening area, the more power is required to maintain high
volume levels with low distortion. Therefore, a moderately powered amplifier or receiver
will function best in a small room. Higher power is required for areas containing many
soft or padded surfaces such as sofas, pillows, thick carpets, heavy drapes, etc. These
surfaces absorb much sound energy and promote a "dry" sound character, crisp and
highly detailed. In a room with mostly hard surfaces and high ceilings, speakers will
produce a more blended or "live" sound and will probably seem less power hungry
because of the great amount of room reflections. This type of environment may require
treble equalization (reduction) and for Home Theater applications, minimal time delay
mode settings to reduce the tendency towards "muddying" up the sound.
ROOM PLACEMENT
Different room positions will significantly affect your speakers overall performance.
There are therefore, several factors to consider when determining the best speaker
location. Speakers of small physical size are typically referred to as "bookshelf"
speakers because they have been designed to perform optimally when placed on a
shelf or stand that is raised off the floor. Speakers of larger size typically handle greater
amounts of power and have been designed to perform optimally when placed on the
floor or raised slightly off the floor by speaker stands or decoupling devices such as
Pinnacle's Solid Brass Isolation Cones.
SEPARATION
Always be sure to provide ample separation between the main speakers. Usually 6 to 12
feet is adequate as greater distances might result in a "hole in the middle" effect. The
best distance between the main speakers is also dependent upon room conditions, size,
and the proximity of the listening area to the speakers. A bit of experimentation is in
order, but smaller rooms will better tolerate closer spacing.
SOUND QUALITY (see Figure 2)
The following points are noteworthy when choosing the best room location for your
speakers:
A) Sound quality is generally improved when all or most of the floor space is carpeted
(whether or not floor placement is selected).
B) The more surfaces of the room that are adjacent to a speaker, the greater its bass
output will be. Drastic differences in sound quality are commonplace when various
speaker positions are experimented with.
C) Maximum bass is obtained in a corner location. That is often not desirable because
the sound may be too heavy. Full size speakers with naturally powerful bass response
should generally be kept away from corners. If they must be placed in the vicinity of
corners because of room constraints, tone controls or equalizers can be employed to
satisfactorily curtail excessive room output. Certain small surround speakers, though
may be designed to benefit most from corner placement.
D) Speakers may be hung from a ceiling or walls if sufficient structural support is
available for the weight of the speaker. If the ceiling is high, angle the speakers
downward to create a wide and powerful soundfield. The closer the woofer is to the
ceiling and walls, the stronger the bass will be. Certain models contain special brackets
to accommodate wall mounting.
E) The best overall imagery (characterized by lifelike, spacious sonic qualities) is
achieved by locating the speakers as far from the walls and corners as possible, while
still maintaining adequate separation between them. Bass will be less prominent, but the
sonic character will be more detailed.
F) Unless the room is very narrow, the best positions will most likely be along the long
wall of the room, facing outward toward the listening area and angled in slightly toward
the center.
Page 4

RECOMMENDED HOME THEATER SPEAKER PLACEMENT:
• We recommend you place your main speakers a few feet to the left & right of your
TV. The best distance between the main speakers is dependent upon room
conditions, size, and the proximity of the listening area to the speakers; usually
6-12 feet is appropriate. A bit of experimentation is in order, but smaller rooms will
better tolerate closer spacing between the speakers.
• We recommend you place your center speaker horizontally on top of (or just below)
your TV.
• For a 5.1 System, we recommend you place your surround speakers behind you,
equally spaced to your left and right, facing towards the front of the room.
• For a 7.1 System, we recommend you place your rear surround speakers behind
you, equally spaced to your left and right, facing towards the front of the room and
your side surround speakers to the left & right of your listening position facing
towards you.
One general rule of thumb: Try to position speakers so that the tweeter's level is fairly
close to your ear level in your normal listening position. High frequencies are much
more directional than low frequencies so it is best that your ears are within a fairly direct
path to the tweeter's output.
VERY IMPORTANT!
Ÿ If you have a Dolby Pro-Logic Home Theater system, make sure that your
receiver’s center channel mode is in the NORMAL position. This will ensure that all
low bass information is sent to your subwoofer and/or main speakers.
Ÿ If you have a Dolby Digital and/or DTS Home Theater system, make sure that you
have correctly configured your receiver's Bass Management System so that all of
your speakers are properly categorized as either SMALL or LARGE. This will
ensure that all appropriate low bass information is sent to each speaker. As a
general rule, a speaker with an 8" or greater diameter woofer may be considered
LARGE. Conversely, a speaker with a woofer 6.5" and under in diameter may be
considered SMALL. Please note that the bass output of a dual woofer speaker
could be comparable to that of a larger single woofer speaker. Example: A dual
6.5" woofer system would generally be considered LARGE since its woofer area
approximates that of a single 10" woofer system.
CAUTION!
• TO BEST PROTECT YOUR EQUIPMENT WE SUGGEST YOU TURN YOUR
AMPLIFIER OFF WHEN CONNECTING OR DISCONNECTING AUDIO CABLES!
• Turntable users: Be aware that when the needle touches down or lifts off of the
vinyl, your speakers may be called upon to momentarily create dangerously high
levels of low frequency information. Warped albums and motor rumble can also
create a great deal of these potentially dangerous subsonic frequencies. We
strongly recommend using a low frequency (subsonic) filter in conjunction with a
turntable to prevent this potential problem and the consequent speaker damage
that can occur.
SECTION II
CONNECTING YOUR SPEAKERS:
Wire Selection
In order to obtain the best sound reproduction from your system, especially strong
bass, speaker wires must be of a heavy gauge. The Gauge number (#18, 16, 14, etc.)
designates the thickness of the conductor that is housed within the insulating jacket of
rubber or plastic. The thickness of the jacket does not matter. The lower the Gauge
number of the wire, the thicker it is and therefore, the lower its electrical resistance will
be. Always use #18 Gauge or heavier (#16, 14, 12, etc.) as per the following
recommendations. Note: All PINNACLE products can accept up to #12 Gauge wire.
Minimum Recommended Gauge - #18 Gauge, suitable for runs up to 12 feet per speaker.
Highly Recommended Gauge - #14 Gauge or lower for superior bass, highs, and musical
definition and can be used for runs up to 25 feet per speaker. For unusually long runs
use #12 Gauge.
Page 5

We cannot recommend #22 or #24 Gauge gold and silver colored wire commonly labeled
"speaker wire" and sold at a variety of consumer outlets. This wire is suitable only for
low cost, low power applications, such as with low power extension speakers. It is
absolutely not meant to be used with high quality systems. Also, NEVER use telephone
wire, solid bell or magnet wire, or anything other than the previously recommended
types of wire. This will ensure your obtaining the maximum possible performance from
your speakers.
POLARIZING OR CODING
Polarized or coded wire is characterized by a clearly visible difference between the two
leads of the cord. This feature makes it simple to keep track of correct connections
between terminals marked (+) or (-).
Here are several of the most common methods of coding:
• separate insulation jacket colors
• a stripe or ridge running the length of one lead
• different colored wires inside the insulating jacket
• a strand of fabric contained within the jacket on one side only
NOTE: All of our speakers conform to the industry standard designation of red as the
positive (+) input terminal and black as the negative (-) input (also known as "common"
or "ground"). Improper hookup will result in a significant loss of bass response and
poor quality sound reproduction. (see next paragraph for clarification)
IN-PHASE vs. OUT-OF-PHASE SOUND
When in-phase, the information recorded equally on both the left and right front
channels appears to come from the center between the two front speakers. The sound
source shifts smoothly as the listener moves about. If one speaker is connected to the
amplifier reversed (plus to minus) then your speakers will be out-of-phase with each
other. The resultant sound will lose much of the bass and seem to be coming from the
walls instead of the center soundstage. Overall, the sonic effect is annoyingly shrill.
The consequence of out-of-phase connections with subwoofers may be even more
noticeable. Take care to connect "right" channel terminals on amplifiers and/or
subwoofers to the "right" speaker and "left" channel terminals to the "left" speaker in
order to recreate the soundstage as the recording engineers intended.
WIRING
Having obtained the sufficient length and correct gauge of wire you are now ready to
hook up your speakers. Before making any connections, please turn off your whole
system and turn your volume control all the way down to prevent accidental overloads.
WIRE PREPARATION
First decide which of the two leads of wire you will use for the (+) connections. It does
not matter which, but make certain that this lead will be attached to the (+) terminals of
both the amplifier (or receiver) and the speakers while the other lead will be connected
to the respective (-) terminals as shown in Figure 3.
Cut the wire to the required lengths. Carefully separate the two leads on both ends of
each wire (a minimum of 1" - 1 1/2") and strip the insulation off of the end of each lead
(about 3/8"), making sure not to damage the fine strands of bare wire housed within the
insulating jacket. Twist together all strands of the bare wire so that they are neat and
tight.
CONNECTING TO TERMINALS
For the location of terminals refer to Figure 3. The ends of neatly twisted bare wire must
be inserted well into the hole of the push or slide spring type terminal while the terminal
tab is held down by pushing against the spring tension. For binding post terminals the
wire must be inserted through the hole which becomes visible when the knurled knob is
screwed counterclockwise. The wire must then be secured by screwing the knob back
clockwise until snug. Remember, loose strands of wire may cause short circuits. When
connecting the wires to the amplifier or receiver's terminals, follow the manufacturer's
instructions. Upon completion, gently tug at all connections to ensure they are
fastened securely.
Page 6

HOME THEATER CONNECTIONS:
Connect your main, center, and surround speakers to their respective output terminals
on the back of your Home Theater receiver. If you have either a powered subwoofer, or
a passive one, refer to their instruction manuals for applicable hook-up options.
After completing all connections, turn the system on, then GRADUALLY increase the
volume level. If there is no sound, distorted sound, or if the amplifier shuts itself down
after a few seconds, IMMEDIATELY TURN THE SYSTEM OFF and turn the volume
control all the way down. Then re-check your wiring for accuracy and for shorts
(adjacent bare wires touching each other). When everything sounds fine, keep the
volume reasonably low while you familiarize yourself with your system's various
controls and operations modes.
CABINET FINISH:
Your speaker cabinets require no maintenance under normal use. The cabinet surface
may, however, be cleaned by using a damp cloth. If you choose to use any kind of
cleaning agent (such as a non-abrasive glass cleaner) please be sure to test a small area
on the bottom of the cabinet first.
TROUBLESHOOTING
Many of the most common complaints about sound system performance can be
corrected simply. All that is required is to check out some basic things when a certain
type of problem is encountered. For now we'll assume everything is hooked up
properly, all equipment is turned on, and there is sound, but it just doesn't sound right.
In fact, often the problem lies in adverse room conditions or poor program material.
Following are some typical problems listed along with possible causes and solutions.
Common Complaints Check For:
A. Bass
1. Too thin Improper phasing, tone/equalizer controls, program material,
room positioning
2. Too heavy Tone/equalizer controls, standing waves, corner placement,
program material
3. Too boomy Lack of sound absorbent material in room, excessive bass
boost
4. Muddy Tone/equalizer controls, poor recording, excessive hard
surfaces in listening room ("live room")
B. Treble
1. Too weak Object obstructing speaker, program material, tone/equalizer
controls, speaker upside down, "dead" room conditions,
dirty tape deck heads
2. Too strong Program material, room placement, excessive tone/equalizer
control boost, "live" room conditions
3. Raspy Poor program material, defective amp or preamp, poorly
tuned station, dusty or worn turntable stylus
4. Hissy Poor program material (recording quality), excessive treble
control boost, noisy amplifier, poorly tuned station, weak
station (use monaural for a stronger signal), poor tape
quality, poor record surface
C. Overall Sound Quality
1. Muffled Program material, tone/equalizer controls, improper speaker
placement, excessive bass boost, extraneous noise (mower,
saw, appliance, etc.) speaker upside down, dirty tape deck
heads
2. Distorted Program material, excessive tone/equalizer boost, excessive
volume, out-of-phase, extraneous noise, poorly tuned
station, damaged tape, dusty or bad stylus
3. Echoes "Live" room conditions, tape print through, program material
4. Hum or Buzz Faulty connecting cables, faulty amp or preamp, fluorescent
lighting, power tools, ungrounded turntable feedback,
incorrectly wired or faulty turntable cartridge
S. Crackling, Popping Bad connections, dirty volume or tone/equalizer controls,
excessive tone/equalizer boost or volume level, worn album
or stylus (turntable users)
6. No Sound Receiver's speaker switches (A & B or 1 & 2) off or
improperly set, wrong input selected, mute on, blown fuse or
short circuit at speaker terminals or amplifier output
terminals
Page 7

LIMITED TRANSFERABLE WARRANTY - PINNACLE AUDIO EQUIPMENT
WHAT IS COVERED: All Pinnacle Loudspeaker Black Diamond speakers are covered by this
warranty for a period of ten (10) years, and Sonic-Fit for a period of seven (7) years, from the date
of the original purchase. The warranty covers all necessary parts and labor to return the speaker to
proper working order. Cabinet surfaces, grille assembly, and other exterior parts subject to normal
wear and tear are not covered except where an inherent structural defect becomes evident. Parts
replacement and labor will be performed at the discretion of the company (Pinnacle Speakers) and
will be provided free of charge unless (in the opinion of our service department, service
representatives, or engineering department) the speaker system has failed due to abuse or negligent
operation. Any latent defect attributable to error in manufacture will always be covered by this
warranty.
WHAT IS NOT COVERED: This warranty will be void and no free services performed if we or any
party acting as our agent determines that the speaker system in question has had any of its
loudspeaker elements (woofer, midrange, tweeter, etc.) or internal circuitry removed or tampered
with in any way whatsoever without express prior authorization from Pinnacle. Furthermore, if the
speaker system is not found to be defective a service charge will be levied. In either case the
minimum charge will be $30.00. An additional charge will be applicable for same day service if
requested (subject to feasibility). This charge will always be in effect even if the actual parts and labor
are covered by this warranty. Any speaker system found to have crimped or melted voice coils or
internal parts that are burned or charred is not covered by the warranty. Voice coils and crossover
parts cannot become charred unless excessive power or clipping signals are fed to the speaker system.
It is possible for an amplifier rated at 50 Watts RMS to permanently damage a speaker system rated
for much higher power levels, since any amplifier or receiver rated at 50 Watts can produce much
more than that, but only at high distortion levels. Amplifiers and receivers are rated at power levels
that they can achieve with minimum, distortion only. Hi-Fi loudspeaker systems are meant to work
only with undistorted power (under 1% distortion). High fidelity equipment rated by the RMS
method (mandatory according to the Federal Trade Commission's regulations) requires that distortion
levels be well below 1% full rated power. Therefore you are obligated to use your equipment with
proper care. Any damage caused to the speaker system from improper use is not covered by
warranty. Pinnacle Speakers reserves the right to make the final determination of whether or not a
particular speaker system has been damaged by abuse or excessive overload.
TO OBTAIN SERVICE: To obtain service under this warranty, either contact your Pinnacle® dealer
or us directly at (516) 576-9052 or service@pinnaclespeakers.com. If you ship your speakers you
are responsible for packing and shipping insurance. The freight must be prepaid. We will, however,
pay return freight charges on any returned speaker that qualifies for
in-warranty service. Sorry, we cannot accept any collect freight charges. You must include a note,
attached to the unit, with your name, phone number and/or email address, and return shipping address
(no Post Office boxes), indicating the nature of the problem you are experiencing. For warranty
service you must also include a copy of your sales receipt. If the speaker returned to us or our agents
for service proves not eligible for warranty repairs or is not found to be defective, then you will have
to pay return freight charges. Please be sure to pack any items you ship us carefully since we cannot
be held responsible for damages incurred during shipping. This warranty may be transferred to a
subsequent owner. SAVE THIS CERTIFICATE AND YOUR SALES RECEIPT. YOU MAY NEED
THEM TO OBTAIN SERVICE UNDER THE PROVISIONS OF THIS LIMITED WARRANTY.
1 Fairchild Court Suite 140
Plainview, NY 11803
Tel. (516) 576 9052, Fax. (516) 576 0826
Http://www.pinnaclespeakers.com
PR MAN AH REV0509
 Loading...