

Page 1

User’s Manual
Manual del Usuario
使用手册
i7300
ReverbMaster
数字多重效果混响器
English / Español / 简体中文
Page 2

i7300
ReverbMaster
数字多重效果混响器
CONTENTS CONTENIDO
目录
Phonic preserves the right to improve or alter any information within this document without prior notice
Phonic se reserva el derecho de mejorar o alterar cualquier información provista dentro de este documento sin previo aviso
PHONIC保留不预先通知即可更新本手册的权利
V1.0 12/05/2008
Introduction 4
Features 4
Preliminary Setup 4
Controls, Connections and Displays5
Using The i7300 8
Using the MIDI Function
10
Editing Presets
11
Specications 15
MIDI Data Format 16
Preset Tables 45
Applications 46
Introducción 18
Características 18
Conguración preliminaria 18
Controles, conexiones y displays 19
Usando i7300 22
Usando función midi 24
Editando presets 25
Especicaciones 29
Formato de dato midi 30
Tablas de preset 45
Aplicaciones 46
简介 32
产品特色 32
初级安装 32
控制,连接,显示 33
产品使用 36
MIDI功能使用 38
编辑预设 39
规格 43
MIDI数据格式 44
预设表 45
应用 46
Page 3

1. Read these instructions before operating this
apparatus.
2. Keep these instructions for future reference.
3. Heed all warnings to ensure safe operation.
4. Follow all instructions provided in this document.
5. Do not use this apparatus near water or in locations
where condensation may occur.
6. Clean only with dry cloth. Do not use aerosol or liquid
cleaners. Unplug this apparatus before cleaning.
7. Do not block any of the ventilation openings. Install
in accordance with the manufacturer’s instructions.
8. Do not install near any heat sources such as radiators,
heat registers, stoves, or other apparatus (including
.
9. Do not defeat the safety purpose of the polarized or
grounding-type plug. A polarized plug has two blades
with one wider than the other. A grounding type plug
has two blades and a third grounding prong. The wide
blade or the third prong is provided for your safety. If
the provided plug does not into your outlet, consult
an electrician for replacement of the obsolete outlet.
10. Protect the power cord from being walked on or
pinched particularly at plug, convenience receptacles,
and the point where they exit from the apparatus.
11. Only use attachments/accessories by the
manufacturer.
12. Use only with a cart, stand, tripod, bracket, or
table by the manufacturer, or sold with
the apparatus. When a cart is used, use caution
when moving the cart/apparatus
combination to avoid injury from tipover.
13. Unplug this apparatus during lighting
storms or when unused for long
periods of time.
14. Refer all servicing to service personnel.
Servicing is required when the apparatus has been
damaged in any way, such as power-supply cord or
plug is damaged, liquid has been spilled or objects
have fallen into the apparatus, the apparatus has
been exposed to rain or moisture, does not operate
normally, or has been dropped.
IMPORTANT SAFETY INSTRUCTIONS
CAUTION: TO REDUCE THE RISK OF ELECTRIC SHOCK,
DO NOT REMOVE COVER (OR BACK)
NO USER SERVICEABLE PARTS INSIDE
REFER SERVICING TO QUALIFIED PERSONNEL
The lightning flash with arrowhead symbol, within an
equilateral triangle, is intended to alert the user to the
presence of uninsulated “dangerous voltage” within the
product
’
magnitude to constitute a risk of electric shock to persons.
The exclamation point within an equilateral triangle is intended to alert the user to the presence of important operating and maintenance (servicing) instructions in the literature
accompanying the appliance.
WARNING: To reduce the risk of or electric shock, do
not expose this apparatus to rain or moisture.
CAUTION: Use of controls or adjustments or performance
of procedures other than those may result in
hazardous radiation exposure.
The apparatus shall not be exposed to dripping or splashing and that no objects with liquids, such as vases,
shall be placed on the apparatus. The MAINS plug is used as the disconnect device, the disconnect device shall
remain readily operable.
Warning: the user shall not place this apparatus in the area during the operation so that the mains switch
can be easily accessible.
CAUTION
RISK OF ELECTRIC SHOCK
DO NOT OPEN
Page 4

4 i7300
INTRODUCTION
Thank you kindly for purchasing another quality Phonic
product which, no doube, will prove to be a valuable
invertment, The i7300 ReverbMaster is a complex, yet
simple machine; complex in that it packs the power to
enhance your adudio in outstanding ways, however
simple enough for any novice audio user to utilize.
The i7300’s controls are few and detailed. The three jog
wheels and six control buttons provided give easy control
over menus and options, whereas the LCD display gives
you a clear, concise overview of the different functions
the i7300 can perform. The amazing 32-bit DSP reliably
accmplishes the complex task of creating such rened
reverberations on audio that need a little (or a lot of)
avor.
This manual thoroughly details the use and functions of
the i7300 ReverbMaster. Though many people don’t nd
it necessary to read manual, it is strongly recommended
you do read the entire manual careful before storing it in
a convenient and safe place for future reference.
FEATURES
● Dedicated rotary controls and illuminated keys for
quick and easy operation
● Large LCD display
● High headroom and resolution with 24-bit A/D and D/A
converters and 256/512 times oversampling
● Internal 32-bit processor with 44.1 kHz sampling rate
● Ture stereo performance and variable stereo image
parameters
● 100 factory programs and 100 user programs
● Dual 10-segment LED level meters
● Balanced XLR and 1/4” TRS connectors for input and
output
● Operating levels of +4 dBu and -10 dBV independently
selectable for input and output
● Foot switch connector for hands-free program
selection and bypass
● MIDI capability allowing real-time program selection
and dump
PRELIMINARY SETUP
1.The i7300 con be applied to a standard professional
audio rack and will take up one unit of rack space.
2.An appropriate input device should be connected to
the Analog In jacks on the rear of the unit. This would
most commonly be a mixer, but you could also connect
to the device from other signal processors. Your choice,
of course.
3.An appropriate output device should be applied to
the Analog Out jacks, also on the rear of the unit. This
could include, but is not limited to, mixers and multi-track
recorders.
4.The supplied AC power cable should be plugged into
the corresponding port on the rear of the machine and
into a wall-socket of a suitable voltage.
5.Take a break and grab a cup of coffee. Have a biscuit
or two, if you like. You deserve it.
6.Turn the device on using the Power switch located at
the front of the unit.
Page 5

5i7300
CONTROLS, CONNECTIONS AND DISPLAYS
Front Panel
1. Input Level / Stereo – Mono Control
Turn this control to adjust the sensitivity of the input signal
between +6 and -40 dB (and -∞ dB, effectively muting
the device). Pushing the control down will allow you to
alternate the input signal between onrmal stereo, reverse
stereo, mono left or mono right This control is always
separate from the presets, menaing that recalling a preset
will not change your current input level or mono / stereo
settings.
2. Input Level Meter
The LCD level meter allows you to read the input signal
level in dB, referenced to the internal digital maximum. This
will provide an indication as to the amount of headroom
available until the audio reaches the maximum digital
output level and is dynamically clipped. When bypass
mode is activated, this display will change to show the
current input and output level of the audio signal.
3. MIDI In Indicator
The MIDI indicator displays the MIDI signal connection
and delivery status, meaning it will illuminate when MIDI
data is being received by the i7300. For more information
on MIDI operation, please refer to the MIDI section of this
manual.
4. User Indicator
The User Indicator illuminates when a user preset is
currently being used, edited, tested or viewed by the user.
This allows you distingusih between user and factory
presets with ease.
5. Stereo Indicator
The stereo indicator illuminates whenever the i7300 input
is in Stereo Normal or Stereo Reverse mode. This LED
will not illuminate when the input mode is set as Mono
Right or Mono Left.
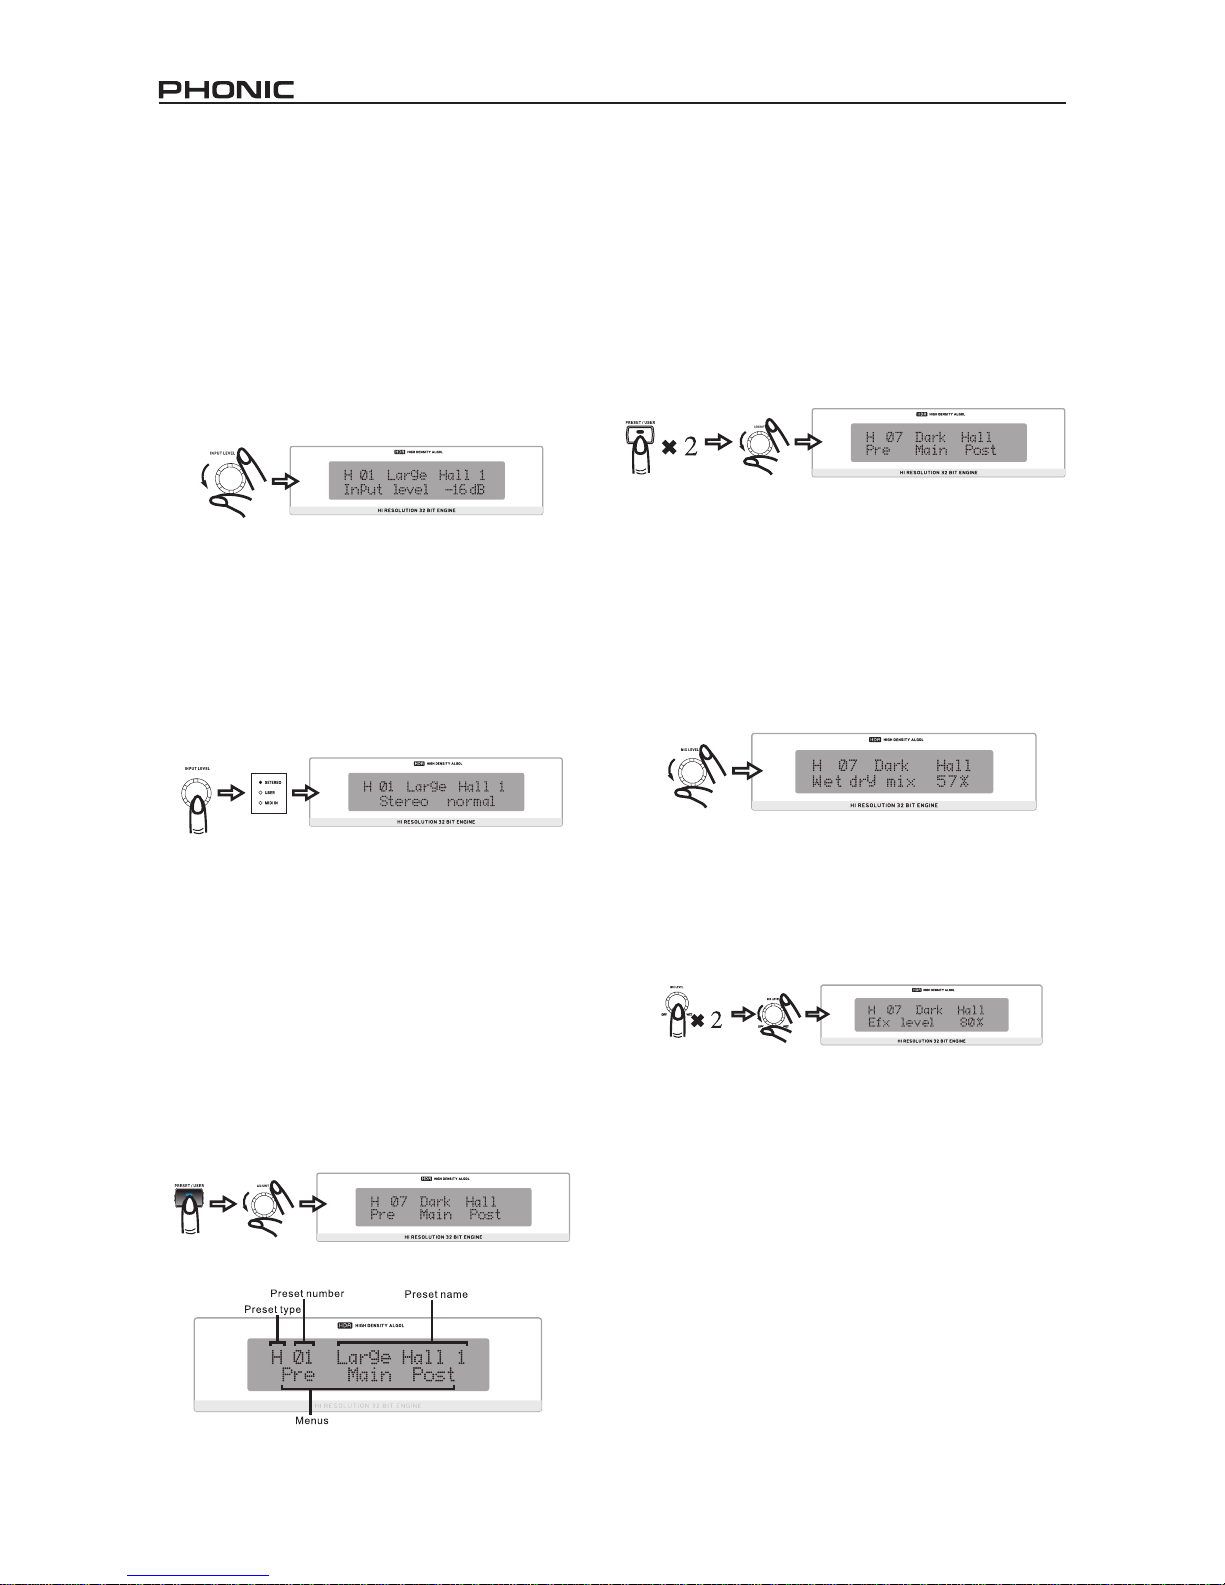
6. LCD Display
The LCD typically displays details of the currently seclected
program, basic parameters being edited, as well as a
variety of other information related to the ReverbMaster’s
functions. The LCD Screen is not particularly hard to make
out, but here are some pointers to make it easier to read.
The display has 2 lines: the rst line will generally show
the reverb program type (“R” – Room – “H” – Hall – “P” –
Plate – and “S” – special), followed by the preset number
(a number from 1 to 25) and preset name; whereas the
second line will display any properties being edited, such
as the input level, mix level, reverb parameters, etcetera.
7. Adjust Control
This control is used to scroll through various parameter
options of the i7300. Pushing the control down will allow
you jump into programs to edit various parameters, as well
as nalize your selections when all editing is complete.
Page 6

6 i7300
8. Preset / User Key
The Preset / User ke is used to recall one of the 100
factory presets. Pushing this key a second time will allow
you to recall a preset previously stored in a user preset
position (which is indicated by the small User indicator to
the left of the LCD display). After pushing the preset key
to enter either the Factory Preset or User Preset menus,
you are able to user the Adjust Control to scroll through
the various presets.
9. Type Key
When selecting presets, pressing this key allows you to
select the type of effect program to use: HALL, ROOM,
PLATE, or SPECIAL. Each of these types will have 25
presets to select from.
10. Store Key
The store key is used to save user-modied programs in
one of the 25 user preset slots, as specied by the user.
Simply press the Store key, chose a preset location, edit
the preset name and press the Store key once more to
nalize.
11. Edit Key
Pressing the Edit key will allow you to adjust various reverb
properties, to further rene you effect. After pressing th
Edit key, a set of parenthesis will appear around the Pre
option on the bottom line of the LCD display. You can
then use the Adjust Control to scroll to the “Main” and
“Post” options, and press the Adjust Control to enter these
menus. Editing of parameters will be discussed in greater
depth further along in this manual.
12. System Key
Pressing the System key allows you to access the
parameter menus, allowing you to adjust the properties of
various functions, such as Footswitch operation and MIDI
controllability. Pushing the System key will enable you
to scroll through these menus; then pressing the Adjust
control will allow you enter the selected menu and adjust
the parameters.
13. Compare / Bypass key
This key acts as a bypass or compare key, depending
on your current use (as explained later in the manual).
Pushing it will either disable all effects or return you to
your previous effect.
14. Mix / EFX Level Control
This control adjusts the dry/wet mixing ratio between 0
and 100%, as displayed on the bottom line of the LCD
display. Pushing the control allows you to adjust the EFX
Level between 0 and 100%.
15. Power Switch
The power switch allows you to turn the ReverbMaster
on and off.
Page 7
7i7300
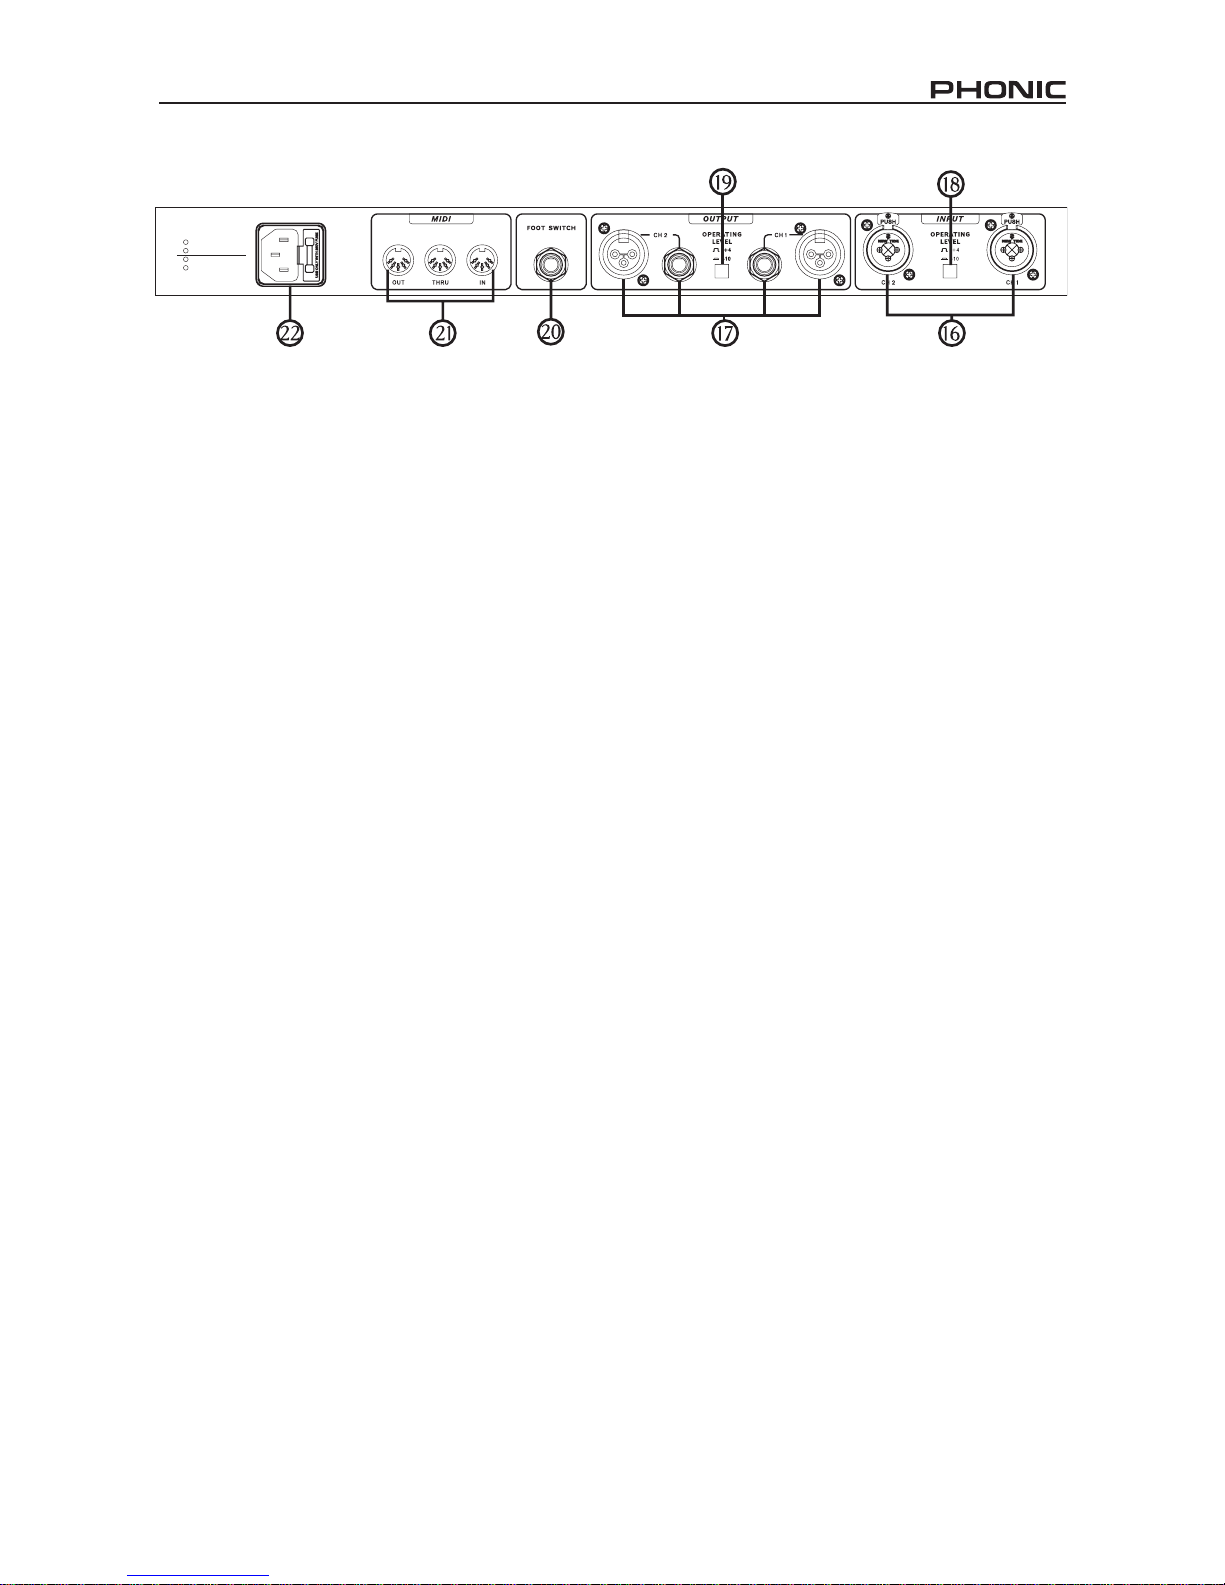
Back Panel
16. Audio Input Connectors
These balanced linput combo connectors (accepting
both XLR and 1/4” TRS jacks) are for the connection of
external devices (such as a mixer or playback feed) to
feed the i7300.
17. Audio Output Connectors
These balanced XLR and 1/4” TRS outputs are for
connecting the i7300 to external devices (such as a mixe
or multi-track recorder) for output of the analog return
signal.
18. Operating Level (In) -10dB / +4dBu
Use this switch to set the input level of the ReverbMaster.
Set at -10dBV for use in conjunction with semi-pro
or consumer level devices or at +4dBu for use with
professional audio gear.
19. Operating Level (Out) -10dB / +4dBu
Use this switch to set the output level of the ReverbMaster.
Set at -10dBV for use in conjunction with semo-pro
or consumer level devices or at +4dBu for use with
professional audio gear.
20. Foot Switch Connector
Connecting a footswitch to this 1/4” TRS phone jack
allows you to either bypass your current effect, or control
the current preset selection – as specied by the user
– making remote, hands-free control of the ReverbMaster
possible.
21. MIDI Connectors
The ReverbMaster sends and receives MIDI data via
these connectiors. The In connector receives MIDI
signals, where the out connector sends MIDI signals
to MIDI external devices. The Thru, on the other hand,
sents the MIDI control data received by the IN, to another,
parallel MIDI device for daisy chaning of MIDI devices.
22. AC Power Cable Connector and Fuse Holder
Connect ht esupplied AC power cord to this connector and
insert the cord’s plug into a wall-socket of suitable voltage.
To replace the i7300’s fuse, remove the fuse cover, take
the old fuse out and replace with another fuse, ensuring
it is the same as is needed by the device (as indicated on
the furse holder cover).
Page 8
8 i7300
Using The i7300
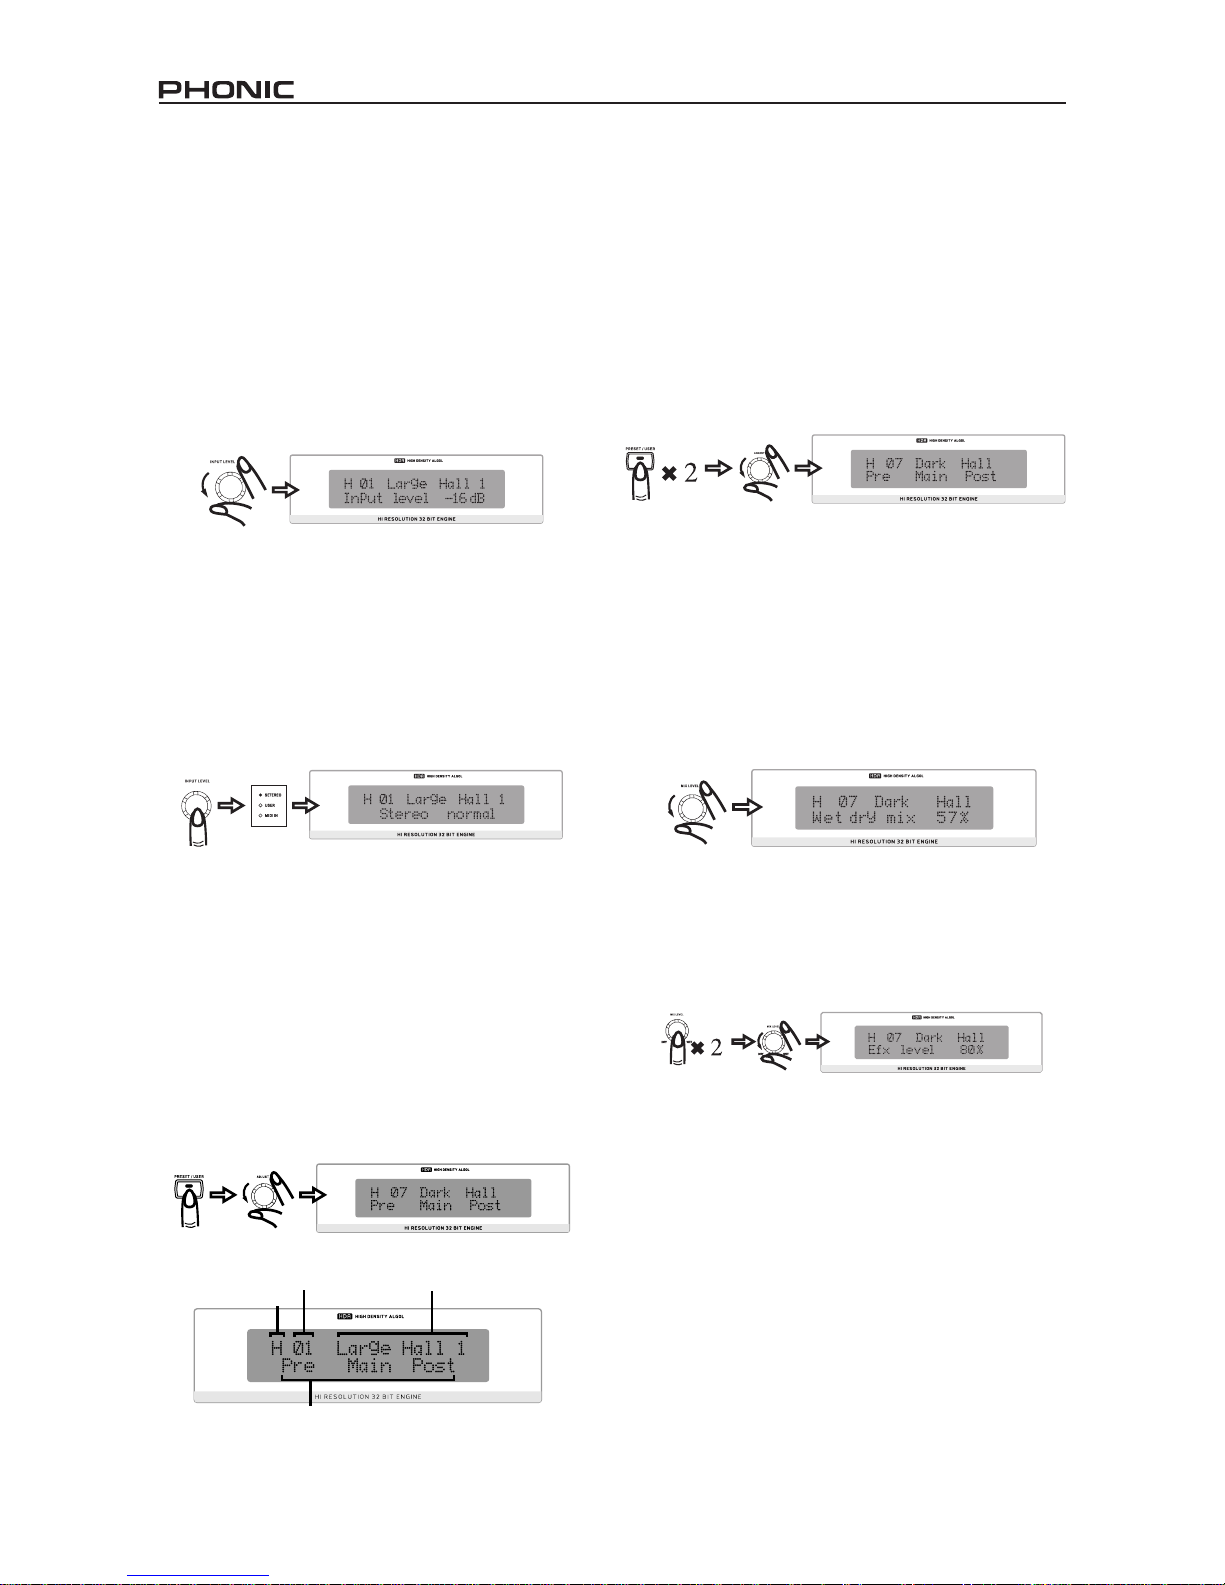
Changing the Input Level
The input level jog wheel should be used to change the
level of input that is being fed into the input ports on the
rear of the i7300. Turning the jog wheel will allow you
to chage the input level between -∞ and 6dB, as will be
displayed on the bottom line of the LCD screen. If, when
changing the input level, the jog wheel is not used for 2
seconds the LCD will revert back to the previous screen.
The input level control is also independent of preset
programs (meaning the input level is not changed when
recalling a preset).
Alternating Between Input Modes
To change he input type, simply press the input level jog
wheel; this will allow you to alternate between stereo
normal, stereo reverse, mono right and mono left. When
stereo normal or stereo reverse are selected the Stereo
indicator to the left of the LCD display will illuminate (this
indicator will. Of course, not illuminate when in either
mono mode). The input mode of the i7300, like the input
level, is in no way changed when recalling a preset.
Selecting a Preset
To select a preset, rst press the Preset / User key on the
front of the i7300; this will enter you into a preset select
mode, allowing you to use the Adjust control to select a
preset. Pressing the Type key will allow you to switch to
different effect types (Hall, Room, Plate and Special).
Each of which has 25 presets that can be browsed by
using the Adjust control. Each preset is individually
named to describe the effect, and is applied automatically
when scrolled to. Pushing the Adjust control will select
the effect and exit the Preset selection mode of the
ReverbMaster.
Selecting User Presets
User presets are chosen basically the same way as factory
ones. First press the Preset / User ke twice, after which
the User LED to the left of the LCD display will illuminate.
From here on, using the Type key and the Adjust control
will allow you to peruse the user presets in the exact
same way as selecting factory presets. When you have
found the preset most suitable for what you need, simply
press the Adjust control down to nalize.
Changing the Mix Level
Use the Mix Level jog wheel to change the ratio of
processed to unprocessed audio (or the saturation of
processed audio over unprocessed). When ou turn
this jog wheel the LCE will show “Wet dry mix” and a
percentage between 0 and 100 on the bottom line (at 0,
or dry, the audio remains completely unprocessed). If the
jog wheel remains unused for 3 seconds the screen will
revert back to whatever was there before using the mix
level jog wheel.
Changing The EFX Level
To edit the Efx level, rst push the Mix Level jog wheel
down twice, then turn to edit between 0 and 100 percent;
effectively changing the total effect output level. If the jog
wheel remains unused of 3 seconds the screen will revert
back to the previous screen.
Page 9
9i7300
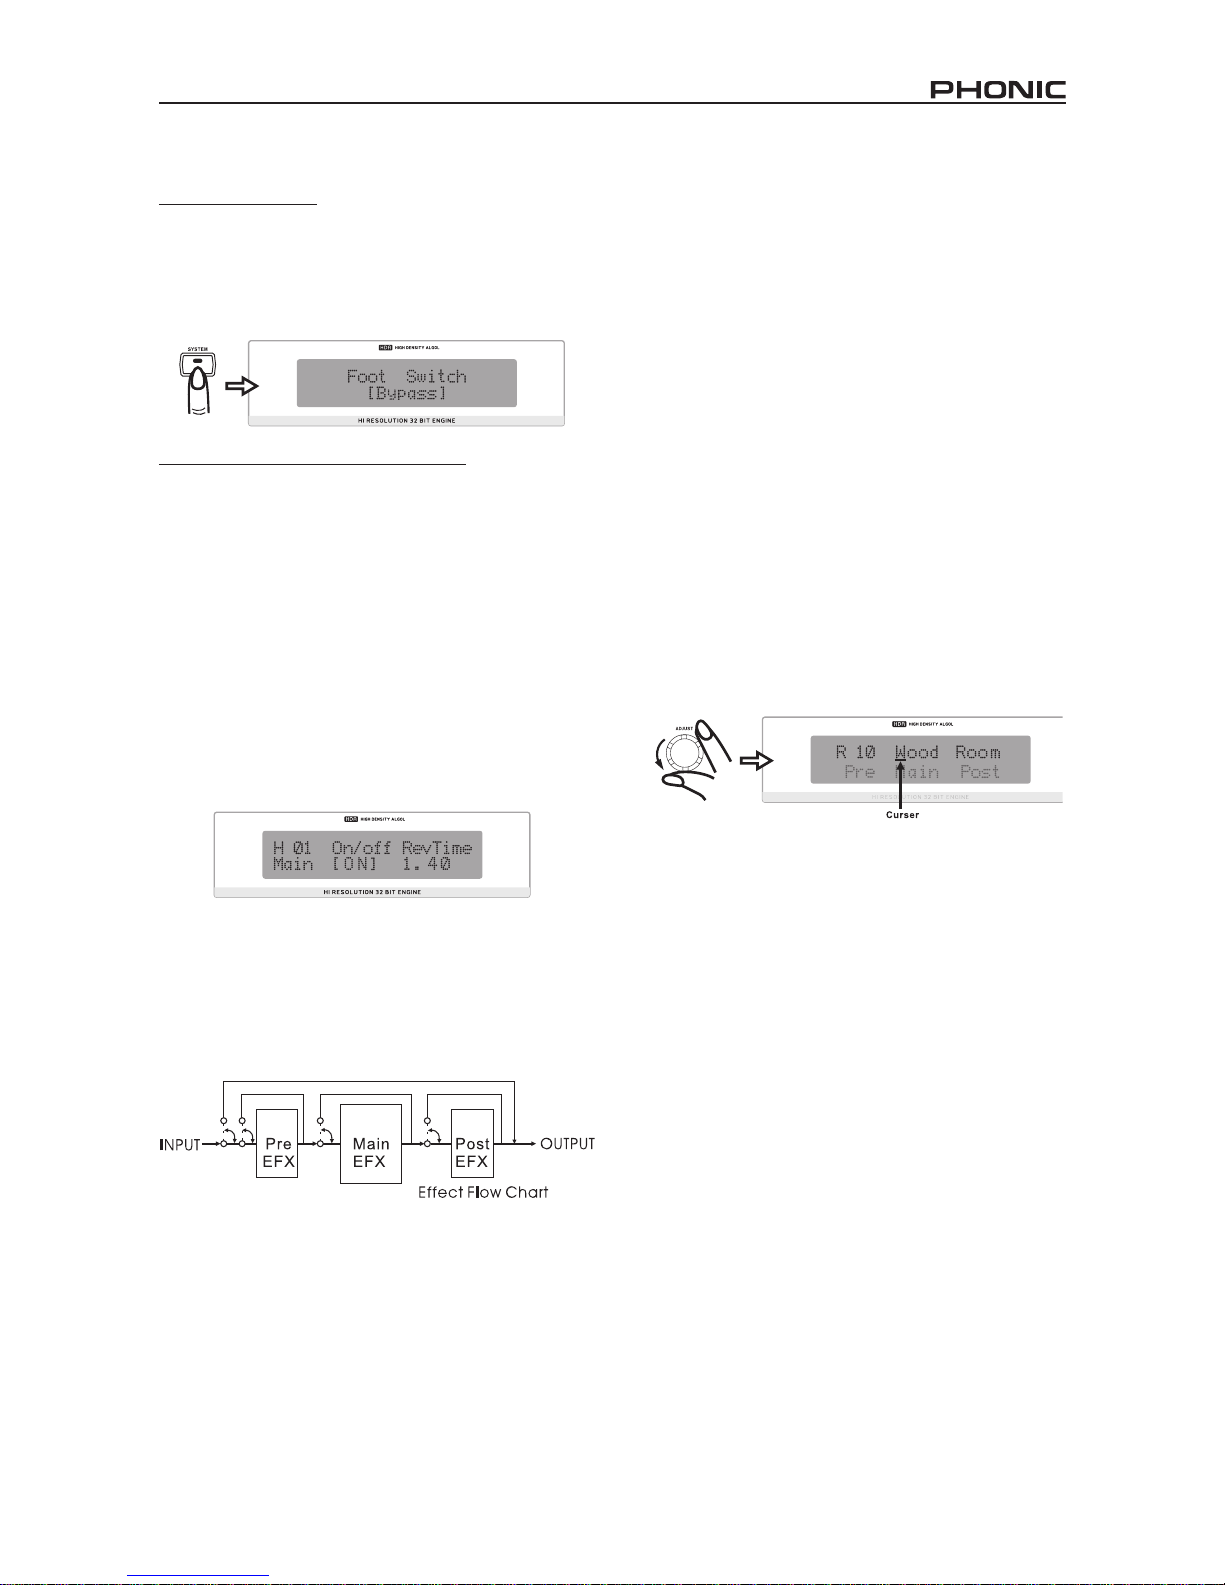
Setting The Footswitch
Changing Function
First, press the System button; the rst option that appears
will be “Foot Switch.” Simply turn the Adjust Control to
alternate the function of the foot switch between “Program
select” and “Bypass”modes. You selection is applied
automatically.
Changing Effect Selection Properties
When the footswitch’s functions is set to ‘Program select,’
pushing to System key twice will bring up a menu that
allows you to alter the properties of this preset selection.
By turning to Adjust Control you can change the footswitch
program select “destination” program, between 1 to 100.
This means you can use the foot switch to jump through
then start all over again.
Compare / Bypass
The Compare / Bypass key, located on the ReverbMaster’s
fron panel, generally acts as a bypass key, stopping any
effects from being applied to the audio. Pressing it a
second time will deactivate bypass mode and return to
your chosen effect. When the bypass key is pressed the
key’s imbedded LED will illuminate.
You can also activate a bypass on each of the separate
stages of Reverb (The Pre, the Post and the Main Effect
– as shown in the diagram below). By simply pressing the
edit key and disabling them through their corresponding
menus (ie. Turning them Off). The bypass can be
deactivated by turning them on once more.
When editing effects, the Compare/Bypass key acts as a
Compare Key, allowing you to revert back to the original
preset used before starting to edit the effect – enabling
you to hear the difference in the two effects. Pushing the
button a second time will revert you back to the edited
program.
Storing Edited Presets
First of all, complete all your alterations to your effect
in “Edit” mode (changing reverb time, delay or other
corresponding options). Then, to store, simply press the
store key, where you will then be allowed to select which
preset slot you wish to ll. Use the Adjust Control to scroll
to the preset slot you wish to use and press the control
down to conrm. This will then move you to the name edit
section, where you can edit the individual letters of the
preset name. The curser is located underneath the letters
of the title. Use the Adjust Control to scroll to any letter
you wish to change, press the control down to select, and
use the control once more to scroll through the various
letters and characters that can be used. Pressing the
control once more will nalize, and you can then move
to the next letter you want to edit. Pressing the Store key
again will complete the saving process.
Auto Saving Settings
The i7300 will automatically save changes to any
parameters you may set (presets, reverb edits, MIDI
settings, etcetera), and keep them – even after the power
is turned off. This ensures none of your settings are lost in
the event of power outages.
Page 10

10 i7300
Using The MIDI Function
Selecting A MIDI Channel
MIDI signals can easily be sent and received by the i7300
– it is simply a case of knowing which channel you want
to send and receive through. Pressing the System key
until the screen displays “Midi Rx Ch” on the top line, and
then turning the Adjust Control, will allow you to select the
channel at which the i7300 will accept MIDI signals (you
can also turn MIDI off through this option). If unsure what
Channel your MIDI device uses, selecting OMNI will allow
the i7300 to receive MIDI signals on all channels. This is
the preferable channel setting when only a single MIDI
device is used.
Daisy Chaining MIDI Signals
By simply plugging a MIDI cable into the Thru port on the
rear panel of the i7300, and then into another MIDI In,
you have affectively produced a MIDI daisy chain. The
signal that is sent to then MIDI In on the rst device is then
conveyed through to the second. This can, of course, be
done multiple times by connecting the MIDI In of a third
– and so on. However, daisy chaining of numerous MIDI
devices will eventually cause degradation of the MIDI
data.
Bulk Dumping of MIDI Data
MIDI dumping allows you to store your presets and settings
on a Personal Computer and recall them at a later time.
To do so, you rst need MIDI Connector on your PC (or a
MIDI to USB adaptor of some sort), as will as a program
that will receive bulk dumps on your personal computer.
After preparing your PC to receive a MIDI dump, press
the System button a few times until the “Midi dump” option
appears on screen . Turn the Adjust control to the left until
“Transmit?” appears on the bottom line. Provided your PC
is ready, pressing the Adjust Control in should transmit
your current settings and presets to the PC. Do not under
any circumstances remove or detach any cords, shut down
your computer or turn off the ReverbMaster while MIDI
data is being transmitted. Once your dump is completed,
you can simply continue to use the i7300 as you were prior
to your MIDI dump.
Retrieving Dumped MIDI Data
So you learnt how to dump MIDI data, and you have
successfully accomplished a MIDI dump. Congratulations!
Now you have to get it back again. To do so, return to
the “Midi dump” option by pressing the System button.
Then turn the Adjust Control until you reach the “Receive”
option. Press the Adjust Control in and you’re ready to go.
Open your MIDI dump le and use the MIDI sent option
of your PC’s MIDI program to sent the data back to the
waiting i7300.
Please Note: under no circumstances should you
ever sent edited or corrupted MIDI dumps back to the
ReverbMaster, as the end result will be quit undesirable.
When re-transmitting data to the i7300 please ensure it
was in no way altered between the initial dump and the
return-dump, and that the initial dump was successful.
Altering the MIDI Program Map
When you have certain external MIDI devices connected
to the MIDI in of the i7300, these devise can be used to
change the preset programs of the i7300 while in use.
Yes, similar to a foot switch’s function; however more
specic, in that any program selected through the MIDI
device can be instantaneously recalled on the i7300,
without switching through all presets.
To change the program mapping of MIDI, push to System
button a few times until the title “Midi program table” is
displayed on screen, and then turn the Adjust Control to
change the MIDI program number. After nding the MIDI
program number you wish to change, push the Adjust
Control down and turn to alter the preset used (you can
choose from the 100 factory presets and the 100 user
dened presets).
Page 11

11i7300
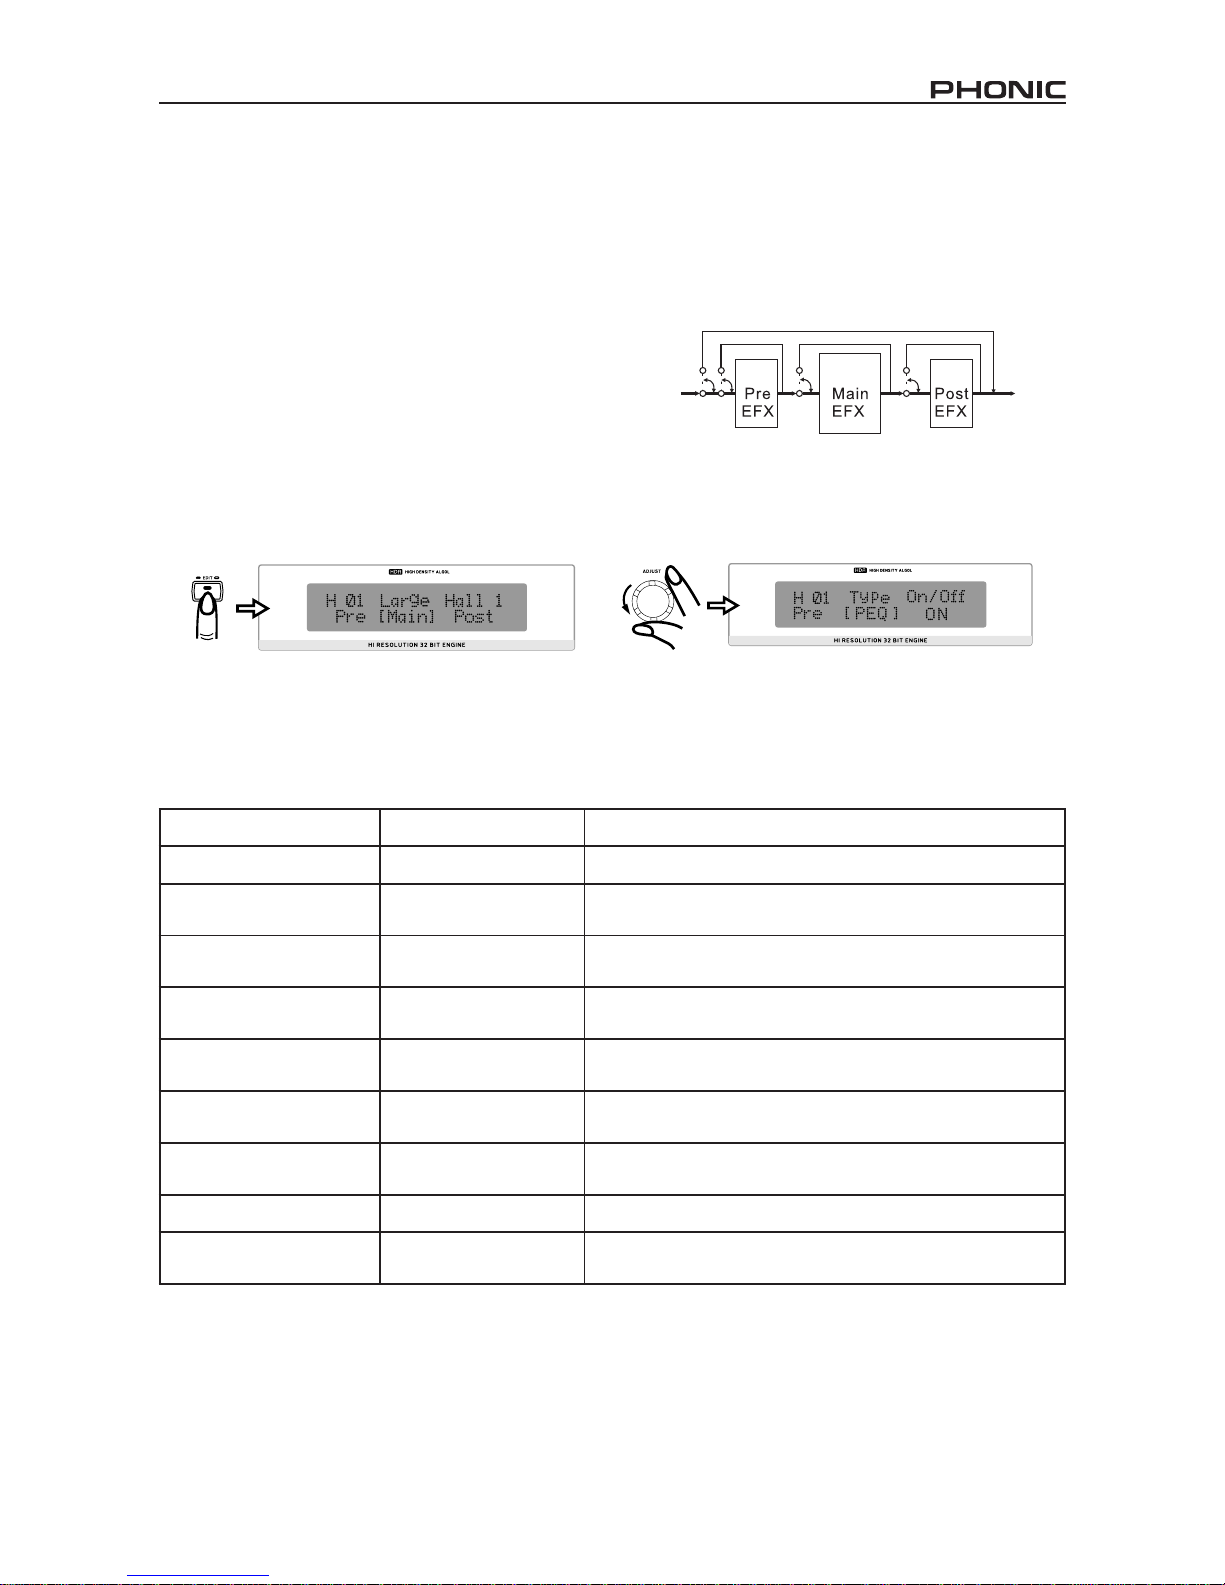
Editing presets
Editing the built in preset program and creating your own, unique reverb is not particularly difcult, if you know what you’r
doing; and this is where you will nd out how to do it. First of all, keey in moind that each program is made up of a Pre EFX,
a Post EFX and the Main reverberation (as indicated in the ow chart below). Recalling any factory preset (or user dened
preset). Recalls the settings of these three stages of reverberation for that particular program. They can be changed by
rst pressing the Edit key.
When pressed, you can then use the Adjust Control to scroll left and right to the Pre, Main and Post menu options. Press
the Adjust Control in to enter any of these menus (you can
jump out to the main menu at any time by pressing the Edit
key once again). Once within the menus, you can once
again use the Adjust Control to scroll left and right through
the different editable parameters. Again, press the Adjust
Control to alter the parameters.
Main Effect Parameters
Below are the main reberb parameters, all of which can be edited or rened to create your own, distinct reverb program.
Editable Property Range Description
RevTime 0.05 to 10.00 sec Deterimines the over-all reverberation time
PreDly 0 to 200 ms Allows users to activate a delay before the main reverb activates
Er/Lev 0 to 100
This helps you adjust the Early reections level (the initial reection that
leads the main reverb)
HeRatio 0.01 to 1.00 Determines the ratio for hi-frequency parts of the reverb effect
LoRatio -90 to 24 Determines the ratio for Low-frequency parts of the reberb effect
HPF 0 Hz to 6 kHz Determines the frequency at which a high pass lter will activate
LPF 34 Hz to 10.0 kHz Allows you to dene at which frequency a low pass lter willactivate
Density 0 to 100 Alters the density of the reverberation
ST Img -100 to 100 Allows you to widen and narrow the stereo image of reverberation
Page 12

12 i7300
Pre and Post Effects
One the following few pages you will be able to nd the various types of Pre and Post effects you are able to apply to help
create your reverb, as well as their editable parameters. Please note that, for the exception of the pre ad post EQ. the
following effect types can be set as either a pre or a post effect, however not as both the pre and post simultaneously.
Operating levels of +4 dBu and -10 dBV independently selectable for input
Editable Property Range Description
Stereo Link On or Off
Activating Stereo Link enables all changes to either channel being applied to
the other
L1 Gain -16 to +16 dB
Enables you to increase or decrease the level of the left EQ band 1 at the
selected frequency
L2 Gain -16 to +16 dB
Enables you to increase or decrease the level of the left EQ band 2 at the
selected frequency
L1 Fq (Frequency) 20 Hz to 20 kHz
Used to select to frequency at which the audio will be cut or boosted for left EQ
band 1
L2 Fq (Frequency) 20 Hz to 20 kHz
Used to select to frequency at which the audio will be cut or boosted for left EQ
band 2
L1 Q 0.1 to 10 Determines the bandwidth of left EQ band 1
L2 Q 0.1 to 10 Determines the bandwidth of left EQ band 2
R1 Gain -16 to +16 dB
Enables you to increase or decrease the level of the right EQ band 1 at the
selected frequency
R2 Gain -16 to +16 dB
Enables you to increase or decrease the level of the right EQ band 2 at the
selected frequency
R1 Fq (Frequency) 20 Hz to 20 kHz
Used to select the frequency at which the audio will be cut or boosted for Right
EQ band 1
R2 Fq (Frequency) 20 Hz to 20 kHz
Used to select the frequency at which the audio will be cut or boosted for Right
EQ band 2
R1 Q 0.1 to 10 Determines the bandwidth of left EQ band 1
R2 Q 0.1 to 10 Determines the bandwidth of left EQ band 2
Flanger
Editable Property Range Description
LFO 0.1 to 10 Low Frequency Oscillator (ie. It oscillates low frequencies)
Pre Delay 1 to 200 ms Enables a delay before the Flanger effect is activated
Depth 0 to 100 Allows users to adjust the depth of modulation
Phase 0 to 180° Used to adjust the phasing of left and right channels
LPF 34 Hz to 10 kHz Determines the frequency at which a low pass lter will activate
Balance 0 to 100
50 being the center, this allows users to adjust the balance of the Flanger
reverb
Mode Typ Sine, Trg or Saw Determines the type of curve used to modulate the anger
FB -100 to 100 Created feedback with positive or negative phasing
Page 13

13i7300
Chorus
Editable Property Range Description
LFO 0.1 to 10 Low Frequency Oscillator (ie. Oscillates low frequencies)
Pre Delay 1 to 200 ms Enalbes a delay before the Chorus effect is activated
Depth 0 to 100 Allows users to adjust the depth of modulation
Phase 0 to 180° Used to adjust the phasing of left and right channels
LPF 34 Hz to 10 kHz Determaines the frequency at which a low pass lter will activate
Balance 0 to 100
50 being the center, this allows users to adjust the balance of the Chorus
reverb
Mode Typ Sine, Trg or Saw Determaines the type of curve used to modulate the Chorus reverb
Phaser
Editable Property Range Description
LFO 0.1 to 10 Low Frequency Oscillator (ie, it oscillates low frequencies)
Depth 0 to 100 Allows users to adjust the depth of modulation
Delay 0.0 to 5.0 Enables a delay before the Phaser effect is activated
Phase 0 to 180° Used to adjust the phasing of left and right channels
FB -100 to 100 Creates feedback with positive or negative phasing
Mod Typ Sine, Trg or Saw Allows users to select waveform used for low frequency oscillation
Balance 0 to 100
50 being the center, this allows users to adjust the balance of the Phaser
reverb
Pan
Editable Property Range Description
Speed 0.1 to 10 Hz Allows you to select the pan speed between 0.1 and 10 Hz
Profundidad 0 a 100 Determines the depth of the pan modulation
Type I <--> D, D-->I, I-->D Allows you to selecty from the 3 types of panning
Mod Typ Sine, Trg or Saw Allows users to select waveform used for low frequency oscillation
Delay
Editable Property Range Description
L Dly 0.00 to 2.55 Allows you to choose the delay time of the left channel
R Dly 0.00 to 2.55 Allows you to choose the delay time of the right channel
C Dly 0.00 to 2.55 Allows you to choose the delay time of a center channel
FB Dly 0.00 to 2.55 Allows you to choose a feedback delay time
L Lvl 0 to 100 Allows you to choose the delay level of the left channel
R Lvl 0 to 100 Allows you to choose the delay level of the right channel
C Lvl 0 to 100 Allows you to choose the delay level of a center channel
FB 0 to 100 Allows you to create feedback at a percentage between 0 and 100
Page 14

14 i7300
Tremo
Editable Property Range Description
Speed 0.1 to 10 Hz Determines the frequency of modulation
Depth 0 to 100 Allows users to adjust the depth of modulation
Phase 0 to 180° Used to adjust the phasing of left and right channels
Mod Typ Sine, Trg or Saw Allows users to select waveform used for low frequecny oscillation
Gate
Editable Property Range Description
St/Link On or Off
Stereo Link mode allows you to edit both the left and right gates
simultaneously
L Thrs -50 to 0 Determines the threshold of the left gate
L Atck 0 to 200 Allows you to select the attach rate of the left gate
L Rele 0.01 to 2.55 Determines the release rate of the left gate
L Hold 0.00 to 2.55 Allows users to dene the time that the gate will remain open
L Range -INF, -50 to 0 Allows users to dene the range of the left gate
R Thrs -50 to 0 Determines the threshold of the right gate
R Atck 0 to 200 Allows you to select the attach rate of the right gate
R Rele 0.01 to 2.55 Determines the release rate of the right gate
R Hold 0.00 to 2.55 Allows user to dene the time that the gate will remain open
R Range -INF, -50 to 0 Allows users to dene the range of the right gate
Compressor
Editable Property Range Description
St/Link On or Off
Stereo Link mode allows you to edit both the left and right gates
simultaneously
L Thrs -50 to 0 Determines the threshold of the left compressor
L Atck 0 to 200 Allows you to select the attach rate of the left compressor
L Rele 0.01 to 2.55 Determines the release rate of the left compressor
L Ratio 1.0 to 10.0, -INF Allows you to dene the ratio of compression that will be applied
R Thrs -50 to 0 Determines the threshold of the right compressor
R Atck 0 to 200 Allows you to select the attack rate of the right compressor
R Rele 0.01 to 2.55 Determines the release rate of the right compressor
R Ratio 1.0 to 10.0, -INF Allows you to dene the ratio of compression that will be applied
Page 15

15i7300
SPECIFICATIONS
Input
Connectors balanced Combo (XLR and 1/4” TRS)
Nominal Level +4 dB or -10 dB (selected by rear panel switch)
Impedance 50 K Ohms
Nominal Level +16 dBu
Output
connectors Balanced XLR and 1/4” TRS
Nominal Level +4 dB o -10 dB (selected by rear panel switch)
Impedance 500 Ohms
Max. Output Level +16 dBu
System
Frequency Response 20 Hz to 20 KHz +/-0.5 dB
Dynamic Range 96 dB typical
THD 0.003 % typ. @ +4 dBu, 1KHz
Noise < -80 dB
Crosstalk < -80 dB
Digital Processing
Converters 24 Bits AD/DA and 32/40 bits Sigma-Delta DSP, 256/512-times Oversampling
Sampling Frequency 44.1 KHz
Program Memory
Memory Areas Program (read-only), User (read/write)
Memory conguration
Four program types (HALL, ROOM, PLATE, SPECIAL), each with 25 preset programs per
type and 25 user set programs per type.
Front Panel
Switches Preset/User, Type, Bypass/compare, Store, Setut, Edit
Rotary Controls Input Level, Adjust, Mix Level / EFX Level
Display Digital-LCD Display, Stereo-LED, User-LED, MIDI IN-LED
Rear Panel
Connectors
Input L/R (COMBO), Output L/R (XLR) (1/4” Phone Jack), Foot Switch (1/4” phone jack),
MIDI interface 5-Pin-DIN-Socket IN/OUT/THRU
Power Requirements
USA / Canada ~120 VAC, 60 Hz
U.K. / Australia ~240 VAC, 50 Hz
Europe ~230 VAC, 50 Hz
Fuse 100-120 VAC: 1 A, 200-240 VAC: 500mA
Power consumption
20 Watts
Mains Connection Standard IEC receptacle
Physical
Dimensions (H x W x D) 51.3 x 482 x 207.6 mm (2.02” x 18.98” x 8.17”)
Weight 2.5 kg (5.5 lbs)
Page 16

16 i7300
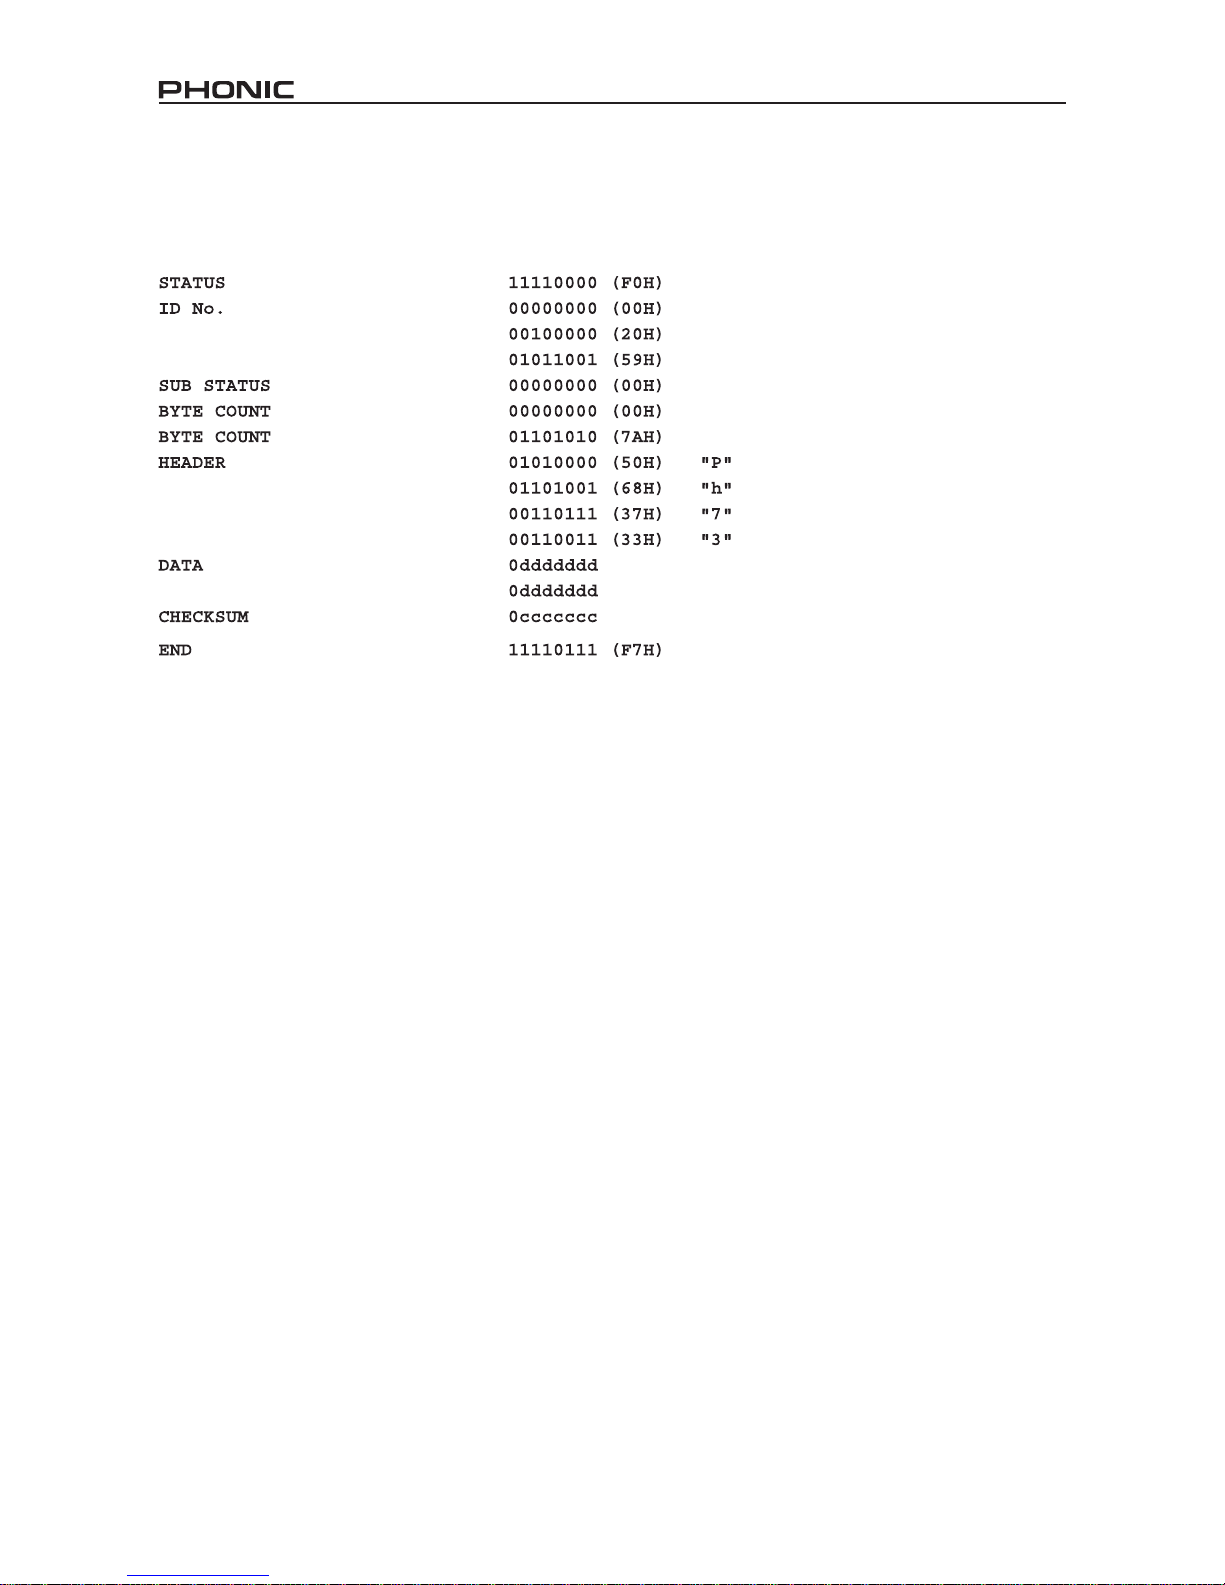
Midi Data Format
System Exclusive Bulk Dumps
When a System Exclusive Bulk Dump is performed on the Phonic i7300, the data is transmitted as follows.
Legend: d = data content
c = checksum
Page 17
Page 18

18 i7300
INTRODUCCIÓN
Gracias por su compra de otro producto de calidad
de Phonic que sin duda será una inversión valiosa. El
i7300 ReverbMaster es un equipo complejo pero simple;
complejo porque llena de potencia para alzar su audio en
maneras excepcionales, sin embargo, es sucientemente
simple para cualquier usuario de audio novato para
utilizar.
Los controles de i7300 son pocos y detallados. Las
tres jog wheels y seis botones de control proporcionan
un control fácil sobre los menues y opciones, en tanto
el display LCD le da una vista general clara, concisa
de las diferentes funciones que i7300 puede hacer. El
asombroso DSP de 32 bits logra la compleja tarea de
crear tales reverberaciones renadas en el audio que
necesita un poco (o mucho) de sabor.
Este manual detalla el uso y las funciones de
i7300 ReverbMaster. Aunque a mucha gente no le
parece necesario leer los manuales, se le sugiere
encarecidamente que lea el manual completo
cuidadosamente antes de guardarlo en un lugar
conveniente y seguro para referencia futura.
CARACTERISTICAS
● Controles giratorios dedicados y teclas iluminadas
para operación rápida y fácil
● Display LCD grande
● Gran capacidad y resolución con convertidores A/D y
D/A de 24 bits y sobremuetreo de 256/512 veces
● Procesador interno de 32 bits con índice de muestreo
44.1 kHz
● Verdadero funcionamiento de estéreo y parámetros
de imagen de estéreo variable
● 100 programas de fábrica y 100 programas de
usuario
● Medidores de nivel LED duales de 10 segmentos
● Conectores balanceados XLR y 1/4” TRS para entrada
y salida
● Niveles de operación de +4 dBu y -10 dBV
independientemente seleccionable para entrada y
salida
● Conector de interruptor de pedal para selección de
programa con mano libre y bypass
● Capacidad MIDI permite selección y deshecho de
programa en tiempo real
CONFIGURACIÓN PRELIMINARIA
1. El i7300 puede ser aplicado a un rack de audio
profesional estándar y ocupará una unidad de espacio
rack.
2. Un dispositivo de entrada apropiado debería ser
conectado a jacks de Entrada Análoga en la parte
trasera de la unidad. Lo más común sería una
mezcladora, pero usted también podría conectar al
dispositivo desde otros procesadores de señal. Es su
elección por supuesto.
3. Un dispositivo de salida apropiado debería ser apli-
cado a jacks de Salida Análoga, también en la parte
trasera de la unidad. Ésto podría incluir, pero no
limitado, a mezcladoras y grabadoras de multi-pistas.
4. El cable de energía AC suministrado debería ser
enchufado dentro del puerto correspondiente en la
parte trasera de equipo y dentro de una toma corriente
de pared de voltaje compatible.
5. Tome un descanso, sirvase una taza de café, una o
dos galletas, si quiere. Usted lo merece!
6. Encienda el dispositivo usando el interruptor de Energía
ubicado en la parte frontal de la unidad.
Page 19

19i7300
CONTROLES, CONEXIONES Y DISPLAYS
Panel Frontal
1. Control de Nivel de Entrada / Estéreo-Mono
Gire este control para ajustar la sensibilidad de la señal
de entrada entre +6 y -40 dB (y -∞ dB, enmudece
efectivamente el dispositivo). Pulsando el control le
permitirá alternar la señal de entrada entre estéreo normal,
estéreo reverso, mono izquierdo o mono derecho. Este
control está siempre separado de los presets, signica
que llamar un preset no cambiará su nivel de entrada
actual o conguraciones de mono/estéreo.
2. Medidor de Nivel de Entrada
El medidor de nivel LED le permite leer el nivel de la señal
de entrada en dB, referenciado al máximo digital interno.
Proveerá una indicación en cuanto a la cantidad de la
capacidad disponible hasta que el audio llega a nivel
máximo de salida digital y es dinámicamente recortado.
Cuando el modo bypass está activado, este display
cambiará para mostrar el nivel actual de entrada y salida
de la señal de audio.
3. Indicador de Entrada MIDI
El indicador MIDI muestra la conexión de señal MIDI y
el estado de entrega, signica que se iluminará cuando
el dato MIDI está siendo recibido por i7300. Para más
información sobre la operación MIDI, por favor consulte
la sección MIDI de este manual.
4. Indicador de Usuario
El Indicador del Usuario se ilumina cuando un preset del
usuario está siendo utilizado, editado, testeado o viendo
por el usuario actualmente. Le permite distinguir entre
presets de usuario y de fábrica con facilidad.
5. Indicador de Estéreo
El indicador de estéreo se ilumina cuando la entrada de
i7300 está en modo Estéreo Normal o Estéreo Reverso.
Este LED no se iluminará cuando el modo de entrada
está seteado como Mono Derecho o Mono Izquierdo.
6. Display LCD
El LCD muestra generalmente detalles de programa
seleccionado actualmente, parámetros básicos siendo
editados y también una variedad de otra información
relacionada con las funciones de ReverbMaster. La
Pantalla LCD no es particularmente difícil de entender,
pero hay algunos indicadores que lo hace más fácil de
leer. La exhibición tiene 2 líneas: la primera línea mostrará
generalmente el tipo de programa de reverberación (“R”Room- “H”-Hall- “P”-Plate y “S”-Special), seguido por el
número de preset (de 1 a 25) y el nombre de preset; en
tanto la segunda línea mostrará cualquier propiedad que
está siendo editada, tales como nivel de entrada, nivel de
mezcla, parámetros de reverberación, etc.
7. Control de Ajuste
Este control es usado para desplazarse por varias
opciones de parámetro de i7300. Al pulsar el control le
permitirá saltar a programas para editar varios parámetros
y nalizar sus selecciones cuando todas las ediciones
están completas.
Tipo de preset
Número de preset Nombre de preset
Menues
Page 20

20 i7300
8. Tecla Preset / Usuario
La tecla Preset/Usuario es usada para llamar a uno
de los 100 presets de fábrica. Pulsando esta tecla una
segunda vez le permitirá llamar a un preset almacenado
previamente en una posición de preset de usuario (que
es indicado por el pequeño indicador de Usuario a la
izquierda de LCD display). Luego de pulsar la tecla preset
para ingresar a los menues de Preset de Fábrica o Preset
del Usuario, usted puede usar el Control de Ajuste para
desplazarse por los varios presets.
9. Tecla de Tipo
Cuando se selecciona presets, presionando esta tecla le
permitirá seleccionar el tipo de programa de efecto para
usar: HALL, ROOM, PLATE o SPECIAL. Cada uno de
estos tipos tendrá 25 presets para seleccionar.
10. Tecla de Almacenamiento
La tecla de almacenamiento es usada para guardar
programas modicados por el usuario en uno de los 25
espacios de preset de usuario, como especicado por el
usuario. Simplemente presione la tecla Almacenar(Store),
elija la ubicación de preset, edite el nombre de psreset
y presione la tecla Almacenar(Store) una vez más para
nalizar.
11. Tecla de Editar
Al presionar la tecla Editar (Edit) le permitirá ajustar
varias propiedades de reverberación, para renar más
su efecto. Luego de presionar la tecla Editar, un set de
paréntesis aparecerá cerca de la opción Pre en la línea
inferior de display LCD. Usted puede entonces usar el
Control de Ajuste para desplazarse a las opciones “Main”
y “Post” y, presione el Control de Ajuste para ingresar a
estos menues. La edición de los parámetros será tratada
con mayor profundidad a lo largo de este manual.
12. Tecla de Sistema
Al presionar la tecla de Sistema le permite acceder a
menues de parámetro, dejandole ajustar las propiedades
de las varias funciones, tales como operación de interruptor
de pedal y controlabilidad de MIDI. Pulsando la tecla de
Sistema le permitirá desplazarse por estos menues; luego
presionando el control de Ajuste le permitirá ingresar al
menú seleccionado y ajustar los parámetros.
13. Tecla de Comparación / Bypass
Esta tecla actúa como una tecla de bypass o de
comparación, dependiendo de su uso actual (como
se explica más adelante en este manual). Pulsandola
desactivará todos los efectos o retorna a su efecto
previo.
14. Control de Nivel de Mezcla / EFX
Este control ajusta la proporción de mezcla seca/mojada
entre 0 y 100%, como se muestra en la línea inferior de
display LCD. Pulsando el control le permite ajustar el
Nivel EFX entre 0 y 100%.
15. Interruptor de Energía
El interruptor de energía le permite encender y apagar el
ReverbMaster.
Page 21

21i7300
Panel de Dorso
16. Conectores de Entrada de Audio
Estos conectores combo de entrada balanceados (aceptan
jacks XLR y 1/4” TRS) son para conectar dispositivos
externos (tales como mezcladora o alimentación de
reproducción) para alimentar el i7300.
17. Conectores de Salida de Audio
Estas salidas balanceada XLR y 1/4” TRS son para
conectar el i7300 a dispositivos externos (tales como
mezcladora o grabadora multi-pista) para generar señal
de retorno análoga.
18. Nivel de Operación (Entrada) -10dB / +4dBu
Utilice este interruptor para setear el nivel de entrada
de ReverbMaster. Setealo en -10dBV para utilizar junto
con dispositivos de nivel semi-pro o de consumidor, o en
+4dBu para utilizar con equipo de audio profesional.
19. Nivel de Operación (Salida) -10dB / +4dBu
Utilice este interruptor para setear el nivel de salida de
ReverbMaster. Setealo en -10dBV para utilizar junto
con dispositivos de nivel semi-pro o de consumidor, o en
+4dBu para utilizar con equipo de audio profesional.
20. Conector de Interruptor de Pedal
Al conectar un interruptor de pedal a este jack de audífono
de 1/4” TRS le permite bypass su efecto actual o controlar
la selección de preset actual – según especicado por el
usuario- haciendo posible el control remoto, a mano-libre
de ReverbMaster.
21. Conectores MIDI
El ReverbMaster envía y recibe dato MIDI vía estos
conectores. El conector de entrada recibe señales MIDI,
mientras que el conector de salida envía señales MIDI
a dispositivos externos MIDI. Por otro lado, Thru envía
dato de control MIDI recibido por la ENTRADA a otro
dispositivo MIDI paralelo, para encadenamiento daisy de
dispositivos MIDI.
22. Conector de Cable de Energía AC y Portafusible
Conecte el cable de energía AC suministrado a este
conector e inserte el enchufe de cable en una toma
corriente de pared de voltaje compatible. Para reemplazar
el fusible de i7300, remueva la cubierta de fusible, saque
el fusible viejo y reemplacelo con otro fusible, asegúrese
que es el mismo como lo necesita el dispositivo (como
indicado en la cubierta de portafusible).
Page 22
22 i7300
USANDO i7300
Cambiando el Nivel de Entrada
La jog wheel de nivel de entrada debería ser utilizada para
cambiar el nivel de la entrada que está siendo alimentada
dentro de los puertos de entrada en la parte trasera de
i7300. Girando la jog wheel le permitirá cambiar el nivel
de entrada entre -∞ y 6dB y, será mostrada en la línea
inferior de la pantalla LCD. Cuando está cambiando el
nivel de la entrada, si la jog wheel no es utilizada por
2 segundos, el LCD retornará a la pantalla anterior. El
control de nivel de entrada es también independiente de
los programas de preset (signica que el nivel de entrada
no se cambia cuando llama a un preset).
Alternando Entre Modos de Entrada
Para cambiar el tipo de entrada, simplemente presione la
jog wheel de nivel de entrada; ésto le permitirá alternar
entre estéreo normal, estéreo reverso, mono derecho y
mono izquierdo. Cuando se selecciona el estéreo normal
o estéreo reverso, el Indicador de Estéreo a la izquierda de
display LCD se iluminará (este indicador no se iluminará,
por supuesto, en ambos modos mono). El modo de
entrada de i7300, como el nivel de entrada, no se cambia
de ninguna manera cuando llama a un preset.
Seleccionando un Preset
Para seleccionar un preset, primero presione la tecla
de Preset / Usuario en la parte frontal de i7300; ésto
le dejará ingresar a un modo de selección de preset,
dejándole utilizar el control de Ajuste para seleccionar
un preset. Presionando la tecla de Tipo le permitirá
cambiar a diferentes tipos de efecto (Hall, Room, Plate
y Special), cada uno tiene 25 presets que puede ser
navegado utilizando el control de Ajuste. Cada preset es
nombrado individualmente para describir el efecto, y es
aplicado automáticamente cuando se desplaza hasta ahí.
Pulsando el control Ajuste se seleccionará el efecto y sale
de modo de la selección de Preset de ReverbMaster.
Tipo de preset
Número de preset Nombre de preset
Menues
Seleccionando Presets del Usuario
Los presets del usuario son elegidos básicamente de
la misma manera que los de fábrica. Primero presione
la tecla Preset / Usuario dos veces, el LED de Usuario
a la izquierda de display LCD se iluminará. De aquí
en adelante, utilizando la tecla Tipo y el control de
Ajuste le permitirá examinar los presets de usuario de
la misma manera como se selecciona los presets de
fábrica. Cuando encuentre el preset que ajusta más a
su necesidad, simplemente presione el control de Ajuste
para nalizar.
Cambiando el Nivel de Mezcla
Utilice la jog wheel de Nivel de Mezcla para cambiar la
proporción de audio procesado a desprocesado (o la
saturación de audio procesado sobre desprocesado).
Cuando usted gira esta jog wheel, el LCD mostrará
“Wet dry mix” (mezcla mojada seca) y el porcentaje
entre 0 y 100 en la línea inferior (en 0 o dry, el audio
queda completamente desprocesado). Si la jog wheel
permanece 3 segundos sin usar, la pantalla volverá a
donde estaba antes de utilizar la jog wheel de nivel de
mezcla.
Cambiando el Nivel EFX
Para editar el nivel Efx, pulse primero la jog wheel de Nivel
de Mezcla dos veces, luego gire para editar el porcentaje
entre 0 y 100; cambiando efectivamente el nivel de salida
de efecto total. Si la jog wheel permanece inutilizada por
3 segundos, la pantalla volverá a la pantalla previa.
Page 23

23i7300
Seteando el Interruptor de Pedal
Cambiando Función
Primero, presione el botón de Sistema; la primera opción
que aparece será “Interruptor de Pedal”. Simplemente
gire el Control de Ajuste para alternar la función de
interruptor de pedal entre modos de “Program select
(Selección de Programa)” y “Bypass”. Su selección es
aplicada automáticamente.
Cambiando Propiedades de Selección de Efecto
Cuando la función de interruptor de pedal está seteada a
‘Program select’, pulsando la tecla de Sistema dos veces
traerá un menú que le permite alterar las propiedades de
esta selección de preset. Girando el Control de Ajuste,
usted puede cambiar el programa de “destinación” de
program select de interruptor de pedal, entre 1 a 100.
Ésto signica que usted puede usar el interruptor de
pedal para saltar por los programas hasta que llegue a su
programa seleccionado, luego empieza todo de nuevo.
Comparación / Bypass
La tecla Comparación / Bypass, ubicada en el panel
frontal de ReverbMaster, generalmente actúa como una
tecla de bypass, deteniendo cualquier efecto que está
siendo aplicado a audio. Presionandolo una segunda
vez, desactivará el modo bypass y retornará a su efecto
elegido. Cuando la tecla de bypass está presionada, el
LED incluído de la tecla se iluminará.
Usted también puede activar un bypass en cada etapa
separada de Reverb (Efecto Pre, Post y Main – como
se muestra en el diagrama más adelante), simplemente
presionando la tecla de edición e incapacitandolos a través
de sus menues correspondientes (es decir, apagandolos).
El bypass puede ser desactivado cambiandolos una vez
más.
ENTRADA SALIDA
Gráfico de Flujo de Efecto
Cuando se edita los efectos, la tecla de Comparación
/ Bypass actúa como una tecla de Comparación,
permitiendole volver a preset original utilizado antes
de comenzar a editar el efecto –le permite escuchar la
diferencia entre los dos efectos. Pulsando el botón una
segunda vez volverá al programa editado.
Almacenando Presets Editados
En primer lugar, complete todas sus alteraciones a
su efecto en el modo “Edit” (cambiando el tiempo de
reverberación, delay u otras opciones correspondientes).
Luego, para almacenar, simplemente presione la tecla de
almacenamiento, donde le permitirá seleccionar el espacio
de preset que usted desea llenar. Utilice el Control de
Ajuste para desplazarse al espacio de preset que usted
desea utilizar y presione el control para conrmar. Esto
lo llevará entonces a la sección de edición de nombre,
donde usted puede editar letras individuales de nombre
de preset. El cursor está ubicado debajo de las letras
de título. Utilice el Control de Ajuste para desplazarse
a cualquier letra que usted desea cambiar, presione el
control para seleccionar y utilice el control una vez más
para desplazarse por las varias letras y caracteres que
pueden ser utilizados. Presionando el control una vez más
se nalizará y usted puede mover a la siguiente letra que
desea editar. Presionando la tecla de Almacenamiento
nuevamente se completará el proceso de guardar.
Conguraciones de Autograbado
El i7300 grabará automáticamente los cambios a
cualquier parámetro que usted podría setear (presets,
ediciones de reverberación, conguraciones de MIDI,
etc.), y los mantiene –incluso luego de apagar la energía.
Ésto asegura que ninguna de sus conguraciones se
pierde en situaciones de corte de electricidad.
Cursor
Page 24

24 i7300
USANDO FUNCIÓN MIDI
Seleccionando un Canal MIDI
Las señales MIDI pueden ser fácilmente enviadas y
recibidas por i7300 – es simplemente cuestión de saber
qué canal usted quiere enviar y recibir. Presione la tecla
de Sistema hasta que la pantalla muestra “Midi Rx Ch”
en la línea superior y, luego gire el Control de Ajuste,
le permitirá seleccionar el canal que i7300 aceptará
las señales MIDI (usted también puede apagar MIDI
por esta opción). Si no está seguro qué canal utiliza su
dispositivo MIDI, seleccionando OMNI permitirá a i7300
a recibir señales MIDI en todos los canales. Esta es la
conguración de canal preferible cuando se utiliza un
solo dispositivo MIDI.
Señales MIDI de Encadenamiento Daisy
Simplemente se enchufa un cable MIDI en el puerto Thru
en el panel dorsal de i7300 y, luego a otra Entrada MIDI,
usted ha producido efectivamente una cadena daisy de
MIDI. La señal que es enviada a la Entrada MIDI en el
primer dispositivo es luego transmitido al segundo. Ésto
puede, por supuesto, hecho varias veces conectando
MIDI Thru de segundo dispositivo a Entrada MIDI de
un tercero –y así sucesivamente. Sin embargo, el
encadenamiento daisy de numerosos dispositivos MIDI
causará eventualmente degradación de dato MIDI.
Descargando Bulto de Dato MIDI
La descarga de MIDI le permite almacenar sus presets
y conguraciones en una Computadora Personal y
llamarlos más tarde. Para hacerlo, primero necesita
Conector MIDI en su PC (o un adaptador MIDI a USB de
mismo tipo), y un programa que recibirá descargas de
bulto en su computadora personal.
Luego de preparar su PC para recibir la descarga MIDI,
presione el botón de Sistema unas pocas veces hasta
que la opción “Midi dump” (Descarga Midi) aparece en la
pantalla. Gire el control de Ajuste a la izquierda hasta que
“Transmit?” (Transmitir?) aparece en la línea inferior. Con la
PC lista, presionando el Control de Ajuste debe de transmitir
sus conguraciones y presets actuales a PC. Mientras el
dato MIDI está siendo transmitido no remueva o separe
algún cable o apague su computadora o ReverbMaster
bajo ninguna circunstancia. Una vez que la descarga es
completada, usted puede simplemente continuar usar el
i7300 como estaba antes de la descarga MIDI.
Recuperando Dato MIDI Descargado
Usted aprendió cómo descargar dato MIDI y ha realizado
exitosamente una descarga MIDI. Felicitaciones! Ahora
tiene que recuperarlo de nuevo. Para eso, regrese a la
opción “Midi dump” presionando el botón de Sistema.
Luego gire el Control de Ajuste hasta que llegue a la opción
“Receive” (Recibir). Presione el Control de Ajuste y está
listo para empezar. Abra su archivo de descarga MIDI y
utilice la opción de envío MIDI de programa MIDI de su
PC para enviar el dato de vuelta a i7300 en espera.
Por favor note: bajo ninguna circunstancia usted debería
enviar descargas MIDI editadas o corrompidas de vuelta
a ReverbMaster, ya que el resultado nal será bastante
indeseable. Cuando retransmite dato a i7300, por favor
asegure que no está alterada de ninguna forma entre la
descarga inicial y la descarga retornada y que la descarga
inicial fue exitosa.
Alterando el Mapa de Programa MIDI
Cuando usted tiene ciertos dispositivos MIDI externos
conectados a entrada MIDI de i7300, estos dispositivos
pueden ser utilizados para cambiar los programas
preseteados de i7300 mientras está en uso. Sí, similar
a la función de interruptor de pedal, sin embargo, más
especíco en que cualquier programa seleccionado por
el dispositivo MIDI puede ser llamado instantáneamente
en i7300 sin pasar por todos los presets.
Para cambiar el mapeo de programa de MIDI, pulse el
botón de Sistema unas pocas veces hasta que el título
“Midi program table” (Tabla de programa midi) muestra en
la pantalla, luego gire el Control de Ajuste para cambiar
el número de programa MIDI. Después de encontrar el
número de programa MIDI que usted desea cambiar,
pulse el Control de Ajuste y gire para alterar el preset
utilizado (usted puede elegir de 100 presets de fábrica y
100 presets denidos por el usuario).
Programa de Midi
Page 25
25i7300
EDITANDO PRESETS
Editando los programas de preset incorporados y creando los propios, la reverberación única no es particularmente difícil
si usted sabe lo que está haciendo, y aquí es donde descubrirá cómo hacerlo. Antes que nada, tenga presente que cada
programa está compuesto de un Pre EFX, un Post EFX y reverberación Principal (como indicado en el siguiente gráco de
ujo). Llamando cualquier preset de fábrica (o preset denido por el usuario), llama las conguraciones de estas tres fases
de reverberación para ese programa particular. Pueden ser cambiados presionando primero la tecla Edit.
Cuando está pulsada, usted puede entonces utilizar
el Control de Ajuste para desplazar hacia izquierda y
derecha de las opciones de menú de Pre, Main y Post.
Presione el Control de Ajuste para entrar a cualquiera
de estos menues (usted puede saltar a menú principal
en cualquier momento presionando la tecla Edit una vez
más). Una vez dentro de los menues, usted puede usar
una vez más el Control de Ajuste para desplazar hacia la
izquierda y derecha a través de los diferentes parámetros
editables. Nuevamente, presione el Control de Ajuste
para alterar los parámetros.
ENTRADA SALIDA
Gráfico de Flujo de Efecto
Parámetros de Efecto Principal
Los siguientes son parámetros principales de la reverberación, todos pueden ser editados o renados para crear sus
propios programas de reverberación distintos.
Propiedad Editable Rango Descripción
Tiempo de Reverberación 0.05 a 10.00 segundos Determina el tiempo de reverberación total
PreDly 0 a 200 ms
Permite a los usuarios a activar un delay antes que la
reverberación se activa
Er/Lev 0 a 100
Esto le ayuda a ajustar el nivel de reexiones Early (el reejo
inicial que guía la reverberación principal)
Índice Alto 0.01 a 1.00
Determina el índice para partes de frecuencia alta de efecto
de reverberación
Índice Bajo -90 a 24
Determina el índice para partes de frecuencia baja de efecto
de reverberación
HPF 0 Hz a 6 kHz
Determina la frecuencia donde el ltro de paso alto se
activará
LPF 34 Hz a 10.0 kHz
Le permite denir en qué frecuencia un ltro de paso bajo se
activará
Densidad 0 a 100 Altera la densidad de la reverberación
ST Img -100 a 100
Le permite ampliar y reducir la imagen de estéreo de
reverberación
Page 26

26 i7300
Efectos Pre y Post
En las siguientes pocas páginas usted podrá descubrir varios tipos de efectos Pre y Post que está capaz de aplicar para
ayudar a crear su reverberación y también sus parámetros editables. Por favor, note que por la excepción de pre y post EQ,
los siguientes tipos de efecto pueden ser seteados como efecto pre o post, sin embargo, no pre y post simultáneamente.
EQ Pre / Post
Propiedad Editable Rango Descripción
Link de Estéreo Encendido o Apagado Activando el Link de Estéreo habilita todos los cambios a canal que
está siendo aplicado a otro
Ganancia L1 -16 a +16 dB Le permite incrementar o disminuir el nivel de EQ izquierdo banda 1 en
la frecuencia seleccionada
Ganancia L2 -16 a +16 dB Le permite incrementar o disminuir el nivel de EQ izquierdo banda 2 en
la frecuencia seleccionada
L1 Fq (Frecuencia) 20 Hz a 20 kHz Utilizado para seleccionar la frecuencia en la cual el audio será
recortado o aumentado para EQ izquierdo banda 1
L2 Fq (Frecuencia) 20 Hz a 20 kHz Utilizado para seleccionar la frecuencia en la cual el audio será
recortado o aumentado para EQ izquierdo banda 2
L1 Q 0.1 a 10 Determina el ancho de banda de EQ izquierdo banda 1
L2 Q 0.1 a 10 Determina el ancho de banda de EQ izquierdo banda 2
Ganancia R1 -16 a +16 dB Le permite incrementar o disminuir el nivel de EQ derecho banda 1 en
la frecuencia seleccionada
Ganancia R2 -16 a +16 dB Le permite incrementar o disminuir el nivel de EQ derecho banda 2 en
la frecuencia seleccionada
R1 Fq (Frecuencia) 20 Hz a 20 kHz Utilizado para seleccionar la frecuencia en la cual el audio será
recortado o aumentado para EQ derecho banda 1
R2 Fq (Frecuencia) 20 Hz a 20 kHz Utilizado para seleccionar la frecuencia en la cual el audio será
recortado o aumentado para EQ derecho banda 2
R1 Q 0.1 a 10 Determina el ancho de banda de EQ derecho banda 1
R2 Q 0.1 a 10 Determina el ancho de banda de EQ derecho banda 2
Flanger
Propiedad Editable Rango Descripción
LFO 0.1 a 10 Oscilador de Frecuencia Baja (es decir, oscila frecuencias bajas)
Pre Delay 1 a 200 ms Habilita un delay antes que el efecto Flanger es activado
Profundidad 0 a 100 Permite a los usuarios a ajustar la profundidad de la modulación
Fase 0 a 180° Utilizado para ajustar la fase de los canales izquierdo y derecho
LPF 34 Hz a 10 kHz Determina la frecuencia en la que activará un ltro de paso bajo
Balance 0 a 100 50 siendo el centro, permite a los usuarios a ajustar el equilibrio de
Flanger reverb
Tipo Mod Sine, Trg o Saw Determina el tipo de curva utilizado para modular anger
FB -100 a 100 Crea la retroalimentación con fase positiva o negativa
Page 27
27i7300
Chorus
Propiedad Editable Rango Descripción
LFO 0.1 a 10 Oscilador de Frecuencia Baja (es decir, oscila frecuencias bajas)
Pre Delay 1 a 200 ms Habilita un delay antes que el efecto Chorus es activado
Profundidad 0 a 100 Permite a los usuarios a ajustar la profundidad de la modulación
Fase 0 a 180° Utilizado para ajustar la fase de los canales izquierdo y derecho
LPF 34 Hz a 10 kHz Determina la frecuencia en la que activará un ltro de paso bajo
Balance 0 a 100 50 siendo el centro, permite a los usuarios a ajustar el equilibrio de
Chorus reverb
Tipo Mod Sine, Trg o Saw Determina el tipo de curva utilizado para modular Chorus reverb
Phaser
Propiedad Editable Rango Descripción
LFO 0.1 a 10 Oscilador de Frecuencia Baja (es decir, oscila frecuencias bajas)
Profundidad 0 a 100 Permite a los usuarios a ajustar la profundidad de la modulación
Delay 0.0 a 5.0 Habilita un delay antes que el efecto Phaser es activado
Fase 0 a 180° Utilizado para ajustar la fase de los canales izquierdo y derecho
FB -100 a 100 Crea la retroalimentación con fase positiva y negativa
Tipo Mod Sine, Trg o Saw Permite a los usuarios a seleccionar waveform utilizado para oscilación
de frecuencia baja
Balance 0 a 100 50 siendo el centro, permite a los usuarios a ajustar el equilibrio de
Phaser reverb
Pan
Propiedad Editable Rango Descripción
Velocidad 0.1 a 10 Hz Le permite seleccionar la velocidad panorámica entre 0.1 y 10 Hz
Profundidad 0 a 100 Determina la profundidad de la modulación panorámica
Tipo I <--> D, D-->I, I-->D Le permite seleccionar de los 3 tipos panorámicos
Tipo Mod Sine, Trg o Saw Permite a los usuarios a seleccionar waveform utilizado para oscilación
de frecuencia baja
Delay
Propiedad Editable Rango Descripción
L Dly 0.00 a 2.55 Le permite elegir el tiempo de delay de canal izquierdo
R Dly 0.00 a 2.55 Le permite elegir el tiempo de delay de canal derecho
C Dly 0.00 a 2.55 Le permite elegir el tiempo de delay de un canal central
FB Dly 0.00 a 2.55 Le permite elegir un tiempo de delay de retroalimentación
L Lvl 0 a 100 Le permite elegir el nivel de delay de canal izquierdo
R Lvl 0 a 100 Le permite elegir el nivel de delay de canal derecho
C Lvl 0 a 100 Le permite elegir el nivel de delay de un canal central
FB 0 a 100 Le permite crear retroalimentación en un procentaje entre 0 y 100
Page 28

28 i7300
Tremo
Propiedad Editable Rango Descripción
Velocidad 0.1 a 10 Hz Determina la frecuencia de modulación
Profundidad 0 a 100 Permite a los usuarios a ajustar la profundidad de la modulación
Fase 0 a 180° Utilizado para ajustar la fase de los canales izquierdo y derecho
Tipo Mod Sine, Trg o Saw Permite a los usuarios a seleccionar waveform utilizado para oscilación
de frecuencia baja
Gate
Propiedad Editable Rango Descripción
St/Link Encendido o Apagado Modo Estéreo Link le permite editar ambas compuertas izquierda y
derecha simultáneamente
L Thrs -50 a 0 Determina el umbral de compuerta izquierda
L Atck 0 a 200 Le permite seleccionar la proporción de ataque de la compuerta
izquierda
L Rele 0.01 a 2.55 Determina la proporción de la liberación de la compuerta izquierda
L Hold 0.00 a 2.55 Permite a los usuarios a denir el tiempo que la compuerta permanecerá
abierta
L Range -INF, -50 a 0 Permite a los usuarios a denir el rango de la compuerta izquierda
R Thrs -50 a 0 Determina el umbral de la compuerta derecha
R Atck 0 a 200 Le permite seleccionar la proporción de ataque de la compuerta
derecha
R Rele 0.01 a 2.55 Determina la proporción de la liberación de la compuerta derecha
R Hold 0.00 a 2.55 Permite a los usuarios a denir el tiempo que la compuerta permanecerá
abierta
R Range -INF, -50 a 0 Permite a los usuarios a denir el rango de la compuerta derecha
Compresor
Propiedad Editable Rango Descripción
St/Link Encendido o Apagado Modo Estéreo Link le permite editar ambos compresores izquierdo y
derecho simultáneamente
L Thrs -50 a 0 Determina el umbral de compresor izquierdo
L Atck 0 a 200 Le permite seleccionar la proporción de ataque de compresor
izquierdo
L Rele 0.01 a 2.55 Determina la proporción de la liberación de compresor izquierdo
L Ratio 1.0 a 10.0, -INF Le permite denir el índice de compresión que será aplicado
R Thrs -50 a 0 Determina el umbral de compresor derecho
R Atck 0 a 200 Le permite seleccionar la proporción de ataque de compresor
derecho
R Rele 0.01 a 2.55 Determina la proporción de la liberación de compresor derecho
R Ratio 1.0 a 10.0, -INF Le permite denir el índice de compresión que será aplicado
Page 29

29i7300
ESPECIFICACIONES
Entrada
Conectores Combo Balanceado (XLR y 1/4” TRS)
Nivel Nominal +4 dB o -10 dB (seleccionado por el interruptor de panel de dorso)
Impedancia 50 K Ohms
Nivel de Entrada Máximo +16 dBu
Salida
Conectores Balanceado XLR y 1/4” TRS
Nivel Nominal +4 dB o -10 dB (seleccionado por el interruptor de panel de dorso)
Impedancia 500 Ohms
Nivel de Salida Máximo +16 dBu
Sistema
Respuesta en Frecuencia 20 Hz a 20 KHz +/-0.5 dB
Rango Dinámico 96 dB típico
THD 0.003 % típico @ +4 dBu, 1KHz
Ruido < -80 dB
Crosstalk < -80 dB
Proceso Digital
Convertidores 24 Bits AD/DA y 32/40 bits Sigma-Delta DSP, 256/512 veces de sobremuestreo
Frecuencia de Muestreo 44.1 KHz
Memoria de Programa
Áreas de Memoria Programa (lectura solamente), Usuario (lectura/escritura)
Conguración de Memoria Cuatro tipos de programa (HALL, ROOM, PLATE, SPECIAL), cada uno con 25 pro-
gramas de preset por tipo y 25 programas seteados por usuario por tipo
Panel Frontal
Interruptores Preset/Usuario, Tipo, Bypass/Comparación, Almacenamiento, Conguración, Edición
Controles Giratorios Nivel de Entrada, Ajuste, Nivel de Mezcla / Nivel EFX
Display Display Digital-LCD, Estéreo-LED, Usuario-LED, ENTRADA MIDI-LED
Panel de Dorso
Conectores Entrada I/D (COMBO), Salida I/D (XLR) (Jack Audífono 1/4”), Interruptor de Pedal
(jack audífono 1/4”), Interfase MIDI 5-pines-DIN-Socket ENTRADA / SALIDA / THRU
Requisitos de Energía
USA / Canadá ~120 VAC, 60 Hz
U.K. / Australia ~240 VAC, 50 Hz
Europa ~230 VAC, 50 Hz
Fusible 100-120 VAC: 1 A, 200-240 VAC: 500mA
Consumo de Energía 20 Watts
Conexiones Principales Receptor IEC Estándar
Físico
Dimensiones (Al x An x P) 51.3 x 482 x 207.6 mm (2.02” x 18.98” x 8.17”)
Peso 2.5 kg (5.5 lbs)
Page 30
30 i7300
FORMATO DE DATO MIDI
Sistema Exclusivo Bulk Dumps
Cuando un Sistema Exclusivo Bulk Dump se ejecuta en Phonic i7300, el dato se transmite como siguiente.
Leyenda: d= contenido de dato
c= suma de chequeo
Page 31

重要安全说明
1. 请在使用本机前,仔细阅读以下说明。
2. 请保留本使用手册,以便日后参考。
3. 为保障操作安全,请注意所有安全警告。
4. 请遵守本使用手册内所有的操作说明。
5. 请不要在靠近水的地方,或任何空气潮湿的地点操作本机。
6. 本机只能用干燥布料擦拭,请勿使用喷雾式或液体清洁剂。清洁本机前请先将电源插头拔掉。
7. 请勿遮盖任何散热口。确实依照本使用手册来安装本机。
8. 请勿将本机安装在任何热源附近。例如:暖气、电暖气、炉灶或其它发热的装置(包括功率
扩大机)。
9. 请注意极性或接地式电源插头的安全目的。极性电源插头有宽窄两个宽扁金属插脚。接地式
电源插头有两支宽扁金属插脚和第三支接地插脚。较宽的金属插脚(极性电源插头)或第三支
接地插脚(接地式电源插头)是为安全要求而制定的。如果随机所附的插头与您的插座不符,
请在更换不符的插座前,先咨询电工人员。
10. 请不要踩踏或挤压电源线,尤其是插头、便利插座、电源线与机身相接处。
11. 本机只可以使用生产商指定的零件/配件。
12. 本机只可以使用与本机搭售或由生产商指定的机柜、支架、三脚架、拖架
或桌子。在使用机柜时,请小心移动已安装设备的机柜,以避免机柜翻倒
造成身体伤害。
13. 在雷雨天或长期不使用的情况下,请拔掉电源插头。
14. 所有检查与维修都必须交给合格的维修人员。本机的任何损伤都须要检修,例如: 电源线或插
头受损,曾有液体溅入或物体掉入机身内,曾暴露于雨天或潮湿的地方,不正常的运作,或曾
掉落等。
这个三角形闪电标志是用来警告用户,装置内的非绝缘危险电压足以造成使人触
电的
危险性。
这个三角形惊叹号标志是用来警告用户,随机使用手册中有重要操作与保养维修
说明。
警告: 为减少火灾或触电的危险性,请勿将本机暴露于雨天或潮湿的地方。
注意: 任何未经本使用手册许可的操控,调整或设定步骤都可能产生危险的电磁幅射。
CAUTION
RISK OF ELECTRIC SHOCK
DO NOT OPEN
PHONIC CORPORATION
Page 32

32 i7300
简介
感谢您选购Phonic高品质产品,它将是您最有价值
的投资,i7300 ReverbMaster是种复合型但结构简
单的产品,它功率强大可出色提升音频,使用简单
便捷.
i7300的控制键少但操作准确,有3个转轮控制键,
6个控制按键,很容易进行菜单选择,LCD显示屏清
晰明了地显示本机的各种不同功能.32-bit DSP性
能卓越,可出色创造精致优雅的音频混响,同时还
增加其质感.
本手册详细介绍了i7300 ReverbMaster使用方法和产
品功能,建议您仔细阅读本手册,读完后请妥善保存
以备日后参阅.
产品特色
●专业旋钮和亮灯显示的按键,让操作更简易.
●超大LCD显示屏
●高性能电平储备和有24-bit A/D和D/A转换器及
256/512次超取样的分辨率
●有44.1 kHz 取样率32-bit内部处理器
●逼真三维效果和可变立体图象参数
●100种出厂预设音乐和100种用户自定义音乐
●2个10段LCD电平表
●用于输入和输出的平衡式XLR和1/4”TRS 连接器
●输入输出可独立选择的+4 dBu 和 -10 dBV操作电
平.
●用于无需手动程序选择和旁通的脚踏开关连接器
●MIDI能进行实时程序选择和卸载
初级安装
1. i7300可安置于标准专业音频支架,占据1个支
架空间单元.
2. 把合适的输入设备连到背面板上的Analog In 插
座,多为混音器,也可连接其它信号处理器,选
择多多.
3. 把合适的输出设备连到背面板上的Analog Out插
座,包 括但不仅 限于混 音器和多 音轨录 音机
等.
4. 随附AC电线,插入本机背板的相应端口,接到
电压合适的墙上插座.
5. 初级安装完成
6. 打开前面板的Power开关就可以使用了.
Page 33

33i7300
控制,连接,显示
前面板
1.输入电平/立体声-单声道控制
在+6 和-40 dB之间(–∞dB为削音)调整输入信号的
灵敏度.按下控制键就可以在正常立体声,反向立体
声,单声道左和单声道右之间改变输入信号.它和预
设相互独立,取消预设将不会改变当前输入电平或单
声道/立体声设定.
2.输入电平表
从LED电平表可读出输入电平信号,附注内部数字最
大值,显示在达最大数字输出电平动态削波之前的电
平储备量.激活旁路模式时,此显示器改为显示当前
音频信号的输入和输出电平.
3.MIDI In 指示灯
显示MIDI信号连接和传输状态,当本机接收MIDI数
据时指示灯亮.欲知MIDI操作的详情,请参阅本手
册中MIDI部分.
4.User指示灯
使用编辑测试或查看用户预设时,此指示灯亮.由此
也可轻易区分用户预设和厂商预设.
5.Stereo指示灯
当输入处于正常立体声和反向立体声模式下时,此
LED灯亮,当输入模式为单声道左或单声道右时,
LED灯不亮.
6.LCD显示屏
显示当前所选程序的详细信息,所编辑的基本参数,
更有多种关于ReverbMaster功能的其它信息.此LCD
显示屏不难辩认,再者还有指示器,读取更容易,显
示屏有2行,第一行显示混响程序类型(" R " – Room
– " H " – Hall – " P " – Plate– " S " – Special),接下
是预设号码(1-25)和预设名,第二行显示当前编辑的
属性,如输入电平,混音电平,混响参数等等.
7.Adjust控制
用于滚动选择各种参数选项,按下控制键便可以进入
程序编辑各种参数,也可以在完成编辑后终止选择.
Page 34

34 i7300
8. Preset / User 键
按键可从100个厂商预置中调用一个,再次按键可以
调用以前存储的用户预置(LCD显示屏左边的User指
示灯亮),按下预置键进入Factory Preset 或 User
Preset 菜单,可用Adjust Control 滚动选择各种预
置.
9. Type键
选择预置时,按此键可以从HALL, ROOM, PLATE,
SPECIAL选择效果程序的种类,每种类型有25个预
置可供选择.
10. Store 键
此存储键可用以将用户修改程序保存于25个用户预设
槽之一,只需按下此键,选择预置位置,编辑预置名
称,再按下此键结束便可.
11.Edit键
可用于调节各种回响属性,按下Edit键后,在Pre选
项旁LCD显示屏的最底端一行出现插入语,然后您
就可以用调节控制滚动选择"Main" 和 "Post"选
项,按下此键进入菜单.下问文会对编辑参数有更
深层次的介绍.
12.System键
按下此键可进入参数菜单调节各种功能的属性,如
脚踏开关的操作和MIDI的可控性.推动此键可滚动
选择菜单,再按下调节控制键就可以进入所选菜单
调节参数.
13.Compare / Bypass 键
可用于旁路和比较,按键可结束所有效果或返回至
前一效果.
14. Mix / EFX Level 控制
可在 0-100%之间调节干湿混合比 率, 并且 显示 于
LCD显示屏的最底端一行,按下此控制键可以在0100%之间调节效果值.
15. 电源开关
可接通或断开电源
Page 35

35i7300
背面板
16.音频输入连接器
平衡式输入组合连接器(接受XLR和 1/4" TRS 插
座)用于连接外部设备(如混音器和回放输入).
17.音频输出连接器
平衡式XLR和 1/4" TRS 输出口可将本机连到其它
外部设备(如混音器或多音轨录音机)输出仿真返
回信号
18.操作电平(In) -10dB / +4dBu
用此 开关设定ReverbMaster的输 入电平,设定为
-10dBV可与半专业或用户电平设备,设定为 +4dBu
可与专业音频设备连用.
19.操作电平(Out) -10dB /+4dBu
用此 开关设定ReverbMaster的输 出电平,设定为
-10dBV可与半专业或用户电平设备,设定为 +4dBu
可与专业音频设备连用.
20.脚踏开关连接器
把脚踏开关连接到此1/4" TRS 耳机插座就可以旁路当
前效果或控制当前预置选择,由用户指定.它可以解
放您的双手并实现对ReverbMaster的遥控.
21.MIDI连接器
ReverbMaster经此连接器传送和接收MIDI数 据.
IN连接器接收MIDI信号,OUT连接器传送MIDI信号,
Thru传送IN连接器接收的MIDI控制数据,另外还可为
MIDI的串行递链并连MIDI设备.
22.AC电线连接器和保险丝座
把 AC电 线 接 到 此插座,然后把插头插到电压合
适的墙 上插座 .所更 换保险 丝时先取 下盖子 ,把
旧 保 险 丝 取出, 换 上 另 外 的符合 要 求 的 保 险丝
(保险丝座盖子上有注明).
Page 36

36 i7300
I7300的使用
改变输入电平
输入电平旋钮可用于改变输入到背面板上输入端口的
输入电平,旋转它便可在-∞到6dB之间调节输入电
平,并且显示在LCD显示屏的最后一行.改变输入电
平时,如果2秒钟内不使用此旋钮,LCD将返回上一显
示.控制输入电平和预置程序是相互独立的(调用预
置时不改变输入电平).
输入模式之间的转换
按下输入电平旋钮就可以从正常立体声,反向立体
声,左单声道和右单声道之间选择改变输入类型,
当选择正常立体声或反向立体声时,LCD显示屏左
边的Stereo指示灯亮(在单声道模式下此指示灯不
亮).调用预置时不改变输入模式.
选择预置
选择预置时,先按下前面板上的 Preset / User键,
进入预置选择模式,再用Adjust控制键选择预置,按
下Type键可以选择不同的效果类型(Hall, Room, Plate,
Special),每种都有25种预置,可以通过Adjust控制
键进行浏览,每种预置名称描述了其效果,滚动选
择时将自动应用,按下Adjust控制键可选择效果和
退出预置选择模式.
选择用户预置
选择用户预置和选择厂商预置方法相似.先按Preset
/ User 两次,LCD显示屏左边的User指示灯亮,然后
再用Type键和Adjust控制键像选择用户预置一样地
仔细选择用户预置,找到所需预置时,按Adjust控
制键确认.
改变混音电平
用Mix Level 旋钮可以改变已处理和未处理音频的比
率,旋转此旋钮时,LCD显示"Wet dry mix" 最后
一行在显示0-100之间的比例(0时音频完全未经处
理).如果连续3秒不使用此旋钮,显示屏回复在
用混音电平旋钮之前的显示.
改变效果电平
如要编辑效果电平,先按Mix Level旋钮两次,旋转
并在0-100之间 进行编辑,便可改变总的效果输出
电平.如果连续3秒不使用此旋钮,显示屏回复原先
显示.
Page 37

37i7300
设定脚踏开关
改变功能
先按下System键,显示选项为"Foot Switch."调节
Adjust控制键在"Program select" 和"Bypass"之间
选择改变脚踏开关功能.您的选择将自动应用.
改变效果选择属性
设定脚踏开关功能为 "Program select" 时,按2次
System键,将会出现可改变预置选择的菜单,旋转
Adjust控制键在1-100之间选择"destination"程序
就可改变脚踏开关程序,这样您就可以用脚踏开关跳
过到所选程序,然后就可以重新开始.
对比/旁通
此键位于前面板,主要用作旁路键,阻止任何效果
应用于音频.按2下此键可解除旁路模式返回到所选
效果.按旁路键时,内建的LED亮灯显示.
按编辑键并关闭相应菜单,便可激活混响各个独立阶
段的旁通(Pre, Post,Main Effect-下图显示),
再次打开他们后可解除旁通.
编辑效果时,Compare/Bypass键作为Compare键使
用,在开始编辑效果之前可返回原来的预置,让您
能在两种效果下感受它们的不同.再次按键可返回
到已编辑程序.
存储编辑预置
首先在"Edit" 模式(改变混响时间,延时或其它选
项)完成对效果的变更,然后按下Store键进行存储,
可存在所选预置槽中,用Adjust Control滚动选择您想
选的预置槽,再按控制键确认,然后进行预置名称编
辑,标题字母下会出现光标,用Adjust Control滚动选
择您想变更的字母,按下控制键确认,再继续编辑需
要更改的字母,按存储键完成存保存程序.
自动保存设定
本产品可自动保存对设定参数(presets, reverb edits,
MIDI设置等)所做的变更,即使是在停电情况下也可
以进行保存,不会造成设定信息的丢失.
Page 38

38 i7300
MIDI功能使用
选择MIDI声道
i7300可轻松收 发MIDI信 号,您只 需 知道收 发 的信
道.按System 键直到屏幕前面一行上显示"Midi Rx
Ch",旋转Adjust Control选择接收信号的信道.如
果您不确定您的MIDI信号用的是哪个信道,请选择
OMNI,所有声道都会接收MIDI信号,这种设9特别适
用于只用单一MIDI设备的情况下.
连接(菊花式)MIDI信号
MIDI信号的串联把MIDI线插入本机背板的Thru 端
口,再连到另一个MIDI IN,就成功建立了串联,传
送到第一个设备上的MIDI IN的信号再传到第二个.
只要将第二个的MIDI Thru连接第三个的MIDI IN以此
类推,就可以进行多次连接,但是太多MIDI设备的串
联可能会造成MIDI数据的降级.
MIDI数据的大量转储
可用于在计算机上存储的预置和设置,并供以后调
用.首先在您的计算机上安装MIDI连接器,还要安
装接收转储的程序.
准备在计算机上接收MIDI dump时,请先按System键
直到屏幕 上 出 现"Midi dump" 选项, 向 左 旋转
Adjust控制器,屏幕最后一行显示"Transmit?",如
果计算机已经准备好,按下Adjust Control就可以向
它传输设定和预置.切勿在传输MIDI数据过程中取
下或拆分线材,关闭计算机或本机.转储完毕后可
继续使用本机.
检索转储的MIDI数据
恭喜你学会 并且能 顺利转储MIDI数据!以下 进行
MIDI转储的检索,先按System键返回"Midi dump"选
项,然后旋转Adjust Control到"Receive"选项,再按
下此控制键就可以了.打开MIDI转储文件,用计算机
上MIDI程序上的MIDI传输选项回传数据到本机.
注意:切勿将已编辑的或有讹误的MIDI转储回传到
本机.在再传输输数据到i7300前,请先确保初始转
储和返回转储之间没有变更,并且可成功完成初始
转储.
变更MIDI程序图
如果把外部MIDI设备连接到i7300的MIDI输入口,使
用中可以用这些设备改变本机的预置程序,类似脚
踏开关功能,并且无需转换预置,经MIDI设备所选
择的程序就可以实时调用到本机,如要改变MIDI的程
序图,先按System键直到屏幕上出现" Midi program
table " ,然后旋转Adjust Control改变MIDI程序编
号,找到所要变更的MIDI程序编号后,按下Adjust
Control,更改使用的预置(可从100个厂商预置和
100个用户自定义预置中进行选择).
Page 39

39i7300
编辑预置
编辑内建预置程序和创立自己的个性混响并不是很难,你如果知道你在做什么也就知道改该怎么做了.首先请记
住每种程序都是由Pre EFX, Post EFX和 Main reverberation(如下图)组成,调用厂商预置(或用户自定义预
置)彻销对程序混响三个阶段的设定,先按下Edit键就
可以进行变更,按键时可用Adjust Control左右滚动选
择Pre, Main和Post 菜单选项,按下Adjust Control就
可以进入任一菜单(再按Edit键就可以主菜单),在
菜单中可以再用Adjust Control在可编辑参数中左右滚
动选择,再按Adjust Control就可变更参数了.
主效果参数
以下为主混音参数,编辑和改进后后可用于创作自己独特的混响程序.
可编辑属性 范围 描述
RevTime 0.05 to 10.00 sec
决定大体的混响时间
PreDly 0 to 200 ms
可在激活主混响之前激活延时
Er/Lev 0 to 100
可调节早期反射声级(初始反射可引导主混响)
HiRatio 0.01 to 1.00
决定混响效果高频部分的比率
LoRatio -90 to 24
决定混响效果低频部分的比率
HPF 0 Hz to 6 kHz
决定激活高通滤波器所需的频率
LPF 34 Hz to 10.0 kHz
可设定激活高通滤波器所需的频率
Density 0 to 100
改变混响密度
ST Img -100 to 100
可扩展或缩小混响的立体影像
Page 40

40 i7300
推杆前/推杆后效果
下文将详细介绍应用于创造混响的前后效果的各种类型,还有其可编辑参数,请注意除前后EQ外,以下效果类
型可设定为前或后效果,但不能同时设定为前和后效果.
Pre / Post EQ
可编辑属性 范围 描述
立体声连接Stereo Link On or Off
激活立体声连接可以将应用于一声道的所有变动同样应
用于另一个
L1 Gain -16 to +16 dB 可增加或减少left EQ band 1在所选频率的电平
L2 Gain -16 to +16 dB 可增加或减少left EQ band 2在所选频率的电平
L1 Fq (Frequency) 20 Hz to 20 kHz 可用于选择left EQ band 1音频削减或提升时的频率
L2 Fq (Frequency) 20 Hz to 20 kHz 可用于选择left EQ band 2音频削减或提升时的频率
L1 Q 0.1 to 10 决定left EQ band 1的频宽
L2 Q 0.1 to 10 决定left EQ band 2的频宽
R1 Gain -16 to +16 dB 在所选频率点上增加或减少right EQ band 1电平
R2 Gain -16 to +16 dB 在所选频率点上增加或减少right EQ band 2电平
R1 Fq (Frequency) 20 Hz to 20 kHz 可用于选择Right EQ band 1音频削减或提升时的频率
R2 Fq (Frequency) 20 Hz to 20 kHz 可用于选择Right EQ band 2音频削减或提升时的频率
R1 Q 0.1 to 10 决定left EQ band 1的频宽
R2 Q 0.1 to 10 决定left EQ band 2的频宽
Flanger镶边器
可编辑属性 范围 描述
LFO 0.1 to 10
低频振荡器
Pre Delay 1 to 200 ms
激活镶边器效果前延时
Depth 0 to 100
调节调幅的深度
Phase 0 to 180°
可调节左右声道的相位
LPF 34 Hz to 10 kHz
决定激活高通滤波器的频率
Balance 0 to 100
以50为中心调节镶边器混音的平衡
Mod Typ Sine, Trg or Saw
决定调节镶边器所用的曲线类型
FB -100 to 100
产生有正负相位校正的回授
Page 41
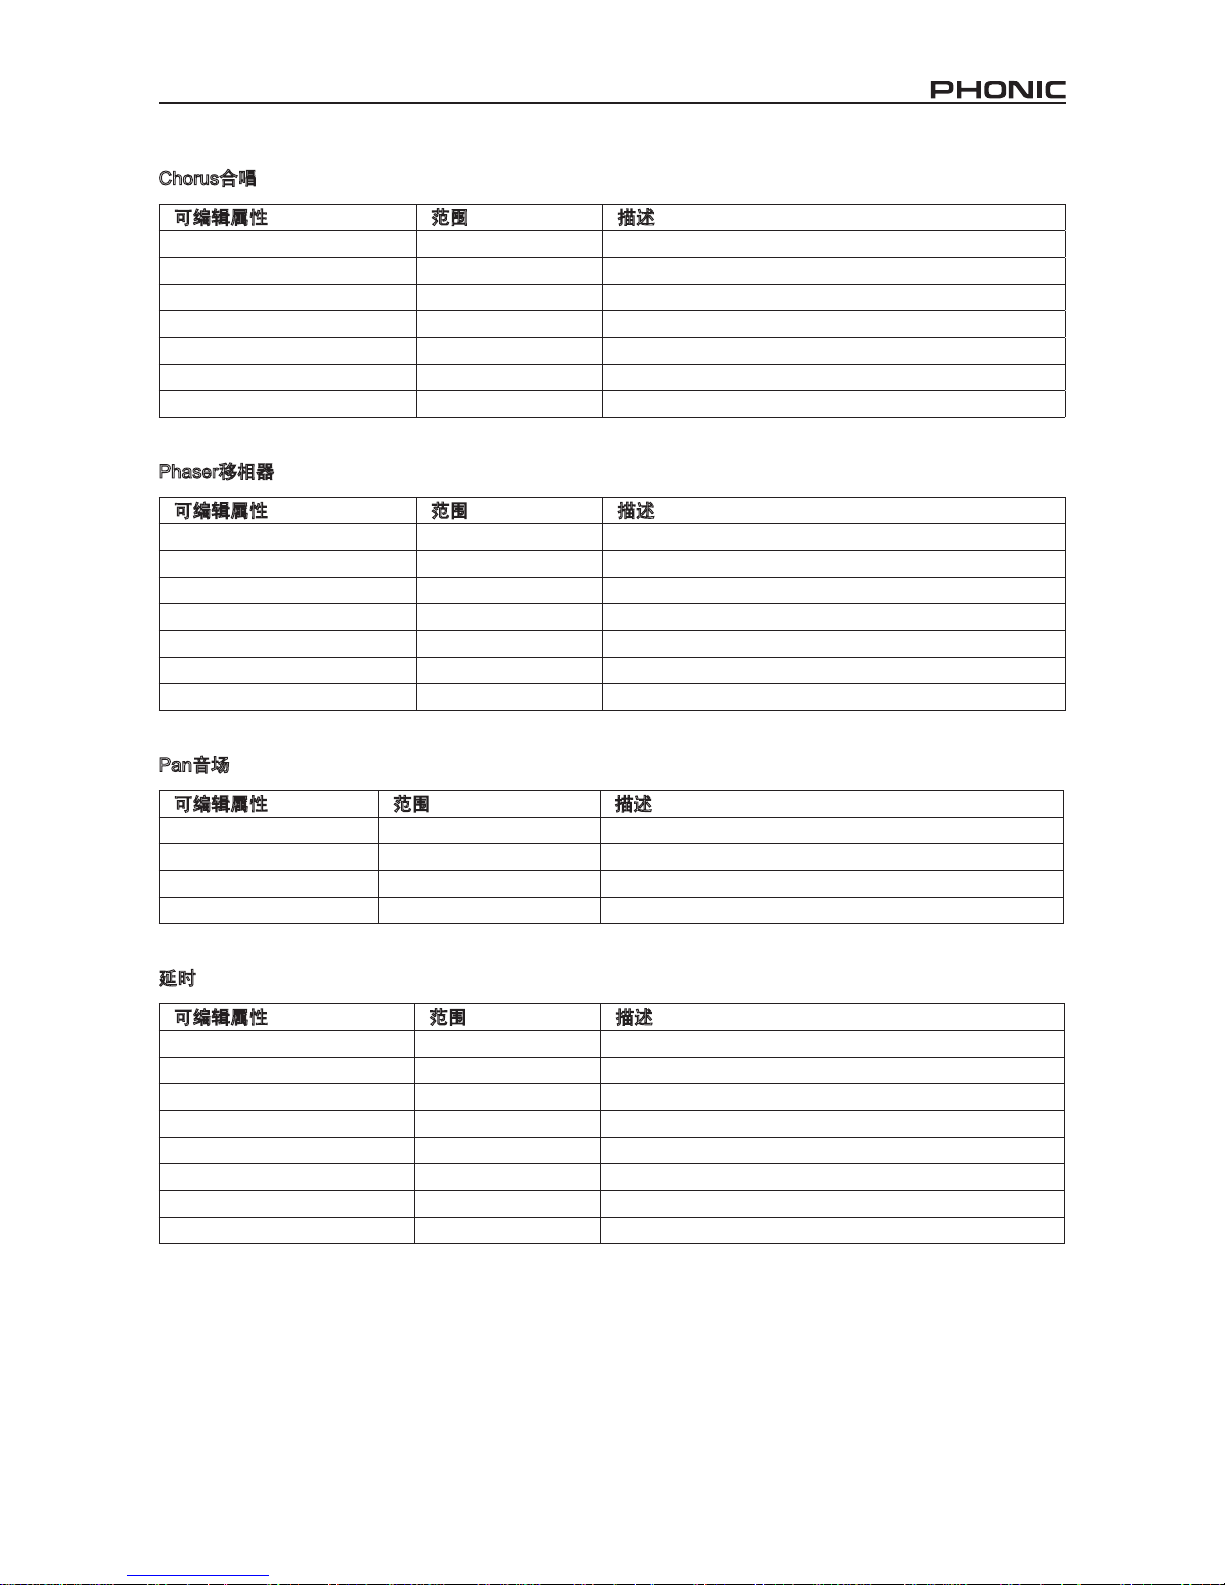
41i7300
Chorus合唱
可编辑属性 范围 描述
LFO 0.1 to 10
低频振荡器
Pre Delay 1 to 200 ms
激活合唱效果前延时
Depth 0 to 1 00
调节调制的深度
Phase 0 to 180°
可调节左右声道的相位
LPF 34 Hz to 10kHz
决定激活高通滤波器的频率
Balance 0 to 100
以50为中心调节合唱混音的平衡
Mod Typ Sine, Trg or Saw
决定调节合唱所用的曲线类型
Phaser移相器
可编辑属性 范围 描述
LFO 0.1 to 10
低频振荡器
Depth 0 to 100
调节调制的深度
Delay 0.0 to 5.0
激活合唱效果前延时
Phase 0 to 180°
可调节左右声道的相位
FB -100 to 100
产生有正负相位校正的回授
Mod Typ Sine, Trg or Saw
可选择低频振动的波形
Balance 0 to 100
以50为中心调节移相器混音的平衡
Pan音场
可编辑属性 范围 描述
Speed 0.1 to 10 Hz 在0.1 和10 Hz之间选择音场速度
Depth 0 to 100
决定音场的深度
Type L<-->R, R-->L, L-->R 可从3种音场中进行选择
Mod Typ Sine, Trg or Saw
可选择低频振动的波形
延时
可编辑属性 范围 描述
L Dly 0.00 to 2.55
可选择左声道的延迟时间
R Dly 0.00 to 2.55
可选择右声道的延迟时间
C Dly 0.00 to 2.55
可选择中间声道的延迟时间
FB Dly 0.00 to 2.55
可选择回授延迟时间
L Lvl 0 to 100
可选择左声道的延迟级
R Lvl 0 to 100
可选择右声道的延迟级
C Lvl 0 to 100
可选择中间声道的延迟级
FB 0 to 100
在0-100%之间制造回授
Page 42

42 i7300
Tremo 颤音
可编辑属性 范围 描述
Speed 0.1 to 10 Hz
决定调制的频率
Depth 0 to 100
调节调制的深度
Phase 0 to 180°
可调节左右声道的相位
Mod Typ Sine, Trg or Saw
可选择低频振动的波形
Gate噪声门
可编辑属性 范围 描述
St/Link On or Off
有立体声连接模式可同时编辑左右噪声门
L Thrs -50 to 0
Determines the threshold of the left gate
决定左噪声门的域值
L Atck 0 to 200
可选择左噪声门的拾音速度
L Rele 0.01 to 2.55
决定左噪声门的释放率
L Hold 0.00 to 2.55
可限定噪声门的打开时间
L Range -INF, -50 to 0
可限定左噪声门的范围
R Thrs -50 to 0
决定右噪声门的域值
R Atck 0 to 200
可选择右噪声门的拾音速度
R Rele 0.01 to 2.55
决定右噪声门的释放率
R Hold 0.00 to 2.55
可限定噪声门的打开时间
R Range -INF, -50 to 0
可限定右噪声门的范围
Compressor 压缩器
可编辑属性 范围 描述
St/Link On or Off
有立体声连接模式可同时编辑左右压缩器
L Thrs -50 to 0
决定左压缩器的极限
L Atck 0 to 200
可选择左压缩器的包络起音速度
L Rele 0.01 to 2.55
决定左压缩器的释放率
L Ratio 1.0 to 10.0, -INF
可限定应用的压缩比率
L Thrs -50 to 0
决定右压缩器的极限
L Atck 0 to 200
可选择右压缩器的拾音速度
L Rele 0.01 to 2.55
决定右压缩器的释放率
L Ratio 1.0 to 10.0, -INF
可限定应用的压缩比率
Page 43
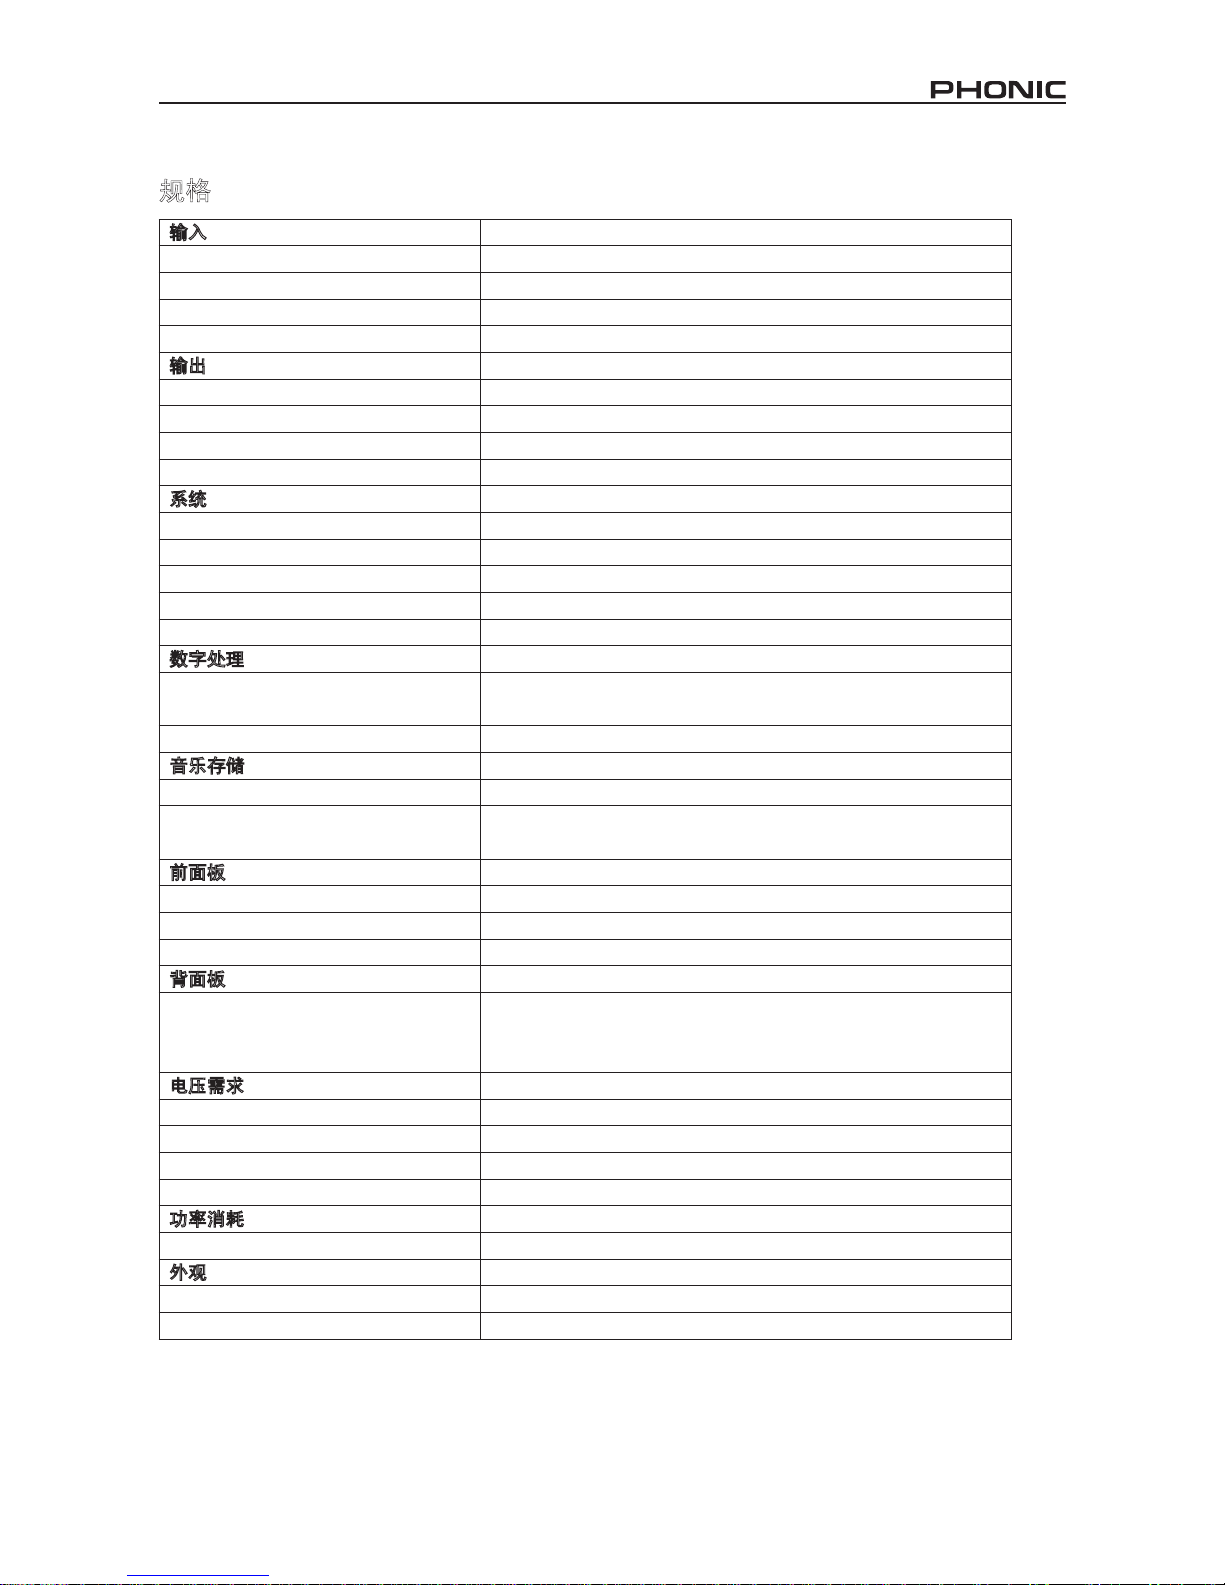
43i7300
规格
输入
连接器
平衡式组合插座(XLR and 1/4” TRS)
额定电平
+4 dB 或 -10 dB (由后面板开关选择)
阻抗
50 K Ohms
最大输出电平
+16 dBu
输出
连接器
平衡式XLR 和1/4” TRS
额定电平
+4 dB 或 -10 dB (由后面板开关选择)
阻抗
500 Ohms
最大输出电平
+16 dBu
系统
频率响应
20 Hz to 20 KHz +/-0.5 dB
制动范围
96 dB typical
THD 0.003% typ. @ +4 dBu, 1 KHz
噪音
< -80 dB
串音
< -80 dB
数字处理
转换器
24Bit AD/DA and 32/40-bit Sigma-Delta DSP, 256/512-times
Oversampling
取样频率
44.1 KHz
音乐存储
存储区域
音乐 (只读),用户(读/写)
存储线路布局
4种音乐类型(HALL, ROOM, PLATE, SPECIAL),每种类型均有
25个预设音乐和25个用户设定音乐
前面板
开关
Preset/User, Type, Bypass/Compare, Store, Setup, Edit
旋转控制器
Input Level, Adjust, Mix Level / EFX Level
显示
Digital-LCD Display, Stereo-LED, User-LED, MIDI IN-LED
背面板
连接器
输入 L/R (COMBO), 输出 L/R (XLR) (1/4” 耳机插座), 脚踏
开关(1/4” 耳机插座), MIDI接口5-Pin-DIN-Socket IN / OUT /
THRU
电压需求
USA/Canada ~120 V AC, 60 Hz
U.K./Australia ~240 V AC, 50 Hz
Europe ~230 V AC, 50 Hz
保险丝
100-120 V AC: 1 A, 200-240 V AC: 500 mA
功率消耗
20 Watts
电源连接
标准IEC 插座
外观
尺寸
51.3 x 482 x 207.6 mm (2.02” x 18.98” x 8.17”)
重量
2.5 kg (5.5 lbs)
Page 44

44 i7300
STATUS 11110000 (F0H)
ID No. 00000000 (00H)
00100000 (20H)
01011001 (59H)
SUB STATUS 00000000 (00H)
BYTE COUNT 00000000 (00H)
BYTE COUNT 01101010 (7AH)
HEADER 01010000 (50H) "P"
01101001 (68H) "h"
00110111 (37H) "7"
00110011 (33H) "3"
DATA 0ddddddd
0ddddddd
CHECKSUM 0ccccccc
END 11110111 (F7H)
Legend: d = data content
c = checksum
Midi 数据格式
系统独特大量转储
当Phonic i7300执行系统独特大量转储时,数据按以下方式传输:
Page 45

45i7300
Large Hall 1 Concert Hall Arena Reverse Hall Small Gorge
Large Hall 2 Dark Hall Jazz Club Spring Hall Big Castle
Medium Hall Puzzle Hall Flashdance Flutter Hall Delay Rev Long
Small Hall 1 Vocal Hall Gothic Hall Kick Gate Over tones
Small Hall 2 Slap Hall Large Church Du al twist Rev Shaking Around
Hall
Large Room Dry Mix Wood Room Tunnel Rec Studio
Medium Room Low Bottom Room Ambience Phonic Studio Rehearsal Room
Small Room Bright Room 1 Compact Room Small Early Fat Space
Live Room Bright Room 2 Echo Vocal Bedroom Reverse Room
Live Gate Room Tiny Gate Room Opera Tiled Room Jazz Room
Room
Rev Chorus Rev Flange 2 Reverb Sway Rev Filter 1 Delay Tap Slap
Chorus Round Flange Room Shock Reverb Rev Filter 2 Panning Delays
Rotary Hall Sweep Reverb Hold N’ Sample Shake Phaser Flange Tap
Throw Back Robotverb Echo Back Detune Heavy Chorus Repeat
Rev Flange 1 Pan Reverb Long Echo Multi Pong Chorus Tap
Special
LA Plate Rev with Tail Industrial Rev Reverse Plate Tape Slap
Delay Spring Perc. Plate Strings Space Small Plate Large & Bright
Fat Plate Long Plate Super Long Medium Plate Slice Plate
Light Plate Vocal Plate Cave Large Plate Techno Gate
Thin Plate Vocal Plate 2 Basic Plate Drum Plate Bubble Rev
Plate
PRESET TABLES TABLAS DE PRESET 预设表
Page 46

46 i7300
1. As a channel insert Como Insert de Canal 用做声道插入点
APPLICATIONS APLICACIONES 应用
2. As a guitar Amp Insert Como Insert Amp de Guitarra 用做吉他放大器的插入点
COMPUTADORA PERSONAL
FOOT SWITCH
INTERRUPTOR DE PEDAL
GUITARRA ELÉCTRICA
BASS AMP
AMPLIFICADOR DE BASS
RETORNO
ENVÍO
IN
ENTRADA
OUT
SALIDA
MIXER
MEZCLADORA
ELECTRIC GUITAR
RETURN
SEND
PERSONAL COMPUTER
电脑
脚踏开关
调音台
输入
输出
输送信号
倒送信号
低音吉他功放
电吉他
Page 47

support@phonic.com http://www.phonic.com
CÓMO COMPRAR EQUIPO ADICIONAL
Y ACCESORIOS DE PHONIC
Para comprar equipos y accesorios opcionales de
Phonic, póngase en contacto con cualquiera de los
distribuidores autorizados de Phonic. Para una lista
de los distribuidores de Phonic visite nuestra página
web en www.phonic.com y entre a la sección Get
Gear. También, puede ponerse en contacto directa
mente con Phonic y le ayudaremos a encontrar un
distribuidor cerca de usted.
SERVICIO Y REPARACIÓN
Para refacciones de reemplazo y reparaciones, por
favor póngase en contacto con nuestro distribuidor
de Phonic en su país. Phonic no distribuye manuales
de servicio directamente a los consumidores y, avisa
a los usuarios que no intenten hacer cualquier
reparación por si mismo, haciendo ésto invalidará
todas las garantías del equipo. Puede encontrar un
distribuidor cerca de usted en
http://www.phonic.com/where/.
INFORMACIÓN DE LA GARANTIA
Phonic respalda cada producto que hacemos con
una garantía sin enredo. La cobertura de garantía
podría ser ampliada dependiendo de su región.
Phonic Corporation garantiza este producto por un
mínimo de un año desde la fecha original de su
compra, contra defectos en materiales y mano de
obra bajo el uso que se instruya en el manual del
usuario. Phonic, a su propia opinión, reparará o
cambiará la unidad defectuosa que se encuentra
dentro de esta garantía. Por favor, guarde los recibos
de venta con la fecha de compra como evidencia de
la fecha de compra. Va a necesitar este comprobante
para cualquier servicio de garantía. No se aceptarán
reparaciones o devoluciones sin un número RMA
apropiado (return merchandise autorization). En
orden de tener esta garantía válida, el producto
deberá de haber sido manejado y utilizado como se
describe en las instrucciones que acompañan esta
garantía. Cualquier atentado hacia el producto o
cualquier intento de repararlo por usted mismo,
cancelará completamente esta garantía. Esta
garantía no cubre daños ocasionados por accidentes, mal uso, abuso o negligencia. Esta garantía es
válida solamente si el producto fue comprado nuevo
de un representante/distribuidor autorizado de
Phonic. Para la información completa acerca de la
política de garantía, por favor visite
http://www.phonic.com/warranty/.
SERVICIO AL CLIENTE Y SOPORTE
TÉCNICO
Le invitamos a que visite nuestro sistema de ayuda
en línea en www.phonic.com/support/. Ahí podrá
encontrar respuestas a las preguntas más frecuen
tes, consejos técnicos, descarga de drivers, instruc
ciones de devolución de equipos y más información
de mucho interés. Nosotros haremos todo el
esfuerzo para contestar sus preguntas lo antes
posible.
TO PURCHASE ADDITIONAL
PHONIC GEAR AND ACCESSORIES
To purchase Phonic gear and optional
accessories, contact any authorized
Phonic distributor. For a list of Phonic
distributors please visit our website at
www.phonic.com and click on Get Gear.
You may also contact Phonic directly and
we will assist you in locating a distributor
near you.
SERVICE AND REPAIR
For replacement parts, service and repairs
please contact the Phonic distributor in
your country. Phonic does not release
service manuals to consumers, and advice
users to not attempt any self repairs, as
doing so voids all warranties. You can
locate a dealer near you at
http://www.phonic.com/where/.
WARRANTY INFORMATION
Phonic stands behind every product we
make with a no-hassles warranty.
Warranty coverage may be extended,
depending on your region. Phonic Corpo
ration warrants this product for a minimum
of one year from the original date of
purchase against defects in material and
workmanship under use as instructed by
the user’s manual. Phonic, at its option,
shall repair or replace the defective unit
covered by this warranty. Please retain the
dated sales receipt as evidence of the date
of purchase. You will need it for any
warranty service. No returns or repairs will
be accepted without a proper RMA number
(return merchandise authorization). In
order to keep this warranty in effect, the
product must have been handled and used
as prescribed in the instructions accompa
nying this warranty. Any tempering of the
product or attempts of self repair voids all
warranty. This warranty does not cover
any damage due to accident, misuse,
abuse, or negligence. This warranty is
valid only if the product was purchased
new from an authorized Phonic
dealer/distributor. For complete warranty
policy information, please visit
http://www.phonic.com/warranty/.
CUSTOMER SERVICE AND
TECHNICAL SUPPORT
We encourage you to visit our online help
at http://www.phonic.com/support/. There
you can find answers to frequently asked
questions, tech tips, driver downloads,
returns instruction and other helpful
information. We make every effort to
answer your questions within one business
day.
购买Phonic产 品 及其周边
器材
使用者如需购买Phonic产品及其周边
器材,请与Phonic授权的经销商取得
联 系 。 访 问 我 们 的 网 站
www.phonic.com,点击 Get Gear 即
可查询 Phonic地 区经销 商的联 系方
式。您也可直接联系Phonic公司,我
们将协助您快速定位离您最近的经销
商。
服务与维修
订购替换零件或维修事宜,请与您所
在地区的Phonic经销商联系。Phonic
不对使用者发行维修手册,且建议使
用者切勿擅自维修机器,否则将无法
获 得 任 何 保 固 服 务 。 您 可 登 录
http://www.phonic.com/where/定位离
您最近的经销商。
产品保固资讯
Phonic承诺对每项产品提供最完善的
保固服务。我们将根据客户群体所在
的地区来拓展我们的服务所涵盖的范
围。自原始购买日起,Phonic即对在
严格遵照使用说明书的操作规范下,
因产品材质和做工所产生的问题提供
至少 1年的 保固服务。 Phonic可在此
保固范围内任意地选择维修或更换缺
陷产品。请务必妥善保管购买产品的
凭证, 以 此获得 保固服 务 。未获 得
RMA号的将不受理退货,以及保固服
务。保固服务只限于正常使用情况下
产生的问题。使用者需严格遵照使用
说明书正确使用,任何肆意损坏或擅
自维修机器,意外事故,错误使用,
人为疏 忽 ,都将 不在保 固 受理范 围
内。此外,担保维修只限于在授权经
销商处的有效购买。欲知全部的保固
政 策 资 讯 , 请 参 考
http://www.phonic.com/warranty/。
客户服务和技术支持
欢 迎 您 访 问 我 们 的 网 站
http://www.phonic.com/support/。从
该网站上,您可获得各种常见问题的
答案, 技 术指导 ,并可 下 载产品 驱
动,获得有关退货指导以及其它帮助
资讯。我们竭尽全力在一个工作日内
回复您的询问。
Page 48

 Loading...