

Philips VR605A-58 User Manual

CONTENTS
1. CONNECTING YOUR VIDEO RECORDER 4..............
Placingthebatteriesintheremotecontrol4...........
ConnectingyourvideorecordertotheTVset4.........
Connectingwithascartcable4......................
Connectingwithoutascartcable5...................
Connectingotherequipment5........................
2. INSTALLING YOUR VIDEO RECORDER 6...............
Initialinstallation6..................................
Allocatingadecoder6..............................
ManualTVchannelsearch7.........................
Satellitereceiver7..................................
Specialinstallationfunctions7.......................
AutomaticTVchannelallocation(FollowTV)8.........
AutomaticTVchannelsearch8......................
Monitorfunction9..................................
SortingandclearingTVchannelsmanually9...........
Settingthelanguage9..............................
Settingthetimeanddate10..........................
3. IMPORTANT NOTES FOR OPERATION 11..............
Generalinformation11..............................
Savingenergy11...................................
Emergencyinterrupt11..............................
Thesymbolsonyourvideorecorderdisplay12.........
Summaryofuserguide13...........................
Userguide(OSD)13.................................
6. PROGRAMMED RECORDING (TIMER) 20...............
’VPS’(VideoProgrammingSystem)and’PDC’
(ProgrammeDeliveryControl)20.....................
Programmingarecording(with’ShowView’)20........
Programmingarecording(without’SHOWVIEW’)21....
Programmingarecordingwith’TURBOTIMER’22......
Howtocheckorchangeaprogrammedrecording
(TIMER)23.........................................
Howtoclearaprogrammedrecording(TIMER)23......
7. ADDITIONAL FUNCTIONS 24.........................
SwitchingtheTVsystem24..........................
Childlock24.......................................
Switchingtheon-screendisplay(OSD)offoron24.....
Continuousplayback25.............................
Automaticswitch-off25.............................
Reducingpicturedisturbance-optimizingthe
modulator26.......................................
Switchingoffthemodulator26.......................
Usingyourvideorecorderremotecontrolwithyour
TVset27..........................................
Selectingthesoundtrack27.........................
8. Before you call an engineer 28.......................
9. GLOSSARY 29......................................
Technicaltermsused29.............................
4. PLAYBACK FUNCTIONS 14..........................
Playingacassette14................................
PlayingNTSCcassettes14...........................
Tapepositionindication14...........................
Searchingfortapepositionwiththepicture(picture
search)15.........................................
Stillpicture/Slowmotion15..........................
Searchingfortapepositionwithoutthepicture(wind
andrewind)15.....................................
InstantView15.....................................
Automaticsearchforatapeposition(indexsearch)15..
Automaticsearchforablankspaceonthetape16.....
Pictureinterference16..............................
Trackingduringplayback16.........................
Trackingduringstillpicture16.......................
5. MANUAL RECORDING 17............................
Recordingwithoutautomaticswitch-off17............
Recordingwithautomaticswitch-off(OTR
one-touch-recording)17.............................
Protectingyourrecordings17........................
Auto-assembling17.................................
Selectingtherecordingspeed(SPorLP)18............
Automaticrecordingfromasatellitereceiver(SAT
RECORDING)18....................................
’DirectRecord’19...................................
Switching’DirectRecord’onoroff19.................

OPERATING INSTRUCTIONS IN BRIEF
The remote control
SMART No function
STANDBY/ON m
CLEAR (CL) Delete : To delete last entry/Clear programmed recording
SELECT Select: To select a function
CHILD LOCK
MONITOR
TURBO TIMER
TIMER k TIMER: To make a TIMER programming with SHOWVIEW or to
Switch on or off : To switch set on or off, interrupt menu
function, interrupt a programmed recording (TIMER)
(TIMER)
Child lock : To switch child lock on/off
TV monitor : To switch between TV reception and VCR
playback
0-9 Number buttons:0-9
TurboTimer: To programme a recording with the function Turbo
Timer
alter or clear a programmed TIMER
MENU Menu : To call up the main menu
OK
Store/Confirm: To store or confirm entry
Q
Select: Cursor left
PLAY G
STOP h
INDEX E Index search: In combination with H / I : to search for previous/next recording
RECORD n Record: To record the programme selected
STILL R
Playback : To play a recorded cassette
H
Rewind : During STOP and STANDBY: rewind, during PLAYBACK: reverse scanning
Pause/Stop: To stop the tape, except while a TIMER-recording is being made
I
Forward wind: During STOP and STANDBY: forward wind, during PLAYBACK: forward
scanning
on the cassette.
Still picture: To stop the tape and show a still picture
Additional TV functions
Sq TV volume: TV volume up
Sr
TV volume: TV volume down
TV y
TV sound off : To switch the sound on or off
TV m
Switch off : To switch off the TV
TV q
TV Programme number: TV programme number up
TV r
TV Programme number: TV programme number down
P
Select: Cursor right
;P q
Select: One line or programme number up
rP =
Select: One line or programme number down

Front of the set
Back of the set
STANDBY m Standby : To switch off or on, interrupt a function, interrupt a programmed recording
(TIMER)
RECORD n Record: To record the programme selected
PROGRAMME r
PROGRAMME q
STOP/EJECT h/J
PLAY G
STILL R
White and red socket
L AUDIO R
Yellow socket
Select: One line or programme number down.
Select: One line or programme number up.
Pause/Stop, eject cassette: To stop the tape and eject the cassette
Playback : To play a cassette
Still picture: To stop the tape and display the actual position on the tape as a still picture
o
Rotary control: turn left: during STOP and STANDBY: rewind, during PLAYBACK: reverse
scanning
turn right: during STOP and STANDBY: wind, during PLAYBACK: forward scanning
Behind the flap at the lefthand corner on the front:
Audio input socket left/right : To connect a camera recorder or video recorder
(programme number ’
: Video input socket : To connect a camera recorder or video recorder (programmenumber
VIDEO
E3’)
’
E3’)
4 Mains socket: To connect the mains cable
AUDIO OUT L R
AV2 EXT2
AV1 EXT1
2
3
Audio output socket, left/right : To connect a HiFi-set
Scart socket 2: To connect a satellite receiver, decoder, video recorder, etc.(programme
E2’)
number ’
Scart socket 1: To connect the TV set (programme number ’E1’)
Aerial input socket: To connect the aerial cable
Aerial output socket: To connect the TV set

OPERATING INSTRUCTIONS PHILIPS VR605A/58
Thank you for buying a PHILIPS video recorder. The
VR605A/58 is one of the most sophisticated and simple-to-use
video recorders (VCR) on the market. Withthis VCR you can
record and play VHS-standard cassettes.
Please take the time to read this operating manualbefore
using your video recorder.
Safety instructions and other notes
ADanger: High voltage!
Do not remove the top cover as there is a risk of an electrical
shock!
AThe video recorder does not contain any components that can
be repaired by the customer. When thevideo recorder is
connected to the power supply there aresome components that
are constantly operational. To switchoff the video recorder
completely you must disconnect itfrom the power supply.
BMake sure that air can circulate freely through the ventilation
slots on the video recorder.
So that you can identify your machine in the eventof theft,
enter the serial number (PROD.NO) here. The serialnumber is
printed on the type plate fixed at the rear of the set.
MODEL NO. VR605A/58
PROD.NO: ......
This product complies with therequirements of the Directive
73/23/EEC + 89/336/EEC + 93/68/EEC.
Interference
The Department of Trade and Industry operates a Radio
Investigation Service to help TV licence holders improve
reception of BBC and ITC programmes where these are being
spoilt by interference.
If your dealer cannot help, ask at a Main PostOffice for the
booklet ’How to Improve Television and Radio Reception’.
BMake sure that no objects or liquids enter the video recorder.If
liquid is spilt into it,disconnect the video recorder immediately
from the power supply and callthe After-sales Service for
advice.
BThe video recorder should not be used immediately after
transportation from a cold to a hot areaor vice versa, or in
conditions of extreme humidity.
After unpacking the video recorder, itshould be allowed to
acclimatize for at least three hours before installation.
C This operating instruction has been printedon nonpolluting
paper.
C Deposit old batteries at the relevantcollection points.
C Please make use of the facilitiesavailable in your country for
disposing of the packaging of the videorecorder in a way that
helps to protect the environment.
C This electronic equipment contains manymaterials that can be
recycled. Please inquire about the possibilitiesfor recycling
your old set.
DShowVIiew is a registered trademark of Gemstar
Development Corporation. ShowView ismanufactured
under licence from Gemstar DevelopmentCorporation.
Technical information
Voltage : 220-240V/50Hz
Power consumption : 16W
Power consumption (Standby) : less than 4W(clock display
off)
Winding time: approx. 100 seconds (CassetteE-180)
Measurements in cm (W / H / D): 38.0/ 9.3 / 26.0
Number of video heads :4
Number of audio heads (HIFI):2
Recording/Playback time: 4 Hours (CassetteE-240)
8 Hours (LP) (Cassette E-240)
List of accessories
• Operating instructions
• Remote control and batteries
• Aerial cable
• Mains cable
• Scart cable (AV-Euro cable)
1

Special functions on your video recorder
Philips has developed a system which produces thebest possible playback
quality. It reduces disturbance on old, worn videocassettes, and emphasises
the detail on very good quality cassettes.
When you connect your video recorder to your televisionand plug it into the
mains, you will be welcomed with an OSD picture. Allyou have to do is follow
the instructions in the "intelligent help line" forthe next step. Enjoy the Automatic
TV channel search/save function and the automatic time adjustment.
You can operate the main functions on your television using your video recorder
remote control, even if your television isnot a Philips one.
This function automatically transfers all thetelevision channel settings onto
your video recorder.
Recordings made on your video recorder can be controlled byan external
satellite receiver.
Your video recorder can ascertain which channel is currentlyplaying on your
television and record from it at the touch of abutton.
Simple programming system for video recorders.Makes programming as easy
as making a telephone call. Simply enter the programmecode which you will
find in your listings magazine.
The precision tape drive from Philips with shortrewind times and automatic
tape length recognition.
2
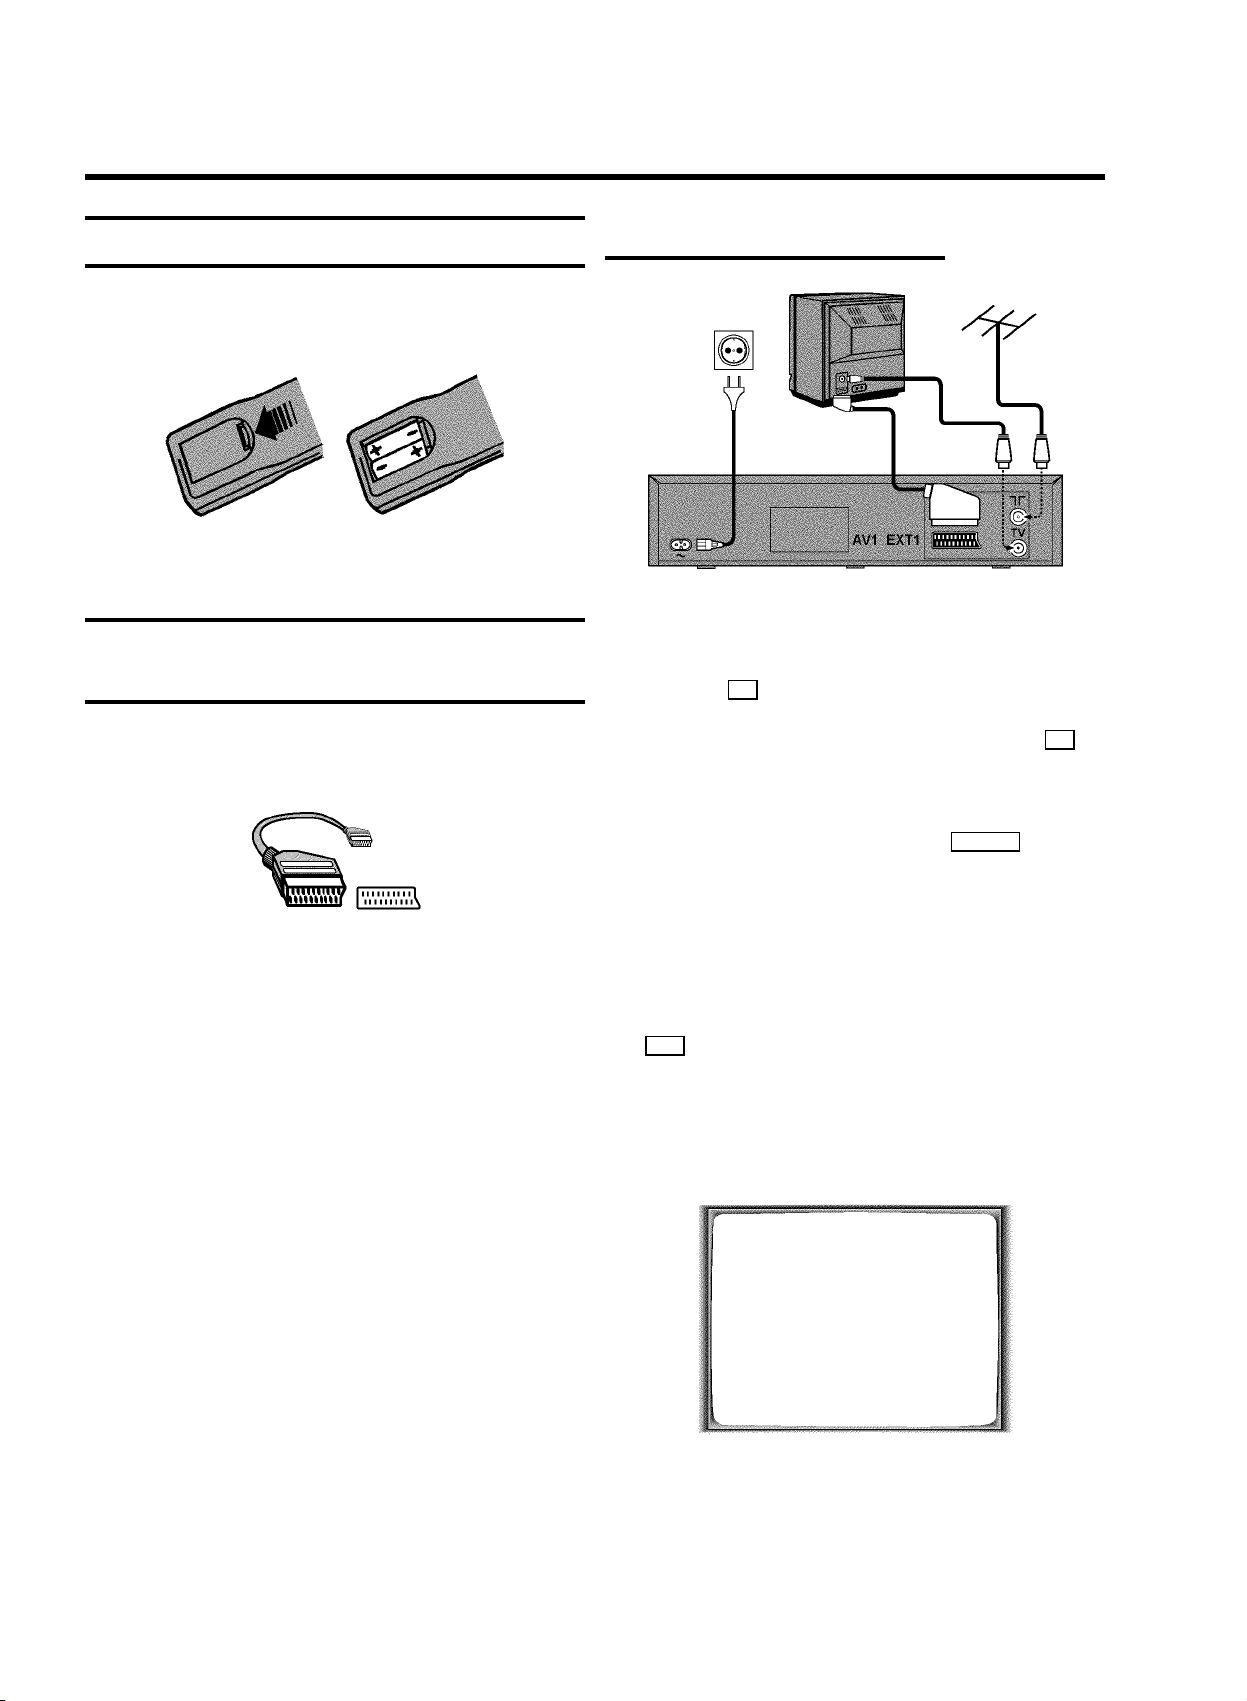
1. CONNECTING YOUR VIDEO RECORDER
Placing the batteries in the remote control
a Open up the battery compartment of your remote control
and place the batteries in it as shown in the picture.
b Close the battery compartment.
Connecting your video recorder to the
TV set
We recommend the use of a scart cable. This willgive you the
best picture and sound quality.
Connecting with a scart cable
a Switch off the TV set.
b Remove the aerial cable plug from your TV set and insert
it into the 2 socket at the back of the video recorder.
c Plug one end of the aerial cable provided into the 3
socket on the video recorder and the other end into the
aerial input socket on your TV set.
If you install your video recorder for thefirst time, select one of
the following options:
E ’Connecting with a scart cable’
If your TV set has a scart socket and youare using a
scart cable.
E ’Connecting without a scart cable’
If you are not using a scart cable.
d Plug one end of a scart cable into the AV1 EXT1 scart
socket at the back of the video recorder and the other
end into the suitable scart socket on your TV set(see
instruction manual TV set).
e Switch on the TV set.
f Insert one end of the mains cable into the mains socket
4 at the back of the video recorder and the other end
into the wall socket.
g If your TV set automatically switches to programme
number e.g.: ’EXT’, ’0’, or ’AV’, this text willappear on the
TV screen:
CONGRATULATIONS
YOU NOW OWN A NEW
PHILIPS
VIDEO RECORDER
CONTINUEpOK
DIf your TV set does not switch to programme number
e.g.: ’EXT’, ’0’, or ’AV’ automatically, selectthe
programme number for the video recorder manually
(see instruction manual TV set).
4

h Then, read the paragraph ’Initial installation’ in the
chapter ’INSTALLING YOUR VIDEO RECORDER’.
Connecting without a scart cable
a Switch off the TV set.
b Remove the aerial cable plug from your TV set and insert
it into the 2 socket at the back of the video recorder.
g When the TV has been tuned read the paragraph ’Initial
installation’ in the chapter ’INSTALLING YOURVIDEO
RECORDER’.
Connecting other equipment
You can connect additional equipment to the AV2 EXT2 socket.
For example: a decoder, a satellite receiver ora camera
recorder.
You can connect a hifi-stereo set to the socket
AUDIO OUT L R (audio output left/right).
c Plug one end of the aerial cable provided into the 3
socket on the video recorder and the other end into the
aerial input socket on your TV set.
d Insert one end of the mains cable into the mains socket
4 at the back of the video recorder and plug the other
end into the wall socket.
e Switch on your TV set and select the programme number
that you have chosen for video playback (see instruction
manual TV set).
f Tune in the TV set until this picture appears.
DThe video recorder will now transmit on channel 36/
Frequenz 591MHz.
CONGRATULATIONS
YOU NOW OWN A NEW
PHILIPS
VIDEO RECORDER
CONTINUEpOK
DIf the picture quality of TV channels on your TV is
poor, please read the section ’Reducing picture
disturbance - optimizing the modulator’ in the
chapter ’ADDITIONAL FUNCTIONS’.
5

2. INSTALLING YOUR VIDEO RECORDER
Initial installation
a Confirm the picture on the TV screen with OK on the
remote control.
b Select the language for the on-screen display (OSD) with
rP = or ;P q .
The display on the video recorder will only showenglish
text.
c Confirm with OK .
d Select the country of your residence with rP = or
;P q .
If this country does not show up, select ’OTHERS’.
Confirm with OK .
’Automatic TV channel search’ starts. This picture will
appear on the screen:
AUTO TUNING
SEARCHING
00 TV CHANNELS FOUND
h Check ’MONTH’ and ’DATE’,’TIME’ in the same way.
i When all the information is correct, confirm with OK .
The initial installation is now complete.
DIf you have connected a satellite receiver, please
read the section ’Satellite receiver’.
DIf you have connected a decoder, you must install it
as described in the next section.
DIf you experience sound distortion or no sound at all
with some TV channels, you may have selected the
wrong TV system for these TV channels. In the
chapter ’Manual TV channel search’ you will find the
information on how to change the TV system.
Allocating a decoder
Some TV stations will send coded TV channels, that youcan
only watch when you use a decoder. You can connect such a
decoder (descrambler) to your video recorder. Withthe
following function, the connected decoder will automatically
be activated for the TV programme you want to watch.
ƒƒƒƒƒƒƒ__________________
PLEASE WAIT...
Wait until all TV channels have been found. This can take
several minutes.
e When all TV channels have been found, ’STORED’ will
appear on the TV screen.
’YEAR’, ’MONTH’, ’DATE’, ’TIME’ will appear on the TV
screen.
CLOCK
YEAR è 2000 p
MONTH 01
DATE 01
TIME 20:00
________________________________
EXITpMENU STOREpOK
a Switch on the TV set. If required, select the programme
number for the video recorder.
b On the video recorder, use ;P q or rP = or number
buttons 0-9 on the remote control to select the
programme number you want to allocate the decoder to.
c Press MENU on the remote control. The main menu will
appear.
d Select the line ’MANUAL SEARCH’ with ;P q or
rP = and confirm with OK .
MANUAL SEARCH
PROGRAMME NUMBER è P01 p
S-CHANNEL NO
CHANNEL NUMBER 21
DECODER OFF
TV SYSTEM AUTO
NICAM ON
________________________________
EXITpMENU STOREpOK
f Check if the year in line ’YEAR’ is correct. Change it if
required with the number buttons 0-9 on the remote
control.
g Select the next line with ;P q or rP = .
6
e Select the line ’DECODER’ with rP = or ;P q .
f Select function ’ON’ with Q or P .
DWhen you select ’OFF’, the decoder will not be
allocated.

g Confirm with OK .
h To end, press MENU .
Your decoder has now been allocated to this TV channel.
DWhen the function is switched on, ’DEC’ will appear
in the video recorder display for the TV channel you
have selected.
DIf you don’t know the channel number of the desired
TV channel, hold P in line ’CHANNEL NUMBER’
to start the automatic search.
Repeat automatic search you until have found the
desired TV channel. A changing channel number
will appear on the TV screen.
h If you want to allocate a decoder, in line ’DECODER’
select ’ON’ with P .
BBC1
Manual TV channel search
In certain cases the ’Automatic TV channel search’ maynot be
able to find all of the TV channels (e.g. coded TV channels).In
that case, use this manual method to set the channels.
a Switch on the TV set. If required, select the programme
number for the video recorder.
b Press MENU on the remote control. The main menu will
appear.
c Select the line ’MANUAL SEARCH’ with rP = or
;P q and confirm with OK .
MANUAL SEARCH
PROGRAMME NUMBER è P01 p
S-CHANNEL NO
CHANNEL NUMBER 21
DECODER OFF
TV SYSTEM AUTO
NICAM ON
________________________________
EXITpMENU STOREpOK
i This video recorder can receive Hi-Fi sound
transmissions in ’NICAM’. However, ifsound distortion
occurs with poor reception, you can switch ’NICAM’off.
To do this, select ’OFF’ in line ’NICAM’ with P or
Q .
j To change the TV system, in line ’TV SYSTEM’, select
the TV system with Q or P .
k Press OK to store the TV channel. ’STORED’ will briefly
appear on the TV screen.
DIf you want to search for further TV channels, start
again at step c.
l To end, press MENU .
Satellite receiver
You can receive channels from the satellite receivervia the
scart socket AV2 EXT2 .
To do this, select programme number ’E1’ with 0 on the
remote control and then select programme number ’E2’ with
rP = . You should select the satellite channels on the
satellite receiver itself.
d Select the line ’PROGRAMME NUMBER’ with rP = or
;P q .
e Select the desired programme number (e.g.: ’P01’) with
Q or P .
f In the line ’S-CHANNEL’, use P to select:
’NO’: To enter the channel
’YES’: To enter a special channel
g Enter the channel of the desired TV channel in line
’CHANNEL NUMBER’ with the number buttons 0-9 .
Special installation functions
You can select one of the following installation functions in
order to adapt the video recorder to your own specific
requirements.
7

Automatic TV channel allocation
(Follow TV)
With this function, the video recorder storesthe channels in
the same order as on the TV set. This only works ifthe video
recorder (socket AV1 EXT1 ) and the TV set are connected
with a scart cable.
DYou must switch off any equipment connected to
socket AV2 EXT2 .
i Confirm with OK on the video recorder-remote control.
DIf you have allocated the wrong TV channel, you can
go back one step with CLEAR (CL) .
j Repeat steps gto juntil all TV channels have been
allocated.
k To end, press MENU .
a Switch on the TV set. If required, select the programme
number for the video recorder.
b Press MENU on the remote control. The main menu will
appear on the screen.
MAIN MENU
CLOCK
AUTO TUNING
MANUAL SEARCH
FOLLOW TV
TV CHANNEL ALLOC.
RECORD SPEED
AUTO STANDBY
TV SYSTEM
LANGUAGE
SPECIAL SETTINGS
________________________________
… EXITpMENU OK
†
c Select the line ’FOLLOW TV’ with rP = or ;P q
and confirm with OK . Take notice of the message on the
TV screen.
d Press OK .’TV01’ will appear in the video recorder
display.
Automatic TV channel search
The video recorder will search for all available TVchannels.
DIf you want to start the automatic TV channel search
again, then follow the instructions below.
a Switch on the TV set. If required, select the programme
number for the video recorder.
b Press MENU on the remote control. The main menu will
appear on the screen.
c Select the line ’AUTO TUNING’ with rP = or
;P q .
d Confirm with OK .
e Select the country of your residence with ;P q or
rP = .
If your country doesn’t show up, select ’OTHERS’.
f Press OK . The ’Automatic TV channel search’ starts.
TV01
e Select programme number ’1’ on the TV set.
f Confirm with OK on the video recorder-remote control.
The video recorder compares the TV channels on the TV
set and the video recorder.
When the video recorder finds the same TV channel as
the TV set, then it stores it at ’P01’.
DWhen ’NOTV’ (no signal from TV set) appears in the
display, the TV channels can not be allocated
automatically. In this case, read paragraph: ’Manual
TV channel allocation’.
g Wait until e.g.: ’TV02’ appears.
h Select the next programme number, e.g.: ’2’ on the TV set.
8
AUTO TUNING
SEARCHING
00 TV CHANNELS FOUND
ƒƒƒƒƒƒƒ__________________
PLEASE WAIT...
g When the TV channel search is complete, ’STORED’ will
appear on the screen.
h To end, press MENU .
How to search for a TV channel manually, you can read in the
section ’Manual TV channel search’.
 Loading...