

TSU9600
Starter’s Guide
Manual de inicio
Guide de démarrage
FR
ES
EN

ENGLISH
TSU9600 Starter’s Guide
ESPAÑOLFRANÇAIS
Starter’s Guide
Manual de inicio
Guide de démarrage
TSU9600
Using the Control Panel
Uso del Panel de Control
Utilisation du panneau de commande
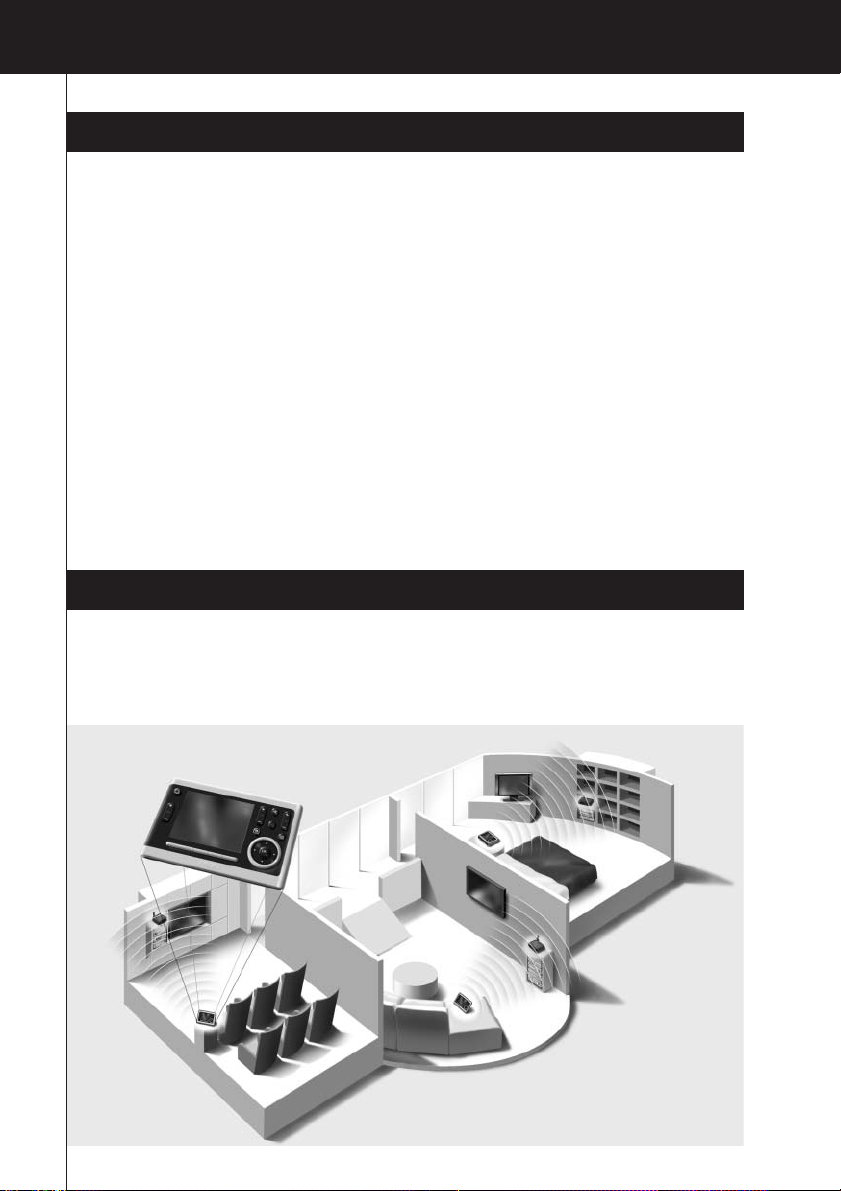
Getting to Know Your Pronto Control Panel
Your TSU9600 Control Panel is designed and manufactured with great care to offer you a reliable
and easy operation of your home theater system. It has been preprogrammed by your installer and
contains a so-called configuration file that contains all the codes, graphical buttons and navigation
behaviour.
1
TSU9600 Starter’s Guide
TSU9600 Starter’s Guide
Contents
Getting to Know Your Pronto Control Panel......................................................................................1
Taking a First Look........................................................................................................................2
Charging the Control Panel............................................................................................................3
Enjoying Your Pronto Control Panel
..................................................................................................3
Controlling Your Home Theater......................................................................................................3
Changing the Pronto Settings ........................................................................................................5
Support
.............................................................................................................................................6
Maintaining the Control Panel .......................................................................................................6
Troubleshooting............................................................................................................................7
Specifications
...................................................................................................................................8
IFU Approbation / Safety Content TSU9600
.......................................................................................i
FCC Compliancy ............................................................................................................................i
Regulations According to R&TTE ....................................................................................................i
2
TSU9600 Starter’s Guide
ENGLISH
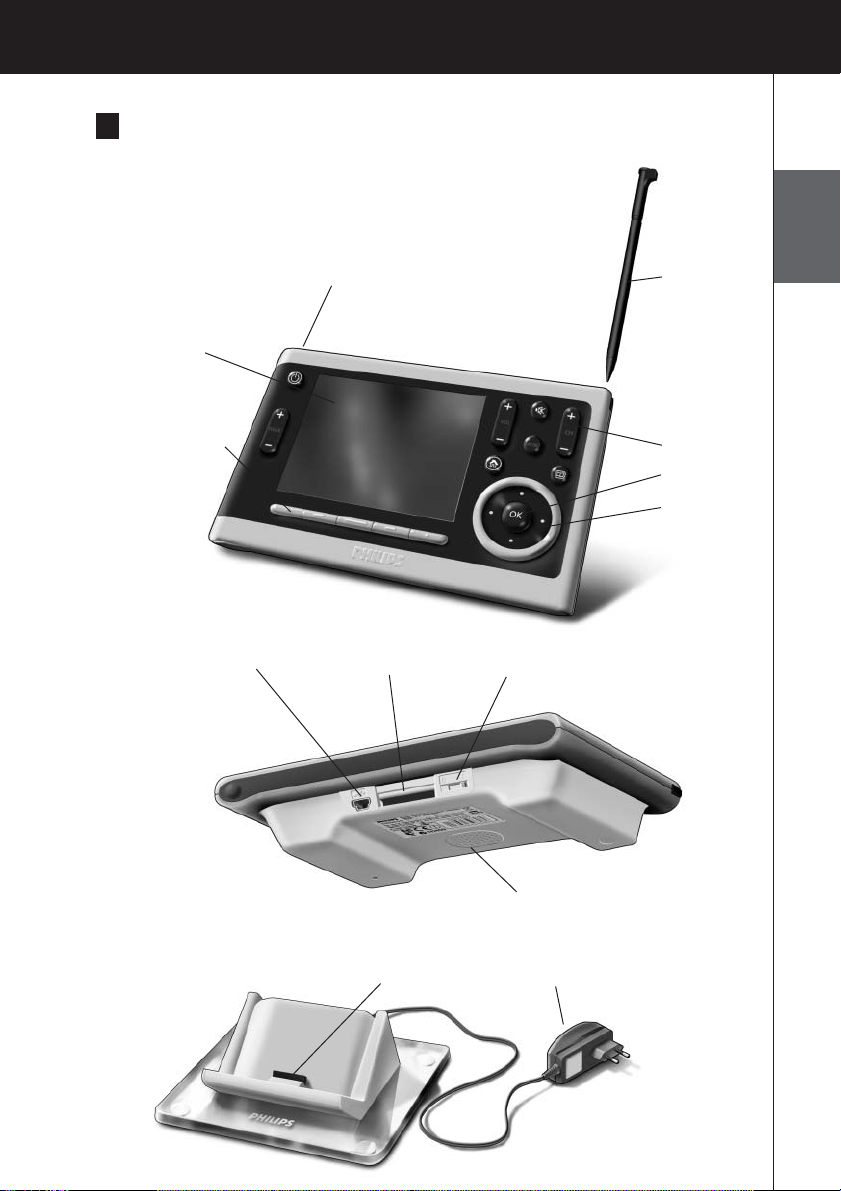
Power adapter
VGA touch
screen
Firm keys
Backlight key Stylus
Hard keys
Cursor keys
Rotary wheel
Docking connector Power switch
Speaker
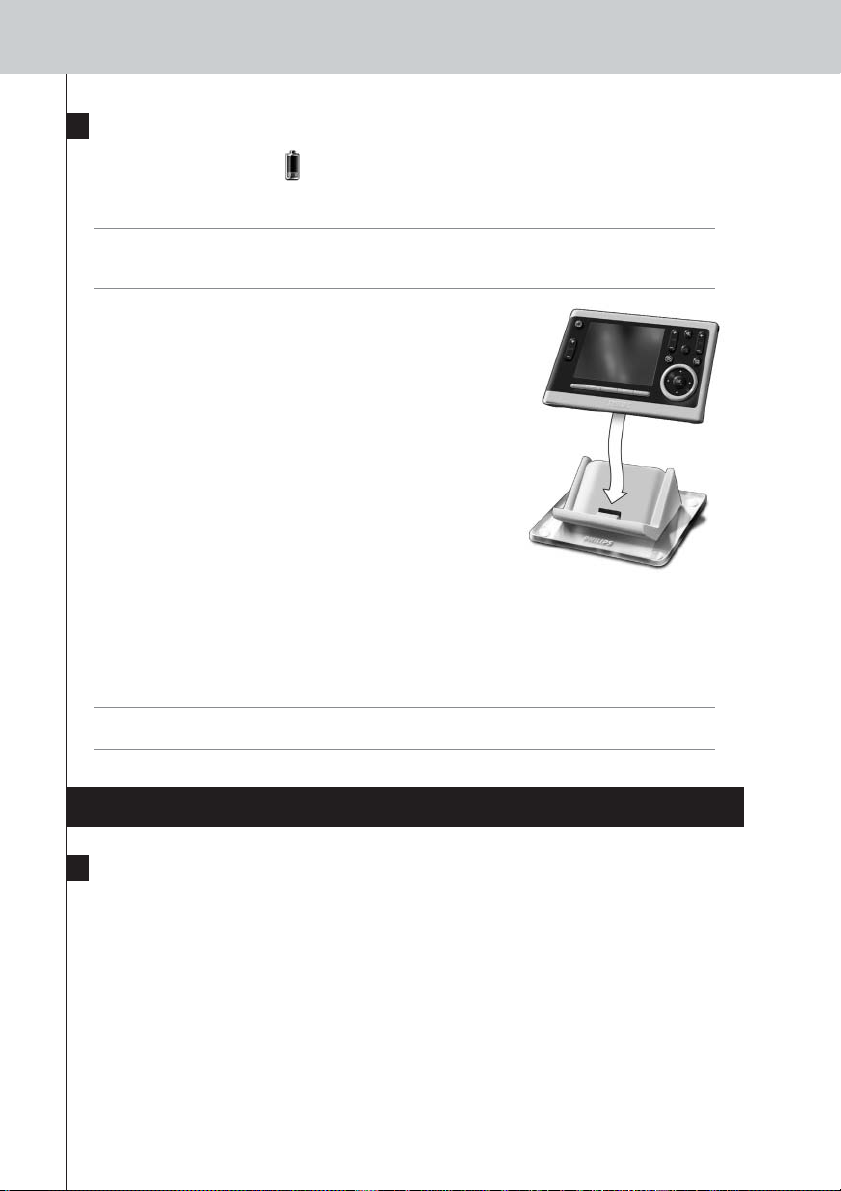
Control Panel
Docking Station
Panel connector
USB connector
This connector
is used by the
installer to configure
the Control Panel.
Taking a First Look
3
TSU9600 Starter’s Guide
Charging the Control Panel
When the Battery level icon on your screen turns red, it is time to charge the Control Panel.
Depending on how your installer has configured the Control Panel, it can be operated for one to
several days.
Note The lifetime of the battery depends on the timeout settings and the settings of the wireless
network configured by your installer. If you notice that the battery is deteriorating, please
contact your installer.
When you place the Control Panel in the docking station, the red
Charging LED on the front of the docking station lights up.
When the Charging LED fades out, the Control Panel is fully
charged. This can take 3 to 4 hours.
When the battery is low and the Charging LED does not light up,
make sure that:
• the power switch at the bottom of the Control Panel is switched to 1.
• the docking station is plugged in the wall outlet. When it is plugged in, the docking station glows
blue.
• the Control Panel is placed properly in the docking station.
• the connector in the docking station is clean and free of obstructions.
Tip It is advised to place the Control Panel in the docking station after use. Even when the screen of
the Control Panel turns black, the Control Panel is still using power.
Enjoying Your Pronto Control Panel
Controlling Your Home Theater
Activating the screen of the Control Panel
•Tap the touch screen with the stylus enclosed or with your finger.
-Or-
•Press the Backlight key.
5
TSU9600 Starter’s Guide
Changing the Pronto Settings
Note It is possible that your installer has blocked the access to the Settings pages. Normally, your
installer has fully programmed your Control Panel and no changes are required.
To open the Settings pages:
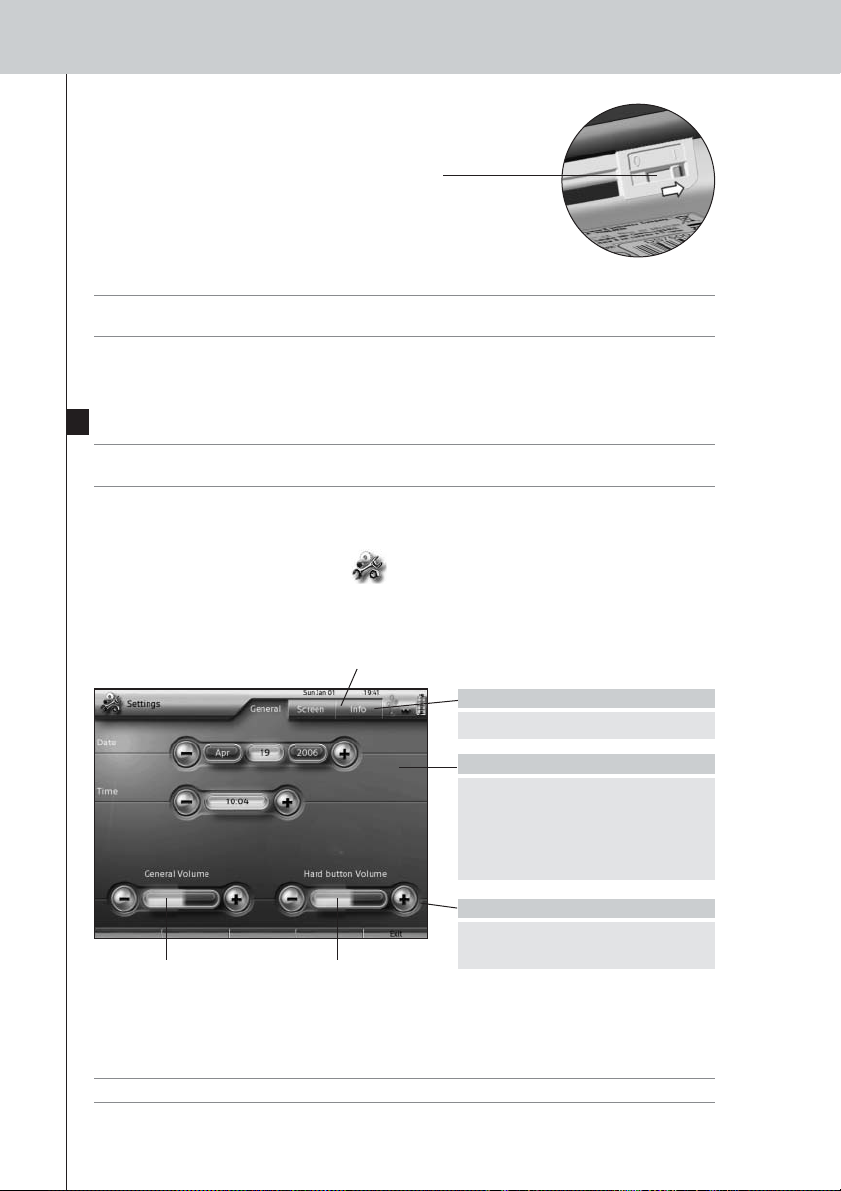
•Press and hold the Settings icon for more than 3 seconds.
General
Tip Press and hold the ‘-’ and ‘+’ buttons to increase or decrease the setting faster.
On the Info Page you can find the version and
network information and memory status.
The General volume
refers all the sounds
you hear when you
operate the Control
Panel.
The Button volume
specifically refers to
the default sound you
hear when you press
a button.
Turning the Control Panel On/Off
Tip Always switch off the Control Panel during transport to avoid the activation of the touchscreen
and battery draining.
To change Date & Time settings
1 Tap the Month, Day, Year, or Time
button.
The button is highlighted.
2 Tap the ‘-’ and ‘+’ buttons to
adjust the date or time.
To change the Volume settings
• Tap the ‘-’ and ‘+’ buttons to
adjust the volume settings.
To access the other Settings pages:
• Tap the different tabs.
Power switch
The Power switch on the
bottom of the Control
Panel turns the Control
Panel on and off.
6
TSU9600 Starter’s Guide
ENGLISH
Screen
Note The screen is calibrated in the factory. Do not use this function unless you experience problems
with the touch screen.
Support
Maintaining the Control Panel
Take care not to damage the touch screen
•Do not drop the Control Panel or subject it to any strong impact.
• Use the stylus enclosed or your finger to tap the touch screen.
Attention Never use an actual pen, pencil or other sharp object on the touch screen to avoid scratching
the touch screen.
Protect the Control Panel from temperature extremes
Keep the Control Panel away from heaters and other heat sources.
The Control Panel is not waterproof
The Control Panel should not be exposed to rain or moisture.
Do not store or use the Control Panel in any location that is extremely damp or wet.
When you have spilled water on the Control Panel, you have to turn it off by switching the Power
switch to 0.
Place the Control Panel in a clean environment to dry.
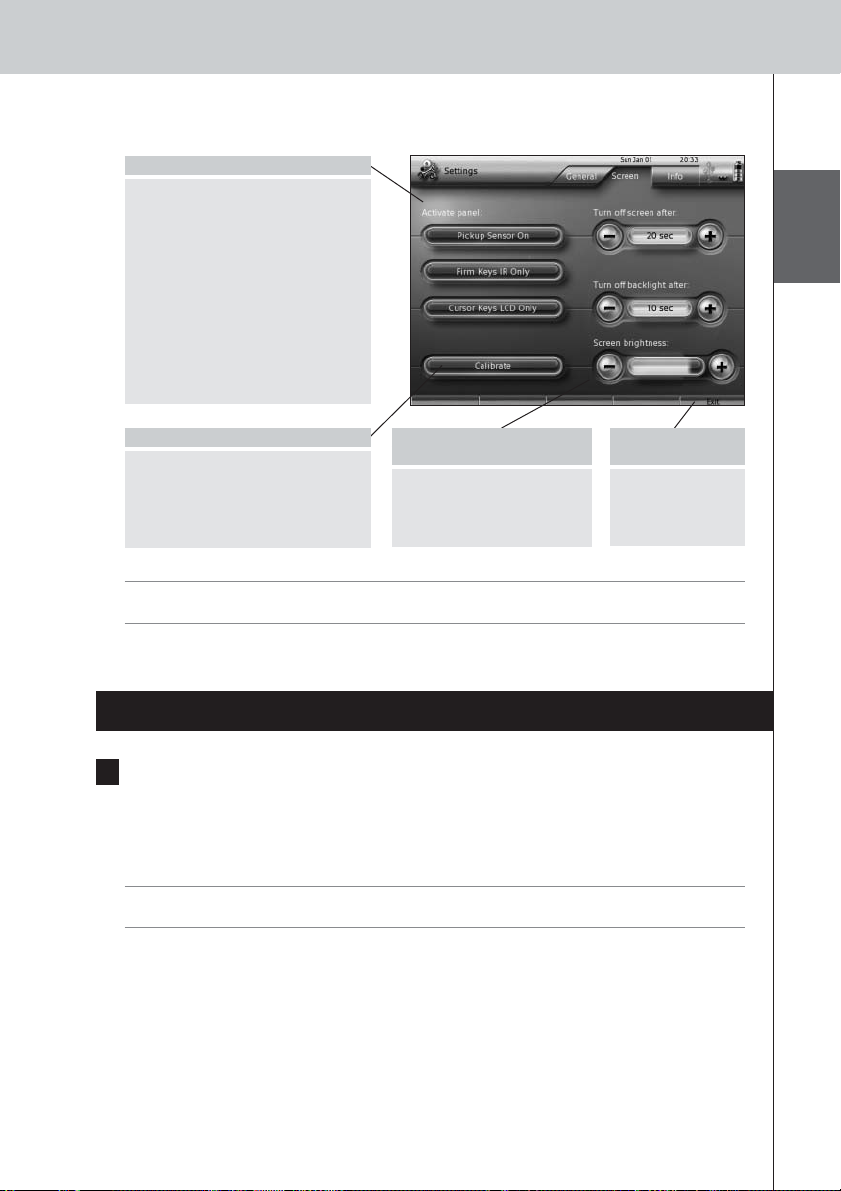
To change the Activation Settings:
• Tap the buttons to toggle
between the different Activation
settings:
Pick up sensor: the Control Panel
switches on when it is tilted.
Firm keys: the Control Panel
switches on and/or sends out IR
when a firm key is pressed
Cursor keys: the Control Panel
switches on and/or sends out IR
when one of the cursor keys is
pressed.
To calibrate the touch screen:
1 Tap the Calibrate button.
2 Follow the on screen instructions
to tap the 4 corners of the
screen.
The touch screen is calibrated.
To change the Time out and
the Brightness settings:
• Tap the ‘-’ and ‘+’ buttons
to adjust the settings.
To exit the
Settings pages:
• Press the right
firm key labeled
Exit.
7
TSU9600 Starter’s Guide
Cleaning the Control Panel
• Use a soft, damp cloth to clean the Control Panel.
• If the touch screen is dirty, clean it with a soft cloth moistened with a diluted window-cleaning
solution.
• Do not use a corrosive detergent or an abrasive sponge.
•Avoid the use of abundant water.
Troubleshooting
The buttons on the touch screen of my Control Panel do not work properly
When you find that tapping a button activates one of the adjacent buttons, or when you have to tap
next to a button to activate it, it is advised to recalibrate the touch screen as described in
‘Changing the Pronto Settings’ on page 8.
Calibrating is a way of adjusting the touch screen to reobtain accuracy and reliability.
The Control Panel goes to stand-by mode automatically
This is a time out feature of the Control Panel to save power. You can adjust the time that the
Control Panel stays active in the Settings pages on the tab Screen, as described in ‘Changing the
Pronto Settings’ on page 8.
My AV-equipment does not respond to commands from the Control Panel
• Check the status of the battery on the screen. If the Battery level icon is red, recharge the
Control Panel.
•When your Control Panel works in a WiFi environment, bear in mind that it may take the network
a few seconds to wake up and start transmitting codes.
•You may be out of reach of the WiFi network. The WiFi activity icon that normally indicates the
WiFi strenght changes into .
Please refer to the next chapter.
The WiFi activity icon shows no WiFi strength
Note The WiFi activity icon may not be visible on the screen, depending on the settings made by
your installer.
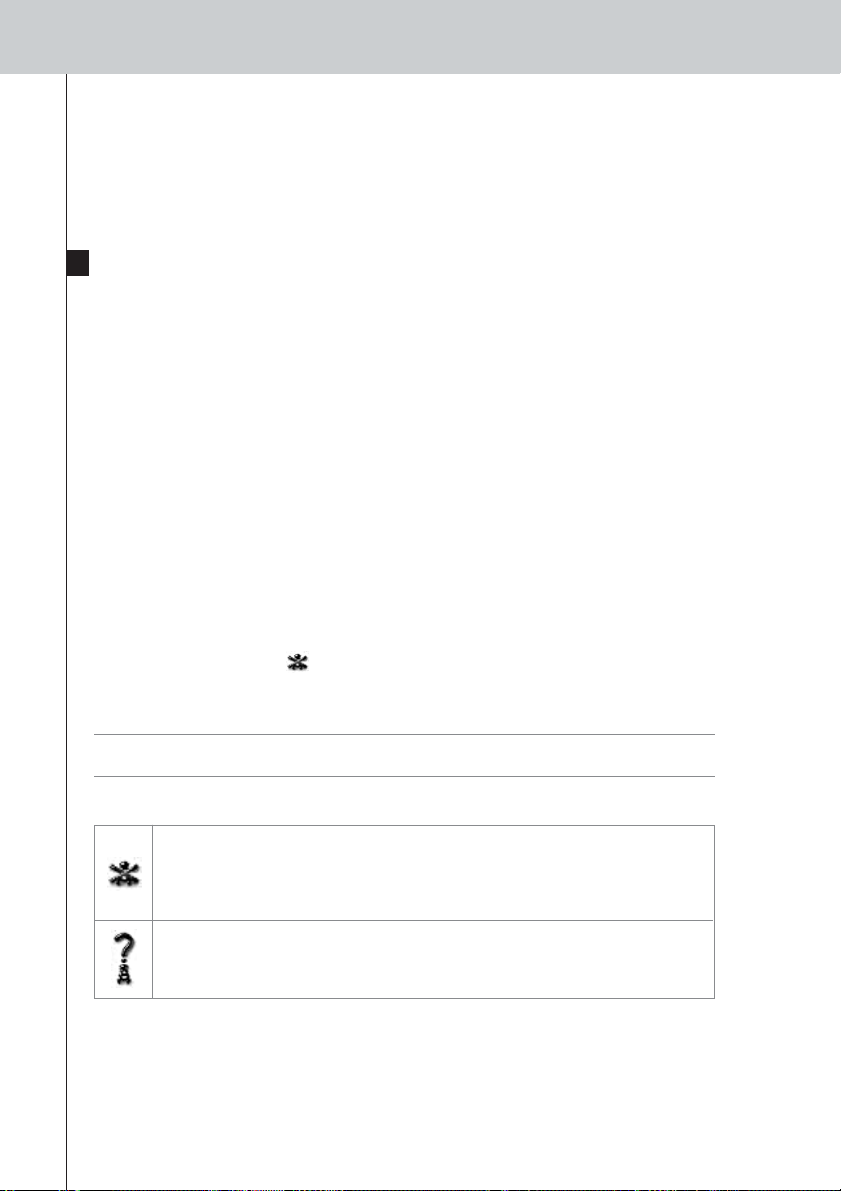
If the Control Panel shows one of the following icons:
My Control Panel runs out of power fast
• When the Control Panel works in a WiFi environment, bear in mind that the Control Panel is still
using power even when its screen is black. It is advised to place the Control Panel in the docking
station each time after use.
• When the battery runs out of power constantly, it may be time to replace the battery. Contact
your installer for more information.
No connection
• The Wireless Access Point is powered down
• The Control Panel is out of range of the Wireless Access point
• There is an encryption problem
No identification
• There occurred an IP problem. If the problem comes up regularly, contact your
installer to change the settings.

8
TSU9600 Starter’s Guide
ENGLISH
Specifications
Display 3.7” TFT color display with touch screen
VGA (640 x 480 pixels) resolution landscape LCD
65,536 colors
Infrared (IR) Operating distance = max. 36 ft (12 m)
Operating angle = 45º at max 15 ft (5 m)
Wireless System WiFi based technology operating at 2.4 GHz
Memory 64 MB SDRAM
64 MB NAND Flash
Power Management Power on by tilting, tapping the screen, pressing the back light button or
tapping the keys
Power off automatically by time out
Battery status indication
Dimensions Control Panel: 6,2 x 3,9 x 1,3 inch (157 x 100 x 34 mm)
Docking Station: 5,4 x 4,1 x 1,9 inch (137 x 103 x 49 mm)
Operating Temperature 41° F – 113° F (5° C - 45° C)
Storage temperature -13° F – 158° F (-25° C - 70° C)
Battery Lithium ion battery, 2100 mAh
Power Adapter 100V-240VAC / 50-60Hz Power adapter
( 5 V DC / 2 A output)
Accessories - Power adapter
- Docking station
- Starter’s Guide
- Warranty certificate
Pronto Control Panel Starter’s Guide
© Copyright 2006 Royal Philips Electronics, Interleuvenlaan 72 - 74, 3000 Leuven (Belgium)
Remarks:
All rights are reserved. Reproduction in whole or in part is prohibited without prior consent of the copyright owner.
Royal Philips Electronics is not liable for omissions or for technical or editorial errors in this manual or for damages
directly or indirectly resulting from the use of the Pronto Control Panel.
The information in this Starter’s Guide may be subject to change without prior notice. All brand or product names are
trademarks or registered trademarks of their respective companies or organizations.

1
RFX9400 Manual de inicio
Introducción al Panel de Control Pronto
El Panel de Control TSU9600 ha sido diseñado y fabricado con el máximo esmero para
proporcionar un manejo fácil y fiable de su sistema Home Theater. Ha sido preprogramado por el
instalador y contiene un archivo de configuración que incluye todos los códigos, botones gráficos y
comportamiento de la navegación.
TSU9600 Manual de inicio
Contenido
Introducción al Panel de Control Pronto ..........................................................................................4
Visión general..............................................................................................................................4
Carga del Panel de Control............................................................................................................5
Utilización del Panel de Control Pronto
............................................................................................7
Control del Home Theater .............................................................................................................7
Cambio de los ajustes del Panel de Control Pronto..........................................................................9
Asistencia
.......................................................................................................................................11
Mantenimiento del Panel de Control ............................................................................................11
Detección de errores...................................................................................................................11
Especificaciones
.............................................................................................................................13
IFU Approbation / Safety Content TSU9600
....................................................................................14
FCC Compliancy..........................................................................................................................14
Regulations According to R&TTE..................................................................................................15

2
RFX9400 Manual de inicio
ESPAÑOL
Adaptador de corriente
Pantalla
táctil VGA
Teclas de
pantalla
Tecla Retroiluminación Lápiz óptico
Teclas rígidas
Teclas de cursor
Rueda giratoria
Conector de la
estación de recarga
Interruptor de encendido
Altavoz
El Panel de Control
Estación de recarga
Conector del Panel
Conector USB
Este conector lo
utiliza el instalador
para configurar el
Panel de Control.
Visión general

RFX9400 Manual de inicio
3
Carga del Panel de Control
Cuando el icono Nivel de batería de la pantalla cambia a rojo, es hora de cargar el Panel de
Control. Según cómo haya configurado el Panel de Control el instalador, puede funcionar durante
uno o varios días.
Nota La duración de la batería depende de los ajustes de temporización y de los ajustes de la red
inalámbrica que haya configurado el instalador. Si observa que la duración de la batería
disminuye, póngase en contacto con su instalador.
Cuando se coloca el Panel de Control en la estación de recarga, se
ilumina el indicador LED de carga rojo que hay en la parte
delantera de la estación de recarga.
Cuando se apaga el indicador LED de carga, indica que el Panel de
Control está totalmente cargado. El proceso de carga puede durar
de 3 a 4 horas.
Cuando la carga de la batería es baja y el indicador LED de carga no se enciende, asegúrese de
que:
• el interruptor de encendido que hay en la parte inferior del Panel de Control está en la posición 1.
• la estación de recarga está enchufada a la toma de corriente. Cuando está enchufada, la
estación de recarga se ilumina en azul.
• el Panel de Control está colocado correctamente en la estación de recarga.
• el conector del Panel está limpio y no está obstruido.
Consejo Después de utilizarlo, es aconsejable colocar el Panel de Control en la estación de recarga.
Aunque la pantalla del Panel de Control esté en negro, sigue consumiendo energía.
Utilización del Panel de Control Pronto
Control del Home Theater
Activación de la pantalla del Panel de Control
•Presione la pantalla táctil con el lápiz óptico incluido o con el dedo.
- O bien -
•Presione la tecla Retroiluminación.

RFX9400 Manual de inicio
5
Cambio de los ajustes del Panel de Control Pronto
Nota Es posible que el instalador haya bloqueado el acceso a las páginas de configuración.
Normalmente, el instalador deja totalmente programado el Panel de Control y no es necesario
modificarlo.
Para abrir las páginas de configuración:
• Mantenga presionado del icono Settings (Configuración) durante más de tres
segundos.
General
Consejo Mantenga presionados los botones “+” y “-” para aumentar o reducir un ajuste rápidamente.
En la página Información puede encontrar la información
de red y versión, así como el estado de la memoria.
Volumen general se
refiere a todos los
sonidos que se oyen al
manejar el Panel de
Control.
Volumen de las teclas
rígidas se refiere
específicamente al
sonido predeterminado
que se oye al presionar
un botón.
Encendido y apagado del Panel de Control
Consejo Durante el transporte, apague siempre el Panel de Control para evitar que se active la pantalla
táctil y se agote la batería.
Para cambiar los ajustes de
Fecha y Hora
1
Presione el botón Mes, Día, Año u Hora.
Se resaltará el botón.
2
Presione los botones “-” y “+” para
ajustar la fecha y la hora.
Para cambiar los ajustes de Volumen
•
Presione los botones “-” y “+” para
ajustar el volumen.
Para acceder a otras páginas de
configuración
•
Presione las distintas pestañas.
Interruptor de encendido
El interruptor de encendido que
hay en la parte inferior del
Panel de Control enciende y
apaga el Panel de Control.

RFX9400 Manual de inicio
ESPAÑOL
6
Pantalla
Nota La pantalla viene calibrada de fábrica. No utilice esta función a menos que tenga problemas
con la pantalla táctil.
Asistencia
Mantenimiento del Panel de Control
Ponga el máximo cuidado para no dañar la pantalla táctil
• No deje caer el Panel de Control ni lo someta a golpes.
• Utilice el lápiz óptico incluido o el dedo para presionar sobre la pantalla táctil.
Atención Para evitar rayar la pantalla táctil, no utilice nunca sobre ella un lápiz o un bolígrafo real, ni
otro objeto puntiagudo.
Proteja el Panel de Control de las temperaturas extremas
Mantenga el Panel de Control alejado de calefactores y otras fuentes de calor.
El Panel de Control no es resistente al agua
El Panel de Control no debe exponerse a la lluvia ni a la humedad.
No guarde ni utilice el Panel de Control en ningún lugar extremadamente húmedo o mojado.
Si se derrama agua sobre el Panel de Control, debe desconectarlo colocando el interruptor de
encendido en la posición 0.
Coloque el Panel de Control en un entorno limpio hasta que se seque.
Para cambiar los ajustes de Activación
•
Pulse los botones para cambiar entre
distintos ajustes de activación:
Sensor de movimiento
: el Panel de
Control se activa cuando se inclina.
Teclas de pantalla
: el Panel de Control
se enciende y/o envía señales IR
cuando se pulsa una tecla de pantalla.
Teclas de cursor
: el Panel de Control se
enciende y/o envía señales IR cuando
se pulsa una tecla de cursor.
Para calibrar la pantalla táctil:
1
Pulse el botón
Calibrar
.
2
Siga las instrucciones de la pantalla
para pulsar las cuatro esquinas de la
pantalla. De este modo se calibra la
pantalla táctil.
Para cambiar los ajustes de
Desactivación por tiempo y Brillo:
•
Presione los botones “-” y “+”
para cambiar los ajustes.
Para salir de las páginas
de configuración:
•
Presione la tecla de
pantalla de la derecha
denominada
Salir
.

RFX9400 Manual de inicio
7
Limpieza del Panel de Control
• Utilice un paño suave y humedecido para limpiar el Panel de Control.
• Si la pantalla táctil está sucia, límpiela con un paño suave humedecido con un limpiacristales
diluido.
• No utilice detergentes corrosivos ni esponjas abrasivas.
• Evite el uso de agua abundante.
Detección de errores
Los botones de la pantalla táctil del Panel de Control no funcionan
correctamente
Si al presionar un botón se activa uno de los botones adyacentes, o si debe presionar cerca de un
botón para activarlo, es aconsejable que vuelva a calibrar la pantalla táctil como se describe en
‘Cambio de los ajustes del Panel de Control Pronto’, en la página 9.
Al volver a realizar la calibración, la pantalla táctil se ajusta para recuperar precisión y fiabilidad.
El Panel de Control pasa al modo en espera automáticamente
Esta es una función de desactivación por tiempo del Panel de Control para ahorrar energía. En las
páginas de configuración de la pestaña Pantalla se puede ajustar el tiempo que el Panel de Control
permanece activo, tal como se describe en ‘Cambio de los ajustes del Panel de Control Pronto’, en
la página 9.
Mi equipo AV no responde a los comandos del Panel de Control
• Compruebe en la pantalla el estado de la batería. Si el icono del nivel de la batería está en
rojo, recargue el Panel de Control.
• Cuando el Panel de Control funciona en un entorno WiFi, tenga en cuenta que es posible que la
red necesite unos segundos para activarse y empezar a trasmitir códigos.
• Es posible que esté fuera del alcance de la red WiFi. El icono de actividad WiFi que
normalmente indica la intensidad de la señal WiFi cambia a .
Consulte el siguiente capítulo.
El icono de actividad WiFi indica que no hay señal WiFi
Nota Según los ajustes que haya configurado el instalador, es posible que el icono de actividad
WiFi no esté visible en pantalla.
Si el Panel de Control muestra uno de los siguientes iconos:
Sin identificación
• Hay un problema de IP. Si el problema se repite con frecuencia, póngase en
contacto con su instalador para cambiar la configuración.
No hay conexión
• El punto de acceso inalámbrico está desconectado.
• El Panel de Control está fuera del radio de alcance del punto de acceso inalámbrico.
• Hay un problema de cifrado.

RFX9400 Manual de inicio
ESPAÑOL
8
El Panel de Control se queda sin batería muy rápidamente
• Cuando el Panel de Control funciona en un entorno WiFi, tenga en cuenta que consume energía
aunque la pantalla esté apagada. Después de utilizar el Panel de Control, es aconsejable
colocarlo en la estación de recarga.
• Si la batería se descarga constantemente, debería pensar en cambiar la batería. Póngase en
contacto con su instalador para solicitar información adicional.
Especificaciones
Pantalla Pantalla a color TFT de 3,7” con pantalla táctil
Pantalla LCD horizontal con resolución VGA (640 x 480 píxeles)
65.536 colores
Infrarrojos (IR) Distancia de funcionamiento = máx. 12 m (36 pies)
Ángulo de funcionamiento = 45º a 5 m (15 pies) máx.
Sistema inalámbrico Tecnología basada en WiFi a 2,4 GHz
Memoria 64 MB de memoria SDRAM
64 MB de memoria NAND Flash
Modo de alimentación Se enciende al inclinarlo o al presionar la pantalla, el botón de retroiluminación
o las teclas
Se apaga automáticamente pasado cierto tiempo
Indicador de estado de la batería
Dimensiones del Panel de Control: 157 x 100 x 34 mm (6,2 x 3,9 x 1,3 pulg.)
de la estación de recarga: 137 x 103 x 49 mm (5,4 x 4,1 x 1,9 pulg.)
Temperatura de funcionamiento: 5° C - 45° C (41° F – 113° F)
de almacenamiento: -25° C - 70° C (-13° F – 158° F)
Batería Batería de iones de litio, 2100 mAh
Adaptador de corriente Adaptador de corriente 100 V-240 V CA / 50-60Hz
(salida 5 V CC / 2 A)
Accesorios - Adaptador de corriente
- Base de conexión
- Manual de inicio
- Certificado de garantía
Panel Pronto – Manual de inicio
© Copyright 2006 Royal Philips Electronics, Interleuvenlaan 72 - 74, 3000 Leuven (Bélgica)
Observaciones:
Todos los derechos reservados. La reproducción total o parcial está prohibida, salvo consentimiento previo del propietario
de los derechos de autor.
Royal Philips Electronics no se responsabiliza de las omisiones o errores técnicos o de edición de este manual, ni
tampoco de los daños derivados directa o indirectamente del uso del Panel Pronto.
La información contenida en este Manual de inicio puede ser modificada sin previo aviso. Todas las marcas y nombres de
productos son marcas comerciales o marcas registradas de sus respectivas empresas u organizaciones.

Découverte de votre Pronto panneau de commande
Votre panneau de commande TSU9600 a été conçu et fabriqué avec soin dans le but de vous
proposer un fonctionnement simple et fiable de votre système de cinéma maison . Il a été
préprogrammé par l’installateur et contient un fichier de configuration comportant tous les codes,
les touches graphiques ainsi que le fonctionnement de la navigation.
1
RFX9400 Guide de démarrage
TSU9600 Guide de démarrage
Table des matières
Découverte de votre Pronto panneau de commande.......................................................................4
Première approche........................................................................................................................4
Charge du panneau de commande .................................................................................................5
Utilisation du Pronto panneau de commande
..................................................................................7
Contrôle de votre cinéma maison...................................................................................................7
Modification des paramètres du Pronto..........................................................................................9
Support
...........................................................................................................................................11
Maintenance du panneau de commande.......................................................................................11
Dépannage.................................................................................................................................12
Spécifications
.................................................................................................................................13
IFU Approbation / Safety Content TSU9600 ..................................................................................14
FCC Compliancy..........................................................................................................................14
Regulations According to R&TTE..................................................................................................15

2
RFX9400 Guide de démarrage
FRANÇAIS
Adaptateur secteur
Écran tactile
VGA
Touches
Touche rétroéclairage Stylet
Touches
mécaniques
Touches
curseur
Molette
rotative
Connecteur de la
station de accueil
Interrupteur Alimentation
Haut-parleur
Le panneau de commande
Station d’accueil
Connecteur du panneau
de commande
Connecteur USB
Ce connecteur est
utilisé par
‘installateur pour
configurer le panneau
de commande.
Première approche

RFX9400 Guide de démarrage
3
Charge du panneau de commande
Lorsque l’icône de Niveau de batterie de votre écran devient rouge, il est temps de charger le
panneau de commande. Selon la configuration établie par l’installateur, votre panneau de
commande peut fonctionner d’un à plusieurs jours.
Remarque L’autonomie de la batterie dépend des paramètres de temporisation et de réseau sans fil
configurés par l’installateur. Si vous remarquez que la batterie se détériore, veuillez
contacter votre installateur.
Lorsque vous placez le panneau de commande dans la station
d’accueil, le voyant DEL de chargement rouge situé sur l’avant
de la station d’accueil s’allume.
Lorsque le voyant de chargement s’éteint, le panneau de
commande est complètement chargé. Cette opération peut prendre
3 à 4 heures.
Si la batterie est faible et que le voyant de chargement ne s’allume pas, vérifiez que :
• l’interrupteur situé au bas du panneau de commande est placé sur 1.
• la station d’accueil est branchée à la prise secteur. S’il est branché, la station d’accueil s’illumine
en bleu.
• le panneau ce commande est placé correctement sur la station d’accueil.
• Le connecteur du panneau de commande est propre, sans obstruction.
Astuce Il est recommandé de placer le panneau de commande sur la station d’accueil après
utilisation. Même si l’écran du panneau de commande devient noir, il est toujours alimenté.
Utilisation du Pronto panneau de commande
Contrôle de votre cinéma maison
Activation de l’écran du panneau de commande
•Tapez sur l’écran tactile avec le stylet joint ou avec votre doigt.
-Ou-
• Appuyez sur la touche Rétroéclairage.

5
RFX9400 Guide de démarrage
Modification des paramètres du Pronto
Remarque Il est possible que l’installateur du panneau de commande ait bloqué l’accès aux pages
Settings (Paramètres). En général, l’installateur a entièrement programmé votre panneau de
commande et aucune autre modification n’est nécessaire.
Pour ouvrir les pages Settings (Paramètres) :
• Maintenez pressée l’icône Settings pendant plus de 3 secondes.
Général
Astuce Maintenez pressées les touches ‘-’ et ‘+’ pour accélérer l’augmentation ou la diminution
des paramètres.
À la page Info vous trouverez les informations de version
et de réseau, ainsi que l’état de la mémoire.
Le Volume général se
rapporte à tous les sons
que vous entendez
lorsque le panneau de
commande fonctionne.
Le volume des
touches mécaniques
se rapporte au son par
défaut que vous entendez
lorsque vous appuyez sur
une touche.
Activation/Désactivation du panneau de commande
Astuce Veillez à toujours éteindre le panneau de commande pendant les transports de manière à
éviter une activation involontaire de l’écran tactile et une utilisation inutile de la batterie.
Pour modifier les paramètres Date & Heure
1
Tapez sur la touché Mois, Jour, Année
ou Heure.
La touche est en surbrillance.
2
Appuyez sur les touches ‘-’ et ‘+’ pour
ajuster la date et l’heure.
Pour modifier les paramètres de Volume
•
Appuyez sur les touches ‘-’ et ‘+’ pour
adapter les paramètres du volume.
Pour accéder aux autres pages Settings :
•
Sélectionnez les différents onglets.
Interrupteur Alimentation
L’interrupteur situé au bas
du panneau de commande
active ou désactive ce
dernier.

RFX9400 Guide de démarrage
FRANÇAIS
6
Écran
Remarque L’écran est calibré à l’usine. N’utilisez pas cette fonctionnalité à moins que vous ne
rencontriez des problèmes avec l’écran tactile.
Support
Maintenance du panneau de commande
Faites attention à ne pas abîmer l’écran tactile.
•Veillez à ne pas laisser tomber le panneau de commande ni à le soumettre à un choc violent.
• Utilisez le stylet ou votre doigt pour taper sur l’écran tactile.
Attention N’utilisez en aucun cas un stylo, un crayon ni tout autre objet pointu sur l’écran tactile, afin
d’éviter tout dommage potentiel.
Protection du panneau de commande face aux températures extrêmes
N’approchez jamais le panneau de commande d’un radiateur ou de toute autre source de chaleur.
Le panneau de commande n’est pas étanche
Le panneau de commande ne doit pas être exposé à la pluie ni à l’humidité.
Ne stockez ni n’utilisez le panneau de commande dans un emplacement humide ou mouillé.
En cas de déversement d’eau sur le panneau de commande, éteignez ce dernier en plaçant
l’interrupteur sur 0.
Placez le panneau de commande dans un environnement propre pour le sécher.
Pour modifier les paramètres Activation
•
Tapez sur les touches pour passer d’un
paramètre Activation à un autre :
Capteur de prise en main
: le panneau
de commande s’active s’il est incliné.
Touches
: le panneau de commande
s’active et/ou envoie un signal IR dès
qu’une touche est pressée.
Touches curseur
: le panneau de
commande s’active et/ou envoie un
signal IR si l’une des touches du
curseur est pressée.
Pour Calibrer l’écran tactile :
1
Tapez sur la touche
Calibrer
.
2
Suivez les instructions à l’écran de
taper sur les 4 coins de l’écran.
L’écran tactile est calibré.
Pour modifier les réglages
Délai d’attente et Brilliance:
•
Appuyez sur les touches ‘-’ et
‘+’ pour ajuster les paramètres.
Pour quitter les pages
Settings :
•
Appuyez sur la
touche
Quitter
à
droite.

RFX9400 Guide de démarrage
7
Nettoyage du panneau de commande
• Utilisez un chiffon doux et humide pour nettoyer le panneau de commande.
• Si l’écran tactile est sale, nettoyez-le avec un chiffon doux humidifié à l’aide d’une solution
diluée de nettoie-vitre.
• N’utilisez ni détergent corrosif, ni éponge abrasive.
• Évitez d’utiliser trop d’eau.
Dépannage
Les touches de l’écran tactile de mon panneau de commande ne fonctionnent
pas correctement
Lorsque vous appuyez sur une touche, si la touche adjacente est activée à la place ou si vous devez
appuyer à côté de la touche de votre choix, il est recommandé de recalibrer l’écran tactile tel que
décrit à la rubrique ‘Modification des paramètres du Pronto’ page 9.
Le calibrage représente un moyen d’ajuster l’écran tactile afin d’assurer précision et fiabilité.
Le panneau de commande se met automatiquement en mode de veille
Il s’agit d’une fonctionnalité de temporisation du panneau de commande permettant d’économiser
l’alimentation. Vous pouvez ajuster le temps pendant lequel le panneau de commande reste actif
dans les pages de paramètres de l’onglet Screen (Écran), tel que décrit à la rubrique ‘Modification
des paramètres du Pronto’ page 9.
Mon équipement audio-vidéo ne répond pas aux commandes du panneau de
commande
• Vérifiez l’état de la batterie à l’écran. Si l’icône Battery Level est rouge, rechargez le panneau
de commande.
• Lorsque votre panneau de commande fonctionne dans un environnement WiFi, n’oubliez pas que
le réseau peut avoir besoin de quelques secondes pour s’activer et démarrer la transmission de
codes.
•Vous êtes peut-être situé en dehors de la portée du réseau WiFi. L’icône WiFi activity (Activité
WiFi) qui indique en général la puissance WiFi se modifie en .
Veuillez vous reporter au chapitre suivant.
L’icône WiFi activity n’affiche aucune puissance WiFi
Remarque L’icône Wifi activity peut ne pas être visible à l’écran, selon les paramètres configurés par
l’installateur.
Si le panneau de commande affiche une des icônes suivantes :
Aucune connexion
• Le point d’accès sans fill est inactif
• Le panneau de commande est hors de portée du point d’accès
• Il existe un problème de cryptage.
Aucune identification
• Il est survenu un problème IP. Si le problème survient de manière régulière,
contactez votre installateur afin de modifier les paramètres.

8
RFX9400 Guide de démarrage
FRANÇAIS
Mon panneau de commande devient rapidement hors tension
• Quand le panneau de commande fonctionne dans un environnement WiFi, n’oubliez pas qu’il est
sous tension même lorsque l’écran est noir. Il est recommandé de placer le panneau de
commande sur la station d’accueil après chaque utilisation.
• Lorsque la batterie chute trop rapidement, il est peut-être temps de la remplacer. Contactez votre
installateur pour plus d’informations.
Spécifications
Affichage Affichage couleur à matrice active (TFT)écran tactile ACL horizontal de 3,7”,
résolution VGA (640 x 480 pixels)
65,536 couleurs
Infrarouge (IR) Distance de fonctionnement = 36 pi (12 m) max.
Angle de fonctionnement = 45º à 15 ft (5 m) max.
Système sans fil Technologie WiFi fonctionnant à 2,4 GHz
Mémoire SDRAM 64 Mo
NAND Flash 64 Mo
Gestion de l’alimentation Activation par inclinaison, en tapant sur l’écran ou sur les touches, en pressant
sur la touche Backlight .
Désactivation automatique par temporisation
Indication d’état de batterie
Dimensions du panneau de commande : 6,2 x 3,9 x 1,3 pouces (157 x 100 x 34 mm)
de la station d’accueil : 5,4 x 4,1 x 1,9 pouces (137 x 103 x 49 mm)
Température de fonctionnement : 41° F – 113° F (5° C - 45° C)
d’entreposage : -13° F – 158° F (-25° C - 70° C)
Batterie Batterie lithium-ion, 2,100 mAh
Adaptateur secteur Adaptateur secteur 100 V-240 Vca/50-60 Hz
(sortie 5 V CC/2 A)
Accessoires - Adaptateur secteur
- Station d’accueil
- Guide de démarrage
- Certificat de garantie
Pronto panneau de commande - Guide de démarrage
© Copyright 2006 Royal Philips Electronics, Interleuvenlaan 72 - 74, 3000 Leuven (Belgique)
Remarques :
Tous droits réservés. La reproduction partielle ou intégrale du document est interdite sans l’autorisation préalable du
propriétaire des droits d’auteur.
Royal Philips Electronics n’est pas responsable des omissions, ni des erreurs techniques ou éditoriales de ce manuel, ni
des dommages directs ou indirects résultant de l’ utilisation du Pronto panneau de commande.
Les informations contenues dans ce guide de démarrage peuvent faire l’objet de modifications sans préavis.
Tous les noms de marques ou produits sont des marques commerciales ou des marques déposées de leurs propriétaires
respectifs.

FCC Warning:
The antenna used with this transmitter must maintain a separation distance of at least 20
cm from all persons and must not be co-located or operating in conjunction with any
other antenna or transmitter in order to satisfy FCC RF exposure compliance.

FCC Compliancy
This device complies with Part 15 of the FCC Rules. Operation is subject to the following two conditions:
• This device may not cause harmful interference.
• This device must accept any interference received, including interference that may cause undesired
operation.
This equipment has been tested and found to comply with the limits for a Class B digital device, pursuant to
part 15 of the FCC rule.
These limits are designed to provide reasonable protection against harmful interference in residential
installations. This equipment generates, uses, and can radiate radio frequency energy and, if not installed and
used in accordance with the instructions, may cause harmful interference to radio communications.
However, there is no guarantee that interference will not occur in a particular installation. If the equipment
does cause harmful interference to radio or television reception, which can be determined by turning the
equipment off and on, the user is encouraged to try to correct the interference by one or more of the following
measures:
• Reorient or relocate the receiving antenna.
• Increase the separation between the equipment and receiver.
• Connect the equipment into an outlet on a different circuit from the receiver.
• Consult the dealer or an experienced radio/TV technician for help.
CAUTION The user changes or modifications not expressly approved by the party responsible for
compliance could void the user’s authority to operate the equipment.
Notice for Canada / Remark pour le Canada
This class B digital apparatus complies with Canadian ICES-003.
Cet appareil numerique de la Classe B est conforme a la norme NMB-003 du Canada
Regulations According to R&TTE
Declaration
Hereby, Philips Consumer Electronics, BL Home Control declares that TSU9600 is in compliance with the
essential requirements and other relevant provisions of Directive 1999/5/EC:
• Radio: ETSI EN 300 328
• EMC: ETSI EN 301 489-1, ETSI EN 301 489-17
• Safety: EN60950-1
Czech My, Philips Consumer Electronics, BL Home Control, prohlašujeme že výrobek TSU9600 splňuje základní
požadavky a ostatní příslušná ustanovení Směrnice 1999/5/EC.
Danish Philips Consumer Electronics, BL Home Control, erklærer herved, at følgende udstyr TSU9600
overholder de væsentlige krav og øvrige relevante krav i direktiv 1999/5/EF.
Dutch Hierbij verklaart Philips Consumer Electronics, BL Home Control, dat deze TSU9600 in
overeenstemming is met de essentiële eisen en de andere relevante bepalingen van richtlijn 1999/5/EG.
Finnish Philips Consumer Electronics, BL Home Control, vakuuttaa täten että TSU9600 tyyppinen laite on
direktiivin 1999/5/EY oleellisten vaatimusten ja sitä koskevien direktiivin muiden ehtojen mukainen.
French Par la présente Philips Consumer Electronics, BL Home Control, déclare que les appareils du type
TSU9600 sont conformes aux exigences essentielles et aux autres dispositions pertinentes de la directive
1999/5/CE.
German Hiermit erklärt Philips Consumer Electronics, BL Home Control, dass sich dieses Gerät (TSU9600) in
Übereinstimmung mit den grundlegenden Anforderungen und den anderen relevanten Vorschriften der
Richtlinie 1999/5/EG befindet". (BMWi).
IFU Approbation / Safety Content TSU9600
i

Greek ΜΕ ΤΗΝ ΠΑΡΟΥΣΑPhilips Consumer Electronics, BL Home Control ∆ΗΛΩΝΕΙ ΟΤΙTSU9600
ΣΥΜΜΟΡΦΩΝΕΤΑΙ ΠΡΟΣ ΤΙΣ ΟΥΣΙΩ∆ΕΙΣΑΠΑΙΤΗΣΕΙΣ ΚΑΙ ΤΙΣ ΛΟΙΠΕΣΣΧΕΤΙΚΕΣ∆ΙΑΤΑΞΕΙΣ
ΤΗΣ Ο∆ΗΛΙΑΣ 1999/5/ΕΚ.
Hungarian A gyártó Philips Consumer Electronics, BL Home Control, kijelenti, hogy ez a TSU9600 megfelel az
1999/5/EK irányelv alapkövetelményeinek és a kapcsolódó rendelkezéseknek.
Italian Con la presente Philips Consumer Electronics, BL Home Control, dichiara che questo TSU9600 è
conforme ai requisiti essenziali ed alle altre disposizioni pertinenti stabilite dalla direttiva 1999/5/CE.
Polish Niniejszym firma Philips Consumer Electronics, BL Home Control, oświadcza, że TSU9600 spełnia
wszystkie istotne wymogi i klauzule zawarte w dokumencie „Directive 1999/5/EC”.
Portuguese Philips Consumer Electronics, BL Home Control, declara que este TSU9600 está conforme com os
requisitos essenciais e outras disposições da Directiva 1999/5/CE
Slovak Philips Consumer Electronics, BL Home Control, týmto prehlasuje že výrobok TSU9600 splňuje základné
požiadavky a iné zodpovedajúce ustanovenia Smernice 1999/5/EC.
Slovenian Philips Consumer Electronics, BL Home Control izjavlja da TSU9600 ustreza zahtevam in ostalim
pogojem v skladu z direktivo 1999/5/EC.
Spanish Por medio de la presente Philips Consumer Electronics, BL Home Control, declara que TSU9600
cumple con los requisitos esenciales y cualesquiera otras disposiciones aplicables o exigibles de la
Directiva 1999/5/CE.
Swedish Härmed intygar, Philips Consumer Electronics, BL Home Control, att denna TSU9600 står i
överensstämmelse med de väsentliga egenskapskrav och övriga relevanta bestämmelser som framgår av
direktiv 1999/5/EG.
Declaration of Conformity(DoC)
The Declaration of Conformity of this product can be found at: http://www.pronto.philips.com/products/DoC.
Marking
In line with CE marking regulations: the CE mark and the class 2 identifier are added to the equipment:
Czech Likvidace starého výrobku
Tento výrobek je navržen a vyroben z materiálů a komponentů nejvyšší kvality, které je možné recyklovat a
opětovně použít. Pokud je výrobek označen tímto symbolem přeškrtnutého kontejneru, znamená to, že
výrobek podléhá směrnici EU 2002/96/EC. Informujte se o místním systému sběru tříděného odpadu
elektrických a elektronických výrobků. Postupujte podle místních pravidel a neodkládejte takové staré
výrobky do běžného komunálního odpadu. Správná likvidace starého výrobku pomůže předcházet
případným nepříznivým účinkům na životní prostředí a lidské zdraví.
Danish Bortskaffelse af dit gamle produkt
Dit produkt er konstrueret med og produceret af materialer og komponenter af høj kvalitet, som kan
genbruges. Når dette markerede affaldsbøttesymbol er placeret på et produkt betyder det, at produktet er
omfattet af det europæiske direktiv 2002/96/EC. Hold dig orienteret om systemet for særskilt indsamling af
elektriske og elektroniske produkter i dit lokalområde. Overhold gældende regler, og bortskaf ikke dine
gamle produkter sammen med dit almindelige husholdningsaffald. Korrekt bortskaffelse af dine gamle
produkter er med til at skåne miljøet og vores helbred.
This device can be used in the following countries:
AT ✔ BE ✔ CH ✔ DE ✔ DK ✔ GR ✔ ES ✔ FI ✔ FR ✔ IE ✔ IT ✔
LU ✔ NL ✔ NO ✔ PT ✔ SE ✔ UK ✔ PL ✔ CZ ✔ HU ✔ SI ✔ SK ✔
ii

Dutch Verwijdering van uw oude product
Uw product is vervaardigd van kwalitatief hoogwaardige materialen en onderdelen, welke gerecycled en
opnieuw gebruikt kunnen worden. Als u op uw product een doorstreepte afvalcontainer op wieltjes ziet,
betekent dit dat het product valt onder de EU-richtlijn 2002/96/EC. Win inlichtingen in over de manier
waarop elektrische en elektronische producten in uw regio gescheiden worden ingezameld. Neem bij de
verwijdering van oude producten de lokale wetgeving in acht en plaats deze producten niet bij het gewone
huishoudelijke afval. Als u oude producten correct verwijdert voorkomt u negatieve gevolgen voor het
milieu en de volksgezondheid.
Finnish Vanhan tuotteen hävittäminen
Tuotteesi on suunniteltu ja valmistettu laadukkaista materiaaleista ja komponenteista, jotka voidaan
kierrättää ja käyttää uudelleen. Tuotteeseen kiinnitetty yliviivatun roskakorin kuva tarkoittaa, että tuote
kuuluu Euroopan parlamentin ja neuvoston direktiivin 2002/96/EC soveltamisalaan. Ota selvää
sähkölaitteille ja elektronisille laitteille tarkoitetusta kierrätysjärjestelmästä alueellasi. Noudata paikallisia
sääntöjä äläkä hävitä vanhoja tuotteita tavallisen talousjätteen mukana. Vanhojen tuotteiden hävittäminen
oikealla tavalla auttaa vähentämään ympäristölle ja ihmisille mahdollisesti koituvia haittavaikutuksia
French Mise au rebut des produits en fin de vie
Ce produit a été conçu et fabriqué avec des matériaux et composants recyclables de haute qualité. Le
symbole d’une poubelle barrée apposé sur un produit signifie que ce dernier répond aux exigences de la
directive européenne 2002/96/EC. Informez-vous auprès des instances locales sur le système de collecte
des produits électriques et électroniques en fin de vie. Conformez-vous à la législation en vigueur et ne
jetez pas vos produits avec les déchets ménagers. Seule une mise au rebut adéquate des produits peut
empêcher la contamination de l’environnement et ses effets nocifs sur la santé.
German Entsorgung Ihres alten Geräts
Ihr Gerät wurde unter Verwendung hochwertiger Materialien und Komponenten entwickelt und hergestellt,
die recycelt und wieder verwendet werden können. Befindet sich dieses Symbol (durchgestrichene
Abfalltonne auf Rädern) auf dem Gerät, bedeutet dies, dass für dieses Gerät die Europäischen Richtlinie
2002/96/EG gilt. Informieren Sie sich über die geltenden Bestimmungen zur getrennten Sammlung von
Elektro- und Elektronik-Altgeräten in Ihrem Land. Richten Sie sich bitte nach den geltenden Bestimmungen
in Ihrem Land, und entsorgen Sie Altgeräte nicht über Ihren Haushaltsabfall. Durch die korrekte Entsorgung
Ihrer Altgeräte werden Umwelt und Menschen vor möglichen negativen Folgen geschützt.
Greek
ΑΑ
ΠΠΟΟΡΡΡΡΙΙΨΨΗΗ ΠΠΑΑΛΛΙΙΟΟΥΥ ΠΠΡΡΟΟΙΙΟΟΝΝΤΤΟΟΣΣ
ΤΟ ΠΡΟΙΟΝ ΑΥΤΟ ΕΧΕΙ ΣΧΕ∆ΙΑΣΤΕΙ ΚΑΙ ΚΑΤΑΣΚΕΥΑΣΤΕΙ ΜΕ ΥΨΗΛΗΣ ΠΟΙΟΤΗΤΑΣ ΥΛΙΚΑ ΚΑΙ
ΕΞΑΡΤΗΜΑΤΑ ΠΟΥ ΜΠΟΡΟΥΝ ΝΑ ΑΝΑΚΥΚΛΩΘΟΥΝ ΚΑΙ ΝΑ ΞΑΝΑΧΡΗΣΙΜΟΠΟΙΗΘΟΥΝ
. ΟΤΑΝ ΕΝΑ
ΠΡΟΙΟΝ ΦΕΡΕΙ ΤΗΝ ΕΝ∆ΕΙΞΗ ΕΝΟΣ ∆ΙΑΓΡΑΜΜΕΝΟΥ ΚΑ∆ΟΥ ΜΕ ΡΟ∆ΕΣ
, ΤΟΤΕ ΤΟ ΠΡΟΙΟΝ ΑΥΤΟ
ΚΑΛΥΠΤΕΤΑΙ ΑΠΟ ΤΗΝ
Ο∆ΗΓΙΑ 2002/96/ΕΚ. ΠΑΡΑΚΑΛΟΥΜΕ ΝΑ ΕΝΗΜΕΡΩΘΕΙΤΕ ΣΧΕΤΙΚΑ ΜΕ ΤΟ
ΤΟΠΙΚΟ ΣΥΣΤΗΜΑ ΞΕΧΩΡΙΣΤΗΣ ΣΥΛΛΟΓΗΣ ΗΛΕΚΤΡΙΚΩΝ ΚΑΙ ΗΛΕΚΤΡΟΝΙΚΩΝ ΠΡΟΙΟΝΤΩΝ
.
Π
ΑΡΑΚΑΛΟΥΜΕ ΝΑ ΑΚΟΛΟΥΘΕΙΤΕ ΤΗΝ ΤΟΠΙΚΟ ΝΟΜΟΘΕΣΙΑ ΚΑΙ ΝΑ ΜΗΝ ΑΠΟΡΡΙΠΤΕΤΕ ΤΑ ΠΑΛΙΑ ΣΑΣ
ΠΡΟΙΟΝΤΑ ΜΑΖΙ ΜΕ ΤΑ ΟΙΚΙΑΚΑ ΣΑΣ ΑΠΟΡΡΙΜΜΑΤΑ
. Η ΣΩΣΤΗ ΜΕΘΟ∆ΟΣ ΑΠΟΡΡΙΨΗΣ ΤΩΝ ΠΑΛΙΩΝ
ΣΑΣ ΠΡΟΙΟΝΤΩΝ ΘΑ ΣΥΜΒΑΛΕΙ ΣΤΗΝ ΑΠΟΦΥΓΗ ΑΡΝΗΤΙΚΩΝ ΕΠΙΠΤΩΣΕΩΝ ΣΤΟ ΠΕΡΙΒΑΛΛΟΝ ΚΑΙ ΤΗΝ
ΑΝΘΡΩΠΙΝΗ ΥΓΕΙΑ.
Hungarian Az elhasznált termék hulladékkezelése
Ezt a terméket minőségi, újrafeldolgozható és újrahasznosítható anyagok és alkatrészek felhasználásával
tervezték és készítették. A termékhez kapcsolódó áthúzott kerekes kuka szimbólum azt jelenti, hogy a
termékre vonatkozik a 2002/96/EK. Európai irányelv. Kérjük, informálódjon az elektromos és elektronikus
hulladékok szelektív gyűjtésének helyi rendszeréről. Kérjük, a helyi szabályok figyelembe vételével járjon
el, és ne dobja az elhasznált terméket a háztartási hulladékgyűjtőbe. Az elhasznált termék megfelelő
hulladékkezelése segítséget nyújt a környezettel és az emberi egészséggel kapcsolatos esetleges negatív
következmények megelőzésében.
Italian Smaltimento di vecchi prodotti
Il prodotto è stato progettato e assemblato con materiali e componenti di alta qualità che possono essere
riciclati e riutilizzati. Se su un prodotto si trova il simbolo di un bidone con ruote, ricoperto da una X, vuol
dire che il prodotto soddisfa i requisiti della Direttiva comunitaria 2002/96/CE. Informarsi sulle modalità di
raccolta, dei prodotti elettrici ed elettronici, in vigore nella zona in cui si desidera disfarsi del prodotto.
Attenersi alle normative locali per lo smaltimento dei rifiuti e non gettare i vecchi prodotti nei normali
rifiuti domestici. Uno smaltimento adeguato dei prodotti aiuta a prevenire l’inquinamento ambientale e
possibili danni alla salute.
IFU Approbation / Safety Content TSU9600
iii

Norwegian Avhending av gamle produkter
Produktet er utformet og produsert i materialer og komponenter av høy kvalitet, som kan resirkuleres og
brukes på nytt. Når denne søppelbøtten med kryss på følger med et produkt, betyr det at produktet dekkes
av det europeiske direktivet 2002/96/EU. Finn ut hvor du kan levere inn elektriske og elektroniske produkter
til gjenvinning i ditt lokalmiljø. Overhold lokale regler, og ikke kast gamle produkter sammen med
husholdningsavfallet. Riktig avhending av de gamle produktene dine vil hjelpe til med å forhindre
potensielle negative konsekvenser for miljøet og menneskers helse.
Polish Usuwanie zużytych produktów
Niniejszy produkt został zaprojektowany i wykonany w oparciu o wysokiej jakości materiały i podzespoły,
które poddane recyklingowi mogą być ponownie użyte. Jeśli na produkcie znajduje się symbol
przekreślonego pojemnika na śmieci na kółkach, podlega on postanowieniom dyrektywy 2002/96/WE.
Należy zapoznać się lokalnymi zasadami zbiórki i segregacji sprzętu elektrycznego i elektronicznego.
Należy przestrzegać lokalnych przepisów i nie wyrzucać zużytych produktów elektronicznych wraz z
normalnymi odpadami gospodarstwa domowego. Prawidłowe składowanie zużytych produktów pomaga
ograniczyć ich szkodliwy wpływ na środowisko naturalne i zdrowie ludzi.
Portuguese Eliminação do seu antigo produto
O seu produto foi desenhado e fabricado com matérias-primas e componentes de alta qualidade, que
podem ser reciclados e reutilizados. Quando este símbolo, com um latão traçado, está afixado a um
produto significa que o produto é abrangido pela Directiva Europeia 2002/96/EC. Informe-se acerca do
sistema de recolha selectiva local para produtos eléctricos e electrónicos. Aja de acordo com os
regulamentos locais e não descarte os seus antigos produtos com o lixo doméstico comum. A correcta
eliminação do seu antigo produto ajuda a evitar potenciais consequências negativas para o meio ambiente
e para a saúde pública.
Slovak Likvidácia tohto produktu
Váš produkt bol navrhnutý a vyrobený pomocou vysokokvalitných materiálov a komponentov, ktoré sa
dajú recyklovať a znova využiť. Keď sa na produkte nachádza symbol prečiarknutého koša s kolieskami,
znamená to, že tento produkt pokrýva Európska smernica 2002/96/EC. Informujte sa o miestnom systéme
separovaného zberu elektrických a elektronických výrobkov. Postupujte podľa miestnych pravidiel a
nevyhadzujte tento produkt do bežného odpadu z domácnosti. Správnou likvidáciou starého produktu
pomôžete zabrániť možným negatívnym následkom na životné prostredie a ľudské zdravie.
Slovenian Odlaganje starega izdelka
Izdelek je zasnovan in izdelan iz visokokakovostnih materialov in komponent, ki jih je mogoče reciklirati in
ponovno uporabiti. Če je izdelek označen s prečrtanim košem za smeti, to pomeni, da je v skladu z
Direktivo EU 2002/96/ES. Seznanite se z lokalnim sistemom za zbiranje odpadnih električnih in
elektronskih komponent. Upoštevajte lokalne predpise in izrabljenega izdelka ne odlagajte z običajnimi
gospodinjskimi odpadki. S pravilnim odlaganjem izrabljenih izdelkov pomagate preprečevati negativne
posledice na okolje in zdravje ljudi.
Spanish Desecho del producto antiguo
El producto se ha diseñado y fabricado con materiales y componentes de alta calidad, que se pueden
reciclar y volver a utilizar. Cuando este símbolo de contenedor de ruedas tachado se muestra en un
producto indica que éste cumple la directiva europea 2002/96/EC. Obtenga información sobre la recogida
selectiva local de productos eléctricos y electrónicos. Cumpla con la normativa local y no deseche los
productos antiguos con los desechos domésticos. El desecho correcto del producto antiguo ayudará a
evitar consecuencias negativas para el medioambiente y la salud humana.
Swedish Kassering av din gamla produkt
Produkten är utvecklad och tillverkad av högkvalitativa material och komponenter som kan både återvinnas
och återanvändas. När den här symbolen med en överkryssad papperskorg visas på produkten innebär det
att produkten omfattas av det europeiska direktivet 2002/96/EG. Ta reda på var du kan hitta närmaste
återvinningsstation för elektriska och elektroniska produkter. Följ de lokala reglerna och släng inte dina
gamla produkter i det vanliga hushållsavfallet. Genom att kassera dina gamla produkter på rätt sätt kan du
bidra till att minska eventuella negativa effekter på miljö och hälsa.
IFU Approbation / Safety Content TSU9600
Concept and realisation of the Guide:
Concepto y elaboración de este Manual de inicio:
Documentation et élaboration de ce Guide de démarrage :
The Human Interface Group, De Regenboog 11, 2800 Mechelen (Belgium)
http://www.higroup.com
3104 205 3423.1
iv

 Loading...