

Page 1
REMOTE CONTROL
USER MANUAL
www.bostonacoustics.com
Boston Acoustics, Inc. 300 jubilee drive peabody ma 01960 USA
t : 978.538.5000 f : 978.538.5100
Page 2
USER MANUAL
TABLE OF CONTENTS
Taking a First Look 2
The Batteries 3
The Remote Control 4
The Touch Screen 5
Using the Freedom Remote 6
Activating the Freedom Remote 6
Operating Devices 8
Working with Modes 10
Adjusting the Settings 11
Defining the Brands of Your Devices 17
Learning Commands 20
Labeling Buttons and Devices 23
Recording Macros 25
NEOedit 29
Maintaining Freedom Remote 31
Important Notices 31
Cleaning Freedom Remote 31
FAQ 32
Troubleshooting 33
General Problems 33
Programming Problems 35
Specifications 36
Table of Brands 37
Index 44
Page 3

USER MANUAL
3
TAKING A FIRST LOOK
USER MANUAL
2
TAKING A FIRST LOOK
The Batteries
When you use the Freedom Remote for the first time, you have to install the
batteries. The Freedom Remote requires 3 AA-batteries (3 x 1.5 V) to function.
You can use either the supplied batteries or purchase rechargeable batteries.
1 Remove the battery cover by releasing the tab and lifting.
2 Place the batteries in the battery compartment.
3 Replace the battery cover.
After a few seconds, the Freedom Remote starts up automatically and an
introduction screen appears. The Freedom Remote beeps twice to indicate
that it has started up successfully.
USER MANUAL
2
This manual is intended to give you specific information on
the use of your Freedom Remote Control. More detailed
information regarding the use of your Boston Acoustics
Freedom System can be found in the Freedom Home Theater
System Setup and Use Guide.
The Freedom Remote is an intelligent remote control that
operates the Freedom Control Center via radio frequencies
(RF). For that reason, the Freedom Remote does not need
to be aimed at the Control Center.
The Freedom Remote also can control virtually all audio and
video devices that respond to infrared (IR) remote control
signals. Its easy-to-use LCD touch screen and its intuitive
interface make it a perfect remote control for every user.
IR codes are stored in the memory of the Freedom Remote,
to activate different brands of video and audio devices. The
Freedom Remote is set up by default to operate your Boston
Acoustics Freedom System. When you have other brands
of external devices connected, you simply define the brands
when you use the Freedom Remote for the first time. See
‘Defining the Brands of Your Devices’ on p. XX for more
details.
The Freedom Remote can also learn IR codes from your
existing remote controls. The Freedom Remote can receive and
store the IR codes by means of its learning eye. See ‘Learning
Commands’ on p. XX for more details.
You can label the touch screen buttons on the Freedom
Remote. Characters and numbers are available for labeling
as well as various audio and video symbols. See ‘Labeling
Buttons and Devices’ on p. XX for more details.
Recording macros is another feature of the Freedom Remote.
If you wish to assign a sequence of commands to a single
button, you can record a macro. See ‘Recording Macros’ on
p. XX for more details.
With the Freedom Edit software for a PC you can create your
own screens and create an individualized look for your remote.
Freedom Edit’s on line help system will guide you through
the process. In the future Freedom Edit will also allow you to
upgrade your Freedom Remote. You can find Freedom Edit on
the included CD-ROM and on the Boston Acoustics website
www.bostonacoustics.com/freedom. See ‘Freedom Edit’ on
p. XX for more details.
Page 4
USER MANUAL
5
USING THE FREEDOM REMOTEUSING THE FREEDOM REMOTE
USER MANUAL
4
Activating the Remote Control
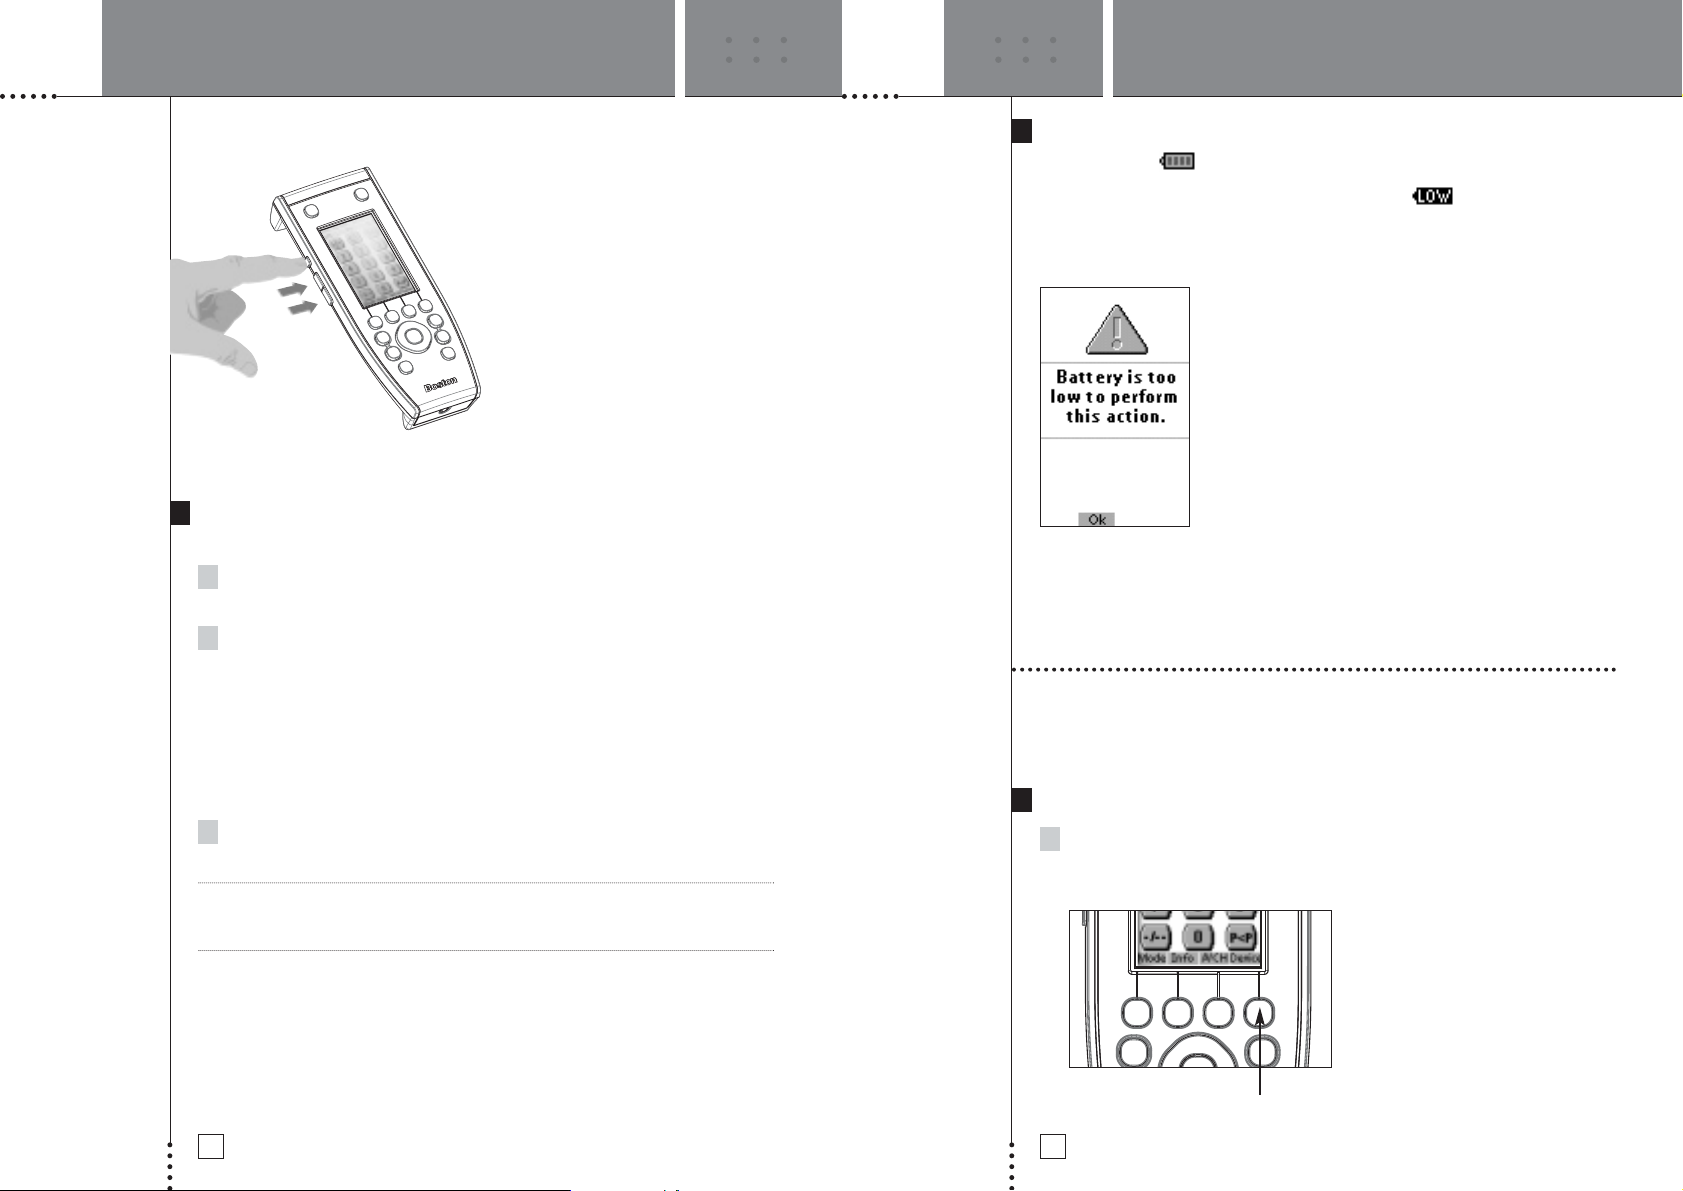
Turning on the Display and the Backlight
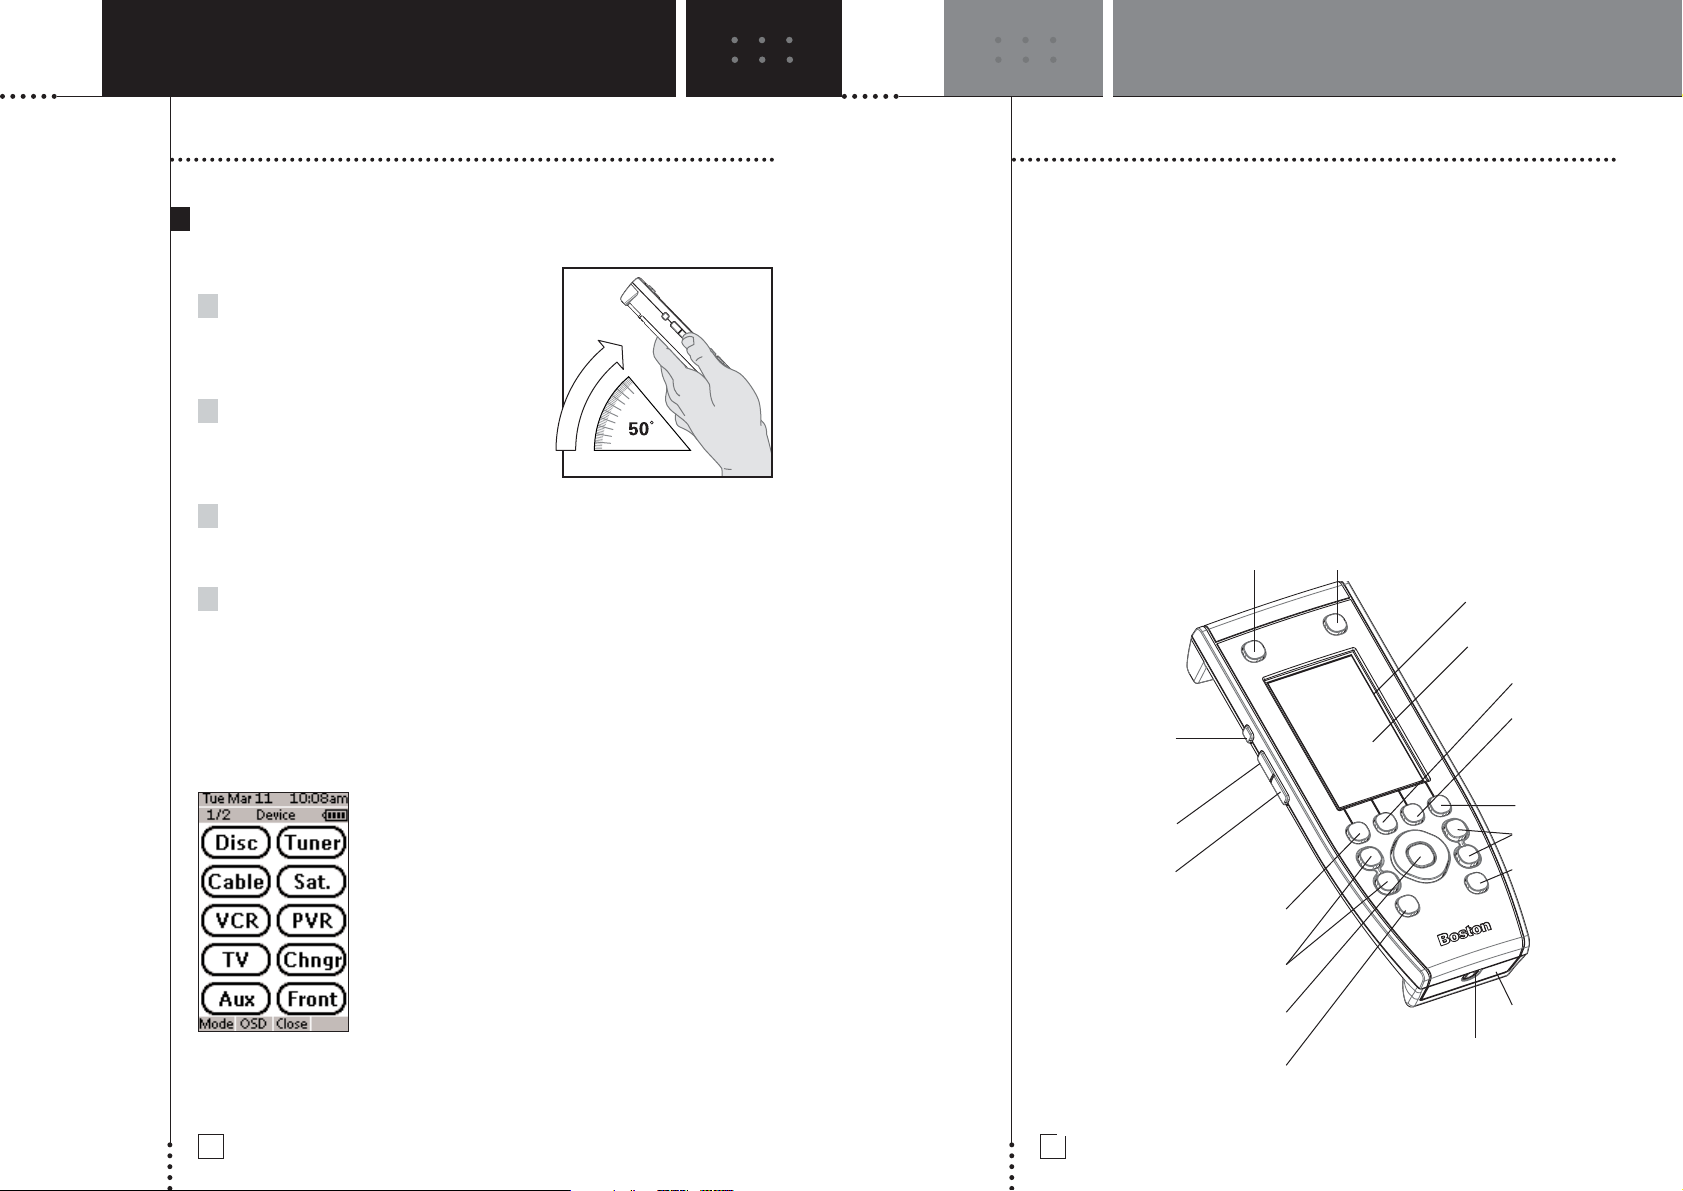
The Remote Control’s display can be activated
in four different ways:
Tilting the unit more than 50 degrees as
illustrated.
The display as well as the backlight will be
activated.
Pressing the backlight button on the
left side.
The display as well as the backlight will
be activated.
Tapping the screen gently with your finger or a blunt, soft object like
a pencil eraser.
The display will be activated, but not the backlight.
Pressing any button will activate the display, but not the backlight.
When the Freedom Remote is switched on for the first time or when it is reset,
the Introduction screen appears for a few seconds. The Freedom Remote then
automatically switches to the Device Overview that displays all potential devices
on your Freedom Remote. You can return to this Device Overview from within other
screens by pressing the Device button. See ‘Activating the Device Overview’ on
p. XX for more details.
Fig 1: Device Overview
The Remote Control Layout
On the Freedom Remote you can perform numerous actions by means of soft and
hard buttons.
• Soft buttons are the buttons you can tap on the LCD touch screen.
• Hard buttons are the buttons located above, below and on the left side of the
LCD touch screen.
• The hard buttons located above the touch screen are the Freedom System
Power and the TV Power.
• The 4 hard buttons just below the touch screen are the Mode button, 2
context specific buttons and the Device button. Their label is displayed at
the bottom of the touch screen.
• The hard buttons located at the bottom of the Freedom Remote are
Volume Up/Down, Channel Up/Down, Mute and TV source.
• The hard buttons located on the left side of the Freedom Remote are the
Backlight button and the Page Up/Down buttons.
Freedom System Power TV power
Serial port for
connecting to a PC
Backlight button to
activate the display
Page Up button
Page Down button
LCD touch screen
Soft buttons
OSD(On Screen
Display)
Close(closes On
Screen Display)
Device button
to go to the
Device Overview
Navigation
buttons
Freedom Mute
Mode button
to switch to another mode
Freedom System Volume
Up/Down
Channel Up/Down
TV source
Learning eye
Page 5
USER MANUAL
7
USING THE FREEDOM REMOTE
Using the Hard Buttons
Hard Buttons can be operated at any time, even without turning on the LCD touch
screen.
Using the Page Up and Page Down Buttons
The controls to operate your devices are typically located on different pages.
You can scroll through these pages using the Page Up and Page Down buttons on
the left side of the touch screen. The page number on the left of the touch screen
indicates the active page number and the total number of screens, for example
1/6. The pages also “wrap around” which means you can go to any page in any
direction.
Using the Backlight Button
Use the Backlight button to activate the Freedom Remote’s display and backlight.
See also ‘Turning on the Display and the Backlight’ on p. 6.
Note If the screen stays black or becomes blank, adjust the contrast using the contrast
buttons on the left side. The Remote Control also has a switch-off feature: it
automatically turns off to save power. In the settings (see p. ???) you can define
the switch-off time for the touch screen.
USING THE FREEDOM REMOTE
USER MANUAL
6
The Touch Screen
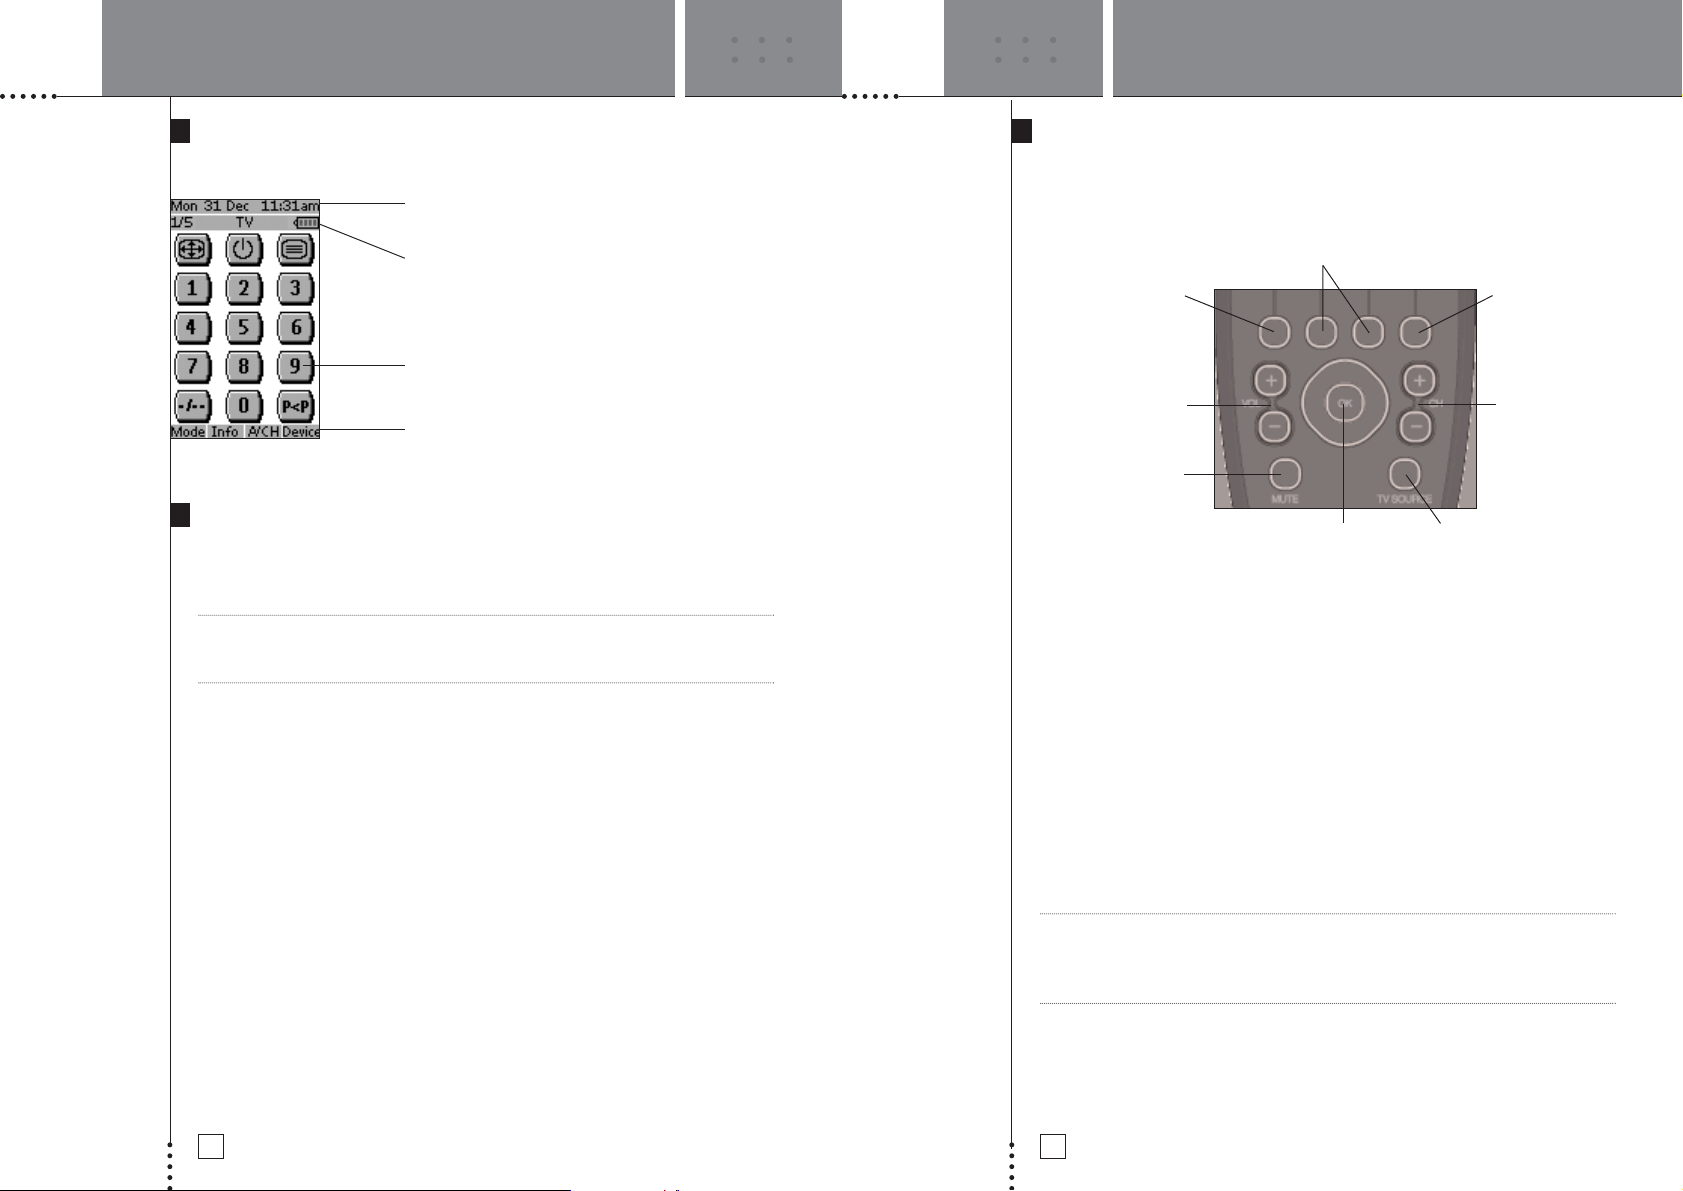
The LCD touch screen is divided into different sections:
Using the Soft Buttons
By tapping the soft buttons on the LCD touch screen you send commands to the
device you have selected. The name of the active device is indicated at the top
of the touch screen.
Note You can operate the soft buttons in the same way you operate hard buttons on a
conventional remote control. When you keep the soft button pressed instead of
tapping it, the Freedom Remote keeps sending the command.
Here the date and time are displayed when you
are operating your devices.
In this area you can see:
· the page number;
· the device you are operating;
· the battery level indicator.
With these soft buttons you operate your device.
These are the labels of the 4 hard buttons below
the touch screen.
Device button:
To activate the Device
Overview.
Channel Up/Down
2 context specific buttons:
Change function depending on the
device you are operating.
Mode button:
Press and hold 3 seconds to
activate the Mode screen.
TV source:
Selects the input on your TV.
Navigation buttons:
To perform actions in the menu of a device, like the
on screen display of a TV or a VCR display. Use the
cursor to move up, down, left or right in the menu
and press OK to select.
Freedom System
Volume Up/Down
Freedom System
Mute
FPO
Page 6
USING THE FREEDOM REMOTE USING THE FREEDOM REMOTE
USER MANUAL
8
USER MANUAL
9
Changing the LCD Contrast
To adjust the LCD contrast on the touch screen:
1 Press and hold the Backlight button.
The screen lights up.
2 While still holding the Backlight button, press the Page Up button once
to increase the LCD contrast one level.
The LCD contrast is adjusted one level up.
–or–
Press the Page Down button once to decrease the LCD contrast one
level.
The LCD contrast is adjusted one level down.
3 Release the Backlight button when the contrast is satisfactory.
The LCD contrast can be adjusted 16 levels.
Note To adjust the contrast multiple levels, you have press the Page Up or Page Down
button multiple times. When you press and hold the Page Up or Page Down
button, the LCD contrast will only change one level.
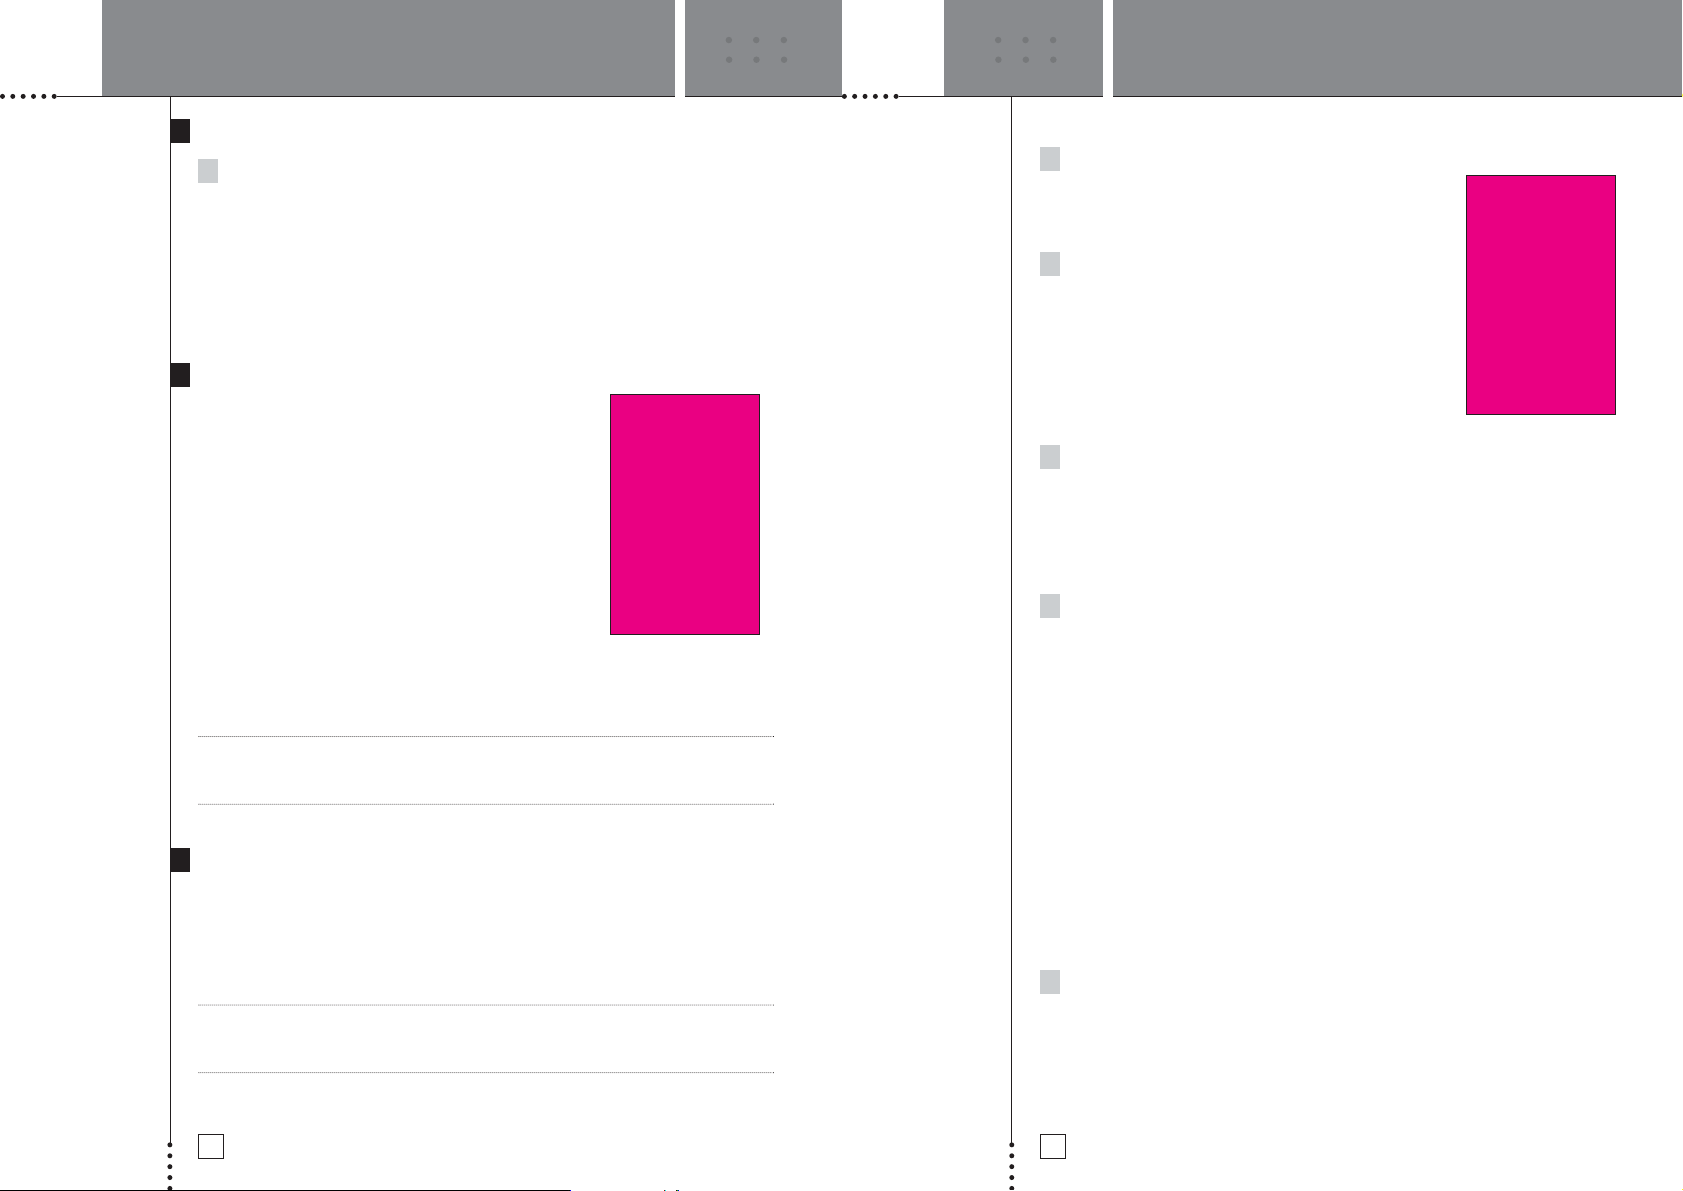
The Battery Status
The battery icon indicates the status of your batteries.
When the battery status is low, the Low Battery icon appears at the top of
the touch screen. You can still operate your devices, but you cannot adjust the
settings, define brands, learn commands or record macros anymore. When you try
to perform these actions, a message screen appears.
Replace the batteries to make the Freedom Remote fully functional again. See ‘The
Batteries’ on p. 3 to replace the batteries.
Operating Devices
To operate devices on your Freedom Remote you have to switch to the Device
Overview. This screen displays the available devices like TV, VCR, Disc, Tuner,
SAT and so on.
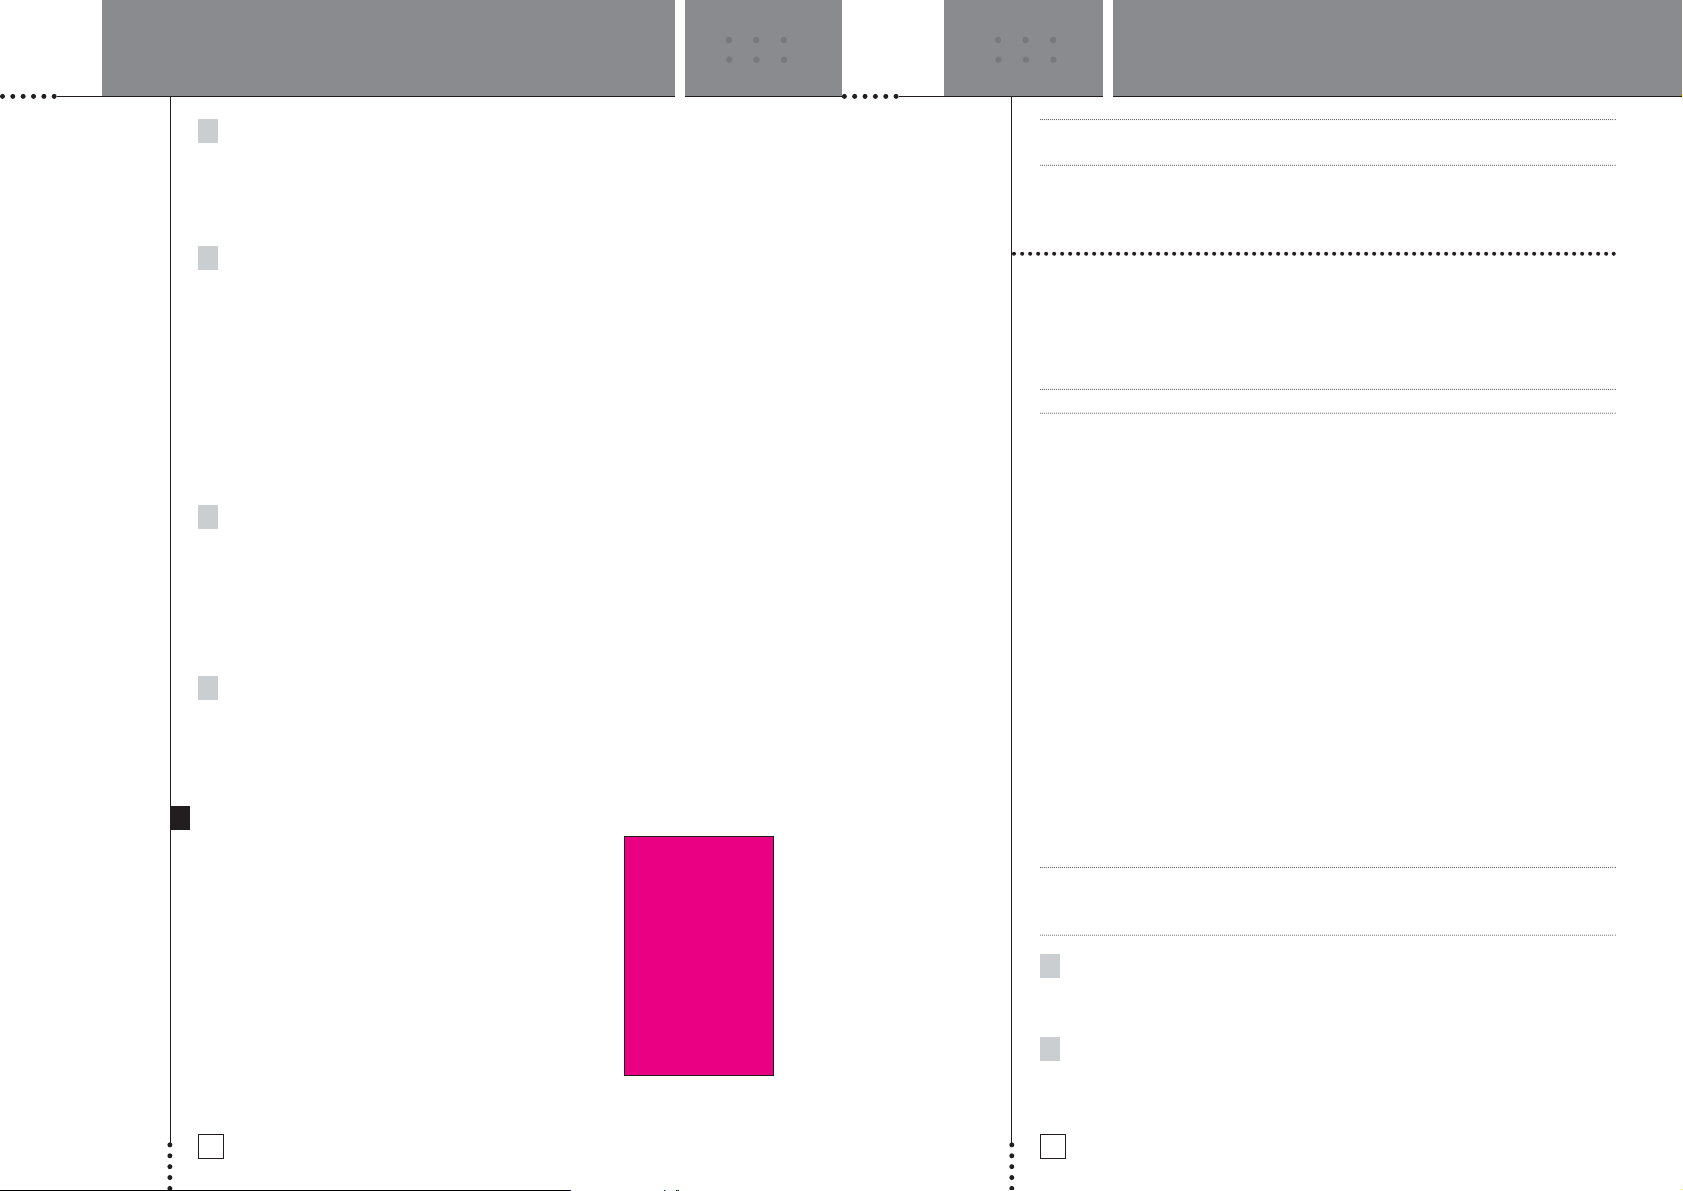
Activating the Device Overview Pages
Press the Device button.
The Device Overview appears, showing the available devices in the Freedom
Remote.
Fig. 2: The Device button
FPO
Page 7
USING THE FREEDOM REMOTE USING THE FREEDOM REMOTE
USER MANUAL
10
USER MANUAL
11
Selecting a Device on the Device Overview
Tap the soft button of the device you want to operate.
The first page of the selected device appears. See ‘Using the Page Up and
Page Down Buttons’ on p. 10 to go to another page of the device.
You operate devices using the buttons on your Freedom Remote:
• Soft buttons (touch screen buttons);
•Hard buttons.
Selecting Other Device Functions
The second page of the Device Overview Section allows
you additional control of your Freedom System. On this
page you will find four soft buttons. Zone 2, Macros,
Listen Modes, and Sleep.
Zone 2- The Freedom System has the ability to provide
audio simultaneously and independently in two different
listening "zones". With the connection of additional
amplification and loudspeakers to the Zone 2 output from
your Freedom Control Center you can for instance, enjoy
a CD in one room and the FM tuner in another.
To activate a device from Zone 2 tap the Zone 2 button.
Devices available now come up in a new page labeled Zone 2. You operate the
devices as you would in Zone 1. To turn off Zone 2, or return operation to Zone 1,
tap the Off or Zone 1 soft buttons at the bottom of the touch screen.
Note If a Zone 2 user selects a device already in operation in Zone 1 (or vice versa) both
users will have control of that same device. This may cause conflicting use and
programming.
Listen Modes
The Freedom Remote allows adjustment of several "listening modes" to allow you
to get maximum enjoyment and performance from your Freedom System. Listening
Modes allow you to use two, five or all six of the system’s speakers, depending on
program type, format and personal taste. The system’s subwoofer is always on,
regardless of the number of speakers being used.
Note A customized Listening Mode page is also available for each device and can be
found on the next-to-last page for each device. This page will only show soft
buttons appropriate for that device.
On the Listening Mode page you will find the following soft buttons:
Stereo
Uses only the front left and front right speakers ,
allowing Freedom to behave like a traditional 2-channel
stereo system.
Surround Music
Uses the front left/center/right and rear left/right
speakers to recreate the ambience of a live musical
performance. This is the default setting for the internal
CD and Tuner, as well as Auxiliary Audio and Changer
external inputs. Additional controls for Surround Music
can be found in the setup menus accessed via the
system on-screen display.
Surround Movie
Uses the front left/center/right and rear left/right speakers to recreate a movie
theater-like surround sound experience from sources that are not Dolby
®
Digital or DTS®. This is the default setting for VCR/PVR, Satellite/Cable and
TV. If any external source changes to a DolbyDigital or DTS signal, Surround
Movie mode will be automatically overridden.
5/6
Turns the rear center speaker on and off. The Freedom System includes the
ability to properly decode the latest surround sound formats: Dolby
®
Digital
Surround EX
™
and DTS®-ES™. Both of these formats are available on DVD, and
DolbyDigital Surround EX may be found on some programming on digital cable
and satellite.
The proper amount of sound will come automatically from the rear center speaker
when watching an EX- or ES-encoded movie. A regular DolbyDigital or DTS
soundtrack will also send sound to this speaker. However, when watching these
movies it is possible that too much sound can come from the rear center speaker,
and not enough from the rear left and right speakers. If that is the case, press the
5/6 button to turn the rear center speaker on and off. The corresponding blue light
on the control center will provide a visual confirmation of the status of the rear
center speaker. Simply chose which system configuration you prefer for a specific
movie soundtrack.
Subw -/+
Adjusts the output level of the subwoofer to match the type of programming
being played. You may also find that a relatively higher subwoofer level is
preferred when playing the system at lower volumes. The range of this control
is -12 to +12, and a visual indication of any level change will appear on the
control center display and your television.
Page 8
USER MANUAL
12
USING THE FREEDOM REMOTE USING THE FREEDOM REMOTE
USER MANUAL
13
Night (Disc and Changer Device only)
Changes the Freedom System’s overall dynamic range while listening to DVD’s.
This will reduce the difference between a movie’s softest and loudest
passages, making the movie more suitable for viewing when you are
concerned about disturbing others.
Listening Mode Memory
The Freedom System will automatically recall both the Listening Mode and the
associated subwoofer level setting for each source. Let’s say that the last time
you played a CD you listened in Surround Music mode and set the subwoofer
to –2. The last time you listened to the Tuner you listened in Stereo and set
the subwoofer to +3. You just finished watching a movie in Dolby Digital
Surround EX with the rear center speaker on and the subwoofer set to +5.
When you switch to Tuner, the system will automatically switch to Stereo,
subwoofer +3. Any changes you make to the Listen Mode settings will be
stored automatically in the system’s memory and recalled the next time you
choose that source.
Macros
A macro allows you to send a sequence of commands using one single button.
You can for instance switch on your TV, turn on your cable box and tune to a
movie channel, all by pressing a single button. Pressing the Macros soft button
on the second page of the Device Overview will bring you to a set of Macro
soft buttons. Refer to "Recording Macros" on page #### to learn how to
program these for your particular needs.
Sleep
You can program your Freedom System to shut off automatically. Using the and + soft buttons allows you to program the Freedom System to shut off
automatically in 15 minute intervals for up to 90 minutes.
Activating The Freedom System On Screen Display
Your Freedom System is equipped with an On Screen
Display (OSD). The OSD is utilized to check system status
and make adjustments to your Freedom System.
Adjustments may include things like TV aspect ratios,
speaker levels and parental controls. (See your Freedom
Home Theater System Setup and Use Guide for complete
information on the use of the OSD)
You access the OSD by pressing the OSD labeled hard
button at the bottom of the LCD display. You use the
Navigation Buttons (up/down/left/right/ok) to access
specific adjustments within the OSD. Use the Close
labeled hard button at the bottom of the LCD display to close the OSD.
Note After pushing the Close button it is necessary to press the Device button to return
to normal remote operation.
Working with Modes
The Freedom Remote starts up in Use mode. In this mode you operate your
devices. For customizing the Freedom Remote (adjusting the settings, defining
brands, learning buttons, labeling buttons and devices or recording macros) you
have to switch to the appropriate mode.
Note When switching between modes you will always return to the last active screen.
The Freedom Remote can be put into 5 different modes. These modes are:
Use mode For operating your devices. See ‘Operating Devices’ on p. 8.
Setup mode For changing the Freedom Remote system settings.
See ‘Adjusting the Settings’ on p. 11 for more details.
Brand mode For defining the brands of your devices using the Freedom
Remote’s database. See ‘Defining the Brands of Your Devices’
on p. 15 for more details.
Learn mode For learning commands from other remote controls. See ‘Learning
Commands’ on p. 18 for more details.
Label mode For labeling buttons on the Freedom Remote. See ‘Labeling
Buttons and Devices’ on p. 21 for more details.
Macro mode For recording macros. You can assign multiple commands to one
single button. See ‘Recording Macros’ on p. 23 for more details.
RF/IR mode For changing mode of communication to external devices. You can
control external components (VCR, satellite reciever) from greater
distances. See “changing the RF/IR settings.”
Note Learning commands, defining brands and recording macros is only possible per
device. This means that you first have to select a specific device to perform these
actions.
1 On the Device Overview tap the soft button of the device you want to
customize.
The first page of the selected device appears.
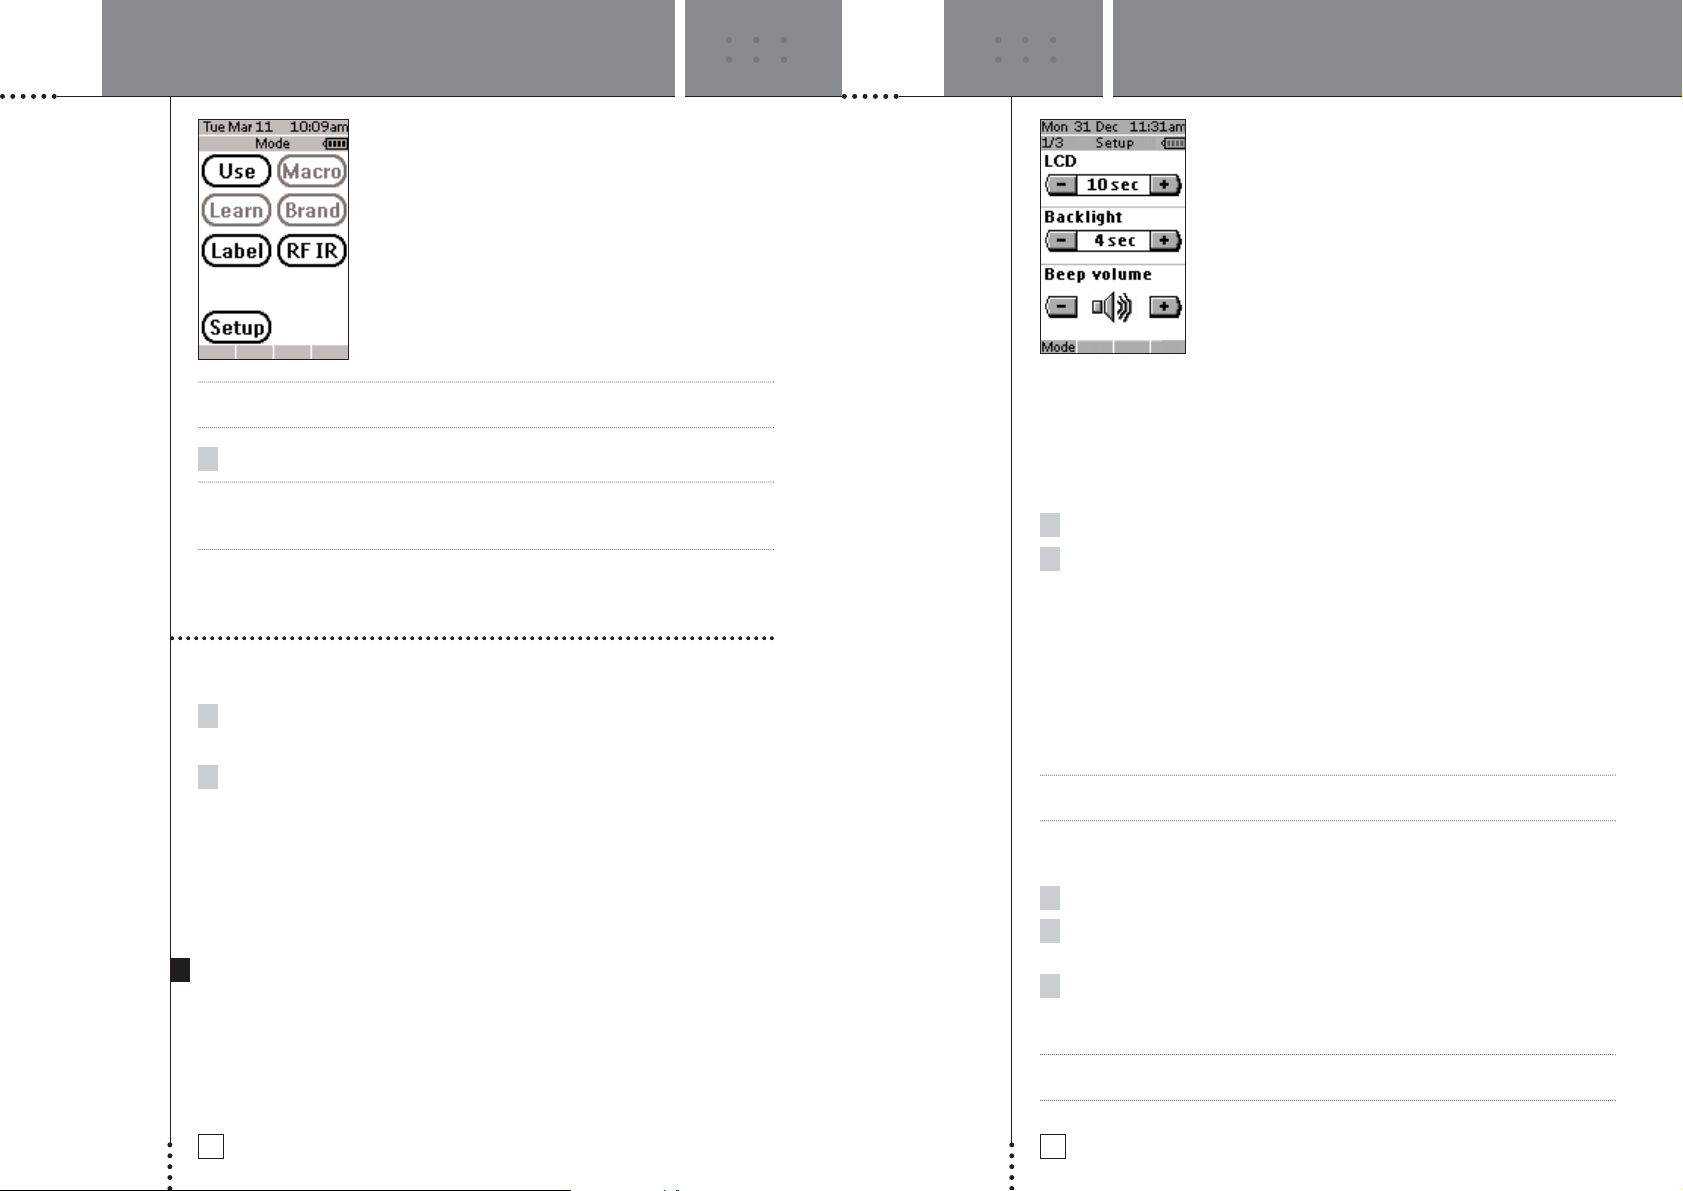
2 Press and hold the Mode button for 3 seconds.
The Mode screen appears.
Page 9
USER MANUAL
14
USER MANUAL
15
Note You have to press and hold the Mode button for 3 seconds to prevent accidental
changes.
3 Select the desired mode from the Mode screen.
Note When you switch to another mode from the Device Overview, you cannot choose
the Brand mode, Learn mode, RF/IR mode and Macro mode. To switch to these
modes you first have to go to the specific device you want to customize.
Adjusting the Settings
The Freedom Remote settings can be adjusted in the Setup mode.
1 Press and hold the Mode button for 3 seconds.
The Mode screen appears.
2Tap Setup in the Mode screen.
The first Setup page appears.
The Freedom Remote settings consist of 3 setup pages with several settings per
page. Use the Page Up and Page Down buttons to navigate to the appropriate
setup page.
First Setup Page
On the first setup page you can adjust:
• the LCD timeout;
• the backlight timeout;
• the beep volume.
Adjust the LCD Timeout
The LCD timeout indicates how long the LCD touch screen stays active before it
turns off. The LCD will only time out when you don’t touch any buttons. You can
set the timeout between 1 second and 120 seconds.
Press ‘+’ to increase or ‘-’ to decrease the time the LCD stays active.
1Tap ‘+’ or ‘-’ once to adjust the timeout 1 second up or down.
2 Press and hold ‘+’ or ‘-’ to adjust the timeout per 10 seconds up or
down.
Adjust the Backlight Timeout
The backlight setting indicates how long the backlight of the LCD touch screen
and the buttons stays active. The backlight timeout can be set between 1 second
and 120 seconds. You can also set the backlight in the ‘On’ setting so that the
backlight automatically activates when the touch screen is tapped or a hard button
is pressed.
Note The backlight cannot stay active longer than the LCD. If you increase the backlight
timeout, the LCD timeout will automatically increase as well.
Press ‘+’ to increase or ‘-’ to decrease the time the backlight stays active.
1Tap ‘+’ or ‘-’ once to adjust the timeout 1 second up or down.
2 Press and hold ‘+’ or ‘-’ to adjust the timeout per 10 seconds up or
down.
3 After you have reached 120 seconds press the ‘+’ once more to jump
to the ‘On’ state for the Backlight timeout.
Note When the settings for the LCD timeout and the backlight timeout are high or when
the backlight is activated automatically, the battery lifetime may be reduced.
USING THE FREEDOM REMOTE USING THE FREEDOM REMOTE
DOUG TO CHECK
Page 10
USER MANUAL
17
USER MANUAL
16
Change the Beep volume
The beep volume setting adjusts or turns off the volume of all button and system
beeps on the Freedom Remote. The beep volume levels are mute, soft, medium
and loud.
Press ‘+’ to increase or ‘-’ to decrease the beep volume.
Second Setup Page
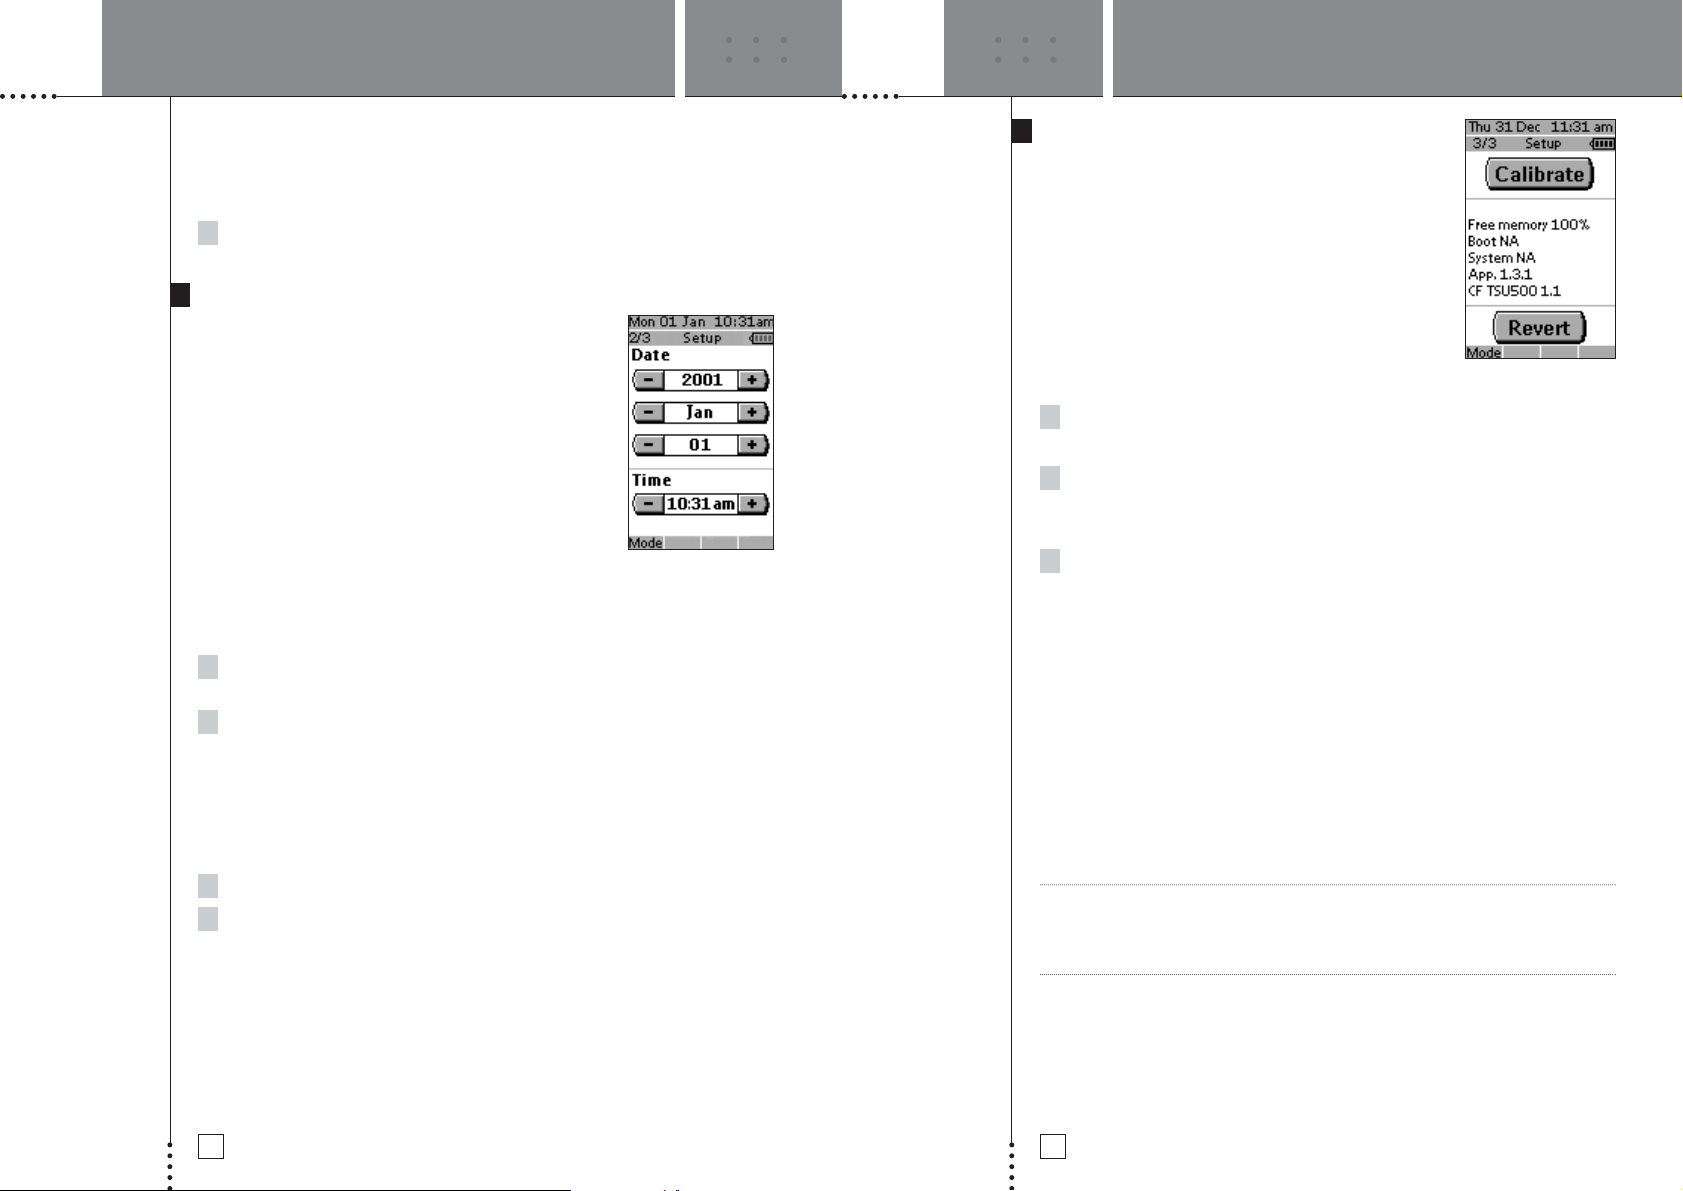
On the second setup page you can adjust the settings
for the date and the time.
Adjust the Date
You can set the year, the month and the day in the date settings.
Press ‘+’ to increase or ‘-’ to decrease the value for the year, month and day.
1Tap ‘+’ or ‘-’ once to adjust the year, month and day one value up
or down.
2 Press and hold ‘+’ or ‘-’ to adjust the values for the year and the month
more rapidly. The value for the day settings will change per 5 days.
The Freedom Remote will immediately reflect the date change at the top of
the screen.
Adjust the Time
1Tap ‘+’ or ‘-’ once to adjust the time 1 minute up or down.
2 Press and hold ‘+’ or ‘-’ to adjust the time more rapidly. The time
will increase or decrease per 30 minutes.
The Freedom Remote will immediately reflect the time change at the top of
the screen.
Third Setup Page
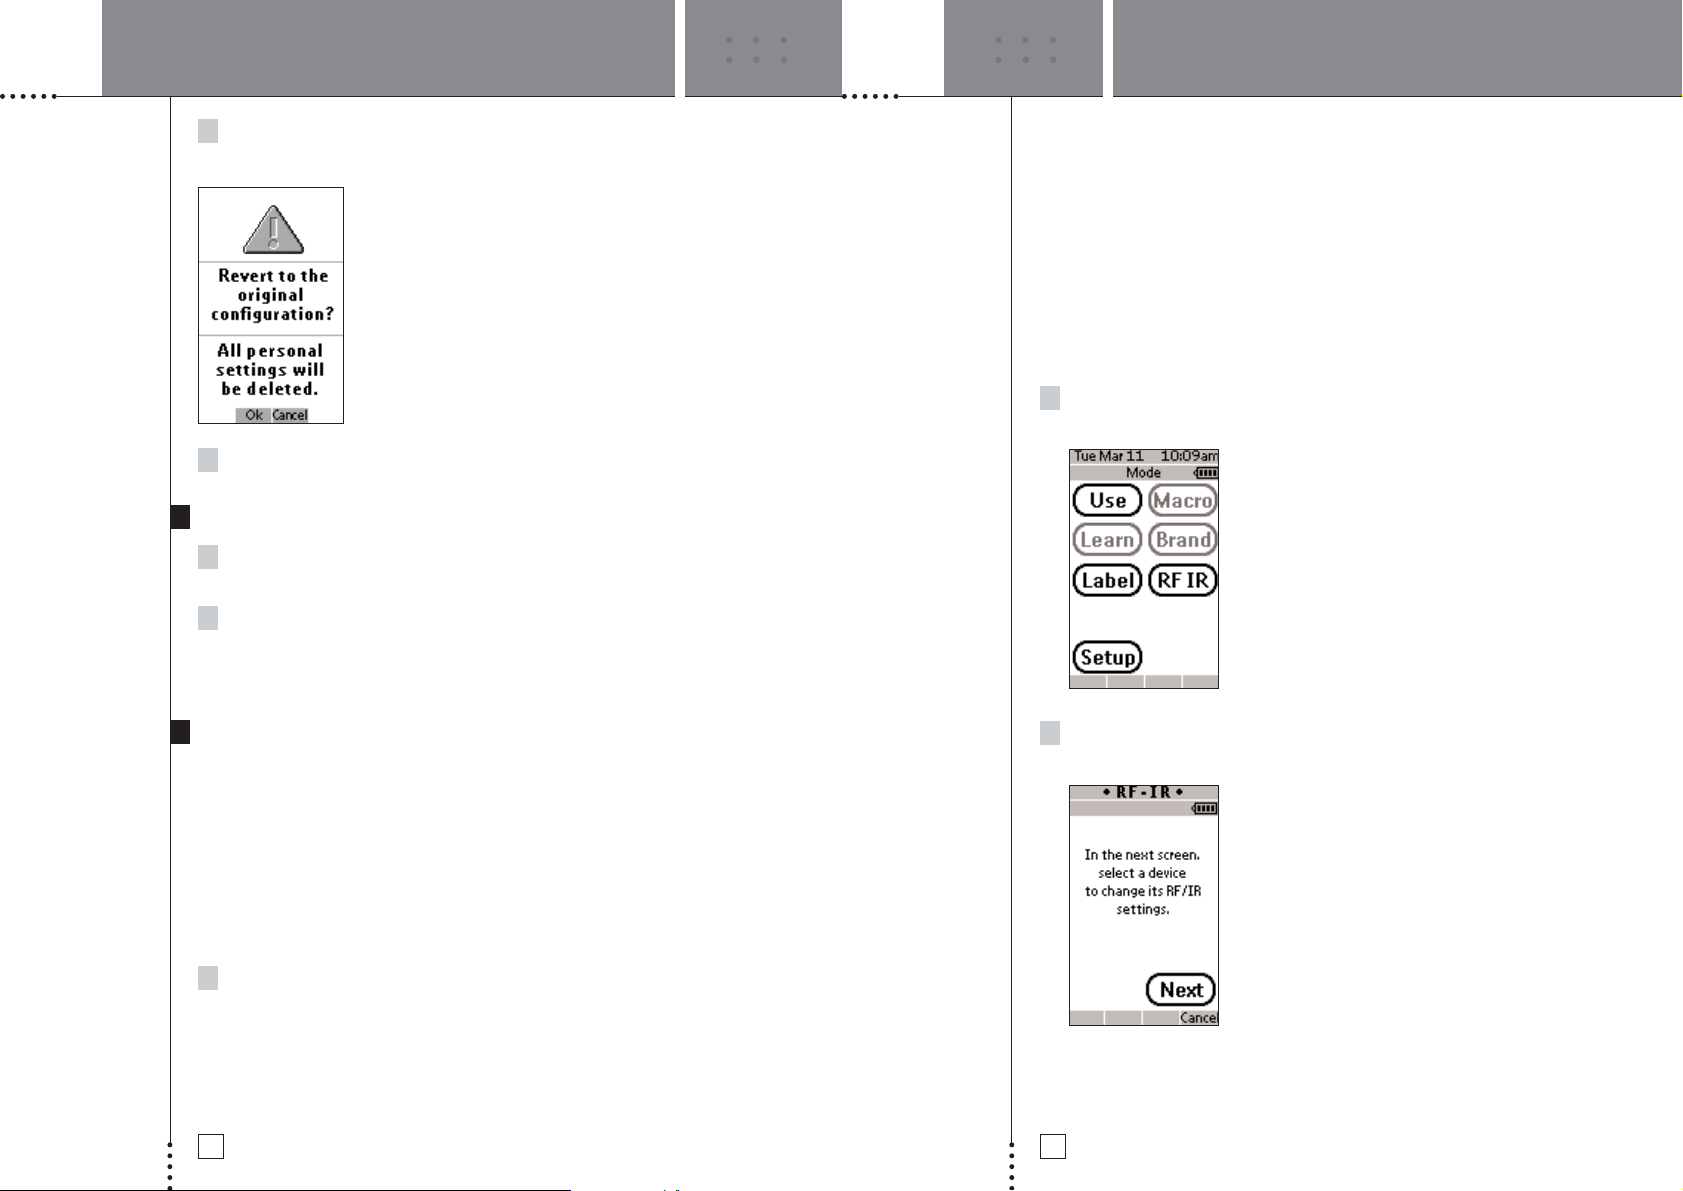
On the third setup page you can:
• Calibrate the touch screen;
• Read information about your device;
• Revert the Freedom Remote.
Calibrate the touch screen
1Tap the Calibrate button.
The first instruction “Touch the top left corner” appears.
2Tap as accurately as possible in the center of the image in the upper
left corner using a blunt tip of a pencil.
The second instruction “Touch the buttom right corner” appears.
3Tap as accurately as possible in the center of the image in the upper
left corner using a blunt tip of a pencil.
A message screen “Calibration successful” appears for 3 seconds. The setup
panel appears again.
The Freedom Remote Information
This page contains information that may be important to the dealer in case of
a defect. The following information is displayed on this screen:
• Free memory (in percentage), which gives you an indication on how much
memory is left to (further) customize the Freedom Remote;
• Boot version;
• Application version;
• Configuration file.
Revert
Warning When you revert the Freedom Remote, all customization is lost permanently.
You loose all the Freedom Remote settings, defined brands, learned codes and
recorded macros. You should save your configuration file to your PC before
reverting. See the Freedom Edit on page XX for more details.
By tapping the Revert button the Freedom Remote will be reverted to the default
configuration. Reverting to the original configuration restores the Freedom Remote
to its initial state. You might have to revert when you notice that scrolling through
pages is slowing down. This might be the case when you have added a lot of
commands to the Freedom Remote.
USING THE FREEDOM REMOTE USING THE FREEDOM REMOTE
Page 11
USER MANUAL
19
USER MANUAL
18
1Tap the Revert button.
A message screen appears to confirm or cancel the revert process.
2 Press OK or Cancel.
To exit Setup Mode
1 Press the Mode button.
The Mode screen appears.
2Tap the mode button you want to go to.
The Freedom Remote switches to this mode. See also ‘Working with Modes’
on p. 10.
Changing the RF/IR Settings
Your Freedom Remote Control comes from the factory ready to control your system
using Radio Frequencies (RF). RF signals have an operating range of 20 meters
(66 feet) in a typical home and unlike traditional Infrared (IR) signals used by most
consumer electronics, RF signals can go through walls and obstacles, allowing you
to operate the system throughout your house. This feature is particularly helpful
when controlling your system from another room or even outside where you may
have additional speakers. There are two reasons why you may want to adjust the
RF/IR characteristics of your Remote Control and Freedom System. One, to extend
control of IR devices by using RF. Two, to resolve system interference problems.
Changing Infrared (IR) Components to Radio Frequency (RF) Control
Additional devices (VCR, Satellite Receiver, etc.) that you may want to connect
to your Freedom System will typically use IR signals to operate via a remote
and your Freedom Remote Control is designed to learn these IR commands,
(see Defining Brands and Learning Commands on pages ###)
However you may choose to operate your IR devices using RF signals giving you
the conveniences of RF as mentioned above. The Freedom System can receive RF
signals from the Remote Control and translate them into IR signals and send them
to the appropriate IR device.
To be able to operate one or more IR devices with RF signals from your
Freedom Remote, you have to change the Remote Control’s RF/IR settings
for those devices. You will also need to connect the supplied Dual IR
Emitter to the rear of your Freedom Control Center. The Emitter also needs
to be placed near the IR device you want to operate, ensuring the Emitter’s
sending eye is pointed at the device. (See your Freedom Home Theater
System Setup and Use Guide for complete information on RF/IR operation)
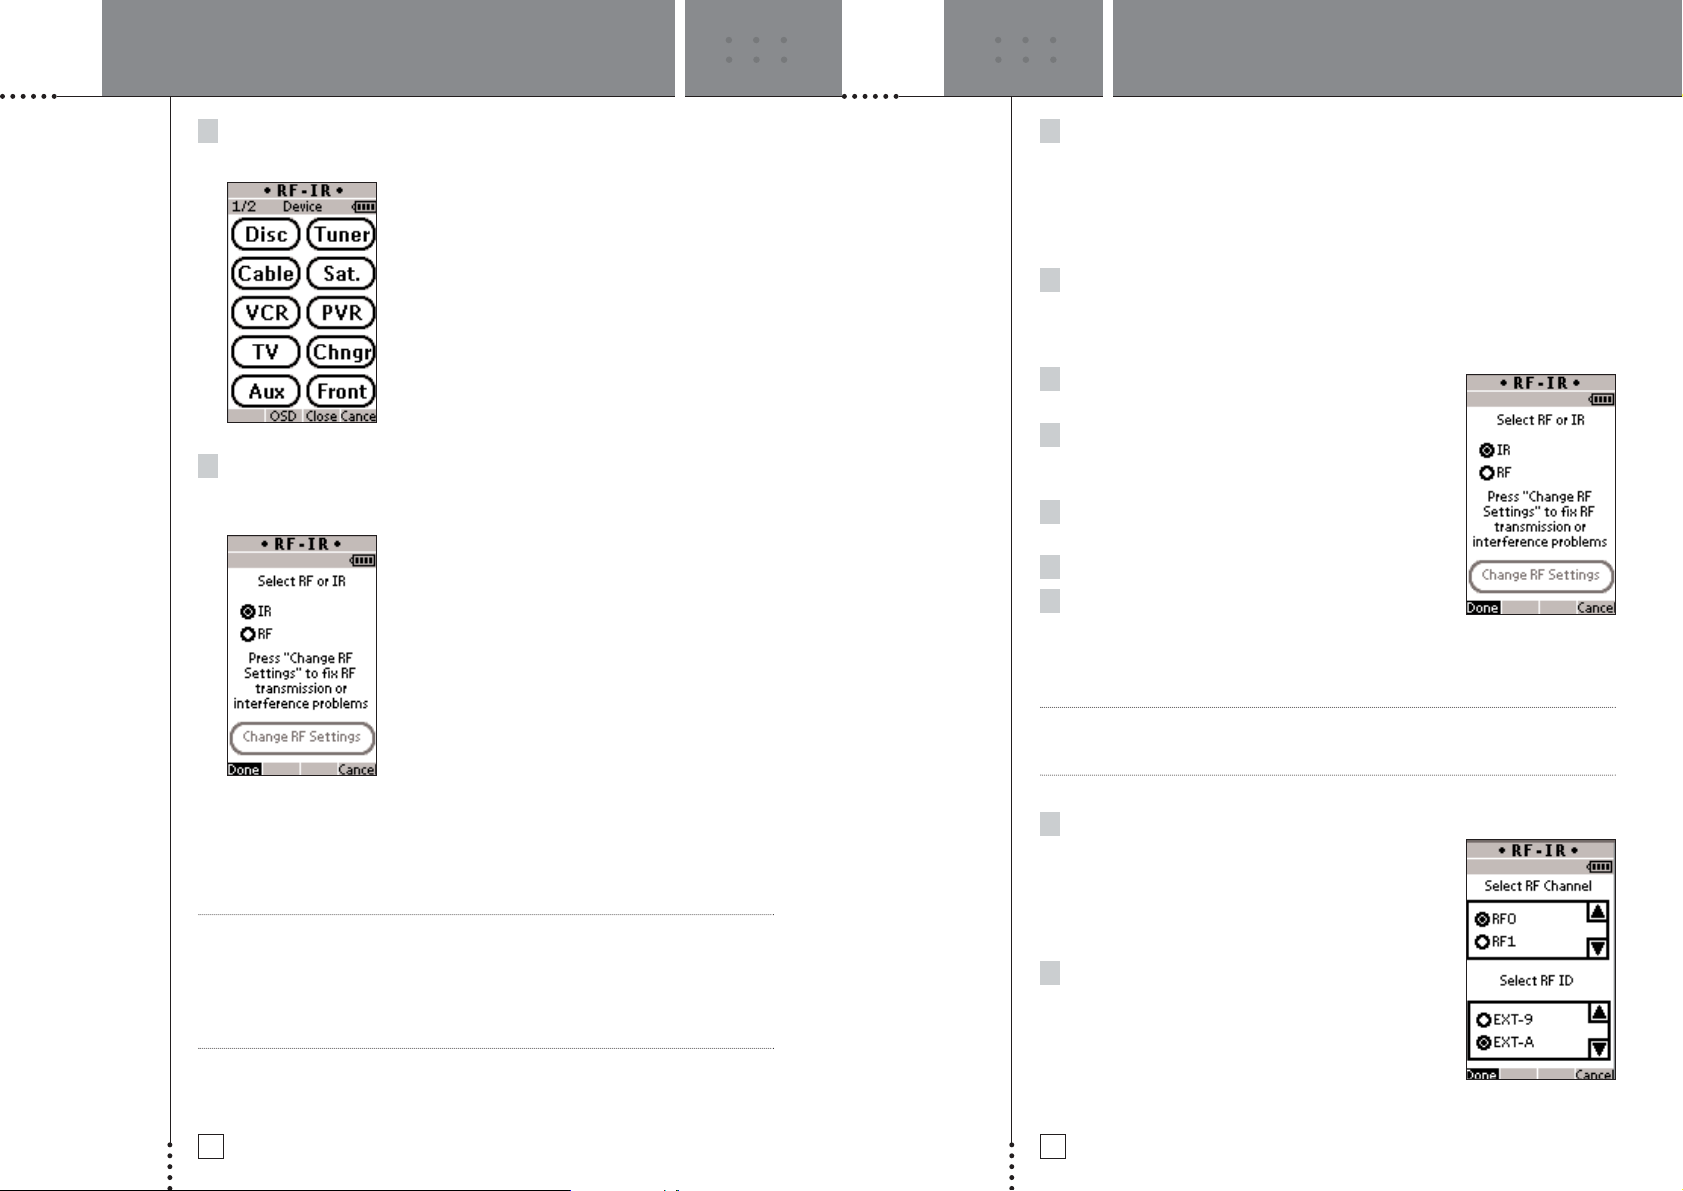
1 From the Device Overview page, press and hold the Mode button for 3
seconds.
2 From the Mode page press the RF/IR button. A message will ask you to
select the device you want to change. Hit Next.
USING THE FREEDOM REMOTE USING THE FREEDOM REMOTE
Page 12
USER MANUAL
20
USER MANUAL
21
3 On the next screen select the device you wish
to change.
4 Then select the transmission mode. The default setting for components
you have connected to your Freedom System is IR. If you want to
change this to RF, press the RF button. Tap the Done button to finish.
Now when using the remote, all commands will be sent to the Freedom System in
RF mode and converted to IR. The IR signal is then sent through the Dual IR Emitter
and delivered to the selected component.
Note Please do not change the RF settings to IR for Disc or Tuner. The Freedom
Control Center does not respond to IR commands. Additionally, changing
the operation of external devices from IR to RF means those devices no
longer respond to IR commands from the Freedom Remote Control. For
more information about RF/IR setup, see your Freedom Home Theater
System Setup and Use Guide for complete information on RF/IR operation).
Changing RF Settings- RF ID
If you have more than one Freedom system in your home or perhaps a neighbor
in close proximity also has a system, you may find that the RF signals from
one system’s Remote Control will interfere with the other. In this case you will
want to change your system’s ID code so that your system operates
independently.
1 Looking at the rear panel of your Freedom Control Center you will find
a dial labeled ID located near the main power line. By rotating the dial,
change the setting from the default A setting to another. Note the new
setting.
2 From the Device Overview page, press and hold
the Mode button for 3 seconds.
3 From the Mode page press the RF/IR button. A
message will ask you to select the device you
want to change. Press Next.
4 On the next screen select the device you wish
to change.
5 Press the button labeled Change RF Settings
6 On the next screen find the box labeled Change
RF ID. Scroll to the ID designation that matches
the ID knob on the back of the Control Center.
Press Done
Note All devices must match the ID number selected on the Control Center. If you
change one device you must change all others in the same manner for proper
operation.
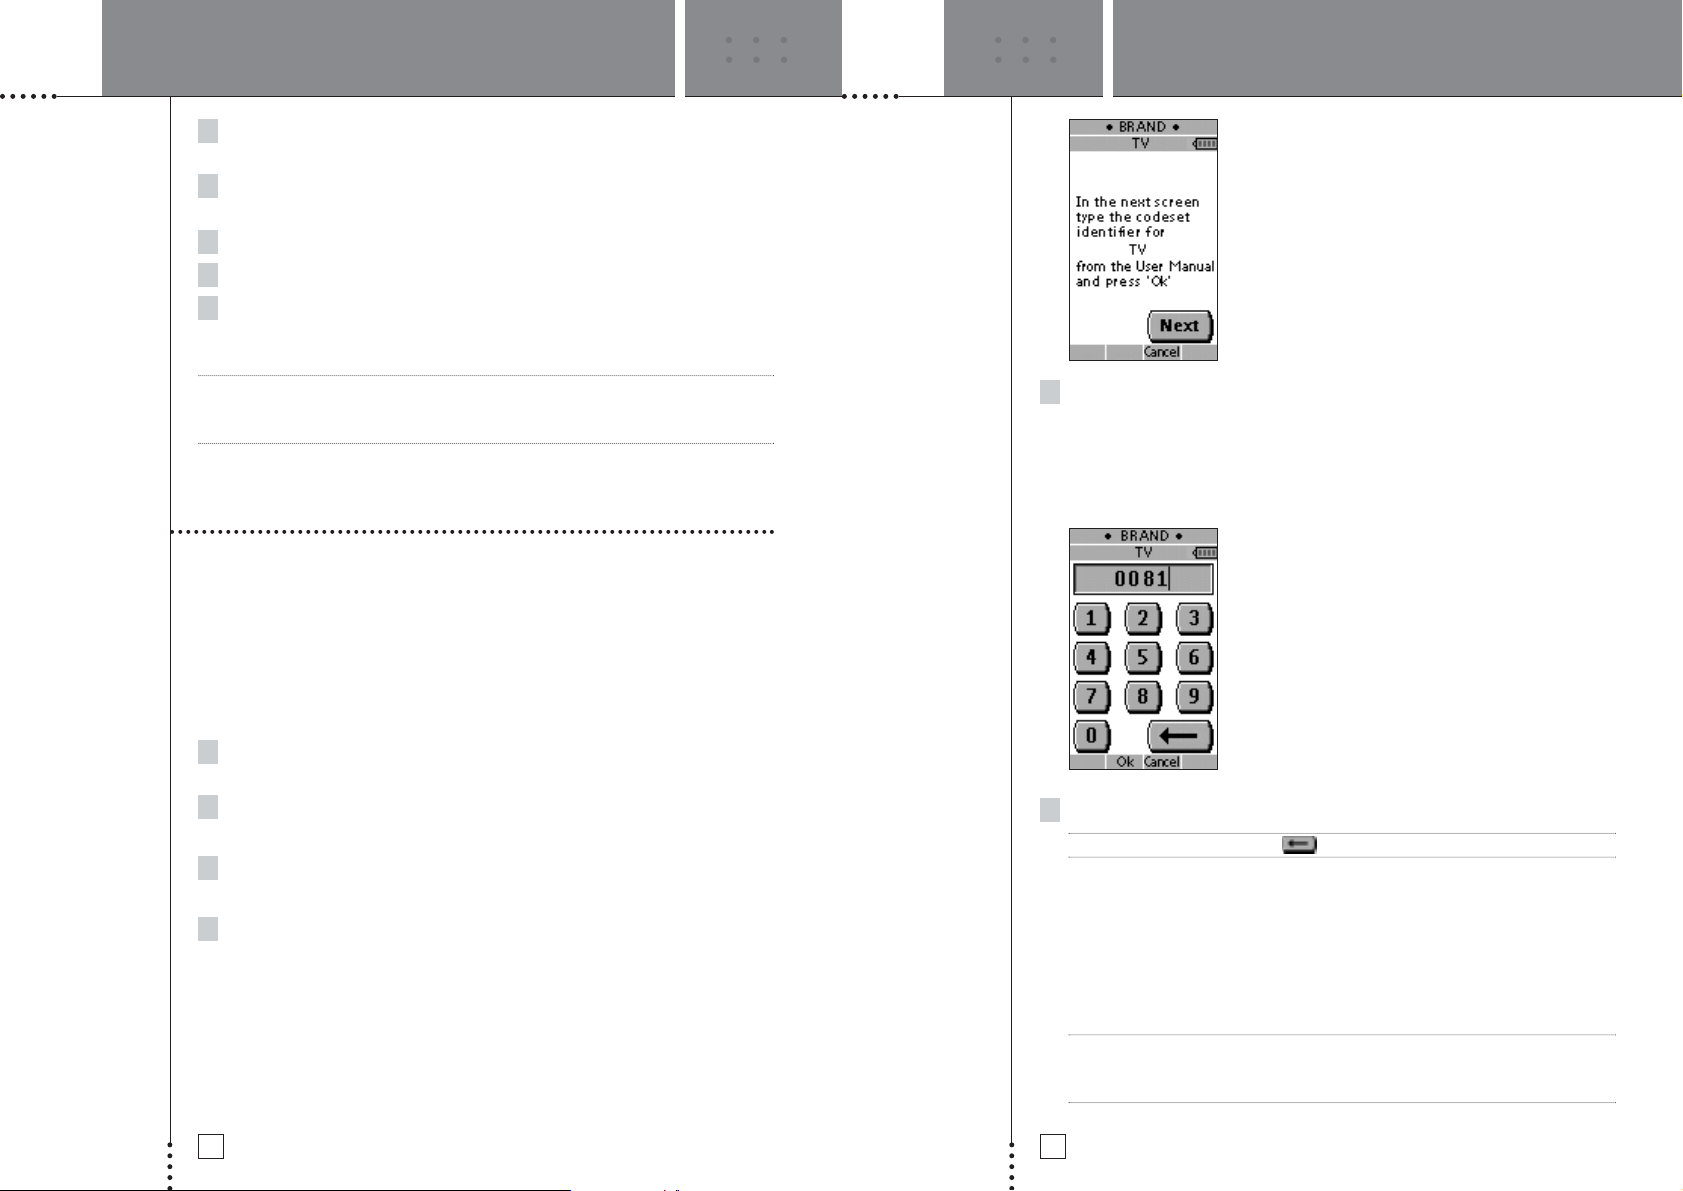
Changing RF Settings- RF Channel
In rare occasions, other RF controlled devices (garage
door openers, cordless phones) may interfere with
the operation of your Freedom Remote Control. If you
suspect interference, you can choose another channel
to operate your Freedom System.
1 Looking at the rear panel of your Freedom
Control Center you will find a dial labeled CH
located near the main power line. By rotating
the dial, change the setting from the default 0
setting to another. Note the new setting.
USING THE FREEDOM REMOTE USING THE FREEDOM REMOTE
Page 13
USER MANUAL
23
USER MANUAL
22
2 From the Device Overview page, press and hold the Mode button for 3
seconds.
3 From the Mode page press the RF/IR button. A message will ask you to
select the device you want to change. Press Next.
4 On the next screen select the device you wish to change.
5 Press the button labeled Change RF Settings
6 On the next screen find the box labeled Change RF Channel. Scroll to
the RF designation that matches the CH knob on the back of the Control
Center. Press Done
Note All devices must match the CH number selected on the Control Center. If you
change one device you must change all others in the same manner for proper
operation.
Defining the Brands of Your Devices
The Freedom Remote can operate other components (VCR, Satellite Receiver) that
you may want to connect to your Freedom System. This eliminates the need to
use multiple remotes from different manufacturers, as well as allow command
operations to be programmed as "macros" (see section on Macros). To take
advantage of the Freedom Remote’s ability to control other brands and devices
follow these steps.
To define brands you have to set the Freedom Remote in Brand mode:
1 Set the Freedom Remote in Use Mode. See ‘Working with Modes’ on
p. 10.
2 Select the device, e.g. TV, for which you want to define the brand.
The device screen appears.
3 Press and hold the Mode button for 3 seconds.
The Mode screen appears.
4Tap Brand on the Mode screen.
An instruction screen appears indicating you can set the brand for the selected
device.
The Freedom Remote is now in Brand mode. ‘Brand’ and the label of the
selected device appear at the top of the LCD touch screen.
5Tap Next to define the code set of your device.
The code set screen appears. When the brand is already defined like in the
default configuration, the code set is displayed.
–or–
Press Cancel to exit Brand mode.
6 Enter the code set from the ‘Table of Brands’ from p. 34 onwards.
Note To delete a number, tap on the LCD touch screen.
In the Table of Brands the brands are ordered alphabetically per device. Some
brands use several code sets for the same device. The code sets in the table
of brands contain only the basic functions of the devices. It is advised to enter
the first code set and try it out. If your device is not responding properly, you
should try out the second code set of the brand. Try out all code sets of the
brand until you can operate the device to your satisfaction.
Note Defining the brand of your device will not erase the commands you have
previously learned to buttons of that device. See ‘Learning Commands’ on
p. 18 for more details.
USING THE FREEDOM REMOTE USING THE FREEDOM REMOTE
Page 14
1 to 4 inches (2 to 10 cm)
USER MANUAL
25
USER MANUAL
24
7 Press OK to define the brand of your device.
When the code set is correct, you will hear a confirmation beep. The IR codes
of the selected device will be installed on the Freedom Remote.
If you entered an incorrect code set, you hear an error beep.
A message screen appears.
1 Press OK.
The Freedom Remote returns to the code set screen where the incorrect code
set is displayed.
2 Look up the correct code set and repeat instructions 6 and 7.
Learning Commands
If an IR code or a brand is not in the database, you can program the Freedom
Remote commands by transmitting IR signals from your existing remote controls to
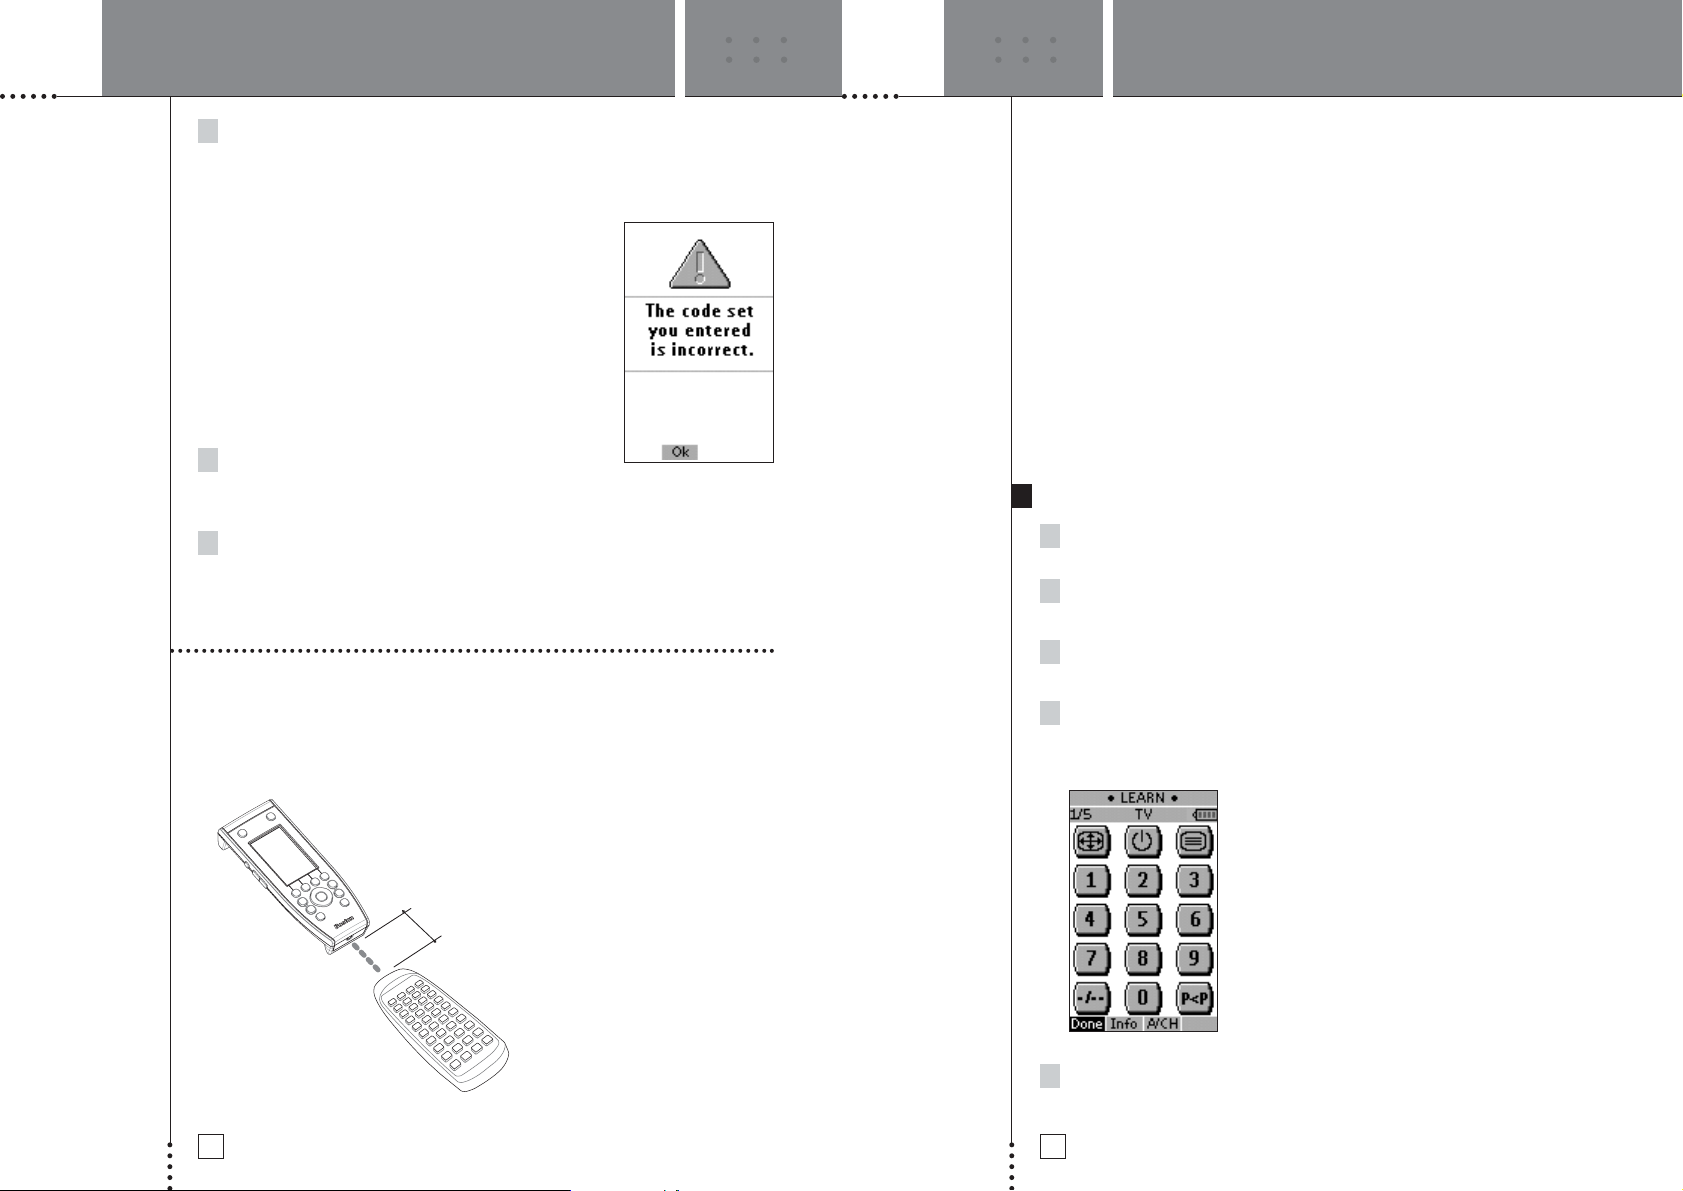
the Freedom Remote’s learning eye. To do this, place the Freedom Remote and the
device’s remote control on a flat surface, 1 to 4 inches (2 to 10 cm) apart.
To learn commands from other remote controls, the Freedom Remote has to be in
Learn mode. Switching to Learn mode is only possible from a specific device, not
from the Device Overview. See ‘Working with Modes’ on p. 10.
Per device you can learn all soft and hard buttons on the Freedom Remote, except
for:
• the Backlight button
• the Page Up and Page Down buttons
• the Mode button
• the Device button
• the Power button
• the OSD button
• the Close button
• the Volume +/- button
• the Mute button
The Learn Sequence
1 Set the Freedom Remote in Use Mode. See ‘Working with Modes’ on
p. 10.
2 Select the device, e.g. TV, with the buttons you want to learn.
The device screen appears.
3 Press and hold the Mode button for 3 seconds.
The Mode screen appears.
4Tap Learn on the Mode screen.
The Freedom Remote is now in Learn Mode. ‘Learn’ and the label of the
selected device appear at the top of the touch screen.
5 Use, if necessary, the Page Up or Page Down button to go to the next
button you want to learn.
USING THE FREEDOM REMOTE USING THE FREEDOM REMOTE
jeff to supply
Page 15
USER MANUAL
26
USER MANUAL
27
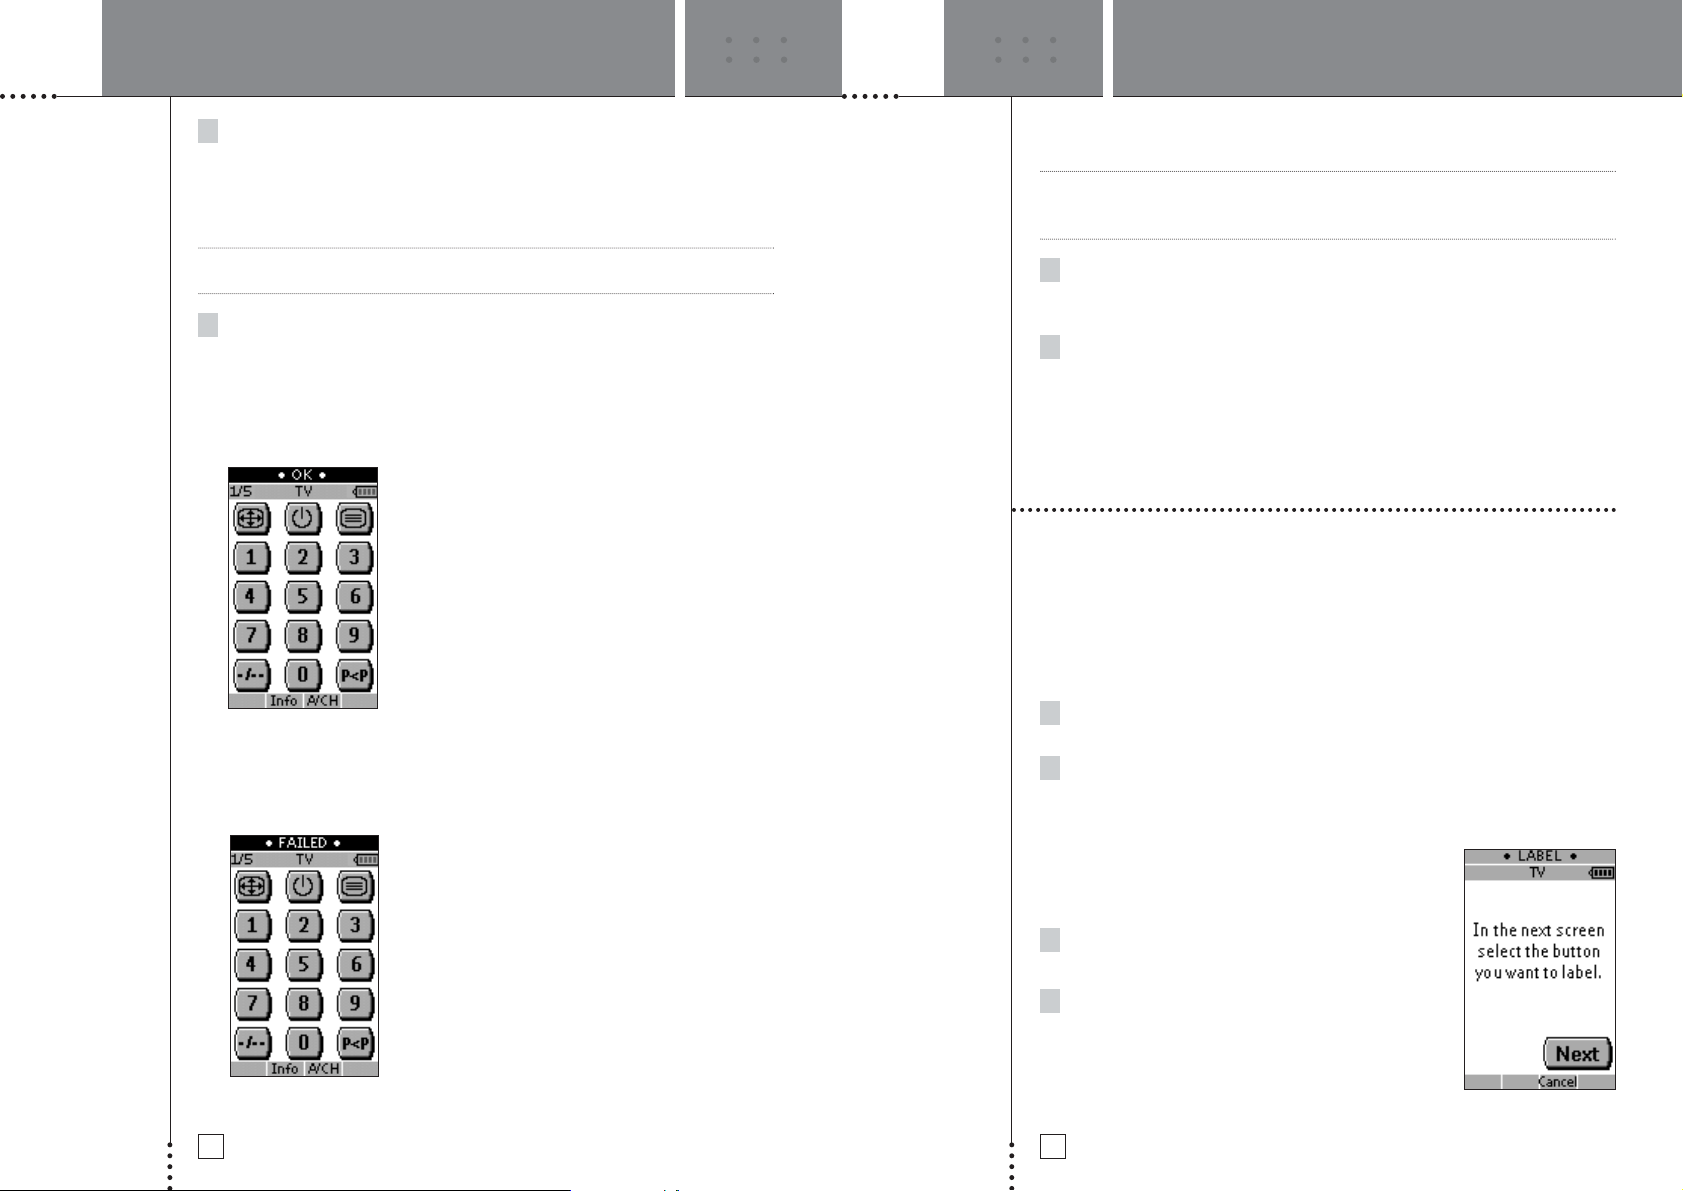
6 Press the soft or hard button you want to learn on the Freedom Remote.
The Learn label changes to Learning, which means the Freedom Remote is
ready to receive commands from an existing remote control. The Freedom
Remote will wait for 5 seconds to receive an IR code from another remote
control.
Note When a hard button is pressed to learn, there is no on screen feedback to indicate
which button is pressed.
7 Press and hold the button on the existing remote control you want to
learn to the Freedom Remote.
When the Freedom Remote receives an IR code:
•You hear a confirmation beep;
• The label changes from Learning to OK. The Learn sequence has been
successful.
When the Freedom Remote does not receive an IR code in 5 seconds:
•You will hear an error beep;
• The label changes from Learning to Failed. The Learn sequence has failed.
• The Freedom Remote will return to Learn mode. Return to step 5 of the Learn
sequence to relearn the button.
TipYou do not have to wait for the OK or Failed to disappear. If you press another
button (soft or hard button), the Freedom Remote Learn sequence immediately
goes back to step 5.
8 Go to other pages of the selected device with the Page Up and Page
Down buttons. Repeat steps 6 and 7 until you have copied all the
commands of the existing remote control.
9 Press Done when you have finished learning commands to the buttons
of your choice.
The Freedom Remote returns to Use Mode. You can try out the new IR codes
or select another device to learn.
Labeling Buttons and Devices
You can label or relabel buttons and devices with:
• Characters in lower case and upper case;
• Numbers;
• Symbols.
To label a button or a device:
1 Set the Freedom Remote in Use Mode. See ‘Working with Modes’ on
p. 10.
2 Select the device, e.g. TV, with the buttons you want to label.
The device screen appears.
-orSelect the Device Overview with the device
buttons you want to label.
The Device Overview appears.
3 Press and hold the Mode button for 3 seconds.
The Mode screen appears.
4Tap Label on the Mode screen.
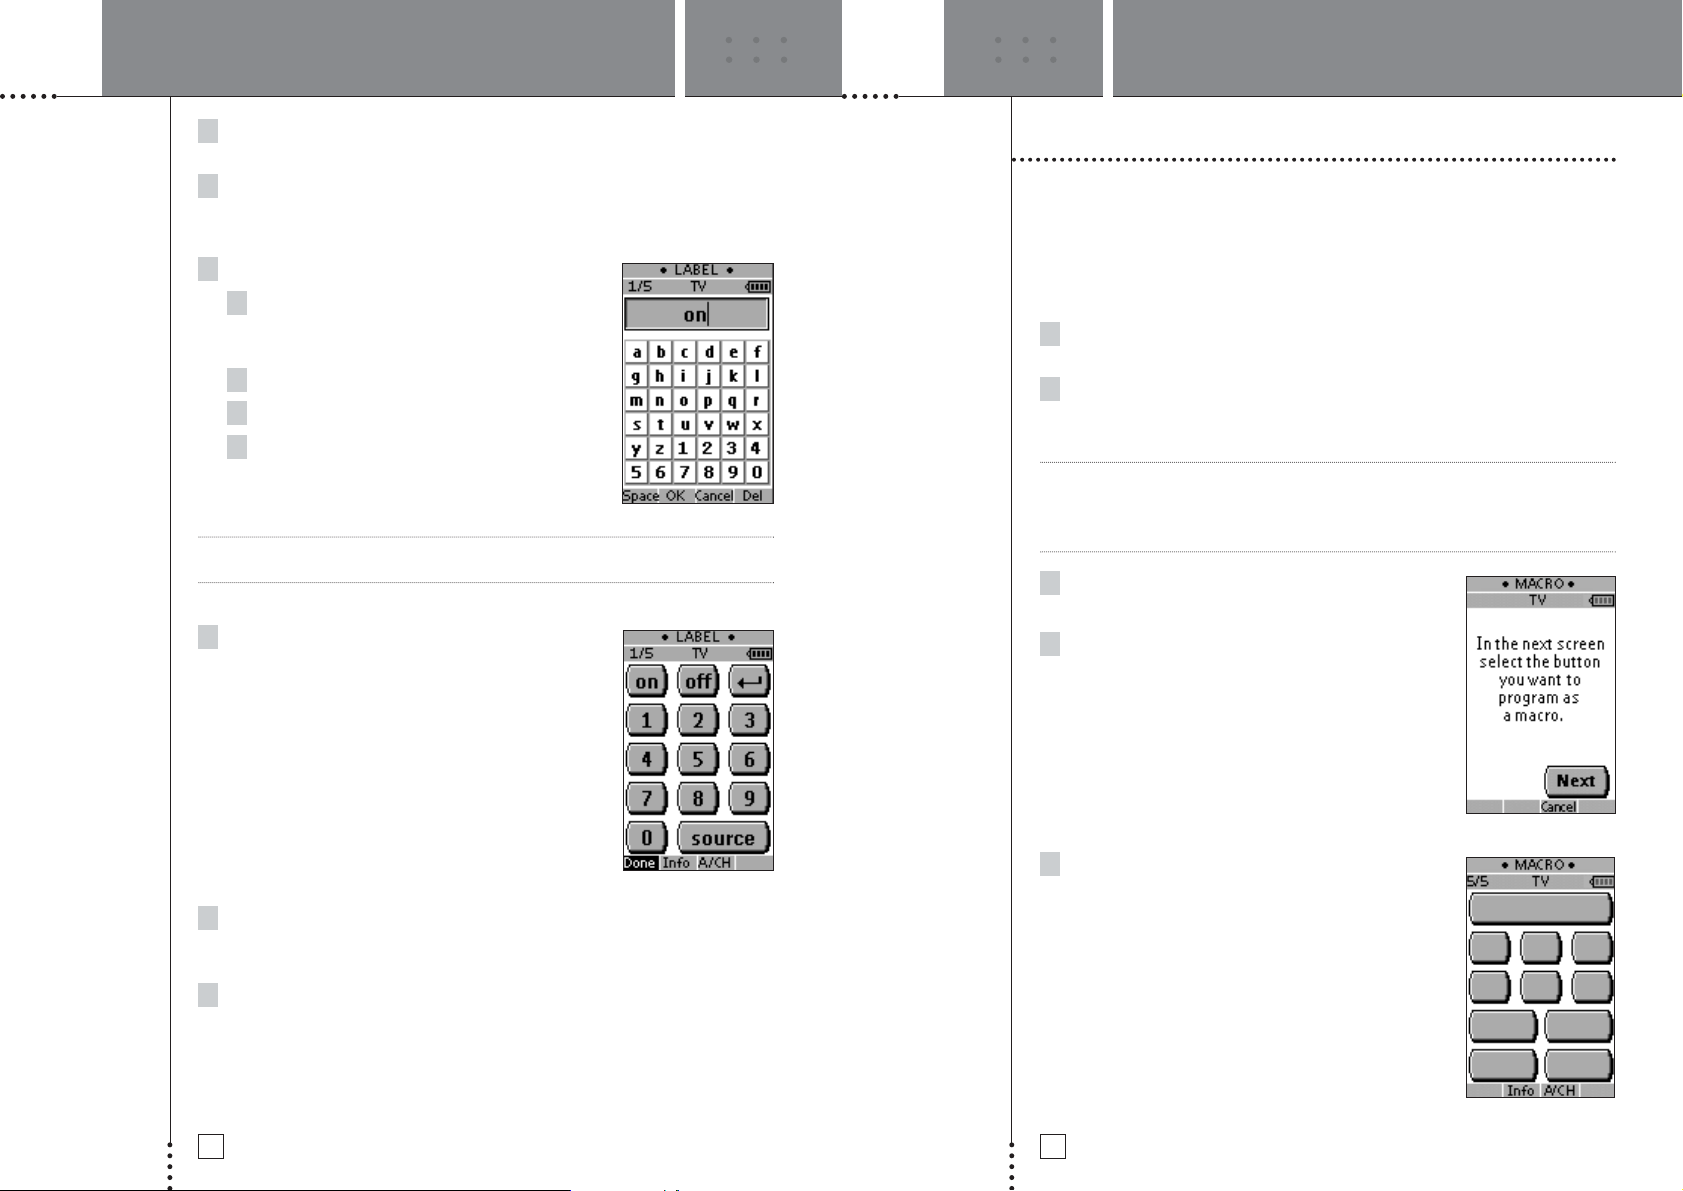
The Freedom Remote is now in Label Mode. ‘Label’
and the name of the selected device appear at the
top of the touch screen with the following message
on screen.
USING THE FREEDOM REMOTE USING THE FREEDOM REMOTE
jeff to supply
jeff to supply
Page 16
USER MANUAL
29
USER MANUAL
28
5 Press Next to display the selected device screen or the Device
Overview in Label Mode.
6Tap the button you want to label.
The Freedom Remote shows a mini-keyboard. The button you want to label is
displayed above the keyboard.
7 Edit the label.
Tab the character, number or symbol you
want to use. Repeat this action for every
character.
To delete a character, press Del.
To enter a space, press Space.
To display other keyboard with capital letters
and symbols, press the Page Up or Page Down
button repeatedly.
Note You will hear an error beep, when you selected more characters than can be
displayed on the selected button.
8Tap OK to save the changes and return to the
panel you were.
-orTap Cancel to return to the panel you were
without saving changes.
9 Label all other elements you want. You can navigate to the different
pages of the selected device screens or the Device Overview, using
the Page Up and the Page Down button.
10 Press Done when you have finished labeling the buttons of your choice.
The Freedom Remote returns to Use Mode. You can see the label or
select another device to label.
Recording Macros
A macro allows you to send a sequence of commands using one single button. You
can for instance, switch on your TV, turn to a movie channel and prepare your VCR
for recording by rewinding the videotape. All this can be done be pressing a single
button on your Freedom Remote.
To record macros, the Freedom Remote has to be in Macro mode.
1 Set the Freedom Remote in Use Mode. See ‘Working with Modes’ on
p. 10.
2 Select the device, e.g. TV, with the buttons you want to program as a
macro.
The device screen appears.
Note Basically, you can assign any button as a macro button. However, it is
recommended to assign only the reserved macro buttons on the last page of every
device. Use the Page Up and Page Down buttons to go to the last page of the
device.
3 Press and hold the Mode button for 3 seconds.
The Mode screen appears.
4Tap Macro on the Mode screen.
A message screen appears. the Freedom Remote
is now in Macro Mode.
5Tap Next.
The device screen with the Macro label appears.
With the Page Up and Page Down buttons you can
go to other screens of the selected device.
USING THE FREEDOM REMOTE USING THE FREEDOM REMOTE
jeff to supply
jeff to supply
Page 17
USER MANUAL
31
USER MANUAL
30
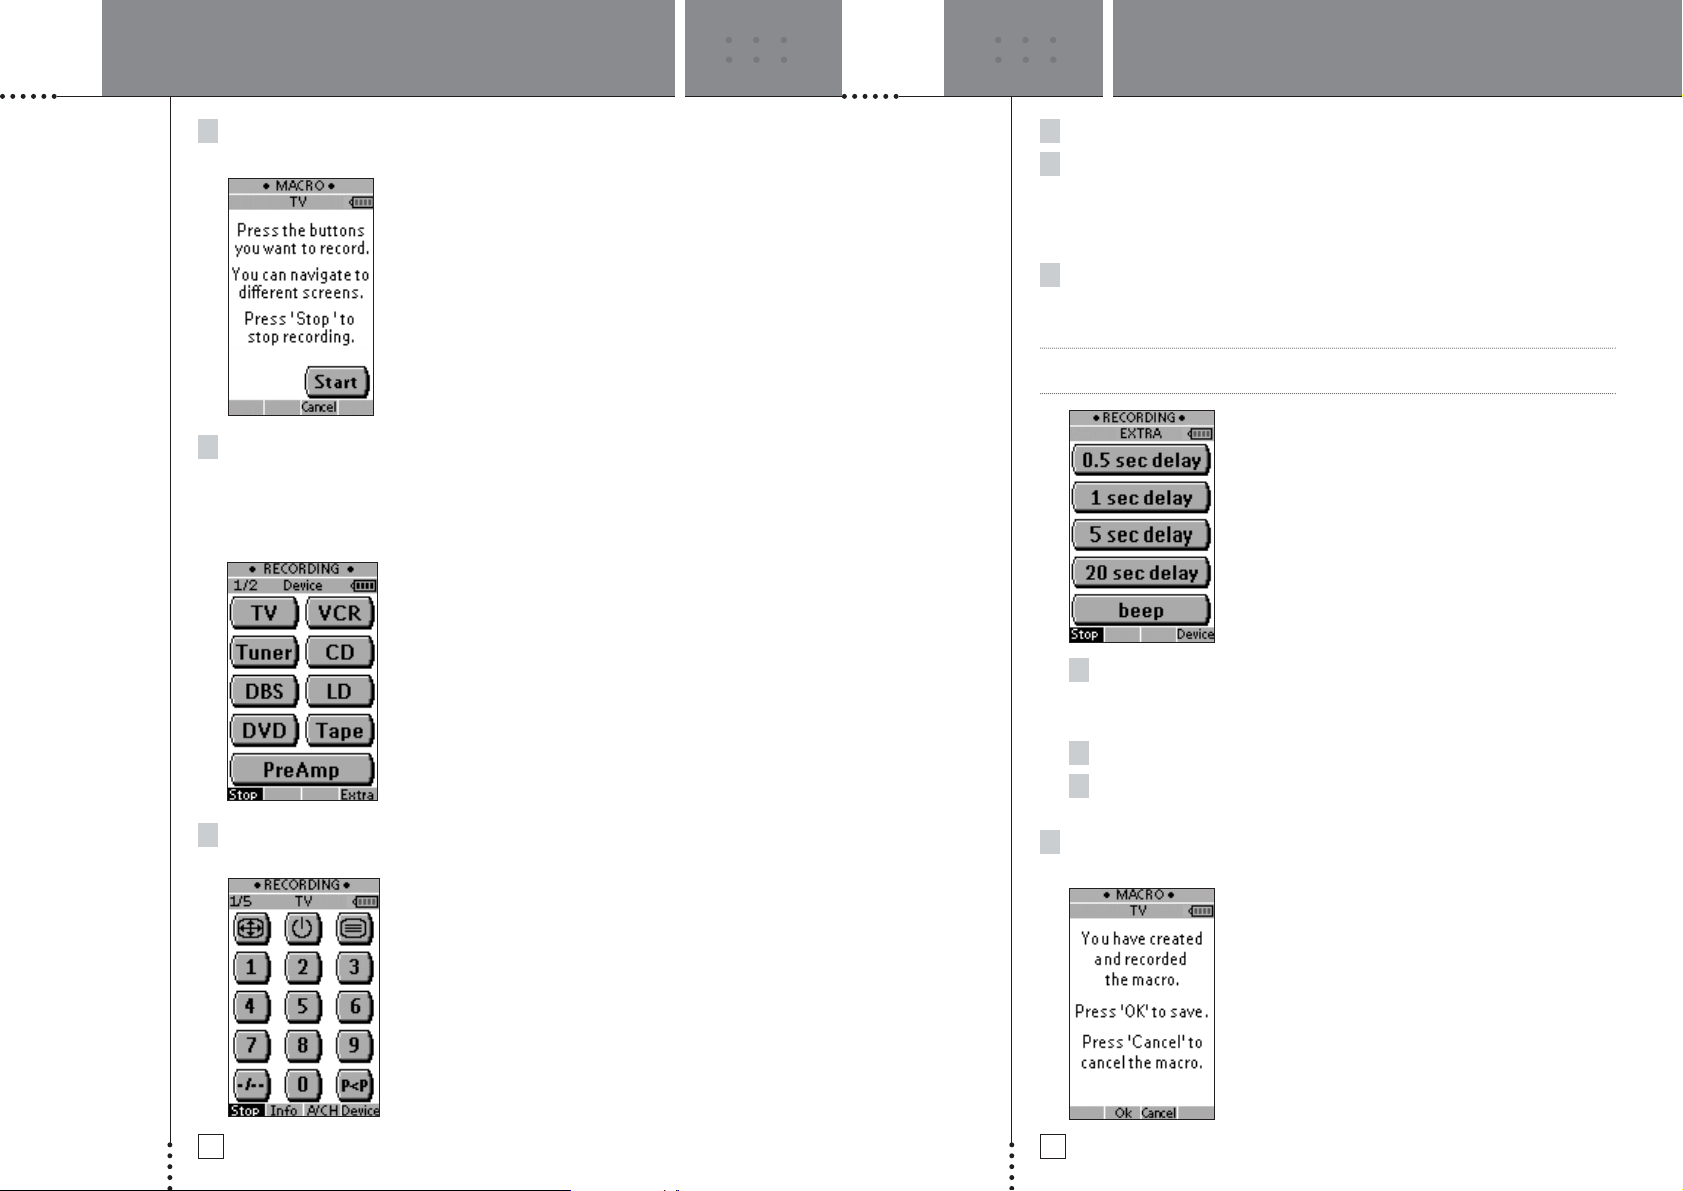
6 Tap the soft or hard button you want to select as a macro.
A message screen appears.
7Tap Start.
The Device Overview appears with the ‘Recording’ label at the top of the
screen. The buttons you tap on this screen will not be recorded. From the
Device Overview you can go to the different devices or you can press the
Extra hard button to go to the Extra screen with delays and beeps.
8Tap the button of the device you want to go to.
The device screen appears.
9Tap the soft or hard buttons with the commands you want to record.
10 Press the Page Up and Page Down buttons to go to different screens of
the same device.
–or–
Press the Device button to go to the Device Overview again.
11 To add delays and beeps to the macro, press the Extra hard button on
the Device Overview.
The Extra screen appears.
Note Delays may be required between commands. Some devices will not respond to
another remote command immediately after turning on.
1To add a delay, tap one of the Delay buttons.
By tapping several Delay buttons, the duration of the delay will be
increased.
2To add a beep, tap the Beep button.
3 Press the Device button to go to the Device Overview again.
12 Press Stop to stop recording.
A message screen appears.
USING THE FREEDOM REMOTE USING THE FREEDOM REMOTE
jeff to supply
jeff to supply
Page 18
FREEDOM EDIT
USER MANUAL
33
USING THE FREEDOM REMOTE
USER MANUAL
32
13 Press OK to save the macro and return to the Mode screen.
The existing command of the selected button is replaced by the macro.
–or–
Press Cancel to return to the Mode screen without saving the macro.
The button retains its previous command.
14 Set the Freedom Remote in Use mode to test the recorded macro.
N
If you want to personalize your Freedom Remote even more beyond its standard
programming features, Freedom Edit is the tool for you to use. Freedom Edit is the
Freedom Remote’s companion software that you find on the included CD-ROM.
You can find more information and updates of the software on
http://www.bostonacoustics.com/freedom.
Freedom Edit is the visual editor for creating and configuring the Freedom Remote
Configuration Files (NCF) on your computer. An NCF is a file that is used to define
the Freedom Remote behavior and look for the LCD touch screen.
Note It is advised to make backup copies of your own configurations. This can be done
with Freedom Edit.
With Freedom Edit you can:
• define the types and brands of your devices;
• generate the Device Overview;
• design the page layout and the appearance of buttons;
• configure the behavior of the hard buttons and soft buttons;
• access Freedom Edit’s extended help system by pressing F1.
• save, duplicate and share NCFs, devices, buttons, bitmaps or codes with
another Freedom Remote;
• preview the NCF on the Freedom Emulator;
• download the new configurations to your Freedom Remote and upload the
configuration file on your Freedom Remote to Freedom Edit by means of the
included serial cable;
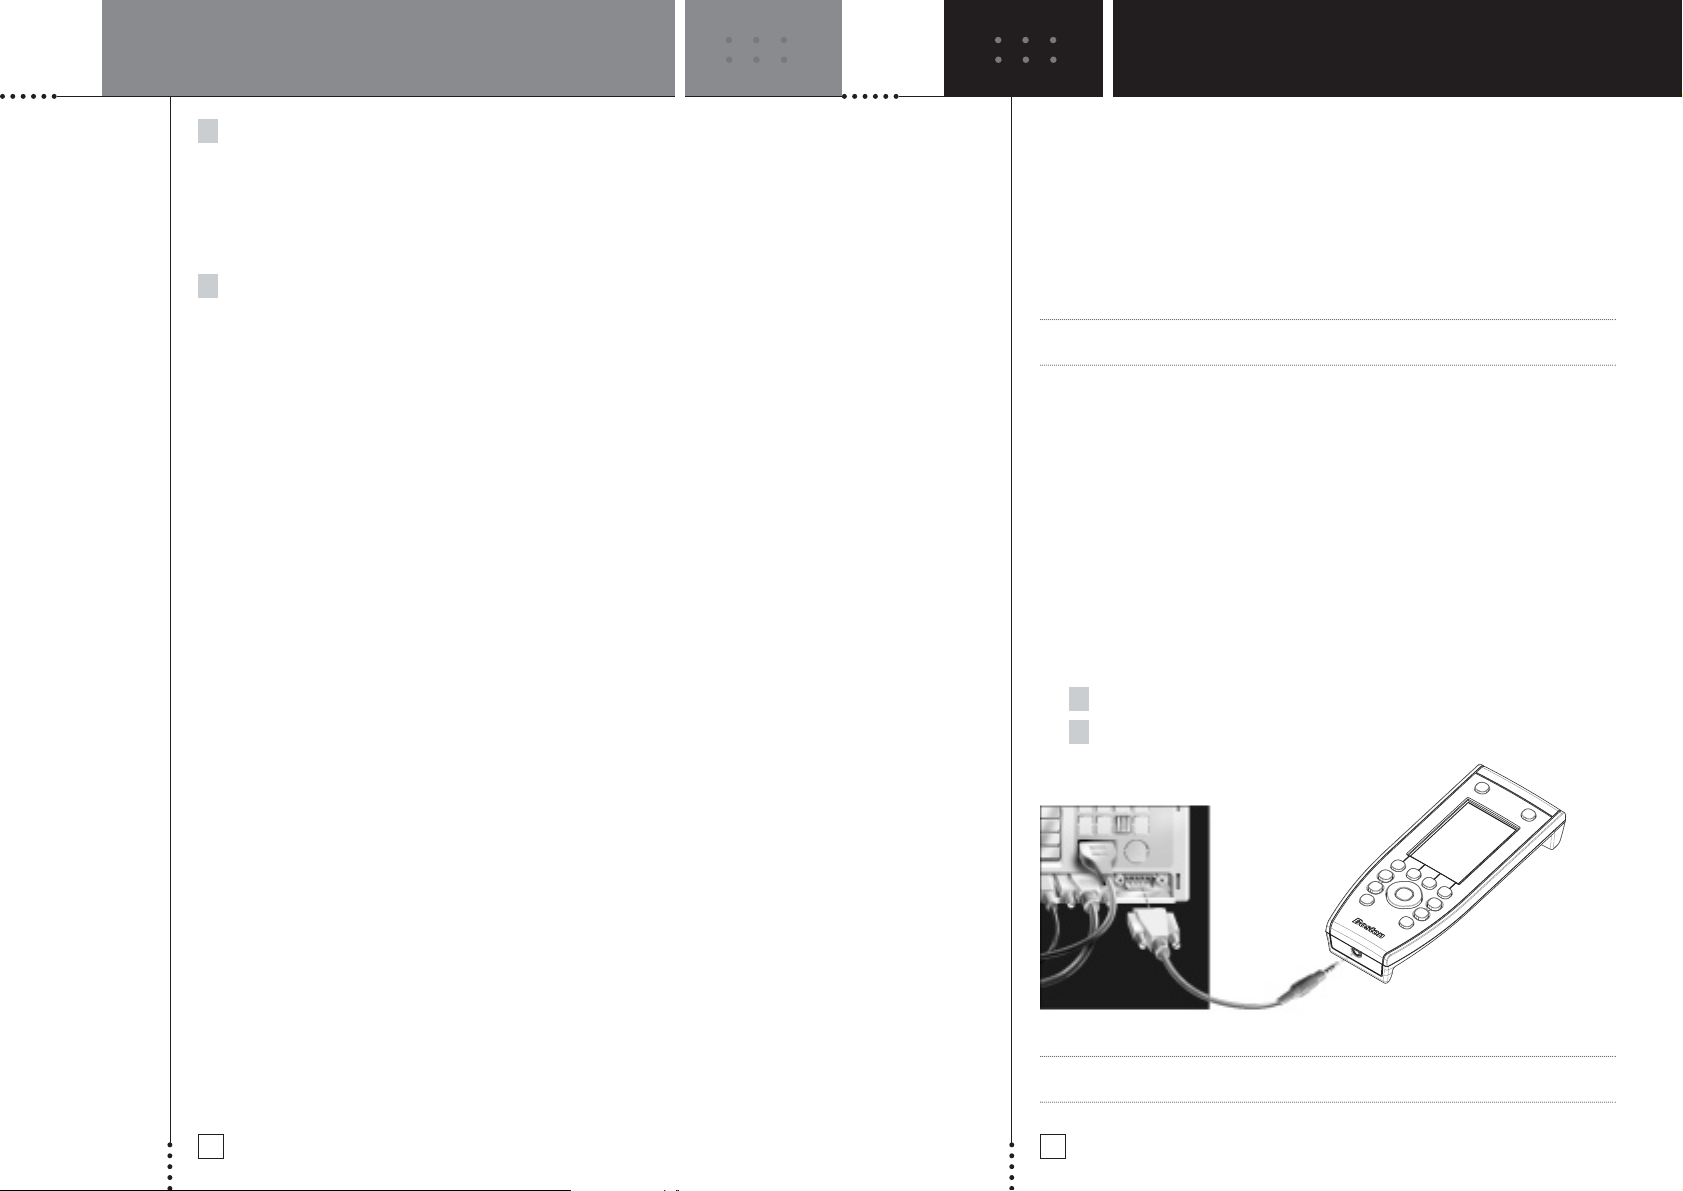
1 Plug one end of the serial cable in the serial port on your computer.
2 Plug the other end of the serial cable in the serial port on the
Freedom Remote.
Note When the Freedom Remote is connected to the PC, the battery lifetime may be
reduced.
Page 19
USER MANUAL
35
USER MANUAL
34
Minimum System Requirements
• PC with a Pentium 166 MHz or higher
•Windows 98/ME/XP or NT 4.0/2000
• 32 MB of RAM
• 16 MB of free hard disk space
• Free serial port
• CD-ROM player
Installing Freedom Edit from the CD-ROM
1 Place the Freedom Edit CD-ROM in your computer.
Freedom Edit setup will start up automatically. If not, you can install Freedom
Edit by double-clicking the FreedomEditSetup.exe file on the CD-ROM.
2 Follow the instructions on screen that will guide you through the
installation procedure.
The first time you run Freedom Edit, you have to accept the license agreement.
Otherwise Freedom Edit will not run.
Important Notices
Take care not to scratch the touch screen
Use your finger to tap the LCD touch screen or use plastic-tipped pens intended for
use with touch screens.
Never use an actual pen, pencil or other sharp object on the LCD touch screen.
Protect the Freedom Remote from extreme temperatures
Keep the Freedom Remote away from heaters and other heat sources.
The Freedom Remote is not waterproof
The Freedom Remote should not be exposed to rain or moisture.
Do not store or use the Freedom Remote in any location that is extremely
damp or wet.
When you have spilled water on the Freedom Remote, you have to take out the
batteries and let the Freedom Remote dry for 48 hours before you place the
batteries back.
When you have spilled other liquids like coffee on the Freedom Remote, you can
clean it with distilled water. Make sure no water gets into the housing.
The touch screen of the Freedom Remote contains a glass element
Do not drop the Freedom Remote or subject it to any strong impact.
Cleaning the Freedom Remote
Use a soft, damp cloth to clean the Freedom Remote.
If the LCD touch screen of the Freedom Remote is spoiled, clean it with a
soft cloth moistened with a diluted window-cleaning solution.
Do not use a corrosive detergent or an abrasive sponge.
Avoid the use of abundant water.
TipYou may want to switch your Freedom Remote to Front input to avoid the system
operation while cleaning. This will eliminate any soft buttons that can be
activated during cleaning.
MAINTAINING FREEDOM REMOTEFREEDOM EDIT
Page 20
TROUBLESHOOTING
USER MANUAL
37
MAINTAINING FREEDOM REMOTE
USER MANUAL
36
How do I reset the Freedom Remote?
Under normal circumstances, you will never have to reset the Freedom Remote.
However, on rare occasions, if the Freedom Remote’s touch screen freezes or if you
notice unusual behavior, you need to perform a reset to get the Freedom Remote
running again. All customized commands and devices are retained, however you
will need to reset the time and date.
1 Slide the battery cover off the back of the Freedom Remote.
You will see the Reset button in the battery compartment.
2 Use an unfolded paperclip or
a sharp pencil to carefully
press the Reset button.
The Freedom Remote restarts and
an Introduction screen appears.
The Freedom Remote beeps twice
to indicate it is ready for use.
How do I revert to the original configuration?
Reverting to the original configuration restores the Freedom Remote’s devices and
commands to its state when you purchased it. This means that all programming is
lost permanently. Normally, you never have to revert the Freedom Remote. See
‘Revert’ on p. 14.
1 Press and hold the Mode button for 3 seconds.
The mode screen appears.
2Tap the Setup button.
3 Scroll to the third setup page.
4Tap the Revert button.
A message screen appears to confirm or cancel the revert process.
5 Press OK or Cancel.
Do I have to calibrate the touch screen?
The Freedom Remote’s touch screen is calibrated when it leaves the factory. You
only have to calibrate the LCD touch screen:
• when you upgrade the Freedom Remote’s software in the future. The Freedom
Remote displays a message to calibrate the touch screen. Complete the
instructions in ‘Calibrate the touch screen’ on p. 14.
• when the touch screen buttons do not respond properly. Navigate to Setup
Mode first as described in ‘Adjusting the Settings’ on p. 11 and continue with
the instructions in ‘Calibrate the touch screen’ on p. 14.
General Problems
The display stays blank or becomes black
• Make sure the batteries are properly installed. See “The Batteries” on page 3.
• Press the Backlight button to make sure the Freedom Remote and the backlight
are turned on. See ‘Turning on the Display and the Backlight’ on p. 6.
• Adjust the contrast using the Backlight button and the Page Up or Page Down
buttons on the left side of the Freedom Remote. See ‘Changing the LCD
Contrast’ on p. 7.
The display is too light or too dark
• Adjust the contrast using the Backlight button and the Page Up or Page Down
buttons on the left side of the Freedom Remote. See ‘Changing the LCD
Contrast’ on p. 7.
The Freedom Remote shuts off automatically
• This is a timeout feature of the Freedom Remote to save power. You can
change the time Freedom Remote stays on in the Settings. See ‘Adjust the
LCD Timeout’ on p. 12.
IR Devices that have been configured for RF do not respond to commands
from the remote control.
• Check in the IR/RF mode if the devices you want to operate are set up
properly.
• Make sure the IR emitter is placed near the devices you want to use with
RF signals.
• Be aware that more than one IR emitter may be needed if have many IR
devices are stacked or located on different shelves.
A device responds to some RF signals and not to others.
It is possible that a device does not respond properly when operated with RF
signals. This is mostly due to IR signals that cannot be properly transmitted as RF
signals. In that case, you have to reconfigure the remote control to operate the
device with IR signals again.
You also may be receiving interference from another RF device, see Choosing
Another Channel.
Reset button
Page 21
TROUBLESHOOTING
USER MANUAL
39
TROUBLESHOOTING
USER MANUAL
38
My Freedom System operates without me controlling it.
You may be receiving interference from another Freedom System, see Changing
The Systems ID code.
External Devices do not respond to commands from the Freedom Remote
• Make sure the Freedom Remote is in Use mode. See ‘Working with Modes’
on p. 10.
• If in IR mode, make sure the Freedom Remote’s sending LED is pointed
towards the device you’re operating.
• Check if the battery level is low. If so, replace the batteries. See ‘The
Batteries’ on page 3.
• Check if you have defined the correct brands for your devices. See ‘Defining
the Brands of Your Devices’ on p.15.
• Check if the button you are trying to use is assigned properly via Brand mode,
Learn mode or Macro mode. See ‘Defining the Brands of Your Devices’ on
p. 15, ‘Learning Commands’ on p. 18 and ‘Recording Macros’ on p. 23.
• Calibrate the touch screen. See ‘Calibrating the touch screen’ on p. 24.
The Freedom Remote does not learn commands from an existing remote
control
• Press and hold the buttons on the existing remote control for a longer or
shorter period of time.
• Make sure the distance between the Freedom Remote and the existing remote
control is between 1 and 4 inches (2 to 10 cm). See ‘Learning Commands’ on
p. 18.
• Do not learn commands directly under fluorescent lights.
• Do not learn commands on a reflecting table surface.
• Check if the battery level is low. If so, replace the batteries.
See ‘The Batteries’ on page 3.
• Check if there is sufficient memory to learn commands. If not, revert the
Freedom Remote. See ‘Freedom Remote Information’ and ‘Revert’ on p. 14.
The Freedom Remote is not recognized by the Freedom Edit software
• Make sure the serial cable is properly connected. See ‘Freedom Edit’ on p. 27.
• Disconnect other equipment connected to the serial ports, e.g. PDA’s.
• Plug the serial cable in another serial port.
•Try to connect multiple times.
Programming Problems
Buttons are not sending the correct commands
• Check if you have defined the correct brands for your devices. See ‘Defining
the Brands of Your Devices’ on p. 15.
• Check whether the button of the device is learned properly. See ‘Learning
Commands’ on p. 18.
• Check whether the macro is recorded properly. See ‘Recording Macros’ on
p. 23.
The Freedom Remote will not switch modes
• Replace the batteries. When the batteries are low the Freedom Remote
prevents you from switching to customizing modes so that no customization
can get lost.
The Freedom Remote is low on memory
• Revert the Freedom Remote. See ‘Revert’ on p. 14.
The configuration file is corrupted
•When this unlikely event occurs, you have to revert to the original
configuration or use Freedom Edit to download a new configuration file. All
your customized commands and devices will be lost and you will have to
reprogram your Freedom Remote. If you use Freedom Edit, it is advised to
make backup copies of your customized configurations. See ‘Revert’ on p. 14
and ‘Freedom Edit’ on p. 27.
The Freedom Remote error message
If the error message ‘Invalid CF version or corrupt Flash!’ occurs:
• Use the Reset button on the back of the Freedom Remote. See ‘How do I reset
the Freedom Remote?’ on p. 30.
•Try to recover the Freedom Remote Configuration File (NCF) by downloading a
backup copy or the default file from Freedom Edit. See ‘Freedom Edit’ on p. 27.
• Go to the Boston Acoustics website http://www.bostonacoustics.com/freedom
for more information.
Page 22
TABLE OF BRANDS
USER MANUAL
41
SPECIFICATIONS
USER MANUAL
40
The specifications and design of this product are subject to change without notice.
Display Monochrome touch screen LCD with 4 gray levels and
digital contrast control.
Resolution: 160 x 100 pixels
Blue EL backlighting for LCD and hard buttons
Interface 3-wire (RS232) serial port connector
Software Built-in Boston Acoustics Radio Frequency codes
Database with IR codes to operate different brands
Total number of devices limited only by memory
Infrared (IR) Infrared sending LED and learning eye
Operating distance of 33 feet (10 meters)
Learning frequency up to 56 kHz and 455 kHz
Learning distance 1 inch (2 cm) up to 4 inch (10 cm)
Memory 2 MB non-volatile flash memory
Batteries 3 AA-batteries (3 x 1,5V): primary or rechargeable
Power management Tilting the unit more than 50 degrees. The display as
well as the backlight will be activated.
Pressing the backlight button on the left side. The display
as well as the backlight will be activated.
Tapping the screen gently with your finger or a blunt, soft
object like a pencil eraser. The display will be activated,
but not the backlight.
Pressing any button will activate the display, but not the
backlight.
Power off automatically
Dimensions 7.8 inch x 3 inch x 1.3 inch (177mm x 74mm x 33mm)
Operating temperature 41°F to 113°F (5°C to 45°C)
Accessories RS232 cable for PC connection
CD-ROM with Freedom Edit software
3 AA-batteries
Database information:
Designed
by UEI Technology
Licensed under U.S. Patent 5,689,353
Portions © UEI 1999
PreAmp
Carver 0296
Curtis Mathes 0327
GE 0105
JVC 0358
Linn 0296
Magnavox 0296
Marantz 0296
Optimus 0422, 0327
Philips 0296
Pioneer 0327
Polk Audio 0296
RCA 0327
Realistic 0422
Sony 0716, 0247
Soundesign 0105
Victor 0358
Wards 0105
Yamaha 0381
Cable
ABC 0030, 0034, 0035
Allegro 0180, 0342
Americast 0926
Archer 0180, 0824
Bell South 0926
Century 0180
Citizen 0180, 0342
Comtronics 0067
Contec 0046
Emerson 0824
Everquest 0042, 0067
Focus 0427
Garrard 0180
Gemini 0042, 0824
General Instrument 0503, 0837
GoldStar 0067, 0171
Goodmind 0824
Hamlin 0047, 0036, 0286, 0061
Hytex 0034
Jasco 0042, 0180, 0342
Jerrold 0030, 0039, 0503, 0042, 0837
Memorex 0027
Motorola 1133
Movie Time 0090
NSC 0090
Oak 0046, 0034
Optimus 0048
Panasonic 0048, 0134, 0027
Paragon 0027
Philips 0180, 0332, 0344
Pioneer 0171, 0560, 0904
Popular Mechanics 0427
Pulsar 0027
Quasar 0027
RCA 0048
Radio Shack 0042, 0910, 0342, 0824
Recoton 0427
Regal 0047, 0286
Runco 0027
SL Marx 0067
Samsung 0067, 0171
Scientific Atlanta 0035, 0504, 0904
Signal 0042, 0067
Sprucer 0048
Starcom 0030, 0042
Stargate 0067, 0042, 0824
Starquest 0042
TV86 0090
Teleview 0067
Tocom 0039
Toshiba 0027
Tusa 0042
Unika 0180
United Artists 0034
Universal 0180, 0218
Viewstar 0090
Zenith 0027, 0552, 0926
Zentek 0427
CD/CDR
Aiwa 0151, 0184
Burmester 0447
California Audio Labs 0056, 0330
Carver 0184, 0206, 0464
DKK 0027
Denon 0030, 0900
Emerson 0332
Fisher 0201, 0206
Garrard 0420, 0447
Genexxa 0059, 0332
Harman/Kardon 0184, 0200
Hitachi 0059
JVC 0099
Kenwood 0055, 0217, 0853, 0064, 0653,
0708
Krell 0184
LXI 0332
FPO
Page 23
TABLE OF BRANDS
USER MANUAL
42
TABLE OF BRANDS
USER MANUAL
43
Linn 0184
MCS 0056
MTC 0447
Magnavox 0184, 0332
Marantz 0184, 0653, 0056, 0207
Mission 0184
NSM 0184
Nikko 0201
Onkyo 0128, 0895
Optimus 0059, 0495, 0447, 0206, 0464,
0332, 1090, 0027, 0064, 0172
Panasonic 0056, 0330
Parasound 0447
Philips 0184, 0653
Pioneer 0059, 0495, 0271, 0332,
1089, 1090
Polk Audio 0184
Proton 0184
QED 0184
Quasar 0056
RCA 0080, 0059, 0495, 0332, 1089,
0206, 0791
Realistic 0206, 0207, 0447
Rotel 0184, 0447
SAE 0184
Sansui 0184, 0332
Sanyo 0206
Scott 0332
Sears 0332
Sharp 0064, 0207, 0888
Sherwood 1094, 0207
Sonic Frontiers 0184
Sony 0027, 0212, 0517
Soundesign 0172
Tascam 0447
Teac 0420, 0447, 0201, 0207
Technics 0330, 0056
Victor 0099
Wards 0080, 0184
Yamaha 0214, 0063, 0915
Yorx 0488
Tape
Aiwa 0224, 0056
Carver 0056
Denon 0103
Harman/Kardon 0209, 0056
JVC 0271
Magnavox 0056
Marantz 0056
Optimus 0054, 0247
Philips 0056
Pioneer 0054, 0247
Polk Audio 0056
RCA 0054, 0247
Sansui 0056
Sony 0270, 0197, 0318
Wards 0054
Yamaha 0124
LD (Laser Disc)
Carver 0221
Denon 0086
Harman/Kardon 0221
Magnavox 0221
Marantz 0221
Mitsubishi 0086
NAD 0086
Optimus 0086
Philips 0221
Pioneer 0086
Polk Audio 0221
Sony 0228
Theta Digital 0221
Tuner
ADC 0558
Aiwa 0148, 1432, 1116
Capetronic 0558
Carver 0069, 1116, 1216
Casio 0222
Clarinette 0222
Denon 1187, 1131
Fisher 0069
Garrard 0490
Harman/Kardon 0137
JBL 0137
JVC 0101
Kenwood 1054, 0069, 0213, 1340,
1596, 1597
Lloyd’s 0222
MCS 0066
Magnavox 0418, 1116, 0558, 1216, 0222
Marantz 1116, 1216, 0066
Modulaire 0222
Nakamichi 0124
Onkyo 0162
Optimus 1050, 0213, 0558, 0069
FPO
Panasonic 0066, 1545
Penney 0222
Philips 1116, 1216, 1296, 0418
Pioneer 0177, 0558, 1050
Proscan 1281
Quasar 0066
RCA 1281, 0558, 1050
Realistic 0222
Sansui 1116
Sharp 0213
Sherwood 0529
Sony 1185, 1085, 1285
Sunfire 1340
Teac 0490
Technics 0066, 1335, 1545, 1336
Thorens 1216
Victor 0101
Yamaha 0203, 0213, 1203
Yorx 0222
DBS (Sattelite)
AlphaStar 0799
Echostar 1032, 0802
Expressvu 0802
GE 0593
General Instrument 0388, 0896, 0654
HTS 0802
Hitachi 0846
Hughes Network Systems 0776
JVC 0802
Jerrold 0388, 0654
Magnavox 0749, 0751
Memorex 0751
Next Level 0896
Panasonic 0728
Philips 1103, 0749, 0751
Primestar 0654, 0388
RCA 0593, 0170, 0419, 0882
Radio Shack 0896
Samsung 1136
Sony 0666
Star Choice 0896
Toshiba 0776, 0817
Uniden 0751, 0749
Zenith 0883
TV
AOC 0046, 0057
Admiral 0120, 0490
Aiko 0119
Akai 0057
Alaron 0206
America Action 0207
Anam 0207
Audiovox 0119, 0207, 0478, 0650
Baysonic 0207
Belcor 0046
Bell & Howell 0043, 0181
Bradford 0207
Brockwood 0046
Broksonic 0263, 0490
CXC 0207
Candle 0057, 0083
Carnivale 0057
Carver 0081
Celebrity 0027
Cineral 0478, 0119
Citizen 0083, 0057, 0087, 0119
Concerto 0083
Contec 0207
Craig 0207
Crosley 0081
Crown 0207
Curtis Mathes 0087, 0057, 0043, 0074, 0078,
0081, 0083, 0120, 0172, 0181,
0193, 0478, 0774, 1174, 1374
Daewoo 0119, 0650, 0046, 0651, 0478
Daytron 0046
Denon 0172
Dumont 0044, 0046
Electroband 0027
Emerson 0263, 0207, 0205, 0206, 0490,
0651, 0650, 0046, 0181
Envision 0057
Fisher 0181
Fujitsu 0206, 0710
Funai 0207, 0198, 0206
Futuretech 0207
GE 0048, 0074, 1374, 0078, 0205,
0478, 1174, 0120, 0774
Gibralter 0044, 0046, 0057
GoldStar 0205, 0046, 0057, 0083
Gradiente 0083, 0080
Grunpy 0206, 0207
FPO
Page 24
TABLE OF BRANDS
USER MANUAL
45
USER MANUAL
44
Hallmark 0205
Harley Davidson 0206
Harman/Kardon 0081
Harvard 0207
Hitachi 0172, 0083, 0043
Infinity 0081
Inteq 0044
JBL 0081
JCB 0027
JVC 0080
KEC 0207
KTV 0207, 0057
Kenwood 0057, 0046
Konka 0734, 0659, 0655, 0665, 0730
LG 0083
LXI 0181, 0074, 0081, 0183, 0205, 0774
Logik 0043
Luxman 0083
MGA 0177, 0046, 0057, 0205
MTC 0087, 0057, 0046, 0083
Magnavox 0081, 0057, 0206, 1281
Majestic 0043
Marantz 0081, 0057
Matsushita 0277
Megatron 0172, 0205
Memorex 0206, 0490, 0205, 0043, 0083,
0177, 0181, 0277
Midland 0044, 0074, 0078, 0774
Minutz 0048
Mitsubishi 0177, 0205, 0046, 0120
Motorola 0120
Multitech 0207
NAD 0183, 0193, 0205
NEC 0057, 0046, 0083
NTC 0119
Nikko 0205, 0057, 0119
Onwa 0207
Optimus 0277, 0193, 0181
Optonica 0120
Orion 0490, 0206, 0263
Panasonic 0078, 0277
Penney 0074, 1374, 0087, 0057, 0048,
0205, 0078, 0046, 0083, 0183, 0774
Philco 0172, 0046, 0057, 0081, 0490
Philips 0081
Pilot 0046, 0057
Pioneer 0193, 0706
Portland 0046, 0119
Princeton 0744
Prism 0078
Proscan 0074, 0774
Proton 0205
Pulsar 0044, 0046
Quasar 0078, 0277
RCA 0074, 1374, 1174, 1274, 0706, 0046,
0078, 0120, 0774, 1074, 1474
Radio Shack 0207, 0057, 0205, 0181,
0046, 0074, 0083, 0774
Realistic 0207, 0181, 0057, 0205,
0046, 0083
Runco 0044, 0057
SSS 0046, 0207
Sampo 0057
Samsung 0087, 0046, 0205, 0057, 0083
Sansei 0478
Sansui 0490
Sanyo 0181
Scimitsu 0046
Scotch 0205
Scott 0263, 0046, 0205, 0206, 0207
Sears 0181, 0083, 0183, 0074, 0081,
0198, 0205, 0206, 0774
Semivox 0207
Semp 0183
Sharp 0120, 0715
Shogun 0046
Signature 0043
Sony 0027
Soundesign 0205, 0206, 0207
Squareview 0198
Starlite 0207
Supreme 0027
Sylvania 0081, 0057
Symphonic 0198
TMK 0083, 0205
TNCi 0044
Tandy 0120
Technics 0078, 0277
Technol Ace 0206
Techwood 0078, 0083
Teknika 0043, 0081, 0206, 0207, 0046,
0119, 0083, 0087, 0177
Telefunken 0083
Toshiba 0183, 0087, 0181, 1283
Vector Research 0057
Victor 0080
Vidikron 0081
Vidtech 0046, 0205
FPO
TABLE OF BRANDS
Wards 0081, 0205, 0043, 0046, 0048,
0057, 0083, 0206
White Westinghouse 0651, 0650, 0490
Yamaha 0046, 0057
Zenith 0044, 0651, 0043, 0119, 0490
VCR
Admiral 0075, 0236
Adventura 0027
Aiko 0305
Aiwa 0027, 0064
Akai 0068
America Action 0305
American High 0062
Asha 0267
Audiovox 0064
Beaumark 0267
Bell & Howell 0131
Broksonic 0148, 0211, 0029, 0236, 0506
CCE 0099, 0305
Calix 0064
Canon 0062
Carver 0108
Cineral 0305
Citizen 0305, 0064
Colt 0099
Craig 0064, 0099, 0074, 0267, 0298
Curtis Mathes 0062, 0068, 0087,
0189, 0787
Cybernex 0267
Daewoo 0305, 0072
Denon 0069
Dynatech 0027
Electrohome 0064
Electrophonic 0064
Emerex 0059
Emerson 0211, 0029, 0236, 0305, 0148,
0506, 0027, 0064, 0070
Fisher 0074, 0131
Fuji 0062
Funai 0027
GE 0062, 0087, 0075, 0267, 0787
Garrard 0027
Go Video 0459, 0553
GoldStar 0064, 0065
Gradiente 0027
HI-Q 0074
Harley Davidson 0027
Harman/Kardon 0065, 0108
Harwood 0099
Hitachi 0069, 0027, 0068
Hughes Network Systems 0069
JVC 0094, 0068
Jensen 0068
KEC 0064, 0305
KLH 0099
Kenwood 0068, 0094, 0065
Kodak 0062, 0064
LXI 0064
Lloyd’s 0027
Logik 0099
MEI 0062
MGA 0070, 0267
MGN Technology 0267
MTC 0027, 0267
Magnasonic 0305
Magnavox 0062, 0108, 0027, 0066, 0176
Magnin 0267
Marantz 0108, 0062
Marta 0064
Matsushita 0062, 0189
Memorex 0131, 0074, 0506, 0027, 0064,
0075, 0062, 0267, 0066, 0189,
0236, 1189
Minolta 0069
Mitsubishi 0070, 0075, 0094
Motorola 0062, 0075
Multitech 0027, 0099
NEC 0065, 0068, 0094, 0131
Nikko 0064
Noblex 0267
Olympus 0062
Optimus 0189, 1189, 0075, 0064,
0131, 0459
Orion 0506, 0029, 0211, 0236
Panasonic 0062, 0189, 1189, 0643
Penney 0062, 0267, 0064, 0069, 0065
Pentax 0069
Philco 0062, 0236, 0506
Philips 0108, 0062, 0645
Pilot 0064
Pioneer 0094
Polk Audio 0108
Profitronic 0267
Proscan 0087, 0787
Protec 0099
Pulsar 0066
Quasar 0062, 0189, 1189
FPO
Page 25
INDEX
USER MANUAL
47
TABLE OF CONTENTS
USER MANUAL
46
RCA 0087, 0176, 0069, 0062, 0075,
0267, 0787
Radio Shack 0027
Radix 0064
Randex 0064
Realistic 0027, 0131, 0074, 0075,
0064, 0062
ReplayTV 0641, 0643
Runco 0066
STS 0069
Samsung 0072, 0267
Sanky 0066, 0075
Sansui 0068, 0506, 0027, 0094,
0236, 0298
Sanyo 0074, 0131, 0267
Scott 0211, 0148, 0070, 0072
Sears 0064, 0069, 0027, 0062,
0074, 0131
Semp 0072
Sharp 0075
Shintom 0099
Shogun 0267
Singer 0099
Sony 0059, 0027, 0062, 0663
Sylvania 0062, 0108, 0027, 0070
Symphonic 0027
TMK 0267
Tatung 0068
Teac 0027, 0068
Technics 0062, 0189
Teknika 0027, 0062, 0064
Thomas 0027
Tivo 0645, 0663
Toshiba 0072, 0070
Totevision 0064, 0267
Unitech 0267
Vector 0072
Vector Research 0065
Video Concepts 0072
Videosonic 0267
Wards 0062, 0087, 0027, 0074,
0267, 0069, 0075, 0099,
0108, 0176, 0787
White Westinghouse 0099, 0305, 0236
XR-1000 0099, 0027, 0062
Yamaha 0065
Zenith 0066, 0027, 0236, 0506
DVD
Apex 0699
Denon 0517
Fisher 0697
GE 0549
Hitachi 0691
Hiteker 0699
JVC 0650, 0585
Kenwood 0709, 0561
Konka 0746, 0738, 0747, 0748
Magnavox 0530, 0702
Marantz 0566
Mitsubishi 0548
Onkyo 0530
Optimus 0598
Oritron 0678
Panasonic 0517, 0659
Philips 0566, 0530
Pioneer 0598, 0552, 0659
Proscan 0549
RCA 0549, 0598
Samsung 0600
Sharp 0657
Sony 0560
Technics 0517
Theta Digital 0598
Toshiba 0530
Yamaha 0517, 0572
Zenith 0618, 0530
FPO
TABLE OF BRANDS
FPO
A
activating
a device, 8
Device Overview, 8
Freedom Remote, 6
adjusting
backlight timeout, 12
beep volume, 13
date, 13
LCD contrast, 7
LCD timeout, 12
settings, 11
time, 13
B
backlight
switching off, 6
timeout, 12
turning on, 6
Backlight button, 4, 6, 10
batteries, 3
installing, 3
status, 8
battery cover, 3
beep
confirmation beep, 17, 19
error beep, 17, 20
two beeps, 3
volume, 13
Brand mode, 15
brands
defining, 15
table, 34
buttons
backlight, 4, 6, 10
calibrate, 14
delay, 25
device, 4
hard, 4, 9
mode, 4, 10
page up and page down, 4, 10
reset, 30
revert, 15
soft, 4, 9
touch screen, 9
C
Calibrate button, 14
calibrating the touch screen, 14
CD-ROM, 27
cleaning Freedom Remote, 29
connecting to PC, 4, 27
customizing
adjusting settings, 11
defining brands, 15
learning commands, 18
Freedom Edit, 27
recording macros, 23
labeling buttons and devices, 21
D
database, 34
date, 13
defining brands, 15
Delay button, 25
Device button, 4
Device Overview, 6, 8
devices
labeling, 21
selecting, 9
display
cleaning, 29
switching off, 6
timeout, 12
turning on, 6
E
editing, See customizing
eye
for learning commands, 4, 18
F
first time usage
activating, 6
adjusting settings, 11
defining brands, 15
H
hard buttons, 4, 9
I
installing
Freedom Edit, 27
the batteries, 3
K
keyboard, 21
character, 22
deleting a character, 22
number, 22
space, 22
symbols, 22
Page 26
USER MANUAL
49
INDEX
USER MANUAL
48
NOTES
L
Label mode, 21
labeling
buttons, 21
devices, 21
LCD
contrast, 7
timeout, 12
Learn mode, 18
learning
commands from existing remote
controls, 18
distance, 18
eye, 4, 18
LED
for sending commands, 4
M
Macro mode, 23
maintaining Freedom Remote, 29
mode, 10
Brand mode, 15
Label mode, 21
Learn mode, 18
Macro mode, 23
Setup mode, 11
Use mode, 10
Mode button, 4, 10
N
NCF, See Freedom Remote
Configuration File
Freedom Edit, 27
NEOemulator, 27
O
overview of devices, 6, 8
P
page number, 5, 10
Page Up/Page Down buttons, 4, 10
Philips website, 2
powering
battery status, 8
installing the batteries, 3
programming, See customizing
Freedom Remote Configuration File, 27
Freedom Remote
cleaning, 29
information, 14
reverting, 14, 30
R
recording macros, 23
relabeling, See labeling
renaming, See labeling
Reset button, 30
resetting the Freedom Remote, 30
Revert button, 15
reverting the Freedom Remote, 14, 30
S
selecting
devices, 9
modes, 10
sending LED, 4
serial cable, 27
serial port, 4, 27
settings
adjusting, 11
reverting, 30
Setup mode, 11
setup page
first, 12
second, 13
third, 14
soft buttons, 4, 9
software, 27
switching modes, 10
switching off display, 6
system requirements, 28
T
table of brands, 34
time, 13
timeout
backlight, 6, 12
LCD, 6, 12
touch screen, 4, 5, 9
calibrating, 14
turning on
backlight, 6
display, 6
Freedom Remote, 6
U
Use mode, 10
W
website, 2
FPO
Page 27
NOTES
USER MANUAL
51
NOTES
USER MANUAL
50
Page 28
© Boston Acoustics, Inc.
All rights are reserved. Reproduction in whole or in part is prohibited without the prior
written consent of the copyright owner. Dolby is a registered trademark of Dolby
Laboratories. DTS is a registered trademark of Digital Theater Systems, Inc.
 Loading...