

Philips SRU9400/17, SRU9400/10, SRU 9400 Instructions For Use Manual
SRU9400/10
Quick & Easy Setup
www.philips.com/urc
Instructions for Use 3
Mode d’emploi 9
Bedienungsanleitung 15
Gebruiksaanwijzing 21
Instrucciones de manejo 27
Manual de utilização 33
Istruzioni per l’uso 39
Инструкция по использованию
45
Kullanım Yönergeleri 51
Bruksanvisning 57
Bruksanvisning 63
Käyttöohje 69
FI
NO
SE
TR
RU
IT
PT
ES
NL
DE
FR
EN
2

3
ENGLISH
Contents
Taking a First Look. . . . . . . . . . . . . . . . . . . . . . . . . . . . . . . . . . . . . . . . . . 3
Setting Up the Remote Control . . . . . . . . . . . . . . . . . . . . . . . . . . . . . . . . 4
Installing Your Devices . . . . . . . . . . . . . . . . . . . . . . . . . . . . . . . . . . . . . . . . 4
Learning Keys. . . . . . . . . . . . . . . . . . . . . . . . . . . . . . . . . . . . . . . . . . . . . . . 5
Copying Keys . . . . . . . . . . . . . . . . . . . . . . . . . . . . . . . . . . . . . . . . . . . . . . . 6
Programming Macros . . . . . . . . . . . . . . . . . . . . . . . . . . . . . . . . . . . . . . . . 6
Adjusting the Display Setting. . . . . . . . . . . . . . . . . . . . . . . . . . . . . . . . . . . 7
Using the Remote Control. . . . . . . . . . . . . . . . . . . . . . . . . . . . . . . . . . . . 7
Selecting a Device . . . . . . . . . . . . . . . . . . . . . . . . . . . . . . . . . . . . . . . . . . . 7
Using Touch Screen Keys and Hard Keys . . . . . . . . . . . . . . . . . . . . . . . . . 7
Using Macros . . . . . . . . . . . . . . . . . . . . . . . . . . . . . . . . . . . . . . . . . . . . . . . 7
Support . . . . . . . . . . . . . . . . . . . . . . . . . . . . . . . . . . . . . . . . . . . . . . . . . . 8
Troubleshooting . . . . . . . . . . . . . . . . . . . . . . . . . . . . . . . . . . . . . . . . . . . . . 8
Need Help? . . . . . . . . . . . . . . . . . . . . . . . . . . . . . . . . . . . . . . . . . . . . . . . . 8
Helpline . . . . . . . . . . . . . . . . . . . . . . . . . . . . . . . . . . . . . . . . . . . . . . . . . 91
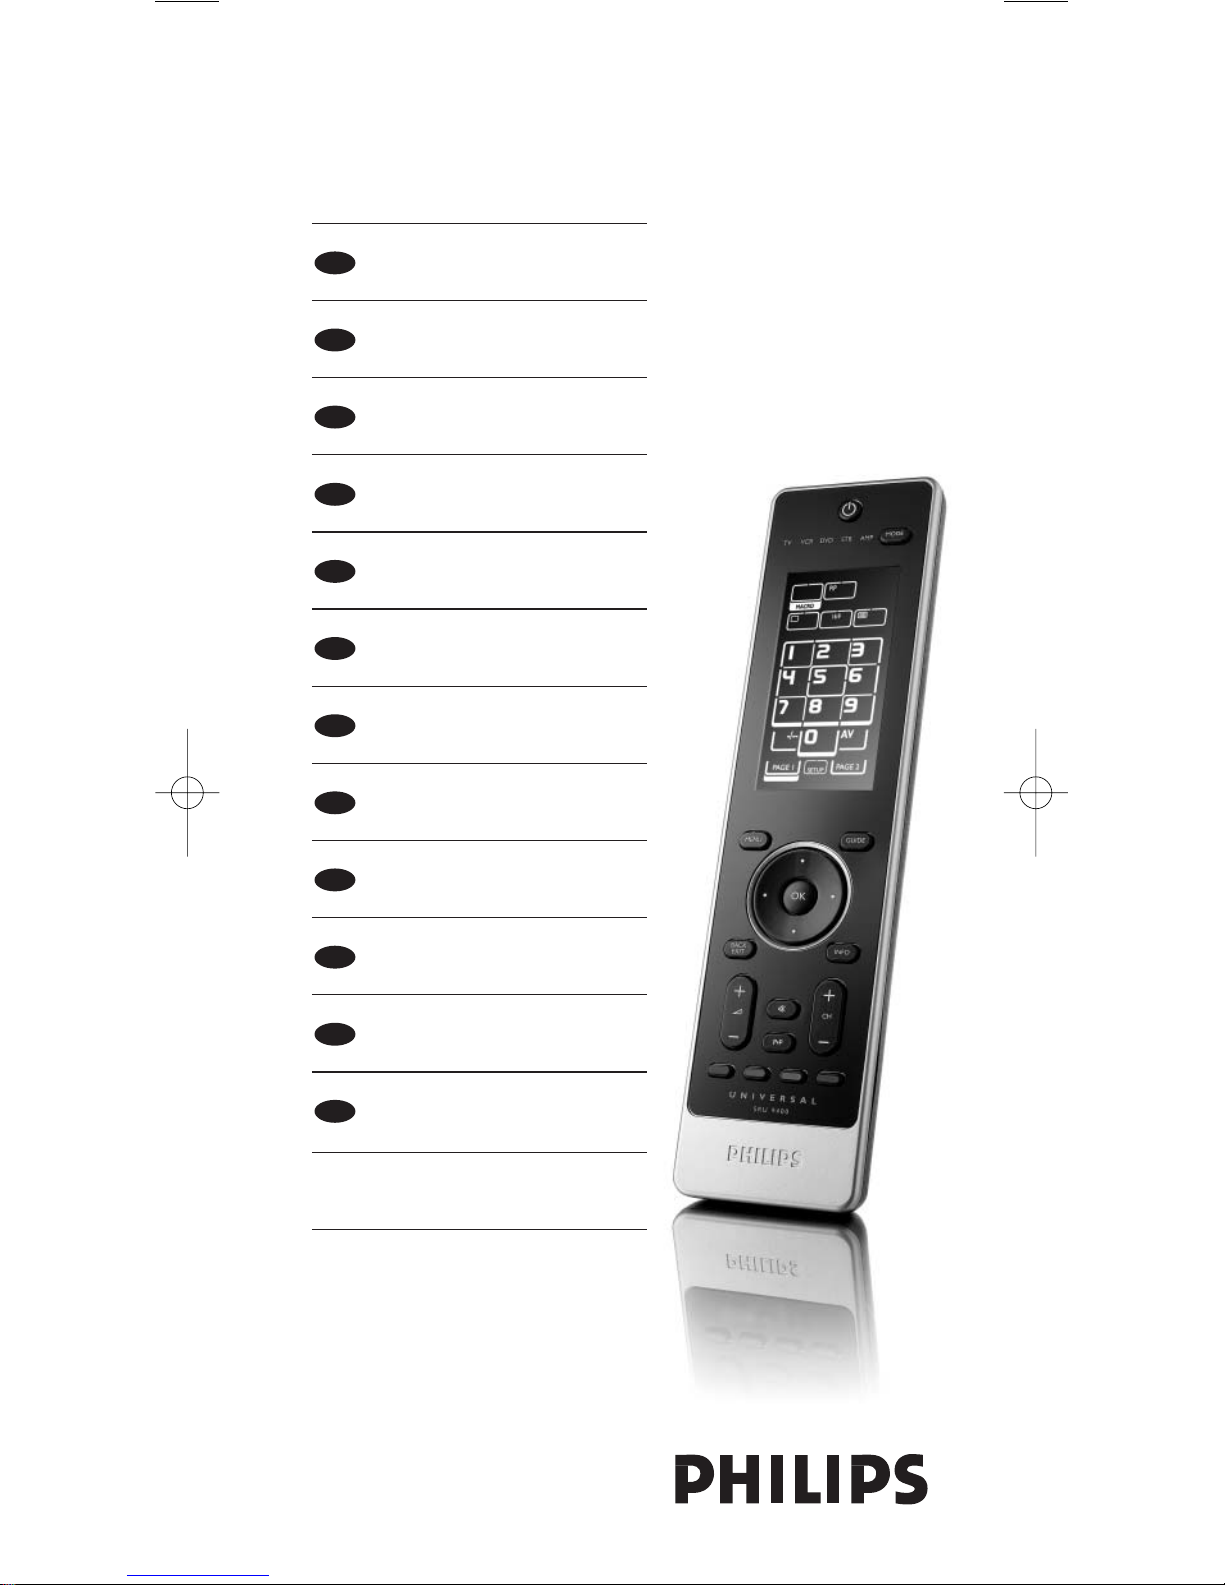
Taking a First Look
Thank you for purchasing the Philips SRU9400 universal remote control.
You can operate 5 appliances with this remote control: a TV,VCR, DVD,
Settopbox and Amplifier.
• Get started by placing the
batteries
in the remote control, as explained on
page 4. In most cases, you will then already be able to operate the 5 devices
mentioned above, provided they are Philips devices.
• Next,
set-up
the remote control.You can have it:
• Operate non-Philips devices.
• Learn functions from other remote controls.
• Copy functions from one key to another key.
•Execute a series of keys with only one key press.
This is explained in the chapter ‘Setting Up the Remote Control’ on page 4.
•
Enjoy
the remote control. Refer to the illustration on page 2 and to the
chapter ‘Using the Remote Control’ on page 7 for more information on using
the remote control.
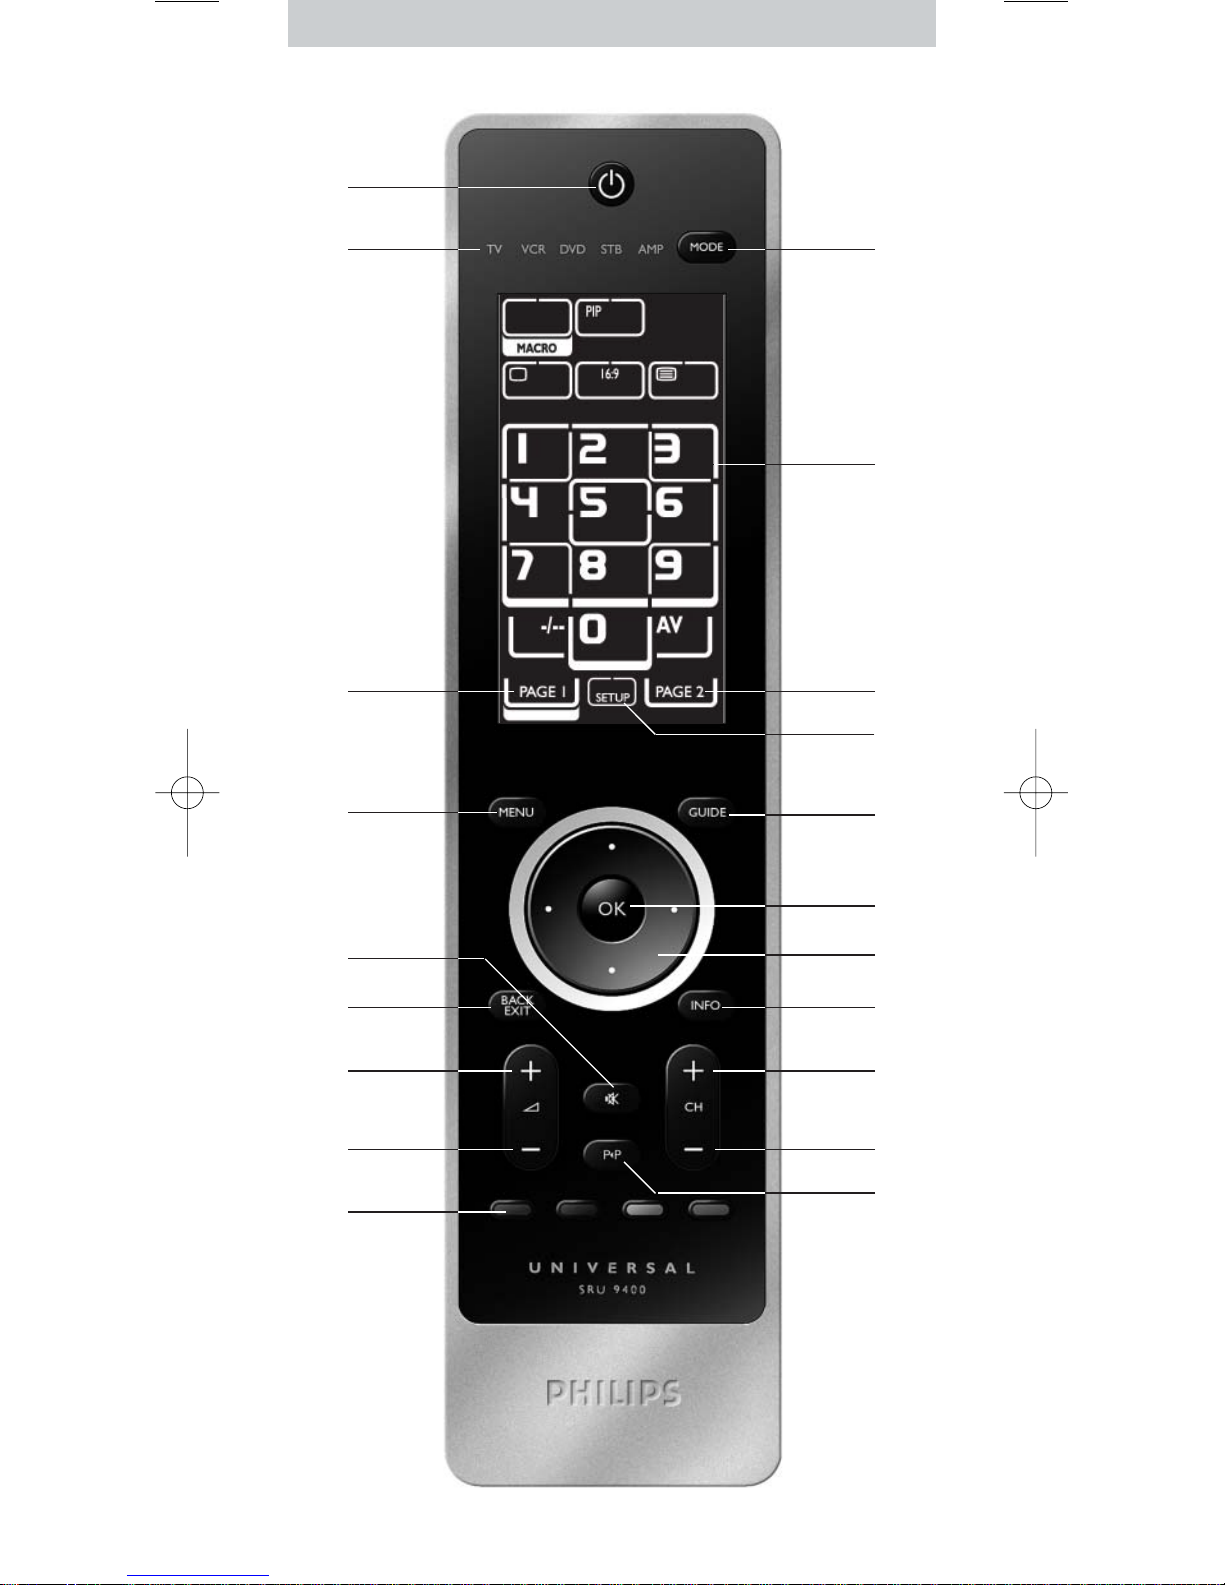
Standby key
Device indicators
Page keys
Menu key
Mute key
Back/Exit key
Volume Up key
Volume Down key
Color keys
Mode key
Touch screen keys
Set-up key
Guide key
Arrow keys and OK key
Info key
Channel Up key
Channel Down key
Previous Program key
ENGLISH - Instructions for Use
4
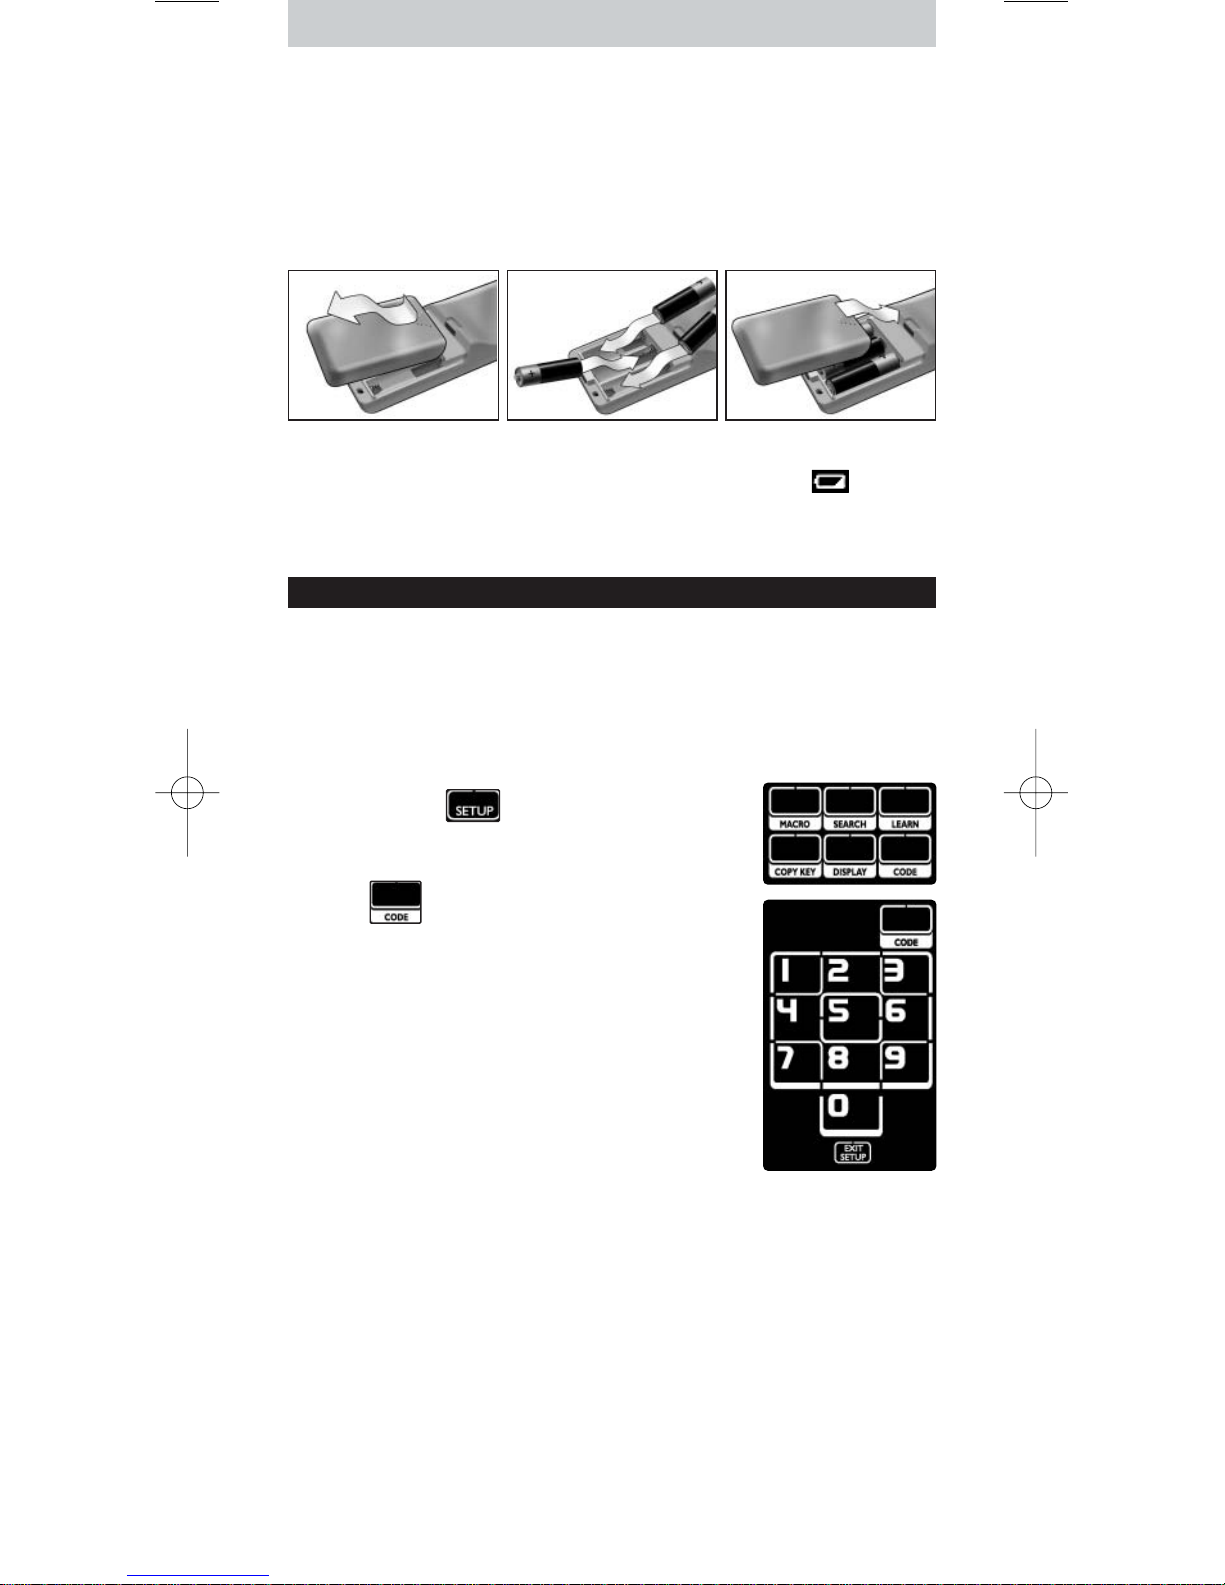
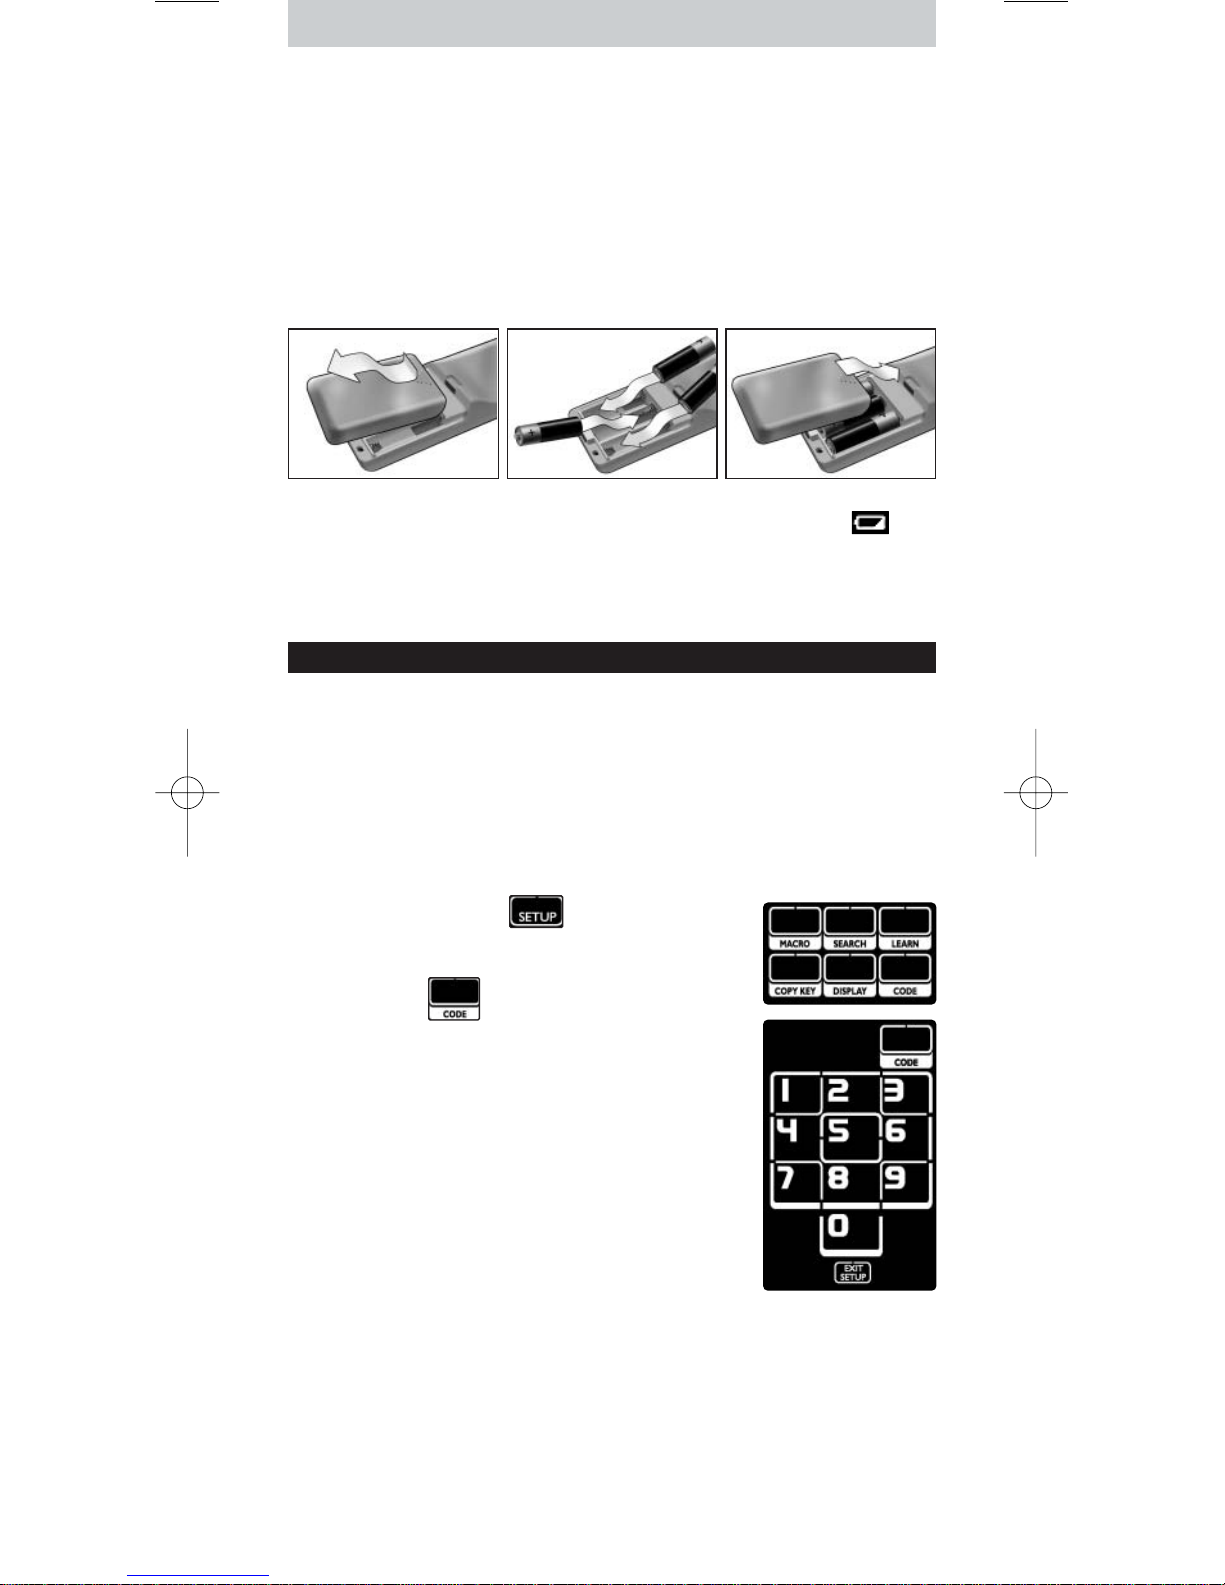
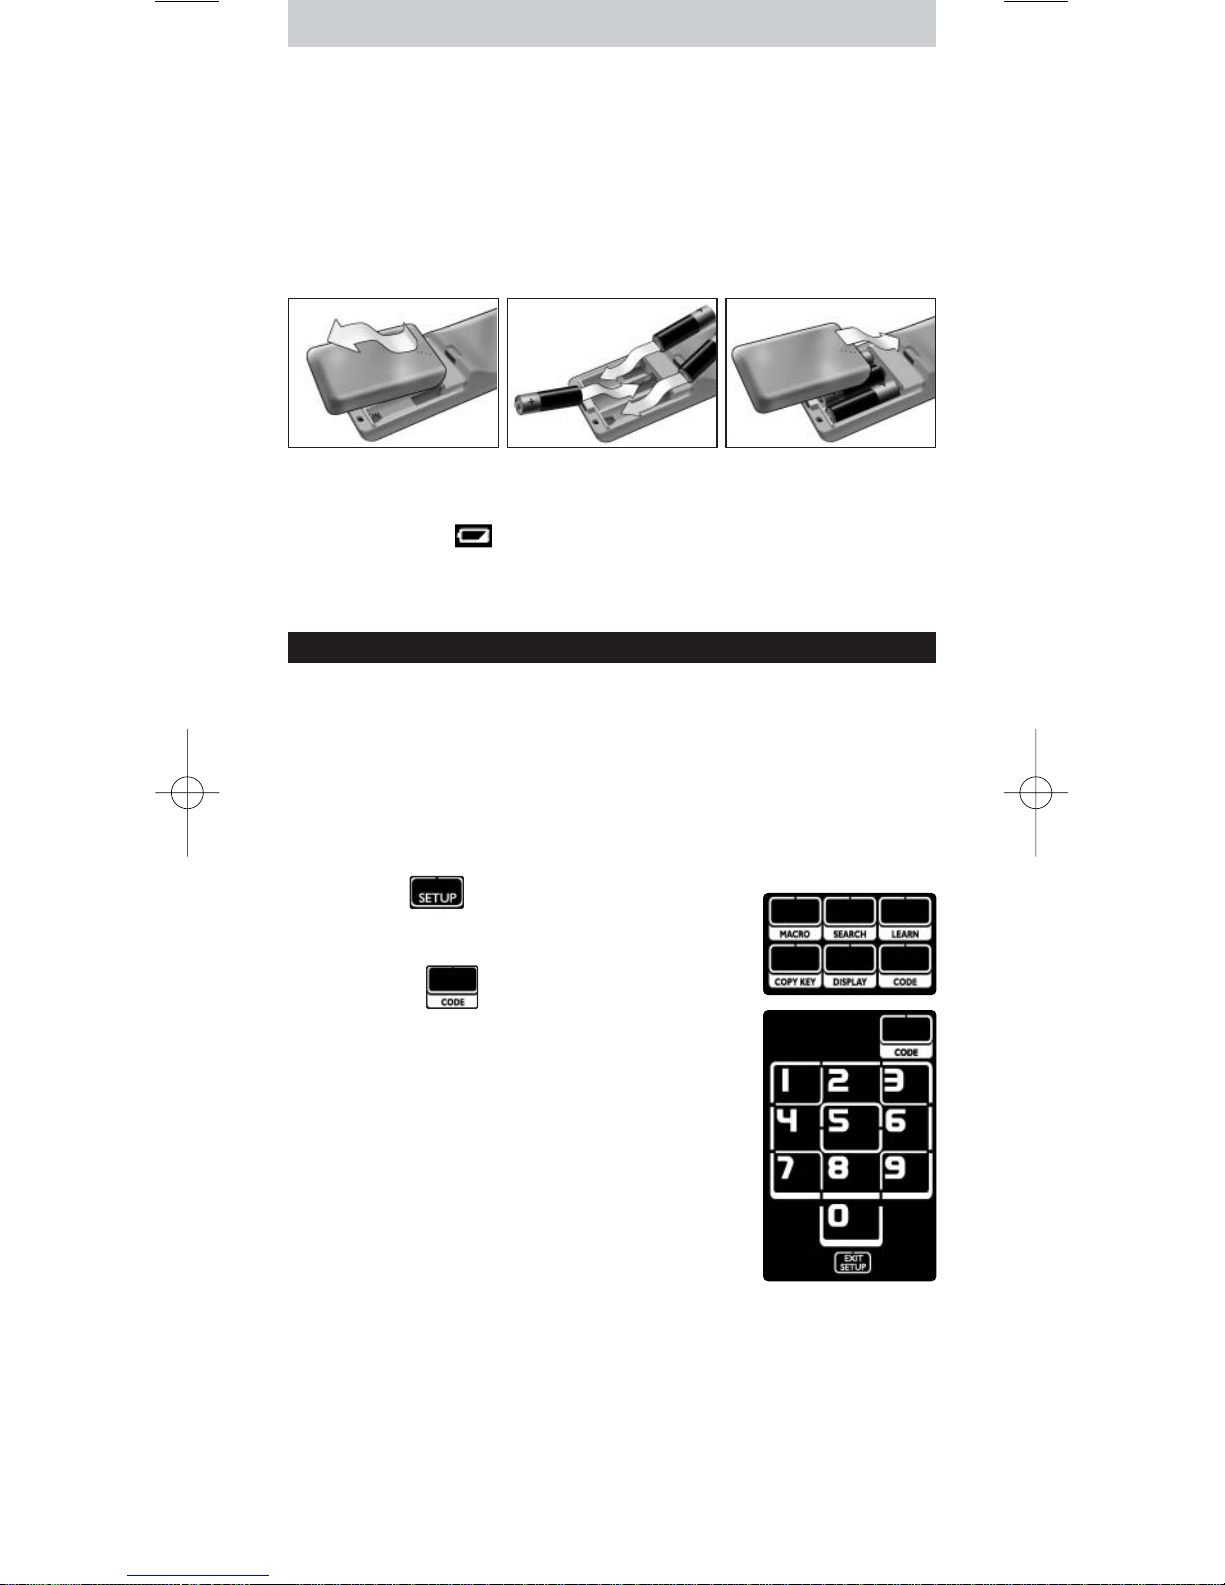
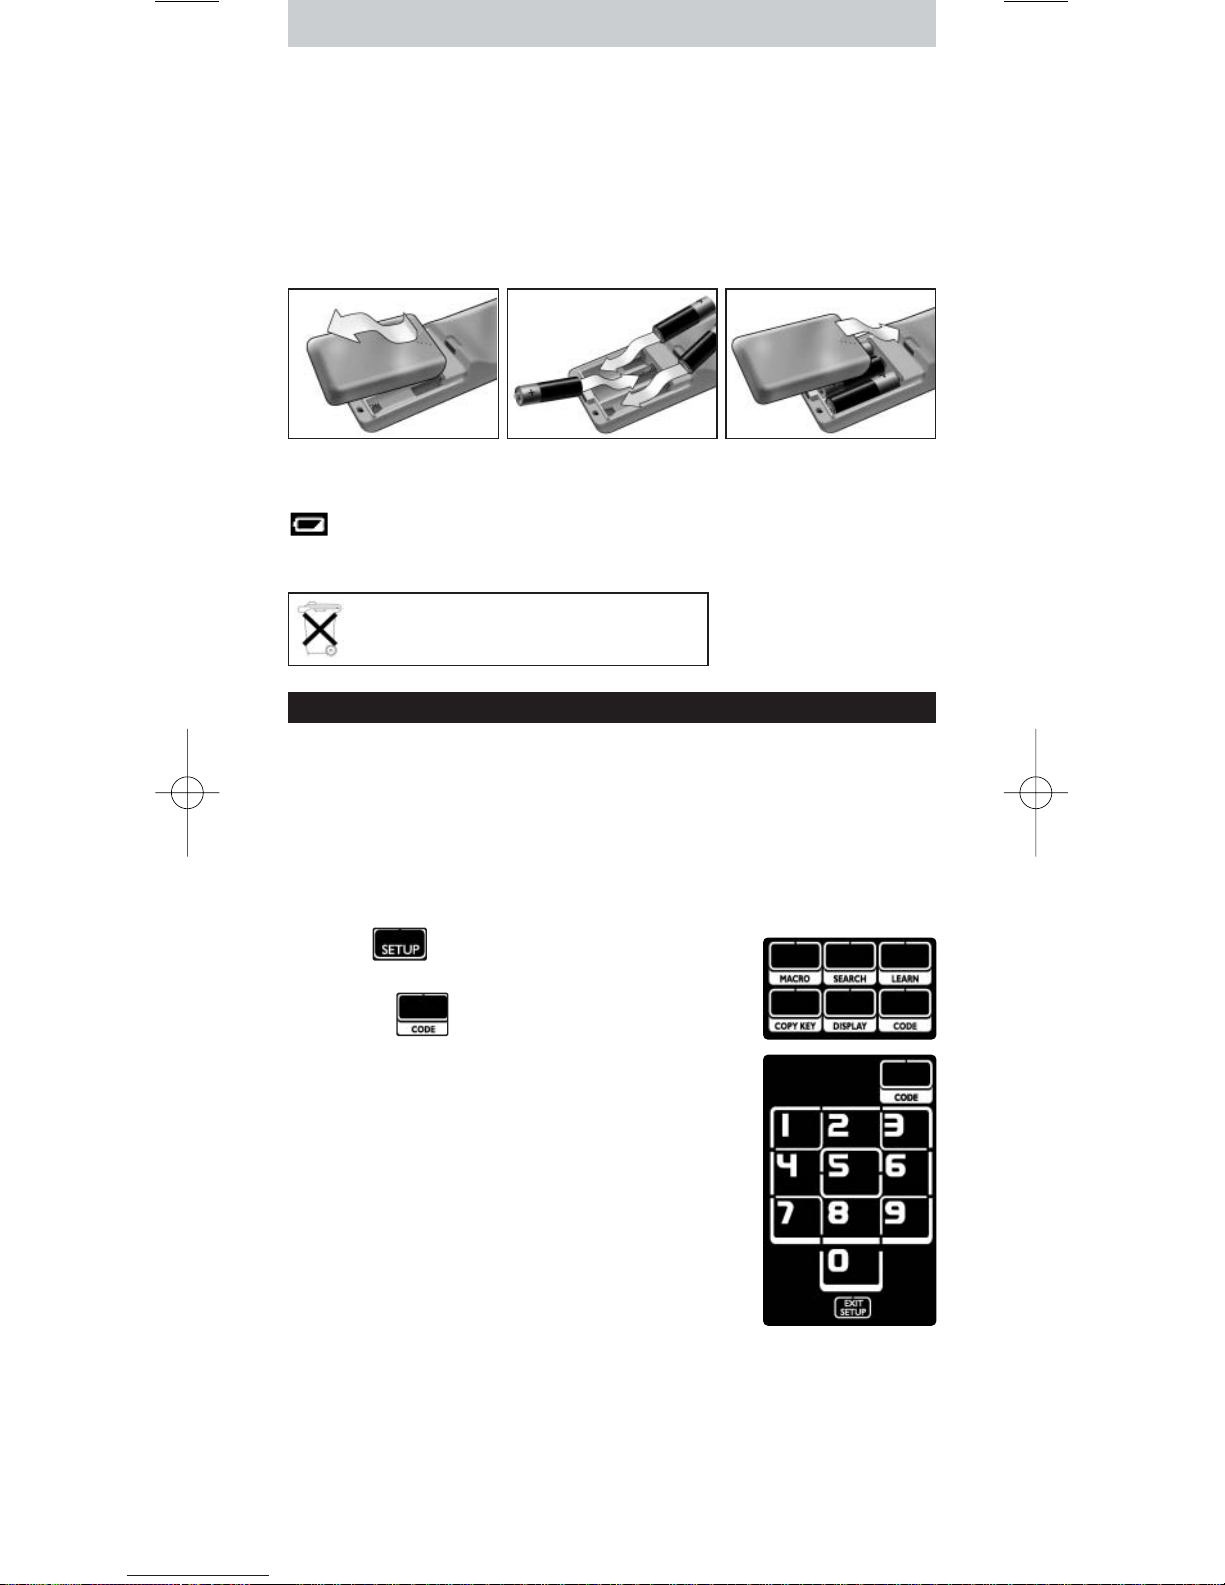
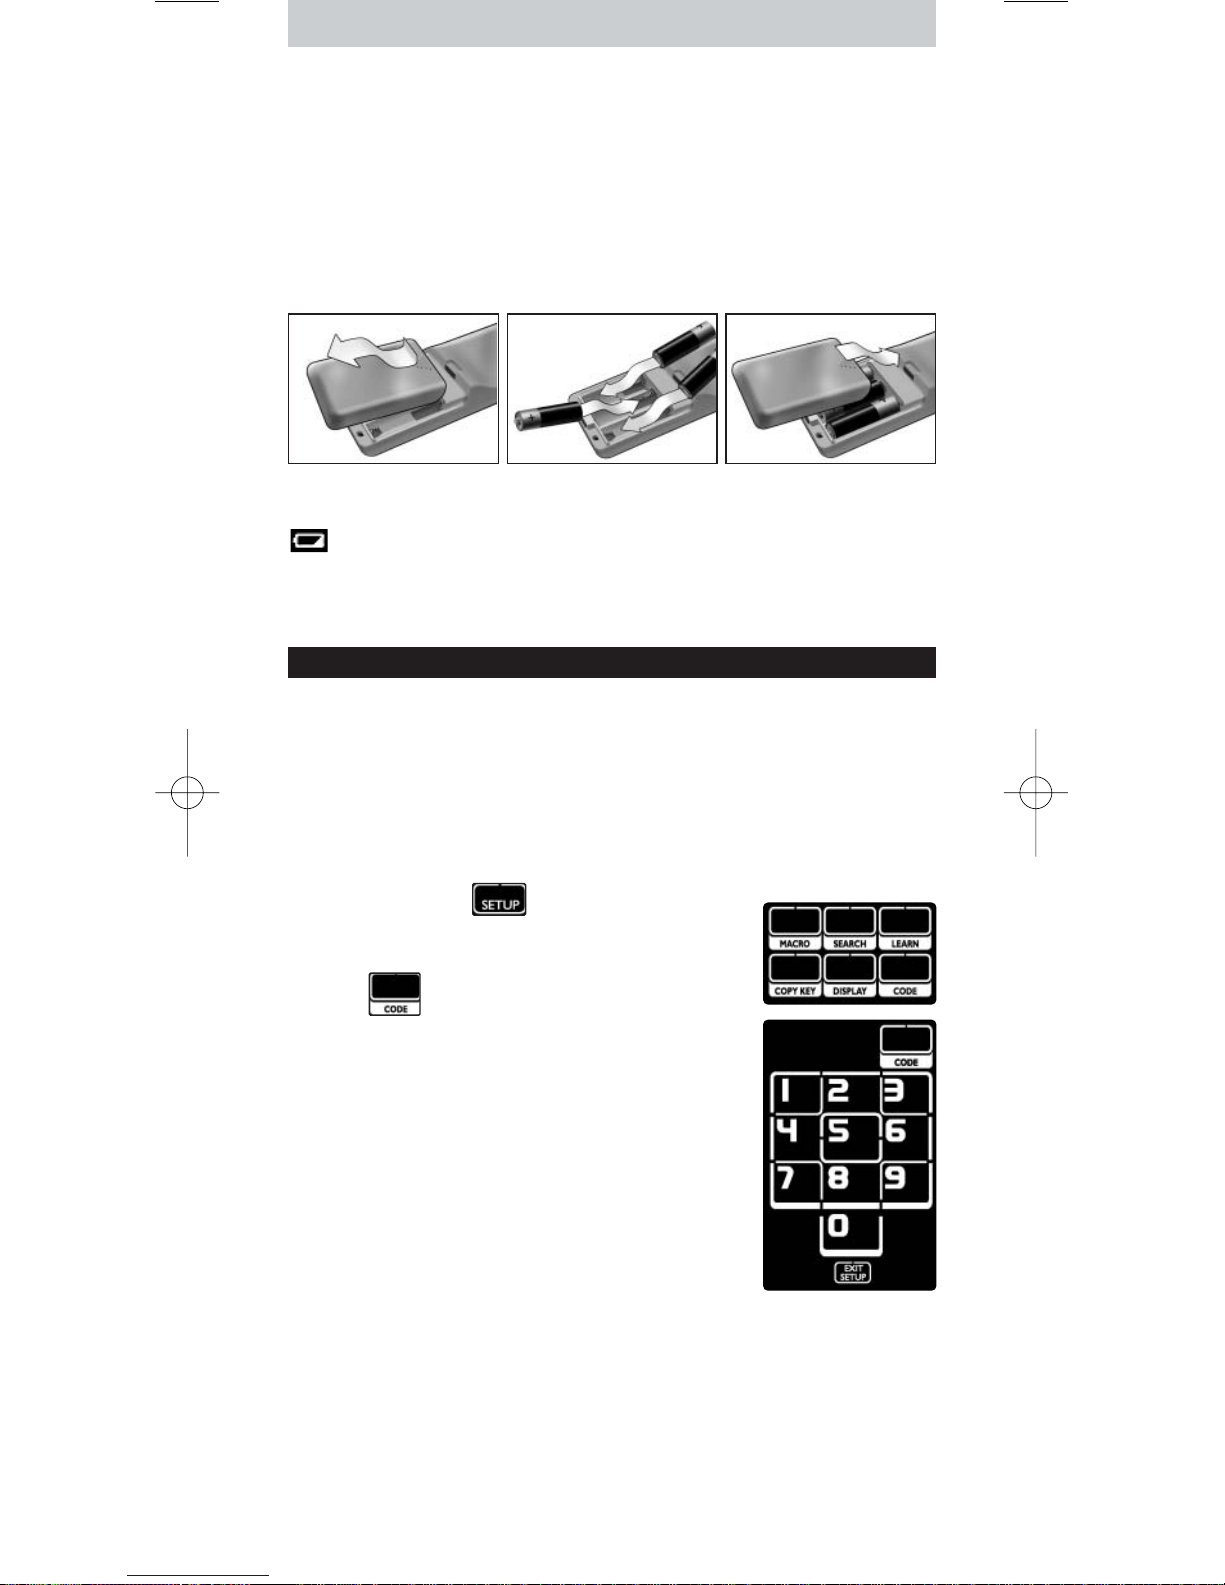
Placing the Batteries in the Remote Control
1 Press the battery cover at the back of the remote control inwards and
slide it in the direction of the arrow.
2 Place the three L06 or AA type alkaline batteries into the battery
compartment, as shown.
3 Slide the cover back on and click it firmly into place.
After a few moments, the first page of the TV touch screen keys appears.
Replacing Batteries
When the batteries are almost empty, the
Battery Low
icon appears.
Please replace the batteries with new L06 or AA type alkaline batteries and
follow the local regulations for disposal of the empty batteries.
Setting Up the Remote Control
Installing Your Devices
To operate a non-Philips device with this remote control, you need to enter
the brand-specific set-up code for that device.You can find a list of set-up
codes at the back of these Instructions for Use.
1 Use the
Mode
key to select the device that you want to operate.
The
Device indicator
lights up.
2 Press and hold for 3 seconds.
The
Set-up
menu appears.
3 Press in the
Set-up
menu.
A numeric pad appears.
4 Look up the brand of your device and the
corresponding
4-digit set-up codes
at the back of
these Instructions for Use.
5 Enter the first
4-digit set-up code
on the numeric
pad.
If the IR-code set is activated, the
Code
key blinks
twice.The last accessed page of the device appears on
the touch screen.
-orIf the IR-code set is not activated, the
Code
key blinks once.
Check the set-up code and try entering it again.
6 Test if the keys work with your device.
If the device is not responding to the SRU9400, repeat the instructions
from step 2 onwards, and try entering the next set-up code that is listed
with the brand of your device.
Repeat instructions 1 to 6 for each device that you want to operate.
You can select a different device with the
Mode
key.
5
ENGLISH
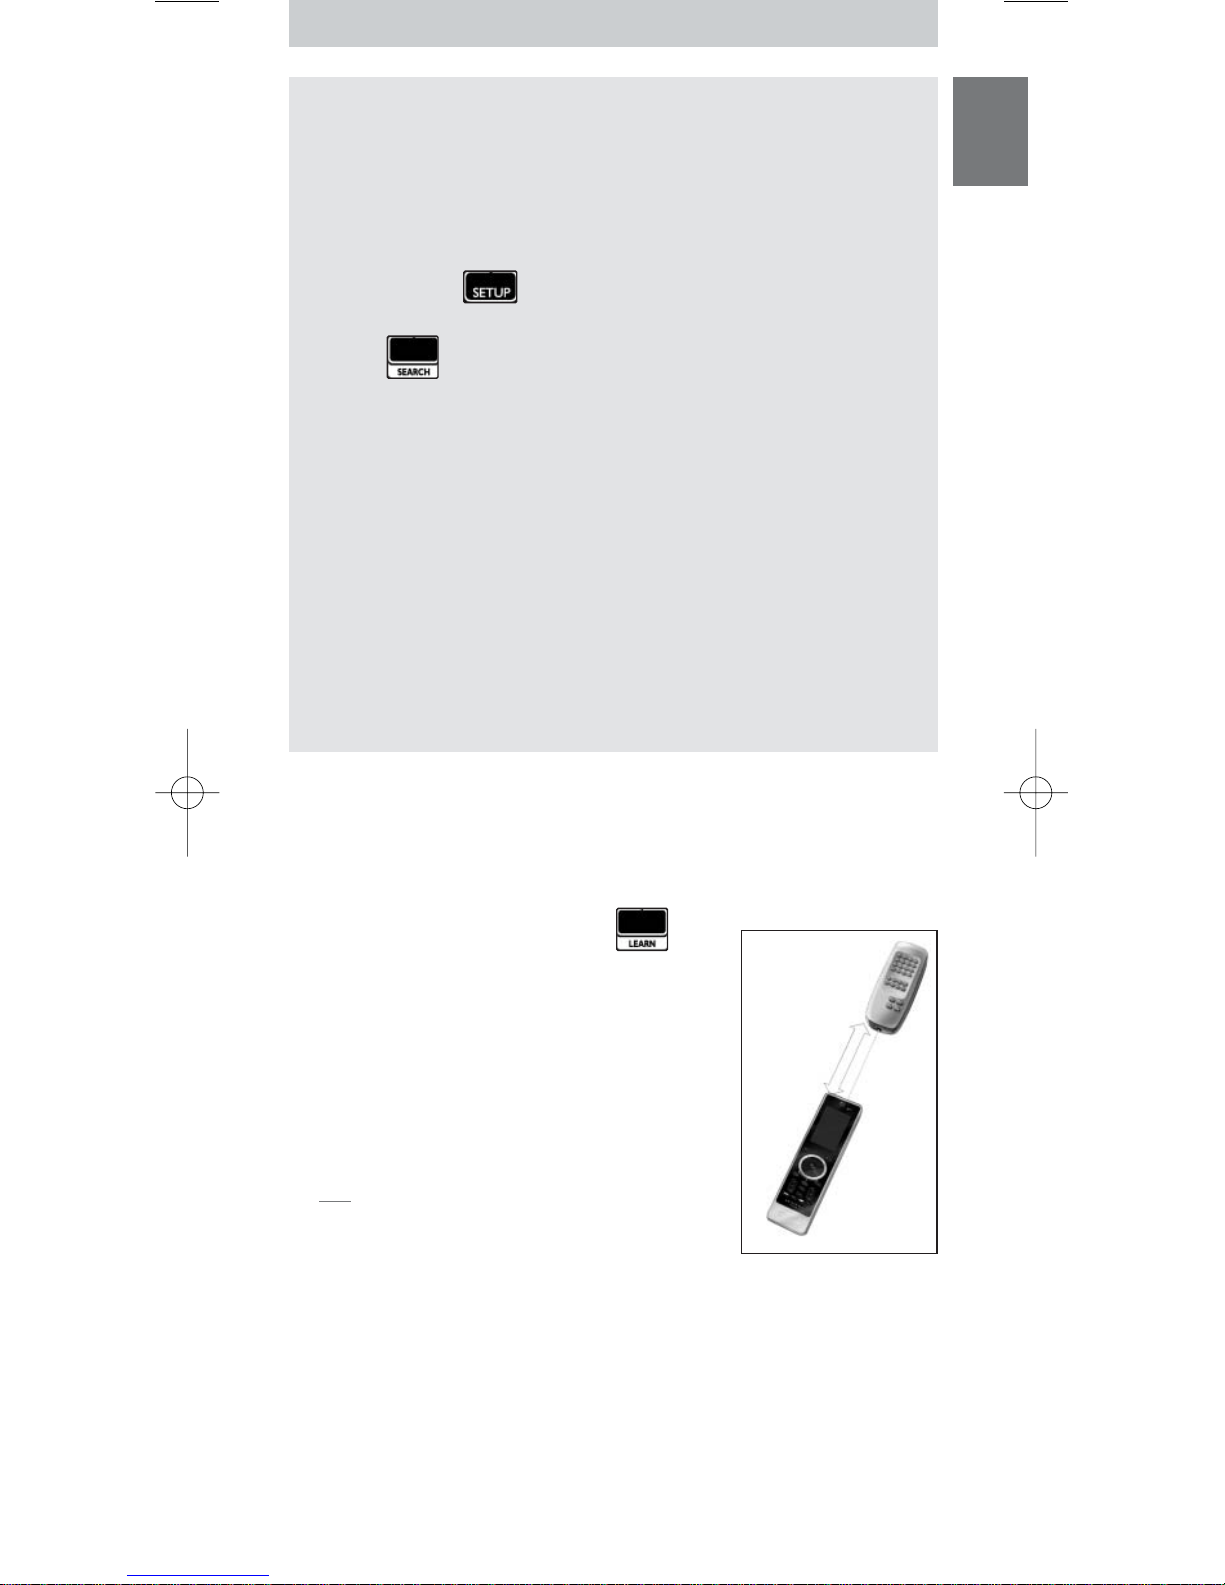
Searching for the IR-code set
If you cannot find the brand of your device and the corresponding setup code in the list, you can let the remote control search for the correct
set-up code.
1 Use the
Mode
key to select the device for which you want to find the
set-up code. Make sure this device is switched on.
The
Device indicator
lights up.
2 Press and hold for 3 seconds.
The
Set-up
menu appears.
3 Press in the
Set-up
menu.
The
Search
and
Exit Setup
keys appear.
4 Press and hold the
OK
key.
The remote control starts transmitting Standby/Power off commands
for the selected device.The
Device indicator
blinks each time a new
code is sent.
5 As soon as the device switches off, release the
OK
key. Make sure no
other keys are pressed.
The IR-code set for the selected device has been activated, and the last
accessed page of the device appears on the touch screen.
6
Tr y out
the device specific keys.
If the activated IR-code set is correct, the device specific keys will
function correctly.
If there are keys that do not function properly, repeat instructions
2
to
5
to search for the set-up code again.
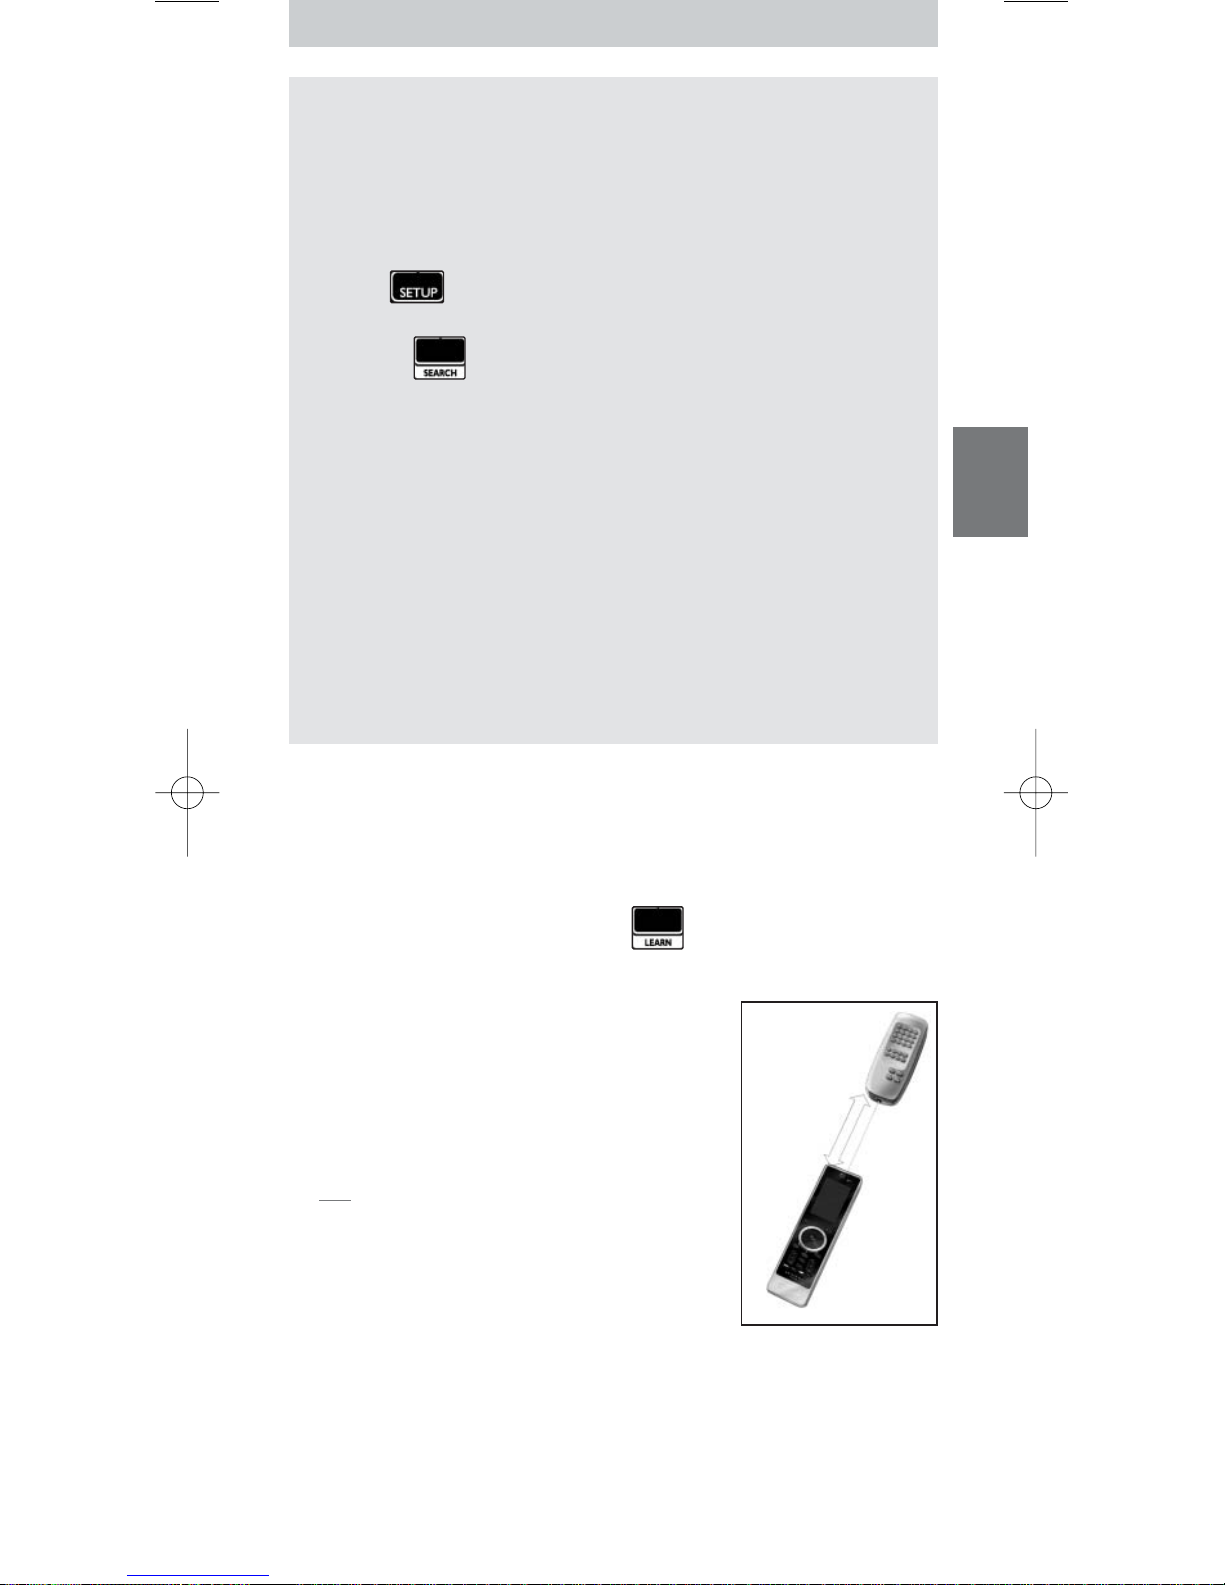
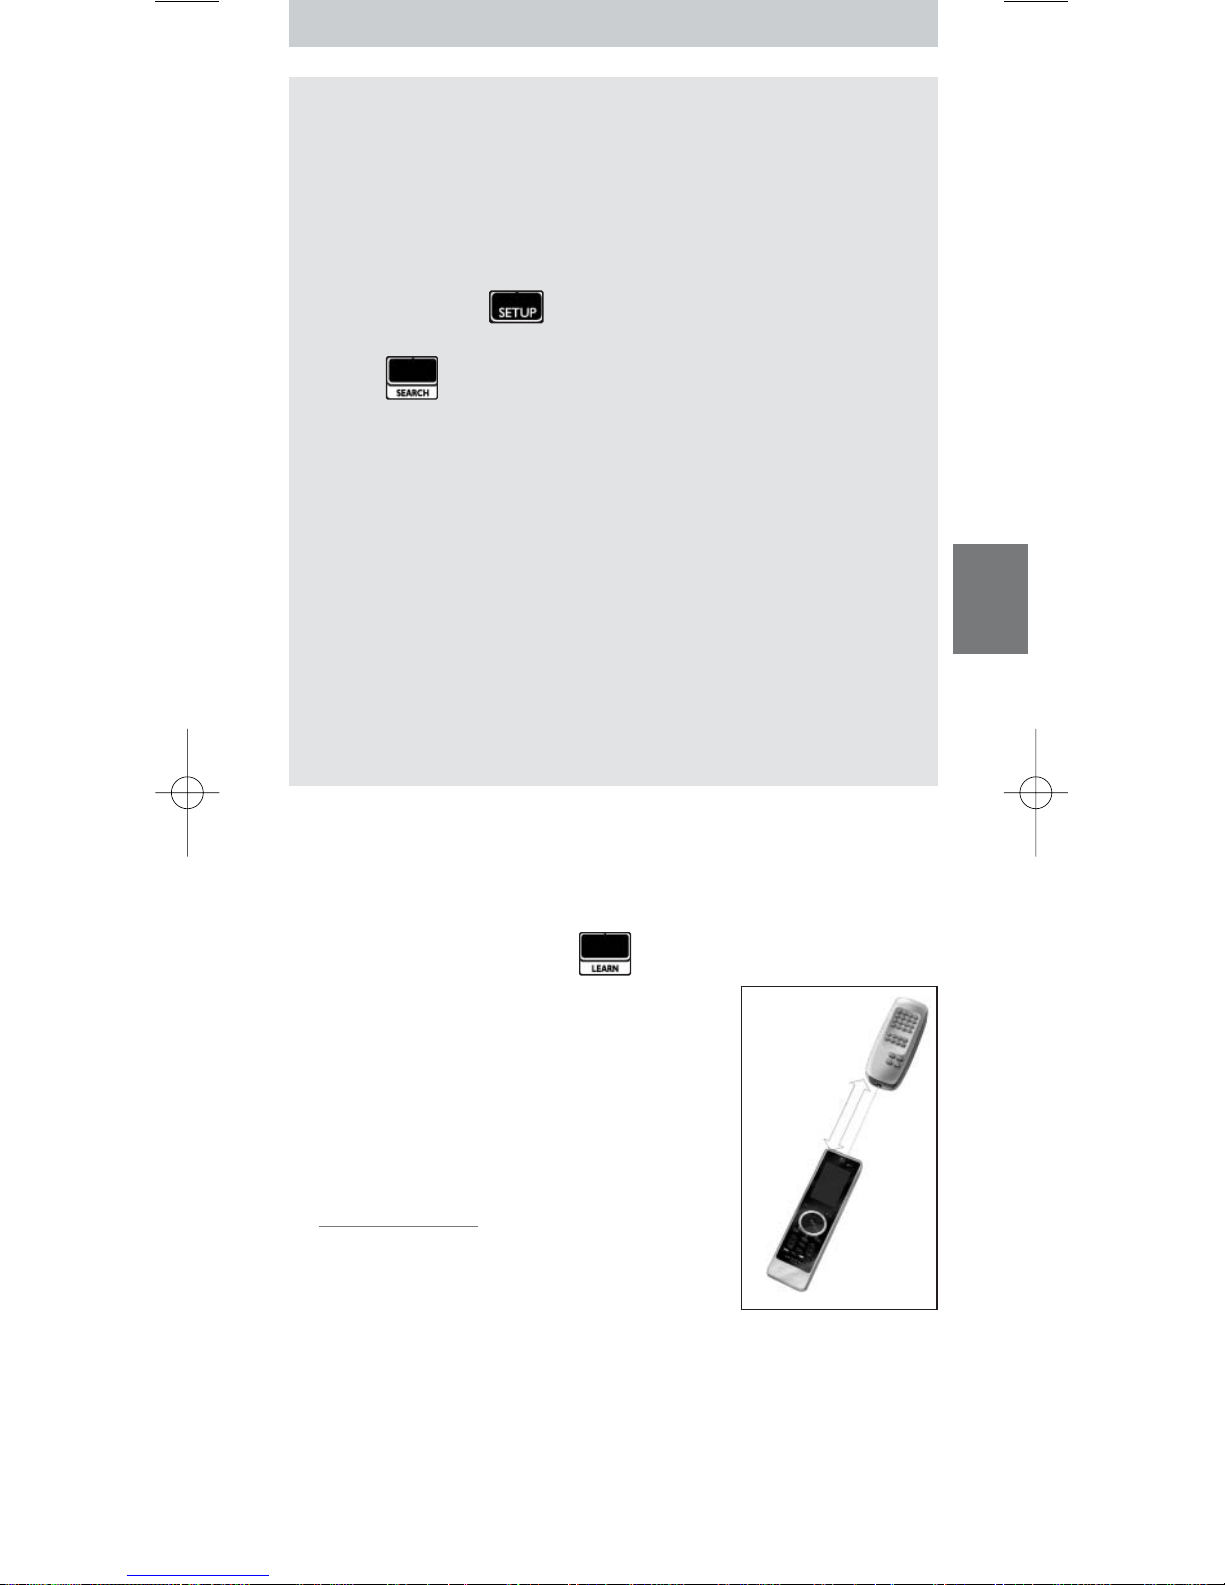
Learning Keys
You can let this SRU9400 remote control
learn
keys from your original
remote control, for example, when a function of the original remote control
is not covered by the touch screen keys.
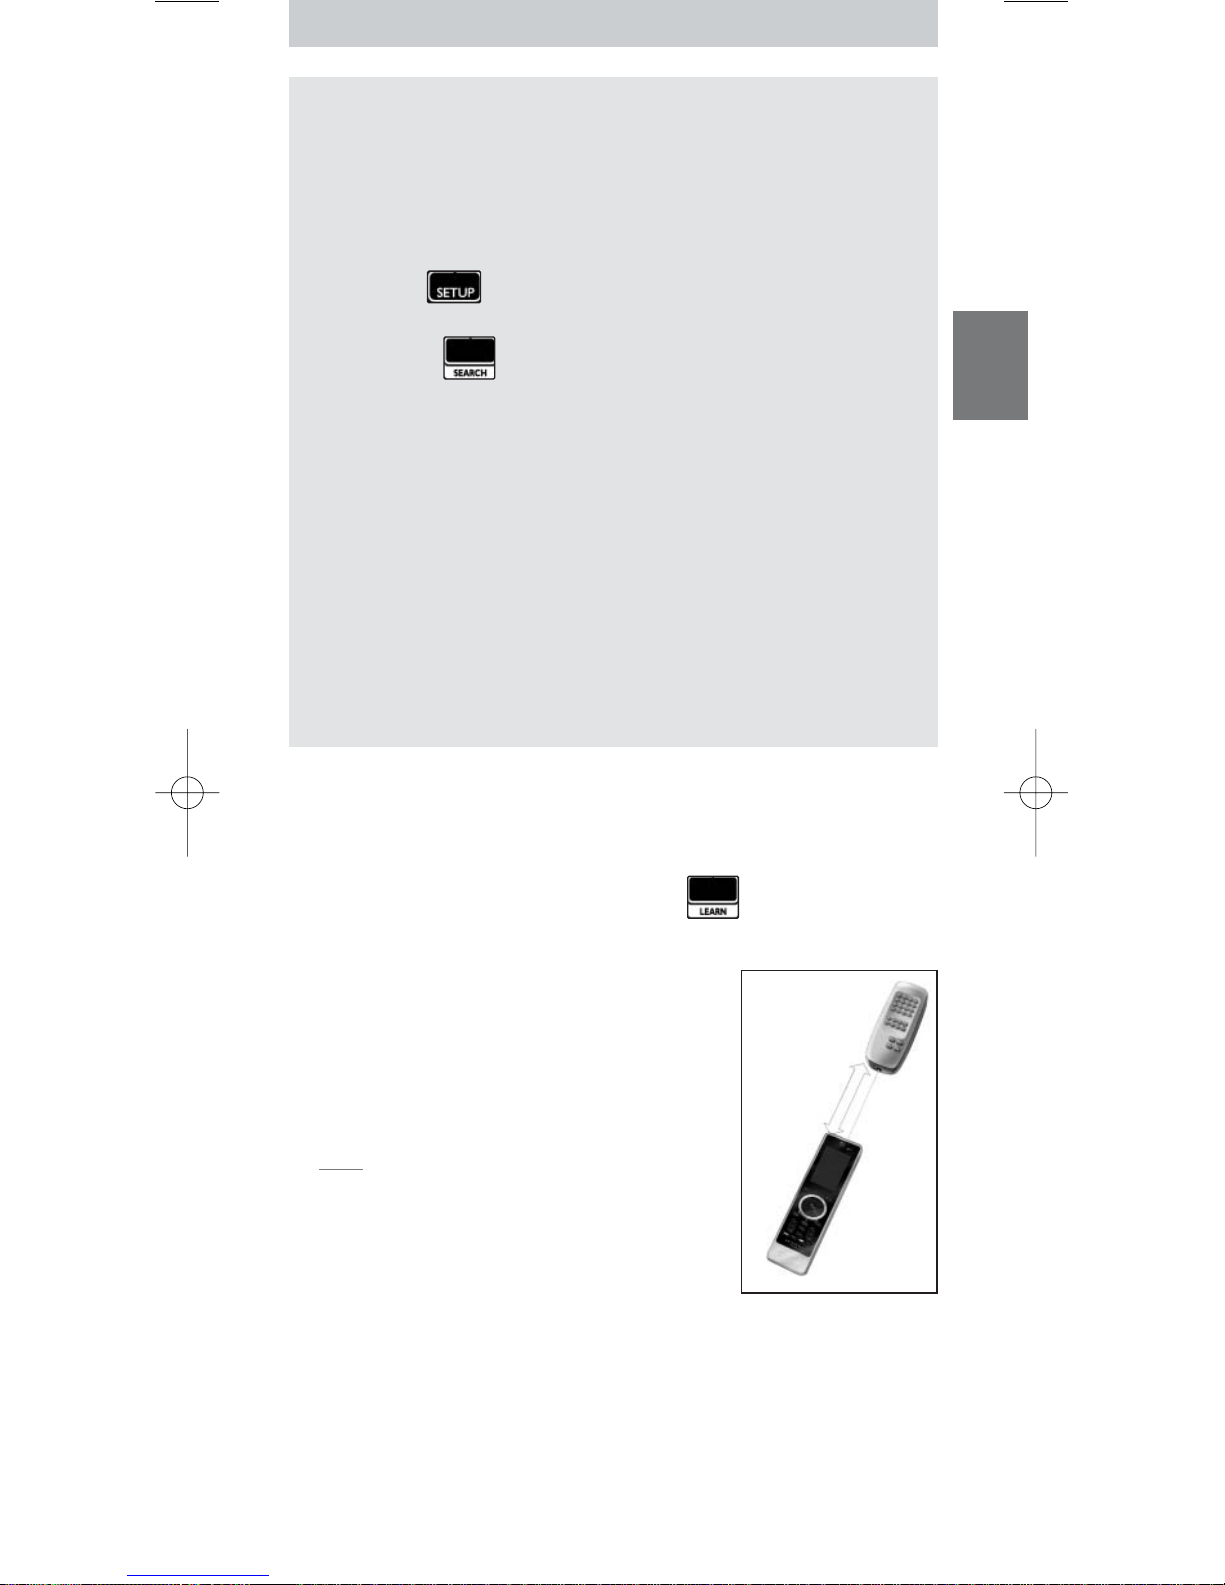
1 Access the
Set-up
menu and press .
Page 1
of the last selected device appears on the
touch screen.
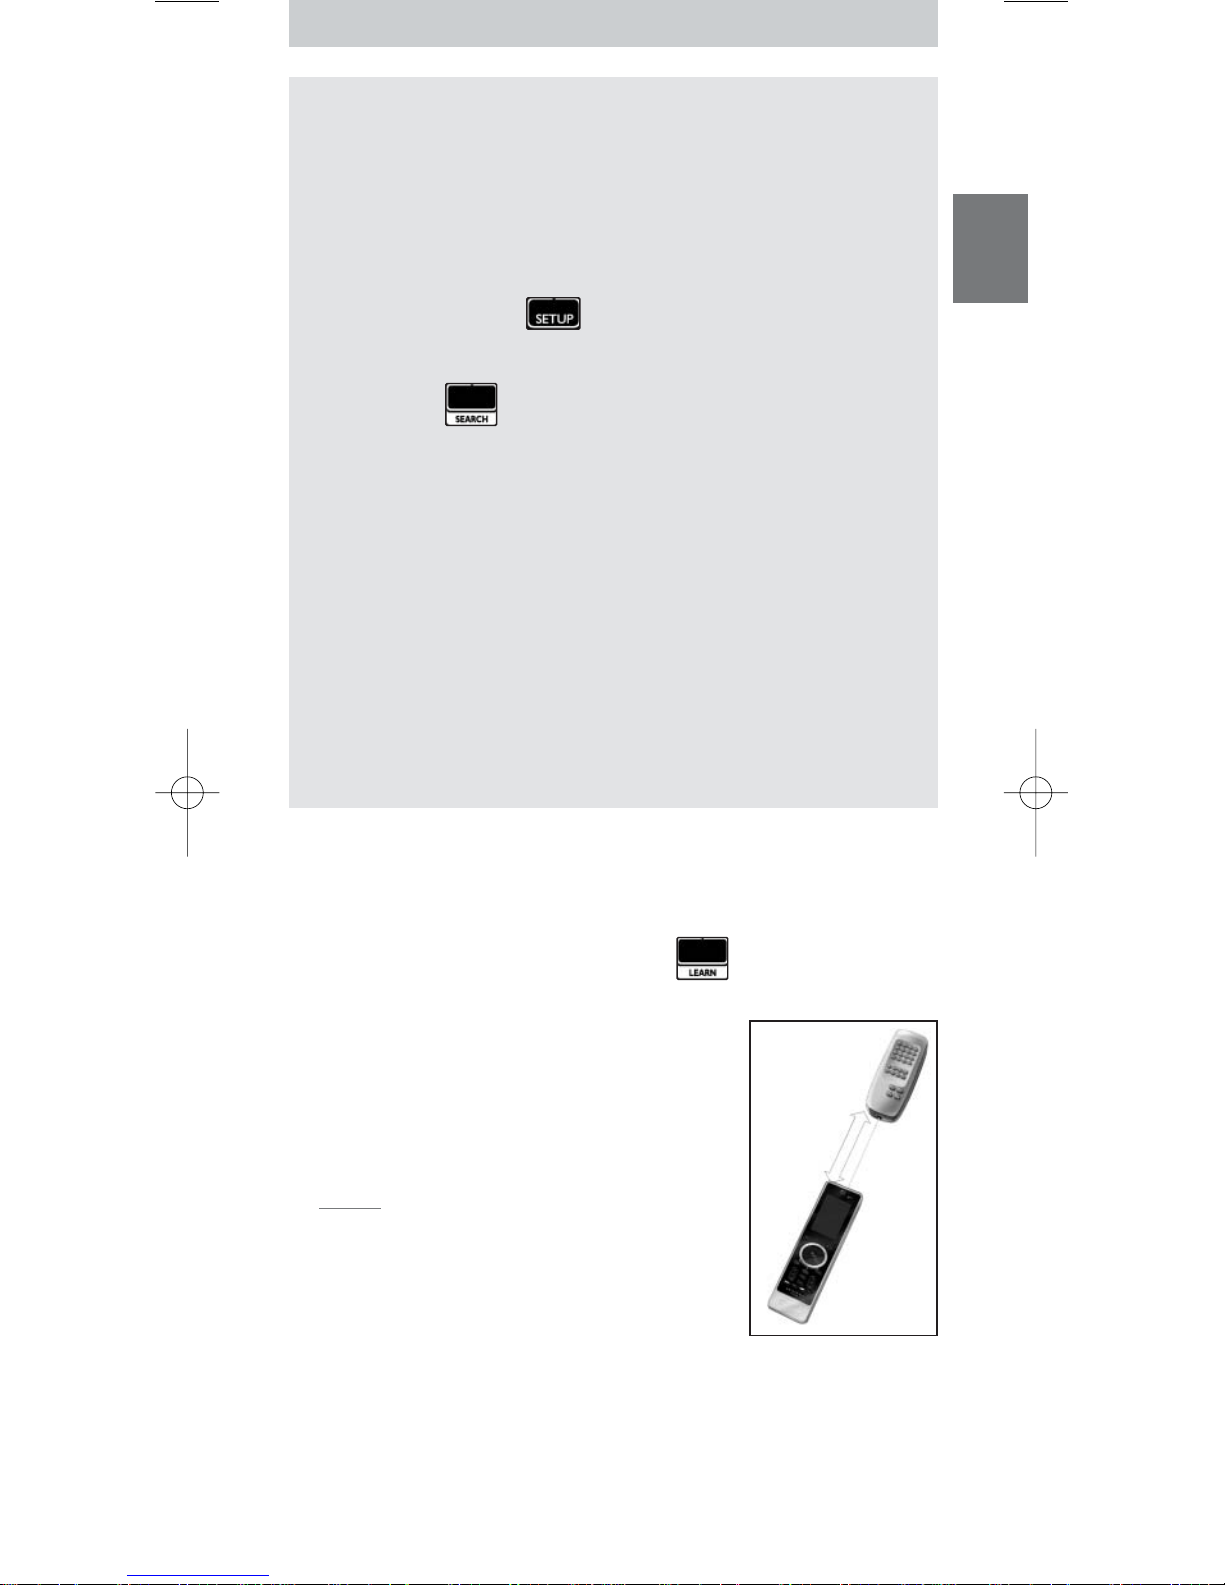
2 Place the SRU9400 remote control and the
original remote control within
2 inches’ or 6
centimeters’
distance from each other.
3 Press the
key
on the
SRU9400
remote control
that will learn a key from the original remote
control.
The
Learn
key remains on.
Tip You can access other keys of the selected
device with the Page 2 key, or you can select a
different device with the Mode key.
4 Press the
key
on the
original
remote control.
A high-pitched beep indicates that the SRU9400 successfully learned the
key. The
Learn
key blinks twice and the
Set-up
menu reappears.
-orA low-pitched beep indicates that the SRU9400 did not learn the key.The
Learn
key blinks once and the
Set-up
menu reappears.
5 Repeat steps
1
to 4for each key that you want the SRU9400 remote
control to learn.
2 inches
6 cm
6
Copying Keys
If you want to use a certain device-function on this remote control for
another device, you can
copy
that function, by copying the key. For example,
when the volume of your devices (DVD,TV,VCR) is controlled through an
amplifier, you can copy the volume functions of the amplifier-page to the
DVD-page.
1 Access the
Set-up
menu and press .
Page 1
of the last selected device appears on the touch screen.
2 Press the
source
key of which you want to copy the function.
This can be any key, except Page 1, Page 2, Setup and Mode.
3 Select the device to which you want to copy the function of the source key
with the
Mode
key.
Page 1 of the selected device appears on the touch screen.
4 Press the
destination
key to which you want to copy the source key.
If the SRU9400 successfully copied the key, the
Copy
key blinks twice and
the
Set-up
menu reappears.
-orIf the SRU9400 did not copy the key, the
Copy
key blinks once and the
Set-up
menu reappears.
Programming Macros
You can program up to 4 macros for operating your devices.
What is a macro?
A macro is
a sequence of key presses
you can program. For example,
for watching a DVD you would normally have to:
•Turn on the TV;
•Turn on the DVD;
•Turn on the surround sound system;
• Select the right input on your TV and surround sound system;
• Press the Play button to start the DVD.
With a macro, the remote control executes all these steps with
just one press
.
You can access the macros at all times by pressing and selecting the
number of the macro. For more information on accessing macros, refer to
the chapter
‘Using Macros’ on page 7.
To program a macro:
1 Access the
Set-up
menu and press .
The numbers 1 to 4 appear.
2 Select the
number
under which you want to store the macro.
If there is already a macro under this number, it will be overwritten.
The last selected device appears on the touch screen.
3 Press the
key sequence
that makes up the macro.
Notes You can program up to 12 steps in a macro.The macro is
automatically stored when you try to program a 13th step, and the Set-up
menu reappears.
You can access other keys of the selected device with the Page 2 key, or you
can select a different device with the Mode key.
4 Press the
OK
key to end the macro.
The
Macro
key blinks twice, and the last accessed page of the device
appears on the touch screen.
7
ENGLISH
Adjusting the Display Setting
When you use the remote control, the display switches on.
After 6 seconds, it switches off again.
You can change this time out to one of the following options:
1 Access the
Set-up
menu and press .
The numbers 1 to 4 appear.
2 Select the desired display
time out
:
1
= 3 seconds;
2
= 6 seconds;
3
= 9 seconds;
4
= 12 seconds.
The
Display
key blinks twice to indicate that the new setting is stored and
the
Set-up
menu reappears.
Note The display time out has an impact on the lifetime of the batteries: the
longer the display stays on, the faster the batteries will drain.
Using the Remote Control
Selecting a Device
You can select a device that you have installed on the remote control with
the
Mode
key:
• The
Device indicator
lights up.
• The touch screen keys for the selected device appear.
• The hard keys operate the selected device.
Using Touch Screen Keys and Hard Keys
The most frequently used functions of your devices are covered in the touch
screen keys and hard keys.
Only the functions for the selected device appear on the touch screen.You
can access other device functions with the
Page 2
key at the bottom of the
touch screen.
Using Macros
This remote control can contain up to 4 different macros.
The macros on the remote control are accessible via .
This key always appears on page 1 of the touch
screen keys, no matter which device you are operating.
1 Press to access the programmed macros.
The numbers 1 to 4 appear on the touch screen.
2 Press the number of the macro that you want to execute.
The macro is executed and the
Device indicator
of the last selected
device lights up.

8
Support
Troubleshooting
Problem Solution
One or more
buttons are not
working with my
device.
•To operate a non-Philips device with the SRU9400, you have
to install that device on the SRU9400 using the brand-specific
set-up code.
Refer to ‘Installing Your Devices’ on page 4.
•If you can’t find the correct set-up code for your device, the
SRU9400 can search the entire database for the correct IRcodes.
Refer to page 5.
•The SRU9400 can also learn keys from your original remote
control.
Refer to ‘Learning Keys’ on page 5.
I cannot find the
brand of my device
in the code list
SRU9400.
The SRU9400 can search the entire database for the correct
IR-codes.
Refer to page 5.
I cannot find my
type of device on
the SRU9400 or in
the list of devices at
the back of these
Instructions for Use.
•‘TV mode’ contains color TV, projectors,TV-VCR
combinations,TV-DVD combinations, plasma TV and LCD TV
•‘VCR mode’ contains VCR and PVR/hard disk recorders
•‘DVD mode’ contains DVD, DVDR and DVD-HDD
combinations
•‘STB mode’ contains satellite boxes, cable boxes and
DVB-T/digital terrestrial decoders.
•‘Amp mode’ contains amplifiers,A/V receivers, home theaters
systems and audio systems.
I cannot wake-up
the SRU9400
anymore.
The battery level is too low.Take out the batteries and insert
new batteries.
Need Help?
If you have any questions about the SRU9400, you can always contact us.
You will find our contact details on page 91 of these Instructions for Use.
Read these Instructions for Use carefully before you contact us.
When you call our helpline, make sure the device is at hand so that our
operators can help you determine whether your remote control is working
properly.
The model number of your Philips universal remote control is SRU9400/10.
Date of purchase: ......../......../........ (day/month/year)
Documentation concept and elaboration:
The Human Interface Group, De Regenboog 11, 2800 Mechelen, Belgium
www.higroup.com
9
FRANÇAIS
Ta b le des matières
Première approche . . . . . . . . . . . . . . . . . . . . . . . . . . . . . . . . . . . . . . . . . . 9
Configuration de la télécommande . . . . . . . . . . . . . . . . . . . . . . . . . . . . . 10
Installation de vos périphériques. . . . . . . . . . . . . . . . . . . . . . . . . . . . . . . 10
Apprentissage de touches. . . . . . . . . . . . . . . . . . . . . . . . . . . . . . . . . . . . 11
Copie de touches . . . . . . . . . . . . . . . . . . . . . . . . . . . . . . . . . . . . . . . . . . 12
Programmation de macros . . . . . . . . . . . . . . . . . . . . . . . . . . . . . . . . . . . 12
Réglages de l’affichage . . . . . . . . . . . . . . . . . . . . . . . . . . . . . . . . . . . . . . . 13
Utilisation de la télécommande. . . . . . . . . . . . . . . . . . . . . . . . . . . . . . . . 13
Sélection d’un périphérique . . . . . . . . . . . . . . . . . . . . . . . . . . . . . . . . . . 13
Utilisation des touches de l’écran tactile . . . . . . . . . . . . . . . . . . . . . . . . 13
Utilisation des macros . . . . . . . . . . . . . . . . . . . . . . . . . . . . . . . . . . . . . . . 13
Support . . . . . . . . . . . . . . . . . . . . . . . . . . . . . . . . . . . . . . . . . . . . . . . . . 14
Dépannage. . . . . . . . . . . . . . . . . . . . . . . . . . . . . . . . . . . . . . . . . . . . . . . . 14
Besoin d’aide ? . . . . . . . . . . . . . . . . . . . . . . . . . . . . . . . . . . . . . . . . . . . . . 14
Helpline . . . . . . . . . . . . . . . . . . . . . . . . . . . . . . . . . . . . . . . . . . . . . . . . . 91
Première approche
Vous venez d’acquérir la télécommande universelle Philips SRU9400. Nous
vous en remercions. Cette télécommande fonctionne avec 5 périphériques :
un téléviseur, un magnétoscope, un lecteur de DVD, un boîtier décodeur et
un amplificateur.
• Commencez par insérer les
piles
dans la télécommande, tel que décrit page 10.
Dans la plupart des cas, les périphériques listés précédemment fonctionneront
dès lors, à partir du moment où il s’agit de modèles Philips.
• Ensuite,
configurez
la télécommande. Cette dernière peut :
• Fonctionner avec des périphériques autres que Philips.
• Apprendre des fonctions d’autres télécommandes.
• Copier des fonctions d’une touche à une autre.
• Exécuter plusieurs touches en une seule activation de touche.
Vous trouverez plus d’informations à ce sujet au chapitre ‘Configuration de la
télécommande’ page 10.
•
Utilisez
la télécommande. Reportez-vous à l’illustration page 2 et au chapitre
‘Utilisation de la télécommande’ page 13 pour obtenir plus d’informations sur
l’utilisation de la télécommande.
Touche Veille
Indicateurs de périphérique
Touches Page
Touche Menu
Touche Mode silencieux
Touche Back/Exit
Touche Volume +
Touche Volume Touches de couleurs
Touche Mode
Touches de l’écran tactile
Touche de configuration
Touche Guide
Touches de direction et OK
Touche Info
Touche Channel +
Touche Channel Touche Programme Précédent
Français – Mode d’emploi
10
Insertion des piles dans la télécommande
1 Exercez une pression vers l’intérieur sur le couvercle du compartiment de
piles, situé à l’arrière de la télécommande, puis faites-le glisser dans le sens
de la flèche.
2 Insérez les trois piles alcalines L06 ou AA dans le compartiment prévu à cet
effet, tel qu’indiqué.
3 Faites glisser le couvercle jusqu’à ce qu’il soit correctement remis en place
et que vous entendiez un déclic.
Après quelques instants, la première page des touches de l’écran tactile du
téléviseur apparaît.
Remplacement des piles
Lorsque les piles sont presque déchargées, l’icône
Batterie faible
apparaît.Veuillez remplacer les piles par de nouvelles piles alcalines L06 ou
AA et suivre la législation locale en vigueur en matière de système de
collecte des piles usagées.
Configuration de la télécommande
Installation de vos périphériques
Afin que la télécommande fonctionne avec vos périphériques autres que
Philips, vous devez entrer un code de configuration spécifique à la marque
de vos modèles.Vous trouverez une liste de codes de configuration à la fin
de ce mode d’emploi.
1 Utilisez la touche
Mode
pour sélectionner le périphérique avec lequel vous
souhaitez que la télécommande interagisse.
L’
indicateur de périphérique
s’allume.
2 Appuyez sur la touche et maintenez-la
enfoncée pendant 3 secondes.
Le menu
Set-up
apparaît.
3 Appuyez sur du menu
Set-up
.
Un pavé numérique apparaît.
4 À la fin de ce mode d’emploi, recherchez le
code de
configuration à 4 chiffres
qui correspond à votre
périphérique.
5 Entrez le premier
code de configuration à
4 chiffres
sur le pavé numérique.
Si le jeu de codes IR est activé, la touche
Code
clignote deux fois. La dernière page affichée du
périphérique apparaît à l’écran tactile.
-ouSi le jeu de codes IR n’est pas activé, la touche
Code
clignote une fois.
Vérifiez le code de configuration et réessayez de l’entrer.
6 Faites un test pour vérifier que les touches fonctionnent avec votre
périphérique.
Si le périphérique ne répond pas à la télécommande SRU9400, répétez les
instructions de l’étape 2, puis essayez d’entrer le code de configuration
suivant listé avec la marque de votre périphérique.
Répétez les instructions 1 à 6 pour chaque périphérique de votre choix.
Vous pouvez sélectionner un périphérique différent au moyen de la touche
Mode
.
11
FRANÇAIS
Recherche du jeu de codes IR
Si vous ne trouvez pas la marque de votre périphérique et le code de
configuration qui lui correspond dans la liste, vous pouvez laisser la
télécommande effectuer la recherche à votre place.
1 Utilisez la touche
Mode
afin de sélectionner le périphérique pour
lequel vous souhaitez trouver le code de configuration.Vérifiez que le
périphérique est sous tension.
L’
indicateur de périphérique
s’allume.
2 Appuyez sur la touche et maintenez-la enfoncée pendant 3
secondes.
Le menu
Set-up
apparaît.
3 Appuyez sur du menu
Set-up
.
Les touches
Search
et
Exit Setup
apparaissent.
4 Appuyez sur la touche
OK
en la maintenant enfoncée.
La télécommande démarre la transmission des commandes
Standby/Power off (Veille/Mise hors tension) pour le périphérique
sélectionné. L’
indicateur de périphérique
clignote chaque fois qu’un
nouveau code est envoyé.
5 Dès que le périphérique est hors tension, relâchez la touche
OK
.
Assurez-vous qu’aucune touche n’est activée.
Le jeu de codes IR pour le périphérique sélectionné a été activé, et la
dernière page affichée du périphérique apparaît à l’écran tactile.
6
Testez
les touches spécifiques au périphérique.
Si le jeu de codes IR activé est correct, les touches spécifiques au
périphérique fonctionnent correctement.
Si certaines touches ne fonctionnent pas correctement, répétez les
instructions
2à 5
pour chercher de nouveau le code de configuration.
Apprentissage de touches
La télécommande SRU9400 peut
apprendre
des touches de votre
télécommande d’origine, par exemple si une fonction de la télécommande
d’origine n’est pas assurée par les touches de l’écran tactile.
1 Accédez au menu
Set-up
, puis appuyez sur .
La
page 1
du dernier périphérique sélectionné apparaît à l’écran tactile.
2 Placez la télécommande SRU9400 et la
télécommande d’origine à une distance de
6 centimètres
l’une de l’autre.
3 Appuyez sur la touche de la télécommande
SRU9400 qui apprendra une touche de la
télécommande d’origine.
La touche
Learn
reste activée.
Astuce Vous pouvez accéder aux autres touches
du périphérique sélectionné avec la touche Page 2
ou vous pouvez sélectionner un autre périphérique
au moyen de la touche Mode.
4 Appuyez sur la
touche
de la télécommande
d’origine
.
Un bip aigu indique que la télécommande SRU9400 a appris la touche avec
succès. La touche
Learn
clignote deux fois et le menu
Set-up
réapparaît.
-ouUn bip grave indique que l’apprentissage de la télécommande SRU9400 a
échoué. La touche
Learn
clignote une fois et le menu
Set-up
réapparaît.
5 Répétez les étapes
1à 4
pour chaque touche dont vous souhaitez
l’apprentissage par la télécommande SRU9400.
6 cm
12
Copie de touches
Si vous souhaitez utiliser une fonction de périphérique spécifique sur cette
télécommande pour un autre appareil, vous pouvez
copier
ladite fonction,
en copiant la touche. Par exemple, lorsque le volume de vos périphériques
(lecteur de DVD, téléviseur, magnétoscope) est contrôlé par un amplificateur,
vous pouvez copier les fonctions de volume de la page de l’amplificateur
vers la page DVD.
1 Accédez au menu
Set-up
, puis appuyez sur .
La page 1 du dernier périphérique sélectionné apparaît à l’écran tactile.
2 Appuyez sur la touche
source
dont vous souhaitez copier la fonction.
Il peut s’agir de n’importe quelle touche autre que Page 1, Page 2, Setup et
Mode.
3 Sélectionnez le périphérique pour lequel vous souhaitez copier la fonction
de la touche source au moyen de la touche
Mode
.
La Page 1 du périphérique sélectionné apparaît à l’écran tactile.
4 Appuyez sur la touche de
destination
vers laquelle vous souhaitez copier
la touche source.
Si la télécommande SRU9400 a réussi à copier la touche, la touche
Copy
Key
clignote deux fois et le menu
Set-up
réapparaît.
-ouSi la copie a échoué, la touche
Copy Key
clignote une fois et le menu
Set-up
apparaît.
Programmation de macros
Vous pouvez programmer jusqu’à 4 macros de fonctionnement avec vos
périphériques.
Qu’est-ce qu’une macro ?
Une macro est
une suite d’activations de touches
que vous pouvez
programmer. Par exemple, pour regarder un DVD, vous devez en
général :
• Mettre le téléviseur en marche ;
• Mettre le lecteur de DVD en marche ;
• Mettre le système de son surround en marche ;
• Sélectionner la bonne entrée sur votre téléviseur et votre système de son
surround
• Appuyez sur la touche Play (Lecture) afin de démarrer le DVD.
À l’aide d’une macro, la télécommande exécute toutes ces étapes
en
une seule activation
.
Vous pouvez accéder aux macros dès que vous le souhaitez en appuyant
sur et en sélectionnant le numéro de la macro.
Pour plus d’informations concernant l’accès aux macros, reportez-vous au
chapitre
‘Utilisation des macros’ page 13.
Pour programmer une macro :
1 Accédez au menu
Set-up
, puis appuyez sur .
Les numéros 1 à 4 s’affichent.
2 Sélectionnez le
numéro
sous lequel vous souhaitez enregistrer la macro.
S’il existe déjà une macro sous ce numéro, elle sera annulée.
Le dernier périphérique sélectionné apparaît à l’écran tactile.
13
FRANÇAIS
3 Appuyez sur la
suite de touches
qui constituent la macro.
Remarques Vous pouvez programmer jusqu’à 12 étapes dans une
macro. La macro est automatiquement enregistrée lorsque vous essayez de
programmer une treizième étape et le menu Set-up réapparaît.
Vous pouvez accéder aux autres touches du périphérique sélectionné avec la
touche Page 2 ou vous pouvez sélectionner un autre périphérique au moyen
de la touche Mode.
4 Appuyez sur la touche
OK
pour terminer la macro.
La touche
Macro
clignote deux fois, et la dernière page affichée du
périphérique apparaît à l’écran tactile.
Réglages de l’affichage
Lorsque vous utilisez la télécommande, l’affichage s’allume. Après 6 secondes,
il s’éteint.
Vous pouvez modifier cette temporisation au moyen d’une des options
suivantes :
1 Accédez au menu
Set-up
, puis appuyez sur .
Les numéros 1 à 4 s’affichent.
2 Sélectionnez
la temporisation
d’affichage de votre choix :
1
= 3 secondes ;
2
= 6 secondes ;
3
= 9 secondes ;
4
= 12 secondes.
La touche
Display
clignote deux fois pour indiquer que le nouveau réglage
est enregistré et le menu
Set-up
réapparaît.
Remarque La temporisation de l’affichage a un impact sur la durée de vie des
piles : plus l’affichage reste activé longtemps, plus les piles s’usent rapidement.
Utilisation de la télécommande
Sélection d’un périphérique
Vous pouvez sélectionner un périphérique que vous avez installé sur la
télécommande au moyen de la touche
Mode
:
•L’
indicateur de périphérique
s’allume.
• Les touches de l’écran tactile pour le périphérique sélectionné apparaissent.
• Les touches interagissent avec le périphérique sélectionné.
Utilisation des touches de l’écran tactile
Les fonctions les plus fréquemment utilisées de vos périphériques sont
assurées par les touches de l’écran tactile.
Les fonctions du périphérique sélectionné uniquement apparaissent à l’écran
tactile.Vous pouvez accéder aux fonctions des autres périphériques au
moyen de la touche
Page 2
au bas de l’écran tactile.
Utilisation des macros
Cette télécommande peut contenir jusqu’à 4 macros différentes.
Les macros de la télécommande sont accessibles via la touche .
Cette touche apparaît toujours à la page 1 des touches de l’écran tactile,
quel que soit le périphérique que vous utilisez.
1 Appuyez sur pour accéder aux macros programmées.
Les numéros 1 à 4 apparaissent à l’écran tactile.
2 Appuyez sur le numéro de la macro que vous souhaitez exécuter.
La macro est exécutée et l’
indicateur de périphérique
du dernier
périphérique sélectionné s’allume.
14
Support
Dépannage
Problème Solution
Une ou plusieurs
touches ne
fonctionnent pas
avec mon
périphérique.
•Pour utiliser un périphérique autre que Philips avec le modèle
SRU9400, vous devez installer le périphérique concerné sur la
télécommande SRU9400 au moyen du code de configuration
spécifique à la marque. Reportez-vous à ‘Installation de vos
périphériques’ page 9.
•Si vous ne trouvez pas le code de configuration qui
correspond à votre périphérique, la télécommande SRU9400
peut rechercher le code IR correct dans toute la base de
données. Reportez-vous à la page 10.
•Le modèle SRU9400 peut également apprendre des touches
de votre télécommande d’origine. Reportez-vous à
‘Apprentissage de touches ‘ page 10.
Je ne trouve pas la
marque de mon
périphérique dans la
liste de codes de
SRU9400.
Le modèle SRU9400 peut rechercher les codes IR corrects
dans toute la base de données.
Reportez-vous à la page 10.
Je ne trouve pas le
type de mon
périphérique sur le
modèle SRU9400, ni
dans la liste des
périphériques située
à la fin de ce mode
d’emploi.
•‘TV mode’ (Mode TV) contient TV couleur, projecteurs,
combinaison TV-magnétoscope, combinaison TV-DVD,TV
plasma et TV LCD
•‘VCR mode’ (Mode Magnétoscope) contient Magnétoscope et
Magnétoscope numérique/enregistreur disque dur
•‘DVD mode’ (Mode DVD) contient DVD, DVDR et
combinaison DVD-disque dur
•‘STB mode’ (Mode décodeur) contient boîtiers décodeurs,
boîtes de jonction et décodeurs terrestres DVB T/numériques.
•‘Amp mode’ (Mode Ampli) contient amplificateurs, récepteurs
A/V, systèmes de home cinéma et systèmes audio.
Je n’arrive plus à
lancer ma
télécommande
SRU9400.
Le niveau des piles est trop bas. Retirez les piles actuelles et
insérez-en de nouvelles.
Besoin d’aide ?
Si vous avez la moindre question concernant la télécommande SRU9400,
n’hésitez pas à nous contacter. Vous trouverez toutes nos coordonnées à la
page 91 de ce mode d’emploi.
Lisez attentivement ce mode d’emploi avant de nous contacter.
Lorsque vous contactez le système d’assistance par téléphone, assurez-vous
d’avoir le périphérique sous la main de sorte que nos opérateurs puissent
vous aider à déterminer si votre télécommande fonctionne correctement.
Le numéro de modèle de votre télécommande universel Philips est le
SRU9400/10.
Date d’achat : ......../......../........ (jour/mois/année)
Documentation et élaboration:
The Human Interface Group, De Regenboog 11, 2800 Mechelen (Belgique)
www.higroup.com
15
DEUTSCH
Inhalt
Überblick . . . . . . . . . . . . . . . . . . . . . . . . . . . . . . . . . . . . . . . . . . . . . . . . 15
Setup der Fernbedienung durchführen . . . . . . . . . . . . . . . . . . . . . . . . . . 16
Ihre Geräte installieren . . . . . . . . . . . . . . . . . . . . . . . . . . . . . . . . . . . . . . 16
Tasten einlesen. . . . . . . . . . . . . . . . . . . . . . . . . . . . . . . . . . . . . . . . . . . . . 17
Tasten kopieren . . . . . . . . . . . . . . . . . . . . . . . . . . . . . . . . . . . . . . . . . . . . 18
Makros programmieren. . . . . . . . . . . . . . . . . . . . . . . . . . . . . . . . . . . . . . 18
Display-Einstellungen anpassen . . . . . . . . . . . . . . . . . . . . . . . . . . . . . . . . 19
Fernbedienung benutzen. . . . . . . . . . . . . . . . . . . . . . . . . . . . . . . . . . . . . 19
Auswahl eines Geräts . . . . . . . . . . . . . . . . . . . . . . . . . . . . . . . . . . . . . . . 19
Bildschirmtasten und feste Tasten . . . . . . . . . . . . . . . . . . . . . . . . . . . . . . 19
Makros ausführen . . . . . . . . . . . . . . . . . . . . . . . . . . . . . . . . . . . . . . . . . . 19
Support . . . . . . . . . . . . . . . . . . . . . . . . . . . . . . . . . . . . . . . . . . . . . . . . . 20
Fehlersuche . . . . . . . . . . . . . . . . . . . . . . . . . . . . . . . . . . . . . . . . . . . . . . . 20
Brauchen Sie Hilfe? . . . . . . . . . . . . . . . . . . . . . . . . . . . . . . . . . . . . . . . . . 20
Helpline . . . . . . . . . . . . . . . . . . . . . . . . . . . . . . . . . . . . . . . . . . . . . . . . . 91
Überblick
Danke, dass Sie sich für die Philips SRU9400 Universalfernbedienung
entschieden haben. Sie können mit dieser Fernbedienung 5 Gerätearten
bedienen: ein TV-Gerät, ein VCR-Gerät, ein DVD-Gerät, eine Set-Top-Box
und einen Verstärker.
• Legen Sie zunächst die
Batterien
, wie auf Seite 16 beschrieben, in die
Fernbedienung ein. Meistens können Sie dann bereits die 5 oben genannten
Geräte bedienen, vorausgesetzt es handelt sich um Geräte von Philips.
• Führen Sie danach das
Setup
der Fernbedienung durch. Sie können:
• Geräte von anderen Herstellern bedienen.
• Funktionen von anderen Fernbedienungen einlesen.
• Funktionen von einer Taste auf eine andere kopieren.
• Eine Folge von Tasten mit nur einem Tastendruck ausführen.
Informationen hierzu finden Sie in Kapitel ‘Setup der Fernbedienung durchführen’
auf Seite 16.
•
Genießen
Sie die einfache Bedienung mit Ihrer SRU9400. Auf der
Abbildung auf Seite 2 und in Kapitel ‘Fernbedienung benutzen’ auf Seite 19
finden Sie weitere Informationen zur Benutzung Ihrer Fernbedienung.
Standby-Taste
Geräteanzeige
Page-Tasten
Menu-Taste
Stummschalt-Taste
Back/Exit-Taste
Lautstärketaste (lauter)
Lautstärketaste (leiser)
Farbtasten
Mode-Taste
Bildschirmtasten
Setup-Taste
Guide-Taste
Pfeiltasten und OK-Taste
Info-Taste
Kanalwahltaste (Kanal weiter)
Kanalwahltaste (Kanal zurück)
Letztes Programm-Taste
Deutsch – Bedienungsanleitung
16
Batterien in die Fernbedienung einlegen
1 Drücken Sie die Batteriefachabdeckung auf der Rückseite der
Fernbedienung nach innen und schieben Sie sie in Richtung des Pfeils auf.
2 Legen Sie die drei L06 oder AA-Alkali-Batterien wie dargestellt in das
Batteriefach.
3 Schieben Sie die Abdeckung wieder auf und klicken Sie sie fest.
Nach ein paar Augenblicken erscheint die erste Seite der Bildschirmtasten
für das TV-Gerät.
Batterien austauschen
Wenn die Batterien fast leer sind, erscheint das Symbol
Batterie schwach
.
Bitte ersetzen Sie die Batterien mit neuen L06 oder AA-Alkali-Batterien und
beachten Sie die örtlichen Bestimmungen zur Entsorgung leerer Batterien.
Setup der Fernbedienung durchführen
Ihre Geräte installieren
Um ein Gerät eines anderen Herstellers mit der Fernbedienung bedienen zu
können, müssen Sie den herstellerspezifischen Setup-Code für dieses Gerät
eingeben. Sie finden ihn in der Liste der Setup-Codes am Ende dieser
Bedienungsanleitung.
1 Wählen Sie mit der
Mode
-Taste das Gerät, das Sie bedienen möchten.
Die
Geräteanzeige
leuchtet auf.
2 Halten Sie für 3 Sekunden gedrückt.
Das
Setup
-Menü erscheint.
3 Drücken Sie im
Setup
-Menü.
Es erscheint eine Zahlentastatur.
4 Suchen Sie den Hersteller Ihres Geräts und die
entsprechenden
4-stelligen Setup-Codes
am Ende
dieser Bedienungsanleitung.
5 Geben Sie den ersten
4-stelligen Setup-Code
mit
der Zahlentastatur ein.
Wird der IR-Code-Satz aktiviert, blinkt die
Code
Taste zweimal. Die zuletzt aufgerufene Seite des
Geräts erscheint auf dem Sensorbildschirm.
-oderWird der IR-Code-Satz nicht aktiviert, blinkt die Code-Taste nur einmal.
Prüfen Sie den Setup-Code und versuchen Sie es erneut.
6 Prüfen Sie, ob Sie Ihr Gerät mit den Tasten bedienen können.
Reagiert das Gerät nicht auf die SRU9400, wiederholen Sie die
Anweisungen ab Schritt 2 und versuchen Sie es mit der Eingabe des
nächsten Setup-Code für den Hersteller des Geräts aus der Liste.
Wiederholen Sie Schritt 1 bis 6 für jedes Gerät, das Sie bedienen möchten.
Sie können ein anderes Gerät mit der
Mode
-Taste wählen.
17
DEUTSCH
Nach dem IR-Code-Satz suchen
Wenn Sie den Hersteller Ihres Geräts und den entsprechenden SetupCode nicht in der Liste finden, können Sie die Fernbedienung nach dem
passenden Setup-Code suchen lassen.
1 Wählen Sie mit der
Mode
-Taste das Gerät, für das Sie den Setup-Code
suchen lassen möchten. Prüfen Sie, ob dieses Gerät eingeschaltet ist.
Die
Geräteanzeige
leuchtet auf.
2 Halten Sie für 3 Sekunden gedrückt.
Das
Setup
-Menü erscheint.
3 Drücken Sie im
Setup
-Menü.
Die Tasten
Search
und
Exit Setup
erscheinen.
4 Halten Sie die
OK
-Taste gedrückt.
Die Fernbedienung startet mit der Übertragung der Befehle
Standby/Abschalten für das ausgewählte Gerät. Die
Geräteanzeige
blinkt jedes Mal, wenn ein neuer Code gesendet wurde.
5 Lassen Sie die
OK
-Taste los, sobald sich das Gerät abschaltet. Stellen
Sie sicher, dass keine anderen Tasten gedrückt werden.
Der IR-Code-Satz für das gewählte Gerät wurde aktiviert und die
zuletzt aufgerufene Seite des Geräts erscheint auf dem
Sensorbildschirm.
6
Probieren
Sie die Tasten für das Gerät aus.
Ist der aktivierte IR-Code-Satz korrekt, reagieren die Tasten richtig.
Finden Sie Tasten, die nicht korrekt funktionieren, wiederholen Sie die
Schritte
2
bis 5, um den Setup-Code erneut zu suchen.
Tasten einlesen
Sie können mit der SRU9400 Fernbedienung Tasten von Ihrer OriginalFernbedienung
einlesen
,z.B.wenn eine Funktion der Original-
Fernbedienung nicht mit den Bildschirmtasten ausgeführt werden kann.
1 Gehen Sie ins
Setup
-Menü und drücken Sie .
Seite 1 des zuletzt ausgewählten Geräts erscheint auf dem
Sensorbildschirm.
2 Platzieren Sie die SRU9400 Fernbedienung und
die Original-Fernbedienung
6 cm
voneinander
entfernt.
3 Drücken Sie die
Taste
auf der
SRU9400
Fernbedienung, die eine Taste der OriginalFernbedienung einlesen soll.
Die Taste
Einlesen
leuchtet weiter.
Tipp Sie können auf weitere Tasten des
ausgewählten Geräts mit der Taste Page 2
zugreifen, oder Sie können verschiedene Geräte mit
der Mode-Taste auswählen.
4 Drücken Sie die gewünschte
Taste
auf der
Original
-Fernbedienung.
Ein hoher Ton zeigt an, dass die SRU9400 die Taste erfolgreich eingelesen
hat. Die Taste
Einlesen
blinkt zweimal und das
Setup
-Menü erscheint
erneut.
-oderEin tiefer Ton zeigt an, dass die SRU9400 die Taste nicht eingelesen hat.
Die Taste
Einlesen
blinkt einmal und das
Setup
-Menü erscheint erneut.
5 Wiederholen sie die Schritte
1
bis 4für jede Taste, die Sie mit der
SRU9400 Fernbedienung einlesen möchten.
6 cm
18
Tasten kopieren
Möchten Sie eine bestimmte Gerätefunktion Ihrer Fernbedienung für andere
Geräte verwenden, so können Sie diese Funktion
kopieren
, indem Sie die
Taste kopieren.Wenn die Lautstärke Ihrer Geräte (DVD,TV,VCR) über einen
Verstärker gesteuert wird, können Sie beispielsweise die
Lautstärkefunktionen der Verstärker-Seite auf die DVD-Seite kopieren.
1 Gehen Sie ins
Setup
-Menü und drücken Sie .
Seite 1 des zuletzt ausgewählten Geräts erscheint auf dem
Sensorbildschirm.
2 Drücken Sie die
Quell
taste, von der Sie die Funktion kopieren möchten.
Dies kann jede beliebige Taste sein, außer den Tasten Page 1, Page 2, Setup
und Mode.
3 Wählen Sie mit der
Mode
-Taste das Gerät, für das Sie die Funktion der
Quelltaste kopieren möchten.
Seite 1 des zuletzt ausgewählten Geräts erscheint auf dem
Sensorbildschirm.
4 Drücken Sie die
Ziel
taste, auf die Sie die Quelltaste kopieren möchten.
Wurde die Taste von der SRU9400 erfolgreich kopiert, blinkt die
Copy
-
Taste zweimal und das
Setup
-Menü erscheint erneut.
-oderWurde die Taste von der SRU9400 nicht kopiert, so blinkt die
Copy
-Taste
einmal und das
Setup
-Menü erscheint erneut.
Makros programmieren
Sie können bis zu 4 Makros zur Bedienung Ihrer Geräte programmieren.
Was ist ein Makro?
Ein Makro ist eine
Folge von Tastenbefehlen
, die Sie programmieren
können. Um eine DVD anzuschauen, müssen Sie z. B. normalerweise
folgendes tun:
• Das TV-Gerät einschalten.
• Den DVD-Player einschalten.
• Das Surround Sound System einschalten.
• Den richtigen Eingang an Ihrem TV-Gerät und Ihrem Surround Sound
System auswählen.
• Die Play-Taste drücken, um die DVD zu starten.
Mit einem Makro führt die Fernbedienung all diese Schritte
mit nur
einem Tastendruck
aus.
Sie können die Makros jederzeit aufrufen, indem Sie drücken und die
Nummer des entsprechenden Makros auswählen.Weitere Informationen zum
Ausführen von Makros finden Sie in Kapitel
‘Makros ausführen’ auf Seite 19.
Um ein Makro zu programmieren:
1 Gehen Sie ins
Setup
-Menü und drücken Sie .
Die Zahlen 1 bis 4 erscheinen.
2 Wählen Sie die
Nummer
, unter der Sie das Makro speichern möchten.
Wenn bereits ein Makro unter dieser Nummer gespeichert ist, wird es
überschrieben.
Das zuletzt ausgewählte Gerät erscheint auf dem Sensorbildschirm.
3 Drücken Sie die gewünschte
Tastenfolge
für Ihr Makro.
Hinweis Sie können bis zu 12 Schritte in einem Makro programmieren.
Das Makro wird automatisch gespeichert, wenn Sie versuchen, einen 13.
Schritt zu programmieren und das Setup-Menü erscheint erneut.
Sie können auf weitere Tasten des ausgewählten Geräts mit der Taste
Page 2 zugreifen, oder Sie können verschiedene Geräte mit der Mode-Taste
auswählen.
19
DEUTSCH
4 Drücken Sie die
OK
-Taste, um das Makro zu beenden.
Die
Macro
-Taste blinkt dreimal und die zuletzt aufgerufene Seite des
Geräts erscheint auf dem Sensorbildschirm.
Display-Einstellungen anpassen
Wenn Sie die Fernbedienung benutzen, schaltet sich das Display ein. Nach 6
Sekunden schaltet es sich wieder ab.
Sie können für diese Zeitabschaltung eine der folgenden Optionen wählen:
1 Gehen Sie ins
Setup
-Menü und drücken Sie .
Die Zahlen 1 bis 4 erscheinen.
2 Wählen Sie die gewünschte
Zeitabschaltung
für Ihr Display:
1
= 3 Sekunden;
2
= 6 Sekunden;
3
= 9 Sekunden;
4
= 12 Sekunden.
Die
Display
-Taste blinkt zweimal und zeigt so an, dass die neue Einstellung
gespeichert wurde. Das S
etup
-Menü erscheint erneut.
Hinweis Die Display-Zeitabschaltung beeinflusst die Lebensdauer der
Batterien. Je länger das Display eingeschaltet ist, desto schneller werden die
Batterien entladen.
Fernbedienung benutzen
Auswahl eines Geräts
Sie können ein Gerät, das Sie auf Ihrer Fernbedienung installiert haben, mit
der Mode-Taste auswählen:
• Die
Geräteanzeige
leuchtet auf.
• Die Bildschirmtasten für das ausgewählte Gerät erscheinen.
• Mit den festen Tasten bedienen Sie das ausgewählte Gerät.
Bildschirmtasten und feste Tasten
Die am häufigsten genutzten Funktionen Ihrer Geräte können Sie über die
Bildschirmtasten und die festen Tasten aufrufen.
Nur die Funktionen für das ausgewählte Gerät erscheinen auf dem
Sensorbildschirm. Sie können weitere Funktionen mit der Taste
Page 2
am
unteren Rand des Sensorbildschirms aufrufen.
Makros ausführen
Diese Fernbedienung kann bis zu 4 verschiedene Makros speichern.
Die Makros der Fernbedienung können über aufgerufen werden.
Diese Taste erscheint immer auf Seite 1 der Bildschirmtasten, egal, welches
Gerät Sie gerade bedienen.
1 Drücken Sie , um auf die programmierten Makros zuzugreifen.
Die Zahlen 1 bis 4 erscheinen auf dem Sensorbildschirm.
2 Drücken Sie die Nummer des Makros, das Sie ausführen möchten.
Das Makro wird ausgeführt und die
Geräteanzeige
des zuletzt
ausgewählten Geräts leuchtet auf.
20
Support
Fehlersuche
Brauchen Sie Hilfe?
Wenn Sie Fragen zur SRU9400 haben, können Sie sich gerne mit uns in
Verbindung setzen. Sie finden unsere Kontaktdaten auf Seite 91 dieser
Bedienungsanleitung.
Lesen Sie diese Bedienungsanleitung sorgfältig durch, bevor Sie sich mit uns
in Verbindung setzen.
Wenn Sie unsere Hotline anrufen, halten Sie das Gerät bereit. So können
Ihnen unsere Servicemitarbeiter dabei helfen, zu entscheiden, ob Ihre
Fernbedienung korrekt funktioniert.
Die Modellnummer der Philips Universalfernbedienung ist SRU9400/10.
Kaufdatum: ......./......../......... (Tag/Monat/Jahr)
Konzept und Gestaltung:
The Human Interface Group, De Regenboog 11, 2800 Mechelen (Belgien)
www.higroup.com
Problem Lösung
Eine oder mehrere
Tasten bedienen das
Gerät nicht richtig.
•Um ein Gerät eines anderen Herstellers mit der SRU9400
bedienen zu können, müssen Sie das Gerät auf der SRU9400
mit dem herstellerspezifischen Setup-Code installieren.
Siehe ‘Ihre Geräte installieren’ auf Seite 16.
•Wenn Sie den passenden Setup-Code für Ihr Gerät nicht
finden können, können Sie in der gesamten Datenbank nach
den passenden IR-Codes suchen.
Siehe Seite 17.
•Die SRU9400 kann auch Tasten von Ihrer OriginalFernbedienung einlesen.
Siehe ‘Tasten einlesen’ auf Seite 17.
Ich kann den
Hersteller meines
Geräts in der CodeListe SRU9400 nicht
finden.
Die SRU9400 kann in der gesamten Datenbank nach den
passenden IR-Codes suchen.
Siehe Seite 17.
Ich kann meinen
Gerätetyp auf der
SRU9400 oder in
der Liste der Geräte
am Ende dieser
Bedienungsanleitung
nicht finden.
•‘TV Mode’ beinhaltet Farbfernseher, Projektoren,TV-VCRKombinationen,TV-DVD-Kombinationen, Plasma-TV-Geräte
und LCD-TV-Geräte.
•‘VCR Mode’ beinhaltet VCR und PVR/Festplattenrekorder
•‘DVD Mode’ beinhaltet DVD, DVDR und DVD-HDD
Kombinationen
•‘STB Mode’ beinhaltet Satellitenempfänger, Kabelempfänger
und DVB T/digitale terrestrische Decoder.
•‘Amp Mode’ beinhaltet Verstärker, A/V-Empfänger, HeimkinoSysteme und Audiosysteme.
Ich kann die
SRU9400 nicht mehr
in Betrieb setzen.
Die Batterie ist zu schwach. Ersetzen Sie die alten Batterien
durch neue.
21
NEDERLANDS
Inhoud
Inleiding . . . . . . . . . . . . . . . . . . . . . . . . . . . . . . . . . . . . . . . . . . . . . . . . . 21
Instellen van de afstandsbediening. . . . . . . . . . . . . . . . . . . . . . . . . . . . . . 22
Installeren van je toestellen. . . . . . . . . . . . . . . . . . . . . . . . . . . . . . . . . . . 22
Leren van toetsen . . . . . . . . . . . . . . . . . . . . . . . . . . . . . . . . . . . . . . . . . . 23
Kopiëren van toetsen . . . . . . . . . . . . . . . . . . . . . . . . . . . . . . . . . . . . . . . 24
Programmeren van macro’s . . . . . . . . . . . . . . . . . . . . . . . . . . . . . . . . . . 24
Wijzigen van de displayinstellingen . . . . . . . . . . . . . . . . . . . . . . . . . . . . . 25
Gebruik van de afstandsbediening. . . . . . . . . . . . . . . . . . . . . . . . . . . . . . 25
Selecteren van een toestel . . . . . . . . . . . . . . . . . . . . . . . . . . . . . . . . . . . 25
Gebruik van de zachte toetsen en de harde toetsen . . . . . . . . . . . . . . 25
Gebruik van macro’s . . . . . . . . . . . . . . . . . . . . . . . . . . . . . . . . . . . . . . . . 25
Ondersteuning . . . . . . . . . . . . . . . . . . . . . . . . . . . . . . . . . . . . . . . . . . . . 26
Verhelpen van storingen . . . . . . . . . . . . . . . . . . . . . . . . . . . . . . . . . . . . . 26
Hulp nodig? . . . . . . . . . . . . . . . . . . . . . . . . . . . . . . . . . . . . . . . . . . . . . . . 26
Helpline . . . . . . . . . . . . . . . . . . . . . . . . . . . . . . . . . . . . . . . . . . . . . . . . . 91
Inleiding
Gefeliciteerd met de aankoop van deze Philips universele afstandsbediening,
de SRU9400. Met deze afstandsbediening kun je 5 verschillende toestellen
bedienen:TV,VCR, DVD, decoder en versterker.
• Plaats om te beginnen de
batterijen
in de afstandsbediening, zoals
aangegeven op pagina 22. In de meeste gevallen zul je dan in staat zijn om
bovengenoemde 5 toestellen te bedienen, op voorwaarde dat het Philips
toestellen zijn.
•Vervolgens kun je de afstandsbediening
instellen
. Je kunt hem gebruiken om:
• toestellen van andere fabrikanten dan Philips te bedienen;
• functies van andere afstandsbedieningen te leren;
• functies van de ene toets naar de andere te kopiëren;
• een reeks toetsfuncties uit te voeren via één druk op een toets.
Dit wordt uitgelegd in het hoofdstuk ‘Instellen van de afstandsbediening’ op
pagina 22.
•
Geniet
van de afstandsbediening. Zie de afbeeldingen op pagina 2 en
hoofdstuk ‘Gebruik van de afstandsbediening’ op pagina 25 voor meer
informatie over het gebruiken van de afstandsbediening.
Standby-toets
Toestelindicators
Pagina-toetsen
Menu-toets
Mute-toets
Back/Exit-toets
Volume omhoog-toets
Volume omlaag-toets
Kleurtoetsen
Mode-toets
Zachte toetsen (in aanraakscherm)
Setup-toetsen
Guide-toets
Pijltjestoetsen en OK-toets
Info-toets
Kanaal omhoog-toets
Kanaal omlaag-toets
Vorig programma-toets
Nederlands – Gebruiksaanwijzing
22
Plaatsen van batterijen in de afstandsbediening
1 Druk het batterijdeksel aan de achterzijde van de afstandsbediening licht in
en schuif hem in de richting van de pijl.
2 Plaats de drie L06 of AA alkalinebatterijen in het batterijvak, zoals
aangegeven.
3 Schuif het deksel terug en klik hem stevig vast.
Na een paar seconden wordt de eerste pagina met TV-toetsen
weergegeven op het aanraakscherm.
Vervangen van de batterijen
Wanneer de batterijen bijna leeg zijn, wordt het
Batterij laag
-pictogram
weergegeven.
Ver vang de batterijen door nieuwe L06 of AA alkalinebatterijen en volg de
lokale richtlijnen voor batterijafval.
Instellen van de afstandsbediening
Installeren van je toestellen
Om toestellen van andere fabrikanten dan Philips te bedienen met deze
afstandsbediening, moet je de merkgebonden instelcode voor het
betreffende toestel invoeren.Achteraan in deze Gebruiksaanwijzing vind je
een lijst met instelcodes.
1 Gebruik de
Mode
-toets om het toestel te selecteren dat je wilt bedienen.
De
Toestelindicator
gaat branden.
2 Houd gedurende 3 seconden ingedrukt.
Het
Setup
-menu verschijnt.
3 Druk op in het
Setup
-menu.
Er verschijnt een numeriek toetsenbord.
4 Zoek het merk van je toestel op en de bijbehorende
4-cijferige instelcodes
achteraan in deze
Gebruiksaanwijzing.
5 Voer de eerste
4-cijferige instelcode
in via het
numerieke toetsenbord.
Als de IR-codeset is geactiveerd, zal de
Code
-toets
twee keer knipperen. De laatst gebruikte pagina van
het toestel verschijnt op het aanraakscherm.
-ofAls de IR-codeset niet is geactiveerd, zal de
Code
-
toets één keer knipperen.
Controleer de instelcode en probeer deze opnieuw in te voeren.
6 Controleer of de toetsen werken met je toestel.
Als het toestel niet reageert op de SRU9400 herhaal je de instructies vanaf
stap 2 en probeer je de volgende instelcode die staat vermeld bij het merk
van je toestel.
Herhaal de stappen 1 tot 6 voor elk toestel dat je wilt bedienen.
Je kunt een ander toestel selecteren via de
Mode
-toets.
Batterijen niet weggooien, maar
inleveren als KCA.
23
NEDERLANDS
Zoeken naar de IR-codeset
Als je het merk van je toestel en de bijbehorende instelcode niet kunt
vinden in de lijst kun je de afstandsbediening laten zoeken naar de juiste
instelcode.
1 Gebruik de
Mode
-toets om het toestel te selecteren waarvoor je de
instelcode wilt zoeken. Zorg ervoor dat het toestel is ingeschakeld.
De
Toestelindicator
gaat branden.
2 Houd gedurende 3 seconden ingedrukt.
Het
Setup
-menu verschijnt.
3 Druk op in het
Setup
-menu.
De toetsen
Search
en
Exit Setup
verschijnen.
4 Houd de
OK-toets
ingedrukt.
De afstandsbediening begint met het zenden van Standby/Uitschakelcommando’s voor het geselecteerde toestel. De
Toestelindicator
knippert telkens wanneer een nieuwe code wordt verzonden.
5 Zodra het toestel uitschakelt, laat je de
OK
-toets los. Zorg ervoor dat
geen andere toetsen worden ingedrukt.
De IR-codeset voor het geselecteerde toestel is nu geactiveerd en de
laatst gebruikte pagina van het toestel verschijnt op het aanraakscherm.
6
Probeer
de toetsen die specifiek zijn voor het toestel.
Als de geactiveerde IR-codeset juist is, zullen de specifieke toetsen voor
het toestel juist werken.
Als er toetsen zijn die niet juist werken, herhaal dan de stappen
2
tot
5
om opnieuw naar de instelcode te zoeken.
Leren van toetsen
Je kunt deze afstandsbediening, de SRU9400, de functies van de toetsen van
de originele afstandsbediening laten
leren
, bijvoorbeeld wanneer een functie
van de originele afstandsbediening niet is opgenomen in de toetsen van het
aanraakscherm.
1 Ga naar het
Setup
-menu en druk op .
Pagina 1 van het laatst geselecteerde toestel verschijnt op het
aanraakscherm.
2 Plaats de SRU9400 en de originele
afstandsbediening op maximaal
6 centimeter
van
elkaar.
3 Druk op de
SRU9400
de
toets
in die een
toetsfunctie moet leren van de originele
afstandsbediening.
De
Learn
-toets blijft branden.
Tip Je kunt andere toetsen van het geselecteerde
toestel benaderen via de Page 2-toets of een
ander toestel selecteren via de Mode-toets.
4 Druk de
toets
op de
originele
afstandsbediening
in.
Een hoge pieptoon geeft aan dat de SRU9400 de
toets met succes heeft geleerd. De
Learn
-toets knippert twee keer en het
Setup-menu verschijnt weer.
-ofEen lage pieptoon geeft aan dat de SRU9400 de toets niet heeft geleerd.
De
Learn
-toets knippert één keer en het
Setup
-menu verschijnt weer.
5 Herhaal de stappen
1
tot 4voor elke toets die de SRU9400 moet leren.
6 cm
24
Kopiëren van toetsen
Als je een bepaalde functie van het toestel op deze afstandsbediening wilt
gebruiken voor een ander toestel kun je deze functie
kopiëren
door de
toets te kopiëren. Bijvoorbeeld, wanneer het volume van je toestel (DVD,TV,
VCR) wordt geregeld via een versterker kun je de volumefuncties van de
versterkerpagina kopiëren naar de DVD-pagina.
1 Ga naar het
Setup
-menu en druk op .
Pagina 1 van het laatst geselecteerde toestel verschijnt op het
aanraakscherm.
2 Druk op de
bron
-toets waarvan je de functie wilt kopiëren.
Dit kan elke toets zijn behalve Page 1, Page 2, Setup of Mode.
3 Gebruik de
Mode
-toets om het toestel te selecteren waarnaar je de
functie van de brontoets wilt kopiëren.
Pagina 1 van het geselecteerde toestel verschijnt op het aanraakscherm.
4 Druk op de
doel
-toets waarnaar je de brontoets wilt kopiëren.
Als de SRU9400 de toets met succes heeft gekopieerd, knippert de
Copy
-
toets twee keer en verschijnt het
Setup
-menu weer.
-ofAls de SRU9400 de toets niet heeft gekopieerd, knippert de
Copy
-toets
één keer en verschijnt het
Setup
-menu weer.
Programmeren van macro’s
Je kunt maximaal 4 macro’s programmeren om je toestellen te bedienen.
Wat is een macro?
Een macro is een
reeks ingedrukte toetsen
die je kunt programmeren.
Bijvoorbeeld, om een DVD te bekijken moet je meestal:
• de TV inschakelen;
• de DVD inschakelen;
• het surround sound-systeem inschakelen;
• de juiste ingang op je TV en het surround sound-systeem selecteren;
• op de Play-toets drukken om de DVD te starten.
Met een macro kan de afstandsbediening al deze handelingen uitvoeren
via
één druk op de knop
.
Je kunt de macro’s altijd activeren door op te drukken en het
nummer van de macro te selecteren. Zie hoofdstuk ‘Gebruik van macro’s’ op
pagina 25 voor meer informatie over het activeren van macro’s.
Om een macro te programmeren:
1 Ga naar het
Setup
-menu en druk op .
De nummers 1 tot 4 verschijnen.
2 Selecteer het
nummer
waaronder je de macro wilt opslaan.
Als er al een macro onder dit nummer staat, zal deze worden
overschreven.
Het laatst geselecteerde toestel verschijnt op het aanraakscherm.
3 Druk de
toetsenreeks
in die de macro vormt.
Opmerking Je kunt maximaal 12 stappen opslaan in een macro. De
macro wordt automatisch opgeslagen wanneer je een 13e stap probeert te
programmeren en vervolgens zal het Setup-menu weer verschijnen.
Je kunt toegang krijgen tot andere toetsen van het geselecteerde toestel via
de Page 2-toets of een ander toestel selecteren via de Mode-toets.
4 Druk op de
OK
-toets om de macro te beëindigen.
De
Macro
-toets knippert twee keer en de laatst gebruikte pagina van het
toestel verschijnt op het aanraakscherm.
25
NEDERLANDS
Wijzigen van de displayinstellingen
Wanneer je de afstandsbediening gebruikt, schakelt de display in. Na 6
seconden schakelt hij weer uit.
Je kunt deze time-out als volgt wijzigen:
1 Ga naar het
Setup
-menu en druk op .
De nummers 1 tot 4 verschijnen.
2 Selecteer de gewenste
time-out
voor het display:
1
= 3 seconden;
2
= 6 seconden;
3
= 9 seconden;
4
= 12 seconden.
De
Display
-toets knippert twee keer om aan te geven dat de nieuwe
instelling is opgeslagen en het
Setup
-menu verschijnt weer.
Opmerking De time-out voor de display heeft invloed op de levensduur van de
batterijen: hoe langer de display aan blijft, hoe sneller de batterijen leeg zullen
raken.
Gebruik van de afstandsbediening
Selecteren van een toestel
Je kunt een toestel dat je op de afstandsbediening hebt geïnstalleerd,
selecteren via de
Mode
-toets:
• de
Toestelindicator
gaat branden;
• op het aanraakscherm verschijnen de zachte toetsen voor het geselecteerde
toestel;
• met de harde toetsen kan het geselecteerde toestel worden bediend.
Gebruik van de zachte toetsen en de harde toetsen
Via de zachte toetsen (op het aanraakscherm) en de harde toetsen
(drukknoppen) heb je toegang tot de belangrijkste functies van je toestellen.
Op het aanraakscherm zie je alleen de functies die van toepassing zijn op
het geselecteerde toestel. Druk op de
Page 2
-toets onderaan op het
aanraakscherm om meer functies te tonen.
Gebruik van macro’s
Deze afstandsbediening kan maximaal 4 verschillende macro’s bevatten.
De macro’s op de afstandsbediening zijn toegankelijk via .
Deze toets verschijnt altijd op pagina 1 van de zachte
toetsen, ongeacht het toestel dat je bedient.
1 Druk op om toegang te krijgen tot de geprogrammeerde macro’s.
De nummers 1 tot 4 verschijnen op het aanraakscherm.
2 Druk op het nummer van de macro die je wilt uitvoeren.
De macro wordt uitgevoerd en de
Toestelindicator
van het laatst
geselecteerde toestel gaat branden.
26
Ondersteuning
Verhelpen van storingen
Probleem Oplossing
Een of meer toetsen
werken niet met
mijn toestel.
•Om een toestel van een andere fabrikant dan Philips met de
SRU9400 te kunnen bedienen, moet je dat toestel op de
SRU9400 installeren met behulp van de merkgebonden
instelcode. Zie ‘Installeren van je toestellen’ op pagina 22.
•Als je de juiste instelcode voor je toestel niet kunt vinden, kun
je de SRU9400 in de volledige databank laten zoeken naar de
juiste IR-codes. Zie pagina 23.
•De SRU9400 kan ook functies leren van de originele
afstandsbediening.
Zie ‘Leren van toetsen’ op pagina 23.
Ik kan het merk van
mijn toestel niet
vinden in de codelijst
van de SRU9400.
De SRU9400 kan in de volledige databank zoeken naar de
juiste IR-codes.
Zie pagina 23.
Ik kan mijn
toesteltype niet
vinden in de
SRU9400 of in het
toesteloverzicht
achteraan in deze
Gebruiksaanwijzing.
•‘TV-modus’ bevat kleuren-TV, projectors,TV/VCR-combinaties,
TV/DVD-combinaties, plasma-TV en LCD TV.
•‘VCR-modus’ bevat VCR en PVR/harddiskrecorders
•‘DVD-modus’ bevat DVD, DVDR en DVD/HDD-combinaties
•‘STB-modus’ bevat satellietdecoders, kabeldecoders en DVB
T/digitale etherdecoders.
•‘Amp-modus’ bevat versterkers, A/V-ontvangers, home
theatre-systemen en audiosystemen.
Ik kan de SRU9400
niet meer opstarten
Het batterijniveau is te laag.Verwijder de batterijen en plaats
nieuwe batterijen.
Hulp nodig?
Wanneer je vragen hebt over de SRU9400, kun je altijd met ons contact
opnemen. Je vindt onze contactgegevens op pagina 91 van deze
Gebruiksaanwijzing.
Lees deze Gebruiksaanwijzing aandachtig door voordat je met ons contact
opneemt.
Let erop dat je het toestel bij de hand hebt wanneer je onze hulplijn belt,
zodat onze medewerkers je kunnen helpen om na te gaan of je
afstandsbediening correct werkt.
Het modelnummer van je Philips afstandsbediening is SRU9400/10.
De aankoopdatum: ......../......../........ (dag/maand/jaar)
Concept en realisatie:
The Human Interface Group, De Regenboog 11, 2800 Mechelen (België)
www.higroup.com
27
ESPAÑOL
Contenido
Visión general . . . . . . . . . . . . . . . . . . . . . . . . . . . . . . . . . . . . . . . . . . . . . 27
Configuración del mando a distancia. . . . . . . . . . . . . . . . . . . . . . . . . . . . 28
Instalación de dispositivos . . . . . . . . . . . . . . . . . . . . . . . . . . . . . . . . . . . . 28
Aprendizaje de teclas . . . . . . . . . . . . . . . . . . . . . . . . . . . . . . . . . . . . . . . 29
Copia de teclas . . . . . . . . . . . . . . . . . . . . . . . . . . . . . . . . . . . . . . . . . . . . 30
Programación de macros . . . . . . . . . . . . . . . . . . . . . . . . . . . . . . . . . . . . 30
Configuración del ajuste de pantalla. . . . . . . . . . . . . . . . . . . . . . . . . . . . 31
Uso del mando a distancia . . . . . . . . . . . . . . . . . . . . . . . . . . . . . . . . . . . 31
Selección de un dispositivo. . . . . . . . . . . . . . . . . . . . . . . . . . . . . . . . . . . 31
Uso de las teclas táctiles y de las teclas fijas. . . . . . . . . . . . . . . . . . . . . . 31
Uso de macros . . . . . . . . . . . . . . . . . . . . . . . . . . . . . . . . . . . . . . . . . . . . 31
Soporte . . . . . . . . . . . . . . . . . . . . . . . . . . . . . . . . . . . . . . . . . . . . . . . . . 32
Resolución de problemas . . . . . . . . . . . . . . . . . . . . . . . . . . . . . . . . . . . . 32
¿Necesita ayuda? . . . . . . . . . . . . . . . . . . . . . . . . . . . . . . . . . . . . . . . . . . . 32
Helpline . . . . . . . . . . . . . . . . . . . . . . . . . . . . . . . . . . . . . . . . . . . . . . . . . 91
Visión general
Gracias por adquirir el mando a distancia universal Philips SRU9400. Podrá
controlar hasta 5 dispositivos diferentes con este mando a distancia: televisor,
vídeo, DVD, SetTopBox y amplificador.
•Para empezar, coloque las
pilas
en el mando a distancia, tal y como se explica
en la página 28. En la mayoría de los casos, podrá controlar los 5 dispositivos
mencionados anteriormente nada más colocar las pilas, siempre y cuando se
trate de dispositivos Philips.
•A continuación,
configure
el mando a distancia. Puede hacer que el mando a
distancia:
• Funcione con dispositivos que no sean Philips.
• Aprenda funciones de otros mandos a distancia.
• Copie funciones de una tecla a otra.
• Ejecute una serie de teclas pulsando una sola tecla.
Para obtener más información al respecto, consulte el capítulo ‘Configuración del
mando a distancia’, en la página 28.
•
Disfrute
del mando a distancia. Consulte la ilustración de la página 2 y el
capítulo ‘Uso del mando a distancia’ en la página 31 para obtener más
información sobre la forma de utilizar el mando a distancia.
Tecla Standby
Indicadores de dispositivo
Teclas Page
Tecla Menu
Tecla Mute
Tecla Back/Exit
Tecla Volume Up
Tecla Volume Down
Teclas de colores
Tecla Mode
Teclas táctiles
Tecla Setup
Tecla Guide
Teclas de dirección y tecla OK
Tecla Info
Tecla Channel Up
Tecla Channel Down
Tecla Previous Program
Español – Instrucciones de manejo
28
Colocación de las pilas en el mando a distancia
1 Presione hacia dentro la tapa del compartimento de las pilas, que se
encuentra en la parte posterior del mando, y deslícela en la dirección que
indica la flecha.
2 Coloque tres pilas alcalinas L06 o AA en el compartimento, tal y como se
muestra en la imagen.
3 Coloque de nuevo la tapa del compartimento en su sitio.
Tras unos segundos, aparecerá la primera página de las teclas táctiles del
televisor.
Sustitución de las pilas
Cuando las pilas están a punto de agotarse, aparece el icono
Batería baja
.
Sustituya las pilas gastadas por pilas alcalinas de tipo L06 o AA nuevas y siga
la normativa regional para la eliminación de residuos al deshacerse de las
pilas usadas.
Configuración del mando a distancia
Instalación de dispositivos
Para controlar un dispositivo que no sea Philips con este mando a distancia,
necesita introducir el código de configuración específico de la marca del
dispositivo. Encontrará una lista de códigos de configuración al final de estas
Instrucciones de uso.
1 Utilice la tecla
Mode
para seleccionar el dispositivo que desee controlar.
El
Indicador de dispositivo
se encenderá.
2 Mantenga pulsado durante 3 segundos.
Aparecerá el menú
Setup
.
3 Pulse en el menú
Setup
.
Aparecerá un teclado numérico.
4 Compruebe la marca de su dispositivo y el
código
de configuración de 4 dígitos
correspondiente al
final de estas Instrucciones de uso.
5 Introduzca el
código de configuración de 4
dígitos
en el teclado numérico.
Si el código IR está activado, la tecla
Code
parpadea
dos veces. La última página accedida en el dispositivo
aparece en la pantalla táctil.
O bien
Si el código IR no está activado, la tecla
Code
parpadea una sola vez.
Compruebe el código de configuración e intente introducirlo de nuevo.
6 Compruebe si las teclas funcionan con su dispositivo.
Si el dispositivo no responde al SRU9400, repita las instrucciones desde el
paso 2 en adelante e intente introducir el siguiente código de configuración
que se muestra junto a la marca de su dispositivo.
Repita las instrucciones 1-6 para cada uno de los dispositivos que desee
controlar.
Puede seleccionar un dispositivo distinto con la tecla
Mode
.
29
ESPAÑOL
Búsqueda del código IR
Si no puede encontrar la marca de su dispositivo o el código de
configuración correspondiente en la lista, puede dejar que el mando a
distancia busque el código de configuración correcto.
1 Utilice la tecla
Mode
para seleccionar el dispositivo para el que desee
buscar el código de configuración.Asegúrese de que el dispositivo esté
encendido.
El
Indicador de dispositivo
se encenderá.
2 Mantenga pulsado durante 3 segundos.
Aparecerá el menú
Setup
.
3 Pulse en el menú
Setup
.
Aparecerán las teclas
Searchy Exit Setup
.
4 Mantenga pulsada la tecla
OK
.
El mando a distancia comenzará a transmitir los comandos
Standby/Power off para el dispositivo seleccionado. El
Indicador de
dispositivo
parpadea cada vez que se envía un nuevo código.
5 En cuanto el dispositivo se apague, suelte la tecla
OK
.Asegúrese de no
pulsar otras teclas.
El código IR establecido para el dispositivo seleccionado se ha activado
y la última página accedida en el dispositivo se muestra en la pantalla
táctil.
6
Pruebe
las teclas específicas del dispositivo.
Si el código IR activado es correcto, las teclas específicas del dispositivo
funcionarán correctamente.
Si hay teclas que no funcionan correctamente, repita las instrucciones
de la
2
a la 5para volver a buscar el código de configuración.
Aprendizaje de teclas
Puede dejar que el mando a distancia SRU9400
aprenda
las teclas del
mando a distancia original; por ejemplo, cuando las teclas táctiles del
dispositivo no cubren una función del mando a distancia original.
1 Acceda al menú
Setup
y pulse .
En la pantalla táctil aparecerá la página 1 del
último dispositivo seleccionado.
2 Coloque el mando a distancia SRU9400 y el
mando a distancia original a
6 centímetros
de
distancia uno del otro.
3 Pulse la
tecla
del mando a distancia
SRU9400
que tiene que aprender una tecla del mando a
distancia original.
La tecla
Learn
permanece activa.
Consejo práctico Puede acceder a otras teclas
del dispositivo seleccionado con la tecla Page 2 o
puede seleccionar un dispositivo distinto con la
tecla Mode.
4 Pulse la
tecla
del mando a distancia
original
.
Un tono de aviso agudo indica que el SRU9400 ha aprendido
correctamente la tecla. La tecla
Learn
parpadea dos veces y vuelve a
aparecer el menú
Setup
.
O bien
Un tono de aviso grave indica que el SRU9400 no ha aprendido la tecla. La
tecla
Learn
parpadea una vez y vuelve a aparecer el menú
Setup
.
5 Repita los pasos del
1
al 4para cada tecla que desee que aprenda el mando
a distancia SRU9400.
6 cm
 Loading...