

Page 1
Always here to help you
RQ1200 series
User manual
Page 2

1
Page 3

ENGLISH 4
БЪЛГАРСКИ 28
ČEŠTINA 54
EESTI 78
HRVATSKI 102
MAGYAR 126
ҚАЗАҚША 149
LIETUVIŠKAI 174
LATVIEŠU 198
POLSKI 222
ROMÂNĂ 246
РУССКИЙ 271
SLOVENSKY 296
SLOVENŠČINA 320
SRPSKI 344
УКРАЇНСЬКА 368
RQ1200 series
Page 4
4
ENGLISH
Introduction
Congratulations on your purchase and welcome to Philips! To fully benet
from the support that Philips offers, register your product at
www.philips.com/welcome.
Please read this user manual, as it contains information about the features
of this shaver as well as some tips to make shaving easier and more
enjoyable.
General description (Fig. 1)
A Shaver
1 Display
2 Shaver on/off button
3 Protection cap
4 RQ12 Shaving unit
5 Trimmer
6 Trimmer on/off slide
B RQ111 Beard Styler attachment (RQ1296, RQ1295, RQ1286, RQ1285,
RQ1275, RQ1265 only)
7 Hair length selector
8 Comb of Beard Styler attachment
C Foldable charger
D Jet Clean System (RQ1296CC, RQ1295CC, RQ1290CC, RQ1286CC,
RQ1285CC, RQ1284CC, RQ1280CC, RQ1275CC, RQ1265CC,
RQ1260CC, RQ1252CC, RQ1251CC, RQ1250CC only)
9 ’Cleaning chamber empty’ symbol
10 Cleaning symbol
11 Drying symbol
12 Jet Clean System on/off button (RQ1008 only: and up/down button
for program selection)
13 Cleaning chamber release button
14 Shaver holder
E Cleaning brush
F HQ200 Cleaning uid (RQ1296CC, RQ1295CC, RQ1290CC,
RQ1286CC, RQ1285CC, RQ1284CC, RQ1280CC, RQ1275CC,
RQ1265CC, RQ1260CC, RQ1252CC, RQ1251CC, RQ1250CC only)
G Pouch
H Adapter
Important
Read this important information carefully before you use the shaver,
the Jet Clean system (RQ1296CC, RQ1295CC, RQ1290CC, RQ1286CC,
RQ1285CC, RQ1284CC, RQ1280CC, RQ1275CC, RQ1265CC,
RQ1260CC, RQ1252CC, RQ1251CC, RQ1250CC only) and the charging
stand. Save this leaet for future reference.
Page 5

ENGLISH 5
Danger
- Keep the adapter dry.
Warning
- The adapter contains a transformer. Do not cut off the adapter to
replace it with another plug, as this causes a hazardous situation.
- The shaver, the Jet Clean system and the charging stand are not
intended for use by persons (including children) with reduced physical,
sensory or mental capabilities, or lack of experience and knowledge,
unless they have been given supervision or instruction concerning use
of these appliances by a person responsible for their safety.
- Children should be supervised to ensure that they do not play with
the shaver, the Jet Clean system and the charging stand.
- Always unplug the shaver before you clean it under the tap.
Caution
- Never immerse the Jet Clean system or the charging stand in water
nor rinse it under the tap.
- Never use water hotter than 80°C to rinse the shaver.
- Do not use the shaver, Jet Clean system, adapter, charging stand or any
other part if it is damaged, as this may cause injury. Always replace a
damaged adapter, charging stand or part with one of the original type.
- Only use the Jet Clean system with the original HQ200 Jet Clean
solution.
- Always place the Jet Clean system on a stable, level and horizontal
surface to prevent leakage.
- When the Jet Clean system is ready for use, do not move it to prevent
leakage of cleaning uid.
- The Jet Clean system thoroughly cleans but does not disinfect your
shaver, therefore do not share the shaver with others.
- Never use compressed air, scouring pads, abrasive cleaning agents or
aggressive liquids such as petrol or acetone to clean the appliance.
- Water may leak from the socket at the bottom of the shaver when you
rinse it. This is normal and not dangerous because all electronics are
enclosed in a sealed power unit inside the shaver.
Compliance with standards
- This shaver is waterproof and complies with the internationally
approved safety regulations. It is suitable for use in the bath or shower
and for cleaning under the tap. For safety reasons, the shaver can
therefore only be used cordlessly.
- The shaver and the Jet Clean system comply with all applicable
standards and regulations regarding exposure to electromagnetic elds.
General
- The adapter is equipped with an automatic voltage selector and is
suitable for mains voltages ranging from 100 to 240 volts.
- The adapter transforms 100-240 volts to a safe low voltage of less than
24 volts.
- Maximum noise level: Lc = 69dB(A)
Page 6

ENGLISH6
The display
Note: Before you use the shaver for the rst time, remove the protective foil
from the display.
The various shaver types have different displays, which are shown in the
MINUTES LEFT
MINUTES LEFT
gures below.
- RQ1296, RQ1295, RQ1290, RQ1286, RQ1285, RQ1280
- RQ1275, RQ1265, RQ1261, RQ1260
- RQ1273, RQ1252, RQ1251, RQ1250
MINUTES LEFT
MINUTES LEFT
Charging
- Charging takes approx. 1 hour.
RQ129x, RQ128x
- When the shaver is charging, the minutes indication ashes.
- The shaving minutes increase until the shaver is fully charged.
- Quick charge: When the shaver contains enough energy for one shave,
the display shows 5 minutes in red.
RQ127x, RQ126x, RQ125x
Note: The displays of the various shaver types look different, but the charging
lights work in the same way.
- When the shaver is charging, rst the bottom charging light ashes, then
the second charging light, and so on until the shaver is fully charged.
- Quick charge: When the shaver contains enough energy for one shave,
the bottom charging light alternately ashes orange and white.
Page 7

MINUTES LEFT
MINUTES LEFT
MINUTES LEFT
MINUTES LEFT
ENGLISH 7
Battery fully charged
RQ129x, RQ128x
- When the battery is fully charged, the minutes indication lights up
continuously. After approx. 30 minutes, the display automatically
switches off again.
Note: The shaver is equipped with an intelligent self-learning system that
monitors the shaver’s energy consumption and converts the remaining battery
capacity into shaving minutes. The energy consumption and therefore the
remaining number of shaving minutes depend on your skin and beard type
and your shaving behaviour (e.g. the use of shaving gel). If the number of
shaving minutes of the fully charged shaver is less than 60 minutes, this is
completely normal and does not mean that the battery capacity of the shaver
has diminished.
RQ127x, RQ126x, RQ125x
Note: The displays of the various shaver types look different, but the charging
lights work in the same way.
- When the battery is fully charged, all charging lights light up
continuously. After approx. 30 minutes, the display automatically
switches off again.
Battery low
RQ129x, RQ128x
- When the battery is almost empty (when there are only 5 or fewer
shaving minutes left), the minutes indication starts to ash.
- When you switch off the shaver, the shaving minutes continue to ash
for a few more seconds. You hear a beep when there are no shaving
minutes left.
RQ127x, RQ126x, RQ125x
Note: The displays of the various shaver types look different, but the charging
lights work in the same way.
- When the battery is almost empty (when there are only 5 or fewer
shaving minutes left), the bottom charging light ashes orange.
- When you switch off the shaver, the bottom charging light continues to
ash orange for a few seconds.
Page 8

ENGLISH8
Remaining battery capacity
RQ129x, RQ128x
MINUTES LEFT
MINUTES LEFT
MINUTES LEFT
MINUTES LEFT
- The remaining battery capacity is indicated by the number of shaving
minutes shown on the display.
RQ127x, RQ126x, RQ125x
Note: The displays of the various shaver types look different, but the charging
lights work in the same way.
- The remaining battery capacity is indicated by the ashing charging
lights.
Clean shaver
For optimal shaving performance, we advise you to clean the shaver after
every use.
Note: The displays of the various shaver types look different, but show the
same symbol.
- The tap symbol ashes to remind you to clean the shaver.
MINUTES LEFT
MINUTES LEFT
Replace shaving unit
For maximum shaving performance, we advise you to replace the shaving
unit every two years.
Note: The displays of the various shaver types look different, but show the
same symbol.
- To remind you to replace the shaving unit, the appliance is equipped
with a replacement reminder which is activated automatically after
approx. two years. The replacement reminder is repeated at 9
successive shaves(RQ128x, RQ127x, RQ126x, RQ125x only) or until
you reset the shaver.
Travel lock (RQ128x, RQ127x, RQ126x, RQ125x only)
You can lock the shaver when you are going to travel. The travel lock
prevents the shaver from being switched on by accident.
Note: The displays of the various shaver types look different, but show the
same symbol.
Page 9

ENGLISH 9
Activating the travel lock
1 Press the on/off button for 3 seconds to enter the travel lock mode.
, RQ128x: The display starts to count down from 3. At 1, the appliance
beeps to indicate that it is locked.
, The lock symbol lights up on the display. After a few seconds it goes
out.
Deactivating the travel lock
1 Press the on/off button for 3 seconds.
, The motor starts running to indicate that the travel lock has been
deactivated.
The shaver is now ready for use again.
Note: When you place the shaver in the plugged-in charger or Jet Clean System,
the travel lock is automatically deactivated.
Power-saving mode (RQ129x only)
The appliance is equipped with an automatic power-saving mode. When
the shaver enters the power-saving mode, the light in the on/off button
goes out to save energy.
- When the appliance is switched off but detects movement for 5
minutes (for instance when you are travelling with the shaver in your
suitcase), it automatically goes into power-saving mode. This mode
prevents the shaver from being switched on by accident.
, The lock symbol ashes on the display to indicate that the appliance
is in power-saving mode.
- To deactivate the power-saving mode, simply press the on/off button.
Blocked shaving heads
MINUTES LEFT
MINUTES LEFT
Note: The displays of the various shaver types look different, but show the
same symbol.
- If the shaving heads are blocked, the shaving unit symbol, the tap
symbol and the exclamation mark ash. In this case, the motor cannot
run because the shaving heads are soiled or damaged.
- When this happens, you have to clean the shaving unit or replace it.
- The shaving unit symbol, the tap symbol and the exclamation mark
continue to ash until you unblock the shaving heads.
Charging
Charging takes approx. 1 hour.
RQ129x, RQ128x, RQ127x, RQ126x: A fully charged shaver has a shaving
time of up to 60 minutes.
Note: RQ129x, RQ128x: When the battery is fully charged, the display shows
the actual remaining shaving minutes (see section ‘Battery fully charged’ in
chapter ‘The display’).
RQ125x: A fully charged shaver has a shaving time of up to 50 minutes.
Charge the shaver before you use it for the rst time and when the display
indicates that the battery is almost empty (see section ‘Battery low’ in
chapter ‘The display’).
Page 10
ENGLISH10
Quick charge
After the shaver has charged for 3 minutes, it contains enough energy for
one shave.
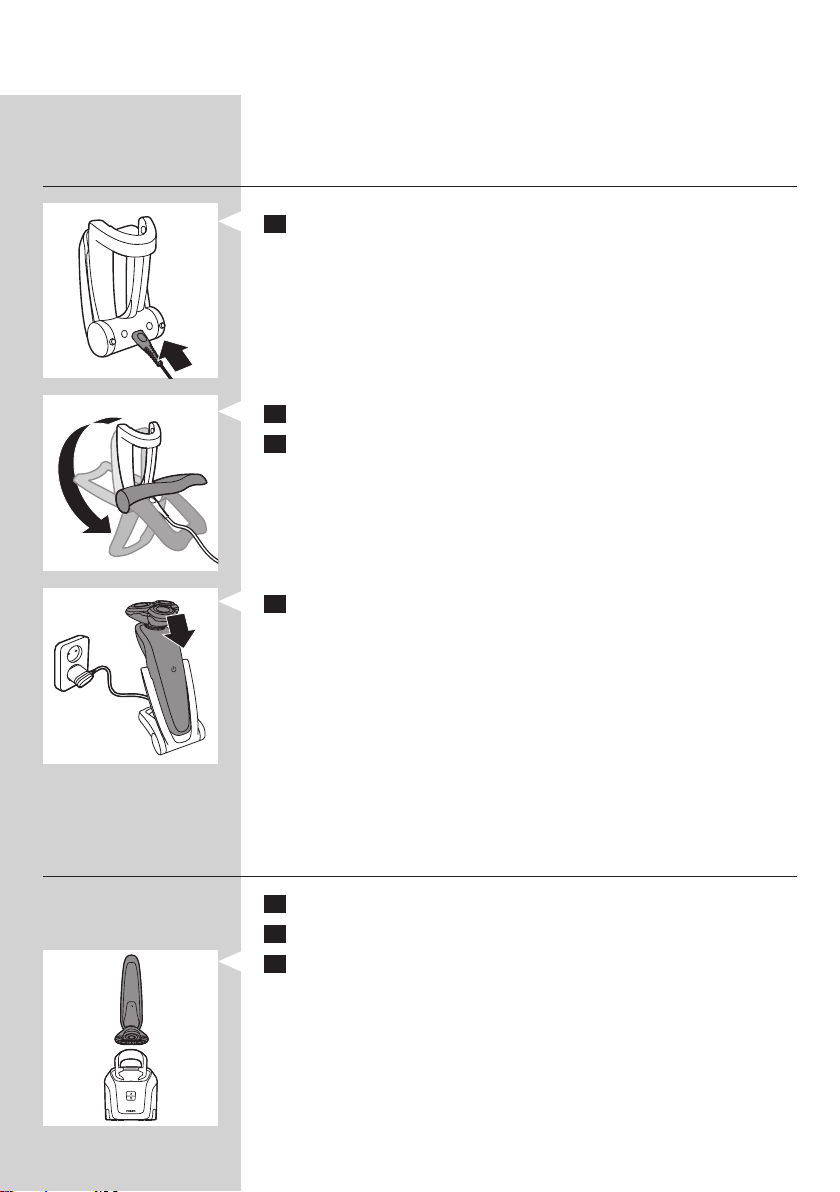
Charging in the charger
1 Insert the small plug into the charger.
2 Unfold the charger (‘click’).
3 Put the adapter in the wall socket.
4 Put the shaver in the charger.
, The display shows that the shaver is charging (see chapter ‘The
display’).
Charging in the Jet Clean System (RQ1296CC, RQ1295CC,
RQ1290CC, RQ1286CC, RQ1285CC, RQ1284CC, RQ1280CC,
RQ1275CC, RQ1265CC, RQ1260CC, RQ1252CC, RQ1251CC,
RQ1250CC only)
1 Put the small plug in the Jet Clean System.
2 Put the adapter in the wall socket.
3 Hold the shaver upside down above the holder with the back of the
shaver pointing towards the holder.
Note: The shaver cannot be placed in the Jet Clean System when the protection
cap is on the shaving unit.
Note: RQ129x only: when you turn the shaver upside down, the minutes
indication on the display is also turned upside down so you can still see to what
level the battery is charged.
Page 11
ENGLISH 11
4 Place the shaver body in the holder behind the two clips (1) and
press it down until it locks into place (2).
, The display shows that the shaver is charging (see section ‘Charging’
in chapter ‘The display’).
Using the shaver
Shaving
Skin adaptation period
Your rst shaves may not bring you the result you expect and your skin
may even become slightly irritated. This is normal. Your skin and beard need
time to adapt to any new shaving system.
We advise you to shave regularly (at least 3 times a week) for a period of
3 weeks to allow your skin to adapt to the new shaver. During this period,
use your new electric shaver exclusively and do not use other shaving
methods. If you use different shaving methods, it is more difcult for your
skin to adapt to the new shaving system.
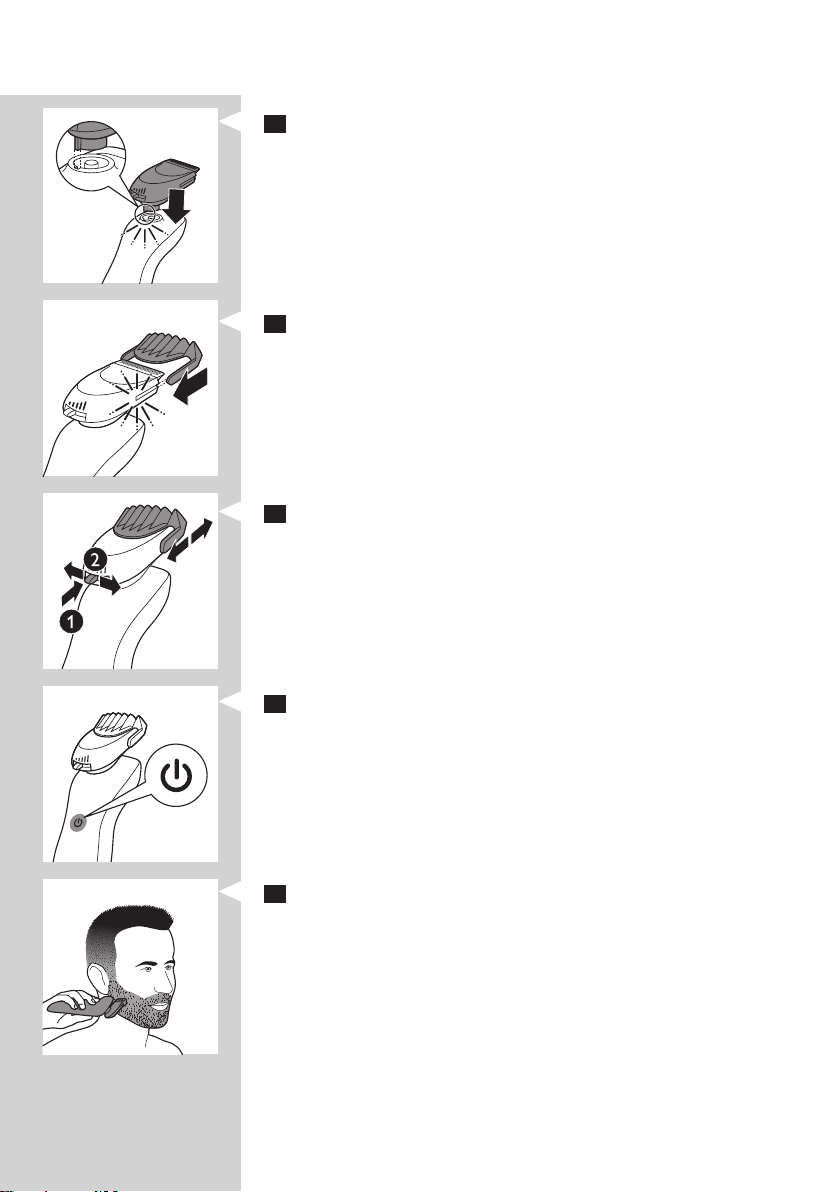
1 Press the on/off button once to switch on the shaver.
, The display lights up for a few seconds.
2 Move the shaving heads over your skin in circular movements.
- Do not make straight movements.
3 Press the on/off button once to switch off the shaver.
, The display lights up for a few seconds and then shows the remaining
battery capacity.
Wet shaving
You can also use this shaver on a wet face with shaving foam or shaving gel.
To shave with shaving foam or shaving gel, follow the steps below:
1 Apply some water to your skin.
2 Apply shaving foam or shaving gel to your skin.
3 Rinse the shaving unit under the tap to ensure that the shaving unit
glides smoothly over your skin.
4 Press the on/off button once to switch on the shaver.
5 Move the shaving heads over your skin in circular movements.
Note: Rinse the shaver under the tap regularly to ensure that it continues to
glide smoothly over your skin.
6 Dry your face and thoroughly clean the shaver after use (see chapter
‘Cleaning and maintenance’).
Note: Make sure you rinse all foam or shaving gel off the shaver.
Page 12
ENGLISH12
Trimming
You can use the trimmer to groom your sideburns and moustache.
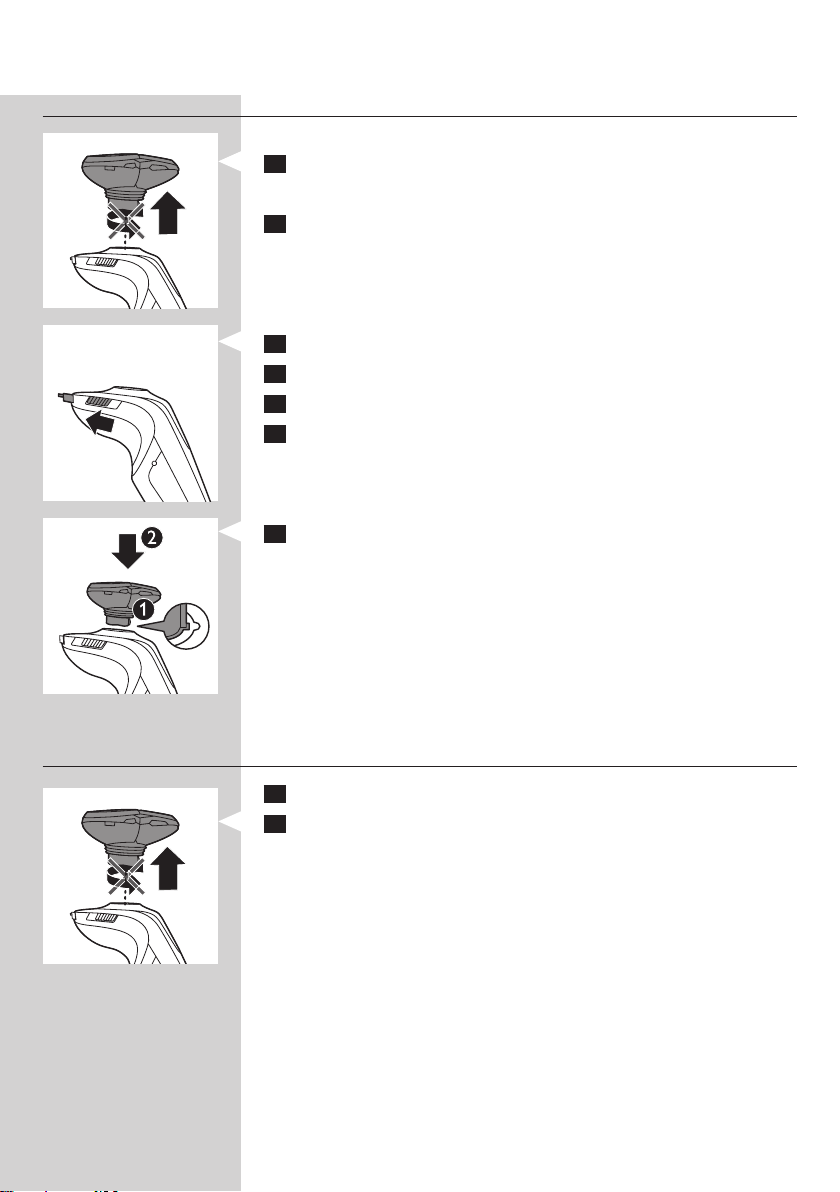
1 Pull the shaving unit straight off the shaver.
Note: Do not twist the shaving unit while you pull it off the shaver.
2 Press the on/off button once to switch on the shaver.
, The display lights up for a few seconds.
3 Slide the trimmer slide forwards to slide out the trimmer.
4 You can now start trimming.
5 Slide the trimmer slide backwards to retract the trimmer.
6 Press the on/off button once to switch off the shaver.
, The display lights up for a few seconds and shows the remaining
battery capacity.
7 Insert the lug of the shaving unit into the slot in the top of the shaver
(1). Then press down the shaving unit (2) to attach it to the shaver
(‘click’).
Using the Beard Styler attachment (RQ1296, RQ1295, RQ1286,
RQ1285, RQ1275, RQ1265 only)
1 Make sure the shaver is switched off.
2 Pull the shaving unit straight off the shaver.
Note: Do not twist the shaving unit while you pull it off the shaver.
Page 13
ENGLISH 13
3 Insert the lug of the Beard Styler attachment into the slot in the top
of the shaver (1). Then press down the beard styler attachment (2)
to attach it to the shaver (‘click’).
Using the Beard Styler attachment with comb
You can use the Beard Styler attachment with the comb attached to style
your beard at one xed setting, but also at different length settings. The
hair length settings on the Beard Styler attachment correspond to the
remaining hair length after cutting and range from 1 to 5mm.
1 Slide the comb straight into the guiding grooves on both sides of the
beard styler attachment (‘click’).
2 Press the length selector (1) and then push it to the left or right (2)
to select the desired hair length setting.
3 Press the on/off button on the shaver to switch it on.
4 You can now start styling your beard.
Using the Beard Styler attachment without comb
You can use the Beard Styler attachment without the comb to contour
your beard, moustache or sideburns.
Page 14

ENGLISH14
1 Pull the comb off the Beard Styler attachment.
Note: Grab the comb in the centre to pull it off the Beard Styler attachment.
Do not pull at the sides of the comb.
2 Press the on/off button to switch on the shaver.
3 You can now start contouring your beard, moustache, sideburns or
neckline.
Beard styles
Below you nd some examples of beard styles you can create.
- A stubble look
- A full beard
Page 15

ENGLISH 15
- A moustache
- A goatee
Cleaning and maintenance
Never use scouring pads, abrasive cleaning agents or aggressive liquids
such as petrol or acetone to clean the shaver, its accessories and the
Jet Clean System (RQ1296CC, RQ1295CC, RQ1290CC, RQ1286CC,
RQ1285CC, RQ1284CC, RQ1280CC, RQ1275CC, RQ1265CC,
RQ1260CC, RQ1252CC, RQ1251CC, RQ1250CC only).
- The best and most hygienic way to clean the shaver is in the Jet Clean
System. You can also rinse the shaver under the tap or clean it with the
cleaning brush supplied.
- Be careful with hot water. Always check if the water is not too hot, to
prevent your hands from getting burnt.
- Clean the shaver after every shave for optimal shaving performance.
- You can clean the outside of the shaver with a damp cloth.
- Regular cleaning guarantees better shaving performance.
Cleaning the shaving unit
Be careful with hot water. Always check if the water is not too hot, to
prevent your hands from getting burnt.
1 Rinse the shaving unit under a hot tap for some time.
Page 16

ENGLISH16
2 Pull open the three shaving heads one by one.
3 Rinse all three shaving heads and all three hair chambers under a hot
tap for 30 seconds.
Note: You can also brush the shaving heads and hair chambers with the
cleaning brush supplied.
Be careful with hot water. Always check if the water is not too hot, to
prevent your hands from getting burnt.
4 Carefully shake off excess water and leave the shaving heads open to
let the shaving unit dry completely.
Never dry the shaving unit with a towel or tissue, as this may damage the
shaving heads.
Cleaning the shaving unit in the Jet Clean System (RQ1296CC,
RQ1295CC, RQ1290CC, RQ1286CC, RQ1285CC, RQ1284CC,
RQ1280CC, RQ1275CC, RQ1265CC, RQ1260CC, RQ1252CC,
RQ1251CC, RQ1250CC only)
The Jet Clean System comes in two types:
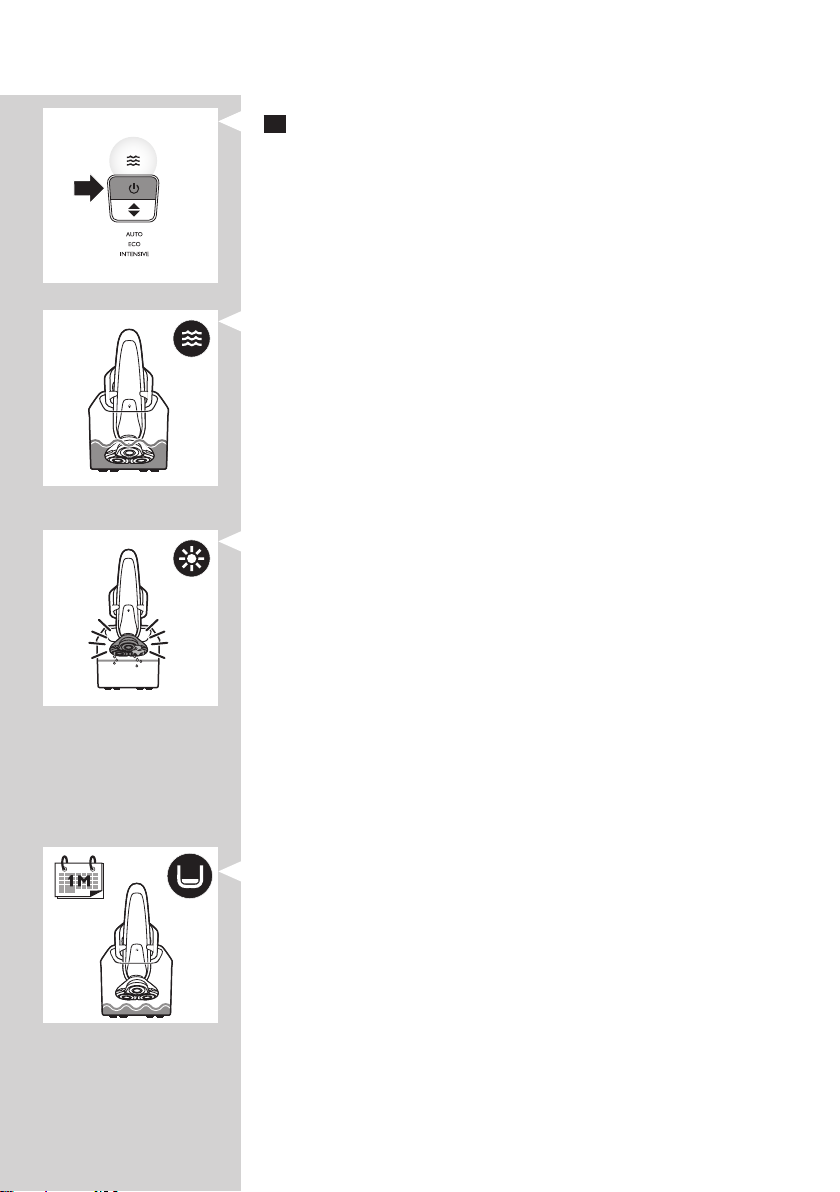
- Type RQ1008 has three cleaning programs: the eco program, the auto
program and the intensive program. Press the up/down button to
select the cleaning program you prefer.
Note: The eco program has a shorter drying time, to save energy. The intensive
program is a more thorough cleaning program.
- Type RQ1007 has one automatic cleaning program. When you
press the on/off button, the Jet Clean System starts cleaning in the
automatic cleaning program.
Preparing the Jet Clean System for use
Fill the cleaning chamber before rst use.
1 Put the small plug in the Jet Clean System.
2 Put the adapter in the wall socket.
, The holder automatically moves to the highest position.
Page 17

ENGLISH 17
3 Simultaneously press the release buttons on both sides of the
cleaning chamber (1). Then lift the Jet Clean System off the cleaning
chamber (2).
, The cleaning chamber remains behind.
4 Unscrew the cap from the bottle with HQ200 cleaning uid.
5 Fill the cleaning chamber with HQ200 cleaning uid to a level
between the two lines.
6 Place the Jet Clean System back onto the cleaning chamber.
Make sure the release buttons click back into place.
Using the Jet Clean System
Note: If you use the shaver with shaving foam or shaving gel, we advise you
to rinse it under the hot tap before you clean it in the Jet Clean System. This
guarantees an optimal lifetime for the cleaning uid.
1 Hold the shaver upside down above the holder with the back of the
shaver pointing towards the holder.
2 Place the shaver body in the holder behind the two clips (1) and
press it down until it locks into place (2).
, The display shows that the shaver is charging (see chapter ‘The
display’).
3 RQ1008: Press the up/down button to select a cleaning program.
Page 18
ENGLISH18
4 Press the on/off button on the Jet Clean System to start the cleaning
program.
, The shaver display stops showing the charging indication.
, The cleaning light starts to ash and the shaver is automatically
lowered into the cleaning uid.
, The cleaning light ashes throughout the cleaning program, which
takes a few minutes.
Note: RQ1007: The cleaning program takes 4 to 6 minutes.
Note: RQ1008: The auto and eco cleaning programs take 4 to 6 minutes. The
intensive program takes approx. 35 minutes.
, During the rst phase of the cleaning program, the shaver
automatically switches on and off several times and moves up and
down.
, During the second phase of the cleaning program, the shaver is
placed in the drying position, indicated by the ashing drying symbol.
This phase takes approx. 2 hours. The shaver stays in this position
until the end of the program.
Note: RQ1008: The drying phase takes 1 hour when you have selected the eco
program.
, After the cleaning program, the charging indication appears on the
shaver display (see chapter ‘The display’).
Note: If you press the on/off button of the Jet Clean System during the cleaning
program, the program aborts. In this case, the cleaning or drying light stops
ashing and the holder moves to the highest position.
Note: If you remove the adapter from the wall socket during the cleaning
program, the program aborts. The holder remains in its current position. When
you put the adapter back into the wall socket, the holder moves to the highest
position.
- When the cleaning uid drops below the minimum level, the ‘cleaning
chamber empty’ symbol star ts to ash and the holder returns to its
starting position.
- If you use the Jet Clean System to clean your shaver every day, you
need to rell the cleaning chamber approx. every 15 days.
Cleaning the Jet Clean System
Clean the cleaning chamber every 15 days.
You can wipe the outside of the Jet Clean System with a damp cloth.
Page 19

ENGLISH 19
1 Simultaneously press the release buttons on both sides of the Jet
Clean System (1). Then lift the Jet Clean System off the cleaning
chamber (2).
, The cleaning chamber remains behind.
2 Pour any remaining cleaning uid out of the cleaning chamber.
You can simply pour the cleaning uid down the sink.
3 Rinse the cleaning chamber under the tap.
The cleaning chamber is not dishwasher-proof.
4 Fill the cleaning chamber with HQ200 cleaning uid to a level
between the two lines.
5 Place the Jet Clean System back onto the cleaning chamber.
Make sure the release buttons click back into place.
Page 20

ENGLISH20
Extra-thorough cleaning method
Make sure the appliance is switched off.
1 Pull the shaving unit straight off the shaver.
Note: Do not twist the shaving unit while you pull it off the shaver.
2 Pull open the three shaving heads one by one.
3 Press the retainer release tab (1) until the retainer opens (2).
Note: Do not clean more than one cutter and shaving guard at a time, since
they are all matching sets. If you accidentally put a cutter in the wrong shaving
guard, it may take several weeks before optimal shaving performance is
restored.
4 Remove the cutter from the shaving guard.
5 Clean the cutter with the cleaning brush supplied.
Page 21

ENGLISH 21
6 Clean the inside of the shaving guard.
7 After cleaning, place the cutter back into the shaving guard with the
cutter legs pointing downwards.
8 Press down the retainer over the cutter.
9 Close the shaving heads.
10 Insert the lug of the shaving unit into the slot in the top of the shaver
(1). Then press the shaving unit downwards (2) to attach it to the
shaver (‘click’).
Cleaning the trimmer
Clean the trimmer every time you have used it.
1 Slide the trimmer slide forwards to slide out the trimmer.
Page 22

ENGLISH22
2 Rinse the trimmer under a hot tap for some time.
3 Slide the trimmer slide backwards to retract the trimmer.
Tip: For optimal trimmer performance, lubricate the trimmer teeth with a drop
of sewing machine oil every six months.
Cleaning the Beard Styler attachment (RQ1296, RQ1295,
RQ1286, RQ1285, RQ1275, RQ1265 only)
Clean the Beard Styler attachment every time you have used it.
1 Pull the comb off the Beard Styler attachment.
2 Rinse the Beard Styler attachment and the comb separately under a
hot tap for some time.
Note: You can also clean the Beard Styler attachment and the comb with the
cleaning brush supplied.
3 Lubricate the trimmer teeth with a drop of sewing machine oil every
six months.
Storage
MINUTES LEFT
MINUTES LEFT
1 Slide the protection cap onto the shaving unit to prevent damage to
the shaving heads.
2 Store the shaver in the pouch supplied.
Replacement
For maximum shaving performance, we advise you to replace the shaving
unit every two years.
Only replace the shaving unit with an original RQ12 Philips Shaving unit.
1 The shaving unit symbol ashes (all types) and you hear a beep
(RQ129x, RQ128x only) when you switch off the shaver .
Note: The displays of the different types look different, but show the same
symbol.
Page 23

ENGLISH 23
2 Pull the old shaving unit straight off the shaver.
Note: Do not twist the shaving unit while you pull it off the shaver.
3 Insert the lug of the new RQ12 shaving unit into the slot in the top
of the shaver (1). Then press down the shaving unit (2) to attach it to
the shaver (‘click’).
4 RQ128x/RQ127x/RQ126x/RQ125x: To reset the shaver, press and
hold the on/off button for approx. 10 seconds.
Note: If you do not reset the shaver at the rst replacement reminder, it
continues to beep (RQ128x only) and show the shaving unit symbol at 8 more
shaves or until you reset the shaver.
Note for RQ129x: You do not need to reset the shaver. After 3 shaves,
the replacement reminder (ashing shaving unit symbol and beeping) is
deactivated automatically.
Ordering accessories
To purchase accessories for this appliance, please visit our online shop at
www.shop.philips.com/service. If the online shop is not available in
your country, go to your Philips dealer or a Philips service centre. If you
have any difculties obtaining accessories for your appliance, please contact
the Philips Consumer Care Centre in your country. You nd its contact
details in the worldwide guarantee leaet.
The following parts are available:
- HQ8505 adapter
- RQ12 Philips Shaving Unit
- HQ110 Philips Shaving Head Cleaning Spray
- HQ200 Philips Cleaning Fluid
- RQ111 Beard Styler attachment
Page 24

ENGLISH24
Shaving heads
- We advise you to replace your shaving heads every two years. Always
replace the shaving unit with an original RQ12 Philips Shaving Unit.
Cleaning
- Specic types only: use Jet Clean Solution (HQ200) for regular cleaning
of the shaving heads.
Environment
- Do not throw away the appliances with the normal household waste
at the end of their life, but hand them in at an ofcial collection point
for recycling. By doing this, you help to preserve the environment.
- The built-in rechargeable shaver battery contains substances that
may pollute the environment. Always remove the battery before you
discard or hand in the shaver at an ofcial collection point. Dispose
of the battery at an ofcial collection point for batteries. If you have
trouble removing the battery, you can also take the appliance to a
Philips service centre. The staff of this centre will remove the battery
for you and will dispose of it in an environmentally safe way.
Removing the rechargeable shaver battery
Only remove the rechargeable battery when you discard the shaver.
Make sure the battery is completely empty when you remove it.
Be careful, the battery strips are sharp.
1 Remove the back panel of the shaver with a screwdriver.
2 Remove the rechargeable battery.
Page 25

Guarantee and support
If you need support or if you have a problem, please visit
www.philips.com/support or read the separate worldwide guarantee
leaet.
Guarantee restrictions
The shaving heads (cutters and shaving guards) are not covered by the
terms of the international guarantee because they are subject to wear.
Troubleshooting
This chapter summarises the most common problems you could
encounter with the appliance. If you are unable to solve the problem with
the information below, visit www.philips.com/support for a list of frequently
asked questions or contact the Consumer Care Centre in your country.
Problem Possible cause Solution
ENGLISH 25
The shaver does not
shave as well as it
used to.
The shaver does not
work when I press
the on/off button.
The shaving heads are damaged or worn. Replace the shaving unit (see
Long hairs obstruct the shaving heads. Clean the shaving heads by
Specic types only: The Jet Clean System has
not cleaned the shaver properly, because
the cleaning uid in the cleaning chamber is
soiled or the cleaning uid level is too low.
The rechargeable battery is empty. Recharge the battery (see
Specic types only: The travel lock
is activated.
The shaving unit is soiled or damaged to
such an extent that the motor cannot run.
In this case, the shaving unit symbol, the tap
symbol and the exclamation mark ash.
The temperature of the shaver is too high. In
this case, the shaver does not work and the
exclamation mark on the display ashes.
chapter ‘Replacement’).
following the steps of the
extra-thorough cleaning method
(see chapter ‘Cleaning and
maintenance’).
Clean the shaver thoroughly
before you continue shaving. If
necessary, clean and rell the
cleaning chamber (see chapter
‘Cleaning and maintenance’).
chapter ‘Charging’).
Press the on/off button for
3 seconds to deactivate the
travel lock.
Clean the shaving unit or replace
it (see chapters ‘Cleaning and
maintenance’ and ‘Replacement’).
Switch off the shaver and let
it cool down. As soon as the
temperature of the shaver has
dropped sufciently, you can
switch on the shaver again.
Page 26

ENGLISH26
Problem Possible cause Solution
RQ1296CC,
RQ1295CC,
RQ1290CC,
RQ1286CC,
RQ1285CC,
RQ1284CC,
RQ1280CC,
RQ1275CC,
RQ1265CC,
RQ1260CC,
RQ1252CC,
RQ1251CC,
RQ1250CC only: The
shaver is not entirely
clean after I clean it in
the Jet Clean System.
The Jet Clean System
does not work when
I press the on/off
button.
The shaver is not fully
charged after I charge
it in the charger/Jet
Clean System.
The cleaning uid in the cleaning chamber
is soiled.
The cleaning uid level is too low. If the
uid volume in the cleaning chamber drops
below the minimum level during the cleaning
program, the program aborts.The cleaning
light and the ‘cleaning chamber empty’
symbol ash at intervals and the holder
returns to its starting position.
You have used another cleaning uid than
the original Philips cleaning uid.
The Jet Clean System is not connected to
the mains.
You have not placed the shaver in the
Jet Clean System properly, so there is no
electrical connection between the Jet Clean
System and the shaver.
You have not placed the shaver in the
charger/Jet Clean System (specic types
only) properly.
Empty and rinse the cleaning
chamber and rell it with new
cleaning uid.
Rell the cleaning chamber with
cleaning uid to a level between
the two lines (see chapter
‘Cleaning and maintenance’).
Only use HQ200
Philips Cleaning Fluid.
Put the small plug in the Jet
Clean System and put the
adapter in the wall socket.
Press the shaver tightly into the
holder to lock it into place.
Make sure you press the shaver
until it locks into place.
Page 27

Problem Possible cause Solution
ENGLISH 27
RQ129x/RQ128x:
The shaver is fully
charged, but the
display shows less
than 60 shaving
minutes.
RQ1008: The
operating time of
the Jet Clean System
is suddenly shorter
or longer than it used
to be.
The shaver is equipped with an intelligent
self-learning system that monitors the
shaver’s energy consumption and converts
the remaining battery capacity into shaving
minutes. The energy consumption and
therefore the remaining number of shaving
minutes depend on your skin and beard type
and your shaving behaviour (e.g. the use of
shaving gel).
You have selected another cleaning program.
The Jet Clean System has three cleaning
programs: the eco program, the normal
program and the intensive program. Each
of these programs has a different operating
time.
If the number of shaving minutes
of the fully charged shaver is
less than 60 minutes, this is
completely normal and does not
mean that the battery capacity
of the shaver has diminished.
Press the up/down button
on the Jet Clean System to
select the cleaning program of
your preference (see chapter
‘Cleaning and maintenance’).
Page 28

28
БЪЛГАРСКИ
Въведение
Поздравления за вашата покупка и добре дошли във Philips! За
да се възползвате изцяло от предлаганата от Philips поддръжка,
регистрирайте продукта си на адрес www.philips.com/welcome.
Прочетете внимателно това ръководство за експлоатация, тъй като
то съдържа информация за функциите на тази самобръсначка, а също
и някои съвети, които ще направят бръсненето ви по-бързо и поприятно.
Общо описание (фиг. 1)
A Самобръсначка
1 Дисплей
2 Бутон за вкл./изкл. на самобръсначката
3 Предпазна капачка
4 RQ12 бръснещ блок
5 Машинка за подстригване
6 Плъзгач вкл./изкл. на приставката за подстригване
B RQ111 Приставка за оформяне на брада (само при RQ1296,
RQ1295, RQ1286, RQ1285, RQ1275, RQ1265)
7 Селектор за дължина на косъма
8 Гребен на приставката за оформяне на брада
C Сгъваемо зарядно устройство
D Система Jet Clean (само при RQ1296CC, RQ1295CC, RQ1290CC,
RQ1286CC, RQ1285CC, RQ1284CC, RQ1280CC, RQ1275CC,
RQ1265CC, RQ1260CC, RQ1252CC, RQ1251CC, RQ1250CC)
9 Символ “празна почистваща камера”
10 Символ на почистване
11 Символ на сушене
12 Бутон за вкл./изкл. на системата Jet Clean (само за RQ1008: и бутон
нагоре/надолу за избор на програма)
13 Бутон за освобождаване на почистващата камера
14 Поставка на самобръсначката
E Четка за почистване
F Течност за почистване HQ200 (само при RQ1296CC, RQ1295CC,
RQ1290CC, RQ1286CC, RQ1285CC, RQ1284CC, RQ1280CC,
RQ1275CC, RQ1265CC, RQ1260CC, RQ1252CC, RQ1251CC,
RQ1250CC)
G Торбичка
H Адаптер
Важно
Преди да използвате самобръсначката, системата Jet Clean (само
при RQ1296CC, RQ1295CC, RQ1290CC, RQ1286CC, RQ1285CC,
RQ1284CC, RQ1280CC, RQ1275CC, RQ1265CC, RQ1260CC,
RQ1252CC, RQ1251CC, RQ1250CC) и зарядната поставка, прочетете
внимателно тази важна информация. Запазете брошурата за справка в
бъдеще.
Page 29

БЪЛГАРСКИ 29
Опасност
- Пазете адаптера сух.
Предупреждение
- В адаптера има трансформатор. Не отрязвайте адаптера, за да го
замените с друг щепсел, тъй като това крие опасности.
- Самобръсначката, системата Jet Clean и зарядната поставка
не са предназначени за ползване от хора (включително деца)
с намалени физически възприятия или с умствени недъзи или
без опит и познания, ако са оставени без наблюдение и не са
инструктирани от страна на отговарящо за тяхната безопасност
лице относно начина на използване на тези уреди.
- Наглеждайте децата, за да не си играят със самобръсначката,
системата Jet Clean и зарядната поставка.
- Винаги изключвайте щепсела от контакта, преди да измиете
самобръсначката с течаща вода.
Внимание
- Никога не потапяйте системата Jet Clean или зарядната поставка
във вода и не ги мийте с течаща вода.
- Никога не изплаквайте самобръсначката с вода, по-гореща от
80°C.
- Не използвайте самобръсначката, системата Jet Clean, адаптера,
зарядната поставка и която и да било друга част, ако тя е
повредена, тъй като това може да причини наранявания. Винаги
заменяйте повредените адаптер, зарядна поставка или част с
оригинални такива.
- Използвайте системата Jet Clean само с оригиналния почистващ
разтвор HQ200 Jet Clean.
- Поставяйте системата Jet Clean винаги върху стабилна, равна и
хоризонтална повърхност, за да предотвратите разливане.
- Когато системата Jet Clean е готова за употреба, не я местете, за
да предотвратите разливане на почистващата течност.
- Системата Jet Clean измива щателно, но не дезинфекцира
самобръсначката, така че не давайте самобръсначката ви да се
ползва от други хора.
- Никога не почиствайте уреда с въздух под налягане, абразивни
гъби, абразивни почистващи препарати или агресивни течности,
като бензин или ацетон.
- От гнездото отдолу на самобръсначката може да тече вода,
когато я изплаквате. Това е нормално и не е опасно, тъй като
цялата електроника е затворена в капсулован захранващ блок
вътре в самобръсначката.
Съответствие със стандартите
- Тази самобръсначка е водоустойчива и съответства на
международно одобрената нормативна уредба за безопасност.
Подходяща е за употреба във ваната или под душа, както и за
измиване с течаща вода. Поради тази причина, от съображения за
сигурност самобръсначката може да се използва само на батерии.
- Самобръсначката и системата Jet Clean отговарят на всички
приложими стандарти и разпоредби относно излагането на
електромагнитни полета.
Page 30

БЪЛГАРСКИ30
Общи положения
- Адаптерът е съоръжен с автоматичен селектор на напрежение и е
подходящ за напрежения на мрежата от 100 до 240 волта.
- Адаптерът преобразува 100-240 волта в безопасно ниско
напрежение под 24 волта.
- Максимално ниво на шума: Lc = 69 dB(A)
Дисплеят
MINUTES LEFT
MINUTES LEFT
Забележка: Преди да използвате самобръсначката за пръв път,
махнете предпазното фолио от дисплея.
Различните модели самобръсначки имат различни дисплеи, показани
на фигурите по-долу.
- RQ1296, RQ1295, RQ1290, RQ1286, RQ1285, RQ1280
- RQ1275, RQ1265, RQ1261, RQ1260
- RQ1273, RQ1252, RQ1251, RQ1250
MINUTES LEFT
MINUTES LEFT
Зареждане
- Зареждането отнема около 1 час.
RQ129x, RQ128x
- Когато самобръсначката се зарежда, мига индикаторът за минути.
- Минутите за бръснене нарастват, докато самобръсначката се
зареди напълно.
- Бързо зареждане: Когато самобръсначката има достатъчно заряд
за едно бръснене, на дисплея се показват 5 минути в червено.
Page 31

MINUTES LEFT
MINUTES LEFT
БЪЛГАРСКИ 31
RQ127x, RQ126x, RQ125x
Забележка: Дисплеите на различните модели изглеждат различно, но
индикаторите за зареждане работят по един и същи начин.
- Когато самобръсначката се зарежда, първо започва да мига
долният индикатор за зареждане, след това вторият индикатор за
зареждане и т. н., докато самобръсначката не се зареди напълно.
- Бързо зареждане: Когато самобръсначката има достатъчно
заряд за едно бръснене, долният индикатор за зареждане мига
последователно в оранжево и бяло.
Напълно заредена батерия
RQ129x, RQ128x
- Когато батерията е напълно заредена, индикаторът за минути
свети непрекъснато. След около 30 минути дисплеят се изключва
автоматично.
Забележка: Самобръсначката е снабдена с интелигентна
самообучаваща се система, която следи нейното потребление на
енергия и превръща останалия заряд на батерията в минути за
бръснене. Потреблението на енергия и съответно оставащите
минути за бръснене зависят от типа на кожата и брадата ви и от
начина ви на бръснене (например дали използвате гел за бръснене).
Ако оставащите минути за бръснене на напълно заредената
самобръсначка са по-малко от 60, това е напълно нормално и не
означава, че капацитетът на батерията е намалял.
RQ127x, RQ126x, RQ125x
Забележка: Дисплеите на различните модели изглеждат различно, но
индикаторите за зареждане работят по един и същи начин.
- Когато батерията е напълно заредена, всички индикатори за
зареждане светят непрекъснато. След около 30 минути дисплеят
се изключва автоматично.
Изтощена батерия
MINUTES LEFT
MINUTES LEFT
RQ129x, RQ128x
- Когато батерията е почти изтощена (когато остават само 5 или
по-малко минути за бръснене), индикаторът за минути започва да
мига.
- Когато изключите самобръсначката, минутите за бръснене
продължават да мигат още няколко секунди. Когато няма повече
останали минути, ще чуете кратък звуков сигнал.
Page 32

БЪЛГАРСКИ32
RQ127x, RQ126x, RQ125x
Забележка: Дисплеите на различните модели изглеждат различно, но
индикаторите за зареждане работят по един и същи начин.
- Когато батерията е почти изтощена (когато остават само 5 или
по-малко минути за бръснене), долният индикатор за зареждане
мига в оранжево.
- Когато изключите самобръсначката, долният индикатор за
зареждане продължава да мига в оранжево още няколко секунди.
Оставащ заряд на батерията
MINUTES LEFT
MINUTES LEFT
MINUTES LEFT
MINUTES LEFT
RQ129x, RQ128x
- Оставащият в батерията заряд се обозначава с броя минути за
бръснене, показани на дисплея.
RQ127x, RQ126x, RQ125x
Забележка: Дисплеите на различните модели изглеждат различно, но
индикаторите за зареждане работят по един и същи начин.
- Оставащият в батерията заряд се определя от светещите
индикатори за зареждане.
Почистете самобръсначката
За най-добри резултати при бръснене ви препоръчваме да почиствате
самобръсначката след всяка употреба.
Забележка: Дисплеите на различните модели изглеждат различно, но
индикацията им е една и съща.
- Символът на чешма мига, за да ви напомня да почистите
самобръсначката.
Page 33

MINUTES LEFT
MINUTES LEFT
БЪЛГАРСКИ 33
Заменете бръснещия блок.
За да постигнете оптимална работа на уреда при бръснене,
препоръчваме ви да подменяте бръснещия блок на всеки две години.
Забележка: Дисплеите на различните модели изглеждат различно, но
индикацията им е една и съща.
- За да ви напомни да смените бръснещия блок, уредът има функция
за напомняне за смяна, която се активира автоматично след около
две години. Напомнянето за смяна се повтаря при 9 поредни
бръснения (само при RQ128x, RQ127x, RQ126x, RQ125x) или
докато не рестартирате самобръсначката.
Заключване при пътуване (само при RQ128x, RQ127x,
RQ126x, RQ125x)
Можете да заключите самобръсначката, когато ви предстои да
пътувате. Заключването при пътуване предпазва самобръсначката от
случайно включване.
Забележка: Дисплеите на различните модели изглеждат различно, но
индикацията им е една и съща.
Задействане на заключването при пътуване
1 Задръжте бутона вкл./изкл. натиснат за 3 секунди, за да влезете в
режим на заключване при пътуване.
, RQ128x: На дисплея започва обратно отброяване от 3.
На 1 уредът издава кратък звуков сигнал, за да покаже, че е
заключен.
, Символът на катинар светва на дисплея и след няколко секунди
угасва.
Освобождаване на заключването при пътуване
1 Задръжте бутона вкл./изкл. натиснат за 3 секунди.
, Електромоторът се завърта, за да покаже, че заключването при
пътуване е деактивирано.
Сега самобръсначката е отново готова за използване.
Забележка: Когато поставите самобръсначката във включено в
мрежата зарядно устройство или система Jet Clean, заключването при
пътуване автоматично се деактивира.
Режим за пестене на енергия (само при RQ129x)
Уредът има автоматичен режим за пестене на енергия. Когато
самобръсначката премине в режим за пестене на енергия, светлината
на бутона за вкл./изкл. се изключва с цел пестене на енергия.
- Когато самобръсначката е изключена, но открива движение
в продължение на 5 минути (например когато пътувате със
самобръсначката в куфара), тя автоматично преминава в режим за
пестене на енергия. Този режим предпазва самобръсначката от
случайно включване.
Page 34

БЪЛГАРСКИ34
, На дисплея мига символът на катинар, за да покаже, че
устройството е в режим за пестене на енергия.
- За да деактивирате режима за пестене на енергия, просто
натиснете бутона за вкл./изкл.
Блокирани бръснещи глави
Забележка: Дисплеите на различните модели изглеждат различно, но
индикацията им е една и съща.
MINUTES LEFT
MINUTES LEFT
- Ако бръснещите глави са блокирани, мигат символът на бръснещ
блок, символът на чешма и символът удивителен знак. В такъв
случай моторът не може да работи, тъй като бръснещите глави са
задръстени или повредени.
- Когато това се случи, трябва да почистите или подмените
бръснещия блок.
- Символът на бръснещ блок, символът на чешма и символът
удивителен знак продължават да мигат, докато не деблокирате
бръснещите глави.
Зареждане
Зареждането отнема около 1 час.
RQ129x, RQ128x, RQ127x, RQ126x: Напълно заредената
самобръсначка може да се използва за бръснене в продължение на
60 минути.
Забележка: RQ129x, RQ128x: Когато батерията е напълно заредена,
дисплеят показва действително оставащите минути за бръснене (вж.
раздел “Напълно заредена батерия” в глава “Дисплеят”).
RQ125x: Напълно заредената самобръсначка може да се използва за
бръснене в продължение на 50 минути.
Заредете самобръсначката, преди да я използвате за първи път и
когато дисплеят покаже, че батерията е почти изтощена (вж. раздел
“Изтощена батерия” в глава “Дисплеят”).
Бързо зареждане
След като самобръсначката се е зареждала в продължение на 3
минути, тя разполага с достатъчно заряд за едно бръснене.
Page 35

БЪЛГАРСКИ 35
Зареждане в зарядното устройство
1 Включете малкия жак в зарядното устройство.
2 Разгънете зарядното устройство (трябва да чуете леко
щракване).
3 Включете адаптера в контакта.
4 Сложете самобръсначката в зарядното устройство.
, Дисплеят показва, че самобръсначката се зарежда (вж. главата
“Дисплеят”).
Зареждане в системата Jet Clean (само при RQ1296CC,
RQ1295CC, RQ1290CC, RQ1286CC, RQ1285CC, RQ1284CC,
RQ1280CC, RQ1275CC, RQ1265CC, RQ1260CC, RQ1252CC,
RQ1251CC, RQ1250CC)
1 Включете малкия жак в системата Jet Clean.
2 Включете адаптера в контакта.
3 Дръжте самобръсначката с главата надолу над поставката, с гръб
насочен към поставката.
Забележка: Самобръсначката не може да се постави в системата Jet
Clean, ако предпазната капачка е на бръснещия блок.
Забележка: Само за RQ129x: когато обърнете самобръсначката
обратно, индикаторът за минути на дисплея също се обръща обратно,
за да виждате оставащия заряд на батерията.
Page 36

БЪЛГАРСКИ36
4 Сложете самобръсначката в поставката зад двете скоби (1) и я
натиснете надолу, докато застане на мястото си (2).
, Дисплеят показва, че самобръсначката се зарежда (вж. раздел
“Зареждане” в глава “Дисплеят”).
Използване на самобръсначката
Бръснене
Период за адаптиране
Първите бръснения може да не дадат резултатите, които очаквате, и
дори може кожата ви леко да се раздразни. Това е нормално. Кожата
и брадата ви се нуждаят от известно време, за да свикнат с новата
система за бръснене.
Съветваме ви да се бръснете редовно (поне 3 пъти седмично)
в продължение на 3 седмици, за да може кожата ви да свикне с
новата самобръсначка. През това време използвайте само новата
си електрическа самобръсначка, без други начини на бръснене. Ако
редувате с други начини на бръснене, кожата ви ще се адаптира потрудно към новата система за бръснене.
1 Натиснете веднъж бутона вкл./изкл., за да включите
самобръсначката.
, Дисплеят светва за няколко секунди.
2 Движете бръснещите глави по кожата си с кръгови движения.
- Не правете праволинейни движения.
3 Натиснете еднократно бутона вкл./изкл., за да изключите
самобръсначката.
, Дисплеят светва за няколко секунди и показва оставащия заряд
на батерията.
Мокро бръснене
Можете да използвате тази самобръсначка и върху мокро лице с пяна
или гел за бръснене.
Ако искате да използвате пяна или гел за бръснене, изпълнете
следните стъпки:
1 Намокрете кожата с малко вода.
2 Нанесете пяна или гел за бръснене.
3 Изплакнете бръснещия блок с течаща вода, за да сте сигурни, че
ще се плъзга гладко по кожата ви.
4 Натиснете веднъж бутона вкл./изкл., за да включите
самобръсначката.
Page 37

БЪЛГАРСКИ 37
5 Движете бръснещите глави по кожата си с кръгови движения.
Забележка: Редовно изплаквайте бръснещия блок с течаща вода, за да
сте сигурни, че ще продължи да се плъзга гладко по кожата ви.
6 Подсушете лицето си и почистете основно самобръсначката
след употреба (вж. главата “Почистване и поддръжка”).
Забележка: Уверете се, че сте изплакнали от самобръсначката
всичката пяна или гел за бръснене.
Подстригване
Можете да ползвате машинката за подстригване, за да оформите
бакенбардите и мустаците.
1 Свалете бръснещия блок от самобръсначката, като го издърпате
по права линия.
Забележка: Не завъртайте бръснещия блок, когато го сваляте от
самобръсначката.
2 Натиснете веднъж бутона вкл./изкл., за да включите
самобръсначката.
, Дисплеят светва за няколко секунди.
3 Плъзнете плъзгача на машинката за подстригване напред, за да я
извадите.
4 Сега можете да започнете подстригването.
5 Плъзнете плъзгача на машинката за подстригване назад, за да я
приберете.
6 Натиснете еднократно бутона вкл./изкл., за да изключите
самобръсначката.
, Дисплеят светва за няколко секунди и показва оставащия заряд
на батерията.
7 Вмъкнете издатината на бръснещия блок в жлеба отгоре на
самобръсначката (1). След това натиснете бръснещия блок
надолу (2), за да го закрепите към самобръсначката (с щракване).
Използване на приставката за оформяне на брада (само при
RQ1296, RQ1295, RQ1286, RQ1285, RQ1275, RQ1265)
1 Уверете се, че самобръсначката е изключена.
2 Свалете бръснещия блок от самобръсначката, като го издърпате
по права линия.
Забележка: Не завъртайте бръснещия блок, когато го сваляте от
самобръсначката.
Page 38

БЪЛГАРСКИ38
3 Вмъкнете издатината на приставката за оформяне на брада в
жлеба отгоре на самобръсначката (1). След това натиснете
приставката за оформяне на брада (2) надолу, за да я
закрепите към самобръсначката (с щракване).
Използване на приставката за оформяне на брада с гребен
Можете да използвате приставката за оформяне на брада с поставен
гребен, за оформите брадата си с точно определена дължина или
с различни настройки за дължина. Настройките за дължина на
приставката за оформяне на брада отговарят на оставащата дължина
на брадата след отрязване и варират от 1 до 5 мм.
1 Плъзнете гребена точно в направляващите жлебове от двете
страни на приставката за оформяне на брада (до щракване).
2 Натиснете селектора за дължина (1), след което го преместете
наляво или надясно (2), за да изберете желаната настройка за
дължина на косъма.
3 Натиснете бутона за вкл./изкл. на самобръсначката, за да я
включите.
4 Сега можете да пристъпите към оформяне на брадата си.
Използване на приставката за оформяне на брада без
гребен
Можете да използвате приставката за оформяне на брада без гребена,
за да оформите контура на брадата, мустаците или бакенбардите.
Page 39

БЪЛГАРСКИ 39
1 Издърпайте гребена от приставката за оформяне на брада.
Забележка: Хванете гребена по средата, за да го издърпате от
приставка за оформяне на брада. Не дърпайте гребена отстрани.
2 Натиснете бутона вкл./изкл., за да включите самобръсначката.
3 Сега можете да пристъпите към оформяне на контурите на
брадата, мустаците, бакенбардите или линията на врата.
Стилове бради
По-долу ще намерите примери за стилове бради, които можете да
оформите.
- Стил с набола брада
- Цяла брада
Page 40

БЪЛГАРСКИ40
- Мустаци
- Козя брадичка
Почистване и поддръжка
Никога не почиствайте с абразивни гъби, абразивни почистващи
препарати или агресивни течности като бензин или ацетон за
почистване на самобръсначката, нейните принадлежности и
системата Jet Clean (само при RQ1296CC, RQ1295CC, RQ1290CC,
RQ1286CC, RQ1285CC, RQ1284CC, RQ1280CC, RQ1275CC,
RQ1265CC, RQ1260CC, RQ1252CC, RQ1251CC, RQ1250CC).
- Най-добрият и хигиеничен начин за почистване на
самобръсначката е със системата Jet Clean. Също така можете да
почиствате самобръсначката с изплакване с течаща вода или с
приложената четка за почистване.
- Внимавайте с горещата вода. Винаги проверявайте дали водата не
е прекалено гореща, за да предпазите ръцете си от изгаряне.
- За най-добри резултати при бръснене почиствайте
самобръсначката след всяка употреба.
- Външната страна на самобръсначката можете да почистите с
влажна кърпа.
- Редовното почистване гарантира по-ефикасно бръснене.
Page 41

БЪЛГАРСКИ 41
Почистване на бръснещия блок
Внимавайте с горещата вода. Винаги проверявайте дали водата не е
прекалено гореща, за да предпазите ръцете си от изгаряне.
1 Изплакнете бръснещия блок с гореща течаща вода.
2 Отворете една след друга трите бръснещи глави с издърпване.
3 Измийте трите бръснещи глави и трите отделения за косми с
гореща течаща вода за 30 секунди.
Забележка: Можете да почистите бръснещите глави и отделенията
за косми и с предоставената четка за почистване.
Внимавайте с горещата вода. Винаги проверявайте дали водата не е
прекалено гореща, за да предпазите ръцете си от изгаряне.
4 Внимателно изтръскайте остатъците от вода и оставете
бръснещите глави отворени, за да се изсуши напълно
бръснещият блок.
Никога не подсушавайте бръснещия блок с кърпа за баня или
хартиени салфетки, защото това може да повреди бръснещите глави.
Page 42

БЪЛГАРСКИ42
Почистване на бръснещия блок в системата Jet Clean
(само при RQ1296CC, RQ1295CC, RQ1290CC, RQ1286CC,
RQ1285CC, RQ1284CC, RQ1280CC, RQ1275CC, RQ1265CC,
RQ1260CC, RQ1252CC, RQ1251CC, RQ1250CC)
Системата Jet Clean има две разновидности:
- Тип RQ1008 с три програми за почистване: икономична,
автоматична и интензивна. Натиснете бутона нагоре/надолу, за да
изберете предпочитаната програма за почистване.
Забележка: Икономичната програма е с по-кратко време за изсушаване,
с цел пестене на енергия. Интензивната програма е програма за поосновно почистване.
- Тип RQ1007 с една автоматична програма за почистване. Когато
натиснете бутона за вкл./изкл., системата Jet Clean започва
почистване с автоматичната програма.
Подготовка на системата Jet Clean за употреба
Преди първото използване напълнете почистващата камера.
1 Включете малкия жак в системата Jet Clean.
2 Включете адаптера в контакта.
, Поставката автоматично се придвижва в най-горно положение.
3 Натиснете едновременно бутоните за освобождаване от двете
страни на почистващата камера (1). След това повдигнете
системата Jet Clean от почистващата камера (2).
, Почистващата камера остава назад.
4 Развинтете капачката от бутилката с почистваща течност HQ200.
5 Напълнете почистващата камера с почистваща течност HQ200
до ниво между двете линии.
6 Поставете системата Jet Clean обратно върху почистващата
камера.
Внимавайте бутоните за освобождаване да щракнат на местата си.
Page 43

БЪЛГАРСКИ 43
Използване на системата Jet Clean
Забележка: Ако сте използвали самобръсначката с пяна или гел за
бръснене, съветваме ви да я изплакнете с гореща течаща вода, преди
да я почистите в системата Jet Clean. Това гарантира оптимален
живот на почистващата течност.
1 Дръжте самобръсначката с главата надолу над поставката, с гръб
насочен към поставката.
2 Сложете самобръсначката в поставката зад двете скоби (1) и я
натиснете надолу, докато застане на мястото си (2).
, Дисплеят показва, че самобръсначката се зарежда (вж. главата
“Дисплеят”).
3 RQ1008: Натиснете бутона нагоре/надолу, за да изберете
програма за почистване.
4 Натиснете бутона за вкл./изкл. на системата Jet Clean, за да
започне действието на програмата за почистване.
, Дисплеят на самобръсначката преустановява показването на
индикатора за зареждане.
, Индикаторът за почистване започва да мига и самобръсначката
автоматично се потапя в почистващата течност.
, Индикаторът за почистване мига през цялото време, докато
се изпълнява програмата за почистване, което отнема няколко
минути.
Забележка: RQ1007: Програмата за почистване отнема от 4 до
6 минути.
Забележка: RQ1008: Автоматичната и икономичната програми за
почистване отнемат от 4 до 6 минути. Интензивната програма
отнема около 35 минути.
, През първата фаза на програмата за почистване самобръсначката
на няколко пъти автоматично се включва и изключва и се движи
нагоре-надолу.
Page 44

БЪЛГАРСКИ44
, През втората фаза на програмата за почистване самобръсначката
се поставя в положение за изсушаване, което се показва с
мигащия символ на изсушаване. Втората фаза отнема около
2 часа. Самобръсначката остава в това положение до края на
програмата.
Забележка: RQ1008: Фазата на изсушаване отнема 1 час, когато сте
избрали икономичната програма.
, След изпълнението на програмата за почистване на дисплея
на самобръсначката се появява индикаторът за зареждане (вж.
главата “Дисплеят”).
Забележка: Ако натиснете бутона за вкл./изкл. на системата Jet Clean
докато се изпълнява програмата за почистване, програмата прекъсва.
В такъв случай индикаторът за почистване или изсушаване спира да
мига и държачът се придвижва в най-горно положение.
Забележка: Ако по време на изпълнение на програмата за почистване
извадите адаптера от контакта, програмата спира. Поставката
остава в текущото си положение. Когато адаптерът отново се
включи в контакта, поставката се придвижва в най-горно положение.
- Когато нивото на почистващата течност спадне под минималното,
символът “празна почистваща камера” започва да мига и държачът
се връща в начално си положение.
- Ако ежедневно използвате системата Jet Clean за почистване
на самобръсначката, ще трябва да пълните почистващата камера
приблизително на всеки 15 дни.
Почистване на системата Jet Clean
Почиствайте почистващата камера на всеки 15 дни.
Външната страна на системата Jet Clean можете да почистите с
влажна кърпа.
1 Натиснете едновременно бутоните за освобождаване от
двете страни на системата Jet Clean (1). След това повдигнете
системата Jet Clean от почистващата камера (2).
, Почистващата камера остава назад.
2 Излейте останалата почистваща течност от почистващата камера.
Можете просто да излеете почистващата течност в мивката.
Page 45

БЪЛГАРСКИ 45
3 Изплакнете почистващата камера с течаща вода.
Почистващата камера не е предназначена за миене в съдомиялна
машина.
4 Напълнете почистващата камера с почистваща течност HQ200
до ниво между двете линии.
5 Поставете системата Jet Clean обратно върху почистващата
камера.
Внимавайте бутоните за освобождаване да щракнат на местата си.
Метод на цялостно почистване
Уверете се, че уредът е изключен.
1 Свалете бръснещия блок от самобръсначката, като го издърпате
по права линия.
Забележка: Не завъртайте бръснещия блок, когато го сваляте от
самобръсначката.
2 Отворете една след друга трите бръснещи глави с издърпване.
Page 46

БЪЛГАРСКИ46
3 Натиснете палеца за освобождаване на фиксатора (1), докато
фиксаторът се отвори (2).
Забележка: Почиствайте ножчетата и предпазителите само един по
един, тъй като те са в комплекти по двойки. Ако случайно объркате
ножчетата и предпазителите, може да са необходими няколко
седмици за възстановяване на оптималната работа при бръснене.
4 Свалете ножчето от предпазителя.
5 Почистете ножчето с приложената четка за почистване.
6 Почистете вътрешността на предпазителя.
7 След почистване, поставете отново ножчето в предпазителя,
като крачетата на ножчето сочат надолу.
Page 47

БЪЛГАРСКИ 47
8 Натиснете надолу фиксатора върху ножчето.
9 Затворете бръснещите глави.
10 Вмъкнете издатината на бръснещия блок в жлеба отгоре на
самобръсначката (1). След това натиснете бръснещия блок
надолу (2), за да го закрепите към самобръсначката (с щракване).
Почистване на машинката за подстригване
Почиствайте машинката за подстригване след всяка употреба.
1 Плъзнете плъзгача на машинката за подстригване напред, за да я
извадите.
2 Изплакнете машинката за подстригване с гореща течаща вода.
3 Плъзнете плъзгача на машинката за подстригване назад, за да я
приберете.
Съвет: С оглед на оптимален режим на работа смазвайте зъбците на
приставката за подстригване с капка фино машинно масло (за шевни
машини) на всеки шест месеца.
Page 48

БЪЛГАРСКИ48
Почистване на приставката за оформяне на брада (само при
RQ1296, RQ1295, RQ1286, RQ1285, RQ1275, RQ1265)
Почиствайте приставката за оформяне на брада след всяка употреба.
1 Издърпайте гребена от приставката за оформяне на брада.
2 Изплакнете приставката за оформяне на брада и гребена,
поотделно, с гореща течаща вода за известно време.
Забележка: Можете да почистите приставката за оформяне на
брада и гребена също и с предоставената четка за почистване.
3 Смазвайте зъбците на приставката за подстригване с капка фино
машинно масло на всеки шест месеца.
Съхранение
1 Плъзнете предпазната капачка върху бръснещия блок, за да
избегнете повреди на бръснещите глави.
2 Съхранявайте самобръсначката в приложената торбичка.
Подмяна
За да постигнете оптимална работа на уреда при бръснене,
препоръчваме ви да подменяте бръснещия блок на всеки две години.
Подменяйте бръснещия блок само с оригинален бръснещ блок Philips
RQ12.
MINUTES LEFT
MINUTES LEFT
1 Символът на бръснещ блок мига (при всички модели) и чувате
кратък звуков сигнал (само при RQ129x, RQ128x), когато
изключите самобръсначката.
Забележка: Дисплеите на различните модели изглеждат различно, но
индикацията им е една и съща.
2 Свалете стария бръснещ блок от самобръсначката, като го
издърпате по права линия.
Забележка: Не завъртайте бръснещия блок, когато го сваляте от
самобръсначката.
Page 49

БЪЛГАРСКИ 49
3 Вмъкнете издатината на новия бръснещ блок RQ12 в жлеба
отгоре на самобръсначката (1). След това натиснете бръснещия
блок надолу (2), за да го закрепите към самобръсначката (с
щракване).
4 RQ128x, RQ127x, RQ126x, RQ125x: За да рестартирате
самобръсначката, натиснете бутона за вкл./изкл. за около
10 секунди.
Забележка: Ако не рестартирате самобръсначката при първото
напомняне за смяна, тя ще продължава да издава звуков сигнал
(само при RQ128x) и да показва символа на бръснещ блок при още
8 бръснения или докато не я рестартирате.
Забележка за RQ129x: Не е необходимо да рестартирате
самобръсначката. След 3 бръснения напомнянето за смяна (мигащ
символ на бръснещ блок и звуков сигнал) се деактивира автоматично.
Поръчване на аксесоари
За да закупите аксесоари за този уред, посетете нашия онлайн
магазин на адрес www.shop.philips.com/service. Ако онлайн
магазинът не е достъпен във вашата страна, посетете търговец на
уреди Philips или сервиз на Philips. Ако срещнете затруднения при
снабдяването с аксесоари за уреда, обърнете се към Центъра за
обслужване на потребители на Philips във вашата страна. Данните за
контакт ще намерите в международната гаранционна карта.
Предлагат се следните части:
- Адаптер HQ8505
- Бръснещ блок RQ12 Philips
- HQ110 Philips спрей за почистване на бръснещи глави
- Течност за почистване HQ200 Philips
- RQ111 Приставка за оформяне на брада
Бръснещи глави
- Съветваме ви да подменяте бръснещите глави на всеки две
години. Подменяйте бръснещия блок само с оригинален бръснещ
блок RQ12 на Philips.
Почистване
- Само за определени модели: използвайте почистващ разтвор Jet
Clean (HQ200) за редовно почистване на бръснещите глави.
Page 50

БЪЛГАРСКИ50
Опазване на околната среда
- След края на срока на експлоатация на уреда не го изхвърляйте
заедно с нормалните битови отпадъци, а го предайте в официален
пункт за събиране, където да бъде рециклиран. По този начин вие
помагате за опазването на околната среда.
- Вградената акумулаторна батерия съдържа вещества, които може
да замърсят околната среда. Непременно извадете батерията,
преди да изхвърлите уреда или да го предадете в официален
пункт за събиране. Предайте батерията в официален пункт за
събиране на батерии. Ако имате проблеми при изваждане на
батерията, може да занесете уреда в сервизен център на Philips.
Там служителите ще извадят батерията и ще я изхвърлят по начин,
опазващ околната среда.
Изваждане на акумулаторната батерия на самобръсначката
Изваждайте акумулаторната батерия само когато ще изхвърляте
самобръсначката. Трябва да сте сигурни, че батерията е напълно
изтощена, когато я изваждате.
Внимавайте, планките на батерията са остри.
1 Свалете задния панел на самобръсначката с отвертка.
2 Извадете акумулаторната батерия.
Гаранция и поддръжка
Ако се нуждаете от поддръжка или имате проблем, посетете
www.philips.com/support или прочетете листовката за
международна гаранция.
Ограничения на гаранцията
Условията на международната гаранция не важат за бръснещите глави
(ножчета и предпазители), тъй като те подлежат на изхабяване.
Отстраняване на неизправности
В тази глава са обобщени най-често срещаните проблеми, които може
да срещнете при използване на уреда. Ако не можете да разрешите
проблема с помощта на информацията по-долу, вижте списъка с често
задавани въпроси на адрес www.philips.com/support или се свържете с
Центъра за обслужване на потребители във вашата страна.
Page 51

Проблем Възможна причина Решение
БЪЛГАРСКИ 51
Самобръсначката
не бръсне толкова
добре, колкото
преди.
Самобръсначката
не работи, когато
натисна бутона за
вкл./изкл.
Бръснещите глави са повредени или
износени.
Дълги косми са блокирали бръснещите
глави.
Само за определени модели: Системата
Jet Clean не е почистила добре
самобръсначката, понеже почистващата
течност в камерата е замърсена или
нивото й е твърде ниско.
Акумулаторната батерия е изтощена. Заредете батерията (вижте глава
Само за определени модели:
Активирано е заключването при
пътуване.
Бръснещият блок е задръстен или
повреден до такава степен, че моторът
не може да работи. В такъв случай мигат
символът на бръснещ блок, символът на
чешма и символът удивителен знак.
Самобръсначката е загряла. В такъв
случай самобръсначката не работи и на
дисплея мига удивителният знак.
Сменете бръснещия блок (вижте
раздел “Замяна”).
Почистете бръснещите глави,
като следвате стъпките на
метода за цялостно почистване
(вж. главата “Почистване и
поддръжка”).
Почистете добре
самобръсначката, преди да
продължите с бръсненето. При
необходимост почистете и
напълнете почистващата камера
(вж. главата “Почистване и
поддръжка”).
“Зареждане”).
Натиснете и задръжте бутона
за вкл./изкл. за 3 секунди, за да
изключите заключването при
пътуване.
Почистете бръснещия блок
или го сменете (вж. глави
“Почистване и поддръжка” и
“Замяна”).
Изключете самобръсначката и я
оставете да се охлади. Когато се
охлади достатъчно, можете да я
включите отново.
Page 52

БЪЛГАРСКИ52
Проблем Възможна причина Решение
Само при
RQ1296CC,
RQ1295CC,
RQ1290CC,
RQ1286CC,
RQ1285CC,
RQ1284CC,
RQ1280CC,
RQ1275CC,
RQ1265CC,
RQ1260CC,
RQ1252CC,
RQ1251CC,
RQ1250CC:
Самобръсначката
не е напълно
почистена след
почистване в
системата Jet Clean.
Системата Jet Clean
не се включва,
когато натисна
бутона за вкл./изкл.
Самобръсначката
не е напълно
заредена след
зареждане в
зарядната поставка/
системата Jet Clean.
Почистващата течност в камерата е
замърсена.
Нивото на почистващата течност
е твърде ниско. Ако по време на
програмата за почистване то спадне
под минималното ниво, програмата се
прекратява. Индикаторът за почистване
и символът “празна почистваща камера”
мигат на интервали, а държачът се
връща в началното си положение.
Използвали сте друга почистваща
течност вместо оригиналната на Philips.
Системата Jet Clean не е включена към
захранването.
Не сте поставили правилно
самобръсначката в системата Jet Clean
и поради това няма електрическа
връзка между системата Jet Clean и
самобръсначката.
Не сте поставили правилно
самобръсначката в зарядната поставка/
системата Jet Clean (само за определени
модели).
Изпразнете и изплакнете
почистващата камера и я
напълнете с нова почистваща
течност.
Допълнете почистващата камера
с почистваща течност до ниво
между двете линии (вж. главата
“Почистване и поддръжка”).
Използвайте само почистващата
течност HQ200 на Philips.
Включете малкия щепсел в
системата Jet Clean и включете
адаптера в електрически контакт.
Натиснете силно
самобръсначката в държача,
докато щракне на мястото си.
Уверете се, че сте натиснали
самобръсначката, докато застане
на мястото си.
Page 53

Проблем Възможна причина Решение
БЪЛГАРСКИ 53
RQ129x, RQ128x:
Самобръсначката е
напълно заредена,
но дисплеят
показва по-малко
от 60 минути за
бръснене.
RQ1008: Времето
на работа на
системата Jet Clean
изведнъж стана
по-кратко или подълго от преди.
Самобръсначката е снабдена с
интелигентна самообучаваща се
система, която следи нейното
потребление на енергия и превръща
останалия заряд на батерията в минути
за бръснене. Потреблението на енергия
и съответно оставащите минути за
бръснене зависят от типа на кожата и
брадата ви и от начина ви на бръснене
(например дали използвате гел за
бръснене).
Избрали сте друга програма за
почистване. Системата Jet Clean
има три програми за почистване:
икономична, нормална и интензивна.
Всяка една програма е с различна
продължителност.
Ако оставащите минути за
бръснене на напълно заредената
самобръсначка са по-малко от
60, това е напълно нормално и
не означава, че капацитетът на
батерията е намалял.
Натиснете бутона за вкл./изкл.
на системата Jet Clean, за да
изберете предпочитаната от
вас програма за почистване
(вж. раздел “Почистване и
поддръжка”).
Page 54

54
ČEŠTINA
Úvod
Gratulujeme vám k zakoupení výrobku a vítáme vás ve světě Philips. Abyste
mohli plně využít podpory, kterou společnost Philips poskytuje, zaregistrujte
svůj výrobek na adrese www.philips.com/welcome.
Přečtěte si tuto uživatelskou příručku. Naleznete zde informace o funkcích
tohoto holicího strojku i několik tipů, díky nimž bude holení snazší a
radostnější.
Všeobecný popis (Obr. 1)
A Holicí strojek
1 Displej
2 Vypínač holicího strojku
3 Ochranný kryt
4 Holicí jednotka RQ12
5 Zastřihovač
6 Posuvné tlačítko pro zapínání/vypínání zastřihovače
B Nástavec na zastřihování vousů RQ111 (pouze modely RQ1296,
RQ1295, RQ1286, RQ1285, RQ1275, RQ1265)
7 Volič délky střihu
8 Hřeben nástavce na zastřihování vousů
C Skládací nabíječka
D Systém Jet Clean (pouze modely RQ1296CC, RQ1295CC,
RQ1290CC, RQ1286CC, RQ1285CC, RQ1284CC, RQ1280CC,
RQ1275CC, RQ1265CC, RQ1260CC, RQ1252CC, RQ1251CC,
RQ1250CC)
9 Symbol „Čisticí komora prázdná“
10 Symbol čištění
11 Symbol sušení
12 Tlačítko pro zapnutí/vypnutí systému Jet Clean (pouze typ RQ1008: a
tlačítko nahoru/dolů pro výběr programu)
13 Uvolňovací tlačítko čisticí komory
14 Držák holicího strojku
E Čisticí kartáč
F Čisticí tekutina HQ200 (pouze modely RQ1296CC, RQ1295CC,
RQ1290CC, RQ1286CC, RQ1285CC, RQ1284CC, RQ1280CC,
RQ1275CC, RQ1265CC, RQ1260CC, RQ1252CC, RQ1251CC,
RQ1250CC)
G Pouzdro
H Adaptér
Důležité
Před použitím holicího strojku, systému Jet Clean (pouze modely
RQ1296CC, RQ1295CC, RQ1290CC, RQ1286CC, RQ1285CC,
RQ1284CC, RQ1280CC, RQ1275CC, RQ1265CC, RQ1260CC,
RQ1252CC, RQ1251CC, RQ1250CC) a nabíjecího stojanu si pečlivě
přečtěte tyto důležité informace a uschovejte tento leták pro budoucí
použití.
Page 55

ČEŠTINA 55
Nebezpečí
- Adaptér udržujte v suchu.
Varování
- Adaptér obsahuje transformátor. Proto tento adaptér nikdy nenahrazujte
jinou zástrčkou, protože by mohla vzniknout nebezpečná situace.
- Osoby (včetně dětí) s omezenými fyzickými a duševními schopnostmi
nebo nedostatkem zkušeností a znalostí by neměly s holicím strojkem,
systémem Jet Clean a nabíjecím stojanem manipulovat, pokud nebyly
o používání těchto přístrojů předem poučeny nebo nejsou pod
dohledem osoby odpovědné za jejich bezpečnost.
- Dohlédněte na to, aby si s holicím strojkem, systémem Jet Clean a
nabíjecím stojanem nehrály děti.
- Holicí strojek před čištěním pod tekoucí vodou vždy odpojte od sítě.
Upozornění
- Systém Jet Clean ani nabíjecí stojan neponořujte do vody, ani je
neoplachujte pod tekoucí vodou.
- Pro oplachování holicího strojku nikdy nepoužívejte vodu teplejší než
80 °C.
- Nepoužívejte holicí strojek, systém Jet Clean, adaptér, nabíjecí stojan ani
žádnou jinou část, pokud jsou poškozené. Mohlo by dojít ke zranění.
Poškozený adaptér, nabíjecí stojan nebo jinou součást vždy vyměňte za
původní typ.
- Systém Jet Clean používejte pouze s originálním řešením Jet Clean
HQ200.
- Systém Jet Clean vždy pokládejte na stabilní a vodorovný povrch, aby
nedocházelo k úniku kapaliny.
- Když je systém Jet Clean připraven k použití, nepohybujte s ním, aby
nedošlo k úniku čisticí kapaliny.
- Systém Jet Clean důkladně čistí strojek, ale nedezinkuje jej, proto holicí
strojek nepůjčujte.
- K čištění přístroje nikdy nepoužívejte stlačený vzduch, kovové žínky,
abrazivní ani agresivní čisticí prostředky, jako je například benzín nebo
aceton.
- Ze zásuvky ve spodní části holicího strojku může po opláchnutí vytékat
voda. To je normální a nehrozí žádné nebezpečí, protože veškeré
elektronické díly holicího strojku jsou uzavřeny ve vodotěsné napájecí
jednotce uvnitř strojku.
Soulad s normami
- Tento holicí strojek je vodotěsný a odpovídá mezinárodním
bezpečnostním předpisům. Je vhodný pro použití při koupeli nebo ve
sprše a můžete jej omývat pod tekoucí vodou. Z důvodů bezpečnosti
můžete holicí strojek používat pouze bez kabelu.
- Holicí strojek a systém Jet Clean odpovídají všem normám a předpisům,
které se týkají elektromagnetických polí.
Obecné informace
- Přístroj je vybaven automatickým voličem napětí; je vhodný do sítě o
napětí v rozmezí 100 až 240 voltů.
- Adaptér transformuje 100 V až 240 V na bezpečné nízké napětí nižší
než 24 V.
- Maximální hladina hluku: Lc = 69 dB (A)
Page 56

ČEŠTINA56
Displej
MINUTES LEFT
MINUTES LEFT
Poznámka: Před prvním použitím holicího strojku sejměte z displeje ochrannou
fólii.
Různé typy holicích strojků mají různé displeje (viz následující obrázky).
- RQ1296, RQ1295, RQ1290, RQ1286, RQ1285, RQ1280
- RQ1275, RQ1265, RQ1261, RQ1260
- RQ1273, RQ1252, RQ1251, RQ1250
MINUTES LEFT
MINUTES LEFT
Nabíjení
- Nabíjení trvá přibližně 1 hodinu.
RQ129x, RQ128x
- Při nabíjení holicího strojku bliká počet minut.
- Počet minut holení se zvyšuje až do úplného nabití strojku.
- Rychlé nabíjení: Když má holicí strojek dostatek energie na jedno
oholení, na displeji se červeně zobrazí údaj 5 minut.
RQ127x, RQ126x, RQ125x
Poznámka: Displeje jednotlivých typů holicích strojků se liší, nabíjecí kontrolky
však fungují stejně.
- Když se holicí strojek nabíjí, bliká nejprve kontrolka na nejnižší úrovni
nabití, potom kontrolka na druhé úrovni a tak dále, dokud není holicí
strojek plně nabitý.
- Rychlé nabíjení: Když má holicí strojek dostatek energie na jedno
oholení, dolní kontrolka nabíjení bliká střídavě oranžově a bíle.
Page 57

Baterie je plně nabitá
ČEŠTINA 57
MINUTES LEFT
MINUTES LEFT
MINUTES LEFT
MINUTES LEFT
RQ129x, RQ128x
- Když je baterie plně nabitá, počet minut trvale svítí. Přibližně po
30 minutách se displej opět automaticky vypne.
Poznámka: Holicí strojek je vybaven inteligentním adaptivním systémem, který
sleduje jeho spotřebu energie a převádí zbývající kapacitu baterie na minuty
holení. Spotřeba energie a tím pádem i zbývající počet minut holení záleží na
typu vaší pleti a vousů a na způsobu holení (např. používání holicího gelu).
Pokud je počet minut holení plně nabitého holicího strojku nižší než 60 minut,
jde o zcela normální jev a neznamená to, že by se kapacita baterie holicího
strojku snížila.
RQ127x, RQ126x, RQ125x
Poznámka: Displeje jednotlivých typů holicích strojků se liší, nabíjecí kontrolky
však fungují stejně.
- Když je baterie plně nabitá, všechny kontrolky nabíjení trvale svítí.
Přibližně po 30 minutách se displej opět automaticky vypne.
Vybitá baterie
RQ129x, RQ128x
- Jakmile je baterie téměř vybitá (pokud zbývá méně než 5 minut holení),
počet minut začne blikat.
- Po vypnutí holicího strojku bude počet minut holení blikat ještě několik
sekund. Jakmile vyprší všechny minuty, uslyšíte pípnutí.
RQ127x, RQ126x, RQ125x
Poznámka: Displeje jednotlivých typů holicích strojků se liší, nabíjecí kontrolky
však fungují stejně.
- Jakmile je baterie téměř vybitá (pokud zbývá jen 5 minut holení nebo
méně), dolní kontrolka nabíjení oranžově bliká.
- Po vypnutí holicího strojku bude dolní kontrolka nabíjení oranžově
blikat ještě několik sekund.
Page 58

ČEŠTINA58
Zbývající kapacita baterie
RQ129x, RQ128x
MINUTES LEFT
MINUTES LEFT
MINUTES LEFT
MINUTES LEFT
- Zbývající kapacita baterie je označena počtem minut holení
zobrazených na displeji.
RQ127x, RQ126x, RQ125x
Poznámka: Displeje jednotlivých typů holicích strojků se liší, nabíjecí kontrolky
však fungují stejně.
- Zbývající kapacita baterie je označena blikajícími kontrolkami nabíjení.
Čištění holicího strojku
Aby byl zajištěn optimální výkon při holení, doporučujeme po každém
použití holicí strojek vyčistit.
Poznámka: Displeje jednotlivých typů holicích strojků se liší, ale zobrazují stejný
symbol.
- Na to, že je načase holicí strojek vyčistit, vás upozorní symbol kohoutku.
MINUTES LEFT
MINUTES LEFT
Výměna holicí jednotky
Aby byl zajištěn maximální holicí výkon, doporučujeme holicí jednotku
vyměnit každé dva roky.
Poznámka: Displeje jednotlivých typů holicích strojků se liší, ale zobrazují stejný
symbol.
- Abyste nezapomněli vyměnit holicí jednotku, je přístroj vybaven funkcí
připomenutí výměny, která se aktivuje automaticky přibližně po 2 letech.
Připomenutí výměny se opakuje po 9 po sobě jdoucích holeních
(pouze modely RQ128x, RQ127x, RQ126x, RQ125x) nebo až do
doby, než resetujete holicí strojek.
Page 59

ČEŠTINA 59
Cestovní zámek (pouze modely RQ128x, RQ127x, RQ126x,
RQ125x)
Před cestováním lze holicí strojek uzamknout. Cestovní zámek zabraňuje
náhodnému zapnutí holicího strojku.
Poznámka: Displeje jednotlivých typů holicích strojků se liší, ale zobrazují stejný
symbol.
Aktivace cestovního zámku
1 Režim cestovního zámku aktivujete podržením tlačítka pro zapnutí/
vypnutí po dobu tří sekund.
, Model RQ128x: Na displeji se zobrazí odpočítávání od 3. Při
1 přístroj pípne na znamení, že je uzamčen.
, Na displeji se rozsvítí symbol zámku. Po několika sekundách opět
zhasne.
Deaktivace cestovního zámku
1 Podržte vypínač po dobu 3 sekund.
, Je spuštěn motor, což označuje, že byl cestovní zámek deaktivován.
Nyní je holicí strojek opět připraven k použití.
Poznámka: Cestovní zámek je po umístění holicího strojku do připojené
nabíječky nebo systému Jet Clean automaticky deaktivován.
Úsporný režim (pouze model RQ129x)
Přístroj je vybaven automatickým úsporným režimem. Když holicí strojek
přejde do úsporného režimu, kontrolka tlačítka pro zapnutí/vypnutí zhasne.
- Detekuje-li vypnutý přístroj po dobu 5 minut pohyb (například když
cestujete a holicí strojek máte v zavazadle), automaticky přejde do
úsporného režimu. Tento režim zabraňuje náhodnému zapnutí holicího
strojku.
, Blikající symbol zámku na displeji označuje, že se zařízení nachází
v úsporném režimu
- Úsporný režim deaktivujete stisknutím tlačítka pro zapnutí/vypnutí.
MINUTES LEFT
MINUTES LEFT
Blokované holicí hlavy
Poznámka: Displeje jednotlivých typů holicích strojků se liší, ale zobrazují stejný
symbol.
- Pokud jsou holicí hlavy blokované, bliká symbol holicí jednotky, symbol
kohoutku a vykřičník. V takovém případě nelze motor spustit, protože
holicí hlavy jsou znečištěny nebo poškozeny.
- Pokud k tomu dojde, je potřeba holicí jednotku vyčistit nebo ji vyměnit.
- Symbol holicí jednotky, symbol kohoutku a vykřičník budou blikat,
dokud holicí hlavy neodblokujete.
Page 60

ČEŠTINA60
Nabíjení
Nabíjení trvá přibližně 1 hodinu.
Modely RQ129x, RQ128x, RQ127x, RQ126x: Plně nabitý holicí strojek
vystačí až na 60 minut holení.
Poznámka: Modely RQ129x, RQ128x: Když je baterie plně nabitá, na displeji
se zobrazí zbývající počet minut holení (viz část „Baterie je plně nabitá“
v kapitole „Displej“).
Model RQ125x: Plně nabitý holicí strojek vystačí až na 50 minut holení.
Před prvním použitím holicího strojku nebo když displej označuje, že
baterie je vybitá (viz část „Vybitá baterie“ v kapitole „Displej“), je nutné
holicí strojek nabít.
Rychlé nabíjení
Po třech minutách nabíjení je kapacita baterie holicího strojku dostatečná
pro jedno holení.
Nabíjení v nabíječce
1 Zasuňte malou zástrčku do nabíječky.
2 Rozložte nabíječku (ozve se „klapnutí“).
3 Zasuňte adaptér do zásuvky.
4 Vložte přístroj do nabíječky.
, Na displeji se zobrazí informace, že se holicí strojek nabíjí (viz
kapitola „Displej“).
Page 61

ČEŠTINA 61
Jak nabíjet v systému Jet Clean (pouze modely RQ1296CC,
RQ1295CC, RQ1290CC, RQ1286CC, RQ1285CC, RQ1284CC,
RQ1280CC, RQ1275CC, RQ1265CC, RQ1260CC, RQ1252CC,
RQ1251CC, RQ1250CC)
1 Zasuňte malou zástrčku do systému Jet Clean.
2 Zasuňte adaptér do zásuvky.
3 Obraťte strojek vzhůru nohama nad držák tak, aby zadní část strojku
směřovala směrem k držáku.
Poznámka: Holicí strojek nelze umístit do systému Jet Clean v případě, že je na
holicí jednotce nasazena ochranná krytka.
Poznámka: Pouze model RQ129x: Při otočení holicího strojku vzhůru nohama
se přepne i počet minut na displeji, takže stále dokážete přečíst úroveň nabití
baterie.
4 Vložte strojek do držáku za dvě svorky (1) a zatlačte ho směrem
dolů, dokud nezapadne na místo (2).
, Na displeji se zobrazí informace, že se holicí strojek nabíjí (viz část
„Nabíjení“ kapitoly „Displej“).
Používání holicího strojku
Holení
Čas pro přizpůsobení pleti
Prvních několik holení nemusí přinést požadované výsledky a vaše pleť
může být dokonce lehce podrážděná. To je normální. Vaše pleť a vousy
potřebují čas, aby se přizpůsobily jakémukoli novému holicímu systému.
Doporučujeme vám holit se pravidelně (alespoň třikrát týdně) po dobu
3 týdnů, aby si vaše pleť mohla zvyknout na nový holicí strojek. Během této
doby používejte výhradně svůj nový elektrický holicí strojek a nepoužívejte
jiné způsoby holení. Když budete používat jiné způsoby, vaše pleť se bude
obtížněji přizpůsobovat novému holicímu systému.
1 Stisknutím tlačítka pro zapnutí/vypnutí holicí strojek zapněte.
, Displej se na několik sekund rozsvítí.
2 Krouživými pohyby pohybujte holicími hlavami po pokožce.
- Nedělejte přímé pohyby.
3 Stisknutím tlačítka pro zapnutí/vypnutí holicí strojek vypněte.
, Displej se na několik sekund rozsvítí a pak zobrazí zbývající kapacitu
baterie.
Page 62

ČEŠTINA62
Mokré holení
Tento holicí strojek lze také použít na mokrou tvář s pěnou nebo gelem na
holení.
Při holení pěnou nebo gelem na holení postupujte takto:
1 Naneste na pokožku trochu vody.
2 Naneste na pokožku pěnu nebo gel na holení.
3 Propláchněte holicí jednotku pod tekoucí vodou. Zajistíte, že bude
hladce klouzat po kůži.
4 Stisknutím tlačítka pro zapnutí/vypnutí holicí strojek zapněte.
5 Krouživými pohyby pohybujte holicími hlavami po pokožce.
Poznámka: Holicí jednotku pravidelně proplachujte pod tekoucí vodou. Zajistíte,
že bude stále hladce klouzat po kůži.
6 Po každém použití holicí strojek důkladně vyčistěte a osušte si tvář
(viz kapitola „Čištění a údržba“).
Poznámka: Nezapomeňte z holicího strojku opláchnout veškerou pěnu nebo
gel.
Zastřihování
Zastřihovač lze použít k úpravě kotlet a kníru.
1 Sejměte holicí jednotku přímo z holicího strojku.
Poznámka: Při snímání z holicího strojku holicí jednotku neohýbejte.
2 Stisknutím tlačítka pro zapnutí/vypnutí holicí strojek zapněte.
, Displej se na několik sekund rozsvítí.
3 Posuňte posuvné tlačítko zastřihovače směrem dopředu a tím
zastřihovač vysuňte.
4 Nyní můžete začít se zastřihováním.
5 Zastřihovač zasunete posunutím posuvného tlačítka zpět.
6 Stisknutím tlačítka pro zapnutí/vypnutí holicí strojek vypněte.
, Displej se na několik sekund rozsvítí a zobrazí zbývající kapacitu
baterie.
7 Vložte výstupek holicí jednotky do zářezu v horní části holicího
strojku (1). Potom zatlačením směrem dolů (2) připojte holicí
jednotku k holicímu strojku (ozve se „klapnutí“).
Page 63

ČEŠTINA 63
Jak používat nástavec na zastřihování vousů (pouze modely
RQ1296, RQ1295, RQ1286, RQ1285, RQ1275, RQ1265)
1 Přesvědčte se, že je přístroj vypnutý.
2 Sejměte holicí jednotku přímo z holicího strojku.
Poznámka: Při snímání z holicího strojku holicí jednotku neohýbejte.
3 Vložte výstupek nástavce na zastřihování vousů do zářezu v horní
části holicího strojku (1). Potom zatlačením směrem dolů připojte
nástavec na zastřihování vousů (2) k holicímu strojku (ozve se
„klapnutí“).
Použití nástavce na zastřihování vousů s hřebenem
Nástavec na zastřihování vousů můžete použít spolu s přiloženým
hřebenem k úpravě vousů s jedním pevným nastavením délky, ale také
s různými nastaveními délky. Nastavení délky vousů na nástavci na
zastřihování vousů odpovídá zbývající délce vousů po holení a pohybuje se
v rozmezí 1 až 5 mm.
1 Nasuňte hřeben do vodicích drážek po obou stranách nástavce na
zastřihování vousů (ozve se „klapnutí“).
2 Stiskněte volič délky (1) a poté jeho posunutím doleva nebo
doprava (2) vyberte požadované nastavení délky vousů.
3 Stisknutím vypínače na holicím strojku jej zapněte.
Page 64

ČEŠTINA64
4 Nyní můžete začít upravovat vousy.
Použití nástavce na zastřihování vousů bez hřebenu
Nástavec na zastřihování vousů bez hřebenu můžete použít k zarovnání
linie vousů, kníru nebo kotlet.
1 Sejměte hřeben z nástavce na zastřihování vousů.
Poznámka: Chcete-li hřeben sejmout z nástavce na zastřihování vousů, uchopte
jej uprostřed. Netahejte za strany hřebenu.
2 Stisknutím tlačítka pro zapnutí/vypnutí holicí strojek zapněte.
3 Můžete začít upravovat linii vousů, kníru, kotlet a krku.
Styly vousů
Níže naleznete několik příkladů stylů vousů, které můžete vytvořit.
- Strniště
Page 65

- Plnovous
- Knír
- Bradka
ČEŠTINA 65
Čištění a údržba
Nikdy nepoužívejte na čištění holicího strojku, jeho příslušenství a
systému Jet Clean drátěnku, abrazivní nebo agresivní čisticí prostředky
(pouze modely RQ1296CC, RQ1295CC, RQ1290CC, RQ1286CC,
RQ1285CC, RQ1284CC, RQ1280CC, RQ1275CC, RQ1265CC,
RQ1260CC, RQ1252CC, RQ1251CC, RQ1250CC).
- Nejlepší a nejhygieničtější způsob čištění holicího strojku zajišťuje
systém Jet Clean. Holicí strojek lze čistit i pod tekoucí vodou nebo
pomocí dodaného čisticího kartáčku.
- Při použití horké vody buďte opatrní. Vždy zkontrolujte, zda není voda
příliš horká, abyste si neopařili ruce.
- Čistěte holicí strojek po každém holení, aby byl zajištěn optimální výkon
holení.
- Vnější povrch holicího strojku čistěte pouze navlhčeným hadříkem.
- Pravidelným čištěním si zajistíte lepší holení.
Page 66

ČEŠTINA66
Čištění holicí jednotky
Při použití horké vody buďte opatrní. Vždy zkontrolujte, zda není voda
příliš horká, abyste si neopařili ruce.
1 Holicí jednotku propláchněte po přiměřenou dobu tekoucí horkou
vodou.
2 Tahem otevřete postupně všechny tři holicí hlavy.
3 Všechny tři holicí hlavy a všechny tři prostory pro odstřižené vousy
oplachujte pod tekoucí horkou vodou po dobu alespoň 30 sekund.
Poznámka: Holicí hlavy a prostory pro odstřižené vousy můžete také vyčistit
přiloženým čisticím kartáčkem.
Při použití horké vody buďte opatrní. Vždy zkontrolujte, zda není voda
příliš horká, abyste si neopařili ruce.
4 Zbylou vodu důkladně vytřepejte a holicí hlavy nechejte otevřené,
aby mohla holicí jednotka zcela vyschnout.
Holicí jednotku nikdy nesušte ručníkem nebo jinou tkaninou, vyvarujete
se tak poškození holicích hlav.
Jak čistit holicí jednotku pomocí systému Jet Clean (pouze
modely RQ1296CC, RQ1295CC, RQ1290CC, RQ1286CC,
RQ1285CC, RQ1284CC, RQ1280CC, RQ1275CC, RQ1265CC,
RQ1260CC, RQ1252CC, RQ1251CC, RQ1250CC)
Systém Jet Clean je dodáván ve dvou typech:
- Typ RQ1008 má tři programy čištění: program eko, program auto a
intenzivní program. Vybraný program zvolíte stisknutím tlačítka nahoru/
dolů.
Poznámka: Program eko má kratší dobu sušení z důvodu úspory energie. Pro
důkladnější zvolte intenzivní program.
Page 67

ČEŠTINA 67
- Typ RQ1007 má jeden automatický čisticí program. Po stisknutí tlačítka
pro zapnutí/vypnutí spustí systém Jet Clean automatický čisticí program.
Příprava systému Jet Clean před použitím
Před prvním použitím naplňte čisticí komoru.
1 Zasuňte malou zástrčku do systému Jet Clean.
2 Zasuňte adaptér do zásuvky.
, Držák se automaticky přesune do nejvyšší polohy.
3 Stiskněte současně obě uvolňovací tlačítka na stranách čisticí komory
(1). Poté vyjměte systém Jet Clean z čisticí komory (2).
, Čisticí komora zůstane, tak jak je.
4 Odšroubujte víčko z lahvičky s čisticí kapalinou HQ200.
5 Čisticí komoru naplňte čisticí kapalinou HQ200 až po úroveň
určenou dvěma čárkami.
6 Systém Jet Clean nasaďte zpět na čisticí komoru.
Ujistěte se, že uvolňovací tlačítka zaklapla zpět.
Použití systému Jet Clean
Poznámka: Pokud s holicím strojkem používáte pěnu nebo gel na holení,
doporučujeme holicí strojek před čištěním v systému Jet Clean propláchnout
pod horkou tekoucí vodou. Tímto postupem zaručíte optimální životnost čisticí
kapaliny.
1 Obraťte strojek vzhůru nohama nad držák tak, aby zadní část strojku
směřovala směrem k držáku.
Page 68

ČEŠTINA68
2 Vložte strojek do držáku za dvě svorky (1) a zatlačte ho směrem
dolů, dokud nezapadne na místo (2).
, Na displeji se zobrazí informace, že se holicí strojek nabíjí (viz
kapitola „Displej“).
3 Typ RQ1008: Stisknutím tlačítka nahoru/dolů zvolte čisticí program.
4 Stisknutím tlačítka pro zapnutí/vypnutí na systému Jet Clean spusťte
program čištění.
, Na displeji holicího strojku se přestane zobrazovat kontrolka
nabíjení.
, Začne blikat kontrolka čištění a holicí strojek se automaticky ponoří
do čisticí kapaliny.
, V průběhu čisticího programu, který trvá několik minut, bliká
kontrolka čištění.
Poznámka: Typ RQ1007: Čisticí program trvá 4 až 6 minut.
Poznámka: Typ RQ1008: Program auto či eko trvá 4 až 6 minut. Intenzivní
program trvá přibližně 35 minut.
, Během první fáze programu čištění se holicí strojek několikrát
automaticky zapne a vypne a přesune nahoru a dolů.
, Během druhé fáze programu čištění se holicí strojek umístí do
polohy pro sušení, která je označena blikajícím symbolem sušení. Tato
fáze trvá přibližně dvě hodiny. Holicí strojek zůstane v této pozici až
do konce programu.
Poznámka: Typ RQ1008: Při programu eko trvá fáze sušení hodinu.
, Po dokončení programu čištění se na displeji holicího strojku zobrazí
kontrolka nabíjení (viz kapitola „Displej“).
Poznámka: Pokud v průběhu čisticího programu stisknete tlačítko pro zapnutí/
vypnutí systému Jet Clean, je program přerušen. V takovém případě přestane
kontrolka čištění nebo sušení blikat a držák se vrátí do nejvyšší polohy.
Poznámka: Pokud během čištění dojde k vytažení zástrčky adaptéru ze
zásuvky, program čištění se přeruší. Držák zůstává v aktuální poloze. Po
opětovném připojení zástrčky adaptéru do zásuvky se držák přesune do
nejvyšší polohy.
- Pokud hladina čisticí kapaliny klesne pod minimální úroveň, začne blikat
symbol „Čisticí komora prázdná“ a držák se vrátí do počáteční polohy.
- Při každodenním používání systému Jet Clean k čištění holicího strojku
je třeba čisticí komoru doplnit přibližně každých 15 dní.
Page 69

ČEŠTINA 69
Čistění systému Jet Clean
Čisticí komoru čistěte vždy po 15 dnech.
Vnější povrch systému Jet Clean otřete navlhčeným hadříkem.
1 Stiskněte současně obě uvolňovací tlačítka na stranách systému Jet
Clean (1). Poté vyjměte systém Jet Clean z čisticí komory (2).
, Čisticí komora zůstane, tak jak je.
2 Vylijte z čisticí komory zbytky čisticí kapaliny.
Čisticí kapalinu lze jednoduše vylít do výlevky.
3 Opláchněte čisticí komoru pod tekoucí vodou.
Čisticí komoru nelze mýt v myčce na nádobí.
4 Čisticí komoru naplňte čisticí kapalinou HQ200 až po úroveň
určenou dvěma čárkami.
5 Systém Jet Clean nasaďte zpět na čisticí komoru.
Ujistěte se, že uvolňovací tlačítka zaklapla zpět.
Page 70

ČEŠTINA70
Postup pro velmi důkladné čištění
Přesvědčte se, že je přístroj vypnutý.
1 Sejměte holicí jednotku přímo z holicího strojku.
Poznámka: Při snímání z holicího strojku holicí jednotku neohýbejte.
2 Tahem otevřete postupně všechny tři holicí hlavy.
3 Stiskněte otvírací kroužek zarážky (1) a zarážka se otevře (2).
Poznámka: Nečistěte současně více než jednu střihací jednotku a kryt pro
holení, protože všechny tvoří kompatibilní sady. Pokud střihací jednotku omylem
vložíte do špatného krytu pro holení, může trvat několik týdnů, než se obnoví
optimální výkon holení.
4 Vyjměte střihací jednotku z krytu pro holení.
5 Střihací jednotku čistěte přiloženým čisticím kartáčkem.
Page 71

ČEŠTINA 71
6 Vyčistěte vnitřní části krytu pro holení.
7 Po vyčištění vložte střihací jednotku zpět do krytu pro holení tak, aby
výstupky střihací jednotky směřovaly dolů.
8 Zarážku zatlačte dolů nad střihací jednotku.
9 Zavřete holicí hlavy.
10 Vložte výstupek holicí jednotky do zářezu v horní části holicího
strojku (1). Potom zatlačením směrem dolů (2) připojte holicí
jednotku k holicímu strojku (ozve se „klapnutí“).
Čištění zastřihovače
Zastřihovač po každém použití vyčistěte.
1 Posuňte posuvné tlačítko zastřihovače směrem dopředu a tím
zastřihovač vysuňte.
Page 72

ČEŠTINA72
2 Zastřihovač po přiměřenou dobu propláchněte tekoucí horkou
vodou.
3 Zastřihovač zasunete posunutím posuvného tlačítka zpět.
Tip: Aby byl zajištěn optimální výkon při zastřihování, kápněte na zuby
zastřihovače jednou za šest měsíců kapku oleje na šicí stroje.
Jak čistit nástavec na zastřihování vousů (pouze modely
RQ1296, RQ1295, RQ1286, RQ1285, RQ1275, RQ1265)
Čistěte nástavec na zastřihování vousů po každém použití.
1 Sejměte hřeben z nástavce na zastřihování vousů.
2 Chvíli oplachujte nástavec na zastřihování vousů a hřeben každý
zvlášť pod tekoucí horkou vodou.
Poznámka: Nástavec na zastřihování vousů a hřeben můžete čistit také
přiloženým čisticím kartáčkem.
3 Na lišty zastřihovače kápněte každých šest měsíců kapku oleje na šicí
stroje.
Skladování
MINUTES LEFT
MINUTES LEFT
1 Na holicí jednotku nasuňte ochrannou krytku, aby nedošlo
k poškození holicích hlav.
2 Holicí strojek uchovávejte v dodaném pouzdru.
Výměna
Aby byl zajištěn maximální holicí výkon, doporučujeme holicí jednotku
vyměnit každé dva roky.
Holicí jednotku nahraďte pouze originální holicí jednotkou Philips RQ12.
1 Při vypnutí holicího strojku zabliká symbol holicí jednotky (všechny
typy) a uslyšíte pípnutí (pouze model RQ129x, RQ128x).
Poznámka: Displeje jednotlivých typů se liší, ale zobrazují stejný symbol.
Page 73

ČEŠTINA 73
2 Sejměte starou holicí jednotku přímo z holicího strojku.
Poznámka: Při snímání z holicího strojku holicí jednotku neohýbejte.
3 Vložte výstupek nové holicí jednotky RQ12 do zářezu v horní části
holicího strojku (1). Potom zatlačením směrem dolů (2) připojte
holicí jednotku k holicímu strojku (ozve se „klapnutí“).
4 Model RQ128x/RQ127x/RQ126x/RQ125x: Pro resetování holicího
strojku stiskněte a podržte tlačítko pro zapnutí/vypnutí po dobu
alespoň 10 sekund.
Poznámka: Pokud nevyresetujete holicí strojek při prvním připomenutí výměny,
bude pípat (pouze model RQ128x) a zobrazovat symbol holicího strojku
během dalších 8 holení nebo dokud jej nevyresetujete.
Poznámka pro typ RQ129x: Holicí strojek není třeba resetovat. Po 3 holeních
se připomínka výměny (blikající symbol holicí jednotky a pípání) automaticky
deaktivuje.
Objednávání příslušenství
Chcete-li zakoupit příslušenství pro tento přístroj, navštivte náš online
obchod na adrese www.shop.philips.com/service. Pokud není online
obchod dostupný ve vaší zemi, obraťte se na prodejce výrobků Philips
nebo servisní středisko Philips. Budete-li mít jakékoli potíže se získáním
příslušenství pro váš přístroj, kontaktujte středisko péče o zákazníky
společnosti Philips ve vaší zemi. Kontaktní informace naleznete v záručním
listu s celosvětovou platností.
Lze objednat následující díly:
- Adaptér HQ8505
- Holicí jednotka Philips RQ12
- Čisticí sprej na holicí hlavy Philips HQ110
- Čisticí tekutina HQ200 Philips
- Nástavec na zastřihování vousů RQ111
Page 74

ČEŠTINA74
Holicí hlavy
- Holicí hlavy doporučujeme měnit každé dva roky. Holicí jednotku
nahraďte pouze originální holicí jednotkou Philips RQ12.
Čištění
- Pouze některé typy: pro pravidelné čištění holicích hlav používejte
roztok Jet Clean (HQ200).
Životní prostředí
- Až přístroje doslouží, nevyhazujte je do běžného komunálního odpadu,
ale odevzdejte je do sběrny k recyklaci. Pomůžete tím chránit životní
prostředí.
- Vestavěná nabíjecí baterie holicího strojku obsahuje látky, které mohou
škodit životnímu prostředí. Před likvidací holicího strojku nebo jeho
odevzdáním na určeném sběrném místě z něj vždy vyjměte baterii.
Baterii odevzdejte na určeném sběrném místě pro baterie. Nedaří-li
se vám baterii vyjmout, můžete zařízení zanést do servisního střediska
společnosti Philips. Zaměstnanci střediska baterii vyjmou a zajistí její
bezpečnou likvidaci.
Vyjmutí nabíjecí baterie holicího strojku
Nabíjecí baterii z přístroje vyjměte pouze tehdy, až budete holicí strojek
likvidovat. Budete-li baterii vyjímat, ujistěte se, že je zcela vybitá.
Pozor, pásky od baterie jsou ostré.
1 Pomocí šroubováku odstraňte zadní panel holicího strojku.
2 Vyjměte nabíjecí baterii.
Záruka a podpora
Více informací a podpory naleznete na adrese www.philips.com/
support nebo samostatném záručním listu s celosvětovou platností.
Omezení záruky
Na holicí hlavy (střihací jednotky a kryty) se nevztahují podmínky
mezinárodní záruky, protože podléhají opotřebení.
Page 75

Řešení problémů
V této kapitole jsou shrnuty nejběžnější problémy, se kterými se můžete
u přístroje setkat. Pokud se vám nepodaří problém vyřešit podle
následujících informací, navštivte webové stránky www.philips.com/support,
kde jsou uvedeny odpovědi na nejčastější dotazy, nebo kontaktujte
Středisko péče o zákazníky ve své zemi.
Problém Možná příčina Řešení
ČEŠTINA 75
Holicí strojek neholí
tak dobře jako dříve.
Holicí strojek po
stisknutí tlačítka
pro zapnutí/vypnutí
nepracuje.
Jsou poškozené nebo opotřebované holicí
hlavy.
Dlouhé vousy blokují holicí hlavy. Holicí hlavy vyčistěte podle kroků
Pouze některé typy: Systém Jet Clean
správně nevyčistil holicí strojek, protože
čisticí kapalina v čisticí komoře je
znečištěná nebo je hladina čisticí kapaliny
příliš nízká.
Nabíjecí baterie je prázdná. Baterii znovu nabijte (viz kapitola
Pouze některé typy: Cestovní zámek je
aktivní.
Holicí jednotka je znečištěná nebo
poškozená do té míry, že motor nelze
spustit. V takovém případě začne na displeji
blikat symbol holicí jednotky, symbol
kohoutku a vykřičník.
Holicí strojek má příliš vysokou teplotu.
V takovém případě holicí strojek nefunguje
a na displeji bliká vykřičník.
Vyměňte holicí jednotku (viz
kapitola „Výměna“).
popsaných v postupu pro velmi
důkladné čistění (viz kapitola
„Čištění a údržba“).
Než budete pokračovat v holení,
holicí strojek důkladně vyčistěte.
Pokud je třeba, vyčistěte a znovu
naplňte čisticí komoru (viz
kapitola „Čištění a údržba“).
„Nabíjení“).
Cestovní zámek deaktivujete
podržením tlačítka pro zapnutí/
vypnutí po dobu tří sekund.
Vyčistěte nebo vyměňte holicí
jednotku (viz kapitoly „Čištění a
údržba“ a „Výměna“).
Vypněte holicí strojek a nechte
ho vychladnout. Jakmile teplota
holicího strojku dostatečně klesne,
je možné strojek opět zapnout.
Page 76

ČEŠTINA76
Problém Možná příčina Řešení
Pouze modely
RQ1296CC,
RQ1295CC,
RQ1290CC,
RQ1286CC,
RQ1285CC,
RQ1284CC,
RQ1280CC,
RQ1275CC,
RQ1265CC,
RQ1260CC,
RQ1252CC,
RQ1251CC,
RQ1250CC: Holicí
strojek není po
vyčištění v systému Jet
Clean dokonale čistý.
Systém Jet Clean se
po stisknutí tlačítka
pro zapnutí/vypnutí
nezapne.
Holicí strojek není po
nabíjení v nabíječce
nebo v systému Jet
Clean plně nabitý.
Čisticí kapalina v čisticí komoře je
znečištěná.
Hladina čisticí kapaliny je příliš nízká. Pokud
objem kapaliny v čisticí komoře klesne
během programu čištění pod minimální
úroveň, program se přeruší. Začnou
v pravidelných intervalech blikat kontrolka
čištění a symbol „Čisticí komora prázdná“
a držák se vrátí do počáteční polohy.
Použili jste jinou čisticí kapalinu než
originální čisticí kapalinu Philips.
Systém Jet Clean není zapojený do
elektrické sítě.
Holicí strojek není správně vložen
do systému Jet Clean a nedošlo tak
k elektrickému propojení mezi holicím
strojkem a systémem Jet Clean.
Holicí strojek jste do nabíječky nebo
systému Jet Clean (pouze některé typy)
neumístili správně.
Vyprázdněte a vypláchněte čisticí
komoru a naplňte ji novým
čisticím roztokem.
Čisticí komoru znovu naplňte
čisticí kapalinou až po úroveň
určenou dvěma čárkami (viz
kapitola „Čištění a údržba“).
Používejte pouze čisticí kapalinu
HQ200 Philips.
Zasuňte malou zástrčku do
systému Jet Clean a zapojte
adaptér do zásuvky ve zdi.
Zatlačte holicí strojek pevně do
držáku, aby v něm byl bezpečně
zajištěn.
Ujistěte se, že se holicí strojek
správně zaklapne.
Page 77

Problém Možná příčina Řešení
ČEŠTINA 77
Model RQ129x/
RQ128x: Holicí strojek
je úplně nabitý, ale
displej zobrazuje méně
než 60 minut holení.
Model RQ1008: Doba
provozu systému Jet
Clean je nečekaně
kratší nebo delší než
obvykle.
Přístroj je vybaven inteligentním
adaptivním systémem, který sleduje
spotřebu energie holicího strojku a převádí
zbývající kapacitu baterie na minuty holení.
Spotřeba energie a tím pádem i zbývající
počet minut holení záleží na typu vaší
pleti a vousů a na způsobu holení (např.
používání holicího gelu).
Zvolili jste jiný program čištění. Systém Jet
Clean má tři čisticí programy: eko program,
normální program a intenzivní program.
Každý z těchto programů trvá jinou dobu.
Pokud je počet minut holení plně
nabitého holicího strojku nižší než
60 minut, jde o zcela normální jev
a neznamená to, že by se kapacita
baterie holicího strojku snížila.
Stisknutím tlačítka nahoru/
dolů systému Jet Clean zvolte
požadovaný čisticí program (viz
kapitola „Čištění a údržba“).
Page 78

78
EESTI
Sissejuhatus
Õnnitleme ostu puhul ja tere tulemast kasutama Philipsit! Philipsi tootetoe
paremaks kasutamiseks registreerige oma toode saidil www.philips.com/
welcome.
Palun lugege see pardli omadusi tutvustav kasutusjuhend läbi. Sellest leiate
ka nõuandeid raseerimise kergemaks ja nauditavamaks muutmise kohta.
Üldine kirjeldus (Jn 1)
A Pardel
1 Ekraan
2 Pardli sisse/välja lülitamise nupp
3 Kaitsekate
4 RQ12 Raseerimispea
5 Piirel
6 Piirli sisse/välja lülitamise liuglüliti
B RQ111 habemekoolutaja tarvik (ainult RQ1296, RQ1295, RQ1286,
RQ1285, RQ1275, RQ1265)
7 Karvapikkuse selektor
8 Habemepiirli tarvik kamm
C Kokkupandav laadija
D Jet Cleani süsteem (ainult RQ1296CC, RQ1295CC, RQ1290CC,
RQ1286CC, RQ1285CC, RQ1284CC, RQ1280CC, RQ1275CC,
RQ1265CC, RQ1260CC, RQ1252CC, RQ1251CC, RQ1250CC)
9 Sümbol „Puhastuskamber tühi”
10 Puhastamissümbol
11 Kuivatamissümbol
12 Jet Clean süsteemi sisse/välja lülitamise nupp (ainult mudelil RQ1008:
lisaks ka programmivalikus üles/alla liikumise nupp)
13 Puhastuskambri vabastusnupp
14 Pardlihoidja
E Puhastusharjake
F HQ200 puhastusvedelik (ainult RQ1296CC, RQ1295CC, RQ1290CC,
RQ1286CC, RQ1285CC, RQ1284CC, RQ1280CC, RQ1275CC,
RQ1265CC, RQ1260CC, RQ1252CC, RQ1251CC, RQ1250CC)
G Kott
H Adapter
Tähtis
Enne pardli, Jet Cleani süsteemi (ainult RQ1296CC, RQ1295CC,
RQ1290CC, RQ1286CC, RQ1285CC, RQ1284CC, RQ1280CC,
RQ1275CC, RQ1265CC, RQ1260CC, RQ1252CC, RQ1251CC,
RQ1250CC) ja laadimisaluse kasutamist lugege läbi see oluline teave.
Hoidke kasutusjuhend edaspidiseks lugemiseks alles.
Page 79

EESTI 79
Oht
- Hoidke adapterit kuivana.
Hoiatus
- Adapteris on voolumuundur. Ärge lõigake adapterit ära, et asendada
seda mõne teise pistikuga. See võib põhjustada ohtlikke olukordi.
- Pardlit ja Jet Clean süsteemi ei tohi kasutada füüsilise, meele- või vaimse
häirega isikud ega ka ebapiisavate kogemuste või teadmistega isikud
(kaasa arvatud lapsed), välja arvatud juhul, kui nende ohutuse eest
vastutav isik neid seadme kasutamise juures valvab või on neid selleks
juhendanud.
- Jälgige, et lapsed ei mängiks pardli ega hooldussüsteemiga Jet Clean.
- Võtke alati pistik pistikupesast välja enne pardli kraani all pesemist.
Ettevaatust
- Ärge kunagi kastke süsteemi Jet Clean või laadimisalust vette ega
loputage neid voolava vee all.
- Ärge kunagi kasutage pardli loputamiseks 80 °C kuumemat vett.
- Ärge kasutage pardlit, süsteemi Jet Clean, adapterit, laadimisalust või
mõnda muud osa, kui see on kahjustatud, sest see võib põhjustada
vigastusi. Vahetage alati kahjustatud adapter, laadimisalus või osa
originaalvaruosa vastu välja.
- Kasutage süsteemi Jet Clean ainult originaalse Jet Cleani lahusega
(HQ200).
- Lekkimise vältimiseks pange hooldussüsteem Jet Clean alati pinnale, mis
on kindel, tasane ja horisontaalne.
- Kui hooldussüsteem Jet Clean on kasutusvalmis, ärge seda
puhastusvedeliku lekkimise ärahoidmiseks teise kohta nihutage.
- Hooldussüsteem Jet Clean peseb pardli küll puhtaks, kuid ei
desintseeri seda, seepärast ärge andke pardlit teistele kasutada.
- Ärge kunagi kasutage seadme puhastamiseks suruõhku, küürimiskäsna,
abrasiivseid puhastusvahendeid ega ka sööbivaid vedelikke nagu bensiin
või atsetoon.
- Loputamise ajal võib pardli põhjas olevast pistikupesast vett välja tilkuda.
See on normaalne ega ole ohtlik, sest kogu elektroonika on pardli sees
olevas hermeetiliselt suletud toiteallikas.
Vastavus standarditele
- Seade vastab rahvusvaheliselt tunnustatud ohutuseeskirjadele. Seda võib
kasutada nii vannis kui ka duši all, aga ka kraani all puhastada. Ohutuse
tagamiseks saab pardlit ainult juhtmeta kasutada.
- Pardel ja Jet Cleani süsteem vastavad kõigile asjakohastele
elektromagnetväljade kiirgust käsitlevatele standarditele ja määrustele.
Üldteave
- Adapter on varustatud automaatse pingevalijaga ja on kasutatav
toitepinge vahemikus 100–240 volti.
- Adapter muundab 100–240 voldise pinge ohutuks vähem kui
24-voldiseks pingeks.
- Maksimaalne müratase: Lc = 69dB(A)
Page 80

EESTI80
Ekraan
Märkus. Enne pardli esmakasutamist eemaldage ekraanilt kaitsekile.
Erinevatel pardlitüüpidel on erinevad ekraanid, mis on näha allpool olevatel
MINUTES LEFT
MINUTES LEFT
joonistel.
- RQ1296, RQ1295, RQ1290, RQ1286, RQ1285, RQ1280
- RQ1275, RQ1265, RQ1261, RQ1260
- RQ1273, RQ1252, RQ1251, RQ1250
MINUTES LEFT
MINUTES LEFT
Laadimine
- Laadimine kestab umbes üks tund.
RQ129x, RQ128x
- Pardli laadimise ajal vilgub minutite näidik.
- Raseerimisminutite näit suureneb seni, kuni pardli aku on täis laetud.
- Kiirlaadimine: kui pardlis on üheks raseerimiskorraks piisavalt energiat,
kuvatakse ekraanil number viis (ehk viis minutit) punasel taustal.
RQ127x, RQ126x, RQ125x
Märkus. Erinevat liiki pardlite ekraanid näevad välja erinevad, kuid
laadimistuled toimivad samamoodi.
- Pardli laadimise ajal hakkab esmalt vilkuma alumine laadimistuli, seejärel
teine laadimistuli jne, kuni pardel on täis laetud.
- Kiirlaadimine: kui pardlil on piisavalt laengut üheks raseerimiskorraks,
hakkab alumine laadimistuli vaheldumisi oranžilt ja valgelt vilkuma.
Page 81

Aku on täis laetud
EESTI 81
MINUTES LEFT
MINUTES LEFT
MINUTES LEFT
MINUTES LEFT
RQ129x, RQ128x
- Kui aku on täiesti täis laetud, hakkab minutite näidik pidevalt põlema.
Umbes 30 minuti pärast lülitub ekraan uuesti automaatselt välja.
Märkus. Pardel on varustatud nutika iseõppiva süsteemiga, mis jälgib pardli
energiatarbimist ja muundab allesjäänud aku mahu raseerimisminutiteks.
Energiatarve ja seega ka allesjäänud raseerimisminutite arv sõltub teie naha
ja habeme tüübist ja raseerimisharjumustest (nt raseerimisgeeli kasutamisest).
Kui täiesti täis laetud pardli raseerimisminutite arv on alla 60 minuti, on see
täiesti normaalne ega tähenda, et pardli akumaht on vähenenud.
RQ127x, RQ126x, RQ125x
Märkus. Erinevat liiki pardlite ekraanid näevad välja erinevad, kuid
laadimistuled toimivad samamoodi.
- Kui aku on täiesti täis laetud, hakkavad kõik laadimistuled pidevalt
põlema. Umbes 30 minuti pärast lülitub ekraan uuesti automaatselt
välja.
Aku on tühi
RQ129x, RQ128x
- Kui aku on peaaegu tühjaks saanud (kui järgi on jäänud viis või vähem
raseerimisminutit), hakkab minutite näidik vilkuma.
- Kui lülitate pardli välja, jääb raseerimisminutite näidik mõneks sekundiks
vilkuma. Kui järgi pole jäänud ühtki raseerimisminutit, kuulete helisignaali.
RQ127x, RQ126x, RQ125x
Märkus. Erinevat liiki pardlite ekraanid näevad välja erinevad, kuid
laadimistuled toimivad samamoodi.
- Kui aku on peaaegu tühi (jäänud on viis või vähem raseerimisminutit),
hakkab alumine laadimistuli oranžilt vilkuma.
- Pärast pardli väljalülitamist jätkab alumine laadimistuli mõne sekundi
jooksul oranžilt vilkumist.
Page 82

EESTI82
Aku jääkmahtuvus
RQ129x, RQ128x
MINUTES LEFT
MINUTES LEFT
MINUTES LEFT
MINUTES LEFT
- Aku jääkmahtuvus kuvatakse ekraanile raseerimisminutite kujul.
RQ127x, RQ126x, RQ125x
Märkus. Erinevat liiki pardlite ekraanid näevad välja erinevad, kuid
laadimistuled toimivad samamoodi.
- Aku jääkmahtuvus kuvatakse vilkuvate laadimistulede kujul.
Pardli puhastamine
Optimaalse raseerimisjõudluse tagamiseks soovitame pardlit pärast igat
kasutuskorda puhastada.
Märkus. Erinevate pardlitüüpide ekraanid näevad välja erinevad, kuid neil
hakkab vilkuma sama sümbol.
- Pardli puhastamise meeldetuletusena hakkab veekraani sümbol vilkuma.
MINUTES LEFT
MINUTES LEFT
Raseerimispea asendamine
Maksimaalse raseerimisjõudluse saavutamiseks soovitame pardlipea
vahetada iga kahe aasta tagant.
Märkus. Erinevate pardlitüüpide ekraanid näevad välja erinevad, kuid neil
hakkab vilkuma sama sümbol.
- Et tuletada teile meelde raseerimisseadme väljavahetamist, on seade
varustatud meeldetuletusfunktsiooniga, mis aktiveerub automaatselt
umbes kahe aasta pärast. Meeldetuletust korratakse üheksa järjestikuse
raseerimise ajal (ainult mudelil RQ128x, RQ127x, RQ126x, RQ125x),
kuni te pardli ümber seadistate.
Reisilukk (ainult mudelil RQ128x, RQ127x, RQ126x, RQ125x)
Reisile minnes võite pardli lukustada. Reisilukk hoiab ära pardli juhusliku
sisselülitumise.
Märkus. Erinevate pardlitüüpide ekraanid näevad välja erinevad, kuid neil
hakkab vilkuma sama sümbol.
Page 83

EESTI 83
Reisluku aktiveerimine
1 Reisilukurežiimi sisenemiseks vajutage kolme sekundi jooksul sisse/
välja lülitamise nuppu.
, RQ128x: ekraanil algab allalugemine alates number kolmest. Üheni
jõudes annab seade reisiluku aktiveerumisest teada helisignaali abil.
, Ekraanile ilmub luku sümbol, mis kustub paari sekundi pärast.
Reisiluku väljalülitamine
1 Vajutage kolme sekundi jooksul sisse/välja lülitamise nuppu.
, Reisiluku inaktiveerimise tähistamiseks hakkab mootor tööle.
Pardel on nüüd uuesti kasutusvalmis.
Märkus. Kui asetate pardli elektrivõrku ühendatud laadijasse või Jet Clean
süsteemi, inaktiveerub reisilukk automaatselt.
Energiasäästurežiim (ainult mudelil RQ129x)
Seadmel on automaatne energiasäästurežiim. Kui pardel lülitub
energiasäästurežiimi, kustub sisse/välja lülitamise nupu märgutuli, säästes nii
energiat.
- Kui seade on välja lülitatud, ent tuvastab liikumise 5 minuti vältel
(näiteks kui reisite ja pardel on teil kohvris), lülitub seade automaatselt
energiasäästurežiimile. See režiim ei lase pardlil kogemata sisse lülituda.
, Ekraanil vilgub luku sümbol, tähistades, et seade on
energiasäästurežiimis.
- Energiasäästurežiimi deaktiveerimiseks vajutage sisse/välja lülitamise
nuppu.
Blokeeritud lõikepead
MINUTES LEFT
MINUTES LEFT
Märkus. Erinevate pardlitüüpide ekraanid näevad välja erinevad, kuid neil
hakkab vilkuma sama sümbol.
- Lõikepeade blokeerimise korral hakkavad raseerimispea sümbol,
veekraani sümbol ja hüüumärk koos vilkuma. Sellisel juhul ei saa mootor
lõikepeade ummistumise või kahjustumise tõttu pöörelda.
- Kui see peaks juhtuma, siis peaksite raseerimispea puhastama või
asendama.
- Raseerimispea sümbol, veekraani sümbol ja hüüumärk jätkavad vilkumist
seni, kuni lõikepead on ummistusest vabastatud.
Laadimine
Laadimine kestab umbes üks tund.
RQ129x, RQ128x, RQ127x, RQ126x: täislaetud pardli raseerimisaeg on
kuni 60 minutit.
Märkus. RQ129x/RQ128x: kui aku on täielikult laetud, näitab ekraan reaalset
allesjäänud tööaega (vt peatüki “Ekraan” jaotist “Aku on täis laetud”).
RQ125x: täislaetud pardel võimaldab juhtmevabalt habet ajada kuni 30
minutit.
Laadige pardlit enne esmakasutust ja siis, kui ekraan näitab, et aku on
peaaegu täiesti tühi (vt peatüki „Ekraan” jaotist „Aku on tühi”).
Kiirlaadimine
Pärast kolmeminutist laadimist on pardlis üheks raseerimiskorraks piisavalt
energiat.
Page 84

EESTI84
Laadijaga laadimine
1 Ühendage väike pistik laadijaga.
2 Tõmmake laadija lahti (klõpsatus!).
3 Sisestage adapter seinakontakti.
4 Asetage seade laadijasse.
, Ekraanikuva näitab, et pardlit laetakse (vt ptk „Ekraan”).
Jet Cleani süsteemis laadimine (ainult RQ1296CC, RQ1295CC,
RQ1290CC, RQ1286CC, RQ1285CC, RQ1284CC, RQ1280CC,
RQ1275CC, RQ1265CC, RQ1260CC, RQ1252CC, RQ1251CC,
RQ1250CC)
1 Sisestage väike pistik Jet Clean süsteemi.
2 Sisestage adapter seinakontakti.
3 Hoidke pardlit tagurpidi aluse kohal selliselt, et pardli tagakülg on
suunatud aluse poole.
Märkus. Pardlit ei ole võimalik Jet Clean süsteemi sisestada, kui raseerimispea
kaitsekate on küljes.
Märkus. Ainult RQ1290: kui pöörate pardli ülemise otsaga allapoole, pöördub
ka minutite näidiku ülemine osa allapoole, nii et saate ikkagi näha, millise
tasemeni aku on laetud.
Page 85

EESTI 85
4 Asetage pardli põhikorpus alusele kahe klambri taha (1) ja vajutage
seda allapoole, kuni see klõpsuga lukustub (2).
, Ekraanikuva näitab, et pardlit laetakse (vt jaotist „Laadimine” peatükis
„Ekraan”).
Pardli kasutamine
Raseerimine
Naha kohanemise periood
Esimeste raseerimistega ei pruugi te oodatud tulemust saavutada ja nahk
võib pärast raseerimist olla isegi pisut ärritatud. See on normaalne. Teie
nahk ja habe vajavad iga uue raseerimissüsteemiga kohanemiseks aega.
Soovitame teil korrapäraselt (vähemalt kolm korda nädalas) raseerida
kolme nädala vältel, et lasta nahal uue pardliga kohaneda. Selle perioodi
vältel kasutage üksnes uut pardlit ja ärge kasutage teisi raseerimismeetodeid.
Vastasel juhul on teie nahal raskem uue raseerimissüsteemiga kohaneda.
1 Pardli sisselülitamiseks vajutage sisse/välja lülitamise nuppu.
, Ekraan läheb mõneks sekundiks heledaks.
2 Liigutage lõikepäid ringikujuliste liigutustega mööda nahka.
- Ärge tehke sirgjoonelisi liigutusi.
3 Pardli väljalülimiseks vajutage üks kord sisse/välja lülitamise nuppu.
, Ekraan läheb mõneks sekundiks heledaks ja seejärel näitab aku
jääkmahtuvust.
Märjalt raseerimine
Seda pardlit saate kasutada ka märjal näol, raseerides raseerimisvahu või
-geeliga.
Raseerimisvahu või -geeliga raseerimisel järgige alltoodud samme.
1 Tehke nahk märjaks.
2 Määrige näonahale raseerimisvahu või -geeliga.
3 Loputage raseerimispead kraani all, et kindlustada raseerimispea
sujuv libisemine nahal.
4 Pardli sisselülitamiseks vajutage sisse/välja lülitamise nuppu.
5 Liigutage lõikepäid ringikujuliste liigutustega mööda nahka.
Märkus. Loputage pardlit korrapäraselt kraanivee all, et see libiseks sujuvalt üle
te naha.
6 Kuivatage nägu ja puhastage pardel pärast kasutamist hoolikalt (vt ptk
„Puhastamine ja hooldus”).
Märkus. Veenduge, et olete kogu vahu või geeli pardlilt ära loputanud.
Page 86

EESTI86
Piiramine
Piirlit võite kasutada põskhabeme ja vuntside hooldamiseks.
1 Tõmmake raseerimispea pardli küljest ära.
Märkus. Ärge keerake pardli küljest tõmbamise ajal raseerimispead.
2 Pardli sisselülitamiseks vajutage sisse/välja lülitamise nuppu.
, Ekraan läheb mõneks sekundiks heledaks.
3 Libistage piirli liugurit ettepoole, et piirel välja lükata.
4 Nüüd võite piiramisega alustada.
5 Libistage piirli liugurit tahapoole, et piirel sisse lükata.
6 Pardli väljalülimiseks vajutage üks kord sisse/välja lülitamise nuppu.
, Ekraan läheb mõneks sekundiks heledaks ja näitab aku jääkmahtuvust.
7 Lükake pardlipea eend pardli (1) ülemises osas olevasse süvendisse.
Pardlipea kinnitamiseks pardli külge suruge seda allapoole (2), kuni
kuulete klõpsatust.
Habemekoolutaja tarviku kasutamine (ainult RQ1296, RQ1295,
RQ1286, RQ1285, RQ1275, RQ1265)
1 Kontrollige, et pardel oleks välja lülitatud.
2 Tõmmake raseerimispea pardli küljest ära.
Märkus. Ärge keerake pardli küljest tõmbamise ajal raseerimispead.
Page 87

EESTI 87
3 Lükake habemekoolutaja tarviku eend pardli (1) ülemises osas
olevasse süvendisse. Habemekoolutaja tarviku (2) kinnitamiseks
pardli külge suruge seda allapoole, kuni kuulete klõpsatust.
Habemekoolutaja tarviku kasutamine koos kammiga
Te võite kasutada habemekoolutaja tarvikut koos kammiga, et oma habet
ühe kindlaksmääratud seadistuse, kuid ka erinevate pikkuseseadete abil
kujundada. Habemekoolutaja tarviku karvapikkuse seaded vastavad juuste
pikkusele pärast lõikust ja jäävad vahemikku 1-5 mm.
1 Lükake kamm habemekoolutaja tarviku kummalgi küljel olevatesse
juhtsoontesse, kuni kuulete klõpsatust.
2 Vajutage pikkuse seadistamisselektorit (1) ja lükake seda vasakule või
paremale (2), et valida soovitud karva pikkus.
3 Pardli sisselülitamiseks vajutage selle sisse-/väljalülitamise nuppu.
4 Nüüd saate oma habet kujundama hakata.
Habemekoolutaja tarviku kasutamine ilma kammita
Võite kasutada habemekoolutaja tarvikut ilma kammita oma habeme,
vuntside või põskhabeme piiramiseks.
Page 88

EESTI88
1 Tõmmake kamm habemekoolutaja tarviku küljest lahti.
Märkus. Haarake kammi keskosast ja tõmmatakse see habemekoolutaja
tarviku küljest ära. Ärge tõmmake kammi külgedelt.
2 Pardli sisselülitamiseks vajutage korra sisse/välja-nupule.
3 Nüüd saate piirata habeme, vuntside, põskhabeme või kuklaosa
piirkonda.
Habemestiilid
Allpool on toodud mõned võimalike habemestiilide näited.
- Kolmepäevahabe
- Täishabe
Page 89

EESTI 89
- Vuntsid
- Kitsehabe
Puhastamine ja hooldus
Ärge kunagi kasutage pardli, selle tarvikute ja Jet Cleani süsteemi
(ainult mudelitel RQ1296CC, RQ1295CC, RQ1290CC, RQ1286CC,
RQ1285CC, RQ1284CC, RQ1280CC, RQ1275CC, RQ1265CC,
RQ1260CC, RQ1252CC, RQ1251CC, RQ1250CC) puhastamiseks
küürimiskäsnu, abrasiivseid puhastusvahendeid ega sööbivaid vedelikke,
nagu bensiini või atsetooni.
- Parim ja kõige hügieenilisem viis on puhastada pardlit Jet Clean
süsteemis. Ka võite pardlit loputada kraani all või puhastada seda
komplektisoleva puhastusharjakesega.
- Olge tulise veega ettevaatlik. Kontrollige alati, et vesi ei oleks liiga tuline,
vastasel korral võite käsi põletada.
- Optimaalse raseerimisjõudluse tagamiseks puhastage pardlit pärast igat
raseerimist.
- Pardli välispinda võite puhastada niiske lapiga.
- Seadme regulaarne puhastamine tagab parema raseerimisjõudluse.
Raseerimispea puhastamine
Olge tulise veega ettevaatlik. Kontrollige alati, et vesi ei oleks liiga tuline,
vastasel korral võite käsi põletada.
1 Loputage raseerimispead lühikest aega kuuma kraanivee all.
Page 90

EESTI90
2 Tõmmake kolm lõikepead üksteise järel lahti.
3 Loputage kõiki kolme lõikepead ja kolme karvakambrit 30 sekundit
kraani all kuuma veega.
Märkus. Lõikepeade ja karvakambrite puhastamiseks võite ka kasutada
komplektisolevat puhastusharjakest.
Olge tulise veega ettevaatlik. Kontrollige alati, et vesi ei oleks liiga tuline,
vastasel korral võite käsi põletada.
4 Raputage hoolikalt liigne vesi minema ja jätke lõikepead avatuks, kuni
raseerimispea on täiesti kuiv.
Ärge kunagi kuivatage raseerimispead käteräti või salvrätikuga, sest nii
võite lõikepäid rikkuda.
Raseerimispea puhastamine Jet Clean süsteemis (ainult
RQ1296CC, RQ1295CC, RQ1290CC, RQ1286CC, RQ1285CC,
RQ1284CC, RQ1280CC, RQ1275CC, RQ1265CC, RQ1260CC,
RQ1252CC, RQ1251CC, RQ1250CC)
Jet Clean süsteem on saadaval kahel mudelil.
- Mudelil RQ1008 on kolm puhastusprogrammi: ökonoomne
programm, automaatne programm ja intensiivne programm. Soovitud
puhastusprogrammi valimiseks vajutage üles/alla liikumise nuppu.
Märkus. Ökonoomses programmis on energia säästmiseks lühem kuivatusaeg.
Intensiivne programm tagab põhjalikuma puhastuse.
- Mudelil RQ1007 on üks automaatne programm. Sisse/välja lülitamise
nupu vajutamisel hakkab Jet Clean süsteem puhastama automaatses
puhastusprogrammis.
Jet Clean süsteemi kasutamiseks ettevalmistamine
Enne esmakasutamist täitke puhastuskamber.
1 Sisestage väike pistik Jet Clean süsteemi.
2 Sisestage adapter seinakontakti.
, Hoidja liigub automaatselt kõige kõrgemasse asendisse.
Page 91

EESTI 91
3 Vajutage samaaegselt puhastuskambri mõlemal küljel asuvatele
vabastusnuppudele (1). Seejärel tõstke Jet Clean süsteem
puhastuskambrist välja (2).
, Puhastuskamber jääb oma kohale.
4 Keerake HQ200 puhastusvedeliku pudeli kork lahti.
5 Täitke puhastuskamber puhastusvedelikuga HQ200 kahe joone
vahele jääva tasemeni.
6 Lükake Jet Clean süsteem uuesti puhastuskambrisse tagasi.
Veenduge, et vabastusnupud on oma kohale klõpsanud.
Jet Clean süsteemi kasutamine
Märkus. Kui kasutasite pardlit raseerimisvahu või -geeliga, siis soovitame seda
enne Jet Clean süsteemis puhastamist loputada kuuma kraanivee all. Selliselt
tagate puhastusvedeliku optimaalse tööea.
1 Hoidke pardlit tagurpidi aluse kohal selliselt, et pardli tagakülg on
suunatud aluse poole.
2 Asetage pardli põhikorpus alusele kahe klambri taha (1) ja vajutage
seda allapoole, kuni see klõpsuga lukustub (2).
, Ekraanikuva näitab, et pardlit laetakse (vt ptk „Ekraan”).
3 RQ1008: puhastusprogrammi valimiseks vajutage üles/alla nuppu.
Page 92

EESTI92
4 Puhastusprogrammi käivitamiseks vajutage Jet Clean süsteemi sisse/
välja lülitamise nuppu.
, Laadimise tähis kustub pardli ekraanilt.
, Puhastamise märgutuli hakkab vilkuma ja pardel kastetakse
automaatselt puhastusvedelikku.
, Puhastamise märgutuli vilgub puhastusprogrammi toimimise ajal, mis
kestab paar minutit.
Märkus. RQ1007: puhastusprogramm kestab 4—6 minutit.
Märkus. RQ1008: automaatse programmi ja ökonoomse programmi
kestvuseks on 4—6 minutit. Intensiivne programm kestab umbes 35 minutit.
, Puhastusprogrammi esimese etapi ajal lülitub pardel mõned korrad
automaatselt sisse-välja ja liigub üles-alla.
, Puhastusprogrammi teise etapi ajal läheb pardel kuivatusasendisse,
mida tähistatakse vilkuva kuivamise sümboliga. Selle etapi kestus on
umbes kaks tundi. Pardel jääb sellesse asendisse programmi lõpuni.
Märkus. RQ1008: kui olete valinud ökonoomse programmi, kestab
kuivamisetapp üks tund.
, Pärast puhastusprogrammi lõppemist kuvatakse ekraanile laadimise
näidik (vt ptk „Ekraan”).
Märkus. Puhastusprogrammi toimimise ajal Jet Clean süsteemi sisse/
välja lülitamise nupu vajutamisel programm katkeb. Sellisel juhul lõpetab
puhastamise või kuivatamise märgutuli vilkumise ja hoidja liigub kõige
kõrgemasse asendisse.
Märkus. Puhastamisprogrammi ajal adapteri seinakontaktist välja tõmbamisel
programm katkeb. Hoidja jääb asendisse, kus ta oli. Kui te lükkate adapteri
seinakontakti tagasi, liigub hoidja kõige kõrgemasse asendisse.
- Kui puhastusvedeliku tase langeb miinimumtasemest allapoole, hakkab
vilkuma sümbol „Puhastuskamber tühi” ja hoidja naaseb lähteasendisse.
- Kui kasutate pardli igapäevaseks puhastamiseks Jet Clean süsteemi,
täitke puhastuskambrit ligikaudu iga 15 päeva järel.
Jet Clean süsteemi puhastamine
Puhastage puhastuskambrit iga 15 päeva tagant.
Jet Clean süsteemi võite väljastpoolt niiske lapiga puhastada.
Page 93

EESTI 93
1 Vajutage samaaegselt Jet Clean süsteemi (1) mõlemal küljel asuvaid
vabastusnuppe. Seejärel tõstke Jet Clean süsteem puhastuskambrist
(2) välja.
, Puhastuskamber jääb oma kohale.
2 Kallake allesjäänud puhastusvedelik puhastuskambrist välja.
Puhastusvedeliku võite lihtsalt valamust alla valada.
3 Loputage puhastuskamber kraani all puhtaks.
Puhastamiskambrit ei tohi nõudepesumasinas pesta.
4 Täitke puhastuskamber puhastusvedelikuga HQ200 kahe joone
vahele jääva tasemeni.
5 Lükake Jet Clean süsteem uuesti puhastuskambrisse tagasi.
Veenduge, et vabastusnupud on oma kohale klõpsanud.
Page 94

EESTI94
Eriti põhjalik puhastamismeetod
Veenduge, et seade on välja lülitatud.
1 Tõmmake raseerimispea otse pardli küljest ära.
Märkus. Ärge keerake pardli küljest tõmbamise ajal raseerimispead.
2 Tõmmake kolm lõikepead üksteise järel lahti.
3 Vajutage ksaatori vabastussakki (1), kuni ksaator avaneb (2).
Märkus. Ärge puhastage samaaegselt rohkem kui ühte lõiketera ja
raseerimisvõret korraga, sest need moodustavad ühtiva komplekti. Kui peaksite
juhuslikult panema lõiketera valesse raseerimisvõresse, siis võib optimaalne
raseerimisjõudlus taastuda alles mõne nädala pärast.
4 Eemaldage lõiketera raseerimisvõrest.
5 Puhastage lõiketera kaasasoleva harjaga.
Page 95

EESTI 95
6 Puhastage raseerimisvõre sisemus.
7 Pärast puhastamist asetage lõiketera raseerimisvõresse nii, et
lõiketera haarad oleksid allapoole suunatud.
8 Lükake ksaatorit allapoole üle lõiketera.
9 Sulgege lõikepead.
10 Lükake raseerimispea eend pardli (1) ülemises osas olevasse
süvendisse. Raseerimispea kinnitamiseks pardli külge suruge seda
allapoole (2), kuni kuulete klõpsatust.
Piirli puhastamine
Puhastage piirlit pärast igat kasutamist.
1 Libistage piirli liugurit ettepoole, et piirel välja lükata.
Page 96

EESTI96
2 Loputage piirlit veidi aega kuuma kraanivee all.
3 Libistage piirli liugurit tahapoole, et piirel sisse lükata.
Nõuanne. Piirli optimaalse jõudluse tagamiseks määrige piirli hambaid iga
kuue kuu tagant tilga õmblusmasinaõliga.
Habemekoolutaja tarviku puhastamine (ainult RQ1296,
RQ1295, RQ1286, RQ1285, RQ1275, RQ1265)
Puhastage habemekoolutaja tarvikut pärast iga kasutuskorda.
1 Tõmmake kamm habemekoolutaja tarviku küljest lahti.
2 Loputage habemekoolutaja tarvikut ja kammi eraldi veidi aega kuuma
vee all.
Märkus. Samuti võite habemekoolutaja tarvikut ja kammi kaasasoleva
puhastusharja abil puhastada.
3 Määrige piirli hambaid iga kuue kuu tagant tilga õmblusmasinaõliga.
Hoiundamine
1 Lõikepeade kahjustamise ärahoidmiseks asetage raseerimispeale
kaitsekate.
2 Hoiustage pardlit komplektisolevas kotis.
MINUTES LEFT
MINUTES LEFT
Osade vahetamine
Maksimaalse raseerimisjõudluse saavutamiseks soovitame pardlipea
vahetada iga kahe aasta tagant.
Asendage raseerimispea originaalse Philipsi raseerimispeaga RQ12.
1 Raseerimispea sümbol vilgub (kõigi mudelite puhul) ja te kuulete
pardlit välja lülitades piiksu (ainult mudelid RQ129x/RQ128x).
Märkus. Eri mudelite ekraanid näivad erinevad, ent kuvavad sama sümbolit..
Page 97

EESTI 97
2 Tõmmake vana raseerimispea otse pardli küljest ära.
Märkus. Ärge keerake pardli küljest tõmbamise ajal raseerimispead.
3 Lükake uue pardlipea RQ12 eend pardli (1) ülemises osas olevasse
süvendisse. Pardlipea kinnitamiseks pardli külge suruge seda allapoole
(2), kuni kuulete klõpsatust.
4 RQ128x/RQ127x/RQ126x/RQ125x: pardli ümberseadistamiseks
hoidke sisse-/väljalülitamise nuppu umbes 10 sekundit all.
Märkus. Kui te ei seadista pardlit ümber pärast esimest meeldetuletust, jääb
see piiksuma (ainult RQ128x) ja näete raseerimispea sümbolit veel
8 raseerimiskorra ajal või seni, kuni pardli ümber seadistate.
Märkus mudeli RQ129x kohta: Te ei pea pardlit ümber seadistama.
Pärast kolme raseerimist inaktiveeritakse meeldetuletusfunktsioon (vilkuv
raseerimispea sümbol ja piiksumine) automaatselt.
Tarvikute tellimine
Sellele seadmele tarvikute ostmiseks külastage meie veebilehte
www.shop.philips.com/service. Kui teie riigis ei ole Philipsi
veebipoodi, pöörduge Philipsi müügiesindaja või Philipsi teeninduskeskuse
poole. Kui te ei leia vajalikke tarvikuid, pöörduge oma riigi Philipsi
klienditeeninduskeskusesse. Selle kontaktandmed leiate ülemaailmselt
garantiilehelt.
Saadaval on järgmised osad:
- adapter HQ8505,
- Philipsi raseerimispea RQ12
- Philipsi HQ110 lõikepeade puhastamise piserdusvedelik,
- Philipsi HQ200 puhastusvedelik.
- RQ111 habemekoolutaja tarvik
Page 98

EESTI98
Lõikepea
- Soovitame raseerimispäid vahetada iga kahe aasta tagant. Alati asendage
raseerimispea originaalse Philipsi raseerimispeaga RQ12.
Puhastamine
- Ainult teatud mudelid: raseerimispeade korrapäraseks puhastamiseks
kasutage Jet Cleani lahust (HQ200).
Keskkond
- Tööea lõpus ei tohi seadmeid tavaliste olmejäätmete hulka visata. Viige
need ringlussevõtmiseks ametlikku kogumispunkti. Seda tehes aitate
keskkonda säästa.
- Sisseehitatud laetav pardli aku sisaldab keskkonda saastavaid aineid.
Enne pardli kasutusest kõrvaldamist või ametlikus kogumispunktis
käitlemist peate alati aku seadmest eemaldama. Aku tuleb
utiliseerimiseks ametlikku akude kogumispunkti viia. Kui teil ei õnnestu
akut ise eemaldada, võite seadme Philipsi hoolduskeskusesse viia, kus
aku eemaldatakse ja keskkonda kahjustamata utiliseeritakse.
Pardli laetava aku eemaldamine
Võtke laetav aku seadmest välja ainult siis, kui kõrvaldate pardli
kasutusest. Veenduge selles, et aku oleks eemaldamisel täiesti tühi.
Ettevaatust, aku klemmiribade ääred on teravad.
1 Eemaldage pardli tagumine paneel kruvikeerajaga.
2 Eemaldage laetav aku.
Garantii ja tugi
Kui vajate abi või teavet, külastage veebilehte www.philips.com/
support või lugege läbi üleilmne garantiileht.
Garantiipiirangud
Lõikepeade (nii lõiketerade kui ka raseerimisvõrede) asendamine pole
rahvusvahelise garantiitingimustega reguleeritud, sest need on kuluvad osad.
Page 99

Veaotsing
Selles peatükis võetakse kokku kõige levinumad probleemid, mis seadmega
juhtuda võivad. Kui te ei suuda alljärgneva teabe abil ise probleemi
lahendada, külastage veebilehte www.philips.com/support, kus on
loetelu korduma kippuvatest küsimustest, või võtke ühendust oma riigi
klienditeeninduskeskusega.
Probleem Võimalik põhjus Lahendus
EESTI 99
Miks pardel ei aja
habet nii hästi nagu
varem?
Pardel ei tööta, kui
ma vajutan sisse/välja
lülitamise nuppu.
Lõikepead on kahjustatud või kulunud. Asendage raseerimispead (vt ptk
Pikad karvad on lõikepead ummistanud. Puhastage lõikepead, järgides
Ainult teatud mudelite puhul: Jet Clean
süsteem pole pardlit korralikult puhastanud,
sest puhastuskambri puhastusvedelik on
must või puhastusvedeliku tase liiga madal.
Laetav aku on tühi. Laadige aku (vt ptk „Laadimine”).
Ainult teatud mudelite puhul: reisilukk on
aktiveeritud.
Raseerimispea on sellisel määral
ummistunud või kahjustunud, et mootor
ei saa pöörelda. Sellisel juhul hakkavad
raseerimispea sümbol, veekoraani sümbol
ning hüüumärk vilkuma.
Pardli temperatuur on liiga kõrge. Sellisel
juhul pardel ei tööta ning ekraanil vilgub
hüüumärk.
“Asendamine”’).
eriti põhjaliku puhastusmeetodi
samme (vt ptk „Puhastamine ja
hooldus”).
Enne raseerimise jätkamist
puhastage pardel hoolikalt.
Vajadusel puhastage ja täitke
puhastuskamber uuesti (vt ptk
„Puhastamine ja hooldus”).
Reisiluku deaktiveerimiseks
vajutage 3 sekundi jooksul sisse/
välja lülitamise nuppu.
Puhastage raseerimispea
või asendage see (vt ptk
„Puhastamine ja hooldus” ning
„Asendamine”).
Lülitage pardel välja ja laske
sel jahtuda. Niipea kui pardli
temperatuur on piisavalt
langenud, võite pardli uuesti sisse
lülitada.
Page 100

EESTI100
Probleem Võimalik põhjus Lahendus
Ainult RQ1296CC,
RQ1295CC,
RQ1290CC,
RQ1286CC,
RQ1285CC,
RQ1284CC,
RQ1280CC,
RQ1275CC,
RQ1265CC,
RQ1260CC,
RQ1252CC,
RQ1251CC,
RQ1250CC: pardel
pole pärast Jet Cleani
süsteemis puhastamist
täiesti puhas.
Kui ma vajutan sisse/
välja lülitamise nuppu,
ei hakka Jet Clean
süsteem tööle.
Pärast laadimist laadijas
või Jet Clean süsteemis
pole pardel täielikult
laetud.
Puhastuskambri puhastusvedelik on must. Tühjendage puhastuskamber ja
Puhastusvedeliku tase on liiga madal. Kui
puhastuskambris oleva puhastusvedeliku
tase langeb puhastusprogrammi toimimise
ajal miinimumtasemest allapoole,
katkestatakse programm. Puhastamise
märgutuli ja sümbol „Puhastuskamber
tühi” hakkavad vilkuma ning hoidja naaseb
lähteasendisse.
Te ei kasuta originaalset Philipsi
puhastusvedelikku.
Jet Clean süsteem pole elektrivõrku
ühendatud.
Te ei asetanud pardlit korralikult Jet Clean
süsteemi, seega puudub Jet Clean süsteemi
ja pardli vahel elektriühendus.
Te ei asetanud pardlit korralikult laadijasse
või Jet Clean süsteemi (ainult teatud
mudelite puhul).
loputage seda ning täitke uue
puhastusvedelikuga.
Täitke puhastuskamber uuesti
puhastusvedelikuga kahe joone
vahel oleva tasemeni (vt ptk
„Puhastamine ja hooldus”).
Kasutage ainult Philipsi
puhastusvedelikku HQ200.
Sisestage väike pistik Jet Clean
süsteemi ja adapter seinakontakti.
Vajutage pardel tihedalt hoidjasse,
nii et see oma kohale lukustuks.
Kontrollige, kas olete pardlit
vajutanud nii, et see oma kohale
lukustuks.
 Loading...