

Philips Royal Gran Crema HD8920 Operating Instructions Manual
PLEASE READ THIS USER MANUAL CAREFULLY BEFORE USING THE MACHINE.
Register your product and get support at
www.philips.com/welcome
English
Type HD8920
OPERATING INSTRUCTIONS
EN
02
02

IMPORTANT SAFEGUARDS
When using electrical appliances, basic safety precautions should always be
followed, including the following:
1. Read all instructions.
2. Do not touch hot surfaces. Use handles or knobs.
3. To protect against fire, electric shock and injury to persons do not immerse
cord, plugs, or appliance in water or other liquid.
4. Close supervision is necessary when the appliance is used by or near
children.
5. Unplug from outlet when not in use and before cleaning. Allow to cool
before putting on or taking off parts, and before cleaning the appliance.
6. Do not operate any appliance with a damaged cord or plug or after the
appliance malfunctions, or has been damaged in any manner. Return
appliance to the nearest authorized service facility for examination, repair
or adjustment.
7. The use of accessory attachments not recommended by the appliance
manufacturer may result in fire, electric shock or injury to persons.
8. Do not use outdoors.
9. Do not let cord hang over edge of table or counter, or touch hot surfaces.
10. Do not place on or near a hot gas or electric burner, or in a heated oven.
11. Always attach plug to appliance first, then plug cord into wall outlet. To
disconnect, turn any control to “off”, then remove plug from wall outlet.
12. Do not use appliance for other than intended use.
13. Save these instructions.
SAVE THESE INSTRUCTIONS

CAUTION
This appliance is for household use only. Any servicing, other than cleaning
and user maintenance, should be performed by an authorized service center.
Do not immerse machine in water. To reduce the risk of fire or electric shock,
do not disassemble the machine. There are no parts inside the machine
serviceable by the user. Repair should be done by authorized service personnel
only.
1. Check voltage to be sure that the voltage indicated on the nameplate
corresponds with your voltage.
2. Never use warm or hot water to fill the water tank. Use cold water only.
3. Keep your hands and the cord away from hot parts of the appliance during
operation.
4. Never clean with scrubbing powders or harsh cleaners. Simply use a soft
cloth dampened with water.
5. For optimal taste of your coffee, use purified or bottled water. Periodic
descaling is still recommended every 2-3 months.
6. Do not use caramelized or flavored coffee beans.
INSTRUCTIONS FOR THE POWER
SUPPLY CORD
A. A short power-supply cord (or detachable power-supply cord) is to be
provided to reduce risks resulting from becoming entangled in or tripping
over a longer cord.
B. Longer detachable power-supply cords or extension cords are available
and may used if care is exercised in their use.
C. If a long detachable power-supply cord or extension cord is used,
1. The marked electrical rating of the detachable power-supply cord or
extension cord should be at least as great as the electrical rating of the
appliance
2. If the appliance is of the grounded type, the extension cord should be a
grounding-type 3-wire cord, and
3. The longer cord should be arranged so that it will not drape over the
counter top or table top where it can be pulled on by children or tripped
over.

2
ENGLISH
Congratulations on your purchase of a Saeco Royal Gran
Crema full automatic espresso machine!
To fully bene t from the support that Saeco o ers, please
register your product at www.philips.com/welcome.
This user manual applies to HD8920.
The machine is made for preparing espresso co ee using
whole co ee beans and for dispensing steam and hot water.
In this user manual you will nd all the information you need
to install, use, clean and descale your machine.
CONTENTS
IMPORTANT..................................................................................................... 4
Safety instructions ....................................................................................................................................4
Warning ....................................................................................................................................................4
Caution .....................................................................................................................................................5
Compliance with standards ......................................................................................................................5
INSTALLATION ................................................................................................. 6
Product overview ......................................................................................................................................6
General description ...................................................................................................................................7
PREPARING FOR USE ........................................................................................ 8
Machine Packaging ...................................................................................................................................8
Machine Installation .................................................................................................................................8
USING THE MACHINE FOR THE FIRST TIME ........................................................12
Automatic rinse/self-cleaning cycle ........................................................................................................12
Manual rinse cycle...................................................................................................................................12
Measuring and Programming Water Hardness ........................................................................................14
“INTENZA+” Water Filter Installation ...................................................................................................... 16
Replacing the “INTENZA+” Water Filter ...................................................................................................19
ADJUSTMENTS ................................................................................................19
Adjusting the Co ee Grinder ...................................................................................................................19
Adjusting the "Aroma" - Amount of Ground Co ee .................................................................................20
Cup-Warming Surface .............................................................................................................................21
Adjusting the Dispensing Spout ..............................................................................................................21
Adjustment of Co ee Length ..................................................................................................................23
ESPRESSO, COFFEE AND AMERICAN COFFEE BREWING .......................................24
Espresso, Co ee and American Co ee Brewing Using Co ee Beans ........................................................24
Espresso and Co ee Brewing Using Pre-Ground Co ee ...........................................................................25
CAPPUCCINO BREWING ...................................................................................27
HOT WATER DISPENSING .................................................................................29

3
ENGLISH
BEVERAGE PROGRAMMING .............................................................................31
Espresso Programming ...........................................................................................................................32
Hot Water Programming .........................................................................................................................33
Beverage Counters .................................................................................................................................. 34
MACHINE PROGRAMMING ...............................................................................34
General Menu ......................................................................................................................................... 35
Display Menu ..........................................................................................................................................35
Water Menu ............................................................................................................................................ 36
Maintenance Menu ................................................................................................................................. 37
Factory Settings ......................................................................................................................................37
CLEANING AND MAINTENANCE ........................................................................38
Daily Cleaning of the Machine .................................................................................................................38
Daily Cleaning of Water Tank ...................................................................................................................39
Daily Cleaning of the Cappuccinatore ......................................................................................................40
Weekly Cleaning of the Machine ............................................................................................................41
Weekly Cleaning of the Brew Group ........................................................................................................42
Monthly Cleaning of the Cappuccinatore ................................................................................................. 44
Monthly Lubrication of the Brew Group ..................................................................................................48
Monthly Cleaning of the Brew Group with “Co ee Oil Remover” .............................................................50
Monthly Cleaning of the Co ee Bean Hopper ..........................................................................................51
DESCALING .....................................................................................................52
MEANING OF THE DISPLAY ...............................................................................56
TROUBLESHOOTING ........................................................................................58
ENERGY SAVING ..............................................................................................60
Stand-by .................................................................................................................................................60
Disposal ..................................................................................................................................................60
TECHNICAL SPECIFICATION ..............................................................................61
GUARANTEE AND SERVICE ...............................................................................62
Warranty .................................................................................................................................................62
Service .................................................................................................................................................... 62
MAINTENANCE PRODUCTS ...............................................................................62

4
ENGLISH
IMPORTANT
Safety instructions
This machine is equipped with safety features. Nevertheless read the safety
instructions carefully and only use the machine as described in these
instructions to avoid accidental injury or damage.
Keep this user manual for future reference.
The term WARNING and this sign warn against possible severe injuries,
danger to life and/or damage to the machine.
The term CAUTION and this sign warn against slight injuries and/or dam-
age to the machine.
Warning
• Connect the machine to a wall socket with a voltage matching the
technical speci cations of the machine.
• Do not let the power cord hang over the edge of a table or counter, or
touch hot surfaces.
• Never immerse the machine, the plug or the power cord in water:
danger of electrical shock!
• Never direct the hot water jet towards body parts: danger of burns!
• Do not touch hot surfaces. Use handles and knobs.
• Remove the plug from the wall socket:
- If a disturbance occurs.
- If the machine will not be used for a long time.
- Before cleaning the machine.
Pull on the plug, not on the power cord. Do not touch the plug with
wet hands.
• Do not use the machine if the plug, the power cord or the machine
looks damaged.
• Do not make any modi cations to the machine or its power cord. Only
have repairs carried out by a service centre authorized by Philips to
avoid any danger.
• This machine is not intended for use by persons (including children)
with reduced physical, sensory or mental capabilities, or lack of experience and knowledge, unless they have been given supervision or
instruction concerning use of the machine by a person responsible for
their safety.
• Children should be supervised to ensure that they do not play with the
machine.

5
ENGLISH
5
• Never insert ngers or other objects into the co ee grinder.
Caution
• The machine is for household use only. It is not intended for use in environments such as sta kitchens of shops, o ces, farms or other work
environments.
• Always put the machine on a at and stable surface.
• Do not place the machine on hot surfaces, next to a hot oven, heater or
similar source of heat.
• Put co ee beans only into the co ee bean hopper. If ground co ee,
instant co ee or any other substance is put in the co ee bean hopper,
it may damage the machine.
• Allow the machine to cool o before putting on or taking o any component.
• Never use warm or hot water to ll the water tank. Use cold water only.
• Never clean with scrubbing powders or harsh cleaners. Simply use a
soft cloth dampened with water.
• Descale your machine regularly. The machine indicates when descaling is needed. Not doing this will make your appliance stop working
properly. In this case repair is not covered under your warranty!
• Do not store the machine at temperature below 0°C. Water left in the
heating system may freeze and cause damage.
• Do not leave water in the water tank when the machine is not used
over a long period of time. The water can become contaminated.
Always use fresh water when you operate the machine.
Compliance with standards
The machine complies with art.13 of the Italian Legislative Decree dated 25
July 2005, no. 151 “Implementation of the Directives 2005/95/EC, 2002/96/EC
and 2003/108/EC on the restriction of the use of certain hazardous substances
in electrical and electronic equipment, as well as waste disposal”.
This machine complies with EU Directive 2002/96/EC.
6
INSTALLATION
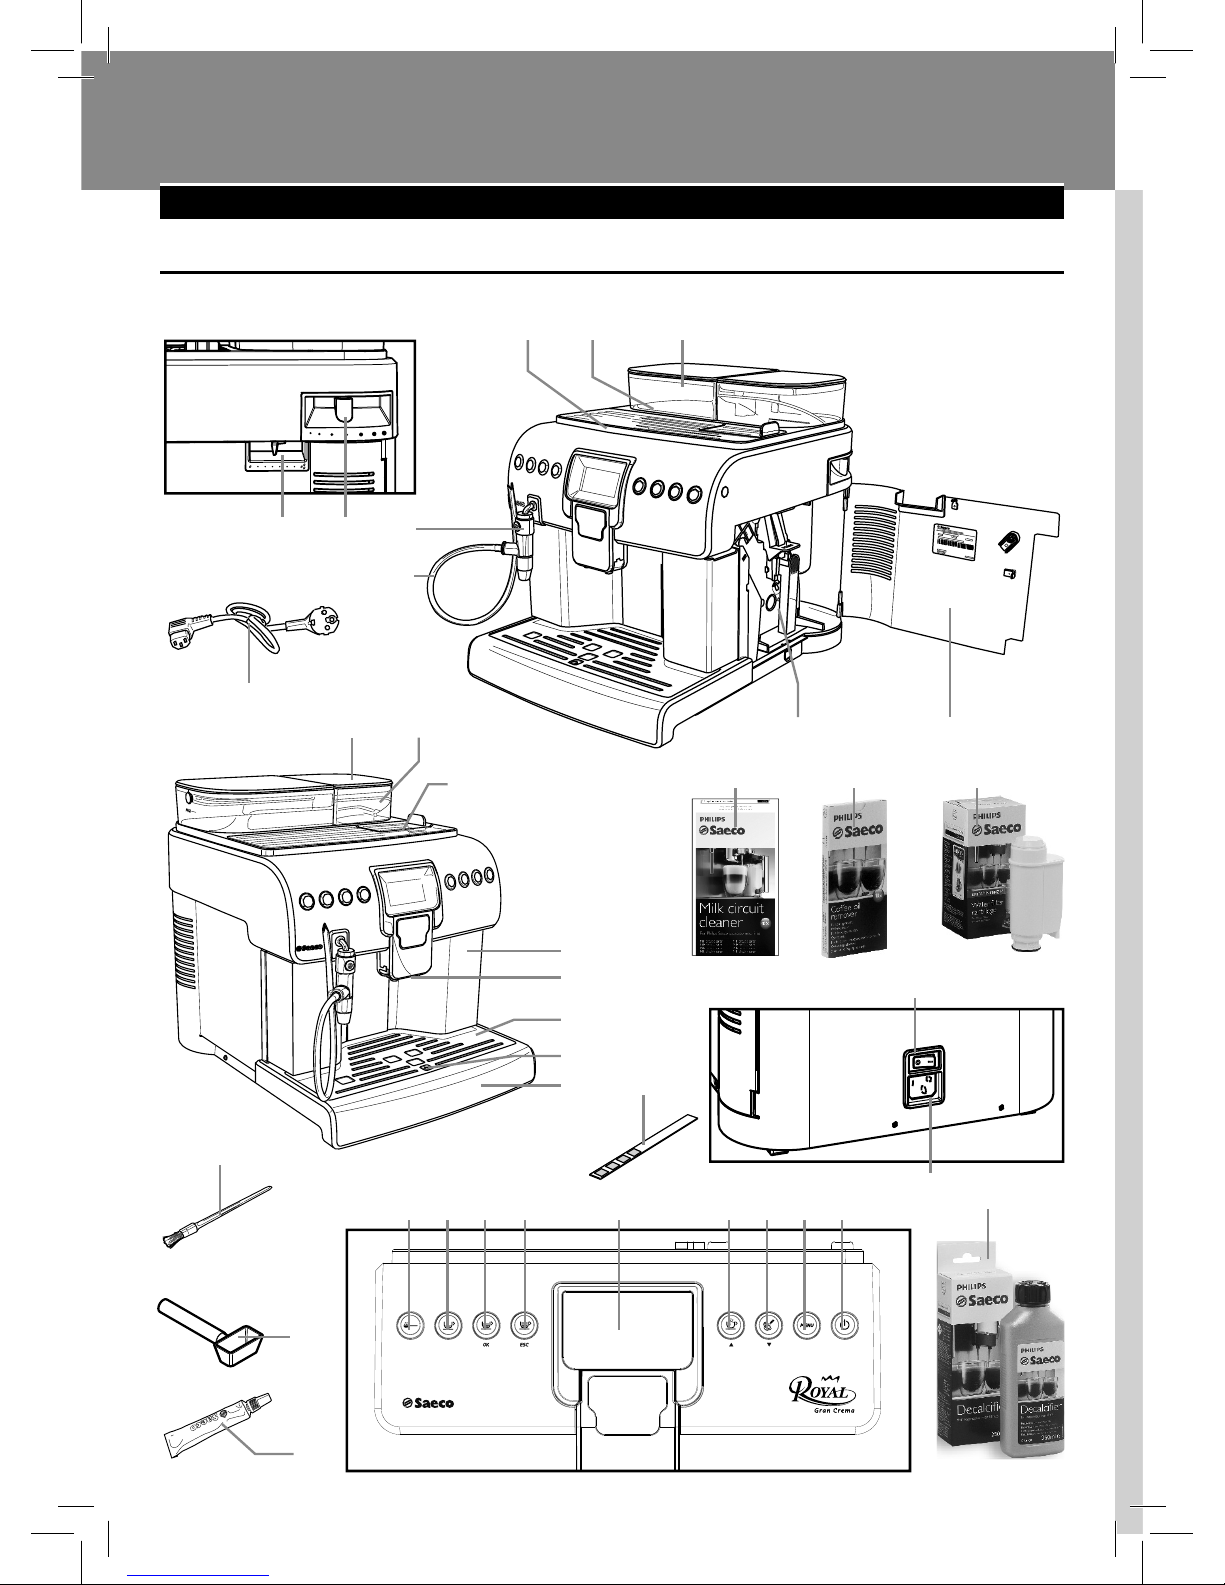
Product overview
22
15
16
24
20
23
21
12 3
11
12
13
14
45
6
7
89
10
25 3026 3127 3228 3329
17
18
34 35 36
19
37

7
ENGLISH
7
General description
1 Cup-warming surface
2 Water tank
3 Water tank lid
4 Co ee dose adjustment
5 Grinder adjustment
6 Cappuccinatore
7 Suction tube
8 Brew group
9 Service door
10 Co ee bean hopper lid
11 Co ee bean hopper
12 Pre-ground co ee compartment + lid
13 Co ee grounds drawer
14 Co ee dispensing spout
15 Cup holder grill
16 Full drip tray indicator
17 Drip tray + (inner) tray cover
18 Power button
19 Power cord socket
20 Water hardness test
21 Grease for brew group
22 Pre-ground co ee measuring scoop
23 Cleaning brush
24 Power cord
25 Pre-ground co ee selection button
26 Espresso brew button
27 Co ee brew button
2nd Function - “OK” button to con rm selection
28 American Co ee brew button
2nd Function - “ESC” button to exit or stop the brewing procedure.
29 Display
30 Hot water dispensing button
2nd Function - “Page Up” button to scroll the menu
31 Steam dispensing button
2nd Function - “Page Down” button to scroll the menu
32 “Menu” button to access the programming mode
33 Stand-by button
34 Milk Circuit Cleaner - to be purchased separately
35 Brew group cleaning tablets - to be purchased separately
36 (INTENZA+)
lter - to be purchased separately
37 Descaling solution - to be purchased separately
8
ENGLISH
PREPARING FOR USE
Machine Packaging
The original packaging has been designed and constructed to protect the
machine during transport. We recommend keeping the packaging material
for possible future transport.
Machine Installation
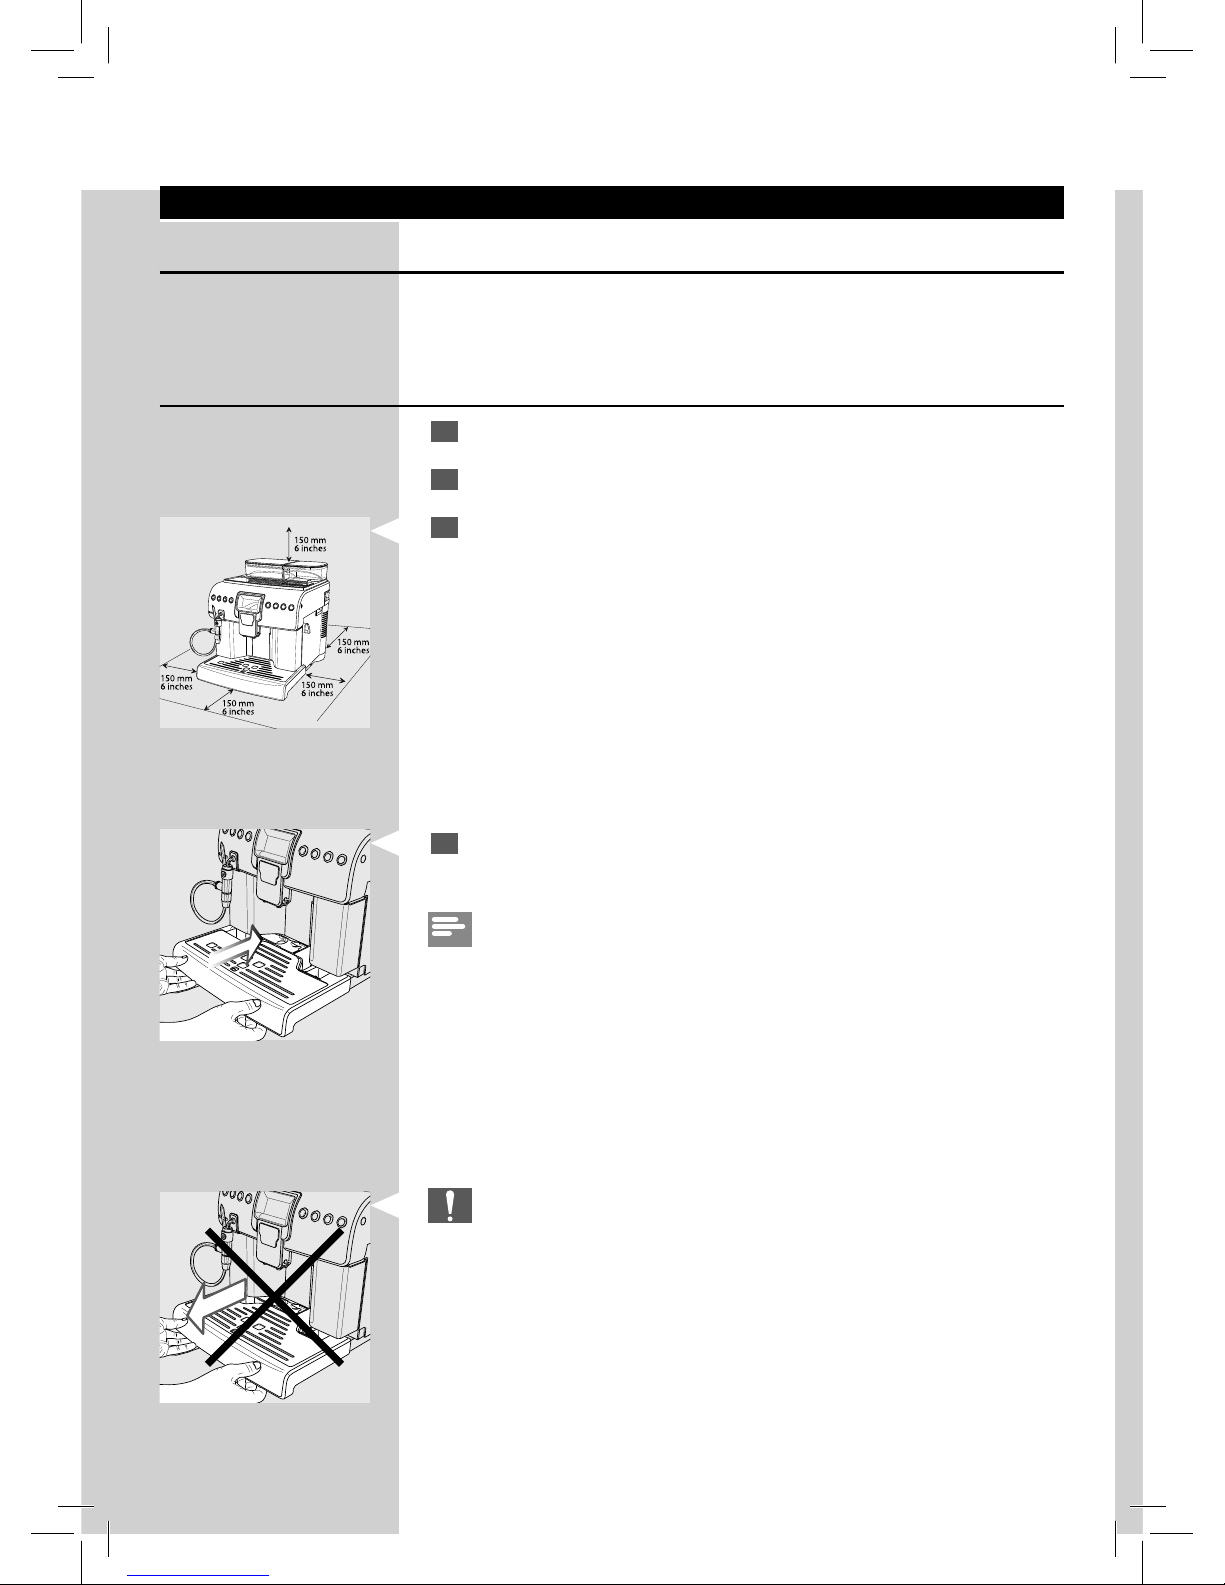
1
Remove the drip tray with grill from the packaging.
2
Remove the machine from the packaging.
3
For best use, it is recommended to:
• Choose a safe, level surface, where there is no danger of overturning the machine or being injured.
• Choose a location that is su ciently well-lit, clean and near an easily reachable socket;
• Allow for a minimum distance from the sides of the machine as
shown in the illustration.
4
Insert the drip tray with grill into the machine. Make sure it is correctly
placed.
Note:
the drip tray collects the water that comes out of the dispensing spout
during each rinse/self-cleaning cycle, as well as co ee that might be spilled
during beverage preparation. Empty and wash the drip tray daily and each
time the full drip tray indicator is raised.
Caution:
NEVER remove the drip tray when the machine has just been turned
on. Wait a couple of minutes for the machine to carry out a rinse/selfcleaning cycle.
9
ENGLISH
9
5
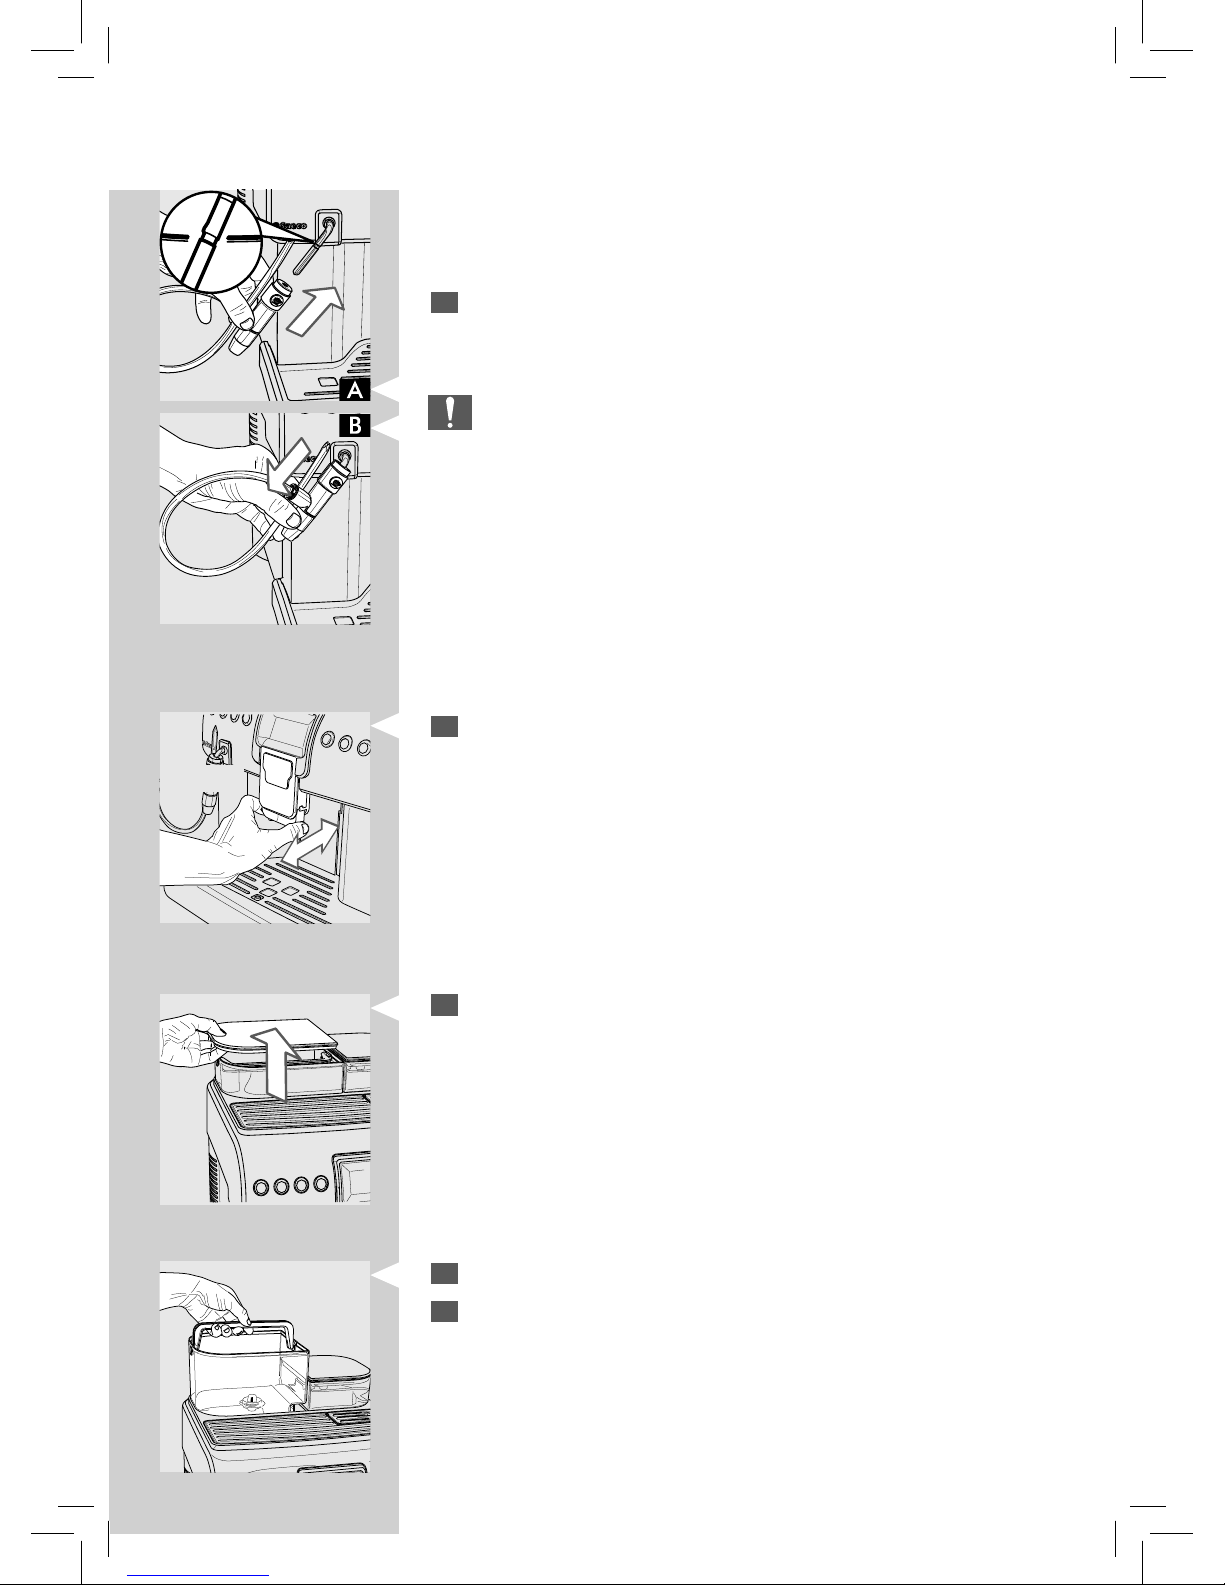
Remove the Cappuccinatore with the suction tube from the package.
Insert the Cappuccinatore until it locks into place in the steam wand
seat (Fig.A).
Caution:
if the Cappuccinatore is tted up to its limit stop (beyond the highlighted seat), it might not operate correctly since no milk is sucked; in
this case stop brewing, let the Cappuccinatore cool down and SLIGHTLY
move it downwards (Fig.B) to place it back in its proper seat (Fig.A).
Follow this procedure to restore the correct operation of the Cappuccinatore.
7
Remove the lid from the water tank.
8
Remove the water tank from its seat by only using the supplied handle.
9
Rinse the water tank with fresh water.
CLICK!
6
Ensure that the dispensing spout is correctly positioned; move it hori-
zontally until you hear the CLICK indicating correct positioning.
Otherwise, some product might leak out of the dispensing spout.

10
ENGLISH
10
Fill the tank with fresh water up to the MAX level and place it back into
the machine. Make sure it is fully inserted.
Put the lid back on.
Caution:
never ll the water tank with warm, hot, sparkling water or any other liquid
as this may cause damage to the water tank and the machine.
11
Remove the co ee bean hopper lid.
12
Slowly pour the co ee beans into the hopper.
Caution:
only co ee beans must be put into the co ee bean hopper. Ground
co ee, instant co ee, caramelized co ee or any other object may
damage the machine.
13
Put the lid on the co ee bean hopper.
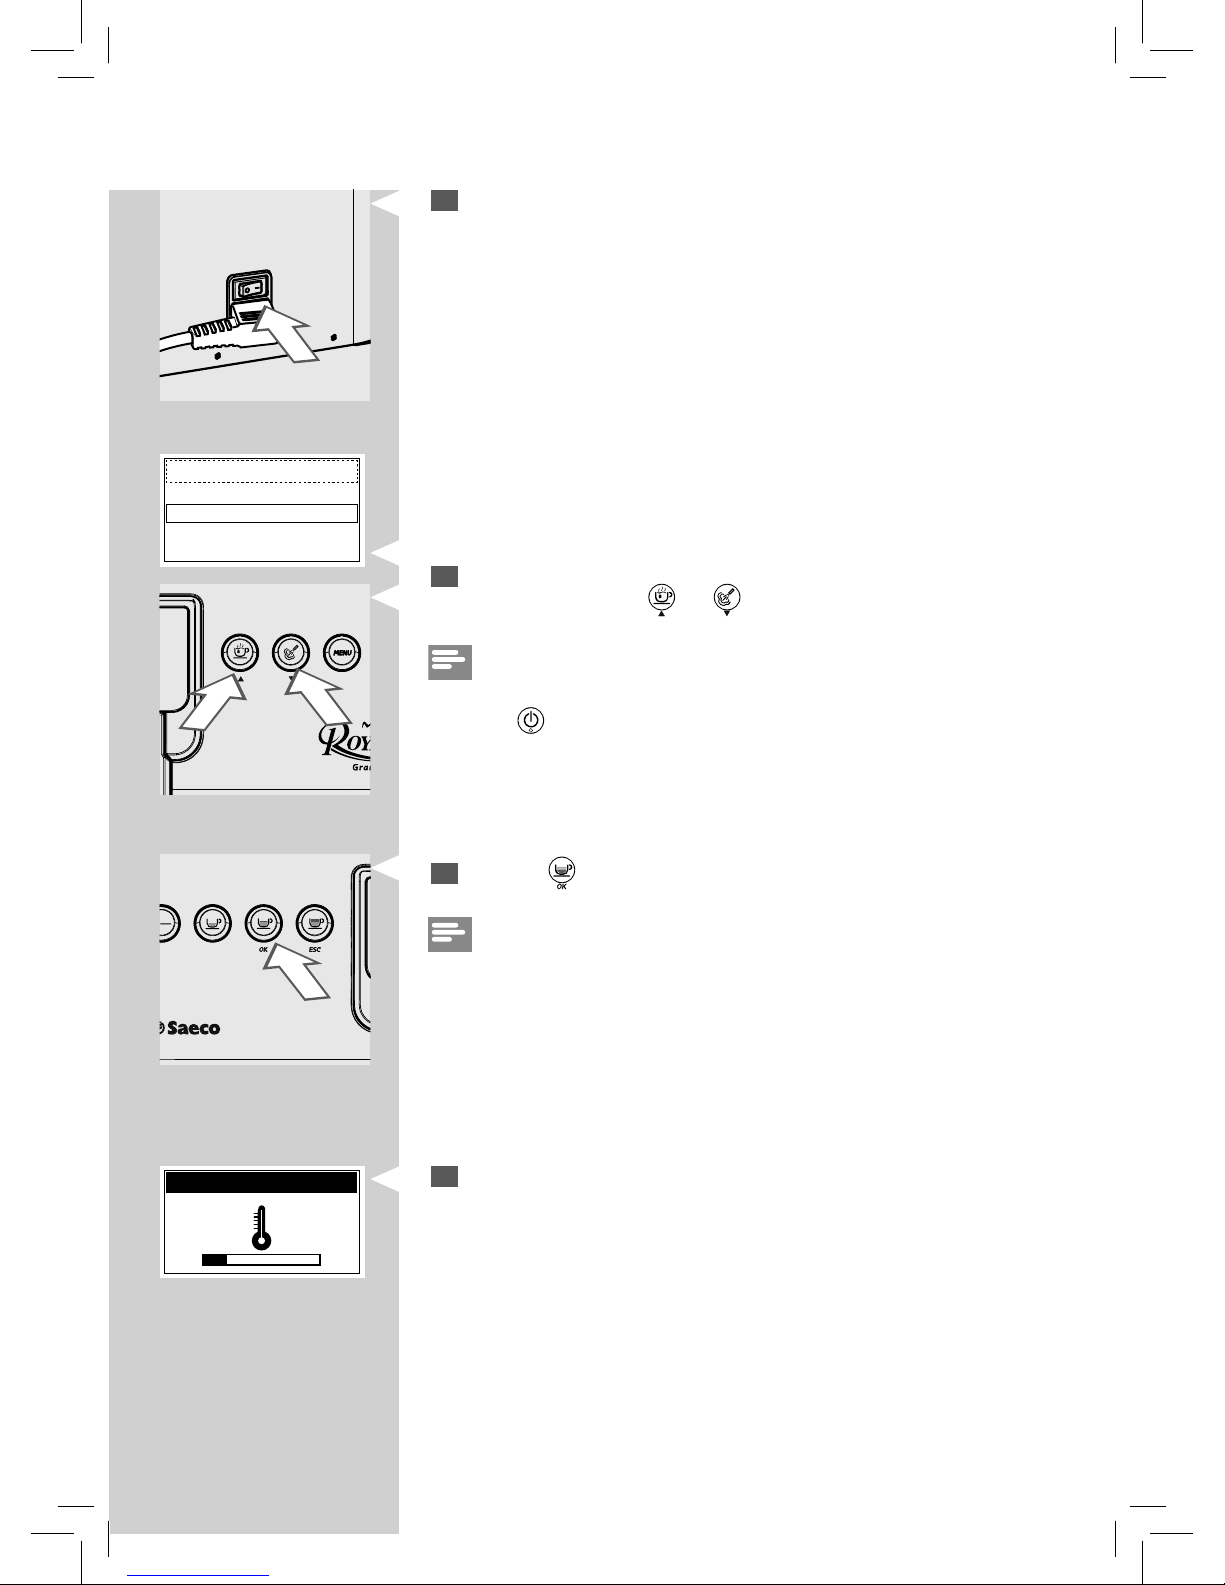
1
2
14
Insert the plug into the rear socket of the machine.
15
Insert the plug on the other end of the power cord into a wall socket
with suitable power voltage.
11
ENGLISH
11
16
Switch the power button to “I” to turn on the machine. The display
shows the stand-by icon.
LANGUAGE
ITALIANO
ENGLISH
DEUTSCH
FRANÇAIS
17
This page will be displayed. Select the desired language by pressing
the scrolling buttons “
” or “ ”.
Note:
the language needs to be selected only upon rst use. From now on, just
press the
“ ”
button to turn on the machine.
18
Press the “ ” button to con rm.
Note:
if no language is selected, you will be requested to select it next time the
machine is started.
19
The machine is in warm-up phase.
HEATING UP…
12
ENGLISH
USING THE MACHINE FOR THE FIRST TIME
Automatic rinse/self-cleaning cycle
When warm-up is completed, the machine automatically performs a rinse/
self-cleaning cycle of the internal circuit with fresh water. This takes less
than a minute.
20
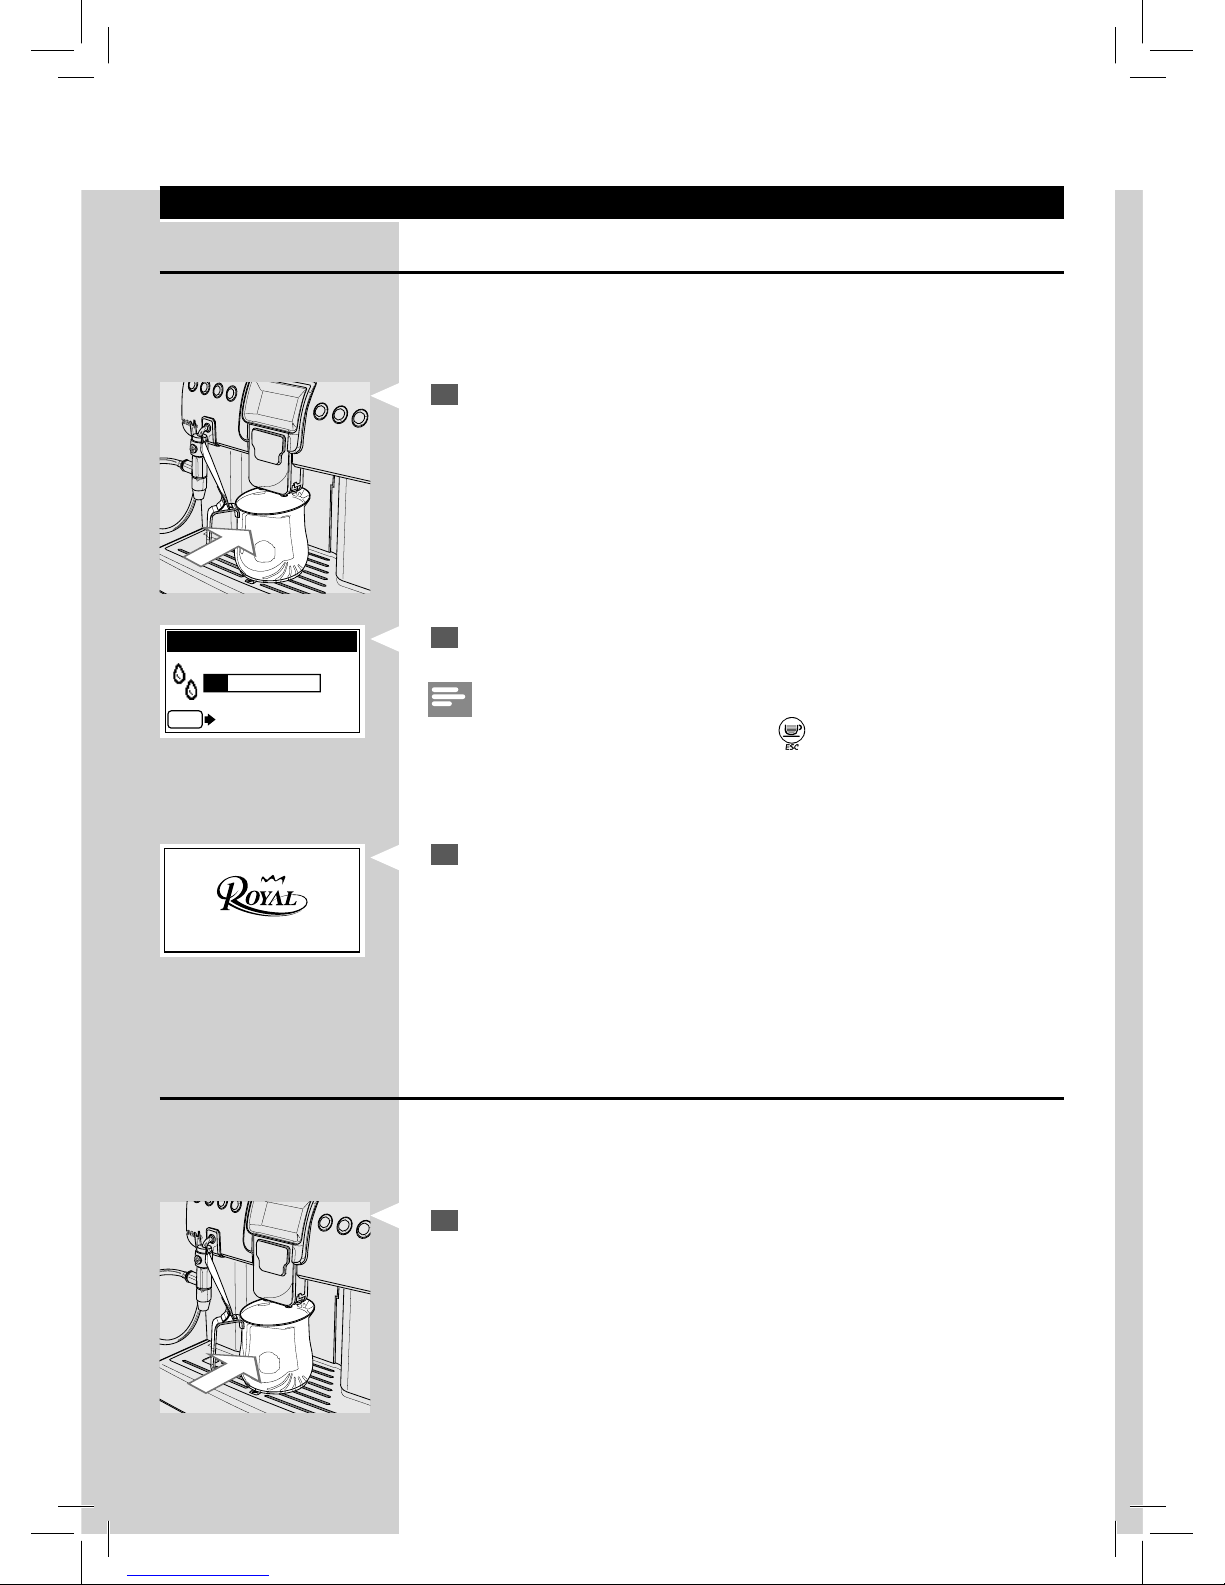
Place a container under the dispensing spout to catch the small
amount of dispensed water.
21
This page will be displayed. Wait for the cycle to nish automatically.
Note:
you can stop dispensing by pressing the “
” button.
22
When the above steps are complete, the machine shows this display.
Manual rinse cycle
You need to initiate this when using the machine for the rst time.
During this process, the co ee brewing cycle is activated and fresh water
ows through the dispensing spout. This takes a few minutes.
1
Place a container under the dispensing spout.
RINSING
ESC
STOP RINSING
Gran Crema

13
ENGLISH
13
2
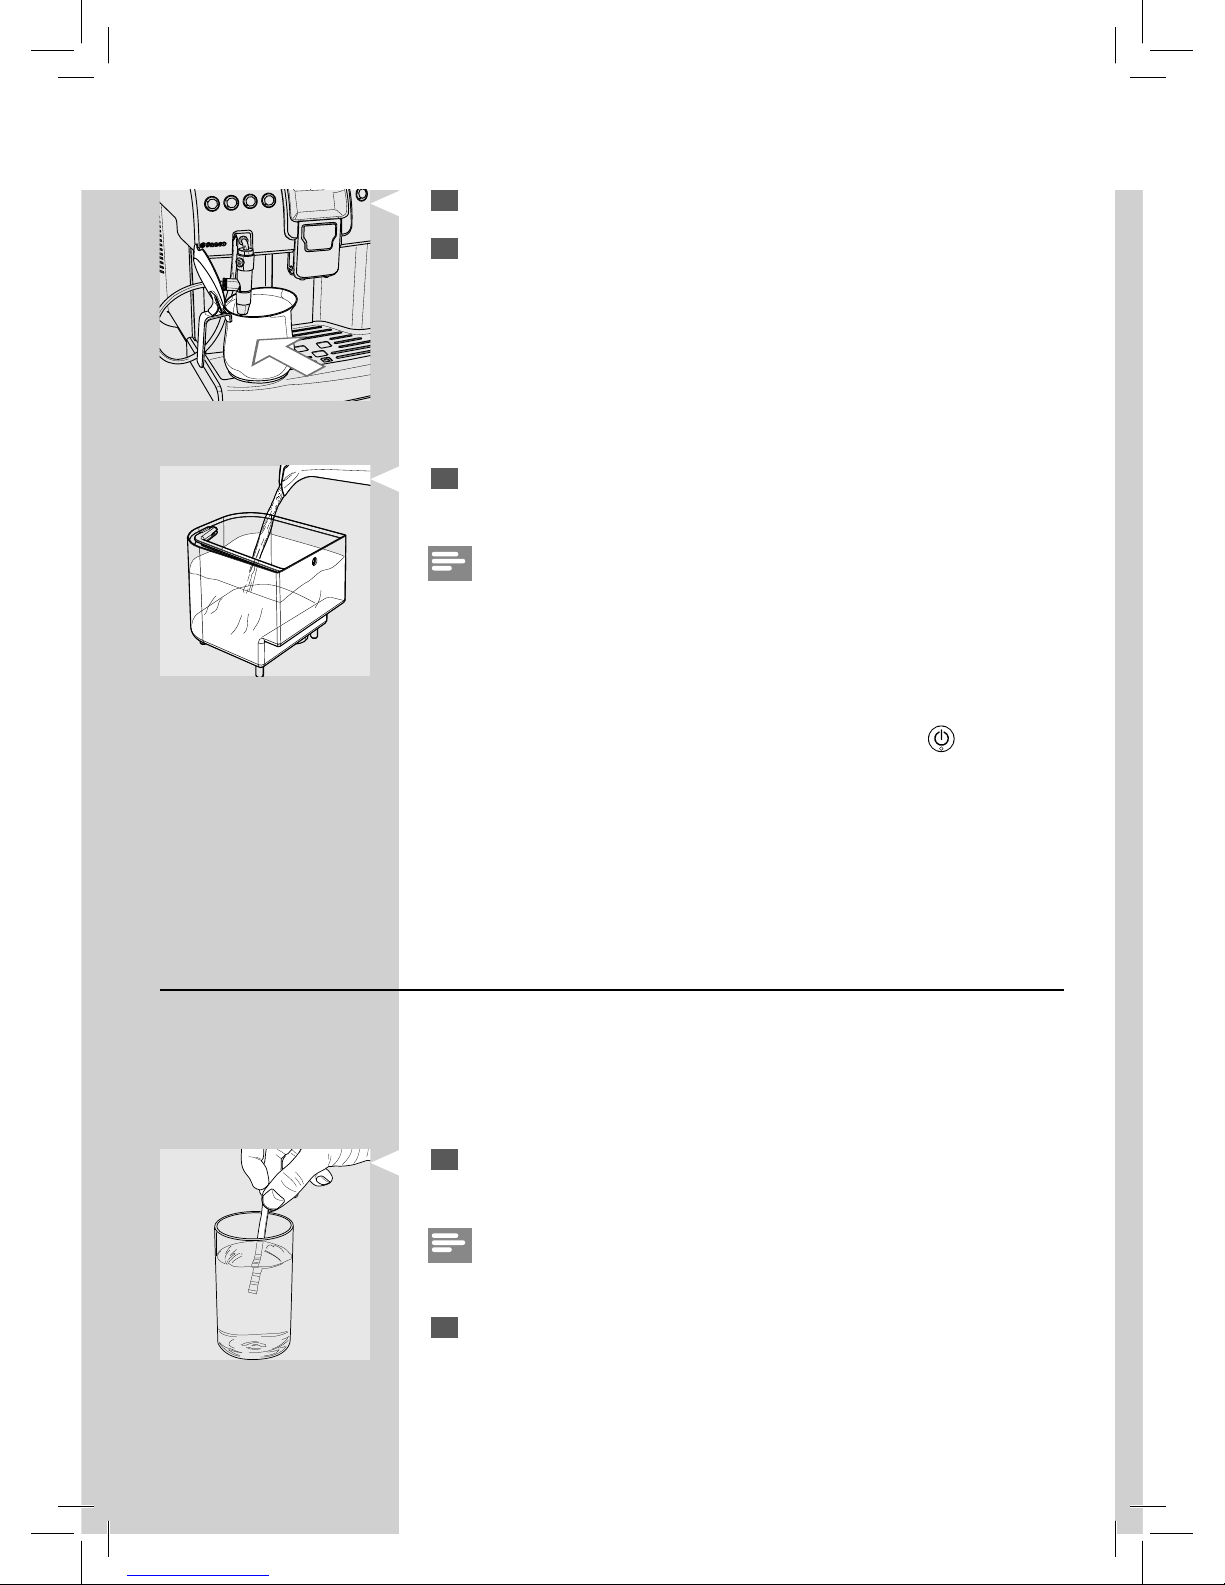
Select the pre-ground co ee brewing function by pressing the “ ”
button. The machine shows this icon.
3
Press the “ ” button.
4
Press the “ ” button. The machine starts dispensing water.
Note:
do not add pre-ground co ee into the compartment.
5
At the end of the operation, empty the container and place it under
the water dispensing spout.
6
Press the “ ” button to start dispensing HOT WATER.
Gran Crema
1
2
MEMO
ESC
INSERT
GROUND COFFEE
AND PRESS OK
HOT WATER
ESC
STOP HOT WATER
14
ENGLISH
Measuring and Programming Water Hardness
Water hardness measuring is very important in order to de ne the descaling frequency and to install the “INTENZA+” water lter (for more detail on
the water lter, see next chapter).
To measure the water hardness follow the steps below.
1
Immerse the water hardness test strip supplied with the machine in
water for 1 second.
Note:
the test strip can only be used for one single measurement.
2
Wait for one minute.
7
At the end of the operation, remove and empty the container.
8
Repeat the steps from 5 to 7 until the water tank is empty, then go on
to step 9.
9
At the end, ll the water tank again up to the MAX level. Now the ma-
chine is ready for co ee brewing.
Note:
when the machine has not been operated for at least two weeks, it will
automatically perform a start-up rinse/self-cleaning cycle. Thereafter you
need to initiate a manual rinse cycle as described above.
The automatic rinse/self-cleaning cycle is also initiated automatically
when starting up the machine (with a cold boiler), when the machine is
preparing to go into stand-by mode or after pressing the “
” button to
turn o the machine (after a co ee has been brewed).
15
ENGLISH
15
3
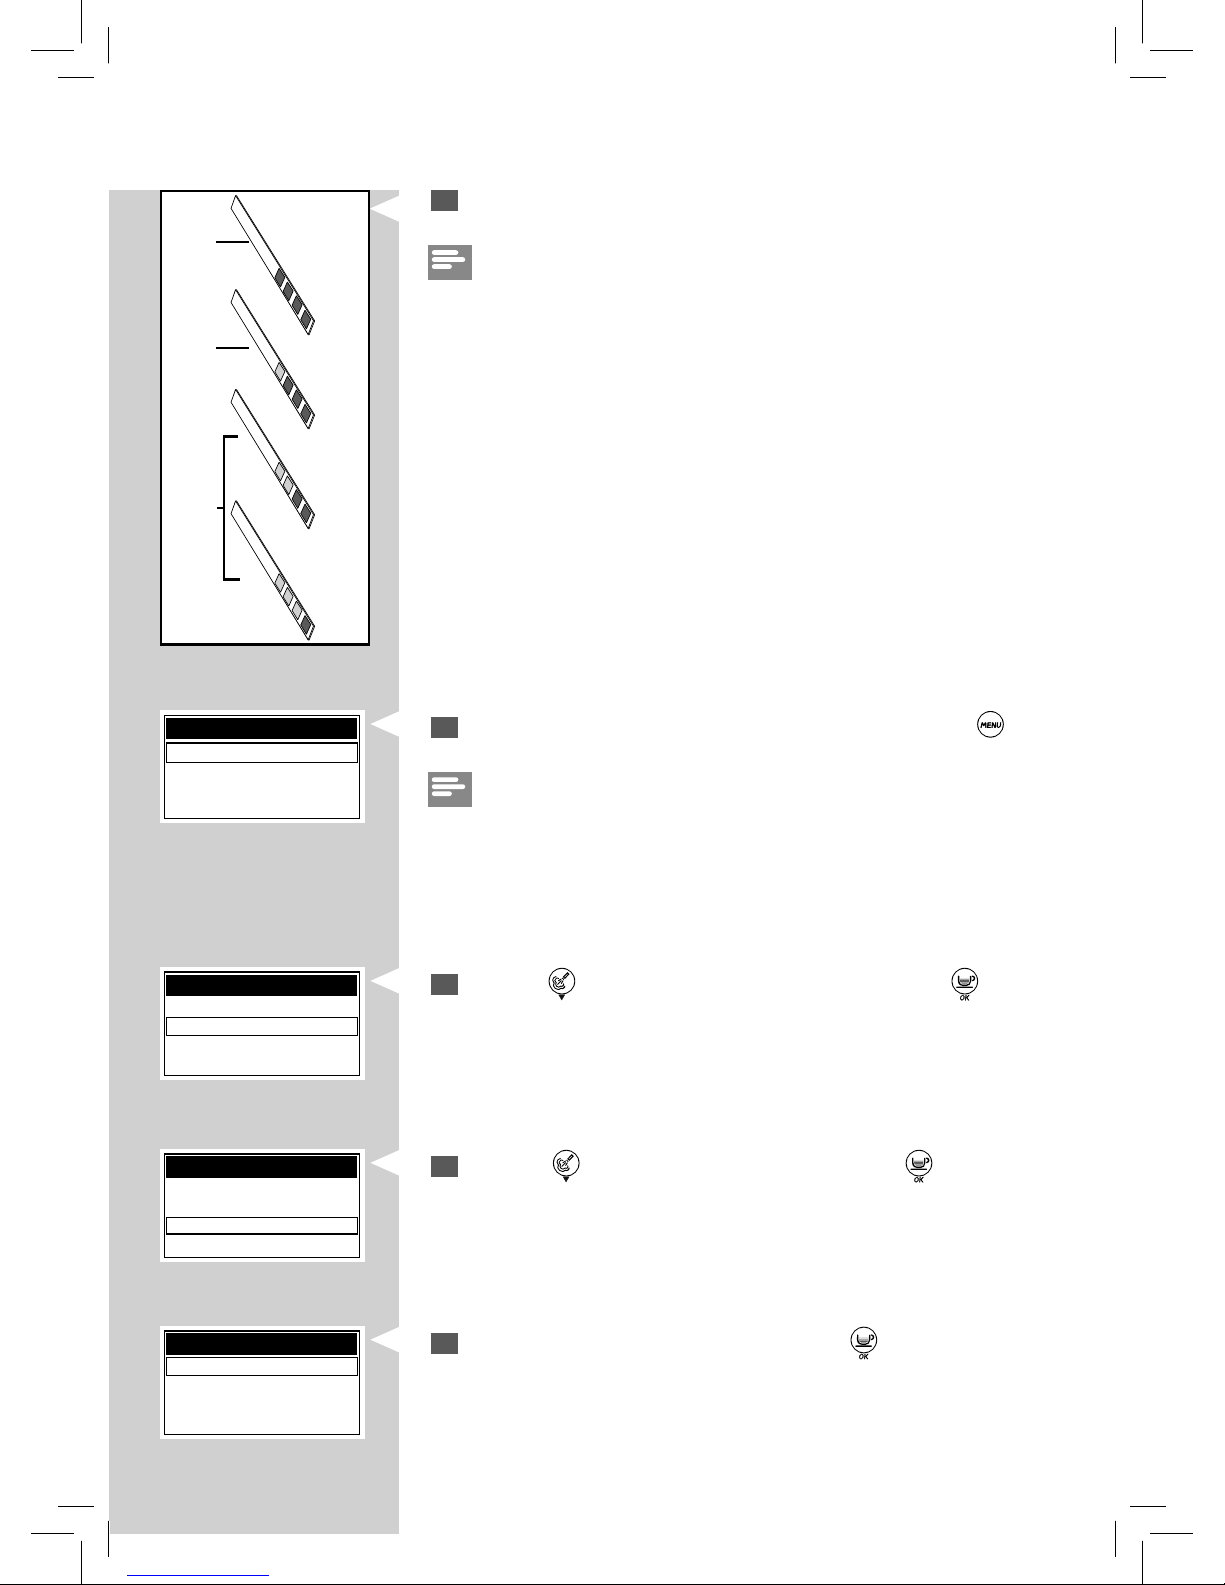
Check how many squares have changed to red, then consult the table.
Note:
the numbers on the test strip match the water hardness adjustment settings.
More precisely:
1 = 1 (very soft water)
2 = 2 (soft water)
3 = 3 (hard water)
4 = 4 (very hard water)
The letters correspond to the references that are located at the base of the
“INTENZA+” water lter (see next chapter).
23 4
A
B
C
Intenza Aroma System
Machine Water Hardness Setting
1
MENU MACCHINA
MENU GENERALE
MENU DISPLAY
MENU ACQUA
MANUTENZIONE
MACHINE MENU
GENERAL MENU
DISPLAY MENU
WATER MENU
MAINTENANCE
WATER MENU
HARDNESS
ENABLE FILTER
ACTIVATE FILTER
MENU
BEVERAGE MENU
MACHINE MENU
4
Now you can program the water hardness setting. Press the
“ ”
but-
ton to access the machine main menu.
Note:
the machine is supplied with standard water hardness setting, which are
suitable for most of the type of water.
5
Press the “ ” button to scroll down the pages. Press the “ ” button
to select MACHINE MENU.
MENU
BEVERAGE MENU
MACHINE MENU
6
Press the “ ” button to select WATER MENU. Press “ ” to con rm.
7
Select the HARDNESS option by pressing the “ ” button and set the
water hardness value.
16
ENGLISH
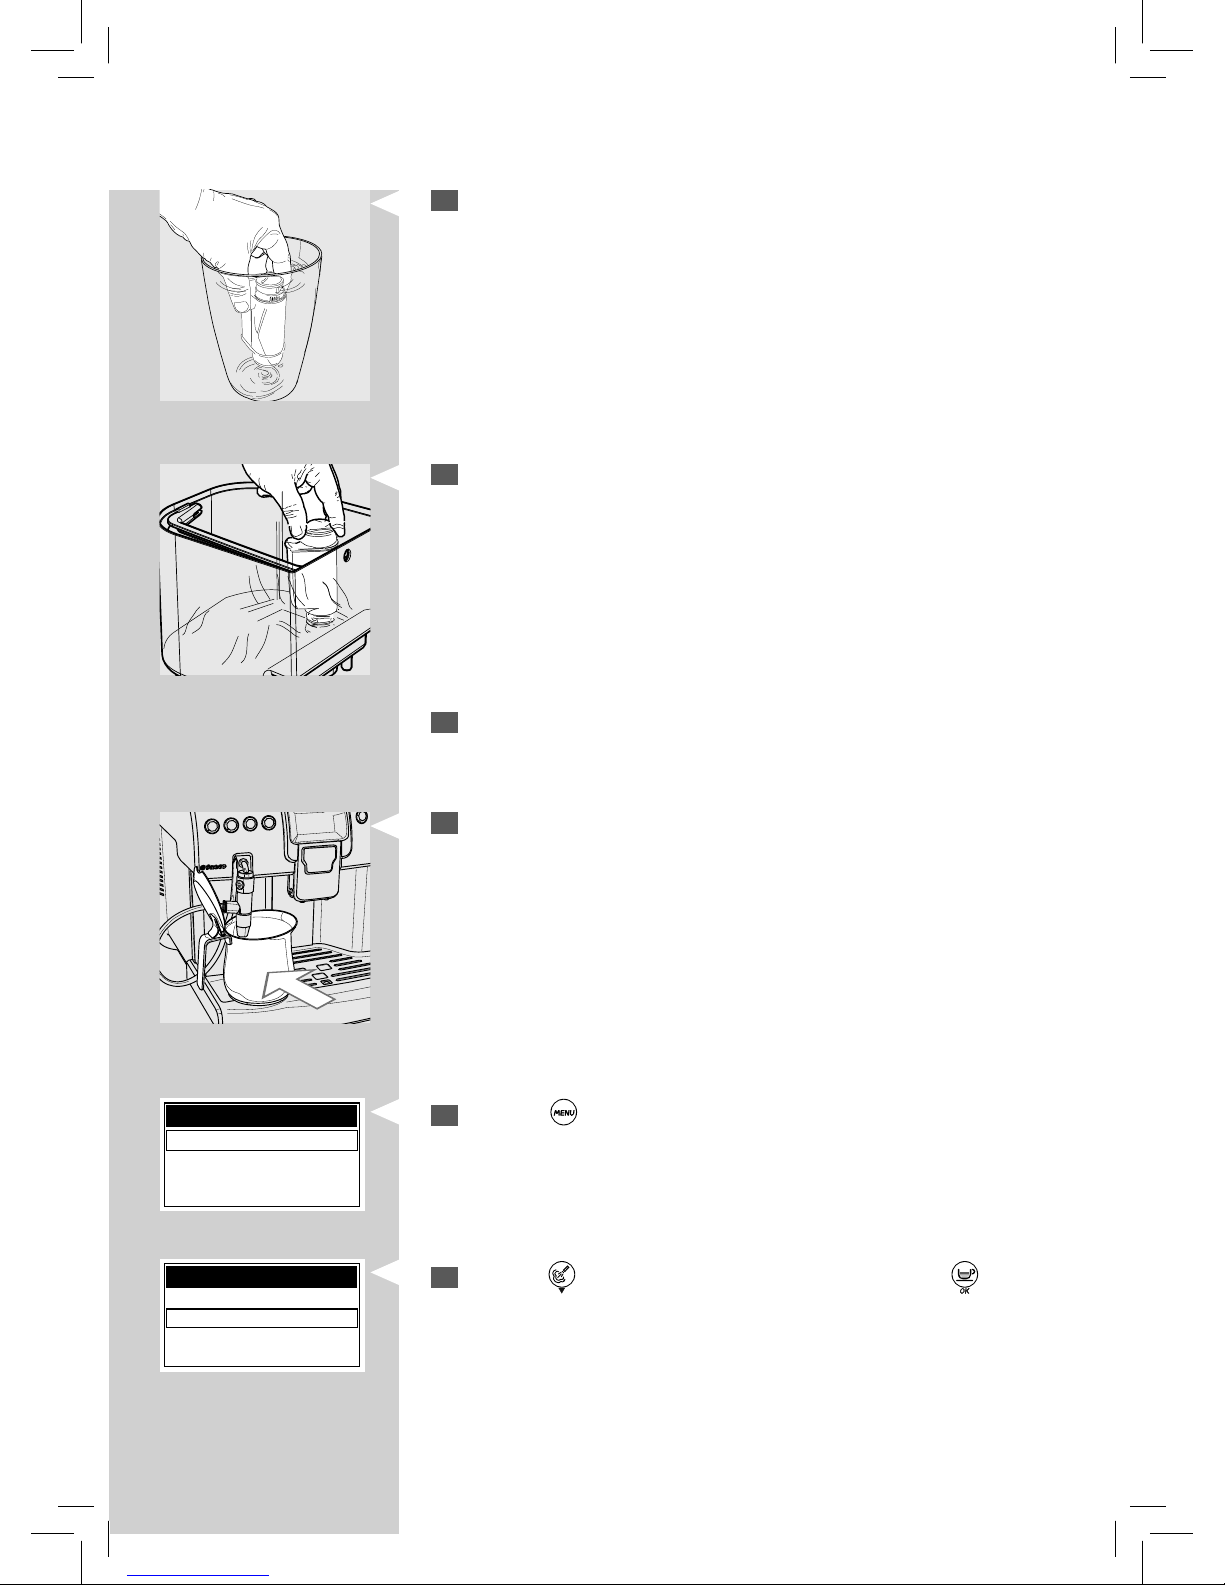
“INTENZA+” Water Filter Installation
We recommend to install the “INTENZA+” water lter as this prevents
limescale build-ups and preserves a more intense aroma to your espresso
co ee.
The INTENZA+ water lter can be purchased separately. For further details,
please refer to the maintenance products page in this manual.
Water is a crucial part of every espresso, so it’s most important to always
have it professionally ltered. Using the “INTENZA+” water lter will prevent
mineral deposits from building up and will improve your water quality.
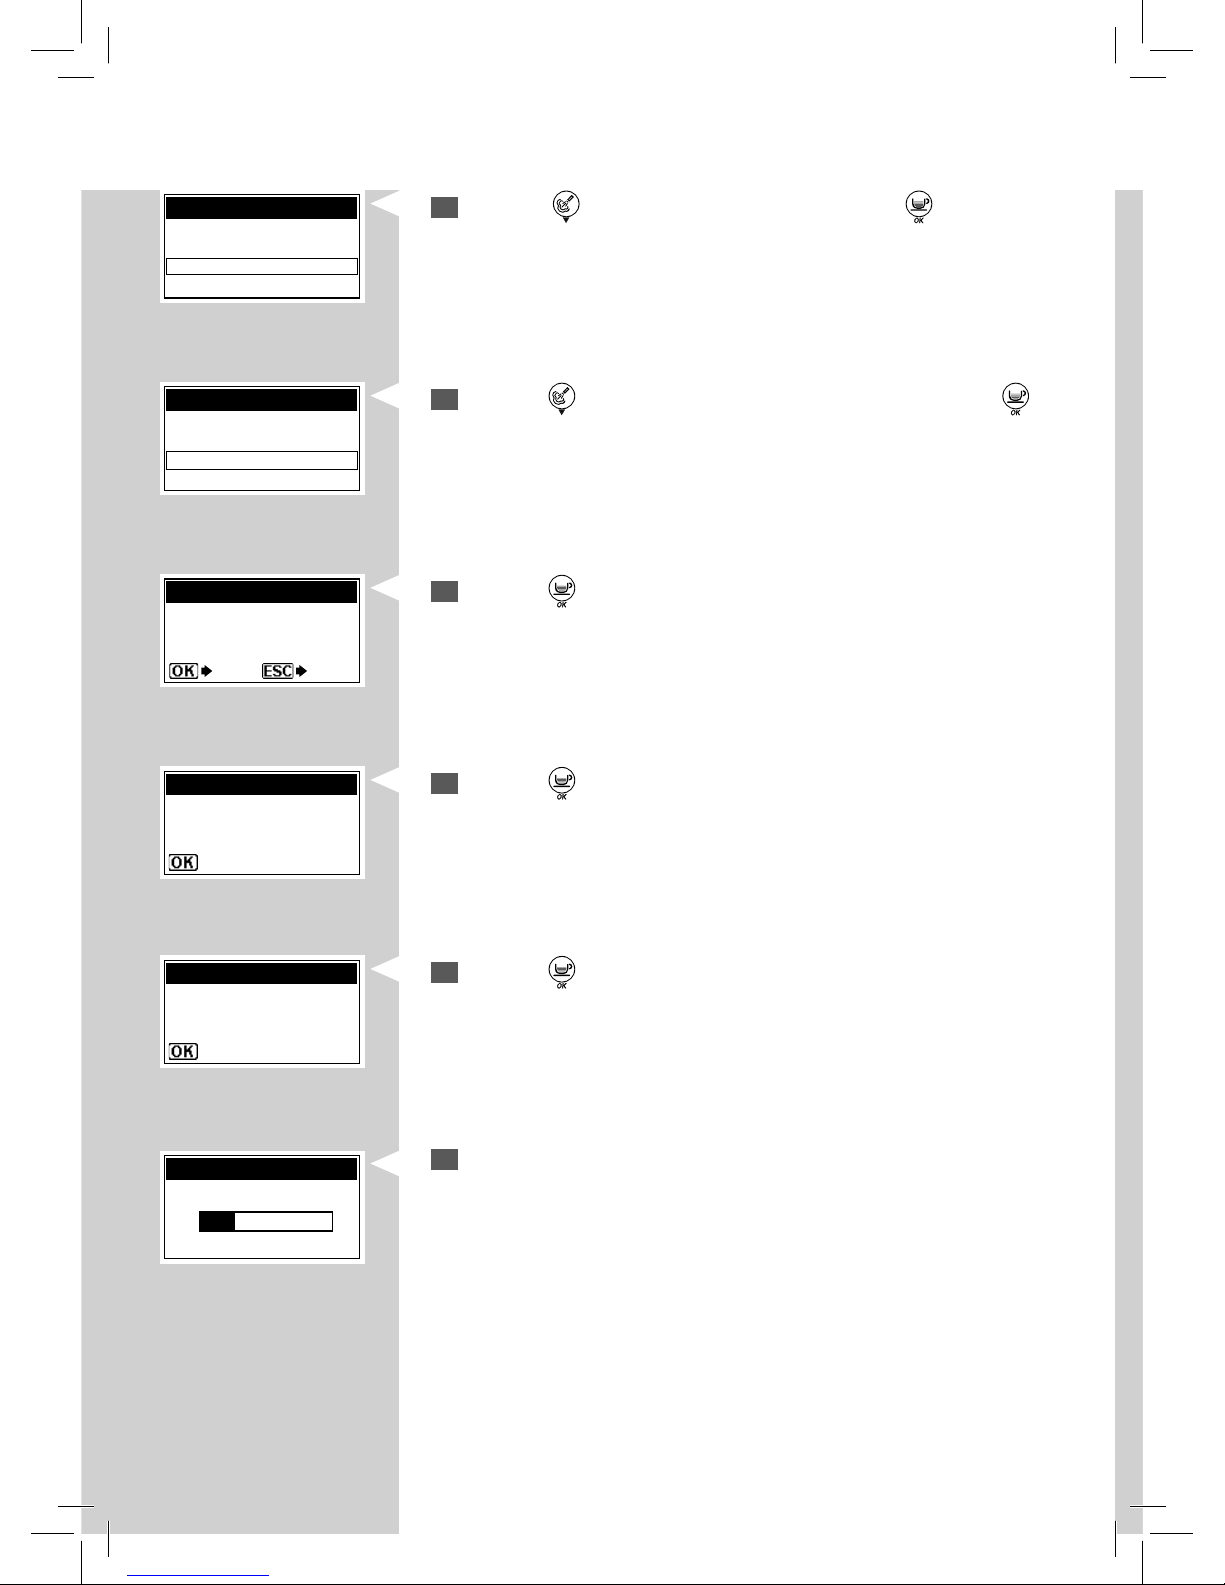
1
Remove the small white lter from the water tank and store it in a dry
place.
HARDNESS
1
2
3
4
8
Select the HARDNESS value by pressing the “ ” or “ ” button and
press the “
” button to store the water hardness value.
Note:
press the “
” button at least two times to get back to main menu.
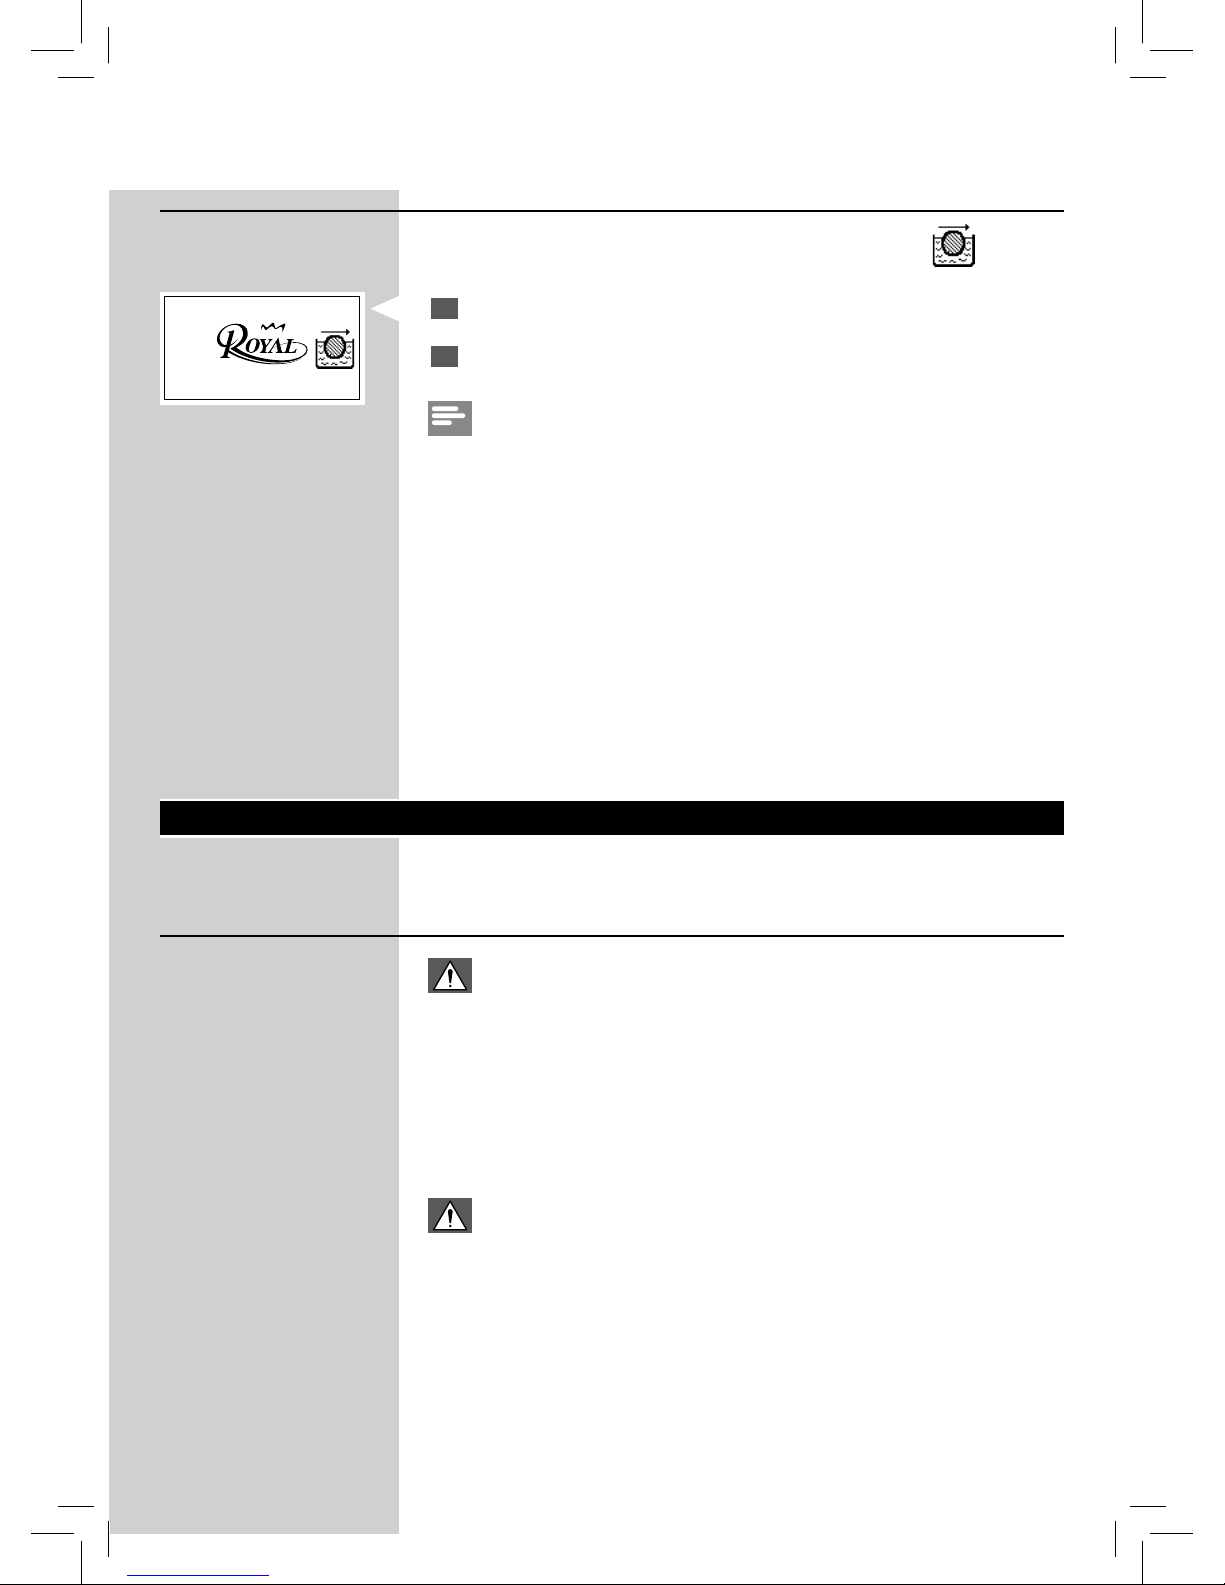
2
Remove the “INTENZA+” water lter from the package and set the lter
according to the measurements assessed (see previous chapter) and
speci ed at the lter base:
A = soft water – equals 1 or 2 on the test strip
B = hard water (standard) – equals 3 on the test strip
C = very hard water – equals 4 on the test strip
17
ENGLISH
17
3
Immerse the “INTENZA+” water lter vertically in cold water (with the
opening positioned upwards) and gently press its sides so as to let the
air bubbles out.
4
Insert the lter into the empty water tank. Press it until it cannot move
further down.
5
Fill the water tank with fresh water and place it back into the machine.
6
Place a large container (1.5 lt) under the Cappuccinatore.
7
Press the
“ ”
button to access the machine main menu.
8
Press the “ ” button to scroll down the pages. Press the “ ” button
to select MACHINE MENU.
MENU
BEVERAGE MENU
MACHINE MENU
MENU
BEVERAGE MENU
MACHINE MENU
18
ENGLISH
9
Press the “ ” button to select WATER MENU. Press “ ” to con rm.
10
Press the “ ” button to select “ACTIVATE FILTER” and press the “ ”
button to con rm.
WATER MENU
HARDNESS
ENABLE FILTER
ACTIVATE FILTER
ACTIVATE FILTER?
ACTIVATE FILTER
YES NO
MACHINE MENU
GENERAL MENU
DISPLAY MENU
WATER MENU
MAINTENANCE
11
Press the “ ” button to con rm that you want to start the lter activa-
tion procedure.
12
Press the “ ” button to con rm that you have inserted the water lter
and lled the water tank.
13
Press the “ ” button to con rm that a container is placed under the
water dispensing spout.
14
The machine starts dispensing water. This page will be displayed. At
the end of the operation, remove the container.
INSERT FILTER.
FILL THE TANK
ACTIVATE FILTER
PLACE A CONTAINER
UNDER THE
WATER SPOUT
ACTIVATE FILTER
ACTIVATE FILTER
19
ENGLISH
19
Replacing the “INTENZA+” Water Filter
When the “INTENZA+” water lter needs to be replaced, the icon is
displayed.
1
Replace the lter as described in the previous chapter.
2
The machine is now programmed to manage a new lter.
Note:
if the lter is already installed and you want to remove (but not replace) it,
select the “ENABLE FILTER” option and set it to OFF.
If there is no “INTENZA+” water lter installed, insert the small white lter
previously removed into the water tank.
Gran Crema
ADJUSTMENTS
The machine allows for certain adjustments so that you can brew the best
co ee possible.
Adjusting the Co ee Grinder
Warning:
the co ee grinder contains moving parts that may be dangerous.
Therefore, do not insert ngers and/or other objects. Turn o the
machine by pressing the ON/OFF button and remove the plug from
the socket before carrying out any type of operation inside the co ee
bean hopper.
The grinders can be set to suit the grinding to your personal taste.
Warning:
the grinder adjustment lever, which is placed on the right side of the
machine, must be turned only when the co ee grinder is working.
 Loading...