

Philips RC1984751A User Manual
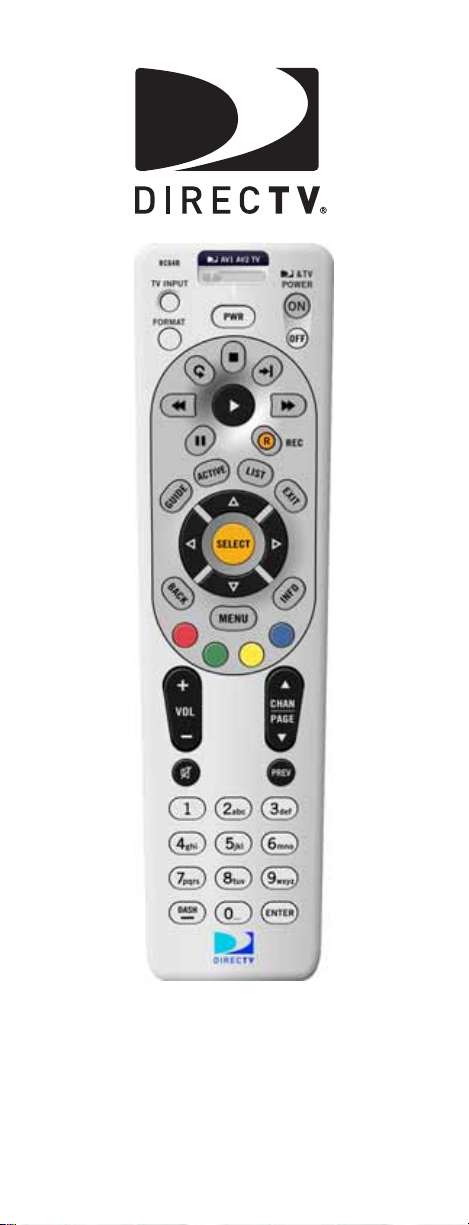
DIRECTV®
Universal Remote Control
User Guide

CONTENTS
Introduction . . . . . . . . . . . . . . . . . . . . . . . . . . . . . . . . . . . . . . . . . . . .3
Features and Functions . . . . . . . . . . . . . . . . . . . . . . . . . . . . . . . . . . .4
Key Charts. . . . . . . . . . . . . . . . . . . . . . . . . . . . . . . . . . . . . . . . .4
Installing Batteries . . . . . . . . . . . . . . . . . . . . . . . . . . . . . . . . . . . . . . .7
Controlling Your DIRECTV
Setting Up Your DIRECTV Remote . . . . . . . . . . . . . . . . . . . . . . 7
Onscreen Remote Setup . . . . . . . . . . . . . . . . . . . . . . . . . . . . . 8
Controlling Your TV. . . . . . . . . . . . . . . . . . . . . . . . . . . . . . . . . . . . . . . 8
Setting Up the TV Input Key . . . . . . . . . . . . . . . . . . . . . . . . . . . . . . . . 9
Deactivating the TV Input Select Key . . . . . . . . . . . . . . . . . . . 9
Controlling Other Components . . . . . . . . . . . . . . . . . . . . . . . . . . . . . .9
Searching for TV, AV1 or AV2 Codes . . . . . . . . . . . . . . . . . . . . . . . . .10
Verifying the Codes . . . . . . . . . . . . . . . . . . . . . . . . . . . . . . . .11
Changing Volume Lock . . . . . . . . . . . . . . . . . . . . . . . . . . . . . . . . . . .11
Locking Volume to AV1, AV2 or TV . . . . . . . . . . . . . . . . . . . . . 11
Activating and Deactivating the RF Transmitter . . . . . . . . . . . . . . . 12
Activating the RF Transmitter. . . . . . . . . . . . . . . . . . . . . . . . . 12
Deactivating the RF Transmitter . . . . . . . . . . . . . . . . . . . . . .12
Restoring Factory Default Settings . . . . . . . . . . . . . . . . . . . . . . . . .13
Troubleshooting . . . . . . . . . . . . . . . . . . . . . . . . . . . . . . . . . . . . . . . . 13
DIRECTV Setup Codes . . . . . . . . . . . . . . . . . . . . . . . . . . . . . . . . . . . . 14
Setup Codes for DIRECTV
Setup Codes for DIRECTV HD Receivers. . . . . . . . . . . . . . . . . 14
Setup Codes for DIRECTV
Setup Codes, Other Devices . . . . . . . . . . . . . . . . . . . . . . . . . . . . . . .15
Setup Codes for TVs . . . . . . . . . . . . . . . . . . . . . . . . . . . . . . . .15
Setup Codes for TVs (DLP) . . . . . . . . . . . . . . . . . . . . . . . . . . .26
Setup Codes for TVs (Plasma) . . . . . . . . . . . . . . . . . . . . . . . .26
Setup Codes for TV/DVD Combos . . . . . . . . . . . . . . . . . . . . . . 28
Setup Codes for TV/VCR Combos . . . . . . . . . . . . . . . . . . . . . . 29
Setup Codes for VCRs. . . . . . . . . . . . . . . . . . . . . . . . . . . . . . . 31
Setup Codes for PVRs . . . . . . . . . . . . . . . . . . . . . . . . . . . . . . . 41
Setup Codes for DVD Players . . . . . . . . . . . . . . . . . . . . . . . . .36
Setup Codes for Audio Receivers. . . . . . . . . . . . . . . . . . . . . . 42
Setup Codes for Audio Amplifiers. . . . . . . . . . . . . . . . . . . . . . 45
Repair or Replacement Policy . . . . . . . . . . . . . . . . . . . . . . . . . . . . .47
Additional Information . . . . . . . . . . . . . . . . . . . . . . . . . . . . . . . . . . .47
Compliance with FCC Rules and Regulations. . . . . . . . . . . . . . . . . . 47
®
Receiver. . . . . . . . . . . . . . . . . . . . . . . . .7
®
Receivers. . . . . . . . . . . . . . . . . .14
®
DVRs. . . . . . . . . . . . . . . . . . . . . .15
2

INTRODUCTION
Congratulations! You now have an exclusive DIRECTV®
Universal Remote Control that will control four
compone nts, inclu ding a DIRECTV Receiver, TV, and two
stereo or video c o mponents (for example, a DVD, stereo, or
second TV). Moreover, its sophisticated technology allows
you to consolidate the clutter of your original remote
contr ols into one easy-to-use unit that's packed with
features such as:
• Four-position MODE slide switch for easy component
selection
• Code library for popular video and stereo componen ts
• Code search to help program control of older or discontinued components
• Memory protection to ensure you will not have to reprogram the remote when the batteries are replaced
Before using y our D IRECTV U ni v ersal R emo te Co n tr ol, y o u
may need to program it to operate with your particular
component. Please follow the instructions detailed in this
guide to set up your DIRECTV Univ ersal R emote Co n tro l so
you can start enjoying its features.
3

FEATURES AND FUNCTIONS
Key Charts
Press this key… To…
Slide the MODE switch to the DIRECTV, AV1,
AV2 or TV positions t o select the c o m po nen t
you want to control. A green LED under
each switch position indicates the
component being controlled.
Press TV INPUT to select the available inputs
on your TV.
NOTE: Additional setup is required to
activate the TV INPUT key. (See
instructions on page 9.)
Press FORMAT to cycle through the
resolution and screen formats. Each press
of the key cycles to the next available
format and /or r esol utio n. (N o t a vaila ble o n
all DIRECTV
Press PWR to turn the selected component
on or off.
Press TV POWER ON/OFF to turn the TV and
DIRECTV Receiver on or off.
(NOTE: These keys are only active after the
remote has been setup for your TV. See
page 8.)
®
Rece ivers.)
Use thes e keys to control your DIRECTV
DVR or your VCR, DVD, or CD/DVD player.
On a DIRECTV DVR, enables one-
touch record for any selected program.
Jumps back 6 sec onds and p la y s video
from that location.
Jumps ahead in a recording.
Use GUIDE to display the DIRECTV
Program Guide.
Press ACTIVE to a c cess special fe at ures,
services, and the DIRECTV Information
channel.
4
Press this key… To…
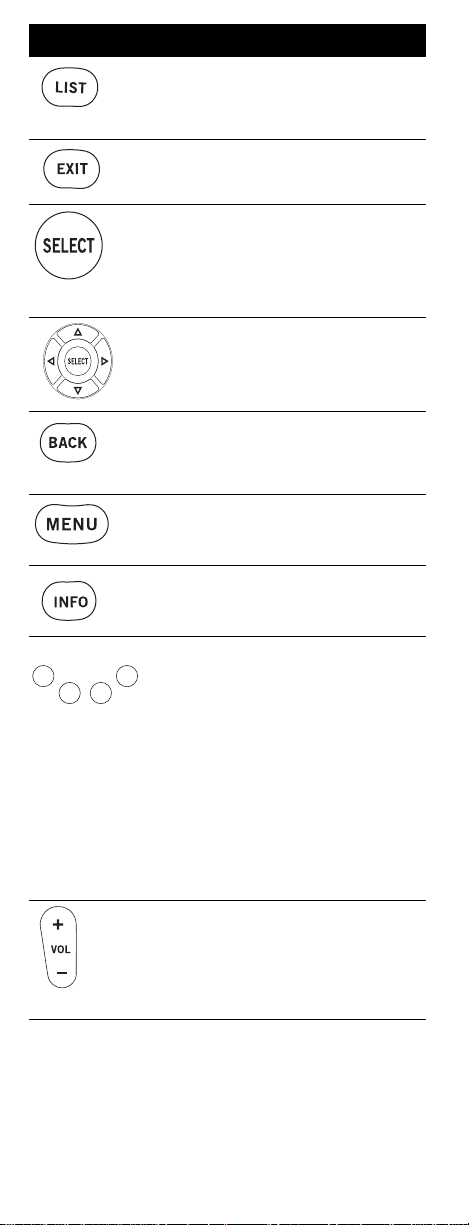
Press LIST to display your TO DO list of
programs. (Not available on all DIRECTV
Receivers.)
Press EXIT to exit menu screens and the
Program Guide and return to live TV.
Press SELECT to choose highlighted items
in menu screens or the Program Guide.
Use the ARROW keys to move aro und in the
Program Guide and menu screens.
Press BACK to return to the previously
displayed screen.
Press MENU to display the Quick Menu in
DIRECTV mode, or other men u fo r anothe r
selected device.
Use INFO to display current channel and
program information when wat ching live
TV or in the Guide.
Press YELLOW in full-screen TV to cycle
through alternate audio tracks
Press BLUE in full-screen TV to display the
Mini-Guide.
Press RED in the Gui de to jump 12 hours
back.
Press GREEN in the Guid e to jump 12 hours
forward.
Other functions vary–look for onscreen
hints or refer to your DIRECTV
user guide. (Not available on all DIRECTV
Receivers.)
Press VOL to raise or lower the sound
volume. The volume key is only active
when the remote is set up for your TV.
®
Receiver's
®
5
Press this key… To…
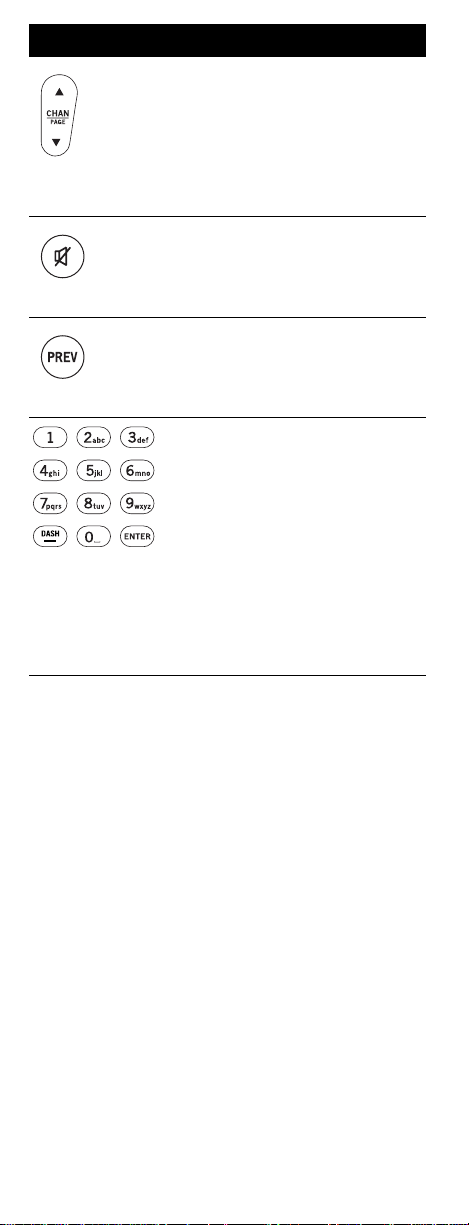
While watching TV, press CHANS (or
T) to select the next higher (or
CHAN
lower) channel.
While in the DIRECTV
menu, press PAGE+ (or PAGE-) to page up
(or down) through available channels in
the Guide.
Press MUTE to turn the sound off or back
on.
Press PREV to return to the last channel
viewed.
Press the number keys to directly enter a
channel number (e.g. 207) while watching
TV or in the Guide.
Press DASH to separate main and subchannel numbers.
Press ENTER to activate number entries
quickly.
Program Guide or
6
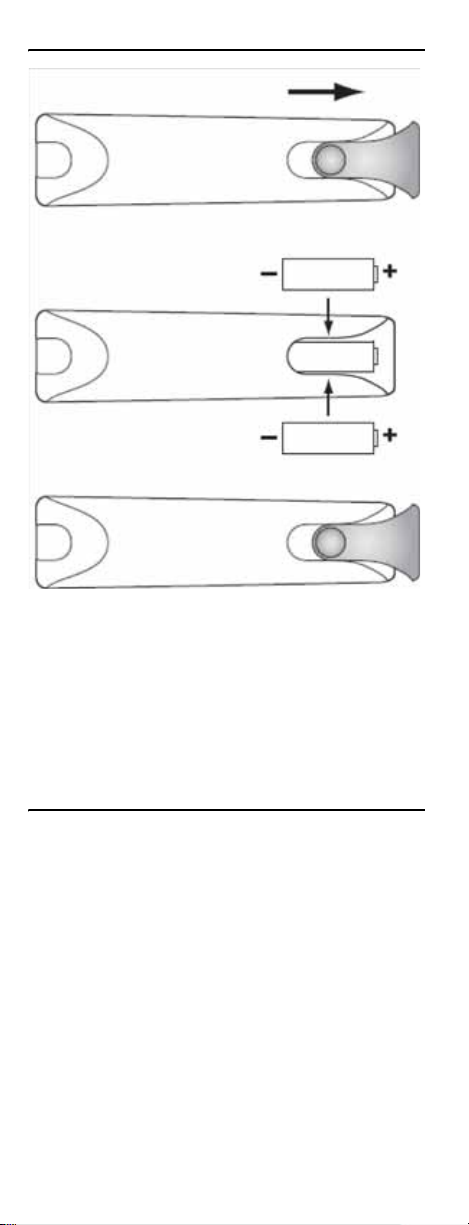
INSTALLING BATTERIES
1. On the back of th e remote control, push down on the
door (as shown), slide the battery cover off, and
remove the used batteries.
2. Obtain two (2) new AA alkaline batteries. Match their
+and - marks to the + and - marks in the battery
case, then insert them.
3. Slide the cover back on until battery door clicks into
place.
CONTROLLING YOUR DIRECTV® RECEIVER
The DIRECTV® Universal Remote Control comes
programmed to work with most DIRECTV Receivers.
Should the remote control not work with your DIRECTV
Receiver, you will need to set up the remote control by
performing the follow ing steps.
Setting Up Your DIRECTV Remote
1. Locate the DIRECTV Receiver's brand and model
number (on the back or bottom panel) and write it in
the spaces below.
BRAND:
......................................................................
MODEL: ......................................................................
7

2. Locate the 5-digit code for your DIRECTV® Receiver.
(See page 14.)
3. Power on the DIRECTV Receiver.
4. Slide the MODE switch to the DIRECTV position.
5. Press and hold the MUTE and SELECT keys until the
green l ight under the DIRECTV position flashes twice,
then release both keys.
6. Using the number keys, enter the 5-digit code. If
performed correctly, the green light under the
DIRECTV position flashes twice.
7. Aim the remote at your DIRECTV Receiver and press
the PWR key once. The DIRECTV Receiver should
turnoff; if it does not, repeat steps 3 and 4, trying each
code for your brand until you find the correct code.
8. For future reference, write down the working code for
your DIRECTV Receiver in the blocks below:
ONSCREEN REMOTE SETUP
Once your remote is setup to work with your DIRECTV
Receiver, you can set it up for your other equipment using
the steps detailed on th e following page s, or you can set it
up onscreen by pressing MENU, then SELECT on Settings,
Setup in the Quick Menu, then selecting Remote from the
left menu.
CONTROLLING YOUR TV
Once you have successfully se t up your DIRE CTV Remote
to operate your DIRECTV Receiver, you can set it up to
control your TV. We recommend you use the on-screen
steps described on page 8, but you can also use the
manual method below:
1. Turn on the TV.
: Please read steps 2-5 completely before proceed-
NOTE
2. Locate the 5-digit code for your TV. (See “Setup
3. Slide the MODE switch to the TV position.
4. Press and h o l d th e MUTE and SELECT keys at the same
5. Using the number keys enter the 5-digit code for your
6. Aim the remote at your TV and press the PWR key
ing. Highlight or write down the codes and component you wish to set up before moving on to
step 2.
Codes for TVs” on page15.)
time until the green light under the TV position
flashes twice, then release both keys.
brand of TV. If performed correctly, the green light
under TV flashed twice.
once. Your TV should turn off. If it does not tu rn off,
repeat steps 3 and 4, trying each code for your brand
until you find the correct code.
8

7. Slide the MODE switch to the DIRECTV position. Press
TV POWER. Your TV should turn on.
8. For future reference, write down the working code for
your TV in the blocks below:
SETTING UP THE TV INPUT KEY
Once you have setup the DIRECTV® Remote control for
your TV, you can activate the TV INPUT key so you can
change the “source”—th e p i ec e of equipment whose signal
is display ed on your TV:
1. Slide the MODE switch to the TV position.
2. Press and hold the MUTE and SELECT keys until the
green light under the TV posi tion flashes twice, then
release both keys.
3. Using the number keys enter 9-6-0. (The green light
under the TV position flashes twice.)
You now can change the input for your TV.
Deactivating the TV Input Select Key
If you want to deactivate the TV INPUT key, repeat steps 1
through 3 from the previous section; the green light will
blink 4 times. Pressing the TV INPUT key will now do
nothing.
CONTROLLING OTHER COMPONENTS
The AV1 and AV2 switch positions can be setup to control a
VCR, DVD, STEREO, second DIRECTV Receiver or second
TV. We recommend you use the onscreen steps
described on page 8, but you can also use the manual
method below:
1. Turn on the component you wish to control (e.g. your
DVD Play er) .
2. Locate the 5-digit code for your component. (See
“Setup Codes, Other Devices” starting on page15.)
3. Slide the MODE switch to the AV1 (or AV2) position.
4. Press and h o l d th e MUTE and SELECT keys at the same
time until the green light under AV1 (or AV2) flashes
twice, then release both keys.
5. Using the NUMBER keys, enter the 5-digit code for the
brand of component being set up. If performed
correctly, the green light under the selected position
flashes twice.
6. Aim the remote at your com ponent and p ress the PWR
key once. The component should turn off; if it does
not, repeat steps 3 and 4, trying each code for your
brand until you find the correct code.
9
7. Repeat steps 1 through 6 to set up a new component
under AV2 (or AV1).
8. For future reference write down the working code for
the component(s) set up under AV1 and AV2 bel ow:
AV1:
COMPONENT: ___________________
AV2:
COMPONENT:___________________
SEARCHING FOR TV, AV1 OR AV2 CODES
If you were unable to find the code for your brand of TV or
component, you can try a code search. This process may
take up to 30 minutes.
1. Turn on the TV or componen t. Insert a tape or disk if
applicable.
2. Slide the MODE switch to the TV, AV1 or AV2 position,
as desired.
3. Press and h o l d th e MUTE and SELECT keys at the same
time until the green light under the selected switc h
position flashes twic e, then release both keys.
4. Enter 9-9-1 followed by one of the following fourdigits:
COMPONENT TYPE COMPONENT ID #
Satellite 0
TV 1
VCR/DVD/PVR 2
Stereo 3
5. Press PWR, or other functions (e.g. PLAY for VCR) you
want to use.
6. Point the remote at the TV or component and press
CHAN
S. Repeatedly press CHANS until the TV or
component turns off or performs the action you
selected in step 5.
NOTE: Every time CHAN
advances to the next code and power is transmitted to the component.
S is pressed the remote
10

7. Use the CHANT key to step back a code.
8. When the TV or component turns off turns off or
performs the action you selected in step 5, stop
pressing the CHAN
SELECT key.
NOTE: If the light flashes 3 times before the TV or com-
ponent responds, you've cycled through all
codes and the code y o u need is not a v ailable . You
must use the remote that came with your TV or
component.
S key. Then, press and release the
Verifying the Codes
Once you have set up the DIRECTV® Universal Remote
Control using the above steps, use the following
instructions to find out the 5-digit code to which your
component responded:
1. Slide the MODE switch to the appropriate pos ition.
2. Press and h o l d th e MUTE and SELECT keys at the same
time until the green light under the selected switc h
position flashes twic e, then release both keys.
3. Enter 9-9-0. (The green light under the selected
switch position flashes twice.)
4. To view the first digit in the code, Press and releas e
then number 1 key. Wait three seconds, and count the
number of times the green light flashes. Write this
number down in the leftmost TV, AV1 or AV2 code
box found on page 10.
5. Repeat step 4 four more times for the remaining
digits; i.e., press number 2 for the second digit, 3 for
the third digit, 4 for the fourth digit and 5 for the final
digit.
CHANGING VOLUME LOCK
Depending on how y ou set up your remote, the VOL and
MUTE may control t he volume only on your TV, regardless
of the position of the MODE switch. This remote can be set
up so that the VOL and MUTE keys work only with the
compo nent selected by the MODE switch. To enable this
feature, perform the following steps:
1. Press and hold the MUTE and SELECT keys until the
green l ight under the DIRECTV position flashes twice,
then release both keys.
2. Using the number k eys, enter 9-9-3. (The green light
will flash twice after the 3.)
3. Press and release the VOL+ key. (The green light
flashes 4 times.)
Now the VOL and MUTE keys will work only for the
compo nent selected by the MODE switch position.
Locking Volume to AV1, AV2 or TV
1. Slide the MODE switch to the AV1, AV2 or TV position to
lock the volume.
2. Press and hold the MUTE and SELECT keys until the
green light under the sel ected switc h flashe s twice and
release both keys.
11

3. Using the number k eys, enter 9-9-3. (The green light
flashes twice.)
4. Press and release the SELECT key. (The green light
flashes twice.)
NOTE: DIRECTV
so the remote will not allow the user to lock volume to the DIRECTV mode.
®
Receivers don’t have volume control,
ACTIVATING AND DEACTIVATING THE RF TRANSMITTER
Your DIRECTV Remote Control features RF (radio
frequency) capability. When you activate the RF feature of
your remote control, you can control your DIRECTV
Receiver from anywhere in your home. You do not need to
be within the line of sight of your receiver t o control it.
NOTE: Not all DIRECTV Receivers are RF-capable. Also,
some RF-capable DIRECTV Receivers include integrated
RF antennas and do not r equire an external antenna. If
your receiver requires the external RF antenna, before
activating the RF transmitter, locate the RF antenna
included with your remote control and insert it into the RF
remote antenna coaxial connector on the back of your
DIRECTV Receiver.
Activating the RF Transmitter
To activate the RF transmitter on your DIRECTV Remote
Control, perform the following steps:
1. Locate the 12 digit Receiver ID (RID) number of your
DIRECTV Receiver. You can find the RID number on
the back panel of your receiver, or inside the CAM
access door next to the reset button.
2. Write down the last six digits of the RID number.
3. Slide the mode switch to DIRECTV, AV1, or AV2.
4. Press and hold the MUTE and SELECT keys until the
green light under the selected switch flashes twice and
release both keys.
5. Using the number k eys, enter 9 6 1. (The green light
flashes twice.)
6. Press and release
twice.)
7. Using the NUMBER keys, enter the last six digits of the
RID number. (See step 2 above.)
8. Press and release the SELECT key. (The green light
flashes twice.)
Deactivating the RF Transmitter
To deactivat e the RF transmitter on your DIRECTV Remote
Control, perform the following steps:
1. Slide the mode switch to DIRECTV, AV1, or AV2.
2. Press and hold the MUTE and SELECT keys until the
green light under the selected switch flashes twice and
release both keys.
3. Using the number k eys, enter 9 6 1. (The green light
flashes twice.)
CHANS. (The green light flashes
12

4. Press and release CHANT. (The green light flashes
twice.)
The RF transmitter on your remote control is now
deactivated. To reactivate the RF transmitter, See
“Activating the RF Transmitter” above.
RESTORING FACTORY DEFAULT SETTINGS
To reset all the functions of the remote control to the
factory defaults (the original, out-of-the-box settings) ,
follow these steps:
1. Press and h o l d th e MUTE and SELECT keys at the same
time until the green light flashes twice, then release
both keys.
2. Using the number k eys, enter 9-8-1. (The green light
flashes 4 times.)
TROUBLESHOOTING
PROBLEM: Light at the top of the remote blinks when you
press a key, but the component does not respond.
SOLUTION 1: Try replacing the batteries (see page 7).
SOLUTION 2: Make sure you are aiming the DIRECTV
Universal Remote Control at your home entertainment
component and that you ar e within 15 feet of the
component you are trying to control.
PROBLEM: The DIRECTV Universal Remote Control does
not contr ol component or commands are not recognized
properly.
SOLUTION: Try all listed codes for the device brand being
set up. Make sure all components can be operated with an
infrared remote control.
PROBLEM: TV/VCR combo does not respond properly.
SOLUTION: Use the VCR codes for y o ur b r and . Som e c o m bo
units may require both a TV code and a VCR code for full
operation (see page 8).
PROBLEM: CHAN
your RCA TV.
SOLUTION: Due to RCA design for certain models (1983-
1987), only the original remote control will operate these
functions.
PROBLEM: Changing channels does not work properly.
SOLUTION: If original remote control required pressing
ENTER to change channels, press ENTER on the DIRECTV
Universal remote control after entering a channel number.
PROBLEM: Remot e control does not turn on Sony or Sharp
TV/VCR Combo.
SOLUTION: For pow er o n, these p r od ucts r equ ir e setting u p
TV codes on the remote control. For Sony, use TV code
10000 and VCR code 20032. For Sharp, use TV code 10093
and VCR code 20048. (See “Controlling Other
Components” on page 9.)
S, CHANT, and PREV do not work for
®
13
DIRECTV SETUP CODES
Setup Codes for DIRECTV® Receivers
DIRECTV all models 00001, 00002
Hughes Network Systems (most
models)
Hughes Network Systems
models GAEB0, GAEB0A, GCB0,
GCEB0A, HBH-SA, HAH-SA
GE models GRD33G2A and
GRD33G3A, GRD122GW
Philips models DSX5500 and
DSX5400
Proscan models PRD8630A and
PRD8650B
RCA models DRD102RW ,
DRD203RW, DRD301RA,
DRD302RA, DRD303RA,
DRD403RA, DRD703RA,
DRD502RB, DRD 503RB,
DRD505RB, DRD515RB,
DRD523RB, a nd DRD705RB
DRD440RE, DRD460RE,
DRD480RE,DRD430RG,
DRD431RG, DRD450RG,
DRD451RG,
DRD485RG,DRD486RG,
DRD430RGA, DRD450RGA,
DRD485RGA, DRD435RH,
DRD455RH, and DRD486R H
Samsung model SIR-S60W 01109
Samsung models SIR-S70, SIR-
S75, SIR-S300W, and SIRS310W
Sony models (All models except
TiVo and Ultimate TV)
Setup Codes for DIRECTV HD Receivers
DIRECTV all models 00001, 00002
Hitachi model 61HDX98B 00819
HNS models HIRD-E8, HTL-HD 01750
LG model LSS-3200A,
HTL-HD
Mitsubishi model SR-HD5 01749, 00749
Philips model DSHD800R 01749
Proscan model PSHD105 00392
RCA models DTC-100, DTC-210 00392
Samsung model SIR-TS360 01609
Samsung models SIR-T S160 01276
00749
01749
00566
00099
00566
00566
00392
01108
01639
01750
14

Sony model s SAT-HD100, 200,
300
Toshiba models DST-3000,
DST-3100, DW65X91
Zenith models DTV1080, HDSAT520
Setup Codes for DIRECTV
DIRECTV all models 00001, 0000 2
HNS models SD-D VR80, SD-
DV40, SD-DVR120,
HDVR2, GXCEBOT, GXCEBOTD
Philips models DSR704,
DSR708, DSR6000,
DSR600R, DRS700/17
RCA models DWD490RE,
DWD496RG
RCA models DVR39, 40, 80, 120 01442
Sony model SAT-T60 00639
Sony model SAT-W60 01640
Samsung models SIR-S4040R,
SIR-S4080R, SIR-S4120R
01639
01749, 01285
01856
®
DVRs
01442
01142, 01442
01392
01442
SETUP CODES, OTHER DEVICES
Setup Codes for TVs
3M 11616
A-Mark 10003
Abex 10032
Accurian 11803
Action 10873
Admiral 10093, 10463
Advent 10761, 10783, 10815, 10817,
10842, 11933
Adventura 10046
Aiko 10092, 11579
Aiwa 10701
Akai 10812, 10702, 100 30 , 100 98,
10672, 11207, 11675, 11676,
11688, 11689, 11690, 11692,
11693, 11903, 11935
Akura 10264
Alaron 10179, 10183, 10216, 10208,
10208
Albatron 10700, 10843
Alfide 10672
Ambassador 10177
America Action 10180
Ampro 10751
15
 Loading...