

Page 1

Hairclipper
QC5050, QC5010
Page 2

2
Page 3
3
1
Page 4

4
Page 5

ENGLISH 6
ESPAÑOL 12
FRANÇAIS (CANADA) 18
28
33
QC5050,QC5010
Page 6

ENGLISH6
Introduction
Dear customer, you have made the right choice! Your new Philips supereasy hair clipper adapts to the contours of the head and enables
comfortable use. To enjoy using the hair clipper we advise you to read the
following information.
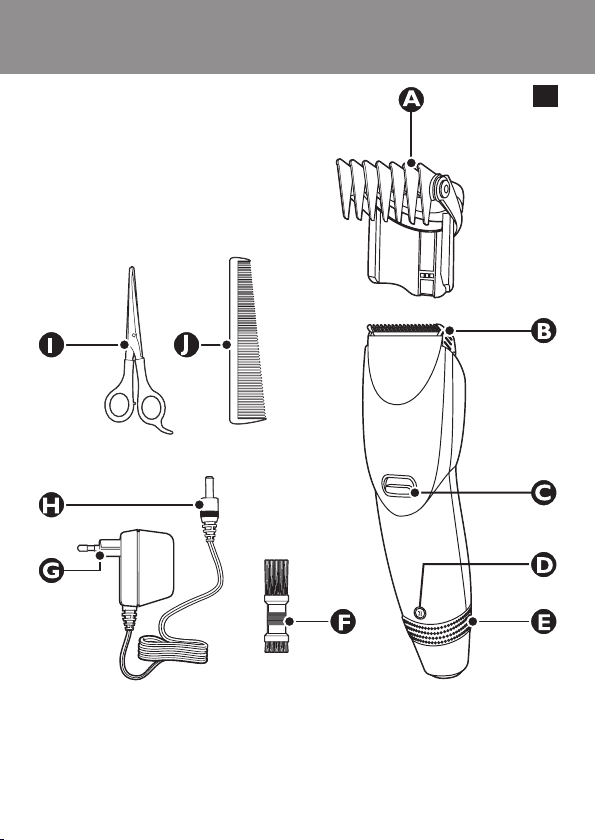
General description (Fig. 1)
A Small comb
B Main cutting element
C On/off slide
D Length indicator
E Length lock (locks the hair length setting)
F Cleaning brush
G Adapter
H Appliance plug
I Scissors (QC5050 only)
J Styling comb (QC5050 only)
Important
Read this user manual carefully before you use the appliance and save
it for future reference.
Check if the voltage indicated on the appliance corresponds to the
local mains voltage before you connect the appliance.
If the adapter is damaged, always have it replaced with one of the
original type in order to avoid a hazard.
The adapter contains a transformer. Do not cut off the adapter to
replace it with another plug, as this causes a hazardous situation.
This appliance is not intended for use by persons (including children)
with reduced physical, sensory or mental capabilities, or lack of
experience and knowledge, unless they have been given supervision
or instruction concerning use of the appliance by a person
responsible for their safety.
Children should be supervised to ensure that they do not play with
the appliance.
Keep the appliance and the adapter dry (Fig. 2).
-
Page 7

ENGLISH 7
Use, charge and store the appliance at a temperature between 15°C
and 35°C.
This appliance is suitable for mains voltages from 220 to 240 volts.
Do not use a damaged adapter.
Do not use the appliance when one of the attachments is damaged
or broken as this may cause injury.
Only use the adapter supplied.
This appliance is only intended for clipping human scalp hair. Do not
use it for another purpose.
Electromagnetic elds (EMF)
This Philips appliance complies with all standards regarding
electromagnetic elds (EMF). If handled properly and according to the
instructions in this user manual, the appliance is safe to use based on
scientic evidence available today.
Charging (QC5050 only)
Charge the appliance for 8 hours (NiCd battery) or 12 hours (NiMh
battery) before you start using it for the rst time.
A fully charged appliance has a cordless clipping time of up to 35 minutes
(NiCd battery) or 50 minutes (NiMh battery).
Do not charge the appliance for more than 24 hours.
1 Make sure the appliance is switched off while charging.
2 Insert the appliance plug into the appliance (Fig. 3).
3 Insert the adapter into the wall socket.
The charging light will go on to indicate that the appliance is
,
charging (Fig. 4).
The charging light will not go out or change colour when the appliance
is fully charged.
Optimising the lifetime of the battery
After the appliance has been charged for the rst time, do not recharge it
between clipping sessions. Continue using it and recharge it only when
the battery is (almost) empty.
Page 8
ENGLISH8
Discharge the battery completely twice a year by letting the motor
run until it stops.
Do not keep the appliance plugged into a wall socket all the time.
If the appliance has not been used for a long time, it must be
recharged for 8 hours (NiCd battery) or 12 hours (NiMh battery).
Corded clipping
QC5050 only:
Do not run the appliance from the mains when the battery is fully
charged.
To use the hair clipper connected to the mains: switch the hair
,
clipper off, connect it to the mains and wait a few seconds before
switching it on.
QC5010 only:
1 Insert the appliance plug into the appliance. (Fig. 3)
2 Insert the adapter into the wall socket.
Using the appliance
Clipping with comb attachment
The hair length after cutting is indicated in millimetres on the
,
display. The settings correspond to the remaining hair length after
cutting.
The hair length after cutting is only visible when the comb is
,
attached.
1 Slide the comb attachment into the guiding grooves of the
appliance (‘click’). (Fig. 5)
Make sure that the arms of the comb attachment have been properly slid
into the grooves on both sides.
2 Set the comb to the desired hair length (3, 6, 9, 12, 15, 18 or
21 millimetres) by turning the length lock (Fig. 6).
3 Switch the appliance on (Fig. 7).
Page 9

ENGLISH 9
Tips
We advise you to start clipping at the highest setting and to reduce
the hair length in small steps until you reach the desired hair length.
If a lot of hair has accumulated in the comb, remove the comb
attachment and blow and/or shake the hair from the comb. Removing
the comb does not change the selected hair length setting.
Write down the hair length settings used to create a certain hairstyle
as a reminder for future clipping sessions.
Clipping without comb attachment:
You can use the clipper without comb attachment to contour the
neckline and the area around the ears.
Remove the comb attachment by pulling it off the appliance (Fig. 8).
,
Never pull at the exible top of the comb attachment. Always pull at the
bottom part.
The comb attachment keeps the cutting unit at a certain distance
,
from your head. This means that, if you use the clipper without the
comb attachment, your hair will be cut off very close to the skin.
Cleaning
Clean the appliance every time you have used it.
Do not use abrasives, scourers or liquids such as alcohol, petrol or
acetone to clean the appliance.
The appliance and the adapter may only be cleaned with the brush
supplied.
1 Make sure the appliance is switched off and disconnected from the
mains when you start cleaning it.
2 Remove the comb attachment by pulling it off the appliance (Fig. 8).
3 Push the middle part of the cutting unit upwards with your thumb
until it opens and then pull it off the appliance (Fig. 9).
Be careful that the cutting unit does not fall to the oor.
4 Clean the cutting unit with the brush supplied (Fig. 10).
Page 10

ENGLISH10
5 Also clean the inside of the appliance with the brush
supplied (Fig. 11).
6 Place the lug of the cutting unit into the slot and push the unit back
onto the appliance (‘click’) (Fig. 12).
This appliance does not need any lubrication.
Replacement
A worn or damaged cutting unit should only be replaced with an original
Philips cutting unit.
Push the middle part of the cutting unit upwards with your thumb
,
until it opens and then pull it off the appliance (Fig. 9).
Be careful that the cutting unit does not fall to the oor.
Place the lug of the new cutting unit into the slot and push the unit
,
back onto the appliance (‘click’) (Fig. 12).
Environment (QC5050 only)
Do not throw the appliance away with the normal household waste
,
at the end of its life, but hand it in at an ofcial collection point for
recycling. By doing this you will help to preserve the
environment (Fig. 13).
The built-in rechargeable battery contains substances that may pollute
the environment. Always remove the battery before discarding the
appliance or handing it in at an ofcial collection point. Dispose of the
battery at an ofcial collection point for batteries. If you have trouble
removing the battery, you can also take the appliance to a Philips service
centre, which will remove the battery for you and will dispose of it in an
environmentally safe way.
Disposal of the battery
Only remove the battery if it is completely empty.
1 Disconnect the appliance from the mains and let the appliance run
until the motor stops.
2 Push the middle part of the cutting unit upwards with your thumb
until it opens and then pull it off the appliance (Fig. 9).
Page 11

ENGLISH 11
Be careful that the cutting unit does not fall to the oor.
3 Remove the upper housing part from the inner part of the
appliance by means of a screwdriver (Fig. 14).
4 Separate the lower housing part from the appliance (Fig. 15).
5 Remove the battery by prying it out of the appliance (Fig. 16).
6 Cut the wires and dispose of the battery in an environmentally safe
way.
Do not connect the appliance to the mains again after it has been
opened.
Guarantee & service
If you need information or if you have a problem, please visit the Philips
website at www.philips.com or contact the Philips Customer Care
Centre in your country (you nd its phone number in the worldwide
guarantee leaet). If there is no Customer Care Centre in your country,
go to your local Philips dealer or contact the Service Department of
Philips Domestic Appliances and Personal Care BV.
Page 12

12
ESPAÑOL
Introducción
Estimado cliente: ha acertado en su elección. El nuevo cortapelos súper
fácil de Philips se adapta a los contornos de la cabeza y permite un uso
cómodo y sencillo. Para disfrutar del cor tapelos, le aconsejamos que lea la
información siguiente.
Descripción general (g. 1)
A Peine-guía pequeño
B Elemento de corte principal
C Botón de encendido/apagado
D Indicador de longitud
E Bloqueo de longitud (bloquea la posición de longitud del pelo)
F Cepillo de limpieza
G Adaptador
H Clavija del aparato
I Tijeras (sólo modelo QC5050)
J Peine de peluquería (sólo modelo QC5050)
Importante
Antes de usar el aparato, lea atentamente este manual del usuario y
consérvelo por si necesitara consultarlo en el futuro.
Antes de enchufar el aparato, compruebe si el voltaje indicado en el
mismo se corresponde con el voltaje de red local.
Si el adaptador está dañado, sustitúyalo siempre por otro del modelo
original para evitar situaciones de peligro.
El adaptador incorpora un transformador. No corte el adaptador
-
para sustituirlo por otra clavija, ya que podría provocar situaciones de
peligro.
Este aparato no debe ser usado por personas (adultos o niños) con
-
su capacidad física, psíquica o sensorial reducida, ni por quienes no
tengan los conocimientos y la experiencia necesarios, a menos que
sean supervisados o instruidos acerca del uso del aparato por una
persona responsable de su seguridad.
Asegúrese de que los niños no jueguen con este aparato.
-
Mantenga el aparato y el adaptador siempre secos (g. 2).
-
Page 13

ESPAÑOL 13
Utilice y guarde el aparato a una temperatura entre 15°C y 35°C.
-
Este aparato es adecuado para voltajes de red de 220 a 240 V.
-
No utilice un adaptador dañado.
-
No utilice el aparato si alguno de los accesorios está dañado o roto,
-
ya que podría ocasionar lesiones.
Utilice únicamente el adaptador que se suministra.
-
Este aparato está ideado para cor tar únicamente el pelo humano. No
-
lo utilice con otra nalidad.
Campos electromagnéticos (CEM)
Este aparato Philips cumple todos los estándares sobre campos
electromagnéticos (CEM). Si se utiliza correctamente y de acuerdo con
las instrucciones de este manual, el aparato se puede usar de forma
segura según los conocimientos cientícos disponibles hoy en día.
Carga (sólo modelo QC5050)
Cargue el aparato durante 8 horas (batería de NiCd) o 12 horas (batería
de NiMh) antes de utilizarlo la primera vez.
Un aparato completamente cargado proporciona un tiempo de corte sin
cable de hasta 35 minutos (batería de NiCd) o 50 minutos (batería de
NiMh).
No cargue el aparato durante más de 24 horas.
1 Asegúrese de que el aparato está apagado mientras se carga.
2 Inserte la clavija del aparato en el mismo (g. 3).
3 Enchufe el adaptador a la red.
El piloto de carga se iluminará para indicar que el aparato se está
,
cargando (g. 4).
El piloto de carga no se apagará ni cambiará de color cuando el aparato
esté completamente cargado.
Cómo optimizar la vida útil de la batería
Después de haber cargado el aparato por primera vez, no vuelva a
cargarlo entre cor te y cor te. Continúe utilizándolo y vuelva a cargarlo
sólo cuando la batería esté (casi) vacía.
Page 14

ESPAÑOL14
Descargue totalmente la batería dos veces al año dejando que el
-
motor funcione hasta que se pare.
No deje el aparato enchufado permanentemente a la red.
-
Si hace mucho tiempo que no utiliza el aparato, debe recargarlo
durante 8 horas (batería de NiCd) o 12 horas (batería de NiMh).
Corte de pelo con el aparato enchufado a la red
Sólo modelo QC5050:
No utilice el aparato enchufado a la red cuando la batería esté
completamente cargada.
Para utilizar el cortapelos enchufado a la red: apague el aparato,
,
enchúfelo a la red y espere unos segundos antes de encenderlo.
Sólo modelo QC5010:
1 Inserte la clavija del aparato en el mismo. (g. 3)
2 Enchufe el adaptador a la red.
Uso del aparato
Corte de pelo con peine-guía
La longitud del pelo después del corte se indica en milímetros en el
,
display. Las medidas corresponden a la longitud del pelo una vez
cortado.
La longitud del pelo después del corte sólo se puede ver si el
,
peine-guía está colocado en el aparato.
1 Deslice el peine-guía del barbero por las ranuras de guía del
aparato (“clic”). (g. 5)
Asegúrese de que los brazos del peine-guía se han deslizado
correctamente por las ranuras de ambos lados.
2 Ajuste el peine-guía a la longitud de pelo deseada (3, 6, 9, 12, 15, 18
o 21 milímetros) girando el bloqueo de longitud (g. 6).
3 Encienda el aparato (g. 7).
Page 15

ESPAÑOL 15
Consejos
Le aconsejamos que comience a cortar el pelo con la posición más
-
alta del peine-guía y que vaya reduciendo la posición de longitud
poco a poco hasta llegar a la longitud deseada.
Si se ha acumulado mucho pelo en el peine, quítelo y sople o sacuda
-
el pelo del peine. Al quitar el peine no se modica la posición de
longitud del pelo seleccionada.
Anote la posición de longitud del pelo usada para crear un
determinado estilo de corte y así poder recordarla en futuras
ocasiones.
Corte de pelo sin peine-guía:
Puede utilizar el cortapelos sin el peine-guía para perlar la línea del
cuello y la zona alrededor de las orejas.
Tire del peine-guía para sacarlo del aparato (g. 8).
,
No tire nunca de la parte superior exible del peine. Tire siempre de su
parte inferior.
El peine-guía mantiene la unidad de corte a una distancia
,
determinada de la cabeza. Esto quiere decir que si utiliza el
cortapelos sin peine-guía le cortará el pelo al ras.
Limpieza
Limpie siempre el aparato después de usarlo.
No use productos abrasivos ni líquidos tales como alcohol, gasolina o
acetona, para limpiar el aparato.
El aparato y el adaptador sólo pueden limpiarse con el cepillo que se
suministra.
1 Antes de empezar a limpiarlo, asegúrese de que el aparato está
apagado y desenchufado de la red.
2 Tire del peine-guía para sacarlo del aparato (g. 8).
3 Presione con el pulgar la parte central de la unidad de corte hacia
arriba hasta que se abra y sáquela del aparato (g. 9).
Tenga cuidado de que la unidad de corte no se caiga al suelo.
Page 16

ESPAÑOL16
4 Limpie la unidad de corte con el cepillo que se suministra (g. 10).
5 Limpie también el interior del aparato con el cepillo que se
suministra (g. 11).
6 Coloque el saliente de la unidad de corte en la ranura y presione
para encajar la unidad en el aparato (“clic”) (g. 12).
El aparato no necesita lubricación.
Sustitución
Una unidad de corte gastada o deteriorada sólo debe ser sustituida por
una unidad de corte original de Philips.
Presione con el pulgar la parte central de la unidad de corte hacia
,
arriba hasta que se abra y sáquela del aparato (g. 9).
Tenga cuidado de que la unidad de corte no se caiga al suelo.
Coloque el saliente de la nueva unidad de corte en la ranura y
,
presione para encajar la unidad en el aparato (“clic”) (g. 12).
Medio ambiente (sólo modelo QC5050)
Al nal de su vida útil, no tire el aparato junto con la basura normal
,
del hogar. Llévelo a un punto de recogida ocial para su reciclado.
De esta manera ayudará a conservar el medio ambiente (g. 13).
La batería recargable incorporada contiene sustancias que pueden
contaminar el medio ambiente. Extraiga siempre la batería antes de
deshacerse del aparato o de llevarlo a un punto de recogida ocial.
Deposite la batería en un lugar de recogida ocial. Si no puede extraer la
batería, puede llevar el aparato a un servicio de asistencia técnica de
Philips, donde la extraerán y se desharán de ella de forma no perjudicial
para el medio ambiente.
Cómo extraer la batería
Extraiga la batería sólo si está completamente descargada.
1 Desenchufe el aparato de la red y deje que funcione hasta que el
motor se pare.
Page 17

ESPAÑOL 17
2 Presione con el pulgar la parte central de la unidad de corte hacia
arriba hasta que se abra y sáquela del aparato (g. 9).
Tenga cuidado de que la unidad de corte no se caiga al suelo.
3 Quite la parte superior de la carcasa del interior del aparato con
un destornillador (g. 14).
4 Separe la parte inferior de la carcasa del aparato (g. 15).
5 Saque la batería del aparato tirando de ella hacia fuera (g. 16).
6 Corte los cables y deseche la batería de una forma no perjudicial
para el medio ambiente.
No vuelva a conectar el aparato a la red una vez que lo haya abierto.
Garantía y servicio
Si necesita información o tiene algún problema, visite la página Web de
Philips en www.philips.com, o póngase en contacto con el Servicio de
Atención al Cliente de Philips en su país (hallará el número de teléfono
en el folleto de la garantía mundial). Si no hay Servicio de Atención al
Cliente de Philips en su país, diríjase a su distribuidor local Philips o
póngase en contacto con el Service Depar tment de Philips Domestic
Appliances and Personal Care BV.
Page 18

18
FRANÇAIS (CANADA)
Introduction
Cher consommateur, vous avez fait le bon choix! Votre nouvelle tondeuse
à cheveux Philips Super-easy s’adapte aux contours de votre tête,
facilitant ainsi son utilisation. An de pouvoir utiliser au mieux la tondeuse
à cheveux, nous vous conseillons de suivre les directives qui suivent.
Description générale (g. 1)
A Petit peigne
B Lame principale
C Bouton coulissant marche/arrêt
D Indicateur de longueur
E Verrou de la longueur de coupe (verrouille le réglage choisi)
F Brosse de nettoyage
G Adaptateur
H Fiche de l’appareil
I Ciseaux (QC5050 uniquement)
J Peigne coiffant (QC5050 uniquement)
Important
Lisez attentivement ce mode d’emploi avant d’utiliser l’appareil et
conservez-le pour un usage ultérieur.
Avant de brancher l’appareil, vériez que la tension indiquée sur
l’appareil correspond à celle du réseau local.
Si l’adaptateur est endommagé, remplacez-le toujours par un
adaptateur de même type pour éviter tout accident.
L’adaptateur contient un transformateur. Pour éviter tout accident,
-
n’essayez pas de remplacer la che de l’adaptateur en la coupant.
Cet appareil ne doit pas être utilisé par des personnes (incluant des
-
enfants) avec capacités physiques, sensorielles ou mentales réduites,
ou qui n’ont pas l’expérience et les connaissances nécessaires, à
moins qu’elles soient sous la surveillance d’une personne responsable
de leur sécurité ou aient reçu de cette personne des directives
concernant l’utilisation de l’appareil.
Les enfants doivent être surveillés pour s’assurer qu’ils ne s’amusent
pas avec l’appareil.
Page 19

FRANÇAIS (CANADA) 19
Gardez l’appareil et l’adaptateur au sec (g. 2).
Utilisez, rechargez et conservez l’appareil à une température entre
15 °C et 35 °C.
Cet appareil fonctionne avec les tensions de secteur se situant entre
220 et 240 V.
N’utilisez pas un adaptateur endommagé.
Pour éviter tout accident, n’utilisez pas l’appareil si un des accessoires
est endommagé ou brisé.
Utilisez uniquement l’adaptateur fourni avec l’appareil.
-
Cet appareil a été conçu uniquement pour tondre les cheveux. Ne
-
l’utilisez jamais à d’autres ns.
Champs électromagnétiques (EMF)
Cet appareil Philips est conforme à toutes les normes relatives aux
champs électromagnétiques (CEM). Il répond aux règles de sécurité
établies sur la base des connaissances scientiques actuelles s’il est
manipulé correctement et conformément au présent mode d’emploi.
Recharge (QC5050 seulement)
Chargez l’appareil pendant 8 heures (pile NiCd) ou 12 heures (pile
NiMh) avant de l’utiliser pour la première fois.
Un appareil dont la charge est complète a une durée d’utilisation sans l
allant jusqu’à 35 minutes (pile NiCd) ou 50 minutes (pile NiMh).
Ne faites pas recharger l’appareil pendant plus de 24 heures.
1 Assurez-vous que l’appareil est en position « arrêt » lorsqu’il se
recharge.
2 Insérez la che de l’appareil dans l’appareil (g. 3).
3 Branchez l’adaptateur sur la prise de courant murale.
Le voyant de charge s’allume pour indiquer que la charge de
,
l’appareil est en cours (g. 4).
Le voyant de charge ne s’éteint pas ou ne change pas de couleur
lorsque l’appareil est complètement chargé.
Page 20

FRANÇAIS (CANADA)20
Optimisez la durée de vie de votre pile
Après avoir chargé l’appareil pour la première fois, évitez de le recharger
entre les utilisations. Continuez plutôt à l’utiliser jusqu’à ce que la pile soit
(presque) à plat.
Déchargez entièrement la pile deux fois par année en laissant le
-
moteur en marche jusqu’à ce qu’il s’arrête.
Évitez de laisser l’appareil branché sur la prise murale en permanence.
Si l’appareil n’a pas été utilisé pendant une longue période, vous
devrez le recharger pendant 8 heures (pile NiCd) ou 12 heures (pile
NiMh).
Utilisation de la tondeuse avec l
QC5050 seulement :
Ne faites pas fonctionner l’appareil à partir d’une prise murale lorsque
la pile est complètement chargée.
,
Pour utiliser la tondeuse sur secteur : arrêtez-la, branchez-la sur la
tension de secteur et patientez quelques secondes avant de la
mettre en marche.
QC5010 seulement :
1 Insérez la che de l’appareil dans l’appareil. (g. 3)
2 Branchez l’adaptateur sur la prise de courant murale.
Utilisation de l’appareil
Utilisation de la tondeuse avec guide de coupe
La longueur des cheveux après la coupe est indiquée en millimètres
,
sur l’afchage. Les réglages correspondent à la longueur de cheveux
après la coupe.
La longueur de cheveux après la coupe n’est visible que lors de
,
l’utilisation du guide de coupe.
1 Faites glisser le guide de coupe sur les glissières de l’appareil (vous
devez entendre un déclic). (g. 5)
Page 21

FRANÇAIS (CANADA) 21
Vériez que les deux branches du guide de coupe sont positionnées
correctement.
2 Verrouillez le réglage de longueur de coupe (3, 6, 9, 12, 15, 18 ou
21 millimètres) en faisant tourner le verrou (g. 6).
3 Mettez l’appareil en marche (g. 7).
Conseils
Nous vous conseillons de commencer par le réglage de coupe le plus
-
élevé et de réduire au fur et à mesure jusqu’à la longueur désirée.
Si des poils se sont accumulés dans le guide de coupe, retirez-le et
-
enlevez-les en soufant et (ou) en secouant le guide de coupe. Le
retrait du guide de coupe ne modie pas la longueur de coupe
sélectionnée.
Notez le réglage de votre longueur de coupe préférée utilisé pour
créer une coiffure en particulier pour vos futures utilisations.
Utilisation de la tondeuse sans le guide de coupe
Vous pouvez utiliser la tondeuse sans le guide de coupe pour tondre les
contours de la nuque et les tours d’oreille.
Retirez le guide de coupe de l’appareil (g. 8).
,
Ne tirez jamais sur la partie supérieure exible du guide de coupe. Tirez
toujours sur la partie inférieure.
Le guide de coupe permet de maintenir l’élément de coupe à
,
bonne distance de la tête. Si vous utilisez la tondeuse sans le guide
de coupe, vos cheveux seront donc coupés au plus près du cuir
chevelu.
Nettoyage
Nettoyez l’appareil après chaque utilisation.
N’utilisez pas de produits abrasifs, de tampons à récurer ou des
substances telles que l’alcool ou l’acétone pour nettoyer l’appareil.
Nettoyez la tondeuse et l’adaptateur uniquement à l’aide de la brosse
fournie.
Page 22

FRANÇAIS (CANADA)22
1 Assurez-vous que l’appareil est en position « arrêt » et débranché
avant de le nettoyer.
2 Retirez le guide de coupe de l’appareil (g. 8).
3 Poussez la partie du milieu de l’élément de coupe vers le haut à
l’aide du pouce jusqu’à ce que l’élément s’ouvre, puis retirez-le de
l’appareil (g. 9).
Veillez à ne pas laisser tomber l’élément de coupe sur le plancher.
4 Nettoyez l’élément de coupe à l’aide de la brosse fournie (g. 10).
5 Nettoyez également l’intérieur de l’appareil à l’aide de la brosse
fournie (g. 11).
6 Insérez la languette de l’élément de coupe dans la fente prévue à
cet effet, puis remettez l’élément en place (vous devez entendre un
déclic) (g. 12).
Cet appareil ne nécessite aucune lubrication.
Remplacement
Vous ne devez remplacer un élément de coupe usé ou endommagé que
par un élément de coupe de marque Philips.
Poussez la partie du milieu de l’élément de coupe vers le haut à
,
l’aide du pouce jusqu’à ce que l’élément s’ouvre, puis retirez-le de
l’appareil (g. 9).
Veillez à ne pas laisser tomber l’élément de coupe sur le plancher.
Insérez la languette du nouvel élément de coupe dans la fente
,
prévue à cet effet, puis remettez l’élément en place (vous devez
entendre un déclic) (g. 12).
Environnement (QC5050 seulement)
Lorsqu’il ne fonctionne plus, ne jetez pas l’appareil avec les ordures
,
ménagères; il est préférable de le déposer à un point de collecte de
produits recyclables. Vous contribuerez ainsi à la protection de
l’environnement (g. 13).
La pile rechargeable intégrée contient des substances qui peuvent nuire à
l’environnement. Veillez à toujours retirer la pile avant de mettre l’appareil
Page 23

FRANÇAIS (CANADA) 23
au rebut ou de le déposer à un endroit assigné à cet effet. Déposez la pile
usagée à un endroit assigné à cet effet. Si vous n’arrivez pas à la retirer,
vous pouvez apporter l’appareil dans un Centre Service Agréé Philips qui
prendra toute l’opération en charge.
Élimination de la pile
Ne retirez la pile que si elle est complètement vide.
1 Débranchez l’appareil de la prise de courant, puis laissez-le
fonctionner jusqu’à ce que le moteur s’arrête.
2 Poussez la partie du milieu de l’élément de coupe vers le haut à
l’aide du pouce jusqu’à ce que l’élément s’ouvre, puis retirez-le de
l’appareil (g. 9).
Veillez à ne pas laisser tomber l’élément de coupe sur le plancher.
3 Retirez la partie supérieure du boîtier de la partie intérieure de
l’appareil à l’aide d’un tournevis (g. 14).
4 Séparez la partie inférieure du boîtier de l’appareil (g. 15).
5 Retirez la pile de l’appareil (g. 16).
6 Coupez les connexions et déposez la pile dans un endroit assigné à
cet effet.
Ne branchez plus l’appareil dans une prise murale après l’avoir ouvert.
Garantie et service
Si vous avez besoin de renseignements ou si vous avez un problème,
visitez le site Web Philips à l’adresse www.philips.com, ou contactez le
centre de service à la clientèle Philips de votre région (vous trouverez le
numéro de téléphone dans le feuillet de garantie). S’il n’y a pas de centre
de service à la clientèle dans votre pays, communiquez avec le détaillant
Philips de votre région ou avec le service d’entretien de Philips Domestic
Appliances and Personal Care BV.
Page 24

24
Page 25

25
Page 26

26
Page 27

27
Page 28

28
Page 29

29
Page 30

303132
Page 31

Page 32

Page 33

33
Page 34

2 3 4 5
34
6
10 11 12 13
14 15 16
7 8 9
Page 35

35
Page 36

u
4203.000.5452.3www.philips.com
 Loading...