

Philips PC-Dictation Microphone User Manual
SpeechMike
Classic/Pro
Professional
PC-dictation microphone
INT
Quick reference......2
www.philips.com/dictation
F
Référence rapide.....7
D
Kurzreferenz..........13

2 Philips Speec hMike Quick Reference
Philips SpeechMike Installation Guide
System requirements
• IBM-compatible PC with Pentium II, 233MHz processor (Pentium III, 500MHz recommended)
• At least 64 MB RAM (128 MB recommended)
• 75 MB hard disk space for SpeechMike drivers & software
• A self-powered USB port (see the Troubleshooting section for details)
• Windows 98 SE*, Windows Me*, Windows 2000 or Windows XP
* Note: Windows 98 SE and Windows Me operating systems are supported for driver installation only!
Installation on Windows 2000 and Windows XP systems
Hardware:
1. Turn on your computer and plug the SpeechMike device into the USB port.
2. The New Hardware Found message will be displa yed on your screen shortly.
Note: If this message does not appear, verify whether the USB port is enabled in the BIOS of your
system. See your hardware documentation for details or contact your hardware vendor.
3. Insta llation will proceed automatically.
Software:
Note: A user must have administrator rights to install the program under Windows 2000 or
Windows XP. Contact your system administrator if you need help.
The SpeechMike software is delivered on t he Driver & Utility CD. When you insert the
Driver & Utility CD int o your CD-ROM d rive, the SpeechMike setup program is automatically started.
Select Install to begin the installation. If the setup program is not run when you insert the
Driver & Utility CD, st art setup manually by doing the following:
1. Double-click the My Computer icon on the desktop.
2. Double-click the CD-ROM drive icon; you will be shown the contents of the CD.
3. Start the program autorun.exe by double-clicking it and select Install.
Installation on Windows 98 SE and Windows ME systems
Note: The Windows 98 Second Edition CD contains the USB drivers for the microphone and
loudspeaker only. The drivers for the LED display and dictation buttons must be installed from the
Driver & Utility CD before connecting the hardware.
1. Turn on your computer and insert the Driver & Utility CD without plugging the SpeechMike device
into the USB port.
2. Auto run.exe will start. If this program is not run when you insert the Driver & Utility CD, start setup
manually by doing the following:
• Double-click the My Computer icon on the desktop.
• Double-click the CD-ROM d rive ic on; you will be shown the con tents of the CD.
• Start the program autorun.exe by double-clicking it.
3. Click Install to begin installation.
4. Remove the Driver & Utility CD and insert your Windows 98 SE or Windows ME CD.

Philips Speech Mik e Quick Reference 3
5. Plug the SpeechMike device into the USB port.
6. When the Add New Hardware Wizard starts, click Next.
7. On the next screen, make sure that Search for the best driver for your device. (Recommended)
is selected. Then click Next.
8. On the following screen, the only option selected should be Specify a location, and the path of the
Windows\inf folder should be displayed in the field. If necessary, uncheck all other options and click
Next.
9. Windows will now start looking for the necessary file s ; click Next.
Note: The required files from the Windows 98 SE or Windows ME CD can be found in the
Setup/Win98 or Setup/WinME subdirectory (respectively), browse to this directory and click OK.
10. After the first part of the installation has been completed successfully, click Finish.
11. Repeat steps 6–10 until all SpeechMike components are installed correctly.
Troubleshooting
• Using the Philips SpeechMike t ogether with ce rtain USB hu bs on certain PCs may cause the
operating system to stop responding when the PC is started. To workaround this: unplug your
SpeechMike before starting the PC and reconnect it afterwards. To solve this problem, we
recommend replacing the USB hub or connecting your SpeechMike directly to the USB port of your
PC.
• Some PC providers limit the output power of USB ports to 100mA (milliamps). These USB ports are
called bus-powered USB ports. Such ports may not provide enough power for some USB devices to
function properly. To resolve this issue, connect a self-powered USB hub to the USB port of your
PC, then connect the USB device via the self-powered hub.
• If the LEDs and buttons of your SpeechMike do not work correctly, refer to the Readme file on the
Driver & Utility CD.
Warning
The cable of your SpeechMike can be damaged if it is kinked or if it is pulled or twisted too much.
Please handle the cable carefully to ensure the best possible performance of your SpeechMike.
For more information please refer to the User Manual on the Driver & Utility CD.
4 Philips Speec hMike Quick Reference
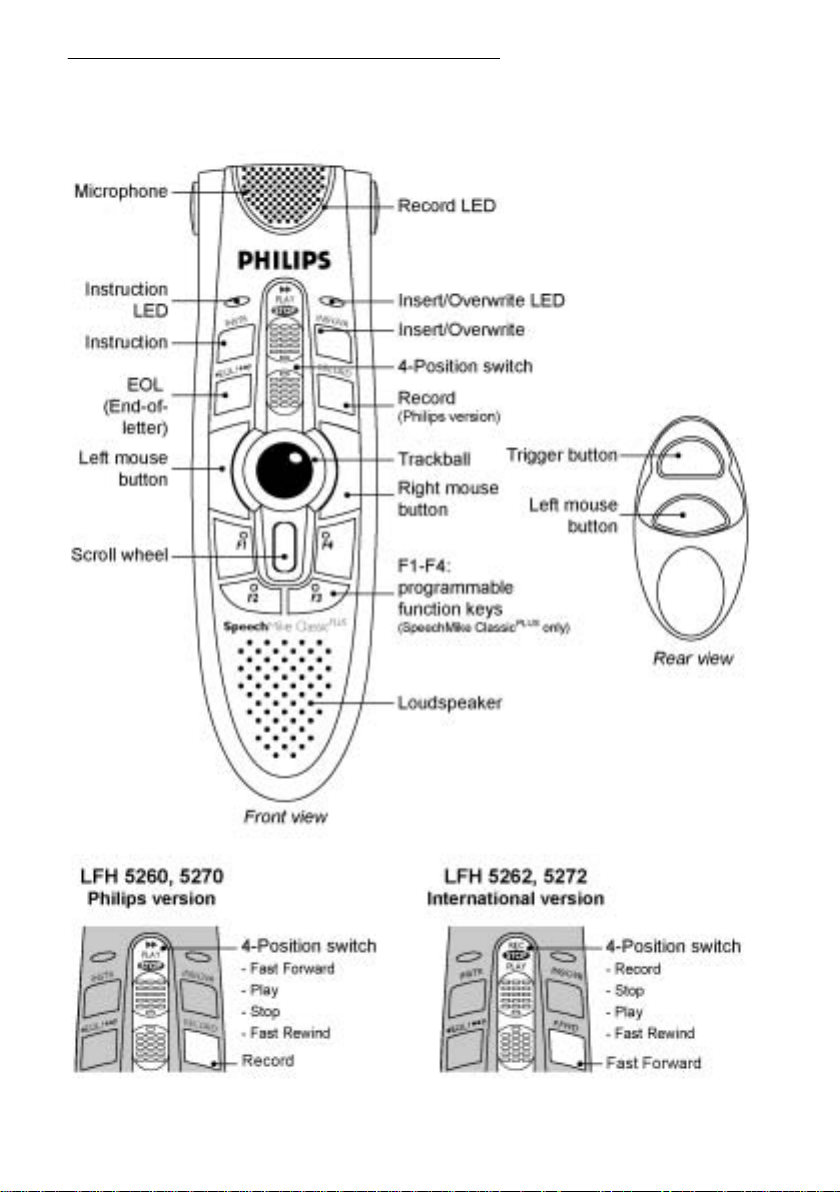
SpeechMike Classic and SpeechMike Classic
PLUS
buttons
Philips Speech Mik e Quick Reference 5
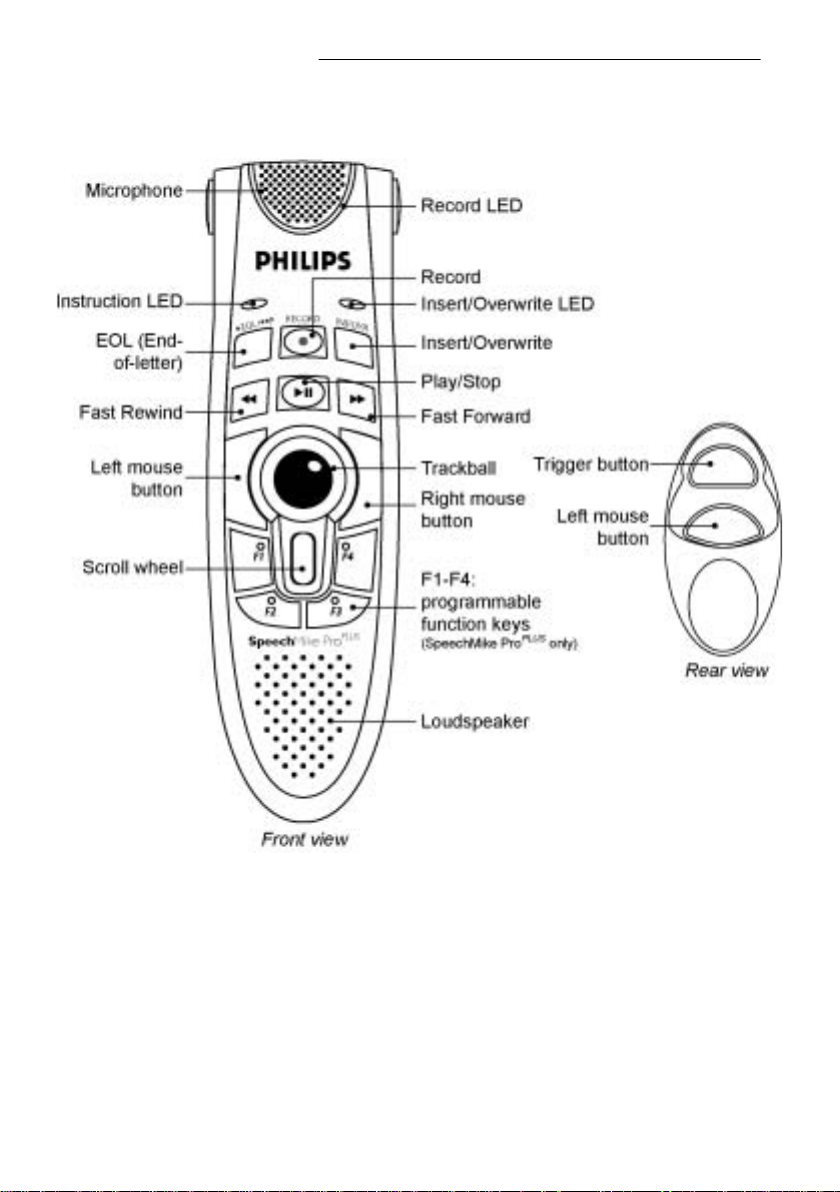
SpeechMike Pro and SpeechMike Pro
PLUS
buttons
6 Philips Speec hMike Quick Reference
COPYRIGHT
© 1997 – 2005 Philips Speech Processing - Dictat ion Systems.
All rights reserved. Reproduction in whole or in part is prohibited without the written consent of the
copyright owner.
Information in this manual is subject to change without notice.
TRADEMARKS
Digital Pocket Memo and SpeechMike are trademarks of Philips.
DISCLAIMER AND NOTICES
Philips Dictation Syste ms has carried out extensive testing with most popula r c onfigurations. However,
since PC add-ons and drivers change very rapidly, we are unable to guarantee conflict-free operation.
Possible solutions for solving such conflicts can be found in the Readme file.
The CE mark confirms that the machine corresponds to the relevant
guidelines of the European Union.
This manual has been printed on chlorine-free, recycled paper, in line
with the highest standards of environmental friendliness.
The cardboard used for packaging can be recycled. This electronic
facility contains recyclable material.
Technical changes and errors excepted.
Declaration of Conformity
Model Numbers: LFH 5260, LFH 5262, LFH 5270, LFH 5272, LFH 5274, LFH 5276
Trade Name : SpeechMike Classic, SpeechMike Pro
Responsible Party: PHILIPS DICTATION SYSTEMS
Address: 64 Perimeter Center East, Fifth Floor
Atlanta, GA 30346
USA
Telephone Number: +1 770 821 2400
This device complies with Part 15 of the FCC Rules. Operation is subject to the following two
conditions:
(1) This device may not cause harmful interference, and (2) this device must accept any interference
received, including interference that may cause undesired operation
Tested To Comply
With FCC Standards
FOR HOME OR OFFICE USE


8 Philips Speec hMike Référence rapide
Philips SpeechMike Guide d'Installation
Système requis
• IBM-compatible PC avec Pentium II, 233MHz processeur (Pentium III, 500MHz recommendés)
• Un minimum de 64 Mo RAM (mémoire vive) (128 Mo est recommandé).
• 75 Mo espace disque dur pour Pilote & Logiciels SpeechMike
• Un port USB autonome (lisez la section sur la gestion de pannes pour détails)
• Windows 98 SE*, Windows Me*, Windows 2000 ou Windows XP
• Possédér le dernier „Service Packs” installé sur votre système d’éxploitation est fort recommandé.
* Note: Les systèmes d’éxploitation Windows 98 SE et Windows Me sont soutenus seulement pour
l’installation du pilote!
Installation sur Windows 2000 et Windows XP
Installation matérielle
1. Démarrez votre opérateur et insérez le SpeechMike dans le port USB.
2. Le message New Hardware Found (Nouveau Matériel Trouvé) apparaîtra sur votre moniteur.
Note: Si ce message n'apparaît pas, verifiez si le port USB est activé dans le BIOS (Basic
Input/Output System) de votre système. Lisez la documentation du matériel pour détails ou contactez
votre vendeur de matériels informatiques.
3. L’installation va procéder automatiquement.
Installation logicielle
Note: L'u tilisateur doit avoir le droit d'administrateur pour installer le programme sous Windows 2000 ou
Windows XP. Contactez votre administrateur de système si vous avez besoin d'aide.
Le logiciel SpeechMike est livré sur le CD SpeechMike. Quand vous insérez ce CD dans votre lecteur
CD-ROM, le programme setup SpeechMike se lancera automatiquement. Sélectionnez Install
(Installer) pour commencer l'installation. Si le programme setup ne démarre pas quand le CD est
inséré, lancez le setup manuellement en faisant comme suit:
1. Double-cliquez l'icône My computer (Mon ordinateur) sur le bureau.
4. Double-cliquez l'icône lecteur CD-ROM; les contenus du CD apparaîtront.
5. Double-cliquez le programme autorun.exe et démarrez-le; sélectionnez Install (Installer).
Installation sur Windows 98 SE et Windows ME
Note: Le CD Deuxième Édition pour Windows 98 contient les pilotes USB seulement pour le
microphone et haut-parleur. Il faut installer le pilote pour les boutons d'affichage LED et dictation du CD
SpeechMike avant brancher le matériel.
1. Démarrez l’ordinateur et insérez le CD SpeechMike sans mettre le SpeechMike dans le port USB.
2. Autorun.exe se lancera. Si ce programme n’est pas exécuté quand vous insérez le CD SpeechMike,
lancez setup manuellement en faisant comme suit:
• Double-cliquez s ur l’icône Mon ordinateur sur le bureau.
• Double-cliquez sur l'icône lecteur CD-ROM; les contenus du CD apparaîtront.
• Double-cliquez s ur le programme autorun.exe pour le lancer.
3. Appuyez Install (Installer) pour lancer l'installation.
4. Enlevez le CD SpeechMike et insérez votre CD Windows 98 SE ou Windows ME.

Philips SpeechMike Référence rapide 9
5. Insérez le SpeechMike dans le port USB.
6. Quand l'Assistant Add New Hardware (Ajouter Nouveau Matériel) se lance, cliquez sur Suite.
7. Sur l'écran sélectionnez Recherche pour le meilleur pilote pour votre périphérique
(recommendé), ensuite appuyez Suite.
8. Sur l'écran suivant, il faut sélectionner seulement l'option Définir la location, et dans ce champ il
faut afficher le chemin d'accès du dossier Windows\inf. Si requis, décochez tous les autres options
et appuyez Suite.
9. Windows commencera à chercher tous les fichier nécessaires; cliquez sur Suite.
Note: Les fichiers requis du CD Windows SE ou Windows ME peut être trouvés dans le sousrépértoire Setup/Win98 ou Setup/WinME (respectivement); allez à ce répértoire et appuyez OK.
10. Après la première part de l'installation est terminée avec succès, cliquez sur Fin.
11. Répétez les étapes 6–10 jusqu'à ce que tous les composants SpeechMike sont installés
corrèctement.
Dépannage
• Utiliser le SpeechMike avec certains hubs US B sur certains PCs peut en résulter que le système
d'exploitation ne réponds pas quand l'ordinateur est démarré. Pour contourner ça, dépassez votre
SpeechMike avant démarrer l'ordinateur et raccrochez-le ensuite. Pour résoudre ce problème, nous
vous recommendons de remplacer le hub USB ou brancher votre SpeechMike dirèctement au port
USB de l'ordinateur.
• Certains vendeurs d'ordinateurs limitent la performance de sortie des ports USB sous 100mA
(milliamps). Ces ports USB sont nommés ports USB bus-commande. L'énergie de ces ports peutêtre n'est pas suffisante pour certains périphérique USB et ils ne fonctionneront pas
convenablement. Pour résoudre ce problème, branchez un hub USB autonome au port USB de
votre ordinateur, et ensuite branchez le périphérique USB par le hub autonome.
• Si les LEDs et les boutons de votre SpeechMike ne fonctionnent pas corrèctement, consulter le
fichier Readme (Lisezmoi).
Avertissement
Le câble de votre SpeechMike peut être abîmé s'il est e ntortillé ou tiré ou tordu à l'excè s . Veuillez
manier le câble soigneusement pour assurer la meilleure performance possible de votre SpeechMike.
Pour plus d'informations, réportez-vous au Manuel d'Utilisation sur le CD SpeechMike.
 Loading...