

Page 1

Micro Hi-Fi System
User manual
Manuel d'utilisation
Manual del usuario
Benutzerhandücher
Gebruikershandleidingen
Manuale per l'utente
Användarhandböckerna
Brugermanual
Käyttöoppaita
Manual do usuário
MCB240
Page 2
Important notes for users in the
U.K.
Mains plug
This apparatus is fitted with an approved 13
Amp plug. To change a fuse in this type of plug
proceed as follows:
1 Remove fuse cover and fuse.
2 Fix new fuse which should be a BS1362 3 Amp,
A.S.T.A. or BSI approved type.
3 Refit the fuse cover.
If the fitted plug is not suitable for your socket
outlets, it should be cut off and an appropriate
plug fitted in its place.
If the mains plug contains a fuse, this should
have a value of 3 Amp. If a plug without a fuse
is used, the fuse at the distribution board
should not be greater than 3 Amp.
Note: The severed plug must be disposed of to
avoid a possible shock hazard should it be
inserted into a 13 Amp socket elsewhere.
How to connect a plug
The wires in the mains lead are coloured with
the following code: blue = neutral (N),
brown = live (L).
¶ As these colours may not correspond with the
colour markings identifying the terminals in
your plug, proceed as follows:
– Connect the blue wire to the terminal
marked N or coloured black.
– Connect the brown wire to the terminal
marked L or coloured red.
– Do not connect either wire to the earth
terminal in the plug, marked E (or e) or
coloured green (or green and yellow).
Before replacing the plug cover, make certain
that the cord grip is clamped over the sheath
of the lead - not simply over the two wires.
Copyright in the U.K.
Recording and playback of material may
require consent. See Copyright Act 1956 and
The Performer’s Protection Acts 1958 to 1972.
Italia
DICHIARAZIONE DI CONFORMITA’
Si dichiara che l’apparecchio MCB240 Philips
risponde alle prescrizioni dell’ar t. 2 comma 1
del D.M. 28 Agosto 1995 n. 548.
Fatto a Eindhoven
Philips Consumer Electronics
Philips, Glaslaan 2
5616 JB Eindhoven, The Netherlands
Norge
Typeskilt finnes på apparatens underside.
Observer: Nettbryteren er sekundert
innkoplet. Den innebygde netdelen er
derfor ikke frakoplet nettet så lenge
apparatet er tilsluttet nettkontakten.
For å redusere faren for brann eller elektrisk
støt, skal apparatet ikke utsettes for regn eller
fuktighet.
CAUTION
Use of controls or adjustments or
performance of procedures other than
herein may result in hazardous
radiation exposure or other unsafe
operation.
VAROITUS
Muiden kuin tässä esitettyjen
toimintojen säädön tai asetusten
muutto saattaa altistaa vaaralliselle
säteilylle tai muille vaarallisille
toiminnoille.
2
Page 3
3
%
!
#
&
^
)
¡
≤
1
@
$
5
8
9
(
*
£
™
∞
)
1
3
4
6
7
8
9
2
5
!
0
33
Page 4

DK
Advarsel: Usynlig laserstråling ved åbning
når sikkerhedsafbrydere er ude af funktion.
Undgå utsættelse for stråling.
Bemærk: Netafbryderen er sekundært
indkoblet og ofbryder ikke strømmen fra
nettet. Den indbyggede netdel er derfor
tilsluttet til lysnettet så længe netstikket
sidder i stikkontakten.
S
Klass 1 laseraparat
Varning! Om apparaten används på annat
sätt än i denna bruksanvisning specificerats,
kan användaren utsättas för osynlig
laserstrålning, som överskrider gränsen för
laserklass 1.
Observera! Stömbrytaren är sekundärt
kopplad och bryter inte strömmen från
nätet. Den inbyggda nätdelen är därför
ansluten till elnätet så länge stickproppen
sitter i vägguttaget.
SF
Luokan 1 laserlaite
Varoitus! Laitteen käyttäminen
muulla kuin tässä käyttöohjeessa mainitulla
tavalla saattaa altistaa käyttäjän
turvallisuusluokan 1 ylittävälle
näkymättömälle lasersäteilylle.
Oikeus muutoksiin varataan. Laite ei
saa olla alttiina tippu-ja roiskevedelle.
Huom. Toiminnanvalitsin on kytketty
toisiopuolelle, eikä se kytke laitetta irti
sähköverkosta. Sisäänrakennettu verkkoosa on kytkettynä sähköverkkoon aina
silloin, kun pistoke on pistorasiassa.
4
Page 5

Index
English ------------------------------------------------ 6
Français -------------------------------------------- 21
Español --------------------------------------------- 36
Deutsch --------------------------------------------- 51
Nederlands ---------------------------------------- 66
Italiano ---------------------------------------------- 81
Svenska --------------------------------------------- 96
English
Français
EspañolDeutschNederlandsItalianoSvenskaDanskSuomi
Dansk --------------------------------------------- 111
Suomi --------------------------------------------- 126
Por tuguês ---------------------------------------- 141
E ----------------------------------------- 156
Por tuguês
5
Page 6

Contents
English
General Information
Environmental Information ................................ 7
Supplied accessories ............................................ 7
Safety information ................................................ 7
About Digital Audio Broadcasting (DAB) ....... 8
Preparations
Rear connections ......................................... 9 –10
Optional connection ......................................... 10
Before using the remote control.................... 10
Replacing battery (lithium CR2025) into the
remote control ................................................... 10
Controls
Controls on the system and remote
control ........................................................... 11~12
Connecting other equipment to your system
FM Radio Reception
Tuning to radio stations .................................... 22
Programming radio stations ............................. 22
Automatic programming
Manual programming
Tuning to preset radio stations ....................... 22
RDS ....................................................................... 22
Setting the RDS clock ....................................... 23
Clock/Timer
Setting the clock ................................................. 24
Viewing the clock ............................................... 24
Setting the timer................................................. 24
Activating and deactivating TIMER ................. 24
Activating and deactivating SLEEP .................. 24
Specifications ........................................... 25
Basic Functions
Switching the system on ................................... 13
Switch the system to
Eco Power Standby mode ................................ 13
Power Saving Automatic Standby .................... 13
Adjusting volume and sound............................ 13
CD/MP3-CD Operation
Loading a disc ...................................................... 14
Basic playback controls ..................................... 14
Playing an MP3 disc ............................................ 15
Different play modes: SHUFFLE and REPEAT15
Programming track numbers ........................... 15
Reviewing the programme ............................... 16
Erasing the programme ..................................... 16
DAB Reception
DAB reception.................................................... 17
Tuning/retuning ................................................... 17
Selecting a station .............................................. 18
Saving presets ...................................................... 19
Recalling a preset ............................................... 19
Viewing the service info ................................... 20
Sorting stations ................................................... 20
Dynamic range control (DRC)........................ 20
Resetting .............................................................. 21
Maintenance.............................................. 25
Tr oubleshooting .................................... 26
6
Page 7

General Information
This product complies with the radio
interference requirements of the European
Community.
Environmental Information
All unnecessary packaging has been omitted. We
have tried to make the packaging easy to
separate into three materials: cardboard (box),
polystyrene foam (buffer) and polyethylene (bags,
protective foam sheet).
Your system consists of materials which can be
recycled and reused if disassembled by a
specialized company. Please observe the local
regulations regarding the disposal of packaging
materials, exhausted batteries and old
equipment.
Disposal of your old product
Your product is designed and
manufactured with high quality
materials and components,
which can be recycled and
reused.
When this crossed-out wheeled bin symbol is
attached to a product it means the product is
covered by the European Directive 2002/96/EC
Please inform yourself about the local separate
collection system for electrical and electronic
products.
Please act according to your local rules and do
not dispose of your old products with your
normal household waste. The correct disposal of
your old product will help prevent potential
negative consequences for the environment and
human health.
Supplied accessories
–2 speaker boxes
– remote control (with battery)
– stand
– screw and plug assembly
Safety Information
● Before operating the system, check that the
operating voltage indicated on the typeplate of
your system is identical with the voltage of your
local power supply. If not, please consult your
dealer.
● Place the system on a flat, hard and stable
surface.
● Place the system in a location with adequate
ventilation to prevent internal heat build-up in
your system. Allow at least 10 cm (4 inches)
clearance from the rear and the top of the unit
and 5 cm (2 inches) from each side.
● The ventilation should not be impeded by
covering the ventilation openings with items, such
as newspapers, table-cloths, cur tains, etc.
● Do not expose the system, batteries or discs to
excessive moisture, rain, sand or heat sources
caused by heating equipment or direct sunlight.
● No naked flame sources, such as lighted candles,
should be placed on the apparatus.
● No objects filled with liquids, such as vases, shall
be placed on the apparatus.
● If the system is brought directly from a cold to a
warm location, or is placed in a very damp room,
moisture may condense on the lens of the disc
unit inside the system. Should this occur, the CD
player would not operate normally. Leave the
power on for about one hour with no disc in the
system until normal playback is possible.
● The mechanical par ts of the set contain self-
lubricating bearings and must not be oiled or
lubricated.
● To prevent injury, this apparatus must be securely
attached to the floor/wall in accordance with the
installation instructions.
● Install this unit near the AC outlet and where the
AC power plug can be reached easily.
● When the system is switched to Standby
mode, it is still consuming some power. To
disconnect the system from the power
supply completely, remove the AC power
plug from the wall socket.
English
7
Page 8

General Information
English
About Digital Audio
Broadcasting (DAB)
DAB digital radio is a new way of broadcasting
radio via a network of terrestrial transmitters. It
provides listeners with more choice and
information delivered in crystal clear, cracklefree sound quality.
– The technology allows the receiver to lock
on to the strongest signal it can find.
–With DAB digital stations there are no
frequencies to remember, and sets are tuned by
station name, so there's no retuning on the
move.
What is a multiplex?
Digital radio operation is made up of a single
block of frequencies called a multiplex. Each
multiplex works within a frequency spectrum,
such as Band III for DAB broadcasts.
Note:
–You will receive only those stations within
your transmission area.
DAB Broadcasters and DLS
Each DAB broadcaster (or multiplex operator)
also provides text and audio data services.
Some programmes are supported by Dynamic
Label Segments (DLS). This is data which you
can read as scrolling text on your DAB radio
display. Some stations transmit the latest news,
travel, and weather, what's on now and next,
website addresses and phone numbers.
For more information on digital radio coverage
and services, please visit: www.drdb.org.
8
Page 9

T-shape Antenna
Preparations
English
Speaker
(right)
AC power cord
Rear connections
The type plate is located at the rear of the
system.
For users in the U.K.: please follow the
instructions on page 2.
A Pow er
Before connecting the AC power cord to the
wall outlet, ensure that all other connections
have been made.
Warning!
–For optimal performance, use only the
original power cable.
–Never make or change any connections
with the power switched on.
To avoid overheating of the system, a safety
circuit has been built in. Therefore, your
system may switch to Standby mode
automatically under extreme conditions. If
this happens, let the system cool down
before reusing it (not available for all versions).
Speaker
(left)
B Speakers Connection
Front Speakers
Connect the speaker wires to the Speaker
terminals, right speaker to "R" and left speaker to
"L", colored (marked) wire to "+" and black
(unmarked) wire to "-".
● Fully insert the stripped portion of the speaker
wire into the terminal as shown.
Notes:
–For optimal sound performance, use the
supplied speakers.
– Do not connect more than one speaker to any
one pair of +/- speaker terminals.
– Do not connect speakers with an impedance
lower than the speakers supplied. Please refer to
the SPECIFICATIONS section of this manual.
9
Page 10

Preparations
English
C Optional connection
The optional equipment and connecting cords
are not supplied. Refer to the operating
instructions of the connected equipment for
details.
Connecting other equipment to your
system
Connect the audio left and right OUT terminals
of a TV, VCR, Laser Disc player, DVD player or
CD Recorder to the AUX terminals.
Note:
– If you are connecting equipment with a mono
output (a single audio out terminal), connect it to
the AUX left terminal. Alternatively, you can use a
“single to double” cinch cable (the output sound
still remain mono).
Replacing battery (lithium
CR2025) into the remote control
1 Pull out the knob A slightly to the left.
2 Pull out the batter y compar tment B .
3 Replace a new batter y and fully insert the
battery compar tment back to the original
position.
Before using the remote control
1 Pull out the plastic protective sheet.
2 Select the source you wish to control by
pressing one of the source select keys on the
remote control (for example CD, TUNER).
3 Then select the desired function (for example
ÉÅ , S , T).
plastic
protective
sheet
CAUTION!
Batteries contain chemical substances, so
they should be disposed of properly.
10
Page 11

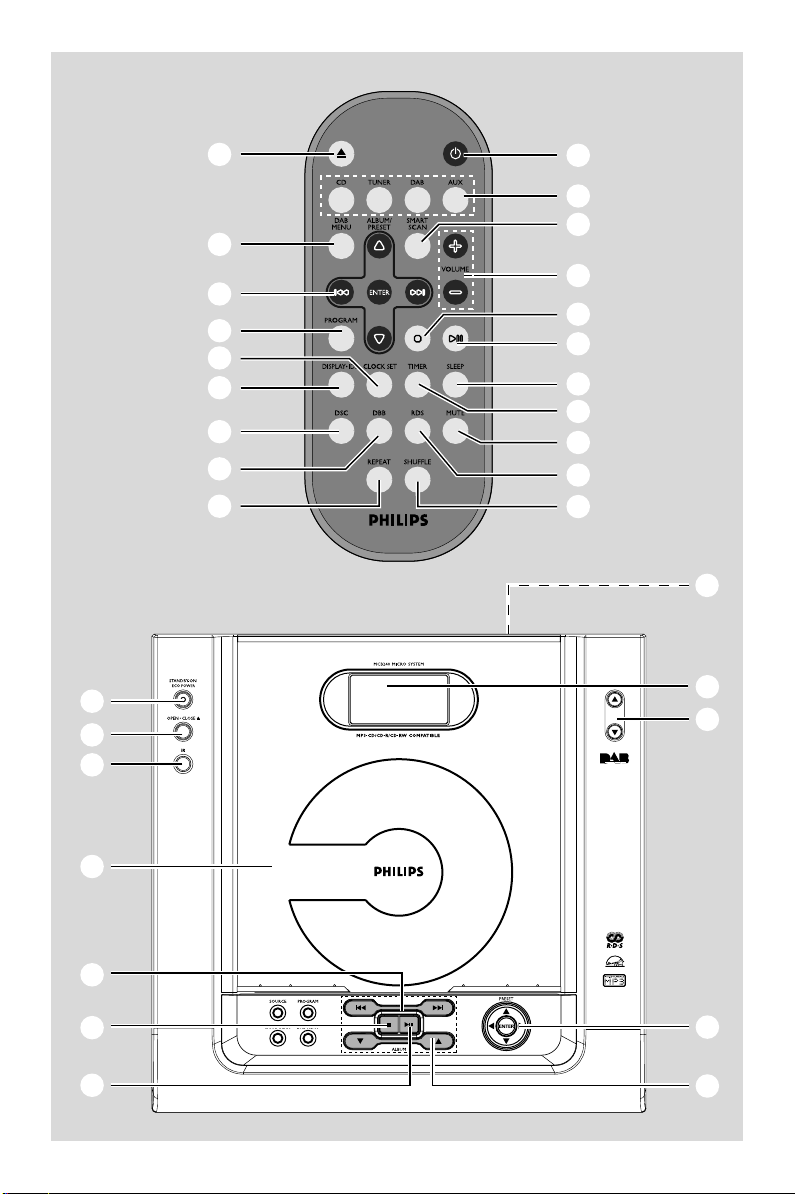
Controls (illustrations on page 3)
Controls on the system and
remote control
1 STANDBY-ON/ECO POWERB
– switches the system on or to Eco Power
standby/normal standby with clock display.
2 Display screen
– shows the status of the system.
3 OPEN • CLOSEç
– opens/closes the CD door.
4 IR
– remote sensor
5 VOLUME (3/4) (+/-)
– adjusts the volume level.
– adjusts the hours and minutes for the clock/timer
function.
6 CD Door
7 S/T
for CD/MP3-CD fast searches back and
forward within a track/disc (press
and hold).
................................. skips to the beginning of a
current/previous/subsequent
track.
8 9
– stops disc playback or erases a disc program.
9 ÉÅ
– starts or interrupts playback.
0 ALBUM 4/3
for TUNER ........ selects a preset radio station.
for MP3-CD .....skips to the beginning of a
current/previous/subsequent
album.
! Navigation controls
PRESET3 / 4ALBUM/PRESET
for TUNER
................................. selects a preset radio station (up,
down).
for MP3-CD (on the remote only)
................................. skips to the beginning of a
current/previous/subsequent
album.
TUNE 1 / 2 (S/T)
for DAB ..............scrolls an option list.
for TUNER ........ tunes to radio stations (down/
up).
for CD/MP3-CD (on the remote only)
................................. fast searches back and forward
within a track/disc (press and
hold).
................................. skips to the beginning of a
current/previous/subsequent
track.
ENTER .............press to select an option (DAB
only)
@ SOURCE
– selects the respective sound source for CD/DAB/
FM/AUX.
# PROGRAM
for CD/MP3-CD programs tracks and reviews
the program.
for TUNER/DAB programs radio stations.
for CLOCK .......(on the set only) selects 12- or
24-hour clock display.
$ SMART SCAN
– autoscans for DAB frequencies.
% DAB MENU
– enables access to advanced setup options.
^ DISPLAY•ID3
for CD/MP3-CD displays disc information
during playback.
for DAB ..............to view DAB service information.
& CLOCK SET
– sets the clock function.
* TIMER
– activates/deactivates or sets the timer function.
( SLEEP
– activates/deactivates or selects the sleeper time.
) DSC (Digital Sound Control)
– selects sound characteristics: POP/ JAZZ/ROCK/
CLASSIC.
English
11
Page 12

Controls (illustrations on page 3)
English
¡ DBB (Dynamic Bass Boost)
– enhances the bass.
™ RDS
–for tuner, displays RDS information.
£ MUTE
– interrupts and resumes sound reproduction.
≤ REPEAT
– repeats a track/album/disc program/entire disc.
∞ SHUFFLE
– plays disc tracks in random order.
§ n
– connects headphones.
Notes for remote control:
– First select the source you wish to control
by pressing one of the source select keys on
the remote control (for example CD,
TUNER).
– Then select the desired function (for
example ÉÅ,S , T).
12
Page 13

Important!
Before you operate the system, complete
the preparation procedures.
Switching the system on
● Press STANDBY-ON/ECO POWER (or B
on the remote).
➜ The system will switch to the last selected
source.
● Press CD, TUNER, DAB or AUX on the
remote control.
➜ The system will switch to the selected source.
● Press OPEN•CLOSEç.
➜ The system will switch to the CD source.
Switching the system to Eco
Power Standby mode
● Press STANDBY-ON/ECO POWER (or B
on the remote).
➜ The backlight for clock display is dim in
standby.
➜ The ECO POWER LED will be lighted.
Basic Functions
● To view clock time in standby mode, press and
hold STANDBY-ON/ECO POWER (or B
on the remote) for more than 3 seconds or
more.
➜ The system enters the standby mode with
clock display.
● The volume level (up to a maximum volume
level of 20), interactive sound settings, last
selected mode (ECO Power Standby or normal
standby), source and tuner presets will be
retained in the player's memory.
Power Saving Automatic Standby
As a power-saving feature, the system
automatically switches to Eco Power/ Standby 15
minutes after a CD has reached the end and no
control is operated.
Adjusting volume and sound
1 Press VOLUME 3 / 4 (+/-) to decrease or
increase the volume.
➜ Display shows the volume level VOL and a
number from MIN 1, 2, ...30, 31 MAX.
2 Press DSC repeatedly to select the desired
sound effect: POP/JAZZ/ROCK/CLASSIC.
3 Press DBB to switch bass enhancement on or
off.
➜ Display shows: DBB ON or DBB OFF.
4 Press MUTE on the remote control to
interrupt sound reproduction instantly.
➜ Playback will continue without sound and
MUTE will flash on the display.
● To activate sound reproduction you can:
– press MUTE again;
– adjust the volume controls;
– change source.
English
13
Page 14

CD/MP3-CD Operation
English
Important!
The lens of the CD player should never be
touched.
Loading a disc
This CD player plays Audio Discs including CD
Recordables, CD-Rewritables and MP3 CD.
● CD-ROM, CD-I, CDV, VCD, DVD or computer
CDs, however, are not possible.
1 Press SOURCE on the front panel of the
system to select CD or press CD on the
remote.
2 Press OPEN•CLOSEç to open the CD
compartment.
➜ OPEN is displayed when the compartment
cover slides up.
3 Inser t a disc with the printed side facing up.
Press OPEN•CLOSEç again to close the
compartment.
➜ CLOSE is displayed followed by READING as
the CD player scans the contents of a disc, and
then the total number of tracks and playing time
(or the total number of albums and tracks for
MP3 disc) are shown.
Basic playback controls
To play a disc
● Press ÉÅ to star t playback.
➜ The current track number and elapsed
playing time of the track are displayed during
disc playback.
To select a different track
● Press S/T once or repeatedly until the
desired track number appears in the display.
● If you have selected a track number shortly after
loading a disc or in the PAUSE position, you will
need to press ÉÅ to start playback.
Te xt display during playback
In CD mode
● Press DISPLAY•ID3 repeatedly to see the
following information.
➜ Tr ack number and elapsed play time of
current track.
➜ Remaining play time of current track.
➜ Total number of tracks played and total
elapsed time.
➜ Total remaining number of tracks and total
remaining play time.
In MP3-CD mode
● Press DISPLAY•ID3 repeatedly to select four
display modes : Number, Album &Title, Album &
Tr ack Number and ID3.
Number ➜ Track number and elapsed play time.
Album &Title ➜ Album name and track title
name.
Album & Track Number ➜ Album number
and track number.
ID-3 ➜ ID-3 tag scrolls once
14
Page 15

CD/MP3-CD Operation
To find a passage within a track
1 Press and hold down on S/T.
2 When you recognize the passage you want,
release S/T.
➜ Normal playback continues.
To stop playback
● Press 9.
To interrupt playback
● Press ÉÅduring playback.
➜ The display freezes and the elapsed playing
time flashes when playback is interrupted.
➜ To resume, press ÉÅ again.
Notes:
CD play will also stop when;
– the CD door is opened.
– the disc has reached the end.
– you select another source: TUNER, DAB or AUX.
– you select standby.
– the set auto off time arrives.
Playing an MP3 disc
1 Load an MP3 disc.
➜ The disc reading time may exceed 10
seconds due to the large number of songs
compiled into one disc.
➜ The total number of albums and tracks (titles)
are shown.
2 Press ALBUM 4/3 (or ALBUM/PRESET 3 /
4 on the remote) to select a desired album.
3 Press S/T to select a desired track.
➜ The album number will change accordingly as
you reach the first track of an album by pressing
S or the last track of an album by pressing
T.
4 Press ÉÅ to star t playback.
Supported MP3 disc formats:
– ISO9660, Joliet
– Maximum title number: 512 (depending on
filename length)
– Maximum album number: 255
– Supported sampling frequencies: 32 kHz,
44.1kHz, 48 kHz
– Supported Bit-rates: 32~256 (kbps), variable
bitrates
Different play modes: SHUFFLE
and REPEAT
You can select and change the various play
modes before or during playback. The REPEAT
modes can also be combined with PROGRAM.
SHUFFLE .........tracks of the entire disc are
played in random order
SHUFFLE and REPEAT ALL
................................. to repeat the entire disc
continuously in random order
REPEAT ALL ...repeats the entire disc/program
REPEAT ...... repeats the current album (for
MP3 CD)
REPEAT ONE .plays the current track
continuously
1 To select your play mode, press SHUFFLE or
REPEAT on the remote control before or
during playback until the display shows the
desired function. (SHUF, NO SHUF, REPEAT
ONE, REPEAT , REPEAT ALL)
2 PressÉÅ to start playback if in the STOP
position.
➜ If you have selected SHUFFLE, playback star ts
automatically.
3 To return to normal playback, press the
respective SHUFFLE or REPEAT button until
the various SHUFFLE / REPEAT modes are no
longer displayed.
● You can also press 9 to cancel your play mode.
Programming track numbers
Program in the STOP position to select and
store your disc tracks in the desired sequence. If
you like, store any track more than once. Up to
20 tracks can be stored in the memory.
1 Press PROGRAM to enter the programming
mode.
➜ A track number is shown and PROG flashes.
2 Use S/T to select your desired track
number.
English
15
Page 16

CD/MP3-CD Operation
English
3 Press PROGRAM to confirm the track number
to be stored.
➜ P-X displays, in which X denotes the next
program number to be stored.
4 Repeat steps 2-3 to select and store all desired
tracks.
➜ PROG FULL is displayed if you attempt to
program more than 20 tracks.
5 Press STOP 9 to finish programming.
➜ PROG DONE is displayed.
6 To star t playback of your disc program, press
ÉÅ directly.
Reviewing the program
In STOP mode, press and hold PROGRAM
until the display shows all your stored track
number in sequence.
Erasing the program
You can erase the program by:
● pressing STOP 9 once in the STOP mode;
● pressing STOP 9 twice during playback;
➜ PROG disappears and PROG CLR displays
briefly.
● opening the CD compartment;
16
Page 17

DAB reception
DAB
1 Press STANDBY-ON/ECO POWERy to on,
then press SOURCE to select DAB (or press
DAB on the remote control).
➜ Display shows Welcome to Digital Radio,
followed by and/or
.
➜ The list of available stations is created/
restored, and the set tunes to the last station
detected / selected.
➜ The name of current station is shown in the
1st display line. The broadcasting text, if available,
scrolls in the 2nd display line (DLS in default
setting).
DAB
The first time you tune to this DAB
● If the tuning fails, the display shows
for 5 seconds and appears.
DAB Reception
➜ Press TUNE 1 / 2 once or more (or S/
T on the remote) to enter Autoscan full
(see Tuning/retuning)
Next time you tune to DAB
● If the tuning fails, the display shows
or .
➜ Retuning to alternative services/frequency
starts automatically.
➜ A dot appears in the screen every 0.5
second.
➜ After successful tuning, the station name
appears and broadcasting text scrolls.
● If retuning also fails, the display shows
or . You can either
➜ Use Autoscan to refresh the list of available
stations (see Resetting).
➜ Press ENTER to go to a tuning indication
(see Tu ning/retuning: To improve
reception).
Tuning/retuning
Autoscan
Autoscan local - scans all the UK frequencies
(in default setting)
Autoscan full - scans all Band III and Band L
frequencies.
● To star t Autoscan local, briefly press SMART
SCAN.
● To star t Autoscan full, press and hold
SMART SCAN until appears.
➜ Display shows and the number
of stations having been detected. A progress bar
appears, indicating the scanning progress.
English
DAB
17
Page 18

DAB Reception
DAB
DAB
English
Notes:
– When moving to another place, you can use
Autoscan to refresh the list of available stations.
– If no station is found during autoscan, the
display will show . (See
Tr oubleshooting)
Manual tune
With Manual Tune, you can quickly access your
desired station according to its channel number.
1 Press DAB MENU to enter the advanced
setup menu.
2 Push TUNE 1 / 2 once or more (or S/T
on the remote) and then, ENTER to select
Manual tune.
➜ Display shows the first channel number and
the respective frequency.
3 If necessary, press TUNE 1 / 2 once or more
(or S/T on the remote) to select your
desired channel number in the list of available
channel numbers.
4 Press ENTER to confirm your selection.
➜ Display shows the channel number and
multiplex name. A bar appears, showing
reception strength.
5 Press ENTER again to tune to the station.
To improve reception
1 Press ENTER when tuning to a station.
➜ A tuning indication appears:
maximum reception
good reception
inadequate reception
no reception
2 To improve reception, extend and adjust the T-
shape antenna.
Note:
–If any action is not confirmed within 7 seconds, it
will be cancelled automatically.
– It is recommended to hang up one end of the Tshape antenna and keep the other end at
horizontal angle to it.
Selecting a station
After your DAB has been tuned, you can select a
station using the Navigation controls.
1 Push TUNE 1 / 2 once or more (or S/T
on the remote) to scroll the list of stored
stations.
➜ 1st display line: current station you are tuning
to 2nd display line: station name changes as you
scroll through the list.
2 When your desired station appears, press
ENTER to select the station.
➜ Tuning to the station star ts.
Indication of display symbols
............................. The station is one of your most
listened to stations;
................................. The list of available stations is
now sorted by the station order
of favorite stations. (See Fav
station in Sorting stations).
18
DAB
A number ...... Preset number assigned to
presets (e.g., 1, 2);
.............................. Station off air
Page 19

DAB
DAB
DAB
DAB
............................... A primary service, followed by
secondary ser vices
............................... A secondary ser vice, preceded
by a primar y ser vice
........................ You can press TUNE 1 / 2 (or
S/T on the remote) to
scroll backward/forward the list.
If tuning to a selected station fails:
● the display shows or
..
➜ Retuning to alternative services/frequency
starts.
➜ A dot appears in the screen every 0.5 second.
➜ After successful tuning, the station name
appears and broadcasting text scrolls.
● If the retuning also fails, the display shows
or . You should
then either:
➜ Use Autoscan to refresh the list of available
stations (see Resetting).
➜ Press ENTER to go to a tuning indication
(see chapter Tuning/retuning, To improve
reception).
DAB Reception
2 Press PROGRAM (make sure you have
selected your desired station and the list of
stations has disappeared from the 2nd display
line).
➜ Display shows: current station name at the
top display line and the stations saved in
program locations at the bottom.
3 Press PRESET 3 / 4 (or ALBUM/PRESET
3 / 4 on the remote) once or more to find a
free location to store your new station.
4 Press PROGRAM.
➜ Display: Preset X saved when a station is
successfully saved (where X denotes a preset
station number).
English
Saving presets
You can store up to 10 DAB radio stations in the
memory.
Manual programming
1 Select your desired station (See Selecting a
station).
➜ The name of current station is shown in the
1st display line. The broadcasting text, if available,
scrolls in the 2nd display line (DLS in default
setting).
Notes:
–You can erase a preset station by storing
another frequency in its place.
– If you have saved presets using Manual
programming, always select Fav station option when
using Station order sorting.
Recalling a preset
1 Press PRESET 3 / 4 (or ALBUM/PRESET
3 / 4 on the remote) once or more to find
your desired preset.
19
Page 20

DAB Reception
DAB
English
➜ Display shows: current station name at the
top display line and available presets at the
bottom.
2 Press ENTER to confirm.
➜ Your desired preset radio station plays.
Viewing the service info
You can view the DAB service info in the
following 7 information modes. Depending on
the DAB radio station you are tuning to, some
information modes may be unavailable.
● To scroll through the information options, press
DISPLAY•ID3 repeatedly until your desired
option appears.
➜ 1st display line: current station name. 2nd
display line: selected service info
DLS (Dynamic Label Segments)
– Displays the scrolling broadcasting text (in
default setting).
Program Type
– Describes content type (e.g. jazz, pop)
Multiplex Name
– Specifies the multiplex of current service. (A
multiplex is a group of stations broadcast by a
multiplex operator.)
Date and Time
– Shows the date & time of current multiplex.
Channel & Frequency
– Displays the channel and central frequency of
current multiplex.
Bit Rate and Audio Status
– Displays the transmission rate of broadcasting
date in bits per second (kbps);
– Display the audio status of current service in
stereo or mono.
Signal Error Rate
– Indicates signal quality: 0-15: Good; 16-30:
Acceptable; 30 or more: Poor.
DAB
Sorting stations
By sorting stations, you can define in what order
the available stations are listed when the DAB is
tuned.
1 Press DAB MENU.
2 Push TUNE 1 / 2 (or S/T on the
remote) and press ENTER to select Station
order.
➜ 1st display line: current station order. 2nd
display line: list of options, including:
Alphanumeric (default)
– Displays all the stations in alphanumeric order.
Fav station
– Depending on the length of listening time, the
set automatically lists 10 stations you most
frequently listen to in alphanumeric order
(favorite ones in the front and others at the
back).
Active station
– Displays active/inactive stations (active ones in
the front and inactive ones at the back).
Prune stations
– Removes inactive stations from the list.
3 Push TUNE 1 / 2 (or S/T on the
remote) and press ENTER to select your
desired option.
➜ Station order is changed as specified.
➜ The last selected station continues to play.
➜ Next time you tune the DAB, the available
stations are listed in the changed order.
Dynamic range control (DRC)
With the 3 DRC value options, you can adjust
the difference in loudness according to your
listening environment:
20
Page 21

1 Press DAB MENU.
2 Push TUNE 1 / 2 once or more (or S/T
on the remote) and then, ENTER to select
DRC value.
3 If necessary, push TUNE 1 / 2 once or more
(or S/T on the remote) and then,
ENTER to select your desired DRC value.
DRC 0 (for outdoor use), DRC 1/2 (for in-home
use), DRC 1 (for headphone use).
DAB
Resetting
If desired, you can restore your radio to its
default setting by using DAB MENU.
1 Press down on DAB MENU for more than 2
seconds.
➜ Display shows:
DAB Reception
English
2 Press ENTER to confirm resetting.
DAB
Note:
– If any of your action is not confirmed within 7
seconds, it is cancelled automatically.
21
Page 22

FM Radio Reception
English
Tuning to radio stations
1 Press SOURCE on the front panel of the
system or TUNER on the remote to select
TUNER.
2 Press and hold TUNE 1 / 2 (or S/T on
the remote).
➜ The radio automatically tunes to a station
with sufficient reception. Display indication during
automatic tuning: SEARCH.
3 Repeat step 2 if necessary until you find the
desired station.
● To tune to a weak station, press TUNE 1 / 2
(or S/T on the remote) briefly and
repeatedly until you have found optimal
reception.
Note:
– If no preset number is selected, default is preset
(1) and all your presets will be overridden.
2 Press PROGRAM for more than 2 seconds to
activate programming.
➜ AUTO PROGRAM is displayed and available
stations are programmed in order of waveband
reception strength: RDS followed by FM. The
last preset automatically stored will then be
played.
Manual programming
1 Tune to your desired station (see “Tuning to
radio stations”).
2 Press PROGRAM to activate programming.
3 Press PRESET 3 / 4 (or ALBUM/PRESET
3 / 4 on the remote) to allocate a number
from 1 to 30 to this station.
4 Press PROGRAM again to confirm the setting.
➜ The preset number and the frequency of the
preset station are shown.
5 Repeat the above four steps to store other
stations.
● You can override a preset station by storing
another frequency in its place.
Tuning to preset radio stations
● Press PRESET 3 / 4 (or ALBUM/PRESET
3 / 4 on the remote) until the desired preset
station is displayed.
Programming radio stations
You can store up to a total of 30 FM radio
stations in the memory.
Automatic programming
Automatic programming will star t with from
preset 1 and stop a the last programmed station.
All the former programmed radio stations will
be overridden.
1 Press PRESET3 / 4 (or ALBUM/PRESET 3
/ 4 on the remote) to select the preset number
where programming should start.
22
RDS
Radio Data System is a service that allows
FM stations to show additional information. If
you are receiving a RDS station, and the
station name are displayed.
When automatic programming is used, RDS
stations will be programmed first.
Page 23

Radio Reception
Scrolling through different RDS
information
● Press RDS briefly and repeatedly to scroll
through the following information (if available):
– Station name
– Programme type such as NEWS, SPORT,
POP M ...
– Radio text messages
– Frequency
Note:
– If you press RDS and the RDS signal is not
available NO RDS is displayed.
Setting the RDS clock
Some RDS radio station may be transmitting a
real clock time at an interval of every minute. It
is possible to set the clock by using a time signal
which is broadcast together with the RDS signal.
1 Tune to a RDS station.
2 The system will read the RDS time and set the
clock automatically.
Note:
– Some RDS radio station may be transmitting a
real time clock at a minute interval. The accuracy
of the transmitted time depends on the
transmitting RDS radio station.
RDS Programme types
NO TYPE .......... No RDS programme type
NEWS .................... News services
AFFAIRS .......... Politics and current affairs
INFO .................... Special information programmes
SPORT ................ Sports
EDUCATE .......... Education and advanced training
DRAMA ................ Radio plays and literature
CULTURE .......... Culture, religion and society
SCIENCE .......... Science
VARIED ............. Entertainment programmes
POP M ................. Pop music
ROCK M ............. Rock music
MOR M ................. Light music
LIGHT M .......... Light classical music
CLASSICS ...... Classical music
OTHER M .......... Special music programmes
WEATHER .......... Weather
FINANCE .......... Finance
CHILDREN ...... Children’s programmes
SOCIAL ............. Social Affairs
RELIGION ...... Religion
PHONE IN ....... Phone In
TRAVEL ............. Travel
LEISURE .......... Leisure
JAZZ .................... Jazz Music
COUNTRY .......... Country Music
NATION M ....... National Music
OLDIES ............. Oldies Music
FOLK M ............. Folk Music
DOCUMENT ...... Documentary
TEST .................... Alarm Test
ALARM ................ Alarm
English
23
Page 24

Clock/Timer
English
Setting the clock
The clock can be set in either 12-hour or 24-
hour mode (“AM12:00” or “00:00”, for
example).
1 In normal standby mode, press CLOCK SET.
➜ The clock digits for the hours flash.
2 Press PROGRAM on the set repeatedly to
select the clock mode.
➜ “AM12:00” or “00:00” is displayed with
“AM12” or “00” flashing.
3 Press VOLUME (3 / 4) (+/-) to set the hours.
4 Press CLOCK SET again.
➜ The clock digits for the minutes flash.
5 Press VOLUME (3 / 4) (+/-) to set the
minutes.
6 Press CLOCK SET to confirm the time.
Note:
– The backlight for clock display is dim in standby.
Viewing the clock
● Press CLOCK SET in power-on mode.
➜ The clock time is displayed.
Setting the timer
● The system can be used as an alarm clock,
whereby the CD, TUNER, DAB, AUX is switched
on at a set time. The clock time needs to be set
first before the timer can be used.
● During setting, if no button is pressed within 90
seconds, the system will exit timer setting mode
automatically.
24
1 In normal standby mode, press and hold TIMER
on the remote control for more than 3 seconds.
➜ The display shows SET TIMER and the
clock digits for the hours flash
2 Press VOLUME (3 / 4) (+/-) to set the hours.
3 Press TIMER again.
➜ The clock digits for the minutes flash.
4 Press VOLUME (3 / 4) (+/-) to set the
minutes.
5 Press TIMER to confirm your desired mode or
just wait a while without any operation.
➜ The display shows SET SOURCE and a
source option flashes.
6 Press VOLUME (3 / 4) (+/-) to select sound
source.
➜ Display sequence shows CD, TUNER, DAB,
AUX.
6 Press TIMER again to confirm.
➜ The timer is now set and activated.
Activating and deactivating
TIMER
● Press TIMER on the remote to turn off the
timer or turn on to the last setting again.
➜ If activated, the display shows .
Note:
– The system will exit timer setting mode if no
button is pressed within 90 seconds.
Activating and deactivating
SLEEP
The sleep timer enables the
system to switch off by itself
after a set period of time.
● Press SLEEP on the remote
control.
➜ SLEEP flashes and the display shows one of
the sleep time options in sequence: 90, 80, 70,
60, 50, 40, 30, 20, 10, OFF... if you have
selected a time. Once SLEEP is activated,
SLEEP is displayed.
● To deactivate, press SLEEP on the remote
control once or more until OFF is shown, or
press STANDBY-ON/ ECO POWER (or B
on the remote).
➜ SLEEP disappears.
Page 25

Specifications
AMPLIFIER
Output power ..........................................2 x 5 W RMS
............................................................ 10 W + 10 W MPO
Signal-to-noise ratio ....................................... ≥ 62 dBA
Frequency response ......... 63 – 16000 Hz, ± 3 dB
Input sensitivity AUX ....................... 0.5 V (max. 2 V)
Impedance loudspeakers ......................................... 4 Ω
Impedance headphones ........................................ 32 Ω
......................................................................................... <0.5W
CD PLAYER
Frequency range .................................. 30 – 16000 Hz
Signal-to-noise ratio ............................................ 75 dBA
TUNER
FM wave range ...................................87.5 – 108 MHz
DAB wave range ........................ Band III and Band L
Sensitivity at 75 Ω
– mono, 26 dB signal-to-noise r atio ............ 2.8 µV
– stereo, 46 dB signal-to-noise ratio ........ 61.4 µV
Selectivity ................................................................. ≥ 28 dB
Total harmonic distor tion ..................................... ≤ 5%
Frequency response ..... 63 – 12500 Hz (± 3 dB)
Signal-to-noise-ratio ...................................... ≥ 50 dBA
SPEAKERS
Bass reflex system
Dimensions (w x h x d) ....166 x 245 x 90 (mm)
GENERAL INFORMATION
AC Power ..................................... 220 – 240 V / 50 Hz
Dimensions (w x h x d) ....250 x 245 x 96 (mm)
Weight(with/without speakers) ...... 4.15 / 2.31 kg
Standby power consumption ............................ <7 W
Eco power standby ................................................. <1 W
Specifications and external appearance are
subject to change without notice.
English
Cleaning the Cabinet
● Use a soft cloth slightly moistened with a mild
detergent solution. Do not use a solution
containing alcohol, spirits, ammonia or abrasives.
Cleaning Discs
● When a disc becomes dir ty,
clean it with a cleaning cloth.
Wipe the disc from the centre
out.
● Do not use solvents such as
benzene, thinner, commercially
available cleaners, or antistatic spray intended for
analogue records.
Maintenance
Cleaning the disc lens
● After prolonged use, dirt or dust may
accumulate at the disc lens. To ensure good
playback quality, clean the disc lens with Philips
CD Lens Cleaner or any commercially available
cleaner. Follow the instructions supplied with
cleaner.
25
Page 26

Troubleshooting
English
WARNING
Under no circumstances should you try to repair the system yourself, as this will invalidate the
warranty. Do not open the system as there is a risk of electric shock.
If a fault occurs, first check the points listed below before taking the system for repair. If you
are unable to remedy a problem by following these hints, consult your dealer or Philips for
help.
Problème
“NO DISC” is displayed.
Radio reception is poor.
The system does not react when buttons
are pressed.
Sound cannot be heard or is of poor
quality.
The left and right sound outputs are
reversed.
The remote control does not function
properly.
Solution
✔ Insert a disc.
✔ Check if the disc is inserted upside down.
✔ Wait until the moisture condensation at the lens
has cleared.
✔ Replace or clean the disc, see “Maintenance”.
✔ Use a finalised CD-RW or correct format disc.
✔ If the signal is too weak, adjust the antenna or
connect an external antenna for better
reception.
✔ Increase the distance between the Micro HiFi
System and your TV or VCR.
✔ Hang up one end of the T-shape antenna and
keep the other end at horizontal angle to it.
✔ Remove and reconnect the AC power plug and
switch on the system again.
✔ Adjust the volume.
✔ Disconnect the headphones.
✔ Check that the speakers are connected correctly.
✔ Check if the stripped speaker wire is clamped.
✔ Check the speaker connections and location.
✔ Select the source (CD or TUNER, for example)
before pressing the function button (ÉÅ, S,
T).
✔ Reduce the distance between the remote
control and the system.
✔ Insert the batter y with its polarities
(+/– signs) aligned as indicated.
✔ Replace the battery.
✔ Point the remote control directly toward
IR sensor on the front of the system.
The timer is not working.
The Clock/Timer setting is erased.
26
✔ Set the clock correctly.
✔ Press TIMER to switch on the timer.
✔ Power has been interrupted or the power cord
has been disconnected. Reset the clock/timer.
 Loading...