

Philips Magic 3-2 Primo, Magic 3-2 Voice, Magic 3-2 Voice SMS User Manual
Easy Install
User Manual

Easy Install
Dear Customer,
With the following installation guide, you can quickly and easily start using your fax machine; you can also find more
detailed explanations and descriptions regarding your machine in the user manual. Please read this carefully, and always follow the safety instructions. After you have finished the installation press the HELP/w key for two seconds.
Your machine will then guide you through the main settings as well as the adjustment to your telephone line.
Packaging
The following items are included in the packaging:
1 user manual incl. installation guide
2 paper tray
3 handset
4 spiral cable for handset
5 fax machine (with loaded inkfilm)
6 mains cable with plug
7 telephone cable with plug
1
3
5
2
Telephone connection
Connect the telephone cable to the fax machine by
inserting it in the socket identified with LINE. Next
connect the telephone plug to the line socket on the
wall.
For Great Britain
For all other countries
4
7
6
2

Easy Install
Handset
Insert one end of the spiral cable into the socket of the
telephone handset and the other end into the socket
identified with a handset on the side of the unit.
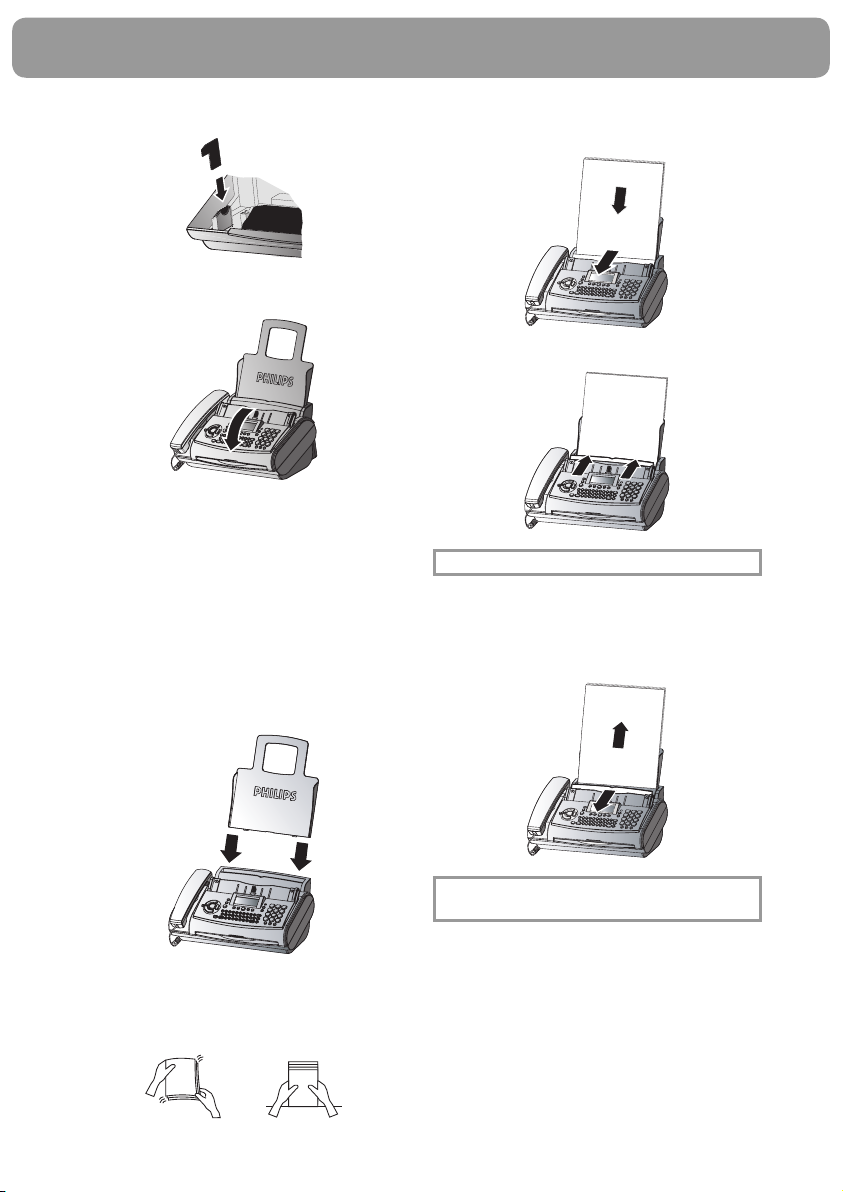
Loading paper
1 Insert the paper tray in the slots provided behind
the paper feed mechanism.
2 Pull the paper feed flap fully forward until it stops.
Insert several sheets of A4 paper (80 g/m
the end-stop in the paper feed mechanism (max. 50
sheets).
2
) up to
3 Close the paper feed flap.
Power supply
Starting up
To finish the installation process you have to go
through some main settings (e.g. adaption of your fax
to the telephone line). Using EASY INSTALL your
fax machine will be configured according to your local
conditions.
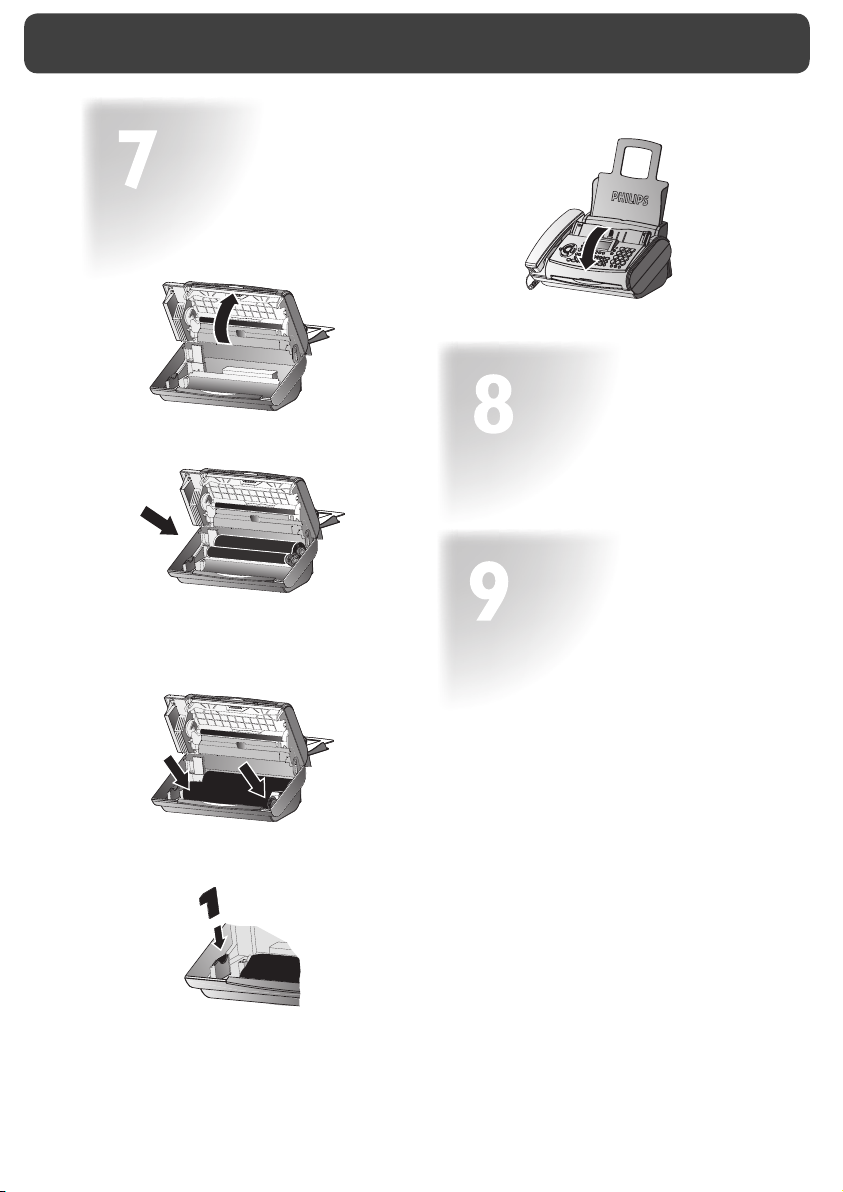
1 Press HELP/w for at least two seconds. Your fax
machine will print one page. Follow the instructions on it.
2 Your fax machine will then guide you on the display
through the first settings, such as your telephone
number and your name.
3 After that it will prompt you to enter the current
time and date. Use the dial pad to enter the correct
time (e.g. 09 15 for 9:15).
4 Enter the correct day, month and year (e.g. 15
05 05 for May 15th, 2005).
5 To conclude press OK
3
3
Easy Install
Ink lm
Your fax machine is supplied complete with a free ink
film for a few trial pages.
A new Plug’n’Print card has to be inserted with each
new ink film (only the first free ink film will work without a Plug’n’Print card).
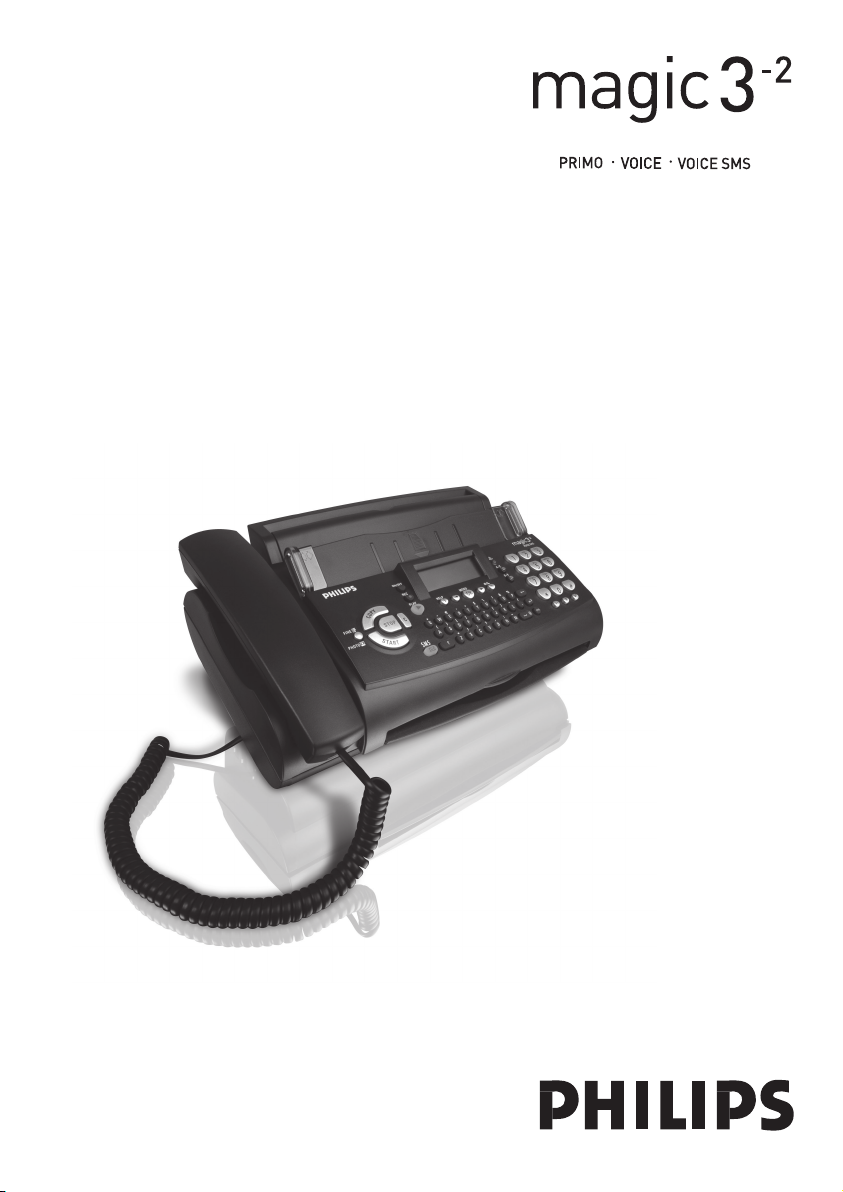
1 Open the fax machine by lifting the operating panel
in the middle until it clicks in place.
2 Lay the large roll in the grooves provided in the
rear ink film compartment.
3 Now take the small roll and lay it in the front ink
film compartment. Make sure that the blue toothed
wheel is on the right and the pin on the left is inserted in the depressions.
4 Break out the new Plug’n’Print card and insert it in
the slot to the left of the ink film compartments.
5 Close the machine by swinging the operation panel
forward, until it snaps in.
Additional devices
You can connect additional devices (telephones, cordless telephones, answering device, PC modem) to your
telephone line (see user manual, chapter Installation /
Additional devices).
SMS W
(for devices with SMS functionality)
Reading SMS messages
When you receive an SMS message you will hear a
beep. The message will be stored and automatically
printed out.
Sending SMS messages
1 Press the SMS key, then u to select SEND SMS
and OK.
2 The display shows TEXT. Enter your text mes-
sage (maximum of 160 characters) and press OK.
3 Enter the recipient’s number. Confirm with OK
and press the SMS key. Your SMS message will be
sent.
4

Answering machine b
(for device with built-in answering machine)
Your answering machine is factory-programmed with
a recorded outgoing message. Activated or deactivate
your answering machine with b ON/OFF. Activated
mode is indicated with the symbol b on the display.
Listening to messages
1 If PLAY flashes, messages have been recorded for
you.
2 Press PLAY to listen to the first message.
After listening to your messages PLAY will stay on
until all messages have been erased.
Deleting messages
1 Press C after having listened to all messages.
2 If you actually want to delete all messages, press C
again.
Sending faxes
1 Insert your documents (max. 10 sheets) loosely
with the printed side to the front into the document feed slot.
Easy Install
2 Dial the number you require.
3 Press START. Transmission now begins.
Copy
1 Insert your documents (max. 10 sheets) loosely
with the printed side to the front into the document feed slot (see above).
2 Briefly press COPY. The copying process starts
immediately.
5
5

User Manual
Description of the machine
1 Mains cable with power plug
2 Document guide
3 Paper feed flap
4 Paper tray
5 Telephone handset
6 Document Feeder
7 Operation panel
Display symbols *
f / F indicates whether you are sending or copying with a higher picture quality or with grey tones. If neither
of the two symbols is visible, the standard resolution is selected.
h appears when faxes are stored in memory.
áéíó indicates ink film consumption.
I appears when you receive another call while using the device or you receive a call in your absence (not available
in all countries).
W appears only if there are new SMS messages in the memory (for device with SMS functionality).
b shows that the built-in answering machine is switched on (for device with built-in answering machine).
$ faxes as well as phone calls are received completely silent.
S/M/ U three symbols on the display indicate the current settings.
8 Printer roller
9 Scanner lid
10 Holder for “Plug’N’Print” card
11 Front ink film compartment
12 Rear ink film compartment
* two lines for device with SMS functionality
6

Controls
User Manual
for device with built-in
answering machine
bON/OFF to activate /
deactivate answering machine
REC press briefly: to record
an internal memo; press and
hold (two seconds): to record
a new outgoing message
PLAY to play back messages. The key flashes when
new messages and memos
have been recorded. After
playback the key stays lit until
messages have been deleted
HELP/w press twice briefly: to print operating instructions for the most
important functions (with references to additional help pages); press and hold
(for two seconds): to start the automatic installation of your fax machine /
printout of Easy Install
u to select options / to adjust the volume / to move the cursor on the display
MENU/ OK to call up functions / to confirm entries
U to select different operation modes. Press briefly: choose between S and
M; press and hold (two seconds): operating mode U on/off
v if the red lamp flashes, please read the message on the display
a press briefly: to call up a name entry; press and hold (two seconds): to
store a telephone number
n press briefly: to select a phone number quickly; press and hold (two
seconds): to store a telephone number
for device with SMS-functionality
MS flashes if there are new SMS messages in the mem-
S
ory. For reading, printing and sending SMS messages
COPY press briefly: copy a document; press and hold (two
seconds): multiple copies
START press briefly: to start the fax transmission; press and
hold (two seconds): polling
FINE f / PHOTO F to select a higher resolution when copy-
ing or sending (for text and graphics – f, for photographs – F)
STOP to stop procedures / to eject documents
C delete while in edit mode / press briefly: move back one menu
level; hold pressed (two seconds): leave menu
PP press briefly: to repeat the last five
numbers you have dialled; press and hold
(two seconds): to browse the list of callers
(depending on country and network)
R press briefly: for special functions, e. g.
for the use with a private branch exchange
and for using various functions provided by
your service provider (call waiting, toggling
calls, etc.); press and hold (two seconds): to
insert a dialling pause between two figures
DIAL / z* for dialling without lifting the
handset. For devices with built-in answering machine for hands-free operation
* for fax machine with built-in answering
machine
7

User Manual
Contents
Packaging . . . . . . . . . . . . . . . . . . . . . . . . . . . . . . . . . . . 2
Telephone connection . . . . . . . . . . . . . . . . . . . . . . . . . 2
Handset . . . . . . . . . . . . . . . . . . . . . . . . . . . . . . . . . . . . . 3
Loading paper . . . . . . . . . . . . . . . . . . . . . . . . . . . . . . . . 3
Power supply . . . . . . . . . . . . . . . . . . . . . . . . . . . . . . . . 3
Starting up . . . . . . . . . . . . . . . . . . . . . . . . . . . . . . . . . . 3
Ink film . . . . . . . . . . . . . . . . . . . . . . . . . . . . . . . . . . . . . 4
Additional devices . . . . . . . . . . . . . . . . . . . . . . . . . . . . 4
SMS W* . . . . . . . . . . . . . . . . . . . . . . . . . . . . . . . . . . . 4
Answering machine b ** . . . . . . . . . . . . . . . . . . . . . 5
Sending faxes . . . . . . . . . . . . . . . . . . . . . . . . . . . . . . . . 5
Copy . . . . . . . . . . . . . . . . . . . . . . . . . . . . . . . . . . . . . . . 5
Description of the machine . . . . . . . . . . . . . . . . . . . . . 6
Controls . . . . . . . . . . . . . . . . . . . . . . . . . . . . . . . . . . . . 7
Safety instructions .......................... 9
Installation .................................... 10
Connection . . . . . . . . . . . . . . . . . . . . . . . . . . . . . . . . . 10
Ink film . . . . . . . . . . . . . . . . . . . . . . . . . . . . . . . . . . . . 10
Loading paper . . . . . . . . . . . . . . . . . . . . . . . . . . . . . . . 12
Removing paper . . . . . . . . . . . . . . . . . . . . . . . . . . . . . 12
Additional devices . . . . . . . . . . . . . . . . . . . . . . . . . . . 12
Easy Install . . . . . . . . . . . . . . . . . . . . . . . . . . . . . . . . . 14
ISDN connection . . . . . . . . . . . . . . . . . . . . . . . . . . . . 14
Private branch exchange . . . . . . . . . . . . . . . . . . . . . . 14
Basic settings ................................ 15
Help function . . . . . . . . . . . . . . . . . . . . . . . . . . . . . . . 15
Time and date . . . . . . . . . . . . . . . . . . . . . . . . . . . . . . . 15
Your number . . . . . . . . . . . . . . . . . . . . . . . . . . . . . . . 15
Your name . . . . . . . . . . . . . . . . . . . . . . . . . . . . . . . . . 15
Correction . . . . . . . . . . . . . . . . . . . . . . . . . . . . . . . . . . 16
Display language . . . . . . . . . . . . . . . . . . . . . . . . . . . . . 16
Distinctive ringing . . . . . . . . . . . . . . . . . . . . . . . . . . . 16
Volume . . . . . . . . . . . . . . . . . . . . . . . . . . . . . . . . . . . . 16
Fax switch .....................................17
Timer U . . . . . . . . . . . . . . . . . . . . . . . . . . . . . . . . . . 17
Set SM mode . . . . . . . . . . . . . . . . . . . . . . . . . . . . . . 17
Special settings . . . . . . . . . . . . . . . . . . . . . . . . . . . . . . 18
External answering machine . . . . . . . . . . . . . . . . . . . 18
Telephone ...................................... 20
Making a call . . . . . . . . . . . . . . . . . . . . . . . . . . . . . . . . 20
Redial PP . . . . . . . . . . . . . . . . . . . . . . . . . . . . . . . . 20
Short dial n . . . . . . . . . . . . . . . . . . . . . . . . . . . 20
Call list . . . . . . . . . . . . . . . . . . . . . . . . . . . . . . . . . . . . 20
Telephone book a . . . . . . . . . . . . . . . . . . . . . . 20
List of numbers . . . . . . . . . . . . . . . . . . . . . . . . . . . . . 22
Group . . . . . . . . . . . . . . . . . . . . . . . . . . . . . . . . . . . . . 22
Hands-free operation z . . . . . . . . . . . . . . . . . . . . . 22
Calling line identification . . . . . . . . . . . . . . . . . . . . . 22
8
Fax & Copy .................................... 23
Feeding documents in . . . . . . . . . . . . . . . . . . . . . . . . 23
Sending faxes . . . . . . . . . . . . . . . . . . . . . . . . . . . . . . . 23
Fax reception . . . . . . . . . . . . . . . . . . . . . . . . . . . . . . . 23
Broadcast . . . . . . . . . . . . . . . . . . . . . . . . . . . . . . . . . . 24
Image quality . . . . . . . . . . . . . . . . . . . . . . . . . . . . . . . 24
Contrast . . . . . . . . . . . . . . . . . . . . . . . . . . . . . . . . . . . 24
Transmission and error reports . . . . . . . . . . . . . . . . . 24
Transmission speed . . . . . . . . . . . . . . . . . . . . . . . . . . 25
Size compression . . . . . . . . . . . . . . . . . . . . . . . . . . . . 25
Fax journal . . . . . . . . . . . . . . . . . . . . . . . . . . . . . . . . . 25
Polled reception . . . . . . . . . . . . . . . . . . . . . . . . . . . . . 25
Send later . . . . . . . . . . . . . . . . . . . . . . . . . . . . . . . . . . 26
Copy . . . . . . . . . . . . . . . . . . . . . . . . . . . . . . . . . . . . . . 26
SMS W * ......................................27
SMS settings . . . . . . . . . . . . . . . . . . . . . . . . . . . . . . . . 27
Disable SMS printing . . . . . . . . . . . . . . . . . . . . . . . . . 27
Reading SMS messages . . . . . . . . . . . . . . . . . . . . . . . 27
Sending SMS messages . . . . . . . . . . . . . . . . . . . . . . . 28
Printing SMS messages . . . . . . . . . . . . . . . . . . . . . . . 28
Deleting SMS messages . . . . . . . . . . . . . . . . . . . . . . . 28
Other SMS functions . . . . . . . . . . . . . . . . . . . . . . . . . 28
Disable SMS reception . . . . . . . . . . . . . . . . . . . . . . . . 29
Answering machine b ** .......... 30
Switching on and off . . . . . . . . . . . . . . . . . . . . . . . . . 30
Recording a message . . . . . . . . . . . . . . . . . . . . . . . . . 30
Anonymous outgoing message . . . . . . . . . . . . . . . . . 30
Listening to messages . . . . . . . . . . . . . . . . . . . . . . . . 30
Play back volume . . . . . . . . . . . . . . . . . . . . . . . . . . . . 30
Deleting messages . . . . . . . . . . . . . . . . . . . . . . . . . . . 30
Forwarding messages . . . . . . . . . . . . . . . . . . . . . . . . . 31
Recording a conversation . . . . . . . . . . . . . . . . . . . . . . 31
VIP code . . . . . . . . . . . . . . . . . . . . . . . . . . . . . . . . . . . 31
Memo . . . . . . . . . . . . . . . . . . . . . . . . . . . . . . . . . . . . . 31
Remote control . . . . . . . . . . . . . . . . . . . . . . . . . . . . . . 32
Hints and Tips ...............................33
Delivery service . . . . . . . . . . . . . . . . . . . . . . . . . . . . . 33
Paper jam . . . . . . . . . . . . . . . . . . . . . . . . . . . . . . . . . . 33
Document jam . . . . . . . . . . . . . . . . . . . . . . . . . . . . . . 33
Easylink . . . . . . . . . . . . . . . . . . . . . . . . . . . . . . . . . . . . 34
Service code . . . . . . . . . . . . . . . . . . . . . . . . . . . . . . . . 34
Care . . . . . . . . . . . . . . . . . . . . . . . . . . . . . . . . . . . . . . . 35
Troubleshooting . . . . . . . . . . . . . . . . . . . . . . . . . . . . . 36
Appendix ....................................... 38
Functions . . . . . . . . . . . . . . . . . . . . . . . . . . . . . . . . . . 38
Technical data . . . . . . . . . . . . . . . . . . . . . . . . . . . . . . . 39
Warranty . . . . . . . . . . . . . . . . . . . . . . . . . . . . . . . . . . . 40
Environment . . . . . . . . . . . . . . . . . . . . . . . . . . . . . . . 41
Index . . . . . . . . . . . . . . . . . . . . . . . . . . . . . . . . . . . . . . 42
* only for devices with SMS functionality
** only for fax machine with built-in answering device
Safety
instructions
Please read all warning notices and instructions and
follow them precisely.
The fax machine must stand securely on a smooth, flat,
horizontal surface (no soft surface such as carpets etc.).
Any fall can cause severe damage to the fax machine
and/or injury to people, especially small children.
Because the document exit is at the front of the machine, this area should be kept unobstructed.
Avoid exposure to direct sunlight (the cartridge is heatsensitive) and close proximity with heaters, radios and
TV sets, air conditioning vents, dust, water and chemicals is not advised.
Make sure that air circulates freely around the fax machine. Do not operate the fax machine in closed boxes,
cupboards, cabinets etc. Never cover the fax machine
(tablecloths, paper, folders etc.). Do not place the fax
machine on beds, tablecloths, cushions, sofas, carpets
or other soft underlays due to the danger of overheating and subsequent fire.
Never connect the telephone in damp rooms unless
the wall sockets are specially designed for humid conditions. Never touch the power plug, connection to the
mains or telephone socket with wet hands.
Never touch uninsulated telephone or power cables
with damaged insulation, unless the telephone cable is
disconnected from the telephone line and/or the power cable is disconnected from the power line.
Place the fax machine on a flat surface and ensure a
minimum clearance of 10 cm between the fax machine
and other machines and objects.
If you would like to use a cordless phone, there should
be a distance of at least 15 cm in between the fax machine and the base station, otherwise you may hear
acoustic interference in your handset.
Ensure safe cable laying (danger of stumbling, damage
to the cable or the fax machine).
User Manual
Disconnect the fax machine from the mains and telephone line before cleaning the surface of the machine.
Never use liquid or gaseous cleaning agents (sprays,
scouring agents, polishes etc.).
Do not allow any liquid to enter the fax machine. Otherwise there is a risk of electric shock or other injury to
people and severe damage to the fax machine. If any
liquid does enter the fax machine, immediately remove
the power plug and have the fax machine professionally inspected.
If the display breaks, a mildly corrosive liquid may leak
out. Avoid contact with skin and eyes.
In case of any damage caused to the housing of your
fax machine in particular to power cables please remove the mains plug and call your service repair centre.
The housing of your fax machine may only be opened
by authorised service personnel.
Your fax machine has been tested in conformity with
standards EN 60950 and IEC 60950 respectively, and
may only be operated with telephone systems and power equipment which meet these standards.
Never expose your fax machine to rain or any other
form of moisture, in order to prevent the risk of electric shock or fire.
In a thunderstorm, disconnect the fax machine from
both the mains and the telephone line. If you are unable to disconnect the fax machine, do not use it and
do not telephone due to the danger of lightning strike
and/or damage to the device.
Neither telephone nor fax will operate during power
failure.
Your fax machine was built for exclusive use in the
country of purchase. It complies with the local network specifications.
9

User Manual
Installation
Connection
Please read all warning notices and instructions and
follow them precisely.
Telephone socket
Connect the telephone cable to the fax machine by inserting it in the socket identified with LINE. Next con-
nect the telephone plug to the line socket on the wall.
In the UK
For all other countries
Handset
Insert one end of the spiral cable into the socket of the
telephone handset and the other end into the socket
identified with a handset on the side of the unit.
Power supply
10
Ink lm
You cannot receive or copy documents unless an ink
film is loaded in the fax machine. The machine is therefore supplied complete with a free ink film for a few
trial pages.
The symbols áéíó indicate how much ink film
has already been used.
The consumption and print setting are stored on the
supplied Plug’n’Print card. A new Plug’n’Print card
therefore has to be inserted with each new ink film.
The settings were made at the factory for the initial
free ink film. Only this one therefore will work without a Plug’n’Print card. If this is missing or if it is not
replaced the message CHANGE CARD appears on the
display.
User Manual
If the message INKFILM LOW appears on the display,
there is not much ink film remaining. However, you
can still print out a few more pages.
If the ink film is finished or if there is no ink film in
the fax machine, the red display lamp flashes, and the
following message appears: REFILL INKFILM.
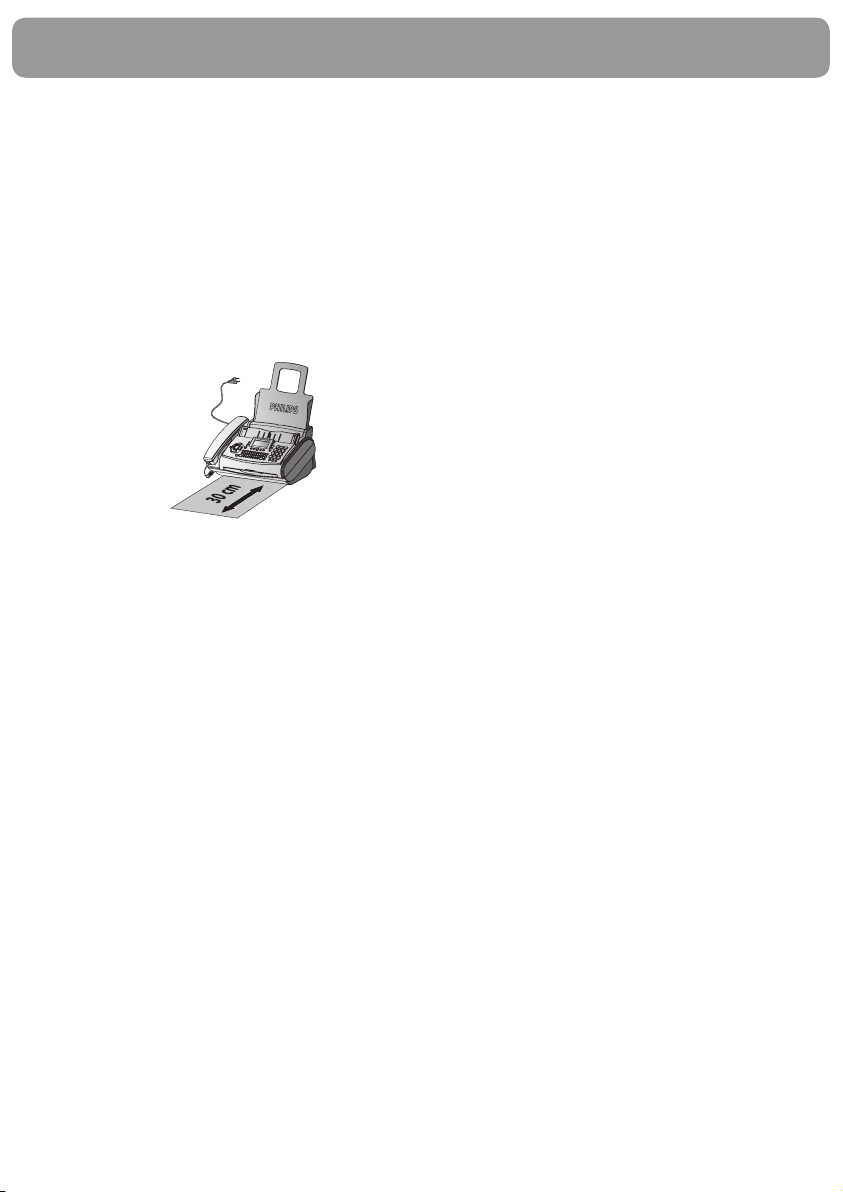
1 Before loading a new ink film you must remove the
paper from the paper feed mechanism! Also follow
the instructions on your ink film packaging!
2 Open the fax machine by lifting the operating panel
in the middle until it clicks in place.
v For use with Philips ink films only!
Removing the ink lm
1 Lift the rear ink film roll holding both sides with
your index fingers upwards, in order to remove it
out of its seat and place it next to the front ink film
roll.
3 Remove the old Plug’n’Print card from the slot to
the left of the ink film compartment (only the initial
free ink film does not have a Plug’n’Print card).
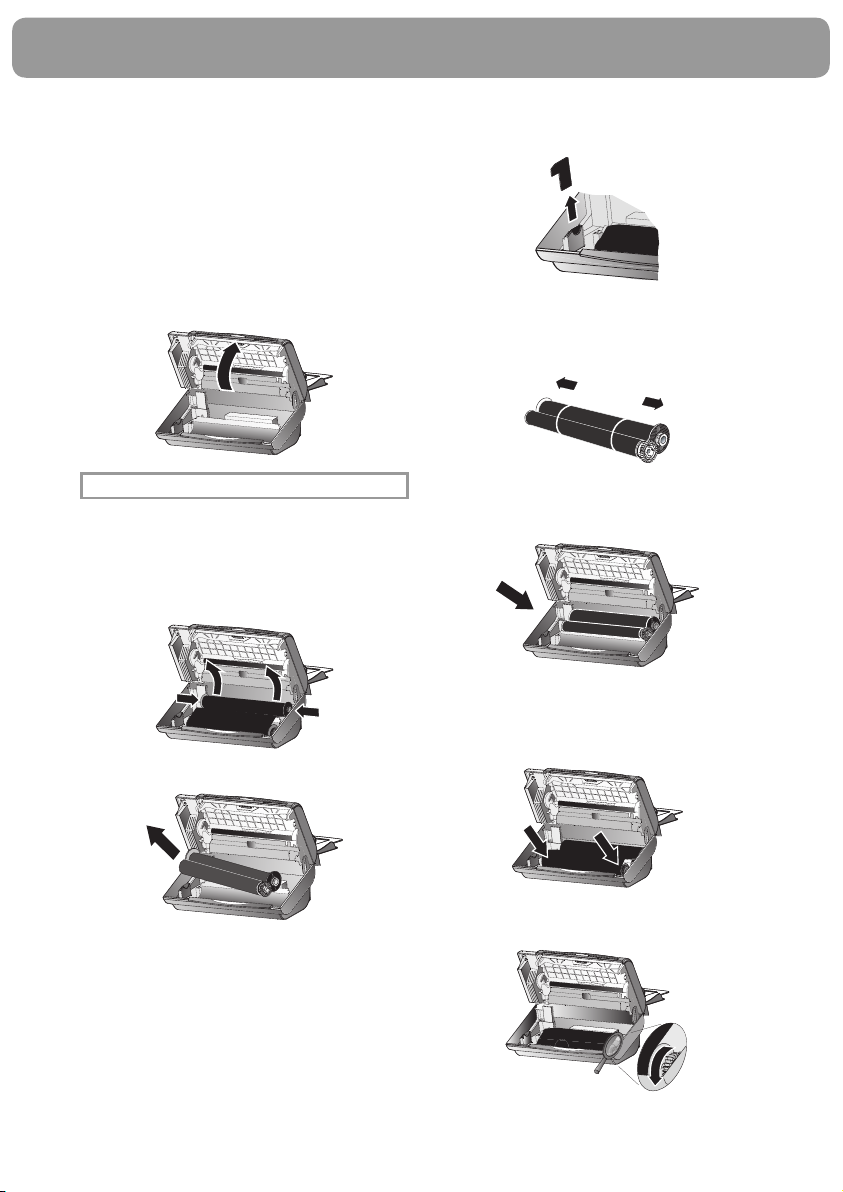
Loading the ink lm
1 Carefully remove the rubber rings from the new ink
film. Take care not to damage the ink film.
2 Lay the large roll in the grooves provided in the
rear ink film compartment. The blue toothed wheel
must be on the right-hand side.
2 Remove both ink film rolls. They cannot be reused.
3 Now take the small roll and lay it in the front ink
film compartment. Make sure that the blue toothed
wheel is on the right and the pin on the left is inserted in the depressions.
4 Turn small roll forward to tension the ink film.
Make sure that the ink film is not creased.
11
User Manual
5 Break out the new Plug’n’Print card and insert it in
the slot to the left of the ink film compartments.
6 Close the machine by swinging the operation panel
forward, until it snaps in.
Loading paper
Before you can copy documents, paper must be loaded
in your fax machine. Please use only the following paper format: standard A4 210 × 297 mm. The fax machine works with normal paper used for writing and
copying and has been optimised for smooth 80g/m
paper. The smoother the paper surface the better the
print quality.
1 Insert the paper tray in the slots provided behind
the paper feed mechanism.
3 Pull the paper feed flap fully forward until it stops. In-
sert several sheets of A4 paper (80 g/m
stop in the paper feed mechanism (max. 50 sheets).
4 Close the paper feed flap.
Never load paper while the fax machine is printing!
Removing paper
2
To remove the paper, open the paper feed flap and
carefully pull out the paper. Close the flap again.
2
) up to the end-
2 To prevent several sheets being drawn into the ma-
chine at once, first fan out the paper to separate the
sheets and then straighten the stack on a flat surface
before inserting it into the paper feed.
12
In the event of a paper jam see Hints and Tips /
Paper jam.
Additional devices
In addition to your fax machine, you can also connect
other devices, such as additional telephones, cordless
telephones, call-fee indicators, answering machines or
modems to a single telephone line. For UK: As long
as the Ringer Equivalent Number (REN value) on the
line doesn’t exceed 4. The REN value of this fax is 1.

User Manual
If you are running an SMS-capable cordless phone
on the same line it is impossible to say which device
will actually receive the SMS message. However, you
can only receive SMS messages on one device at any
one time. Try to disable SMS reception on the cordless
phone. If you cannot do this, disable SMS reception on
the fax machine (see SMS / Disable SMS reception).
If you intend using special auxiliary devices with your
fax machine, please contact your dealer.
If you wish to receive faxes via modem, you must set
your fax machine to MANUAl RECEPTION.
Same socket
In the UK
You can connect additional devices to the same tele-
phone socket. Make sure the fax machine is the first
device connected to the line.
Separate sockets
You can connect additional devices to separate sockets
on the same line even if they are in different rooms.
In the UK
For all other countries
For all other countries
You can connect additional devices to the same telephone
socket by using the socket labeled EXT on your machine.
EXT
v Connecting additional devices to the same sock-
et ensures you the optimal functioning of your
fax switch (e. g. call transfer). Your fax machine
can control the additional devices.
v If you connect additional devices to separate
sockets (e. g. in separate rooms) your fax switch
cannot control them (which means that your
machine behaves like any ordinary machine).
For this reason e. g. call transfer is not possible.
Therefore we recommend you to connect your
additional devices to the same socket.
13

User Manual
Easy Install
Using EASY INSTALL your fax machine will be con-
figured according to your local conditions.
1 Press HELP/w for at least two seconds. Your fax
machine will print one page. Pull out the page firmly and follow the instructions.
2 Your fax machine will then guide you on the display
through the first settings such as your fax number
and your name.
3 Afterwards you need to enter the current time and
date. Use the dial pad to enter the correct time and
date. Confirm with OK.
ISDN connection
Your fax machine is not an ISDN fax (group 4), but
an analogue fax machine (group 3). Therefore it cannot be used directly on an ISDN connection. You will
need an (analogue) adapter or an ISDN connection for
analogue devices. For further information please refer
to your ISDN instructions.
If problems occur with fax reception over the ISDN
line, please note that many ISDN systems must be
specially configured for this (refer to the operating
manual of your ISDN system).
For devices with SMS functionality: Analog terminals must be SMS-compatible.
Private branch exchange
Private branch exchange systems are very common in
large companies. ISDN connections are private branch
exchanges and are used very often in private households. To get a connection from a private branch exchange to the public network you have to dial a key to
obtain the outside line.
1 Select function 15 by pressing MENU and then en-
tering the digits 15. Press OK.
2 You can switch on the PABX operation using
u.
PABX: YES
PABX: NO
3 Then press OK.
4 Now enter the key that has to be pressed to obtain
an outside line.
This outside line access code must be obtained from
the manufacturer. This is either 0 or R (in some systems also described as FLASH) or a number key.
5 Press OK.
6 Use u to select CHECK: YES and press
OK.
Your machine will then check that the outside line can
be obtained. If the check is successful, briefly appears:
check OK.
If the check is successful, briefly appears:
check NOT OK.
You will be asked to repeat the entry. Change the outside
line access code. If you have entered the correct code
but the display nevertheless reads check NOT OK
then delete the code by pressing C.
In case your PABX requires R to obtain an outside
line but it is still not possible to get through to the
line, your system might not be according to the most
recent regulations. Therefore some technical settings
have to be changed on your fax machine. Please refer to your Fax Call Centre (In the UK – you will
find the telephone number on the back cover).
14
 Loading...