


Table of contents
1 Introduction
1 Introduction ................................ 1
Overview of the machine .................................................2
Description of machine ................................................... 2
General view of functions ................................................ 3
Location of controls ........................................................ 4
2 Installation ................................... 5
Location .........................................................................5
Connecting the fax machine ............................................ 5
Replacing the ink film ..................................................... 6
Removing the old ink film ...............................................6
Loading the new ink film ................................................6
Loading paper .................................................................7
Removing paper ..............................................................8
Paper jam ....................................................................... 8
Easy Install ..................................................................... 9
Connecting additional devices ......................................... 9
Private branch exchange - Line type ............................... 10
3 Basic functions .......................... 11
HELP function .............................................................11
Time and date .............................................................. 11
Entering your number ...................................................11
Entering your name ...................................................... 11
Correction ....................................................................11
Language of display .......................................................12
Type of ring signal......................................................... 12
Volume of the ring signal ............................................... 12
6 Fax .............................................. 17
Feeding documents in ................................................... 17
Sending faxes ................................................................ 17
Copying ....................................................................... 17
Image quality ................................................................18
Contrast ....................................................................... 18
Transmission report - error report .................................. 18
Overseas function -Transmission ....................................18
Size compression ...........................................................18
Fax journal.................................................................... 18
Polled reception ............................................................ 18
Polling send .................................................................. 19
Send later ..................................................................... 19
7 Hints & Tips ............................... 20
Service code ..................................................................23
Care and maintenance ................................................... 23
Clean the scanner .......................................................... 23
Clean the roller .............................................................24
Safety instructions .........................................................24
8 Appendix .................................... 25
Technical data ............................................................... 25
Glossary ....................................................................... 25
International guarantee .................................................. 26
Index.............................................. 27
4 Fax switch .................................. 13
Setup of the fax reception .............................................. 13
Special settings ..............................................................13
Easylink - Setting additional devices ...............................13
External answering machine .......................................... 14
5 Telephone ................................... 15
Making a call ................................................................ 15
Redial ...........................................................................15
Short dial n ......................................................... 15
Telephone book a................................................ 15
List of telephone numbers ............................................. 16
Call transfer .................................................................. 16
Mute ............................................................................ 16
Calling line identification .............................................. 16
1
Overview of the machine
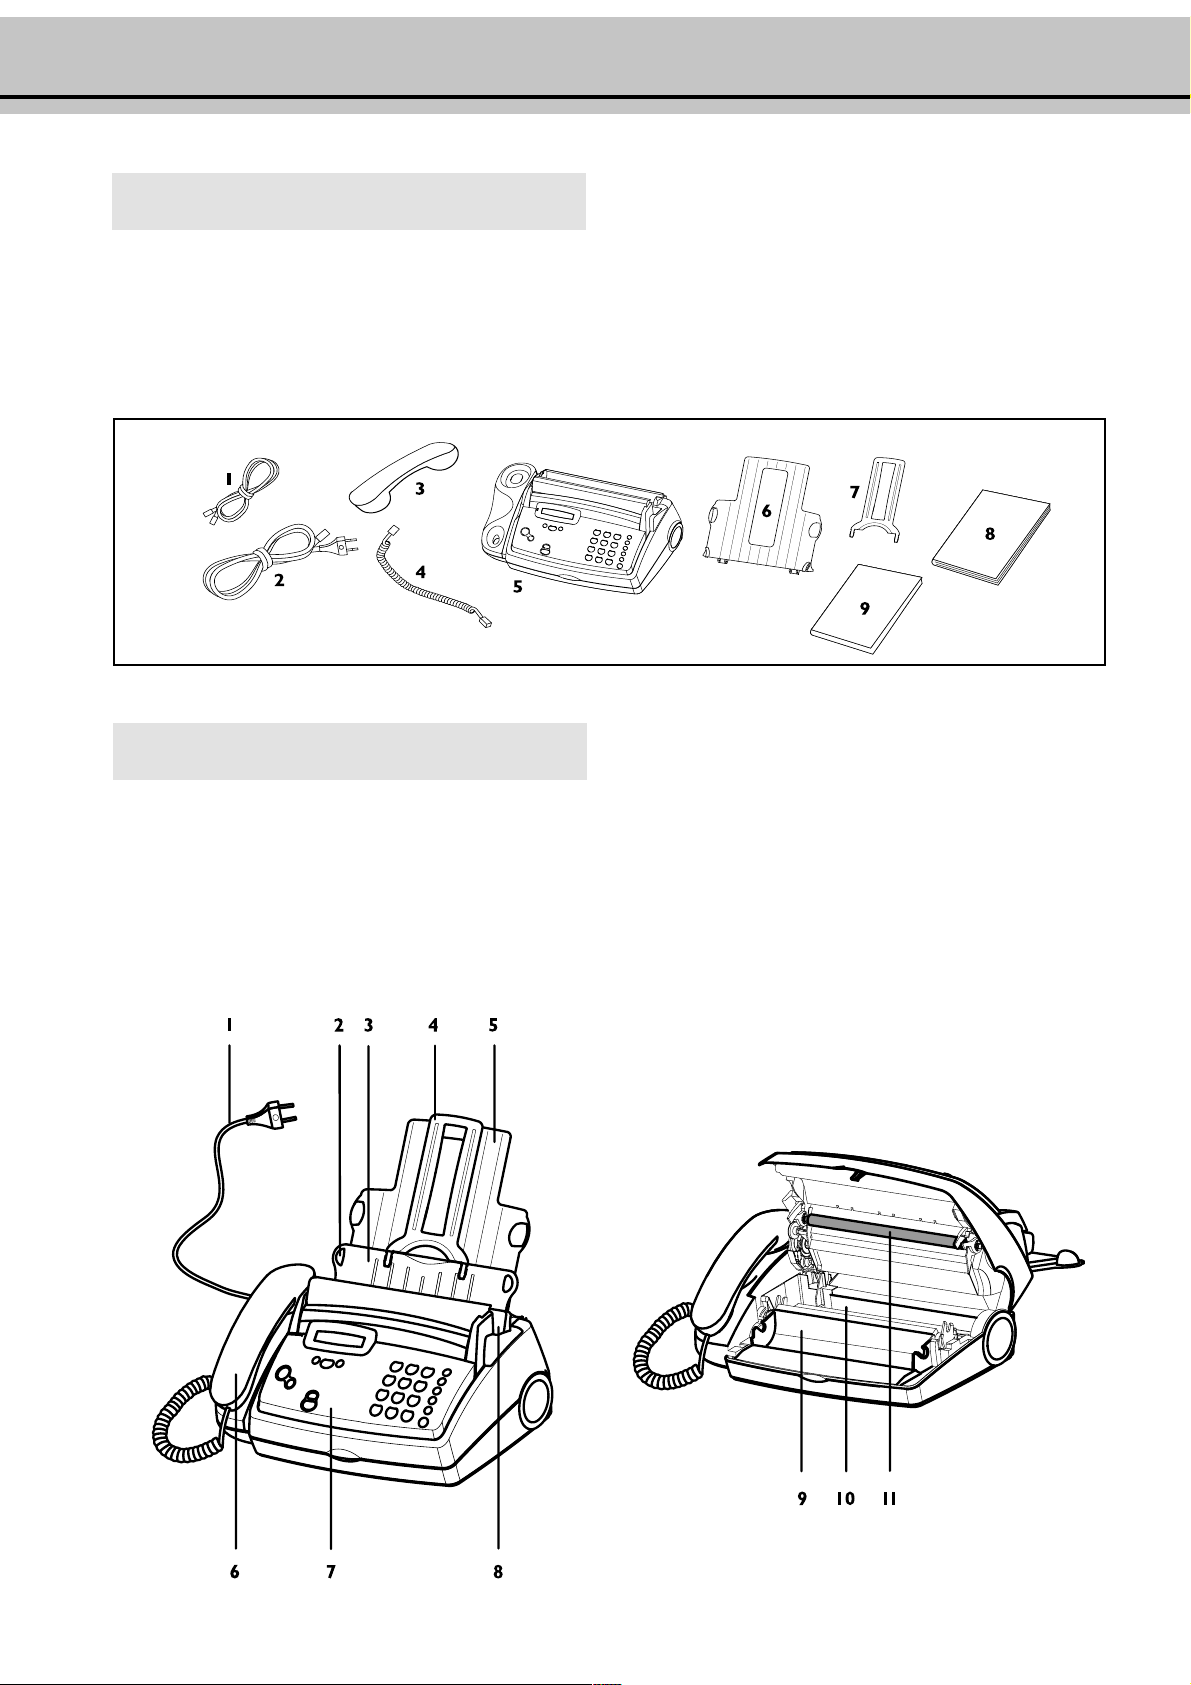
The following items are included in the packaging:
1 Telephone cable with plug
2 Mains cable with plug
3 Telephone handset
4 Spiral cable for telephone handset
Description of machine
5 Fax machine
6 Paper tray
7 Document support
8 User manual
9 Installation guide
1 Mains cable with power plug
2 Document guide
3 Paper feed flap
4 Document support
5 Paper tray
6 Telephone handset
7 Operation panel
8 Scanner
9 Front ink film compartment
10 Rear ink film compartment
11 Printer roller
2

General view of functions
You can print out a list of functions by pressing MENU three
times.
1 Setup Page
11 Set Language
(select the language of the display text) ......................... 12
12 Set time and date
(setting time and date) ................................................ 11
13 Your telephone number
(enter your telephone number) .................................... 11
14 Your name
(enter your name) ....................................................... 11
15 Line type
(setting the private branch exchange) ........................... 10
2 Fax
21 Transmission speed/overseas function
(setting for half-speed transmission) ............................. 18
22 Polled reception
(you can call up fax messages) ...................................... 19
23 Polling send
(your fax message can be fetched)................................. 19
24 Send later
(faxes will be sent later) ................................................ 19
15-MaY-00 12:30
FINE f/PHOTO F
indicates whether you are sending or copying with a higher picture quality or with grey tones. If neither of the two symbols is
visible, the standard resolution is selected. To change the resolution use FINE/PHOTO.
! Never expose your fax machine to rain or any other
form of moisture, in order to prevent the risk of
electric shock or fire.
! In a thunderstorm, disconnect the fax machine from
both the mains and the telephone line. If you are
unable to disconnect the fax machine, do not use it
and do not telephone due to the danger of lightning
strike and/or damage to the device.
3 Fax switch
31 Ring count
(Setup of faxreception) ................................................ 13
34 Easylink
(codes for use with additional telephones) .................... 13
4 Others
41 Fax journal
(log of the last ten fax documents received and sent) ..... 18
42 Dialling list
(print out of stored names and numbers) ..................... 16
43 Transmission report
(automatic print out of transmission protocols) ............ 18
44 Ringer types
(selection between ten ringer types).............................. 12
45 Service code
(deleting personal settings) .......................................... 23
46 Size compression
(size compression of received fax messages) ................... 18
47 Set contrast
(setting of contrast for copy / fax transamission ............ 18
3

Location of controls
<<
< to select options / to move cursor to left of display
<<
MENU/OK for calling up functions / to confirm entries
>>
> to select options / to insert a space when entering a name /
>>
to move cursor to right of display
Display lamp
If this lamp flashes, please read the
message on the display.
nn
n
nn
press briefly: to select a phone number
press and hold (two seconds): to store a telephone number
aa
a
aa
press briefly: to call up a name entry
press and hold (two seconds): to store a name entry
HELP/INSTALL
press briefly (twice): print operating instructions for the
most important functions with references to additional help
pages
press and hold (two seconds): to start the automatic installation of your fax machine / printout of Easy Install
TT
T
TT
temporary mute of microphone during a call / transferring a
call from the fax machine to another telephone (only for
serial connections, see Glossary)
RR
R
RR
press briefly: for special functions, e. g. for the use with a
private branch exchange and for using various functions provided by your service provider (call waiting etc.)
press and hold: to insert a dialling pause between two figures
PPPP
PP
PPPP
press briefly: to repeat the last five numbers you have dialled
press and hold (two seconds): to browse the list of callers
START/COPY
press briefly: to start fax transmission or to copy a document
press and hold (two seconds): rapid call-up of faxes
f f
FINE
f /PHOTO
f f
to select a higher resolution when copying or sending
(for text and graphics - FINE; for photographs - PHOTO)
FF
F
FF
STOP stops procedures / document ejection
CLEAR
press briefly: to delete messages / entries / individual symbols
press and hold (two seconds): to cancel the whole entry
4

! Neither telephone nor fax will operate during power
failure.
! Your fax machine was built for exclusive use in the
country of purchase. It complies with the local
network specifications.
Location
1
The fax machine must stand securely on a smooth, flat,
horizontal surface (no soft surface such as carpets etc.).
2
Avoid exposure to direct sunlight (the ink film is heatsensitive) and close proximity with heaters, radios and TV
sets, air conditioning vents, dust, water and chemicals - is
not advised.
3
Avoid heat build-up by ensuring that the machine is not
covered. Place the fax in such a way as to ensure free
circulation of air around it.
2 Installation
For all other countries
4
If you would like to use a cordless phone, there should be a
distance of at least 15 cm in between the fax machine and
the base station, otherwise you may hear acoustic interference in your handset.
Connecting the fax machine
To the telephone socket
Connect the telephone cable to the fax machine by inserting it in
the socket on the bottom of the machine identified with LINE.
Insert the cable in the groove provided.
In the UK
Handset to the fax machine
Insert one end of the spiral cable into the socket of the handset
and the other end of the spiral cable into the socket identified
with a handset symbol, on the bottom of the machine, and
press it into the specially provided cable groove.
5

To the power supply
Removing the old ink film
! Please note that the handset must be replaced
before you connect the machine to the power
supply.
1
Plug the power connector into the back of the fax
machine. Plug the mains cable into the wall socket. The
machine will carry out an internal test. Afterwards you
need to enter the current time and date.
2 Use the dial pad to enter the correct time and date.
Confirm with OK.
1
Lift the rear ink film roll holding both sides with your index
fingers upwards, in order to remove it out of its seat and
place it next to the front ink film roll.
2
Remove both ink film rolls. They cannot be reused. Dispose
of the ink film rolls with normal waste. Load a new ink film,
because your fax machine cannot work correctly without it.
Replacing the ink film
You cannot receive or copy documents unless an ink film is
loaded in the fax machine. For this reason an ink film for 50
pages has been inserted into your machine. The commercially
available ink film PFA 321 has a capacity of approx. 260 pages.
If the ink film is finished or if there is no ink film in the fax
machine, the red display lamp flashes, and the following message appears:
refill inkfilm
1 Before loading a new ink film you must remove the paper
from the paper feed mechanism! Also follow the instructions on your ink film packaging!
2
To obtain optimum quality, please use only ink films as
specified on your original roll. For safety reasons, do not
use any other brands because they can damage your fax
machine.
3
Open the machine by carefully lifting the operation panel
at the recess in the middle.
Loading the new ink film
1
Carefully remove the rubber rings from the new ink film.
Take care not to damage the ink film.
2 Lay the large roll in the grooves provided in the rear ink film
compartment.
6

3
Now take the small roll and lay it in the front ink film
compartment. Please make sure that the smaller roller is
inserted into the side identations.
4
Turn small roll forward to tension the ink film. Make sure
that the ink film is not creased.
A silver strip is fixed to the start of the ink film, so the
quality of the first few pages may be impaired.
Loading paper
Before you can copy documents, paper must be loaded in your
fax machine. Please use only the following paper format:
standard A4, 210 x 297 mm. The fax machine works with
normal paper used for writing and copying and has been
optimised for smooth 80 g/m
surface the better the print quality. If there is no paper in the
fax machine the red display lamp flashes and on the display
appears:
1
Insert the paper tray in the slots provided behind the paper
feed mechanism.
2
papier. The smoother the paper
OUT OF PAPER
5 Close the machine by swinging the operation panel forward,
until it snaps in.
6 Insert the yellow sheet with the printed side upwards and
press START/COPY.
2 Stick the paper support insertion in the openings provided
on the paper feed flap.
7

3 To prevent several sheets being drawn into the machine at
once, first fan out the paper to separate the sheets and then
straighten the stack on a flat surface before inserting it into
the paper feed.
4
Pull the paper feed flap fully forward until it stops. Insert
several sheets of A4 paper (80 g) up to the end-stop in the
paper feed mechanism (max. 50 sheets).
Removing paper
1 Pull the paper feed flap forward.
2 Pull the paper out.
3 Close the paper feed flap.
5
Close the paper feed flap.
! Never load paper while the fax machine is printing!
Do not use paper that has already been printed on
one side! This could lead to a paper jam.
Paper jam
Open the operation panel. Pull the paper carefully outwards from
the inside. Before closing the panel the ink film roll must be
tensioned by turning the front ink film roll forwards.
! Do not pull the paper out from the top of the
machine because doing so can tear the paper and
disrupt the functionality of the fax machine
8
Easy Install
To separate sockets
(not in all countries)
Using Easy Install your fax machine will be configured according
to your local conditions.
1 Press HELP/INSTALL for at least two seconds. Your fax
machine will print one page with the header Easy Install. Pull
out the page firmly.
2 Your fax machine will then guide you on the display through
the first settings such as your telephone number and your
name.
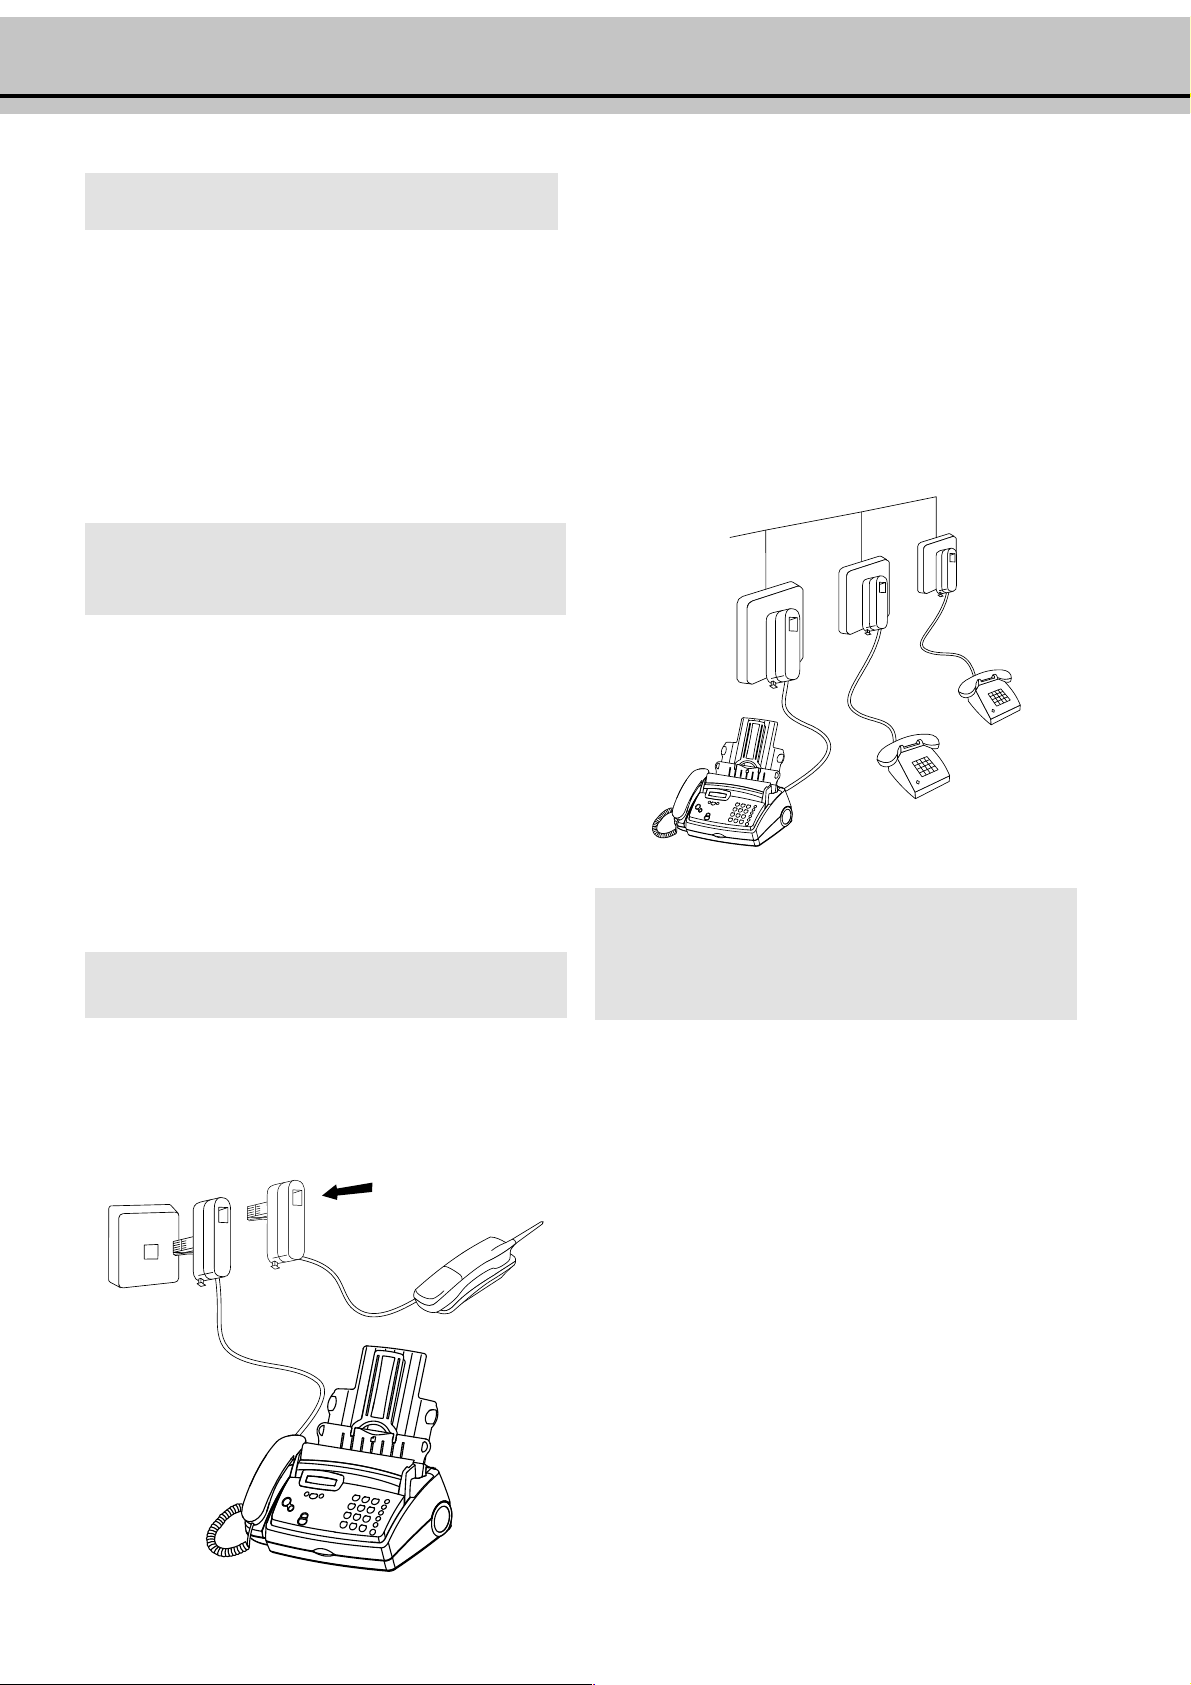
Connecting additional devices
In addition to your fax machine, you can also connect other devices, such as additional telephones, call-fee indicators, answer-
ing machines or modems to a single telephone line [for UK: As
long as the Ringer Equivalent Number (REN value) on the line
doesn’t exceed 4. The REN value of this fax is 1].
You can connect additional devices to separate sockets on the same
line even if they are in different rooms. Make sure that the fax
machine is the first device connected.
Please note: If you connect additional devices to separate sockets
(e.g. in separate rooms) your active fax switch cannot control them
(which means that your fax machine behaves like any ordinary fax
machine). For this reason e.g. call transfer is not possible. Therefore we recommend you to connect your additional devices to the
same socket.
To the same socket
(not in all countries)
You can connect additional devices to the same telephone plug.
Make sure that the fax machine is the first device connected
to the line.
Connecting additional devices to the same socket ensures
you the optimal functionality of your active fax switch
(e.g. call transfer). Your fax machine can control the
additional devices.
If you intend using special auxiliary devices with your fax
machine, please contact your dealer.
If you wish to receive faxes via modem, you must set your
fax machine to
fax: manual
.
9
 Loading...